Embed Size (px)
Citation preview

PUBLICSAP HANA Cockpit 2.0 SP 10Document Version: 1.0 – 2019-04-05
SAP HANA Administration with SAP HANA Cockpit
© 2
019
SAP
SE o
r an
SAP affi
liate
com
pany
. All
right
s re
serv
ed.
THE BEST RUN

Content
1 SAP HANA Administration with SAP HANA Cockpit. . . . . . . . . . . . . . . . . . . . . . . . . . . . . . . . . . 9
2 Set up SAP HANA Cockpit for the First Time. . . . . . . . . . . . . . . . . . . . . . . . . . . . . . . . . . . . . . . 112.1 Determine Ports for SAP HANA Cockpit and Cockpit Manager. . . . . . . . . . . . . . . . . . . . . . . . . . . . .12
3 Open SAP HANA Cockpit. . . . . . . . . . . . . . . . . . . . . . . . . . . . . . . . . . . . . . . . . . . . . . . . . . . . . 15
4 Authorizations Needed for Monitoring and Administration. . . . . . . . . . . . . . . . . . . . . . . . . . . . 16
5 Setup and Administration with the Cockpit Manager. . . . . . . . . . . . . . . . . . . . . . . . . . . . . . . . 235.1 Managing Cockpit Users. . . . . . . . . . . . . . . . . . . . . . . . . . . . . . . . . . . . . . . . . . . . . . . . . . . . . . . 24
Create or Enable a Cockpit User. . . . . . . . . . . . . . . . . . . . . . . . . . . . . . . . . . . . . . . . . . . . . . . 25Grant a Cockpit User Access to Specific Groups. . . . . . . . . . . . . . . . . . . . . . . . . . . . . . . . . . . . 27Edit Settings for a Cockpit User. . . . . . . . . . . . . . . . . . . . . . . . . . . . . . . . . . . . . . . . . . . . . . . .28Delete a Cockpit User or Revoke Cockpit Access. . . . . . . . . . . . . . . . . . . . . . . . . . . . . . . . . . . .29
5.2 Configuring Cockpit Settings. . . . . . . . . . . . . . . . . . . . . . . . . . . . . . . . . . . . . . . . . . . . . . . . . . . . 30Setting Data Collection . . . . . . . . . . . . . . . . . . . . . . . . . . . . . . . . . . . . . . . . . . . . . . . . . . . . . 31Setting Proxy Server. . . . . . . . . . . . . . . . . . . . . . . . . . . . . . . . . . . . . . . . . . . . . . . . . . . . . . . .31Setting Connection Timeout. . . . . . . . . . . . . . . . . . . . . . . . . . . . . . . . . . . . . . . . . . . . . . . . . . 32Specifying Display of Auto-Generated Groups. . . . . . . . . . . . . . . . . . . . . . . . . . . . . . . . . . . . . 32
5.3 Working with Resources and Resource Groups. . . . . . . . . . . . . . . . . . . . . . . . . . . . . . . . . . . . . . . .33Register a Resource. . . . . . . . . . . . . . . . . . . . . . . . . . . . . . . . . . . . . . . . . . . . . . . . . . . . . . . . 34Edit Resource Settings, including SSO. . . . . . . . . . . . . . . . . . . . . . . . . . . . . . . . . . . . . . . . . . . 38Unregister a Resource. . . . . . . . . . . . . . . . . . . . . . . . . . . . . . . . . . . . . . . . . . . . . . . . . . . . . . 43Export Resources. . . . . . . . . . . . . . . . . . . . . . . . . . . . . . . . . . . . . . . . . . . . . . . . . . . . . . . . . 44Import Resources. . . . . . . . . . . . . . . . . . . . . . . . . . . . . . . . . . . . . . . . . . . . . . . . . . . . . . . . . 45Managing Resource Groups. . . . . . . . . . . . . . . . . . . . . . . . . . . . . . . . . . . . . . . . . . . . . . . . . . 47
5.4 Managing Resources, Users, and Groups with the Cockpit APIs. . . . . . . . . . . . . . . . . . . . . . . . . . . . 52Using Cockpit POST APIs. . . . . . . . . . . . . . . . . . . . . . . . . . . . . . . . . . . . . . . . . . . . . . . . . . . . 54Using Cockpit GET APIs. . . . . . . . . . . . . . . . . . . . . . . . . . . . . . . . . . . . . . . . . . . . . . . . . . . . . 57
5.5 Sending User Notifications and Monitoring Sessions. . . . . . . . . . . . . . . . . . . . . . . . . . . . . . . . . . . 66Monitor Active Browser Sessions. . . . . . . . . . . . . . . . . . . . . . . . . . . . . . . . . . . . . . . . . . . . . . 66Send a Notification to Logged-In Users. . . . . . . . . . . . . . . . . . . . . . . . . . . . . . . . . . . . . . . . . . 67
5.6 View Logs to Troubleshoot the Cockpit. . . . . . . . . . . . . . . . . . . . . . . . . . . . . . . . . . . . . . . . . . . . . 695.7 Using XS CLI Commands to Troubleshoot the Cockpit. . . . . . . . . . . . . . . . . . . . . . . . . . . . . . . . . . 70
6 Security Aspects of SAP HANA Cockpit. . . . . . . . . . . . . . . . . . . . . . . . . . . . . . . . . . . . . . . . . . 726.1 Setting Up Single Sign-On. . . . . . . . . . . . . . . . . . . . . . . . . . . . . . . . . . . . . . . . . . . . . . . . . . . . . . 74
2 P U B L I CSAP HANA Administration with SAP HANA Cockpit
Content

Configure SSO Access to the SAP HANA Cockpit. . . . . . . . . . . . . . . . . . . . . . . . . . . . . . . . . . . 75Configure SSO Access to a Resource. . . . . . . . . . . . . . . . . . . . . . . . . . . . . . . . . . . . . . . . . . . . 78
6.2 Import a Certificate for Encrypted Communication. . . . . . . . . . . . . . . . . . . . . . . . . . . . . . . . . . . . 806.3 Ensuring a Secure Browser Connection. . . . . . . . . . . . . . . . . . . . . . . . . . . . . . . . . . . . . . . . . . . . . 816.4 Data Protection and Privacy in SAP HANA Cockpit. . . . . . . . . . . . . . . . . . . . . . . . . . . . . . . . . . . . .826.5 Auditing in SAP HANA Cockpit. . . . . . . . . . . . . . . . . . . . . . . . . . . . . . . . . . . . . . . . . . . . . . . . . . .84
7 Personalizing the SAP HANA Cockpit. . . . . . . . . . . . . . . . . . . . . . . . . . . . . . . . . . . . . . . . . . . . 86
8 Administering and Monitoring a Multiresource Landscape. . . . . . . . . . . . . . . . . . . . . . . . . . . . 878.1 Managing Multiple Resources in SAP HANA Cockpit. . . . . . . . . . . . . . . . . . . . . . . . . . . . . . . . . . . .87
Managing Groups of Resources. . . . . . . . . . . . . . . . . . . . . . . . . . . . . . . . . . . . . . . . . . . . . . . .898.2 Working with the Resource Directory. . . . . . . . . . . . . . . . . . . . . . . . . . . . . . . . . . . . . . . . . . . . . . 89
Open the Resource Directory. . . . . . . . . . . . . . . . . . . . . . . . . . . . . . . . . . . . . . . . . . . . . . . . . 90Connect to a Resource using Database Credentials. . . . . . . . . . . . . . . . . . . . . . . . . . . . . . . . . .93Monitor Alerts from Multiple Resources. . . . . . . . . . . . . . . . . . . . . . . . . . . . . . . . . . . . . . . . . . 94Monitor Aggregate Health. . . . . . . . . . . . . . . . . . . . . . . . . . . . . . . . . . . . . . . . . . . . . . . . . . . .95
8.3 Working with Configurations and Configuration Templates. . . . . . . . . . . . . . . . . . . . . . . . . . . . . . . 97Take a Snapshot of a Resource's Configuration. . . . . . . . . . . . . . . . . . . . . . . . . . . . . . . . . . . . . 97Compare Resource Configurations. . . . . . . . . . . . . . . . . . . . . . . . . . . . . . . . . . . . . . . . . . . . . 98Apply a Configuration Template. . . . . . . . . . . . . . . . . . . . . . . . . . . . . . . . . . . . . . . . . . . . . . . 101Create a Configuration Template. . . . . . . . . . . . . . . . . . . . . . . . . . . . . . . . . . . . . . . . . . . . . . 102Modify a Configuration Template. . . . . . . . . . . . . . . . . . . . . . . . . . . . . . . . . . . . . . . . . . . . . . 103Delete a Configuration Template. . . . . . . . . . . . . . . . . . . . . . . . . . . . . . . . . . . . . . . . . . . . . . 104
8.4 SAP EarlyWatch Alert Service. . . . . . . . . . . . . . . . . . . . . . . . . . . . . . . . . . . . . . . . . . . . . . . . . . .105
9 Managing Tenant Databases . . . . . . . . . . . . . . . . . . . . . . . . . . . . . . . . . . . . . . . . . . . . . . . . . 1069.1 Assign the OS User and Group for High Isolation. . . . . . . . . . . . . . . . . . . . . . . . . . . . . . . . . . . . . 106
Increase the System Isolation Level. . . . . . . . . . . . . . . . . . . . . . . . . . . . . . . . . . . . . . . . . . . . 1079.2 Clear the OS User and Group when Decreasing Isolation. . . . . . . . . . . . . . . . . . . . . . . . . . . . . . . . 112
Decrease the System Isolation Level. . . . . . . . . . . . . . . . . . . . . . . . . . . . . . . . . . . . . . . . . . . . 1139.3 Create a Tenant Database. . . . . . . . . . . . . . . . . . . . . . . . . . . . . . . . . . . . . . . . . . . . . . . . . . . . . . 1149.4 Start a Tenant Database. . . . . . . . . . . . . . . . . . . . . . . . . . . . . . . . . . . . . . . . . . . . . . . . . . . . . . . 1179.5 Stop a Tenant Database. . . . . . . . . . . . . . . . . . . . . . . . . . . . . . . . . . . . . . . . . . . . . . . . . . . . . . . 1189.6 Prevent the Start of a Tenant Database at System Startup. . . . . . . . . . . . . . . . . . . . . . . . . . . . . . . 1199.7 Rename a Tenant Database. . . . . . . . . . . . . . . . . . . . . . . . . . . . . . . . . . . . . . . . . . . . . . . . . . . . 1209.8 Delete a Tenant Database. . . . . . . . . . . . . . . . . . . . . . . . . . . . . . . . . . . . . . . . . . . . . . . . . . . . . . 1219.9 Restrict Features Available to a Tenant Database. . . . . . . . . . . . . . . . . . . . . . . . . . . . . . . . . . . . . 123
Copy Restricted Features. . . . . . . . . . . . . . . . . . . . . . . . . . . . . . . . . . . . . . . . . . . . . . . . . . . 1249.10 Lock Parameters Against Editing for a Tenant Database. . . . . . . . . . . . . . . . . . . . . . . . . . . . . . . . 125
Default Blacklisted System Properties in Tenant Databases. . . . . . . . . . . . . . . . . . . . . . . . . . . 126Unlock Blacklisted Parameters. . . . . . . . . . . . . . . . . . . . . . . . . . . . . . . . . . . . . . . . . . . . . . . 128
SAP HANA Administration with SAP HANA CockpitContent P U B L I C 3

Copy Blacklisted Parameters. . . . . . . . . . . . . . . . . . . . . . . . . . . . . . . . . . . . . . . . . . . . . . . . .1299.11 Create a Fallback Snapshot. . . . . . . . . . . . . . . . . . . . . . . . . . . . . . . . . . . . . . . . . . . . . . . . . . . . 1309.12 Reset to a Fallback Snapshot. . . . . . . . . . . . . . . . . . . . . . . . . . . . . . . . . . . . . . . . . . . . . . . . . . . .1319.13 Delete a Fallback Snapshot. . . . . . . . . . . . . . . . . . . . . . . . . . . . . . . . . . . . . . . . . . . . . . . . . . . . .1329.14 Copy or Move a Tenant Database Using Replication. . . . . . . . . . . . . . . . . . . . . . . . . . . . . . . . . . . 1339.15 Reset the SYSTEM Password of a Tenant using the Cockpit. . . . . . . . . . . . . . . . . . . . . . . . . . . . . . 1359.16 Configuring Memory and CPU Usage for Tenant Databases. . . . . . . . . . . . . . . . . . . . . . . . . . . . . . 136
Define Memory Allocation Limits. . . . . . . . . . . . . . . . . . . . . . . . . . . . . . . . . . . . . . . . . . . . . . 138Define CPU Cores Allocation Limits. . . . . . . . . . . . . . . . . . . . . . . . . . . . . . . . . . . . . . . . . . . . 146
9.17 Monitoring Tenant Databases in SAP HANA Cockpit. . . . . . . . . . . . . . . . . . . . . . . . . . . . . . . . . . . 151Database Details. . . . . . . . . . . . . . . . . . . . . . . . . . . . . . . . . . . . . . . . . . . . . . . . . . . . . . . . . .151Monitor Alerts for a Tenant Database. . . . . . . . . . . . . . . . . . . . . . . . . . . . . . . . . . . . . . . . . . . 154
9.18 Add or Remove Services in a Tenant Database. . . . . . . . . . . . . . . . . . . . . . . . . . . . . . . . . . . . . . . 1559.19 Change the Port of a Service in a Tenant Database. . . . . . . . . . . . . . . . . . . . . . . . . . . . . . . . . . . . 157
10 Administering and Monitoring a Database. . . . . . . . . . . . . . . . . . . . . . . . . . . . . . . . . . . . . . . 15910.1 Using the Overview to Manage a Resource. . . . . . . . . . . . . . . . . . . . . . . . . . . . . . . . . . . . . . . . . . 160
Tiles Available on the Overview. . . . . . . . . . . . . . . . . . . . . . . . . . . . . . . . . . . . . . . . . . . . . . . 162System General Information. . . . . . . . . . . . . . . . . . . . . . . . . . . . . . . . . . . . . . . . . . . . . . . . . 168
10.2 Manage Services. . . . . . . . . . . . . . . . . . . . . . . . . . . . . . . . . . . . . . . . . . . . . . . . . . . . . . . . . . . .168Service Details. . . . . . . . . . . . . . . . . . . . . . . . . . . . . . . . . . . . . . . . . . . . . . . . . . . . . . . . . . . 169Operations on Services. . . . . . . . . . . . . . . . . . . . . . . . . . . . . . . . . . . . . . . . . . . . . . . . . . . . . 172
10.3 Start a Resource. . . . . . . . . . . . . . . . . . . . . . . . . . . . . . . . . . . . . . . . . . . . . . . . . . . . . . . . . . . . 17410.4 Stop a Resource. . . . . . . . . . . . . . . . . . . . . . . . . . . . . . . . . . . . . . . . . . . . . . . . . . . . . . . . . . . . 17510.5 Analyze Memory Statistics. . . . . . . . . . . . . . . . . . . . . . . . . . . . . . . . . . . . . . . . . . . . . . . . . . . . . 176
Types of Memory Alerts. . . . . . . . . . . . . . . . . . . . . . . . . . . . . . . . . . . . . . . . . . . . . . . . . . . . 180System Views Used to Create Memory Alerts. . . . . . . . . . . . . . . . . . . . . . . . . . . . . . . . . . . . . 183
10.6 Monitor Tables by Size and Usage. . . . . . . . . . . . . . . . . . . . . . . . . . . . . . . . . . . . . . . . . . . . . . . . 18310.7 Manage Table Redistribution in SAP HANA Cockpit. . . . . . . . . . . . . . . . . . . . . . . . . . . . . . . . . . . .185
View Current Table Distribution. . . . . . . . . . . . . . . . . . . . . . . . . . . . . . . . . . . . . . . . . . . . . . . 185Table Placement Rules. . . . . . . . . . . . . . . . . . . . . . . . . . . . . . . . . . . . . . . . . . . . . . . . . . . . . 192Generate and Execute a Table Redistribution Plan. . . . . . . . . . . . . . . . . . . . . . . . . . . . . . . . . . 198View Redistribution Execution History. . . . . . . . . . . . . . . . . . . . . . . . . . . . . . . . . . . . . . . . . . 201
10.8 Managing Warm Data with the Native Storage Extension. . . . . . . . . . . . . . . . . . . . . . . . . . . . . . . 203Using the NSE Advisor for Warm Data Recommendations. . . . . . . . . . . . . . . . . . . . . . . . . . . . 204Viewing and Modifying Load Unit Configuration. . . . . . . . . . . . . . . . . . . . . . . . . . . . . . . . . . . 205
10.9 Monitor Disk Volume. . . . . . . . . . . . . . . . . . . . . . . . . . . . . . . . . . . . . . . . . . . . . . . . . . . . . . . . . 205Reclaim Space. . . . . . . . . . . . . . . . . . . . . . . . . . . . . . . . . . . . . . . . . . . . . . . . . . . . . . . . . . .207
10.10 Configure Host Failover. . . . . . . . . . . . . . . . . . . . . . . . . . . . . . . . . . . . . . . . . . . . . . . . . . . . . . . 20810.11 Monitoring Alerts. . . . . . . . . . . . . . . . . . . . . . . . . . . . . . . . . . . . . . . . . . . . . . . . . . . . . . . . . . . 213
Work with Alerts. . . . . . . . . . . . . . . . . . . . . . . . . . . . . . . . . . . . . . . . . . . . . . . . . . . . . . . . . . 214Alert Details. . . . . . . . . . . . . . . . . . . . . . . . . . . . . . . . . . . . . . . . . . . . . . . . . . . . . . . . . . . . .216
4 P U B L I CSAP HANA Administration with SAP HANA Cockpit
Content

Alert Priorities. . . . . . . . . . . . . . . . . . . . . . . . . . . . . . . . . . . . . . . . . . . . . . . . . . . . . . . . . . . 21710.12 Configuring Alerts. . . . . . . . . . . . . . . . . . . . . . . . . . . . . . . . . . . . . . . . . . . . . . . . . . . . . . . . . . . 217
Configure Alerting Thresholds. . . . . . . . . . . . . . . . . . . . . . . . . . . . . . . . . . . . . . . . . . . . . . . . 218Switch Alerting Off/On. . . . . . . . . . . . . . . . . . . . . . . . . . . . . . . . . . . . . . . . . . . . . . . . . . . . . 219Set Up E-Mail Notification. . . . . . . . . . . . . . . . . . . . . . . . . . . . . . . . . . . . . . . . . . . . . . . . . . .220Check for Alerts Out of Schedule. . . . . . . . . . . . . . . . . . . . . . . . . . . . . . . . . . . . . . . . . . . . . . 222
10.13 Manage System Configuration in SAP HANA Cockpit. . . . . . . . . . . . . . . . . . . . . . . . . . . . . . . . . . 223Parameters. . . . . . . . . . . . . . . . . . . . . . . . . . . . . . . . . . . . . . . . . . . . . . . . . . . . . . . . . . . . . 224Create a Configuration Template. . . . . . . . . . . . . . . . . . . . . . . . . . . . . . . . . . . . . . . . . . . . . . 231Apply a Configuration Template. . . . . . . . . . . . . . . . . . . . . . . . . . . . . . . . . . . . . . . . . . . . . . .232Compare Configurations. . . . . . . . . . . . . . . . . . . . . . . . . . . . . . . . . . . . . . . . . . . . . . . . . . . 232Snapshots. . . . . . . . . . . . . . . . . . . . . . . . . . . . . . . . . . . . . . . . . . . . . . . . . . . . . . . . . . . . . .233
10.14 Managing Workload Classes in SAP HANA Cockpit. . . . . . . . . . . . . . . . . . . . . . . . . . . . . . . . . . . .235Apply Global Settings. . . . . . . . . . . . . . . . . . . . . . . . . . . . . . . . . . . . . . . . . . . . . . . . . . . . . . 236Create a Workload Class. . . . . . . . . . . . . . . . . . . . . . . . . . . . . . . . . . . . . . . . . . . . . . . . . . . . 237Create a Workload Class Mapping. . . . . . . . . . . . . . . . . . . . . . . . . . . . . . . . . . . . . . . . . . . . . 239Edit a Workload Class. . . . . . . . . . . . . . . . . . . . . . . . . . . . . . . . . . . . . . . . . . . . . . . . . . . . . .240Create User-Specific Parameters. . . . . . . . . . . . . . . . . . . . . . . . . . . . . . . . . . . . . . . . . . . . . . 241Disable or Enable a Workload Class. . . . . . . . . . . . . . . . . . . . . . . . . . . . . . . . . . . . . . . . . . . . 242Import Workload Classes. . . . . . . . . . . . . . . . . . . . . . . . . . . . . . . . . . . . . . . . . . . . . . . . . . . 243Export Workload Classes. . . . . . . . . . . . . . . . . . . . . . . . . . . . . . . . . . . . . . . . . . . . . . . . . . . 244Monitor Workload Classes. . . . . . . . . . . . . . . . . . . . . . . . . . . . . . . . . . . . . . . . . . . . . . . . . . 245
10.15 Managing Admission Control in SAP HANA Cockpit. . . . . . . . . . . . . . . . . . . . . . . . . . . . . . . . . . . 245Use the Cockpit to Manage Admission Control. . . . . . . . . . . . . . . . . . . . . . . . . . . . . . . . . . . . 246Admission Control Default Configuration Parameters. . . . . . . . . . . . . . . . . . . . . . . . . . . . . . . 247Admission Control Advanced Analytics. . . . . . . . . . . . . . . . . . . . . . . . . . . . . . . . . . . . . . . . . 249
10.16 Monitoring Health in Multi-Host Systems. . . . . . . . . . . . . . . . . . . . . . . . . . . . . . . . . . . . . . . . . . 24910.17 Manage Hadoop Clusters. . . . . . . . . . . . . . . . . . . . . . . . . . . . . . . . . . . . . . . . . . . . . . . . . . . . . .25210.18 Using the Cockpit to Troubleshoot an Unresponsive Resource . . . . . . . . . . . . . . . . . . . . . . . . . . . 25210.19 Collect and Download Diagnosis Information with the Cockpit. . . . . . . . . . . . . . . . . . . . . . . . . . . .25310.20 Monitoring the Network Between Multiple Hosts . . . . . . . . . . . . . . . . . . . . . . . . . . . . . . . . . . . . . 25510.21 Managing Licenses. . . . . . . . . . . . . . . . . . . . . . . . . . . . . . . . . . . . . . . . . . . . . . . . . . . . . . . . . . 256
License Keys for SAP HANA Database. . . . . . . . . . . . . . . . . . . . . . . . . . . . . . . . . . . . . . . . . . 256View Licenses. . . . . . . . . . . . . . . . . . . . . . . . . . . . . . . . . . . . . . . . . . . . . . . . . . . . . . . . . . . 258Install a Permanent License. . . . . . . . . . . . . . . . . . . . . . . . . . . . . . . . . . . . . . . . . . . . . . . . . 260Export Usage Data. . . . . . . . . . . . . . . . . . . . . . . . . . . . . . . . . . . . . . . . . . . . . . . . . . . . . . . . 262Delete Licenses. . . . . . . . . . . . . . . . . . . . . . . . . . . . . . . . . . . . . . . . . . . . . . . . . . . . . . . . . . 263
10.22 Display Backups. . . . . . . . . . . . . . . . . . . . . . . . . . . . . . . . . . . . . . . . . . . . . . . . . . . . . . . . . . . . 263
11 Monitoring, Analyzing, and Improving Performance in SAP HANA Cockpit . . . . . . . . . . . . . . 26811.1 Monitoring Performance in SAP HANA Cockpit. . . . . . . . . . . . . . . . . . . . . . . . . . . . . . . . . . . . . . 269
Monitoring and Analyzing with the Performance Monitor. . . . . . . . . . . . . . . . . . . . . . . . . . . . . 270
SAP HANA Administration with SAP HANA CockpitContent P U B L I C 5

Monitoring and Analyzing Threads. . . . . . . . . . . . . . . . . . . . . . . . . . . . . . . . . . . . . . . . . . . . .276Monitoring and Analyzing Sessions. . . . . . . . . . . . . . . . . . . . . . . . . . . . . . . . . . . . . . . . . . . . 279Monitoring and Analyzing Statements. . . . . . . . . . . . . . . . . . . . . . . . . . . . . . . . . . . . . . . . . . 279Monitoring Blocked Transactions. . . . . . . . . . . . . . . . . . . . . . . . . . . . . . . . . . . . . . . . . . . . . .283
11.2 Analyzing Performance in SAP HANA Cockpit. . . . . . . . . . . . . . . . . . . . . . . . . . . . . . . . . . . . . . . 284Capturing and Replaying Workloads. . . . . . . . . . . . . . . . . . . . . . . . . . . . . . . . . . . . . . . . . . . 284Analyzing Workloads. . . . . . . . . . . . . . . . . . . . . . . . . . . . . . . . . . . . . . . . . . . . . . . . . . . . . . 313Analyzing Statement Performance. . . . . . . . . . . . . . . . . . . . . . . . . . . . . . . . . . . . . . . . . . . . 320
11.3 Improving Performance in SAP HANA Cockpit. . . . . . . . . . . . . . . . . . . . . . . . . . . . . . . . . . . . . . . 332Getting Recommendations. . . . . . . . . . . . . . . . . . . . . . . . . . . . . . . . . . . . . . . . . . . . . . . . . . 332Monitoring and Managing Data Cache. . . . . . . . . . . . . . . . . . . . . . . . . . . . . . . . . . . . . . . . . . 335Managing Plan Stability. . . . . . . . . . . . . . . . . . . . . . . . . . . . . . . . . . . . . . . . . . . . . . . . . . . . 339Managing Statement Hints. . . . . . . . . . . . . . . . . . . . . . . . . . . . . . . . . . . . . . . . . . . . . . . . . . 341
12 Security Administration. . . . . . . . . . . . . . . . . . . . . . . . . . . . . . . . . . . . . . . . . . . . . . . . . . . . . 34212.1 SAP HANA Security Checklists and Recommendations. . . . . . . . . . . . . . . . . . . . . . . . . . . . . . . . 342
General Recommendations. . . . . . . . . . . . . . . . . . . . . . . . . . . . . . . . . . . . . . . . . . . . . . . . . 343Checklist for Secure Handover. . . . . . . . . . . . . . . . . . . . . . . . . . . . . . . . . . . . . . . . . . . . . . . 343
12.2 SAP HANA Database Checklists and Recommendations. . . . . . . . . . . . . . . . . . . . . . . . . . . . . . . .344Recommendations for Database Users, Roles, and Privileges. . . . . . . . . . . . . . . . . . . . . . . . . . 344Recommendations for Network Configuration. . . . . . . . . . . . . . . . . . . . . . . . . . . . . . . . . . . . 352Recommendations for Data Encryption. . . . . . . . . . . . . . . . . . . . . . . . . . . . . . . . . . . . . . . . . 356Recommendations for File System and Operating System. . . . . . . . . . . . . . . . . . . . . . . . . . . . 358Recommendations for Auditing. . . . . . . . . . . . . . . . . . . . . . . . . . . . . . . . . . . . . . . . . . . . . . . 361Recommendations for Trace and Dump Files. . . . . . . . . . . . . . . . . . . . . . . . . . . . . . . . . . . . . 362Recommendations for Tenant Database Management. . . . . . . . . . . . . . . . . . . . . . . . . . . . . . .364
12.3 Monitoring Critical Security Settings . . . . . . . . . . . . . . . . . . . . . . . . . . . . . . . . . . . . . . . . . . . . . 365View Status of Security Settings. . . . . . . . . . . . . . . . . . . . . . . . . . . . . . . . . . . . . . . . . . . . . . 366Security Tiles and Links. . . . . . . . . . . . . . . . . . . . . . . . . . . . . . . . . . . . . . . . . . . . . . . . . . . . 367Network Security Details. . . . . . . . . . . . . . . . . . . . . . . . . . . . . . . . . . . . . . . . . . . . . . . . . . . 370
12.4 Managing Server-Side Data Encryption. . . . . . . . . . . . . . . . . . . . . . . . . . . . . . . . . . . . . . . . . . . . 372Encryption Configuration. . . . . . . . . . . . . . . . . . . . . . . . . . . . . . . . . . . . . . . . . . . . . . . . . . . 373Change the SSFS Master Keys. . . . . . . . . . . . . . . . . . . . . . . . . . . . . . . . . . . . . . . . . . . . . . . .377Set the Root Key Backup Password. . . . . . . . . . . . . . . . . . . . . . . . . . . . . . . . . . . . . . . . . . . . 380Back Up Root Keys. . . . . . . . . . . . . . . . . . . . . . . . . . . . . . . . . . . . . . . . . . . . . . . . . . . . . . . . 381Changing Encryption Root Keys. . . . . . . . . . . . . . . . . . . . . . . . . . . . . . . . . . . . . . . . . . . . . . 382Enabling Encryption of Data and Log Volumes. . . . . . . . . . . . . . . . . . . . . . . . . . . . . . . . . . . . 384Enable Encryption of Data and Log Backups. . . . . . . . . . . . . . . . . . . . . . . . . . . . . . . . . . . . . .390Disable Data Encryption. . . . . . . . . . . . . . . . . . . . . . . . . . . . . . . . . . . . . . . . . . . . . . . . . . . . 391Import Backed-up Root Keys. . . . . . . . . . . . . . . . . . . . . . . . . . . . . . . . . . . . . . . . . . . . . . . . 393
12.5 Auditing Database Activity. . . . . . . . . . . . . . . . . . . . . . . . . . . . . . . . . . . . . . . . . . . . . . . . . . . . .395Activate and Configure Auditing. . . . . . . . . . . . . . . . . . . . . . . . . . . . . . . . . . . . . . . . . . . . . . 395
6 P U B L I CSAP HANA Administration with SAP HANA Cockpit
Content

Create an Audit Policy. . . . . . . . . . . . . . . . . . . . . . . . . . . . . . . . . . . . . . . . . . . . . . . . . . . . . 396Delete Audit Entries. . . . . . . . . . . . . . . . . . . . . . . . . . . . . . . . . . . . . . . . . . . . . . . . . . . . . . . 399Auditing Details. . . . . . . . . . . . . . . . . . . . . . . . . . . . . . . . . . . . . . . . . . . . . . . . . . . . . . . . . .400Audit Trail View. . . . . . . . . . . . . . . . . . . . . . . . . . . . . . . . . . . . . . . . . . . . . . . . . . . . . . . . . . 403Audit Trail Targets. . . . . . . . . . . . . . . . . . . . . . . . . . . . . . . . . . . . . . . . . . . . . . . . . . . . . . . . 407Best Practices and Recommendations for Creating Audit Policies. . . . . . . . . . . . . . . . . . . . . . 409
12.6 Configure the Database Password Policy and Password Blacklist. . . . . . . . . . . . . . . . . . . . . . . . . . 411Password Policy Details. . . . . . . . . . . . . . . . . . . . . . . . . . . . . . . . . . . . . . . . . . . . . . . . . . . . .413
12.7 Configure a Password Policy for a User Group. . . . . . . . . . . . . . . . . . . . . . . . . . . . . . . . . . . . . . . 42012.8 Managing Client Certificates. . . . . . . . . . . . . . . . . . . . . . . . . . . . . . . . . . . . . . . . . . . . . . . . . . . .421
Client Certificates. . . . . . . . . . . . . . . . . . . . . . . . . . . . . . . . . . . . . . . . . . . . . . . . . . . . . . . . 423Certificate Collections . . . . . . . . . . . . . . . . . . . . . . . . . . . . . . . . . . . . . . . . . . . . . . . . . . . . . 424View Certificates in the Certificate Store. . . . . . . . . . . . . . . . . . . . . . . . . . . . . . . . . . . . . . . . .427View Certificate Collections. . . . . . . . . . . . . . . . . . . . . . . . . . . . . . . . . . . . . . . . . . . . . . . . . 429Import a Trusted Certificate into the Certificate Store. . . . . . . . . . . . . . . . . . . . . . . . . . . . . . . 431Create a Certificate Collection. . . . . . . . . . . . . . . . . . . . . . . . . . . . . . . . . . . . . . . . . . . . . . . .432Set the Purpose of a Certificate Collection. . . . . . . . . . . . . . . . . . . . . . . . . . . . . . . . . . . . . . . 434Export a Client Certificate. . . . . . . . . . . . . . . . . . . . . . . . . . . . . . . . . . . . . . . . . . . . . . . . . . .435SQL Statements and Authorization for In-Database Certificate Management (Reference). . . . . .436
12.9 Data Anonymization. . . . . . . . . . . . . . . . . . . . . . . . . . . . . . . . . . . . . . . . . . . . . . . . . . . . . . . . . 441Show Anonymization Views. . . . . . . . . . . . . . . . . . . . . . . . . . . . . . . . . . . . . . . . . . . . . . . . . .441
13 Managing Database Users and Roles. . . . . . . . . . . . . . . . . . . . . . . . . . . . . . . . . . . . . . . . . . . 44313.1 View a Database User. . . . . . . . . . . . . . . . . . . . . . . . . . . . . . . . . . . . . . . . . . . . . . . . . . . . . . . . 444
Database User Details. . . . . . . . . . . . . . . . . . . . . . . . . . . . . . . . . . . . . . . . . . . . . . . . . . . . . 444Database Users. . . . . . . . . . . . . . . . . . . . . . . . . . . . . . . . . . . . . . . . . . . . . . . . . . . . . . . . . . 448
13.2 View a Database Role. . . . . . . . . . . . . . . . . . . . . . . . . . . . . . . . . . . . . . . . . . . . . . . . . . . . . . . . 450Database Role Details. . . . . . . . . . . . . . . . . . . . . . . . . . . . . . . . . . . . . . . . . . . . . . . . . . . . . . 451Database Roles. . . . . . . . . . . . . . . . . . . . . . . . . . . . . . . . . . . . . . . . . . . . . . . . . . . . . . . . . . 453
13.3 Create a Catalog Role. . . . . . . . . . . . . . . . . . . . . . . . . . . . . . . . . . . . . . . . . . . . . . . . . . . . . . . . 455Prerequisites for Granting and Revoking Privileges and Roles. . . . . . . . . . . . . . . . . . . . . . . . . . 457System Privileges (Reference). . . . . . . . . . . . . . . . . . . . . . . . . . . . . . . . . . . . . . . . . . . . . . . .459Object Privileges (Reference). . . . . . . . . . . . . . . . . . . . . . . . . . . . . . . . . . . . . . . . . . . . . . . . 464
13.4 Change a Role. . . . . . . . . . . . . . . . . . . . . . . . . . . . . . . . . . . . . . . . . . . . . . . . . . . . . . . . . . . . . 46913.5 Delete a Role. . . . . . . . . . . . . . . . . . . . . . . . . . . . . . . . . . . . . . . . . . . . . . . . . . . . . . . . . . . . . . 47013.6 Create a User Group. . . . . . . . . . . . . . . . . . . . . . . . . . . . . . . . . . . . . . . . . . . . . . . . . . . . . . . . . 470
User Group Details. . . . . . . . . . . . . . . . . . . . . . . . . . . . . . . . . . . . . . . . . . . . . . . . . . . . . . . . 472SQL Statements and Authorization for User Group Administration (Reference). . . . . . . . . . . . . 474
13.7 Create a Database User. . . . . . . . . . . . . . . . . . . . . . . . . . . . . . . . . . . . . . . . . . . . . . . . . . . . . . . 477Unpermitted Characters in User Names. . . . . . . . . . . . . . . . . . . . . . . . . . . . . . . . . . . . . . . . 480
13.8 Create a Restricted Database User. . . . . . . . . . . . . . . . . . . . . . . . . . . . . . . . . . . . . . . . . . . . . . . 48113.9 Assign Roles to a Database User. . . . . . . . . . . . . . . . . . . . . . . . . . . . . . . . . . . . . . . . . . . . . . . . 485
SAP HANA Administration with SAP HANA CockpitContent P U B L I C 7
13.10 Assign Privileges to a User. . . . . . . . . . . . . . . . . . . . . . . . . . . . . . . . . . . . . . . . . . . . . . . . . . . . . 486
13.11 Change a Database User. . . . . . . . . . . . . . . . . . . . . . . . . . . . . . . . . . . . . . . . . . . . . . . . . . . . . . 487
13.12 Deactivate a Database User. . . . . . . . . . . . . . . . . . . . . . . . . . . . . . . . . . . . . . . . . . . . . . . . . . . . 488
13.13 Delete a Database User. . . . . . . . . . . . . . . . . . . . . . . . . . . . . . . . . . . . . . . . . . . . . . . . . . . . . . . 490
13.14 Add a SAML Identity Provider in SAP HANA Cockpit. . . . . . . . . . . . . . . . . . . . . . . . . . . . . . . . . . . 491
13.15 Add a JWT Identity Provider in SAP HANA Cockpit. . . . . . . . . . . . . . . . . . . . . . . . . . . . . . . . . . . . 492
14 System Replication. . . . . . . . . . . . . . . . . . . . . . . . . . . . . . . . . . . . . . . . . . . . . . . . . . . . . . . . 494
14.1 Monitoring SAP HANA System Replication with the SAP HANA Cockpit. . . . . . . . . . . . . . . . . . . . . 494
SAP HANA System Replication Details . . . . . . . . . . . . . . . . . . . . . . . . . . . . . . . . . . . . . . . . . 495
14.2 General Prerequisites for Configuring SAP HANA System Replication. . . . . . . . . . . . . . . . . . . . . . 499
14.3 Configure SAP HANA System Replication with the SAP HANA Cockpit. . . . . . . . . . . . . . . . . . . . . .502
Configure SAP HANA System Replication from the Primary System. . . . . . . . . . . . . . . . . . . . . 503
Configure SAP HANA System Replication from the Primary and the Secondary Systems. . . . . . 504
Reinitialize the Secondary System. . . . . . . . . . . . . . . . . . . . . . . . . . . . . . . . . . . . . . . . . . . . .506
14.4 Perform a Takeover with the SAP HANA Cockpit. . . . . . . . . . . . . . . . . . . . . . . . . . . . . . . . . . . . . 506
14.5 Perform a Failback with the SAP HANA Cockpit. . . . . . . . . . . . . . . . . . . . . . . . . . . . . . . . . . . . . . 507
14.6 Disable SAP HANA System Replication with the SAP HANA Cockpit. . . . . . . . . . . . . . . . . . . . . . . 509
15 Backup and Recovery. . . . . . . . . . . . . . . . . . . . . . . . . . . . . . . . . . . . . . . . . . . . . . . . . . . . . . . 510
15.1 Display the Backup Configuration Settings. . . . . . . . . . . . . . . . . . . . . . . . . . . . . . . . . . . . . . . . . 510
15.2 Change the Backup Configuration Settings. . . . . . . . . . . . . . . . . . . . . . . . . . . . . . . . . . . . . . . . . 511
Backup Configuration Settings. . . . . . . . . . . . . . . . . . . . . . . . . . . . . . . . . . . . . . . . . . . . . . . 512
15.3 Create Data Backups and Delta Backups. . . . . . . . . . . . . . . . . . . . . . . . . . . . . . . . . . . . . . . . . . . 521
15.4 Create a Data Snapshot (Native SQL). . . . . . . . . . . . . . . . . . . . . . . . . . . . . . . . . . . . . . . . . . . . . 524
15.5 Schedule Backups. . . . . . . . . . . . . . . . . . . . . . . . . . . . . . . . . . . . . . . . . . . . . . . . . . . . . . . . . . 529
Activate Backup Schedules. . . . . . . . . . . . . . . . . . . . . . . . . . . . . . . . . . . . . . . . . . . . . . . . . .533
Manage Backup Schedules. . . . . . . . . . . . . . . . . . . . . . . . . . . . . . . . . . . . . . . . . . . . . . . . . . 536
15.6 Recover a Database. . . . . . . . . . . . . . . . . . . . . . . . . . . . . . . . . . . . . . . . . . . . . . . . . . . . . . . . . 538
Recover a System Database to a Point in Time. . . . . . . . . . . . . . . . . . . . . . . . . . . . . . . . . . . . 542
15.7 Copy a Database. . . . . . . . . . . . . . . . . . . . . . . . . . . . . . . . . . . . . . . . . . . . . . . . . . . . . . . . . . . .546
15.8 Housekeeping: Backup Catalog and Backup Storage. . . . . . . . . . . . . . . . . . . . . . . . . . . . . . . . . . 551
Delete Backup Generations. . . . . . . . . . . . . . . . . . . . . . . . . . . . . . . . . . . . . . . . . . . . . . . . . .552
Delete Full Backups. . . . . . . . . . . . . . . . . . . . . . . . . . . . . . . . . . . . . . . . . . . . . . . . . . . . . . . 554
16 SAP HANA Smart Data Access. . . . . . . . . . . . . . . . . . . . . . . . . . . . . . . . . . . . . . . . . . . . . . . . 557
16.1 Monitor Details Using SAP HANA Cockpit. . . . . . . . . . . . . . . . . . . . . . . . . . . . . . . . . . . . . . . . . . 557
8 P U B L I CSAP HANA Administration with SAP HANA Cockpit
Content

1 SAP HANA Administration with SAP HANA Cockpit
Use the Web-based administration tool SAP HANA cockpit for the administration, monitoring and maintenance of SAP HANA systems.
The SAP HANA cockpit provides tools for the administration and monitoring of SAP HANA databases (resources), and for development capabilities through the SAP HANA database explorer. You can manage multiple resources, each running version SAP HANA 1.0 SPS 12, or later. Resources running version SAP HANA 2.0 SPS 01 or later run in multi-container mode, but you can also monitor single-container systems running earlier versions of SAP HANA.
What can I do with the cockpit?
The SAP HANA cockpit provides aggregate, system and database administration features, such as database monitoring, user management, and data backup. You can use the SAP HANA cockpit to start and stop systems or services, monitor the system, configure system settings, and manage users and authorizations.
Cockpit apps that allow you to manage SAP HANA options and capabilities (for example, SAP HANA dynamic tiering) are only available if the option or capability has been installed.
How can I keep an eye on the big picture?
When you first launch the cockpit, you can see system and tenant databases. (The cockpit refers to these as resources). A resource is an SAP HANA system (identified by a host name and instance number) which may be a system or tenant database in a tenant (database) container, or a system in a single database container. These resources are organized into resource groups - you'll only see resources belonging to the groups to which your cockpit user has been granted access. At a glance, you can see top alerts from more than one resource, compare resource configurations and monitor the health of multiple resources.
Whenever you like, you can drill down to perform in-depth monitoring on an individual system or tenant. In order to see alerts and other data for this individual resource you'll need to enter database user credentials. These database user credentials must preexist (i.e. they will have already been created on the resource you are drilling into), and must have the system privilege CATALOG READ and SELECT on _SYS_STATISTICS. For any systems running version SAP HANA 2.0 SPS 01, or later, the cockpit resource administrator has the option to enable or enforce single sign-on (SSO).
SAP HANA Administration with SAP HANA CockpitSAP HANA Administration with SAP HANA Cockpit P U B L I C 9

How do I get access to groups of resources?
A single COCKPIT_ADMIN user is created through the cockpit installation process. This user creates other cockpit users through the Cockpit Manager configuration tool, which is launched through a separate URL provided during installation.
The cockpit administrator assigns the role of Cockpit Resource Administrator to at least one cockpit user. The Cockpit Resource Administrator registers resources, again through the Cockpit Manager. When resources are registered they are added to auto-generated resource groups, based on system usage type.
Since the Cockpit Resource Administrator cannot grant cockpit users access to an auto-generated resource group, they must also create one or more custom resource groups. They add registered resources to each group, and grant access to one or more of the cockpit users which were created by the COCKPIT_ADMIN. When you launch the cockpit, you'll be able to see all the registered resources that belong to each of the resource groups to which the Cockpit Resource Administrator has granted you access.
About SAP HANA Administration with SAP HANA Cockpit
This documentation provides information on the Cockpit Manager configuration tool, and on all the features available through the aggregate and system overviews within the SAP HANA cockpit. The SAP HANA database explorer and other linked applications such as the SAP HANA database lifecycle manager and the SAP HANA XS advanced cockpit are documented separately. Also refer to the SAP HANA Administration Guide as the comprehensive source of information for administering SAP HANA using all SAP HANA administration tools.
Related Information
SAP Note 2380291
10 P U B L I CSAP HANA Administration with SAP HANA Cockpit
SAP HANA Administration with SAP HANA Cockpit

2 Set up SAP HANA Cockpit for the First Time
After installation and before other users are able to access the SAP HANA cockpit, you need to perform several steps.
Prerequisites
● You have access to the cockpit administrator (COCKPIT_ADMIN) user, created during the installation process
● You have access to the master password which you were prompted to enter during the installation process.● You know the URLs for the cockpit and the cockpit manager, created during the installation process.
Procedure
1. Connect to the Cockpit Manager and sign in as the COCKPIT_ADMIN user. The COCKPIT_ADMIN user and corresponding master password were established during cockpit installation.You can reach the Cockpit Manager by entering the Cockpit Manager URL created during cockpit installation, or by following the Manage Cockpit link in the cockpit. The URL takes this form:
https://<cockpit-host>:<port-number>
2. Create other cockpit users, keeping in mind what cockpit actions you want them to be able to perform.3. Register resources.4. Create resource groups and add registered resources to each group.5. Assign cockpit users access to one or more groups of resources.6. Determine whether you would like to configure single sign-on authentication to the cockpit and/or the
registered resources.7. Share the credentials of the newly-created cockpit users with the appropriate people, and instruct them to
sign in to the SAP HANA cockpit .
In the cockpit, the Resource Directory displays all the registered resources to which this cockpit user has access.
Related Information
Open SAP HANA Cockpit [page 15]Working with Resources and Resource Groups [page 33]
SAP HANA Administration with SAP HANA CockpitSet up SAP HANA Cockpit for the First Time P U B L I C 11

Setting Up Single Sign-On [page 74]Managing Cockpit Users [page 24]SAP Note 2380291
2.1 Determine Ports for SAP HANA Cockpit and Cockpit Manager
The ports for SAP HANA cockpit and the cockpit manager can be determined in the XS console after the cockpit installation.
Prerequisites
● You are logged in as <sid>adm user.● You know the XS organization manager user password. The password matches the master password,
which is set during installation.
Context
Ports, through which the SAP HANA cockpit and the cockpit manager can be accessed, are assigned automatically by the installer. Once the cockpit installation is successfully completed, information about host and ports is displayed. If this information is no longer available, you can execute the following commands in the XS console to determine ports.
You can also assign free ports to SAP HANA cockpit during installation. For more information, see SAP Note 2389709 in Related Information.
Procedure
1. Change to the directory that contains the XS Advanced installation:
cd <sapmnt>/<SID>/xs/bin
By default, <sapmnt> is /hana/shared.
2. Log on to the SAP HANA XS advanced runtime. To do this, use the following command:
./xs-admin-login
3. Enter the XS organization manager user password.
12 P U B L I CSAP HANA Administration with SAP HANA Cockpit
Set up SAP HANA Cockpit for the First Time

4. Display a list of the applications running in the current space. In the command shell, run the following command:
xs apps
A list of all running apps is displayed. Information on host and ports are displayed in the urls column. The SAP HANA cockpit is listed as cockpit-web-app. The cockpit manager is listed as cockpit-admin-web-app.
Output Code
Getting apps in org "HANACockpit" / space "SAP" as COCKPIT_ADMIN... Found apps:name requested state instances memory disk urls----------------------------------------------------------------------------------------------------------------------auditlog-db STOPPED 0/1 16.0 MB <unlimited> <none> auditlog-server STARTED 1/1 256 MB <unlimited> https://<hostname>:51002 auditlog-broker STARTED 1/1 64.0 MB <unlimited> https://<hostname>:51003 deploy-service STARTED 1/1 280 MB <unlimited> https://<hostname>:51004 auditlog-odata STARTED 1/1 128 MB <unlimited> https://<hostname>:51005 component-registry-db STOPPED 0/1 16.0 MB <unlimited> <none> auditlog-ui STARTED 1/1 64.0 MB <unlimited> https://<hostname>:51007 product-installer STARTED 1/1 256 MB <unlimited> https://<hostname>:51006 hrtt-service STARTED 1/1 512 MB <unlimited> https://<hostname>:51009 sqlanlz-svc STARTED 1/1 256 MB <unlimited> https://<hostname>:51010 sqlanlz-ui STARTED 1/1 128 MB <unlimited> https://<hostname>:51011 hrtt-core STARTED 1/1 512 MB <unlimited> https://<hostname>:51012 sapui5_fesv2 STARTED 1/1 256 MB <unlimited> https://<hostname>:51015 sapui5_fesv3 STARTED 1/1 256 MB <unlimited> https://<hostname>:51025 cockpit-adminui-svc STARTED 1/1 128 MB <unlimited> https://<hostname>:51022 cockpit-collection-svc STARTED 1/1 768 MB <unlimited> https://<hostname>:51016 cockpit-hdb-svc STARTED 1/1 768 MB <unlimited> https://<hostname>:51018 cockpit-hdbui-svc STARTED 1/1 128 MB <unlimited> https://<hostname>:51020 cockpit-landscape-svc STARTED 1/1 128 MB <unlimited> https://<hostname>:51019 cockpit-persistence-svc STARTED 1/1 768 MB <unlimited> https://<hostname>:51017 cockpit-telemetry-svc STARTED 1/1 768 MB <unlimited> https://<hostname>:51026 cockpit-xsa-svc STARTED 1/1 768 MB <unlimited> https://<hostname>:51024 cockpit-admin-web-app STARTED 1/1 128 MB <unlimited> https://<hostname>:51023
SAP HANA Administration with SAP HANA CockpitSet up SAP HANA Cockpit for the First Time P U B L I C 13

cockpit-web-app STARTED 1/1 512 MB <unlimited> https://<hostname>:51021
Related Information
SAP Note 2389709
14 P U B L I CSAP HANA Administration with SAP HANA Cockpit
Set up SAP HANA Cockpit for the First Time

3 Open SAP HANA Cockpit
You access the SAP HANA cockpit from a Web browser.
Prerequisites
● You know the URL for the cockpit, created during the installation process.● You have a cockpit user name and password.● For each resource you have been authorized to monitor through the cockpit, you have a database user
name and password.● Your Web browser supports the SAPUI5 library sap.m.
For more information about SAPUI5 browser support, see SAP Note 1716423 and the Product Availability Matrix (PAM) for SAPUI5.
Procedure
1. Enter the SAP HANA cockpit URL in your browser.2. Enter your cockpit user name and password.
The SAP HANA cockpit opens. Tiles appear that you can click to access the Resource Directory and resource groups you're authorized to use.
3. Click the Resource Directory tile. Here you can see all the resources to which you are authorized.4. For each resource, set your database credentials.5. Double-click on a specific resource to access the Overview for that resource.
Related Information
Security Aspects of SAP HANA Cockpit [page 72]SAP Note 1716423Product Availability Matrix (PAM) for SAPUI5
SAP HANA Administration with SAP HANA CockpitOpen SAP HANA Cockpit P U B L I C 15

4 Authorizations Needed for Monitoring and Administration
To view information about the SAP HANA database and access the various applications for administration and monitoring, you need to connect to the resource with a database user with appropriate database privileges. If you don't have the required privileges, specific tiles, features, or actions may not be available to you.
NoteTo be able to connect to a resource and see minimum monitoring information, the connecting database user must have system privilege CATALOG READ and the SELECT privilege on the schema _SYS_STATISTICS.
Database Monitoring and Administration
These tables list the database privileges required to view information about an SAP HANA database on the System Overview page and to access monitoring and administration functions on subsequent pages.
Monitoring
To Access... You Need These SAP HANA Privileges...
Overall Database Status ● CATALOG READ system privilege● SELECT privileges on:
○ SYS_DATABASES.m_services○ SYS_DATABASES.m_service_memory○ SYS_DATABASES.m_service_statistics○ SYS_DATABASES.m_heap_memory_reset○ SYS.m_services○ SYS.m_service_memory○ SYS.m_service_statistics○ SYS.m_heap_memory_reset○ _SYS_STATISTICS.STATISTICS_SCHEDULE○ _SYS_STATISTICS.HELPER_ALERT_CHECK_INAC
TIVE_SERVICES_AGE
Alerts SELECT privileges on _SYS_STATISTICS
Memory Usage No additional authorization required
Memory Analysis ● CATALOG READ system privilege● SELECT on _SYS_STATISTICS object privileges
CPU Usage No additional authorization required
Disk Usage No additional authorization required
Performance Monitor No additional authorization required
16 P U B L I CSAP HANA Administration with SAP HANA Cockpit
Authorizations Needed for Monitoring and Administration

To Access... You Need These SAP HANA Privileges...
Monitor Statements To enable or disable memory tracking, you need the INIFILE ADMIN privilege.
To cancel the session, you need the SESSIONS ADMIN privilege.
Sessions To cancel sessions or operations, you need the SESSION ADMIN privilege.
Threads To cancel sessions or operations, you need the SESSION ADMIN privilege.
Monitor expensive statements To configure expensive statements, you need the INIFILE ADMIN privilege.
Open SQL plan cache To configure SQL plan cache, you need the INIFILE ADMIN privilege.
Open blocked transactions No additional authorization required
Smart Data Access No additional authorization required
Alerting and Diagnostics
To Access... You Need These SAP HANA Privileges...
Configure alerts SELECT privileges on _SYS_STATISTICS
Plan trace ● To turn plan trace on or off, you need the TRACE ADMIN privilege.
● To retrieve the status and to configure plan trace, you need the INIFILE ADMIN privilege.
System Replication
To Access... You Need These SAP HANA Privileges...
System Replication No additional authorization required
Other Administration
To Access... You Need These SAP HANA Privileges...
Apply configuration templates System privilege INIFILE ADMIN
Application and Platform Lifecycle Management
To Access... You Need These SAP HANA Privileges...
Platform Lifecycle Management <sid>adm privileges
Application Lifecycle Management Not applicable.
For more information about the availability of the application lifecycle management GUI, see the section on SAP HANA application lifecycle management in the SAP HANA Administration Guide.
SAP HANA Administration with SAP HANA CockpitAuthorizations Needed for Monitoring and Administration P U B L I C 17

General Information
To Access... You Need These SAP HANA Privileges...
General Information System privilege CATALOG READ and SELECT on _SYS_STATISTICS
Help links No additional authorization required
Security
Security
To Access... You Need These SAP HANA Privileges...
Data Encryption ● To enable/disable encryption: ENCRYPTION ROOT KEY ADMIN
● To view SSFS master key information: RESOURCE ADMIN
Auditing To see, create, change, and delete audit policies, system privilege AUDIT ADMIN. (AUDIT ADMIN does not allow you to delete the audit log.)
To delete the audit log, AUDIT OPERATOR.
To change the auditing status, one of the following system privileges:
● AUDIT ADMIN● INIFILE ADMIN
To see the system views AUDIT_LOG, system privilege AUDIT READ, AUDIT ADMIN, or AUDIT OPERATOR.
To see the audit policies, the system privilege CATALOG READ or AUDIT ADMIN.
Authentication To see information about authentication, system privilege INIFILE ADMIN.
To be able to see the password blacklist on opening the Password Policy and Blacklist page, you need SELECT privilege on _SYS_PASSWORD_BLACKLIST (_SYS_SECURITY).
User & Role Management
To Access... You Need These SAP HANA Privileges...
Manage users To view, create, and manage users, system privilege USER ADMIN.
To view users, system privilege CATALOG READ.
To change your own password, no privilege is required.
18 P U B L I CSAP HANA Administration with SAP HANA Cockpit
Authorizations Needed for Monitoring and Administration

To Access... You Need These SAP HANA Privileges...
Assign roles to users To view and assign roles, system privilege ROLE ADMIN.
To view roles, system privilege CATALOG READ.
Assign privileges to users To assign privileges, the privileges must be granted with the permission to grant them to other users.
To view all the privileges granted, system privilege CATALOG READ.
Manage roles To create and manage roles, system privilege ROLE ADMIN and the privileges required to grant specific privileges to roles.
To view roles, system privilege CATALOG READ.
To grant object privileges on your own objects to a role, no privilege is required.
Manage user groups To create and modify user groups, system privilege USER ADMIN.
To modify an existing user group configured for exclusive administration, the object privilege USERGROUP OPERATOR on the user group.
Security Related Links
To Access... You Need These SAP HANA Privileges...
Manage certificates To read and change certificates, CERTIFICATE ADMIN.
To read certificates, CATALOG READ or TRUST ADMIN.
Manage certificate collections To create certificate collections and assign certificates, TRUST ADMIN.
To see, change, or delete a certificate collection, you must:
● Have the system privilege DATABASE ADMIN and the object privilege REFERENCES, DROP or ALTER on a certificate collection.
● Be the owner of the certificate collection and have one of the following system privileges:○ SSL ADMIN○ USER ADMIN○ CERTIFICATE ADMIN
To see certificate collections, CATALOG READ.
Network security information System privilege CATALOG READ
View anonymization report System privilege CATALOG READ
Manage SAML identity providers System privilege USER ADMIN
SAP HANA Administration with SAP HANA CockpitAuthorizations Needed for Monitoring and Administration P U B L I C 19

To Access... You Need These SAP HANA Privileges...
Manage JWT identity providers System privilege USER ADMIN
Security administration help No additional authorization required
SAP HANA security website No additional authorization required
Security checklists No additional authorization required
Backup and Recovery (SAP HANA Cockpit)
Authorizations for Backup and Recovery (SAP HANA Cockpit)
To Perform This Task... You Need These SAP HANA Privileges...
System Database Tenant Database
Tenant Database
(Through the System Database)
View and create database backups
BACKUP ADMIN or BACKUP OPERATOR (recommended for batch users only).
BACKUP ADMIN or BACKUP OPERATOR (recommended for batch users only).
DATABASE BACKUP OPERATOR
DATABASE BACKUP ADMIN
DATABASE ADMIN
Delete database backups BACKUP ADMIN BACKUP ADMIN DATABASE BACKUP ADMIN
DATABASE ADMIN
Recover or copy a database Operating system user <sid>adm
(not possible) DATABASE RECOVERY OPERATOR
DATABASE ADMIN
Schedule backups BACKUP ADMIN
SELECT privileges for the following tables:
● _SYS_XS.JOB_SCHEDULES
● _SYS_XS.JOBS
BACKUP ADMIN
SELECT privileges for the following tables:
● _SYS_XS.JOB_SCHEDULES
● _SYS_XS.JOBS
DATABASE BACKUP OPERATOR
DATABASE BACKUP ADMIN
DATABASE ADMIN and SELECT privileges for the following tables:
● _SYS_XS.JOB_SCHEDULES
● _SYS_XS.JOBS
20 P U B L I CSAP HANA Administration with SAP HANA Cockpit
Authorizations Needed for Monitoring and Administration
To Perform This Task... You Need These SAP HANA Privileges...
System Database Tenant Database
Tenant Database
(Through the System Database)
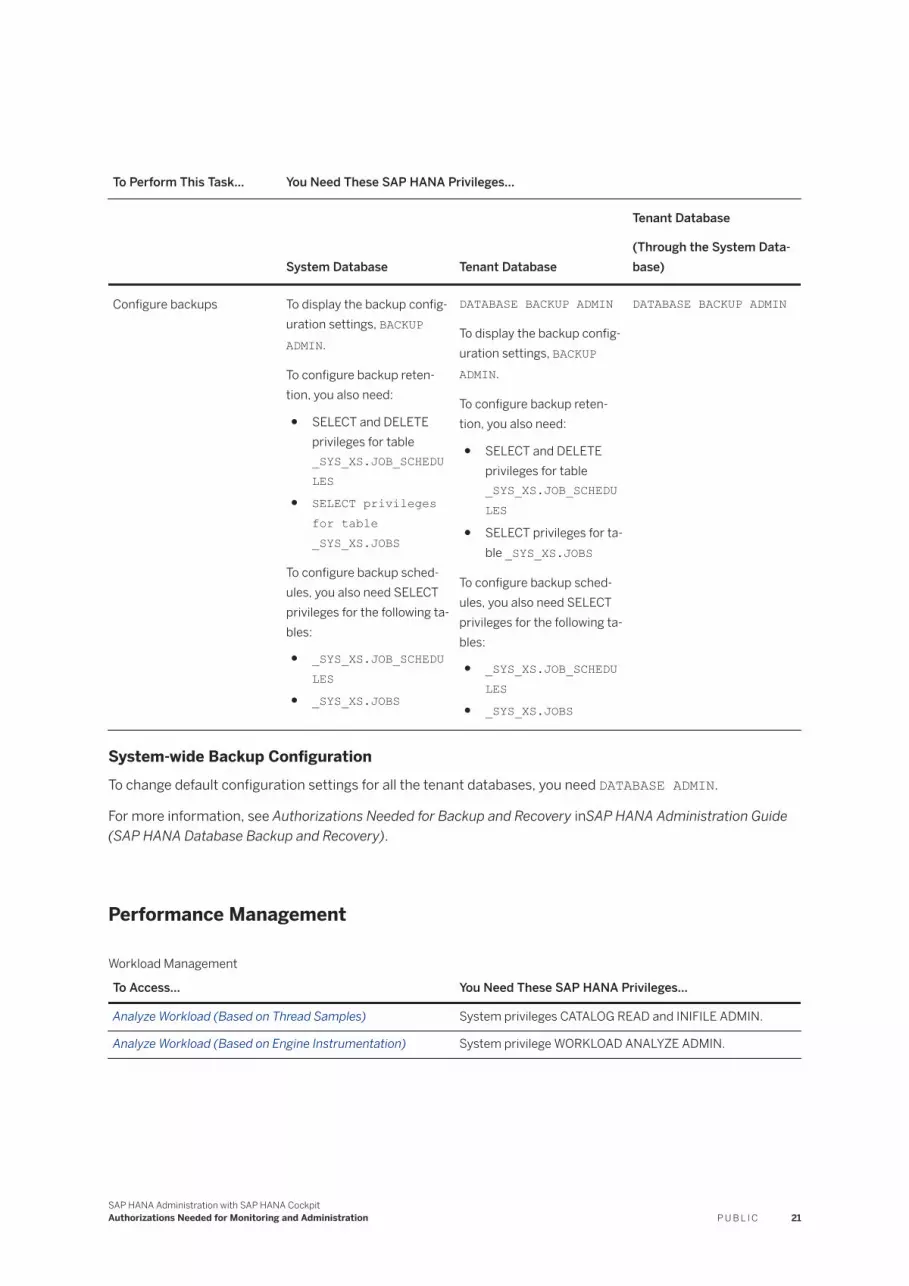
Configure backups To display the backup config-uration settings, BACKUP ADMIN.
To configure backup retention, you also need:
● SELECT and DELETE privileges for table _SYS_XS.JOB_SCHEDULES
● SELECT privileges for table _SYS_XS.JOBS
To configure backup schedules, you also need SELECT privileges for the following tables:
● _SYS_XS.JOB_SCHEDULES
● _SYS_XS.JOBS
DATABASE BACKUP ADMIN
To display the backup config-uration settings, BACKUP ADMIN.
To configure backup retention, you also need:
● SELECT and DELETE privileges for table _SYS_XS.JOB_SCHEDULES
● SELECT privileges for table _SYS_XS.JOBS
To configure backup schedules, you also need SELECT privileges for the following tables:
● _SYS_XS.JOB_SCHEDULES
● _SYS_XS.JOBS
DATABASE BACKUP ADMIN
System-wide Backup ConfigurationTo change default configuration settings for all the tenant databases, you need DATABASE ADMIN.
For more information, see Authorizations Needed for Backup and Recovery inSAP HANA Administration Guide (SAP HANA Database Backup and Recovery).
Performance Management
Workload Management
To Access... You Need These SAP HANA Privileges...
Analyze Workload (Based on Thread Samples) System privileges CATALOG READ and INIFILE ADMIN.
Analyze Workload (Based on Engine Instrumentation) System privilege WORKLOAD ANALYZE ADMIN.
SAP HANA Administration with SAP HANA CockpitAuthorizations Needed for Monitoring and Administration P U B L I C 21
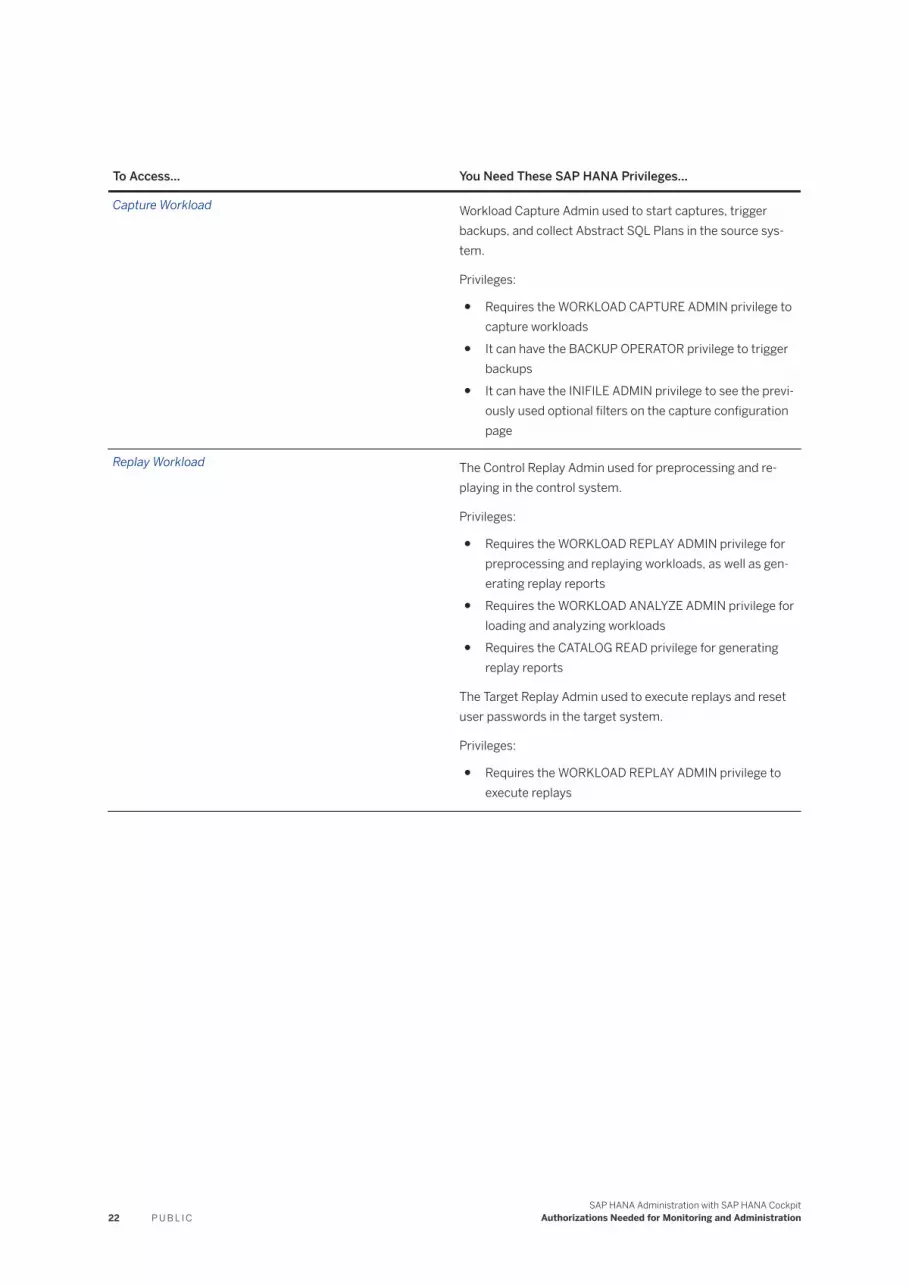
To Access... You Need These SAP HANA Privileges...
Capture Workload Workload Capture Admin used to start captures, trigger backups, and collect Abstract SQL Plans in the source system.
Privileges:
● Requires the WORKLOAD CAPTURE ADMIN privilege to capture workloads
● It can have the BACKUP OPERATOR privilege to trigger backups
● It can have the INIFILE ADMIN privilege to see the previously used optional filters on the capture configuration page
Replay Workload The Control Replay Admin used for preprocessing and replaying in the control system.
Privileges:
● Requires the WORKLOAD REPLAY ADMIN privilege for preprocessing and replaying workloads, as well as generating replay reports
● Requires the WORKLOAD ANALYZE ADMIN privilege for loading and analyzing workloads
● Requires the CATALOG READ privilege for generating replay reports
The Target Replay Admin used to execute replays and reset user passwords in the target system.
Privileges:
● Requires the WORKLOAD REPLAY ADMIN privilege to execute replays
22 P U B L I CSAP HANA Administration with SAP HANA Cockpit
Authorizations Needed for Monitoring and Administration

5 Setup and Administration with the Cockpit Manager
The Cockpit Manager configuration tool is an application separate from the SAP HANA cockpit itself. Launch the Cockpit Manager using the URL that was provided during cockpit installation.
The functionality visible in the Cockpit Manager depends on the role(s) assigned to the user accessing the Cockpit Manager. The administrator roles of cockpit administrator, cockpit user administrator and cockpit resource administrator can perform the tasks necessary to enable users of SAP HANA cockpit to manage and monitor resources. These roles can be assigned together to one user, or to separate individuals.
Before other cockpit users can make full use of SAP HANA cockpit, the cockpit user administrator needs to use the Cockpit Manager to:
● Create and manage cockpit users
Then, the cockpit resource administrator needs to use the Cockpit Manager to:
● Register resources● Create resource groups● Add resources to resource groups● Grant cockpit users access to resource groups
Optionally, the cockpit administrator can to use the Cockpit Manager to:
● Modify settings related to the configuration of the cockpit.
NoteDuring cockpit installation, a master user, COCKPIT_ADMIN, is automatically created. Its password corresponds to the master password which you were prompted to enter during the installation process. This master user is assigned all three administrator roles, and can therefore access all aspects of the Cockpit Manager, and can create users, register resources, and assign users and resources to resource groups. However, you may wish to assign administrator roles to other users.
Related Information
Set up SAP HANA Cockpit for the First Time [page 11]Determine Ports for SAP HANA Cockpit and Cockpit Manager [page 12]Open SAP HANA Cockpit [page 15]Managing Cockpit Users [page 24]Working with Resources and Resource Groups [page 33]Configuring Cockpit Settings [page 30]Security Aspects of SAP HANA Cockpit [page 72]Using XS CLI Commands to Troubleshoot the Cockpit [page 70]
SAP HANA Administration with SAP HANA CockpitSetup and Administration with the Cockpit Manager P U B L I C 23

5.1 Managing Cockpit Users
Using the Cockpit Manager administration tool, the cockpit user administrator, can create cockpit user log on credentials.
A cockpit user administrator is the only role that can create other cockpit users (application users).
Cockpit Users vs. Database Users
Selecting Cockpit Users in the Cockpit Manager allows you to create cockpit users that can be assigned to a group of resources. Once cockpit users have access to a resource group, they will be able to monitor each of the resources within the group, as well as see aggregate data for the group. A cockpit user who isn't given access to any resource groups can log in to the cockpit, but their My Resources page displays zero resources. A cockpit user who is given access only to a group that contains no resources also sees a display of zero resources.
NoteCockpit users are distinct from the database user credentials associated with the individual resources managed and monitored through the cockpit. Before they can drill down from the aggregate monitoring in the cockpit to a specific system, each cockpit user is required to enter existing database user credentials (unless single sign-on is in effect). Database users are not managed through the Cockpit Manager, but rather through the Manage Users link on the system Overview.
Each cockpit user must be assigned at least one cockpit role, which will dictate what portions of the cockpit or the Cockpit Manager they can access. (Cockpit roles are unrelated to the roles associated with database users. The latter govern which SAP HANA privileges are assigned to a database user).
NoteDuring cockpit installation, a master user, COCKPIT_ADMIN, is automatically created. Its password corresponds to the master password which you were prompted to enter during the installation process. This master user is assigned all three administrator roles, and can therefore access all aspects of the Cockpit Manager, and can create users, register resources, and assign users and resources to resource groups. However, you may wish to assign administrator roles to other users.
Because cockpit roles were introduced as of SAP HANA 2.0 SPS 01, if your COCKPIT_ADMIN was created during the installation of an earlier version, you may wish to assign it additional roles if you want to continue to access all aspects of the cockpit and the Cockpit Manager, and you will have to log on again to have this change take effect.
Related Information
Create or Enable a Cockpit User [page 25]Grant a Cockpit User Access to Specific Groups [page 27]
24 P U B L I CSAP HANA Administration with SAP HANA Cockpit
Setup and Administration with the Cockpit Manager

Add or Remove Users in Resource Groups [page 51]Managing Resource Groups [page 47]Register a Resource [page 34]Security Aspects of SAP HANA Cockpit [page 72]
5.1.1 Create or Enable a Cockpit User
As a cockpit user administrator, you can create new cockpit users, or allow existing business users to access the SAP HANA cockpit.
Context
The Create User wizard allows you to create cockpit users by entering new credentials or by choosing to provide cockpit access to existing business users that have been created through other means.
Procedure
1. Connect to the Cockpit Manager and sign in as a cockpit user administrator.You can reach the Cockpit Manager by entering the Cockpit Manager URL created during cockpit installation, or by following the Manage Cockpit link in the cockpit. The URL takes this form:
https://<cockpit-host>:<port-number>
2. In the Cockpit Manager, select Cockpit Users.3. Select Create User.4. In the Create User wizard, do one of the following:
○ Select the checkbox to enable an existing business user to access the cockpit, then select the user from the drop-down list.
○ Enter a new user name, enter and confirm a password, and enter an e-mail address.5. Assign a cockpit role to the user. Choose one, or a combination of:
Cockpit Role Permits access to
Cockpit Administrator The Cockpit Settings section of the Cockpit Manager, where they can configure cockpit settings.
Cockpit Resource Administrator The Registered Resource and Resource Groups sections of the Cockpit Manager, where they can register resources, create resource groups, and assign cockpit users to resource groups.
Cockpit User Administrator The Manage Users section of the Cockpit Manager, where they can create and manage cockpit users.
SAP HANA Administration with SAP HANA CockpitSetup and Administration with the Cockpit Manager P U B L I C 25

Cockpit Role Permits access to
Cockpit User The SAP HANA cockpit, where they can view and monitor all resources in any assigned resource groups.
Cockpit Power User The SAP HANA cockpit and the Registered Resource section of the Cockpit Manager.
To assign the Cockpit Power User role, select Allow this user to register resources under Cockpit User Role.
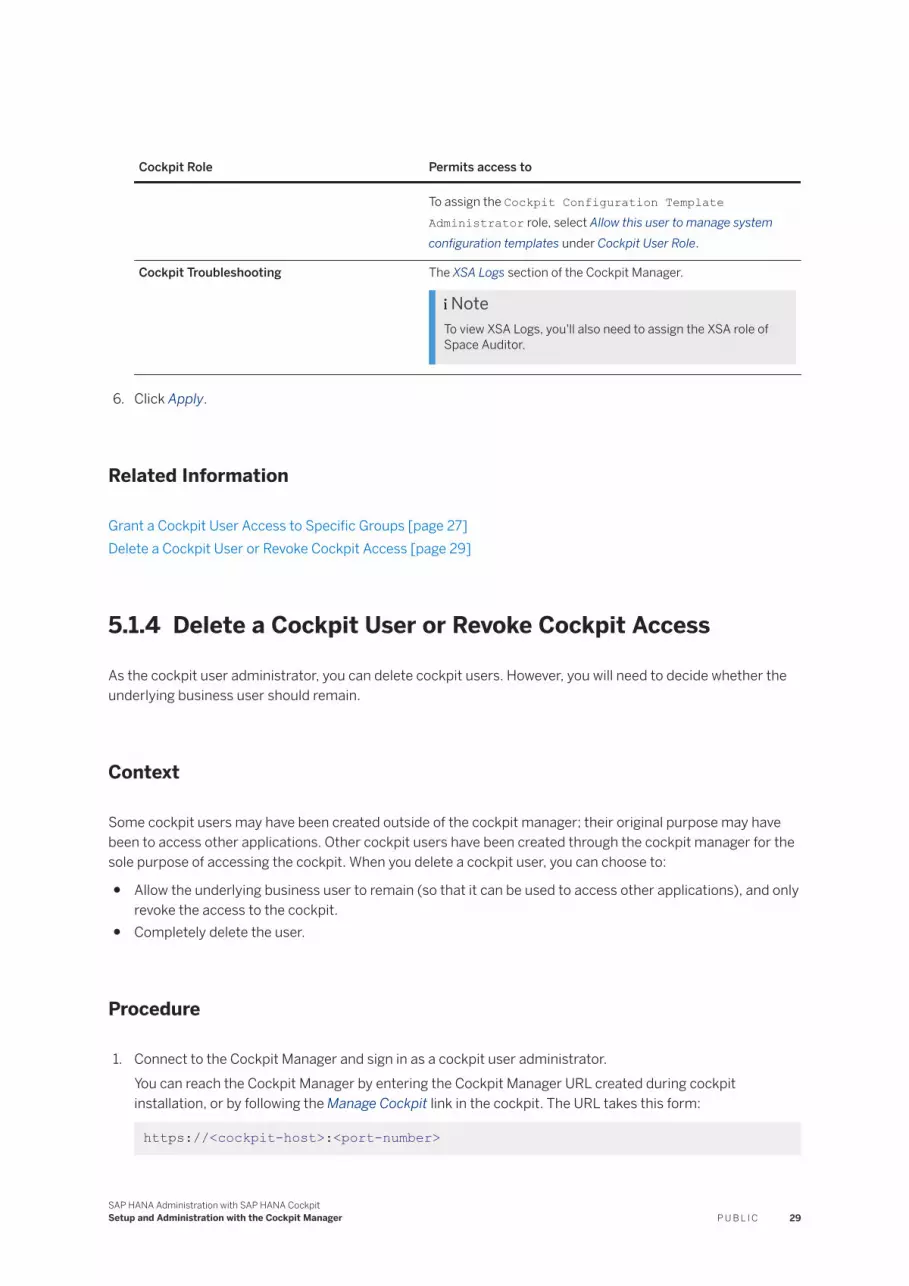
Cockpit Configuration Template Administrator The SAP HANA cockpit, where they can create, delete, and modify templates in the Configuration Templates section, in addition to using the priviliges of the Cockpit User role.
To assign the Cockpit Configuration Template Administrator role, select Allow this user to manage system configuration templates under Cockpit User Role.
Cockpit Troubleshooting The XSA Logs section of the Cockpit Manager.
NoteTo view XSA Logs, you'll also need to assign the XSA role of Space Auditor.
6. If the cockpit user administrator that you used to access the Cockpit Manager has also been assigned the Cockpit Resource Administrator role, you can choose Add Groups and select the group(s) that the users which you create will be able to access. (Any Cockpit Resource Administrator can also do this through the Resource Groups section of the Cockpit Manager.)
7. (Optional) Scroll up and review what you entered.8. Select Create User.
On the Cockpit Users page, you can see the list of cockpit users, which includes the one you just added or enabled.
NoteA new cockpit user cannot see any resources until someone with the Cockpit Resource Administrator role assigns them to at least one resource group that contains at least one registered resource.
Related Information
Grant a Cockpit User Access to Specific Groups [page 27]Edit Settings for a Cockpit User [page 28]
26 P U B L I CSAP HANA Administration with SAP HANA Cockpit
Setup and Administration with the Cockpit Manager

5.1.2 Grant a Cockpit User Access to Specific Groups
Add or remove resource groups from the list of groups that a specific user can access.
Context
In order for cockpit users to monitor and manage registered resources, you need to assign them to the resource group to which these resources belong.
NoteThis task can be done in the Resource Groups section of the Cockpit Manager by a Cockpit Resource Administrator. However, if you, as the Cockpit User Administrator also have the Cockpit Resource Administrator role, you have the option to make these changes through the Cockpit Users section.
Procedure
1. Connect to the Cockpit Manager and sign in as a cockpit user administrator with cockpit resource administrator privileges (a user with the roles COCKPIT_USER_ADMIN and COCKPIT_RESOURCE_ADMIN).You can reach the Cockpit Manager by entering the Cockpit Manager URL created during cockpit installation, or by following the Manage Cockpit link in the cockpit. The URL takes this form:
https://<cockpit-host>:<port-number>
2. In the Cockpit Manager, select Cockpit Users.3. In the left pane, select the user whose access you want to modify.4. Select Grant Access to Resource Groups. (This link is only visible if the Cockpit User Administrator
has the been assigned the Cockpit Resource Administrator role.)
5. Select the group(s) that the user will be permitted to access and click OK.
The group(s) to which the user now has access are listed under User Details.
6. (Optional) To remove the user's access to a group, click the red to the right of the group that you want to remove from this user, and confirm the request.
Results
The group is no longer listed under User Details. The group can be reassigned to this user or other users at any time.
SAP HANA Administration with SAP HANA CockpitSetup and Administration with the Cockpit Manager P U B L I C 27
Related Information
Add or Remove Users in Resource Groups [page 51]Create or Enable a Cockpit User [page 25]Delete a Cockpit User or Revoke Cockpit Access [page 29]
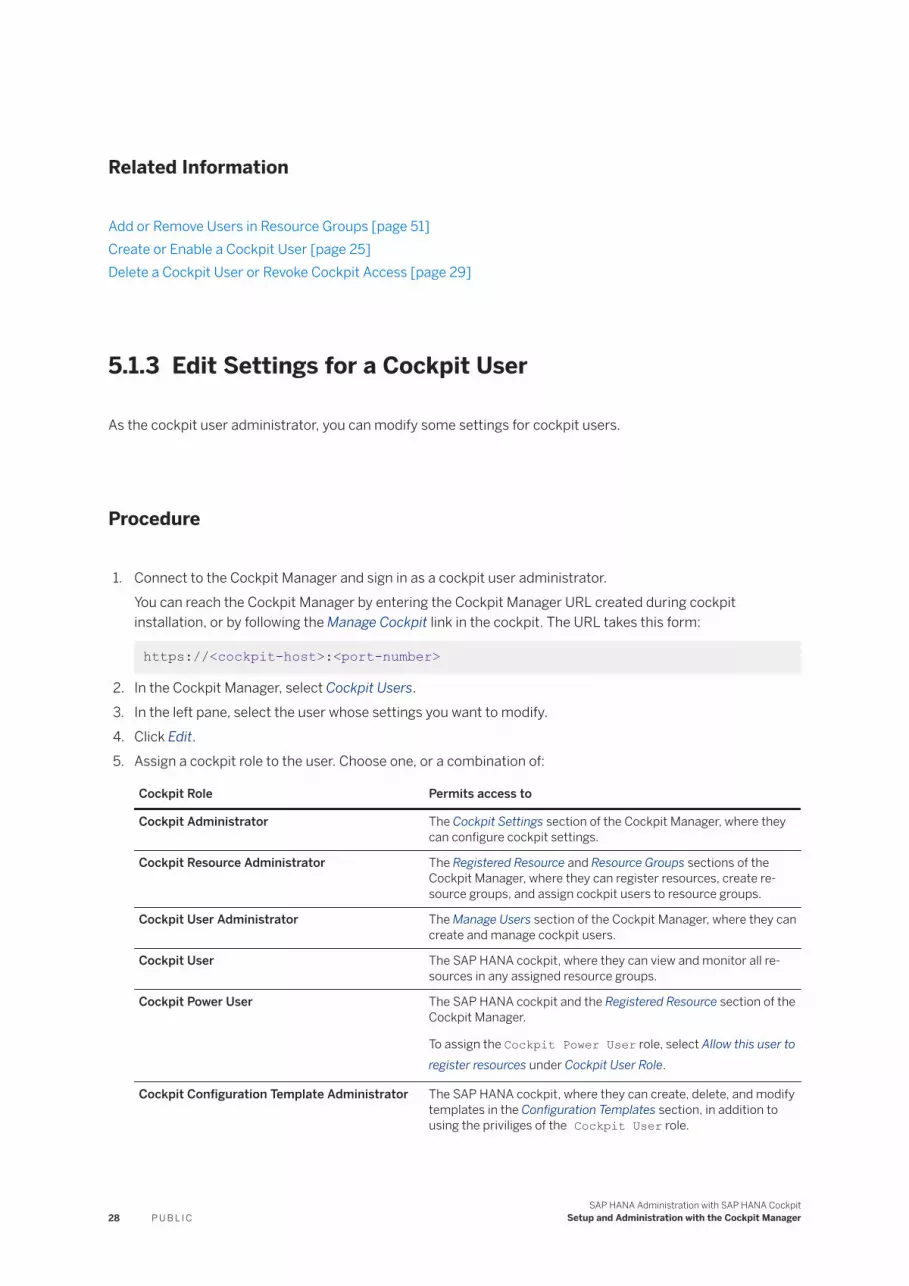
5.1.3 Edit Settings for a Cockpit User
As the cockpit user administrator, you can modify some settings for cockpit users.
Procedure
1. Connect to the Cockpit Manager and sign in as a cockpit user administrator.You can reach the Cockpit Manager by entering the Cockpit Manager URL created during cockpit installation, or by following the Manage Cockpit link in the cockpit. The URL takes this form:
https://<cockpit-host>:<port-number>
2. In the Cockpit Manager, select Cockpit Users.3. In the left pane, select the user whose settings you want to modify.4. Click Edit.5. Assign a cockpit role to the user. Choose one, or a combination of:
Cockpit Role Permits access to
Cockpit Administrator The Cockpit Settings section of the Cockpit Manager, where they can configure cockpit settings.
Cockpit Resource Administrator The Registered Resource and Resource Groups sections of the Cockpit Manager, where they can register resources, create resource groups, and assign cockpit users to resource groups.
Cockpit User Administrator The Manage Users section of the Cockpit Manager, where they can create and manage cockpit users.
Cockpit User The SAP HANA cockpit, where they can view and monitor all resources in any assigned resource groups.
Cockpit Power User The SAP HANA cockpit and the Registered Resource section of the Cockpit Manager.
To assign the Cockpit Power User role, select Allow this user to register resources under Cockpit User Role.
Cockpit Configuration Template Administrator The SAP HANA cockpit, where they can create, delete, and modify templates in the Configuration Templates section, in addition to using the priviliges of the Cockpit User role.
28 P U B L I CSAP HANA Administration with SAP HANA Cockpit
Setup and Administration with the Cockpit Manager
Cockpit Role Permits access to
To assign the Cockpit Configuration Template Administrator role, select Allow this user to manage system configuration templates under Cockpit User Role.
Cockpit Troubleshooting The XSA Logs section of the Cockpit Manager.
NoteTo view XSA Logs, you'll also need to assign the XSA role of Space Auditor.
6. Click Apply.
Related Information
Grant a Cockpit User Access to Specific Groups [page 27]Delete a Cockpit User or Revoke Cockpit Access [page 29]
5.1.4 Delete a Cockpit User or Revoke Cockpit Access
As the cockpit user administrator, you can delete cockpit users. However, you will need to decide whether the underlying business user should remain.
Context
Some cockpit users may have been created outside of the cockpit manager; their original purpose may have been to access other applications. Other cockpit users have been created through the cockpit manager for the sole purpose of accessing the cockpit. When you delete a cockpit user, you can choose to:
● Allow the underlying business user to remain (so that it can be used to access other applications), and only revoke the access to the cockpit.
● Completely delete the user.
Procedure
1. Connect to the Cockpit Manager and sign in as a cockpit user administrator.You can reach the Cockpit Manager by entering the Cockpit Manager URL created during cockpit installation, or by following the Manage Cockpit link in the cockpit. The URL takes this form:
https://<cockpit-host>:<port-number>
SAP HANA Administration with SAP HANA CockpitSetup and Administration with the Cockpit Manager P U B L I C 29

2. In the Cockpit Manager, select Cockpit Users.3. In the left pane, select the user.4. Select Delete.5. In the Confirm Request dialog:
Choose... In order to...
Remove Access Only Allow the business user to continue to exist outside the cockpit, but without cockpit access
Delete User Delete the business user from the cockpit and from any additional applications
Cancel Neither delete the user nor the cockpit access.
Results
When you choose to remove access or completely delete the user, the user is removed from the list on the Cockpit Users page.
Related Information
Create or Enable a Cockpit User [page 25]Grant a Cockpit User Access to Specific Groups [page 27]Security Aspects of SAP HANA Cockpit [page 72]
5.2 Configuring Cockpit Settings
In the Cockpit Manager, as a cockpit administrator, you can select Settings to configure data collection, proxy server settings, and the connection timeout period, and to control whether or not SAP HANA Cockpit displays auto-created groups.
Related Information
Setting Data Collection [page 31]Setting Proxy Server [page 31]Setting Connection Timeout [page 32]Specifying Display of Auto-Generated Groups [page 32]Working with Resources and Resource Groups [page 33]
30 P U B L I CSAP HANA Administration with SAP HANA Cockpit
Setup and Administration with the Cockpit Manager

5.2.1 Setting Data Collection
As a cockpit administrator, you can reconfigure the default, preconfigured SAP HANA cockpit global settings for collecting monitoring data, such as system status, alert counts, and other data from registered resources.
In the Cockpit Manager, select Cockpit Settings, and then Data Collection.
If necessary, you can change the defaults to specify:
● How many worker threads the collection service should use. Increasing threads can improve response time but uses more memory. The default is 5 threads.
● Whether and how often the cockpit collects system status and alert counts. The default is 60 seconds.● Whether and how often the cockpit collects key performance area monitoring data from each managed
resource.The default is 5 minutes.
There may be a brief lag before your changes in values take effect.
NoteYou can also modify the collection settings for a specific resource by editing the details of that resource. Doing so overrides the global settings for that particular resource. See Override Data Collection for a Resource.
TipThe cockpit can support 1000s of registered resources. If the System Health Monitor displays ‘Not Collected’ for specific resources, you may wish to investigate the collection service log for rejected collections and reconfigure the worker threads accordingly.
Related Information
Using XS CLI Commands to Troubleshoot the Cockpit [page 70]Override Data Collection for a Resource [page 42]
5.2.2 Setting Proxy Server
As a cockpit administrator, you can optionally set up a proxy server to use with SAP HANA cockpit through the Cockpit Manager by selecting Settings, then Proxy.
There are two types of proxies available: the Network proxy and the HTTP(S) proxy. In both cases, you need to specify the host and port number.
For an HTTP(S) proxy you can also specify exceptions that should not use the proxy host. Use the No Proxy Host field to enter the exceptions (addresses beginning with the strings you enter, separated by semi-colons).
TipAfter setting up a proxy server, be sure to check Enable before selecting Save.
SAP HANA Administration with SAP HANA CockpitSetup and Administration with the Cockpit Manager P U B L I C 31

Related Information
Setting Data Collection [page 31]Setting Connection Timeout [page 32]
5.2.3 Setting Connection Timeout
As a cockpit administrator, you can specify the length of time that the SAP HANA cockpit waits for a connection before initiating a timeout through the Cockpit Manager by selecting Settings, then Connections.
If a server connection is unresponsive, you may want to ensure that the cockpit doesn't wait for a response indefinitely. You can configure the following timeout periods:
Timeout period Default
Standard database connect timeout 30 seconds
Long running tasks database connect timeout 48 hours
SAP Control connect timeout 15 seconds
SAP Control read timeout 30 minutes
Related Information
Setting Data Collection [page 31]Setting Proxy Server [page 31]
5.2.4 Specifying Display of Auto-Generated Groups
As a cockpit administrator, you can choose whether or not SAP HANA cockpit displays resources as part of auto-created resource groups, or solely as part of resource groups that you create.
A resource group—a named set of one or more registered resources—controls management and monitoring privileges. When you assign a cockpit user to a resource group that you have created, you enable the user to monitor and manage the group's resources through the cockpit. Each registered resource also belongs to a usage type resource group. These auto-created groups of resources (Production, Test, Development) are based on the system usage type of each resource. System usage type is configured during system installation, or later using the global.ini file with the usage parameter in the system_information section.
You can choose to hide one or more of the auto-created groups through the Cockpit Manager by selecting Settings, then Display, and deselecting or selecting each box. Opting to hide the auto-created groups does not affect the system usage type associated with the resource. It simply prevents the cockpit from organizing the display of resources by auto-created group.
32 P U B L I CSAP HANA Administration with SAP HANA Cockpit
Setup and Administration with the Cockpit Manager

Related Information
Working with Resources and Resource Groups [page 33]
5.3 Working with Resources and Resource Groups
Through the Cockpit Manager, any user with the Cockpit Resource Administrator role can register resources and create groups of resources that other cockpit users will be able to access with SAP HANA cockpit.
SAP HANA cockpit provides aggregate monitoring, which means you and other cockpit users can see data from multiple resources simultaneously. Resource groups govern which resources each user is permitted to monitor and manage.
Selecting Registered Resources allows you to see all the resources that have been registered, and to register more.
Selecting Resource Groups allows you to see all the groups that have been created, along with the resources and cockpit users that have been associated with each. Here, you can also create a new resource group, or add a resource or cockpit user to a group.
Once they have access to a group, the specified cockpit users will be able to monitor each of the resources within the group, as well as see aggregate data for the group. A cockpit user who isn't given access to any groups can log in to the cockpit, but their My Resources page displays zero resources. A cockpit user who is given access only to a group that contains no resources also sees a display of zero resources.
The auto-generated groups of resources (Production, Test, Development) are based on the system usage type of each resource. System usage type is configured during system installation, or later using the global.ini file with the usage parameter in the system_information section. Each resource belongs to an auto-generated group, however you can prevent these from being visible by configuring the cockpit settings.
Related Information
Register a Resource [page 34]Unregister a Resource [page 43]Managing Resource Groups [page 47]Managing Cockpit Users [page 24]Configuring Cockpit Settings [page 30]Specifying Display of Auto-Generated Groups [page 32]
SAP HANA Administration with SAP HANA CockpitSetup and Administration with the Cockpit Manager P U B L I C 33

5.3.1 Register a Resource
Add a resource so that cockpit users can monitor and manage it with SAP HANA cockpit.
Prerequisites
● Your cockpit user has the assigned role Cockpit Resource Administrator or Cockpit Power User. If you use the Cockpit Power User role, you can register a resource, but you can't assign it to a resource group.
● To create a technical user during registration, you have to provide the credentials of an administrator on the resource who has user creation privileges. If you don't have such credentials, ask someone who does to create a technical user for the resource before you register it. (The technical user is a dedicated database user the cockpit will use to collect health data from the resource. It's exempt from the password expiration policy. SAP recommends that you not allow human users to log in with the technical user's credentials.) See Create a Technical User [page 37].
● If you plan to encrypt the SAP Control or database connection, in SAP HANA XS advanced, you have:1. Manually imported the server root certificate(s)2. Trusted the certificate(s) using the command syntax xs trust-certificate <ALIAS> -c
<CERT_FILE>3. Exported the certificate(s) to the cockpit using the commands xs restage cockpit-hdb-service
followed by xs restart service cockpit-hdb-svcSee Import a Certificate for Encrypted Communication [page 80].
● If you plan to add the resource to a group during the registration process, the group must already exist. See Create a Resource Group [page 48].
Context
To make a resource available to cockpit users, first register the resource, then add the resource to at least one resource group, and finally assign cockpit users to the resource group.
Procedure
1. Connect to the Cockpit Manager and sign in as a cockpit user with the Cockpit Resource Administrator role or the Cockpit Power User role.
You can reach the Cockpit Manager by entering the Cockpit Manager URL created during cockpit installation, or by following the Manage Cockpit link in the cockpit. The URL takes this form:
https://<cockpit-host>:<port-number>
2. In the Cockpit Manager, select Register a Resource.3. In the Resource section:
34 P U B L I CSAP HANA Administration with SAP HANA Cockpit
Setup and Administration with the Cockpit Manager

a. Specify whether the name of the resource should be system-generated (taking the form database name @ system name), or one that you will enter here.
b. Enter the host name for the resource you want to register.
You may need to enter a fully qualified host name. For example, if myhost doesn't work, try myhost.mycompany.com.
NoteYou can register a resource whose statistics server isn't running or is unreachable, but some cockpit features won't be available for that resource until its statistics server recovers.
c. Specify an identifier for the resource — an instance number or (for DBaaS resources) port number — and enter the identifier you specified.
d. Select one of:○ Single container○ Multiple containers - System database○ Multiple containers - Tenant database. If you select Tenant database, enter the database name.
e. (Optional) Enter a description of the resource.4. In the Connection section, choose whether to encrypt the cockpit's connections to SAP Control (for
starting and stopping) and to the database. For information about obtaining certificates, see Certificate Management in SAP HANA in the SAP HANA Security Guide.
○ If you encrypt the SAP Control connection, you are allowing a secure connection (HTTPS) to SAP Control (provided that you have met the prerequisite importing the trusted certificate(s) to the cockpit).
○ If you encrypt the database connection using a secure JDBC connection, choose whether to validate the certificate. This option lets you stipulate whether to verify that the remote server is trusted by the cockpit. Deselect the checkbox if the SAP HANA database has a certificate that differs from the one currently imported, or if you have not imported the certificate from the SAP HANA database into XS advanced. However, the recommendation is that you instead import a certificate for encrypted connections.
○ Optionally, you can enter a hostname to override the one in the certificate. You could do this to avoid the validation failure that may result from the hostname in a certificate differing from the hostname that cockpit uses to connect, as in the case, for example, of a host alias, or a short hostname instead of a fully qualified domain name.
5. In the Technical User section:
Option Description
If this resource already has a technical user (a database user the cockpit uses to collect monitoring data from the resource):
Enter its user name and password.
If this resource does not yet have a technical user, click Create New Technical User and complete the following:
1. In the Create Technical User dialog:○ Enter the user name and password of a resource administrator user with
user creation privileges.○ Enter a user name and password for the new technical user.○ (Optional) Select Grant EarlyWatch Alert permission.
SAP HANA Administration with SAP HANA CockpitSetup and Administration with the Cockpit Manager P U B L I C 35

Option Description
○ (Optional) Select Grant Telemetry permission.2. Click Create.
The user name and password of the new technical user appear in the Technical User section.
CautionYou can use the Create New Technical User button to create more technical users, but a resource can have only one active technical user at a time. Be sure to disable or remove any technical users you don't want to use.
The technical users you create are exempt from the password expiration policy.
6. (Optional for Cockpit Resource Administrators) In the Resource Groups section, enter a name for a resource group that this resource will belong to and select Add Group. Repeat to create more groups.
NoteThese registered resources are not visible to cockpit users until the cockpit resource administrator adds them to a group.
7. (Optional) In the Contact section, enter the name, e-mail address, and other information.8. Select Review.9. Go over the details on the Register Resource Review page and use the Edit links to make changes.10. When you're satisfied with the information on the resource, select Register (lower right).
○ If the cockpit is unable to connect to the resource and the host agent reports that the resource is stopped or has an invalid or expired license, you see a confirmation request warning that the information you provided can't be validated. Click Yes to register the unreachable resource. (If you click No, the cockpit does not register the resource.)
○ If the cockpit is unable to connect to the host agent to learn the status of the resource, you see a confirmation request asking for the resource's SAP HANA system ID. Enter the system ID and press OK to register the unreachable resource. (If you click Cancel, the cockpit does not register the resource.)
NoteIf you enter an incorrect system ID here, or if you entered an incorrect hostname, instance number, technical user, or technical user password for this resource, the cockpit allows the registration because it can't tell the difference between a host or resource that's unreachable and one that doesn't exist.
Results
When registration is successful, you can see the list of registered resources on the Resource Details page, which includes the one you just added (a fact displayed in the Registered By field. If the newly registered resource has an invalid or expired license or is offline or stopped, its software version appears as 0.00.000.00.0(UNKNOWN).
36 P U B L I CSAP HANA Administration with SAP HANA Cockpit
Setup and Administration with the Cockpit Manager

Next Steps
● Each cockpit user accessing the resource needs to enter an existing database user name and password that has the system privilege CATALOG READ and SELECT on _SYS_STATISTICS (under Credentials) in order to drill down to monitor the system, unless single sign-on is in effect.
● If you've registered an offline resource, you can use the cockpit to start it. See Start a Resource.
Related Information
Create a Resource Group [page 48]Working with the Resource Directory [page 89]Managing Cockpit Users [page 24]Unregister a Resource [page 43]Create a Technical User [page 37]Security Aspects of SAP HANA Cockpit [page 72]Import a Certificate for Encrypted Communication [page 80]Start a Resource [page 174]SAP EarlyWatch Alert Service [page 105]
5.3.1.1 Create a Technical User
Before registering a resource, set up a dedicated database user that SAP HANA cockpit will use to collect health data for monitoring (such as information on alerts and system performance).
Prerequisites
You have the credentials of an administrator account on the resource that has user creation privileges.
Context
You can create a technical user when you register a resource with the cockpit if you can provide the credentials of an administrator on that resource with the ability to create user accounts. In that case, you need not follow the steps below. These steps are useful when a user with the Cockpit Power User role will be registering the resource. In that scenario, create a technical user for the resource before the power user registers it.
The technical user requires the CATALOG READ system privilege and SELECT on the _SYS_STATISTICS schema and is exempt from password expiration policies. SAP recommends that you set up a dedicated account for the technical user; do not allow human users to use it. See Security Aspects of SAP HANA Cockpit.
SAP HANA Administration with SAP HANA CockpitSetup and Administration with the Cockpit Manager P U B L I C 37

Procedure
1. Set up the technical user account on the resource to be registered:
Use SQL to create the technical user required to register a resource through the SAP HANA cockpit and grant the minimum necessary authorizations:
CREATE USER <username> PASSWORD <password> NO FORCE_FIRST_PASSWORD_CHANGE VALID UNTIL FOREVER; GRANT CATALOG READ to <username>; GRANT SELECT on SCHEMA _SYS_STATISTICS to <username>
2. Give the technical user credentials to the person who will register the resource.
Related Information
Managing Cockpit Users [page 24]Security Aspects of SAP HANA Cockpit [page 72]Register a Resource [page 34]
5.3.2 Edit Resource Settings, including SSO
Once a resource has been registered, you, as a cockpit resource administrator, may have reason to modify some of the original registration settings. Additionally, on a database running SAP HANA 2.0 SPS 01 you can enable or enforce single sign-on (SSO) user authentication.
Prerequisites
Your cockpit user has the assigned role Cockpit Resource Administrator.
Procedure
1. Connect to the Cockpit Manager and sign in as a cockpit user with the Cockpit Resource Administrator role.
You can reach the Cockpit Manager by entering the Cockpit Manager URL created during cockpit installation, or by following the Manage Cockpit link in the cockpit. The URL takes this form:
https://<cockpit-host>:<port-number>
2. On the Cockpit Manager page, click Registered Resources.The Resources page lists all the systems known to the SAP HANA cockpit.
38 P U B L I CSAP HANA Administration with SAP HANA Cockpit
Setup and Administration with the Cockpit Manager

3. In the left pane, select the resource whose settings you want to modify.
NoteIf the credentials for this resource's technical user (the login the cockpit uses to collect system health and version information) need to be updated, an indicator in the Resource Directory alerts you to the problem. This might happen because the technical user's password has changed, for example, or the login has been deleted. If you see a message about a missing technical user or technical user password, you can't monitor the resource until you update the technical user's credentials.
4. Click Edit.5. (Optional) In the Resource Details section, edit the name of the resource.6. (Optional) In the Resource Details section, edit the description of the resource.7. (Optional) In the Technical User section, make changes to:
○ The user name and password of the technical user○ The technical user's EarlyWatch Alert permission (grant or remove)○ The technical user's telemetry permission (grant or remove)
8. (Optional) In the Connection section, change whether the cockpit's connections to SAP Control and to the database are encrypted. For information about obtaining certificates, see Certificate Management in SAP HANA in the SAP HANA Security Guide.
○ If you encrypt the SAP Control connection, you are allowing a secure connection (HTTPS) to SAP Control (provided that you have met the prerequisite importing the trusted certificate(s) to the cockpit).
○ If you encrypt the database connection using a secure JDBC connection, choose whether to validate the certificate. This option lets you stipulate whether to check that the remote server is trusted by the cockpit. You can use this option if you have not imported the certificate from the SAP HANA database into XS advanced, or if the SAP HANA database has a certificate that differs from the one currently imported.
○ Optionally, you can enter a host name to override the one in the certificate. You could do this to avoid the validation failure that may result from the hostname in a certificate differing from the host name that cockpit uses to connect, as in the case, for example, of a host alias, or a short hostname instead of a fully qualified domain name.
9. (Optional) In the Contact section, edit the name, e-mail address, and other information for the person or group who can resolve problems and answer questions about this resource. You can delete the contact information when the user or users are deleted, or if the information is no longer required for any reason.
10. (Optional) In the Single Sign On section, choose Yes to allow SSO access to this resource rather than having the cockpit prompt for a database user name and password when cockpit users drill down to the detailed information and monitoring capabilities in the system overview.
NoteBefore enabling SSO, consider migrating the Personal Security Environment (PSE) file to an in-database store. When SSO is enabled, a new PSE file may be created, which may prevent cockpit access to stored certificates. See SAP Note 265666.
a. In the dialog box, in order to authorize this change, enter the credentials of an existing database user with the privileges:○ TRUST ADMIN
SAP HANA Administration with SAP HANA CockpitSetup and Administration with the Cockpit Manager P U B L I C 39

○ CERTIFICATE ADMIN○ USER ADMIN
b. Specify whether SSO should be enforced by selecting one of:
Enforce SSO Option Description
Yes Cockpit users must use SSO to access this resource
No In the Resource Directory, cockpit users can choose whether to access this resource with SSO or to enter alternate database user credentials.
NoteEnforce SSO through cockpit only after you have configured it on the database. See Enforce Single Sign-On.
11. Review the table listing any resource groups to which this resource currently belongs.12. (Optional) Click Add Resource to Group to specify which resource groups should include this resource by
selecting from a list of existing resource groups.13. Click Save.
Related Information
Enforce Single Sign-On [page 40]SAP Note 265666Override Data Collection for a Resource [page 42]
5.3.2.1 Enforce Single Sign-On
You can enforce single sign-on (SSO) user authentication on resources running SAP HANA 2.0 SPS 01 or later, provided that you follow this ordered process.
Prerequisites
● Ensure that the cockpit users who will be accessing this resource have been created.
40 P U B L I CSAP HANA Administration with SAP HANA Cockpit
Setup and Administration with the Cockpit Manager

Context
NoteBefore enabling SSO, consider migrating the Personal Security Environment (PSE) file to an in-database store. When SSO is enabled, a new PSE file may be created, which may prevent cockpit access to stored certificates. See SAP Note 265666.
Procedure
1. As a cockpit user with the Cockpit Resource Administratorrole, use the Cockpit Manager to register the resource.
2. Edit the resource and enable SSO. You’ll need to provide credentials for a database user with the TRUST ADMIN, USER ADMIN and CERTIFICATE ADMIN privileges.
NoteIf you enforce SSO before configuring the remote database, you will not be able to complete the setup through cockpit. (You will need to use another tool like hdbsql).
3. As any cockpit user, sign in to the cockpit.4. Connect to the resource as an existing database user with the TRUST ADMIN, USER ADMIN and
CERTIFICATE ADMIN privileges.5. In the Manage Users application, set the JWT mappings.6. Ask the newly configured database user to connect to the resource through the cockpit.7. Return to the Cockpit Manager, edit the resource and enforce SSO (if desired).
The cockpit user will be able to connect to the resource using SSO.
Next Steps
Repeat this process for each managed resource on which you want to configure SSO.
Related Information
Security Aspects of SAP HANA Cockpit [page 72]SAP Note 265666
SAP HANA Administration with SAP HANA CockpitSetup and Administration with the Cockpit Manager P U B L I C 41

5.3.2.2 Override Data Collection for a Resource
You can modify the collection settings for a specific resource by editing the details of that resource. Doing so overrides the global settings for that particular resource. Changes should only be performed if necessary.
Prerequisites
Your cockpit user has the assigned role Cockpit Resource Administrator.
Procedure
1. On the Cockpit Manager page, click Registered Resources.The Resources page lists all the systems known to the SAP HANA cockpit.
2. In the left pane, select the resource whose settings you want to modify.3. In the right pane, select the Data Collection Settings tab, and view the globally set data collection settings.4. Click Edit.5. In either the Status and Alert Counts or the Resource and Feature Data sections, or both, select Resource
Override.6. Opt to disable the data collection or to modify the settings.7. Select Save.
NoteTo revert to the global setting, in resource edit mode, toggle to Global Settings (instead of Resource Override).
Related Information
Setting Data Collection [page 31]
42 P U B L I CSAP HANA Administration with SAP HANA Cockpit
Setup and Administration with the Cockpit Manager

5.3.3 Unregister a Resource
Remove one or more resources from SAP HANA cockpit.
Prerequisites
Your cockpit user has the assigned role Cockpit Resource Administrator.
Procedure
1. Connect to the Cockpit Manager and sign in as a cockpit user with the Cockpit Resource Administrator role.
You can reach the Cockpit Manager by entering the Cockpit Manager URL created during cockpit installation, or by following the Manage Cockpit link in the cockpit. The URL takes this form:
https://<cockpit-host>:<port-number>
2. In the Cockpit Manager, click Registered Resources.The Resources page lists all the systems known to the SAP HANA cockpit.
3. Click the Unregister link for the resource(s) you're unregistering and confirm the request.On the Resources page, you can see the list of registered systems, which no longer includes the one(s) you just removed.
NoteThe resource(s) will no longer be included in any resource groups, nor accessible to cockpit users.
Related Information
Register a Resource [page 34]Managing Resource Groups [page 47]Working with the Resource Directory [page 89]
SAP HANA Administration with SAP HANA CockpitSetup and Administration with the Cockpit Manager P U B L I C 43

5.3.4 Export Resources
Export registration information about resources in the form of a file you can use to import the resources into another system.
Prerequisites
● Your cockpit user has the assigned role Cockpit Resource Administrator.● The resources you're exporting are running and available on the network.
Context
Create a .json export file you can import into another system running the SAP HANA cockpit..
Procedure
1. Connect to the Cockpit Manager and sign in as a cockpit user with the Cockpit Resource Administrator role.
You can reach the Cockpit Manager by entering the Cockpit Manager URL created during cockpit installation, or by following the Manage Cockpit link in the cockpit. The URL takes this form:
https://<cockpit-host>:<port-number>
2. In the Cockpit Manager, select Registered Resources.3. At the bottom of the screen, click the overflow button (the three dots to the right of Register Resource),
then click Export Resources.4. (Optional) On the Export Resources screen, use the drop-down to select the group that contains the
resources to be exported.5. Select the resources you want to export and move on to the next step. Click the Resource box in the top
row to select all resources in the group.6. (Optional) Click to Save technical user login names in the export file.
Only the names of technical users are saved; you'll need to enter the technical users' passwords when you import the resources.
7. (Optional) Click to Save contact settings in the export file.8. Click Save export file.9. At the prompt, open or save the .json export file.
44 P U B L I CSAP HANA Administration with SAP HANA Cockpit
Setup and Administration with the Cockpit Manager

Next Steps
Copy the .json export file to a location accessible to the importing system, then use the file to import the resources to the new system.
Related Information
Import Resources [page 45]
5.3.5 Import Resources
Add multiple resources so that users can monitor and manage them with SAP HANA cockpit.
Prerequisites
● Your cockpit user has the assigned role Cockpit Resource Administrator.● You have created a .json or .xml export file on another SAP HANA system that specifies the resources to
be imported, and you have copied that file to a location accessible to the importing system.● If you plan to encrypt the SAP Control or database connection, in SAP HANA XS advanced, you have:
1. Manually imported the server root certificate(s)2. Trusted the certificate(s) using the command syntax xs trust-certificate <ALIAS> -c
<CERT_FILE>3. Exported the certificate(s) to the cockpit using the commands xs restage cockpit-hdb-service
followed by xs restart service cockpit-hdb-svc.See Import a Certificate for Encrypted Communication [page 80].
● The resources you're importing are running and available on the network.
Context
Adding resources to groups enables users to access them. To make a resource available to cockpit users, first register the resource, then add the resource to at least one resource group, and finally assign cockpit users to the resource group.
SAP HANA Administration with SAP HANA CockpitSetup and Administration with the Cockpit Manager P U B L I C 45

Procedure
1. Connect to the Cockpit Manager and sign in as a cockpit user with the Cockpit Resource Administrator role.
You can reach the Cockpit Manager by entering the Cockpit Manager URL created during cockpit installation, or by following the Manage Cockpit link in the cockpit. The URL takes this form:
https://<cockpit-host>:<port-number>
2. In the Cockpit Manager, select Import Resources.3. On the Import File screen:
a. Choose the file type to be imported:
○ HANA Cockpit exported JSON file○ HANA Studio exported XML file
b. Click Browse to choose your exported file.
If you choose an export file created from a cockpit version SP 10 or later, you see an Include collection settings checkbox, which is selected by default. These may include settings for statuses, alerts, resources, and so on, which could override your global cockpit settings. Unselect this option if you don't want to override your global cockpit settings.
c. Click Step 2 to continue.
The cockpit displays a list of resources from the file.4. Select the resources you want to register and click the next step.5. For each resource you're importing, enter the technical user name (if prompted) and password.6. (Optional) Enter the name and contact information of someone responsible for each resource you're
importing.7. Click Review to check what you've entered.
To add or edit optional information like the description and contact details, click Edit at the bottom of the page.
8. Click Import Resources to register the imported resources.
Next Steps
(Optional) Add the imported resources to groups.
Related Information
Export Resources [page 44]Managing Resource Groups [page 47]
46 P U B L I CSAP HANA Administration with SAP HANA Cockpit
Setup and Administration with the Cockpit Manager

5.3.6 Managing Resource Groups
As a cockpit user with the Cockpit Resource Administrator role, you can create, populate, or remove the groups used to grant resources access to other cockpit users.
A resource group—a named set of one or more registered resources—controls management and monitoring privileges. When you assign a cockpit user to a resource group that you have created, you enable the user to monitor and manage the group's resources through the cockpit.
NoteA cockpit user has no access to a resource unless the user and the resource belong to the same resource group.
Assigning resources and cockpit users to resource groups let you, as a cockpit resource administrator:
● View and administer similar resources together.● Control which cockpit users can see and use particular resources.
You can create resource groups whatever way you want—for example, by groups based on resources' geographic location, ownership, or purpose.
Each resource also belongs to an auto-generated group, however you can prevent these from being visible by configuring the cockpit settings. These auto-generated groups of resources (Production, Test, Development) are based on the system usage type of each resource. System usage type is configured during system installation, or later using the global.ini file with the usage parameter in the system_information section.
NoteIn order to have access to a resource, a cockpit user must be granted access to a resource group that you create and to which you assign the resource. You cannot assign cockpit users to an auto-generated group, or to individual resources.
Related Information
Create a Resource Group [page 48]Add or Remove Resources in Resource Groups [page 49]Delete a Resource Group [page 50]Add or Remove Users in Resource Groups [page 51]Managing Cockpit Users [page 24]Specifying Display of Auto-Generated Groups [page 32]
SAP HANA Administration with SAP HANA CockpitSetup and Administration with the Cockpit Manager P U B L I C 47

5.3.6.1 Create a Resource Group
Set up a group you can use to display, manage, and control access to related resources.
Prerequisites
Your cockpit user has the assigned role Cockpit Resource Administrator.
Context
When you create a resource group, you can add both resources and cockpit users. Only users assigned to the group can see and access the group's resources.
Procedure
1. Connect to the Cockpit Manager and sign in as a cockpit user with the Cockpit Resource Administrator role.
You can reach the Cockpit Manager by entering the Cockpit Manager URL created during cockpit installation, or by following the Manage Cockpit link in the cockpit. The URL takes this form:
https://<cockpit-host>:<port-number>
2. In the Cockpit Manager, select Resource Groups.3. Click Create Group (bottom of page).4. On the Create Group page, enter a name in the Name field.
In a group name, you can use uppercase and lowercase letters, the digits 0 through 9, underscores, hyphens, periods, and spaces.
5. (Optional) Enter a description of the group in the Description field.6. Click to expand the next step.7. (Optional) Click Add Resources and select registered resources to add to the new group.8. Click to expand the next step.9. (Optional) Click Add Users and select cockpit users who will have access to the new group.10. Scroll up and review what you entered.11. Click Create Group.
The cockpit displays the new group on the Resource Groups page. By double clicking the group name, you can open the Resource Directory, displaying all the resources in this group.
48 P U B L I CSAP HANA Administration with SAP HANA Cockpit
Setup and Administration with the Cockpit Manager

Related Information
Add or Remove Resources in Resource Groups [page 49]Add or Remove Users in Resource Groups [page 51]Remove a Resource Group [page 50]
5.3.6.2 Add or Remove Resources in Resource Groups
Add a resource to a resource group or remove a resource from a resource group.
Prerequisites
Your cockpit user has the assigned role Cockpit Resource Administrator.
Procedure
1. Connect to the Cockpit Manager and sign in as a cockpit user with the Cockpit Resource Administrator role.
You can reach the Cockpit Manager by entering the Cockpit Manager URL created during cockpit installation, or by following the Manage Cockpit link in the cockpit. The URL takes this form:
https://<cockpit-host>:<port-number>
2. In the Cockpit Manager, select Resource Groups.3. In the left pane, select the group you want to modify.
Only the resource groups created by administrators appear on the Resource Groups page. You cannot modify or delete the auto-generated groups based on configured system usage type (Production, Development, Test), nor the My Resources group, which is a compilation of all groups that a user has access to.
4. (Optional) To add a resource:a. If necessary, click Resources to display the list of resources in this group.b. Click Add Resource (far right).c. Select the resources to add and click OK.
The cockpit displays the group, including the newly added resource or resources, on the Resource Groups screen. By double clicking the group name, you can open the Resource Directory, displaying all the resources in this group.
5. (Optional) To remove a resource:a. If necessary, click Resources to display the list of resources in this group.b. Click the red to the right of the resource to be deleted and confirm the deletion.
SAP HANA Administration with SAP HANA CockpitSetup and Administration with the Cockpit Manager P U B L I C 49

The cockpit displays the group, without the removed resource, on the Resource Groups screen.
Related Information
Create a Resource Group [page 48]Remove a Resource Group [page 50]Working with the Resource Directory [page 89]Search, Sort, and Filter Tools in the Resource Directory [page 92]
5.3.6.3 Delete a Resource Group
Delete a resource group from the SAP HANA cockpit.
Prerequisites
Your cockpit user has the assigned role Cockpit Resource Administrator.
Procedure
1. Connect to the Cockpit Manager and sign in as a cockpit user with the Cockpit Resource Administrator role.
You can reach the Cockpit Manager by entering the Cockpit Manager URL created during cockpit installation, or by following the Manage Cockpit link in the cockpit. The URL takes this form:
https://<cockpit-host>:<port-number>
2. In the Cockpit Manager, select Resource Groups.3. In the left pane, select the group you want to remove.4. Click Delete (upper right) and confirm the deletion.
On the Resource Groups page, you can see the list of groups, which no longer includes the one you just removed. The registered resources from the group will be available for you to include in other groups.
NoteAny cockpit users who had access to these resources solely through this resource group will not be able to access them.
50 P U B L I CSAP HANA Administration with SAP HANA Cockpit
Setup and Administration with the Cockpit Manager

Related Information
Create a Resource Group [page 48]Add or Remove Resources in Resource Groups [page 49]Working with the Resource Directory [page 89]Search, Sort, and Filter Tools in the Resource Directory [page 92]
5.3.6.4 Add or Remove Users in Resource Groups
Add a cockpit user to a resource group or remove a user from a resource group.
Prerequisites
● Your cockpit user has the assigned role Cockpit Resource Administrator.● The Cockpit User Administrator has created some cockpit users. See Managing Cockpit Users.
Context
Only cockpit users who are assigned to a resource group can see the group's registered resources in the cockpit.
Procedure
1. Connect to the Cockpit Manager and sign in as a cockpit user with the Cockpit Resource Administrator role.
You can reach the Cockpit Manager by entering the Cockpit Manager URL created during cockpit installation, or by following the Manage Cockpit link in the cockpit. The URL takes this form:
https://<cockpit-host>:<port-number>
2. In the Cockpit Manager, select Resource Groups.3. In the left pane, select the group you want to modify.
Only the resource groups created by administrators appear on the Resource Groups page. You cannot modify or delete the auto-generated groups based on configured system usage type (Production, Development, Test), nor the My Resources group, which is a compilation of all groups that a user has access to.
4. (Optional) To add a cockpit user:
SAP HANA Administration with SAP HANA CockpitSetup and Administration with the Cockpit Manager P U B L I C 51

a. If necessary, click Users to display the list of cockpit users in this group.b. Click Add User (far right).c. Select the users to add and click OK.
The cockpit displays the group, including the newly added cockpit user(s), on the Resource Groups page.
5. (Optional) To remove a user:a. If necessary, click Users to display the list of cockpit users in this group.b. Click the red to the right of the user to be deleted and confirm the deletion.
The cockpit displays the group, without the removed user, on the Resource Groups page.
Related Information
Managing Resource Groups [page 47]Managing Cockpit Users [page 24]
5.4 Managing Resources, Users, and Groups with the Cockpit APIs
SAP HANA cockpit provides modifying (POST) and nonmodifying (GET) REST APIs. You access the APIs differently depending on whether you're calling a POST or a GET API and whether you're calling it programmatically or from a browser.
Using Cockpit APIs from an External Program
The external tool you use to invoke SAP HANA cockpit APIs must be capable of sending complex REST calls. The tool might be a custom program or a browser with a REST console plug-in. A browser with a REST plug-in will be useful for testing.
To access cockpit POST and GET APIs from an external program, you must:
1. Obtain a service key for the external tool. (You do this only once.)2. Obtain an OAuth token using information in the service key, plus a cockpit user with the appropriate role.
(You can use the OAuth token until it expires—usually in 30 minutes.)3. Using the OAuth token, invoke one or more cockpit APIs.
Obtaining a Service Key
The cockpit runs on SAP HANA extended application services, advanced model (XS advanced), which provides authentication and authorization to external tools via service keys to the User Authentication and Authorization
52 P U B L I CSAP HANA Administration with SAP HANA Cockpit
Setup and Administration with the Cockpit Manager
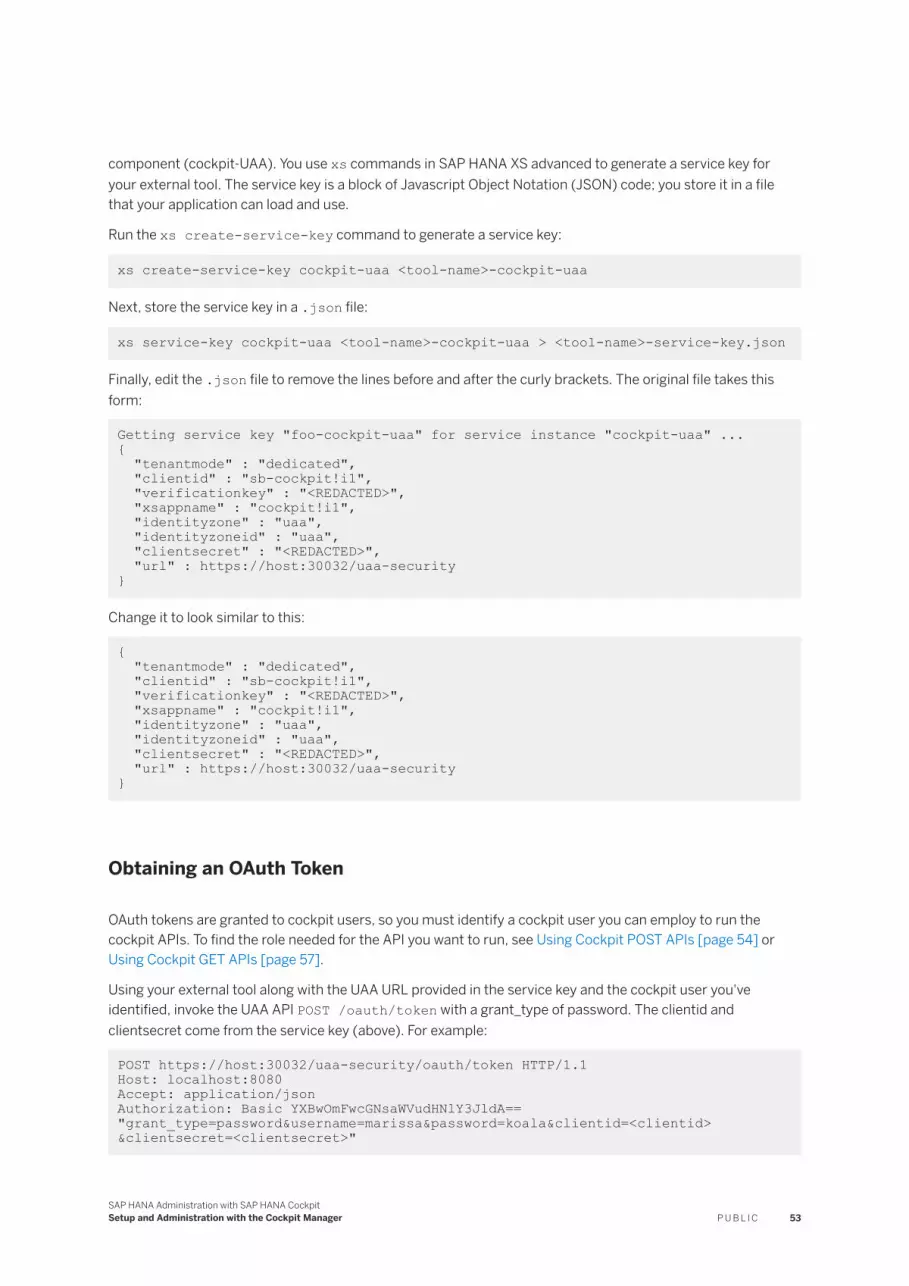
component (cockpit-UAA). You use xs commands in SAP HANA XS advanced to generate a service key for your external tool. The service key is a block of Javascript Object Notation (JSON) code; you store it in a file that your application can load and use.
Run the xs create-service-key command to generate a service key:
xs create-service-key cockpit-uaa <tool-name>-cockpit-uaa
Next, store the service key in a .json file:
xs service-key cockpit-uaa <tool-name>-cockpit-uaa > <tool-name>-service-key.json
Finally, edit the .json file to remove the lines before and after the curly brackets. The original file takes this form:
Getting service key "foo-cockpit-uaa" for service instance "cockpit-uaa" ...{ "tenantmode" : "dedicated", "clientid" : "sb-cockpit!i1", "verificationkey" : "<REDACTED>", "xsappname" : "cockpit!i1", "identityzone" : "uaa", "identityzoneid" : "uaa", "clientsecret" : "<REDACTED>", "url" : https://host:30032/uaa-security}
Change it to look similar to this:
{ "tenantmode" : "dedicated", "clientid" : "sb-cockpit!i1", "verificationkey" : "<REDACTED>", "xsappname" : "cockpit!i1", "identityzone" : "uaa", "identityzoneid" : "uaa", "clientsecret" : "<REDACTED>", "url" : https://host:30032/uaa-security}
Obtaining an OAuth Token
OAuth tokens are granted to cockpit users, so you must identify a cockpit user you can employ to run the cockpit APIs. To find the role needed for the API you want to run, see Using Cockpit POST APIs [page 54] or Using Cockpit GET APIs [page 57].
Using your external tool along with the UAA URL provided in the service key and the cockpit user you've identified, invoke the UAA API POST /oauth/token with a grant_type of password. The clientid and clientsecret come from the service key (above). For example:
POST https://host:30032/uaa-security/oauth/token HTTP/1.1 Host: localhost:8080Accept: application/jsonAuthorization: Basic YXBwOmFwcGNsaWVudHNlY3JldA=="grant_type=password&username=marissa&password=koala&clientid=<clientid> &clientsecret=<clientsecret>"
SAP HANA Administration with SAP HANA CockpitSetup and Administration with the Cockpit Manager P U B L I C 53

Expect a response code of 200 with a body similar to this:
{ "access_token":"2YotnFZFEjr1zCsicMWpAA", "token_type":"bearer", "expires_in":3600}
TipNotice the value of expires_in, which tells you how long (in seconds) you can use the token before getting a new one.
For more on the POST /oauth/token API, see https://github.com/cloudfoundry/uaa/blob/master/docs/UAA-APIs.rst .
Invoking Cockpit APIs
To obtain the URL for the cockpit-adminui-svc, which you'll use to access the cockpit APIs programatically as described above, issue this command to SAP HANA XS advanced:
$ xs apps | grep cockpit-adminui-svccockpit-adminui-svc STARTED 1/1 128 MB <unlimited> https://host:51025
Related Information
Using Cockpit POST APIs [page 54]Using Cockpit GET APIs [page 57]
5.4.1 Using Cockpit POST APIs
Details on the SAP HANA cockpit APIs that create, delete, or change objects in the cockpit..
For instructions on setting up programmatic access to the cockpit APIs, see Managing Resources, Users, and Groups with the Cockpit APIs [page 52].
The APIs described in the table below accept HTTP POST operations with arguments passed in the body in JSON format. Each API returns data in JSON format.
Success
If an API succeeds, it returns:
54 P U B L I CSAP HANA Administration with SAP HANA Cockpit
Setup and Administration with the Cockpit Manager
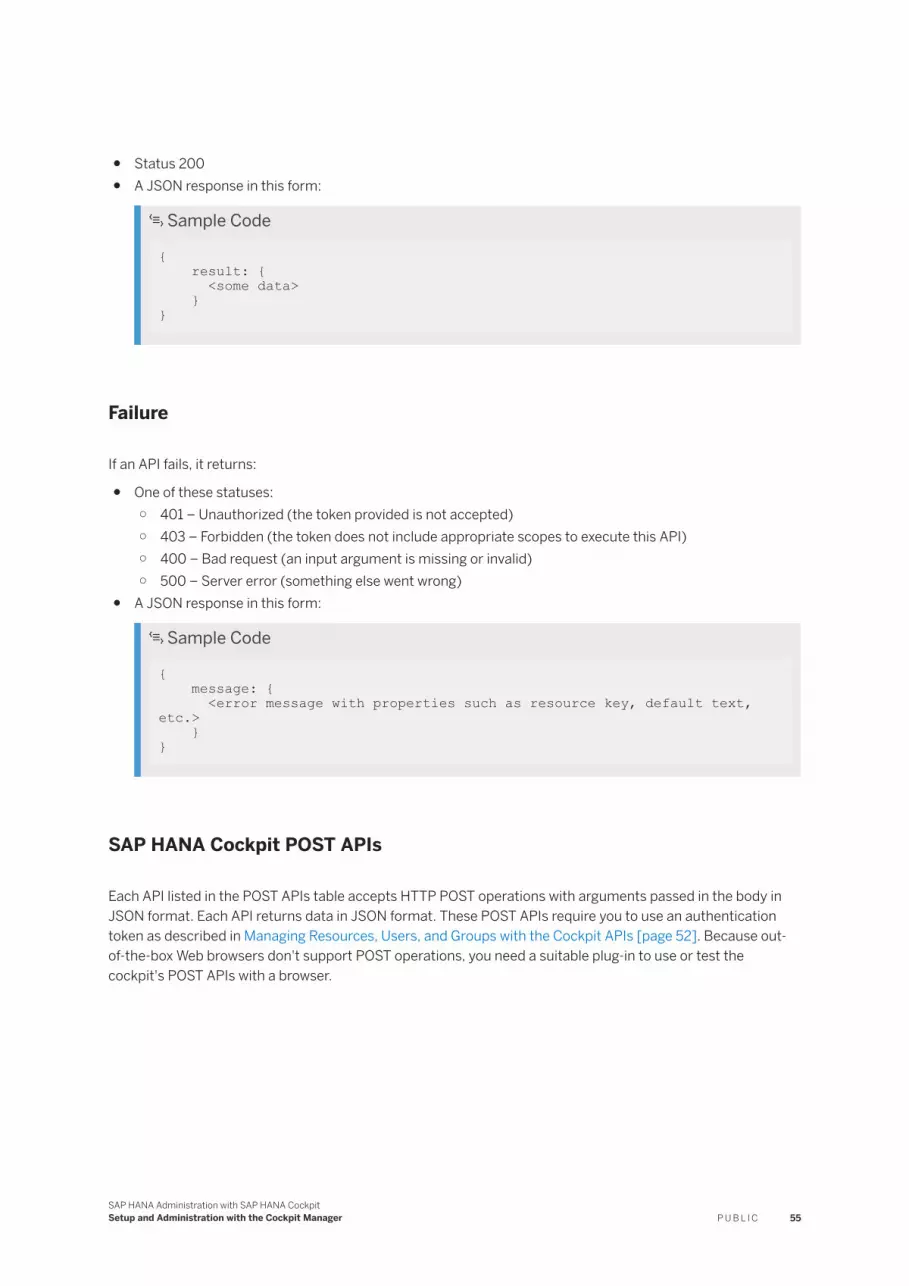
● Status 200● A JSON response in this form:
Sample Code { result: { <some data> }}
Failure
If an API fails, it returns:
● One of these statuses:○ 401 – Unauthorized (the token provided is not accepted)○ 403 – Forbidden (the token does not include appropriate scopes to execute this API)○ 400 – Bad request (an input argument is missing or invalid)○ 500 – Server error (something else went wrong)
● A JSON response in this form:
Sample Code { message: { <error message with properties such as resource key, default text, etc.> }}
SAP HANA Cockpit POST APIs
Each API listed in the POST APIs table accepts HTTP POST operations with arguments passed in the body in JSON format. Each API returns data in JSON format. These POST APIs require you to use an authentication token as described in Managing Resources, Users, and Groups with the Cockpit APIs [page 52]. Because out-of-the-box Web browsers don't support POST operations, you need a suitable plug-in to use or test the cockpit's POST APIs with a browser.
SAP HANA Administration with SAP HANA CockpitSetup and Administration with the Cockpit Manager P U B L I C 55

POST APIs
API What It Does Input Parameters Response1 Required Role
/registration/SystemRegister
Registers an SAP HANA resource with the cockpit using JDBC. Post to the API with parameters in the body in JSON format (Content-Type=application/json; charset=UTF-8).
hostName
instanceNumber or port
techUser
techUserCredentials
isMultiTenant – can be omitted if you specify port instead of instanceNumber
databaseName – can be omitted if you specify port instead of instanceNumber
security (encryptJDBC, validateServerCertificate, hostNameInCertificate)
resid – resource ID of newly registered resource
Cockpit Resource Administrator or Cockpit Power User
/registration/SystemUnregister
Unregisters an SAP HANA resource. Post to the API with parameters in the body in JSON format (Content-Type=application/json; charset=UTF-8).
resid – integer, required. The unique resource ID previously returned by a registration API.
Cockpit Resource Administrator or, if you registered the resource, Cockpit Power User
/registration/ResourceUnregister
Unregisters an SAP HANA resource.
Deprecated—use SystemUnregister instead.
resid Cockpit Resource Administrator
/group/GroupCreate
Creates a new resource group
groupName
groupDescription
groupId Cockpit Resource Administrator
/group/GroupDelete
Deletes a resource group
groupId Cockpit Resource Administrator
1 See also the general responses described above under Success and Failure.
56 P U B L I CSAP HANA Administration with SAP HANA Cockpit
Setup and Administration with the Cockpit Manager

API What It Does Input Parameters Response1 Required Role
/user/CockpitUserCreate
Creates a new cockpit user
username
password
roleCollections[]
cockpitId – ID of newly created user
Cockpit Administrator
/user/CockpitUserDelete
Deletes a cockpit user
deleteFromUAA
userId
username
Cockpit Administrator
/group/GroupResourceAdd
Adds a resource to a group
groupId
resourceId
Cockpit Resource Administrator
/group/GroupResourceRemove
Removes a resource from a group
groupId
resourceId
Cockpit Resource Administrator
/group/GroupUserAdd
Adds a user to a group
groupId
userId
Cockpit Resource Administrator
/group/GroupUserRemove
Removes a user from a group
groupId
userId
Cockpit Resource Administrator
5.4.2 Using Cockpit GET APIs
Details on SAP HANA cockpit APIs that provide information about registered resources and resource groups. The GET APIs don't create, delete, or change anything in the cockpit.
Each API with "Get" in its name (RegisteredResourcesGet, for example) is protected with both authentication and authorization checks; you must be authenticated as a SAP HANA cockpit user to invoke the APIs.
To call GET APIs programatically, follow the instructions in Managing Resources, Users, and Groups with the Cockpit APIs [page 52] for getting a token and calling against the cockpit-landscape-svc. Look below for details on what the GET APIs do and which privileges you need to use them.
To call GET APIs from a browser, follow the instructions below.
When you call GET APIs from a browser, you cannot go directly to the cockpit-adminui-svc or cockpit-landscape-svc, since although the browser can send a GET it cannot support sending an authentication token. That’s where the app-router comes in: it acts as a middleman, ensuring all browser requests that pass through it include an authentication token.
If you’re using a browser to test a GET you must go through the app-router, using either the cockpit-admin-web-app or cockpit-web-app URL.
1 See also the general responses described above under Success and Failure.
SAP HANA Administration with SAP HANA CockpitSetup and Administration with the Cockpit Manager P U B L I C 57

RegisteredResourcesGet
Returns information about the resources registered in SAP HANA cockpit.
Privileges required: COCKPIT_RESOURCE_ADMIN or COCKPIT_POWER_USER. The information returned depends on your role:
● If you have COCKPIT_RESOURCE_ADMIN, RegisteredResourcesGet returns information on all resources registered with this cockpit.
● If you have COCKPIT_POWER_USER, RegisteredResourcesGet returns information on all resources registered by you with this cockpit.
You can invoke RegisteredResourcesGet in two ways:
● Through the cockpit-admin-web-app port via the app-router. The call is redirected to the XSA sign-in page if it doesn't present an app-router cookie indicating authentication status. This form of invocation through the app-router is ideal for testing with a Web browser, but not ideal for programmatic calls.
● Against the cockpit-adminui-svc endpoint. Calls using this method must present a valid authentication token.
API Endpoints for RegisteredResourcesGet
cockpit-admin-web-app /cp/admin/resource/RegisteredResourcesGet
cockpit-adminui-svc /resource/RegisteredResourcesGet
RegisteredResourcesGet supports query parameters in OData format, for example, $count, $top=, $skip=, $orderby=.
When it succeeds, RegisteredResourcesGet returns HTTP status 200 and the result data. Otherwise, it returns an HTTP response code and text describing why the request failed – for example, 403, "Permission Denied."
A successful response is a JSON object in this format:
{ "result": [ { "BuildNumber": "1522210459", "CertificateHostName": "", "CollectionConfigurations": [], "Connections": [ { "Host": "host.domain.com", "IsSAPControlAuthenticated": false, "PortType": "INSTANCE", "PortValue": 1, "Role": "MASTER", "SAPControlUserName": null } ], "CreatedBy": "COCKPIT_ADMIN", "DatabaseName": "DBNAME", "Designation": "CUSTOM", "EncryptedJDBC": false, "EncryptedSAPControl": false, "GroupCount": 1, "HardwarePlatform": "30A8S20Q0B", "Host": "host.domain.com", "HostName": "host.domain.com", "OSVersion": "SUSE Linux Enterprise Server 12.1",
58 P U B L I CSAP HANA Administration with SAP HANA Cockpit
Setup and Administration with the Cockpit Manager
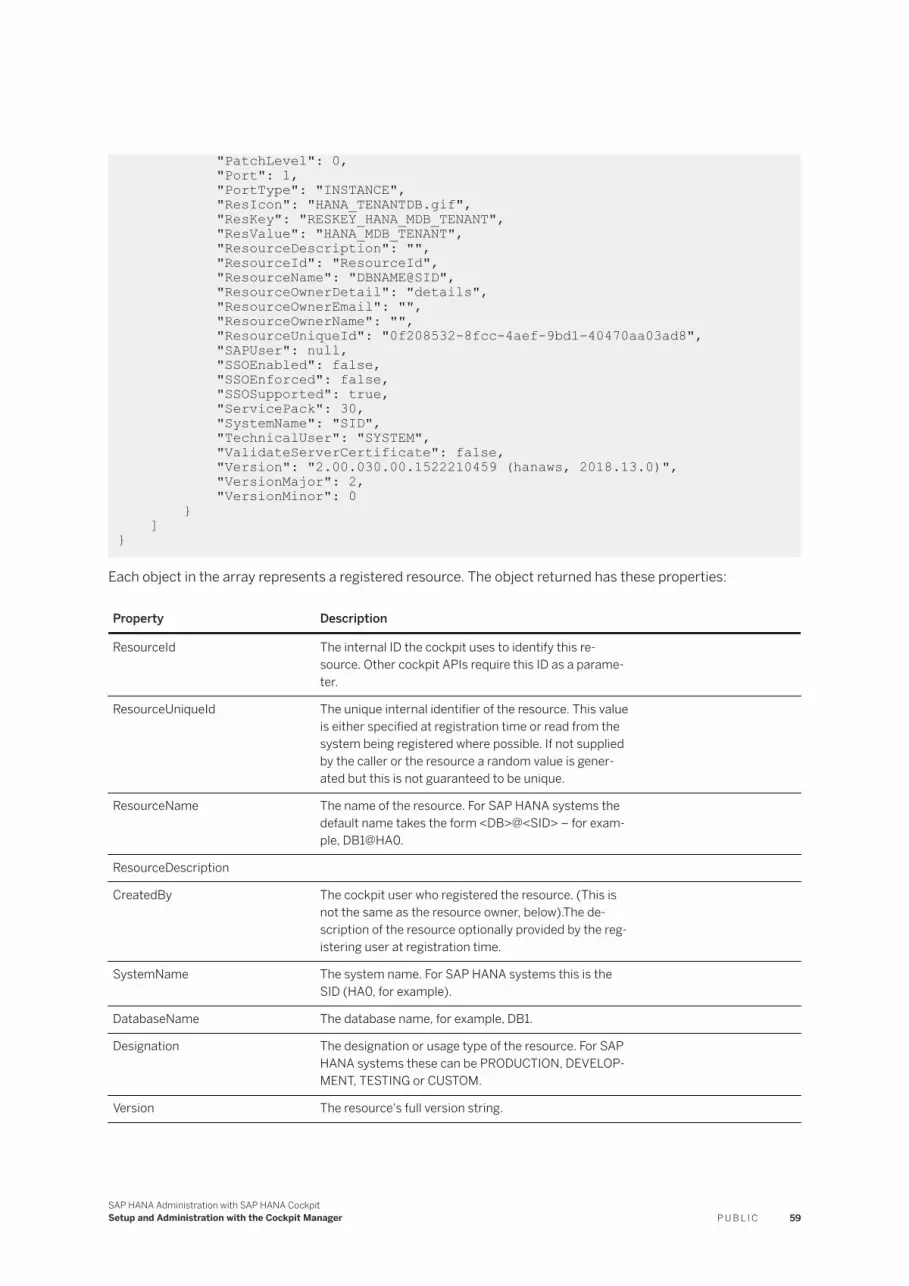
"PatchLevel": 0, "Port": 1, "PortType": "INSTANCE", "ResIcon": "HANA_TENANTDB.gif", "ResKey": "RESKEY_HANA_MDB_TENANT", "ResValue": "HANA_MDB_TENANT", "ResourceDescription": "", "ResourceId": "ResourceId", "ResourceName": "DBNAME@SID", "ResourceOwnerDetail": "details", "ResourceOwnerEmail": "", "ResourceOwnerName": "", "ResourceUniqueId": "0f208532-8fcc-4aef-9bd1-40470aa03ad8", "SAPUser": null, "SSOEnabled": false, "SSOEnforced": false, "SSOSupported": true, "ServicePack": 30, "SystemName": "SID", "TechnicalUser": "SYSTEM", "ValidateServerCertificate": false, "Version": "2.00.030.00.1522210459 (hanaws, 2018.13.0)", "VersionMajor": 2, "VersionMinor": 0 } ]}
Each object in the array represents a registered resource. The object returned has these properties:
Property Description
ResourceId The internal ID the cockpit uses to identify this resource. Other cockpit APIs require this ID as a parameter.
ResourceUniqueId The unique internal identifier of the resource. This value is either specified at registration time or read from the system being registered where possible. If not supplied by the caller or the resource a random value is generated but this is not guaranteed to be unique.
ResourceName The name of the resource. For SAP HANA systems the default name takes the form <DB>@<SID> – for example, DB1@HA0.
ResourceDescription
CreatedBy The cockpit user who registered the resource. (This is not the same as the resource owner, below).The description of the resource optionally provided by the registering user at registration time.
SystemName The system name. For SAP HANA systems this is the SID (HA0, for example).
DatabaseName The database name, for example, DB1.
Designation The designation or usage type of the resource. For SAP HANA systems these can be PRODUCTION, DEVELOPMENT, TESTING or CUSTOM.
Version The resource's full version string.
SAP HANA Administration with SAP HANA CockpitSetup and Administration with the Cockpit Manager P U B L I C 59

Property Description
VersionMajor The major version of the resource as an integer (for example, 2)
VersionMinor The minor version of the resource as an integer (for example, 0)
ServicePack The service pack of the resource as an integer (for example, 20)
PatchLevel The patch level of the resource as an integer.
BuildNumber The build number of the resource.
ResKey The description of the resource optionally provided by theA resource key for the type of the resource (for example "RESKEY_HANA_MDB_SYSTEM")).
ResValue The type of the resource (for example, HANA_SYSTEM).
ResIcon A path to an icon used to render the resource type (not currently used)
OSVersion The version of the operating system where the resource is running
HardwarePlatform The platform where the resource is running (for example, VMware Virtual Platform).
ResourceOwnerName Optional owner name. This is not necessarily the same person who registered the system and does not have to be a cockpit user. This is someone to contact with questions or problems.
ResourceOwnerEmail Optional. The e-mail address of the owner.
ResourceOwnerDetail Optional. Additional details on the resource owner. This might include work hours, location, or phone number.
SSOSupported If this value is true, this resource supports single sign-on from the cockpit.
SSOEnabled If this value is true, single sign-on from the cockpit is turned on.
SSOEnforced If this value is true, single sign-on is the only available authentication method from the cockpit.
EncryptedJDBC If this value is true, communication with this resource uses an encrypted database connection.
EncryptedSAPControl If this value is true, communication with the host agent managing this resource uses TLS.
ValidateServerCertificate If this value and EncryptedJDBC are both true, the client validates the server (resource) using pre-installed certificates.
CertificateHostName If set the connection uses this value instead of the host name provided in the server certificate for encrypted database connections
TechnicalUser The name of the technical user the cockpit uses for this resource.
60 P U B L I CSAP HANA Administration with SAP HANA Cockpit
Setup and Administration with the Cockpit Manager

Property Description
Host (& HostName) The main host name of the resource. Duplicated in both fields for compatibility.
PortType The type of the main connection to the resource. Set to either "INSTANCE" or "SQL". If INSTANCE the port is an instance number. If SQL the port is a SQL port.
Port The instance number or SQL port (for example, the indexserver SQL port) of the main connection to the resource.
GroupCount The number of groups this resource belongs to.
Connections All possible connections to the resource (for scale-out systems or those with host aliases, for example). The main connection as dictated by Role is copied into the properties above.
An array of connection objects in this form:
Property DescriptionDesc
Role The role of the connection: MASTER, MASTER_ALIAS, TENANT_MASTER, SLAVE, or STANDBY.
PortType INSTANCE or SQL.
PortValue Instance number or SQL port number.
Host Host name for this connection.
IsSAPControlAuthenticated If true, authenticated has been set (by the current user) for the SAP Control functionality.
SAPControlUserName The name of the SAP Control user, if set.
GroupsForUserGet
Returns information about the resource groups (including the default groups Development, Production, and Test) that are visible to you.
You can invoke GroupsForUserGet in two ways:
● Through the cockpit-web-app port via the app-router. The call is redirected to the XSA sign-in page if it doesn't present an app-router cookie indicating authentication status. This form of invocation through the app-router is ideal for testing with a Web browser, but not ideal for programmatic calls.
● Against the cockpit-landscape-svc endpoint. Calls using this method must present a valid authentication token.
SAP HANA Administration with SAP HANA CockpitSetup and Administration with the Cockpit Manager P U B L I C 61

API Endpoints for GroupsForUserGet
cockpit-web-app /cp/ls/group/GroupsForUserGet
cockpit-landscape-svc /group/GroupsForUserGet
GroupsForUserGet supports query parameters in OData format, for example, $count, $top=, $skip=, $orderby=.
When it succeeds, GroupsForUserGet returns HTTP status 200 and the result data. Otherwise, it returns an HTTP response code and text describing why the request failed – for example, 403, "Permission Denied."
A successful response is a JSON object in this format:
{ "d": { "results": [ { "Description": "...", "Id": "123", "Name": "GROUPNAME", "__metadata": { "id": "https://host.domain.com:post/od/Groups(123L)", "type": "com.sap.hana.cockpit.persistence.odata.Group", "uri": "https://host.domain.com:post/od/Groups(123L)" } } ] }}
Each object in the array represents a resource group. The object returned has these properties:
Property Description
Type An integer representing the type of the group:
1 = ALL group2 = AUTO group (Production, Development, or Test)3 = Group created by a user
Name The name of the group.
Description Optional. The description of the group provided by the user who created it.
CreatedBy For Type 3 groups only. The cockpit user who created this resource group.
Id For Type 3 groups only. The groupId of this group.
ResourceCount The number of resources in this group.
RunWithAlert The number of resources in this group that have active alerts.
NotRunning The number of resources in this group that are not in the state RUNNING..
GroupResourcesGet
Returns information about the resources in a specified group that's visible to you. Only groups returnd by GroupsForUserGet can be used as arguments for GroupResourcesGet.
62 P U B L I CSAP HANA Administration with SAP HANA Cockpit
Setup and Administration with the Cockpit Manager

GroupResourcesGet supports two forms of parameters: either a groupId obtained with GroupsForUserGet, or the groupDesignation of an automatic group. These are either PRODUCTION, DEVELOPMENT, TEST, CUSTOM or ALL. The ALL group represents every resource that you are authorized to see; it's a useful way for a non-admin user to get the list of all visible resources. If you specify a groupId you do not have access to, an error will occur.
You can invoke GroupResourcesGet in two ways:
● Through the cockpit-web-app port via the app-router. The call is redirected to the XSA sign-in page if it doesn't present an app-router cookie indicating authentication status. This form of invocation through the app-router is ideal for testing with a Web browser, but not ideal for programmatic calls.
● Against the cockpit-landscape-svc endpoint. Calls using this method must present a valid authentication token.
API Endpoints for GroupResourcesGet
cockpit-web-app /cp/ls/group/GroupResourcesGet
cockpit-landscape-svc /group/GroupResourcesGet
GroupResourcesGet requires one of these query parameters:
● ?groupId=<id> or● ?groupDesignation=<string>
GroupResourcesGet supports query parameters in OData format, for example, $count, $top=, $skip=, $orderby=.
When it succeeds, GroupsForUserGet returns HTTP status 200 and the result data. Otherwise, it returns an HTTP response code and text describing why the request failed – for example, 403, "Permission Denied."
A successful response is a JSON object in this format:
{ "result": [ { "AlertCountHigh": 2, "AlertCountMedium": 0, "Availability": 3, "AvailableGroups": { "__deferred": { "uri": "https://host.domain.com:port/pd/ResourceOverviews(123L)" } }, "BuildNumber": "1493036600", "Capacity": -1, "Connections": [ { "Host": "host", "IsSAPControlAuthenticated": false, "PortType": "INSTANCE", "PortValue": 0, "Role": "MASTER", "SAPControlUserName": null } ], "DatabaseName": "", "Designation": "PRODUCTION", "GroupCount": 1, "Host": "host.domain.com", "HostName": "host.domain.com",
SAP HANA Administration with SAP HANA CockpitSetup and Administration with the Cockpit Manager P U B L I C 63

"IsAuthenticated": false, "IsAuthenticatedWithSSO": false, "PatchLevel": 9, "Performance": -1, "Port": 0, "PortType": "INSTANCE", "RemoteUserName": null, "ResValue": "HANA_SYSTEM", "ResourceDescription": "", "ResourceId": "123", "ResourceName": "ResourceName", "SAPControlAuthenticated": false, "SAPControlUser": "", "SSOEnabled": false, "SSOEnforced": false, "SSOSupported": null, "ServicePack": 122, "State": "UNKNOWN", "SystemName": "SystemName", "UserGroupCount": 1, "Version": "1.00.122.09.1493036600 (fa/hana1sp12)", "VersionMajor": 1, "VersionMinor": 0, "XSASupported": null } ]}
Each object in the array represents a resource group. The object returned has these properties:
Property Description
ResourceId The internal ID the cockpit uses to identify this resource. Other cockpit APIs require this ID as a parameter.
ResourceName The name of the resource. For SAP HANA systems the default name takes the form <DB>@<SID> – for example, DB1@HA0.
ResourceDescription The description of the resource optionally provided by the registering user at registration time.
DatabaseName The database name, for example, DB1.
SystemName The system name. For SAP HANA systems this is the SID (HA0, for example).
Designation The designation or usage type of the resource. For SAP HANA systems these can be PRODUCTION, DEVELOPMENT, TESTING or CUSTOM.
Version The resource's full version string.
VersionMajor The major version of the resource as an integer (for example, 2)
VersionMinor The minor version of the resource as an integer (for example, 0)
ServicePack The service pack of the resource as an integer (for example, 20)
PatchLevel The patch level of the resource as an integer.
64 P U B L I CSAP HANA Administration with SAP HANA Cockpit
Setup and Administration with the Cockpit Manager

Property Description
BuildNumber The build number of the resource.
ResValue The type of the resource (for example, HANA_SYSTEM).
SSOSupported If this value is true, this resource supports single sign-on from the cockpit.
XSASupported If this value is true, this resource has a running XS advanced server.
SSOEnabled If this value is true, single sign-on from the cockpit is turned on.
SSOEnforced If this value is true, single sign-on is the only available authentication method from the cockpit.
IsAuthenticated If this value is true, the current user is authenticated with this resource.
IsAuthenticatedWithSSO If this value is true, the current user is authenticated with this resource using single sign-on.
RemoteUserName The database user currently used to authenticate with the resource.
Host (& HostName) The main host name of the resource. Duplicated in both fields for compatibility.
State The state of the resource (RUNNING or STOPPED, for example).
Availability A score describing the availability of the resource.
Performance A score describing the performance of the resource.
Capacity A score describing the capacity of the resource.
AlertCountHigh The number of high-level alerts currently active.
AlertCountMedium The number of medium-level alerts currently active.
PortType The type of the main connection to the resource. Set to either "INSTANCE" or "SQL". If INSTANCE the port is an instance number. If SQL the port is a SQL port.
Port The instance number or SQL port (for example, the indexserver SQL port) of the main connection to the resource.
GroupCount The number of groups this resource belongs to.
Connections All possible connections to the resource (for scale-out systems or those with host aliases, for example). The main connection as dictated by Role is copied into the properties above.
An array of connection objects in this form:
Property DescriptionDesc
SAP HANA Administration with SAP HANA CockpitSetup and Administration with the Cockpit Manager P U B L I C 65

Property Description
Role The role of the connection: MASTER, MASTER_ALIAS, TENANT_MASTER, SLAVE, or STANDBY.
PortType INSTANCE or SQL.
PortValue Instance number or SQL port number.
Host Host name for this connection.
IsSAPControlAuthenticated If this value is true, authenticated has been set (by the current user) for the SAP Control functionality.
SAPControlUserName The name of the SAP Control user, if set.
5.5 Sending User Notifications and Monitoring Sessions
Use Active Sessions to send pop-up notifications to SAP HANA cockpit users in real time and to monitor browser sessions.
Related Information
Monitor Active Browser Sessions [page 66]Send a Notification to Logged-In Users [page 67]
5.5.1 Monitor Active Browser Sessions
Learn how many users are connected to SAP HANA cockpit, what response time they're experiencing, and which part of the cockpit they're looking at.
Prerequisites
Your cockpit user has one of these roles:
● Cockpit Administrator
66 P U B L I CSAP HANA Administration with SAP HANA Cockpit
Setup and Administration with the Cockpit Manager

● Cockpit User Administrator
Context
Each active browser session represents a user. The Cockpit Manager's main screen lists the number of browser sessions next to the Active Sessions option.
On the Active Sessions screen, you can see:
● Which users are logged in to the cockpit. (Users logged in to the Cockpit Manager are not included.)● Each user's recent response time (latency) measured in milliseconds. Delays become noticeable at 150 to
200 ms.● Each user's location in the cockpit. For example, #Shell-home is the Home screen and
#resourcedirectory-show is the Resource Directory.
Procedure
1. Connect to the Cockpit Manager and sign in as a cockpit administrator or cockpit user administrator.You can reach the Cockpit Manager by entering the Cockpit Manager URL created during cockpit installation. The URL takes this form:
https://<cockpit-host>:<port-number>
2. In the Cockpit Manager, select Active Sessions.3. (Optional.) Enter a user's name in the Search Sessions field to filter the list of users.
Related Information
Send a Notification to Logged-In Users [page 67]
5.5.2 Send a Notification to Logged-In Users
Send a pop-up alert to all users logged in to SAP HANA cockpit.
Prerequisites
Your cockpit user has one of these roles:
● Cockpit Administrator
SAP HANA Administration with SAP HANA CockpitSetup and Administration with the Cockpit Manager P U B L I C 67

● Cockpit User Administrator
Context
To alert users to upcoming service disruptions or similar events, you can use Active Sessions to send two types of user notifications:
● Inform. These messages appear in the browser window for five seconds. Users don't need to react to them.● Interrupt. These messages remain in the browser window until the user clicks to dismiss them.
Procedure
1. Connect to the Cockpit Manager and sign in as a cockpit administrator or cockpit user administrator.You can reach the Cockpit Manager by entering the Cockpit Manager URL created during cockpit installation. The URL takes this form:
https://<cockpit-host>:<port-number>
2. In the Cockpit Manager, select Active Sessions.3. To send an inform message to all logged-in users:
a. Click Inform (upper right).b. Enter your message.c. Click Send Message.
4. To send an interrupt message to all logged-in users:a. Click Interrupt (upper right).b. Select a type: Information or Warning.
An information message displays an info symbol. A warning message displays an orange warning symbol.
c. Enter a title.d. Enter your message.e. Choose text to appear on the button users must click to dismiss your message.f. Click Send Message.
Related Information
Monitor Active Browser Sessions [page 66]
68 P U B L I CSAP HANA Administration with SAP HANA Cockpit
Setup and Administration with the Cockpit Manager

5.6 View Logs to Troubleshoot the Cockpit
Find entries in the SAP HANA cockpit operational logs.
Prerequisites
Your cockpit user has these roles:
● Troubleshooting (a cockpit role)● Space Auditor (an XSA role - if you don't have the Space Auditor role, you can add it as described in step 2
[page 69].)
Context
View log entries to troubleshoot problems like missing monitoring data on cockpit pages, resource registration failure, and connection timeouts.
Procedure
1. Connect to the Cockpit Manager and sign in as a user with the Troubleshooting role.You can reach the Cockpit Manager by entering the Cockpit Manager URL created during cockpit installation. The URL takes this form:
https://<cockpit-host>:<port-number>
2. In the Cockpit Manager, select XSA Logs.
If you don't have Space Auditor, an XS advanced role, a notification about the role appears. You can add Space Auditor with this xs command:
xs set-space-role COCKPIT_ADMIN HANACockpit SAP SpaceAuditor Adding role 'SpaceAuditor' to user COCKPIT_ADMIN in space "SAP" of org "HANACockpit" ...OK
3. In the log viewer, there are two required fields for selecting and filtering log entries: Application and Lines.a. From the Application list, select a service—for example, cockpit-landscape-svc.b. From the Lines list:
○ Select All to display all the entries in the log.○ Select Last to specify the number of entries from the end of the log to display. For example, if you
select Last and enter 10, the cockpit displays the last 10 entries in the log.○ Select Recent to see the 25 most recent entries.
SAP HANA Administration with SAP HANA CockpitSetup and Administration with the Cockpit Manager P U B L I C 69

○ Select Time Interval to specify a range of time from which to display log entries. For example, to see log entries for the last four hours, select Time Interval. In the Since field, select today's date and set the time to four hours ago. In the Until field, select today's date and current time.
4. The log viewer has three optional fields: Cockpit Area, Type, and Source.a. (Optional) From the Cockpit Area list, select a component. Your selection here reduces the number of
options in the Application list.b. (Optional) Select one or more log types from the Type list. To remove a log type, click the cancel icon
next to its name.c. (Optional) Select one or more log sources from the Source list. To remove a log source, click the cancel
icon next to its name.5. When you're satisfied with the settings in the filtering fields, click Go.
The cockpit displays any log entries that meet you specifications.6. (Optional) You can use the tools in the Log Lines row to search, download, sort, and customize the display
of the log entries.○ Search: Enter a full or partial search term in the Search field to display only log entries that contain
your term.○ Download: Click the Download icon to download a .txt file containing the displayed log entries.
○ Sort: Click the Sort icon to choose sorting criteria for the log entries.○ Customize display: Click the Table Personalization icon to remove and reorganize the columns of the
log entry table.
5.7 Using XS CLI Commands to Troubleshoot the Cockpit
If you encounter issues with SAP HANA cockpit, you can use XS CLI commands to view services logs and application status.
You can execute the XS CLI commands on the machine where the cockpit is installed, using the <sid>adm account, or remotely using the XSA Client. For complete details on logging into the SAP HANA XS advanced runtime console and on the XS CLI: Application Management commands, see SAP HANA Developer Guide for SAP HANA XS Advanced Model.
Viewing Logs of Various Services
You can investigate potential issues by viewing the log file of a specific service with the command xs logs <APP>, where <APP> is the name of the application whose log-file details you want to display.
If you encounter issues with... View the application log for...
Resource registration, resource group management, cockpit user management, or other Cockpit Manager issues
● cockpit-admin-web-app● cockpit-admin-ui-svc● cockpit-persistence-svc
70 P U B L I CSAP HANA Administration with SAP HANA Cockpit
Setup and Administration with the Cockpit Manager

If you encounter issues with... View the application log for...
Displaying or retrieving data, or issues related to specific SAP HANA cockpit applications
● cockpit-web-app● cockpit-hdbui-svc● cockpit-hdb-svc● cockpit-landscape-svc● cockpit-persistence-svc
Collections ● cockpit-collection-svc● cockpit-hdb-svc● cockpit-persistence-svc
TipIn the log of cockpit-collection-svc, if you see: A collection could not be submitted for execution because the worker thread pool is exhausted, then consider increasing the collection worker thread pool in the data collection settings through the cockpit manager. Increase the threads incrementally, rechecking the log each time, until the issue is resolved.
Viewing Application Status
After viewing log files, you can also look at application status with the xs apps command. Ensure that the following services are in the STARTED state, and that instances are up and running:
● hrtt-service● sqlanlz-svc● sqlanlz-ui hrtt-core● sapui5_fesv2● cockpit-persistence-svc● cockpit-hdb-svc● cockpit-collection-svc● cockpit-hdbui-svc● cockpit-landscape-svc● cockpit-web-app● cockpit-adminui-svc● cockpit-admin-web-app
Related Information
View Logs to Troubleshoot the Cockpit [page 69]Setting Data Collection [page 31]Managing Cockpit Users [page 24]Working with Resources and Resource Groups [page 33]
SAP HANA Administration with SAP HANA CockpitSetup and Administration with the Cockpit Manager P U B L I C 71

6 Security Aspects of SAP HANA Cockpit
Security considerations for SAP HANA cockpit include user management, single sign-on and certificate management.
User Authentication
Several types of credentials are used within SAP HANA cockpit:
Credential Details
COCKPIT_ADMIN The master user for the cockpit created during the installation process. The password for the cockpit administrator user is the master password established during the installation process. This master user is assigned all three administrator roles, and can therefore access all aspects of the Cockpit Manager, and can create users, register resources, and assign users and resources to resource groups.
Cockpit Users The business users with access to the cockpit.
Each is assigned one or more roles. See Managing Cockpit Users for details.
Technical User An application global per-resource set of database credentials for access to remote resources and necessary to regularly gather information such as state, status, and other generalized KPIs.
The technical user is created outside of the cockpit, but the technical user must be specified when a resource is registered in the cockpit. The technical user requires the privileges necessary to perform registration and statistics gathering: at a minimum, CATALOG READ system privilege and SELECT permission on _SYS_STATISTICS catalog.
72 P U B L I CSAP HANA Administration with SAP HANA Cockpit
Security Aspects of SAP HANA Cockpit

Credential Details
Database User (User Remote Login) The per resource/per user set of database credentials for a remote resource used by the cockpit user to view more sensitive information, and to make changes within their roles as defined on that resource.
Each cockpit user needs to provide database user credentials with the system privilege CATALOG READ and SELECT on _SYS_STATISTICS in order to drill down in the cockpit to the overview information for a specific resource. The cockpit securely encrypts and stores separate database credentials for each cockpit user, but you can clear and re-enter the credentials through the Resource Directory when you desire to do so. We recommend that each cockpit user connects with different database user credentials.
Single Sign-On (SSO) For any systems running version SAP HANA 2.0 SPS 01, or later, the cockpit resource administrator has the option to enable or enforce SSO. See Setting Up Single Sign-On.
Operating System User A per resource set of credentials for accessing the SAP Control process (starting and stopping the resource, and restoring features). This is usually the <sid>adm account. The cockpit securely encrypts and stores these credentials, but you can clear and re-enter the credentials through the Resource Directory when you desire to do so.
Internal Communication Service-to-service authentication
SAP HANA Service Broker User For application persistence using the application's SAP HANA express database
NoteUse SQL to create the technical user required to register a resource through the SAP HANA cockpit and grant the minimum necessary authorizations:
CREATE USER <username> PASSWORD <password> NO FORCE_FIRST_PASSWORD_CHANGE VALID UNTIL FOREVER; GRANT CATALOG READ to <username>; GRANT SELECT on SCHEMA _SYS_STATISTICS to <username>
Network and Communication Security
The cockpit uses secure protocols on all client browser connections to HTTPS ports. Communication to SAP HANA databases uses JDBC, and may be secured by importing certificates into the cockpit. Additional communication is made to the remote hosts using a restful interface which also may be secured. You can use properly signed certificates for the cockpit’s external ports as well. For more information about obtaining certificates, see Certificate Management in SAP HANA in the SAP HANA Security Guide.
In a large enterprise it’s likely that you may generate internal certificates that are signed by an internal certificate signing authority. In this case, you could insert the single (root) certificate from the signing
SAP HANA Administration with SAP HANA CockpitSecurity Aspects of SAP HANA Cockpit P U B L I C 73

authority. Any certificates signed by that authority (such as HTTPS or JDBC certificates) are automatically trusted. However, in a default installation, the SAP HANA system generates a self-signed certificate. In this situation, if the certificate is not replaced by a correctly signed one, then that specific certificate should be imported in order to enable trust.
Related Information
Managing Cockpit Users [page 24]Edit Settings for a Cockpit User [page 28]Working with the Resource Directory [page 89]Managing Database Users and Roles [page 443]Import a Certificate for Encrypted Communication [page 80]Setting Up Single Sign-On [page 74]
6.1 Setting Up Single Sign-On
Single sign-on (SSO) is a form of authentication which allows user access without requiring that the user enter credentials every time.
The SAP HANA cockpit offers the option to configure SSO to access cockpit itself (including the cockpit manager), and to connect to a registered resource.
Configuring SSO access to the cockpit itself means that you need not provide cockpit user credentials in order to access the cockpit or the cockpit manager.
The option to enable or enforce single-sign on (SSO) for a specific resource removes the need for providing database user credentials each time you connect to the resource. If you enforce SSO, cockpit users must use SSO to access the resource. If you enable SSO, but do not enforce it, cockpit users can choose whether to access this resource with SSO or to enter alternate database user credentials.
NoteBefore enabling SSO, consider migrating the Personal Security Environment (PSE) file to an in-database store. When SSO is enabled, a new PSE file may be created, which may prevent cockpit access to stored certificates. See SAP Note 2656666.
Related Information
Edit Resource Settings, including SSO [page 38]Enforce Single Sign-On [page 40]Configure SSO Access to the SAP HANA Cockpit [page 75]Configure SSO Access to a Resource [page 78]
74 P U B L I CSAP HANA Administration with SAP HANA Cockpit
Security Aspects of SAP HANA Cockpit
SAP Note 2656666
6.1.1 Configure SSO Access to the SAP HANA Cockpit
To configure single-sign on authentication to the SAP HANA cockpit, use the cockpit for SAP HANA extended application services, advanced model (XS advanced cockpit) and the SAP Cloud Platform Identity Authentication Administration Console. These are external tools and not part of the SAP HANA cockpit itself.
Context
Authentication standard supported for SSO to SAP HANA cockpit: SAML
For more information about the XS advanced cockpit, including standards supported for SSO, refer to Maintaining the XS Advanced Runtime Environment with SAP HANA XS Advanced Cockpit or Managing SAML Identity Providers in XS Advanced in the SAP HANA Administration Guide.
NoteThe steps in these instructions detail how to configure SSO access using the SAP Cloud Platform Identity Authentication Administration Console. If you are using another identity provider (IDP), the steps or details may vary.
Procedure
1. Log in to the SAP Cloud Platform Identity Authentication Administration Console and create named groups.a. Navigate to
https://<IDP_URL>/adminb. Select User Groups.c. Use Add + to provide a name for each group. For example:
○ HANA_COCKPIT_ADMIN○ HANA_COCKPIT_RESOURCE_ADMIN○ HANA_COCKPIT_USER_ADMIN○ HANA_COCKPIT_USER○ HANA_COCKPIT_POWER_USER
In the example above we use cockpit roles for group names; you can choose your own group names.d. Select Save.e. Exit the SAP Cloud Platform Identity Authentication Administration Console.
2. Use the XS advanced cockpit to add a new SAML identity provider.a. Retrieve SAML2 metadata from your IDP.
For example, using the SAP IDP, navigate to
SAP HANA Administration with SAP HANA CockpitSecurity Aspects of SAP HANA Cockpit P U B L I C 75

https://<IDP_URL>/saml2/metadatab. Use the xs a command to access the xsa-cockpit URL.
c. In the left pane, select Security Trust Configuration .d. Select New Trust Configuration to add a new provider.e. In the metadata text box, enter XML based on the SAML metadata you retrieved from the IDP in step
2.a [page 75].f. Select Parse to fill in the remaining fields.g. Select Save.
3. In the XS advanced cockpit, map the role collections. (For more information, see SAP Note 2569903).
a. Select Security Trust Configuration.b. Select the trust configuration you created in step 2 [page 75].c. Select Role Collection Mappings.d. Select New Role Collection Mapping to map each of the role collections to a group within the IDP. If you
use the sample group names in step 1.c [page 75], the mappings are:
Role Collection Group Name
COCKPIT_ADMIN HANA_COCKPIT_ADMIN
COCKPIT_RESOURCE_ADMIN HANA_COCKPIT_RESOURCE_ADMIN
COCKPIT_USER_ADMIN, XS_USER_ADMIN HANA_COCKPIT_USER_ADMIN
COCKPIT_USER HANA_COCKPIT_USER
COCKPIT_POWER_USER HANA_COCKPIT_POWER_USER
NoteIf you're using the COCKPIT_USER_ADMIN role collection, you must map both COCKPIT_USER_ADMIN and XS_USER_ADMIN to the IDP group representing the cockpit user administrator, in this case HANA_COCKPIT_USER_ADMIN.
e. Select Save.
4. Retrieve spring SAML metadata fromhttps://<cockpit_FQDN>3<instance#>32/uaa-security/saml/metadata
For example, if the cockpit is running on yourserver.company.com instance 03, the URL is
https://yourserver.company.com:30332/uaa-security/saml/metadata5. The file for use in the IDP configuration downloads automatically.6. Log in to the SAP Cloud Platform Identity Authentication Administration Console and create a new
application to represent the SAP HANA cockpit.a. Select Applications and Resources.b. Select Add Application.c. Enter an application name.d. Select Save.
7. In the SAP Cloud Platform Identity Authentication Administration Console, configure SAML.a. Select the new application.
76 P U B L I CSAP HANA Administration with SAP HANA Cockpit
Security Aspects of SAP HANA Cockpit

b. Select SAML 2.0 Configuration.c. Select the browse button to locate and select the downloaded metadata file (~/Downloads/
spring_saml_metadata.xml).
NoteOnly one application may be configured with the SAML provider. An error will occur if you introduce a duplicate, even with a different name.
8. In the SAP Cloud Platform Identity Authentication Administration Console, configure the application Name ID attribute.a. Select Name ID Attribute.b. Select Email.c. Select Save.
9. In the SAP Cloud Platform Identity Authentication Administration Console, provide assertion attributes.a. Select Assertion Attributes.b. Add a groups attribute.c. Modify the groups attribute (lowercase) to Groups (title case).d. Accept the default assertion attribute for First name, Last name and E-mail.
10. In the SAP Cloud Platform Identity Authentication Administration Console, add the user.a. Select User Management.b. Select Add User.c. Provide last name, email and user type, and account activation options.d. Press Save.
11. In the SAP Cloud Platform Identity Authentication Administration Console, edit the user.a. Select Applications.b. Add the application you created in the XSA Admin tools.c. Select User Groups and add the groups appropriate for this user (corresponding to the cockpit role).
12. Log in to the SAP HANA cockpit. You see the link on the sign-in page, and do not need to enter cockpit user credentials. (Selecting the link might bring up the IDP authentication page.)
Related Information
Setting Up Single Sign-On [page 74]Configure SSO Access to a Resource [page 78]SAP Note 2569903
SAP HANA Administration with SAP HANA CockpitSecurity Aspects of SAP HANA Cockpit P U B L I C 77

6.1.2 Configure SSO Access to a Resource
Enabling single sign-on (SSO) allows a cockpit user to log on to a resource without being prompted for database user credentials.
Prerequisites
● The resource has been registered in the cockpit. It meets these version restrictions:○ SAP HANA 1.0 SPS 12 revision 14 or later, or○ SAP HANA 2.0 SPS 01 or later
● You have a database user with the CATALOG READ, TRUST ADMIN, CERTIFICATE ADMIN, and USER ADMIN privileges.The database user we use in the steps below is SSO_USER.To assign the necessary system privileges to an existing user called SSO_USER, execute these SQL statements:
GRANT TRUST ADMIN TO SSO_USER;GRANT CERTIFICATE ADMIN TO SSO_USER;GRANT USER ADMIN TO SSO_USER;GRANT CATALOG READ TO SSO_USER;
● You have a second database user with the USER ADMIN system privilege.The second database user we use in the steps below is USER_ADMIN.
● A user with the Cockpit Administrator or Cockpit User Administrator role has created one or more cockpit users who will be accessing this resource and assigned them the role Cockpit User.The cockpit user we use in the steps below is COCKPIT_USER.
● For step 1 [page 79], you have a cockpit user with the Cockpit Administrator or Cockpit Resource Administrator role.The cockpit administrator we use in the steps below is COCKPIT_ADMIN.
Context
Authentication standard supported for SSO to a managed resource: JSON Web Token (JWT).
NoteBefore enabling SSO, consider migrating the Personal Security Environment (PSE) file to an in-database store. When SSO is enabled, a new PSE file may be created, which may prevent cockpit access to stored certificates. See SAP Note 265666.
The steps below configure SSO for a single managed SAP HANA resource. You'll need to perform them for each resource where SSO is needed. There's a separate set of steps for configuring SSO for the cockpit itself—see the Related Links at the end.
The result of this process is to link the cockpit account we're calling COCKPIT_USER with the database account we're calling SSO_USER. When SSO is enabled, you'll be able to sign in to the cockpit as COCKPIT_USER by entering the password, and from there sign in to a resource as SSO_USER without providing credentials. You
78 P U B L I CSAP HANA Administration with SAP HANA Cockpit
Security Aspects of SAP HANA Cockpit

can also sign in to the resource using different database credentials. If you choose to enforce SSO, you will be able to sign in to the resource from the cockpit only as SSO_USER.
Procedure
1. Enable SSO in the Cockpit Manager:a. Log in to the Cockpit Manager as COCKPIT_ADMIN.b. Select Registered Resources.c. In the left column, choose the resource for which you want to enable SSO.d. Click Edit (bottom of screen).e. Scroll down to the Single Sign On section and select Enable SSO: Yes.f. In the Authorize SSO Setting Change dialog, enter the credentials of a cockpit user that has the
CATALOG READ, TRUST ADMIN, CERTIFICATE ADMIN, and USER ADMIN privileges. We're using SSO_USER here, as described in the Prerequisites.
g. Click Save.2. Sign in to the database as a user with the USER ADMIN system privilege—we're using USER_ADMIN here.3. On the System Overview page for the resource, click Manage users (under User & Role Management).4. Select the user with the CATALOG READ, TRUST ADMIN, CERTIFICATE ADMIN, and USER ADMIN
privileges—SSO_USER for purposes of this procedure.5. To set the JWT mappings:
a. Under Authentication, select JWT - You must add at least one identity provider.b. Click Add JWT Identity.c. Select XS_APPLICATIONUSER from the Identity Provider dropdown.d. Turn off the Automatic Mapping by Provider.e. Enter the user name of an existing cockpit user in External Identity—we're using COCKPIT_USER here
—and click Save.6. Log out of the cockpit and log in as COCKPIT_USER (the cockpit user for which you just set up JWT).7. Go to the Resource Directory and click the Choose Authentication link for the resource you're configuring.8. Make sure Log on via single sign on is selected and click OK.9. Click the resource name to log in.
The resource signs you in as SSO_USER, though you logged in to the cockpit as COCKPIT_USER.10. (Optional) Enforce SSO through the Cockpit Manager:
a. On the Home page, under Manage Landscape, click Manage Cockpit to return to the Cockpit Manager.b. Click Registered Resources.c. Choose the resource for which you want to enforce SSO and click Edit (lower right).d. Under Single Sign On, select Enforce SSO: Yes and click Save.e. In the Authorize SSO Setting Change dialog, enter the credentials of SSO_USER.f. Click Go to SAP HANA Cockpit (lower right) to return to the cockpit.g. Open the Resource Directory and find the resource for which you've configured SSO.
The resource's Credentials column now says SSO enforced. You can access the database only as COCKPIT_USER's mapped database user, SSO_USER—the cockpit does not allow you to enter other credentials.
SAP HANA Administration with SAP HANA CockpitSecurity Aspects of SAP HANA Cockpit P U B L I C 79

Next Steps
Repeat these steps as needed to enable SSO for other resources.
Related Information
Create or Enable a Cockpit User [page 25]Configure SSO Access to the SAP HANA Cockpit [page 75]SAP Note 2656666
6.2 Import a Certificate for Encrypted Communication
You can import a certificate to enable an encrypted HTTP connection from the cockpit to SAP Control, or an encrypted JDBC connection from the cockpit to an SAP HANA database.
Procedure
1. Sign on as <sid>adm to the remote system with which you want the cockpit to establish a connection.
2. On the remote system, run the sapgenpse tool to export the certificate(s) from the in-memory certificate collection, or from the file-system PSE ($SECUDIR/sapgenpse export_own_cert).
The location of the required certificate(s) depends on how you manage certificates in your system. For instance, you may be able to open a browser, point to SAP Control, and obtain the certificate.
3. Sign on as <sid>adm to the system hosting the cockpit.
4. Run the command XS login, and provide the name and password of the COCKPIT_ADMIN so that the <sid>adm can execute the xs command line tool in the user context of COCKPIT_ADMIN.
5. In SAP HANA XS advanced model (XSA), trust the certificates using the command syntax xs trust-certificate <ALIAS> -c <CERT_FILE>, where <ALIAS> is a unique alias for the certificate within XSA, for example. BZ1_SAPCONTROL and <CERT_FILE> is the certificate you exported from the remote system.
6. Run the commands xs restage cockpit-hdb-service cockpit-hdb-svc followed by xs restart service cockpit-hdb-svc to refresh the certificates for the cockpit.
See XS CLI: Certificates in the SAP HANA Developer Guide (For SAP HANA XS Advanced Model). For information about obtaining certificates, see Certificate Management in SAP HANA in the SAP HANA Security Guide.
80 P U B L I CSAP HANA Administration with SAP HANA Cockpit
Security Aspects of SAP HANA Cockpit
Related Information
SAP Note 2300943Register a Resource [page 34]
6.3 Ensuring a Secure Browser Connection
After you’ve installed the SAP HANA cockpit, ensure that communication with your web browser is encrypted.
Context
Unencrypted communication with a browser could pose a security risk. To secure the connection, provide the XSA server with a certificate that is signed by a certificate authority, or use your own self-signed certificate.
NoteThe steps outlined here are deliberately generic so as to apply to all configuration scenarios. For a detailed, specific example, see SAP Note 2631903.
Procedure
1. To use a certificate from a certificate authority:a. Obtain a signed certificate from the certificate authority.b. In SAP HANA XS advanced model (XSA), verify the domain using the command xs domains..c. Set the XS domain certificate using the command xs set-certificate <domain> -c
<CERT_FILE> -k <CERT_KEY>.d. Restart XSA using the command XSA restart.
2. To use your own certificate:a. Create a self-signed root certificate.b. Create a second certificate that is signed by the root certificatec. In SAP HANA XS advanced model (XSA), verify the domain using the command xs domains..d. Set the XS domain certificate using the command xs set-certificate <domain> -c
<CERT_FILE> -k <CERT_KEY>.e. Restart XSA using the command XSA restart.f. Update your browser’s list of trusted root certificates to include the newly-created root certificate file.
SAP HANA Administration with SAP HANA CockpitSecurity Aspects of SAP HANA Cockpit P U B L I C 81
NoteThe XS domain name is tied to the certificate request. If the domain name starts out basically as the host name, you can change the domain name to a virtual host name so it’s easy to remember and easy to re-direct. The certificate for the domain needs to contain both the actual and virtual host names.
Related Information
SAP Note 2631903SAP Note 2243019SAP Note 2300936
6.4 Data Protection and Privacy in SAP HANA Cockpit
SAP HANA cockpit provides tools you can use to conform to legal and business requirements for protecting personal data stored in the system.
Introduction
Data protection is associated with numerous legal requirements and privacy concerns. In addition to compliance with general data privacy regulation, it is necessary to consider compliance with industry-specific legislation in different countries. SAP provides specific features and functions to support compliance with regard to relevant legal requirements, including data protection. SAP does not give any advice on whether these features and functions are the best method to support company, industry, regional, or country-specific requirements. Furthermore, this information should not be taken as advice or a recommendation in regards to additional features that would be required in specific IT environments; decisions related to data protection must be made on a case-by-case basis, taking into consideration the given system landscape and the applicable legal requirements.
NoteSAP does not provide legal advice in any form. SAP software supports data protection compliance by providing security features and specific data protection-relevant functions, such as simplified blocking and deletion of personal data. In many cases, compliance with applicable data protection and privacy laws will not be covered by a product feature. Definitions and other terms used in this document are not taken from a particular legal source.
82 P U B L I CSAP HANA Administration with SAP HANA Cockpit
Security Aspects of SAP HANA Cockpit

Glossary
Term Definition
Consent The action of the data subject confirming that the usage of his or her personal data shall be allowed for a given purpose. A consent functionality allows the storage of a consent record in relation to a specific purpose and shows if a data subject has granted, withdrawn, or denied consent.
Deletion The irreversible destruction of personal data.
Personal data Any information relating to an identified or identifiable natural person ("data subject"). An identifiable natural person is one who can be identified, directly or indirectly, in particular by reference to an identifier such as a name, an identification number, location data, an online identifier or to one or more factors specific to the physical, physiological, genetic, mental, economic, cultural, or social identity of that natural person.
Purpose A legal, contractual, or in other form justified reason for the processing of personal data. The assumption is that any purpose has an end that is usually already defined when the purpose starts.
User Consent
SAP HANA cockpit stores only personal data entered by users; it never collects personal data without a user's knowledge.
Logging Read Access and Changes
SAP HANA cockpit provides tools for auditing access and changes to personal data stored in SAP HANA databases. For details, see Auditing Database Activity.
Information Report
SAP HANA cockpit does not store any personal data except what is entered (if anything) in the optional contact information for resources. This typically includes the name and e-mail address of the contact person, and you can see it in the resource registration.
Deletion of Personal Data
You can remove unneeded user accounts and resource contact information. See:
● Edit Resource Settings, Including SSO
SAP HANA Administration with SAP HANA CockpitSecurity Aspects of SAP HANA Cockpit P U B L I C 83

● Delete a Cockpit User or Revoke Cockpit Access
Related Information
Auditing Database Activity [page 395]Edit Resource Settings, including SSO [page 38]Delete a Cockpit User or Revoke Cockpit Access [page 29]
6.5 Auditing in SAP HANA Cockpit
Audit logging lets you track events like logins and creation and deletion of user accounts.
Prerequisites
● You have the password for the COCKPIT_ADMIN user, or● If you want to use the Audit Log as a user other than COCKPIT_ADMIN, you have created an appropriate
role collection and assigned it to that user. Give the role collection the application role AuditLogViewer, which is part of application auditlog-ui and role template AuditLogViewer. For details on building role collections, see Maintain Roles for XS Advanced Applications in the SAP HANA Administration Guide.
Context
You can use the Audit Log to identify log entries for events that you want to track.
Procedure
1. Log in to SAP HANA express edition or XS advanced:xs login [-a <API_URL>] [-u <username>] [-p <password>] [-o <organization>] [-s <space>]
where <API_URL> is the API endpoint (for example, https://api.example.com)
2. To list applications, enter:xs a
3. In the results, find the entry for the auditlog-ui service, which includes a URL.4. Enter the auditlog-ui URL in a browser to open the Audit Log.
84 P U B L I CSAP HANA Administration with SAP HANA Cockpit
Security Aspects of SAP HANA Cockpit

5. Use the Audit Log sorting and filtering tools to find logged events of interest to you.
SAP HANA Administration with SAP HANA CockpitSecurity Aspects of SAP HANA Cockpit P U B L I C 85

7 Personalizing the SAP HANA Cockpit
You can customize the default home page of the SAP HANA cockpit, and the Overview of each system or tenant database.
The home page features tiles that allow you to launch apps, and which may also show additional information. The page can be personalized and tiles can be added, removed, or bundled. Since the cockpit is role-based, only apps relating to your role are displayed. You can personalize your home page in a variety of ways. Tiles can be rearranged directly, but most actions require you to activate the edit mode. For example, activate edit mode to rearrange groups of tiles or customize tiles.
Similarly, when you access the Overview of a tenant or system database (by drilling down from the Resource Directory), you have access to many tiles (sometimes referred to as cards), each representing a specific cockpit application. (If you don't have the required privileges, specifc tiles, features, or actions may not be available to you.) You can drag and drop to arrange these tiles in your preferred order, or hide superfluous tiles.
To enable more enhanced personalization functions, from either the cockpit home page or the Overview, open the Me area (identified by the icon of a person) and then select Edit Home Page. While most actions in the Me area are available independently of the current context, some of the actions are directly tied to the content shown in the main content area. These include:
● Settings and preferences● A catalog of available apps (the app finder)● Tools to personalize the current content● Recently used and frequently visited apps
In the Me area, if Single Sign-On authentication is not enabled for your cockpit user, you can also change your cockpit password by selecting User Account and Change Password.
Related Information
Using the Overview to Manage a Resource [page 160]Working with the Resource Directory [page 89]
86 P U B L I CSAP HANA Administration with SAP HANA Cockpit
Personalizing the SAP HANA Cockpit

8 Administering and Monitoring a Multiresource Landscape
For resource groups to which you have access, you can monitor aggregated information representing each of the group's individual database resources.
A resource is an SAP HANA system, identified by a host and instance number. You can see data from multiple resources simultaneously—you can check the overall health of systems located within a data center or across your enterprise. You can drill down into status indicators for more detailed information.
Related Information
Managing Multiple Resources in SAP HANA Cockpit [page 87]Working with the Resource Directory [page 89]Monitor Alerts from Multiple Resources [page 94]Monitor Aggregate Health [page 95]Working with Configurations and Configuration Templates [page 97]
8.1 Managing Multiple Resources in SAP HANA Cockpit
Starting with an aggregate view of your registered resources in SAP HANA cockpit allows you to quickly discover any resources in your environment that have issues.
You can also pay attention to the groups of resources and decide whether you need to navigate into a group to investigate potential issues, or drill down to individual resources to obtain more details by clicking tabs, tiles, links, and numbers.
When you first access the cockpit, the landscape level page displays important high-level information about all the resources to which you have been granted access. A resource is an SAP HANA system, identified by a host and instance number, which may be a single- or multihost system. If you don't see any resources when you open the cockpit, either there are no resources registered in the cockpit, or your cockpit resource administrator has not assigned resources to you. See Setting Up Cockpit with the Cockpit Manager and Working with Resources and Resource Groups.
Groups
Each resource belongs to a usage type group (Production, Test, and Development) depending on configured system usage type. The resources may also belong to one or more groups created by the cockpit resource
SAP HANA Administration with SAP HANA CockpitAdministering and Monitoring a Multiresource Landscape P U B L I C 87

administrator. Included with each group you see the number of resources in the group, and the number not running at the time of the most recent refresh. You can refresh the displayed data (which is collected at a specified interval) using the refresh icon in the top right corner.
Resource Directory
Selecting Resource Directory allows you to view each resource, its connection, version, and resource groups to which it belongs. Selecting the name of any resources allows you to drill down to overview information for that individual resource.
TipUnless your administrator has enabled single sign-on, you'll need to connect to the resource with a database user that has the system privilege CATALOG READ and SELECT on _SYS_STATISTICS.
You can use the cockpit to monitor and manage more than one resource, each running version SAP HANA 1.0 SPS 12 or later. Any resource running version SAP HANA 2.0 SPS 01 or later is set in multiple-container mode by default. The cockpit can also monitor single-container systems running earlier versions of SAP HANA. When you drill down to the system Overview, and subsequently to Manage Services, the operations you have the option to perform depend on whether you are displaying a tenant or a system database.
Additional Functionality
The tiles each launch additional functionality. If you are the cockpit adminstrator user, or, for example, a cockpit resource administrator user, Manage Cockpit gives you access to the Cockpit Manager. Developers and administrators can also visually browse database objects (tables and schemas) and execute SQL statements.
Related Information
Set up SAP HANA Cockpit for the First Time [page 11]Determine Ports for SAP HANA Cockpit and Cockpit Manager [page 12]Open SAP HANA Cockpit [page 15]Open the Resource Directory [page 90]Using the Overview to Manage a Resource [page 160]Working with Configurations and Configuration Templates [page 97]Setup and Administration with the Cockpit Manager [page 23]Working with Resources and Resource Groups [page 33]
88 P U B L I CSAP HANA Administration with SAP HANA Cockpit
Administering and Monitoring a Multiresource Landscape

8.1.1 Managing Groups of Resources
You can monitor and resolve issues by accessing information about a group of resources.
Each resource belongs to a usage type group (Production, Test, and Development) depending on configured system usage type. The resources may also belong to one or more groups created by the cockpit resource administrator.
Related Information
Set up SAP HANA Cockpit for the First Time [page 11]Determine Ports for SAP HANA Cockpit and Cockpit Manager [page 12]Working with the Resource Directory [page 89]
8.2 Working with the Resource Directory
The Resource Directory within SAP HANA cockpit contains information about all the registered resources belonging to resource groups to which you have been granted access.
For each resource, you can drill down for more information. Through the Resource Directory, you can also specify the database user credentials required to drill down to an individual resource, which is necessary unless single sign-on is in effect for that resource.
Related Information
Open the Resource Directory [page 90]Resource Details [page 90]Group by System [page 91]Search, Sort, and Filter Tools in the Resource Directory [page 92]
SAP HANA Administration with SAP HANA CockpitAdministering and Monitoring a Multiresource Landscape P U B L I C 89
8.2.1 Open the Resource Directory
Display a list of registered resources to which you have been granted access.
Procedure
1. Connect to the cockpit and sign in.The URL takes this form:
https://<cockpit-host>:<port-number>
The port number was configured during cockpit installation.2. Select Resource Directory.
Each resource is displayed in a separate row, along with any high, medium or low alerts related to availability, performance and capacity.
3. At the top of the Resource Directory,
○ Enter a name in the Search field to find a resource○ Select a status from the Status list to see only resources with that status (such as stopped or running
with issues)○ Select a level from the Alerts list to see only resources with alerts at that level (such as high or
medium)○ Select a group from the Group list to see only the resources in that group○ Select a usage type from the Usage Type list to see only resources of that usage type (production,
development, test, or custom.)○ Select a type from the Type list to see only resources of that type (such as system or tenant databases)
4. (Optional) Select a specific resource to drill down to that resource's system Overview, or right click one or more resources to open in new tab(s).
Related Information
Resource Details [page 90]Search, Sort, and Filter Tools for Resources and Groups [page 92]Connect to a Resource using Database Credentials [page 93]
8.2.1.1 Resource Details
In the SAP HANA cockpit Resource Directory, you can see detailed information about resources.
The Resource Directory provides these details about each registered resource:
90 P U B L I CSAP HANA Administration with SAP HANA Cockpit
Administering and Monitoring a Multiresource Landscape

Detail Description
Status Running, deleting, issues, replicating, starting, stopping, stopped, transitioning, or unknown.
Resource The name of the resource and its host. Click the resource name to display the resource's Overview page.
Type The resource type—for example, SAP HANA database, SAP HANA system database, or SAP HANA tenant database.
Version The resource's software version. If the resource has been offline or stopped since it was registered, its version is 0.00.000.00.0 (UNKNOWN).
Description The description entered by the cockpit user who registered the resource.
Usage The usage type assigned to the resource: production, development, test, or custom.
Credentials When you click the link in the Credentials column, you may enter your SAP HANA database user name and password (unless single sign-on is enforced for this resource). The cockpit securely encrypts and stores separate database credentials for each cockpit user; the database user name and password you enter cannot be used by other cockpit users. See Connect to a Resource using Database Credentials.
SAP Control Credentials To save credentials for SAPControl to use for starting and stopping the resource and restoring features, click Manage Credentials and enter the name and password of the resource's <sid>adm OS user.
The cockpit securely encrypts and stores the credentials.
If you wish to clear the credentials, click Manage Credentials and select Delete the stored credentials for this resource.
Groups The number of resource groups this resource belongs to. Click the number to display a list of the groups.
Related Information
Open the Resource Directory [page 90]Search, Sort, and Filter Tools for Resources and Groups [page 92]Security Aspects of SAP HANA Cockpit [page 72]Connect to a Resource using Database Credentials [page 93]
8.2.1.2 Group by System
The Resource Directory in SAP HANA cockpit lists each registered resource. If you choose, you can organize the list by system and tenant databases.
The Resource Directory provides details about each resource, listing a different resource in each row. By selecting Group by System, you can order the list so that tenant databases are displayed under their related system databases.
SAP HANA Administration with SAP HANA CockpitAdministering and Monitoring a Multiresource Landscape P U B L I C 91

Related Information
Resource Details [page 90]Search, Sort, and Filter Tools for Resources and Groups [page 92]
8.2.1.3 Search, Sort, and Filter Tools in the Resource Directory
Use the search, sort, and filter tools to work with the list of resources in the Resource Directory.
Search Enter a full or partial resource or group name in the search box at the top of the screen and click the search icon . The list is reduced to show only resources or groups that match your search string.
Change sorting rules You can modify the sorting rules to:
● List resources in descending or ascending order● Sort resources by issues score, resource name, state,
availability, performance, capacity, or alert count.The issues score is a weighted ranking that identifies the resources most in need of attention. It's computed for each resource using all the indicators displayed in the Resource Directory, with extra weight given (to produce a higher ranking) for resources that are not running (Status column) and resources that have high-priority alerts (Alert Counts column).
Click the settings icon , then click the sort icon . Choose sorting rules and click OK.
Add a filter You can filter the list of resources by:
● Resource Status● Alert Priority● Group● Usage Type● Database Type
Click the settings icon , then click the filter icon . Select the type of filter (resource type, for example) and select one or more options or click Select All. Click OK to save the filter.
Modify a filter Each active filter appears in the blue bar at the top of the list of resources.
To modify a filter, click the settings icon , click the filter icon , and select the type of filter. The filtering options appear. You can use the search tool to find the option you need.
92 P U B L I CSAP HANA Administration with SAP HANA Cockpit
Administering and Monitoring a Multiresource Landscape

Cancel all filters or a single filter Click Restore on the blue bar at the top of the list of resources or in the Adapt Filters window.
Filtered parameters persist per user session.
Related Information
Open the Resource Directory [page 90]Resource Details [page 90]
8.2.2 Connect to a Resource using Database Credentials
Provide the credentials necessary to connect to a specific resource using SAP HANA cockpit.
Context
The cockpit resource adminstrator user may have used the Cockpit Manager configuration tool to enable cockpit to make use of the database's single sign-on (SSO) user authentication for a particular resource (running SAP HANA 2.0 SPS 01 or later). If not, each cockpit user needs to provide database user credentials in order to connect directly to the resource so as to drill down to information in the system Overview. We recommend that each cockpit user connects with different database user credentials. You can also connect using the <sid>adm user if you want the resource to be able to access the SAP Control process (which involves starting and stopping the resource, and restoring features).
TipUnless your administrator has enabled single sign-on, you'll need to connect to the resource with a database user that has the system privilege CATALOG READ and SELECT on _SYS_STATISTICS.
TipTo improve system security, and to more effectively audit system activity, it is strongly recommended to set up a named database user account for each SAP HANA cockpit user in each registered system.
Procedure
1. In SAP HANA cockpit on the My Resources page or any Group Overview page, click View resources directory (under Administration).
2. At the top of the Resource Directory page, click Resources to display information about registered resources.
SAP HANA Administration with SAP HANA CockpitAdministering and Monitoring a Multiresource Landscape P U B L I C 93

3. In the row displaying the resource to which you want to connect, choose to:
○ Select the link in the SAPControl Credentials column, and enter the name and password of the resource's <sid>adm user.
○ Select the link in the Credentials column. The wording on the link and in the subsequent dialog depend on how the cockpit resource administrator user has configured this resource in the Cockpit Manager:
Resource Configuration Credentials Column displays... Action
SSO has been enforced SSO Enforced You must connect to the resource through SSO. You don't need to enter database credentials.
SSO has been allowed SSO Enabled, or the most recently used database user name, with a link to Choose Authentication
Through the Choose Authentication dialog, you can choose to connect to the resource through SSO, or you can enter a different database user name and password.
SSO hasn't been allowed and you have not previously connected to the resource
The Enter Credentials link Through the Enter Credentials dialog, you must enter a database user name and password. The cockpit securely stores and encrypts the credentials for next time.
SSO hasn't been allowed but you have previously connected to the resource
The most recently used database user name, with a link to Manage Credentials
Through the Manage Credentials dialog, you can choose to enter a database user name and password, or simply clear the previously used database credentials.
The cockpit securely encrypts and stores the credentials, and allows you to connect to the resource.
4. Select a resource name to drill down to that resource.
Related Information
Resource Details [page 90]Search, Sort, and Filter Tools for Resources and Groups [page 92]Administering and Monitoring a Database [page 159]
8.2.3 Monitor Alerts from Multiple Resources
At a glance, you can see high-priority alerts from more than one resource.
Prerequisites
Your database user needs the object privilege SELECT on the schema _SYS_STATISTICS.
94 P U B L I CSAP HANA Administration with SAP HANA Cockpit
Administering and Monitoring a Multiresource Landscape

Procedure
1. Connect to the cockpit and sign in.The URL takes this form:
https://<cockpit-host>:<port-number>
The port number was configured during cockpit installation.2. Select Resource Directory.
Each resource is displayed in a separate row, along with any high, medium or low alerts related to availability, performance and capacity.
3. Click on an alert to drill down to the Alerts Monitor for the resource that is showing the alert.For more information about the Alerts Monitor, see Work with Alerts.
Related Information
Managing Multiple Resources in SAP HANA Cockpit [page 87]Monitoring Alerts [page 213]Work with Alerts [page 214]
8.2.4 Monitor Aggregate Health
You can view high-level information about the running status, availability, performance, capacity, and alert counts of all your resources. You can drill down to see details about individual resources.
Prerequisites
Your database user needs the system privilege CATALOG READ.
Context
Each resource tile on the Home screen displays indicators when its resource reports any of these serious conditions:
● Invalid technical user – this resource is running, but SAP HANA cockpit is unable to monitor it because the credentials for the user the cockpit employs to collect health data are incorrect or expired.
● License expired – this resource is running but its software license has expired.● No SQL access – this resource is running but isn't responding to SQL queries.
SAP HANA Administration with SAP HANA CockpitAdministering and Monitoring a Multiresource Landscape P U B L I C 95

● Running with issues – this resource is running but has one or more high-severity alerts such as missed backups or an SSL certificate that's expired or about to expire.
● Stopped – this resource isn't running.
In the Resource Directory, in addition to the above, you'll see high-level status indicators:
● Status – are managed resources running?● Availability – are managed resources reachable on the network? Are they able to serve the business needs
of their users, including humans and applications? Performance and capacity issues can affect availability.● Performance – are managed resources meeting the response time expectations of database users,
including humans and applications?● Capacity – do managed resources have the system resources to support their applications?● Alerts – do any managed resources need attention? Alert events, given priorities of high, medium, or low,
are triggered when a resource exceeds state and range thresholds.
Procedure
1. Connect to the cockpit and sign in.The URL takes this form:
https://<cockpit-host>:<port-number>
The port number was configured during cockpit installation.2. Check the resource tiles on the Home screen. If you see any problem indicators, you can click through or
continue to the Resource Directory.3. Select Resource Directory.
Each resource is displayed in a separate row, along with any high, medium or low alerts related to availability, performance and capacity.
4. To investigate issues:
○ If a resource's alert counts are not 0, click the alert count numbers to drill down to the alerts page.○ If there's a licence problem, click the resource name. The System Overview offers a link to the license
manager.○ If the technical user is invalid, click the resource name. The System Overview offers a link to the
Cockpit Manager, where you (or administrator with Cockpit Manager privileges) can update the technical user credentials.
5. If any status indicator shows a problem, click the resource name to drill down to the overview for that resource.
96 P U B L I CSAP HANA Administration with SAP HANA Cockpit
Administering and Monitoring a Multiresource Landscape

8.3 Working with Configurations and Configuration Templates
Compare the configuration parameters for managed resources or use a configuration template to capture a set of parameter values and apply them to other databases, systems, or hosts.
Related Information
Take a Snapshot of a Resource's Configuration [page 97]Compare Resource Configurations [page 98]Apply a Configuration Template [page 101]Create a Configuration Template [page 102]Modify a Configuration Template [page 103]Delete a Configuration Template [page 104]
8.3.1 Take a Snapshot of a Resource's Configuration
Save a configuration snapshot: a timestamped copy of a managed resource's full set of configuration parameters.
Prerequisites
● Register the resource whose configuration you want to capture.
Context
Snapshots let you capture an accurate record of each resource's configuration; track configuration changes; and provide context to the historical data SAP HANA cockpit collects.
Procedure
1. Connect to the cockpit and sign in.The URL takes this form:
https://<cockpit-host>:<port-number>
SAP HANA Administration with SAP HANA CockpitAdministering and Monitoring a Multiresource Landscape P U B L I C 97

The port number was configured during cockpit installation.2. Select Compare Configurations.3. In the Configuration Manager's left pane:
○ Select the target resource's type, or○ Select the target resource's group
4. Select the resource whose configuration you want to capture.
To sort the list of resources, click the Sort icon and choose sorting rules.5. If you haven't authenticated with the resource you selected, sign in at the prompt.6. Click the Snapshots tab in the middle of the screen.
The cockpit lists any previous snapshots of this resource's configuration.7. Take the snapshot by selecting the + icon.8. (Optional) Enter a description for the snapshot. The cockpit automatically associates the snapshot with its
resource.9. (Optional) To delete a snapshot, select it in the snapshots list and click Delete Snapshot.
8.3.2 Compare Resource Configurations
Compare the current configurations of two resources, compare two snapshots, or compare a current resource configuration to a snapshot.
Prerequisites
● Add the resources whose configuration you want to compare.● Ensure that the resource or resources whose configurations you want to compare support configuration
management. SAP HANA systems support configuration management in version SAP HANA 1.0 SPS 12 and later.
Context
To run a comparison, you select a source and a target to compare.
● When you compare two current configurations, the source and target resources must be of the same type (two SAP HANA systems, for example) and must be running the same software version.
● When you compare a current configuration to a snapshot, they must belong to the same system. That is, you cannot compare a current configuration to a snapshot of another system.
● When you compare two snapshots, they must belong to the same system. That is, you cannot compare a snapshot of one system to a snapshot of another system.
98 P U B L I CSAP HANA Administration with SAP HANA Cockpit
Administering and Monitoring a Multiresource Landscape
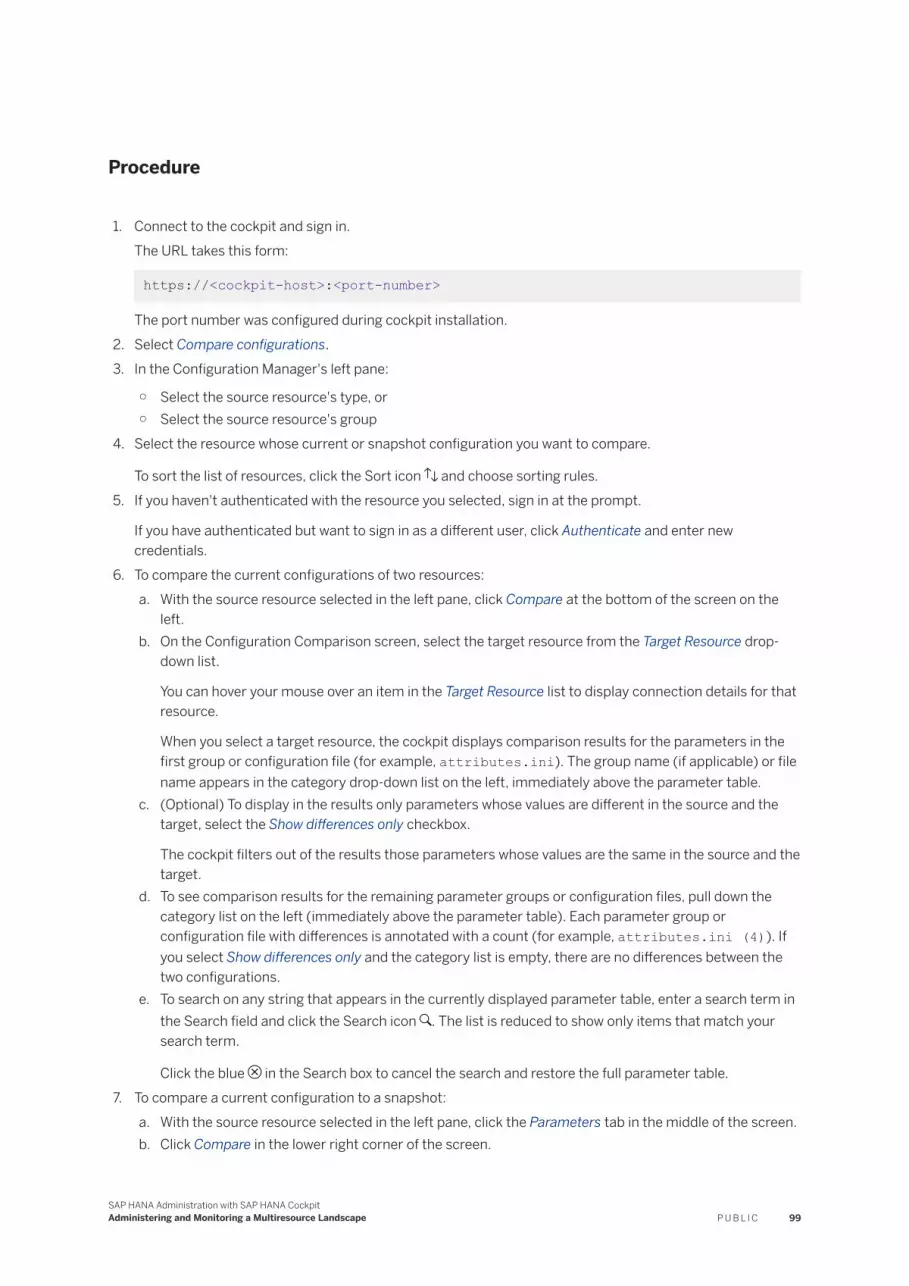
Procedure
1. Connect to the cockpit and sign in.The URL takes this form:
https://<cockpit-host>:<port-number>
The port number was configured during cockpit installation.2. Select Compare configurations.3. In the Configuration Manager's left pane:
○ Select the source resource's type, or○ Select the source resource's group
4. Select the resource whose current or snapshot configuration you want to compare.
To sort the list of resources, click the Sort icon and choose sorting rules.5. If you haven't authenticated with the resource you selected, sign in at the prompt.
If you have authenticated but want to sign in as a different user, click Authenticate and enter new credentials.
6. To compare the current configurations of two resources:a. With the source resource selected in the left pane, click Compare at the bottom of the screen on the
left.b. On the Configuration Comparison screen, select the target resource from the Target Resource drop-
down list.
You can hover your mouse over an item in the Target Resource list to display connection details for that resource.
When you select a target resource, the cockpit displays comparison results for the parameters in the first group or configuration file (for example, attributes.ini). The group name (if applicable) or file name appears in the category drop-down list on the left, immediately above the parameter table.
c. (Optional) To display in the results only parameters whose values are different in the source and the target, select the Show differences only checkbox.
The cockpit filters out of the results those parameters whose values are the same in the source and the target.
d. To see comparison results for the remaining parameter groups or configuration files, pull down the category list on the left (immediately above the parameter table). Each parameter group or configuration file with differences is annotated with a count (for example, attributes.ini (4)). If you select Show differences only and the category list is empty, there are no differences between the two configurations.
e. To search on any string that appears in the currently displayed parameter table, enter a search term in the Search field and click the Search icon . The list is reduced to show only items that match your search term.
Click the blue in the Search box to cancel the search and restore the full parameter table.7. To compare a current configuration to a snapshot:
a. With the source resource selected in the left pane, click the Parameters tab in the middle of the screen.b. Click Compare in the lower right corner of the screen.
SAP HANA Administration with SAP HANA CockpitAdministering and Monitoring a Multiresource Landscape P U B L I C 99

NoteThere are two Compare buttons at the bottom of the screen—be sure to click the one on the right. Its hover text says Compare system configuration to a specific snapshot.
c. On the Configuration Comparison screen, select the target snapshot from the Target Snapshot drop-down list.
The Target Snapshot menu lists the snapshots by timestamp. Hover your mouse over the timestamp in the list to see that snapshot's description (if it has one).
The cockpit displays comparison results for the parameters in the first group or configuration file (for example, attributes.ini). The group name (if applicable) or file name appears in the drop-down menu on the left immediately above the parameter table.
d. (Optional) To display in the results only parameters whose values are different in the source and the target, select the Show differences only checkbox.
The cockpit filters out of the results those parameters whose values are the same in the source and the target. If there are no differences between the source and the target in the current configuration file, the cockpit displays No differences found in the parameter table.
e. To see comparison results for the remaining parameter groups or configuration files, pull down the category list on the left (immediately above the parameter table). Each parameter group or configuration file with differences is annotated with a count (for example, attributes.ini (4)). If you select Show differences only and the category list is empty, there are no differences between the configuration and the snapshot.
f. To search on any string that appears in the currently displayed parameter table, enter a search term in the Search field and click the Search icon . The list is reduced to show only items that match your search term.
Click the blue in the Search box to cancel the search and restore the full parameter table.8. To compare two snapshots:
a. With the resource selected in the left pane, click the Snapshots tab in the middle of the screen.b. Select the source snapshot from the list.c. Select Compare Snapshots.d. On the Configuration Comparison screen, select the target snapshot from the Target Snapshot drop-
down list.
The Target Snapshot list shows the snapshots by timestamp. Hover your mouse over the timestamp in the list to see that snapshot's description (if it has one).
The cockpit displays comparison results for the parameters in the first group or configuration file (for example, attributes.ini). The group name (if applicable) or file name appears in the category drop-down list on the left immediately above the parameter table.
e. (Optional) To display in the results only parameters whose values are different in the source and the target, select the Show differences only checkbox.
The cockpit filters out of the results those parameters whose values are the same in the source and the target. If there are no differences between the source and the target in the currently displayed configuration settings, the cockpit displays No differences found in the parameter table.
f. To see comparison results for the remaining parameter groups or configuration files, pull down the category list on the left (immediately above the parameter table). Each parameter group or configuration file with differences is annotated with a count (for example, attributes.ini (4)). If
100 P U B L I CSAP HANA Administration with SAP HANA Cockpit
Administering and Monitoring a Multiresource Landscape

you select Show differences only and the category list is empty, there are no differences between the two snapshots.
g. To search on any string that appears in the currently displayed parameter table, enter a search term in the Search field and click the Search icon . The list is reduced to show only items that match your search term.
Click the blue in the Search box to cancel the search and restore the full parameter table.
8.3.3 Apply a Configuration Template
Use a configuration template to set parameter values for databases, systems, or hosts.
Prerequisites
● You have the system privilege INIFILE ADMIN on the resource to which you are applying a configuration template.
● You have permission to set configuration parameters on the target system(s).
Context
Every configuration template has a layer: database, system, or host. When you apply a database-layer template, it affects only the database you select. When you apply a system-layer template, it affects all the associated tenant databases, and when you apply a host-layer template, it affects all the databases on that host.
Procedure
1. Connect to the cockpit and sign in.The URL takes this form:
https://<cockpit-host>:<port-number>
The port number was configured during cockpit installation.2. Click Configuration Templates.3. Select a configuration template from the list.
Select the template's row in the list (not its radio button) to display its parameters and their values.4. Click Apply to Databases.5. (Optional) In the Select Databases window, enter a full or partial resource or host name in the Search field
to filter the list of resources.
SAP HANA Administration with SAP HANA CockpitAdministering and Monitoring a Multiresource Landscape P U B L I C 101
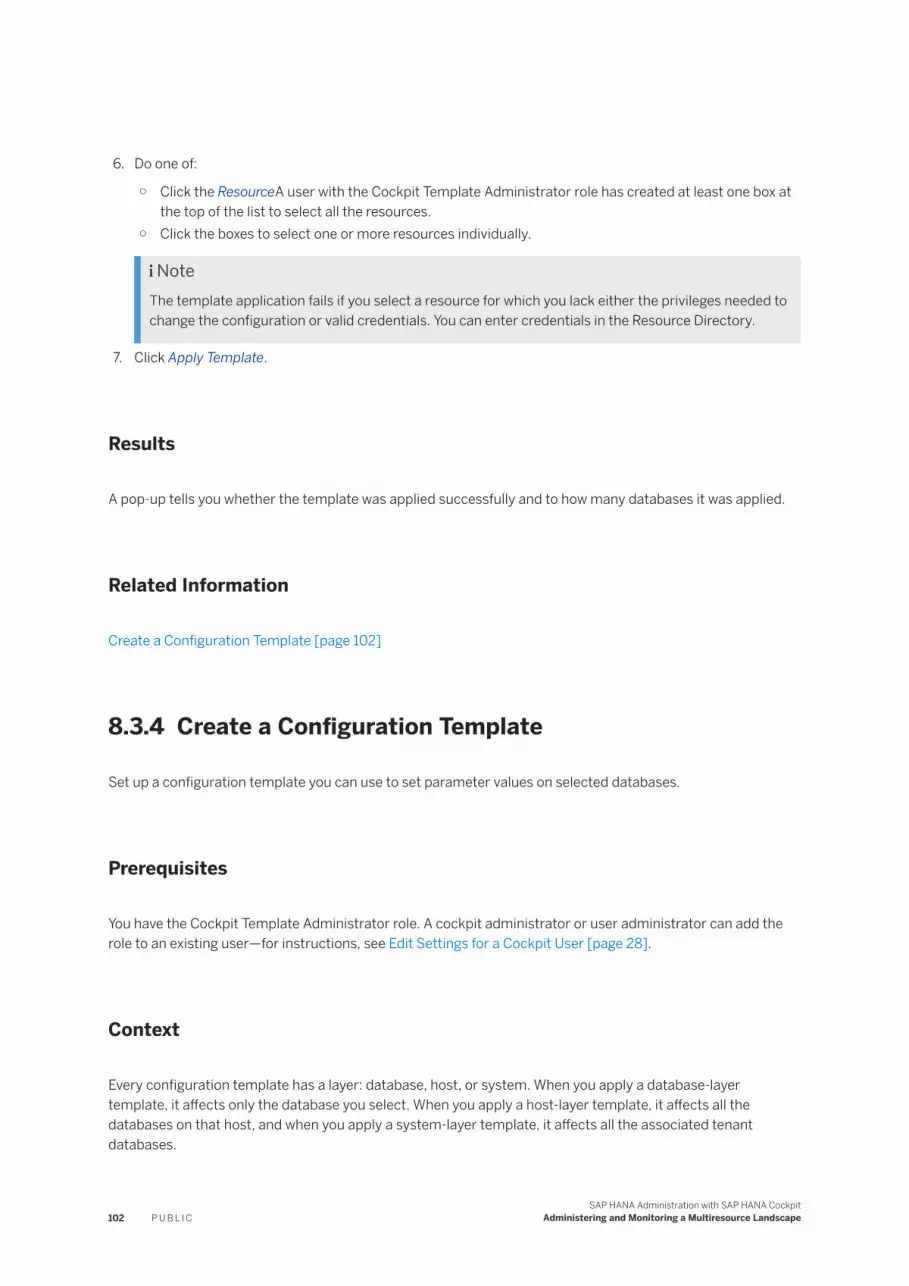
6. Do one of:
○ Click the ResourceA user with the Cockpit Template Administrator role has created at least one box at the top of the list to select all the resources.
○ Click the boxes to select one or more resources individually.
NoteThe template application fails if you select a resource for which you lack either the privileges needed to change the configuration or valid credentials. You can enter credentials in the Resource Directory.
7. Click Apply Template.
Results
A pop-up tells you whether the template was applied successfully and to how many databases it was applied.
Related Information
Create a Configuration Template [page 102]
8.3.4 Create a Configuration Template
Set up a configuration template you can use to set parameter values on selected databases.
Prerequisites
You have the Cockpit Template Administrator role. A cockpit administrator or user administrator can add the role to an existing user—for instructions, see Edit Settings for a Cockpit User [page 28].
Context
Every configuration template has a layer: database, host, or system. When you apply a database-layer template, it affects only the database you select. When you apply a host-layer template, it affects all the databases on that host, and when you apply a system-layer template, it affects all the associated tenant databases.
102 P U B L I CSAP HANA Administration with SAP HANA Cockpit
Administering and Monitoring a Multiresource Landscape

Procedure
1. Connect to the cockpit and sign in.The URL takes this form:
https://<cockpit-host>:<port-number>
The port number was configured during cockpit installation.2. Click Configuration Templates.3. Click Create Template.4. Enter a name for your new template and a description. The description is optional.5. Select the layer at which you want to create the template: database, host, or system.6. Select the database, host, or system whose parameters will serve as the model for the template. (You can
add, remove, and reset the parameters later.)7. Do one of:
○ Click the box at the top of the list to select all the parameters.○ Click boxes to select one or more parameters individually.
8. Click Review.9. Check the template and use the Edit links to correct it as needed.10. Click Create Template.
Related Information
Apply a Configuration Template [page 101]Modify a Configuration Template [page 103]Delete a Configuration Template [page 104]
8.3.5 Modify a Configuration Template
Rename a configuration template, change its description, add or remove parameters, or change parameter values.
Prerequisites
You have the Cockpit Template Administrator role. A cockpit administrator or user administrator can add the role to an existing user—for instructions, see Edit Settings for a Cockpit User [page 28].
SAP HANA Administration with SAP HANA CockpitAdministering and Monitoring a Multiresource Landscape P U B L I C 103

Procedure
1. Connect to the cockpit and sign in.The URL takes this form:
https://<cockpit-host>:<port-number>
The port number was configured during cockpit installation.2. Click Configuration Templates.3. Select the row (not the radio button) of the template you want to modify.4. To change the template's name or description, click Rename and enter the changes.5. To change a parameter's value, click its Edit Specific Value link, then:
○ Enter a new value and click Save, or○ Click Assign Default and click Save, or○ Click Cancel.
6. To remove a parameter from the template, click its Delete Parameter icon.7. To add a parameter, click Include More Parameters and select from the list.
Related Information
Create a Configuration Template [page 102]Apply a Configuration Template [page 101]Delete a Configuration Template [page 104]
8.3.6 Delete a Configuration Template
Delete a configuration template from SAP HANA cockpit.
Prerequisites
You have the Cockpit Template Administrator role. A cockpit administrator or user administrator can add the role to an existing user—for instructions, see Edit Settings for a Cockpit User [page 28].
Context
104 P U B L I CSAP HANA Administration with SAP HANA Cockpit
Administering and Monitoring a Multiresource Landscape

Procedure
1. Connect to the cockpit and sign in.The URL takes this form:
https://<cockpit-host>:<port-number>
The port number was configured during cockpit installation.2. Click Configuration Templates.3. Select the row (not the radio button) of the template you want to delete.4. Click Delete and confirm that you want to delete the template.
Related Information
Create a Configuration Template [page 102]Apply a Configuration Template [page 101]Modify a Configuration Template [page 103]
8.4 SAP EarlyWatch Alert Service
Cockpit users with Support Hub user credentials and the required authorizations can select the SAP EarlyWatch Alert tile to launch the Solution Finder for SAP EarlyWatch Alert in the SAP ONE Support Launchpad.
The Solution Finder for SAP EarlyWatch Alert offers a full text search of all SAP EarlyWatch Alert reports for any affected system. The search results display related alerts (sorted by severity), recommendations by SAP and additional information. You can select specific systems to see the complete corresponding paragraph from the relevant SAP EarlyWatch Alert report.
SAP HANA Administration with SAP HANA CockpitAdministering and Monitoring a Multiresource Landscape P U B L I C 105

9 Managing Tenant Databases
Administer and monitor tenant databases using SAP HANA cockpit.
As the administrator of a tenant (database) system, you are responsible for creating and configuring new tenant databases, subsequently monitoring the availability and performance of databases, and performing certain database administration tasks.
Any systems running version SAP HANA 2.0 SPS 01, or later runs in multiple-container mode, by default. The cockpit can also monitor single-container systems running earlier versions of SAP HANA. If your system was updated or installed in single-container mode, you can keep it in its current state, but it cannot have tenant databases unless you convert it to multiple-container mode.
Related Information
Monitoring Tenant Databases in SAP HANA Cockpit [page 151]Create a Tenant Database [page 114]Start a Tenant Database [page 117]Delete a Tenant Database [page 121]
9.1 Assign the OS User and Group for High Isolation
Specify the appropriate operating system user and group when moving a tenant database from a low to a high isolation level.
Prerequisites
The operating system user and operating system group exist.
Context
If you have modified the isolation level to high, during the process the entire system is restarted. Any tenant that does not have a specified OS user and OS group will not be able to restart. Perform the following in order to restart the tenant:
106 P U B L I CSAP HANA Administration with SAP HANA Cockpit
Managing Tenant Databases

Procedure
1. Open Manage Databases in the SAP HANA cockpit by choosing the link displayed under the system database in the Resource Directory, or at the top of the Overview for the system database.
2. Select the tenant database to which you want to assign an OS user and group. When the system is running in high isolation mode, any tenant without an OS user and OS group displays a status of Not Running.
3. From the overflow menu above the table, select Assign OS user & group.4. Enter the name of the existing OS user and OS group you want the tenant to use, and click OK.
Next Steps
Start the tenant database.
Related Information
Clear the OS User and Group when Decreasing Isolation [page 112]
9.1.1 Increase the System Isolation Level
You can increase the isolation level of an existing system from low (default) to high. With high isolation, the processes of individual tenant databases run under dedicated operating system (OS) users belonging to dedicated (OS) groups and internal communication is secured.
Prerequisites
● You have root access to the SAP HANA system.● You are logged on to the system database in the SAP HANA cockpit.● You have the system privilege DATABASE ADMIN.● Internal SAP HANA communication has been appropriately configured for TLS/SSL.
[communication] ssl in the global.ini file must have the value false (default) or systemPKI.
CautionIf you are using a manually configured public key infrastructure (PKI) to secure internal communication between hosts, the property [communication] ssl must be true. You can switch to system PKI by changing setting the parameter to systemPKI.
For more information, see Secure Internal Communication and Server-Side TLS/SSL Configuration Properties for Internal Communication in the SAP HANA Security Guide.
SAP HANA Administration with SAP HANA CockpitManaging Tenant Databases P U B L I C 107

● If the system is running in an SAP HANA system replication configuration, the system PKI SSFS data file and key file have been copied from the primary system to the same location on the secondary system(s):○ $DIR_INSTANCE/../global/security/rsecssfs/data/SSFS_<SID>.DAT○ $DIR_INSTANCE/../global/security/rsecssfs/key/SSFS_<SID>.KEY
Procedure
1. For every tenant database, create a dedicated OS user and group:a. As root user, log on to the server on which the name server of the system database is running.b. Create new groups for every tenant database:
groupadd <groupname>c. Create new users for every tenant database, specifying sapsys as the primary group:
useradd -g sapsys <username>d. Add every new user to the sidshm group and their own group as secondary groups:
usermod -G <sid>shm,<usergroup> <username>
NoteIf the system is distributed across multiple hosts, you must create identical users and groups on every host. Users and groups must have the same names and IDs on all hosts.
2. Stop all tenant databases in the system.
In the system database, execute the SQL statement ALTER SYSTEM STOP DATABASE <databasename>.
TipYou can also stop tenant databases in the Manage Databases app of the SAP HANA cockpit.
3. Configure the system for high isolation.
As the operating system user <sid>adm, log on to the server on which the master index server is running and run the following command:python /usr/sap/<SID>/HDB<instance>/exe/python_support/convertMDC.py --change=databaseIsolation --isolation=high
This command runs the following actions:
○ Stops the system○ Changes the value of the [multidb] database_isolation property in the global.ini file to
high○ Starts the system
4. Assign every database to their respective OS user and group.In the system database, execute the SQL statement ALTER DATABASE <databasename> OS USER '<username>' OS GROUP '<groupname>'
TipYou can also assign OS users and groups in the Manage Databases app of the SAP HANA cockpit.
108 P U B L I CSAP HANA Administration with SAP HANA Cockpit
Managing Tenant Databases
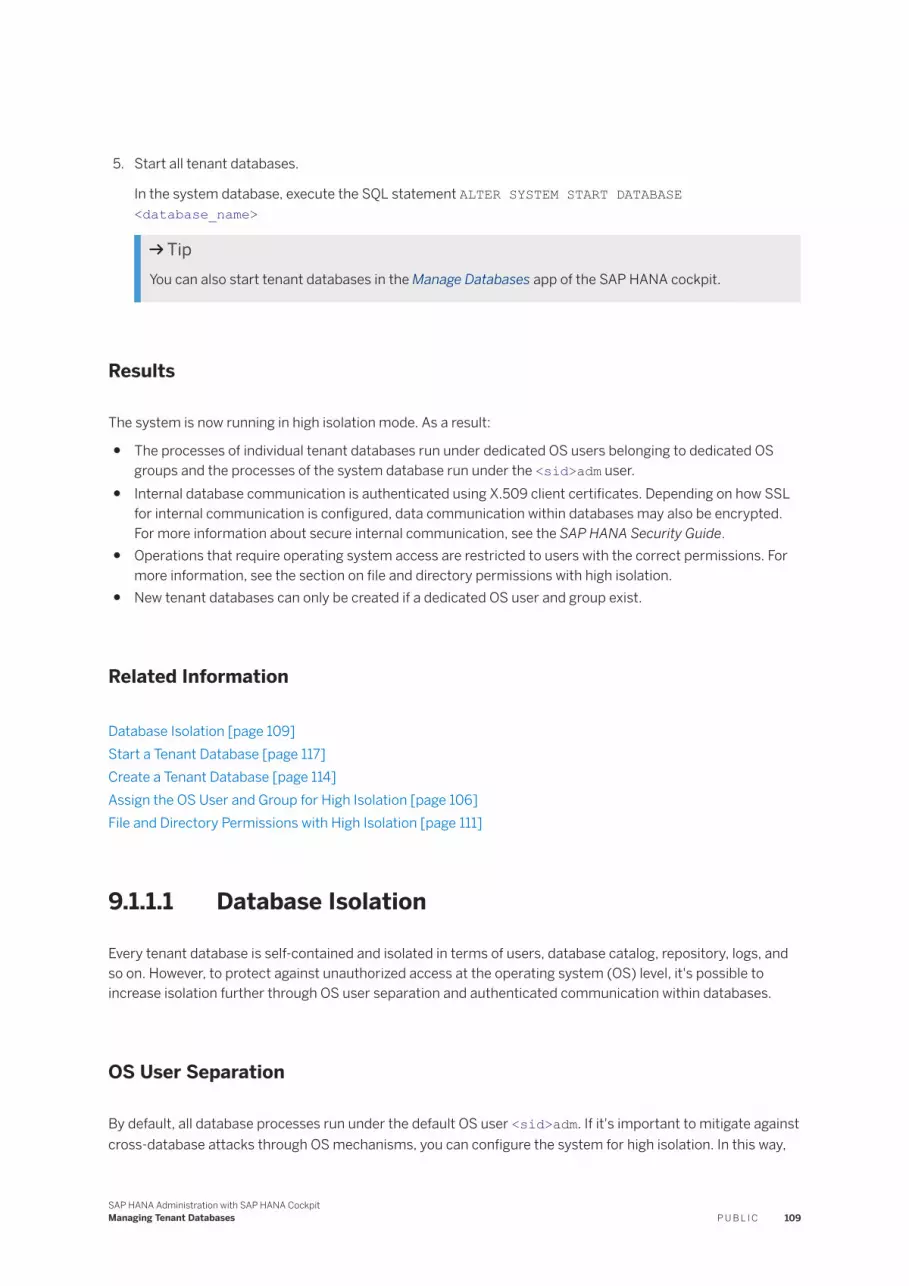
5. Start all tenant databases.
In the system database, execute the SQL statement ALTER SYSTEM START DATABASE <database_name>
TipYou can also start tenant databases in the Manage Databases app of the SAP HANA cockpit.
Results
The system is now running in high isolation mode. As a result:
● The processes of individual tenant databases run under dedicated OS users belonging to dedicated OS groups and the processes of the system database run under the <sid>adm user.
● Internal database communication is authenticated using X.509 client certificates. Depending on how SSL for internal communication is configured, data communication within databases may also be encrypted. For more information about secure internal communication, see the SAP HANA Security Guide.
● Operations that require operating system access are restricted to users with the correct permissions. For more information, see the section on file and directory permissions with high isolation.
● New tenant databases can only be created if a dedicated OS user and group exist.
Related Information
Database Isolation [page 109]Start a Tenant Database [page 117]Create a Tenant Database [page 114]Assign the OS User and Group for High Isolation [page 106]File and Directory Permissions with High Isolation [page 111]
9.1.1.1 Database Isolation
Every tenant database is self-contained and isolated in terms of users, database catalog, repository, logs, and so on. However, to protect against unauthorized access at the operating system (OS) level, it's possible to increase isolation further through OS user separation and authenticated communication within databases.
OS User Separation
By default, all database processes run under the default OS user <sid>adm. If it's important to mitigate against cross-database attacks through OS mechanisms, you can configure the system for high isolation. In this way,
SAP HANA Administration with SAP HANA CockpitManaging Tenant Databases P U B L I C 109

the processes of individual tenant databases must run under dedicated OS users belonging to dedicated OS groups, instead of all database processes running under <sid>adm. Database-specific data on the file system is subsequently protected using standard OS file and directory permissions.
Note<sid>adm is the OS user for the system database.
Authenticated Communication
In addition, once high isolation has been configured, internal database communication is secured using the Transport Layer Security (TLS)/Secure Sockets Layer (SSL) protocol. Certificate-based authentication is used to ensure that only the processes belonging to the same database can communicate with each other. It is also possible to configure internal communication so that all data communication within databases is encrypted.
NoteIf cross-database access is enabled, communication between configured tenant databases is allowed.
High Database Isolation
110 P U B L I CSAP HANA Administration with SAP HANA Cockpit
Managing Tenant Databases

Configuration
You can specify the isolation level of the system during installation. The default isolation level is low. It is also possible to change the isolation level of an existing system (from low to high or from high to low) at any time. For more information about how to do this, see Increase the System Isolation Level in the SAP HANA Administration Guide. Once high isolation has been configured, a dedicated OS user and group must exist for every tenant database. Otherwise, it's not possible to create or start a tenant database.
Internal database communication is secured with the same mechanism used for securing other internal SAP HANA communication channels. Once high isolation has been configured, authenticated communication within databases is enabled without any change required to the default TLS/SSL configuration for internal communication. However, encryption of data communication may need to be configured explicitly.
Related Information
File and Directory Permissions with High Isolation [page 111]Increase the System Isolation Level [page 107]
9.1.1.2 File and Directory Permissions with High Isolation
In an SAP HANA system configured for high isolation, database-specific data on the file system is protected using standard file and directory permissions. All file and directory permissions are managed by the SAP HANA system and do not need to be set by the administrator.
System Database
The following table shows who has access to which data on the file system:
Files and DirectoriesTenant OS User in Tenant OS Group <sid>adm User
Files in directory containing system configuration files Read permission (644) Read permission (644)
Files in trace directory of the system database Read and write permissions (600)
Directory containing Backint parameter file Read permission (700) Read permission (700)
Backint parameter file Read and write permissions (600)
Read and write permissions (600)
SAP HANA Administration with SAP HANA CockpitManaging Tenant Databases P U B L I C 111

Tenant Database
The following table shows who has access to which data on the file system:
NoteIf you want to grant the system administrator access to the tenant database backup files and directories, you need to add the <sid>adm user to each tenant's operating system group.
Files and DirectoriesTenant OS User in Tenant OS Group <sid>adm User
Database-specific directories containing:
● Data volumes● Log volumes● Log mirror volumes● Backups
Read, write, and execute permissions (770)
Database-specific directories containing:
● Configuration (*ini) files● Trace files
Read, write, and execute permissions (770)
Read, write, and execute permissions (770)
Files in database-specific directory containing:
● Configuration (*ini) files● Trace files
Read and write permissions (666)
Read and write permissions (666)
Directory containing Backint parameter file Read, write, and execute permissions (750)
Read, write, and execute permissions (750)
Backint parameter file Read and write permissions (640)
Read and write permissions (640)
9.2 Clear the OS User and Group when Decreasing Isolation
If you have modified the isolation level from high to low, you may wish to clear the previously assigned operating system user and operating system group.
Procedure
1. Open Manage Databases in the SAP HANA cockpit by choosing the link displayed under the system database in the Resource Directory, or at the top of the Overview for the system database.
2. Select the tenant database from which you want to clear the OS user and group.3. From the overflow menu above the table, select Assign OS user & group.4. Delete the name of the existing OS user and OS group, and click OK.
112 P U B L I CSAP HANA Administration with SAP HANA Cockpit
Managing Tenant Databases

Next Steps
Start the tenant database.
Related Information
Assign the OS User and Group for High Isolation [page 106]
9.2.1 Decrease the System Isolation Level
If you configured a system for high isolation during installation or later, you can decrease it back to the default low level if necessary. With low isolation, the processes of all databases run under the default operating system (OS) user <sid>adm.
Prerequisites
● You have root access to the SAP HANA system.● You are logged on to the system database in the SAP HANA cockpit.● You have the system privilege DATABASE ADMIN.
Procedure
1. Stop all tenant databases in the system.
In the system database, execute the SQL statement ALTER SYSTEM STOP DATABASE <databasename>.
TipYou can also stop tenant databases in the Manage Databases app of the SAP HANA cockpit.
2. Configure the system for low isolation.
As the operating system user <sid>adm, log on to the server on which the master index server is running and run the following command:
python /usr/sap/<SID>/HDB<instance>/exe/python_support/convertMDC.py --change=databaseIsolation --isolation=low
This command runs the following actions:
○ Stops the system
SAP HANA Administration with SAP HANA CockpitManaging Tenant Databases P U B L I C 113
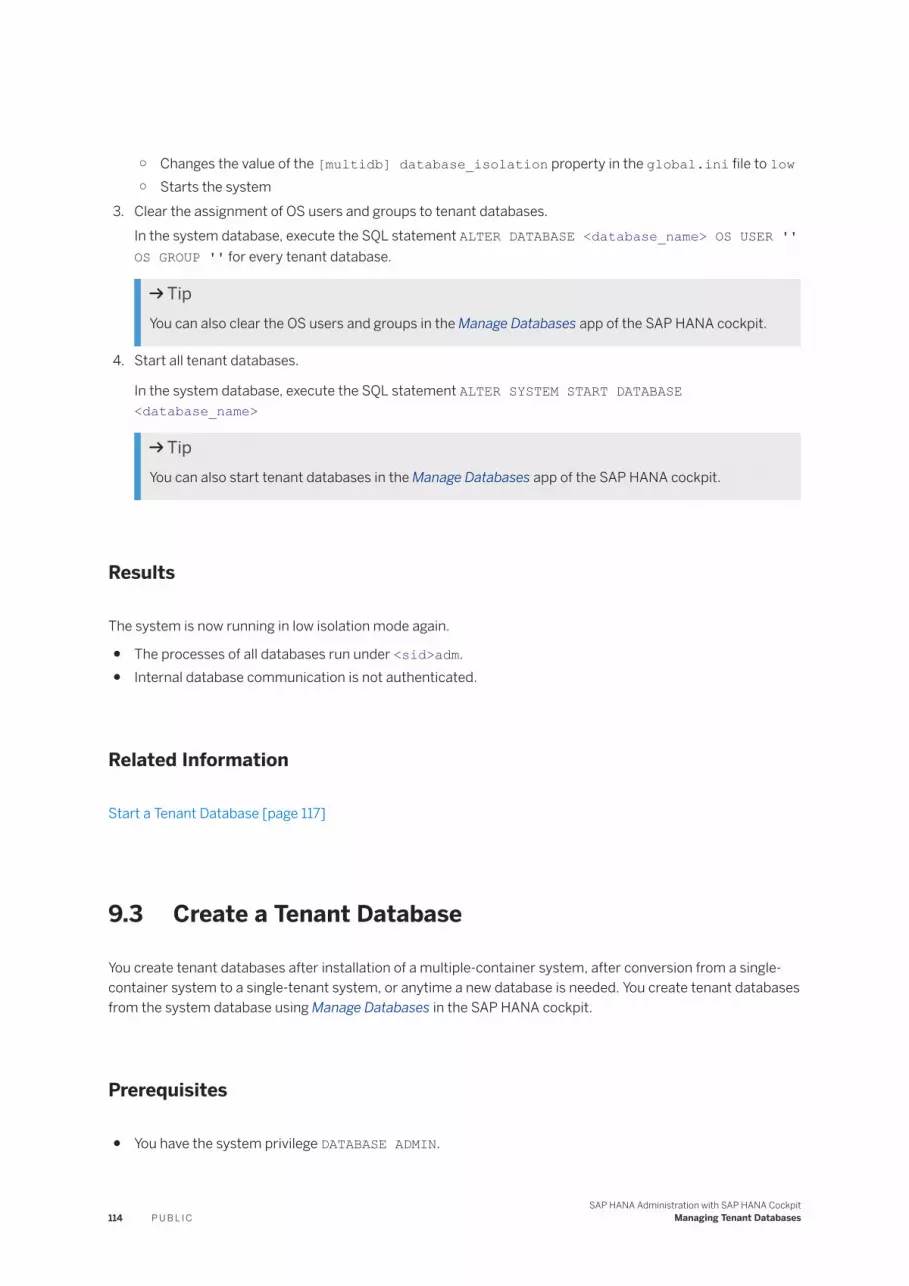
○ Changes the value of the [multidb] database_isolation property in the global.ini file to low○ Starts the system
3. Clear the assignment of OS users and groups to tenant databases.In the system database, execute the SQL statement ALTER DATABASE <database_name> OS USER '' OS GROUP '' for every tenant database.
TipYou can also clear the OS users and groups in the Manage Databases app of the SAP HANA cockpit.
4. Start all tenant databases.
In the system database, execute the SQL statement ALTER SYSTEM START DATABASE <database_name>
TipYou can also start tenant databases in the Manage Databases app of the SAP HANA cockpit.
Results
The system is now running in low isolation mode again.
● The processes of all databases run under <sid>adm.● Internal database communication is not authenticated.
Related Information
Start a Tenant Database [page 117]
9.3 Create a Tenant Database
You create tenant databases after installation of a multiple-container system, after conversion from a single-container system to a single-tenant system, or anytime a new database is needed. You create tenant databases from the system database using Manage Databases in the SAP HANA cockpit.
Prerequisites
● You have the system privilege DATABASE ADMIN.
114 P U B L I CSAP HANA Administration with SAP HANA Cockpit
Managing Tenant Databases
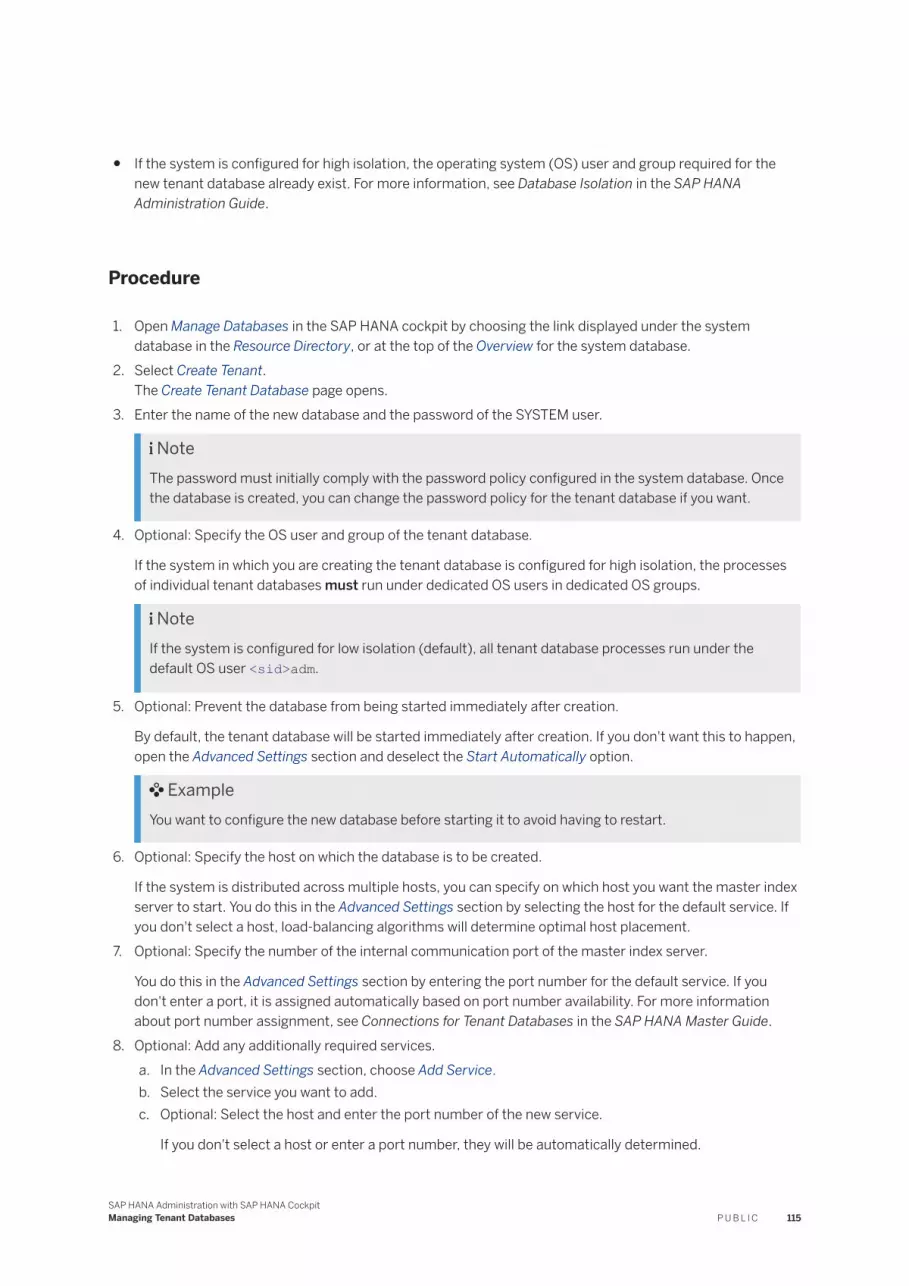
● If the system is configured for high isolation, the operating system (OS) user and group required for the new tenant database already exist. For more information, see Database Isolation in the SAP HANA Administration Guide.
Procedure
1. Open Manage Databases in the SAP HANA cockpit by choosing the link displayed under the system database in the Resource Directory, or at the top of the Overview for the system database.
2. Select Create Tenant.The Create Tenant Database page opens.
3. Enter the name of the new database and the password of the SYSTEM user.
NoteThe password must initially comply with the password policy configured in the system database. Once the database is created, you can change the password policy for the tenant database if you want.
4. Optional: Specify the OS user and group of the tenant database.
If the system in which you are creating the tenant database is configured for high isolation, the processes of individual tenant databases must run under dedicated OS users in dedicated OS groups.
NoteIf the system is configured for low isolation (default), all tenant database processes run under the default OS user <sid>adm.
5. Optional: Prevent the database from being started immediately after creation.
By default, the tenant database will be started immediately after creation. If you don't want this to happen, open the Advanced Settings section and deselect the Start Automatically option.
ExampleYou want to configure the new database before starting it to avoid having to restart.
6. Optional: Specify the host on which the database is to be created.
If the system is distributed across multiple hosts, you can specify on which host you want the master index server to start. You do this in the Advanced Settings section by selecting the host for the default service. If you don't select a host, load-balancing algorithms will determine optimal host placement.
7. Optional: Specify the number of the internal communication port of the master index server.
You do this in the Advanced Settings section by entering the port number for the default service. If you don't enter a port, it is assigned automatically based on port number availability. For more information about port number assignment, see Connections for Tenant Databases in the SAP HANA Master Guide.
8. Optional: Add any additionally required services.a. In the Advanced Settings section, choose Add Service.b. Select the service you want to add.c. Optional: Select the host and enter the port number of the new service.
If you don't select a host or enter a port number, they will be automatically determined.
SAP HANA Administration with SAP HANA CockpitManaging Tenant Databases P U B L I C 115

9. Click Create Tenant Database. If the host does not have at least three available ports, a dialog prompts you with the option to reserve additional instance numbers.
The system starts creating the database. This may take a few moments to complete.
Technically, the creation process runs in the background as follows:
○ The database is assigned a unique system local ID.○ If you did not specify host information, load-balancing algorithms determine optimal host placement.○ If you did not specify the number of the internal communication port, it is assigned automatically
based on port number availability.○ The necessary data and log volumes are created on the affected hosts.○ The new database is entered in the M_DATABASES system view of the system database.○ The daemon.ini file is updated and the daemon process is triggered to start the indexserver service
and any additionally added services on each configured host.○ The specified password is set for the user SYSTEM in the new database.
Results
The new tenant database is created and possibly started, and appears in Manage Databases. It is now also in the M_DATABASES view (SELECT * FROM "PUBLIC"."M_DATABASES".
Delivery units (DUs) containing automated content start to be deployed in the background. If the system is online, you can monitor the progress of deployment by executing the following statement:SELECT * FROM "PUBLIC"."M_SERVICE_THREADS" WHERE THREAD_TYPE = 'ImportOrUpdate Content';
For more information about automated content, see SAP HANA Content in the SAP HANA Security Guide.
Next Steps
● Perform a full data backup. For more information, see Performing Backups in the SAP HANA Administration Guide.
● Adjust the value for the maximum number of asynchronous I/O requests by updating the value of the fs.aio-max-nr parameter in /etc/sysctl.conf. For more information, see Linux Kernel Parameters in the SAP HANA Administration Guide.
● Configure the new tenant database as required. For more information, see the section on managing Tenant Databases in the SAP HANA Administration Guide.
Related Information
Delete a Tenant Database [page 121]Start a Tenant Database [page 117]Monitoring Tenant Databases in SAP HANA Cockpit [page 151]
116 P U B L I CSAP HANA Administration with SAP HANA Cockpit
Managing Tenant Databases

9.4 Start a Tenant Database
You start tenant databases from the system database on the Manage Databases page of the SAP HANA cockpit.
Prerequisites
● The database user with which you connect to the SAP HANA database has the privilege DATABASE START or DATABASE ADMIN.
Context
As a system administrator, you can start tenant databases either individually, or all at once by starting the whole system. For more information about how to start the whole system, see the sections on stopping and starting a resource.
Procedure
1. Open Manage Databases in the SAP HANA cockpit by choosing the link displayed under the system database in the Resource Directory, or at the top of the Overview for the system database.
2. Select the tenant database that you want to start.3. Choose Start Tenant.
The database starts. This may take a few moments.
Results
● The database is started.● The status of database changes accordingly.
Related Information
Start a Resource [page 174]SAP HANA SQL and System Views ReferencePrevent the Start of a Tenant Database at System Startup [page 119]
SAP HANA Administration with SAP HANA CockpitManaging Tenant Databases P U B L I C 117

9.5 Stop a Tenant Database
You stop tenant databases from the system database on the Manage Databases page of the SAP HANA cockpit.
Prerequisites
● The database user with which you connect to the SAP HANA database has the privilege DATABASE STOP or DATABASE ADMIN.
● Consider backing the database up first.
Context
As a system administrator, you can stop tenant databases either individually, or all at once by stopping the whole system. For more information about how to stop the whole system, see the sections on stopping and starting a resource.
Procedure
1. Open Manage Databases in the SAP HANA cockpit by choosing the link displayed under the system database in the Resource Directory, or at the top of the Overview for the system database.
2. Select the tenant database that you want to stop.3. Choose Stop Tenant.
The database stops. This may take a few moments.
Results
● The database is stopped.
NoteThis is a hard stop. The database is stopped immediately even if users are connected. Open transactions are aborted and rolled back; no savepoint operation is forced. It is not possible to back up a stopped database.
● The status of database changes accordingly.
118 P U B L I CSAP HANA Administration with SAP HANA Cockpit
Managing Tenant Databases

Related Information
Stop a Resource [page 175]SAP HANA SQL and System Views Reference
9.6 Prevent the Start of a Tenant Database at System Startup
You can prevent the start of individual tenant databases.
Prerequisites
● You are logged on to the system database.● You have the system privilege DATABASE ADMIN.
Context
By default, all tenant databases that were running before the SAP HANA system was stopped are restarted upon system startup. For troubleshooting purposes you may want to prevent a particular database from starting until the issue is resolved. You do this in the SAP HANA cockpit using Manage Databases, or from the system database using the ALTER DATABASE statement.
Procedure
You can prevent a tenant restart through the cockpit:1. Open Manage Databases in the SAP HANA cockpit by choosing the link displayed under the system
database in the Resource Directory, or at the top of the Overview for the system database.2. Select the tenant.3. From the overflow menu above the table, choose Set Restart Mode .4. In the dialog, select No auto-restart from the drop-down menu.
The tenant database will not be started after a system restart. You can opt to display the restart mode of all tenants through the gear icon in the Manage Databases table header.
Alternatively, you can prevent a tenant restart by executing the ALTER DATABASE statement:
ALTER DATABASE database_name NO RESTART
SAP HANA Administration with SAP HANA CockpitManaging Tenant Databases P U B L I C 119

The tenant database will not be started after a system restart. You can verify this by querying the public view M_DATABASES. The result will look like this:
| DATABASE_NAME |DESCRIPTION | RESTART_MODE ||-----------------|----------------------------------|--------------|| SYSTEMDB | SystemDB-<SID>-<INSTANCE> | DEFAULT || <SID> | SingleDB-<SID>-<INSTANCE> | NO |
To restore the default behavior, execute the following ALTER DATABASE statement:
ALTER DATABASE <database_name> DEFAULT RESTART
Then, start the tenant database manually. At the next system startup, the tenant database will be restarted.
Related Information
Start a Tenant Database [page 117]Stop a Tenant Database [page 118]
9.7 Rename a Tenant Database
You can use the cockpit to rename a tenant database.
Prerequisites
● The database user with which you connect to the SAP HANA database has the privilege DATABASE ADMIN.● The database to be renamed is not running.● The database to be renamed is not part of a copy or move operation.● The database to be renamed does not have system replication active.● The database to be renamed does not have the SAP HANA dynamic tiering option.
.
Procedure
1. Open Manage Databases in the SAP HANA cockpit by choosing the link displayed under the system database in the Resource Directory, or at the top of the Overview for the system database.
2. Select the tenant database that you want to rename.3. If necessary, choose Stop Tenant.
The database stops. This may take a few moments.
120 P U B L I CSAP HANA Administration with SAP HANA Cockpit
Managing Tenant Databases

4. From the overflow menu above the table, select Rename Tenant.5. In the Rename Tenant dialog, enter the new name, and select Rename.
The database is renamed. On-disk directories that contain the tenant name are also renamed. Existing backups are not renamed but backup history remains continuous.
Related Information
Create a Tenant Database [page 114]Delete a Tenant Database [page 121]
9.8 Delete a Tenant Database
You can delete tenant databases that are no longer required. You delete tenant databases from the system database using the Manage Databases app of the SAP HANA cockpit.
Prerequisites
You have the system privilege DATABASE ADMIN.
Context
If you delete a tenant database that is running SAP HANA 2.0 SPS 01 or later, you have the option to keep the backup directories of the deleted tenant. Backups can then only be removed by deleting them from the file system. If you delete a tenant database that is running an earlier version of SAP HANA, the backup directories will be deleted automatically. It is therefore recommended that if you want to preserve these backup directories, you relocate them before deleting the database.
Deletion a tenant database (including all current backup directories) uses the DROP DATABASE statement in conjunction with the DROP BACKUPS clause. Backup directories that were previously in use, and backups that are written to third-party backup tools, are not deleted.
NoteOnce you have deleted the tenant, you can still access and consume any undeleted database backups by creating a new tenant with the same name. This will only work if the system was not configured for high isolation.
SAP HANA Administration with SAP HANA CockpitManaging Tenant Databases P U B L I C 121

Procedure
1. Open Manage Databases in the SAP HANA cockpit by choosing the link displayed under the system database in the Resource Directory, or at the top of the Overview for the system database.
2. Stop the tenant database that you plan to delete by selecting it and then clicking Stop Tenant .
The system commences the process to stop the database. Once stopped, its status changes to Stopped.3. From the overflow menu above the table, choose Delete Tenant .4. If this database is running SAP HANA 2.0 SPS 01 or later, choose whether to Keep Backup Directories or
Delete Directories and proceed with the database deletion, or Cancel the database deletion. If the database is running an earlier version of SAP HANA, choose whether to Delete Tenant or Cancel the database deletion.
Results
The system commences the process to delete the database. Once deleted, the database disappears from the list. Volumes and trace files are removed.
Next Steps
If you configured the SAP Web Dispatcher to route HTTP(s) requests to the deleted database, you need to update the configuration.
Related Information
SAP HANA SQL and System Views ReferenceStart a Tenant Database [page 117]
122 P U B L I CSAP HANA Administration with SAP HANA Cockpit
Managing Tenant Databases

9.9 Restrict Features Available to a Tenant Database
To safeguard and/or customize your system, certain features of the SAP HANA database can be disabled in tenant databases. You can do this in the SAP HANA cockpit.
Prerequisites
● The system database is registered in the SAP HANA cockpit.● You have the system privilege INIFILE ADMIN.
Context
Some features of the SAP HANA database are not required or desirable in certain environments, in particular features that provide direct access to the file system, the network, or other resources. To maximize your control over the security of your system, you can disable these features in tenant databases, for example import and export operations or the ability to back up the database.
The system view M_CUSTOMIZABLE_FUNCTIONALITIES provides information about those features that can be disabled and their status. This view exists in both the SYS schema of every database, where it contains database-specific information, and in the SYS_DATABASES schema of the system database, where it contains information about the enablement of features in all databases.
For more information about the features that can be disabled and why, see Restricted Features in Tenant Databases in the SAP HANA Tenant Databases.
You can disable features in tenant databases in the customizable_functionalities section of the global.ini file, as well as in the SAP HANA cockpit as described here.
Procedure
1. Open Manage Databases in the SAP HANA cockpit by choosing the link displayed under the system database in the Resource Directory, or at the top of the Overview for the system database.
2. On the Manage Databases screen, click Manage Restricted Features (upper right).
To see the Manage Restricted Features button, you might need to widen the window or click the three dots in the upper right corner of the screen.
3. On the Restricted Features for Tenants page, the active database is highlighted in the left pane. Click the name of another tenant or system to manage its features.
4. To restrict a feature, select its checkbox. (Or deselect to clear the checkbox).
NoteThe information in the Layer column indicates where the feature was defined. If a feature is not specifically defined at the database, then system-defined values are used. If there are no system-
SAP HANA Administration with SAP HANA CockpitManaging Tenant Databases P U B L I C 123

defined values, then default values are used. Thus, if you choose to restrict a system-defined value, it is restricted on all of the system's tenants.
5. (Optional) To delete a feature, you must be viewing the tenant or system in which it was defined. Select the delete icon at the end of the row.
NoteIf you delete a database-defined feature, the system-defined values will be used. If there are no system-defined values, then default values are used.
6. Click Save to restrict the features you selected.
Next Steps
Stop and restart the affected tenant database.
Related Information
Stop a Tenant Database [page 118]Start a Tenant Database [page 117]Lock Parameters Against Editing for a Tenant Database [page 125]
9.9.1 Copy Restricted Features
Copy all features that have been restricted on another tenant and apply them to this tenant.
Prerequisites
● The system database is registered in the SAP HANA cockpit.● You have the system privilege INIFILE ADMIN.
Procedure
1. Open Manage Databases in the SAP HANA cockpit by choosing the link displayed under the system database in the Resource Directory, or at the top of the Overview for the system database.
2. On the Manage Databases screen, click Manage Restricted Features (upper right).
124 P U B L I CSAP HANA Administration with SAP HANA Cockpit
Managing Tenant Databases

To see the Manage Restricted Features button, you might need to widen the window or click the three dots in the upper right corner of the screen.
3. On the Restricted Features for Tenants page, the active database is highlighted in the left pane.4. Select Copy Restricted Features.5. Select the tenant or system from which you wish to copy the restricted features (the source).6. Select OK.
All features that were restricted on the source database or system are now also restricted on this (target) database or system.
9.10 Lock Parameters Against Editing for a Tenant Database
To ensure the stability and performance of the overall system or for security reasons, you can prevent certain system parameters from being changed by tenant database administrators, for example, parameters related to resource management. A configuration change blacklist is available for this purpose. You configure the blacklist in the SAP HANA cockpit.
Prerequisites
● The system database is registered in the SAP HANA cockpit.● You have the system privilege INIFILE ADMIN.
Context
System configuration (*.ini) files have a database layer to facilitate the configuration of system parameters for individual tenant databases. However, it may be desirable to prevent changes to certain parameters being made directly in tenant databases because they could, for example, affect the performance of the system as a whole (CPU and memory management parameters).
You can use the cockpit to blacklist parameters for a particular database—that is, to lock them against editing. (The blacklist is stored in multidb.ini.) Several parameters are blacklisted by default, so you'll see them when you visit the Blacklisted Parameters for Tenants page for a tenant. You can remove default properties from that page—that is, make them editable by the tenant—and you can add parameters—lock them so they cannot be edited.
NoteProperties in the blacklist can still be configured at all levels in the system database. For more information about configuring system properties, see Configuring SAP HANA System Properties (INI Files).
SAP HANA Administration with SAP HANA CockpitManaging Tenant Databases P U B L I C 125

Procedure
1. Open Manage Databases in the SAP HANA cockpit by choosing the link displayed under the system database in the Resource Directory, or at the top of the Overview for the system database.
2. On the Manage Databases screen, click Manage Blacklisted Parameters (upper right).3. On the Blacklisted Parameters for Tenants page, the active tenant is highlighted in the left pane. Click the
name of another tenant to manage its parameters.4. To add a parameter to the blacklist, click Add Parameter at the top of the screen.5. In the Add Parameter to Blacklist dialog, select the configuration file in which the parameter you want to
add appears. To add a parameter that appears in more than one file, select Any with the specified section.6. Enter or select your parameter's section in the configuration file. If you start to type the section name, the
cockpit offers section names that match what you've entered—click to select one. If you prefer to select the section, click the double box at the end of the Section field to see a list. You can even combine the two methods: enter a few characters to narrow the number of choices offered when you click the double box.
7. Enter or select the parameter or parameters you want to add to the blacklist. If you start to type the parameter name, the cockpit offers section names that match what you've entered—click to select one. If you prefer to select the section, click the double box at the end of the Parameters field to see a list. You can even combine the two methods: enter a few characters to narrow the number of choices offered when you click the double box.
You can enter multiple parameters if they're all in the section you specified. You can also specify new parameters.
8. Click OK to save the new blacklist entries.
Related Information
Restrict Features Available to a Tenant Database [page 123]
9.10.1 Default Blacklisted System Properties in Tenant Databases
In systems that support tenant databases, there is configuration change blacklist multidb.ini, which is delivered with a default configuration.
The table below lists the system properties that are included in the multidb.ini file by default. This means that tenant database administrators cannot change these properties. System administrators can still change these properties in the system database in all layers.
You can customize the default configuration change blacklist by changing existing entries in the multidb.ini file and adding new ones. For more information about how to prevent changes to specific system properties in tenant databases, see Prevent Changes to System Properties in Tenant Databases in the SAP HANA Administration Guide.
126 P U B L I CSAP HANA Administration with SAP HANA Cockpit
Managing Tenant Databases

File/Section Properties Description
auditing configuration ● default_audit_trail_type
● emergency_audit_trail_type
● alert_audit_trail_type● critical_audit_trail_ty
pe● audit_statement_length
Prevents configuration of audit trail targets and the maximum audit statement length
communication * Prevents configuration of default key and trust stores, as well as other critical communication settings
global.ini/customizable_functionalities
* Prevents disabling of restricted features
global.ini/extended_storage * Prevents configuration of extended storage (SAP HANA dynamic tiering)
global.ini/persistence ● basepath_datavolumes_es● basepath_logvolumes_es● basepath_databackup_es● basepath_logbackup_es
global.ini/system_replication
● keep_old_style_alert● enable_full_sync● operation_mode
Prevents configuration of certain system replication settings
global.ini/system_replication_communication
*
global.ini/system_replication_hostname_resolution
*
global.ini/xb_messaging * Prevents configuration of messaging
multidb.ini/readonly_parameters
* Prevents configuration of the multidb.ini file itself
indexserver.ini/authentication
SapLogonTicketTrustStore Prevents configuration of the trust store for user authentication with logon/assertion tickets
memorymanager ● allocationlimit● minallocationlimit● global_allocation_limit● async_free_threshold● async_free_target
Prevents configuration of memory allocation parameters
execution max_concurrency Prevents configuration of threading and parallelization parameters
SAP HANA Administration with SAP HANA CockpitManaging Tenant Databases P U B L I C 127

File/Section Properties Description
session ● maximum_connections● maximum_external_connec
tions
sql sql_executors
Related Information
Unlock Blacklisted Parameters [page 128]Copy Blacklisted Parameters [page 129]
9.10.2 Unlock Blacklisted Parameters
Remove a parameter from the blacklist for a tenant database so that the parameter can be edited.
Prerequisites
● The system database is registered in the SAP HANA cockpit.● You have the system privilege INIFILE ADMIN.
Context
By removing a parameter from the blacklist, you can enable it to be edited. However, you can remove only parameters that you or other users have added to the blacklist—you can't remove parameters that are on the blacklist by default. Default parameters are displayed without delete or edit controls on the Blacklisted Parameters for Tenants page.
Procedure
1. Open Manage Databases in the SAP HANA cockpit by choosing the link displayed under the system database in the Resource Directory, or at the top of the Overview for the system database.
2. On the Manage Databases screen, click Manage Blacklisted Parameters (upper right).
To see the Manage Blacklisted Features button, you might need to widen the window or click the three dots in the upper right corner of the screen.
128 P U B L I CSAP HANA Administration with SAP HANA Cockpit
Managing Tenant Databases

3. On the Blacklisted Parameters for Tenants page, the active tenant is highlighted in the left pane. Click the name of another tenant to manage its parameters.
4. To remove a parameter to the blacklist, click the red X to the right of the parameter to be deleted and confirm the deletion.
The cockpit displays the blacklist without the parameter you removed.
Related Information
Lock Parameters Against Editing for a Tenant Database [page 125]
9.10.3 Copy Blacklisted Parameters
Copy parameters that have been added to another tenant's blacklist.
Prerequisites
● The system database is registered in the SAP HANA cockpit.● You have the system privilege INIFILE ADMIN.
Context
Copy the blacklist from one tenant to another. The tenant receiving the copy is the one selected in the Tenants list in the left pane. If you've added parameters to the target tenant before copying, you can choose whether to keep them. Parameters on the blacklist by default are not copied.
Procedure
1. Open Manage Databases in the SAP HANA cockpit by choosing the link displayed under the system database in the Resource Directory, or at the top of the Overview for the system database.
2. On the Manage Databases screen, click Manage Blacklisted Parameters (upper right).3. On the Blacklisted Parameters for Tenants page, the active tenant is highlighted in the left pane. Click the
name of another tenant to manage its parameters.4. Click Copy Parameters at the top of the screen.5. In the Copy Parameters dialog, select the tenant whose blacklist you want to copy (the source), and specify
the tenant to which you want to copy the parameters (the target).
SAP HANA Administration with SAP HANA CockpitManaging Tenant Databases P U B L I C 129

6. To make this tenant's blacklist an exact copy of the source tenant's blacklist, discarding any parameters you've added, select Replace all parameters, making target and source identical. To keep parameters you've added, select Augment the target parameters with those from the source.
7. Click OK to copy the blacklist.
9.11 Create a Fallback Snapshot
You can use the cockpit to create a fallback snapshot of a tenant database. You can revert the state of a tenant database to a specific point in time if needed.
Prerequisites
● The database user with which you connect to the SAP HANA database has the privilege DATABASE ADMIN.
Context
You can create a fallback snapshot for a tenant database. It allows you to revert to a particular database state. If you no longer need the fallback snapshot, you can delete it.
A fallback snapshot may be useful if you perform changes to the contents of a database that you may need to roll back quickly, e.g. if you upgrade to a new version of an application.
Note● Fallback snapshots can only be created for tenant databases.● Configuration changes are not included.● You can only create one fallback snapshot per tenant database. If you want to create a new fallback
snapshot, delete the existing one first.● A service cannot be added or removed if a fallback snapshot already exists.● A fallback snapshot does not replace a database backup.● A fallback snapshot is not included in a database backup.● A fallback snapshot can also be created if the tenant database is running in the primary system of a
system replication setup. However, the following restrictions apply:○ To initially configure system replication, delete the existing fallback snapshots on the primary
system.○ The operation mode for system replication must be logreplay or logreplay_readaccess.○ Fallback snapshots are propagated to the secondary system with the continuous log shipping. If a
full data shipping is needed to re-sync the primary and the secondary, the fallback snapshot will not be available on the secondary afterwards.
130 P U B L I CSAP HANA Administration with SAP HANA Cockpit
Managing Tenant Databases

Procedure
1. Open Manage Databases in the SAP HANA cockpit by choosing the link displayed under the system database in the Resource Directory, or at the top of the Overview for the system database.
2. Select the tenant database for which you want to create a fallback snapshot.3. From the overflow menu above the table, select Create Fallback Snapshot.
You can also create a fallback snapshot by executing the ALTER DATABASE statement in the system database:
ALTER DATABASE <database name> CREATE FALLBACK SNAPSHOT;
A fallback snapshot is created. You can verify this by querying the system view SYS_DATABASES.M_SNAPSHOTS.
Related Information
Reset to a Fallback Snapshot [page 131]Delete a Fallback Snapshot [page 132]
9.12 Reset to a Fallback Snapshot
You can use the cockpit to reset a tenant database to a fallback snapshot.
Prerequisites
● The database user with which you connect to the SAP HANA database has the privilege DATABASE ADMIN.
Context
You can revert to a particular database state by resetting to a fallback snapshot. This may be useful if you performed changes to the contents of a database that you need to roll back quickly.
Procedure
1. Open Manage Databases in the SAP HANA cockpit by choosing the link displayed under the system database in the Resource Directory, or at the top of the Overview for the system database.
SAP HANA Administration with SAP HANA CockpitManaging Tenant Databases P U B L I C 131

2. Select the tenant database that you want to revert to the state captured in the fallback snapshot.3. From the overflow menu above the table, select Reset to Fallback Snapshot.
You can also start a tenant database from a fallback snapshot by executing the ALTER DATABASE statement in the system database:
ALTER SYSTEM START DATABASE <database name> FROM FALLBACK SNAPSHOT;
The tenant database is reset to the state captured in the fallback snapshot.
Next Steps
The fallback snapshot will remain available after the reset. If you no longer need the fallback snapshot, delete it.
Related Information
Create a Fallback Snapshot [page 130]Delete a Fallback Snapshot [page 132]
9.13 Delete a Fallback Snapshot
You can use the cockpit to delete a fallback snapshot of a tenant database.
Prerequisites
● The database user with which you connect to the SAP HANA database has the privilege DATABASE ADMIN.
Context
You can delete a fallback snapshot for a tenant database. You can only create one fallback snapshot per tenant database. If you need to create a new fallback snapshot, delete the existing one first.
132 P U B L I CSAP HANA Administration with SAP HANA Cockpit
Managing Tenant Databases

Procedure
1. Open Manage Databases in the SAP HANA cockpit by choosing the link displayed under the system database in the Resource Directory, or at the top of the Overview for the system database.
2. Select the tenant database for which you want to delete a fallback snapshot.3. From the overflow menu above the table, select Delete Fallback Snapshot.
You can also delete a fallback snapshot by executing the ALTER DATABASE statement in the system database:
ALTER DATABASE <database name> DROP FALLBACK SNAPSHOT;
The fallback snapshot is deleted.
Related Information
Create a Fallback Snapshot [page 130]Reset to a Fallback Snapshot [page 131]
9.14 Copy or Move a Tenant Database Using Replication
Use system replication to copy or move a tenant database from one system to another.
Prerequisites
● For the source (the original tenant database): if encryption is required for the copy or move, you need an account with the privilege INIFILE ADMIN.
● For the target (the resource where you're putting the moved or copied database):○ You need an account with the privileges DATABASE ADMIN, CREDENTIAL ADMIN, and CATALOG READ.○ If encryption is required for the copy or move, you also need the privileges CERTIFICATE ADMIN and
TRUST ADMIN for the target resource.● Back up the tenant database before copying or moving it.
CautionWhen you use the cockpit to move a tenant, the source database is deleted as part of the process. If the source is running SAP HANA 2.0 SP01 or earlier, its backups are also deleted as part of the process—you can't roll back! Before moving, SAP recommends that you run a backup, then replicate the backup to a new location.
SAP HANA Administration with SAP HANA CockpitManaging Tenant Databases P U B L I C 133

Context
For conceptual background information, refer to Copying and Moving Tenant Databases Between Systems in the SAP HANA Administration Guide.
Procedure
1. Open Manage Databases in the SAP HANA cockpit by choosing the link displayed under the system database in the Resource Directory, or at the top of the Overview for the system database.
2. In the overflow menu (top right), select Configure Replication.3. Use the drop-down menu to choose the target system.
If encryption is required for the copy or move, you'll see a notice warning that both the source and the target will be restarted.
4. Enter credentials if the cockpit prompts you to do so. The cockpit alerts you about any missing privileges.5. Enter or browse to the location of the public key certificate if the cockpit prompts you to do so.
If the certificates configured for the source and target system match, this step is skipped.6. Click Review to go over the information you've provided. You can use the Edit links on the review page to
make changes.7. Click Prepare for Copy/Move (bottom right) to continue.
NoteIf encryption is required, this step triggers the restarts of the source and target resources.
8. On the progress screen, wait for the cockpit to complete the steps needed to get ready for the copy or move operation. A check appears next to each step as it's completed. When all steps are complete, click the Copy or move … link to continue.
9. Choose whether to copy or move the tenant database.10. On the source page, you can change the source database. The cockpit prompts you if authentication is
required or if the source has not been backed up.11. On the target page, you can change the target database.12. (Optional) Under Advanced Settings, the cockpit lists the source's services. Use the services fields to
create corresponding new services for the target. (Advanced settings are not present on a resource that has only one host.)
13. If the isolation level requires it, the cockpit prompts you to enter a dedicated OS user and group for the source.
14. Click Review, check the information on the review page, and click Copy Tenant Database or Move Tenant Database (bottom right) to continue.The progress screen shows how far along the copy or move process is.
If you change your mind before the process is complete, click Cancel Copy or Cancel Move (lower right). The cockpit stops and drops the target tenant database.
If you don't want to wait, click Run in Background (upper right) to go to the Manage Databases page for the source, where the tenant's status is Copying or Moving until the process is complete.
134 P U B L I CSAP HANA Administration with SAP HANA Cockpit
Managing Tenant Databases

15. When the cockpit reports that the copy or move succeeded on the progress page, click Go to Backup and immediately back up the new tenant.
Next Steps
Register the new tenant with the cockpit or ask your administrator to do so.
Related Information
Monitoring Tenant Databases in SAP HANA Cockpit [page 151]Create Data Backups and Delta Backups [page 521]Configure SAP HANA System Replication from the Primary System [page 503]
9.15 Reset the SYSTEM Password of a Tenant using the Cockpit
If the password of the SYSTEM user in a tenant database is lost, you as the system administrator can reset it from the system database.
Prerequisites
● You cannot log on to the tenant database as the SYSTEM because the password has been irretrievably lost.● There is no user available with the system privilege USER ADMIN who can reset the SYSTEM user
password.
NoteIf you can log on as SYSTEM or another user with the system privilege USER ADMIN, do not use the procedure described here to change the password of the SYSTEM user. Instead, change the password using the User editor in the SAP HANA cockpit
● You are connected to the system database and have the system privilege DATABASE ADMIN.
Procedure
1. Open Manage Databases in the SAP HANA cockpit by choosing the link displayed under the system database in the Resource Directory, or at the top of the Overview for the system database.
SAP HANA Administration with SAP HANA CockpitManaging Tenant Databases P U B L I C 135

2. Stop the tenant database by selecting it and then clicking Stop Tenant .
The system commences the process to stop the database. Once stopped, its status changes to Not running.
3. From the overflow menu above the table, select Reset Password.4. In the dialog, enter and confirm a new temporary password for the SYSTEM user.5. Select Reset Password & Restart.
Results
● The password for the SYSTEM user is reset and the tenant database is started.● You will have to change the password the next time you log on with this user, this time in line with the
password policy of the tenant database.● If the SYSTEM user was previously deactivated, locked, or expired, it is now activated again. In this case, we
recommend that you return it to its deactivated state.● If auditing is enabled, the password change is automatically logged in both the system and tenant database
audit trails.
Related Information
Monitoring Tenant Databases in SAP HANA Cockpit [page 151]
9.16 Configuring Memory and CPU Usage for Tenant Databases
Manage and control the memory and CPU usage of your system by configuring limits for individual tenant databases. If necessary, you can also reserve memory for the system database.
Managing Resource Usage of Tenant Databases
Several system properties allow you to influence the allocation of memory and CPU resources in SAP HANA systems. System properties (INI) files have a database layer to facilitate the configuration of properties for individual tenant databases.
The properties listed below are particularly useful for influencing the resource consumption of tenant databases.
● [memorymanager] allocationlimit in the global.ini fileUse this property to limit the maximum amount of memory (in MB) that can be allocated individually to processes of a tenant database. Each process of a tenant database can allocate the specified value. Setting
136 P U B L I CSAP HANA Administration with SAP HANA Cockpit
Managing Tenant Databases

the allocation limit too low might cause the tenant database to become inaccessible until more memory can be allocated.
ExampleExecuted from the system database:ALTER SYSTEM ALTER CONFIGURATION ('global.ini', 'DATABASE', 'MYDB') SET ('memorymanager', 'allocationlimit') = '8192' WITH RECONFIGURE;
NoteMemory alignment will happen on the fly and may therefore take some time. To make it happen immediately, you can restart the database.
● [execution] max_concurrency in the global.ini fileUse this property to influence the maximum number of CPU cores that can be used for each tenant database by limiting the number of concurrently running threads used by the JobExecutor subsystem. A reasonable default value is the number of cores divided by the number of tenant databases. Do not specify a value of 0. A change of this value takes effect immediately.
ExampleExecuted from the system database:ALTER SYSTEM ALTER CONFIGURATION ('global.ini', 'DATABASE', 'MYDB') SET ('execution', 'max_concurrency') = '4' WITH RECONFIGURE;
NoteIn NUMA architectures, setting the max_concurrency parameter is not enough to achieve the desired performance gains, so you should also bind sockets that share memory using the affinity setting. For more information, see Controlling CPU Consumption.
Managing Memory Usage of System Database
After installation, the system database contains only data required to monitor and manage the system, as well as statistics data related to itself. This results in an average memory consumption of 15 GB.
However, if the system database is experiencing performance problems, for example, out-of-memory situations, you can reserve a minimum amount of memory (MB) for the system database by configuring the parameter [multidb] systemdb_reserved_memory in the global.ini file.
Related Information
Controlling CPU Consumption [page 147]
SAP HANA Administration with SAP HANA CockpitManaging Tenant Databases P U B L I C 137

9.16.1 Define Memory Allocation Limits
As part of the provisioning process, you can ensure that memory is shared appropriately between tenant databases. By setting the memory allocation limits for each database on a host, you ensure appropriate memory sharing through setting the maximum amount of memory that can be allocated for a particular tenant database.
Context
In the SAP HANA cockpit you can use the Memory Allocation tab of the Configure Workload Allocation app to view and modify memory allocation limits. These limits correspond to the settings of the allocationlimit parameter in the memory manager section of the global.ini file.
SAP HANA preallocates and manages its own memory pool, used for storing in-memory table data, thread stacks, temporary results, and other system data structures. When more memory is required for table growth or temporary computations, the SAP HANA memory manager obtains it from the pool. When the pool cannot satisfy the request, the memory manager increases the pool size by requesting more memory from the operating system, up to a predefined allocation limit.
You can adjust the allocation limit for the services in the system at the following levels:
● System● Tenant Database (these settings override the system settings)● Host (these settings override the database and system settings)
For each database (or each database per host in a multi-host system), you can also refer to a mini-chart representing the memory usage of the indexserver in one day, where the vertical line shows the allocation limit setting for this specific database, dark green shows the actual used memory and light green shows the peak used memory.
The allocation limit value is applied to each service (e.g. indexserver, nameserver, compileserver,). However, when the Configure Workload Allocation app calculates the total memory available for allocation, only the indexserver is considered, since it requires much more memory than the other services.
Procedure
1. Open Manage Databases in the SAP HANA cockpit by choosing the link displayed under the system database in the Resource Directory, or at the top of the Overview for the system database.
2. Select Configure Workload Allocation from the overflow menu in the header.3. Select Memory Allocation.4. View the Default allocation limit per service, or choose to edit the default by clicking the pencil icon.
Changing the default causes each of the databases and hosts to inherit the value of the allocation limit (except those databases or hosts that have an allocation limit that already differs from the default).
5. View the Allocation Limit for each database or host, or choose to edit the value by clicking the pencil.6. If you choose to edit the limit value, the Edit Allocation Limit dialog displays. Enter a value, or clear the
allocation limit input field to revert to the allocation limit inherited from the default value.
138 P U B L I CSAP HANA Administration with SAP HANA Cockpit
Managing Tenant Databases

The total memory available for allocation is equal to the sum of the allocation limits for each database (regardless of whether you have edited the limit or allowed the default value to be inherited). A warning will display if this sum exceeds the global allocation limit (the amount of available memory per host). However, SAP HANA does allow the sum of the allocation limits to exceed the global allocation limit.
Related Information
SAP HANA Used Memory [page 139]Memory Sizing [page 141]Allocated Memory Pools and Allocation Limits [page 142]SAP HANA Memory Usage and the Operating System [page 143]
9.16.1.1 SAP HANA Used Memory
The total amount of memory used by SAP HANA is referred to as used memory. It includes program code and stack, all data and system tables, and the memory required for temporary computations.
SAP HANA consists of a number of processes running in the Linux operating environment. Under Linux, the operating system (OS) is responsible for reserving memory to all processes. When SAP HANA starts up, the OS reserves memory for the program code (sometimes called the text), the program stack, and static data. It then dynamically reserves additional data memory when requested by the SAP HANA memory manager. Dynamically allocated memory consists of heap memory and shared memory.
The following figure shows used memory, consisting of code, stack, and table data:
SAP HANA Used Memory
SAP HANA Administration with SAP HANA CockpitManaging Tenant Databases P U B L I C 139

Since the code and program stack size are about 6 GB, almost all of used memory is used for table storage, computations, and database management.
Service Used Memory
An SAP HANA system consists of multiple services that all consume memory, in particular the indexserver service, the main database service. The index server holds all the data tables and temporary results, and therefore dominates SAP HANA used memory.
Peak Used Memory
Ultimately, it is more important to understand the behavior of used memory over time and under peak loads. For this purpose, SAP HANA has a special used memory indicator called peak used memory. As the value for used memory is a current measurement, peak used memory allows you to keep track of the maximum value for used memory over time.
You can also reset peak used memory. This can be useful if you want to establish the impact of a certain workload on memory usage. So for example, you can reset peak used memory, run the workload, and then examine the new peak used memory value.
Memory Usage of Tables
The dominant part of the used memory in the SAP HANA database is the space used by data tables. Separate measurements are available for column-store tables and row-store tables.
NoteThe SAP HANA database loads column-store tables into memory column by column only upon use. This is sometimes called "lazy loading". This means that columns that are never used will not be loaded and memory waste is avoided. When the SAP HANA database runs out of allocatable memory, it will try to free up some memory by unloading unimportant data (such as caches) and even table columns that have not been used recently. Therefore, if it is important to measure precisely the total, or worst-case, amount of memory used for a particular table, it is important to ensure that the table is first fully loaded into memory. You can do this by loading the table into memory.
Memory Usage of Expensive Statements
Every query and statement consumes memory, for the evaluation of the statement plan, caching, and, mainly the calculation of intermediate and final results. While many statement executions use only a moderate amount of memory, some queries, for instance using unfiltered cross joins, will tax even very large systems.
140 P U B L I CSAP HANA Administration with SAP HANA Cockpit
Managing Tenant Databases

Expensive statements are individual SQL statements whose execution time exceeded a configured threshold. The expensive statements trace records information about these statements for further analysis. If in addition to activating the expensive statements trace, you enable per-statement memory tracking, the expensive statements trace will also show the peak memory size used to execute expensive statements.
It is further possible to protect an SAP HANA system against excessive memory usage due to uncontrolled queries by limiting the amount of memory used by single statement executions per host.
Related Information
Monitoring and Analyzing with the Performance Monitor [page 270]Monitor Tables by Size and Usage [page 183]Monitor and Analyze Active Statements [page 280]Monitor and Analyze Expensive Statements [page 282]
9.16.1.2 Memory Sizing
Memory sizing is the process of estimating in advance the amount of memory that will be required to run a certain workload on an SAP HANA database. To understand memory sizing, several questions need to be answered.
● What is the size of the data tables that will be stored in the SAP HANA database?You may be able to estimate this based on the size of your existing data, but unless you precisely know the compression ratio of the existing data and the anticipated growth factor, this estimate may not be accurate.
● What is the expected compression ratio that SAP HANA will apply to these tables?The column store of the SAP HANA database automatically uses a combination of various advanced compression algorithms (dictionary, RLE, sparse, and so on) to compress each table column separately. The achieved compression ratio depends on many factors, such as the nature of the data, its organization and data types, the presence of repeated values, the number of indexes (SAP HANA requires fewer indexes), and so on.
● How much extra working memory will be required for temporary computations?The amount of extra memory will depend on the size of the tables (larger tables will create larger intermediate result tables in operations such as joins), but even more on the expected workload in terms of the concurrency and complexity of analytical queries (each concurrent query needs its own workspace).
The following SAP Notes provide additional tools and information to help you size the required amount of memory:
● SAP Note 1514966 - SAP HANA 1.0: Sizing SAP In-Memory Database● SAP Note 1637145 - SAP BW on HANA: Sizing SAP In-Memory Database● SAP Note 2296290 - New Sizing Report for BW on HANA
However, the most accurate method is to import several representative tables into an SAP HANA system, measure the memory requirements, and extrapolate from the results.
SAP HANA Administration with SAP HANA CockpitManaging Tenant Databases P U B L I C 141

Related Information
SAP Note 1514966SAP Note 1637145SAP Note 2296290
9.16.1.3 Allocated Memory Pools and Allocation Limits
SAP HANA, across its different processes, reserves a pool of memory before actual use. This pool of allocated memory is preallocated from the operating system over time, up to a predefined global allocation limit, and is then efficiently used by SAP HANA as needed.
SAP HANA preallocates and manages its own memory pool, used for storing in-memory table data, thread stacks, temporary results, and other system data structures. When more memory is required for table growth or temporary computations, the SAP HANA memory manager obtains it from the pool. When the pool cannot satisfy the request, the memory manager increases the pool size by requesting more memory from the operating system, up to a predefined allocation limit.
By default, the allocation limit is calculated as follows: 90% of the first 64 GB of available physical memory on the host plus 97% of each further GB.
The limit can be changed by modifying the global_allocation_limit configuration parameter in the global.ini file. It can be defined either as a fixed value in MB or as a flexible percentage of the available main memory size. If you enter a percentage value the precise value of the limit will be calculated automatically by the system. Moreover, if you then change the size of the container where the system runs the allocation limit will automatically adjust to the correct percentage of the new container size.
There is normally no reason to change the value of this parameter although, for example, on development systems with more than one SAP HANA system installed on a single host you could limit the size of the memory pool to avoid resource contentions or conflicts.
A change may also be necessary to remain in compliance with the memory allowance of your license if you purchased a license for less than the total amount of physical memory available. This is illustrated in the following examples:
Example● You have a server with 512GB, but purchased an SAP HANA license for only 384 GB. You therefore set
the global_allocation_limit to 393216 (384 * 1024 MB).● You have a distributed HANA system on four hosts with 512 GB each, but purchased an SAP HANA
license for only 768 GB. Set the global_allocation_limit to 196608 (192 * 1024 MB on each host).
Service Allocation Limit
In addition to the global allocation limit, each service running on the host has an allocation limit, the service allocation limit. Given that collectively, all services cannot consume more memory than the global allocation
142 P U B L I CSAP HANA Administration with SAP HANA Cockpit
Managing Tenant Databases

limit, each service has what is called an effective allocation limit. The effective allocation limit of a service specifies how much physical memory a service can in reality consume given the current memory consumption of other services.
ExampleA single-host system has 100 GB physical memory. Both the global allocation limit and the individual service allocation limits are 92.5% (default values). This means the following:
● Collectively, all services of the SAP HANA database can use a maximum of 92.5 GB.● Individually, each service can use a maximum of 92.5 GB.
Therefore, if 2 services are running and the current memory pool of service 1 is 50 GB, then the effective allocation limit of service 2 is 42.5 GB. This is because service 1 is already using 50 GB and together they cannot exceed the global allocation limit of 92.5 GB.
What happens when the allocation limit is reached?
Memory is a finite resource. Once the allocation limit has been reached and the pool is exhausted, the memory manager can no longer allocate memory for internal operations without first giving up something else. Buffers and caches are released, and column store tables are unloaded, column by column, based on a least-recently-used order, up to a preset lower limit. When tables are partitioned over several hosts, this is managed on a host-by-host basis; that is, column partitions are unloaded only on hosts with an acute memory shortage.
The need for table (column or partition) unloading should be avoided since it leads to performance degradation later when the table is queried and the data has to be reloaded. You can identify pool exhaustion by examining the M_CS_UNLOADS system view.
However, it is still possible that the memory manager needs more memory than is available leading to an out-of-memory failure. This may happen, for example, when too many concurrent transactions use up all memory, or when a particularly complex query performs a cross join on very large tables and creates a huge intermediate result that exceeds the available memory.
9.16.1.4 SAP HANA Memory Usage and the Operating System
Due to the way in which SAP HANA manages memory, the relationship between Linux memory indicators and SAP HANA's own memory indicators may not correlate as expected.
From the perspective of the Linux operating system, SAP HANA is a collection of separate processes. Linux programs reserve memory for their use from the Linux operating system. The entire reserved memory footprint of a program is referred to as its virtual memory. Each Linux process has its own virtual memory, which grows when the process requests more memory from the operating system, and shrinks when the process relinquishes unused memory. You can think of virtual memory size as the memory amount that the process has requested (or allocated) from the operating system, including reservations for its code, stack, data, and memory pools under program control. SAP HANA's virtual memory is logically shown in the following figure:
SAP HANA Virtual Memory
SAP HANA Administration with SAP HANA CockpitManaging Tenant Databases P U B L I C 143

NoteSAP HANA really consists of several separate processes, so the figure above shows all SAP HANA processes combined.
Virtual, Physical, and Resident Memory
When part of the virtually allocated memory actually needs to be used, it is loaded or mapped to the real, physical memory of the host and becomes resident. Physical memory is the DRAM memory installed on the host. On most SAP HANA hosts, it ranges from 256 gigabytes (GB) to 1 terabyte (TB). It is used to run the Linux operating system, SAP HANA, and all other programs.
Resident memory is the physical memory actually in operational use by a process. Over time, the operating system may swap out some of a process's resident memory according to a least-recently-used algorithm to make room for other code or data. Thus, a process's resident memory size may fluctuate independently of its virtual memory size. In a properly-sized SAP HANA appliance, there is enough physical memory, so that swapping is disabled and should not be observed.
This can be illustrated as follows:
SAP HANA Resident Memory
144 P U B L I CSAP HANA Administration with SAP HANA Cockpit
Managing Tenant Databases

On a typical SAP HANA appliance, the resident memory part of the operating system and all other running programs usually does not exceed 2 GB. The rest of the memory is therefore dedicated for the use of SAP HANA.
When memory is required for table growth or for temporary computations, the SAP HANA code obtains it from the existing memory pool. When the pool cannot satisfy the request, the SAP HANA memory manager will request and reserve more memory from the operating system. At this point, the virtual memory size of SAP HANA processes grows.
Once a temporary computation completes or a table is dropped, the freed memory is returned to the memory manager, which recycles it to its pool without informing the operating system. Therefore, from SAP HANA's perspective, the amount of used memory shrinks, but the processes' virtual and resident memory sizes are not affected. This creates a situation where the used memory value may shrink to below the size of SAP HANA's resident memory. This is normal.
NoteThe memory manager may also choose to return memory back to the operating system, for example when the pool is close to the allocation limit and contains large unused parts.
Related Information
SAP HANA Used Memory [page 139]Memory Sizing [page 141]Allocated Memory Pools and Allocation Limits [page 142]
SAP HANA Administration with SAP HANA CockpitManaging Tenant Databases P U B L I C 145

9.16.2 Define CPU Cores Allocation Limits
As part of the provisioning process, you can ensure that CPU cores are shared appropriately between tenant databases. By setting the allocation limits, you ensure appropriate sharing of CPU cores, effectively specifying the maximum number of CPU cores that can be used by a particular tenant on a particular host.
Context
In the SAP HANA cockpit you can use the CPU Allocation tab of the Configure Workload Allocation app to view and modify the CPU cores allocation limit. This limit corresponds to the settings of the max_concurrency parameter in the global.ini file.
Each host in an SAP HANA system has a physical set of CPU cores. You can adjust the maximum number of CPU cores available for allocation at each of the following levels:
● System● Tenant database (these settings override the system settings)● Host (these settings override the database and system settings)
For each database (or each database per host in a multi-host system), you can also refer to a mini-chart representing the CPU usage of the indexserver in one day, where dark green shows the peak CPU usage, and light green shows the average CPU usage.
Procedure
1. Open Manage Databases in the SAP HANA cockpit by choosing the link displayed under the system database in the Resource Directory, or at the top of the Overview for the system database.
2. Select Configure Workload Allocation from the overflow menu in the header.3. Select CPU Allocation.4. View the Default CPU cores allocation limit, or choose to edit the default by clicking the pencil icon.
Changing the default causes each of the databases and hosts to inherit the value of the allocation limit (except those databases or hosts that have an allocation limit that already differs from the default).
5. View the CPU Core Limit for each of the databases, or choose to edit the value by clicking the pencil.6. If you choose to edit the limit value, the Edit Max CPU Cores dialog displays. Enter a value, or clear the
allocation limit input field to revert to the allocation limit inherited from the default value.The total number of CPU cores available for allocation is equal to the sum of the allocation limits for each database (regardless of whether you have edited the limit or allowed the default value to be inherited). A warning will display if this sum exceeds the number of physical CPU cores.
Related Information
Controlling CPU Consumption [page 147]
146 P U B L I CSAP HANA Administration with SAP HANA Cockpit
Managing Tenant Databases

9.16.2.1 Controlling CPU Consumption
If the physical hardware on a host is shared between several processes you can use CPU affinity settings to assign a set of logical cores to a specific SAP HANA process. These settings are coarse-grained and apply on the OS and process-level.
Prerequisites
You can use the affinity configuration parameter to restrict CPU usage of SAP HANA server processes to certain CPUs or ranges of CPUs.
Using the configuration option, we firstly analyze how the system CPUs are configured and then, based on the information returned, apply affinity settings in daemon.ini to bind specific processes to logical CPU cores. Processes must be restarted before the changes become effective. This approach applies primarily to the use cases of SAP HANA tenant databases and multiple SAP HANA instances on one server; you can use this, for example, to partition the CPU resources of the system by tenant database.
TipAs an alternative to applying CPU affinity settings you can achieve similar performance gains by changing the parameter [execution] max_concurrency in the global.ini configuration file. This may be more convenient and does not require the system to be offline.
To make the changes described here you require access to the operating system of the SAP HANA instance to run the Linux lscpu command and you require the privilege INIFILE ADMIN.
Information about the SAP HANA system topology is also available from SAP HANA monitoring views as described in a following subsection SAP HANA Monitoring Views for CPU Topology Details. Use of the NUMA NODE clause for SQL statements is described in the following topic. Further information can also be found in KBA 2470289: FAQ: SAP HANA Non-Uniform Memory Access (NUMA).
Context
For Xen and VMware, the users in the VM guest system see what is configured in the VM host. So the quality of the reported information depends on the configuration of the VM guest. Therefore SAP cannot give any performance guarantees in this case.
Procedure
1. Firstly, to confirm the physical and logical details of your CPU architecture, analyze the system using the lscpu command. This command returns a listing of details of the system architecture. The table which follows gives a commentary on the most useful values based on an example system with 2 physical chips (sockets) each containing 8 physical cores. These are hyperthreaded to give a total of 32 logical cores.
SAP HANA Administration with SAP HANA CockpitManaging Tenant Databases P U B L I C 147

# Feature Example Value
1 Architecture x86_64
2 CPU op-mode(s) 32-bit, 64-bit
3 Byte Order LittleEndian
4 CPUs 32
5 On-line CPU(s) list 0-31
6 Thread(s) per core 2
7 Core(s) per socket 8
8 Socket(s) 2
9 NUMA node(s) 2
21 NUMA node0 CPU(s) 0-7,16-23
22 NUMA node1 CPU(s) 8-15,24-31
○ 4-5: This example server has 32 logical cores numbered 0 - 31○ 6-8: Logical cores ("threads") are assigned to physical cores. Where multiple threads are assigned to a
single physical core this is referred to as 'hyperthreading'. In this example, there are 2 sockets, each socket contains 8 physical cores (total 16). Two logical cores are assigned to each physical core, thus, each core exposes two execution contexts for the independent and concurrent execution of two threads.
○ 9: In this example there are 2 NUMA (Non-uniform memory access) nodes, one for each socket. Other systems may have multiple NUMA nodes per socket.
○ 21-22: The 32 logical cores are numbered and specifically assigned to one of the two NUMA nodes.
NoteEven on a system with 32 logical cores and two sockets the assignment of logical cores to physical CPUs and sockets can be different. It is important to collect the assignment in advance before making changes. A more detailed analysis is possible using the system commands described in the next step. These provide detailed information for each core including how CPU cores are grouped as siblings.
2. In addition to the lscpu command you can use the set of system commands in the /sys/devices/system/cpu/ directory tree. For each logical core there is a numbered subdirectory beneath this node (/cpu12/ in the following examples). The examples show how to retrieve this information and the table gives details of some of the most useful commands available:
Examplecat /sys/devices/system/cpu/present
cat /sys/devices/system/cpu/cpu12/topology/thread_siblings_list
148 P U B L I CSAP HANA Administration with SAP HANA Cockpit
Managing Tenant Databases

Command Example Output Commentary
present 0-15 The number of logical cores available for scheduling.
cpu12/topology/core_siblings_list 4-7, 12-15 The cores on the same socket.
cpu12/topology/thread_siblings_list 4, 12 The logical cores assigned to the same physical core (hyperthreading).
cpu12/topology/physical_package_id 1 The socket of the current core - in this case cpu12.
Other Linux commands which are relevant here are sched_setaffinity and numactl. sched_setaffinity limits the set of CPU cores available (by applying a CPU affinity mask) for execution of a specific process (this could be used, for example, to isolate tenants) and numactl controls NUMA policy for processes or shared memory.
3. Based on the results returned you can use the affinity setting to restrict CPU usage of SAP HANA server processes to certain CPUs or ranges of CPUs. You can do this for the following servers: nameserver, indexserver, compileserver, preprocessor, and xsengine (each server has a section in the daemon.ini file). The affinity setting is applied by the TrexDaemon when it starts the other HANA processes using the command sched_setaffinity. Changes to the affinity settings take effect only after restarting the HANA process. The examples and commentary below show the syntax for the ALTER SYSTEM CONFIGURATION commands required.
ExampleTo restrict the nameserver to two logical cores of the first CPU of socket 0 (see line 21 in the example above), use the following affinity setting:
ALTER SYSTEM ALTER CONFIGURATION ('daemon.ini', 'SYSTEM') SET ('nameserver', 'affinity') = '0,16'
ExampleTo restrict the preprocessor and the compileserver to all remaining cores (that is, all except 0 and 16) on socket 0 (see line 21 in the example above), use the following affinity settings:
ALTER SYSTEM ALTER CONFIGURATION ('daemon.ini', 'SYSTEM') SET ('preprocessor', 'affinity') = '1-7,17-23' ALTER SYSTEM ALTER CONFIGURATION ('daemon.ini', 'SYSTEM') SET ('compileserver', 'affinity') = '1-7,17-23'
ExampleTo restrict the indexserver to all cores on socket 1 (see line 22 in the example above), use the following affinity settings:
ALTER SYSTEM ALTER CONFIGURATION ('daemon.ini', 'SYSTEM') SET ('indexserver', 'affinity') = '8-15,24-31'
4. You can assign affinities to different tenants of a multi-tenant database on the same host as shown here. Run these SQL statements on the SYSTEMDB.
SAP HANA Administration with SAP HANA CockpitManaging Tenant Databases P U B L I C 149

ExampleIn this scenario tenant NM1 already exists, here we add another tenant NM2:
CREATE DATABASE NM2 ADD AT LOCATION 'host:30040' SYSTEM USER PASSWORD Manager1;
Set the configuration parameter to bind CPUs to specific NUMA nodes on each tenant can use the following notation with a dot to identify the specific tenant:
ALTER SYSTEM ALTER CONFIGURATION ('daemon.ini','SYSTEM') SET ('indexserver.NM1', 'affinity') ='0-7,16-23'; ALTER SYSTEM ALTER CONFIGURATION ('daemon.ini','SYSTEM') SET ('indexserver.NM2', 'affinity') ='8-15,24-31';
5. To assign affinities to multiple indexservers of the same tenant on the same host execute the following SQL statements on the SYSTEMDB to apply the instance_affinity[port] configuration parameter:
ExampleIn this scenario an indexserver is already running on tenant NM1 on port 30003, here we add another indexserver on a different port:
ALTER DATABASE NM1 ADD 'indexserver' AT LOCATION 'host:30040';
Set the different instances of the instance_affinity[port] configuration parameter to bind CPUs to specific NUMA nodes on each indexserver. The configuration parameter has a 1-2 digit suffix to identify the final significant digits of the port number, in this example 30003 and 30040:
ALTER SYSTEM ALTER CONFIGURATION ('daemon.ini','SYSTEM') SET ('indexserver.NM1', 'instance_affinity[3]')='0-7,16-23'; ALTER SYSTEM ALTER CONFIGURATION ('daemon.ini','SYSTEM') SET ('indexserver.NM1', 'instance_affinity[40]')='8-15,24-31';
Restart the indexserver processes to make the affinity settings effective.
6. You can test the settings either in SQL or using hdbcons as shown here:
Run this query on the tenant or SystemDB:
select * from M_NUMA_NODES;
Using hdbcons the process ID of the indexserver process is required as a parameter:
hdbcons -p <PID> "jexec info"
Related Information
Configuring Memory and CPU Usage for Tenant Databases [page 136]SAP Note 2470289
150 P U B L I CSAP HANA Administration with SAP HANA Cockpit
Managing Tenant Databases

9.17 Monitoring Tenant Databases in SAP HANA Cockpit
As the tenant database administrator, you can monitor the availability, resource usage, and performance of tenant databases in the SAP HANA cockpit from the system database.
Aggregate system information is available on the Overview page of the system database. The Overview page of the system database has separate sections for Tenant Monitoring and Administration and System DB Monitoring and Administration. The latter displays information and links for the monitoring the system database as a resource itself. For more information, see Using the System Overview.
Drilling down on the Overall Tenant Statuses tile displays the Manage Databases page which provides you with further information for all tenant databases. From Manage Databases, you can then drill down to more detailed information about each individual tenant database. You can use the cockpit to monitor and manage more than one resource, each running version SAP HANA 1.0 SPS 12 or later. Any resource running version SAP HANA 2.0 SPS 01 or later is set in multiple-container mode by default. The cockpit can also monitor single-container systems running earlier versions of SAP HANA. When you drill down to the system Overview, and subsequently to Manage Services, the operations you have the option to perform depend on whether you are displaying a tenant or a system database.
NoteTo perform operations on a tenant database, you have the system privilege DATABASE ADMIN.
Related Information
Using the Overview to Manage a Resource [page 160]Database Details [page 151]Monitor Alerts for a Tenant Database [page 154]
9.17.1 Database Details
The Manage Databases page provides you with detailed information about all databases, as well as several drill-down options for more detailed information about individual databases.
The table below lists the information available for databases, as well as the available drill-down option.
SAP HANA Administration with SAP HANA CockpitManaging Tenant Databases P U B L I C 151

Column Description Drill-Down Option
Database Name Name of the tenant database Click the database name to open the Overview, from which you can drill down to the Manage Services page.
Manage Services allows you to analyze the status and resource usage of the individual services of the database. For more information, see Service Details. From Manage Services, you can also stop and start services.
Status Status of the database:
● Redistribution Running: A table redistribution plan has been executed
● Deleting: Resource is being deleted● Error: Resource is in an error state● Running with Issues: At least one service is
not running, or there is at least one high alert
● Maintenance: Resource is in enforced maintenance mode
● Replicating: Resource is undergoing replication
● Running: Resource is running● Starting: Resource is starting● Stopped: Resource is stopped● Stopping: Resource is stopping● Transitioning: Resource is transitioning
(starting or stopping)● Unknown: Resource is in an unknown state
No specific drill-down
Start Time The time of the most recent start of the database
No specific drill-down
152 P U B L I CSAP HANA Administration with SAP HANA Cockpit
Managing Tenant Databases
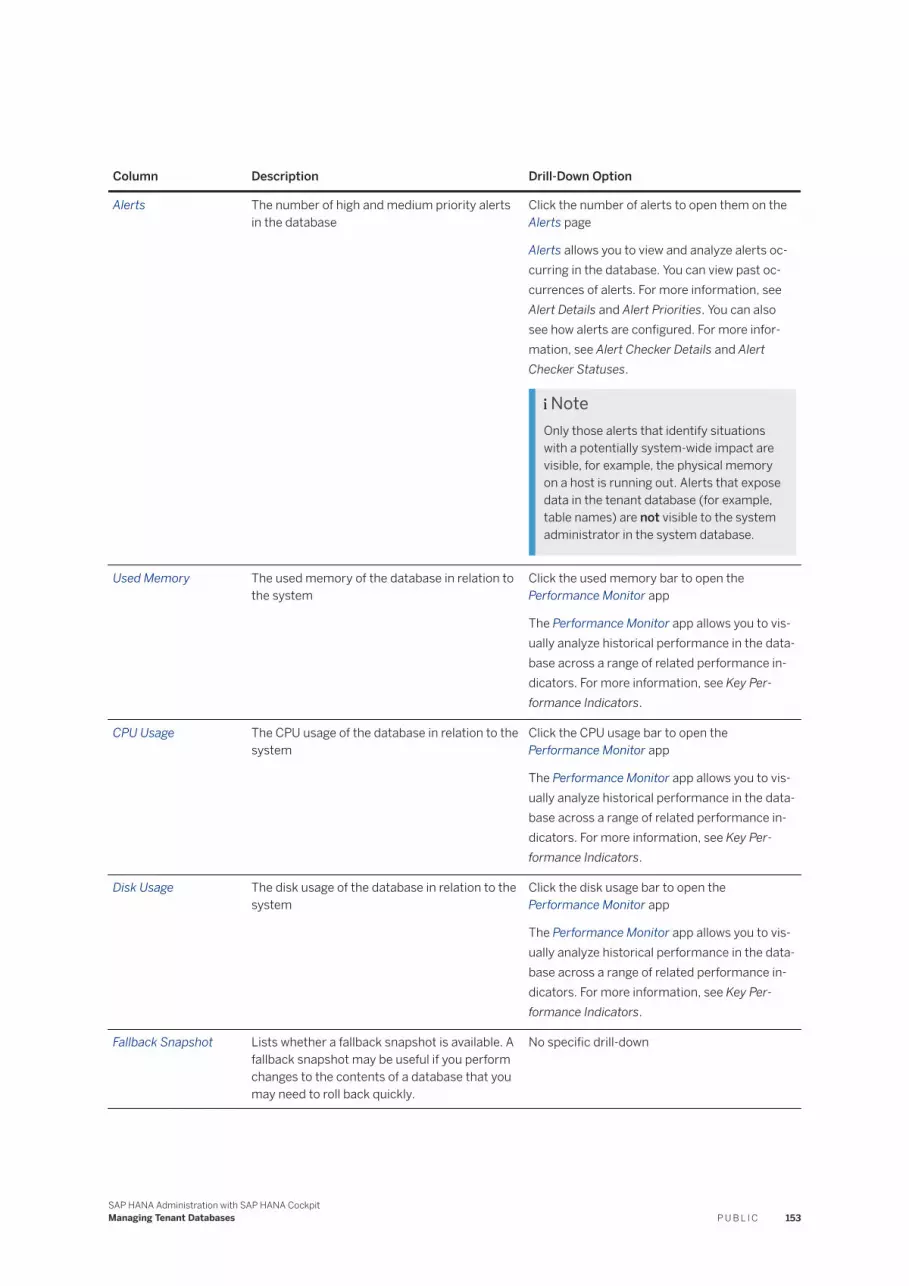
Column Description Drill-Down Option
Alerts The number of high and medium priority alerts in the database
Click the number of alerts to open them on the Alerts page
Alerts allows you to view and analyze alerts occurring in the database. You can view past occurrences of alerts. For more information, see Alert Details and Alert Priorities. You can also see how alerts are configured. For more information, see Alert Checker Details and Alert Checker Statuses.
NoteOnly those alerts that identify situations with a potentially system-wide impact are visible, for example, the physical memory on a host is running out. Alerts that expose data in the tenant database (for example, table names) are not visible to the system administrator in the system database.
Used Memory The used memory of the database in relation to the system
Click the used memory bar to open the Performance Monitor app
The Performance Monitor app allows you to visually analyze historical performance in the database across a range of related performance indicators. For more information, see Key Performance Indicators.
CPU Usage The CPU usage of the database in relation to the system
Click the CPU usage bar to open the Performance Monitor app
The Performance Monitor app allows you to visually analyze historical performance in the database across a range of related performance indicators. For more information, see Key Performance Indicators.
Disk Usage The disk usage of the database in relation to the system
Click the disk usage bar to open the Performance Monitor app
The Performance Monitor app allows you to visually analyze historical performance in the database across a range of related performance indicators. For more information, see Key Performance Indicators.
Fallback Snapshot Lists whether a fallback snapshot is available. A fallback snapshot may be useful if you perform changes to the contents of a database that you may need to roll back quickly.
No specific drill-down
SAP HANA Administration with SAP HANA CockpitManaging Tenant Databases P U B L I C 153

Related Information
Service Details [page 169]Alert Details [page 216]Alert Priorities [page 217]Key Performance Indicators [page 274]
9.17.2 Monitor Alerts for a Tenant Database
Alert situations in tenant databases may potentially impact the health of the overall system. For this reason, you as system administrator can monitor alerts occurring in individual tenant databases. You can do this from the system database in the SAP HANA cockpit.
Prerequisites
To be able to drill down to the alert information of a tenant database, you must have registered it as a resource in the cockpit.
Procedure
1. Open Manage Databases in the SAP HANA cockpit by choosing the link displayed under the system database in the Resource Directory, or at the top of the Overview for the system database.
2. Open the alerts of a particular database by clicking the number of alerts indicated for that database in the Top Resources with Alerts tile.All high and medium priority alerts occurring in all databases in the system are displayed in list format on the left. To see more detailed information about a specific alert on the right, simply select it.
TipYou can also access database-specific alerts from Alerts in the Manage Databases app.
Next Steps
It may be helpful to see how alerts are configured in individual tenant databases. To navigate to the configuration of alert checkers from the Alerts app, click View Alert Configuration in the footer toolbar.
154 P U B L I CSAP HANA Administration with SAP HANA Cockpit
Managing Tenant Databases

Related Information
Using the Overview to Manage a Resource [page 160]Manage Services [page 168]Work with Alerts [page 214]
9.18 Add or Remove Services in a Tenant Database
You can add or remove services in the SAP HANA cockpit.
Prerequisites
The database user (with which you have connected to the resource) must have the system privilege DATABASE ADMIN.
Procedure
1. Open Manage Databases in the SAP HANA cockpit by choosing the link displayed under the system database in the Resource Directory, or at the top of the Overview for the system database.
2. Click the status of the tenant to open Manage Services.
3. To add a service, select Manage Services Add Service .
You can also add a service by executing the ALTER DATABASE statement in the system database:
Example
What How
A new index server with automatic host placement and automatic port assignment
ALTER DATABASE DB0 ADD 'indexserver'
A new index server on a specific host accessible via a specific SQL port (30148)
NoteThe SQL port number is the internal communication port number plus 1.
ALTER DATABASE DB0 ADD 'indexserver' AT LOCATION 'HOST_A:30146'
SAP HANA Administration with SAP HANA CockpitManaging Tenant Databases P U B L I C 155
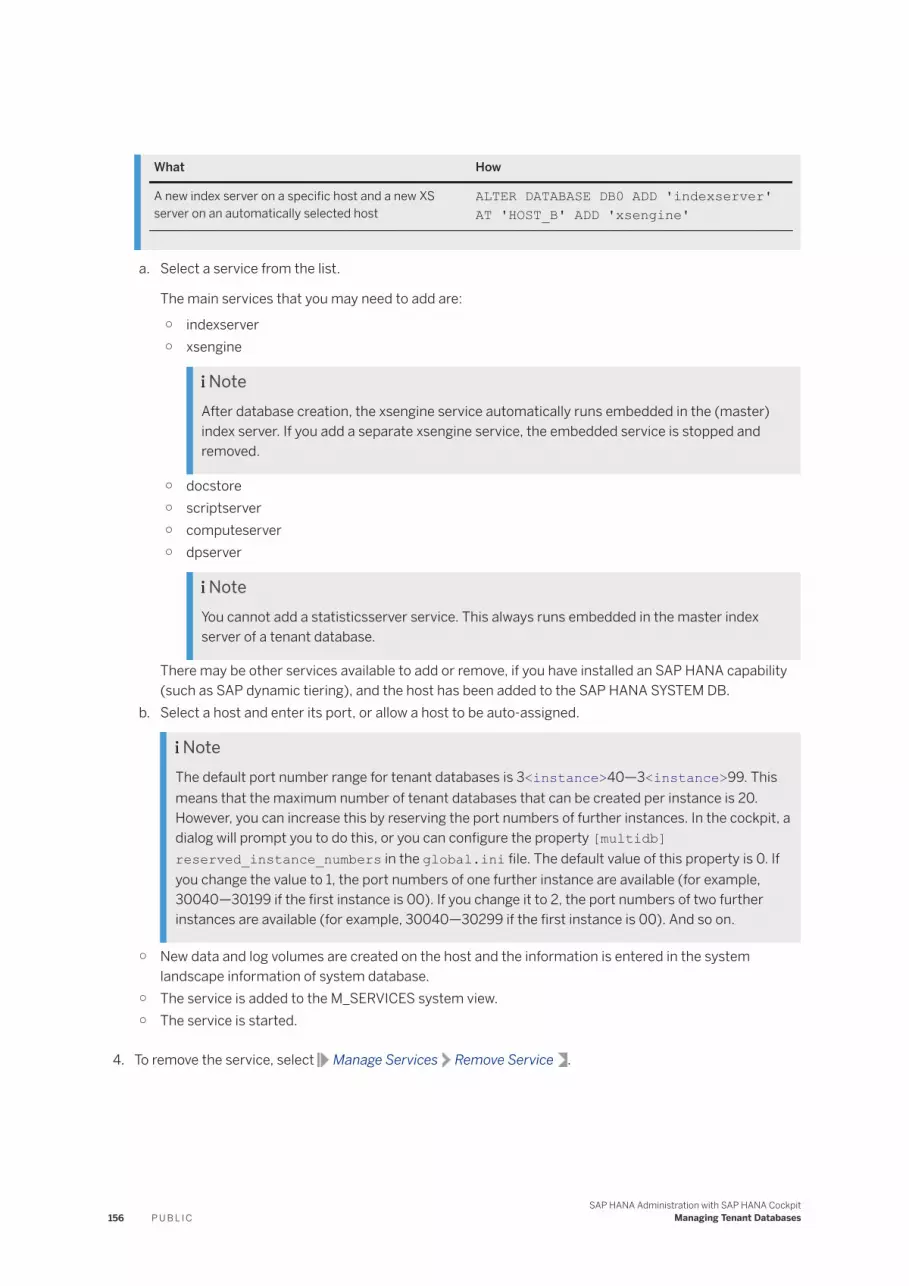
What How
A new index server on a specific host and a new XS server on an automatically selected host
ALTER DATABASE DB0 ADD 'indexserver' AT 'HOST_B' ADD 'xsengine'
a. Select a service from the list.
The main services that you may need to add are:
○ indexserver○ xsengine
NoteAfter database creation, the xsengine service automatically runs embedded in the (master) index server. If you add a separate xsengine service, the embedded service is stopped and removed.
○ docstore○ scriptserver○ computeserver○ dpserver
NoteYou cannot add a statisticsserver service. This always runs embedded in the master index server of a tenant database.
There may be other services available to add or remove, if you have installed an SAP HANA capability (such as SAP dynamic tiering), and the host has been added to the SAP HANA SYSTEM DB.
b. Select a host and enter its port, or allow a host to be auto-assigned.
NoteThe default port number range for tenant databases is 3<instance>40—3<instance>99. This means that the maximum number of tenant databases that can be created per instance is 20. However, you can increase this by reserving the port numbers of further instances. In the cockpit, a dialog will prompt you to do this, or you can configure the property [multidb] reserved_instance_numbers in the global.ini file. The default value of this property is 0. If you change the value to 1, the port numbers of one further instance are available (for example, 30040—30199 if the first instance is 00). If you change it to 2, the port numbers of two further instances are available (for example, 30040—30299 if the first instance is 00). And so on.
○ New data and log volumes are created on the host and the information is entered in the system landscape information of system database.
○ The service is added to the M_SERVICES system view.○ The service is started.
4. To remove the service, select Manage Services Remove Service .
156 P U B L I CSAP HANA Administration with SAP HANA Cockpit
Managing Tenant Databases

You can also remove a service by executing the ALTER DATABASE statement in the system database:
ExampleALTER DATABASE DB0 REMOVE 'indexserver' AT LOCATION 'HOST_A:30146'
NoteNot all services can be removed. You cannot remove a global service, the master index server, or the primary index server on a host.
○ The service is stopped and removed from the system landscape information of system database.○ The service is removed from the M_SERVICES system view.○ Data volumes and traces files are removed.
9.19 Change the Port of a Service in a Tenant Database
You can change the port of a service in the SAP HANA cockpit.
Prerequisites
The database user (with which you have connected to the resource) must have the system privilege DATABASE ADMIN.
Procedure
1. Open Manage Databases in the SAP HANA cockpit by choosing the link displayed under the system database in the Resource Directory, or at the top of the Overview for the system database.
2. To change the port of a service, select Manage Services Change Port .3. In the Change Port dialog, select the New Port for the service.4. Optional: If reserved instances are configured for the host, you can choose to select ports available on
another instance.
NoteThe default port number range for tenant databases is 3<instance>40—3<instance>99. This means that the maximum number of tenant databases that can be created per instance is 20. However, you can increase this by reserving the port numbers of further instances.
5. Optional: Start the service after changing the port.
SAP HANA Administration with SAP HANA CockpitManaging Tenant Databases P U B L I C 157

By default, the service is not started after the port is changed. If you want the service to be started after the port is changed, enable the Start Automatically option.
158 P U B L I CSAP HANA Administration with SAP HANA Cockpit
Managing Tenant Databases

10 Administering and Monitoring a Database
Keep track of database health, services, memory allocation, performance, and alerts.
SAP HANA cockpit helps you to monitor many details pertaining to single- and multi-host resources. You can perform such tasks as:
● Monitor overall database health● Monitor status and resource usage of individual database services● Analyze database performance across a range of key performance indicators related to memory, disk, and
CPU usage● Analyze the comparative memory utilization of column tables● Analyze the memory statistics of the components of database services● Monitor alerts occurring in the database and analyze patterns of occurrence● Configure the alerting mechanism, for example, change alert threshold values, switch alert checkers on/
off, and check for alerts out of schedule● Monitor the status of system replication (if enabled)
It's important that you monitor the operation of SAP HANA databases on a regular basis. Although SAP HANA actively alerts you of critical situations, keeping an eye on resource usage and performance will help you identify patterns, forecast requirements, and recognize when something is wrong.
Related Information
Using the Overview to Manage a Resource [page 160]Start a Resource [page 174]Stop a Resource [page 175]Manage Services [page 168]Analyze Memory Statistics [page 176]Monitoring Alerts [page 213]Configuring Alerts [page 217]Managing Workload Classes in SAP HANA Cockpit [page 235]Monitor Tables by Size and Usage [page 183]Manage System Configuration in SAP HANA Cockpit [page 223]Monitoring Health in Multi-Host Systems [page 249]Manage Hadoop Clusters [page 252]System General Information [page 168]Using the Cockpit to Troubleshoot an Unresponsive Resource [page 252]
SAP HANA Administration with SAP HANA CockpitAdministering and Monitoring a Database P U B L I C 159

10.1 Using the Overview to Manage a Resource
The Overview displays important metrics and available functions, regardless of whether the resource you are managing is a single-host or multi-host system, or a tenant database.
Through the Overview, you can view key health indicators for this specific resource, such as database status, alerts, and resource utilization. You also have access to tools that allow you to perform database administrations tasks, such as performance analysis, and executing SQL statements. Different parts of a single tile can link to different views or applications. This way, you can see various components in a single view and make the decision whether to further examine issues by drilling down.
The Overview is organized by tiles, each of which represents a task or group of actions. You can search for a specific tile, or filter by area to see related tiles.
To launch the Overview, drill down on the name of the resource from the Resource Directory. Unless your administrator has enabled single sign-on, you'll need to connect to the resource with a database user that has the system privilege CATALOG READ and SELECT on _SYS_STATISTICS.
NoteIf you register an offline resource and display its Overview, you'll notice that much of the information that appears on the Overview of an online resource is missing. You can use the cockpit to start the resource: click the Stopped icon, then click Start System.
Overall Database Status
Overall Database Status can be running, running with issues, or stopped. Clicking on this status brings you to Manage Services where you can stop or kill a service, and start or stop a system.
Alerts
Alert counts for the resource are displayed for high- and medium-priority alerts, broken down by the nine alert categories defined in SAP HANA. (You can refresh the displayed data by using the manual or auto-refresh icons in the top right corner). Clicking on the Alerts tile brings you to the Alert Monitor for the resource. In the bottom right corner there is a status message showing vital information about SAP HANA processes that collect data. By noting the status messages within the tile, you can easily ascertain the validity of what you are seeing.
Usage and Performance Metrics
You can monitor key database metrics through the CPU Usage, Memory Usage and Disk Usage tiles, as well as the Threads, Sessions and Monitor Statements tiles. In a multi-host system, each host is represented by a clickable bar, with the selected host having a time graph displayed to the right of the bar chart. Hover over the bars to see details for the selected host. If a bar is highlighted, there is an associated high (red) or medium
160 P U B L I CSAP HANA Administration with SAP HANA Cockpit
Administering and Monitoring a Database

(yellow) alert. With single-host resources, since there is only one host, no bar graphs are displayed. By viewing this high-level information, you can decide whether to drill down to the Performance Monitor. See Monitoring and Analyzing with the Performance Monitor.
Smart Data Access
Without copying data directly into an SAP HANA database, you can use Smart Data Access to access remote data as if it were stored in local tables. Refer to the Smart Data Access section of the SAP HANA Administration Guide.
System Replication
If a database resource is part of a system replication configuration, you can monitor the status of replication between the primary system and the secondary system(s). See Monitor System Replication.
Additional Functionality
You can launch additional functionality by selecting any of the links organized under the headings Monitoring, DB Administration, User and Role Management, Alerting and Diagnostics, Other Administration, Application Lifecycle Management, Platform Lifecycle Management and Help. Specific links and related tasks are described in the subsequent topics of this guide.
Security
The Data Storage Security, Auditing, Authentication blocks and the Security Related Links help you to monitor many critical security settings. Additionally, you can perform administration tasks related to data and communication encryption, and audit logging. See Monitoring Critical Security Settings.
Performance Management
Use Analyze Workload, Capture Workload and Replay Workload to manage performance. See Capturing and Replaying Workloads.
Use Analyze Workload to analyze the database performance. See Monitoring, Managing, and Analyzing Performance in SAP HANA Cockpit.
SAP HANA Administration with SAP HANA CockpitAdministering and Monitoring a Database P U B L I C 161

Additionally-installed SAP HANA Contexts
Other cockpit features that allow you to manage additionally-installed contexts (for example, SAP HANA dynamic tiering) are only visible and available if the specific context has been installed.
Related Information
Monitoring Tenant Databases in SAP HANA Cockpit [page 151]Manage Services [page 168]Monitoring Alerts [page 213]Monitoring and Analyzing with the Performance Monitor [page 270]Monitoring, Analyzing, and Improving Performance in SAP HANA Cockpit [page 268]Monitoring SAP HANA System Replication with the SAP HANA Cockpit [page 494]Monitoring Critical Security Settings [page 365]Capturing and Replaying Workloads [page 284]Managing Multiple Resources in SAP HANA Cockpit [page 87]Connect to a Resource using Database Credentials [page 93]Personalizing the SAP HANA Cockpit [page 86]
10.1.1 Tiles Available on the Overview
The SAP HANA cockpit offers many apps to help you administer and monitor databases. These are accessible by selecting individual tiles or links on the system Overview. If you don't have the required privileges, specifc tiles, features, or actions may not be available to you.
Alerting and Diagnostics
Link Description
Alerts Indicates the number of high and medium alerts currently raised in the database and opens Alerts where you can view and analyze alert details
Configure alerts Opens Alert Configuration where you can configure alert schedules and thresholds and set up e-mail notification
View trace and diagnostic files Opens the Trace tool of the SAP HANA Database Explorer for SAP HANA cockpit
NoteThe Trace tool opens in a new window.
162 P U B L I CSAP HANA Administration with SAP HANA Cockpit
Administering and Monitoring a Database

Link Description
Troubleshoot unresponsive systems Opens an application where you can troubleshoot and diagnose problems, even when the system is stopped or cannot be reached by SQL due to performance problems
Administration
Tile Description
Manage Services Indicates overall database health
The following statuses are possible:
● RunningAll services are running.
● Running with issuesAll services are running, but there are high-priority alerts.
● Not runningOne or more services are not started.
The number of services running and not running are indicated. If the database is distributed across multiple hosts, this includes all services on worker hosts.
This tile opens Manage Services where you can monitor the status and resource usage of individual database services, as well as perform other administration tasks such as stopping and removing services.
Used Memory Indicates the total amount of memory currently used by the SAP HANA database in relation to the allocation limit
If the database is distributed across multiple hosts, the memory usage of all worker hosts is indicated. The host with the highest (most critical) memory usage is shown in more detail.
This tile opens Performance Monitor where you can visualize and explore the usage history of key system resources (CPU, memory, and disk). When you access Performance MonitorIndicates the percentage of CPU used by the SAP HANA database compared with the operating system as a whole from the Used Memory tile, memory-related KPIs are automatically selected.
CPU Usage Indicates the percentage of CPU used. If the database is distributed across multiple hosts, the CPU usage of all worker hosts is indicated. The host with the highest (most critical) CPU usage is shown in more detail.
This tile opens Performance Monitor where you can visualize and explore the usage history of key system resources (CPU, memory, and disk). When you access Performance Monitor from the CPU Usage tile, CPU-related KPIs are automatically selected.
SAP HANA Administration with SAP HANA CockpitAdministering and Monitoring a Database P U B L I C 163

Tile Description
Disk Usage Indicates the total usage of all disks, that is including space used by non-SAP HANA data
The disk with the highest (most critical) disk usage is shown in more detail.
This tile opens Performance Monitor where you can visualize and explore the usage history of key system resources (CPU, memory, and disk). When you access Performance Monitor from the Disk Usage tile, disk-related KPIs are automatically selected.
Table Usage Indicates the number of hosts monitored and the name of the host with the highest memory usage.
If alerts exist, the tile displays the total for medium and high priority alerts.
This tile opens Table Usagewhere you can visualize tables by size, explore the usage history of tables, and move tables to warm storage.
Monitor Statements Indicates the number of long-running statements and blocking situations as determined by the corresponding alerts.
If statement memory tracking is enabled, this is also indicated.
This tile opens Monitor Statements where you can analyze the most critical statements currently running in the database and if necessary, enable statement memory tracking.
Manage Workload Classes This tile opens Manage Workload Classes.
Threads Indicates the number of currently active and blocked threads
This tile opens Threads where you can analyze active threads currently running in the database.
Service Restarts Indicates the number of services that have been manually or automatically restarted
If restarts have been detected, this tile opens Alerts where you can view the related alerts.
Manage Roles and Users Opens the Security tool of the SAP HANA Web-based Development Workbench where you can provision users
NoteThe Security tool of the SAP HANA Web-based Development Workbench opens in a new window and requires additional roles, either sap.hana.xs.ide.roles::SecurityAdmin or the parent role sap.hana.xs.ide.roles::Developer.
SAP HANA Administration Help Opens the SAP HANA documentation that describes those database administration tasks that you can perform using the SAP HANA cockpit
164 P U B L I CSAP HANA Administration with SAP HANA Cockpit
Administering and Monitoring a Database

System Replication
Tile Description
System Replication Indicates status of system replication
Information displayed includes:
● Type of landscape (2 tier or 3 tier)● Replication mode
(SYNC, SYNCMEM or ASYNC) – in a 3 tier landscape only the replication mode between the primary and tier 2 is shown, because the replication mode between tier 2 and tier 3 must be ASYNC
● The following states can be shown:○ Not configured (meaning system replication is not
configured)○ Active and in sync (green square)○ All services are active but not yet in sync yet (yel
low triangle)○ Errors in Replication (red circle)
This tile opens the System Replication app where you see an overview of the system replication: the header shows the number of active and standby hosts (for multi host systems with more than two hosts) / host name (for systems with less than 3 nodes), average log buffer write wait time, which depending on the replication mode in use, shows the time taken to ship the log buffers to the secondary.
● SYNC/SYNCMEM: round trip time to send the log buffers and receive an acknowledgment
● ASYNC: ASYNC: start time is when the log buffers are created, end time is when they are sent out to the network.
All changes to data are captured in the redo log, which SAP HANA persists in form of log buffers of 4 KB to 1 MB size in the log volumes. In SAP HANA system replication every write transaction requires that the redo log buffers are not only written locally to persistent storage but are also shipped to the secondary site. This log buffer write wait time KPI represents the time taken to ship log buffers to the secondary site over the last 24 hours.
SAP HANA Administration with SAP HANA CockpitAdministering and Monitoring a Database P U B L I C 165

Smart Data Access
Tile Description
Remote Connections Monitor Indicates the number of active remote connections
This tile opens the Remote Connections Monitor app, where you can analyze remote connections in the database.
Remote Statements Monitor Indicates the number of running remote statements
This tile opens the Remote Statements Monitor app, where you can analyze remote statements in the database.
Performance Management
Tile Description
Capture Workload Indicates the number of captured workloads
If a workload is being captured, this tile indicates its name, the start time, and the duration.
The tile opens the Capture Workload app, where you can capture and monitor workloads. You can start and stop any started captures directly from this tile.
Replay Workload Indicates the number of replayed workloads
If a captured workload is being replayed, this tile indicates its name, the start time, and the duration.
The tile opens the Replay Workload app, where you can preprocess workloads, replay preprocessed workloads and monitor during workload replay. You can start and stop any started replays directly from this tile.
Analyze Workload Indicates overall system health
The tile opens the Analyze Workload app, where you can identify the root cause of performance issues.
166 P U B L I CSAP HANA Administration with SAP HANA Cockpit
Administering and Monitoring a Database

Security
Tile Description
Network Security Information Indicates the cryptographic library in use in the system and the minimum accepted version of the transport layer security/secure sockets layer (TLS/SSL) protocol
This tile opens the Network Security Information app where you can see more detailed information about network configuration.
Auditing Indicates whether or not auditing is enabled in the system, the number of audit policies, the configured audit trail target, as well as any auditing-related alerts
If a firefighter policy is active in the system (that is, a policy that audits all the actions of a particular user), this is also indicated.
This tile opens the Auditing app where you can see more detailed information about audit policies and how auditing is configured.
Data Storage Security Indicates whether or not data volumes are encrypted, as well as when the master keys of the secure stores in the file system (SSFS) were changed
This tile opens the Data Volume Encryption app where you see more information about the encryption status of individual data volume, as well as enable or disable encryption.
CautionDo not enable data volume encryption in an existing system without having first read the section Enable Data Volume Encryption in an Existing SAP HANA System.
SAP HANA Documentation – Security Administration Provides access to the SAP HANA documentation that describes those security administration tasks that you can perform using the SAP HANA cockpit
Certificate Management
Tile Description
Certificate Store Provides access to the certificate store, an in-database repository for X.509 client certificates
Configure Certificate Collections Indicates the number of collections and the number of certificates that are due to expire (if any), and provides access to the Certificate Collections app
SAP HANA Administration with SAP HANA CockpitAdministering and Monitoring a Database P U B L I C 167

10.1.2 System General Information
Accessing general information about the SAP HANA system, such as operational status and database version, can assist you to monitor your system.
In SAP HANA cockpit, you can access General Information by drilling down in the system Overview. To do this, your database user needs the system privilege CATALOG READ.
Details include:
● Information such as operational status, system usage type, whether the system has multiple hosts, the number of hosts (if distributed), and database version
● The SAP HANA version history● Information about the plug-ins that are installed● The status of replication from your production system to a secondary system. This information is only
available and applicable if you are operating a secondary instance of your database (for example, in a high availability scenario). If this is the case, then content from the primary or production instance of your database is replicated to the secondary instance.
10.2 Manage Services
To monitor the health of your SAP HANA database in more detail, for example, to troubleshoot performance bottlenecks, you can analyze the status and resource usage of individual database services. If necessary, you can perform follow-up operations, such as starting missing services, stopping a service, or killing a service. You can also start or stop a system.
Context
You can use the cockpit to monitor and manage more than one resource, each running version SAP HANA 1.0 SPS 12 or later. Any resource running version SAP HANA 2.0 SPS 01 or later is set in multiple-container mode by default. The cockpit can also monitor single-container systems running earlier versions of SAP HANA. When you drill down to the system Overview, and subsequently to Manage Services, the operations you have the option to perform depend on whether you are displaying a tenant or a system database.
Procedure
Open Manage Services in SAP HANA cockpit by clicking the Overall Database Status in the system Overview.You see the status of all the services in the database. For each service, detailed information about its memory consumption is available. For more information, see Service Details.
168 P U B L I CSAP HANA Administration with SAP HANA Cockpit
Administering and Monitoring a Database

NoteNot all columns are visible by default. You can configure which columns are visible by clicking the configuration button in the table toolbar. You can configure the sort order of the information by clicking the sort button.
Next Steps
● If there are any alerts in the system, you can open them by clicking Go to Alerts.● If you want to investigate the memory usage history of a particular service, click the mini chart in the
Memory column to open Memory Analysis for the service in a new window. See Analyze Memory Allocation Statistics. You can also use Reset Memory Statistics link to clear the statistics history.
● Depending on the situation, you may need to perform further operations on all or selected services (for example, start, stop, or kill a service). For more information about the available options, see Operations on Services.
● If necessary, you can also start or stop a system. See Start a Resource and Stop a Resource.
Related Information
Open SAP HANA Cockpit [page 15]Service Details [page 169]Operations on Services [page 172]Monitoring Alerts [page 213]Analyze Memory Statistics [page 176]Assign Roles to a Database User [page 485]Start a Resource [page 174]Stop a Resource [page 175]Add or Remove Services in a Tenant Database [page 155]
10.2.1 Service Details
Manage Services provides you with detailed information about database services for an individual resource.
NoteNot all of the columns listed below are visible by default. You can add and remove columns in the table personalization dialog, which you open by clicking the personalization icon in the table toolbar.
The table below lists the information available for services.
SAP HANA Administration with SAP HANA CockpitAdministering and Monitoring a Database P U B L I C 169

Column Description
Host Name of the host on which the service is running
Status The status of the service
The following statuses are possible:
● Running● Running with Issues (where at least one service is not running, or there is at least one
high alert)● Starting● Stopping● Stopped● Not Running
To investigate why the service is not running, you can navigate to the crash dump file created when the service stopped.
NoteThe crash dump file opens in the Trace tool of the SAP HANA Web-based Development Workbench. For this, you need the role sap.hana.xs.ide.roles::TraceViewer or the parent role sap.hana.xs.ide.roles::Developer.
Service Service name, for example, indexserver, nameserver, xsengine, and so on
Role Role of the service in a failover situation
Automatic failover takes place when the service or the host on which the service is running fails.
The following values are possible:
● MasterThe service is the active master worker.
● No entryThe service is a slave worker.
● StandbyThe service is in standby mode. It does not contain any data and does not receive any requests.
Port Port that the system uses for internal communication between services
Start Time Time at which the service started
NoteThe time is given in the timezone of the SAP HANA server.
CPU Mini chart visualizing the CPU usage of the service
Clicking the mini chart opens the Performance Monitor for a more detailed breakdown of CPU usage.
170 P U B L I CSAP HANA Administration with SAP HANA Cockpit
Administering and Monitoring a Database

Column Description
Memory Mini chart visualizing the memory usage of the service
● Dark green shows the service's used memory.● Light green shows the service's peak memory.● The grey stroke represents the effective allocation limit.● The light grey background represents the physical memory.
Clicking the mini chart opens the Memory Analysis app for a more detailed breakdown of memory usage.
Used Memory (MB) Amount of memory currently used by the service
Clicking the mini chart opens the Memory Analysis app for a more detailed breakdown of memory usage.
Peak Memory (MB) Highest amount of memory ever used by the service
Effective Allocation Limit (MB) Effective maximum memory pool size that is available to the process considering the current memory pool sizes of other processes
Memory Physical on Host (MB)
Total memory available on the host
All Process Memory on Host (MB)
Total used physical memory and swap memory on the host
Allocated Heap Memory (MB) Heap part of the allocated memory pool
Allocated Shared Memory (MB)
Shared memory part of the allocated memory pool
Allocation Limit (MB) Maximum size of allocated memory pool
CPU Process (%) CPU usage of process
CPU Host (%) CPU usage on host
Memory Virtual on Host (MB) Virtual memory size on the host
Process Physical Memory (MB)
Process physical memory used
Process Virtual Memory (MB) Process virtual memory
Shrinkable Size of Caches (MB)
Memory that can actually be freed in the event of a memory shortage
Size of Caches (MB) Part of the allocated memory pool that can potentially be freed in the event of a memory shortage
Size of Shared Libraries (MB) Code size, including shared libraries
Size of Thread Stacks (MB) Size of service thread call stacks
Used Heap Memory (MB) Process heap memory used
Used Shared Memory (MB) Process shared memory used
SQL Port SQL port number
Process ID Process ID
SAP HANA Administration with SAP HANA CockpitAdministering and Monitoring a Database P U B L I C 171

Related Information
Analyze Memory Statistics [page 176]Monitoring and Analyzing with the Performance Monitor [page 270]
10.2.2 Operations on Services
As an administrator, you may need to perform certain operations on all or selected services, for example, start missing services, or stop or kill a service.
You can perform several operations on database services from Manage Services. You can trigger these operations by selecting the service and then clicking the required option in the footer toolbar.
NoteTo perform operations on services, you need to be an administrator. Depending on the service, some options may not be available. You can use the cockpit to monitor and manage more than one resource, each running version SAP HANA 1.0 SPS 12 or later. Any resource running version SAP HANA 2.0 SPS 01 or later is set in multiple-container mode by default. The cockpit can also monitor single-container systems running earlier versions of SAP HANA. When you drill down to the system Overview, and subsequently to Manage Services, the operations you have the option to perform depend on whether you are displaying a tenant or a system database.
Option Description
Start Missing Services Starts any inactive services. Can only be performed in Manage Services for the system database.
Stop Service Stops the selected service normally
The service is then typically restarted.
Kill Service Stops the selected service immediately and if the related option is selected, creates a crash dump file
The services is then typically restarted.
Add Service Adds the service you select from the list. Can only be performed in Manage Services for the system database. Services cannot be added to the system database itself.
NoteTo add a service, you must have the EXECUTE privilege on the stored procedure SYS. UPDATE_LANDSCAPE_CONFIGURATION.
172 P U B L I CSAP HANA Administration with SAP HANA Cockpit
Administering and Monitoring a Database

Option Description
Remove Service Removes the selected service. Can only be performed in Manage Services for the system database.
You can only remove services that have their own persistence. If data is still stored in the service's persistence, it is re-distributed to other services.
You cannot remove the following services:
● Name server● Master index server● Primary index server on a host
NoteTo remove a service, you must have the EXECUTE privilege on the stored procedure SYS. UPDATE_LANDSCAPE_CONFIGURATION.
Reset Memory Statistics Resets all memory statistics for all services. Can only be performed in Manage Services for the system database.
Peak used memory is the highest recorded value for used memory since the last time the memory statistics were reset. This value is useful for understanding the behavior of used memory over time and under peak loads. Resetting peak used memory allows you, for example, to establish the impact of a certain workload on memory usage. If you reset peak used memory and run the workload, then you can then examine the new peak used memory value.
Go To Alerts Displays the alerts for this database.
NoteThe SAP HANA database provides several features in support of high availability, one of which is service auto-restart. In the event of a failure or an intentional intervention by an administrator that disables one of the SAP HANA services, the service auto-restart function automatically detects the failure and restarts the stopped service process. For more information about high availability, see High Availability for SAP HANA in the SAP HANA Administration Guide.
Related Information
Start a Resource [page 174]Stop a Resource [page 175]Work with Alerts [page 214]
SAP HANA Administration with SAP HANA CockpitAdministering and Monitoring a Database P U B L I C 173

10.3 Start a Resource
Use SAP HANA cockpit to start a resource.
Prerequisites
You have the credentials of the operating system user (<sid>adm user) that was created when the system was installed.
Procedure
1. In SAP HANA cockpit, from the Resource Directory, drill down to the Overview.2. On the Overall Database Status tile, click Start System.
Results
The database services start one by one, including those of any tenant databases. For details on starting an individual tenant database, see Start a Tenant Database.
When all services have started, the system has the status Running.
TipTo analyze any problems that may occur during startup, you can access the system's diagnosis files from the homepage of the SAP HANA cockpit.
If you're unable to start a resource that was registered while it was unreachable, check the information entered during registration. The cockpit can't check the registration information for an unreachable resource, and thus can't tell the difference between a host or resource that's unreachable and one that doesn't exist. In particular, make sure these are correct:
● Host name● Instance number● Technical user name and password● SAP HANA system ID
If you find an error, unregister the resource and register it again.
Related Information
Start a Tenant Database [page 117]
174 P U B L I CSAP HANA Administration with SAP HANA Cockpit
Administering and Monitoring a Database

Manage Services [page 168]Register a Resource [page 34]Unregister a Resource [page 43]
10.4 Stop a Resource
Use SAP HANA cockpit to stop a resource.
Prerequisites
You have the credentials of the operating system user (<sid>adm user) that was created when the system was installed.
Procedure
1. In SAP HANA cockpit, from the Resource Directory, drill down to the Overview.2. On the Overall Database Status tile, click Stop System.3. Specify how you want to stop the system:
Option Description
Softly The system is stopped after all running statements have finished. If the system doesn't stop before the specified timeout, it is stopped immediately. The default timeout is 5 minutes.
Immediately The system is stopped immediately. Open transactions are aborted and rolled back.
Results
The database services stop one by one. The services of tenant databases are stopped. For more information about how to stop an individual tenant database, see Stop a Tenant Database in the SAP HANA Administration Guide.
When all services have stopped, the system has the status Stopped.
TipTo analyze problems even when the system is stopped, you can access the system's diagnosis files from the homepage of the SAP HANA cockpit.
SAP HANA Administration with SAP HANA CockpitAdministering and Monitoring a Database P U B L I C 175

Related Information
Manage Services [page 168]Stop a Tenant Database [page 118]
10.5 Analyze Memory Statistics
Analyzing the memory allocation of the SAP HANA database can help you understand and resolve unusual memory usage and out-of-memory incidents.
Context
The Memory Analysis app enables you to visualize and explore the memory allocation of every service of a selected host during a specified time range. If you notice an increase in overall memory usage, you can investigate whether it's due to a particular component, allocator, or table.
Procedure
1. On the Memory Usage card in the Overview, click Analyze Memory History to open Memory Analysis.2. Use the elements in the header to configure the display of memory statistics:
Element Description
Host and Services Selection drop-down Opt to display memory statistics from a different host and service combination.
Units Selection drop-down Select a unit of measure in which to display all memory statistics
Time Selection Select a time range for the memory allocation (upper) section, or select Custom in order to edit the time range.
Open In Opt to view the service you have selected through the Memory Analysis app in the Performance Monitor or the Workload Analyzer.
Collection Frequency link View how often information is collected to populate the various charts and graphs. If it is necessary, you can use the Configuration of System Properties app to modify the interval parameter of a statisticsserver component. Use caution because changes to the interval may affect performance.
176 P U B L I CSAP HANA Administration with SAP HANA Cockpit
Administering and Monitoring a Database

Element Description
Memory Alert Settings Access these settings under the gear icon to turn on or off the display of alerts and specify which priority level of alerts should be displayed.
Threshold of Memory Usage View the threshold of high priority memory usage alerts so you can determine what percentage of the effective allocation limit is being used by a service.
NoteData is collected and displayed only after the statistics server has been enabled. Ensure that you have configured the systvem properties (the .ini file) so that the statistics server's active parameter been set to true.
3. Analyze the memory statistics by exploring the data in the upper chart.
Element Description
Allocated Memory The pool of memory preallocated by the host for storing in-memory table data, thread stacks, temporary results and other system data structures.
Host Allocation Limit The global_allocation_limit for the host (as set in the global.ini configuration file).
Service Allocation Limit Each service running on the host has an allocation limit. Collectively, all services cannot consume more memory than the global allocation limit.
Total Used Memory The total amount of memory used by the selected service on the selected host, including program code and stack, all data and system tables, and the memory required for temporary computations.
Memory Alert Icon Represents one or more alerts triggered by a memory event. You can click individual alert icons and scroll through details, or navigate to the Alerts app.
4. Move the vertical selection bar in the upper chart to populate the data in the lower chart. The vertical selection bar snaps to the closest time for which there is collected data for the components. You can control what is displayed in the lower chart by selecting one of its top tabs, as described in the next steps.
5. Select the Top Consumers tab to have the lower chart display details about what is consuming the most memory for the host and service, in the given time period. Up to 50 top consumers are displayed. You can step through the collected data points by using the arrow buttons.
Element Description
Consumer Up to 50 allocators, objects or other elements that have consumed the most memory during the specific time (chosen by the vertical selection bar in the upper chart).
Used Memory The amount of memory consumed, displayed in the measurement units specified at the top of the page.
SAP HANA Administration with SAP HANA CockpitAdministering and Monitoring a Database P U B L I C 177

Element Description
Component The component with which the consumer is associated.
Used memory history Expand Used memory history to see a chart of the top consumers (up to 10) for the time range selected at the top of the page.
6. Select the Components tab to have the lower chart display the Used Memory by Component.
Element Description
Used Memory by Component For the specific time (chosen by the vertical selection bar in the upper chart), the components of the selected service are listed in descending order of used memory.
Used Memory by Type The donut chart displays a visual representation of the types of used memory for the specific time.
Components Used Memory History Filling the checkbox of one or more components populates the Used Memory History chart.
7. Select the Allocators tab to display more detailed memory use in the lower chart. You can filter by component type. You can step through the collected data points by using the arrow buttons. (Allocators that have used less than 1 GB of memory are not displayed.)
Element Description
Used Memory by Allocator For the specific time (chosen by the vertical selection bar in the upper chart), allocators of the selected component are listed in descending order of used inclusive memory. By clicking on a allocator, you can expand the list.
Filter by component name To further refine the displayed allocator data, select the fil-ter icon to specify one or more component name.
Allocators Used Memory History Filling the checkbox of one or more allocators populates the Used Memory History chart.
8. Select the Tables tab to see statistics about tables' used memory or number of rows in the lower chart. Filter the display using the Chart Value, Show Top (number), Filter by Schema, and Time Range filter options.
Element Description
Top Tables by Size When you select the Used Memory Size chart value, the chart displays the breakdown of memory usage of the highest consuming tables for the specified time.
Top Tables by Growth When you select the Used Memory Size chart value, the chart displays the memory usage of the tables with the largest change in consumption for the selected time period. Hover over the data to see the Previous Size memory usage value from the beginning of the time period and the Growth during the time period (where the current size of the table is the sum of Previous Size and Growth).
178 P U B L I CSAP HANA Administration with SAP HANA Cockpit
Administering and Monitoring a Database

Element Description
Top Tables by Rows When you select the Number of Rows chart value, the chart displays the number of rows for each of the highest consuming tables for the specific time (chosen by the vertical selection bar in the upper chart).
Top Tables by Rows Growth When you select the Number of Rows chart value, the chart displays the number or rows for each of the tables with the largest change in consumption for the selected time period.
9. Select the Out of Memory Events tab to have the lower chart display the number of unique out-of-memory events that have occurred in the time range specified in the header. (The vertical selection bar does not influence the number of events displayed.)
Element Description
Occurrences The number of times a specific OOM event has been triggered.
Last Occurrence The time and date of the most recent occurrence of the OOM event.
Last Reason The parameter that triggered the most recent occurrence of the OOM event.
Statement The SQL statement related to the OOM event.
Statement Hash The unique identifier for the OOM event. Click the OOM identifier to open the Workload Analyzer and investigate the event.
TipIf an event has a corresponding OOM dump file, you can select View Trace to launch the Dump Viewer in the SAP Database Explorer.
In Memory Statistics charts you can choose to display historical data for a time range between 24 hours and six weeks. In order to have a date range longer than six weeks (42 days), you can use SQL to update the RETENTION_DAYS_CURRENT value in the table "_SYS_STATISTICS"."STATISTICS_SCHEDULE".
Related Information
Types of Memory Alerts [page 180]System Views Used to Create Memory Alerts [page 183]Manage Services [page 168]Manage System Configuration in SAP HANA Cockpit [page 223]
SAP HANA Administration with SAP HANA CockpitAdministering and Monitoring a Database P U B L I C 179

10.5.1 Types of Memory Alerts
The Memory Statistics chart can notify you about a variety of memory-related alerts.
Memory alerts related to the entire system
Alert Description Threshold Units ALERT_ID
Licensed memory usage Determines what percentage of licensed memory is used.
percent 44
Overflow of metadata version space
Determines the overflow ratio of the metadata version space.
ratio 74
Agent memory usage Determines what percentage of total memory available on the agent is used .
percent 701
Memory alerts related to the host
Alert Description Threshold Units ALERT_ID
Host physical memory usage Determines what percentage of total physical memory available on the host is used. All processes that consume memory are considered, including non-SAP HANA processes.
percent 1
Streaming project physical memory usage
Determines what percentage of total physical memory available on the host is used for the streaming project.
percent 602
Plan cache hit ratio Determines whether the plan cache hit ratio is too low.
ratio 91
Cached view size Determines how much memory is occupied by the cached view.
percent 81
Memory alerts related to services
Alert Description Threshold Units ALERT_ID
Memory usage of name server
Determines what percentage of allocated shared memory is being used by the name server on a host.
percent 12
Memory usage of services Determines what percentage of its effective allocation limit is being used by a service.
percent 43
Plan cache hit ratio Determines whether the plan cache hit ratio is too low.
ratio 91
180 P U B L I CSAP HANA Administration with SAP HANA Cockpit
Administering and Monitoring a Database

Alert Description Threshold Units ALERT_ID
Cached view size Determines how much memory is occupied by the cached view.
percent 81
Memory alerts related to tables
Alert Description Threshold Units ALERT_ID
Record count of non-partitioned column-store tables
Determines the number of records in non-partitioned column-store tables, but ignores information stored in statistics_exclude_tables. Current table size is not critical. Partitions need only be considered if tables are expected to grow rapidly. (A non-partitioned table cannot contain more than 2,000,000,000 (2 billion) rows).
records 17
Alert_Mon_Column_Tables _Record_Count_Incl
Determines the number of records in non-partitioned column-store statistics_exclude_tables. This alert is inactive, unless you activate it.
records 117
Table growth of non-partitioned column-store tables
Determines the growth rate of non-partitioned column tables.
percent 20
Record count of column-store table partitions
Determines the number of records in the partitions of column-store tables, but ignores information stored in statistics_exclude_tables. A table partition cannot contain more than 2,147,483,648 (2 billion) rows.
records 27
Alert_Partitioned_Table _Record_Count_Incl
Determines the number of records in the partitions of column-store statistics_exclude_tables. This alert is inactive, unless you activate it.
records 127
Size of delta storage of column-store tables
Determines the size of the delta storage of column tables.
MB 29
SAP HANA Administration with SAP HANA CockpitAdministering and Monitoring a Database P U B L I C 181

Alert Description Threshold Units ALERT_ID
Total memory usage of column-store tables
Determines what percentage of the effective allocation limit is being consumed by individual column-store tables as a whole (that is, the cumulative size of all of a table's columns and internal structures).
percent 40
Memory usage of main storage of column-store tables
Determines what percentage of the effective allocation limit is being consumed by the main storage of individual column-store tables.
percent 45
Columnstore unloads Determines how many columns in columnstore tables have been unloaded from memory. This can indicate performance issues.
tables 55
Total memory usage of table-based audit log
Determines what percentage of the effective memory allocation limit is being consumed by the database table used for table-based audit logging. If this table grows too large, the availability of the database could be impacted.
percent 64
Table growth of rowstore tables
Determines the growth rate of rowstore tables.
percent 67
Total memory usage of row store
Determines the current memory size of a row store used by a service.
percent 68
Row store fragmentation Check for fragmentation of row store.
71
Overflow of rowstore version space
Determines the overflow ratio of the row store version space.
ratio 73
Rowstore version space skew Determines whether the row store version chain is too long.
version 75
Auto merge of column-store tables
Determines whether the delta merge of a table was executed successfully.
records 88
182 P U B L I CSAP HANA Administration with SAP HANA Cockpit
Administering and Monitoring a Database

10.5.2 System Views Used to Create Memory Alerts
The SAP HANA cockpit displays memory alerts in the Memory Analysis app based on SAP HANA system views.
The following system views provide the information with which values for current and historical memory allocation are calculated:
Views from the _SYS schema:
● M_HOST_RESOURCE_UTILIZATION● M_SERVICE_MEMORY● M_SERVICE_COMPONENT_MEMORY● M_RS_TABLES● M_HEAP_MEMORY● M_CS_COLUMNS● M_OUT_OF_MEMORY_EVENTS● M_SQL_PLAN_STATISTICS
Views from the _SYS_STATISTICS schema:
● HOST_RESOURCE_UTILIZATION_STATISTICS● HOST_SERVICE_MEMORY● HOST_SERVICE_COMPONENT_MEMORY● HOST_HEAP_ALLOCATORS● GLOBAL_ROWSTORE_TABLES_SIZE_BASE● HOST_COLUMN_TABLES_PART_SIZE● STATISTICS_OBJECTS● STATISTICS_CURRENT_ALERTS● STATISTICS_ALERT_INFORMATION● STATISTICS_ALERT_THRESHOLDS● GLOBAL_OUT_OF_MEMORY_EVENTS
For more information about these views, see the SAP HANA SQL and System Views Reference.
10.6 Monitor Tables by Size and Usage
Monitor tables to optimize resource utilization and improve query performance.
Context
With Table Usage you can visualize tables by size, explore the usage history of tables, and move tables to warm storage.
SAP HANA Administration with SAP HANA CockpitAdministering and Monitoring a Database P U B L I C 183

Procedure
1. On the Overview page, choose the Monitor table usage link.You see the status of the top column tables in the system by usage.
2. To filter tables shown, adjust the Total Access/Size/Display values and click Go. Click Reset to remove filters.
For the best display, select up to 50 tables. Two options for table analysis are available:
○ For table format display, choose (Show table history as table).○ For graphical format display, choose (Show table history as graph). Mouse over a bubble to show
usage per column table.
Next Steps
Monitor table operations to identify where you can improve performance and reduce memory utilization. Large in-memory tables that are accessed infrequently are good candidates for the SAP HANA dynamic tiering option. Note that tables moved into dynamic tiering disappear from table analysis displays.
Data Distribution Optimizer is part of the SAP HANA Data Warehousing Foundation option, which provides packaged tools for large scale SAP HANA use cases to support more efficient data management and distribution in an SAP HANA landscape. With Data Distribution Optimizer, SAP HANA Data Warehousing Foundation provides an SAP HANA XS-based tool to plan, adjust and analyze landscape redistribution. For more information, see SAP HANA Data Warehousing Foundation - Data Distribution Optimizer Administration Guide in Related Information.
Related Information
Alert Details [page 216]Alert Priorities [page 217]Important Disclaimer for Features in SAP HANA [page 560]SAP Note 2092669
184 P U B L I CSAP HANA Administration with SAP HANA Cockpit
Administering and Monitoring a Database

10.7 Manage Table Redistribution in SAP HANA Cockpit
Use the SAP HANA cockpit to manage table redistribution. You can view and save the current table distribution, automatically generate an optimized table distribution, re-run a previously executed plan, or restore a saved plan.
Context
In a scale-out system, tables and table partitions are distributed across multiple hosts. The location of the tables and partitions can affect performance when queries need to access several tables. You may want to redistribute the tables or partitions to better optimize for particular capabilities. Or you may want to add a new host to the scale-out system and therefore need to redistribute the tables so that some will reside on the new host.
Procedure
Open Table Redistribution in SAP HANA cockpit by clicking Table Distribution in the system Overview.Executed table distribution operations are displayed.
Related Information
Save Current Table Distribution [page 201]Generate and Execute a Table Redistribution Plan [page 198]View Current Table Distribution [page 185]Rerun Table Distribution Plan [page 203]Restore Saved Table Distribution Plan [page 202]
10.7.1 View Current Table Distribution
To support the analysis and monitoring of performance issues in a distributed SAP HANA system, you can use the SAP HANA cockpit to see how tables are distributed across the hosts.
Context
In the case of partitioned tables, you can see how the individual partitions and sub-partitions are distributed, as well as detailed information about the physical distribution, for example, partition ID, partition size, and so on.
SAP HANA Administration with SAP HANA CockpitAdministering and Monitoring a Database P U B L I C 185

Procedure
1. In the SAP HANA cockpit system Overview, select View Current Table Distribution from the lower right of the Table Distribution card.
2. Use the filtering options to refine the list of tables displayed according to table name and/or schema.3. (Optional) Use the checkboxes to display the list of tables as grouped or not grouped, and choose whether
to display the number of partitions and partition IDs.4. (Optional) Select the Analysis tab to display the number of records, partitions and table sizes per host.5. Select Go.
A list of tables is displayed.6. When you hover over a table name, table group name, or the intersection of a table and host, if the item is
displayed in blue, this indicates that you can can click it to display a popover. On the popover, view the displayed information or select an item to perform a specific action.
Related Information
Load or Unload Tables [page 187]Move a Table to Another Host [page 188]Move Table Partitions [page 188]Perform a Delta Merge [page 189]Truncate or Drop a Table [page 190]Display Table Content, Meta Data, Access Statistics, or Runtime Data [page 191]Export as CSV [page 192]
10.7.1.1 View Memory Usage
Using the popover available in View Table Distribution, you can view available memory usage data.
Procedure
1. Open Table Redistribution in SAP HANA cockpit by clicking Table Distribution in the system Overview.2. In the table header, select the View Table Distribution button.3. Select Go.
A list of tables is displayed.4. When you hover over a table name or table group partition ID, click to display a popover.5. In the popover, select View Memory Usage.
186 P U B L I CSAP HANA Administration with SAP HANA Cockpit
Administering and Monitoring a Database

Results
Available memory usage data is displayed.
Related Information
Memory Sizing [page 141]View Current Table Distribution [page 185]
10.7.1.2 Load or Unload Tables
Using the popover available in View Table Distribution, if you have the necessary privileges, you can load or unload tables into memory.
Context
As the SAP HANA database automatically manages the loading and unloading of tables it is not normally necessary to manually load and unload individual tables and table columns. However, this may be necessary for example:
● To precisely measure the total or “worst case” amount of memory used by a particular table (load)● To actively free up memory (unload)
Procedure
1. Open Table Redistribution in SAP HANA cockpit by clicking Table Distribution in the system Overview.2. In the table header, select the View Table Distribution button.3. Select Go.
A list of tables is displayed.4. When you hover over a table name or table group name, click to display a popover.
○ If the table is currently loaded, select Unload from the popover to unload the table.○ If the table is currently unloaded, select Load from the popover to load the table.
5. Select Yes to confirm.
SAP HANA Administration with SAP HANA CockpitAdministering and Monitoring a Database P U B L I C 187

Related Information
Memory Sizing [page 141]View Current Table Distribution [page 185]
10.7.1.3 Move a Table to Another Host
Using the popover available in View Table Distribution, if you have the necessary privileges, you can move a table to another host.
Procedure
1. Open Table Redistribution in SAP HANA cockpit by clicking Table Distribution in the system Overview.2. In the table header, select the View Table Distribution button.3. Select Go.
A list of tables is displayed.4. When you hover over a non-partitioned table name, click to display a popover.5. In the popover, select the arrow to the right of Move table to another host.6. From the drop down list, select the host name.7. Select Move.8. In the dialog box, confirm that you want to proceed with the operation.
Related Information
View Current Table Distribution [page 185]
10.7.1.4 Move Table Partitions
Using the popover available in View Table Distribution, if you have the necessary privileges, you can move table partitions to another host.
Prerequisites
You are familiar with partitioning concepts and operations, as outlined in the Table Partitioning section of the SAP HANA Administration guide.
188 P U B L I CSAP HANA Administration with SAP HANA Cockpit
Administering and Monitoring a Database

Procedure
1. Open Table Redistribution in SAP HANA cockpit by clicking Table Distribution in the system Overview.2. In the table header, select the View Table Distribution button.3. Select Go.
A list of tables is displayed.4. When you hover over the intersection of a table and host, click to display a popover.5. Select the arrow to the right of Move Table Partitions.6. From the drop down list, select a host.7. Select the partitions to be moved (or select the check box beside a host to move all the partitions on that
host).8. Select Move.
Related Information
View Current Table Distribution [page 185]
10.7.1.5 Perform a Delta Merge
Using the popover available in View Table Distribution, if you have the necessary privileges, you can merge the column store table delta storage into a table's main storage.
Context
It may be necessary or useful to trigger a merge operation in some situations, for example:
● An alert has been issued because a table is exceeding the threshold for the maximum size of delta storage.● You need to free up memory. Executing a delta merge operation on tables with large delta storages is one
strategy for freeing up memory. The delta storage does not compress data well and it may hold old versions of records that are no longer required for consistent reads.
See also The Delta Merge Operation in SAP HANA Administration Guide.
Procedure
1. Open Table Redistribution in SAP HANA cockpit by clicking Table Distribution in the system Overview.2. In the table header, select the View Table Distribution button.3. Select Go.
SAP HANA Administration with SAP HANA CockpitAdministering and Monitoring a Database P U B L I C 189

A list of tables is displayed.4. When you hover over a table name or table group name, click to display a popover.5. If a delta merge is possible, Delta Merge is a selectable option on the popover. Select Delta Merge.6. Select Yes to confirm.
Results
The delta merge operation is executed.
Related Information
View Current Table Distribution [page 185]
10.7.1.6 Truncate or Drop a Table
Using the popover available in View Table Distribution, if you have the necessary privileges, you can move a trucate or drop a table.
Procedure
1. Open Table Redistribution in SAP HANA cockpit by clicking Table Distribution in the system Overview.2. In the table header, select the View Table Distribution button.3. Select Go.
A list of tables is displayed.4. When you hover over a partitioned table name or table group name, click to display a popover.5. On the popover, select the arrow to the right of Advanced Operations.
○ Select Truncate Table to truncate the table and remove the table contents.○ Select Drop Table to drop the table.
In the case of a table group, select which tables you want to truncate or drop.6. In the dialog box, confirm that you want to proceed with the operation.
190 P U B L I CSAP HANA Administration with SAP HANA Cockpit
Administering and Monitoring a Database

10.7.1.7 Display Table Content, Meta Data, Access Statistics, or Runtime Data
Using the popover available in View Table Distribution, for a partitioned or non-partitioned table you can display the first 100 rows of data, the xml-formatted meta data, the table access statistics, and the runtime data.
Context
If you are viewing a partitioned table from SAP HANA version SPS 03 or later, you can also view the partition statistics.
Procedure
1.2. Open Table Redistribution in SAP HANA cockpit by clicking Table Distribution in the system Overview.3. In the table header, select the View Table Distribution button.4. Select Go.
A list of tables is displayed.5. When you hover over a table name, click to display the popover.6. Select one of:
○ Show Content○ Show Meta Data○ Show Runtime Data○ Show Access Statistics
A new window displays the details.7. Move between the displayed information by selecting the different tabs.8. (Optional) On the Meta Data tab, select Save As to save the meta data as a local file.9. (Optional) On the Runtime Data tab, to display size information, close the window, select Load Table from
the popover, and then re-select Show Runtime Data.10. (Optional) On the Access Statistics tab, select Reset to restart the collection of access statistics data.
Related Information
View Current Table Distribution [page 185]
SAP HANA Administration with SAP HANA CockpitAdministering and Monitoring a Database P U B L I C 191

10.7.1.8 Export as CSV
Using the popover available in View Table Distribution, you can export a table or a group of tables as a CSV.
Procedure
1. Open Table Redistribution in SAP HANA cockpit by clicking Table Distribution in the system Overview.2. In the table header, select the View Table Distribution button.3. Select Go.
A list of tables is displayed.4. When you hover over a partition name, a table name or table group name, click to display a popover.5. Select Export as CSV.
NoteIf you launch the popover from a table group name, all the tables in the group will be included in the export.
6. In the dialog, specify the path to which the CSV will be saved.7. Specify export options by selecting or de-selecting checkboxes.
Refer to the EXPORT Statement (Data Import Export) topic in the SAP HANA SQL and System Views Reference for more information on these options.
8. Select Save.
10.7.2 Table Placement Rules
Specify rules for where new tables/partitions are placed or where tables/partitions are moved during a redistribution.
Because tables interact with and depend on other tables, in a distributed database landscape, time can be lost when tables or dependent parts are placed on different hosts. Also, the placement of table partitions in the landscape could be a performance critical issue. You can classify each table with group type and subtype information. For your different table classification patterns, a set of configuration values is stored. During operations like table redistribution these patterns are used for control (for example, the placement of parts or the number of partitions). See also the Table Placement section of the SAP HANA Administration Guide.
Related Information
Add a Table Placement Rule [page 193]Manage Table Placement Rule Locations [page 197]
192 P U B L I CSAP HANA Administration with SAP HANA Cockpit
Administering and Monitoring a Database

10.7.2.1 Add a Table Placement Rule
Create a new table placement rule.
Procedure
1. In the SAP HANA cockpit system Overview, select Edit Table Placement Rules from the overflow menu on the lower right of the Table Distribution card.All table placement rules are displayed.
2. Select Add.3. Select or specify a schema name, group name, type and subtype, and table name.4. Specify the rule conditions.
Rule Condition Description
Location There are predefined values for possible locations:○ master: represents the master node○ slave: represents all slave nodes that belong to the
worker group ‘default’○ all: represents all nodes that belong to the worker
group ‘default’, i.e. master node and slave nodes.You can also define a custom location. See Manage Table Placement Rule Locations.
Repartition the table when number of rows exceeds The minium number of records that must exist in the table before a calculation of repartitioning begins. (MIN_ROWS_FOR_PARTITIONING)
Maximum number of rows per partition If the row count in one of the partitions exceeds this value then further splits are considered. (REPARTITIONING_THRESHOLD)
When partitioning, ensure an initial number of partitions The total number of partitions is the interger double of this value. For example, entering a value of 3 leads to a partition number sequence of 1, 3, 6, 12. (INITIAL_PARTITIONS)
Each table in this group has the same number of partitions
Checking the box specifies that all partitions of the tables in a group will contain the same number of partitions
Split the dynamic others partitions when the number of rows exceeds ...
Applies to tables that use the dynamic range partitioning feature.
The maximum number of partitions for a table is 12, by default. (If necessary, you can change the default by modifying the config parameter max_partitions. The maximum number of partitions for a table is also limited to the number of available hosts for the specific table as provided by the table placement landscape. For example, if a table is configured by table placement to be located on slave indexserver and the landscape has 3 slave nodes, you will get 3 or fewer partitions for this table. (If necessary, you can change this behaviour by modifying the config parameter max_partitions_limited_by_locations.
5. Select Save.Suppose you set the following table placement rule:
SAP HANA Administration with SAP HANA CockpitAdministering and Monitoring a Database P U B L I C 193

Location Slave
Repartition the table when number of rows exceeds 40,000,000
Maximum number of rows per partition 30,000,000
When partitioning, ensure an initial number of partitions 3
○ If the landscape has 6 slave nodes, and a table has 1 exiting partition and 39,000,000 records, when the placement rule is applied the table will stay at 1 partition, because the 40,000,000 value was not exceeded.
○ If the landscape has 6 slave nodes, and a table has 1 exiting partition and 40,000,001 records, when the placement rule is applied the table will get 3 partitions, because the 40,000,000 value was exceeded, and the number of records in the table divided by 30,000,000 was greater than 1.
○ If the landscape has 6 slave nodes, and a table has 1 exiting partition and 90,000,001 records, when the placement rule is applied the table will get 6 partitions, because the 40,000,000 value was exceeded, and the number of records in the table divided by 30,000,000 was greater than 3.
Related Information
Manage Table Redistribution in SAP HANA Cockpit [page 185]
10.7.2.2 Edit a Table Placement Rule
Modify an existing table placement rule.
Procedure
1. In the SAP HANA cockpit system Overview, select Edit Table Placement Rules from the overflow menu on the lower right of the Table Distribution card.All table placement rules are displayed.
2. Select an existing table placement rule, then select the edit icon.3. Edit the rule conditions.
Rule Condition Description
Location There are predefined values for possible locations:○ master: represents the master node○ slave: represents all slave nodes that belong to the
worker group ‘default’○ all: represents all nodes that belong to the worker
group ‘default’, i.e. master node and slave nodes.
194 P U B L I CSAP HANA Administration with SAP HANA Cockpit
Administering and Monitoring a Database

Rule Condition Description
You can also define a custom location. See Manage Table Placement Rule Locations.
Repartition the table when number of rows exceeds The minium number of records that must exist in the table before a calculation of repartitioning begins. (MIN_ROWS_FOR_PARTITIONING)
Maximum number of rows per partition If the row count in one of the partitions exceeds this value then further splits are considered. (REPARTITIONING_THRESHOLD)
When partitioning, ensure an initial number of partitions The total number of partitions is the interger double of this value. For example, entering a value of 3 leads to a partition number sequence of 1, 3, 6, 12. (INITIAL_PARTITIONS)
Each table in this group has the same number of partitions
Checking the box specifies that all partitions of the tables in a group will contain the same number of partitions
Split the dynamic others partitions when the number of rows exceeds ...
Applies to tables that use the dynamic range partitioning feature.
The maximum number of partitions for a table is 12, by default. (If necessary, you can change the default by modifying the config parameter max_partitions. The maximum number of partitions for a table is also limited to the number of available hosts for the specific table as provided by the table placement landscape. For example, if a table is configured by table placement to be located on slave indexserver and the landscape has 3 slave nodes, you will get 3 or fewer partitions for this table. (If necessary, you can change this behaviour by modifying the config parameter max_partitions_limited_by_locations.
4. Select Save.Suppose you set the following table placement rule:
Location Slave
Repartition the table when number of rows exceeds 40,000,000
Maximum number of rows per partition 30,000,000
When partitioning, ensure an initial number of partitions 3
○ If the landscape has 6 slave nodes, and a table has 1 exiting partition and 39,000,000 records, when the placement rule is applied the table will stay at 1 partition, because the 40,000,000 value was not exceeded.
○ If the landscape has 6 slave nodes, and a table has 1 exiting partition and 40,000,001 records, when the placement rule is applied the table will get 3 partitions, because the 40,000,000 value was exceeded, and the number of records in the table divided by 30,000,000 was greater than 1.
○ If the landscape has 6 slave nodes, and a table has 1 exiting partition and 90,000,001 records, when the placement rule is applied the table will get 6 partitions, because the 40,000,000 value was exceeded, and the number of records in the table divided by 30,000,000 was greater than 3.
Related Information
Add a Table Placement Rule [page 193]
SAP HANA Administration with SAP HANA CockpitAdministering and Monitoring a Database P U B L I C 195

10.7.2.3 Copy a Table Placement Rule
Create a new table placment rule by copying an existing rule and reusing the same or modified parameters.
Procedure
1. In the SAP HANA cockpit system Overview, select Edit Table Placement Rules from the overflow menu on the lower right of the Table Distribution card.All table placement rules are displayed.
2. Select a rule, then select the copy icon.a. Modify the rule conditions as desired
Rule Condition Description
Location There are predefined values for possible locations:○ master: represents the master node○ slave: represents all slave nodes that belong to the
worker group ‘default’○ all: represents all nodes that belong to the worker
group ‘default’, i.e. master node and slave nodes.You can also define a custom location. See Manage Table Placement Rule Locations.
Repartition the table when number of rows exceeds The minium number of records that must exist in the table before a calculation of repartitioning begins. (MIN_ROWS_FOR_PARTITIONING)
Maximum number of rows per partition If the row count in one of the partitions exceeds this value then further splits are considered. (REPARTITIONING_THRESHOLD)
When partitioning, ensure an initial number of partitions
The total number of partitions is the interger double of this value. For example, entering a value of 3 leads to a partition number sequence of 1, 3, 6, 12. (INITIAL_PARTITIONS)
Each table in this group has the same number of partitions
Checking the box specifies that all partitions of the tables in a group will contain the same number of partitions
Split the dynamic others partitions when the number of rows exceeds ...
Applies to tables that use the dynamic range partitioning feature.
The maximum number of partitions for a table is 12, by default. (If necessary, you can change the default by modifying the config parameter max_partitions. The maximum number of partitions for a table is also limited to the number of available hosts for the specific table as provided by the table placement landscape. For example, if a table is configured by table placement to be located on slave indexserver and the landscape has 3 slave nodes, you will get 3 or fewer partitions for this table. (If necessary, you can change this behaviour by modifying the config parameter max_partitions_limited_by_locations.
b. Select Save.
196 P U B L I CSAP HANA Administration with SAP HANA Cockpit
Administering and Monitoring a Database

Suppose you set the following table placement rule:
Location Slave
Repartition the table when number of rows exceeds 40,000,000
Maximum number of rows per partition 30,000,000
When partitioning, ensure an initial number of partitions 3
○ If the landscape has 6 slave nodes, and a table has 1 exiting partition and 39,000,000 records, when the placement rule is applied the table will stay at 1 partition, because the 40,000,000 value was not exceeded.
○ If the landscape has 6 slave nodes, and a table has 1 exiting partition and 40,000,001 records, when the placement rule is applied the table will get 3 partitions, because the 40,000,000 value was exceeded, and the number of records in the table divided by 30,000,000 was greater than 1.
○ If the landscape has 6 slave nodes, and a table has 1 exiting partition and 90,000,001 records, when the placement rule is applied the table will get 6 partitions, because the 40,000,000 value was exceeded, and the number of records in the table divided by 30,000,000 was greater than 3.
Related Information
Add a Table Placement Rule [page 193]
10.7.2.4 Manage Table Placement Rule Locations
Manage a list of locations for table placement rules.
Procedure
1. In the SAP HANA cockpit system Overview, select Edit Table Placement Rules from the overflow menu on the lower right of the Table Distribution card.All table placement rules are displayed.
2. Add or edit a table placement rule.3. In the Rule Conditions column, select Manage Locations.4. In the Manage Locations dialog, select the right arrow to display more information about the location.
The volume IDs and hosts are listed.5. (Optional) If you are viewing a previously created custom location, you can select or deselect the volumes
you want to associate with the location.6. (Optional) Select Add Location to add a new, custom location.
The list of all possible volumes and hosts appears with checkboxes.
SAP HANA Administration with SAP HANA CockpitAdministering and Monitoring a Database P U B L I C 197
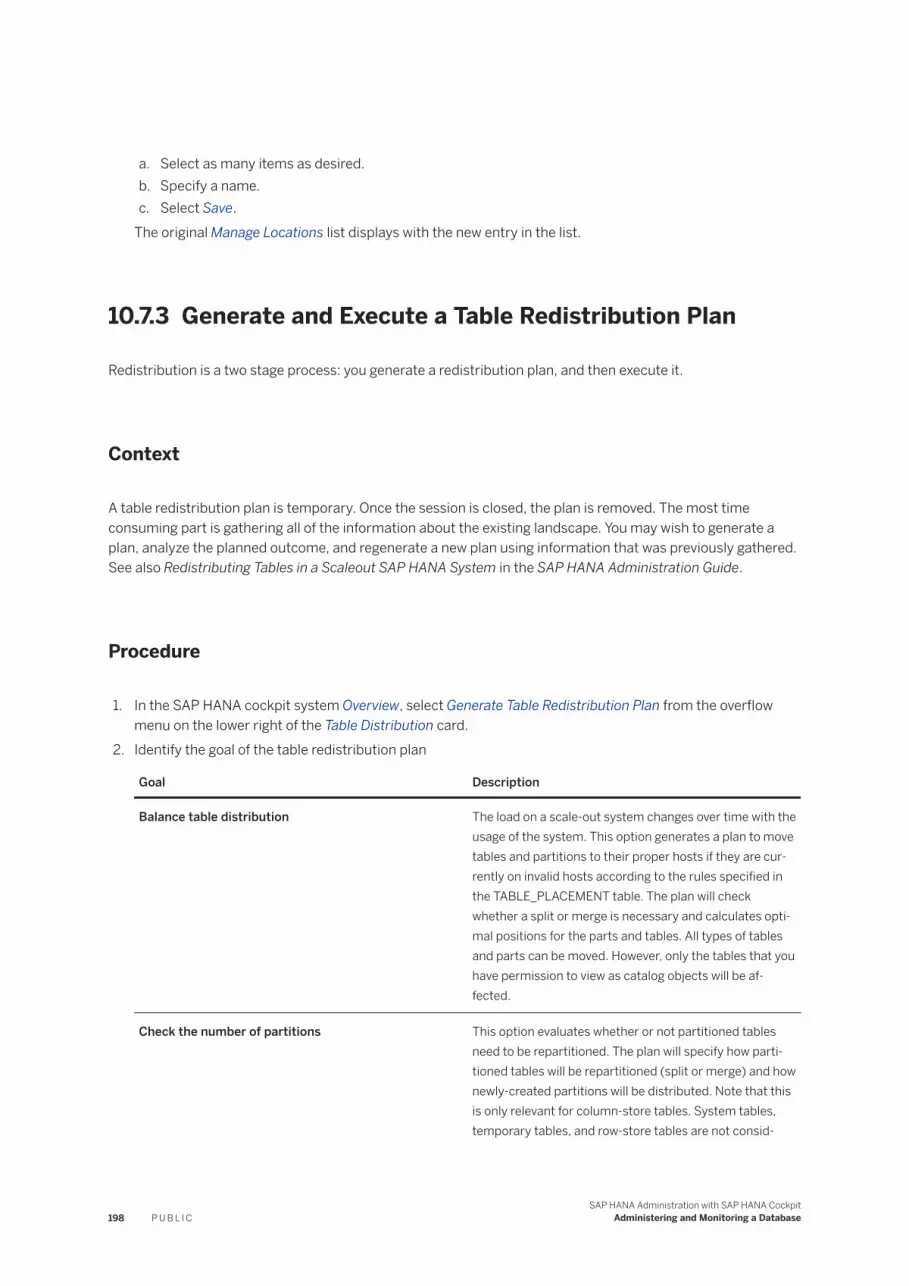
a. Select as many items as desired.b. Specify a name.c. Select Save.
The original Manage Locations list displays with the new entry in the list.
10.7.3 Generate and Execute a Table Redistribution Plan
Redistribution is a two stage process: you generate a redistribution plan, and then execute it.
Context
A table redistribution plan is temporary. Once the session is closed, the plan is removed. The most time consuming part is gathering all of the information about the existing landscape. You may wish to generate a plan, analyze the planned outcome, and regenerate a new plan using information that was previously gathered. See also Redistributing Tables in a Scaleout SAP HANA System in the SAP HANA Administration Guide.
Procedure
1. In the SAP HANA cockpit system Overview, select Generate Table Redistribution Plan from the overflow menu on the lower right of the Table Distribution card.
2. Identify the goal of the table redistribution plan
Goal Description
Balance table distribution The load on a scale-out system changes over time with the usage of the system. This option generates a plan to move tables and partitions to their proper hosts if they are currently on invalid hosts according to the rules specified in the TABLE_PLACEMENT table. The plan will check whether a split or merge is necessary and calculates optimal positions for the parts and tables. All types of tables and parts can be moved. However, only the tables that you have permission to view as catalog objects will be affected.
Check the number of partitions This option evaluates whether or not partitioned tables need to be repartitioned. The plan will specify how partitioned tables will be repartitioned (split or merge) and how newly-created partitions will be distributed. Note that this is only relevant for column-store tables. System tables, temporary tables, and row-store tables are not consid
198 P U B L I CSAP HANA Administration with SAP HANA Cockpit
Administering and Monitoring a Database

Goal Description
ered. In a scale-out system, partitioned tables are distributed across different index servers. The location of the different partitions can be specified manually or determined by the database when the table is initially partitioned. Over time, this initial partitioning may no longer be optimal, for example, if a partition has grown significantly.
Redistribute tables after adding host(s) After adding one or more worker hosts to a scale-out system, you may need to redistribute the tables across the active indexservers. This option checks whether new partitions can be created and generates a plan to move the tables and table partitions as necessary.
Check the correct location of tables and partitions This option generates a plan to move tables and partitions to their proper hosts if they are on invalid hosts according to the rules specified in the TABLE_PLACEMENT table. Only the tables that you have permission to view as catalog objects will be affected.
Calculate table groups This option generates a plan that includes table group analysis. You may specify how to analyze the table groups, for example, analyzing statement cache, existing group, or dependent object.
Housekeeping Some regular operations need to be done from time to time. This option allows you to perform various operations in the system, such as, optimize compressions, defrag, load table, merge delta. Only the tables that you have permission to view as catalog objects will be affected. Also, you must have appropriate privileges to perform specific housekeeping operations, such as delta merge.
3. Specify which tables to consider in the redistribution by setting any combination of options:
○ schema(s)○ table group(s)○ group type(s)○ group subtype(s)○ table name○ tables with or without LOB files, or both○ loaded or unloaded tables, or both○ filled or empty tables, or both○ used or unused tables, or both
You can also specify which outcome you are interested in (for example, balance the workload per host), and how much weight you want to apply to that desired outcome. You can specify the order in which to process the tables, and other options.
SAP HANA Administration with SAP HANA CockpitAdministering and Monitoring a Database P U B L I C 199

4. (Optional) If you have selected Balance table distribution or Redistribute tables after adding host(s) as a goal, you can opt to analyze table groups by turning on the corresponding switch. If you chose Calculate table groups, you can analyze table groups without the switch.a. Select the analysis types to include in the table group analysis.b. (Optional) Click Add to add an analysis type to the table.c. When you add an analysis type, choose the analysis type, preview name, and source (current HANA
system, imported data, or capture file). The source defaults to your selection on the analysis type page. If your source is imported data, specify the schema for M_* tables. If you choose to analyze statement cache, the data source can be a capture file. If your source is a capture file, specify the capture root directory and capture ID.
d. (Optional) You may include or exclude schemas in the table filter. Use the Add Schema button to add combinations of schemas and tables. To delete a schema-table row, click the x at the end of the row.
e. (Optional) You may add or delete items from the groups table to choose groups to analyze or exclude from the analysis.You may also analyze dependent objects such as views, functions, or procedures.
f. If you chose Calculate table groups as a goal, a table group preview displays. On this screen, you may filter the result set and show proposed differences between the proposed group and the current group. Click the View Details button to show the table, schema, data class, and size for a particular row. You can scroll right to see all of the columns in the row.
5. Select any advanced options you wish to include.6. Select the Review button.7. Select the Generate Table Distribution button.
The progress status displays on screen. When progress is complete, the Table Redistribution Plan page displays.
8. (Optional) In the Plan Steps tab, select a row to review details of a single operation or step group.9. (Optional) In the Analysis tab, use the drop down variant selector, and the filter check boxes in order to
display relevant planned and actual data.10. (Optional) Select Regenerate with Modified Parameters.
a. Indicate whether the table redistribution plan should use landscape information collected from the previously generated plan, or perform a new collection of landscape information.
b. Adjust the goal of the table redistribution plan, as desired.c. Adjust the plan options, as desired.d. Select the Review button.e. Select the Generate Table Distribution button.
11. After the plan has been generated successfully, and you have reviewed and are satisfied with the details, select Execute Plan.
As the plan executes, you can monitor plan execution functionality.
Related Information
Save Current Table Distribution [page 201]Restore Saved Table Distribution Plan [page 202]
200 P U B L I CSAP HANA Administration with SAP HANA Cockpit
Administering and Monitoring a Database

10.7.4 View Redistribution Execution History
At any time, you can view previously-executed table redistribution plans.
Procedure
1. In the SAP HANA cockpit system Overview, select View Redistribution Execution History from the overflow menu on the lower right of the Table Distribution card.
Executed table distribution operations are displayed, including those that are:○ Running○ Finished○ Failed○ Cancelled
NoteTable distribution errors that are Finished include those that are Finished with Errors. Take note of the number of failed steps in the Finished (Failed) column.
2. Select a specific table distribution to drill-down to the table redistribution details.3. Choose the Errors, All Statements, or Parameters tabs to view specific information.4. Select a row to drill-down to details about steps.
10.7.4.1 Save Current Table Distribution
You can save a current table distribution as a distribution plan through the SAP HANA cockpit, provided that no table distribution operations are currently running.
Context
Changing how tables are distributed across the hosts of a distributed SAP HANA system is a critical operation. Therefore, before executing a redistribution operation, it is strongly recommended that you backup the landscape so that it can be restored if necessary.
Procedure
1. Open Table Redistribution in SAP HANA cockpit by clicking Table Distribution in the system Overview.2. In the table header, select the Save Current Table Distribution button.
SAP HANA Administration with SAP HANA CockpitAdministering and Monitoring a Database P U B L I C 201

TipThis button is not available for selection if an executed table distribution is currently running.
3. Select Save.
The table distribution is saved as a distribution plan. You can rerun this plan at a later time if you wish.
Related Information
Rerun Table Distribution Plan [page 203]Restore Saved Table Distribution Plan [page 202]
10.7.4.2 Restore Saved Table Distribution Plan
You can restore a distribution plan through the SAP HANA cockpit.
Context
Changing how tables are distributed across the hosts of an SAP HANA system is a critical operation. You may need to restore the table distribution from a previous point in time.
Procedure
1. Open Table Redistribution in SAP HANA cockpit by clicking Table Distribution in the system Overview.2. Select a specific table distribution.3. In the table header, select the Restore Saved Distribution button.4. In the dialog, confirm that you want to restore the saved table distribution.
Related Information
Save Current Table Distribution [page 201]
202 P U B L I CSAP HANA Administration with SAP HANA Cockpit
Administering and Monitoring a Database

10.7.4.3 Rerun Table Distribution Plan
You can run a previously-executed table distribution plan through the SAP HANA cockpit.
Procedure
1. Open Table Redistribution in SAP HANA cockpit by clicking Table Distribution in the system Overview.2. Select a specific table distribution.3. In the table header, select the Rerun Plan button.4. In the dialog, specify whether you want to rerun the entire plan or only the failed steps.5. (Optional) While the plan is running, you can opt to select Increase Parallel Execution in order to specify the
number of operations that can be executed simultaneously.
Related Information
Save Current Table Distribution [page 201]
10.8 Managing Warm Data with the Native Storage Extension
SAP HANA native storage extension (NSE) is a general-purpose, built-in warm data store in SAP HANA that lets you manage less-frequently accessed data without fully loading it into memory.
SAP HANA NSE integrates disk-based database technology (for example, disks and SSDs) with the SAP HANA in-memory database for an improved cost-to-performance ratio, while complementing other warm data tiering solutions such as SAP HANA Extension Node and SAP HANA dynamic tiering.
For more information, see SAP HANA Native Storage Extension in the SAP HANA Administration Guide.
SAP HANA Administration with SAP HANA CockpitAdministering and Monitoring a Database P U B L I C 203

10.8.1 Using the NSE Advisor for Warm Data Recommendations
Use the native storage extension (NSE) Advisor to get suggestions about load units for tables, partitions, or columns according to how frequently they are accessed.
Context
The recommendation is generally to change the object to:
● Page-loadable to reduce memory footprint without much performance impact.● Column-loadable to improve performance by keeping hot objects in memory.
Procedure
1. In the SAP HANA cockpit system Overview, select Recommendations from the Database Administration card.
The SAP HANA cockpit loads the recommendations, with each recommendation having an impact level of High, Medium, or Low.
2. Click on the Ad Hoc, Physical Design, and SQL Recommendation tabs to see detailed analysis for each of these subjects. See Getting Recommendations [page 332] for more information.
3. Use the ALTER TABLE command to make changes to the tables load units. See ALTER TABLE4. (Optional) Click the Configure button to display the Configure Recommendations screen. From this screen,
select the:○ General tab to determine the time period from which to show recommendations.○ Physical Design tab to determine the thresholds for the:
○ Ratio between the executed output record and the estimated output size.○ Average service network request size (in GBs).○ Minimum size for an object to be considered for a load unit, the percentage of object to consider
as hot objects, and the percentage of objects to consider as cold objects.○ SQL tab to determine the minimum:
○ Execution count and gain ratio for abstract plans.○ Size of the result set for the threshold of a large result count.
○ Generate Recommendations tab to:○ Determine if the NSE Advisor collects statistics. On by default. Select Clear Data Statistics
Recommendations to clear the statistics from the cache.○ Determine if the NSE Advisor tracks resources for memory usage and network transfers at the
statement level. Off by default.○ Enable the NSE Advisor to collect statistics. Select Clear NSE Recommendations to clear the
recommendation cache.○ Open the Plan Stability app. See Managing Plan Stability [page 339].
204 P U B L I CSAP HANA Administration with SAP HANA Cockpit
Administering and Monitoring a Database

○ Open the SQL Analyzer app. See Analyze Statement Performance [page 323].
10.8.2 Viewing and Modifying Load Unit Configuration
View information on configured load units for SAP HANA NSE tables, partitions, sub-partitions, and columns and modify load unit configurations using SAP HANA Cockpit.
Procedure
1. In the Home page, under Monitor Landscape, click Resource Directory tile. The Resource Directory page lists all registered resources.
2. Click the required resource. On the Memory Usage card in the System Overview, click View Load Unit Configuration to open Load Unit Configuration page.
The Load Unit Configuration view provides the details on configured load unit, such as part ID (partition's identifier), range, the value of configured load unit (in the Load Unit Setting column), and the effective load unit (in the Effective Unit column). The effective unit value is derived as per load unit hierarchy. If a column’s effective unit is displayed as UNLOADED, it indicates that the table is either not loaded or a non-logging table.
3. On the Load Unit Configuration page, click SQL Console to open SAP HANA Database Explorer for SAP HANA Cockpit. Run SQL commands to update the load units.○ ALTER TABLE … ALTER LOAD UNIT command to alter the load unit configuration for an entire table.
This command affects all partitions and columns in the table.○ ALTER TABLE … ALTER LOAD UNIT command to alter the load unit configuration for one or more
table partitions.○ ALTER TABLE … ALTER … <alter load unit column syntax> command to alter the load unit
configuration for one or more table columns.For more information on each command, see Changing the Load Unit Using ALTER TABLE in the SAP HANA Administration Guide.
10.9 Monitor Disk Volume
In order to ensure that the database can always be restored to its most recent committed state, you can use the SAP HANA cockpit to check disk statistics to check that there is enough space on disk for data volumes and log volumes.
Context
A disk has multiple volumes. Each volume has a data volume and a log volume. Data volumes have one file (datavolume_0000.dat). Log volumes often have hundreds of files (multiple logsegment_000_0000003.dat;
SAP HANA Administration with SAP HANA CockpitAdministering and Monitoring a Database P U B L I C 205

single logsegment_000_directory.dat). Log segment files have a state (Formatting, Preallocated, Writing, Closed, Truncated, BackedUp, RetainedFree, Free). Only log segment files with state Free can be reused. Log segment files have a fixed size although the size can vary per service. (For example, indexserver=1024MB; xsengine=8MB).
You may wish to monitor volume if, for example:
● You receive an alert about disk I/O read failure and want to see which volume has the issue and why.● You are running out of disk space.● You know you are having a backup issue or a replication issue and want to understand how it's affecting
disk usage.
Procedure
1. Open Disk Volume Monitor in SAP HANA cockpit from the system Overview.2. (Optional) Filter the information displayed in the chart and the table:
○ Using the arrow beside the title (top left), select a pre-defined variant, or manage and save a custom variant.
○ Select from the drop-down lists to display a specific combination of host, tenant (if applicable), volume type (data volume or log volume), service and volume ID.
3. View the information in the table:
Column Description
Volume ID The ID of the volume.
Service The name of the service.
Type Whether this is a data volume or log volume.
Size [MB] Current size of the volume.
Used [MB] Amount of disk space used on the host's hard disk.
Used [%] Amount of disk space used on the host's hard disk as a percentage of the whole.
State In the case of log files, whether the state is Formatting, Preallocated, Writing, Closed, Truncated, BackedUp, RetainedFree or Free. The log segment file's state indicates its availability for reuse.
Files Number of files of the same type and state for the particular host and service.
Path Location of the service's data and log files in the file system.
Host The name of the host.
Tenant The name of the tenant.
4. Drill down on a row to see Disk Volume Details for a specific volume.5. Select the various tabs to move to the corresponding section of the volume details.
206 P U B L I CSAP HANA Administration with SAP HANA Cockpit
Administering and Monitoring a Database
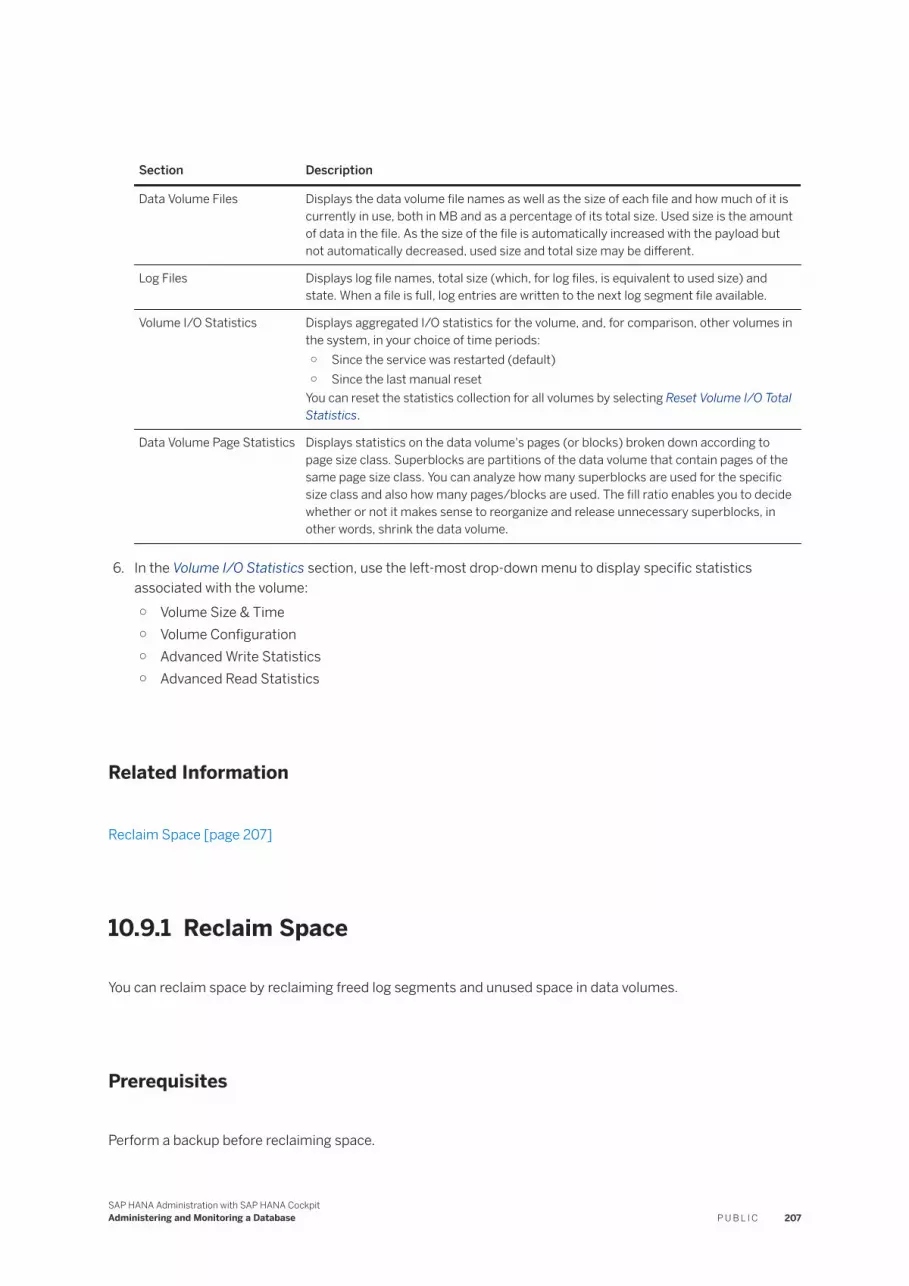
Section Description
Data Volume Files Displays the data volume file names as well as the size of each file and how much of it is currently in use, both in MB and as a percentage of its total size. Used size is the amount of data in the file. As the size of the file is automatically increased with the payload but not automatically decreased, used size and total size may be different.
Log Files Displays log file names, total size (which, for log files, is equivalent to used size) and state. When a file is full, log entries are written to the next log segment file available.
Volume I/O Statistics Displays aggregated I/O statistics for the volume, and, for comparison, other volumes in the system, in your choice of time periods:○ Since the service was restarted (default)○ Since the last manual reset
You can reset the statistics collection for all volumes by selecting Reset Volume I/O Total Statistics.
Data Volume Page Statistics Displays statistics on the data volume's pages (or blocks) broken down according to page size class. Superblocks are partitions of the data volume that contain pages of the same page size class. You can analyze how many superblocks are used for the specific size class and also how many pages/blocks are used. The fill ratio enables you to decide whether or not it makes sense to reorganize and release unnecessary superblocks, in other words, shrink the data volume.
6. In the Volume I/O Statistics section, use the left-most drop-down menu to display specific statistics associated with the volume:○ Volume Size & Time○ Volume Configuration○ Advanced Write Statistics○ Advanced Read Statistics
Related Information
Reclaim Space [page 207]
10.9.1 Reclaim Space
You can reclaim space by reclaiming freed log segments and unused space in data volumes.
Prerequisites
Perform a backup before reclaiming space.
SAP HANA Administration with SAP HANA CockpitAdministering and Monitoring a Database P U B L I C 207

Context
The reclaim operation is across hosts & volumes per database & tenant. You can reclaim all log files in Free state but at least log_preformat_segment_count segments (by default, two) per database service will not be reclaimed. For data volumes, the reclaim is calculated by volume size – (used size * specified percentage_of_overload_size).
Procedure
1. Open Disk Volume Monitor in SAP HANA cockpit from the system Overview.2. Select Reclaim Space from the top toolbar.3. In the dialog, select Reclaim (Free) log segments and/or Reclaim data volume.4. Select the Reclaim Space button.
10.10 Configure Host Failover
For multi-host systems, you can configure host auto-failover so that if an active host fails, standby hosts take over to ensure the continued availability of the database.
Context
Host roles for failover are normally configured during installation. Using SAP HANA cockpit, you can monitor the status of individual hosts and switch the configured roles of hosts; you cannot increase or decrease the number of worker hosts and standby hosts in relation to each other.
The primary reason for changing the configured roles is to prepare for the removal of a host. In this case, change the configured role of the name server host to SLAVE and the configured role of the index server host to STANDBY before stopping the database instance on the host and removing the host.
NoteTo change host configuration, your database user must have the system privilege RESOURCE ADMIN and the object privilege EXECUTE on the procedure UPDATE_LANDSCAPE_CONFIGURATION.
Procedure
1. Open Host Failover in SAP HANA cockpit by clicking the corresponding link on the Database Administration tile in the system Overview.
208 P U B L I CSAP HANA Administration with SAP HANA Cockpit
Administering and Monitoring a Database

All the hosts in the system are displayed, whether or not they are operational, as well as additional information about their auto-failover status and configuration.
2. Click the gear button to customize which columns to display.
Column Description
Host Host name
Active Indicates the status of services running on the host.
The following statuses are possible:○ YES
All services are active.○ PARTIAL
Some services are active.○ STARTING
Some services are active, some are starting.○ STOPPING
Some services are active, some are stopping.○ NO
No services are active.
Host Status Indicates the host's status and whether the system is operational.
The following statuses are possible:○ OK
The system is operational and the host's actual role corresponds to its configured role.○ IGNORE
The system is operational. The host is configured as a standby host and is available, but not in use.
○ INFOThe system is operational. The host's actual role is different from its configured role.
○ WARNINGThe system is not operational. The host will become available after start-up or failover.
○ ERRORThe system is not operational. The host is missing.
SAP HANA Administration with SAP HANA CockpitAdministering and Monitoring a Database P U B L I C 209

Column Description
Failover Status Displays the failover status so you can see which hosts are active and which are on standby.
The following statuses are possible:○ <Empty>
Failover is neither active nor pending.○ WAITING ... SEC
The host has failed. The system is waiting to fail over.○ WAITING
The host has failed. The system is waiting for the host to restart to prevent unnecessary failover.
○ FAILOVER TO <host>The host has failed and failover to a target host is in progress.
○ FAILBACK TO <host>Failback to a worker host is in progress. This happens when the assigned standby host is stopped. However, there is no automatic failback while the standby host is still assigned since this would cause downtime.
○ FAILEDFailover is not possible, for example, no further standby hosts available. For more information, see the nameserver trace.
Nameserver Role (Configured)
Specifies the host's configured role as name server.
The following roles are possible:○ MASTER 1, MASTER 2, MASTER 3
When you install a distributed system, up to three hosts are automatically configured as master name servers. The configured nameserver role of these hosts is MASTER 1, MASTER 2, and MASTER 3.
○ SLAVEAdditional hosts in your system are configured as slave name servers. The configured nameserver role of these hosts is SLAVE.
Nameserver Role (Actual)
Specifies the host's actual role as name server.
The following roles are possible:○ MASTER
During system start-up, one of the hosts configured as master name servers (that is, those hosts with the configured name server role MASTER 1, MASTER 2, or MASTER 3) is designated to be the active master name server. The actual nameserver role of this host is MASTER. This master name server assigns one volume to each starting index server (those with actual role MASTER or SLAVE), or no volume if it is a standby host (actual indexserver role STANDBY).If this active master nameserver host fails, one of the remaining hosts configured as a master nameserver becomes the active master name server.
○ SLAVEThe actual nameserver role of the remaining hosts configured as master and slave hosts is SLAVE.
210 P U B L I CSAP HANA Administration with SAP HANA Cockpit
Administering and Monitoring a Database

Column Description
Indexserver Role (Configured)
Specifies the host's configured role as index server.
The following roles are possible:○ WORKER○ STANDBY
When you install a distributed system, you can configure hosts either as WORKER or STANDBY index servers. A host configured as a standby index server is not used for database processing. All database processes run on the standby host, but they are idle and do not allow SQL connections.
Indexserver Role (Actual)
Specifies the host's actual role as index server.
The following roles are possible:○ MASTER
The actual master indexserver is assigned on the same host as the name server with the actual role MASTER. The actual index server role of this host is MASTER. The master index server provides metadata for the other active index servers (that is, those with actual indexserver role SLAVE).
○ SLAVEThe actual index server role of remaining hosts (except those configured as standby hosts) is SLAVE. These are active index servers and are assigned to one volume. If an active index server fails, the active master name server assigns its volume to one of the standby hosts.
○ STANDBYThe actual indexserver role of standby hosts is STANDBY. A standby host is not assigned a volume by the active master name server and it does not open an SQL port.
During normal operation when all hosts are available, a host with the configured role WORKER has the actual role MASTER or SLAVE, and a host with the configured role STANDBY has the actual role STANDBY. In the event of failover, the actual index server role of a host with the configured role STANDBY changes to SLAVE. The host status of the failed host changes from OK to INFO and the host status of the standby host changes from IGNORE to INFO.
NoteFailover is configured only for the name server and the index server on each host. The other components (for example, xsengine) are not configured individually as they are always failed over together with the index server.
Failover Group (Configured/Actual)
A failover group can be defined for each host. In the event of failover, the name server tries to fail over to a host within the same group.
Worker Groups (Configured/Actual)
The worker groups (also referred to as host sub-roles) for the host can be set here. This is required to support heterogeneous hardware in the landscape which is required, for example, for the extension node feature.
Worker groups may also be relevant in a single-host installation. The worker group name is a free text value that is validated to trap illegal characters.
SAP HANA Administration with SAP HANA CockpitAdministering and Monitoring a Database P U B L I C 211

Column Description
Host Roles (Config-ured)
Specifies the host's configured database role.
The following roles are possible:○ WORKER
Worker host for database processing○ STANDBY
Standby host for database processing
Depending on your installation, the following additional host roles may be configured:○ EXTENDED_STORAGE_WORKER
Worker host for SAP HANA dynamic tiering○ EXTENDED_STORAGE_STANDBY
Standby host for SAP HANA dynamic tiering○ ETS_WORKER
Worker host for SAP HANA accelerator for SAP ASE○ ETS_STANDBY
Standby host for SAP HANA accelerator for SAP ASE○ STREAMING
Host for SAP HANA Streaming Analytics○ XS_STANDBY
Standby host for SAP HANA XS advanced runtime○ XS_WORKER
Host for SAP HANA XS advanced runtime
NoteMultiple host roles are not supported in production environments. However, if XS advanced runtime is installed, hosts can share multiple roles.
Host Roles (Actual) Specifies the host's actual database role
Storage Partition Specifies the number of the mnt000... subdirectory used by the host for storing data and logs, for example, 1 if the subdirectory is mnt00001, 2 if it is mnt00002, and so on.
During installation, volumes for storing data and log files are defined. These are the directories where data and logs are stored. The default directories are:
○ /hana/data/<SID> for data
○ /hana/log/<SID> for logs
Each active host has exactly one subdirectory beneath these directories called mnt00001, mnt00002, and so on. The next level in the file hierarchy is the actual volume, with one subdirectory for each service called hdb00001, hdb00002, and so on.
In the event of failover, the volumes of the failed host are reassigned to the standby host.
212 P U B L I CSAP HANA Administration with SAP HANA Cockpit
Administering and Monitoring a Database

Column Description
Removal Status Indicates the status of the table redistribution operation used to move data off the index server of a host that you plan to remove.
Before you can remove an active host from a single-container system, you must move the tables on the index server of this host to the index servers on the remaining hosts in the system. Once the value in the Removal Status column changes to REORG FINISHED or REORG NOT REQUIRED, you can physically remove the host using the SAP HANA lifecycle management tool hdblcm(gui).
If your system is configured as a multiple-container system, you have to remove tenant-specific services first and then remove the host using the SAP HANA database lifecycle manager (HDBLCM). For more information, see Remove a Service from a Tenant Database in the SAP HANA Administration Guide.
The following statuses are possible:○ <Empty>
Host has not been marked for removal.○ REORG PENDING
A redistribution operation is required to move tables to other hosts.○ REORG ACTIVE
A redistribution operation is in progress. For more information, you can query the system tables SYS.REORG_OVERVIEW and SYS.REORG_STEPS.
○ REORG FAILEDA redistribution operation was executed and failed. For more information, query the system table SYS.REORG_STEPS.
○ REORG FINISHEDA redistribution operation has completed. The host can be uninstalled.
○ REORG NOT REQUIREDA redistribution operation is not required. The host can be uninstalled.
3. If you make changes to a configured role or configured group, click Apply so that your changes take effect.
Related Information
Add or Remove Services in a Tenant Database [page 155]Monitoring Tenant Databases in SAP HANA Cockpit [page 151]
10.11 Monitoring Alerts
As an administrator, you actively monitor the status of the system and its services and the consumption of system resources. However, you are also alerted to critical situations, for example: a disk is becoming full, CPU usage is reaching a critical level, or a server has stopped.
The internal monitoring infrastructure of the SAP HANA database is continuously collecting and evaluating information about status, performance, and resource usage from all components of the SAP HANA database.
SAP HANA Administration with SAP HANA CockpitAdministering and Monitoring a Database P U B L I C 213

In addition, it performs regular checks on the data in system tables and views and when configurable threshold values are exceeded, it issues alerts. In this way, you are warned of potential problems. The priority of the alert indicates the severity of the problem and depends on the nature of the check and configured threshold values. For example, if 90% of available disk space is used, a low priority alert is issued; if 98% is used, a high priority alert is issued. For more information about the technical implementation of monitoring and alerting features in SAP HANA, see The Statistics Service in the SAP HANA Administration Guide.
A summary of all alerts in the database is available on the home page of the SAP HANA cockpit. To get more information about these alerts and to analyze the historical occurrence of alerts, you can drill down into the Alerts app.
In addition, several configuration options are available so that you can tailor alerting in the SAP HANA database to your needs (for example, changing alerting thresholds, setting up e-mail notification of alerts, and switching particular alerts off).
Related Information
Configuring Alerts [page 217]Work with Alerts [page 214]Search, Sort, and Filter Tools for Alerts [page 215]Alert Details [page 216]Alert Priorities [page 217]
10.11.1 Work with Alerts
Find resources with alerts, drill down for information on active alerts, and use an alert checker.
Prerequisites
Your database user needs the object privilege SELECT on the schema _SYS_STATISTICS.
Procedure
1. On the Overview page, choose the Alerts tile.2. On the Alert Details page, click an alert in the left pane to display information.
If the list of alerts is long, use the Search, Sort, Filter, and Past Alerts tools in the left pane to find particular alerts.
3. (Optional) Use the drop-down menu on the right to change the time period shown on the Past Occurrences of Alert graph.
214 P U B L I CSAP HANA Administration with SAP HANA Cockpit
Administering and Monitoring a Database

4. (Optional) To display all past occurrences of the selected alert, click Past Alerts (bottom of left pane). To restore the list to current alerts only, click again.
5. (Optional) Click Configure Alert (lower right) to view, execute, or modify the alert checker for the alert currently displayed.a. Review the details on the Alert Checker Configuration page.b. Click Edit (lower right) to make changes.
For example, you can add e-mail addresses to receive alert notifications, or click the Schedule Active button to enable or disable the alert. Click Save.
c. When you're satisfied with the settings, click Check Now (lower right).
The alert checker notifies you when the check is done. If the check generated alerts, you can click Go to Alerts to see them.
Related Information
Search, Sort, and Filter tools for Alerts [page 215]Open SAP HANA Cockpit [page 15]Alert Details [page 216]Alert Priorities [page 217]
10.11.1.1 Search, Sort, and Filter Tools for Alerts
Use Search, Sort, and Filter tools to work with lists of alerts.
Search Enter full or partial alert text in the Search box at the top of the screen and click the search icon. The list is reduced to show only alerts that match your search string.
Change sorting rules You can modify the sorting rules to:
● List alerts in ascending (the default) or descending order
● Sort by alert text, category, alert checker, priority, or date (the default).
Click the sort icon, choose sorting rules, and click OK.
SAP HANA Administration with SAP HANA CockpitAdministering and Monitoring a Database P U B L I C 215
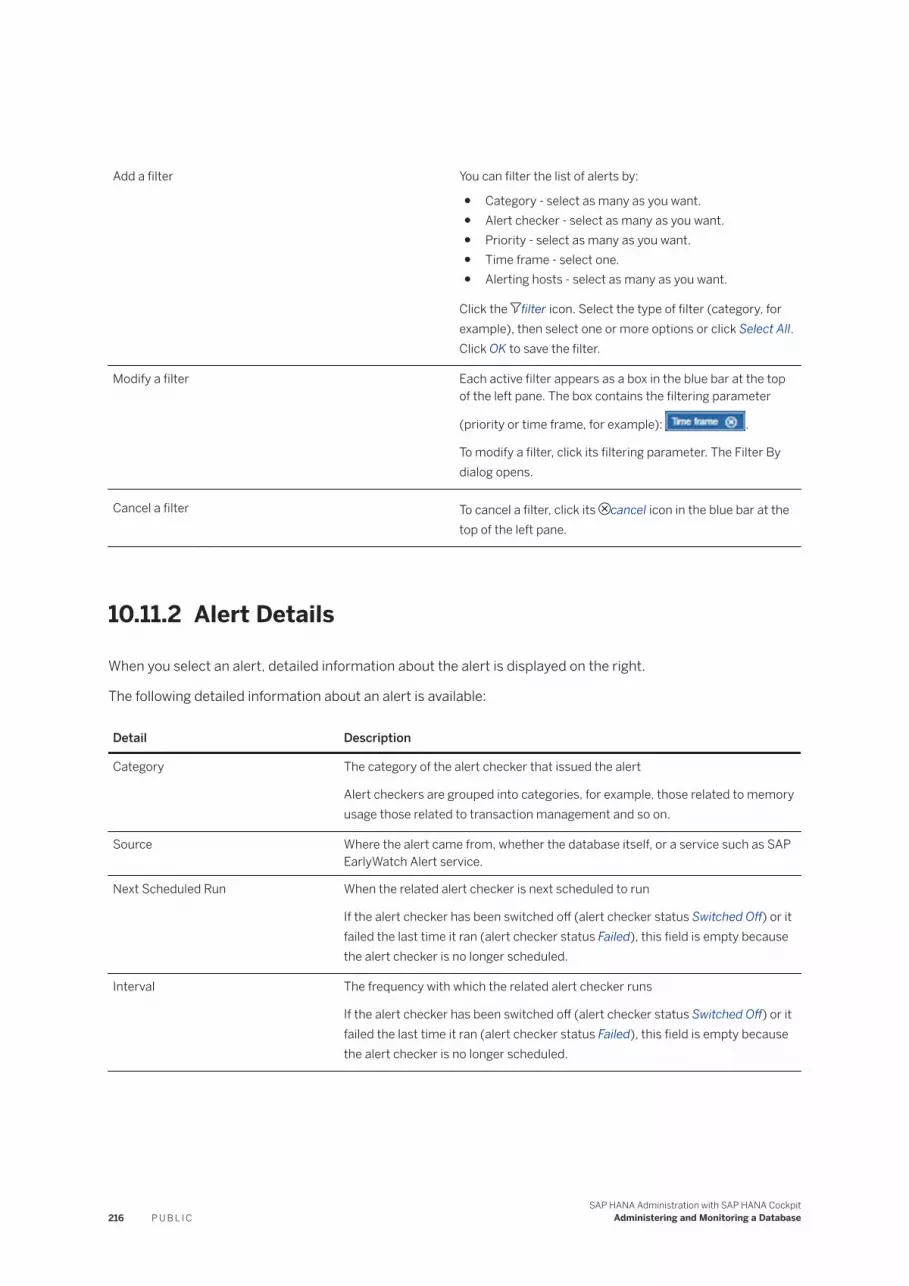
Add a filter You can filter the list of alerts by:
● Category - select as many as you want.● Alert checker - select as many as you want.● Priority - select as many as you want.● Time frame - select one.● Alerting hosts - select as many as you want.
Click the filter icon. Select the type of filter (category, for example), then select one or more options or click Select All. Click OK to save the filter.
Modify a filter Each active filter appears as a box in the blue bar at the top of the left pane. The box contains the filtering parameter
(priority or time frame, for example): .
To modify a filter, click its filtering parameter. The Filter By dialog opens.
Cancel a filter To cancel a filter, click its cancel icon in the blue bar at the top of the left pane.
10.11.2 Alert Details
When you select an alert, detailed information about the alert is displayed on the right.
The following detailed information about an alert is available:
Detail Description
Category The category of the alert checker that issued the alert
Alert checkers are grouped into categories, for example, those related to memory usage those related to transaction management and so on.
Source Where the alert came from, whether the database itself, or a service such as SAP EarlyWatch Alert service.
Next Scheduled Run When the related alert checker is next scheduled to run
If the alert checker has been switched off (alert checker status Switched Off) or it failed the last time it ran (alert checker status Failed), this field is empty because the alert checker is no longer scheduled.
Interval The frequency with which the related alert checker runs
If the alert checker has been switched off (alert checker status Switched Off) or it failed the last time it ran (alert checker status Failed), this field is empty because the alert checker is no longer scheduled.
216 P U B L I CSAP HANA Administration with SAP HANA Cockpit
Administering and Monitoring a Database

Detail Description
Alerting Host & Port Name and port of the host that issued the alert
In a system replication scenario, alerts issued by secondary system hosts can be identified here. This allows you to ensure availability of secondary systems by addressing issues before an actual failover.
For more information about monitoring secondary systems in SAP HANA, see Monitoring Secondary Sites in the SAP HANA Administration Guide.
Alert Checker Name and description of the related alert checker
Proposed Solution Possible ways of resolving the problem identified in the alert, with a link to the supporting app, if available
Past Occurrences of Alert Configurable graphical display indicating how often the alert occurred in the past
10.11.3 Alert Priorities
The priority of an alert indicates the severity of the problem and how quickly action needs to be taken.
Priority Description
Information Action recommended to improve system performance or stability
Low Medium-term action required to mitigate the risk of downtime
Medium Short-term action required (few hours, days) to mitigate the risk of downtime
High Immediate action required to mitigate the risk of downtime, data loss, or data corruption
10.12 Configuring Alerts
Several configuration options are available so that you can tailor alerting in the SAP HANA database to your needs.
The following configuration options are possible:
● Change the threshold values that trigger alerts of different priorities.● Set up e-mail notifications so that specific people are informed when alerts are issued.
In addition, you can perform the following actions on alert checkers:
● Run alert checkers on a once-off basis, regardless of their configured schedule or status● Switch alert checkers off and on
SAP HANA Administration with SAP HANA CockpitAdministering and Monitoring a Database P U B L I C 217

Related Information
Configure Alerting Thresholds [page 218]Switch Alerting Off/On [page 219]Set Up E-Mail Notification [page 220]Check for Alerts Out of Schedule [page 222]
10.12.1 Configure Alerting Thresholds
In many cases, you can configure the thresholds that trigger an alert. An alert checker can have a low, medium, and high priority threshold.
Context
Thresholds can be configured for any alert checker that measures variable values that should stay within certain ranges, for example, the percentage of physical memory used or the age of the most recent data backup. Many alert checkers verify only whether a certain situation exists or not. Threshold values cannot be configured for these alert checkers. For example, alert checker 4 detects services restarts. If a service was restarted, an alert is issued.
Procedure
1. Open Alert Configuration in SAP HANA cockpit by clicking the corresponding link on the Alerting and Diagnostics tile in the system Overview.
2. Find the alert checker whose thresholds you want to change.The detailed configuration of the alert checker is displayed on the right. For more information, see Alert Checker Details.
3. Open the alert checker for editing by clicking Edit.4. Change the threshold values as required.
The threshold value depends on what the specific alert checker is measuring. For example, for alert checker 2 (disk usage), you could enter 90, 95 and 100 as the thresholds, where 90, 95, and 100 represent the percentage of disk space used.
TipThe unit for the threshold value of the alert checker is indicated in brackets above the entry fields.
5. Save the alert checker.
218 P U B L I CSAP HANA Administration with SAP HANA Cockpit
Administering and Monitoring a Database

Results
Alerts are issued when the alert checker records values that exceed the configured thresholds.
Related Information
Assign Roles to a Database User [page 485]
10.12.2 Switch Alerting Off/On
If you no longer want a particular alert to be issued, you can switch off the underlying alert checker so it no longer runs automatically according to schedule. Alert checkers that the system has disabled must be switched back on manually.
Context
In some situations you may want to stop a particular alert from being issued, either because it is unnecessary (for example, alerts that notify you when there are other alerts in the system) or because it is not relevant in your system (for example, backup-related alerts in test systems where no backups are performed).
CautionIf you switch off alerts, you may not be warned about potentially critical situations in your system.
You can switch an alert checker back on again at any time.
You may also want to switch on alert checkers that the system has disabled, that is checkers with the status Failed. The system automatically disables alert checkers when they fail to run, for example, due to a shortage of system resources.
NoteThe system automatically switches failed alert checkers back on after a certain length of time. For more information, see Alert Checker Statuses.
It is possible to disable an alert for a particular table or schema. This is supported for the alerts "Record count of non-partitioned column-store tables" (ID 17) and "Table growth of non-partitioned column-store tables" (ID 20).
To exclude an alert to be issued for a particular table, use the following SQL statement:
INSERT INTO _sys_statistics.statistics_exclude_tables VALUES (<alert_id>, '<schema_name>', '<table_name>')
SAP HANA Administration with SAP HANA CockpitAdministering and Monitoring a Database P U B L I C 219

To exclude an alert to be issued for all tables of a particular schema, use the following SQL statement:
INSERT INTO _sys_statistics.statistics_exclude_tables VALUES (<alert_id>, '<schema_name>', null)
To re-enable the alerts, delete the entries from the table _sys_statistics.statistics_exclude_tables.
Procedure
1. Open Alert Configuration in SAP HANA cockpit by clicking the corresponding link on the Alerting and Diagnostics tile in the system Overview.
2. Find the alert checker that you want to switch off or on.The detailed configuration of the alert checker is displayed on the right. For more information, see Alert Checker Details.
3. Open the alert checker for editing by clicking Edit.4. Set the Schedule Active switch control to No or Yes.5. Save the alert checker.
Results
If you switched the alert checker off, its status changes to Switched Off and it is no longer scheduled to run automatically.
If you switched the alert checker on, its status changes to Active and it starts running again automatically according to its configured schedule.
Related Information
Open SAP HANA Cockpit [page 15]
10.12.3 Set Up E-Mail Notification
You can configure alert checkers so that you and other responsible administrators receive push notifications by e-mail when alerts are issued.
Context
If you want to be notified by e-mail about new alerts when they are issued, you can set this up in through Alerts Configuration. You can configure one or more default recipients to be notified when any alert checker issues an
220 P U B L I CSAP HANA Administration with SAP HANA Cockpit
Administering and Monitoring a Database

alert. In addition, if different people need to be notified about different alerts, you can configure dedicated recipients for these alert checkers.
Note the following behavior:
● If you configure checker-specific recipients, default recipient(s) will not be notified.● If you delete all checker-specific recipients, default recipient(s) will be notified again, if configured.● You can configure checker-specific recipients regardless of whether or not default recipients are
configured.
Procedure
1. To open the Define Alerts application in SAP HANA cockpit, go to the System Overview and select Configure Alerts on the Alerting and Diagnostics tile.
TipYou can also open Define Alerts from the Manage Alerts application: click Alert Definitions.
2. Configure the e-mail sender:a. In the footer toolbar, choose Configure Email, then Sender.b. Enter the following information for the e-mail sender:
○ Sender's e-mail addressE-mail address that is entered as the e-mail sender
○ SMTP serverThe mail server that the system sends the e-mails to
NoteThe statistics service does not support a mail server that requires additional authentication.
○ SMTP portThe default SMTP port is 25. If the configured mail server uses a different port, you must enter it.
3. Optional: Configure one or more default recipients.Default recipients are notified about alerts generated by all alert checkers except those that have checker-specific recipients configured.a. In the footer toolbar, click the envelope icon and choose Default Recipient(s).b. Enter the e-mail addresses of the recipients.c. Save the configuration.
4. Optional: Configure one or more recipients for specific alert checkers.Checker-specific recipients are notified only about alerts generated by the alert checker in question. Default recipients (if configured) are not.a. Find the alert checker that you want to configure.
The detailed configuration of the alert checker is displayed on the right.b. Open the alert checker for editing by clicking Edit.c. In the Email field, enter the e-mail addresses of the recipients.d. Save the alert checker.
SAP HANA Administration with SAP HANA CockpitAdministering and Monitoring a Database P U B L I C 221

Results
The configured recipients will receive an email when an alert checker issues an alert. If the alert checker issues the same alert the next time it runs, no further e-mail is sent. However, when the alert checker runs and it does not issue an alert, indicating that the issue is resolved or no longer occurring, a final e-mail is sent.
Related Information
Open SAP HANA Cockpit [page 15]
10.12.4 Check for Alerts Out of Schedule
In general, alert checkers run automatically according to a configured schedule. If necessary, you can run an alert checker on a once-off basis outside of its schedule.
Context
In some cases, you may want to check for a particular alert outside of the alert checker's configured schedule. For example, to verify that the problem identified by a previous alert has been resolved.
Running an alert checker in this ad hoc way does not affect its configured schedule.
NoteIf you want to manually run an alert checker with the status Switched Off or Failed, you must switch it back on first.
Procedure
1. Open Alert Configuration in SAP HANA cockpit by clicking the corresponding link on the Alerting and Diagnostics tile in the system Overview.
2. Find the alert checker that you want to run.The detailed configuration of the alert checker is displayed on the right. For more information, see Alert Checker Details.
3. Choose Check Now in the footer toolbar.The alert checker starts running. Once it has finished, you will be notified of the result.
222 P U B L I CSAP HANA Administration with SAP HANA Cockpit
Administering and Monitoring a Database

Related Information
Open SAP HANA Cockpit [page 15]Switch Alerting Off/On [page 219]
10.13 Manage System Configuration in SAP HANA Cockpit
From the system overview, you can drill down to view and manage configuration (*.ini) files.
Open System Configuration in SAP HANA cockpit by clicking Configure system properties under Database Administration in the system Overview.
Configuration files are separated into sections; sections bundle parameters of the same category. parameters can be configured at different levels or layers depending on the configuration file. Layers control where parameter values apply and how parameters inherit default values. These layers are available:
Layer Description
Default The default value for the parameter
System The system-specific value for the parameter (configurable in the system database)
If a system-specific value is not configured for a parameter, the default value applies.
Database The database-specific value for the parameter (configurable in the system or tenant database)
For some parameters, it is possible to set database-specific values. If a database-specific value is not configured, the host-specific value applies.
Host The host-specific value for the parameter (configurable in the system database)
For some parameters, it is possible to set host-specific values for multiple-host systems. If a host-specific value is not configured for a parameter that can be set at host level, the system-specific value applies.
You can change configuration values (Change Layer) or quickly modify a value or assign a default.
You can use drop-down filters to select the Configuration File and the Section and Host in order to display specific configuration file contents.
In general, SAP recommends that you do not change the default values of parameters unless the documentation suggests it or you are instructed to do so by SAP Support. While most parameters can be changed when the database is running, changes to some parameters require a database restart to take effect. To find out whether a restart is required for frequently used parameters, refer to the online reference in the SAP Help Portal.
Related Information
SAP HANA Administration with SAP HANA CockpitAdministering and Monitoring a Database P U B L I C 223

Database-Specific Configuration Parameters [page 227]Add a System Property Section in SAP HANA Cockpit [page 224]Add a System Property Parameter in SAP HANA Cockpit [page 225]Modify a System Property in SAP HANA Cockpit [page 225]Restore a System Property Default in SAP HANA Cockpit [page 226]
10.13.1 Parameters
You can specify configuration files, sections, and one or more layers (or none).
10.13.1.1 Add a System Property Section in SAP HANA Cockpit
In the configuration files of an SAP HANA system, sections bundle parameters of the same category.
Prerequisites
● Your database user has the system privilege INIFILE ADMIN.● You must have the system privilege DATABASE ADMIN to change the system property of a tenant database
from the system database.
Procedure
1. Open System Configuration in SAP HANA cockpit by selecting the Manage System Configurationlink from the Database Administrationsection of the system Overview.
2. (Optional) Use drop-down menus to select the Configuration File in order to display specific configuration file contents.
3. Select Add Section.4. Select a file from the drop down list.5. Enter the name of the section.6. Enter a parameter name and a value.7. Assign the parameter value to layers8. Click OK.
224 P U B L I CSAP HANA Administration with SAP HANA Cockpit
Administering and Monitoring a Database

10.13.1.2 Add a System Property Parameter in SAP HANA Cockpit
In the configuration files of an SAP HANA system, you can add a parameter.
Prerequisites
● Your database user has the system privilege INIFILE ADMIN.● You must have the system privilege DATABASE ADMIN to change the system property of a tenant database
from the system database.
Procedure
1. Open System Configuration in SAP HANA cockpit by clicking the corresponding Database Administration link in the system Overview.
2. Use drop-down menus to select the Configuration File in order to display specific configuration file contents.
3. Select plus icon to add a parameter.4. From the drop down list, select the layer to Add Values To.5. Enter the parameter name and value.6. Specify the layer to which the parameter applies.7. Click OK.
10.13.1.3 Modify a System Property in SAP HANA Cockpit
In the configuration files of an SAP HANA system, you can modify parameter values.
Prerequisites
● Your database user has the system privilege INIFILE ADMIN.● You must have the system privilege DATABASE ADMIN to change the system property of a tenant database
from the system database.
SAP HANA Administration with SAP HANA CockpitAdministering and Monitoring a Database P U B L I C 225

Context
NoteIn general, we do not recommend changing the default values of parameters unless stated in the documentation or instructed by SAP Support. For more information about configuration parameters refer to the online reference in the SAP Help Portal.
Procedure
1. Open System Configuration in SAP HANA cockpit by clicking the corresponding Database Administration link in the system Overview.
2. Use drop-down menus to select the Configuration File and the Section in order to display specific configuration file contents.All the parameters in the section are listed. You can identify parameters that can have user-defined values because of the option to edit at the end of the row.
3. Select Edit for the value you wish to modify.4. Enter the new value and click Save.
10.13.1.4 Restore a System Property Default in SAP HANA Cockpit
In the configuration files of an SAP HANA system, you can reset changed parameters to their default values.
Prerequisites
● Your database user has the system privilege INIFILE ADMIN.● You must have the system privilege DATABASE ADMIN to change the system property of a tenant database
from the system database.
Procedure
1. Open System Configuration in SAP HANA cockpit by clicking the corresponding Database Administration link in the system Overview.
2. Use drop-down menus to select the Configuration File and the Section in order to display specific configuration file contents.All the parameters in the section are listed. You can identify parameters that have user-defined values by the edit (pencil) icon at the end of the row.
226 P U B L I CSAP HANA Administration with SAP HANA Cockpit
Administering and Monitoring a Database

3. Select the edit icon for the user-defined value you wish to reset.4. Select Assign Default.
The user-defined value is cleared and the default value is re-applied.
10.13.1.5 Database-Specific Configuration Parameters
In addition to the layers "default", "system", and "host", system configuration files also have a "database" layer to facilitate the configuration of properties for individual databases.
In general, you can configure database-specific properties both in the system database and in tenant databases themselves. Properties configured in the system database can be applied to all databases (if configured in the system layer) or to specific databases (if configured in database layer).
Properties configured in a tenant database apply to that tenant database only. Only properties in the following files can be configured in tenant databases:
● attributes.ini● docstore.ini● dpserver.ini● esserver.ini● executor.ini● extensions.ini● global.ini● indexserver.ini● multidb.ini● scriptserver.ini● xsengine.ini
File Location
If properties are configured in the database layer, a database-specific configuration file is stored at the following location on the server: /hana/shared/$SID/global/hdb/custom/config/DB_<dbname>
ExampleThe properties in the nameserver.ini file are not database specific. They can only be configured at system level. The nameserver.ini file is therefore stored at /hana/shared/$SID/global/hdb/custom/config.
However, the properties in the indexserver.ini can be database specific. Properties that are configured in the system layer and apply to all databases are stored in the indexserver.ini at /hana/shared/$SID/global/hdb/custom/config. Properties configured for an individual database override the system-layer value and are stored in the indexserver.ini at /hana/shared/$SID/global/hdb/custom/config/DB_<dbname>.
SAP HANA Administration with SAP HANA CockpitAdministering and Monitoring a Database P U B L I C 227

Layered Configuration
Many properties can be configured in the system, host, and database layer. Values configured in the database layer take precedence over system-layer values.
However, when you are connected to a tenant database, you will see the database-layer value of a property is also displayed as the system-layer value. This is because from the perspective of the tenant database, the database and the system are effectively the same. The true system-layer value (that is, the value configured for all databases in the system database ) is displayed in the tenant database as the default-layer value.
Values configured in the host layer take precedence over database-layer values. Host values can only be configured in the system database.
To view actual configuration values, open System Configuration in SAP HANA cockpit by selecting the Manage System Configurationlink from the Database Administrationsection of the system Overview, or query the following system views:
● M_INIFILE_CONTENTS (SYS_DATABASES)This view can be accessed only from the system database. It contains the values configured for all properties on system, host, and database layer for all active databases.
● M_INIFILE_CONTENTS (SYS)This view is available in every database and contains the values that apply to the database in question. Values that were configured in the system layer in the system database are identified as default-layer values. Values that were configured in the database layer in the tenant database are identified as system- and database-layer values. Values configured at the host layer are shown only for hosts on which the database is running.
ExampleA system has 3 tenant databases DB1, DB2, and DB3, distributed across 2 hosts Host A and Host B:
228 P U B L I CSAP HANA Administration with SAP HANA Cockpit
Administering and Monitoring a Database

The default value of the property [execution] max_concurrency in the global.ini file is 0. The system administrator changes the default configuration of this property in the indexserver.ini file as follows:
First, the system administrator creates a new system-layer value (10) in indexserver.ini. Since the system-layer value applies to all tenant databases and cannot be changed by a tenant database user, users on all tenant databases initially see the value 10 as the default configuration:
Next, the system administrator sets a new value (20) for DB1, while leaving the configuration for DB2 and DB3 unchanged.
NoteIn DB1, the database-layer value is duplicated to the system layer because from the perspective of the tenant database, the database and the system are effectively the same.
Finally, the system administrator sets a new value (15) for host A. Since host values take precedence over database values, this changes the effective value for DB1 and DB2.
SAP HANA Administration with SAP HANA CockpitAdministering and Monitoring a Database P U B L I C 229

10.13.1.6 View Change History
You can view the change history of one or more values.
Context
If a row in the table is selected when the View Change History button is pressed, then the configuration file, section, and parameter are prefilled in the Change History screen and the screen automatically loads the data.
If a row is not selected when this screen is launched, then only the filters set on the screen that launched it are set and the table is populated.
Procedure
1. Open System Configuration in SAP HANA cockpit by selecting the Manage System Configurationlink from the Database Administrationsection of the system Overview.
2. While the Parameters tab is active, select View Change History.The change history table is displayed, sorted by time. You can personalize the table, including grouping, sorting, hiding columns, column order.
230 P U B L I CSAP HANA Administration with SAP HANA Cockpit
Administering and Monitoring a Database

10.13.2 Create a Configuration Template
Set up a configuration template of parameter settings from one database that you can later apply to other databases.
Prerequisites
You're familiar with the layers at which parameters can be configured. See Manage System Configuration in SAP HANA Cockpit [page 223].
Procedure
1. On the Home page, click Configuration Templates.2. Select Create Template.3. Enter a name and description for the new template.4. Specify the layer from which you'll select parameters for this template.5. Select a resource from which you'll select parameters for this template.6. Select parameters for the template.7. Select Review. If necessary, click Edit to change your selections.8. Select Create Template
Next Steps
Apply the template to copy the parameter values to another database (or to the same database after making changes).
Related Information
Apply a Configuration Template [page 232]
SAP HANA Administration with SAP HANA CockpitAdministering and Monitoring a Database P U B L I C 231

10.13.3 Apply a Configuration Template
Use a configuration template to copy parameter settings from one database to another.
Prerequisites
● Your database user has the system privilege INIFILE ADMIN.● A configuration template has been created. See Create a Configuration Template [page 231].
Procedure
1. On the Home page, click Configuration Templates.2. Choose a template.3. Select Apply to Databases.4. Choose a database to which to apply the template.5. Click Apply Template.
Results
A message tells you whether the template was applied.
10.13.4 Compare Configurations
You can compare the configuration of other databases or snapshots.
Prerequisites
● Your database user has the system privilege INIFILE ADMIN.● You must have the system privilege DATABASE ADMIN to change the system property of a tenant database
from the system database.
232 P U B L I CSAP HANA Administration with SAP HANA Cockpit
Administering and Monitoring a Database

Procedure
1. On the Home page, click Compare Configurations.2. Choose a type and a source.
Compare Options
System Database ○ You can choose from any system database that you are authorized to view.
○ You can choose one or more databases as targets.
Tenant Database ○ You can choose from any tenant database that you are authorized to view.
○ You can choose one or more tenants as targets.
Snapshots ○ You can choose from snapshots that were created for this resource.
3. Click Compare.4. Choose one or more targets. The targets must be of the same type as the source.5. (Optional) Choose Show differences only.6. Enter a configuration file name, section, and layer, or leave them blank to have all the parameters included
in the results.
The list is updated automatically.
10.13.5 Snapshots
You can take snapshots, view details, compare, and delete snapshots.
10.13.5.1 Take a Snapshot
At any time, you can create a new snapshot.
Procedure
1. Open System Configuration in SAP HANA cockpit by selecting the Manage System Configurationlink from the Database Administrationsection of the system Overview.
2. While the Snapshots tab is active, select Take Snapshot.3. Enter a descriptive name, and select OK.
The new snapshot is added to the list.
SAP HANA Administration with SAP HANA CockpitAdministering and Monitoring a Database P U B L I C 233

10.13.5.2 View Snapshot Details
You can drill down from the list of snapshots to view parameter details of a particular snapshot.
Procedure
1. Open System Configuration in SAP HANA cockpit by selecting the Manage System Configurationlink from the Database Administrationsection of the system Overview.
2. While the Snapshots tab is active, select the snapshot you want to view.3. Select the right arrow icon.
10.13.5.3 Delete a Snapshot
You can remove a snapshot from the list of snapshots.
Procedure
1. Open System Configuration in SAP HANA cockpit by selecting the Manage System Configurationlink from the Database Administrationsection of the system Overview.
2. While the Snapshots tab is active, select the snapshot you want to delete.3. Select the delete icon.4. Confirm by selecting Delete Snapshot.
10.13.5.4 Compare Snapshots
You can compare snapshots directly from the Snapshots tab of System Configuration.
Procedure
1. Open System Configuration in SAP HANA cockpit by selecting the Manage System Configurationlink from the Database Administrationsection of the system Overview.
2. While the Snapshots tab is active, select the snapshot you want to compare, or drill down to view snapshot details.
3. Select Compare.The comparison screen appears, just as it would if you had selected Compare from the Parameters tab.
234 P U B L I CSAP HANA Administration with SAP HANA Cockpit
Administering and Monitoring a Database

Related Information
Compare Configurations [page 232]
10.14 Managing Workload Classes in SAP HANA Cockpit
Several configuration options are available so that you can tailor workload classes in the SAP HANA database to your needs.
You can manage workload in SAP HANA by creating workload classes and workload class mappings. Workload classes and mappings are SQL object for workload management in SAP HANA. The goal of workload classes and mappings is to provide an easy way for administrators to regulate applications based on pre-defined mapping rules in order to avoid resource shortages with regard to CPU and memory consumption. Appropriate workload parameters are dynamically applied to each client session.
You can classify workloads based on user and application context information and apply configured resource limitations (for example, a statement memory limit). Workload classes allow SAP HANA to influence dynamic resource consumption on the session or statement level. When a request from an application arrives in SAP HANA, the corresponding workload class is determined based on the information given by the session context such as application name, application user name and database user name. Once the corresponding workload class is determined, the application request can have its resources limited according to the workload class definition.
Statement memory limits will not apply if memory tracking is inactive in SAP HANA cockpit. You can activate memory tracking in the Configuration settings.
Related Information
Create a Workload Class [page 237]Create a Workload Class Mapping [page 239]Create User-Specific Parameters [page 241]Apply Global Settings [page 236]Disable or Enable a Workload Class [page 242]Import Workload Classes [page 243]Export Workload Classes [page 244]
SAP HANA Administration with SAP HANA CockpitAdministering and Monitoring a Database P U B L I C 235

10.14.1 Apply Global Settings
You can apply global settings which are used as default values for workload classes. Enabling memory tracking allows you to also monitor the amount of memory used by single workload classes.
Context
Workload Classes lists existing workload classes and provides you with information about the workload handling of the database. You can create and edit workload classes and corresponding workload class mappings.
Procedure
1. On the Overview page, choose the Manage workload classes link.
The workload classes created in the database are listed. By default, workload classes are listed alphabetically. For each entry, you can see the execution priority, the statement memory and thread limits, the total memory and thread limits, and the number of mappings. For databases running SAP HANA SPS 03 or higher, you can also see the query timeout value.
NoteNot all of the columns listed below are visible by default. You can add and remove columns in the table personalization dialog, which you open by clicking the personalization icon in the table toolbar.
2. To monitor the memory consumption of workload classes, enable memory tracking using Monitor Statements .
Information about the memory consumption of workload classes is collected and displayed.
For more information about memory tracking and setting memory limits, see Setting a Memory Limit for SQL Statements in the SAP HANA Administration Guide.
3. To limit the memory consumption and number of threads per statement for the system globally select Edit Global Limits.
4. Specify values for the following fields:
Field Name Description
Limit Type Individual Statement Limit or Total Aggregate Statement Limit
Statement Memory Limit Displayed if Individual Statement Limit is the specified limit type. Maximum amount of memory the statement may use, in GB.
Total Memory Limit Displayed if Total Aggregate Statement Limit is the specified limit type. Maximum amount of memory all statements may use, in GB.
Statement Thread Limit Displayed if Individual Statement Limit is the specified limit type. Maximum number of parallel threads the statement may execute
236 P U B L I CSAP HANA Administration with SAP HANA Cockpit
Administering and Monitoring a Database

Field Name Description
Total Thread Limit Displayed if Total Aggregate Statement Limit is the specified limit type. Maximum number of parallel threads all statements may execute.
Query Timeout The amount of time in seconds before the query times out. (Available for databases running SAP HANA SPS 03 or higher).
5. Select Save.6. Click on a workload class entry in the list.
The mappings created for the workload class are listed, grouped, by default, by Application User Name.
Related Information
Create a Workload Class [page 237]Create a Workload Class Mapping [page 239]Create User-Specific Parameters [page 241]Disable or Enable a Workload Class [page 242]Import Workload Classes [page 243]Export Workload Classes [page 244]
10.14.2 Create a Workload Class
You can create workload classes to manage the workload of the SAP HANA system.
Context
You can classify workloads based on user and application context information and apply configured resource limitations (for example, a statement memory limit). Workload classes allow SAP HANA to influence dynamic resource consumption . A workload class must contain at least one workload class mapping that specifies the workload based on user and application context information.
Procedure
1. On the Overview page, choose the Manage workload classes link.
The workload classes created in the database are listed. By default, workload classes are listed alphabetically. For each entry, you can see the execution priority, the statement memory and thread limits, the total memory and thread limits, and the number of mappings. For databases running SAP HANA SPS 03 or higher, you can also see the query timeout value.
SAP HANA Administration with SAP HANA CockpitAdministering and Monitoring a Database P U B L I C 237

NoteNot all of the columns listed below are visible by default. You can add and remove columns in the table personalization dialog, which you open by clicking the personalization icon in the table toolbar.
2. Specify the workload class details.
Field Name Description
Workload Class Name A name for the new workload class
Execution Priority Priority, from 0 (lowest) to 9 (highest)
Limit Type Individual Statement Limit or Total Aggregate Statement Limit
Statement Memory Limit Displayed if Individual Statement Limit is the specified limit type. Maximum amount of memory the statement may use, as either an absolute or relative value.
Total Memory Limit Displayed if Total Aggregate Statement Limit is the specified limit type. Maximum amount of memory all statements may use, as either an absolute or relative value.
Statement Thread Limit Displayed if Individual Statement Limit is the specified limit type. Maximum number of parallel threads the statement may execute, as either an absolute or relative value.
Total Thread Limit Displayed if Total Aggregate Statement Limit is the specified limit type. Maximum number of parallel threads all statements may execute, as either an absolute or relative value.
Query Timeout The amount of time in seconds before the query times out. (Available for databases running SAP HANA SPS 03 or higher).
3. You can also immediately create a mapping for the workload class by entering the mapping properties under Mapping Details (Optional). Refer to Creating a Workload Class Mapping for details.
4. Select Create.
Results
The workload class is created and displayed in the list. If you have specified mapping properties, a mapping will also be created and assigned to the workload class. Before you apply a workload class, you will need to assign a mapping
Related Information
Create a Workload Class Mapping [page 239]Create User-Specific Parameters [page 241]Disable or Enable a Workload Class [page 242]Import Workload Classes [page 243]Export Workload Classes [page 244]
238 P U B L I CSAP HANA Administration with SAP HANA Cockpit
Administering and Monitoring a Database

Create a User Group [page 470]
10.14.3 Create a Workload Class Mapping
Mappings link workload classes to client sessions depending on the value of a specific client information property. A workload class must contain at least one workload class mapping that specifies the workload based on user and application context information.
Procedure
1. On the Overview page, choose the Manage workload classes link.
The workload classes created in the database are listed. By default, workload classes are listed alphabetically. For each entry, you can see the execution priority, the statement memory and thread limits, the total memory and thread limits, and the number of mappings. For databases running SAP HANA SPS 03 or higher, you can also see the query timeout value.
NoteNot all of the columns listed below are visible by default. You can add and remove columns in the table personalization dialog, which you open by clicking the personalization icon in the table toolbar.
2. Find the workload class to which you want to add a workload class mapping. Open the workload class by clicking on its entry in the list.
3. Workload class mappings are identified here on screen by a Name value. Specify the mapping properties.
The workload class with the greatest number of matching properties to the session variables passed from the client is applied. If two workload mappings have the same number of matching properties then they are matched in the prioritized order as listed in the table: application user name client application component name application component type application name user name . For example, a mapping where the application user matches takes precedence over a mapping where the database user matches (assuming an equal number of matching properties).
Field Name Description
Application User Name Name of the user logged in to the application.
Client ABAP client number. For example, 000.
Application Component Name Name of the application component. For example, /SSB/ALERT_NOTIFICATION_REPORT.
Application Component Type Name of the component type.
Application Name Name of the application.
Database User Name Name of the database user. For example, SYSTEM. You cannot enter both a user name and a user group.
SAP HANA Administration with SAP HANA CockpitAdministering and Monitoring a Database P U B L I C 239

Field Name Description
User Group Name Name of the user group. If you wish, you instead of entering a name, you can first create a new user group by selecting the Add User Group link. You cannot enter both a user name and a user group.
4. Select Create.
Results
The workload class mapping is created and displayed in the list.
Related Information
Create User-Specific Parameters [page 241]Disable or Enable a Workload Class [page 242]Import Workload Classes [page 243]Export Workload Classes [page 244]Create a User Group [page 470]
10.14.4 Edit a Workload Class
Procedure
1. On the Overview page, choose the Manage workload classes link.
The workload classes created in the database are listed. By default, workload classes are listed alphabetically. For each entry, you can see the execution priority, the statement memory and thread limits, the total memory and thread limits, and the number of mappings.
NoteNot all of the columns listed below are visible by default. You can add and remove columns in the table personalization dialog, which you open by clicking the personalization icon in the table toolbar.
2. Select a workload class entry in the list.3. Select Edit.4. In the Edit Workload Class dialog, modify the desired fields.
240 P U B L I CSAP HANA Administration with SAP HANA Cockpit
Administering and Monitoring a Database

Field Name Description
Workload Class Name A name for the workload class
Execution Priority Priority, from 0 (lowest) to 9 (highest)
Limit Type Individual Statement Limit or Total Aggregate Statement Limit
Statement Memory Limit Displayed if Individual Statement Limit is the specified limit type. Maximum amount of memory the statement may use, in GB.
Total Memory Limit Displayed if Total Aggregate Statement Limit is the specified limit type. Maximum amount of memory all statements may use, in GB.
Statement Thread Limit Displayed if Individual Statement Limit is the specified limit type. Maximum number of parallel threads the statement may execute
Total Thread Limit Displayed if Total Aggregate Statement Limit is the specified limit type. Maximum number of parallel threads all statements may execute.
5. Select Save.
10.14.5 Create User-Specific Parameters
User-specific parameters can be created for workload classes.
Context
You can set the execution priority and the statement memory limit for each database user individually. These settings will apply to all workload class mappings created for a given database user.
Procedure
1. On the Overview page, choose the Manage workload classes link.
The workload classes created in the database are listed. By default, workload classes are listed alphabetically. For each entry, you can see the execution priority, the statement memory and thread limits, the total memory and thread limits, and the number of mappings. For databases running SAP HANA SPS 03 or higher, you can also see the query timeout value.
NoteNot all of the columns listed below are visible by default. You can add and remove columns in the table personalization dialog, which you open by clicking the personalization icon in the table toolbar.
2. Select User-Specific Parameters.3. Select Create. Specify the user-specific parameters, then select Save.
SAP HANA Administration with SAP HANA CockpitAdministering and Monitoring a Database P U B L I C 241
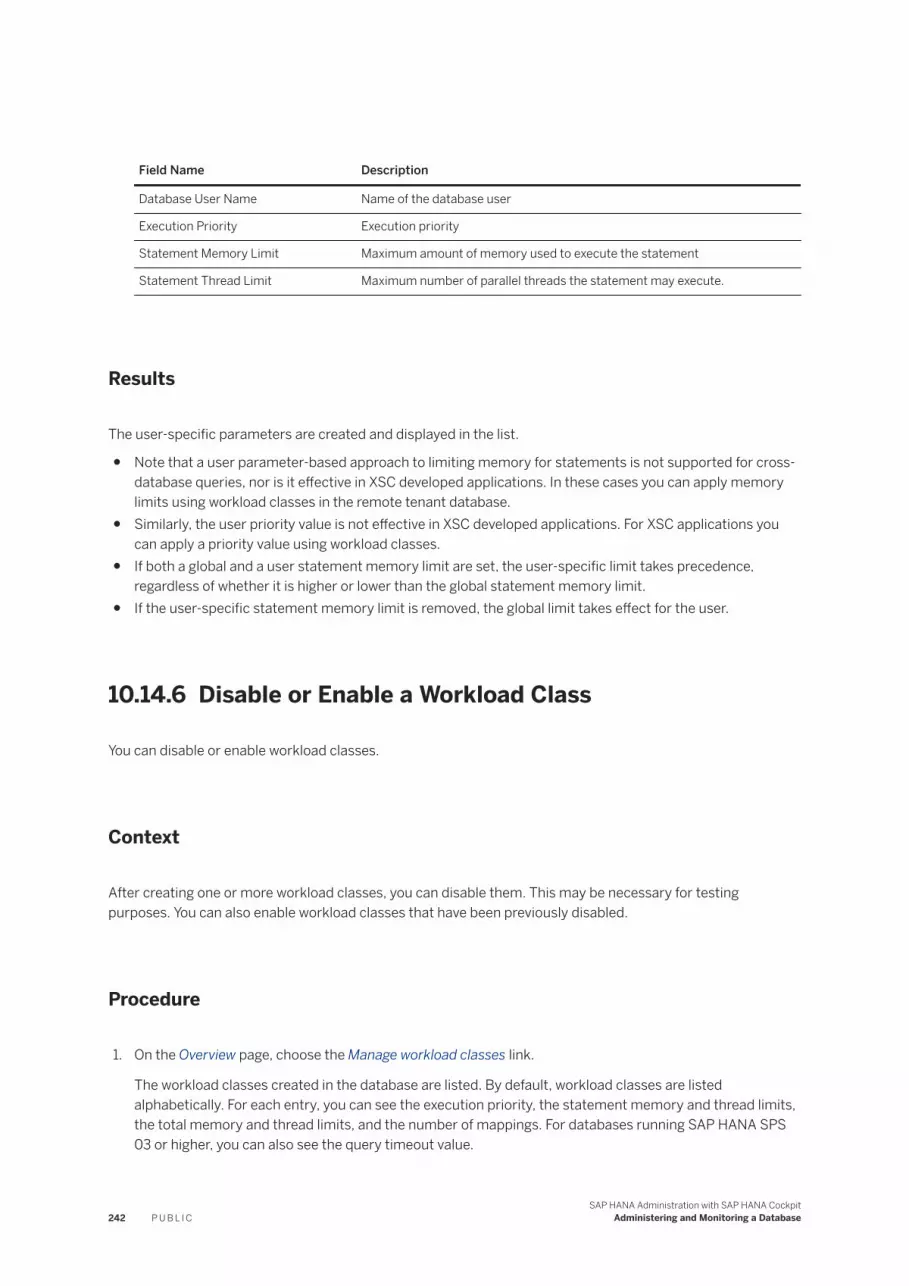
Field Name Description
Database User Name Name of the database user
Execution Priority Execution priority
Statement Memory Limit Maximum amount of memory used to execute the statement
Statement Thread Limit Maximum number of parallel threads the statement may execute.
Results
The user-specific parameters are created and displayed in the list.
● Note that a user parameter-based approach to limiting memory for statements is not supported for cross-database queries, nor is it effective in XSC developed applications. In these cases you can apply memory limits using workload classes in the remote tenant database.
● Similarly, the user priority value is not effective in XSC developed applications. For XSC applications you can apply a priority value using workload classes.
● If both a global and a user statement memory limit are set, the user-specific limit takes precedence, regardless of whether it is higher or lower than the global statement memory limit.
● If the user-specific statement memory limit is removed, the global limit takes effect for the user.
10.14.6 Disable or Enable a Workload Class
You can disable or enable workload classes.
Context
After creating one or more workload classes, you can disable them. This may be necessary for testing purposes. You can also enable workload classes that have been previously disabled.
Procedure
1. On the Overview page, choose the Manage workload classes link.
The workload classes created in the database are listed. By default, workload classes are listed alphabetically. For each entry, you can see the execution priority, the statement memory and thread limits, the total memory and thread limits, and the number of mappings. For databases running SAP HANA SPS 03 or higher, you can also see the query timeout value.
242 P U B L I CSAP HANA Administration with SAP HANA Cockpit
Administering and Monitoring a Database

NoteNot all of the columns listed below are visible by default. You can add and remove columns in the table personalization dialog, which you open by clicking the personalization icon in the table toolbar.
2. To disable workload classes:a. From the overflow menu above the table, select Disable.b. Select one or more workload classes.c. Select OK.
The workload classes are disabled.3. To enable workload classes:
a. Select Enable.b. Select one or more workload classes.c. Select OK.
The workload classes are enabled.
10.14.7 Import Workload Classes
Workload classes can be imported from another system, as in the case of going from a test system to a production system.
Prerequisites
You have a file containing workload classes exported from another system.
Procedure
1. On the Overview page, choose the Manage workload classes link.
The workload classes created in the database are listed. By default, workload classes are listed alphabetically. For each entry, you can see the execution priority, the statement memory and thread limits, the total memory and thread limits, and the number of mappings. For databases running SAP HANA SPS 03 or higher, you can also see the query timeout value.
NoteNot all of the columns listed below are visible by default. You can add and remove columns in the table personalization dialog, which you open by clicking the personalization icon in the table toolbar.
2. From the overflow menu above the table, select Import.3. In the dialog, select Browse to specify where to retrieve the file containing previously exported workload
class definitions.
SAP HANA Administration with SAP HANA CockpitAdministering and Monitoring a Database P U B L I C 243

4. Use the dialog options to specify what should happen when an imported workload class matches one that is already in the list:○ Do not import the file○ Only import classes or mappings that are not duplicates○ Import the file; overwrite duplicate classes or mappings○ Remove all classes and mappings before importing the file
Because Query Timeout is only available on databases running SAP HANA SPS 03 or higher, if the query timeout is a value other than 0, you will not be able to import from a database running SAP HANA SPS 03 or higher to a database running an earlier version of SAP HANA.
Results
The Import Results dialog shows the number of workload class definitions that were successfully imported, and may include details about workload class definitions that failed to import or that were overwritten or skipped.
Related Information
Export Workload Classes [page 244]
10.14.8 Export Workload Classes
Workload classes can be exported in preparation for importing them into another system, as in the case of going from a test system to a production system.
Procedure
1. On the Overview page, choose the Manage workload classes link.
The workload classes created in the database are listed. By default, workload classes are listed alphabetically. For each entry, you can see the execution priority, the statement memory and thread limits, the total memory and thread limits, and the number of mappings.For databases running SAP HANA SPS 03 or higher, you can also see the query timeout value.
NoteNot all of the columns listed below are visible by default. You can add and remove columns in the table personalization dialog, which you open by clicking the personalization icon in the table toolbar.
2. Select one or more workload classes.
244 P U B L I CSAP HANA Administration with SAP HANA Cockpit
Administering and Monitoring a Database

Because Query Timeout is only available on databases running SAP HANA SPS 03 or higher, if the query timeout is a value other than 0, you will not be able to import from a database running SAP HANA SPS 03 or higher to a database running an earlier version of SAP HANA.
3. From the overflow menu above the table, select Export.4. Follow the prompts in the dialog to specify where to save the file.
Related Information
Import Workload Classes [page 243]
10.14.9 Monitor Workload Classes
You can view monitoring and analysis information on workload class usage.
Procedure
1. On the Overview page, choose the Manage workload classes link.
The workload classes created in the database are listed. By default, workload classes are listed alphabetically. For each entry, you can see the execution priority, the statement memory and thread limits, the total memory and thread limits, and the number of mappings. For databases running SAP HANA SPS 03 or higher, you can also see the query timeout value.
2. To monitor workload classes and active statements, select Monitor.3. Use the filter to select one or more workload classes.
The table displays the workload classes. The graph displays the number of active statements, arranged by used memory and number of threads per statement.
4. (Optional) Adjust the data refresh rate using the refresh icon at the top right.5. (Optional) Select a specific row in order to drill down.
The display changes to show the active statements for the selected workload class.6. (Optional) Select Details to drill down to statement details.
10.15 Managing Admission Control in SAP HANA Cockpit
You can use SAP HANA cockpit to manage peak load by applying processing limits and determining how to handle new requests if the system is close to the point of saturation.
You can apply thresholds to define an acceptable limit for the percentage of memory usage or percentage of CPU capacity. Threshold values for admission control to determine when requests are queued or rejected are
SAP HANA Administration with SAP HANA CockpitAdministering and Monitoring a Database P U B L I C 245

defined as configuration parameters. See also Managing Peak Load (Admission Control) in the SAP HANA Administration Guide.
New requests will be queued until adequate processing capacity is available or a timeout is reached. Also, a higher threshold can be defined to determine the maximum workload level above which new requests will be rejected. If requests have been queued, items in the queue are processed when the load on the system reduces below the threshold levels. If the queue exceeds a specified size or if items are queued for longer than a specified period of time they are rejected.
Related Information
Use the Cockpit to Manage Admission Control [page 246]
10.15.1 Use the Cockpit to Manage Admission Control
You can manage how new, incoming requests to run statements are rejected or queued based on memory and CPU statistics so as to manage peak load.
Prerequisites
CPU and Memory resource tracking are active. (You can use the Configuration Manager to set to true the two parameters global.ini [resource tracking] enable_tracking and global.ini [resource tracking] memory_tracking.)
Context
Admission control checks the current resource consumption within a system and in conjunction with the defined threshold values decides whether or not a new statement will be admitted during peak situations in the system.
Procedure
1. On the Overview page, choose the Manage workload classes link.2. From the overflow menu above the table, select Manage Admission Control.
The cockpit displays Workload Admission Control Settings.3. Ensure that there is a check-mark next to Enable admission control so that requests can be rejected or
queued based on CPU and memory resource tracking statistics.
246 P U B L I CSAP HANA Administration with SAP HANA Cockpit
Administering and Monitoring a Database

4. View or adjust the default settings for each of the parameters and thresholds.5. Select Save.
Results
Any changes you make are saved as new settings in global.ini [session_admission_control], or, in the case of admission control log management settings, in global.ini [session_admission_control_events] . You can view these new settings using the Configuration Manager.
Related Information
Manage System Configuration in SAP HANA Cockpit [page 223]Admission Control Default Configuration Parameters [page 247]
10.15.2 Admission Control Default Configuration Parameters
The default configuration parameters for admission control can be modified through SAP HANA Cockpit using Workload Admission Control Settings.
Changes are saved to global.ini [session_admission_control], or, in the case of admission control log management settings, to global.ini [session_admission_control_events] .
Field Name Parameter Default Min/Max Detail
Enable admission control ...
enable True Enables or disables admission control.
CPU threshold for queuing new requests
queue_cpu_threshold
90 0/100 The percentage of CPU usage above which requests will be queued.
Memory threshold for queuing new requests
queue_memory_threshold
90 0/100 The percentage of memory usage above which requests will be queued.
CPU threshold for rejecting new requests
reject_cpu_threshold
0 0/100 The percentage of CPU usage above which requests will be rejected. The default value 0 means that no requests are rejected, but may be queued.
SAP HANA Administration with SAP HANA CockpitAdministering and Monitoring a Database P U B L I C 247

Field Name Parameter Default Min/Max Detail
Memory threshold for rejecting new requests
reject_memory_threshold
0 0/100 The percentage of memory usage above which requests will be rejected. The default value 0 means that no requests are rejected, but may be queued.
Admission control log management
Field Name Parameter Default Min/Max Detail
Event logging level event_level
2 1/5 Level of report event, where 1=OFF 2=BASIC (REJECT, QUEUE) 3=BASIC_CONFIG (REJECT, QUEUE, CONFIGURATION CHANGE) 4=DEBUG (REJECT, QUEUE, CONFIGURATION CHANGE, EXCLUDE) and 5=ALL (REJECT, QUEUE, CONFIGURATION CHANGE, EXCLUDE, ADMIT)
Add to log if wait time is greater than
queue_wait_time_threshold
100000 0/uint64_max
The length of time measured in microseconds for which a request must be queued above which it is included in the event log (default is one tenth of a second). If the parameter is set to 0 then events are not logged.
Max number of log records
record_limit
1000000 1/int32_max
The maximum record count permitted in the monitor of historical events.
Queue management
Field Name Parameter Default Min/Max Detail
Maximum queue size max_queue_size
10000 1/int32_max
The maximum number of requests which can be queued. Requests above this number will be rejected.
Interval for checking to release queued requests
dequeue_interval
1000 100/int32 max
Unit: milliseconds. Use this parameter to set the frequency of the check to reevaluate the load in comparison to the thresholds. The default is 1000ms (1 second). This value is recommended to avoid overloading the system, though values from 100ms are supported.
Batch size when releasing queued requests
dequeue_size
50 1/9999 Use this parameter to set the de-queue batch size, that is, the number of queued items which are released together
248 P U B L I CSAP HANA Administration with SAP HANA Cockpit
Administering and Monitoring a Database

Field Name Parameter Default Min/Max Detail
once the load is sufficiently reduced. This value can be between 1 and 100 queued requests.
Statistics collection management
Field Name Parameter Default Min/Max Detail
Averaging factor averaging_factor
70 1/100 This percentage value gives a weighting to the statistic averaging process: a low value has a strong moderating effect (but may not adequately reflect real CPU usage) and a value of 100% means that no averaging is performed, that is, only the current value for memory and CPU consumption is considered.
Statistics collection interval
statistics_collection_interval
1000 100/int32 max
Unit milliseconds. The statistics collection interval is set by default to 1000ms (1 second) which has a negligible effect on performance. Values from 100ms are supported. Statistics details are visible in the view M_ADMISSION_CONTROL_STATISTICS.
10.15.3 Admission Control Advanced Analytics
10.16 Monitoring Health in Multi-Host Systems
For scale-out or multiple-host systems, SAP HANA cockpit provides status information on the health of system components on their respective servers, and on resource utilization of hardware components, including CPU, memory, network, and storage on the respective servers.
Open System Health in SAP HANA cockpit by clicking Monitor system health under Monitoring in the system Overview of a multi-host system.
The system health charts display the most recent 10 minutes of data, organized by hosts within the system. The host types include master, standby, dynamic tiering, streaming. The health metrics are:
Metric Details
Status Status of the main service (indexserver)
SAP HANA Administration with SAP HANA CockpitAdministering and Monitoring a Database P U B L I C 249

Metric Details
Critical alerts Number of high priority alerts for the given host
CPU % Percentage of CPU usage for the given host
Memory % Percentage of memory usage for the given host
Out of Memory Events Number of out of memory events
Unloads Number of columns unloaded due to low memory
Disk Usage % Percentage of disk usage for the given host
Network I/O Number of network input/output events
Statements Changes in number of statements per second
Versions Number of multiversion concurrency control versions
Disk I/O Number of disk input/output events
To reduce the number of hosts or show particular hosts side by side, click the settings icon and select the desired hosts from the list.
By selecting specific system health information, you can drill down to details about alerts when critical alerts are present.
When the you click on a chart, instead of navigating directly to the Performance Monitor, Memory Analysis or Workload Analysis, a popover appears that redisplays the chart, and offers multiple actions.
Clicking on... Gives the option to...
CPU chart ● View CPU chart displays the Performance Monitor with a CPU chart● View all metrics for this host displays the Performance Monitor with all
metrics● View CPU for all hosts displays the Performance Monitor with a CPU chart
for each host in the scale-out system
Memory chart ● Analyze memory history displays Memory Analysis● View memory chart displays the Performance Monitor with a memory
chart● View all metrics for this host displays the Performance Monitor with all
metrics● View memory for all hosts displays the Performance Monitor with a mem
ory chart for each host in the scale-out system
Column Unload chart ● View column unload chart displays the Performance Monitor with a column unload chart
● View all metrics for this hostdisplays the Performance Monitor with all metrics
● View column unloads for all hostsdisplays the Performance Monitor with a column unload chart for each host in the scale-out system
250 P U B L I CSAP HANA Administration with SAP HANA Cockpit
Administering and Monitoring a Database

Clicking on... Gives the option to...
Disk I/O chart ● View column unload chart displays the Performance Monitor with a single chart containing: Data Write Size, Data Read Size, Log Write Size, Log Read Size, Data Backup Write Size, Data Backup Read Size
● View all metrics for this host displays the Performance Monitor with all metrics
● View disk I/O for all hostsdisplays the Performance Monitor with a chart (containing the same metrics as the single chart above) for each host in the scale-out system
Disk Usage chart ● View disk usage chart displays the Performance Monitor with a disk used chart
● View all metrics for this host displays the Performance Monitor with all metrics
● View disk usage for all hosts displays the Performance Monitor with a disk used chart for each host in the scale-out system
MVCC Versions chart ● View MVCC versions chartdisplays the Performance Monitor with a single chart containing: Acquired Record Locks, Active Commit ID Range, Active Versions
● View all metrics for this host displays the Performance Monitor with a shows all metrics
● View MVCC versions for all hostsdisplays the Performance Monitor with a chart (containing the same metrics as the single chart above) for each host in the scale-out system
Statements chart ● Analyze workload displays Workload Analysis● View statements chart displays the Performance Monitor with a state
ments chart● View all metrics for this host displays the Performance Monitor with all
metrics● View statements for all hostsdisplays the Performance Monitor with a
statements chart for each host in the scale-out system
Network I/O chart ● View network I/O chart displays the Performance Monitor with a single chart containing Network In, Network Out
● View all metrics for this host displays the Performance Monitor with all metrics
● View network I/O for all hosts displays the Performance Monitor with a chart containing Network In, Network Out for each host in the scale-out system
Related Information
Monitoring and Analyzing with the Performance Monitor [page 270]
SAP HANA Administration with SAP HANA CockpitAdministering and Monitoring a Database P U B L I C 251

10.17 Manage Hadoop Clusters
You can navigate from theSAP HANA cockpit to the Apache Ambari Web site and monitor Hadoop clusters.
Context
You can find more information about Hadoop clusters in the SAP HANA Administration Guide.
Procedure
1. Open Add Cluster Information by clicking the Manage Hadoop cluster link in the Overview of a system in SAP HANA cockpit.
2. Select Add and enter the cluster name and the Ambari URL (for example, http://my.ambari.server.url:8080).
You are directed to the Ambari Web site.
The cluster name and URL information that you enter is not saved in the SAP HANA database. When you close the browser, the information is deleted.
Related Information
Using the Overview to Manage a Resource [page 160]
10.18 Using the Cockpit to Troubleshoot an Unresponsive Resource
Using SAP HANA cockpit, you can identify performance issues in a specific system or a tenant database by examining transactional information.
Once you have opened SAP HANA cockpit, you can open Troubleshoot Unresponsive System by clicking the corresponding link on the Alerting and Diagnostics tile in the system Overview..
TipFrom My Resources, which is displayed when you first open the cockpit, selecting a resource name in the Recently Accessed list allows you to drill down to the Overview for that individual resource.
252 P U B L I CSAP HANA Administration with SAP HANA Cockpit
Administering and Monitoring a Database

Troubleshoot Unresponsive System organizes information about the system by tab. You can diagnose:
● Connections● Transactions● Blocked Transactions● Threads
You can select one connection or transaction to cancel, or choose to cancel all of them.
NoteTo access this page and trigger the collection of the above information, you require the credentials of the <sid>adm user. These can be entered for the system or tenant database in the Resource Directory.
Related Information
Open SAP HANA Cockpit [page 15]Using the Overview to Manage a Resource [page 160]Working with the Resource Directory [page 89]
10.19 Collect and Download Diagnosis Information with the Cockpit
To help SAP Support analyze and diagnose problems with the SAP HANA database, you can collect diagnosis information into a zip file, which you can then download and attach to a support message for example. With the SAP HANA cockpit, you can create and manage system information dumps.
Prerequisites
● If the database is online, you need the following privileges:
To... You Need...
Collect diagnosis information EXECUTE privilege on the procedure SYS.FULL_SYSTEM_INFO_DUMP_CREATE
SAP HANA Administration with SAP HANA CockpitAdministering and Monitoring a Database P U B L I C 253

To... You Need...
List diagnosis information SELECT privilege on the view SYS.FULL_SYSTEM_INFO_DUMPS
In the system database of a multiple-container system, you also need SELECT on SYS_DATABASES.FULL_SYSTEM_INFO_DUMPS so that you can see diagnosis information collected from tenant databases.
Download collected diagnosis information EXECUTE privilege on the procedure SYS.FULL_SYSTEM_INFO_DUMP_RETRIEVE
Delete collected diagnosis information EXECUTE privilege on the procedure SYS.FULL_SYSTEM_INFO_DUMP_DELETE
● If the system is online, but you want to switch it to offline before collecting information, you will be prompted to connect to the resource using the SAP Control credentials.
● If the system is offline (including the system database in a multiple-container system), you must have credentials of the operating system administrator (user <sid>adm).
● If the database is a tenant database in a multiple-container system and it is offline, you must be logged on to the system database and have the privileges listed above. It is not possible to collect, list, download, or delete diagnosis information from an offline tenant database.
Context
Procedure
1. On the system overview page, under Alerting & Diagnostics, select Manage full system information dumps.2. On the Diagnosis Files page, if the system is online, you can use the drop down list to switch to offline. You
will be prompted to connect to the resource with the SAP Control credentials. (If the system is offline, you cannot switch to online).
3. On the Diagnosis Files page, choose a zip file from the list or click Collect Diagnostics to create a new zip file.
4. When creating a new zip file, specify the scope of information to be collected:
Option Description
Collect from existing files
Select this option if you want to collect diagnosis information for one or more file types, for a specific time period, by default the last 7 days. If you also want information from system views, then select Include system views.
NoteIf you are connected to the system database of a multiple-container system, only information from the system views of the system database will be collected. Information from the system views of tenant databases will not be collected regardless of this option.
254 P U B L I CSAP HANA Administration with SAP HANA Cockpit
Administering and Monitoring a Database

Option Description
Information from system views is collected through the execution of SQL statements, which may impact performance. In addition, the database must be online, so this option is not available in diagnosis mode.
Create and collect one or multiple sets of runtime environment (RTE) dump files
Select this option if you want to restrict the information collected to one or more RTE dump files. You can configure the creation and collection of dump files by specifying the following additional information:○ The number sets to be collected (that is, the number of points in time at which RTE dump files
will be collected). Possible values are 1- 5.○ The interval (in minutes) at which RTE dump files are to be collected (possible values are 1, 5,
10, 15, and 30). The default value is 1.○ The host(s) from which RTE dump files are to be collected.○ The service(s) for each selected host from which RTE dump files are to be collected.○ The section(s) from each selected service from which RTE dump files are to be collected.
The system collects the relevant information and saves it to a zip file. This may take some time and can be allowed to run in the background.
If you are connected to the system database of a multiple-container system, information from all tenant databases is collected and saved to separate zip files.
10.20 Monitoring the Network Between Multiple Hosts
For scale-out systems, it is possible to monitor network traffic between hosts using the Monitor Network link in the SAP HANA cockpit.
On the Network Overview page, you can view the number of hosts and use the following tabs to monitor the network for multiple hosts:
● Network TrafficUse this tab to understand the role of each host and the size of the sent (Request Size) and received data (Response Size) between the hosts of the scale-out SAP HANA database. The sender host sends requests to the receiver host which responses. You can change the unit on the top right.
● Network Speed Check (Internal Communication)The list offers an overview of all network channels between the involved hosts starting with the slowest network connection.The Measure Network Speed link offers the possibility to measure the network speed between the hosts in a scale-out SAP HANA database. You can select the size of the package for the speed check.
● Network Speed Check (System Replication Communication)The list offers an overview of all network channels between the involved hosts in the system replication configuration.The Measure Network Speed link offers the possibility to measure the network speed between the hosts in a system replication configuration.
SAP HANA Administration with SAP HANA CockpitAdministering and Monitoring a Database P U B L I C 255

10.21 Managing Licenses
A valid license key is required to use the SAP HANA database. Additional license keys are required for certain applications running on SAP HANA, as well as and certain SAP HANA options and capabilities. You can use the SAP HANA cockpit to see which licenses are available in your system, to install new license keys, and to view memory usage with respect to licensing.
Related Information
View Licenses [page 258]Install a Permanent License [page 260]Delete Licenses [page 263]License Keys for SAP HANA Database [page 256]
10.21.1 License Keys for SAP HANA Database
The SAP HANA database supports two kinds of license keys: temporary license keys and permanent license keys.
Temporary license keys are automatically installed in an SAP HANA system. Permanent license keys have to be requested on SAP Support Portal and applied to the individual SAP HANA system.
A single license key is required, regardless of the number of tenant databases. You install the license key in the system database. It is not possible to do this in a tenant database.
Temporary License Keys
A temporary license key, which is valid for 90 days, is automatically installed with a new SAP HANA system. During this period, you should request and apply a permanent license key.
Permanent License Keys
You can request a permanent license key on SAP Support Portal (http://support.sap.com ) under Request a Key. Permanent license keys are valid until the predefined expiration date. Furthermore, they specify the amount of memory licensed to the target SAP HANA installation. Before a permanent license key expires, you should request and apply a new permanent license key. If a permanent license key expires, a temporary license key valid for 28 days is automatically installed. During this time, you can request and install a new permanent license key.
256 P U B L I CSAP HANA Administration with SAP HANA Cockpit
Administering and Monitoring a Database

There are two types of permanent license key available for SAP HANA: unenforced and enforced. If an unenforced license key is installed, the operation of SAP HANA is not affected if its memory consumption exceeds the licensed amount of memory. However, if an enforced license is installed, the system is locked down when the current memory consumption of SAP HANA exceeds the licensed amount of memory plus some tolerance. If this happens, either SAP HANA needs to be restarted, or a new license key that covers the amount of memory in use needs to be installed.
The two types of permanent license key differ from each other in the following line in the license key file:
License Key Type License Key File Entry
Unenforced SWPRODUCTNAME=SAP-HANA
Enforced SWPRODUCTNAME=SAP-HANA-ENF
SWPRODUCTNAME=SAP-HANA-DEV
SWPRODUCTNAME=SAP-HANA-DIGITAL
NoteIt is technically possible to install an enforced license in an SAP HANA instance with a regular, unenforced permanent license. In this case, the unenforced license key has priority. That is, if a valid unenforced license key is found, excessive memory consumption will not result in a system lockdown. However, if one license key expires and becomes invalid, the other one, if valid, becomes the valid license key of the instance. If the latter is an enforced license key, then the memory consumption check is enforced.
System Lockdown
The system goes into lockdown mode in the following situations:
● The permanent license key has expired and either:○ You did not renew the subsequently installed temporary license key within 28 days, or○ You did renew the subsequently installed temporary license key but the hardware key has changed
● The installed license key is an enforced license key and the current memory consumption exceeds the licensed amount plus the tolerance.
● You deleted all license keys installed in your database.
In lockdown mode, no queries are possible. Only a user with the system privilege LICENSE ADMIN can connect to the database and execute license-related queries, such as, obtain previous license data, install a new license key, and delete installed license keys.
In addition, the database cannot be backed up in lockdown mode.
Further SAP HANA Licenses
Additional licenses are required for certain applications running on the SAP HANA database, as well as certain SAP HANA options and capabilities. For more information, see SAP Note 1644792.
SAP HANA Administration with SAP HANA CockpitAdministering and Monitoring a Database P U B L I C 257

Related Information
SAP Support PortalSAP Note 1644792
10.21.2 View Licenses
You can view licenses installed in your SAP HANA database on the License page of the SAP HANA cockpit.
Context
You have the system privilege LICENSE ADMIN.
Procedure
On the Overview page, choose the Manage system licenses link.
Results
The License page opens. All licenses installed in the database are listed on the left. If you want to view the full details, including memory usage data, related to a particular license, simply click it. For more information, see License Details.
NoteIf you are viewing license information in the system database, usage data is for the system as a whole. In a tenant database, only the usage data of the tenant is shown.
Related Information
License Details [page 259]
258 P U B L I CSAP HANA Administration with SAP HANA Cockpit
Administering and Monitoring a Database

10.21.2.1 License Details
The License page provides you with detailed information about all licenses installed in the SAP HANA database.
General Information for SAP HANA Database Licenses
Field Description
Hardware Key Unique hardware key
System ID Unique SAP system identifier
License Type License type, either permanent or temporary
Product Description SAP HANA database
Starts On Date as of which the license is valid
Expires On Date on which the license will expire
Licensed Memory Usage Amount of memory usage licensed
Peak Memory Usage Highest recorded value for main memory usage consumed by the SAP HANA database
GLAS ID Unique product ID of SAP HANA required for license auditing
NoteIf you are viewing the information in the system database, memory usage data is for the system as a whole. In a tenant database, only the memory usage data of the tenant is shown.
The following additional fields are available if SAP Business Warehouse (SAP BW) is running on the SAP HANA database.
Field Description
Peak Memory Usage of SAP BW Highest recorded value for main memory usage consumed by SAP BW
GLAS ID of SAP BW Unique product ID of SAP BW required for license auditing
Peak Memory Usage of Non-SAP BW Components Highest recorded value for main memory usage consumed by SAP HANA
GLAS ID of Non-SAP BW Components Unique product ID of SAP HANA required for license auditing
General Information for Other SAP HANA Licenses
Field Description
Hardware Key Unique hardware key
SAP HANA Administration with SAP HANA CockpitAdministering and Monitoring a Database P U B L I C 259

Field Description
System ID Unique SAP system identifier
License Type License type, either permanent or temporary
Product Description Product for which the license is valid
Starts On Date as of which the license is valid
Expires On Date on which the license will expire
Licensed <license_metric> Amount of usage licensed
The unit of measurement varies from product to product. For example, SAP HANA dynamic tiering licensing is based on hard disk usage.
Peak <license_metric> Highest recorded usage value consumed
GLAS ID Unique product ID required for license auditing
Memory Usage
The memory usage graph is available for SAP HANA database licenses and shows you the peak memory usage recorded every month for the previous twelve months.
10.21.3 Install a Permanent License
To use SAP HANA, you must request and install a permanent license key. You can do this in the SAP HANA cockpit.
Prerequisites
● You have the necessary authorization to request permanent license keys on SAP Support Portal.● To install a license key in the SAP HANA system, you have the system privilege LICENSE ADMIN.
Context
You need to request and install a permanent license key, for example, if the current license key of your SAP HANA system is about to expire, or you want to extend the amount of memory licensed for your system.
A single license key is required, regardless of the number of tenant databases in the system.
You install the license key in the system database. It is not possible to do this in a tenant database.
260 P U B L I CSAP HANA Administration with SAP HANA Cockpit
Administering and Monitoring a Database

NoteYou can also request and install the license keys required for applications running on SAP HANA, as well as SAP HANA options and capabilities, using the procedure described here.
Procedure
1. On the Overview page, choose the Manage system licenses link.
NoteIf the system is in lockdown, you will be automatically prompted to navigate to the License page.
2. Request a permanent license key as follows:a. On the License page, choose the Request New button in the footer.
If the system is currently running on a temporary license key, the hardware key and the system ID are displayed. If the system already has a valid permanent license key, the installation number and system number are displayed. You will need this information to fill out the license key request form.
b. Choose SAP Support Portal.c. In SAP Support Portal, choose Request a Key.
You are forwarded to the license key application of the SAP ONE Support Launchpad, where you can request a new key. When completing the request form, if you have the installation number and system number, then enter them first so that the other input fields are auto-completed. When you have finished, choose Submit.
The permanent license will be sent to you as an e-mail attachment.3. Install the license key by choosing Upload License Key and uploading the license file (*.txt file) that you
received by e-mail.
NoteIf you are installing a second or subsequent permanent license key, it must have the same system-identification data as the permanent license key previously installed in the database. In particular, the system ID (SID), hardware key, installation number, and system number must be the same. If any difference is detected in this data, the installation of the license key fails and no change is made to the license key in the database.
SAP HANA Administration with SAP HANA CockpitAdministering and Monitoring a Database P U B L I C 261

10.21.4 Export Usage Data
SAP HANA licensing is based on used memory. The SAP HANA database keeps track of the highest value for used memory per calendar month for a one-year period. You may be requested by SAP to export this data for license audit purposes to verify the suitability of your license.
Prerequisites
You have the system privilege LICENSE ADMIN.
Procedure
1. On the Overview page, choose the Manage system licenses link.2. Click Export System Measurement in the footer toolbar.
Results
Usage data for all installed licenses is exported to the file SAPHANASystemMeasurement.xml, which is downloaded in line with your browser's file download settings.
NoteIn Safari, the file is not automatically downloaded. Instead, the content opens in a new tab or window and you must manually save the file by pressing CMD + S , choosing page source, and specifying a file name.
Related Information
SAP Note 1704499
262 P U B L I CSAP HANA Administration with SAP HANA Cockpit
Administering and Monitoring a Database

10.21.5 Delete Licenses
You can delete all existing license keys in the SAP HANA database, for example, if permanent license keys with an incorrect installation number or incorrect system number were installed.
Prerequisites
You have the system privilege LICENSE ADMIN.
Procedure
1. On the Overview page, choose the Manage system licenses link.2. Click Delete All Licenses in the footer toolbar.
Results
All permanent license keys are deleted.
If you are in the system database, this results in the lockdown of the system database and any tenant databases that do not have their own tenant-specific license key. You must install a new, valid permanent license key is required to unlock the database(s).
If you are in a tenant database, the license keys installed in the system database now take effect.
10.22 Display Backups
You can display information about the backups created and the backup configuration.
Context
In SAP HANA cockpit as a Service, your database is backed up automatically to ensure that it can be recovered to its most recent consistent state.
No intervention from a system administrator is needed to create database and log backups.
SAP HANA Administration with SAP HANA CockpitAdministering and Monitoring a Database P U B L I C 263

Procedure
To display information about the database backups...1. From SAP HANA cockpit, select a SAP HANA database and open the system overview.2. Choose Manage database backups.
The following information from the backup catalog is displayed:
○ Time range that the backup catalog covers○ Total size of the backup catalog○ Information about the most recent backups within the time range
This information includes: status, start time, backup type, duration, size, destination type, and a comment
3. You have the following display options:
To... Steps
Display more details about a backup. Click its row.
Display an overview of backup generations. Choose the chart icon.
The chart shows the start time of the backup generation, its total size, and the sizes of the full data backup and the associated delta backups and log backups that can be used in combination for a recovery.
Change the order in which the columns are displayed. Choose Settings, and use the arrow buttons.
In the same way, you can also customize the backup details pages for each database.
4. You can customize the information displayed.
Choose Filter.
A dialog box is displayed.
You can filter the following information:
Backup Type By default, Complete Data Backup and Data Snapshot are selected.
Delta backups are included in the backup catalog, but are not displayed by default in SAP HANA cockpit.
To display information about delta backups, select Differential Data Backup and Incremental Data Backup and confirm.
Status You can display backups with the status:
○ Canceled○ Failed
264 P U B L I CSAP HANA Administration with SAP HANA Cockpit
Administering and Monitoring a Database

○ PreparedA data snapshot has been prepared, but has not been confirmed or abandoned.
○ RunningIf a backup is running, its progress is displayed.
○ Successful
Start Time You can display backups from a specific time range.
To display information about the backup configuration...5. Choose Configure Backup.
The system-specific configuration settings for the database are displayed.
Backup Catalog Settings
Setting Description
Destination Type The destination type is the file system or a third-party backup tool (Backint).
Location For file system backups, by default, the backup catalog is backed up to: /hana/mounts/backup/catalog
For Backint, the backup data is written through the third-party backup tool. The location cannot be changed.
Log Settings: Log Mode
Setting Description
Log Mode SAP HANA uses two log modes: normal and overwrite.
By default, SAP HANA runs in log mode normal.
Log Settings: Log Backup
Setting Description
Create Log Backups Automatic log backups are enabled or disabled.
If Create Log Backups is disabled, the other settings in the parameter group cannot be changed.
Use Consolidated Backups To improve the performance of log backups, SAP HANA can write multiple log segments of a service to a single consolidated log backup.
If you do not use consolidated log backups, each log segment is backed up to its own backup.
SAP HANA Administration with SAP HANA CockpitAdministering and Monitoring a Database P U B L I C 265

Setting Description
Maximum Size (GB) The default value is 16 GB.
This means that one backup operation creates consolidated log backups with a maximum size of 16 GB.
The minimum size is 8 GB. The maximum size allowed is 64 GB.
Destination Type The destination type can be the file system or a third-party backup tool.
Location For Backint, the backup data is written through a third-party backup tool. You cannot change the location.
For file system backups, by default, SAP HANA log segments in the log area are backed up to: /hana/mounts/backup/log
Back Up Logs At latest after specified time limit: If log segments become full, they are backed up immediately, even if the log backup time limit has not been reached.
(This is the same as log backup interval mode: immediate)
Only after specified time limit: Log segments are backed up after the time limit you specify. This means that log segments are not automatically backed up if the log segments become full.
(This is the same as log backup interval mode: service)
Time Limit (Minutes) By default, the time limit is 15 minutes.
The maximum permitted time limit is 1440 minutes (24 hours).
Data Backup Settings
Setting Description
Destination Type The destination type can be the file system or a third-party backup tool.
Location Backint: The backup data is written through a third-party backup tool. The location cannot be changed.
File system backups: By default, the backups are written to: /hana/mounts/backup/data
266 P U B L I CSAP HANA Administration with SAP HANA Cockpit
Administering and Monitoring a Database

Setting Description
Limit Maximum Size (File System Backups) The maximum file size applies to the data backups of all services.
If the size of a data backup file for a service exceeds the specified limit, SAP HANA splits the file into multiple smaller files.
Restrictions for Tenant Database Users
Setting Description
Users Can Create Backups Default: No
All users of a tenant database are prevented from creating backups.
Users Have Free Choice of Backup Destination NoteFor file-system backups only.
Default: No
Users who are allowed to create backups can only create backups in the default backup destination or a subpath of the default backup destination.
SAP HANA Administration with SAP HANA CockpitAdministering and Monitoring a Database P U B L I C 267

11 Monitoring, Analyzing, and Improving Performance in SAP HANA Cockpit
You can monitor, analyze, and improve the performance of the database using the SAP HANA cockpit.
How do you use performance monitoring tools in SAP HANA cockpit?
● Monitoring Performance in SAP HANA Cockpit [page 269]● Monitoring Performance in SAP HANA Cockpit [page 269]● Improving Performance in SAP HANA Cockpit [page 332]● Monitoring and Analyzing with the Performance Monitor [page 270]● Capturing and Replaying Workloads [page 284]● Analyzing Workloads [page 313]● Analyzing Statement Performance [page 320]● Managing Plan Stability [page 339]● Getting Recommendations [page 332]● Managing Statement Hints [page 341]
268 P U B L I CSAP HANA Administration with SAP HANA Cockpit
Monitoring, Analyzing, and Improving Performance in SAP HANA Cockpit

Related Information
Monitoring Performance in SAP HANA Cockpit [page 269]Analyzing Performance in SAP HANA Cockpit [page 284]Improving Performance in SAP HANA Cockpit [page 332]
11.1 Monitoring Performance in SAP HANA Cockpit
Monitoring past and current information about the performance of the SAP HANA database is important for root-cause analysis and the prevention of future performance issues.
You can use the following tools to monitor fine-grained aspects of system performance in the SAP HANA cockpit:
● Use the Performance Monitor to visually analyze historical performance data across a range of key performance indicators related to memory, disk, and CPU usage.
● Use Threads to monitor the longest-running threads active in your system.You can use it to see, for example, how long a thread is running, or if a thread is blocked for a prolonged period.
● Use the Sessions tile to monitor all sessions in your landscape.● Use the Statements Monitor to analyze the current most critical statements running in the database.● Use Expensive Statements to analyze individual SQL queries whose execution time was above a configured
threshold.● Use the SQL plan cache to get an insight into the workload of the SAP HANA database as it lists all
statements currently cached in the SAP HANA database.● Use the Blocked Transactions to monitor the details of transactionally blocked threads.
Related Information
Monitoring and Analyzing with the Performance Monitor [page 270]Monitoring and Analyzing Threads [page 276]Monitoring and Analyzing Sessions [page 279]Monitor and Analyze Active Statements [page 280]Monitor and Analyze Expensive Statements [page 282]Monitor and Analyze Statements with SQL Plan Cache [page 281]Monitoring Blocked Transactions [page 283]
SAP HANA Administration with SAP HANA CockpitMonitoring, Analyzing, and Improving Performance in SAP HANA Cockpit P U B L I C 269

11.1.1 Monitoring and Analyzing with the Performance Monitor
Analyzing the performance of the SAP HANA database over time can help you pinpoint bottlenecks, identify patterns, and forecast requirements. Use the Performance Monitor to visually analyze historical performance data across a range of key performance indicators related to memory, disk, and CPU usage.
You can access the Performance Monitor as follows:
● Click on the Monitor Performance link or directly on the title of the Memory Usage, CPU Usage, or Disk Usage tile.
● Click on the Monitor performance link on the Monitoring tile.● Open the Performance Monitor through the Workload Analysis page. For more information, see: Analyzing
Workloads Based on Thread Samples.● Open the Performance Monitor through the Memory Analysis page. For more information, see: Analyze
Memory Statistics.
The Performance Monitor opens displaying the load graph for the selected resource: CPU, disk, or memory. The load graph initially visualizes resource usage of all hosts and services listed on the left according to the default KPI group of the selected resource.
You can customize the information displayed on the load graph, for example:
● Switch between a number of predefined views, like Default, CPU, Disk, and Memory.● Create customized views by adding or deleting hosts, services and KPIs in the settings menu. Then choose
Save As in the My Views menu. Insert a name in the Save View dialog and confirm. You can delete or edit the custom views by choosing Manage in My Views or in the settings menu.
● Define the monitored time frame by entering your desired dates or selecting form Presets● Set the automatic refresh rate● Use the Add Chart button to create custom charts displaying the host and services selection, and selected
KPIsFor a list of all available KPIs, see Key Performance Indicators.
● The hierarchically sorted table legend displays the KPI unit, y-axis scale, as well as minimum, maximum, and average values. Filter the results you see in the chart by selecting only the KPIs you are interested in.
● Zoom into a specific time on a graph by brushing across the desired selection on the load graph directly. Click on the zoom in button on upper right corner of the highlighted area. Select Undo in the header toolbar to zoom out again
● Compare the performance of your selected KPIs at different times using the Performance Comparison page. For more information, see Compare Performance.
● In the Settings menu, customize your graphs by including hosts and services as well as additional KPIs in the Charts tab. In the Alerts tab, configure alerts according to category and priority status.
Related Information
Key Performance Indicators [page 274]Compare Performance [page 271]Collecting Performance Monitor Data for SAP Support [page 272]Import Performance Monitor Data [page 272]
270 P U B L I CSAP HANA Administration with SAP HANA Cockpit
Monitoring, Analyzing, and Improving Performance in SAP HANA Cockpit

Export Performance Monitor Data [page 273]Analyze Workloads Based on Thread Samples [page 316]Analyze Memory Statistics [page 176]
11.1.1.1 Compare Performance
Use Performance Comparison to examine the performance of your selected KPIs at different time intervals.
Procedure
1. In the Performance Monitor, select the KPIs you want to compare.2. Brush across the desired time selection on the load graph directly.
This selection will make up the main chart that you can contrast to any additional charts you create on the Performance Comparison page.
3. Click on the comparison button on the upper right corner of the highlighted area.4. The Performance Comparison page opens, displaying the KPIs as well as hosts and services that were
selected in the Performance Monitor.5. Optional: You can add or remove KPIS by clicking the Refine KPIs button in the header toolbar and making
your selection. You can also adjust hosts and services.
Optional: You can adjust the time range of the chart by selecting the desired start and end of the monitored time interval, or choosing from Presets in the header toolbar.
6. Add an aditional chart for comaring performance at different time intervals by selecting the Add a chart to compare link on the bottom of the screen or by clicking the Add chart button in the header toolbar.
A selection of preset time intervals to choose from opens. Once you have made your choice, the additional chart displaying that time range appears.
NoteThe Add a chart to compare link is only available for the first additional chart, any other chart must be added by using the Add Chart button in the header toolbar.
7. Optional: Per default, the monitored time interval is defined via a range. To choose a time interval that is dynamically adjusted to the time interval of the main chart, click on the Relational button above the respective chart and make your time interval selection.
8. Optional: Update the chart by pressing the Update button above the respective chart.9. Optional: You can bookmark a time range in a load chart to easily refer to it in the future.
Highlight a time range on the desired chart, click the navigation icon on the top right corner of the highlighted area, and choose Bookmark Selection.
The highlighted area changes color to indicate that a bookmark has been set. Above the chart containing bookmarks, there is a link with the number of bookmarks contained in the chart. It lists the bookmarked time range as well as the bookmark selection date. Clicking it highlights and navigates to the bookmarked time range on the chart.
SAP HANA Administration with SAP HANA CockpitMonitoring, Analyzing, and Improving Performance in SAP HANA Cockpit P U B L I C 271

It is possible to name the bookmark by clicking the navigation icon on the highlighted area and selecting Add Description. The description is displayed in the bookmark list above the chart.
To modify the description, click on the navigation icon. You can also delete the bookmark through the navigation icon or by clicking the trash bin.
10. Navigate to the Performance Monitor or Workload Analysis page by highlighting a time range, clicking on the navigation icon and making your selection.
11.1.1.2 Collecting Performance Monitor Data for SAP Support
To help SAP Support analyze and diagnose problems with your system, you can collect a snapshot of the performance monitor data from your system into a zip file. You can trigger the collection of diagnosis information from the SAP HANA cockpit.
Related Information
Import Performance Monitor Data [page 272]Export Performance Monitor Data [page 273]
11.1.1.2.1 Import Performance Monitor Data
To analyze and diagnose problems with the SAP HANA database, you can import performance monitor data from a zip file into the SAP HANA cockpit.
Procedure
1. Open the Performance Monitor via the Memory Usage, CPU Usage, or Disk Usage tiles or by selecting the Monitor Performance link in the Monitoring tile on the homepage of the SAP HANA cockpit.The Performance Monitor opens displaying the load graph for the selected resource: CPU, disk, or memory.
2. Select Import on the bottom of the page.
The Support Tools page opens, displaying a list of available performance monitor data sets.3. Optional: If your desired data set is not in the system yet, you can import it from a local or a remote file. To
do this, select Import on the bottom of the page.
The Import dialog opens, presenting you with the options of importing a data set from a local or a remote file.
4. Select the file containing the performance monitor data set that you want to import and fill in a description. Click Import to confirm your selection.
272 P U B L I CSAP HANA Administration with SAP HANA Cockpit
Monitoring, Analyzing, and Improving Performance in SAP HANA Cockpit
The system imports the performance monitor data set from the zip file. This may take some time and runs in the background.
Once the performance monitor data is available, it is displayed in the list of Performance Monitor Data Sets.
Next Steps
You can open a performance monitor data set by clicking the corresponding entry under Performance Monitor Data Sets. The Performance Monitor opens and displays the KPI data stored inside the data set. Use the Performance Monitor to visually analyze historical performance data across a range of key performance indicators related to memory, disk, and CPU usage.
Related Information
Monitoring and Analyzing with the Performance Monitor [page 270]
11.1.1.2.2 Export Performance Monitor Data
To help SAP Support analyze and diagnose problems with the SAP HANA database, you can export performance monitor data into a zip file, which you can then download and, for example, attach to a support message.
Procedure
1. Open the Performance Monitor by clicking Show all on the Memory Usage, CPU Usage, or Disk Usage tile on the homepage of the SAP HANA cockpit.The Performance Monitor opens to a display of the load graph for the selected resource: CPU, disk, or memory.
2. Select Export All in the footer bar to export the CPU, disk, or memory KPI data.
Click Export in the Export All dialog.The system collects the relevant information and saves it to a zip file. This may take some time and runs in the background.
Once the collection is available, you can download it by clicking the download button. It will be saved to the download directory of your browser on your client.
Related Information
Monitoring and Analyzing with the Performance Monitor [page 270]
SAP HANA Administration with SAP HANA CockpitMonitoring, Analyzing, and Improving Performance in SAP HANA Cockpit P U B L I C 273
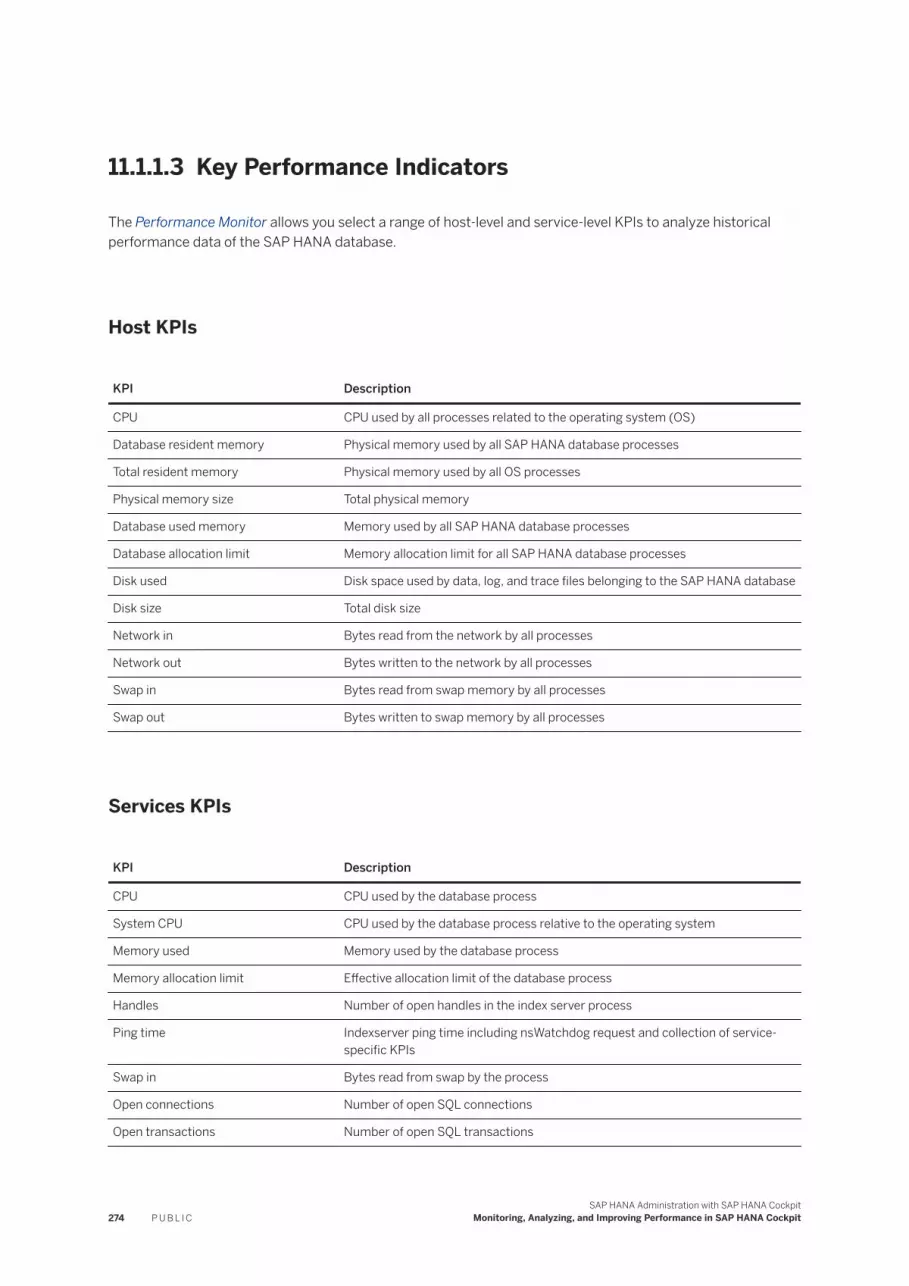
11.1.1.3 Key Performance Indicators
The Performance Monitor allows you select a range of host-level and service-level KPIs to analyze historical performance data of the SAP HANA database.
Host KPIs
KPI Description
CPU CPU used by all processes related to the operating system (OS)
Database resident memory Physical memory used by all SAP HANA database processes
Total resident memory Physical memory used by all OS processes
Physical memory size Total physical memory
Database used memory Memory used by all SAP HANA database processes
Database allocation limit Memory allocation limit for all SAP HANA database processes
Disk used Disk space used by data, log, and trace files belonging to the SAP HANA database
Disk size Total disk size
Network in Bytes read from the network by all processes
Network out Bytes written to the network by all processes
Swap in Bytes read from swap memory by all processes
Swap out Bytes written to swap memory by all processes
Services KPIs
KPI Description
CPU CPU used by the database process
System CPU CPU used by the database process relative to the operating system
Memory used Memory used by the database process
Memory allocation limit Effective allocation limit of the database process
Handles Number of open handles in the index server process
Ping time Indexserver ping time including nsWatchdog request and collection of service-specific KPIs
Swap in Bytes read from swap by the process
Open connections Number of open SQL connections
Open transactions Number of open SQL transactions
274 P U B L I CSAP HANA Administration with SAP HANA Cockpit
Monitoring, Analyzing, and Improving Performance in SAP HANA Cockpit

KPI Description
Blocked transactions Number of blocked SQL transactions
Statements Number of finished SQL statements
Active commit ID range Range between newest and oldest active commit ID
Pending session request count Number of pending requests
Active versions Number of active MVCC versions
Acquired record locks Number of acquire record locks
Read requests Number of read requests (selects)
Write requests Number of write requests (insert, update, and delete)
Merge requests Number of merge requests
Column unloads Number of table and column unloads
Active threads Number of active threads
Waiting threads Number of waiting threads
Total threads Total number of threads
Active SqlExecutors Total number of active SqlExecutor threads
Waiting SqlExecutors Total number of waiting SqlExecutor threads
Total SqlExecutors Total number of SqlExecutor threads
Data write size Bytes written to data area
Data write time Time used for writing to data area
Log write size Bytes written to log area
Log write time Time used for writing to log area
Data read size Bytes read from data area
Data read time Time used for reading from data area
Log read size Bytes read from log area
Log read time Time used for reading from log area
Data backup write size Bytes written to data backup
Data backup write time Time used for writing to data backup
Log backup write size Bytes written to log backup
Log backup write time Time used for writing to log backup
Mutex Collisions Number of collisions on mutexes
Read/Write Lock Collisions Number of collisions on read/write locks
SAP HANA Administration with SAP HANA CockpitMonitoring, Analyzing, and Improving Performance in SAP HANA Cockpit P U B L I C 275

11.1.2 Monitoring and Analyzing Threads
Use Threads to monitor the longest-running threads active in your system. You can use it to see, for example, how long a thread is running, or if a thread is blocked for a prolonged period.
Analyzing the threads running in the SAP HANA database can be helpful when analyzing the current system load.
You can identify which statements or procedures are being executed and at what stage they are, who else is connected to the system, and if there are any internal processes running as well.
The Threads tile provides information about the number of currently active and blocked threads in the database.
Open the Threads page by clicking either the number of active threads or blocked threads on the tile.
The Threads page allows you to monitor the longest-running threads in your current system. You can retrieve more information or customize what is being displayed, for example:
● Filter threads by host, service, and thread type● Choose the sorting order by checking the Group and Sort box and selecting the sorting parameters● See the call stack information on your chosen thread● Define columns and choose the parameters you want information on
When you have selected a thread, you can Navigate To the Sessions or Blocked Transactions page for the thread with the same connection ID.
If a thread is in a blocked transaction or is using an excessive amount of memory, you can cancel the operation executing the thread by clicking Cancel Operations in the footer toolbar.
Related Information
Thread Details [page 276]
11.1.2.1 Thread Details
The Threads tile provides you with detailed information about the 1000 longest-running threads currently active in the database.
NoteNot all of the columns listed below are visible by default. You can add and remove columns in the table personalization dialog, which you open by clicking the personalization icon in the table toolbar.
276 P U B L I CSAP HANA Administration with SAP HANA Cockpit
Monitoring, Analyzing, and Improving Performance in SAP HANA Cockpit

Thread Information
The table below lists the information available for threads.
Detail Description
Blocking Transaction Blocking transaction
Duration (ms) Duration (ms)
Host Host name
Port Internal port
Service Service name
Hierarchy Thread grouping information. Filled with Connection ID/Update Transaction ID/Transaction ID or left empty for inactive threads
Connection ID Connection ID
Thread ID Thread ID
Calling The thread or service which the thread calls
Caller The thread or service which called this thread
Thread Type Thread type
Thread Method Thread method
Thread Detail Thread detail
User User
Application User Application user name
CPU Time CPU time of thread
Cumulative CPU Time CPU time of thread and associated children
Transaction ID Transaction ID
Update Transaction ID Update transaction ID
Thread Status Thread state
Connection Transaction ID Transaction object ID
Connection Start Time Connected Time
Connection Idle Time (ms) Time that the connection is unused and idle
Connection Status Connection Status: 'RUNNING' or 'IDLE'
Client Host Host name of client machine
Client IP IP of client machine
Client PID Client Process ID
Connection Type Connection type: Remote, Local, History (remote), History (local)
Own Connection Own connection: TRUE if own connection, FALSE if not
SAP HANA Administration with SAP HANA CockpitMonitoring, Analyzing, and Improving Performance in SAP HANA Cockpit P U B L I C 277

Detail Description
Memory Size per Connection Allocated memory size per connection
Auto Commit Commit mode of the current transaction: TRUE if the current connection is in auto-commit mode, FALSE otherwise
Last Action The last action done by the current connection: ExecuteGroup, CommitTrans, AbortTrans, PrepareStatement, CloseStatement, ExecutePrepared, ExecuteStatement, FetchCursor, CloseCursor, LobGetPiece, LogPutPiece, LobFind, Authenticate, Connect, Disconnect, ExecQidItab, CursorFetchItab, InsertIncompleteItab, AbapStream, TxStartXA, TxJoinXA
Current Statement ID Current statement ID
Current Operator Name Current operator name
Fetched Record Count Sum of the record count fetched by select statements
Sent Message Size (Bytes) Total size of messages sent by the current connection
Sent Message Count Total message count sent by the current connection
Received Message Size (Byte) Total size of messages/transactions received by the current connection
Received Message Count Total message/transaction count received by the current connection
Creator Thread ID Thread ID who created the current connection
Created By Engine component that created the connections: Session, Planning, Repository, CalcEngine, Authentication, Table Exporter, Loader, LLVM, JSVM, IMS Search API, OLAP Engine, Mergedog, Ping Status, Name Server, Queue Server, SQL Stored Procedure, Authorization, TrexViaDbsl from ABAP, HybridTable Reorganizer, Session external
Is Encrypted Encrypted: TRUE if the secure communication is enabled (SSL enabled), FALSE, otherwise
Connection End Time The time when the connection is closed for history connections
Blocked Update Transaction ID Write transaction ID of the write transaction waiting for the lock
Blocking Transaction ID Transaction object ID of the transaction holding the lock
Thread ID of Lock Owner Connection ID associated with the blocked write transaction
Blocking Update Transaction ID Write transaction ID of the write transaction holding the lock
Transactional Lock Type Transactional lock type
Transactional Lock Mode Transactional lock mode
Lock Wait Component Waiting for lock component
Lock Wait Name Waiting for lock ID
Timestamp of Blocked Transaction Timestamp of the blocked transaction
Waiting Record ID ID of the record on which the lock is currently placed
278 P U B L I CSAP HANA Administration with SAP HANA Cockpit
Monitoring, Analyzing, and Improving Performance in SAP HANA Cockpit

Detail Description
Waiting Object Name Name of the object on which the lock is currently placed
Waiting Object Type Type of the object on which the lock is currently placed
Waiting Schema Name Name of the schema on which the lock is currently placed
11.1.3 Monitoring and Analyzing Sessions
Use the Sessions tile to monitor all sessions in your landscape.
Analyzing the sessions connected to your SAP HANA database helps you identify which applications or which users are currently connected to your system, as well as what they are doing in terms of SQL execution.
The Sessions tile displays the number of active and total sessions.
Open the Sessions tile.
The Sessions page allows you to monitor all sessions in the current landscape. You can see the following information:
● Active/inactive sessions and their relation to applications● Whether a session is blocked and, if so, which session is blocking it● The number of transactions that are blocked by a blocking session● Statistics such as average query runtime and the number of DML and DDL statements in a session● The operator currently being processed by an active session
To support monitoring and analysis, you can perform the following actions on the Sessions page:
● Cancel a session by choosing Cancel Sessions● Save the data sets as a text or html file by choosing the Save As... button.
11.1.4 Monitoring and Analyzing Statements
Use Monitor Statements to monitor and analyze different types of statements in your system.
Open the Monitor Statements page by selecting the Top SQL Statements tile.
There are four views available in the table on the Monitor Statements page:
Monitor Statements Table
View Function
Overview An overview and analysis of the most critical statements running in the database.
Active Statements A list of all statements currently running in the system.
SAP HANA Administration with SAP HANA CockpitMonitoring, Analyzing, and Improving Performance in SAP HANA Cockpit P U B L I C 279

View Function
SQL Plan Cache Insights into the workload of the SAP HANA database through a list of all statements currently cached in the SAP HANA database
Expensive Statement Trace Analysis of individual SQL queries whose execution time is above a configured threshold.
You can use the search bar above the table to search for and display only the SQL statements you are interested in.
Related Information
Monitor and Analyze Active Statements [page 280]Monitor and Analyze Statements with SQL Plan Cache [page 281]Monitor and Analyze Expensive Statements [page 282]Monitoring and Analyzing Sessions [page 279]
11.1.4.1 Monitor and Analyze Active Statements
Use the Overview page to analyze the current most critical statements running in the database, and the Active Statements view to see all actively running statements.
Context
Analyzing the current most critical statements running in the SAP HANA database can help you identify the root cause of poor performance, CPU bottlenecks, or out-of-memory situations. Enabling memory tracking allows you to monitor the amount of memory used by single statement executions.
Statements are ranked based on a combination of the following criteria:
● Runtime of the current statement execution● Lock wait time of the current statement execution● Cursor duration of the current statement execution
Procedure
1. Open the Overview page by clicking on the Top SQL Statements tile in the SAP HANA cockpit.
The Overview view opens. It allows you to analyze the most current statements running in the database. You can see:
280 P U B L I CSAP HANA Administration with SAP HANA Cockpit
Monitoring, Analyzing, and Improving Performance in SAP HANA Cockpit

○ The 100 most critical statements, listed in order of the longest runtime○ The full statement string and ID of the session in which the statement is running○ Application, application user, and the database running the statement○ Whether a statement is related to a blocking transaction
2. Optional: To support monitoring, you can perform these actions on the Overview page:a. See the full SQL statement by selecting More next to the statement string.b. Navigate to the Sessions application to analyze the session with the same ID by clicking on the icon
next to the workload class column.c. Set up or modify workload classes by clicking a statement's Workload Class Name. Choose New to
create a new workload class or Existing to select a workload class from a list, then fill in the fields.d. Personalize the columns displayed in the Overview view through the settings menu on the top right.
3. Open the Active Statements page by clicking on the Top SQL Statements tile in the SAP HANA cockpit and selecting the desired view.
The Active Statements view opens, showing:○ The full statement string and ID of the session in which the statement is running○ The host and port, as well as the connection ID of the active statement○ The last executed time○ If the statement has a parent statement and its ID
4. Optional: You can navigate to the SQL Plan Cache view by selecting the right icon in the Active Statements table.
Related Information
Create a Workload Class [page 237]Create a Workload Class Mapping [page 239]
11.1.4.2 Monitor and Analyze Statements with SQL Plan Cache
Use the SQL Plan Cache view to get an insight into the workload of the SAP HANA database as it lists all statements currently cached in the SAP HANA database.
Context
Analyzing all statements currently cached in the SAP HANA database can help you identify statement hashes, as well as if a statement has been correctly cached.
Technically, the plan cache stores compiled execution plans of SQL statements for reuse, which gives a performance advantage over recompilation at each invocation. For monitoring reasons, the plan cache keeps statistics about each plan, for instance number of executions, min/max/total/average runtime, and lock/wait
SAP HANA Administration with SAP HANA CockpitMonitoring, Analyzing, and Improving Performance in SAP HANA Cockpit P U B L I C 281
statistics. Analyzing the plan cache is very helpful as one of the first steps in performance analysis because it gives an overview about what statements are executed in the system.
NoteDue to the nature of a cache, seldom-used entries are evicted from the plan cache.
The SQL plan cache is useful for observing overall SQL performance as it provides statistics on compiled queries. You can get insight into frequently executed queries and slow queries with a view to finding potential candidates for optimization.
Procedure
1. Open the SQL Plan Cache view by clicking on the Top SQL Statements tile in the SAP HANA cockpit and selecting the desired view in the table.
The SQL Plan Cache opens.2. To support monitoring and analysis, you can perform the following actions on the SQL Plan Cache page:
a. Open the selected SQL statement with the SQL analyzer by clicking More next to the statement string and selecting to Open in SQL Analyzer.
b. Open the selected SQL statement with SQL analyzer and save the executed plan statistics as a PLV file by clicking on More next to the statement string and selecting to Analyze and Save Plan.
c. Save the data sets as a text or html file by choosing the Save As... button.d. Configure the plan cache size.e. Clear all cached statements by choosing to Clear All Plan Cache.
11.1.4.3 Monitor and Analyze Expensive Statements
Use the Expensive Statements view to analyze individual SQL queries whose execution time is above a configured threshold.
Context
Analyzing expensive statements can help you understand why they exceed duration thresholds.
The expensive statements trace records information about the expensive statements for further analysis and displays it on the Expensive Statements Trace page.
282 P U B L I CSAP HANA Administration with SAP HANA Cockpit
Monitoring, Analyzing, and Improving Performance in SAP HANA Cockpit

Procedure
1. Open the Expensive Statements view by clicking on the Top SQL Statements tile in the SAP HANA cockpit and selecting the desired view in the table.
The Expensive Statements view opens2. To support monitoring and analysis, you can perform these actions on the Expensive Statements Trace
page:a. Define the monitored date.b. Filter expensive statements, refresh the list, choose the sorting parameter, and filter by parameter.c. Save the data sets as a text or html file by choosing the Save As... button.d. Open an expensive statement with the SQL analyzer by clicking More next to the statement string.e. Set up or modify workload classes by clicking a statement's Workload Class Name. Choose New to
create a new workload class or Existing to select a workload class from a list, then fill in the fields.
Related Information
Create a Workload Class [page 237]Create a Workload Class Mapping [page 239]
11.1.5 Monitoring Blocked Transactions
Use Blocked Transactions to monitor transactionally blocked threads. You can use it to see, for example, what transaction is blocking a thread, the type of lock held, and the owner of the lock.
Blocked transactions are transactions that are unable to be processed further because they need to acquire transactional locks (record or table locks) that are currently held by another transaction. Transactions can also be blocked while waiting for other resources such as network or a disk (database or metadata locks).
Analyzing the blocked transactions in SAP HANA database can be helpful when analyzing the current system load, as transactionally blocked threads can impact application responsiveness.
You can find the Open Blocked Transactions link in the Monitoring list on the SAP HANA cockpit.
The Blocked Transactions feature provides information on the number of currently blocked threads in the database.
To support monitoring and analysis, you can perform the following actions on the Blocked Transactions page:
● Filter transactions with the help user-defined keywords● Select to hide own or idle sessions● Customize the blocked transaction columns to show only desired parameters● Click on a blocked transaction and select Navigate To… on the bottom right of the screen to jump to
Threads or Sessions with the same connection ID.
SAP HANA Administration with SAP HANA CockpitMonitoring, Analyzing, and Improving Performance in SAP HANA Cockpit P U B L I C 283

11.2 Analyzing Performance in SAP HANA Cockpit
You can analyze the performance of the database using the SAP HANA cockpit.
You can use the following tools to analyze fine-grained aspects of database performance in the SAP HANA cockpit:
● Use the capture and replay to detect, analyze, or verify any potential issues before applying changes or upgrades.
● Use the workload analyzer to analyze the database performance through data from thread samples. You can also use it to analyze the workload captured with the capture and replay tool, or any other workload occurring in a system.
● Use the SQL analyzer to understand performance issues of a query execution and other query execution aspects of the SAP HANA database.
Related Information
Capturing and Replaying Workloads [page 284]Analyzing Workloads [page 313]Analyzing Statement Performance [page 320]
11.2.1 Capturing and Replaying Workloads
Capturing and replaying workloads from an SAP HANA database helps you evaluate potential impacts on performance or stability after a change in the hardware or software configuration.
The following sections provide an overview of SAP HANA capture and replay:
What can I do with SAP HANA capture and replay?
This tool allows you to capture the workload of a source system and to replay the captured workload on a target system without applications.
Moreover, you can use the tool to analyze the captured workload and the reports generated after replaying the workload. Comparing the performance between the source and target systems can help you find the root cause of performance differences.
284 P U B L I CSAP HANA Administration with SAP HANA Cockpit
Monitoring, Analyzing, and Improving Performance in SAP HANA Cockpit

What is a workload?
Workload in the context of SAP HANA can be described as a set of requests with common characteristics. For more information about workload, see Workload in the Context of SAP HANA.
In the context of SAP HANA capture and replay, workload can mean any change to the database via SQL statements that come from SAP HANA client interfaces such as JDBC, ODBC, or DBSL. The workload can be created by applications or clients (for example, SAP NetWeaver or Analytic).
When should I use SAP HANA capture and replay?
Use SAP HANA capture and replay to detect, analyze, or verify any potential issues before applying changes or upgrades, such as:
● Hardware change● SAP HANA revision upgrade● SAP HANA ini file change● Table partitioning change● Index change● Landscape reorganization for SAP HANA scale-out systems● Apply HINT to queries
For more information on possible use cases, see An overview of possible use cases for SAP HANA capture and replay.
How can I access SAP HANA capture and replay?
Open SAP HANA capture and replay from the SAP HANA cockpit. On the Overview page search for the Capture Workload and Replay Workload tiles.
How does SAP HANA capture and replay work?
The main steps involved in the capturing and replaying process are:
1. CaptureIn this step the tool automatically collects the execution context information together with the incoming requests to the database. The captured workload file stores the start times of the SQL statements.A database backup is recommended after starting capturing to ensure that the source and target systems are in a consistent state.
2. PreprocessIn this step the tool reconstructs and optimizes the captured workload file to make it replayable on a target system. This process is a one-time operation and the stored preprocessed workload file can be replayed multiple times.
SAP HANA Administration with SAP HANA CockpitMonitoring, Analyzing, and Improving Performance in SAP HANA Cockpit P U B L I C 285

3. ReplayThe replayer is a service on operating system level that needs to be started before replaying.The tool replays the preprocessed file based on the SQL statement timestamp or on the transactional order. Together with the collected execution context it allows you to accurately simulate the database workload.
4. AnalyzeFor a final analysis, you can generate comparison reports displaying a capture-replay or a replay-replay comparison. You can analyze the statements based on results or on performance.
Related Information
Landscape Considerations [page 286]System Privileges [page 290]Files and Sizing Guidelines [page 291]Capturing a Workload [page 293]Replaying a Workload [page 297]https://blogs.sap.com/2019/01/15/an-overview-of-possible-use-cases-for-sap-hana-capture-and-replay/SAP Note 2362820
11.2.1.1 Landscape Considerations
A 3-tier setup is recommended.
The 3-tier setup has the following advantages:
● Three or more servers are possible depending on the number of dedicated replayer systems.● The replay results will be stored in the separate control system when recovering the target system.● This setup is recommended for replays with re-initialization of the target system.● This setup is recommended for scenarios with multiple replayers.
The graphic below offers an example of a 3-tier setup. Keep in mind that the replayers and SAP HANA cockpit can run on the control system server or on individual servers.
286 P U B L I CSAP HANA Administration with SAP HANA Cockpit
Monitoring, Analyzing, and Improving Performance in SAP HANA Cockpit

NoteSAP HANA capture and replay can also be used with SAP HANA, Express Edition installations. For more information, see Adjust the Global Allocation Limit in the Getting Started with SAP HANA 2.0, express edition (Virtual Machine Method) or Capture and replay with multiple distributed replayers on SAP HANA, Express Edition.
System types
These systems should be part of a 3-tier setup:
SAP HANA Administration with SAP HANA CockpitMonitoring, Analyzing, and Improving Performance in SAP HANA Cockpit P U B L I C 287

System Type Description
Source System ● The original workload is captured here● The captured workload file and the database backup are initially created here and
stored on disk
NoteRunning a capture will have an overhead on CPU utilization and disk I/O.
Control System ● This can be a dedicated system or a shared system● Manages and directs replayers when running a replay● Stores replay results for analysis● Preprocessing is executed here● Serves as central monitoring system for the replay process
NotePreprocessing and replaying require CPU and memory to execute.
Target System ● This can be a dedicated system or a shared system● The replay is executed here, even though it's started from the control system● For meaningful replay results, the system should be in consistent state with the source
system (recovered via database backup from the source system)
NoteIf the control system and target system are the same, the replay results are lost when the target system is recovered.
Replayer ● Process running on the operating system● Is responsible for reading from preprocessed workload files and executing workload on
the target system● Replayers can run on individual systems● Multiple replayers can be used to scale the workload during replay● Replayers can run on SAP HANA, express edition installations
RecommendationRun the replayers on the control system or a separate system because the replay requires CPU and memory to execute.
288 P U B L I CSAP HANA Administration with SAP HANA Cockpit
Monitoring, Analyzing, and Improving Performance in SAP HANA Cockpit

System Type Description
SAP HANA cockpit 2.0 ● Used to set up, configure, monitor, analyze while capturing, preprocessing and replaying
● SAP HANA cockpit 2.0 can run on SAP HANA, express edition installations
RecommendationRun SAP HANA cockpit 2.0 on the control system host.
NoteThe replayers and SAP HANA cockpit can run on the control system server or on individual servers.
Prerequisites
● Check the disk performance to ensure that there is sufficient bandwidth for capturing and preprocessing workloads without any performance bottlenecks. If disk performance is not sufficient, the active capture can impact the source system.
● Check the available disk space in combination with the characteristics of the workload that should be captured. The required disk space is highly dependent on the type of workload being captured.Use the disk space that is dedicated to the database instance itself.
● One replayer service is sufficient to execute a replay successfully. For a better scalability and performance in large workload scenarios, multiple replayers can be used for all replaying purposes. When using multiple replayers, distribute and divide all involved components (for example, target instance, control instance, one or more replayers) on different hosts and systems. Doing so will reflect the initial captured workload as realistic as possible. This will also reduce the effect which the resource consumption of the components might have on a replay.
● Use a separate control and target instance for replaying workloads. If a replayed statement causes a crash, it will be displayed in the replay report. When you use one and the same control and target instance, the replay report entry causing a crash will not be successfully sent to the control instance.
● Use the secure store for saving passwords and authenticating users. For more information, see Secure User Store (hdbuserstore) in the SAP HANA Security Guide.
● The target system should meet the same privacy and security prerequisites as the source system. Since the target system processes the same data as the source system, it should meet an appropriate security level depending on data criticality.Unnecessary network connections to the target system should not be allowed. Users registered on the source system might be able to access the target system after a replay has been completed.
● Regarding version dependencies, the following rules can be followed:○ Target system >= Control system & Replayers >= Source system○ The source system should be at least 122.14+ for captures with transactional replay enabled
● To trigger replays, the control system and target system must be registered in the same SAP HANA cockpit. The user in the SAP HANA cockpit should be able to access them both.When registering the target system, the cockpit does not store the credentials. For more information, see Register a Resource.
SAP HANA Administration with SAP HANA CockpitMonitoring, Analyzing, and Improving Performance in SAP HANA Cockpit P U B L I C 289

For more information, see SAP Note 2362820.
Related Information
https://blogs.sap.com/2017/12/20/capture-and-replay-with-multiple-distributed-replayers-on-sap-hana-express-edition/SAP Note 2362820
11.2.1.2 System Privileges
You need the following system privileges when using SAP HANA capture and replay.
System and User Description
Cockpit User for SAP HANA cockpit ● Requires the Cockpit Resource Administrator role● It is used for registering, managing and accessing resources
Workload Capture Admin for the source system
● Used to start captures and trigger backups in the source system● Requires the WORKLOAD CAPTURE ADMIN privilege to capture workloads● Optional: BACKUP OPERATOR privilege to trigger backups● Optional: INIFILE ADMIN privilege to see the previously used optional filters
on the capture configuration page● This user needs to be used as the connecting user when registering the
source system in the same SAP HANA cockpit
Control Replay Admin for the control system
● Used for preprocessing and replaying in the control system● Requires the WORKLOAD REPLAY ADMIN privilege for preprocessing and re
playing workloads, as well as generating replay reports● Requires the WORKLOAD ANALYZE ADMIN privilege for loading and analyz
ing workloads● Requires the CATALOG READ privilege for generating replay reports● This user needs to be used as the connecting user when registering the con
trol system in the same SAP HANA cockpit
Target Replay Admin for the target system
● Used to execute replays and reset user passwords in the target system● Requires the WORKLOAD REPLAY ADMIN privilege to execute replays● This user needs to be used as the connecting user when registering the tar
get system in the same SAP HANA cockpit
290 P U B L I CSAP HANA Administration with SAP HANA Cockpit
Monitoring, Analyzing, and Improving Performance in SAP HANA Cockpit
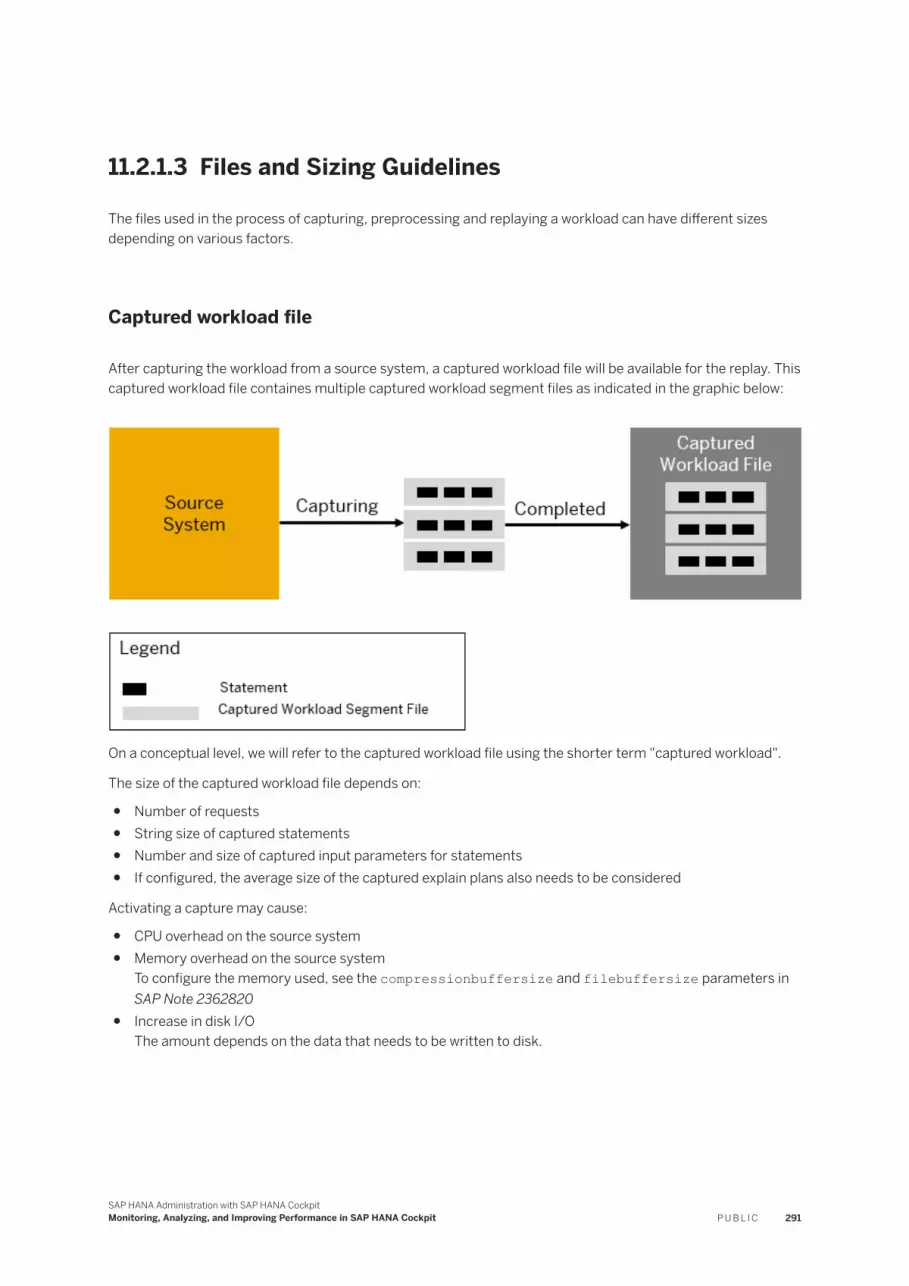
11.2.1.3 Files and Sizing Guidelines
The files used in the process of capturing, preprocessing and replaying a workload can have different sizes depending on various factors.
Captured workload file
After capturing the workload from a source system, a captured workload file will be available for the replay. This captured workload file containes multiple captured workload segment files as indicated in the graphic below:
On a conceptual level, we will refer to the captured workload file using the shorter term "captured workload".
The size of the captured workload file depends on:
● Number of requests● String size of captured statements● Number and size of captured input parameters for statements● If configured, the average size of the captured explain plans also needs to be considered
Activating a capture may cause:
● CPU overhead on the source system● Memory overhead on the source system
To configure the memory used, see the compressionbuffersize and filebuffersize parameters in SAP Note 2362820
● Increase in disk I/OThe amount depends on the data that needs to be written to disk.
SAP HANA Administration with SAP HANA CockpitMonitoring, Analyzing, and Improving Performance in SAP HANA Cockpit P U B L I C 291

Preprocessed workload file
To optimize the captured workload file before replaying it, you need to preprocess it first.
While preprocessing the captured workload file, the captured statement segment files are stored in a directory. After the preprocessing is completed, the output is a preprocessed workload file containing the directory with multiple files as indicated in the graphic below:
On a conceptual level, we will refer to the preprocessed workload file using the shorter term "preprocessed workload".
The size of the preprocessed workload file is larger than the captured workload file. The size varies depending on the compression and content of the captured workload file. Preprocessed workload files are always uncompressed.
Preprocessing a captured workload file may cause:
● CPU utilizationThe database will utilize the CPU as much as possible to achieve the best performance.
● Memory consumption● Increase in disk I/O
The amount depends on the data that needs to be read and written.
Replay
The replay process is performed by the replayer, which should be running before starting the replay as indicated in the graphic below:
Running a replayer may cause:
292 P U B L I CSAP HANA Administration with SAP HANA Cockpit
Monitoring, Analyzing, and Improving Performance in SAP HANA Cockpit
● CPU utilization● Memory consumption
The amount of memory consumed depends on the size of the preprocessed workload file. However, even though the replayer is a separate process running on the operating system of a SAP HANA installation, its memory can be limited using the global allocation limit of its host database.
● Increase in disk I/OThe amount depends on the data that needs to be read from disk.
The duration of the replay depends on the duration of the capture.
Running a replay may cause:
● CPU utilizationThe target system will use resources according to the workload being replayed.
● Memory consumptionThe amount of memory consumed depends on the content of the preprocessed workload file.
● Increase in disk I/O on the control systemThe amount depends on the data that needs to be written and read and is influenced by the replay result size.
The size of the replay result depends on:
● The total record count● The memory allocated for each record● If configured, the average size of the captured explain plans also needs to be considered
NoteWhen using different servers, capturing, preprocessing, and replaying may cause network traffic.
Related Information
SAP Note 2362820
11.2.1.4 Capturing a Workload
You can capture the entire workload from a source system or only a part of this workload.
To capture the workload from a source system, use the Capture Workload tile.
Related Information
Capture a Workload [page 294]Monitoring a Captured Workload [page 297]Capture Configuration Settings [page 295]
SAP HANA Administration with SAP HANA CockpitMonitoring, Analyzing, and Improving Performance in SAP HANA Cockpit P U B L I C 293

11.2.1.4.1 Capture a Workload
You can capture the workload from a source system.
Prerequisites
You have the Workload Capture Admin user for the source system. For the requiered and optional privileges, see System Privileges.
Procedure
1. On the Overview page, you can choose the Capture Workload tile or choose Start New Capture directly from the tile.
If you choose the Capture Workload tile, the Capture Management page opens. If you already captured workload with SAP HANA capture and replay, you see the captured workload located in the currently configured capture destination. You can also see information such as name, status, start time, size, duration, or capture usage.
If you choose Start New Capture directly from the tile, the Configure New Capture page opens.2. Optional: To change the capture destination, choose Configure Capture on the bottom right of the Capture
Management page.
The captured workload file is stored by default in the $SAP_RETRIEVAL_PATH/trace directory with a *.cpt file extension. For tenant databases there is a subfolder in the trace directory for each tenant. Since the default trace directory generally resides in the same storage area with data and log volumes, capturing workloads may affect the performance across the entire system over time. If you enter a different destination for the captured workload file, you may have a better distribution of the disk I/O between the data and log volumes and the captured workload file.
3. To start configuring the new capture, choose New Capture on the Capture Management page on the bottom right.
On the Configure New Capture page it is mandatory to enter the name of the new capture.
You can customize other optional settings before you start the capture. For an overview of these settings, see Capture Configuration Settings.
4. Choose Start Capture on the bottom right.
The new captured workload is displayed on the Capture Management page with the status Capturing. You can stop the capture or you can let it run as long as you wish.
Related Information
Capture Configuration Settings [page 295]
294 P U B L I CSAP HANA Administration with SAP HANA Cockpit
Monitoring, Analyzing, and Improving Performance in SAP HANA Cockpit

System Privileges [page 290]Monitoring a Captured Workload [page 297]
11.2.1.4.1.1 Capture Configuration Settings
You can customize several optional settings before you start capturing a workload.
The tables provide an overview of the settings that can be customized.
General Information
Setting Description
Usage Select if you will use the captured workload for a replay, an analysis, or both.
Your selection in this field impacts the collected data. For example, when capturing a workload for analysis, the Workload Details option is automatically turned on in the Data Collection section.
Capture Name Enter a name for the capture. This field is mandatory.
Description Enter a description of the capture for future reference.
Schedule You can schedule the capture to start at a specific point in time by specifying the start and end time. If you turn it on, the status of your captured workload changes to Scheduled. After setting a specific time, you can change it later. However, once you schedule a capture, you can't turn off the schedule setting anymore.
Capture Control
Setting Description
Create Backup Turn it on to automatically create a database backup of the source system after starting the capture.
RecommendationTo ensure that the source system and the target system are in a consistent state for capture and replay, we recommend to perform a database backup after starting the capture. A database backup is required only for the first time, because incremental backups can be used once the system has been initialized for the first time. For more information about backups, see SAP HANA Backup and Recovery.
Use the Backup Settings link to choose the backup type (for example, complete, differential, incremental), to select between Backint integration or file-based backups, to add a prefix to the file name, to define a path to store the backup file, or to enter parameters for the Backint.
By creating a backup, you can ensure the ability to use the Synchronize with backup option during replay. For more information, see Replay Configuration Settings.
SAP HANA Administration with SAP HANA CockpitMonitoring, Analyzing, and Improving Performance in SAP HANA Cockpit P U B L I C 295

Setting Description
Overwrite Capture When Time Exceeds
Turn it on and enter a time to remove the captured workload segment files that are older than the specified time you entered.
Only closed segments are deleted. The currently active captured workload segment file is not affected.
Overwrite Capture When Disk Usage Exceeds
Turn it on and select a ratio to remove the old captured workload segment files when the disk usage exceeds the specified percentage.
Only closed segments are deleted. The currently active captured workload segment file is not affected.
Data Collection
Setting Description
Explain Plan Turn it on to collect the output of the EXPLAIN PLAN command for the captured statements.
You can use this information for analysis after the replay.
Workload Details Turn it on to collect additional information for the workload analyzer such as application source, involved threads, network statistics, or related objects.
If this option is disabled, the captured workload file can still be viewed using the workload analyzer, but less information will be available for the review.
SQL Input Parameters Turn it on to see the parameter values in the replay report. To do so, turn on the Workload Details option first. This allows you to enable the SQL Input Parameters option.
This option is needed for replaying.
Optional Filter
Setting Description
Optional Filter Use the additional filters to capture only desired aspects of the workload.
Filters can include different aspects such as:
● Application Name (for example, HDBStudio)● Application User Name is the name of the user logged in to the application.● Database User Name is the name of the database user (for example, SYSTEM).● Client is the ABAP client number (for example, 000).
Related Information
Replay Configuration Settings [page 303]
296 P U B L I CSAP HANA Administration with SAP HANA Cockpit
Monitoring, Analyzing, and Improving Performance in SAP HANA Cockpit
11.2.1.4.2 Monitoring a Captured Workload
You can monitor a captured workload.
To view monitoring information such as duration, the number of captured statements, or disk space, open the Capture Monitor by choosing the started capture from the Capture Management page. If you defined any filters, these can also be viewed in the Capture Information section.
If you didn’t create a backup when starting the capture, you can also start a backup from the Capture Monitor page. If you do so, you can check any details about the backup by clicking the drop-down arrow next to Capture Monitor and opening the previously started backup from the Related Apps section.
Back on the Capture Management page, you can see the capture's name, status, duration, number of statements, size, or usage. You can filter captured workloads by the start time.
You can use the captured workload file for replay or analyzing. From the Capture Management page, you can open the workload analyzer. It is mandatory to load the captured workload before opening it with the workload analyzer. You can do this in two ways:
● You can load the captured workload by clicking Start in the Workload Analysis column. Then choose the captured workload to open the Workload Analysis page.
● Alternatively, you can choose a captured workload which was not loaded before. Load it after opening the Workload Analysis page using the Load button on the top right.
For more information, see Analyze Workloads Based on Captured Workloads.
You can monitor the captured workload in the M_WORKLOAD_CAPTURE system view. For more information, see M_WORKLOAD_CAPTURES System View in the SAP HANA SQL and System View Reference guide.
Related Information
Analyze Workloads Based on Captured Workloads [page 318]
11.2.1.5 Replaying a Workload
You can replay the preprocessed workload based on the SQL statement timestamp or on the transactional order.
Replaying a workload implies that the captured statements are executed again.
RecommendationManually copy the captured workload files from the source system to the control system and the database backup from the source system to target system.
You can replay all captured workloads as often as necessary.
SAP HANA Administration with SAP HANA CockpitMonitoring, Analyzing, and Improving Performance in SAP HANA Cockpit P U B L I C 297
RecommendationWhen running consecutive replays, restore the target system back to a consistent state after a replay and before running another replay. This is necessary because after replaying a workload on a system, any changes applied during that replay will remain active in the system.
ExampleLet's assume the captured workload file includes the statement <INSERT INTO TABLE A VALUES (x). During a replay, value x will be inserted into table A. At the end of the replay, table A contains value x. If you run another replay without resetting the system to its initial state, table A will contain duplicate values x,x at the end of the replay or the statement will fail (for example, in the case of unique constraint errors). As x,x does not reflect the intended end result of the replay, it is recommended to restore the system after every replay when running multiple replays of the same captured workload.
The following two steps are necessary before replaying the captured workload:
1. Preprocess a captured workloadThe preprocessing step is required to optimize the captured workload file before replaying it. For more information, see Preprocess a Captured Workload.
2. Start the replayerThe replay process is performed by the replayer, which should be running before starting the replay. The replayer is a service on operating system level that reads SQL commands from the preprocessed workload file and executes them one-by-one in timestamp-based order. For more information, see Start and Stop the Replayer.
You can preprocess a captured workload and replay the preprocessed workload using the Replay Workload tile.
After replaying the preprocessed workload, you can generate replay reports. If you want to see the SQL statement parameters in the replay report, load the .cpt file after opening the workload analyzer.
Related Information
Preprocess a Captured Workload [page 299]Start and Stop the Replayer [page 300]Replay a Preprocessed Workload [page 302]Replay Configuration Settings [page 303]Monitoring a Replayed Workload [page 306]Generating Replay Reports [page 307]Generate a Replay-Replay Comparison Report [page 307]Set a Breakpoint [page 312]Analyzing Replay Reports [page 308]
298 P U B L I CSAP HANA Administration with SAP HANA Cockpit
Monitoring, Analyzing, and Improving Performance in SAP HANA Cockpit
11.2.1.5.1 Preprocess a Captured Workload
The preprocessing step is necessary to optimize the captured workload file before replaying it.
Prerequisites
● You have the Control Replay Admin user for the control system. For the required and optional privileges, see System Privileges.
● You have captured workloads using the Capture Workload tile. For more information, see Capture a Workload.
● Copy the captured workload file from the source system to the target system in the trace directory. If you use a control system that is different from the target system, copy the captured workload file to the control system.
RecommendationPerform the preprocessing step in a separate system, not in the source system.
Procedure
1. On the Overview page, choose the Replay Workload tile.
The Replay Management page opens displaying an overview of the captured workload located on the current system in the Replay Candidate tab.
2. Choose Start in the Preprocess Status column to start preprocessing the captured workload. If the status is not available, open the Details link to understand why.
Related Information
Capture a Workload [page 294]System Privileges [page 290]
SAP HANA Administration with SAP HANA CockpitMonitoring, Analyzing, and Improving Performance in SAP HANA Cockpit P U B L I C 299

11.2.1.5.2 Start and Stop the Replayer
The replayer is a service on operating system level that should be running before starting the replay.
Prerequisites
● You have a user with the WORKLOAD REPLAY ADMIN system privilege to control the replayer. Store the logon credentials in the secure store. For more information, see Secure User Store (hdbuserstore) in the SAP HANA Security Guide.
● When using multiple replayers distribute and divide all involved components (for example, target instance, control instance, one or more replayers) on different hosts and systems.
NoteThe replayer is not a part of the SAP HANA database services that are running as deamon process. You must start and stop it yourself.
Procedure
1. Configure a hdbuserstore entry to authenticate the replayer with the database using the following command on the operating system on which your SAP HANA database is installed:hdbuserstore SET <key name> <host name@tenant database name> <user name> <password>
2. Start the replayer using the following command on the Linux command line of the system that you want to start the replayer on:hdbwlreplayer -controlhost <controlHost> (-controlport <controlPort> | -controlinstnum <controlInstanceNumber> [-controldbname <controlDatabaseName>]) -controladminkey <userName,secureStoreKey> -port <listenPortNumber>
NoteRunning the command on the target system does not trigger the replay, it only starts the replayer.
The controlhost, controlinstnum, controladminkey, and controldbname parameters indicate the location of the control system.
Parameter Description
Parameter Description
controlhost Specifies the database host name of the control or target system (without a sqlport).
controlinstnum Specifies the database instance number.
300 P U B L I CSAP HANA Administration with SAP HANA Cockpit
Monitoring, Analyzing, and Improving Performance in SAP HANA Cockpit

Parameter Description
controladminkey
Specifies the user name and secure store key of the control management connection separated by a comma.
controldbname Specifies the database name. When connected to a tenant, the tenant name should be used. When connected to a system database, the system database should be used as control database name.
port Specifies the discretional port number for internal communication. You can use every port which is currently free. This port is used as long as the replayer is running.
NoteDo not to use any default ports or ports used by other processes (for example, 22 or 8080).
controlport Specifies the control instance.
To start multiple instances of the replayer in parallel, define a specific port for each instance. The setup of the second instance fails when two instances run on the same port.
When running replays with a longer duration, you can add & at the end of the command line. This starts the process in the background and you can close the terminal connection immediately.
Examplehdbwlreplayer -controlhost <controlHost> (-controlport <controlPort> | -controlinstnum <controlInstanceNumber> [-controldbname <controlDatabaseName>]) -controladminkey <userName,secureStoreKey> -port <listenPortNumber> &
NoteIf you want to use SSL encryption with the replayer, navigate to the wlreplayer.ini file on the OS and edit or add the section [replay_client] as follows:○ Add the parameter enable_target_ssl_connection = [true|false] to enable SSL
connections between the target system and the replayer○ Add the parameter enable_control_ssl_connection = [true|false] to enable SSL
connections between the control system and the replayer
Only fully qualified domain names can be used for <controlHost> when starting the replayer.
3. If the console is still open, use Ctrl+C to stop the replayer. Alternatively, identify the OS process ID of the running replayer and shut it down using kill<pid>.
Related Information
SAP Note 2362820
SAP HANA Administration with SAP HANA CockpitMonitoring, Analyzing, and Improving Performance in SAP HANA Cockpit P U B L I C 301

11.2.1.5.3 Replay a Preprocessed Workload
You can replay all preprocessed workloads as often as necessary.
Prerequisites
● You have the Target Replay Admin user. For the requiered and optional privileges, see System Privileges● The target system meets the same security and privacy prerequisites as the source system. Since the
target system processes the same data as the source system, it should meet an appropriate security level depending on data criticality.
RecommendationDo not allow unnecessary network connections to the target system. Users registered on the source system could access the target system after the replay is completed.
● You have preprocessed the captured workloads using the Replay Workload tile. For more information, see Preprocess a Captured Workload.
● The replayer is running. For more information, see Start and Stop the Replayer.
Procedure
1. On the Overview page, you can choose the Replay Workload tile or choose Start New Replay directly from the tile.
The Replay Management page opens displaying the captured workload.2. To change the preprocess destination, choose Configure Replay on the bottom right.
After the preprocessing is completed, the preprocessed workload file is stored by default in the $SAP_RETRIEVAL_PATH/trace directory. Since the default trace directory generally resides in the same storage area with data and log volumes, preprocessing workloads may affect the performance across the entire system. If you enter a different destination, you may have a better distribution of the disk I/O between the data and log volumes, and the preprocessed files.
3. Choose a preprocessed workload with the status Preprocessed to start configuring it for the replay.
The Replay Configuration page opens allowing you to configure various mandatory and optional settings. For more information about each setting, see Replay Configuration Settings.
NoteIf a database backup is available, restore the database before starting the replay in the target system. For more information, see SAP HANA Backup and Recovery. When running a replay on a target system that has been restored using a backup taken automatically during the capture process, activate the Synchronize Replay with Backup.
If no or only outdated database backups are available, you can still restore the database or manually export parts of the data before starting the replay in the target system. When running a replay on a
302 P U B L I CSAP HANA Administration with SAP HANA Cockpit
Monitoring, Analyzing, and Improving Performance in SAP HANA Cockpit

target system that was restored using old backups or contains only smaller manual exports of data, deactivate the Synchronize Replay with Backup option.
4. After configuring the replay, choose Review to view the replay configuration.5. To start the replay, choose Confirm.
The Replay Management opens displaying the workloads that are being replayed in the Replay List tab.
Related Information
Preprocess a Captured Workload [page 299]System Privileges [page 290]Start and Stop the Replayer [page 300]Replay Configuration Settings [page 303]Replay a Preprocessed Workload [page 302]Analyzing Replay Reports [page 308]
11.2.1.5.3.1 Replay Configuration Settings
The Replay Configuration allows you to configure several settings.
The General Information page allows you to customize the following mandatory and optional settings:
General Replay Information
Setting Replay Name
Type Mandatory
Description Enter a name for the replay. By default this field has the same name as the initial captured file.
Setting Description
Type Optional
Description Enter a description for the replay for your future reference. This information can be used when changing settings for different replays.
Target System Information
Setting Host
Type Mandatory
SAP HANA Administration with SAP HANA CockpitMonitoring, Analyzing, and Improving Performance in SAP HANA Cockpit P U B L I C 303

Setting Host
Description Select a host name from the list.
The information for the identifier, instance number, port number, and container will be filled automatically.
Setting Identifier, Instance Number, Port Number
Type Mandatory
Description These fields are automatically filled when selecting the host.
Setting Container
Type Mandatory
Description This field is automatically filled when selecting the host.
Target Instance Options
Setting Request Rate
Type Mandatory
Description Modify the rate at which the statements are replayed.
You can decrease the wait time between statements during replay. For example, statement B starts 1second after statement A has been triggered. When setting the request rate from 1x to 2x, this difference will only be 0.5 seconds.
Setting Synchronize Replay with Backup
Type Optional
Description This option allows you to synchronize the replay with an existing database backup. It compares the log position ID of each transaction with the restart log ID of the backup used for recovery of the target system
The option is turned on by default allowing the replayer to compare each statement with the database backup. This option makes it possible to check if there are no duplicate inserts and if the backup and replay are aligned. A backup is required for this option to work correctly. If it's tuned on without a recovery or with a wrong recovery, transactions might be rolled back.
If the option is turned off, the replayer will replay statements even if no backup is present. If turned off and no recovery from the backup created during capture has been made, it's possible that transactions are missed during replay. If turned off, but recovery from the backup created during capture has been made, it's possible that unexpected results can occur during replay.
304 P U B L I CSAP HANA Administration with SAP HANA Cockpit
Monitoring, Analyzing, and Improving Performance in SAP HANA Cockpit

Setting Collect Explain Plan
Type Optional
Description Collect the output of the EXPLAIN PLAN command for captured statements. You can use this information for comparison after the replay.
Setting Transactional Replay
Type Optional
Description This option enables guaranteed transactional consistency during a replay.
NoteEnabling this option may cause overhead to query runtime as transactional consistency needs to be checked constantly.
Optional Filter
Setting Optional Filter
Type Optional
Description Use the Optional Filter to selectively replay only desired aspects of workloads.
Filters can include different aspects such as Application Name, Application User Name, Database User Name, Client.
The Replay Information page allows you to customize the following mandatory settings:
Setting Replayer Authentication
Type Mandatory
Description Enter the database user who has the WORKLOAD REPLAY ADMIN privilege and will be used for the final preparation steps in the target instance.
Select the authentication method and enter the credentials.
Setting Replayer List
Type Mandatory
Description Check the running Replayer that will be used to connect to the target system and facilitate the replay.
Setting User Authentication
Type Mandatory
SAP HANA Administration with SAP HANA CockpitMonitoring, Analyzing, and Improving Performance in SAP HANA Cockpit P U B L I C 305

Setting User Authentication
Description Enter the SYSTEM user and the technical user.
For a realistic replay, all users that are part of the workload, which has been chosen to be replayed, must be authenticated. For more information, see Secure User Store (hdbuserstore) in the SAP HANA Security Guide.
To conduct a stable replay, reset the passwords of the database users. To reset the password for the database users captured in the source system you have the following options:
● You can reset the passwords at once for all users not authenticated by external tools or created during the replay. As a result, these users will receive new passwords and get authenticated for the replay.Choose Reset Password to reset all passwords for all users except for the SYSTEM user and the technical user. This can be helpful when you don't know the actual password of each user. On the Reset Password window enable the confirmation box and choose Confirm. All selected user passwords in the defined target system will be changed as defined in this step.
● You can authenticate users manually using the secure user store keys. The User List provides details on the authentication method for each user.
Related Information
System Privileges [page 290]
11.2.1.5.3.2 Monitoring a Replayed Workload
You can monitor a replayed workload.
The Replay Management shows the workloads that are being replayed in the Replay List tab. You can start multiple replays in parallel. For more information on each replay, open the Details link in the message field.
To stop a replay when it is in progress, choose Stop in the Replay Status column. The status of the replay changes then to Stopped.
Import replay reports using the Import Replay button on the Replay List tab. For information on the security implications and configuration steps needed for importing replay reports, see SAP Note 2109565.
To access the Replay Monitor, choose the running replay. The monitoring view provides information such as duration, number of statements, size, and other details about the replay in progress. You can navigate away from the monitoring view using the arrow on the top right and can return anytime.
If you have already replayed preprocessed workloads, you can generate comparison reports for further analysis. For more information, see Generating Comparison Reports.
You can monitor the preprocessed workload in the M_WORKLOAD_REPLAY_PREPROCESSES system view and the replayed workload in the M_WORKLOAD_REPLAYS system view. For more information, see M_WORKLOAD_REPLAY_PREPROCESSES System View and M_WORKLOAD_REPLAYS System View in the SAP HANA SQL and System View Reference guide.
306 P U B L I CSAP HANA Administration with SAP HANA Cockpit
Monitoring, Analyzing, and Improving Performance in SAP HANA Cockpit

Related Information
Generating Replay Reports [page 307]SAP Note 2109565
11.2.1.5.3.3 Generating Replay Reports
You can generate replay reports after successfully replaying a captured workload.
On the Replay Management page you can generate replay reports displaying:
● Capture-Replay ComparisonYou can open a capture-replay comparison choosing a replay from the Replay List. When opening a comparison report directly from the Replay List, the report shown always compares values from the original captured workload with values from the replay.
● Replay-Replay ComparisonWhen using the Compare Replays button on the bottom right, the report shown always compares different replays with each other based on the same initial captured workload.For more information about generating a report based on a replay-replay comparison, see Generate a Replay-Replay Comparison Report.
Related Information
Generate a Replay-Replay Comparison Report [page 307]Analyzing Replay Reports [page 308]
11.2.1.5.3.3.1 Generate a Replay-Replay Comparison Report
You can compare two or more replayed workloads with each other based on the same initial captured workload.
Prerequisites
● You have a user with the WORKLOAD REPLAY ADMIN, CATALOG READ, and WORKLOAD ANALYZE ADMIN system privileges.
● You have replayed preprocessed workloads using the Replay Workload tile. For more information, see Replay a Preprocessed Workload.
SAP HANA Administration with SAP HANA CockpitMonitoring, Analyzing, and Improving Performance in SAP HANA Cockpit P U B L I C 307

Context
You can start the comparison of the replayed workloads from the Replay List in the Replay Management.
Procedure
1. On the Replay List tab, click Compare Replays on the bottom right.
The Select Baseline Replay dialog opens allowing you to select the replayed workload that you want to compare. Use the Target SID information to distinguish between the replays.
2. Select one entry from the displayed list and click Close.
The Select Target Replay dialog opens allowing you to select the replayed workload that you want to compare with the previously selected workload. The list displays replayed workloads based on the same initial captured workload.
3. Select one or more entries from the displayed list and click Compare Replays on the bottom right.
The Replay Report opens displaying a comparison of the selected replayed workloads.
Related Information
System Privileges [page 290]Replay a Preprocessed Workload [page 302]Analyzing Replay Reports [page 308]
11.2.1.5.3.4 Analyzing Replay Reports
You can use comparison reports to analyze the completed replay.
The information is displayed on four tabs:
● Overview● Load● Performance Comparison● Result Comparison
On the performance and result comparison tabs you can perform the following actions:
● Download detailed information in JSON format by choosing the download button at the top of the statement detail table.In the Download SQL Statements dialog, you can select the category of statements as well as the number of statements. For the performance comparison, these categories are All, Comparable, Faster, Slower, Replay Failed. For the result comparison, these categories are All, Identical, Verification Skipped, Replay Failed.
308 P U B L I CSAP HANA Administration with SAP HANA Cockpit
Monitoring, Analyzing, and Improving Performance in SAP HANA Cockpit

● Export replay reports to store them outside the database using the Export Replay button.
On the performance and result comparison tabs you can open the execution details for a specific statement by selecting the statement from the list. You can use the detailed execution level of both report types to compare the EXPLAIN PLAN results between the initial captured and replayed workloads, or between the baseline and target workloads. Comparing the plans can provide guidance for further statement-level investigation. This is only possible if the Collect Explain Plan setting was activated for both the capture and the replay during the configuration steps. For more information about this setting, see Capture Configuration SettingsReplay Configuration Settings.
Related Information
Replay Configuration Settings [page 303]Capture Configuration Settings [page 295]Overview [page 309]Load [page 310]Performance Comparison [page 311]Result Comparison [page 311]
11.2.1.5.3.4.1 Overview
The Overview tab displays an overall comparison of the SQL statements involved in the capturing and replaying process.
NoteWhen you turn off the Transactional Replay option on the Replay Configuration page, the result comparison does not include guaranteed transactional correctness. When running replays with this option turned on, the performance comparison can include a runtime overhead due to the transactional consistency.
Overview Information
Block Name Description
Result Comparison
In a result-based comparison you get an overview of the statements with identical or different results.
Click the block to open directly the Result Comparison tab.
Performance Comparison
In a performance-based comparison you get an overview of the statements based on a comparison of runtimes.
You can change the tolerance ratio selecting a value from the drop-down list or entering a new value.
Click the block to open directly the Performance Comparison tab.
SAP HANA Administration with SAP HANA CockpitMonitoring, Analyzing, and Improving Performance in SAP HANA Cockpit P U B L I C 309

Block Name Description
Different Statements
Displays the top SQL statements that have different results from the selected baseline in descending order.
You can click each row to open the Execution Detail page for the selected SQL statement. Use the drop-down arrow to filter the statements by time or by the number of records that have different results.
Slower Statements
Displays the top SQL statements that have a different performance ordered by the difference in execution time.Use the drop-down arrow to filter the statements by elapsed time, CPU time, or by execution time.
You can click each row to open the Execution Detail page for the selected SQL statement. To view KPI details for each statement, you can click the icon on the right at the end of the row.
Verification Skipped
Displays the distribution of reasons for statements with skipped result comparison.
Replay Failed Displays the distribution of reasons for the statements, which failed during replay. Use the drop down arrow to filter the statements by time or error code.
Capture Information
Displays information on the capture system, capture options, and the properties of the capture file.
Replay Information
Displays information on the replay system and the replay options.
If the comparison was made between two replays, the information is displayed in a Baseline Replay Information block and in a Target Replay Information block.
Related Information
Replay a Preprocessed Workload [page 302]
11.2.1.5.3.4.2 Load
The load chart compares both the capture and the replay based on selected KPIs.
This tab includes load charts comparing both the captured and the replayed workloads after a capture-replay comparison, or the baseline and the target workloads after a replay-replay comparison. The capture values are represented by a solid line, the replay values are represented by a dotted line.
The KPIs can be toggled independently for both the capture and replay aspects making it easier to compare them with each other. Additional KPIs can be added using the Show More KPIs button on top right of the load chart.
310 P U B L I CSAP HANA Administration with SAP HANA Cockpit
Monitoring, Analyzing, and Improving Performance in SAP HANA Cockpit

11.2.1.5.3.4.3 Performance Comparison
The performance-based comparison provides an overview of statements compared by runtime.
Based on the selected tolerance ratio, the statements are classified as Comparable when they have a similar runtime within the defined tolerance ratio, Faster, Slower, or Failed.
You can sort the displayed statements by clicking directly the column header. You can sort them in ascending or descending order or you can filter the list. You can use the fields and buttons on top to:
● Search for a specific statement● Change the tolerance ratio● Display more statements● Restore to default● Refresh the displayed data● Download detailed information in JSON format● Change the sorting criteria● Change filters● Group● Add more columns for analysis
To view a summary of how the execution time was spent, select the statistics symbol at the end of each statement line.
To open the execution details for a specific statement, select the statement from the list. On the Execution Details page, you can:
● Create a list of further statements, by choosing Show More Statements on the top right● Search the list of individual executions● View any parameters that might have been part of the query. To display the parameters, the associated
captured workload file must be loaded in the workload analyzer.● View the runtime KPIs for that execution● Display the explain plan comparison for that statement
For failed executions you can see why the statement execution failed and what reasons can be investigated further by manual statement-level analysis.
11.2.1.5.3.4.4 Result Comparison
The result-based comparison provides an overview of statements with, for example, identical or different results.
The result-based replay report also includes a classification of statement types based on the content of those statements being either deterministic or non-deterministic. Deterministic statements should always deliver the same results during a replay. Non-deterministic statements are expected to deliver different results (for example, because they don't contain an explicit sorting of results).
Statements are classified as:
● Identical if their result sets have the same row count and the same result hash
SAP HANA Administration with SAP HANA CockpitMonitoring, Analyzing, and Improving Performance in SAP HANA Cockpit P U B L I C 311

● Different if any of these criteria differ between capture and replay● Skipped if they are related to system calls, monitoring view accesses or other internal actions, which don't
require a result-based check● Failed if they returned an error code
You can sort the displayed statements by clicking directly the column header. You can sort them in ascending or descending order or you can filter the list. You can use the fields and buttons on top to:
● Search for a specific statement● Display more statements● Restore to default● Refresh the displayed data● Download detailed information in JSON format● Change the sorting criteria● Change filters● Group● Add more columns for analysis
To open the execution details for a specific statement, select the statement from the list.
On the Execution Details page, you can search the list of individual executions, bring up a list of other statements to choose from with the Show More Statements button, view runtime KPIs for that execution as well as the result-based values, view any parameters that might have been part of the query, or display an explain plan comparison for that statement.
For skipped executions you can see why the verification of an execution was skipped.
For executions with different results you can see why the results are classified as being different. This classification is based on the result set’s row count and result hash.
For failed executions you can see why the statement execution failed and what reasons can be investigated further by manual statement-level analysis such as the performance comparison tab.
11.2.1.5.3.5 Set a Breakpoint
When you identify a problem in the replay report, you can set a breakpoint to pause the replay exactly where the identified problem occurred.
Context
You can start the replay a second time after setting breakpoints.When starting the replay again, this would allow you to look for example at system views before that statement is executed, or to look at the trace file.
You can set a breakpoint from the performance comparison or results comparison tabs on the Replay Report page.
312 P U B L I CSAP HANA Administration with SAP HANA Cockpit
Monitoring, Analyzing, and Improving Performance in SAP HANA Cockpit

Procedure
1. Open the Execution Details by choosing a statement from the SQL statements list.2. Choose Set Breakpoints on the top right.3. Choose Save on the top right.4. Go back to the Replay Management page to configure and start the replay again.5. After starting the replay, open the Replay Monitor to view the breakpoints and a list of all statements.
On the bottom right you can use the Resume Replay button to execute the paused statement and continue to the next breakpoint. Or you can use the Execute and Pause button to execute the paused statement and then pause again.
Related Information
Replay a Preprocessed Workload [page 302]
11.2.2 Analyzing Workloads
Analyzing workloads from an SAP HANA database with the workload analyzer can help you identify the root cause of performance issues.
The following sections provide an overview of the workload analyzer tool:
What is the workload analyzer tool?
The workload analyzer is a tool that allows you to analyze the workload captured with the capture and replay tool, or any other workload occurring in a system.
The workload analyzer has two versions:
● The workload analyzer based on thread samplesThis version uses thread samples data to analyze the performance.
● The workload analyzer based on captured workloadsThis version of the tool performs the analysis using the captured workloads containing all the statistics of the query execution. Furthermore, it allows a deeper analysis with a full set of execution details.For more information on how to capture the workload of a system with the capture and replay tool, see Capture a Workload.
SAP HANA Administration with SAP HANA CockpitMonitoring, Analyzing, and Improving Performance in SAP HANA Cockpit P U B L I C 313

What is the workload analyzer based on thread samples?
The workload analyzer based on thread samples is a solution for analyzing database performance using thread samples.
The workload analyzer based on thread samples provides a workload analysis using different KPIs, and it offers the following information sets:
● On the upper part of the screen, the chart displays the system resource usage. The chart displays both a real-time and a historical analysis. The information displayed on the grey background represents the historical analysis of the workload. Both analysis types are based on the sampling data. However, the historical analysis contains only aggregated data.
● On the lower part of the screen, the main analysis page offers the following four sections:○ Top SQL Statements
This section displays the analysis chart displaying the number of threads by lock wait time, and below, statement information and SQL statement. The option to navigate to the SQL analyzer tool for further investigation is provided by clicking on an entry on the chart.
○ Background JobsThis section displays in the main chart information on the job progress. The miniature chart shows the system load data within the time range specified in the upper load chart, and the table below displays information on the delta merge.
○ TimelineThis section displays a timeline chart of the workloads, and a statements table containing thread-level information below. Clicking a block on the table will highlight the corresponding statement entry in the table.
○ ThreadsIn this section the main stacked area chart displays a more detailed visualization of the chart on the upper part of the screen based on a selected dimension (for example, thread type) over a given period of time. The bar charts located at the bottom next to it display the top five statements consuming most of the threads during the given timeframe. Clicking a specific statement hash opens a dialog with detailed statement information and an option to analyze it further with the SQL analyzer tool.
For more information on how to use the workload analyzer based on thread samples, see Analyze Workloads Based on Thread Samples.
What is the workload analyzer based on captured workloads?
The workload analyzer based on captured workloads is a solution for analyzing database performances based on the workload captured with the capture and replay tool.
The workload analyzer based on engine instrumentation offers you two analysis types:
● On the upper part of the screen, the chart displays the system resource usage.● On the lower part of the screen, three sections are displayed with further analysis:
○ Capture InformationThis section offers a detailed overview of the information on the captured workload, such as a summary, capture overview, filter options, database, and more. Selecting the section description will allow you to jump to the information you are interested in.
314 P U B L I CSAP HANA Administration with SAP HANA Cockpit
Monitoring, Analyzing, and Improving Performance in SAP HANA Cockpit

○ Top SQL StatementsIn this section, the graph displays the top SQL statements of the captured workload, and allows you to select the dimension you are interested in for graphical representation.
○ TimelineThis section offers a timeline analysis based on an application and statement level hierarchy enables you to evaluate anomalies in the timeline and identify potentially problematic statements.
○ ThreadsIn this section the main stacked area chart displays a more detailed visualization of the chart on the upper part of the screen based on a selected dimension (for example, thread type) over a given period of time. The bar charts located at the bottom next to it display the top five statements consuming most of the threads during the given timeframe. Clicking a specific statement hash opens a dialog with detailed statement information and an option to analyze it further with the SQL analyzer tool.
In contrast to the workload analyzer based on thread samples, using this tool requires to capture and load the workload before analyzing the performance. Capturing all the workload by default is not recommended because it introduces an overhead to system performance.
For more information on how to use the workload analyzer based on engine instrumentation, see Analyze Workloads Based on Engine Instrumentation.
Why should you use the workload analyzer tool?
The workload analyzer gives you an overview of the system's health at a glance. Moreover, the tool helps you identify the root cause of performance issues either by a real-time analysis or by reviewing historical data.
How to access the workload analyzer tool?
You can access both versions of the workload analyzer from the SAP HANA cockpit as follows:
● To access the workload analyzer based on thread samples, you have the following possibilities:○ Open the Analyze Workloads link from the CPU Usage, Disk Usage, Memory Usage, or SQL Statements
tile on the SAP HANA cockpit.or
○ Navigate to the page from the Performance Monitor page by selecting Analyze Workload from the Open in link. For more information about the performance monitor, see Monitoring and Analyzing with the Performance Monitor.or
○ Navigate to the page from the Memory Analysis page by selecting Workload Analysis from the Open in link. For more information on the memory analyzer, see Analyze Memory Statistics.
● To access the workload analyzer based on captured workloads, you have the following possibilities:○ Click on the Open Captured Workloads link on the Analyze Workloads tile or on the displayed number of
captured workloads on the Capture Workload tile. The Capture Management page opens displaying a list of captured workloads.
SAP HANA Administration with SAP HANA CockpitMonitoring, Analyzing, and Improving Performance in SAP HANA Cockpit P U B L I C 315

NoteOnly workloads with the status Loaded can be analyzed. If the desired workload is Not Loaded, select Start next to the status to load the captured workload before proceeding.
Click on a Workload Analysis status of the workload you wish to analyze. The Capture Report page opens where you can select to Analyze Workload.
○ Open the workload analyzer based on thread samples. The chart on system resource usage on the top of the page displays areas highlighted in green when a workload has been captured. Drag across the highlighted area.
NoteIf a workload has not been loaded yet, you need to click on icon in the highlighted area and select Load Capture. The Capture Report page opens, allowing you to Load Workload on the top of the page.
Related Information
Capture a Workload [page 294]Analyze Workloads Based on Thread Samples [page 316]Analyze Workloads Based on Captured Workloads [page 318]Monitoring and Analyzing with the Performance Monitor [page 270]Analyze Memory Statistics [page 176]
11.2.2.1 Analyze Workloads Based on Thread Samples
You can analyze database performance using the workload analyzer based on thread samples.
Prerequisites
You have the system privileges CATALOG READ and INIFILE ADMIN.
Procedure
1. Open the workload analyzer either clicking on the chart in the Analyze Workloads tile or navigate to it from the Performance Monitor or the Memory Analysis page. For more information, see the How to access the workload analyzer tool section in Analyzing Workloads.
316 P U B L I CSAP HANA Administration with SAP HANA Cockpit
Monitoring, Analyzing, and Improving Performance in SAP HANA Cockpit

The workload analyzer opens displaying a chart on system resource usage on the upper part of the screen and a more detailed visualization distributed in four sections:
Section descriptions
Section Description
Top SQL Statements A graphical representation of number of threads by lock wait time, and statement information and SQL statement.
Background Jobs A chart displaying information on the jobs running in the background, and a delta merge table.
Timeline A graph displaying the workloads by application name and statement hash, and a list of statements in a table.
Threads Two graphs with customizable dimensions.
2. Analyze the displayed charts using the following features:a. On the top part of the screen, set the observed time range by selecting from presets or entering a
custom time range, or by using the navigation buttons.b. In the settings menu, select desired KPIs. The selected KPIs appear in the legend area on the left-side
of the chart. For a list of all available KPIs, see Key Performance Indicators.c. Customize your chart by applying a number of filtering options to only analyze the workloads you are
interested in.d. Import and export datasets in order to store the data in an application and to analyze it in another
system.e. Navigate to the Performance Monitor page to monitor and analyze the performance of the SAP HANA
database over time. For more information on the performance monitor tool, see: Monitoring and Analyzing with the Performance Monitor.
f. Navigate to the workload analyzer based on captured data tool to analyze captured and loaded workloads. The chart on system resource usage on the top of the page displays areas highlighted in green when a workload has been captured. Drag across the highlighted area.
NoteIf a workload has not been loaded yet, you first need to click on the icon in the highlighted area and select Load Capture. The Capture Report page opens, giving you the option to Load Workload on the top of the page.
The workload analyzer based on captured data tool opens, displaying information on the capture. For more information, see Analyze Workloads Based on Captured Data.
g. Navigate to the Current Table Distribution page to see how tables are distributed accross the hosts. You can do this in the following ways:
○ In the Top SQL Statements section, select one or more statements from a chart or table. In the dialog window, choose Open in Current Table Distribution.
○ In the Timeline section, select one or more statements from the chart. In the dialog window, choose Open in Current Table Distribution.
○ In the Timeline section, select a statement from the table and see the Accessed Tables. In the dialog, choose Open in Current Table Distribution.
SAP HANA Administration with SAP HANA CockpitMonitoring, Analyzing, and Improving Performance in SAP HANA Cockpit P U B L I C 317

○ In the Threads section, select one or more bars from the secondary dimension chart. In the dialog, choose Open in Current Table Distribution.
h. On the lower part of the screen in the Top SQL Statements section, select a SQL statement on the graph to see the statement hash, wait time, and number of waiting threads. Optional: You can navigate to the SQL Analyzer page by clicking on Open in SQL Analyzer to analyze query execution performance. For more information on the SQL analyzer tool, see: Analyzing Statement Performance.
i. On the lower part of the screen in the Background Jobs section, edit the granularity of the chart, and customize the delta merge table by setting the sorting order and defining the displayed columns.
j. Customize the timeline chart in the Timeline section by adding new dimensions. Click on Edit and select dimensions to add or remove from the chart.
k. In the Threads section, see the workload analysis information you desire in the graphs by selecting from the primary and secondary dimensions on the left of each graph.
Related Information
Analyzing Workloads [page 313]Key Performance Indicators [page 274]Analyzing Statement Performance [page 320]View Current Table Distribution [page 185]
11.2.2.2 Analyze Workloads Based on Captured Workloads
You can analyze database performance using the workload analyzer based on captured workloads.
Prerequisites
You have the system privileges WORKLOAD ANALYZE ADMIN.
Context
In order to analyze the captured workload, the file has to be loaded into the database.
Procedure
1. In the SAP HANA cockpit, click on the number of captured workloads in the Capture Workload tile.
The Capture Management page opens, displaying captured workloads that can be analyzed with the workload analyzer based on captured workload.
318 P U B L I CSAP HANA Administration with SAP HANA Cockpit
Monitoring, Analyzing, and Improving Performance in SAP HANA Cockpit

NoteOnly workloads with the status Loaded can be analyzed. If the desired workload is Not Loaded, select Start next to the status to load the captured workload before proceeding. Please note that there is a 4 second delay in the initiation of the capturing process.
For information on how to open the workload analyzer based on captured workload from the workload analyzer based on thread sampling, see Analyzing Workloads.
2. Click on the status of a loaded workload.
The Workload Analysis page opens.
It displays a load chart overview of the workload on the top of the screen and the following information sections below:
Sections
Description
A summary of informative data on the captured workload.
A graphic representation of number of threads by lock wait time, and statement information and SQL statement.
A graph displaying the workloads by application name and statement hash, and a list of statements in a table.
Two graphs with customizable dimensions.
NoteThis view is only available if the workload was captured in the same system.
3. Analyze the captured workload using the following features:a. Select the time range for the workload analysis by clicking on the date displayed on the top of the
screen and selecting from a predefined set of time ranges or entering a custom range.b. Navigate back to the capture management page by clicking on the Manage Captures link.c. Customize the information displayed on the load graph on the upper part of the screen by selecting the
host and services, filtering the results, or selecting the desired KPIs. The selected KPIs appear in the legend area on the left-side of the chart. For a list of all available KPIs, see Key Performance Indicators. Moreover, you can set specific filters (for example, statement hash, thread type, or application source) in order to analyze only the data you are interested in.
d. On the lower part of the screen in the Top SQL Statements section, select a workload on the graph to see the statement hash, wait time, and number of waiting threads. Optional: You can navigate to the SQL Analyzer page by clicking on Open in SQL Analyzer to analyze query execution performance. For more information on the SQL analyzer tool, see: Analyzing Statement Performance.
e. Customize the timeline chart in the Timeline section by adding new dimensions. Click on Edit and select dimensions to add or remove from the chart.
Related Information
Capture a Workload [page 294]Key Performance Indicators [page 274]
SAP HANA Administration with SAP HANA CockpitMonitoring, Analyzing, and Improving Performance in SAP HANA Cockpit P U B L I C 319

Analyzing Workloads [page 313]
11.2.3 Analyzing Statement Performance
Analyzing statement performance helps you understand performance issues of a query execution and other query execution aspects of the SAP HANA database.
The following sections provide an overview of the SQL analyzer tool:
What is the SQL analyzer tool?
The SQL analyzer is a query performance analysis tool of SAP HANA. The tool can be used to view detailed information on each query execution and can help you evaluate potential bottlenecks and optimizations for these queries.
How can you access the SQL analyzer?
You can open the SQL analyzer from the SAP HANA cockpit or from the SAP Web IDE for SAP HANA.
● From the SAP HANA cockpit there are nine ways to open the SQL Analyzer:○ Use the Expensive Statements page.
Open the Monitor expensive statements link from the Monitoring link list. The Expensive Statements Trace page opens, allowing you to identify which SQL statements require a significant amount of time and resources. Each statement string is provided with a More link, which opens the Full SQL Statement dialog. Click Open in SQL Analyzer to open the selected query with the SQL analyzer tool.
○ Use the SQL Plan Cache page.Open the Open SQL plan cache link from the Monitoring link list. The SQL Plan Cache page opens, allowing you to manage registered statement hints. Each statement string is provided with a More link, which opens the Full SQL Statement dialog. Click Open in SQL Analyzer to open the selected query with the SQL analyzer tool.
○ Using the Statement Hints page.Open the Statement Hints page by clicking on the Statement Hints section of the Manage SQL Performance tile, or by clicking the Manage statements hints link from the Database Administration link list. The Statement Hints page opens, allowing you to manage registered statement hints. Each statement string is provided with a More link, which opens the Full SQL Statement dialog. Click Open in SQL Analyzer to open the selected query with the SQL analyzer tool.
○ Use the Plan Stability page.Open the Plan Stability page by clicking on the Plan Stability section on the Manage SQL Performance tile, or by clicking the Manage plan stability link from the Database Administration link list. The Plan Stability page opens. Each captured plan is provided with a More link next to the statement string, which opens the Full SQL Statement dialog. Click Open in SQL Analyzer to open the selected query with the SQL analyzer tool.
○ Use the Plan Trace page.
320 P U B L I CSAP HANA Administration with SAP HANA Cockpit
Monitoring, Analyzing, and Improving Performance in SAP HANA Cockpit

Open the Plan Trace page by clicking on the Plan Trace section on the Manage SQL Performance tile, or by clicking the Plan trace link from the Alerting and Diagnostics link list. The Plan Trace page opens. Each traced plan is provided with a More link next to the statement string, which opens the Full SQL Statement dialog. Click Open in SQL Analyzer to open the selected query with the SQL analyzer tool.
○ Use the Saved Plans page.Open the Saved Plans page by clicking on the Saved Plans section on the Manage SQL Performance tile, or by clicking the Manage saved plans link from the Alerting and Diagnostics link list. The Saved Plans page opens. Each saved plan is provided with a More link next to the statement string, which opens the Full SQL Statement dialog. Click Open in SQL Analyzer to open the selected query with the SQL analyzer tool.
○ Use the Workload Analysis (based on thread sampling) page.Open the Workload Analysis (based on thread sampling) page by clicking on the chart on the Analyze Workloads tile. The Workload Analysis page opens. In the Top SQL Statements page, click on any entry to open the Current Selection dialog. Click Open in SQL Analyzer to open the selected query with the SQL analyzer tool.
○ Use the Execute SQL link from the Database Explorer link list.On the Overview page, open the Execute SQL link. The SAP HANA database explorer opens. In the menu of the Analyze button, click Analyze SQL to open the SQL analyzer.
● From the SAP Web IDE for SAP HANA you can open the SQL analyzer in a SQL Console by clicking Analyze SQL in the menu of the Analyze button.
Which views are supported by the SQL analyzer?
The following views are supported by the SQL analyzer:
SQL Analyzer Views
View Description
Overview This view provides an overview of the query execution including metadata for the analysis. It displays the following KPIs:
● Time● Dominant Operators● Statistics● SQL Performance Recommendations
To get more information on the KPIs, see Analyze Statement Performance.
Plan Graph This view provides graphical guidance to help you understand and analyze the execution plan of a SQL statement. In case of SQLScript, the SQLScript definition is also displayed.
SQL This view displays the complete SQL string that is analyzed.
SAP HANA Administration with SAP HANA CockpitMonitoring, Analyzing, and Improving Performance in SAP HANA Cockpit P U B L I C 321

View Description
Operators This view provides a list of operators used during query execution and includes additional details about each operator, which can be used for analysis.
Timeline This view provides a complete overview of the execution plan based on the visualization of sequential time-stamps.
Tables in Use This view provides a list of tables used during query execution and includes further details on tables, which can be used for further analysis. It can be used to understand which tables are needed to fulfill a given SQL statement execution.
Table Accesses This view provides details on the table accesses performed during the processing of a SQL statement, which can be used for analysis.
Compilation Summary This view provides details on the query compilation process. It can be used to understand how much time was spent on which operation, which cost-based information was used, and what the plan properties are.
Recommendations This view shows details on the provided recommendation allowing you to understand the reasoning for it.
Related Information
Analyze Statement Performance [page 323]Monitor and Analyze Expensive Statements [page 282]Monitor and Analyze Statements with SQL Plan Cache [page 281]Managing Statement Hints [page 341]Managing Plan Stability [page 339]Manage Saved Plans [page 331]Analyze Workloads Based on Thread Samples [page 316]Monitor and Analyze Statements with Plan Trace [page 326]
322 P U B L I CSAP HANA Administration with SAP HANA Cockpit
Monitoring, Analyzing, and Improving Performance in SAP HANA Cockpit
11.2.3.1 Analyze Statement Performance
The SQL analyzer is used to analyze statement execution performance.
Context
From the SAP HANA cockpit the SQL analyzer can be opened using the Monitor expensive statements link, the Plan Trace link, or the SAP HANA database explorer. You can also open the tool from the SAP Web IDE for SAP HANA. For more information on how to open the SQL analyzer, see section How can you access the SQL analyzer? in Analyzing Statement Performance.
Procedure
1. Open the SQL analyzer using the SAP HANA cockpit or the SAP Web IDE for SAP HANA.
The SQL Analyzer page opens, displaying the following views:○ Overview○ Plan Graph○ SQL○ Operators○ Statement Statistics (SQLScript only)○ Timeline○ Tables in Use○ Table Accesses○ Compilation Summary○ Recommendations
2. Open the Overview tab to view important KPIs required to begin a performance analysis before going into the complex details.
KPI Description
KPI Description
Time The initial compilation time
The elapsed time indicating the total response time from the query execution request time to the end time of the query execution
SAP HANA Administration with SAP HANA CockpitMonitoring, Analyzing, and Improving Performance in SAP HANA Cockpit P U B L I C 323

KPI Description
Dominant Operators Operators sorted by their execution time
You can navigate to the Operators tab on the table below by clicking Open Operators on the bottom of the tile. This will show the operators sorted in descending order by execution time.
Statistics System version: The version of the system where the execution occurred
Tables in use: Total number of tables touched by any operators during execution
You can navigate to the Tables in Use tab on the table below by clicking this line.
Result Records: The final result record count
Memory Allocated: Total memory allocated for executing the statement
Distribution: Number of SAP HANA index servers that are related to the query execution
The name of the host
SQL Performance Recommendations Recommendations on how you can improve the performance of SQL-related operations.
3. Open the Plan Graph tab to understand and analyze the execution plan of an SQL statement. It displays a visualization of a critical path based on inclusove execution time of operators and allows you to identify the most expensive path in a query execution plan.
In case of a SQLScript, the Plan Graph displays its complete definition. To retrieve the information in a text format, you can copy the definition by clicking the copy icon.
In the Plan Graph tab you can open the Detail Properties view by clicking one of the operators. This view offers detailed information on the operator such as name, location, ID, summary.
You can open the edge infromation detail by clicking one of the links between the operators. This view offers further information on the edge values, such as target, source, output cardinality, fetch call count, and estimated output cardinality.
Furthermore, you can configure plan graph settings. You can set the color of the nodes by type or location, and choose to show either physical or logical inner plans.
4. Open the SQL tab to get the complete view of the SQL statement string that is being analyzed.5. Open the Operators tab to pinpoint specific operators of interest.
The view lists characteristics of all operators and supports:○ Display of various KPIs, for example physical (whether an operation is a real, physically executed one),
offset, execution time, CPU time○ Setting of filters along all the columns/KPIs○ Display of the number of operators within the filtered set
324 P U B L I CSAP HANA Administration with SAP HANA Cockpit
Monitoring, Analyzing, and Improving Performance in SAP HANA Cockpit

○ Immediate aggregated information (max, min, sum, and so on) for the same KPIs on the filtered operator set
○ Detailed display of all operators within the filtered set6. Open the Tables in Use tab for an overview of which tables have been used during the processing of a
statement.
The view displays the following information:○ The name of the table○ The host and port of the table's partition in the Location column○ The partition number of the table's partition in the Partition column○ The maximum possible amount of data processed for a given table during the execution of a
statement, including the possibility of multiple accesses, in the Max. Entries Processed column○ How often a table has been accessed during statement execution in the Number of accesses column○ The maximum processing time across the possibly multiple table accesses in the Maximum processing
time column7. Open the Statement Statistics to view a set of statistics (SQLScript only) for each SQL statement involved
in the procedure. This set of statistics provides a good starting point for analyzing the performance of a procedure as it lets users easily drill-down the most expensive SQL statement.
The following information is available for each statement so that users can sort the column (criterion) of their interest to find the most expensive statement: SQL Statement, Line Number, Execution Count, Execution Times, Compilation Times, Memory Allocated, Result Record Count, Explain Plan Result, and Procedure Comment.
8. Open the Timeline tab to get a complete overview of the execution plan based on the visualization of sequential time-stamps. The operator tree table displays hierarchical parent-child relationships and container-inner plan relationships. Based on the operators, the timeline chart shows the operations executed at different time intervals.
9. Open the Table Accesses tab to see the details on the table accesses performed during the processing of a statement.
The view displays the following information:
○ The Offset time for accessing the table○ The name of the table○ The Conditions that affect the table accesses○ The Processing Time○ The amount of entries processed during an operation in the Entries Processed column○ The host and port of the table's partition in the Location column○ The operator’s unique ID in a query execution result in the Operator Id column○ The name of the operator○ The detail information of an operator in the Details column○ The partition number of the table's partition in the Partition column
For cached plans, the table displays the following information: Inclusive Estimated Cost, Exclusive Estimated Cost, and the Estimated Output Size.
Optional: To get aggregated information for each column, choose the aggregator functions in the drop-down menu under the column name. If an aggregator is chosen, you can see More information for your chosen query.
SAP HANA Administration with SAP HANA CockpitMonitoring, Analyzing, and Improving Performance in SAP HANA Cockpit P U B L I C 325

Optional: To refine results, click on Filters on the upper right corner. The Filters page appears, where you can choose the information type, operator, and enter values according to which you wish to filter the Table Accesses. Choose OK to confirm. If you want to remove the filters you selected, go to the Filters page and choose to Restore to defaults.
Optional: To sort the results, click the sorting icon next to the Filters button and choose the sorting order.
Optional: To customize the columns displayed in the information list, click on the settings icon on the upper right corner and choose to hide or display the desired columns.
10. Open the Compilation Summary tab to view details on the query compilation process, including compilation time breakdown, cost-based optimization details, and plan properties.
11. Open the Recommendations tab to see the details for each provided recommendation. This allows you to easier understand the reasoning behind the recommendation for SQL query optimization.
12. Optional: Re-execute the SQL query by clicking the Re-execute button on the top right corner. If the query is parameterized, you can change the parameter values.
With a parameterized query, the Input Parameters appears, prompting you to enter your desired parameters in the Parameter tab. You can list the parameter values and separate them by a comma, or enter and edit them individually. Where applicable, you can check the Empty value box. The values you entered are reflected in the SQL string that you can see in the SQL Statement tab. Click on Execute SQL to analyze the SQL string according to the parameter values you entered and see the result on the SQL Analyzer page.
Related Information
Analyzing Statement Performance [page 320]
11.2.3.2 Monitor and Analyze Statements with Plan Trace
Plan Trace is a trace feature for SQL analyzer.
Context
Plan Trace enables you to collect SQL queries and their execution plans, executed in a given time frame. For each SQL query traced you can visualize the execution plan for performance analysis. Only 'SELECT' statements are traced with Plan Trace.
Procedure
1. Open the Plan Trace page by clicking on the Plan Trace section on the Manage SQL Performance tile.
326 P U B L I CSAP HANA Administration with SAP HANA Cockpit
Monitoring, Analyzing, and Improving Performance in SAP HANA Cockpit

The Plan Trace page opens, displaying a set of statistics for each SQL statement collected in a given time frame. To find the most expensive SQL statements use the displayed categories (for example, start and end time, schema, user, statement hash).
2. Click the Configure Trace button on the bottom right to configure the plan trace.
The Configuration dialog opens, allowing you to set the options you want.3. Optional: Open the selected statement string with the SQL analyzer by clicking theMore link in the Full SQL
Statement dialog.
11.2.3.3 Analyzing SQL and Saving Plans
This function of the SAP HANA cockpit allows you to save SQL plans, download them, and load a file from the SAP HANA database.
There are two ways in which you can record SQL plans for future reference with the SAP HANA cockpit:
● You can save them within the SAP HANA database filesystem, and● Download the saved SQL plans as local PLV files on your personal computer.
Both of these options are available with this functionality.
Additionally, you can also load PLV files into the SQL Analyzer tool from the trace folder in the SAP HANA database.
Related Information
Save Plans as Files [page 327]Load Files [page 329]Download Files [page 330]
11.2.3.3.1 Save Plans as Files
You can save SQL plans within the SAP HANA database.
Prerequisites
Since this functionality can be accessed from different performance management and monitoring tools within the SAP HANA cockpit, please check the privileges they might require respectively.
SAP HANA Administration with SAP HANA CockpitMonitoring, Analyzing, and Improving Performance in SAP HANA Cockpit P U B L I C 327

Context
Saving SQL plans helps you record them as PLV files in the trace folder within the SAP HANA database.
You can save SQL plans from the following performance monitoring tools:
● Expensive Statements● Plan Stability● SQL Analyzer● Statement Hints
Procedure
1. Save a SQL plan from Expensive Statement Trace, Plan Stability, or Statement Hints:a. In the table view, select the More option on your desired statement string.
A dialogue appears offering several options.b. Choose to Analyze SQL and Save Plan.
A window appears, displaying the SAP HANA database file folder, where the SQL plan is being saved, and prompting you to enter a prefix for a filename.
c. To finalize the saving process, enter a desired prefix for a filename of your saved SQL plan and confirm.2. Save a SQL plan from the SQL Analyzer by choosing the Execute and Save option from the Execute menu
on the upper right corner of the page.
NoteChoosing the Execute option will not save the plan.
On the bottom of the screen, the filename appears, along with the SAP HANA database folder, where the SQL plan would be saved. On the upper right corner, you can select to Download the file. The dialogue also allows you to Copy the path of the SQL plan.
For more, see: Download Files.
Related Information
Analyzing SQL and Saving Plans [page 327]Monitoring and Analyzing with the Statements MonitorManaging Plan StabilityAnalyzing Statement Performance [page 320]Managing Statement HintsManaging Statement Hints [page 341]Download Files [page 330]
328 P U B L I CSAP HANA Administration with SAP HANA Cockpit
Monitoring, Analyzing, and Improving Performance in SAP HANA Cockpit

11.2.3.3.2 Load Files
You can load saved files within the SAP HANA database.
Prerequisites
To load files, you have to have saved SQL plans in the SAP HANA database. For more, see: Save Plans.
Context
Loading saved SQL plans into the database will allow you to open the saved SQL plan with the SQL Analyzer.
You can load saved SQL plans from the Saved Plans tool in SAP HANA cockpit.
Procedure
1. To load files into the SAP HANA database, click the Load PLV button on the upper right corner of the Saved Plans page.
A dialogue appears, prompting you to select files you want to load into the current system. The location of the files appears on the top of the file list.
2. Choose the desired files that you want to load into the SAP HANA database and confirm.
Related Information
Analyzing SQL and Saving Plans [page 327]Save Plans as Files [page 327]Analyzing Statement Performance [page 320]
SAP HANA Administration with SAP HANA CockpitMonitoring, Analyzing, and Improving Performance in SAP HANA Cockpit P U B L I C 329

11.2.3.3.3 Download Files
You can download saved SQL plans as local files to your hard drive.
Prerequisites
To download files, you have to have saved SQL plans in the SAP HANA database. For more, see: Save Plans.
Since this functionality can be accessed from different performance management and monitoring tools within the SAP HANA cockpit, please check the privileges they might require respectively.
Context
Downloading SQL plans helps you share the SQL plans as a PLV file with others.
You can download SQL plans from the Saved Plans and the SQL Analyzer tools.
Procedure
1. Download SQL plans as local files to your hard drive from the Saved Plans tool by choosing the download icon next to the desired statement string.
2. Download SQL plans as local files to your hard drive from the SQL Analyzer tool by clicking the Download button on the upper right corner of the executed parameterized query.
A dialogue appears that allows you to Download the file to your hard drive.
For more, see: Save Plans and Analyze Statement Performance.
Related Information
Analyzing SQL and Saving Plans [page 327]Save Plans as Files [page 327]Manage Saved PlansAnalyzing Statement Performance [page 320]
330 P U B L I CSAP HANA Administration with SAP HANA Cockpit
Monitoring, Analyzing, and Improving Performance in SAP HANA Cockpit

11.2.3.4 Manage Saved Plans
The SQL analyzer result page shows SQL plans saved from a previously executed query.
Context
The saved plans feature allows you to revisit SQL statement queries that were executed with the SQL analyzer in a previous session without having to re-execute them in the current session.
Procedure
1. Open the Saved Plans page by clicking on the Saved Plans section on the Manage SQL Performance tile.
The SQL Analyzer result page opens, displaying the Saved Plans table, containing the collected information on previously executed SQL queries. To find the your desired SQL statements, use the displayed categories (for example, system version, statement string, plan type, user name, schema name, statement hash, and so on).
2. Optional: You can delete saved plans in two ways:a. Mark the checkbox on the left of the listed statement, and select Delete on the top of the table.
The Delete Plan dialog opens, asking you if you want to delete both the plan and the corresponding PLV file, or just the plan.
b. Select a statement and click on the trash bin icon next to the statement string.
The Delete File dialog opens, making sure if you want to delete the chosen PLV file.
NoteThis option does not get rid of the plan, just the PLV file. If you want to delete the plan as well, choose the former method.
3. Optional: You can search saved plans by entering a statement string keyword in the search field.4. Optional: You can sort the order of the table and filter results by the desired parameter.5. Optional: You can customize what columns are shown in the table in the settings menu.
Related Information
Analyzing Statement Performance [page 320]Analyze Statement Performance [page 323]
SAP HANA Administration with SAP HANA CockpitMonitoring, Analyzing, and Improving Performance in SAP HANA Cockpit P U B L I C 331

11.3 Improving Performance in SAP HANA Cockpit
You can improve the performance of the database using the SAP HANA cockpit.
You can use the following tools to analyze fine-grained aspects of system performance in the SAP HANA cockpit:
● Use the Recommendations to get suggestions on how to improve and optimize your database.● Use the Data Cache to monitor and manage different types of cached queries.● Use the Manage plan stability to restore performance speed from the previous to the current system.● Use the Manage statement hints to add statement hints to an SQL statement without modifying the actual
statement in the application.
Related Information
Getting Recommendations [page 332]Monitoring and Managing Data Cache [page 335]Managing Plan Stability [page 339]Managing Statement Hints [page 341]
11.3.1 Getting Recommendations
Use recommendations to get suggestions for changes you can apply to the SAP HANA database to increase its performance and operation.
In contrast to alerts, recommendations are not warnings that you must react to. They offer rule-based advice on database performance improvement and show the next steps on how to implement the suggested changes.
There are three different types of recommendations:
● Ad hoc recommendations are based on an SAP-internal support tool that logs the most impactful changes you can make to improve performance of the SAP HANA database.
● Physical Design recommendations target the object design within the database and make suggestions on which changes to it could offer the most positive impact to the SQL performance, memory footprint, CPU usage, etc.
● SQL Recommendations are based on analysis of the SQL statements executed by the system and offer suggestions regarding changes to SQL statements.
How can you access recommendations?
You can access recommendations from the system overview page of the SAP HANA cockpit as follows:
● Open the Recommendations card.
332 P U B L I CSAP HANA Administration with SAP HANA Cockpit
Monitoring, Analyzing, and Improving Performance in SAP HANA Cockpit

● Open the SQL Analyzer tool and go to the Recommendations section.
NoteThe Recommendations section is only visible when there are any available recommendations.
To find out how to access the SQL analyzer, see Analyzing SQL Performance.
Related Information
View and Follow Recommendations [page 333]Configure Recommendations [page 334]Analyzing Statement Performance [page 320]
11.3.1.1 View and Follow Recommendations
Recommendations is used for suggestions for database performance and operation improvements.
Context
Recommendations can be opened from the SAP HANA cockpit overview page or the SQL Analyzer. For more information on how to open Recommendations, refer to section How can you access recommendations? in Getting Recommendations.
Procedure
1. Open Recommendations.
The Recommendations page opens, displaying the overview page with three different types of recommendations.○ Ad hoc○ Physical Design○ SQL Recommendations.
Each section displays the recommendation count.2. Select a recommendation you wish to follow up.
The detailed recommendation view opens. This information and actions available on this page differ depending on the recommendation type.
SAP HANA Administration with SAP HANA CockpitMonitoring, Analyzing, and Improving Performance in SAP HANA Cockpit P U B L I C 333

Recommendation type Information Navigation options
Ad hoc ○ Impact○ Data source○ Recommended actions
SAP Notes
Physical Design ○ Impact○ Data source○ Recommended actions
You can search, sort, and configure the following sections:○ Related object or object tables, or○ Related SQL statement strings
○ Suggested application to address the presented issue
○ From a SQL statement string, SQL Analyzer.
SQL Recommendations ○ Impact○ Data source○ Recommended actions
You can search, sort, and configure the following section:○ Related SQL statement strings
○ Suggested application to address the presented issue
○ From a SQL statement string, SQL Analyzer, or
○ Plan Stability
Optional: You can enlarge the detailed recommendation view to fit the screen.
3. Follow up on the recommended action by navigating to the suggested application.4. Optional: If you do not choose to navigate to the suggested application, you can exit the detailed
recommendation view and go back to the overview page or choose another recommendation from the sidebar.
Related Information
Getting Recommendations [page 332]Configure Recommendations [page 334]Managing Plan Stability [page 339]Analyzing Statement Performance [page 320]
11.3.1.2 Configure Recommendations
Context
For information on how to open Recommendations, refer to section How can you access recommendations? in Getting Recommendations.
334 P U B L I CSAP HANA Administration with SAP HANA Cockpit
Monitoring, Analyzing, and Improving Performance in SAP HANA Cockpit

Procedure
1. Open Recommendations.
The Recommendations page opens.2. Choose the Configure link.
The Configure Recommendations dialog opens. The different types of configurations can be found in four tabs: general, physical design, SQL, and generate recommendations.
3. Choose to show only recommendations collected for the last month, week, day, or two hours in the General category.
4. In the Physical Design category, you can adjust the triggers for the following recommendations:
○ The threshold for the Review data statistics recommendation○ The threshold for the Review table distribution status recommendation○ The size and percentages of hot and cold object thresholds for the Update load unit recommendation.
5. In the SQL Recommendations category, you can adjust the triggers for the following recommendations:
○ The maximum and minimum execution count for the Enable/disable Abstract SQL Plan recommendation
○ The minimum total result count for the Add more filters recommendation6. Choose which data sources to use for recommendations in the Generate Recommendations category.
You can change the collection status or navigate to the application for further configuration for the following:○ Data Statistics Advisor
Optional: You can choose to clear all data statistics recommendations.○ Resource Tracking for Memory Usage and Network Transfer in Statement Level○ Plan Stability○ SQL Analyzer○ Native Storage Extension (NSE) Advisor
Optional: You can choose to clear all NSE recommendations.
Related Information
Getting Recommendations [page 332]View and Follow Recommendations [page 333]Managing Warm Data with the Native Storage Extension [page 203]
11.3.2 Monitoring and Managing Data Cache
Use Data Cache for an overview and management options of different types of cached queries.
Cached data helps improve the performance of the SAP HANA database by allowing you to retrieve data quickly without repeated query execution.
SAP HANA Administration with SAP HANA CockpitMonitoring, Analyzing, and Improving Performance in SAP HANA Cockpit P U B L I C 335
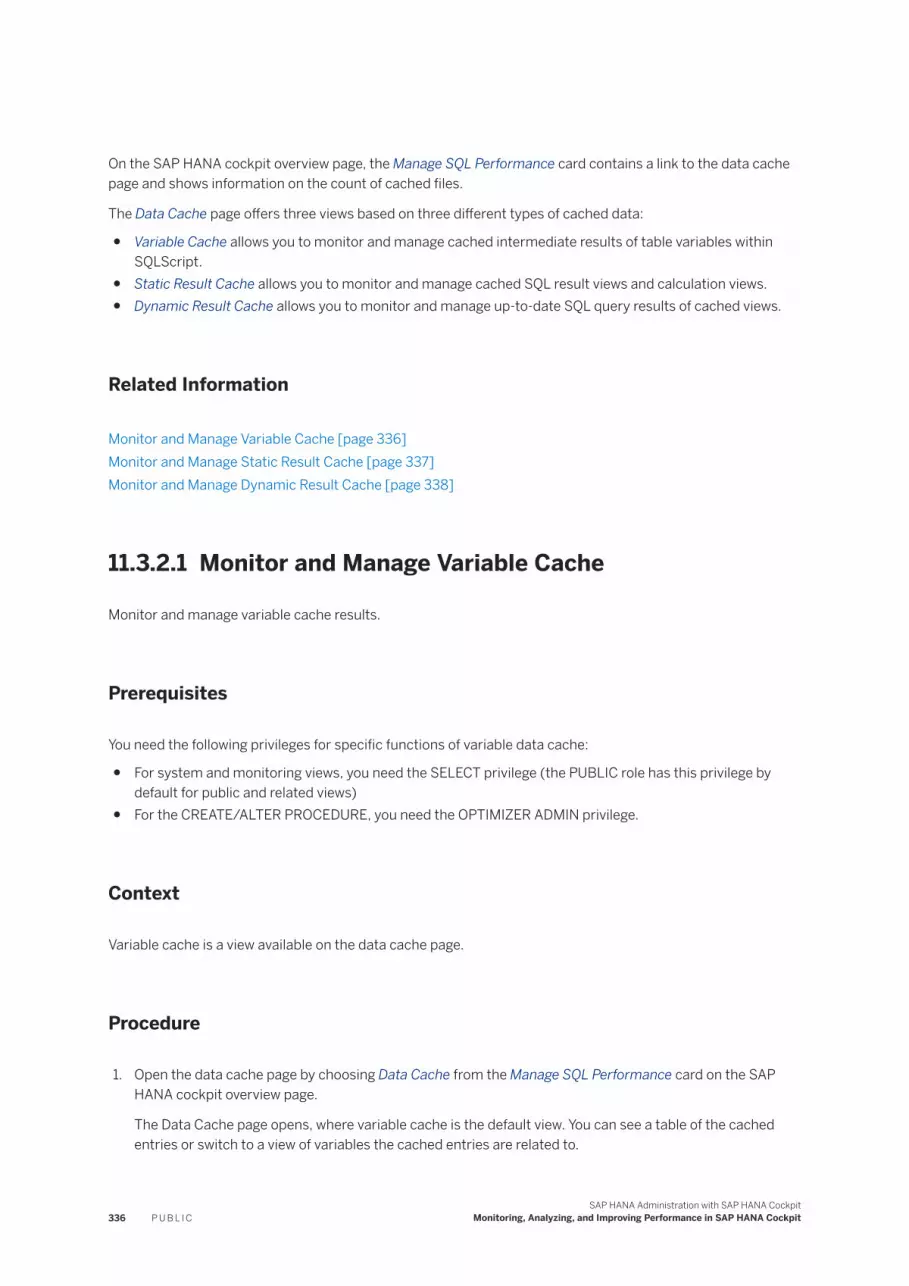
On the SAP HANA cockpit overview page, the Manage SQL Performance card contains a link to the data cache page and shows information on the count of cached files.
The Data Cache page offers three views based on three different types of cached data:
● Variable Cache allows you to monitor and manage cached intermediate results of table variables within SQLScript.
● Static Result Cache allows you to monitor and manage cached SQL result views and calculation views.● Dynamic Result Cache allows you to monitor and manage up-to-date SQL query results of cached views.
Related Information
Monitor and Manage Variable Cache [page 336]Monitor and Manage Static Result Cache [page 337]Monitor and Manage Dynamic Result Cache [page 338]
11.3.2.1 Monitor and Manage Variable Cache
Monitor and manage variable cache results.
Prerequisites
You need the following privileges for specific functions of variable data cache:
● For system and monitoring views, you need the SELECT privilege (the PUBLIC role has this privilege by default for public and related views)
● For the CREATE/ALTER PROCEDURE, you need the OPTIMIZER ADMIN privilege.
Context
Variable cache is a view available on the data cache page.
Procedure
1. Open the data cache page by choosing Data Cache from the Manage SQL Performance card on the SAP HANA cockpit overview page.
The Data Cache page opens, where variable cache is the default view. You can see a table of the cached entries or switch to a view of variables the cached entries are related to.
336 P U B L I CSAP HANA Administration with SAP HANA Cockpit
Monitoring, Analyzing, and Improving Performance in SAP HANA Cockpit

2. Optional: Enable or disable data cache collection in the Variables tab.3. Optional: Remove a cached entry or drop the variable with all related entries.4. Support monitoring and management of variable cache results in the following ways:
○ Search the results by object name or schema○ Filter and sort the results by choosing the header of a column○ Select which columns you want to be displayed and their order in the settings menu○ Customize column width by adjusting the borders.
Related Information
Monitoring and Managing Data Cache [page 335]Monitor and Manage Static Result Cache [page 337]Monitor and Manage Dynamic Result Cache [page 338]
11.3.2.2 Monitor and Manage Static Result Cache
Monitor and manage static result cache.
Prerequisites
You need the following privileges for specific functions of static result cache:
● For system and monitoring views, you need the SELECT privilege (the PUBLIC role has this privilege by default for public and related views)
● For the CREATE/ALTER PROCEDURE, you need the OPTIMIZER ADMIN privilege.
Context
Static result cache is a view available on the data cache page.
Procedure
1. Open the data cache page by choosing Data Cache from the Manage SQL Performance card on the SAP HANA cockpit overview page.
The Data Cache page opens, where variable cache is the default view.
SAP HANA Administration with SAP HANA CockpitMonitoring, Analyzing, and Improving Performance in SAP HANA Cockpit P U B L I C 337

2. Choose the Static Result Cache view.
The static result view opens, displaying a table of cached SQL query result entries. You can choose to see metadata the cached entries are related to, or to exclusions from static result cache.
3. Optional: Remove a cached entry or drop the metadata with all related entries.4. Support monitoring and management of static result cache results in the following ways:
○ Search the results by object name or schema○ Filter and sort the results by choosing the header of a column○ Select which columns you want to be displayed and their order in the settings menu○ Customize column width by adjusting the borders.
Related Information
Monitoring and Managing Data Cache [page 335]Monitor and Manage Variable Cache [page 336]Monitor and Manage Dynamic Result Cache [page 338]
11.3.2.3 Monitor and Manage Dynamic Result Cache
Monitor and manage dynamic result cache.
Prerequisites
You need the following privileges for specific functions of dynamic result cache:
● For system and monitoring views, you need the SELECT privilege (the PUBLIC role has this privilege by default for public and related views)
● For the CREATE/ALTER PROCEDURE, you need the OPTIMIZER ADMIN privilege.
Context
Dynamic result cache is a view available on the data cache page.
Procedure
1. Open the data cache page by choosing Data Cache from the Manage SQL Performance card on the SAP HANA cockpit overview page.
338 P U B L I CSAP HANA Administration with SAP HANA Cockpit
Monitoring, Analyzing, and Improving Performance in SAP HANA Cockpit

The Data Cache page opens, where variable cache is the default view.2. Choose the Dynamic Result Cache view.
The dynamic result cache view opens, displaying a table of the cached SQL query result entries. You can choose to see metadata the cached entries are related to, or to exclusions from dynamic result cache.
3. Optional: Remove a cached entry or drop the metadata with all related entries4. Support monitoring and management of dynamic result cache results in the following ways:
○ Search the results by object name or schema○ Filter and sort the results by choosing the header of a column○ Select which columns you want to be displayed and their order in the settings menu○ Customize column width by adjusting the borders.
Related Information
Monitoring and Managing Data Cache [page 335]Monitor and Manage Variable Cache [page 336]Monitor and Manage Static Result Cache [page 337]
11.3.3 Managing Plan Stability
Plan stability helps ensure the fast performance of queries by capturing query plans in a source system and reusing them in a target system to regenerate the original query plan.
In SAP HANA, the SQL query processor parses SQL statements and generates SQL query execution plans. As the query processor and the query optimizer continue to be developed (in, for example, the SAP HANA Execution Engine - HEX) the resultant execution plans for a given query may change from one SAP HANA release to another. Although all developments are intended to improve performance of a query, it is possible it might not be equivalent after an upgrade.
In order to guarantee the performance of a query in new system upgrades, the plan stability feature offers the option to preserve a query's execution plan by capturing an abstraction of the plan and reusing it after the upgrade to regenerate the original plan and retain the original performance. In some cases, using statement hints may provide a solution to a loss of performance, see Managing Statement Hints.
Related Information
Manage Plan Stability [page 340]Managing Statement Hints [page 341]
SAP HANA Administration with SAP HANA CockpitMonitoring, Analyzing, and Improving Performance in SAP HANA Cockpit P U B L I C 339

11.3.3.1 Manage Plan Stability
Use plan stability to capture query plans in a source system and reuse them in a target system to regenerate the original query plan.
Procedure
1. Open the Plan Stability page by clicking on the Plan Stability section on the Manage SQL Performance tile.
The Manage Plan Stability page opens. If you have any captured abstract SQL plans from the source system, they are displayed in the table view.
2. To capture SQL query plans from the source system, turn the Capture Abstract SQL Plans on.
You are prompted to configure the capture options. Filter the captures by user, choose whether you want to include plans form the SQL Plan Cache, and select Start Capture.
The Capture Status appears on the top of the screen, displaying the progress of captured execution plans and plans from SQL Plan Cache.
Optional: Press the refresh button next to the Capture Status to see the captured plans in the table below.
Optional: If you want to terminate the capture process prematurely, turn the Capture Abstract SQL Plans off. After the process is turned off, the captured query plans are displayed in the Captured Plan table.
3. Optional: See the full SQL statement string of a query by selecting More next to the visible statement string snippet in the table.
4. To apply the imported SQL query plans to the current system, turn the Apply Abstract SQL Plans on.
NoteThis will only apply to the SQL queries listed in the Captured Plan table.
Optional: Enable or disable the SQL query plans being applied to the current system by selecting them in the table and choosing Enable or Disable above the table. You can also Select All query plans, or choose to Delete your selections.
Optional: To see the progress of the query plan application, press the refresh button.5. Optional: You can adjust the settings such as the maximum number of saved plans and maximum memory
allocation in the Configure Capture dialog.6. Optional: You can change the location details (host and port) of the server by selecting Update Locations
from the Advanced options menu.
The Update Locations dialog opens where you can set the desired host and port.7. A migration of abstract SQL plans is necessary after a system upgrade. If you are trying to use Plan
Stability features with outdated data, you will be prompted to migrate the abstract SQL plans into the upgraded system. You can also do this actively by by selecting Migrate ASPs from the Advanced options menu.
The Migrate Abstract SQL Plans dialog opens, prompting you to confirm your choice.
340 P U B L I CSAP HANA Administration with SAP HANA Cockpit
Monitoring, Analyzing, and Improving Performance in SAP HANA Cockpit

NoteDuring the migration of abstract SQL plans to the upgraded system other Plan Stability functionalities are not available.
11.3.4 Managing Statement Hints
Use Statement Hints to add statement hints to an SQL statement without modifying the actual statement in the application.
Statement Hints allows you to pair an SQL statement string with a string of hints to be used during execution. Whenever a particular SQL statement is then executed in SAP HANA, the assigned statement hints are automatically added to the statement for execution.
Open the Statement Hints page by clicking on the Statement Hints section of the Manage SQL Performance tile.
SAP HANA Administration with SAP HANA CockpitMonitoring, Analyzing, and Improving Performance in SAP HANA Cockpit P U B L I C 341

12 Security Administration
Monitor critical security settings and perform administration tasks related to user authentication, data and communication encryption, and audit logging.
NoteIn addition to this documentation, please also refer to the SAP HANA Security Guide and SAP HANA Security Checklists and Recommendations.
NoteNot all security-related administration and configuration tasks in SAP HANA are possible with SAP HANA cockpit. For some tasks, you may require other tools. For complete information about all administration tasks and tools, see the SAP HANA Security Administration section of the SAP HANA Administration Guide.
12.1 SAP HANA Security Checklists and Recommendations
SAP HANA has many configuration settings that allow you to customize your system for your implementation scenario and system environment. Some of these settings are specifically important for the security of your system, and misconfiguration could leave your system vulnerable. This document contains information and recommendations on critical settings.
About this Document
This document contains checklists and recommendations to help you operate and configure SAP HANA securely. However, please note the following:
● The checklists and recommendations contained in this document are not exhaustive. In addition, depending on your specific implementation scenario and technical environment, some of the recommendations may not apply or be different.
● Do not use the checks contained in this document as instructions on how to configure individual settings. If a particular check result indicates an insecure setting, refer to the indicated documentation and follow the instructions there to change the configuration setting.
● This document does not replace the SAP HANA Security Guide, the central document for all information relating to the secure operation and configuration of SAP HANA.
342 P U B L I CSAP HANA Administration with SAP HANA Cockpit
Security Administration

12.1.1 General Recommendations
General recommendations for keeping SAP HANA secure.
● Create a security concept for the SAP HANA scenario that you want to implement as early as possible in your implementation project.
● Install SAP HANA revisions that are marked as security-relevant as soon as possible. Do this by checking SAP HANA security notes either directly, or using services provided by SAP Support.For more information, see SAP HANA Security Patches in the SAP HANA Security Guide.
12.1.2 Checklist for Secure Handover
If you received your SAP HANA system pre-installed from a hardware or hosting partner, there are several things we strongly recommend you do immediately after handover.
● Change the password of all operating system users, in particular the following:○ <sid>adm○ root○ sapadm
For more information, see your operating system documentation.● In all databases, review all database users created by the installing party, and delete or deactivate those
that are not needed in your scenario.
RememberIf you received a system with tenant databases, make sure to do this in all tenant databases and in the system database.
For more information about database users that are created in the SAP HANA database by default, see the SAP HANA Security Guide.
● In all databases, change the password of all predefined database users, in particular the password of the database user SYSTEM. In addition, deactivate the SYSTEM user. For more information, see the SAP HANA Security Guide.
RememberIf you received a system with tenant databases, make sure to do this in all tenant databases and in the system database.
NotePredefined internal technical users (SYS, _SYS_* users) are permanently deactivated and cannot be used to log on. It is not possible to change the password of these users.
● Change the following encryption master keys:○ Instance secure store in the file system (SSFS)○ System public key infrastructure (PKI) SSFS
For more information about how to change the encryption master keys, see SAP Note 2183624 (Potential information leakage using default SSFS master key in HANA) and the SAP HANA Administration Guide.
SAP HANA Administration with SAP HANA CockpitSecurity Administration P U B L I C 343

● Re-create the system public key infrastructure (PKI) used to protect internal communication in order to create new certificates and private keys. You can trigger this by deleting the system PKI SSFS. Alternatively, you can use SAPControl to reset the system PKI with the methods UpdateSystemPKI[<force>] and UpdateInstancePSE[<force>].
NoteIn a system replication landscape, you must copy the system PKI SSFS data file and key file from the primary system to the same location on the secondary system(s). For more information, see the section on secure internal communication in the SAP HANA Security Guide.
Related Information
Change a Database User [page 487]Change the SSFS Master Keys [page 377]SAP Control WebServiceSAP Note 2183624
12.2 SAP HANA Database Checklists and Recommendations
Checklists and recommendations to help you operate and configure the SAP HANA database securely
TipSAP Note 1969700 contains collections of useful SQL statements for monitoring and analyzing the SAP HANA database. The statements contained in the file HANA_Security_MiniChecks.txt perform all of the SQL-based checks listed in this document.
12.2.1 Recommendations for Database Users, Roles, and Privileges
Recommendations for securing access to SAP HANA.
SYSTEM User
Default The database user SYSTEM is the most powerful database user with irrevocable system privileges. The SYSTEM user is active after database creation.
344 P U B L I CSAP HANA Administration with SAP HANA Cockpit
Security Administration

Recommendation Use SYSTEM to create database users with the minimum privilege set required for their duties (for example, user administration, system administration). Then deactivate SYSTEM. You may however temporarily reactivate the SYSTEM user for emergency or bootstrapping tasks. See Deactivate the SYSTEM User in the SAP HANA Security Guide.
NoteThe SYSTEM user is not required to update the SAP HANA database system; a lesser-privileged user can be created for this purpose. However, to upgrade SAP support package stacks, SAP enhancement packages and SAP systems using the Software Update Manager (SUM) and to install, migrate, and provision SAP systems using the Software Provisioning Manager (SWPM), the SYSTEM user is required and needs to be temporarily reactivated for the duration of the upgrade, installation, migration or provisioning.
How to Verify In the system view USERS, check the values in columns USER_DEACTIVATED, DEACTIVATION_TIME, and LAST_SUCCESSFUL_CONNECT for the user SYSTEM.
Related Alert No
More Information See the sections on predefined users and deactivating the SYSTEM user in the SAP HANA Security Guide.
Password Lifetime of Database Users
Default With the exception of internal technical users (_SYS_* users), the default password policy limits the lifetime of user passwords to 182 days (6 months).
Recommendation Do not disable the password lifetime check for database users that correspond to real people.
In 3-tier scenarios with an application server, only technical user accounts for the database connection of the application server should have a password with an unlimited lifetime (for example, SAP<sid> or DBACOCKPIT).
NoteSuch technical users should have a clearly identified purpose and the minimum authorization required in SAP HANA.
How to Verify In the USERS system view, check the value in the column IS_PASSWORD_LIFETIME_CHECK_ENABLED. If it is FALSE, the password lifetime check is disabled.
The time of the last password change is indicated in the column LAST_PASSWORD_CHANGE_TIME.
Related Alert No
More Information See the section on the password policy in the SAP HANA Security Guide.
SAP HANA Administration with SAP HANA CockpitSecurity Administration P U B L I C 345

System Privileges
Default System privileges authorize database-wide administration commands. The users SYSTEM and _SYS_REPO users have all these privileges by default.
Recommendation System privileges should only ever be granted to users actually need them.
In addition, several system privileges grant powerful permissions, for example, the ability to delete data and to view data unfiltered and should be granted with extra care as follows:
Only administrative or support users should have the following system privileges in a production database:
● CATALOG READ● TRACE ADMIN
In a database of any usage type, the following system privileges should be granted only to administrative users who actually need them:
● ADAPTER ADMIN● AGENT ADMIN● AUDIT ADMIN● AUDIT OPERATOR● BACKUP ADMIN● BACKUP OPERATOR● CERTIFICATE ADMIN● CREATE REMOTE SOURCE● CREDENTIAL ADMIN● ENCRYPTION ROOT KEY ADMIN● EXTENDED STORAGE ADMIN● INIFILE ADMIN● LDAP ADMIN● LICENSE ADMIN● LOG ADMIN● MONITOR ADMIN● OPTIMIZER ADMIN● RESOURCE ADMIN● SAVEPOINT ADMIN● SERVICE ADMIN● SESSION ADMIN● SSL ADMIN● TABLE ADMIN● TRUST ADMIN● VERSION ADMIN● WORKLOAD ADMIN● WORKLOAD * ADMIN
346 P U B L I CSAP HANA Administration with SAP HANA Cockpit
Security Administration

How to Verify To check which user has a particular system privilege, query the EFFECTIVE_PRIVILEGE_GRANTEES system view, for example:
SELECT * FROM EFFECTIVE_PRIVILEGE_GRANTEES WHERE OBJECT_TYPE = 'SYSTEMPRIVILEGE' AND PRIVILEGE = 'SSL ADMIN' AND GRANTEE NOT IN ('SYSTEM','_SYS_REPO');
Related Alert No
More Information See the section on system privileges in the SAP HANA Security Guide and the secton on system views for verifying user authorization in the SAP HANA Administration Guide.
System Privileges: Critical Combinations
Default The users SYSTEM and _SYS_REPO users have all system privileges by default.
Recommendation Critical combinations of system privileges should not be granted together, for example:
● USER ADMIN and ROLE ADMIN● CREATE SCENARIO and SCENARIO ADMIN● AUDIT ADMIN and AUDIT OPERATOR● CREATE STRUCTURED PRIVILEGE and STRUCTUREDPRIVILEGE ADMIN
How to Verify To check a user's privileges query the EFFECTIVE_PRIVILEGES system view, for example:
SELECT * FROM "PUBLIC"."EFFECTIVE_PRIVILEGES" WHERE USER_NAME = '<USER_NAME>';
Related Alert No
More Information See the section on system privileges in the SAP HANA Security Guide and the secton on system views for verifying user authorization in the SAP HANA Administration Guide.
System Privilege: DATA ADMIN
Default The system privilege DATA ADMIN is a powerful privilege. It authorizes a user to execute all data definition language (DDL) commands in the SAP HANA database. Only the users SYSTEM and _SYS_REPO users have this privilege by default.
Recommendation No user or role in a production database should have this privilege.
How to Verify You can verify whether a user or role has the DATA ADMIN privilege by executing the statement:
SELECT * FROM EFFECTIVE_PRIVILEGE_GRANTEES WHERE OBJECT_TYPE = 'SYSTEMPRIVILEGE' AND PRIVILEGE = 'DATA ADMIN' AND GRANTEE NOT IN ('SYSTEM','_SYS_REPO');
Related Alert No
SAP HANA Administration with SAP HANA CockpitSecurity Administration P U B L I C 347

More Information See the section on system privileges in the SAP HANA Security Guide and the secton on system views for verifying user authorization in the SAP HANA Administration Guide.
System Privilege: DEVELOPMENT
Default The system privilege DEVELOPMENT authorizes some internal ALTER SYSTEM commands. Only the users SYSTEM and _SYS_REPO users have this privilege by default.
Recommendation No user or role in a production database should have this privilege.
How to Verify You can verify whether a user or role has the DEVELOPMENT privilege by executing the statement:
SELECT * FROM EFFECTIVE_PRIVILEGE_GRANTEES WHERE OBJECT_TYPE = 'SYSTEMPRIVILEGE' AND PRIVILEGE = 'DEVELOPMENT' AND GRANTEE NOT IN ('SYSTEM','_SYS_REPO');
Related Alert No
More Information See the section on system privileges in the SAP HANA Security Guide and the secton on system views for verifying user authorization in the SAP HANA Administration Guide.
Analytic Privilege: _SYS_BI_CP_ALL
Default The predefined analytic privilege _SYS_BI_CP_ALL potentially allows a user to access all the data in activated views that are protected by XML-based analytic privileges, regardless of any other XML-based analytic privileges that apply.
Only the predefined roles CONTENT ADMIN and MODELING have the analytic privilege _SYS_BI_CP_ALL by default, and only the user SYSTEM has these roles by default.
Recommendation Do not grant this privilege to any user or role in a production database.
How to Verify You can verify whether a user or role has the _SYS_BI_CP_ALL privilege by executing the statement:
SELECT * FROM EFFECTIVE_PRIVILEGE_GRANTEES WHERE OBJECT_TYPE = 'ANALYTICALPRIVILEGE' AND OBJECT_NAME = '_SYS_BI_CP_ALL' AND PRIVILEGE = 'EXECUTE' AND GRANTEE NOT IN ('SYSTEM','MODELING', 'CONTENT_ADMIN');
Related Alert No
More Information See the sections on privileges and predefined database roles in the SAP HANA Security Guide and the secton on system views for verifying user authorization in the SAP HANA Administration Guide.
348 P U B L I CSAP HANA Administration with SAP HANA Cockpit
Security Administration

Debug Privileges
Default No user has debug privileges
Recommendation The privileges DEBUG and ATTACH DEBUGGER should not be assigned to any user for any object in production systems.
How to Verify You can verify whether a user or role has debug privileges by executing the statements:
SELECT * FROM GRANTED_PRIVILEGES WHERE PRIVILEGE='DEBUG' OR PRIVILEGE='ATTACH DEBUGGER';
Related Alert No
More Information See the section on privileges in the SAP HANA Security Guide and the secton on system views for verifying user authorization in the SAP HANA Administration Guide.
Predefined Catalog Role CONTENT_ADMIN
Default The role CONTENT_ADMIN contains all privileges required for working with information models in the repository of the SAP HANA database.
The user SYSTEM has the role CONTENT_ADMIN by default.
Recommendation Only the database user used to perform system updates should have the role CONTENT_ADMIN. Otherwise do not grant this role to users, particularly in production databases. It should be used as a role template only.
How to Verify You can verify whether a user or role has the CONTENT_ADMIN role by executing the statement:
SELECT * FROM GRANTED_ROLES WHERE ROLE_NAME = 'CONTENT_ADMIN' AND GRANTEE NOT IN ('SYSTEM');
Related Alert No
More Information See the section on predefined database roles in the SAP HANA Security Guide and the secton on system views for verifying user authorization in the SAP HANA Administration Guide.
Predefined Catalog Role MODELING
Default The role MODELING contains the predefined analytic privilege _SYS_BI_CP_ALL, which potentially allows a user to access all the data in activated views that are protected by XML-based analytic privileges, regardless of any other XML-based analytic privileges that apply.
The user SYSTEM has the role MODELING by default.
Recommendation Do not grant this role to users, particularly in production databases. It should be used as a role template only.
SAP HANA Administration with SAP HANA CockpitSecurity Administration P U B L I C 349

How to Verify You can verify whether a user or role has the MODELING role by executing the statement:
SELECT * FROM GRANTED_ROLES WHERE ROLE_NAME ='MODELING' AND GRANTEE NOT IN ('SYSTEM');
Related Alert No
More Information See the section on predefined database roles in the SAP HANA Security Guide and the secton on system views for verifying user authorization in the SAP HANA Administration Guide.
Predefined Catalog Role SAP_INTERNAL_HANA_SUPPORT
Default The role SAP_INTERNAL_HANA_SUPPORT contains system privileges and object privileges that allow access to certain low-level internal system views needed by SAP HANA development support in support situations.
No user has the role SAP_INTERNAL_HANA_SUPPORT by default.
Recommendation This role should only be granted to SAP HANA development support users for their support activities.
How to Verify You can verify whether a user or role has the SAP_INTERNAL_HANA_SUPPORT role by executing the statement:
SELECT * FROM EFFECTIVE_ROLE_GRANTEES WHERE ROLE_NAME = 'SAP_INTERNAL_HANA_SUPPORT';
Related Alert ID 63 (Granting of SAP_INTERNAL_HANA_SUPPORT role)
More Information See the section on predefined database roles in the SAP HANA Security Guide and the section on system views for verifying user authorization in the SAP HANA Administration Guide.
Predefined Repository Roles
Default SAP HANA is delivered with a set of preinstalled software components implemented as SAP HANA Web applications, libraries, and configuration data. The privileges required to use these components are contained within repository roles delivered with the component itself.
The standard user _SYS_REPO automatically has all of these roles. Some may also be granted automatically to the standard user SYSTEM to enable tools such as the SAP HANA cockpit to be used immediately after installation.
350 P U B L I CSAP HANA Administration with SAP HANA Cockpit
Security Administration

Recommendation As repository roles can change when a new version of the package is deployed, either do not use them directly but instead as a template for creating your own roles, or have a regular review process in place to verify that they still contain only privileges that are in line with your organization's security policy.
Furthermore, if repository package privileges are granted by a role, we recommend that these privileges be restricted to your organization’s packages rather than the complete repository. Therefore, for each package privilege (REPO.*) that occurs in a role template and is granted on .REPO_PACKAGE_ROOT, check whether the privilege can and should be granted to a single package or a small number of specific packages rather than the full repository.
How to Verify To verify whether a user or role has a particular role, execute the following statement, for example:
SELECT * FROM EFFECTIVE_ROLE_GRANTEES WHERE ROLE_NAME ='sap.hana.xs.admin.roles::HTTPDestAdministrator';
Related Alert No
More Information For a list of all roles delivered with each component, see SAP HANA Security Reference
Information Components Delivered as SAP HANA Content in the SAP HANA Security Guide.
User Parameter CLIENT
Default The CLIENT user parameter can be used to authorize named users in SAP HANA database. Only a user with the USER ADMIN system privilege can change the value of the CLIENT parameter already assigned to other users. However, at runtime, any user can assign an arbitrary value to the CLIENT parameter either by setting the corresponding session variable or passing the parameter via placeholder in a query. While this is the desired behavior for technical users that work with multiple clients such as SAP Business Warehouse, S/4 HANA, or SAP Business Suite, it is problematic in named user scenarios if the CLIENT parameter is used to authorize access to data and not only to perform data filter-ing.
Recommendation Prevent named users from changing the CLIENT user parameter themselves but allow technical users to do so in their sessions and/or queries.
How to Verify To verify that users are generally not permitted to change the CLIENT user parameter, ensure that the parameter [authorization] secure_client_parameter in the global.ini file is set to true:
SELECT * FROM "M_INIFILE_CONTENTS" WHERE KEY='SECURE_CLIENT_PARAMETER';
To verify that only permitted roles or users can change the CLIENT user parameter, execute the following statement:
SELECT * FROM EFFECTIVE_PRIVILEGE_GRANTEES WHERE OBJECT_TYPE = 'SYSTEMPRIVILEGE' AND PRIVILEGE = 'CLIENT PARAMETER ADMIN';
SAP HANA Administration with SAP HANA CockpitSecurity Administration P U B L I C 351

Related Alert No
More Information See SAP Note 2582162 and the section on authorization in the SAP HANA Administration Guide.
Related Information
SAP Note 2582162
12.2.2 Recommendations for Network Configuration
Recommendations for integrating SAP HANA securely into your network environment.
General Recommendations
For general recommendations, please read the section on network security in the SAP HANA Security Guide.
Open Ports
Default During installation, ports such as SQL 3<instance_no>15 and HTTP 80<instance_no> are opened by default
Recommendation Only ports that are needed for running your SAP HANA scenario should be open. For a list of required ports, see the SAP HANA Administration Guide.
How to Verify Verify opened ports at operating system level using Linux commands such as netcat or netstat.
Related Alert No
More Information See the section on communication channel security in the SAP HANA Security Guide and the section on ports and connections in the SAP HANA Administration Guide.
352 P U B L I CSAP HANA Administration with SAP HANA Cockpit
Security Administration

Internal Host Name Resolution in Single-Host System
Default SAP HANA services use IP addresses to communicate with each other. Host names are mapped to these IP addresses through internal host name resolution, a technique by which the use of specific and/or fast networks can be enforced and communication restricted to a specific network. In single-host systems, SAP HANA services listen on the loopback interface only (IP address 127.0.0.1).
In global.ini files, the [communication] listeninterface is set to .local.
Recommendation Do not change the default setting.
How to Verify Check which ports are listening using the SAP HANA cockpit.
This information is available in the Network Security Information app available in the SAP HANA Security Overview catalog. The value of the Listening On field should be Local Network.
Alternatively, execute the following SQL statement:
SELECT * FROM "PUBLIC" . "M_INIFILE_CONTENTS" WHERE SECTION = 'communication' AND KEY = 'listeninterface';
Related Alert No
More Information See the section ports and connections in the SAP HANA Administration Guide.
Internal Host Name Resolution in Multiple-Host System
Default In a distributed scenario with multiple hosts, the network needs to be configured so that inter-service communication is operational throughout the entire landscape. The default configuration depends on how you installed your system.
SAP HANA Administration with SAP HANA CockpitSecurity Administration P U B L I C 353

Recommendation Multiple-host systems can run with or without a separate network definition for inter-service communication. The recommended setting depends accordingly:
● If a separate network is configured for internal communication, the parameter [communication] listeninterface should be set to .internal. In addition, you should add key-value pairs for the IP addresses of the network adapters used for SAP HANA internal communication in the [communication] internal_hostname_resolution section.
● If a separate network is not configured for internal communication, the parameter [communication] listeninterface should be set to .global. This setting exposes internal SAP HANA service ports, so it is strongly recommended that you secure internal SAP HANA ports with an additional firewall.
NoteCommunication properties are in the default configuration change blacklist (multidb.ini). This means that they cannot initially be changed in tenant databases. They must be changed from the system database. If appropriate for your scenario, you can remove these properties from the change blacklist. SAP HANA deployment scenarios are described in the SAP HANA Master Guide. For more information about how to edit the change blacklist, see the SAP HANA Administration Guide.
How to Verify Check which ports are listening using the SAP HANA cockpit.
This information is available in the Network Security Information app available in the SAP HANA Security Overview catalog. The value of the Listening On field should be Global Network or Internal Network.
Alternatively, execute the following SQL statements:
SELECT * FROM "PUBLIC" . "M_INIFILE_CONTENTS" WHERE SECTION = 'communication' AND KEY = 'listeninterface';
SELECT * FROM "PUBLIC" . "M_INIFILE_CONTENTS" WHERE SECTION = 'internal_hostname_resolution';
Related Alert 86 (Internal communication is configured too openly)
More Information See the section on internal hostname resolution in the SAP HANA Administration Guide.
Host Name Resolution in System Replication
Default The parameter [system_replication_communication] listeninterface parameter is set to .global.
354 P U B L I CSAP HANA Administration with SAP HANA Cockpit
Security Administration

Recommendation The recommended setting depends on whether or not a separate network is defined for internal communication:
● If a separate internal network channel is configured for system replication, the parameter [system_replication_communication] listeninterface parameter should be .internal. You also need to add key-value pairs for the IP addresses of the network adapters for the system replication in the [system_replication_hostname_resolution] section.
● If a separate network is not configured for system replication, the parameter [system_replication_communication] listeninterface parameter should be set to .global. However, in this case, it is important to secure communication using TSL/SSL and/or to protect the SAP HANA landscape with a firewall. In the [system_replication_hostname_resolution] section, add entries for all hosts of neighboring sites (at a minimum) or all hosts of own site as well as for all hosts of neighboring sites. In addition, set the parameter [system_replication_communication] allowed_sender to restrict possible communication to specific hosts. The parameter value must contain a list of the foreign hosts that are part of the SAP HANA system replication landscape.
NoteCommunication properties are in the default configuration change blacklist (multidb.ini). This means that they cannot initially be changed in tenant databases. They must be changed from the system database. If appropriate for your scenario, you can remove these properties from the change blacklist. SAP HANA deployment scenarios are described in the SAP HANA Master Guide. For more information about how to edit the change blacklist, see the SAP HANA Administration Guide.
How to Verify To check the value of the above parameters, execute the following statements:
SELECT * FROM "PUBLIC" . "M_INIFILE_CONTENTS" WHERE SECTION = 'system_replication_communication' AND KEY = 'listeninterface';
SELECT * FROM "PUBLIC" . "M_INIFILE_CONTENTS" WHERE SECTION = 'system_replication_communication' AND KEY = 'internal_hostname_resolution';
SELECT * FROM "PUBLIC". "M_INIFILE_CONTENTS"WHERE SECTION = 'system_replication_communication' AND KEY = 'allowed_sender';
Related Alert No
More Information See the section on hostname resolution for system replication in the SAP HANA Administration Guide.
SAP HANA Administration with SAP HANA CockpitSecurity Administration P U B L I C 355

12.2.3 Recommendations for Data Encryption
Recommendations for data encryption and encryption key management
Instance SSFS Master Key
Default The instance secure store in the file system (SSFS) protects internal root keys in the file system. A unique master key is generated for the instance SSFS in every installation.
Recommendation If you received your system pre-installed from a hardware or hosting partner, we recommend that you change the master key of the instance SSFS immediately after handover to ensure that it is not known outside of your organization.
How to Verify Check the change date of the master key in the SAP HANA cockpit.
This information is available in the SAP HANA cockpit on the resource overview page.
Related Alert 84 (Insecure instance SSF encryption configuration)
More Information See the section on server-side data encryption in the SAP HANA Security Guide and the section on changing the SSFS master keys in the SAP HANA Administration Guide.
System PKI SSFS Master Key
Default The system public key infrastructure (PKI) SSFS protects the X.509 certificate infrastructure that is used to secure internal TLS/SSL-based communication. A unique master key is generated for the system PKI SSFS in every installation.
Recommendation If you received your system pre-installed from a hardware or hosting partner, we recommend that you change the master key of the instance SSFS immediately after handover to ensure that it is not known outside of your organization.
How to Verify Check the change date of the master key in the SAP HANA cockpit.
This information is available in the SAP HANA cockpit on the resource overview page.
Related Alert 84 (Insecure instance SSF encryption configuration)
More Information See the section on server-side data encryption in the SAP HANA Security Guide and the section on changing the SSFS master keys in the SAP HANA Administration Guide.
356 P U B L I CSAP HANA Administration with SAP HANA Cockpit
Security Administration

Root Encryption Keys
Default SAP HANA features the following data encryption services:
● Data volume encryption● Redo log encryption● Data and log backup encryption● An internal encryption service available to applications requiring data encryption
Unique root keys are generated for all services in every database.
Recommendation If you received your system pre-installed from a hardware or hosting partner, we recommend that you change all root keys immediately after handover to ensure that they are not known outside of your organization.
How to Verify Query system view ENCRYPTION_ROOT_KEYS.
Related Alert No
More Information See the sections on server-side data encryption in the SAP HANA Security Guide and the SAP HANA Administration Guide.
Encryption Key of the SAP HANA Secure User Store (hdbuserstore)
Default The secure user store (hdbuserstore) is a tool installed with the SAP HANA client. It is used to store SAP HANA connection information, including user passwords, securely on clients.
Information contained in the SAP HANA secure user store is encrypted using a unique encryption key.
Recommendation If you are using the current version of the SAP HANA client, there is no need to change the encryption key of the secure user store. However, if you are using an older version of the SAP HANA client, we recommend changing the encryption key after installation of the SAP HANA client.
How to Verify You know the encryption has been changed if the file SSFS_HDB.KEY exists in the directory where the SAP HANA client is installed.
Related Alert No
More Information See the sections on hdbuserstore in the SAP HANA Security Guide and SAP HANA Administration Guide, as well as SAP Note 2210637.
Data and Log Volume Encryption
Default Data and log volume encryption are not enabled
Recommendation We recommend that you enable data and log volume encryption immediately after installation or handover from your hardware or hosting partner and after you have changed the root encryption keys for both services.
SAP HANA Administration with SAP HANA CockpitSecurity Administration P U B L I C 357

How to Verify Execute the following statement:
SELECT * FROM M_ENCRYPTION_OVERVIEW WHERE SCOPE='LOG' OR SCOPE = 'PERSISTENCE'
Related Alert No
More Information See the section on data and log volume encryption in the SAP HANA Security Guide and the section on enabling encryption of data and log volumes in the SAP HANA Administration Guide.
Related Information
Change the SSFS Master Keys [page 377]Changing Encryption Root Keys [page 382]SAP Note 2210637Enabling Encryption of Data and Log Volumes [page 384]
12.2.4 Recommendations for File System and Operating System
Recommendations for secure operating system access and data storage in the file system
General Recommendation
Stay up to date on security recommendations available for your operating system and consider them in the context of your implementation scenario and security policy.
See also the following SAP Notes:
● SAP Note 1944799 (SUSE Linux Enterprise Server 11.x for SAP Applications)● SAP Note 2009879 (Red Hat Enterprise Linux (RHEL) 6.x)
358 P U B L I CSAP HANA Administration with SAP HANA Cockpit
Security Administration

Operating System Users
Default Only operating system (OS) users that are needed for operating SAP HANA exist on the SAP HANA system, that is:
● sapadm (required to authenticate to SAP Host Agent)● <sid>adm (required by the SAP HANA database)● Dedicated OS users for every tenant database if the system is configured for high isola
tion
NoteThere may be additional OS users that were installed by the hardware vendor. Check with your vendor.
Recommendation Ensure that no additional unnecessary users exist.
How to Verify Refer to your operating system documentation
Related Alert No
More Information See the section on predefned users in the SAP HANA Security Guide.
OS File System Permissions
Default The access permission of files exported to the SAP HANA server can be configured using the [import_export] file_security parameter in the indexserver.ini configuration file. The default permission set is 640 ([import_export] file_security=medium).
Recommendation Do not change default access permission of exported files. In addition, ensure that only a limited number of database users have the system privilege IMPORT and EXPORT.
How to Verify ● You can verify the parameter setting by executing the command:SELECT * FROM "PUBLIC" . "M_INIFILE_CONTENTS" WHERE SECTION = 'import_export' AND KEY = 'file_security';
● You can verify which users or roles have the IMPORT or EXPORT privilege by executing the statement:SELECT * FROM EFFECTIVE_PRIVILEGE_GRANTEES WHERE (OBJECT_TYPE = 'SYSTEMPRIVILEGE') AND (PRIVILEGE = 'EXPORT' OR PRIVILEGE='IMPORT');
● You can verify the permissions of directories in the file system using the SAP HANA database lifecycle manager (HDBLCM) resident program with installation parameter check_installation.
Related Alert No
More Information See the section on checking the installation of an SAP HANA system using the SAP HANA database lifecycle manager (HDBLCM) in the SAP HANA Administration Guide, as well as SAP Note 2252941.
SAP HANA Administration with SAP HANA CockpitSecurity Administration P U B L I C 359
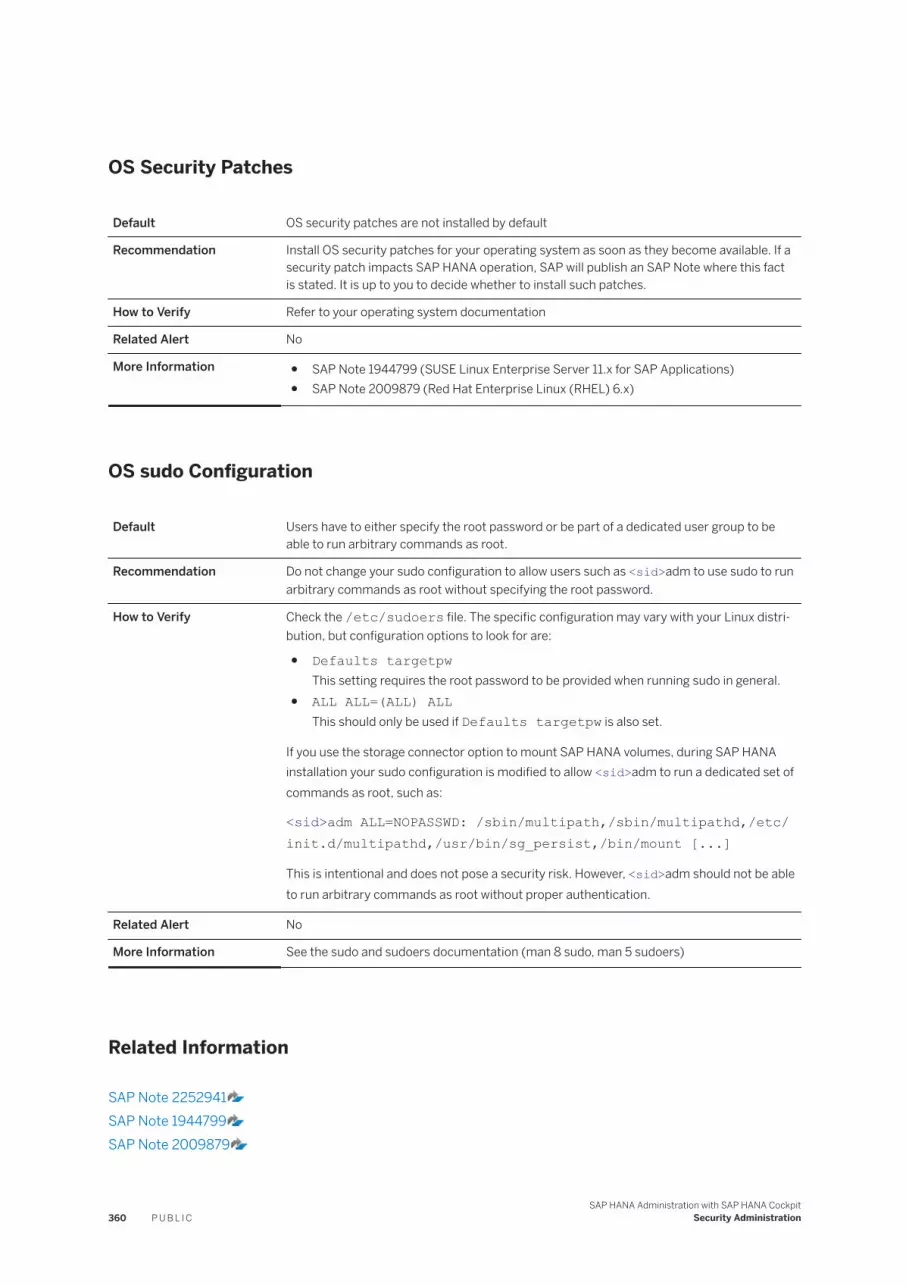
OS Security Patches
Default OS security patches are not installed by default
Recommendation Install OS security patches for your operating system as soon as they become available. If a security patch impacts SAP HANA operation, SAP will publish an SAP Note where this fact is stated. It is up to you to decide whether to install such patches.
How to Verify Refer to your operating system documentation
Related Alert No
More Information ● SAP Note 1944799 (SUSE Linux Enterprise Server 11.x for SAP Applications)● SAP Note 2009879 (Red Hat Enterprise Linux (RHEL) 6.x)
OS sudo Configuration
Default Users have to either specify the root password or be part of a dedicated user group to be able to run arbitrary commands as root.
Recommendation Do not change your sudo configuration to allow users such as <sid>adm to use sudo to run arbitrary commands as root without specifying the root password.
How to Verify Check the /etc/sudoers file. The specific configuration may vary with your Linux distribution, but configuration options to look for are:
● Defaults targetpwThis setting requires the root password to be provided when running sudo in general.
● ALL ALL=(ALL) ALLThis should only be used if Defaults targetpw is also set.
If you use the storage connector option to mount SAP HANA volumes, during SAP HANA installation your sudo configuration is modified to allow <sid>adm to run a dedicated set of commands as root, such as:
<sid>adm ALL=NOPASSWD: /sbin/multipath,/sbin/multipathd,/etc/init.d/multipathd,/usr/bin/sg_persist,/bin/mount [...]
This is intentional and does not pose a security risk. However, <sid>adm should not be able to run arbitrary commands as root without proper authentication.
Related Alert No
More Information See the sudo and sudoers documentation (man 8 sudo, man 5 sudoers)
Related Information
SAP Note 2252941SAP Note 1944799SAP Note 2009879
360 P U B L I CSAP HANA Administration with SAP HANA Cockpit
Security Administration

12.2.5 Recommendations for Auditing
Recommendations for audit configuration
Auditing
Default Auditing is disabled by default.
Recommendation Verify whether auditing is required by your security concept, for example to fulfill specific compliance and regulatory requirements.
How to Verify Check the status of auditing in the SAP HANA cockpit
This information is available on the Auditing tile of the SAP HANA Security Overview catalog.
Alternatively, you can execute the following statement:
SELECT * FROM "PUBLIC" . "M_INIFILE_CONTENTS" WHERE SECTION = 'auditing configuration' AND KEY = 'global_auditing_state';
Related Alert No
More Information See the sections on audting in the SAP HANA Security Guide and the SAP HANA Administration Guide.
Audit Trail Target: syslog
Default The default audit trail target is syslog (SYSLOGPROTOCOL) for the system database
Recommendation If you are using syslog, ensure that it is installed and configured according to your requirements (for example, for writing the audit trail to a remote server).
How to Verify Refer to your operating system documentation
Related Alert No
More Information See the section on audit trails in the SAP HANA Security Guide and your operating system documentation.
Audit Trail Target: CSV Text File
Default The audit trail target CSV text file (CSVTEXTFILE) is not configured by default
Recommendation Do not configure CSV text file (CSVTEXTFILE) as an audit trail target in a production system as it has severe restrictions.
SAP HANA Administration with SAP HANA CockpitSecurity Administration P U B L I C 361

How to Verify Check the configured audit trail targets in the Auditing of the SAP HANA cockpit
Alternatively, execute the following statements:
● SELECT * FROM "PUBLIC" . "M_INIFILE_CONTENTS" WHERE SECTION = 'auditing configuration' AND VALUE = 'CSVTEXTFILE';
● SELECT * FROM "PUBLIC"."AUDIT_POLICIES" WHERE TRAIL_TYPE='CSV';
Related Alert No
More Information See the section on audit trails in the SAP HANA Security Guide.
12.2.6 Recommendations for Trace and Dump Files
Recommendations for handling trace and dump files
Trace Files
Default Basic tracing of activity in database components is enabled by default, with each database service writing to its own trace file. Other traces (for example, SQL trace, expensive statements trace, performance trace) must be explicitly enabled.
Users with the system privilege CATALOG READ can read the contents of trace files in the SAP HANA studio. At operating system level, any user in the SAPSYS group can access the trace directory: /usr/sap/<SID>/HDB<instance>/<host>/trace/<db_name>
Recommendation ● Enable tracing to troubleshoot specific problems only and then disable.● Exercise caution when setting or changing the trace level. A high trace level may expose
certain security-relevant data (for example, database trace level DEBUG or SQL trace level ALL_WITH_RESULTS).
● Delete trace files that are no longer needed.
How to Verify ● You can check which traces are enabled and how they are configured in the Administration editor of the SAP HANA studio on the Trace Configuration tab.
● You can view trace files in the Administration editor of the SAP HANA studio on the Diagnosis Files tab and using the SAP HANA Database Explorer, which is integrated into the SAP HANA cockpit and SAP Web IDE for SAP HANA.
Related Alert No
More Information See the section on security risks of trace and dump files in the SAP HANA Security Guide and the section on configuring traces in the SAP HANA Administration Guide.
362 P U B L I CSAP HANA Administration with SAP HANA Cockpit
Security Administration

Dump Files
Default The system generates core dump files (for example, crash dump files) automatically. Runtime (RTE) dump files can be triggered explicitly, for example by using the SAP HANA database management console (hdbcons) or as part of a full system information dump (fullSystemInfoDump.py).
RTE dump files must be generated by the <sid>adm user.
CautionTechnical expertise is required to use hdbcons. To avoid incorrect usage, use hdbcons only with the guidance of SAP HANA development support.
To create RTE dump files in a running system as part of a full system information dump in the SAP HANA studio, a user requires the EXECUTE privilege on procedure SYS.FULL_SYSTEM_INFO_DUMP_CREATE.
Dump files are stored in the trace directory and have the same access permissions as other trace files (see above).
Runtime dump files created as part of a full system information dump can be retrieved by users with the EXECUTE privilege on the procedure SYS.FULL_SYSTEM_INFO_DUMP_RETRIEVE using the SAP HANA studio. At operating system level, any user in the SAPSYS group can access their storage location: /usr/sap/SID/SYS/global/sapcontrol/snapshots
Recommendation ● Generate runtime dump files to analyze specific error situations only, typically at the request of SAP support.
● Delete dump files that are no longer needed.
How to Verify ● You can view core dump files in the Administration editor of the SAP HANA studio on the Diagnosis Files tab.
● You can download the file collections generated by a full system information dump in the Administration editor of the SAP HANA studio on the Diagnosis Files tab.
Related Alert No
More Information See the section on security risks of trace and dump files in the SAP HANA Security Guide and the section on collecting diagnosis information for SAP Support in the SAP HANA Administration Guide.
SAP HANA Administration with SAP HANA CockpitSecurity Administration P U B L I C 363
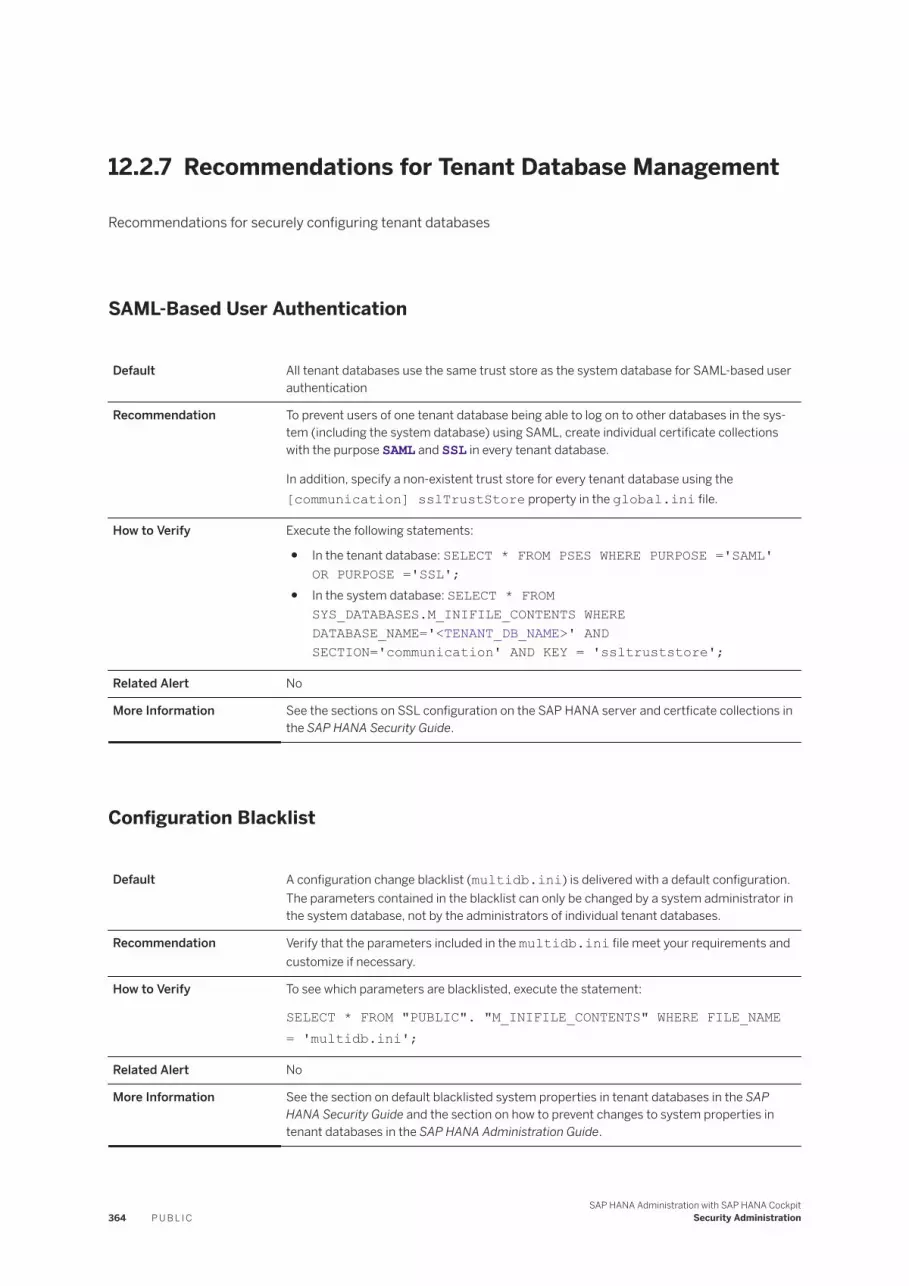
12.2.7 Recommendations for Tenant Database Management
Recommendations for securely configuring tenant databases
SAML-Based User Authentication
Default All tenant databases use the same trust store as the system database for SAML-based user authentication
Recommendation To prevent users of one tenant database being able to log on to other databases in the system (including the system database) using SAML, create individual certificate collections with the purpose SAML and SSL in every tenant database.
In addition, specify a non-existent trust store for every tenant database using the [communication] sslTrustStore property in the global.ini file.
How to Verify Execute the following statements:
● In the tenant database: SELECT * FROM PSES WHERE PURPOSE ='SAML' OR PURPOSE ='SSL';
● In the system database: SELECT * FROM SYS_DATABASES.M_INIFILE_CONTENTS WHERE DATABASE_NAME='<TENANT_DB_NAME>' AND SECTION='communication' AND KEY = 'ssltruststore';
Related Alert No
More Information See the sections on SSL configuration on the SAP HANA server and certficate collections in the SAP HANA Security Guide.
Configuration Blacklist
Default A configuration change blacklist (multidb.ini) is delivered with a default configuration. The parameters contained in the blacklist can only be changed by a system administrator in the system database, not by the administrators of individual tenant databases.
Recommendation Verify that the parameters included in the multidb.ini file meet your requirements and customize if necessary.
How to Verify To see which parameters are blacklisted, execute the statement:
SELECT * FROM "PUBLIC". "M_INIFILE_CONTENTS" WHERE FILE_NAME = 'multidb.ini';
Related Alert No
More Information See the section on default blacklisted system properties in tenant databases in the SAP HANA Security Guide and the section on how to prevent changes to system properties in tenant databases in the SAP HANA Administration Guide.
364 P U B L I CSAP HANA Administration with SAP HANA Cockpit
Security Administration

Restricted Features
Default To safeguard and/or customize your system, it is possible to disable certain database features that provide direct access to the file system, the network, or other resources, for example import and export operations and backup functions.
No features are disabled by default.
Recommendation Review the list of features that can be disabled and disable those that are not required in your implementation scenario.
How to Verify To see the status of features, query the system view M_CUSTOMIZABLE_FUNCTIONALITIES:
SELECT * FROM "PUBLIC". "M_CUSTOMIZABLE_FUNCTIONALITIES";
Related Alert No
More Information See the section on restricted features in tenant databases in the SAP HANA Security Guide and the section on how to disable features on tenant databases in the SAP HANA Administration Guide.
Related Information
Certificate Collections [page 424]Default Blacklisted System Properties in Tenant Databases [page 126]
12.3 Monitoring Critical Security Settings
SAP HANA has many configuration settings that allow you to customize your system for your implementation scenario and system environment. Some of these settings are important for the security of your system. Misconfiguration could leave your system vulnerable. The SAP HANA cockpit allows you to monitor several critical security settings at a glance.
NoteIn addition to using SAP HANA cockpit to monitor critical security settings, please refer to SAP HANA Security Checklists and Recommendations. This document provides more detailed information as well as recommendations for many settings.
Related Information
View Status of Security Settings [page 366]Security Tiles and Links [page 367]
SAP HANA Administration with SAP HANA CockpitSecurity Administration P U B L I C 365

12.3.1 View Status of Security Settings
You can view the status of critical security settings of the SAP HANA database in the SAP HANA cockpit on the System Overview page.
Prerequisites
You have the authorization to see security-related information as described in the section Security Tiles and Links.
Procedure
1. On the System Overview page, navigate to the Security area.2. Review the security status displayed on the various tiles, drilling down for more detailed information and
functions.
Related Information
Security Tiles and Links [page 367]
366 P U B L I CSAP HANA Administration with SAP HANA Cockpit
Security Administration

12.3.2 Security Tiles and Links
The Security section of the System Overview page contains information related to critical security settings and links to further information and configuration options.
Security Tiles and Links
Tiles
Tile Description Required Authorization
Data Encryption Indicates the status of data volume encryption, log volume encryption, and backup encryption
The on/off switches allow to you enable or disable each type of encryption.
CautionDo not enable data volume encryption in an existing operational database without having first read the section Enabling and Disabling Encryption of Data and Log Volumes.
If you are connected to the system database, you will also see when the master keys of the secure stores in the file system (SSFS) were changed.
This tile opens the Data Encryption Configuration page, where you can see more information about the encryption status, enable or disable encryption, and change encryption keys.
System privilege CATALOG READ, ENCRYPTION ROOT KEY ADMIN (to enable/disable encryption), and RESOURCE ADMIN (to view SSFS master key information)
SAP HANA Administration with SAP HANA CockpitSecurity Administration P U B L I C 367

Tile Description Required Authorization
Auditing Indicates whether auditing is enabled in the database, the number of audit policies, and the configured audit trail target
The Auditing switch allows you enable or disable auditing in the database.
If a firefighter policy is active in the database (that is, a policy that audits all the actions of a particular user), this is also indicated.
This tile opens the Auditing page, where you can see more detailed information about audit policies, as well as create new ones. You can also make changes to global auditing settings.
To see information about auditing status audit policies, you need the system privileges AUDIT ADMIN or CATALOG READ.
To see information about audit trail targets, you need the system privilege INIFILE ADMIN.
Authentication Indicates the status of the password policy (default or customized), the user authentication mechanisms configured for single sign-on in the database, and when the password of the SYSTEM user was last changed
This tile opens the Password Policy and Blacklist page where you can see and edit the password policy and blacklist.
System privilege CATALOG READ
To see the password blacklist on opening the Password Policy and Blacklist page, you need SELECT privilege on _SYS_SYS_PASSWORD_BLACKLIST (_SYS_SECURITY).
Anonymization
Link Description Authorization
View anonymization report Opens the Anonymization page, where you can view all calculation views with anonymization node views configured
CATALOG READ
Security Related Links
Link Description Authorization
Manage certificates Opens the Certificates page, where you can import certificates into the certifi-cate store
CATALOG READ, SSL ADMIN, USER ADMIN,TRUST ADMIN, or CERTIFICATE ADMIN
368 P U B L I CSAP HANA Administration with SAP HANA Cockpit
Security Administration

Link Description Authorization
Manage certificate collections Opens the Certificate Collections page, where you can create and configure certificate collections
CATALOG READ, SSL ADMIN, USER ADMIN,TRUST ADMIN, or CERTIFICATE ADMIN
View network security information Opens the Network Security Information page, where you can see more detailed information about network configuration.
CATALOG READ
Manage SAML identity providers Opens the SAML Identity Provider page, where you can see existing identity providers in the database and add new ones
USER ADMIN
Manage JWT identity providers Opens the JWT Identity Provider page, where you can see existing identity providers in the database and add new ones
USER ADMIN
Security administration help Opens the SAP HANA documentation that describes those security administration tasks that you can perform using the SAP HANA cockpit
No additional authorization required
SAP HANA security website Opens the SAP HANA security website No additional authorization required
Security checklists Opens the document Security Checklists and Recommendations on SAP Help Portal
No additional authorization required
User & Role Management
Link Description Authorization
Manage users Opens the Users page, where you view and manage database users
CATALOG READ to view users and USER ADMIN to create and manage users
Assign roles to users Opens the Assign Roles page, where you can see which roles are assigned to a user create and assign roles
CATALOG READ to view roles and ROLE ADMIN to assign roles
Assign privileges to users Opens the Assign Privileges page, where you can see which roles are assigned to a user create and assign roles
CATALOG READ to view users; to assign privileges, USER ADMIN and the privileges required to grant specific privileges to the user
Manage roles Opens the Roles page, where you view and manage roles in the database
CATALOG READ to view roles; to create and manage roles, ROLE ADMIN and the privileges required to grant specific privileges to roles
SAP HANA Administration with SAP HANA CockpitSecurity Administration P U B L I C 369

Link Description Authorization
Manage user groups Opens the User Groups page, where you view and manage user groups
CATALOG READ to view user groups; USER ADMIN to create user groups; object privilege USERGROUP OPERATOR on the group to edit user groups config-ured for exclusive administration
Related Information
Enabling Encryption of Data and Log Volumes [page 384]
12.3.3 Network Security Details
You can view important configuration settings related to secure internal SAP HANA communication and secure external SQL client communication in the SAP HANA cockpit.
NoteFor more information about how to configure secure communication, see the SAP HANA Security Guide.
General Settings
Field Description
Cryptographic Provider The cryptographic service provider being used by the SAP HANA server
Maximum TLS/SSL Protocol Version Accepted The maximum TLS/SSL protocol version accepted
Minimum TLS/SSL Protocol Version Accepted The minimum TLS/SSL protocol version accepted
Allowed TLS/SSL Cipher Suites The encryption algorithms allowed for TLS/SSL connections
This value depends on the cryptographic service provider used. The default values are PFS:HIGH::EC_HIGH:+EC_OPT (CommonCryptoLib) and ALL:!ADH:!LOW:!EXP:!NULL:@STRENGTH (OpenSSL).
370 P U B L I CSAP HANA Administration with SAP HANA Cockpit
Security Administration

Internal Communication
Field Description
TLS/SSL Secured Indicates whether or not internal communication channels are secured using TLS/SSL
The following values are possible:
● Disabled (default)● System PKI● Manual configuration
For more information about these values, see Server-Side TLS/SSL Configuration Properties for Internal Communication in the SAP HANA Security Guide.
Listening On Indicates the listening interface for internal SAP HANA connections
The following values are possible:
● Local networkSAP HANA services listen on the loopback interface only (IP address 127.0.0.1). Only connections from the local machine are possible. This value is only relevant for single-host systems and is the recommended configuration.
● Global networkIn multiple-host systems without a separate internal network, SAP HANA services listen on all available network interfaces. Connections from remote machines are possible.
CautionThis setting exposes the internal SAP HANA service ports. To avoid a vector for security attacks, it is strongly recommended that you secure SAP HANA internal ports with an additional firewall.
● Internal networkIn multiple-host systems with a separate internal network, SAP HANA services listen on a network interface within the allowed network mask. Only connections from machines (hosts) in the internal network are possible.
For more information, see Configuring the Network for Multiple Hosts and Configuring SAP HANA Inter-Service Communication in the SAP HANA Administration Guide.
Internal Host Name Resolution The IP addresses of the network adapters used for SAP HANA internal communication
This is relevant for multiple-host systems with a separate internal network (service communication: Internal network).
Key Store The key store file that contains the server’s private key(s)
SAP HANA Administration with SAP HANA CockpitSecurity Administration P U B L I C 371

Field Description
Trust Store The trust store file that contains the server’s public certifi-cate(s)
Validate Client Certificates Indicates whether or not the certificate of the communication partner is validated
External JDBC/ODBC Communication
Field Description
Enforce TLS/SSL for SQL Connections Indicates whether all clients communicating with the SAP HANA database via the SQL interface are required to use a secured connection
The database refuses SQL connection attempts that don't use TLS/SSL.
Key Store The key store file that contains the server’s private key(s)
Trust Store The trust store file that contains the server’s public certifi-cate(s)
Validate Client Certificates Indicates whether or not the certificate of the communication partner is validated
12.4 Managing Server-Side Data Encryption
SAP HANA features a number of encryption services for encrypting data at rest, as well as an internal encryption service available to applications with data encryption requirements. SAP HANA uses the secure store in the file system (SSFS) functionality to all root encryption keys.
For more detailed information about the encryption services supported by SAP HANA, see the SAP HANA Security Guide.
Related Information
Encryption Configuration [page 373]Change the SSFS Master Keys [page 377]Set the Root Key Backup Password [page 380]Back Up Root Keys [page 381]Changing Encryption Root Keys [page 382]Enabling Encryption of Data and Log Volumes [page 384]Enable Encryption of Data and Log Backups [page 390]Disable Data Encryption [page 391]Import Backed-up Root Keys [page 393]
372 P U B L I CSAP HANA Administration with SAP HANA Cockpit
Security Administration

12.4.1 Encryption Configuration
We recommend that you configure data encryption immediately after handover of your system from a hardware or hosting partner.
First-Time Configuration
The following figure shows the recommended process for configuring encryption in your SAP HANA system for the first time.
Immediately after system handover from your hardware or hosting partner, perform the following steps.
On the SAP HANA serverChange the master keys of the instance SSFS and the system PKI SSFS.
Unique master keys are generated during installation or update. However, if you received your system pre-installed from a hardware or hosting partner, we recommend that you change them immediately after handover to ensure that they are not known outside of your organization. You can also change the master keys any time later.
NoteIn a system-replication configuration, you change the instance SSFS master key on the primary system. To trigger replication of the new key to the secondary system, you must subsequently restart the secondary system. In multi-tier system replication scenarios involving three systems, restart the tier-2 secondary system first, then the tier-3 secondary system. If a secondary system takes over from its replication source before the new master key has been replicated, all systems registered will use the old key from the former secondary system instead.
SAP HANA Administration with SAP HANA CockpitSecurity Administration P U B L I C 373

In the system database
1. Set the password for the root key backup for the system database.This password is required to securely back up root keys and subsequently restore backed-up root keys during data recovery.
CautionThe password is stored in the instance SSFS along with the other root keys and used whenever you create a backup of the encryption root keys. The password is required to restore the instance SSFS content before a recovery and should be stored in a separate safe location. Losing this password may result in the database being unrecoverable.
NoteIn a system-replication configuration, set the root key backup password in the primary system only. The password will be propagated to all secondary systems. The secondary systems must be running and replicating.
2. Change the encryption root keys for all encryption services in the system database, that is:○ Data volume encryption○ Redo log encryption○ Data and log backup encryption○ Internal application encryption
Unique root keys are generated during installation or database creation. However, if you received SAP HANA from a hardware or hosting partner, we recommend that you change them immediately after handover to ensure that they are not known outside of your organization. You can also change root keys any time later.
NoteIn a system-replication configuration, change root keys in the primary system only. New keys will be propagated to all secondary systems. The secondary systems must be running and replicating.
Change all encryption root keys in the system database as follows:1. Generate new root keys.2. Back up the new root keys to a root key backup file (*.rkb) in a secure location.
CautionStore the root key backup file in a safe location. Losing this file may result in the database being unrecoverable.
3. Activate the new root keys.4. Back up activated root keys.
You must back up all keys after you generate or activate a key of any type. This ensures that you always have an up-to-date backup of your root keys available for recovery.For more information about how the key change process works for each of the root key types, see the SAP HANA Security Guide.
3. Enable the required encryption services in the system database:○ Data volume encryption○ Redo log encryption
374 P U B L I CSAP HANA Administration with SAP HANA Cockpit
Security Administration

○ Data and log backup encryption
RecommendationAlthough SAP HANA provides you with the flexibility to encrypt data volumes, redo logs, and backups independently of each other, if you require full protection in the persistence layer, we recommend that you enable all services.
NoteIt is not necessary to enable the internal application encryption service explicitly. It is available automatically to requesting applications.
NoteIn a system-replication configuration, enable (or disable) encryption in the primary system only. The setting will be propagated to all secondary systems. The secondary systems must be running and replicating.
4. Configure how you want encryption to be handled in new tenant databases.By default, all encryption services are initially disabled and only tenant database administrators can enable them. You can change this configuration with the following parameters in the database_initial_encryption section of the global.ini configuration file.○ persistence_encryption (default: off)○ log_encryption (default: off)○ backup_encryption (default: off)○ encryption_config_control (default: local_database)
In the first tenant database (if automatically created during installation)1. Set the password for the root key backup for the first tenant database.2. Change the encryption root keys for all encryption services in the first tenant database as described above.3. Enable the required encryption services in the first tenant database.
Initially, only the tenant database administrator can do this in the tenant database.
NoteThe tenant database administrator can subsequently hand over this configuration control to the system administrator by executing the statement ALTER SYSTEM ENCRYPTION CONFIGURATION CONTROLLED BY SYSTEM DATABASE.
RememberIn a system-replication configuration, perform all steps in the primary system only. The configuration will be propagated to all secondary systems. The secondary systems must be running and replicating.
In subsequent tenant databasesAfter you have created an additional tenant database, perform the following steps:
1. Set the password for the root key backup for the tenant database.2. Back up all root keys to a root key backup file (*.rkb) in a secure location.
SAP HANA Administration with SAP HANA CockpitSecurity Administration P U B L I C 375

CautionStore the root key backup file in a safe location. Losing this file may result in the database being unrecoverable.
NoteIt is not necessary to change the root keys in new tenant databases. Unique root keys are generated on database creation and cannot be known outside of your organization.
3. Change the status of encryption services in the tenant database if required.Encryption services are initially configured in line with the parameters in the database_initial_encryption section of the global.ini configuration file as described above. Initially, encryption is disabled.Who can enable or disable encryption services initially depends on how the parameter encryption_config_control is configured:○ If the value of this parameter is local_database (default), then only the tenant database
administrator can enable or disable encryption from the tenant database.○ If it is system_database, then only the system database administrator can enable or disable
encryption from the system database.
NoteIf the tenant database administrator has control over encryption configuration and later wants to hand over this control to the system administrator, the tenant database administrator must execute the statement ALTER SYSTEM ENCRYPTION CONFIGURATION CONTROLLED BY SYSTEM DATABASE. If the system administrator has control and wants to hand it over to the tenant database administrator, the system administrator must execute the statement ALTER DATABASE <database_name> ENCRYPTION CONFIGURATION CONTROLLED BY LOCAL DATABASE. For simplicity, the system administrator can hand over control to all tenants instead of one by one by executing statement ALTER SYSTEM ENCRYPTION CONFIGURATION CONTROLLED BY LOCAL DATABASES.
RememberIn a system-replication configuration, perform all steps in the primary system only. The configuration will be propagated to all secondary systems. The secondary systems must be running and replicating.
During operationPeriodically change the SSFS master keys, as well as the encryption root keys in all databases in line with your security policy.
Configuration After Update from a Single-Container System
If you updated from a single-container system, your system has a system database and one tenant database. The existing data encryption configuration is retained. Note the following:
● The SSFS master keys for the system remain unchanged.● Existing encryption root keys are the encryption root keys of the tenant database. The update process
generates new unique root keys for the system database.
376 P U B L I CSAP HANA Administration with SAP HANA Cockpit
Security Administration

● If a root key backup password existed before update, it is the root key backup password of the tenant database. The system database will not have a root key backup password set.
● Encryption services that were enabled before update are enabled in both the system database and the tenant database.
Related Information
Change the SSFS Master Keys [page 377]Set the Root Key Backup Password [page 380]Changing Encryption Root Keys [page 382]Enabling Encryption of Data and Log Volumes [page 384]
12.4.2 Change the SSFS Master Keys
The secure stores in the file system (SSFS) used by SAP HANA are protected by unique master keys, generated during installation or update. However, if you received your system pre-installed from a hardware or hosting partner, we recommend that you change these master keys immediately after handover to ensure that they are not known outside your organization.
Prerequisites
● You have shut down the SAP HANA system.● You have the credentials of the operating system user (<sid>adm) that was created when the system was
installed.● You have the system privilege INIFILE ADMIN.
Context
SAP HANA uses the instance SSFS to protect the following encryption root keys:
● The root keys used for:○ Data volume encryption○ Redo log encryption○ Data and log backup encryption○ Internal application encryption service of the database
● The password of the root key backup● Encryption configuration information
These root keys protect all encryption keys (and data) used in the SAP HANA database from unauthorized access.
SAP HANA Administration with SAP HANA CockpitSecurity Administration P U B L I C 377

The system database and all tenant databases have their own encryption root keys.
The system PKI SSFS is used to protect the X.509 certificate infrastructure that secures internal SSL/TLS-based communication between hosts in a multiple-host system or between processes of individual databases in the system.
You can change the SSFS master keys using the command line tool rsecssfx, which is installed with SAP HANA and available at /usr/sap/<SID>/HDB<instance>/exe.
Before changing the SSFS master keys, note the following:
● In a distributed SAP HANA system, every host must be able to access the file location of the instance SSFS master key.
● The SSFS master keys only have to be changed once for the whole instance and not per tenant database.● In a system-replication configuration, you change the instance SSFS master key on the primary system. To
trigger replication of the new key to the secondary system, you must subsequently restart the secondary system. In multi-tier system replication scenarios involving three systems, restart the tier-2 secondary system first, then the tier-3 secondary system. If a secondary system takes over from its replication source before the new master key has been replicated, all systems registered will use the old key from the former secondary system instead.
Procedure
1. Log on to the SAP HANA system host as the operating system user, <sid>adm.
2. Change the master key of the instance SSFS as follows:a. Re-encrypt the instance SSFS with a new key with the command:
export RSEC_SSFS_DATAPATH=/usr/sap/<SID>/SYS/global/hdb/security/ssfs export RSEC_SSFS_KEYPATH=<path to current key file> rsecssfx changekey $(rsecssfx generatekey -getPlainValueToConsole)
For script languages bash and csh the syntax is:
rsecssfx changekey `rsecssfx generatekey -getPlainValueToConsole`
NoteThe command uses backticks.
b. Configure the specified key file location in the global.ini configuration file at /usr/sap/<SID>/SYS/global/hdb/custom/config/global.ini.
If the file does not exist, create it. Add the following lines:
[cryptography] ssfs_key_file_path = <path to key file>
NoteThe default path of the key file is /usr/sap/<sid>/SYS/global/hdb/security/ssfs. If you change the default path, you may need to reconfigure it in the event of a system rename.
378 P U B L I CSAP HANA Administration with SAP HANA Cockpit
Security Administration

3. Re-encrypt the system PKI SSFS with a new key with the following command:
export RSEC_SSFS_DATAPATH=/usr/sap/<SID>/SYS/global/security/rsecssfs/data export RSEC_SSFS_KEYPATH=<path to current key file> rsecssfx changekey $(rsecssfx generatekey -getPlainValueToConsole)
NoteThe default path of the key file is /usr/sap/<sid>/SYS/global/security/rsecssfs/key. If you change the default path, you may need to reconfigure it in the event of a system rename.
For script languages bash and csh the syntax is:
rsecssfx changekey `rsecssfx generatekey -getPlainValueToConsole`
NoteThe command uses backticks.
Next Steps
In a system-replication setup, perform the following steps:
1. Configure the location of the instance SSFS master key file on the secondary system(s). The file itself will be automatically copied when you restart the secondary system(s)
2. Restart the secondary system(s) to trigger the replication of the key files.
RememberIn multi-tier system replication scenarios involving three systems, restart the tier-2 secondary system first, then the tier-3 secondary system.
For file system-based copies of SAP HANA database installations, you must manually save and restore the instance SSFS master key file. Otherwise data loss can occur.
In regular backup and recovery scenarios, the SSFS must always be restored from the root key backup before a database recovery, unless:
● You have never changed the redo log encryption key.● You are performing a recovery into the same database from which the backup was taken, and the
database's SSFS is intact and contains the latest root key changes.
NoteIt is not necessary to save the system PKI SSFS key file. The system will generate a new system PKI SSFS automatically if required.
SAP HANA Administration with SAP HANA CockpitSecurity Administration P U B L I C 379

Related Information
Import Backed-up Root Keys [page 393]SAP Note 2183624
12.4.3 Set the Root Key Backup Password
The root key backup password is required to securely back up the root keys of the database and subsequently to restore the backed-up root keys during data recovery.
Prerequisites
You have the system privilege ENCRYPTION ROOT KEY ADMIN.
Procedure
1. On the System Overview page, navigate to the Security area.2. Open the Data Encryption Configuration page by clicking the Data Encryption tile.3. Choose Manage Keys.4. On the Manage Keys page, click Set Root Key Backup Password and specify the password.
The length and layout of the password must be in line with the database's password policy.
CautionIf the root key backup already has a password, it will be overwritten.
NoteIn a system-replication configuration, set the root key backup password in the primary system only. The password will be propagated to all secondary systems. The secondary systems must be running and replicating.
Results
The password is set and stored in the secure store in the file system (SSFS) together with other root keys. The password must be set to enable root keys to be backed up securely. You must provide this password to import root keys from the backup into the database before starting a recovery. All root key backups taken after the password is set use this password to protect the backup files.
380 P U B L I CSAP HANA Administration with SAP HANA Cockpit
Security Administration

For more information about root key backup, see the SAP HANA Security Guide.
CautionThe password is stored in the instance SSFS along with the other root keys and used whenever you create a backup of the encryption root keys. The password is required to restore the instance SSFS content before a recovery and should be stored in a separate safe location. Losing this password may result in the database being unrecoverable.
TipTo verify that a password is the same as the one stored in the instance SSFS, use the statement ALTER SYSTEM VALIDATE ENCRYPTION ROOT KEYS BACKUP PASSWORD.
Related Information
Password Policy Details [page 413]
12.4.4 Back Up Root Keys
After you have generated or activated new encryption root keys, or created a new tenant database with new root keys, you must back up all root keys.
Prerequisites
● You have the system privilege ENCRYPTION ROOT KEY ADMIN.● You have set the root key backup password.● The external location to which you plan to back up root keys is accessible.
Procedure
1. From the System Overview, navigate to the Data Encryption tile.
The Data Encryption Configuration page appears.2. Choose Manage Keys.3. Choose Back Up Root Keys.4. Save the root key backup file to a secure location.
SAP HANA Administration with SAP HANA CockpitSecurity Administration P U B L I C 381

CautionStore the root key backup file in a safe location. If this file is lost, it may not be possible to recover the database.
5. Optional: To ensure that the backup file can be recovered, validate the password for the root key backup file. Log on to the SAP HANA server as operating system user <sid>adm, and use the following command in the hdbnsutil tool:
cd /usr/sap/<sid>/<HDBinstance_no>/exe ./hdbnsutil -validateRootKeysBackup <filename> [--password=<passphrase>]
RecommendationWe recommend that you do not enter the password on the command line. You will be interactively prompted to enter it. In this way, you avoid unintentionally leaving the password in command history and making it visible in process monitoring tools provided by the operating system.
Related Information
Set the Root Key Backup Password [page 380]
12.4.5 Changing Encryption Root Keys
Unique root keys are generated during installation or database creation. However, if you received SAP HANA from a hardware or hosting partner, we recommend that you change them immediately after handover to ensure that they are not known outside of your organization. You can also change root keys any time later.
Change the root keys for the following encryption services immediately after handover of your system and periodically during operation:
● Data volume encryption● Redo log encryption● Data and log backup encryption● Internal application encryption
SAP recommends to always change encryption root keys as follows:
1. Generate new keys.2. Back up new keys.3. Activate new keys.4. Back up activated keys.
You must back up all keys after you generate or activate a key of any type. This ensures that you always have an up-to-date backup of your root keys available for recovery.
For more information about how the key change process works for each of the root key types, see the SAP HANA Security Guide.
382 P U B L I CSAP HANA Administration with SAP HANA Cockpit
Security Administration

NoteIn a system-replication configuration, change root keys in the primary system only. New keys will be propagated to all secondary systems. The secondary systems must be running and replicating.
You can change root keys using the SAP HANA cockpit or from the command line.
Related Information
Change Root Keys Using SAP HANA Cockpit [page 383]
12.4.5.1 Change Root Keys Using SAP HANA Cockpit
The process for changing encryption root keys involves first generating the new keys and backing them up, and then activating them and backing them up again. You can change all root keys following this process on the Manage Keys page of the SAP HANA cockpit.
Prerequisites
● You have the system privilege ENCRYPTION ROOT KEY ADMIN.● You have set the root key backup password.● The external location to which you plan to back up root keys is accessible.
Procedure
1. On the System Overview page, navigate to the Security area.2. Open the Data Encryption Configuration page by clicking the Data Encryption tile, and then choose Manage
Keys.3. On the Manage Keys page, choose Change Root Keys.4. If you have not already done so, set the root key backup password.
The length and layout of the password must be in line with the database's password policy.
CautionThe password is stored in the instance SSFS along with the other root keys and used whenever you create a backup of the encryption root keys. The password is required to restore the instance SSFS content before a recovery and should be stored in a separate safe location. Losing this password may result in the database being unrecoverable.
SAP HANA Administration with SAP HANA CockpitSecurity Administration P U B L I C 383

5. Select the root keys that you want to change.6. Back up all root keys to a secure location.
CautionStore the root key backup file in a safe location. Losing this file may result in the database being unrecoverable.
7. Activate the new keys.8. Back up all root keys again.9. Optional: To ensure that the backup file can be recovered, validate the password for the root key backup
file. Log on to the SAP HANA server as operating system user <sid>adm, and use the following command in the hdbnsutil tool:
cd /usr/sap/<sid>/<HDBinstance_no>/exe ./hdbnsutil -validateRootKeysBackup <filename> [--password=<passphrase>]
RecommendationWe recommend that you do not enter the password on the command line. You will be interactively prompted to enter it. In this way, you avoid unintentionally leaving the password in command history and making it visible in process monitoring tools provided by the operating system.
Results
If encryption is enabled, new data is encrypted with the new root keys.
On the Data Encryption page, the active version of changed root keys increments by one and the last changed date is updated.
Related Information
Password Policy Details [page 413]
12.4.6 Enabling Encryption of Data and Log Volumes
You can enable data volume encryption and redo log encryption in a new SAP HANA database or in an existing operational database.
RecommendationAlthough SAP HANA provides you with the flexibility to encrypt data volumes, redo logs, and backups independently of each other, if you require full protection in the persistence layer, we recommend that you enable all services.
384 P U B L I CSAP HANA Administration with SAP HANA Cockpit
Security Administration

Related Information
Enable Data and Log Volume Encryption in a New SAP HANA Database [page 385]Enable Data and Log Volume Encryption in an Existing SAP HANA Database [page 386]
12.4.6.1 Enable Data and Log Volume Encryption in a New SAP HANA Database
The recommended time to enable data and log volume encryption is immediately after tenant database creation. If you received SAP HANA from a hardware or hosting partner, enable encryption after handover.
Prerequisites
● The tenant database has control of enabling encryption.By default, encryption can be enabled/disabled only in the tenant database directly and not from the system database. To see how your database is configured, query the system view SYS.M_ENCRYPTION_OVERVIEW. For more information about how to switch control, see the section on encryption configuration.If the system database has control, encryption can only be enabled/disabled using SQL from the system database. For more information, see the SAP HANA Administration Guide.
● You have the system privilege ENCRYPTION ROOT KEY ADMIN.● You have changed and backed up the encryption root keys if necessary.
SAP HANA generates unique root keys on installation or database creation. However, if you received SAP HANA from a hardware or hosting partner, you might want to change the root keys used for data volume encryption and redo log encryption to ensure they are not known outside your organization. For more information, see the section on changing root encryption keys.
NoteIn a system-replication configuration, change the root keys used for data volume encryption and log volume encryption in the primary system only. The new keys will be propagated to all secondary systems.
Procedure
1. On the System Overview page, navigate to the Security area.2. On the Data Encryption tile, enable data volume encryption and redo log encryption with the on/off switch.
NoteYou can also enable encryption on the Data Encryption Configuration page.
SAP HANA Administration with SAP HANA CockpitSecurity Administration P U B L I C 385

Results
All data persisted to data volumes is encrypted and all future redo log entries persisted to log volumes are encrypted.
You can monitor the progress of data volume encryption service by service on the Data Encryption Configuration page. Once encryption of a data volume has completed, the status changes to Encrypted.
Related Information
Encryption Configuration [page 373]Changing Encryption Root Keys [page 382]
12.4.6.2 Enable Data and Log Volume Encryption in an Existing SAP HANA Database
There are two ways to enable encryption in an existing operational SAP HANA database. The recommended way involves dropping and re-creating the tenant database. If this is not possible (for example, because it would result in too much downtime), you can enable encryption immediately. However, be aware that your data will only be fully protected after some delay.
Context
NoteIdeally, you enable encryption in the system database and tenant databases immediately on creation.
Enabling data volume encryption and redo log encryption does not increase data size.
386 P U B L I CSAP HANA Administration with SAP HANA Cockpit
Security Administration

12.4.6.2.1 Enable Data and Log Volume Encryption with Database Re-Creation
The recommended way to enable data volume encryption and redo log encryption in an existing operational SAP HANA database is after first dropping and re-creating the tenant database.
Prerequisites
● You have the system privilege ENCRYPTION ROOT KEY ADMIN.● You have the system privilege DATABASE ADMIN.● You have the privileges required to perform backup and recovery.
Context
Enabling data volume encryption and redo log encryption after re-creating your tenant database ensures that new encryption root keys are generated. In addition, it provides complete protection. If you enable encryption without re-creating the database, only the pages in use within the data volumes will be encrypted. Pages in data volumes that are not in use may still contain old content and will only be overwritten and encrypted over time. This means that your data in data volumes will only be fully protected after some delay. In addition, only future redo log entries will be encrypted. Existing redo log files are not encrypted.
For more information about this recommendation, see SAP Note 2159014.
The following is the overall process for enabling encryption with database re-creation. For more information on individual steps, see the corresponding section.
Procedure
1. Perform a data backup.2. Drop the tenant database.3. Clean the disk space.4. Create the tenant database again.5. Set the password for the root key backup in the tenant database.6. Back up all root keys to a root key backup file (*.rkb) in a secure location.7. Enable data volume encryption and redo log encryption.
By default, encryption is initially disabled in a new database and can be enabled only in the tenant database. This initial configuration is controlled by the parameters in the database_initial_encryption section of the global.ini configuration file. To see how the database is configured, query the system view SYS.M_ENCRYPTION_OVERVIEW, or from the system database SYS_DATABASES.M_ENCRYPTION_OVERVIEW.
SAP HANA Administration with SAP HANA CockpitSecurity Administration P U B L I C 387

8. Recover your tenant database.
Results
All data persisted to data volumes is encrypted and all future redo log entries persisted to log volumes are encrypted.
Related Information
Encryption Configuration [page 373]Create Data Backups and Delta Backups [page 521]Delete a Tenant Database [page 121]Create a Tenant Database [page 114]Set the Root Key Backup Password [page 380]Back Up Root Keys [page 381]Enable Data and Log Volume Encryption in a New SAP HANA Database [page 385]Recover a Database [page 538]SAP Note 2159014
12.4.6.2.2 Enable Data and Log Volume Encryption Without Database Re-Creation
If it is not possible to drop and re-create your SAP HANA database to enable encryption and redo log encryption, for example, because it would result in too much downtime, you can enable encryption immediately. However, this is not recommended because your data will only be fully protected after some delay.
Prerequisites
● The tenant database has control of enabling encryption.By default, encryption can be enabled/disabled only in the tenant database directly and not from the system database. To see how your database is configured, query the system view SYS.M_ENCRYPTION_OVERVIEW. For more information about how to switch control, see the section on encryption configuration.If the system database has control, encryption can only be enabled/disabled using SQL from the system database. For more information, see the SAP HANA Administration Guide.
● You have the system privilege ENCRYPTION ROOT KEY ADMIN.● You have changed and backed up the encryption root keys if necessary.
388 P U B L I CSAP HANA Administration with SAP HANA Cockpit
Security Administration

SAP HANA generates unique root keys on installation or database creation. However, if you received SAP HANA from a hardware or hosting partner, you might want to change the root keys used for data volume encryption and redo log encryption to ensure they are not known outside your organization.
NoteIn a system-replication configuration, change the root keys used for data volume encryption and log volume encryption in the primary system only. The new keys will be propagated to all secondary systems.
Context
For maximum protection, we recommend that you drop and re-create your SAP HANA database before enabling data volume encryption and redo log encryption. If you enable encryption once the database has been operational, only the pages in use within the data volumes will be encrypted. Pages in data volumes that are not in use may still contain old content and will only be overwritten and encrypted over time. This means that your data in data volumes will only be fully protected after some delay. In addition, only future redo log entries will be encrypted. Existing redo log files are not encrypted.
For more information about this recommendation, see SAP Note 2159014.
Procedure
1. On the System Overview page, navigate to the Security area.2. On the Data Encryption tile, enable data volume encryption and redo log encryption with the on/off switch.
NoteYou can also enable encryption on the Data Encryption Configuration page.
Results
Encryption is now active for all new data saved to disk as of the next savepoint operation. Existing data starts being encrypted in the background. Only after this process has completed is all your data encrypted.
You can monitor the progress of data volume encryption service by service on the Data Encryption Configuration page. Once encryption of a data volume has completed, the status changes to Encrypted
RememberDue to the shadow memory nature of SAP HANA database persistence, the data area may still contain outdated, unencrypted versions of pages.
All future redo log entries persisted to log volumes are encrypted. Previous unencrypted redo log entries remain unencrypted.
SAP HANA Administration with SAP HANA CockpitSecurity Administration P U B L I C 389

RememberExisting redo log files will not be encrypted until they are overwritten.
Related Information
Encryption Configuration [page 373]SAP Note 2159014
12.4.7 Enable Encryption of Data and Log Backups
You can enable encryption of full data backups, delta data backups, and log backups in an SAP HANA database at any time.
Prerequisites
● The tenant database has control of enabling encryption.By default, encryption can be enabled/disabled only in the tenant database directly and not from the system database. To see how your database is configured, query the system view SYS.M_ENCRYPTION_OVERVIEW. For more information about how to switch control, see the section on encryption configuration.If the system database has control, encryption can only be enabled/disabled using SQL from the system database. For more information, see the SAP HANA Administration Guide.
● You have the system privilege ENCRYPTION ROOT KEY ADMIN.● You have changed and backed up the encryption root keys if necessary.
SAP HANA generates unique root keys on installation or database creation. However, if you received SAP HANA from a hardware or hosting partner, consider changing the backup encryption root key to ensure it is not known outside your organization.
NoteIn a system-replication configuration, change the root keys used for data volume encryption and log volume encryption in the primary system only. The new keys will be propagated to all secondary systems.
Procedure
1. On the System Overview page, navigate to the Security area.2. On the Data Storage Security tile, enable backup encryption with the on/off switch.
390 P U B L I CSAP HANA Administration with SAP HANA Cockpit
Security Administration

NoteYou can also enable backup volume encryption on the Data Encryption Configuration page.
Results
Backup encryption is enabled. Subsequent log backups, as well as full backups and delta data backups will be encrypted.
NoteIf backup encryption is active, a data snapshot is not automatically encrypted. Data in storage snapshots is encrypted as part of data volume encryption.
Related Information
Encryption Configuration [page 373]Changing Encryption Root Keys [page 382]Enabling Encryption of Data and Log Volumes [page 384]
12.4.8 Disable Data Encryption
Disabling data volume encryption triggers the decryption of all encrypted data. Newly persisted data is not encrypted. Disabling redo log encryption makes sure that future redo log entries are not encrypted when they are written to disk.
Prerequisites
● The tenant database has control of enabling encryption.By default, encryption can be enabled/disabled only in the tenant database directly and not from the system database. To see how your database is configured, query the system view SYS.M_ENCRYPTION_OVERVIEW. For more information about how to switch control, see the section on encryption configuration.If the system database has control, encryption can only be enabled/disabled using SQL from the system database. For more information, see the SAP HANA Administration Guide.
● You have the system privilege ENCRYPTION ROOT KEY ADMIN.
SAP HANA Administration with SAP HANA CockpitSecurity Administration P U B L I C 391

Procedure
1. On the System Overview page, navigate to the Security area.2. On the Data Encryption tile, disable the relevant encryption service using the on/off switch.
NoteYou can also disable each encryption service on the Data Encryption Configuration page.
Results
Data volume encryptionData starts being decrypted in the background. Depending on the size of the SAP HANA database, this process can be very time consuming. Only after this process has completed is all your data decrypted. Newly persisted data is not encrypted.
You can monitor the progress of data volume decryption service by service. Once decryption of a data volume has completed, the status changes to Unencrypted.
Redo log encryptionNew redo log entries are not encrypted. Existing redo log entries are not decrypted. Log entries will only be fully unencrypted when all encrypted entries have been overwritten.
Backup encryptionNew data backups, delta backups, and log backups are not encrypted. On an unencrypted data volume, data snapshots are also unencrypted.
Related Information
Encryption Configuration [page 373]
392 P U B L I CSAP HANA Administration with SAP HANA Cockpit
Security Administration

12.4.9 Import Backed-up Root Keys
Before performing a recovery from encrypted data and log backups, you must import backed-up root keys. The imported keys are then used to initialize the instance SSFS. In this way, the SSFS has the consistent versioned key information required to recover encrypted data backups and replay redo logs.
Prerequisites
● You have the credentials of the operating system user (<sid>adm).● You can log on to the system database and have the system privileges DATABASE STOP.● The location of the root key backup file (*.rkb) is accessible.● If using hdbnsutil, you know the ID of the database whose root keys you want to back up. You can
determine the IDs of all tenant databases by executing the following SQL command in the system database:
SELECT DATABASE_NAME, CASE WHEN (DBID = '' AND DATABASE_NAME = 'SYSTEMDB') THEN 1 WHEN (DBID = '' AND DATABASE_NAME <> 'SYSTEMDB') THEN 3 ELSE TO_INT(DBID) END DATABASE_ID FROM (SELECT DISTINCT DATABASE_NAME, SUBSTR_AFTER (SUBPATH,'.') AS DBID FROM SYS_DATABASES.M_VOLUMES);
Procedure
1. Log on to the SAP HANA server as operating system user <sid>adm.
2. Validate that you have the password for the root key backup file:
cd /usr/sap/<sid>/<HDBinstance_no>/exe ./hdbnsutil -validateRootKeysBackup <filename> [--password=<passphrase>]
NoteIf you don't provide the password on the command line, you will be prompted to enter it.
3. In the system database, stop the tenant database to be recovered.You can do this in the SAP HANA cockpit or by executing the statement ALTER SYSTEM STOP <database_name>.
4. Import the backed-up root keys using the hdbnsutil program:
cd /usr/sap/<sid>/<HDBinstance_no>/exe ./hdbnsutil -recoverRootKeys <filename>.rkb --dbid=<dbid> --password=<passphrase> --type=ALL
SAP HANA Administration with SAP HANA CockpitSecurity Administration P U B L I C 393

RecommendationWe recommend that you do not enter the password on the command line. You will be interactively prompted to enter it. In this way, you avoid unintentionally leaving the password in command history and making it visible in process monitoring tools provided by the operating system.
NoteIf you have backed-up root keys to different files, for example according to root key type, you need to execute the command several times.
Note○ <dbid> is the tenant database ID.○ The <type> option is the root key type and also accepts the values PERSISTENCE, LOG, BACKUP,
and APPLICATION. The value ALL specifies that root keys of all types are imported. If you do not specify any value for <type>, all key types are imported.
Results
The instance SSFS is initialized with the imported root keys. Root keys of the imported type already in the SSFS are overwritten.
Next Steps
Recover the database. For more information, see the section on database recovery.
Related Information
Stop a Tenant Database [page 118]Recover a Database [page 538]
394 P U B L I CSAP HANA Administration with SAP HANA Cockpit
Security Administration

12.5 Auditing Database Activity
Auditing provides you with visibility on who did what in the SAP HANA database (or tried to do what) and when. This allows you, for example, to log and monitor read access to sensitive data.
Related Information
Activate and Configure Auditing [page 395]Create an Audit Policy [page 396]Delete Audit Entries [page 399]Audit Trail Targets [page 407]Best Practices and Recommendations for Creating Audit Policies [page 409]
12.5.1 Activate and Configure Auditing
The auditing feature of the SAP HANA database allows you to monitor and record selected actions performed in your database. To be able to use this feature, it must first be activated for the database. It is then possible to create and activate the required audit policies. You can do this on the Auditing page of the SAP HANA cockpit.
Prerequisites
You have the system privileges AUDIT ADMIN and INIFILE ADMIN.
Procedure
1. On the System Overview page, click the Auditing tile.
The Auditing page opens.2. Enable auditing.
a. Open the Configuration tab and choose Edit.b. Set the auditing status to Enable.
NoteYou can also enable auditing directly on Auditing tile with the on/off switch.
3. Optional: Configure the required audit trail targets.
By default, this is possible only in the system database.
SAP HANA Administration with SAP HANA CockpitSecurity Administration P U B L I C 395

You can configure multiple audit trail targets: one for the database (Overall Audit Trail Target), and optionally one or more for the severity of audited actions, that is the audit level of the corresponding audit entries. If you do not configure a specific target for an audit level, audit entries are written to the overall audit trail target. For more information about the available audit trail targets, see Audit Trail Targets.
Database table is the default audit trail target for tenant databases and syslog for the system database.
NoteIf you are configuring auditing in a tenant database, you cannot change the audit trail targets. This is because the underlying system properties ([auditing configuration] *_audit_trail_type) are in the configuration change blacklist multidb.ini. Audit trails are by default written to an internal database table of the tenant database. Although not recommended, it is possible to change the audit trail target of a tenant database in the following ways:
○ The system administrator changes the audit trail targets for individual tenant databases directly by configuring the relevant system property ([auditing configuration] *_audit_trail_type) in the global.ini file. For more information about the system properties for configuring audit trail targets and the configuration change blacklist in the SAP HANA Security Guide.
○ The system administrator removes the relevant system property ([auditing configuration] *_audit_trail_type) from the configuration change blacklist, thus enabling the tenant database administrator to change the audit trail target.
CautionTo ensure the privacy of tenant database audit trails, it is recommended that you do not change the default audit trail target (internal database table) of tenant databases.
4. Save your configuration.
Results
Auditing is activated in your database and you can now create audit policies.
Related Information
Create an Audit Policy [page 396]Audit Trail Targets [page 407]Default Blacklisted System Properties in Tenant Databases [page 126]
12.5.2 Create an Audit Policy
An audit policy defines the actions to be audited, as well as the conditions under which the action must be performed to be relevant for auditing. When an action occurs, the policy is triggered and an audit event is
396 P U B L I CSAP HANA Administration with SAP HANA Cockpit
Security Administration

written to the audit trail. Audit policies are database specific. You can create audit policies on the Auditing page of the SAP HANA cockpit.
Prerequisites
You have the system privilege AUDIT ADMIN.
Procedure
1. On the System Overview page, click the Auditing tile.2. On the Audit Policies tab of the Auditing page, click the Create Audit Policy button.3. Enter the policy name.4. Select the audited action status.
The action status specifies when the actions in the policy are to be audited. The following values are possible:
Status Description
All All executions of the specified actions are audited, whether successful or unsuccessful.
Successful (default) The action is audited only when the SQL statement is successfully executed.
Unsuccessful The action is audited only when the SQL statement is unsuccessfully executed.
NoteAn unsuccessful attempt to execute an action means that the user was not authorized to execute the action. If another error occurs (for example, misspellings in user or object names and syntax errors), the action is generally not audited. In the case of actions that involve data manipulation (that is, INSERT, SELECT, UPDATE, DELETE, and EXECUTE statements), additional errors (for example, invalidated views) are audited.
5. Specify the actions to be audited.
NoteOnly actions belonging to the same category can be combined together in the same policy.
Selecting All Actions covers not only all actions that can be audited individually, but also actions that cannot otherwise be audited. Such a policy is referred to as a firefighter policy and is useful if you want to audit the actions of a particularly privileged user, for example.
CautionThe actions that are audited are limited to those that take place inside the database engine while it is running. Therefore, database restart and recovery will not be audited.
SAP HANA Administration with SAP HANA CockpitSecurity Administration P U B L I C 397

6. If necessary, select the target object(s) to be audited.You must specify a target object if the actions to be audited involve data manipulation, for example, the actions SELECT, INSERT, UPDATE, DELETE, and EXECUTE. The actions in the policy will only be audited when they are performed on the specified object or objects.When specifying target objects, note the following:○ You can only enter schemas, tables, views, procedures, and functions.○ The target object must be valid for all actions in the policy.
7. If necessary, select the user(s) to be audited.
It is possible to specify that the actions in the policy be audited only when performed by a particular user or users (Only the selected users). Alternatively, you can specify that the actions in the policy be audited when performed by all users except a particular user or users (All users except those selected).
The actions in the policy will only be audited when performed by the specified user(s). If you do not specify a user, the actions will be audited regardless of who performs them.
NoteYou must specify a user if you chose to audit all actions.
8. Optional: Select the audit level.The audit level specifies the severity of the audit entry written to the audit trail when the actions in the policy occur and ranges from INFO to EMERGENCY. The default level is INFO.
9. Optional: Select one or more policy-specific audit trail targets (system database only).Audit entries triggered by this policy will be written to the specified audit trail target(s). If you do not specify a policy-specific target, entries will be written to the audit trail target for the audit level of the policy if configured, or the audit trail target configured for the system.
10. Optional: Specify a retention period.
A retention period can only be specified for audit policies that have database table set explicitly as the audit trail target, not database table as the default target.
Set Delete audit entries automatically to On.
Specify a time period, after which audit entries will be deleted.11. Specify whether you want the audit policy to be immediately enabled (default) or initially disabled on
creation.12. Choose Review to check the configuration of the new audit policy.13. Save the new audit policy.
Results
The new policy appears in the list of audit policies. Unless you configured it otherwise, the new policy is automatically enabled. This means that when an action in the policy occurs under the conditions defined in the policy, an audit entry is created in the audit trail target(s) configured for the policy. If an action event is audited by multiple audit polices and these audit policies have different audit trail targets, the audit entry is written to all trail targets.
You can disable a policy at any time by changing the policy status. It is also possible to delete a policy.
398 P U B L I CSAP HANA Administration with SAP HANA Cockpit
Security Administration

NoteAudit policies are not owned by the database user who creates them and therefore will not be deleted if the corresponding database user is deleted.
Related Information
Audit Trail Targets [page 407]
12.5.3 Delete Audit Entries
If the audit trail target is or was a database table, you can delete old audit entries, for example to prevent the audit table from growing indefinitely.
Prerequisites
● The audit trail target is or was Database Table.● You have archived the audit entries that you plan to delete.● You have the system privilege AUDIT OPERATOR.
Context
The database monitors the size of the table with respect to the memory allocation limit and issues an alert when it reaches defined values (by default 5%, 7%, 9%, and 11% of the allocation limit). This behavior can be configured with check 64.
NoteIf the table has grown so large that there is not enough memory available to delete old entries as described here, you can use the SQL command ALTER SYSTEM CLEAR AUDIT LOG ALL to completely empty the table. However, even if you archived the audit table beforehand (recommended), any new entries written between the time of archiving and the time of clearing may be lost.
Procedure
1. On the System Overview page, click the Auditing tile.
An overview of the audit policies is displayed.
SAP HANA Administration with SAP HANA CockpitSecurity Administration P U B L I C 399

2. Choose the Audit Trail tab.3. Choose Delete Audit Entries and select which audit entries you want to be deleted.
○ Entries older than a specific number of days○ Entries created before a date○ All entries
4. Choose Delete to delete the specified audit entries from the audit table.
Results
The audit entries that you selected are deleted.
Related Information
Configure Alerting Thresholds [page 218]
12.5.4 Auditing Details
On the Auditing page of the SAP HANA cockpit you can view and manage audit policies, audit trail targets, and the database table audit trail.
Audit Policies
TipYou can refine the list of audit polices by using the filtering options available in the table toolbar. Filter by
policy name or audited action by entering the term directly in the search field, or click the (Filter Settings) button and select the required filter options. To clear all filters, click (Clear All Filters).
Field Description
Audit Policy Audit policy name
Policy Status An audit policy can be either Enabled or Disabled.
400 P U B L I CSAP HANA Administration with SAP HANA Cockpit
Security Administration

Field Description
Audited Actions An audit policy can specify several related actions to be audited.
For a full list of all actions that can be audited, see the documentation for SQL access control statement CREATE AUDIT POLICY in the SAP HANA SQL and Systems View Reference.
Audited Action Status When the actions in the policy are to be audited:
● On successful execution● On unsuccessful execution● All executions of the specified action are audited,
whether successful or unsuccessful.
Audit Level The severity of the audit entry written to the audit trail when the actions in the policy occur
The following audit levels are possible
● Emergency● Critical● Alert● Warning● Info
Users User(s) included in the audit policy or excluded from the audit policy
Actions in the policy are audited when performed by either the specified user(s) or any user except the specified user(s).
Audited Objects The following audited object types are possible:
● Schemas (and all objects contained within)● Tables● Views● Procedures● Sequences
Audit Trail Target Policy-specific audit trail target(s)
If there is no policy-specific audit trail target, audit entries generated by the policy are written to the audit trail target for the audit level of the policy if configured, or the audit trail target configured for the database. The applicable default audit trail target is always indicated in brackets.
SAP HANA Administration with SAP HANA CockpitSecurity Administration P U B L I C 401
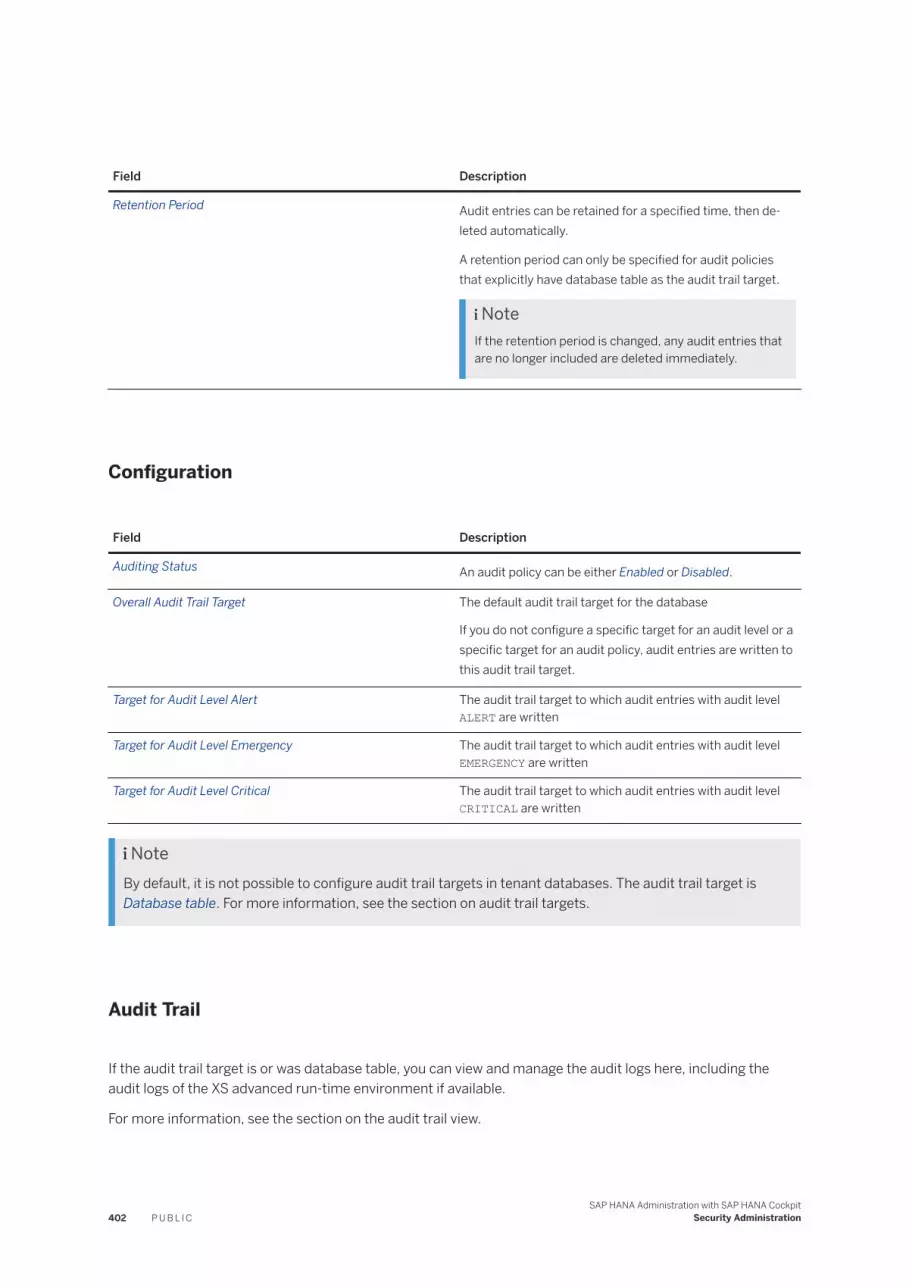
Field Description
Retention Period Audit entries can be retained for a specified time, then deleted automatically.
A retention period can only be specified for audit policies that explicitly have database table as the audit trail target.
NoteIf the retention period is changed, any audit entries that are no longer included are deleted immediately.
Configuration
Field Description
Auditing Status An audit policy can be either Enabled or Disabled.
Overall Audit Trail Target The default audit trail target for the database
If you do not configure a specific target for an audit level or a specific target for an audit policy, audit entries are written to this audit trail target.
Target for Audit Level Alert The audit trail target to which audit entries with audit level ALERT are written
Target for Audit Level Emergency The audit trail target to which audit entries with audit level EMERGENCY are written
Target for Audit Level Critical The audit trail target to which audit entries with audit level CRITICAL are written
NoteBy default, it is not possible to configure audit trail targets in tenant databases. The audit trail target is Database table. For more information, see the section on audit trail targets.
Audit Trail
If the audit trail target is or was database table, you can view and manage the audit logs here, including the audit logs of the XS advanced run-time environment if available.
For more information, see the section on the audit trail view.
402 P U B L I CSAP HANA Administration with SAP HANA Cockpit
Security Administration

Related Information
Audit Trail Targets [page 407]Audit Trail View [page 403]Delete Audit Entries [page 399]
12.5.5 Audit Trail View
For each occurrence of an audited action, one or more audit entries are written to the audit trail. If the audit trail target is a database table, you can view the log on the Auditing page of the SAP HANA cockpit. It is also possible to view the audit logs of the XS advanced run-time environment.
To view the audit trail, on the System Overview page, click the Auditing tile.
On the Audit Trail tab, you can choose from the following log entries:
● All LogsBoth database and XS advanced audit entries
● SAP HANA LogsAudit entries written by audit polices configured in the database
● XSA LogsAudit entries written by the audit log service of XS advanced
The following sections describe the layout of the audit trail and the options for configuring the layout.
Audit Trail Columns: SAP HANA Logs
Default Columns
Field Description
Time Stamp Time of event occurrence (in system local time)
Policy Name Name of the audit policy that was triggered
Level Severity of audited action
Status Execution status of the statement
Client Host Name of the host where the action occurred
User Name User who performed the action
Statement Statement that was executed
Additional Columns
Field Description
Action Action that was audited and thus triggered the policy
SAP HANA Administration with SAP HANA CockpitSecurity Administration P U B L I C 403

Field Description
Application User Name Application user who performed the action
CautionTreat this information with caution. It comes from the application and SAP HANA has no way of verifying its authenticity.
Client Host Name of the client machine
Client IP IP address of the client application
Client PID Process ID of the client process
Client Port Port of the client process
Comment Additional information about the audited event
NoteCurrently in case of failed logon attempts, the reason for failure appears in this field.
Connection ID ID of the session in which the statement was executed
File Name Configuration file name, for example global.ini
Grantable Indication of whether the privilege or role was granted with or without GRANT/ADMIN OPTION
Grantee Name of the target user of the action, for example, grantee in a GRANT statement
Grantee Schema Name of the schema of a granted or revoked role
Key Configuration parameter, for example global_auditing_state
Object Name Name of the object on which an action was performed, for example, a privilege was granted
Original Database Name of tenant database in which the query originated; relevant for cross-database queries between tenant databases
Original User Name of database user who executed the query in the origin tenant database; relevant for cross-database queries between tenant databases
Port Port number
Previous Value Previous value of the parameter, for example CSVTEXTFILE
Privilege Name Name of the privilege that was granted or revoked
Role Name Name of the role that was granted or revoked
Role Schema Name Name of the schema in which a role was created/dropped, or the schema of a granted/ revoked role
Schema Name Name of the schema where the action occurred, for example, a privilege was granted on a schema, or a statement was executed on object in a schema
Section Configuration section name, for example auditing configuration
Service Name of the service where the action occurred
404 P U B L I CSAP HANA Administration with SAP HANA Cockpit
Security Administration

Field Description
Value New parameter value, for example CSTABLE
XS Application User Name XS application user name, for example, XSA_ADMIN
Audit Trail Columns: XSA Logs
Default Columns
Field Description
Time Time that the event occurred
XSA Organization ID Application organization GUID
XSA Space ID Application space GUID
App Name of the application
XSA Instance ID GUID of the used audit log service instance
User Name of the application user
Message Unique audit log message ID generated by the audit service
Additional Columns
Field Description
Attachment Name Name of the attachment that triggered the event.
Attachment ID ID of the attachment that triggered the event
Attribute Attribute that was changed
Attribute New Value Old value of the attribute
Attribute Old Value New value of the attribute
Binding ID Application binding GUID in regards to the specific auditlog service instance that is being used
Category Type
Client Host IP of the client host
Client IP IP of the client application
Client PID PID of the client process
Client Port Port of the client process
Connection ID Connection ID
Created Time of the event occurrence at the client side
Host Name of the host where the event occurred
Level Severity level of the event
Policy Name Name of the audit policy triggered
Port Port number
SAP HANA Administration with SAP HANA CockpitSecurity Administration P U B L I C 405

Field Description
Service Servcie name
Statement SQL statement that caused the event
Statement User Name of the user who executed the statement
Successful Whether the event was successful or no
User Name Name of the user connected to the database
XSA Channel Communication protocol that was used when the audit event was triggered
XSA Data Subject Owner of the accessed personal data
XSA Message IP IP address of the event occurrence
XSA Object Object containing the accessed personal data
XSA Tenant XSA tenant GUID
XSA UUID Unique audit log message ID generated by the audit service
Audit Trail View Configuration
You can configure the audit trail view by clicking the (Settings) icon. The following options are available.
NoteYour preferences are not saved when you log out of the cockpit.
Option Description
Columns Select the columns you want to see and the order in which they are displayed.
Sort Sort the audit trail by one or more columns in ascending or descending order.
Filter Filter the audit trail by creating complex include and exclude filters.
NoteValues are case sensitive.
Group Organize the audit trail by grouping events according to a particular field (for example, audited action, policy and so on).
Related Information
Delete Audit Entries [page 399]
406 P U B L I CSAP HANA Administration with SAP HANA Cockpit
Security Administration
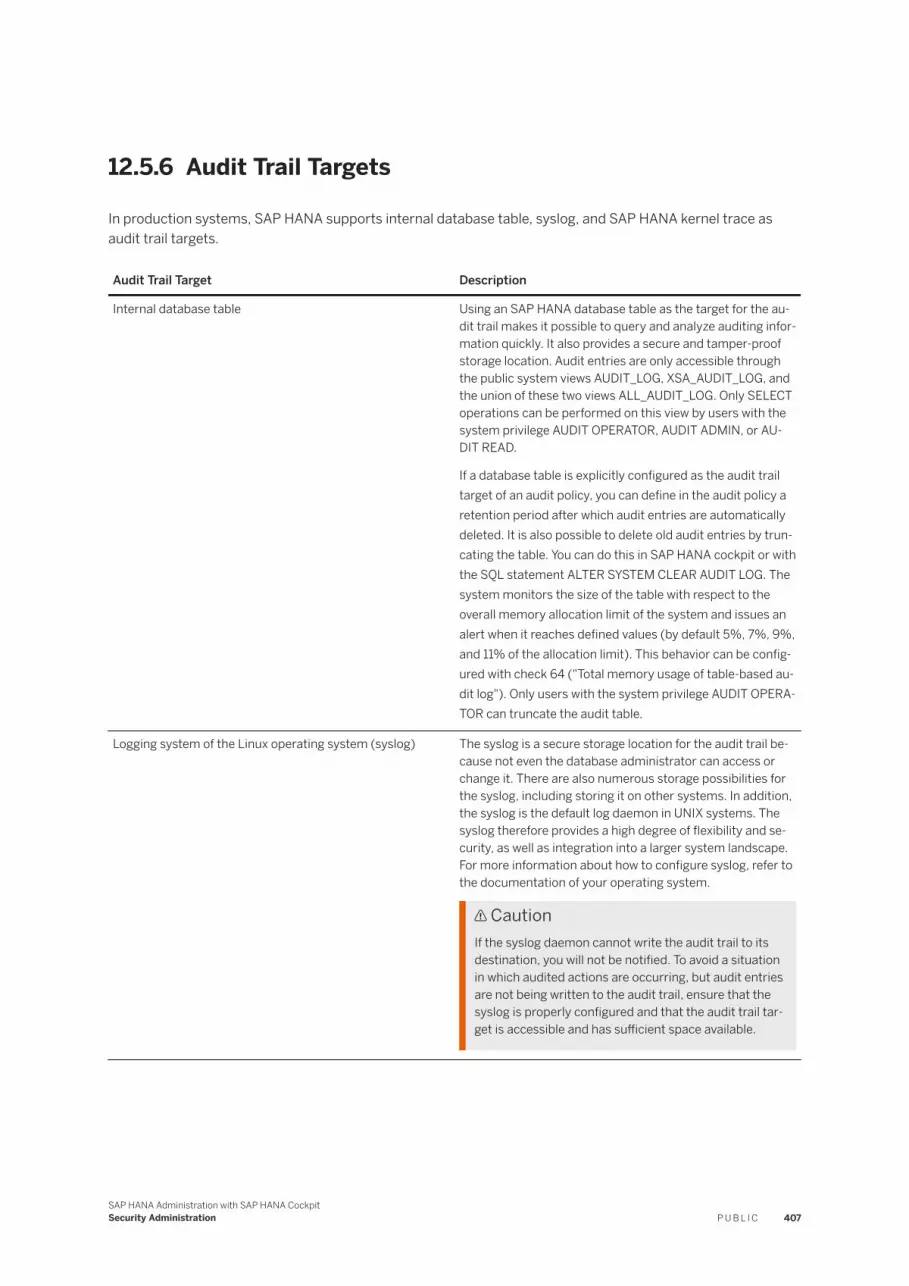
12.5.6 Audit Trail Targets
In production systems, SAP HANA supports internal database table, syslog, and SAP HANA kernel trace as audit trail targets.
Audit Trail Target Description
Internal database table Using an SAP HANA database table as the target for the audit trail makes it possible to query and analyze auditing information quickly. It also provides a secure and tamper-proof storage location. Audit entries are only accessible through the public system views AUDIT_LOG, XSA_AUDIT_LOG, and the union of these two views ALL_AUDIT_LOG. Only SELECT operations can be performed on this view by users with the system privilege AUDIT OPERATOR, AUDIT ADMIN, or AUDIT READ.
If a database table is explicitly configured as the audit trail target of an audit policy, you can define in the audit policy a retention period after which audit entries are automatically deleted. It is also possible to delete old audit entries by truncating the table. You can do this in SAP HANA cockpit or with the SQL statement ALTER SYSTEM CLEAR AUDIT LOG. The system monitors the size of the table with respect to the overall memory allocation limit of the system and issues an alert when it reaches defined values (by default 5%, 7%, 9%, and 11% of the allocation limit). This behavior can be config-ured with check 64 ("Total memory usage of table-based audit log"). Only users with the system privilege AUDIT OPERATOR can truncate the audit table.
Logging system of the Linux operating system (syslog) The syslog is a secure storage location for the audit trail because not even the database administrator can access or change it. There are also numerous storage possibilities for the syslog, including storing it on other systems. In addition, the syslog is the default log daemon in UNIX systems. The syslog therefore provides a high degree of flexibility and security, as well as integration into a larger system landscape. For more information about how to configure syslog, refer to the documentation of your operating system.
CautionIf the syslog daemon cannot write the audit trail to its destination, you will not be notified. To avoid a situation in which audited actions are occurring, but audit entries are not being written to the audit trail, ensure that the syslog is properly configured and that the audit trail target is accessible and has sufficient space available.
SAP HANA Administration with SAP HANA CockpitSecurity Administration P U B L I C 407

Audit Trail Target Description
SAP HANA kernel trace The audit log can be written to a kernel trace file (*.ltc) in the trace directory (/usr/sap/<sid>/<instance>/<host>/trace).
The kernel trace output is not human-readable. It must be converted into a CSV-formatted files using the command-line tool hdbtracediag and then loaded into relational tables for SQL analysis.
hdbtracediag is available on the SAP HANA server at /usr/sap/<sid>/HDB<instance>/exe.
Additionally, the option exists to store the audit trail in a CSV text file. This should only be used for test purposes in non-production systems. A separate CSV file is created for every service that executes SQL.
CautionYou must not use a CSV text file for a production system as it has severe restrictions.
Firstly, it is not sufficiently secure. By default, the file is written to the same directory as trace files (/usr/sap/<sid>/<instance>/<host>/trace). This means that database users with the system privilege DATA ADMIN, CATALOG READ, TRACE ADMIN, or INIFILE ADMIN can access it. In the SAP HANA database explorer, it is listed under Database Diagnostics Files, and at operating system level, any user in the SAPSYS group can access it.
Secondly, audit trails are created for each server in a distributed database system. This makes it more difficult to trace audit events that were executed across multiple servers (distributed execution).
Audit Trails for Tenant Databases
By default, tenant database administrators cannot configure audit trail targets independently for their database since the underlying system properties are in the default configuration change blacklist (multidb.ini). The default target for all audit trails in tenant databases is internal database table. Although not recommended, it is possible to change the audit trail target of a tenant database in the following ways:
● The system administrator changes the audit trail targets for individual tenant databases directly by configuring the relevant system property ([auditing configuration] *_audit_trail_type) in the global.ini file. For more information about the system properties for configuring audit trail targets and the configuration change blacklist in the SAP HANA Security Guide.
● The system administrator removes the relevant system property ([auditing configuration] *_audit_trail_type) from the configuration change blacklist, thus enabling the tenant database administrator to change the audit trail target.
CautionTo ensure the privacy of tenant database audit trails, it is recommended that you do not change the default audit trail target (internal database table) of tenant databases.
408 P U B L I CSAP HANA Administration with SAP HANA Cockpit
Security Administration

Related Information
Default Blacklisted System Properties in Tenant Databases [page 126]Delete Audit Entries [page 399]Configure Alerting Thresholds [page 218]
12.5.7 Best Practices and Recommendations for Creating Audit Policies
General Best Practices
To reduce the performance impact of auditing, consider some basic guidelines for creating audit policies.
● Create as few audit policies as possible. It is usually better to have one complex policy than several simple ones.
RememberSome audit actions cannot be combined in the same policy.
● Use audit actions that combine other actions where possible.
ExampleAudit the GRANT ANY action instead of the GRANT PRIVILEGE and the GRANT STRUCTURED PRIVILEGE actions.
● Create audit policies for DML actions only if required. Auditing DML actions impacts performance more than auditing DDL actions.
● Do not create audit policies for actions that are automatically audited, for example CREATE AUDIT POLICY. For a list of actions that are always audited, see the section on the default audit policy in the SAP HANA Security Guide.
● Do not create audit policies for database-internal tables that are involved in administration actions. Create policies for the administration actions themselves.
ExampleP_USER_PASSWORD is an internal database tables that cannot be accessed by any user, not even SYSTEM. Changes in these tables are carried out by internal mechanisms, and not by DML operations. Don't include these tables in an audit policy. Instead create an audit policy for changes to users (ALTER USER action) instead.
● Create a firefighter policy (that is, a policy that audits all actions for a user) only in exceptional circumstances, for example, to check whether a certain user is being used for everyday work or if a support user has been given access to the system. Firefighter policies may create large amounts of audit data and significantly impact performance if they are used for high-load users.
SAP HANA Administration with SAP HANA CockpitSecurity Administration P U B L I C 409

Recommended Audit Policies
Once auditing is active in the database, certain actions are always audited in the internal audit policy MandatoryAuditPolicy. In addition, consider the following recommendations.
Audit policies for administrative activitiesAt a minimum, we recommend that you create audit policies in development and production systems to audit the following additional administrative activities:
● Changes to SAP HANA configuration files (*.ini files). The relevant audit action is SYSTEM CONFIGURATION CHANGE.
Sample Code
CREATE AUDIT POLICY "configuration changes" AUDITING SUCCESSFUL SYSTEM CONFIGURATION CHANGE LEVEL WARNING; ALTER AUDIT POLICY "configuration changes" ENABLE;
● Changes to users. The relevant audit actions are:○ CREATE USER○ ALTER USER○ DROP USER
Sample Code
CREATE AUDIT POLICY "user administration" AUDITING SUCCESSFUL CREATE USER, ALTER USER, DROP USER LEVEL INFO; ALTER AUDIT POLICY "user administration" ENABLE;
● Changes to authorization. The relevant audit actions are:○ GRANT ANY○ REVOKE ANY
Sample Code
CREATE AUDIT POLICY "authorizations" AUDITING SUCCESSFUL GRANT ANY, REVOKE ANY LEVEL INFO; ALTER AUDIT POLICY "authorizations" ENABLE;
If design-time roles and authorizations are used, also audit the execution of the grant/revoke of design-time roles and privileges.
Sample Code
CREATE AUDIT POLICY "designtime privileges" AUDITING SUCCESSFUL EXECUTE on _SYS_REPO.GRANT_ACTIVATED_ANALYTICAL_PRIVILEGE,_SYS_REPO.GRANT_ACTIVATED_ROLE,_SYS_REPO.GRANT_APPLICATION_PRIVILEGE,_SYS_REPO.GRANT_PRIVILEGE_ON_ACTIVATED_CONTENT,_SYS_REPO.GRANT_SCHEMA_PRIVILEGE_ON_ACTIVATED_CONTENT,_SYS_REPO.REVOKE_ACTIVATED_ANALYTICAL_PRIVILEGE,_SYS_REPO.REVOKE_ACTIVATED_ROLE,_SYS_REPO.REVOKE_APPLICATION_PRIVILEGE,_SYS_REPO.REVOKE_PRIVILEGE_ON_ACTIVATED_CONTENT,
410 P U B L I CSAP HANA Administration with SAP HANA Cockpit
Security Administration

_SYS_REPO.REVOKE_SCHEMA_PRIVILEGE_ON_ACTIVATED_CONTENTLEVEL INFO; ALTER AUDIT POLICY "designtime privileges" ENABLE;
● Changes to the SAP HANA license key
Sample Code
CREATE AUDIT POLICY "license creation" AUDITING ALL SET SYSTEM LICENSE LEVEL INFO; CREATE AUDIT POLICY "license deletion" AUDITING ALL UNSET SYSTEM LICENSE LEVEL INFO;ALTER AUDIT POLICY "license creation" ENABLE; ALTER AUDIT POLICY "license deletion" ENABLE;
● Recovery of tenant databases
Sample Code
CREATE AUDIT POLICY "recover database" AUDITING ALL RECOVER DATA LEVEL INFO; ALTER AUDIT POLICY "recover database" ENABLE;
Additional policies in production systems
In production systems, additional audit policies are usually required to log further activities as defined by IT policy and to meet governance and legal requirements such as SOX compliance.
We also recommend auditing not only successful events but unsuccessful events by defining the audit action status ALL. Knowing about unsuccessful events might be a prerequisite to discovering an attack on your system.
CautionSAP HANA audit policies are defined at the database level and cannot cover all requirements for data protection and privacy. The business semantics of data are part of the application definition and implementation. It is therefore the application that "knows", for example, which tables in the database contain sensitive personal data, or how business level objects, such as sales orders, are mapped to technical objects in the database.
12.6 Configure the Database Password Policy and Password Blacklist
The passwords of database users are subject to certain rules. These are defined in the password policy and the password blacklist. You can change the default password policy of the database and maintain entries in the password blacklist in line with your organization’s security requirements.
SAP HANA Administration with SAP HANA CockpitSecurity Administration P U B L I C 411

Prerequisites
● You have the system privilege INIFILE ADMIN.● You have the object privileges SELECT, INSERT, and DELETE for the _SYS_PASSWORD_BLACKLIST table in
the _SYS_SECURITY schema.
Procedure
1. On the System Overview page, navigate to the Security area and click the Authentication tile.
The Password Policy and Blacklist page opens.2. Click Edit in the footer bar.3. In the Password Policy area, configure the options in line with your security requirements.
All options have a default value. For more information about the individual options and their default values, see Password Policy Details.
TipTo reset the default password policy, click Set Default in the footer toolbar. This will reset all options to their default values.
4. In the Password Blacklist area, add the words or partial words that you want to prohibit in passwords.The following configuration options are available:
Option Description
Contained in Password If you select this option, passwords that contain the blacklisted word are excluded. If you do not select this option, only passwords that match the blacklisted word exactly are excluded.
Case-Sensitive If you select this option, the blacklisted word is case sensitive.
ExampleIf you add the words SAP, my_sap_pwd, and sap_password to the blacklist and select the Contained in Password checkbox, then passwords containing "SAP", "my_sap_pwd", and "sap_password" are not allowed, regardless of how the password policy is configured.
5. Click Save to save the password policy and password blacklist.
Results
The passwords of database users must be created and changed in line with the defined policy.
412 P U B L I CSAP HANA Administration with SAP HANA Cockpit
Security Administration

Related Information
Configure a Password Policy for a User Group [page 420]
12.6.1 Password Policy Details
On the Password Policy and Blacklist page, you can view the password policy and change the its default configuration.
● Minimum Password Length [page 413]● Lowercase Letters/Uppercase Letters/Numerical Digits/Special Characters Required [page 414]● Lifetime of Initial Password [page 415]● Minimum Password Lifetime [page 415]● Maximum Password Lifetime [page 415]● Maximum Duration of User Inactivity [page 416]● Notification of Password Expiration [page 416]● User Lock Time [page 417]● Exempt SYSTEM User from Locking [page 417]● Number of Allowed Failed Logon Attempts [page 417]● Number of Last Used Passwords That Cannot Be Reused [page 418]● Password Change Required on First Logon [page 419]● Detailed Error Information on Failed Logon [page 419]
NoteThe individual password policy options are defined by parameters in the password policy section of the indexserver.ini configuration file, or in the case of the system database, the nameserver.ini file.
Minimum Password Length
The minimum number of characters that the password must contain
Parameter minimal_password_length
Default Value 8 (characters)
Additional Information You must enter a value between 6 and 64.
UI Label Minimum Password Length
SAP HANA Administration with SAP HANA CockpitSecurity Administration P U B L I C 413

Lowercase Letters/Uppercase Letters/Numerical Digits/Special Characters Required
The character types that the password must contain and how many
Parameter password_layout
Default Value Aa1, that is, at least one uppercase letter, at least one number, and at least one lowercase letter
Additional Information The following character types are possible:
● Lowercase letter (a-z)● Uppercase letter (A-Z)● Numerical digits (0-9)● Special characters (underscore (_), hyphen (-), and so on)
Any character that is not an uppercase letter, a lowercase letter, or a numerical digit is considered a special character.
The following formats are supported for passwords:
<password> ::= { <letter> [ { <letter_or_digit> | # | $ }[…] ] | <digit> [ <letter_or_digit> […] ] | <any_quoted_string> }
If configuring this option in the indexserver.ini file using the password_layout parameter, you can use any specific letters, numbers and special characters, and the characters can be in any order. For example, the default value example could also be represented by a1A, hQ5, or 9fG. To enforce the use of at least one of each character type including special characters, you specify A1a_ or 2Bg?. To enforce the use of a specific number of a particular character type, specify the character type multiple times. For example, if passwords must contain at least 3 digits, you could specify the layout with a123A or 789fG.
NotePasswords containing special characters other than underscore must be enclosed in double quotes ("). The SAP HANA studio does this automatically. When a password is enclosed in double quotes ("), any Unicode characters may be used.
CautionThe use of passwords enclosed in double quotes (") may cause logon issues depending on the client used. The SAP HANA studio and hdsql support passwords enclosed in double quotes (").
UI Labels Lowercase Letters/Uppercase Letters/Numerical Digits/Special Characters Required
414 P U B L I CSAP HANA Administration with SAP HANA Cockpit
Security Administration

Lifetime of Initial Password
The number of days for which the initial password or any password set by a user administrator for a user is valid
Parameter maximum_unused_initial_password_lifetime
Default Value 7 (days)
Additional Information You must enter a value of at least 1.
If a user has not logged on using the initial password within the given period of time, the user will be deactivated until their password is reset.
NoteIn SAP HANA 1.0 SPS 12 and earlier, this parameter was misspelled as maximum_unused_inital_password_lifetime. If this parameter had a user-specified value before upgrade, this value will be set as the value of the parameter maximum_unused_initial_password_lifetime. The misspelled parameter is unset and disappears from the custom configuration file.
UI Label Lifetime of Initial Password
Minimum Password Lifetime
The minimum number of days that must elapse before a user can change his or her password
Parameter minimum_password_lifetime
Default Value 1 (day)
Additional Information If you enter the value 0, the password has no minimum lifetime.
UI Label Minimum Password Lifetime
Maximum Password Lifetime
The number of days after which a user's password expires
Parameter maximum_password_lifetime
Default Value 182 (days)
SAP HANA Administration with SAP HANA CockpitSecurity Administration P U B L I C 415

Additional Information You must enter a value of at least 1.
A user administrator can exclude users from this password check with the following SQL statement: ALTER USER <user_name> DISABLE PASSWORD LIFETIME. However, this is recommended only for technical users only, not database users that correspond to real people.
A user administrator can re-enable the password lifetime check for a user with the following SQL statement: ALTER USER <user_name> ENABLE PASSWORD LIFETIME.
UI Label Maximum Password Lifetime
Maximum Duration of User Inactivity
The number of days after which a password expires if the user has not logged on
Parameter maximum_unused_productive_password_lifetime
Default Value 365 (days)
Additional Information You must enter a value of at least 1.
If a user has not logged on within the given period of time using any authentication method, the user will be deactivated until their password is reset.
UI Label Maximum Duration of User Inactivity
Notification of Password Expiration
The number of days before a password is due to expire that the user receives notification
Parameter password_expire_warning_time
Default Value 14 (days)
Additional Information Notification is transmitted via the database client (ODBC or JDBC) and it is up to the client application to provide this information to the user.
If you enter the value 0, the user does not receive notification that his or her password is due to expire.
The system also monitors when user passwords are due to expire and issues a medium priority alert (check 62). This may be useful for technical database users since password expiration results in the user being locked, which may affect application availability. It is recommended that you disable the password lifetime check of technical users so that their password never expires (ALTER USER <technical_username> DISABLE PASSWORD LIFETIME).
416 P U B L I CSAP HANA Administration with SAP HANA Cockpit
Security Administration

UI Label Notification of Password Expiration
User Lock Time
The number of minutes for which a user is locked after the maximum number of failed logon attempts
Parameter password_lock_time
Default Value 1440 (minutes)
Additional Information If you enter the value 0, the user is unlocked immediately. This disables the functionality of parameter maximum_invalid_connect_attempts.
A user administrator can reset the number of invalid logon attempts and reactivate the user account with the following SQL statement: ALTER USER <user_name> RESET CONNECT ATTEMPTS. It is also possible to reactivate the user in the user editor of the SAP HANA Studio.
To lock a user indefinitely, enter the value -1. On the Password Policy and Blacklist page of the SAP HANA cockpit, this corresponds to selecting the Lock User Indefinitely checkbox. The user remains locked until reactivated by a user administrator as described above.
UI Label User Lock Time
Exempt SYSTEM User from Locking
Indicates whether or not the user SYSTEM is locked for the specified lock time (password_lock_time) after the maximum number of failed logon attempts (maximum_invalid_connect_attempts)
Parameter password_lock_for_system_user
Default Value true
Additional Information This parameter cannot be configured for a user group.
UI Label Exempt SYSTEM User from Locking
Number of Allowed Failed Logon Attempts
The maximum number of failed logon attempts that are possible; the user is locked as soon as this number is reached
Parameter maximum_invalid_connect_attempts
SAP HANA Administration with SAP HANA CockpitSecurity Administration P U B L I C 417

Default Value 6 (failed logon attempts)
Additional Information You must enter a value of at least 1.
A user administrator can reset the number of invalid logon attempts with the following SQL statement: ALTER USER <user_name> RESET CONNECT ATTEMPTS
The first time a user logs on successfully after an invalid logon attempt, an entry is made in the INVALID_CONNECT_ATTEMPTS system view containing the following information:
● The number of invalid logon attempts since the last successful logon● The time of the last successful logon
A user administrator can delete information about invalid logon attempts with the following SQL statement: ALTER USER <user_name> DROP CONNECT ATTEMPTS
RecommendationCreate an audit policy to log activity in the INVALID_CONNECT_ATTEMPTS system view. For example, create an audit policy that logs data query and manipulation statements executed on this view.
NoteAlthough this parameter is not valid for the SYSTEM user, the SYSTEM user will still be locked if the parameter password_lock_for_system_user is set to true. If password_lock_for_system_user is set to false, the SYSTEM user will not be locked regardless of the number of failed logon attempts.
UI Label Number of Allowed Failed Logon Attempts
Number of Last Used Passwords That Cannot Be Reused
The number of last used passwords that the user is not allowed to reuse when changing his or her current password
Parameter last_used_passwords
Default Value 5 (previous passwords)
Additional Information If you enter the value 0, the user can reuse his or her old password.
UI Label Number of Last Used Passwords That Cannot Be Reused
418 P U B L I CSAP HANA Administration with SAP HANA Cockpit
Security Administration

Password Change Required on First Logon
Defines whether users have to change their initial passwords immediately the first time they log on
Parameter force_first_password_change
Default Value True
Additional Information If this parameter is set to true, users can still log on with the initial password but every action they try to perform will return the error message that they must change their password.
If this parameter is set to false, users are not forced to change their initial password immediately the first time they log on. However, if a user does not change the password before the number of days specified in the parameter maximum_unused_initial_password_lifetime, then the password still expires and must be reset by a user administrator.
A user administrator (that is, a user with the system privilege USER ADMIN) can force a user to change his or her password at any time with the following SQL statement: ALTER USER <user_name> FORCE PASSWORD CHANGE
A user administrator can override this password policy setting for individual users (for example, technical users) with the following SQL statement:
● CREATE USER <user_name> PASSWORD <password> [NO FORCE_FIRST_PASSWORD_CHANGE]
● ALTER USER <user_name> PASSWORD <password> [NO FORCE_FIRST_PASSWORD_CHANGE]
NoteThis parameter is only valid for users connecting with their SAP HANA database user name and password. It is not valid for connections established through other authentication mechanisms.
UI Label Password Change Required on First Logon
Detailed Error Information on Failed Logon
Indicates the detail level of error information returned when a logon attempt fails
Parameter detailed_error_on_connect
Default Value false
SAP HANA Administration with SAP HANA CockpitSecurity Administration P U B L I C 419

Additional Information If set to false, only the information authentication failed is returned.
If set to true, the specific reason for failed logon is returned:
● Invalid user or password● User is locked● Connect try is outside validity period● User is deactivated
UI Label Detailed Error Information on Failed Logon
12.7 Configure a Password Policy for a User Group
If the users of a user group have different password requirements, you can configure group-specific values for the individual options of the password policy on the User Groups page of the SAP HANA cockpit.
Prerequisites
You have the object privilege USERGROUP OPERATOR on the user group. If the user group is configured for shared administration (administration mode: Group and user administrators), system privilege USER ADMIN is also sufficient.
Context
The users of different user groups may have different requirements when it comes to passwords. For example, you may want the passwords of technical users to be very complex.
You configure group-specific values only for the required password policy options. You don't have to configure a value for all options. For those options without a group-specific value, the value from database password policy is simply copied. When you save and enable the password policy, it applies to users in the group until you enable the user group policy.
Procedure
1. On the System Overview page, choose the Manage user groups link.2. Select the relevant user group.3. In the Password Policy area, choose Configure and configure the options in line with the user group's
requirements.
420 P U B L I CSAP HANA Administration with SAP HANA Cockpit
Security Administration

The initial values for all options are copied from the password policy configured for the database. If you do not configure a group-specific value for a particular parameter, the value from database password policy applies. Choosing Reset Default reapplies all values from the database password policy.
For more information about the password policy options, see Password Policy Details.4. To enable the group password policy, choose Save and Enable.
Results
The user group password policy is configured and effective for users in the user group.
TipTo determine which password policy a user is currently subject to, query the system view M_EFFECTIVE_PASSWORD_POLICY.
Related Information
Password Policy Details [page 413]Configure the Database Password Policy and Password Blacklist [page 411]Create a User Group [page 470]
12.8 Managing Client Certificates
SAP HANA uses X.509 client certificates as the basis for securing internal and external communication channels, as well as for several user authentication mechanisms. Certificates can be stored and managed in files in the file system and in some cases directly in the SAP HANA database.
Certificate Management in the Database
All certificate-based user authentication mechanisms in SAP HANA, as well as secure communication between SAP HANA and clients that access the SQL interface of the database rely on X.509 client certificates for authentication and verifying digital signatures. For ease of management, it's possible to store these certificates and configure their usage directly in the SAP HANA database.
In addition, in-database certificates must be used to secure communication during the process of copying or moving a tenant database between two systems, and to secure communication between SAP HANA and an LDAP server being used for user authentication and authorization.
The following figure shows for which purposes in-database certificates stored in certificate collections can be used. In-database certificates and certificate collections can be fully managed in the SAP HANA cockpit.
SAP HANA Administration with SAP HANA CockpitSecurity Administration P U B L I C 421

NoteAlthough we recommend creating and managing both certificates and certificate collections in the database, files containing certificates may also be stored in the file system.
In-Database Certificates
Certificate Management in the File System
Although we recommend using in-database storage where possible, you can store and manage certificates in trust and key stores located in the file system, in so-called personal security environments or PSEs.
CautionBy default, the same PSE in the file system is shared by all databases for all external communication channels (including HTTP) and certificate-based authentication. Different PSEs must be explicitly configured for tenant databases.
RecommendationYou can migrate certificates from file-system based storage to in-database storage. If you do migrate certificates in the file system to the database, delete all related files from the file system to avoid any potential conflicts. For more information, see SAP Note 2175664.
However, not all certificates can be stored in the database, in particular the certificates required to secure internal communication channels using the system public key infrastructure (system PKI), and HTTP client access using SAP Web Dispatcher. These certificates are contained in PSE files located in the file system.
CautionDo not delete these files from the file system.
The following figure shows for which purposes certificates stored in PSEs in the file system are possible. These PSEs are available by default and can be managed using for example the SAP Web Dispatcher administration tool or the SAPGENPSE tool, both of which are delivered with SAP HANA. If you are using OpenSSL, you can also use the tools provided with OpenSSL.
422 P U B L I CSAP HANA Administration with SAP HANA Cockpit
Security Administration

NoteOpenSSL is deprecated. If you are using OpenSSL, migrate to CommonCryptoLib. For more information, see SAP Note 2093286.
Default File-Based PSEs
Related Information
Client Certificates [page 423]Certificate Collections [page 424]SQL Statements and Authorization for In-Database Certificate Management (Reference) [page 436]SAP Note 2175664SAP Note 2093286
12.8.1 Client Certificates
X.509 client certificates required for certificate-based user authentication and secure communication between SAP HANA and clients that access the SQL interface of the database can be stored and managed directly in the SAP HANA database.
Certificates stored in the SAP HANA database can be used for:
● Trust validationCertificates used for trust validation are the public-key certificates of trusted communication partners or root certificates from trusted Certification Authorities. These certificates contain the public part of a user's or component's public and private key pair.
● Server authenticationCertificates used for server authentication are the public-key certificates of the SAP HANA server used to identify the server to connecting clients. In addition to the public-key information of the server, these certificates contain the server's private keys, as well as the intermediate certificates that complete the trust chain from the server certificate to the root certificate that the communication partner (client) trusts.
SAP HANA Administration with SAP HANA CockpitSecurity Administration P U B L I C 423

NotePrivate keys are stored securely using the internal application encryption service of the SAP HANA database. For more information, see Server-Side Data Encryption in the SAP HANA Security Guide.
Once they have been imported into the database, certificates can be assigned to certificate collections. Certificate collections are also created and managed directly in the database, where they serve a unique purpose.
NoteAlthough we recommend creating and managing both certificates and certificate collections in the database, files containing certificates may also be stored in the file system.
Related Information
Certificate Collections [page 424]
12.8.2 Certificate Collections
A certificate collection (or PSE) is a secure location where the public information (public-key certificates) and private information (private keys) of the SAP HANA server are stored. A certificate collection may also contain the public information (public-key certificates) of trusted communication partners or root certificates from trusted Certification Authorities. Certificate collections can be created and managed as database objects directly in the SAP HANA database.
Certificate Collection Purposes
Certificate collections uniquely serve one of the following purposes in the database in which they exist.
For... Set the Purpose...
Database replication with the aim of copying or moving a tenant database to another system
DATABASE REPLICATION
User authentication based on JSON Web Tokens JWT
Communication between SAP HANA and an LDAP server being used for user authentication and authorization
LDAP
User authentication based on SAML assertions SAML
User authentication based on logon and assertion tickets SAP LOGON
424 P U B L I CSAP HANA Administration with SAP HANA Cockpit
Security Administration

For... Set the Purpose...
Communication between SAP HANA and an LDAP server being used for user authentication and authorization
SSL
User authentication based on X.509 certificates X509
Smart Data Access REMOTE SOURCE
The client certificates required for each purpose are assigned to the corresponding certificate collection from the in-database certificate store. A certificate can be assigned to more than one certificate collection.
NoteYou only need to set your own key or a private key in collections used for client-server communication, that is with purpose SSL. Although it is possible to do so, there is no need to set a private key for certificate collections used for trust validation.
NoteAlthough we recommend creating and managing both certificates and certificate collections in the database, files containing certificates may also be stored in the file system.
Certificate Collections with Qualified Purpose
Collections with the purposes SAML, JWT, and SSL may be qualified further. The purposes SAML and JWT can be specific to individual identity providers, and the purpose SSL can be specific to individual hosts.
This means that for SAML- and JWT-based authentication, you can assign the purpose SAML or JWT to several collections by adding different identity providers to each collection. In this way, the assertions or tokens issued by different providers can be validated separately. Identity providers must already exist in the database before they can be added to a collection, and each provider can only be assigned to one certificate collection.
Similarly, for client-server communication, you can assign the purpose SSL to several collections by adding host names to each collection. This allows you to configure separate sets of certificates for different hosts. Host names must only be entered in the correct format (for example, example.acme.com), and each host name can be assigned to several certificate collections.
If multiple collections with the same purpose exist, note the following behavior:
● Collections with qualified purposes take precedence over a collection with the same purpose that has not been qualified, that is a collection with the same purpose that has not been assigned any providers or hosts.
NoteOnly one collection with an unqualified purpose may exist.
● If there is only one collection with a particular purpose and it is qualified, any unassigned providers or host names that may be configured cannot be validated. In this case, the trust store located on the file system and configured with the global.ini parameter [communication] sslTrustStore is used instead (sapsrv.pse by default).
SAP HANA Administration with SAP HANA CockpitSecurity Administration P U B L I C 425

This behavior can be illustrated with the following example.
ExampleMultiple SAML identity providers are configured in your database (providerA, providerB, and providerC). Initially, two certificate collections are used for SAML-based user authentication. The first collection (pse1) is assigned the purpose SAML but no specific identity providers have been added. The second collection (pse2) is also assigned the purpose SAML but is qualified for a specific identity provider (providerA). This is configured as follows:
SET PSE pse1 PURPOSE SAML; SET PSE pse2 PURPOSE SAML FOR PROVIDER providerA;
With this configuration, collection pse2 has a qualified purpose and is used to validate requests signed by providerA only. Collection pse1 is not qualified with any specific providers and so is used to validate requests from all other providers configured in the database.
If you now drop collection pse1, requests from providerB and providerC can no longer be validated. This is because there is no collection with the unqualified purpose SAML, and these providers have not been added to any other collection with purpose SAML. This means that it is no longer possible to log on or connect to the database using providerB and providerC (assuming that sapsrv.pse does not contain the necessary certificates).
In addition to creating a new collection with the unqualified purpose SAML, you could resolve the situation in a number of ways:
● Create one or more additional collections with the purpose SAML and assign the other providers to these:
Sample Code
CREATE PSE pse3; SET PSE pse3 PURPOSE SAML FOR PROVIDER providerB;CREATE PSE pse4; SET PSE pse4 PURPOSE SAML FOR PROVIDER providerC;
Collections pse3 and pse4 are now used to validate requests signed by providerB and providerC respectively.
● Assign the other providers to the existing collection with qualified SAML purpose (pse2):
Sample Code
ALTER PSE pse2 ADD PROVIDER providerB, providerC;
pse2 is now used to validate requests signed by providerA, providerB, and providerC.
● Remove the provider assigned to the existing collection, thus making it applicable to all providers:
Sample Code
SET PSE pse2 PURPOSE SAML;
pse2 is now used to validate requests signed by all providers.
426 P U B L I CSAP HANA Administration with SAP HANA Cockpit
Security Administration

Ownership of Certificate Collections
A certificate collection is a database object created in runtime. It is therefore owned by the database user who creates it. If a certificate collection is in use, in other words it has been assigned one of the above purposes, it is not possible to change it (for example, add or remove certificates) or to delete it. However, if the owner of the certificate collection is deleted, the certificate collection will be deleted even if it currently in use.
CautionThe deletion of a certificate collection that is assigned a purpose could render the database unusable. For example, if TLS/SSL is being enforced for all client connections and the certificate collection used for TLS/SSL is deleted, no new client connections to the database can be opened.
12.8.3 View Certificates in the Certificate Store
You can view certificates stored in the database on the Certificate Store page of the SAP HANA cockpit.
Prerequisites
You have the system privilege CERTIFICATE ADMIN or TRUST ADMIN.
Procedure
On the System Overview page, navigate to the Security area and choose the security link Manage certificates.
The Certificate Store page opens. All certificates in the certificate store are listed. If you want to view the full details of a certificate, simply click it. For more information, see Certificate Details.
If the certificate is used in one or more certificate collections, you can navigate to the Certificate Collections page by clicking the collection name in the Used In column.
NoteYou will only see the certificate collection if you have the object privilege ALTER, DROP, or REFERENCES on the collection.
Related Information
Certificate Details [page 428]
SAP HANA Administration with SAP HANA CockpitSecurity Administration P U B L I C 427

12.8.3.1 Certificate Details
On the Certificate Store page of the SAP HANA cockpit you can view the details of all certificates in the certificate store of the SAP HANA database.
Field Description
Issued To (CN) Common name of the person or entity identified by the certificate
Issued To (DN) Distinguished name of the person or entity identified by the certificate
Issued By (CN) Common name of the entity that verified the information and issued the certificate
Issued By (DN) Distinguished name of the entity that verified the information and issued the certificate
Issued On Date on which the certificate was issued
Expires On End of certificate's validity
Used In The certificate collections to which the certificate has been assigned
Version X.509 version (as specified in the corresponding RFC)
Public Key Algorithm Public key algorithm
Public Key Length Public key length
Signature Algorithm The cryptographic algorithm used to sign the certificate
Basic Constraints Whether the certificate belongs to a certification authority (CA)
Fingerprint The hash of the entire certificate, used as a unique identifier in the certificate store
Serial Number Serial number assigned by the certificate issuer
Related Information
Certificate Collection Details [page 430]
428 P U B L I CSAP HANA Administration with SAP HANA Cockpit
Security Administration

12.8.4 View Certificate Collections
You can view the certificate collections available in the database on the Certificate Collections page of the SAP HANA cockpit.
Prerequisites
You have the system privilege CATALOG READ and either TRUST ADMIN, USER ADMIN, or SSL ADMIN.
Procedure
On the System Overview page, navigate to the Security Related Links area and choose the security link Manage certificate collections.The Certificate Collections page opens. All existing collections are listed on the left. To see more detailed information about a specific collection on the right, simply select it. For more information, see Certificate Collection Details.
NoteIn back-end terminology, certificate collections are referred to as personal security environments (PSEs).
Related Information
Certificate Collections [page 424]
SAP HANA Administration with SAP HANA CockpitSecurity Administration P U B L I C 429

12.8.4.1 Certificate Collection Details
On the Certificate Collections page of the SAP HANA cockpit, you can view the details of all certificate collections in the SAP HANA database.
Field Description
Purpose Purpose of the collection
● DATABASE REPLICATIONDatabase replication for the purposes of copying or moving a tenant database to another system
● JWTUser authentication based on JSON Web Tokens
● LDAPCommunication between SAP HANA and an LDAP server being used for user authentication and authorization
● SAMLUser authentication based on SAML assertions
● SAP LOGONUser authentication based on logon and assertion tickets
● SSL/TLSCommunication between SAP HANA and an LDAP server being used for user authentication and authorization
● X509User authentication based on X.509 certificates
Provider SAML or JWT identity provider if the collection purpose is SAML or JWT
Private Key Indicates whether or not a private key has been set for the collection
Only a collection with the purpose SSL/TLS requires a private key. This is the key that the SAP HANA server uses to identify itself to connecting clients. While possible, there is no need to set a private key for certificate collections used for trust validation.
Created By Database user who created the collection
Comment Optional comment
430 P U B L I CSAP HANA Administration with SAP HANA Cockpit
Security Administration

Field Description
Certificates Certificates assigned to the collection
The function of each certificate in the certificate collection is indicated. The following functions are possible:
● TRUSTThe certificate is the public-key certificate of a trusted communication partner.
● PERSONALThe certificate is a server certificate belonging to the SAP HANA system and contains a private key.
● CHAINThe certificate is an intermediate certificate that is part of the trust chain from the server certificate to the root certificate that the communication partner (client) trusts.
For more information about the other certificate fields, see Certificate Details.
Related Information
Certificate Details [page 428]
12.8.5 Import a Trusted Certificate into the Certificate Store
You can store the public-key certificates of trusted communication partners, as well and the root certificates of trusted Certification Authorities directly in the SAP HANA database. You do this on the Certificate Store page of the SAP HANA cockpit.
Prerequisites
● You have the system privilege System privilege CERTIFICATE ADMIN.● The certificate that you want to add is available on your client in PEM format.
Procedure
1. On the System Overview page, navigate to the Security area and choose the security link Manage certificates.The Certificate Store page opens, listing all certificates already in the certificate store.
SAP HANA Administration with SAP HANA CockpitSecurity Administration P U B L I C 431

2. Import the certificate:a. Click Import.b. Specify the location of the certificate file on your client or paste the content of the file.c. Click OK.
The certificate is imported into the database and appears in the list of certificates in the certificate store. You can see the content of the certificate by navigating to its details view. For more information, see Certificate Details.
Results
The certificate is available for assignment to one or more certificate collections.
Related Information
Certificate Details [page 428]
12.8.6 Create a Certificate Collection
You can create a certificate collection on the Certificate Collections page. Then, you add the relevant trusted certificates and if necessary, the server certificate.
Prerequisites
● You have the system privilege TRUST ADMIN.● The certificates you want to add to the collection are in the certificate store. For more information, see Add
a Certificate to the Certificate Store.● If you plan to add a server certificate to the collection, it is available on your client in PEM format.
Procedure
1. On the System Overview page, navigate to the Security Related Links area and choose the security link Manage certificate collections.
The Certificate Collections page opens. All existing collections are listed on the left.
2. Create a new collection by clicking the Add button in the footer toolbar and entering the name of the collection.The collection is created and appears in the list of collections on the left.
432 P U B L I CSAP HANA Administration with SAP HANA Cockpit
Security Administration

CautionYou are the owner of the certificate collection. If your database user is deleted, the collection will also be deleted even if it currently in use. This could render the database unusable, for example, if SSL is being enforced for all client connections.
3. Add a trusted certificate by clicking Add Certificate and then selecting the certificate.
All certificates in the certificate store are available for selection. You can select more than one.
The trusted certificate is added to the collection. It has the function TRUST.4. Optional: Add the server certificate.
In addition to the public-key certificates of trusted communication partners, you can add the certificate of the SAP HANA server. This certificate contains the server's private key, as well as the intermediate certificates that complete the trust chain from the server certificate to the root certificate that the communication partner (client) trusts. The server certificate is necessary if the collection will be used for a purpose that includes server authentication (for example, purpose SSL). To add a server certificate, proceed as follows:a. Click Set Own Certificate.b. Specify the location of the certificate file on your client or paste the content of the file.c. Click OK.
As a result:
○ The server certificate is added to the collection. It has the function PERSONAL.○ Any intermediate certificates that are part of the trust chain from the server certificate to the root
certificate are also added. They have the function CHAIN.○ The Private Key attribute changes from Absent to Present.
Next Steps
Set the purpose of the collection.
Related Information
Set the Purpose of a Certificate Collection [page 434]
SAP HANA Administration with SAP HANA CockpitSecurity Administration P U B L I C 433

12.8.7 Set the Purpose of a Certificate Collection
You specify the purpose of a collection on the Certificate Collections page, for example SAML user authentication. A collection may have only one purpose and a purpose may only be served by one collection.
Prerequisites
● If you are not the owner of the certificate collection, you need the object privilege REFERENCES on the certificate collection.
● You have the necessary system privilege to set the purpose:
Purpose Privilege
User authentication USER ADMIN
SSL/TLS (secure client-server communication over JDBC/ODBC)
SSL ADMIN
NoteIn addition, the server certificate containing the server's private key must be part of the collection.
DATABASE REPLICATION DATABASE ADMIN
LDAP LDAP ADMIN
REMOTE SOURCE CREATE REMOTE SOURCE
Procedure
1. On the System Overview page, navigate to the Security Related Links area and choose the security link Manage certificate collections.
2. Find and select the collection that you want to set the purpose for.3. Open the collection for editing by choosing Edit Purpose.4. In the dialog box, select the purpose:
Option Description
DATABASE REPLICATION
Communication between two systems via external SQL connections for the purposes of copying or moving a tenant database
JWT User authentication based on JSON Web Token (JWT)
LDAP Communication between the SAP HANA database and an LDAP server being used for user authentication and authorization
SAML User authentication based on SAML assertions
SAP LOGON User authentication based on logon and assertion tickets
434 P U B L I CSAP HANA Administration with SAP HANA Cockpit
Security Administration

Option Description
SSL/TLS Client-server communication over JDBC/ODBC secured using SSL/TLS
X509 User authentication based on X.509 client certificates
REMOTE SOURCE Access data stored in a remote data source. For example, using Smart Data Access or Rserve.
NoteOnly the purposes that have been enabled by the system administrator are visible, and only those you are authorized for are enabled.
5. Select a provider.
NoteOnly the providers that have been enabled by the system administrator are visible, and only those you are authorized for are enabled.
6. Specify a host.You need to manually specify the host name to be used.
7. Save the collection.
Results
The collection starts being used for the selected purpose immediately. If another collection had been assigned the purpose before, it will no longer be used.
12.8.8 Export a Client Certificate
You can export the contents of a client certificate available in the certificate store. For example, you may need to export the SAP HANA server certificate to set up a trust relationship with trusted clients.
Prerequisites
You have the system privilege CERTIFICATE ADMIN or TRUST ADMIN.
NoteFor information on how to set up the database client so that it accepts the server's certificate (or root certificate), including the use of the openssl or sapgenpse commands to extract and import these certificates, refer to the section Implement Mutual Authentication in the SAP HANA Client Interface Programming Reference.
SAP HANA Administration with SAP HANA CockpitSecurity Administration P U B L I C 435

Procedure
1. On the System Overview page, navigate to the Security area and choose the security link Manage certificates.
The Certificate Store page opens. All certificates in the certificate store are listed.
NoteYou can also navigate to certificates through the certificate collection to which they are assigned.
2. Find the certificate you want to export and navigate to the detailed view.3. Click Show PEM Representation in the footer.4. Export the certificate contents using copy and paste.
12.8.9 SQL Statements and Authorization for In-Database Certificate Management (Reference)
All administration tasks related to in-database certificate management can be performed using SQL.
The following table lists the SQL statements for creating and managing certificates and certificate collections in the SAP HANA database, including the required authorization for each task. For more detailed information about the syntax of the statements mentioned, see the SAP HANA SQL and System Views Reference.
NoteCertificate collections are referred to as personal security environments (PSEs) in back-end terminology.
To... Execute the Statement... With the Authorization...
See certificates in the in-database certificate store
SELECT * FROM CERTIFICATES
NoteYou can also view certificates on the Certificate Store app of the SAP HANA cockpit.
System privilege CERTIFICATE ADMIN or TRUST ADMIN
If you have object privilege ALTER on a certificate collection, you'll also be able to see the certificates used in this collection.
See certificate collections SELECT * FROM PSES
NoteYou can also view certificate collections in the Certificate Store app of the SAP HANA cockpit.
System privilege TRUST ADMIN
If you have object privilege ALTER, DROP, or REFERENCES on a certificate collection, you'll also be able to see this collection.
436 P U B L I CSAP HANA Administration with SAP HANA Cockpit
Security Administration

To... Execute the Statement... With the Authorization...
See which certificates are used in a certificate collection
SELECT * FROM PSE_CERTIFICATES
NoteYou can also see this information on the Certificate Store app of the SAP HANA cockpit.
Object privilege ALTER, DROP, or REFERENCES on the certificate collection
Add a certificate to the in-database certificate store
CREATE CERTIFICATE FROM <certificate_content> [ COMMENT <comment> ]
System privilege CERTIFICATE ADMIN
Delete a certificate from the in-database certificate
NoteIf the certificate has already been added to a certificate collection, it can't be deleted.
DROP CERTIFICATE <certificate_id>
System privilege CERTIFICATE ADMIN
View certificate collections in the database, including the certificates they contain
SELECT * FROM PSE_CERTIFICATES
NoteYou can also view certificate collections on the Certificate Collection app of the SAP HANA cockpit.
System privilege CATALOG READ and either TRUST ADMIN, USER ADMIN, or SSL ADMIN
NoteIf you own a certificate collection or you have the object privilege ALTER, DROP, or REFERENCES on a certificate collection, you'll be able to see it without the above privileges.
Create a certificate collection CREATE PSE <PSE_name> System privilege TRUST ADMIN
Add a public-key certificate to a certifi-cate collection
ALTER PSE <PSE_name> ADD CERTIFICATE <certificate_id>
● Nothing if you're the owner of the certificate collection
● Object privilege ALTER on the certificate collection if you're not the owner
NoteIf the purpose of the certificate collection has already been set, then system privilege USER ADMIN or SSL ADMIN is additionally required depending on whether the purpose is user authentication or secure communication.
Remove a public-key certificate from a certificate collection
ALTER PSE <PSE_name> DROP CERTIFICATE <certificate_id>
SAP HANA Administration with SAP HANA CockpitSecurity Administration P U B L I C 437

To... Execute the Statement... With the Authorization...
Add a private key to a certificate collection
ALTER PSE <PSE_name> SET OWN CERTIFICATE <certificate_content>
● Nothing if you're the owner of the certificate collection
● Object privilege ALTER on the certificate collection if you're not the owner
Set the purpose of a certificate collection and qualify it if necessary
SET PSE <PSE_name> PURPOSE <purpose>
The following PSE purposes are possible:
System privilege USER ADMIN if the purpose is user authentication (SAML, X.509, JWT, or logon tickets)
NoteObject privilege REFERENCES on the certificate collection is additionally required if you are not the owner of the collection.
SAML
You can qualify the purpose SAML for specific identity providers as follows: SET PSE <PSE_name> PURPOSE SAML FOR PROVIDER <provider, ...>
NoteA provider can only be used to qualify the purpose of one collection. If you use SET PSE to assign a provider that is already assigned to another collection, the provider is removed from the other collection. If this was the only provider assigned to the other collection, the purpose is also removed.
USER ADMIN
438 P U B L I CSAP HANA Administration with SAP HANA Cockpit
Security Administration

To... Execute the Statement... With the Authorization...
JWT
You can qualify the purpose JWT for specific identity providers as follows: SET PSE <PSE_name> PURPOSE JWT FOR PROVIDER <provider, ...>
NoteA provider can only be used to qualify the purpose of one collection. If you use SET PSE to assign a provider that is already assigned to another collection, the provider is removed from the other collection. If this was the only provider assigned to the other collection, the purpose is also removed.
USER ADMIN
X509 USER ADMIN
SAP LOGON USER ADMIN
SSL
You can qualify the purpose SSL for specific host names as follows: SET PSE <PSE_name> PURPOSE SSL FOR HOST <host_name, ...>.
NoteThe same host name can be used to qualify the purpose of multiple collections.
NoteYou can only assign the purpose SSL if a private key has already been added.
System privilege SSL ADMIN if the purpose is secure client-server communication (SSL)
DATABASE REPLICATION System privilege DATABASE ADMIN if the purpose is copying or moving a tenant database between systems
LDAP System privilege LDAP ADMIN if the purpose is LDAP-based user authentication and authorization
REMOTE SOURCE System privilege CREATE REMOTE SOURCE
SAP HANA Administration with SAP HANA CockpitSecurity Administration P U B L I C 439

To... Execute the Statement... With the Authorization...
Unset the purpose of a certificate collection
UNSET PSE <PSE_name> PURPOSE <PSE_purpose>
NoteIf the collection has identity providers or host names assigned, these are also removed from the collection.
Add an identity provider or host name to a certificate collection with purpose SAML or JWT, or SSL.
● ALTER PSE <PSE_name> ADD PROVIDER <SAML_or_JWT_provider>
● ALTER PSE <PSE_name> ADD HOST <host_name>
NoteYou can only use this statement to add further providers or host names to a collection. In other words, the collection must have at least one provider or host name already added. To add the first provider or host name, use the SET PSE statement.
● System privilege USER ADMIN if the purpose is SAML or JWT
● System privilege SSL ADMIN if the purpose is secure client-server communication (SSL)
Remove an identity provider or host name from a certificate collection with purpose SAML or JWT, or SSL.
● ALTER PSE <PSE_name> DROP PROVIDER <SAML_or_JWT_provider>
● ALTER PSE <PSE_name> DROP HOST <host_name>
NoteYou cannot use this statement to remove the last provider or host name assigned to a collection. To remove the last provider or host name, use the UNSET PSE statement.
● System privilege USER ADMIN if the purpose is SAML or JWT
● System privilege SSL ADMIN if the purpose is secure client-server communication (SSL)
See which certificate collections have qualified purposes
SELECT * FROM PSE_PURPOSE_OBJECTS
System privilege TRUST ADMIN
If you have object privilege ALTER or REFERNCES on a certificate collection or are the owner of the collection, you'll also be able to see information about that collection.
440 P U B L I CSAP HANA Administration with SAP HANA Cockpit
Security Administration

To... Execute the Statement... With the Authorization...
Delete a certificate collection DROP PSE <PSE_name>
NoteIf the certificate collection has already been assigned a purpose, it can't be deleted.
● Nothing, if you're the owner of the certificate collection
● Object privilege DROP on the certificate collection, if you're not the owner
12.9 Data Anonymization
To enable analytics on data while still protecting the privacy of individuals, data anonymization capabilities are made available in SAP HANA in the form of anonymization views in the case of SQL, and as anonymization nodes in the case of calculation views.
NoteSAP HANA provides only features and tools that help customers to implement data protection requirements and facilitate the required discussions between data scientists and data protection officers.
For more information about data anonymization in SAP HANA, see the SAP HANA Security Guide.
For more information about modeling calculation views with anonymization nodes, see the SAP HANA Modeling Guide for XS Advanced Model.
Related Information
Show Anonymization Views [page 441]
12.9.1 Show Anonymization Views
As a data protection officer or data controller, you can retrieve information about all SQL anonymization views in the SAP HANA database as well as a list of all calculation views with anonymization nodes configured.
Prerequisites
You have system privilege CATALOG READ.
SAP HANA Administration with SAP HANA CockpitSecurity Administration P U B L I C 441

Procedure
On the System Overview page, navigate to the Security area and choose the Anonymization Report tile.On the Anonymization Report page, you can see all anonymized views in the database as well as all calculation views that have one or more anonymization nodes configured. The following information is available:○ The name of the anonymized view or calculation view○ The name of the anonymization nodes (for calculation views only)○ The anonymization method used: k-anonymity, l-diversity, or differential privacy○ Configuration values of the relevant method○ Columns in the view, including anonymization information○ KPI values for anonymized views
442 P U B L I CSAP HANA Administration with SAP HANA Cockpit
Security Administration

13 Managing Database Users and Roles
As a user administrator for the SAP HANA database, you create and configure database users, as well as authorize them to work with the database by assigning the necessary roles.
The recommended process for provisioning users is as follows:
1. Define and create roles.
NoteYou can create only catalog roles using the SAP HANA cockpit. Design-time roles (database artifact with file suffix .hdbrole) can be created using the SAP Web IDE for SAP HANA and deployed using SAP HANA deployment infrastructure (SAP HANA DI).
2. Define and create user groups.3. Create users in user groups.4. Grant roles to users.
NoteCreating user groups and assigning users to user groups is an optional step and depends on the requirements in your setup. For more information about user groups, see the SAP HANA Security Guide.
Further tasks related to user provisioning include for example:
● Deleting users when they leave the organization● Reactivating users after too many failed logon attempts● Deactivating users if a security violation has been detected● Resetting user passwords
NoteUse SQL to create the technical user required to register a resource through the SAP HANA cockpit and grant the minimum necessary authorizations:
CREATE USER <username> PASSWORD <password> NO FORCE_FIRST_PASSWORD_CHANGE VALID UNTIL FOREVER; GRANT CATALOG READ to <username>; GRANT SELECT on SCHEMA _SYS_STATISTICS to <username>
Related Information
Create a Catalog Role [page 455]Create a User Group [page 470]Create a Database User [page 477]Assign Roles to a Database User [page 485]
SAP HANA Administration with SAP HANA CockpitManaging Database Users and Roles P U B L I C 443

13.1 View a Database User
You can view database users on the User page of the SAP HANA cockpit.
Prerequisites
You have the system privilege CATALOG READ. You don't require any additional privileges to view your own database user.
Procedure
1. On the System Overview page, navigate to the Security area and choose the Manage users link.
The User page opens. All existing database users are displayed in list format on the left.2. To see more detailed information about a specific user, simply select it.
For more information, see Database User Details.
Related Information
Database User Details [page 444]
13.1.1 Database User Details
On the User page of the SAP HANA cockpit, you can view the details of all users in the SAP HANA database.
General Information
Field Description
User Name Unique user name
User Group User group that the user is a member of
A user can belong to only one user group, but a user does not have to be a member of any group.
444 P U B L I CSAP HANA Administration with SAP HANA Cockpit
Managing Database Users and Roles

Field Description
E-Mail User's e-mail address
Valid From/To Validity period of the user
If the user account is not currently within its validity period, the user is inactive and cannot log on.
If no validity period is configured, the user is indefinitely valid.
Last Successful Login The last time the user logged on successfully
Deactivated Since Time the user was deactivated
Creation of Objects in Own Schema Indicates whether or not the user can create objects in their database schema
Standard users can create objects in their schema. Restricted users cannot.
For more information about the difference between standard and restricted users, see Database Users.
PUBLIC Role Indicates whether or not the user has the PUBLIC role
Standard users have this role by default. Restricted users do not.
For more information about the difference between standard and restricted users, see Database Users.
Disable ODBC/JDBC Access Indicates whether or not the user can connect to the database via ODBC or JDBC
By default, ODBC/JDBC access is disabled for restricted users, meaning they can only connect via HTTP/HTTPS, and enabled for standard users.
For more information about the difference between standard and restricted users, see Database Users.
Comment Free-text comment or description (if applicable)
SAP HANA Administration with SAP HANA CockpitManaging Database Users and Roles P U B L I C 445

Authorization Mode
Field Description
Authorization Mode Indicates whether the user's authorization is based on LDAP group membership or local SAP HANA mechanisms
A user with authorization mode LDAP is granted roles exclusively based on their LDAP group membership. It is not possible to grant such a user other roles or privileges directly.
The default user authorization mode is Local. This means that the user must be granted roles and privileges directly.
For more information about LDAP group authorization, see the SAP HANA Security Guide.
Assign Roles Open the Assign Roles app where you can assign roles to the user
Assign Privileges Open the Assign Privileges app where you can assign privileges to the user
Authentication
Field Description
Password Indicates whether or not user name-password authentication is enabled
Users accessing the SAP HANA database authenticate themselves by entering their database user name and either their local SAP HANA password or a password stored in an LDAP directory server.
Force password change on next logon Indicates whether the user must change a password set by a user administrator the first time he or she logs on, regardless of how the password policy parameter Password Change Required on First Logon is configured
Kerberos Indicates whether or not Kerberos authentication is enabled
If enabled, the external identity to which the database user is mapped must be specified.
SAP Logon Ticket, SAP Assertion Ticket Indicates whether or not authentication using SAP logon or assertion tickets is enabled
SAML Indicates whether or not SAML authentication is enabled
If enabled, the external identity to which the database user is mapped can be explicitly specified. Alternatively, if the option Automatic Mapping by Provider is selected, the identity provider is allowed to map its users to the database user.
446 P U B L I CSAP HANA Administration with SAP HANA Cockpit
Managing Database Users and Roles

Field Description
JWT Indicates whether or not JSON Web Token authentication is enabled
If enabled, the external identity to which the database user is mapped can be explicitly specified. Alternatively, if the option Automatic Mapping by Provider is selected, the identity provider is allowed to map its users to the database user.
X509 Indicates whether or not X.509 certificate authentication is enabled
NoteFor more information about authentication mechanisms, see the SAP HANA Security Guide.
Custom User Properties
Additional user properties can be configured for client applications. The following properties are available by default:
Property Description
CLIENT The session client
When you create SAP HANA calculation views, it is possible to filter the data according to the client specified in table fields such as MANDT or CLIENT.
LOCALE The user's locale
When you create SAP HANA information models (attribute views, analytic views, and calculation views), this parameter can be used to translate information according to the user's locale.
PRIORITY The priority with which the thread scheduler handles statements executed by the user
Priority values of 0 (lowest priority) to 9 (highest) are available; the default priority is 5.
SAP HANA Administration with SAP HANA CockpitManaging Database Users and Roles P U B L I C 447

Property Description
STATEMENT MEMORY LIMIT The maximum memory (in GB) that can be used by a statement executed by the user
The properties statement_memory_limit and statement_memory_limit_threshold in the memory_manager section of the global.ini configu-ration file are used to limit the memory that can be allocated with respect to statement execution.
statement_memory_limit_threshold indicates what percentage of the global memory allocation limit must be in use before the specific value of statement_memory_limit is applied. If this memory limit is being applied and a statement execution exceeds it, then the statement is aborted.
With this user parameter, you can set a user-specific limit that takes precedence over the global statement memory limit.
For more information about memory usage, see Setting a Memory Limit for SQL Statements in the SAP HANA Administration Guide.
STATEMENT THREAD LIMIT The maximum number of threads that can be used by a statement executed by the user
TIME ZONE The user's timezone
The standard database formats for locale and timezone are supported.
Related Information
Create a User Group [page 470]Assign Roles to a Database User [page 485]Assign Privileges to a User [page 486]
13.1.2 Database Users
Every user who wants to work with the SAP HANA database must have a database user.
Database users are created with either the CREATE USER or CREATE RESTRICTED USER statement, or using the SAP HANA cockpit.
448 P U B L I CSAP HANA Administration with SAP HANA Cockpit
Managing Database Users and Roles

Standard Users
Standard users correspond to users created with the CREATE USER statement. By default they can create objects in their own schema and read data in system views. Read access to system views is granted by the PUBLIC role, which is granted to every standard user.
Restricted Users
Restricted users, which are created with the CREATE RESTRICTED USER statement, initially have no privileges. Restricted users are intended for provisioning users who access SAP HANA through client applications and who are not intended to have full SQL access via an SQL console. If the privileges required to use the application are encapsulated within an application-specific role, then it is necessary to grant the user only this role. In this way, it can be ensured that users have only those privileges that are essential to their work.
Compared to standard database users, restricted users are initially limited in the following ways:
● They cannot create objects in the database as they are not authorized to create objects in their own database schema.
● They cannot view any data in the database as they are not granted the standard PUBLIC role.● They are only able to connect to the database using HTTP/HTTPS.
For restricted users to connect via ODBC or JDBC, access for client connections must be enabled by executing the SQL statement ALTER USER <user_name> ENABLE CLIENT CONNECT or enabling the corresponding option for the user in the SAP HANA cockpit.For full access to ODBC or JDBC functionality, users also require the predefined role RESTRICTED_USER_ODBC_ACCESS or RESTRICTED_USER_JDBC_ACCESS.
NoteDisabling ODBC/JDBC access for a user, either a restricted user or a standard user, does not affect the user's authorizations or prevent the user from executing SQL commands via channels other than JDBC/ODBC. If the user has been granted SQL privileges (for example, system privileges and object privileges), he or she is still authorized to perform the corresponding database operations using, for example, a HTTP/HTTPS client.
A user administrator can convert a restricted user into a standard user (or vice versa) as follows:
● Granting (or revoking) the PUBLIC roleYou can do this by editing the user in the SAP HANA cockpit or with the SQL statement ALTER USER <username> GRANT | REVOKE ROLE PUBLIC.
● Granting (or revoking) authorization to create objects in the user's own schemaYou can do this by editing the user in the SAP HANA cockpit or with the SQL statement ALTER USER <username> GRANT | REVOKE CREATE ANY ON OWN SCHEMA.
● Enabling (or disabling) full SQLYou can do this by editing the user in the SAP HANA cockpit or with the SQL statement ALTER USER <user_name> ENABLE CLIENT CONNECT.
NoteA user is only identified as a restricted user in system view USERS if he doesn't have the PUBLIC role or authorization for his own schema.
SAP HANA Administration with SAP HANA CockpitManaging Database Users and Roles P U B L I C 449

Predefined Database Users
When an SAP HANA database is created, several database users are created by default. The most important of these is the SYSTEM database user, which should be deactivated in production systems.
Several technical database users (that is, database users that do not correspond to real people) are also created, for example, SYS and _SYS_REPO.
For more information about other predefined database users, see the SAP HANA Security Guide.
13.2 View a Database Role
You can view database roles on the Role page of the SAP HANA cockpit.
Prerequisites
You have the system privilege CATALOG READ or ROLE ADMIN.
NoteEven if ROLE ADMIN was revoked from your user, you can still view roles that you created yourself.
Procedure
1. On the System Overview page, navigate to the Security area and choose the Manage roles link.
The Role page opens. All existing database roles are displayed in list format on the left.2. To see more detailed information about a specific role, simply select it.
For more information, see Database Role Details.
Related Information
Database Role Details [page 451]
450 P U B L I CSAP HANA Administration with SAP HANA Cockpit
Managing Database Users and Roles

13.2.1 Database Role Details
On the Role page of the SAP HANA cockpit, you can view the details of all roles in the SAP HANA database.
General Information
Field Description
Schema Schema in which the role exists (if applicable)
The schema represents the role's runtime namespace, which allows it to be used in different contexts.
A role without a schema is a global role.
CautionA role with a namespace will be deleted if the schema is deleted.
Creator User who created the role
LDAP Groups LDAP groups that have been mapped to the role (if applicable)
Database users configured for LDAP authorization who belong to the specified group(s) are automatically granted the role in line with your LDAP configuration for SAP HANA. For more information, see the SAP HANA Security Guide.
Comment Free-text comment or description (if applicable)
Type The role type:
● CatalogA role created in run-time with the SQL statement CREATE ROLE
● Catalog (LDAP)A catalog role with LDAP group mappings
● HDIA role created using the SAP Web IDE for SAP HANA and deployed using SAP HANA deployment infrastructure (SAP HANA DI)
● HDI (LDAP)A HDI role with LDAP group mappingsLDAP groups are mapped to the activated catalog role.
● Repository roleA role created in the built-in repository of the SAP HANA database using either the SAP HANA Web Workbench or the SAP HANA studio
Is Part of Roles Indicates whether the role is included in another role
SAP HANA Administration with SAP HANA CockpitManaging Database Users and Roles P U B L I C 451

Field Description
Roles Other roles granted to this role
System Privileges System privileges granted to the role
System privileges control general system activities. They are mainly used for administrative purposes, such as creating schemas, creating and changing users and roles, performing data backups, managing licenses, and so on.
For a list of all system privileges, see System Privileges (Reference).
Object Privileges Object privileges granted to the role
Object privileges are used to allow access to and modifica-tion of database objects, such as tables and views. Depending on the object type, different actions can be authorized (for example, SELECT, CREATE ANY, ALTER, DROP, and so on).
For a list of all object privileges, see Object Privileges (Reference).
Analytic Privileges Analytic privileges granted to the role
Analytic privileges are used to control read access to data in SAP HANA information models (that is, analytic views, attribute views, and calculation views) depending on certain values or combinations of values.
Is Part of Roles Other roles to which this role has been granted
Application Privileges Application privileges granted to the role
Application privileges are used to authorize user and client access to SAP HANA XS classic applications.
NoteApplication privileges are not relevant in the context of SAP HANA XS advanced applications. For more information about the authorization concept of the SAP HANA XS advanced, see the SAP HANA Security Guide.
Package Privileges Package privileges granted to the role
Package privileges are used to allow access to and the ability to work in packages in the repository of the SAP HANA database.
NoteWith SAP HANA XS advanced, source code and web content are not versioned and stored in the repository, so package privileges are not relevant in this context.
452 P U B L I CSAP HANA Administration with SAP HANA Cockpit
Managing Database Users and Roles

Field Description
Privileges on Users Privileges on users granted to the role
ATTACH DEBUGGER is the only privilege that can be granted on a user.
For example, User A can grant User B the privilege ATTACH DEBUGGER to allow User B debug SQLScript code in User A's session. User A is only user who can grant this privilege. Note that User B also needs the object privilege DEBUG on the relevant SQLScript procedure.
Related Information
Database Roles [page 453]System Privileges (Reference) [page 459]Object Privileges (Reference) [page 464]
13.2.2 Database Roles
A database role is a collection of privileges that can be granted to either a database user or another role in runtime.
A role typically contains the privileges required for a particular function or task, for example:
● Business end users reading reports using client tools such as Microsoft Excel● Modelers creating models and reports● Database administrators operating and maintaining the database and its users
Privileges can be granted directly to users of the SAP HANA database. However, roles are the standard mechanism of granting privileges as they allow you to implement complex, reusable authorization concepts that can be modeled on business roles.
Creation of Roles
Roles in the SAP HANA database can exist as runtime objects only (catalog roles), or as design-time objects that become catalog objects on deployment (database artifact with file suffix .hdbrole).
In an SAP HANA XS classic environment, database roles are created in the built-in repository of the SAP HANA database using either the SAP HANA Web Workbench or the SAP HANA studio. These are also referred to as repository roles. In an SAP HANA XS advanced environment, design-time roles are created using the SAP Web IDE and deployed using SAP HANA deployment infrastructure (SAP HANA DI, or HDI).
SAP HANA Administration with SAP HANA CockpitManaging Database Users and Roles P U B L I C 453
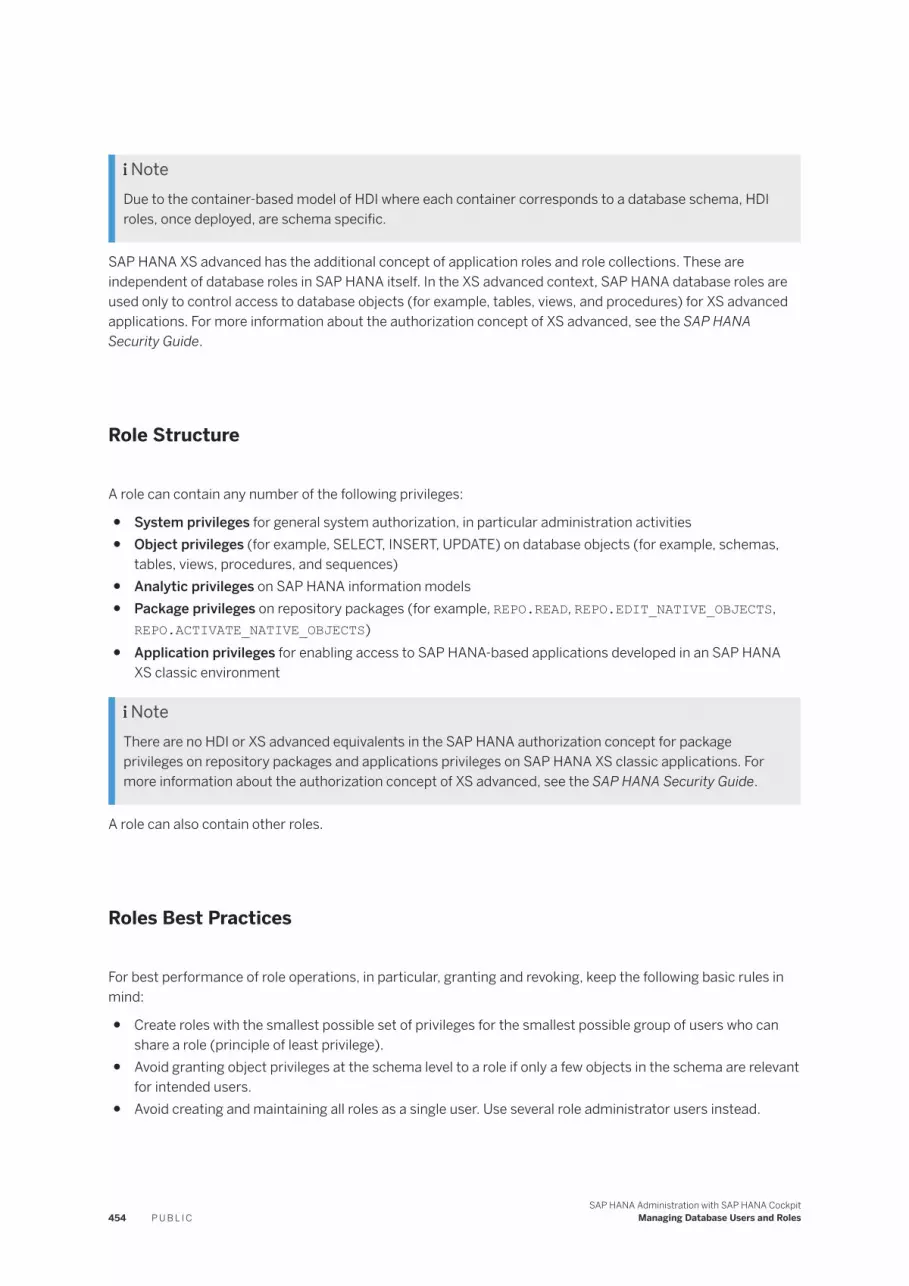
NoteDue to the container-based model of HDI where each container corresponds to a database schema, HDI roles, once deployed, are schema specific.
SAP HANA XS advanced has the additional concept of application roles and role collections. These are independent of database roles in SAP HANA itself. In the XS advanced context, SAP HANA database roles are used only to control access to database objects (for example, tables, views, and procedures) for XS advanced applications. For more information about the authorization concept of XS advanced, see the SAP HANA Security Guide.
Role Structure
A role can contain any number of the following privileges:
● System privileges for general system authorization, in particular administration activities● Object privileges (for example, SELECT, INSERT, UPDATE) on database objects (for example, schemas,
tables, views, procedures, and sequences)● Analytic privileges on SAP HANA information models● Package privileges on repository packages (for example, REPO.READ, REPO.EDIT_NATIVE_OBJECTS,
REPO.ACTIVATE_NATIVE_OBJECTS)● Application privileges for enabling access to SAP HANA-based applications developed in an SAP HANA
XS classic environment
NoteThere are no HDI or XS advanced equivalents in the SAP HANA authorization concept for package privileges on repository packages and applications privileges on SAP HANA XS classic applications. For more information about the authorization concept of XS advanced, see the SAP HANA Security Guide.
A role can also contain other roles.
Roles Best Practices
For best performance of role operations, in particular, granting and revoking, keep the following basic rules in mind:
● Create roles with the smallest possible set of privileges for the smallest possible group of users who can share a role (principle of least privilege).
● Avoid granting object privileges at the schema level to a role if only a few objects in the schema are relevant for intended users.
● Avoid creating and maintaining all roles as a single user. Use several role administrator users instead.
454 P U B L I CSAP HANA Administration with SAP HANA Cockpit
Managing Database Users and Roles

13.3 Create a Catalog Role
You can create a new role directly in runtime and grant it the privileges and roles necessary for the task or function that it represents on the Role page of the SAP HANA cockpit. It is also possible to map roles to LDAP groups if you are implementing user authorization based on LDAP group membership.
Prerequisites
● You have the system privilege ROLE ADMIN.● You have the privileges required to grant privileges and roles to the new role. For more information, see
Prerequisites for Granting and Revoking Privileges and Roles.
Procedure
1. On the System Overview page, navigate to the Security area and choose the Manage roles link.
The Role page opens. All existing database roles are displayed in list format on the left.2. Create the role:
a. Click the Add button in the footer toolbar.b. Specify a unique role name.c. Optional: Enter a comment or text to describe the role.d. Optional: Assign the role a runtime namespace by choosing the schema in which to create the role.
Role namespaces allow you to reuse role names in different contexts. If you do not select a schema, the role will be created as a global role.
CautionA role with a namespace will be deleted if the schema is deleted.
3. Optional: If you are implementing user authorization based on LDAP group membership, map one or more LDAP group to the role:a. Enable the assignment of LDAP groups to the role.b. Add the required LDAP groups by specifying the unique distinguished name (DN).
Users configured for LDAP authorization who belong to the specified group(s) are automatically granted the role in line with your LDAP configuration for SAP HANA. For more information, see the SAP HANA Security Guide.
4. Choose Save.
The role is created.5. Assign the required roles to the role:
a. In the Roles area, choose Edit.b. Choose Add and select the roles you want to assign.
SAP HANA Administration with SAP HANA CockpitManaging Database Users and Roles P U B L I C 455
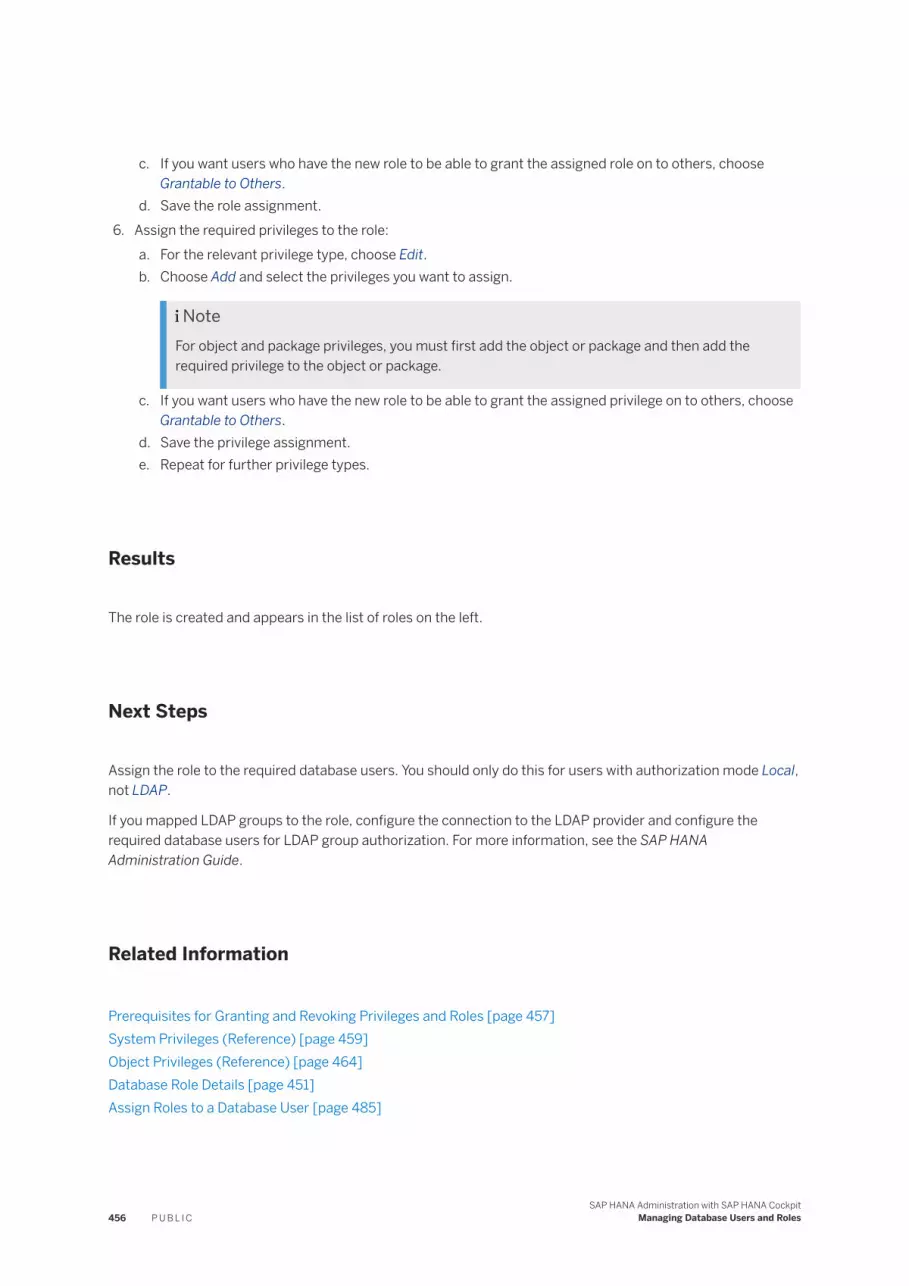
c. If you want users who have the new role to be able to grant the assigned role on to others, choose Grantable to Others.
d. Save the role assignment.6. Assign the required privileges to the role:
a. For the relevant privilege type, choose Edit.b. Choose Add and select the privileges you want to assign.
NoteFor object and package privileges, you must first add the object or package and then add the required privilege to the object or package.
c. If you want users who have the new role to be able to grant the assigned privilege on to others, choose Grantable to Others.
d. Save the privilege assignment.e. Repeat for further privilege types.
Results
The role is created and appears in the list of roles on the left.
Next Steps
Assign the role to the required database users. You should only do this for users with authorization mode Local, not LDAP.
If you mapped LDAP groups to the role, configure the connection to the LDAP provider and configure the required database users for LDAP group authorization. For more information, see the SAP HANA Administration Guide.
Related Information
Prerequisites for Granting and Revoking Privileges and Roles [page 457]System Privileges (Reference) [page 459]Object Privileges (Reference) [page 464]Database Role Details [page 451]Assign Roles to a Database User [page 485]
456 P U B L I CSAP HANA Administration with SAP HANA Cockpit
Managing Database Users and Roles

13.3.1 Prerequisites for Granting and Revoking Privileges and Roles
To be able to grant and revoke privileges and roles to and from users and roles, several prerequisites must be met.
The following table lists the prerequisites that a user must meet to grant privileges and roles to another user (or role).
Prerequisites for Granting Privileges
To grant... The granting user needs...
A system privilege The system/object privilege being granted and be authorized to grant it to other users and roles
An object privilege on an object that exists only in runtime
An object privilege on an activated object created in the repository, such as a calculation view
The object privilege EXECUTE on the procedure GRANT_PRIVILEGE_ON_ACTIVATED_CONTENT
An object privilege on schema containing activated objects created in the repository, such as a calculation view
The object privilege EXECUTE on the procedure GRANT_SCHEMA_PRIVILEGE_ON_ACTIVATED_CONTENT
A package privilege The package privilege being granted and be authorized to grant it to other users and roles
An analytic privilege The object privilege EXECUTE on the procedure GRANT_ACTIVATED_ANALYTICAL_PRIVILEGE
An application privilege The object privilege EXECUTE on the procedure GRANT_APPLICATION_PRIVILEGE
Privilege on user ATTACH DEBUGGER To be the user on which ATTACH DEBUGGER is granted
A role created in runtime Either:
● The role being granted and be authorized to grant it to other users and roles, or
● The system privilege ROLE ADMIN
A role created in the repository The object privilege EXECUTE on the procedure GRANT_ACTIVATED_ROLE
A role created in an HDI container Either:
● Privileges to execute GRANT_CONTAINER_SCHEMA_ROLES in the container's API schema, or, if the user is a container group administrator, privileges to execute GRANT_CONTAINER_SCHEMA_ROLES in the container group's API schema.
● The system privilege ROLE ADMIN
Prerequisites for Revoking Privileges
To revoke ... The revoking user needs...
A system privilege To be the user who granted the privilege
An object privilege on an object that exists only in runtime
SAP HANA Administration with SAP HANA CockpitManaging Database Users and Roles P U B L I C 457

To revoke ... The revoking user needs...
An object privilege on an activated object created in the repository, such as a calculation view
The object privilege EXECUTE on the procedure REVOKE_PRIVILEGE_ON_ACTIVATED_CONTENT
An object privilege on schema containing activated objects created in the repository, such as a calculation view
The object privilege EXECUTE on the procedure REVOKE_SCHEMA_PRIVILEGE_ON_ACTIVATED_CONTENT
A package privilege The user who granted the privilege
An analytic privilege The object privilege EXECUTE on the procedure REVOKE_ACTIVATED_ANALYTICAL_PRIVILEGE
An application privilege The object privilege EXECUTE on the procedure REVOKE_APPLICATION_PRIVILEGE
Privilege on user ATTACH DEBUGGER To be the user on which ATTACH DEBUGGER is granted
A role created in runtime ● To be the user who granted the role, or● The system privilege ROLE ADMIN
NoteWith the exception of roles granted by technical user _SYS_REPO, a user with ROLE ADMIN cannot revoke roles granted by technical users SYS and _SYS*.
A role created in the repository The object privilege EXECUTE on the procedure REVOKE_ACTIVATED_ROLE
A role created in an HDI container Either:
● Privileges to execute REVOKE_CONTAINER_SCHEMA_ROLES in the container's API schema, or, if the user is a container group administrator, privileges to execute REVOKE_CONTAINER_SCHEMA_ROLES in the container group's API schema.
● The system privilege ROLE ADMIN
Authorization of User _SYS_REPO
If you are implementing your authorization concept using roles and you are creating roles in the repository of the SAP HANA database, the technical user _SYS_REPO is the granting and revoking user. _SYS_REPO automatically meets all of the above prerequisites with the exception of those for granting/revoking objects privileges on objects that exist only in runtime. These privileges must be explicitly granted to _SYS_REPO. For more information about roles as repository objects, see the SAP HANA Security Guide.
How are HDI roles granted and revoked?
In the SAP HANA deployment infrastructure (HDI), there are two types of users that can grant or revoke roles.
Roles created in an HDI container can be granted to (or revoked from) other roles and users either by an administrator of the container or an administrator of the container group that the container belongs to.
458 P U B L I CSAP HANA Administration with SAP HANA Cockpit
Managing Database Users and Roles

Preferably, roles created in an HDI container are granted or revoked by a container administrator.
13.3.2 System Privileges (Reference)
System privileges control general system activities.
General System Privileges
System Privilege Description
ADAPTER ADMIN Controls the execution of the following adapter-related statements: CREATE ADAPTER, DROP ADAPTER, and ALTER ADAPTER. It also allows access to the ADAPTERS and ADAPTER_LOCATIONS system views.
AGENT ADMIN Controls the execution of the following agent-related statements: CREATE AGENT, DROP AGENT, and ALTER AGENT. It also allows access to the AGENTS and ADAPTER_LOCATIONS system views.
ATTACH DEBUGGER Authorizes debugging across different user sessions. For example, userA can grant ATTACH DEBUGGER to userB to allow userB to debug a procedure in userA’s session (userB still needs DEBUG privilege on the procedure, however).
AUDIT ADMIN Controls the execution of the following auditing-related statements: CREATE AUDIT POLICY, DROP AUDIT POLICY, and ALTER AUDIT POLICY, as well as changes to the auditing configuration. It also allows access to the AUDIT_LOG, XSA_AUDIT_LOG, and ALL_AUDIT_LOG system views.
AUDIT OPERATOR Authorizes the execution of the following statement: ALTER SYSTEM CLEAR AUDIT LOG. It also allows access to the AUDIT_LOG system view.
AUDIT READ Authorizes read-only access to the rows of the AUDIT_LOG, XSA_AUDIT_LOG, and ALL_AUDIT_LOG system views.
BACKUP ADMIN Authorizes BACKUP and RECOVERY statements for defining and initiating backup and recovery procedures. It also authorizes changing system configuration options with respect to backup and recovery.
BACKUP OPERATOR Authorizes the BACKUP statement to initiate a backup.
SAP HANA Administration with SAP HANA CockpitManaging Database Users and Roles P U B L I C 459

System Privilege Description
CATALOG READ Authorizes unfiltered access to the data in the system views that a user has already been granted the SELECT privilege on. Normally, the content of these views is filtered based on the privileges of the user. CATALOG READ does not allow a user to view system views on which they have not been granted the SELECT privilege.
CERTIFICATE ADMIN Authorizes the changing of certificates and certificate collections that are stored in the database.
CLIENT PARAMETER ADMIN Authorizes a user to override the value of the CLIENT parameter for a database connection or to overwrite the value of the $$client$$ parameter in an SQL query.
CREATE CLIENTSIDE ENCRYPTION KEYPAIR Authorizes a user to create client-side encryption key pairs.
CREATE R SCRIPT Authorizes the creation of a procedure by using the language R.
CREATE REMOTE SOURCE Authorizes the creation of remote data sources by using the CREATE REMOTE SOURCE statement.
CREATE SCENARIO Controls the creation of calculation scenarios and cubes (calculation database).
CREATE SCHEMA Authorizes the creation of database schemas using the CREATE SCHEMA statement.
CREATE STRUCTURED PRIVILEGE Authorizes the creation of structured (analytic privileges).
Only the owner of the privilege can further grant or revoke that privilege to other users or roles.
CREDENTIAL ADMIN Authorizes the use of the statements CREATE CREDENTIAL, ALTER CREDENTIAL, and DROP CREDENTIAL.
DATA ADMIN Authorizes reading all data in the system views. It also enables execution of Data Definition Language (DDL) statements in the SAP HANA database.
A user with this privilege cannot select or change data in stored tables for which they do not have access privileges, but they can drop tables or modify table definitions.
DATABASE ADMIN Authorizes all statements related to tenant databases, such as CREATE, DROP, ALTER, RENAME, BACKUP, and RECOVERY.
DATABASE START Authorizes a user to start any database in the system and to select from the M_DATABASES view.
460 P U B L I CSAP HANA Administration with SAP HANA Cockpit
Managing Database Users and Roles

System Privilege Description
DATABASE STOP Authorizes a user to stop any database in the system and to select from the M_DATABASES view.
DROP CLIENTSIDE ENCRYPTION KEYPAIR Authorizes a user to drop other users' client-side encryption key pairs.
ENCRYPTION ROOT KEY ADMIN Authorizes all statements related to management of root keys:
Allows access to the system views pertaining to encryption (for example, ENCRYPTION_ROOT_KEYS, M_ENCRYPTION_OVERVIEW, M_PERSISTENCE_ENCRYPTION_STATUS, M_PERSISTENCE_ENCRYPTION_KEYS, and so on).
EXPORT Authorizes EXPORT to a file on the SAP HANA server. The user must also have the SELECT privilege on the source tables to be exported.
EXTENDED STORAGE ADMIN Authorizes the management of SAP HANA dynamic tiering and the creation of extended storage.
IMPORT Authorizes the import activity in the database using the IMPORT statements. The user must also have the INSERT privilege on the target tables to be imported.
INIFILE ADMIN Authorizes making changes to system settings.
LDAP ADMIN Authorizes the use of the CREATE | ALTER | DROP | VALIDATE LDAP PROVIDER statements.
LICENSE ADMIN Authorizes the use of the SET SYSTEM LICENSE statement to install a new license.
LOG ADMIN Authorizes the use of the ALTER SYSTEM LOGGING [ON | OFF] statements to enable or disable the log flush mechanism.
MONITOR ADMIN Authorizes the use of the ALTER SYSTEM statements for events.
OPTIMIZER ADMIN Authorizes the use of the ALTER SYSTEM statements concerning SQL PLAN CACHE and ALTER SYSTEM UPDATE STATISTICS statements, which influence the behavior of the query optimizer.
SAP HANA Administration with SAP HANA CockpitManaging Database Users and Roles P U B L I C 461

System Privilege Description
RESOURCE ADMIN Authorizes statements concerning system resources (for example, the ALTER SYSTEM RECLAIM DATAVOLUME and ALTER SYSTEM RESET MONITORING VIEW statements). It also authorizes many of the statements available in the Management Console.
ROLE ADMIN Authorizes the creation and deletion of roles by using the CREATE ROLE and DROP ROLE statements. It also authorizes the granting and revoking of roles by using the GRANT and REVOKE statements.
Activated repository roles, meaning roles whose creator is the predefined user _SYS_REPO, can neither be granted to other roles or users nor dropped directly. Not even users with the ROLE ADMIN privilege can do so. Check the documentation concerning activated objects.
SAVEPOINT ADMIN Authorizes the execution of a savepoint using the ALTER SYSTEM SAVEPOINT statement.
SCENARIO ADMIN Authorizes all calculation scenario-related activities (including creation).
SERVICE ADMIN Authorizes the ALTER SYSTEM [START|CANCEL|RECONFIGURE] statements for administering system services of the database.
SESSION ADMIN Authorizes the ALTER SYSTEM commands concerning sessions to stop or disconnect a user session or to change session variables.
SSL ADMIN Authorizes the use of the SET...PURPOSE SSL statement. It also allows access to the PSES system view.
STRUCTUREDPRIVILEGE ADMIN Authorizes the creation, reactivation, and dropping of structured (analytic) privileges.
TENANT ADMIN Authorizes the tenant operations performed by the ALTER SYSTEM [RESUME|SUSPEND] TENANT statements.
TABLE ADMIN Authorizes LOAD, UNLOAD and MERGE of tables and table placement.
TRACE ADMIN Authorizes the use of the ALTER SYSTEM...TRACES statements for operations on database trace files and authorizes changing trace system settings.
TRUST ADMIN Authorizes the use of statements to update the trust store.
462 P U B L I CSAP HANA Administration with SAP HANA Cockpit
Managing Database Users and Roles

System Privilege Description
USER ADMIN Authorizes the creation and modification of users by using the CREATE | ALTER | DROP USER statements.
VERSION ADMIN Authorizes the use of the ALTER SYSTEM RECLAIM VERSION SPACE statement of the multi-version concurrency control (MVCC) feature.
WORKLOAD ADMIN Authorizes execution of the workload class and mapping statements (for example, CREATE | ALTER | DROP WORKLOAD CLASS, and CREATE | ALTER | DROP WORKLOAD MAPPING).
WORKLOAD ANALYZE ADMIN Used by the Analyze Workload, Capture Workload, and Replay Workload applications when performing workload analysis.
WORKLOAD CAPTURE ADMIN Authorizes access to the monitoring view M_WORKLOAD_CAPTURES to see the current status of capturing and captured workloads, as well of execution of actions with the WORKLOAD_CAPTURE procedure.
WORKLOAD REPLAY ADMIN Authorizes access to the monitoring views M_WORKLOAD_REPLAY_PREPROCESSES and M_WORKLOAD_REPLAYS to see current status of preprocessing, preprocessed, replaying, and replayed workloads, as well as the execution of actions with the WORKLOAD_REPLAY procedure.
<identifier>.<identifier> Components of the SAP HANA database can create new system privileges. These privileges use the component-name as the first identifier of the system privilege and the component-privilege-name as the second identifier.
Repository System Privileges
NoteThe following privileges authorize actions on individual packages in the SAP HANA repository, used in the SAP HANA Extended Services (SAP HANA XS) classic development model. With SAP HANA XS advanced, source code and web content are no longer versioned and stored in the repository of the SAP HANA database.
System Privilege Description
REPO.EXPORT Authorizes the export of delivery units for example
SAP HANA Administration with SAP HANA CockpitManaging Database Users and Roles P U B L I C 463
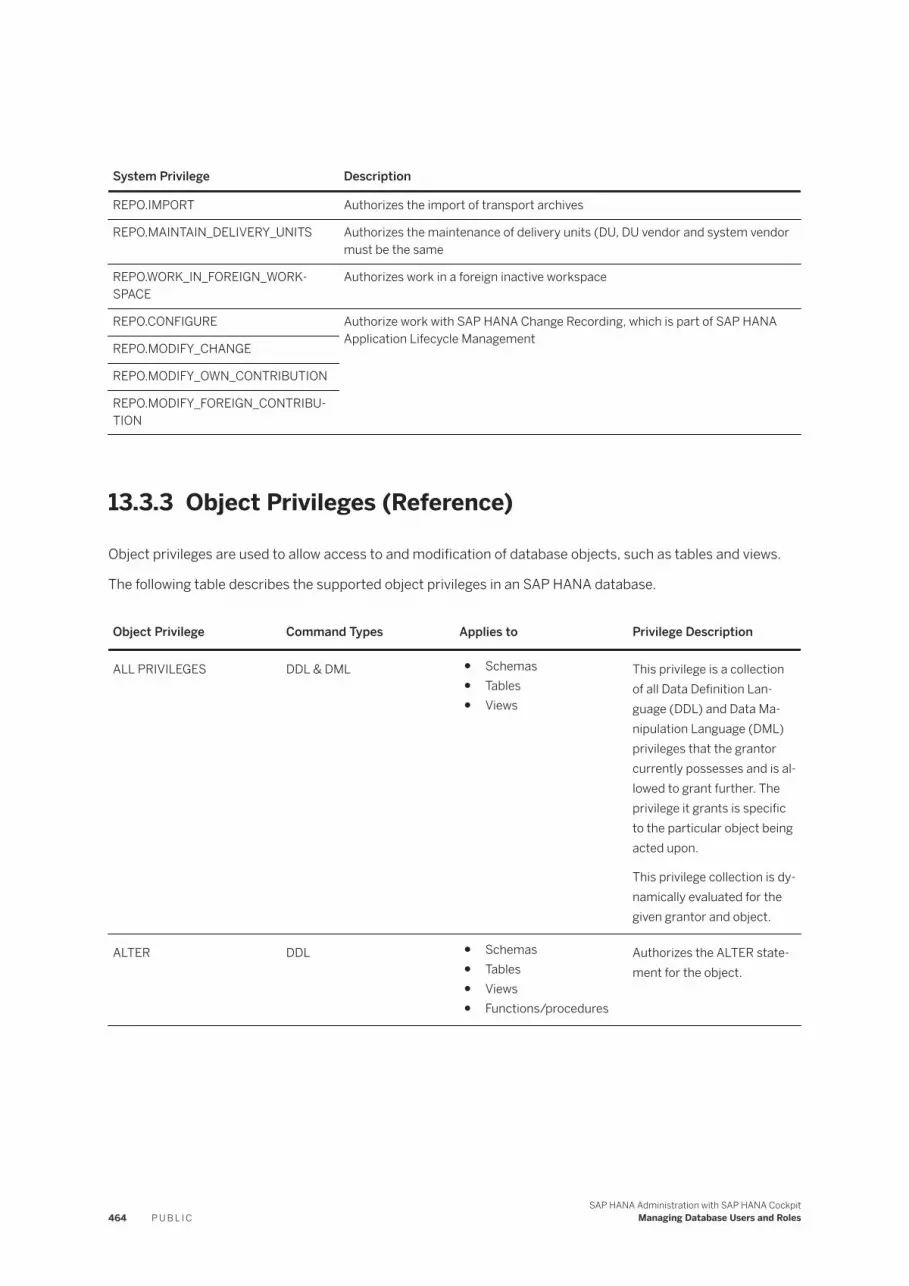
System Privilege Description
REPO.IMPORT Authorizes the import of transport archives
REPO.MAINTAIN_DELIVERY_UNITS Authorizes the maintenance of delivery units (DU, DU vendor and system vendor must be the same
REPO.WORK_IN_FOREIGN_WORKSPACE
Authorizes work in a foreign inactive workspace
REPO.CONFIGURE Authorize work with SAP HANA Change Recording, which is part of SAP HANA Application Lifecycle Management
REPO.MODIFY_CHANGE
REPO.MODIFY_OWN_CONTRIBUTION
REPO.MODIFY_FOREIGN_CONTRIBUTION
13.3.3 Object Privileges (Reference)
Object privileges are used to allow access to and modification of database objects, such as tables and views.
The following table describes the supported object privileges in an SAP HANA database.
Object Privilege Command Types Applies to Privilege Description
ALL PRIVILEGES DDL & DML ● Schemas● Tables● Views
This privilege is a collection of all Data Definition Language (DDL) and Data Manipulation Language (DML) privileges that the grantor currently possesses and is allowed to grant further. The privilege it grants is specific to the particular object being acted upon.
This privilege collection is dynamically evaluated for the given grantor and object.
ALTER DDL ● Schemas● Tables● Views● Functions/procedures
Authorizes the ALTER statement for the object.
464 P U B L I CSAP HANA Administration with SAP HANA Cockpit
Managing Database Users and Roles

Object Privilege Command Types Applies to Privilege Description
CREATE ANY DDL ● Schemas● Tables● Views● Sequences● Functions/procedures● Remote sources● Graph workspaces
Authorizes all CREATE statements for the object.
CREATE OBJECT STRUCTURED PRIVILEGE
DDL ● Schemas● Views
Authorizes creation of structured privilege commands on the object even if the user does not need to have the CREATE STRUCTURED PRIVILEGE.
CREATE VIRTUAL FUNCTION
DDL ● Remote sources Authorizes creation of virtual functions (the REFERENCES privilege is also required).
CREATE VIRTUAL PROCEDURE
DDL ● Remote sources Authorizes creation of virtual procedure to create and run procedures on a remote source.
CREATE VIRTUAL PACKAGE DDL ● Schemas Authorizes creation of virtual packages that can be run on remote sources.
CREATE VIRTUAL TABLE DDL ● Remote sources Authorizes the creation of proxy tables pointing to remote tables from the source entry.
CREATE TEMPORARY TABLE DDL ● Schemas Authorizes the creation of a temporary local table, which can be used as input for procedures, even if the user does not have the CREATE ANY privilege for the schema.
DEBUG DML ● Schemas● Calculation Views● Functions/procedures
Authorizes debug functionality for the procedure or calculation view or for the procedures and calculation views of a schema.
DEBUG MODIFY DDL ● Functions/procedures For internal use only.
SAP HANA Administration with SAP HANA CockpitManaging Database Users and Roles P U B L I C 465

Object Privilege Command Types Applies to Privilege Description
DELETE DML ● Schemas● Tables● Views● Functions/procedures
Authorizes the DELETE and TRUNCATE statements for the object.
While DELETE applies to views, it only applies to updatable views (that is, views that do not use a join, do not contain a UNION, and do not use aggregation).
DROP DDL ● Schemas● Tables● Views● Sequences● Functions/procedures● Remote sources● Graph workspaces
Authorizes the DROP statements for the object.
EXECUTE DML ● Schemas● Functions/procedures
Authorizes the execution of a SQLScript function or a database procedure by using the CALLS or CALL statement respectively. It also allows a user to execute a virtual function.
INDEX DDL ● Schemas● Tables
Authorizes the creation, modification, or dropping of indexes for the object.
INSERT DML ● Schemas● Tables● Views
Authorizes the INSERT statement for the object.
The INSERT and UPDATE privilege are both required on the object to allow the REPLACE and UPSERT statements to be used.
While INSERT applies to views, it only applies to updatable views (views that do not use a join, do not contain a UNION, and do not use aggregation).
466 P U B L I CSAP HANA Administration with SAP HANA Cockpit
Managing Database Users and Roles

Object Privilege Command Types Applies to Privilege Description
REFERENCES DDL ● Schemas● Tables
Authorizes the usage of all tables in this schema or this table in a foreign key defini-tion, or the usage of a personal security environment (PSE). It also allows a user to reference a virtual function package.
SELECT DML ● Schemas● Tables● Views● Sequences● Graph workspaces
Authorizes the SELECT statement for the object or the usage of a sequence. When selection from system-versioned tables, users must have SELECT on both the table and its associated history table.
SELECT CDS METADATA DML ● Schemas● Tables
Authorizes access to CDS metadata from the catalog.
SELECT METADATA DML ● Schemas● Tables
Authorizes access to the complete metadata of all objects in a schema (including procedure and view defini-tions), including objects that may be located in other schemas.
TRIGGER DDL ● Schemas● Tables
Authorizes the CREATE TRIGGER/DROP TRIGGER statement for the specified table or the tables in the specified schema.
UNMASKED DML ● Schemas● Views● Tables
Authorizes access to masked data in user-defined views and tables. This privilege is required to view the original data in views and tables that are defined by using the WITH MASK clause.
SAP HANA Administration with SAP HANA CockpitManaging Database Users and Roles P U B L I C 467

Object Privilege Command Types Applies to Privilege Description
UPDATE DML ● Schemas● Tables● Views
While UPDATE applies to views, it only applies to updatable views (views that do not use a join, do not contain a UNION, and do not use aggregation).
USERGROUP OPERATOR DML ● User groups Authorizes a user to change the settings for a user group, and to add and remove users to/from a user group.
Users with the USERGROUP OPERATOR privilege can also create and drop users, but only within the user group they have the USERGROUP OPERATOR privilege on (CREATE USER <user_name> SET USERGROUP <usergroup_name>).
A user can have the USERGROUP OPERATOR privilege on more than one user group, and a user group can have more than one user with the USERGROUP OPERATOR privilege on it.
<identifier>.<identifier>
DDL Components of the SAP HANA database can create new object privileges. These privileges use the component-name as first identifier of the system privilege and the component-privilege-name as the second identifier.
468 P U B L I CSAP HANA Administration with SAP HANA Cockpit
Managing Database Users and Roles

13.4 Change a Role
You can change the roles and privileges assigned to a role on the Role page of the SAP HANA cockpit.
Prerequisites
● You have the system privilege ROLE ADMIN or are the owner of the role.● You have the privileges required to grant privileges and roles to the role. For more information, see
Prerequisites for Granting and Revoking Privileges and Roles.
Context
It is possible to change a catalog role by revoking roles and privileges from the role or granting further roles and privileges.
CautionDo not change roles that were originally created in design time, that is, HDI roles or repository roles. If you change the runtime version of such a role, your changes will be overwritten the next time a new version of the design-time role is deployed. For more information about creating roles in design time, see the SAP HANA developer documentation.
Procedure
1. On the System Overview page, navigate to the Security area and choose the Manage roles link.
The Role page opens. All existing database roles are displayed in list format on the left.2. Find the role you want to change.
TipSearch for a role by entering the name or part of the name in the search box.
3. To change the role's LDAP group mapping or comment, choose the Edit button in the header area.4. To change the roles or privileges assigned to the role, select the relevant tab page and choose Edit.5. Make the required changes and save.
Related Information
Database Role Details [page 451]
SAP HANA Administration with SAP HANA CockpitManaging Database Users and Roles P U B L I C 469

13.5 Delete a Role
You can delete a role on the Role page of the SAP HANA cockpit.
Prerequisites
You have the system privilege ROLE ADMIN.
Procedure
1. On the System Overview page, navigate to the Security area and choose the Manage roles link.
The Role page opens. All existing database roles are displayed in list format on the left.2. Find the role you want to change.
TipSearch for a role by entering the name or part of the name in the search box.
3. Choose Delete.
Results
The role is deleted.
NoteYou can also use the above procedure to delete HDI and repository roles. However, these roles will be recreated when they are deployed again.
13.6 Create a User Group
Create and configure a user group to manage related users together.
Prerequisites
You have the system privilege USER ADMIN.
470 P U B L I CSAP HANA Administration with SAP HANA Cockpit
Managing Database Users and Roles

Context
User groups are an efficient way to manage users:
● Every user group can have its own dedicated administrator(s). In this way, user management tasks can be delegated to several people independently of each other.
● A user group can be configured for exclusive administration, which means that only the designated group administrator(s) can manage the users in the group. This could be useful, for example, to protect highly-privileged users or technical users from accidental deletion or manipulation.
● Group specific-user configuration is possible. By setting user properties at the group level, you can configure related users quickly and differently to users in other groups. For example, you could put the technical users required by connecting applications into their own user group with a customized password policy so that the passwords of these users are extra complex.
NoteUser groups do not control data access. They are intended to support a separation of user management duties. A user's authorization (roles and privileges) control data access.
For more information about user groups, see the SAP HANA Security Guide.
Procedure
1. On the System Overview page, navigate to the Security area and choose the Manage user groups link.2. Choose New User Group.3. Specify the new group name.4. Specify the administration mode:
○ Group administrators and user administrators (shared administration)Not only designated group administrators can modify the group but also any user administrator (that is, any user with system privilege USER ADMIN).This is the default administration mode.
○ Group administrators only (exclusive administration)Only the designated group administrator(s) can modify the group, for example, adding new users to the group or removing users from the group. In this way, groups of users can be managed completely independently of each other.
NoteTo add an existing user from the global pool of users to the user group, as well as remove a user from the group (and return it to the global pool of users), the group administrator also needs to be a user administrator, that is have system privilege USER ADMIN.
5. Optional: Prevent yourself as the creator and owner of the group from being a group administrator.
You, as creator and owner of the group, are automatically a group administrator because you have the object privilege USERGROUP OPERATOR on the user group. By deselecting the checkbox Group creator can manage group, you will not be grated this privilege. However, you can still grant it to other users to authorize them to be group administrators.
SAP HANA Administration with SAP HANA CockpitManaging Database Users and Roles P U B L I C 471

6. Optional: Enter a comment or text to describe the user group.7. Save the user group.
Results
The user group is created.
Next Steps
● Designate the user group administrators. You do this by granting the object privilege USERGROUP OPERATOR on the user group to the relevant users or roles.
● Add users to the user group. You can do this by choosing the Move Users to Group or Create User button depending on whether you want to add an existing user or a new user.
● If required, configure a group-specific password policy.
RememberIf you configured the user group for exclusive administration, only a group administrator can add/remove users and configure the password policy. The group administrator may also need to be a user administrator, that is have system privilege USER ADMIN.
Related Information
SQL Statements and Authorization for User Group Administration (Reference) [page 474]Create a Database User [page 477]Assign Privileges to a User [page 486]Configure a Password Policy for a User Group [page 420]Create a Workload Class [page 237]Create a Workload Class Mapping [page 239]
13.6.1 User Group Details
On the User Group page of the SAP HANA cockpit, you can view the details of a user group.
Field Description
Owner User who created the group
472 P U B L I CSAP HANA Administration with SAP HANA Cockpit
Managing Database Users and Roles

Field Description
Group Administration Mode Specifies who can manage the group:
● Group administrators and user administrators (shared administration)Not only designated group administrators can modify the group but also any user administrator (that is, any user with system privilege USER ADMIN).This is the default administration mode.
● Group administrators only (exclusive administration)Only the designated group administrator(s) can modify the group, for example, adding new users to the group or removing users from the group. In this way, groups of users can be managed completely independently of each other.
NoteTo add an existing user from the global pool of users to the user group, as well as remove a user from the group (and return it to the global pool of users), the group administrator also needs to be a user administrator, that is have system privilege USER ADMIN.
The user administrator can configure the administration mode when creating the group, or later by editing the group.
Comment Free-text comment or description
Users in Group Database users in the group
A user can belong to only one user group.
NoteUsers don't have to be a member of any group. Users who are not in any group are managed as normal by user administrators.
Password Policy Group-specific configuration of the password policy
The user group password policy is effective if a group-specific value has been configured for at least one option and the group policy has been enabled. For those options with no group-specific value, the value from the database password policy is copied.
If no group-specfic values have been configured for any parameters or the group policy has not been enabled, the password policy configured for the database is the effective.
SAP HANA Administration with SAP HANA CockpitManaging Database Users and Roles P U B L I C 473

13.6.2 SQL Statements and Authorization for User Group Administration (Reference)
Creating and configuring user groups, and subsequently managing the users in those groups requires different combinations of privileges.
Creating and Configuring User Groups
User administrators create and configure user groups. Group administrators can change the configuration.
To... You need... For example...
Create a user group System privilege USER ADMIN ● CREATE USERGROUP TechnicalUsers;
● CREATE USERGROUP Research DISABLE USER ADMIN;
Change the administration mode of a user group
System privilege USER ADMIN ● ALTER USERGROUP TechnicalUsers DISABLE USER ADMIN;
● ALTER USERGROUP Research ENABLE USER ADMIN;
Make another user the group administrator of a user group
● System privilege USER ADMIN, or● Object privilege USERGROUP OP
ERATOR on the group with the option to grant it to others
GRANT USERGROUP OPERATOR ON USERGROUP TechnicalUsers TO TechnicalUsersAdmin;
474 P U B L I CSAP HANA Administration with SAP HANA Cockpit
Managing Database Users and Roles

To... You need... For example...
Configure user parameters and enable/disable usergroup parameter sets
● System privilege USER ADMIN, or● Object privilege USERGROUP OP
ERATOR on the group
NoteIf the user group has been config-ured for exclusive administration, USERGROUP OPERATOR on the group is required.
● CREATE USERGROUP Training SET PARAMETER 'password_layout' = 'A1a!', 'minimal_password_length' = '7' ENABLE PARAMETER SET 'password policy';
● ALTER USERGROUP TechnicalUsers SET PARAMETER 'force_first_password_change' = 'false';
● ALTER USERGROUP TechnicalUsers ENABLE PARAMETER SET 'password policy';
● ALTER USERGROUP TechnicalUsers DISABLE PARAMETER SET 'password policy';
Delete a user group System privilege USER ADMIN
NoteYou cannot delete a user group if there are still users in the group.
DROP USERGROUP Training;
Managing Users
Managing users who are not in any user group
User administrators manage users who do not belong to a user group.
To... You need... For example...
Create, change, delete a user not in any user group
System privilege USER ADMIN CREATE USER Michael PASSWORD <password>;
Managing users in a user group configured for shared administration (default)
Group administrators and user administrators can manage users in user groups configured with the option ENABLE USER ADMIN.
SAP HANA Administration with SAP HANA CockpitManaging Database Users and Roles P U B L I C 475

To.. You need... For example...
Create a user in the user group ● System privilege USER ADMIN, or● Object privilege USERGROUP OP
ERATOR on the group
CREATE USER John PASSWORD <password> SET USERGROUP Research;
Delete a user in the user group ● System privilege USER ADMIN, or● Object privilege USERGROUP OP
ERATOR on the group
DROP USER John CASCADE;
Add an existing user from the global pool of users to the user group
System privilege USER ADMIN ALTER USER Julie SET USERGROUP Research;
Move a user from another user group to the user group
● System privilege USER ADMIN, or● Object privilege USERGROUP OP
ERATOR on both groups
ALTER USER Julie SET USERGROUP Training;
Remove a user from the user group (and return to the global pool of users)
System privilege USER ADMIN ALTER USER Julie UNSET USERGROUP;
Users in a user group configured for exclusive administrationOnly group administrators can manage users in user groups configured with the option DISABLE USER ADMIN.
To.. You need... For example...
Create a user in the user group Object privilege USERGROUP OPERATOR on the user group
CREATE USER sapsid PASSWORD <password> SET USERGROUP TechnicalUsers;
Delete a user in the user group Object privilege USERGROUP OPERATOR on the user group
DROP USER sapsid CASCADE;
Add an existing user from the global pool of users to the user group
● System privilege USER ADMIN and● Object privilege USERGROUP OP
ERATOR on the group
ALTER USER Thomas SET USERGROUP TechnicalUsers;
Move a user from another user group to the user group
● Object privilege USERGROUP OPERATOR on both groups
NoteIf the user's current group is not configured for exclusive administration, object privilege USERGROUP OPERATOR on this group is not required; system privilege USER ADMIN is sufficient.
ALTER USER Julie SET USERGROUP TechnicalUsers;
Remove a user from the user group ● System privilege USER ADMIN and● Object privilege USERGROUP OP
ERATOR on the group
ALTER USER Thomas UNSET USERGROUP;
476 P U B L I CSAP HANA Administration with SAP HANA Cockpit
Managing Database Users and Roles

13.7 Create a Database User
You create a standard database user for every person who needs to work directly with the SAP HANA database. When you create a user, you also configure how the user will be authenticated and optionally add the user to a user group.
Prerequisites
● You have the system privilege USER ADMIN.● If you are creating the user in a user group configured for exclusive administration, you must have the
privilege USERGROUP OPERATOR on the user group. For more information about user groups, see the SAP HANA Security Guide
● If you are integrating SAP HANA database users into a single sign-on (SSO) environment using one or more of the supported mechanisms, the necessary infrastructure must be in place and configured. For more information about SSO, see the SAP HANA Security Guide.
● If you are implementing LDAP group authorization or LDAP-based authentication, the necessary infrastructure must be in place and configured. For more information, see the section on configuring LDAP group authorization in the SAP HANA Administration Guide.
Procedure
1. On the System Overview page, navigate to the Security area and choose the Manage users link.
The User page opens. All existing database users are displayed in list format on the left.
2. Create a new user by clicking the Add button in the footer toolbar and choosing Create User.3. Specify the new user name.
You must give the user a unique name. User names can contain any CESU-8 characters except for a small subset. For more information, see Unpermitted Characters in User Names.
4. Optional: Select the user group to which you want to the assign the user.
RememberIf the user group is configured for exclusive administration, you must have the privilege USERGROUP OPERATOR on the user group.
5. Optional: Specify the user's e-mail address.6. Optional: Specify a validity period for the user, including the appropriate time zone.
For example, if you are creating a user for a new employee, you can enter their start date in the Valid From field.
If you do not enter any values, the user is immediately and indefinitely valid.7. Optional: Prevent the user from being able to create objects in his own database schema by selecting No
for the option Creation of Objects in Own Schema.
SAP HANA Administration with SAP HANA CockpitManaging Database Users and Roles P U B L I C 477

NoteIf you select No for both this option and the next option (PUBLIC Role), the user will be created as a restricted user, not a standard user.
8. Optional: Prevent the user from being granted the standard PUBLIC role by selecting No for the option PUBLIC Role.
The PUBLIC role contains the privileges for filtered read-only access to the system views. To see data in a particular view, the user also needs the SELECT privilege on the view.
NoteIf you select No for both this option and the previous option (Creation of Objects in Own Schema), the user will be created as a restricted user, not a standard user.
9. Optional: Prevent the user from being able to connect to the database via ODBC and JDBC clients by selecting the corresponding checkbox.
By default, standard users have access via ODBC and JDBC clients.
If you disable ODBC/JDBC client access, the user can still connect via HTTP. Furthermore, disabling ODBC/JDBC access does not affect the user's authorizations or prevent the user from executing SQL commands via channels other than JDBC/ODBC.
10. Optional: Enter a comment or text to describe the user.11. Optional: Set the authorization mode to LDAP if the user's authorization is based on LDAP group
membership.
A user with authorization mode LDAP is granted roles exclusively based on their LDAP group membership. It is not possible to grant such a user other roles or privileges directly.
The default user authorization mode is Local. This means that the user must be granted roles and privileges directly as normal.
NoteSetting the authorization mode of the user is only one step in the configuration of LDAP group authorization. For more information, see the section on configuring LDAP group authorization in the SAP HANA Administration Guide.
12. Specify how the user can be authenticated.
NoteYou must specify at least one authentication mechanism. For more information about the supported mechanisms, see Database User Details.
Authentication Mechanism Required Configuration
User name and password Select the type of password.
The user can be authenticated by a password stored in the SAP HANA database (option: Local) or a password stored in an LDAP directory server (option: LDAP).
478 P U B L I CSAP HANA Administration with SAP HANA Cockpit
Managing Database Users and Roles

Authentication Mechanism Required Configuration
If you choose authentication by local password, enter and confirm the user's initial password. You can override the password policy setting (Password Change Required on First Logon) that forces users to change a password set by a user administrator the first time they log on. This is useful for technical users, for example.
Kerberos Enter the user principal name (UPN) specified in the Microsoft Active Directory or the Kerberos Key Distribution Center as the external ID.
SAP logon and assertion tickets No additional user configuration required in user definition
SAML Choose Add Identity Provider, select the identity provider, and then enter the user ID known to the SAML identity provider.
Alternatively, you can allow the identify provider to map its users to the database user by enabling automatic mapping by provider.
NoteThe identity provider must already be created. You can do this on the SAML Identity Provider page or using the SQL statement CREATE SAML PROVIDER.
JWT (JSON Web Token) Choose Add Identity Provider, select the identity provider, and then enter the user ID known to the JWT identity provider.
Alternatively, you can allow the identify provider to map its users to the database user by enabling automatic mapping by provider.
NoteThe identity provider must already be created. You can do this on the JWT Identity Provider page or using the SQL statement CREATE JWT PROVIDER.
X.509 certificate Choose Add X509 Certificate Manually and enter the user's public key certificate information.
NoteX.509 certificates are supported only for HTTP access through the SAP HANA XS classic server.
13. Optional: Specify additional user properties required by client applications.You can select from the available properties (see Database User Details) or manually enter a property.
14. Save the user.
SAP HANA Administration with SAP HANA CockpitManaging Database Users and Roles P U B L I C 479

Results
The user is created and appears in the list of users on the left. A new schema is created for the user in the catalog. It has the same name as the user.
Next Steps
Assign roles or privileges to the user (authorization mode Local only).
Related Information
Create a User Group [page 470]Unpermitted Characters in User Names [page 480]Database User Details [page 444]Assign Roles to a Database User [page 485]Assign Privileges to a User [page 486]Database Users [page 448]Add a SAML Identity Provider in SAP HANA Cockpit [page 491]Add a JWT Identity Provider in SAP HANA Cockpit [page 492]
13.7.1 Unpermitted Characters in User Names
User names can contain any CESU-8 characters except for a small subset.
The following characters are not allowed as user names:
Unicode Character Character Name
U+0021 ! Exclamation mark
U+0022 " Quotation mark
U+0024 $ Dollar sign
U+0025 % Percent sign
U+0027 ' Apostrophe
U+0028 ( Left parenthesis
U+0029 ) Right parenthesis
U+002A * Asterisk
U+002B + Plus sign
480 P U B L I CSAP HANA Administration with SAP HANA Cockpit
Managing Database Users and Roles

Unicode Character Character Name
U+002C , Comma
U+002E . Full stop
U+002F / Solidus
U+003A : Colon
U+003B ; Semicolon
U+003C < Less-than sign
U+003D = Equals sign
U+003E > Greater-than sign
U+003F ? Question mark
U+0040 @ Commercial at
U+005B [ Left square bracket
U+005C \ Reverse solidus
U+005D ] Right square bracket
U+005E ^ Circumflex accent
U+0060 ` Grave accent
U+007B { Left curly bracket
U+007C | Vertical line
U+007D } Right curly bracket
U+007E ~ Tilde
13.8 Create a Restricted Database User
You create a restricted user for users who access SAP HANA through client applications – full SQL access via an SQL console is not intended. When you create a restricted user, you also configure how the user will be authenticated and optionally add the user to a user group.
Prerequisites
● You have the system privilege USER ADMIN.● If you are creating the user in a user group configured for exclusive administration, you must have the
privilege USERGROUP OPERATOR on the user group. For more information about user groups, see the SAP HANA Security Guide
● If you are integrating SAP HANA database users into a single sign-on (SSO) environment using one or more of the supported mechanisms, the necessary infrastructure must be in place and configured. For more information about SSO, see the SAP HANA Security Guide.
SAP HANA Administration with SAP HANA CockpitManaging Database Users and Roles P U B L I C 481

● If you are implementing LDAP group authorization or LDAP-based authentication, the necessary infrastructure must be in place and configured. For more information, see the section on configuring LDAP group authorization in the SAP HANA Administration Guide.
Procedure
1. On the System Overview page, navigate to the Security area and choose the Manage users link.
The User page opens. All existing database users are displayed in list format on the left.
2. Create a new restricted user by clicking the Add button in the footer toolbar and choosing Create Restricted User.
3. Specify the new user name.You must give the user a unique name. User names can contain any CESU-8 characters except for a small subset. For more information, see Unpermitted Characters in User Names.
4. Optional: Select the user group to which you want to the assign the user.
RememberIf the user group is configured for exclusive administration, you must have the privilege USERGROUP OPERATOR on the user group.
5. Optional: Specify the user's e-mail address.6. Optional: Specify a validity period for the user, including the appropriate time zone.
For example, if you are creating a user for a new employee, you can enter their start date in the Valid From field.
If you do not enter any values, the user is immediately and indefinitely valid.7. Optional: Allow the user to create objects in her own database schema by selecting Yes for the option
Creation of Objects in Own Schema.
NoteIf you select Yes for this option, the user will be created as a standard user, not a restricted user.
8. Optional: Grant the user the standard PUBLIC role by selecting Yes for the corresponding option.
The PUBLIC role contains the privileges for filtered read-only access to the system views. To see data in a particular view, the user also needs the SELECT privilege on the view.
NoteIf you select Yes for this option, the user will be created as a standard user, not a restricted user.
9. Optional: Allow the user to connect to the database via ODBC and JDBC clients by deselecting the corresponding checkbox.
By default, restricted users are only able to connect to the database using HTTP. You must explicitly allow access via ODBC and JDBC clients by changing this setting.
482 P U B L I CSAP HANA Administration with SAP HANA Cockpit
Managing Database Users and Roles

For full access to ODBC or JDBC functionality, you must grant restricted users the standard role RESTRICTED_USER_ODBC_ACCESS or RESTRICTED_USER_JDBC_ACCESS. You can do this on the Assign Roles page.
10. Optional: Enter a comment or text to describe the user.11. Optional: Set the authorization mode to LDAP if the user's authorization is based on LDAP group
membership.
A user with authorization mode LDAP is granted roles exclusively based on their LDAP group membership. It is not possible to grant such a user other roles or privileges directly.
The default user authorization mode is Local. This means that the user must be granted roles and privileges directly as normal.
NoteSetting the authorization mode of the user is only one step in the configuration of LDAP group authorization. For more information, see the section on configuring LDAP group authorization in the SAP HANA Administration Guide.
12. Specify how the user can be authenticated.
NoteYou must specify at least one authentication mechanism. For more information about the supported mechanisms, see Database User Details.
Authentication Mechanism Required Configuration
User name and password Select the type of password.
The user can be authenticated by a password stored in the SAP HANA database (option: Local) or a password stored in an LDAP directory server (option: LDAP).
If you choose authentication by local password, enter and confirm the user's initial password. You can override the password policy setting (Password Change Required on First Logon) that forces users to change a password set by a user administrator the first time they log on. This is useful for technical users, for example.
Kerberos Enter the user principal name (UPN) specified in the Microsoft Active Directory or the Kerberos Key Distribution Center as the external ID.
SAP logon and assertion tickets No additional user configuration required in user definition
SAML Choose Add Identity Provider, select the identity provider, and then enter the user ID known to the SAML identity provider.
Alternatively, you can allow the identify provider to map its users to the database user by enabling automatic mapping by provider.
SAP HANA Administration with SAP HANA CockpitManaging Database Users and Roles P U B L I C 483

Authentication Mechanism Required Configuration
NoteThe identity provider must already be created. You can do this on the SAML Identity Provider page or using the SQL statement CREATE SAML PROVIDER.
JWT (JSON Web Token) Choose Add Identity Provider, select the identity provider, and then enter the user ID known to the JWT identity provider.
Alternatively, you can allow the identify provider to map its users to the database user by enabling automatic mapping by provider.
NoteThe identity provider must already be created. You can do this on the JWT Identity Provider page or using the SQL statement CREATE JWT PROVIDER.
X.509 certificate Choose Add X509 Certificate Manually and enter the user's public key certificate information.
NoteX.509 certificates are supported only for HTTP access through the SAP HANA XS classic server.
13. Optional: Specify additional user properties required by client applications.You can select from the available properties (see Database User Details) or manually enter a property.
14. Save the user.
Results
The user is created and appears in the list of users on the left. A new schema is also created for the user in the catalog. It has the same name as the user. However, as a restricted user, the user is not authorized to create objects in this schema. For more information about all restrictions, see Database Users.
Next Steps
Assign roles to the user (authorization mode Local only).
Related Information
Unpermitted Characters in User Names [page 480]
484 P U B L I CSAP HANA Administration with SAP HANA Cockpit
Managing Database Users and Roles

Database User Details [page 444]Assign Roles to a Database User [page 485]Database Users [page 448]Add a SAML Identity Provider in SAP HANA Cockpit [page 491]
13.9 Assign Roles to a Database User
Roles are the standard mechanism of granting privileges to SAP HANA database users. It is recommended that you assign roles to users instead of granting privileges individually. You can grant roles to users on the Assign Roles page of the SAP HANA cockpit.
Prerequisites
● The roles you want to assign are available.● You have the privileges required to grant roles.
If you have the system privilege ROLE ADMIN, you can grant any role. Otherwise, the following applies:○ To grant a catalog role, that is a role created in runtime using SQL, you need to have the role being
granted yourself and be authorized to grant it to other users and roles, or the system privilege ROLE ADMIN.
○ To grant a HDI role, that is a schema-specific role created using the SAP Web IDE and deployed using SAP HANA deployment infrastructure, you need privileges to execute GRANT_CONTAINER_SCHEMA_ROLES in the container's API schema, or, if you are a container group administrator, privileges to execute GRANT_CONTAINER_SCHEMA_ROLES in the container group's API schema. For more information, see Prerequisites for Granting and Revoking Privileges and Roles.
○ To grant a repository role, that is a role created in the repository of the SAP HANA database, you need the object privilege EXECUTE on the procedure GRANT_ACTIVATED_ROLE.
Procedure
1. On the System Overview page, navigate to the Security area and choose the Assign roles to users link.
The Assign Roles page opens.2. Find the user you want to edit.
Detailed information about the user is displayed, including all roles already assigned and who assigned them.
3. Open the user for editing by clicking Edit.4. Grant the user roles by clicking Assign Roles, selecting the relevant roles, and clicking OK.
NoteIf you are granting a HDI role and you have both authorization to execute the GRANT_CONTAINER_SCHEMA_ROLES procedure and the system privilege ROLE ADMIN, you can
SAP HANA Administration with SAP HANA CockpitManaging Database Users and Roles P U B L I C 485

choose which granting mechanism to use. Selecting the HDI Container API option grants the role by the execution of the procedure. Otherwise, the role is granted through the execution of the GRANT statement.
5. Optional: Authorize the user to grant the role to other users and roles, by selecting Grantable to Others.
NoteThis option is not available for roles created in the repository.
6. Save the user.
The user is granted the selected roles.
Related Information
Database Roles [page 453]Prerequisites for Granting and Revoking Privileges and Roles [page 457]
13.10 Assign Privileges to a User
It is recommended that you assign roles to users instead of granting privileges individually. However, you can still grant privileges directly to users on the Assign Privileges page.
Prerequisites
● You have the system privilege USER ADMIN.● You have the privileges required to grant specific privileges to the user.
To grant SQL privileges, you must have the privilege and/or role yourself and be authorized to grant it to someone else. To grant privileges on activated repository objects, you must be authorized to execute certain stored procedures. For more information, see Prerequisites for Granting and Revoking Privileges and Roles.
Procedure
1. On the System Overview page, navigate to the User & Role Management area and choose Assign privileges to users.
The Assign Privileges app opens.2. Find the user you want to edit.
The user's existing privileges are displayed, as well as who assigned them.
486 P U B L I CSAP HANA Administration with SAP HANA Cockpit
Managing Database Users and Roles

3. Assign the required privileges to the user:a. For the relevant privilege type, choose Edit.b. Choose Add and select the privileges you want to assign.
NoteFor object and package privileges, you must first add the object or package and then add the required privilege to the object or package.
c. If you want users who have the new privilege to be able to grant the assigned privilege on to others, choose Grantable to Others.
d. Save the privilege assignment.e. Repeat for further privilege types.
Related Information
Prerequisites for Granting and Revoking Privileges and Roles [page 457]System Privileges (Reference) [page 459]Object Privileges (Reference) [page 464]Assign Roles to a Database User [page 485]
13.11 Change a Database User
You can change an existing database user on the User page of the SAP HANA cockpit.
Prerequisites
● You have the system privilege USER ADMIN.● If the user is in a user group configured for exclusive administration, you must have the privilege
USERGROUP OPERATOR on the user group. For more information about user groups, see the SAP HANA Security Guide
● If you are integrating SAP HANA database users into a single sign-on (SSO) environment using one or more of the supported mechanisms, the necessary infrastructure must be in place and configured. For more information about single sign-on integration, see the SAP HANA Security Guide.
Procedure
1. On the System Overview page, navigate to the Security area and choose the Manage users link.
SAP HANA Administration with SAP HANA CockpitManaging Database Users and Roles P U B L I C 487

The User page opens. All existing database users are displayed in list format on the left.2. Find the user you want to change.
TipSearch for a user by entering the name or part of the name in the search box, or create a filter by clicking the Filter button.
3. Open the user for editing by clicking Edit.4. Make the required changes.
For more information about the individual fields and settings, see Database User Details.
RememberTo change the user's authorization, open the Assign Roles or Assign Privileges pages.
Related Information
Database User Details [page 444]Assign Roles to a Database User [page 485]Assign Privileges to a User [page 486]
13.12 Deactivate a Database User
Users can be automatically deactivated for security reasons, for example, if they violate password policy rules. However, as a user administrator, you may need to explicitly deactivate a user, for example, if an employee temporarily leaves the company or a security violation is detected. You can deactivate a user on the User page of the SAP HANA cockpit.
Prerequisites
● You have the system privilege USER ADMIN.● If the user is in a user group configured for exclusive administration, you must have the privilege
USERGROUP OPERATOR on the user group. For more information about user groups, see the SAP HANA Security Guide
488 P U B L I CSAP HANA Administration with SAP HANA Cockpit
Managing Database Users and Roles

Procedure
TipAs an administrator you may want to temporarily deactivate all users in a system except certain administrative users so that these users can perform administration or maintenance tasks. For more information about how to do this without deactivating users individually as described here, see SAP Note 1986645.
1. On the System Overview page, navigate to the Security area and choose the Manage users link.
The User page opens. All existing database users are displayed in list format on the left.2. Find the user you want to deactivate.
TipSearch for a user by entering the name or part of the name in the search box, or create a filter by clicking the Filter button.
3. Click Deactivate in the footer bar.
Results
The database user is now deactivated and remains so until you reactivate. The user still exists in the database, but cannot connect to the database any more.
NoteIt may still appear as though deactivated users are still active in the system (for example when a procedure that was created by the user with DEFINER MODE is called).
You can activate the user again by clicking Activate in the footer.
Related Information
SAP Note 1986645
SAP HANA Administration with SAP HANA CockpitManaging Database Users and Roles P U B L I C 489

13.13 Delete a Database User
You may need to delete a database user if an employee leaves your organization for example. You can delete a user with on the User page of the SAP HANA cockpit.
Prerequisites
● You have the system privilege USER ADMIN.● If the user is in a user group configured for exclusive administration, you must have the privilege
USERGROUP OPERATOR on the user group. For more information about user groups, see the SAP HANA Security Guide
Procedure
1. On the System Overview page, navigate to the Security area and choose the Manage users link.
The User page opens. All existing database users are displayed in list format on the left.2. Find the user you want to delete.
TipSearch for a user by entering the name or part of the name in the search box, or create a filter by clicking the Filter button.
3. Specify whether or not you want to delete dependent objects, such as schemas, tables, views, and procedures with the user.
CautionIf you choose the Cascade option, all objects owned by the user are deleted, and privileges granted to others by the user are revoked. Furthermore, all objects in the user's schema are deleted even if they are owned by a different user. All privileges on these objects are also revoked.
Results
The user is deleted.
490 P U B L I CSAP HANA Administration with SAP HANA Cockpit
Managing Database Users and Roles

13.14 Add a SAML Identity Provider in SAP HANA Cockpit
If you are implementing Security Assertion Markup Language (SAML) to authenticate users accessing SAP HANA via the SQL interface directly (that is using JDBC and ODBC clients), you must add the SAML identity providers for the required users. You can do this using the SAP HANA cockpit.
Prerequisites
● You have created a certificate collection with the purpose SAML in the database and have imported the X.509 certificates that will be used to sign the SAML assertions from the identity provider. Ensure that the entire certificate chain of the X.509 certificate is available.
CautionWe recommend creating certificate collections for individual purposes in the database directly, rather than using trust stores (PSE) in the file system. By default, the same PSE in the file system is shared by all databases for all external communication channels (including HTTP) and certificate-based authentication. Different PSEs must be explicitly configured for tenant databases.
● You have the system privilege USER ADMIN.
Procedure
NoteWhile you can configure SAML providers for ODBC/JDBC-based SAML authentication using the SAP HANA cockpit, SAP HANA studio or SQL, always use the SAP HANA XS Administration Tool to configure SAML providers that will be used for HTTP access via the XS classic server.
1. On the System Overview page, navigate to the Security area and choose the Manage SAML providers link.2. Add a new identity provider.
a. Enter the name of the identity provider.
The following naming conventions apply:
○ Spaces and special characters except underscore (_) are not permitted.○ The name must start with a letter.○ The name cannot exceed 127 characters.
b. Enter the entity ID.c. Select the appropriate X.509 certificate.
NoteIt is not possible to enter the issuer and subject distinguished names (DNs) manually. If the certificate is not available, click Go to Certificate Store and import it. Then, return to the SAML
SAP HANA Administration with SAP HANA CockpitManaging Database Users and Roles P U B L I C 491

Identity Provider page and start again. For more information, see the section in importing a trusted certificate into the certificate store.
d. Click Add.
Results
The identity provider is now available for mapping to individual database users. You can do this when you create the database user. Alternatively, if the database user already exists, you can change their authentication details.
Related Information
Managing Client Certificates [page 421]Create a Database User [page 477]Change a Database User [page 487]
13.15 Add a JWT Identity Provider in SAP HANA Cockpit
If you are using JSON Web Tokens (JWT) to authenticate users accessing SAP HANA via the SQL interface directly (that is using JDBC and ODBC clients) or clients that connect to SAP HANA through the SAP HANA XS advanced server, you must add the JWT identity providers for the required users. You can do this using the SAP HANA cockpit.
Prerequisites
● You have created a certificate collection with the purpose JWT in the database and have imported the X.509 certificates that will be used to validate incoming tokens from the identity provider. Ensure that the entire certificate chain of the X.509 certificate is available.
● You have the system privilege USER ADMIN.
Procedure
1. On the System Overview page, navigate to the Security area and choose the Manage JWT providers link.2. Add a new identity provider.
a. Enter the name of the identity provider.
492 P U B L I CSAP HANA Administration with SAP HANA Cockpit
Managing Database Users and Roles

b. Enter the issuer URL.
This is used to map the token to an identity provider. It corresponds to the name provided in the iss claim of the JWT tokens issued by this JWT provider
c. Enter the external identity claim.
This is the claim in the JWT token used for mapping the SAP HANA user to an external user name, for example user name.
Results
The identity provider is now available for mapping to individual database users. You can do this when you create the database user. Alternatively, if the database user already exists, you can change their authentication details.
Related Information
Managing Client Certificates [page 421]Create a Database User [page 477]Change a Database User [page 487]
SAP HANA Administration with SAP HANA CockpitManaging Database Users and Roles P U B L I C 493

14 System Replication
Determine whether a database resource is part of a system replication configuration, and monitor the status of replication between the primary system and the secondary systems.
14.1 Monitoring SAP HANA System Replication with the SAP HANA Cockpit
To monitor SAP HANA system replication, you can use the System Replication tile in the SAP HANA cockpit.
To open the System Replication Overview page, click the System Replication tile on the Overview page in the SAP HANA cockpit.
The System Replication Overview displays a graphical representation of the system replication landscape with the following information:
● The name and role of the system, as well as the selected operation modeFor the operation modes logreplay and logreplay_readaccess a retention time estimation is also displayed. The Estimated log retention time is an estimation of the time left before the primary system starts to overwrite the RetainedFree marked log segments and a full data shipping becomes necessary to get the primary and secondary systems back in sync after a disconnect situation. The Estimated log full time is an estimation of the time left before the primary system runs into a log full. The value shown in the header shows the situation into which the system could run first: log retention or log full.
● If the SQL ports of the secondary system are open for read access● The replication mode used between the systems● The current average redo log shipping time and the average size of shipped redo log buffers
It describes how long it took on average to send redo log buffers to the secondary site based on measurements of the last 24 hours.
Furthermore, detailed information on system replication is provided in the following tabs:
NoteThese tabs are displayed only if you configured a system replication before.
Tabs on the System Replication Overview
Tab Name Description
Related Alerts The Related Alerts tab provides a description of any existing alerts, as well as their priority. This tab is only displayed when system replication related alerts are available.
Replicated Services The Replicated Services tab provides information on the replication status per site and service.
494 P U B L I CSAP HANA Administration with SAP HANA Cockpit
System Replication

Tab Name Description
Network The Network tab provides information on the time it took to ship the redo log to the secondary system and to write the redo log to the local log volume on disk.
You can select the network connection that you want to analyze (for example, Network Site 1 to 2 or Network Site 2 to 3). The graph displayed compares the local write wait time with the remote write wait time monitored over the last 24 hours.
Log Shipping Backlog The Log Shipping Backlog tab provides a graphical representation on the history of the log shipping backlog.
Log Replay The Log Replay tab provides a graphical representation on the delay of the secondary system. This tab is displayed if the chosen operation mode for the system replication landscape is logreplay or logreplay_readaccess.
When this tab is activated for a secondary system, the log replay delay is shown for the last 24 hours.
Furthermore, in this tab you can select to visualize the estimated log retention time as well as the estimated log full time for all system replication relevant services.
Network Speed Check The Network Speed Check tab provides a way to measure the network speed of the system replication host-to-host network channel mappings.
Network Security Settings The Network Security Settings tab displays the specific network security details configured between the primary and the secondary systems.
14.1.1 SAP HANA System Replication Details
Detailed information from the M_SERVICE_REPLICATION and the M_SYSTEM_REPLICATION monitoring views about system replication.
General Overview
Column Description
Site ID 1 Generated ID of the primary site
Secondary Site ID 2 Generated ID of the secondary site
Service Name of the service
Volume ID Persistence volume ID
Operation Mode ● LOGREPLAY● LOGREPLAY_READACCESS● DELTA DATA SHIPPING
SAP HANA Administration with SAP HANA CockpitSystem Replication P U B L I C 495

Column Description
Replication Mode Configured replication mode:
● SYNC: synchronous replication with acknowledgement when buffer has been written to disk on the secondary system
● SYNCMEM: synchronous replication with acknowledgement when buffer arrived in memory on the secondary system
● ASYNC: asynchronous replication where the primary does not wait for the acknowledgement
● UNKNOWN: is set if replication mode could not be determined (this might be the case, for example. if there are communication errors when getting status information from a service).
Replication Status Current status of replication:
● UNKNOWN: secondary did not connect to primary since last restart of the primary
● INITIALIZING: initial data transfer is running, in this state, the secondary is first usable when this is finished
● SYNCING: secondary is syncing again (for example, after a temporary connection loss or restart of the secondary)
● ACTIVE: initialization or sync with primary is complete and secondary is continuously replicating. If crash occurs, no data loss will occur in SYNC replication mode.
● ERROR: replication cannot take place because the secondary system is not accessible (details can be found in Replication Details)
Replication Details Additional information for Replication Status, for example, the error text if status is ERROR.
Full Sync Indicates if the service is currently operating in sync replication mode with the full sync option set.
If full sync is enabled in a running system, full sync might not be active immediately. This is done to prevent the system from blocking transactions immediately when setting the parameter to true. Instead, in a first step, full sync has to be enabled. In a second step it is internally activated, when the secondary is connected and becomes ACTIVE.
● DISABLED: full sync is not configured at all● ENABLED: full sync is configured, but it is not yet active,
so transactions do not block in this state. To become active the secondary has to connect and Replication Status has to be ACTIVE.
● ACTIVE: full sync mode is configured and active. If a connection of a connected secondary is getting closed, transactions on the primary side will block in this state.
If full sync is enabled when an active secondary is currently connected, the FULL_SYNC will be immediately set to ACTIVE.
496 P U B L I CSAP HANA Administration with SAP HANA Cockpit
System Replication

Column Description
Secondary Fully Recoverable TRUE: No full data backup is needed after takeover on secondary. Backups created on the primary and local log segments enable a full database recovery.
FALSE: Log segments needed for a full database recovery are missing. After takeover a full data backup has to be executed before a full recovery up to the most recent time point can be executed.
Secondary Active Status of the secondary node (also see ACTIVE_STATUS in M_SERVICES)
Secondary Connect Time Timestamp the secondary connected to the primary. If there are reconnects from the secondary side, this field contains the last connect time.
Secondary Reconnect Count Number of reconnects from secondary side for this service.
Secondary Failover Count Number of failovers for this service on secondary side.
Buffer Full count Number of times, the asynchronous replication buffer was full since last service restart (only relevant for replication mode async; 0 for replication modes sync/syncmem).
Log Positions
Column Description
Last Log Position Last known log position on primary
Last Log Position Time Timestamp of last known log position
Replayed Log Position Log end position of the last known replayed log buffer on secondary site
Replayed Log Position Time Timestamp of the last known replayed log buffer on the secondary site
Last Shipped Log Position Time Timestamp of last log position being shipped to secondary
Shipped Log Buffer Count Number of log buffers shipped to secondary
Shipped Log Buffers Total Size (Bytes) Size of all log buffers shipped to secondary
Shipped Log Buffers Total Time (µs) Time taken to ship all the log buffers to the secondary.
● SYNC/SYNCMEM: total round trip time to send the log buffers and receive the acknowledgment.
● ASYNC: start time when sending the log buffers, end time when the OS reports that the log buffers were sent (and the log shipping buffer space was freed). This could be shorter than the SYNC/SYNCMEM duration
Time delay (ms) Time delay between the last shipped log position time and the replayed log position time on the secondary
Size delay (Bytes) Size delay between the last shipped log position size and the replayed log position size on the secondary (1 log position = 64 bytes)
SAP HANA Administration with SAP HANA CockpitSystem Replication P U B L I C 497

Savepoints
Column Description
Last Savepoint Version Last savepoint version on primary
Last Savepoint Log Position Log position of current savepoint
Last Savepoint Start Time Timestamp of current savepoint
Last Shipped Savepoint Version Last savepoint version shipped to secondary
Last Shipped Savepoint Log Position Log position of last shipped savepoint
Last Shipped Savepoint Time Timestamp of last shipped savepoint
Full Data Replica
Column Description
Full Data Replica Shipped Count Number of full data replicas shipped to secondary
Full Data Replica Shipped Total Size (Bytes) Total size of all full data replica shipped to secondary
Full Data Replica Shipping Total Time (µs) Duration for shipping all full data replica
Last Full Data Replica Shipped Size (Bytes) Size of last full data replica shipped to secondary
Start Time of Last Full Data Replica Start time of last full data replica
End Time of Last Full Data Replica End time of last full data replica
Delta Data ReplicaThis information is only displayed if the operation mode is delta_datashipping.
Column Description
Delta Data Replica Shipped Count Number of delta data replicas shipped to secondary
Delta Data Replica Shipped Total Size (Bytes) Total size of all delta data replicas shipped to secondary
Delta Data Replica Shipped Total Time (µs) Duration for shipping of all delta data replicas
Size of Last Delta Data Replica (Bytes) Size of last delta data replica
Start Time of Last Delta Data Replica Start time of last data delta replica
End Time of Last Delta Data Replica End time of last data delta replica
Log Shipping Backlog
Column Description
Current Replication Backlog Size (Bytes) Current replication backlog in bytes, this means, size of all log buffers that have been created on primary site, but not yet sent to the secondary site.
Even in replication modes sync/syncmem this column can have a value different from 0.
Here it represents the size of log buffers that are in the local send queue (max number of those buffers is the number configured log buffers on primary site).
Max Replication Backlog Size (Bytes) Max replication backlog in bytes (max value of BACKLOG_SIZE since system start).
498 P U B L I CSAP HANA Administration with SAP HANA Cockpit
System Replication

Column Description
Current Replication Backlog Time (µs) Current replication backlog in microseconds. This is time difference between time of the last sent log buffer and the current log buffer.
Even in replication modes sync/syncmem this column can have a value different from 0, because log buffers are still in the send queue (max number of these buffers is the number of log buffers configured on primary site).
Max Replication Backlog Time (µs) Max replication backlog in microseconds (max value of BACKLOG_TIME since system startup).
Log ReplayThis information is only displayed if the operation mode is logreplay and logreplay_readaccess.
Column Description
Replay Backlog Size (Bytes) Specifies the size of all log buffers that have been shipped to the secondary site but have not yet been replayed on the secondary site.
Max Replay Backlog Size (Bytes) Specifies the maximum value of the REPLAY_BACKLOG_SIZE since the system startup.
Replay Backlog Time (µs) Specifies the time difference between the time of the last shipped log buffer and the last replayed log buffer on the secondary site.
Max Replay Backlog Time (µs) Specifies the maximum value of REPLAY_BACKLOG_TIME since the system startup.
14.2 General Prerequisites for Configuring SAP HANA System Replication
Before you configure SAP HANA system replication, several prerequisites must be fulfilled.
● The primary and secondary system are both installed and configured. You have verified that both are independently up and running.
● SAP HANA systems can only be replicated as the whole system. This means that the system database and all tenant databases are part of the system replication. A takeover can only be performed as a whole system. A takeover on the level of a single tenant database is not possible.
● The configuration of active hosts in the primary and secondary system must be the same. This means that the number of active hosts, the names of the host roles, failover groups, and worker groups must be identical in both systems. This implies that if there is a standby host on the primary system it need not be available on the secondary system and vice versa.
● Check that the host names in the primary system are different to the host names used in the secondary system. You can see the SAP HANA host name for each host in the environment variable SAP_RETRIEVAL_PATH (/usr/sap/<SID>/HDB<InstNo>/<hostname>) and with the python script landscapeHostConfiguration.py. For more information, see Host Name Resolution for System Replication and Checking the Status with landscapeHostConfiguration.py.
SAP HANA Administration with SAP HANA CockpitSystem Replication P U B L I C 499

If the host names of the primary and the secondary system are the same (for example, because two systems are used that have identical host names), change the host names used on the secondary system. For more information, see Rename an SAP HANA System Host.
● System replication between two systems on the same host is not supported.● Both systems should run on the same endianness platform.● You are logged on to both systems as the operating system user (user <sid>adm) or you have provided its
credentials when prompted.● You need the operating system user to set up a system replication landscape, to perform a takeover and a
failback, as well as to disable system replication with the SAP HANA cockpit. For more information, see Operating System User <sid>adm and Connect to a Resource using Database Credentials.
● The secondary system must have the same SAP system ID (<SID>) and instance number as the primary system.
NoteThe primary system replicates all relevant license information to the secondary system. An additional license is not required. For more information, see SAP Note 2211663.
● All configuration steps have to be executed on the master name server node only.● The .ini file configuration must be similar for both systems. Any changes made manually, or by SQL
commands on one system should be manually duplicated on the other system.Automatic configuration parameter checks will alert you to configuration differences between the two systems.
NoteTo keep the ini file configuration similar on both systems, the INI parameter checker is per default configured to check for differences. Additionally, it can be configured to replicate parameter changes from the primary system to the secondary system.
● Ensure that log_mode is set to normal in the persistence section of the global.ini file. This mode means that the log segments are backed up.
● During an upgrade of the system replication landscape, the software version of the current secondary system must be equal or newer to the version of the current primary system.
NoteDuring a failback, the roles of your systems in the system replication landscape switch. Make sure in this case that your primary system does not have a newer software version than the secondary system.
NoteFor Active/Active (read enabled) setups, the SAP HANA versions must be the same on the primary and the secondary system. Use this setup mainly during the upgrade process of the system replication landscape.
● To secure the system replication communication channel between the primary and the secondary system, configure the ini parameters [system_replication_communication] / listeninterface and allowed_sender as described in Host Name Resolution for System Replication.
500 P U B L I CSAP HANA Administration with SAP HANA Cockpit
System Replication

NoteIf you plan to add SAP HANA dynamic tiering to your landscape in the future, please seeSAP Note 2447994 before you enable HANA system replication. SAP HANA dynamic tiering requires certain communication ports, operation modes, and replication modes.
● If a new tenant database is created in a running SAP HANA system replication, it must be backed up to participate in the replication. Afterward, the initial data shipping is started automatically for this tenant database. If a takeover is done while the initial data shipping is running and not finished, this new tenant database will not be operational after takeover and will have to be recovered with backup and recovery (see the SAP HANA Database Backup and Recovery section of the SAP HANA Administration Guide).
● Before you configure SAP HANA system replication, you must copy the system PKI SSFS .key and the .dat file from the primary system to the secondary system:/usr/sap/<SID>/SYS/global/xsa/security/ssfs/data/SSFS_<SID>.DAT/usr/sap/<SID>/SYS/global/xsa/security/ssfs/key/SSFS_<SID>.KEY For more information, see SAP Note 2369981.If you have XS advanced installed, you must also copy the system PKI SSFS .key and the .dat file from the primary system to the secondary system in the following directories:/usr/sap/<SID>/SYS/global/xsa/security/ssfs/data/SSFS_<SID>.DAT/usr/sap/<SID>/SYS/global/xsa/security/ssfs/key/SSFS_<SID>.KEYThe copied files will become active during system restart. Therefore, it is recommended to copy them when the secondary system is offline (for example, before registration).
● For SAP HANA system replication, a port offset value of 100 is configured to reserve ports for system replication communication. The port number of the replication port is calculated by adding the value for this replication port offset to the internal port number of the corresponding service. Thus, although the same <instance number> is used for primary and secondary systems, the <instance number>+1 is reserved for both systems, because this port range is needed for system replication communication. For SAP HANA systems, this port offset is set to 10000 shifting the ports from the 3<instance number>00 to the 4<instance number>00 port range for the services. This is necessary in SAP HANA system replication with SAP HANA systems, because after 3<instance number>99 is reached new tenant databases allocate port numbers of the next higher instance number.
NoteTo avoid interference with ephemeral ports it might be necessary to adjust the OS port range when using SAP HANA system replication in combination with SAP HANA tenant databases. On Linux this can be accomplished with the following command in the system startup script: echo "50000 65535" > /proc/sys/net/ipv4/ip_local_port_range.
● In preparation for maintenance tasks (for example, near zero downtime upgrades), configure a user in the local userstore under the SRTAKEOVER key. For more information, see Configure a User Under the SRTAKEOVER Key.
● SAP HANA dynamic tiering is not supported with multitarget system replication. For more information about SAP HANA system replication with SAP HANA dynamic tiering, see SAP Note 2447994.
Related Information
Connect to a Resource using Database Credentials [page 93]SAP Note 2211663
SAP HANA Administration with SAP HANA CockpitSystem Replication P U B L I C 501

SAP Note 2369981SAP Note 2300936SAP Note 2447994
14.3 Configure SAP HANA System Replication with the SAP HANA Cockpit
To configure SAP HANA system replication in the SAP HANA cockpit, first enable system replication on the primary system and then register the secondary system.
Prerequisites
● You have considered all the general prerequisites needed to set up system replication. For more information, see General Prerequisites for Setting Up SAP HANA System Replication.
● You have added both systems in the SAP HANA cockpit.● You need the operating system user to set up a system replication landscape with the SAP HANA cockpit.
For more information, seeOperating System User <sid>adm and Connect to a Resource using Database Credentials.
Context
The System Replication tile on the system overview page provides the possibility to configure system replication. Once the configuration is done, the tile displays information on the operation mode, the replication mode, the configuration type, and the status of system replication.
The secondary system can be registered from the primary system or from the Overview page of the SAP HANA cockpit. You can register again a previously stopped secondary system when a full data shipping is needed or when you want to change the operation mode
Related Information
General Prerequisites for Configuring SAP HANA System Replication [page 499]Configure SAP HANA System Replication from the Primary System [page 503]Configure SAP HANA System Replication from the Primary and the Secondary Systems [page 504]Reinitialize the Secondary System [page 506]Connect to a Resource using Database Credentials [page 93]
502 P U B L I CSAP HANA Administration with SAP HANA Cockpit
System Replication

14.3.1 Configure SAP HANA System Replication from the Primary System
To configure SAP HANA system replication, first enable system replication on the primary system and then register the secondary system. Use the SAP HANA cockpit to execute these separate steps in one configuration step from the primary system.
Prerequisites
You have considered all the general prerequisites needed to set up system replication. For more information, see General Prerequisites for Setting Up SAP HANA System Replication.
Context
This topic describes how to configure system replication from the primary system in SAP HANA cockpit in one configuration step. You can use this method for 2-tier and 3-tier setups.
NoteIf you plan to add SAP HANA dynamic tiering to your landscape in the future, see SAP Note 2447994 before you enable HANA system replication. SAP HANA dynamic tiering requires certain communication ports, operation modes, and replication modes.
Procedure
1. On the Overview page of the future primary system, choose the System Replication tile.
If you never configured system replication before, this tile displays the message System replication is not yet enabled for this system.
The System Replication page opens. If you performed a data backup before enabling system replication, this page displays the last data backup on the top left and the Configure System Replication button on the top right.
2. Choose Configure System Replication.
The System Replication Configuration dialog opens, allowing you to run the configuration in background.3. Enter the logical name used to represent the primary system in the Tier 1 System Details screen area.4. Enter the logical name used to represent the secondary system in the Tier 2 System Details screen area.
Keep in mind that the secondary system must have the same SAP system ID (<SID>) and instance number as the primary system so that they are identified as secondaries.
5. Select the secondary system host and mark the checkbox below this area to stop the system.
SAP HANA Administration with SAP HANA CockpitSystem Replication P U B L I C 503

6. Select a replication mode. For more information on the available replication modes, see Replication Modes for SAP HANA System Replication.
7. Select an operation mode. For more information on the available operation modes, see Operation Modes for SAP HANA System Replication.
8. Decide whether to initiate a full data shipping or not.9. Check Start Secondary after Registration.10. Optional: To add a third tier to your system replication landscape configuration, click Add Tier 3 System on
the bottom left.11. Choose Configure.
Related Information
General Prerequisites for Configuring SAP HANA System Replication [page 499]SAP Note 2447994
14.3.2 Configure SAP HANA System Replication from the Primary and the Secondary Systems
To set up SAP HANA system replication, first enable system replication on the primary system and then register the secondary system. Use the SAP HANA cockpit to execute these configuration steps on the primary system and separately on the secondary system.
Prerequisites
You have considered all the general prerequisites needed to set up system replication. For more information, see General Prerequisites for Setting Up SAP HANA System Replication.
Context
This topic describes how to enable system replication on the primary system and then register the secondary system using the SAP HANA cockpit. You can use this method to configure any system replication setups you want.
NoteIf you plan to add SAP HANA dynamic tiering to your landscape in the future, see SAP Note 2447994 before you enable HANA system replication. SAP HANA dynamic tiering requires certain communication ports, operation modes, and replication modes.
504 P U B L I CSAP HANA Administration with SAP HANA Cockpit
System Replication

Procedure
1. On the Overview page of the future primary system, choose the System Replication tile.
If you never configured system replication before, this tile displays the message System replication is not yet enabled for this system.
The System Replication page opens. If you performed a data backup before enabling system replication, this page displays overview information on the primary system on the top left and the Enable This System as Primary link on the top right.
2. Enter the logical name used to represent the primary system and choose Configure on the bottom right.3. On the Overview of the future secondary system, choose the Overall Database Status tile.4. Choose Stop System on the bottom right, because the system has to be offline in order to be registered as
a secondary system.
Back on the Overview of the future secondary system, the Overall Database Status tile displays the status Stopped.
5. On the Overview page of the secondary system, choose the System Replication tile.
The System Replication page opens, displaying overview information about the secondary system on the top left and the Register Secondary System button on the top right.
6. Choose Register Secondary System.
The System Replication Configuration page opens.7. On the System Replication Configuration page enter the logical name used to represent the secondary
system.8. On the System Replication Configuration page select a replication mode. For more information on the
available replication modes, see Replication Modes for SAP HANA System Replication.9. Select an operation mode. For more information on the available operation modes, see Operation Modes
for SAP HANA System Replication.10. Enter the host of the source system.
NoteIf you are operating a distributed system on multiple hosts, enter the name of the host on which the master name server is running.
11. Check Start Secondary after Registration.12. Review the configured information and choose Configure on the bottom right.
The System Replication Configuration dialog opens. After the configuration is complete, the System Replication Overview page displays information on the configured systems.
Related Information
General Prerequisites for Configuring SAP HANA System Replication [page 499]SAP Note 2447994
SAP HANA Administration with SAP HANA CockpitSystem Replication P U B L I C 505

14.3.3 Reinitialize the Secondary System
You can register again a previously stopped secondary system using the SAP HANA cockpit.
Context
You can register again a previously stopped secondary system. You must do this when a full data shipping is needed or when you want to change the operation mode.
Procedure
1. On the Overview page of the stopped secondary system, choose the System Replication tile.2. On the System Replication Overview, choose Reinitialize Secondary System on the top right.3. On the System Replication Configuration page, you can now change the configuration.
Change the operation mode or resync the persistencies using the Initiate full data shipping option.
The secondary system is up and running again.
14.4 Perform a Takeover with the SAP HANA Cockpit
You can perform a takeover on your secondary system using the SAP HANA cockpit.
Prerequisites
● It is recommended to stop the primary system before starting a takeover.
NoteIf you are performing a takeover as part of a planned downtime, you should first make sure that the primary system has been fully stopped before performing a takeover to the secondary system.
● The secondary system must be fully initialized.● You need the operating system user to perform a takeover with the SAP HANA cockpit. For more
information, see Operating System User <sid>adm and Connect to a Resource using Database Credentials.● The takeover command can be executed both when the secondary system is offline or online.
506 P U B L I CSAP HANA Administration with SAP HANA Cockpit
System Replication

Procedure
1. On the Overview page of the secondary system meant to perform the takeover, choose the System Replication tile.
The System Replication tile opens displaying the System Replication Overview.2. Choose Take Over on the top right.3. To start the takeover, click Ok in the System takes over dialog.4. Stop the primary system from the Overall Database Status.
Related Information
Connect to a Resource using Database Credentials [page 93]
14.5 Perform a Failback with the SAP HANA Cockpit
To perform a failback in the SAP HANA cockpit, register the former primary system as secondary to the current primary.
Prerequisites
● You need the operating system user to perform a failback with the SAP HANA cockpit. For more information, see Operating System User <sid>adm and Connect to a Resource using Database Credentials.
● The former primary system is not running.● The current primary system is running.
Context
In the SAP HANA cockpit you can perform a failback either from the current primary system or from the former primary system (this is the future secondary). The configuration steps are the same as described in Configure System Replication from the Primary System or Configure System Replication from the Primary and the Secondary System.
This procedure describes how to register the former primary as a new secondary. Use the System Replication tile on the system Overview page of the former stopped primary to register this system as a new secondary.
SAP HANA Administration with SAP HANA CockpitSystem Replication P U B L I C 507

Procedure
1. Register the secondary system as follows:a. On the Overview page of the former primary system, choose the System Replication tile.
The System Replication page opens.b. Choose Register as Secondary on the top right.
The Register Secondary System page opens.c. On the Register Secondary System page enter the logical name used to represent the secondary
system.d. Select a replication mode. For more information on the available replication modes, see Replication
Modes for SAP HANA System Replication.e. Select an operation mode. For more information on the available operation modes, see Operation
Modes for SAP HANA System Replication.f. Enter the host of the source system.
NoteIf you are operating a distributed system on multiple hosts, enter the name of the host on which the master name server is running.
g. Check Start Secondary after Registration.2. Review the configured information and choose Configure on the bottom right.
Results
The original primary system is now registered as the secondary system with the current primary system (that is, the original secondary system). The secondary system is getting in sync again with the primary system. As such, it is attempting to avoid a full data shipping.
Verify that the secondary system replication status is All services are active and in sync.
Related Information
Perform a Failback with the SAP HANA Cockpit [page 507]Configure SAP HANA System Replication from the Primary and the Secondary Systems [page 504]Connect to a Resource using Database Credentials [page 93]
508 P U B L I CSAP HANA Administration with SAP HANA Cockpit
System Replication

14.6 Disable SAP HANA System Replication with the SAP HANA Cockpit
You can disable SAP HANA system replication in an SAP HANA system using the SAP HANA cockpit.
Prerequisites
● The secondary system must be offline.● You need the operating system user to disable system replication with the SAP HANA cockpit. For more
information, see Operating System User <sid>adm and Connect to a Resource using Database Credentials.
Procedure
1. Stop the secondary system from the Overall Database Status tile2. Unregister the secondary system as follows:
a. On the Overview page of the stopped secondary system, choose the System Replication tile.
The System Replication tile opens displaying the System Replication Overview.b. Choose Unregister this Secondary on the top right.
Depending whether your system should be online or offline after unregistering it, check the Start system after unregistration option in the confirmation dialog and choose OK. For more information, see SAP Note 1945676.
3. Disable system replication on the primary system as follows:a. On the Overview page of the primary system, choose the System Replication tile.
The System Replication tile opens displaying the System Replication Overview.b. Choose Disable System Replication on the top right and confirm that you want to disable system
replication.
The Ignore the secondary system option allows you to disable the primary system even though the secondary is still attached. This could be relevant, if the secondary has been uninstalled in the meantime.
Related Information
Connect to a Resource using Database Credentials [page 93]SAP Note 1945676
SAP HANA Administration with SAP HANA CockpitSystem Replication P U B L I C 509

15 Backup and Recovery
Use SAP HANA cockpit to manage backups, and recover a database.
Related Information
Display the Backup Configuration Settings [page 510]Change the Backup Configuration Settings [page 511]Create Data Backups and Delta Backups [page 521]Schedule Backups [page 529]Recover a Database [page 538]Copy a Database [page 546]
15.1 Display the Backup Configuration Settings
Using SAP HANA cockpit, you can display an overview of the active backup configuration settings for the system database and for each tenant database.
Prerequisites
The database must first be registered in SAP HANA cockpit.
Procedure
1. From SAP HANA cockpit, select a database (the system database or a tenant database) to display the system overview.
2. Choose Manage database backups.
The backup catalog overview is displayed.3. Choose Configure Backup.
The system-specific configuration settings for the database are displayed.
510 P U B L I CSAP HANA Administration with SAP HANA Cockpit
Backup and Recovery

NoteIf the backup scheduler is enabled, you can change its settings for the database. You can also change the retention policy.
From here, no other settings can be changed.
Related Information
Change the Backup Configuration Settings [page 511]
15.2 Change the Backup Configuration Settings
Using SAP HANA cockpit, you can change the systemwide default backup and recovery configuration settings.
Prerequisites
You have the authorization DATABASE ADMIN.
Changes to the systemwide default configuration settings are made through the system database.
Procedure
1. From SAP HANA cockpit, select a system database to display the system overview.2. Choose Manage Databases.
An overview of the databases in the SAP HANA system is displayed.3. Choose Configure Backup.
An overview of the current systemwide backup configuration settings is displayed.
The log mode and the backup encryption status for the whole SAP HANA system is displayed.
For more information, see SAP HANA Backup Encryption.4. You can navigate directly to a specific settings group.
You can choose Backint Settings, Catalog Settings, Log Settings, Data Backup, or Restrictions for Tenant Database Users.
For more information about scheduling backups, see Schedule Backups.5. To change a group of configuration settings, choose Edit.
SAP HANA Administration with SAP HANA CockpitBackup and Recovery P U B L I C 511

Make the desired changes.
For more information about the individual configuration options, see Backup Configuration Settings.
NoteWhen you edit a settings group, SAP HANA cockpit checks whether the configuration settings are within the recommended range. If a setting has been changed to a non-recommended setting, a setting within the recommended range is proposed. You then have the option to save or discard the recommended setting.
6. Save or discard your changes.
○ To save your changes, choose Save.○ To discard your changes, choose Cancel.○ To reset a parameter to the default setting, choose Reset to Default.
When you save, the changes takes effect immediately for the system database and all the tenant databases.
Related Information
Backup Configuration Settings [page 512]Display the Backup Configuration Settings [page 510]Schedule Backups [page 529]
15.2.1 Backup Configuration Settings
The backup configuration settings are described in the following sections.
Backint Settings
The parameter options for third-party backup tools are only available if the Backint agent is installed.
Backint Parameter FilesIf required by the third-party backup tool, you can specify Backint parameter files for data backup, log backups, and the backup catalog. The content and syntax of the parameter files is tool-specific and defined by the tool vendor.
For more information, see the vendor documentation for the third-party backup tool.
NoteIf you disable Backint, check that the destination used for file-based backups is correct.
512 P U B L I CSAP HANA Administration with SAP HANA Cockpit
Backup and Recovery

Setting Description
Use the Same Parameter File for All You can use the same Backint parameter file for data backups, log backups, and for backups of the backup catalog.
Data Backup, Log Backup, Catalog Backup You can specify a different Backint parameter file for data backups, log backups, and for backups of the backup catalog.
NoteTo use a parameter file, there needs to be a symbolic link pointing from /usr/sap/<SID>/SYS/global/hdb/opt/hdbconfig/ to the actual parameter file in the directory.
If a new host is added, ensure that the database services have access to the Backint agent and the parameter file.
NoteTo specify parameter files for the databases in a high isolation system, you need to work from the system database.
With high isolation, the settings are configured separately for the system database and the tenant databases. For each database, you can use a different Backint parameter file for data backups, log backups, and for backups of the backup catalog.
In an SAP HANA database with many tenant databases, many Backint parameter files may be needed to ensure high isolation.
For more information, see Isolation Level High for Backups and Third-Party Backup Tools.
Backint Response Timeout
Setting Description
Set Timeout (Catalog and Log Backups) Enable a timeout for the connection to the third-party backup tool. The timeout is measured from the time of the first request to the Backint for SAP HANA agent.
NoteThis timeout is reset when data is transferred.
SAP HANA Administration with SAP HANA CockpitBackup and Recovery P U B L I C 513
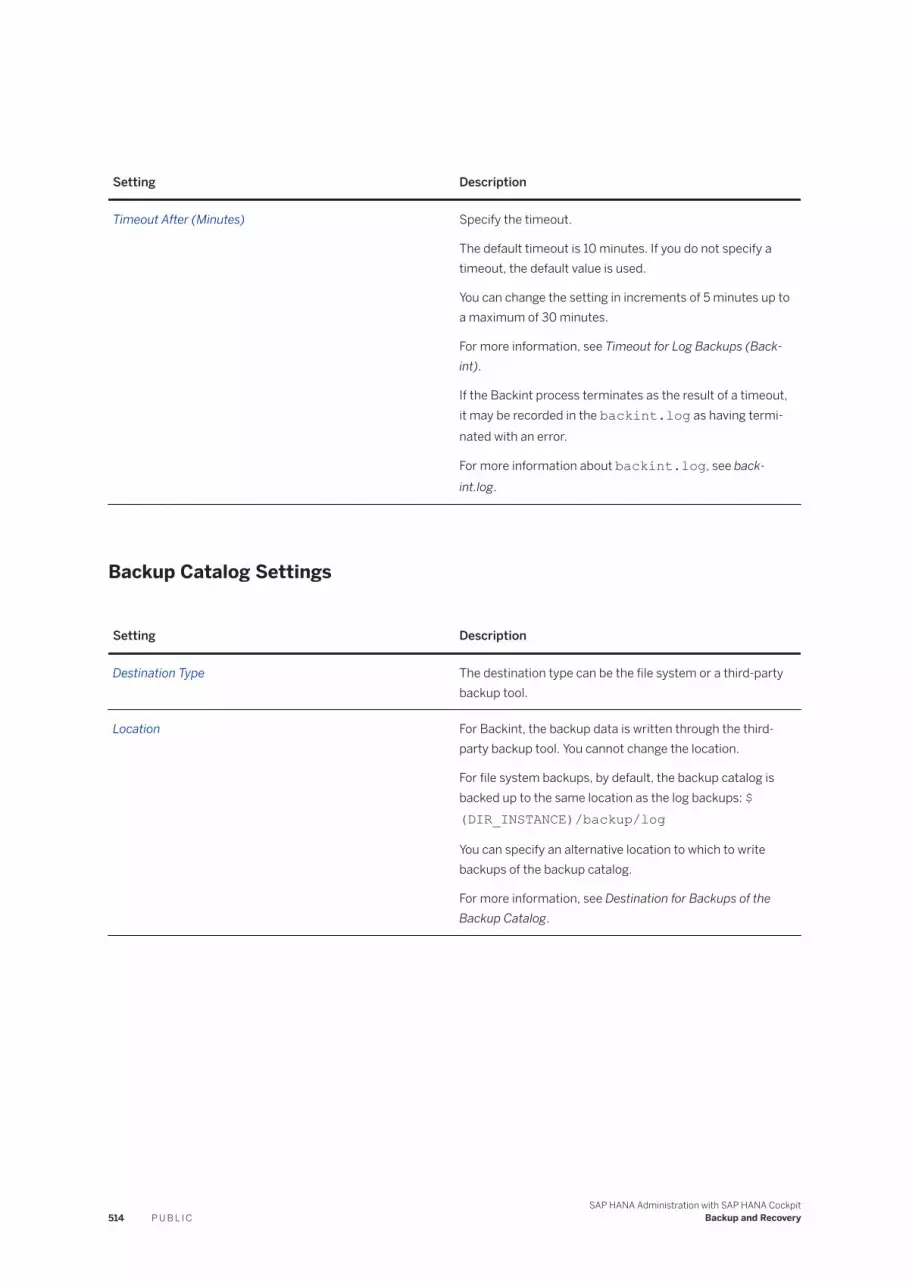
Setting Description
Timeout After (Minutes) Specify the timeout.
The default timeout is 10 minutes. If you do not specify a timeout, the default value is used.
You can change the setting in increments of 5 minutes up to a maximum of 30 minutes.
For more information, see Timeout for Log Backups (Backint).
If the Backint process terminates as the result of a timeout, it may be recorded in the backint.log as having terminated with an error.
For more information about backint.log, see backint.log.
Backup Catalog Settings
Setting Description
Destination Type The destination type can be the file system or a third-party backup tool.
Location For Backint, the backup data is written through the third-party backup tool. You cannot change the location.
For file system backups, by default, the backup catalog is backed up to the same location as the log backups: $(DIR_INSTANCE)/backup/log
You can specify an alternative location to which to write backups of the backup catalog.
For more information, see Destination for Backups of the Backup Catalog.
514 P U B L I CSAP HANA Administration with SAP HANA Cockpit
Backup and Recovery

Log Settings
Log Mode
Setting Description
Log Mode SAP HANA uses two log modes: normal and overwrite.
By default, SAP HANA runs in log mode normal.
TipIf you change the log mode from overwrite – where log backups are not written – to log mode normal, you must create a full data backup to ensure that log backups are written again, and that the database can be recovered to the most recent point in time.
For more information, see Change Log Modes.
Log Backup
Setting Description
Create Log Backups Enable or disable automatic log backups.
If Create Log Backups is disabled, the other settings in the parameter group cannot be changed.
To enable log backups, the log mode must be set to normal. In log mode overwrite, you cannot change the log backup settings.
For more information, see Log Modes.
CautionDuring normal system operation (log mode normal), it is strongly recommended that you enable automatic log backups. When log segments are backed up, the space they occupied in the log area can be freed. SAP HANA can overwrite the newly freed space in the log area with new log entries. In this way, automatic log backups can prevent the log area from filling. If automatic log backups are disabled, the log area grows until the file system is full. If the file system is full, and no more log segments can be created, the database freezes.
SAP HANA Administration with SAP HANA CockpitBackup and Recovery P U B L I C 515

Setting Description
Use Consolidated Backups To improve the performance of log backups, SAP HANA can write multiple log segments of a service to a single consolidated log backup.
If you do not use consolidated log backups, each log segment is backed up to its own backup.
For more information, see Consolidated Log Backups.
Maximum Size (GB) You can configure the maximum size of consolidated log backups in increments of 8 GB.
The default value is 16 GB.
This means that one backup operation creates consolidated log backups with a maximum size of 16 GB.
The minimum size is 8 GB. The maximum size allowed is 64 GB.
For more information, see Consolidated Log Backups.
Destination Type The destination type can be the file system or a third-party backup tool.
Location For Backint, the backup data is written through a third-party backup tool. You cannot change the location.
For file system backups, by default, SAP HANA log segments in the log area are backed up to: $(DIR_INSTANCE)/backup/log
You can specify an alternative location.
Back Up Logs Specify when to back up the log segments.
At latest after specified time limit: If log segments become full, they are backed up immediately, even if the log backup time limit has not been reached.
(This is the same as log backup interval mode: immediate)
Only after specified time limit: Log segments are backed up after the time limit you specify. This means that log segments are not automatically backed up if the log segments become full.
(This is the same as log backup interval mode: service)
For more information, see Set the Interval Mode for Log Backups.
516 P U B L I CSAP HANA Administration with SAP HANA Cockpit
Backup and Recovery

Setting Description
Time Limit (Minutes) Specify the time limit for log backups.
By default, the time limit is 15 minutes.
The maximum permitted time limit is 1440 minutes (24 hours).
Data Backup Settings
Data Backup
Setting Description
Destination Type The destination type can be the file system or a third-party backup tool.
Location Backint: The backup data is written through a third-party backup tool. You cannot change the location.
File system backups: By default, the backups are written to the following location: $(DIR_INSTANCE)/backup/data
You can specify an alternative location to which to write data backups.
For more information, see Parameters for Data Backup Settings.
Limit Maximum Size (File System Backups) For file system backups, you can specify a maximum file size.
The maximum file size applies to the data backups of all services.
If the size of a data backup file for a service exceeds the specified limit, SAP HANA splits the file into multiple smaller files.
Maximum Size (GB) You can specify the maximum file size of data backups in increments of 50 GB up to 2000 GB.
The actual size of data backups may be smaller than the specified maximum size.
SAP HANA Administration with SAP HANA CockpitBackup and Recovery P U B L I C 517

Setting Description
Parallel Streams (Backint Backups) When creating a data backup, a third-party backup tool can use multiple channels in parallel to write the backup data for each service.
By default, SAP HANA uses one channel for data backups. If required, you can configure SAP HANA to use additional channels. When multiple channels are used, SAP HANA distributes the data equally across the available channels.
You can use up to 32 parallel streams for backups using a third-party tool.
All the parts of a multistreamed backup are approximately the same size.
For more information, see Multistreaming Data Backups with Third-Party Backup Tools.
NoteTo create multistreamed data backups, the third-party backup tool must also be configured to use multiple channels with good performance.
For more information about the configuration of the backup tool, consult the vendor documentation.
Data Backup SchedulerFrom SAP HANA cockpit, open the system overview of the SAP HANA database, for which you want to schedule a backup, and choose Manage database backups Configure Backup .
Setting Description
Enable Data Backup Scheduler To be able to execute scheduled data backups, the data backup scheduler must be enabled. (If the scheduler is not enabled, you can still schedule backups, but they cannot be executed.)
NoteA backup of a tenant database must be scheduled through the tenant database itself. A backup of a tenant database cannot be scheduled through the system database.
For more information, see Schedule Backups.
518 P U B L I CSAP HANA Administration with SAP HANA Cockpit
Backup and Recovery

Setting Description
Assigned Database User The user that activates the backup schedules is also used to execute the backups. If the data backup scheduler is running, the associated user is displayed.
Restrictions for Tenant Database Users
Setting Description
Users Can Create Backups You can prevent all users of a tenant database from creating backups.
For more information about authorizations, see Authorizations Needed for Backup and Recovery.
Users Have Free Choice of Backup Destination NoteFor file-system backups only.
For users who are allowed to create backups, you can allow backups to be created:
● In any directory● Only in the default backup destination or a subpath of
the default backup destination.Users can create new subdirectories for backups below the default backup destination.
NoteAfter you change the permission for the backup destination for all tenant databases, the database must be restarted.
Retention Policy
From SAP HANA cockpit, select a SAP HANA database and open the system overview. Then choose Manage database backups. To access the retention policy options, choose Configure Backup and navigate to Retention Policy.
NoteThe functionality for configuring a retention policy is only supported from SAP HANA SPS03. In earlier SAP HANA releases, this functionality is not available.
SAP HANA Administration with SAP HANA CockpitBackup and Recovery P U B L I C 519

Setting Description
Enable Retention Policy Scheduler Enable the scheduler to allow SAP HANA to automatically schedule jobs to delete backup generations.
Assigned Database User The user that activates the retention policy schedules is also used to perform retention actions. If the retention policy scheduler is running, the associated user is displayed.
Delete Backup Generations Automatically Specify whether to have SAP HANA automatically delete backup generations in accordance with the criteria you define.
Retain Backup Generations Younger Than Specify a number of days. Backup generations will be retained for that number of days.
By default, backup generations are retained for three days.
Minimum no. of Retained Backup Generations You can keep a minimum of between 1 and 14 backup generations.
By default, two backup generations are retained.
Options for Backup Deletion You can delete the records of the unwanted data backup(s) from the backup catalog only, or you can delete both the records in the backup catalog and the physical backups from the file system and y third-party backup tool, if you are using one.
Start Daily Automatic Deletion You can define a period of one hour at which to begin automatically deleting unwanted backups. Alternatively, you can configure SAP HANA to start deleting unwanted backups at any time of the day.
The period you specify is interpreted as UTC.
Related Information
Schedule Backups [page 529]
520 P U B L I CSAP HANA Administration with SAP HANA Cockpit
Backup and Recovery

15.3 Create Data Backups and Delta Backups
Using SAP HANA cockpit, you can create data backups and delta backups (differential backups and incremental backups).
Procedure
1. From SAP HANA cockpit, select a SAP HANA database and open the system overview.2. Choose Manage database backups.
The following information from the backup catalog is displayed:
○ Time range that the backup catalog covers○ Total size of the backup catalog○ Information about the most recent backups within the time range
This information includes: status, start time, backup type, duration, size, destination type, and a comment
3. You have the following display options:
To... Steps
Display more details about a backup. Click its row.
Display an overview of backup generations. Choose the chart icon.
The chart shows the start time of the backup generation, its total size, and the sizes of the full data backup and the associated delta backups and log backups that can be used in combination for a recovery.
From the overview of backup generations, you can delete backup generations.
For more information, see Delete Backup Generations.
Change the order in which the columns are displayed. Choose Settings, and use the arrow buttons.
In the same way, you can also customize the backup details pages for each database.
4. You can customize the information displayed.
Choose Filter.
A dialog box is displayed.
SAP HANA Administration with SAP HANA CockpitBackup and Recovery P U B L I C 521

You can filter the following information:
Backup Type By default, Complete Data Backup and Data Snapshot are selected.
Delta backups are included in the backup catalog, but are not displayed by default in SAP HANA cockpit.
To display information about delta backups, select Differential Backup and Incremental Backup and confirm.
Status You can display backups with the status:
○ Canceled○ Failed○ Prepared
A data snapshot has been prepared, but has not been confirmed or abandoned.
NoteTo create a data snapshot, you need to use native SQL.
○ RunningIf a backup is running, its progress is displayed.
○ Successful
Start Time You can display backups from a specific time range.
5. Choose Create Backup.6. Specify the backup type:
Option Description
Complete A data backup includes all the data structures that are required to recover the database.
Incremental An incremental backup stores the data changed since the last data backup - either the last data backup or the last delta backup (incremental or differential).
Differential Differential backups store all the data changed since the last full data backup.
The estimated size of the backup is displayed. This information is read from table M_BACKUP_SIZE_ESTIMATIONS.
For more information, see M_BACKUP_SIZE_ESTIMATIONS System View.
7. Specify the backup destination type.
Option Description
File Writes the backup data to the file system.
Backint Writes the backup data through a third-party backup tool.
522 P U B L I CSAP HANA Administration with SAP HANA Cockpit
Backup and Recovery

Option Description
NoteThis option is only available if a third-party backup tool is installed.
The Backint parameters have no effect on the behavior of SAP HANA. For information about the Backint parameters, contact your tool vendor.
8. Specify the backup prefix.
The current data and time is proposed by default.
TipTo be able to more easily identify archived backups, it is strongly recommended to use a unique prefix for each backup. For example, a timestamp.
9. Specify the backup destination.
Option Description
For file-based backups:
Ensure that there is sufficient space at the specified backup destination.
The default backup destination can changed as required.
More information: Estimate the Space Needed for a Data Backup.
For third-party backup tools:
For third-party backup tools, the destination is always /usr/sap/<SID>/SYS/global/hdb/backint/<database_name>.
You can only change the backup prefix.
10. To start the backup, choose Back Up.
The progress of the backup is displayed.
Canceling a Running Backup
You can cancel a running data backup or a delta backup (differential or incremental).
NoteThe option to cancel a backup is only available while a backup is running.
From the backup dialog, choose Cancel Backup.
The backup is canceled and you are notified.
After you have canceled a backup, you can start a new data backup.
TipIf you cancel a running backup performed by a third-party backup tool, it is recommended to ensure that any incomplete backups are physically deleted.
SAP HANA Administration with SAP HANA CockpitBackup and Recovery P U B L I C 523

NoteIn some situations, it may not be possible to cancel a running backup. For example, if it is not possible to access internal locks, or if a running backup. For example, if it is not possible to access internal locks, or if a file cannot be written to an NFS mount.
When all volumes have been backed up, the backup catalog overview is displayed again. Here, you can verify that the backup was completed successfully.
Related Information
Delete Backup Generations [page 552]
15.4 Create a Data Snapshot (Native SQL)
You can create a data snapshot of an SAP HANA database system with one or more tenant databases. You create a data snapshot using SQL.
Prerequisites
● A data snapshot can only be created through the system database.It is not possible to create a data snapshot for a tenant database separately.
● The SAP HANA database (the system database and all the tenant databases) is online, and all the configured services are running.To check whether the database is online:
SAP HANA cockpit On the Tenant Monitoring and Administration block, the system status for the system database and the tenant database is System Running.
SAP HANA studio Go to the Administration Console.
Go to the Overview tab.
In the section Operational Status, all the SAP HANA services should be started.
524 P U B L I CSAP HANA Administration with SAP HANA Cockpit
Backup and Recovery

Context
A data snapshot is created in three steps that are performed in the SAP HANA database and at storage system level.
Step to Create a Data Snapshot Description
Prepare the database for the data snapshot. An internal database snapshot is created that reflects a consistent database state at the point in time it is created in the file system.
NoteIf an internal database snapshot exists, no new data backups or new data snapshots can be created.
Conversely, while a data backup is running, you cannot create a data snapshot.
Create the data snapshot. The data snapshot is created based on the previously created internal database snapshot.
NoteTo ensure its consistent state, the data snapshot relies on the previously created internal database snapshot. If the database or a database service is restarted, the internal database snapshot is lost.
At this stage, the data snapshot is in the SAP HANA data area. To be able to create further data snapshots or data backups, you need to manually make all the files and directories from the data area available in a separate storage location. and then confirm the data snapshot.
RememberData snapshots only offer increased data safety if they are moved or replicated to a separate storage medium. The files and directories under the mountpoint of the data area must all be stored together. The data volumes themselves must not be moved.
SAP HANA Administration with SAP HANA CockpitBackup and Recovery P U B L I C 525

Step to Create a Data Snapshot Description
Confirm or Abandon the data snapshot. When the data snapshot was successfully created, you must confirm or abandon it to be able to create further data snapshots or data backups.
When a data snapshot is confirmed, it is recorded in the backup catalog as successful. When a data snapshot is abandoned, it is recorded in the backup catalog as unsuccessful.
The data snapshot is always recorded in the backup catalog - even if the internal database snapshot is lost before the data snapshot is confirmed. When the data snapshot is confirmed, you are notified whether the data snapshot can be used for a recovery.
NoteIf the confirm fails, the database snapshot is marked as unsuccessful. You should physically delete the data snapshot because it may not be possible to use it for recovery.
Procedure
To execute SQL statements, you can use the SQL console in SAP HANA cockpit or SAP HANA studio.1. Create a new internal database snapshot.
From the system database, execute the following SQL statement:
BACKUP DATA FOR FULL SYSTEM CREATE SNAPSHOT [COMMENT <STRING>];
Optionally, add a comment. This comment can help to identify the data snapshot in the backup catalog.
NoteFOR FULL SYSTEM is mandatory to create a snapshot.
Sample Code
BACKUP DATA FOR FULL SYSTEM CREATE SNAPSHOT COMMENT 'SNAPSHOT-2019-10-22';
For more information, see BACKUP DATA CREATE SNAPSHOT Statement (Backup and Recovery) in the SAP HANA SQL and System Views Reference.
An internal database snapshot is now created ('prepared').
526 P U B L I CSAP HANA Administration with SAP HANA Cockpit
Backup and Recovery

NoteThe snapshot will be created for the entire SAP HANA database, that is, the system database and all the tenant databases. It is not possible to create snapshots for an individual tenant database or only for the system database.
2. Find out the backup ID of the internal database snapshot in the state PREPARED.
NoteSAP HANA cannot ensure that the backup ID of the data snapshot of the system database and the backup ID of the tenant database are the same. As data snapshots are administered by the system database, you must use the backup ID of the system database to create the data snapshot.
Use the following SQL statement:
SELECT * FROM M_BACKUP_CATALOG WHERE ENTRY_TYPE_NAME = 'data snapshot';
Sample Code
SELECT BACKUP_ID, COMMENT FROM M_BACKUP_CATALOG WHERE ENTRY_TYPE_NAME = 'data snapshot' AND STATE_NAME = 'prepared' AND COMMENT = 'SNAPSHOT-2019-10-22';
Make a note of the backup ID.
NoteOlder internal database snapshots may exist in the state successful or unsuccessful.
The database is now prepared for the data snapshot.
An internal database snapshot is created, reflecting a consistent database state at the point in time it is created.
NoteIf an internal database snapshot exists, no new data backups or new data snapshots can be created.
Conversely, while a data backup is running, you cannot create a data snapshot.
At this stage, all the snapshot-relevant data is only stored in the data area. To be able to use the data snapshot for a recovery later on, this data needs to be stored in a separate location.
3. In the storage system, make all the files and directories from the data area available together in a separate storage location.
To create the data snapshot, you can use the tool provided by your storage vendor. For more information, consult the tool documentation.
NoteA data snapshot contains all the persisted data in the data area. For this reason, the files and directories under the mountpoint of the data area must all be stored together.
SAP HANA Administration with SAP HANA CockpitBackup and Recovery P U B L I C 527

CautionFor a recovery using a data snapshot, only the data area must be restored from the storage tool. You still can use the log area for the recovery.
NoteThe directory name of the data area is defined by configuration parameter basepath_datavolumes in the global.ini configuration file, in the persistence section.
After the data snapshot has been created in a separate storage location, it needs to be confirmed.4. Confirm or Abandon the data snapshot.
Use the following SQL statement:
Option Description
Confirm BACKUP DATA FOR FULL SYSTEM CLOSE SNAPSHOT BACKUP_ID <BACKUP_ID> SUCCESSFUL <STRING>;
Confirm that the data snapshot has been successfully saved to a new storage location.
You can specify an external ID to identify the data snapshot later in the storage system.
Sample Code
BACKUP DATA FOR FULL SYSTEM CLOSE SNAPSHOT BACKUP_ID 1489592445498 SUCCESSFUL 'SNAPSHOT-2019-10-22';
Abandon BACKUP DATA FOR FULL SYSTEM CLOSE SNAPSHOT BACKUP_ID <BACKUP_ID> UNSUCCESSFUL [<STRING>];
If the data snapshot cannot be created, or if confirmation fails, choose Abandon.
Optionally, you can add a comment to explain why the data snapshot was not successful.
Sample Code
BACKUP DATA FOR FULL SYSTEM CLOSE SNAPSHOT BACKUP_ID 1489592445498 UNSUCCESSFUL 'SNAPSHOT-2019-10-22 FAILED';
For more information, see BACKUP DATA CLOSE SNAPSHOT Statement (Backup and Recovery) in the SAP HANA SQL and System Views Reference.
TipIt is strongly recommended to confirm or abandon a data snapshot as soon as possible after it has been created.
While the data snapshot is being prepared or created, the snapshot-relevant data is frozen. While the snapshot-relevant data remains frozen, changes can still be made in the database. Such changes will not cause the frozen snapshot-relevant data to be changed. Instead, the changes are written to
528 P U B L I CSAP HANA Administration with SAP HANA Cockpit
Backup and Recovery

positions in the data area that are separate from the data snapshot. Changes are also written to the log.
However, the longer the snapshot-relevant data is kept frozen, the more the data volume can grow.
NoteIf the database or an individual database service is restarted, the internal database snapshot is lost. If the database snapshot is lost before the data snapshot is confirmed, the data snapshot is still written. During confirmation, the database notifies you that the data snapshot cannot be used.
After you have confirmed or abandoned a data snapshot, it is recorded in the backup catalog as either successful or unsuccessful.
NoteA data snapshot now exists for both the system database and the tenant database.
The internal database snapshot that was used to create the data snapshot is discarded.
It is now possible to create further data snapshots or data backups.
15.5 Schedule Backups
Using SAP HANA cockpit, you can schedule data backups or delta backups to run without supervision at specific intervals.
Prerequisites
● You require the following authorizations:
Authorization Purpose
System privilege BACKUP ADMIN Schedule backups for the current database.
This can be the system database or a tenant database.
System privilege DATABASE ADMIN Schedule backups for tenant databases through the system database. (Not for the system database itself)
SELECT privileges for the following tables: ○ _SYS_XS.JOB_SCHEDULES○ _SYS_XS.JOBS
● Backup schedules must be activated globally.
NoteThe user that activates the backup schedules is also used to execute the backups.
SAP HANA Administration with SAP HANA CockpitBackup and Recovery P U B L I C 529
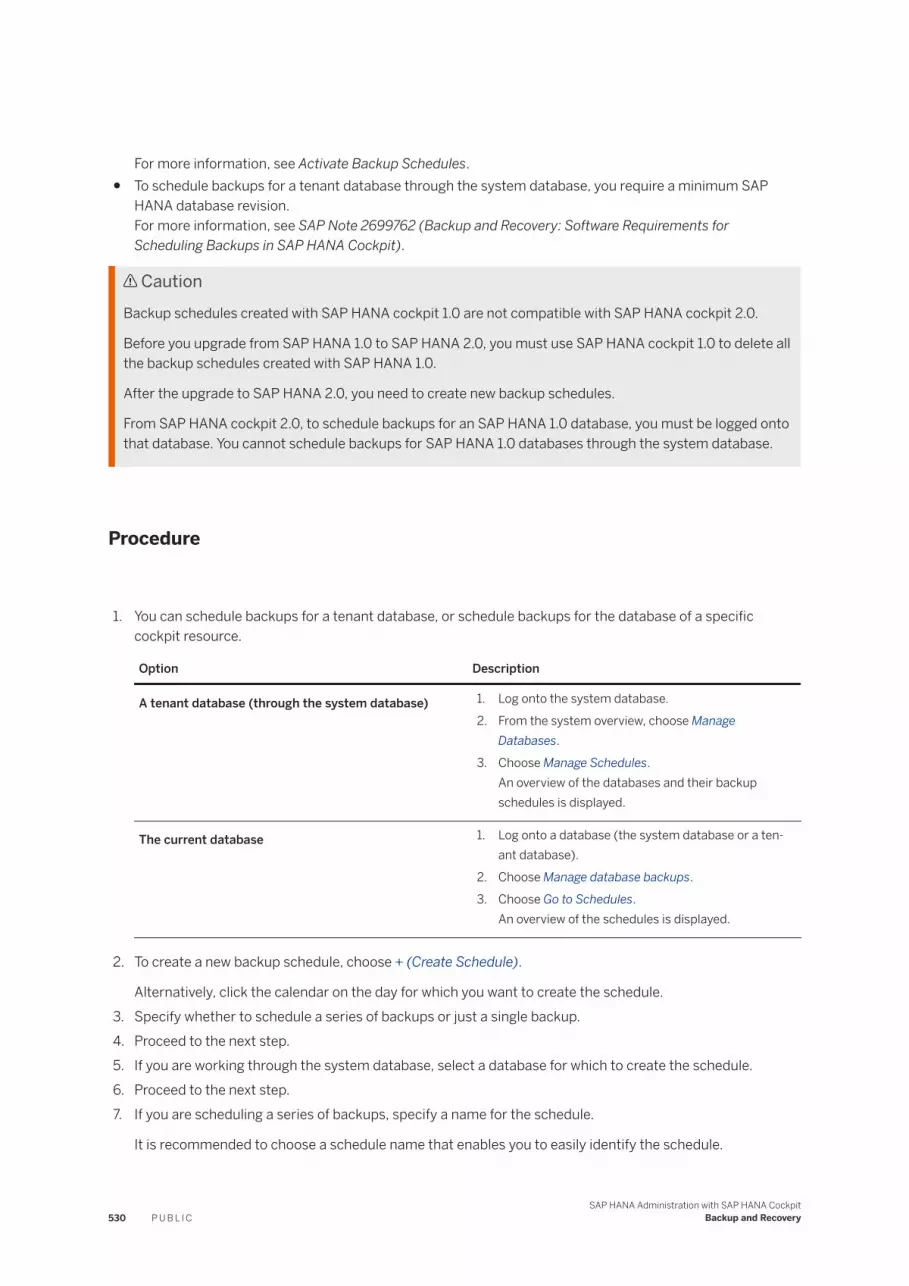
For more information, see Activate Backup Schedules.● To schedule backups for a tenant database through the system database, you require a minimum SAP
HANA database revision.For more information, see SAP Note 2699762 (Backup and Recovery: Software Requirements for Scheduling Backups in SAP HANA Cockpit).
CautionBackup schedules created with SAP HANA cockpit 1.0 are not compatible with SAP HANA cockpit 2.0.
Before you upgrade from SAP HANA 1.0 to SAP HANA 2.0, you must use SAP HANA cockpit 1.0 to delete all the backup schedules created with SAP HANA 1.0.
After the upgrade to SAP HANA 2.0, you need to create new backup schedules.
From SAP HANA cockpit 2.0, to schedule backups for an SAP HANA 1.0 database, you must be logged onto that database. You cannot schedule backups for SAP HANA 1.0 databases through the system database.
Procedure
1. You can schedule backups for a tenant database, or schedule backups for the database of a specific cockpit resource.
Option Description
A tenant database (through the system database) 1. Log onto the system database.2. From the system overview, choose Manage
Databases.3. Choose Manage Schedules.
An overview of the databases and their backup schedules is displayed.
The current database 1. Log onto a database (the system database or a tenant database).
2. Choose Manage database backups.3. Choose Go to Schedules.
An overview of the schedules is displayed.
2. To create a new backup schedule, choose + (Create Schedule).
Alternatively, click the calendar on the day for which you want to create the schedule.3. Specify whether to schedule a series of backups or just a single backup.4. Proceed to the next step.5. If you are working through the system database, select a database for which to create the schedule.6. Proceed to the next step.7. If you are scheduling a series of backups, specify a name for the schedule.
It is recommended to choose a schedule name that enables you to easily identify the schedule.
530 P U B L I CSAP HANA Administration with SAP HANA Cockpit
Backup and Recovery

8. Proceed to the next step.9. Specify the backup type.
Option Description
Complete A complete data backup includes all the data that is required to recover the database to a consistent state.
Differential Backs up all the data changed since the last full data backup (complete data backup or data snapshot).
Incremental Backs up the data changed since the last full data backup (complete data backup or data snapshot) or the last incremental or differential backup.
NoteCurrently, scheduling data snapshots is not supported.
10. Specify the Destination Type.
Option Description
File If you are creating a backup to the file system, select File. If necessary, you can specify a new destination or change the default destination.
For more information, see Parameters for Data Backup Settings.
Backint If you are working with a third-party backup tool, select the destination type Backint and, if needed, specify the Backint Parameters.
For more information, see Working with Third-Party Backup Tools.
11. Specify a Backup Prefix.
TipTo be able to more easily identify archived backups, it is strongly recommended to use a unique prefix for each backup.
By default, the name of each scheduled backup is prefixed with the timestamp of the start of the backup. The placeholder <[date]_[time]> is automatically converted to the current timestamp.
12. Specify a Backup Destination.
The default backup destination is proposed.
For file-based data backups, you have the option to change the default backup destination or to specify a different destination for the current backup only.
By default, file-based data backups are written to a subdirectory of $DIR_INSTANCE/backup/data:
System database: $DIR_INSTANCE/backup/data/SYSTEMDB
Tenant database: $DIR_INSTANCE/backup/data/DB_<tenant_database>
For backups created using third-party backup tools, a named pipe is created in the file system for the system database or tenant database. The default backup destination for third-party backup tools cannot be changed.
SAP HANA Administration with SAP HANA CockpitBackup and Recovery P U B L I C 531

13. Optionally, add a comment.
A comment helps you to later identify the backups in the backup catalog.14. Proceed to the next step.15. If you are scheduling a series of backups, specify the recurrence pattern.
You can schedule the backup to run each week, once each month, every two months, quarterly, twice a year, or once a year.
16. Proceed to the next step.17. Specify the recurrence options for the backup schedule.
The recurrence options depend on whether you specified a weekly or month-based recurrence pattern.
Recurrence Setting Description
Time Zone Select the time zone in which you want to specify the backup time.
You can select any time zone that is convenient for you.
Create Backups At Specify a time to run the scheduled backups in the selected time zone.
You can specify a time manually or choose the clock icon to select a time from the list.
(Weekly) Create Backups On Specify on which days of the week you want the backups to be created.
You can select one or more days.
(Month-based) Create Backups On (UTC) Specify a day or a week of the month.
Day of Month: You can select the first day, the 15th day, or the last day in the month.
Week of Month: Specify which day of the month to create the backup. For example, the last Sunday in the month or the first Monday in the month.
Activate Schedule On Specify a day in the selected time zone.
The first backup scheduled will be created on this day or as soon as possible afterwards when the schedule criteria are fulfilled.
When you have specified the recurrence options, SAP HANA cockpit displays when the first backup will be created. The time is shown in both the time in the specified time zone and UTC.
If you specified a month-based recurrence pattern, the months in which the backups will be created are also shown. For example, October or Monthly.
18. Choose Review.
A summary of the schedule options is displayed.
To make changes, choose Edit for an option group.
532 P U B L I CSAP HANA Administration with SAP HANA Cockpit
Backup and Recovery

19. Choose Save Schedule.
The new schedule is saved and is active immediately.
The next backup scheduled will be created at the time displayed.
CautionIf SAP HANA is offline at a time for which backups are scheduled, scheduled backups will not run.
Note that when SAP HANA is running again, skipped backups are not automatically rescheduled.
Related Information
Manage Backup Schedules [page 536]Activate Backup Schedules [page 533]Enable the XS Job Scheduler (XS Classic) [page 534]Enable the XS Engine (XS Classic) [page 535]SAP Note 2699762
15.5.1 Activate Backup Schedules
Backup schedules must be activated globally.
Context
NoteThe user that activates the backup schedules is also used to execute the backups.
Procedure
1. From SAP HANA cockpit, go to the database overview.
2. Choose Manage database backups Configure Backup .
3. Go to Data Backup Settings Data Backup Scheduler .4. Choose Edit.5. Set Enable Data Backup Scheduler to YES.6. Save.
SAP HANA Administration with SAP HANA CockpitBackup and Recovery P U B L I C 533

NoteYou may need to manually enable the XS Job Scheduler, and possibly also the XS Engine.
For information about how to manually enable the XS Job Scheduler, see Enable the XS Job Scheduler (XS Classic).
For information about how to manually enable the XS Engine, see Enable the XS Engine (XS Classic).
Related Information
Enable the XS Job Scheduler (XS Classic) [page 534]Enable the XS Engine (XS Classic) [page 535]Schedule Backups [page 529]
15.5.1.1 Enable the XS Job Scheduler (XS Classic)
To schedule data backups or delta backups SAP HANA cockpit, the XS Job Scheduler (XS Classic) must be enabled.
Prerequisites
The XS Job Scheduler requires the XS Engine to be enabled.
Normally, the XS Engine is enabled by default. In some cases, particularly with SAP HANA Express, the XS Engine is not enabled by default, and you may need to activate the XS Engine manually.
Context
You can normally enable the XS Job Scheduler from SAP HANA cockpit.
For more information, see Schedule Backups.
If you need to enable the XS Job Scheduler manually, follow the steps described below.
The XS Job Scheduler is enabled separately for the system database and for each tenant database.
NoteA backup of a tenant database must be scheduled through the tenant database itself. A backup of a tenant database cannot be scheduled through the system database.
534 P U B L I CSAP HANA Administration with SAP HANA Cockpit
Backup and Recovery

Procedure
1. For the system database, the XS Job Scheduler must be enabled in the nameserver.ini file.
To enable the XS Job Scheduler, you can use the following SQL statement:
ALTER SYSTEM ALTER configuration ('nameserver.ini','SYSTEM') SET ('scheduler','enabled')= 'true' WITH reconfigure;
2. For each tenant database, the XS Job Scheduler must be enabled in the xsengine.ini file.
To enable the XS Job Scheduler, you can use the following SQL statement:
ALTER SYSTEM ALTER configuration ('xsengine.ini','SYSTEM') SET ('scheduler','enabled')= 'true' WITH reconfigure;
Related Information
Schedule Backups [page 529]Enable the XS Engine (XS Classic) [page 535]
15.5.1.2 Enable the XS Engine (XS Classic)
To schedule backups using SAP HANA cockpit, the XS scheduler must be enabled. The XS scheduler requires the XS engine to be running.
Context
Normally, the XS engine is enabled by default in an SAP HANA system. In some cases, particularly with SAP HANA Express, the XS engine is not enabled by default, and you may need to activate the XS engine manually.
The XS engine is enabled separately for the system database and for each tenant database.
Procedure
1. For the system database, the XS engine must be enabled in the nameserver.ini file.
To enable the XS engine, you can use the following SQL statements:
ALTER SYSTEM ALTER configuration ('nameserver.ini','SYSTEM') SET ('httpserver','embedded')= 'true' WITH reconfigure;
ALTER SYSTEM ALTER configuration ('nameserver.ini','SYSTEM') SET ('httpserver','workerpoolsize')= '5' WITH reconfigure;
SAP HANA Administration with SAP HANA CockpitBackup and Recovery P U B L I C 535

TipIt is recommended that you set the workerpool size to 5 for the system database. However, if you need to schedule many backup jobs, consider increasing the value in accordance with your system requirements.
2. For each tenant database, the XS engine must be enabled in the xsengine.ini file.
To enable the XS engine, you can use the following SQL statement:
ALTER SYSTEM ALTER configuration ('xsengine.ini','SYSTEM') SET ('httpserver','embedded')= 'true' WITH reconfigure;
ALTER SYSTEM ALTER configuration ('xsengine.ini','SYSTEM') SET ('httpserver','workerpoolsize')= '5' WITH reconfigure;
TipIt is recommended that you set the workerpool size to 5 for a tenant database. However, if you need to schedule many backup jobs, consider increasing the value in accordance with your system requirements.
Related Information
Schedule Backups [page 529]Enable the XS Job Scheduler (XS Classic) [page 534]
15.5.2 Manage Backup Schedules
You can display an overview of backup schedules, pause or reactivate schedules, and delete schedules.
Procedure
1. From SAP HANA cockpit, open the system overview of the SAP HANA database, for which you want to schedule a backup, and choose Manage database backups.
An overview of the information from the backup catalog is displayed.2. To display an overview of backup schedules, choose Go to Schedules.
You can display the schedules for a week or for a whole month. Choose 1 Month or 1 Week from the pull-down menu.
536 P U B L I CSAP HANA Administration with SAP HANA Cockpit
Backup and Recovery
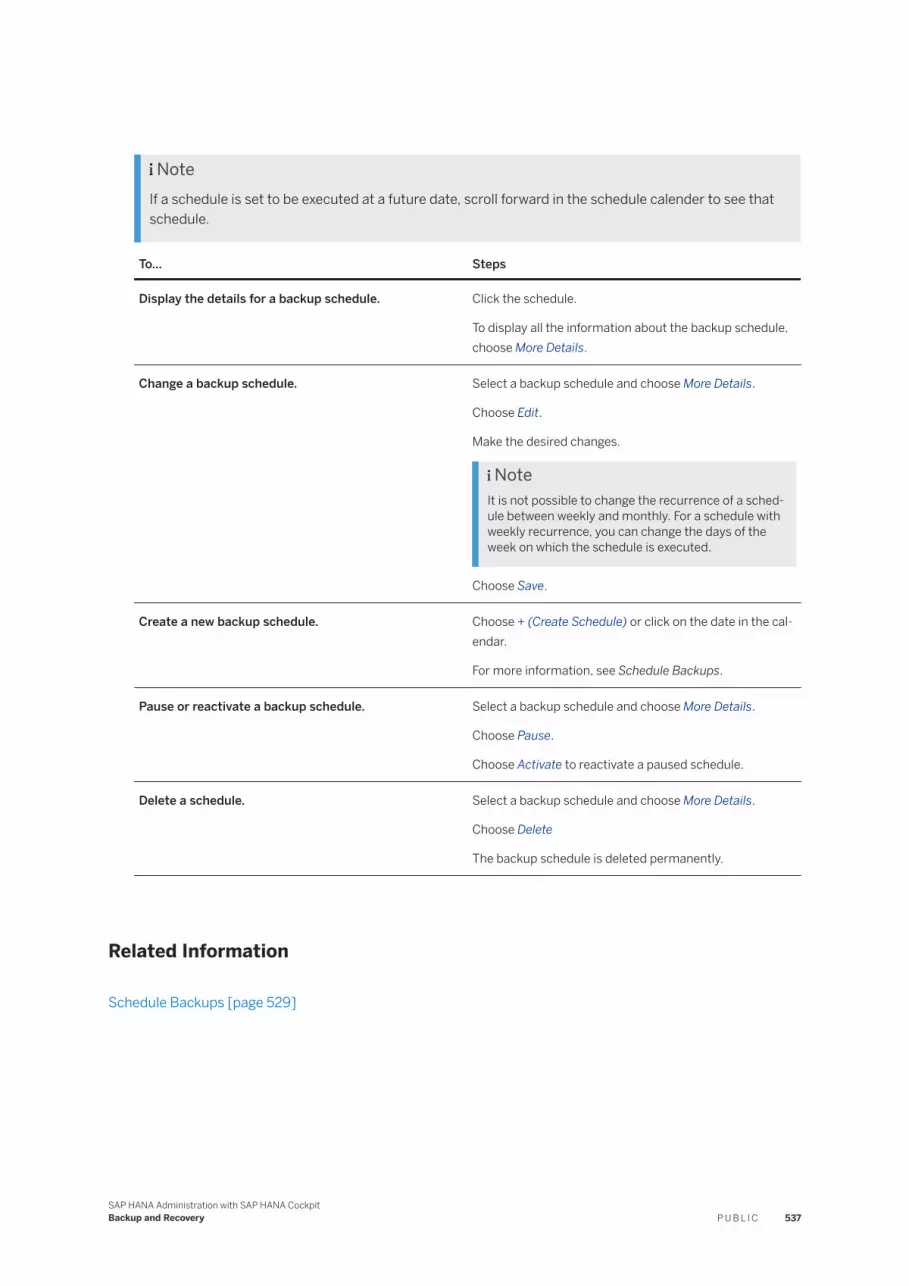
NoteIf a schedule is set to be executed at a future date, scroll forward in the schedule calender to see that schedule.
To... Steps
Display the details for a backup schedule. Click the schedule.
To display all the information about the backup schedule, choose More Details.
Change a backup schedule. Select a backup schedule and choose More Details.
Choose Edit.
Make the desired changes.
NoteIt is not possible to change the recurrence of a schedule between weekly and monthly. For a schedule with weekly recurrence, you can change the days of the week on which the schedule is executed.
Choose Save.
Create a new backup schedule. Choose + (Create Schedule) or click on the date in the calendar.
For more information, see Schedule Backups.
Pause or reactivate a backup schedule. Select a backup schedule and choose More Details.
Choose Pause.
Choose Activate to reactivate a paused schedule.
Delete a schedule. Select a backup schedule and choose More Details.
Choose Delete
The backup schedule is deleted permanently.
Related Information
Schedule Backups [page 529]
SAP HANA Administration with SAP HANA CockpitBackup and Recovery P U B L I C 537

15.6 Recover a Database
Using SAP HANA cockpit, you can recover an SAP HANA database to its most recent state or to a specific point in time.
Context
A tenant database is recovered through its system database.
A tenant database can be recovered to its most recent state or to a specific point in time.
Using SAP HANA cockpit, a system database can only be recovered to its most recent state. To recover a system database to a point in time, use the recoverSys.py tool.
CautionIf you recover a system database to a point in time, tenant databases that were registered after that point in time will be lost.
For more information, see Recover a System Database to a Point in Time.
NoteA recovery to the most recent state or to a point in time is equivalent to the SQL statement RECOVER DATABASE (not RECOVER DATA).
For more information, see RECOVER DATABASE Statement (Backup and Recovery) and RECOVER DATA Statement (Backup and Recovery) in the SAP HANA SQL and System Views Reference.
Procedure
1. From SAP HANA cockpit, select the system database.
Option Description
To recover the system database
Choose Recover database.
If the system database is still running, you are prompted to shut it down.
If the system database is shut down for recovery, all its tenant databases are automatically shut down as well. The whole SAP HANA system is not available until the recovery of the system database has been completed.
To recover a tenant database
Choose Manage Databases.
Select the row with the tenant database and choose Recover Tenant.
538 P U B L I CSAP HANA Administration with SAP HANA Cockpit
Backup and Recovery
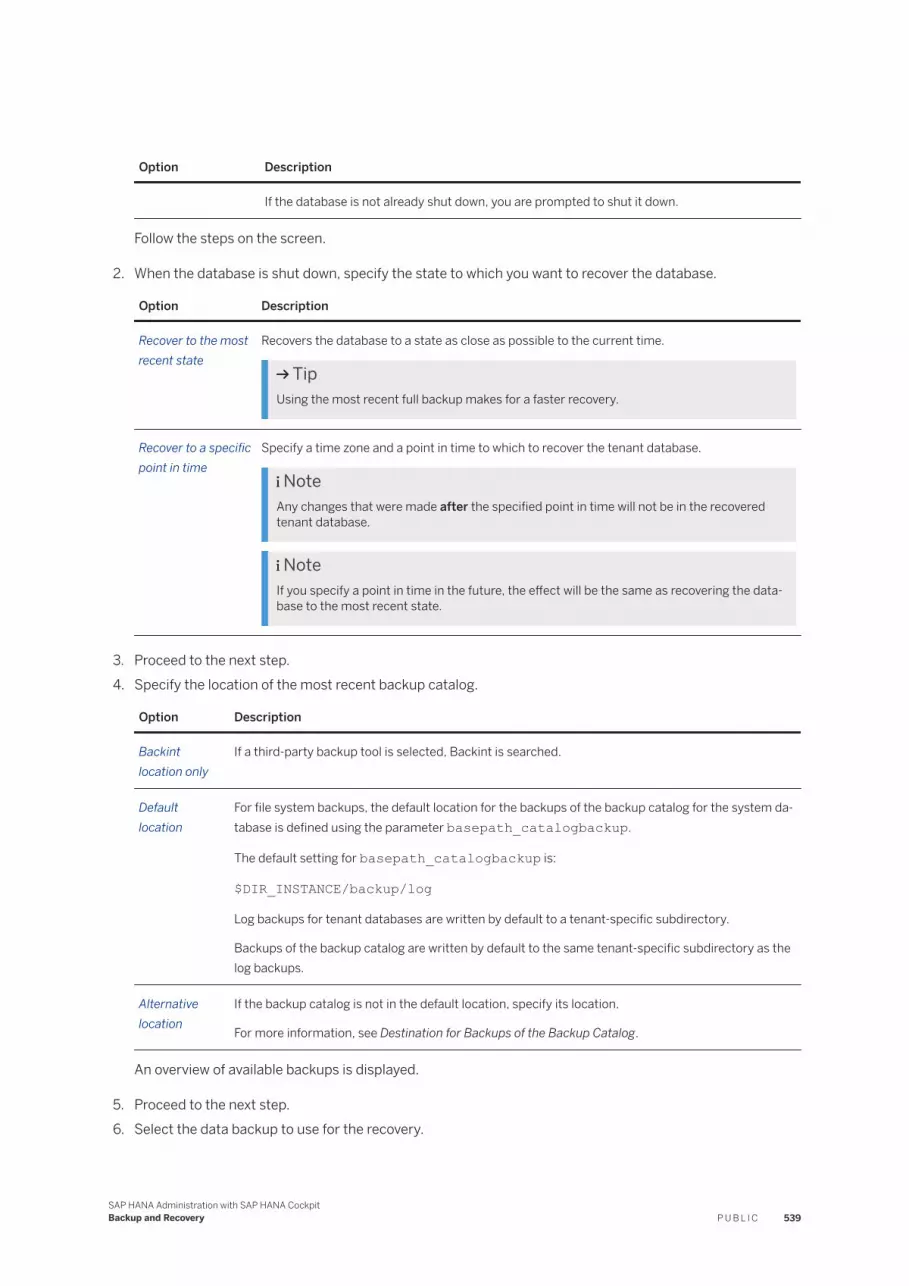
Option Description
If the database is not already shut down, you are prompted to shut it down.
Follow the steps on the screen.
2. When the database is shut down, specify the state to which you want to recover the database.
Option Description
Recover to the most recent state
Recovers the database to a state as close as possible to the current time.
TipUsing the most recent full backup makes for a faster recovery.
Recover to a specific point in time
Specify a time zone and a point in time to which to recover the tenant database.
NoteAny changes that were made after the specified point in time will not be in the recovered tenant database.
NoteIf you specify a point in time in the future, the effect will be the same as recovering the database to the most recent state.
3. Proceed to the next step.4. Specify the location of the most recent backup catalog.
Option Description
Backint location only
If a third-party backup tool is selected, Backint is searched.
Default location
For file system backups, the default location for the backups of the backup catalog for the system database is defined using the parameter basepath_catalogbackup.
The default setting for basepath_catalogbackup is:
$DIR_INSTANCE/backup/log
Log backups for tenant databases are written by default to a tenant-specific subdirectory.
Backups of the backup catalog are written by default to the same tenant-specific subdirectory as the log backups.
Alternative location
If the backup catalog is not in the default location, specify its location.
For more information, see Destination for Backups of the Backup Catalog.
An overview of available backups is displayed.
5. Proceed to the next step.6. Select the data backup to use for the recovery.
SAP HANA Administration with SAP HANA CockpitBackup and Recovery P U B L I C 539

7. Proceed to the next step.8. Specify whether to use delta backups (differential and incremental backups).
CautionThe full backups and the delta backups must be in the same location for the recovery to work correctly.
For more information about delta backups, see Delta Backups.9. Proceed to the next step.10. If necessary, you can change the location to be searched for data backups and delta backups.
To specify additional locations for log backups, choose Add more.
If you leave the locations empty, SAP HANA uses the backup locations specified in the backup catalog.11. Proceed to the next step.12. Check whether the backups are available.
Here, you can decide whether to check if all the backups needed are available and can be accessed before the recovery starts. The availability check is performed at the beginning of the recovery.
NoteSAP HANA does not check the integrity of the backups content on block level.
For more information, see Manually Checking Whether a Recovery is Possible.
13. Proceed to the next step.14. Specify whether to initialize the log area.
CautionIf you initialize the log area, the content of the log area is lost.
No log records from the log area can then be replayed during the recovery. Only the log backups can be used.
In the following situations, you must initialize the log area:
○ The log area is unusable.○ You are recovering the database to a different system.
15. Choose Review.
An overview of the settings for the recovery is displayed.
To change any settings, choose Edit.
All the settings that you specified are retained until you change them.16. To display the SQL statement to be used for the recovery, choose Display SQL Statement.
For more information, see Recovering a Database Using Native SQL.17. To perform the recovery, choose Start Recovery.
The progress of the recovery for each SAP HANA service is displayed.
540 P U B L I CSAP HANA Administration with SAP HANA Cockpit
Backup and Recovery

Results
When the recovery is completed, a message confirms this, and shows the point in time to which the database was recovered.
NoteThe SQL statement used for a recovery is recorded in backup.log. For a point-in-time recovery, the point in time is specified in the SQL statement as UTC.
The time at which the recovery was started and completed is recorded in backup.log as local server time, not UTC.
For more information, see Diagnosis Files for Backup and Recovery.
NoteThe point in time that SAP HANA returns after a recovery may be before the point in time that you specified for the recovery. This is because the point in time that was actually reached in the recovery is that of the most recent global COMMIT to the database that was recovered.
NoteWhen you recover and restart a system database, its tenant databases are not automatically restarted. You should first check that the system database was recovered successfully, then restart the tenant databases manually.
The SAP HANA database is now online and can be used by applications.
Related Information
Recover a System Database to a Point in Time [page 542]Create a Data Snapshot (Native SQL) [page 524]
SAP HANA Administration with SAP HANA CockpitBackup and Recovery P U B L I C 541

15.6.1 Recover a System Database to a Point in Time
To recover an SAP HANA database, it is strongly recommended that you use SAP HANA cockpit. Using SAP HANA cockpit, it is only possible to recover a system database to its most recent state. To recover a system database to a point in time, you can use the recoverSys.py tool.
Prerequisites
NoteThe recoverSys.py tool can only be used to recover a system database. recoverSys.py cannot be used to recover a tenant database. To recover a tenant database, use SAP HANA cockpit or native SQL.
CautionIf you recover a system database to a point in time, tenant databases that were registered after that point in time will be lost.
● The system database is offline.● You are logged with the OS user <sid>adm.
Context
To call recoverSys.py, enter the statement in the following format: HDBSettings.sh recoverSys.py [<parameters>]
If you run HDBSettings.sh recoverSys.py without any parameters, recoverSys.py performs a recovery to the most recent point in time.
NoteStarting recoverSys.py on its own does not do anything.
Procedure
To recover a system database:1. Set the environment using HDBSettings.sh.
2. Execute the recoverSys.py tool: HDBSettings.sh recoverSys.py [<parameters>].
recoverSys.py shuts down the database.
542 P U B L I CSAP HANA Administration with SAP HANA Cockpit
Backup and Recovery

Results
Once the system database has started, recoverSys.py terminates.
To check that the recovery was successful, see the backup.log.
For more information, see Diagnosis Files for Backup and Recovery.
NoteIf recoverSys.py returns an exit code '0', this is not confirmation that the recovery was successful.
The recovery is not complete yet.
If you use the parameter --wait, the script waits until the recovery has completed.
If you do not use the --wait parameter, you need to manually check whether the recovery has completed by looking at the instance status or the logs.
Related Information
Options for Recovery with recoverSys.py [page 543]SAP HANA SQL and System Views Reference
15.6.1.1 Options for Recovery with recoverSys.py
The default behavior of the recoverSys.py tool can be overridden using the options described below.
Options for recoverSys.py
recoverSys.py Options Description
--help Get help for the recoverSys.py script.
SAP HANA Administration with SAP HANA CockpitBackup and Recovery P U B L I C 543

recoverSys.py Options Description
--command="<SQL command>" Use this option to specify an SQL recovery command.
Sample CodeThis statement performs a recovery to the database state of '2023-10-22 15:00:00'.
HDBSettings.sh recoverSys.py --command="RECOVER DATABASE UNTIL TIMESTAMP '2023-10-22 15:00:00'"
NoteIf you specify a point in time in the future, the effect will be the same as recovering the database to the most recent state.
Sample CodeThis statement performs a recovery to the database state of '2018-10-22 15:00:00' based on the data backup identified by BACKUP ID '1380740407446', using the backup catalog located in '/remote/backup/CHH/catalog'.
HDBSettings.sh recoverSys.py --command="RECOVER DATABASE UNTIL TIMESTAMP '2018-10-22 15:00:00' USING CATALOG PATH ('/remote/backup/CHH/catalog') USING BACKUP_ID 1380740407446 CHECK ACCESS USING FILE"
The statement checks the availability of the backup files before performing the recovery.
Sample CodeTo perform a recovery on a remote host, pass the recovery command to a remote shell command.
ssh <sid>adm@<remoteHost> "HDBSettings.sh recoverSys.py --command=\"RECOVER DATABASE UNTIL TIMESTAMP '2018-10-22 15:00:00'\""
RememberThe times specified are UTC times.
544 P U B L I CSAP HANA Administration with SAP HANA Cockpit
Backup and Recovery

recoverSys.py Options Description
--wait Causes the script to wait until the recovery has completed (either successfully or unsuccessfully).
Default: The script does not wait for the recovery to complete. The recovery is started and runs in the background.
If the script is terminated manually, the database recovery will not stop.
For more information, see Starting and Stopping Distributed SAP HANA Systems Using sapcontrol.
NoteIf recoverSys.py is called automatically, you should use the option --wait to wait for the recovery to complete before you send further commands to the database.
--password=<password> If authentication is necessary, you can supply a password for <sid>adm.
If you do not specify the password, recoverSys.py prompts you to enter a password.
NoteIf you use the --password option, the password can be displayed in the process list of the operating system.
--timeout=<time> Specify a timeout for database shutdown and start.
Default: 120s
--licenseFile=<file name> Specify a license key file to append to the recovery command as a SET LICENSE clause.
If you specify a command using the --command option, SET LICENSE is automatically appended to the command.
NoteAn SAP HANA license key becomes invalid if the <SID> or landscape ID is changed. The recovered system is assigned a temporary license that is valid for 90 days. You can apply to SAP to have the license from the source system transferred to a new license key for the recovered system.
--semaphoreOnly For use by SAP HANA cockpit and SAP HANA studio only.
SAP HANA Administration with SAP HANA CockpitBackup and Recovery P U B L I C 545

recoverSys.py Options Description
--masterOnly For use by SAP HANA cockpit and SAP HANA studio only.
--forceMaster <host> recoverSys.py attempts to use the current host as the master host for the recovery. If this host cannot be used as a master, recoverSys.py fails. To use a different host, use --forceMaster to specify the master host for the recovery.
NoteAt most, three hosts can be used as the master host. The roles of the hosts are defined through the nameserver.ini file. For this reason, it is not possible to use any random host as the master host.
--feature For use by SAP HANA studio only.
--silent Use this option to reduce diagnostics output.
--cancel Use this option to cancel a recovery after it has started.
NoteCanceling a recovery makes the database state inconsistent. SAP HANA prevents an inconsistent database from being started.
To be able to work with the database again after canceling a recovery, you would need to perform the recovery again.
For more information, see Cancel a Recovery.
15.7 Copy a Database
Using SAP HANA cockpit, you can create a copy of an SAP HANA database by using backups of that database to recover to the same system or a different system.
1. In SAP HANA cockpit, choose Copy database.2. Follow the instructions on the screen.
The actual sequence of steps that you perform depends on the specific options that you choose.
The options are described in the sections below.
546 P U B L I CSAP HANA Administration with SAP HANA Cockpit
Backup and Recovery

Specify the Database to Copy To
System database In SAP HANA cockpit, go to the system database overview.
Choose Copy Database.
From here, follow the steps on the screen.
You are prompted to shut down the system database in a later step.
Tenant database In SAP HANA cockpit, go to Overall Tenant Statuses.
Select the tenant database that you want to copy.
Choose Copy Tenant.
If the tenant database is not already offline, you are prompted to shut it down.
Specify the Database Copy Type
Full data backup only Create a copy of the database from the start time of the full data backup.
Data and log backups Create a copy of the database to a specific point in time.
In the next step, you are prompted to specify the time zone, the date and the time.
Specify Whether to Use a Backup Catalog
If you are copying a database using a full data backup only, you can either select the data backup from the backup catalog, or specify its location without using a backup catalog.
A copy to a point in time is not possible if the full data backup is not recorded in the backup catalog.
No Copy the database without using a backup catalog.
In the next steps, you are prompted to select the location of the data backup in the file system. The data backup to use is identified by its prefix.
SAP HANA Administration with SAP HANA CockpitBackup and Recovery P U B L I C 547

File System:
ExampleFor the tenant database PR1TENANT, the location of the data backup could look like this:
/usr/sap/PR1/HDB00/backup/data/DB_PR1TENANT/
Data Snapshot:
If you copy a database using a data snapshot, make the data snapshot available in the data area of the target system.
Backint:
Backups made using third-party tools always use the destination /usr/sap/<SID>/SYS/global/hdb/backint.
In the next steps, you are prompted to specify the source system and the backup prefix.
Yes Use a backup catalog to locate the data backup.
In the next step, you are prompted to specify the location of the backup catalog.
File System:
ExampleFor the tenant database PR1TENANT, if the backup catalog is in the same directory as the log backups, the location to specify could look like this:
/usr/sap/PR1/HDB00/backup/log/DB_PR1TENANT/
Backint:
Use the backup catalog in a third-party backup tool.
In the next steps, you are prompted to specify the source system and the backup prefix.
For more information, see Working with Third-Party Backup Tools.
548 P U B L I CSAP HANA Administration with SAP HANA Cockpit
Backup and Recovery

Specify the Backup Location
Backint If you copy a database using a third-party backup tool, in the next step, specify the source system.
File system In the next step, specify the location and prefix of the data backup to be used.
ExampleFor the tenant database PR1TENANT, the location to specify could look like this:
/usr/sap/PR1/HDB00/backup/data/DB_PR1TENANT/
For the system database, the location to specify could look like this.
/usr/sap/PR1/HDB00/backup/data/SYSTEMDB/
Data snapshot If you recover SAP HANA from a data snapshot, you must shut down the database before you make the data snapshot available in the data area of the storage system.
For more information, see Recover a Database From a Data Snapshot.
Specify the Source Database
System database Specify the SID of the source system.
Tenant database Specify whether to copy the tenant database from:
● A tenant database in the same SAP HANA system● A tenant database in a different SAP HANA system● A SAP HANA single-container system
A SAP HANA single-container system can only be copied to a tenant database, not to a system database.
NoteFor a database copy, it is not possible to mix backups from different sources.
The backup catalog, the data backups, and the log backups must be from either only a third-party tool or only the file system.
(For a standard database recovery, it is possible to use a combination of backups from a third-party tool and the file system, provided that the backups originate from the same SAP HANA database.)
SAP HANA Administration with SAP HANA CockpitBackup and Recovery P U B L I C 549

Specify the Backup to be Used
If you are using a backup catalog: An overview of the available backups is displayed, depending on whether the catalog is in the file system or a third-party backup tool.
It is not possible to mix backups from the different sources.
If you are not using a backup catalog: Specify whether to use a data backup from the file system or a data snapshot.
If you are using a data backup, in the next step, specify the location and the prefix of the backup.
In the next step, if required, specify alternative locations for the data and log backups.
Check the Availability of the Backups
Optionally, you can check the availability of the backups to be used for the database copy.
This check ensures that the backups exist at the location specified.
Review Your Settings
Choose Review to display a summary of the settings you specified.
To display the SQL statement that will be used for the copy, choose Display SQL Statement.
To change the settings, choose Edit. All the settings that you specified are retained until you change them.
Start the Database Copy
If the settings are correct, choose Start Copy.
SAP HANA cockpit displays a warning that you are about to overwrite the target system.
To start the database copy, choose Start Copy again.
The progress of the copy for each SAP HANA service is displayed.
While the database is being copied, it is possible to cancel the copy process.
550 P U B L I CSAP HANA Administration with SAP HANA Cockpit
Backup and Recovery

Result
When the database copy is completed, a message confirms this.
A copy of the SAP HANA database is created in the location you specified.
If you copied a tenant database The copy of the SAP HANA database is now online and can be used by applications.
If you copied a system database You now need to copy the tenant databases in the SAP HANA system.
NoteFor a database copy to a point in time, SAP HANA cockpit shows the point in time to which the copy was made.
The point in time that SAP HANA returns after a copy is the point in time of the last COMMIT to the database that has been copied.
For this reason, this point in time may be before the point in time that you specified for the copy.
Database CredentialsTo allow SAP HANA cockpit to connect to the copied database, you may need to change the credentials of the user that is registered in SAP HANA cockpit.
CautionEnsure that the correct passwords are used to connect to the copied SAP HANA database. If an incorrect password is used multiple times, SAP HANA may respond by locking that database user account.
15.8 Housekeeping: Backup Catalog and Backup Storage
It is recommended to regularly check whether old full backups or backup generations can be deleted.
om
For example, you can delete full backups and backup generations if they are no longer needed for a recovery, or to keep your backup storage space at an optimum level.
TipIt is important to regularly truncate the backup catalog because, as it increases in size, it can consume a lot of storage space and also take longer to write each new backup.
Archiving BackupsFull backups that need to be retained for an extended period can be archived in a secure location and then removed from the backup catalog. Ensure that these backups cannot be accessed directly by SAP HANA and cannot be deleted.
SAP HANA Administration with SAP HANA CockpitBackup and Recovery P U B L I C 551

An archived full data backup can still be used to recover SAP HANA, even if it is not recorded in the backup catalog.
If you need to ensure that you can recover SAP HANA from older log backups and delta backups, you need to retain backups of the backup catalog.
Related Information
Delete Backup Generations [page 552]Delete Full Backups [page 554]
15.8.1 Delete Backup Generations
You can display an overview of backup generations, and delete backup generations that are no longer needed for a recovery.
Context
A backup generation comprises one successfully created full backup (complete data backup or data snapshot) and the following backups created after the full backup and up to the start time of the next successful full backup:
● Delta backups (differential or incremental backups)● Log backups● Backups of the backup catalog
You can delete the backup catalog records of backup generations, but retain the associated physical backups. Optionally, you can delete the records from the backup catalog and also the associated physical backups.
Procedure
1. From SAP HANA cockpit, select a SAP HANA database and open the system overview.
Option Description
To access a system database Choose Manage database backups.
An overview of information from the backup catalog is displayed for the system database.
552 P U B L I CSAP HANA Administration with SAP HANA Cockpit
Backup and Recovery

Option Description
To access a tenant database from its system database 1. From the system database overview, choose Manage Databases.
2. From the overview of the databases in the SAP HANA system, select the tenant database in the Backup column.The backup catalog overview for the tenant database is displayed.
To access the overview of backup generations for a tenant database from the tenant database itself
Choose Manage database backups.
An overview of information from the backup catalog is displayed for the tenant database.
2. To display an overview of backup generations, choose the chart icon.
The chart shows the start time and end time of the backup generation, its total size, and the sizes of the full data backup and the associated delta backups, log backups, and backups of the backup catalog that can be used for a recovery.
NoteThe end time of a backup generation is the start time of the next backup generation.
To customize the information displayed, choose Filter.
In the dialog box, you can specify a time range from which to display the backup generations.3. Click the row of the most recent backup generation that you want to retain.
A summary of information about the backup generation is displayed.4. To delete one or more backup generations, choose Delete Backup Generations.
CautionWhen you select one backup generation, all the backup generations that are older than the selected backup generation will be deleted.
This includes the backup generations that are displayed, and also the backup generations that are outside of the time filter, and therefore not currently displayed.
5. In the dialog box, select an option:
Option Description
Remove from backup catalog only
Delete only the backup catalog records of backup generations, but retain the associated physical backups.
Also delete physically
Delete the records from the backup catalog and also the associated physical backups.
You can delete the physical backups in either the file system or a third-party backup tool, or both.
SAP HANA Administration with SAP HANA CockpitBackup and Recovery P U B L I C 553

Option Description
CautionWhen you confirm, the records of the backups are deleted from the backup catalog immediately, even though it may take some more time for the physical backups to be deleted.
NoteSAP HANA can only physically delete backups that are in the location recorded in the backup catalog. SAP HANA cannot physically delete backups that have been moved to a different location.
6. To confirm, choose Delete.
The backup generations are deleted in accordance with the options you specified.
15.8.2 Delete Full Backups
You can display an overview of full backups (and delta backups), and also delete individual full data backups.
Context
NoteTo ensure that no backups are deleted that would prevent SAP HANA from being recovered, it is not possible to delete delta backups and log backups individually.
You can delete the backup catalog records of individual full backups, but retain the associated physical backups. Optionally, you can delete the records in the backup catalog and also the associated physical backups.
For example, to comply with legal requirements for data retention, you may wish to retain specific historical data backups, but without the intention of using them for a production database recovery.
NoteIf a full backup is physically available, but not recorded in the backup catalog, that full backup can still be used to recover the database.
To be able to recover SAP HANA using third-party data backups that are not recorded in the backup catalog, the data backups must have a unique prefix.
554 P U B L I CSAP HANA Administration with SAP HANA Cockpit
Backup and Recovery

Procedure
1. From SAP HANA cockpit, select a SAP HANA database and open the system overview.
Option Description
To access a system database Choose Manage database backups.
An overview of information from the backup catalog is displayed for the system database.
To access a tenant database from its system database: 1. From the system database overview, choose Manage Databases.
2. From the overview of the databases in the SAP HANA system, select the tenant database in the Backup column.The backup catalog overview for the tenant database is displayed.
To access the overview of system overview for a tenant database from the tenant database itself:
Choose Manage database backups.
An overview of information from the backup catalog is displayed for the tenant database.
a. To customize the information displayed, choose Filter.
From the dialog box, you can filter the following information:
Backup Type By default, Complete Data Backup and Data Snapshot are selected.
To display information about delta backups, select Differential Backup and Incremental Backup and confirm.
Status You can display backups with the status:
○ Canceled○ Failed○ Prepared
A data snapshot has been prepared, but has not been confirmed or abandoned.
NoteTo create a data snapshot, you need to use native SQL.
○ Running○ Successful
Start Time You can display backups from a specific time range.
b. To change the order in which the columns are displayed, choose Settings, and use the arrow buttons.
SAP HANA Administration with SAP HANA CockpitBackup and Recovery P U B L I C 555

2. To delete a full backup (complete data backup or data snapshot), choose the Delete icon for that backup.
In the dialog box, specify whether to:
Remove from backup catalog only Delete only the backup catalog record of a full backup, but retain the associated physical backup.
Also delete physically Remove the record of the backup from the backup catalog and delete the associated physical backup.
You can delete the physical full backup in either the file system or a third-party backup tool.
CautionWhen you confirm, the record of the backup is deleted from the backup catalog immediately, even though it may take some more time for the physical backup to be deleted.
NoteSAP HANA can only physically delete backups that are in the location recorded in the backup catalog. SAP HANA cannot physically delete backups that have been moved to a different location.
3. To confirm, choose Delete.
Before a backup is physically deleted, the following plausibility checks are performed:
○ For a file-based backup: The system checks the backup ID.○ For third-party backup tools: The system checks the external backup ID (EBID) and whether the path
to the backup is identical to the backup location of the current database.
If the plausibility check is successful, the system starts deleting the physical backup in the background.
NoteThe delete operation continues until all the parts of the selected backup have been deleted.
If the system or a service is stopped and restarted, the delete operation is automatically resumed.
You can monitor the progress of the deletion operation in the backup.log file.
Related Information
Delete Backup Generations [page 552]Create Data Backups and Delta Backups [page 521]
556 P U B L I CSAP HANA Administration with SAP HANA Cockpit
Backup and Recovery

16 SAP HANA Smart Data Access
SAP HANA smart data access allows you to access remote data as if the data was stored in local tables in SAP HANA, without copying the data into SAP HANA.
This capability provides operational and cost benefits and supports the development and deployment of next-generation analytical applications requiring the ability to access, synthesize, and integrate data from multiple systems in real-time regardless of where the data is located or what systems are generating it.
In SAP HANA, you create virtual tables which point to remote tables in different data sources and then write SQL queries in SAP HANA, using these virtual tables. The SAP HANA query processor optimizes these queries by executing the relevant part of the query in the target database, returning the results of the query to SAP HANA, and then completing the operation.
Related Information
Monitor Details Using SAP HANA Cockpit [page 557]
16.1 Monitor Details Using SAP HANA Cockpit
View detailed information about the remote statements executed and active connections active in the database.
Context
Use the monitoring tools to monitor:
Remote connections active in the database
Provides details about the connections that were opened in the current session, including when the connection was opened, how many remote statements were executed, and the name of the remote source.
Remote statements executed in the database
Allows you to see the full SQL text of the SQL statements executed on remote sources. It also shows you when the query was started, how long the query took, and the number of records that were returned.
SAP HANA Administration with SAP HANA CockpitSAP HANA Smart Data Access P U B L I C 557

Procedure
1. On the system overview, scroll to SAP HANA Smart Data Access Administration.2. Choose the information type to monitor.
○ Running Statements○ Active Connections
Results
Information available for remote connections
Detail Description
Connection Specifies the connection ID
Adapter Specifies the name of the adapter for the remote source
Status Specifies the status of the connection. Valid entries are CONNECTED or DISCONNECTED
Source Name Specifies the remote source name
Source User Specifies the user name on the remote source
Start Time Start time of first query execution
Statements Specifies the statement start time
Details Specifies information on the adapter properties.
Information available for remote statements
Detail Description
SQL Statement Specifies the statement string
Start Time Specifies the statement start time
End Time Specifies the statement end time
SAP HANA cockpit: Statement Runtime (Seconds) Specifies the query execution time
558 P U B L I CSAP HANA Administration with SAP HANA Cockpit
SAP HANA Smart Data Access

Detail Description
Status Query execution status:
● Analyzing: Query is being analyzed by the query optimizer
● Optimizing: Query is being optimized by the query optimizer
● Executing: Query is running● Closed: Query has completed● Failed: Query execution failed
Rows Specifies the number of rows returned in the query result
Fetched Size Specifies the byte size of fetched records
Remote Source Name Specifies the remote source name
User Specifies the remote source name
Transaction Specifies the transaction ID
SAP HANA Administration with SAP HANA CockpitSAP HANA Smart Data Access P U B L I C 559

Important Disclaimer for Features in SAP HANA
For information about the capabilities available for your license and installation scenario, refer to the Feature Scope Description for SAP HANA.
560 P U B L I CSAP HANA Administration with SAP HANA CockpitImportant Disclaimer for Features in SAP HANA

Important Disclaimers and Legal Information
HyperlinksSome links are classified by an icon and/or a mouseover text. These links provide additional information.About the icons:
● Links with the icon : You are entering a Web site that is not hosted by SAP. By using such links, you agree (unless expressly stated otherwise in your agreements with SAP) to this:
● The content of the linked-to site is not SAP documentation. You may not infer any product claims against SAP based on this information.● SAP does not agree or disagree with the content on the linked-to site, nor does SAP warrant the availability and correctness. SAP shall not be liable for any
damages caused by the use of such content unless damages have been caused by SAP's gross negligence or willful misconduct.
● Links with the icon : You are leaving the documentation for that particular SAP product or service and are entering a SAP-hosted Web site. By using such links, you agree that (unless expressly stated otherwise in your agreements with SAP) you may not infer any product claims against SAP based on this information.
Beta and Other Experimental FeaturesExperimental features are not part of the officially delivered scope that SAP guarantees for future releases. This means that experimental features may be changed by SAP at any time for any reason without notice. Experimental features are not for productive use. You may not demonstrate, test, examine, evaluate or otherwise use the experimental features in a live operating environment or with data that has not been sufficiently backed up.The purpose of experimental features is to get feedback early on, allowing customers and partners to influence the future product accordingly. By providing your feedback (e.g. in the SAP Community), you accept that intellectual property rights of the contributions or derivative works shall remain the exclusive property of SAP.
Example CodeAny software coding and/or code snippets are examples. They are not for productive use. The example code is only intended to better explain and visualize the syntax and phrasing rules. SAP does not warrant the correctness and completeness of the example code. SAP shall not be liable for errors or damages caused by the use of example code unless damages have been caused by SAP's gross negligence or willful misconduct.
Gender-Related LanguageWe try not to use gender-specific word forms and formulations. As appropriate for context and readability, SAP may use masculine word forms to refer to all genders.
SAP HANA Administration with SAP HANA CockpitImportant Disclaimers and Legal Information P U B L I C 561

www.sap.com/contactsap
© 2019 SAP SE or an SAP affiliate company. All rights reserved.
No part of this publication may be reproduced or transmitted in any form or for any purpose without the express permission of SAP SE or an SAP affiliate company. The information contained herein may be changed without prior notice.
Some software products marketed by SAP SE and its distributors contain proprietary software components of other software vendors. National product specifications may vary.
These materials are provided by SAP SE or an SAP affiliate company for informational purposes only, without representation or warranty of any kind, and SAP or its affiliated companies shall not be liable for errors or omissions with respect to the materials. The only warranties for SAP or SAP affiliate company products and services are those that are set forth in the express warranty statements accompanying such products and services, if any. Nothing herein should be construed as constituting an additional warranty.
SAP and other SAP products and services mentioned herein as well as their respective logos are trademarks or registered trademarks of SAP SE (or an SAP affiliate company) in Germany and other countries. All other product and service names mentioned are the trademarks of their respective companies.
Please see https://www.sap.com/about/legal/trademark.html for additional trademark information and notices.
THE BEST RUN


