Embed Size (px)
Citation preview
Setup GuideEN
安裝說明TC
EN Assembly 6
TC 組裝
ENInk Supply SystemContact a service engineer to attach the “Ink Supply System”.
TC供墨系統請聯繫服務工程師安裝〝供墨系統〞。
EN Connecting the Power Cable18
TC 連接電源線
EN Installing the Software19
TC 安裝軟體
EN Using the Printer25
TC 使用印表機
TC 簡介
重要的安全說明
使用印表機之前,請閱讀下列這些指示說明。同時,請務必遵守印表機上所標示的警告訊息和指示。
使用印表機之前,請務必閱讀一般資訊 (PDF)。
! 警告
請勿堵住產品上的通風口。 ❏
請勿在靠近孩童的環境中安裝或使用本產品,可能會造成孩童受傷。 ❏
! 注意
請勿在一個不穩固的位置或是會受到其它設備震動影響的位置安裝或存放印表機。 ❏
請不要在容易有油煙和灰塵的位置、或是容易有濕氣或可能會被弄濕的位置安裝印表機。 ❏
移動產品時,請勿將其向前、向後、向左、或向右傾斜超過 ❏ 10 度。
因為產品很重,不應該一個人搬運。 ❏
當抬起產品時,請確定是抬起手冊中所指示的位置。 ❏
確定您在抬起產品時有使用正確的姿勢。 ❏
組裝產品前,確定已收拾在安裝區域裡的包裝板、包裝材料、及隨附的項目。 ❏
當產品放在有腳輪 ( 輪子 ) 的腳架上時,請務必確認在執行工作前已固定住腳輪,使其無法 ❏
移動。
當腳輪 ( 輪子 ) 和固定旋鈕已固定時,請勿試圖移動腳架。 ❏
當要移動安裝在腳架上的印表機時,請避開有臺階或地板不平的位置。 ❏
圖示說明
! 警告 請務必遵守警告事項,以免身體嚴重受傷。
! 注意 請務必遵守注意事項,以免身體受傷。
c 附註:請務必遵守附註事項,以免損壞設備。
秘訣:提供使用印表機的實用技巧及其他資訊。
插圖
在此手冊圖示中的印表機的某些方面可能與實機不同,但這些差異性並不會影響到組裝步驟。
EN Introductions
Important Safety InstructionsRead all of these instructions before setting up your printer. Also be sure to follow all warnings and instructions marked on the printer. Make sure you read the General Information (PDF) before using the printer.
!WarningDo not obstruct the vents on the product. ❏Do not setup or use this product in an area where children may come close. Children may be ❏injured by the equipment.
!CautionDo not install or store the printer in an unstable location or a location subject to vibrations from ❏other equipment.Do not install the printer in locations subject to oily smoke and dust, or in locations subject to ❏humidity or where it could easily get wet.Do not tilt the product more than 10 degrees forward, back, left, or right while moving it. ❏Because the product is heavy, it should not be carried by one person. ❏When lifting the product, make sure you lift at the locations indicated in the manual. ❏Make sure you use the correct posture when lifting the product. ❏Before assembling the product, make sure you clear away the packaging sheets, packing ❏materials, and supplied items from the installation area.When placing the product on a stand with casters (wheels), make sure you secure the casters ❏before you perform the work so that they do not move.Do not try to move the stand while the casters (wheels) and adjusters are secured. ❏When moving the printer while it is on the stand, avoid locations with steps or uneven flooring. ❏
Meaning of Symbols
!Warning Warnings must be followed to avoid serious bodily injury.
!Caution Cautions must be followed to avoid bodily injury.
c Important : Important must be followed to avoid damage to this product.
Note : Notes contain useful or additional information on the operation of this product.
IllustrationsThe printer shown in the illustrations in this guide differs in some respects from the actual product, but these differences have no effect on the assembly process.
2
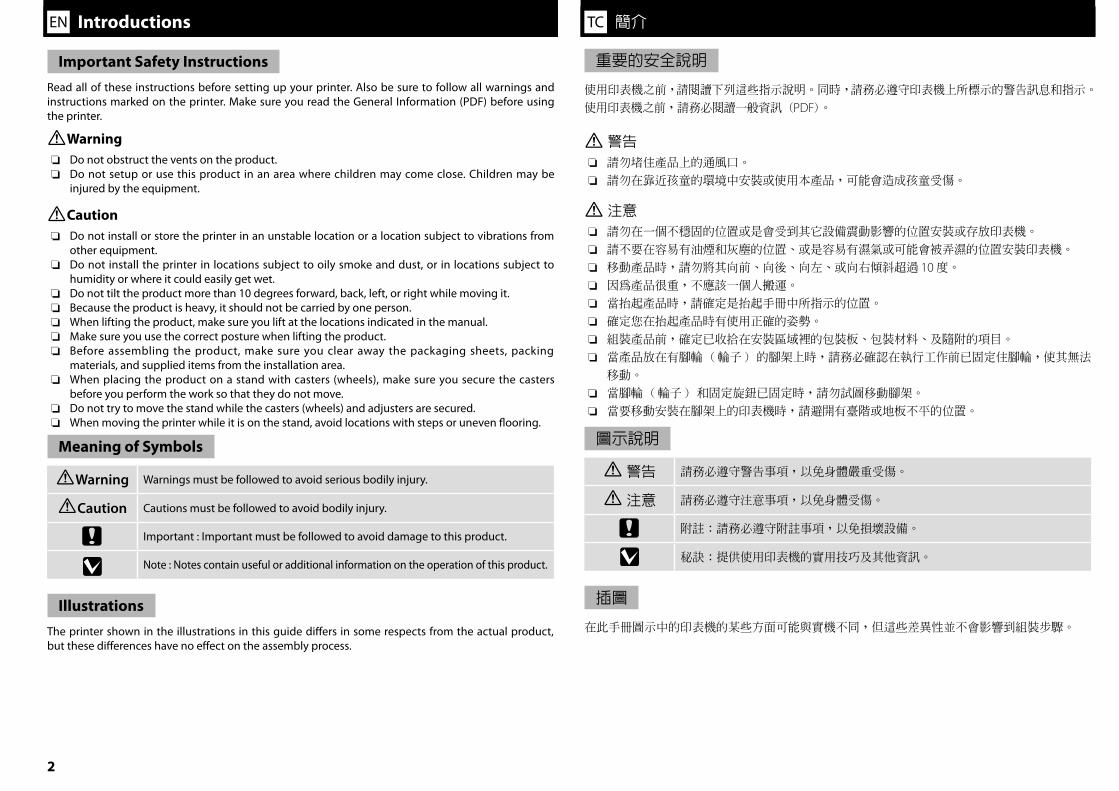
EN Choosing a Place for the Printer TC 選擇放置印表機的位置
Instructions for Placing the Printer
Leave adequate room as shown in the table for setting up the printer. ❏Choose a flat and stable location that can support the printer weight (about 280 kg). ❏The printer requires two power cables supplying a total amperage of 20A at 100v or 10A at 240V. ❏If the combined capacity can not be supplied by a single outlet, connect the cables to different outlets with independent power sources.Operate the printer under the following conditions: ❏Temperature: 15 to 35°C (20 to 30˚C recommended)Humidity: 20 to 80% without condensationEven the conditions above are met, you may not print properly if the environmental conditions ❏are not proper for the paper. See the instructions of the paper for more detailed information.Keep the printer away from drying, direct sunlight, or heat sources to maintain the appropriate ❏humidity.Avoid locations subject to dust and sand. ❏
放置印表機的說明
請依照圖示,在桌面上預留足夠的空間以設置印表機。 ❏選擇一處能承受印表機重量的平穩位置。(約 ❏ 280 kg)電源線的數量和總安培數如下: ❏ 2 條電源線;100V 時總安培數為 20A,240V 時總安培數為10A若組合電流無法由單個插座提供,請將電源線連接至具備獨立電源的不同插座。請在下列環境中操作印表機: ❏- 溫度:15 至 35 ℃ (建議 20 至 30℃ )- 濕度:20 至 80% 沒有凝結即使符合了上述條件,但如果環境條件不適合紙張,還是可能無法正確列印。詳細資料,請 ❏查看紙張的操作說明。避免將印表機放在過於乾燥、陽光直射、或高溫之處以維持適當的濕度。 ❏避開容易有灰塵和沙子的位置。 ❏
3
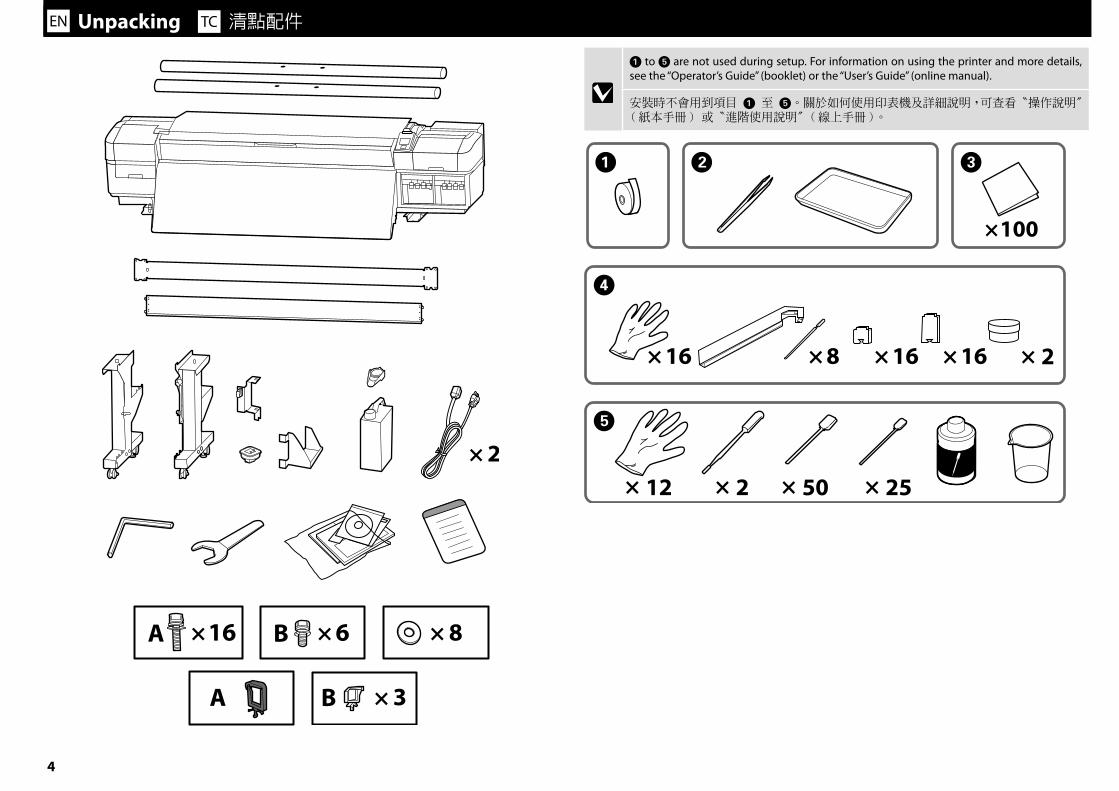
EN Unpacking TC 清點配件
[6
A to E are not used during setup. For information on using the printer and more details, see the “Operator’s Guide” (booklet) or the “User’s Guide” (online manual).
安裝時不會用到項目 A 至 E。關於如何使用印表機及詳細說明,可查看〝操作說明〞(紙本手冊 ) 或〝進階使用說明〞(線上手冊 )。
[2 5[ 252
4
T24
2
T[ 28
T4 8
T3 8
4 4 8
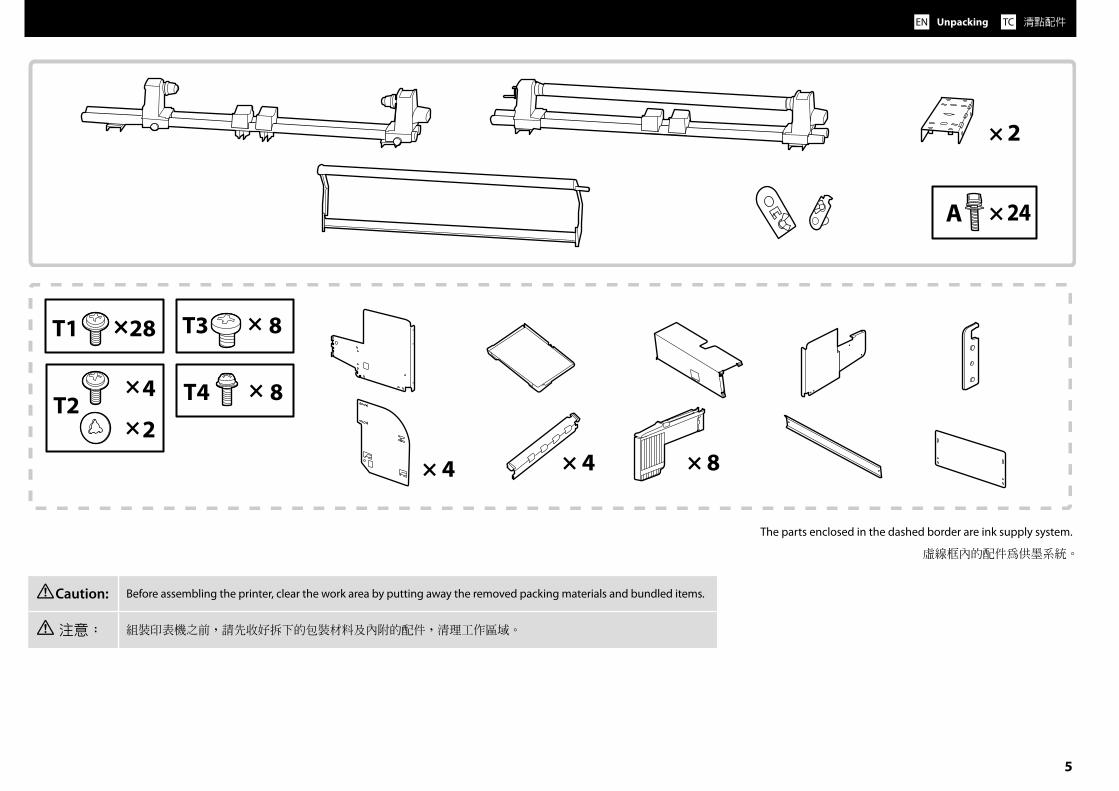
The parts enclosed in the dashed border are ink supply system.
虛線框內的配件為供墨系統。
!Caution: Before assembling the printer, clear the work area by putting away the removed packing materials and bundled items.
! 注意: 組裝印表機之前,請先收好拆下的包裝材料及內附的配件,清理工作區域。
EN Unpacking TC 清點配件
5
8
2
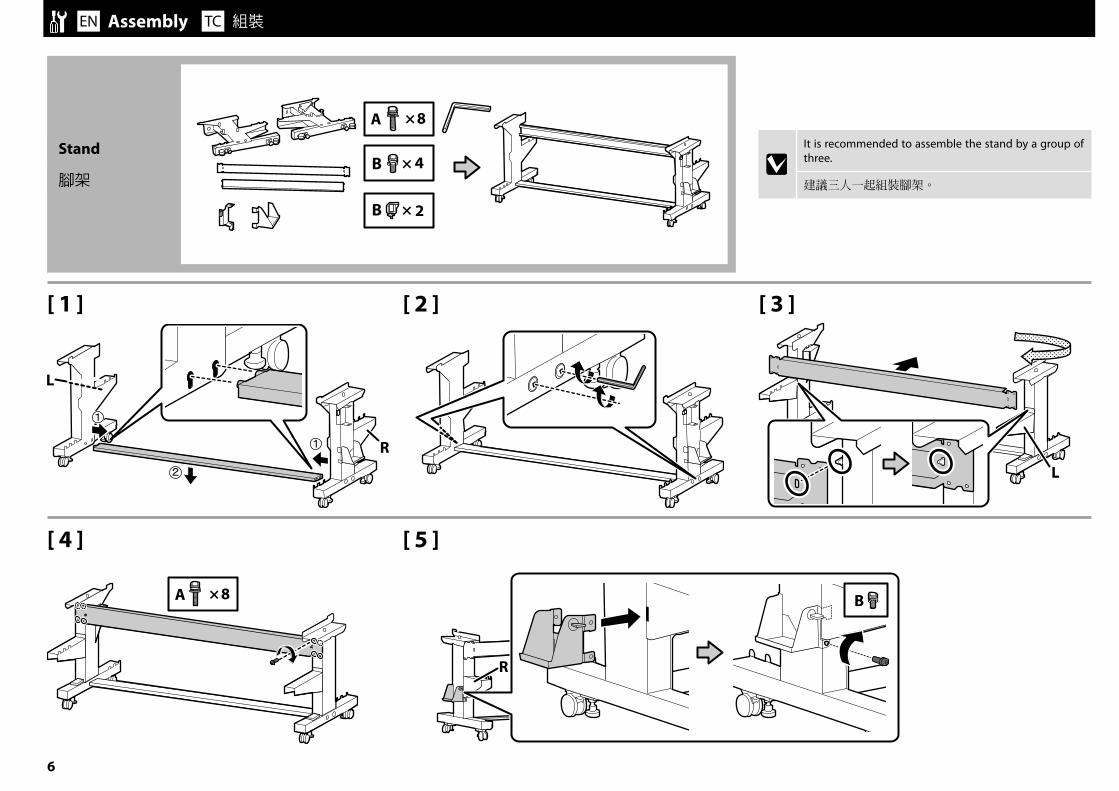
EN Assembly TC 組裝
Stand
腳架
[ [ [ [ 2 [ [ 3 [
[ 5 [[ 4 [
8
It is recommended to assemble the stand by a group of three.
建議三人一起組裝腳架。
6

[ [ [
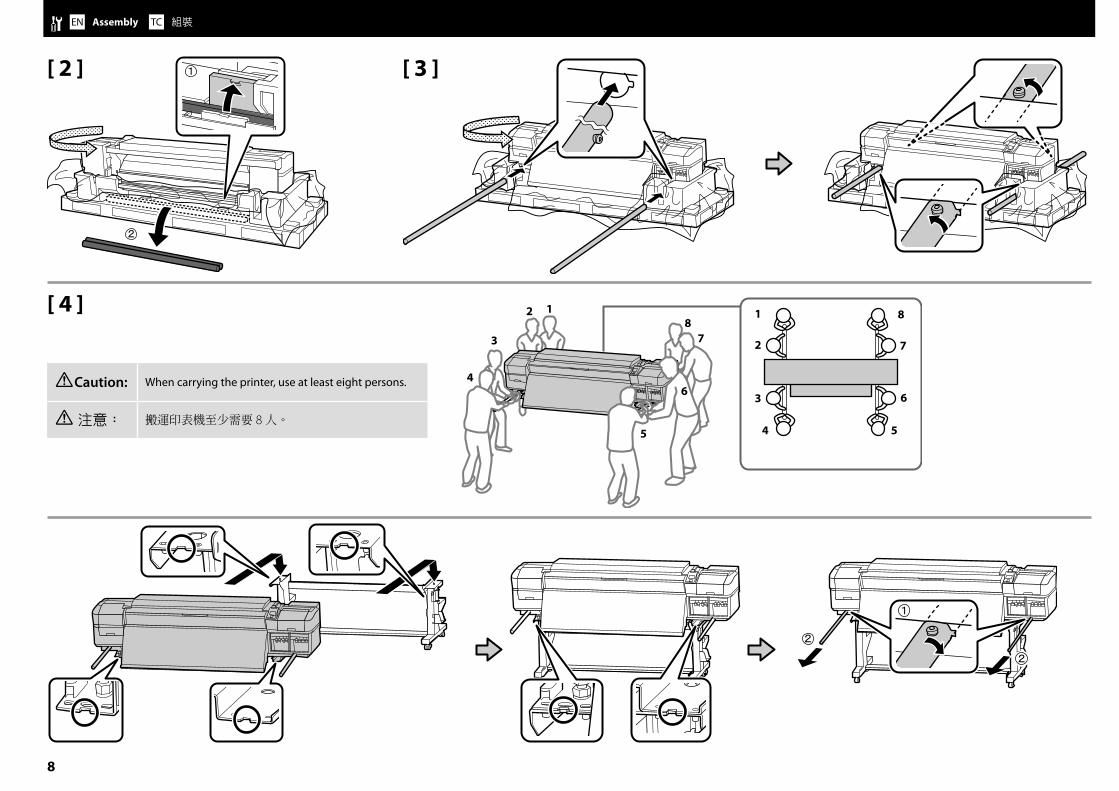
Printer Installation
安裝印表機
EN Assembly TC 組裝
[ [ [
cBefore using the printer, be sure the stand is fixed in place. When moving the printer unlock the casters.
使用印表機之前,請確認腳架已固定到位。當要搬動印表機時,請解開腳輪的鎖定。
[ 6 [2
[
[ 4 [
!Caution: When carrying the printer, use at least eight persons.
! 注意: 搬運印表機至少需要 8 人。
EN Assembly TC 組裝
[ 2 [ [ 3 [
8
EN Assembly TC 組裝
[ [ [
[ 8 [
[ 5 [
[ [ [
[ 6 [
[ [[ [
[

EN Assembly TC 組裝
[ [2 [[ [[ [
cPlace the caution label for your language over the English label.
請將繁體中文的警告標籤貼在英文標籤上方。
The lid of the Waste Ink Bottle is required when disposing of the waste ink. Keep the lid. Do not throw it away.
處理廢墨時需要使用廢墨桶的蓋子。請收好蓋子。切勿丟棄。
[ [3 [ [ [4 [
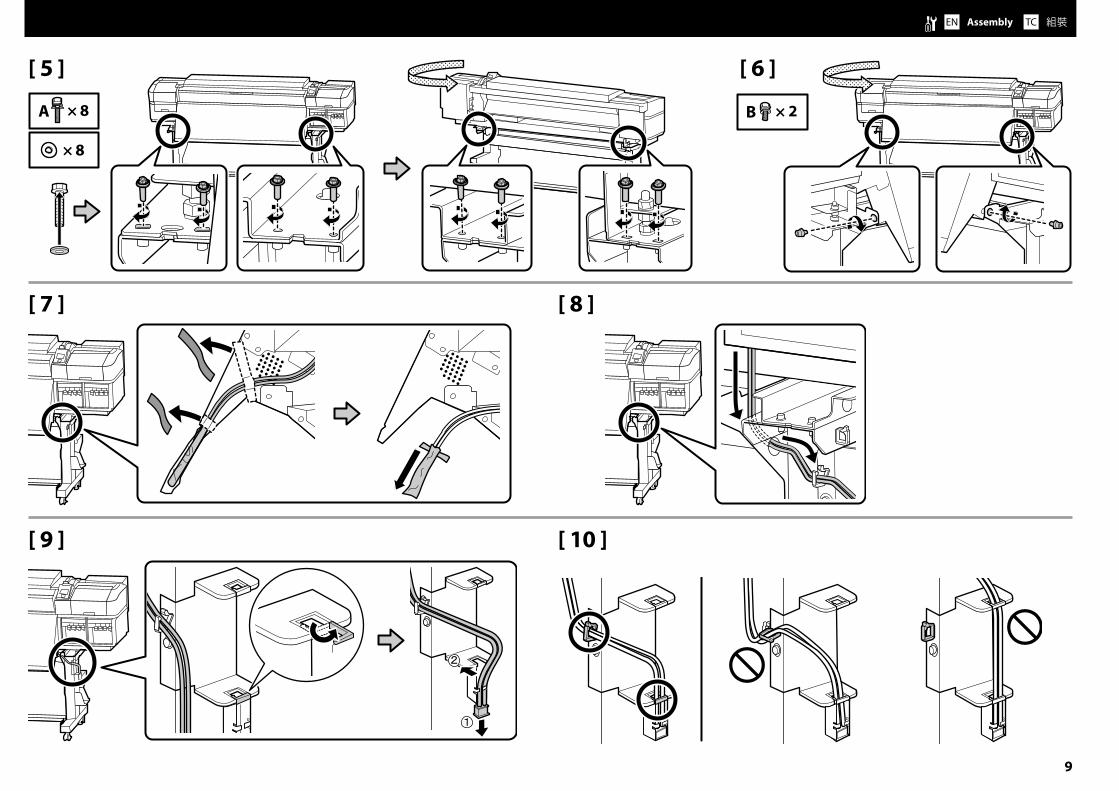
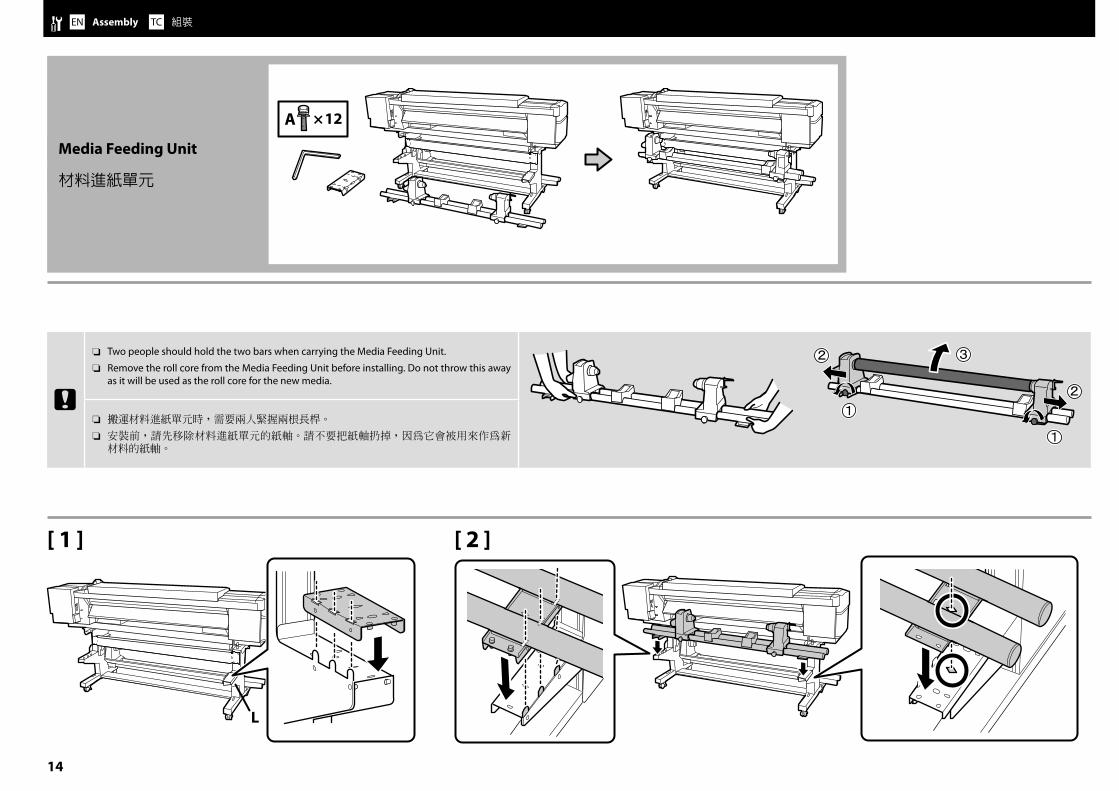
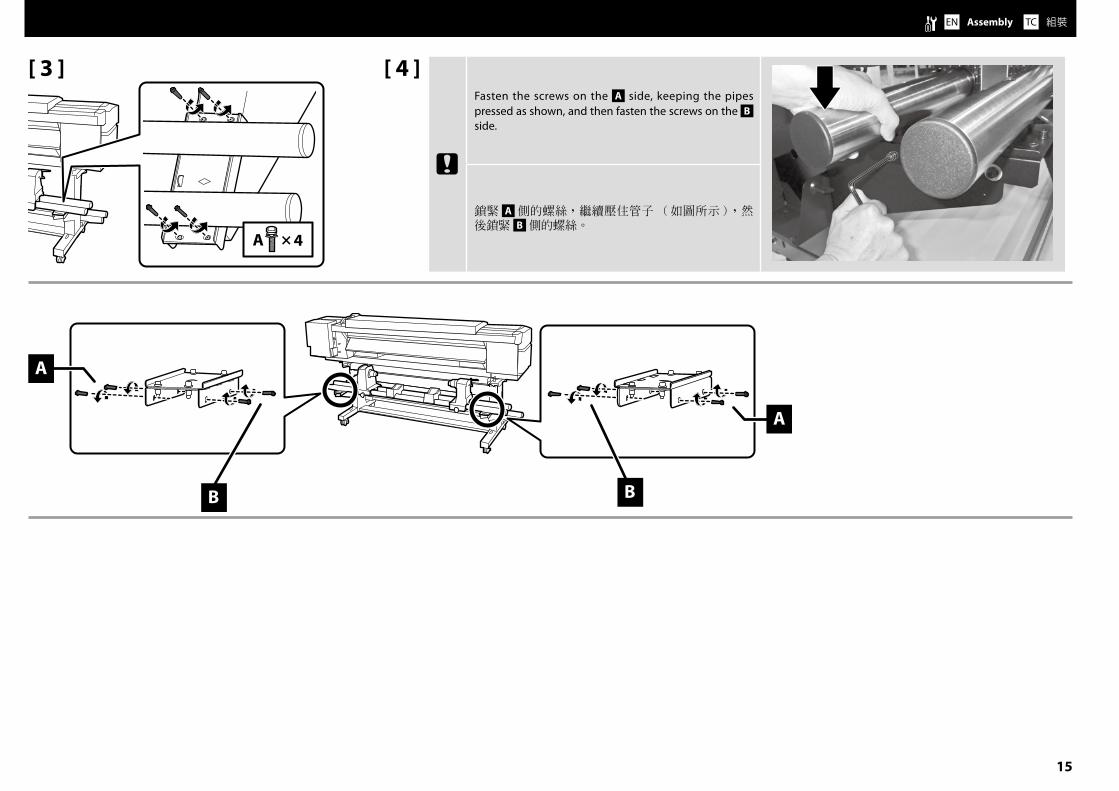
Next, remove the following items from the packaging and install them in order: auto take-up reel unit > tension bar > media feeding unit .
接著,請從包裝中取出下列品項並依序安裝:自動收紙單元 > 拉桿 > 材料進紙單元 。
[[

EN Assembly TC 組裝
Auto Take-up Reel Unit
自動收紙單元
cCarry the Auto Take-up Reel Unit using two persons, each holding the two bars as shown in the figure on the right.
搬運自動收紙單元需要兩人,請如右圖所示,各自緊握兩根長桿。
[ [ [ [ 2 [
[[
EN Assembly TC 組裝
[ 4 [
B B
A
A
[ 3 [
[ 5 [ [ 6 [
c
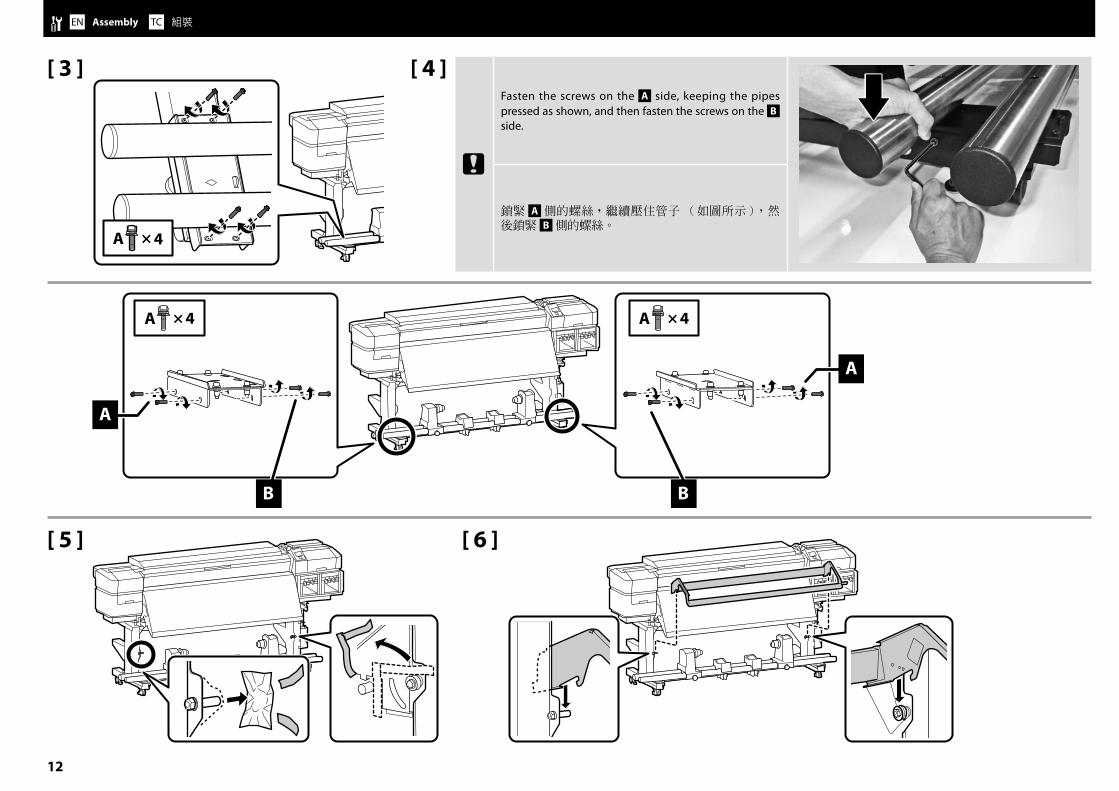
Fasten the screws on the A side, keeping the pipes pressed as shown, and then fasten the screws on the B side.
鎖緊 A 側的螺絲,繼續壓住管子 ( 如圖所示 ),然後鎖緊 B 側的螺絲。
[2
EN Assembly TC 組裝
[ [ [ [ [[ [
[ [ [ [ 8 [
[3
[ 2 [
EN Assembly TC 組裝
[ [ [
Media Feeding Unit
材料進紙單元
c
Two people should hold the two bars when carrying the Media Feeding Unit. ❏
Remove the roll core from the Media Feeding Unit before installing. Do not throw this away ❏as it will be used as the roll core for the new media.
搬運材料進紙單元時,需要兩人緊握兩根長桿。 ❏
安裝前,請先移除材料進紙單元的紙軸。請不要把紙軸扔掉,因為它會被用來作為新 ❏材料的紙軸。
[4
EN Assembly TC 組裝
[ 3 [ [ 4 [
A
B B
A
c
Fasten the screws on the A side, keeping the pipes pressed as shown, and then fasten the screws on the B side.
鎖緊 A 側的螺絲,繼續壓住管子 ( 如圖所示 ),然後鎖緊 B 側的螺絲。
[5
[ 3 [
EN Assembly TC 組裝
[ [ [
[ 2 [
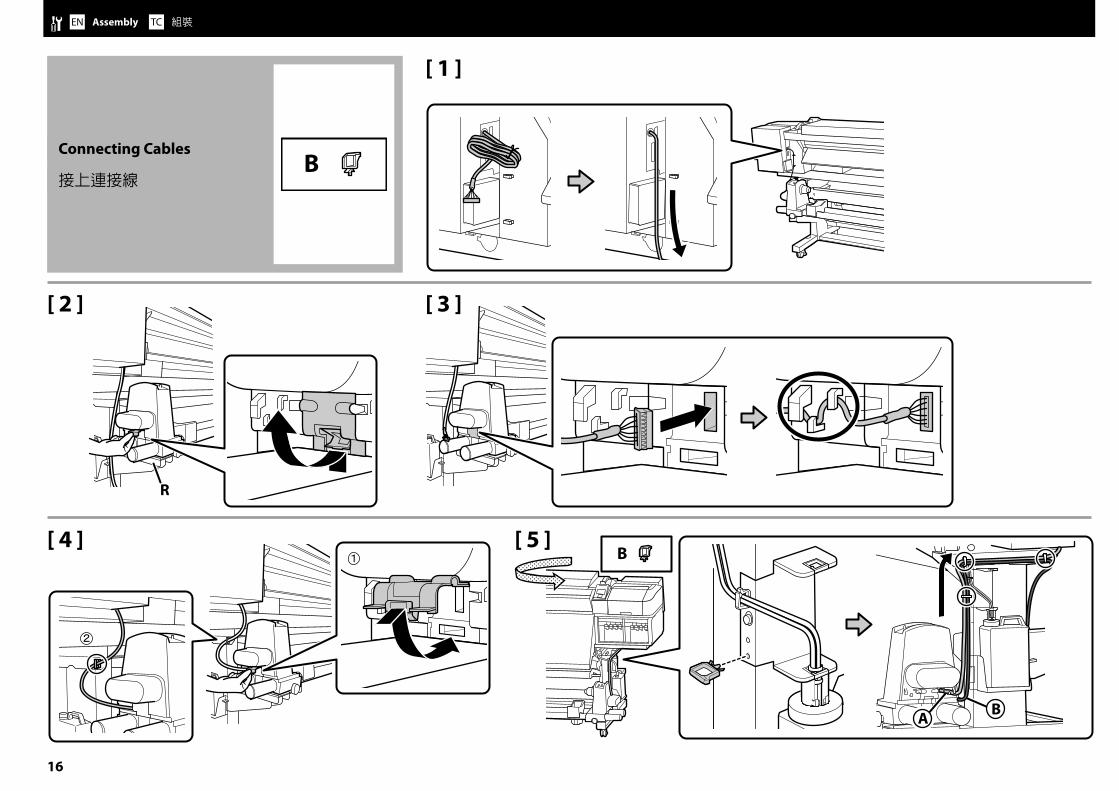
Connecting Cables
接上連接線
[ 4 [ [ 5 [
A B
[6
EN Assembly TC 組裝
[ [ [
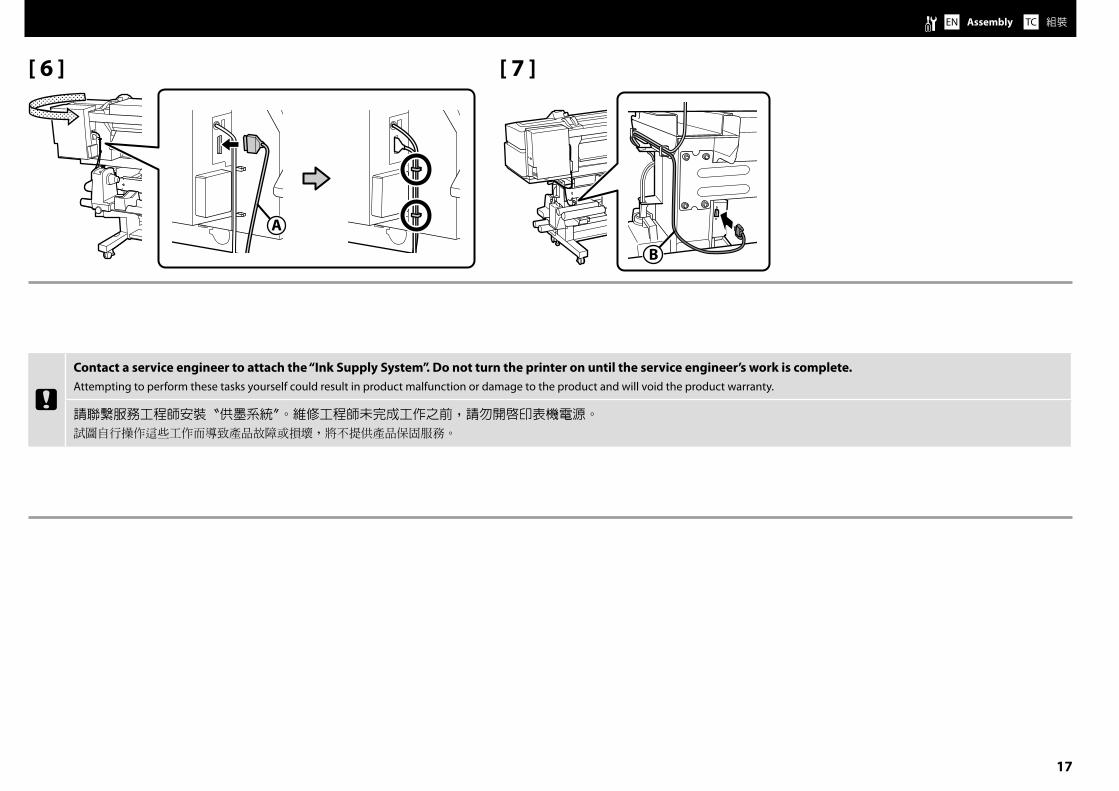
B
[ 6 [
A
cContact a service engineer to attach the “Ink Supply System”. Do not turn the printer on until the service engineer’s work is complete.Attempting to perform these tasks yourself could result in product malfunction or damage to the product and will void the product warranty.
請聯繫服務工程師安裝〝供墨系統〞。維修工程師未完成工作之前,請勿開啟印表機電源。
試圖自行操作這些工作而導致產品故障或損壞,將不提供產品保固服務。
[[
EN Connecting the Power Cable TC 連接電源線
c
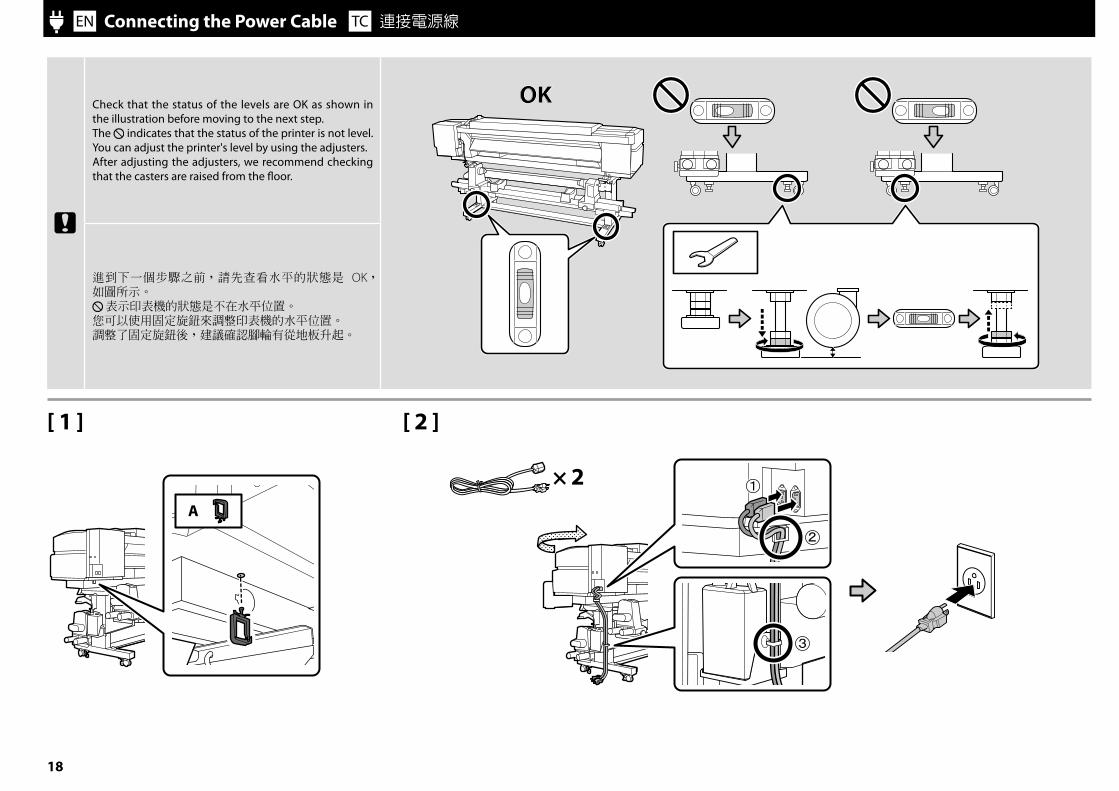
Check that the status of the levels are OK as shown in the illustration before moving to the next step.The indicates that the status of the printer is not level. You can adjust the printer's level by using the adjusters.After adjusting the adjusters, we recommend checking that the casters are raised from the floor.
進到下一個步驟之前,請先查看水平的狀態是 OK,如圖所示。
表示印表機的狀態是不在水平位置。您可以使用固定旋鈕來調整印表機的水平位置。調整了固定旋鈕後,建議確認腳輪有從地板升起。
[ [ [ [ 2 [
[8
EN Installing the Software TC 安裝軟體
[ [ [
Installing the Required Software
安裝必要的軟體
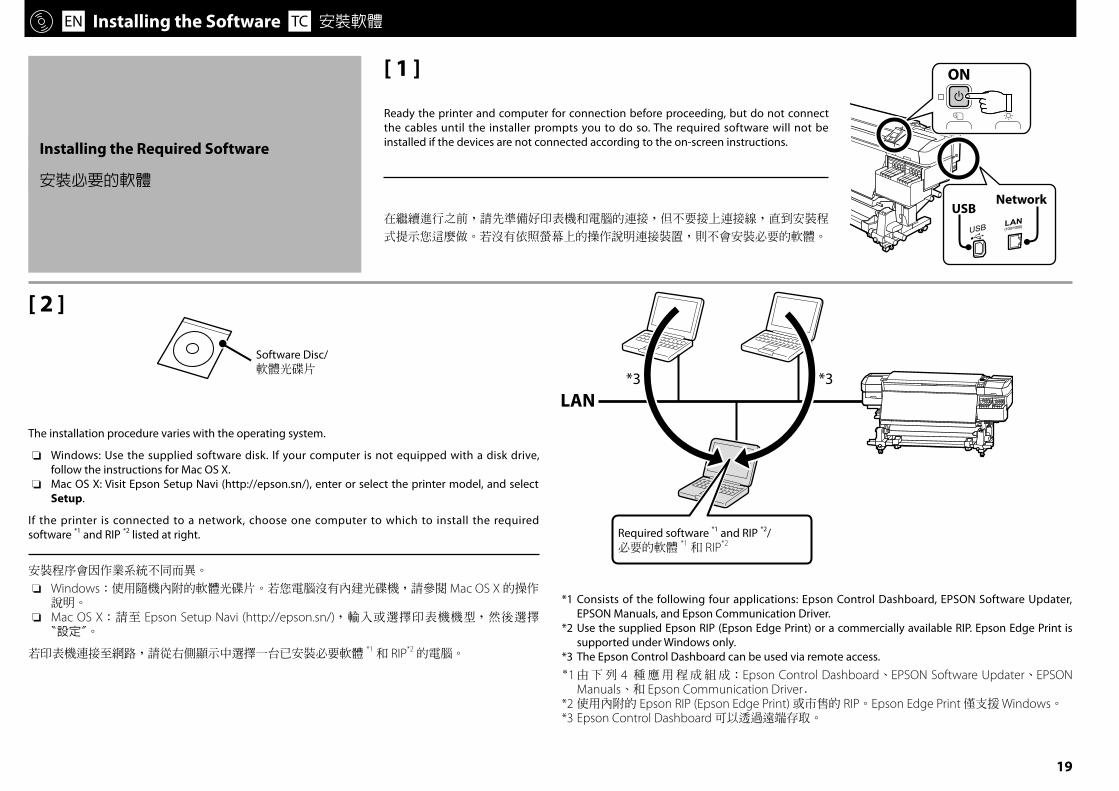
Ready the printer and computer for connection before proceeding, but do not connect the cables until the installer prompts you to do so. The required software will not be installed if the devices are not connected according to the on-screen instructions.
[ 2 [
*1 Consists of the following four applications: Epson Control Dashboard, EPSON Software Updater, EPSON Manuals, and Epson Communication Driver.
*2 Use the supplied Epson RIP (Epson Edge Print) or a commercially available RIP. Epson Edge Print is supported under Windows only.
*3 The Epson Control Dashboard can be used via remote access.
*1 由下列 4 種應用程成組成:Epson Control Dashboard、EPSON Software Updater、EPSON Manuals、和 Epson Communication Driver.
*2 使用內附的 Epson RIP (Epson Edge Print) 或市售的 RIP。Epson Edge Print 僅支援 Windows。*3 Epson Control Dashboard 可以透過遠端存取。
在繼續進行之前,請先準備好印表機和電腦的連接,但不要接上連接線,直到安裝程
式提示您這麼做。若沒有依照螢幕上的操作說明連接裝置,則不會安裝必要的軟體。
USBNetwork
ON
Software Disc/軟體光碟片
The installation procedure varies with the operating system.
Windows: Use the supplied software disk. If your computer is not equipped with a disk drive, ❏follow the instructions for Mac OS X.Mac OS X: Visit Epson Setup Navi (http://epson.sn/), enter or select the printer model, and select ❏Setup.
If the printer is connected to a network, choose one computer to which to install the required software *1 and RIP *2 listed at right.
安裝程序會因作業系統不同而異。
Windows ❏ :使用隨機內附的軟體光碟片。若您電腦沒有內建光碟機,請參閱 Mac OS X 的操作說明。Mac OS X ❏ :請至 Epson Setup Navi (http://epson.sn/),輸入或選擇印表機機型,然後選擇 〝設定〞。
若印表機連接至網路,請從右側顯示中選擇一台已安裝必要軟體*1 和 RIP*2 的電腦。
Required software *1 and RIP *2/必要的軟體
*1 和 RIP*2
[[
EN Installing the Software TC 安裝軟體
Windows
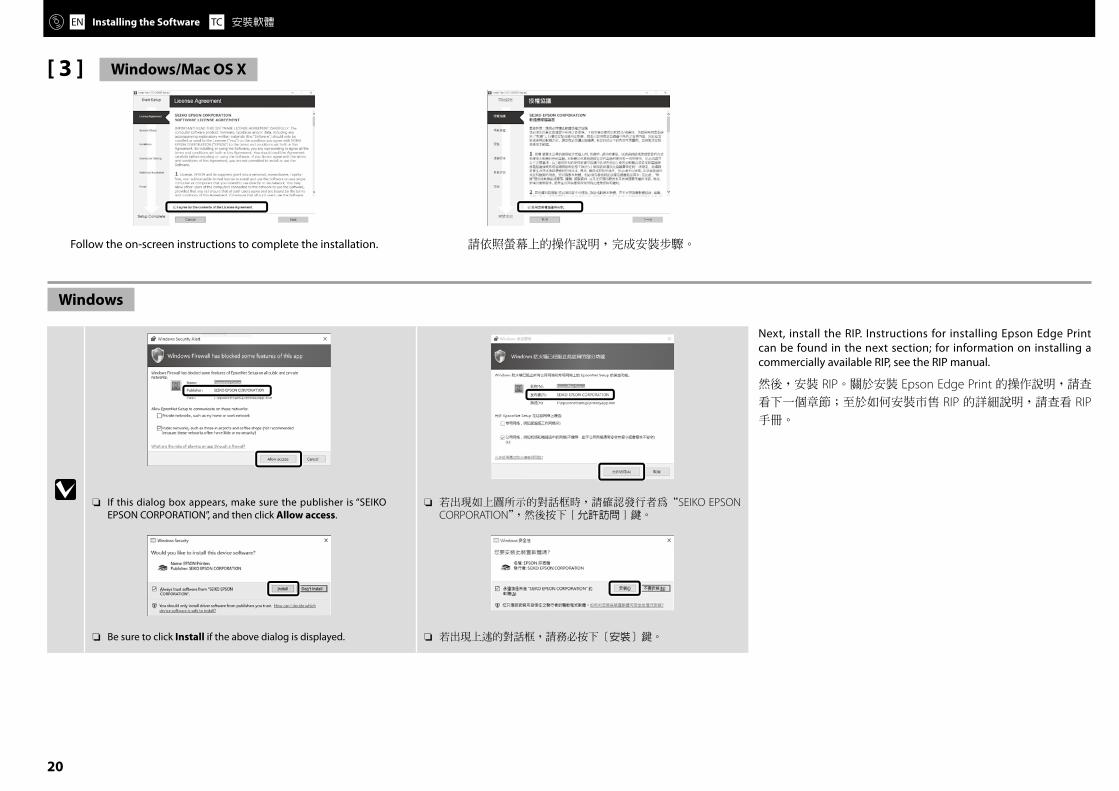
If this dialog box appears, make sure the publisher is “SEIKO ❏EPSON CORPORATION”, and then click Allow access.
若出現如上圖所示的對話框時,請確認發行者為“ ❏ SEIKO EPSON CORPORATION”,然後按下 [允許訪問 ] 鍵。
Be sure to click ❏ Install if the above dialog is displayed. 若出現上述的對話框,請務必按下[ ❏ 安裝]鍵。
Windows/Mac OS X
Next, install the RIP. Instructions for installing Epson Edge Print can be found in the next section; for information on installing a commercially available RIP, see the RIP manual.
然後,安裝 RIP。關於安裝 Epson Edge Print 的操作說明,請查
看下一個章節;至於如何安裝市售 RIP 的詳細說明,請查看 RIP 手冊。
[ 3 [
Follow the on-screen instructions to complete the installation. 請依照螢幕上的操作說明,完成安裝步驟。
2[
EN Installing the Software TC 安裝軟體
Installing Epson Edge Print
安裝 Epson Edge Print
[ [ [
Install Epson Edge Print to the computer to which you installed the required software. If your computer is not equipped with a built-in disk drive, connect an external drive.
[ 2 [
Follow the on-screen instructions to complete the installation. 請依照螢幕上的操作說明,完成安裝步驟。
If the AutoPlay dialog is not displayed, right-click the CD drive icon in Windows Explorer and select Install or run program from your media.
若沒有顯示〝自動播放〞對話框,請在 Windows 檔案總管中的
光碟機圖示上按下滑鼠右鍵並選擇〝從您的媒體安裝或執行程
式〞。
Select Create a desktop shortcut to place a shortcut icon on the desktop for quick access to Epson Edge Print.
選擇〝建立桌面捷徑〞即可在桌面上建立捷徑圖示以便快速使用 Epson Edge Print。
Proceed to the next section for information on launching Epson Edge Print.
關於如何啟動 Epson Edge Print 的詳細說明,請繼續進行下一
個章節。
將 Epson Edge Print 安裝至已安裝了必要軟體的電腦中。若您的電腦沒有裝備內建光碟機,
請連接外接式光碟機。
Epson Edge Print
2[
EN Installing the Software TC 安裝軟體
How to Start Epson Edge Print
如何啟動Epson Edge Print
Launch Epson Edge Print using either of the following two methods:Double-click the shortcut icon on the desktop. ❏Click the Windows start button and select ❏ All Programs > Epson Software > Epson Edge Print.
The first time you use Epson Edge Print, you will be prompted to accept the license agreement. See Epson Edge Print help for more information.
第一次使用 Epson Edge Print,將會出現接受軟體授權協議的提示。詳細資訊,請查看 Epson Edge Print 說明。
使用下列其中一種方式啟動 Epson Edge Print:雙擊桌面上的捷徑圖示。•
按下• Windows 開啟鍵並選擇 所有程式 > Epson Software > Epson Edge Print。
22
EN Installing the Software TC 安裝軟體
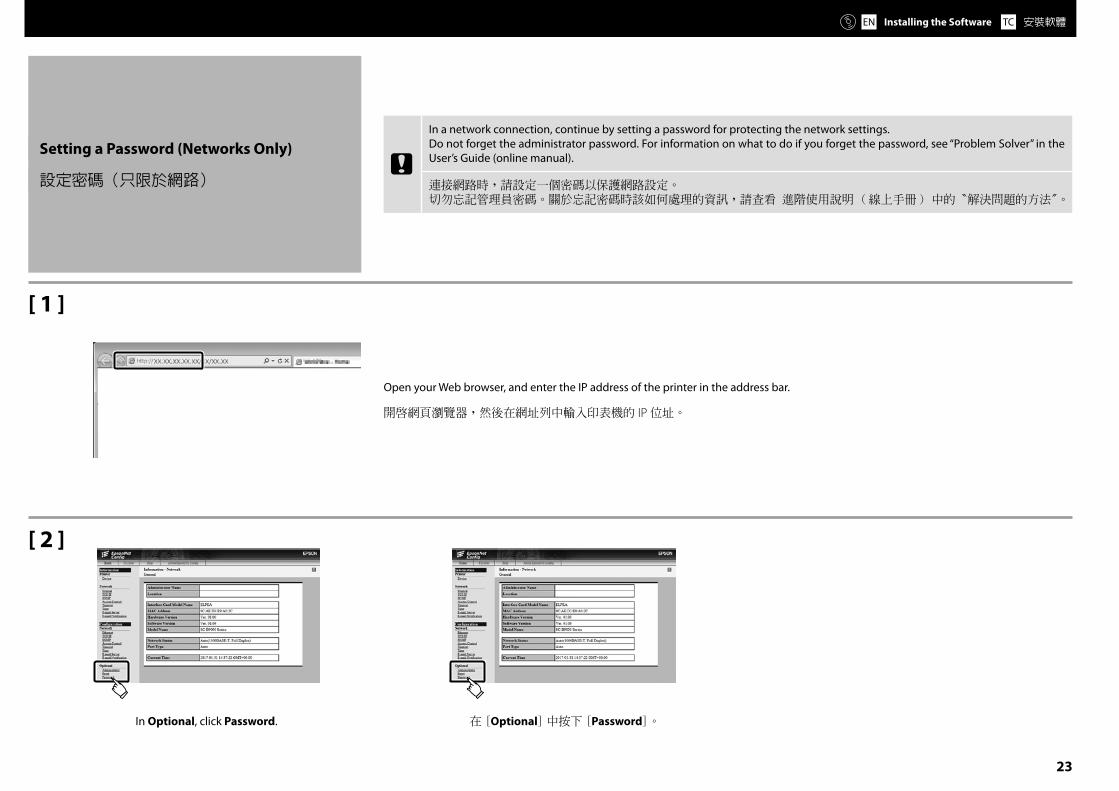
[ 2 [
In Optional, click Password. 在 [Optional] 中按下 [Password]。
Open your Web browser, and enter the IP address of the printer in the address bar.
開啟網頁瀏覽器,然後在網址列中輸入印表機的 IP 位址。
[ [ [
cIn a network connection, continue by setting a password for protecting the network settings.Do not forget the administrator password. For information on what to do if you forget the password, see “Problem Solver” in the User’s Guide (online manual).
連接網路時,請設定一個密碼以保護網路設定。切勿忘記管理員密碼。關於忘記密碼時該如何處理的資訊,請查看 進階使用說明 ( 線上手冊 ) 中的〝解決問題的方法〞。
Setting a Password (Networks Only)
設定密碼(只限於網路)
23
EN Installing the Software TC 安裝軟體
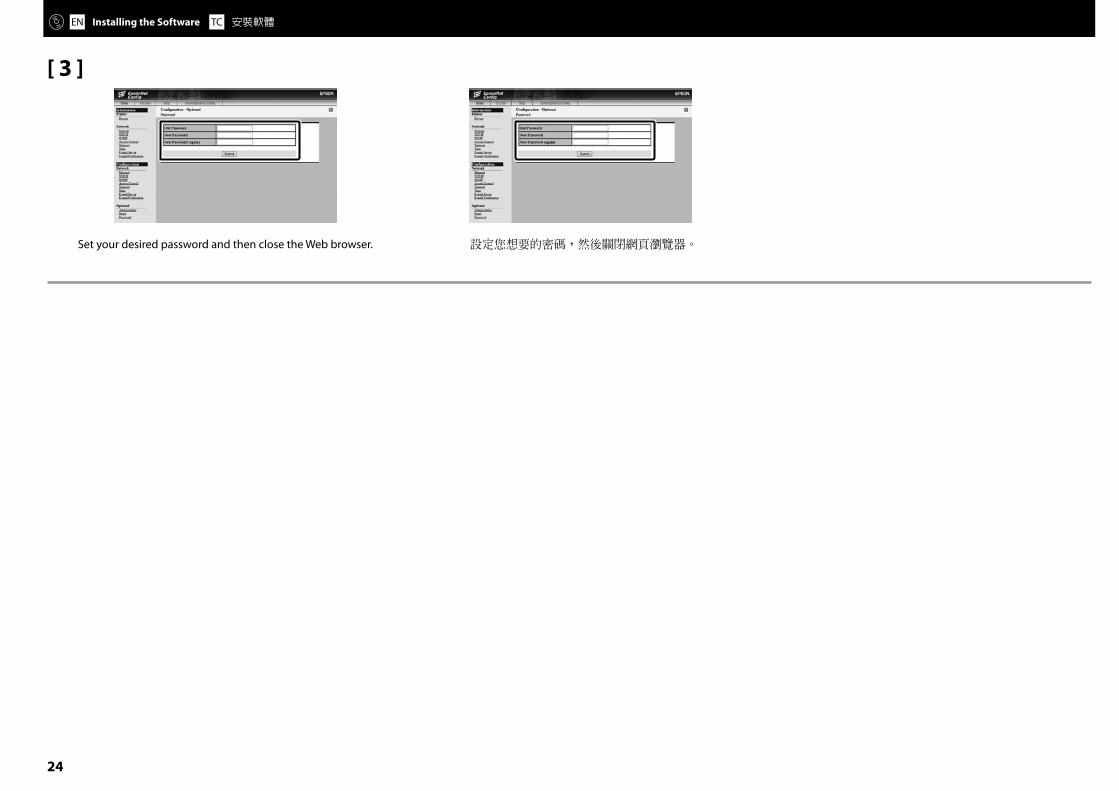
[ 3 [
Set your desired password and then close the Web browser. 設定您想要的密碼,然後關閉網頁瀏覽器。
24
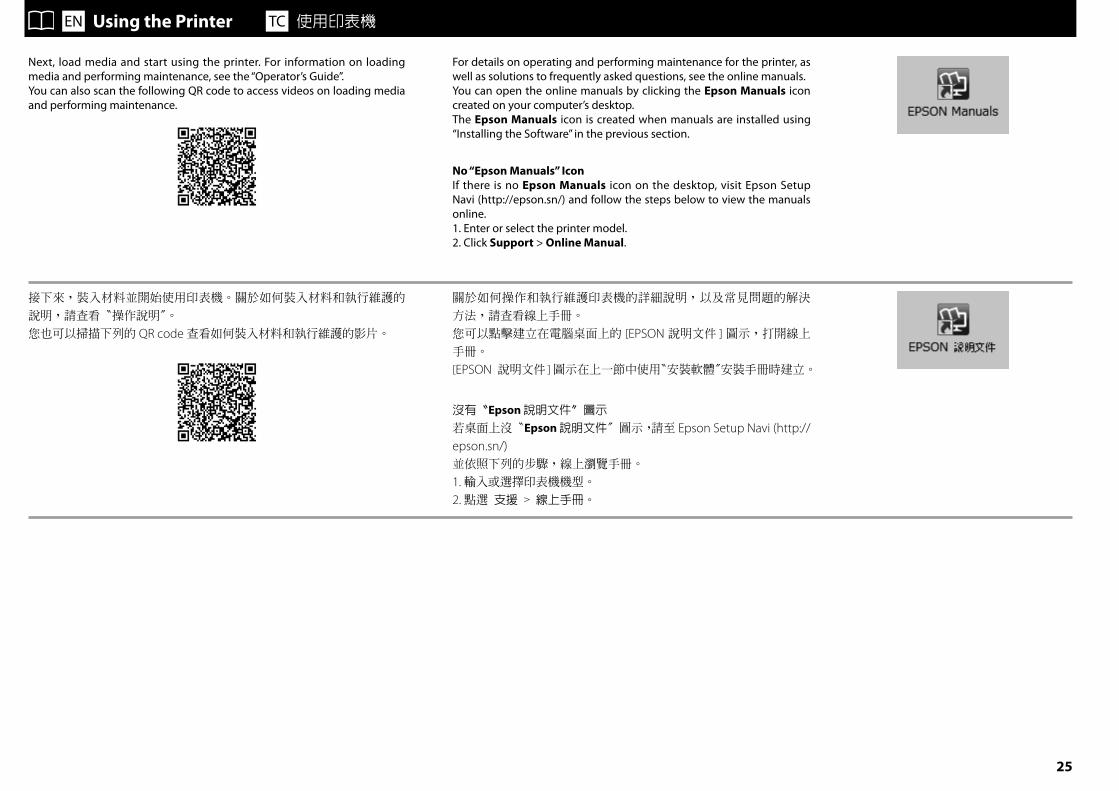
Next, load media and start using the printer. For information on loading media and performing maintenance, see the “Operator’s Guide”.You can also scan the following QR code to access videos on loading media and performing maintenance.
For details on operating and performing maintenance for the printer, as well as solutions to frequently asked questions, see the online manuals.You can open the online manuals by clicking the Epson Manuals icon created on your computer’s desktop.The Epson Manuals icon is created when manuals are installed using “Installing the Software” in the previous section.
No “Epson Manuals” IconIf there is no Epson Manuals icon on the desktop, visit Epson Setup Navi (http://epson.sn/) and follow the steps below to view the manuals online.1. Enter or select the printer model.2. Click Support > Online Manual.
接下來,裝入材料並開始使用印表機。關於如何裝入材料和執行維護的
說明,請查看〝操作說明〞。
您也可以掃描下列的 QR code 查看如何裝入材料和執行維護的影片。
EN Using the Printer TC 使用印表機
關於如何操作和執行維護印表機的詳細說明,以及常見問題的解決
方法,請查看線上手冊。
您可以點擊建立在電腦桌面上的 [EPSON 說明文件 ] 圖示,打開線上
手冊。
[EPSON 說明文件 ] 圖示在上一節中使用〝安裝軟體〞安裝手冊時建立。
沒有〝Epson 說明文件〞圖示
若桌面上沒〝Epson 說明文件〞圖示,請至 Epson Setup Navi (http://epson.sn/)並依照下列的步驟,線上瀏覽手冊。
1. 輸入或選擇印表機機型。
2. 點選 支援 > 線上手冊。
25
TC 此資訊僅適用於台灣地區(Information for Users in Taiwan Only)
商品名稱產品名稱:大圖輸出機
製造年份 , 製造號碼和生產國別:見機體標示
電力規格額定電壓 (#1,#2): AC 100-120V / AC 200-240V額定頻率 (#1,#2): 50/60 Hz耗電量(列印時): 約 440 W額定電流 (#1,#2): 10A (AC 100-120V) / 5A (AC 200-240V)
警語檢修本產品之前,請先拔掉本產品的電源線。
相容性適用系統:根據 RIP 的規格而定
使用方法見內附相關說明文件
緊急處理方法發生下列狀況時,請先拔下印表機的電源線並洽詢 Epson 授權服務中心:
電源線或插頭損壞 ❏
有液體噴灑到印表機 ❏
印表機摔落或機殼損壞 ❏
印表機無法正常操作或是列印品質與原來有明顯落差 ❏
注意事項只能使用印表機標籤上所註明的電源規格。 ❏請保持工作場所的通風良好。 ❏
製造商:SEIKO EPSON CORPORATION地址: 80 Harashinden, Hirooka, Shiojiri-shi,
Nagano-ken, 399-0785, JAPAN電話:81-263-52-2552
進口商:台灣愛普生科技股份有限公司
地址:台北市信義區松仁路 7 號 14 樓電話:(02) 8786-6688 ( 代表號 )
廢電池請回收
警告使用者 :
此為甲類資訊技術設備,於居住環境中使用時,可
能會造成射頻擾動,在此種情況下,使用者會被要
求採取某些適當的對策。
26

2[
MEMO

EPSON, EPSON EXCEED YOUR VISION, EXCEED YOUR VISION and their logos are registered trademarks or trademarks of Seiko Epson Corporation.© 2017 Seiko Epson Corporation.Printed in XXXXXX