Embed Size (px)
Citation preview
SC22-UG-EN-Rev1
Slide Converter 2.2
User's Guide
April 27, 2018Rev. 1
Slide Converter 2.2 - User's Guide
Contents
Disclaimer....................................................................................................................... 3
1 System Requirements................................................................................................... 5
2 Installation................................................................................................................... 6
3 User Interface............................................................................................................. 133.1 Settings.....................................................................................................................................16
3.2 Information window................................................................................................................18
3.3 Workflow..................................................................................................................................18
4 Conversion direction parameters................................................................................234.1 MRXS to MRXS:........................................................................................................................23
4.2 SVS to MRXS:............................................................................................................................24
4.3 NDPI to MRXS:..........................................................................................................................25
4.4 Plain TIFF to MRXS:..................................................................................................................26
4.5 IMAGE to MRXS:......................................................................................................................27
4.6 MRXS to DICOM:......................................................................................................................28
4.7 MRXS to ROCHE TIFF:...............................................................................................................29
4.8 MRXS to TILED TIFF:.................................................................................................................30
4.9 MRXS to SVS:............................................................................................................................32
5 Conversion queue....................................................................................................... 33
6 Integration with Scanner control software ..................................................................35
April 27, 2018 - Rev. 1 3DHISTECH Ltd. 2(35)
Slide Converter 2.2 - User's Guide
Disclaimer
Copyright © 2001-2018 3DHISTECH Ltd.
All rights reserved.
Intellectual property related to the 3DHISTECH products are as follows:
EP 1,789,831; US 7,663,078; EP 2,024,772; JP 2009-512685; US 12/301,781; EP 1,644,767; JP 2007- 516451; US 7,327,515; EP 1,994,398; JP 2008-557835; US 12/281,566; U0700210; US 6,246,785; HU0900142; HU0700404; PCT/HU2007/000065; PCT/HU2014/000020; EP 08762668.5; US 12/663,537; PCT/AT2006/000492; JP 2008-542552; EP 06817469; US 12/095,545; PCT/AT2006/000493; EP 06817470.5; US 12/095,596; HU0900741; US 61/264,732; US 11/826,752; P0401870; PCT/IB2005/050344; US 11/662,976; HU0700409; US 12/042,050; US 77/636,144 and 007502032.
The above mentioned granted patents, granted utility model, registered trademarks, pending international and national patent applications and the other corresponding IP are the sole properties of the 3DHISTECH Ltd.
3DHISTECH Ltd. is not liable for damage of whatever nature (including, but not limited to, general or specific damage, indirect damage, consequential damage or incidental damage, including the results of the analysis of the digitized slides, for example, change of health status related to erroneous diagnosis from the digitized slide(s) that stems from or is associated with use of Product, digitized slides, quality of staining, quality of stained slides, quality of used method of staining. 3DHISTECH Ltd.assumes no responsibility for the functionality and fault-free condition of your “application programs” (Workflows, VBA macros, Commander scripts).
CAUTION
This product has not been approved or cleared as a medical device by the U.S. Food and Drug Administration.
Do not use this device in close proximity to sources of strong electromagnetic radiation (e.g. unshielded intentional RF sources), as these may interfere with the proper operation.
April 27, 2018 - Rev. 1 3DHISTECH Ltd. 3(35)
Slide Converter 2.2 - User's Guide
Third-Party Disclaimer (LibTIFF – TIFF Library and Utilities)
3DHISTECH Ltd. is not liable for damage of whatever nature (including, but not limited to, general or specific damage, indirect damage, consequential damage or incidental damage, including damage resulting from lost profits, interruption of business, loss of business information, pecuniary loss or similar damage) that stems from or is associated with the incorporated part of this Product that is made by third parties.
Further Information
For the latest information on 3DHISTECH products and services, please visit our website at the following URL: http://www.3dhistech.com.
Company Address:
3DHISTECH Kft.
3 Öv street1141 Budapest – HUNGARY
April 27, 2018 - Rev. 1 3DHISTECH Ltd. 4(35)
Slide Converter 2.2 - User's Guide 1 System Requirements
1 System Requirements
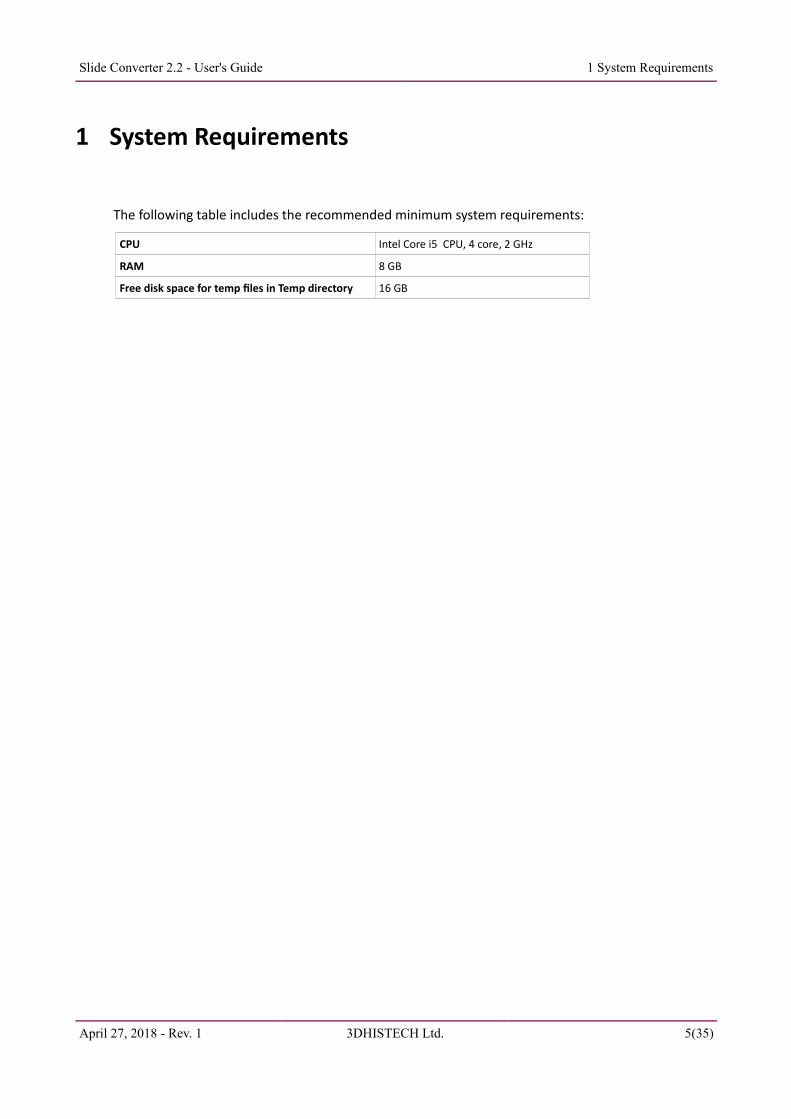
The following table includes the recommended minimum system requirements:
CPU Intel Core i5 CPU, 4 core, 2 GHz
RAM 8 GB
Free disk space for temp files in Temp directory 16 GB
April 27, 2018 - Rev. 1 3DHISTECH Ltd. 5(35)
Slide Converter 2.2 - User's Guide 2 Installation
2 Installation
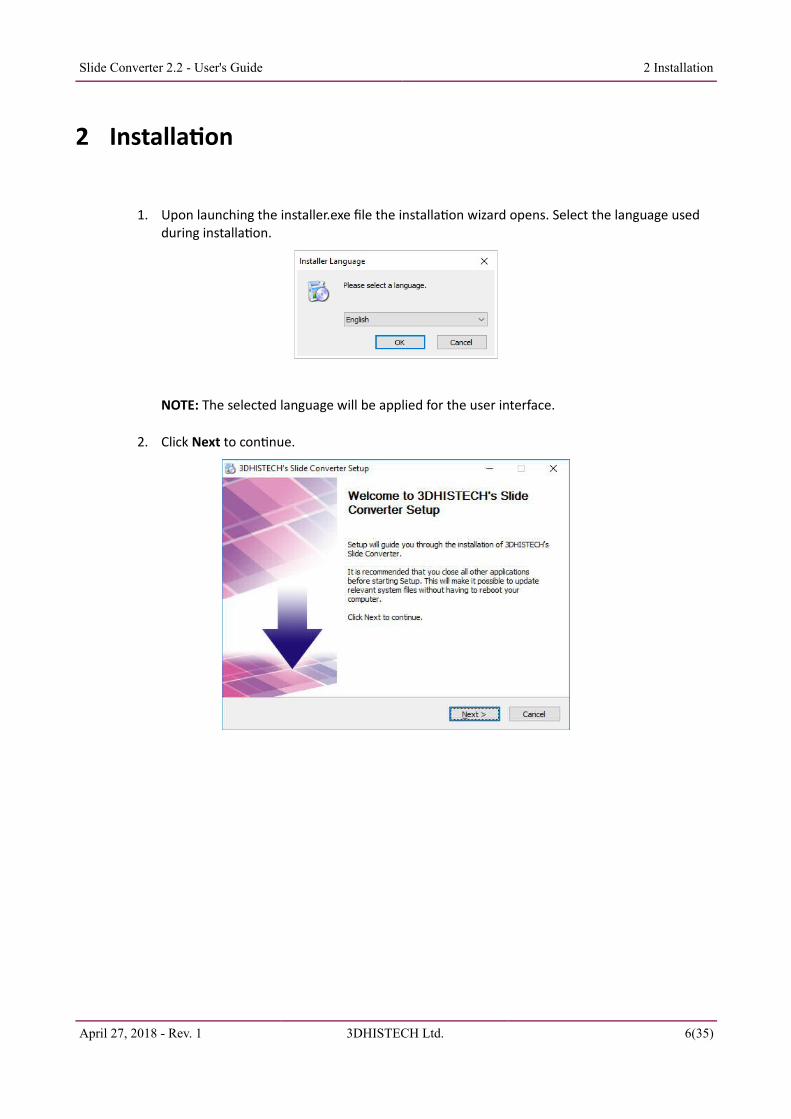
1. Upon launching the installer.exe file the installation wizard opens. Select the language used during installation.
NOTE: The selected language will be applied for the user interface.
2. Click Next to continue.
April 27, 2018 - Rev. 1 3DHISTECH Ltd. 6(35)
Slide Converter 2.2 - User's Guide 2 Installation
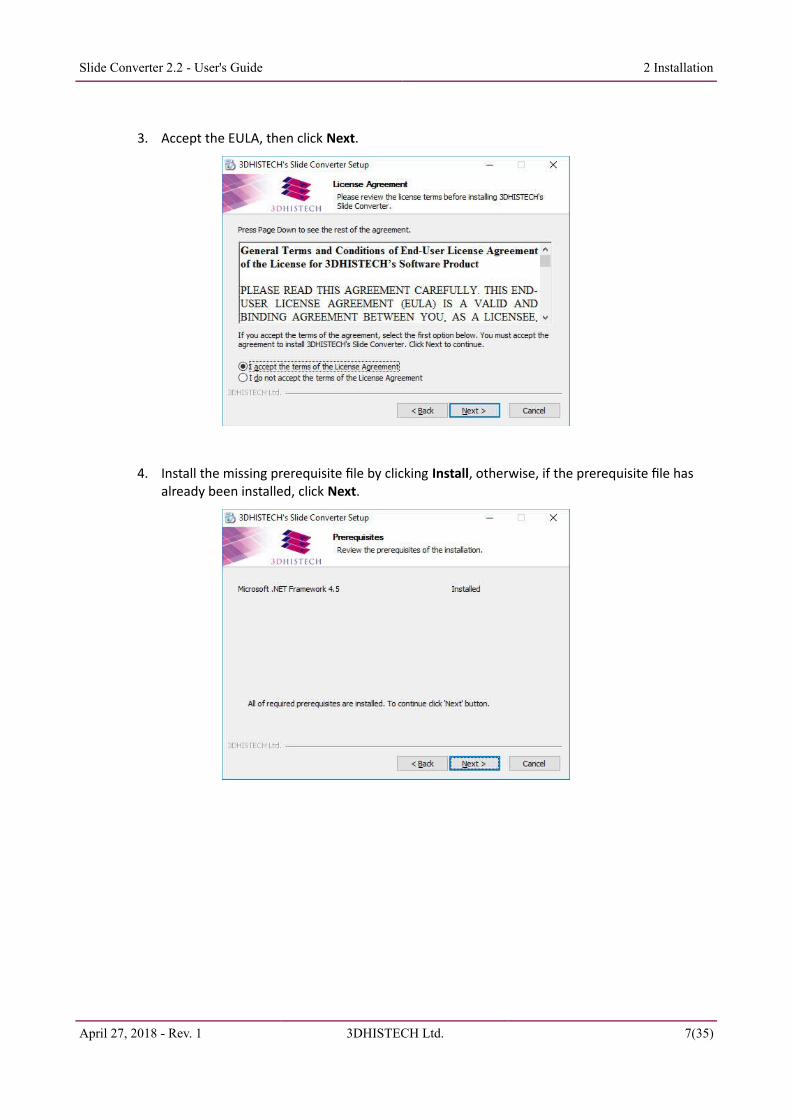
3. Accept the EULA, then click Next.
4. Install the missing prerequisite file by clicking Install, otherwise, if the prerequisite file has already been installed, click Next.
April 27, 2018 - Rev. 1 3DHISTECH Ltd. 7(35)
Slide Converter 2.2 - User's Guide 2 Installation
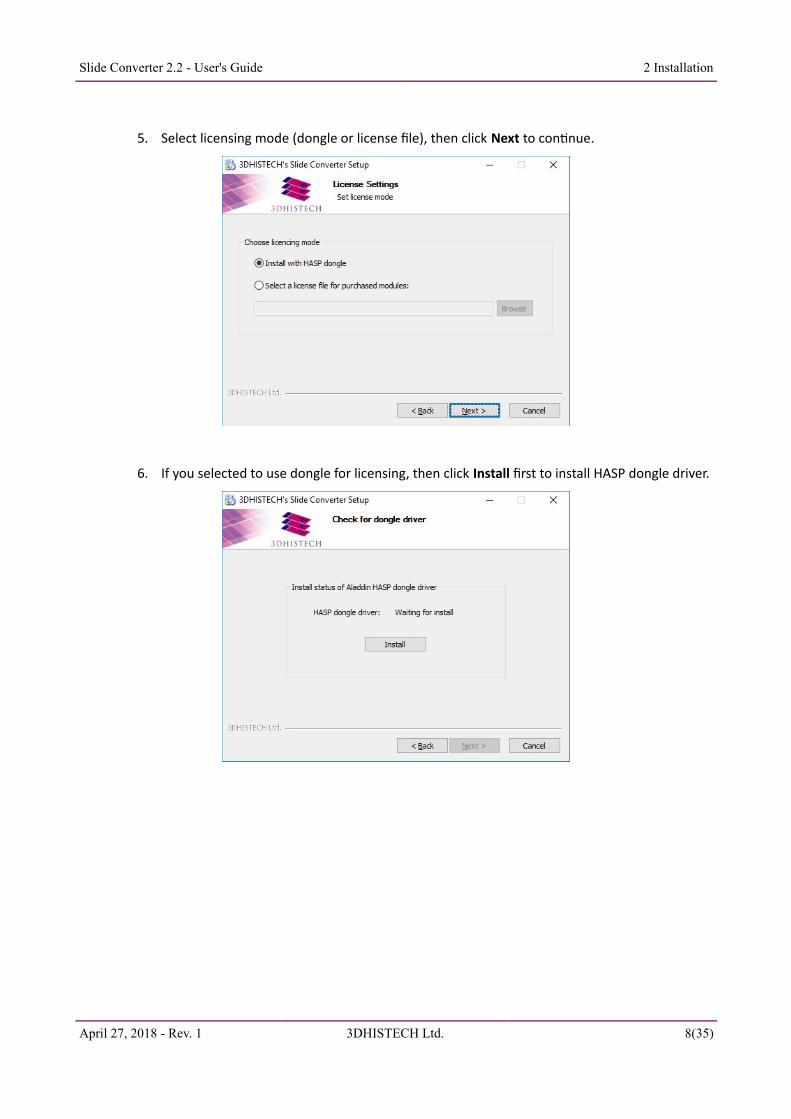
5. Select licensing mode (dongle or license file), then click Next to continue.
6. If you selected to use dongle for licensing, then click Install first to install HASP dongle driver.
April 27, 2018 - Rev. 1 3DHISTECH Ltd. 8(35)
Slide Converter 2.2 - User's Guide 2 Installation
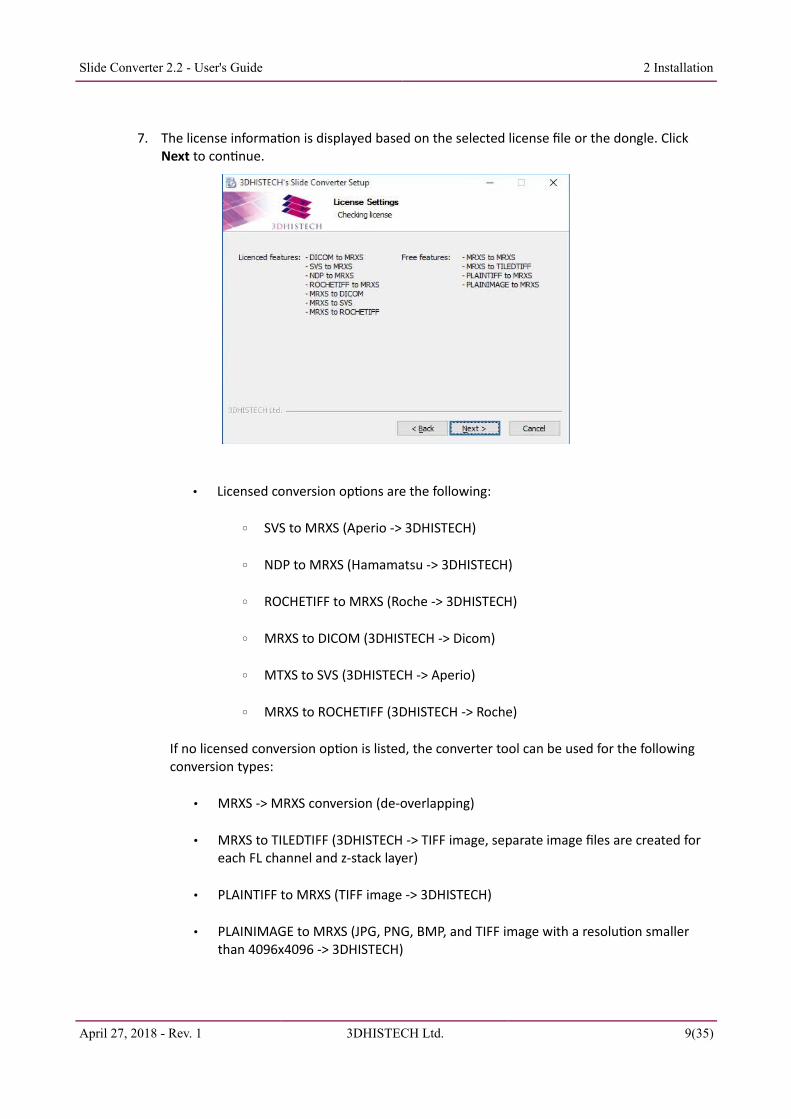
7. The license information is displayed based on the selected license file or the dongle. Click Next to continue.
• Licensed conversion options are the following:
◦ SVS to MRXS (Aperio -> 3DHISTECH)
◦ NDP to MRXS (Hamamatsu -> 3DHISTECH)
◦ ROCHETIFF to MRXS (Roche -> 3DHISTECH)
◦ MRXS to DICOM (3DHISTECH -> Dicom)
◦ MTXS to SVS (3DHISTECH -> Aperio)
◦ MRXS to ROCHETIFF (3DHISTECH -> Roche)
If no licensed conversion option is listed, the converter tool can be used for the following conversion types:
• MRXS -> MRXS conversion (de-overlapping)
• MRXS to TILEDTIFF (3DHISTECH -> TIFF image, separate image files are created for each FL channel and z-stack layer)
• PLAINTIFF to MRXS (TIFF image -> 3DHISTECH)
• PLAINIMAGE to MRXS (JPG, PNG, BMP, and TIFF image with a resolution smaller than 4096x4096 -> 3DHISTECH)
April 27, 2018 - Rev. 1 3DHISTECH Ltd. 9(35)
Slide Converter 2.2 - User's Guide 2 Installation
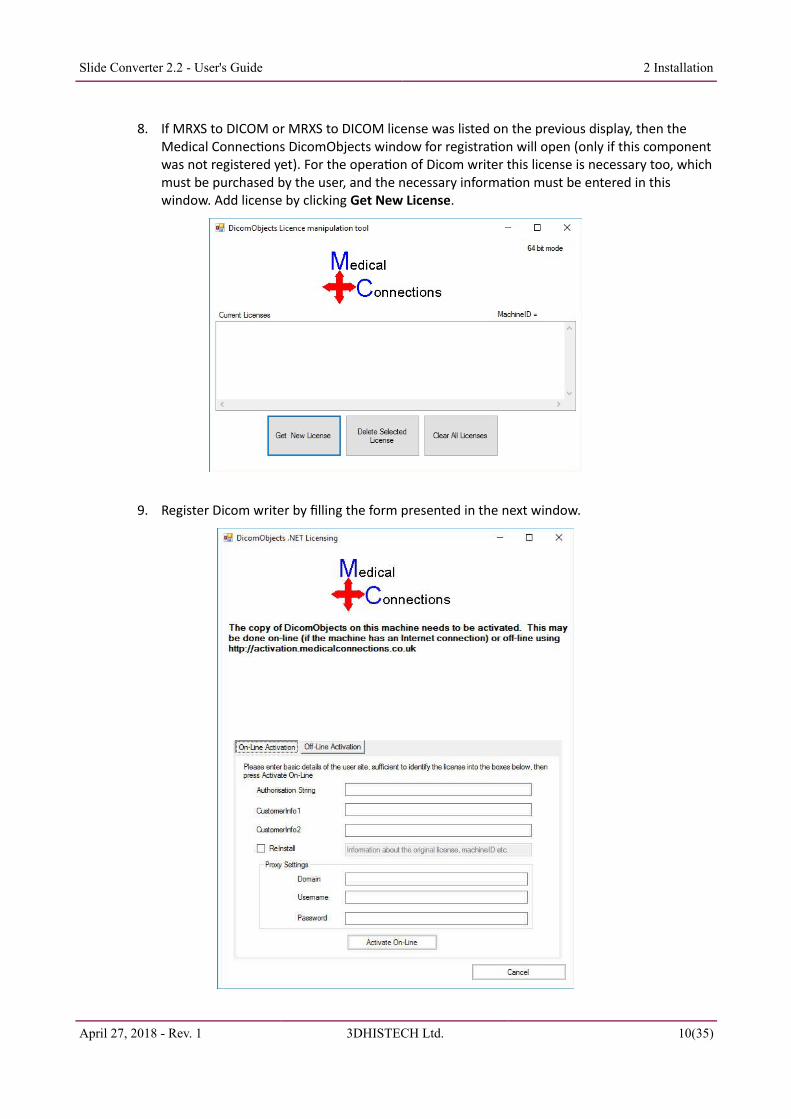
8. If MRXS to DICOM or MRXS to DICOM license was listed on the previous display, then the Medical Connections DicomObjects window for registration will open (only if this component was not registered yet). For the operation of Dicom writer this license is necessary too, which must be purchased by the user, and the necessary information must be entered in this window. Add license by clicking Get New License.
9. Register Dicom writer by filling the form presented in the next window.
April 27, 2018 - Rev. 1 3DHISTECH Ltd. 10(35)
Slide Converter 2.2 - User's Guide 2 Installation
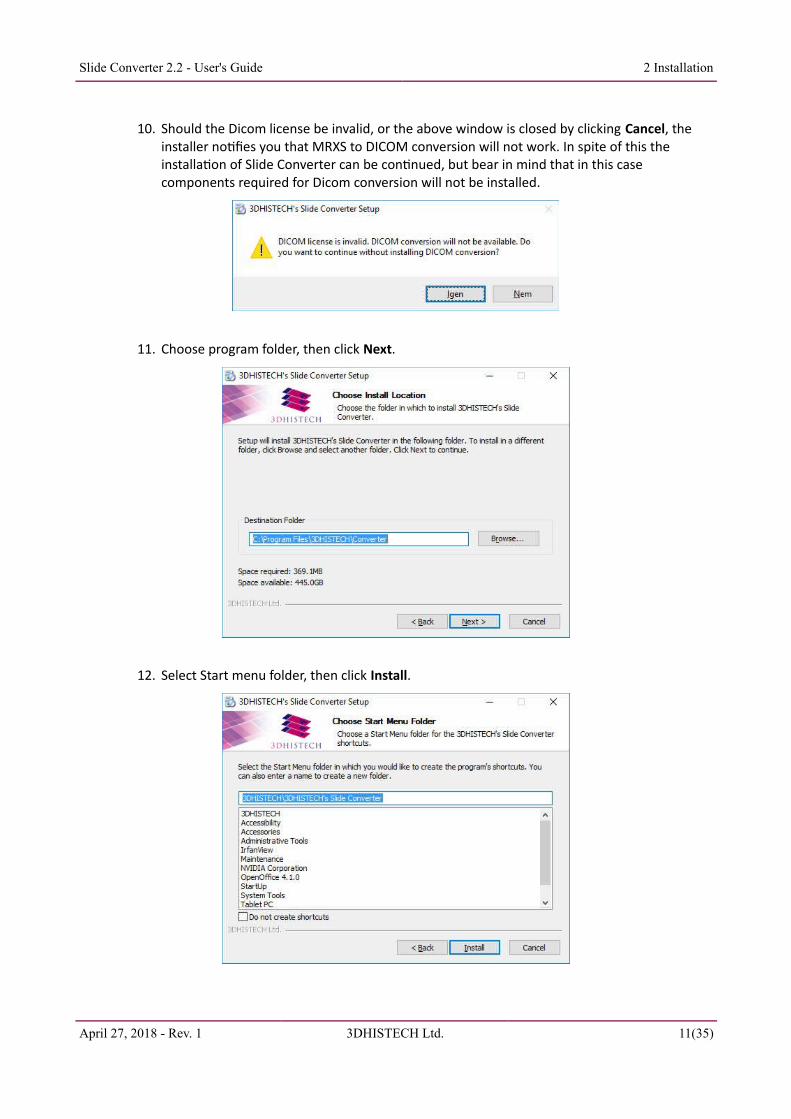
10. Should the Dicom license be invalid, or the above window is closed by clicking Cancel, the installer notifies you that MRXS to DICOM conversion will not work. In spite of this the installation of Slide Converter can be continued, but bear in mind that in this case components required for Dicom conversion will not be installed.
11. Choose program folder, then click Next.
12. Select Start menu folder, then click Install.
April 27, 2018 - Rev. 1 3DHISTECH Ltd. 11(35)
Slide Converter 2.2 - User's Guide 2 Installation
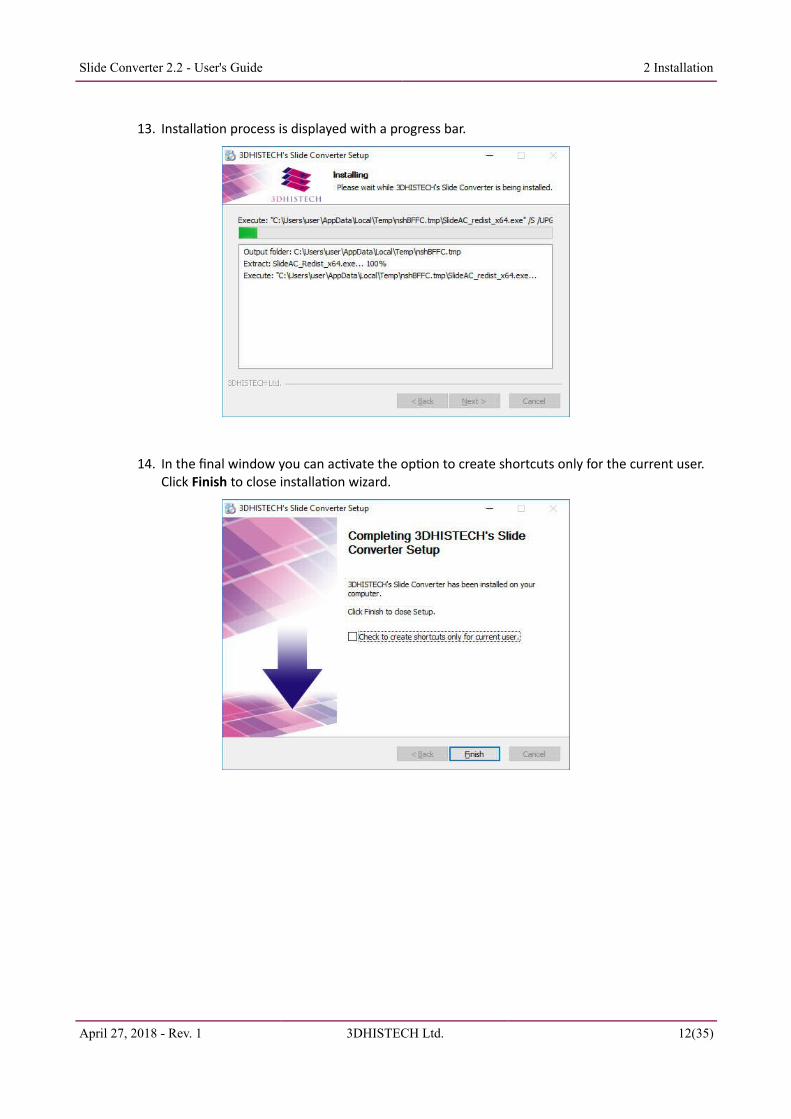
13. Installation process is displayed with a progress bar.
14. In the final window you can activate the option to create shortcuts only for the current user. Click Finish to close installation wizard.
April 27, 2018 - Rev. 1 3DHISTECH Ltd. 12(35)
Slide Converter 2.2 - User's Guide 3 User Interface
3 User Interface
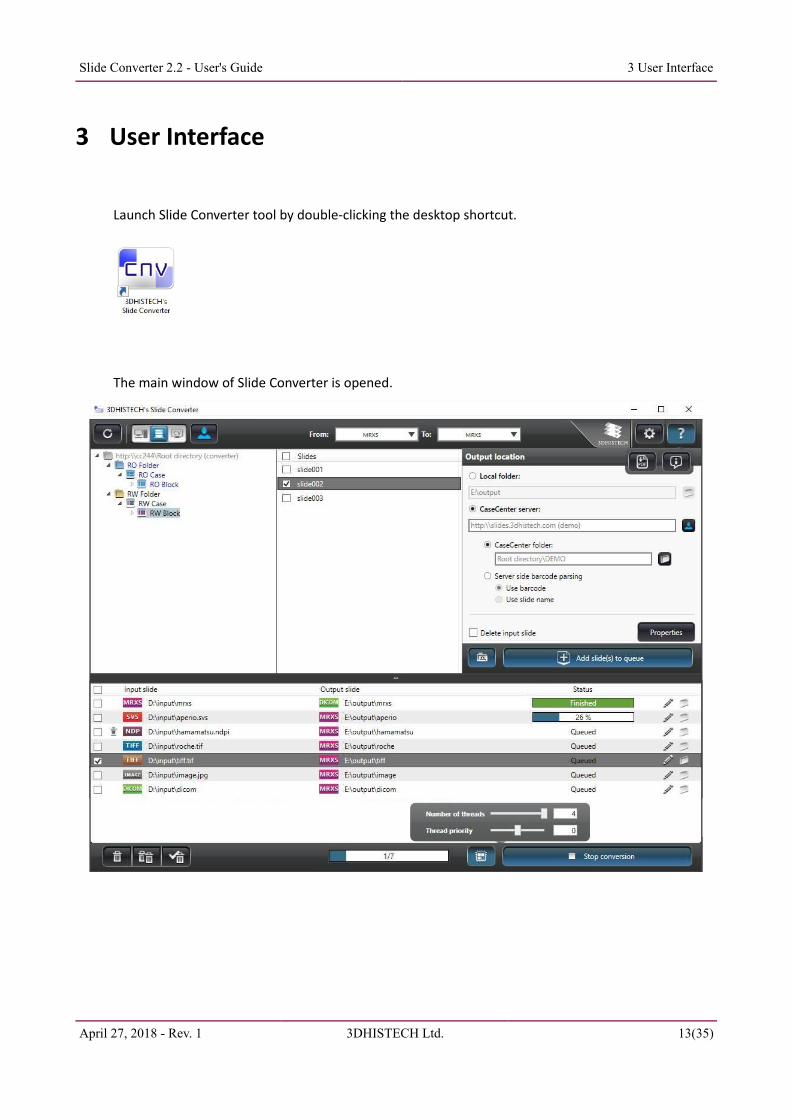
Launch Slide Converter tool by double-clicking the desktop shortcut.
The main window of Slide Converter is opened.
April 27, 2018 - Rev. 1 3DHISTECH Ltd. 13(35)
Slide Converter 2.2 - User's Guide 3 User Interface
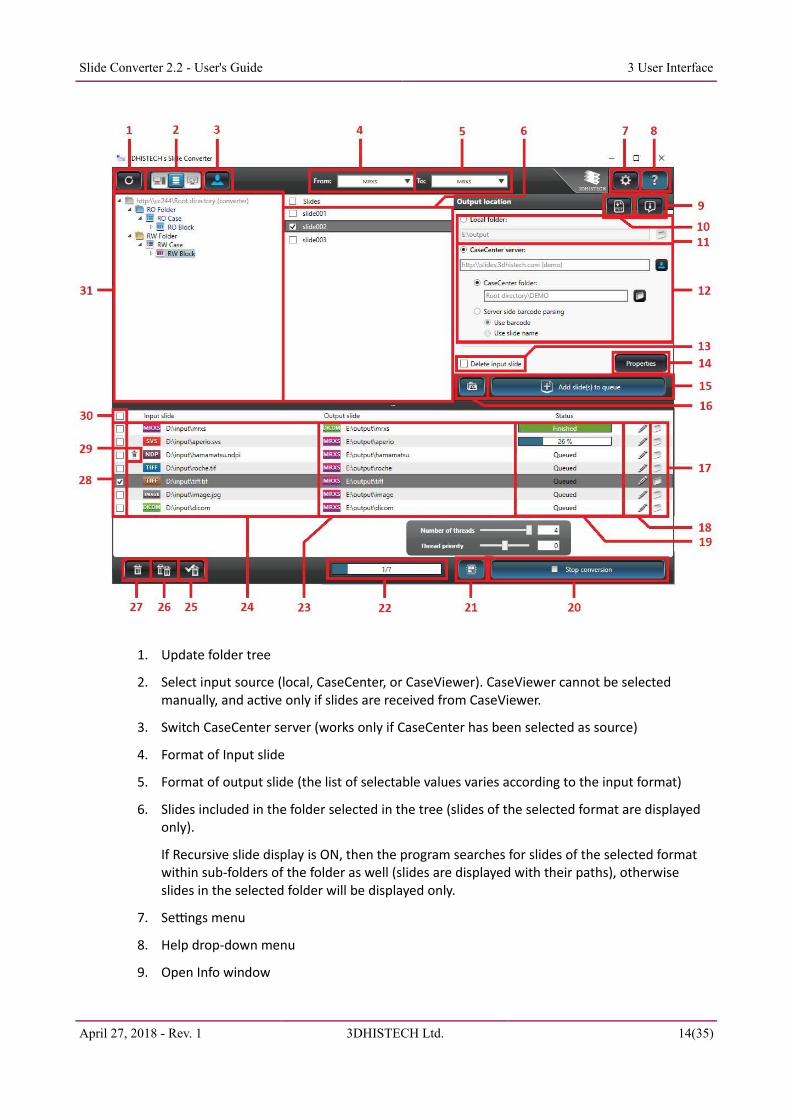
1. Update folder tree
2. Select input source (local, CaseCenter, or CaseViewer). CaseViewer cannot be selected manually, and active only if slides are received from CaseViewer.
3. Switch CaseCenter server (works only if CaseCenter has been selected as source)
4. Format of Input slide
5. Format of output slide (the list of selectable values varies according to the input format)
6. Slides included in the folder selected in the tree (slides of the selected format are displayed only).
If Recursive slide display is ON, then the program searches for slides of the selected format within sub-folders of the folder as well (slides are displayed with their paths), otherwise slides in the selected folder will be displayed only.
7. Settings menu
8. Help drop-down menu
9. Open Info window
April 27, 2018 - Rev. 1 3DHISTECH Ltd. 14(35)
Slide Converter 2.2 - User's Guide 3 User Interface
10. Open User's Guide in PDF
11. Select output destination (local folder)
12. Select output destination (CaseCenter server and folder, or automatic slide upload through barcode parsing)
13. Delete input slide
14. Define conversion parameters
15. Add selected slides to queue
16. Add complete folder (with all slides and subfolders) to queue
17. Open converted slide (MRXS file opens with CaseViewer, other formats are opened with the assigned external program, folder is opened when slide is folder type)
18. Modify parameters of slides in the queue
19. Progress bar (for actual slide)
20. Start/Stop conversion
21. Multi-threading support (set the number of threads used during conversion process)
22. Progress bar (for total queue)
23. List of slides in the queue, displayed with their destination path and output formats.
24. List of slides in the queue, displayed with their source path and input formats.
25. Remove converted slides from the queue
26. Remove all slides from the queue
27. Remove selected slides from the queue
28. Select slide
29. Trash bin for input slides being deleted after conversion
30. Select all slides
31. Folder tree for the selection of the source slide
April 27, 2018 - Rev. 1 3DHISTECH Ltd. 15(35)
Slide Converter 2.2 - User's Guide 3 User Interface
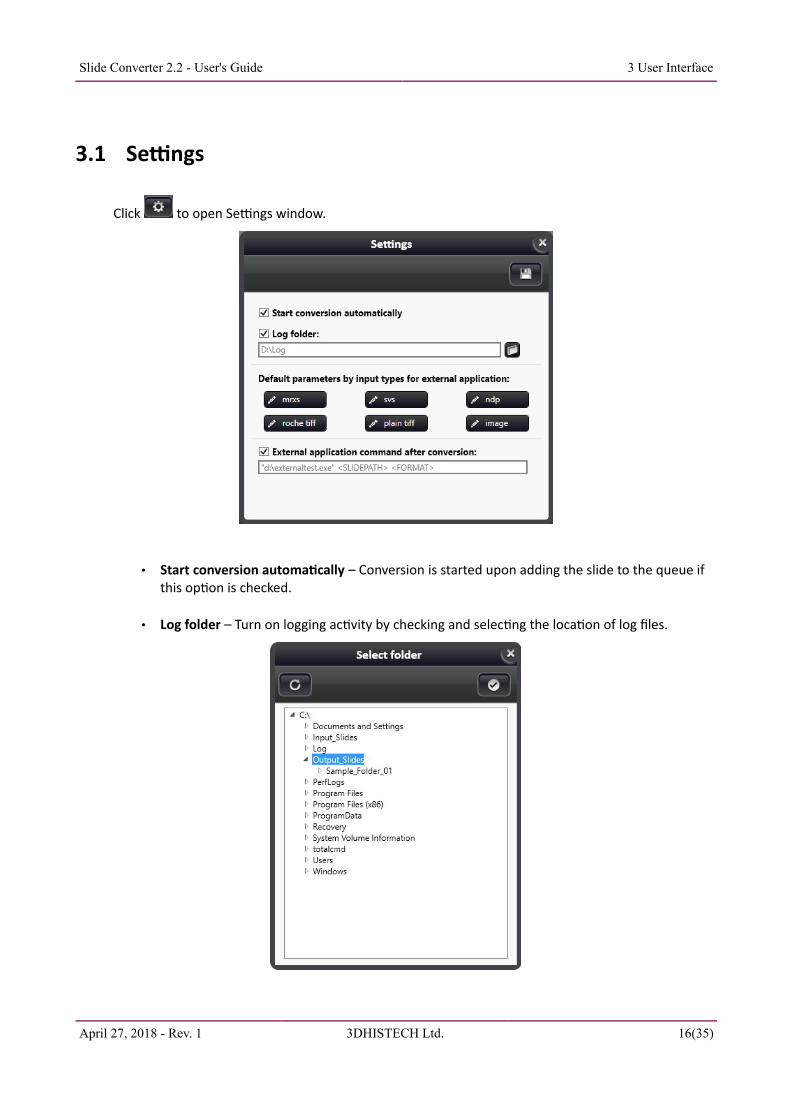
3.1 Settings
Click to open Settings window.
• Start conversion automatically – Conversion is started upon adding the slide to the queue if this option is checked.
• Log folder – Turn on logging activity by checking and selecting the location of log files.
April 27, 2018 - Rev. 1 3DHISTECH Ltd. 16(35)
Slide Converter 2.2 - User's Guide 3 User Interface
The name of a log file consists of the following parts: „convert_log_” + date and time of conversion + file extension (for example, converter_log_20160317143005.xml)
A log file includes the data of slides processed in a single queue:
• conversion status
• input slide
• input format
• output slide
• output format
• conversion parameters (including switches used for the specific conversion)
• start of conversion
• end of conversion
• duration
• error message(s)
• conversion steps and their time
• Default parameters for external application call – If an external program calls the converter (converter.exe with the path of the convertible slide in the parameter, for example: "c:\Program Files\3DHISTECH\Converter\Converter.exe" "d:\slide"), then the input slide is transferred to the converter queue. The parameters used can be defined here, in separate input formats (see Section 4 for more details).
• External application command after conversion – It is available for you to set an application that the software calls with which slides can be opened after conversion. The following parameters can be forwarded to the external application:
◦ <SLIDEPATH> : path of the newly converted slide
◦ <FORMAT> : format of the slide, can have the following values:
▪ mrxs : 3DHISTECH MRXS slide
▪ dicom : DICOM slide
▪ rochetiff : Roche TIFF slide
▪ svs : Aperio SVS slide
▪ tiledtiff : Tiled TIFF
• Click to save settings.
April 27, 2018 - Rev. 1 3DHISTECH Ltd. 17(35)
Slide Converter 2.2 - User's Guide 3 User Interface
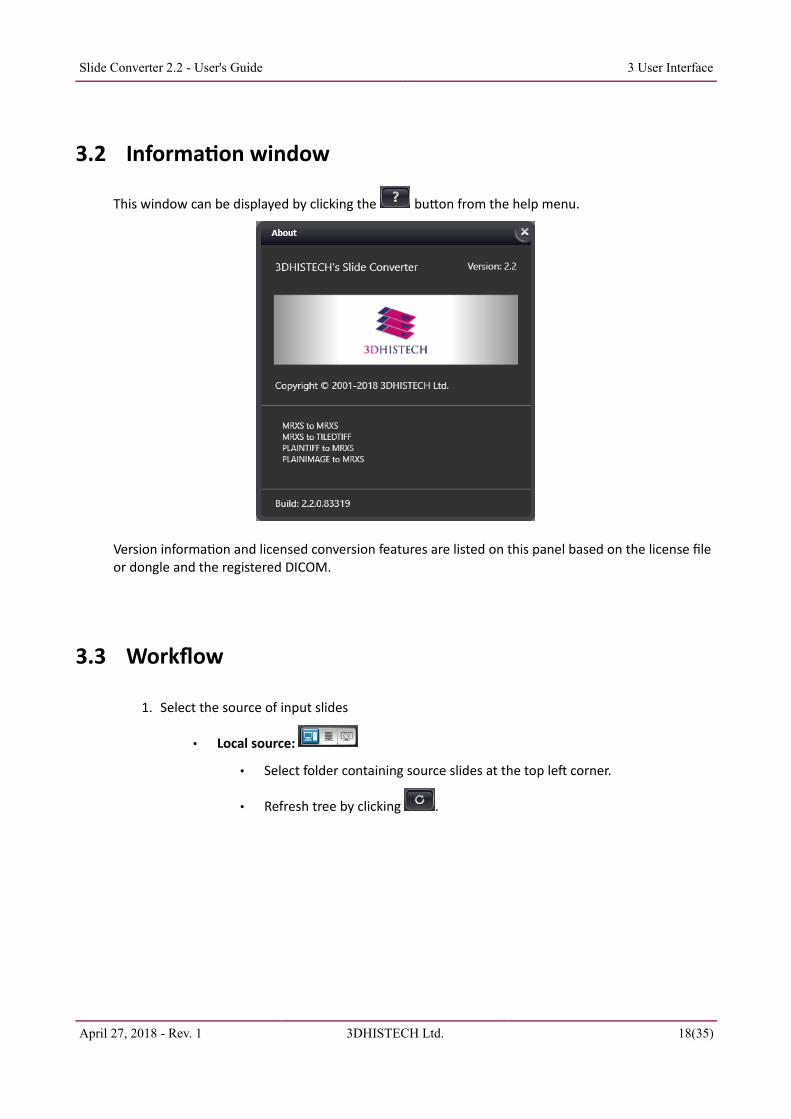
3.2 Information window
This window can be displayed by clicking the button from the help menu.
Version information and licensed conversion features are listed on this panel based on the license file or dongle and the registered DICOM.
3.3 Workflow
1. Select the source of input slides
• Local source:
• Select folder containing source slides at the top left corner.
• Refresh tree by clicking .
April 27, 2018 - Rev. 1 3DHISTECH Ltd. 18(35)
Slide Converter 2.2 - User's Guide 3 User Interface
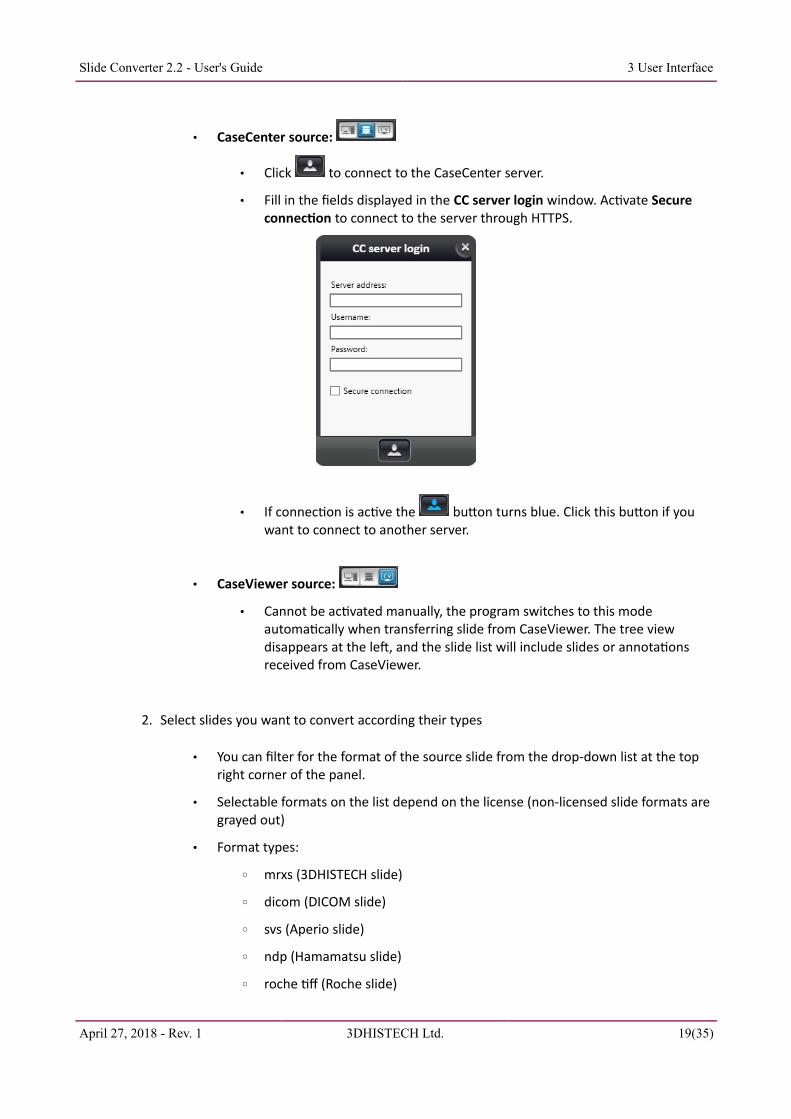
• CaseCenter source:
• Click to connect to the CaseCenter server.
• Fill in the fields displayed in the CC server login window. Activate Secure connection to connect to the server through HTTPS.
• If connection is active the button turns blue. Click this button if you want to connect to another server.
• CaseViewer source:
• Cannot be activated manually, the program switches to this mode automatically when transferring slide from CaseViewer. The tree view disappears at the left, and the slide list will include slides or annotations received from CaseViewer.
2. Select slides you want to convert according their types
• You can filter for the format of the source slide from the drop-down list at the top right corner of the panel.
• Selectable formats on the list depend on the license (non-licensed slide formats are grayed out)
• Format types:
◦ mrxs (3DHISTECH slide)
◦ dicom (DICOM slide)
◦ svs (Aperio slide)
◦ ndp (Hamamatsu slide)
◦ roche tiff (Roche slide)
April 27, 2018 - Rev. 1 3DHISTECH Ltd. 19(35)
Slide Converter 2.2 - User's Guide 3 User Interface
◦ plain tiff (TIFF image)
◦ image (JPG, PNG, BMP, or TIFF image smaller than 4096x4096 pixel size)
3. Select type of output slide
• The output formats listed depend on the type of the input slide and the license (non-licensed formats are inactive on the list)
• Slides of the same format type only can be selected for conversion at a time
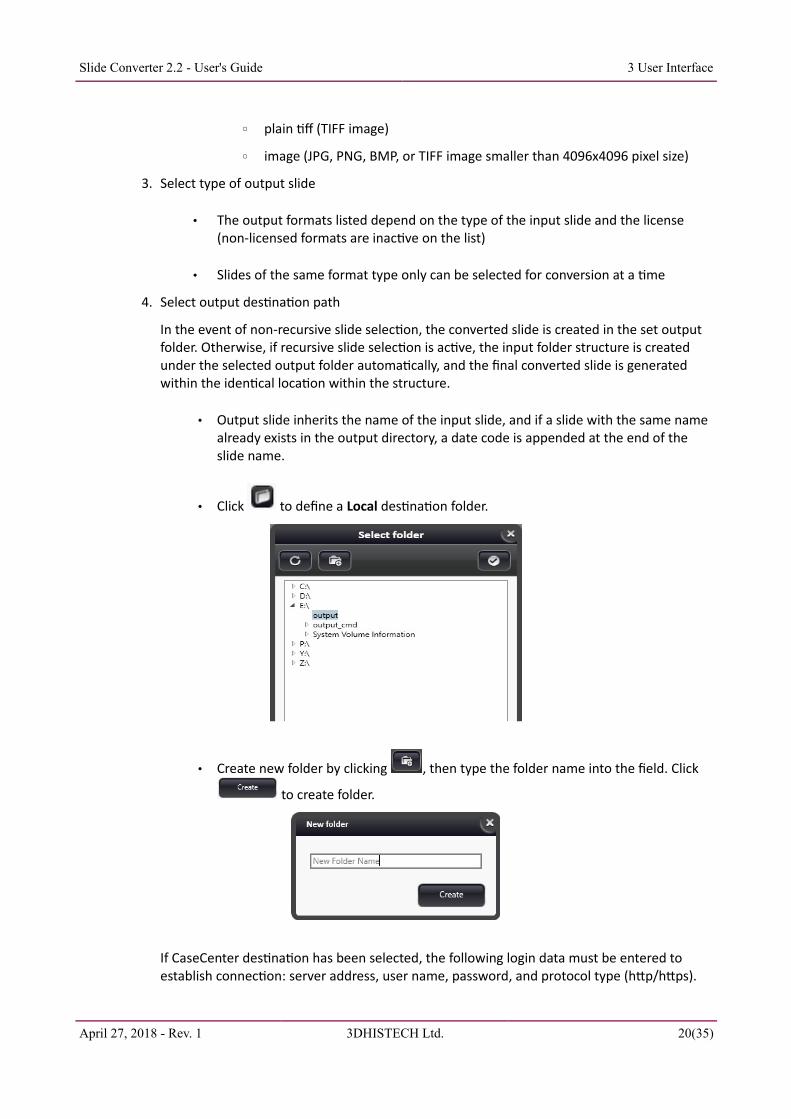
4. Select output destination path
In the event of non-recursive slide selection, the converted slide is created in the set output folder. Otherwise, if recursive slide selection is active, the input folder structure is created under the selected output folder automatically, and the final converted slide is generated within the identical location within the structure.
• Output slide inherits the name of the input slide, and if a slide with the same name already exists in the output directory, a date code is appended at the end of the slide name.
• Click to define a Local destination folder.
• Create new folder by clicking , then type the folder name into the field. Click
to create folder.
If CaseCenter destination has been selected, the following login data must be entered to establish connection: server address, user name, password, and protocol type (http/https).
April 27, 2018 - Rev. 1 3DHISTECH Ltd. 20(35)
Slide Converter 2.2 - User's Guide 3 User Interface
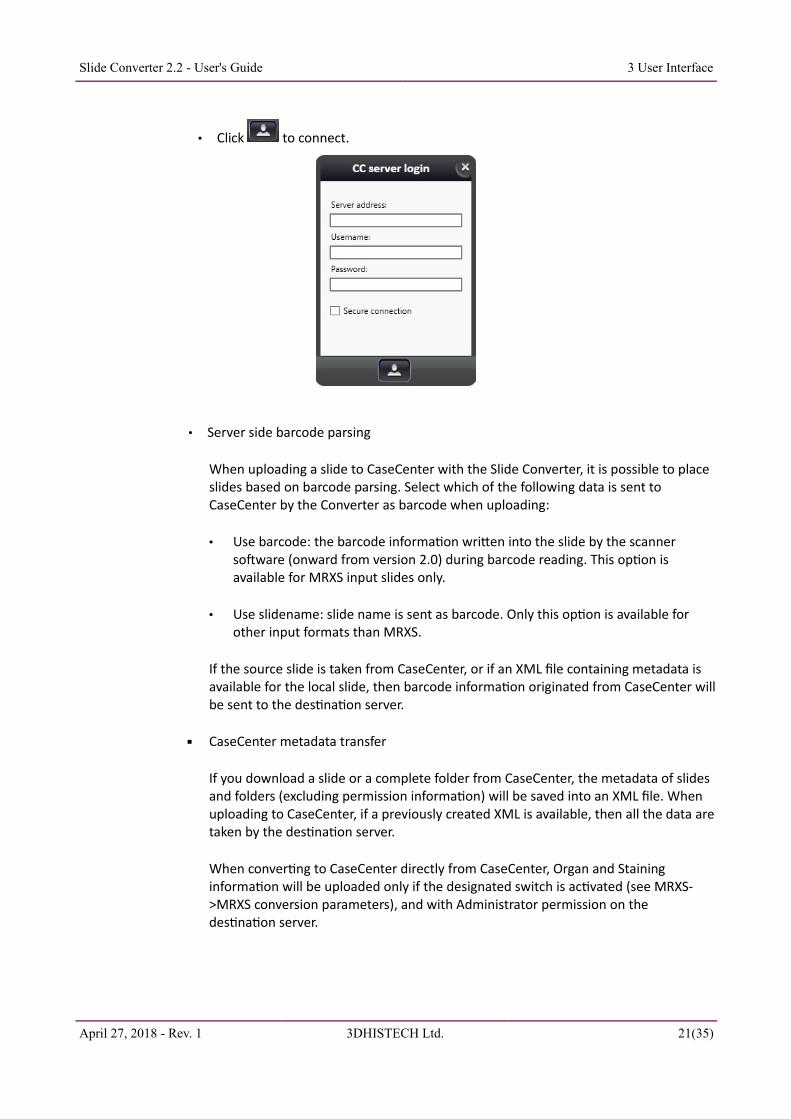
• Click to connect.
• Server side barcode parsing
When uploading a slide to CaseCenter with the Slide Converter, it is possible to place slides based on barcode parsing. Select which of the following data is sent to CaseCenter by the Converter as barcode when uploading:
• Use barcode: the barcode information written into the slide by the scanner software (onward from version 2.0) during barcode reading. This option is available for MRXS input slides only.
• Use slidename: slide name is sent as barcode. Only this option is available for other input formats than MRXS.
If the source slide is taken from CaseCenter, or if an XML file containing metadata is available for the local slide, then barcode information originated from CaseCenter willbe sent to the destination server.
▪ CaseCenter metadata transfer
If you download a slide or a complete folder from CaseCenter, the metadata of slides and folders (excluding permission information) will be saved into an XML file. When uploading to CaseCenter, if a previously created XML is available, then all the data aretaken by the destination server.
When converting to CaseCenter directly from CaseCenter, Organ and Staining information will be uploaded only if the designated switch is activated (see MRXS->MRXS conversion parameters), and with Administrator permission on the destination server.
April 27, 2018 - Rev. 1 3DHISTECH Ltd. 21(35)
Slide Converter 2.2 - User's Guide 3 User Interface
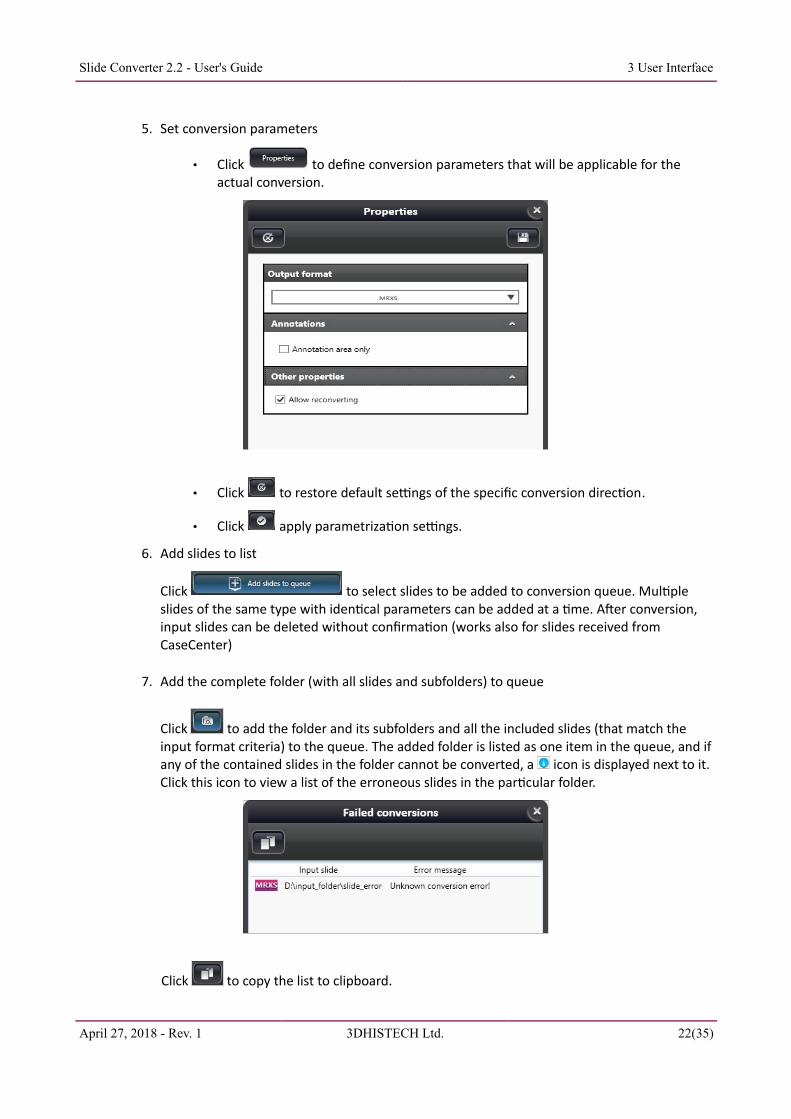
5. Set conversion parameters
• Click to define conversion parameters that will be applicable for the actual conversion.
• Click to restore default settings of the specific conversion direction.
• Click apply parametrization settings.
6. Add slides to list
Click to select slides to be added to conversion queue. Multiple slides of the same type with identical parameters can be added at a time. After conversion, input slides can be deleted without confirmation (works also for slides received from CaseCenter)
7. Add the complete folder (with all slides and subfolders) to queue
Click to add the folder and its subfolders and all the included slides (that match the input format criteria) to the queue. The added folder is listed as one item in the queue, and if any of the contained slides in the folder cannot be converted, a icon is displayed next to it. Click this icon to view a list of the erroneous slides in the particular folder.
Click to copy the list to clipboard.
April 27, 2018 - Rev. 1 3DHISTECH Ltd. 22(35)
Slide Converter 2.2 - User's Guide 4 Conversion direction parameters
4 Conversion direction parameters
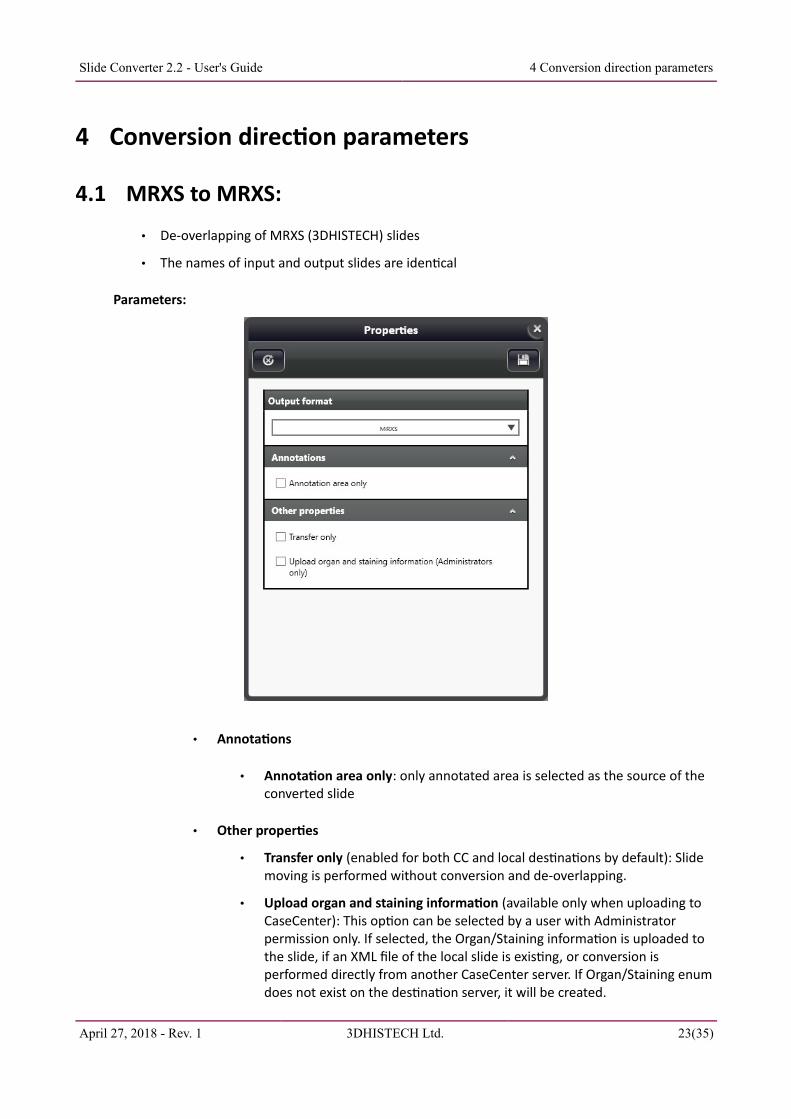
4.1 MRXS to MRXS:
• De-overlapping of MRXS (3DHISTECH) slides
• The names of input and output slides are identical
Parameters:
• Annotations
• Annotation area only: only annotated area is selected as the source of the converted slide
• Other properties
• Transfer only (enabled for both CC and local destinations by default): Slide moving is performed without conversion and de-overlapping.
• Upload organ and staining information (available only when uploading to CaseCenter): This option can be selected by a user with Administrator permission only. If selected, the Organ/Staining information is uploaded to the slide, if an XML file of the local slide is existing, or conversion is performed directly from another CaseCenter server. If Organ/Staining enum does not exist on the destination server, it will be created.
April 27, 2018 - Rev. 1 3DHISTECH Ltd. 23(35)
Slide Converter 2.2 - User's Guide 4 Conversion direction parameters
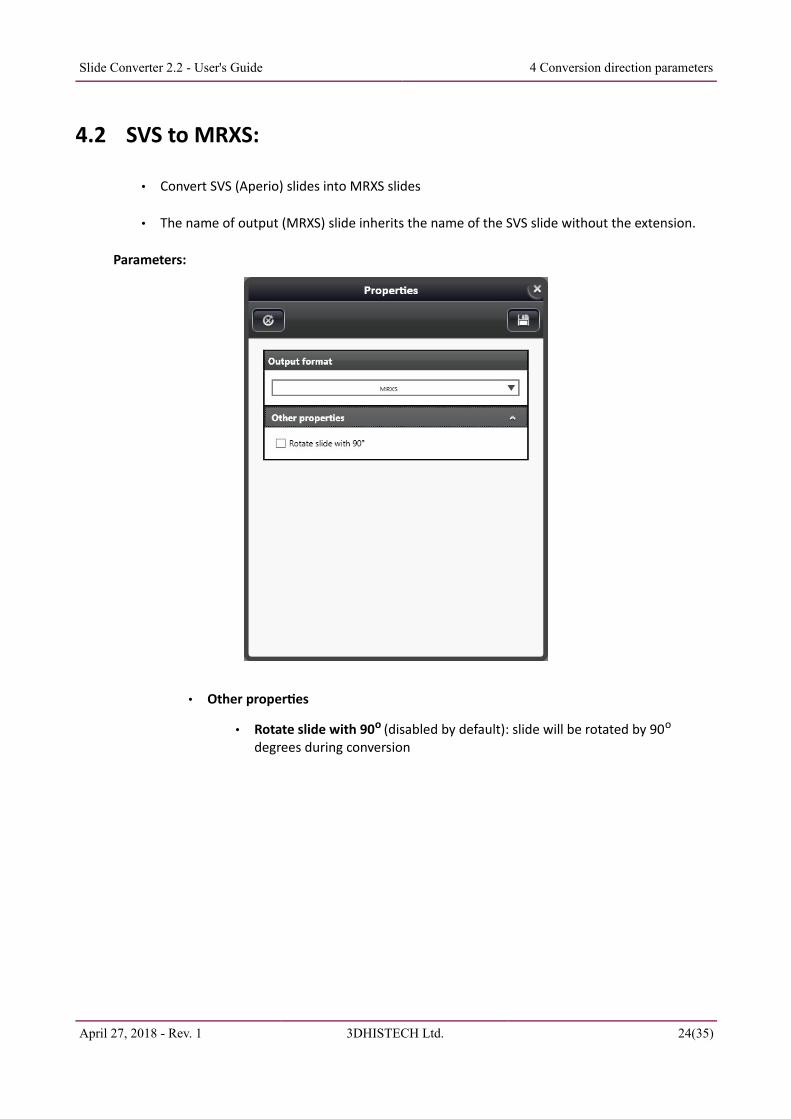
4.2 SVS to MRXS:
• Convert SVS (Aperio) slides into MRXS slides
• The name of output (MRXS) slide inherits the name of the SVS slide without the extension.
Parameters:
• Other properties
• Rotate slide with 90o (disabled by default): slide will be rotated by 90o degrees during conversion
April 27, 2018 - Rev. 1 3DHISTECH Ltd. 24(35)
Slide Converter 2.2 - User's Guide 4 Conversion direction parameters
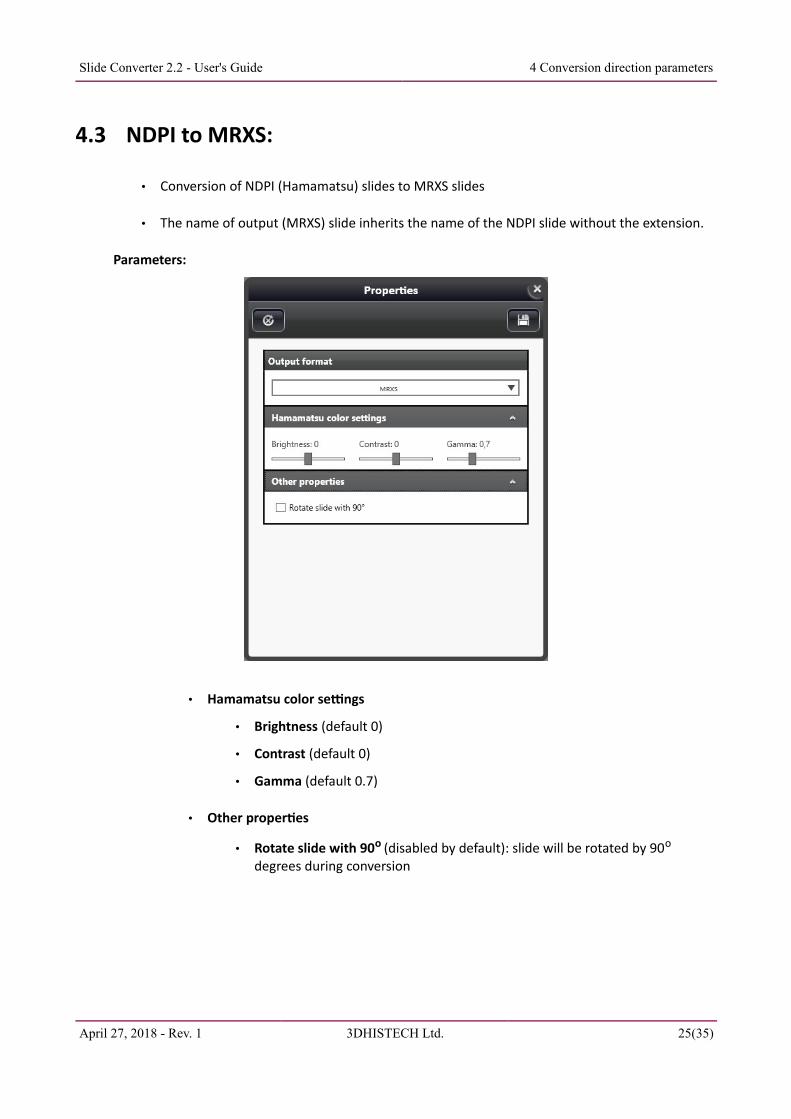
4.3 NDPI to MRXS:
• Conversion of NDPI (Hamamatsu) slides to MRXS slides
• The name of output (MRXS) slide inherits the name of the NDPI slide without the extension.
Parameters:
• Hamamatsu color settings
• Brightness (default 0)
• Contrast (default 0)
• Gamma (default 0.7)
• Other properties
• Rotate slide with 90o (disabled by default): slide will be rotated by 90o degrees during conversion
April 27, 2018 - Rev. 1 3DHISTECH Ltd. 25(35)

Slide Converter 2.2 - User's Guide 4 Conversion direction parameters
4.4 Plain TIFF to MRXS:
• Plain TIFF files will be converted to MRXS slides
• The name of output (MRXS) slide inherits the name of the TIFF file without the extension.
Parameters:
• Image resolution
• Set horizontal and vertical image resolution values (x and y values - DPI)
April 27, 2018 - Rev. 1 3DHISTECH Ltd. 26(35)
Slide Converter 2.2 - User's Guide 4 Conversion direction parameters
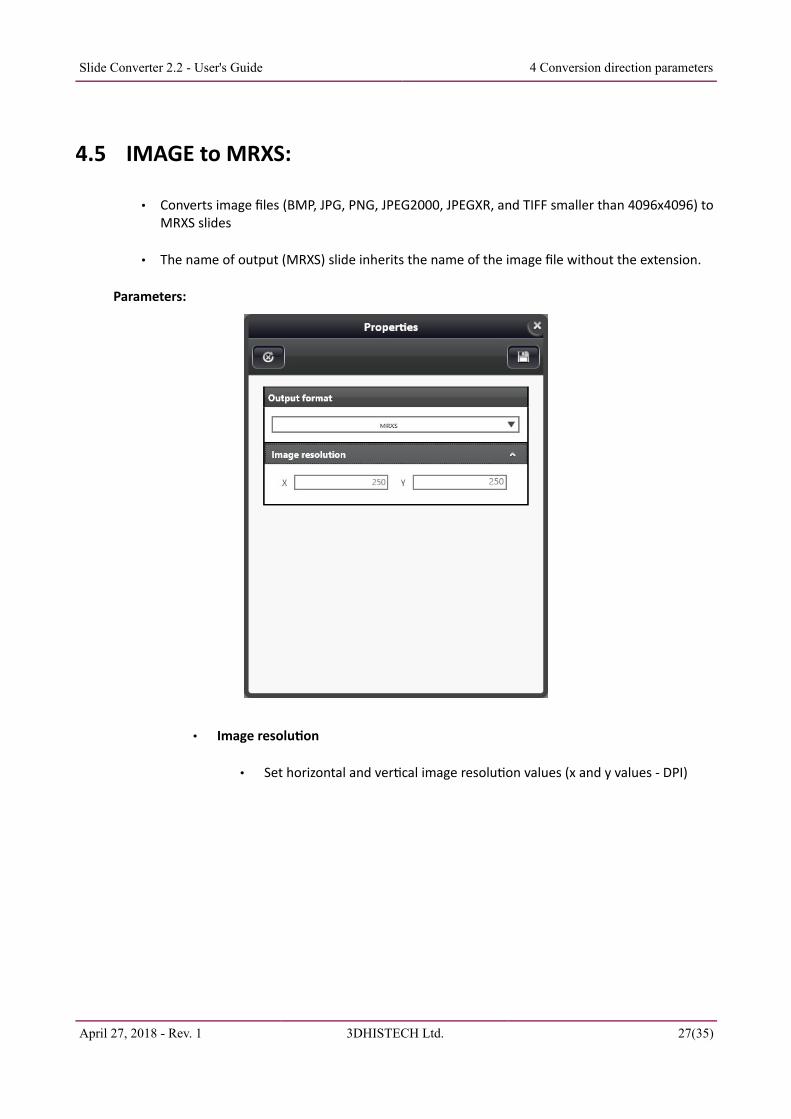
4.5 IMAGE to MRXS:
• Converts image files (BMP, JPG, PNG, JPEG2000, JPEGXR, and TIFF smaller than 4096x4096) toMRXS slides
• The name of output (MRXS) slide inherits the name of the image file without the extension.
Parameters:
• Image resolution
• Set horizontal and vertical image resolution values (x and y values - DPI)
April 27, 2018 - Rev. 1 3DHISTECH Ltd. 27(35)
Slide Converter 2.2 - User's Guide 4 Conversion direction parameters
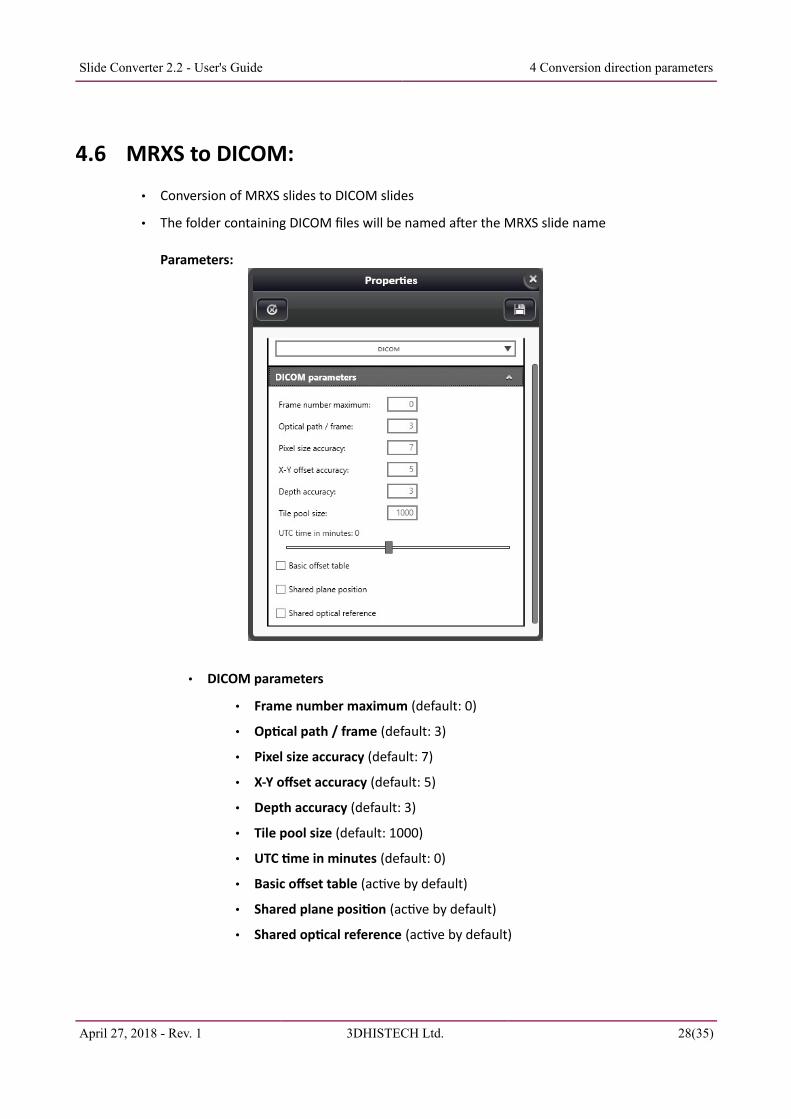
4.6 MRXS to DICOM:
• Conversion of MRXS slides to DICOM slides
• The folder containing DICOM files will be named after the MRXS slide name
Parameters:
• DICOM parameters
• Frame number maximum (default: 0)
• Optical path / frame (default: 3)
• Pixel size accuracy (default: 7)
• X-Y offset accuracy (default: 5)
• Depth accuracy (default: 3)
• Tile pool size (default: 1000)
• UTC time in minutes (default: 0)
• Basic offset table (active by default)
• Shared plane position (active by default)
• Shared optical reference (active by default)
April 27, 2018 - Rev. 1 3DHISTECH Ltd. 28(35)
Slide Converter 2.2 - User's Guide 4 Conversion direction parameters
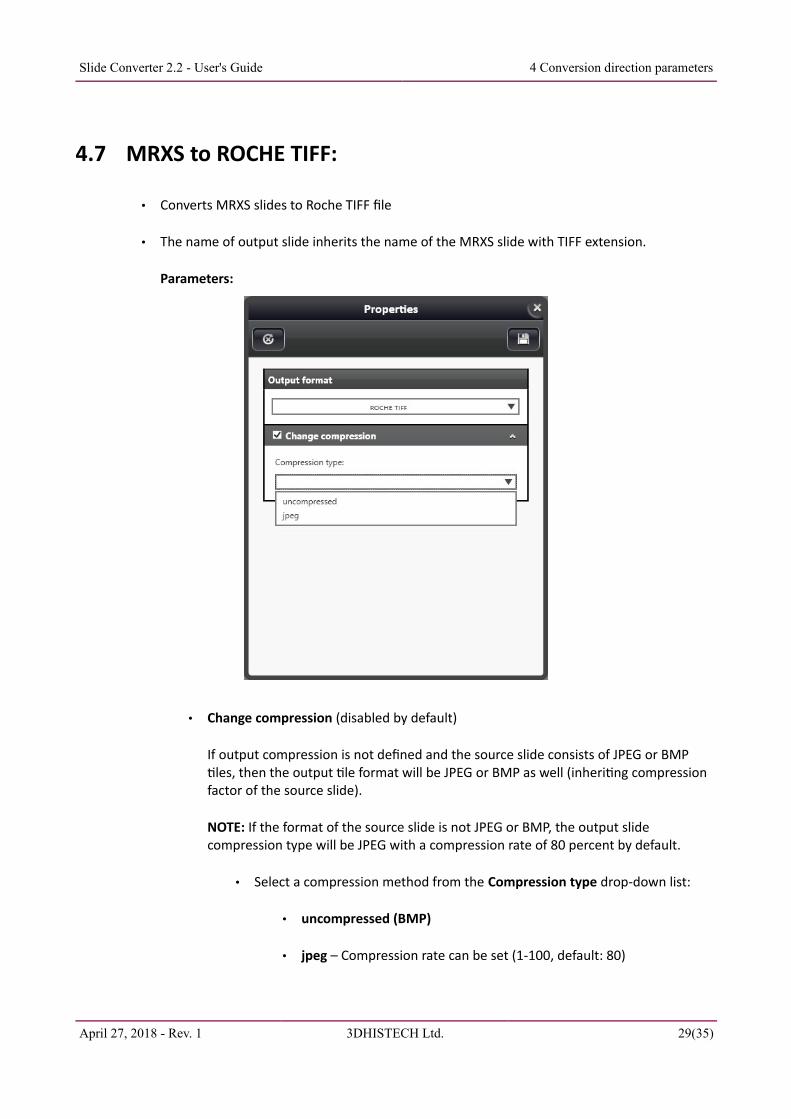
4.7 MRXS to ROCHE TIFF:
• Converts MRXS slides to Roche TIFF file
• The name of output slide inherits the name of the MRXS slide with TIFF extension.
Parameters:
• Change compression (disabled by default)
If output compression is not defined and the source slide consists of JPEG or BMP tiles, then the output tile format will be JPEG or BMP as well (inheriting compression factor of the source slide).
NOTE: If the format of the source slide is not JPEG or BMP, the output slide compression type will be JPEG with a compression rate of 80 percent by default.
• Select a compression method from the Compression type drop-down list:
• uncompressed (BMP)
• jpeg – Compression rate can be set (1-100, default: 80)
April 27, 2018 - Rev. 1 3DHISTECH Ltd. 29(35)
Slide Converter 2.2 - User's Guide 4 Conversion direction parameters
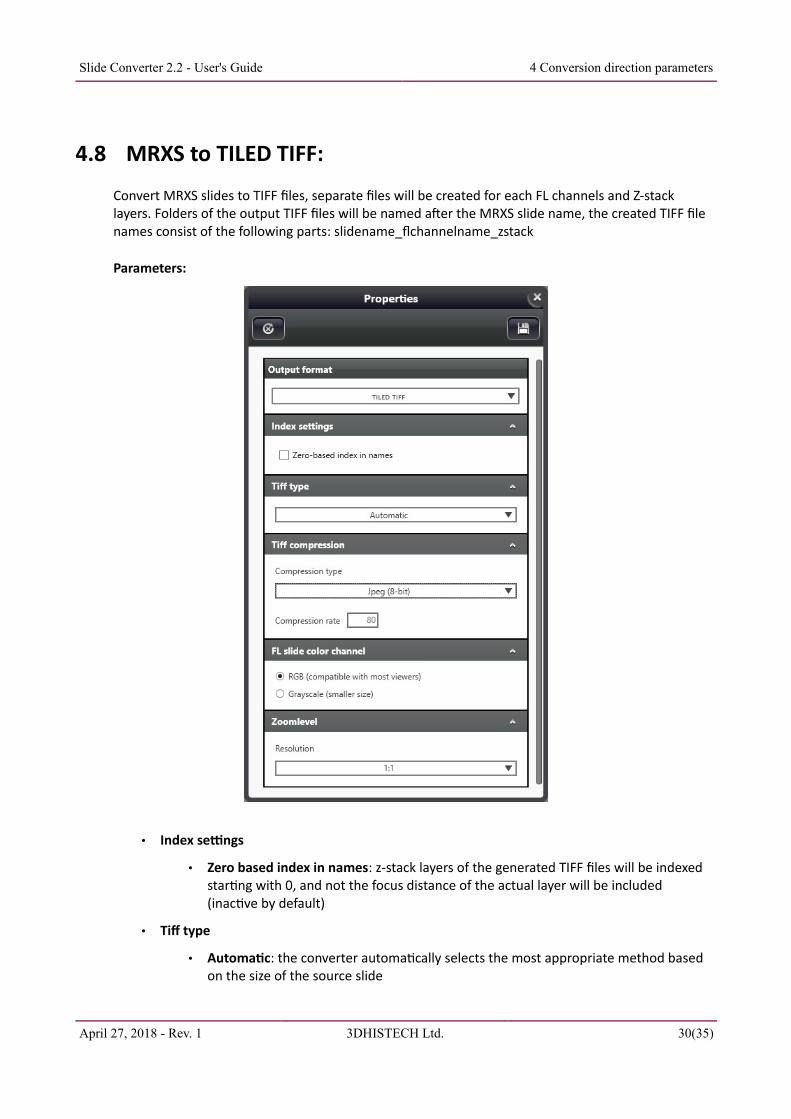
4.8 MRXS to TILED TIFF:
Convert MRXS slides to TIFF files, separate files will be created for each FL channels and Z-stack layers. Folders of the output TIFF files will be named after the MRXS slide name, the created TIFF file names consist of the following parts: slidename_flchannelname_zstack
Parameters:
• Index settings
• Zero based index in names: z-stack layers of the generated TIFF files will be indexed starting with 0, and not the focus distance of the actual layer will be included (inactive by default)
• Tiff type
• Automatic: the converter automatically selects the most appropriate method based on the size of the source slide
April 27, 2018 - Rev. 1 3DHISTECH Ltd. 30(35)
Slide Converter 2.2 - User's Guide 4 Conversion direction parameters
• Force simple tiff: TIFF files use 32-bit offset addressing, therefore file size is limited to a maximum of 4Gb.
• Force big tiff: Big TIFF files use 64-bit offset addressing allowing the creation of biggerTIFF files.
• TIFF compression
Select a compression method from the Compression type drop-down list:
◦ Jpeg (8-bit) – compression rate can be set (1-100, default: 80)
◦ Lossless compression 8-bit
◦ Lossless compression native – color depth of the source slide is inherited (16-bit is supported)
◦ Uncompressed 8-bit
◦ Uncompressed native – color depth of the source slide is inherited (16-bit is supported)
• FL slide color channel
◦ RGB – a 24-/48-bit color TIFF image is created. File size is bigger, but most of the image viewers are capable to open it.
◦ Grayscale – an 8-/16-bit grayscale TIFF image is created. File size is smaller, but some of the viewers cannot handle it.
• Zoomlevel
◦ Set the level of zoom at which the TIFF image is created in order to get the smallest file size possible.
April 27, 2018 - Rev. 1 3DHISTECH Ltd. 31(35)
Slide Converter 2.2 - User's Guide 4 Conversion direction parameters
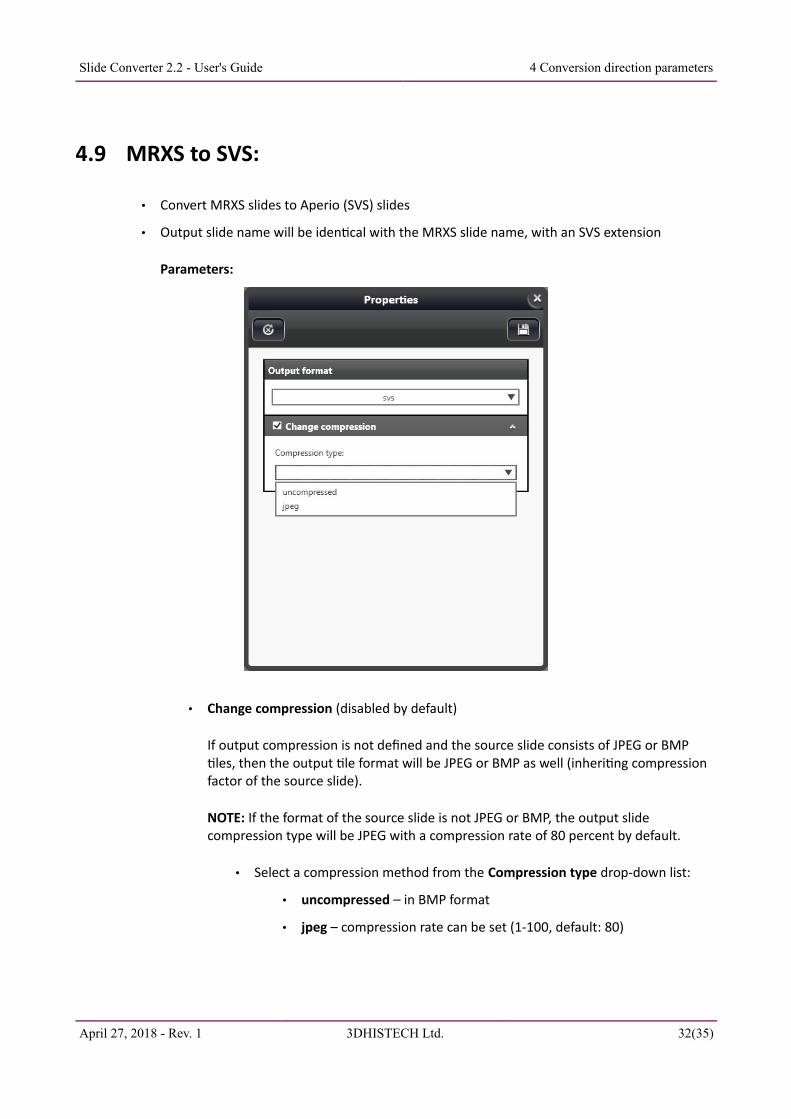
4.9 MRXS to SVS:
• Convert MRXS slides to Aperio (SVS) slides
• Output slide name will be identical with the MRXS slide name, with an SVS extension
Parameters:
• Change compression (disabled by default)
If output compression is not defined and the source slide consists of JPEG or BMP tiles, then the output tile format will be JPEG or BMP as well (inheriting compression factor of the source slide).
NOTE: If the format of the source slide is not JPEG or BMP, the output slide compression type will be JPEG with a compression rate of 80 percent by default.
• Select a compression method from the Compression type drop-down list:
• uncompressed – in BMP format
• jpeg – compression rate can be set (1-100, default: 80)
April 27, 2018 - Rev. 1 3DHISTECH Ltd. 32(35)
Slide Converter 2.2 - User's Guide 5 Conversion queue
5 Conversion queue• The number of queued conversion processes is not limited
• Queued processes can be removed by the following:
NOTE: Not running processes can be removed only, those with the status of “In progress” cannot.
• – Remove selected items
• – Remove all
• – Remove converted items
• Finished / Total conversion progress bar
• – Stop converting
• – Start converting
If you move the cursor over the input/output format of a queued slide conversion process, the path of the source file is displayed in tooltips. Other slide- and conversion-related data are displayed on the queue panel:
• input format (slide path in tooltip)
• output format (slide path in tooltip)
• slide name
• trash bin icon, if the source file is being deleted
• conversion status / progress
• editing of parameters:
• Parameters of conversions that are not already finished, stopped or erroneous can be edited only (output format, folder and every other parameters), otherwise the defined parameters can be viewed only.
• Open output slide or folder
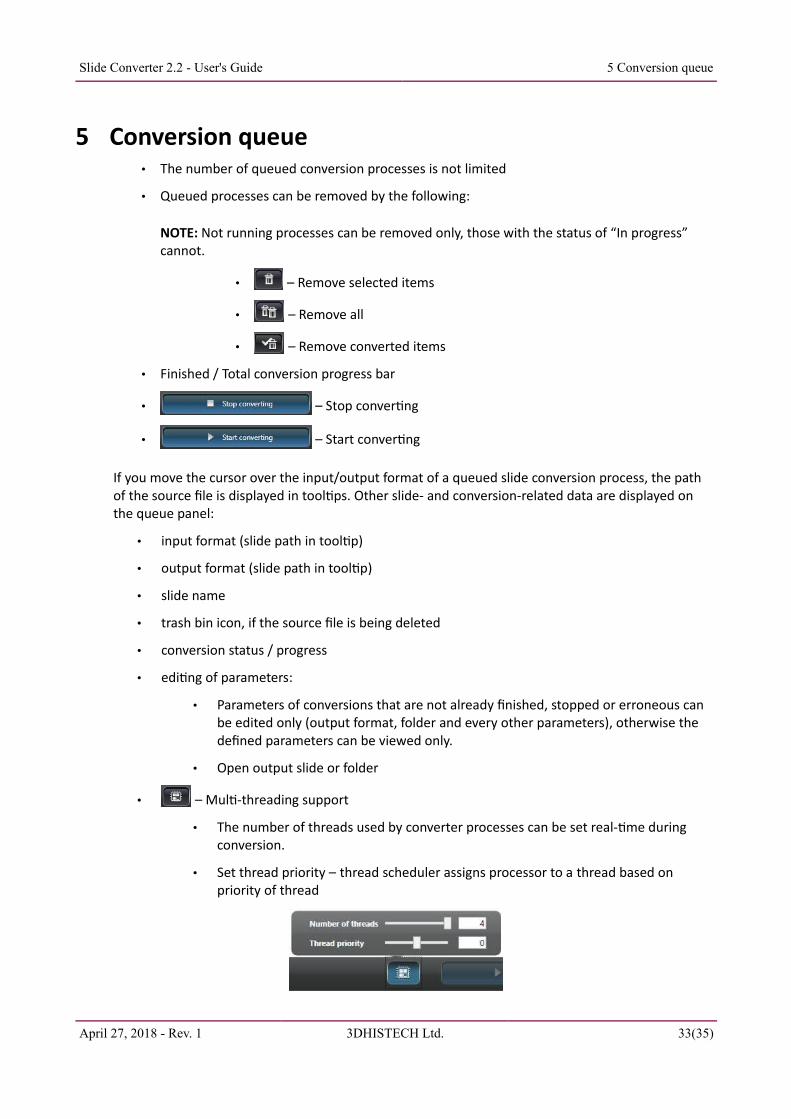
• – Multi-threading support
• The number of threads used by converter processes can be set real-time during conversion.
• Set thread priority – thread scheduler assigns processor to a thread based on priority of thread
April 27, 2018 - Rev. 1 3DHISTECH Ltd. 33(35)
Slide Converter 2.2 - User's Guide 5 Conversion queue
Conversion statuses:
• Queued: Conversion process has been added to the list, but not yet processed
• In progress: Conversion in progress (percentage is shown in a progress bar)
• Error: Conversion failed due to an error (cause is displayed in a tooltip)
• Stopping: Conversion is being stopped
• Stopped: Conversion has been stopped
• Finished: Conversion has successfully been finished
Start conversion:
• Conversions are processed based on the list (from top to bottom)
• Only those listed processes will be run which statuses are not “Finished”
• Additional conversion process can be added to the end of the list during running conversion
• Processes that are not yet started can be removed from the list only.
• Editing of parameters is not possible during conversion
• After finishing a conversion process, the converter starts with the following item in the queue
• If logging is on, the log file is updated after each conversion
Stop conversion:
• The actual conversion process will be terminated
• The status of the terminated process will be „Stopping” first, then „Stopped” if termination was successful. The upcoming conversion will not be started.
Erroneous of stopped conversion:
• Faulty or incomplete files created during erroneous of stopped conversion will be deleted after the actual conversion is stopped
April 27, 2018 - Rev. 1 3DHISTECH Ltd. 34(35)
Slide Converter 2.2 - User's Guide 6 Integration with Scanner control software
6 Integration with Scanner control software
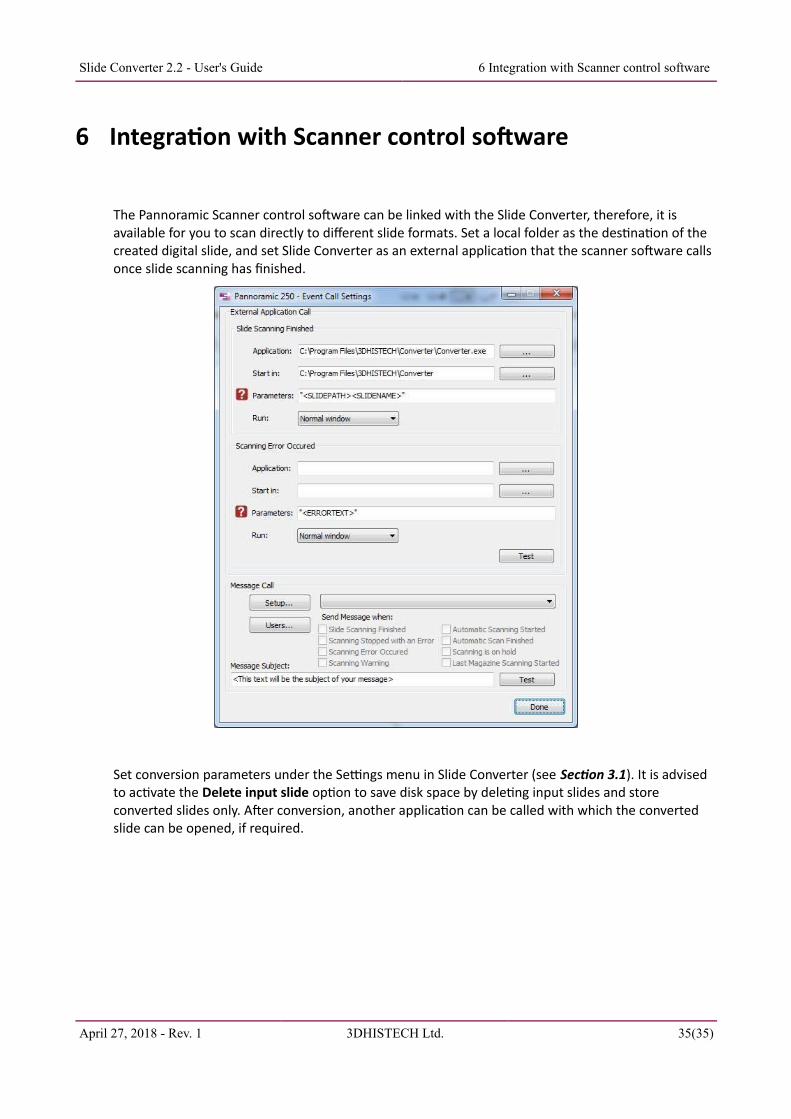
The Pannoramic Scanner control software can be linked with the Slide Converter, therefore, it is available for you to scan directly to different slide formats. Set a local folder as the destination of the created digital slide, and set Slide Converter as an external application that the scanner software calls once slide scanning has finished.
Set conversion parameters under the Settings menu in Slide Converter (see Section 3.1). It is advised to activate the Delete input slide option to save disk space by deleting input slides and store converted slides only. After conversion, another application can be called with which the converted slide can be opened, if required.
April 27, 2018 - Rev. 1 3DHISTECH Ltd. 35(35)


