Embed Size (px)
Citation preview

NOTICE
Note that when converting this document from its original format to a .pdf file, some minor font and format changes may occur causing slight variations. When viewing and printing this document, we cannot guarantee that your specific PC or printer will support all of the fonts or graphics. Therefore, when you view the document fonts may be substituted and your individual printer may not have the capability to print the document correctly.


NWD-125888-001 ISSUE 1.0
User Guide
September 2011

i
Specifications of this software and the content of this manual are subject to change without notice in the future. Names ofcompanies, organizations, products, figures, characters, data and other objects are fictitious unless specified otherwise.There is no relation between these names and the ones of actual products, groups, individuals and so on.
This software and help (manual) can be used only in the usage conditions shown below.
Note that starting use of this software constitutes your acceptance of these usage conditions. Therefore, be sure to readthe following content before using this software.
SOFTWARE LICENSE AGREEMENT
NEC Corporation (hereinafter called "NEC") grants certain license to you pursuant to the terms and conditions of thisSoftware License Agreement (hereinafter called the "Agreement") to use the software (hereinafter called the "Software")and related documents (hereinafter called the "Documents") (the Software and the Documents collectively called the"Licensed Products"). As using the Licensed Products indicates your acceptance of the following terms and conditions ofthis Agreement, please read them carefully before your commencement of using or installing the Licensed Products. Oncestart using the Software, you are deemed that you have agreed on the terms and conditions of the Agreement. If you donot accept terms and conditions set forth in the Agreement, please do not use the Software and you shall return all theunused material provided for the Software in the original shipping container with the receipt of payment to the place ofpurchase for full refund.
1. License
(1) Subject to the terms and conditions set forth herein, NEC grants to you the non-transferable, non-exclusive andlimited license to install the Software on your computer(s) connected to NEC's UNIVERGE series (hereinaftercalled the "PC") and to use the Software in accordance with the Documents simultaneously up to the number ofclient licenses you purchased. The PC also includes virtual PC(s) for thin client system.
(2) Except as otherwise expressly stated herein, you shall not (i) copy, modify, translate, quote or create anyderivative work of all or any part of the Licensed Products, (ii) sell, rent, lease, distribute, sublicense or otherwisetransfer all or any part of the Licensed Products except as set forth in Section 1(4) below, (iii) reverse engineer,decompile, reverse assemble or otherwise attempt to gain access to the source code of all or any part of theSoftware, (iv) remove, alter, cover or obfuscate any copyright notices, trademark notices or other proprietary rightsnotices placed or embedded on or in the Licensed Products, (v) use all or any part of the Software other than onthe PC, (vi) unbundle any part of the Software, (vii) use the Licensed Products for the development of anyapplication program for commercial use, (viii) use the Licensed Products in life support systems, humanimplantation, nuclear facilities or systems or any other application where failure could lead to a loss of life orcatastrophic property damage, or (ix) cause or permit any third party to do any of the foregoing.
(3) Upon giving prior written notice to you, NEC shall have the right to audit your use, deployment, and exploitation ofthe Licensed Products for the purpose of confirming whether you comply with the terms and conditions of thisAgreement. Such audit shall be conducted during regular business hours at your site and in such a manner as notto interfere unreasonably with your normal business activities.
(4) You may transfer your rights and obligations under the terms and conditions of this Agreement to a third party,provided, however, that the following conditions shall be fulfilled; (i) such third party agrees to be bound by all theterms and conditions of this Agreement, and (ii) you transfer all the Licensed Products to such third party anddestroy all the copies of the Licensed Products.
Usage Conditions of This Software
This Agreement for Overseas Use.Please read Japanese version for use in Japan.This License is only effective for overseas use.

ii
2. Intellectual Property Rights
Nothing in this Agreement shall be construed as transferring any or all intellectual property rights in, and to, theLicensed Products and all the update versions thereof, whether or not provided by NEC. You agree that NEC or itssuppliers shall retain such all the intellectual property rights, whether or not any part thereof is or may be copyrighted orpatented.
3. No Warranty
(1) NEC hereby disclaims all warranties of any kind whatsoever, expressly or impliedly, regarding the LicensedProducts.
(2) In the event that NEC makes the update version, bug-fix version, function added version or modification of theLicensed Products or program to be such (hereinafter collectively called the "Updated Program"), NEC may, at itssole discretion, provide you with the Updated Program or the information related to the Updated Program inaccordance with the Software Support Agreement separately entered into between NEC and you.
4. Termination
(1) You may terminate this Agreement by giving NEC a thirty (30) days prior written notice.
(2) In the event that you fail to comply with any provision of this Agreement, NEC may, at any time, terminate thisAgreement.
(3) Upon any termination of this Agreement, you shall not use the Licensed Products for any purpose and shallimmediately destroy all the Licensed Products. Sections 1(2), 1(3), 2, 3, 5, 6, 7 and 8 shall survive any terminationof this Agreement.
5. Export Control
You shall not export directly or indirectly all or any part of the Licensed Products to any foreign countries without anynecessary approval of each government agency according to the applicable laws, regulations and administrativeguidance of each country having competent jurisdiction and the United States of America.
6. Limitation of Liability
IN NO EVENT SHALL NEC AND ITS DISTRIBUTORS BE LIABLE TO YOU FOR ANY INDIRECT, SPECIAL,INCIDENTAL, CONSEQUENTIAL OR PUNITIVE DAMAGES (INCLUDING LOSS OF PROFITS ANDPROCUREMENT COSTS FOR ANY SUBSTITUTE) ON ACCOUNT OF OR ARISING OUT OF USE OF THELICENSED PRODUCTS OR IMPOSSIBILITY THEREOF, EVEN IF ADVISED OF THE POSSIBILITY OF SUCHDAMAGES. THE MAXIMUM AGGREGATE LIABILITY OF NEC AND ITS DISTRIBUTORS, WHETHER IN TORT,CONTRACT OR ANY OTHER LEGAL THEORY, SHALL NOT EXCEED ONE HUNDRED PERCENT (100%) OF THEPRICE ACTUALLY PAID FOR PURCHASING THE LICENSED PRODUCTS BY YOU.

iii
7. Third Party Software
(1) This Software includes third party software components, which shall be granted under GNU General PublicLicense (hereinafter called "GPL") and/or GNU Lesser General Public License (hereinafter called "LGPL") byGNU, and PCRE License. Such software is not subject to the terms and conditions of this Agreement but those ofthe applicable license.Please visit the following GNU website for GPL and LGPL. GPL: http://www.gnu.org/licenses/gpl.html LGPL: http://www.gnu.org/licenses/lgpl.html
PRCE License, granting software under terms of the "BSD" license, requests to insert following statement.
THE "BSD" LICENCE Redistribution and use in source and binary forms, with or without modification, arepermitted provided that the following conditions are met: * Redistributions of source code must retain the abovecopyright notice, this list of conditions and the following disclaimer. * Redistributions in binary form must reproducethe above copyright notice, this list of conditions and the following disclaimer in the documentation and/or othermaterials provided with the distribution. * Neither the name of the University of Cambridge nor the name of GoogleInc. nor the names of their contributors may be used to endorse or promote products derived from this softwarewithout specific prior written permission.THIS SOFTWARE IS PROVIDED BY THE COPYRIGHT HOLDERS AND CONTRIBUTORS "AS IS" AND ANYEXPRESS OR IMPLIED WARRANTIES, INCLUDING, BUT NOT LIMITED TO, THE IMPLIED WARRANTIES OFMERCHANTABILITY AND FITNESS FOR A PARTICULAR PURPOSE ARE DISCLAIMED. IN NO EVENT SHALLTHE COPYRIGHT OWNER OR CONTRIBUTORS BE LIABLE FOR ANY DIRECT, INDIRECT, INCIDENTAL,SPECIAL, EXEMPLARY, OR CONSEQUENTIAL DAMAGES (INCLUDING, BUT NOT LIMITED TO,PROCUREMENT OF SUBSTITUTE GOODS OR SERVICES; LOSS OF USE, DATA, OR PROFITS; ORBUSINESS INTERRUPTION) HOWEVER CAUSED AND ON ANY THEORY OF LIABILITY, WHETHER INCONTRACT, STRICT LIABILITY, OR TORT (INCLUDING NEGLIGENCE OR OTHERWISE) ARISING IN ANYWAY OUT OF THE USE OF THIS SOFTWARE, EVEN IF ADVISED OF THE POSSIBILITY OF SUCH DAMAGE.
(2) The Software also includes other software components granted by OpenSSL Project and patents granted byMPEG LA, L.L.C. They are intended third party beneficiaries of this Agreement. The terms and conditions hereinare made expressly for the benefit of and are also enforceable by them, even though they are not in anycontractual relationship with you.
OpenSSL Project requests to insert following statement. "This product includes software developed by theOpenSSL Project for use in the OpenSSL Toolkit (http://www.openssl.org/)."
MPEG LA, L.L.C. requests to insert following statement. "THIS PRODUCT IS LICENSED UNDER THE MPEG-4VISUAL PATENT PORTFOLIO LICENSE FOR THE PERSONAL AND NON-COMMERCIAL USE OF A CON-SUMER FOR (i) ENCODING VIDEO IN COMPLIANCE WITH THE MPEG-4 VISUAL STANDARD ("MPEG-4VIDEO") AND/OR (ii) DECODING MPEG-4 VIDEO THAT WAS ENCODED BY A CONSUMER ENGAGED IN APERSONAL AND NON-COMMERCIAL ACTIVITY AND/OR WAS OBTAINED FROM A VIDEO PROVIDERLICENSED BY MPEG LA TO PROVIDE MPEG-4 VIDEO. NO LICENSE IS GRANTED OR SHALL BE IMPLIEDFOR ANY OTHER USE. ADDITIONAL INFORMATION INCLUDING THAT RELATING TO PROMOTIONAL,INTERNAL AND COMMERCIAL USES AND LICENSING MAY BE OBTAINED FORM MPEG LA, LLC. SEEHTTP://WWW.MPEGLA.COM."
8. General Provisions
(1) This Agreement shall be governed by and interpreted in accordance with the laws of Japan.
(2) All disputes related to this Agreement shall be governed by the Tokyo District Court as the exclusive jurisdictionalcourt of the first trial.
(3) Except as expressly set forth in the Section 1(4), the Licensee shall not transfer, assign or delegate thisAgreement or any rights or obligations hereunder for any reason, without the prior written consent of NEC.
(4) This Agreement constitutes the entire agreement between the Licensee and NEC and supersedes any and all oralor written agreements previously existing between the Licensee and NEC with respect to the subject matterhereof.
(5) The Software is a "commercial item" as that term is defined in 48 C.F.R. 2.101, consisting of "commercialcomputer software" and "commercial computer software documentation" as such terms are used in 48 C.F.R.12.212. Consistent with 48 C.F.R. 12.212 and 48 C.F.R. 227.7202-1 through 227.7202-4, NEC provides theSoftware to U.S. Government End Users only pursuant to the terms and conditions therein.

iv
9. NoticeNEC Corporation, IT Network Global Solutions Division5-7-1 Shiba Minato-ku Tokyo 108-0001, JapanTelephone: +81-3-3798-8713
The following company names and product names contained in this document may be trademarks of other companies.
• Microsoft and Windows are registered trademarks of Microsoft Corporation in the United States and other countries.• Windows® 2000 Professional is an abbreviation for Microsoft® Windows® 2000 Professional operating system.• Windows® XP is an abbreviation for Microsoft® Windows® XP Professional operating system or Microsoft®
Windows® XP Home Edition operating system.• Windows® Vista is an abbreviation for Microsoft® Windows® Vista Ultimate operating system or Microsoft®
Windows® Vista Business operating system.• Windows® Vista is an abbreviation for Microsoft® Windows® 7 Ultimate operating system or Microsoft® Windows® 7
Enterprise operating system.• This document describes Windows® 2000 Professional as Windows 2000.• This document describes Windows® XP Professional and Windows® XP Home Edition as Windows XP.• This document describes Windows® Vista as Windows Vista.• This document describes Windows® 7 as Windows 7.• The screenshots are used in accordance with the Microsoft Corporation guidelines.• Adobe® Flash® Player. Copyright (c) 1996 - 2008. Adobe Systems Incorporated. All Rights Reserved. Patents
pending in the United States and other countries. Adobe and Flash are either trademarks or registered trademarks in the United States and/or other countries.
THE BASIC LIBRARY FUNCTIONSWritten by: Philip Hazel Email local part: ph10 Email domain: cam.ac.ukUniversity of Cambridge Computing Service, Cambridge, England. Copyright (c) 1997-2008 University of Cambridge Allrights reserved.
THE C++ WRAPPER FUNCTIONSContributed by: Google Inc. Copyright (c) 2007-2008, Google Inc. All rights reserved.
2010-11 NEC Corporation. All rights reserved.C

vv
ContentsContentsUsage Conditions of This Software ••••••••••••••••••••• i
Features of Softphone •••••••••••••••••••••••••••• 1
How to Use Softphone •••••••••••••••••••••••••••• 3
Starting Softphone •••••••••••••••••••••••••••••••••••••• 3Starting Normally ••••••••••••••••••••••••••••••••••• 3Starting after Updating Softphone •••••••••••••••• 4
Ending Softphone ••••••••••••••••••••••••••••••••••••••• 4Stopping Softphone to Wait for Restart during
System Standby •••••••••••••••••••••••••••••••••• 5Restarting Softphone ••••••••••••••••••••••••••••••••••• 5Updating Softphone ••••••••••••••••••••••••••••••••••••• 6
About the Standard Skin ••••••••••••••••••••••••• 7
Main Panel •••••••••••••••••••••••••••••••••••••••••• 7Name and Function of Each Component on the Main
Panel •••••••••••••••••••••••••••••••••••••••••••••••••• 8Main Panel - Components ••••••••••••••••••••••••• 9
Start •••••••••••••••••••••••••••••••••••••••••••••••• 13 Contacts •••••••••••••••••••••••••••••••••••••••••••• 16 Favorites ••••••••••••••••••••••••••••••••••••••••••• 18 Telephone Function ••••••••••••••••••••••••••••••• 19 Line ••••••••••••••••••••••••••••••••••••••••••••••••• 19 Fixed Function ••••••••••••••••••••••••••••••••••••• 19 Call History ••••••••••••••••••••••••••••••••••••••••• 20 Outgoing Calls ••••••••••••••••••••••••••••••••••••• 21 Incoming Calls ••••••••••••••••••••••••••••••••••••• 21 Outgoing IM •••••••••••••••••••••••••••••••••••••••• 22 Incoming IM •••••••••••••••••••••••••••••••••••••••• 22 Search Results •••••••••••••••••••••••••••••••••••• 23 Function •••••••••••••••••••••••••••••••••••••••••••• 23 User Configurations ••••••••••••••••••••••••••••••• 24 Send IM •••••••••••••••••••••••••••••••••••••••••••• 25 Chat History •••••••••••••••••••••••••••••••••••••••• 26 Forwarding Settings ••••••••••••••••••••••••••••••• 26 Voice Mail Settings •••••••••••••••••••••••••••••••• 27 Phone Book •••••••••••••••••••••••••••••••••••••••• 28 10-key •••••••••••••••••••••••••••••••••••••••••••••• 28 Import/Export •••••••••••••••••••••••••••••••••••••• 29
Changing the Display •••••••••••••••••••••••••••••••••• 30Enlarging the Main Panel •••••••••••••••••••••••••••••• 30Minimizing the Main Panel ••••••••••••••••••••••••••••• 31
Task Tray - Icons •••••••••••••••••••••••••••••••••• 31Menu Items and Usage ••••••••••••••••••••••••••• 31
About the Toolbar Skin •••••••••••••••••••••••••• 32
Main Panel ••••••••••••••••••••••••••••••••••••••••• 32Name and Function of Each Component on the Toolbar
Skin ••••••••••••••••••••••••••••••••••••••••••••••••••• 32Toolbar Skin - Components ••••••••••••••••••••••• 32
Display Position of the Toolbar Skin •••••••••••••••••• 34Changing the Display Position ••••••••••••••••••• 34
Hiding the Toolbar Skin Automatically ••••••••••••••• 34Switching Modes between Display and Hide ••• 34
Hiding the NEC Logo •••••••••••••••••••••••••••••••••• 35Switching Modes between Display and Hide ••• 35
Displaying the LCD Area •••••••••••••••••••••••••••••• 35Switching Modes between Display and Hide ••• 35
Hiding the Status Notification Area/Icons •••••••••••• 36Switching Modes between Display and Hide ••• 36
Hiding the Input Area •••••••••••••••••••••••••••••••••• 36Switching Modes between Display and Hide ••• 36
Hiding the Phone Function Area ••••••••••••••••••••• 37Switching Modes between Display and Hide ••• 37
Changing the Position of Areas •••••••••••••••••••••• 37Changing the Position of Area ••••••••••••••••••• 37
Browse Window of the Toolbar Skin ••••••••••••••••• 38Enlarging the Browse Window ••••••••••••••••••• 38Closing the Browse Window ••••••••••••••••••••• 38
Input Area on the Toolbar Skin ••••••••••••••••••••••• 39Using the Input Area •••••••••••••••••••••••••••••• 39Selecting the Preferred Function •••••••••••••••• 39
Launcher on the Toolbar Skin •••••••••••••••••••••••• 39
About Volume Control ••••••••••••••••••••••••••• 40
Controlling Volume •••••••••••••••••••••••••••••••••••• 40Using Mute ••••••••••••••••••••••••••••••••••••••••••••• 40
Placing a Call •••••••••••••••••••••••••••••••••••••• 41
Inputting the Phone Number •••••••••••••••••••••••••• 41Dialing after Checking the Input Phone Number 41
Redialing ••••••••••••••••••••••••••••••••••••••••••••••• 41Redialing the Last Number Dialed ••••••••••••••• 41Redialing from the Recent Input List •••••••••••• 42
Dialing from the Call History •••••••••••••••••••••••••• 42Dialing from the Call History ••••••••••••••••••••• 42
Dialing from the Contacts List •••••••••••••••••••••••• 43Dialing from the Contact Information/E-mail
Received ••••••••••••••••••••••••••••••••••••••••••••• 44Copying a Phone Number •••••••••••••••••••••••••••• 44Selecting a Phone Number Displayed in Another
Application ••••••••••••••••••••••••••••••••••••••••••• 45Dialing a Phone Number linked in a Website •••••••• 46
Setting ••••••••••••••••••••••••••••••••••••••••••••• 46Dialing ••••••••••••••••••••••••••••••••••••••••••••• 47
Selecting a Phone Number Displayed in a Website 47Dialing from the Search Results •••••••••••••••••••••• 48
Receiving a Call ••••••••••••••••••••••••••••••••••• 49
Receiving a Call for You (Prime Line) •••••••••••••••• 49Receiving a Call for Another Person (Subline) •••••• 50
Using Start •••••••••••••••••••••••••••••••••••••••• 50Using Lines •••••••••••••••••••••••••••••••••••••••• 51Using the Handset •••••••••••••••••••••••••••••••• 51Using the Function Keys of the Handset •••••••• 52
vi
Placing a Call on Hold/Transferring a Call • 53
Placing a Call on Hold ••••••••••••••••••••••••••••••••• 53Enabling Anyone to Pick Up a Call on Hold ••••• 53Enabling Only You to Pick Up a Call on Hold ••• 53
Picking Up a Call on Group Hold •••••••••••••••••••••• 54Transferring a Call ••••••••••••••••••••••••••••••••••••• 54
Performing a Direct Transfer ••••••••••••••••••••• 54Performing a Consultation Transfer •••••••••••••• 55
Configuring Your Call Forwarding •••••••••••• 56
Configuring Call Forwarding ••••••••••••••••••••••••••• 57Canceling a Call Forwarding Configuration •••••••••• 58Changing Forwarding Destinations ••••••••••••••••••• 58Viewing the Forwarding Destinations ••••••••••••••••• 59
Using a Handset Other Than the USB Handset ••••••••••••••••••••••••••••••••••••••••••••••• 60
Using a PS (PHS/PCS) •••••••••••••••••••••••••••••••• 60 Placing a Call Using a PS (Collaboration with
PS) •••••••••••••••••••••••••••••••••••••••••••••••• 60 Receiving a Call Using a PS •••••••••••••••••••••• 60 Placing a Call on Hold Using a PS ••••••••••••••• 61 Switching to the Handset Connected to the PC • 61
Using a Fixed Phone ••••••••••••••••••••••••••••••••••• 62 Placing a Call Using a Fixed Phone (Collaboration
with Fixed Phone) ••••••••••••••••••••••••••••••• 62 Receiving a Call Using a Fixed Phone ••••••••••• 63 Placing a Call on Hold Using a Fixed Phone •••• 63 Switching to the Handset Connected to the PC • 64
Import/Export •••••••••••••••••••••••••••••••••••••••• 65
Using Import •••••••••••••••••••••••••••••••••••••••••••• 65Using Export •••••••••••••••••••••••••••••••••••••••••••• 66
USB Handset - How to Use the Function Keys Setting Tool (HandsetConfig) •••••••••••••••••• 68
How to Use a Data Meeting •••••••••••••••••••• 69
Data Meeting Screen •••••••••••••••••••••••••••••••••• 69Starting a Data Meeting •••••••••••••••••••••••••••••••• 69
Setting Up a Data Meeting •••••••••••••••••••••••• 69Joining a Data Meeting ••••••••••••••••••••••••••• 70
Ending a Data Meeting •••••••••••••••••••••••••••••••• 70Ending a Data Meeting •••••••••••••••••••••••••••• 70Leaving a Data Meeting ••••••••••••••••••••••••••• 71
Using Video Communication •••••••••••••••••••••••••• 71Icons •••••••••••••••••••••••••••••••••••••••••••••••• 71Starting Video Communication ••••••••••••••••••• 72
Using the Communication Board ••••••••••••••••••••• 72Icons ••••••••••••••••••••••••••••••••••••••••••••••• 72Sharing Data •••••••••••••••••••••••••••••••••••••• 73Turning a Page •••••••••••••••••••••••••••••••••••• 74Saving the Shared Data •••••••••••••••••••••••••• 75
Using File Transfer •••••••••••••••••••••••••••••••••••• 76Transferring a File •••••••••••••••••••••••••••••••• 76Receiving a File ••••••••••••••••••••••••••••••••••• 77
Using Chat ••••••••••••••••••••••••••••••••••••••••••••• 78Icons ••••••••••••••••••••••••••••••••••••••••••••••• 78Sending Chat ••••••••••••••••••••••••••••••••••••• 78Sending Whisper Chat ••••••••••••••••••••••••••• 79
Using a 3-Party Meeting •••••••••••••••••••••••••••••• 80Starting a Data Meeting from a 3-Party Meeting 80
Adding up to 8 Parties to a Meeting •••••••••••••••••• 81Starting a Data Meeting from a Meeting •••••••• 81
How to Use Various Settings ••••••••••••••••••••••••• 82Displaying the Settings Screen •••••••••••••••••• 82Configuring Participants •••••••••••••••••••••••••• 82Configuring Communication Board •••••••••••••• 84Configuring Chat •••••••••••••••••••••••••••••••••• 85
How to Use Favorites and Telephone Function (Lines/Fixed functions) •••••••••••••••••••••••••• 87
Using Telephone Function •••••••••••••••••••••••••••• 87Using a Call Functions Button ••••••••••••••••••• 87Renaming a Button ••••••••••••••••••••••••••••••• 87
Adding a Line Button or a Call Functions Button to Favorites ••••••••••••••••••••••••••••••••••••••••••••• 88
By Drag and Drop •••••••••••••••••••••••••••••••• 88Using the Right-Click Menu •••••••••••••••••••••• 89
Changing the Position of a Button in Favorites ••••• 89By Drag and Drop •••••••••••••••••••••••••••••••• 89By Cut and Paste ••••••••••••••••••••••••••••••••• 90
Copying a Button Registered to Favorites ••••••••••• 91Deleting a Button from Favorites ••••••••••••••••••••• 92
How to Use Contacts •••••••••••••••••••••••••••• 93
Adding a New Contact •••••••••••••••••••••••••••••••• 93Deleting a Contact ••••••••••••••••••••••••••••••••••••• 95Editing a Contact •••••••••••••••••••••••••••••••••••••• 95Moving a Contact •••••••••••••••••••••••••••••••••••••• 96
Using the Right-Click Menu •••••••••••••••••••••• 96By Drag and Drop •••••••••••••••••••••••••••••••• 97
Copying a Contact ••••••••••••••••••••••••••••••••••••• 98About Group Registration ••••••••••••••••••••••••••••• 99
Registering a New Group •••••••••••••••••••••••• 99Renaming a Group ••••••••••••••••••••••••••••••• 99Deleting a Group ••••••••••••••••••••••••••••••••• 100
Moving a Group •••••••••••••••••••••••••••••••••••••• 101Using the Right-Click menu ••••••••••••••••••••• 101Using Drag & Drop •••••••••••••••••••••••••••••• 102
Copying a Group ••••••••••••••••••••••••••••••••••••• 102

vii
Checking the Presence Status of a Contact •••••••• 103Placing a Call ••••••••••••••••••••••••••••••••••••••••• 104
Using the Mouse •••••••••••••••••••••••••••••••• 104Transmitting an IM ••••••••••••••••••••••••••••••••••• 105
Transmitting an IM ••••••••••••••••••••••••••••••• 105Starting Chat (2-party) ••••••••••••••••••••••••••••••• 106
Opening Chat (2-party) Screen ••••••••••••••••• 106Inviting Other Parties to Chat Conference •••••••••• 107
Inviting Other Parties to Chat Conference ••••• 107Sending an E-mail •••••••••••••••••••••••••••••••••••• 107
Sending an E-mail ••••••••••••••••••••••••••••••• 107Making Online Notification ••••••••••••••••••••••••••• 108
Setting Online Notification •••••••••••••••••••••• 108Canceling Online Notification Setting •••••••••• 109
Sending DTMF tone •••••••••••••••••••••••••••••••••• 110Redirecting Voice Mail ••••••••••••••••••••••••••••••• 110
How to Use the Call History •••••••••••••••••• 112
Displaying the Incoming Calls/Outgoing Calls ••••• 112Displaying the Outgoing calls ••••••••••••••••••• 112Displaying the Incoming Calls •••••••••••••••••• 113
Sorting the Call History •••••••••••••••••••••••••••••• 114Starting with the Latest Call ••••••••••••••••••••• 114Starting with the Oldest Call •••••••••••••••••••• 115In Reverse Alphabetical Order of Names •••••• 115In Alphabetical Order of Names •••••••••••••••• 115
Dialing from the Call History ••••••••••••••••••••••••• 116Dialing from the Incoming Calls/Outgoing Calls 116Dialing from the Outgoing IM/Incoming IM •••• 116
Transmitting an IM from the Call History ••••••••••• 117Transmitting an IM from the Incoming Calls/Outgoing
Calls •••••••••••••••••••••••••••••••••••••••••••• 117Transmitting an IM from the Outgoing IM/Incoming
IM ••••••••••••••••••••••••••••••••••••••••••••••• 118Sending an E-mail from the Incoming Calls/Outgoing
Calls •••••••••••••••••••••••••••••••••••••••••••••••• 119Deleting an Entry from the Incoming Calls/Outgoing
Calls •••••••••••••••••••••••••••••••••••••••••••••••• 120Adding an Entry in the Incoming Calls/Outgoing Calls to
Contacts •••••••••••••••••••••••••••••••••••••••••••• 120
How to Use IM •••••••••••••••••••••••••••••••••••• 122
Displaying the Outgoing IM/Incoming IM ••••••••••• 122Displaying the Outgoing IM ••••••••••••••••••••• 122Displaying the Incoming IM ••••••••••••••••••••• 122
Transmitting an IM ••••••••••••••••••••••••••••••••••• 123Using Send IM ••••••••••••••••••••••••••••••••••• 123Using the Phone Book •••••••••••••••••••••••••• 124Deleting the Destination •••••••••••••••••••••••• 125
Registering a Message Template ••••••••••••••••••• 126Registering a Message Template •••••••••••••• 126Using a Message Template ••••••••••••••••••••• 126Editing a Message Template ••••••••••••••••••• 127Deleting a Message Template •••••••••••••••••• 127
Receiving an IM •••••••••••••••••••••••••••••••••••••• 128Using the IM Reception Icon •••••••••••••••••••• 128Using Short Message Notification •••••••••••••• 128
Replying to an IM Received ••••••••••••••••••••••••• 129Using the IM Reception Log •••••••••••••••••••• 129
Deleting an Entry from the Outgoing IM/Incoming IM ••••••••••••••••••••••••••••••••••••••••••••••••••• 130
Adding an Entry in the Outgoing IM/Incoming IM to Contacts •••••••••••••••••••••••••••••••••••••••••••• 130
How to Use Chat ••••••••••••••••••••••••••••••••• 132
Using Chat (2-Party) ••••••••••••••••••••••••••••••••• 132About the Chat Screen •••••••••••••••••••••••••• 132About Emoticon Selection Screen •••••••••••••• 133Starting a Chat From the Contacts ••••••••••••• 134Starting a Chat from the Call History ••••••••••• 134Starting a Chat from the Search Results ••••••• 135Starting a Chat from the Presence Status
Display •••••••••••••••••••••••••••••••••••••••••• 136Sending a Chat Message ••••••••••••••••••••••• 137Sending a Character String with Hyperlink •••• 137Using the Emoticons in a Chat ••••••••••••••••• 138Placing a Call to the Chat Destination ••••••••• 138Sending an Email to the Chat Destination ••••• 138Displaying the History During a Chat ••••••••••• 139Saving the Displayed Message in a Chat •••••• 140
Using Chat Conference •••••••••••••••••••••••••••••• 141About the Chat Conference Screen •••••••••••• 141Inviting Another Party to a Chat Conference •• 142Inviting to a Chat Conference from the Call
History •••••••••••••••••••••••••••••••••••••••••• 142Inviting to a Chat Conference from the Search
Results •••••••••••••••••••••••••••••••••••••••••• 143Inviting a Chat Destination to a Chat
Conference ••••••••••••••••••••••••••••••••••••• 143Adding a Participant to a Chat Conference •••• 144Being Invited to a Chat Conference •••••••••••• 144Starting a Chat (2-Party) with a Participant of Chat
Conference ••••••••••••••••••••••••••••••••••••• 145Ending a Chat Conference •••••••••••••••••••••• 145Placing a Call to a Participant of Chat
Conference ••••••••••••••••••••••••••••••••••••• 146Sending an Email to a Participant of Chat
Conference ••••••••••••••••••••••••••••••••••••• 146Using Chat History ••••••••••••••••••••••••••••••••••• 147
About Chat History Screen •••••••••••••••••••••• 147Displaying the Chat History Screen •••••••••••• 148Confirming the Chat History •••••••••••••••••••• 148Deleting the Chat History ••••••••••••••••••••••• 149
How to Use Search •••••••••••••••••••••••••••••• 150
How to Search •••••••••••••••••••••••••••••••••••••••• 150Normal Search ••••••••••••••••••••••••••••••••••• 150Temporary Search ••••••••••••••••••••••••••••••• 151Searching a Directory ••••••••••••••••••••••••••• 151About the Search Keywords •••••••••••••••••••• 152

viii
Dialing from the Search Results •••••••••••••••••••• 156Transmitting an IM from the Search Results ••••••• 156Sending an E-mail from the Search Results ••••••• 157Adding an Entry in the Search Results to the Contacts
List •••••••••••••••••••••••••••••••••••••••••••••••••• 158
How to Use the Launcher ••••••••••••••••••••• 160
Registering a Softphone Function in the Launcher 160Registration Using the Right-Click Menu •••••• 160Registration from the Navigation Window ••••• 161Registration from the Launcher Edit Screen •• 161
Registering an External Application/File in the Launcher ••••••••••••••••••••••••••••••••••••••••••• 162
Registration Using the Right-Click Menu •••••• 162Registration from the Launcher Edit Screen •• 164Registration by Drag and Drop ••••••••••••••••• 165
Deleting a Registered Button •••••••••••••••••••••••• 166Deletion Using the Right-Click Menu •••••••••• 166Deletion on the Launcher Edit Screen ••••••••• 166
Editing a Registered Button ••••••••••••••••••••••••• 167Editing the Pop-up Caption Using the Right-Click
Menu ••••••••••••••••••••••••••••••••••••••••••• 167Editing the Pop-up Caption on the Launcher Edit
Screen •••••••••••••••••••••••••••••••••••••••••• 168Changing a Softphone Button Using the Right-Click
Menu ••••••••••••••••••••••••••••••••••••••••••• 169Changing a Softphone Button on the Launcher Edit
Screen •••••••••••••••••••••••••••••••••••••••••• 169Changing an External Application/File Using the
Right-Click Menu •••••••••••••••••••••••••••••• 170Changing an External Application/File on the
Launcher Edit Screen ••••••••••••••••••••••••• 171Moving a Registered Button ••••••••••••••••••••••••• 172
Moving a Button on the Launcher Edit Screen 172Moving a Button by Drag and Drop •••••••••••• 173
How to Use Voice Mail ••••••••••••••••••••••••• 174
Using Call Recording •••••••••••••••••••••••••••••••• 174Changing the Destination of the Recording File ••• 174
Using the Right-Click Menu on a Contact ••••• 174Using a Contact ••••••••••••••••••••••••••••••••• 175Using the Contact Information/E-Mail
Received ••••••••••••••••••••••••••••••••••••••• 176Copying a Phone Number •••••••••••••••••••••• 176Using a Phone Number Linked in a Website •• 177
Listening to the Call Recording •••••••••••••••••••••• 178Using Voice Message Recording ••••••••••••••••••• 178
Setting •••••••••••••••••••••••••••••••••••••••••••• 178Canceling •••••••••••••••••••••••••••••••••••••••• 179Listening to a Voice Message Recorded or
Forwarding It ••••••••••••••••••••••••••••••••••• 179
Recording a Conversation in the PC •••••• 180
Using Call Recording •••••••••••••••••••••••••••••••• 180Canceling Call Recording •••••••••••••••••••••••••••• 181
Listening to the Call Recording •••••••••••••••••••••• 181Deleting a Recording File •••••••••••••••••••••••••••• 181Sending a Recording File by E-mail •••••••••••••••• 182
Sending from the Call Recording Screen •••••• 182Sending from the Call History ••••••••••••••••••• 183
How to Use Voice Message Recording ••• 184
Checking the Voice Message Recording Setting •• 184Setting/Canceling Voice Message Recording •••••• 184
Setting •••••••••••••••••••••••••••••••••••••••••••• 184Canceling ••••••••••••••••••••••••••••••••••••••••• 185
Starting Voice Message Recording Manually ••••••• 185Listening to a Voice Message Recorded ••••••••••• 186Deleting a Recording File •••••••••••••••••••••••••••• 186Sending a Recording File by E-mail •••••••••••••••• 187
How to Collaborate with Microsoft Outlook •••••••••••••••••••••••••••••••••••••••••••••• 188
Setting Up the Environment ••••••••••••••••••••••••• 188When newly installing SP350 while Microsoft
Outlook is started •••••••••••••••••••••••••••••• 188About the Softphone Toolbar •••••••••••••••••••••••• 189
Displaying the Softphone Toolbar •••••••••••••• 189Name and Function of Each Part ••••••••••••••• 189
Operations Using the Softphone Toolbar ••••••••••• 190Call/Transfer after Selecting a Contact ••••••••• 190Opening the IM Send Screen after Selecting a
Contact ••••••••••••••••••••••••••••••••••••••••• 190Opening the Presence Display Panel after Selecting
a Contact ••••••••••••••••••••••••••••••••••••••• 191Operations after Selecting an E-mail ••••••••••• 192
Searching the Outlook Contact Information •••••••• 192About Name •••••••••••••••••••••••••••••••••••••• 192About Company Name •••••••••••••••••••••••••• 192About Department Name •••••••••••••••••••••••• 193
Configuring User Settings ••••••••••••••••••••• 194
User Information •••••••••••••••••••••••••••••••••••••• 194User Name ••••••••••••••••••••••••••••••••••••••• 194
Registering Your User Name •••••••••••••••• 194Login •••••••••••••••••••••••••••••••••••••••••••••• 195
Saving Your Login ID and Password •••••••• 195Phone Functions ••••••••••••••••••••••••••••••••••••• 196
Origination •••••••••••••••••••••••••••••••••••••••• 196Dialing after Adding a Number to the Beginning of
the Phone Number •••••••••••••••••••••••• 196Dialing by Clicking on a Phone Number in Another
Application ••••••••••••••••••••••••••••••••• 197Displaying a Confirmation Dialog When Dialed by
Clicking on Another Application ••••••••••• 197Displaying the Main Panel When You Operate the
Handset •••••••••••••••••••••••••••••••••••• 198Displaying a Confirmation Dialog When Dialing
from the Context Menu •••••••••••••••••••• 198

ix
Termination •••••••••••••••••••••••••••••••••••••• 199Displaying the Main Panel When You Have a New
Incoming Call •••••••••••••••••••••••••••••• 199Minimize the Main Panel to the Task Tray When
Not Used ••••••••••••••••••••••••••••••••••• 200Switching the Browse Window to Start for an
Incoming Call or a Call on Hold •••••••••• 200Receiving a Call for Another Person Only by
Lifting the Handset •••••••••••••••••••••••• 201Ringtone ••••••••••••••••••••••••••••••••••••••••• 201
Setting the PC Speaker to Output the Ringtone •••••••••••••••••••••••••••••••••••• 201
Changing the Ringtone •••••••••••••••••••••• 202Ringtone Patterns ••••••••••••••••••••••••••••••• 203
Setting the Ringtone Patterns ••••••••••••••• 203Holding Tone ••••••••••••••••••••••••••••••••••••• 204
Changing the Holding Tone ••••••••••••••••• 204Disconnection •••••••••••••••••••••••••••••••••••• 205
Automatically Disconnecting a Call on Termination (Automatic Idle Return) ••••• 205
Disconnecting a Call after a Pause ••••••••• 206Presence •••••••••••••••••••••••••••••••••••••••••••••• 206
Rejecting/Forwarding Calls While in "Leaving seat" Status •••••••••••••••••••••••••••••••• 206
Selecting an "Absent" Reason •••••••••••••• 207Setting the "Leaving seat" Status
Automatically ••••••••••••••••••••••••••••••• 208Simplifying the Presence Display ••••••••••• 209
IM •••••••••••••••••••••••••••••••••••••••••••••••••••••• 209Displaying a Pop-up on IM Reception •••••• 209Displaying a Confirmation Dialog When an IM
Destination Number Is Added •••••••••••• 210Chat ••••••••••••••••••••••••••••••••••••••••••••••••••• 210
Specifying the number of days that the chat messages are retained •••••••••••••••••••• 210
Phone Book ••••••••••••••••••••••••••••••••••••••••••• 211Using Contact data for Search •••••••••••••• 211Setting the Information Retrieval Software • 211Setting the Caller Information Panel
Undisplayed •••••••••••••••••••••••••••••••• 212Closing the Caller Information Panel
Automatically ••••••••••••••••••••••••••••••• 212Using Directory Search •••••••••••••••••••••• 213Setting the searching mode for Collaboration
with Microsoft Outlook ••••••••••••••••••••• 214Recording ••••••••••••••••••••••••••••••••••••••••••••• 214
PC Recording •••••••••••••••••••••••••••••••••••• 214Saving All PC Recording Files •••••••••••••• 214Specifying the Folder in Which to Save PC
Recording Files •••••••••••••••••••••••••••• 215Setting the PC Recording Start Method •••• 215
Voice Message Recording •••••••••••••••••••••• 216Setting the Time before the Automated
Response •••••••••••••••••••••••••••••••••• 216Setting the Recording Time ••••••••••••••••• 216Specifying the Reply Message •••••••••••••• 217
Voice Mail •••••••••••••••••••••••••••••••••••••••• 217Enabling Voice Mail Destination Change ••• 217Displaying the 10-key Keypad When the After
Record Button Is Pressed ••••••••••••••••• 218Audio Setting ••••••••••••••••••••••••••••••••••••••••• 218
Displaying a Warning When No Handset Is Connected to the PC •••••••••••••••••••••• 218
Automatically Switching Your Handset to the Handset Connected to the PC •••••••••••• 219
Displaying Warning Message for Predetermined Audio Device ••••••••••••••••••••••••••••••• 219
User Operations •••••••••••••••••••••••••••••••••••••• 220Using the [Ctrl] Key to Display the Main Panel
from the Task Tray ••••••••••••••••••••••••• 220Moving to the Call/Transfer Number Inputting
Area Automatically ••••••••••••••••••••••••• 220Enabling Input of "#" from the Keyboard •••• 221Enabling the F2 or Space Key to Answer/
Originate/Disconnect a Call ••••••••••••••• 221Enabling to Answer and Drop Calls by Hotkey
Operation ••••••••••••••••••••••••••••••••••• 222Receiving Calls to Others by Hotkey
Operation ••••••••••••••••••••••••••••••••••• 223Stopping Softphone to Wait for Restart during
System Standby •••••••••••••••••••••••••••• 223Hiding Unregistered Call Function Buttons • 224Setting Single/Double Click to Display Detailed
Data of Call History/Contacts/Search •••• 225Changing the Search Target ••••••••••••••••• 225Displaying Confirmation Message When Call
Forward - All Calls Setting Is Available ••• 226Displaying a Confirmation Dialog When the
Default Button Is Selected for Display Setting of Call Function Buttons •••••••••••••••••••••• 226
Displaying a Confirmation Dialog When Dialed from the Contacts/Call History/Search ••• 227
Devices •••••••••••••••••••••••••••••••••••••••••••••••• 227Specifying a Network to Be Used ••••••••••• 227
Panel Design ••••••••••••••••••••••••••••••••••••••••• 228Changing the Panel Design ••••••••••••••••• 228Selecting the Preferred Function for the Input
Area ••••••••••••••••••••••••••••••••••••••••• 229Exiting Start Screen Automatically •••••••••• 229
How to Use the Wizard ••••••••••••••••••••••••• 230
Using the Wizard for Environmental Setting •••••••• 230Loading the Configuration File •••••••••••••••••• 230Configuring Manual Settings •••••••••••••••••••• 231
Tips ••••••••••••••••••••••••••••••••••••••••••••••••••• 234
When You Want to Save the IM Log •••••••••••••••• 234When You Want to Send a Number during a Call •• 235
Registering a Number ••••••••••••••••••••••••••• 235Sending a Number ••••••••••••••••••••••••••••••• 236
When You Want to Insert a Pause •••••••••••••••••• 236

x
FAQs •••••••••••••••••••••••••••••••••••••••••••••••• 237
When Using Windows XP Service Pack 2 ••••••••• 237When Using Softphone in a Virtual Network
Environment •••••••••••••••••••••••••••••••••••••••• 238When Softphone Does Not Start or End •••••••••••• 238Softphone Startup Error •••••••••••••••••••••••••••••• 238About the Display of Softphone ••••••••••••••••••••• 239Warning Message for Audio Device Setting Is
Displayed ••••••••••••••••••••••••••••••••••••••••••• 239While in Standby Mode •••••••••••••••••••••••••••••• 240When Placing a Call ••••••••••••••••••••••••••••••••• 240When You Have an Incoming Call •••••••••••••••••• 240When Talking on the Phone ••••••••••••••••••••••••• 241When Using Your Terminal (such as PS) as the
Handset •••••••••••••••••••••••••••••••••••••••••••• 241When Using a Multifunction Phone as the Handset 241When Using Absent Forwarding •••••••••••••••••••• 242When Checking the Presence Status of Contacts • 242When Using IM ••••••••••••••••••••••••••••••••••••••• 242When Using Chat •••••••••••••••••••••••••••••••••••• 242When Using PC Recording •••••••••••••••••••••••••• 242When Using Voice Mail •••••••••••••••••••••••••••••• 243While in a Data Meeting ••••••••••••••••••••••••••••• 243When Using Video Communication ••••••••••••••••• 243When Using the Communication Board •••••••••••• 244When Using File Transfer ••••••••••••••••••••••••••• 244When Using Chat •••••••••••••••••••••••••••••••••••• 244When using SP350 in VPCC mode ••••••••••••••••• 244When terminal connection fails at startup (VPCC mode
only) •••••••••••••••••••••••••••••••••••••••••••••••• 245When you want to change the speech audio device (in
the case of US100 in VPCC mode) •••••••••••••• 245When you want to change the ringtone output destination
(in the case of US100 in VPCC mode) ••••••••••• 246When you want to change the speech audio device (in
the case of US110 in VPCC mode) •••••••••••••• 246When you want to change the output destination of
ringtone (in the case of US110 in VPCC mode) • 247
Constrained Conditions for Data Meeting 249
1.Restrictions on the Communication Board ••••••• 2502.Restrictions on Registering Shared Data ••••••••• 2503.Restrictions on Saving Shared Data •••••••••••••• 254

1
Features of Softphone
Softphone "SP350" is a telephone operated with a PC.Handset and headset are used for communication.
The following services are available using functions onlySoftphone can provide.
Features of Softphone
Multi-Party Video Meeting
Participants can talk face-to-face with a camera connected to the PC.* Video sending is not available in VPCC mode.
Collaboration with Other Terminals
Other terminals (PS, fixed telephone, etc.) connected to the IP telephony server can be used as a handset (Option).
IM (Instant Message)
IM can be sent to up to 8 people at a time. You can place a phone call or send a reply mail right after receiving an IM.* Only for users of "UNIVERGE Soft Client SP350",
"DtermSP30(SIP-mode)" and "MH250".
Sending messages at a time
Search
"Phone book", "Contacts", and "Call history" can be searched. The search result can be used to refer to related information, place a call, or send an IM.
Communication Board for Sharing Data
The same data can be referenced or operated on their own PCs during a call.
Confirmation of Other Party's Status
Status of the other party such as online, on the phone, etc. can be confirmed before placing an internal call (Option).
Incoming/Outgoing LogPhone Book
Contacts
In a call
Online
AliceAlice
BettyBetty

2
Features of Softphone
Creation of Contacts List
Registering to the contact list makes phone call or IM operation easier.Smooth communication is available; phone call when the other party is present, mail when away, or IM when on the phone or when leaving the seat temporarily.
Chat
Up to 8 people can participate in a meeting using the chat func-tion at a place where one should keep quiet.
File Transfer
Information files can be transferred by a drag and drop opera-tion during a meeting. Files can be transferred to a selected person.
Register
AliceAlice
Ethan
Betty
CathyCathy
Dorothy
EthanEthan
DorothyBetty
OK!
Yes
3
How to Use Softphone
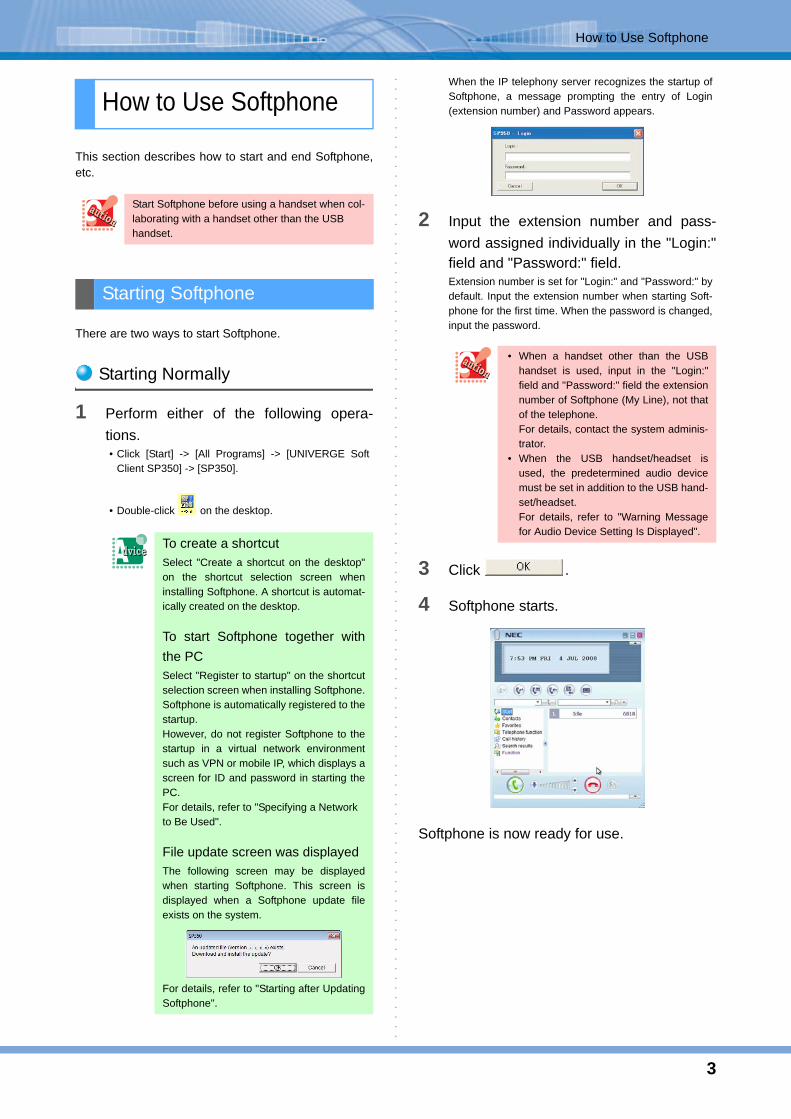
This section describes how to start and end Softphone,etc.
There are two ways to start Softphone.
Starting Normally
1 Perform either of the following opera-tions.• Click [Start] -> [All Programs] -> [UNIVERGE Soft
Client SP350] -> [SP350].
• Double-click on the desktop.
When the IP telephony server recognizes the startup ofSoftphone, a message prompting the entry of Login(extension number) and Password appears.
2 Input the extension number and pass-word assigned individually in the "Login:"field and "Password:" field.Extension number is set for "Login:" and "Password:" bydefault. Input the extension number when starting Soft-phone for the first time. When the password is changed,input the password.
3 Click .
4 Softphone starts.
Softphone is now ready for use.
How to Use Softphone
Start Softphone before using a handset when col-laborating with a handset other than the USB handset.
Starting Softphone
To create a shortcutSelect "Create a shortcut on the desktop"on the shortcut selection screen wheninstalling Softphone. A shortcut is automat-ically created on the desktop.
To start Softphone together withthe PCSelect "Register to startup" on the shortcutselection screen when installing Softphone.Softphone is automatically registered to thestartup.However, do not register Softphone to thestartup in a virtual network environmentsuch as VPN or mobile IP, which displays ascreen for ID and password in starting thePC.For details, refer to "Specifying a Network to Be Used".
File update screen was displayedThe following screen may be displayedwhen starting Softphone. This screen isdisplayed when a Softphone update fileexists on the system.
For details, refer to "Starting after UpdatingSoftphone".
• When a handset other than the USBhandset is used, input in the "Login:"field and "Password:" field the extensionnumber of Softphone (My Line), not thatof the telephone.For details, contact the system adminis-trator.
• When the USB handset/headset isused, the predetermined audio devicemust be set in addition to the USB hand-set/headset.For details, refer to "Warning Messagefor Audio Device Setting Is Displayed".

4
How to Use Softphone
Starting after Updating SoftphoneWhen an update file for Softphone newer than the oneinstalled on your PC exists on the system, the versioncan be checked automatically and be upgraded easily.
1 Start Softphone.When procedure 1 in "Starting Normally" is performed,the following screen is displayed if a new Softphoneupdate file exists on the system.
2 Click .After the Softphone update file is downloaded, the newSoftphone is installed automatically.Clicking [Cancel] during Softphone version upgradestarts Softphone of the version currently installed, with-out updating the file.
After the update is completed, the versionupgraded Softphone starts.
There are two ways to end Softphone.
1 Perform either of the following opera-tions.
• Right-click on the task tray.The following menu is displayed.
• When the main panel is used, right-click on the taskbar.
The following menu is displayed.
2 Click [Close].Click [Close] when right-clicking the taskbar icon.The following screen is displayed.
3 Click .
Softphone has now ended.
• Contact the system administrator for whetherSoftphone update is performed or not.
• If version upgrade fails due to a failure indownloading the update file or insufficient diskspace, an error screen is displayed and Soft-phone already installed starts.
• To update Softphone, 150 MB or more freedisk space is required.
• For Windows Vista or Windows 7, the adminis-trator right must be assigned for each applica-tion in addition to the existing administratorright.
Ending Softphone
• Be sure to turn the PC off after Softphone isended.
• Softphone cannot be ended during a call orwhen a dial tone or ring back tone is heard,excluding the cases where collaboration withtelephone is performed.
• When the toolbar skin is used, Softphone can-not be ended from the taskbar.
Getting a call when Softphone is notstarted or the PC is turned offWhen the optional presence server function is
used, the presence status (Absent: ) is noti-fied to the other party's terminal. This icon indi-cates that Softphone is not started or the PC isturned off.When Logout Forwarding is set, calls are for-warded to the forwarding destination.

5
How to Use Softphone
Stopping Softphone to Wait for Restart during System Standby
When the PC is switched to the standby state, Soft-phone can be stopped to wait for restart during systemstandby.For details, refer to "Stopping Softphone to Wait forRestart during System Standby".
1 Select [Sleep] from the shutdown menu.
* A Windows XP screen is used.
2 Click .
3 Softphone waits for restart.
4 Click if you use Softphoneagain after the PC returns from standby.
Restart Softphone when needed.
1 Right-click on the task tray.The following menu is displayed.
2 Click [Restart].The following screen is displayed.
3 Click .The following screen is displayed.
When the IP telephony server recognizes the startupof Softphone, a message prompting the entry of Login(extension number) and Password appears.
When [Transition to standby based on elapsedtime] is set in the [System standby] field on the[Power Options Properties] screen, the followingoperation is performed.• Windows 2000: Softphone waits for restart.
However, if Softphone ringswithin the set period, theelapsed time is reset andreturned to 0. Therefore, ifSoftphone rings repeatedlywithin the set period, theelapsed time is returned to 0each time and the PC cannottransit to the standby state.
• Windows XP : Softphone does not wait forrestart and continues its oper-ation.
• Windows Vista: Softphone waits for restartand operations such as a callare not available.
• Windows 7 : Softphone waits for restartand operations such as a callare not available.
When [No] is clickedStart Softphone manually after the PC returnsfrom standby.For details, refer to "Starting Softphone".
Restarting Softphone
Softphone cannot be restarted during a call orwhen a dial tone or ring back tone is heard.Restart it when the call ends.
6
How to Use Softphone
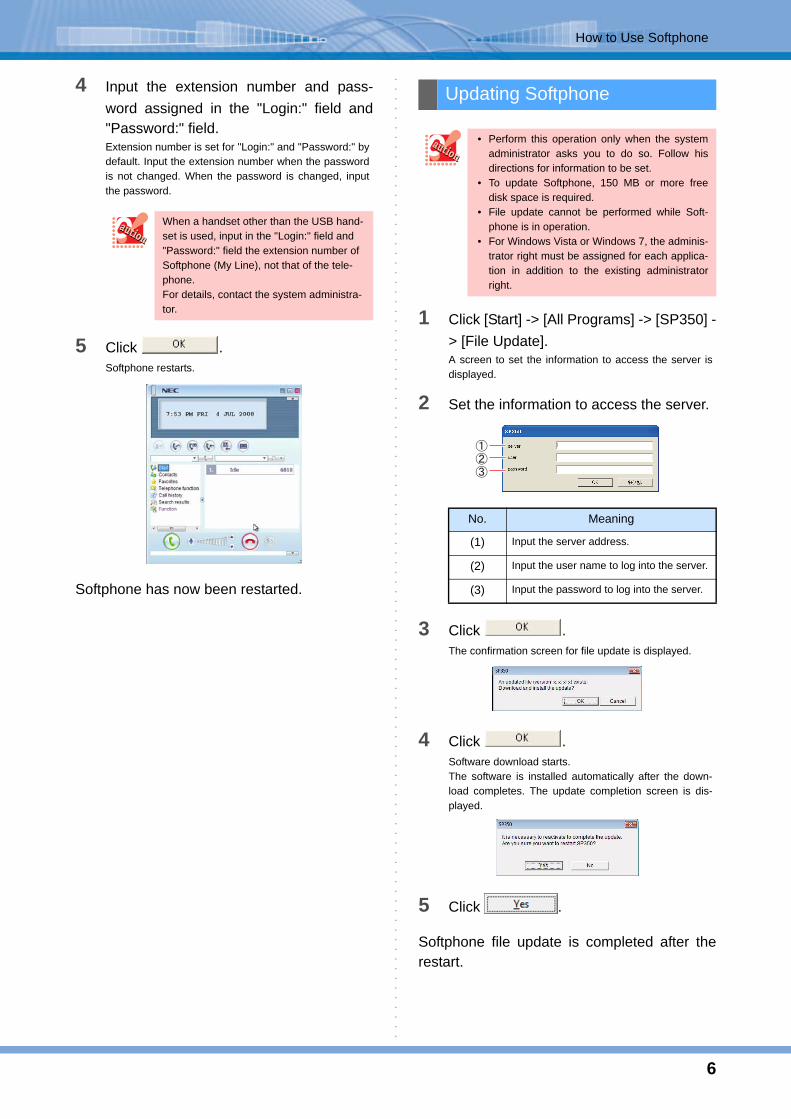
4 Input the extension number and pass-word assigned in the "Login:" field and"Password:" field.Extension number is set for "Login:" and "Password:" bydefault. Input the extension number when the passwordis not changed. When the password is changed, inputthe password.
5 Click .Softphone restarts.
Softphone has now been restarted.
1 Click [Start] -> [All Programs] -> [SP350] -> [File Update].A screen to set the information to access the server isdisplayed.
2 Set the information to access the server.
3 Click .The confirmation screen for file update is displayed.
4 Click .Software download starts.The software is installed automatically after the down-load completes. The update completion screen is dis-played.
5 Click .
Softphone file update is completed after therestart.
When a handset other than the USB hand-set is used, input in the "Login:" field and "Password:" field the extension number of Softphone (My Line), not that of the tele-phone.For details, contact the system administra-tor.
Updating Softphone
• Perform this operation only when the systemadministrator asks you to do so. Follow hisdirections for information to be set.
• To update Softphone, 150 MB or more freedisk space is required.
• File update cannot be performed while Soft-phone is in operation.
• For Windows Vista or Windows 7, the adminis-trator right must be assigned for each applica-tion in addition to the existing administratorright.
No. Meaning
(1) Input the server address.
(2) Input the user name to log into the server.
(3) Input the password to log into the server.

7
About the Standard Skin
f
Main Panel
About the Standard Skin
To minimize the main panel of Soft-phone to the task trayFor details, refer to "Minimizing the Main Panel".To prevent Softphone from overlappingother applicationsFor details, refer to "About Toolbar Skin".

8
About the Standard Skin
The main panel has components for various settings, presence display, call/answer, and disconnection. This sectiondescribes name and function of each component on the main panel.
Name and Function of Each Component on the Main Panel
• In the case of VPCC mode, Voice Mail Settings--one of the functions in the navigation area is hidden.
Message Waiting Lamp
Call/transfer number inputting areaContacts
FavoritesTelephone function- Line- Fixed function
Call history- Outgoing calls- Incoming calls- Outgoing IM- Incoming IM
Minimize buttonMaximize buttonExit button
LCD
Status notification area
Function- User configurations- Send IM- Chat History- Forwarding settings- Voice mail settings- Phone book- 10-key- Import/Export
Off Hook/Answer button
MuteVolume Control
End call button
File Transfer button
Launcher area
Search keyword input area

9
About the Standard Skin
Main Panel - Components
Components Name Description
Message Wating Lamp
Blinks at an incoming call from an external/internal line. In addi-tion, when the phone recording function (option) is used, this lamp blinks if a mes-sage is recorded.
Minimize button
Softphone is minimized to the task tray when clicked.Clicking the icon in the task tray restores the screen. In addition, automatic restoration at call termination can also be set.
Maximize button
Softphone is maxi-mized when clicked. When the screen is maximized, the [Maxi-mize] button changes to the [Restore] button.
Exit buttonExits Softphone when clicked.
LCD
Displays date/time and information according to the status in two rows.
Launcher area
Starts the applications associated with regis-tered applications and files or functions in the SP350 navigation win-dow when the button is clicked while SP350 is used if external appli-cations, files, or func-tions in the SP350 navigation window are registered in advance.
Status notification area
Displays various sta-tuses such as (your) presence, missed call, IM reception, Call forward - All Calls setting.
Search keyword input area
Searches for relevant data from collaborat-ing phone book, con-tacts, and call history with a name or phone number input in the area.
Call/transfer number inputting area
Places/transfers a call by inputting a phone number.
Start
Displays the line sta-tus in the browse win-dow. The status for the prime line is always displayed, and that for lines other than the prime line are dis-played only while a call is on hold/incoming or a user is placing a call/operating Softphone. A user can perform gen-eral phone operations such as answer, hold, transfer, record, record to PC, and data meet-ing from this window.
Contacts
Opens the contacts list when clicked. Register-ing parties you contact frequently to the con-tacts list makes opera-tions such as placing a call and transmitting an IM easier.
Favorites
Frequently used phone functions can be cop-ied. These functions can be operated with-out displaying the lines and assigned func-tions.
Telephone function
Displays "Line" and "Fixed function" below in the navigation win-dow when clicked.
Line
Displays phone func-tion buttons for lines registered by the IP telephony server in the browse window. When a line is set to the but-ton, the line number is displayed on the but-ton. Any button can be registered to the [Favorites] button from here.
Components Name Description

10
About the Standard Skin
Fixed function
Displays phone func-tion buttons for assigned functions reg-istered by the IP tele-phony server in the browse window. Any button can be regis-tered to the [Favorites] button from here.
Call history
Phone call log and IM log can be viewed. Dis-plays the [Outgoing calls], [Incoming calls], [Outgoing IM], and [Incoming IM] buttons when clicked. When a log type to be viewed is clicked, details of each log are displayed in "log type + date/time + name + organization" format. When a log item is selected, "date/time + (call duration)", "phone number", "IM number", "e-mail address", and "pres-ence" are displayed.
Outgoing calls
Displays outgoing logs and outgoing (no answer) logs in the browse window. Call related files are dis-played on the related information.
Incoming calls
Displays incoming logs and incoming (no answer) logs in the browse window. Call related files are dis-played on the related information. When you did not answer an incoming call to you (prime line incoming call), the Missed Call icon blinks in blue.
Outgoing IM
Displays IM transmission logs and IM transmission failure logs in the browse win-dow. IM body is dis-played on the related information.
Components Name Description
Incoming IM
Displays IM reception (unread) logs and IM reception (read) logs in the browse window. IM body is displayed on the related informa-tion. When you receive an IM, the IM Recep-tion icon changes to [New IM received].
Search results
Information can be searched from "phone book", "contacts", and "call history" by input-ting a search keyword and clicking the search button. The "search results" function lists the result for you to view the related infor-mation and perform operations such as call origination and IM transmission from the detail data easily.
FunctionDisplays each function in the navigation win-dow.
User con-figurations
Displays the [User con-figurations] screen for basic settings such as outgoing call and incoming call when clicked.
Send IM
Selecting [Send IM] from the function menu opens the new IM transmission screen. In addition, selecting [Send IM] from the right-click menu on a list of [Contacts] and [Call history] opens the transmission screen with destination num-ber and message body quoted. A message with the same content can be transmitted up to eight persons.
Chat History
Selecting [Chat His-tory] from the function menu opens the Chat History screen.In Chat History screen, confirming chat messages that have been sent and received, and saving/deleting chat logs can be performed.
Components Name Description
11
About the Standard Skin
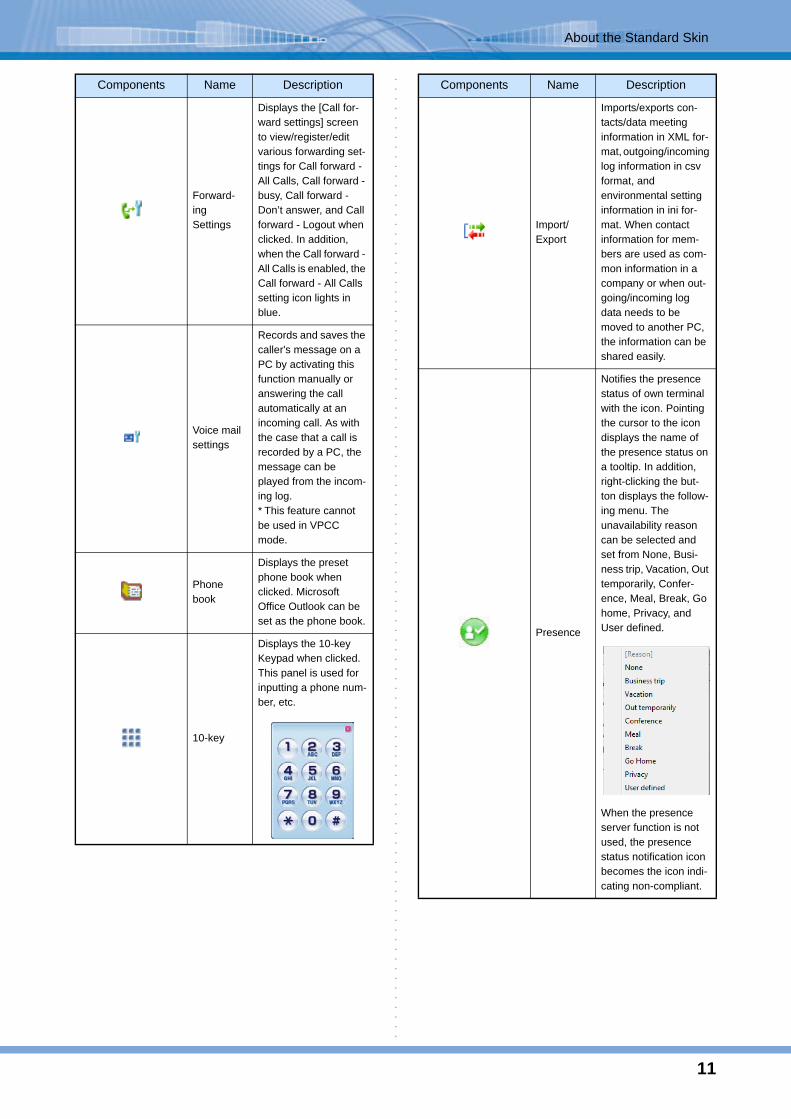
Forward-ing Settings
Displays the [Call for-ward settings] screen to view/register/edit various forwarding set-tings for Call forward - All Calls, Call forward - busy, Call forward - Don’t answer, and Call forward - Logout when clicked. In addition, when the Call forward - All Calls is enabled, the Call forward - All Calls setting icon lights in blue.
Voice mail settings
Records and saves the caller's message on a PC by activating this function manually or answering the call automatically at an incoming call. As with the case that a call is recorded by a PC, the message can be played from the incom-ing log.* This feature cannot be used in VPCC mode.
Phone book
Displays the preset phone book when clicked. Microsoft Office Outlook can be set as the phone book.
10-key
Displays the 10-key Keypad when clicked. This panel is used for inputting a phone num-ber, etc.
Components Name Description
Import/Export
Imports/exports con-tacts/data meeting information in XML for-mat, outgoing/incoming log information in csv format, and environmental setting information in ini for-mat. When contact information for mem-bers are used as com-mon information in a company or when out-going/incoming log data needs to be moved to another PC, the information can be shared easily.
Presence
Notifies the presence status of own terminal with the icon. Pointing the cursor to the icon displays the name of the presence status on a tooltip. In addition, right-clicking the but-ton displays the follow-ing menu. The unavailability reason can be selected and set from None, Busi-ness trip, Vacation, Out temporarily, Confer-ence, Meal, Break, Go home, Privacy, and User defined.
When the presence server function is not used, the presence status notification icon becomes the icon indi-cating non-compliant.
Components Name Description

12
About the Standard Skin
Missed Call icon
Notifies a missed call with the icon. Pointing the cursor to the icon displays the "number of missed calls" on a tool-tip. In addition, clicking the missed call status notification icon dis-plays the incoming log, and the latest log is automatically selected.
IM Reception icon
Notifies an IM recep-tion with the icon. Pointing the cursor to the icon displays the "number of new IMs received" and "number of unread IMs" on a tooltip. When there is no new IM reception, only the "number of unread IMs" is dis-played.
Call Forward - All Calls setting icon
Notifies the status of Call forward - All Calls setting with the icon. Pointing the cursor to the icon displays the "status of Call forward - All Calls setting" on a tooltip. Although vari-ous forwardings (Call forward - All Calls, Call forward - Busy, Call for-ward - Don’t answer, and Call forward - Logout) can be set, the icon indicates the set-ting status of "Call for-ward - All Calls" only.
Voice Mes-sage Recording icon
Notifies the status of voice message recording setting with the icon. The voice message recording can be enabled/disabled here. Pointing the cur-sor to the icon displays the "status of voice message recording setting" on a tooltip.* This feature cannot be used in VPCC mode.
Components Name Description
PC Recording icon
Notifies the status of PC recording with the icon. Displays the operation screen for PC recording when clicked. Pointing the cursor to the icon dis-plays the "status of PC recording" on a tooltip.
Data Meet-ing icon
Notifies the status of data meeting with the icon. A user who clicked the [Data Meet-ing] button on the Soft-phone GUI during a call hosts the data meeting with called party as an organizer. Pointing the cursor to the icon displays the "preparing a data meeting", "holding a data meeting (orga-nizer)", or "holding a data meeting (partici-pant)" on a tooltip according to the status. This icon is not dis-played when the data meeting is not used.
Off Hook/Answer button
Click this button to place a call or pick up a call. It lights in use. In addition, right-clicking this button displays the following menu.
• Clipboard call/Transfer to ''Select this menu toplace/transfer a callusing a phone num-ber copied fromother applications.
• Last number callSelect this menu toredial the last calledparty.
Mute
Click this button to mute caller's voice.
Volume Control
Click these buttons to control the ring volume and earpiece volume.
Components Name Description

13
About the Standard Skin
Start
Clicking (Start) in the navigation window displays theline status in the browse window.The status for the prime line is always displayed, andthat for lines other than the prime line are displayed onlywhile a call is on hold/incoming or a user is placing acall/operating Softphone.A user can perform general phone operations such asanswer, hold, transfer, record, record to PC, and datameeting from this window.
< Start screen >
End call button
Click this button to disconnect a call. In addition, setting the handset back to the mount also disconnects a call.
File Transfer button
Click this button to transfer files. Folders cannot be transferred. In addition, simulta-neous transfer of two or more files is only available for reception not for transmission.
Components Name Description
To switch the screen to the start screenautomatically for an incoming callRefer to "Switching the Browse Window to Startfor an Incoming Call or a Call on Hold".
<Main panel>
<Start screen display>

14
About the Standard Skin
< Item names on the start screen > < Status display when a call is incoming >
[When the prime line is on the phone]
[When a line other than the prime line is called]
Icons to be displayed while a call is incoming to a line other than yours are the Answer and IM icons.
No. Item Name Description
(1) Line numberDisplays a line number reg-istered to phone function buttons for lines.
(2) Status display icon/status display
Displays the status of each line with an icon. The sta-tus display conforms to the specifications of the IP tele-phony server.
(3) Other party's informa-tion
Displays the phone number and name in one line.
(4)Group 1 where other party belongs (first row)
When the phone number of the other party's informa-tion exists and the data for the number exists in the search target (contacts and Outlook), the company name set to the search tar-get is displayed in one line.
(5)Group 2 where other party belongs (second row)
As with the above, the department name set to the search target is displayed in one line.
(6) Line name
Displays the button display name when the line button is set to be displayed.Displays the phone number of the line button when the line name is not set.
Line displayarea
Function display area
<Main panel>
<Start screen display>
<Main panel>
<Start screen display>

15
About the Standard Skin
< How to use buttons on the start screen > < Icons on the function display area >Phone functions such as answer, transfer, hold, meeting,record, and SP350 functions such as IM, PC recording,and data meeting are displayed as icons on the functiondisplay area according to the line status. To operateeach function, click an icon or select an item from theright-click menu.
Icons displayed on the function display area are as fol-lows.
Button Name Description
Answer
Answers an incoming call. The status transits to on the phone. Cancels the hold when a call is on hold.
TransferPerforms a normal transfer oper-ation. Right-clicking this button performs a "hooking" operation.
Hold
Performs a normal hold opera-tion. The status display transits to on hold, and the icon changes to the Answer and IM icons. Right-clicking this button performs "exclusive hold" operation.
3-partyPerforms a normal meeting oper-ation (3-party meeting).
Record
Starts recording a call. After the recording is started, the icon changes to the Stop icon. In addi-tion, when Record or Exit function button is not registered, or a UMS is not used, the operation is to "start PC recording". The panel for PC recording can be dis-played from the right-click menu "Live Recording".
Stop
Stops recording a call. After the recording is stopped, the icon changes to the Saving Record File icon. After the saving is fin-ished, the icon changes to the Record icon. In addition, the panel for PC recording can be displayed from the right-click menu "Live Recording".
Saving Record File
-
Data Meet-ing (Start)
Starts a data meeting. The opera-tion available during the meeting is user update (organizer only).
Data Meet-ing (User Update)
Updates users participating in a data meeting.
ListenStarts a listening operation of recorded data.
Short Mes-sage
Displays the screen for IM trans-mission. The phone number of the other party's information is displayed on the destination. This icon is displayed only when the other party's information exists.
Record Voice Message
Starts recording a voice mes-sage.
Status Icon to be Displayed
Others in operation
None
Idle [Listen] icon
Incoming call
[Answer] icon
[Short Message] icon
[Record Voice Message] icon
Hold[Answer] icon
[Short Message] icon
In operation
[Transfer] icon
[Hold] icon
[3-party] icon
[Record] icon
[Stop] icon
[Saving Record File] icon
Busy
[Transfer] icon
[Hold] icon
[3-party] icon
[Data Meeting] icon
[Record] icon
[Stop] icon
[Saving Record File] icon

16
About the Standard Skin
Contacts
Clicking (Contacts) in the navigation windowdisplays the contacts list in the browse window. Regis-tering parties you contact frequently to the contacts listmakes operations such as placing a call and sending anIM easier. The status of other party is displayed depend-ing on the presence.For details, refer to "How to Use Contacts".
• Only the prime line is always displayed at thetop.
• Newly displayed lines are displayed at the bot-tom.
• When a user answers a line other than theprime line, the line will be displayed just belowthe prime line.
• The line number displayed on the start screenis the line number set to phone function buttonsfor lines.
• Up to 32 lines can be displayed in the line infor-mation area in the browse window.
• When function buttons are not registered inadvance, icons cannot be operated since theyare not displayed.
• The status display conforms to the specifications of the IP telephony server.
• Other party's information is only the phonenumber if the information is not set to the con-tacts and phone book as the search target.
• When the phone number cannot be obtained from the IP telephony server, the phone num-ber is not displayed.
• When there is no phone number to be dis-played, other party's information and group 1/2where other party belongs are not displayed,and the blank lines are collapsed.
• Up to 510 characters can be displayed for bothgroup 1 and group 2 where other partybelongs.
• The button display name set to the line buttonin the phone function screen is displayed as theline name. When the line name is not set, thephone number of the line button is displayed.
• In the case of VPCC mode, icons and buttonsfor voice mail settings are not displayed.
• In the case of VPCC mode, the PC recordingbutton is not displayed depending on the typeof the thin client terminal. For details, contactthe system administrator.
<Main panel>
<Contacts list display>
Group name
Contacts(Name [presence])- Phone number- IM number- Chat Number- E-mail addresses
<Contacts list screen>

17
About the Standard Skin
< Component names and descriptions forcontacts list >
<Presence>
Icon Name Description
Top
Indicates the top of the contacts list. This icon is always displayed.All other items such as contacts and groups are located under the Top icon.
Group
Displays the name of the depart-ment, etc. where a contact belongs. (The name can be modi-fied.)
Contact topDisplays the name of a contact and the presence status (refer to <Presence>).
Phone number 1
Up to four phone numbers per contact can be registered.The phone number for the pres-ence status display and IM trans-mission is Phone number 1 only.
Phone number 2 to 4
IM number
This is the number for IM trans-mission.When Telephphone number 1 or IM/Chat number is set, this icon is displayed.Note that IM/Chat number has priority.
Chat Number
This is the number for chat transmission.When Telephone number 1 or IM/Chat number is set, this icon is displayed. Note that IM/Chat number has priority.
E-mail address 1 to 4
Up to four e-mail addresses per contact can be registered.
Icon Name Description
Idle Indicates that the party is online.
Leaving seat
Indicates that the party is not at the seat. If the reason has been set, it is also shown after the name.
BusyIndicates that the party is currently on the phone.
Absent
Indicates that the terminal of the party is not running. If the reason has been set, it is also shown after the name.
Unconfirmed
Indicates that the number of the party is not compliant with the presence server function. This icon is also shown for contacts to which the Phone number 1 has not been set.

18
About the Standard Skin
For an ACD presence user registered in the contacts,[ACD Line Presence] and [Ordinary Line Presence]described below are displayed in the contact detail infor-mation.
< ACD Line Presence >
< Ordinary Line Presence >
Favorites
Clicking (Favorites) in the navigation windowdisplays the favorites screen in the browse window.Frequently used lines and assigned functions registeredby a user are displayed.For details, refer to "How to Use the Favorites andPhone Function Menu (Lines/Assigned Functions)".
Icon Name Description
IdleIndicates the party has been logged in the ACD system and the ACD line is currently idle.
Leaving seat
Indicates that the party has been logged in the ACD system and the ACD line is currently in leaving seat status.Leaving seat is not supported in the SV8300 for ACD mode.
Work
Indicates that the party has been logged in the ACD system and the ACD line is currently in work mode.
BusyIndicates that the party has been logged in the ACD system and the ACD line is currently busy.
Log outIndicates that the party has not been logged in the ACD system.
Off lineIndicates that the party has not been logged in the SP350.
Icon Name Description
IdleIndicates that the ordinary line is idle.
BusyIndicates that the ordinary line is busy.
Off lineIndicates that the ordinary line is off line.
• This setting is valid only when the presenceserver function of the options is used.
• When the presence server function is not used,only "name" and icon are displayed on thecontacts list.
Click
<Main panel>
<Favorites screen>

19
About the Standard Skin
Telephone Function
Clicking (Telephone function) in the navigation win-
dow displays (Line) and (Fixed function).
< Details of line buttons >
Line
Clicking (Line) in the navigation window displaysfunctions and lines set by the IP telephony server.A call can be received, and functions can be used byusing these lines.
Fixed Function
Clicking (Fixed function) in the navigation windowdisplays functions set by the IP telephony server.A call can be received, and functions can be used byusing these lines.
No. Name Meaning
(1) Phone function button (lines)
The phone function but-tons for lines. The color of
the line is .
(2) Phone function button (assigned functions)
The phone function but-tons for assigned func-tions. The color of the line
is .
(3) Button numberWhen a line is set to the button, the line number is displayed.
(4) LampLights when a line oper-ates.
(5) Button name
The function name set by the IP telephony server is displayed. The button name can be modified.
Click
<navigation area>
<Line screen>
<Fixed function screen>

20
About the Standard Skin
Call History
Clicking (Call history) in the navigation window
displays (Outgoing calls), (Incoming calls),
(Outgoing IM), and (Incoming IM). Phone call history and IM history can be viewed.In addition, "call related files" or "IM body" are displayedin the related information area by selecting a history.For details, refer to "How to Use the Call History".
< Browse window >
< Icons for top of log and detail data >
< Log type icons >
< Presence icons >
Icon Description
Date/time + name + (organization)(* "Hour:minute" is displayed when the date/time is today. "Month/date" is dis-played when the date/time is before today.)Refer to "<Log type icons>".
Date/time + (call duration)
Phone number
IM number
Chat Number
E-mail address
PresenceRefer to "<Presence icons>".
Click
Number of histories
Related information
Detailed history
Sort
Icon Name Description
Outgoing Indicates an outgoing log.
Outgoing (no answer)
Indicates an outgoing (no answer) log.
Incoming Indicates an incoming log.
Incoming (no answer)
Indicates an incoming (no answer) log.
IM transmission
Indicates an IM transmission log.
IM transmission failure
Indicates an IM transmission failure log.
IM reception (unread)
Indicates an IM reception (unread) log.
IM reception (read)
Indicates an IM reception (read) log.
Icon Name Description
IdleIndicates that the party is online.
Leaving seat
Indicates that the party is not at the seat. If the reason has been set, it is also shown after the name.
BusyIndicates that the party is currently on the phone.
Absent
Indicates that the terminal of the party is not running or Soft-phone is not activated. If the reason has been set, it is also shown after the name.
• Up to 500 call logs/up to 1000 IM logs can bestored. When the number of logs exceeds thelimit, the log is deleted from the oldest one.
• Multiple selections of logs cannot be performedby a range specification with a mouse.

21
About the Standard Skin
Outgoing Calls
Clicking (Outgoing calls) in the navigation windowdisplays outgoing call history and outgoing (no answer)call history in the browse window.
Incoming Calls
Clicking (Incoming calls) in the navigation windowdisplays incoming logs and incoming (no answer) logs inthe browse window.
Click
<Outgoing calls screen>
Click
<Incoming calls screen>

22
About the Standard Skin
Outgoing IM
Clicking (Outgoing IM) in the navigation window dis-plays IM transmission logs and IM transmission failurelogs in the browse window.
Incoming IM
Clicking (Incoming IM) in the navigation window dis-plays IM reception (unread) logs and IM reception (read)logs in the browse window.
Click
<Outgoing IM screen>
Click
<Incoming IM screen>

23
About the Standard Skin
Search Results
Clicking (Search results) in the navigation windowlists the search results. The search results to be listedare results of searching from the search keyword inputarea.
Function
Clicking (Function) in the navigation window dis-plays following icons.
• Up to one presence can be displayed on thesearch results.
• The search results are deleted when a userexits Softphone.
Click
Number of search results
Information related to search results
Search keyword input area
Sort
Search result list
<Search result list screen>
• User configura-tions
• Voice mail settings
• Send IM • Phone book
• Chat History • 10-key
• Forwarding settings
• Import/Export
In the case of VPCC mode, the icon for Voice Mail Settings is not displayed.
Click
<Main panel>

24
About the Standard Skin
User Configurations
Clicking (User configurations) under (Function)in the navigation window displays the [User configura-tions] screen. The user configurations function is func-tion for each user to modify user configurations andmaintenance configurations of Softphone.
Click
<Main panel>
<User configurations screen>
No. Name Description
(1) Category Displays menus for user configura-tions.
(2) Setting item display area
Displays setting items for user configu-rations.
(3) Simple explanation display area
Displays the simple explanation for the item selected in the setting item display area.
(4) [OK] button Saves the modified settings and exits user configurations.
(5) [Cancel] button
Exits user configurations.
(6) [Apply] but-ton
Saves the modified settings. The [Apply] button is enabled when the user configurations are modified.
(7) [Default] button
Changes all the items displayed in the setting item display area back to default.
(8) Control but-tons dis-play area
Displays the [OK], [Cancel], [Apply], and [Default] buttons.
(9) [Minimize] button
The button for User configurations is displayed on the toolbar, and the screen is stored in the button when clicked.
(10) [Maximize] button
Maximizes the display of the [User con-figurations] screen when clicked.
(11) [Close] button
Closes the [User configurations] screen when clicked.

25
About the Standard Skin
Send IM
Clicking (Send IM) under (Function) in the navi-gation window displays the [IM send] screen. From the[IM send] screen, an IM can be transmitted to the otherparty who runs Softphone.For details, refer to "How to Use IM".
< Description of IM send screen >
Click
<Main panel>
<IM send screen>
No. Name Description
(1) Destination listbox Set the number of the other party where you want to transmit a mes-sage.
(2) Number input box ([Number Setting] field)
Input the number of the other party where you want to transmit a mes-sage.
(3) [Add] button ([Number Setting] field)
Set the input number to the destination.
(4) [Delete] button ([Num-ber Setting] field)
Deletes the number selected in the destina-tion.
(5) Transmission message input box
Input messages to be transmitted.
(6) [Send] button Transmits the created IM.
(7) [New Message] button Deletes the content of [Number Setting], [To], and [Body] fields.
(8) [Cancel] button Cancels the IM creation.
(9) Message template list (message template)
Frequently used phrases can be registered here.
(10) [<<] button (message template)
Adds the selected mes-sage template to the mes-sage.
(11) [>>] button (message template)
Adds the selected phrase in the message to the message template.
(12) [Edit] button (message template)
Edits the selected mes-sage template.
(13) [Add] button (message template)
Creates a new message template.
(14) [Delete] button (mes-sage template)
Deletes the selected mes-sage template.

26
About the Standard Skin
Chat History
Clicking (Chat History) under (Function) in thenavigation window displays the [Chat History] screen.From the [Chat History] screen, confirming chatmessages that have been sent and received and saving/deleting chat logs can be performed. For details, refer to "How to Use Chat".
Forwarding Settings
Clicking (Forwarding settings) under (Function)in the navigation window displays the [Call forward set-tings] screen. A call to you when you are away or on thephone can be forwarded to forwarding destinations reg-istered in advance. There are four ways of forwarding acall.• Call forward - All Calls
Forwards a call received when you are away.• Call forward - Busy
Forwards a call received when you are on the phone.• Call forward - Don't answer
Forwards a call when you cannot answer the phoneeven though a certain period of time has passed sincethe ringtone sounds.
• Call forward - LogoutForwards a call received when Softphone is notstarted or the PC is turned off.
Click
<Main panel>
<Chat History screen>
When the telephony server doesn’t use this func-tion, the CF-L tab becomes a gray out display. Fordetails, contact the system administrator.
To use this function, set the service function in theIP telephony server in advance. For details, con-tact the system administrator.
Click
<Main panel>
<Call forward settings screen>

27
About the Standard Skin
Numbers which can be registered as forwarding destina-tions are as follows.• Extension number Extension numbers of meeting rooms, other divisions,
etc. can be registered.• External number
Mobile phone numbers, phone numbers of trip desti-nations, etc. can be registered.
• Voice mailBy setting the voice mail of an option to a forwardingdestination, you can use it as a voice messagerecorder. Refer to "Using Voice Message Recording".
Voice Mail Settings
Clicking (Voice mail settings) under (Function) in
the navigation window or clicking (Voice MessageRecording) icon in the status display area sets the voicemessage recording. The caller's message is recordedand saved on a PC by activating the voice messagerecording manually or answering the call automaticallyat an incoming call.
< Setting status notification of voice messagerecording >
• To use this function, set the service function inthe IP telephony server in advance. For details,contact the system administrator.
• The [Call forward - All Calls setting] icon lightsin blue when the Call forward - All Calls settingis available.The icon does not light when the Call forward -Busy, Call forward - Don't answer, or Call for-ward - Logout setting is available.
• If your system requires input of an additionalnumber such as "0" before the phone numberfor placing an outbound call, make sure to inputthe additional number before the phonenumber of the forwarding destination.Example: To forward a call to an external
number "03-1234-5678", input"00312345678".
- When Softphone starts and when theforwarding setting panel opens, theforwarding destination information actuallyset at the time is automatically read. Thus,the characters "Forwarding" and the phonenumber of a forwarding destination may bedisplayed in the LCD.
- The forwarding destination informationautomatically read is checked with thesetting contents in each forwarding settingtab of Softphone. When there is a match, theinformation is checked. In addition, theinformation is displayed in the current settingtab. However, the phone number of theforwarding destination automatically read isup to the first eight digits. If a forwardingdestination number whose first eight digitsare the same exists in the same forwardingtab, the upper forwarding destination isselected, which may be different from theforwarding number actually set.
• Up to five forwarding destinations can be regis-tered. However, If a forwarding destination isset from other than the [Call forward settings]screen and it does not exist in the five destina-tion numbers registered in advance, it is over-written in the fifth forwarding destinationnumber.
• Make sure to cancel the forwarding settingbefore changing a forwarding destination.
Icon Function Name
Operation
Voice mes-sage recording on
Indicates the voice message recording is on.
Voice mes-sage recording off
Indicates the voice message recording is off.
Voice mes-sage recording disabled
Indicates the voice message recording is disabled.
Click
Click
<Navigation window> or
<Status display area>

28
About the Standard Skin
Phone Book
Clicking (Phone book) under (Function) in thenavigation window displays the phone book. A call canbe originated/transferred to the party selected on thephone book.
10-key
Clicking (10-key) under (Function) in the navi-gation window displays the 10-key Keypad. This panel isused to input phone numbers.The number input by the 10-key Keypad is displayed onthe top of the LCD.
< LCD number display >
• When a call is answered automatically by thevoice message recording, the log type is"Incoming (no answer)", and the [Missed Call]icon is displayed.
• During originating a call or on the phone, theicon is displayed, but enabling/disabling thevoice message recording is not allowed. Click-ing the icon at this moment generates a warn-ing beep.
• When the collaboration with a telephone isused, the [voice message recording disabled]icon is displayed. When the handset switchingis enabled, an icon other than the [voice mes-sage recording disabled] icon is displayed.
• Clicking the [Voice Message Recording] iconwhile a call is incoming, an answering messageis played.
• In the case of VPCC mode, this function cannotbe used.
• Softphone must be restarted when the informa-tion retrieval software is changed.
• [Microsoft Outlook], which must be installed, can be specified.
• When Softphone is used by collaborating with Microsoft Outlook, refer to "How to Collaborate with Microsoft Outlook".
• In the following cases, [Specify the DefaultSearch Target] of [User Operation] in the [Userconfigurations] screen is disabled.- When Microsoft Outlook is installed and
[Microsoft Outlook] is selected in [Informa-tion retrieval software] of [Phone Book] in the [User configurations] screen.
In addition, (Phone book) button on themain panel becomes the button exclusively forstarting the application selected in [PhoneBook] in the [User configurations] screen.
Click
<Main panel>
<10-key Keypad>
When keys areclicked
<10-key Keypad>
LCD displaysthem.

29
About the Standard Skin
Import/Export
Clicking (Import/Export) under (Function) in thenavigation window displays the [Import/Export Wizard]screen.Data formats that can be input/output are as follows.• Contacts/data meeting information:XML format• Outgoing/incoming log information:CSV format• Environmental setting information:INI formatFor details, refer to "Import/Export".
< Description of each area >
[Import/export selection]
Click
<Main panel>
<Import/Export Wizard screen>
No. Button Name Description
(1) [Back] button Returns to the previous step. The button is dis-abled in the first step.
(2) [Next] button Proceeds to the next step.
(3) [Cancel] button Cancels the import/export operation.
(4) Area to select import/export
Select [Import] or [Export].
• Data exported by DtermSP30 cannot beimported to SP350.
• When contacts are imported by [Add], the datais added to the bottom.
• When the file type is [Environmental setting],the addition method is [Replacement] only.
• "Maintenance settings" are included in[Environmental setting] of the target function.
• In the case of VPCC mode, data conferenceinformation cannot be imported/exported.

30
About the Standard Skin
Display patterns available for Softphone are launcherdisplay, LCD display, and no display.To change the display, click each button as shownbelow.
The main panel can be enlarged in vertical and horizon-tal directions.When the main panel is enlarged, only the navigationwindow and browse window on the main panel (indi-cated by a red dotted line) are enlarged.
Changing the Display
Click
Click
<Non-display (at SP350 startup)>
<LCD display>
<Launcher display (Display all)>
Enlarging the Main Panel
Drag a side line of the panel:Changes the horizontal size
Drag the lower right corner of the panel:Changes the horizontaland vertical sizes
Drag the top or bottom line of the panel:Changes the vertical size
Main panel (before size change)
Main panel (after size change)

31
About the Standard Skin
Task Tray - IconsWhile Softphone is minimized to the task tray as an icon,you can see the status such as idle, on the phone, andincoming call. In addition, by right-clicking the icon, youcan perform operations such as the version informationdisplay, help, restart, and exit.The icon is displayed as follows according to the statusof Softphone.
Menu Items and UsageRight-clicking the icon displays the following menus.
Minimizing the Main Panel
To display the main panelClick on the task tray.The main panel is displayed as before it is mini-mized to the task tray.
To display the main panel with the [Ctrl]keyA setting is necessary.For details, refer to "Using the [Ctrl] Key to Dis-play the Main Panel from the Task Tray".
When a call is incomingThe ringtone sounds, and the display of theicon changes.
Click
Icon Meaning
Standby status (idle status)
A call is incoming to your phone (prime line) (Depending on the setting, the main panel is automatically displayed as before it is minimized to the task tray.)
A call is incoming to another phone (other than the prime line)
On the phone
On the phone (encryption enabled)
A call is incoming to another phone while you are on the phone
A call is incoming to another phone while you are on the phone (encryption enabled)
Menu Name Description
VersionUse this menu to display the version of Softphone.
GuideUse this menu to display the Quick Ref-erence of Softphone.
RestartUse this menu to exit and restart Soft-phone.
Exit Use this menu to exit Softphone.

32
About the Toolbar Skin
When selecting the toolbar skin, you can use Softphonewithout overlapping other application windows.For how to select the toolbar skin, refer to "Changing thePanel Design".
Main Panel
The toolbar skin consists of five areas and has buttonsfor various settings, presence display, answering, andcalling.This section describes the name and function of eachbutton.
Toolbar Skin - ComponentsFor description of each button, refer to the description ofthe corresponding button in "Main Panel - Components"in "About the Standard Skin".
About the Toolbar Skin
Name and Function of EachComponent on the Toolbar Skin
Launcher area
LCD areaStatus notification
area
Input areaPhone function
area
To use undisplayed buttonsClick (Function list button). From thedisplayed menu, select the function you want touse.Note that the navigation window are not displayedwhen the toolbar skin is in use. To display them,switch the panel design to the standard skin.For details, refer to "Changing the Panel Design".
To change the display order of theareasYou can change the display order.For details, refer to "Changing the Position ofAreas".
While the toolbar skin is being displayedThe icon is not displayed on the taskbar.
The LCD Area is hidden as default. To use it,change the mode to display.For details, refer to "Displaying the LCD Area".
Components Name
Message Wating Lamp
Minimize button
Exit button
Call/Transfer button (Call/transfer number inputting area)
Serch target button (Search key-word input area)
Presence
Missed Call icon
IM Reception icon
Call Forward - All Calls setting icon
Voice Message Recording icon
PC Recording icon

33
About the Toolbar Skin
Data Meeting icon
File Transfer
Call/Answer button
Mute
Volume Control button
End call button
Start
Contacts
Favorites
Line
Fixed function
Outgoing calls
Incoming calls
Outgoing IM
Incoming IM
Search results
User configurations
Send IM
Chat History
Forwarding Settings
Voice mail settings
Phone book
Components Name
10-key
Import/Export
Command list button
To control volumeClick (Volume control button) to display theVolume Control screen. You can control thevolume on this screen with the same operation asthe standard skin.For details, refer to "About Volume Control".To close the Volume Control screen, click
(Volume control button) again.
• In the case of VPCC mode, the Voice Mail Set-tings icon, the Data Conference icon, FileTransfer and Voice Mail Settings are not dis-played.
• In the case of VPCC mode, the PC recordingicon is not displayed depending on the type ofthe thin client terminal. For details, contact thesystem administrator.
Components Name

34
About the Toolbar Skin
The toolbar skin can be located at the top or bottom ofthe PC screen.
Changing the Display Position
1 Point the cursor at the left edge of thetoolbar skin.
2 Drag the toolbar skin to the top or bottomof the PC screen.
While Softphone is not in use or while using otherapplications, you can hide the toolbar skin automatically.You can also display the toolbar skin always in front ofother application windows.
Switching Modes between Displayand Hide
1 Right-click on the left edge of the toolbarskin.The following menu appears.
2 Click [Auto Hide].The hidden panel appears when you bring the cursorcloser to the toolbar skin.
Display Position of the ToolbarSkin
• Do not place the panel at the position wherethe Windows taskbar is located. Otherwise thepanel may not be normally displayed.
• In the multi-display environment, the panel canbe placed on any screen. Note that the panelcannot be placed crossing over two or morescreens.
Point the cursor at theleft edge and drag it.
Hiding the Toolbar SkinAutomatically
If you don't want to display the panelalways in front of other applicationwindowsIn the above Step 2, click "Always on Top".
To minimize the toolbar skin to the tasktrayClicking the Minimize button minimizes the tool-bar skin to the task tray. If the browse window orvolume control screen is displayed at this time,they are also minimized to the task tray.
Bring the cursor closerto the toolbar skin.

35
About the Toolbar Skin
You can hide the NEC logo on the toolbar skin asneeded.The following part can be displayed/hidden.
Switching Modes between Displayand Hide
1 Right-click on the left edge of the toolbarskin.The following menu appears.
2 Click [Logo].
You can switch the display mode of the LCD area on thetoolbar skin between display and hide as needed.The following part can be displayed/hidden.
Switching Modes between Displayand Hide
1 Right-click on the left edge of the toolbarskin.The following menu appears.
2 Click [LCD Area].
Hiding the NEC Logo Displaying the LCD Area
• The LCD area is hidden as default.• Only one line can be displayed in the LCD
area. Information of two lines is displayed bythe following way as default.- When both 1st line and 2nd line have
information to be displayed, they arealternately displayed at regular intervals(about one second).
- When either 1st line or 2nd line hasinformation to be displayed, only the line withinformation is displayed.
You can give priority on 1st line rather thanalternate display. For details, refer to "Setting LCD Area Not toProvide Alternate Display".

36
About the Toolbar Skin
You can switch the display mode of the statusnotification area on the toolbar skin between display andhide as needed.You can also switch the display mode for each icon notonly the whole area.The following part can be displayed/hidden.
Switching Modes between Displayand Hide
1 Right-click on the left edge of the toolbarskin.The following menu appears.
2 Select [Status Indicators].The submenu appears.
3 Click [Status Indicators].
You can switch the display mode for the input area onthe toolbar skin as needed.The following part can be displayed/hidden.
Switching Modes between Displayand Hide
1 Right-click on the left edge of the toolbarskin.The following menu appears.
2 Click [Input box].
Hiding the Status NotificationArea/Icons
To hide the icons on the statusnotofication areaIn the above Step 3, click the icon name you wantto hide.
Hiding the Input Area
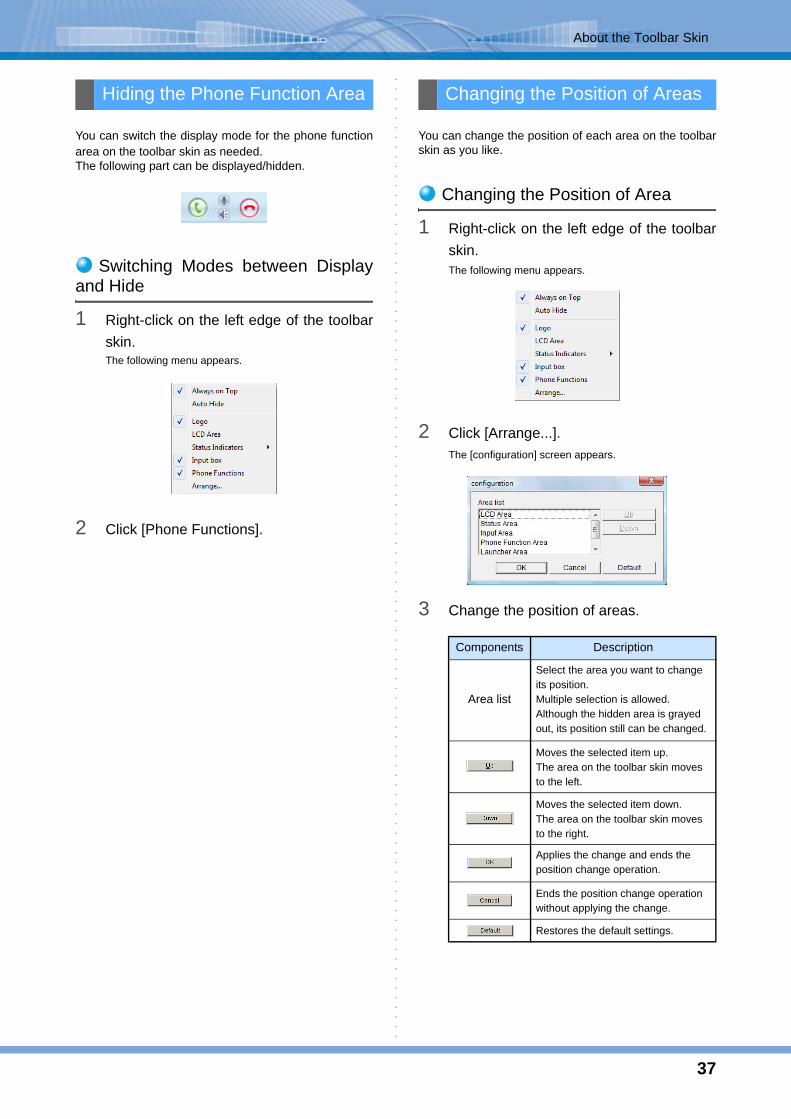
37
About the Toolbar Skin
You can switch the display mode for the phone functionarea on the toolbar skin as needed.The following part can be displayed/hidden.
Switching Modes between Displayand Hide
1 Right-click on the left edge of the toolbarskin.The following menu appears.
2 Click [Phone Functions].
You can change the position of each area on the toolbarskin as you like.
Changing the Position of Area
1 Right-click on the left edge of the toolbarskin.The following menu appears.
2 Click [Arrange...].The [configuration] screen appears.
3 Change the position of areas.
Hiding the Phone Function Area Changing the Position of Areas
Components Description
Area list
Select the area you want to change its position.Multiple selection is allowed.Although the hidden area is grayed out, its position still can be changed.
Moves the selected item up.The area on the toolbar skin moves to the left.
Moves the selected item down.The area on the toolbar skin moves to the right.
Applies the change and ends the position change operation.
Ends the position change operation without applying the change.
Restores the default settings.

38
About the Toolbar Skin
Clicking a button such as Lines, Assigned Functions,Outgoing Log, or Incoming Log pops up the browsewindow near the button.Example: When clicking (Lines)
Enlarging the Browse Window
The browse window can be enlarged heightwise andwidthwise freely. However, you cannot move the windowapart from the toolbar skin.
Closing the Browse WindowTo close the browse window, perform any of thefollowing operations.• Click (Close button) located in the upper right
corner of the window.• Click the button whose browse window is being
displayed again.* Unless the window has been activated through the
Missed Call icon or IM Reception icon.• Click another button to display another browse
window. (The currently displayed browse window willbe closed and the browse window for the clickedbutton will appear instead.)
Browse Window of the ToolbarSkin

39
About the Toolbar Skin
The standard skin has Call/transfer number input areaand Search keyword input area separately, however,these two areas are unified into one area on the toolbarskin.
Using the Input AreaClicking (Call/Transfer button) after inputting aphone number places/transfers a call.Clicking (Search start button) or (Searchtarget button) after inputting a search keyword searchesphone book/contacts/logs for the data and displays thesearch result.
Selecting the Preferred Function
On the [User configurations] screen, you can selecteither [Call/Transfer Function] or [Retrieval Function] asthe preferred function. [Retrieval Function] is set bydefault.For details, refer to "Selecting the Preferred Function forthe Input Area".You can perform the following operations if the preferredfunction is set.• After a search keyword or phone number is input, the
function can be executed just by pressing the [Enter]key.
• Input history can be displayed by clicking(Recent Input button) at the right of the input
area.
External applications/files or function buttons forSoftphone can be registered to the launcher of the tool-bar skin with the same operation as the standard skin.For details, refer to "How to Use the Launcher".
Input Area on the Toolbar Skin
When using the non-preferred function• The function can be executed by pressing the
[Enter] key with holding the [Shift] key afterinputting a phone number or search keyword.
• Input history cannot be displayed.
Search target button
Call/transfer number button Searchstart button
Launcher on the Toolbar Skin
Difference from the launcher of thestandard skinThe following are the differences between thetoolbar skin and the standard skin.• Up to 30 buttons can be registered to the
launcher of the toolbar skin.• To use buttons that are not displayed on the
toolbar skin, click (Function List Menubutton) and select the function you want to usefrom the displayed menu.
・ Items registered to each launcher are recordedseparately for the the toolbar skin and thestandard skin. They are not inherited when thepanel design is changed.
• By default, all Softphone functions havealready been registered to the launcher of thetoolbar skin.

40
About Volume Control
You can control the ring volume and earpiece volume tonine levels, respectively.
• Control the ring volume while receiving a call or inthe idle state.• Control the earpiece volume while talking or placinga call.
You can block all sounds including your voice from beingtransmitted to the caller.
1 Click (Mute button).The [Mute] button blinks in blue, and your voice is mutedon the other side.Clicking the [Mute] button again restores to the formerstate.
About Volume Control
Controlling Volume
All the volume indicators blink in red oryellow while using the USB handset(recommended) as a Softphonereceiver.Due to network congestion or other reason,speech quality is getting lower. Blinking indicatesthe following.• Blinking in red --- Transmission quality is get-
ting lower.• Blinking in yellow --- Reception quality is getting
lower.Blinking will be cleared when the communicationquality is recovered.
The volume indicators may blink in blue only inthe case of VPCC mode.• Blinking in blue --- A communication error has
occurred between server terminals. Blinking willstop after recovering from the communicationerror. For details, refer to "When a Communica-tion Error Has Occurred Between Server Termi-nals."
You can control the ring volume to three levelsdepending on the USB handset (recommended)to be used.For the type of handset to be used, contact thesystem administrator.
Click
Click
UP
down
Using Mute

41
Placing a Call
This section describes how to place a call in variousways.
Dialing after Checking the InputPhone NumberYou can check if the input phone number is correctbefore placing a call.
1 Click the Call/transfer number inputtingarea.The cursor blinks.
2 Type the number to call using the key-board.The typed number is displayed in the Call/transfernumber inputting area.
3 Press the [Enter] key or click (Call
button).You hear the ringback tone.
4 Start a conversation after the other partygets on the line.
Click (End call button) to disconnect thecall.
When you want to call someone you called before, youcan redial easily.
Redialing the Last Number Dialed
1 Right-click (Call/Answer button).The following menu appears.
2 Click [Last number call].The last number you called is displayed on the LCD andyou hear the ringback tone.
3 Start a conversation after the other partygets on the line.
Click (End call button) to disconnect the call.
Placing a Call
Inputting the Phone Number
If your system requires input of an additionalnumber such as "0" before the phone number forplacing an outbound call, make sure to input theadditional number before the phone number.Example: To place a call to an external line "03-
1234-5678", input "00312345678".
If you use the USB handset (recommended)Lift the handset now.
If the typed number was wrongPress the [Back space] or [Delete] key to deletethe wrong number, and then retype the correctnumber.
To make a pause between numbersType "," (comma). One "," (comma) makes apause for 2 seconds.
To place a call using the 10-key KeypadClick (Call/Answer button) and input thenumber using the 10-key Keypad.For how to display the 10-ley Keypad, refer to"10-key".
Redialing
If you use the USB handset (recommended)Lift the handset now.
If the last number you called has any pauses, thepauses will be cleared when redialing in theabove way.

42
Placing a Call
Redialing from the Recent Input ListSoftphone stores up to 32 numbers which were called byusing Call/transfer number inputting area. You can usethese numbers to redial easily.
1 Click (Recent Input button).The Recent Input list appears.
2 Select the number to call from the list.
3 Click (Call button).You hear the ringback tone.
4 Start a conversation after the other partygets on the line.
Click (End call button) to disconnect the call.
You can place a call using the call history.
Dialing from the Call HistoryThis section describes how to place a call using
(Incoming calls).
1 Click (Incoming calls) in (Call history).The [Incoming calls] screen is displayed.
2 Click the history of the party to call.The detail data is displayed.
3 Click (Phone number) in the detaileddata.You can also get the same result by the following opera-tions.• Double-click the phone number in the detailed data
(option setting is required).• Press the [Enter] key with the number selected.• Select [Call/Transfer(M)] from the right-click menu.
The following confirmation dialog appears.
4 Click .The number of the other party is displayed on the LCDand you hear the ringback tone.
5 Start a conversation after the other partygets on the line.
Click (End call button) to disconnect thecall.
If you use the USB handset(recommended)Lift the handset now.
Dialing from the Call History
If you use the USB handset (recommended)Lift the handset now.

43
Placing a Call
You can check if the other party is currently available foryour call before placing a call. Current status of the otherparty can be checked by the presence mark on the con-tacts list or presence status shown after the name.
The meaning of each mark is as follows.
For how to use Contacts, refer to "Checking the Pres-ence Status of a Contact".
1 Click (Contacts).The contacts List screen is displayed on the browse win-dow.
2 Click at the top of Contacts toopen the detailed information.
3 Click the party to call.You can also place a call by right-clicking on the partyname to call and clicking [Call/Transfer(M)] on the dis-played menu.
4 Click (Phone number).A confirmation message appears.
5 Click .The number of the other party is displayed on the LCDand you hear the ringback tone.
6 Start a conversation after the other partygets on the line.
Click (End call button) to disconnect the call.
Dialing from the Contacts List
The other party's status shown in the contacts listcan be displayed only when using the presenceserver function of the options. For details, contactthe system administrator.
Mark Name Description
Idle Indicates that the party is online.
Leaving seat
Indicates that the party is not at the seat. If the reason has been set, it is also shown after the name.
BusyIndicates that the party is currently on the phone.
AbsentIndicates that the terminal of the party is not running. If the reason has been set, it is also shown after the name.
Unconfirmed
Indicates that the number of the party is not compliant with the presence server function. This icon is also shown for contacts to which the Phone number 1 has not been set.
Click
If you use the USB handset (recommended)Lift the handset now.
To add a number to the beginning of thephone number of the clicked memberbuttonThe number to be added can be set in [Call] in[User configurations] in advance.For details, refer to "Dialing after Adding a Num-ber to the Beginning of the Phone Number".

44
Placing a Call
You can place a call using a contact in Microsoft Outlook or a phone number included in a received E-mail.
1 Display the application/file's screen thatincludes the number to call.
2 Drag and drop the phone number
onto (Call/Answer button).The number of the other party is displayed on the LCDand you hear the ringback tone.
3 Start a conversation after the other partygets on the line.
Click (End call button) to disconnect the call.
You can copy a phone number to place a call easily.
1 Display the screen in which the phonenumber to call is displayed.
2 Highlight the phone number to select.
3 Right-click on the selected phone numberand click [Copy] on the displayed menu.
4 Right-click on (Call/Answer button)The following menu appears.
5 Click [Clipboard Call/Transfer to "].The phone number which was copied in Step 3 is dis-played in “.
The number of the other party is displayed on the LCDand you hear the ringback tone.
6 Start a conversation after the other partygets on the line.
Click (End call button) to disconnect the call.
Dialing from the Contact Infor-mation/E-mail Received
This function is not available when a phone num-ber cannot be dragged and dropped like OutlookExpress.In this case, refer to "Copying a Phone Number".
If you use the USB handset (recommended)Lift the handset now.
To add a number to the beginning of thedragged phone numberThe number to be added can be set in [Call] in[User configurations] in advance.For details, refer to "Dialing after Adding aNumber to the Beginning of the Phone Number".
Copying a Phone Number
If you use the USB handset (recommended)Lift the handset now.
To add a number to the beginning of thecopied phone numberThe number to be added can be set in [Call] in[User configurations] in advance.For details, refer to "Dialing after Adding aNumber to the Beginning of the Phone Number".
To make a pause between numbersType "," (comma). One "," (comma) makes apause for 2 seconds.

45
Placing a Call
You can select a phone number displayed in anotherapplication to place a call easily.
1 Select (highlight) the phone number tocall.
2 Originate a call as you set in [User config-urations].The number of the other party is displayed on the LCDand you hear the ringback tone.
3 Start a conversation after the other partygets on the line.
Click (End call button) to disconnect the call.
Selecting a Phone Number Dis-played in Another Application
• To use this function, user settings are requiredin advance.For details, refer to "Dialing by Clicking on aPhone Number in Another Application".
• To use this function, set the middle mouse but-ton as the "middle button" as default.
• This function uses the clipboard. You cannotuse this function with application which cannotcopy texts.
• Operation with the following applications hasbeen confirmed.- Internet Explorer6.0/7.0/8.0/10.0- Outlook Express- Adobe Reader 6.0/7.0/8.0/9.0/10- Microsoft Outlook- Microsoft PowerPoint- Microsoft Word- Microsoft Excel- WeMail32 (e-mail program)- Becky! (e-mail program)- When Acrobat Reader with protected mode
enabled is used, this function may not beused.
To check the other party's phone num-ber before originating a messageThe following confirmation dialog can be dis-played to check the number to call before theorigination.For details, refer to "Displaying a ConfirmationDialog When Dialed by Clicking on Another Appli-cation".
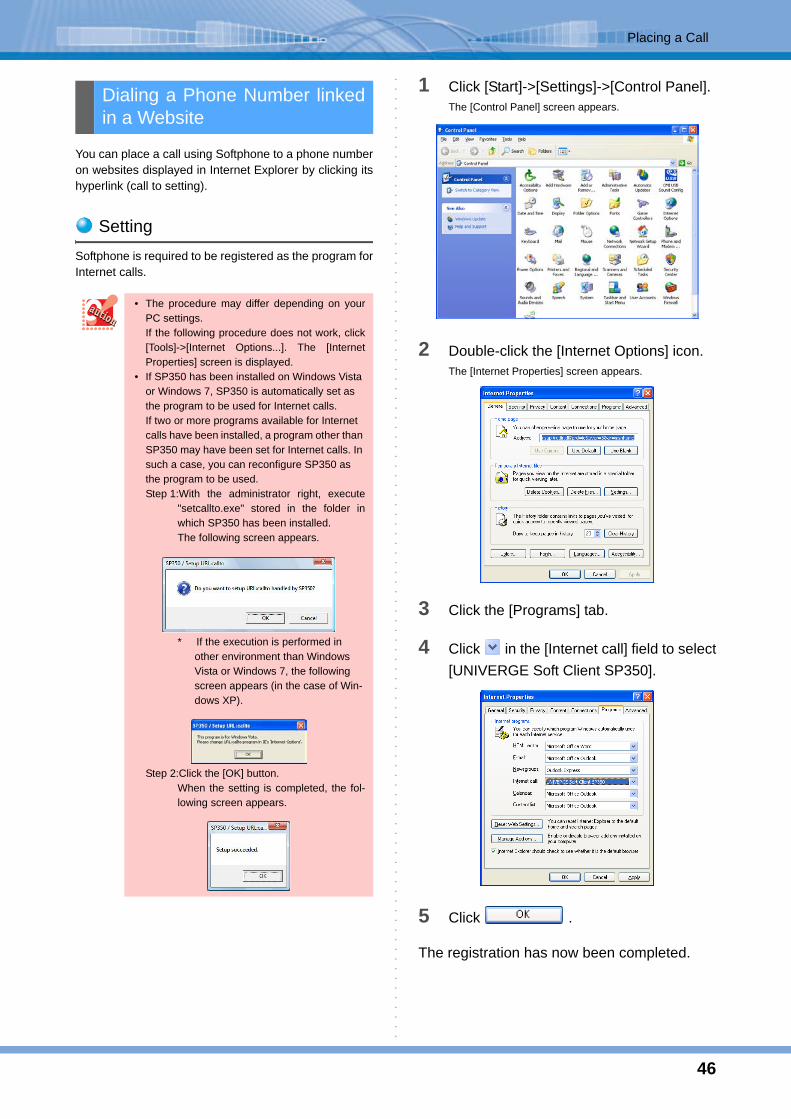
46
Placing a Call
You can place a call using Softphone to a phone numberon websites displayed in Internet Explorer by clicking itshyperlink (call to setting).
SettingSoftphone is required to be registered as the program forInternet calls.
1 Click [Start]->[Settings]->[Control Panel].The [Control Panel] screen appears.
2 Double-click the [Internet Options] icon.The [Internet Properties] screen appears.
3 Click the [Programs] tab.
4 Click in the [Internet call] field to select[UNIVERGE Soft Client SP350].
5 Click .
The registration has now been completed.
Dialing a Phone Number linkedin a Website
• The procedure may differ depending on yourPC settings.If the following procedure does not work, click[Tools]->[Internet Options...]. The [InternetProperties] screen is displayed.
• If SP350 has been installed on Windows Vista or Windows 7, SP350 is automatically set as the program to be used for Internet calls.If two or more programs available for Internet calls have been installed, a program other than SP350 may have been set for Internet calls. In such a case, you can reconfigure SP350 as the program to be used.Step 1:With the administrator right, execute
"setcallto.exe" stored in the folder inwhich SP350 has been installed.The following screen appears.
* If the execution is performed in other environment than Windows Vista or Windows 7, the following screen appears (in the case of Win-dows XP).
Step 2:Click the [OK] button.When the setting is completed, the fol-lowing screen appears.

47
Placing a Call
Dialing
1 Display the website.
2 Click the hyperlink of the phone number.The number of the other party is displayed on the LCDand you hear the ringback tone.
3 Start a conversation after the other partygets on the line.
Click (End call button) to disconnect the call.
You can place a call easily by selecting a phone numberon websites displayed in Internet Explorer.
1 Select (highlight) the number to call.
2 Right-click on the selected number.The following menu appears.
3 Click [Call by SP350].The number of the other party is displayed on the LCDand you hear the ringback tone.
4 Start a conversation after the other partygets on the line.
Click (End call button) to disconnect the call.
If you use the USB handset (recommended)Lift the handset now.
To add a number to the beginning of theclicked phone numberThe number to be added can be set in [Call] in[User configurations] in advance.For details, refer to "Dialing after Adding aNumber to the Beginning of the Phone Number".
Selecting a Phone Number Dis-played in a Website
To check the other party's phone num-ber before originating a messageThe following confirmation dialog can be dis-played to check the number to call before theorigination.For details, refer to "Displaying a ConfirmationDialog When Dialing from the Context Menu".

48
Placing a Call
You can place a call using search results.For how to search, refer to "How to Use Search".
1 After searchThe search result is displayed in the browse window.
2 Click the party to call.The detailed data is displayed.
3 Click (Phone number) of the party tocall.You can also get the same result by the following opera-tions.• Double-click a phone number displayed in the
detailed data.• Press the [Enter] key when selecting a phone number
in the detailed data.• Select [Call/Transfer(M)] from the right-click menu.
The following confirmation dialog appears.
4 Click .
5 Start a conversation after the other partygets on the line.
Click (End call button) to disconnect thecall.
Dialing from the Search Results To add a number to the beginning of thephone number of the clicked memberbuttonThe number to be added can be set in [Call] in[User configurations] in advance.For details, refer to "Dialing after Adding a Num-ber to the Beginning of the Phone Number".

49
Receiving a Call
This section describes how to receive a call in variousways.
You can tell whether an incoming call is an internal callor an external call by the ringtone.• Receiving an internal call -- longer ringtone• Receiving an external call -- shorter ringtone
1 (Message Waiting Lamp) blinks in red andSoftphone rings.When the phone book specified for "Information retrieval software" in [User configurations] is installed, the Caller Information Panel pops up to display the caller's com-pany name, department name, name, and caller number obtained by automatic search in the address book. How-ever, when "Use Contact Data In Information Retrieval" is enabled in [User configurations], the Contacts infor-mation is given priority.
The number of characters that can be displayed on theCaller Information Panel• Company name
Up to 34 characters• Department name
Up to 34 characters• Name
Up to 34 characters• Number
Up to 24 characters
2 Click (Start) on the navigation win-dow.The start screen is displayed on the browse window.
3 Click (Answer icon).The status display changes to "Busy".
4 Talk with the other party.
Click (End call button) to disconnect the call.
Receiving a Call
Receiving a Call for You (PrimeLine)
To change the ringtoneThe ringtone for internal and external call can bechanged to your favorite one.For details, refer to "Changing the Ringtone".
To change the ringtone for a frequentlycalling partyYour favorite ringtone can be set for calls from theparty registered as a member.For details, refer to "Setting the Ringtone Pat-terns".
• If there is no data in the phone book,then only the number is displayed.
• If the caller number is not notified,"Caller number not notified" is displayedin the number field.
Search is not properly performedfor the phone book.The exchange number registration may berequired depending on the registrationinformation of the phone book. For details,contact the system administrator.
To close the Caller InformationPanel automaticallyThe displayed Caller Information Panel canbe closed automatically when a call is dis-connected.For details, refer to "Closing the CallerInformation Panel Automatically".
When (Call/Answer button)is usedClick the Call/Answer button now to talkwith the caller.
If you use the USB handset(recommended)Lift the handset now.

50
Receiving a Call
You can receive a call for another person in your group.
Using Start
1 A call for another person is incoming.
2 Click (Start) on the navigation win-dow.The start screen is displayed on the browse window."Incoming" is displayed for the extension number for the incoming call.
3 Click (Answer icon).The status display changes to "Busy".
When the phone book specified for "Information retrieval software" in [User configurations] is installed, the Caller Information Panel pops up to display the caller's com-pany name, department name, name, and caller number obtained by automatic search in the address book. How-ever, when "Use Contact Data In Information Retrieval" is enabled in [User configurations], the Contacts infor-mation is given priority. For details, refer to Step 1 in "Receiving a Call for You (Prime Line)".
4 Talk with the other party.
Click (End call button) to disconnect the call.
Receiving a Call for AnotherPerson (Subline)
If you receive an incoming call for the prime linewhile answering a subline, the Caller InformationPanel is not displayed until you answer the call ordisconnect the subline call. The displayed panelis not updated (the panel during the call remainsunchanged.)
If you use the USB handset(recommended)Lift the handset now.
To switch to the start screen auto-matically for an incoming callThe browse window can be switched to thestart screen automatically when a call isincoming. For details, refer to "Switchingthe Browse Window to Start for anIncoming Call or a Call on Hold".
To add a number to the beginning of thephone number of the clicked memberbuttonThe number to be added can be set in [Call] in[User configurations] in advance.For details, refer to "Dialing after Adding aNumber to the Beginning of the Phone Number".

51
Receiving a Call
Using Lines
1 A call for another person is incoming.
2 Click (Line) in (Telephone function) on the navigation window.The lines are displayed and the internal line with incom-ing call blinks in red.
3 Click the line button blinking in red.The clicked line button lights in blue.
4 Talk with the other party.
Click (End call button) to disconnect the call.
Using the Handset
1 A call for another person is incoming.
2 Lift the handset.
3 Talk with the other party.
Click (End call button) to disconnect the call.
If you use the USB handset(recommended)Lift the handset now.
To display the other party's name on theline panelTo identify who is placing an internal call easily,the name can be displayed by moving the cursorcloser to a button.For details, refer to "Using the Phone FunctionMenu".
To confirm who the call is forbefore answeringClick the function key.The internal line with incoming call blinks inred.
This function is available for the specifiedUSB handset. For details, contact the sys-tem administrator.
• To use this function, user setting isrequired in advance.For details, refer to "Receiving a Call forAnother Person Only by Lifting the Handset".
• If there are two or more incoming calls forother internal lines, the answering orderdepends on the setting of the IP tele-phony server. For details, contact the systemadministrator.
To place a call while a call is incomingfor another internal lineClick the Talk button or line button and then lift thehandset.

52
Receiving a Call
Using the Function Keys of the Handset
1 A call for another person is incoming.
2 Lift the handset.
3 Press a function key (F1, F2, F3, or F4) towhich the answering function is regis-tered.
You have now answered an incoming call for asubline.
To use this function, the answering function needsto be registered to a function key in advance.For details, refer to "USB Handset - How to Use the Function Keys Setting Tool (HandsetConfig)".

53
Placing a Call on Hold/Transferring a Call
This section describes how to place an internal or exter-nal call on hold and how to transfer a call to another per-son.
There are two ways of placing a call on hold.• Placing a call on hold
A call on hold can be picked up by any phone in thegroup.
• Placing a call on exclusive holdA call on hold can be picked up only by the phone thathas placed the call on hold.
Enabling Anyone to Pick Up a Callon HoldA call on hold can be picked up by any phone in thesame group.
< Placing a call on hold >
1 You are on the phone.
2 Click (Hold button).The other party hears the holding melody.
The call has now been placed on hold.
< Picking up a call on hold on the prime line >1 A call is on hold.
2 Click (Call/Answer button) / (Answer
button).
3 Talk with the other party.
Click (End call button) to disconnect the call.
< Picking up a call on hold on a line other thanthe prime line >
1 A call is on hold.
2 Click the button of the line on hold.
3 Talk with the other party.
Click (End call button) to disconnect the call.
Enabling Only You to Pick Up a Callon Hold
- Exclusive Hold -
A call on hold cannot be picked up by phones other thanthe phone that has placed the call on hold.
< Placing a call on hold >
1 You are on the phone.
2 Right-click (Hold button).The following menu appears.
3 Click [Exclusive Hold].The other party hears the holding melody.
The call has now been placed on hold.
Placing a Call on Hold/Transferring a Call
Placing a Call on Hold
To change the holding toneThe holding tone you hear while a call is on holdcan be changed to a melody you like.For details, refer to "Changing the Holding Tone".
If you use the USB handset(recommended)Lift the handset now.
If you use the USB handset(recommended)Lift the handset now.

54
Placing a Call on Hold/Transferring a Call
< Picking up a call on hold >
1 A call is on hold.
2 Click (Call/Answer button) / (Answer
button).
3 Talk with the other party.
Click (End call button) to disconnect the call.
A call on group hold can be picked up with the USB handset.
1 Lift the handset.
2 Press the function key to which the grouphold function is registered (F1, F2, F3, orF4).
3 Press the group number to be answeredwithin four seconds.
The call on the specified group hold has nowbeen picked up.
You can transfer a call to another person.There are two ways of transferring a call.• Performing a direct transfer
During an active call, you verbally announce the call tothe transfer receiver, and then transfer the call to thereceiver.
• Performing a consultation transferDuring an active call, you place an internal call to thetransfer receiver to announce the incoming call, andthen transfer the call to the receiver.
Performing a Direct TransferYou transfer a call after verbally announcing the call tothe transfer receiver.
[Transfer sender]
1 You are on the phone.
2 Click (Hold button).The other party hears the holding melody.
3 Announce the call to the transfer receiververbally.
[Transfer receiver]
4 Click (Answer button).
Alternatively, click the line blinking in red after displaying
the line panel by clicking (Line) in (Telephonefunction) on the navigation window.
5 Talk with the other party.
Click (End call button) to disconnect the call.
If you use the USB handset(recommended)Lift the handset now.
Picking Up a Call on GroupHold
• To use this function, register the group holdfunction to a function key in advance.For details, refer to "USB Handset - How to Usethe Function Keys Setting Tool(HandsetConfig)".
• When five seconds or more have passed sincethe function key for the group hold function ispressed, the pressed number is treated not asa group number but as normal dial.
Transferring a Call
If you use the USB handset(recommended)Lift the handset now.

55
Placing a Call on Hold/Transferring a Call
Performing a Consultation TransferYou transfer a call to a person away from you after plac-ing a consultation call to advise the person of the incom-ing call.
[Transfer sender]
1 You are on the phone.
2 Click (Transfer button).The other party hears the holding melody.
3 Input the extension number of the transferreceiver.You hear the ringback tone for the internal call and thereceiver is called.
4 Advise the transfer receiver of the incom-ing call when the receiver gets on theline.
5 Click (End call button).
[Transfer receiver]
6 After answering the internal call, wait fora while.
7 When the transfer sender clicks (End
call button), the transfer receiver is auto-matically connected to the transferredcall.
8 Talk with the other party.
Click (End call button) to disconnect the call.
z
To transfer a call using ContactsClick (Contacts) on the navigationwindow in Step 1 or 2 and click the phonenumber of the transfer receiver. Then, go toStep 4.
To add a number to the beginningof the phone numberTo add a number to the beginning of thephone number of the clicked memberbutton, the number to be added can be setin [Call] in [User configurations] inadvance.For details, refer to "Dialing after Adding aNumber to the Beginning of the PhoneNumber".
To transfer a call without talking with thetransfer receiverAfter inputting the extension number of the trans-fer receiver and calling the receiver in Step 3,
click (End call button) before the transferreceiver answers your call. When the transfer
receiver clicks (Call/Answer button), thereceiver is connected to the transferred call. Atthis time, if the transfer receiver does not answeryour call or is in another call, clicking (Transferbutton) again can return the call back to you.

56
Configuring Your Call Forwarding
A call for you received when you are away or in anothercall can be forwarded to forwarding destinations regis-tered in advance. There are four ways of forwarding acall.• Call forward - All Calls
Forwards a call received when you are away.• Call forward - Busy
Forwards a call received when you are in another call.• Call forward - Don't answer
Forwards a call when you cannot answer the phoneeven though a certain period of time has passed sincethe ringtone sounds.
• Call forward - LogoutForwards a call received when you do not start Soft-phone or when your PC is turned off.
Numbers which can be registered as forwarding destina-tions are as follows.• Extension number Extension numbers of meeting rooms, other depart-
ments, etc. can be registered.• External number
Mobile phone numbers, phone numbers of trip desti-nations, etc. can be registered.
• Voice mailBy setting the optional voice mail for forwarding desti-nation, you can use it as a voice message recorder.Refer to "Using Voice Message Recording".
Configuring Your Call Forwarding
To use this function, set the service function in the IP telephony server in advance. For details, con-tact the system administrator.
When the IP telephony server doesn't use this function, this function tab becomes a gray out dis-play.
If your system requires input of an additionalnumber such as "0" before the phone number forplacing an outbound call, make sure to input theadditional number before the phone number ofthe forwarding destination.Example: To forward a call to an external number
"03-1234-5678", input "00312345678".• When Softphone starts and when the forward-
ing setting panel opens, the forwarding destina-tion information actually set at the time is automatically read. Thus, the characters "For-warding" and the phone number of a forward-ing destination may be displayed in the LCD.
• The forwarding destination information auto-matically read is checked with the setting con-tents in each forwarding setting tab of Softphone. When there is a match, the informa-tion is checked. In addition, the information is displayed in the [Present settings] tab. How-ever, the phone number of the forwarding desti-nation automatically read is up to the first eight digits. If a forwarding destination number whose first eight digits are the same exists in the same forwarding tab, the upper forwarding destination is selected, which may be different from the forwarding number actually set.

57
Configuring Your Call Forwarding
1 Click (Forwarding Setting button).The [Call forward settings] screen appears.
2 Click the forwarding type to be set.
Example: In case of Call forward - All CallsThe following screen appears.
3 Input a forwarding destination name andnumber in the [Name] field and [Number]field.Up to five forwarding destinations can be registered foreach forwarding type, and, among them, one destinationcan be set as the forwarding destination.Configurable number of characters:• Name
Up to 50 characters• Number
Up to 24 characters
4 Check the forwarding destination to bealways used.
5 Click .
6 Click .The forwarding setting button lights in blue (only whenthe Call forward - All Calls setting is available).
The forwarding has now been set.
Configuring Call Forwarding
When the IP telephony server doesn't use the function, the function tab becomes a gray out display. For details, contact the system administrator.
Up to five forwarding destinations can be registered. However, If a forwarding desti-nation is set from other than the [Call for-ward settings] screen and it does not exist in the five destination numbers registered in advance, it is overwritten in the fifth for-warding destination number.
A confirmation dialog can be displayed toprevent a mistake when the Call forward -All Calls setting is available.For details, refer to "Displaying Confirma-tion Message When Call Forward - AllCalls Setting Is Available".
The forwarding setting button lights in blue onlywhen the Call forward - All Calls setting is avail-able.The button does not light when the Call forward -Busy, Call forward - Don't answer, or Call forward- Logout setting is available.

58
Configuring Your Call Forwarding
1 Click (Forwarding Setting button).The [Call forward settings] screen appears.
2 Click the forwarding type to be canceled.
Example: In case of Call forward - All CallsThe following screen appears.
3 Click .
4 Click .The light of the forwarding setting button is turned off(only when Call forward - All Calls is canceled).
The forwarding configuration has now beencanceled.
1 Click (Forwarding Setting button).The [Call forward settings] screen appears.
2 Click the forwarding type for which tochange the forwarding destination.
Example: In case of Call forward - All CallsThe following screen appears.
3 Click .
4 Check the forwarding destination to beused.
Canceling a Call ForwardingConfiguration
Changing ForwardingDestinations
Make sure to cancel the forwarding configurationbefore changing the forwarding destination.

59
Configuring Your Call Forwarding
5 Click .
6 Click .The Forwarding Setting button illuminates in blue onlywhen Call forward.
The forwarding destination has now changed.
The forwarding setting status and forwarding destinationnumber for each forwarding type can be checked.
1 Click (Forwarding Setting button).The [Call forward settings] screen appears.
2 Click .The settings for each forwarding type are displayed.
When a forwarding type is set, the forwarding destina-tion name and forwarding destination number are dis-played.
Click to close the screen.
A confirmation dialog can be displayed toprevent a mistake when the Call forward -All Calls setting is available.For details, refer to "Displaying Confirma-tion Message When Call Forward - AllCalls Setting Is Available".
Up to five forwarding destinations can be regis-tered. However, If a forwarding destination is set from other than the [Call forward settings] screen and it does not exist in the five destination num-bers registered in advance, it is overwritten in the fifth forwarding destination number.
Viewing the Forwarding Desti-nations

60
Using a Handset Other Than the USB Handset
(Option)
A handset such as a PS and fixed phone can be used asa Softphone handset.
You can use an optional PS as a Softphone handset.* A VoWLAN dual terminal/VoWLAN terminal can be
used with the same operation as that for PS.
Placing a Call Using a PS(Collaboration with PS)You can use either a PS or Softphone to input the otherparty's number.
< Inputting the phone number using a PS >
1 Press the other party's number with thePS.
2 Press the [Talk] button of the PS.The LCD on Softphone displays the other party's num-ber and you hear the ringback tone from the PS.
3 Start a conversation after the other partygets on the line.Press the [End] button of the PS to terminate the call.
< Inputting the phone number using Soft-phone >
1 Click the Call/transfer number inputtingarea.The cursor blinks.
2 Type the number to call using the key-board.The typed number is displayed in the Call/transfernumber inputting area.
3 Press the [Enter] key.
4 Press the [Talk] button of the PS.Your hear the ringback tone from the PS.
5 Start a conversation after the other partygets on the line.
Press the [End] button of the PS to terminatethe call.
For other ways of placing a call, refer to "Placing a Call".
Receiving a Call Using a PS
< Receiving a call for you >
1 The PS rings.The line button for the extension number of the PS onSoftphone blinks in red.
2 Press the [Talk] button of the PS.
3 Talk with the other party.
Press the [End] button of the PS to terminatethe call.
Using a Handset Other Than the USB Handset
To use this function, the service function must be set at the IP telephony server in advance. For details, contact the system administrator.Note that the current version has the following restrictions.• There are two types of collaboration with
a telephone.a: Collaboration with a telephoneb: No collaboration with a telephone- In above a, if you use a PS or fixed phone as
a handset for collaboration, start Softphonebefore using the handset.
- In above a, if you switch the handset for col-laboration with Softphone to the one con-nected to the PC, it is regarded as above b.
- In above a, a data meeting is disconnectedwhen a handset for collaboration with Soft-phone is disconnected.
- When the other party is in above a, specifythe number for the handset for collaborationwith Softphone to transmit an IM.
• When you switch the handset for collaborationwith Softphone to the one connected to the PCand use the handset for collaboration for a call,the following services are not available.- Services during a call such as hold and for-
warding using Softphone- Data meeting
Using a PS (PHS/PCS)
Click
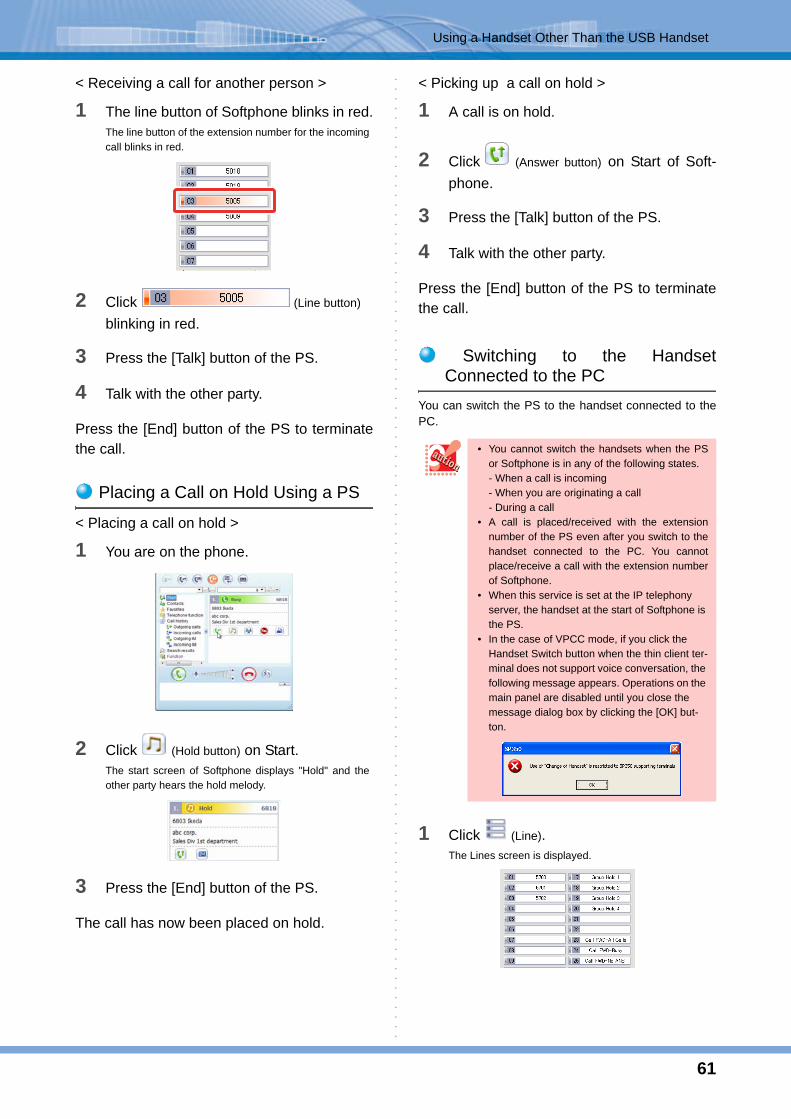
61
Using a Handset Other Than the USB Handset
< Receiving a call for another person >
1 The line button of Softphone blinks in red.The line button of the extension number for the incomingcall blinks in red.
2 Click (Line button) blinking in red.
3 Press the [Talk] button of the PS.
4 Talk with the other party.
Press the [End] button of the PS to terminatethe call.
Placing a Call on Hold Using a PS
< Placing a call on hold >
1 You are on the phone.
2 Click (Hold button) on Start.The start screen of Softphone displays "Hold" and theother party hears the hold melody.
3 Press the [End] button of the PS.
The call has now been placed on hold.
< Picking up a call on hold >
1 A call is on hold.
2 Click (Answer button) on Start of Soft-phone.
3 Press the [Talk] button of the PS.
4 Talk with the other party.
Press the [End] button of the PS to terminatethe call.
Switching to the HandsetConnected to the PC
You can switch the PS to the handset connected to thePC.
1 Click (Line).The Lines screen is displayed.
• You cannot switch the handsets when the PSor Softphone is in any of the following states.- When a call is incoming- When you are originating a call- During a call
• A call is placed/received with the extensionnumber of the PS even after you switch to thehandset connected to the PC. You cannotplace/receive a call with the extension numberof Softphone.
• When this service is set at the IP telephony server, the handset at the start of Softphone is the PS.
• In the case of VPCC mode, if you click the Handset Switch button when the thin client ter-minal does not support voice conversation, the following message appears. Operations on the main panel are disabled until you close the message dialog box by clicking the [OK] but-ton.

62
Using a Handset Other Than the USB Handset
2 Click (Handset
switch button).The button lights in red.
You can now use the handset connected tothe PC.
You can use a fixed phone as a Softphone handset.
Placing a Call Using a Fixed Phone(Collaboration with Fixed Phone)You can use either a fixed phone or Softphone to inputthe other party's number.
< Inputting the phone number using a fixedphone >
1 Lift the handset of the fixed phone.You hear the dial tone from the handset.
2 Press the other party's number with thefixed phone.The LCD on Softphone displays the other party's num-ber and you hear the ringback tone from the handset.
3 Start a conversation after the other partygets on the line.Put the handset of the fixed phone down to terminatethe call.
< Inputting the phone number using Soft-phone >
1 Click (Call/Answer button).When you use a multifunction phone as the handset,you hear the dial tone from the speaker of the phone.
2 Type the number to call using the key-board.The typed number is displayed in the Call/transfernumber inputting area.
3 Press the [Enter] key.
4 Lift the handset of the fixed phone.You hear the ringback tone from the handset.
5 Start a conversation after the other partygets on the line.
Put the handset of the fixed phone down toterminate the call.
For other ways of placing a call, refer to "Placing a Call".
To switch the handset back to the PSAfter confirming that the PS is not in use, click thehandset switch button. Each time you click thebutton, the handset is switched.
To automatically switch to the handsetwhen you connect it to the PCRefer to "Automatically Switching Your Handsetto the Handset Connected to the PC".
Using a Fixed Phone
This function depends on the model ofthe IP telephony server.For details, contact the system administrator.

63
Using a Handset Other Than the USB Handset
Receiving a Call Using a FixedPhone
< Receiving a call for you >
1 The fixed phone rings.The line button for the extension number of the fixedphone on Softphone blinks in red.
2 Lift the handset of the fixed phone.
3 Talk with the other party.
Put the handset of the fixed phone down toterminate the call.
< Receiving a call for another person >
1 The line button of Softphone blinks in red.The line button of the extension number for the incomingcall blinks in red.
2 Click (Line button) blinking in red.When you use a multifunction phone as the handset,press the line button of the phone blinking in red.
3 Lift the handset of the fixed phone.
4 Talk with the other party.
Put the handset of the fixed phone down toterminate the call.
Placing a Call on Hold Using aFixed Phone
< Placing a call on hold >
1 You are on the phone.
2 Click (Hold button) on Start.The start screen of Softphone displays "Hold" and theother party hears the hold melody.
3 Put the handset of the fixed phone down.
The call has now been placed on hold.
< Picking up a call on hold >
1 A call is on hold.
2 Lift the handset of the fixed phone.
3 Click (Answer button) on Start.
4 Talk with the other party.
Put the handset of the fixed phone down toterminate the call.
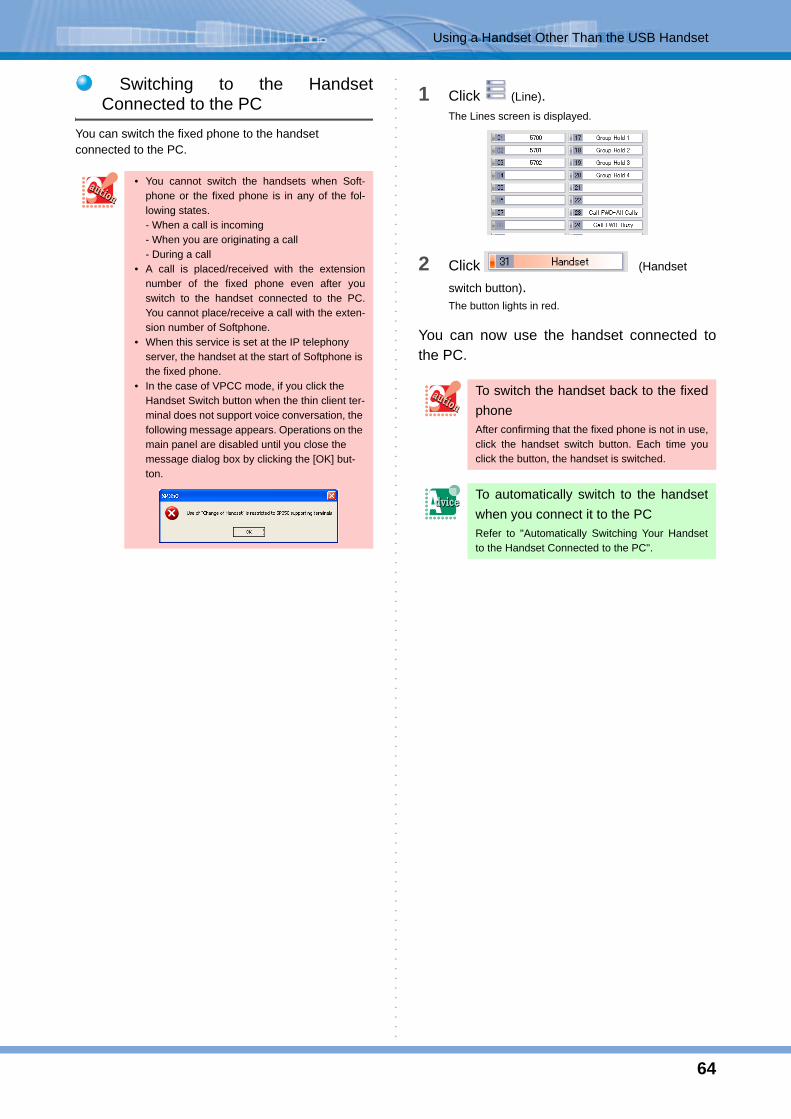
64
Using a Handset Other Than the USB Handset
Switching to the HandsetConnected to the PC
You can switch the fixed phone to the handset connected to the PC.
1 Click (Line).The Lines screen is displayed.
2 Click (Handset
switch button).The button lights in red.
You can now use the handset connected tothe PC.
• You cannot switch the handsets when Soft-phone or the fixed phone is in any of the fol-lowing states.- When a call is incoming- When you are originating a call- During a call
• A call is placed/received with the extensionnumber of the fixed phone even after youswitch to the handset connected to the PC.You cannot place/receive a call with the exten-sion number of Softphone.
• When this service is set at the IP telephony server, the handset at the start of Softphone is the fixed phone.
• In the case of VPCC mode, if you click the Handset Switch button when the thin client ter-minal does not support voice conversation, the following message appears. Operations on the main panel are disabled until you close the message dialog box by clicking the [OK] but-ton.
To switch the handset back to the fixedphoneAfter confirming that the fixed phone is not in use,click the handset switch button. Each time youclick the button, the handset is switched.
To automatically switch to the handsetwhen you connect it to the PCRefer to "Automatically Switching Your Handsetto the Handset Connected to the PC".

65
Import/Export
Data of maintenance configuration items of another PC can be imported into your PC. Conversely, data of main-tenance configuration items of your PC can be exported, and then imported into another PC.
Using the Import/Export function can import environmen-tal settings and reflect them on your PC.
1 Click (Import/Export) in (Function) onthe navigation window.The [Import/Export Wizard] screen appears.
2 Select [Import] and click .The [Import of file] screen appears.
3 Click on the right of [File Path] field.The [Open] screen appears.
4 Select a file to open.Or, input the file name in the [File name] field.
5 Click .
6 Input the file path and click .
< Addition method >
Import/Export
Using ImportTo input the file path directly• Type, or copy and paste the file path in
the [File name] field.• Up to 259 characters can be used to
input the file path.
Function Description
AdditionAdds the data, such as the contacts data or incoming/outgoing log data, without deleting the existing data.
Replacement
Deletes the existing data, such as the contacts data or incoming/outgo-ing log data, and sets the imported data.

66
Import/Export
7 Select [Addition] or [Replacement], and
click .
8 Click .
You have now finished the file import.
Using the Import/Export function can export environmental settings, etc.
1 Click (Import/Export) in (Function) onthe navigation window.The [Import/Export Wizard] screen appears.
2 Select [Export] and click .The [Export of file] screen appears.
< Target function >
• The [Next] button on the [Import of file] screenis enabled only when a valid path is set in the[File Path] field (when a file exists).
• The default addition method is [Addition].• When the file type is [Environmental setting] or
[Data conference], the addition method is[Replacement] only.
• If the read data is partially destroyed, only thedata for which the following required items areacquired can be imported.- Contacts: Name + (Phone number or E-mail
address)- Call history: Event type (ADD/DEL) + Man-
agement number + Log type + Date and time
• If the maximum number of entries will beexceeded when imported, a dialog appearsconfirming whether to continue importingbefore starting data addition.
• Data exported by DtermSP30 cannot beimported to SP350.
• If the maximum number of entries will beexceeded while a history of calls is imported by[Addition], the entire existing log is deleted anda maximum of 500 new entries are imported.
• When the maximum number of entries isreached while the contacts data is imported by[Addition], the addition is stopped, with the filedata not added. (* A warning pop-up appears.)
Using Export
Function Description
ContactsContacts information in XML format (default)
Call history Call history information in CSV for-mat
A history of calls
Call log information in CSV format
IM log IM log information in CSV format
Environmental setting
User settings in INI format + mainte-nance settings
Data confer-ence
Data conference information in XML format
Chat history Chat history information in XML for-mat

67
Import/Export
3 Select a function you want to export, and
click .The file path input screen appears.
4 Click on the right of [File Path] field.The [Save as] screen appears.
5 Input the save file name in the [Filename] field.Or, select a file.
6 Click .
7 Click .The following screen appears.
8 Click .
You have now finished the file export.
To input the file path directly• Type, or copy and paste the file path in
the [File name] field.• Up to 259 characters can be used to
input the file path.
• The [OK] button on the file path input screen isenabled only when a valid path is set in the[File Path] field.
• When an existing file name is specified, thatfile is overwritten.
• Depending on the OS, when a saved CSV fileis opened with Excel, the line break code maybe displayed like "•••".
• Up to 259 characters can be used to input thefile path.

68
USB Handset - How to Use the Function Keys Setting Tool (HandsetConfig)
You can assign functions to be used to the USB handset supporting the function keys setting tool.
1 Confirm that the handset supporting the tool is connected.
2 In the state where SP350 is started, click[Start] -> [Programs] -> [UNIVERGESoft Client SP350] -> [HandsetConfig].
The Function Keys Setting Tool (HandsetConfig) startsand the following screen is displayed.
3 Click of the function key to assign afunction and click a function.
The following functions can be set.
4 Click .The setting is applied.
5 Click .The Function Key Setting Tool is ended.
The function key has now been set.
USB Handset - How to Use the Function Keys Setting Tool (HandsetConfig)
• The USB handsets supporting the tool are as follows.- UTR-1-1(BK)- UTR-1-1RS(BK)- UTR-1W-1(BK)
• In the case of VPCC mode, the following USB handset is supported.- UTR-1W-1(BK)
• To assign the speaker or audio device switch-ing to a function key, the UBS headset must also be used.
• Only UTR-1W-1(BK) which updated firmware can be used in Windows 7.
Item
Hold
Transfer
Answer
Group hold
Speaker
Mute
Volume control - Up
Volume control - Down
Device source change
Function key button assigned to Line buttons 1 to 32
To change the function key settingback to the defaultClick the [Default] button to change the set-ting back to the default.
To switch the audio device fromthe task tray iconYou can switch the device to be used by selecting the following menu displayed by
clicking (Selecting handset) or (Selecting headset) icon.
The following screen was dis-played.When the setting of the target function keyis the same as that of another function key,the following warning message is dis-played.
If it is OK to set the same function to thetarget function key, click the [Yes] button.
The following screen was dis-playedWhen you try to end the Function Key Set-ting Tool without applying the settingchange, the following message is dis-played.
When you do not apply the setting change,click the [Yes] button.
Item

69
How to Use a Data Meeting
SP350 allows you to have a meeting by video communi-cation or shared data using the PC display.For constrained conditions for data meeting, refer to "Constrained Conditions for Data Meeting".
You can have a data meeting with the other party.
Setting Up a Data Meeting
1 You are on the phone.The start screen displays the Data Meeting icon.
2 Click (Data Meeting).The [Data Meeting] screen appears.
The [Data conference participation invitation] dialogappears on the display of the other party.
3 The other party clicks .The [Data Meeting] screen appears on the display of theother party.
You have now started the data meeting.
How to Use a Data Meeting
Data Meeting Screen
Starting a Data Meeting
Menu bar
Communication Board
Video com-munication
Chat
If you click the Data Meeting icon in anenvironment where Adobe® Flash® Player hasnot been installed, the following messageappears. Please download Adobe® Flash® Playerfrom Adobe Systems Web site or other applicableWeb site, and install Adobe® Flash® Player.
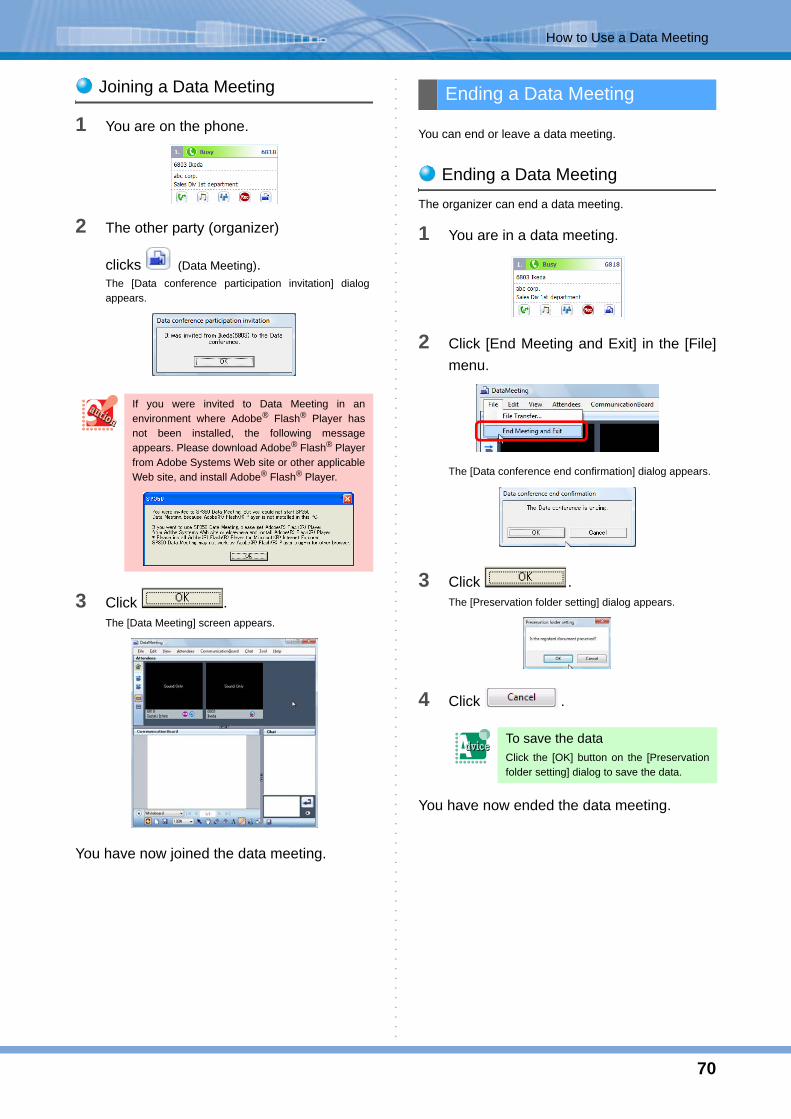
70
How to Use a Data Meeting
Joining a Data Meeting
1 You are on the phone.
2 The other party (organizer)
clicks (Data Meeting).The [Data conference participation invitation] dialogappears.
3 Click .The [Data Meeting] screen appears.
You have now joined the data meeting.
You can end or leave a data meeting.
Ending a Data MeetingThe organizer can end a data meeting.
1 You are in a data meeting.
2 Click [End Meeting and Exit] in the [File]menu.
The [Data conference end confirmation] dialog appears.
3 Click .The [Preservation folder setting] dialog appears.
4 Click .
You have now ended the data meeting.
If you were invited to Data Meeting in anenvironment where Adobe® Flash® Player hasnot been installed, the following messageappears. Please download Adobe® Flash® Playerfrom Adobe Systems Web site or other applicableWeb site, and install Adobe® Flash® Player.
Ending a Data Meeting
To save the dataClick the [OK] button on the [Preservationfolder setting] dialog to save the data.

71
How to Use a Data Meeting
Leaving a Data MeetingParticipants can leave a data meeting. Even aparticipant leave a meeting, other participants cancontinue the meeting.
1 You are in a data meeting.
2 Click [Leave and Exit] in the [File] menu.
The [Data conference leaving confirmation] dialogappears.
3 Click .If data is currently registered, the [Preservation foldersetting] dialog appears.
4 Click .
You have now left the data meeting.
Data meeting participants can talk face-to-face.
Icons
To save the dataClick the [OK] button on the [Preservationfolder setting] dialog to save the data.
Using Video Communication
• Video communication is available only when you are talking with the other party. The Data Meeting button is not displayed when you are not talking with the other party.
• In the case of VPCC mode, Video sending function cannot be used.
Button Name Description
Update participant list
Updates the participant list to the latest state.
Display video in single-deck format
Displays video in single-deck format.
Display video in double-deck for-mat
Displays video in double-deck format.
/
Stop video transmis-sion
Starts/stops video transmission.
/
Stop video transmis-sion/recep-tion
Starts/stops video transmission/reception.
Organizer icon
Indicates that the participant is the organizer.
Data Meet-ing Status icon
Indicates if the user during a call can join or have joined the data meeting.
Call status icon
Indicates the status of the user during a call.
Phone number of participant
Image of participant
Name of participant

72
How to Use a Data Meeting
Starting Video Communication
1 You are in a data meeting.
2 Click (Stop Video Transmission button).Your image is transmitted to the other party.
3 The other party clicks (Stop Video
Transmission button).The other party's image is transmitted to your PC. EachPC displays the other party's image.
4 Talk using video communication.Each PC displays the other party's image.
Click (End call button) to disconnect thecall.
Data meeting participants can use the white board ontheir own PC. Participants can share data and write inthe shared data freely to share and exchange informa-tion. Operations can be performed simultaneously.
IconsTo start video communicationimmediatelyYou can start video communication imme-diately by clicking the Data Meeting button
without clicking (Stop Video Transmis-sion button).For details, refer to "<Configuring videotransmission/reception>".
Using the CommunicationBoard
Button Name Description
Open/Close Tool-bar button
Switches display/nondisplay of the lower part of the toolbar.
Data Name box
Selects the data or displays the selected data name.
Top Page button
Displays the top page of the dis-played data
Previous Page but-ton
Displays the previous page of the displayed data.
Page Num-ber area
Displays the page number of the displayed data.
Next Page button
Displays the next page of the dis-played data.
Last Page button
Displays the last page of the dis-played data.
Lock button Locks operations by other partici-pants.
Synchroni-zation but-ton
Switches the synchronization sta-tus of the data or page switching with other terminals.
Add Page button
Adds a page to the white board.
Save Data button
Saves the data currently dis-played.
Scale box Changes or displays the scale of the displayed page.

73
How to Use a Data Meeting
Sharing DataData can be shared at a meeting by data registration.
< Drag and drop >
1 Drag the data to be shared.
2 Drop it to the Communication Board.
The [Register document] screen appears. The screendisappears automatically when the registration is com-pleted.
3 Select a file to be shared from the dataname box.The data is displayed on the Communication Board ofthe participants.
The data has now been shared.
Select but-ton
Selects the Selection tool.
Hand Tool button
Selects the Hand tool.
Eraser but-ton
Selects the Eraser tool.
Erase All button
Erases all objects created by yourself on the displayed page.
Text button Selects the Text tool.
Pen button Selects the Pen tool.
Magical Pen button
Selects the Magical Pen tool.
Shape but-ton
Selects the Shape tool.
Paste but-ton
Pastes the captured image data.
Color Selection button
Changes the color of objects.
Line Width box
Changes the line width of objects.
Select Font button
Changes the font of the Text tool.
Lock Status icon
Indicates whether you or another participant has locked the opera-tion.
Button Name Description
drop
drag

74
How to Use a Data Meeting
< Menu >
1 Select the [Communication Board] menu.
2 Select [Open Document].The [Open] screen appears.
3 Select a file to be shared.
4 Click .The [Register document] screen appears. The screendisappears automatically when the registration is com-pleted.
5 Select a file to be shared from the dataname box.The data is displayed on the Communication Board ofthe participants.
The data has now been shared.
Turning a PageYou can change the page of the data used for a datameeting.
1 Select the [Communication Board] menu.
2 Select [Go To].[First Page], [Previous Page], [Next Page] and [LastPage] are displayed.

75
How to Use a Data Meeting
3 Select [Next Page].Or, click (Next Page button).The next page is displayed.
The page has now been turned.
Saving the Shared DataThe participants can write in the shared data freely.Your can save the file after writing in it in the format inwhich you have registered the data.
1 The participants write in the shared datafreely.
2 Select the [Communication Board] menu.
3 Select [Save Document].
Or, click (Save Data button).
The [Save As] screen appears.
4 Specify the destination to save and inputthe file name.
5 Click (Save Data button).The [Save Document] screen appears.
The data has now been saved.
To use the button to turn a pageFor details, refer to "Icons".
The page of the other party is notchanged.You can turn a page only of your own datain the asynchronous state.Click (Synchronization button).
Only the user who has registered the data can save it. Handwriting, figures, and texts are saved as image. You can save the data only when the file format in which you have registered the data is Word or PowerPoint.Writing out of the written image (gray area) is not reflected in a Word file.
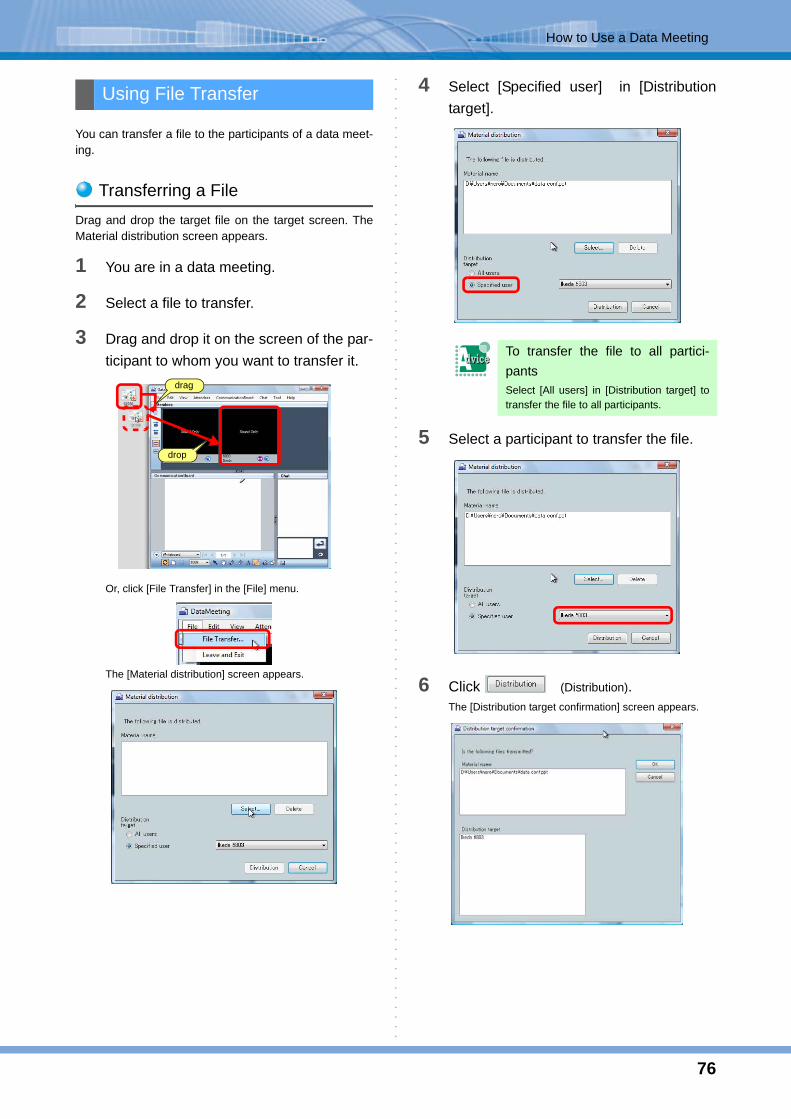
76
How to Use a Data Meeting
You can transfer a file to the participants of a data meet-ing.
Transferring a FileDrag and drop the target file on the target screen. TheMaterial distribution screen appears.
1 You are in a data meeting.
2 Select a file to transfer.
3 Drag and drop it on the screen of the par-ticipant to whom you want to transfer it.
Or, click [File Transfer] in the [File] menu.
The [Material distribution] screen appears.
4 Select [Specified user] in [Distributiontarget].
5 Select a participant to transfer the file.
6 Click (Distribution).The [Distribution target confirmation] screen appears.
Using File Transfer
drop
drag
To transfer the file to all partici-pantsSelect [All users] in [Distribution target] totransfer the file to all participants.

77
How to Use a Data Meeting
7 Click .The [Transmission result] screen appears.
8 Click .
The file has now been transferred.
Receiving a FileYou can receive a transferred file and save it.
1 Receive a file.The [File reception] screen appears.
2 Specify the destination to save.
3 Click (Save button).The [File Save completion] screen appears.
4 Click .
The received file has now been saved in thespecified directory.
To confirm the file immediatelyClick the [Open] button on the [File Savecompletion] screen to open the received fileimmediately or to open the saved directory.• Extensions of received files which imme-
diately openTXT, DOC, XLS, PPT, PDF, JPEG, JPG,GIF, TIFF, MP3, WMV, AVI, HTML, HTM
• Extensions of received files whosesaved directory opensExtensions other than the above

78
How to Use a Data Meeting
You can communicate with the other party using charac-ters (chat). You can give contents that are hard to con-vey in conversation (website address, address, etc.)easily.
Icons
Sending Chat
1 You are in a data meeting.
2 Click the chat input area and input a mes-sage for the participants.
3 Click (Send Chat button).Or, click [Send] in the [Chat] menu.The input message is displayed on the display of otherparticipants.
Using Chat
Button Name Description
Save File button
Saves all messages in the chat display area as a text file.
Send Chat button
Sends the message in the chat display area to all other partici-pants.
Display Whisper Chat Screen but-ton
Displays the Whisper Chat screen to send whisper chat.
Button Name Description
Switch Dis-play check box
Sets whether to display the Whis-per Chat screen after the mes-sage transmission.
Send Chat button
Sends the message in the chat display area to the participant specified in the Destination field.
Chat input area
Chat display area
Destination display area
Chat input area
To restrict the destination of amessageWhen three or more parties are using chat,you can send a message to a specific par-ticipant.For details, refer to "Sending WhisperChat".

79
How to Use a Data Meeting
4 When you receive a message from a par-ticipant, the chat display area displays it.Repeat Steps 3 to 5 for conversation using characters.
5 To save the content of the chat when you
have finished, click (Save File button).Or, select [Save] in the [Chat] menu.The [Save As] screen appears.
6 Specify the file name to save.
7 Click .
Sending Whisper ChatYou can send a message only to the specified partici-pant.
1 You are in a data meeting.
2 Click .The [Whisper Chat] screen appears.
3 Select a destination to send whisper chat.
4 Click the chat input area and input a mes-sage.
5 Click .The message is displayed in the chat display area in acolor different from that of ordinary chat messages.
6 Click when you finish whisper chat.Or, click [Close] in the [File] menu.
The whisper chat has now been sent.

80
How to Use a Data Meeting
Another party can be joined to an external or internal callto hold a 3-party meeting.
Starting a Data Meeting from a 3-Party Meeting
1 You are on an external or internal call.
2 Input the number of the party to invite in
(Call/transfer
number inputting area).
Or, click (Transfer button) to input the number of theparty to invite on the 10-key Keypad.
3 Click (Call/Transfer button).The call with the other party is put on hold and the otherparty hears the hold melody.You hear the ringback tone. The party to invite can beeither internal or external.
4 When the third party answers, tell himthat a 3 party meeting will be started.
5 Click (3-party).The call on hold is retrieved.
6 The three parties talk on the phone.
7 The organizer clicks (Data Meeting).While a data meeting is being started, [Preparing aData Meeting] icon is displayed.
The Data Meeting Panel appears.
Using a 3-Party Meeting
If you click the Data Meeting icon in anenvironment where Adobe® Flash® Player hasnot been installed, the following messageappears. Please download Adobe® Flash® Playerfrom Adobe Systems Web site or other applicableWeb site, and install Adobe® Flash® Player.

81
How to Use a Data Meeting
The [Data conference participation invitation] dialogappears on the display of the other parties.
8 The other parties click .The [Data Meeting] screen appears on the display of theother parties.
Click (End call button) to disconnect thecall.
Up to 8 parties can join a data meeting simultaneously. In addition to parties using Softphone, parties using an ordinary extension phone or using an external line can join a meeting.At the same time, a data meeting can be held among parties using Softphone.
Starting a Data Meeting from aMeetingA user who clicks the Data Meeting button during ameeting can organize a data meeting with the other par-ties.
1 Each party joins a meeting.
2 The organizer clicks (Data Meeting).While a data meeting is being started, the [Prepar-ing a Data Meeting] icon is displayed.The [Data Meeting] screen appears.
The [Data conference participation invitation] dialogappears on the display of the other parties.
3 The other parties click .The [Data Meeting] screen appears on the display of theother parties.
* This above shows an example of a 5-party meeting.
The data meeting has now been started froma meeting.
Adding up to 8 Parties to aMeeting
To use this function, set the service function in the IP telephony server in advance. For details, con-tact the system administrator.
If you click the Data Meeting icon in anenvironment where Adobe® Flash® Player hasnot been installed, the following messageappears. Please download Adobe® Flash® Playerfrom Adobe Systems Web site or other applicableWeb site, and install Adobe® Flash® Player.

82
How to Use a Data Meeting
You can set up various items for a data meeting.
Displaying the Settings Screen
1 Click the [Tool] menu.The menu list appears.
2 Click [Set Up].The [Tool] screen appears.
Configuring ParticipantsYou can change the settings of "Video sending andreceiving setting", "Video sending and receiving qualitysetting", and "Change of capture device" on the Partici-pants tab of the Settings screen.
< Video sending and receiving setting >You can set whether to transmit/receive video simulta-neously with the start of a data meeting.
How to Use Various Settings
When video is restricted in the service restriction,the Participants tab is not displayed on the Set-tings screen.
To start video transmission/receptionsimultaneously with the start of a datameetingSelect [The video sending and receiving begins atthe same time as starting.] to start video transmis-sion/reception simultaneously with the start of adata meeting
To start only video reception simulta-neously with the start of a data meetingSelect [Only the video receiving begins at thesame time as starting. (It doesn't sending.)] tostart only video reception simultaneously with thestart of a data meeting.
To not transmit/receive video right afterthe start of a data meeting, but to startvideo transmission/reception manuallySelect [Not doing anything, and video sendingand receiving setting immediately after start byhand power.] to start video transmission/receptionmanually.

83
How to Use a Data Meeting
< Video sending and receiving qualitysetting >You can set the quality of the video to be transmitted.
< Change of capture device >You can change the camera to be used when two ormore cameras are connected.
The change is reflected when you join a datameeting next time.
To use the high quality video transmis-sionSelect [High: QCIF (176*144)] to use the highquality video transmission for a data meeting.
To use the ordinary quality video trans-missionSelect [Normal: QCIF (176*144)] to use the ordi-nary quality video transmission for a data meet-ing.
To use the low quality video transmis-sionSelect [Low: QCIF (176*144)] to use the low qual-ity video transmission for a data meeting.
The change is reflected when you join a datameeting next time.
To restore the default valuesClick to restore all default values.

84
How to Use a Data Meeting
Configuring Communication BoardYou can change the settings of "Auto Save" and "Regis-ter Document" on the [Communication Board] tab of the[Tool] screen.
< Auto Save >You can set whether to save the content of the Commu-nication Board automatically when a data meeting ends.
< Register Document >You can specify whether to standardize the high-quality printing in registering Excel data.
When the communication board is restricted inthe service restriction, the [CommunicationBoard] tab is not displayed on the [Tool] screen.
To save the content of the Communica-tion Board automaticallyCheck [It preserves it automatically] and specifythe destination to save it. The messages aresaved automatically in the folder specified as thedestination when a data meeting ends.
To standardize the high-quality printingCheck [The print qualities of the Excel sheet areunited in high qualitys and document is regis-tered.] to standardize the high-quality printing.
To keep the printing qualityUncheck [The print qualities of the Excel sheetare united in high qualitys and document is regis-tered.] to keep the printing quality.

85
How to Use a Data Meeting
Configuring ChatYou can change the settings of "Font", "Display color ofchat message", and "Background color of chat messagedisplay region" on the [Chat] tab of the [Tool] screen.
< Font >You can change the font and size of chat messages dis-played on the chat screen.
< Display color of chat message >You can change the color of chat messages displayedon the chat screen.
To change the display color of mes-sages you transmitSelect and set [My display color] to change thedisplay color of your own messages. For whisperchat messages, the [Whisper chat display color]is used.
To change the display color of otherparticipants' messagesSelect and set [Other’s display color] to changethe display color of other participants' messages.
To change the display color of whisperchat messagesSelect and set [Whisper chat display color] tochange the display color of whisper chat mes-sages.

86
How to Use a Data Meeting
< Background color of chat message displayregion >You can change the background color of the chat char-acter display area.
< Header display style >You can specify whether to insert a line break betweenthe header (user name) and the message.
< Auto Save >You can set whether to save chat messages automati-cally when a data meeting ends.
To remove the line break between theheader (user name) and the messageUncheck [There is changing line] to remove theline break between the user name and the mes-sage.
To save chat messages automaticallywhen a data meeting endsCheck [It preserves it automatically] and specifythe destination to save them.The messages are saved automatically in thefolder specified as the destination when a datameeting ends.

87
How to Use Favorites and Telephone Function (Lines/Fixed functions)
This section describes how to use Call functions buttonson Telephone function, how to add Call functions buttonsto Favorites, how to copy those buttons, and how todisplay names of the other party.
Call functions buttons are displayed to be used on thebrowse window displayed by selecting a Line or a Fixedfunction from Telephone function in the navigationwindow. Names of Call functions buttons can be modi-fied.This section describes Fixed functions.
Using a Call Functions Button
1 Click (Line) or (Fixed function) inthe navigation window.Call functions buttons are displayed in the browsewindow.
2 Click a button to use in the browse window.
The specified function is now running.
Renaming a Button
You can change the display settings registered to each
button registered to (Line), (Fixed function),
and (Favorites).
1 Right-click the button to change the set-tings.The right-click menu appears.
How to Use Favorites and Telephone Function (Lines/Fixed functions)
Using Telephone Function To hide buttons which are not regis-tered to functionsClick (User configurations) in the navigationwindow to display the [User configurations]screen. Check [Selects whether to display anunregistered in Call functions buttons or not] of[User Operation].For details, refer to "Hiding Unregistered Callfunctions buttons".

88
How to Use Favorites and Telephone Function (Lines/Fixed functions)
2 Click [Set] on the right-click menu.The [Display Setting] screen appears.
3 Change [Label] in the [Display Setting]screen.
4 Click .
The setting has now been changed.When the button name or comment is changed in Favorites, the button name or comment in the original list is also changed.
You can register frequently used Call functions buttons
to (Favorites).
By Drag and Drop
1 Drag the button to add to Favorites.
2 Drop it onto (Favorites) in the navi-gation window.
To restore the settingsClick in the [Display Setting]screen.
To change tooltipsChange the comment in the [Comment] field inthe [Display Settings] screen.
• Regarding changing the button name, if thenumber of characters of the button nameexceeds the maximum number of charactersto display on the button, "..." will be displayedafter the last character. Up to 18 characterscan be displayed.
• Display settings can be changed via each ofFavorites, Lines and Fixed functions.
• When Label or Comment is changed in Linesor Fixed functions, the label or comment regis-tered to Favorites is also changed.
Adding a Line Button or a CallFunctions Button to Favorites
Drag
Drop

89
How to Use Favorites and Telephone Function (Lines/Fixed functions)
The [Favorites] screen appears in the browse window.
The registration has now been completed.
Using the Right-Click Menu
1 Right-click the button to add to Favorites.The right-click menu appears.
2 Click [Add to Favorites].The [Favorites] screen appears in the browse window.
The registration has now been completed.
You can change the alignment of buttons registered toFavorites.
By Drag and Drop
1 Drag the button to change the alignment.
Newlyregistered
• Line buttons and Fixed function buttons can beregistered redundantly.
• Up to 40 buttons can be added to Favorites.• If the original function button or line number
has been deleted, it will also be deleted inFavorites automatically.
• Lumps of buttons which has been registered to Favorites complies with the IP telephony server specification.
• Right-clicking on a button without button nameon it does not make any changes.
If the following message appears
This message indicates that the number of but-tons in Favorites has reached the maximum num-ber and thus the registration failed.
Changing the Position of a But-ton in Favorites
Drag

90
How to Use Favorites and Telephone Function (Lines/Fixed functions)
2 Drop it onto where you want to place on.
The screen with the changed alignment is displayed inthe window.
The setting has now been changed.
By Cut and Paste
1 Right-click the button to change the align-ment.The right-click menu appears.
2 Click [Cut].
3 Right-click on the destination button.
4 Click [Add].
The setting has now been changed.
The button of which its alignment has beenchanged is placed below the button onto whichyou dropped.
Drop
Alignment ischanged
• If the number of buttons in Favorites has beenreached the maximum number, the buttonalignment cannot be changed by "cut andpaste".
• The alignment of Line buttons and Fixed func-tion buttons cannot be changed.
• The button you cut will be added below thedestination button.
Alignment is changed

91
How to Use Favorites and Telephone Function (Lines/Fixed functions)
You can copy buttons registered in Favorites.
1 Right-click the button to copy.The right-click menu appears.
2 Click [Copy].
3 Right-click on the destination button.The right-click menu appears.
4 Click [Add].
The button has now been copied.
Copying a Button Registered toFavorites
• If no data to copy exists in the clipboard, but-tons cannot be added.Example: Addition without copying
• If the number of buttons registered in Favoritesreaches the maximum number, buttons cannotbe copied because the menus [Copy] and[Add] are disabled.
• Buttons cannot be copied onto Line buttons orFixed function buttons.
• The button you copy will be added below thedestination button.

92
How to Use Favorites and Telephone Function (Lines/Fixed functions)
You can delete buttons from Favorites.
1 Right-click the button to delete.The right-click menu appears.
2 Click [Clear].
The button has now been deleted.
Deleting a Button from Favor-ites
• If the original function button or line numberhas been deleted, it will also be deleted inFavorites automatically.
• Original buttons of Lines or Fixed functionscannot be deleted.

93
How to Use Contacts
This section describes how to use Contacts. When theoptional presence server function is used, you can havesmooth communication with a contact depending on thecontact's status such as placing a call when online,sending an IM when on the phone or unavailable, orsending an e-mail when away.
Members can be registered in the contacts list. This sec-tion describes how to register a member using the right-click menu.
1 In Contacts, right-click the top or a groupto which to add a contact.The right-click menu appears.
2 Click [Add a Contact].The [Contact Setting] screen appears.
3 Fill in necessary items.
How to Use Contacts
• Multiple contacts can be selected, but multiplegroups cannot be selected.
• Contacts and a group cannot be selected atthe same time.
• The contact detail information is displayed onlyfor the currently selected contact.
• In the case of VPCC mode, "Ringtone Pattern"cannot be used.
Adding a New Contact
• When registering the telephone numberthat Presence, IM, and Chat functionsdo not support, it is recommended toregister it in Telephone number 2 orlater.
• If [IM/Chat number] remains blank whenregistered, the number in Telephonenumber 1 field is automatically input in[IM/Chat number]. So input IM/Chatnumber if it is different from Telephonenumber 1.

94
How to Use Contacts
4 Click .
The registration has now been completed.
• To register a contact, set [Name] andeither number(s) or address(es) for[Telephone number1] to [Telephonenumber4] or [Email Address1] to [EmailAddress4].
• Up to 64 characters can be input in[Telephone number1] to [Telephonenumber4] on the [Contact Setting]screen.
• Up to 64 characters can be entered in[IM/Chat number] on the [Contact Set-ting] screen.
• Up to 256 characters can be input in[Email Address1] to [Email Address4] onthe [Contact Setting] screen.
• [Ringer Pattern] on the [Contact Setting]screen cannot be usedunless [Telephone number1] is set.
• When SP350 R4 or before is upgraded,the data in phone number 1 is automati-cally used as IM/Chat number.
• When the contacts data that has beenexported in SP350 R4 or before isimported, the data in phone number 1 isautomatically used as IM/Chat number.
To register contacts from Call historyRefer to "Adding an Entry in Outgoing calls/Incoming calls to Contacts".
To register contacts from the IM logRefer to "Adding an Entry in Outgoing IM/Incoming IM to Contacts".
To register contacts from Search resultsRefer to "Adding an Entry in Search results toContacts".
When Softphone has been updatedfrom DtermSP30Contents of the member buttons for DtermSP30 are carried over to the contacts list. This informa-tion is placed directly below the top, and corre-sponds to the contact detail information as follows.DtermSP30 -> SP350Member button data -> Contact detail
informationName -> NamePhone Number -> Telephone number1Pop-Up -> None (Not carried over)E-mail Address -> Email Address1Ringtone Patterns -> Ringer Pattern
• Up to 100 contacts can be registered.• If an attempt is made to add a new contact
when 100 contacts are already registered, awarning message appears, and the operationis stopped.
• When there are contacts who have the sameTelephone number1 and if the ringer pattern ischanged in [Ringer Pattern] on the [ContactSetting] screen, all settings for the contacts areshared, and the same ringer pattern is appliedto the contacts.
• If a set WAV file cannot be played when one of Pattern 1 to Pattern 10 is selected in [Ringer Pattern] on the [Contact Setting] screen, the pattern specified by the IP telephony server is applied.
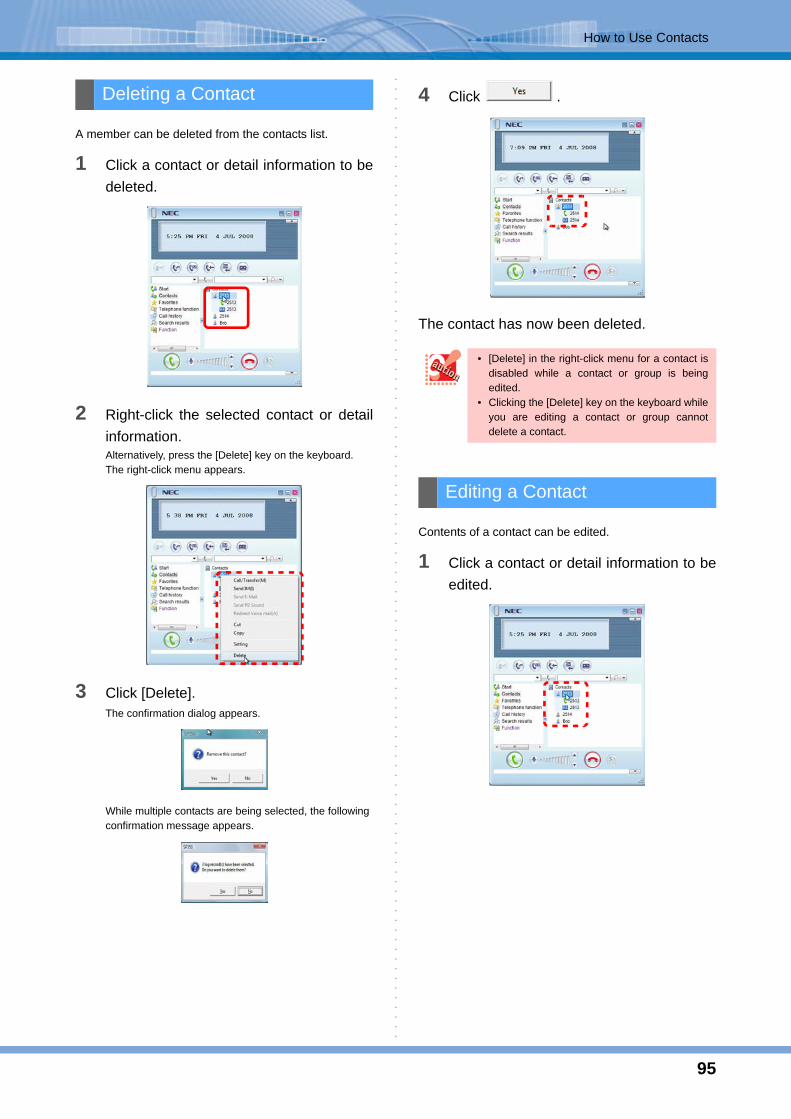
95
How to Use Contacts
A member can be deleted from the contacts list.
1 Click a contact or detail information to bedeleted.
2 Right-click the selected contact or detailinformation.Alternatively, press the [Delete] key on the keyboard.The right-click menu appears.
3 Click [Delete].The confirmation dialog appears.
While multiple contacts are being selected, the followingconfirmation message appears.
4 Click .
The contact has now been deleted.
Contents of a contact can be edited.
1 Click a contact or detail information to beedited.
Deleting a Contact
• [Delete] in the right-click menu for a contact isdisabled while a contact or group is beingedited.
• Clicking the [Delete] key on the keyboard whileyou are editing a contact or group cannotdelete a contact.
Editing a Contact

96
How to Use Contacts
2 Right-click the selected contact or detailinformation.The right-click menu appears.
3 Click [Setting].The [Contact Setting] screen appears.
4 Make required changes.
5 Click .
The contact have now been edited.
A contact registered in the contacts list can be moved.
Using the Right-Click Menu
1 Click a contact or detail information to bemoved.
2 Right-click the selected contact or detailinformation.The right-click menu appears.
3 Click [Cut].
• [Setting] in the right-click menu for a contact isdisabled while a contact or group is beingedited.
• While multiple contacts are being selected,[Settings] on the right-click menu for Contactsis grayed out.
Moving a Contact

97
How to Use Contacts
4 Click the group to which to move the con-tact.
5 Right-click the selected group.The right-click menu appears.
6 Select [Paste].The screen after the move is displayed.
The contact has now been moved.
By Drag and Drop
1 Drag a contact or detail information to bemoved.
2 Drop it on the group to which to move it.
The screen after the move is displayed.
The contact has now been moved.
• [Cut] and [Paste] in the right-click menu for acontact are grayed out when a contact orgroup is being edited.
• The moved contact is displayed at the end ofthe destination group.
The moved contact is displayed at the end of thedestination group.
Drag
Drop

98
How to Use Contacts
A contact can be copied.
1 Click a contact or detail information to becopied.
2 Right-click the selected contact or detailinformation.The right-click menu appears.
3 Click [Copy].
4 Select the copy destination group andright-click on it.The right-click menu appears.
5 Click [Paste].The screen after the paste is displayed.
The contact has now been copied.
Copying a Contact
• Even if a contact is copied, the OnlineNotification setting is not copied.
• When you overwrite the contents of the clip-board by "copying" or "cutting" text in anotherapplication after clicking [Cut] in the right-clickmenu for a contact, the [Cut] operation is can-celed.
• If an attempt is made to copy a contact with[Copy]/[Paste] when 100 contacts are alreadyregistered, a warning message appears at thetiming of clicking [Paste], and the copy of thecontact is canceled.
• The copied contact is displayed at the end ofthe destination group.

99
How to Use Contacts
This section describes group registration/editing/dele-tion.Also, Contacts can be managed by group.
Registering a New GroupGroups can be created in the contacts list.
1 Select the top of the contacts list or agroup and right-click on it.The right-click menu appears.
2 Click [Add A Group].The [Group Name Setting] dialog appears.
3 Input a group name.
4 Click .A new group is added.
The group has now been added.
Renaming a GroupA group name can be edited.
1 Click a group to be renamed.
2 Right-click the selected group.The right-click menu appears.
About Group Registration
• Up to 100 characters can be input as thegroup name in the [Group Name Set-tings] dialog.
• A group cannot be set with the groupname field blank.
• Up to 500 groups can be registered.• If an attempt is made to add a new group when
500 groups are already registered, a warningmessage appears, and the operation is can-celed.
• A group created directly below the top istreated as the first layer, and up to ten layerscan be nested.

100
How to Use Contacts
3 Click [Setting].The [Group Name Setting] dialog appears.
4 Input a group name.
5 Click .
The group name has now been edited.
Deleting a Group
1 Click a group to be deleted.
2 Right-click the selected group.Alternatively, press the [Delete] key on the keyboard.The right-click menu appears.
3 Click [Delete].The confirmation dialog appears.
4 Click .
The group has now been deleted.
• Up to 100 characters can be input as thegroup name in the [Group Name Set-tings] dialog.
• A group cannot be set with the groupname field blank.
• Multiple groups cannot be selected.• When you right-click during group editing or
you right-click a group in the tenth layer, the[Add A Group] menu item is disabled.

101
How to Use Contacts
Groups registered in the contact list can be moved.
Using the Right-Click menu
1 Click the group you want to move.
2 Right-click the group you have selected.The right-click menu appears.
3 Click [Cut].
4 Click the group move destination.
5 Right-click the group you have selected.The right-click menu appears.
6 Click [Paste].The screen after the move is completed appears.
This completes the move operation.
• Multiple groups cannot be selected.• [Delete] in the right-click menu is disabled
while you are editing a contact or group.
Moving a Group
• While editing contacts and groups, [Cut] and[Paste] on the right-click menu of groups aregrayed out.
• The moved group is displayed at the back of allmoved groups at the move destination.
• A group cannot be moved to its subordinategroups.
• Move cannot be performed for layers largethan 10 layers.

102
How to Use Contacts
Using Drag & Drop
1 Drag the group you want to move.
2 Drop it at the move destination.
The screen after the move is completed appears.
This completes the move operation.
A group can be copied.
1 Click the group you want to copy.
2 Right-click the group you have selected.The right-click menu appears.
3 Click [Copy].
• The moved group is displayed at the back of allmoved groups in the move destination.
• A group cannot be moved to its subordinategroups.
• Move cannot be performed for layers largerthan 10 layers.
Drag
Drop
Copying a Group

103
How to Use Contacts
4 Click the copy destination.
5 Right-click the group you have selected.The right-click menu appears.
6 Click [Paste].The screen after the paste is completed appears.
This completes the copy operation.
Presence status of a contact can be checked when thecontact is registered in the contacts list.Icons and characters indicating the presence status forcontacts are automatically updated.
1 Click the group of a contact to bechecked.Presence status can be checked with the top item
for the contact.
< Presence status >
• While editing contacts and groups, [Cut] and[Paste] on the right-click menu of groups aregrayed out.
• The copied group is displayed at the back of allmoved groups in the move destination.
• A group cannot be moved to its subordinategroups.
• Move cannot be performed for layers largerthan 10 layers.
Checking the Presence Statusof a Contact
Icon Name Description
Idle Indicates that the party is online.
Leaving seat
Indicates that the party is not at the seat. If the reason has been set, it is also shown after the name.
BusyIndicates that the party is currently on the phone.
Absent
Indicates that the terminal of the party is not running. If the reason has been set, it is also shown after the name.
Unconfirmed
Indicates that the number of the party is not compliant with the presence server function. This icon is also shown for contacts to which the Telephone number1 has not been set.

104
How to Use Contacts
For an ACD presence user registered in the contacts,[ACD Line Presence] and [Ordinary Line Presence]described below are displayed in the contact detail infor-mation.
< ACD Line Presence >
< Ordinary Line Presence >
You can place a call to a contact registered in the con-tacts list.
Using the Mouse
1 Click the top item of a contact you want tocall.The detail information is displayed.
2 Click (Telephone number) in the detailinformation.The confirmation dialog appears.You can also get the same result by the following opera-tions.• Click [Call/Transfer(M)] in the right-click menu.
• Press the [Enter] key with [ (Telephone number]selected in the detail information.
• Double-click [ Telephone number] in the detail infor-mation (option setting is required).
3 Click .You hear the ringback tone.
4 Start a conversation after the other partygets on the line.
Click (End call button) to disconnect thecall.
Icon Name Description
IdleIndicates the party has been logged in the ACD system and the ACD line is currently idle.
Leaving seat
Indicates that the party has been logged in the ACD system and the ACD line is currently in leaving seat status.This is not supported for the SV8300.
Work
Indicates that the party has been logged in the ACD system and the ACD line is currently in work mode.
BusyIndicates that the party has been logged in the ACD system and the ACD line is currently busy.
Log outIndicates that the party has not been logged in the ACD system.
Off lineIndicates that the party has not been logged in the SP350.
Icon Name Description
IdleIndicates that the ordinary line is idle.
BusyIndicates that the ordinary line is busy.
Off lineIndicates that the ordinary line is off line.
• Enable the presence server function setting inorder to conduct presence-related operations.
• Set Telephone number1 of detail informa-tion to display the presence status.
Placing a Call
If you use the USB handset (rec-ommended)Lift the handset now.

105
How to Use Contacts
When (Telephone number1) is input for a contact, anIM can be transmitted to the contact.For details, refer to "How to Use IM".
Transmitting an IM
1 Click the top item of a contact to which totransmit an IM.The detail information is displayed.
2 Click (IM number) in the detailinformation.The [IM send] screen appears.You can also get the same result by the followingoperations.• Click [Send IM(I)] in the right-click menu.• Press the [Enter] key with [ (IM number)] selected
in the detail information.• Double-click [ (IM number)] in the detailed informa-
tion (option setting is required).
If Microsoft Outlook is set as the phone book, a name acquired by the phone book search is displayed in the destination name in the [IM send] screen.
The search target is "Contacts" or "Microsoft Outlook"that is selected in [User configurations].For details, refer to "How to Use IM".
3 Input a message.
4 Click .
The IM has now been transmitted to the otherparty.
When multiple phone numbers are set The submenu for the right-click menu item [Call/Transfer(M)] is displayed. Select a phone numberfrom the submenu and perform an origination/transfer operation.
• [Call/Transfer(M)] in the right-click menu is hid-den if all Telephone number1 to Telephonenumber4 are unused.
• All call/transfer operations using the contactslist support [Prefix with external call number] in[User configurations].
• The call/transfer method with the single clickoperation can be changed to the double-clickoperation in [User configurations].For details, refer to "Setting Single/DoubleClick to Display Detailed Data of Call History/Contacts/Search".
• While multiple contacts are being selected,[Call/Transfer] on the right-click menu isgrayed out.
Transmitting an IM

106
How to Use Contacts
When Telephone number1 or IM/Chat number is inputfor a contact, 2-party Chat can be started.For details, refer to "How to Use Chat".
Opening Chat (2-party) Screen
1 Click the top item of a contact with whichyou want to chat.The detail information is displayed.
2 Click (Chat Number) in the detailinformation. The [Chat (2-party)] screen appears.You can also get the same result by the following opera-tions.• Click [Begin chat] in the right-click menu.• Press the [Enter] key with [ (Chat Number)] in the
detail information.• Double-click [ (Chat Number)] in the detailed
information (option setting is required).
• When (Telephone number1) IM/Chat Num-ber is unused, [Send IM(I)] in the right-clickmenu for a contact is hidden.
• If an IM transmission operation is executed when the [IM send] screen has already been displayed, an IM number of the detail information is added to the "To" field in the dis-played [IM send] screen.
• The IM transmission method with the singleclick operation can be changed to the double-click operation in [User configurations].For details, refer to "Setting Single/DoubleClick to Display Detailed Data of Call History/Contacts/Search".
Starting Chat (2-party)
• When Phone number1 and IM/Chat number isset to unused, [Begin chat] in the right-clickmenu of Contacts is always hidden. And whilemore than one contact is being selected, it isgrayed out.
• If 10 Chat screens have been opened (includ-ing 2-party and conference), another Chat screen cannot be newly opened.

107
How to Use Contacts
When Telephone number1 or IM/Chat number is inputfor a contact, invitation to Conference Chat can be per-formed. For details, refer to "How to Use Chat".
Inviting Other Parties to ChatConference
1 Click the top item of a contact which youwant to invite.The right-click menu appears.
2 Click [Call a chat conference].The Chat Conference screen is displayed.
An e-mail can be sent using Contacts.
Sending an E-mail
1 Click the top item of a contact to whichyou want to send an e-mail. The detail information is displayed.
2 Click (Email Address) in the detail infor-mation.The mail send screen appears. (The image is forOutlook Express.)You can also get the same result by the followingoperations.• Click [Send E-mail] in the right-click menu.• Press the [Enter] key with [ (Email Address)]
selected in the detail information.• Double-click [ (Email Address)] in the detailed infor-
mation (option setting is required).The mail creation screen appears with the e-mailaddress set in the [To:] field.
The e-mail has now been sent.
Inviting Other Parties to ChatConference
• A conference leader can open only one ChatConference screen.
• If ten Chat screens have been opened (includ-ing 2-party and conference), another Chat screen cannot be newly opened.
Sending an E-mail

108
How to Use Contacts
When the status of a contact in the contacts list changesto "Idle", the notification message can be displayed.This setting is valid only when the presence serverfunction of the options is used.
Setting Online Notification
1 Click the top item of a contact for whichyou want to set Online Notification.
2 Right-click the selected contact.The right-click menu appears.
3 Click [Online Notification].
Online Notification has now been set.When Online Notification setting is completed, the background color of the top item of the contact changes, and the display is highlighted.
When multiple e-mail addresses are setThe submenu for the right-click menu item [SendE-mail] is displayed. Select an e-mail addressfrom the submenu and perform an e-mail sendingoperation.
• The mailer used in the mailing function usesthe program selected in the [E-mail:] field of[Internet programs] of [Control Panel]-[InternetOptions...].
• [Send E-mail] in the right-click menu for a con-tact is hidden when all Email Address1 toEmail Address4 are unused.
• The e-mail sending method with the singleclick operation can be changed to the double-click operation in [User configurations].For details, refer to "Setting Single/DoubleClick to Display Detailed Data of Call History/Contacts/Search".
Making Online Notification
While multiple contacts are being selected, online notification can neither be set nor canceled.

109
How to Use Contacts
Canceling Online NotificationSetting
1 Click the top item of a contact for whichOnline Notification is already set.
2 Right-click the selected contact.The right-click menu appears.
3 Click [Online Notification].The background color and highlighted characters of thetop item of the contact are changed to the normal statusdisplay.
Online Notification has now been canceled.
When a contact for which Online Notifi-cation is set changes to "Idle"The following the Online Notify dialog appears.The following operations are available in theonline status notification dialog.[Call] : Places a call to the contact whose
status becomes online.[Transfer] : Transfers a call to the contact whose
status becomes online.[Send IM] : Opens the [IM send] screen in which
the contact whose status becomesonline is automatically input as thedestination.
[OK]: Does nothing and closes the OnlineNotify dialog.
Pressing any button closes the Online Notify dia-log, and the online status notification is released.
• When (Telephone number1) is unused,[Online Notification] in the right-click menu fora contact is hidden.
• When the presence server function is not set,[Online Notification] in the right-click menu fora contact is always hidden.
• When the notification is set, the characters ofthe top item of a contact are highlighted inboldface, and "[Online Notify]" is added afterthe character string of the presence status.
• When the notification is set, the check icon isdisplayed in the left side of [Online Notification]in the right-click menu.
• Online Notification can be set when thepresence status of a contact is one of the fol-lowing. If the contact's status is other than thefollowing, [Online Notification] in the right-clickmenu is disabled.
- Busy
- Leaving seat
- Absent

110
How to Use Contacts
With Contacts, you can send DTMF tone to the party you are talking on the phone.
1 You are on the phone.
2 Click a contact to which you want to sendDTMF tone.
3 Right-click the selected contact.The right-click menu appears.
4 Click [Send PB Sound].
PB Sound have now been sent.
With Contacts, call recording data can be redirected.
1 During recording with the UMS.The destination of the current recording data is dis-played in the LCD.
2 Click a contact to which the recordingdata is to be redirected.The detail information is displayed.
3 Click (Telephone number) in the detailinformation.The recording data displayed in the LCD is redirected.You can also get the same result by the followingoperations.• Click [Redirect Voice mail] in the right-click menu.
• Press the [Enter] key with [ (Telephone number)]selected in the detail information.
• Double-click [ (Telephone number)] in the detailinformation (option setting is required).
The destination has now been changed.
Sending DTMF tone
When multiple phone numbers are setThe submenu for the right-click menu item [SendPB Sound] is displayed. Select a phone numberfrom the submenu and send PB Sound.
• While multiple contacts are being selected,[Send PB Sound] on the right-click menu isgrayed out.
• [Send PB Sound] in the right-click menu for acontact is hidden if all Telephone number1 toTelephone number4 are unused.
• [Send PB Sound] in the right-click menu for a contact can be selected only when the line sta-tus is "On the phone" or "In operation".
Redirecting Voice Mail

111
How to Use Contacts
When multiple phone numbers are setThe submenu for the right-click menu item[Redirect Voice mail] is displayed. Select a phonenumber from the submenu and change the desti-nation.
• To change the recording destination with thismethod, enable [Voice mail Cooperation] in[Voice mail] under [Recording] in [User config-uration].
• While multiple contacts are being selected,[Redirect Voice mail] on the right-click menu isgrayed out.
• UMS-related keys need to be registered tofunction keys.
• [Redirect Voice mail] in the right-click menu fora contact is hidden if all Telephone number1 toTelephone number4 are unused.
• [Redirect Voice mail] in the right-click menu fora contact is hidden if [Recording] of the UMSfunction is not set to a line key.
• [Redirect Voice mail] in the right-click menu fora contact can be selected if the phone functionbutton of the UMS function key [Recording] islighted when the right-click menu is displayed.If the light of the phone function button is off,the menu is disabled.

112
How to Use the Call History
This section describes how to use the call history suchas how to display the call history and how to place a callby using the history.
Clicking (Call History) in the navigation window
displays (Outgoing calls), (Incoming
calls), (Outgoing IM), and (Incoming IM) to check the history.
Up to 500 call histories (outgoing calls+Incoming calls)and up to 1000 IM logs (outgoing IM+incoming IM) canbe stored. When the number of histories/logs exceedsthe limit, the history/log is deleted from the oldest one.
(Outgoing calls) and (Incoming calls) can be dis-
played from (Call History) in the navigation window. "History/log type + date/time + name + organization" are displayed at the top of history. In the detail data, "date/time + (call duration)", "phone number", "IM number", "e-mail address", and "presence" are displayed.
Displaying the Outgoing calls
1 Click (Call History) in the navigation win-dow.
(Outgoing calls), (Incoming calls),
(Outgoing IM), and (Incoming IM) are dis-played.
2 Click (Outgoing calls).The outgoing calls are displayed in the browse window.
3 Click the party to check the history detail.The history detail is displayed in the browse window.
How to Use the Call History
Displaying the Incoming Calls/Outgoing Calls
"Hour:minute" is displayed when the date/time is today. "Month/date" is displayed when the date/time is before today.

113
How to Use the Call History
Displaying the Incoming Calls
1 Click (Call History) in the navigation win-dow.
(Outgoing calls), (Incoming calls),
(Outgoing IM), and (Incoming IM) are dis-played.
2 Click (Incoming calls).The incoming calls are displayed in the browse window.
3 Click the party to check the history detail.The history detail is displayed in the browse window.
• The call history may not be recorded properly.• When the number of histories is too many to
display in one screen, the "vertical scroll bar"appears. When the number of characters forthe name and organization is too long to dis-play in one screen, the "horizontal scroll bar"appears.
• The detail data that can be displayed at a timeis one history only. When another history isselected, the previously opened detail data willbe closed automatically. (The presence thatcan be checked at a time is one item onlysince the presence is also displayed in thedetail data.)
• The number of "phone number" and "e-mailaddress" that can be displayed in the call his-tory is one for each item.
• When the presence function is not used, theitem "presence" is not displayed.
• When a "UMS" number is called, "Voice Mail"is displayed on the top of history.
• When the name cannot be obtained throughthe search, the phone number is displayed onthe top of history.
• Items that data cannot be obtained through thesearch are not displayed.
• When multiple items match as a result of thesearch, the item that matched first is displayedregardless of the registered type of the number(common to "Outlook" and "contacts").
• The phone number to be used for the search isset to the phone number and IM number dis-played on the detail data of the history. In thiscase, numbers that do no support IM are alsoset (common to "Outlook" and "contacts").
• For the e-mail address of the detail data of thehistory, the one with the highest priority is set.(1)Outlook : "E-mail" only ("E-mail 2" and
"E-mail 3" are excluded.)(2)Contacts : "E-mail address 1" to "E-mail
address 4"• The organization of the detail data of the his-
tory is set as the following format.(1)Outlook : (company/department)(2)Contacts : (group name/group name/...)
• If there is only one item to be displayed in thebracket for the organization of the detail data ofthe history, "/" is not displayed. In addition, ifthere is no item to be displayed in the bracket,"(/)" is not displayed.

114
How to Use the Call History
The order of the call history can be sorted by time or
name. Histories to be sorted are (Outgoing
calls), (Incoming calls), (Outgoing IM), and
(Incoming IM) displayed by clicking (Call His-tory)
This section describes the case of sorting (Outgoing calls).
Starting with the Latest Call
1 Click (Call History) in the navigation win-dow.
2 Click (Outgoing calls) to sort the displayorder.
3 Click [Reverse time order] from
(Sort).
The sort has now been completed.
• The call history may not be recorded properly.• When the number of histories is too many to
display in one screen, the "vertical scroll bar"appears. When the number of characters forthe name and organization is too long to dis-play in one screen, the "horizontal scroll bar"appears.
• The detail data that can be displayed at a timeis one history only. When another history isselected, the previously opened detail data willbe closed automatically. (The presence thatcan be checked at a time is one item onlysince the presence is also displayed in thedetail data.)
• The number of "phone number" and "e-mailaddress" that can be displayed in the call his-tory is one for each item.
• When the presence function is not used, theitem "presence" is not displayed.
• When a "UMS" number is called, "Voice Mail"is displayed on the top of history.
• When the name cannot be obtained throughthe search, the phone number is displayed onthe top of history.
• Items that data cannot be obtained through thesearch are not displayed.
• When multiple items match as a result of thesearch, the item that matched first is displayedregardless of the registered type of the number(common to "Outlook" and "contacts").
• The phone number to be used for the search isset to the phone number and IM number dis-played on the detail data of the history. In thiscase, numbers that do no support IM are alsoset (common to "Outlook" and "contacts").
• For the e-mail address of the detail data of thehistory, the one with the highest priority is set.(1)Outlook : "E-mail" only ("E-mail 2" and
"E-mail 3" are excluded.)(2)Contacts : "E-mail address 1" to "E-mail
address 4"• The organization of the detail data of the his-
tory is set as the following format.(1)Outlook : (company/department)(2)Contacts : (group name/group name/...)
• If there is only one item to be displayed in thebracket for the organization of the detail data ofthe history, "/" is not displayed. In addition, ifthere is no item to be displayed in the bracket,"(/)" is not displayed.
Sorting the Call History
When the result is the same based on the "time",the "name" is used for comparison. If the result isstill the same, the "organization" is used for com-parison.

115
How to Use the Call History
Starting with the Oldest Call
1 Click (Call History) in the navigation win-dow.
2 Click (Outgoing calls) to sort the displayorder.
3 Click [Time order] from
(Sort).
The sort has now been completed.
In Reverse Alphabetical Order ofNamesThe descending order of names and phone numbers isas follows."Z(z)" -> "A(a)" -> "9" -> "0" -> "symbols"
1 Click (Call History) in the navigation win-dow.
2 Click (Outgoing calls) to sort the displayorder.
3 Click [Reverse name order] from
(Sort).
The sort has now been completed.
In Alphabetical Order of NamesThe ascending order of names and phone numbers is asfollows."symbols" -> "0" -> "9" -> "A(s)" -> "Z(z)"
1 Click (Call History) in the navigation win-dow.
2 Click (Outgoing calls) to sort the displayorder.
3 Click [Name order] from
(Sort).
The sort has now been completed.
When the result is the same based on the "time",the "name" is used for comparison. If the result isstill the same, the "organization" is used for com-parison.
When the result is the same based on the"name", the "organization" is used for compari-son. If the result is still the same, the "time" isused for comparison.
When the result is the same based on the"name", the "organization" is used for compari-son. If the result is still the same, the "time" isused for comparison.

116
How to Use the Call History
You can place a call using the call history.
Dialing from the Incoming Calls/Outgoing CallsThis section describes how to place a call using
(Incoming calls).
1 Click (Incoming calls) in (Call History).
2 Click the history of the party to call.The detail data is displayed.
3 Click (Phone number) in the detail data.You can also get the same result by the following opera-tions.• Double-click the phone number in the detailed data
(option setting is required).• Press the [Enter] key with the number selected.• Select [Call/Transfer(M)] from the right-click menu.
The following confirmation dialog appears.
4 Click .The number of the other party is displayed on the LCDand you hear the ringback tone.
5 Start a conversation after the other party gets on the line.
Click (End call button) to disconnect thecall.
Dialing from the Outgoing IM/Incoming IMThis section describes how to place a call using
(Incoming IM).
1 Click (Incoming IM) in (Call History).The incoming IM is displayed.
2 Click the history of the party to call.The detail data is displayed.
3 Click (Phone number) in the detaildata.You can also get the same result by the following opera-tions.• Double-click the phone number in the detailed data
(option setting is required).• Press the [Enter] key with the number selected.• Select [Call/Transfer(M)] from the right-click menu.
The following confirmation dialog appears.
4 Click .The number of the other party is displayed on the LCDand you hear the ringback tone.
5 Start a conversation after the other party gets on the line.
Click (End call button) to disconnect thecall.
Dialing from the Call History
If you use the USB handset (rec-ommended)Lift the handset now.
If you use the USB handset (rec-ommended)Lift the handset now.

117
How to Use the Call History
You can transmit an IM using the call history.
Transmitting an IM from the IncomingCalls/Outgoing CallsThis section describes how to transmit an IM using
(Incoming calls).
1 Click (Incoming calls) in (Call History).The incoming calls are displayed.
2 Click the history of the party to transmit amessage.The detail data is displayed.
3 Click (IM number) in the detail data.You can also get the same result by the following opera-tions.• Double-click the IM number in the detailed data
(option setting is required).• Press the [Enter] key with the IM number selected.• Select [Send IM(I)] from the right-click menu.
The [IM send] screen appears.
At this moment, the name obtained by the search is dis-played in the [To] field.
The search target is "contacts" or "Microsoft Outlook"that is selected in the user configurations.
(*) Directory search is performed when [Use directorysearch] is on.
4 Input a message.
Transmitting an IM from the CallHistory
• Up to 300 characters can be transmitted in amessage.
• An IM cannot be transmitted when the terminalof the party is not running or Softphone is notactivated.
Use of Contacts
for Search
Information Retrieval Software
Displayed Content
Used
Microsoft Outlook
Search in the order of [Contacts] -> [Microsoft Outlook] -> [Directory] (*)
Microsoft Outlook (priority on directory search)
Search in the order of [Contacts] -> [Directory] -> [Microsoft Outlook] (*)
None Search of "Contacts"
Not used
Microsoft Outlook
Search in the order of [Microsoft Outlook] -> [Directory] (*)
Microsoft Outlook (priority on directory search)
Search in the order of [Directory] -> [Microsoft Outlook] (*)
None No search
Search is not properly performedfor the phone book.The exchange number registration may berequired depending on the registrationinformation of the phone book. For details,contact the system administrator.

118
How to Use the Call History
5 Click .
The IM has now been transmitted to the otherparty.
(IM Transmission icon) is displayed next to the trans-mitted message in the list of the [Outgoing IM] screen.
Transmitting an IM from the Outgoing IM/Incoming IM
This section describes how to transmit an IM using
(Incoming IM).
1 Click (Incoming IM) in (Call History).The incoming IM is displayed.
2 Click the history of the party to transmit amessage.The detail data is displayed.
3 Click (IM number) in the detail data.You can also get the same result by the following opera-tions.• Double-click the IM number in the detailed data
(option setting is required).• Press the [Enter] key with the IM number selected.• Select [Send IM(I)] from the right-click menu.
The [IM send] screen appears.
At this moment, the name obtained by the search is dis-played in the [To] field.
The search target is "contacts" or "Microsoft Outlook"that is selected in the user configurations.
(*) Directory search is performed when [Use directorysearch] is on.
The "Message transmission failure!"dialog appears.
The IM has not been transmitted due to a reasonsuch as network congestion. Transmit the IMagain.
Use of Contacts
for Search
Information Retrieval Software
Displayed Content
Used
Microsoft Outlook
Search in the order of [Contacts] -> [Microsoft Outlook] -> [Directory] (*)
Microsoft Outlook (priority on directory search)
Search in the order of [Contacts] -> [Directory] -> [Microsoft Outlook] (*)
None Search of "Contacts"
Not used
Microsoft Outlook
Search in the order of [Microsoft Outlook] -> [Directory] (*)
Microsoft Outlook (priority on directory search)
Search in the order of [Directory] -> [Microsoft Outlook] (*)
None No search
Search is not properly performedfor the phone book.The exchange number registration may berequired depending on the registrationinformation of the phone book. For details,contact the system administrator.

119
How to Use the Call History
4 Input a message.
5 Click .
The IM has now been transmitted to the otherparty.
(IM Transmission icon) is displayed next to the trans-mitted message in the list of the [Outgoing IM] screen.
You can send an e-mail using the call history.
This section describes how to send an e-mail using
(Incoming calls).
1 Click (Incoming calls) in (Call History).The incoming calls are displayed.
2 Click the history of the party to transmitan e-mail.The detail data is displayed.
3 Click (E-mail address) in the detail data.The mail send screen appears. (The image is forOutlook Express.)You can also get the same result by the following opera-tions.• Double-click the e-mail address in the detailed data
(option setting is required).• Press the [Enter] key with the e-mail address
selected.• Select [Send E-mail] from the right-click menu.
The mail creation screen appears with the e-mailaddress set in the [To...] field.
The e-mail has now been sent.
The "Message transmission failure!"dialog appears.
The IM has not been transmitted due to a reasonsuch as network congestion. Transmit the IMagain.
Sending an E-mail from theIncoming Calls/Outgoing Calls
If another mail creation screen hasalready appearedA new mail creation screen appears separately(depending on the specification of the mailer).
• The mailer activated from [Send E-mail] or [Attach to E-mail] is the program selected in the [E-mail:] field of [Internet programs] on the [Programs] tab (selected from [Tools] -> [Internet Options...] in Internet Explorer).
• When no e-mail address is registered to thedetail data, the right-click menus, [Send E-mail] and [Copy E-mail Address] are disabled.
• An e-mail can be sent to multiple destinationsby selecting two or more histories.

120
How to Use the Call History
You can delete the incoming calls/outgoing calls.This section describes how to delete the outgoing calls.
1 Click (Outgoing calls) in (Call History).The outgoing calls are displayed.
2 Select the history to be deleted.The detail data is displayed.
3 Press the [Delete] key.Or, click [Delete] from the right-click menu.The history can be deleted regardless of whether the topitem is selected or the detail data is selected.The following dialog appears.
4 Click .
The history has now been deleted.
You can add an entry in the incoming calls/outgoing callsto Contacts.This section describes how to add an entry in the outgo-ing calls to Contacts.
1 Select the history of the party to be added
to (Contacts).
2 Drag and drop the history onto [Con-tacts].
Or, select [Registers in Contacts] from the right-clickmenu.The [Contact Setting] screen appears.
3 Input the setting items.
Deleting an Entry from theIncoming Calls/Outgoing Calls
To delete multiple historiesSelect multiple histories to be deleted.
Adding an Entry in the IncomingCalls/Outgoing Calls to Con-tacts

121
How to Use the Call History
4 Click .The new contact is added to the end the tree under thetop of the contacts list.
The entry has now been added to Contacts.
• When a warning message is displayed, thesetting is not completed. Check the following.- Is [Name] left blank?- Is [unused] set to all of [Telephone
number1] to [Telephone number4] and[Email Address1] to [Email Address4]?
• When the [Cancel] button is clicked, all thecontents input from the [Contact Setting]screen are discarded, and a contact is notadded.
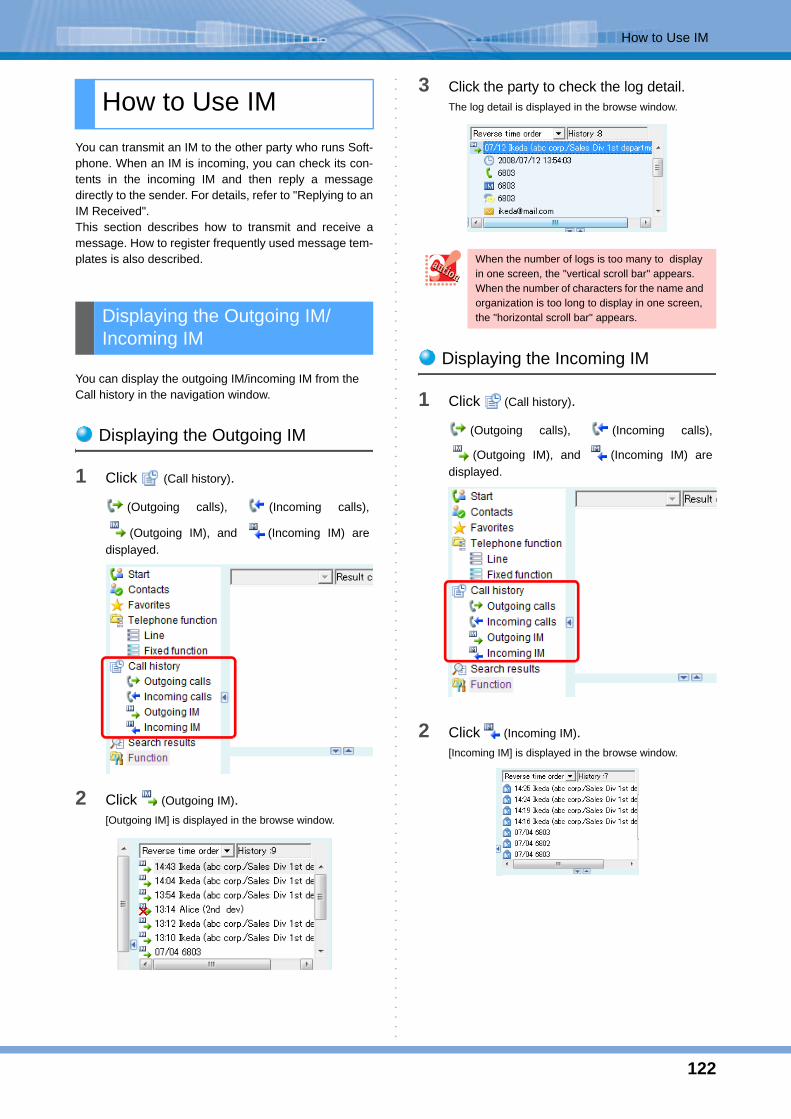
122
How to Use IM
You can transmit an IM to the other party who runs Soft-phone. When an IM is incoming, you can check its con-tents in the incoming IM and then reply a messagedirectly to the sender. For details, refer to "Replying to anIM Received".This section describes how to transmit and receive amessage. How to register frequently used message tem-plates is also described.
You can display the outgoing IM/incoming IM from the Call history in the navigation window.
Displaying the Outgoing IM
1 Click (Call history).
(Outgoing calls), (Incoming calls),
(Outgoing IM), and (Incoming IM) aredisplayed.
2 Click (Outgoing IM).[Outgoing IM] is displayed in the browse window.
3 Click the party to check the log detail.The log detail is displayed in the browse window.
Displaying the Incoming IM
1 Click (Call history).
(Outgoing calls), (Incoming calls),
(Outgoing IM), and (Incoming IM) aredisplayed.
2 Click (Incoming IM).[Incoming IM] is displayed in the browse window.
How to Use IM
Displaying the Outgoing IM/Incoming IM
When the number of logs is too many to display in one screen, the "vertical scroll bar" appears. When the number of characters for the name and organization is too long to display in one screen, the "horizontal scroll bar" appears.

123
How to Use IM
3 Click the party to check the log detail.The log detail is displayed in the browse window.
Clicking (Send IM) of (Function) displays the [IM send] screen. Selecting "IM Transmission" from the right-click menu on a list of "Contacts" or "Call history" opens the transmission screen with destination number and message body quoted. A message with the same content can be transmitted up to eight persons.
Using Send IM
1 Click (Send IM) of (Function).The [IM send] screen is displayed.
2 Input the extension number of the party inthe [Number Setting] to send a message.
3 Click .The number of the party input to the [Number Setting] isadded to the destination listbox.At this moment, the name obtained by the search isdisplayed in the [To] field.
The search target is "contacts" or "Microsoft Outlook"that is selected in the user configurations.
(*) Directory search is performed when [Use directorysearch] is on.
When the number of logs is too many to display in one screen, the "vertical scroll bar" appears. When the number of characters for the name and organization is too long to display in one screen, the "horizontal scroll bar" appears.
Transmitting an IM
• Up to 300 characters can be transmitted in amessage.
• IMs cannot be transmitted when the terminal ofthe party is not running or Softphone is notactivated.
If the following message appears
Two or more [IM send] screens cannot be opened at one time. Clicking the [OK] but-ton on the dialog discards the message you are currently editing.
Use of Contacts
for Search
Information Retrieval Software
Displayed Content
Used
Microsoft Outlook
Search in the order of [Contacts] -> [Microsoft Outlook] -> [Directory] (*)
Microsoft Outlook (priority on directory search)
Search in the order of [Contacts] -> [Directory] -> [Microsoft Outlook] (*)
None Search of "Contacts"
Not used
Microsoft Outlook
Search in the order of [Microsoft Outlook] -> [Directory] (*)
Microsoft Outlook (priority on directory search)
Search in the order of [Directory] -> [Microsoft Outlook] (*)
None No search
Search is not properly performedfor the phone book.The exchange number registration may berequired depending on the registrationinformation of the phone book. For details,contact the system administrator.

124
How to Use IM
4 Input a message.
5 Click .
The IM has now been transmitted to the otherparty.
(IM Transmission icon) is displayed next to thetransmitted message in the list of the outgoing IMscreen.
Using the Phone BookIf Microsoft Outlook has been installed, you can check the current status of the other party before the IM trans-mission.
1 Click (Phone book) in (Function) .The [Phone Book] screen is displayed.
2 Click the party to send a message in the[Contacts] field.The selected party is highlighted.
3 Click on the toolbar.Or click [Transmit an IM] on the right-click menu.The [IM send] screen is displayed.
At this moment, the name obtained by the search is dis-played in the [To] field.
The "Message transmission failure!"dialog appears.
The IM has not been transmitted due to a reasonsuch as network congestion. Transmit the IMagain.

125
How to Use IM
The search target is "contacts" or "Microsoft Outlook"that is selected in the user configurations.
(*) Directory search is performed when [Use directorysearch] is on.
4 Input a message.
5 Click .
The IM has now been transmitted to the otherparty.
(IM Transmission icon) is displayed next to the trans-mitted message in the list of the outgoing IM screen.
Deleting the Destination
1 Select the destination number.
2 Click .Or click [Delete] on the right-click menu.
3 Click .
The destination has now been deleted.
Use of Contacts
for Search
Information Retrieval Software
Displayed Content
Used
Microsoft Outlook
Search in the order of [Contacts] -> [Microsoft Outlook] -> [Directory] (*)
Microsoft Outlook (priority on directory search)
Search in the order of [Contacts] -> [Directory] -> [Microsoft Outlook] (*)
None Search of "contacts"
Not used
Microsoft Outlook
Search in the order of [Microsoft Outlook] -> [Directory] (*)
Microsoft Outlook (priority on directory search)
Search in the order of [Directory] -> [Microsoft Outlook] (*)
None No search
Search is not properly performedfor the phone book.The exchange number registration may berequired depending on the registrationinformation of the phone book. For details,contact the system administrator.
The "Message transmission failure!"dialog appears.
The IM has not been transmitted due to a reasonsuch as network congestion. Transmit the IMagain.

126
How to Use IM
Frequently used messages can be registered as mes-sage templates such as "Call me when you get back." or"Contact me as soon as possible!".
Registering a Message TemplateYou can register a message template using the IM inprocess of creation.
1 Creating a message
2 Select the part to be registered.
3 Click .
4 The selected message is copied to themessage template area.
The message has now been registered.Back to the message in process of creation and continue to create the message.
Using a Message Template
1 Creating a message
2 Click the message template to be used.
3 Click .The selected message is copied to where the cursor isplaced in the message input area.
Registering a Message Tem-plate
Up to 228 characters can be used for a message template.
If you click the [>>] button without selecting thepart to be registered, a message saying "Selectany text to be registered as a message template!"appears.
To add a message template directlyClicking the [Add] button displays a screen for themessage template registration. Input a messagein the screen and click the [OK] button.

127
How to Use IM
4 Continue to create a message.
5 Click .The following dialog appears.
The IM has now been transmitted.
Editing a Message Template
1 Display the [IM send] screen.
2 Click the message template to select.
3 Click .The [Message Template] screen appears.
4 Edit the message.
5 Click .
The message has now been edited.
Deleting a Message Template
1 Display the [IM send] screen.
2 Click the fixed message to be deleted.
3 Click .The following dialog appears.
4 Click .
The message has now been deleted.

128
How to Use IM
When you receive an IM, you are notified by (IMReception icon).Pointing the cursor to the icon displays the "number of new IMs received" and "number of unread IMs" on a tooltip. If the pop-up setting has been set, a dialog appears to notify.
Using the IM Reception Icon
1 An IM is received.The IM Reception icon is displayed as "New IMreceived".
2 Click (IM Reception icon).The [Incoming IM] screen is displayed.
3 Click the log to display the message.The IM body is displayed.
Using Short Message NotificationTo display a pop-up screen when receiving an IM, setthe pop-up setting in advance.For how to set, refer to "Displaying a Pop-up on IMReception".
1 An IM is received.The [Short Message Notification] dialog is displayed.
Receiving an IM
Icon Name Description
New IM receivedIndicates that you have received one or more new IM.
Unread IMIndicates that you have one or more unread IM(s).
No IM receivedIndicates that there is no new IMs.
To reply to an IMRefer to "Replying to an IM Received".
To place a callRefer to "Dialing from the Call History".
• (New IM received icon) is displayed alsowhen a new IM is received whileselecting (Outgoing IM) or (IncomingIM) of (Call history) in the navigation win-dow.
• If SP350 ends while (New IM receivedicon) is displayed, (New IM received icon)will not be displayed at the next activation and
(Unread IM icon) will be displayedinstead.
• If SP350 ends while (Unread IM icon) is displayed, (Unread IM icon) will be still displayed at the next activation.
• Only one [Short Message Notification]dialog is displayed even if you receivedtwo or more IMs.
• If you close the screen after clicking the [Message] or [Cancel] button, (Unread IM icon) is displayed.
• Up to 1000 newly received IMs can bedisplayed.

129
How to Use IM
2 Receive an IM while the [Short MessageNotification] dialog is displayed.The number of new IMs displayed in the [Short MessageNotification] dialog gets bigger with receiving more IMs.
3 Click .[Incoming IM] is displayed and the [Short MessageNotification] dialog is closed.
4 Click the log to show the message con-tent.The content of received IM is displayed.
Clicking (Incoming IM) of (Call history) in the navigation window displays incoming IMs. You can reply to the received IM easily by selecting the party on the incoming IM.
Using the IM Reception Log
1 Click (Incoming IM) in (Call history).The [Incoming IM] screen is displayed.
2 Click the party to reply.The log detail is displayed.
3 Click (IM Number).The [IM send] screen appears.
The [IM send] screen also can be displayed by clicking[Send IM] on the right-click menu.
The other party's number is set in the [To] field and themessage in the received IM is quoted in the messagefield automatically (">" is added to the beginning of thequoted part).
4 Input your message.
The displayed number of received IMs getsbigger only if you have checked [Enablepop-up notification when a Short Messageis received.] in the IM setting in the Userconfigurations.
To reply to an IMRefer to "Replying to an IM Received".
To place a callRefer to "Dialing from the Call History".
Replying to an IM Received

130
How to Use IM
5 Click .The following dialog appears.
Your reply IM has now been transmitted.
You can delete outgoing IM/incoming IM.
This section describes how to delete (Outgoing IM).
1 Click (Outgoing IM) in (Call history).The [Outgoing IM] is displayed.
2 Select the log to be deleted.The log detail is displayed.
3 Press the [Delete] key.Or select [Delete] on the right-click menu.You can delete the log by selecting either the top item ordetailed data.The following dialog appears.
4 Click .
The log has now been deleted.
You can add parties, whom you sent IMs to or whom youreceived IMs from, to Contacts.
1 Select the log to be added to (Contacts).
2 Drag and drop the log onto [Contacts].
Or, select [Registers in Contacts] from the right-clickmenu.The [Contact Setting] screen appears.
To send IMs to parties you called beforeor parties who called you beforeRefer to "Transmitting an IM from the Call His-tory".
Deleting an Entry from the Out-going IM/Incoming IM
To delete multiple logsSelect multiple logs to be deleted.
Adding an Entry in the OutgoingIM/Incoming IM to Contacts

131
How to Use IM
3 Input the setting items.
4 Click .The new contact is added to the end the tree under thetop of the contacts list.
The entry has now been added to Contacts.
• When a warning message is displayed, thesetting is not completed. Check the followings.- Is [Name] left blank?- Is [unused] set to all of [Telephone
number1] to [Telephone number4] and[Email Address1] to [Email Address4]?
• When the [Cancel] button is clicked, all thecontents input from the [Contact Setting]screen are discarded, and a contact is notadded.

132
How to Use Chat
You can chat with another party who is running the Soft-phone."2-Party Chat", "Chat Conference", and "Chat History"are provided as the Chat function.
You can communicate with the other party usingcharacters (chat). You can give contents that are hard toconvey in conversation (website address, address, etc.)easily.
About the Chat Screen
< Components of Chat Screen (2-Party) >How to Use Chat
Using Chat (2-Party)
Destination display area
Chat display area
Chat input area
Emoticon selection button
Other function button area
Components Name Description
Destination display area
The other party's name and chat number are dis-played.
Minimize button
The screen is minimized to the task tray when clicked.Clicking the icon in the task tray restores the screen.
Maximize button
The screen is maximized when clicked.When the screen is maximized, the [Maximize] button changes to the [Restore] button.
Exit buttonExits the screen when clicked.
Chat display area
The name and chat number of the party who sent the message, the message posted time, and the message itself are displayed.The emoticons can be put in the message.Character strings starting with [http://], [https://], [callto:], and [mailto:] are displayed as hyperlink.
History display area
The history for each 5 days is displayed in the chat display area when each item is clicked.
Chat input area
Chat can be edited in this area. Up to 300 characters can be entered.
Emoticon selection button
Displays the Emoticon Selection screen.
Call/Transfer button
Places a call/transfers a call to the other party in a chat.
Send Mail button
Sends a mail to the other party in a chat.
Invite to Chat Con-ference button
Invites the other party of the 2-Party Chat to a Chat Conference.
Save File button
Saves all the messages in the chat display area in a file.
Size change area
The screen size can be changed by mouse drag.

133
How to Use Chat
About Emoticon Selection Screen
In a chat, not only text but also simple animation icon"Emoticon" can be used.To use the emoticons, click the Emoticon selection but-ton on the Chat screen to open the Emoticon Selectionscreen.25 emoticons are provided. When an emoticon isselected, the corresponding identification character isput in the chat Input area.
< List of Identification Characters and ToolTips for Emoticons >
• The priority of the name information to be dis-played in the Chat Screen is as follows.1) Information acquired from the Contacts List.2) "User name" set in the "User Information" of
"User Settings" on the other party’s termi-nal.
3) "Chat Number" received from the otherparty.
• If there are multiple persons who meet thesearch criteria, the search result is acquired bythe following way.1) If the contacts that meet the search criteria
are located in the different hierarchies in thecontacts list, the contact in the upper hierar-chy is acquired.
2) If the contacts that meet the search criteriaare located in the same hierarchy in thecontacts list, the contact to be acquired isnot determined.
EmoticonIdentification
CharacterTool tip
(_warai_) Smile
(_yorokobi_) Big smile
(_niyari_) Grin
(_onegai_) Please
<Emoticon Selection Screen>
(_dogeza_) Apologize
(_ase_) Sweat
(_yabai_) Oh My God!
(_shobon_) Sad
(_naki_) Shed tears
(_uwaan_) Cry
(_muka_) Grumpy
(_kora_) Angry
(_bikkuri_) Shocked
(_hatena_) Question
(_hirameki_) I got an idea
(_akanbe_) Tongue
(_kuchibue_) Whistle
(_waru_) Devil
(_good_) Thumbs up
(_boo_) Thumbs down
(_ryokai_) Yes sir!
(_bye_) Bye
(_v-sign_) V sign
(_hakushu_) Applause
(_akushu_) Handshake
EmoticonIdentification
CharacterTool tip

134
How to Use Chat
Starting a Chat From the Contacts
1 Click the person with whom you want tochat.Detail information is displayed.
2 Click the Chat Number icon.The Chat screen for 2-party appears.
• The Chat screen (2-Party) can also be displayedby right-clicking the top of the contact with whomyou want to chat and selecting "Begin chat" in theright-click menu.
Starting a Chat from the Call History
You can start a chat from the detail information of Call History (Outgoing/Incoming logs, and IM sending/receiv-ing histories).Here describes an example using Outgoing log, how-ever, the procedures when using Incoming logs and IM sending/receiving histories are same.
1 Click the person with whom you want tochat on the Call History (Outgoing logs).The detail information is displayed.
• Up to 10 Chats (2-Party/Conference you areinvited) can be performed at the same time.If you attempt to start 11th chat, the followingerror message is displayed.However, Chat Conference in which you arean organizer is not included in this limitation.You can always initiate one Chat Conferenceas an organizer.
Example) When two chats (2-Party) are inprogress, 8 more Chat Conferences in whichyou were invited can be started.

135
How to Use Chat
2 Click the Chat Number icon.The Chat screen (2-Party) appears.
• The Chat screen (2-Party) can also be displayedby right-clicking the person with whom you want tochat in the Call History and selecting "Begin chat"in the right-click menu.
Starting a Chat from the SearchResults
You can start a chat from the detail information of the search results (Contacts, Outgoing/Incoming logs, and IM sending/receiving histories).Here describes an example using Contacts, however, the procedures when using Outgoing/Incoming logs and IM sending/receiving logs are same.
1 Click the person with whom you want tochat in the search results displayed aftersearch using the search keyword inputarea.The detail information is displayed.
2 Click the Chat Number icon.The Chat screen (2-Party) appears.

136
How to Use Chat
• The Chat screen (2-Party) can also be displayedby right-clicking the person with whom you want tochat in the search results and selecting "Beginchat" in the right-click menu.
Starting a Chat from the PresenceStatus Display
1 Click the person with whom you want tochat in the contacts list.The details information is displayed. The person is inleaving seat status here.
2 Set Online Notification to the person in"Absent" status in the right-click menu.
3 The status of the person changes to"Idle". The Online Notify dialog pops up.
4 Click [Begin chat] button.The Chat screen (2-Party) appears.

137
How to Use Chat
Sending a Chat Message
1 Click the Chat input area in the Chatscreen.Chat messages can be edited from the keyboard of thePC.
• Up to 300 characters can be input in a chat.• Pressing Alt + Enter key starts a new line.
2 Press the Enter key to send the chatmessage.The sent message is displayed in the chat display areaon both the party who sent the message and the partywho received the message.
Sending a Character String withHyperlink
A character string with hyperlink can be sent to the other party.
1 Enter a character string starting with"http://", "https://", "callto:", or "mailto:" inthe chat input area.
2 Press the Enter key to send the chatmessage.The sent message is displayed in the chat display areaon both the party who sent the message and the partywho received the message.The character strings input in the chat display area aredisplayed as hyper link.
• The following range of character string isregarded as a hyper link.
Start from "http://", "https://", "callto:", or "mailto:"until a space or the end of the line by the returnkey. If neither a space nor the end of the line isfound, until the end of the sentence.

138
How to Use Chat
Using the Emoticons in a Chat
The emoticons can be sent to the chat destination.
1 Click the Emoticon Selection button onthe Chat screen.The Emoticon Selection screen is displayed.
2 Select an emoticon from the EmoticonSelection screen.The identification character for the selected emoticon isput in the chat input area.
3 Press the Enter key to send the chatmessage.The sent message is displayed in the chat display areaon both the party who sent the message and the partywho received the message.The emoticon for the identification character input in thechat input area is displayed.
• The identification characters for the emoticonscan be directory typed on the Chat input area.
• An emoticon is not counted as one character butas a character string. For example, (_warai_) iscounted as 9 characters including "(" and ")".
Placing a Call to the Chat Destination
< In the case of 2-Party Chat >
Click the Call/Transfer button on the Chat screen.The chat number of the other party is displayed on theLCD, and ring back tone is heard.
Sending an Email to the ChatDestination
< In the case of 2-Party Chat >
Click the [Send E-mail] button on the Chat screen.
The mail send screen appears.The mail address registered in the User Settingsscreen on the other party's terminal is set in the [To:]field.
• If the other party does not set an Email address inthe User Settings, his/her Email address that isregistered in your contacts is acquired. If theEmail address is not registered in your contactseither, nothing is performed even when the [SendE-Mail] button is clicked.
• If more than one Email address is registered forthe other party in Contacts, the menu below popsup on clicking the [Send E-Mail] button and youcan select one from the menu.

139
How to Use Chat
Displaying the History During a Chat
Chat History can be displayed during a chat.You can select either of 5 days, 10 days, or 15 days to display.
1 Click [5days] during a Chat.
The chat history from now to 5 days ago is displayed,and [5 days] becomes black and cannot be clicked.
• When [10 days] is clicked, the chat history fromnow to ten days ago is displayed, and [5 days]and [10 days] become black and cannot beclicked.
• When [15 days] is clicked, the chat history fromnow to fifteen days ago is displayed, and [5 days],[10 days], and [15 days] become black and cannotbe clicked.
• The displayed history becomes invisible even if achat with the same person is started again afterclosing the Chat screen.

140
How to Use Chat
Saving the Displayed Message in aChat
By using [Save File button] on the Chat screen, Chat Conference screen, or Chat History screen, the displayed message in the chat can be saved.
1 Click (Save File button) during a chat.
2 The [Save As] screen appears.
3 Enter the file name and click [OK].The chat history is saved in html format file.
• The generated file can be displayed with abrowser such as Internet Explorer.
• The chat history can also be saved by clicking onthe chat display area and select [Save] in theright-click menu.

141
How to Use Chat
A Chat Conference with up to 8 parties can be opened.
About the Chat Conference Screen
< Components of Chat Conference Screen >
Using Chat Conference
Components Name Description
Conference Organizer display area
The name and Chat num-ber of the Conference organizer are displayed.
Minimize button
The screen is minimized to the task tray when clicked.Clicking the icon in the task tray restores the screen.
Maximize button
The screen is maximized when clicked.When the screen is maximized, the [Maximize] button changes to the [Restore] button.
Exit button
Exits the screen when clicked.When you are an organizer, clicking this button ends the Chat Con-ference.When you are an invited participant, clicking this button makes you leave the Chat Conference.
Other function button area
Chat input area Emoticon selection screen
Chat display area
Confer-ence Orga-nizer display area
List of partici-pants
Chat display area
The name and chat number of the party who sent the message, the message posted time, and the message itself are displayed.The emoticons can be put in the message.Character string starting with [http://], [https://], [callto:], and [mailto:] are displayed as hyper link.
List of participants
The name and chat number for the participants are displayed.The following operations are provided to the participants.- Call/Transfer- Send Email- Start 2-Party Chat- Leave the Chat Confer-
ence (For invitedparticipants)
- End the Chat Confer-ence (For the organizer)
History display area
The history for each 5 days is displayed in the chat display area when each item is clicked.
Chat input area
Chat can be edited in this area. Up to 300 characters can be entered.
Emoticon selection button
Displays the Emoticon Selection screen.
Save File button
Saves all the messages in the chat display area in a file.
Size change area
The screen size can be changed by mouse drag.
Components Name Description
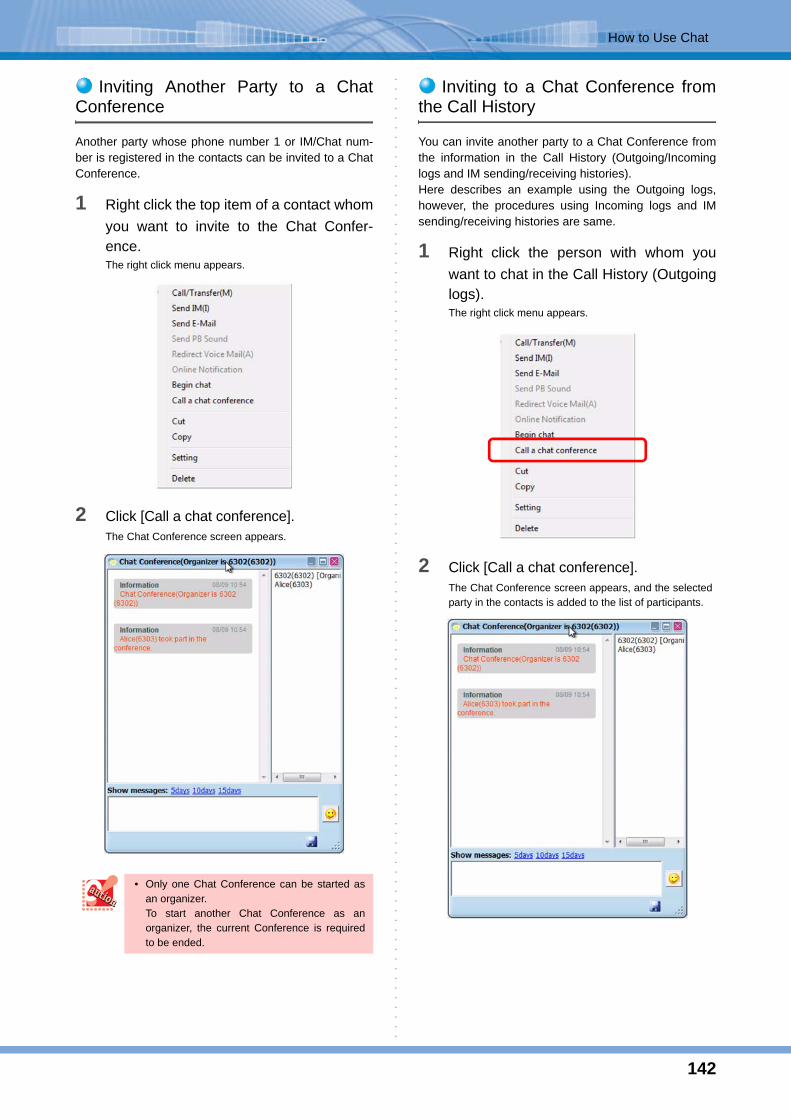
142
How to Use Chat
Inviting Another Party to a ChatConference
Another party whose phone number 1 or IM/Chat num-ber is registered in the contacts can be invited to a ChatConference.
1 Right click the top item of a contact whomyou want to invite to the Chat Confer-ence.The right click menu appears.
2 Click [Call a chat conference].The Chat Conference screen appears.
Inviting to a Chat Conference fromthe Call History
You can invite another party to a Chat Conference fromthe information in the Call History (Outgoing/Incominglogs and IM sending/receiving histories).Here describes an example using the Outgoing logs,however, the procedures using Incoming logs and IMsending/receiving histories are same.
1 Right click the person with whom youwant to chat in the Call History (Outgoinglogs).The right click menu appears.
2 Click [Call a chat conference].The Chat Conference screen appears, and the selectedparty in the contacts is added to the list of participants.
• Only one Chat Conference can be started asan organizer.To start another Chat Conference as anorganizer, the current Conference is requiredto be ended.

143
How to Use Chat
Inviting to a Chat Conference from theSearch Results
You can invite another party to a Chat Conference from the information in the search results (Contacts, Outgo-ing/Incoming logs, and IM sending/receiving histories). Here describes an example using the contacts, however, the procedures when using the Outgoing/Incoming logs and IM sending/receiving histories are same.
1 Right click the person with whom youwant to chat from the search resultsdisplayed after search using the searchkeyword input area.The right-click menu appears.
2 Click [Call a chat conference].The Chat Conference screen appears, and the selectedperson in the contacts is added to the list of participants.
Inviting a Chat Destination to a ChatConference
You can invite the other party of a chat to a Chat Confer-ence.
1 Click [Call a chat conference] buttonduring a 2-Party Chat.
The Chat Conference screen appears, and the selectedparty in the contacts is added to the list of participants.

144
How to Use Chat
Adding a Participant to a Chat Confer-ence
1 Click the person whom you want to inviteto the Chat Conference on the contactslist.The detail information is displayed.
2 Select the person whom you want toinvite to the Chat Conference from thecontacts and drag and drop it to the list ofparticipants on the Chat Conferencescreen.The selected person is invited to the Chat Conferenceand the person is added to the list of participants.
Being Invited to a Chat Conference
1 You are invited to the Chat Conferenceby the organizer.The task trey icon for Chat Conference screen is dis-played on the task trey, and it blinks.
2 Click the task trey icon for the Chat Con-ference screen.The Chat Conference screen appears. The received message (a message to notify that youwere invited to the Chat Conference) is displayed on theChat display area.

145
How to Use Chat
Starting a Chat (2-Party) with aParticipant of Chat Conference
1 Select the participant with whom youwant to chat during Chat Conference andselect [Begin chat] in the right-click menu.
The Chat screen (2-Party) appears.
Ending a Chat Conference
< When you are an organizer >
1 Select the organizer from the list ofparticipants and select [End the chat con-ference] in the right-click menu.
The following dialog appears.
2 Select [Yes].The Chat Conference has ended now and all the partici-pants are deleted from the list of participants.The chat input areas on all the participants (both orga-nizer and invited participants) are grayed out, and theycannot send a message.
• You can also exit Chat Conference by clicking[Exit] button at the upper right corner of the ChatConference screen.
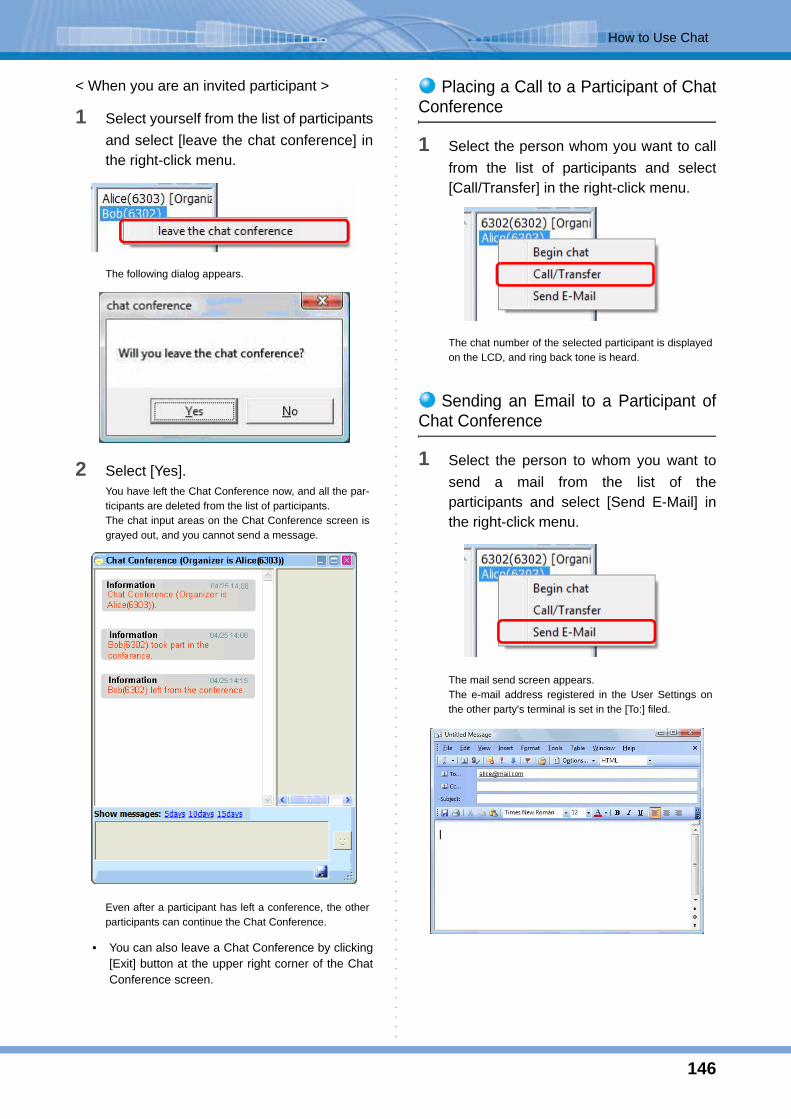
146
How to Use Chat
< When you are an invited participant >
1 Select yourself from the list of participantsand select [leave the chat conference] inthe right-click menu.
The following dialog appears.
2 Select [Yes].You have left the Chat Conference now, and all the par-ticipants are deleted from the list of participants. The chat input areas on the Chat Conference screen isgrayed out, and you cannot send a message.
Even after a participant has left a conference, the otherparticipants can continue the Chat Conference.
• You can also leave a Chat Conference by clicking[Exit] button at the upper right corner of the ChatConference screen.
Placing a Call to a Participant of ChatConference
1 Select the person whom you want to callfrom the list of participants and select[Call/Transfer] in the right-click menu.
The chat number of the selected participant is displayedon the LCD, and ring back tone is heard.
Sending an Email to a Participant ofChat Conference
1 Select the person to whom you want tosend a mail from the list of theparticipants and select [Send E-Mail] inthe right-click menu.
The mail send screen appears.The e-mail address registered in the User Settings onthe other party's terminal is set in the [To:] filed.

147
How to Use Chat
• If the other party does not set an Email address inthe User Settings, his/her Email address that isregistered in your contacts is acquired. If Emailaddress is not registered in your contacts either,the mail send screen does not appear even whenthe [Send E-Mail] button is clicked.
• If more than one Email address is registered forthe party in the contacts, the sub menu for [SendE-mail] appears and you can select one from themenu.
On the Chat History screen, all the histories of 2-PartyChat and Chat Conference can be displayed.On the screen, you can confirm, save, and delete thechat histories. The chat histories are summarized by thechat numbers of the other parties to display in the list ofthe other parties at the upper right pane of the screen.By selecting a person from the list of the other parties,the dates on which you chatted with the selected personare displayed in each 2-Party Chat History and ChatConference History. Selecting the date displays all themessages that were posted on the date in the chatdisplay area.
About Chat History Screen
< Components on Chat History screen >
Using Chat History
List of the other parties
Destination display area
Chat display area
2-Party Chat Histories
Chat Con-ference history
Other function button area
Components Name Description
Destination display area
The other party's name and chat number are displayed.
Minimize button
The screen is minimized to the task tray when clicked.Clicking the icon in the task tray restores the screen.
Maximize button
The screen is maximized when clicked.When the screen is maximized, the [Maximize] button changes to the [Restore] button.
Exit buttonExits the screen when clicked.
Chat display area
The name and chat number of the party who sent the message, the message posted time, and the message itself are displayed.The emoticons can be put in the message.Character strings starting with [http://], [https://], [callto:], and [mailto:] are displayed as hyper link.
List of the other parties
The persons with whom you have chatted with in the past are displayed. By selecting the person, the dates on which you chatted with the person are displayed in each 2-Party Conference History and Chat Conference History respectively.
2-Party Chat history (upper pane), Chat Confer-ence history (lower pane)
By selecting the date, all the chat histories that were performed on the date are displayed in the chat display area.
Save File button
Saves all the histories in the chat display area in a file when clicked.
Size change area
The screen size can be changed by mouse drag.

148
How to Use Chat
Displaying the Chat History Screen
1 Click the (Chat History) under the
(Function) in the Navigation Window.
2 The Chat History screen appears.
• By registering "Chat History" in the launcher, theChat History screen can be displayed from thelauncher.
Confirming the Chat History
1 Select a person with whom you havechatted from the list of the other parties.The dates on which you chatted with the person are dis-played in each 2-Party Conference history and ChatConference history.All the histories of the 2-Party Chat on the latest dateare displayed in the chat display area.
• If there is no history of 2-Party Chat, all the histo-ries of the Chat Conference on the latest date aredisplayed in the chat display area.
2 Select a date in the 2-Party Chat historyor the Chat Conference history.All the histories on the selected date are displayed in thechat display area.
Click

149
How to Use Chat
Deleting the Chat History
< Deleting by name >
1 Select the person whose chat history youwant to delete from the list of the otherparties and select [Delete History] in theright-click menu.
A confirmation message appears.
2 Select [Yes] on the confirmationmessage.All the histories of the selected person are deleted.
• If you are chatting with the person whose chat his-tory you are trying to delete, an error messageappears to cancel the operation.
< Deleting by date >
1 Select the date of the history that youwant to delete from the list of 2-Pary Chathistory or Chat Conference history andselect [Delete History] in the right-clickmenu.
All the histories of the selected date are deleted.
• If you are chatting with the person whose chat his-tory you are trying to delete, an error messageappears to cancel the operation.
• You can select multiple dates to delete at once.
• In the list of the other parties, only one personcan be selected.
• In 2-Party Chat History and Chat ConferenceHistory, multiple dates can be selected. Whenselecting multiple dates, the history of the new-est date is displayed in the chat display area.
• After using the chat function, if the chat func-tion is disabled by unchecking the [Use Chat]check box of the [Security] in the [MaintenanceScreen], this function becomes disabled butthe Chat History is retained. When the functionis enabled again, the history before disablingthe function can be restored.

150
How to Use Search
Information can be searched from the "phone book","contacts", or "call history" by entering a search keywordand clicking the search button. The "Search results"function lists the results for you to reference the relatedinformation and perform operations such as callorigination and IM transmission from the detailed dataeasily.
Normal SearchThis section describes how to search for informationwhen the default search target is [Contacts].
1 Input a search keyword.
2 Click (List Topics button).Or, press the [Enter] key.The search result is displayed on the browse window.
You have finished the normal search.
How to Use Search
How to Search
To change the default search targetThe default search target can be changed in[User configurations].For details, refer to "Changing the SearchTarget".
• [Phone Book] in the search target list is dis-abled.
• When Softphone is an English version,[Phone book] is not displayed in the searchtarget list.
• The default search target is [Phone book]. If[Phone book] cannot be selected, however, thedefault changes to [Contacts].
• The search target that was selected in [Userconfigurations] before Softphone ends is car-ried over when Softphone starts next time.
• Rolling the mouse over the search buttondisplays the current search target on the tool-tip.
• When the search target is [Phone book],clicking the search button opens theapplication-dependent search result screen,not moving to [Search results] in the functionmenu. At this time, the search result ofSoftphone is not updated.
• If the [Enter] key is pressed while the mousecursor is in the search keyword field, a searchfor the characters input in the field is executed.
• The information targeted for search is "Name","Phone number", "Group (Contacts)","Organization (Call history)", and "E-mailaddress". (*"Time" and "IM text" are nottargeted for search.)
• If even one hit is not found, a message "Thereis no match" is displayed.

151
How to Use Search
Temporary Search
1 Input a search keyword.
2 Click (Search Target button).The search target list appears.
3 Click the target you want to search.The search result is displayed on the browse window.
You have finished the temporary search.
Searching a Directory
Directory search enables to search contacts from thephonebook in the directory server by a simple operation.
1 Enter a search keyword.
2 Click (search target button).The search target list appears. Execute by selecting[Directly Search].
If [Directory Search] is being specified in [Default SearchTarget], search can be started with (search startbutton) or the [Enter] key.
3 Click the search target you want tospecify.The search result appears in the viewing window.If the presence server has been set up, the presenceinformation of phone number 1 is also displayed.
(In directory search, the result-related informationdisplay area is not used.)
• [Phone Book] in the search target list is dis-abled.
• When Softphone is an English version, [Phonebook] is not displayed in the search target list.
• The search target selected by the [SearchTarget] button is valid only once, and does notaffect the next search.
• When the search target is [Phone book],clicking the search button opens theapplication-dependent search result screen,not moving to [Search results] in the functionmenu. At this time, the search result ofSoftphone is not updated.
• The information targeted for search is "Name","Phone number", "Group (Contacts)","Organization (Call history)", and "E-mailaddress". (*"Time" and "IM text" are nottargeted for search.)
• If no keyword is input, the search target list isnot displayed with a click on the button.
• If even one hit is not found, a message "Thereis no match." is displayed.

152
How to Use Search
About the Search Keywords
In directory search, the following keywords can becombined to search contacts.In many cases, it is sufficient by searching for last nameand first name.
LegendDescription Convention
Keyword Example
Multiple keywords
Delimit keywords with a blank " ".To search a blank itself, enclose it with double quotations " ".When multiple keywords are entered, contacts that match all conditions are searched (AND condition).
Suzuki -> SuzukiIchiro Suzuki -> Ichiro + Suzuki"Ichiro Suzuki" -> Ichiro Suzuki
Prefix The keyword type is automatically determined according to the keyword type determination rule, but a prefix such as "tel:" is used in order to expressly specify the keyword type.For more information about usable prefixes, see the Keyword Type Table.
Be careful with typographic errors of prefixes. If misspelled or 2-byte characters are mixed, search will be made for "persons with that specific name."
tel:1234mail:[email protected]:Suzukiname:"Ichiro Suzuki"
Partial matching rule specification
Partial matching rule can be specified using ‘*.’Keyword + * -> Starts with keyword (forward matching).* + Keyword -> Ends with keyword (backward matching).* + Keyword + * -> Contains keyword (partial matching).
Unless otherwise specified, predefined partial matching rule will apply depending on the keyword type.Note that backward matching (ending with _) is always used for phone numbers, and ‘*’ is used as a keyword and as part of phone numbers.
Suzu**_*suzuki@sample*mail:*suzuki@sample*
Complete matching specification
Complete matching can be specified by placing ‘=’ in front of a keyword.If a prefix is used, use ‘=’ in place of ‘:’ such as in "tel=1234."Note that partial matching specification with ‘*’ takes precedence over complete matching specification, which functions exactly according to partial matching rule.
[email protected]=Suzukisan=Suzu* (last name starting with Suzu)
Negating condition specification
Using “!," contacts "not matching the keyword" are searched.By using negating conditions, search results can be filtered. Note that search cannot be conducted only with a negating condition keyword.
!Suzuki!*_!*suzuki@sample*mail:!*suzuki@sample*sn:!Suzuki
LegendDescription Convention
Keyword Example

153
How to Use Search
Keyword Type
Description Convention
Keyword Example
Phone number
A keyword consisting of only numbers (0-9), #, *, -, +, ( and ).
A keyword consisting of only numbers and above symbols is interpreted as a search for a phone number. At this time, phone numbers ending with the keyword are searched. For example, ‘1234’ searches phone numbers ending with 1234.
Phone numbers are always searched with backward matching specification (ending with the keyword). ‘*’ is handled as part of a phone number.
123401-2345
Note: 1234* specifies a backward matching search of phone numbers having ...1234*.
Prefixed phone number
A keyword starting with "tel:" or "callto:"
A character string following "tel:" is searched as a phone number. At this time, contacts whose phone numbers end with the keyword are searched.
tel:1234tel:01-2345
Note: tel:1234* specifies a backward matching search of phone numbers ending with 1234*.
Email address
Alphanumeric word + ‘@’ + alphanumeric wordNote that the alphanumeric word at the left of @ cannot be omitted.
Search is performed by interpreting an alphanumeric keyword containing @ as an email address. Partial matching search is performed by default.
[email protected]@sample
Note: @abc.com cannot be used.
Prefixed email address
A keyword staring with "mail:" or "mailto:"
Search is performed by interpreting a character string following "mail:" as an email address. Partial matching search is performed by default.
mail:[email protected]@samplemail.ichiro.suzuki
Name (last name or first name)
A keyword not containing numbers and @
Search is conducted by interpreting keywords which are neither phone numbers nor email addresses as last names or first names.
"Suzuki" -> Contacts whose last names or first names start with "Suzuki" are searched. Forward matching search is performed by default.
SuzukiIchiro
Prefixed last name
A keyword starting with "sn:"
Search is performed by interpreting a character string starting with "sn:" as a last name.Use this to expressly specify a last name. Forward matching search is performed by default.
sn:Suzuki
Prefixed first name
A keyword starting with "gn:"
Search is performed by interpreting a character string starting with "gn:" as a first name.Use this to expressly specify a first name. Forward matching search is performed by default.
gn:Ichiro
Keyword Type
Description Convention
Keyword Example

154
How to Use Search
Search Examples
Prefixed name (last name + first name)
A keyword starting with "name:"
Search is performed by interpreting a character string starting with "name:" as first and last names. Partial matching search is performed by default. It is necessary to also specify a blank (‘ ‘).
name:"Ichiro Suzuki"
Note: Because a name normally contains a blank (‘ ‘), enclose a blank with double quotation marks " ".
Unusable words
The following searches cannot be performed because they are ambiguous as search conditions:• Only one
alphanumeric character
• Less than 3 numeric characters
• Negating conditions only
*sn:a01tel:01!Suzuki
Keyword Type
Description Convention
Keyword Example
Keyword Meaning
Ichiro Suzuki Contacts whose first or last name starts with "Ichiro" and last or first name with "Suzuki" are searched.In many cases, specifying both first and last names is sufficient as a search con-dition.
name:"Ichiro Suzuki"
Contacts whose full name is "Ichiro Suzuki" are searched. It is necessary to also specify a blank; whether a blank is 1- or 2-byte character is also distinguished.
1234 Contacts whose phone number ends with "1234" are searched.This is used to search contacts from their phone numbers. Please note that search is made in backward matching mode.
Contacts containing email address "[email protected]" are searched.Although partial matching search is per-formed by default, note that the character string in front of @ is required as a search condition. Any keywords not con-taining the character string in front of @ (starting with @) will result in search fail-ure.
Suzuki 1234 Contacts whose last or first name starts with "Suzuki" and whose phone number ends with "1234" are searched. Search conditions can be specified as many as desired, and contacts that match all of the search conditions are searched. Search can be filtered by specifying multiple search conditions.
Suzuki !1234 Contacts whose last or first name starts with "Suzuki" and whose phone number does not end with "1234" are searched. Search can be filtered by using negating conditions.

155
How to Use Search
• The upper display limit of search results is 20results. If the number of search results is toomany and desired contacts cannot besearched, filter search by adding searchconditions. In many cases, search is sufficientif both first and last names are specified.
• If "Directory Search" cannot be executed (itdoes not appear in selections), the settings fordirectory search may be insufficient. Set up"Phonebook" in user settings.
• Search cannot be performed.- "No matching information" is displayed.-> The search keyword may be wrong. Checkthe keyword.Especially, if the spelling of the prefix isincorrect, search is conducted for "personswith the incorrectly specified name."
- An error message such as "... is not allowedas a directory search character string" isdisplayed.-> A character string which cannot be used asa search keyword is used. Check thekeyword.
- An error message such as "Directory searchhas not been configured correctly" isdisplayed.-> The settings may be wrong. Check thesettings.
- A search takes several tens of seconds, or asearch fails after several tens of seconds andan error message is displayed.-> There may be a directory server failure. Ifthe problem persists, contact your systemadministrator.
- An error sound is generated and search is notexecuted.-> Only one directory search can beperformed at the same time. After theprevious search result is displayed, performanother search.
• In directory search, phone numbers are always searched for backward matching (ending with ...). ‘*’ is also searched as part of a phone number.
• Directory search is linked with neither contactsearch nor phonebook search. Directorysearch searches contacts only from thedirectory server. The keyword rule also takeseffect for directory search.
• Only registered items are displayed in searchresult display. Especially when only names areregistered, clicking a name may not displayany of advanced items.
• In search result display, phone numbers mighthave been edited to numbers that can becalled (prefixed with 0). (For example, 03-1234-5678 -> 0-03-1234-5678) On the otherhand, desired phone numbers may not befound if directory search is performed withedited phone numbers (prefixed with 0).
• To enable directory search, it is necessary toinstall the keyword rule configuration file, setup the directory server in maintenancesettings, and set up the login to the directoryserver in user settings. For more informationabout the content of settings, contact yoursystem administrator.
• The keyword rule may be changed throughcustomization by your system administrator.Additionally, the usable keywords and displayitems may be different from the manualdescription depending on the settings of thedirectory server.
• The presence information is displayed onlywhen presence information is registered inphone number 1. In the case that the presenceserver is not set, there is no data, etc. it is notdisplayed.

156
How to Use Search
You can place a call using the search result.
1 You have performed a search.The search result is displayed on the browse window.
2 Click the person you want to call.The detailed data is displayed.
3 Click (phone number) of the personyou want to call.You can also get the same result by the followingoperations.• Double-click the phone number in the detailed data.• Press the [Enter] key with the phone number selected
in the detailed data.• Select [Call/Transfer(M)] from the right-click menu.
A confirmation dialog appears.
4 Click .
5 Start a conversation after the other partyanswers the phone.
Click (End call button) to disconnect thecall.
You can transmit an IM using the search result.
1 You have performed a search.The search result is displayed on the browse window.
2 Click the person to whom you want tosend an IM.The detailed data is displayed.
3 Click (IM number) of the person towhom you want to send an IM.You can also get the same result by the followingoperations.• Double-click the IM number in the detailed data.• Press the [Enter] key with the IM number selected in
the detailed data.• Select [Call/Transfer(M)] from the right-click menu.
Dialing from the Search Results To add a number to the beginning of thephone number of the clicked memberbuttonThe number to be added can be set in [Call] in[User configurations] in advance.For details, refer to "Dialing after Adding aNumber to the Beginning of the Phone Number".
Transmitting an IM from theSearch Results

157
How to Use Search
The [IM send] screen appears.
4 Input a message.
5 Click .
6 Click .
The IM has now been transmitted to the otherparty.
(IM Transmission icon) is displayed next to thetransmitted message in the list on the [Outgoing IM]screen.
You can send an e-mail using the search results.
1 You have performed a search.The search result is displayed on the browse window.
2 Click the person to whom you want tosend an e-mail.The detailed data is displayed.
3 Click the e-mail address
in the detailed data.The mail send screen appears. (The image is for Outlook Express.)You can also get the same result by the following operations.• Double-click the e-mail address in the detailed data
(option setting is required).• Press the [Enter] key with the e-mail address selected
in the detailed data.• Select [Send E-mail] from the right-click menu.
The mail creation screen appears with the e-mailaddress set in the [To...] field.
The e-mail can now be sent.
The "Message transmission failure!"dialog appears.
The IM has not been transmitted due to a reasonsuch as network congestion. Transmit the IMagain.
Sending an E-mail from theSearch Results

158
How to Use Search
You can register an entry in the search results to thecontacts list.The following describes the registration method usingthe right-click menu.
1 You have performed a search.The search result is displayed on the browse window.
2 Click an entry you want to add to the con-tacts list.
3 Right-click on the entry.The right-click menu appears.
4 Select [Registers in Contacts].The [Contact Setting] screen appears.
If another mail creation screen hasalready appearedA new mail creation screen appears separately(depending on the specification of the mailer).
• The mailer activated from [Send E-mail] or [Attach to E-mail] is the program selected in the [E-mail:] field of [Internet programs] on the [Programs] tab (selected from [Tools] -> [Internet Options...] in Internet Explorer).
• When no mail address is registered to thedetailed data, the right-click menus, [Send E-mail] and [Copy E-mail Address] are disabled.
• An e-mail can be sent to multiple destinationsby selecting two or more log entries.
Adding an Entry in the SearchResults to the Contacts List

159
How to Use Search
5 Input the required data.
6 Click .
The contact has now been registered.
• To register a contact, set [Name] andeither number(s) or address(es) for[Telephone number1] to [Telephonenumber4] or [Email Address1] to [EmailAddress4].
• Up to 255 characters can be input in[Telephone number1] to [Telephonenumber4] on the [Contact Setting]screen.
• Up to 256 characters can be input in[Email Address1] to [Email Address4] onthe [Contact Settings] screen.
• [Ringer Pattern] on the [Contact Setting]screen cannot be usedunless [Telephone number1] is set.

160
How to Use the Launcher
The Launcher is an area in which you can registerexternal applications/files or functions from thenavigation window of Softphone.From the Launcher, you can start applications/files andswitch between the navigation window and the browsewindow.
Registration Using the Right-ClickMenu
1 Right-click in the Launcher area.The right-click menu appears.
2 Select [Add].The submenu appears.
3 Select [Navigation window].The [New Button] screen appears.
4 Click [Link To], and select the link youwant to register.
5 Input the pop-up caption.
6 Click .
You have now registered the function in theLauncher.
How to Use the Launcher
• When Softphone has been updated fromDtermSP30, the shortcuts that were set by theuser on the toolbar of DtermSP30 are not car-ried over to Softphone.
• In the case of VPCC mode, the Softphonefunction "Voice Message Recording Setting"cannot be registered.
Registering a SoftphoneFunction in the Launcher
• Up to 100 characters can be used forthe pop-up caption of a button set in theLauncher.
• When the [Popup] field remains blank,the predetermined caption is used.
• When the predetermined captionexceeds 100 characters, thesubsequent characters are cut off.
• Up to eight (8) buttons can be registered in theLauncher.
• Multiple buttons that have the same link can beregistered.
• The following Softphone features cannot beregistered as buttons:- Telephone function menu- Call history- Function
• Right-clicking on an icon in the Launcher addsa new button to the left of that right-clickedicon.

161
How to Use the Launcher
Registration from the NavigationWindow
1 Right-click a function you want to registerin the Launcher.The right-click menu appears.
2 Click [Launcher].
You have now registered the function in theLauncher.
Registration from the Launcher EditScreen
1 Right-click in the Launcher area.The right-click menu appears.
2 Click [Customize].The [Launcher Edit] screen appears.
3 Click .The pull-down menu appears.
• Up to eight (8) buttons can be registered in theLauncher.
• Multiple buttons that have the same link can beregistered.
• The following Softphone features cannot beregistered as buttons:- Telephone function menu- Call history- Function
If a maximum number of buttons arealready registered in the Launcher, the[Add] button is disabled.

162
How to Use the Launcher
4 Click [Navigation window].The [New Button] screen appears.
5 Click [Link To], and select the link youwant to register.
6 Input the pop-up caption.
7 Click .The button and pop-up caption are added to the [Cur-rent] area.
8 Click .
You have now registered the function in theLauncher.
Registration Using the Right-ClickMenu
1 Right-click in the Launcher area.The right-click menu appears.
2 Select [Add].The submenu appears.
3 Click [External].The [New Button] screen appears.
• Up to 100 characters can be used forthe pop-up caption of a button set in theLauncher.
• When the [Popup] field remains blank,the predetermined caption is used.
• When the predetermined captionexceeds 100 characters, thesubsequent characters are cut off.
• Up to eight (8) buttons can be registered in theLauncher.
• Multiple buttons that have the same link can beregistered.
• The following Softphone features cannot beregistered as buttons:- Telephone function menu- Call history- Function
Registering an External Appli-cation/File in the Launcher

163
How to Use the Launcher
4 Click .The [Launcher Edit] screen appears.
5 Select the external application or file youwant to register.
6 Click .The application/file is registered in the [Link To] field.
7 Input the pop-up caption.
8 Click .
You have now finished the registration in theLauncher area.
• Up to 100 characters can be used forthe pop-up caption of a button set in theLauncher.
• When the [Popup] field remains blank,the predetermined caption is used.
• When the predetermined captionexceeds 100 characters, thesubsequent characters are cut off.
• If the external application does not existwhen selected, an error message is out-put from OS.
• Up to eight (8) buttons can be registered in theLauncher.
• Multiple buttons that have the same link can beregistered.
• The link to an external application/file whosebutton is registered in the Launcher is nottraced when it has moved.
• When the icon of an external application/file ischanged, it is not reflected on the button in theLauncher.

164
How to Use the Launcher
Registration from the Launcher EditScreen
1 Right-click in the Launcher area.The right-click menu appears.
2 Click [Customize].The [Launcher Edit] screen appears.
3 Click .The pull-down menu appears.
4 Click [External].The [New Button] screen appears.
5 Click .The [Launcher Edit] screen appears.
6 Select the external application or file youwant to register.
7 Click .The application/file is registered in the [Link To] field.
8 Input the pop-up caption.
If a maximum number of buttons arealready registered in the Launcher area,the [Add] button is disabled.

165
How to Use the Launcher
9 Click .The icon and pop-up caption are added to the [Current]area.
10 Click .
You have finished the registration in theLauncher.
Registration by Drag and Drop
1 Select the icon of the external application or file you want to register.
2 Drag and drop the icon into the Launcherarea.
The Main Panel is displayed with the icon registered inthe Launcher area.
You have finished the registration in theLauncher.
• Up to 100 characters can be used forthe pop-up caption of a button set in theLauncher.
• When the [Popup] field remains blank,the predetermined caption is used.
• When the predetermined captionexceeds 100 characters, thesubsequent characters are cut off.
• Up to eight (8) buttons can be registered in theLauncher.
• Multiple buttons that have the same link can beregistered.
• The link to an external application/file whosebutton is registered in the Launcher is nottraced when it has moved.
• When the icon of an external application/file ischanged, it is not reflected on the button in theLauncher.

166
How to Use the Launcher
You can delete a button from the Launcher.
Deletion Using the Right-ClickMenu
1 Right-click the button you want to deletefrom the Launcher.The right-click menu appears.
2 Click [Delete].A confirmation dialog appears.
3 Click .
The button has been deleted.
Deletion on the Launcher EditScreen
1 Right-click in the Launcher area.The right-click menu appears.
2 Click [Customize].The [Launcher Edit] screen appears.
3 Click the button you want to delete.
To register multiple applications/files ata timeThe icons of multiple applications/files can bedragged and dropped into the Launcher area at atime as long as there are vacancies.
• Up to eight (8) buttons can be registered in theLauncher.
• Multiple buttons that have the same link can beregistered.
• For the buttons dragged and dropped into theLauncher, the complete path of the file name/URL/callto of the linked application/file is usedas the predetermined pop-up caption.
• When the predetermined caption exceeds 100characters, the subsequent characters are cutoff.
• The link to an external application/file whosebutton is registered in the Launcher is nottraced when it has moved.
• When the icon of an external application/file ischanged, it is not reflected on the button in theLauncher.
• If the maximum number of buttons is exceededwhen multiple applications/files' icons aredragged and dropped into the Launcher at atime, a warning is displayed only onceregardless of the excess number.
Deleting a Registered Button

167
How to Use the Launcher
4 Click .The button has been deleted from the [Current] area.
5 Click .
The button has been deleted.
You can edit a button registered in the Launcher.
Editing the Pop-up Caption Using the Right-Click Menu
1 Right-click the button you want to edit.The right-click menu appears.
2 Click [Setting].The [Edit Button] screen appears.
3 Edit the pop-up caption.
4 Click .
The pop-up caption has been changed.
To select multiple filesIn the [Launcher Edit] screen, you can select mul-tiple files by clicking them while holding down the [Shift]/[Ctrl] key.
Editing a Registered Button
• You cannot change a button registered to execute a Softphone function to a but-ton for opening an external application/file.
• When the [Popup] field remains blank,the predetermined caption is used.
• When the predetermined captionexceeds 100 characters, the subse-quent characters are cut off.

168
How to Use the Launcher
Editing the Pop-up Caption on theLauncher Edit Screen
1 Right-click in the Launcher area.The right-click menu appears.
2 Click [Customize].The [Launcher Edit] screen appears.
3 Click the button you want to edit.
4 Click .The [Edit Button] screen appears.
5 Edit the pop-up caption.
6 Click .The caption in the [Current] field has been changed.
7 Click .
The pop-up caption has been changed.
• You cannot change a button registered to execute a Softphone function to a but-ton for opening an external application/file.
• When the [Popup] field remains blank,the predetermined caption is used.
• When the predetermined captionexceeds 100 characters, the subse-quent characters are cut off.

169
How to Use the Launcher
Changing a Softphone Button Usingthe Right-Click Menu
1 Right-click the button you want tochange.The right-click menu appears.
2 Click [Setting].The [Edit Button] screen appears.
3 Click [Link To] and change links.
4 Change the pop-up caption.
5 Click .
You have now changed buttons.
Changing a Softphone Button onthe Launcher Edit Screen
1 Right-click in the Launcher area.The right-click menu appears.
2 Click [Customize].The [Launcher Edit] screen appears.
3 Click the button you want to change.
4 Click .The [Edit Button] screen appears.
• You cannot change a button registered to execute a Softphone function to a but-ton for opening an external application/file.
• When the [Popup] field remains blank,the predetermined caption is used.
• When the predetermined captionexceeds 100 characters, the subse-quent characters are cut off.

170
How to Use the Launcher
5 Click [Link To] and change links.
6 Change the pop-up caption.
7 Click .The button and pop-up caption in the [Current] fieldhave been changed.
8 Click .
You have now changed buttons.
Changing an External Application/File Using the Right-Click Menu
1 Right-click the button you want tochange.The right-click menu appears.
2 Click [Setting].The [Edit Button] screen appears.
3 Click .The [Launcher Edit] screen appears.
4 Select the file you want to set.
5 Click .The link has been changed.
• You cannot change a button registered to execute a Softphone function to a but-ton for opening an external application/file.
• When the [Popup] field remains blank,the predetermined caption is used.
• When the predetermined captionexceeds 100 characters, the subse-quent characters are cut off.
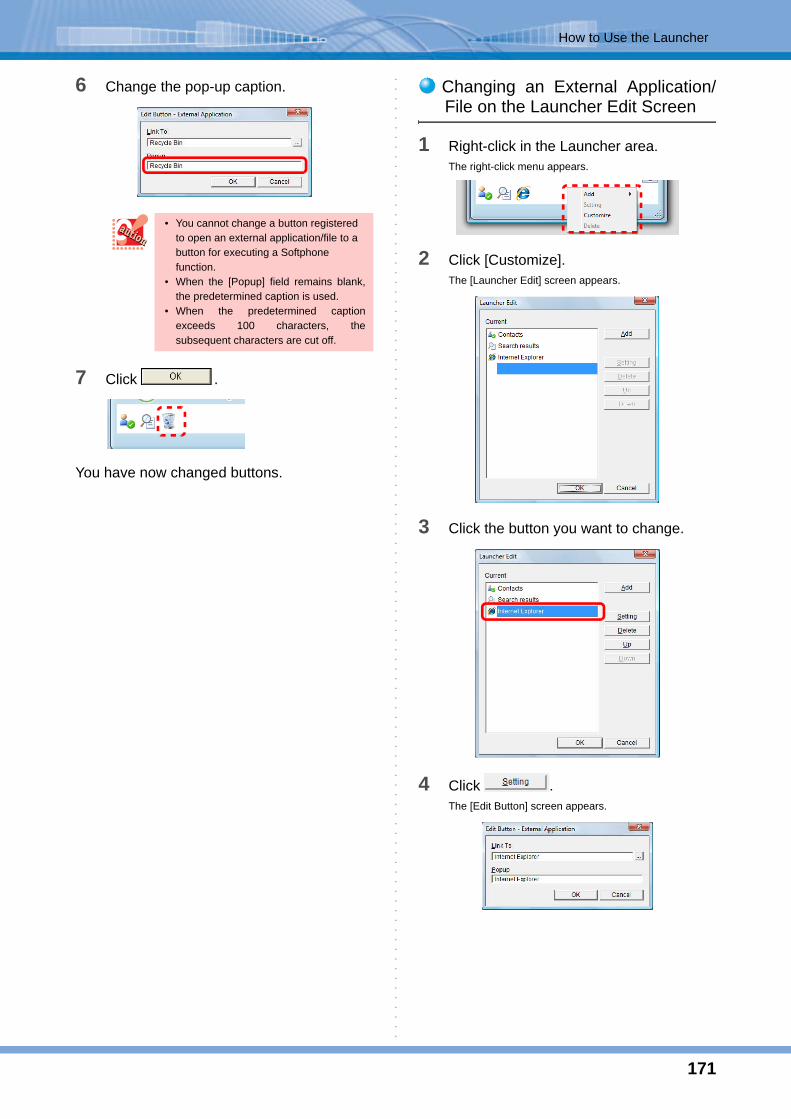
171
How to Use the Launcher
6 Change the pop-up caption.
7 Click .
You have now changed buttons.
Changing an External Application/File on the Launcher Edit Screen
1 Right-click in the Launcher area.The right-click menu appears.
2 Click [Customize].The [Launcher Edit] screen appears.
3 Click the button you want to change.
4 Click .The [Edit Button] screen appears.
• You cannot change a button registered to open an external application/file to a button for executing a Softphone function.
• When the [Popup] field remains blank,the predetermined caption is used.
• When the predetermined captionexceeds 100 characters, thesubsequent characters are cut off.

172
How to Use the Launcher
5 Click .The [Launcher Edit] screen appears.
6 Select the file you want to set.
7 Click .The link has been changed.
8 Change the pop-up caption.
9 Click .The button and pop-up caption in the [Current] fieldhave been changed.
10 Click .
You have now changed buttons.
Moving a Button on the LauncherEdit Screen
1 Right-click in the Launcher area.The right-click menu appears.
2 Click [Customize].The [Launcher Edit] screen appears.
• You cannot change a button registered to open an external application/file to a button for executing a Softphone function.
• When the [Popup] field remains blank,the predetermined caption is used.
• When the predetermined captionexceeds 100 characters, thesubsequent characters are cut off.
Moving a Registered Button

173
How to Use the Launcher
3 Click the button you want to move.
4 Click or .
The screen below uses as an example.
5 Click .
You have now moved the button.
Moving a Button by Drag and Drop
1 Select the button you want to move in theLauncher.
2 Drag and drop it into the new position.
The Launcher area after the move is shown below.
You have now moved the button.
When the top line in the list is selected, the [Up]button is disabled. When the bottom line or theline above the bottom line is selected, the [Down]button is disabled.
• In the Launcher area, when an icon is draggedand dropped on a button on the left side of theicon, the icon is positioned to the left of thebutton.
• In the Launcher area, when an icon is draggedand dropped on a button on the right side ofthe icon, the icon is positioned to the right ofthe button.

174
How to Use Voice Mail
(Option)
The optional UMS enables Softphone to record a calland transfer the recorded call to another person.In addition, Softphone can be used as a voice messagerecorder.
For details of the operation, refer to the help or instruc-tion of the UMS.
1 On the phone.
2 Click (Record button).Or, click the record button registered to the line function.
Call recording is started.The record button lights during the recording.
Click (End call button) to disconnect the call.Clicking the End call button stops recording.
Using the Right-Click Menu on aContact
1 During recording.The destination of the current recording file is displayed on the top of the LCD.
2 Click (Contacts).The browser window switches to the contacts list.
3 Select and right-click the contact of theparty to send the recording file.The following menu appears.
How to Use Voice Mail
Display image of LCD may differ depending on the IP telephony server type.
Using Call Recording
Changing the Destination of theRecording File

175
How to Use Voice Mail
4 Click [Redirect Voice mail(A)].
The destination has now been changed.The destination of the current recording file is displayed on the top of the LCD.
Using a Contact
1 During recording.The destination of the current recording file is displayedon the top of the LCD.
2 Click (Contacts).The browser window switches to the contacts list.
3 Click the contact of the party to send therecording file.
The destination has now been changed.The destination of the current recording file is displayed on the top of the LCD.
To add a number to the beginning of theright-clicked contact's phone numberThe number to be added can be set in [Call]under [Conversation] in [User configurations] inadvance.For details, refer to "Dialing after Adding aNumber to the Beginning of the Phone Number".
To change a destination by this method, [Voice mail Cooperation (Effective only at the time of Voice mail use)] in [Voice mail] under [Recording] in [User configurations] must be checked in advance. (When the function is disabled, the call is transferred.) For user configurations, refer to "Enabling Voice Mail Destination Change".
To add a number to the beginning of theclicked contact's phone numberThe number to be added can be set in [Call]under [Conversation] in [User configurations] inadvance.For details, refer to "Dialing after Adding aNumber to the Beginning of the Phone Number".
The call is transferred without changingthe destination.Check if [Voice mail Cooperation (Effective onlyat the time of Voice mail use)] in [Voice mail]under [Recording] in [User configurations] isenabled. When the item is disabled, the call istransferred.For user configurations, refer to "Enabling VoiceMail Destination Change".

176
How to Use Voice Mail
Using the Contact Information/E-Mail ReceivedYou can change the destination by using a contact in Microsoft Outlook or phone number included in a received E-mail.
1 During recording.The destination of the current recording file is displayedon the top of the LCD.
2 Display a screen of an application or file to which the number to call is registered.
3 Drag and drop the phone number
onto (Call/Answer button).The number of the other party is displayed on the LCD.
The destination has now been changed.The destination of the current recording file is displayed on the top of the LCD.
Copying a Phone NumberYou can copy a phone number to change the destinationeasily.
1 During recording.The destination of the current recording file is displayedon the top of the LCD.
2 Display the screen in which the phone number of the other party to change the destination is displayed.
3 Highlight the phone number to select, and right-click on the selected phone number.
4 Click [Copy].
• To change a destination by this method, [Voicemail Cooperation (Effective only at the time ofVoice mail use)] in [Voice mail] under[Recording] in [User configurations] must bechecked in advance. (When the function isdisabled, the call is transferred.) For userconfigurations, refer to "Enabling Voice MailDestination Change".
• This function is not available when a phonenumber cannot be dragged and dropped likethe address book of Outlook Express. In thiscase, refer to "Copying a Phone Number".
To add a number to the beginning of thedragged&dropped phone numberThe number to be added can be set in [Call]under [Conversation] in [User configurations] inadvance.For details, refer to "Dialing after Adding aNumber to the Beginning of the Phone Number".
The call is transferred without changingthe destination.Check if [Voice mail Cooperation (Effective onlyat the time of Voice mail use)] in [Voice mail]under [Recording] in [User configurations] isenabled. When the item is disabled, the call istransferred.For user configurations, refer to "Enabling VoiceMail Destination Change".
To change a destination by this method, [Voice mail Cooperation (Effective only at the time of Voice mail use)] in [Voice mail] under [Recording] in [User configurations] must be checked in advance. (When the function is disabled, the call is transferred.) For user configurations, refer to "Enabling Voice Mail Destination Change". For user configurations, refer to "Enabling Voice Mail Destination Change".

177
How to Use Voice Mail
5 Right-click on (Call/Answer button).The following menu appears.
6 Click [Clipboard Call/Transfer to "].The phone number which was copied is displayed after‘"’.
The destination has now been changed.The destination of the current recording file is displayed on the top of the LCD.
Using a Phone Number Linked in aWebsite
You can change the destination by using Softphone to aphone number on websites displayed in InternetExplorer by clicking its hyperlink (call to setting).
1 During recording.The destination of the current recording file is displayedon the top of the LCD.
2 Display the website.
3 Click the hyperlink of the phone number.
The destination has now been changed.The destination of the current recording file is displayed on the top of the LCD.
To add a number to the beginning of thecopied phone numberThe number to be added can be set in [Call]under [Conversation] in [User configurations] inadvance.For details, refer to "Dialing after Adding aNumber to the Beginning of the Phone Number".
The call is transferred without changingthe destination.Check if [Voice mail Cooperation (Effective onlyat the time of Voice mail use)] in [Voice mail]under [Recording] in [User configurations] isenabled. When the item is disabled, the call istransferred.For user configurations, refer to "Enabling VoiceMail Destination Change".
• To change a destination by this method, [Voicemail Cooperation (Effective only at the time ofVoice mail use)] in [Voice mail] under[Recording] in [User configurations] must bechecked in advance. (When the function isdisabled, the call is transferred.) For userconfigurations, refer to "Enabling Voice MailDestination Change".
• To use this function, a setting is required. Forthe setting, refer to "Setting" in "Dialing aPhone Number linked in a Home Page".
To add a number to the beginning of thelinked phone numberThe number to be added can be set in [Call]under [Conversation] in [User configurations] inadvance.For details, refer to "Dialing after Adding aNumber to the Beginning of the Phone Number".
The call is transferred without changingthe destination.Check if [Voice mail Cooperation (Effective onlyat the time of Voice mail use)] in [Voice mail]under [Recording] in [User configurations] isenabled. When the item is disabled, the call istransferred.For user configurations, refer to "Enabling VoiceMail Destination Change".

178
How to Use Voice Mail
1 Click (Listen button) in the startscreen.Or, click the [Listen] button registered to the line or clickthe log which contains the file to listen in the incoming/outgoing log and click the recording file from the relatedinformation.
You hear the guidance when Softphone connects to theUMS. Follow the guidance for subsequent operations.
The voice mail can answer the phone instead of youwhile you are absent and record the message like avoice message recorder. The recording file can be lis-tened later again or forwarded to another person to lis-ten.
For operations during recording or how to listen a mes-sage, refer to the help or instruction of the UMS.
Setting
1 Click (Call Forward - All Calls setting icon).Or, click (Forwarding settings) in the navigation win-dow.The [Call forward settings] screen appears.
2 Click a forwarding type to be set.
Example: In case of call forward - all callsThe following screen is displayed.
3 Input the extension number of the voicemail in the [Number] field that is leftblank.
4 Check the field that the number is input inStep 3.
5 Click .
6 Click .(Call Forward - All Calls Setting icon lights in blue
only when Call Forward - All Calls has been set.
The voice message recording has now beenset.
Listening to the Call Recording
Using Voice Message Record-ing
A confirmation dialog can be displayed toprevent a mistake when call forward - allcalls is set.For details, refer to "Displaying Confirma-tion Message When Call Forward - AllCalls Setting Is Available".

179
How to Use Voice Mail
Canceling
1 Click (Call Forward - All Calls setting icon).Or, click (Forwarding Settings) in the navigationwindow.The [Call forward settings] screen appears.
2 Click a forwarding type to be canceled.
Example: In case of call forward - all callsThe following screen is displayed.
3 Click .
4 Click .The light of (Call Forward - All Calls setting icon) isturned off (only when the call forward - all calls is can-celed).
The voice message recording has now beencanceled.
Listening to a Voice MessageRecorded or Forwarding ItFor details, refer to the help or instruction of the UMS.

180
Recording a Conversation in the PC
A conversation is recorded and stored in the PC.In addition, the recorded file can be played from the callhistory.
<Description of buttons>
1 Click (PC Recording icon).The call recording screen appears.
2 On the phone.
3 Click .The call recording starts.
4 Click .The call recording pauses.
5 Click .
The recording file has now been saved as afile.
Recording a Conver-sation in the PC
In the case of VPCC mode, this function cannotbe used depending on the type of the thin clientterminal. For details, contact the systemadministrator.
No. Button Description
(1) RecordStarts recording. During recording, the button blinks to indicate that the call is being recorded.
(2) Pause Pauses recording.
(3) CancelDiscards the recorded WAV file without saving.
(4) SaveSaves the recorded WAV file to the default save folder.
(5) Send E-mail
Sends an e-mail with the last saved WAV file attached.
Using Call Recording
• When the voice mail with the optionalUMS is also used, right-click the[Record] button of the start screen andselect [Live Recording] from the menu.
• The call may not be recorded dependingon the other party (in this case, the[Record] button is disabled).
• The call cannot be recorded for thehandset for collaboration (the [Record]button is disabled).
File Format Size
PCM Approx. 1MB per minute
GSM6.1 Approx. 0.1MB per minute
• The holding tone when the other party holdsthe call may be recorded depending on theother party.
• The size of the recorded file varies dependingon the file format to be set.For the file format to be set, check with thesystem administrator.
• In the case of VPCC mode, the file format is"G.711" (approximately 0.5 MB per minute) instead of "PCM."
When the call is disconnected duringrecording.The recording file is automatically saved as a file.
When the file is not saved
Click .
To change the destination to save therecording fileSet the destination from [Live Recording] under[Recording] in [User configurations] screen.For details, refer to "Specifying the Folder inWhich to Save PC Recording Files".
To start recording automatically whenthe call is startedSet the destination from [Live Recording] under[Recording] in [User configurations] screen.For details, refer to "Setting the PC RecordingStart Method".

181
Recording a Conversation in the PC
1 During call recording.
2 Click .
The recording has now been canceled.The recording file is not created.
The outgoing calls screen is used here as an example.
1 Click (Outgoing calls) or (Incoming calls)
in the navigation window.The outgoing calls screen or the incoming calls screen isdisplayed in the navigation window.
2 Click the call log to listen from the outgo-ing calls or incoming calls.The recording files are displayed in the relatedinformation.
3 Right-click the recording file to be played.Or, double-click the file.The right-click menu appears.
4 Click [Open].Or, click [Choose Program].
The recording file has now been played.The file will be played with the application prespecified by Windows.Example: Windows Media Player etc.
The outgoing log screen is used here as an example.
1 Click (Outgoing calls) or (Incoming calls)
in the navigation window.The outgoing calls screen or the incoming calls screen isdisplayed in the navigation window.
Canceling Call Recording
Listening to the Call Recording
Deleting a Recording File

182
Recording a Conversation in the PC
2 Click the call log to delete from the outgo-ing calls or incoming calls.The recording files are displayed in the relatedinformation.
3 Right-click the recording file to bedeleted.The right-click menu appears.
4 Click [Delete].A confirmation message appears.
5 Click .
The recording file has now been deleted.
You can send a recording file easily by e-mail.
Sending from the Call RecordingScreenYou can send an e-mail with the last saved recording fileattached by clicking the [Send E-mail] button on the callrecording screen.
1 During call recording.
2 The call is terminated.
3 Click (Send E-mail) button.
The mail send screen appears.
(The image is for Outlook Express.)
To select multiple recording filesTo select multiple recording files, click thefiles while holding down the [Shift] key or[Ctrl] key.
Sending a Recording File by E-mail
• The [Send E-mail] button does not work in thefollowing cases if clicked.- During PC recording.- The recording file has never been saved
since Softphone was activated.• An error occurs if the last saved file is deleted
by operations from the history of call screenetc.
• Only one mail creation screen can be openedat a time. When a mail screen in process ofcreation is opened, close the screen and per-form the operation again.

183
Recording a Conversation in the PC
Sending from the Call HistoryThe outgoing log screen is used here as an example.
1 Click (Outgoing calls) or (Incoming calls)
in the navigation window.The outgoing calls screen or the incoming calls screen isdisplayed in the navigation window.
2 Click the call log to send from the outgo-ing calls or incoming calls.The recording files are displayed in the relatedinformation.
3 Right-click the recording file to be sent.The right-click menu appears.
4 Click [Attach File].The mail send screen appears.(The image is for Outlook Express.)
• When one file is selected
• When multiple files are selected
5 Input the e-mail address of the otherparty in the [To...] field.Fill out the [CC...] and [BCC...] fields as necessary.
6 Input the title of the e-mail in the[Subject:] field.
7 Input the contents of the e-mail in themessage body.
8 Click [Send].
The e-mail has now been sent.
To select multiple recording filesTo select multiple recording files, click thefiles while holding down the [Shift] key or[Ctrl] key.
• An error occurs if the selected file is deleted.• Only one mail creation screen can be opened
at a time. When a mail screen in process ofcreation is opened, close the screen and per-form the operation again.

184
How to Use Voice Message Recording
The voice message recording function allows you torecord the caller's message by manual activation or afterthe automated response, and save it in the PC.The recorded message can be played back from theincoming calls as when a conversation is recorded in thePC.
You can check the voice message recording settingstatus with the Voice Message Recording icon in theStatus notification area.
< Voice message recording setting statuses >
Setting
1 Click (Voice mail settings) in (Function) on the navigation window.Or, click (Voice Message Recording icon) in the Sta-tus notification area.
You have set up the voice message recording.
How to Use Voice Message Recording
In the case of VPCC mode, this function cannotbe used.
Checking the Voice MessageRecording Setting
Icon Name Description
Voice message recording on
Indicates the voice message recording is on.
Voice message recording off
Indicates the voice message recording is off.
Voice message recording disabled
Indicates the voice message recording is disabled.
Setting/Canceling Voice Mes-sage Recording
Click

185
How to Use Voice Message Recording
Canceling
1 Click (Voice mail settings) in (Function)
on the navigation window while the voicemessage recording setting is on.Or, click (Voice Message Recording icon) in the Sta-tus notification area.
You have canceled the voice message record-ing setting.
1 Click (Record button) on the Start screenwhen you have an incoming call on yourpersonal internal line (prime line).
The following screen appears, starting the messagerecording.
You have now started the message recordingmanually.
Click
Starting Voice MessageRecording Manually
Message recording cannot be manually startedwhile a line (subline) other than your personalinternal line is in a call or in the case of a callback.
To change the time before theautomated response, the recordingtime, the reply message file, or thefolder in which to save the recording fileYou can pre-set the above items in [MemoRec]under [Recording] in [User configurations].For details, refer to the following:-> "Setting the Time before the Automated
Response"-> "Setting the Recording Time"-> "Specifying the Reply Message"-> "Specifying the Folder in Which to Save PC
Recording Files"
To talk with the other party duringmessage recordingClicking/pressing any of the following buttonsallows you to talk with the other party duringmessage recording:• Call/Answer button• Mute button• Prime line button• Hook button on the handsetYou can also transfer the call or place it on hold.In this case, however, the message recording iscanceled, so nothing continues to be recorded.

186
How to Use Voice Message Recording
1 Click (Incoming calls) in (Call history) onthe navigation window.The incoming calls screen is displayed on the browsewindow.
2 From the incoming calls list, click the callhistory you want to listen to.The recording file is displayed as the related informa-tion.
3 Right-click the recording file you want toplay.Or, double-click the file.The right-click menu appears.
4 Click [Open].Or, click [Choose Program].
The recording file has now been played.The file will be played with the application prespecified by Windows.Example: Windows Media Player etc.
1 Click (Incoming calls) in (Call history) onthe navigation window.The incoming calls screen is displayed on the browsewindow.
2 From the incoming calls list, click the callhistory that has a recording file you wantto delete.The recording file is displayed as the related informa-tion.
3 Right-click the recording file you want todelete.The right-click menu appears.
Listening to a Voice MessageRecorded
Deleting a Recording File
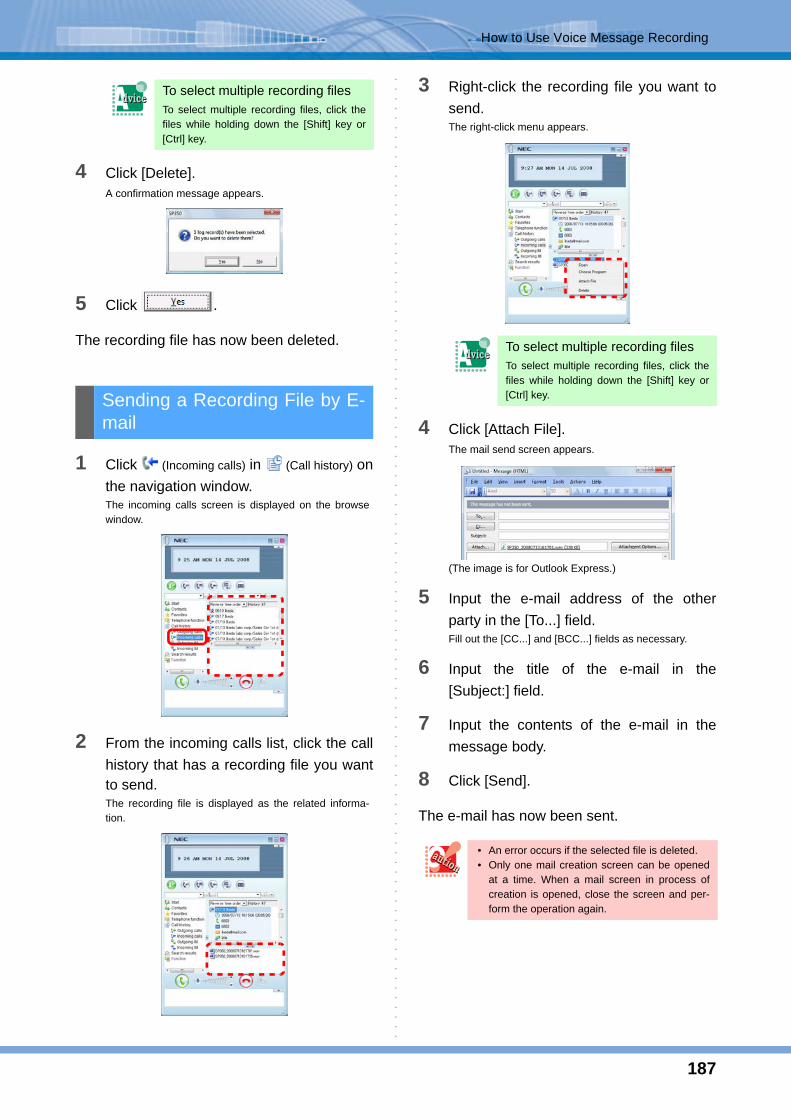
187
How to Use Voice Message Recording
4 Click [Delete].A confirmation message appears.
5 Click .
The recording file has now been deleted.
1 Click (Incoming calls) in (Call history) onthe navigation window.The incoming calls screen is displayed on the browsewindow.
2 From the incoming calls list, click the callhistory that has a recording file you wantto send.The recording file is displayed as the related informa-tion.
3 Right-click the recording file you want tosend.The right-click menu appears.
4 Click [Attach File].The mail send screen appears.
(The image is for Outlook Express.)
5 Input the e-mail address of the otherparty in the [To...] field.Fill out the [CC...] and [BCC...] fields as necessary.
6 Input the title of the e-mail in the[Subject:] field.
7 Input the contents of the e-mail in themessage body.
8 Click [Send].
The e-mail has now been sent.
To select multiple recording filesTo select multiple recording files, click thefiles while holding down the [Shift] key or[Ctrl] key.
Sending a Recording File by E-mail
To select multiple recording filesTo select multiple recording files, click thefiles while holding down the [Shift] key or[Ctrl] key.
• An error occurs if the selected file is deleted.• Only one mail creation screen can be opened
at a time. When a mail screen in process ofcreation is opened, close the screen and per-form the operation again.

188
How to Collaborate with Microsoft Outlook
Softphone originates/transfers calls, transmits IMs, dis-plays the presence of users, and searches informationby collaborating with the contacts of Microsoft Outlook.Softphone's operation collaborating with Microsoft Out-look2002/2003/2007/2010 has been confirmed.
The screens of Microsoft Outlook2003 are used here forexplanation.
When newly installing SP350 whileMicrosoft Outlook is started
To use Softphone collaborating with Microsoft Outlook, Microsoft Outlook must be restarted. Softphone can be used by collaborating with Microsoft Outlook after the restart.
When the user who uses Softphone is not the user who installed Softphone, perform the procedure below for the environmental settings of Outlook (add-in integration for Softphone) to use Softphone collaborating with Microsoft Outlook.
1 From the menu of Outlook, click [Tools] ->[Options].The following screen appears.
2 Click .The following screen appears.
3 Click .The following screen appears.
4 Click .The following screen appears.
5 Click .The screen to add add-ins appears.
6 Specify "SP30OutlookAddin.dll" located in the installation folder of Softphone.
7 Click the [OK] button.
How to Collaborate with Microsoft Outlook
Setting Up the Environment

189
How to Collaborate with Microsoft Outlook
8 Check that "SP350 Addin" is checked.If the item is not checked, click and check the box.
9 Click the [OK] button for all the screens.
The environmental settings have now beenfinished.
Displaying the Softphone ToolbarTo perform the origination, IM transmission, and pres-ence display collaborating with the contacts of Outlook, the Softphone toolbar must be used.
1 From the menu of Outlook, click [View] ->[Toolbar].The following screen appears.
2 Check [SP350].
The Softphone toolbar has now been dis-played.
Name and Function of Each PartNames and functions of the Softphone toolbar neces-sary for the collaboration are as follows.
• Auto Search mode (Default)
• Manual Search mode
About the Softphone Toolbar
Item Function
Start Softphone button Starts Softphone.
Contact's name Displays the name of the selected contact (displays up to 16 charac-ters).
Number display window Lists all the numbers registered to the selected contact.
Call/Transfer button Originates/transfers a call to the number displayed in the number display window.
Send message button Opens the [IM send] screen with the number displayed in the num-ber display window as the desti-nation.
Contact Information but-ton
Displays the presence status of the number displayed in the num-ber display window.
Search Contact button Execute searching of contact by E-mail address (only Manual search mode).
StartSoftphonebutton
Contact's name
Numberdisplaywindow
Call/Trans-fer button
Send message button
Contact Infor-mation button
Search Contact button

190
How to Collaborate with Microsoft Outlook
Call/Transfer after Selecting aContact
1 Switch the view of Outlook to [Contacts].
2 Select a number from the number displaywindow.Select the number to originate/transfer the call from thelist of the number display window.
3 Click .The number of the other party is displayed on the LCD,and you hear the ringback tone.
4 Start a conversation after the other partygets on the line.
Opening the IM Send Screen after Selecting a Contact
1 Switch the view of Outlook to [Contacts].
2 Select a number from the number displaywindow.Select the number to transmit the IM from the list of thenumber display window.
Operations Using the SoftphoneToolbar
To originate/transfer a call to thenumber not on the listTo originate/transfer a call to the numbernot registered to the contacts, input thenumber directly to the number displaywindow and press the [Enter] key beforeperforming the subsequent operations.
When there is a line on the phone, the callis transferred.
To transmit an IM to the numbernot on the listTo transmit an IM to the number not regis-tered to the contacts, input the numberdirectly to the number display window andpress the [Enter] key before performing thesubsequent operations.

191
How to Collaborate with Microsoft Outlook
3 Click .The [IM send] screen with the selected number as thedestination appears.
For subsequent operations, refer to "How toUse IM".
Opening the Presence DisplayPanel after Selecting a Contact
1 Switch the view of Outlook to [Contacts].
2 Select a number from the number displaywindow.Select the number to display the presence display panelfrom the list of the number display window.
3 Click .The presence display panel for the selected number ispopped up.
To display the presence displaypanel for the number not on the listTo display the presence display panel forthe number not registered to the contacts,input the number directly to the numberdisplay window and press the [Enter] keybefore performing the subsequent opera-tions.

192
How to Collaborate with Microsoft Outlook
Operations after Selecting an E-mail
1 Switch the view of Outlook to [Mail].
2 Check that the inbox is opened.
3 Click the e-mail to be operated.Click in Manual Search mode.
4 Click on the number display windowand select a number.
5 Click one of the buttons on the toolbar.You can perform one of operations from [Call/Transfer],[Send message], or [Contact Information].
The number of the other party can be obtained by auto-matic search from the contacts of Outlook upon anincoming call etc. to display the party's name, companyname, and department name.In addition, the types of contact numbers for the searchare as follows.• Business• Business 2• Home• Mobile
For the usage of the contacts of Outlook to search infor-mation, refer to "Setting the Information Retrieval Soft-ware".
About Name[Full Name...] on the [General] tab in the contact screenis displayed as the name.
About Company Name[Company] on the [General] tab in the contact screen isdisplayed as the company name.
To execute manual searching byEmail addressRefer to "Setting the searching mode forCollaboration with Microsoft Outlook".
• The information is reflected to the toolbar only when one message is selected.
• Select a mail from [Inbox]. [Outbox] is not thetarget of the search.
• Items to be searched are e-mail addresses reg-istered as [E-mail], [E-mail 2], and [E-mail 3].
• When the mail for which any return addresshas been set is selected, the return address isto be searched.
Searching the Outlook ContactInformation

193
How to Collaborate with Microsoft Outlook
About Department Name[Department] on the [Details] tab in the contact screen isdisplayed as the department name.
The information may not be searched properly inthe following cases.• Characters other than numbers, "*", or "#" are
used for the phone numbers in the contact.• The total number of characters registered for
full name, company, department, and so onexceeds 254 characters.

194
Configuring User Settings
This section describes the settings to use Softphonemore usefully.
This section describes how to register the user name tobe disclosed, to log into Softphone automatically, tochange the password, and to change the interface lan-guage.
User NameYou can set the user name to be disclosed to partici-pants of a data meeting, and the mail address to be noti-fied to the other party of Chat.
You can register your user name to Softphone to displayit in the following cases.• When you transmit an IM (as the source name)
• During a data meeting (as the name displayed on a member button)
You can register your Email address to Softphone to dis-play it in the following cases.
• When the other parties of chat (2-party/conference)send you a mail
1 Click (User configurations) in(Function) on the navigation window.The [User configurations] screen appears.
2 Click User Name in [User Info].The following screen appears.
Configuring User Settings
User Information
Registering Your User Name
• The Email address to be used as a destinationon the Chat screen is decided in the followingorder.1. Email address registered to the user name
of the other party2. Email address acquired by searching in
Contacts with the other partyÅfs numberIf any Email address cannot be acquired by the above ways, a mail cannot be sent from the Chat (2-party/conference) screen.

195
Configuring User Settings
3 Input a user name in the [User Name]field, and a mail address in the [MailAddress] field.
4 Click .
Your user name has now been registered.
LoginYou can set whether to input the login ID and the pass-word automatically to start Softphone.
You can configure setting to start Softphone withoutinputting the login ID and password.
1 Click (User configurations) in (Function) on the navigation window.The [User configurations] screen appears.
2 Click Login in [User Info].The following screen appears.
3 Check [AutoLogin].
4 Input the extension number in the [LoginID] field.
5 Input the password in the [Password]field.Contact the system administrator for the password.
Configurable number of characters 4 to 10 characters (only 0 to 9, *, and # can be used)
* For the configurable number of characters, contactthe system administrator.
6 Click .
Automatic login has now been enabled.
• [Email Address] of [User Name] in [User Infor-mation] is blank as default.
• Up to 256 characters can be entered in [EmailAddress] of [User Name] in [User Information].
Saving Your Login ID and Pass-word
To request only the passwordCheck [AutoLogin] and input only the login ID.

196
Configuring User Settings
This section describes how to set phone functions.
OriginationYou can configure settings for originating a call.
This setting is used when you use a system that requires a number such as "0" to be added to the phone number when placing an external call.You can configure a setting to add a number automati-cally when you place a call using a phone number included in a member button, call log, contact of Microsoft Outlook, signature of received e-mail, etc.
1 Click (User configurations) in(Function) on the navigation window.The [User configurations] screen appears.
2 Click Call in [Conversation].The following screen appears.
3 Check [Prefix with external call number].
4 Input in the [Prefix a number beginningwith the following number] field the targetstarting number when specific numbersare added.
5 Input the specific numbers to be added inthe [Prefix number] field.
6 Click .
The setting has now been configured.
Phone Functions
Dialing after Adding a Number tothe Beginning of the Phone Num-ber
If the prefix number need to more thantwo numbers then it can be input withspace for separator.
To confirm whether to add additionalnumbers every timeCheck [Confirm when dialing] after Step 5.
If you know in advance the phone num-bers to which no numbers are addedCheck [Setting the beginning number without pre-fixing a number] after Step 5. Then, input in the[Do not prefix a number beginning with the follow-ing number] field the starting numbers of thephone numbers to which no numbers are added.e.g.: Not to add numbers only when the phone
numbers start with "001"Input "001" in the [Do not prefix a numberbeginning with the following number] field.

197
Configuring User Settings
You can configure a setting to originate a call easily byselecting a phone number displayed in another applica-tion and using the middle mouse button.
1 Click (User configurations) in(Function) on the navigation window.The [User configurations] screen appears.
2 Click Call in [Conversation].The following screen appears.
3 Click in the [Click calling operation] field to select any of the following.
• No usedDisables this origination operation.
• Middle Mouse Button OnlyOriginate a call when you click the middle mousebutton.
• CTRL + Middle Mouse ButtonOriginate a call when you press the [Ctrl] key andthe middle mouse button simultaneously.
4 Click .
The setting has now been configured.
A confirmation dialog can be displayed when you origi-nate a call by clicking on a phone number in anotherapplication.
1 Click (User configurations) in(Function) on the navigation window.The [User configurations] screen appears.
2 Click Call in [Conversation].The following screen appears.
3 Check [The dialog of the calling confirma-tion is displayed].
4 Click .
The setting has now been configured.
Dialing by Clicking on a PhoneNumber in Another Application
Displaying a Confirmation DialogWhen Dialed by Clicking onAnother Application

198
Configuring User Settings
The main panel minimized to the task tray can bedisplayed automatically when you operate the USBhandset or the phone used in place of the USB handsetfor originating or transferring a call. The main panel canalso be displayed on the front when the main panel ishidden by a screen of another application.Also, the screensaver program, which has been startedon the PC, is cancelled at the same time with main paneldisplay.
1 Click (User configurations) in(Function) on the navigation window.The [User configurations] screen appears.
2 Click Call in [Conversation].The following screen appears.
3 Check [Display main panel if Minimizedto system tray when going offhook].
4 Click .
The setting has now been configured.
A confirmation dialog can be displayed when you origi-nate a call by selecting a phone number on the websitedisplayed on Internet Explorer.
1 Click (User configurations) in(Function) on the navigation window.The [User configurations] screen appears.
2 Click Call in [Conversation].The following screen appears.
3 Check [The dialog of the context menucalling confirmation is displayed.].
4 Click .
The setting has now been configured.
Displaying the Main Panel WhenYou Operate the Handset
To cancel the settingUncheck [Display main panel if Minimized to sys-tem tray when going offhook] in Step 3.
• The screensaver programs that can be can-celed are those which are installed on the oper-ating system as standard. Other screensaverprograms which are created independentlycannot be cancelled.
• In the case of VPCC mode, only the screen-saver programs on the virtual PC side can becancelled; the screensaver programs on thethin client terminal side cannot be cancelled.
Displaying a Confirmation DialogWhen Dialing from the ContextMenu

199
Configuring User Settings
TerminationYou can configure a setting to receive an incoming call.
The main panel minimized to the task tray can be dis-played automatically when you have an incoming call.Also, the screensaver program, which has been startedon the PC, is cancelled at the same time with main paneldisplay.
1 Click (User configurations) in(Function) on the navigation window.The [User configurations] screen appears.
2 Click Receive in [Conversation].The following screen appears.
3 Check the items.• Check [Expand the Panel if a call is received to the
primary Extension.].- Displays the main panel when there is an incomingcall for you
• Check [Expand the panel if a call is received to thesecondary Extension.].- Check [Whether select Line No. or not].
- Displays the main panel when there is anincoming call for the specified line.
4 Click .
The setting has now been configured.
Displaying the Main Panel WhenYou Have a New Incoming Call
To specify two or more lines in the[Whether select Line No. or not] field in[Expand the panel if a call is received tothe secondary Extension.]In Step 3, separate the line numbers with acomma (,) or connect the starting and ending linenumbers of a range with a hyphen (-).e.g.:• 2,3,4 : Line numbers 2, 3, and 4 are specified• 2- : Line numbers 2 and later are all speci-
fied• 2-10 : Line numbers 2 to 10 are specified.
• The screensaver programs that can be can-celed are those which are installed on the oper-ating system as standard. Other screensaverprograms which are created independentlycannot be cancelledked.
• In the case of VPCC mode, only the screen-saver programs on the virtual PC side can becancelled; the screensaver programs on thethin client terminal side cannot be cancelled.

200
Configuring User Settings
The main panel can be minimized automatically whenSoftphone is not used.
1 Click (User configurations) in(Function) on the navigation window.The [User configurations] screen appears.
2 Click Receive in [Conversation].The following screen appears.
3 Check [Automatically system tray].
4 Click .
The setting has now been configured.
The browse window can be switched to the start screenautomatically on the standard skin when there is anincoming call or a call is put on hold.The start screen can be popped up on the toolbar skin.
1 Click (User configurations) in(Function) on the navigation window.The [User configurations] screen appears.
2 Click Receive in [Conversation].The following screen appears.
3 Select the items.• Select [Switch to start if a call is receiving to the pri-
mary extension].- Select whether to switch the browse window to
start when there is an incoming call for you or thecall is put on hold.
• Select [Switch to start if a call is receiving to the sec-ondary extension]- Select whether to switch the browse window to
start when there is an incoming call for anotherperson or the call is put on hold.
- Check [Whether select Line No. or not].-Specify lines.
4 Click .
The setting has now been configured.
Minimize the Main Panel to theTask Tray When Not Used
• This setting can be configured only when[Expand the Panel if a call is received to the pri-mary Extension.] or [Expand the panel if a callis received to the secondary Extension.] ischecked.
• When you are originating a call or on a callusing Softphone, the main panel will not beminimized to the task tray.
• When there is an incoming call for the linespecified in "Displaying the Main Panel WhenYou Have a New Incoming Call", the mainpanel will not be minimized to the task tray.
Switching the Browse Window toStart for an Incoming Call or a Callon Hold

201
Configuring User Settings
You can receive a call for another person only by liftingthe handset.
1 Click (User configurations) in(Function) on the navigation window.The [User configurations] screen appears.
2 Click Receive in [Conversation].The following screen appears.
3 Check [For use with USB Handset only: Lifting handset will answer calls to secondary Extension.].
4 Click .
The setting has now been configured.
RingtoneYou can set the output destination of the ringtone whenyou receive an incoming call and configure a setting tochange the ringtones depending on conditions.
The ringtone can be output from the PC speaker.
1 Click (User configurations) in(Function) on the navigation window.The [User configurations] screen appears.
2 Click Sound in [Conversation].The following screen appears.
3 Check [Specify Sound Output to Com-puter Speakers].
4 Click .
The setting has now been configured.
Receiving a Call for Another Per-son Only by Lifting the Handset
A USB handset with the off-the-hook function is required to use this function. For handsets that can be used, contact the system administrator.
Setting the PC Speaker to Outputthe Ringtone
In the case of VPCC mode, this function cannot be used.
• The ringtone is output from the speaker of thedefault device set in [Sounds and AudioDevices Properties].
• With this setting, the USB handset (recom-mended) does not output the ringtone.

202
Configuring User Settings
You can set separate ringtones for a call from an internalline (between internal lines) and a call from an externalline (termination at station line) or for a call for the primeline and a call for a subline.
1 Click (User configurations) in(Function) on the navigation window.The [User configurations] screen appears.
2 Click Sound in [Conversation].The following screen appears.
3 Click to select a setting for separateringtones.
4 Click of the item to change.The following screen appears.
5 Specify a WAVE file (*.wav).Changing the Ringtone
In the case of VPCC mode, this function cannot be used.
To specify the ringtone for an inter-nal callInput a WAVE file name in the [Ring Soundfor Extension call] field or click [...] (refer-ence button) on the right of the field toselect a WAVE file in the [Open] screen.
To specify the ringtone for anexternal callInput a WAVE file name in the [Ring Soundfor Outside Line call] field or click [...] (refer-ence button) on the right of the field toselect a WAVE file in the [Open] screen.
To specify the ringtone for a callfor the prime lineInput a WAVE file name in the [Ring Soundfor Prime Line call] field or click [...] (refer-ence button) on the right of the field toselect a WAVE file in the [Open] screen.
To specify the ringtone for a callfor a sublineInput a WAVE file name in the [Ring Sound for Sub Line call] field or click [...] (refer-ence button) on the right of the field to select a WAVE file in the [Open] screen.
• Only the following audio file format canbe used. Other formats are not sup-ported.Usable file format
• WAVE format (*.wav)- Audio format : PCM- Average data rate : 16kb/sec- Sampling frequency : 8kHz- Sampling size : 16bit- Channel : Monaural
• If the specified audio file is opened byan application other than SP350, you donot hear the ringtone when you have anincoming call.
• An audio file on the network cannot beset. Copy the file to your PC to use it forthe ringtone.
• When selecting [Specify Ring Sound for Prime and Sub Line call], set at the IP telephony server the ringtones for the prime line and the sublines. For details, contact the system administrator.

203
Configuring User Settings
6 Click .The location of the specified file is displayed.
7 Click .
The setting has now been changed.
Ringtone PatternsUp to 10 ringtones can be set.
Two or more ringtones can be registered to change theringtone for each party registered in Contacts.
1 Click (User configurations) in(Function) on the navigation window.The [User configurations] screen appears.
2 Click Ringer Patterns in [Conversation].The following screen appears.
3 Click of the item to set in the ringtonesetting field.The following screen appears.
When you click the [OK] button, the fol-lowing message appears.
The audio file size exceeds about 1MB.When the size of the specified file is large (largerthan about 1MB), the response may take timesince the playback of the ringtone has a heavyload.
Specifying the playback file results in an errorwhen [Specify Sound Output to Computer Speak-ers] is not checked on the Sound screen of [Con-versation].
Setting the Ringtone Patterns
• At the IP telephony server, configure a settingto sound the ringtone for the prime line. Fordetails, contact the system administrator.
• In the case of VPCC mode, this function can-not be used.

204
Configuring User Settings
4 Specify a WAVE file (.wav).
5 Click .The location of the specified file is displayed.
6 Click .
The setting has now been configured.
Holding ToneThe holding tone for a call on hold can be set.
The holding tone can be changed.
1 Click (User configurations) in(Function) on the navigation window.The [User configurations] screen appears.
2 Click Hold Sound in [Conversation].The following screen appears.
3 Click of the item to change.The following screen appears.
4 Specify a WAVE file (*.WAV).
• Only the following audio file format canbe used. Other formats are not sup-ported.Usable file format
• WAVE format (*.wav)- Audio format : PCM- Average data rate : 16kb/sec.- Sampling frequency : 8kHz- Sampling size : 16bit- Channel : Monaural
• If the specified audio file is opened byan application other than SP350, you donot hear the ringtone when you have anincoming call.
• An audio file on the network cannot beset. Copy the file to your PC to use it forthe ringtone.
Specifying the playback file results in an errorwhen [Specify Sound Output to Computer Speak-ers] is not checked on the Sound screen of [Con-versation].
Changing the Holding Tone
In the case of VPCC mode, this function cannotbe used.
Input a WAVE file name in the [WAV file ForHold Sound] field or click [...] (referencebutton) on the right of the field to select aWAVE file in the [Open] screen.

205
Configuring User Settings
5 Click .The location of the specified file is displayed.
6 Click .
The setting has now been changed.
DisconnectionThe operations when you finish a call can be set.
Softphone can be returned to idle automatically when acall is disconnected in such a case that the other partyhangs up first.
1 Click (User configurations) in(Function) on the navigation window.The [User configurations] screen appears.
2 Click End call in [Conversation].The following screen appears.
3 Check [At end of a call, hang up automat-ically when the other party has hung up.].
4 Click .
The setting has now been configured.
• Only the following audio file format canbe used. Other formats are not sup-ported.Usable file format
• WAVE format (*.wav)- Audio format : PCM- Average data rate : 16kb/sec- Sampling frequency : 8kHz- Sampling size : 16bit- Channel : Monaural
• If the specified audio file is opened by anapplication other than SP350, you do nothear the ringtone when you have anincoming call.
• An audio file on the network cannot beset. Copy the file to your PC to use it forthe ringtone.
• When selecting [Specify Ring Sound for Prime and Sub Line call], set at the IP telephony server the ringtones for the prime line and the sublines. For details, contact the system administrator.
When you click the [OK] button, the fol-lowing message appears.
The audio file size exceeds about 1MB.When the size of the specified file is large (largerthan about 1MB), the response may take timesince the playback of the ringtone has a heavyload.
• Depending on the connection configuration,the specified holding tone may not be soundedfor a call on hold even the holding tone ischanged in the [WAV file For Hold Sound] field.
• Specifying the playback file results in an errorwhen [Specify Sound Output to ComputerSpeakers] is not checked on the Sound screenof [Conversation].
Automatically Disconnecting aCall on Termination (AutomaticIdle Return)
Depending on the other party's state, Softphonemay not be returned to idle automatically evenyou hear the restriction tone or the busy tone ofthe other party.

206
Configuring User Settings
A call can be disconnected in about two seconds afterthe Disconnect button is clicked.When you enable the F2 key to answer/originate/disconnect a call, the call can be disconnected in abouttwo seconds after the F2 key is pressed.This setting puts a pause similar to the one put when youactually replace your handset.
1 Click (User configurations) in(Function) on the navigation window.The [User configurations] screen appears.
2 Click End call in [Conversation].The following screen appears.
3 Check [The Dropping call operation byclicking the End call button is delayed.].
4 Click .
The setting has now been configured.
The presence functions indicating "Leaving seat" or"Away" status, etc., and display format of the presencecan be set.
When the "Leaving seat" status is set, an incoming callcan be rejected or forwarded to another number.
1 Click (User configurations) in(Function) on the navigation window.The [User configurations] screen appears.
2 Click [Presence].The following screen appears.
3 Click in the [When Presence buttonis selected and flashing] field to selectany of the following.The following screen appears.
• NoneSelect this when this collaboration operation is notused.
• Activate the DND(Do Not Disturb) featureSelect this to reject calls when the "Leaving seat"status is set.
Disconnecting a Call after aPause
Presence
This setting is valid only when the optional pres-ence server function is used.
Rejecting/Forwarding Calls Whilein "Leaving seat" Status

207
Configuring User Settings
• Activate the CF-A(Call FWD-All Calls) featureSelect this to forward calls to another number whenthe "Leaving seat" status is set.
4 Click .
The setting has now been configured.
The "Absent" reason can be displayed on the PC displayof the parties who have registered you in Contacts onlywhen your Softphone is not started or your PC is turnedoff.This setting is valid only when the optional presenceserver function is used.
1 Click (User configurations) in(Function) on the navigation window.The [User configurations] screen appears.
2 Click [Presence].The following screen appears.
3 Select an "Absent" reason.
4 Click .
The setting has now been configured.
• To use this function, set the service function in the IP telephony server in advance. For details, contact the system administrator.
• This setting is valid only when theoptional presence server function isused.
• Even this setting is enabled, calls arenot rejected automatically when the"Leaving seat" status is set automati-cally.
• This function is not available when theterminal is used as an ACD terminal,and ACD presence is enabled.
• This setting is valid only when theoptional presence server function isused.
• To forward calls to another number, Callforward - All Calls must be set. Fordetails, refer to "Putting a Call on Hold/Transferring a Call".
• When this setting is enabled, pressing
(Presence button) cancels theCall forward - All Calls as well as the"Leaving seat" status even Call forward -All Calls is set in the main panel.
• Even this setting is enabled, calls arenot forwarded automatically when the"Leaving seat" status is set automati-cally.
• This function is not available when theterminal is used as an ACD terminal,and ACD presence is enabled.For details, contact the system adminis-trator.
When calls are forwarded to UMSA message "I'm out right now...." is heard.
Selecting an "Absent" Reason

208
Configuring User Settings
The "Leaving seat" status is set automatically in any ofthe following states.• The mouse or keyboard is not operated for more than
the period set here.• The screen-saver is activated.
1 Click (User configurations) in(Function) on the navigation window.The [User configurations] screen appears.
2 Click [Presence].The following screen appears.
3 Check [Automatically set out of seat indi-cation].
Å@
4 Set the time until the "Leaving seat" sta-tus is set automatically.
Å@
Configurable time• 1 to 60 (minutes)
5 Click .
The setting has now been configured.
When there is no suitable reason in thelistInput the reason in the [Absence Reason Free-dom Setting] field. Up to 30 characters can beused.
To save the "Absent" reasonThe "Absent" reason set here returns to [None]when Softphone is ended. To use the same"Absent" reason when the "Absent" status is setor Softphone is started next time, check [Reasonfor absence will not be cleared if SP350 isrestarted.].
This function is not available when the terminal isused as an ACD terminal, and ACD presence isenabled.For details, contact the system administrator.
Setting the "Leaving seat" StatusAutomatically
• This setting is valid only when the optionalpresence server function is used.
• To set the "Leaving seat" status automaticallywhen the screen-saver is activated, use astandard screen-saver (excluding 3D screen-saver (3D text, 3D pipe, etc.) and channelscreen-saver).
• Even “Activate the DND(Do Not Disturb) fea-ture” is set for the "Leaving seat" status, callsare not rejected automatically when the "Leav-ing seat" status is set automatically.
• Even Activate the CF-A(Call FWD-All Calls)feature is set for the "Leaving seat" status,calls are not forwarded automatically when the"Leaving seat" status is set automatically.

209
Configuring User Settings
You can make the presence display on the top item ofcontact simple to the icon display.
1 Click (User Configurations) under
(Function) in the navigation window.The [User Configurations] screen appears.
2 Click [Presence].The following screen is displayed.
3 Select to check [Simplify presence indica-tion].
4 Click
The setting has now been configured.
You can configure settings for using IM.
The [Short Message Notification] dialog can bedisplayed when you receive an IM.
1 Click (User configurations) in(Function) on the navigation window.The [User configurations] screen appears.
2 Click [IM].The following screen appears.
3 Check [Enable pop-up notification when aShort Message is received.].
4 Click .
The setting has now been configured.
Simplifying the Presence Display
• This setting is valid only when the optionalpresence server function is used.
• Character strings that had been displayedbefore the setting can be confirmed as a tooltipdisplayed by hovering the cursor over the topitem of Contacts.
IM
Displaying a Pop-up on IM Recep-tion

210
Configuring User Settings
A confirmation dialog can be displayed when you add anIM destination number.
1 Click (User configurations) in (Function) on the navigation window.The [User configurations] screen appears.
2 Click [IM].The following screen appears.
3 Check [When a Telephone number isadded to the Destination List Box, theconfirmation message is displayed.].
4 Click .
The setting has now been configured.
The number of days that the chat messages are retainedin the chat message log is specified.If the chat function is disabled on the MaintenanceScreen, this menu is not displayed.
Specifying the number of days that the transmitted chatmessages to be retained is possible. After the elapse ofthe specified period, the messages are automaticallydeleted. (Default: 0 (Infinity))
1 Click (User configurations) in (Function)
on the navigation window.The [User configurations] screen appears.
2 Click [Chat].The following screen appears.
• The [Delete Chat Messages from log after] of [Chat]is set to 0 as default (indefinite).
• The [Delete Chat Messages from log after] of [Chat]can be set to 0 to 30.
• A change made in [Delete Chat Messages from logafter] of [Chat] becomes effective on the next startup.
3 Enter the number of days that the chatmessages to be retained (0 to30 days).The default is 0 (Not deleted).
4 Click .
The setting has now been configured.
Displaying a Confirmation DialogWhen an IM Destination NumberIs Added
Chat
Specifying the number of daysthat the chat messages areretained

211
Configuring User Settings
You can configure settings for using the phone book.
The name and organization of the calling party can beautomatically searched based on the calling party'snumber using the Contact data.
1 Click (User configurations) in(Function) on the navigation window.The [User configurations] screen appears.
2 Click [PhoneBook].The following screen appears.
3 Check [Use Contact data InformationRetrieval].
4 Click .
The setting has now been configured.
You can specify the Information retrieval software toautomatically search for the name and organization ofthe calling party based on the calling party's number.The specified Information retrieval software can bestarted by clicking the Address Book button.For details in case Microsoft Outlook is selected, refer to"How to Collaborate with Microsoft Outlook".
1 Click (User configurations) in(Function) on the navigation window.The [User configurations] screen appears.
2 Click [PhoneBook].The following screen appears.
3 Select Information retrieval software.
4 Click .
Phone Book
Using Contact data for Search
When the Contact data is used, information issearched in the order of "Contact data", then"Information retrieval software".
Setting the Information RetrievalSoftware
• Softphone must be restarted when the Infor-mation retrieval software is changed.
• [Microsoft Outlook], which must be installed, can be specified.
• "Directory Search" can additionally be used only if "Use directory search" described later is enabled. If "Microsoft Outlook" is specified, a directory is searched in Outlook first and, if not found, then also searched in the directory server.If "Microsoft Outlook (priority on directory)" is being selected, a directory is searched in the directory server first and, if not found, then searched in the phonebook of Outlook.

212
Configuring User Settings
5 Restart SP350.For details, refer to "Restarting Softphone".
The setting has now been changed.
You can set the Caller Information Panel undisplayed.
1 Click (User configurations) in(Function) on the navigation window.The [User configurations] screen appears.
2 Click [PhoneBook].The following screen appears.
3 Uncheck [Caller Information Panel].
4 Click .
The setting has now been configured.
The Caller Information Panel can be closedautomatically when you disconnect a call.
1 Click (User configurations) in(Function) on the navigation window.The [User configurations] screen appears.
2 Click [PhoneBook].The following screen appears.
3 Check [A Caller Information Panel is automatically closed after a telephone call end.].
4 Set the time until the Caller Information Panel is automatically closed.
Configurable time• 0 to 60 (seconds)
5 Click .
The setting has now been configured.
Setting the Caller InformationPanel Undisplayed
• The screensaver programs that can be can-celed are those which are installed on the oper-ating system as standard. Other screensaverprograms which are created independentlycannot be cancelled.
• In the case of VPCC mode, only the screen-saver programs on the virtual PC side can becancelled; the screensaver programs on thethin client terminal side cannot be cancelled.
Closing the Caller InformationPanel Automatically
The Caller Information Panel is closedautomatically in the following cases.• When the calling party hangs up while ringing• When a call is disconnected

213
Configuring User Settings
To use directory search in the search entry area, check[Use directory search] to enable it. Also, if a password isrequired to use the directory server, check [Loginrequired by Directory Server], and then enter theusername and password.Regarding whether or not directory search can be usedand the login password for the directory server, followthe instructions of the system administrator.
1 Click (User configurations) in(Function) on the navigation window.The [User configurations] screen appears.
2 Click [PhoneBook].The following screen appears.
3 Check [Use directory search].Directory search is enabled in the Search window.
4 Set up the username and password.If an instruction is given by the system administratorto check [Login required by Directory Server], checkthat checkbox and then enter the LoginID andPassword.
5 Click .
This completes setup.For the settings to take effect and use directory search, it is necessary to restart SP350.
Using Directory Search
• Whenever the settings of directory search arechanged, restart SP350 to reflect changes.
• If "Microsoft Outlook" is being selected as infor-mation search software, by enabling [Usedirectory search], name and company/organi-zation search from caller phone numbers,which is performed when receiving calls, canalso be performed from the directory server inaddition to the phonebook of Outlook. At thistime, data of Outlook phonebook takes prece-dence.If "Microsoft Outlook (priority on directory)" isbeing selected, a directory is searched in thedirectory server first and, if not found, thensearched in the phonebook of Outlook.
• The settings related to the directory server arealso performed separately in maintenance set-tings. To enable directory search, it is neces-sary to install the keyword rule configuration fileand set up the directory server in maintenancesettings. Regarding the contents of these set-tings, please follow instructions from your sys-tem administrator.
• In maintenance settings, the availability of ser-vices that use the directory server may be setup. If directory search cannot be used or setup, there is a possibility that the services aredisabled; in such a case, contact the systemadministrator.

214
Configuring User Settings
You can configure settings for searching mode for col-laboration with Microsoft Outlook.
1 Click (User configurations) in(Function) on the navigation window.The [User configurations] screen appears.
2 Click [PhoneBook].The following screen appears.
3 Check [Manually search contact list when collaborating with Microsoft Outlook.].
4 Click .
The setting has now been configured.
You can configure settings for recording.
PC RecordingYou can configure settings for saving PC recording and the PC recording start method.
The recording files can be saved even after the call log isdeleted.
1 Click (User configurations) in(Function) on the navigation window.The [User configurations] screen appears.
2 Click Live recording in [Recording].The following screen appears.
3 Select an item in [Deletion of Live record-ing Files].
4 Click .
The setting has now been configured.
Setting the searching mode forCollaboration with Microsoft Out-look
Default is auto search mode.If the number of entries in Contacts is large, theprocessing time of searching will be long.
Recording
In the case of VPCC mode, this function cannotbe used depending on the type of the thin clientterminal. For details, contact the systemadministrator.
Saving All PC Recording Files
By the default setting, the recording files aredeleted when the call log is deleted.
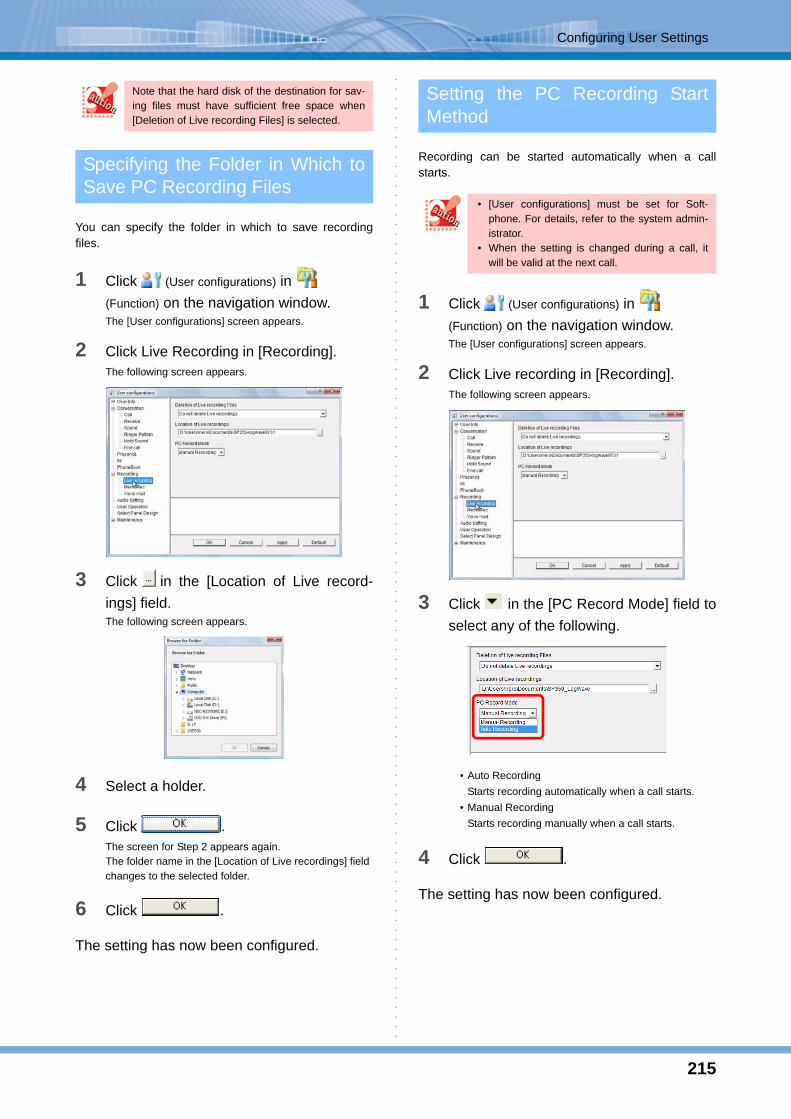
215
Configuring User Settings
You can specify the folder in which to save recordingfiles.
1 Click (User configurations) in(Function) on the navigation window.The [User configurations] screen appears.
2 Click Live Recording in [Recording].The following screen appears.
3 Click in the [Location of Live record-ings] field.The following screen appears.
4 Select a holder.
5 Click .The screen for Step 2 appears again.The folder name in the [Location of Live recordings] fieldchanges to the selected folder.
6 Click .
The setting has now been configured.
Recording can be started automatically when a callstarts.
1 Click (User configurations) in(Function) on the navigation window.The [User configurations] screen appears.
2 Click Live recording in [Recording].The following screen appears.
3 Click in the [PC Record Mode] field toselect any of the following.
• Auto RecordingStarts recording automatically when a call starts.
• Manual RecordingStarts recording manually when a call starts.
4 Click .
The setting has now been configured.
Note that the hard disk of the destination for sav-ing files must have sufficient free space when[Deletion of Live recording Files] is selected.
Specifying the Folder in Which toSave PC Recording Files
Setting the PC Recording StartMethod
• [User configurations] must be set for Soft-phone. For details, refer to the system admin-istrator.
• When the setting is changed during a call, itwill be valid at the next call.

216
Configuring User Settings
Voice Message RecordingYou can set the time before the automated response, therecording time, and the reply message file.
You can set the time before the automated responsestarts after you have an incoming call.
1 Click (User configurations) in(Function) on the navigation window.The [User configurations] screen appears.
2 Click MemoRec in [Recording].The following screen appears.
3 Click in the [Time until automaticresponding] field to select time (5 sec-onds is set by default).
Time to select• 3 to 15 (seconds)
4 Click .
The setting has now been configured.
You can set the recording time for the voice messagerecording.
1 Click (User configurations) in(Function) on the navigation window.The [User configurations] screen appears.
2 Click MemoRec in [Recording].The following screen appears.
3 Click in the [Recording Time] fieldto select time (30 seconds is set bydefault).
Time to select• 30 to 120 (seconds)
4 Click .
The setting has now been configured.
In the case of VPCC mode, this function cannotbe used.
Setting the Time before the Auto-mated Response
To use the voice message recording, further set-tings are required. For details, refer to "How to Use Voice Message Recording".
Setting the Recording Time
To use the voice message recording, further set-tings are required. For details, refer to "How to Use Voice Message Recording".

217
Configuring User Settings
You can specify the message played back at the auto-mated response of the voice message recording.
1 Click (User configurations) in(Function) on the navigation window.The [User configurations] screen appears.
2 Click MemoRec in [Recording].The following screen appears.
3 Specify a file name in the [ResponseMessage File] field.
4 Click .
The setting has now been configured.
Voice MailYou can configure settings for changing the voice maildestination or displaying the 10-key Keypad.
You can easily change the voice mail destination for thecall recording using the optional voice mail.
1 Click (User configurations) in(Function) on the navigation window.The [User configurations] screen appears.
2 Click Voice mail in [Recording].The following screen appears.
Specifying the Reply Message
To use the voice message recording, further set-tings are required. For details, refer to "How to Use Voice Message Recording".
• Only the following audio file format canbe used. Other formats are not sup-ported.Usable file format
• WAVE format (*.wav)- Audio format : PCM- Average data rate : 16kb/sec- Sampling frequency : 8kHz- Sampling size : 16bit- Channel : Monaural
• If the specified audio file is opened byan application other than SP350, you donot hear the ringtone when you have anincoming call.
• An audio file on the network cannot beset. Copy the file to your PC to use it forthe ringtone.
When you click the [OK] button, the fol-lowing message appears.
The audio file size exceeds about 1MB.When the size of the specified file is large (largerthan about 1MB), the response may take timesince the playback of the ringtone has a heavyload.
Specifying the playback file results in an errorwhen [Specify Sound Output to Computer Speak-ers] is not checked on the Sound screen of [Con-versation].
Enabling Voice Mail DestinationChange
This function is valid only when the optional UMSis used. For details, refer to the system adminis-trator.
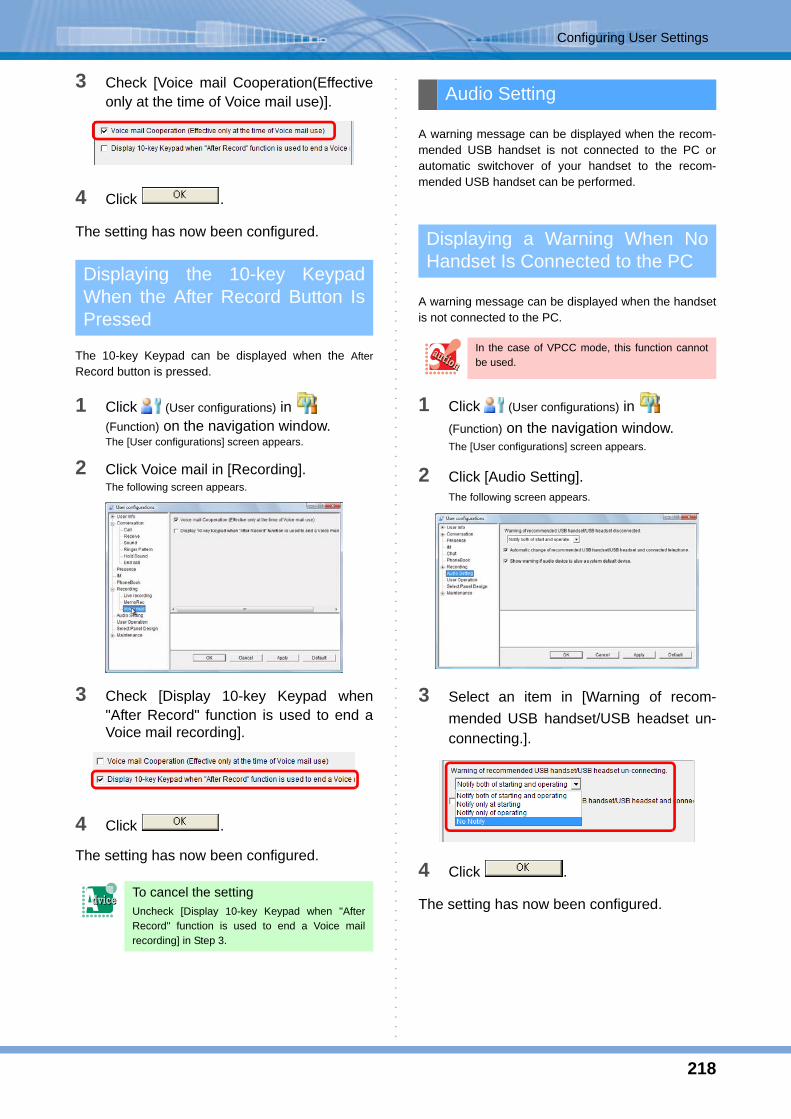
218
Configuring User Settings
3 Check [Voice mail Cooperation(Effectiveonly at the time of Voice mail use)].
4 Click .
The setting has now been configured.
The 10-key Keypad can be displayed when the AfterRecord button is pressed.
1 Click (User configurations) in(Function) on the navigation window.The [User configurations] screen appears.
2 Click Voice mail in [Recording].The following screen appears.
3 Check [Display 10-key Keypad when"After Record" function is used to end aVoice mail recording].
4 Click .
The setting has now been configured.
A warning message can be displayed when the recom-mended USB handset is not connected to the PC orautomatic switchover of your handset to the recom-mended USB handset can be performed.
A warning message can be displayed when the handsetis not connected to the PC.
1 Click (User configurations) in(Function) on the navigation window.The [User configurations] screen appears.
2 Click [Audio Setting].The following screen appears.
3 Select an item in [Warning of recom-mended USB handset/USB headset un-connecting.].
4 Click .
The setting has now been configured.
Displaying the 10-key KeypadWhen the After Record Button IsPressed
To cancel the settingUncheck [Display 10-key Keypad when "AfterRecord" function is used to end a Voice mailrecording] in Step 3.
Audio Setting
Displaying a Warning When NoHandset Is Connected to the PC
In the case of VPCC mode, this function cannotbe used.

219
Configuring User Settings
Your handset can be switched from the fixed phone tothe handset automatically when the handset is con-nected to the PC.
1 Click (User configurations) in(Function) on the navigation window.The [User configurations] screen appears.
2 Click [Audio Setting].The following screen appears.
3 Check [Automatic change of recom-mended USB handset/USB headset andconnected telephone.].
4 Click .
The setting has now been configured.
When the USB handset/headset is used, the predeter-mined audio device must be set in addition to the USBhandset/headset.If the setting is not correct, the following warning mes-sage is displayed.
Selecting whether to display or not the warning messagefor USB predetermined audio device.
1 Click (User configurations) in(Function) on the navigation window.The [User configurations] screen appears.
2 Click [Audio Setting].The following screen appears.
3 Check [Show warning if audio device isalso a system default device.].
4 Click .
The setting has now been completed.
Automatically Switching YourHandset to the Handset Con-nected to the PC
• Softphone must be set for collaboration with aphone. For the setting for collaboration with aphone, contact the system administrator.
• The handset cannot be switched when Soft-phone or the collaborating PS or fixed phone isin any of the following states.- When a call is incoming- When you are originating a call- During a call
• A call is placed/received with the extensionnumber of the collaborating PS or fixed phoneeven after you switch to the handsetconnected to the PC. You cannot place/receivea call with the extension number of Softphone.
• When this service is set at the IP telephonyserver, the handset at the start of Softphone isthe collaborating PS or fixed phone.
• In the case of VPCC mode, this functioncannot be used depending on the type of thethin client terminal. For details, contact thesystem administrator.
Displaying Warning Message forPredetermined Audio Device

220
Configuring User Settings
You can configure settings for various user operations ofthe Softphone functions.
Pressing the [Ctrl] key can also display the main panelhidden by another application used.Set how many times you need to press the [Ctrl] key todisplay the main panel.
1 Click (User configurations) in(Function) on the navigation window.The [User configurations] screen appears.
2 Click [User Operation].The following screen appears.
3 Click in the [Hot Key to restore Mini-mized main panel from System Tray] field to select any of the following.• Not Used
Select this when this setting is not used.• Press CTRL twice
Press the [CTRL] key twice in a row displays the mainpanel.
• Press CTRL three timesPress the [CTRL] key three times in a row displaysthe main panel.
• Press CTRL four timesPress the [CTRL] key four times in a row displays themain panel.
4 Click .
5 Restart SP350.For details, refer to "Restarting Softphone".
The setting has now been changed.
The cursor can be moved to the call/transfer numberinputting area automatically when the [Ctrl] key ispressed to display the main panel from the task tray(Separate setting is required. Refer to "Using the [Ctrl]Key to Display the Main Panel from the Task Tray".)
1 Click (User configurations) in(Function) on the navigation window.The [User configurations] screen appears.
2 Click [User Operation].The following screen appears.
3 Check [Auto move to Call/Transfer num-ber inputting area].
4 Click .
The setting has now been configured.
User Operations
Using the [Ctrl] Key to Display theMain Panel from the Task Tray
Moving to the Call/Transfer Num-ber Inputting Area Automatically

221
Configuring User Settings
You can input "#" by pressing the [/] key on the 10-keyKeypad of the PC.You can input numbers, "*", and "#" with the 10-key Key-pad when you use a keyboard with the 10-key Keypad.
1 Click (User configurations) in(Function) on the navigation window.The [User configurations] screen appears.
2 Click [User Operation].The following screen appears.
3 Check [Convert keyboard number pad's[/] key to a [#]].
4 Click .
The setting has now been configured.
You can answer /originate/disconnect a call by pressingthe F2 or Space Key.
1 Click (User configurations) in(Function) on the navigation window.The [User configurations] screen appears.
2 Click [User Operation].The following screen appears.
3 Click in the [Press F2 or Space keyfor:] field to select any of the following.• No Action
Select this when this setting is not used.• Answer
Select this when using the [F2] or [Space] key toanswer an incoming call.
• Call/Focus movement to transfer number inputtingarea/Answer/Hang upSelect this when using the the [F2] or [Space] key tomove the cursor to the call/transfer number inputtingarea, answer a call, or disconnect a call.
4 Click .
The setting has now been configured.
Enabling Input of "#" from theKeyboard
To cancel the settingUncheck [Convert keyboard number pad’s [/] keyto a [#] in Step 3.
Enabling the F2 or Space Key toAnswer/Originate/Disconnect aCall

222
Configuring User Settings
It is possible to answer and drop calls by just pressingthe [Pause] or [Scroll Lock] key on the keyboard.
1 Click (User Settings) of (Functions) in the Navigation window.The User Settings window appears.
2 Click "User Operation."The following screen appears.
3 Check [Answer or Drop call usinghotkey].
4 Click in the [Answer (Press hotkeyonce)/Drop (Press hotkey twice)] box andselect the key you will use.• [Pause] key• [Scroll Lock] key
5 Click .
This completes the settings.
Enabling to Answer and DropCalls by Hotkey Operation
This function takes effect in VPCC mode only.
• If the function of another application is alreadyassigned to a key you are assigning as ahotkey, select another key according to Step 4.
• Depending on the type of the screensaver pro-gram, only the screensaver program is can-celled by hot key operation and neither answernor dropping can be done. If password lock isapplied to the screensaver program, log in andthen perform hot key operation.

223
Configuring User Settings
It is possible to answer calls to others by just pressing akey on the keyboard which has been assigned as a hotkey.
1 Click (User Settings) of (Functions) in the Navigation window.The User Settings window appears.
2 Click "User Operation."The following screen appears.
3 Check [Answer or Drop call usinghotkey].
4 Check [Answer calls to secondary extensionsby hotkey].
5 Click .
This completes the settings.
When the PC is switched to the standby state, Soft-phone can be stopped to wait for restart during systemstandby.
1 Click (User configurations) in(Function) on the navigation window.The [User configurations] screen appears.
Receiving Calls to Others byHotkey Operation
This function takes effect in VPCC mode only.
• If the function of another application is alreadyassigned to a key you are assigning as a hotkey, select another key according to Step 4 in“Enabling to Answer and Drop Calls by HotkeyOperation.”
• Depending on the type of the screensaver pro-gram, only the screensaver program is can-celled by hot key operation and neither answernor dropping can be done. If password lock isapplied to the screensaver program, log in andthen perform hot key operation.
Stopping Softphone to Wait forRestart during System Standby
When [Transition to standby based on elapsedtime] is set in the [System standby] field on the[Power Options Properties] screen, the followingoperation is performed.• Windows 2000: Softphone waits for restart.
However, if Softphone ringswithin the set period, theelapsed time is reset andreturned to 0. Therefore, ifSoftphone rings repeatedlywithin the set period, theelapsed time is returned to 0each time and the PC cannottransit to the standby state.
• Windows XP : Softphone does not wait forrestart and continues its oper-ation.
• Windows Vista: Softphone waits for restartand operations such as a callare not available.
• Windows 7 : Softphone waits for restartand operations such as a callare not available.

224
Configuring User Settings
2 Click [User Operation].The following screen appears.
3 Check [On entering system stand-by orhibernate, stop and wait for restart confi-mation at resume.].
4 Click .
The setting has now been configured.
The line number on the call function buttons or the but-tons to which a function is not registered can be hidden.
1 Click (User configurations) in(Function) on the navigation window.The [User configurations] screen appears.
2 Click [User Operation].The following screen appears.
3 Check [Selects whether to display anunregistered in Call functions buttons ornot.].The following screen appears.
4 Click .
The setting has now been changed.
Hiding Unregistered Call FunctionButtons
To display unregistered call functionbuttonsUncheck [Selects whether to display an unregis-tered in Call functions buttons or not.] in Step 3.

225
Configuring User Settings
You can set the click operation to display detailed data ofCall history/Contacts/Search.
1 Click (User configurations) in(Function) on the navigation window.The [User configurations] screen appears.
2 Click [User Operation].The following screen appears.
3 Click in the [Trigger when clicking a Detailed data of Call history/Contacts/Search] field to select either of the follow-ing.
• Single clickSingle-click to enable detailed data of the Call history/Contacts/Search
• Double clickDouble-click to enable detailed data of the Call his-tory/Contacts/Search
4 Click .
The setting has now been configured.
You can change the search target of a search keyword.
1 Click (User configurations) in(Function) on the navigation window.The [User configurations] screen appears.
2 Click [User Operation].The following screen appears.
3 Click in the [Specifies the Default Search Target] field to select any of the following.The following screen appears.
• ContactsTransits to the [Search results] function to display theresult.
• Call historyTransits to the [Search results] function to display theresult.
• Outgoing callsTransits to the [Search results] function to display theresult.
• Incoming callsTransits to the [Search results] function to display theresult.
• Outgoing IMTransits to the [Search results] function to display theresult.
• Incoming IMTransits to the [Search results] function to display theresult.
• Directory searchDirectory search results can be displayed by going to[Search Result]. This can be selected when DirectorySearch is already set up.
Setting Single/Double Click to Dis-play Detailed Data of Call History/Contacts/Search
Changing the Search Target

226
Configuring User Settings
4 Click .
The setting has now been configured.
A confirmation dialog can be displayed to prevent a mis-take when Call forward - All Calls is set.
1 Click (User configurations) in(Function) on the navigation window.The [User configurations] screen appears.
2 Click [User Operation].The following screen appears.
3 Check [Displays confirmation messagewhen Call forward-All calls setting isavailable.].
4 Click .
The setting has now been configured.
A confirmation dialog can be displayed to prevent a mis-take when the default button is selected for display set-ting of call function buttons.
1 Click (User configurations) in(Function) on the navigation window.The [User configurations] screen appears.
2 Click [User Operation].The following screen appears.
3 Check [Selects whether to display confir-mation message or not.].
4 Click .
The setting has now been configured.
Displaying Confirmation MessageWhen Call Forward - All Calls Set-ting Is Available
Displaying a Confirmation DialogWhen the Default Button IsSelected for Display Setting ofCall Function Buttons

227
Configuring User Settings
A confirmation dialog can be displayed to prevent a mis-take when a call is originated from detailed data of theContacts/Call History/Search.
1 Click (User configurations) in(Function) on the navigation window.The [User configurations] screen appears.
2 Click [User Operation].The following screen appears.
3 Check [Selects whether to display a con-firmation message of the calling confir-mation dialog at Contact/Call history/Search].
4 Click .
The setting has now been configured.
You can configure a setting for the devices to be used.
When Softphone is used in a virtual network environ-ment such as VPN or mobile IP, NIC/IP address can bespecified if necessary.
1 Click (User configurations) in(Function) on the navigation window.The [User configurations] screen appears.
2 Click [Device].The following screen appears.
Displaying a Confirmation DialogWhen Dialed from the Contacts/Call History/Search
Devices
Specifying a Network to Be Used
• To use Softphone in a virtual network, Soft-phone must be started in the following order.(1) Start the PC.(2) Log into the virtual network.(3) Start Softphone.When Softphone is registered to start-up, (3)comes earlier than (2), so Softphone cannot beused.Therefore, do not register Softphone to start-up when Softphone is used in a virtual networkenvironment.
• The [Device] screen of User configurationsappears only when two or more network inter-faces are installed in the PC in which Soft-phone is installed.

228
Configuring User Settings
3 Check [Specifies NIC/IP Address].
4 Select an item in [Network Interface](NIC).
5 Select an item in [IP Address].
6 Click .
7 Restart SP350.For details, refer to "Restarting Softphone".
The network to be used has now been changed.
You can select either [Standard Skin] or [Toolbar Skin] asthe panel design.
1 Click (User configurations) in(Function) on the navigation window.The [User configurations] screen appears.
2 Click [Select Panel Design].The following screen appears.
3 Click in the [Panel Design Selection]field and select either of the following.• Standard Skin
Selects the standard skin.• Toolbar Skin
Selects the toolbar skin.
4 Click .
5 Restart SP350.For details, refer to "Restarting Softphone".
The panel design has now been changed.
Select a network interface (NIC) installed ashardware. Selecting one provided as soft-ware may cause improper operation.
Select an IP address that is accessible to theIP telephony server. Selecting an inaccessi-ble address may cause improper operation.
Panel Design
Changing the Panel Design

229
Configuring User Settings
You can select either [Call/Transfer Function] or[Retrieval Function] as the preferred function which isexecuted preferentially.You can perform the following operations if the preferredfunction is set.- After a phone number or search keyword is input, thefunction can be executed just by pressing the [Enter]key.- Input history can be displayed by clicking(Recent Input button) in the input area.
1 Click (User configurations) in(Function) on the navigation window.The [User configurations] screen appears.
2 Click [Select Panel Design].The following screen appears.
3 Click in the [Select the main functionof the input area] field and select either ofthe following.
• Call/Transfer FunctionGives priority to Call/Transfer Function.
• Retrieval FunctionGives priority to Retrieval Function.
4 Click .
The preferred function has now been set.
You can exit the start screen automatically when anyactive line is no more displayed on the screen of thetoolbar skin.
1 Click (User configurations) in(Function) on the navigation window.The [User configurations] screen appears.
2 Click [Select Panel Design].The following screen appears.
3 Check [Auto close Action Window].
4 Click .
The setting has now been configured.
Selecting the Preferred Functionfor the Input Area
• The preferred function can be set only when[Toolbar Skin] has been selected in the [PanelDesign Selection] field.
Exiting Start Screen Automatically
• The preferred function can be set only when[Toolbar Skin] has been selected in the [PanelDesign Selection] field.
• When checked: Alternating Two-Step display isprovided (default)
• When unchecked: Alternating Two-Step dis-play is not provided

230
How to Use the Wizard
When starting SP350 without necessary settings per-formed after the installation, the wizard starts automati-cally. You can easily setup the minimum settingsrequired for the activation by simply inputting informationin accordance with the wizard direction.
If the minimum information has not been setup after the installation (the initial data of the registry data for the VoIP server setting cannot be obtained), the wizard starts automatically which helps you to setup easily.
Loading the Configuration File
1 Start SP350.The [SP350 Wizard] screen appears.
2 Check [Load Configuration File].
3 Click .The [Open] screen appears.
4 Select the configuration file to read.
5 Click .A dialog appears to notify that the setting has beendone.
6 Click .
The configuration file has now been loaded.
How to Use the Wiz-ard
Using the Wizard for Environ-mental Setting
If the environmental setting has been doneat the installation with [Automatic environ-ment setting] for instance (refer to above*1), SP350 will start without the wizard acti-vated.
If the following dialog appearsafter clicking the [Open] button
Click the [OK] button.The following dialog appears.
Data has not been loaded successfullybecause the configuration file does notcomply with SP350.Click the [OK] button and start from Step 1again.
In the case of VPCC mode, this message isnot displayed.

231
How to Use the Wizard
Configuring Manual Settings
1 Start SP350.The [SP350 Wizard] screen appears.
2 Check [Input Directly].
3 Click .The following screen is displayed.
4 Input the necessary data for the serverconnection.
5 Click .The following screen is displayed.
6 If you want to use the presence function,check [Use Presence].The following screen is displayed.
Name Description
Host Name / IP Address
Specify a host name or IP address of the IP telephony server to be connected. The first data is man-datory. This field is blank by default.
Port Number Specify the destination port num-ber of the IP telephony server to be connected. The first data is mandatory. The default value is 5060.
If the following dialog appearsafter clicking the [Next] button.
• Necessary item(s) has not been filledout. Click the [OK] button and start fromStep 4 again.
• The port number is invalid. Click the [OK] button and start from Step 4 again.

232
How to Use the Wizard
7 Input the necessary data for the serverconnection.
8 Click .The following screen is displayed.
9 Set the numbering plan.
About setting the numbering planIf you want delete the exchange number from the num-ber registered in the addoress book when originating ortransferring a call, changing destination, displaying sta-tus (presence), or transmitting an IM, set the exchangenumber.
If the exchange number is required in order to searchcaller information over the address book with its origina-tion number, specify the digit number of the originationnumber to which the exchange number is required.
The following screen is displayed.
10 Click .The following screen is displayed.
If you don't use the presence func-tionsUncheck [Use Presence] and click the[Next] button.
Name Description
Presence Host Name / IP Address
Specify the host name of the pres-ence server or the IP address to be used. If you use the presence function, you must specify the presence server host name.
Presence Port Number
Specify the port number of the presence server to be used. If you use the presence function, you must specify the port number of the presence server.
When connecting Presence server, prefix [access code + local office code] with extension number
If you check this checkbox, you can connect to the presence server with your exchange num-ber and prime line number.
If the following dialog appearsafter clicking the [Next] button.
• Necessary item(s) has not been filledout. Click the [OK] button and start fromStep 7 again.
• The port number is invalid. Click the [OK] button and start from Step 7 again.
If you don't the numbering planClick the [Next] button.
Name Description
Access code + Local office
Set the access code + local office. (Default: blank)
Maximum of sta-tion
Set the digit number of the origina-tion number to which the access code + local office is added. (Default:0)

233
How to Use the Wizard
11 Check [Use Terminal Cooperation] if youuse other phone for collaboration.
12 Click .The following dialog appears.
13 Click .
The manual setting has now been completed.
In the case of VPCC mode, this message isnot displayed.
If the following dialog appears afterclicking the [OK] button.
The write operation of the settings has failed. For details, contact the system administrator.

234
Tips
This section describes tips on using Softphone moreconveniently.
The IM function can store a maximum of 1000 logentries. When this maximum number is exceeded, logentries are deleted starting with the oldest one.Store the IM log list by the following procedure.For details, refer to "Using Export".
1 Click (Import/Export) in (Function) onthe navigation window.The [Import/Export Wizard] screen appears.
2 Select [Export].
3 Click .The [Export of file] screen appears.
4 Select [IM Log].
5 Click .The file path input screen appears.
6 Click .The [Save As] screen appears.
7 Input the name of the file to be saved.
8 Click .The file path has been input.
Tips
When You Want to Save the IMLog

235
Tips
9 Click .
10 Click .
The IM log has now been saved as a CSV-for-mat file.
You can pre-register a number to be input when makingwork-related ticket reservations or checking the voicemessages recorded.
Registering a Number
1 Click (Contacts) on the navigation win-dow.The Contacts list is displayed on the browse window.
2 Right-click on the top of the Contacts listor the group in which you want to registera number.The right-click menu appears.The following explains an example of when the top isclicked.
3 Click [Add A Contact].The [Contact Setting] screen appears.
4 Input the number you want to register in[Telephone number 1].Example:When the input procedure is "3->2->1->2->2->
55535", type "3,2,1,2,2,55535".
• The [Next(N)] button on the file path inputscreen is enabled only when a valid path is setin the [File Path] field.
• When an existing file name is specified in Step7, that file is overwritten.
• Depending on the OS, when a saved CSV fileis opened with Excel, the line break code maybe displayed like "•••".
When You Want to Send aNumber during a Call
To insert a pause between num-bersInput "," (comma).For details, refer to "When You Want toInsert a Pause".

236
Tips
5 Input [Name].Example: Type "Ticket reservation".
6 Click .
The number has now been registered.
Sending a Number
1 You are on the phone.
2 Click (Contacts) on the navigation win-dow.The Contacts list is displayed on the browse window.
3 Right-click the contact in which the num-ber is registered.The right-click menu appears.
4 Click [Send PB Sound].
The registered number has now been sent.
When you want to inset a pause between numbers, input"," (comma). One comma corresponds to a 2-secondpause.Pauses can be used when:• Dialing after dragging and dropping a number• Dialing after copying and pasting a number• Dialing from the Call/transfer number inputting area• Dialing from the Contacts
When You Want to Insert aPause

237
FAQs
Read this section when you have questions and prob-lems.
When Windows XP Service Pack 2 is applied, the fire-wall function of Windows is automatically enabled, and Softphone cannot be used normally. When the warning screen appears, disable the firewall setting for Softphone with either one of methods.
Disabling in advance before starting Softphone1. Click [Start] -> [Control Panel] -> [Windows Secu-
rity Center] -> [Windows Firewall], and click the [Exceptions] tab in the [Windows Firewall Set-tings] screen.The following screen appears.
2. Click the [Add program...] button.The following screen appears.
3. Add "SP350".When the installation directory is not changed, specify the following path and click the [OK] button.• SP350: "C:\Program Files\NEC\
SP350\ClientPhone32.exe"The screen for Step 1 changes as below.
4. Check that "SP350" is displayed in [Program or port].
5. Click the [OK] button.
The firewall setting for Softphone has now been dis-abled.
Disabling at starting SoftphoneWhen firewall setting is not disabled before Soft-phone is started, the setting can be disabled with thefollowing procedure.
(1) Click the [Unblock] button in the [Windows Security Alert] screen.
FAQs
When Using Windows XP Service Pack 2

238
FAQs
Disabling at starting video conference(1) Click the [Unblock] button in the [Windows
Security Alert] screen that appears at the start of the video conference.
When Softphone is used in a virtual network environ-ment such as VPN and mobile IP, Softphone chooses the appropriate network information at the startup. How-ever, this function may not work normally according to your PC's environment.In this case, specify the following two items.• NIC mounted as hardware (not virtual)• Server accessible IP addressFor details, refer to "Specifying a Network to Be Used".
Softphone does not start.(1) Did you start Softphone immediately after ending
it? Restart Softphone after a while.
(2) If Softphone does not start after double-clickingthe [SP350] icon, contact the systemadministrator.
(3) Are the login ID and password correct?
(4) If Softphone does not start after inputting the cor-rect login ID and password, contact the systemadministrator.
(5) Did you disable the firewall setting for Softphonewhen applying Windows XP Service Pack 2?For details, refer to "When Using Windows XPService Pack 2".
(6) Did you disable the Internet Connection Firewallfunction for the case with Windows XP ServicePack 1 or earlier?For details, refer to "About Firewall of WindowsXP Service Pack1 or Earlier".
Softphone does not end.(1) Softphone cannot be ended while you are on the
phone and hear the ring back tone or busy tonefrom the handset. Make sure that Softphone isdisconnected.
(2) When [This program is not responding.] is dis-played and Windows cannot be ended, end Soft-phone forcibly.
(3) If the behavior is abnormal at the next start ofSoftphone, contact the system administrator.
The power of PC is turned off without ending Soft-phone.(1) If the behavior is abnormal at the next start of
Softphone, contact the system administrator.
When Softphone is registered to the startup, a Soft-phone start error may occur at the PC startup. In thiscase, adjust the time to start Softphone with the follow-ing procedure.
1. Click [Start] -> [Programs] -> [UNIVERGE Soft Client SP350] -> [Automatic Start Setting].
The following screen appears.
2. Check the [Run SP350 on startup] field.
3. Click next to the [Add Startup Delay (in seconds)] field to select the delay time.- 0/15/30/45/60/75/90/105/120/135/150/165/180(seconds)
4. Click the [Configure] button.
When Using Softphone in a Vir-tual Network Environment
When Softphone Does Not Startor End
Softphone Startup Error

239
FAQs
The display is odd/characters are defective.(1) Did you change [Font size] in the display proper-
ties of your PC?When the font size other than [Normal] is set,Softphone may not be displayed normally.
Windows DPI is required to be set to normal size(96DPI).
To confirm or change DPI setting, right-click on an emptyarea on your Windows desktop, and go to [Properties] ->[Display Properties] or [Personalize]. In the displayedmenu, you can confirm or change it as shown below.
- For Windows 7Click [Personalize] -> [Display]. Select [Smaller-100%].
- For Windows VistaClick [Personalization] -> [Adjust font size (DPI)].Select [Default scale (96DPI)].
- For Windows XPGo to [Display Properties] -> [Settings] ->[Advanced] -> [General]. In DPI setting, select[Normal size (96DPI)].
- For Windows 2000Go to [Display Properties] -> [Settings] ->[Advanced] -> [General]. In font size setting, select[Smaller font].
When an audio device other than USB handset/headsetis equipped on your PC, perform the following setting.
1. Connect the USB handset/headset.
2. Open the [Sounds and Audio Devices Properties] screen.
3. Select the [Audio] tab.
4. Change the default device for [Sound playback] and [Sound recording].Change the setting to the device other than "Handset for VoIP" or "Plantronics Headset" (the name of the device equipped on your PC).
5. Check [Use only default devices].
Windows 2000 usersFor Windows2000, convert [Sounds and AudioDevices] to [Sounds and Multimedia], [Use onlydefault devices] to [Use only preferred devices], and[Handset for VoIP]/[Plantronics Headset] to [USBAudio Device] when reading.
Windows Vista or Windows 7 usersFor Windows Vista or Windows 7, convert [Soundsand Audio Devices] to [Hardware and Sound] ->[Sound]. Also, convert the [Audio] tab to [Speakers]on the [Playback] tab and [Microphone] on the[Recording] tab when reading.
About the Display of Softphone Warning Message for AudioDevice Setting Is Displayed
Audio device is notchanged when this itemis checked.

240
FAQs
The handset is disconnected from the USB port.(1) End Softphone, and insert the plug of the handset
to the USB port again (you can insert the plugwhile the power of the PC is on). A message mayappear at the insertion.
(2) When the handset does not operate normally afterthe insertion, end Softphone and restart the PC.
(3) If the problem still persists, contact the systemadministrator.
The PC is suspended.(1) Softphone may not operate normally after the
recovery from the suspension. Restart Softphoneif it does not operate normally.
(2) When Softphone does not operate normally afterthe restart, end Softphone and restart the PC.
(3) When Softphone does not operate normally afterthe restart, contact the system administrator.
The phone book does not open when Phone Bookin the navigation window is clicked.(1) The phone book is not assigned. Assign the
phone book from [Information retrieval software]of [Phone Book] in the [User configurations]screen.For details, refer to "Setting the InformationRetrieval Software".
The call cannot be placed by copying the phonenumber.(1) Is the copied phone number correct?
The call cannot be placed by clicking the phonenumber on the website.(1) Did you perform the setting to dial a phone num-
ber linked in a website?For details, refer to "Dialing a Phone Numberlinked in a Website".
The call to an external line cannot be placed.(1) Do you use the system that requires to input an
additional number such as "0" prior to the phonenumber for placing a call? If so, either one of thefollowing operations is required.• Input an additional number such as "0" and
input the other party's phone number.• To place a call by copying or drag&drop the
phone number, set the number to be added in[Call] under [Conversation] in the [User configu-rations] screen in advance.For details, refer to "Dialing after Adding aNumber to the Beginning of the PhoneNumber".
(2) If you still cannot place the call to the external line,contact the system administrator.
The ringtone does not sound.(1) Is the ring volume set to low? Try to control the
ring volume.
(2) Is the handset disconnected from the USB port ofthe PC? If so, insert the plug firmly.
(3) If the problem still persists, contact the systemadministrator.
The ringtone does not sound continuously.(1) When operations such as virus scan or download
are performed, the ringtone may not sound contin-uously due to the decrease of OS process time.
While in Standby Mode
When Placing a Call
When You Have an IncomingCall

241
FAQs
The other party's voice cannot be heard.(1) Is the earpiece volume set to low? Try to control
the earpiece volume.
(2) Is the handset disconnected from the USB port ofthe PC? If so, insert the plug firmly.
(3) If the problem still persists, contact the systemadministrator.
My voice cannot be heard by the other party.(1) Is the [Mute] button clicked? Click the [Mute] but-
ton again.
The voice during the call breaks up.(1) When operations such as virus scan or download
are performed, the voice during the call may breakup due to the decrease of OS process time.
When the USB handset is used, the microphonevolume is low, or my voice cannot be heard bythe other party.(1) Remove and insert the plug of the USB handset
after Softphone is ended. If the problem still per-sists, repeat this procedure.
The other party's voice is heard not from the hand-set but from the speakers of the PC.(1) End Softphone and restart the PC.
(2) If the problem still persists, contact the systemadministrator.
The PC froze during the call.(1) The call is disconnected. Restart the PC, and
place a call again.
(2) If the behavior is abnormal at the next start of thePC, contact the system administrator.
The other party's voice is slightly delayed.(1) There is no problem since this is the specification
of Softphone.
The call on hold cannot be answered again.(1) For the exclusive hold call, the call can be
answered only by the phone that held the call.
The call is attempted to transfer to the nearby per-son, but the person cannot answer the call.(1) Is the call self held? For the exclusive hold call,
the call can be answered only by the phone thatheld the call.
The volume indicator blinks in yellow or red.(1) Is a high load placed on the PC? Quit some of
applications.
(2) Is the network load high? Contact the networkadministrator.
* The system environment that optional other termi-nals (such as PS) can be used and settings at the IP telephony server are required.
The terminal (such as PS) cannot be used as thehandset.(1) Settings at the IP telephony server are required.
For details, contact the system administrator.
(2) Is the radio wave condition of the PS "out of ser-vice"? Move to the "in service" area.
What if a call is incoming when the terminal (suchas PS) is at the "out of service" area?(1) When the logout forwarding is set, the call is for-
warded to the party.
(2) The operation set at the IP telephony server inadvance is performed.Example: Makes an out-of-service announce-
ment/forwards to the specified number etc.For details, contact the system administrator.
* The system environment that a multifunction phone can be used and settings at the IP telephony server are required.
The multifunction phone cannot be used as thehandset.(1) Settings at the IP telephony server are required.
For details, contact the system administrator.
When Talking on the Phone
When Using Your Terminal(such as PS) as the Handset
When Using a MultifunctionPhone as the Handset

242
FAQs
The call is not forwarded to the specified forward-ing destination.(1) Did you configure the call forwarding in the [Call
forward settings] screen?
(2) Is the phone number of the forwarding destinationcorrect?
(3) Did you register the phone number of the forward-ing destination with an additional number such as"0" prior to the phone number when the destina-tion is an external line?
* The function can be used only by the system thatmounts the optional presence server.
The other party does not answer even though thepresence status is "Idle".(1) The other party may be unavailable without set-
ting the unavailability. Place a call again after awhile.
The IM is not transmitted.(1) Is the extension number of the destination cor-
rect?
(2) It may take a little time to deliver the message.
(3) Does the other party start Softphone?
The other party seems to transmit an IM, but no IMis received.(1) Is the extension number of the destination that the
other party specified correct?
(2) Is the "New IM received" icon or the “Unread IM“icon displayed on the toolbar? In this case, thebehavior at the IM reception is set not to pop upthe IM reception notification.
(3) It may take a little time to deliver the message.
The Chat is not transmitted.(1) Is the extension number of the destination
correct?(2) It may take a little time to deliver the message.(3) Does the other party start Softphone?
The other party seems to transmit a Chat, but noChat is received.(1) Is the extension number of the destination that the
other party specified correct?(2) Is the "New IM received" icon or the "Unread IM"
icon displayed on the toolbar? In this case, thebehavior at the IM reception is set not to pop upthe IM reception notification.
(3) It may take a little time to deliver the message.
The PC recording cannot be used.(1) When the UMS is mounted to the system you use,
clicking the Record button on the start screen acti-vates the voice mail not the PC recording. In thiscase, right-click the Record button and select[Live recording].For details, refer to "Recording a Conversation inthe PC".
(2) Is the capacity of the hard disk is nearly full?The size of the recorded file varies depending onthe file format to be set.For the file format to be set, check with the systemadministrator.
When Using Absent Forwarding
When Checking the PresenceStatus of Contacts
When Using IM
When Using Chat
When Using PC Recording
File Format Size
PCM Approx. 1MB per minute
GSM6.1 Approx. 0.1MB per minute
• In the case of VPCC mode, this function cannotbe used depending on the type of the thin clientterminal. For details, contact the system admin-istrator.
• In the case of VPCC mode, the file format is"G.711" (approximately 0.5 MB per minute) instead of "PCM."

243
FAQs
* The function can be used only by the system thatmounts the optional UMS.
For details, refer to the help or instruction of the UMS.
* The system environment that a data meeting can be used and settings at the IP telephony server are required.
The data meeting cannot be started.(1) Settings at the IP telephony server are required.
For details, contact the system administrator.
(2) The meeting trunk may be full to capacity. Performthe operation again after a while.
(3) In order to use Data Meeting, the installation ofAdobe® Flash® Player from Adobe Systems isrequired. If Adobe® Flash® Player has not been installed onyour PC, download Adobe® Flash® Player fromAdobe Systems Web site or other applicable Website and install it.Please install Adobe® Flash® Player forMicrosoft® Internet Explorer.Data Meeting may not work with Adobe® Flash®
Player plug-ins for other browsers.
(4) If the operating system of your PC is changedafter installing SP350, it is necessary to reinstallSP350.If you continue to use SP350 without reinstallingit, it may cause problems such as some functionsdo not work.
A loud sound is produced at the start of the datameeting.(1) When the organizer calls participants, a loud
sound may be produced; however, this is notabnormal since this is the specification of Soft-phone.If this is annoying, set the earpiece volume to low,or hold the handset away from one's ear until allthe participants are ready.
The phone is disconnected during the meeting.(1) If you are the organizer of the data meeting, the
data meeting itself is over.
(2) If you are a participant, you cannot participate inthe meeting until you call the organizer again, andthe organizer updates the participants.
Notes for organizers(1) To check the participation, always check with the
real voice from participants.• When a participant transfers the meeting call,
the organizer cannot check that.• When another person responds to the
convocation from another phone in place of theparticipant, the organizer cannot check that.
Constrained conditions for data meeting(1) For details, refer to "Constrained Conditions for
Data Meeting".
Video communications cannot be used.(1) Is the camera properly connected?
(2) Did you install applications such as an antivirussoftware and firewall software? When such soft-ware is used with Softphone, settings may berequired. For details, contact the systemadministrator.
When the other party does not connect a camera(1) Only the video of your side can be transmitted to
the other side.
The motion of the video is not smooth.(1) The video may not move smoothly or stop
depending on the network condition.
(2) When you browse websites or send/receive e-mails during the data meeting, the motion mayslow down.
When Using Voice Mail
While in a Data Meeting
When Using Video Communica-tion

244
FAQs
The communication board cannot be used.(1) Did you install applications such as an antivirus
software and firewall software? When such soft-ware is used with Softphone, settings may berequired. For details, contact the systemadministrator.
The white board cannot be used.(1) Is (Lock button) clicked? If so, the operation of
the white board cannot be shared with the otherparty.
(2) Did you install applications such as an antivirussoftware and firewall software? When such soft-ware is used with Softphone, settings may berequired. For details, contact the systemadministrator.
The operation is slow.(1) The white board may operate slowly or be inter-
rupted depending on the network traffic condition.
(2) When you browse websites or send/receive e-mails during the data meeting, the operation mayslow down.
The file transfer cannot be used.(1) Did you install applications such as an antivirus
software and firewall software? When such soft-ware is used with Softphone, settings may berequired. For details, contact the systemadministrator.
The transfer speed is slow.(1) The speed of the file transfer may become
extremely slow or the transfer may be discon-nected depending on the network traffic condition.
(2) When you browse websites or send/receive e-mails during the file transfer, the operation mayslow down.
(3) Transferring a large-sized file may take time.
The chat cannot be used.(1) Did you install applications such as an antivirus
software and firewall software? When such soft-ware is used with Softphone, settings may berequired. For details, contact the systemadministrator.
(2) This feature is not available with SP350 R4 orbefore and the terminals other than SP350.
The time to display the message is slow.(1) The time to display the message may become
extremely slow depending on the network trafficcondition.
(2) When you browse websites or send/receive e-mails during the chat, the operation may slowdown.
Please ask the system administrator whether the SP350is operating in VPCC mode.The terminals on which VPCC mode is available areUS60, US100, US110 and RDC (Remote Desktop Con-nection).
When Using the Communica-tion Board
When Using File Transfer
When Using Chat
When using SP350 in VPCCmode
• On US60 and client PC with Windows RemoteDesktop Connection, a handset cannot beused. The collaboration with another terminal isnecessary.
• Even on client PC with Remote Desktop Con-nection, a handset can be used by using thevoice option software (SP350 SV LICENSE forVPCC).

245
FAQs
(1) Voice conversation is performed on terminalsother than the thin client terminal when startingSoftphone; however, if the settings areinsufficient, it will be conducted on the thin clientterminal. If the thin client terminal does notsupport voice conversation, or the thin clientterminal is busy, the following screen appears.
• If you want to exit Softphone, click the [Exit]button.
• When the thin client terminal is reconnected,Softphone will be restarted.
(2) If an error occurs in version check when the thinclient terminal supports voice conversation, thefollowing screen appears.If this screen appears, contact the systemadministrator.
• If you want to exit Softphone, click the [Exit] but-ton.
• When the thin client terminal is reconnected,Softphone will be restarted.
(1) Click the audio device selection icon on the tasktray.
A list of the output destinations of ringtone (Devicefor Ringing) and talking devices is displayed.
(2) Click the name of the device you want to use fortalking.The icon display changes depending on thedevice selected.
This changes the speech audio device(Device for Voice).
< Meanings of Audio Device Selection Icons >
When terminal connection failsat startup (VPCC mode only)
• While the above screen is being displayed, it isnot possible to start Softphone from the Startmenu or a shortcut on the desktop. Exit theabove screen by clicking the [Exit] button first,and then restart Softphone.
• Regarding whether or not the terminal supportsvoice conversation, contact the system admin-istrator.
When you want to change thespeech audio device (in thecase of US100 in VPCC mode)
Icon Meaning
The line input terminal is set up for audio device for voice.
The analog handset of the phone terminal is set up for audio device for voice.
The headset of the phone terminal is set up for for audio device for voice.
While ringing or talking, do not change thevolume using the volume control displayed on thetaskbar of the operating system of the US100side. If changed, sound will be generated fromboth the speaker and the handset beingconnected to the line output.

246
FAQs
You can change the ringtone output destinationaccording to the form of use.
(1) Click the audio device selection icon on the tasktray.
A list of the output destinations of ringtone (Devicefor Ringing) and talking devices is displayed.
The default ringtone output destination is the lineoutput.
(2) Click the name of the output destination fromwhich you want to generate ringtone.The output destination that will generate ringtoneis checked.
This sets up the line output and handsetoutput of ringtone.
To silent ringtone, click the ringtone output destinationagain according to Step 2 to uncheck it.
(1) Click the audio device selection icon on the tasktray.
A menu of usable device names appears.
(2) Click the name of the device you want to use fortalking.If the compatible USB handset (NECi UTR-1W-1)is connected, you can select it.
The icon display changes depending on thedevice selected.
This changes the speech audio device(Device for Voice).
When you want to change theringtone output destination (inthe case of US100 in VPCCmode)
• When beep sound is selected, line output andhandset output cannot be selected. Further-more, the ringtone volume cannot be changed.
• All of ringtones cannot be unchecked. One ofthe ringtones must be checked.
• While ringing or talking, do not change thevolume using the volume control displayed onthe taskbar of the operating system of theUS100 side. If changed, sound will begenerated from both the speaker and thehandset being connected to the line output.
When you want to change thespeech audio device (in thecase of US110 in VPCC mode)

247
FAQs
< Meanings of Audio Device Selection Icons >
You can change the output destination of ringtoneaccording to the form of use.
(1) Click the audio device selection icon on the tasktray.
A list of the output destinations of ringtone (Devicefor Ringing) and talking devices is displayed.
The default ringtone output destination is the Spk-out.
(2) Click the output destination from which you wantto generate ringtone.The output destination where ringtone will begenerated is checked.
This completes the settings of the line outputand handset output of ringtone.
To silent ringtone, click the ringtone output destinationagain according to Step 2 to uncheck it.
Icon Meaning
The line input terminal is set up for audio device for voice.
The analog handset of the phone terminal is set up for audio device for voice.
The headset of the phone terminal is set up for audio device for voice.
The compatible USB handset (NECi UTR-1W-1) is set up for audio device for voice.
• The handset compatible with the US110 is theNECi UTR-1W-1D (BK) only.
• When starting Softphone, the talking devicepreviously used on that terminal will automati-cally be selected.
• If a USB handset is not being connected, thefollowing appears and no USB handset can beselected.
• If Softphone is started in the state where noUSB handset is being connected to theterminal at which a USB handset was usedpreviously, the following screen appears.
• If a USB handset comes off while using aterminal, it is necessary to restart the terminal.At that time, the following screen appears. TheUSB handset will not operate even if it isreconnected without restarting.
When you want to change theoutput destination of ringtone(in the case of US110 in VPCCmode)

248
FAQs
When a USB handset is selected, ringtone is alsogenerated from the USB handset. At this time,ringtone cannot be output from the Spk-out of theUS110, for instance.

249
Constrained Conditions for Data Meeting
The following table indicates restrictions that may beapplied to the use of data meetings.
(X: Restricted, - : Not applicable)
Constrained Conditions for Data Meeting
Related OfficeOffice2007
Office2003
OfficeXP
Office2000
1.Restrictions on the Communication Board
1.1There are fonts unavailable for the communication board.
X X X X
1.2IME is on and the accelerator key [Alt + X] is disabled.
2.Restrictions on Registering Shared Data
2.1Shared data containing 1000 pages or more cannot be registered.
X X X X
2.2Office 2007/2010 documents cannot be registered in the Office 2000 environment.
- - - X
2.3Encrypted Office documents cannot be registered.
- - X X
2.4An unedited Excel file (which contains no data to be printed) cannot be registered as shared data.
X X X X
2.5Encrypted PDF files cannot be registered.
X X X X
2.6Registering shared data may take time.
X X X X
2.7Notes on canceling the confirmation dialog for IRM document registration.
X X - -
2.8A dialog to prompt installation of "Compat-ibility Pack for Office 2007/2010" appears.
- X X X
2.9A print dialog appears during Word file regis-tration as shared data.
- - - X
2.10A print dialog appears during Excel file regis-tration as shared data.
X X X X
2.11Shared data cannot be registered during dis-play of a modal dialog in PowerPoint.
X X X X
2.12Images of shared data registered or AutoShape display may be different from originals.
X X X X
2.13Some Excel sheets cannot be registered as shared data.
X X X X
2.14An Excel sheet may be split when registered.
X X X X
2.15Only the worksheet displayed when a Excel file is saved may be registered.
- - - X
2.16PowerPoint animations are disabled.
X X X X
2.17Fonts for PDF files may turn into garbled characters.
X X X X
2.18Complex images such as Visio drawings may not be normally displayed.
X X X X
Related OfficeOffice2007
Office2003
OfficeXP
Office2000

250
Constrained Conditions for Data Meeting
1.1 There are fonts unavailable for thecommunication boardWhen text is written in the communication board, thetext may be displayed not in the correct font, but in asimilar font, depending on the selected font. Even iftext is displayed in a font to be displayed correctly,special characters specific to the font may not be dis-played correctly in the communication board.(Shared data to which text is additionally written issaved in the correct font.)
2.1 Shared data containing 1000 pages or more cannot be registered.
Share data containing 1000 pages or more cannot be registered with the communication board.
2.2 Office 2007/2010 documents cannot be regis-tered in the Office 2000 environment.Even if "Compatibility Pack for Office 2007/2010" is installed in the Office 2000 environment, Office 2007/2010 documents cannot be registered.
2.3 Encrypted Office documents cannot be regis-tered.When a document encrypted with IRM is registered in an Office 2000/Office XP environment, a warning message is registered as the shared data, and the contents of the shared data are not registered. Decrypt the document before registration.(IRM is a function for Office 2003 and later versions. IRM is not supported for Office 2000 and Office XP.)
3.Restrictions on Saving Shared Data
3.1Shared data cannot be saved in Office 2000.
- - - X
3.2Office 2007 documents cannot be saved as shared data with "Compatibility Pack for Office 2007/2010".
- X X X
3.3Shared data cannot be saved during display of a modal dialog in Pow-erPoint.
X X X X
Related OfficeOffice2007
Office2003
OfficeXP
Office2000 1.Restrictions on the
Communication Board
2.Restrictions on RegisteringShared Data
(The registered warning message)

251
Constrained Conditions for Data Meeting
2.4 An unedited Excel file (which contains no datato be printed) cannot be registered as shareddata.An unedited Excel file (containing no data to beprinted) cannot be registered as shared data, and adialog indicating printing in process is kept displayed.Press the [Cancel] button to cancel the registration.
2.5 Registering shared data may take time.Registering shared data normally takes two to threeseconds per page (in case of a PC equipped withPentium 4 at 2.8GHz and 768 MB memory). How-ever, registering shared data containing many objectsmay take considerable time.
2.6 Notes on canceling the confirmation dialog forIRM document registration.When a document with IRM is registered, a confirma-tion dialog may appear. The data can be registered if the user ID and password are correctly input at the time.If the registration is canceled, the confirmation dialogmay be displayed multiple times. In this case, pressthe [Cancel] button in the confirmation dialog eachtime the dialog is displayed.
(The [RegisterDocument] dialog isdisplayed continuously)
(An unedited file is tried to be regis-tered as shared data)
(The file cannot be registered)
(Clicking the [Cancel] button duringthe registration)

252
Constrained Conditions for Data Meeting
2.7 Shared data cannot be registered duringdisplay of a modal dialog in PowerPoint.Shared data cannot be registered when a modal dia-log is displayed after PowerPoint is started. If the modal dialog is closed at this time, the shared data registration continues. If nothing is performed with the modal dialog displayed, a time-out occurs in about three minutes, and a dialog indicating that share data cannot be registered appears.
2.8 Images of shared data registered orAutoShape display may be different from origi-nals.Images of shared data registered or AutoShape dis-play may become rough, blur, or decolorized.Images of shared data to which contents are addi-tionally written are saved with the same quality as theoriginal images.
2.9 Some Excel sheets cannot be registered asshared data.Sheets of Excel documents including macros maynot be able to be registered.In this case, delete the macros and unify the page settings for all sheets.
A modal dialog is a dialog screen that disablesother operations in the application.Modal dialog examples are the [Open] dialog, thedialog displayed before closing a file (asking if thefile is to be saved), and the dialog which displaysthe version of the application.

253
Constrained Conditions for Data Meeting
2.10 An Excel sheet may be split when registered.Since a document in which cells are widely used on one sheet is registered in the same condition as dis-played in the print preview, information on one sheet is divided into multiple pages.In this case, adjust the reduction ratio to include one sheet in one page before registration.
2.11 PowerPoint animations are disabled.Animation information of PowerPoint documents including animations is deleted and the animations do not work.
2.12 Fonts for PDF files may turn into garbledcharacters.If a PDF file for which font embedding is not set is registered as shared data, characters may turn into garbled characters.Specify font embedding when creating PDF files.To embed a font with Adobe Acrobat, uncheck "Do not send fonts to "Adobe PDF"" in the property of an Adobe PDF document and set font embedding in the PDF setting editing before creating the PDF.
2.13 Complex images such as Visio drawings maynot be normally displayed.When complex image formats created by Visio, etc.are imported into Office documents using [Import anObject] or [Import an Image], parts of the images maydisappear or get black.(Types of images which the phenomenon may occur
in)• Grouped object• Enhanced Metafile (EMF, WMF)• Microsoft Visio drawing• Microsoft Excel graph• Microsoft Word graphic• OLE objects other than the above
< Example >
To solve the problem, display the original file with asupported application and do the followings.
• Cancel grouping• Convert shape drawings such as Visio into a
Microsoft Office drawing objects.• Change the object overlapping order.
As the alternative solution when this problem cannotbe solved even with the above methods, captureimages can be pasted in the white board.
(Normal) (Problem of imageblacking)

254
Constrained Conditions for Data Meeting
3.1 Shared data cannot be saved in Office 2000.With PCs in which Office 2000 is installed, shareddata created and modified in data meetings cannotbe saved.To save shared data, use PCs in which Office XP,Office 2003, or Office 2007/2010 is installed.
3.2 Office 2007/2010 documents cannot be savedas shared data with "Compatibility Pack forOffice 2007/2010".Office documents registered with the installed "Com-patibility Pack for Office 2007/2010" cannot be saved as shared data.
3.3 Shared data cannot be saved during display ofa modal dialog in PowerPoint.Shared data cannot be saved when the modal dialog is displayed after PowerPoint is started. If the modal dialog is closed at this time, subsequent processing is continued. If no operation is taken with the modal dialog displayed, the registration and cancel time out in about three minutes, and the dialog indicating that share data cannot be saved appears.
3.Restrictions on SavingShared Data
(A modal dialog is displayed in PowerPoint)
(The [SaveDocument] dialog is displayed con-tinuously)
A modal dialog is the dialog to disable other oper-ations in the application.For example, there are dialogs such as the[Open] dialog, the dialog displayed before closinga file (asking if the file is to be saved), and thedialog which displays the version of the applica-tion.


