Embed Size (px)
Citation preview
VANDERBILT STUDENT VOLUNTEERS FOR SCIENCE
http://studentorgs.vanderbilt.edu/vsvs
Carbon Dioxide Properties Spring 2012
Goal: To introduce students to various properties of CO2 . To illustrate that changes in states of matter are physical changes. Fits Tennessee standards SPI 0507.9.1 LESSON OUTLINE I. Introduction A. Share some information about physical and chemical changes with students. Make sure to emphasize sublimation since that is the major phase change the students will observe in this lesson. B. Give students some background information about dry ice. C. Use the given thermometers to help students understand different temperatures. D. Students will see that water can be frozen using dry ice. II. Comparing Dry Ice to H2O Ice – Divide Students into Pairs Students observe a piece of dry ice and a piece of H2O ice that have been placed in separate ziploc bags. The Ziploc bag containing dry ice inflates from CO2 gas given off when dry ice sublimes. Dry ice doesn’t leave behind a liquid when it melts because it sublimes (changes from a solid to a gas). III. Illustrating Physical Changes with Dry Ice Students place a piece of dry ice in water and are told to record everything they observe. See diagram for possible observations. Emphasize that these are physical changes. The bubbles are produced from the sublimation of solid carbon dioxide to carbon dioxide gas because the water raises the temperature of solid carbon dioxide above its sublimation temperature. IV. Illustrating Chemical Changes with Dry Ice Bromothymol blue is used as an indicator to show that carbon dioxide can make water more acidic. Students infer that natural rainwater is slightly acidic because of carbon dioxide. V. Finish Demonstration on Freezing Water with Dry ice VI. CO2 as a Fire Extinguisher - Demonstration Use the CO2 gas given off from dry ice to extinguish a candle. VII. Review
Materials: 1 trash bag for used cups 1 plastic homemade “dewar” 1 10 oz cup 1 plastic bag containing:
1 Styrofoam cup of H2O ice 3 Styrofoam cups of dry ice
32 Ziploc snack bags 16 plates 1 plastic bag containing: 2 pairs of work gloves for handling dry ice 1 small tea candle 1 box of matches
1 aluminum pan (small) 1 soda bottle - NO LID 6 500 mL bottles of water 32 6 oz. short clear plastic cups 1 plastic bag containing: 3 dropper bottles of bromothymol blue indicator 16 laminated BTB color charts 1 Bag containing:
1 bottle labeled “rain” water (.001M HCl) 1 bottle labeled distilled water
1 Training binder containing: 32 observation Sheets 17 instruction Sheets and thermometer diagrams (back to back). One for VSVS team, 1 for each pair.)
1 answer sheet for VSVS team (in sheet protector)
While one team member starts the introduction, another should write the following vocabulary words on the board: dry ice, sublimation, physical change, chemical change. Whenever possible, refer to vocabulary words throughout the lesson and during review.
Preparation for this lesson: 1. One VSVS volunteer will fill the 16 6 oz cups 1/3 full with water. 2. Another VSVS volunteer will copy the thermometer diagram and the vocabulary words onto
the board. 3. Divide the students into pairs. 4. Give each pair an instruction sheet (contains thermometer diagram on back). This includes
the procedures students need to follow for their hands-on activities. You will still need to guide them through the procedures, and make sure they are completing the observation sheet.
5. Students will need to use their own pencils.
Note: In this lesson use the words carbon dioxide and the term CO2 interchangeably so the students will become familiar with both.
______________________
I. Introduction A. Physical and Chemical Changes Ask students if they understand the difference between chemical changes and physical changes. Make sure to include the following information in the discussion.
§ Physical changes change the state or phase of the substance, not its chemical composition. o The physical properties of the substance change, not its chemical structure.
An example of a physical change is in making peanut butter. Grinding peanuts is a physical change because the peanuts are still peanuts, even though they are ground up (in a different form) and have different texture (physical property change).
o Phase changes are physical changes: when liquid water is frozen, it changes from a liquid to a solid. Each phase, however, is chemically the same (all H2O).
o Sublimation is a phase change where a substance goes directly from a solid to a gas without passing through the liquid phase.
§ In chemical changes, a new substance is formed due to a chemical reaction. For example, rusting of iron and burning paper are all chemical changes. The chemical properties of the starting and finished products are different.
B. Background on CO2 § Write CO2 on the board. Ask students: What is CO2? carbon dioxide § Ask students: What do the C and the O stand for? C stands for carbon and O stands for oxygen § Ask students: What does the 2 stand for? "2" means 2 O’s for every 1 C § Ask students: What do you know about CO2?
Accept student responses and share the following information if it is not mentioned in the discussion. o Air contains a very small amount of carbon dioxide (about 0.03%). Oceans contain 50
times more. o Humans inhale oxygen and exhale CO2. o Plants use CO2 to carry out the process of photosynthesis. The photosynthesis reactions
of plants convert carbon dioxide to oxygen. o CO2 is solid at –108° F or –78° C. o CO2 is a gas at room temperature. o CO2 dissolves in water and is what gives fizz to carbonated drinks. o Carbon dioxide is a greenhouse gas in the atmosphere. It helps keep the atmosphere
warm. o Since the Industrial Age, people have added carbon dioxide to the atmosphere by burning
fossil fuels like coal, oil, and natural gas. § Ask students: What is dry ice?
Accept student responses and share the following information if it is not mentioned in the discussion. o Dry ice is solid CO2. o Dry ice is called "dry” because it changes directly from a solid to a gas (sublimes)
without passing through the liquid phase. o Dry ice is used in the manufacturing of plastics, chemicals, beverages, pharmaceuticals,
metals and many other products.
Your Notes: ______________________________________________________________________________
______________________________________________________________________________
______________________________________________________________________________
______________________________________________________________________________
______________________________________________________________________________
______________________________________________________________________________
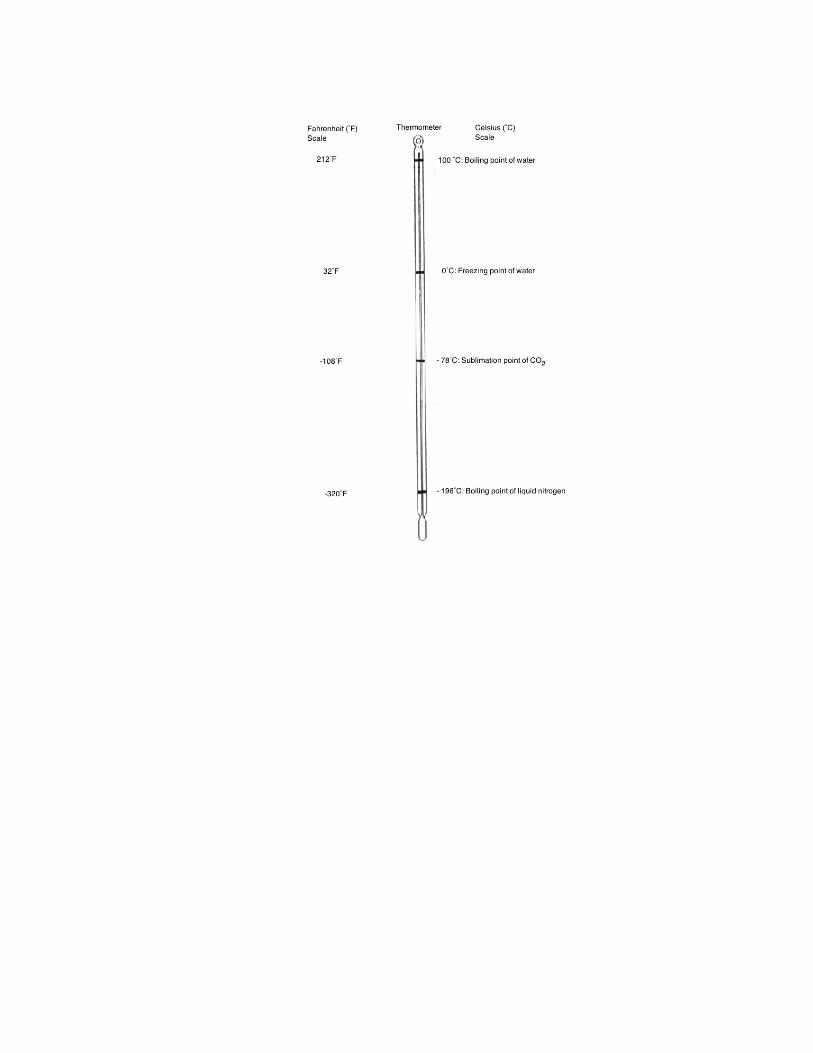
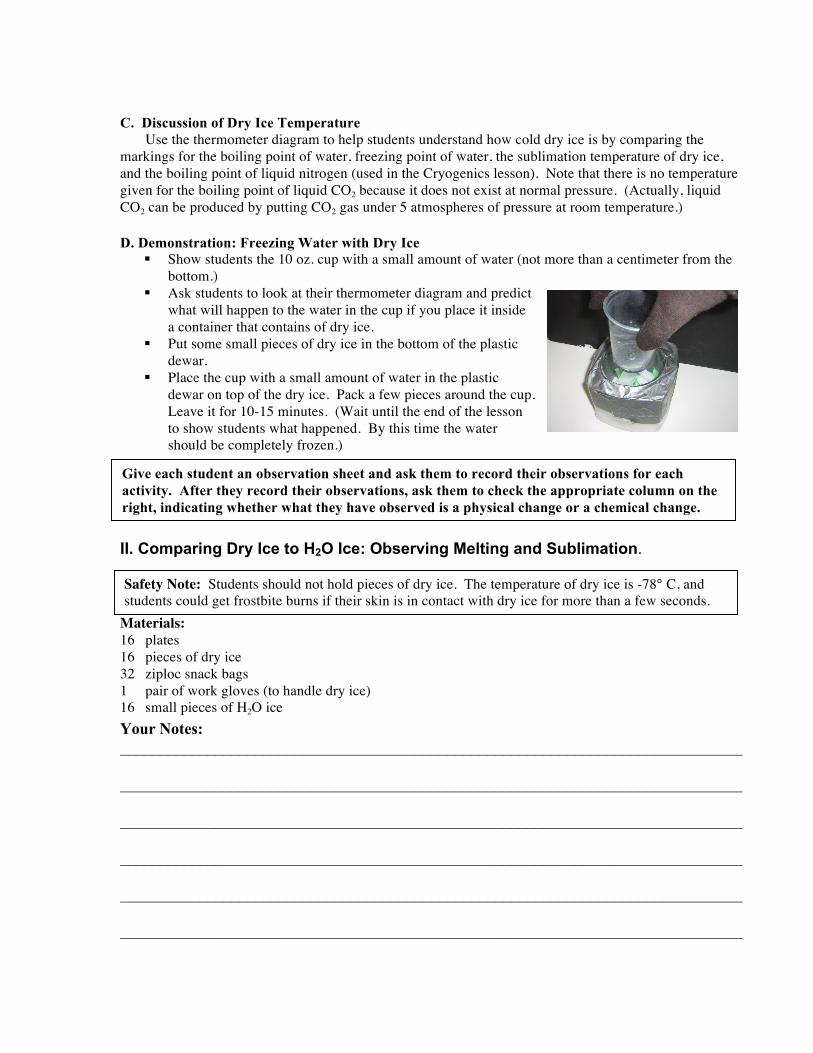
C. Discussion of Dry Ice Temperature Use the thermometer diagram to help students understand how cold dry ice is by comparing the markings for the boiling point of water, freezing point of water, the sublimation temperature of dry ice, and the boiling point of liquid nitrogen (used in the Cryogenics lesson). Note that there is no temperature given for the boiling point of liquid CO2 because it does not exist at normal pressure. (Actually, liquid CO2 can be produced by putting CO2 gas under 5 atmospheres of pressure at room temperature.) D. Demonstration: Freezing Water with Dry Ice
§ Show students the 10 oz. cup with a small amount of water (not more than a centimeter from the bottom.)
§ Ask students to look at their thermometer diagram and predict what will happen to the water in the cup if you place it inside a container that contains of dry ice.
§ Put some small pieces of dry ice in the bottom of the plastic dewar.
§ Place the cup with a small amount of water in the plastic dewar on top of the dry ice. Pack a few pieces around the cup. Leave it for 10-15 minutes. (Wait until the end of the lesson to show students what happened. By this time the water should be completely frozen.)
II. Comparing Dry Ice to H2O Ice: Observing Melting and Sublimation.
Materials: 16 plates 16 pieces of dry ice 32 ziploc snack bags 1 pair of work gloves (to handle dry ice) 16 small pieces of H2O ice
Safety Note: Students should not hold pieces of dry ice. The temperature of dry ice is -78° C, and students could get frostbite burns if their skin is in contact with dry ice for more than a few seconds.
Give each student an observation sheet and ask them to record their observations for each activity. After they record their observations, ask them to check the appropriate column on the right, indicating whether what they have observed is a physical change or a chemical change.
Your Notes: ______________________________________________________________________________
______________________________________________________________________________
______________________________________________________________________________
______________________________________________________________________________
______________________________________________________________________________
______________________________________________________________________________
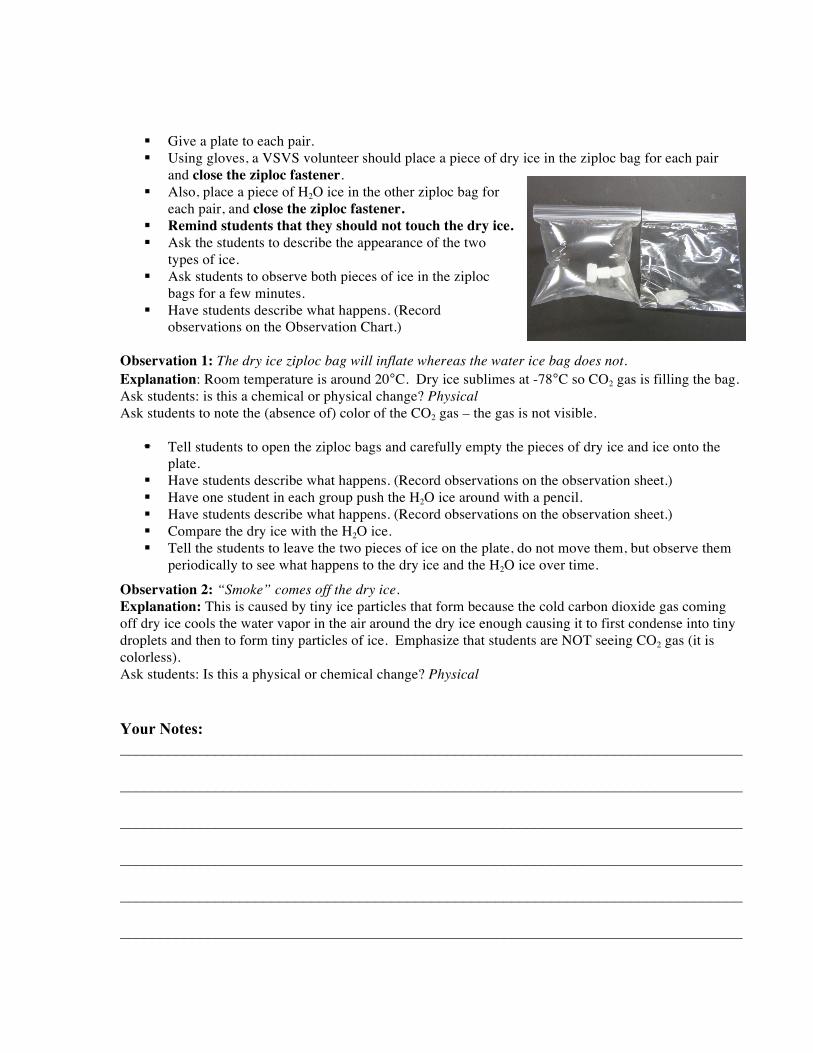
§ Give a plate to each pair. § Using gloves, a VSVS volunteer should place a piece of dry ice in the ziploc bag for each pair
and close the ziploc fastener. § Also, place a piece of H2O ice in the other ziploc bag for
each pair, and close the ziploc fastener. § Remind students that they should not touch the dry ice. § Ask the students to describe the appearance of the two
types of ice. § Ask students to observe both pieces of ice in the ziploc
bags for a few minutes. § Have students describe what happens. (Record
observations on the Observation Chart.) Observation 1: The dry ice ziploc bag will inflate whereas the water ice bag does not. Explanation: Room temperature is around 20°C. Dry ice sublimes at -78°C so CO2 gas is filling the bag. Ask students: is this a chemical or physical change? Physical Ask students to note the (absence of) color of the CO2 gas – the gas is not visible.
§ Tell students to open the ziploc bags and carefully empty the pieces of dry ice and ice onto the plate.
§ Have students describe what happens. (Record observations on the observation sheet.) § Have one student in each group push the H2O ice around with a pencil. § Have students describe what happens. (Record observations on the observation sheet.) § Compare the dry ice with the H2O ice. § Tell the students to leave the two pieces of ice on the plate, do not move them, but observe them
periodically to see what happens to the dry ice and the H2O ice over time.
Observation 2: “Smoke” comes off the dry ice. Explanation: This is caused by tiny ice particles that form because the cold carbon dioxide gas coming off dry ice cools the water vapor in the air around the dry ice enough causing it to first condense into tiny droplets and then to form tiny particles of ice. Emphasize that students are NOT seeing CO2 gas (it is colorless). Ask students: Is this a physical or chemical change? Physical
Your Notes: ______________________________________________________________________________
______________________________________________________________________________
______________________________________________________________________________
______________________________________________________________________________
______________________________________________________________________________
______________________________________________________________________________
Observation 3: The dry ice moves around the plate and sometimes buzzes. Explanation: The carbon dioxide gas being given off propels the piece of dry ice, often causing a vibration or buzzing.
Observation 4: Later when the two pieces have disappeared, the students will notice a puddle where the H2O ice was and there will be no puddle where the dry ice was. Explanation: Students should recall that dry ice sublimes (becomes a gas without passing through the liquid phase), thus it does not leave a puddle. Regular ice leaves a puddle because solid ice turns to a liquid at temperatures above 0°C.
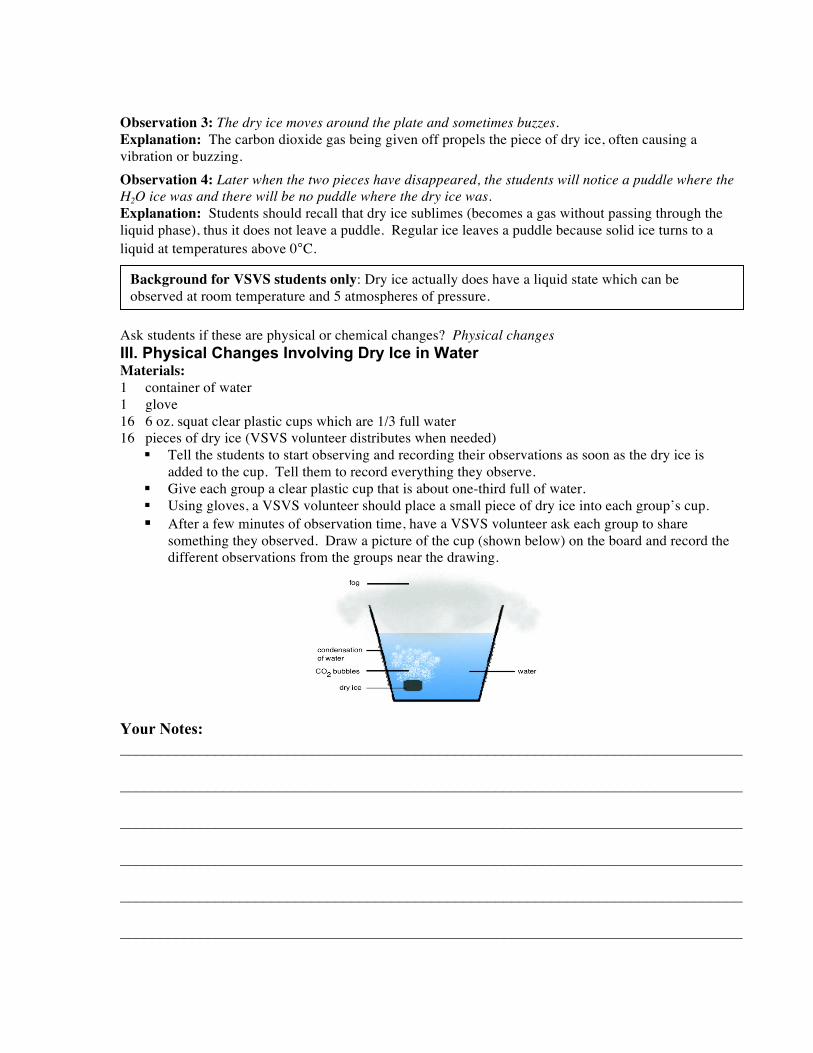
Ask students if these are physical or chemical changes? Physical changes III. Physical Changes Involving Dry Ice in Water Materials: 1 container of water 1 glove 16 6 oz. squat clear plastic cups which are 1/3 full water 16 pieces of dry ice (VSVS volunteer distributes when needed)
§ Tell the students to start observing and recording their observations as soon as the dry ice is added to the cup. Tell them to record everything they observe.
§ Give each group a clear plastic cup that is about one-third full of water. § Using gloves, a VSVS volunteer should place a small piece of dry ice into each group’s cup. § After a few minutes of observation time, have a VSVS volunteer ask each group to share
something they observed. Draw a picture of the cup (shown below) on the board and record the different observations from the groups near the drawing.
Background for VSVS students only: Dry ice actually does have a liquid state which can be observed at room temperature and 5 atmospheres of pressure.
Your Notes: ______________________________________________________________________________
______________________________________________________________________________
______________________________________________________________________________
______________________________________________________________________________
______________________________________________________________________________
______________________________________________________________________________
Notes: Condensation occurs on the outside of the cup.Use the following list and explanations to check the observations. (There may be other valid observations that are not listed here. Accept those as well.)
The following are all physical changes: Observation 1: Dry ice gives off bubbles when it is added to water. Explanation: The water is warm enough (room temp. is approximately 20°C or 68°F) to cause the dry ice to sublime and give off carbon dioxide bubbles. Observation 2: A white fog appears over the water in the top of the glass. Explanation: The air above the water (and in the room) contains water vapor. When the temperature of the air is lowered by the cold carbon dioxide gas, the water vapor condenses to small water droplets (a fog) or ice particle (smoke) that are suspended in the carbon dioxide gas. Again, emphasize that carbon dioxide gas is colorless. Regular fog occurs when the temperature of the air drops below the dew point temperature or the temperature when water vapor in the air condenses to water droplets. Regular fog is heavier than air because it contains water droplets. This is why fog is close to the ground. Fog “burns off” after the sun comes up and the temperature increases.
Observation 3: The white fog stays in the top of the glass and any white fog that leaves the glass goes down along the side of the glass rather than up in the air. Explanation: Carbon dioxide is colder and heavier than air. The fog that went out of the glass was carried down rather than up into the air. Tell students that dry ice is often used to create smoke and fog-like effects in the movies and at concerts.
Observation 4: Fog that goes down along the glass disappears near the bottom of the glass. Explanation: The fog has warmed up enough (to its dew point) to vaporize the water, leaving only carbon dioxide which is colorless.
IV. Chemical Changes Involving Carbon Dioxide and Water Tell students that carbon dioxide gas can make water more acidic.
Brief Discussion of Acids and Bases and Indicators § Ask students for examples of some common acids and bases:
o Some common acids are vinegar, carbonated drinks, lemon juice. § Some common bases are milk, Tums, soap
Your Notes: ___________________________________________________________________________
___________________________________________________________________________
___________________________________________________________________________
___________________________________________________________________________
___________________________________________________________________________
___________________________________________________________________________
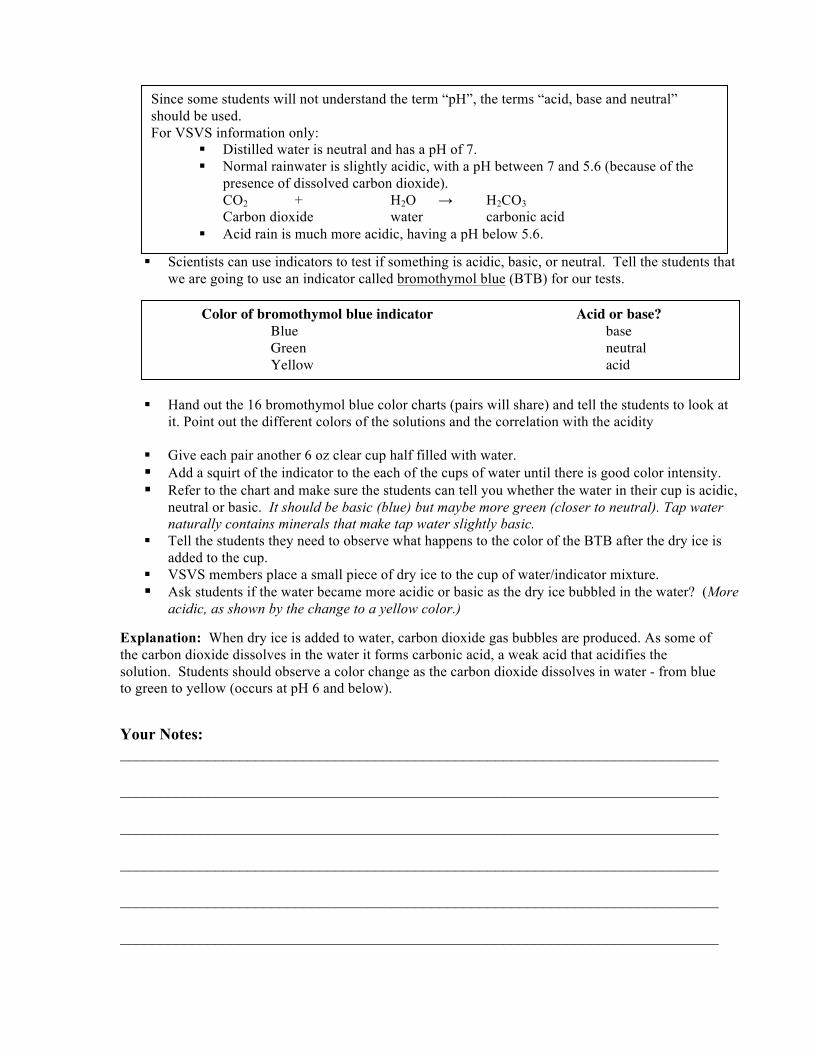
§ Scientists can use indicators to test if something is acidic, basic, or neutral. Tell the students that we are going to use an indicator called bromothymol blue (BTB) for our tests.
§ Hand out the 16 bromothymol blue color charts (pairs will share) and tell the students to look at
it. Point out the different colors of the solutions and the correlation with the acidity
§ Give each pair another 6 oz clear cup half filled with water. § Add a squirt of the indicator to the each of the cups of water until there is good color intensity. § Refer to the chart and make sure the students can tell you whether the water in their cup is acidic,
neutral or basic. It should be basic (blue) but maybe more green (closer to neutral). Tap water naturally contains minerals that make tap water slightly basic.
§ Tell the students they need to observe what happens to the color of the BTB after the dry ice is added to the cup.
§ VSVS members place a small piece of dry ice to the cup of water/indicator mixture. § Ask students if the water became more acidic or basic as the dry ice bubbled in the water? (More
acidic, as shown by the change to a yellow color.) Explanation: When dry ice is added to water, carbon dioxide gas bubbles are produced. As some of the carbon dioxide dissolves in the water it forms carbonic acid, a weak acid that acidifies the solution. Students should observe a color change as the carbon dioxide dissolves in water - from blue to green to yellow (occurs at pH 6 and below).
Since some students will not understand the term “pH”, the terms “acid, base and neutral” should be used. For VSVS information only:
§ Distilled water is neutral and has a pH of 7. § Normal rainwater is slightly acidic, with a pH between 7 and 5.6 (because of the
presence of dissolved carbon dioxide). CO2 + H2O → H2CO3 Carbon dioxide water carbonic acid
§ Acid rain is much more acidic, having a pH below 5.6.
Color of bromothymol blue indicator Acid or base? Blue base Green neutral Yellow acid
Your Notes: ___________________________________________________________________________
___________________________________________________________________________
___________________________________________________________________________
___________________________________________________________________________
___________________________________________________________________________
___________________________________________________________________________
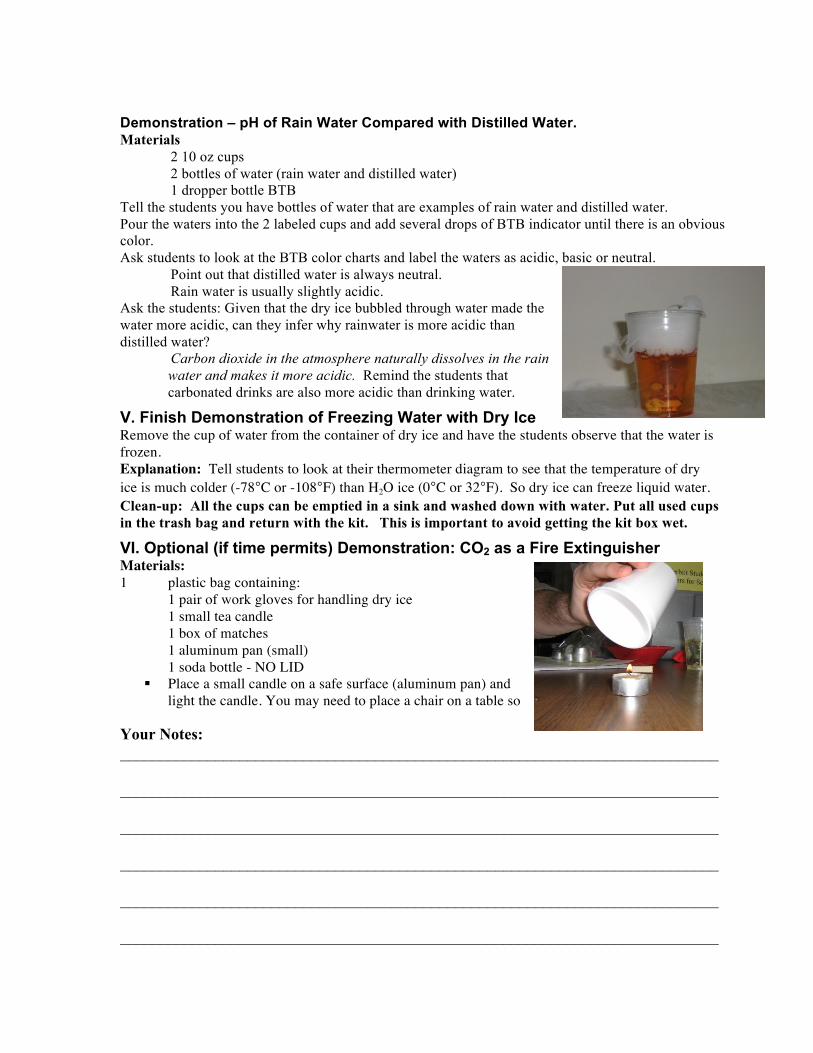
Demonstration – pH of Rain Water Compared with Distilled Water. Materials 2 10 oz cups 2 bottles of water (rain water and distilled water) 1 dropper bottle BTB Tell the students you have bottles of water that are examples of rain water and distilled water. Pour the waters into the 2 labeled cups and add several drops of BTB indicator until there is an obvious color. Ask students to look at the BTB color charts and label the waters as acidic, basic or neutral. Point out that distilled water is always neutral. Rain water is usually slightly acidic. Ask the students: Given that the dry ice bubbled through water made the water more acidic, can they infer why rainwater is more acidic than distilled water?
Carbon dioxide in the atmosphere naturally dissolves in the rain water and makes it more acidic. Remind the students that carbonated drinks are also more acidic than drinking water.
V. Finish Demonstration of Freezing Water with Dry Ice Remove the cup of water from the container of dry ice and have the students observe that the water is frozen. Explanation: Tell students to look at their thermometer diagram to see that the temperature of dry ice is much colder (-78°C or -108°F) than H2O ice (0°C or 32°F). So dry ice can freeze liquid water.
Clean-up: All the cups can be emptied in a sink and washed down with water. Put all used cups in the trash bag and return with the kit. This is important to avoid getting the kit box wet.
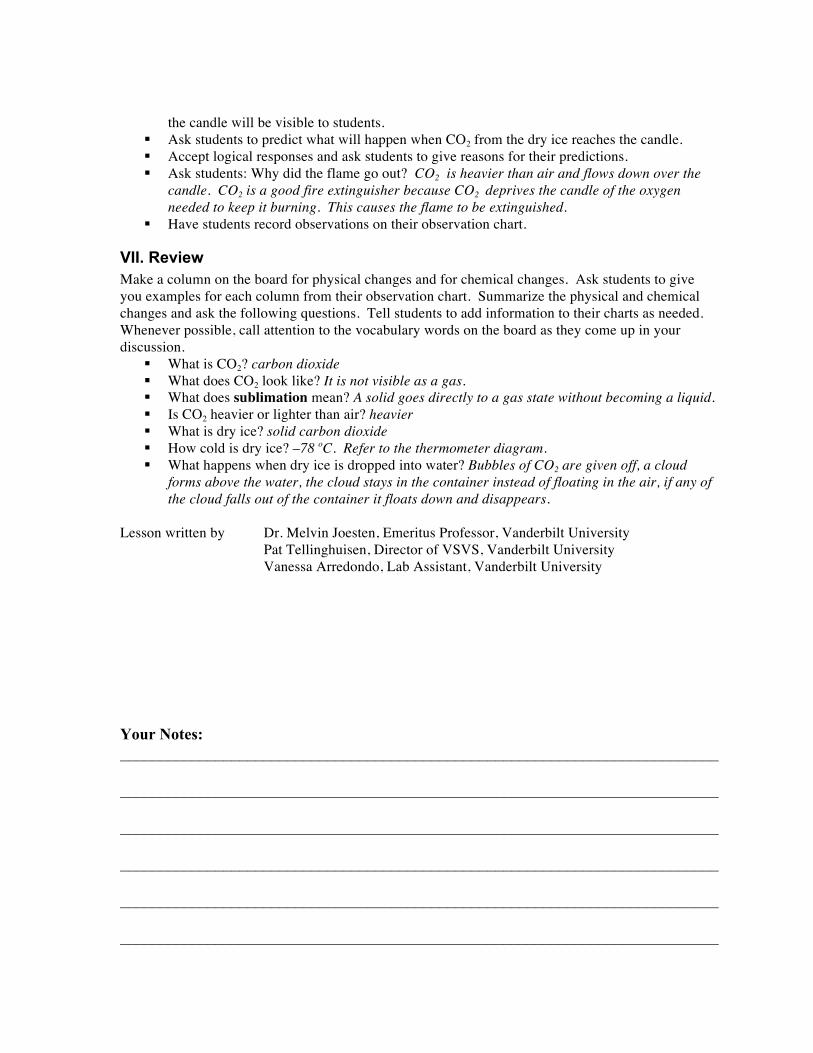
VI. Optional (if time permits) Demonstration: CO2 as a Fire Extinguisher Materials: 1 plastic bag containing: 1 pair of work gloves for handling dry ice 1 small tea candle 1 box of matches
1 aluminum pan (small) 1 soda bottle - NO LID
§ Place a small candle on a safe surface (aluminum pan) and light the candle. You may need to place a chair on a table so
Your Notes: ___________________________________________________________________________
___________________________________________________________________________
___________________________________________________________________________
___________________________________________________________________________
___________________________________________________________________________
___________________________________________________________________________
the candle will be visible to students. § Ask students to predict what will happen when CO2 from the dry ice reaches the candle. § Accept logical responses and ask students to give reasons for their predictions. § Ask students: Why did the flame go out? CO2 is heavier than air and flows down over the
candle. CO2 is a good fire extinguisher because CO2 deprives the candle of the oxygen needed to keep it burning. This causes the flame to be extinguished.
§ Have students record observations on their observation chart.
VII. Review Make a column on the board for physical changes and for chemical changes. Ask students to give you examples for each column from their observation chart. Summarize the physical and chemical changes and ask the following questions. Tell students to add information to their charts as needed. Whenever possible, call attention to the vocabulary words on the board as they come up in your discussion.
§ What is CO2? carbon dioxide § What does CO2 look like? It is not visible as a gas. § What does sublimation mean? A solid goes directly to a gas state without becoming a liquid. § Is CO2 heavier or lighter than air? heavier § What is dry ice? solid carbon dioxide § How cold is dry ice? –78 oC. Refer to the thermometer diagram. § What happens when dry ice is dropped into water? Bubbles of CO2 are given off, a cloud
forms above the water, the cloud stays in the container instead of floating in the air, if any of the cloud falls out of the container it floats down and disappears.
Lesson written by Dr. Melvin Joesten, Emeritus Professor, Vanderbilt University Pat Tellinghuisen, Director of VSVS, Vanderbilt University Vanessa Arredondo, Lab Assistant, Vanderbilt University
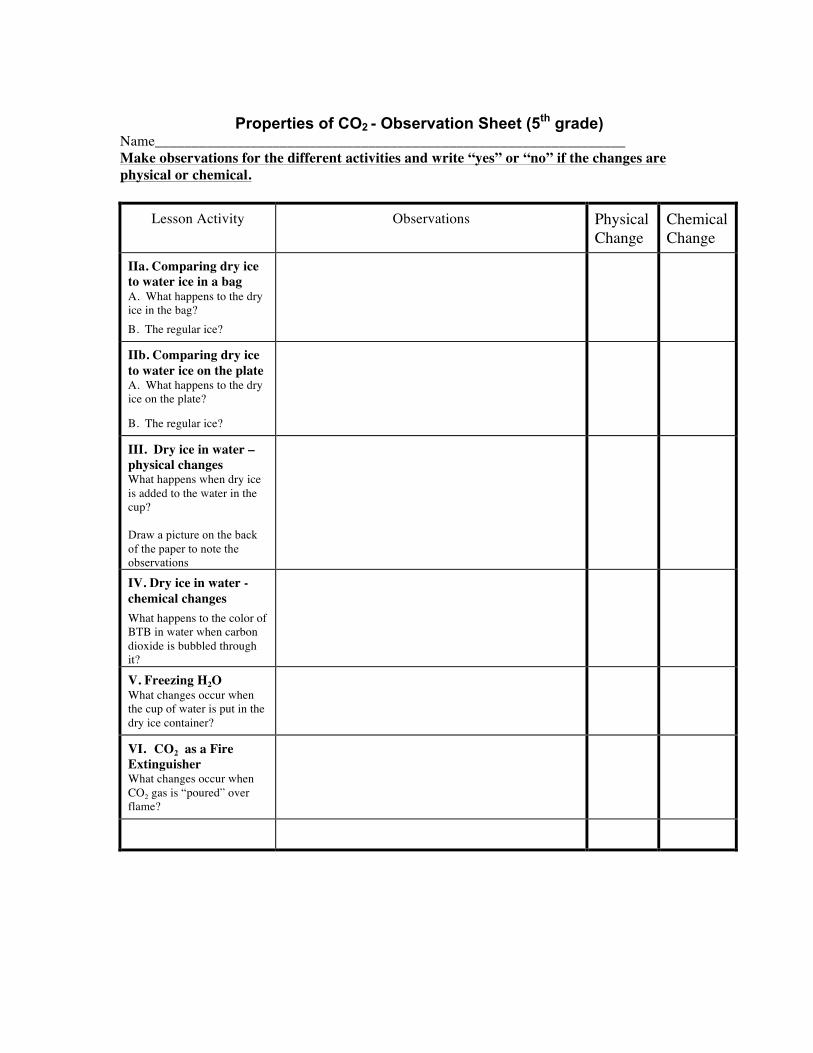
Properties of CO2 - Observation Sheet (5th grade) Name________________________________________________________________ Make observations for the different activities and write “yes” or “no” if the changes are physical or chemical.
Lesson Activity
Observations Physical Change
Chemical Change
IIa. Comparing dry ice to water ice in a bag A. What happens to the dry ice in the bag? B. The regular ice?
IIb. Comparing dry ice to water ice on the plate A. What happens to the dry ice on the plate?
B. The regular ice?
III. Dry ice in water – physical changes What happens when dry ice is added to the water in the cup? Draw a picture on the back of the paper to note the observations
IV. Dry ice in water - chemical changes What happens to the color of BTB in water when carbon dioxide is bubbled through it?
V. Freezing H2O What changes occur when the cup of water is put in the dry ice container?
VI. CO2 as a Fire Extinguisher What changes occur when CO2 gas is “poured” over flame?
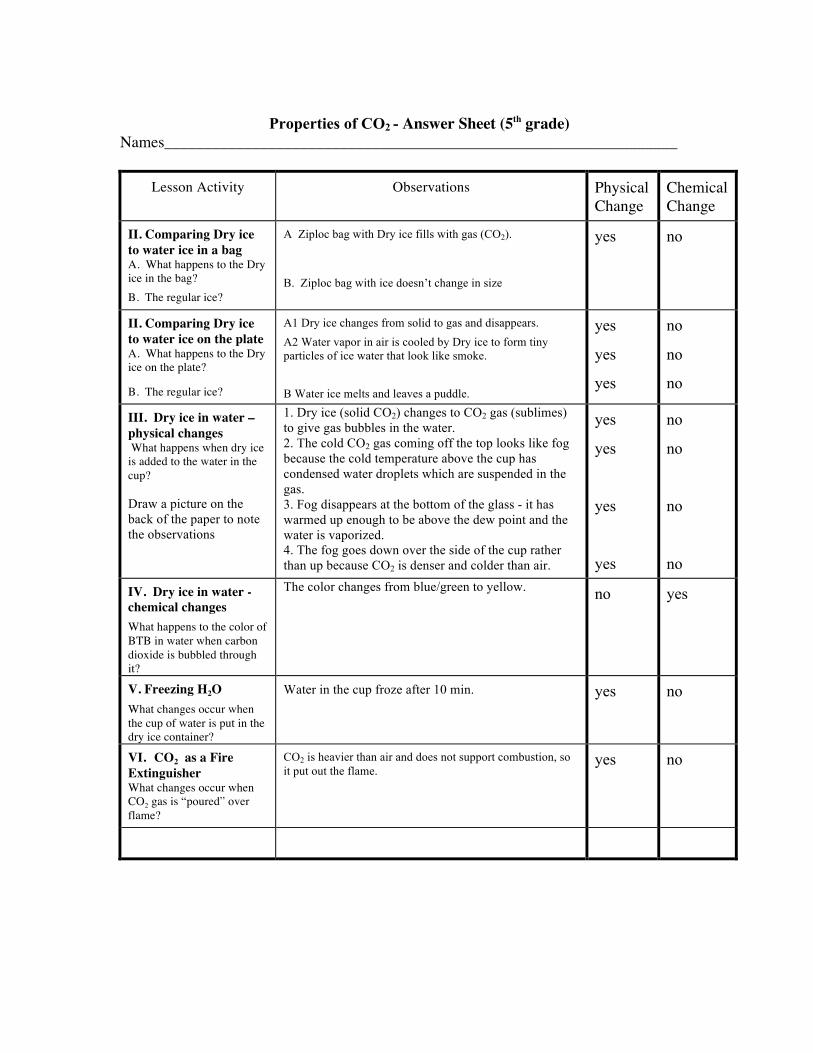
Properties of CO2 - Answer Sheet (5th grade) Names________________________________________________________________
Lesson Activity
Observations Physical Change
Chemical Change
II. Comparing Dry ice to water ice in a bag A. What happens to the Dry ice in the bag? B. The regular ice?
A Ziploc bag with Dry ice fills with gas (CO2).
B. Ziploc bag with ice doesn’t change in size
yes
no
II. Comparing Dry ice to water ice on the plate A. What happens to the Dry ice on the plate?
B. The regular ice?
A1 Dry ice changes from solid to gas and disappears. A2 Water vapor in air is cooled by Dry ice to form tiny particles of ice water that look like smoke. B Water ice melts and leaves a puddle.
yes
yes
yes
no
no
no
III. Dry ice in water – physical changes What happens when dry ice is added to the water in the cup? Draw a picture on the back of the paper to note the observations
1. Dry ice (solid CO2) changes to CO2 gas (sublimes) to give gas bubbles in the water. 2. The cold CO2 gas coming off the top looks like fog because the cold temperature above the cup has condensed water droplets which are suspended in the gas. 3. Fog disappears at the bottom of the glass - it has warmed up enough to be above the dew point and the water is vaporized. 4. The fog goes down over the side of the cup rather than up because CO2 is denser and colder than air.
yes
yes
yes
yes
no
no
no
no
IV. Dry ice in water - chemical changes What happens to the color of BTB in water when carbon dioxide is bubbled through it?
The color changes from blue/green to yellow. no yes
V. Freezing H2O What changes occur when the cup of water is put in the dry ice container?
Water in the cup froze after 10 min. yes no
VI. CO2 as a Fire Extinguisher What changes occur when CO2 gas is “poured” over flame?
CO2 is heavier than air and does not support combustion, so it put out the flame. yes
no


