Embed Size (px)
Citation preview

Talend Data IntegrationInstallation Guide for Linux
8.0Last updated: 2022-06-27

Contents
Copyright........................................................................................................................ 4
Talend Data Integration : Prerequisites................................................................... 5About this installation guide..........................................................................................................................................5Preparing your installation............................................................................................................................................. 5Hardware requirements.................................................................................................................................................... 6Software requirements......................................................................................................................................................8Database Privileges......................................................................................................................................................... 21Installing the XULRunner package............................................................................................................................21Setting up JAVA_HOME.................................................................................................................................................. 22
Installing your Talend Data Integration using Talend Installer............................23Introducing Talend Installers.......................................................................................................................................23Installation modes of Talend Installer and Talend Studio Installer............................................................. 23Installing Talend Studio with the Talend Studio Installer...............................................................................24Talend Installer specific prerequisites................................................................................................................... 24Using Talend Installer graphical installation mode............................................................................................25
Installing your Talend Data Integration manually................................................. 31Manual installation order..............................................................................................................................................31Setting up your version control system.................................................................................................................. 31Installing and configuring Talend Administration Center................................................................................ 32Installing and configuring Talend Identity and Access Management.......................................................... 64Installing and configuring Talend Artifact Repository.......................................................................................73Installing and configuring your Talend JobServer...............................................................................................77Installing Talend Runtime............................................................................................................................................ 87Installing and configuring Talend logging modules.......................................................................................... 89Setting up update repositories for Talend Studio and Continuous Integration........................................91Installing and configuring your Talend Studio.....................................................................................................92Installing and configuring Talend CommandLine.............................................................................................100Installing and configuring Talend SAP RFC Server.......................................................................................... 102Installing and configuring Talend Data Preparation........................................................................................114Installing and configuring Talend Data Stewardship...................................................................................... 124
Installing your Talend Data Integration using RPM (Red Hat PackageManager).................................................................................................................... 135
About installing Talend applications and services using RPM.....................................................................135Installing third-party applications with RPM......................................................................................................135Installing and configuring Talend Administration Center with RPM......................................................... 143Installing and configuring Talend Data Stewardship with RPM..................................................................147Installing and configuring Talend Identity and Access Management with RPM....................................150Installing and configuring Talend JobServer with RPM..................................................................................153Installing and configuring Talend Log Server with RPM............................................................................... 156Installing and configuring Talend Data Preparation with RPM................................................................... 158Installing and configuring Talend Component Server with RPM................................................................161Installing and configuring Talend Runtime with RPM....................................................................................163
Uninstalling Talend products..................................................................................168Uninstalling Talend products via the uninstall file on Linux.......................................................................168Uninstalling Talend products manually on Linux.............................................................................................168
Appendices.................................................................................................................169

Introduction to the Talend products......................................................................................................................169Architecture of the Talend products...................................................................................................................... 174Cheatsheet: start and stop commands for Talend server modules.............................................................176Installing Talend servers as services..................................................................................................................... 177H2 Database Administration & Maintenance..................................................................................................... 187Supported Third-Party System/Database/Business Application Versions.................................................190

Copyright
4
CopyrightAdapted for 7.3.1. Supersedes previous releases.
Copyright © 2021 Talend. All rights reserved.
The content of this document is correct at the time of publication.
However, more recent updates may be available in the online version that can be found on Talend Help Center .
Notices
All brands, product names, company names, trademarks and service marks are the properties of their respective owners.
End User License Agreement
The software described in this documentation is provided under Talend 's End User Software and Subscription Agreement("Agreement") for commercial products. By using the software, you are considered to have fully understood andunconditionally accepted all the terms and conditions of the Agreement.
To read the Agreement now, visit http://www.talend.com/legal-terms/us-eula?utm_medium=help&utm_source=help_content.

Talend Data Integration : Prerequisites
5
Talend Data Integration :Prerequisites
About this installation guide
This guide explains how to install and configure your Talend product. You can install your product by using the TalendInstaller, by manually installing the Talend modules, or with the Red Hat Package Manager (RPM). Before you begin, werecommend that you read the Preparing your installation section, and verify that you meet the hardware and softwarerequirements for your installation.
Note: Talend Support will investigate issues related to third-party components and databases if they are required for theTalend product to function, but Talend cannot provide patches on behalf of third-party components or databases.
Preparing your installation
Installation modes
There are three methods to install your Talend product:
• Install using the Talend Installer. This is the recommended way of installing your Talend product. For more information,see Introducing Talend Installers on page 23.
• Install manually. You can customize every step of your installation. For more information, see Manual installation orderon page 31.
• Install using the Red Hat Package Manager. You can deploy and install applications and services on RPM-based systems.For more information, see About installing Talend applications and services using RPM on page 135
Files to download
To install your Talend product, you need to download your license key file and the relevant software packages.
Download the following files:
• Your personal license key that you received by email.
This file has no file extension, and it is required to access each Talend module. Keep this file in a safe place.• The software packages that correspond to the modules you want to install.
Software packages
This page lists the software packages you need to download to install your Talend product.
For the software package file names in the tables below:
• YYYYMMDD_HHmm corresponds to the package timestamp.• A.B.C. corresponds to package version number (major.minor.patch.).
Note: The software modules must be the same version on both the client and server side. When downloading softwarepackages, make sure the timestamps and version numbers are the same.
The links to download the software packages are listed in your licence email.

Talend Data Integration : Prerequisites
6
Talend Installer software package
File name Description
Talend-Tools-Installer-YYYYMMDD_HHmm-VA.B.C-installer.zip + dist file
A wizard-based application that guides you step-by-step through theTalend Tools module installation and configuration.
The Talend Tools Installer package includes two files: a .zip and adist file. Download and store them in the same directory.
The dist file is required to install Talend products. When you finish theinstallation, you can remove it.
Manual installation software packages
File name Description
Talend-Studio-YYYYMMDD_HHmm-VA.B.C.zip CommandLine interface to the IDE + Studio IDE (GUI)
Talend-AdministrationCenter-YYYYMMDD_HHmm-VA.B.C.zip
Talend Administration Center is the web-based application used tomanage Talend projects and users, and the Talend Artifact Repository.
Talend-IAM-VA.B.C.zip The Talend Identity and Access Management server is used to enableSingle Sign-On between Talend Data Preparation and Talend DataStewardship.
Talend-JobServer-YYYYMMDD_HHmm-VA.B.C.zip Talend JobServer is the stand-alone execution server.
Talend-SAP-RFC-Server-YYYYMMDD_HHmm-VA.B.C.zip
Talend SAP RFC Server provides the central gateway for SAP IDoccommunication. It acts as the single point of communication betweenSAP and Talend products.
Talend-DataStewardship-VA.B.C.zip Talend Data Stewardship is a comprehensive tool you can use toconfigure and manage data assets and organize the interactions on datawhenever human intervention is required.
Talend-DataPreparation-Server-VA.B.C.zip Talend Data Preparation enables information workers to cut hours outof their work day by simplifying and expediting the laborious and time-consuming process of preparing data for analysis or other data-driventasks.
Community and Support
There are several ways to get help and support for your Talend installation:
• Official Talend Documentation. Here you can find everything to help you install and use your Talend product.• Talend Community. This is the place where you can ask questions to the community, and get answers.• Talend Professional Support. If you are a Talend subscription customer, you can open a ticket to the Talend Support.
Talend Support Services cover only Talend software as defined in the End User Software and Subscription Agreement.• Talend Consulting Portal. If you are a Talend subscription customer, you can ask for a consultant to help through the
installation of your Talend product.
Hardware requirements
Before installing your Talend product, make sure the machines you are using meet the following hardware requirementsrecommended by Talend.
Memory and disk usage heavily depends on the size and nature of your Talend projects. However, in summary, if your Jobsinclude many transformation components, you should consider upgrading the total amount of memory allocated to yourservers, based on the following recommendations.

Talend Data Integration : Prerequisites
7
Memory usage
Product Client/Server Memory requirements
(minimum-recommended)
Talend Administration Center Server 4GB – 8GB
Talend Identity and Access Management Server 2GB – 4GB
Talend JobServer Server 1GB – 1GB
Talend Studio Client 3GB – 4GB
Talend Runtime Server 2GB – 4GB
Talend Data Preparation Server 4GB – 8GB
Talend Data Stewardship Server 4GB – 8GB
Talend Dictionary Service Server 1GB – 2GB
Talend Log Server Server 3GB – 6GB
Talend SAP RFC Server Server 800MB – 1GB
Note: Depending on the number of executed processes running on a module, you may need to increase the availablememory. If you have several products installed on the same host, Talend recommends to use an i7 CPU with 8 logicalprocessors.
Disk space requirements
Product Client or Server Required disk space forinstallation
Required disk space for use
Talend Administration Center withTalend Artifact Repository
Server 800MB 800MB minimum + project size =20GB+ recommended
Talend Identity and AccessManagement
Server 1GB 1+GB recommended
Talend JobServer Server 12MB 2GB minimum + project size = 20GB+ recommended
Talend Studio Client 3GB 3GB+ recommended
Talend Runtime Server 1.7GB+ 2GB+ recommended for JobServerif embedded JobServer is used torun Jobs
Talend Data Preparation Server 300MB 1GB+ datasets size2
Talend SAP RFC Server Server 100MB 1GB – 2GB recommended
Talend Data Stewardship Server 3GB 100 MB3
Talend Dictionary Service Server 1GB 1GB+ recommended
1 For example, 5 million records = 10 GB required space on the disk. Talend recommends you double the required size to avoid problems during high transactions.
2 These requirements do not take the MongoDB metadata size into account.
3 Recommended for a campaign that counts 50,000 tasks, each task having 50 attributes.
Talend Data Integration : Prerequisites
8
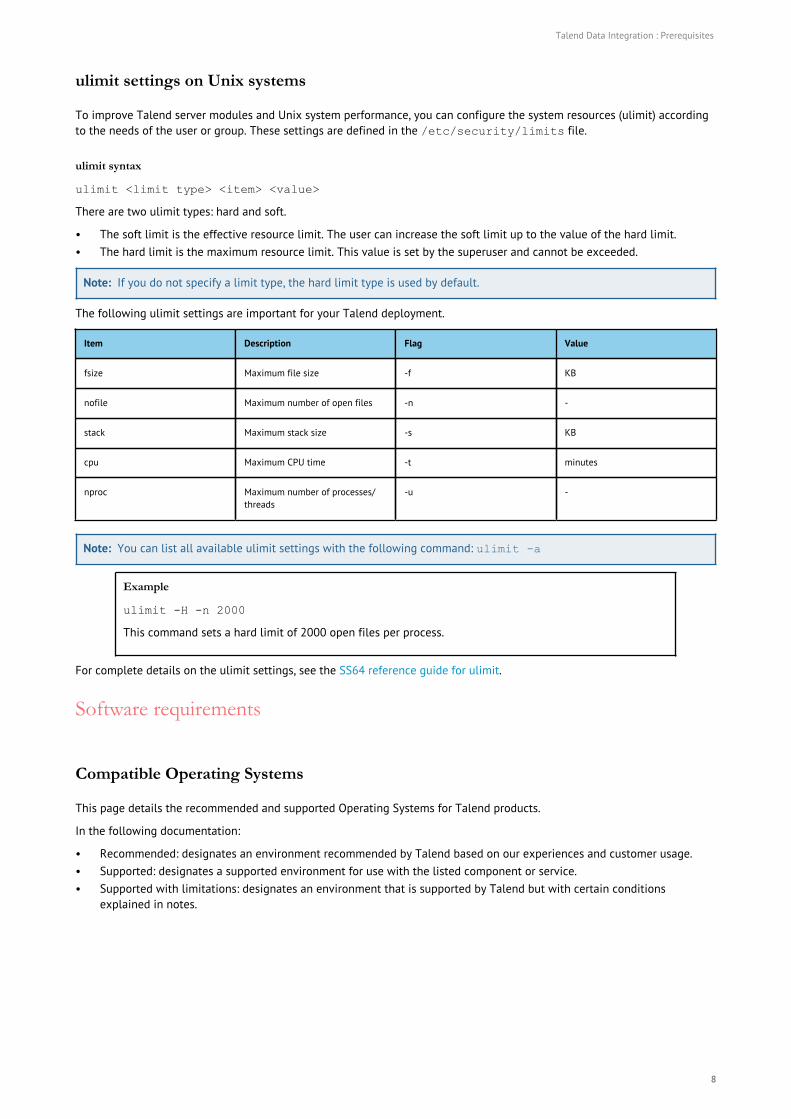
ulimit settings on Unix systems
To improve Talend server modules and Unix system performance, you can configure the system resources (ulimit) accordingto the needs of the user or group. These settings are defined in the /etc/security/limits file.
ulimit syntax
ulimit <limit type> <item> <value>
There are two ulimit types: hard and soft.
• The soft limit is the effective resource limit. The user can increase the soft limit up to the value of the hard limit.• The hard limit is the maximum resource limit. This value is set by the superuser and cannot be exceeded.
Note: If you do not specify a limit type, the hard limit type is used by default.
The following ulimit settings are important for your Talend deployment.
Item Description Flag Value
fsize Maximum file size -f KB
nofile Maximum number of open files -n -
stack Maximum stack size -s KB
cpu Maximum CPU time -t minutes
nproc Maximum number of processes/threads
-u -
Note: You can list all available ulimit settings with the following command: ulimit -a
Example
ulimit -H -n 2000
This command sets a hard limit of 2000 open files per process.
For complete details on the ulimit settings, see the SS64 reference guide for ulimit.
Software requirements
Compatible Operating Systems
This page details the recommended and supported Operating Systems for Talend products.
In the following documentation:
• Recommended: designates an environment recommended by Talend based on our experiences and customer usage.• Supported: designates a supported environment for use with the listed component or service.• Supported with limitations: designates an environment that is supported by Talend but with certain conditions
explained in notes.

Talend Data Integration : Prerequisites
9
Talend Studio
Table 1: Compatible operating systems for Talend Studio
Operating system family (64 bit) Operating system Version Support type
Ubuntu 20.04 Recommended
8 SupportedRed Hat Enterprise Linux Server
7 Supported
8 SupportedCentOS
7 Supported
Debian 10 Supported
Linux
Amazon Linux Amazon Linux 2 Supported
11 SupportedWindows
10 Recommended
2019 Supported
2016 Supported
Microsoft
Windows Server
2012 Supported
Big Sur 11 Supported
Catalina 10.15 Supported
Mac Apple MacOS
Mojave 10.14 Supported
Amazon Linux Amazon Linux 2 Supported1Amazon Workspace
Windows 10 Supported2
1 Minimum requirements for use: 1 vCPU and 2 GiB of memory.
2 Minimum requirements for use: 2 vCPU and 8 GiB of memory.
Talend Server modules
Given that Oracle has a stated compatibility statement for Redhat RHEL, Talend considers that Oracle Linux is supported, forthose versions which correspond to RHEL versions that Talend lists in the User Documentation.
The server modules include:
• Talend Administration Center• Talend Data Preparation• Talend Data Stewardship• Talend JobServer• Talend Log Server• Talend Runtime• Talend Identity and Access Management• Talend SAP RFC Server

Talend Data Integration : Prerequisites
10
Table 2: Compatible operating systems for Talend Server modules
Operating system family (64 bit) Operating system Version Support type
8 RecommendedRed Hat Enterprise Linux Server
7 Supported
8 RecommendedCentOS
7 Supported
Debian 10 Supported
Ubuntu 20.04 Recommended
Amazon Linux Amazon Linux 2 Supported
Linux
SUSE Linux Enterprise Server (SLES) 15 Supported
2019 RecommendedWindows Server
2016 Supported
Microsoft
Windows Server on AWS 2016 Supported
1 Microsoft Windows Server 2012 is not supported by Talend Data Preparation.
Statement regarding Virtualization and Docker deployments
Talend supports running on virtual machines and Docker containers. For both Virtualization Systems and Linux based Dockercontainers, Talend relies on the vendors’ compatibility statements to ensure the proper running and execution of the Talendsoftware.
Talend does not deliver prepackaged Docker Images or Dockerfile for Talend applications.
Compatible Java Environments
The following tables provide information on the recommended Java Environment you should download and install to useyour Talend product.
The Compiler Compliance Level corresponds to the Java version used for the Job code generation. This option can bechanged in the Studio preferences. For more information, see Setting the compiler compliance level.
Note: All Talend products and associated third-party applications, such as the Hadoop cluster, should use the same Javaversion for compliance. Before you install or upgrade any associated third-party application, Talend recommends that youcheck which Java version they support.
In the following documentation:
• Recommended: designates an environment recommended by Talend based on our experiences and customer usage.• Supported: designates a supported environment for use with the listed component or service.• Supported with limitations: designates an environment that is supported by Talend but with certain conditions
explained in notes.
Studio Java environments
Table 3: Compatible Java environments for Talend Studio
Java platform Java version Support type
OpenJDK (recommended distribution: Zulu) 11 Recommended
Talend Data Integration : Prerequisites
11
Java platform Java version Support type
Oracle JDK 11 Recommended
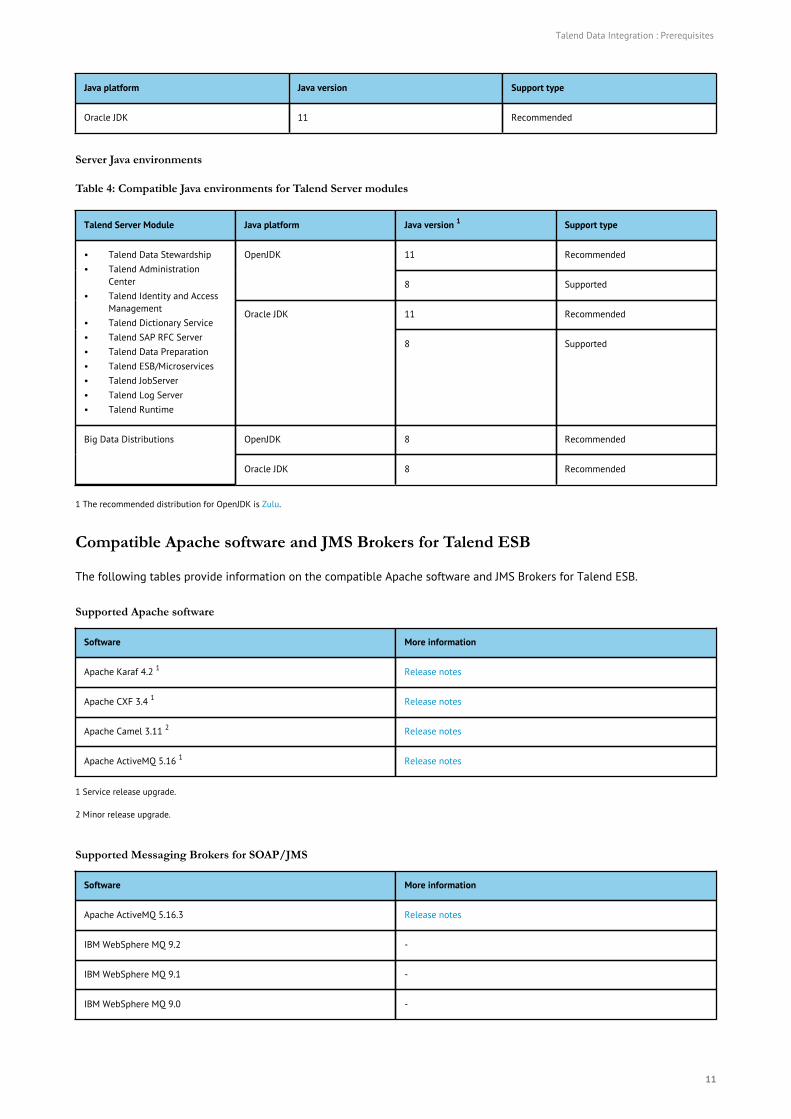
Server Java environments
Table 4: Compatible Java environments for Talend Server modules
Talend Server Module Java platform Java version 1 Support type
11 RecommendedOpenJDK
8 Supported
11 Recommended
• Talend Data Stewardship• Talend Administration
Center• Talend Identity and Access
Management• Talend Dictionary Service• Talend SAP RFC Server• Talend Data Preparation• Talend ESB/Microservices• Talend JobServer• Talend Log Server• Talend Runtime
Oracle JDK
8 Supported
OpenJDK 8 RecommendedBig Data Distributions
Oracle JDK 8 Recommended
1 The recommended distribution for OpenJDK is Zulu.
Compatible Apache software and JMS Brokers for Talend ESB
The following tables provide information on the compatible Apache software and JMS Brokers for Talend ESB.
Supported Apache software
Software More information
Apache Karaf 4.2 1 Release notes
Apache CXF 3.4 1 Release notes
Apache Camel 3.11 2 Release notes
Apache ActiveMQ 5.16 1 Release notes
1 Service release upgrade.
2 Minor release upgrade.
Supported Messaging Brokers for SOAP/JMS
Software More information
Apache ActiveMQ 5.16.3 Release notes
IBM WebSphere MQ 9.2 -
IBM WebSphere MQ 9.1 -
IBM WebSphere MQ 9.0 -

Talend Data Integration : Prerequisites
12
Compatible web application servers
The following tables provide information on the recommended and supported Web application servers for the Talend servermodules.
In the following documentation:
• Recommended: designates an environment recommended by Talend based on our experiences and customer usage.• Supported: designates a supported environment for use with the listed component or service.• Supported with limitations: designates an environment that is supported by Talend but with certain conditions
explained in notes.
Talend Administration Center
Web application servers Version Support type
9.0 1 RecommendedApache Tomcat
8.5 2 Supported
Pivotal tc Server 4.1 Supported
1 TLS 1.2 is supported. For more information, see https://tomcat.apache.org/tomcat-9.0-doc/ssl-howto.html.
2 TLS 1.2 is supported. For more information, see https://tomcat.apache.org/tomcat-8.5-doc/ssl-howto.html.
Compatible containers
The following tables provide information on the recommended and supported containers for the Talend server modules.
In the following documentation:
• Recommended: designates an environment recommended by Talend based on our experiences and customer usage.• Supported: designates a supported environment for use with the listed component or service.• Supported with limitations: designates an environment that is supported by Talend but with certain conditions
explained in notes.
Talend ESB
Runtime Containers Version Support type
Talend Runtime (Apache Karaf) 7.3 2 Recommended
9.0.30 1 RecommendedApache Tomcat
9.0.30 3 Supported
1 Recommended version for Talend Identity Management.
2 Not recommended for Talend Identity Management.
3 Only for CXF Services, Camel Routes, Service Activity Monitoring, Talend Identity Management and Security Token Service.
Compatible Web browsers
The following table provides information on the recommended and supported Web browsers you should use to take themost of your Talend products.
The minimum supported screen resolution is 1366 x 768 (px). Browser and system settings, such as scaling, zooming, andwindow size, will affect browser compatibility.
In the following documentation:
• Recommended: designates an environment recommended by Talend based on our experiences and customer usage.

Talend Data Integration : Prerequisites
13
• Supported: designates a supported environment for use with the listed component or service.• Supported with limitations: designates an environment that is supported by Talend but with certain conditions
explained in notes.
Web browser Support type
Mozilla Firefox ESR latest available browser version Recommended
Mozilla Firefox latest available browser version Supported
Microsoft Edge latest available browser version Supported
Apple Safari latest available browser version Supported
Google Chrome latest available browser version Supported
Compatible version control systems
The following table provides information on the recommended and supported version control systems you can use to storeyour Talend projects.
In the following documentation:
• Recommended: designates an environment recommended by Talend based on our experiences and customer usage.• Supported: designates a supported environment for use with the listed component or service.• Supported with limitations: designates an environment that is supported by Talend but with certain conditions
explained in notes.
Git version control servers
Version control servers Version Support type Authentication type
SaaS Recommended
Enterprise 2.21 Recommended
GitHub
3.x Supported
HTTPS
Personal Access Tokens5
SSH authorized keys
SaaS Supported
LTS release Server 6.1 to 6.10 Supported
Bitbucket1
7.5 Supported
HTTPS
SaaS3 SupportedAzure DevOps
TFS 2018 to latest 4 Supported
HTTPS
AWS CodeCommit SaaS Supported HTTPS
SSH authorized keys
GitLab SaaS Supported
GitLab 2 12 to latest version Supported
HTTPS
Gitblit 1.8 Deprecated HTTPS
SSH authorized keys
Note: Talend recommends that you use Talend Studio to make changes to your repository workspace, and that you useyour version control system for Talend projects from Talend Studio.

Talend Data Integration : Prerequisites
14
1 Compatibility checked with Bitbucket versions 5.6 and 5.10. Talend assumes that all minor versions of 5.x are backwards compatible. To see the changes between
versions, see the Bitbucket upgrade matrix.
2 Latest version (with backward compatibility to GitLab 12)
3 Formerly Azure VSTS.
4 Formerly Azure TFS.
5 To learn how to connect using a personal access token, see Authorizing a personal access token for use with SAML single sign-on.
Compatible databases
The following tables provide information on the recommended and supported databases you can use with Talend servermodules.
In the following documentation:
• Recommended: designates an environment recommended by Talend based on our experiences and customer usage.• Supported: designates a supported environment for use with the listed component or service.• Supported with limitations: designates an environment that is supported by Talend but with certain conditions
explained in notes.
Talend Administration Center
Table 5: Compatible databases for Talend Administration Center
Database Version Supported driver Support type
8.0 RecommendedMySQL4,5
5.7
mysql-connector-java-8.x.jar
Supported
19c RecommendedOracle
18c
ojdbc10.jar
ojdbc8.jarSupported
Azure SQL - mssql-jdbc-9.4.0.jre11.jar
mssql-jdbc-9.4.0.jre8.jar
Supported
H2 1 2.16 h2-2.1.210.jar Not supported for production
MariaDB 2 10.5 mariadb-java-client-2.7.4.jar Supported
2019 Supported
2017 Supported
2016 Supported
MS SQL Server 3
2014
mssql-jdbc-10.2.0.jre8.jar
mssql-jdbc-9.4.0.jre11.jar
mssql-jdbc-9.4.0.jre8.jar
Supported
13 Supported
12 Supported
11 Supported
10 Supported
PostgreSQL
9.6
postgresql-42.2.10.jar
Supported
Aurora 2.07.2 mysql-connector-java-8.0.26.jar Supported
Talend Data Integration : Prerequisites
15
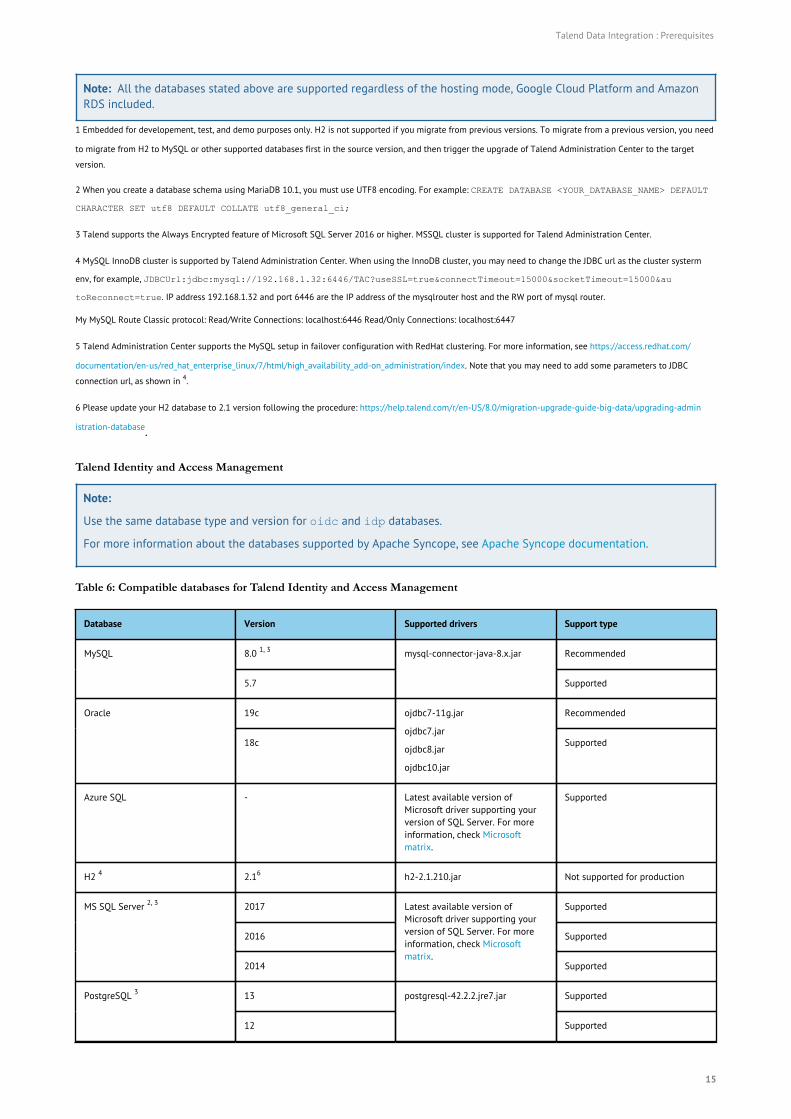
Note: All the databases stated above are supported regardless of the hosting mode, Google Cloud Platform and AmazonRDS included.
1 Embedded for developement, test, and demo purposes only. H2 is not supported if you migrate from previous versions. To migrate from a previous version, you need
to migrate from H2 to MySQL or other supported databases first in the source version, and then trigger the upgrade of Talend Administration Center to the target
version.
2 When you create a database schema using MariaDB 10.1, you must use UTF8 encoding. For example: CREATE DATABASE <YOUR_DATABASE_NAME> DEFAULT
CHARACTER SET utf8 DEFAULT COLLATE utf8_general_ci;
3 Talend supports the Always Encrypted feature of Microsoft SQL Server 2016 or higher. MSSQL cluster is supported for Talend Administration Center.
4 MySQL InnoDB cluster is supported by Talend Administration Center. When using the InnoDB cluster, you may need to change the JDBC url as the cluster systerm
env, for example, JDBCUrl:jdbc:mysql://192.168.1.32:6446/TAC?useSSL=true&connectTimeout=15000&socketTimeout=15000&au
toReconnect=true. IP address 192.168.1.32 and port 6446 are the IP address of the mysqlrouter host and the RW port of mysql router.
My MySQL Route Classic protocol: Read/Write Connections: localhost:6446 Read/Only Connections: localhost:6447
5 Talend Administration Center supports the MySQL setup in failover configuration with RedHat clustering. For more information, see https://access.redhat.com/
documentation/en-us/red_hat_enterprise_linux/7/html/high_availability_add-on_administration/index. Note that you may need to add some parameters to JDBC
connection url, as shown in 4.
6 Please update your H2 database to 2.1 version following the procedure: https://help.talend.com/r/en-US/8.0/migration-upgrade-guide-big-data/upgrading-admin
istration-database.
Talend Identity and Access Management
Note:
Use the same database type and version for oidc and idp databases.
For more information about the databases supported by Apache Syncope, see Apache Syncope documentation.
Table 6: Compatible databases for Talend Identity and Access Management
Database Version Supported drivers Support type
8.0 1, 3 RecommendedMySQL
5.7
mysql-connector-java-8.x.jar
Supported
19c RecommendedOracle
18c
ojdbc7-11g.jar
ojdbc7.jar
ojdbc8.jar
ojdbc10.jar
Supported
Azure SQL - Latest available version ofMicrosoft driver supporting yourversion of SQL Server. For moreinformation, check Microsoftmatrix.
Supported
H2 4 2.16 h2-2.1.210.jar Not supported for production
2017 Supported
2016 Supported
MS SQL Server 2, 3
2014
Latest available version ofMicrosoft driver supporting yourversion of SQL Server. For moreinformation, check Microsoftmatrix.
Supported
13 SupportedPostgreSQL 3
12
postgresql-42.2.2.jre7.jar
Supported
Talend Data Integration : Prerequisites
16
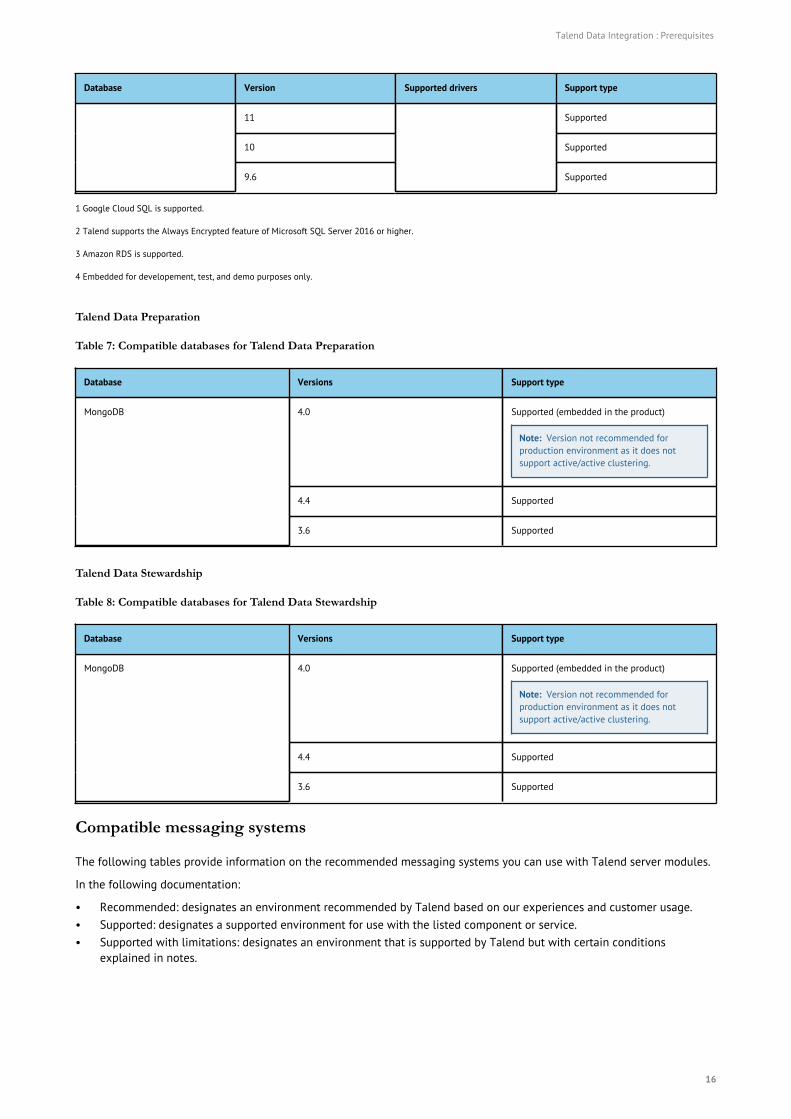
Database Version Supported drivers Support type
11 Supported
10 Supported
9.6 Supported
1 Google Cloud SQL is supported.
2 Talend supports the Always Encrypted feature of Microsoft SQL Server 2016 or higher.
3 Amazon RDS is supported.
4 Embedded for developement, test, and demo purposes only.
Talend Data Preparation
Table 7: Compatible databases for Talend Data Preparation
Database Versions Support type
4.0 Supported (embedded in the product)
Note: Version not recommended forproduction environment as it does notsupport active/active clustering.
4.4 Supported
MongoDB
3.6 Supported
Talend Data Stewardship
Table 8: Compatible databases for Talend Data Stewardship
Database Versions Support type
4.0 Supported (embedded in the product)
Note: Version not recommended forproduction environment as it does notsupport active/active clustering.
4.4 Supported
MongoDB
3.6 Supported
Compatible messaging systems
The following tables provide information on the recommended messaging systems you can use with Talend server modules.
In the following documentation:
• Recommended: designates an environment recommended by Talend based on our experiences and customer usage.• Supported: designates a supported environment for use with the listed component or service.• Supported with limitations: designates an environment that is supported by Talend but with certain conditions
explained in notes.

Talend Data Integration : Prerequisites
17
Table 9: Supported messaging systems
Messaging system Version Talend platform Support type
2.8 Talend Data Preparation RecommendedApache Kafka
2.8 Talend Data Stewardship Recommended
Compatible artifact repository
The following table provides information on the supported artifact repository you can use with Talend server modules.
In the following documentation:
• Recommended: designates an environment recommended by Talend based on our experiences and customer usage.• Supported: designates a supported environment for use with the listed component or service.• Supported with limitations: designates an environment that is supported by Talend but with certain conditions
explained in notes.
Artifact repository Version Support type
SaaS RecommendedJFrog Artifactory
7.27.31 Recommended
3.30 to 3.35 RecommendedSonatype Nexus
2.14 Supported
1 Latest at the date of release — November 16, 2021.
Note: Supported Java versions for JFrog Artifactory and Sonatype Nexus may vary, check Compatible Java Environmentson page 10 for more informations.
Compatible execution servers
Use the following table to ensure that your execution server version is compatible with Talend Administration Center andTalend Studio versions.
Note: The information contained in this section is valid at the date of publication but may be subject to change at a laterdate.
Job Servers (Talend JobServer and Job server in Talend Runtime)
Talend Administration Center and Talend Studio version Compatible Talend JobServer versions
8.0.x 7.1.x, 7.2.x, 7.3.x and 8.0.x
Talend Data Preparation and Talend Administration Center compatibility
The following table shows the compatibility between Talend Administration Center and Talend Data Preparation versions.
Talend Administration Center Compatible Talend Data Preparation version
7.1.x 7.1.x (2.8.x)
7.2.x 7.2.x (3.1.x)
7.3.x 7.3.x (3.7.x)

Talend Data Integration : Prerequisites
18
Talend Administration Center Compatible Talend Data Preparation version
8.0.x 8.0.x (3.22.x)
Proxy and firewall allowlist information
The following tables list the most important TCP/IP ports the Talend products use.
You need to make sure that your firewall configuration is compatible with these ports or change the default ports whereneeded.
Add the following websites to the allowlist on every machine that runs a Talend module:
URL Port Usage
update.talend.com 443 For downloading additional packages such asTalend Metadata Bridge and upgrades fromTalend Studio tools
talend-update.talend.com 443 For downloading libraries in Talend Studio(mainly for components)
www.talend.com 443 For testing and sending usage statistics fromTalend Studio
talendforge.org 443 For using Talend Exchange in Talend Studioand for users actions such as clicking on forumlinks
community.talend.com 443 For user actions, such as clicking on Communitylinks, etc.
help.talend.com 443 For user actions, such as clicking on help links,etc.
Note: If your deployment depends on other third-party software, you may need to add other URLs to your allowlist.Talend recommends adding to the allowlist all hostnames that have dynamic IP addresses.
In this table:
• Port: a TCP/IP port or a range of ports.• Active: Active for a standard installation of the product (Standard Installation is defined here as Server or Client
installation using Talend Installer with the default values provided in the Installer User Interface).• Direction: In (Inbound) and Out (Outbound) refer to the direction of requests between a port and the service
communicating with it. For example, if a service is listening for HTTP requests on port 9080, then it is an inbound portbecause other services are performing requests on it. However, if the service calls another service on a given port, thenit is an outbound port.
• Usage: which part of the Product component uses this port (for example 1099 is used by the JMX Monitoring componentof Talend Runtime).
• Configuration file: the file or location where the value can be changed.• Note: anything which is important to mention additionally.
Talend Studio ports
Port Direction Usage Configuration file
8090
Active: N
IN tESBProviderRequest (SOAP DataServer) and tRESTRequest (RESTData Service default port)
REST: Preferences / Talend /ESB SOAP: tESBProviderRequestcomponent details

Talend Data Integration : Prerequisites
19
Talend Identity and Access Management ports
Port Direction Usage Configuration file Note
9080
Active: Y
IN Talend Identity and AccessManagement Server -Apache Tomcat HTTP Port
/conf/server.xml
9009
Active: Y
IN Talend Identity and AccessManagement Server- Apache Tomcat AJPConnector Port
/conf/server.xml
(none)
Active: Y*
OUT Talend Identity and AccessManagement Server -Database
/conf/iam.properties
* By default a MySQLdatabase is used (notnetwork accessible).If another databaseshould be used the portis related to the typeand configuration of thisdatabase.
Talend Administration Center ports
Port Direction Usage Configuration file Note
5601
Active: Y
OUT Talend AdministrationCenter Kibana port
Configuration Page inTalend AdministrationCenter Web-UI
8080
Active: Y
IN Talend AdministrationCenter Server ApacheTomcat HTTP Port
/conf/server.xml
8009
Active: Y
IN Talend AdministrationCenter Server ApacheTomcat AJP Connector Port
/conf/server.xml
10000 - 11000
Active: N
IN Talend AdministrationCenter Server ExternalTalend JobServer
Add scheduler.conf.statisticsRangePorts=10000-11000 to /webapps/org.talend.administrator/WEB-INF/classes/configuration.properties
A free port is chosen inthe allotted range on theAdministrator machine,where the job will sendthe statistics informationduring its execution.Default is 10000-11000but it can be configured toanother port range.
The range of ports is onlyopened when real-timestatistics gathering isactivated for a Job.
(none)
Active: Y*
OUT Talend AdministrationCenter Server Database
Configuration Page inTalend AdministrationCenter Web-UI
* By default a MySQLdatabase is used (notnetwork accessible).If another databaseshould be used the portis related to the typeand configuration of thisdatabase.
Talend Data Preparation ports
Port Direction Usage Configuration file
5044
Active: Y
OUT Talend Data Preparation auditserver port
config/audit.properties

Talend Data Integration : Prerequisites
20
Port Direction Usage Configuration file
9999
Active: Y
IN Talend Data Preparation UserInterface port
config/application.properties
8989
Active: Y
OUT Talend Data Preparation backendport
config/application.properties
27017
Active: Y
OUT MongoDB port <MongoDB>/mongod.cfg
Talend Data Stewardship ports
Port Direction Usage Configuration file
5044
Active: Y
OUT Talend Data Stewardship auditserver port
conf/audit.properties
19999
Active: Y
IN Apache Tomcat HTTP Port tomcat/conf/server.xml
19924
Active: Y
IN Apache Tomcat Shutdown Port tomcat/conf/server.xml
19928
Active: Y
IN Apache Tomcat AJP ConnectorPort
tomcat/conf/server.xml
27017
Active: Y
OUT MongoDB port <MongoDB>/mongod.cfg
2181
Active: Y
OUT Apache Zookeeper port <Kafka>/config/zookeeper.properties
9092
Active: Y
OUT Apache Kafka port <Kafka>/config/server.properties
Talend Log Server ports
Port Direction Usage Configuration file
5044
Active: Y
IN Talend Log Server audit serverport
logstash-talend.conf
8057
Active: Y
IN Talend logging module - Auditlog4j ports
logstash-talend.conf
Talend Runtime ports
Port Direction Usage Configuration file (./etc)
8000
Active: Y
IN Talend JobServer - Command Port org.talend.remote.jobserver.server.cfg
8001
Active: Y
IN Talend JobServer JobServer - FileTransfer Port
org.talend.remote.jobserver.server.cfg

Talend Data Integration : Prerequisites
21
Port Direction Usage Configuration file (./etc)
8888
Active: Y
IN Talend JobServer JobServer -Monitoring Port
org.talend.remote.jobserver.server.cfg
Talend JobServer ports
Port Direction Usage Configuration file
8000
Active: Y
IN Talend JobServer - Command Port org.talend.remote.jobserver.server.cfg
8001
Active: Y
IN Talend JobServer - File TransferPort
org.talend.remote.jobserver.server.cfg
8555
Active: Y
IN Talend JobServer - ProcessMessaging Port
<TalendJobServerPath>/conf/TalendJobServer.properties
8888
Active: Y
IN Talend JobServer - Monitoring Port org.talend.remote.jobserver.server.cfg
Database Privileges
Database privileges for Talend Administration Center
In order to perform database backup operations in the web application, the administrator user needs to be able to executethe <database> dump command into the target database schema.
To be able to manage the Talend Administration Center database (create, edit or drop tables for example), he/she must alsohave the following system privileges:
• Create• Read• Update• Delete
To view the full rights and roles table for the Talend Administration Center, see The Talend Administration Center UserGuide: User roles and rights in the Administration Center.
Installing the XULRunner package
On Linux, the XULRunner package is required to run the Studio. The XULRunner package version that is recommended isXULRunner v1.9.2.28.
The supported versions are v1.8.x - 1.9.x and v3.6.x.
Procedure
1. Download XULRunner v1.9.2.28 from this location.
2. Unpack the archive file in the same directory where you unpacked the studio archive, but do not unpack it within theStudio folder.
3. Add the following line at the end of the Studio .ini file that corresponds to your Linux architecture:
-Dorg.eclipse.swt.browser.XULRunnerPath=</usr/lib/xulrunner>
where </usr/lib/xulrunner> is the XULRunner installation path.

Talend Data Integration : Prerequisites
22
Example
For example, if you have unpacked the Studio in a directory under your user home directory /home/<user>/Talend/, you need to add the following to the .ini file: -Dorg.eclipse.swt.browser.XULRunnerPath=/home/<user>/Talend/xulrunner/
Setting up JAVA_HOME
In order for your Talend product to use the Java environment installed on your machine, you must set the JAVA_HOMEenvironment variable.
Procedure
1. In the directory where Java is installed, find the location of the bin folder that contains the virtual machine: bin/server/jvm.dll.
For example:
• /usr/lib/jvm/java-x-oracle
• /usr/lib/jvm/zulu-11
2. Open a terminal.
3. Use the export command to set the JAVA_HOME and Path variables.
For example:
• export JAVA_HOME=/usr/lib/jvm/jdk11.0.13export PATH=$JAVA_HOME/bin:$PATH
• export JAVA_HOME=/usr/lib/jvm/<zulu_jdk>export PATH=/$JAVA_HOME/bin:$PATH
4. Add these lines at the end of the global profiles in the /etc/profile file or in the user profiles in the ~/.profilefile.
After changing one of these files you have to log on again.
Note: If you use sudo to run the Installer to install system services, make sure to use sudo -E before starting theinstallation.

Installing your Talend Data Integration using Talend Installer
23
Installing your Talend DataIntegration using Talend Installer
Introducing Talend Installers
Talend provides different installers to install your product.
• Talend Studio Installer: This installer allows you to automatically install your Talend Studio without any prerequisitesthanks to its embedded Java Environment. For more information see Installing Talend Studio with the Talend StudioInstaller on page 24.
• Talend Installer: This installer allows you to automatically install your Talend Studio and all Talend Server modules. Formore information see Using Talend Installer graphical installation mode on page 25.
When installing Talend Studio, either using the installer or manually, a minimal version with some basic Data Integrationfeatures is installed. After Talend Studio installation, to use those features that are not shipped with Talend Studio bydefault, you need to install them through the Feature Manager. For more information, see Installing features using theFeature Manager.
Installation modes of Talend Installer and Talend Studio Installer
This section provides information about the different installation modes that Talend Installer and Talend Studio Installer canrun in.
Note that the log files generated during the installation can be found in /tmp/.
Note also that, once Talend Installer has completed the installation of the products, a directory (called Talend by default) iscreated with sub-folders for each Talend product.
The following installation modes are available:
• Graphical mode: allows full interactivity through a graphical user interface.• Text mode: provides full interactivity with users in the command line. It is equivalent to any GUI mode but the pages
are displayed in text mode in a console.
Example of text mode where the user enters the --mode text option from the command line:
<TalendInstallerDirectory> ./<TalendInstallerFileName-linux64-installer.run> --mode text
Note: This installation mode is only available on Unix platforms. It is automatically used if no graphical mode isavailable but it also can be forced using the --mode text command.
• Unattended mode: is especially useful for automating the installation processes. This silent mode will perform anunattended installation that will not prompt the user for any information.
For more information about the available options of the unattended mode, see Talend Installer and Talend StudioInstaller Unattended mode available options.
Procedure
1. To perform an Unattended installation, write a simple .txt script in which you will define the options values.
Note: For a complete list of values, use the help command.
mode=unattendeddebugtrace=/home/user/Talend_install_files/debugInstall.txtlicenseFile=/home/user/Talend_install_files/licenseprefix=/home/user/TalendinstallMode=server

Installing your Talend Data Integration using Talend Installer
24
In this example, the script details the silent installation of the server installation mode.
The installation directory created is called Talend and the license file used is located in the /home/user/Talend_install_files directory.
You can also create a script for a custom installation mode. For example: in this case, specify in your script the productsand modules to install as well as the configuration information of these products. For example, the enable-components parameter allows you to do a comma-separated list of these products, while the tacPort parameter allows you tospecify the port to use for Talend Administration Center.
2. Launch the silent installation using the --optionfile <filename> command, where <filename> is the name ofthe script which contains the list of pairs <key>=<value>.
To install Talend products as services via the Installer, you are required to run the application as Administrator ORto disable User Account Control. For more information on these installation modes, please refer to the online Bitrockdocumentation.
Installing Talend Studio with the Talend Studio Installer
Talend Studio Installer is a convenient way of installing your Talend Studio. As it comes with an embedded JavaEnvironment, you can install it without any prerequisites.
Warning: Make sure that the path of your installation directory and that of your workspace directory contain no space orspecial characters, which may cause Talend Studio to fail to work because of JVM compatibility issues.
Procedure
1. Download the TalendStudio-A-B-C-linux-x64-installer.run file.
2. Double-click the TalendStudio-A-B-C-linux-x64-installer.run file to launch Talend Studio Installer.
3. Make the TalendStudio-A-B-C-linux-x64-installer.run file executable with the following command:
chmod +x TalendStudio-A-B-C-linux-x64-installer.run
4. Launch the Talend Studio Installer with the following command:
./TalendStudio-A-B-C-linux-x64-installer.run
5. Accept the License Agreement.
6. Choose the directory where you want your Talend product to be installed.
7. Add your license file.
8. Choose where you want the workspace directory to be located.
9. Launch the installation.
Talend Installer specific prerequisites
Prior to launching the Talend Installer, check that:
• you have downloaded a Talend-Tools-Installer-YYYYYYYY_YYYY-VA.B.C-installer.zip holding afolder.
In the folder that you will extract, you will find a dist file and executable files corresponding to the supportedoperating systems.
Use Talend-Tools-Installer-YYYYYYYY_YYYY-V-A.B.C-linux-x64-installer.run.
In the file name, YYYYYYYY_YYYY is the timestamp and A.B.C is the revision level (Major.Minor.Patch).
The dist file is only required to install Talend products. Once the installation and configuration is complete, you canremove it.
• JRE 1.8.0 or higher is installed on the machine on which you want to install the Talend modules.
Note: With JRE, make sure the jvm.dll file is located in your JRE directory under the bin\server\ folder.
• to enable Talend Installer graphical installation mode with CentOS 8, before launching the Installer as a root user, usethe command xhost local:root as a regular user.

Installing your Talend Data Integration using Talend Installer
25
A umask value of 022 is required during installation. Other umask values are not supported.
Note that Talend Installer does not support the sdshell utility.
IMPORTANT:
Talend Installer allows you to get out-of-the-box Talend solutions that do not require any manual installation. However,these solutions are not provided in a production-ready environment as they may require additional configurations oroptimizations according to your specific needs.
For example, you may want to change the MySQL database that is embedded by default in Talend Administration Centerwith your own database (PostgreSQL or Oracle for example). If you do this, you need to install the driver for the relevantdatabase. For more information, see Installing database drivers in your Web application server on page 36.
Note: Talend Installer is used only for first installations of Talend solutions. Therefore, if you want to know more aboutthe migration and upgrade processes, please refer to the migration procedures.
Using Talend Installer graphical installation mode
When using Talend Installer graphical installation mode, three installation modes are available.
Installation mode allows you to...
Server install all Talend server modules using the default configuration. For more information see Installing Talendmodules using Talend Installer Server installation mode on page 25.
Client install Talend Studio only. For more information, see Installing Talend modules using Talend Installer Clientinstallation mode on page 27.
Custom select the Talend modules to install and set advanced parameters. For more information, see Installing Talendmodules using Talend Installer Custom installation mode on page 27.
Installing Talend modules using Talend Installer Server installation mode
The Server mode installation is a convenient way of installing Talend Studio and all the Talend server modules included inyour licence with default settings. It also installs these modules as services on your machine.
Based on your licence, the following modules can be installed:
• Talend Administration Center• Talend Log Server• Talend Identity and Access Management• Talend MDM Server• Talend Data Stewardship• Talend Runtime• Talend JobServer• Talend Data Preparation• Talend Dictionary Service• Talend SAP RFC Server• Kafka and Zookeeper• MongoDB server
Accessing modules installed using Talend Installer Server installation mode
Talend Installer installs the Talend Server modules with their default configuration. The following table lists the defaultscredentials and URLs for the modules.
Note: Before starting the installation, make sure that MongoDB is not already installed on your computer.

Installing your Talend Data Integration using Talend Installer
26
Modules installed Details
Talend Administration Center • Access URL: http://localhost:8080/org.talend.administrator
• Default administrator username: [email protected]• Default administrator password: admin
Talend Identity and Access Management N/A
Talend Log Server Filebeat is automatically installed.
Talend Data Stewardship Access URL: http://localhost:19999
Talend Data Preparation Access URL: http://localhost:9999
Talend Dictionary Service Acces URL: http://localhost:8187
Talend Runtime N/A
Talend JobServer N/A
Talend SAP RFC Server N/A
Talend MDM Server Access URL: http://localhost:8180/talendmdm
Apache Kafka and Zookeeper servers N/A
MongoDB Server N/A
Performing a Server installation with Talend Installer
Before you begin
• Download all required files. For more information, see Talend Installer specific prerequisites on page 24.• Check that all default ports are open. For more informations, see Proxy and firewall allowlist information on page 18.• Make sure that there are no other instance of MongoDB installed on your machine.• Ensure the dist file is in the same folder as the Talend-Tools-Installer-YYYYYYYY_YYYY-VA.B.C-linux-
x64-installer.run
Procedure
1. Run the installer.
• To run the Talend Installer from the desktop, login as superuser then double click the Talend-Tools-Installer-YYYYYYYY_YYYY-VA.B.C-linux-x64-installer.run file.
• To run the Talend Installer from the command line, first make the file an executable then run the installer. To dothis, enter the following commands:
chmod +x Talend-Tools-Installer-YYYYYYYY_YYYY-VA.B.C-linux-x64-installer.run./Talend-Tools-Installer-YYYYYYYY_YYYY-VA.B.C-linux-x64-installer.run
Note: To install Talend server modules as services, in the Select Components setup window, select TalendServer Services.
2. Accept the License Agreement.
3. Choose the directory where you want your Talend product to be installed.
4. Choose Server in the installation mode list.
5. Add your license file.
6. Follow the steps about the required databases.
7. Launch the installation.
8. Once the installation is complete, you can remove the dist file to save some space on your disk.

Installing your Talend Data Integration using Talend Installer
27
Results
The modules installed in English.
Talend Installer creates a usedports.txt file where all the ports used by Talend Server modules are listed.
A user with tds-user as username and duser as password is automatically created in MongoDB for Talend DataStewardship.
A user with dataprep-user as username and duser as password is automatically created in MongoDB for Talend DataPreparation.
Talend Installer generates the AdminUser.txt file at the root of the MongoDB installation folder. It contains thecredentials for a user with the administrator rights in clear text. It is recommended to restrict the access to this file.
Installing Talend modules using Talend Installer Client installation mode
The Client installation mode allows you to install and configure Talend Studio.
Performing a Client installation with Talend Installer
The Client installation mode is a simple way of installing your Talend Studio with its default configuration.
Before you begin
• Download all required files. For more information, see Talend Installer specific prerequisites on page 24.• Check that all default ports are open. For more informations, see Proxy and firewall allowlist information on page 18.• Ensure the dist file is in the same folder as the Talend-Tools-Installer-YYYYYYYY_YYYY-VA.B.C-linux-
x64-installer.run
Procedure
1. Run the installer.
• To run the Talend Installer from the desktop, first login as superuser then make the file an executable and doubleclick the Talend-Tools-Installer-YYYYYYYY_YYYY-VA.B.C-linux-x64-installer.run file.
• To run the Talend Installer from the command line, first make the file an executable then run the installer. To dothis, enter the following commands:
chmod +x Talend-Tools-Installer-YYYYYYYY_YYYY-VA.B.C-linux-x64-installer.run./Talend-Tools-Installer-YYYYYYYY_YYYY-VA.B.C-linux-x64-installer.run
Note: To install Talend server modules as services, in the Select Components setup window, select TalendServer Services.
2. Accept the License Agreement.
3. Choose the directory where you want your Talend product to be installed.
4. Choose Client in the installation mode list.
5. Add your license file.
6. Launch the installation.
7. Once the installation is complete, you can remove the dist file to save some space on your disk.
ResultsTalend Studio is now installed and can be executed.
Installing Talend modules using Talend Installer Custom installation mode
The Custom installation mode is a customizable installation method of Talend Installer. It allows you to choose whatto install, where and how. This way, you can fully customize your installation and choose, for example, to install TalendAdministration Center on a machine and Talend Studio on another.
Here are the modules you can install with Talend Installer Custom installation mode:
• Talend Administration Center

Installing your Talend Data Integration using Talend Installer
28
• Talend Log Server• Talend Identity and Access Management• Talend Data Stewardship• Talend Runtime• Talend JobServer• Talend Data Preparation• Talend SAP RFC Server• Talend Studio• Talend Server Services
The following table sums up all the details you can configure for each chosen module.
For the following module... You can configure...
Tomcat instance to use
Administrator user name and password
Enable external Single-Sign On (SSO)
Use of Talend Log Server
Database
Port
Talend Administration Center
Web application directory
Talend Log Server Cluster name
Tomcat instance to use
Talend Administration Center connection parameters
Talend Identity and Access Management parameters
Use a fully qualified domain name when configuring values for IAM hostname and Post-logout redirection URL to Talend Data Stewardship andTalend Data Preparation.
Talend Identity and Access Management
Language (English, French, Japanese or Chinese)
The selected language is used for Talend Identity and AccessManagement, Talend Data Stewardship, Talend Data Preparation andTalend Dictionary Service.
Tomcat instance to use
Language (English, French, Japanese or Chinese)
The selected language is used for Talend Data Stewardship, Talend DataPreparation and Talend Dictionary Service.
Audit logging
MongoDB database1
Kafka connection parameters host
Zookeeper connection parameters
Talend Administration Center connection parameters
Talend Data Stewardship
Talend Identity and Access Management parameters
Use a fully qualified domain name when configuring IAM URL.

Installing your Talend Data Integration using Talend Installer
29
For the following module... You can configure...
Talend Runtime Port configuration
PortsTalend JobServer
Cache duration
Big Data Support
Kerberos cluster
MongoDB database1
Kafka connection parameters
Talend Administration Center connection parameters
Server IP and ports
Talend Identity and Access Management parameters
Use a fully qualified domain name when configuring IAM URL.
Language (English, French, Japanese or Chinese)
The selected language is used for Talend Data Preparation and TalendDictionary Service.
Talend Data Preparation
Audit logging
Tomcat Port
Audit logging
MongoDB database1
Talend Administration Center connection parameters
Talend Dictionary Service
Talend Identity and Access Management parameters
Use a fully qualified domain name when configuring IAM URL.
Talend Kafka and Zookeeper Zookeeper data directory
SAP configuration
JMS Broker URL
Talend SAP RFC Server
Library
Talend Studio Workspace directory location
Filebeat (audit client) Talend Log Server host and port
1: If you want to secure connections with MongoDB using SSL, MongoDB Enterprise Server has to be manually installed onyour machine. For more information, see https://docs.mongodb.com/v3.2/security/.
Performing a Custom installation with Talend Installer
Before you begin
• Download all required files. For more information, see Talend Installer specific prerequisites on page 24.• Check that all default ports are open. For more informations, see Proxy and firewall allowlist information on page 18.• Ensure that only one instance of MongoDB is installed on your machine.

Installing your Talend Data Integration using Talend Installer
30
• Ensure the dist file is in the same folder as the Talend-Tools-Installer-YYYYYYYY_YYYY-VA.B.C-linux-x64-installer.run
Procedure
1. Run the installer.
• To run the Talend Installer from the desktop, first login as superuser then make the file an executable and doubleclick the Talend-Tools-Installer-YYYYYYYY_YYYY-VA.B.C-linux-x64-installer.run file.
• To run the Talend Installer from the command line, first make the file an executable then run the installer. To dothis, enter the following commands:
chmod +x Talend-Tools-Installer-YYYYYYYY_YYYY-VA.B.C-linux-x64-installer.run./Talend-Tools-Installer-YYYYYYYY_YYYY-VA.B.C-linux-x64-installer.run
Note: To install Talend server modules as services, in the Select Components setup window, select TalendServer Services.
2. Accept the License Agreement.
3. Choose the directory where you want your Talend product to be installed.
4. Choose Custom in the installation mode list.
5. Add your license file.
6. Follow the different configuration steps.
7. Launch the installation.
8. Once the installation is complete, you can remove the dist file to save some space on your disk.
Results
Talend Installer creates a usedports.txt file where all the ports used by Talend Server modules are listed.
Filebeat is automatically installed with Talend Log Server.
A user with tds-user as username and duser as password is automatically created in MongoDB for Talend Data Stewardship.
A user with dataprep-user as username and duser as password is automatically created in MongoDB for Talend DataPreparation.
If you chose to use the embedded MongoDB instance, Talend Installer generates the AdminUser.txt file at the rootof the MongoDB installation folder. It contains the credentials for a user with the administrator rights in clear text. It isrecommended to restrict the access to this file.

Installing your Talend Data Integration manually
31
Installing your Talend DataIntegration manually
Manual installation order
In order for your Talend product to be installed correctly, the manual installation procedures must be executed in thefollowing order:
1. Setting up your version control system on page 312. Installing and configuring Talend Administration Center on page 323. Installing and configuring Talend Identity and Access Management on page 644. Installing and configuring Talend logging modules on page 895. Installing and configuring your Talend Studio on page 926. Installing and configuring Talend CommandLine on page 1007. Installing and configuring Talend SAP RFC Server on page 1028. Installing and configuring Talend Data Preparation on page 1149. Installing and configuring Talend Data Stewardship on page 124
Setting up your version control system
Installing and configuring Git
This procedure describes how to install and configure Git in order to store all your project data (Jobs, Database connections,Routines, Joblets, etc.) in the shared Repository of the Talend Studio.
For more information on the supported Git servers, see Compatible version control systems on page 13.
Note: This procedure might not be necessary if the Git server you install already provides Git and you don't need it onyour local machine.
Procedure
1. Download the Git version corresponding to your system at https://git-scm.com/downloads and follow the installationinstructions.
2. Create an SSH key pair in Talend Studio instead of using a Git tool, to ensure the key is compatible with Talend Studio.
a) Open a terminal instance.b) Generate a new key by using the following command, where email is the email address of the Git server account:
ssh-keygen -t ecdsa -b 256 -m PEM -C "email"
c) When you are prompted to enter a file in which to save the key, press Enter to accept the default file location, ortype a name and press Enter.
d) When you are prompted to enter a passphrase, press Enter to leave it empty.
3. Put the generated key file in the /home/User_Name/.ssh folder.
4. Add the public key to the settings of your Git server.
a) Create a known-hosts file by executing the following command:
ssh-keyscan -H git_server_hostname >> known_hosts
b) If you are using multiple SSH private keys, create a config file in your .ssh folder and add the following contentin the file to specify which key file is used for which Git server.

Installing your Talend Data Integration manually
32
Warning: This config file takes precedence over the Eclipse configuration.
Host <git_server1_hostname>IdentityFile /home/username/.ssh/key1Host <git_server2_hostname>IdentityFile /home/username/.ssh/key2
5. Add the connection information to the Talend Administration Center configuration. For more information, see Setting upGit parameters in Talend Administration Center User Guide.
Installing and configuring Talend Administration Center
Talend Administration Center is a Web-based administration application that allows Talend Studio project managers toadministrate users and projects and manage access to the remote repository.
For more information regarding Talend Administration Center and Tomcat, see Apache Tomcat Server on page 169.
For more information on the scheduling management strategy in Talend Administration Center, see the section below onrecommendations about environment and configuration.
After installing Talend Administration Center, you can configure it to download and install patches for Talend Studio. Formore information, see Downloading and applying an update to Talend Studio via Talend Administration Center .
Recommendations about environment and configuration for Talend AdministrationCenter
This section applies to Talend Administration Center users who want to optimize their environment to support a givenamount of concurrent tasks.
Note that these recommendations are currently incomplete, the following ones still need to be investigated:
• recommended resources according to the number of logged users from Studio• recommended resources according to the number of logged Talend Administration Center users• recommended resources according to the number of concurrent executions of plans
Recommended resources according to the number of concurrent task executions
(*) using CPU Intel(R) Xeon(R)L5640 @ 2.27GHz
(**) using MySQL
500 concurrent task and planexecutions
1000 concurrent task and planexecutions
2000 concurrent task and planexecutions
Recommended minimal CPU(*) number for each TalendAdministration Center host
2 4 8
Recommended minimal memoryfor each Talend AdministrationCenter host
>= 3000 MB >= 4000 MB >= 8000 MB
Recommended minimal memoryfor each Talend AdministrationCenter JVM (-Xmx)
>= 1500 MB >= 3000 MB >= 6000 MB
Recommended minimal CPU (*)number for database(**) host
2 4 6
Recommended minimal memoryfor database(**) host
>= 1500 MB >= 3000 MB >= 6000 MB
Recommended minimal number ofremote JobServers
1 2 2
Recommended minimal CPU (*)number for each JobServer host
1 2 2

Installing your Talend Data Integration manually
33
(*) using CPU Intel(R) Xeon(R)L5640 @ 2.27GHz
(**) using MySQL
500 concurrent task and planexecutions
1000 concurrent task and planexecutions
2000 concurrent task and planexecutions
(apart from CPU needed for JVM ofexecuted jobs)
Recommended minimal memoryfor each JobServer host
(apart from memory needed forJVM of executed jobs)
>= 1000 MB >= 2500 MB >= 5000 MB
Recommended minimal memoryfor each JobServer JVM (-Xmx)
>= 250 MB >= 500 MB >= 1000 MB
Recommended configuration
Description Location Configuration property Default/Minimal value Recommended value
Maximum number ofdatabase connections inthe Quartz connectionpool
Talend AdministrationCenter configuration file
"WEB-INF/classes/quartz.properties" :
org.quartz.dataSource.QRTZ_DS.maxConnections
30 org.quartz.threadPool.threadCount + 3
Maximum number ofconcurrent Jobs handledby the Scheduler
Talend AdministrationCenter configuration file
"WEB-INF/classes/quartz.properties" :
org.quartz.threadPool.threadCount
30 MAX_CONCURRENT_TASK_EXECUTIONS+ MAX_CONCURRENT_PLAN_EXECUTIONS
Maximum databaseconnections for TalendAdministration Center(apart from Quartz)
Talend AdministrationCenter configuration file
"WEB-INF/classes/configuration.properties" :
hibernate.c3p0.max_size
32 MAX_CONCURRENT_TASK_EXECUTIONS+ MAX_CONCURRENT_PLAN_EXECUTIONS+ MAX_CONCURRENT_LOGGED_USERS
Defines the periodbetween each remote Jobcheck
Talend AdministrationCenter database tableconfiguration
scheduler.conf.taskStatusRefreshTime
1 • ifMAX_CONCURRENT_TASK_EXECUTIONS< 20 : scheduler.conf.taskStatusRefreshTime = 1
• ifMAX_CONCURRENT_TASK_EXECUTIONS> 20 : scheduler.conf.taskStatusRefreshTime =MAX_CONCURRENT_TASK_EXECUTIONS /20
Defines the size of threadpool which checks thelatest executions atstartup
Talend AdministrationCenter database tableconfiguration
dashboard.conf.taskExecutionsHistory.threadPoolSize
10 ( MAX_CONCURRENT_TASK_EXECUTIONS+ MAX_CONCURRENT_PLAN_EXECUTIONS ) / 25
Defines the size of threadpool which checks all thetasks at startup
Talend AdministrationCenter database tableconfiguration
scheduler.conf.simultaneousThreadsForStatusRefresh
5 MAX_CONCURRENT_TASK_EXECUTIONS / 50
Defines the number ofmaximum opened files fordatabase process
Host of database server Maximum opened files:
For example, underLinux set the Mysqlconfiguration property"open_files_limit" andensure that the system file
(depends on operatingsystem)
( MAX_CONCURRENT_TASK_EXECUTIONS+ MAX_CONCURRENT_PLAN_EXECUTIONS+ MAX_CONCURRENT_LOGGED_USERS ) x 3

Installing your Talend Data Integration manually
34
Description Location Configuration property Default/Minimal value Recommended value
limit is >= to the formulaon the right
Defines the number ofmaximum connectionsallowed to the database
Database server Max connections:
For example, set the Mysqlconfiguration property"max_connections =10000"
(depends on databasevendor)
(org.quartz.dataSource.QRTZ_DS.maxConnections +hibernate.c3p0.max_size)x 1, 2
Defines the maximumnumber of concurrentconnections accepted bythe JobServer
JobServer configurationfile
"conf/TalendJobServer.properties" :
org.talend.remote.server.MultiSocketServer.
MAX_CONCURRENT_CONNECTIONS
1000 MAX_CONCURRENT_JOBS_EXECUTIONS x 2
Table 10: Definition of variables
Variable Description
MAX_CONCURRENT_JOBS_EXECUTIONS Maximum expected number of concurrent executed Jobs on JobServerside
MAX_CONCURRENT_LOGGED_USERS Maximum expected number of concurrent logged users (TalendAdministration Center + Studio) on Talend Administration Center side
MAX_CONCURRENT_PLAN_EXECUTIONS Maximum expected number of concurrent plan executions on TalendAdministration Center side
MAX_CONCURRENT_TASK_EXECUTIONS Maximum expected number of concurrent task executions on TalendAdministration Center side
You might encounter performance issues if the properties are not properly configured.
The following properties have the biggest influence on performance and memory consumption. By default their values are:
• hibernate.c3p0.max_size=32• org.quartz.threadPool.threadCount = 30• org.quartz.dataSource.QRTZ_DS.maxConnections = 30
Default values work if you have less than 10 tasks running at the same time.
If you have more tasks you can find optimal org.quartz.threadPool.threadCount using the following formula:
org.quartz.threadPool.threadCount = 3 x peak quantity of Jobs running at the same time
You don't need too many redundant threads because each thread consumes memory.
The number of connections depends on how fast Talend Administration Center is interacting with the database server andon how many Jobs are running at the same time.
The total number of database connections = org.quartz.threadPool.threadCount + hibernate.c3p0.max_size
The total number of database connections cannot be more than what is configured on the server, for example in MySQL it is150. But the optimal number can also be calculated using the following formula:
org.quartz.dataSource.QRTZ_DS.maxConnections = 3 x peak quantity of Jobs running at the same time
hibernate.c3p0.max_size=3 x peak quantity of Jobs running at the same time
In some cases, if the connection to the database has no delay, you can use the following formula:
org.quartz.dataSource.QRTZ_DS.maxConnections = 2 x peak quantity of Jobs running at the same time
hibernate.c3p0.max_size=2 x peak quantity of Jobs running at the same time

Installing your Talend Data Integration manually
35
Deploying Talend Administration Center on an application server
Deploying Talend Administration Center on Apache Tomcat
Procedure
1. Install the Apache Tomcat application server and stop the Apache Tomcat service if it is automatically started.
2. Open the /etc/default/tomcat8 file, or the /etc/tomcat/tomcat.conf file on CentOS/RHEL, to edit it.
3. Uncomment the Apache Tomcat security setting and change the default setting as follows:
TOMCAT8_SECURITY=no
4. Unzip the package delivered by Talend: Talend-AdministrationCenter-YYYYYYYY_YYYY-VA.B.C.zip.
This will give you access to the different components needed to benefit from all the Talend Administration Centerfunctionalities:
• org.talend.administrator.war, the archive containing the actual Talend Administration Center Webapplication.
• Artifact-Repository-Nexus-VA.B.C.D.zip, the archive containing an artifact repository software, basedon Sonatype Nexus, that will be used to handle software updates and DI artifacts . For more information, seeIntroduction to the Talend products on page 169.
• Artifact-Repository-Artifactory.zip, the archive containing Talend scripts to initialize users in JFrogArtifactory, that will be used to handle software updates and DI artifacts. For more information, see Introduction tothe Talend products on page 169.
5. Copy the Web application, org.talend.administrator.war, into the webapps directory of Apache Tomcat.
Once you have copied this war file, you can either unzip it manually under the same directory, or let Apache Tomcatunzip the web application at startup.
6. Start Apache Tomcat by running the following file:
<TomcatPath>/bin/startup.sh
Results
Warning: The storage of log outputs is managed by the Apache Tomcat application server by default, but you can alsodefine your own path for storing the logs. From 4.0, you can configure the path directly from Talend AdministrationCenter. For more information on manual configuration in prior versions, see Configuring the log storage mode on page41.
If you deploy a large number of applications on Apache Tomcat, you should increase its memory to improve its performance.For more information on this process, see Increasing the memory of Apache Tomcat on page 36.
Deploying Talend Administration Center on Pivotal tc Server
Procedure
1. Install Pivotal tc Server as explained in the Pivotal documentation: https://tcserver.docs.pivotal.io/3x/docs-tcserver/topics/install-getting-started.html.
2. Create a Pivotal tc Server instance as explained in the Pivotal documentation: https://tcserver.docs.pivotal.io/3x/docs-tcserver/topics/postinstall-getting-started.html.
3. Stop your Pivotal tc Server instance.
4. Unzip the archive delivered by Talend.
5. Copy the Web application, org.talend.administrator.war, into the webapps folder of your Pivotal tc Serverinstance. For example:
/home/tcserver/pivotal-tc-server/myserver/webapps/
6. Start your Pivotal tc Server instance to automatically deploy Talend Administration Center.
Increasing the memory of Pivotal tc Server
Procedure
1. Go to <PivotalPath>/bin and edit the setenv.sh file.
2. Add the following line:

Installing your Talend Data Integration manually
36
set JAVA_OPTS=%JAVA_OPTS% -XX:MaxMetaspaceSize=512m -Xmx1024m -Xms256m
Results
The Pivotal tc Server memory heap size is now increased and the server can hold several web applications.
Talend Administration Center basic configuration
Increasing the memory of Apache Tomcat
Procedure
1. Edit the configuration file.
• On Ubuntu, the configuration file is <TomcatPath>/bin/catalina.sh.• On CentOS/RHEL, the configuration file is /etc/tomcat/tomcat.conf.• On other Linux distributions, the configuration file is /usr/share/tomcat/conf.
2. Add the following line:
set JAVA_OPTS=%JAVA_OPTS% -XX:MaxMetaspaceSize=512m -Xmx1024m -Xms256m
3. If you are an Oracle user, add the following line in order to specify the catalog and schema database parameters, and toavoid errors during Talend Administration Center startup:
Xmx<1G> -Dtalend.catalog=<catalogName> -Dtalend.schema=<schemaName>
Results
The Apache Tomcat memory size is now increased and the server can hold several web applications.
Masking Apache Tomcat version
To secure Apache Tomcat server from malicious attacks, it is necessary to hide its version information.
Procedure
1. Create a folder under <TomcatPath>/lib/org/apache/catalina/util.
2. Create a file ServerInfo.properties.
3. Add a property in the file and mask the property server.info:
server.info=Apache Tomcat Version XYZ
4. Save the file.
Installing database drivers in your Web application server
If you are not using the MySQL or embedded H2 database with Talend Administration Center, you must install the driver forthe database to use in your Web application server.
For more information regarding the databases compatible with Talend Administration Center, see Compatible databases onpage 14.
Procedure
1. Stop your Web application server.
2. If you use Apache Tomcat, clean the <apache-tomcat>/work/Catalina/localhost folder.
3. Make sure that the driver for the database you want to use does not exist in any of the following folders. If the driveralready exists in one of these folders, skip the next step.
Web application Server used Folders to check
Apache Tomcat <TomcatPath>/webapps/org.talend.administrator/WEB-INF/lib
4. Download the correct database driver(s) from the official provider website, according to the version of the JVM you useto run your Web application server and the version of the database you want to use.

Installing your Talend Data Integration manually
37
If you use Oracle, use a copy of the ojdbcX.jar file from your Oracle installation.
Note that those drivers are specific and that you should only download the ones that you need.
Database used Driver to download
Azure SQL / SQL Server https://docs.microsoft.com/en-us/sql/connect/jdbc/overview-of-the-jdbc-driver
Oracle http://www.oracle.com/technetwork/database/features/jdbc/index-091264.html
PostgreSQL http://jdbc.postgresql.org/download.html
MariaDB https://downloads.mariadb.org/connector-java/
5. Place the driver(s) you need in the right folder:
• In <TomcatPath>/webapps/org.talend.administrator/WEB-INF/lib for Apache Tomcat.
6. Restart your Web application server.
(Best Practice) Using VACUUM with PostgreSQL for Talend Administration Center users
When using Talend Administration Center to retrieve, schedule and/or execute Jobs, many update/delete databaseoperations are performed, which may result in performance slowdown if you are using PostgreSQL.
Indeed, it is recommended to execute the VACUUM command with PostgreSQL, as items that are deleted or obsoleted by anupdate are not physically removed from their table.
The standard form of VACUUM removes dead row versions in tables and indexes and marks the space available for futurereuse. However, it will not return the space to the operating system, except in the special case where one or more pagesat the end of a table become entirely free and an exclusive table lock can be easily obtained. In contrast, VACUUM FULLactively compacts tables by writing a complete new version of the table file with no dead space. This minimizes the sizeof the table, but can take a long time. It also requires extra disk space for the new copy of the table, until the operationcompletes. It is recommended to run VACUUM FULL quarterly.
For more information on the VACUUM command, see the PostgreSQL documentation.
For more information on how to set up automatic vacuuming (which is a process launched at regular intervals by thePostgreSQL server to execute VACUUM only on the tables that have been updated), see the PostgreSQL documentation.
Configuring Tomcat to use a proxy server
Procedure
1. Stop your Tomcat server.
2. Set the configuration. The configuration file is <TomcatPath>/bin/setenv.sh. If the file does not exist, create it.
3. Add the following parameters, changing the parameters to match with your configuration:
CATALINA_OPTS=$CATALINA_OPTS -Dhttp.proxyHost=proxy.server.com # Specify the host name or IP address of your HTTP proxy server. You can use this parameter for http and https host names.CATALINA_OPTS=$CATALINA_OPTS -Dhttp.proxyPort=YourHttpProxyPort # Specify the port number of your proxy server.CATALINA_OPTS=$CATALINA_OPTS -Dhttp.nonProxyHosts="localhost|host.mydomain.com|192.168.0.1" # Specify a list of hosts separated by "|" that do not require access through your proxy server.
For example:
CATALINA_OPTS=$CATALINA_OPTS -Dhttp.proxyHost=proxy.server.com CATALINA_OPTS=$CATALINA_OPTS -Dhttp.proxyPort=3128CATALINA_OPTS=$CATALINA_OPTS -Dhttp.nonProxyHosts="localhost|host.mydomain.com|192.168.0.1"
For more information about proxy configuration, see https://docs.oracle.com/javase/8/docs/technotes/guides/net/proxies.html.
4. Restart your Tomcat server.

Installing your Talend Data Integration manually
38
Synchronizing Web application and server time zones
To make sure that the DST change and the time zones are correctly taken into account, check that your OS includes anenvironment variable set as follows:
On Windows: TZ=Europe/Paris
On Linux: Export TZ="Europe/Paris"
Launching Talend Administration Center for the first time
The recommended way to configure the connection to the database and to the shared repository is through the Webinterface of Talend Administration Center.
Procedure
1. Start the application server on which Talend Administration Center is installed.
2. Open a Web browser and type in the following URL:
http://localhost:8080/<ApplicationPath>
Replace localhost with the IP address or the hostname of the Web server if the Web browser IP is different fromthe machine you are on, and <ApplicationPath> with the Talend Administration Center Web application path. Forexample, http://localhost:8080/org.talend.administrator.
Choose a port according to your environment. The default port 8080 may clash with another application.
3. Type in the default admin password. MySQL database connection parameters are displayed and some automatic checksare performed on driver, URL, connection, version information.
If you do not want to use the MySQL database, you can set up a different database server (MSSQL or Oracle) and set thecorresponding connection parameters. For more information, see Configuring Talend Administration Center to run on adifferent database than MySQL on page 38.
4. Click Set new license, then browse your system to the License file you received from Talend and click Upload. A finalLicense check is performed.
5. Click Go to Login.
6. On the Login page, type in the default connection login for your first access (login: [email protected],password: admin).
Those credentials correspond to the default user of the Web application. You can create a new one using the Usersmenu in Talend Administration Center, and then delete the [email protected] user after connecting with thecredential you have created.
After the first connection, it is strongly recommended not to use the default user account to access the application forsecurity reasons. You can either change the default credentials of this account ([email protected]/admin)or create another administrator user and remove the default account. This account has only the role SecurityAdministrator. Its type is No Project Access so it does not count in the license.
If your Web access is restricted, you may need to click Validate your license manually to perform the validation of yourlicense key. Follow the instructions on screen.
Results
Once the license is validated, the navigation bar of Talend Administration Center opens with all the pages accessible for thedefault administrator user account.
For more information on which pages of Talend Administration Center an administrator user can access, see the TalendAdministration Center User Guide.
Configuring Talend Administration Center to run on a different database than MySQL
By default, the Talend Administration Center Web application is configured to run with the default MySQL database.
Before you begin
• The external database must have been created with a utf8 collation.• If you want to use a MySQL, Oracle or MS SQL database for Talend Administration Center, install the right database
driver in the application server as described in Installing database drivers in your Web application server on page 36.

Installing your Talend Data Integration manually
39
• For MySQL users: to prevent further transaction issues when resuming a trigger on the Job Conductor page of TalendAdministration Center, it is recommended to configure the transaction isolation level under the [mysqld] group in themysql.ini or mysql.conf configuration file as follows: transaction-isolation=READ-COMMITTED.
Procedure
1. Start the application server, then open a Web browser and type the URL of the Talend Administration Center Webapplication.
2. On the Login page, click Go to db config page, then enter the administrator password (by default, it is admin).
Note that if you are starting Talend Administration Center for the first time, you already are on the databaseconfiguration page.
Note:
Depending on the database security setting , you may need to add additional parameters to your connection URL. ForWindows users connecting to a MySQL database, you must load the time zone data into the time zone tables. Youcan do this by adding the serverTimeZone parameter to the URL:
jdbc:mysql://hostname:{ip_address}:3306/{db_name}?useSSL=false&serverTimezone={server_time_zone}&allowPublicKeyRetrieval=true
3. In the Database type list, select your database. As a result, the Driver and URL fields are automatically updated with thetemplate corresponding to this database.
4. In the URL field, replace the parameters in brackets with your database details.
Note that you can click the Reload from file button to reload your previous database as changes are not saved until youclick Save.
5. Click Save to take your changes into account.

Installing your Talend Data Integration manually
40
Link Talend Administration Center to your version control system
Procedure
1. Click Configuration to access the setting page of Talend Administration Center.
2. Change the following parameters for the Git module using the parameters you have set during the installation processof the Git server.
Parameter name Description
Server Location URL Git repository URL.
Username Git repository user.
Password Git repository password.
Note: If you use multi-factor authentication or single sign-on for your version control system, you should generatea personal access token (Git), and use this in place of your password when setting up your version control system inTalend Administration Center.
Note: If your Git is on an Azure DevOps Server, get the private access token for the user following the instructionsprovided by Microsoft (https://docs.microsoft.com/en-us/azure/devops/organizations/accounts/use-personal-access-tokens-to-authenticate?view=azure-devops) and fill the Password field with the token.
For examples of Git URLs, and more details, see Installing and configuring Git on page 31.
If you use several Git repositories to store your projects, refer to the User Guide of Talend Administration Center andcheck the Advanced settings procedure.
Results
The link to Git is now established, you can thus create a new project in order for the Talend clients to have at least oneproject in their workspace.
Next steps:
• Create one or more users from the Users page.• Create a new, remote, collaborative project from the Projects page.• Associate the user(s) with the project from the Project authorizations page.
For more details, see the Talend Administration Center User Guide.
Enabling hash code as Git repository folder nameYou can enable the use of hash code as Git repository folder name to avoid conflicts on temporary folders. If so, you need toupdate a configuration file.
Procedure
1. Stop Tomcat.
2. Open the following file to edit it:
<tomcat_path>WEB-INF\classes\configuration.properties
3. Add the following:
git.conf.enableHashRepositoryUrl=true
Note that this configuration may increase disk space usage if you use different protocols (http / https / ssh, etc.) toaccess the same repository.
4. Restart Tomcat.
Results
Now a separate local folder will be created for each Git repository URL entered in Talend Administration Center.

Installing your Talend Data Integration manually
41
Configuring the log storage mode
The log outputs are stored by default in the server application standard log file (STDOUT) as defined in the Log4j.xmlfile located in the <ApplicationPath>/WEB-INF/classes folder. However you can store the log in a different file bysetting the path to this file in the Log4j.xml file.
Procedure
To do so, simply set the path in the Configuration page in Talend Administration Center.
For more information, refer to your Talend Administration Center User Guide. If you leave the path field blank in theConfiguration page, then you can also customize the Log4j.xml to address your custom needs.
Reduce the number of unauthenticated calls to your Git server
When using the Git HTTP protocol, you can force the use of username/password authentication for all pull, push, fetch andls-remote operations.
Procedure
1. Stop your Tomcat server.
2. Open the following file to edit it:
<tomcat_path>/WEB-INF/classes/configuration.properties
3. Add the following line:
git.conf.http.onlyUsernamePasswordAuth=true
4. Restart your Apache Tomcat server.
Configuring GitBlit using SSH authentication
This article describes how to configure Gitblit with Talend Administration Center using SSH authentication.
This was tested on the following architecture:
• Talend Administration Center installed on Windows• Git installed on a Linux box
Prerequisite: You have installed and configured Git as explained in Talend Installation Guide .
1. Use the following command to add the public key in the authorized_keys file located in your .ssh folder:
cat id_rsa.pub >> authorized_keys2. Set the permission using the following command:
chmod 600 id_rsa.pub3. Download Gitblit from http://gitblit.com4. Install Tomcat and deploy the Gitblit war file.5. Use the following command to add the git server as known_hosts:
ssh -l <git_username> -p 29418 <git_server>.
Run the same command on the server hosting Talend Administration Center as well to create the known_hosts file.6. Open Gitblit with the following address: https://servernName:port/<war_file_name>7. Use the default username and password (admin/admin) to log in:

Installing your Talend Data Integration manually
42
8. Click the arrow at the left corner and select my profile to set up the SSH key for your user.9. Paste the content of the public key into the key field and save it:
10. Add the connection information to Talend Administration Center: go to > Settings > Configuration > Git and enter theSSH URL in the Git server url field.
In this configuration, Username and Password fields may remain empty. For more information, follow this link.
Configuring AWS CodeCommit using SSH authentication
This section describes how to configure AWS CodeCommit with Talend Administration Center using SSH authentication.
Procedure
1. Follow the procedure described in this link.
2. From Talend Administration Center, go to > Settings > Configuration > Git. Enter the SSH URL in the Git server url field.

Installing your Talend Data Integration manually
43
In this configuration, Username and Password fields may remain empty. For more information, follow this link.
3. Go to Projects > Advanced settings. Fill in the fields with the adequate information and click on Save:
Enabling Auto Refresh in Talend Runtime for Talend Administration Center deployment
Procedure
1. Stop your Apache Tomcat server.
2. Set the configuration. The configuration file is <TomcatPath>/bin/setenv.sh. If the file does not exist, create it.
3. Add the following parameter:
CATALINA_OPTS=$CATALINA_OPTS -Dorg.talend.tac.esb.feature.install.error.refresh=true
4. Restart your Apache Tomcat server.
ResultsFeatures will be reinstalled with enabled Auto Refresh in Talend Runtime.
Talend Administration Center advanced configuration
Most of the configuration parameters are stored in the Talend Administration Center database, like backup-related settings,port information, timeout duration, security settings, login delay and so on.
Some parameters can be updated, activated or deactivated from the Configuration page of the Web application or directly inthe configuration.properties file, but you might need to edit some of them manually in the configuration table ofthe Talend Administration Center database. To access this database, open the database web console. To edit this database,open its web console which is accessible from the Database node of the Configuration page of Talend Administration Center.
Setting up Talend Administration Center Single Sign-On (SSO)
You have the possibility to implement a unified sign-on and authentication to access Talend Administration Center throughdifferent Identity provider systems (IdP) and to manage the roles and project types of the application users.
Note: The SSO feature is not available for applications connecting to Talend Administration Center. The applications likeTalend MDM, Talend Data Preparation, Talend Data Stewardship, and Talend Dictionary Service do not have SSO. The SSOfeature is available for Talend Cloud applications connecting to Talend Management Console.
Procedure
1. Enable SSO for Talend Administration Center during installation, either via Talend Installer or from a configuration file,see Enabling Single-Sign On for Talend Administration Center on page 44.
2. Set up SSO and user roles and project types from your Identity Provider system.
3. If you are connecting Talend Administration Center with the Talend Identity and Access Management, in the<installation_path>/iam/apache-tomcat/conf/iam.properties file, set the value for the belowparameters to the username and the password of the user with the role Security Administrator in Talend AdministrationCenter:
tac.user-name=<username_security_administrator>tac.password=<password_security_administrator>

Installing your Talend Data Integration manually
44
Note: Whenever you change your Talend Administration Center password, make sure to replace your old passwordwith the new one in the iam.properties file here.
4. (Optional) You can create an "emergency user" in Talend Administration Center in case your Identity Provider istemporarily unavailable, see Defining an emergency user for Talend Administration Center on page 46.
Results
Setting up SSO in your Identity Provider system allows users to access all their applications, including Talend AdministrationCenter, by signing in one time for all services. If a user tries to sign in to Talend Administration Center when SSO is set up,he or she is redirected to the SSO sign-in page.
Enabling Single-Sign On for Talend Administration Center
To activate SSO for Talend Administration Center during installation, you can:
• activate SSO via Talend Installer (recommended)• activate SSO by editing a configuration file
Note that, if you do not activate SSO during installation, you still have the possibility to do so on the Configuration pageonce you are logged in the web application. For more information, see the Talend Administration Center User Guide.
For information on configuring the Identity Providers, see the SSO guides for SiteMinder, PingFederate, Okta, AD FS 2.0,3.0/4.0, Azure Active Directory and Keycloack.
• SSO Guides
Enabling Single-Sign On for Talend Administration Center via Talend Installer
Before you begin
You have chosen to perform a Custom installation, that allows you to customize settings during installation. See Installationmodes of Talend Installer and Talend Studio Installer on page 23 and Using Talend Installer graphical installation mode onpage 25 for more information.
Procedure
In the Talend Administration Center Configuration step of the Installer, select the Enable SSO check box to activate SSOduring installation and continue the installation process.
Results
SSO is activated, which means the first time the administrator logs in Talend Administration Center, he or she will be able toconfigure the link between the application and his or her Identity provider system directly from the Talend AdministrationCenter Database Configuration page.
For more information, see Talend Administration Center User Guide.
Enabling Single-Sign On for Talend Administration Center in the configuration file
Procedure
1. Open the <tomcat_path>/WEB-INF/classes/configuration.properties file to edit it.
2. Set the sso.field.useSSOLogin parameter value to true and save your changes.
Results
SSO is activated, which means the first time the administrator logs in Talend Administration Center, he or she will be able toconfigure the link between the application and his or her Identity provider system directly from the Talend AdministrationCenter Database Configuration page.
For more information, see Talend Administration Center User Guide.
Linking Talend Administration Center to an Identity Provider
Procedure
1. Log in to Talend Administration Center.

Installing your Talend Data Integration manually
45
2. From the Configuration page, expand the SSO node.
3. If SSO has not been enabled yet, select true in the Use SSO Login field.
4. Click Launch Upload in the IDP metadata field and upload the Identity Provider (IdP) metadata file you have previouslydownloaded from your Identity Provider system.
5. In the Service Provider Entity ID field, enter the Entity ID of your Service Provider (available in the configuration of theIdP).
You can find examples following this link.
6. Click Launch Upload in the IDP Authentication Plugin field and upload the Identity Provider metadata file you havepreviously downloaded from the Identity Provider system.
The jar files provided by Talend are located in the <TomcatPath>/webapps/org.talend.administrator/idp/plugins directory.
It is possible to rewrite the authentication code if necessary.
The Identity Provider System field changes automatically depending on your Identity Provider system.
7. Click Identity Provider Configuration and fill out the required information.
You can find examples following this link.
8. Set the Use Role Mapping field to true to map the application project types and the user roles with those defined in theIdentity Provider system.
Once you have defined project types/roles at the Identity Provider side, you cannot to edit them from TalendAdministration Center.
9. Click Mapping Configuration and fill in the role/project type fields with the corresponding SAML attributes previouslyset in the Identity Provider system.
Project type examples:
• MDM = MDM• DI = DI• DM = DM• NPA = NPA
Role examples:
• Talend Administration Center roles
• Administrator = tac_admin• Operation Manager = tac_om
Setting the Talend Administration Center roles is mandatory.• Talend Data Preparation roles
• Administrator = dp_admin• Data Preparator = dp_dp
• Talend Data Stewardship roles
• Data Steward = tds_ds
The project types and roles set in the Identity Provider will override the roles set in Talend Administration Center.
The project types and roles set in the Identity Provider override the roles set in Talend Administration Center at userlogin.
If your organization does not accept custom attributes in the SAML token, either:
a) Select Show Advanced Configuration in the wizard and, in Path to Value, enter the XPath expression to target theSAML value to map to the corresponding Talend Administration Center object (Project Types, Roles, Email, FirstName, Last Name).
Example: /saml2p:Response/saml2:Assertion/saml2:AttributeStatement/saml2:Attribute[@Name='tac.projectType']/saml2:AttributeValue/text()
b) Set Use Role Mapping to false.
In this case, you cannot create users manually, but the user type and the user roles can be edited in TalendAdministration Center.
When users log in for the first time, their type is No Project Access.

Installing your Talend Data Integration manually
46
The default login timeout is set to 120 seconds, which you can change by adding the sso.config.clientLoginTimeout parameter with the desired timeout to the <ApplicationPath>/WEB-INF/classes/configuration.properties file.
Results
You are able to log in to Talend Administration Center through your Identity Provider.
Defining an emergency user for Talend Administration CenterIn case your Identity Provider is temporarily unavailable and you need to connect to Talend Administration Center, you havethe possibility to create a temporary emergency user.
Procedure
1. Open the following file to edit it:
<tomcat_path>WEB-INF\classes\configuration.properties
2. Uncomment the parameters sso.emergency.username and sso.emergency.password, edit the credentials ofthe emergency user if needed then save your changes.
3. Restart Tomcat.
4. Log into Talend Administration Center using the previously defined credentials. After logging out from the currentsession, this user account will be removed.
Setting up High Availability
Installing Tomcat in cluster mode
Procedure
1. Install one Tomcat server.
2. Edit the <ApplicationPath>/WEB-INF/classes/quartz.properties file.
3. Uncomment the following lines by removing the hash character preceding the command:
#org.quartz.scheduler.instanceName = MyClusteredScheduler#org.quartz.scheduler.instanceId = AUTO#org.quartz.jobStore.isClustered = true#org.quartz.jobStore.clusterCheckinInterval = 20000
4. Share the user-defined Jobs folder and task logs folder with the new Tomcat instance.
5. Start Tomcat to deploy Talend Administration Center.
Duplicating Tomcat and the TAC web application
Procedure
1. Duplicate this Tomcat instance on different servers, as many times as needed.
Warning: It is not supported to have the different Talend Administration Center Tomcat servers on the same OSinstance when configuring high availability.
Warning: Make sure that all system clocks are synchronized (the clocks must be within a second of each other).For more information on time-sync services, please refer to the appropriate Microsoft documentation about SNTP,Windows Time Service tools and Network Clocks.
2. Duplicate the org.talend.administrator Web application to all Tomcat instances. Make sure that all Webapplication configurations are identical.
3. Launch one Tomcat instance following the commands given in Deploying Talend Administration Center on ApacheTomcat on page 35.
4. Launch the other instances of Tomcat following the same procedure.

Installing your Talend Data Integration manually
47
Results
Fail-over will occur when one of the multiple execution servers fails while in the midst of executing one or more tasks.When a server fails, the other servers of the cluster detect the condition and identify the tasks in the database that were inprogress within the failed server. Any tasks marked for recovery will be taken over by another server.
Note that the ranking of servers to be used for load balancing is based on indicators, whose bounds (such as free disk spacelimits) and weight are defined in the file: monitoring_client.properties which is located in <ApplicationPath>/WEB-INF/lib/org.talend.monitoring.client-A.B.C.jar. These values can be edited according to yourneeds. For more information, see Configuring the indicators which determine which server to be used for load balancing onpage 52.
Note: One known minor issue related to the DST change might prevent the failover to operate properly. However as asimple workaround, simply restart Tomcat after the time change. This should have no impact on executions.
Migrating database X to database Y
If you want to migrate from one database to another, for example from H2 to MySQL, you need to use the MetaServletcommand called migrateDatabase.
As the source database is updated during the migration process, it is mandatory to back it up before migrating it.
The MetaServlet application is located in <TomcatPath>/webapps/<TalendAdministrationCenter>/WEB-INF/classes folder.
To display the help of this command (with related parameters), you need to enter the following in the MetaServletapplication:
./MetaServletCaller.sh --tac-url=<yourApplicationURL> -h migrateDatabase
For more information on the MetaServlet application, see the Talend Administration Center User Guide.
Warning: When migrating to Postgresql or MSSQL/SQLServer, the database and schema name must match the one of thesource database.
See below an example of migration between H2 and MySQL databases.
To be able to use this command, you need to put it on one single line first.
./MetaServletCaller.sh --tac-url http://localhost:8080/org.talend.administrator --json-params='{"actionName":"migrateDatabase","dbConfigPassword":"admin","mode":"synchronous","sourcePasswd":"tisadmin","sourceUrl":"jdbc:h2:/home/Talend/<version>/tac/apache-tomcat/webapps/org.talend.administrator/WEB-INF/database/talend_administrator","sourceUser":"tisadmin","targetPasswd":"root","targetUrl":"jdbc:mysql://localhost:3306/base","targetUser":"root"}'
Warning:
• Encode special characters in source/target database URL. For example, encode & as %26 and ; as %3B.• Use single quote for *json-params, for example:
./MetaServletCaller.sh --tac-url http://192.168.30.36:8080/org.talend.administrator-7.3.1/ -v --json-params='{"actionName":"migrateDatabase","skipBackup":"true","dbConfigPassword":"admin","mode":"synchronous","sourcePasswd":"root","sourceUrl":"'jdbc:mysql://mysql-8:3306/tac?useSSL=false%26serverTimezone=UTC%26allowPublicKeyRetrieval=true'","sourceUser":"root","targetPasswd":"Root1234!","targetUrl":"'jdbc:sqlserver://mssql-2017:1433%3BdatabaseName=tac'","targetUser":"sa"}'
Use case: Migrating database X to database Y using MetaServlet
The examples use the following conventions:
Talend Administration Center URL
http://tac.test.fr:8081/org.talend.administrator/DB config password: admin
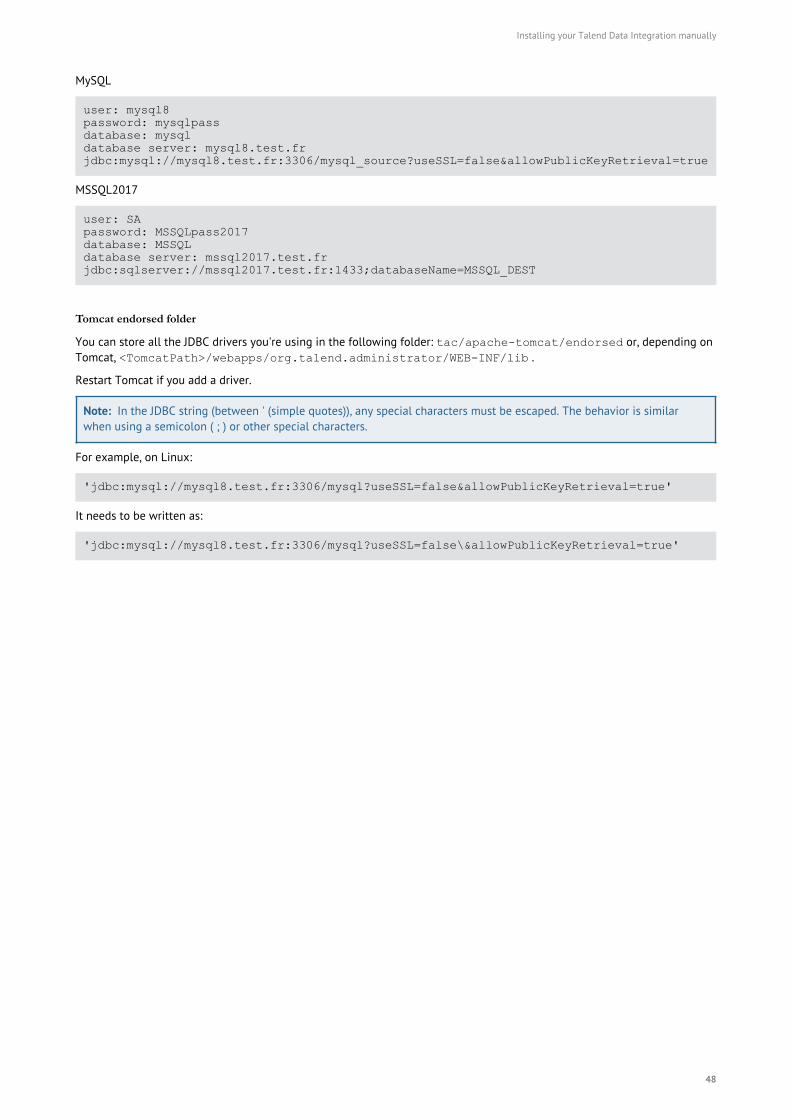
Installing your Talend Data Integration manually
48
MySQL
user: mysql8password: mysqlpassdatabase: mysqldatabase server: mysql8.test.frjdbc:mysql://mysql8.test.fr:3306/mysql_source?useSSL=false&allowPublicKeyRetrieval=true
MSSQL2017
user: SApassword: MSSQLpass2017database: MSSQLdatabase server: mssql2017.test.frjdbc:sqlserver://mssql2017.test.fr:1433;databaseName=MSSQL_DEST
Tomcat endorsed folder
You can store all the JDBC drivers you're using in the following folder: tac/apache-tomcat/endorsed or, depending onTomcat, <TomcatPath>/webapps/org.talend.administrator/WEB-INF/lib .
Restart Tomcat if you add a driver.
Note: In the JDBC string (between ' (simple quotes)), any special characters must be escaped. The behavior is similarwhen using a semicolon ( ; ) or other special characters.
For example, on Linux:
'jdbc:mysql://mysql8.test.fr:3306/mysql?useSSL=false&allowPublicKeyRetrieval=true'
It needs to be written as:
'jdbc:mysql://mysql8.test.fr:3306/mysql?useSSL=false\&allowPublicKeyRetrieval=true'

Installing your Talend Data Integration manually
49
Migration from MySQL to MySQL
Use the following command:
mysql> drop database mysql_dest;Query OK, 12 rows affected (0.10 sec) mysql> create database mysql_dest;Query OK, 1 row affected (0.00 sec) mysql> grant ALL PRIVILEGES on *.* to 'mysql8'@'%';Query OK, 0 rows affected (0.01 sec)
# /opt/Talend/tac/apache-tomcat/webapps/org.talend.administrator/WEB-INF/classes/MetaServletCaller.sh --tac-url http://tac.test.fr:8081/org.talend.administrator/ -v --json-params='{"actionName":"migrateDatabase","skipBackup":"true","dbConfigPassword":"admin","mode":"synchronous","sourcePasswd":"mysqlpass","sourceUrl":"'jdbc:mysql://mysql8.test.fr:3306/mysql?useSSL=false\&allowPublicKeyRetrieval=true'","sourceUser":"mysql8","targetPasswd":"mysqlpass","targetUrl":"'jdbc:mysql://mysql8.test.fr:3306/mysql_dest?useSSL=false\&allowPublicKeyRetrieval=true'","targetUser":"mysql8"}' -> URL: http://tac.test.fr:8081/org.talend.administrator/-> Json parameters: {"actionName": "migrateDatabase","dbConfigPassword": "admin","mode": "synchronous","skipBackup": "true","sourcePasswd": "mysqlpass","sourceUrl": "jdbc:mysql://mysql8.test.fr:3306/mysql?useSSL=false&allowPublicKeyRetrieval=true","sourceUser": "mysql8","targetPasswd": "mysqlpass","targetUrl": "jdbc:mysql://mysql8.test.fr:3306/mysql_dest?useSSL=false&allowPublicKeyRetrieval=true","targetUser": "mysql8"}-> Complete request: http://tac.test.fr:8081/org.talend.administrator//metaServlet?eyJhY3Rpb25OYW1lIjoibWlncmF0ZURhdGF...{"executionTime":{"millis":20052,"seconds":20},"returnCode":0}
Migration from MySQL to MSSQL
If you're migrating to MSSQL/SQLServer, the source database and destination database name must be dbo. The dbo sourcedatabase needs to be the active Talend Administration Center database.
Use the following command to create a destination database and schema:
$ /opt/mssql-tools/bin/sqlcmd -S localhost -U SA -P MSSQLpass20171> CREATE DATABASE dbo;2> go

Installing your Talend Data Integration manually
50
# /opt/Talend/tac/apache-tomcat/webapps/org.talend.administrator/WEB-INF/classes/MetaServletCaller.sh --tac-url http://tac.test.fr:8081/org.talend.administrator/ -v --json-params='{"actionName":"migrateDatabase","skipBackup":"true","dbConfigPassword":"admin","mode":"synchronous","sourcePasswd":"mysqlpass","sourceUrl":"'jdbc:mysql://mysql8.test.fr:3306/dbo?useSSL=false\&allowPublicKeyRetrieval=true'","sourceUser":"mysql8","targetPasswd":"MSSQLpass2017","targetUrl":"'jdbc:jtds:sqlserver://mssql2017.test.fr:1433/dbo'","targetUser":"SA"}' -> URL: http://tac.test.fr:8081/org.talend.administrator/-> Json parameters:{"actionName": "migrateDatabase","dbConfigPassword": "admin","mode": "synchronous","skipBackup": "true","sourcePasswd": "mysqlpass","sourceUrl": "jdbc:mysql://mysql8.test.fr:3306/dbo?useSSL=false&allowPublicKeyRetrieval=true","sourceUser": "mysql8","targetPasswd": "MSSQLpass2017","targetUrl": "jdbc:jtds:sqlserver://mssql2017.test.fr:1433/dbo","targetUser": "SA"}-> Complete request: http://tac.test.fr:8081/org.talend.administrator//metaServlet?eyJhY3Rpb25OYW1lIjoibWlncmF0ZURhdGF...{"executionTime":{"millis":20062,"seconds":20},"returnCode":0}
Migrating from MSSQL to MySQL
Use the following command:
# /opt/Talend/tac/apache-tomcat/webapps/org.talend.administrator/WEB-INF/classes/MetaServletCaller.sh --tac-url http://tac.test.fr:8081/org.talend.administrator/ -v --json-params='{"actionName":"migrateDatabase","skipBackup":"true","dbConfigPassword":"admin","mode":"synchronous","sourcePasswd":"MSSQLpass2017","sourceUrl":"'jdbc:jtds:sqlserver://mssql2017.test.fr:1433/mssql_test'","sourceUser":"SA","targetPasswd":"mysqlpass","targetUrl":"'jdbc:mysql://mysql8.test.fr:3306/mysql_dest?useSSL=false\&allowPublicKeyRetrieval=true'","targetUser":"mysql8"}' -> URL: http://tac.test.fr:8081/org.talend.administrator/-> Json parameters:{"actionName": "migrateDatabase","dbConfigPassword": "admin","mode": "synchronous","skipBackup": "true","sourcePasswd": "MSSQLpass2017","sourceUrl": "jdbc:jtds:sqlserver://mssql2017.test.fr:1433/mssql_test","sourceUser": "SA","targetPasswd": "mysqlpass","targetUrl": "jdbc:mysql://mysql8.test.fr:3306/mysql_dest?useSSL=false&allowPublicKeyRetrieval=true","targetUser": "mysql8"}-> Complete request: http://tac.test.fr:8081/org.talend.administrator//metaServlet?eyJhY3Rpb25OYW1lIjoibWlncmF0ZURhdGF...{"executionTime":{"millis":28108,"seconds":28},"returnCode":0}
Managing the database parameters
The configuration parameters are stored in the database, except for the parameters related to the Talend AdministrationCenter database that are stored in the following file:
<ApplicationPath>/WEB-INF/classes/configuration.properties
The database-related passwords are encrypted at start up, when this file is parsed and loaded in the database.

Installing your Talend Data Integration manually
51
Change the encrypted default account password
Procedure
1. Open the configuration.properties file to edit it.
2. Note that the encrypted password is followed by: ,Encrypt
Remove all that is after the = sign, including ,Encrypt, and type in the new password of the default account.
3. Save your changes and close the file. At next startup, the password will be encrypted in the database and the file will beupdated with this encrypted password.
Change the default password used to configure the database
After the first connection, it is strongly recommended not to use the default user account to access the application forsecurity reasons. You can either change the default credentials of this account ([email protected]/admin) orcreate another administrator user and remove the default account. This account has only the role Security Administrator. Itstype is No Project Access so it does not count in the license.
About this task
You can also follow these steps if you are unable to login to the database configuration page of Talend AdministrationCenter.
Procedure
1. Stop your Talend Administration Center instance.
2. Scroll down the configuration.properties file until you find the database.config.password parameter.
3. Change the admin default password to a more individual and secure password, in plain text.
4. Save the file.
5. Restart your Talend Administration Center instance using the new password.
Clearing lock of taskexecutionhistory table
About this taskIf you encounter lock issue of the taskexecutionhistory table in the database, follow these steps to resolve it.
Procedure
1. Open the configuration.properties file to edit it.
2. Set lockTimeout for connection pool by URL, for example:
jdbc:sqlserver://localhost:1433/tac801;lockTimeout=1800
In cluster mode, change this connection URL on all instances of Talend Administration Center.
It is also recommended to enable the READ_COMMITTED_SNAPSHOT option:
ALTER DATABASE <database name> SET READ_COMMITTED_SNAPSHOT ON WITH ROLLBACK IMMEDIATE;
3. Save your changes and close the file.

Installing your Talend Data Integration manually
52
Managing the connection pool via Tomcat
By default, a third-party application (c3p0) has been embedded into the configuration file of Talend Administration Center, tomanage the connection pool.
The following procedure allows Tomcat to manage directly the connection pool. You can also apply this procedure to JBoss.
Procedure
1. In the <ApplicationPath>/WEB-INF/classes folder, change the default setting of the configuration.properties file to:
database.useContext=True
2. In the WEB-INF folder, edit the web.xml file and add the following piece of code before the closing tag </web-app>:
<resource-ref>
<description>Our Datasource</description> <res-ref-name>jdbc/ADMINISTRATOR_CONNECTION</res-ref-name> <res-type>javax.sql.DataSource</res-type> <res-auth>Container</res-auth>
</resource-ref>
3. In the WEB-INF folder, edit the context.xml file and configure the parameters of connection to the database bymodifying the following elements:
Element name Value Note
jdbc:mysql://{ip_address}:3306/{db_name} For MySQL, where ip_addresscorresponds to the database IP addressand db_name corresponds to its name.
jdbc:oracle:thin:@{ip_address}:1521:{db_name} For Oracle, where ip_addresscorresponds to the database IP addressand db_name corresponds to its name.
jdbc:jtds:sqlserver://{ip_address}:1433/{db_name} For SQL Server, where ip_addresscorresponds to the database IP addressand db_name corresponds to its name.
url
jdbc:h2:file:{dir_path/}<db_name>;MVCC=TRUE;AUTO_SERVER=TRUE; LOCK_TIMEOUT=15000
For H2, where dir_path correspondsto the database path and db_namecorresponds to its name.
username The username used to log in your database, talend_admin bydefault.
-
password The password used to log in your database, talend_admin bydefault.
-
org.gjt.mm.mysql.Driver For MySQL.
oracle.jdbc.driver.OracleDriver For Oracle.
net.sourceforge.jtds.jdbc.Driver For SQL Server.
driverClassName
org.h2.Driver For H2.
4. Copy the relevant .jar file corresponding to the database in which your data is stored in <TomcatPath>/lib/.
Configuring the indicators which determine which server to be used for load balancing
You can edit and overwrite the default configuration used to determine which server to be used for load balancing in clustermode.
Procedure
1. Open the monitoring_client.properties file which is located in the following .jar file:

Installing your Talend Data Integration manually
53
<ApplicationPath>/WEB-INF/lib/org.talend.monitoring.client-x.y.z.rabcd.jar
2. The weight values defined in this file will impact the server to be used to process data. Edit the values according to yourneeds and save your modifications.
3. Copy the edited file in the following directory to overwrite the one located in the .jar file:
<ApplicationPath>/WEB-INF/lib/org.talend.monitoring.client-x.y.z.rabcd.jar
Job server rate computationThis document describes how execution servers in Talend Administration Center are assigned stars, in other words, how aserver is said to be better than another for a Job execution.
The Job server is a probe running on the execution server. It will measure some features of the execution server such as theavailable memory, the available disk space, and so on. This information is sent to Talend Administration Center which thencomputes a rate value for this server.
A server has a set of features:
• the free disk space• the free physical memory• the free swap memory• the idle CPU usage• the nice CPU usage• the total CPU usage• the number of CPU
Some features are more important than the other. Therefore, you can weight these features to give more importance to someof them. This weight is set by the user in the monitoring_client.properties file. Let's call weight{i} the weightof the ith feature.
You can choose the range in which the feature is supposed to be good enough. This means you set some limits to be fulfilledby the feature of the server. For instance, a server is not a good server for the execution of the Job if it does not have 1Go ofdisk space. The lower limit on the disk would therefore be 1Go (to be set in the monitoring_client.properties file).Let's call Min{i} the lower limit defined on feature i and Max{i} its upper limit.
The server has an actual value for each feature. For instance, the server i has only 500 MB of free disk space. Let's call thisvalue the actual value of the feature: value{i}.
The basic assumption is that the server is perfect as long as all of its features have actual values in the range defined by thelimits. When some of its features have values outside the defined ranges, the server is not very good.
How to compute the Job server rate
Let's define the offset of the feature as the difference between the limit and the actual value.
value{i} - Max{i}, when value{i} > Max{i}
0, when Min{i} < value{i} < Max{i}Offset{i}=
Min{i} - value{i}, when value{i} < Min{i}
The relative offset is given by the offset divided by the range:
rel_offset{i} = offset{i} / [ Max{i} - Min{i} ]
It's a positive value.

Installing your Talend Data Integration manually
54
The rate of the server is computed as a weighted sum of all its relative offsets times a factor of -100:
rate = -100 Σ weight{i} x rel_offset{i}
At this stage, the rate is an unbounded negative number. In order to get a number between 0 and 100, the following formulais used:
normalized rate = 100 / [ 1 - rate / scale ]
where scale = 2000.
The scale is an arbitrary number that indicates the sensitivity to bad values. A normalized rate equal to 100 means that theserver is good. A normalized rate lower than 100 means that the server is not so good. The lower the normalized rate is, theworst is the server. When all feature values are in the expected ranges, then the rate is 0 and the normalized rate is 100.
If the disk space is required to be between 1 GB and 2 GB and the actual disk space is 500 MB, then the relative offset is 1/2.The weight being 8, the normalized rate will be 100/ [ 1 + 400/2000 ] = 83.33.
The below chart shows how the rate evolves according to the free disk space of the server and for two different weights(supposing that all other server features are inside the defined limits).
The server rate updates each 90 seconds, which could be changed by setting the value of the parameter notification.conf.checking.frequencyCheckJobServerState.
Talend Administration Center lists rated servers in descending order, checks one by one from higher rate to lower rate to findout the best one, which should also have deployed Job.
Customizing the Talend Administration Center Menu tree view
You have the possibility to customize the Menu tree view of the Talend Administration Center Web application by addingdynamic links to the website of your choice.
Procedure
1. Open the following file:
<ApplicationPath>/WEB-INF/classes/configuration.properties

Installing your Talend Data Integration manually
55
2. At the end of the file, enter the dynamic link to the website of your choice using the following syntax:dynamiclink.<key>=<label>#<url>#<order>.
For example, you can create the link to http://www.talend.com by entering: dynamiclink.talendcom=Talend#http://www.talend.com#8.
In this syntax, <key> indicates the technical key of this link configured, <label> is the link name displayed on theMenu tree view, <url> is the website address you need to link to and <order> specifies the position of this link onthe Menu tree view.
Note: For further information about the order numbers used by Talend Administration Center to arrange the Menuitems, check the menuentries.properties file provided in the same classes folder.
3. Save the configuration.properties file edited.
For more information on how these links are displayed in the Menu tree view of the Talend Administration Center Webapplication, see the Talend Administration Center User Guide.
Configuring Talend Administration Center login delay
Setting up a login delay allow you to improve the security of your Web application by slowing brute force attacks.
Procedure
In the configuration table of the Talend Administration Center database, change the value of the useLoginDelayparameter to true.
Results
Failed login attempts will now generate a time delay which increases exponentially with each failed attempt.
Configuring LDAP(S) for Talend Administration Center
Generate a key
Procedure
1. Create a folder where you want to store your Keystore.
2. Open a terminal.
3. Using the cd command, go to the folder you created.
4. Enter the following command:
<JAVA_HOME>/bin/keytool -genkey -keystore <myKeystoreName> -keyalg RSA
Replace <JAVA_HOME> with the path to the folder where Java is installed and <myKeystoreName> with the name ofyour Keystore.
5. Enter the password you want to create for your Keystore twice. Then, if needed, enter other optional information, suchas your name or the name of your organization.
6. Enter yes to confirm the information you provided.
7. Enter the password you have previously defined.
Configure LDAP(S) for Talend Administration CenterTo set the new Keystore location, edit the JAVA_OPTS environment variable.
Procedure
To edit the JAVA_OPTS environment variable, add the following lines to your JAVA_OPTS environment variable:
-Djavax.net.ssl.keyStore=/<myDirectory>/<myKeystore>-Djavax.net.ssl.keyStorePassword=<myPassword>
In this example, <myDirectory> is the installation directory of your Keystore, <myKeystore> is the name of yourKeystore and <myPassword> is the password you have previously defined for your Keystore.

Installing your Talend Data Integration manually
56
To enable the debug logging of LDAP client, add the following line in the <ApplicationPath>/WEB-INF/classes/log4j.xml file:
<logger name="org.apache.directory.api" additivity="true"> <level value="debug" /> </logger>
Then restart Talend Administration Center and set log threshold to TRACE in the Logs group of the Configuration page.
Managing encryption of Git passwords in LDAP for Talend Administration Center
If you are using LDAP authentication in Talend Administration Center, you may want to encrypt the Git password thatis stored in it. Once you have encrypted your password, you need to compile a Java class that will allow you to managepassword decryption in Talend Administration Center.
Apache Subversion is deprecated from 7.3.1 R2021-08 release onwards
Before you begin
• You have previously encrypted your password using the library of your choice. This library will be used both to encryptand decrypt your password.
• The Tomcat server holding Talend Administration Center is stopped.
Procedure
1. Create a class file named DecryptLdapPassword.java based on the following code:
import org.talend.administrator.common.crypto.LDAPCrypto;/** * */public class DecryptLdapPassword implements LDAPCrypto { @Override public String decrypt(String encryptedPassword) throws Exception { String decryptedPassword = null; // // instructions to decrypt password // return decryptedPassword; }}
2. If you are using an IDE:
a) Add the <TalendAdministrationCenterPath>/WEB-INF/classes folder of your Talend AdministrationCenter application to the classpath of your project.
b) Add your algorithm library to the classpath.c) Insert required instructions to decrypt the Git password stored in LDAP.
If you are not using an IDE:
a) Execute the following command to compile the .jar used for your decryption library as well as the java class inthe directory of your choice:
On UNIX systems:
cd <directoryOfMyJavaClass_DecryptLdapPassword>javac -classpath .:/org.talend.administrator-6.0.1-SNAPSHOT/WEB-INF/classes/:<myDirectory>/encryptionAlgorithm.jar DecryptLdapPassword.java
On Windows systems:
cd directoryOfMyJavaClass_DecryptLdapPasswordjavac -classpath .;c:\org.talend.administrator-6.0.1-SNAPSHOT\WEB-INF\classes\;c:\my\directory\encryptionAlgorithm.jar DecryptLdapPassword.java
3. Get the compiled class DecryptLdapPassword.class and copy it to the following directory: <TalendAdministrationCenterPath>/WEB-INF/classes
4. Open the file <TalendAdministrationCenterPath>/WEB-INF/classes/configuration.properties,uncomment the ldap.decryption.class= line and enter the class you have compiled as value of the property.

Installing your Talend Data Integration manually
57
5. Copy the .jar file used for the encryption algorithm in the following folder: <TalendAdministrationCenterPath>/WEB-INF/lib
6. Restart the Tomcat server.
Configuring SSL for Talend Administration Center and client applications
Setting up a self-signed certificateConfigure TLS/SSL in Talend Administration Center
Procedure
1. Create a keystore containing a self signed certificate using the command:
keytool -genkey -keyalg RSA -alias tac-tomcat -keystore tac-tomcat-keystore.jks -storepass tacadmin -validity 3600 -keysize 2048
2. Enter the password for your keystore twice, then enter the other optional information, such as your name, the name ofyour organization, your state and so on, if needed. For example,
Enter keystore password:Re-enter new password:What is your first and last name?[Unknown]: localhostWhat is the name of your organizational unit?[Unknown]: DevelopmentWhat is the name of your organization?[Unknown]: TalendWhat is the name of your City or Locality?[Unknown]: SuresnesWhat is the name of your State or Province?[Unknown]: FRWhat is the two-letter country code for this unit?[Unknown]: FRIs CN=localhost, OU=TAC, O=Talend SA, L=Suresnes, ST=FR, C=FR correct?[no]: YEnter key password for (RETURN if same as keystore password):
Make sure to use the same password for key and file.
3. Open the following file:
<TAC_HOME>/apache-tomcat/conf/server.xml
4. Comment the non-SSL part.
<Connector executor="tomcatThreadPool"port="8080" protocol="HTTP/1.1"connectionTimeout="20000"throwOnFailure="true"redirectPort="8443" />
5. Add the keystore certificate to Apache Tomcat trustore.
#export certificate into .cert filekeytool -keystore tac-tomcat-keystore.jks -alias tac-tomcat -export -file tac-tomcat.cert#import certificate into jkskeytool -keystore tac-tomcat-truststore.jks -alias tac-tomcat -import -file tac-tomcat.cert
This is necessary to avoid the following exception:
Caused by: sun.security.provider.certpath.SunCertPathBuilderException: unable to find valid certification path to requested target during user authentication.
6. Open the following file:
<TAC_HOME>/apache-tomcat/setenv.sh
7. Change the line
set "JAVA_OPTS=%JAVA_OPTS% -Xmx4096m -Dfile.encoding=UTF-8"

Installing your Talend Data Integration manually
58
with
set "JAVA_OPTS=%JAVA_OPTS% -Xmx4096m -Dfile.encoding=UTF-8 -Djavax.net.ssl.trustStore=$CATALINA_HOME/conf/tac-tomcat-truststore.jks -Djavax.net.ssl.trustStorePassword=tacadmin"
8. Restart Talend Administration Center.
Check the Talend Administration Center URL with the following address https://localhost:8443/org.talend.administrator.
For more information, see https://tomcat.apache.org/tomcat-9.0-doc/ssl-howto.html.
Configure TLS/SSL in Talend JobServer
Procedure
Edit the Talend JobServer start script start_rs.sh to set the JVM arguments to trust the Talend AdministrationCenter.
MY_JMV_ARGS="-Djavax.net.ssl.trustStore=/path/tac-tomcat-truststore.jks -Djavax.net.ssl.trustStorePassword=tacadmin"
Enable SSL for Nexus 3
Note: For more information on the Nexus directories, see https://help.sonatype.com/repomanager3/installation-and-upgrades/directories.
Procedure
1. Copy the keystore file into the $install-dir/etc/ssl folder.
2. Copy the keystore file into the $install-dir\etc\ssl folder.
3. Edit the $data-dir/etc/nexus.properties file to add the SSL port and the reference to the SSL configurationfile.
# Jetty sectionapplication-port=8081application-port-ssl=8441application-host=0.0.0.0nexus-args=${jetty.etc}/jetty.xml,${jetty.etc}/jetty-http.xml,${jetty.etc}/jetty-https.xml,${jetty.etc}/jetty-requestlog.xmlnexus-context-path=/
4. Edit the SSL configuration file $install-dir/etc/jetty/jetty-https.xml for the certificate and password:
<New id="sslContextFactory" class="org.eclipse.jetty.util.ssl.SslContextFactory"> <Set name="KeyStorePath"><Property name="ssl.etc"/>/keystore.jks</Set> <Set name="KeyStorePassword">password</Set> <Set name="KeyManagerPassword">password</Set>
The path must just be the name of the keystore file (preceded by a slash) as the file must be in a specific directory.
5. Start Nexus and you can login to Nexus URL using SSL port.
Enable SSL for Artifactory
Procedure
1. Generate the CA key.
openssl genrsa -out local.key 2040Generating RSA private key, 2040 bit long modulus (2 primes)..............................+++++.......+++++e is 65537 (0x010001)
The local.key file is generated.

Installing your Talend Data Integration manually
59
2. Generate a CA certificate request.
➜ zhengshu openssl req -new-key local.key -out local.csrreq: Unrecognized flag new-keyreq: Use -help for summary.➜ zhengshu openssl req -new -key local.key -out local.csrYou are about to be asked to enter information that will be incorporatedinto your certificate request.What you are about to enter is what is called a Distinguished Name or a DN.There are quite a few fields but you can leave some blankFor some fields there will be a default value,If you enter '.', the field will be left blank.-----Country Name (2 letter code) [AU]:FRState or Province Name (full name) [Some-State]:FRLocality Name (eg, city) []:SurnessOrganization Name (eg, company) [Internet Widgits Pty Ltd]:TalendOrganizational Unit Name (eg, section) []:DeveloperCommon Name (e.g. server FQDN or YOUR name) []:RDEmail Address []:[email protected] Please enter the following 'extra' attributesto be sent with your certificate requestA challenge password []:tacadminAn optional company name []:tac
The local.csr file is generated.
3. Generate the CA root certificate.
openssl x509 -req -in local.csr -extensions v3_ca -signkey local.key -out local.crtSignature oksubject=C = FR, ST = FR, L = Surness, O = Talend, OU = Developer, CN = RD, emailAddress = [email protected] Private key➜ zhengshu ltotal 20Kdrwxrwxr-x 2 oem oem 4.0K 11月 9 16:06 .drwxr-xr-x 44 oem oem 4.0K 11月 9 16:06 ..-rw-rw-r-- 1 oem oem 1.3K 11月 9 16:06 local.crt-rw-rw-r-- 1 oem oem 1.1K 11月 9 16:04 local.csr-rw------- 1 oem oem 1.7K 11月 9 16:02 local.key➜ zhengshu openssl genrsa -out my_server.key 2040Generating RSA private key, 2040 bit long modulus (2 primes)...................+++++..........+++++e is 65537 (0x010001)
The local.crt file is generated.
4. Configure a Custom Base URL in Artifactory.
a) On the Admin tab, select Configuration > General > Custom Base URL.b) Set the Custom Base URL field to the value used to contact Artifactory. For example: https://yourdo
main.com.
For more information on configuring the base URL, see https://www.jfrog.com/confluence/display/JFROG/General+System+Settings.
Defining an SSL connection to other applicationsTo configure secured connection (SSL/TLS) to other applications in Talend Administration Center, you need to specifythe keystore.path, keystore.password, truststore.path, truststore.password properties in theconfiguration.properties file.
If you used secured connection in previous versions and these properties were not specified before, then import correctcertificate to keystore and truststore and specify the keystore.path, keystore.password, truststore.path,truststore.password properties in the configuration.properties file.
Procedure
1. Stop your Tomcat server.
2. Open the following file:
<ApplicationPath>/WEB-INF/classes/configuration.properties

Installing your Talend Data Integration manually
60
3. Uncomment and edit the following lines to define your keystore path, keystore password, truststore path, and truststorepassword:
#keystore.path=c://keystore#keystore.password=changekeystorepass#truststore.path=c://truststore#truststore.password=changetruststorepass
4. Save your changes and restart your Tomcat server.
Once the passwords are read by Talend Administration Center, they will be replaced by encrypted ones.
Setting up a root Certificate Authority chainA secured HTTPS connection between Talend Administration Center webserver and client applications (Studio, Nexus/artifactory, GIT, etc.) can be achieved through a certificate chain that provides a common and long-term (>10 years)certification.
About this task
Procedure
1. Generate a certificate .cer file following various sub-steps:
a) Prepare the below values according to your configuration:
• server IP: serverIP• SAN IP:serverIP or additional domain names (if available)• Keystore password: changeit• Server Pretty Name: serverPrettyName
b) In Powershell, generate the private key with the appropriate values.
keytool -genkey -alias serverIP -keyalg RSA -keysize 4096 -keystore talendKey.jks-dname "CN=serverIP, OU=name of the organizational unit/department, O=name of thecompany/organization, ST=name of the region or state , C=name of the country" -keypass changeit -storepass changeit -ext SAN=ip:serverIP,dns:serverPrettyName
c) Perform the Certificate Signing Request with the appropriate values, to obtain a .csr file.
keytool -certreq -file serverIP.csr -keystore talendKey.jks -storepass changeit -alias serverIP -ext SAN=ip:serverIP,dns:serverPrettyName
d) Countersign the .csr file using a Certificate Authority.e) Download the approved certificate in OpenSSL format.f) Extract the first certificate content from the above file and paste it in serverIP.cer file, through a text editor tool.g) In case of a change in certificate chain or first installation, the certificate needs to be added to the truststore.
Extract the first server-related entry from the serverIP.cer file and paste it in the chain.cer file. The chain shouldinclude the root and intermediate signatures. keytool -import -file /opt/talend/talend-version/truststore/Talend_certificate/chain.cer -keystore /opt/talend/talend-version/truststore/BitTalend -alias chain
Note: If you have set self-signed certificates instead of a common Certificate Authority certificate, you can usethe certificate chain to initialise the java keystore by importing all certificates. For more information, see thecorresponding section Configuring SSL for Talend Administration Center.
2. Merge the downloaded serverIP.cer file with the key p12 file that is currently available in the JKS store:
a) Convert JKS to PKCS format using keytool: keytool -importkeystore -srckeystore talendKey.jks-destkeystore talendKey.p12 -deststoretype PKCS12
b) Extract the key file from PKCS and create a separate key file: openssl pkcs12 -in talendKey.p12 -nodes -nocerts -out talendKey.key
3. Combine the certificate, the key file and the certificate chain into a new p12 file:
openssl pkcs12 -export -in <serverIP>.cer -inkey talendKey.key -out certificate.p12 -chain -CAfile chain.cer -name <serverIp>
4. Convert p12 file to the keystore using java keytool
Nexus: keytool -importkeystore -srckeystore certificate.p12 -srcstoretype PKCS12 -destkeystore keystore

Installing your Talend Data Integration manually
61
Talend Administration Center:keytool -importkeystore -srckeystore certificate.p12 -srcstoretype PKCS12 -destkeystore /opt/talend/talend-version/truststore/BitTalend
5. If you are using Nexus, store the generated keystore (and truststore) in nexusinstall>etc>ssl subfolder. To implementthe changes, stop Nexus and restart it.
6. Make sure that keynames/passwords are correct in etc/jetty/jetty-https.xml file.
7. To configure the SSL connection:
• If the certificate is set on Tomcat webserver, enter the following command: /opt/talend/talend-version/truststore/Talend_SSL/Talend_TAC_QA" keystorePass="keystore pass".
Then configure Tomcat: open the <TomcatPath>/conf/server.xml file, uncomment and edit the SSL part asfollows:
<Connector port="8443" protocol="HTTP/1.1" SSLEnabled="true" maxThreads="150" scheme="https" secure="true" clientAuth="true" sslProtocol="TLS" keystoreFile="<SSLFolderPath/serverKeystore.jks" keystorePass=<keystorePassword> truststoreFile="<SSLFolderPath/serverTruststore.jks" truststorePass=<trustStorePassword> />
• If the certificate is only set on the webapp itself, see this section https://help.talend.com/r/en-US/7.3/installation-guide-big-data-linux/defining-ssl-connection and enter the following command: keytool -delete -alias tomcat -keystore /opt/talend/talend-version/truststore/BitTalend -storepasschangeit
ResultsRestart Talend Administration Center service.
Enter Talend Administration Center URL: https://localhost:8080/org.talend.administrator in a browser. The
application is now displayed together with a green padlock icon: .
Setting the custom key for encryption
In the <tomcat_path>\WEB-INF\classes\configuration.properties file, the master.key parameter ismandatory for encoding and decoding all sensitive information. If this parameter is missing, Talend Administration Centercan not work properly.
After the installation of Talend Administration Center, it is mandatory to rotate the master key. To do so:
1. In the Database Configuration page of Talend Administration Center, click Change master key.

Installing your Talend Data Integration manually
62
2. Enter text (there is no limitation for text) in the Change master key field and click Launch Key Rotation.
The new master key will be hashed in SHA256, encoded in base256 and saved in <tomcat_path>\WEB-INF\classes\configuration.properties. The property with information when this master key was last used isalso added. For example,
master.key.2020-08-19-17-40=âjhiàkjjiinioliâknqãolmßqppãllkßmaster.key.2020-08-19-17-40_LastUsed=2020-08-19
2020-08-19-17-40 is the identifier of the new master key which contains the master key creation time just tounderstand which master key is the latest.
Re-encryption of sensitive data will be started and execution of master key rotation will be logged in accordance tologging configuration. For more information, see Setting up the Logging parameters in Talend Administration Center UserGuide.
You can clean unused master keys manually or configure automatic cleaner in database by enabling master.key.cleaner to positive number. By default automatic master key cleaner is disabled. The value of master.key.cleanermeans the quantity of days when master key is unused before it is cleaned. The latest master key will be never deleted.
Warning:
master.key.*** properties cannot be changed or added directly in <tomcat_path>\WEB-INF\classes\configuration.properties. You can only delete unused ones.
If you have the same master.key.*** name, you need to do the rotation on one of the databases, and delete oldmaster keys.
If your Talend Administration Center is in cluster mode, proceed as follow to rotate the master key:
1. Stop all Talend Administration Center nodes in the cluster except the one where master key rotation will be executed.2. Start the master key rotation in the Database Configuration page.

Installing your Talend Data Integration manually
63
3. Copy the new master key master.key.YYYY-MM-dd-HH-ss that is generated in the <tomcat_path>\WEB-INF\classes\configuration.properties file to the configuration.properties of all Talend AdministrationCenter nodes.
4. Start the Talend Administration Center nodes that have been stopped.
Enabling browser cache in Talend Administration Center
For security reasons, Talend Administration Center supports Cache-Control attributes to protect the browser cachingof sensitive information. By default, the browser caching is disabled. The following headers are added in every TalendAdministration Center response:
Cache-Control: No-store, No-cachePrgama: No-Cache
To enable browser cache, set the value of browser.cache.enabled to true in the <tomcat_path>WEB-INF\classes\configuration.properties file.
Enabling second level cache in Talend Administration Center
You can enable second level cache in Talend Administration Center to speed up performance and decrease connections todatabase. It is recommended to enable second level cache when Talend Administration Center is used in cluster mode toachieve strong consistency.
Procedure
1. Open the following file to edit it:
<tomcat_path>WEB-INF\classes\configuration.properties
2. Set the value of hibernate.use_second_level_cache to true to enable second level cache or false todisable it as needed then save your changes. It is true by default.
Setting Secure attribute on session cookie
By default, Talend Administration Center does not set the Secure attribute on the session cookie because TalendAdministration Center might not be deployed over TLS. However, in production Talend Administration Center should bedeployed over TLS and include the Secure attribute. This can be configured at the Tomcat level.
Procedure
1. Stop your Tomcat server.
2. Open the following file:
<TomcatPath>/conf/web.xml
3. Add the following lines to the session-config section:
<cookie-config> <http-only>true</http-only> <secure>true</secure></cookie-config>
4. Save your changes and restart your Tomcat server.
Enabling HTTP Strict Transport Security
HTTP Strict Transport Security (HSTS) is a web server directive that informs user agents and web browsers how to handle itsconnection through a response header sent at the very beginning and back to the browser.
Talend Administration Center supports HSTS to instruct web browsers to only access the application using HTTPS.
To enable HSTS when accessing Talend Administration Center, the following conditions must be satisfied:
• A valid certificate which must be non self signed but verified by Certificate Authority.• Redirect from HTTP to HTTPS on the same host, if you are listening on port 8080.• Serve all sub-domains over HTTPS. In particular, you must support HTTPS for the WWW sub-domain if a DNS record for
that sub-domain exists.

Installing your Talend Data Integration manually
64
• The first access to Talend Administration Center resource should be with the HTTPS protocol. Browsers will thenremember that the site should only be accessed using HTTPS in the following 2 years.
Installing and configuring Talend Identity and Access Management
This section describes the installation and configuration of Talend Identity and Access Management that allow you tomanage the user access to Talend Data Preparation and Talend Data Stewardship.
The recommended installation method for Talend Identity and Access Management is the automatic installation with TalendInstaller.
Installing Talend Identity and Access Management
Procedure
1. Copy and extract the iam-A.B.C-distribution.zip archive file in the directory of your choice.
2. Go to iam-A.B.C/apache-tomcat-x.x.xx/bin.
3. Add the execution rights to the executable files by typing chmod 755 *.sh.
4. Start Talend Identity and Access Management by executing the startup.sh file.
Results
Now that Talend Identity and Access Management is installed, it is strongly recommended not to use the default ApacheSyncope user account to access the application for security reasons. You can change the default credentials of this account(admin/password) by editing the adminPassword parameter in the iam-A.B.C/apache-tomcat-x.x.xx/webapps/syncope/WEB-INF/classes/security.properties file. For more information, see Apache Syncopedocumentation.
You can now access the Talend Identity and Access Management Apache Syncope Console with the following URL: http://localhost:9080/syncope-console/.
Note: You cannot log into Talend Data Preparation using port 9080, this port is used for Syncope. To log into Talend DataPreparation via Talend Identity and Access Management, use port 9999.
Changing Talend Identity and Access Management database
As the embedded H2 database is not recommended for production environments, it is advised to change the Talend Identityand Access Management database.
Talend Identity and Access Management uses two different databases:
• One for the OpenId Connect service: oidc• One for the Fediz Identity Provider: idp
Procedure
1. Stop Talend Identity and Access Management if it has been already started.
2. Place the JDBC driver jar file corresponding to the database you want to use in the iam-A.B.C/apache-tomcat-x.x.xx/lib folder and make sure that it has the same permissions as the other jar files.
For more information on the supported databases, see Compatible databases on page 14.
3. Update the provisioning.properties and domains/Master.properties files as described in ApacheSyncope documentation.
4. Edit the iam-A.B.C/apache-tomcat-x.x.xx/conf/iam.properties file and update the followingparameters:
Parameter Description
idp.db.url IDP database JDBC URL.
idp.db.driverClassName Fully qualified driver class name, com.mysql.jdbc.Driver for example.
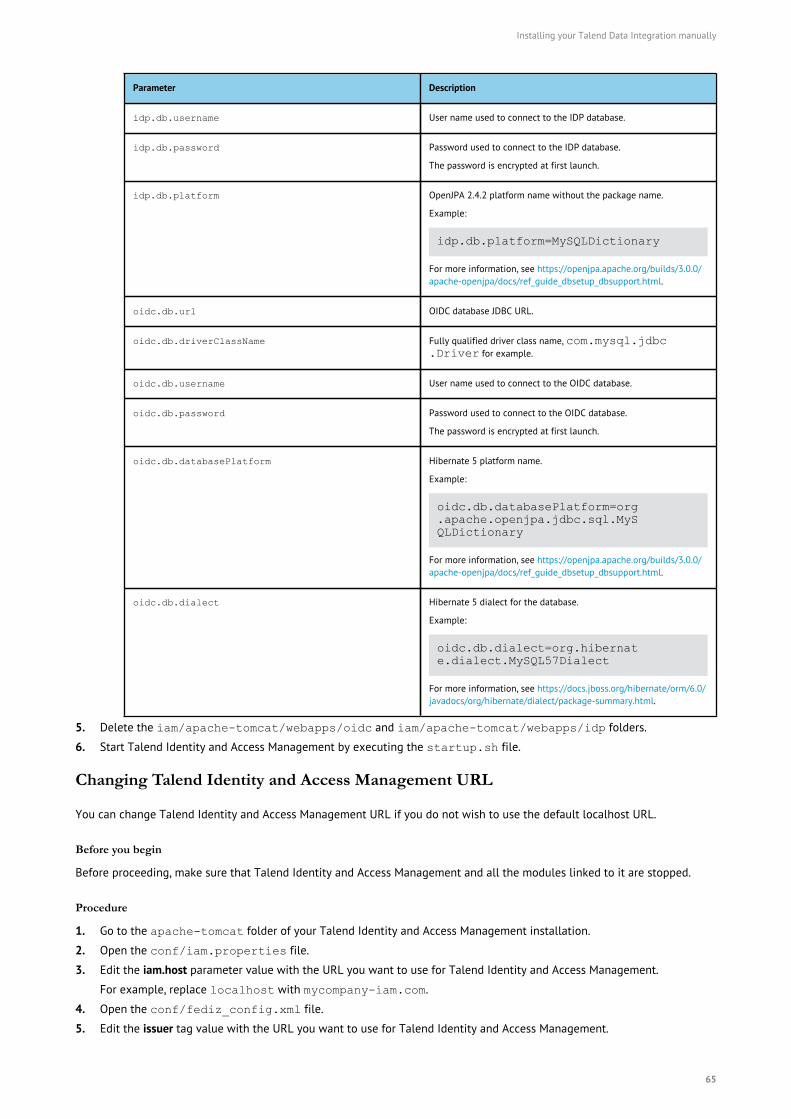
Installing your Talend Data Integration manually
65
Parameter Description
idp.db.username User name used to connect to the IDP database.
idp.db.password Password used to connect to the IDP database.
The password is encrypted at first launch.
idp.db.platform OpenJPA 2.4.2 platform name without the package name.
Example:
idp.db.platform=MySQLDictionary
For more information, see https://openjpa.apache.org/builds/3.0.0/apache-openjpa/docs/ref_guide_dbsetup_dbsupport.html.
oidc.db.url OIDC database JDBC URL.
oidc.db.driverClassName Fully qualified driver class name, com.mysql.jdbc.Driver for example.
oidc.db.username User name used to connect to the OIDC database.
oidc.db.password Password used to connect to the OIDC database.
The password is encrypted at first launch.
oidc.db.databasePlatform Hibernate 5 platform name.
Example:
oidc.db.databasePlatform=org.apache.openjpa.jdbc.sql.MySQLDictionary
For more information, see https://openjpa.apache.org/builds/3.0.0/apache-openjpa/docs/ref_guide_dbsetup_dbsupport.html.
oidc.db.dialect Hibernate 5 dialect for the database.
Example:
oidc.db.dialect=org.hibernate.dialect.MySQL57Dialect
For more information, see https://docs.jboss.org/hibernate/orm/6.0/javadocs/org/hibernate/dialect/package-summary.html.
5. Delete the iam/apache-tomcat/webapps/oidc and iam/apache-tomcat/webapps/idp folders.
6. Start Talend Identity and Access Management by executing the startup.sh file.
Changing Talend Identity and Access Management URL
You can change Talend Identity and Access Management URL if you do not wish to use the default localhost URL.
Before you begin
Before proceeding, make sure that Talend Identity and Access Management and all the modules linked to it are stopped.
Procedure
1. Go to the apache-tomcat folder of your Talend Identity and Access Management installation.
2. Open the conf/iam.properties file.
3. Edit the iam.host parameter value with the URL you want to use for Talend Identity and Access Management.
For example, replace localhost with mycompany-iam.com.
4. Open the conf/fediz_config.xml file.
5. Edit the issuer tag value with the URL you want to use for Talend Identity and Access Management.

Installing your Talend Data Integration manually
66
For example, replace http://localhost:9080/idp/federation with http://mycompany-iam.com:9080/idp/federation.
6. Drop the OIDP and the IDP databases.
• If you are using the default database, back up and delete the idp and oidc folders.• If you are using another database, back up the database and delete all the tables.
7. Edit the configuration files of all the modules linked to Talend Identity and Access Management to update the URL ofthe service.
• For Talend Data Preparation, edit the <data_prep>/config/application.properties configuration file.• For Talend Data Stewardship, edit the <tds>/apache-tomcat/conf/data-stewardship.properties
configuration file.
8. Restart all the services.
Adding additional top-level domains to Talend Identity and Access Management
By default, Talend Identity and Access Management supports fully-qualified domain names (FDQN). To use Talend Identityand Access Management with a hostname that does not follow the pattern of an FQDN, you need to add a parameter to theTalend Identity and Access Management configuration file.
Before you begin
Stop Talend Identity and Access Management and all the modules linked to it.
Procedure
1. Go to the apache-tomcat folder of your Talend Identity and Access Management installation.
2. Open the conf/iam.properties file.
3. Add the iam.additionalTLDs parameter to the iam.properties file.
The parameter value identifies valid top-level domain names.
• iam.additionalTLDs=lan: All domain names on the LAN are valid.• iam.additionalTLDs=mycompany: The domain name mymachine.mycompany is valid.• iam.additionalTLDs=mycompany,mycompany2: List multiple top-level domain names by using comma-separated
values.
4. Restart Talend Identity and Access Management.
Linking Talend Identity and Access Management with Talend Data Preparation
If you have installed Talend Identity and Access Management manually, you need to create an OIDC client in order to linkTalend Identity and Access Management with Talend Data Preparation. Note that this operation is automatically done if youinstall Talend Identity and Access Management using Talend Installer.
Procedure
1. Stop Talend Identity and Access Management and Talend Data Preparation if they have been already started.
2. Go to iam-A.B.C/apache-tomcat-x.x.xx/clients.
3. Create a tdp-client.json file.
4. Paste the following content:
{"post_logout_redirect_uris" : [ "https://my-machine:9999", "https://localhost:9999", "https://127.0.0.1:9999" ],"grant_types" : [ "authorization_code", "refresh_token", "password" ],"scope" : "openid refreshToken","client_secret" : "+1/7vegEOVHeQD9JKmtz8I9s4tgVuRMqC2ja7efFHro=","redirect_uris" : [ "https://my-machine:9999/signIn", "https://localhost:9999/signIn", "https://127.0.0.1:9999/signIn" ],"client_name" : "TDP DataPrep","client_id" : "64xIVPxviKWSog"}
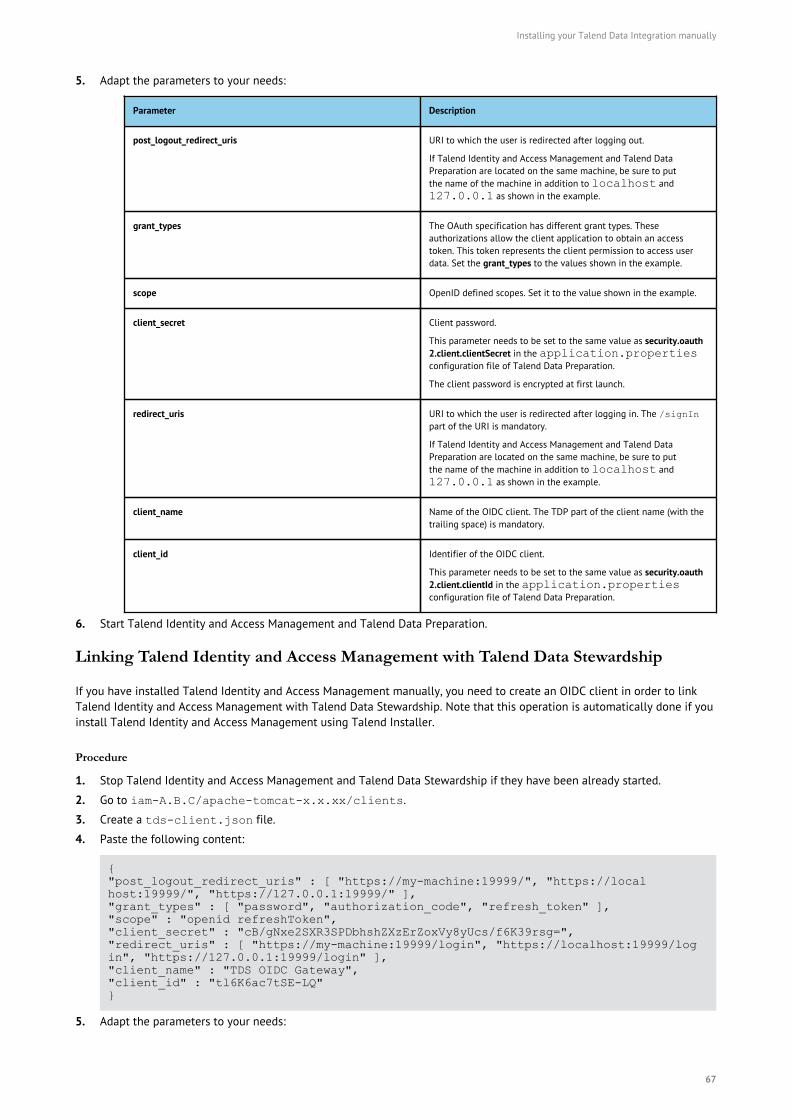
Installing your Talend Data Integration manually
67
5. Adapt the parameters to your needs:
Parameter Description
post_logout_redirect_uris URI to which the user is redirected after logging out.
If Talend Identity and Access Management and Talend DataPreparation are located on the same machine, be sure to putthe name of the machine in addition to localhost and127.0.0.1 as shown in the example.
grant_types The OAuth specification has different grant types. Theseauthorizations allow the client application to obtain an accesstoken. This token represents the client permission to access userdata. Set the grant_types to the values shown in the example.
scope OpenID defined scopes. Set it to the value shown in the example.
client_secret Client password.
This parameter needs to be set to the same value as security.oauth2.client.clientSecret in the application.propertiesconfiguration file of Talend Data Preparation.
The client password is encrypted at first launch.
redirect_uris URI to which the user is redirected after logging in. The /signInpart of the URI is mandatory.
If Talend Identity and Access Management and Talend DataPreparation are located on the same machine, be sure to putthe name of the machine in addition to localhost and127.0.0.1 as shown in the example.
client_name Name of the OIDC client. The TDP part of the client name (with thetrailing space) is mandatory.
client_id Identifier of the OIDC client.
This parameter needs to be set to the same value as security.oauth2.client.clientId in the application.propertiesconfiguration file of Talend Data Preparation.
6. Start Talend Identity and Access Management and Talend Data Preparation.
Linking Talend Identity and Access Management with Talend Data Stewardship
If you have installed Talend Identity and Access Management manually, you need to create an OIDC client in order to linkTalend Identity and Access Management with Talend Data Stewardship. Note that this operation is automatically done if youinstall Talend Identity and Access Management using Talend Installer.
Procedure
1. Stop Talend Identity and Access Management and Talend Data Stewardship if they have been already started.
2. Go to iam-A.B.C/apache-tomcat-x.x.xx/clients.
3. Create a tds-client.json file.
4. Paste the following content:
{"post_logout_redirect_uris" : [ "https://my-machine:19999/", "https://localhost:19999/", "https://127.0.0.1:19999/" ],"grant_types" : [ "password", "authorization_code", "refresh_token" ],"scope" : "openid refreshToken","client_secret" : "cB/gNxe2SXR3SPDbhshZXzErZoxVy8yUcs/f6K39rsg=","redirect_uris" : [ "https://my-machine:19999/login", "https://localhost:19999/login", "https://127.0.0.1:19999/login" ],"client_name" : "TDS OIDC Gateway","client_id" : "tl6K6ac7tSE-LQ"}
5. Adapt the parameters to your needs:

Installing your Talend Data Integration manually
68
Parameter Description
post_logout_redirect_uris URI to which the user is redirected after logging out.
If Talend Identity and Access Management and Talend DataStewardship are located on the same machine, be sure to putthe name of the machine in addition to localhost and127.0.0.1 as shown in the example.
grant_types The OAuth specification has different grant types. Theseauthorizations allow the client application to obtain an accesstoken. This token represents the client permission to access userdata. Set the grant_types to the values shown in the example.
scope OpenID defined scopes. Set it to the value shown in the example.
client_secret Client password.
This parameter needs to be set to the same value as oidc.tds.secretin the data-stewardship.properties configurationfile of Talend Data Stewardship.
The client password is encrypted at first launch.
redirect_uris URI to which the user is redirected after logging in. The /loginpart of the URI is mandatory.
If Talend Identity and Access Management and Talend DataStewardship are located on the same machine, be sure to putthe name of the machine in addition to localhost and127.0.0.1 as shown in the example.
client_name Name of the OIDC client. The TDS part of the client name (with thetrailing space) is mandatory.
client_id Identifier of the OIDC client.
This parameter needs to be set to the same value as oidc.tds.id inthe data-stewardship.properties configurationfile of Talend Data Stewardship.
6. Start Talend Identity and Access Management and Talend Data Stewardship.
Securing connections for Talend Identity and Access Management
Procedure
1. Open the <installation_path>/iam/apache-tomcat/conf/server.xml file.
2. Comment the non-SSL part:
<!-- <Connector port="9080" protocol="HTTP/1.1" connectionTimeout="20000" redirectPort="9443" /> -->
3. Uncomment the following lines:
<!-- <Connector port="9443"protocol="org.apache.coyote.http11.Http11NioProtocol"maxThreads="150"SSLEnabled="true"Scheme="https" secure="true"clientAuth="false"sslProtocol="TLS"/> -->
keystoreFile="<installation_path>/certs-single/server.keystore.jks"keystorePass="tomcat"/>
4. Add the following lines:
keystoreFile="<certificate_path>/server.keystore.jks" keystorePass="<certificate_password>"

Installing your Talend Data Integration manually
69
5. Open the <installation_path>/iam/apache-tomcat/conf/iam.properties file and change the belowURLs from http to https:
iam.url=https://${iam.host}:<port>tac.url=https://<host_name>:<port>/org.talend.administrator
6. In the <installation_path>/iam/apache-tomcat/conf/iam.properties file, set the value for the belowparameters to the username and the password of the user with the role Security Administrator in Talend AdministrationCenter:
tac.user-name=<username_security_administrator>tac.password=<password_security_administrator>
Note: Whenever you change your Talend Administration Center password, make sure to replace your old passwordwith the new one in the iam.properties file here.
7. Delete the oidc and idp folders so that Talend Identity and Access Management can recreate them on the nextstartup.
8. Open the <installation_path>/iam/apache-tomcat/conf/fediz_config.xml file and change the belowURL from http to https:
<issuer>https://<iam_url:port>/idp/federation</issuer>
Installing Talend Identity and Access Management in cluster mode
You can install several instances of Talend Identity and Access Management in cluster mode if you want to benefit from ahigh availability and a better scalability with your product.
Clustering is the process of grouping together a set of similar physical systems in order to ensure a level of operationalcontinuity and minimize the risk of unplanned downtime, in particular by taking advantage of load balancing and failoverfeatures.
To enable high-availability support for Talend Identity and Access Management, you need to:
1. Install different instances of Talend Identity and Access Management.2. Create a database in MongoDB server to store users' session data.3. Configure Talend Identity and Access Management to share session data between different instances.
Architecture of Talend Identity and Access Management in cluster mode
The following diagram illustrates the architecture behind Talend Identity and Access Management when set up in clustermode.

Installing your Talend Data Integration manually
70

Installing your Talend Data Integration manually
71
This architecture is composed of several functional blocks:
• A client connects to any running instance of a Talend application.• A Load Balancer accepts incoming traffic from Talend application instances and routes requests to any running instance
of Talend Identity and Access Management in the cluster.• Talend Identity and Access Management securely authenticate users, authorize users to access Talend applications and
save users' session data in MongoDB.• MongoDB stores and loads users' session data. You can configure MongoDB in cluster mode. For more information, see
MongoDB documentation.
Note: The embedded H2 database is not recommended for production environments. To check which databases arerecommended for production environments, see Compatible databases on page 14. To change the Talend Identity andAccess Management database, see Changing Talend Identity and Access Management database on page 64. Talendalso recommends that all nodes in the cluster share the same OIDC and IDP.
Installing Talend Identity and Access Management in cluster mode
To perform this installation, you need to install and configure as many instances of Talend Identity and Access Managementand its dependencies as necessary.
Before you begin
• You have configured a Load Balancer for Talend Identity and Access Management.
About this taskAll nodes within the same Talend Identity and Access Management high availability installation must be running the sameTalend Identity and Access Management version.
Procedure
1. Install a first Talend Identity and Access Management instance.
For more information on the installation procedure, see Installing Talend Identity and Access Management on page64.
2. Repeat the installation steps and configure other instances of Talend Identity and Access Management.
Creating the database for session data storage in MongoDB
You need to create a database for storing session data in MongoDB.
Before you beginYou must have admin rights to be able to create the database.
Procedure
1. Create a database in MongoDB to store session data, using the following command:
use <databasename>
Example
use sessions
2. Create a user in this database, using the following command:
use <databasename>db.createUser( { user: "<username>", pwd: "<password>", roles: [ { role: "dbOwner", db: "<databasename>" } ] } )
The command can take the following fields:

Installing your Talend Data Integration manually
72
Field Description
<databasename> The name of the database for session data storage.
<username> The name for the created user.
<password> The password for the created user.
Important: The password must be URL encoded otherwise theconnection fails.
This user must be granted with the dbOwner role to be able to perform any administrative action on the database.
Example
To create a user named session-user with the password suser in the database named sessions, use thefollowing command:
use sessionsdb.createUser( { user: "session-user", pwd: "suser", roles: [ { role: "dbOwner", db: "sessions" } ] } )
3. Stop Talend Identity and Access Management.
Configuring session data storage for Talend Identity and Access Management
Configure Talend Identity and Access Management to share session data between different instances.
Before you begin
• You stopped Talend Identity and Access Management.• You created a database for session data storage in MongoDB. For more information, see Creating the database for
session data storage in MongoDB on page 71.
Procedure
1. Open the <InstallationPath>/iam/apache-tomcat/bin/setenv.sh file.
2. To set the SPRING_SESSION_STORE_TYPE environment variable and specify the backend for storing session data,add the following line:
export SPRING_SESSION_STORE_TYPE=mongo
3. Set the SPRING_DATA_MONGODB_URI environment variable to the connection string of your MongoDB instances,using the following syntax:
export SPRING_DATA_MONGODB_URI=mongodb://<username>:<password>@<mongo-host1>:<mongo-port1>,<mongo-host2>:<mongo-port2>,...,<mongo-hostN>:<mongo-portN>/<database-name>
The components of the URI are:
Component Description
mongodb:// This prefix is required.
username
password
Optional: The client will attempt to log in to the database using theseauthentication credentials after connecting to the MongoDB instances.
mongo-host Server address (hostname or IP address) to connect to.
mongo-port The default value is 27017.
database-name The name of the database for session data storage.

Installing your Talend Data Integration manually
73
If you configured MongoDB in cluster mode, <mongo-host1> is the name of the first host in the cluster, using<mongo-port1>, and so on.
Example
To describe a connection to a MongoDB database named sessions hosted on example.talend.com with the portnumber 27017, add the following line:
export SPRING_DATA_MONGODB_URI=mongodb://example.talend.com:27017/sessions
4. Start Talend Identity and Access Management.
What to do next
Start your Talend application and login.
Access the database created for session data storage in MongoDB. The database contains the current session data.
Installing and configuring Talend Artifact Repository
This tool is used for the Software Update feature and its instance holds the talend-updates repository where the updates areretrieved by the user.
It can also be used as a catalog for the Jobs created from Talend Studio or any other Java IDE. For this, two repositories areavailable: repo-snapshot for development purposes and repo-release for production purposes.
So when unzipping Talend Administration Center zip file, you will find two archive files. One is called Artifact-Repository-Nexus-VA.B.C.D.E containing scripts to configure Nexus. The other is called Artifact-Repository-Artifactory containing Talend scripts to initialize the Artifactory repository.
Nexus is based on Sonatype Nexus. You need to install Nexus and to configure it with the initialization file in Artifact-Repository-Nexus-VA.B.C.D.E or to configure it manually. For more information on how to use it, see SonatypeNexus documentation on http://www.sonatype.org/nexus.
For more information on how to use the Artifactory repository, see https://jfrog.com/artifactory/.
For more information on how to configure Talend Artifact Repository in Talend Runtime , see Configuring Talend ArtifactRepository in Talend Runtime on page 89.
Installing Nexus
Talend Artifact Repository is based on Nexus. Before using Talend Artifact Repository, you need to manually install SonatypeNexus.
Go to the Sonatype Nexus download page to download Nexus: https://help.sonatype.com/repomanager3/download/download-archives---repository-manager-3.
Configuring Nexus
You need to create and configure the required repositories in Nexus. You can start Nexus configuration either by usingthe .init file in Talend Administration Center .zip file or manually.
Configuring Nexus with the Talend Administration Center .zip file
After the installation of Nexus, you can use Talend Administration Center .zip file to configure your instance.
About this task
Procedure
1. Unzip Talend Administration Center .zip file, then unzip Artifact-Repository-Nexus-VA.B.C.D.E archivefile.
2. Inside the Artifact-Repository-Nexus-VA.B.C.D.E archive file, you can find the migration-A.B.C folderthat contains the migration script as well as a .properties file.

Installing your Talend Data Integration manually
74
3. Copy the <NewNexusInstallationDirectory>\migration-A.B.C folder to the location of your choice.
4. Open the migration-A.B.C\nexus.properties file and check the URL, port and login connection information.Also check the version format. Update these parameters if needed and save your changes.
5. Launch Nexus.
6. Log into the Sonatype Nexus Repository Web application. In the nexus.properties file, you can find theapplication URL. After the first connection, it is strongly recommended to change the default credentials of the defaultadministrator account.
7. Browse to the migration-A.B.C folder and execute the following command: java -jar <nexus-init-A.B.C.jar> in which <nexus-init-A.B.C.jar> corresponds to the .jar file name that is in the migration-A.B.C folder. For example: java -jar nexus-init-8.0.1.jar.
Note: For further purposes, nexus-init-A.B.C.jar file can be found at this location: <Tomcat>/webapps/org.talend.administrator/repository/nexus.
ResultsRefresh Nexus website, in the Users tab, you can now see the following users:
• talend-custom-libs-admin (password: talend-custom-libs-admin) : This user is used in Talend AdministrationCenter Configuration > User Libraries group. Talend Studio gets the configuration information from TalendAdministration Center to upload and download third-party libraries.
• talend-updates-admin (password: talend-updates-admin): This user is used in Talend Administration CenterConfiguration > Software Update group. Talend Administration Center downloads the patch from Talend UpdateServer and use this account to upload the patch to Nexus. Talend Studio can download the patch from Nexus withoutcredentials.
In the Roles tab, you can see the following roles:
• talend-updates-admin• talend-updates-read-only• talend-custom-libs-admin• talend-custom-libs-snapshot-read-only• talend-custom-libs-release-read-only
In the Repositories tab, you can see the following repositories:
• talend-custom-libs-release• talend-custom-libs-snapshot• talend-updates
What to do next
Go to the Configuration page of Talend Administration Center and add the configuration settings for the created repositories.
For more information, see Configuring the Software Update repository in Talend Administration Center on page 77,Configuring Talend Artifact Repository in Talend Administration Center on page 77 and the online publication aboutsetting up the user library location in Talend Administration Center on Talend Help Center (https://help.talend.com).
Configuring Nexus manually
You can create the roles, users, and repositories manually.
Procedure
1. Start by running Nexus.
2. Go to the Sonatype Nexus Repository Manager interface.
3. Under the Users tab, create the following users:
• talend-updates-admin: this user is used in Talend Administration Center Configuration > Software Update group.Talend Administration Center downloads the patch from Talend Update Server and uses this account to upload thepatch to Nexus. Talend Studio can download the patch from Nexus without credentials.

Installing your Talend Data Integration manually
75
• talend-custom-libs-admin: this user is used in Talend Administration Center Configuration > User Libraries group.Talend Studio gets the configuration information from Talend Administration Center to upload and download third-party libraries.
a) Click Create local user.b) Write talend-updates-admin as the ID and fill the other required fields.c) Go to the Roles sub-section and add talend-updates-admin to the Granted list.d) Click Create local user.e) Create the user with the talend-custom-libs-admin ID.f) Go to the Roles sub-section and add talend-custom-libs-admin to the Granted list.g) Open the admin user.h) Add the nx-admin role to the Granted list.i) Open the anonymous user.j) Add the nx-anonymous, talend-custom-libs-release-read-only, talend-custom-libs-snapshot-read-only and talend-
updates-read-only roles to the Granted list.
Note: The anonymous user is not secure and not used in Talend Administration Center or Talend Studio. It isrecommended to disable the anonymous user in Nexus.
4. Go to the Repositories tab to create the following repositories:
• talend-updates• talend-custom-libs-snapshot• talend-custom-libs-release
a) Click Create repository.b) Select maven2 (hosted) from the list.c) Name your repository talend-updates.d) Under the sub-section version policy, select Release.e) Click Create repository to save your changes.f) Create another maven2 (hosted) repository named talend-custom-libs-snapshot.g) Under the sub-section version policy, select snapshot.h) Click Create repository to save your changes.i) Create the last maven2 (hosted) repository and name it talend-custom-libs-release.
5. Under the sub-section version policy, select Release.
6. Go to the Roles tab, click Create role > Nexus role and create the following roles with the following privileges added tothe Given list:
Option Description
Role ID Privileges
talend-updates-admin nx-repository-view-maven2-talend-updates-add
nx-repository-view-maven2-talend-updates-browse
nx-repository-view-maven2-talend-updates-edit
nx-repository-view-maven2-talend-updates-read
nx-script-*-run
talend-updates-read-only nx-repository-view-maven2-talend-updates-read
nx-repository-view-maven2-talend-updates-browse
nx-script-*-run
talend-custom-libs-admin nx-repository-view-maven2-talend-custom-libs-release-add
nx-repository-view-maven2-talend-custom-libs-release-browse

Installing your Talend Data Integration manually
76
Option Description
nx-repository-view-maven2-talend-custom-libs-release-edit
nx-repository-view-maven2-talend-custom-libs-release-read
nx-repository-view-maven2-talend-custom-libs-snapshot-add
nx-repository-view-maven2-talend-custom-libs-snapshot-browse
nx-repository-view-maven2-talend-custom-libs-snapshot-edit
nx-repository-view-maven2-talend-custom-libs-snapshot-read
nx-script-*-run
talend-custom-libs-snapshot-read-only nx-repository-view-maven2-talend-custom-libs-snapshot-browse
nx-repository-view-maven2-talend-custom-libs-snapshot-read
nx-script-*-run
talend-custom-libs-release-read-only nx-repository-view-maven2-talend-custom-libs-release-browse
nx-repository-view-maven2-talend-custom-libs-release-read
nx-script-*-run
What to do next
Go to the Configuration page of Talend Administration Center and add the configuration settings for the created repositories.
For more information, see Configuring the Software Update repository in Talend Administration Center on page 77,Configuring Talend Artifact Repository in Talend Administration Center on page 77 and the online publication aboutsetting up the user library location in Talend Administration Center on Talend Help Center (https://help.talend.com).
Configuring Artifactory
Make sure that the Artifactory repository is already installed and launched. For more information, see https://jfrog.com/artifactory/.
Note: It is recommended to change the port of the Artifactory repository to 8045, as the default port 8040 is in conflictwith Talend Runtime.
If you are using an enterprise version of the Artifactory, unzip the Artifact-Repository-Artifactory archive filein a dedicated folder, and run the artifactory-init-VA.B.C.D.E.jar to initialize the Artifactory repository withrepositories and users created and permissions set for the Talend Administration Center.
If you are using an open source version of the Artifactory, you need to create manually the users and repositories as for theNexus repository. For more information, see Configuring Nexus on page 73.
Note: If your connection with the Artifactory does not work, add the property artifactory.addDefaultUrlContext=false in the <tomcat_path>/webapps/org.talend.administrator/WEB-INF/classes/configuration.properties file.

Installing your Talend Data Integration manually
77
Configuring the Software Update repository in Talend Administration Center
Once you installed Talend Artifact Repository and started it, you can configure it to use Talend Software Update.
Once you have launched and configured the Software Update repository, go to the Configuration page of TalendAdministration Center and fill in the following information in the Software Update group:
• Talend update url: Location URL to the Talend remote repository from which software updates are retrieved.• Talend update username and Talend update password: Type in the credentials of the software update repository user
that you received from Talend.• Local repository url: Type in the location URL to the repository where software updates are stored.• Local deployment username and Local deployment password: Type in the credentials of the user with deployment rights
to the local repository.• Local reader username and Local reader password: Type in the credentials of the user with read rights to the local
repository.• Local repository ID: Type in the ID of the repository in which software updates are published.
In the Software Update page of Talend Administration Center, you can now see the versions and patches available anddownload them according to your needs.
Configuring Talend Artifact Repository in Talend Administration Center
Before you begin
Talend Artifact Repository is launched.
Procedure
1. Go to the Configuration page of Talend Administration Center.
2. Fill in the following information in the Artifact Repository node:
Field Action
Artifact repository type Select the type of artifact repository (NEXUS, NEXUS 3, andArtifactory).
URL Type in the location URL to your Talend Artifact Repository.
Username Type in the name of the repository user with Manager role.
Password Type in the password of the repository user with Manager role.
Default Release Repo Type in the Talend Artifact Repository Release repository name.
Default Snapshot Repo Type in the Talend Artifact Repository Snapshot repository name.
Default Group ID Type in the name of the group in which to publish your Jobsartifacts.
Results
From the Job Conductor page of Talend Administration Center, you can retrieve all the artifacts published in the tworepositories to configure their execution in your execution server. For more information, see the Talend AdministrationCenter User Guide.
Installing and configuring your Talend JobServer
The execution servers allow you to execute the Jobs (processes) developed with Talend Studio from the TalendAdministration Center web application.
When working with Talend Studio local projects, you can enable the authentication on Talend JobServer based on theusers.csv file. For more information, see Enable user authentication for Talend Studio local projects on page 79.

Installing your Talend Data Integration manually
78
When working with Talend Studio remote projects, the authentication on Talend JobServer is based on TalendAdministration Center. For more information, see Configure user authentication for Talend Studio remote projects and JobConductor using Talend Administration Center on page 79.
Installing your Talend JobServer
Note: You may need to change the java.library path in order to load the correct native library for your system. Inthis case, adapt the variable MY_JSYSMON_LIB_DIR in the script start_rs.sh.
Talend JobServer is an application that allows a system installed on the same network as the Web application to declareitself as an execution server. These systems must obviously have a working JVM. For more information about theprerequisites of Talend JobServer, see Compatible Operating Systems on page 8.
Information about Talend JobServer resources
Once you have declared these execution servers in the Servers page of the Talend Administration Center Web application,their resources (CPU, RAM, etc.) are displayed. For more information on how to do this, see your Talend AdministrationCenter User Guide.
For some operating systems, the CPU information may not be available. You can test your system by setting up the followingvariable as true:
org.talend.monitoring.jmx.api.OsInfoRetriever.FORCE_LOAD in the file TalendJobServer.properties.
Unzip the archive file
Procedure
1. First select the servers that will be used to execute the Jobs developed with Talend Studio.
2. Then, on each server, uncompress the archive file containing the Talend JobServer application matching your version ofTalend Studio.
The archive file name for example reads: Talend-JobServer-YYYYMMDD_HHmm-VA.B.C.zip
3. In the uncompressed file you need to configure the file TalendJobServer.properties that you can find in thedirectory <root>/conf/ where <root> is the Talend JobServer path.
For example, if you want to change the directory where Talend JobServer stores its data, change the org.talend.remote.jobserver.commons.config.JobServerConfiguration.ROOT_PATH parameter.
4. Modify the installation directory of Talend JobServer and check that the 8000, 8001 and 8888 ports are available.
Warning:
You may get this warning message when launching the Job Server, it means that the directory does not exist.
AbstractDataCleaner - pathDir is not a directory
The directory is used to store the archive file of Jobs sent from the Talend Administration Center or the executionlog. This directory will be cleaned from time to time according to the settings in the file <Job Server_install_dir>/conf/TalendJobServer.properties.
No action is required, this is an informational warning message. The directory will be created automatically once atask is deployed and sent from Talend Administration Center to Job Server.
User authentication on Talend JobServer
Two user authentication modes exist: the authentication based on a .csv file and the authentication based on TalendAdministration Center.
There can be only one authentication mode configured on Talend JobServer at a time.
It is highly recommended to use authentication while using Talend Studio remote projects. The authentication based onTalend Administration Center is the only authentication mode available for remote projects.

Installing your Talend Data Integration manually
79
The authentication based on a .csv file is not supported for remote projects. This is the only authentication mode availablefor Talend Studio local projects.
Enable user authentication for Talend Studio local projects
Procedure
1. To enable user authentication on Talend JobServer, you need to define one or more lines of username and passwordpairs in the users.csv file that you can find in the <root>/conf/ directory where <root> is the Talend JobServerpath.
2. In the directory you have unzipped, you will find the start_rs.sh and the stop_rs.sh files that will let yourespectively start and stop Talend JobServer.
Configure user authentication for Talend Studio remote projects and Job Conductor using Talend Administration CenterTalend JobServer uses Talend Administration Center based authentication for Talend Studio remote projects and for the JobConductor in Talend Administration Center.
The authentication mode based on Talend Administration Center replaces the user authentication based on the users.csvfile.
Talend Administration Center checks:
• whether the user is authorized to work with the project the job belongs to, and• if this project is associated to the specific Talend JobServer.
Procedure
1. Open TalendJobServer.properties and uncomment the following line:
#org.talend.remote.jobserver.commons.config.JobServerConfiguration.TAC_URLS=http://host1:8080/org.talend.administrator,http://host2:8080/org.talend.administrator
If the line is commented out, you will not be able to authenticate.
2. Specify the Talend Administration Center URL of the Talend Administration Center instance to use for authorization.
If you have set up a cluster involving multiple Talend Administration Center instances in your Talend system to providehigh availability, specify a comma-separated list of Talend Administration Center instances.
Talend JobServer will randomly choose an instance from this list and perform an automatic fail over in case of aconnection problem.
If the specified Talend Administration Center instances run in https, configure secure connections to Talend AdministrationCenter.
3. Configure TLS/SSL in Talend Administration Center.
For more information, see https://tomcat.apache.org/tomcat-8.0-doc/ssl-howto.html.
4. Generate a KeyStore in .jks format:
a) Connect to Talend Administration Center in a browser using https.b) Click on the HTTPS certificate chain > lock icon > Certificate Details.c) Export the server's certificate from the server KeyStore to a tacCert.cert certificate file.d) Use the following command to import the certificate into the KeyStore tacTrustStore.jks:
keytool -import -noprompt -file <path_to_tacCert.cert> -alias tacCert -keystore tacTrustStore.jks -storepass password
5. Edit the Talend JobServer start script start_rs.sh to set the JVM arguments to trust the Talend AdministrationCenter certificate:
MY_JMV_ARGS="-Djavax.net.ssl.trustStore=/path/tacTrustStore.jks -Djavax.net.ssl.trustStorePassword=password"
Configuring the JVM for your Talend JobServer (optional)
Talend JobServer allows you to choose another JVM than the one used by default to launch your Jobs.

Installing your Talend Data Integration manually
80
Procedure
1. Go to the directory <root>/conf/, where <root> is the Talend JobServer path, and open the TalendJobServer.properties file to edit it.
2. In the line dedicated to the Job launcher path, add the path to your java executable after the equal sign.
# Set the executable path of the binary which will run the job, for example: /usr/bin/java/java or "c:\\Program Files\\Java\\bin\\java.exe"org.talend.remote.jobserver.commons.config.JobServerConfiguration.JOB_LAUNCHER_PATH=/usr/bin/java/java
The use of quotes is only necessary when your path contains spaces, as shown in the capture. Otherwise, type in thepath without quotes.
3. Save your changes and close the file.
Results
The next time you launch Talend JobServer, the java executable used will be the one you have previously set in theTalendJobServer.properties file.
Understanding the Talend JobServer clean-up cycle
The Talend JobServer cleans up Job artifacts on a schedule, based on data cleaning parameters. You can customize theTalend Job Server clean-up schedule by changing the parameters in the TalendJobserver.properties file, listedunder Temporary data cleaning parameters. Configuring these values is optional.
General clean-up frequency
The general clean-up schedule is defined by the FREQUENCY_CLEAN_ACTION parameter. You can disable the general clean-up by setting this parameter to 0.
Job repository and archive clean-up
Job artifacts are cleaned up in the next clean-up cycle when the following conditions are met:
• The Job is not running.• Either the MAX_DURATION_BEFORE_CLEANING_OLD_JOBS or MAX_OLD_JOBS parameter is met.
Job execution log clean-up
Job logs are cleaned up in the next cycle when the following conditions are met:
• Either the MAX_DURATION_BEFORE_CLEANING_OLD_EXECUTIONS_LOGS or MAX_OLD_EXECUTIONS_LOGS parameter ismet.
• The Job execution is released. A Job is released after 50 Job executions. You can change the Job release frequency bychanging the MIN_NUMBER_JOB_EXECUTIONS_BEFORE_RELEASE parameter.
A log without errors is released if the elapsed time since the start of the log is greater than the time defined in theMAX_DURATION_BEFORE_JOB_EXECUTION_RELEASE_NORMAL_CASE and MAX_DURATION_BEFORE_JOB_EXECUTION_RELEASE_ABNORMAL_CASE parameters.
Note: For each MAX_OLD_* and MAX_DURATION_* parameter pair, whichever is reached first will trigger a cleaningaction.
Talend JobServer clean-up parameters
The following tables lists the default values for each of the clean-up parameters.
Note: All parameters in this file are prefixed with org.talend.remote.jobserver.commons.config.JobServerConfiguration.
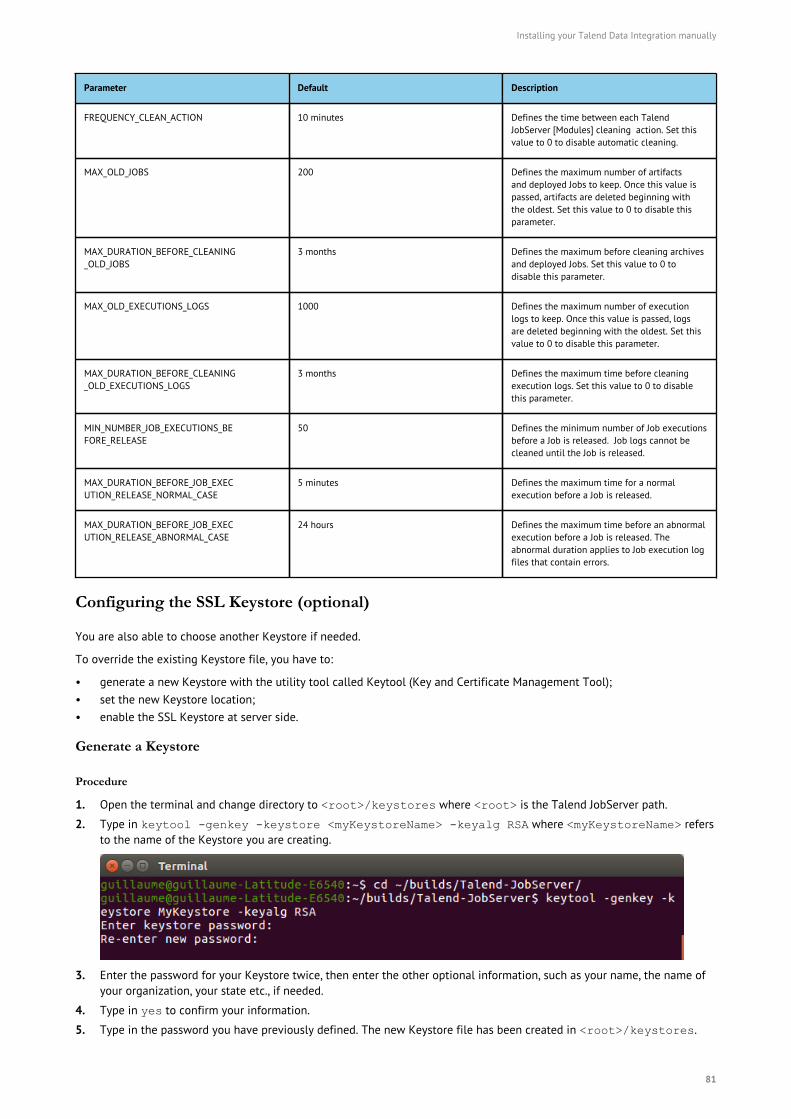
Installing your Talend Data Integration manually
81
Parameter Default Description
FREQUENCY_CLEAN_ACTION 10 minutes Defines the time between each TalendJobServer [Modules] cleaning action. Set thisvalue to 0 to disable automatic cleaning.
MAX_OLD_JOBS 200 Defines the maximum number of artifactsand deployed Jobs to keep. Once this value ispassed, artifacts are deleted beginning withthe oldest. Set this value to 0 to disable thisparameter.
MAX_DURATION_BEFORE_CLEANING_OLD_JOBS
3 months Defines the maximum before cleaning archivesand deployed Jobs. Set this value to 0 todisable this parameter.
MAX_OLD_EXECUTIONS_LOGS 1000 Defines the maximum number of executionlogs to keep. Once this value is passed, logsare deleted beginning with the oldest. Set thisvalue to 0 to disable this parameter.
MAX_DURATION_BEFORE_CLEANING_OLD_EXECUTIONS_LOGS
3 months Defines the maximum time before cleaningexecution logs. Set this value to 0 to disablethis parameter.
MIN_NUMBER_JOB_EXECUTIONS_BEFORE_RELEASE
50 Defines the minimum number of Job executionsbefore a Job is released. Job logs cannot becleaned until the Job is released.
MAX_DURATION_BEFORE_JOB_EXECUTION_RELEASE_NORMAL_CASE
5 minutes Defines the maximum time for a normalexecution before a Job is released.
MAX_DURATION_BEFORE_JOB_EXECUTION_RELEASE_ABNORMAL_CASE
24 hours Defines the maximum time before an abnormalexecution before a Job is released. Theabnormal duration applies to Job execution logfiles that contain errors.
Configuring the SSL Keystore (optional)
You are also able to choose another Keystore if needed.
To override the existing Keystore file, you have to:
• generate a new Keystore with the utility tool called Keytool (Key and Certificate Management Tool);• set the new Keystore location;• enable the SSL Keystore at server side.
Generate a Keystore
Procedure
1. Open the terminal and change directory to <root>/keystores where <root> is the Talend JobServer path.
2. Type in keytool -genkey -keystore <myKeystoreName> -keyalg RSA where <myKeystoreName> refersto the name of the Keystore you are creating.
3. Enter the password for your Keystore twice, then enter the other optional information, such as your name, the name ofyour organization, your state etc., if needed.
4. Type in yes to confirm your information.
5. Type in the password you have previously defined. The new Keystore file has been created in <root>/keystores.

Installing your Talend Data Integration manually
82
Set the location of the new Keystore
To set the new Keystore location, you can either edit the JAVA_OPTS environment variable or edit the launching script ofthe Talend JobServer.
Procedure
1. Edit the JAVA_OPTS environment variable
2. Add the following lines:
-Djavax.net.ssl.keyStore=/<myDirectory>/<myKeystore>-Djavax.net.ssl.keyStorePassword=<myPassword>
In those lines, <myDirectory> is the installation directory of your Keystore, <myKeystore> is the name of yourKeystore and <myPassword> is the password you have previously defined for your Keystore.
If you have not created the JAVA_OPTS environment variable yet, you have to create it before completing this procedure.
You can also set the location of the new Keystore in the start_rs.sh file as shown in the following capture:
Configure the service
Procedure
Edit an init script with start and stop commands as described in Installing Talend JobServer as a service on page177.
What to do next
Now you just have to enable Secure Sockets Layer as described in Enabling the SSL encryption in Talend Runtime on page88.
Configuring user impersonation for Talend JobServer
The Talend Administration Center web application allows you to run tasks as different UNIX system users, through the RunAs option. To avoid errors when starting the task on the server, you need first to:
• give specific permissions to some server directories.• give necessary authorizations to the directories and files created by Talend JobServer by configuring the umask.• define the Operating System users allowed to run tasks from the server.
Tip: By default, the user name must start with a lower-case letter from a to z, followed by a combination of lower-case letters (a to z) and numbers (from 0 to 9). To allow using characters other than those letters and numbers,you need to modify the regular expression ^[a-z][-a-z0-9]*\$ in the value of the org.talend.remote.jobserver.server.TalendJobServer.RUN_AS_USER_VALIDATION_REGEXP parameter in the file{Job_Server_Installation_Folder}\agent\conf\TalendJobServer.properties. For example:
• To define a user name pattern that should include a dot, like firstname.lastname, modify the regularexpression to ^[a-z][-a-z0-9]*.[a-z][-a-z0-9]*\$.
• To allow using one or more underscores (_) in the user name, modify the regular expression to ^[a-z][-a-z_0-9]*\$.
For more information on this feature, see the Talend Administration Center User Guide.
Defining the list of users allowed to run tasks as different users
Procedure
1. Open the <jobserver_path>/conf/TalendJobServer.properties file.
Installing your Talend Data Integration manually
83
2. Edit the org.talend.remote.jobserver.server.TalendJobServer.RUN_AS_ALLOWLIST value and add allthe users you need.
Note: Spaces and commas are valid separators for user name values in this file.
Starting Talend JobServer with sudo
To start Talend JobServer with sudo, proceed as follows.
Setting the Talend JobServer directory permissions
About this taskIf you have already started Jobs from this server, it is recommended to remove the directory <jobserver_path>/TalendJobServerFiles to avoid unexpected authorizations on already deployed Jobs or cached files.
Procedure
1. Add each user allowed to run tasks (for example, user called subuser) to the 'root' group, as well as to the group of theuser who owns the parent directories of Talend JobServer (for example, group of the user called my_user).
Example
> sudo usermod -a -G myuser_group subuser> sudo usermod -a -G root subuser
2. Give the execute permission to myuser_group in the following directories by executing chmod g+rx /<directory_path>.
Example
/DIRECTORY_1/DIRECTORY_1/DIRECTORY_2/DIRECTORY_1/DIRECTORY_2/Talend-JobServer/DIRECTORY_1/DIRECTORY_2/Talend-JobServer/TalendJobServersFiles/DIRECTORY_1/DIRECTORY_2/Talend-JobServer/TalendJobServersFiles/cache/DIRECTORY_1/DIRECTORY_2/Talend-JobServer/TalendJobServersFiles/cache/lib
Note: The READ authorization for the group is only required for deployed files.
Configuring the umask of the user launching Talend JobServer
Procedure
• Set the user profile with the umask u=rwx,g=rx,o= umask.
It is the same as umask 0027.
Results
This configuration will create:
• directories with group authorization equal to r-x• files with group authorization equal to r--• no authorizations for others
Starting Talend JobServer
Procedure
Start Talend JobServer using the sudo sh start_rs.sh command.
Note: If you do not use sudo, the Jobs will hang because a password will be required on the Talend JobServer side.

Installing your Talend Data Integration manually
84
Starting Talend JobServer without sudo
The user that starts Talend Remote Engine needs to be allowed to start processes as other users without having to enter apassword.
Procedure
1. Change the sudoers file on the machine that runs Talend Remote Engine, using the sudo visudo command.
2. Edit the sudoers.
Example
# ...# User alias specificationUser_Alias JOB_SERVER = jerry
# Cmnd alias specificationCmnd_Alias RUN_JOB = /bin/ps, /usr/bin/java, /bin/sh, /bin/grep, /bin/kill
# ...# Add after the line: %sudo ALL=(ALL:ALL) ALLJOB_SERVER ALL=(jules,jim) NOPASSWD: RUN_JOB
In this example, it is assumed that user jerry will start Talend Remote Engine and Tasks may have to run under theexisting users, jules and jim.
The Talend Remote Engine process started by jerry will need to be able to execute the following commands asjules or jim:
/bin/ps/usr/bin/java/bin/sh/bin/grep/bin/kill
For security reasons, do not allow more commands.
Results
To start Talend Remote Engine, the user can run sh start_rs.sh instead of sudo sh start_rs.sh.
Disabling some SSL ciphers (optional)
SSL ciphers are encryption algorithms that are used to establish a secure communication. Some cipher suites offer a lowerlevel of security than others, and you may want to disable these ciphers.
Procedure
1. Go to the directory <root>/conf/ and open the TalendJobServer.properties file.
2. Add to the following parameter the list of ciphers that you want to disable:
org.talend.remote.jobserver.server.TalendJobServer.DISABLED_CIPHER_SUITES

Installing your Talend Data Integration manually
85
Here is the list of the ciphers supported by Talend JobServer:
TLS_KRB5_WITH_3DES_EDE_CBC_MD5TLS_KRB5_WITH_RC4_128_SHASSL_DH_anon_WITH_DES_CBC_SHATLS_DH_anon_WITH_AES_128_CBC_SHATLS_DHE_RSA_WITH_AES_128_CBC_SHASSL_DHE_RSA_EXPORT_WITH_DES40_CBC_SHASSL_RSA_EXPORT_WITH_RC4_40_MD5SSL_DHE_RSA_WITH_3DES_EDE_CBC_SHATLS_KRB5_WITH_3DES_EDE_CBC_SHASSL_RSA_WITH_RC4_128_SHATLS_KRB5_WITH_DES_CBC_MD5TLS_KRB5_EXPORT_WITH_RC4_40_MD5TLS_KRB5_EXPORT_WITH_DES_CBC_40_MD5SSL_DHE_DSS_EXPORT_WITH_DES40_CBC_SHATLS_KRB5_EXPORT_WITH_RC4_40_SHASSL_DH_anon_EXPORT_WITH_RC4_40_MD5SSL_DHE_DSS_WITH_DES_CBC_SHATLS_KRB5_WITH_DES_CBC_SHASSL_RSA_WITH_NULL_MD5SSL_DH_anon_WITH_3DES_EDE_CBC_SHATLS_RSA_WITH_AES_128_CBC_SHASSL_DHE_RSA_WITH_DES_CBC_SHATLS_KRB5_EXPORT_WITH_DES_CBC_40_SHASSL_DH_anon_EXPORT_WITH_DES40_CBC_SHASSL_RSA_WITH_NULL_SHATLS_KRB5_WITH_RC4_128_MD5SSL_RSA_WITH_DES_CBC_SHATLS_EMPTY_RENEGOTIATION_INFO_SCSVSSL_RSA_EXPORT_WITH_DES40_CBC_SHASSL_DH_anon_WITH_RC4_128_MD5SSL_RSA_WITH_RC4_128_MD5TLS_DHE_DSS_WITH_AES_128_CBC_SHASSL_DHE_DSS_WITH_3DES_EDE_CBC_SHASSL_RSA_WITH_3DES_EDE_CBC_SHA
Configuring stats and trace message transfer for Talend JobServer
You can specify a port through which the Talend Studio fetches the latest stats and trace messages from the TalendJobServer for Jobs being executed remotely.
Procedure
1. Go to the directory <root>/conf/, where <root> is the Talend JobServer path, and open the TalendJobServer.properties file to edit it.
2. In the line dedicated to the configuration of the message transfer port, specify a port number.
org.talend.remote.jobserver.server.TalendJobServer.PROCESS_MESSAGE_PORT=<port_number>
The default port is 8555. You can specify any port that is available in the system.
3. To enable stats and trace message transfer, set the following parameter to true.
org.talend.remote.jobserver.server.TalendJobServer.ENABLED_PROCESS_MESSAGE=true
If the Talend JobServer is deployed on the same machine with the Talend Studio, you can set this parameter to falseto disable the service and save your port resources.
4. Save your changes and restart the Talend JobServer so that the configuration takes effect.
Encrypting secrets stored in JobServer configuration file
You can enable encryption of password properties in the Talend JobServer configuration file.
By default, this encryption feature is disabled. To enable it, do the following.

Installing your Talend Data Integration manually
86
Procedure
1. Go to the directory <root>/conf/, where <root> is the Talend JobServer path, and open the aeskey.dat file toedit it.
The aeskey.dat file contains a Base64 encoded secret in the following format:
aes.key=<BASE64 encoded AES key>
2. Generate your own encryption secret.
For example, using the command:
openssl rand 32 | base64
3. Replace the secret in <root>/conf/aeskey.dat with your own one.
4. Open the <root>/conf/TalendJobServer.properties file to edit it.
5. Set the following parameter to true.
org.talend.remote.jobserver.encrypt=true
6. Save your changes and restart the Talend JobServer so that the configuration takes effect.
Results
On start of Talend JobServer, this setting will cause the following passwords to be encrypted using the Base64 encodedsecret in property aes.key inside <root>/conf/aeskey.dat:
• org.talend.jmxmp.ssl.keyStorePassword
• org.talend.jmxmp.ssl.trustStorePassword
• org.talend.remote.server.ssl.keyStorePassword
• org.talend.remote.server.ssl.trustStorePassword
To modify the location and/or name of the key file, set the encryption.keys.file system property in the TalendJobServer start script start_rs.sh.
Note: For Talend ESB, you need to set org.talend.remote.jobserver.encrypt=true in <KARAF_HOME>/etc/org.talend.remote.jobserver.server.cfg and store your secret inside <KARAF_HOME>/etc/aeskey.dat. To modify location and/or the name of the key file, set the encryption.keys.file system property inthe start script trun.
Disabling hostname verification for the Talend Administration Center client
Talend JobServer allows you to disable hostname verification for the Talend Administration Center client.
Note: It is not secure to do this in production. It is only suitable for testing when Talend Administration Center is runningover TLS with a test certificate.
Procedure
1. Go to the directory <root>/conf/, where <root> is the Talend JobServer path, and open the TalendJobServer.properties file to edit it.
2. Uncomment the following line:
#org.talend.remote.jobserver.commons.config.JobServerConfiguration.TLS_DISABLE_CN_CHECK=true
3. Save your changes and close the file.
Disabling ZeroMQ on your JobServer

Installing your Talend Data Integration manually
87
Using real-time statistics on Talend Administration Center but not consuming them may result in excessive memory usage.If you observe ZeroMQ related memory leaks, you can disable ZeroMQ on the Talend JobServer by adding the followingparameter in the Talend JobServer configuration file:
org.talend.remote.jobserver.server.TalendJobServer.ENABLED_PROCESS_MESSAGE=false
Note that if you disable ZeroMQ on Talend JobServer, that will disable the real-time statistics on Talend AdministrationCenter too.
Shutting down your JobServer gracefully
You can shut down Talend JobServer in a graceful manner without human interaction to wait for possibly running Jobs tostop.
Procedure
To gracefully shut down your Talend JobServer, use the stop_rs.sh command with the -w <numberOfSeconds>argument.
Behavior of the stop script:
Command Behavior
stop_rs.sh Terminates the JobServer if no Jobs are running. If any Jobs are running, liststhe Jobs and allows the user to press any key to refresh the list or Y or y toterminate all the running Jobs.
stop_rs.sh -f Makes the JobServer terminate running Jobs and itself immediately.
stop_rs.sh -w <numberOfSeconds> Terminates the JobServer as soon as no Jobs are running anymore. If thereare still Jobs running after the specified number of seconds the script willterminate with the return code 2.
stop_rs.sh -f -w <numberOfSeconds> Gives running Jobs the specified number of seconds to finish. If they do not,then makes the JobServer to terminate the running Jobs and itself.
Installing Talend Runtime
If you are willing to use both Talend Runtime and Talend JobServer on the same machine, you are required to change theport numbers because, by default, both servers are using the same ports.
Talend Runtime is an OSGi container, based on Apache Karaf, allowing you to deploy and execute various components andapplications inside its deploy folder.
Installing the Talend Runtime containers
Procedure
1. Select the servers that will be used for the execution.
2. On each server, unzip the archive file containing the Talend Runtime application matching your release version ofTalend Studio.
The archive file name for example reads: Talend-Runtime-V6.4.1.zip
3. In the unzipped file, you might need to configure the org.ops4j.pax.web.cfg file to change the HTTP listeningport that you can find in the directory Talend-Runtime-VA.B.C/etc. Note that this file also allows you to definethe artifact repository URL.
4. Browse to the bin directory and run the trun file to launch Talend Runtime.
5. Go to the Servers page of Talend Administration Center.
Only users that have Operation Manager role and rights can have a read-write access to this page. For more informationon access rights, see your Talend Administration Center User Guide. So, you have to connect to Talend AdministrationCenter as an Operation Manager to be able to configure your servers.
6. Define the server as follows:

Installing your Talend Data Integration manually
88
Field Description
Label TestingServer
Description Type in the description of server.
Host localhost
Command port 8000
File transfer port 8001
Monitoring port 8888
Timeout on unknown status(s) 120
Username Type in the username for user authentication to access a Job server.
Password Type in the password for user authentication to access a Job server.
Active Select/clear the check box to activate/deactivate this server
Use SSL Select/clear the check box to use or not your own SSL Keystore toencrypt the data prior to transmission.
For more information about how to enable SSL, see Enabling theSSL encryption in Talend Runtime on page 88.
Talend Runtime By default, servers created are Job servers.
To deploy and execute your Jobs tasks into Talend Runtime,select the Talend Runtime check box. The following fields willdisplay: Mgmt-Server port, Mgmt-Reg port, Admin Console port andInstance.
Mgmt-Server port RMI Server Port (44444 by default). This field is mandatory.
Mgmt-Reg port RMI Registry Port (1099 by default). This field is mandatory.
Admin Console port Port of the Administration Web Console (8040 by default). Thisfield is mandatory and allows to activate the Admin server buttonallowing you to access the Administration Web console.
Instance Type in the name of the container instance in which you will deployand execute your Jobs tasks, trun by default.
This corresponds to the configuration of a Talend Runtime on the system that hosts the Web application. For any othersystem, the Host field should contain the IP address of the system. Check also that the ports 8000, 8001 and 8888 areavailable. These ports must be the same as defined in the TalendJobServer.properties defined above. Theusername and password pairs are defined in the user.properties file, which is located in the <runtime_install_path>\etc\ folder. The default admin username and password in the user.propertires file is tadmin /tadmin. However, you still need to set the password from the Talend Administration Center Server page.
7. Click the Servers page again so that the Talend Runtime servers appear with their properties.
Enabling the SSL encryption in Talend Runtime
The execution servers provided by Talend allows you to encrypt data prior to transmission via an existing SSL Keystore.
Procedure
1. Go to the etc directory and open the org.talend.remote.jobserver.server.cfg file to edit it.
2. In theorg.talend.remote.jobserver.server.TalendJobServer.USE_SSL=false line, replace falsewith true.

Installing your Talend Data Integration manually
89
The next time you launch your execution server, the SSL protocol will be used to secure the communication betweenservers and clients.
3. In Talend Administration Center, select the Use https check box to enable the encryption.
Enabling remote JMX access in Talend Runtime
For security reasons, remote access to the Talend Runtime Container is restricted. By default, remote JMX access and SSHaccess is only possible from localhost (IP address 127.0.0.1) and the Talend Administration Center can not connect to theTalend Runtime on a different host.
In order for the Talend Runtime to be accessible to the Talend Administration Center, remote JMX access must be enabled.This can be done in one of the following ways.
Procedure
1. Edit the <RuntimeContainerPath>/etc/org.apache.karaf.management.cfg file and set the followingvalues.
rmiRegistryHost = 0.0.0.0rmiServerHost = 0.0.0.0
2. Set the following OS environment variables before starting the Talend Runtime (or set them in the setenv.sh file):
export ORG_APACHE_KARAF_MANAGEMENT_RMIREGISTRYHOST=0.0.0.0 export ORG_APACHE_KARAF_MANAGEMENT_RMISERVERHOST=0.0.0.0
You can set the values of rmiRegistryHost and rmiServerHost to either 0.0.0.0 or 127.0.0.1. Any othervalue like hostname or IP address of the network interface does not work.
• 0.0.0.0: Access succeeds through localhost (127.0.0.1) and remote network interfaces. In TalendAdministration Center, setting the value of the host to either localhost or 127.0.0.1 only works for theTalend Runtime on the same host. If the value of the Host field is set to the hostname or IP address of the host,then it can be accessed locally or remotely.
• 127.0.0.1: Access succeeds only through localhost (127.0.0.1) for the Talend Runtime on the same hostas Talend Administration Center. In Talend Administration Center, the value of the host must be localhost or127.0.0.1. The hostname or remote IP address does not work as access is restricted to localhost.
Configuring Talend Artifact Repository in Talend Runtime
The default Talend Artifact Repository URL is described in the etc/org.ops4j.pax.url.mvn.cfg file.
If your artifact repository has been installed on another URL, edit the org.ops4j.pax.url.mvn.repositories part ofthe file.
Installing and configuring Talend logging modules
Talend logging modules, which is the Talend Log Server based on Elasticsearch and Kibana, let you view output logs filteredby categories and event types, such as Data Integration, ESB, or MDM events. You can access the output logs from theLogging page in the Talend Administration Center. For more information on how to display the logs in Talend AdministrationCenter, see the Talend Administration Center User Guide.
Talend recommends installing Talend logging modules with the Talend Installer.
Installing the Talend logging modules
You need to manually install Talend Log Server which includes Kibana and Filebeat to collect logs.
Before you beginThe Elasticsearch container requires that the vm.max_map_count parameter to be set to at least 262144. Check this value onyour machine and increase it if needed.
Installing your Talend Data Integration manually
90
To check this value, run the following command:
sysctl vm.max_map_count
If you need to increase the value, run the following command:
sysctl -w vm.max_map_count=262144
To permanently write the value to the sysctl.conf file, run the following command:
vm.max_map_count = 262144
Procedure
1. Copy and extract the Talend-LogServer-VA.B.C.zip archive file in the directory of your choice.
Note: The directory name must not contain spaces or non-ASCII characters.
2. To start Talend Log Server launch the start_logserver.sh executable file.
You cannot run Elasticsearch as the root user. Elasticsearch is part of the Talend Log Server, therefore you cannot runthe executable file as root user.
3. Configure the values for LOG_PATH and APP_NAME for Filebeat:
• Open the filebeat.yml file located in the Filebeat directory and set the LOG_PATH and APP_NAME values asfollows:
paths: - ${LOG_PATH:/home/Talend/7.2.1/tac/apache-tomcat/logs/*} fields: app_id: ${APP_NAME:TAC}
• Or, set the LOG_PATH and APP_NAME environment variables:
export LOG_PATH="/home/Talend/7.2.1/tac/apache-tomcat/logs/*"export APP_NAME="TAC"
4. Start Filebeat:
filebeat -e -c filebeat.yml
Results
You can now access Talend Log Server with the following URL: http://localhost:5601/app/kibana#/dashboard/Default-Dashboard.
When you start the Talend Log Server, if you do not see logstash-*, talendesb-*, and talendaudit-* indices,complete the following steps:
1. Delete the .kibana index.
curl -XDELETE 'http://localhost:9200/.kibana'
2. Stop the Talend Log Server.3. Start the Talend Log Server.
Configuring Talend logging modules with an external Elastic stack with X-Pack
You can deploy Transport Layer Security to the whole Elastic stack (Elasticsearch, Kibana, Filebeat and Logstash). To do so,refer to the Elastic documentation: Setting up TLS on a cluster.
Note: If you plan to upgrade your Elastic stack, Talend recommends to verify the upgrade requirements from Elastic, andto check the breaking changes between major versions. For details, refer to Upgrading Elastic Stack .

Installing your Talend Data Integration manually
91
Setting up update repositories for Talend Studio and Continuous Integration
Talend provides the following ways to configure update repositories, also called p2 repositories, before installing updates,namely the patch zips assigned to you, and feature packages in Talend Studio or building your project artifacts usingContinuous Integration.
• Use the official Talend repositories directly, for example:
• https://update.talend.com/Studio/8/base for the official repository for feature packages• https://update.talend.com/Studio/8/updates/latest for the latest Talend Studio monthly update
For more information about the URL of the official repository for each Talend Studio monthly update, see Data FabricRelease Notes.
• Use proxy repositories that link to the official Talend repositories (recommended)
For more information, see Setting up update repositories by creating proxy repositories on page 91.• Use repositories that host the official Talend repositories
For more information, see Setting up update repositories by hosting them on page 91.
For more information about how to configure the base and update URLs for update repositories in Talend Studio, seeConfiguring update repositories.
For more information about how to configure the -Dtalend.studio.p2.base and -Dtalend.studio.p2.updateparameters for p2 repositories when using Continuous Integration, see Building and Deploying.
Setting up update repositories by creating proxy repositories
You can set up the update repositories (p2 repositories) by creating proxy repositories.
Before you beginThe artifact repository has been installed, either Sonatype Nexus or JFrog Artifactory. For more information, see Installingand configuring Talend Artifact Repository on page 73.
About this taskThis procedure shows you how to set up an update repository for Talend Studio feature packages by creating a proxyrepository. You can follow it to create an update repository for any Talend Studio monthly updates.
Procedure
1. If you are using Sonatype Nexus, create a proxy repository in a raw format.
2. If you are using JFrog Artifactory, create a virtual repository in a generic or maven format.
3. Name the new repository repo-base, for example.
4. Link the new repository to the official repository for Talend Studio feature packages, https://update.talend.com/Studio/8/base in this example.
Later, you can use http://<repo-server>/repo-base to configure the base URL in Talend Studio or the -Dtalend.studio.p2.base parameter in Continuous Integration, where <repo-server> is the IP address or thehost name of your artifact repository server.
Setting up update repositories by hosting them
You can set up the update repositories (p2 repositories) by hosting the official Talend repositories.
About this task
This procedure shows you how to host an update repository for Talend Studio feature packages using Apache Tomcat. Youcan follow it to host an update repository for any Talend Studio monthly updates.
Procedure
1. Download the archive for Talend Studio feature packages, Talend_Full_Studio_p2_repository-YYYYMMDD_HHmm-VA.B.C.zip in this example.
2. Extract the archive in the webapps folder of Apache Tomcat.

Installing your Talend Data Integration manually
92
3. Rename the folder for Talend Studio feature packages to repo-base, for example.
4. Start Apache Tomcat.
Later, you can use http://<repo-server>/repo-base to configure the base URL in Talend Studio or the -Dtalend.studio.p2.base parameter in Continuous Integration, where <repo-server> is the IP address or thehost name of the Apache Tomcat server.
Note that you can also use other server tools besides Apache Tomcat, and you can even host a repository using a localfolder and then configure the URL using the complete path to the folder.
Installing and configuring your Talend Studio
When installing Talend Studio, either using the installer or manually, a minimal version with some basic Data Integrationfeatures is installed. After Talend Studio installation, to use those features that are not shipped with Talend Studio bydefault, you need to install them through the Feature Manager. For more information, see Installing features using theFeature Manager.
Warning: Although you can install some external plugins via the Eclipse menu item Help > Install External Software inTalend Studio, Talend provides no guarantee that they can work.
Unzipping the archive
Procedure
1. Copy the Talend-Tools-Studio-YYYYYYYY_YYYY-VA.B.C.zip archive to a directory of your choice.
Warning: Make sure that:
• The installation path contains no space or special characters, which may cause Talend Studio to fail to workbecause of JVM compatibility issues.
• The installation path is as short as possible to prevent installation issues such as failure of extracting files tothe target directories.
2. Unzip it.
3. Create a file (without extension) named license containing your license key (found in your email), and paste the fileat the root of the extracted directory.
Launching your Talend Studio
Procedure
1. Double-click the Talend-Studio-linux-gtk-x86_64 or Talend-Studio-gtk-aarch64 executable to launchyour Talend Studio.
2. In the dialog box that appears, perform one of the following actions:
• If your license and project have been set in Talend Administration Center and you want to retrieve this license,select the My product license is on a remote server option, select Server URL from the list, enter the server URL andthe login credentials, and then click Fetch to retrieve the license.
• If your license and project have been set in Talend Cloud Management Console and you want to retrieve thislicense, select the My product license is on a remote server option, select a Talend Integration Cloud server orCloud Custom from the list, and then enter the login credentials and click Fetch to retrieve the license.
If you select Cloud Custom, you can edit, if needed, the server URL automatically filled in the Server URL field.• Click My product license is on the local file system to browse and select your license file.
Note: If you use proxy that requires authentication to connect to Talend Administration Center or Talend CloudManagement Console that uses HTTPs and get the error message 407 proxy authorization required, youneed to add the parameter -Djdk.http.auth.tunneling.disabledSchemes with the empty value in thecorresponding .ini file according to your operating system and relaunch your Talend Studio.
3. If needed, set a migration token to allow importing projects or project items exported from earlier versions of TalendStudio.

Installing your Talend Data Integration manually
93
4. Click Next to launch your Talend Studio.
Tip:
If your Talend Studio fails to connect to the remote server, a dialog box is displayed to allow you to:
• Retry connecting to the remote server.• Modify the connection timeout time to allow more retries. The value 0 means no connection timeout.
If needed, click Cancel to close the dialog box and check your connection details.
If you get an invalid registry error, add the osgi.nl=en_US parameter in the <Talend-Studio>/configuration/config.ini file and relaunch your Talend Studio by running the command ./Talend-Studio-linux-gtk-x86_64 -clean or ./Talend-Studio-linux-gtk-aarch64 -clean from a terminal.
The -clean parameter is needed only once. It is recommended not to use it when launching Talend Studio byrunning the executable file.
Specifying another JVM to launch Talend Studio
It is possible to have more than one JVM installation on your machine and to use another JVM to launch Talend Studio for aparticular purpose. This section shows how to specify another JVM to launch Talend Studio.
Procedure
1. Go to the Talend Studio installation directory.
2. Execute the command ./Talend-Studio-linux-gtk-x86_64 -vm <JDK_Directory> or ./Talend-Studio-gtk-aarch64 -vm <JDK_Directory>, where <JDK_Directory> is the installation directory of JDK, forexample, /opt/Program Files/Java/jdk-11.0.12/bin.
Setting up a local connection in Talend Studio
Talend Studio allows you to create a local connection so that you can work on your projects locally.
Procedure
1. Launch Talend Studio.
2. In the Talend Studio login window, click the Manage Connections button to open the Connections window.
3. In the Connections window, click the + button to create a new connection.
4. Select Local from the Repository list and enter a Name and Description for the connection.
5. Enter the user account in the User E-mail field.
6. Specify the directory for your local workspace.
Warning: Make sure that the path of your workspace directory contains no space or special characters, which maycause Talend Studio to fail to work because of JVM compatibility issues.
7. Click OK.
Results
You can now select the newly created connection in the Talend Studio login window to connect to your local projects.
Setting up a remote connection in Talend Studio
You can set up a connection to Talend Administration Center or to Talend Integration Cloud.
Procedure
1. Launch Talend Studio.
2. In the Talend Studio login window, click the Manage Connections button to open the Connections window.
3. In the Connections window that opens, click the + button to create a new connection.

Installing your Talend Data Integration manually
94
4. From the Repository list, select:
• Remote TAC to create a connection to Talend Administration Center.• a Talend Cloud server or Cloud Custom to create a connection to Talend Integration Cloud.
If you select Cloud Custom, you can edit, if needed, the server URL automatically filled in the Server URL field.
5. Enter the name and the description for the connection in the corresponding Name and Description fields.
6. Enter the email and the password for the user you created in Talend Administration Center or Talend CloudManagement Console in the corresponding User name and User password fields.
Note:
• The logon credential information is case sensitive and must be exactly the same as defined in the TalendAdministration Center.
• If SSO is enabled in Talend Administration Center, you need to enter SSO username and password in the Username and User password fields. For more information, contact your administrator.
7. Specify the directory for your workspace in the Workspace field.
Be careful not to use an existing local workspace. If needed, you can create another folder in the Talend Studioalongside the default workspace folder.
Warning: Make sure that the path of your workspace directory contains no space or special characters, which maycause Talend Studio to fail to work because of JVM compatibility issues.
8. Enter the URL for Talend Administration Center (for example, http://localhost:8080/org.talend.administrator but, depending on your configuration, you may have to replace <localhost> with the serverIP address, and <8080> with the port set for the application), or edit the URL for Talend Integration Cloud if needed, inthe Web-app URL field and then click Check url to validate the connectivity.
Tip:
If your Talend Studio fails to connect to the remote server, a dialog box is displayed to allow you to:
• Retry connecting to the remote server.• Modify the connection timeout time to allow more retries. The value 0 means no connection timeout.
If needed, click Cancel to close the dialog box and check your connection details.
9. If needed, select the Don't save TAC credentials in Studio check box to not save your Talend Administration Centercredentials in Talend Studio.
With this check box selected, your Talend Administration Center credentials will not be saved in Talend Studio, and anew Administration Center Repository dialog box will be popped up when Talend Studio restarts, where you can enteryour Talend Administration Center credentials.
10. Click OK.
Results
You can now select the newly created connection in the Talend Studio login window to connect to a collaborative project.
Setting up multiple connections in Talend Studio using a script
Talend Studio allows you to create multiple connections in one go using a connection creation script.
The following example demonstrates how to create a local connection and a Talend Administration Center connection inone go using a script.
Procedure
1. Create a script file to define the connection details in JSON format.

Installing your Talend Data Integration manually
95
In this example, name the script myConnections.json put it in the Talend Studio installation directory.
[ { "name": "localConnection", "description": "My local connection", "local": true, "user": "[email protected]", "workSpace": "D:\\Talend\\workspace" }, { "name": "remoteConnection", "description": "My TAC connection", "local": false, "user": "[email protected]", "password": "mypassword", "workSpace": "D:\\Talend\\remoteworkspace", "url": "http://192.128.8.88:8081/org.talend.administrator" }]
Warning: Make sure that the path of your workspace directory contains no space or special characters, which maycause Talend Studio to fail to work because of JVM compatibility issues.
2. In the Talend Studio installation directory, run the following command:
Note: This example assumes you are using Talend Studio on Microsoft Windows. If you are working on anotherOperating System, use the executable file of Talend Studio corresponding to your Operating System.
Talend-Studio-win-x86_64.exe -nosplash -application org.talend.commandline.GenerateConnection -consoleLog -data commandline-workspace -f myConnections.json
3. Launch Talend Studio.
4. In the Talend Studio login window, click the Manage Connections button to open the Connections window and checkyour connections.
Results
The connections defined in the script file are created and shown in the Connections window.
Configuring a proxy repository for libraries in Talend Studio
By default, the libraries required by Talend Studio are downloaded from Talend official repository https://talend-update.talend.com/nexus/content/repositories/libraries. You can set up a proxy on your local repositoryand link the proxy to Talend official repository. This allows each Studio instance to download the same jar files much faster.
The following procedure shows you how to configure a proxy repository for libraries in Talend Studio.
Procedure
1. Click File > Edit Project Properties from the menu bar to open the Project Settings dialog box.
2. Click General > Artifact Proxy Setting to open the corresponding view.
3. Select the Enable Proxy Setting check box.
4. From the Type drop-down list, select the type of the repository.
5. In the URL field, enter the URL of your local repository.
6. In the Username and Password fields, enter the proxy authentication credentials.
7. In the Repository Id field, enter the ID of your repository.
8. Click Check Connection to verify the connection status.
9. Click Apply and Close to save your changes and close the dialog box.
Note that you can also configure a proxy repository by adding the following parameters in the Studio .ini filecorresponding to your operating system and restart your Talend Studio. If the proxy repository is configured in both

Installing your Talend Data Integration manually
96
the .ini file and the Project Settings dialog box, the configuration in the .ini file will take effect and overwrite theconfiguration in the Project Settings dialog box.
-Dnexus.proxy.url=<proxy_repository_url>-Dnexus.proxy.repository.id=<proxy_repository_id>-Dnexus.proxy.username=<proxy_username>-Dnexus.proxy.password=<proxy_password>-Dnexus.proxy.type=<proxy_repository_type>
The valid values for the repository type are NEXUS_3 and ARTIFACTORY.
Configuring Talend Studio to enable connection with Talend Administration Center viaa proxy server with basic authentication
When working on a remote project behind a proxy server with basic authentication, you need to complete some specificsettings in your Talend Studio to enable a secure connection with the remote Talend Administration Center.
Note: This documentation provides settings for both HTTP and HTTPS proxy servers. You can make your own choicebased on the type of your proxy server.
For how to configure a secure connection with the Talend Administration Center using SSL, see Setting up a rootCertificate Authority chain or How to configure a bidirectional secure connection between Talend Studio and TalendAdministration Center .
Procedure
1. In your Talend Studio, select Window > Preferences > from the menu to open the Preferences window, expand theGeneral > Network Connections nodes, and define your proxy settings.
Alternatively, or if you are using Talend CommandLine, set your proxy by adding the following lines to the .ini fileunder the root of the Studio installation directory:
-Dhttp.proxySet=true-Dhttp.proxyHost=<proxy_server_host>-Dhttp.proxyPort=<proxy_server_port>-Dhttp.nonProxyHosts=localhost-Dhttp.proxyUser=<proxy_server_user>-Dhttp.proxyPassword=<proxy_server_password>-Dhttps.proxyHost=<proxy_server_host>-Dhttps.proxyPort=<proxy_server_port>-Dhttps.proxyUser=<proxy_server_user>-Dhttps.proxyPassword=<proxy_server_password>
2. Do the following:
• Update the .gitconfig file as follows:
git config --global http.proxy http://<git_username>:<git_password>@<proxy_server_host>git config --global https.proxy http://<git_username>:<git_password>@<proxy_server_host>
ResultsAfter restarting your Talend Studio, you will be able to connect to Talend Administration Center via a proxy server with basicauthentication.
Rotating encryption keys in Talend Studio
Two encryption keys are now used by Talend Studio, Talend Administration Center and Talend components to encrypt anddecrypt passwords with the AES GCM 256 algorithm.
• system.encryption.key: for encrypting and decrypting nexus passwords and the passwords in theconnection_user.properties file and the <jobname>_<jobversion>.item Job properties files. All Studiousers working on the same project must have the same system encryption key.
• routine.encryption.key: for encrypting and decrypting passwords when building and running Jobs.

Installing your Talend Data Integration manually
97
Warning: We strongly recommend you rotate the key on one Studio, deploy the new key on Talend Administration Centerand Talend JobServer if needed, and then distribute the new key to other Studios.
The default values of these two keys system.encryption.key.v1 and routine.encryption.key.v1 are stored inthe encryption key configuration file /configuration/studio.keys, which is created under the installation directoryof your Talend Studio after you run the Talend Studio executable file Talend-Studio-linux-gtk-x86_64 for the firsttime. Below is an example of the newly created studio.keys file.
system.encryption.key.v1=ObIr3Je6QcJuxJEwErWaFWIxBzEjxIlBrtCPilSByJI\=routine.encryption.key.v1=YBoRMn8gwD1Kt3CcowOiGeoxRbC2eNNVm7Id6vA3hrk\=
If the default system encryption key is not used to encrypt and decrypt any password, you can modify its value by removingits default value and restarting Talend Studio, ObIr3Je6QcJuxJEwErWaFWIxBzEjxIlBrtCPilSByJI\= in aboveexample.
The default routine encryption key value cannot be modified. If you have already logged on to a project, Talend allows youto rotate an encryption key by adding a new version of the key in the encryption key configuration file.
Note that the new version of the system encryption key will take effect for a Job only after you modify and save the Job.
About this taskThe following procedure shows you how to rotate an encryption key.
Procedure
1. Open the key configuration file /configuration/studio.keys under the installation directory of your TalendStudio.
2. Add a new version of the encryption key with an empty value by adding the following line:
• For the system encryption key:
system.encryption.key.v<version_number>=
• For the routine encryption key:
routine.encryption.key.v<version_number>=
where <version_number> is a simple integer which represents the version of the new encryption key and should behigher than any existing version number, for example,
system.encryption.key.v2=routine.encryption.key.v2=
Warning: Any previous version of the encryption key must not be deleted if it has already been used to encrypt apassword.
3. Save the key configuration file and restart your Talend Studio.
The new version of the encryption key value will be generated and saved in the key configuration file.
4. If you are rotating the routine encryption key and your Jobs are executed on Talend JobServer, copy the keyconfiguration file for Talend Studio to a directory on the server where Talend JobServer is installed and set the JVMparameter -Dencryption.keys.file on Talend JobServer.
For more information, see Set a JVM property for all the Jobs executed by a JobServer on Windows / Linux.
5. If you are rotating the system encryption key while working on a remote project, set the same encryption key for TalendAdministration Center.
a) Copy the key configuration file for Talend Studio to a directory on the server where Talend Administration Center isinstalled, for example, D:/StudioKeys.
b) Open the file <TomcatPath>/bin/catalina.sh under the installation directory of your Talend AdministrationCenter.
c) Add the following line at the beginning of the file:
JAVA_OPTS="-Dencryption.keys.file=/d/StudioKeys/studio.keys"

Installing your Talend Data Integration manually
98
6. If you are rotating the routine encryption key and your Jobs are executed from Job Conductor in Talend AdministrationCenter, copy the key configuration file for Talend Studio to a directory on the server where Talend AdministrationCenter is installed and set the JVM parameter -Dencryption.keys.file for the corresponding task in TalendAdministration Center.
For more information about how to set JVM parameters for a task in Talend Administration Center, see Setting JVMparameters for specific tasks.
7. Restart your Talend Administration Center for any reconfiguration on it.
Configuring a JDK path to build Jobs
This article uses JDK8 to demonstrate how to configure the JDK path in Talend Studio.
Talend Studio requires a JDK installation on your machine instead of JRE only to build Jobs. You must configure the JDK pathfrom the Installed JREs window in Talend Studio before building Jobs. Otherwise, the target archive file will not be created.
For more information on how to select the correct JDK version according to your Talend product version, see the Talendinstallation documentation on Talend Help Center (https://help.talend.com).
Configuring the JDK path in Talend Studio
A Wrong Java setup dialog pops up whenever your Talend Studio starts up.
Procedure
1. Click Windows > Preferences, expand the Java node, and then click Installed JREs.
2. Click the Add button to install a new JRE or click the Edit button to edit an existing JRE.
3. Browse to the location of JDK 8 and select it, in this example C:\Program Files\Java\jdk1.8.0_144.

Installing your Talend Data Integration manually
99
4. Click OK to validate your change and close the window.
Warning: If you have several Java instances installed, make sure to remove the JREs in the Installed JREs window, inorder to avoid the JRE to take precedence over the JDK.
Disabling Internet access for the Studio
About this task
You can disable Internet access for your Talend Studio by editing the Studio .ini file.
Warning: Do this only if you have no needs of accessing the Internet to download and install custom components, third-party libraries, and so on.
Procedure
1. Open the Studio .ini file corresponding to your operating system, and add the following line to it:
-Dtalend.disable.internet=true
2. Restart your Talend Studio.When launched again, the Studio will not show:
• The Exchange link on the toolbar• The Talend > Exchange node in the Preferences dialog
Optimizing Talend Studio performance
If you experience slowness while working with Talend Studio, there are several ways to optimize its performance.
Installing your Talend Data Integration manually
100
Hardware considerations
Make sure to check the Hardware requirements on page 6 section of this guide. Keep in mind that those are the minimumrequirements to be able to work with Talend products.
Talend recommends you double the disk space required to avoid problems during high transactions.
For an optimized performance, Talend also recommends to use a solid-state drive (SSD).
Adding Talend to the antivirus allowlist
Antivirus real-time scans can cause performance issues when a great number of files needs to be scanned.
One solution for Talend Studio slowless is to add Talend installation and workspace directories to your antivirus allowlist.
Check your antivirus documentation for more information on how to add files and folders to its allowlist.
Editing the memory and JVM settings
To gain in performance at runtime and when launching Talend Studio you can edit the memory settings in the .ini file.
By default, the .ini file sets the following JVM parameters:
-vmargs-Xms64m-Xmx768m-XX:MaxPermSize=512m-Dfile.encoding=UTF-8
Note: The settings of the .ini configuration file will only impact the performance of Talend Studio, not the jobexecution itself.
Procedure
1. Find and open the Talend-Studio-linux-gtk-x86_64.ini or the Talend-Studio-gtk-aarch64.ini file.
2. Edit the memory attributes according to your system memory availability. For example:
-vmargs -Xms512m -Xmx1536m -XX:MaxMetaspaceSize=512m
Tip: For big projects, you may need to increase Xmx to 4096m.
For more details, see http://www.oracle.com/technetwork/java/hotspotfaq-138619.html.
Example
With 8 GB of memory available on 64-bit system, the optimal settings can be:
-vmargs-Xms1024m-Xmx4096m-XX:MaxPermSize=512m-Dfile.encoding=UTF-8
Installing and configuring Talend CommandLine
Installing Talend CommandLine
This section shows you how to install Talend CommandLine by upgrading either a brand new or an existing Talend Studio.
For more information about Talend CommandLine, see CommandLine.
Warning: After an existing Talend Studio is upgraded to Talend CommandLine, it is recommended not to use it as TalendStudio any more.

Installing your Talend Data Integration manually
101
Procedure
1. If you want to install Talend CommandLine by upgrading a brand new Talend Studio, copy the Talend-Studio-YYYYMMDD_HHmm-VA.B.C.zip archive file onto the machine where you want to install Talend CommandLine andunzip it under a folder the name of which does not contain any space character.
2. Rename the Talend Studio folder for more clarity, CmdLine in this example.
Warning: Renaming the folder into CommandLine is causing problems, so it is recommended to rename itdifferently.
3. Open the terminal and change the working directory to the CmdLine folder.
4. Run the commandline-linux_upgrade.sh command to upgrade Talend Studio to Talend CommandLine. Use thefollowing parameters if needed.
Parameter Description
-Dlicense.path Specify the path to the license of your Talend product if it is not in the CmdLine folder.
-DtalendDebug Set its value to true if you want to show log details when upgrading Talend Studio to TalendCommandLine.
-Dtalend.studio.p2.base Specify the URL of the repository for Talend Studio feature packages.
If the URL is not specified in the command, you can choose to specify it with one of thefollowing values in a pop-up window after running the command.
• Type 1 to use the URL of Talend official website and then type y if you want to upgradeTalend CommandLine to the latest version.
• Type 2 to enter your own repository URL.• Type 3 to use the URL configured in Talend Studio.
Note: If you have installed any patch for Talend Studio, it is recommended to choosethis value.
For more information, see Configuring update repositories.
-Dtalend.studio.p2.update Specify the URL of the repository for Talend updates.
If the URL is not specified in the command, you can choose to specify it with one of thefollowing values in a pop-up window after running the command.
• Type 1 to use the URL of Talend official website and then type y if you want to upgradeTalend CommandLine to the latest version.
• Type 2 to enter your own repository URL.• Type 3 to use the URL configured in Talend Studio.
Note: If you have installed any patch for Talend Studio, it is recommended to choosethis value.
For more information, see Configuring update repositories.
When done, a commandline-linux.sh file which lets you launch Talend CommandLine is generated.
5. Run the commandline-linux.sh file.
You can stop Talend CommandLine execution by pressing Ctrl+C.
Editing the memory and JVM settings for Talend CommandLine
To gain in performance at runtime and when launching Talend CommandLine, you can edit the memory settings in thecorresponding .ini file.
Procedure
1. Edit the Talend-Studio-linux-gtk-x86_64.ini file.
2. Edit the memory attributes. For example:
-vmargs -Xms512m -Xmx1536m -XX:MaxMetaspaceSize=512m

Installing your Talend Data Integration manually
102
Tip: For big projects, you may need to increase Xmx to 4096m.
For more details, see http://www.oracle.com/technetwork/java/hotspotfaq-138619.html.
3. Edit the commandline-linux.sh file.
4. Change the following information:
Talend-Studio-win-x86_64.exe -nosplash -application org.talend.studiolite.p2.featmanage.UpgradeCommandlineApplication -consoleLog -data commandline-workspace shell %*
to
./Talend-Studio-linux-gtk-x86_64 -nosplash -application org.talend.studiolite.p2.featmanage.UpgradeCommandlineApplication -consoleLog -data commandline-workspace shell $@
Tip: For big projects, you may need to increase Xmx to 4096m.
Accessing user-defined components from Talend CommandLine
If you need to install user-defined components (that you developed locally or downloaded from Talend Exchange forexample), then you need to notify Talend CommandLine with the user component folder.
To configure the path to these components, simply use the following command:
setUserComponentPath -up <UserComponentPath>
To clear this path, type in the command:
setUserComponentPath -c
Installing and configuring Talend SAP RFC Server
Talend SAP RFC Server is a standalone server that acts as a gateway between Talend Studio and an SAP server. Itreceives SAP IDocs or SAP BW Data Source objects from the SAP server and makes them available for processing by thetSAPIDocReceiver component or the tSAPDataSourceReceiver component and other components in Talend Jobs. For moreinformation about these components, see Talend Components Reference Guide.
Talend SAP RFC Server is built on an embedded Apache Active MQ. It publishes IDocs or Data Source objects in JMS (JavaMessage Service) topics or replicates them to JMS queues for batch processing. The tSAPIDocReceiver component or thetSAPDataSourceReceiver component can then subscribe to these JMS topics or read from the JMS queues.
Note that the SAP server needs to be configured to operate with Talend SAP RFC Server. For more information on how toconfigure SAP, see How to configure SAP to operate with Talend SAP RFC Server.
Installing Talend SAP RFC Server manually
Before you begin
The proprietary library sapjco3.jar is required for the Talend SAP RFC Server to operate correctly.
Procedure
1. Extract the archive file to the destination folder of your choice.
2. In Talend SAP RFC Server destination folder, move the sapjco3.jar file under user/lib .
Configuring a Talend SAP RFC server
This section walks you through the procedures of configuring your Talend SAP RFC Server, including customizing the tsap-rfc-server.properties file and SAP connection configuration files, creating an SAP user, creating an RFC destination,configuring the services files, and so on.

Installing your Talend Data Integration manually
103
Configuring the tsap-rfc-server.properties file
The configuration file tsap-rfc-server.properties for Talend SAP RFC Server is located under the $TSAPS_HOME/conf directory (where $TSAPS_HOME corresponds to the directory where the Talend SAP RFC Server has been installed).This file consists of five sections. Before starting Talend SAP RFC Server, you can configure the file to enable someadditional features of the server according to your needs.
Note:
• Talend SAP RFC Server doesn't support the SAP cluster configuration.• Any change of the configuration file requires a restart of the Talend SAP RFC Server.
Before the sections
• logging.config: Specifies the log configuration file, which sets the log levels (mandatory).• loader.path: Specifies directories or archives to append to classpath for including sapjco3.jar. The directories or
archives need to be separated with commas (mandatory).• named.connections: Specifies the path to the directory that holds the SAP connection configuration files
(mandatory).
Note: The named.connections parameter is effective only if you have applied Patch_20210820_TDI-45536_v1-7.3.1.
Health section
This section controls the showing of health information.
• management.endpoint.health.show-details: Sets the level of showing health information, which is collectedby summarizing all the HealthIndicator results (mandatory).
Note: This section is effective only if you have applied Patch_20210820_TDI-45536_v1-7.3.1.
JMS broker section
The JMS Broker section sets up the interaction with the embedded or remote JMS broker.
To enable user authentication, you need to uncomment the following four parameters and set their values. If you don'tenable user authentication, the tSAPIDocReceiver component or the tSAPDataSourceReceiver component can also connectto Talend SAP RFC Server without setting the value for their user and password fields.
• jms.login.config=conf/user-authentication/login.config: File system directory containing JAASauthentication configuration.
• jms.login.configDomain=tsaps-domain: Domain of JAAS authentication configuration to use.• jms.login.username: JAAS username used to authenticate a publisher or sender.• jms.login.password: JAAS password used to authenticate a publisher or sender.
Note: The username and password values are used by the tSAPIDocReceiver or the tSAPDataSourceReceiver componentto connect to the Talend SAP RFC Server. They must also exist in the $TSAPS_HOME/conf/user-authentication/users.properties file. In this file, each row represents a username and a password pair, where the username value ison the left side of the equals sign and the password value is on the right side of the equals sign.
To enable the SSL transport mechanism, copy the key store file for SSL to the $TSAPS_HOME/conf folder. Thenuncomment the following two parameters (the path to the key store file and the password for the key store file) in theconfiguration file and set their values
• jms.ssl.keystore.path: The path to a key store for SSL.• jms.ssl.keystore.password: A password for a key store for SSL.• jms.durable.queue.replicate: Whether JMS messages should be replicated in durable queues.• jms.durable.queue.retentionPeriod: Retention period for JMS messages in durable queues in milliseconds (by
default: 7 days).

Installing your Talend Data Integration manually
104
Embedded broker section
The Embedded Broker section details the connection information of the used embedded JMS broker. If you use an externalJMS broker, these values are commented out. The following lists the settings:
• jms.bindAddress: The host address and port (ex: tcp://localhost:61616) for the JMS broker to listen for incomingconnections (mandatory).
• jms.persistent: Whether JMS messages are persisted or not. This way, the Talend SAP RFC Server keeps a copy ofall IDocs received in queues named after the IDoc. This is meant to serve the tSAPIDocReceiver component in batchmode. When the receiver runs, it collects all IDocs stored in the durable queues since the last time it ran.
By default, messages are kept in the queues for up to seven days. You can change the retention period by uncommenting thisparameter in the configuration file and updating its value to meet your own requirement.
• jms.dataDirectory: File system location used by the JMS broker to persist data.• jms.useJmx: Sets whether or not the Broker's services should be exposed into JMX or not.
Remote broker section
The Remote Broker section details the connection information to a remote or external broker. If you use an embeddedbroker, this section is commented out. The following lists the settings:
• jms.broker.url: When active, connects to a remote broker instead of an embedded one.• jms.reconnect.interval: Interval between reconnection attempts.• rfc.server.remote.broker.url: URLs of the brokers for failover. Broker URLs need
to be provided in this form: rfc.server.remote.broker.url=failover:(tcp://ip_address1:port_number1,tcp://ip_address2:port_number2, ...).
Note: The rfc.server.remote.broker.url parameter is effective only if you have installed the R2021-01 RFCserver update or a later one delivered by Talend. For more information, check with your administrator.
Error Page's Content section
The Error Page's Content section specifies the way error messages are displayed. The values can be always, on-param,and never.
• server.error.include-message=always
• server.error.include-binding-errors=always
Note: The two parameters in this section are available only when you have installed the 8.0.1-R2022-05 Studio Monthlyupdate or a later one delivered by Talend. For more information, check with your administrator.
Kafka section
The Kafka section details the Kafka connection information needed to use the streaming mode feature. It also containssettings for configuring an Azure eventhub as a Kafka cluster.
• kafka.bootstrap.servers=<kafka_setting>: Kafka broker addresses (in the form of host:port number)separated by commas (mandatory).
• kafka.security.protocol=SASL_SSL
• kafka.sasl.mechanism=PLAIN
• kafka.sasl.jaas.config=org.apache.kafka.common.security.plain.PlainLoginModulerequired username="$ConnectionString" password="{YOUR.EVENTHUBS.CONNECTION.STRING}";
Note:
• kafka.security.protocol=SASL_SSL, kafka.sasl.mechanism=PLAIN, and kafka.sasl.jaas.config=org.apache.kafka.common.security.plain.PlainLoginModule requiredusername="$ConnectionString" password="{YOUR.EVENTHUBS.CONNECTION.STRING}"; arerequired when feature.streaming.enabled is set to true in an SAP connection configuration file.
• For information about configuring an Azure eventhub as a Kafaka cluster, go to Quickstart: Data streaming withEvent Hubs using the Kafka protocol.

Installing your Talend Data Integration manually
105
Configuring an SAP connection configuration file
You can connect to multiple SAP systems through a Talend SAP RFC Server by creating an SAP connection configurationfile under the $TSAPS_HOME/conf/named-connectiond directory for each of the connections (where $TSAPS_HOMEcorresponds to the directory where the Talend SAP RFC Server has been installed). An SAP connection configuration fileconsists of three sections. Before starting Talend SAP RFC Server, you can configure SAP connection configuration files toenable some additional features of the server according to your needs.
Note:
• Talend SAP RFC Server doesn't support the SAP cluster configuration.• Any change of the configuration file requires a restart of the Talend SAP RFC Server.• The $TSAPS_HOME/conf/named-connectiond directory and SAP connection configuration files are necessary
only if you have applied Patch_20210820_TDI-45536_v1-7.3.1.• You can customize the path to the $TSAPS_HOME/conf/named-connectiond directory by setting the
named.connections parameter in the tsap-rfc-server.properties file.
Feature section
The Feature section details the connection information to enable functionalities involving the Talend SAP RFC Server.
• feature.idoc.enabled: Enables the IDoc feature.• feature.idoc.transactional: Enables the transactional management feature.
• Reports the entire transaction as a failure to SAP when a message does not get delivered to the JMS broker.• Automatically reconnects to the remote JMS broker.
• feature.idoc.transactionAbortTimeOut: Refers to the IDoc package processing timeout value inmilliseconds.
• feature.idoc.mock.enabled: Replaces the IDoc receiver with a mock, which produces an IDoc package every 5seconds. Not used for SAP servers.
• feature.bw_source_system.enabled: Enables the BW source system feature.• feature.bw_source_system.mock.enabled: Replaces the BW source with a mock, which produces a BW data
request every 5 seconds. Not used for SAP servers.• feature.streaming.enabled: Enables the streaming mode features (requires a remote connection to a Kafka
cluster).
Note: Install a Kafka server version 2.1 onwards prior to using the streaming mode feature. For more information,refer to http://kafka.apache.org/quickstart.
• feature.streaming.timeout: Refers to the timeout value for the streaming to start.• feature.streaming.limit.parallel: Maximum number of data streams that can be extracted in parallel. A
value of -1 does not limit the number of data streams.• feature.streaming.threadCount: The number of threads for data extraction. The default is 2.• feature.streaming.topic.partitionCount: Kafka topic partition count. The default is 2.• feature.streaming.topic.replicationFactor: Kafka topic replication factor. The default is 1.
Note: The feature.bw_source_system.mock.enabled and feature.streaming.limit.parallelparameters are effective only if you have applied Patch_20210820_TDI-45536_v1-7.3.1.
SAP JCO server section
The SAP JCO Server section details the SAP information the RFC server needs to connect through RFC calls to SAP.
• jco.server.gwhost: SAP gateway host on which the RFC server should be registered (mandatory).• jco.server.gwserv: SAP gateway service, i.e. the port used for the registration (mandatory).• jco.server.progid: Identifier for IDoc on the gateway and as the destination in the SAP system (mandatory).• jco.server.connection_count: Number of connections registered at the gateway (mandatory).• jco.server.worker_thread_count: Number of threads that can be used by the JCOServer instance.• jco.server.worker_thread_min_count: Number of threads that are kept running by the JCOServer instance.• jco.server.trace: Enables or disables the RFC trace, this is useful for debugging.

Installing your Talend Data Integration manually
106
• destination_name=RFC destination : Sets the RFC destination. You need to set this parameter when the RFCdestination differs from its program ID. With this parameter enabled, the value of this parameter is used as the importparameter IV_RFC_DESTINATION of BAPI /CMT/TLND_TABLE_JOIN_STREAM. Otherwise, the program ID (jco.server.progid) is used as the import parameter.
SAP JCO client section
The SAP JCO client section includes the connection information to the SAP ABAP server. You need all the options providedand you can use the credentials of the user with RFC call rights.
Set the password in clear text, which is then overwritten with the # number sign value when the Talend SAP RFC Serverstarts.
Creating an SAP user
You can either create a dialog user or a technical user. However, it is recommended that you create a technical user as theirpassword does not expire.
Procedure
Create a user profile that has rights to the following:
• rights to make RFC calls, at least the Authorization check for RFC Access role
• rights to access the authorization objects of any IDoc
Creating an RFC Destination
You can create an RFC destination that points to Talend SAP RFC Server using the SAP transaction SALE or SM59 that leadsdirectly to the configuration.
Before you begin
Before proceeding with the following steps, make sure that an SAP user has been created to connect with Talend Jobs andTalend SAP RFC Server.
Procedure
1. Log on to SAP as SAP Admin using SAP GUI.

Installing your Talend Data Integration manually
107
2. Go to the SAP transaction SALE or SM59 that leads directly to the configuration.
3. Click Create RFC Connections and then choose to create a new TCP/IP based RFC destination, TALEND_TL_RFC_DESTINATION in this example.

Installing your Talend Data Integration manually
108
4. In the Technical Settings tab, select Registered Server Program for Activation Type, and then configure ProgramID and Gateway Options accordingly.

Installing your Talend Data Integration manually
109
Remember: The SAP Program ID has to be identical to the entry in Talend SAP RFC Server.
5. In the Unicode tab, set the Unicode/Non-Unicode configuration.

Installing your Talend Data Integration manually
110
Tip: Unicode is highly recommended.
6. Configure Talend SAP RFC Server by editing its configuration file if needed.
7. Start Talend SAP RFC Server.
For more information about configuring and starting Talend SAP RFC Server, see Installing Talend SAP RFC Servermanually and Starting or stopping a Talend SAP RFC Server.

Installing your Talend Data Integration manually
111
8. Click Connection Test to check the connection status to Talend SAP RFC Server.
Results
If all parameters are configured correctly, you should get a similar screen as shown below. This shows that a Talend Jobusing the tSAPIDocReceiver component is now ready to receive IDocs.

Installing your Talend Data Integration manually
112
Configuring the services file
In the SAP configuration, you can see that the host name is specified. However, it is not true for the port because the port isin a standard range and must be specified in the services file on the client machine.
You can find the services file in:
• Windows: C:\Windows\System32\drivers\etc\services• Linux or Unix-based systems: /etc/services
Procedure
Specify the port in the services file.
a) Determine the port number by checking the SAP JCO server section in your SAP connection configuration file.
The following image shows a configuration example of the SAP Gateway Server, sapgw31:
The last two digits for sapgw determines the last two digits of the port number. In the example shown above, thelast two digits of the port number is 31. The range for the last two port numbers is 00 to 99.
The default ranges for SAP include 3200 to 3299 for sapdp and 3300 to 3399 for sapgw.
Configuring your machine
To run SAP RFC Jobs in the Talend Studio, copy the sapjco3.dll file to the executable path in your machine.
Procedure
1. Go to the %PATH% environment on your machine.
2. For Windows users, paste the sapjco3.dll file to the C:\\Windows\System32 directory.
Verifying the connection to the SAP RFC system
Check if Talend Studio has successfully connected to the SAP RFC system.
Procedure
1. Logon to the SAP GUI.
2. Go to the transaction SM59.
3. Select the RFC destination from the list of TCP/IP connections. This displays a window with information about the RFCdestination.
4. Click Connection Test.
Debugging
The SAP RFC server receives the IDocs and places these into the JMS topic. One IDoc type results to one topic.
If the embedded JMS broker is used, the topics are not visible. To check what data is stored and to see if messages arereceived from SAP or consumed by the Job, you need to configure an SAP RFC server that uses an external JMS broker.
Tip: You can use the Apache ActiveMQ as a broker, since it offers a browser-based user interface to the topics.
Topic names are in the format of TALEND.IDOCS.<IDoc Type>. They are set by the consuming Jobs and the <IDocType> field indicates the IDoc type configured in the tSAPIDocReceiver component.

Installing your Talend Data Integration manually
113
You can also possibly write SAP trace files. This feature is initially switched off by default, but you can switch it on by settingthe configuration file:
#Enable/disable RFC trace (1=on or 0=off)jco.server.trace=1
Starting or stopping a Talend SAP RFC Server
You can manually start or stop a Talend SAP RFC Server by running the scripts or batch files in the bin directory.
Procedure
1. Check to see if the process is running by running the ps command.
2. Set up the Talend SAP RFC Server as a Linux service.
On RedHat and Ubuntu, the systemd service is used to start and stop services. You can find the files that control thesystemd service in /etc/systemd/system.

Installing your Talend Data Integration manually
114
From the example, the sap-rfc file is added and not installed by default. If you wish to add your Talend SAP RFCServer, use the following sample service file and ensure to change the paths that suit your installation:
# SystemD descriptor file for Talend SAP RFC Server
[Unit]
Description=Talend SAP RFC Server service
Before=runlevel3.target runlevel5.target
After=local-fs.target remote-fs.target network-online.target time-sync.target systemd-journald-dev-log.socket
Wants=network-online.target
Conflicts=shutdown.target
[Service]
Type=simple
Environment=JAVA_HOME=/usr/java/jre1.8.0_171-amd64
ExecStart=/opt/talend/7.0.1/sap-rfc-server/bin/start-tsaps.sh
ExecStop=/opt/talend/7.0.1/sap-rfc-server/bin/stop-tsaps.sh
User=talenduser
Group=talendgroup
WorkingDirectory=/opt/talend/7.0.1/sap-rfc-server
[Install]
WantedBy=multi-user.target
3. Open a terminal instance.
4. Open the command prompt.
5. Enter and execute the following commands (where $TSAPS_HOME corresponds to the directory where the Talend SAPRFC Server has been installed or extracted).
• Run the following commands to start a Talend SAP RFC Server.
cd $TSAPS_HOME/bin./start-tsaps.sh
• Run the following commands to stop a Talend SAP RFC Server.
cd $TSAPS_HOME/bin./stop-tsaps.sh
Installing and configuring Talend Data Preparation
Using Talend Installer is the recommended way to install Talend Data Preparation but you can perform a manual installationif needed.
Note: The SSO feature is not available for Talend Data Preparation connecting to Talend Administration Center. The SSOfeature is available for Talend Cloud applications connecting to Talend Management Console.
Installing Talend Data Preparation manually
This procedure contains the steps to manually install Talend Data Preparation on your machine.

Installing your Talend Data Integration manually
115
Before you begin
• Talend Administration Center is installed and running.• Talend Identity and Access Management is installed and running.• A Talend Data Preparation user exists in Talend Administration Center. For more information, see Talend Administration
Center User Guide.• There are no other instances of MongoDB installed on your machine.• To use Talend Data Preparation with Big Data, use one of the supported Hadoop distribution. For more information, see
Supported Hadoop distribution versions for Talend Data Preparation with Big Data on page 202.• Before installing Talend Data Preparation, make sure that you fulfill the hardware and software requirements. For more
information, see .
Procedure
1. Download a MongoDB instance from https://www.mongodb.com/download-center and install it.
For more information on the supported MongoDB databases, see Compatible databases on page 14.
For more information on how to install it, see MongoDB documentation.
If you want to secure connections with MongoDB using SSL, MongoDB Enterprise Server has to be manually installed onyour machine. For more information, see https://docs.mongodb.com/v4.0/security/.
2. Unzip the Talend-DataPreparation-Server-VA.B.C.zip file where you want Talend Data Preparation to beinstalled.
3. Unzip the <Data_Preparation_Path>/services/components-api-service-rest-all-components-VA.B.C.zip file where you want Components Catalog to be installed.
4. Add mongo to the PATH environment variable.
5. Create the dataprep database in MongoDB using the following command: use dataprep.
6. Create the following user for the dataprep database in MongoDB:
• Username: dataprep-user• Password: duser
To do this, you can use the following command:
db.createUser( { user: "dataprep-user", pwd: "duser", roles: [{ role: "readWrite", db: "dataprep"}]})
You can automatically create the user and password by executing the <Data_Preparation_Path>/create_mongo_user.sh file.
Configuring the Components Catalog server
Procedure
1. Open the <Components_Catalog_Path>/config/application.properties file.
2. To change the default port exposed for the Components Catalog endpoints, edit the following line:
server.port=8989
3. To change the context path for the Components Catalog endpoints, edit the following line:
server.contextPath=/tcomp
Note that the server.contextpath and server.port properties must match the properties defined fortcomp.server.url in the <Data_Preparation_Path>/config/application.properties file.
4. To enable the Components Catalog server for use with Talend Data Preparation in a Big Data context, add the followingline to the file:
hadoop.conf.dir=/path/to/Hadoop/configuration/directory
This property can also be set as an environment variable. Environment variables take precedence over values set in theapplication.properties file.
5. To use the Components Catalog server with a secure Hadoop cluster (using Kerberos), add the following line to the file:
krb5.config=/path/to/Kerberos/configuration/file/krb5.conf
This property can also be set as an environment variable. Environment variables take precedence over values set in theapplication.properties file.

Installing your Talend Data Integration manually
116
6. Save your changes to the properties file.
7. Restart Components Catalog for your changes to be taken into account. You can do so using the start.sh script in the<Components_Catalog_Path> folder.
Configuring Talend Data Preparation
Configuring Talend Data Preparation after installation
Procedure
1. Open the <Data_Preparation_Path>/config/application.properties file and edit the following TalendData Preparation properties:
Field Action
public.ip Enter the hostname you want to use to access Talend DataPreparation.
server.port Enter the port you want to use for Talend Data Preparation userinterface.
iam.ip Enter the URL to your Talend Identity and Access Managementinstance.
security.oauth2.client.clientId Enter the Talend Identity and Access Management OIDC clientidentifier.
security.oauth2.client.clientSecret Enter the Talend Identity and Access Management OIDC clientpassword.
iam.scim.url Make sure that Talend Identity and Access Management port is correct.
app.products[0].id=TDS
app.products[0].name=Data Stewardship
app.products[0].url=<place_your_tds_url_here>
Enter the URL to your Talend Data Stewardship instance.
All the passwords entered in the properties file are encrypted when you start your Talend Data Preparation instance.
2. Update the following fields with your MongoDB settings:
Field Description
spring.data.mongodb.host Host name of your MongoDB instance
spring.data.mongodb.port Port number of your MongoDB instance
spring.data.mongodb.database Name of the database on which Talend Data Preparation is connected,dataprep by default. The database is created when you first launchTalend Data Preparation.
spring.data.mongodb.username Username used to connect to the database
spring.data.mongodb.password Password used to connect to the database
3. To enable the interaction between Talend Data Preparation and the Components Catalog service, edit the following linewith your Components Catalog server host and port:
tcomp.server.url=http://<tcomp_host>:<tcomp_port>/tcomp
4. To enable the app switcher after installing Talend Data Preparation and Talend Data Stewardship, uncomment thefollowing lines and add the URL to your Talend Data Stewardship instance:
app.products[0].id=TDSapp.products[0].name=Data Stewardshipapp.products[0].url=<place_your_tds_url_here>

Installing your Talend Data Integration manually
117
You must also add the URL to your Talend Data Preparation instance to the configuration file for Talend DataStewardship. For more information, see the section about configuring Talend Data Stewardship after installation.
5. By default, audit logs are enabled. You must specify the correct appender.http.url parameter in the audit.properties file, or disable audit logs. For more information, see Enabling and configuring audit capabilities in Talend DataPreparation.
6. To enable the semantic types, edit the following lines: dataquality.semantic.list.enable=true anddataquality.server.url=http://<local machine ip>:8187/.
7. Before starting Talend Data Preparation, launch, in order:
1. Apache Kafka2. MongoDB3. MinIO
8. Execute the start.sh file to start your Talend Data Preparation instance.
Configuring logs for Talend Data Preparation
Talend Data Preparation logs allows you to analyze and debug the activity of Talend Data Preparation.
Talend Data Preparation logs are located in <Data_Preparation_Path>/data/logs/app.log.
To configure the settings of your log files, edit the <Data_Preparation_Path>/config/log4j2.xml file:
• For more information on how to set the log4j information level, see http://logging.apache.org/log4j/1.2/apidocs/org/apache/log4j/Level.html.
• For more information on how to set the log rotation, see https://logging.apache.org/log4j/2.x/manual/configuration.html#AutomaticReconfiguration.
Configuring an HTTPS connection for Talend Data Preparation and its dependencies
Configuring an HTTPS connection for Talend Data Preparation
To set up an HTTPS secure connection between the different services, as well as with the MongoDB server, you need to editthe application.properties file.
Note that securing the MongoDB connection is not possible if you selected the embedded MongoDB instance during theinstallation process.
If you want to secure connections with MongoDB using SSL, MongoDB Enterprise Server has to be manually installed on yourmachine. For more information, refer to the supported MongoDB versions in Compatible databases.
Procedure
1. Open the <Data_Preparation_Path>/config/application.properties file.
2. To define the path and password of the certificate for the Data Preparation server, edit the following lines:
# server TLS setuptls.key-store=/path/to/key-store.jkstls.key-store-password=key-store_password
3. To define the path and password of the signing Certificate Authority (CA) that issued the server certificate, edit thefollowing lines:
tls.trust-store=/path/to/trust-store.jkstls.trust-store-password=trust-store_password
4. To make the security control more flexible regarding the certificate common name and its URL, edit the following lines:
# false to disable hostname verificationtls.verify-hostname=true

Installing your Talend Data Integration manually
118
5. To define the path and password of the signing Certificate Authority (CA) that issued the MongoDB server certificate,edit the following lines:
mongodb.ssl=truemongodb.ssl.trust-store=/path/to/trus-store.jksmongodb.ssl.trust-store-password=trust-store-password
6. Change the services URLs from http to https:
dataset.service.url=https://${public.ip}:${server.port}dataset-dispatcher.service.url=https://${public.ip}:${server.port}transformation.service.url=https://${public.ip}:${server.port}preparation.service.url=https://${public.ip}:${server.port}fullrun.service.url=https://${public.ip}:${server.port}gateway.service.url=https://${public.ip}:${server.port}security.oidc.client.logoutSuccessUrl=https://${public.ip}:${server.port}gateway-api.service.url=https://${public.ip}:${server.port}zuul.routes.api.url=https://${public.ip}:${server.port}/apizuul.routes.upload.url=https://${public.ip}:${server.port}/api
Results
Talend Data Preparation only supports the Java Key Store (.jks) format to store keys and certificates.
Configuring Talend Data Preparation when Talend Administration Center is in HTTPS
For Talend Data Preparation to be able to connect to a Talend Administration Center instance running in https, TalendData Preparation must trust the Talend Administration Center certificate.
Procedure
1. Retrieve Talend Administration Center certificate, or its Certificate Authority and add it to an existing or new .jks filefollowing this example:
keytool -import -trustcacerts -alias <cert-alias> -file <tac_certificate.crt> -keystore <truststore.jks>
2. In the <Data_Preparation_Path>/config/application.properties file, add the following properties toset the truststore:
tls.trust-store=/path/to/<truststore.jks>tls.trust-store-password=<trust-store_password>
false to disable hostname verificationtls.verify-hostname=true
3. Restart Talend Data Preparation.
Configuring an HTTPS connection with Talend Dictionary Service
Securing the connection between Talend Data Preparation and Talend Dictionary Service requires editing theircorresponding configuration files.
You will first have to configure Talend Dictionary Service as a service in HTTPS. Then, you will enable SSL communicationbetween Talend Data Preparation and Talend Dictionary Service running in HTTPS.
Before you begin
• Talend Data Preparation has been configured as a service in HTTPS. For more information, see Configuring an HTTPSconnection for Talend Data Preparation on page 117.
• Talend Dictionary Service has been configured as a service in HTTPS. For more information, see Securing connectionsfor Talend Dictionary Service.
• You have generated a certificate for Talend Data Preparation and Talend Dictionary Service, and added it to your Webbrowser truststore.

Installing your Talend Data Integration manually
119
Procedure
1. To enable SSL communication between Talend Data Preparation and Talend Dictionary Service running in HTTPS,retrieve the Talend Dictionary Service certificate, or its Certificate Authority, and add it to the Talend Data Preparationtruststore using the following command:
keytool -import -trustcacerts -alias <cert-alias> -file <dictionary-service_certificate.crt> -keystore <truststore.jks>
2. In the <Data_Preparation_Path>/config/application.properties file, add the following properties toset the truststore:
tls.trust-store=/path/to/<truststore.jks>tls.trust-store-password=<trust-store_password>
false to disable hostname verificationtls.verify-hostname=true
3. Restart the services.
Results
Your Talend Data Preparation instance running in HTTPS can now communicate with Talend Dictionary Service, also runningwith a secured HTTPS connection.
Configuring an HTTPS connection with Talend Identity and Access Management
Securing the connection between Talend Data Preparation and Talend Identity and Access Management requires editingtheir corresponding configuration files.
You will first have to configure Talend Identity and Access Management as a service in HTTPS. Then, you will enable SSLcommunication between Talend Data Preparation and Talend Identity and Access Management running in HTTPS.
Before you begin
• Talend Data Preparation has been configured as a service in HTTPS. For more information, see Configuring an HTTPSconnection for Talend Data Preparation on page 117.
• Talend Identity and Access Management has been configured as a service in HTTPS. For more information, see Securingconnections for Talend Identity and Access Management on page 68.
• You have generated a certificate for Talend Data Preparation and Talend Identity and Access Management, and added itto your Web browser truststore.
• Make sure that you have the latest Apache Tomcat version installed.
Procedure
1. To enable SSL to access the Talend Identity and Access Management server, add the following lines to the<TDP_installation_path>/dataprep/start.bat file if you are using Windows, or the <TDP_installation_path>/dataprep/start.sh file if your are using Linux.
-Djavax.net.ssl.trustStore=/path/to/<trust-store.jks>-Djavax.net.ssl.trustStorePassword=<trust-store password>
2. To enable SSL communication between Talend Data Preparation and Talend Identity and Access Management runningin HTTPS, retrieve the Talend Identity and Access Management certificate, or its Certificate Authority, and add it to theTalend Data Preparation truststore using the following command:
keytool -import -trustcacerts -alias <cert-alias> -file <IAM_certificate.crt> -keystore <truststore.jks>
3. In the <Data_Preparation_Path>/config/application.properties file, add the following properties toset the truststore:
tls.trust-store=/path/to/<truststore.jks>tls.trust-store-password=<trust-store_password>
false to disable hostname verificationtls.verify-hostname=true
4. Restart the services.

Installing your Talend Data Integration manually
120
Results
Your Talend Data Preparation instance running in HTTPS can now communicate with Talend Identity and AccessManagement, also running with a secured HTTPS connection.
Using the tDataprepRun component with an HTTPS connection
Procedure
1. Retrieve Talend Data Preparation certificate, or its Certificate Authority and add it to an existing or new .jks filefollowing this example:
keytool -import -trustcacerts -alias <cert-alias> -file <dp_certificate.crt> -keystore <truststore.jks>
2. To make the Studio trust the Talend Data Preparation certificate, edit the .ini file used to start the Studio:
-Djavax.net.ssl.trustStore=/path/to/<trust-store.jks>-Djavax.net.ssl.trustStorePassword=<trust-store password>
3. When designing your Job in the Studio, connect a tSetKeystore component to the data input component with anOnSubjobOk link in order for the Job to trust the Talend Data Preparation certificate. For more information on how toconfigure the tSetKeystore, see Talend Components Reference Guide.
Results
For more information on how to use the tDataprepRun component and how to operationalize a recipe in a Talend Job, see Talend Help Center (https://help.talend.com).
Configuring Talend Data Preparation to use X-Frame-Options
With the TPS-4173 patch, it is possible to embed the Talend Data Preparation application in a Web page using an i-framewithout specific configuration.
However, if you want to use further options in your configuration, such as X-Frame-Options for example, you will need tomodify some configuration files for Talend Data Preparation and Talend Identity and Access Management.
Consult your Talend support representative to know if the patch has been applied.
The different X-Frame-Options directives that you can set are the following:
Header Description
X-Frame-Options:DENY The deny directive completely disables the loading of the page in aframe, regardless of what site is trying to call it. This directive is helpfulin order to lock down your site, but at the cost of many features.
X-Frame-Options:SAMEORIGIN The sameorigin directive allows the page to be loaded in a frame on thesame origin as the page itself.
X-Frame-Options:ALLOW-FROM http://<hostname> The allow-from URI directive allows the page to only be loaded in aframe on the specified origin and or domain.
Using the ALLOW-FROM value
How to use the ALLOW-FROM X-Frame-Option.
Procedure
1. Stop your Talend Data Preparation instance and its corresponding services, as well as the Talend Identity and AccessManagement service.
2. Open the <Data_Preparation_Path>/config/application.properties file and set the X-Frame-Options parameter to http://<hostname>, with <hostname> corresponding to the server hostname from which youwould want to allow access.

Installing your Talend Data Integration manually
121
3. Open the <IAM_Path>/tomcat/conf/web.xml file and set the antiClickJackingOption parameter toALLOW-FROM http://<hostname>, with <hostname> corresponding to the server hostname from which youwould want to allow access.
The <hostname> value must be the same in both configuration files.
4. Restart your Talend Data Preparation instance and its corresponding services, as well as the Talend Identity and AccessManagement service.
ResultsYou can now open the Talend Data Preparation application from the desired i-frame.
Using the DENY or SAMEORIGIN values
How to use the DENY or SAMEORIGIN X-Frame-Options.
Procedure
1. Stop your Talend Data Preparation instance and its corresponding services, as well as the Talend Identity and AccessManagement service.
2. Open the <Data_Preparation_Path>/config/application.properties file and set the desired value forthe X-Frame-Options parameter.
3. Restart your Talend Data Preparation instance and its corresponding services, as well as the Talend Identity and AccessManagement service.
Talend Data Preparation in cluster mode
You can install several instances of Talend Data Preparation in cluster mode if you want to benefit from a high availabilityand a better scalability with your product.
Clustering is the process of grouping together a set of similar physical systems in order to ensure a level of operationalcontinuity and minimize the risk of unplanned downtime, in particular by taking advantage of load balancing and failoverfeatures.
Architecture of Talend Data Preparation in cluster mode
The following diagram illustrates the architecture behind Talend Data Preparation and Talend Dictionary Service when setup in cluster mode.
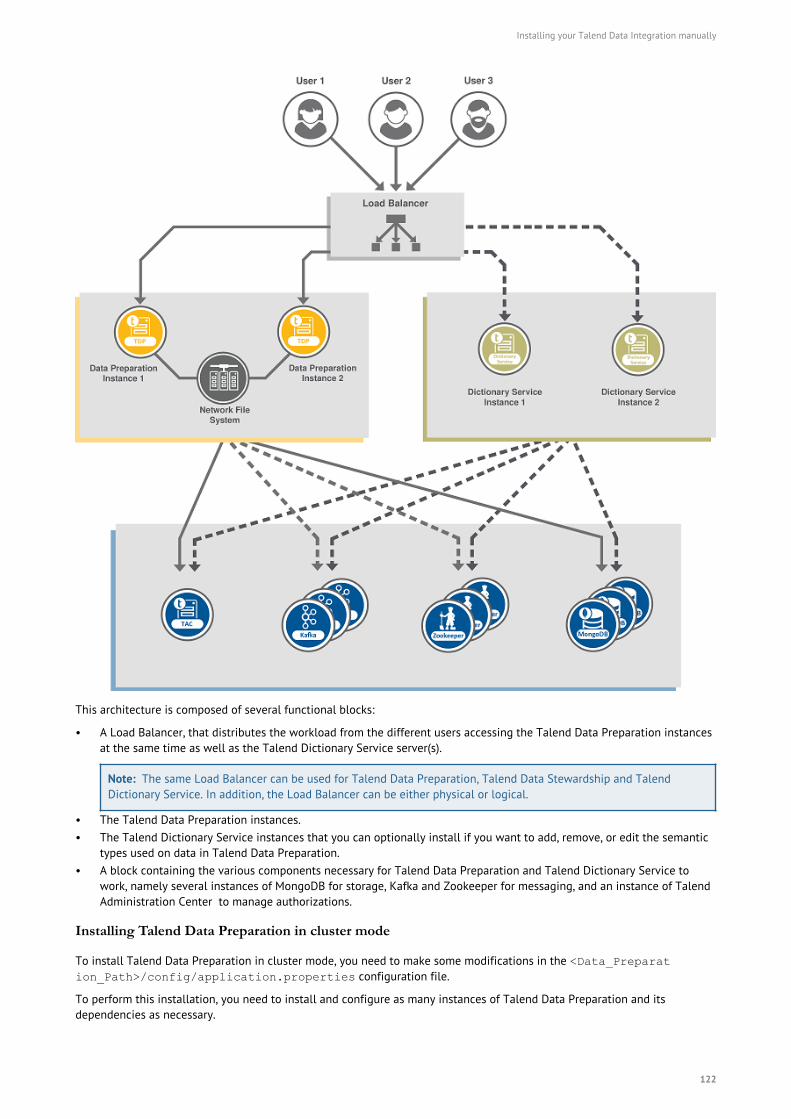
Installing your Talend Data Integration manually
122
This architecture is composed of several functional blocks:
• A Load Balancer, that distributes the workload from the different users accessing the Talend Data Preparation instances at the same time as well as the Talend Dictionary Service server(s).
Note: The same Load Balancer can be used for Talend Data Preparation, Talend Data Stewardship and TalendDictionary Service. In addition, the Load Balancer can be either physical or logical.
• The Talend Data Preparation instances.• The Talend Dictionary Service instances that you can optionally install if you want to add, remove, or edit the semantic
types used on data in Talend Data Preparation.• A block containing the various components necessary for Talend Data Preparation and Talend Dictionary Service to
work, namely several instances of MongoDB for storage, Kafka and Zookeeper for messaging, and an instance of TalendAdministration Center to manage authorizations.
Installing Talend Data Preparation in cluster mode
To install Talend Data Preparation in cluster mode, you need to make some modifications in the <Data_Preparation_Path>/config/application.properties configuration file.
To perform this installation, you need to install and configure as many instances of Talend Data Preparation and itsdependencies as necessary.
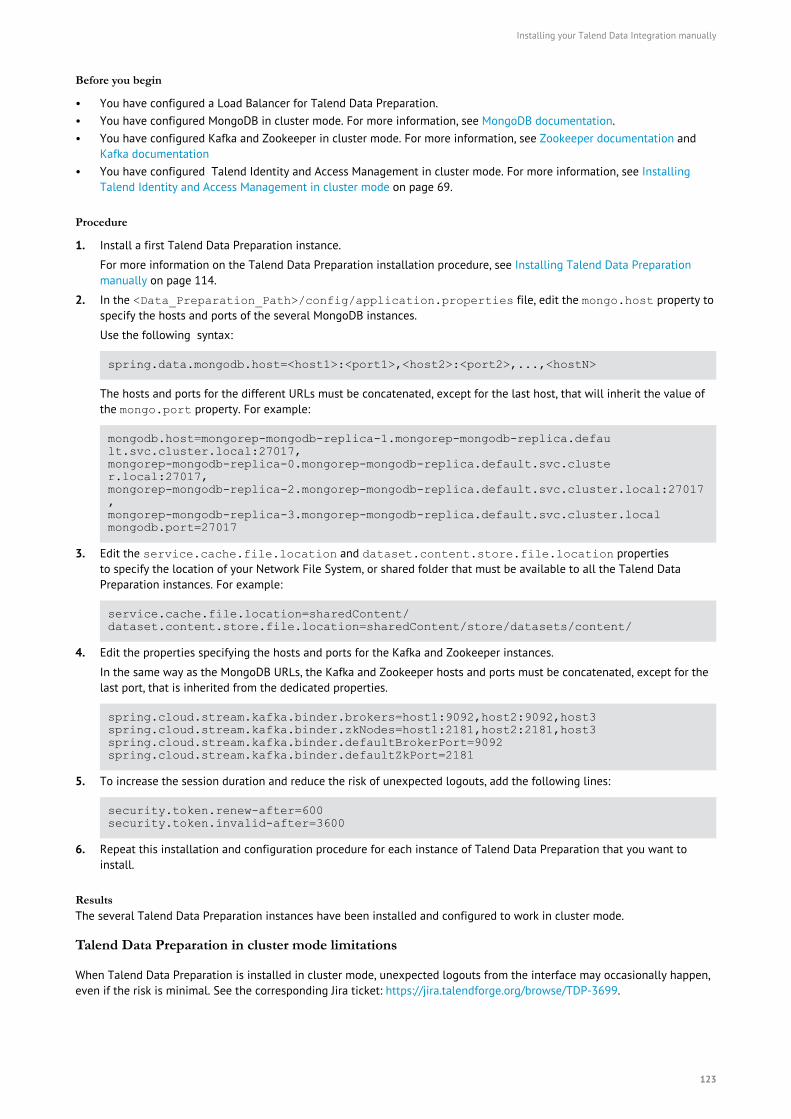
Installing your Talend Data Integration manually
123
Before you begin
• You have configured a Load Balancer for Talend Data Preparation.• You have configured MongoDB in cluster mode. For more information, see MongoDB documentation.• You have configured Kafka and Zookeeper in cluster mode. For more information, see Zookeeper documentation and
Kafka documentation• You have configured Talend Identity and Access Management in cluster mode. For more information, see Installing
Talend Identity and Access Management in cluster mode on page 69.
Procedure
1. Install a first Talend Data Preparation instance.
For more information on the Talend Data Preparation installation procedure, see Installing Talend Data Preparationmanually on page 114.
2. In the <Data_Preparation_Path>/config/application.properties file, edit the mongo.host property tospecify the hosts and ports of the several MongoDB instances.
Use the following syntax:
spring.data.mongodb.host=<host1>:<port1>,<host2>:<port2>,...,<hostN>
The hosts and ports for the different URLs must be concatenated, except for the last host, that will inherit the value ofthe mongo.port property. For example:
mongodb.host=mongorep-mongodb-replica-1.mongorep-mongodb-replica.default.svc.cluster.local:27017,mongorep-mongodb-replica-0.mongorep-mongodb-replica.default.svc.cluster.local:27017,mongorep-mongodb-replica-2.mongorep-mongodb-replica.default.svc.cluster.local:27017,mongorep-mongodb-replica-3.mongorep-mongodb-replica.default.svc.cluster.localmongodb.port=27017
3. Edit the service.cache.file.location and dataset.content.store.file.location propertiesto specify the location of your Network File System, or shared folder that must be available to all the Talend DataPreparation instances. For example:
service.cache.file.location=sharedContent/dataset.content.store.file.location=sharedContent/store/datasets/content/
4. Edit the properties specifying the hosts and ports for the Kafka and Zookeeper instances.
In the same way as the MongoDB URLs, the Kafka and Zookeeper hosts and ports must be concatenated, except for thelast port, that is inherited from the dedicated properties.
spring.cloud.stream.kafka.binder.brokers=host1:9092,host2:9092,host3spring.cloud.stream.kafka.binder.zkNodes=host1:2181,host2:2181,host3spring.cloud.stream.kafka.binder.defaultBrokerPort=9092spring.cloud.stream.kafka.binder.defaultZkPort=2181
5. To increase the session duration and reduce the risk of unexpected logouts, add the following lines:
security.token.renew-after=600security.token.invalid-after=3600
6. Repeat this installation and configuration procedure for each instance of Talend Data Preparation that you want toinstall.
ResultsThe several Talend Data Preparation instances have been installed and configured to work in cluster mode.
Talend Data Preparation in cluster mode limitations
When Talend Data Preparation is installed in cluster mode, unexpected logouts from the interface may occasionally happen,even if the risk is minimal. See the corresponding Jira ticket: https://jira.talendforge.org/browse/TDP-3699.

Installing your Talend Data Integration manually
124
Installing and configuring Talend Data Stewardship
Using Talend Installer is the recommended way to install Talend Data Stewardship but you can perform a manualinstallation if needed.
Note: The SSO feature is not available for Talend Data Stewardship connecting to Talend Administration Center. The SSOfeature is available for Talend Cloud applications connecting to Talend Management Console.
Installing Talend Data Stewardship manually
This procedure contains the steps to manually install Talend Data Stewardship on your machine.
Before you begin
• Talend Identity and Access Management is installed and running.• Talend Administration Center is installed and running.• A Talend Data Stewardship user exists in Talend Administration Center. For more information, see Talend
Administration Center User Guide.• There are no other instance of MongoDB installed on your machine.• If you want to benefit from Talend Dictionary Service to display, create, or update semantic types in Talend Data
Stewardship, download the latest MinIO version from this page and follow the MinIO documentation for installation, orinstall an S3 repository.
Procedure
1. Download Apache Kafka from https://kafka.apache.org/downloads and install it. For more information on how to installit, see Apache Kafka documentation.
For more information on the supported Apache Kafka version, see Compatible messaging systems on page 16.
2. Download a MongoDB instance from https://www.mongodb.com/download-center and install it. For more informationon how to install it, see MongoDB documentation.
For more information on the supported MongoDB databases, see Compatible databases on page 14.
If you want to secure connections with MongoDB using SSL, MongoDB Enterprise Server has to be manually installed onyour machine. For more information, see https://docs.mongodb.com/v4.0/security/.
3. Add mongo to the PATH environment variable.
4. Create the tds database in MongoDB using the following command: use tds.
5. Create the following user for the tds database in MongoDB:
• Username: tds-user• Password: duser
To do this, you can use the following command:
db.createUser( { user: "tds-user", pwd: "duser", roles: [{ role: "readWrite", db: "tds"}]})
6. Download Apache Tomcat from http://tomcat.apache.org/download-80.cgi and install it. For more information on howto install it, see Apache Tomcat documentation.
For production environments, it is recommended to use a separate Tomcat instance for Talend Data Stewardship.
7. Stop your Tomcat instance if it was automatically started.
8. Unzip the Talend-DataStewardship-VA.B.C.zip to a TDS_files folder.
9. Remove the contents of the <Tomcat>/webapps/ folder.
10. Create a <Tomcat>/app folder and copy the .war files from TDS_files.
11. Copy the files contained in TDS_files/context to <Tomcat>/conf/Catalina/localhost.
12. Copy the configuration file contained in TDS_files/config to <Tomcat>/conf.

Installing your Talend Data Integration manually
125
Configuring Talend Data Stewardship
Configuring Talend Data Stewardship after installation
Procedure
1. Open the <Tomcat>/conf/data-stewardship.properties file and edit the following Talend Data Stewardshipproperties for MongoDB:
Field Description
spring.data.mongodb.host Host name of your MongoDB instance
spring.data.mongodb.port Port number of your MongoDB instance
spring.data.mongodb.database Name of the database on which Talend Data Stewardship is connected,tds by default
spring.data.mongodb.username Username used to connect to the database
spring.data.mongodb.password Password used to connect to the database
spring.data.mongodb.uri URI of the MongoDB instance to connect to
If you connect to the MongoDB instance via a URI, the followingparameters must be commented out: spring.data.mongodb.host,spring.data.mongodb.port, spring.data.mongodb.database,spring.data.mongodb.username, spring.data.mongodb.password
Note: This configuration parameter is available only if you haveinstalled the TPS-4354 patch delivered by Talend. For moreinformation, check with your administrator.
2. Update the following fields with the Gateway configuration parameters:
Field Description
frontend.url Replace ${tinstall.tds.tomcat.protocol} with ApacheTomcat protocol and ${tinstall.tds.tomcat.port.http}with Apache Tomcat HTTP port.
backend.url Replace ${tinstall.tds.tomcat.protocol} with ApacheTomcat protocol and ${tinstall.tds.tomcat.port.http}with Apache Tomcat HTTP port.
schemaservice.url Replace ${tinstall.tds.tomcat.protocol} with ApacheTomcat protocol and ${tinstall.tds.tomcat.port.http}with Apache Tomcat HTTP port.
semanticservice.url Enter the URL to Talend Dictionary Service.
If your license does not include Talend Dictionary Service, delete thisline.
historyservice.url Replace ${tinstall.tds.tomcat.protocol} with ApacheTomcat protocol and ${tinstall.tds.tomcat.port.http}with Apache Tomcat HTTP port.
monitoringservice.url Replace ${tinstall.tds.tomcat.protocol} with ApacheTomcat protocol and ${tinstall.tds.tomcat.port.http}with Apache Tomcat HTTP port.
3. Update the following field with the Apache Kafka configuration:
Field Description
kafka.broker Enter the host and the port corresponding to your Apache Kafkabroker.

Installing your Talend Data Integration manually
126
4. Update the following fields with the configuration for Talend Identity and Access Management:
Field Action
oidc.url Enter the URL to your Talend Identity and Access Management,
oidc.userauth.url Enter the URL to your Talend Identity and Access ManagementUserAuthentication,
scim.url Enter the URL to your Talend Identity and Access Management SCIM,
oidc.gateway.id Enter the URL to your Talend Identity and Access Management OIDCclient identifier.
oidc.gateway.secret Enter the Talend Identity and Access Management OIDC password.
oidc.tds.id Enter the Talend Identity and Access Management OIDC clientidentifier.
oidc.tds.secret Enter the Talend Identity and Access Management OIDC password.
oidc.history.id Enter the Talend Identity and Access Management OIDC clientidentifier you have generated for Talend Data Stewardship.
oidc.history.secret Enter the Talend Identity and Access Management OIDC password youhave generated for Talend Data Stewardship.
oidc.schema.id Enter the Talend Identity and Access Management OIDC clientidentifier you have generated for Talend Data Stewardship.
oidc.schema.secret Enter the Talend Identity and Access Management OIDC password youhave generated for Talend Data Stewardship.
oidc.monitoring.id Enter the Talend Identity and Access Management OIDC clientidentifier.
oidc.monitoring.secret Enter the Talend Identity and Access Management OIDC password.
All the passwords entered in the properties file are encrypted when you start your Talend Data Stewardship instance.
5. To configure the access to Talend Dictionary Service, edit the following fields:
Field Description
tsd.enabled Set the value of this parameter to true in order to enable theinteraction between Talend Data Stewardship and Talend DictionaryService
tsd.maven.connector.s3Repository.bucket-url Enter the URL of your MinIO or S3 repository bucket.
tsd.maven.connector.s3Repository.base-path Enter the base path of your MinIO or S3 repository.
tsd.maven.connector.s3Repository.username Enter the username of your MinIO or S3 repository.
tsd.maven.connector.s3Repository.password Enter the password of your MinIO or S3 repository.
tsd.maven.connector.s3Repository.s3.region Enter the region of your MinIO or S3 repository.
tsd.maven.connector.s3Repository.s3.endpoint Enter the URL of your MinIO or S3 repository server.
tsd.dictionary-provider-facade.producer-url Enter the URL to your Talend Dictionary Service instance.
6. To enable the app switcher after installing Talend Data Stewardship and Talend Data Preparation, uncomment thefollowing line and add the URL to your Talend Data Preparation instance:
tds.front.tdpUrl=<Talend_Data_Preparation_URL>

Installing your Talend Data Integration manually
127
You must also add the URL to your Talend Data Stewardship instance to the configuration file for Talend DataPreparation. For more information, see the section about configuring Talend Data Preparation after installation.
7. Optional: Enable HTTP compression for Talend Data Stewardship in Apache Tomcat:
a) Open the <Tomcat>\conf\server.xml file.b) Add the following attributes to the HTTP Connector configuration used for Talend Data Stewardship:
compression="on"compressionMinSize="2048"compressibleMimeType="text/html,text/xml,text/javascript,text/css,application/javascript,application/json"
8. Start Talend Data Stewardship by launching, in order:
1. Apache Kafka2. MongoDB3. Apache Tomcat4. MinIO5. Talend Administration Center6. Talend Identity and Access Management Service
Configuring logs for Talend Data Stewardship
Talend Data Stewardship logs allows you to analyze and debug the activity of Talend Data Stewardship.
Talend Data Stewardship logs are located in <Data_Stewardship_Path>/apache-tomcat/logs. Thecatalina.out file is an aggregated version of all the available log files.
Procedure
1. Open the following files:
• <Data_Stewardship_Path>/apache-tomcat/conf/data-stewardship-core-logback.xml for thecore backend service log
• <Data_Stewardship_Path>/apache-tomcat/conf/data-stewardship-history-logback.xml forthe history service log
• <Data_Stewardship_Path>/apache-tomcat/conf/data-stewardship-schema-logback.xml forthe schemas management service log
2. Add the following line before the <root> element:
<logger name="org.talend" level="DEBUG"/>
Results
The log information level is now set to DEBUG, but you can set it to another value. For more information on log levels, seehttp://logging.apache.org/log4j/1.2/apidocs/org/apache/log4j/Level.html.
Configuring the Apache Kafka topic names for Talend Data Stewardship
You can enable the configuration of the Apache Kafka topic names for Talend Data Stewardship by adding extra parametersto the data-stewardship.properties file and changing their values accordingly.
Procedure
1. Open the <Tomcat>/conf/data-stewardship.properties file.
2. Add the following lines:
tds.taskBatch.topic=impact-analysis-batchschema.crud.topic=schemasschema.references.topic=schemas-referencesdq.dictionary.topic=dqDictionary
This example shows the default values of the parameters which you can change according to your needs.
However, if you change the value of dq.dictionary.topic, you should also change it in spring.cloud.stream.bindings.dqDictionary.destination in the tdqdict.properties file.

Installing your Talend Data Integration manually
128
Configuring Talend Data Stewardship to support Kerberized Apache Kafka
You can set up Talend Data Stewardship to work with an external Kerberized Apache Kafka.
Before you begin
Make sure you have the following resources:
• Client Kerberos configuration file: krb5.conf• JAAS Kerberos configuration file: kafka_client_jaas.conf• Kerberos keytab file: hostname.keyTab• JKS truststore: krb5.truststore
Procedure
1. Create an <install_dir>/kafka-kerberos/ directory and copy the below files into it:
• krb5.conf
• kafka_client_jaas.conf
• hostname.keyTab
• krb5.truststore
2. Add the below java options to the <install_dir>/tds/apache-tomcat/bin/setenv.sh file:
-Djava.security.auth.login.config=<install_dir>/kafka-kerberos/kafka_client_jaas.conf-Djava.security.krb5.conf=<install_dir>/kafka-kerberos/krb5.conf
3. Open the <install_dir>/kafka-kerberos/kafka_client_jaas.conf file and check that the keyTabproperty is as below:
keyTab=<install_dir>/kafka-kerberos/hostname.keyTab
4. Edit the <install_dir>/tds/apache-tomcat/bin/conf/data-stewardship.properties file to add oredit the following lines:
kafka.ssl.truststore.location=<install_dir>/kafka-kerberos/krk5.truststorekafka.ssl.truststore.password=<your_truststore_password>spring.cloud.stream.kafka.binder.configuration.ssl.truststore.location=${kafka.ssl.truststore.location}spring.cloud.stream.kafka.binder.configuration.ssl.truststore.password=${kafka.ssl.truststore.password}spring.kafka.properties.ssl.truststore.location=${kafka.ssl.truststore.location}spring.kafka.properties.ssl.truststore.password=${kafka.ssl.truststore.password}
Configuring an HTTPS connection for Talend Data Stewardship and its dependencies
Generating an SSL certificate
To configure Talend Data Stewardship to run securely using the Secure Sockets Layer (SSL) protocol, you need to start bygenerating a trusted signed certificate.
Procedure
1. Generate an SSL certificate.
For more information about how to generate a keystore file, see How to generate a keystore file.
2. As an administrator, import the certificate into your JVM using the command:
keytool -import -trustcacerts -file <certificate_path> -alias <certificate_name> -keystore "%JAVA_HOME%/jre/lib/security/cacerts".
Results
Talend Data Stewardship only supports the Java Key Store (.jks) format to store keys and certificates.

Installing your Talend Data Integration manually
129
Securing connections for Talend Data Stewardship
To secure connections between Talend Data Stewardship, the MongoDB server, and Apache Kafka, you need to edit thedata-stewardship.properties file.
Important: In the following procedure, the MongoDB server module, the Apache Kafka module, and other Talend DataStewardship modules must all use the same truststore.
Note:
If you select the embedded MongoDB instance during the installation process, securing the MongoDB connection is notpossible.
To secure connections with MongoDB using SSL, MongoDB Enterprise Server has to be manually installed on yourmachine. For more information, see https://docs.mongodb.com/v3.2/security/.
Procedure
1. Open the <Data_Stewardship_Path>/apache-tomcat/conf/data-stewardship.properties file.
2. To trust the server certificate used by Talend Data Stewardship, add the following properties with the appropriatevalues:
http.ssl.truststore.location=<path_to_truststore>http.ssl.truststore.password=<truststore_password>
Note: To be able to work with Talend Data Stewardship, make sure you only use one truststore.
3. By default, Talend Data Stewardship does not verify that the hostname matches the certificate common name.
To enable this verification, add the following property and set the value to true:
http.ssl.verify.hostname=true
4. To allow Talend Data Stewardship to use private key authentication, add the following properties with the appropriatevalues:
http.ssl.keystore.location=<path_to_keystore>http.ssl.keystore.password=<keystore_password>http.ssl.key.password=<key_password>
5. To secure connections with MongoDB, add the following properties with the appropriate values:
spring.data.mongodb.ssl=truespring.data.mongodb.ssl.trust-store=<path_to_truststore>spring.data.mongodb.ssl.trust-store-password=<truststore_password>
6. To secure connections with Kafka using communication encryption only, add the following properties with theappropriate values:
kafka.security.protocol=SSLkafka.ssl.truststore.location=<path_to_truststore>kafka.ssl.truststore.password=<truststore_password>
7. To secure connections with Kafka using authentication, add the following properties with the appropriate values:
kafka.ssl.keystore.location=<path_to_keystore>kafka.ssl.keystore.password=<keystore_password>kafka.ssl.key.password=<key_password>
Note that the communication encryption parameters must also be defined to use authentication.

Installing your Talend Data Integration manually
130
8. To secure connections with the message broker, add the following properties with the appropriate values:
spring.cloud.stream.kafka.binder.configuration.security.protocol=SSLspring.cloud.stream.kafka.binder.configuration.ssl.truststore.location=<path_to_truststore>spring.cloud.stream.kafka.binder.configuration.ssl.truststore.password=<truststore_password>spring.cloud.stream.kafka.binder.configuration.ssl.keystore.location=<path_to_keystore>spring.cloud.stream.kafka.binder.configuration.ssl.keystore.password=<keystore_password>spring.cloud.stream.kafka.binder.configuration.ssl.key.password=<key_password>spring.cloud.stream.kafka.binder.configuration.ssl.endpoint.identification.algorithm=<ssl_algorithm>spring.kafka.properties.security.protocol=SSLspring.kafka.properties.ssl.truststore.location=<path_to_truststore>spring.kafka.properties.ssl.truststore.password=<truststore_password>spring.kafka.properties.ssl.keystore.location=<path_to_keystore>spring.kafka.properties.ssl.keystore.password=<keystore_password>spring.kafka.properties.ssl.key.password=<key_password>
9. To secure connection with Talend Identity and Access Management, edit the following lines:
tds.security=iamoidc.url=https://<host_name:port>/oidcoidc.userauth.url=https://<host_name:port>/oidcscim.url=https://<host_name:port>/scim
10. Change the services URLs from http to https:
tds.history.service.url=https://${public.ip}:${server.port}/data-history-serviceschema.service.url=https://${public.ip}:${server.port}/schemaservice
11. Change the gateway URLs from http to https:
frontend.url=https://<datastewardship_server:port>/internal/frontendbackend.url=https://<datastewardship_server:port>/internal/data-stewardshipschemaservice.url=https://<datastewardship_server:port>/internal/schemaservicehistoryservice.url=https://<datastewardship_server:port>/internal/data-history-service
What to do next
To enable HTTPS support on Tomcat, see https://tomcat.apache.org/tomcat-8.0-doc/ssl-howto.html.
To enable SSL support on MongoDB, see https://docs.mongodb.com/v3.0/tutorial/configure-ssl/.
To enable SSL support on Kafka, see http://kafka.apache.org/documentation.html#security_ssl.
To enable SSL support on Talend Identity and Access Management, see Securing connections for Talend Identity and AccessManagement on page 68.
Securing connections for Talend Administration Center
Procedure
1. Open the <Data_Stewardship_Path>/tac/apache-tomcat/conf/server.xml file and comment the non-SSL part:
<!-- <Connector port="8080" protocol="HTTP/1.1" connectionTimeout="20000" redirectPort="8443" /> -->

Installing your Talend Data Integration manually
131
2. Uncomment the following lines:
<!-- <Connector port="8443" protocol="org.apache.coyote.http11.Http11NioProtocol" maxThreads="150" SSLEnabled="true" scheme="https" secure="true" clientAuth="false" sslProtocol="TLS"/> -->
3. Add the following lines:
keystoreFile="<certificate_path>/server.keystore.jks" keystorePass="<certificate_password>"
Talend Data Stewardship in cluster mode
You can install several instances of Talend Data Stewardship in cluster mode if you want to benefit from a high availabilityand a better scalability with your product.
Clustering is the process of grouping together a set of similar physical systems in order to ensure a level of operationalcontinuity and minimize the risk of unplanned downtime, in particular by taking advantage of load balancing and failoverfeatures.
Architecture of Talend Data Stewardship in cluster mode
The following diagram illustrates the architecture behind Talend Data Stewardship and Talend Dictionary Service when setup in cluster mode.

Installing your Talend Data Integration manually
132
This architecture is composed of several functional blocks:
• A Load Balancer, that distributes the workload from the different users accessing the Talend Data Stewardship instancesat the same time as well as the Talend Dictionary Service server(s).
Note: The same Load Balancer can be used for Talend Data Preparation, Talend Data Stewardship and TalendDictionary Service. In addition, the Load Balancer can be either physical or logical.
• The Talend Data Stewardship instances.• The Talend Dictionary Service instances that you can optionally install if you want to add, remove, or edit the semantic
types used on data in Talend Data Stewardship.• A block containing the various components necessary for Talend Data Stewardship and Talend Dictionary Service to
work, namely several instances of MongoDB for storage, Kafka and Zookeeper for messaging, and an instance of TalendAdministration Center to manage authorizations.
Installing Talend Data Stewardship in cluster mode
To install Talend Data Stewardship in cluster mode, you need to make some modifications in the <Data_Stewardship_Path>/tds/apache-tomcat/conf/data-stewardship.properties configuration file.
To perform this installation, you need to install and configure as many instances of Talend Data Stewardship and itsdependencies as necessary.

Installing your Talend Data Integration manually
133
Before you begin
• You have configured a Load Balancer for Talend Data Stewardship.• You have configured MongoDB in cluster mode. For more information, see MongoDB documentation.• You have configured Kafka and Zookeeper in cluster mode. For more information, see Zookeeper documentation and
Kafka documentation• You have configured Talend Identity and Access Management in cluster mode. For more information, see Installing
Talend Identity and Access Management in cluster mode on page 69.
Procedure
1. Install a first Talend Data Stewardship instance.
For more information on the installation procedure, see Installing Talend Data Stewardship manually on page 124.
2. In the <Data_Stewardship_Path>/tds/apache-tomcat/conf/data-stewardship.properties file, editthe mongodb.host property to specify the hosts and ports of the several MongoDB instances.
Use the following syntax:
spring.data.mongodb.host=<host1>:<port1>,<host2>:<port2>,...,<hostN>
The hosts and ports for the different URLs must be concatenated, except for the last host, that will inherit the value ofthe mongodb.port property. For example:
spring.data.mongodb.host=mongorep-mongodb-replica-1.mongorep-mongodbreplica.default.svc.cluster.local:27017,mongorep-mongodb-replica-0.mongorep-mongodbreplica.default.svc.cluster.local:27017,mongorep-mongodb-replica-2.mongorep-mongodbreplica.default.svc.cluster.local:27017,mongorep-mongodb-replica-3.mongorep-mongodbreplica.default.svc.cluster.localspring.data.mongodb.host=27017
3. Edit the properties specifying the hosts and ports for the Kafka and Zookeeper instances.
In the same way as the MongoDB URLs, the Kafka and Zookeeper hosts and ports must be concatenated, except for thelast port, that is inherited from the dedicated properties.
talend.kafka.brokers=host1:9092,host2:9092,host3talend.kafka.port=9092talend.zookeeper.nodes=host1:2181,host2:2181,host3talend.zookeeper.port=2181
Specify also the below peer port parameters which identify the host name with the port number.
kafka.broker=host1:9092,host2:9092,host3:9092schema.kafka.broker=host1:9092,host2:9092,host3:9092
4. To increase the session duration and reduce the risk of unexpected logouts, add the following lines:
security.token.renew-after=600security.token.invalid-after=3600
5. Repeat the above steps to install and configure other instances of Talend Data Stewardship.
Make sure to increment the values for the below parameters at <Data_Stewardship_Path>/tds/apache-tomcat/conf/data-stewardship.properties for each Talend Data Stewardship instance to have a uniqueproperty per instance:
tds.dqDictionary.group=TDSCoreDqDictionaryGroup1schema.dqDictionary.group=SchemaServiceDqDictionaryGroup1
6. Edit the <Data_Stewardship_Path>/iam/apache-tomcat/clients/tds-client.json files to add theredirection URLs in the post_logout_redirect_uris and redirect_uris fields specifying the load balancerports.
Optionally, to access directly one of the Talend Data Stewardship instances add the redirection URLs of the otherinstances in the fields.
7. Create partitions for Kafka topics in each Talend Data Stewardship instance:

Installing your Talend Data Integration manually
134
a) Launch a Talend Data Stewardship instance. This automatically creates several Kafka topics.b) Stop the instance and define the partitions per topics manually. You need to define as many partitions as Kafka
nodes.
For more information, see Kafka documentation.c) Restart the instance.
Results
You have installed several Talend Data Stewardship instances and configured them to work in cluster mode.
Note: If you have a Platform license which includes Talend Dictionary Service, you may want to install it in cluster modeas well. For more information, see Installing Talend Dictionary Service in cluster mode.

Installing your Talend Data Integration using RPM (Red Hat Package Manager)
135
Installing your Talend DataIntegration using RPM (Red HatPackage Manager)
About installing Talend applications and services using RPM
Talend provides RPM packages that allow you to deploy applications and services easily.
You can deploy and install RPM packages individually as explained in this document.
For this version, respectively replace RPM version and RPM build number placeholders in URLs and file names with 8.0.1and 202111091610, unless stated otherwise.
Ansible is an automation tool that can help deploy applications using infrastructure as code. You can use Ansible toautomate the deployment of Talend applications through RPMs.
The templates of Ansible playbooks to install and configure Talend applications using RPMs are available at https://github.com/Talend/ansible-talend-platform/tags.
Installing third-party applications with RPM
Several third-party applications are needed by Talend applications to operate correctly. RPMs of the following applicationsare provided by Talend.
Note: Sonatype Nexus is no longer provided by Talend. You need to install either Sonatype Nexus or JFrog Artifactorymanually. Check Installing and configuring Talend Artifact Repository on page 73 for more information.
Instructions contained in this document are designed to help you install third-party applications with their defaultconfiguration.
For support on configuring and using third-party applications, refer to their respective vendors.
Third-party applications provided through RPMs include:
• Tomcat• MongoDB• Kafka• Zookeeper (included with Kafka)• Filebeat• MinIO
Refer to the installation procedure of each Talend application to learn about its dependencies and associated services.
Installing and configuring Tomcat with RPM
You can use the talend-tomcat RPM to install Tomcat on any RPM-based system supported by Talend and compatiblewith systemd, like RHEL/CentOs..
Check the full list of supported systems in Supported Third-Party System/Database/Business Application Versions on page190.
Note: This document details how to install Tomcat using the RPM provided by Talend. If you already have a custominstallation of Tomcat that is ready to be used, you are not required to install this RPM.
Each Talend application relying on Tomcat requires a distinct Tomcat with different settings. The Tomcat RPM packageprovided by Talend cannot be installed more than once in parallel. For that reason, it must be used as a master Tomcat,using the shared mode, when installing the following modules with RPM: Talend Administration Center, Talend Identityand Access Management, Talend MDM and Talend Data Stewardship.

Installing your Talend Data Integration using RPM (Red Hat Package Manager)
136
For example, refer to the Talend Administration Center RPM configuration parameters on page 145 section to get moredetails on RPM parameters and on the available modes.
Importing the PGP key
All packages are signed. To be able do install a package, you must first download and install the public signing key.
Procedure
Download and install the public signing key using the following command:
rpm --import http://www.opensourceetl.net/rpms/GPG-KEY-talend
Installing Tomcat from the RPM repository
Install Tomcat with its default configuration using RPM.
Before you begin
• Tomcat requires Java 11. You can use either Oracle Java or OpenJDK.• Make sure that the JAVA_HOME variable is correctly set to the Java home directory. For example: /usr/java/jdk1
1.0.13-amd64.
Tip: You can set it in the /root/.bashrc file by adding the following line to it: export JAVA_HOME=$(dirname $(dirname $(readlink -e /usr/bin/java))).
The default installation also installs the following dependencies:
• which
In case of custom installation, these dependencies must be installed beforehand.
Procedure
1. Create a file called talend.repo in the /etc/yum.repos.d directory, containing the following configuration:
[talend-8.0.1]name=Talend 8.0.1baseurl='https://<user>:<password>@www.opensourceetl.net/rpms/talend/8.0.1/base/x86_64/'enabled=1gpgcheck=1gpgkey=http://www.opensourceetl.net/rpms/GPG-KEY-talend
Credentials (user and password) are provided in the license email sent by Talend.
Your repository is now ready for use.
2. Install Tomcat with the following command:
• To install the package with its default configuration, use the following command:
sudo yum install talend-tomcat
This command does not require any additional parameter. It installs the package and its dependencies with theirdefault configuration in the default /opt/talend directory.
• The talend-tomcat package is relocatable, meaning that you can install it in any other directory, as follows:
rpm -i --prefix=<InstallPath> https://<user>:<password>@www.opensourceetl.net/rpms/talend/<rpm_version>/base/x86_64/talend-tomcat-9.0.30-1.x86_64.rpm
In this case, all other applications depending on Tomcat and installed with RPM must be installed in that samefolder, or with correct Tomcat parameters set for the application.
Directory layout of the Tomcat RPM
The RPM installs the module with the following directory layout:
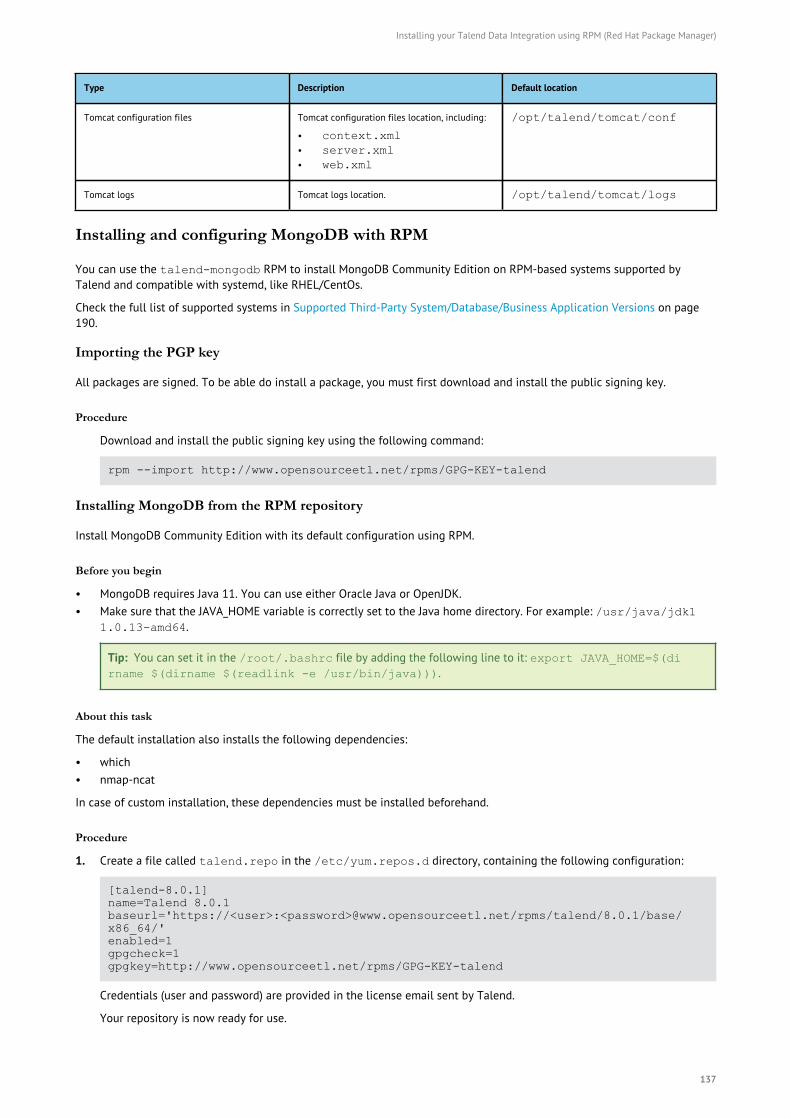
Installing your Talend Data Integration using RPM (Red Hat Package Manager)
137
Type Description Default location
Tomcat configuration files Tomcat configuration files location, including:
• context.xml• server.xml• web.xml
/opt/talend/tomcat/conf
Tomcat logs Tomcat logs location. /opt/talend/tomcat/logs
Installing and configuring MongoDB with RPM
You can use the talend-mongodb RPM to install MongoDB Community Edition on RPM-based systems supported byTalend and compatible with systemd, like RHEL/CentOs.
Check the full list of supported systems in Supported Third-Party System/Database/Business Application Versions on page190.
Importing the PGP key
All packages are signed. To be able do install a package, you must first download and install the public signing key.
Procedure
Download and install the public signing key using the following command:
rpm --import http://www.opensourceetl.net/rpms/GPG-KEY-talend
Installing MongoDB from the RPM repository
Install MongoDB Community Edition with its default configuration using RPM.
Before you begin
• MongoDB requires Java 11. You can use either Oracle Java or OpenJDK.• Make sure that the JAVA_HOME variable is correctly set to the Java home directory. For example: /usr/java/jdk1
1.0.13-amd64.
Tip: You can set it in the /root/.bashrc file by adding the following line to it: export JAVA_HOME=$(dirname $(dirname $(readlink -e /usr/bin/java))).
About this task
The default installation also installs the following dependencies:
• which• nmap-ncat
In case of custom installation, these dependencies must be installed beforehand.
Procedure
1. Create a file called talend.repo in the /etc/yum.repos.d directory, containing the following configuration:
[talend-8.0.1]name=Talend 8.0.1baseurl='https://<user>:<password>@www.opensourceetl.net/rpms/talend/8.0.1/base/x86_64/'enabled=1gpgcheck=1gpgkey=http://www.opensourceetl.net/rpms/GPG-KEY-talend
Credentials (user and password) are provided in the license email sent by Talend.
Your repository is now ready for use.

Installing your Talend Data Integration using RPM (Red Hat Package Manager)
138
2. Install MongoDB.
• To install the package with its default configuration, use the following command:
sudo yum install talend-mongodb
This command does not require any additional parameter. It installs the package and its dependencies with theirdefault configuration in the default /opt/talend directory.
• If the default parameters do not match your requirements, install the package with custom parameters using theRPM command.
For example, the following command installs the module in a specific directory:
rpm -i --prefix=<InstallPath> https://<user>:<password>@www.opensourceetl.net/rpms/talend/<rpm_version>/base/x86_64/<rpm_name>-<rpm_version>-<rpm_build_number>.x86_64.rpm
The list of configuration parameters is detailed in MongoDB RPM configuration parameters on page 138.
Note: When installing the package with custom parameters, the dependencies listed above are not installed.You need to install them beforehand.
The package is now installed. You can start the service and use it.
Running MongoDB with systemd
Start, stop and monitor the status of the MongoDB service using systemd.
Procedure
• Start the service using the following command:
sudo systemctl start talend-mongodb
• Stop the service using the following command:
sudo systemctl stop talend-mongodb
• Check the status of the service using the following command:
sudo systemctl status talend-mongodb
• Check logging information using the journalctl command.
For example:
• To list service journal entries:
sudo journalctl --unit talend-mongodb
• To list service journal entries after a specific date:
sudo journalctl --unit talend-mongodb --since "2018-08-17 13:15:17"
MongoDB RPM configuration parameters
The MongoDB RPM uses a set of parameters to perform the installation.
To use custom values, set up these parameters in environment variables before performing the installation.
Variable Default value Description
TALEND_INSTALL_USER talend This user is set as the owner of base folder forthe package. The user is created if missing.
TALEND_INSTALL_GROUP talend This group is set as the owner of base folder forthe package. The group is created if missing.

Installing your Talend Data Integration using RPM (Red Hat Package Manager)
139
Variable Default value Description
TALEND_INSTALL_SYSTEMD 1 Whether to install SystemD services. Possiblevalues are 0 (false) or 1 (true). Services arecreated and enabled, but not started.
Directory layout of the MongoDB RPM
The RPM installs the module with the following directory layout:
Type Description Default location
start_mongo.sh Shell script to start the service. /opt/talend/mongodb
stop_mongo.sh Shell script to stop the service. /opt/talend/mongodb
Configuration files MongoDB configuration files location:
• mongod.cfg
/opt/talend/mongodb
Installing and configuring Apache Kafka and Zookeeper with RPM
You can use the talend-kafka RPM to install Apache Kafka and Zookeeper on RPM-based systems supported by Talendand compatible with systemd, like RHEL/CentOs.
Check the full list of supported systems in Supported Third-Party System/Database/Business Application Versions on page190.
Importing the PGP key
All packages are signed. To be able do install a package, you must first download and install the public signing key.
Procedure
Download and install the public signing key using the following command:
rpm --import http://www.opensourceetl.net/rpms/GPG-KEY-talend
Installing Apache Kafka and Zookeeper from the RPM repository
Install Apache Kafka and Zookeeper with its default configuration using RPM.
Before you begin
• Apache Kafka and Zookeeper requires Java 11. You can use either Oracle Java or OpenJDK.• Make sure that the JAVA_HOME variable is correctly set to the Java home directory. For example: /usr/java/jdk1
1.0.13-amd64.
Tip: You can set it in the /root/.bashrc file by adding the following line to it: export JAVA_HOME=$(dirname $(dirname $(readlink -e /usr/bin/java))).
About this task
The default installation also installs the following dependencies:
• which• sed• gawk• coreutils
In case of custom installation, these dependencies must be installed beforehand.
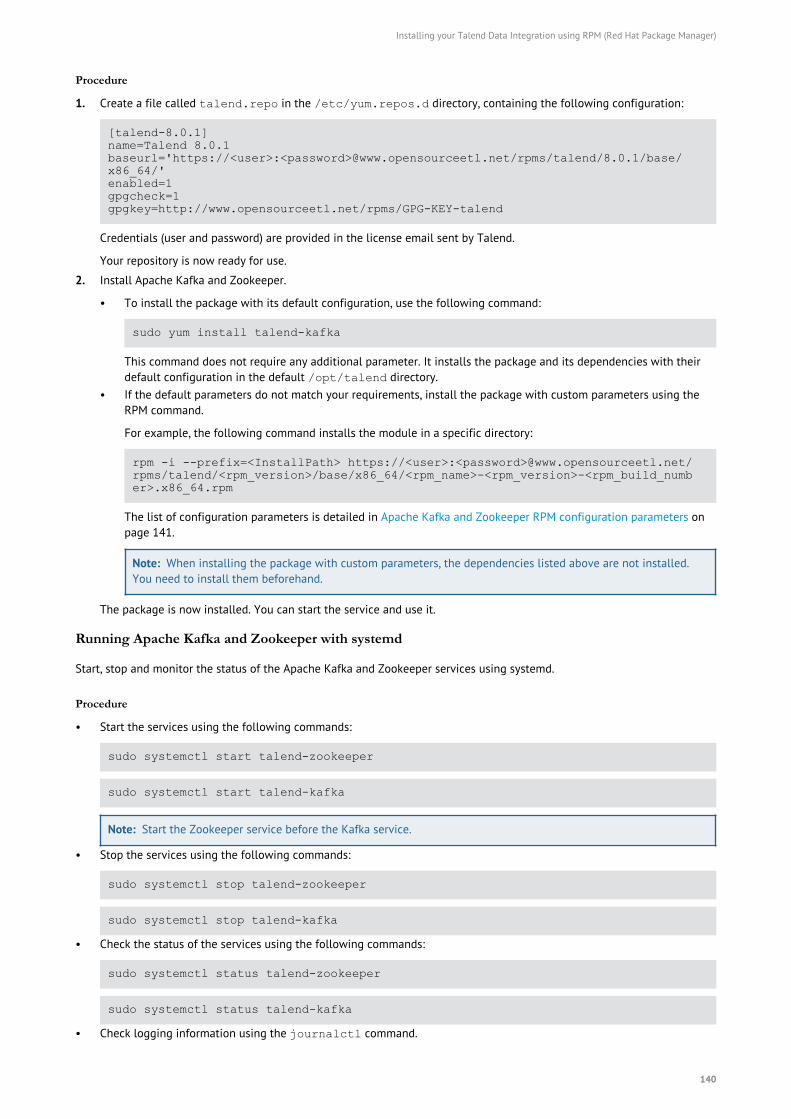
Installing your Talend Data Integration using RPM (Red Hat Package Manager)
140
Procedure
1. Create a file called talend.repo in the /etc/yum.repos.d directory, containing the following configuration:
[talend-8.0.1]name=Talend 8.0.1baseurl='https://<user>:<password>@www.opensourceetl.net/rpms/talend/8.0.1/base/x86_64/'enabled=1gpgcheck=1gpgkey=http://www.opensourceetl.net/rpms/GPG-KEY-talend
Credentials (user and password) are provided in the license email sent by Talend.
Your repository is now ready for use.
2. Install Apache Kafka and Zookeeper.
• To install the package with its default configuration, use the following command:
sudo yum install talend-kafka
This command does not require any additional parameter. It installs the package and its dependencies with theirdefault configuration in the default /opt/talend directory.
• If the default parameters do not match your requirements, install the package with custom parameters using theRPM command.
For example, the following command installs the module in a specific directory:
rpm -i --prefix=<InstallPath> https://<user>:<password>@www.opensourceetl.net/rpms/talend/<rpm_version>/base/x86_64/<rpm_name>-<rpm_version>-<rpm_build_number>.x86_64.rpm
The list of configuration parameters is detailed in Apache Kafka and Zookeeper RPM configuration parameters onpage 141.
Note: When installing the package with custom parameters, the dependencies listed above are not installed.You need to install them beforehand.
The package is now installed. You can start the service and use it.
Running Apache Kafka and Zookeeper with systemd
Start, stop and monitor the status of the Apache Kafka and Zookeeper services using systemd.
Procedure
• Start the services using the following commands:
sudo systemctl start talend-zookeeper
sudo systemctl start talend-kafka
Note: Start the Zookeeper service before the Kafka service.
• Stop the services using the following commands:
sudo systemctl stop talend-zookeeper
sudo systemctl stop talend-kafka
• Check the status of the services using the following commands:
sudo systemctl status talend-zookeeper
sudo systemctl status talend-kafka
• Check logging information using the journalctl command.

Installing your Talend Data Integration using RPM (Red Hat Package Manager)
141
For example:
• To list service journal entries:
sudo journalctl --unit talend-zookeeper
sudo journalctl --unit talend-kafka
• To list service journal entries after a specific date:
sudo journalctl --unit talend-zookeeper --since "2018-08-17 13:15:17"
sudo journalctl --unit talend-kafka --since "2018-08-17 13:15:17"
Apache Kafka and Zookeeper RPM configuration parameters
The Apache Kafka and Zookeeper RPM uses a set of parameters to perform the installation.
To use custom values, set up these parameters in environment variables before performing the installation.
Variable Default value Description
TALEND_INSTALL_USER talend This user is set as the owner of base folder forthe package. The user is created if missing.
TALEND_INSTALL_GROUP talend This group is set as the owner of base folder forthe package. The group is created if missing.
TALEND_INSTALL_SYSTEMD 1 Whether to install SystemD services. Possiblevalues are 0 (false) or 1 (true). Services arecreated and enabled, but not started.
Directory layout of the Apache Kafka and Zookeeper RPM
The RPM installs the module with the following directory layout:
Type Description Default location
Shell scripts Several Shell scripts are available to start andstop the Apache Kafka and Zookeeper services:
• start_zookeeper.sh• stop_zookeeper.sh• start_kafka.sh• stop_kafka.sh
/opt/talend/kafka
Configuration files Apache Kafka and Zookeeper configurationfiles, including:
• server.properties• zookeeper.properties
/opt/talend/kafka/config
Logs Log file location for Apache Kafka andZookeeper.
/opt/talend/kafka/logs
Installing and configuring Filebeat with RPM
You can use the talend-filebeat RPM to install Filebeat on RPM-based systems supported by Talend and compatiblewith systemd, like RHEL/CentOs.
Check the full list of supported systems in Supported Third-Party System/Database/Business Application Versions on page190.
Importing the PGP key
All packages are signed. To be able do install a package, you must first download and install the public signing key.

Installing your Talend Data Integration using RPM (Red Hat Package Manager)
142
Procedure
Download and install the public signing key using the following command:
rpm --import http://www.opensourceetl.net/rpms/GPG-KEY-talend
Installing Filebeat from the RPM repository
Install Filebeat with its default configuration using RPM.
Before you begin
• Talend Data Preparation requires Java 11. You can use either Oracle Java or OpenJDK.• Make sure that the JAVA_HOME variable is correctly set to the Java home directory. For example: /usr/java/jdk1
1.0.13-amd64.
Tip: You can set it in the /root/.bashrc file by adding the following line to it: export JAVA_HOME=$(dirname $(dirname $(readlink -e /usr/bin/java))).
About this task
The default installation also installs the following dependencies:
• coreutils• which• sed• gawk
In case of custom installation, these dependencies must be installed beforehand.
Procedure
1. Create a file called talend.repo in the /etc/yum.repos.d directory, containing the following configuration:
[talend-8.0.1]name=Talend 8.0.1baseurl='https://<user>:<password>@www.opensourceetl.net/rpms/talend/8.0.1/base/x86_64/'enabled=1gpgcheck=1gpgkey=http://www.opensourceetl.net/rpms/GPG-KEY-talend
Credentials (user and password) are provided in the license email sent by Talend.
Your repository is now ready for use.
2. Install Filebeat.
• To install the package with its default configuration, use the following command:
sudo yum install talend-filebeat
This command does not require any additional parameter. It installs the package and its dependencies with theirdefault configuration in the default /opt/talend directory.
• If the default parameters do not match your requirements install the package with custom parameters using theRPM command.
For example, the following command installs the module in a specific directory:
rpm -i --prefix=<InstallPath> https://<user>:<password>@www.opensourceetl.net/rpms/talend/<rpm_version>/base/x86_64/<rpm_name>-<rpm_version>-<rpm_build_number>.x86_64.rpm
The list of configuration parameters is detailed in Filebeat RPM configuration parameters on page 143.
Note: When installing the package with custom parameters, the dependencies are not installed. You need toinstall them beforehand.

Installing your Talend Data Integration using RPM (Red Hat Package Manager)
143
The package is now installed. You can start the service and use it.
Running Filebeat with systemd
Start, stop and monitor the status of the Filebeat service using systemd.
Procedure
• Start the service using the following command:
sudo systemctl start talend-filebeat
• Stop the service using the following command:
sudo systemctl stop talend-filebeat
• Check the status of the service using the following command:
sudo systemctl status talend-filebeat
• Check logging information using the journalctl command.
For example:
• To list service journal entries:
sudo journalctl --unit talend-filebeat
• To list service journal entries after a specific date:
sudo journalctl --unit talend-filebeat --since "2018-08-17 13:15:17"
Filebeat RPM configuration parameters
The Filebeat RPM uses a set of parameters to perform the installation.
To use custom values, set up these parameters in environment variables before performing the installation.
Variable Default value Description
TALEND_INSTALL_USER talend This user is set as the owner of base folder forthe package. The user is created if missing.
TALEND_INSTALL_GROUP talend This group is set as the owner of base folder forthe package. The group is created if missing.
TALEND_INSTALL_SYSTEMD 1 Whether to install SystemD services. Possiblevalues are 0 (false) or 1 (true). Services arecreated and enabled, but not started.
Directory layout of the Filebeat RPM
The RPM installs the module with the following directory layout:
Type Description Default location
Configuration files Filebeat configuration files location, including:
• filebeat.yml
/opt/talend/filebeat
Installing and configuring Talend Administration Center with RPM
You can use the talend-tac RPM to install Talend Administration Center on RPM-based systems supported by Talend andcompatible with systemd, like RHEL/CentOs.

Installing your Talend Data Integration using RPM (Red Hat Package Manager)
144
Check the full list of supported systems in Supported Third-Party System/Database/Business Application Versions on page190.
Importing the PGP key
All packages are signed. To be able do install a package, you must first download and install the public signing key.
Procedure
Download and install the public signing key using the following command:
rpm --import http://www.opensourceetl.net/rpms/GPG-KEY-talend
Installing Talend Administration Center from the RPM repository
Install Talend Administration Center with its default configuration using RPM.
Before you begin
• Talend Administration Center requires Java 11. You can use either Oracle Java or OpenJDK.• Make sure that the JAVA_HOME variable is correctly set to the Java home directory. For example: /usr/java/jdk1
1.0.13-amd64.
Tip: You can set it in the /root/.bashrc file by adding the following line to it: export JAVA_HOME=$(dirname $(dirname $(readlink -e /usr/bin/java))).
• Make sure that Tomcat is already installed. You can either install the talend-tomcat RPM or use your own installation ofTomcat. In the latter case, make sure that the Tomcat path is correctly set in your environment variables, as explained inTalend Administration Center RPM configuration parameters on page 145.
About this task
The default installation also installs the following dependencies:
• coreutils• which• tar• unzip• sed• gawk
In case of custom installation, these dependencies must be installed beforehand.
Procedure
1. Create a file called talend.repo in the /etc/yum.repos.d directory, containing the following configuration:
[talend-8.0.1]name=Talend 8.0.1baseurl='https://<user>:<password>@www.opensourceetl.net/rpms/talend/8.0.1/base/x86_64/'enabled=1gpgcheck=1gpgkey=http://www.opensourceetl.net/rpms/GPG-KEY-talend
Credentials (user and password) are provided in the license email sent by Talend.
Your repository is now ready for use.
2. Install Talend Administration Center.
• To install the package with its default configuration, use the following command:
sudo yum install talend-tac

Installing your Talend Data Integration using RPM (Red Hat Package Manager)
145
This command does not require any additional parameter. It installs the package and its dependencies with theirdefault configuration in the default /opt/talend directory.
• If the default parameters do not match your requirements (custom Tomcat installation, different installationdirectory, and so on), install the package with custom parameters using the RPM command.
For example, the following command installs the module in a specific directory:
rpm -i --prefix=<InstallPath> https://<user>:<password>@www.opensourceetl.net/rpms/talend/<rpm_version>/base/x86_64/<rpm_name>-<rpm_version>-<rpm_build_number>.x86_64.rpm
The list of configuration parameters is detailed in Talend Administration Center RPM configuration parameters onpage 145.
Note: When installing the package with custom parameters, the dependencies listed above are not installed.You need to install them beforehand. Also, make sure that the path to Tomcat is correct.
The package is now installed. You can start the service and use it.
Running Talend Administration Center with systemd
Start, stop and monitor the status of the Talend Administration Center service using systemd.
Procedure
• Start the service using the following command:
sudo systemctl start talend-tac
• Stop the service using the following command:
sudo systemctl stop talend-tac
• Check the status of the service using the following command:
sudo systemctl status talend-tac
• Check logging information using the journalctl command.
For example:
• To list service journal entries:
sudo journalctl --unit talend-tac
• To list service journal entries after a specific date:
sudo journalctl --unit talend-tac --since "2018-08-17 13:15:17"
Talend Administration Center RPM configuration parameters
The Talend Administration Center RPM uses a set of parameters to perform the installation.
To use custom values, set up these parameters in environment variables before performing the installation.
Variable Default value Description
TALEND_INSTALL_USER talend This user is set as the owner of base folder forthe package. The user is created if missing.
TALEND_INSTALL_GROUP talend This group is set as the owner of base folder forthe package. The group is created if missing.
TALEND_INSTALL_SYSTEMD 1 Whether to install SystemD services. Possiblevalues are 0 (false) or 1 (true). Services arecreated and enabled, but not started.

Installing your Talend Data Integration using RPM (Red Hat Package Manager)
146
The following variables are available for packages based on Tomcat:
Variable Default value Description
TALEND_TOMCAT_HOME $(TALEND_INSTALL_PREFIX)/tomcat
Base folder of Tomcat which will be used fordeployment. It can be provided by Talend(RPM), or a custom Tomcat.
TALEND_TOMCAT_MODE shared Specifies if Tomcat should be used as amaster Tomcat (shared) or directly by thecurrent application (direct). Possible values areshared or direct.
Each Talend application relying on Tomcatrequires a distinct Tomcat with differentsettings. The Tomcat RPM package providedby Talend cannot be installed more that oncein parallel. For that reason, you must use theshared mode to use it as a master Tomcat,unless you already have installed a dedicatedTomcat for each application. In the latter case,you can use the direct mode.
TALEND_TOMCAT_SETUP 1 (true) if $TALEND_TOMCAT_HOME =${TALEND_INSTALL_PREFIX}/tomcat or0 (false) if $TALEND_TOMCAT_HOME !=${TALEND_INSTALL_PREFIX}/tomcat
Controls whether to set up Tomcat with itsdefault configuration or not. It must be trueif Tomcat is provided by Talend. If Tomcat isalready configured with specific parameters, setit to 0.
TALEND_TOMCAT_PORT The default port is different depending on theinstalled application:
• For Talend Administration Center: 8080• For Talend MDM Server: 8180• For Talend Data Stewardship: 19999• For Talend Dictionary Service: 8187• For Talend Identity and Access
Management: 9080
Port used by Tomcat.
The following variables are specific to Talend Administration Center:
Variable Default value Description
TALEND_TAC_WEBAPP_NAME org.talend.administrator This is a web-application name for TalendAdministration Center. This parameter isrequired because it is a parameter for thedeployment process which runs in post-installconfiguration script (configure.sh)
Directory layout of the Talend Administration Center RPM
The RPM installs the module with the following directory layout:
Type Description Default location
start_tac.sh Shell script to start the service. /opt/talend/tac
stop_tac.sh Shell script to stop the service. /opt/talend/tac
Configuration files Talend Administration Center configurationfiles, including:
• configuration.properties
• log4j.xml• quartz.properties
/etc/talend/tac
Logs Log files location. /opt/talend/tac/archive/logs

Installing your Talend Data Integration using RPM (Red Hat Package Manager)
147
Type Description Default location
Tomcat configuration files Tomcat configuration files location, including:
• context.xml• server.xml• web.xml
$TALEND_TAC_TOMCAT_BASE/conf
Tomcat logs Tomcat logs location. $TALEND_TAC_TOMCAT_BASE/logs
Installing and configuring Talend Data Stewardship with RPM
You can use the talend-tds RPM to install Talend Data Stewardship on RPM-based systems supported by Talend andcompatible with systemd, like RHEL/CentOs.
Check the full list of supported systems in Supported Third-Party System/Database/Business Application Versions on page190.
Importing the PGP key
All packages are signed. To be able do install a package, you must first download and install the public signing key.
Procedure
Download and install the public signing key using the following command:
rpm --import http://www.opensourceetl.net/rpms/GPG-KEY-talend
Installing Talend Data Stewardship from the RPM repository
Install Talend Data Stewardship with its default configuration using RPM.
Before you begin
• Talend Data Stewardship requires Java 11. You can use either Oracle Java or OpenJDK.• Make sure that the JAVA_HOME variable is correctly set to the Java home directory. For example: /usr/java/jdk1
1.0.13-amd64.
Tip: You can set it in the /root/.bashrc file by adding the following line to it: export JAVA_HOME=$(dirname $(dirname $(readlink -e /usr/bin/java))).
• Make sure that Tomcat is already installed. You can either install the talend-tomcat RPM or use your own installation ofTomcat. In the latter case, make sure that the Tomcat path is correctly set in your environment variables, as explained inTalend Data Stewardship RPM configuration parameters on page 149.
About this task
The default installation also installs the following dependencies:
• coreutils• which• tar• unzip• sed• gawk
In case of custom installation, these dependencies must be installed beforehand.

Installing your Talend Data Integration using RPM (Red Hat Package Manager)
148
Procedure
1. Create a file called talend.repo in the /etc/yum.repos.d directory, containing the following configuration:
[talend-8.0.1]name=Talend 8.0.1baseurl='https://<user>:<password>@www.opensourceetl.net/rpms/talend/8.0.1/base/x86_64/'enabled=1gpgcheck=1gpgkey=http://www.opensourceetl.net/rpms/GPG-KEY-talend
Credentials (user and password) are provided in the license email sent by Talend.
Your repository is now ready for use.
2. Install Talend Data Stewardship.
• To install the package with its default configuration, use the following command:
sudo yum install talend-tds
This command does not require any additional parameter. It installs the package and its dependencies with theirdefault configuration in the default /opt/talend directory.
• If the default parameters do not match your requirements (custom Tomcat installation, different installationdirectory, and so on), install the package with custom parameters using the RPM command.
For example, the following command installs the module in a specific directory:
rpm -i --prefix=<InstallPath> https://<user>:<password>@www.opensourceetl.net/rpms/talend/<rpm_version>/base/x86_64/<rpm_name>-<rpm_version>-<rpm_build_number>.x86_64.rpm
The list of configuration parameters is detailed in Talend Data Stewardship RPM configuration parameters on page149.
Note: When installing the package with custom parameters, the dependencies listed above are not installed.You need to install them beforehand. Also, make sure that the path to Tomcat is correct.
The package is now installed. You can start the service and use it.
Running Talend Data Stewardship with systemd
Start, stop and monitor the status of the Talend Data Stewardship service using systemd.
Before you begin
Make sure that the following services are installed and running before starting Talend Data Stewardship:
• talend-tac• talend-mongodb• talend-iam• talend-zookeeper• talend-kafka• talend-dictionary-service
Note: Start the services in the specified order.
Procedure
• Start the service using the following command:
sudo systemctl start talend-tds
• Stop the service using the following command:
sudo systemctl stop talend-tds

Installing your Talend Data Integration using RPM (Red Hat Package Manager)
149
• Check the status of the service using the following command:
sudo systemctl status talend-tds
• Check logging information using the journalctl command.
For example:
• To list service journal entries:
sudo journalctl --unit talend-tds
• To list service journal entries after a specific date:
sudo journalctl --unit talend-tds --since "2018-08-17 13:15:17"
Talend Data Stewardship RPM configuration parameters
The Talend Data Stewardship RPM uses a set of parameters to perform the installation.
To use custom values, set up these parameters in environment variables before performing the installation.
Variable Default value Description
TALEND_INSTALL_USER talend This user is set as the owner of base folder forthe package. The user is created if missing.
TALEND_INSTALL_GROUP talend This group is set as the owner of base folder forthe package. The group is created if missing.
TALEND_INSTALL_SYSTEMD 1 Whether to install SystemD services. Possiblevalues are 0 (false) or 1 (true). Services arecreated and enabled, but not started.
The following variables are available for packages based on Tomcat:
Variable Default value Description
TALEND_TOMCAT_HOME $(TALEND_INSTALL_PREFIX)/tomcat
Base folder of Tomcat which will be used fordeployment. It can be provided by Talend(RPM), or a custom Tomcat.
TALEND_TOMCAT_MODE shared Specifies if Tomcat should be used as amaster Tomcat (shared) or directly by thecurrent application (direct). Possible values areshared or direct.
Each Talend application relying on Tomcatrequires a distinct Tomcat with differentsettings. The Tomcat RPM package providedby Talend cannot be installed more that oncein parallel. For that reason, you must use theshared mode to use it as a master Tomcat,unless you already have installed a dedicatedTomcat for each application. In the latter case,you can use the direct mode.
TALEND_TOMCAT_SETUP 1 (true) if $TALEND_TOMCAT_HOME =${TALEND_INSTALL_PREFIX}/tomcat or0 (false) if $TALEND_TOMCAT_HOME !=${TALEND_INSTALL_PREFIX}/tomcat
Controls whether to set up Tomcat with itsdefault configuration or not. It must be trueif Tomcat is provided by Talend. If Tomcat isalready configured with specific parameters, setit to 0.
TALEND_TOMCAT_PORT The default port is different depending on theinstalled application:
• For Talend Administration Center: 8080• For Talend MDM Server: 8180• For Talend Data Stewardship: 19999• For Talend Dictionary Service: 8187
Port used by Tomcat.

Installing your Talend Data Integration using RPM (Red Hat Package Manager)
150
Variable Default value Description
• For Talend Identity and AccessManagement: 9080
Directory layout of the Talend Data Stewardship RPM
The RPM installs the module with the following directory layout:
Type Description Default location
Configuration files Talend Data Stewardship configuration fileslocation, including:
• ROOT.xml• audit.properties• data-stewardship-core-
logback.xml• data-stewardship-
gateway-logback.xml• data-stewardship-
history-logback.xml• data-stewardship-
schema-logback.xml• data-stewardsh
ip.properties• internal#data-history-
service.xml• internal#data-
stewardship.xml• internal#frontend.xml• internal#schem
aservice.xml
/opt/talend/tds/config
Logs Log files location. /opt/talend/tds/logs
Tomcat configuration files Tomcat configuration files location, including:
• context.xml• server.xml• web.xml• catalina.policy• catalina.properties• jaspic-providers.xml• jaspic-providers.xsd• logging.properties• tomcat-users.xml• tomcat-users.xsd
$TALEND_TDS_TOMCAT_BASE/conf
Tomcat logs Tomcat logs location. $TALEND_TDS_TOMCAT_BASE/logs
Installing and configuring Talend Identity and Access Management withRPM
You can use the talend-iam RPM to install Talend Identity and Access Management on RPM-based systems supported byTalend and compatible with systemd, like RHEL/CentOs.
Check the full list of supported systems in Supported Third-Party System/Database/Business Application Versions on page190.
Importing the PGP key
All packages are signed. To be able do install a package, you must first download and install the public signing key.

Installing your Talend Data Integration using RPM (Red Hat Package Manager)
151
Procedure
Download and install the public signing key using the following command:
rpm --import http://www.opensourceetl.net/rpms/GPG-KEY-talend
Installing Talend Identity and Access Management from the RPM repository
Install Talend Identity and Access Management with its default configuration using RPM.
Before you begin
• Talend Identity and Access Management requires Java 11. You can use either Oracle Java or OpenJDK.• Make sure that the JAVA_HOME variable is correctly set to the Java home directory. For example: /usr/java/jdk1
1.0.13-amd64.
Tip: You can set it in the /root/.bashrc file by adding the following line to it: export JAVA_HOME=$(dirname $(dirname $(readlink -e /usr/bin/java))).
• Make sure that Tomcat is already installed. You can either install the talend-tomcat RPM or use your own installation ofTomcat. In the latter case, make sure that the Tomcat path is correctly set in your environment variables, as explained inTalend Identity and Access Management RPM configuration parameters on page 152.
About this task
The default installation also installs the following dependencies:
• coreutils• which• gawk• unzip• sed
In case of custom installation, these dependencies must be installed beforehand.
Procedure
1. Create a file called talend.repo in the /etc/yum.repos.d directory, containing the following configuration:
[talend-8.0.1]name=Talend 8.0.1baseurl='https://<user>:<password>@www.opensourceetl.net/rpms/talend/8.0.1/base/x86_64/'enabled=1gpgcheck=1gpgkey=http://www.opensourceetl.net/rpms/GPG-KEY-talend
Credentials (user and password) are provided in the license email sent by Talend.
Your repository is now ready for use.
2. Install Talend Identity and Access Management.
• To install the package with its default configuration, use the following command:
sudo yum install talend-iam
This command does not require any additional parameter. It installs the package and its dependencies with theirdefault configuration in the default /opt/talend directory.
• If the default parameters do not match your requirements (custom Tomcat installation, different installationdirectory, and so on), install the package with custom parameters using the RPM command.
For example, the following command installs the module in a specific directory:
rpm -i --prefix=<InstallPath> https://<user>:<password>@www.opensourceetl.net/rpms/talend/<rpm_version>/base/x86_64/<rpm_name>-<rpm_version>-<rpm_build_number>.x86_64.rpm

Installing your Talend Data Integration using RPM (Red Hat Package Manager)
152
The list of configuration parameters is detailed in Talend Identity and Access Management RPM configurationparameters on page 152.
Note: When installing the package with custom parameters, the dependencies listed above are not installed.You need to install them beforehand. Also, make sure that the path to Tomcat is correct.
The package is now installed. You can start the service and use it.
Running Talend Identity and Access Management with systemd
Start, stop and monitor the status of the Talend Identity and Access Management service using systemd.
Procedure
• Start the service using the following command:
sudo systemctl start talend-iam
• Stop the service using the following command:
sudo systemctl stop talend-iam
• Check the status of the service using the following command:
sudo systemctl status talend-iam
• Check logging information using the journalctl command.
For example:
• To list service journal entries:
sudo journalctl --unit talend-iam
• To list service journal entries after a specific date:
sudo journalctl --unit talend-iam --since "2018-08-17 13:15:17"
Talend Identity and Access Management RPM configuration parameters
The Talend Identity and Access Management RPM uses a set of parameters to perform the installation.
To use custom values, set up these parameters in environment variables before performing the installation.
Variable Default value Description
TALEND_INSTALL_USER talend This user is set as the owner of base folder forthe package. The user is created if missing.
TALEND_INSTALL_GROUP talend This group is set as the owner of base folder forthe package. The group is created if missing.
TALEND_INSTALL_SYSTEMD 1 Whether to install SystemD services. Possiblevalues are 0 (false) or 1 (true). Services arecreated and enabled, but not started.
The following variables are available for packages based on Tomcat:
Variable Default value Description
TALEND_TOMCAT_HOME $(TALEND_INSTALL_PREFIX)/tomcat
Base folder of Tomcat which will be used fordeployment. It can be provided by Talend(RPM), or a custom Tomcat.
TALEND_TOMCAT_MODE shared Specifies if Tomcat should be used as amaster Tomcat (shared) or directly by the

Installing your Talend Data Integration using RPM (Red Hat Package Manager)
153
Variable Default value Description
current application (direct). Possible values areshared or direct.
Each Talend application relying on Tomcatrequires a distinct Tomcat with differentsettings. The Tomcat RPM package providedby Talend cannot be installed more that oncein parallel. For that reason, you must use theshared mode to use it as a master Tomcat,unless you already have installed a dedicatedTomcat for each application. In the latter case,you can use the direct mode.
TALEND_TOMCAT_SETUP 1 (true) if $TALEND_TOMCAT_HOME =${TALEND_INSTALL_PREFIX}/tomcat or0 (false) if $TALEND_TOMCAT_HOME !=${TALEND_INSTALL_PREFIX}/tomcat
Controls whether to set up Tomcat with itsdefault configuration or not. It must be trueif Tomcat is provided by Talend. If Tomcat isalready configured with specific parameters, setit to 0.
TALEND_TOMCAT_PORT The default port is different depending on theinstalled application:
• For Talend Administration Center: 8080• For Talend MDM Server: 8180• For Talend Data Stewardship: 19999• For Talend Dictionary Service: 8187• For Talend Identity and Access
Management: 9080
Port used by Tomcat.
Directory layout of the Talend Identity and Access Management RPM
The RPM installs the module with the following directory layout:
Type Description Default location
start_iam.sh Shell script to start the service. /opt/talend/iam
stop_iam.sh Shell script to stop the service. /opt/talend/iam
Configuration files Talend Identity and Access Managementconfiguration files, including:
• iam.properties
/etc/talend/iam
Logs Log files location. /opt/talend/iam/archive/logs
Tomcat configuration files Tomcat configuration files location, including:
• context.xml• server.xml• web.xml
$TALEND_IAM_TOMCAT_BASE/conf
Tomcat logs Tomcat logs location. $TALEND_IAM_TOMCAT_BASE/logs
Installing and configuring Talend JobServer with RPM
You can use the talend-jobserver RPM to install Talend JobServer on RPM-based systems supported by Talend andcompatible with systemd, like RHEL/CentOs.
Check the full list of supported systems in Supported Third-Party System/Database/Business Application Versions on page190.

Installing your Talend Data Integration using RPM (Red Hat Package Manager)
154
Importing the PGP key
All packages are signed. To be able do install a package, you must first download and install the public signing key.
Procedure
Download and install the public signing key using the following command:
rpm --import http://www.opensourceetl.net/rpms/GPG-KEY-talend
Installing Talend JobServer from the RPM repository
Install Talend JobServer with its default configuration using RPM.
Before you begin
• Talend JobServer requires Java 11. You can use either Oracle Java or OpenJDK.• Make sure that the JAVA_HOME variable is correctly set to the Java home directory. For example: /usr/java/jdk1
1.0.13-amd64.
Tip: You can set it in the /root/.bashrc file by adding the following line to it: export JAVA_HOME=$(dirname $(dirname $(readlink -e /usr/bin/java))).
About this task
The default installation also installs the following dependencies:
• coreutils• which• gawk• sed
In case of custom installation, these dependencies must be installed beforehand.
Procedure
1. Create a file called talend.repo in the /etc/yum.repos.d directory, containing the following configuration:
[talend-8.0.1]name=Talend 8.0.1baseurl='https://<user>:<password>@www.opensourceetl.net/rpms/talend/8.0.1/base/x86_64/'enabled=1gpgcheck=1gpgkey=http://www.opensourceetl.net/rpms/GPG-KEY-talend
Credentials (user and password) are provided in the license email sent by Talend.
Your repository is now ready for use.
2. Install Talend JobServer.
• To install the package with its default configuration, use the following command:
sudo yum install talend-jobserver
This command does not require any additional parameter. It installs the package and its dependencies with theirdefault configuration in the default /opt/talend directory.
• If the default parameters do not match your requirements install the package with custom parameters using theRPM command.
For example, the following command installs the module in a specific directory:
rpm -i --prefix=<InstallPath> https://<user>:<password>@www.opensourceetl.net/rpms/talend/<rpm_version>/base/x86_64/<rpm_name>-<rpm_version>-<rpm_build_number>.x86_64.rpm
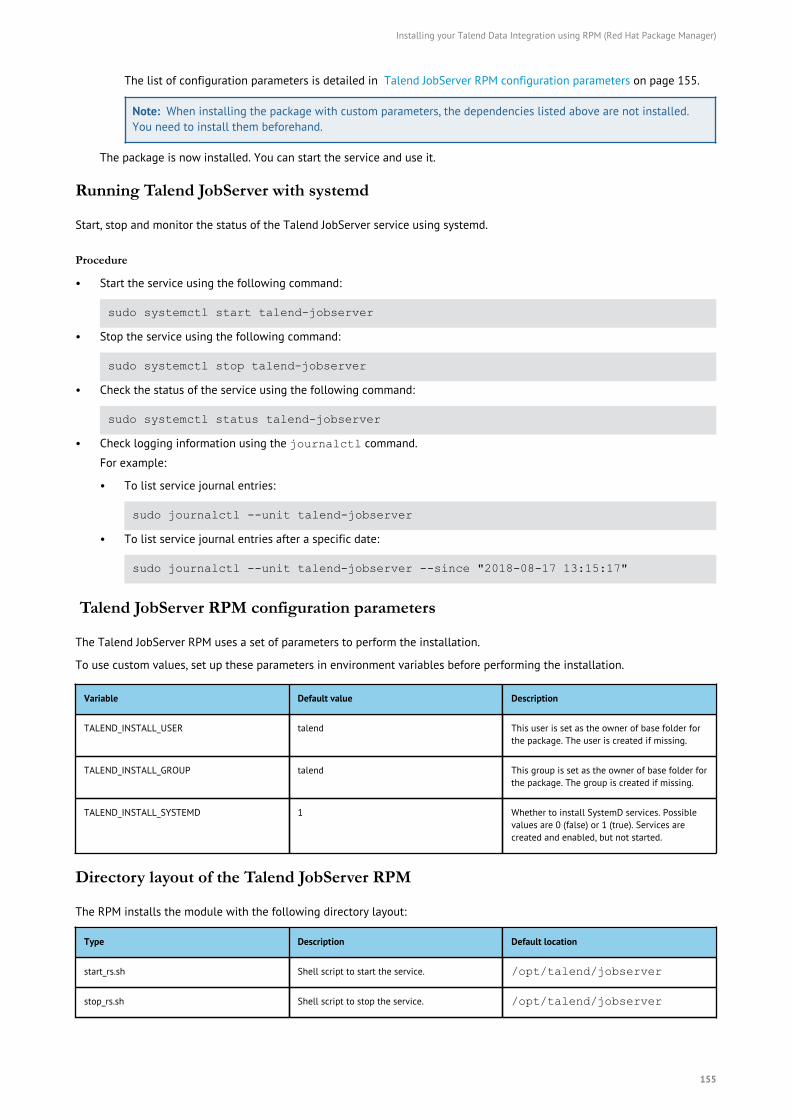
Installing your Talend Data Integration using RPM (Red Hat Package Manager)
155
The list of configuration parameters is detailed in Talend JobServer RPM configuration parameters on page 155.
Note: When installing the package with custom parameters, the dependencies listed above are not installed.You need to install them beforehand.
The package is now installed. You can start the service and use it.
Running Talend JobServer with systemd
Start, stop and monitor the status of the Talend JobServer service using systemd.
Procedure
• Start the service using the following command:
sudo systemctl start talend-jobserver
• Stop the service using the following command:
sudo systemctl stop talend-jobserver
• Check the status of the service using the following command:
sudo systemctl status talend-jobserver
• Check logging information using the journalctl command.
For example:
• To list service journal entries:
sudo journalctl --unit talend-jobserver
• To list service journal entries after a specific date:
sudo journalctl --unit talend-jobserver --since "2018-08-17 13:15:17"
Talend JobServer RPM configuration parameters
The Talend JobServer RPM uses a set of parameters to perform the installation.
To use custom values, set up these parameters in environment variables before performing the installation.
Variable Default value Description
TALEND_INSTALL_USER talend This user is set as the owner of base folder forthe package. The user is created if missing.
TALEND_INSTALL_GROUP talend This group is set as the owner of base folder forthe package. The group is created if missing.
TALEND_INSTALL_SYSTEMD 1 Whether to install SystemD services. Possiblevalues are 0 (false) or 1 (true). Services arecreated and enabled, but not started.
Directory layout of the Talend JobServer RPM
The RPM installs the module with the following directory layout:
Type Description Default location
start_rs.sh Shell script to start the service. /opt/talend/jobserver
stop_rs.sh Shell script to stop the service. /opt/talend/jobserver

Installing your Talend Data Integration using RPM (Red Hat Package Manager)
156
Type Description Default location
start_jconsole.sh Shell script to start the job console. /opt/talend/jobserver
Configuration files Talend JobServer configuration files location,including:
• TalendJobServer.properties
/opt/talend/jobserver/conf
Installing and configuring Talend Log Server with RPM
You can use the talend-logserver RPM to install Talend Log Server on RPM-based systems supported by Talend andcompatible with systemd, like RHEL/CentOs.
Check the full list of supported systems in Supported Third-Party System/Database/Business Application Versions on page190.
Importing the PGP key
All packages are signed. To be able do install a package, you must first download and install the public signing key.
Procedure
Download and install the public signing key using the following command:
rpm --import http://www.opensourceetl.net/rpms/GPG-KEY-talend
Installing Talend Log Server from the RPM repository
Install Talend Log Server with its default configuration using RPM.
Before you begin
• Talend Log Server requires Java 11. You can use either Oracle Java or OpenJDK.• Make sure that the JAVA_HOME variable is correctly set to the Java home directory. For example: /usr/java/jdk1
1.0.13-amd64.
Tip: You can set it in the /root/.bashrc file by adding the following line to it: export JAVA_HOME=$(dirname $(dirname $(readlink -e /usr/bin/java))).
About this task
The default installation also installs the following dependencies:
• coreutils• which• gawk• sed
In case of custom installation, these dependencies must be installed beforehand.
Procedure
1. Create a file called talend.repo in the /etc/yum.repos.d directory, containing the following configuration:
[talend-8.0.1]name=Talend 8.0.1baseurl='https://<user>:<password>@www.opensourceetl.net/rpms/talend/8.0.1/base/x86_64/'enabled=1gpgcheck=1gpgkey=http://www.opensourceetl.net/rpms/GPG-KEY-talend
Installing your Talend Data Integration using RPM (Red Hat Package Manager)
157
Credentials (user and password) are provided in the license email sent by Talend.
Your repository is now ready for use.
2. Install Talend Log Server.
• To install the package with its default configuration, use the following command:
sudo yum install talend-logserver
This command does not require any additional parameter. It installs the package and its dependencies with theirdefault configuration in the default /opt/talend directory.
• If the default parameters do not match your requirements install the package with custom parameters using theRPM command.
For example, the following command installs the module in a specific directory:
rpm -i --prefix=<InstallPath> https://<user>:<password>@www.opensourceetl.net/rpms/talend/<rpm_version>/base/x86_64/<rpm_name>-<rpm_version>-<rpm_build_number>.x86_64.rpm
The list of configuration parameters is detailed in Talend Log Server RPM configuration parameters on page 158.
Note: When installing the package with custom parameters, the dependencies listed above are not installed.You need to install them beforehand.
The package is now installed. You can start the service and use it.
Running Talend Log Server with systemd
Start, stop and monitor the status of the Talend Log Server service using systemd.
About this taskThree services are available for Talend Log Server:
• talend-elastic• talend-kibana• talend-logstash
talend-elastic and talend-kibana services are automatically started when starting the talend-logstash service.
Procedure
• Start the services using the following command:
sudo systemctl start talend-logstash.service
• Stop the services using the following command:
sudo systemctl stop talend-logstash.service
• Check the status of the services using the following command:
sudo systemctl status talend-logstash.service
• Check logging information using the journalctl command.
For example:
• To list service journal entries:
sudo journalctl --unit talend-logstash.service
• To list service journal entries after a specific date:
sudo journalctl --unit talend-logstash.service --since "2018-08-17 13:15:17"
Installing your Talend Data Integration using RPM (Red Hat Package Manager)
158
Talend Log Server RPM configuration parameters
The Talend Log Server RPM uses a set of parameters to perform the installation.
To use custom values, set up these parameters in environment variables before performing the installation.
Variable Default value Description
TALEND_INSTALL_USER talend This user is set as the owner of base folder forthe package. The user is created if missing.
TALEND_INSTALL_GROUP talend This group is set as the owner of base folder forthe package. The group is created if missing.
TALEND_INSTALL_SYSTEMD 1 Whether to install SystemD services. Possiblevalues are 0 (false) or 1 (true). Services arecreated and enabled, but not started.
Directory layout of the Talend Log Server RPM
The RPM installs the module with the following directory layout:
Type Description Default location
start_logserver.sh Shell script to start the service. /opt/talend/logserver
stop_logserver.sh Shell script to stop the service. /opt/talend/logserver
start_logstash_daemon.sh Shell script to start Logstash. /opt/talend/logserver
start_kibana_daemon.sh Shell script to start Kibana. /opt/talend/logserver
Configuration files Talend Log Server configuration files location,including:
• logstash-talend.conf• template_esb.json• template_kibana.json
/opt/talend/logserver
Elasticsearch Talend Log Server includes a version ofElasticsearch.
/opt/talend/logserver/elasticsearch-7.3.2
Logstash Talend Log Server includes a version ofLogstash.
/opt/talend/logserver/logstash-7.3.2
Kibana Talend Log Server includes a version of Kibana. /opt/talend/logserver/kibana-7.3.2-linux-x86_64
Installing and configuring Talend Data Preparation with RPM
You can use the talend-tdp RPM to install Talend Data Preparation on RPM-based systems supported by Talend andcompatible with systemd, like RHEL/CentOs.
Check the full list of supported systems in Supported Third-Party System/Database/Business Application Versions on page190.
Importing the PGP key
All packages are signed. To be able do install a package, you must first download and install the public signing key.

Installing your Talend Data Integration using RPM (Red Hat Package Manager)
159
Procedure
Download and install the public signing key using the following command:
rpm --import http://www.opensourceetl.net/rpms/GPG-KEY-talend
Installing Talend Data Preparation from the RPM repository
Install Talend Data Preparation with its default configuration using RPM.
Before you begin
• Talend Data Preparation requires Java 11. You can use either Oracle Java or OpenJDK.• Make sure that the JAVA_HOME variable is correctly set to the Java home directory. For example: /usr/java/jdk1
1.0.13-amd64.
Tip: You can set it in the /root/.bashrc file by adding the following line to it: export JAVA_HOME=$(dirname $(dirname $(readlink -e /usr/bin/java))).
Procedure
1. Create a file called talend.repo in the /etc/yum.repos.d directory, containing the following configuration:
[talend-8.0.1]name=Talend 8.0.1baseurl='https://<user>:<password>@www.opensourceetl.net/rpms/talend/8.0.1/base/x86_64/'enabled=1gpgcheck=1gpgkey=http://www.opensourceetl.net/rpms/GPG-KEY-talend
Credentials (user and password) are provided in the license email sent by Talend.
Your repository is now ready for use.
2. Install Talend Data Preparation.
• To install the package with its default configuration, use the following command:
sudo yum install talend-tdp
This command does not require any additional parameter. It installs the package and its dependencies with theirdefault configuration in the default /opt/talend directory.
• If the default parameters do not match your requirements install the package with custom parameters using theRPM command.
For example, the following command installs the module in a specific directory:
rpm -i --prefix=<InstallPath> https://<user>:<password>@www.opensourceetl.net/rpms/talend/<rpm_version>/base/x86_64/<rpm_name>-<rpm_version>-<rpm_build_number>.x86_64.rpm
The list of configuration parameters is detailed in Talend Data Preparation RPM configuration parameters on page160.
Note: When installing the package with custom parameters, the dependencies are not installed. You need toinstall them beforehand.
The package is now installed. You can start the service and use it.
Running Talend Data Preparation with systemd
Start, stop and monitor the status of the Talend Data Preparation service using systemd.
Installing your Talend Data Integration using RPM (Red Hat Package Manager)
160
Before you begin
Make sure that the following services are installed and running before starting Talend Data Preparation:
• talend-tac• talend-mongodb• talend-iam• talend-zookeeper• talend-kafka• talend-dictionary-service• talend-tcomp• talend-streamsrunner• talend-sjs
Note: Start the services in the specified order.
Procedure
• Start the service using the following command:
sudo systemctl start talend-tdp
• Stop the service using the following command:
sudo systemctl stop talend-tdp
• Check the status of the service using the following command:
sudo systemctl status talend-tdp
• Check logging information using the journalctl command.
For example:
• To list service journal entries:
sudo journalctl --unit talend-tdp
• To list service journal entries after a specific date:
sudo journalctl --unit talend-tdp --since "2018-08-17 13:15:17"
Talend Data Preparation RPM configuration parameters
The Talend Data Preparation RPM uses a set of parameters to perform the installation.
To use custom values, set up these parameters in environment variables before performing the installation.
Variable Default value Description
TALEND_INSTALL_USER talend This user is set as the owner of base folder forthe package. The user is created if missing.
TALEND_INSTALL_GROUP talend This group is set as the owner of base folder forthe package. The group is created if missing.
TALEND_INSTALL_SYSTEMD 1 Whether to install SystemD services. Possiblevalues are 0 (false) or 1 (true). Services arecreated and enabled, but not started.
Directory layout of the Talend Data Preparation RPM
The RPM installs the module with the following directory layout:

Installing your Talend Data Integration using RPM (Red Hat Package Manager)
161
Type Description Default location
Shell scripts Several scripts allow you to start and stop theservice, as well as to create MongoDB users:
• start.sh or start.bat• stop.sh or stop.bat• create_mongo_user.sh
/opt/talend/tdp/Talend-DataPreparation-Server
Configuration files Talend Data Preparation configuration fileslocation, including:
• application.properties• audit.properties• config.properties• streams_tuning
.properties
/etc/talend/tdp
Installing and configuring Talend Component Server with RPM
You can use the talend-tcomp RPM to install Talend Component Server on RPM-based systems supported by Talend andcompatible with systemd, like RHEL/CentOs.
Check the full list of supported systems in Supported Third-Party System/Database/Business Application Versions on page190.
Importing the PGP key
All packages are signed. To be able do install a package, you must first download and install the public signing key.
Procedure
Download and install the public signing key using the following command:
rpm --import http://www.opensourceetl.net/rpms/GPG-KEY-talend
Installing Talend Component Server from the RPM repository
Install Talend Component Server with its default configuration using RPM.
Before you begin
• Talend Component Server requires Java 11. You can use either Oracle Java or OpenJDK.• Make sure that the JAVA_HOME variable is correctly set to the Java home directory. For example: /usr/java/jdk1
1.0.13-amd64.
Tip: You can set it in the /root/.bashrc file by adding the following line to it: export JAVA_HOME=$(dirname $(dirname $(readlink -e /usr/bin/java))).
Procedure
1. Create a file called talend.repo in the /etc/yum.repos.d directory, containing the following configuration:
[talend-8.0.1]name=Talend 8.0.1baseurl='https://<user>:<password>@www.opensourceetl.net/rpms/talend/8.0.1/base/x86_64/'enabled=1gpgcheck=1gpgkey=http://www.opensourceetl.net/rpms/GPG-KEY-talend
Credentials (user and password) are provided in the license email sent by Talend.
Your repository is now ready for use.

Installing your Talend Data Integration using RPM (Red Hat Package Manager)
162
2. Install Talend Component Server.
• To install the package with its default configuration, use the following command:
sudo yum install talend-tcomp
This command does not require any additional parameter. It installs the package and its dependencies with theirdefault configuration in the default /opt/talend directory.
• If the default parameters do not match your requirements install the package with custom parameters using theRPM command.
For example, the following command installs the module in a specific directory:
rpm -i --prefix=<InstallPath> https://<user>:<password>@www.opensourceetl.net/rpms/talend/<rpm_version>/base/x86_64/<rpm_name>-<rpm_version>-<rpm_build_number>.x86_64.rpm
The list of configuration parameters is detailed in Talend Component Server RPM configuration parameters onpage 162.
Note: When installing the package with custom parameters, the dependencies are not installed. You need toinstall them beforehand.
The package is now installed. You can start the service and use it.
Running Talend Component Server with systemd
Start, stop and monitor the status of the Talend Component Server service using systemd.
Procedure
• Start the service using the following command:
sudo systemctl start talend-tcomp
• Stop the service using the following command:
sudo systemctl stop talend-tcomp
• Check the status of the service using the following command:
sudo systemctl status talend-tcomp
• Check logging information using the journalctl command.
For example:
• To list service journal entries:
sudo journalctl --unit talend-tcomp
• To list service journal entries after a specific date:
sudo journalctl --unit talend-tcomp --since "2018-08-17 13:15:17"
Talend Component Server RPM configuration parameters
The Talend Component Server RPM uses a set of parameters to perform the installation.
To use custom values, set up these parameters in environment variables before performing the installation.
Variable Default value Description
TALEND_INSTALL_USER talend This user is set as the owner of base folder forthe package. The user is created if missing.

Installing your Talend Data Integration using RPM (Red Hat Package Manager)
163
Variable Default value Description
TALEND_INSTALL_GROUP talend This group is set as the owner of base folder forthe package. The group is created if missing.
TALEND_INSTALL_SYSTEMD 1 Whether to install SystemD services. Possiblevalues are 0 (false) or 1 (true). Services arecreated and enabled, but not started.
The following variables are specific to Talend Component Server:
Variable Default value Description
TALEND_TCOMP_BASE /opt/talend/tcomp Installation directory of the Talend ComponentServer (talend-streamsrunner).
Directory layout of the Talend Component Server RPM
The RPM installs the module with the following directory layout:
Type Description Default location
Shell scripts Several scripts allow you to start and stop theservice:
• start.sh or start.bat• stop.sh or stop.bat
/opt/talend/tcomp/bin
Configuration files Talend Component Server configuration fileslocation, including:
• application.properties• application_ja
.properties• components.list• git.properties• jdbc_config.json• logback-spring.xml• settings.xml
/etc/talend/tcomp
Installing and configuring Talend Runtime with RPM
You can use the talend-runtime RPM to install Talend Runtime on RPM-based systems supported by Talend andcompatible with systemd, like RHEL/CentOs.
Check the full list of supported systems in Supported Third-Party System/Database/Business Application Versions on page190.
Importing the PGP key
All packages are signed. To be able do install a package, you must first download and install the public signing key.
Procedure
Download and install the public signing key using the following command:
rpm --import http://www.opensourceetl.net/rpms/GPG-KEY-talend
Installing Talend Runtime from the RPM repository
Install Talend Runtime with its default configuration using RPM.

Installing your Talend Data Integration using RPM (Red Hat Package Manager)
164
Before you begin
• Talend Runtime requires Java 11. You can use either Oracle Java or OpenJDK.• Make sure that the JAVA_HOME variable is correctly set to the Java home directory. For example: /usr/java/jdk1
1.0.13-amd64.
Tip: You can set it in the /root/.bashrc file by adding the following line to it: export JAVA_HOME=$(dirname $(dirname $(readlink -e /usr/bin/java))).
About this task
The default installation also installs the following dependencies:
• which• nmap-ncat• coreutils• sed• gawk
In case of custom installation, these dependencies must be installed beforehand.
Procedure
1. Create a file called talend.repo in the /etc/yum.repos.d directory, containing the following configuration:
[talend-8.0.1]name=Talend 8.0.1baseurl='https://<user>:<password>@www.opensourceetl.net/rpms/talend/8.0.1/base/x86_64/'enabled=1gpgcheck=1gpgkey=http://www.opensourceetl.net/rpms/GPG-KEY-talend
Credentials (user and password) are provided in the license email sent by Talend.
Your repository is now ready for use.
2. Install Talend Runtime.
• To install the package with its default configuration, use the following command:
sudo yum install talend-runtime
This command does not require any additional parameter. It installs the package and its dependencies with theirdefault configuration in the default /opt/talend directory.
• If the default parameters do not match your requirements, install the package with custom parameters using theRPM command.
For example, the following command installs the module in a specific directory:
rpm -i --prefix=<InstallPath> https://<user>:<password>@www.opensourceetl.net/rpms/talend/<rpm_version>/base/x86_64/<rpm_name>-<rpm_version>-<rpm_build_number>.x86_64.rpm
The list of configuration parameters is detailed in Talend Runtime RPM configuration parameters on page 165.
Note: When installing the package with custom parameters, the dependencies listed above are not installed.You need to install them beforehand.
The package is now installed. You can start the service and use it.
Running Talend Runtime with systemd
Start, stop and monitor the status of the Talend Runtime service using systemd.

Installing your Talend Data Integration using RPM (Red Hat Package Manager)
165
Procedure
• Start the service using the following command:
sudo systemctl start talend-runtime
• Stop the service using the following command:
sudo systemctl stop talend-runtime
• Check the status of the service using the following command:
sudo systemctl status talend-runtime
• Check logging information using the journalctl command.
For example:
• To list service journal entries:
sudo journalctl --unit talend-runtime
• To list service journal entries after a specific date:
sudo journalctl --unit talend-runtime --since "2018-08-17 13:15:17"
Talend Runtime RPM configuration parameters
The Talend Runtime RPM uses a set of parameters to perform the installation.
To use custom values, set up these parameters in environment variables before performing the installation.
Variable Default value Description
TALEND_INSTALL_USER talend This user is set as the owner of base folder forthe package. The user is created if missing.
TALEND_INSTALL_GROUP talend This group is set as the owner of base folder forthe package. The group is created if missing.
TALEND_INSTALL_SYSTEMD 1 Whether to install SystemD services. Possiblevalues are 0 (false) or 1 (true). Services arecreated and enabled, but not started.
Directory layout of the Talend Runtime RPM
The RPM installs the module with the following directory layout:

Installing your Talend Data Integration using RPM (Red Hat Package Manager)
166
Type Description Default location
Configuration files Talend Runtime configuration files location,including:
• all.policy• branding-ssh.properties• branding.properties• config.properties• custom.properties• distribution.info• equinox-debug.
properties• filebeat_em.yml• java.util.logg
ing.properties• jmx.acl.cfg• jmx.acl.java.l
ang.Memory.cfg• jmx.acl.org.ap
ache.karaf.bundle.cfg• jmx.acl.org.ap
ache.karaf.config.cfg• jmx.acl.org.ap
ache.karaf.security.jmx.cfg
• jmx.acl.osgi.compendium.cm.cfg
• jre.properties• keys.properties• keystores/SSLKeystore• keystores/keystore.jks• keystores/trun.jks• keystores/trun
Keystore.properties• org.apache.act
ivemq.webconsole.cfg• org.apache.ari
es.transaction.cfg• org.apache.cxf
.http.conduits-common.cfg
• org.apache.cxf.osgi.cfg• org.apache.cxf
.workqueues-default.cfg• org.apache.cxf.xkms.cfg• org.apache.fel
ix.eventadmin.impl.EventAdmin.cfg
• org.apache.felix.fileinstall-deploy.cfg
• org.apache.karaf.command.acl.bundle.cfg
• org.apache.karaf.command.acl.config.cfg
• org.apache.karaf.command.acl.feature.cfg
• org.apache.karaf.command.acl.jaas.cfg
• org.apache.karaf.command.acl.kar.cfg
• org.apache.karaf.command.acl.scope_bundle.cfg
• org.apache.karaf.command.acl.shell.cfg
• org.apache.karaf.command.acl.system.cfg
• org.apache.karaf.decanter.appender.file.cfg
• org.apache.karaf.decanter.appender.jms.cfg
• org.apache.karaf.decanter.appender.log.cfg
• org.apache.karaf.decanter.collector.eventadmin-framework.cfg
• org.apache.karaf.decanter.collector.eventadmin-karaf.cfg
• org.apache.karaf.decanter.collector.eventadmin-sam.cfg
• org.apache.karaf.decanter.collector.jms.cfg
• org.apache.karaf.decanter.collector.log.cfg
• org.apache.karaf.decanter.marshaller.json.cfg
• org.apache.karaf.features.cfg
• org.apache.karaf.features.repos.cfg
• org.apache.karaf.jaas.cfg
• org.apache.karaf.kar.cfg
• org.apache.karaf.log.cfg
• org.apache.karaf.management.cfg
• org.apache.karaf.shell.cfg
• org.ops4j.pax.logging.cfg
• org.ops4j.pax.url.mvn.cfg
• org.ops4j.pax.web.cfg• org.talend.esb
.locator.cfg• org.talend.esb
.registry.client.policy.cfg
• org.talend.esb.registry.client.wsdl.cfg
• org.talend.esb.sam.agent.cfg
• org.talend.esb.sts.server.cfg
• org.talend.remote.jobserver.server.cfg
• profile.cfg• scripts/shell.
completion.script• settings.xml.sample• shell.init.script• startup.properties• system.properties• users.csv• users.properties
/opt/talend/runtime/etc

Installing your Talend Data Integration using RPM (Red Hat Package Manager)
167
Type Description Default location
Logs Log files location. /opt/talend/runtime/log

Uninstalling Talend products
168
Uninstalling Talend products
Uninstalling Talend products via the uninstall file on Linux
About this task
This method is recommended to uninstall Talend products. If you have issues with this uninstallation method, follow themanual uninstallation instructions.
Procedure
1. Open the Terminal.
2. Locate the uninstall file under Talend installation folder. If Talend products are installed as services, root privilegesare required.
3. Execute the uninstall file with the following command: ./uninstall.
4. Follow the instructions.
ResultsThe uninstallation is complete. If you need to reinstall Talend products, refer to the following section: Introducing TalendInstallers on page 23.
Uninstalling Talend products manually on Linux
If you have any issues when uninstalling Talend products via the uninstall file or your installation is broken, follow themanual uninstallation instructions below.
Procedure
1. List all Talend services using the following command: ls -l /etc/systemd/system/talend*.
2. Stop each service on the list with the command: systemctl stop <service name>. Replace <service name>with the name of the service. For example: systemctl stop talend-tac-7.x.1.
3. Disable each service with the command: systemctl disable <service name>.
For example: systemctl disable talend-tac-7.x.1.
4. Make sure no Talend services are running with the command: ps -ef | grep talend | grep -v grep.
If Talend services appear in the output, go through the list and kill the services still running with the command kill-9 <pid>. <pid> is the first number of the output for each service.
5. Delete the installation folder with the command: rm -rf <folder>. For example: rm -rf Talend-7.x.1.
ResultsThe uninstallation is complete. If you need to reinstall Talend products, refer to the following section: Introducing TalendInstallers on page 23.

Appendices
169
Appendices
Introduction to the Talend products
The present section lists all the elements required for using the Talend products. To ease their management, we recommendthat you centralize all the server modules on one single system.
Note: All Talend applications to be installed must be the same version.
• An application server (Apache Tomcat server) that hosts Talend Administration Center.• A database server storing the administration metadata of Talend Administration Center (by default, a MySQL database is
used).• A version control system for Project metadata.• A Web browser to access Web application:
• Talend Administration Center where projects, users and processes can be managed and administrated. For moreinformation, see the Talend Administration Center User Guide.
• An artifact repository in which are stored software updates, external libraries and artifacts.• Execution servers (JobServers) or Talend Runtime execution containers (based on Apache Karaf) to deploy and execute
processes.• A Studio API to carry out technical processes. For more information, see the Talend Studio User Guide.
Each of these elements is detailed in the following sub-sections.
Apache Tomcat Server
The Apache Tomcat server is an application server that hosts Talend Administration Center. This Web application givesaccess to all management and administration functionalities for an integration project, allowing users to (depending on theirrole):
• Create and manage projects.• Create and manage user accounts and roles/rights.• Access the Job Conductor to schedule, deploy and execute Jobs.• Access the Monitoring node to monitor the execution of Jobs and visualize the logs.
Note: Talend Administration Center can also be hosted by JBoss or Pivotal tc application servers.
Database
The administration database server is used to store administration information and manage the persistence in TalendAdministration Center. By default a MySQL database is used, but you can also use an embedded H2 database, MS SQL Server,or Oracle to store all cross-project data (users, projects, authorization, license, tasks, triggers, monitoring).
The administration database will be named <talend_administrator> in the rest of this document.
The <talend_administrator> administration database will contain all the data related to project information andadministration including: administration data, project declaration, user declaration and authorization, task list, etc.
The tables in this database are automatically created when connecting for the first time to Talend Administration Center.The created tables include (among others):
• a Users table,• a Projects table,• a Rights table.
Warning: These tables are created, populated and managed automatically by Talend, users do not need to take anyaction.

Appendices
170
Version control system
We recommend you to store several projects per repository, simply in order not to have too many repositories to deal with.However you can choose to store only one project per Git repository, if you prefer so.
For more information on how to configure your version control systems, see Setting up your version control system on page31.
You can also have several version control repositories each containing several projects. For more information on how tocreate projects and store them in Git, see the Talend Administration Center User Guide.
Talend Artifact Repository
The artifact repository delivered by Talend and based on Sonatype Nexus is a preconfigured application centralizing themanagement and usage of the Software Update, User libraries and snapshots and releases repositories:
• Software Update is used to manage application updates (patches) distributed by Talend. By default the talend-updates repository is embedded within Software Update and retrieves the updates published by Talend. Thisrepository allows the user to visualize the updates available.
• The User libraries repository is used to store all external libraries. These libraries are retrieved by Talend Studio at start-up and shared with Talend Administration Center via the talend-custom-libs repository.
• The snapshots and releases repositories are used as a catalog in which all artifacts to be deployed and executed arestored. These artifacts are designed by the user from Talend Studio or any other Java IDE. By default, the snapshotsrepository is used for development purposes and the releases repository is used for production. These repositories makeartifacts available for deployment and or execution in an execution server.
Talend also support JFrog Artifactory to be used with Talend server modules. An archive containing Talend scripts toinitialize the Artifact repository is delivered in the Talend Administration Center package.
Software update repository
The following image shows the architecture of Software Update linked to Talend Administration Center and to the TalendStudio.

Appendices
171
To download and install some software updates, you need to connect to Software Update (integrated within the TalendArtifact Repository) and its embedded repository named talend-updates.
To do so, you must install Talend Artifact Repository on your machine and log in its Web interface.
In Talend Administration Center, the patches available for the current version that have been copied from the Talend remoterepository to the local talend-updates repository are detected and the administrator can accept them.
Talend Studio is connected to Talend Administration Center to retrieve the repository connection information and theupdates are detected and installed automatically.
For more information on how to check updates via these repositories, see the Talend Administration Center and TalendStudio User Guides.
User Libraries repository
The following image shows the architecture of the User Libraries repository.

Appendices
172
To download and install some specific third-party Java libraries or database drivers that are needed by Talend Studio,you need to connect to the User Libraries repository (integrated within the Talend Artifact Repository) and its embeddedrepository named talend-custom-libs-release.
To do so, you must install Talend Artifact Repository on your machine and log in its Web interface.
When Talend Studio opens, the external libraries missing from the local talend-custom-libs-release repository aredetected. You are prompted to download them from the remote artifact repository, hosted by Talend, and install them.
Talend Administration Center is connected to Talend Studio and to the local repository and the installed libraries are sharedautomatically.
Snapshots and Releases artifact repositories
The following image shows the architecture of the snapshots and releases repositories linked to Talend Studio, to anexecution server and to Talend Administration Center.

Appendices
173
The artifact repository is also used to store as artifacts all the Services, Routes and Jobs created in Studio or any GenericOSGi Feature created in any other Java IDE.
From Talend Studio, you can publish those artifacts in the snapshots and releases repositories (integrated withinTalend Artifact Repository). The artifacts are provided to an execution server and then can be selected through TalendAdministration Center in order to set their deployment.
When the deployment of an artifact is initiated in Talend Administration Center, the execution server requests thecorresponding artifact in the artifact repository. Then, the artifact can be deployed and executed.
Two embedded repositories are provided to store your artifacts:
• a snapshots repository to publish snapshot artifacts for development purposes,• a releases repository to publish stable artifacts for production purposes.
Talend Runtime
Talend Runtime (based on Apache Karaf) is an execution container in which you can deploy and execute all your Jobs storedon your Git repository.
For more information on the installation of Talend Runtime, see Installing Talend Runtime on page 87.
Talend JobServer
Talend JobServer is an application that allows a system installed on the same network as Talend Administration Centerto declare itself as an execution server. These systems must obviously have a working JVM. For more information on theinstallation of Talend JobServer, see Installing and configuring your Talend JobServer on page 77.
Talend Studio
Talend Studio is a rich client that allows the user (such as a project manager, a developer or a DBA) to work on any Talendproject for which he has authorization.
Talend Studio offers a comprehensive set of tools and functions for all its key capabilities including:

Appendices
174
• Integration• Activity monitoring Console
These tools are ALL accessible in different perspectives from one Talend Studio.
Note: The availability of perspectives in your Talend Studio depends either on the license you have when you areworking in a local project, or on the type of the remote project itself when you are working in remote projects.
For further information on user authorization on remote project, see the Talend Administration Center User Guide.
For further information about the different perspectives available in the studio, see the Talend Studio User Guide.
For more information on how to install Talend Studio, see Installing and configuring your Talend Studio on page 92.
Talend Activity Monitoring Console log database
If you want to use the Talend Activity Monitoring Console, an <AMC> log database must be created, which can be installedon any server. This <AMC> database will initially be empty. Its name may be modified, but you must take into account thismodification in the rest of this document.
The <AMC> database will contain three tables that collect data allowing users to monitor Jobs. The three tables will collectdata from the following components:
• tFlowMeterCatcher,• tLogCatcher,• tStatCatcher.
Instructions on how to create these tables and their structure is provided in the Talend Activity Monitoring Console UserGuide.
A corresponding SQL user must be created and thus mapped to have access to this database. This user should be granted the"create" and "update" rights.
Architecture of the Talend products
The operating principles of the Talend products could be summarized as briefly as the following topics:
• building technical or business-related processes,• administrating users, projects, access rights and processes and their dependencies,• deploying and executing technical processes,• monitoring the execution of technical processes.
Note: Depending on your license, some of the functional blocks may not be available to you.
Each of the above topics can be isolated in different functional blocks and the different types of blocks and theirinteroperability can be described as in the following architecture diagram :

Appendices
175
Building and administrating
The CLIENTS block includes one or more Talend Studio APIs and Web browsers that could be on the same or on differentmachines.
From the Talend Studio API, end-users can carry out technical processes regardless of data volume and process complexity.
The Talend Studio allows the user to work on any project for which he has authorization. For more information, see theTalend Studio User Guide.
From a Web browser, end-users connect to the remotely based Talend Administration Center through a secured HTTPprotocol. The end-user category in this description may include developers, project managers, administrators and any otherperson involved in building data flows.
Each of these end-users will use either Talend Studio or Talend Administration Center or both of them depending on thecompany policy.
Additionally, from the Web Browser you access the Talend Data Preparation Web application. This is where you import yourdata, from local files or other sources, and cleanse or enrich it by creating new preparations on this data. You can also accessthe Talend Data Stewardship Web application. This is where campaign owners and data stewards manage campaigns andtasks.
The TALEND SERVERS and DATABASES blocks and the Git grey circle include a web-based Talend Administration Center(application server) connected to two shared repositories: one based on a Git server and one based on a database server(Admin).
Talend Administration Center also enables to configure the tasks that handle job executions and triggers. It also looks afterthe job generation and deployment to the execution servers. For more information, see the Talend Administration CenterUser Guide.
Talend Administration Center also includes the servers used by the Talend Web applications, namely Talend DataPreparation and Talend Data Stewardship. The Talend Identity and Access Management server is used to enable Single Sign-On between those applications.

Appendices
176
Deploying and executing
The Artifact Repository grey circle represents the artifact repository that stores all the:
• Software Updates available for download.
The TALEND EXECUTION SERVERS block represents the execution servers that run technical processes according to theexecution scheduling set up in the Talend Administration Center Web application. Those execution servers can be of:
• One or more Talend Runtime (execution container) deployed inside your information system. Talend Runtime deploysand executes the technical processes according to the set up defined in the Talend Administration Center Webapplication. Those processes are Jobs built from Talend Studio and centralized on the Git server.
• One or more Talend JobServer deployed inside your information system that run technical processes (Jobs) according toscheduled time, date or event set in the Talend Administration Center Web application.
The end-user can transfer technical processes to a remote execution server directly from Talend Studio (distant run).
Note:
You must install the Talend JobServer files ("Agent"), delivered by Talend, on each of the execution servers tobecome operational.
For more information, see Installing and configuring your Talend JobServer on page 77.
Monitoring
The Monitoring circle represents the monitoring: Talend Activity Monitoring Console.
Talend Activity Monitoring Console allows end-users to monitor the execution of technical processes. It provides detailedmonitoring capabilities that can be used to consolidate log information collected, understand the interaction betweenunderlying data flows, prevent faults that could be unexpectedly generated and support system management decisions. Formore information on Talend Activity Monitoring Console, see the Talend Activity Monitoring Console User Guide.
Cheatsheet: start and stop commands for Talend server modules
The following table sums up the commands or executables you can use to start and stop Talend server modules.
Talend server module Start command/executable Stop command/executable
Apache Tomcat service for TalendAdministration Center
sh <TomcatPath>/bin/startup.sh sh <TomcatPath>/bin/shutdown.sh
JBoss service for Talend Administration Center sh <JBossPath>/bin/run.sh sh <JBossPath>/bin/shutdown.sh
Talend Artifact Repository <ArtifactRepositoryPath>/bin/nexusrun by default or
nexus.sh console for Nexus 2
Ctrl+C
Talend JobServer <JobServerPath>/start_rs.sh <JobServerPath>/stop_rs.sh
Talend Log Server sh <LogServerPath>/start_logserver.sh
sh <LogServerPath>/stop_logserver.sh
1: The command/executable to use depends whether you installed your Talend product using manual installation or using automatic installation.

Appendices
177
Installing Talend servers as services
Installing Talend JobServer as a service
Installing Talend JobServer as a service on RedHat/CentOS 7 Systems
Before you begin
All the following commands have to be executed with super-user privileges.
Procedure
1. Create the service file with the following command:
touch /etc/systemd/system/Talend-JobServer.service
2. Assign the relevant rights to the file you created:
chmod 664 /etc/systemd/system/Talend-JobServer.service
3. Paste the following content in the file while adapting it to your configuration:
[Unit]Description=Talend Execution Server (JobServer) serviceAfter=network.target
[Service]Type=forkingEnvironment=JAVA_HOME=/opt/jdk1.8.0_201/jreEnvironment=PATH=/bin:/usr/local/sbin:/usr/local/bin:/usr/sbin:/usr/bin:/opt/jdk1.8.0_201/jre/binExecStart=/opt/Talend-7x1/jobserver/start_jobserver.shExecStop=/opt/Talend-7x1/jobserver/stop_jobserver.shUser=talenduserGroup=talendgroupRestart=on-abort
[Install]WantedBy=multi-user.target
4. Reload the service daemon:
systemctl daemon-reload
5. Start the service:
systemctl start Talend-JobServer.service

Appendices
178
Installing Talend JobServer as a service on RedHat/CentOS 6
Procedure
1. Create/Copy the following script to the /etc/init.d/jobserver file:
# chkconfig: 345 91 10# description: Starts and stops the jobserver daemon.#
# Source function library.. /etc/rc.d/init.d/functions
# Get config.. /etc/sysconfig/network
# Check that networking is up.[ "${NETWORKING}" = "no" ] && exit 0
user=cxpjobserver=/u/bin/Talend/jobserver_3.0.1startup=start_rs.shshutdown=stop_rs.sh
start(){ echo -n $"Starting jobserver service: " su - $user -c "cd $jobserver && sh $startup &" RETVAL=$? echo}
stop(){ echo -n $ "Stopping jobserver service: " su - $user -c "cd $jobserver && sh $shutdown" RETVAL=$? echo}
restart() { stop start}
# See how we were called.case "$1" instart) start ;;stop) stop ;;restart) restart ;;*) echo $"Usage: $0 {start|stop|restart}" exit 1esac
exit 0
2. Edit the user and jobserver variable values in the script (with the dedicated user to run Talend JobServer, and theTalend JobServer path respectively).
3. To make sure that the script is executable, type:
# chmod 0755 /etc/init.d/jobserver
4. Type in the following commands to add the service to your system:
chkconfig --listchkconfig --add jobserver

Appendices
179
Installing Talend JobServer as a service on Ubuntu
Procedure
1. Create/Copy the following script to the /etc/init.d/jobserver file as explained in Installing Talend JobServer asa service on RedHat/CentOS 6 on page 178.
2. Edit the user and jobserver variable values in the script (with the dedicated user to run Talend JobServer, and theTalend JobServer path respectively).
3. To make sure that the script is executable, type:
# chmod 0755 /etc/init.d/jobserver
4. Execute the following command:
# update-rc.d jobserver defaults 60
Install Talend JobServer as a service on OpenSuse
Before you begin
The following procedure needs to be performed with root privileges.
Procedure
1. Make sure that the three scripts jobserver_start, jobserver_stop and jobserver are executable.
2. Copy usr/bin/jobserver_start and usr/bin/jobserver_stop into /usr/bin/.
3. Copy etc/ini.d/jobserver in /etc/init.d/.
4. Edit the configuration file etc/sysconfig/jobserver and set the path to your installation directory.
5. Copy this file into /etc/sysconfig/.
6. Execute the following command to create a link called rcjobserver:
ln -s /etc/init.d/jobserver /usr/sbin/rcjobserver
7. To start or stop Talend JobServer manually, use:
rcjobserver start
rcjobserver stop
8. Install the service using:
Yast > System > System Services
9. Type in:
chkconfig -e jobserver
10. Set the variable to ON
11. Run SuSEconfig.
Note: The Talend JobServer installation path can be edited through Yast > /etc/sysconfig Editor in Applications/Talend.
Installing Apache Tomcat as a service
Installing the service on RedHat/CentOS 7 Systems
Before you begin
All the following commands have to be executed with super-user privileges.
Procedure
1. Create the service file with the following command:
touch /etc/systemd/system/tomcat.service
2. Assign the relevant rights to the file you created:
chmod 664 /etc/systemd/system/tomcat.service
Appendices
180
3. Paste the following content in the file while adapting it to your configuration:
[Unit]Description=Apache Tomcat Web Application ContainerAfter=syslog.target network.target
[Service]Type=forking
Environment=JAVA_HOME=/usr/lib/jvm/jreEnvironment=CATALINA_PID=/opt/tomcat/temp/tomcat.pidEnvironment=CATALINA_HOME=/opt/tomcatEnvironment=CATALINA_BASE=/opt/tomcatEnvironment='CATALINA_OPTS=-Xms512M -Xmx1024M -server -XX:+UseParallelGC'Environment='JAVA_OPTS=-Djava.awt.headless=true -Djava.security.egd=file:/dev/./urandom'
ExecStart=/opt/tomcat/bin/startup.shExecStop=/bin/kill -15 $MAINPID
[Install]WantedBy=multi-user.target
4. Reload the service daemon:
systemctl daemon-reload
5. Start the service:
systemctl start tomcat.service

Appendices
181
Installing the service on RedHat/CentOS 6 and Ubuntu Systems
Procedure
1. Create/Copy the following script to the /etc/init.d/tomcat file:
# chkconfig: 345 91 10# description: Starts and stops the Tomcat daemon.#
# Source function library.. /etc/rc.d/init.d/functions
# Get config.. /etc/sysconfig/network
# Check that networking is up.[ "${NETWORKING}" = "no" ] && exit 0
user=cxptomcat=/u/bin/Tomcat/apache-tomcat-8.0.33/startup=$tomcat/bin/startup.shshutdown=$tomcat/bin/shutdown.sh#export JAVA_HOME=/usr/local/java
status(){ps ax --width=1000 | grep "[o]rg.apache.catalina.startup.Bootstrap start"| awk '{printf $1 " "}' | wc | awk'{print $2}' > /tmp/tomcat_process_count.txtread line < /tmp/tomcat_process_count.txtif [ $line -gt 0 ]; thenecho -n "tomcat ( pid "ps ax --width=1000 | grep "[o]rg.apache.catalina.startup.Bootstrap start"| awk '{printf $1 " "}'echo -n ") is running..."echoelseecho "Tomcat is stopped"fi}start(){ echo -n $"Starting Tomcat service: " #daemon -c su - $user -c "$startup" RETVAL=$? echo}
stop(){ action $"Stopping Tomcat service: " su - $user "$shutdown" RETVAL=$? echo}
restart(){ stop start}
# See how we were called.case "$1" instart) start ;;stop) stop ;;status) status tomcat ;;restart) restart ;;*) echo $"Usage: $0 {start|stop|status|restart}"

Appendices
182
exit 1esac
exit 0
2. Edit the user and tomcat variable values in the script to match your configuration.
3. To make sure that the script is executable, type:
# chmod 0755 /etc/init.d/tomcat
4. Type in the following commands to add the service to your system:
chkconfig --listchkconfig --add tomcat
Installing Talend Runtime as a service
The Talend Runtime Container is based on Apache Karaf. Karaf Wrapper (for service wrapper) makes it possible to install theTalend Runtime Container as a service.
Installing the wrapper
Procedure
1. Browse to the container/bin folder of the Talend Runtime installation directory, then launch the container byexecuting the trun file as root.
2. To install the wrapper feature, type:
karaf@trun> feature:install wrapper
Once installed, wrapper feature will provide wrapper:install new command in the trun, which allows you toinstall Talend Runtime as a service.
3. To install the service, type in the following command:
karaf@trun> wrapper:install
Alternatively, to register the container as a service in automatic start mode, simply type:
karaf@trun> wrapper:install -s AUTO_START -n TALEND-CONTAINER -d Talend-Container -D"Talend Container Service"
where TALEND-CONTAINER is the name of the service, Talend-Container is the display name of the service and"Talend Container Service" is the description of the service.
Here is an example of wrapper:install command executed on Linux:
karaf@trun()> feature:install wrapperkaraf@trun()> wrapper:install -s AUTO_START -n TALEND-CONTAINER \-d Talend-Container -D "Talend Container Service"Creating file: <TalendRuntimePath>/bin/TALEND-CONTAINER-wrapperCreating file: <TalendRuntimePath>/bin/TALEND-CONTAINER-serviceCreating file: <TalendRuntimePath>/etc/TALEND-CONTAINER-wrapper.confCreating file: <TalendRuntimePath>/lib/libwrapper.soCreating file: <TalendRuntimePath>/lib/karaf-wrapper.jarCreating file: <TalendRuntimePath>/lib/karaf-wrapper-main.jarSetup complete. You may want to tweak the JVM properties in the wrapperconfiguration file:<TalendRuntimePath>/etc/TALEND-CONTAINER-wrapper.confbefore installing and starting the service.
Results
The wrapper files are installed, you now have to install the Talend Runtime service.
Installing the Talend Runtime service on RedHat/CentOS 7 Systems
Before you begin
In the following procedure, TALEND-CONTAINER is the name of the service and is only given as an example. Note also that<TalendRuntimePath> is the Talend Runtime installation directory.
All the following commands have to be executed with super-user privileges.

Appendices
183
Procedure
1. Create the service file with the following command:
touch /etc/systemd/system/Talend-Container.service
2. Assign the relevant rights to the file you created:
chmod 664 /etc/systemd/system/Talend-Container.service
3. Paste the following content in the file while adapting it to your configuration:
[Unit]Description=Talend Runtime ServiceAfter=network.target
[Service]ExecStart=<TalendRuntimePath>/bin/trunType=simple
[Install]WantedBy=default.target
4. Reload the service daemon:
systemctl daemon-reload
5. Start the service:
systemctl start Talend-Container.service
Installing the Talend Runtime service on RedHat/CentOS 6 Systems
Before you begin
In the following procedure, TALEND-CONTAINER is the name of the service and is only given as an example. Note also that<TalendRuntimePath> is the Talend Runtime installation directory.
Procedure
1. Install the service file with the following commands:
ln -s /<TalendRuntimePath>/bin/TALEND-CONTAINER-service /etc/init.d/chkconfig TALEND-CONTAINER-service --add
2. Start the service with the following command:
service TALEND-CONTAINER-service start
3. To start the service when the machine is rebooted, type the following command:
chkconfig TALEND-CONTAINER-service on
Results
The service is now installed.
To stop the service, type the following command: service TALEND-CONTAINER-service stop
To disable starting the service when the machine is rebooted, type the following command: chkconfig TALEND-CONTAINER-service off
To uninstall the service, type the following commands:
chkconfig TALEND-CONTAINER-service --delrm /etc/init.d/TALEND-CONTAINER-service
Installing the Talend Runtime service on Ubuntu
Before you begin
In the following procedure, TALEND-CONTAINER is the name of the service and is only given as an example. Note also that<TalendRuntimePath> is the Talend Runtime installation directory.

Appendices
184
Procedure
1. Install the service file with the following command:
ln -s /<TalendRuntimePath>/bin/TALEND-CONTAINER-service /etc/init.d/
2. Start the service with the following command:
/etc/init.d/TALEND-CONTAINER-service start
3. To start the service when the machine is rebooted, type the following command:
update-rc.d TALEND-CONTAINER-service defaults
Results
The service is now installed.
To stop the service, type the following command: /etc/init.d/TALEND-CONTAINER-service stop
To disable starting the service when the machine is rebooted, type the following command: update-rc.d -f TALEND-CONTAINER-service remove
To uninstall the service, type the following command: rm /etc/init.d/TALEND-CONTAINER-service
Installing Talend Log Server as a service
Note: Talend Log Server is deprecated from Talend 8.0 onwards.
Installing Talend Log Server as a service on RedHat/CentOS 7 Systems
Before you begin
All the following commands have to be executed with super-user privileges.
Procedure
1. Create the service file with the following command:
touch /etc/systemd/system/Talend-LogServer.service
2. Assign the relevant rights to the file you created:
chmod 664 /etc/systemd/system/Talend-LogServer.service
3. Paste the following content in the file while adapting it to your configuration:
[Unit]Description=Talend Log Server ServiceAfter=network.target
[Service]WorkingDirectory=<LogServerPath>ExecStart=/bin/bash start_logserver.shExecStop=/bin/bash stop_logserver.shType=forking
[Install]WantedBy=default.target
4. Reload the service daemon:
systemctl daemon-reload
5. Start the service:
systemctl start Talend-LogServer.service
Results
Filebeat is automatically installed and started as a service, only if you selected the option to use LogServer when installinga Talend module that provides this option, such as Talend Administration Center or Talend Data Stewardship. The followingimage is an example of this option:
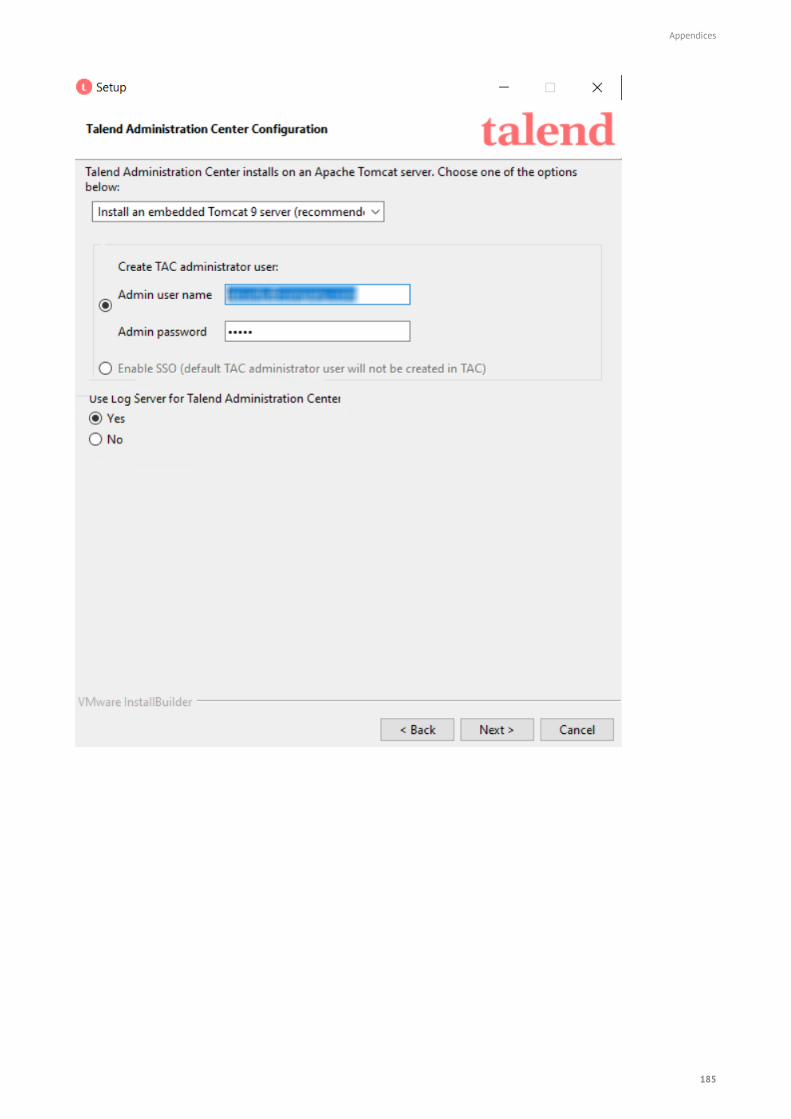
Appendices
185

Appendices
186
Installing Talend Log Server as a service on RedHat/CentOS 6 and Ubuntu Systems
Procedure
1. Create a script from which Talend Log Server can be run in the /etc/init.d/tlogserver directory, such as thefollowing:
#!/bin/sh## tlogserver: this script starts and stops the monolithic jar## chkconfig: - 85 15# description: logstash is an open source log management system.# processname: tlogstash# config: %%%LOGSERV_CONFIG%%%# binary: %%%LOGSERV_JAR%%%prog=tlogserverPATH=%%%INSTALLDIR%%%/logserv:/sbin:/bin:/usr/sbin:/usr/binNAME=tlogserver test -x $DAEMON || exit 0 set -e start() { echo -n $"Starting $prog: " %%%INSTALLDIR%%%/logserv/start_logserver.sh} stop() { echo -n $"Stopping $prog: " %%%INSTALLDIR%%%/logserv/stop_logserver.sh} case "$1" in start) start ;; stop) stop ;; restart) stop start ;; *) N=/etc/init.d/$NAME echo "Usage: $N {start|stop|restart}" >&2 exit 1 ;; esac exit 0
2. Ensure that the file above is executable. To do this, you can execute the following command in the /etc/init.d/tlogserver directory:
# chmod +x /etc/init.d/tlogserver
3. Execute the following command to activate the startup script:
# update-rc.d tlogserver defaults 60
Results
Filebeat is automatically installed and started as a service, only if you selected the option to use LogServer when installinga Talend module that provides this option, such as Talend Administration Center or Talend Data Stewardship. The followingimage is an example of this option:

Appendices
187
H2 Database Administration & Maintenance
This Chapter provides information about how to manage and back up the H2 embedded database.
For more information about how to use the H2 database and web console, refer to the H2 database documentation at http://www.h2database.com.
About H2 embedded database
H2 is a relational database management system written in Java. It can be embedded in Java applications or run in the client-server mode.
This database is one of the databases in Talend Administration Center to store all cross-project information such as users,authorizations, projects...

Appendices
188
Administrating the H2 database through the Web console
To help you administrate the H2 embedded database, a dedicated Web console is available directly from TalendAdministration Center.
Connecting to the H2 Web Console
From Talend Administration Center, you can access the H2 administration console.
For more information about H2 use and troubleshooting, please refer to the H2 online documentation on http://www.h2database.com.
Procedure
1. From the main Menu, click Configuration to access the Configuration page.
2. On the Configuration page, expand the Database node to display the parameters.
3. In the Web Console field, click the link to access the H2 Web Console.
4. The H2 Web Console's Login page displays:
5. In the User Name and Password fields, type in the connection login and password to the database, by defaulttisadmin and tisadmin.
6. The JDBC URL field reads by default:
jdbc:h2:/<ApplicationPath>/WEB-INF/database/talend_administrator;AUTO_SERVER=TRUE;MVCC=TRUE;LOCK_TIMEOUT=15000
where <ApplicationPath> is the location where org.talend.administrator was deployed.
Warning: If you have moved the H2 embedded database location, then fill out the JDBC URL field with the updatedURL information. Prior to clicking Connect, click the Test Connection button in order to check the new URL. In case ofa mistyped URL, the JDBC URL will revert back to the original URL information.
7. Click Connect.

Appendices
189
Results
The Web database administration page displays.
Backing up the H2 database
The configuration parameters of the H2 database backup is already set by default so that the backup occurs on an dailybasis.
If you need or want to make edits to this setting, edit the configuration file:
<ApplicationPath>/WEB-INF/classes/configuration.properties
The cron-based backup of the embedded database triggers everyday at 3.45am all year round. The syntax reads as follows"Seconds Minutes Hours Day-of-month Month Day-of-week Year", such as for example:
• 0 45 3 ? * * * (default setting - trigger every day at 3.45am)• 0 45 5 ? * MON-FRI (every Monday, Tuesday, Wednesday, Thursday and Friday at 5.45 am)
More examples are available on http://www.quartz-scheduler.org/documentation/quartz-2.2.x/tutorials/tutorial-lesson-06.html.
Other automatic backups are performed at startup and shutdown of the application server:
database.embedded.backup.doBackupAtStartup=truedatabase.embedded.backup.doBackupAtShutdown=true
The backup files are stored at the following location, up to the 30 latest backups:
<ApplicationPath>/WEB-INF/database/backups
Setting up the H2 database for access from other machines
To allow other users to access the H2 database for centralized storage of cross-project information, you need to start the H2server and edit the database URL to make Talend Administration Center work.

Appendices
190
Starting the H2 server
Procedure
1. Stop Tomcat service if it is running.
2. Unzip your H2 database server package to any of your local drives.
The latest H2 database server package is available at http://www.h2database.com/html/download.html.
3. Open a CMD window, navigate to the drive where the H2 database server package was unzipped, and change directoryto h2\bin, which contains the h2*.jar file.
4. Start the H2 server as a service using the following command:
java -cp h2*.jar org.h2.tools.Server -tcp -tcpAllowOthers-tcpPort <port_number>
Results
Now other users can access the H2 database, but you still need to edit the database URL to make Talend AdministrationCenter work.
Configuring the H2 database URL
You need to edit the database URL to make Talend Administration Center work.
Procedure
1. Open the configuration.properties file in the <ApplicationPath>/WEB-INF/Classes folder, and edit theH2 database URL setting as follows:
database.url=jdbc:h2:tcp://<IP_address>:<port_number>/file:<ApplicationPath>/WEB-INF/database/talend_administrator;AUTO_SERVER=TRUE;IFEXISTS=TRUE;MVCC=TRUE;LOCK_TIMEOUT=15000
where <IP_address> is your IP address, <port_number> is the TCP port number specified in the command used tostart the H2 server, and <ApplicationPath> is the location where org.talend.administrator was deployed.
2. Start the Tomcat service.
3. Start your Talend Administration Center Web application.
Results
Now others can access and use the H2 database through the URL address.
Supported Third-Party System/Database/Business Application Versions
This document provides the information about the versions of the systems or databases or business applications supportedby Talend Studio.
Supported systems, databases and business applications by Talend components
The access to these systems, databases and business applications varies depending on the Studio you are using.
Systems/Databases Versions OS
2003 WindowsAccess 1
2007 Windows
Amazon Aurora MySQL edition v5 (5.6 and 5.7) -
Amazon AWS Redshift Spectrum - -
Amazon RDS for Microsoft SQL Server - -

Appendices
191
Systems/Databases Versions OS
12.1.0.2 (all versions, all editions) -
12.2.0.1 (all versions, all editions) -
18.0.0.0 (all versions, all editions) -
Amazon RDS for Oracle
19.0.0.0 (all versions, all editions) -
Amazon Redshift 2.x -
Amazon S3 - -
Amazon Simple Queue Service (Amazon SQS) - -
AS/400 V7R1 to V7R3 -
Cassandra 3.0 to 4.x Windows + Linux
5.x WindowsCouchBase
6.0 Windows
CouchDB 1.0.2 Windows
DB2 11.x -
DB Generic ODBC Windows
DynamoDB - -
5.6.x -Elasticsearch
6.4.x -
Exasol 6.0 and earlier Windows
Excel - -
eXist-db 1.4.0 -
FireBird 2.1 Windows + Linux
FTP - -
4.3.x Windows (client only) + Linux
5.x Windows (client only) + Linux
Greenplum
6.x Windows (client only) + Linux
HSQLDb 1.8.0 to 2.4 -
IBM DB2 and IBM DB2 Z/OS 11.x Windows + Linux
Informix 11.50 Windows + Linux
10.2 Windows + LinuxIngres
11 Windows + Linux
Interbase - -

Appendices
192
Systems/Databases Versions OS
JavaDB 6 Windows + Linux
JDBC - -
JSON - -
0.8.2.0 Windows + Linux
0.9.0.1 Windows + Linux
0.10.0.1 Windows + Linux
1.1.0 Windows + Linux
2.2.1 Windows + Linux
Kafka 2
2.4.x Windows + Linux
LDAP No version limitation Windows + Linux
MapRDB - -
MarkLogic V9 -
MaxDB 7.6 -
Microsoft Azure Blob Storage - -
Microsoft Azure Synapse Analytics - -
Dynamics AX 4.0 -Microsoft AX
Dynamics AX 2012 -
2011 -
2015 -
Microsoft CRM
2016 -
2011 -
2016 -
Microsoft CRM Online
2018 -
Microsoft SQL Server 3 2014 to latest version Windows + Linux
3.2.x for Spark Jobs Windows + LinuxMongoDB
4.4.x for Standard Jobs Windows + Linux
MySQL 5.x Windows + Linux
MySQL 8.x Windows + Linux
MariaDB Windows + Linux
Amazon RDS Windows + Linux
MySQL
Google Cloud SQL Windows + Linux

Appendices
193
Systems/Databases Versions OS
MOM - -
1.x.x Linux
2.x.x / 2.2.x / 2.3 Linux
3.2.x Linux
3.5.x Linux
Neo4j
4.0.x Linux
7.0.x Windows + Linux
7.1.x Windows + Linux
7.2.x Windows + Linux
Netezza
11.x Windows + Linux
2018 Windows + LinuxNetSuite
2019 Windows + Linux
Oracle 12c Release 1 Windows + Linux
Oracle 12c Release 2 Windows + Linux
Oracle 18c Windows + Linux
Oracle 19c Windows + Linux
Oracle
Deprecated versions: Oracle 8i/9i/10g/11g
Palo Open source version 5 -
3.1 -ParAccel
3.5 -
v7.2 to v8.x Windows + Linux
v9.x / v10.x / v11.x / v12.1 Windows + Linux
Amazon RDS Windows + Linux
PostgreSQL
Google Cloud SQL Windows + Linux
v7.2 to v8.x Windows + LinuxPostgresPlus
v9.x Windows + Linux
Red Hat BRMS 6.1 Windows + Linux
REST Service - Windows + Linux
Salesforce v52 and earlier Windows + Linux
SAP 4.6 Windows + Linux
SAP Business Suite (ERP) Netweaver: From 7.3 to 7.5 Windows + Linux

Appendices
194
Systems/Databases Versions OS
ERP6.0, From EhP6 to EhP8 Windows + Linux
Netweaver: From 7.3 to 7.5 Windows + LinuxSAP Business Warehouse (BW)
ERP6.0, From EhP6 to EhP8 Windows + Linux
SAP HANA 4 BW4HANA (through DSO components) Windows + Linux
Snowflake 3.13.1 Windows + Linux
ServiceNow - -
SOAP Service - -
SQLite 3.6.7 Windows + Linux
12.5 Windows + Linux
12.7 Windows + Linux
15.2 Windows + Linux
15.5 Windows + Linux
15.7 Windows + Linux
Sybase
16.0 Windows + Linux
12.5 Windows + Linux
12.7 Windows + Linux
15.2 Windows + Linux
SybaseIQ
16.0 Windows + Linux
Teradata 12 to 17 5 Windows + Linux
VectorWise 2 Windows + Linux
Vertica 9.0.x to 9.3.1 Windows + Linux
Vtiger 5.0 -VtigerCRM
Vtiger 5.1 -
Workday - -
1 When working with Java 8, only the General collation mode is supported.
2 The Kerberos kinit option and the Kerberos keytab option are both supported. For information about the security options supported by the Kafka components, see
Talend Help Center .
3 Microsoft SQL Server support is provided through the Microsoft SQL JDBC driver. For more information, see the Download Microsoft JDBC Driver for SQL Server page.
4 Supported through SAP JDBC driver.
5 Teradata 17 is supported only when you have installed the R2020-12 Studio Monthly update or a later one delivered by Talend. For more information, check with
your administrator.

Appendices
195
Messaging brokers supported by Talend messaging components
Supported messaging brokers / standards Component
tJMSInputJMS standard 1.1
tJMSOutput
tMicrosoftMQInputMicrosoftMQ 3.0
tMicrosoftMQOutput
tMomInputJBoss Messaging 1.4.4
tMomOutput
tMomInputWebSphere MQ 8.0
tMomOutput
tMomInputActiveMQ 5.15.10
tMomOutput
tRabbitMQInputRabbitMQ 3.8.9 release
Note: The support for RabbitMQ 3.8.9 release is available only if you have installedthe R2020-09 Studio Monthly update or a later one delivered by Talend. For moreinformation, check with your administrator.
tRabbitMQOutput
Supported Big Data platforms
In general, Talend certifies a specific release version for a given Big Data (Hadoop) Distribution vendor. These are typicallywhat is recommended for use for that vendor. For incremental upgrades and service packs by a given vendor, Talendrelies on the vendors' compatibility statements to ensure the proper running and execution of the Talend software. Wherecompatibility is stated, Talend also supports that version under our Support SLA. If an incompatibility should be verified bythe Hadoop vendor, then Talend considers that a re-test and upgrade may be necessary.
If the Hadoop distribution you want to use is not yet supported and available in your Talend Studio, it may be availablethrough an update. You can search for support information on the Talend Help Center .
For details, search for adding support for the latest Hadoop distribution on Talend Help Center
For more information about the versions of all the supported third-party systems/databases, see Supported systems,databases and business applications by Talend components on page 190.
Supported Big Data platform distribution versions for Talend Jobs
Regular Hadoop distributions and dynamic support for Hadoop distributions
To find the compatibility between regular Hadoop distributions and Talend-supported Big Data elements, click on a Big Datarelated element below.
• HBase• HCatalog• HDFS• Hive• Sqoop• Spark• Azure Data Lake Storage Gen2• Kafka in Spark Streaming Jobs• Kudu in Spark Batch Jobs• Impala

Appendices
196
Old versions of the supported Big Data platforms are being retired by their vendors. Talend ceases to support a version oncethis version reaches its date of end of support set by its vendor.
Talend and its community provide you with the convenience to keep using a version its vendor ceases to support in Talendproducts. For this reason, this version could be still listed in the following tables and available in the products but Talendstops providing support for this version.
Talend supports the minor versions of the distribution versions listed in the following tables.
Table 11: Supported Hadoop distributions with HBase
Hadoop distribution Version Supports Kerberos Kinit and Keytab
v3.14.12-1 YesHDP
The other 3.x versions - compatible throughDynamic Distributions
Note: HDP 3.0 and lower distributions aredeprecated through Dynamic Distributions.
-
6.1.1 Yes
The other 6.x versions - compatible throughDynamic Distributions
-
7.1.1 Yes
Cloudera
The other 7.1.x versions - compatible throughDynamic Distributions
-
Table 12: Supported Hadoop distributions with HCatalog
Hadoop distribution Version Supports Kerberos Kinit and Keytab
v3.14.12-1 YesHDP
The other 3.x versions - compatible throughDynamic Distributions
Note: HDP 3.0 and lower distributions aredeprecated through Dynamic Distributions.
-
6.1.1 YesCloudera
The other 6.x versions - compatible throughDynamic Distributions
-
Table 13: Supported Hadoop distributions with HDFS
Hadoop distribution Version Supports Kerberos Kinit and Keytab
v3.14.12-1 YesHDP
The other 3.x versions - compatible throughDynamic Distributions
Note: HDP 3.0 and lower distributions aredeprecated through Dynamic Distributions.
-
Cloudera 6.1.1 Yes
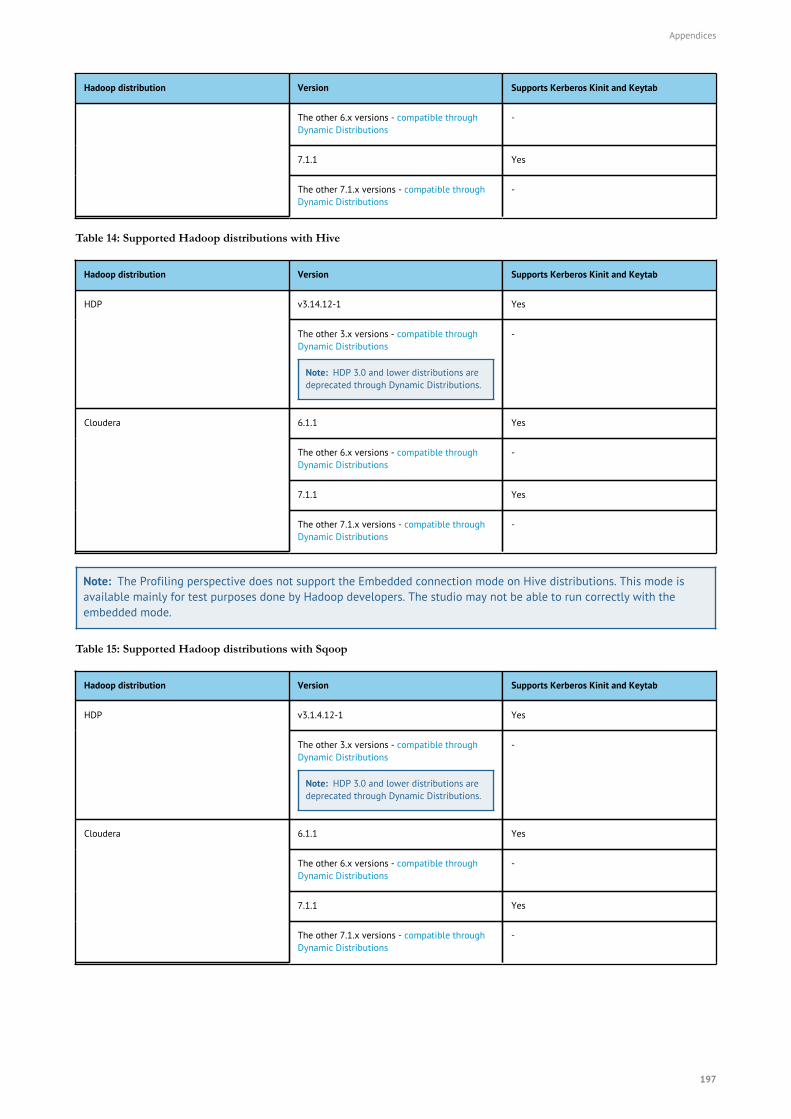
Appendices
197
Hadoop distribution Version Supports Kerberos Kinit and Keytab
The other 6.x versions - compatible throughDynamic Distributions
-
7.1.1 Yes
The other 7.1.x versions - compatible throughDynamic Distributions
-
Table 14: Supported Hadoop distributions with Hive
Hadoop distribution Version Supports Kerberos Kinit and Keytab
v3.14.12-1 YesHDP
The other 3.x versions - compatible throughDynamic Distributions
Note: HDP 3.0 and lower distributions aredeprecated through Dynamic Distributions.
-
6.1.1 Yes
The other 6.x versions - compatible throughDynamic Distributions
-
7.1.1 Yes
Cloudera
The other 7.1.x versions - compatible throughDynamic Distributions
-
Note: The Profiling perspective does not support the Embedded connection mode on Hive distributions. This mode isavailable mainly for test purposes done by Hadoop developers. The studio may not be able to run correctly with theembedded mode.
Table 15: Supported Hadoop distributions with Sqoop
Hadoop distribution Version Supports Kerberos Kinit and Keytab
v3.1.4.12-1 YesHDP
The other 3.x versions - compatible throughDynamic Distributions
Note: HDP 3.0 and lower distributions aredeprecated through Dynamic Distributions.
-
6.1.1 Yes
The other 6.x versions - compatible throughDynamic Distributions
-
7.1.1 Yes
Cloudera
The other 7.1.x versions - compatible throughDynamic Distributions
-

Appendices
198
Table 16: Supported Hadoop distributions with Spark
Hadoop distribution Version Works with SparkStand-alone
Works with Spark YARN Supports KerberosKinit and Keytab
v3.1.4.12-1 - v2.3 (deprecated) Yes (YARN only)HDP
The other 3.x versions - compatiblethrough Dynamic Distributions
Note: HDP 3.0 and lowerdistributions are deprecatedthrough Dynamic Distributions.
- - -
6.1.1 v2.4 v2.4 Yes (YARN only)
The other 6.x versions - compatiblethrough Dynamic Distributions
- - -
7.1.1 v2.4 v2.4 Yes (YARN only)
Cloudera
The other 7.1.x versions - compatiblethrough Dynamic Distributions
- - -
Table 17: Supported Hadoop distributions with Azure Data Lake Storage Gen2 (ADLS Gen2)
Hadoop distribution Version Works with Spark Stand-alone
Works with Spark YARN Supports Kerberos Kinitand Keytab
v3.1.4.12-1 - v2.3 (deprecated) Yes (YARN only)HDP
The other 3.x versions- compatible throughDynamic Distributions
Note: HDP 3.0 andlower distributions aredeprecated throughDynamic Distributions.
- - -
6.1.1 v2.4 v2.4 Yes (YARN only)Cloudera
The other 6.x versions- compatible throughDynamic Distributions
- - -
If you need information about the Big Data Cloud platforms supported by Talend with ADLS Gen2, see the following sectioncalled Supported Cloud Big Data platform distribution versions for Talend Jobs of your installation guide.
Table 18: Supported Hadoop distributions with Kafka in Spark Streaming Jobs
Hadoop distribution Version Works with SparkStand-alone
Works with SparkYARN
Supports KerberosKinit and Keytab
Kafka versions
v3.1.4.12-1 - v2.3 (deprecated) Yes (YARN only) v2.xHDP
The other 3.xversions - compatiblethrough DynamicDistributions
- - - -
Cloudera 6.1.1 v2.4 v2.4 Yes (YARN only) v2.x

Appendices
199
Hadoop distribution Version Works with SparkStand-alone
Works with SparkYARN
Supports KerberosKinit and Keytab
Kafka versions
The other 6.xversions - compatiblethrough DynamicDistributions
- - - -
7.1.1 v2.4 v2.4 Yes (YARN only) v2.x
The other 7.1.xversions - compatiblethrough DynamicDistributions
- - - -
Table 19: Supported Hadoop distributions with Kudu in Spark Batch Jobs
Hadoop distribution Version Supports Kerberos Kinit and Keytab
7.1.1 -Cloudera
The other 7.1.x versions - compatible throughDynamic Distributions
-
Table 20: Supported Hadoop distributions with Impala
Hadoop distribution Version Supports Kerberos Kinit and Keytab
7.1.1 -Cloudera
The other 7.1.x versions - compatible throughDynamic Distributions
-
Supported Cloud Big Data platform distribution versions for Talend Jobs
Cloud Hadoop distributions
Talend supports the following cloud platforms for Big Data. Click your cloud platform to see the Big data supportinformation.
• Amazon EMR• Databricks on AWS• Databricks on Azure• Microsoft HDInsight
Old versions of the supported Big Data platforms are being retired by their vendors. Talend ceases to support a version oncethis version reaches its date of end of support set by its vendor.
Talend and its community provide you with the convenience to keep using a version its vendor ceases to support in Talendproducts. For this reason, this version could be still listed in the following tables and available in the products but Talendstops providing support for this version.
Talend supports the minor versions of the platform versions listed in the following tables.

Appendices
200
Table 21: Amazon EMR
Amazon EMR version Supported frameworks Supported Hadoopelements in Spark batch
Supported Hadoopelements in Sparkstreaming
Supported Hadoopelements in Standard
v5.29.0 (Hadoop 2.8.5) Standard
Spark v2.4
HBase
HDFS
HCatalog
Hive
HBase
HDFS
HCatalog
Hive
HBase
HDFS
HCatalog
Hive
Sqoop
v6.2.0 (Hadoop 3.2.1) Standard
Spark v3.0
HBase
HDFS
HCatalog
Hive
HBase
HDFS
HCatalog
Hive
HBase
HDFS
HCatalog
Hive
Sqoop
The supported Amazon EMR version for the tAmazonEMRManage component is 5.29.0.
Table 22: Databricks on AWS for Big Data
Databricks on AWS version Supported frameworks Supported elements inSpark batch
Supported elements inSpark streaming
Supported elements inStandard
5.5 LTS Standard
Spark v2.4
Hive
S3
DynamoDB
Snowflake
MongoDB
TDM components astechnical preview
tDataprepRun
Hive
S3
DynamoDB
Kinesis
Snowflake
MongoDB
TDM components astechnical preview
tDataprepRun
DBFS
6.4 Standard
Spark v2.4.5
Azure Blob Storage
ADLS Gen2
Snowflake
DeltaLake
Azure Blob Storage
ADLS Gen2
DBFS
7.3 LTS Standard
Spark v3.0.1
Hive
S3
DynamoDB
Snowflake
MongoDB
DeltaLake
ADLS Gen2
Azure Blob Storage
Hive
S3
DynamoDB
Snowflake
MongoDB
DeltaLake
ADLS Gen2
Kinesis
Azure Blob Storage
DBFS

Appendices
201
Table 23: Databricks on Azure for Big Data
Databricks on Azureversion
Supported frameworks Supported elements inSpark batch
Supported elements inSpark streaming
Supported elements inStandard
5.5 LTS Standard
Spark v2.4
Hive
Azure Blob Storage
ADLS Gen1
ADLS Gen2
Snowflake
DeltaLake
MongoDB
TDM components astechnical preview
tDataprepRun
Hive
Azure Blob Storage
ADLS Gen1
ADLS Gen2
Snowflake
DeltaLake
MongoDB
TDM components astechnical preview
tDataprepRun
DBFS
6.4 Standard
Spark v2.4.5
Azure Blob Storage
ADLS Gen2
Snowflake
DeltaLake
Azure Blob Storage
ADLS Gen2
DBFS
7.3 LTS Standard
Spark v3.0.1
Hive
S3
DynamoDB
Snowflake
MongoDB
DeltaLake
ADLS Gen1
ADLS Gen2
Azure Blob Storage
Hive
S3
DynamoDB
Snowflake
MongoDB
DeltaLake
ADLS Gen1
ADLS Gen2
Azure Blob Storage
DBFS
Table 24: Microsoft HD Insight for Big Data
Microsoft HD Insightversion
Supported frameworks Supported elements inSpark batch
Supported elements inSpark streaming
Supported elements inStandard
4.0 Spark v2.4 ADLS Gen2
Azure Blob Storage
Hive
ADLS Gen2
Azure Blob Storage
Hive
ADLS Gen2
Azure Blob Storage
Hive
Supported Cloudera Navigator versions for Talend Jobs
The support for Cloudera Navigator is available to the Spark Jobs you are creating in the Studio, which means you must beusing a subscription-based Talend Big Data solution.
Cloudera Navigator uses a Cloudera SDK library to provide functionalities and must be compatible with the version of thisSDK library. The version of your Cloudera Navigator is determined by the Cloudera Manager installed with your Clouderadistribution and the compatible SDK is automatically used based on the version of your Navigator.
However, not all the Cloudera Navigator versions have their compatible SDK versions. For more details about the ClouderaSDK versions and their compatible Navigator versions, see the Cloudera documentation about Cloudera Navigator SDKVersion Compatibility.
In the following documentation:
• supported: Talend went through a complete QA validation process.• compatible: Talend did not go through a complete QA validation process but the feature should work as part of
Cloudera backward compatibility on Cloudera V5.X branches.

Appendices
202
Important: The support for Cloudera Navigator is only available for Studio version 7.3.
Studio version Cloudera Navigator version Related Cloudera version Support type
6.1.1 6.1.1 Supported
2.4 5.5 to 5.8 Supported
2.12.0 5.11 to 5.14 Supported
2.5 to 2.7 5.5 to 5.8 Compatible
2.9.3 to 2.9.x 5.11 to 5.14 Compatible
2.10.3 to 2.10.x 5.11 to 5.14 Compatible
2.11.2 to 2.11.x 5.11 to 5.14 Compatible
7.3
2.12.1 to 2.12.x 5.11 to 5.14 Compatible
Supported Hadoop distribution versions for Talend Data Preparation with Big Data
In general, Talend certifies a specific release version for a given Big Data (Hadoop) Distribution vendor. These are typicallywhat is recommended for use for that vendor. For incremental upgrades and service packs by a given vendor, Talendrelies on the vendors' compatibility statements to ensure the proper running and execution of the Talend software. Wherecompatibility is stated, Talend also supports that version under our Support SLA. If an incompatibility should be verified bythe Hadoop vendor, then Talend considers that a re-test and upgrade may be necessary.
The following table lists the supported Hadoop distributions for Talend Data Preparation with Big Data.
Distribution Supported version
HDP 3.14 and above
Cloudera 6.1.1 and above
EMR 5.29 and above
Hadoop 2.7 and above
Supported ELK versions
Talend products support the Elastic Stack. Below, you will find the versions of ELK downloaded on your computer wheninstalling Talend products. If you would like to upgrade your version of ELK, please refer to Elastic documentation.
Talend version ELK (Elasticsearch/Kibana/Logstash) version
8.0 7.3.2
7.3 7.3.2
7.2 6.7.1
7.1 6.1.2
Supported databases for profiling data
The table below lists the databases supported from the Profiling perspective of Talend Studio. For a complete list aboutsupported third-party systems, see Supported systems, databases and business applications by Talend components on page190.
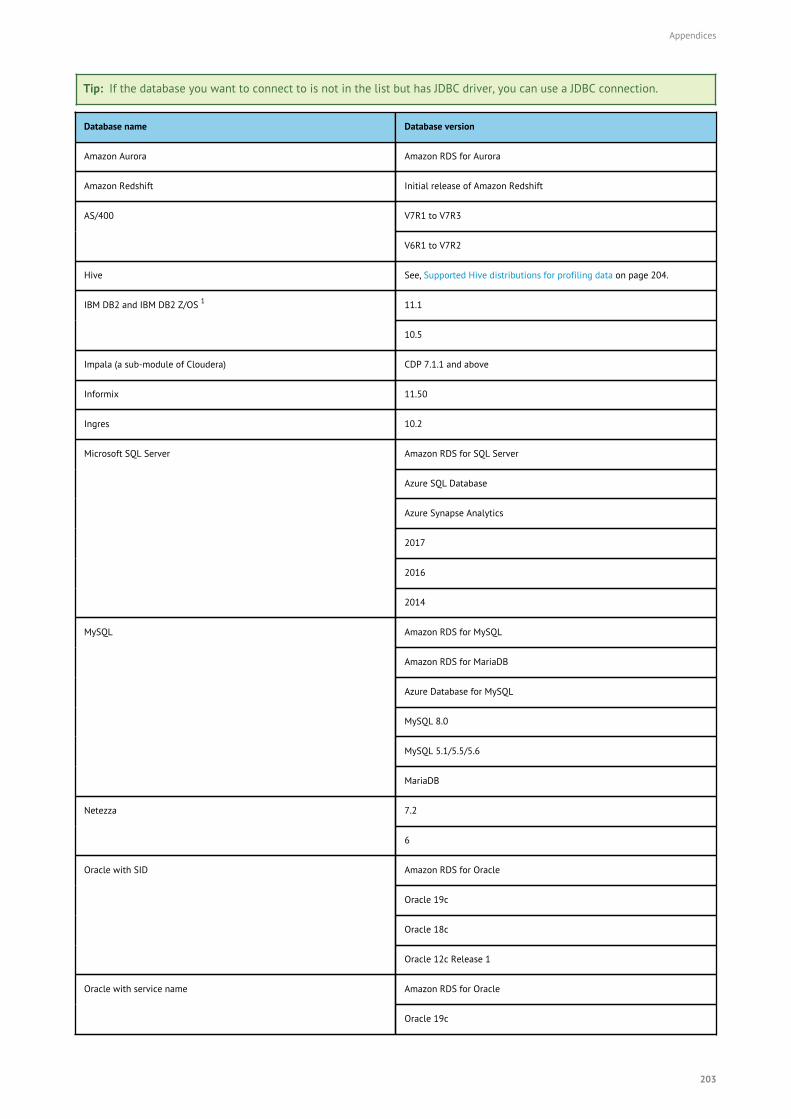
Appendices
203
Tip: If the database you want to connect to is not in the list but has JDBC driver, you can use a JDBC connection.
Database name Database version
Amazon Aurora Amazon RDS for Aurora
Amazon Redshift Initial release of Amazon Redshift
V7R1 to V7R3AS/400
V6R1 to V7R2
Hive See, Supported Hive distributions for profiling data on page 204.
11.1IBM DB2 and IBM DB2 Z/OS 1
10.5
Impala (a sub-module of Cloudera) CDP 7.1.1 and above
Informix 11.50
Ingres 10.2
Amazon RDS for SQL Server
Azure SQL Database
Azure Synapse Analytics
2017
2016
Microsoft SQL Server
2014
Amazon RDS for MySQL
Amazon RDS for MariaDB
Azure Database for MySQL
MySQL 8.0
MySQL 5.1/5.5/5.6
MySQL
MariaDB
7.2Netezza
6
Amazon RDS for Oracle
Oracle 19c
Oracle 18c
Oracle with SID
Oracle 12c Release 1
Amazon RDS for OracleOracle with service name
Oracle 19c

Appendices
204
Database name Database version
Oracle 18c
Oracle 12c Release 1
Amazon RDS for PostgreSQL
Azure Database for PostgreSQL
12.1
10
9.1+
PostgreSQL
8.3
SAP Hana 2 2.0
SQLite 3.6.7
16.0
15.7
15.2
12.7
Sybase (ASE and IQ)QLite
12.5
16
15
14
13
Teradata
12
Vertica 9.x
1 Binary large objects (BLOBs) are not supported.2 SAP Hana is supported for Table, View and Calculation View schemas.
Supported Hive distributions for profiling data
The table below shows the compatibility between big data distributions and the HiveServer.
Note: The Hive embedded mode is available for test purposes for Hadoop developers. When in embedded mode, thestudio may not run correctly.
Big data distribution HiveServer 1 HiveServer2
HortonWorks HDP 3.1 - Standalone
CDH 6.x - StandaloneCloudera 1
CDP Private Cloud Base 7.x - Standalone

Appendices
205
Big data distribution HiveServer 1 HiveServer2
Apache 1.0.0 (Hive 0.9.0) Embedded and Standalone -Apache
Apache 0.20.23 (Hive 0.7.1) Standalone -
Pivotal HD 1.0.1 (deprecated) Standalone -Pivotal HD
Pivotal HD 2.0 (deprecated) Embedded (Linux only) andStandalone
Embedded (Linux only) andStandalone (Linux only)
1 Kerberos authentication is supported.


