Embed Size (px)
Citation preview
TEAM OFFENSE
Motion Offense
Basic Motion Principles
Pass and Front Cut (1-on-2)
Pass and Back Door Cut (1-on-2)
4-v-0, 6 Passes, Pass and Cut
4-v-0, 6 Passes, Drive and Kick
3-v-3 Progression
4-on-4, 5-on-5 Shell
Zone Offense
Fundamentals
Attacking Even Front Zones
Even Front: Gaps and X
Attacking Odd Front Zones
Odd Front: 4 Out
Baseline Out of Bounds (BLOB)
Cross
Up
Screen the Screener
Stack (versus Zone)
Press Break
Simple 1-1-2-1 Press Break
Versus Man and Zone
Transition
Carolina (with Fullback)
3-on-2, 2-on-1
Bust Out Outlet
Full Court Zig-Zag Passes
Outlet Drill
Basic Motion Principles
1. Have Fun and Encourage Team Play - Everyone gets lots of touches in practice AND in games. Try all players at
different positions. Don't pigeonhole 'BIGS'.
2. Motion Offense Comes Seamlessly Off Transition - If you don't score out of transition, you are in motion.
3. Spacing - MOST IMPORTANT THING. Perimeter operates OUTSIDE the 3 point line!!! Middle is meant for
drives/flashes. If on weakside, KEEP SPACED, your turn is coming!!!
4. Ball Reversal - SECOND MOST IMPORANT THING
a. No ball reversal: 15% chance to score (ie, likely failure)
b. Ball reversal: 50% plus chance to score
c. The more spaced the perimeter players are, the quicker they can whip the ball around to the
weakside, then attack!!
5. Motion entries - These are small things that get you into motion offense.
a. Wing Screen - Wing (2) ball screens for Point (1). Point dribbles to wing. 5 can post up. 2 can cut to
basket, and if doesn’t receive ball, go weakside. 4 and 3 can replace.
b. Post Screen - Post (5) ball screens for 1. Wing (2) must be VERY wide to allow driving lane. 5 executes
pick/roll. Meantime 4 and 3 are screening each other to get open after 1 drive.
c. ‘Stack’ Screen - 3/5 and 2/4 get in low post stack position, and 4 and 5 set screens for 2 and 3,
respectively, to get to the wing. If overplayed, 2 or 3 can cheat to high post for quick hitter. You
could also have the 3 and 2 ‘cross’ each other and go to the other wing.
d. Low Post ‘Double Screen’ - Get in same stack position, but run the 3 into a double screen set by 4 and
2 on the low post—quick hitter shot in the short corner.
e. High Post Flash - When the ball is on top (1 or 2), 5 can flash to the high-post. If the ball is passed to 5
at the high post, 3 and 4 should be thinking about a back-cut to the hoop if they are being denied the
pass. 5 passes to the back-cutter for the easy lay-up.
6. x Big flashes to hi post. Point Guard simply passes to wing. Point guard hands off to wing, etc.
7. Perimeter Players - Cut hard after pass. No jog.
Best option: Cut to Hoop. 2nd best: Screen Away HARD!!!
2 Exceptions:
a. Feed the Post: After pass, relocate for shot.
b. Ball Reversal: If your pass starts a reversal, stay spaced
8. Back Door Cut - Let's say you are spaced outside 3 point line (as you should be), and you are 1 pass away. If
your defender crosses the 3 point line to deny you the pass, CUT HARD BACK DOOR!!!
9. Count to “One One Thousand”
c. When you catch the ball, rip and “read the
d. rim” for a second to assess
e. Cut to hoop, screen away, or v-cut in same area to get open
10. Pass to a Moving Teammate - Passing to stationary teammate = turnover
11. Drive - When ball is starting to be reversed, encourage players to keep it going. NEVER drive against the
reversal (ie, don't drive back into the strong side). When ball has finally reversed, it's time to drive. When
someone drives, everyone relocates. Work on middle and baseline drives. When driving, encourage kids to
get to hoop. But if they can't, teach them to jump stop and pass.
12. Inside Player(s), lots of Roles
a. Transition: Always 'run to rim' in transition. Look for ball. Cut away from driving teammates.
b. Screener:
i. Side Pick n Roll: On-ball screen after reversal for wing. Send wing for middle drive. Roll to
basket (pick and roll).
ii. BACK SCREEN weakside for wings to flash into paint (flex cut).
iii. High Screen to free up the point guard if he's overplayed
c. Poster: When ball reversal has happened, can post up. No more than 2 seconds
d. Flasher: Relieves pressure. Can flash from low to hi to help PG out. Make sure they always catch and
turns first
13. Screening - Practice proper technique: Butt is low, feet are wide, back of head is facing the direction the
player is 'sending' his teammate. MUST SPRINT INTO SCREENS!!! Raised Fist = “I'm coming to screen for you.”
When player receives a ball screen, USE IT (ie, dribble by at speed, with at least 2 dribbles).
14. Relieving Pressure
a. Flash: Post (usually guarded by lazy big) can always flash open. Then reverse ball and dive.
b. Ball Screen: (assuming still has dribble). SPRINT to screen for perimeter teammate
c. Handoff (more advanced): Closest guard SPRINTS to the ball. Accepts handoff and uses teammate as
a screener. A handoff is a type of screen, aka, Weave Screen.
d. Feed the Post - When ball is reversed, Big often posts up low, on block. If perimeter players are
properly spread, easy to feed. Usually bounce pass. Then perimeter players can relocate in case of
double team.
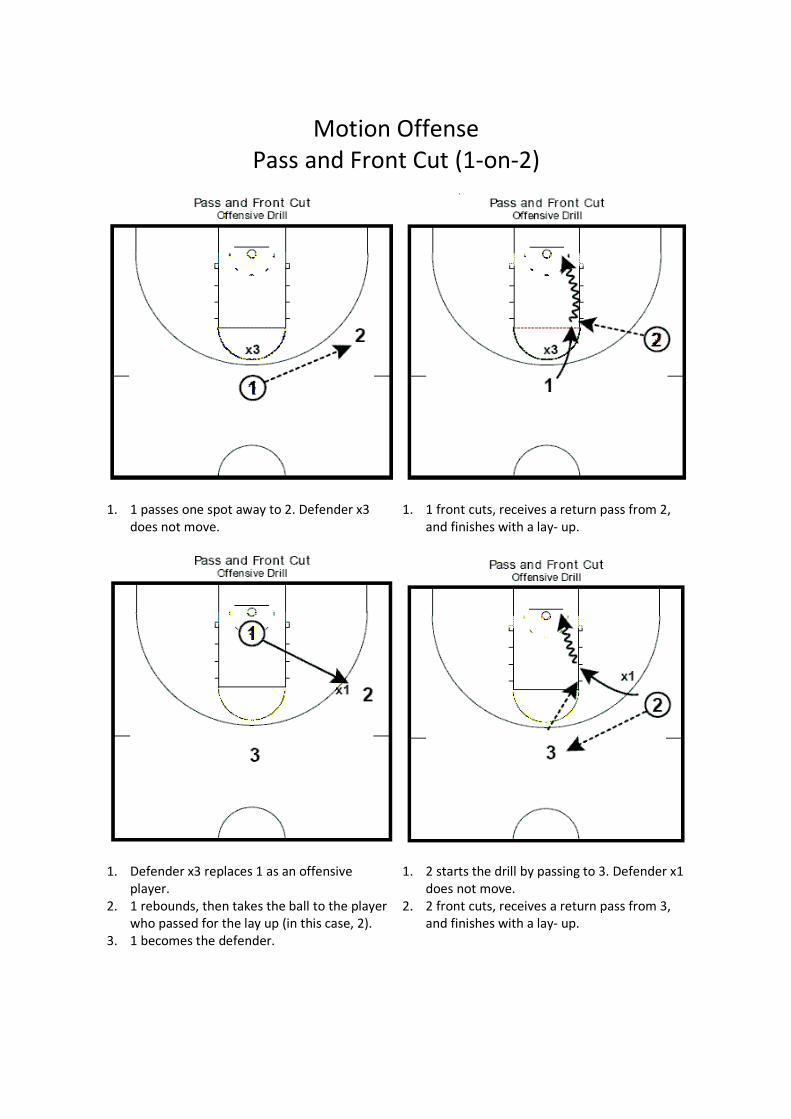
Motion Offense
Pass and Front Cut (1-on-2)
1. 1 passes one spot away to 2. Defender x3
does not move.
1. 1 front cuts, receives a return pass from 2,
and finishes with a lay- up.
1. Defender x3 replaces 1 as an offensive
player.
2. 1 rebounds, then takes the ball to the player
who passed for the lay up (in this case, 2).
3. 1 becomes the defender.
1. 2 starts the drill by passing to 3. Defender x1
does not move.
2. 2 front cuts, receives a return pass from 3,
and finishes with a lay- up.
Motion Offense
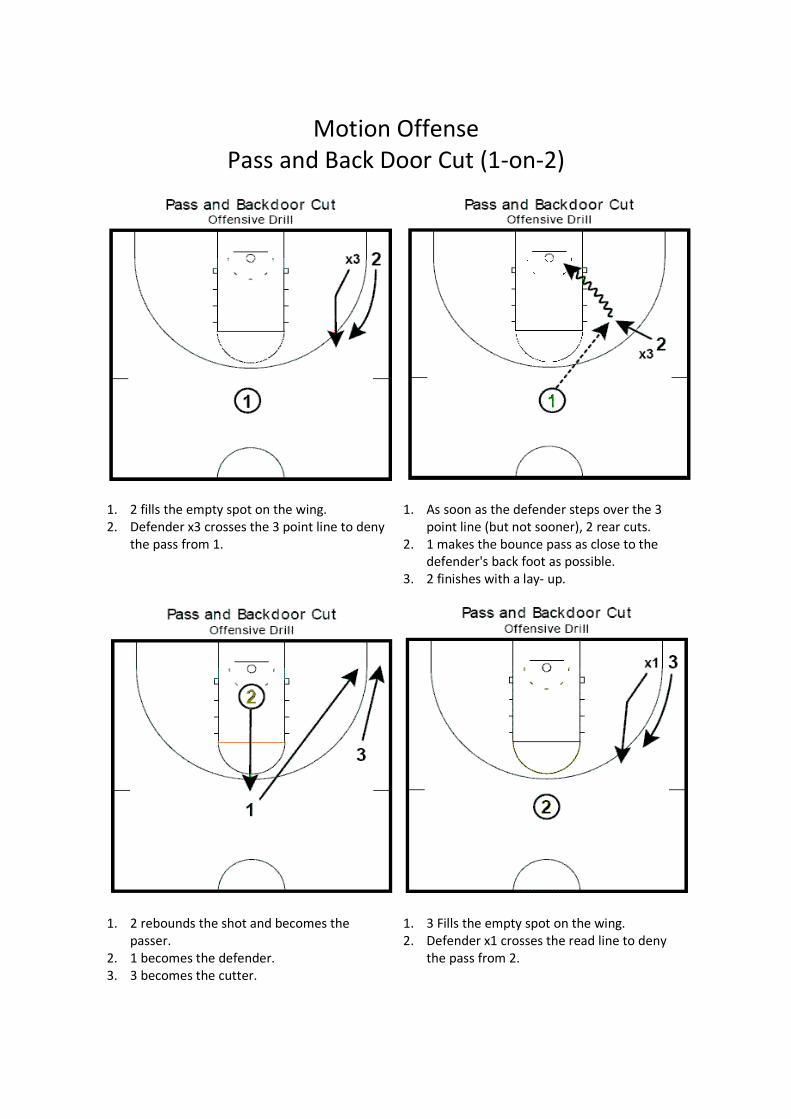
Pass and Back Door Cut (1-on-2)
1. 2 fills the empty spot on the wing.
2. Defender x3 crosses the 3 point line to deny
the pass from 1.
1. As soon as the defender steps over the 3
point line (but not sooner), 2 rear cuts.
2. 1 makes the bounce pass as close to the
defender's back foot as possible.
3. 2 finishes with a lay- up.
1. 2 rebounds the shot and becomes the
passer.
2. 1 becomes the defender.
3. 3 becomes the cutter.
1. 3 Fills the empty spot on the wing.
2. Defender x1 crosses the read line to deny
the pass from 2.
Motion Offense
4-v-0, 6 Passes, Pass and Cut
1. Perhaps most important motion offense drill
besides shell. Goal of drill is to get players
used to spacing, reacting, pass and cut
actions in motion offense.
2. Cutting to rim (“basket cutting”) is MUCH
better than screening away and to get used
to where to position themselves off the ball.
3. Once they master the “dance steps”, coach
can allow team to pass to whomever they
choose.
4. This will be hard, but helpful in mastering
motion offense principles.
5. Coaching emphasis should be on spacing
(outside the 3 point line), catch and read the
rim, hard basket cuts, and positioning
without the ball.
6. To start, 1 passes to 2 and cuts. 4 and 3 fill
up.
1. 1 stops for second under the basket, and
reads the situation. Could I post up?
2. If not (and in this drill, not open) fades to
weakside wing.
3. 2 passes to 4 and cuts.
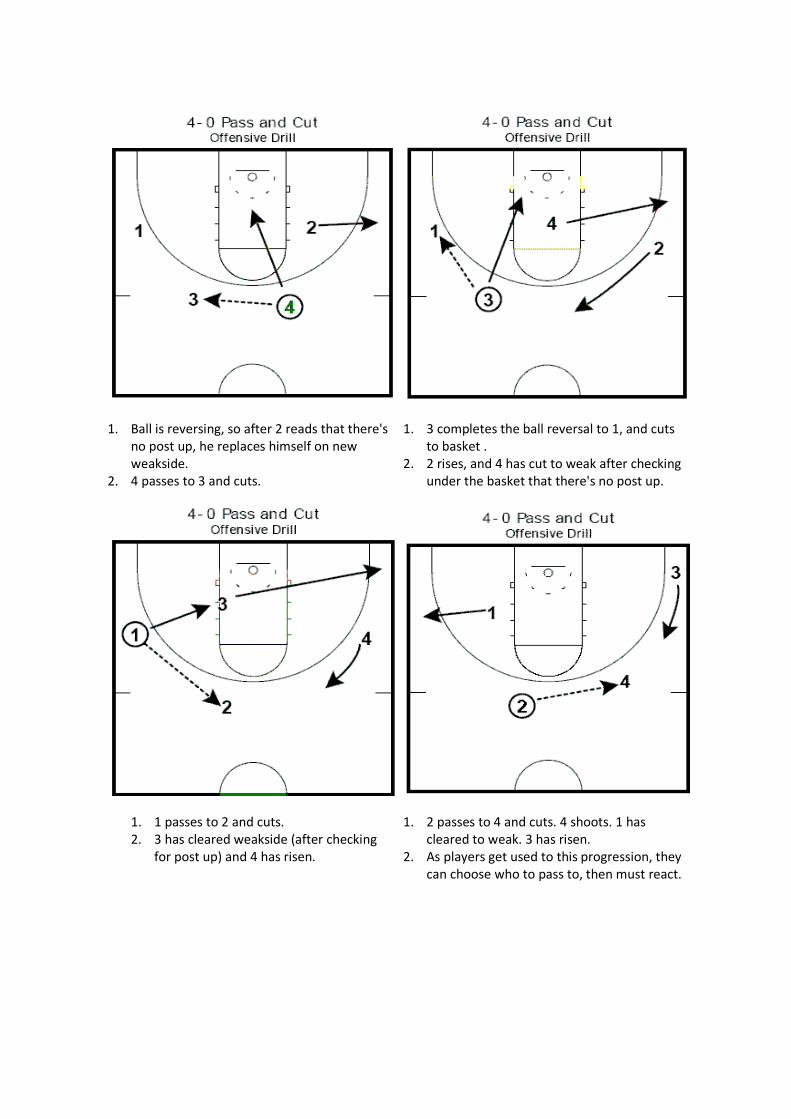
1. Ball is reversing, so after 2 reads that there's
no post up, he replaces himself on new
weakside.
2. 4 passes to 3 and cuts.
1. 3 completes the ball reversal to 1, and cuts
to basket .
2. 2 rises, and 4 has cut to weak after checking
under the basket that there's no post up.
1. 1 passes to 2 and cuts.
2. 3 has cleared weakside (after checking
for post up) and 4 has risen.
1. 2 passes to 4 and cuts. 4 shoots. 1 has
cleared to weak. 3 has risen.
2. As players get used to this progression, they
can choose who to pass to, then must react.
Motion Offense
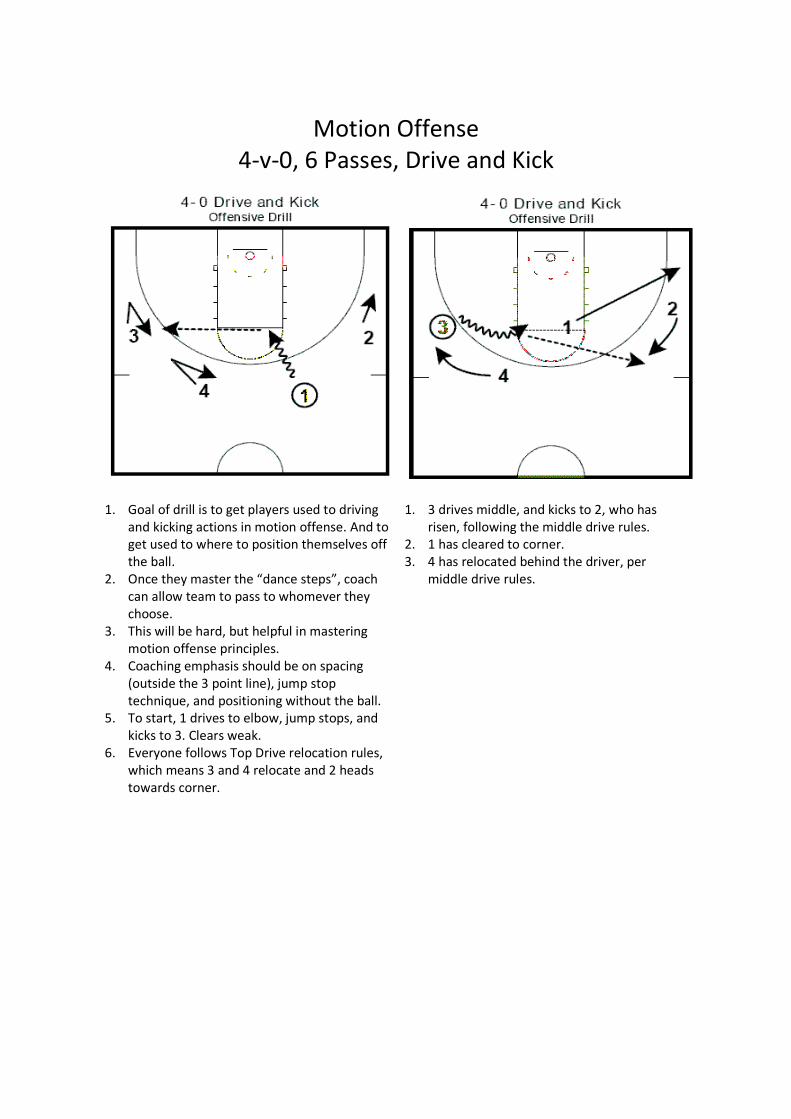
4-v-0, 6 Passes, Drive and Kick
1. Goal of drill is to get players used to driving
and kicking actions in motion offense. And to
get used to where to position themselves off
the ball.
2. Once they master the “dance steps”, coach
can allow team to pass to whomever they
choose.
3. This will be hard, but helpful in mastering
motion offense principles.
4. Coaching emphasis should be on spacing
(outside the 3 point line), jump stop
technique, and positioning without the ball.
5. To start, 1 drives to elbow, jump stops, and
kicks to 3. Clears weak.
6. Everyone follows Top Drive relocation rules,
which means 3 and 4 relocate and 2 heads
towards corner.
1. 3 drives middle, and kicks to 2, who has
risen, following the middle drive rules.
2. 1 has cleared to corner.
3. 4 has relocated behind the driver, per
middle drive rules.
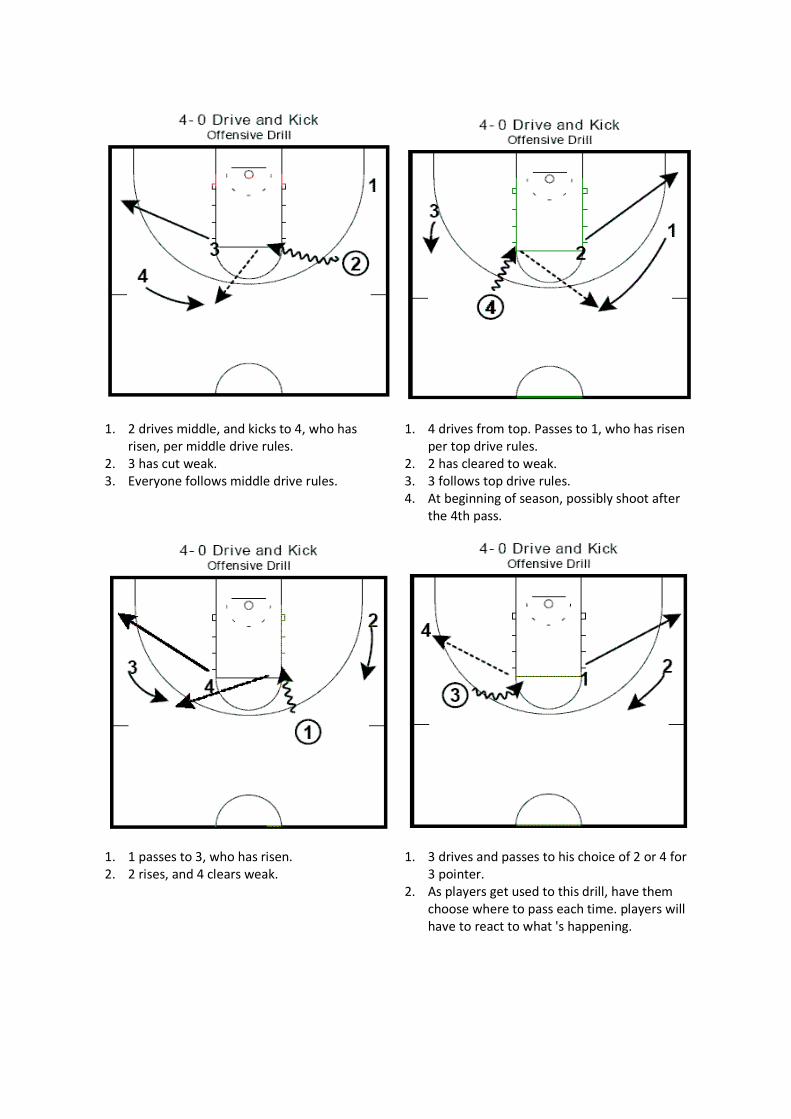
1. 2 drives middle, and kicks to 4, who has
risen, per middle drive rules.
2. 3 has cut weak.
3. Everyone follows middle drive rules.
1. 4 drives from top. Passes to 1, who has risen
per top drive rules.
2. 2 has cleared to weak.
3. 3 follows top drive rules.
4. At beginning of season, possibly shoot after
the 4th pass.
1. 1 passes to 3, who has risen.
2. 2 rises, and 4 clears weak.
1. 3 drives and passes to his choice of 2 or 4 for
3 pointer.
2. As players get used to this drill, have them
choose where to pass each time. players will
have to react to what 's happening.
Motion Offense
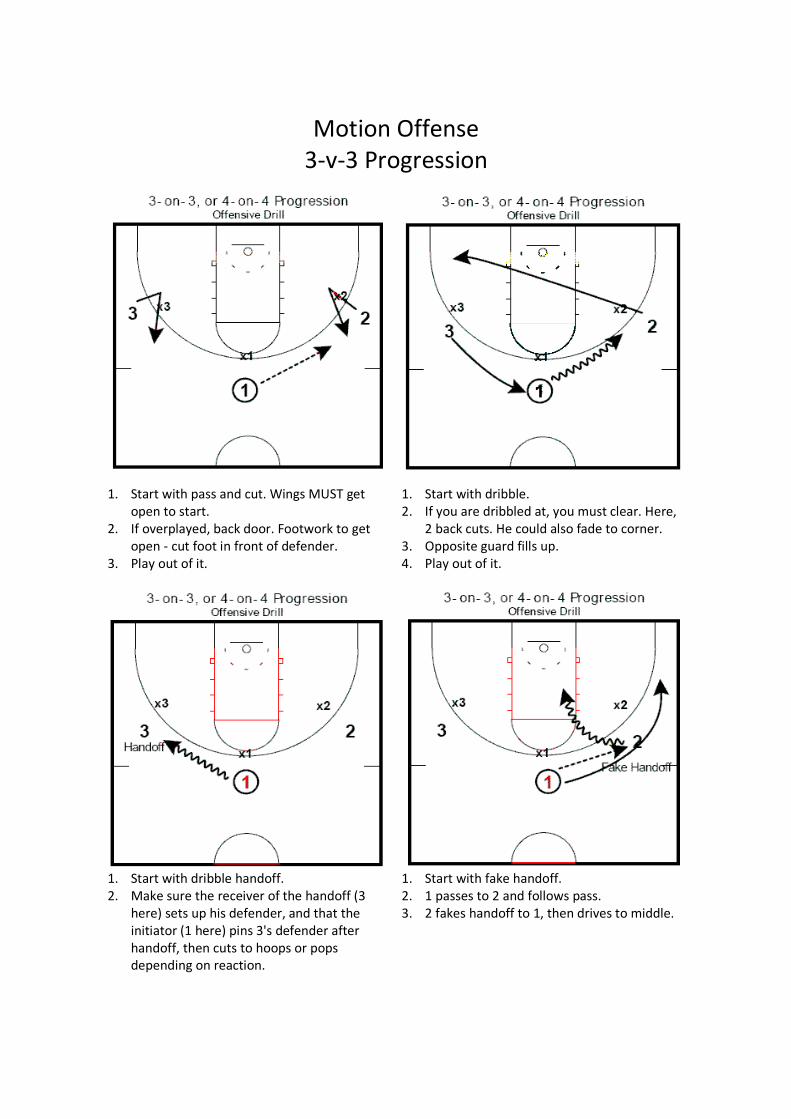
3-v-3 Progression
1. Start with pass and cut. Wings MUST get
open to start.
2. If overplayed, back door. Footwork to get
open - cut foot in front of defender.
3. Play out of it.
1. Start with dribble.
2. If you are dribbled at, you must clear. Here,
2 back cuts. He could also fade to corner.
3. Opposite guard fills up.
4. Play out of it.
1. Start with dribble handoff.
2. Make sure the receiver of the handoff (3
here) sets up his defender, and that the
initiator (1 here) pins 3's defender after
handoff, then cuts to hoops or pops
depending on reaction.
1. Start with fake handoff.
2. 1 passes to 2 and follows pass.
3. 2 fakes handoff to 1, then drives to middle.
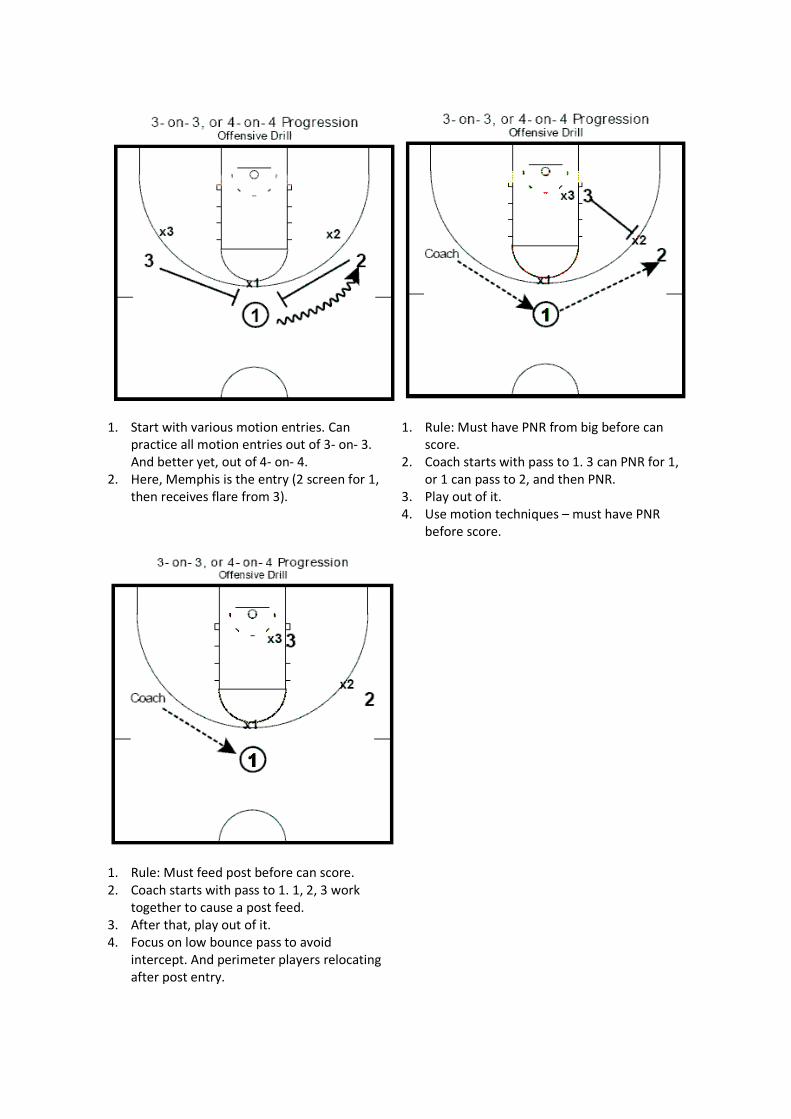
1. Start with various motion entries. Can
practice all motion entries out of 3- on- 3.
And better yet, out of 4- on- 4.
2. Here, Memphis is the entry (2 screen for 1,
then receives flare from 3).
1. Rule: Must have PNR from big before can
score.
2. Coach starts with pass to 1. 3 can PNR for 1,
or 1 can pass to 2, and then PNR.
3. Play out of it.
4. Use motion techniques – must have PNR
before score.
1. Rule: Must feed post before can score.
2. Coach starts with pass to 1. 1, 2, 3 work
together to cause a post feed.
3. After that, play out of it.
4. Focus on low bounce pass to avoid
intercept. And perimeter players relocating
after post entry.
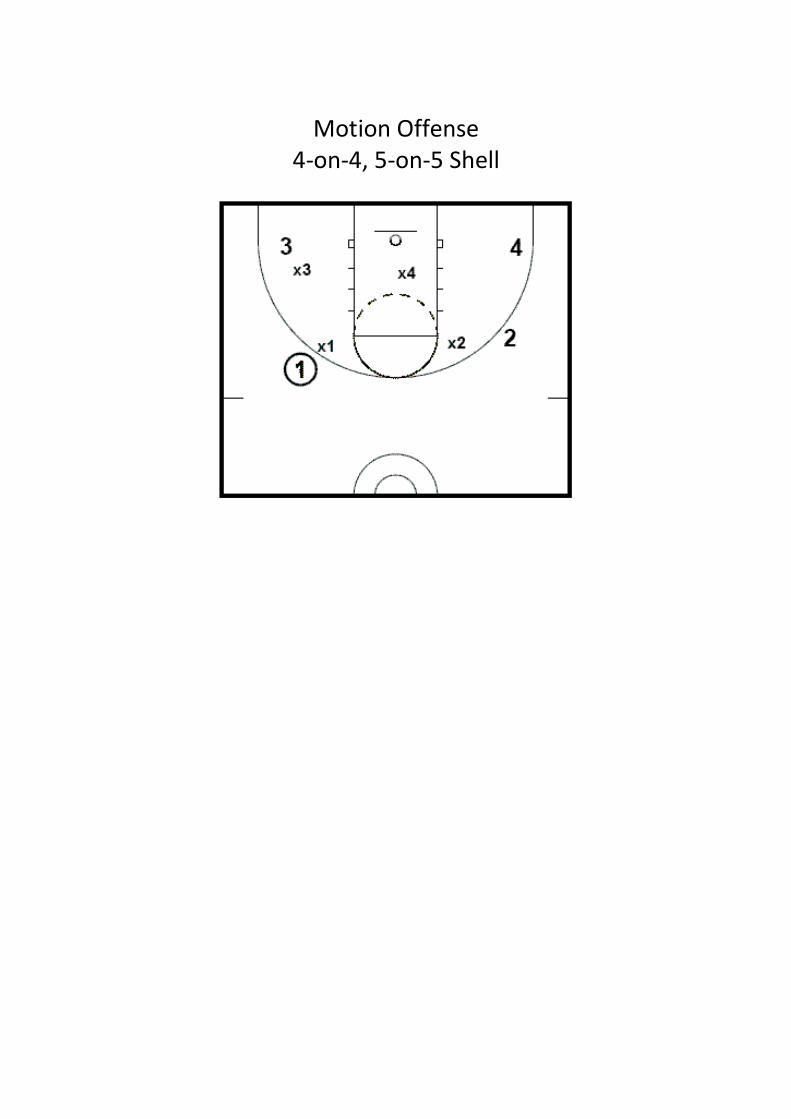
Motion Offense
4-on-4, 5-on-5 Shell
Zone Offense
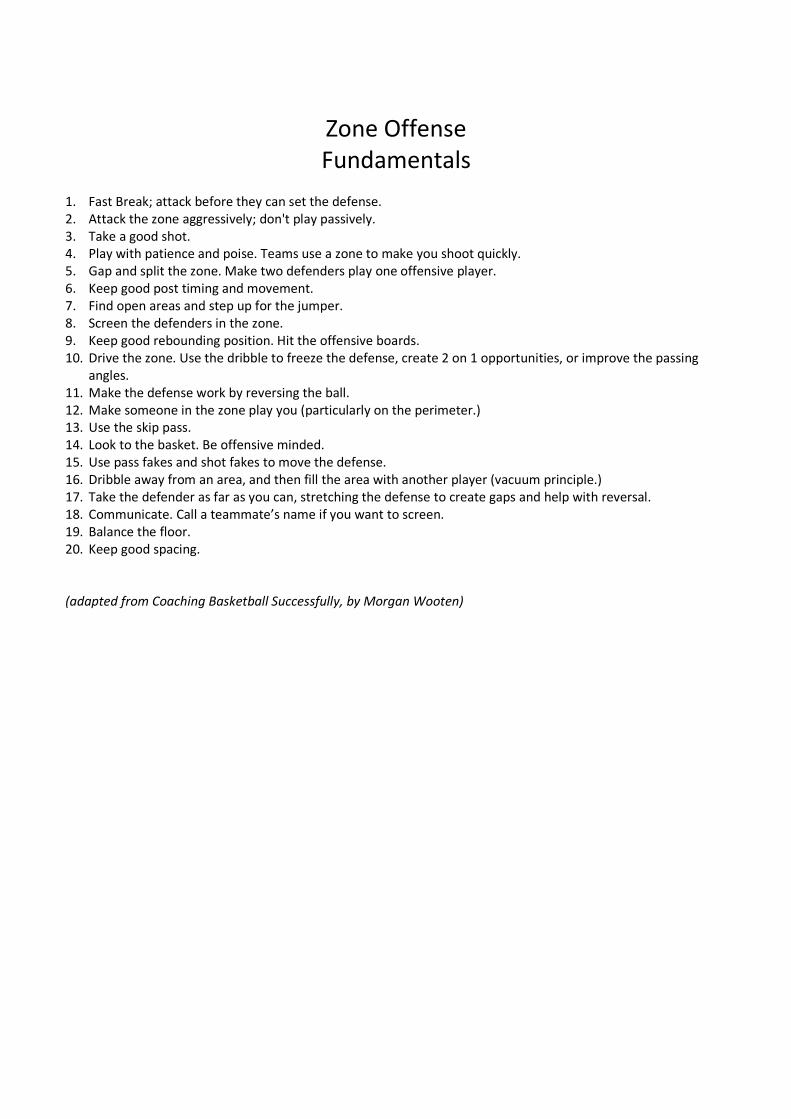
Fundamentals
1. Fast Break; attack before they can set the defense.
2. Attack the zone aggressively; don't play passively.
3. Take a good shot.
4. Play with patience and poise. Teams use a zone to make you shoot quickly.
5. Gap and split the zone. Make two defenders play one offensive player.
6. Keep good post timing and movement.
7. Find open areas and step up for the jumper.
8. Screen the defenders in the zone.
9. Keep good rebounding position. Hit the offensive boards.
10. Drive the zone. Use the dribble to freeze the defense, create 2 on 1 opportunities, or improve the passing
angles.
11. Make the defense work by reversing the ball.
12. Make someone in the zone play you (particularly on the perimeter.)
13. Use the skip pass.
14. Look to the basket. Be offensive minded.
15. Use pass fakes and shot fakes to move the defense.
16. Dribble away from an area, and then fill the area with another player (vacuum principle.)
17. Take the defender as far as you can, stretching the defense to create gaps and help with reversal.
18. Communicate. Call a teammate’s name if you want to screen.
19. Balance the floor.
20. Keep good spacing.
(adapted from Coaching Basketball Successfully, by Morgan Wooten)
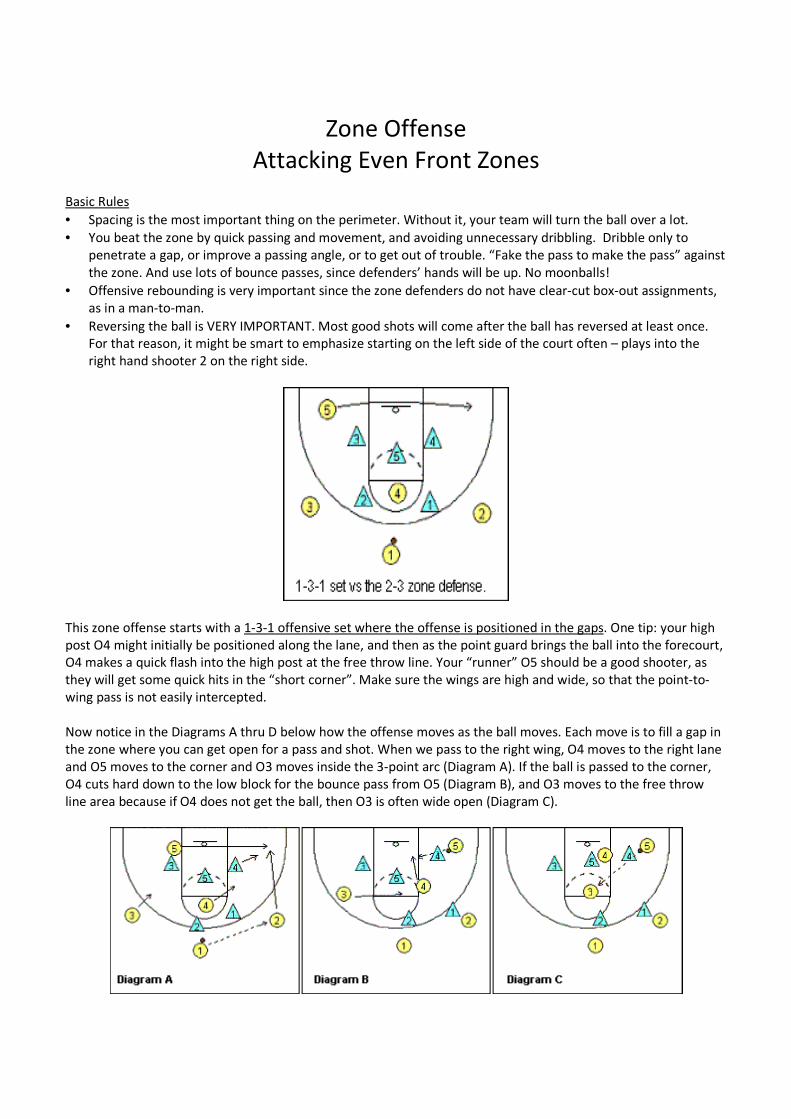
Zone Offense
Attacking Even Front Zones
Basic Rules
• Spacing is the most important thing on the perimeter. Without it, your team will turn the ball over a lot.
• You beat the zone by quick passing and movement, and avoiding unnecessary dribbling. Dribble only to
penetrate a gap, or improve a passing angle, or to get out of trouble. “Fake the pass to make the pass” against
the zone. And use lots of bounce passes, since defenders’ hands will be up. No moonballs!
• Offensive rebounding is very important since the zone defenders do not have clear-cut box-out assignments,
as in a man-to-man.
• Reversing the ball is VERY IMPORTANT. Most good shots will come after the ball has reversed at least once.
For that reason, it might be smart to emphasize starting on the left side of the court often – plays into the
right hand shooter 2 on the right side.
This zone offense starts with a 1-3-1 offensive set where the offense is positioned in the gaps. One tip: your high
post O4 might initially be positioned along the lane, and then as the point guard brings the ball into the forecourt,
O4 makes a quick flash into the high post at the free throw line. Your “runner” O5 should be a good shooter, as
they will get some quick hits in the “short corner”. Make sure the wings are high and wide, so that the point-to-
wing pass is not easily intercepted.
Now notice in the Diagrams A thru D below how the offense moves as the ball moves. Each move is to fill a gap in
the zone where you can get open for a pass and shot. When we pass to the right wing, O4 moves to the right lane
and O5 moves to the corner and O3 moves inside the 3-point arc (Diagram A). If the ball is passed to the corner,
O4 cuts hard down to the low block for the bounce pass from O5 (Diagram B), and O3 moves to the free throw
line area because if O4 does not get the ball, then O3 is often wide open (Diagram C).

Now look at Diagram D. If the pass from the wings goes instead to O4 near the elbow, O4 can either shoot or pass
to O3 for an open shot, or to O5 in the corner.
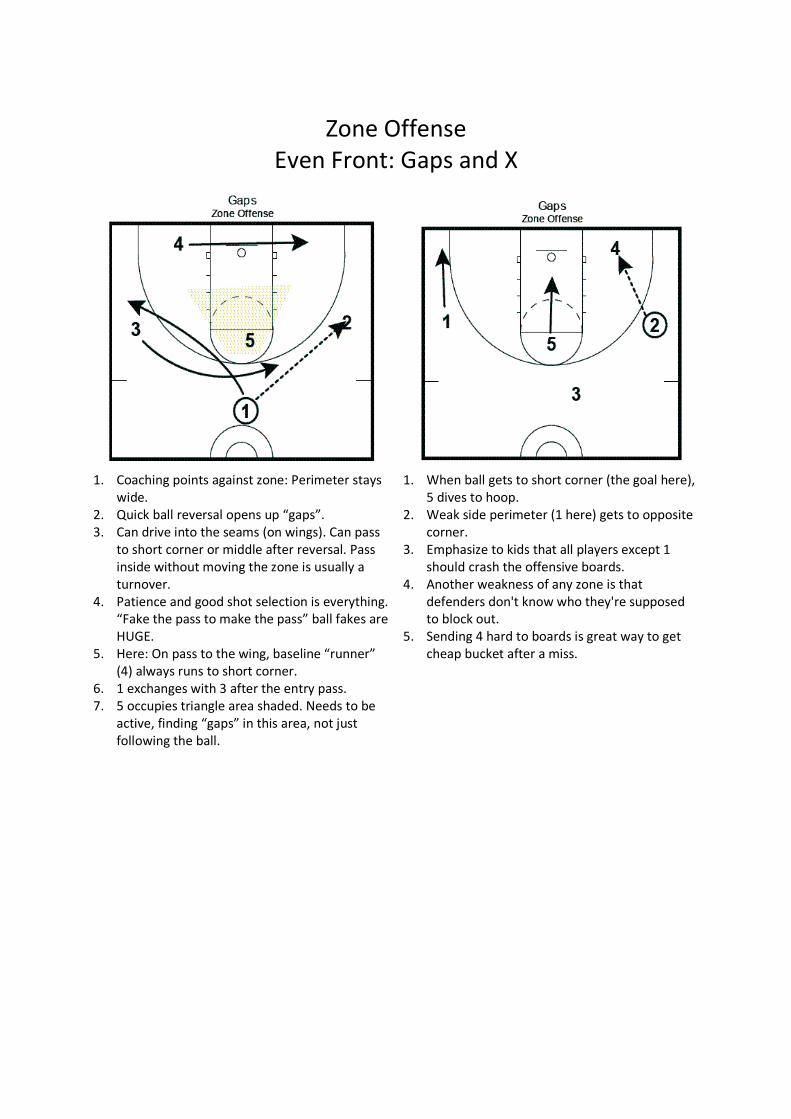
Zone Offense
Even Front: Gaps and X
1. Coaching points against zone: Perimeter stays
wide.
2. Quick ball reversal opens up “gaps”.
3. Can drive into the seams (on wings). Can pass
to short corner or middle after reversal. Pass
inside without moving the zone is usually a
turnover.
4. Patience and good shot selection is everything.
“Fake the pass to make the pass” ball fakes are
HUGE.
5. Here: On pass to the wing, baseline “runner”
(4) always runs to short corner.
6. 1 exchanges with 3 after the entry pass.
7. 5 occupies triangle area shaded. Needs to be
active, finding “gaps” in this area, not just
following the ball.
1. When ball gets to short corner (the goal here),
5 dives to hoop.
2. Weak side perimeter (1 here) gets to opposite
corner.
3. Emphasize to kids that all players except 1
should crash the offensive boards.
4. Another weakness of any zone is that
defenders don't know who they're supposed
to block out.
5. Sending 4 hard to boards is great way to get
cheap bucket after a miss.
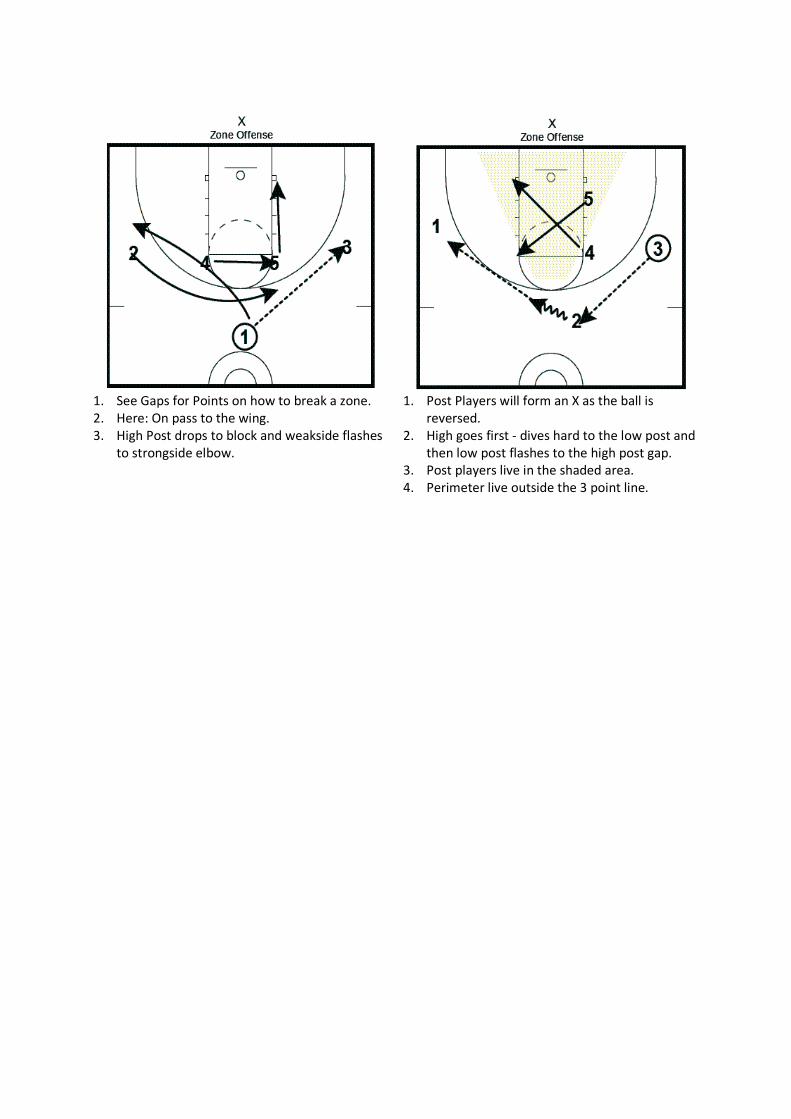
1. See Gaps for Points on how to break a zone.
2. Here: On pass to the wing.
3. High Post drops to block and weakside flashes
to strongside elbow.
1. Post Players will form an X as the ball is
reversed.
2. High goes first - dives hard to the low post and
then low post flashes to the high post gap.
3. Post players live in the shaded area.
4. Perimeter live outside the 3 point line.
Zone Offense
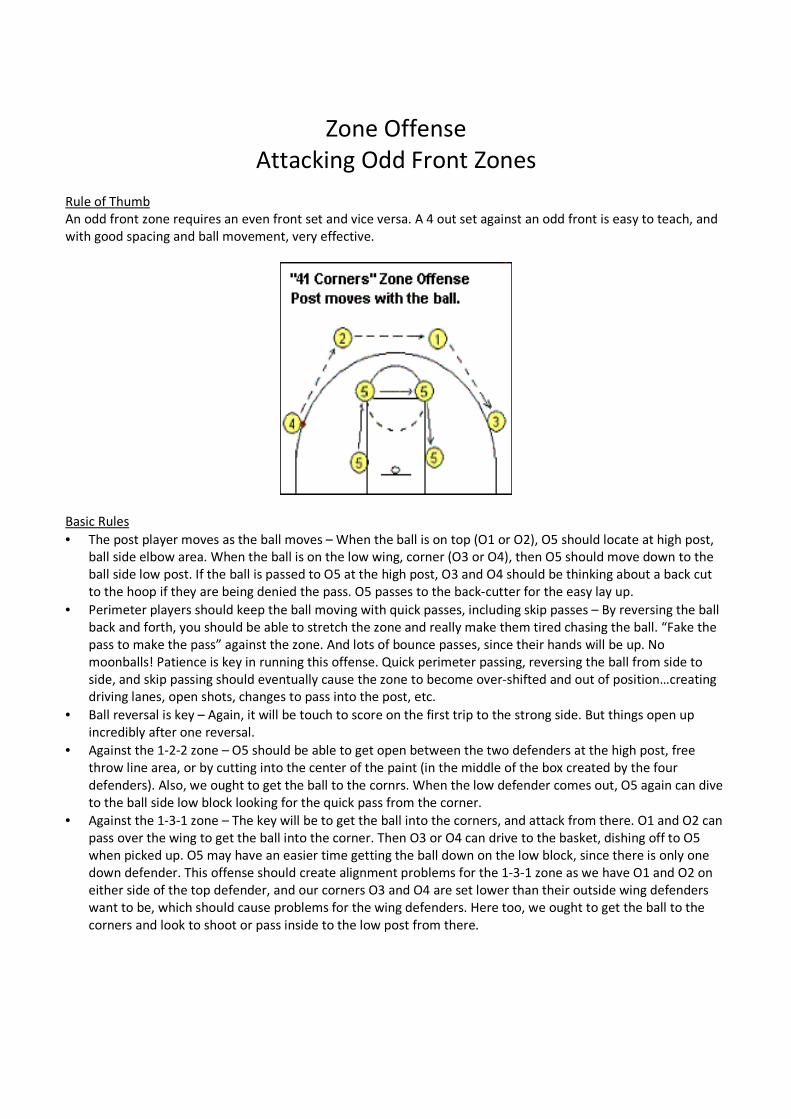
Attacking Odd Front Zones
Rule of Thumb
An odd front zone requires an even front set and vice versa. A 4 out set against an odd front is easy to teach, and
with good spacing and ball movement, very effective.
Basic Rules
• The post player moves as the ball moves – When the ball is on top (O1 or O2), O5 should locate at high post,
ball side elbow area. When the ball is on the low wing, corner (O3 or O4), then O5 should move down to the
ball side low post. If the ball is passed to O5 at the high post, O3 and O4 should be thinking about a back cut
to the hoop if they are being denied the pass. O5 passes to the back-cutter for the easy lay up.
• Perimeter players should keep the ball moving with quick passes, including skip passes – By reversing the ball
back and forth, you should be able to stretch the zone and really make them tired chasing the ball. “Fake the
pass to make the pass” against the zone. And lots of bounce passes, since their hands will be up. No
moonballs! Patience is key in running this offense. Quick perimeter passing, reversing the ball from side to
side, and skip passing should eventually cause the zone to become over-shifted and out of position…creating
driving lanes, open shots, changes to pass into the post, etc.
• Ball reversal is key – Again, it will be touch to score on the first trip to the strong side. But things open up
incredibly after one reversal.
• Against the 1-2-2 zone – O5 should be able to get open between the two defenders at the high post, free
throw line area, or by cutting into the center of the paint (in the middle of the box created by the four
defenders). Also, we ought to get the ball to the cornrs. When the low defender comes out, O5 again can dive
to the ball side low block looking for the quick pass from the corner.
• Against the 1-3-1 zone – The key will be to get the ball into the corners, and attack from there. O1 and O2 can
pass over the wing to get the ball into the corner. Then O3 or O4 can drive to the basket, dishing off to O5
when picked up. O5 may have an easier time getting the ball down on the low block, since there is only one
down defender. This offense should create alignment problems for the 1-3-1 zone as we have O1 and O2 on
either side of the top defender, and our corners O3 and O4 are set lower than their outside wing defenders
want to be, which should cause problems for the wing defenders. Here too, we ought to get the ball to the
corners and look to shoot or pass inside to the low post from there.
Zone Offense
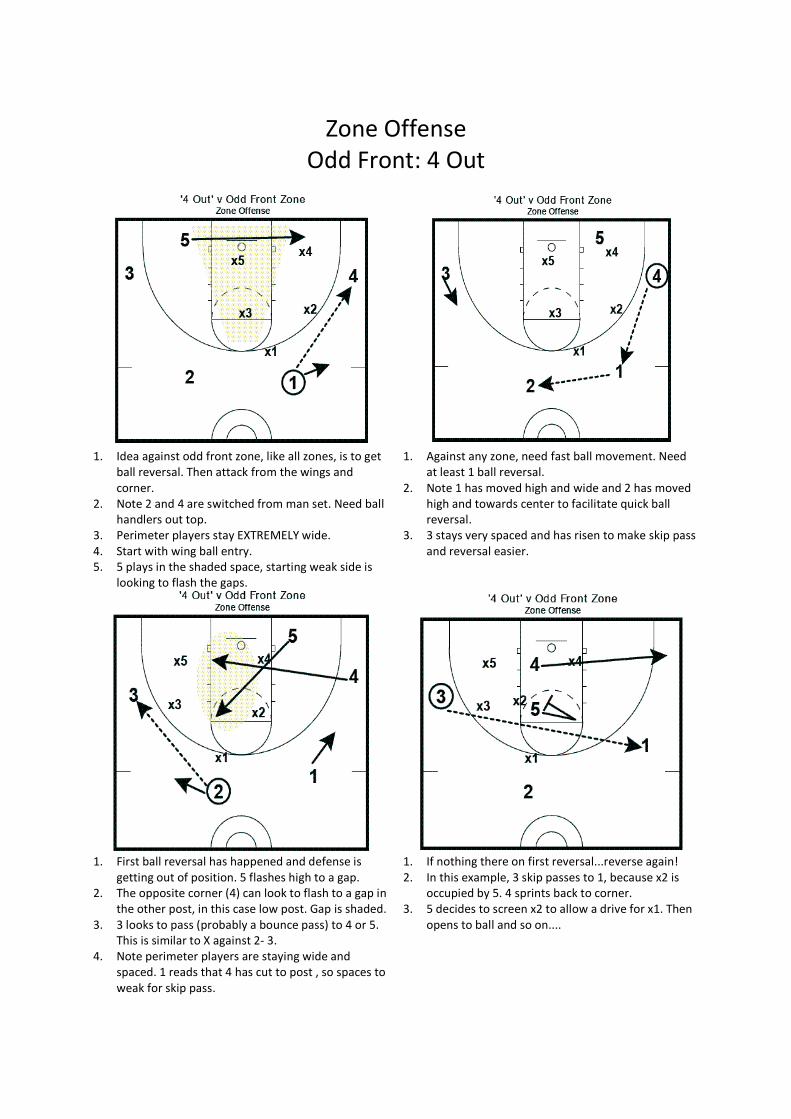
Odd Front: 4 Out
1. Idea against odd front zone, like all zones, is to get
ball reversal. Then attack from the wings and
corner.
2. Note 2 and 4 are switched from man set. Need ball
handlers out top.
3. Perimeter players stay EXTREMELY wide.
4. Start with wing ball entry.
5. 5 plays in the shaded space, starting weak side is
looking to flash the gaps.
1. Against any zone, need fast ball movement. Need
at least 1 ball reversal.
2. Note 1 has moved high and wide and 2 has moved
high and towards center to facilitate quick ball
reversal.
3. 3 stays very spaced and has risen to make skip pass
and reversal easier.
1. First ball reversal has happened and defense is
getting out of position. 5 flashes high to a gap.
2. The opposite corner (4) can look to flash to a gap in
the other post, in this case low post. Gap is shaded.
3. 3 looks to pass (probably a bounce pass) to 4 or 5.
This is similar to X against 2- 3.
4. Note perimeter players are staying wide and
spaced. 1 reads that 4 has cut to post , so spaces to
weak for skip pass.
1. If nothing there on first reversal...reverse again!
2. In this example, 3 skip passes to 1, because x2 is
occupied by 5. 4 sprints back to corner.
3. 5 decides to screen x2 to allow a drive for x1. Then
opens to ball and so on....
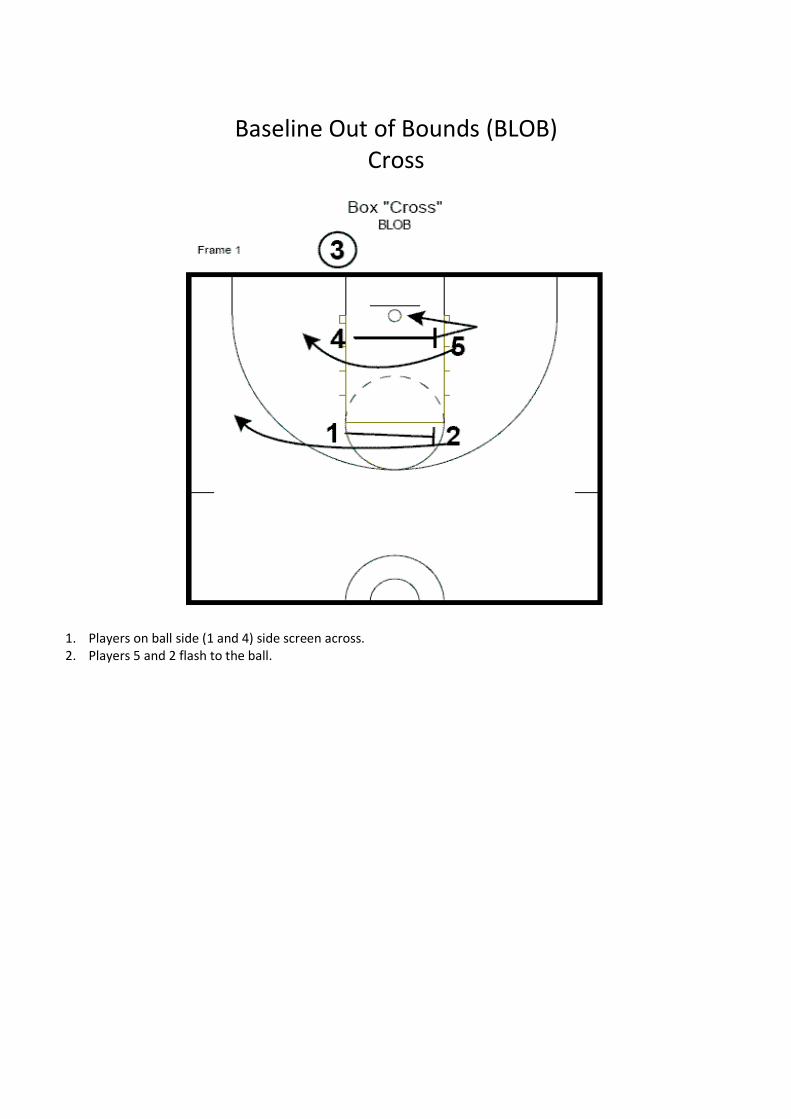
Baseline Out of Bounds (BLOB)
Cross
1. Players on ball side (1 and 4) side screen across.
2. Players 5 and 2 flash to the ball.
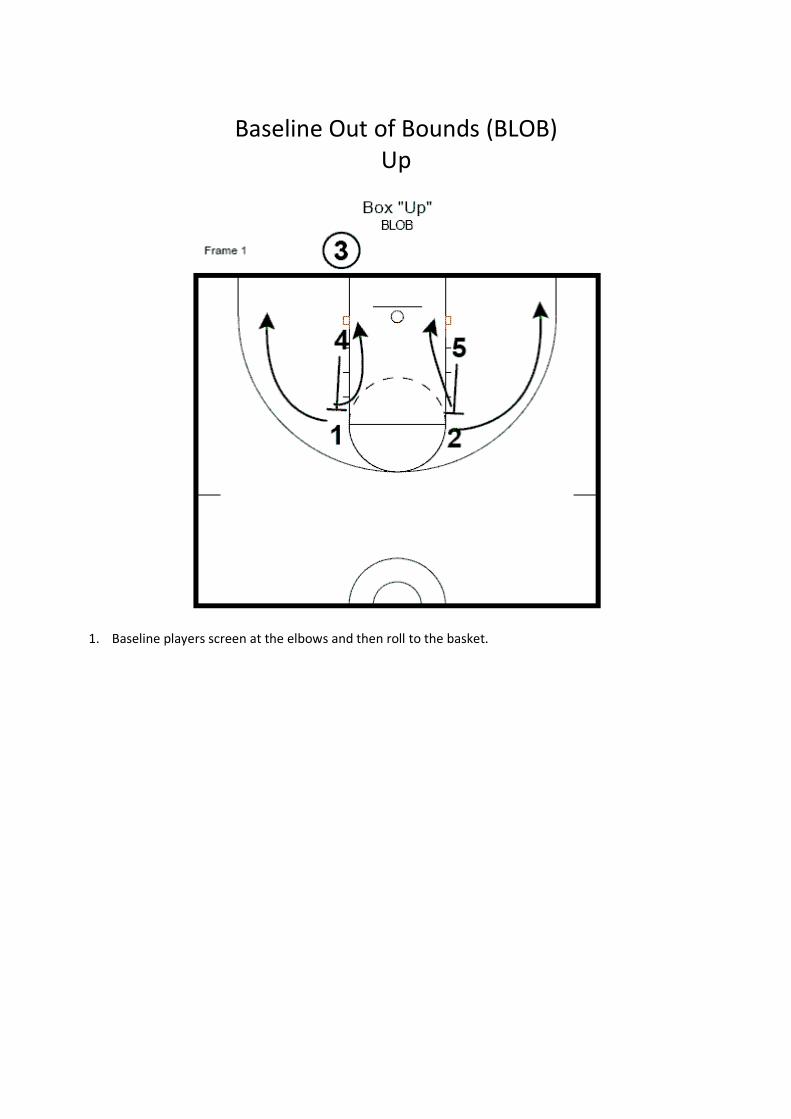
Baseline Out of Bounds (BLOB)
Up
1. Baseline players screen at the elbows and then roll to the basket.
Baseline Out of Bounds (BLOB)
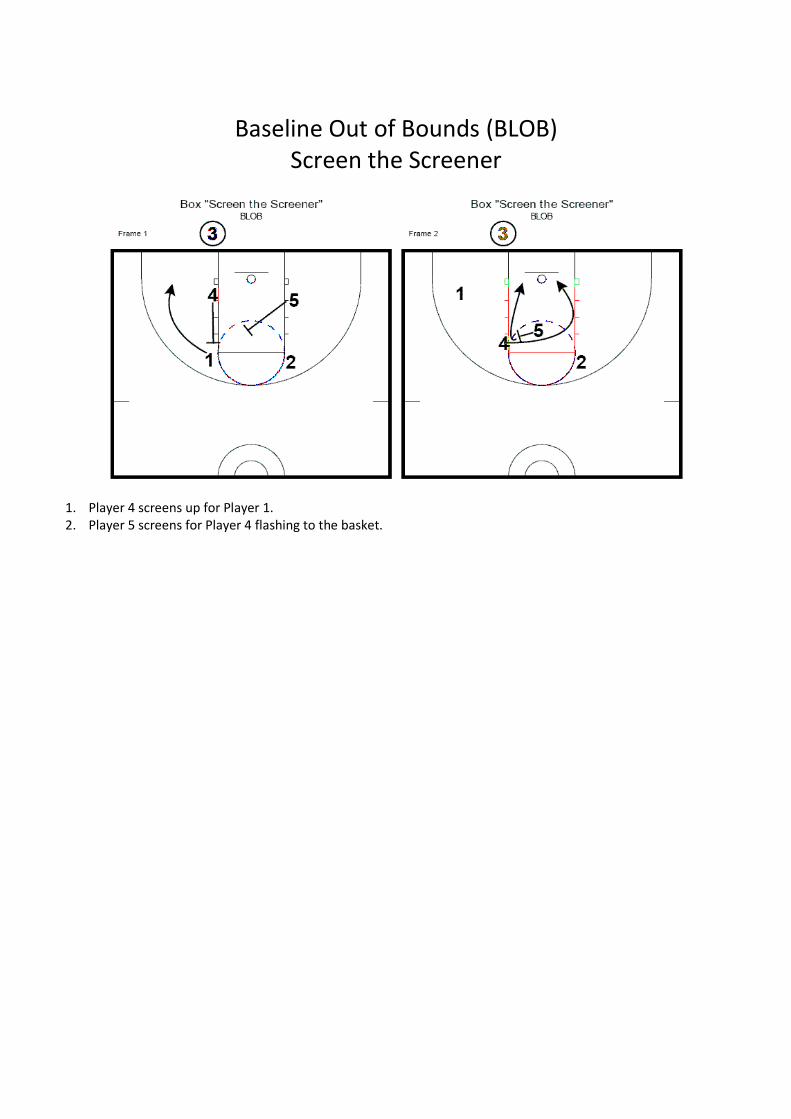
Screen the Screener
1. Player 4 screens up for Player 1.
2. Player 5 screens for Player 4 flashing to the basket.
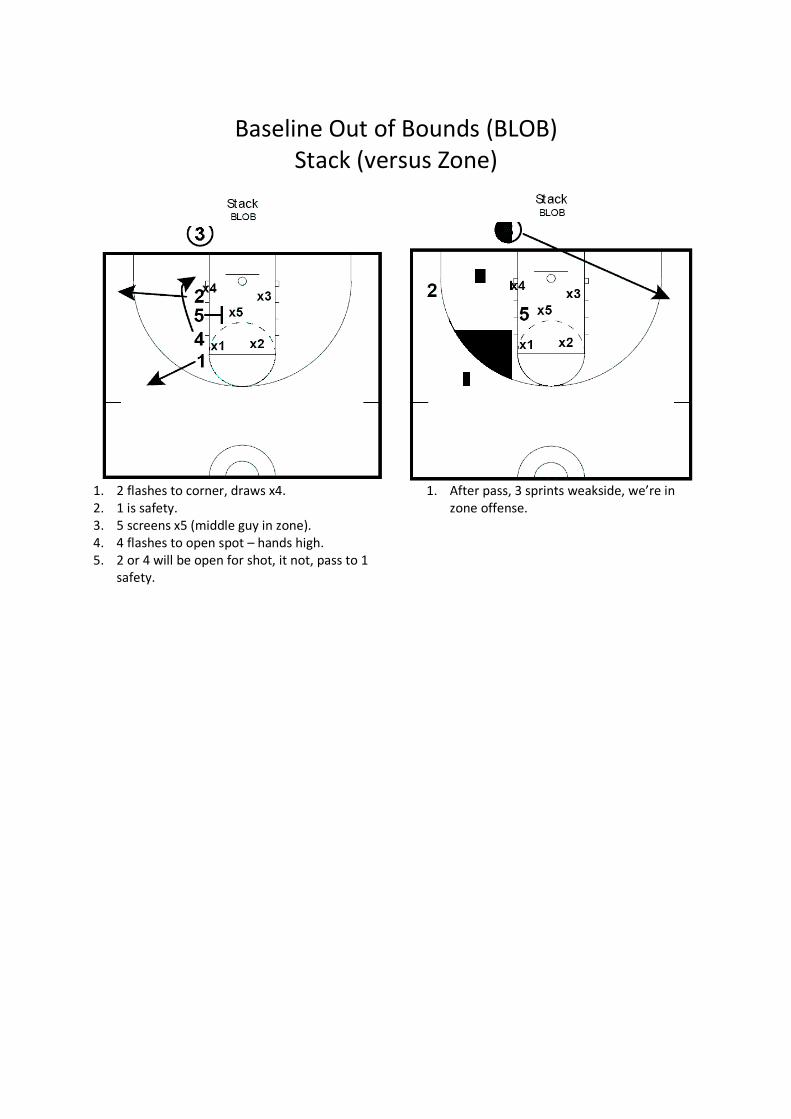
Baseline Out of Bounds (BLOB)
Stack (versus Zone)
1. 2 flashes to corner, draws x4.
2. 1 is safety.
3. 5 screens x5 (middle guy in zone).
4. 4 flashes to open spot – hands high.
5. 2 or 4 will be open for shot, it not, pass to 1
safety.
1. After pass, 3 sprints weakside, we’re in
zone offense.
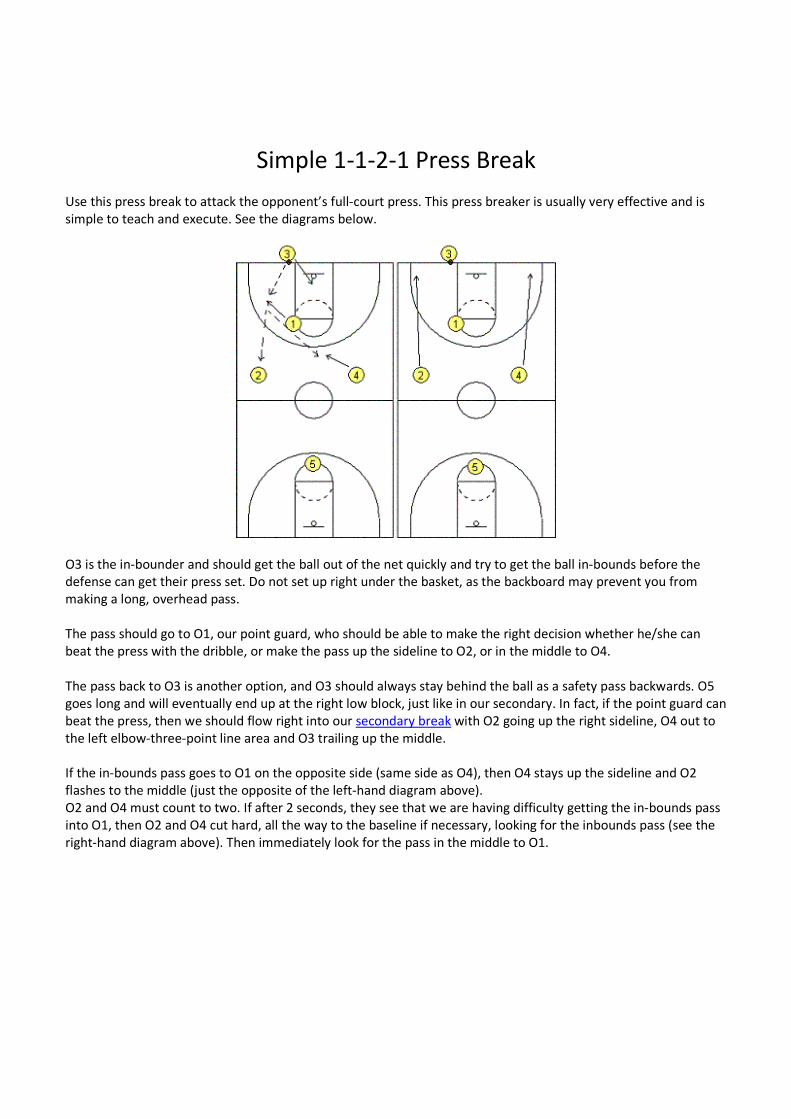
Simple 1-1-2-1 Press Break
Use this press break to attack the opponent’s full-court press. This press breaker is usually very effective and is
simple to teach and execute. See the diagrams below.
O3 is the in-bounder and should get the ball out of the net quickly and try to get the ball in-bounds before the
defense can get their press set. Do not set up right under the basket, as the backboard may prevent you from
making a long, overhead pass.
The pass should go to O1, our point guard, who should be able to make the right decision whether he/she can
beat the press with the dribble, or make the pass up the sideline to O2, or in the middle to O4.
The pass back to O3 is another option, and O3 should always stay behind the ball as a safety pass backwards. O5
goes long and will eventually end up at the right low block, just like in our secondary. In fact, if the point guard can
beat the press, then we should flow right into our secondary break with O2 going up the right sideline, O4 out to
the left elbow-three-point line area and O3 trailing up the middle.
If the in-bounds pass goes to O1 on the opposite side (same side as O4), then O4 stays up the sideline and O2
flashes to the middle (just the opposite of the left-hand diagram above).
O2 and O4 must count to two. If after 2 seconds, they see that we are having difficulty getting the in-bounds pass
into O1, then O2 and O4 cut hard, all the way to the baseline if necessary, looking for the inbounds pass (see the
right-hand diagram above). Then immediately look for the pass in the middle to O1.
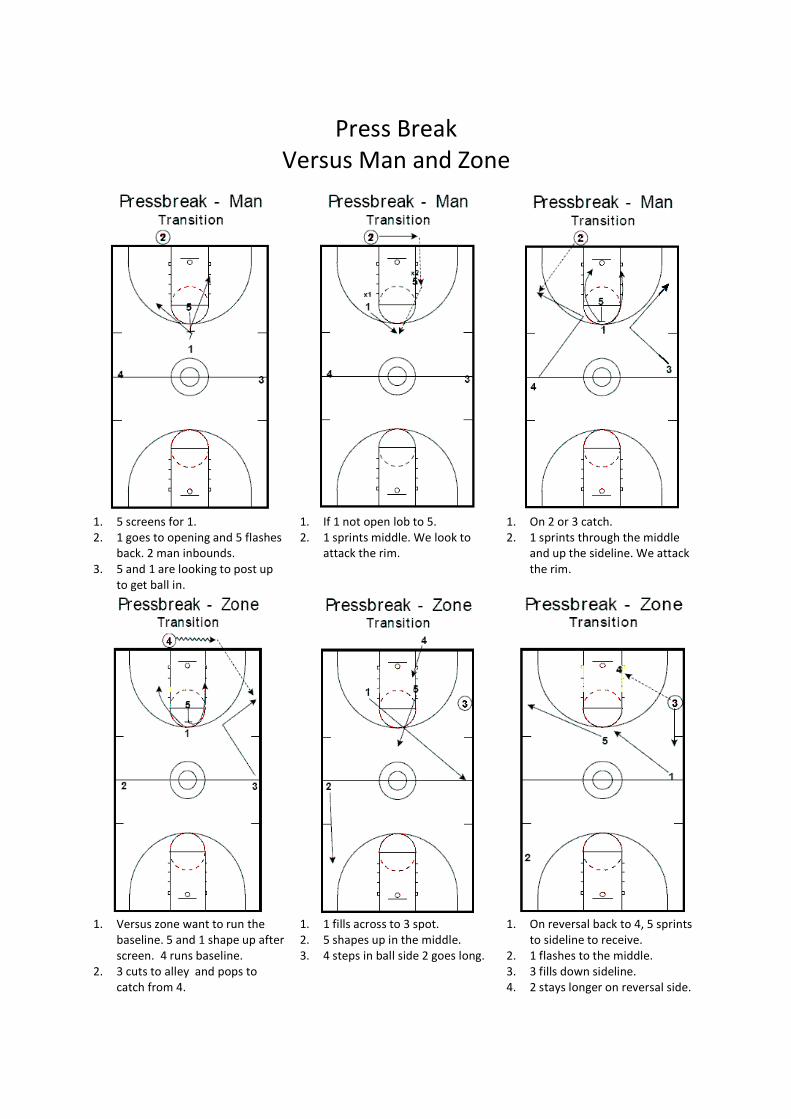
Press Break
Versus Man and Zone
1. 5 screens for 1.
2. 1 goes to opening and 5 flashes
back. 2 man inbounds.
3. 5 and 1 are looking to post up
to get ball in.
1. If 1 not open lob to 5.
2. 1 sprints middle. We look to
attack the rim.
1. On 2 or 3 catch.
2. 1 sprints through the middle
and up the sideline. We attack
the rim.
1. Versus zone want to run the
baseline. 5 and 1 shape up after
screen. 4 runs baseline.
2. 3 cuts to alley and pops to
catch from 4.
1. 1 fills across to 3 spot.
2. 5 shapes up in the middle.
3. 4 steps in ball side 2 goes long.
1. On reversal back to 4, 5 sprints
to sideline to receive.
2. 1 flashes to the middle.
3. 3 fills down sideline.
4. 2 stays longer on reversal side.
Transition
"Transition" refers to the process of changing from defense to offense (transition offense), or offense to defense
(transition defense). Your transition offense can be a slow, walk-it-up-floor transition, an aggressive fast break
transition, or something in between. Each coach has to decide which is best for his team and his personnel. Do
you really want an up-tempo fast game, especially if you have a strong half-court game with good post men, or if
your guards are not particularly quick, have trouble keeping the ball under control, or are inexperienced?
On the other hand, if your team is quick, with good, experienced ball handlers, an aggressive up-tempo style has
advantages. LYBA generally favors an up-tempo game, as it seems to develop skills better than a slow-down.
Advantages
• The fast break can produce easy scores.
• Pushing the ball up the floor quickly puts pressure on the opponent, and they will be constantly worrying
about getting back on defense. This thinking may cause them to be less aggressive going for their offensive
rebounds, and may keep their point guard from penetrating (thinking he has to stay back to prevent the fast
break).
• An aggressive team attitude on offense will often carry over to your defense and rebounding.
• An up-tempo game will favor the team that is well-conditioned. A poorly conditioned team will "run out of
gas" by the fourth quarter.
• The fast-break will often break the opponent's press defense.
• A team that plays up-tempo will usually use more of its bench players, with frequent substitutions. This often
creates good team harmony with many players getting playing time. An up-tempo game will favor the team
with a "deep bench", with many good substitute players.
• The players and fans enjoy a well-played up-tempo game.
• Getting the ball up the floor quickly before the defense is set is a good tactic against zone defenses.
Transition Offensive Basics
• Always keep under control. You don't want your fast-breaking style to result in turnovers and missed
opportunities to score. Players (particularly ball-handlers) must learn to recognize when to push the break,
and when to slow down and stay under control. They must learn not to force bad passes.
• Outlet pass after rebound. When an inside player gets a defensive rebound, the rebounder should
immediately look to pass to a guard to get the ball up the court. It’s OK for rebounders to dribble out of
double teams. Key to protect the ball and aggressively use pivot. Teach your ball-handlers that on every
defensive rebound, they must move quickly into a position quickly where the rebounder can pass to them. Try
to get them to locate above the free-throw-line-extended—if they try to receive a hand off, they will be hard
pressed to push a fast break.
• Inbound Pass after made basket. Some coaches like to assign the same person (LHS BOYS WILL USE THE 4 or
5) to be the inbounds passer each time a basket is made, or the ball is out-of-bounds. The post players should
be taught to get up the floor quickly which allows spacing and room for the guards to bring the ball up, and
can also result in a long pass and lay-up if the post player beats the defense up the floor. Running the floor
hard is a primary role for the ‘big guy’.
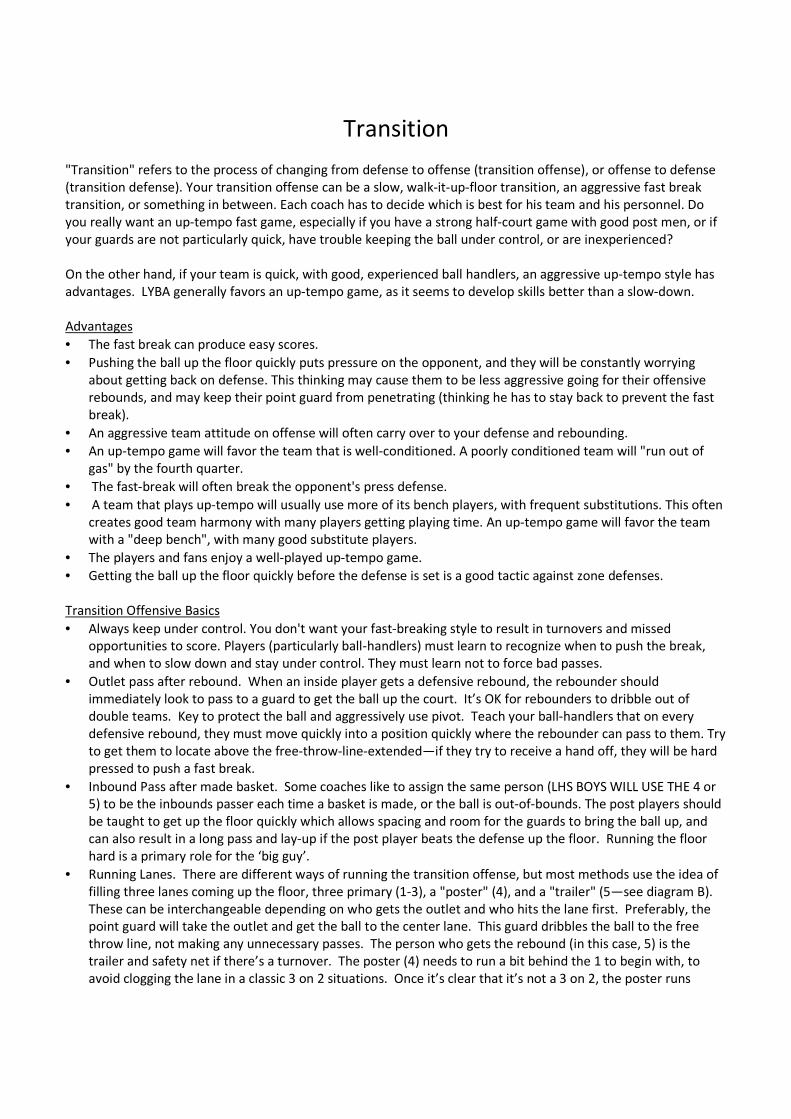
• Running Lanes. There are different ways of running the transition offense, but most methods use the idea of
filling three lanes coming up the floor, three primary (1-3), a "poster" (4), and a "trailer" (5—see diagram B).
These can be interchangeable depending on who gets the outlet and who hits the lane first. Preferably, the
point guard will take the outlet and get the ball to the center lane. This guard dribbles the ball to the free
throw line, not making any unnecessary passes. The person who gets the rebound (in this case, 5) is the
trailer and safety net if there’s a turnover. The poster (4) needs to run a bit behind the 1 to begin with, to
avoid clogging the lane in a classic 3 on 2 situations. Once it’s clear that it’s not a 3 on 2, the poster runs
directly to the rim--they will then naturally go to strong side post. In general, you want your big men who
don’t get the rebound to run the floor aggressively.
• End of Break. The two outside lanes should cut at 45 degrees to the hoop for a pass from the point, and the
lay-up. If the point guard pops the free throw jumper, the wings and poster should crash the boards for the
rebound. If neither happens, the wings should cross under the basket and fill the opposite corner or wing, the
poster gets to the post, and the point guard should move to the right side of the free throw circle.
• Trailer. In all the commotion, likely the opposing team has forgotten about the trailer. The wing or point
should look for the trailer spotting up at the weak-side elbow for a quick hitter.
• Naturally into half-court offense. If no shot develops, the floor is spread, and the team gets into its half court
offense. A good way to start is to have the trailer 5 to ball screen the wing or point who has the ball, then roll
to hoop.
In summary, a successful fast break depends on:
• Getting the defensive rebound.
• A good, quick outlet pass.
• Filling the lanes.
• Maintaining control. "Be quick, but never hurry."
• Recognition. Don't force the break or pass if it is not there.

Transition
Carolina (with Fullback)
1. Divide players into two teams of at least 5
players at opposite ends of the court.
2. Team A starts out with the ball at halfcourt
and one B player.
3. Play until Team A scores of until team B gets
the ball.
4. Once Team B has possession, two players join
and attack 3-on-2. (If Team A scores, take the
ball out and attack. If there is a defensive
rebound by Team B, fill lanes and go).
5. Play continues until Team B attacks 5-on-4.
6. Once 5-on-4 is complete, restart drill with no
Team B and attacking first 2-on-1.
7. Emphasis for the offense – make quick
decisions and finding the open man. Should
get an open shot.
8. Emphasis for the defense – stop the ball first,
communicating which man they are picking
up, leave man furthest from the ball open.
Improves help skills.
1. Team B adds 2 players from under the
basket and attacks players from Team A
that just had the ball (3-on-2).

1. Team A adds 2 players from under the basket
and attacks the 3 players from Team B that
just had the ball (4-on-5).
1. Team B adds 2 players from under the
basket and attaches the 4 players from
Team B that just had the ball (5-on-4).
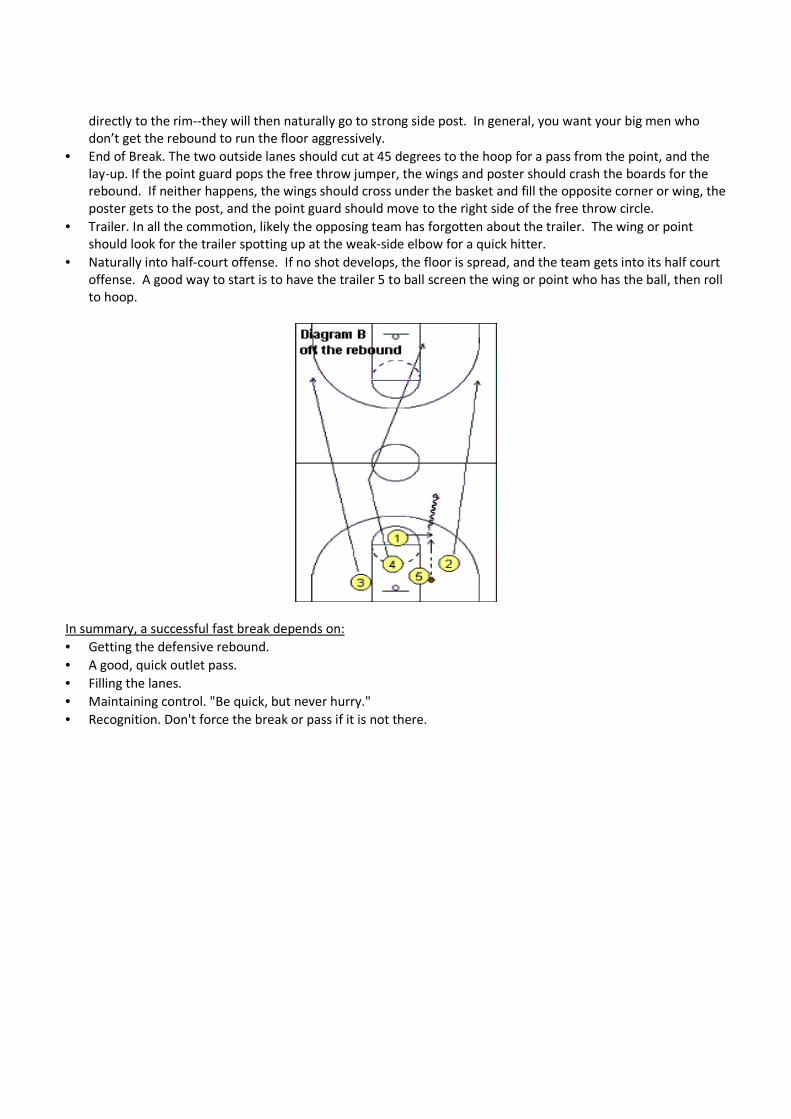
Transition
3-on-2, 2-on-1
1. X1 puts ball off the backboard, grabs the rebound and outlet passes to X2, team fast breaks (3-v-2 defenders).
2. Player that takes last shot runs back on defense against O1 and O2, coming back in the opposite direction.
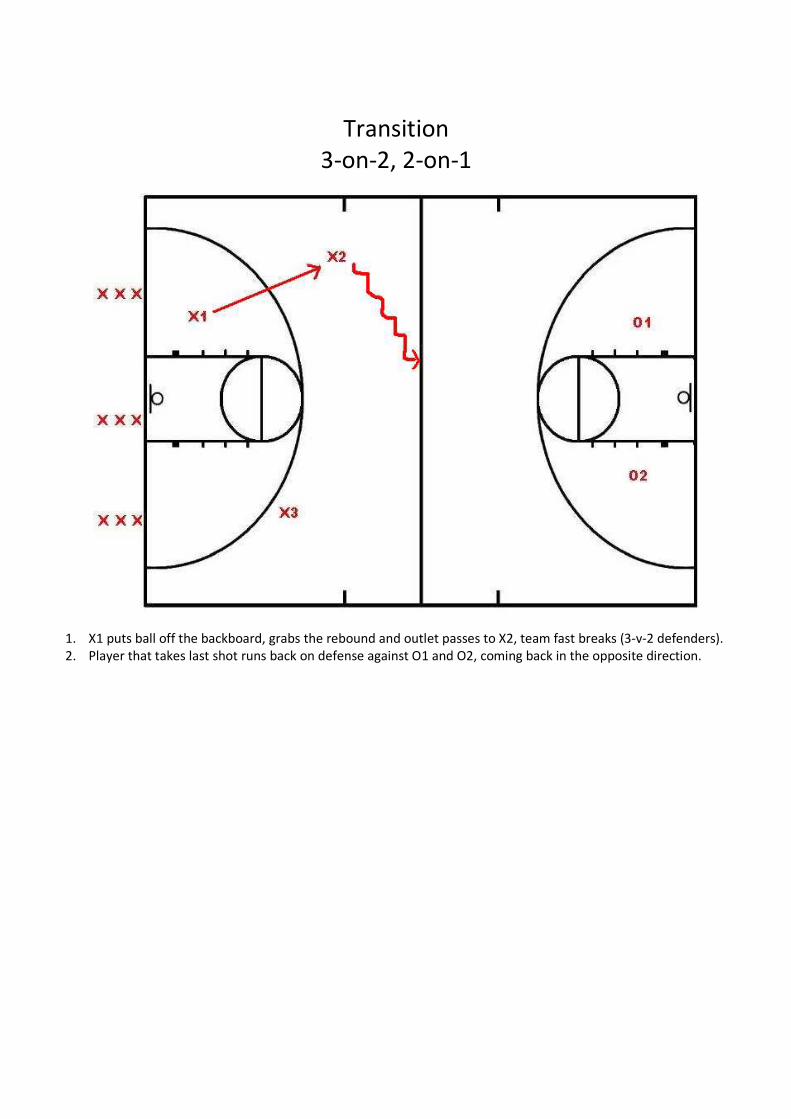
Transition
Bust Out Outlet
1. Full Court transition from both sides.
2. Start with rebounding line (4,3,2,1 at top here) throwing ball to self against boards.
3. Jump with 2 hands to rebound, pivot, and 1 or 2 quick “bust out” dribbles to escape a trap that often happens
after defensive rebound.
4. Meantime, outlet is running down the court (1 here).
5. Pitch up for a layup.
Variations
• Right side, left side.
• See how many layups, short shots in 2 minutes.
• Have the outlet passes run to the wing and accept the pass back, etc.
Transition
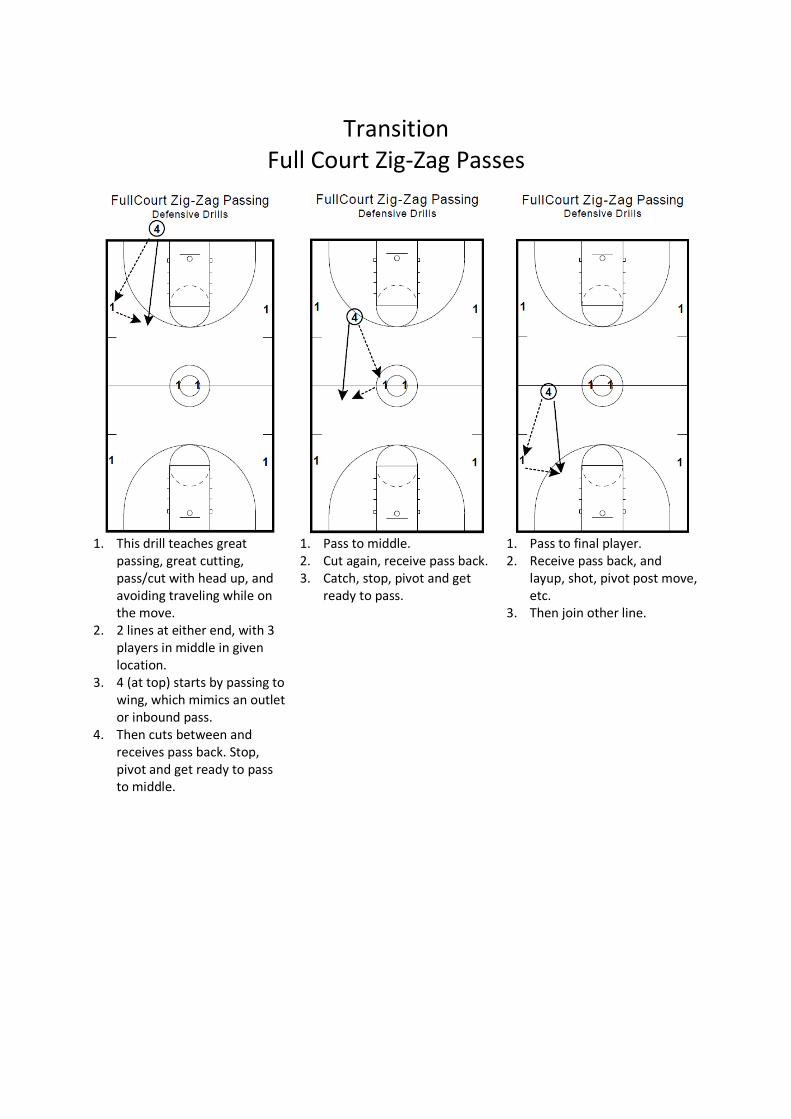
Full Court Zig-Zag Passes
1. This drill teaches great
passing, great cutting,
pass/cut with head up, and
avoiding traveling while on
the move.
2. 2 lines at either end, with 3
players in middle in given
location.
3. 4 (at top) starts by passing to
wing, which mimics an outlet
or inbound pass.
4. Then cuts between and
receives pass back. Stop,
pivot and get ready to pass
to middle.
1. Pass to middle.
2. Cut again, receive pass back.
3. Catch, stop, pivot and get
ready to pass.
1. Pass to final player.
2. Receive pass back, and
layup, shot, pivot post move,
etc.
3. Then join other line.
Transition
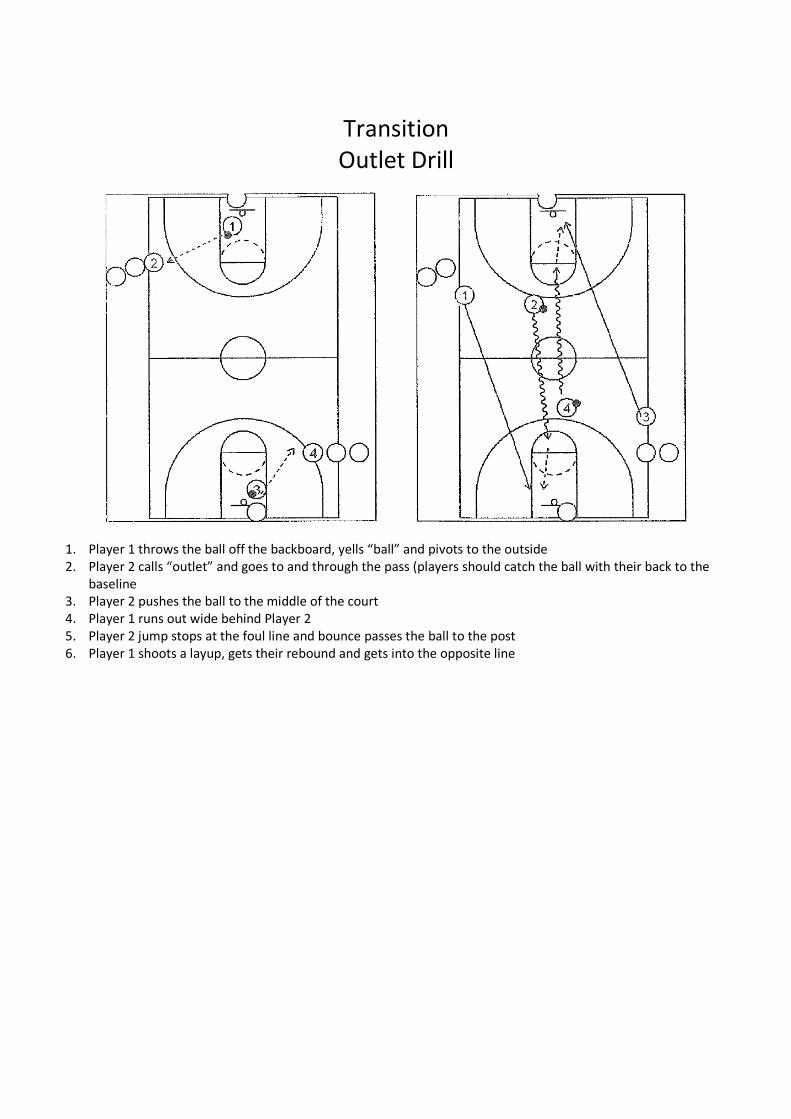
Outlet Drill
1. Player 1 throws the ball off the backboard, yells “ball” and pivots to the outside
2. Player 2 calls “outlet” and goes to and through the pass (players should catch the ball with their back to the
baseline
3. Player 2 pushes the ball to the middle of the court
4. Player 1 runs out wide behind Player 2
5. Player 2 jump stops at the foul line and bounce passes the ball to the post
6. Player 1 shoots a layup, gets their rebound and gets into the opposite line


