Embed Size (px)
Citation preview
1

2
Community Renewable Energy
Toolkit for Malawi copyright©2014 CES/MuREA by Cross-Wave Crest Investments CCI All rights reserved. Replication of this material must reference that this toolkit has been
produced through partnership between Community Energy Scotland and Mulanje
Renewable Energy Agency (MuREA) through the Scottish Government funded
MREAP programme, co-ordinated by the University of Strathclyde Design and layout by cci Cover redesign by cci Printed by cci – [email protected]

3
Table of Contents
Acknowledgements ..............................................................................................................6
Toolkit Background ............................................................................................................................... 7 Who is this Toolkit For? ....................................................................................................................... 8 Which Section Has the Answers You Need? ........................................................................................ 8
Chapter 1– Introduction ................................................................................................... 9
1.1 Introduction to Energy ....................................................................................................... 10 1.2 Introduction to Renewable Energy ...................................................................................... 10
Chapter 2 - The Community Energy Development Process ................................... 12 Chapter 3 - Energy for Community Services .............................................................. 22
3.1 How to Assess Needs in a Community ................................................................................. 22 3.2 How to Carry Out a Baseline Energy Audit ............................................................................22 3.3 How Access to Energy Can Impact on Health Care ............................................................... 23 3.4 Energy Supply Options for Health-Care Facilities ...................................................................23 3.5 How Access to Energy Can Impact on Education .................................................................. 25 3.6 Energy Supply Options for Education Facilities ......................................................................26 3.7 How Access to Energy Can Impact Other Sectors ................................................................. 27
Chapter 4 - Technologies for Cooking, Space Heating and Minimising Firewood Use............................................................................................................................29
4.1 Esperanza Stoves ........................................................................................................29 4.1.1 Introduction ................................................................................................................... 29 4.1.2 Materials Required to Build an Esperanza ......................................................................... 30 4.1.3 How to Construct an EsperanzaStove ............................................................................... 31 4.1.4 Problem Solving for the Esperanza Stove .......................................................................... 33
4.2 The Changu Changu Stove .....................................................................................34 4.2.1 Introduction .................................................................................................................... 34 4.2.2 Materials Needed to Make a Changu Changu Stove ...........................................................34 4.2.3 How to Construct a Changu Changu Stove ......................................................................... 34 4.2.4 Problem Solving for the Changu Changu Stove ................................................................... 36
4.3 The Chitetezo Mbaula – The Protecting Stove .................................................. 36 4.3.1 Introduction ................................................................................................................... 36 4.3.2 Materials Needed to Construct a Chitetezo Mbaula ...........................................................37 4.3.3 How to Construct a Chitetezo Mbaula and a Bonfire Kiln ....................................................38 4.3.4 Problem Solving for a Chitetezo Mbaula and a Bonfire Kiln ................................................ 44 4.3.5 Using a Bonfire Kiln ......................................................................................................... 45
4.4 Fuel Efficient Stove Comparison .......................................................................... 46
4.5 The Fireless Cooker ................................................................................................ 47 4.5.1 Introduction ................................................................................................................... 47 4.5.2 Materials Needed to Construct a Fireless Cooker ...............................................................49 4.5.3 How to Construct a Fireless Cooker .................................................................................. 50 4.5.4 Problem Solving with Fireless Cookers .............................................................................. 51
4
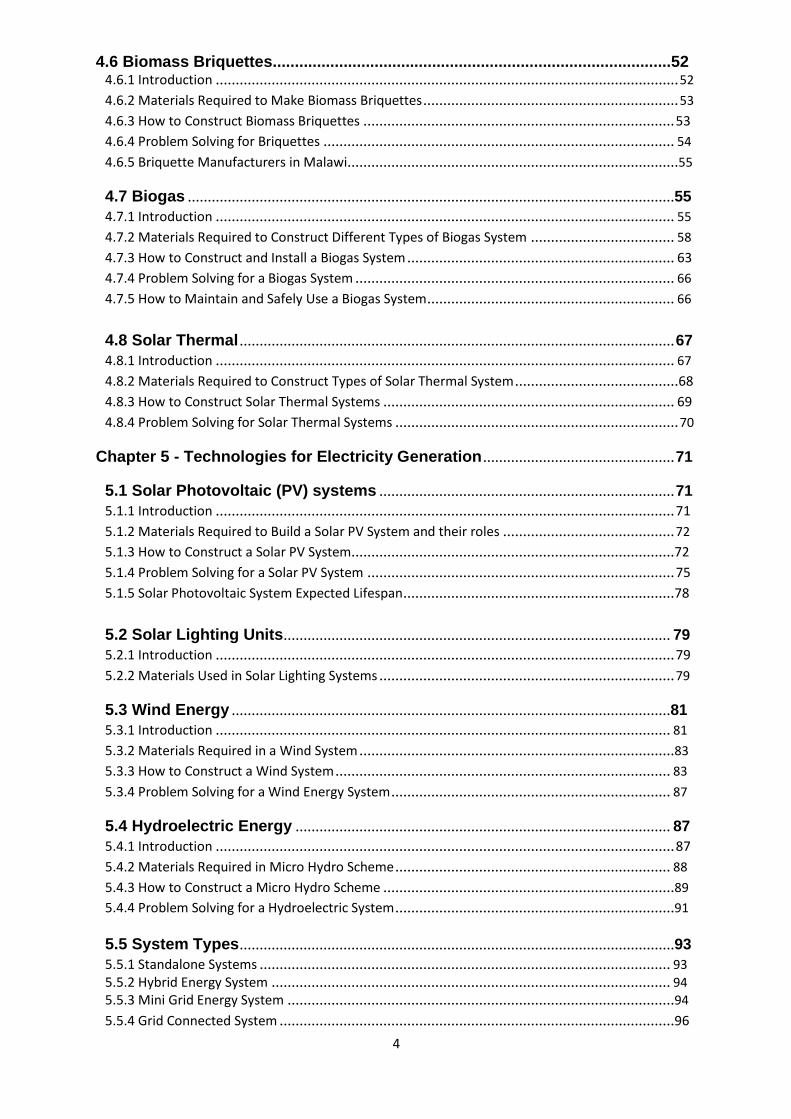
4.6 Biomass Briquettes..........................................................................................52 4.6.1 Introduction .................................................................................................................... 52 4.6.2 Materials Required to Make Biomass Briquettes ................................................................ 53 4.6.3 How to Construct Biomass Briquettes .............................................................................. 53 4.6.4 Problem Solving for Briquettes ........................................................................................ 54 4.6.5 Briquette Manufacturers in Malawi...................................................................................55
4.7 Biogas ..........................................................................................................................55 4.7.1 Introduction ................................................................................................................... 55 4.7.2 Materials Required to Construct Different Types of Biogas System .................................... 58 4.7.3 How to Construct and Install a Biogas System ................................................................... 63 4.7.4 Problem Solving for a Biogas System ................................................................................ 66 4.7.5 How to Maintain and Safely Use a Biogas System .............................................................. 66
4.8 Solar Thermal ............................................................................................................. 67 4.8.1 Introduction ................................................................................................................... 67 4.8.2 Materials Required to Construct Types of Solar Thermal System .........................................68 4.8.3 How to Construct Solar Thermal Systems ......................................................................... 69 4.8.4 Problem Solving for Solar Thermal Systems ....................................................................... 70
Chapter 5 - Technologies for Electricity Generation ................................................ 71
5.1 Solar Photovoltaic (PV) systems .......................................................................... 71 5.1.1 Introduction ................................................................................................................... 71 5.1.2 Materials Required to Build a Solar PV System and their roles ........................................... 72 5.1.3 How to Construct a Solar PV System.................................................................................72 5.1.4 Problem Solving for a Solar PV System ............................................................................. 75 5.1.5 Solar Photovoltaic System Expected Lifespan ....................................................................78
5.2 Solar Lighting Units................................................................................................. 79 5.2.1 Introduction ................................................................................................................... 79 5.2.2 Materials Used in Solar Lighting Systems .......................................................................... 79
5.3 Wind Energy ..............................................................................................................81 5.3.1 Introduction .................................................................................................................. 81 5.3.2 Materials Required in a Wind System ...............................................................................83 5.3.3 How to Construct a Wind System .................................................................................... 83 5.3.4 Problem Solving for a Wind Energy System ...................................................................... 87
5.4 Hydroelectric Energy .............................................................................................. 87 5.4.1 Introduction ................................................................................................................... 87 5.4.2 Materials Required in Micro Hydro Scheme ..................................................................... 88 5.4.3 How to Construct a Micro Hydro Scheme .........................................................................89 5.4.4 Problem Solving for a Hydroelectric System ......................................................................91 5.5 System Types .............................................................................................................93 5.5.1 Standalone Systems ....................................................................................................... 93 5.5.2 Hybrid Energy System .................................................................................................... 94 5.5.3 Mini Grid Energy System .................................................................................................94 5.5.4 Grid Connected System ...................................................................................................96
5
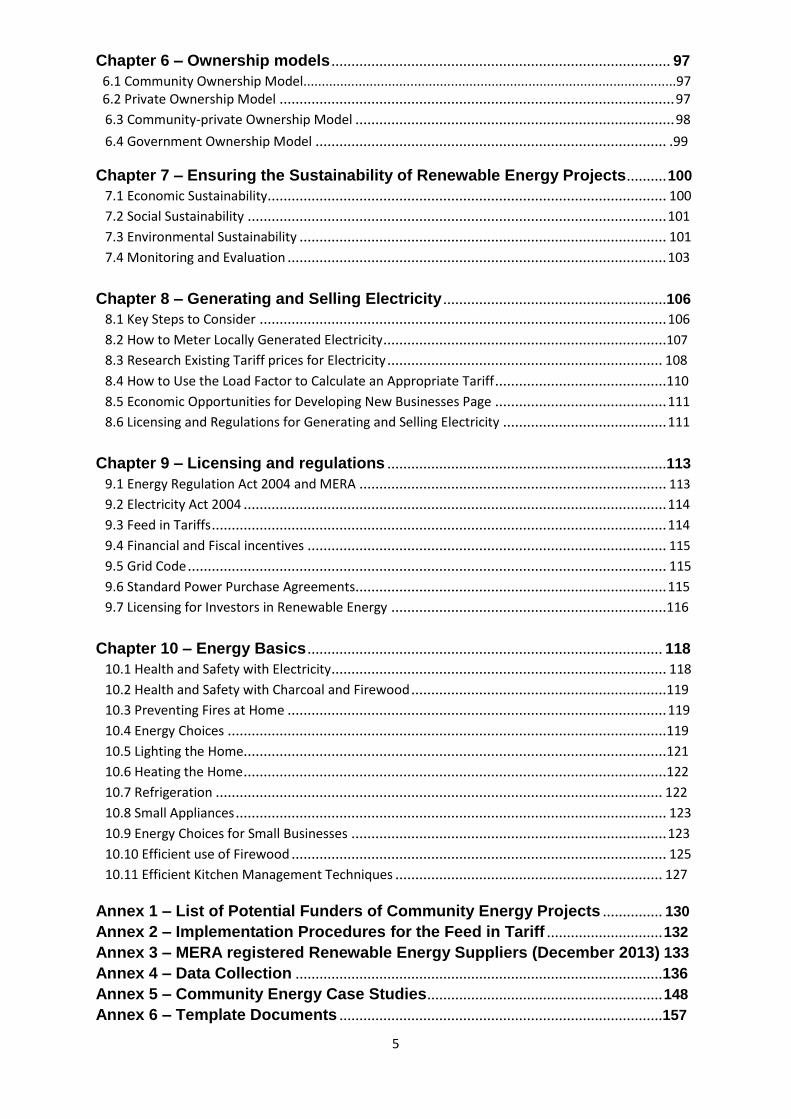
Chapter 6 – Ownership models ..................................................................................... 97 6.1 Community Ownership Model.....................................................................................................97 6.2 Private Ownership Model ................................................................................................... 97
6.3 Community-private Ownership Model ................................................................................ 98 6.4 Government Ownership Model ........................................................................................ .99
Chapter 7 – Ensuring the Sustainability of Renewable Energy Projects .......... 100
7.1 Economic Sustainability .................................................................................................... 100 7.2 Social Sustainability ......................................................................................................... 101 7.3 Environmental Sustainability ............................................................................................ 101 7.4 Monitoring and Evaluation ............................................................................................... 103
Chapter 8 – Generating and Selling Electricity ........................................................106
8.1 Key Steps to Consider ...................................................................................................... 106 8.2 How to Meter Locally Generated Electricity .......................................................................107 8.3 Research Existing Tariff prices for Electricity ..................................................................... 108 8.4 How to Use the Load Factor to Calculate an Appropriate Tariff ...........................................110 8.5 Economic Opportunities for Developing New Businesses Page ........................................... 111 8.6 Licensing and Regulations for Generating and Selling Electricity ......................................... 111
Chapter 9 – Licensing and regulations ......................................................................113
9.1 Energy Regulation Act 2004 and MERA ............................................................................. 113 9.2 Electricity Act 2004 .......................................................................................................... 114 9.3 Feed in Tariffs .................................................................................................................. 114 9.4 Financial and Fiscal incentives .......................................................................................... 115 9.5 Grid Code ........................................................................................................................ 115 9.6 Standard Power Purchase Agreements.............................................................................. 115 9.7 Licensing for Investors in Renewable Energy .....................................................................116
Chapter 10 – Energy Basics ......................................................................................... 118
10.1 Health and Safety with Electricity .................................................................................... 118 10.2 Health and Safety with Charcoal and Firewood ................................................................119 10.3 Preventing Fires at Home ............................................................................................... 119 10.4 Energy Choices ..............................................................................................................119 10.5 Lighting the Home..........................................................................................................121 10.6 Heating the Home ..........................................................................................................122 10.7 Refrigeration ................................................................................................................ 122 10.8 Small Appliances ............................................................................................................ 123 10.9 Energy Choices for Small Businesses ............................................................................... 123 10.10 Efficient use of Firewood .............................................................................................. 125 10.11 Efficient Kitchen Management Techniques ................................................................... 127
Annex 1 – List of Potential Funders of Community Energy Projects ............... 130 Annex 2 – Implementation Procedures for the Feed in Tariff ............................. 132 Annex 3 – MERA registered Renewable Energy Suppliers (December 2013) 133 Annex 4 – Data Collection ............................................................................................136 Annex 5 – Community Energy Case Studies ........................................................... 148 Annex 6 – Template Documents .................................................................................157

6
Acknowledgements The production of this toolkit has seen specific input from a number of sources Nyung'unya CBO of
Likangaliya Village, TA Nazombe from Phalombe; Bondo Micro Hydro Scheme Committee from
Mulanje; Mchenga Stove Production Group working with Concern Universal in Balaka; Solar Energy
Entrepreneurs Committee members working with Solar Aid and COOPI in Salima; Topham Sukasuka,
Emmanuel Mjimapemba, Kondwani Gondwe; Kelvin Tembo; Rhollent Kumwenda; Levis Maolera;
Duncan Masonje;Hastings Zomba; Francis Chagunda; Georgy Davis; Jenny Simons; Penny George;
Peter Dauenhauer; Damien Frame; Sheelagh O’Reilly; Catherine Currie; Drew Corbyn; Martin Ketembo and Sarah Jones. This toolkit has had strategic input from the Community Energy Development Programme Strategic Energy Partners:
Concern Universal Mulanje Renewable Energy Agency (MuREA) Mzuzu University The University of Malawi Polytechnic – WASHTED
And the MREAP Partners:
University of Strathclyde IODPARC Sgurr Energy Community Energy Scotland
The editing of the toolkit was carried out by Martin Ketembo and Sarah Jones.

7
Start Here for Information on Community Led Renewable Energy Projects!
Toolkit Background This toolkit has been written as part of the Community Energy Development Programme (CEDP) and
has been produced through a partnership between Community Energy Scotland (CES) and Mulanje
Renewable Energy Agency (MuREA). This toolkit is supplemented by a booklet; “The Renewable
Energy Information Booklet” which is designed to give communities information on important
factors to consider when designing renewable energy systems and how to carry out basic repair and
maintenance of these systems. This toolkit is also supplemented by a series of diagrams which can
be used by a Development Worker to illustrate key messages from this toolkit. Hard copies of these
materials can be accessed by contacting the Community Energy Development Programme at this
website http://www.communityenergymalawi.org/#!contact/c2ua, alternatively electronic copies
of these materials can be accessed at http://www.communityenergymalawi.org/#!links/c8hd. The CEDP is delivered by Community Energy Scotland, Scotland’s only national charity dedicated to
supporting community energy projects. To find out more about Community Energy Scotland visit
www.communityenergyscotland.org.uk and to find out more on the CEDP and the partners that it
works with visit www.communityenergymalawi.org. The CEDP is funded by the Scottish
Government under the Malawi Renewable Energy Action Programme (MREAP). The MREAP came
about following a scoping study led by Professor Graham Ault of the Department of Electrical and
Electronic Engineering, University of Strathclyde.To read more on the scoping study visit
http://www.strath.ac.uk/eee/energymalawi/information/ and if you would like to learn more about
the field work, reports and research undertaken by IOD Parc (one of the MREAP project partners) to
assess the status of off-gird community owned renewable energy projects in Malawi please visit the
documents under the “ISP Outputs” heading at
http://www.strath.ac.uk/eee/energymalawi/documentation/. You can find out more on the
involvement of the Scottish Government in Malawi visit
http://www.scotland.gov.uk/Topics/International/int-dev/Maps/Malawi/MREAP.
8
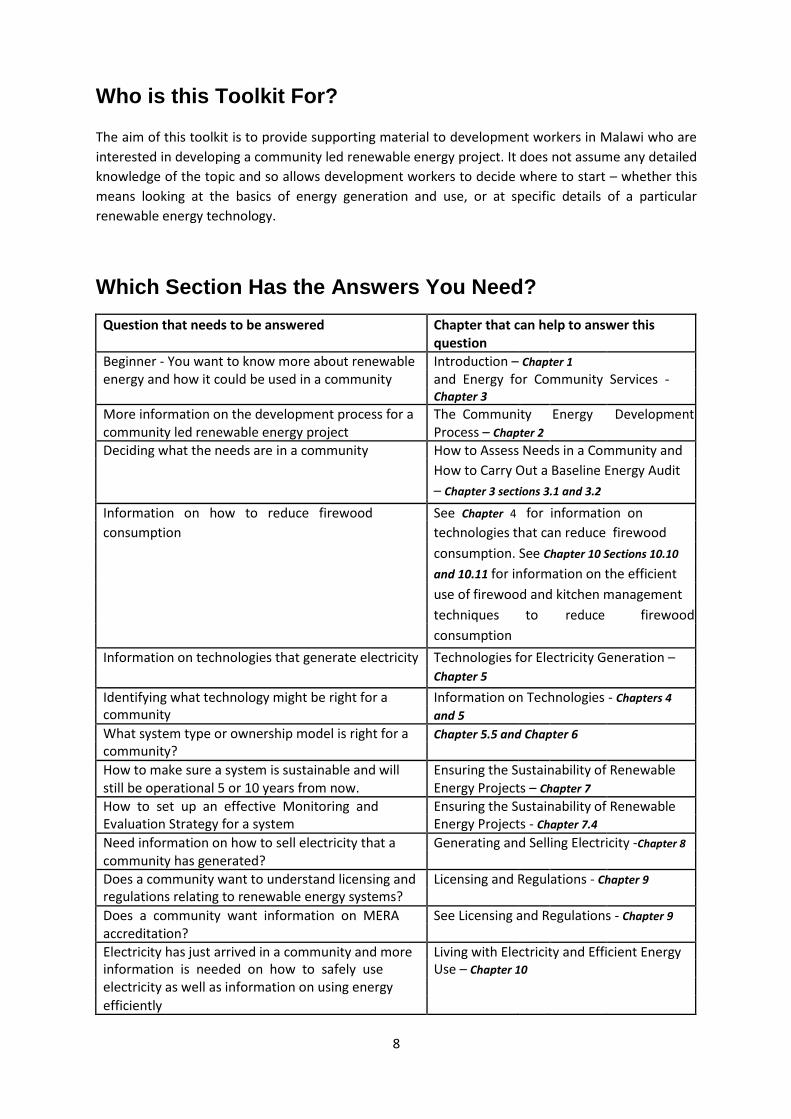
Who is this Toolkit For? The aim of this toolkit is to provide supporting material to development workers in Malawi who are
interested in developing a community led renewable energy project. It does not assume any detailed
knowledge of the topic and so allows development workers to decide where to start – whether this
means looking at the basics of energy generation and use, or at specific details of a particular
renewable energy technology.
Which Section Has the Answers You Need?
Question that needs to be answered Chapter that can help to answer this question
Beginner - You want to know more about renewable Introduction – Chapter 1 energy and how it could be used in a community and Energy for Community Services -
Chapter 3 More information on the development process for a The Community Energy Development community led renewable energy project Process – Chapter 2 Deciding what the needs are in a community How to Assess Needs in a Community and
How to Carry Out a Baseline Energy Audit – Chapter 3 sections 3.1 and 3.2
Information on how to reduce firewood See Chapter 4 for information on consumption technologies that can reduce firewood
consumption. See Chapter 10 Sections 10.10 and 10.11 for information on the efficient use of firewood and kitchen management techniques to reduce firewood consumption
Information on technologies that generate electricity Technologies for Electricity Generation – Chapter 5
Identifying what technology might be right for a Information on Technologies - Chapters 4 community and 5 What system type or ownership model is right for a Chapter 5.5 and Chapter 6 community? How to make sure a system is sustainable and will Ensuring the Sustainability of Renewable still be operational 5 or 10 years from now. Energy Projects – Chapter 7 How to set up an effective Monitoring and Ensuring the Sustainability of Renewable Evaluation Strategy for a system Energy Projects - Chapter 7.4 Need information on how to sell electricity that a Generating and Selling Electricity -Chapter 8 community has generated? Does a community want to understand licensing and Licensing and Regulations - Chapter 9 regulations relating to renewable energy systems? Does a community want information on MERA See Licensing and Regulations - Chapter 9 accreditation? Electricity has just arrived in a community and more Living with Electricity and Efficient Energy information is needed on how to safely use Use – Chapter 10 electricity as well as information on using energy efficiently
9
Chapter 1
INTRODUCTION Before we look at the hows and whys in detail, it is worth examining the general energy context in Malawi. The application of renewable energy is not new in Malawi. In the early 1900s, Christian missionaries
used solar PV for lighting, solar thermal for water heating and windmills for water pumping in a
number of their churches, health and educational institutions. These technologies largely came in
through donations. To facilitate the development of RETs in the country in 1999 the DoEA prepared
an umbrella program, the National Sustainable and Renewable Energy Program (NSREP) funded by
the UNDP. The objective was to “increase access to and efficient use of renewable energy in Malawi
for a larger cross-section of the rural and peri-urban population and to provide a viable and
sustainable contribution to the country’s energy mix.”1 The conceptualization of NSREP resulted in
the formulation and implementation of a number of energy projects. Issues concerning energy in Malawi are dealt with by The Ministry of Energy. The Ministry has one
Department which was established in 1992 as one of the three departments that constituted the
then Ministry of Energy and Mining. The Government of Malawi adopted the first ever Energy Policy
on 22nd
January 2003. One of the central pillars of the Policy is the liberalization of the Energy Sector
to allow for greater private sector participation and investment. Malawi has one of the lowest rates of access of electricity to its population. Currently, only 9 percent
of the population has access to electricity2. Wood fuel (firewood and charcoal) is the main source of
energy for households in the country3 and this high demand for wood as a fuel source has
contributed to serious deforestation and degradation of the environment. Deforestation, in turn, has
resulted in heavy river siltation creating further problems in the generation of hydroelectric power,
which accounts for almost 100% of the grid supply. The average household electrification rate in
rural areas in Malawi is still less than the national average, and reportedly does not reach even 1%4.
This low electrification rate is considered to be one of causes of Malawi`s low average life span, low
literacy rate and poverty. The Government of Malawi recognizes that renewable energy sources such as small hydro, wind,
biomass, biogas, solar, geothermal and municipal waste have the potential to increase the power
supply and diversification of electricity generation sources in Malawi as well as improving income
and employment through improved livelihood opportunities. You can read more on the role of
renewable energy in promoting sustainable livelihoods and other benefits in Chapter 3. The GoM developed the national energy policy and Energy Regulation Act of 2004 which encourages
the promotion and development of these indigenous renewable energy sources to enhance the
country’s electricity supply capacity. Communities which are at a distance from the existing grid or
proposed grid extension programme stand to benefit from renewable energy which in addition to
1Government of Malawi (2008) Draft Renewable Energy Strategy, Dept Of Energy Affairs, Lilongwe
2 Government Of Malawi (2013) Energy Sector Investment Profile,
3Government Of Malawi(2003) Malawi Energy Policy , Department Of Energy Affairs, Lilongwe
4Government Of Malawi, (2008) Biomass Energy Strategy, Dept Of Energy, Lilongwe
10
being clean, is locally available. Although some renewable energy technologies are expensive, cheap
and affordable technologies do exist which communities can access. This toolkit will guide
communities through the steps to enable them to harness the affordable renewable energy
technologies available in “The Warm Heart of Africa”.
1.1 Introduction to Energy ‘Energy’ can be defined as ‘the ability to do work’ and the rate at which energy is generated or used
is measured in Watts. The unit of Watts most commonly used when discussing energy consumption
is the kilo Watt – i.e. 1000 Watts – or 1kW.
Energy rating Electrical appliances are rated in kilowatts. So, for example an oil filled radiant heater is rated at
1.5kW. This means that when the heater is switched on it will immediately consume up to a
maximum 1.5kW. Where large amounts of energy are generated or consumed, the units used are
more likely to be in one of the following formats; Mega Watt (1,000,000 Watts or 1MW), Giga Watt
(1,000,000,000 Watts or 1GW) or even Tera Watt (1,000,000,000,000 Watts or 1TW).
Energy consumption Units of energy consumption are usually expressed in terms of the amount of energy used over a
certain period – the standard term for this is kilowatt hours or kWh i.e. the amount of energy
consumed over an hour. The 1.5kW heater if left on for an hour with a constant electrical supply will
therefore consume 1.5kWh of energy. By the same token, a 60W light bulb left on for an hour will
consume 0.06kWh = 60 Watts X 1 hour = 60 Watt hours or 0.06 kWh. Electricity is sold by the kWh,
which equals 1 unit. The current domestic tariff is around 22.5MWK per kWh (see page 103 for
ESCOM tariffs as of February 2014. Therefore keeping the electric heater on for 1 hour will consume
1.5 units of electricity – 33.75 MWK. Energy generation The same rationale is applied to energy generation. Generators are rated in kW or MW, indicating
the maximum that can be generated at any moment. If a 1kW generator is operating at full capacity
for 1 hour it will generate 1kWh. However, the amount of energy generated will depend on how
much useful energy is available to power the generator. It will only generate to its maximum rated
level if it is supplied with sufficient useful energy. This applies equally to a small diesel generator or a
wind generator, the only difference is that a small diesel generator will generally either be full on
(with fuel), or off (no fuel) whereas the output from a wind generator will vary with wind speed.
1.2 Renewable Energy – An Introduction Renewable energy is generally defined as energy that comes from resources which are continually replenished on a human timescale through biological reproduction or other naturally recurring processes. Renewable resources include sunlight, wind, water, waves and geothermal energy. While many renewable energy projects are large-scale, renewable technologies are also suited to rural and remote areas, where energy is often crucial in human development. As sources of renewable energy are free, fuel cost is often free (the exception being biomass which
will have a cost in terms of sourcing pellets, briquettes woodchip or logs). However whilst the fuel is
free or low cost, the capital investment required to harness the renewable energy can sometimes be
quite significant compared to traditional (fossil fuel) based systems. All systems need to be regularly
maintained, just as with traditional systems. Some organizations provide financial assistance to
11
community groups undertaking renewable energy projects, for a full list of organisations and
foundations that will fund renewable energy projects in Malawi see Annex 1. From the user’s perspective, there is no reason for any significant difference in operation of renewable systems compared with traditional sources – user-friendly control panels are standard. With certain technologies, however, there is a requirement to be aware of the limits of operation and to think a bit more carefully about energy requirements. However, the on-going cost of renewable energy based systems is likely to be lower than those based on fossil sources and fossil fuels are widely expected to increase in cost as global demand increases. In addition, as the use of renewable systems increase, economies of scale will mean installation costs will become more competitive. Renewable energy systems will therefore become an increasingly attractive option. The advantages of renewable energy are that:
It is sustainable and should not ever deplete.
In regions that produce renewable energy technologies, economic growth is seen with the creation of high value jobs
Fuel should be free or low cost It is environmentally friendly The facilities used to produce renewable energy require less maintenance.
A disadvantage is that:
Whilst renewable energy resources are often abundant, because the resource is not as energy dense, it can take time for you to collect enough of the resource to convert
into the energy that you need.
The supply is not always reliable, which forces producers to always have a back-up
source or alternative material on hand. The cost of storing energy in batteries and
other energy storage devices is decreasing all the time and is increasingly becoming
an option for communities in Malawi.
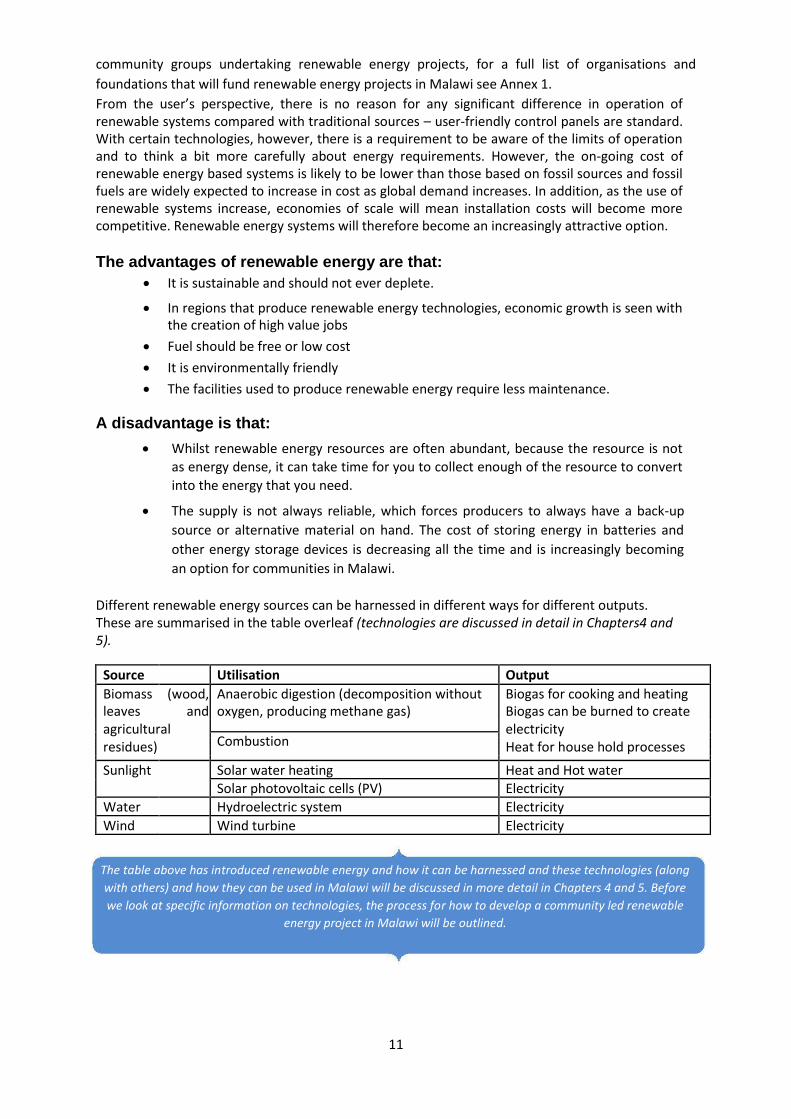
Different renewable energy sources can be harnessed in different ways for different outputs. These are summarised in the table overleaf (technologies are discussed in detail in Chapters4 and 5).
Source Utilisation Output
Biomass (wood, Anaerobic digestion (decomposition without Biogas for cooking and heating
leaves and oxygen, producing methane gas) Biogas can be burned to create
agricultural electricity
Combustion
residues) Heat for house hold processes
Sunlight Solar water heating Heat and Hot water
Solar photovoltaic cells (PV) Electricity
Water Hydroelectric system Electricity
Wind Wind turbine Electricity
The table above has introduced renewable energy and how it can be harnessed and these technologies (along
with others) and how they can be used in Malawi will be discussed in more detail in Chapters 4 and 5. Before
we look at specific information on technologies, the process for how to develop a community led renewable
energy project in Malawi will be outlined.
12
Chapter 2
THE COMMUNITY ENERGY DEVELOPMENT PROCESS
Introduction
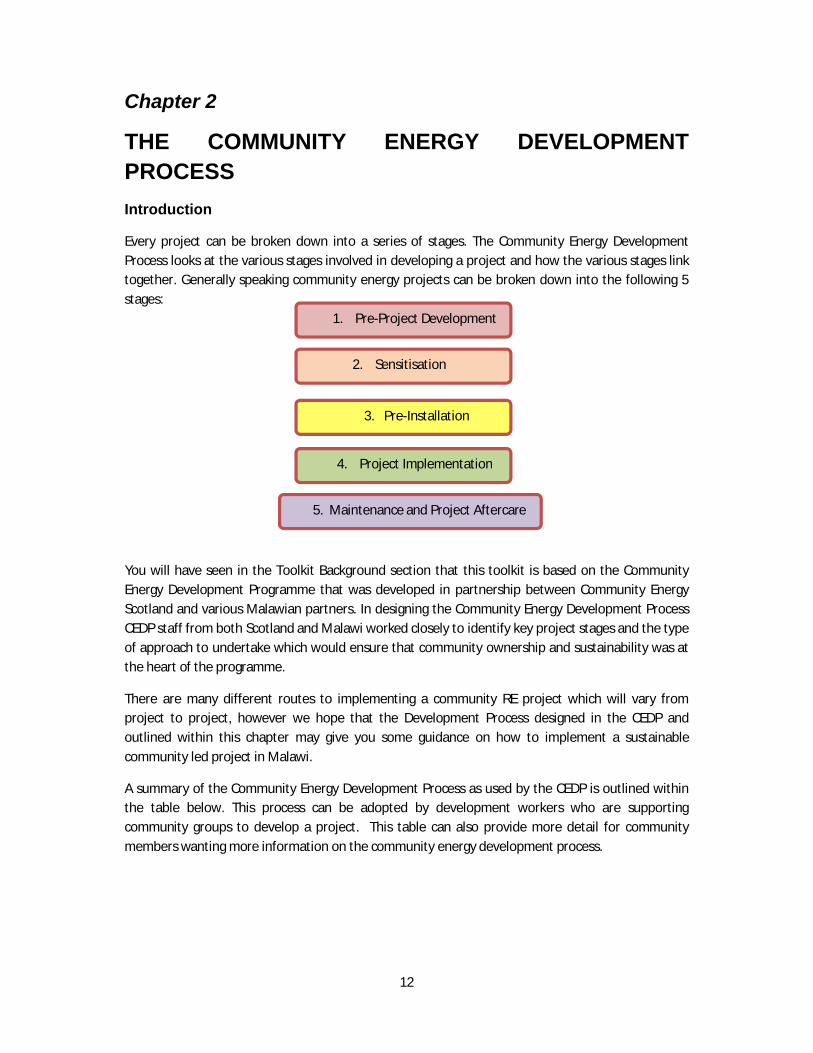
Every project can be broken down into a series of stages. The Community Energy Development Process looks at the various stages involved in developing a project and how the various stages link together. Generally speaking community energy projects can be broken down into the following 5 stages:
You will have seen in the Toolkit Background section that this toolkit is based on the Community Energy Development Programme that was developed in partnership between Community Energy Scotland and various Malawian partners. In designing the Community Energy Development Process CEDP staff from both Scotland and Malawi worked closely to identify key project stages and the type of approach to undertake which would ensure that community ownership and sustainability was at the heart of the programme.
There are many different routes to implementing a community RE project which will vary from project to project, however we hope that the Development Process designed in the CEDP and outlined within this chapter may give you some guidance on how to implement a sustainable community led project in Malawi.
A summary of the Community Energy Development Process as used by the CEDP is outlined within the table below. This process can be adopted by development workers who are supporting community groups to develop a project. This table can also provide more detail for community members wanting more information on the community energy development process.
1. Pre-Project Development
2. Sensitisation
4. Project Implementation
5. Maintenance and Project Aftercare
3. Pre-Installation
13
ACTIVITY OBJECTIVES
1. Pre-Project Development
For a development worker, the first stage of the pre-project development process will be to outline the key aims and objectives of your project; you will then need to decide where your project will be implemented. Please note that for all organisations hoping to develop a community energy project in Malawi it is important that your project is in line with the Paris Declaration principals and therefore fits within the Government of Malawi plans and priorities (for more info on this see Chapter1).
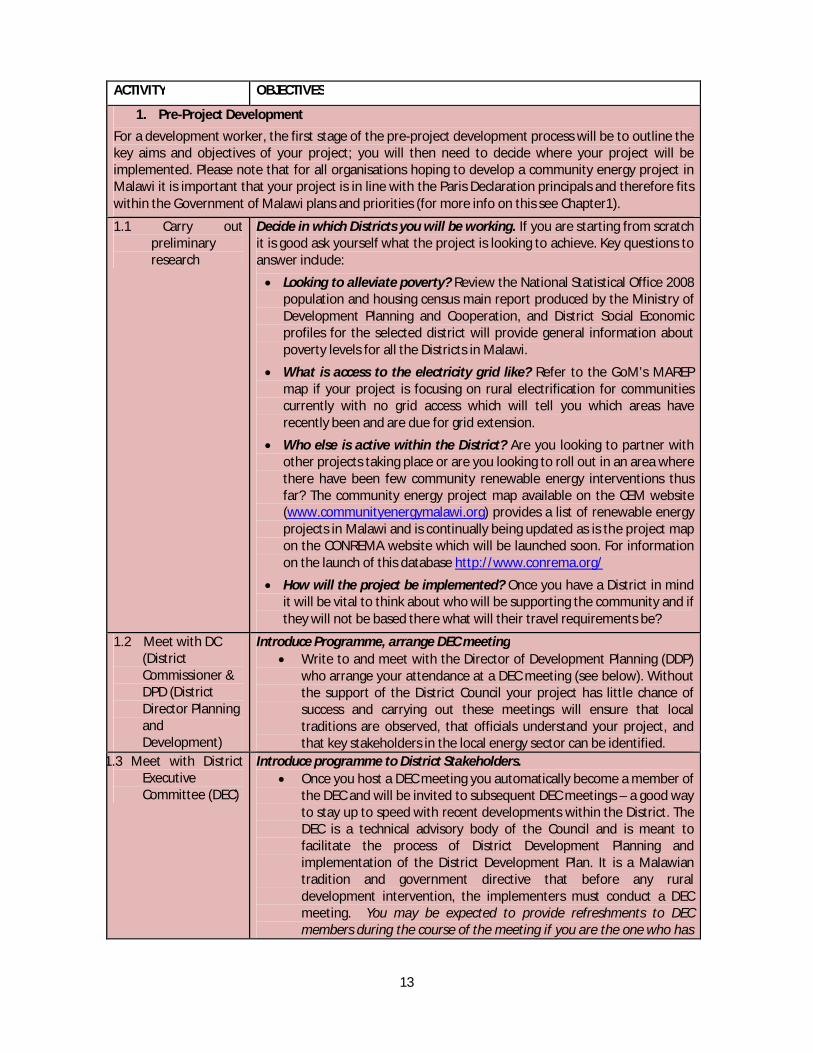
1.1 Carry out preliminary research
Decide in which Districts you will be working. If you are starting from scratch it is good ask yourself what the project is looking to achieve. Key questions to answer include:
Looking to alleviate poverty? Review the National Statistical Office 2008 population and housing census main report produced by the Ministry of Development Planning and Cooperation, and District Social Economic profiles for the selected district will provide general information about poverty levels for all the Districts in Malawi.
What is access to the electricity grid like? Refer to the GoM’s MAREP map if your project is focusing on rural electrification for communities currently with no grid access which will tell you which areas have recently been and are due for grid extension.
Who else is active within the District? Are you looking to partner with other projects taking place or are you looking to roll out in an area where there have been few community renewable energy interventions thusfar? The community energy project map available on the CEM website (www.communityenergymalawi.org) provides a list of renewable energy projects in Malawi and is continually being updated as is the project map on the CONREMA website which will be launched soon. For information on the launch of this database http://www.conrema.org/
How will the project be implemented? Once you have a District in mind it will be vital to think about who will be supporting the community and if they will not be based there what will their travel requirements be?
1.2 Meet with DC (District Commissioner & DPD (District Director Planning and Development)
Introduce Programme, arrange DEC meeting Write to and meet with the Director of Development Planning (DDP)
who arrange your attendance at a DEC meeting (see below). Without the support of the District Council your project has little chance of success and carrying out these meetings will ensure that local traditions are observed, that officials understand your project, and that key stakeholders in the local energy sector can be identified.
1.3 Meet with District Executive Committee (DEC)
Introduce programme to District Stakeholders. Once you host a DEC meeting you automatically become a member of
the DEC and will be invited to subsequent DEC meetings – a good way to stay up to speed with recent developments within the District. The DEC is a technical advisory body of the Council and is meant to facilitate the process of District Development Planning and implementation of the District Development Plan. It is a Malawian tradition and government directive that before any rural development intervention, the implementers must conduct a DEC meeting. You may be expected to provide refreshments to DEC members during the course of the meeting if you are the one who has
14
called the meeting.
1.4 Meet with District Environmental Sub- Committee and Social Affairs (DESC)
Determine possible communities to work with. Once official meetings with the DEC have taken place, speak with the
DESC about which communities would be good to work with. The DESC comprise government officials and NGOs who carry out and oversee environmental activities within the District. They have a good working knowledge of local communities and can signpost you to those with a particular need or drive to address their energy needs.
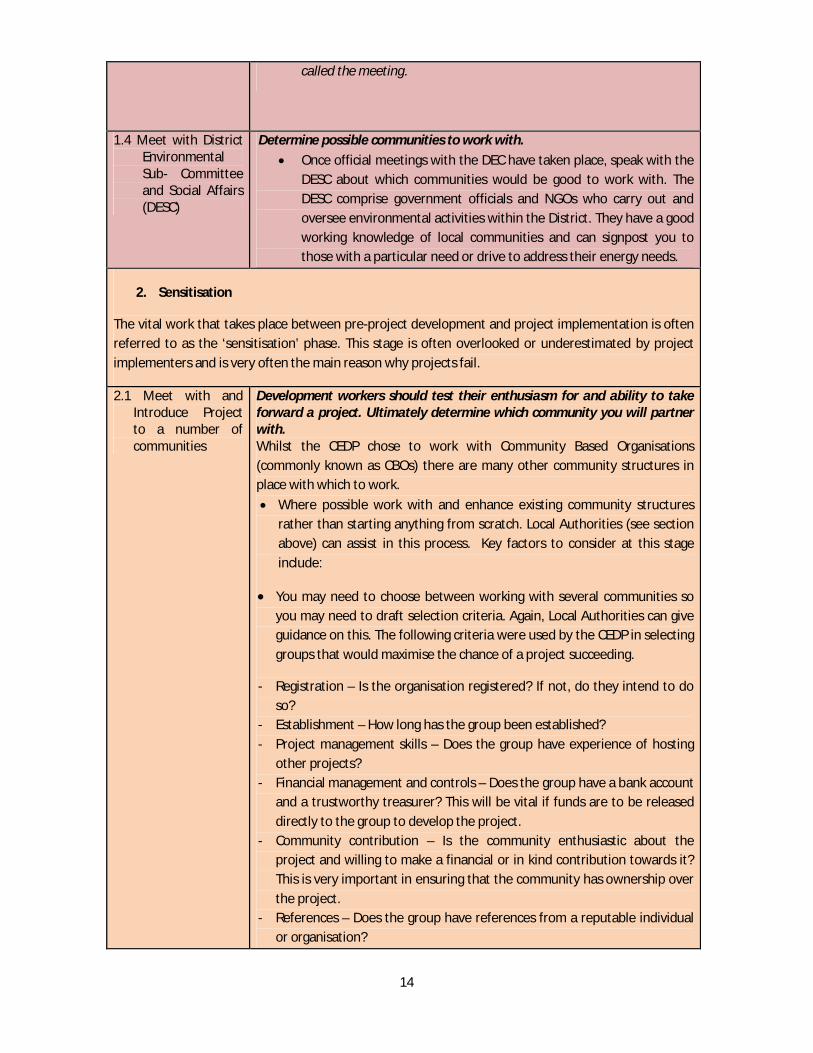
2. Sensitisation
The vital work that takes place between pre-project development and project implementation is often referred to as the ‘sensitisation’ phase. This stage is often overlooked or underestimated by project implementers and is very often the main reason why projects fail.
2.1 Meet with and Introduce Project to a number of communities
Development workers should test their enthusiasm for and ability to take forward a project. Ultimately determine which community you will partner with.Whilst the CEDP chose to work with Community Based Organisations (commonly known as CBOs) there are many other community structures in place with which to work. Where possible work with and enhance existing community structures
rather than starting anything from scratch. Local Authorities (see section above) can assist in this process. Key factors to consider at this stage include:
You may need to choose between working with several communities so you may need to draft selection criteria. Again, Local Authorities can give guidance on this. The following criteria were used by the CEDP in selecting groups that would maximise the chance of a project succeeding.
- Registration – Is the organisation registered? If not, do they intend to do so?
- Establishment – How long has the group been established? - Project management skills – Does the group have experience of hosting
other projects? - Financial management and controls – Does the group have a bank account
and a trustworthy treasurer? This will be vital if funds are to be released directly to the group to develop the project.
- Community contribution – Is the community enthusiastic about the project and willing to make a financial or in kind contribution towards it? This is very important in ensuring that the community has ownership over the project.
- References – Does the group have references from a reputable individual or organisation?

15
- Enthusiasm – is there drive for the project, especially if community contributions are expected?
Before making a final selection, meet with the communities and the Group Village Head and get a feel for what the community is like. The community may have different priorities, they may be speaking with another development organisation to deliver such a project or your project would be better implemented elsewhere (don’t assume that all development partners keep the DEC up to speed with their plans for project development!)
2.2 Give feedback to unselected communities
Explain to unsuccessful communities as to why they were not chosen to partake and give suggestions as to areas they may want to work on to increase their capacity to take forward a development project. Groups involved in the CEDP found this useful as it provided advice on areas that they could improve on so that they might be considered for other developments in the future. On this process, Mavuto (Southern Region CEDP Development Officer) said:
2.3 Carry out detailed Needs Assessment with Selected Community
See Chapter 3 Section 1 for more detail
Development worker to gain detail on community need and priorities.Now that a group has been selected to work with, a needs assessment ought to be carried out to ascertain what the main issues are in the community.
Do not go into a community with preconceptions, the project is based on community need so if the project does not address a need and does not receive community buy-in it will most likely fail.
The outcome of the needs assessment will determine what type of renewable energy project should be implemented so it is important that everyone in the community has the opportunity to voice their opinion, otherwise there will be issues with community buy-in.
The needs assessment should be carried out in person, in the community, by an individual that is confident and competent to carry out this activity.
Everyone within the community is given the opportunity to contribute and it is important they are not adversely influenced by other community members. To aid this, run separate focus group discussions for different demographics of the community i.e. men,
“The response from those CBOs that were not successful was astonishing. Initially we thought that they would be demoralised after learning that they have not been successful but ironically they were happy to know their fate. They said that it was probably the first time they have received any feedback from development workers to their area. The feedback itself helped them to see which areas they need to work on as a development arm of the community. This will help the CBO to reorganise for the benefit of the communities.”
16
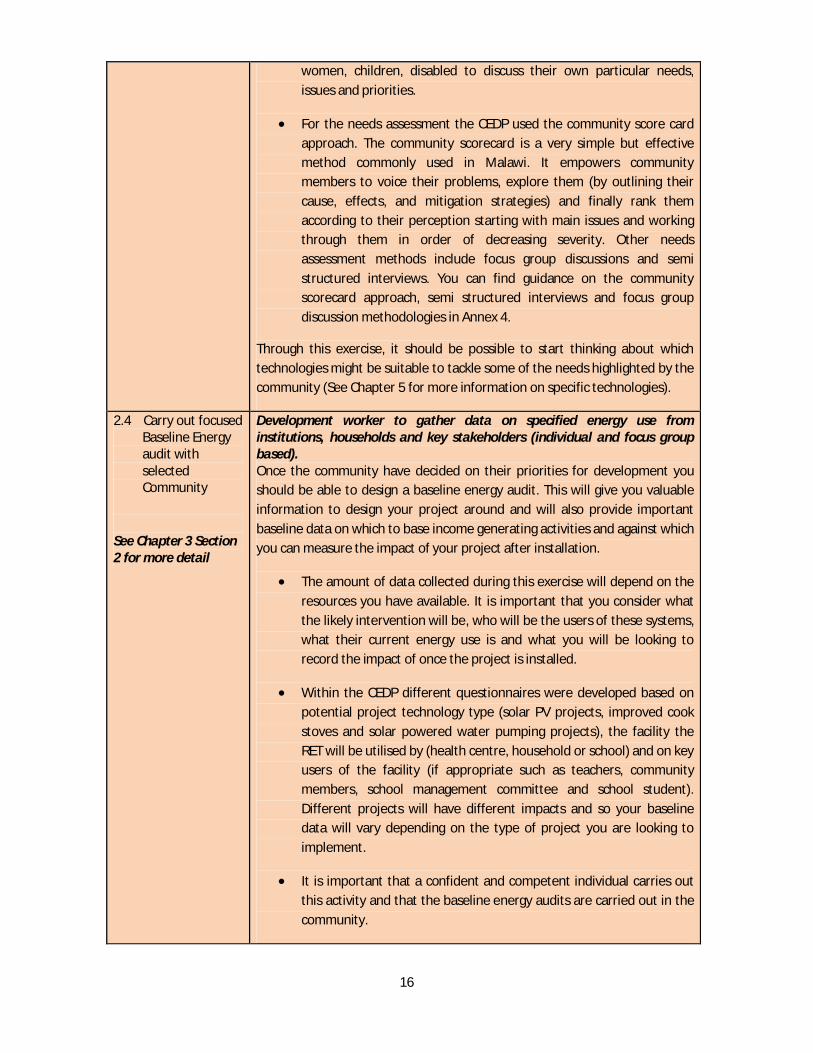
women, children, disabled to discuss their own particular needs, issues and priorities.
For the needs assessment the CEDP used the community score card approach. The community scorecard is a very simple but effective method commonly used in Malawi. It empowers community members to voice their problems, explore them (by outlining their cause, effects, and mitigation strategies) and finally rank them according to their perception starting with main issues and working through them in order of decreasing severity. Other needs assessment methods include focus group discussions and semi structured interviews. You can find guidance on the community scorecard approach, semi structured interviews and focus group discussion methodologies in Annex 4.
Through this exercise, it should be possible to start thinking about which technologies might be suitable to tackle some of the needs highlighted by the community (See Chapter 5 for more information on specific technologies).
2.4 Carry out focused Baseline Energy audit with selected Community
See Chapter 3 Section 2 for more detail
Development worker to gather data on specified energy use from institutions, households and key stakeholders (individual and focus group based).Once the community have decided on their priorities for development you should be able to design a baseline energy audit. This will give you valuable information to design your project around and will also provide important baseline data on which to base income generating activities and against which you can measure the impact of your project after installation.
The amount of data collected during this exercise will depend on the resources you have available. It is important that you consider what the likely intervention will be, who will be the users of these systems, what their current energy use is and what you will be looking to record the impact of once the project is installed.
Within the CEDP different questionnaires were developed based on potential project technology type (solar PV projects, improved cook stoves and solar powered water pumping projects), the facility the RET will be utilised by (health centre, household or school) and on key users of the facility (if appropriate such as teachers, community members, school management committee and school student). Different projects will have different impacts and so your baseline data will vary depending on the type of project you are looking to implement.
It is important that a confident and competent individual carries out this activity and that the baseline energy audits are carried out in the community.
17
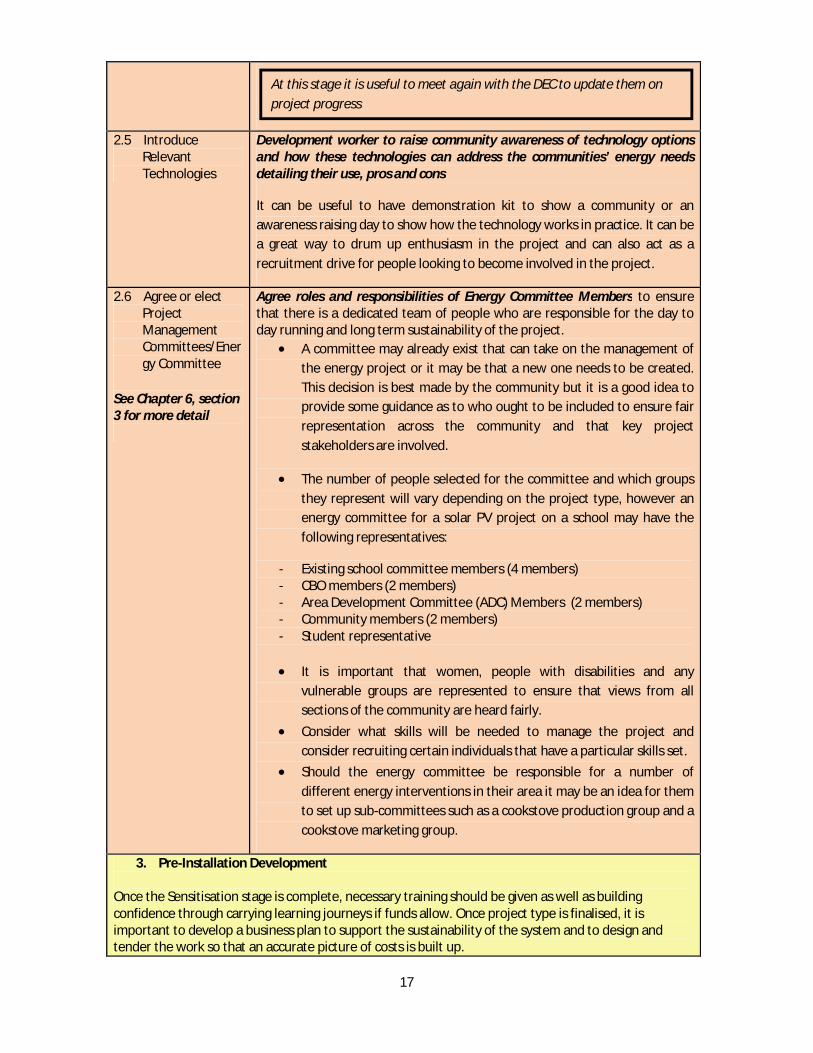
2.5 Introduce Relevant Technologies
Development worker to raise community awareness of technology options and how these technologies can address the communities’ energy needs detailing their use, pros and cons
It can be useful to have demonstration kit to show a community or an awareness raising day to show how the technology works in practice. It can be a great way to drum up enthusiasm in the project and can also act as a recruitment drive for people looking to become involved in the project.
2.6 Agree or elect Project Management Committees/Energy Committee
See Chapter 6, section 3 for more detail
Agree roles and responsibilities of Energy Committee Members to ensure that there is a dedicated team of people who are responsible for the day to day running and long term sustainability of the project.
A committee may already exist that can take on the management of the energy project or it may be that a new one needs to be created. This decision is best made by the community but it is a good idea to provide some guidance as to who ought to be included to ensure fair representation across the community and that key project stakeholders are involved.
The number of people selected for the committee and which groups they represent will vary depending on the project type, however an energy committee for a solar PV project on a school may have the following representatives:
- Existing school committee members (4 members)- CBO members (2 members)- Area Development Committee (ADC) Members (2 members)- Community members (2 members)- Student representative
It is important that women, people with disabilities and any vulnerable groups are represented to ensure that views from allsections of the community are heard fairly.
Consider what skills will be needed to manage the project and consider recruiting certain individuals that have a particular skills set.
Should the energy committee be responsible for a number of different energy interventions in their area it may be an idea for them to set up sub-committees such as a cookstove production group and a cookstove marketing group.
3. Pre-Installation Development
Once the Sensitisation stage is complete, necessary training should be given as well as building confidence through carrying learning journeys if funds allow. Once project type is finalised, it is important to develop a business plan to support the sustainability of the system and to design and tender the work so that an accurate picture of costs is built up.
At this stage it is useful to meet again with the DEC to update them on project progress
18
3.1 Carry out Skills Audit within the community
See Chapter 6, section 3 for more detail
Capacity gaps identified and programme of training determinedThe first stage of this to find out who has what skills and then set that against what skills are required to manage and operate the system. From there you can develop an appropriate training schedule for the community. (See Chapter 7 for information on how training needs fit into the type of project you are developing).
3.2 Carry out community training workshops
See Chapter 6, section 3 for more detail
Raise community confidence and capacity to manage, operate and sustain the systemThe basic training listed below as well as other necessary training sessions should be provided to the Energy Committee where funding allows. It is this training which will build the capacity and the confidence of the Energy Committee and wider community group and prepare them for the management of the project. If community groups do not have or are not given the training they need to effectively manage and operate the project themselves, it is highly likely that the project will fail once the support of the funder is withdrawn.
Village Savings and Loan Training – This training can be important for community members and in particular stove production groups and areas where solar lanterns are likely to be sold. It is aimed at empowering the participants with knowledge and skills on savings and business management.
Leadership training – This training is designed for members of the Energy Committee so that they gain confidence and skills in management. Topics included: Qualities of a leader; Duties and responsibilities of leaders; Leadership in the Energy Committee
CBO management training - This training is aimed at empowering community organisation leaders with managerial knowledge and skills to help them effectively run their organisation. Topics include Organization management; Conflict resolution and management; CBO management; Development of work plans and reports; Resources mobilization and Project management.
Renewable Energy Technologies (RETs) training – This training is aimed at empowering the energy committee and members of the community organisation with knowledge of various RETs. This is essential so that people within the community understand the technologies which will be implemented in their community. Topics included: a discussion of different RETs, how RETs work, how they are implemented, where they can be implemented, their benefits, the benefits of RETs in rural communities in Malawi and other relevant emerging issues.
Cookstove production – Cook stove producer groups are all trained in the production of stoves. To ensure you get the best training, enquire if there are already stove production groups in your area which could provide training. There is detailed guidance on how to make a variety of cookstove models in Chapter 4.
Marketing and Selling of Cookstoves – It is important that there is a good
19
strategy in place for marketing and sale of cook stoves once they have been produced. Advice should be given to community members on how to advertise and how to manage the business of selling cook stoves.
3.3 Carry out Learning Journeys
See Chapter 6, section 3 for more detail
Allow community to see a live project for themselves and understand some of the opportunities and pitfalls from their peersThe energy committees that the CEDP worked with found “Learning Journeys” interesting, informative and highly useful as the groups could see what issues they may encounter with their system, how to fix those issues or prevent them from occurring in the first place. Groups also benefit from networking with other groups that are involved with community energy projects. This will build a further source of support and information for groups involved in community energy projects.
3.4 Business Planning Process
See Chapter 7, section 1 for more detail on how to make a system more sustainable through the adoption of a business plan
Finalise a business plan to support the sustainability of the systemAll systems will require a certain amount of maintenance and repair during their lifespan. To make sure that there are sufficient funds to cover the repair and maintenance of the installed system it may be necessary to think of a number of income generating ideas linked to the renewable technologies. Examples include:
If a solar PV system is to be installed, surplus electricity can be used for mobile phone charging, battery charging, a barber shop or to refrigerate cold drinks.
If funds are available, purchase a small number of solar lanterns directly from a producer. In this way, they can be purchased at a wholesale price and sold on to community members for a small profit. The profits can be used to purchase more lanterns AND to go towards a maintenance fund for the new system.
Groups may need support discussing their income generating ideas, the development partner should make time to discuss the business plan with the group in the community and support the group to make a plan which will ensure sufficient income for the project. For examples of Business Plan templates see Annex 6.
3.5 Design and Tendering Process for system
See Chapters 4 and 5for more detail on technology specific tips that will ensure system sustainability
Determine contractor that represents quality and value for money.At this stage the needs of the community should have been identified as well as potential renewable technologies to address these needs. Representatives from the groups will have undergone the necessary training to provide a solid foundation for management and operation the RET and where funding allows, groups will have gone to visit operational projects to learn from the experience of their peers. Following input from supporting officers and the training sessions, groups should therefore have a good idea of the type of project that they would like to install. The next step is to obtain quotes from different system supplier and installers.
The first step is to design your system. Some general guidance on
20
what to look out for when designing a system can be found in the relevant technology sections in Chapters 4 and 5. Unless you are a confident renewable energy practitioner we advise you to employ the services of a professional to help you design the system which will take into account the demand of the system users and possible income generating activities too. If you would like help with this please contact your local CEM Development Officer.
Once you have your design in place you are ready to put your project out to tender. It is always advisable to get several different quotes to ensure value for money. You should also consider the geographical locations of your contractors in relation to the project location for ease of access to possible future repairs. Whoever you select, you ought to ensure that they have Malawi Energy Regulatory Authority (MERA) accreditation. For more information on MERA and MERA accreditation see Chapter 9 and see Annex 3.
Seek references from other groups who have had work done by a contractor, they can give valuable feedback on the quality of their work and follow up support.
4. Project Implementation
Now that you have commissioned the project, it is time for the exciting part, system installation! The factors to consider when reaching this stage are outlined below. Installation checklists for specific technologies are outlined in Chapters 4 and 5.
4.1 System installation
See Chapters 4, 5 and 6 for further discussion on important factors to consider at this stage.
Some companies will only supply parts, some will only install the systems. To make things easier, consider commissioning a company who will supply parts AND install the system. This can make the installation process easier.
Make sure that the company is MERA accredited (see Chapter 9 and Annex 3 for more detail on this).
Are there similar projects in your area which are being developed at the same time? If so, look at coming together to find a single supplier and installer. You could reduce costs as both systems can be installed at the same time thus reducing travel costs for the company.
Some materials and components may need to be imported from abroad so make sure you plan enough time for all components to arrive.
Think about travel logistics. Is it possible to visit the community where the project will be in the rainy season? If not, the installation may need to be postponed.
It will be important that development workers are present during critical stages of the installation. This will ensure that the installation process progresses smoothly.
21
Consider the security of your system – will you need to have a guard to protect the system once it is installed? This may need to be a cost that is incorporated into the systems maintenance fund
5. Maintenance and Project Aftercare
Once your system is installed there is still much to do in regard to project monitoring and evaluation, system repair and maintenance and implantation of the planned income generation activities.
5.1 Monitoring and Evaluation
See Chapter 7, section 4 for more detail
A number of donors will require a robust monitoring and evaluation framework so that the impact of the installed project can be measured. Some donors may have their own framework that they would like you to use but if no/little information is provided on this, a monitoring framework was developed by the CEDP which could be adopted. For more detail on this see Chapter 7, Section 4.
5.2 Income Generation Activities
As outlined in section 3.4 of this table, it is essential to make a business plan outlining income generating activities to contribute to a maintenance fund. We hope that by maximising the opportunities to install confidence and capacity in the community during the project development phase these income generating ideas have a good chance of success.
5.3 System Repairs No system can run forever without requiring repairs and new parts. Information on basic technology repair for different renewable systems is outlined in Chapters 4 and 5.
Having read Chapter 2 you should now have a clear idea of the development process for a community led renewable energy project.
Chapter 3 below will discuss why access to a clean, affordable source of energy is so important for communities in Malawi. Chapter 3 will also discuss a method for assessing what the needs are in a community and how to select a renewable energy technology to address this need.
22
Chapter 3
ENERGY FOR COMMUNITY SERVICES
How Renewable Energy can Impact on Community Services
This chapter introduces how to assess the issues and needs in your community as well as how to carry out a baseline energy audit to assist project design. This will be followed by a discussion on how renewable energy could replace traditional sources of energy and have socioeconomic benefits in areas of health (reduced kerosene inhalation), education (longer studying hours) and economic benefits (reduced spending on energy therefore increased livelihood opportunities). This may provide some ideas for how renewable energy can address needs and improve services in your community. For an example of how renewable energy is improving access to a number of community services see the Bondo Case Study in Annex 5.
3.1 How to Assess the Needs in a Community
As discussed in section 2.3 of the table Chapter 2, one of the key steps in developing a community renewable project is to assess what the issues and needs are in your community. In this way, a renewable energy project that addresses a key need in your community can be installed and improve access to some of the services outlined above. Some of the needs in your community may include some of the issues highlighted in this chapter such as access to clean, affordable and reliable electricity for lighting, water pumping or to power small appliances for businesses. It is more likely that the community will get behind a project if it addresses a key need in their community therefore making the project more sustainable. Some methods for assessing the needs of the community include a community scorecard approach, focus group discussions or semi structured interviews with different groups from the community to establish what the key needs are. Guidance on methodologies for assessing need can be found in Annex 6. As a development Worker, once you have assessed the key needs in the community, you will need to start thinking about what technologies could address the needs of that community (these technologies will be addressed in Chapter 4 and 5).
3.2 How to Carry Out a Baseline Energy Audit
As already outlined in section 2.4 of the table in Chapter 2, it is important that once the needs of the community have been assessed, a baseline energy audit should be carried out in the community to give you valuable information on which to design your project. For example, it will give you a good idea of what the current energy usage is, what the community would like extra energy for and how would they like to use this extra energy. This information will help you to design the size of the project, you do not want to install a system that does not meet the energy demands of the community!
The energy audit will also provide important baseline data on which you can measure the impact of your project after installation. For the CEDP, different baseline questionnaires were developed based on potential project technology type (solar PV projects, improved
23
cook stoves and solar powered water pumping projects), the facility the RET will be utilised by (health centre, household or school) and on key users of the facility (if appropriate such as teachers, community members, school management committee and school student). This will provide a great baseline from which to assess the impact of RETs installed by the programme. There is an example of a baseline energy audit used by the CEDP in Annex 6.
Energy has a significant role to play in providing community services which in turn are fundamental to improving the lives of people and the achievement of the Malawi Development Strategies. The type of energy system and source of energy you use can have significant impacts on this service provision in your community. This chapter will now examine how renewable energy can have a positive impact on community services in five key areas:
1. Health care: hospitals2. Education: schools3. Public institutions4. Infrastructure services5. Livelihoods
3.3 How Access to Energy Can Impact on Health Care
Access to health care facilities in poor remote areas is faced by many challenges ranging from poor road networks, lack of electricity to carry out clinical services and lack of personnel to staff health centres. Supporting improvements in health-care systems is a cornerstone of development and central to improving people’s lives. Through installing a renewable energy system to provide electricity for a health centre you will be able to improve health provision in a number of ways (see top table overleaf).
In addition, through using renewable, clean sources of energy for cooking, lighting and heating in the household, there is a significant reduction in the amount of smoke produced and inhaled by householders. As a result, there are fewer respiratory illnesses and eye infections which are associated with smoke inhalation from traditional fuels in the home.
Access to a reliable source of renewable energy can improve all of the services outlined overleaf.
3.4 Energy Supply Options for Health-Care Facilities
Energy supply options vary greatly in rural and urban areas and in most instances the full range of energy services required by health facilities cannot be met by electricity alone. In order to generate the electricity needed for the services listed in the table above, Solar PV, Wind or hydroelectric technologies could be used. For more information on these technologies see Chapter 4 and 5.
Solid, liquid and/or gas fuels are a necessary fuel source for health centres and can represent a large proportion of a health facility’s energy consumption. One option to mitigate this is to use a fireless cooker or fuel efficient stoves (see Chapter 4) to reduce indoor air pollution, mitigate health problems for the cook whilst also providing space heating and reducing the amount of firewood needed. These energy-efficient stoves and boilers can help manage the cost and collection burden of fuel consumption.
24
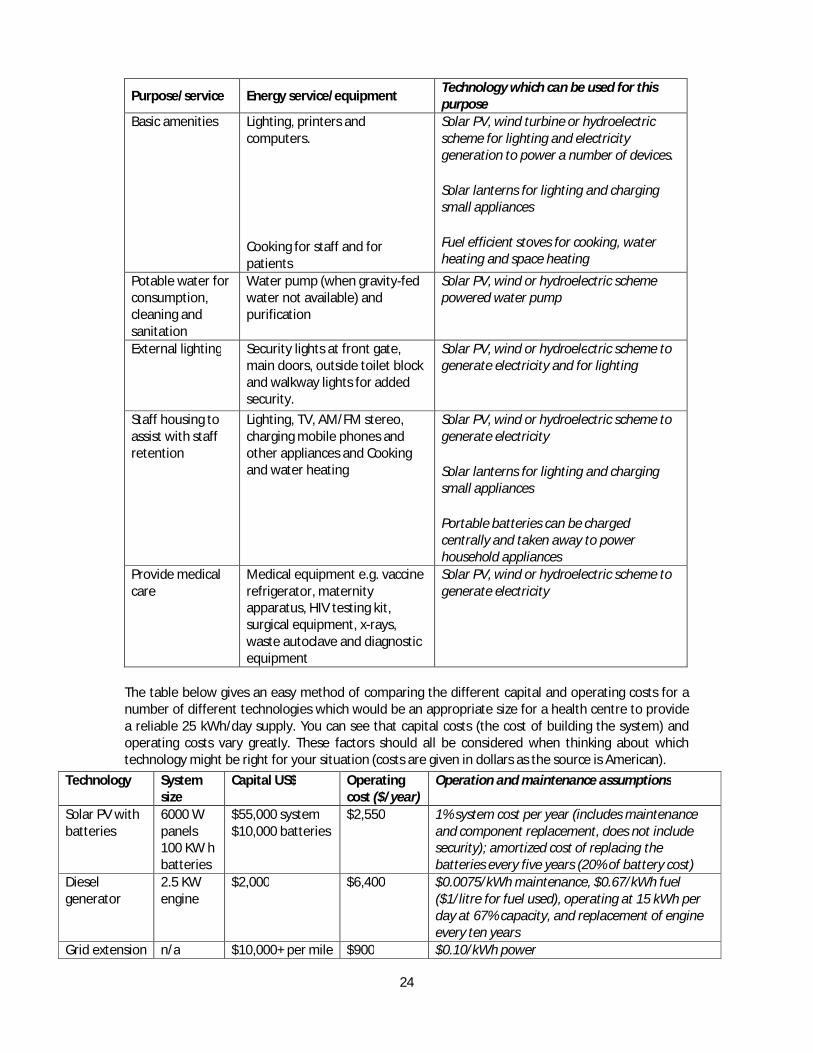
Purpose/service Energy service/equipmentTechnology which can be used for this purpose
Basic amenities Lighting, printers and computers.
Cooking for staff and for patients
Solar PV, wind turbine or hydroelectric scheme for lighting and electricity generation to power a number of devices.
Solar lanterns for lighting and charging small appliances
Fuel efficient stoves for cooking, water heating and space heating
Potable water for consumption,cleaning and sanitation
Water pump (when gravity-fed water not available) and purification
Solar PV, wind or hydroelectric scheme powered water pump
External lighting Security lights at front gate, main doors, outside toilet block and walkway lights for added security.
Solar PV, wind or hydroelectric scheme to generate electricity and for lighting
Staff housing to assist with staff retention
Lighting, TV, AM/FM stereo, charging mobile phones and other appliances and Cooking and water heating
Solar PV, wind or hydroelectric scheme to generate electricity
Solar lanterns for lighting and charging small appliances
Portable batteries can be charged centrally and taken away to power household appliances
Provide medical care
Medical equipment e.g. vaccine refrigerator, maternity apparatus, HIV testing kit, surgical equipment, x-rays, waste autoclave and diagnostic equipment
Solar PV, wind or hydroelectric scheme to generate electricity
The table below gives an easy method of comparing the different capital and operating costs for a number of different technologies which would be an appropriate size for a health centre to provide a reliable 25 kWh/day supply. You can see that capital costs (the cost of building the system) and operating costs vary greatly. These factors should all be considered when thinking about which technology might be right for your situation (costs are given in dollars as the source is American).
Technology System size
Capital US$ Operating cost ($/year)
Operation and maintenance assumptions
Solar PV with batteries
6000 W panels100 KW h batteries
$55,000 system$10,000 batteries
$2,550 1% system cost per year (includes maintenance and component replacement, does not include security); amortized cost of replacing the batteries every five years (20% of battery cost)
Diesel generator
2.5 KW engine
$2,000 $6,400 $0.0075/kWh maintenance, $0.67/kWh fuel ($1/litre for fuel used), operating at 15 kWh per day at 67% capacity, and replacement of engine every ten years
Grid extension n/a $10,000+ per mile $900 $0.10/kWh power
25
3.5 How Access to Energy can Impact on Education
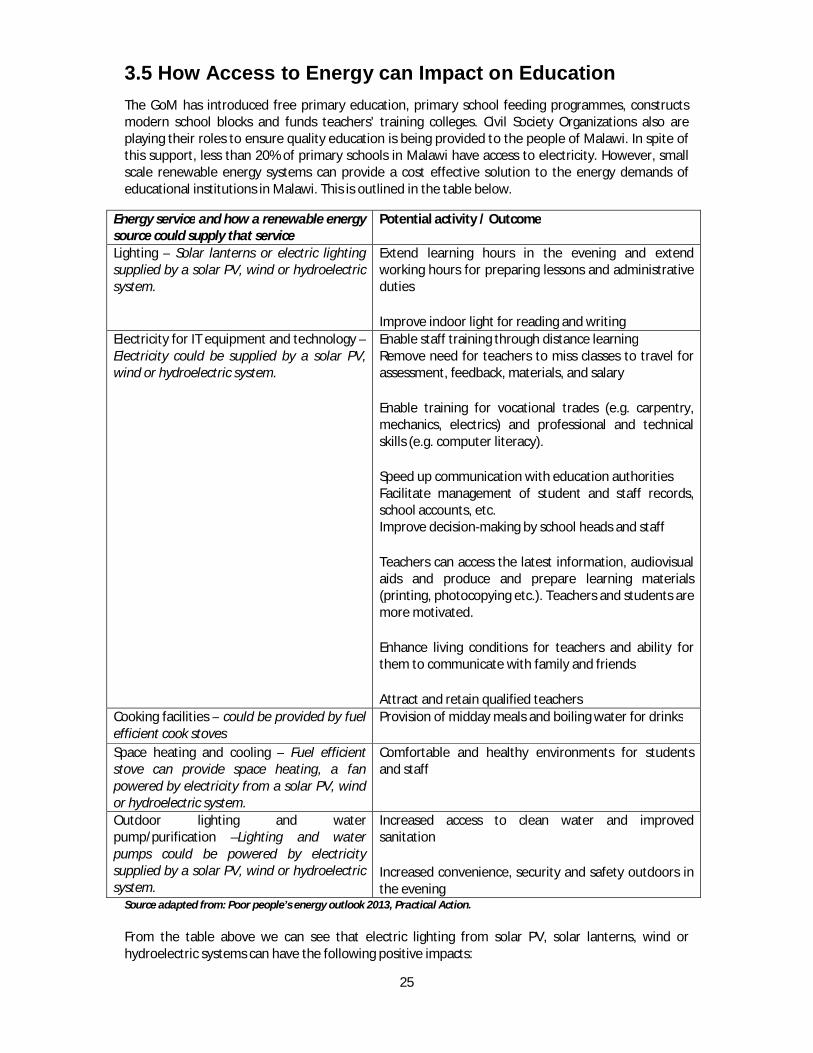
The GoM has introduced free primary education, primary school feeding programmes, constructs modern school blocks and funds teachers’ training colleges. Civil Society Organizations also are playing their roles to ensure quality education is being provided to the people of Malawi. In spite of this support, less than 20% of primary schools in Malawi have access to electricity. However, small scale renewable energy systems can provide a cost effective solution to the energy demands of educational institutions in Malawi. This is outlined in the table below.
Energy service and how a renewable energy source could supply that service
Potential activity / Outcome
Lighting – Solar lanterns or electric lighting supplied by a solar PV, wind or hydroelectric system.
Extend learning hours in the evening and extend working hours for preparing lessons and administrative duties
Improve indoor light for reading and writing Electricity for IT equipment and technology –Electricity could be supplied by a solar PV, wind or hydroelectric system.
Enable staff training through distance learningRemove need for teachers to miss classes to travel for assessment, feedback, materials, and salary
Enable training for vocational trades (e.g. carpentry, mechanics, electrics) and professional and technical skills (e.g. computer literacy).
Speed up communication with education authoritiesFacilitate management of student and staff records, school accounts, etc.Improve decision-making by school heads and staff
Teachers can access the latest information, audiovisual aids and produce and prepare learning materials (printing, photocopying etc.). Teachers and students are more motivated.
Enhance living conditions for teachers and ability for them to communicate with family and friends
Attract and retain qualified teachersCooking facilities – could be provided by fuel efficient cook stoves
Provision of midday meals and boiling water for drinks
Space heating and cooling – Fuel efficient stove can provide space heating, a fan powered by electricity from a solar PV, wind or hydroelectric system.
Comfortable and healthy environments for students and staff
Outdoor lighting and water pump/purification –Lighting and water pumps could be powered by electricity supplied by a solar PV, wind or hydroelectric system.
Increased access to clean water and improved sanitation
Increased convenience, security and safety outdoors in the evening
Source adapted from: Poor people’s energy outlook 2013, Practical Action.
From the table above we can see that electric lighting from solar PV, solar lanterns, wind or hydroelectric systems can have the following positive impacts:
26
Allow schools to operate outside daylight hours, extending the working hours for students, adults, and teachers.
For schools with too many pupils, longer classroom hours can allow additional classes to accommodate more students and/or reduce class sizes.
Students without electric lighting at home can stay at school to study and complete homework, leading to better grades. Evening classes can also be run for other members of the community.
Teachers can prepare for lessons, mark homework, conduct staff meetings and carry out administrative tasks with the result that teachers are often happier and more likely to stay in rural teaching posts
There is less reliance on expensive, dangerous and polluting kerosene or paraffin lamps for lighting
3.6 Energy Supply Options for Education Facilities
As with a health centre, the supply of energy for thermal needs – cooking, water heating and space heating – can represent a large portion of a school’s energy consumption and expenditure and a range of traditional biomass and modern fuels are typically used. Improved fuels and stoves reduce indoor air pollution and mitigate health problems for the cook. Energy efficient stoves and boilers can help manage the cost or collection burden of fuel consumption and reduce environmental degradation and deforestation. To find more information on fuel efficient technologies see Chapter 4.
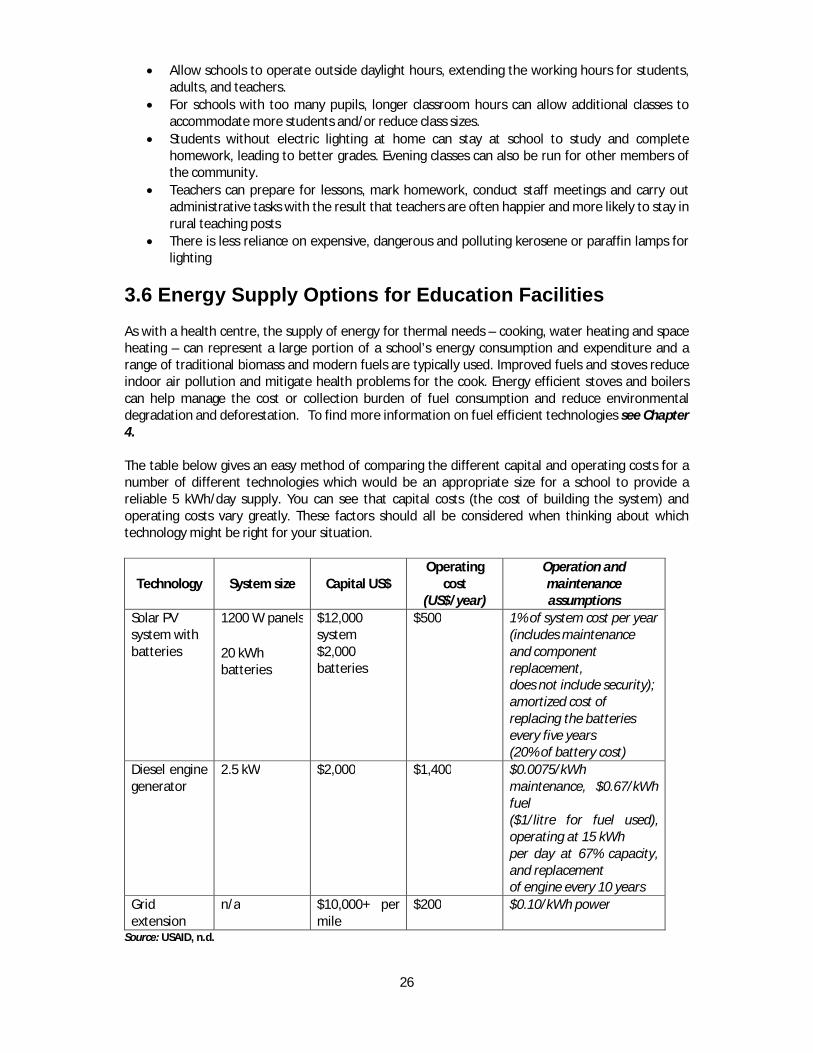
The table below gives an easy method of comparing the different capital and operating costs for a number of different technologies which would be an appropriate size for a school to provide a reliable 5 kWh/day supply. You can see that capital costs (the cost of building the system) and operating costs vary greatly. These factors should all be considered when thinking about which technology might be right for your situation.
Technology System size Capital US$Operating
cost (US$/year)
Operation and maintenance assumptions
Solar PV system with batteries
1200 W panels
20 kWh batteries
$12,000 system$2,000 batteries
$500 1% of system cost per year (includes maintenance and component replacement,does not include security); amortized cost ofreplacing the batteries every five years(20% of battery cost)
Diesel engine generator
2.5 kW $2,000 $1,400 $0.0075/kWh maintenance, $0.67/kWh fuel($1/litre for fuel used), operating at 15 kWhper day at 67% capacity, and replacementof engine every 10 years
Grid extension
n/a $10,000+ per mile
$200 $0.10/kWh power
Source: USAID, n.d.

27
3.7 How Access to Energy can Impact Other Sectors
In rural areas, off-grid electrical systems are often the most appropriate option. Renewable energy systems can provide sufficient clean, affordable energy to supply these services (see Chapters 4 and 5 for information on how to choose the right technology). Through access to clean, affordable and reliable energy source services can be improved as follows:
Clean cooking water is required in institutions where people live such as prisons and orphanages. This could be provided by a solar powered water pumping station.
Lighting, cooling, ICTs and social events tend to take place after dark when people are free to attend. This could be powered from a battery system charged using wind, solar PV or hydroelectric energy.
Improved information and communication can facilitate improved governance, human resource management, training delivery, and support infrastructure. Computers and mobile phones and internet access can be powered by wind, solar PV or hydroelectric energy.
Improved Lighting Tall poles and distribution lines can make street lighting expensive to install and the long hours of operation can make them expensive to run. In areas where grid electricity is not available, solar PV has proven to be an alternative solution for street lights. It is important to consider issues around management, battery maintenance, and even theft of batteries as well as the ownership model for the system (local ownership models have proved more effective). You can read more about different ownership models of renewable systems in Chapter 5.
Water Access Access to clean drinking water is a significant issue in Malawi. A range of pumping technologies exist that can be powered by human effort, diesel or electricity. Pumps powered by electricity can be powered by renewable sources of electricity such as wind, solar PV or hydroelectric systems. The pump may represent only a small proportion of total installation costs and drilling the borehole can prove costly, but ongoing costs for maintenance and fuel for electricity can be significant, especially with high local fuel costs if the pump is not powered by renewable energy i.e. diesel or grid electricity.
Livelihoods Energy is a driver of modern living. With a reliable, clean and reasonable priced energy source, a number of different livelihood options are available which were not there previously. Through using renewable energy sources in off-grid areas you can increase the livelihood opportunities for a community (See Annex 5 for case studies of renewable energy improving livelihoods). Some livelihood opportunities that can be powered by electricity from solar PV, wind or hydroelectricity include:
- Maize mills - Barbershops and hair dressing salons - Battery and phone charging services

28
How to develop a project has been discussed in Chapter 2 and how renewable energy projects provide a great opportunity to access clean, affordable and reliable energy for Malawi has been discussed in Chapter 3 along with how to assess the need in your community and how to carry out a baseline energy audit. Chapters 4 and 5will discuss different renewable energy technologies which can be used in Malawi:
Chapter 4 – Technologies involved in cooking, space heating and the use of firewoodChapter 5 – Technologies that can be used to generate electricity.
Chapter 4 will examine and compare three fuel efficient stove models used in Malawi and describe the fireless cookers which are all used to reduce firewood consumption. How to reduce firewood consumption through substituting firewood using biomass briquettes, biogas and solar thermal technology will then be discussed.
There is more information on how to use reduce firewood consumption in sections 9.3 and 9.4 of this toolkit.

29
Chapter 4
TECHNOLOGIES FOR COOKING, SPACE HEATING AND MINIMISING FIREWOOD USE
Chapters 4 and 5 will introduce the renewable energy technologies found in Malawi and discuss
them under these main headings:
1. Introduction to technology with advantages and disadvantages
2. The materials required for construction
3. How to construct - Installation and Scoping checklists
4. Problem Solving and issues to be aware of
5. Any additional information
Chapter 5 will examine technologies that generate electricity, here in Chapter 4 we will examine
technologies for cooking, space heating and minimising firewood use starting with fuel efficient cook
stoves.
Three cook stoves which are suitable for use in Malawi are outlined below: the Esperanza; the
Changu Changu and the Chitetezo Mbaula (protecting stove). The first two are fixed stoves and the
Chitetezo Mbaula is a portable stove. It is worth mentioning that whilst each of these stoves has
their own merits, there are some benefits which are common to all fuel efficient stoves and these
include:
1. Fuel efficient stoves produce less smoke as the combustion occurs within the stove chamber.
This results in fewer respiratory diseases and eye infections for those who spend a lot of time
close to the fire such as women and children.
2. Reduced use of firewood, the reduction in the amount of firewood used will vary between stove
models; information on this is given in each stove section.
3. Because the fire is contained within the stove, you are less likely to burn yourself and there is a
lower risk of fire.
4. Reduced cooking time – as the body of the stove retains heat from the fire, food often cooks
quicker. This means that householders have more time to spend on other activities.
4.1 Esperanza Stoves 4.1.1 Introduction The Esperanza stove derived its name from one of the tea estates in Mulanje where testing of the first stove was done. It is a fixed stove and was targeted at the staff houses of the tea estates. Over time the stove has been installed in houses for the urban poor. The Esparanza stove can be constructed in any kitchen both in urban, peri urban and rural areas
Advantages of the Esparanza stoves It is a fixed stove, so it can last longer
It is easier to clean because the cemented outside can easily be wiped down.

30
Firewood savings range from 55 – 60%. This figure can increase with proper Firewood and Kitchen Management techniques (see Chapter 10, section 10 and 11) which saves money and time spent on firewood buying and collection respectively.
Disadvantages of Esparanza stove It is more expensive because it requires burnt bricks, top plate, cement and ring bricks which
can be purchased and transported to the site.
Requires a skilled and trained bricklayer to construct, thus increasing the capital cost.
Top: Esparanza stoves at St Annes Health Centre, Bembeke – Dedza. Bottom: Esparanza stove in a home
4.1.2 Materials Required to Built An Esperanza To construct one Esparanza stove, you require the following:
a) 3 open (U) bricks* b) 4 round (ring) bricks* c) 1 top plate* * The ring bricks and top plates are produced at Minimini tea estate in Mulanje and Mulima Stove Group near Lujeri Factory in Mulanje. They have been trained on production by MuREA (002651466369) and one can contact either of the three for assistance.
Ring brick Top plate U Brick
d) Grate (12 x 12 cm or ceramic) e) 80 bricks (22.5cm x 11 cm x 6.5cm) f) 25 kg cement g) 2 wheel barrows sand
The stove is 0.5 by 0.5 meters on the base with a height of 30 cm. The dimensions in most cases depend on the size of bricks. Currently, the stove costs US$30 but the price depends on the distance the ring bricks have to travel as well as the number of stoves that are required by an institution.

31
4.1.3 How to Construct an Esperanza Stove Pictorial Construction of Esperanza Stove
Step 1: Level the area you want to construct the
stove
Step 2: Mark the area and the centre where the stove
will be constructed. Fix the first U brick where ash will be collected from. Distance of 5 cm between the U brick and common brick.
Step 3: Lay the first layer of bricks.
Step 4: Place the first ring brick, make sure the bricks
inter-lock
Step 5: Put a grate (see arrow)* on top of ring
brick and then two U bricks making sure the U brick interlock. Proceed with brick work on the outer side.
Step 6: Put two ring bricks on top of the last U brick,
brick work follows maintaining the gap to the outside. The gap becomes door for firewood. Another 5 – 8 cm square gap (pointer) is between corner header and firewood entrance stretcher for secondary air in flow

32
Step 7: Place a hard cardboard or mesh over the
centre of the stove. This prevents the next layer of bricks falling in the gap. (you can plaster the stove or leave, at this stage)
Step 8: Cover the cardboard or carton by putting
bricks to cover the inserts of the stove
Step 9: Make skirt of the stove by placing half
bats of bricks round the ring brick. Distance should be 6 cm from the outer edge of the ring brick. Fix top plate and plaster at an angle for free water drainage inside
Step 10: Plaster the stove and wait for two weeks for
it to completely dry.
*grate is gauze / mesh wire cut 12 cm square. Grate should be 3 mm thick
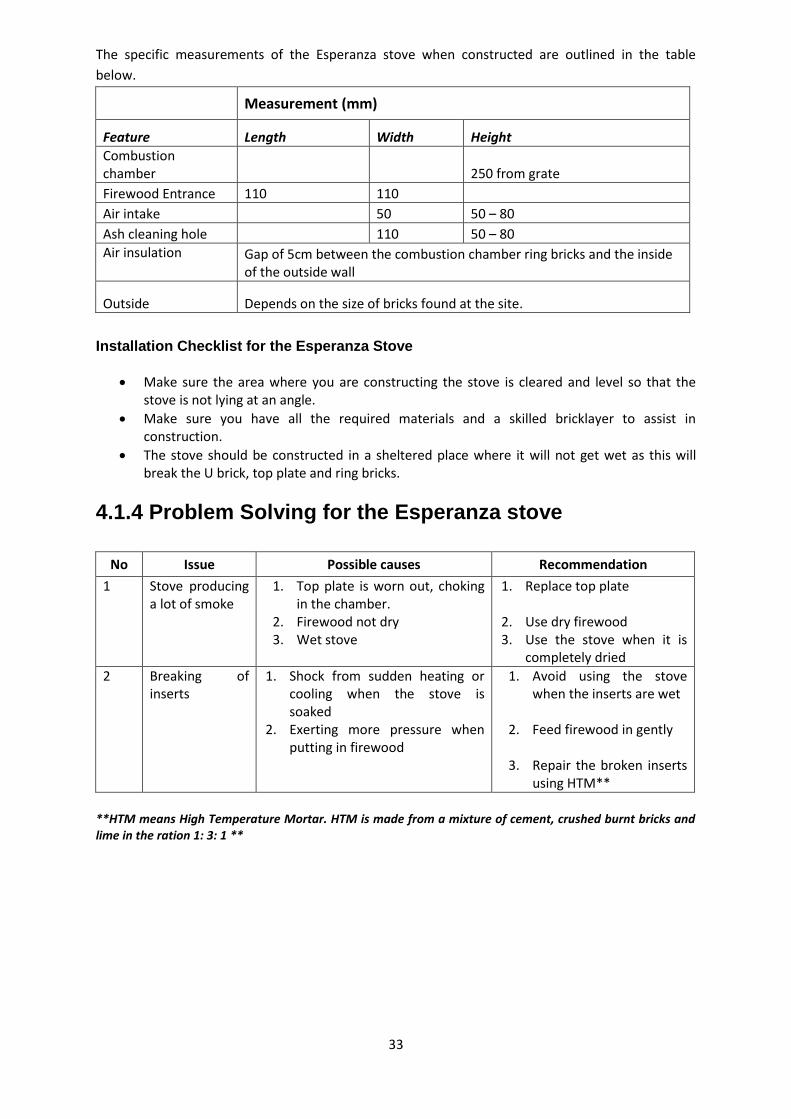
33
The specific measurements of the Esperanza stove when constructed are outlined in the table
below.
Measurement (mm)
Feature Length Width Height Combustion chamber 250 from grate
Firewood Entrance 110 110
Air intake 50 50 – 80
Ash cleaning hole 110 50 – 80 Air insulation
Gap of 5cm between the combustion chamber ring bricks and the inside of the outside wall
Outside Depends on the size of bricks found at the site.
Installation Checklist for the Esperanza Stove
Make sure the area where you are constructing the stove is cleared and level so that the stove is not lying at an angle.
Make sure you have all the required materials and a skilled bricklayer to assist in construction.
The stove should be constructed in a sheltered place where it will not get wet as this will break the U brick, top plate and ring bricks.
4.1.4 Problem Solving for the Esperanza stove
No Issue Possible causes Recommendation
1 Stove producing a lot of smoke
1. Top plate is worn out, choking in the chamber.
2. Firewood not dry 3. Wet stove
1. Replace top plate
2. Use dry firewood 3. Use the stove when it is
completely dried
2 Breaking of inserts
1. Shock from sudden heating or cooling when the stove is soaked
2. Exerting more pressure when putting in firewood
1. Avoid using the stove when the inserts are wet
2. Feed firewood in gently
3. Repair the broken inserts using HTM**
**HTM means High Temperature Mortar. HTM is made from a mixture of cement, crushed burnt bricks and lime in the ration 1: 3: 1 **

34
4.2 The Changu Changu Stove
4.2.1 Introduction The Changu Changu fixed stove derives its name from the very fast nature of cooking and the rapid construction procedure and materials used. Changu is ‘chichewa’ – vernacular for fast.
Advantages of the Changu Changu stove You can reduce your wood fuel consumption by up to 66% reducing household wood use
from three or four bundles of wood per week to just one. The materials to build a Changu Changu stove are free The Changu Changu cookstove has a double wood burner, making it perfectly suited to
Malawian cooking methods of preparing rice or nsima in one pot, and vegetables or meat in another pot simultaneously.
The Changu Changu is low-technology product, it does not necessarily require a trained artisan, brick layer to construct or any stove inserts
It can be made in just one hour (once bricks have been dried for 3 days). Cleaner (less ash)
Disadvantages of the Changu Changu Stove It is not portable, it is a fixed stove
The stove is not waterproof, it is made of mud so if there is a leak in the kitchen, the stove may get damaged
It needs regular maintenance as it is made of mud
4.2.2 Materials Needed to Make a Changu Changu Stove Bricks: 26 small bricks (un burnt or burnt)ideal size 22.5cm x 11cm x 6.5cm
Equipment: 1 x 20 litre bucket, 1 x 5 litre cooking pot, 1 x hoe, 1 x trowel
Mud mortar mix: 7.5 litres clay soil, 7.5 litres sandy soil - mix with about 5 litres of water
4.2.3 How to Construct a Changu Changu Stove
There is a detailed video for how to make a Changu Changu stove from Ripple Africa which you can
access here: http://www.rippleafrica.org/wp-content/uploads/2012/02/Changu-Changu-Moto-step-by-step-guide-feb-2012.pdf but for those without internet access, the process is outlined in
full below.
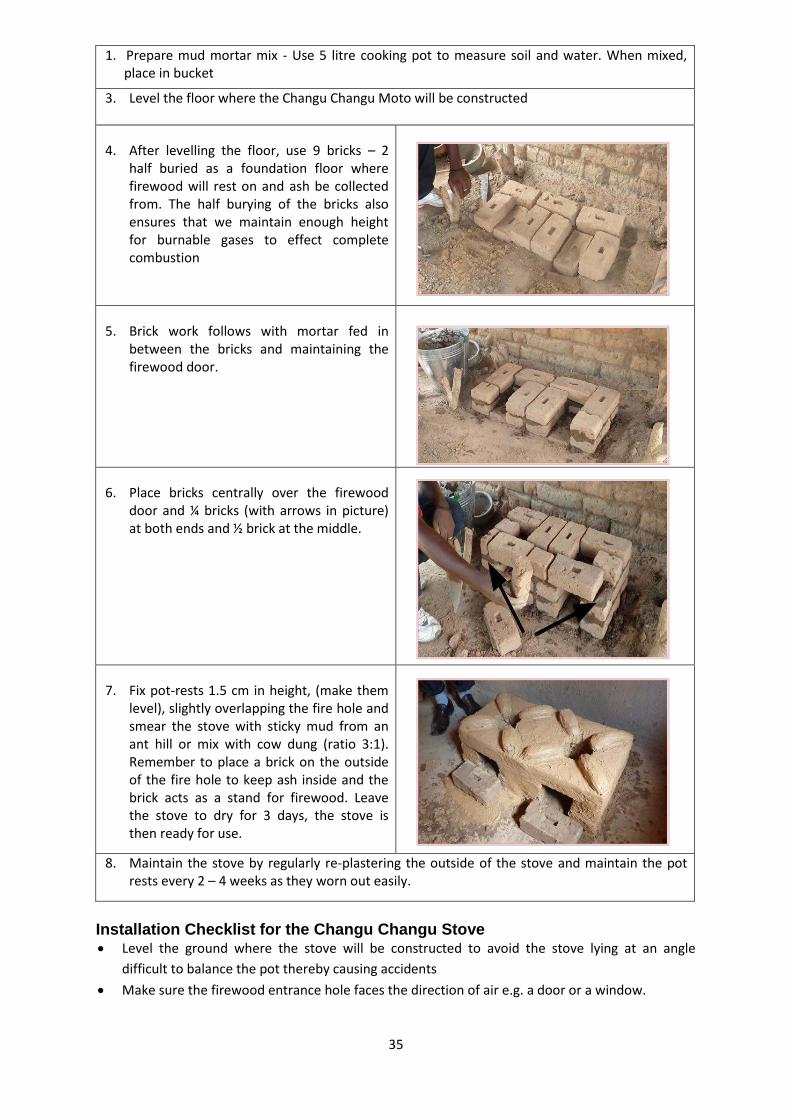
35
1. Prepare mud mortar mix - Use 5 litre cooking pot to measure soil and water. When mixed, place in bucket
3. Level the floor where the Changu Changu Moto will be constructed
4. After levelling the floor, use 9 bricks – 2 half buried as a foundation floor where firewood will rest on and ash be collected from. The half burying of the bricks also ensures that we maintain enough height for burnable gases to effect complete combustion
5. Brick work follows with mortar fed in between the bricks and maintaining the firewood door.
6. Place bricks centrally over the firewood door and ¼ bricks (with arrows in picture) at both ends and ½ brick at the middle.
7. Fix pot-rests 1.5 cm in height, (make them level), slightly overlapping the fire hole and smear the stove with sticky mud from an ant hill or mix with cow dung (ratio 3:1). Remember to place a brick on the outside of the fire hole to keep ash inside and the brick acts as a stand for firewood. Leave the stove to dry for 3 days, the stove is then ready for use.
8. Maintain the stove by regularly re-plastering the outside of the stove and maintain the pot rests every 2 – 4 weeks as they worn out easily.
Installation Checklist for the Changu Changu Stove Level the ground where the stove will be constructed to avoid the stove lying at an angle
difficult to balance the pot thereby causing accidents
Make sure the firewood entrance hole faces the direction of air e.g. a door or a window.
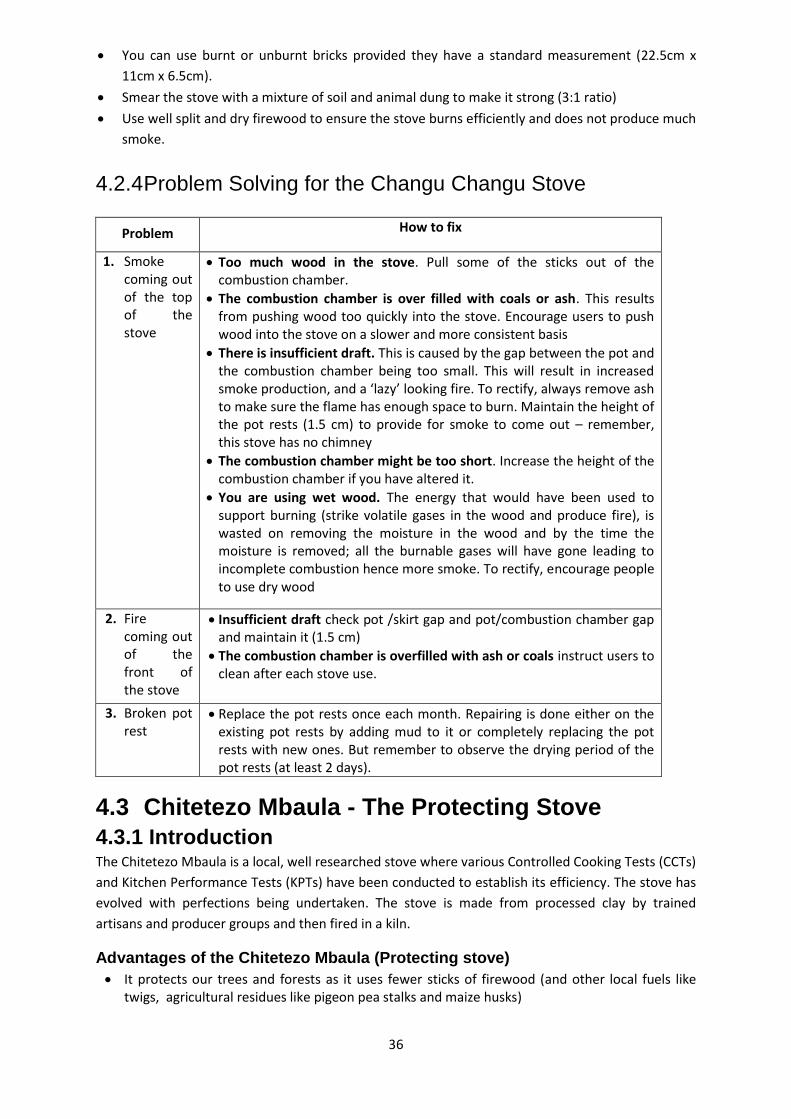
36
You can use burnt or unburnt bricks provided they have a standard measurement (22.5cm x
11cm x 6.5cm).
Smear the stove with a mixture of soil and animal dung to make it strong (3:1 ratio)
Use well split and dry firewood to ensure the stove burns efficiently and does not produce much
smoke.
4.2.4 Problem Solving for the Changu Changu Stove
Problem How to fix
1. Smoke coming out of the top of the stove
Too much wood in the stove. Pull some of the sticks out of the combustion chamber.
The combustion chamber is over filled with coals or ash. This results from pushing wood too quickly into the stove. Encourage users to push wood into the stove on a slower and more consistent basis
There is insufficient draft. This is caused by the gap between the pot and the combustion chamber being too small. This will result in increased smoke production, and a ‘lazy’ looking fire. To rectify, always remove ash to make sure the flame has enough space to burn. Maintain the height of the pot rests (1.5 cm) to provide for smoke to come out – remember, this stove has no chimney
The combustion chamber might be too short. Increase the height of the combustion chamber if you have altered it.
You are using wet wood. The energy that would have been used to support burning (strike volatile gases in the wood and produce fire), is wasted on removing the moisture in the wood and by the time the moisture is removed; all the burnable gases will have gone leading to incomplete combustion hence more smoke. To rectify, encourage people to use dry wood
2. Fire coming out of the front of the stove
Insufficient draft check pot /skirt gap and pot/combustion chamber gap and maintain it (1.5 cm)
The combustion chamber is overfilled with ash or coals instruct users to clean after each stove use.
3. Broken pot rest
Replace the pot rests once each month. Repairing is done either on the existing pot rests by adding mud to it or completely replacing the pot rests with new ones. But remember to observe the drying period of the pot rests (at least 2 days).
4.3 Chitetezo Mbaula - The Protecting Stove 4.3.1 Introduction The Chitetezo Mbaula is a local, well researched stove where various Controlled Cooking Tests (CCTs)
and Kitchen Performance Tests (KPTs) have been conducted to establish its efficiency. The stove has
evolved with perfections being undertaken. The stove is made from processed clay by trained
artisans and producer groups and then fired in a kiln.
Advantages of the Chitetezo Mbaula (Protecting stove) It protects our trees and forests as it uses fewer sticks of firewood (and other local fuels like
twigs, agricultural residues like pigeon pea stalks and maize husks)
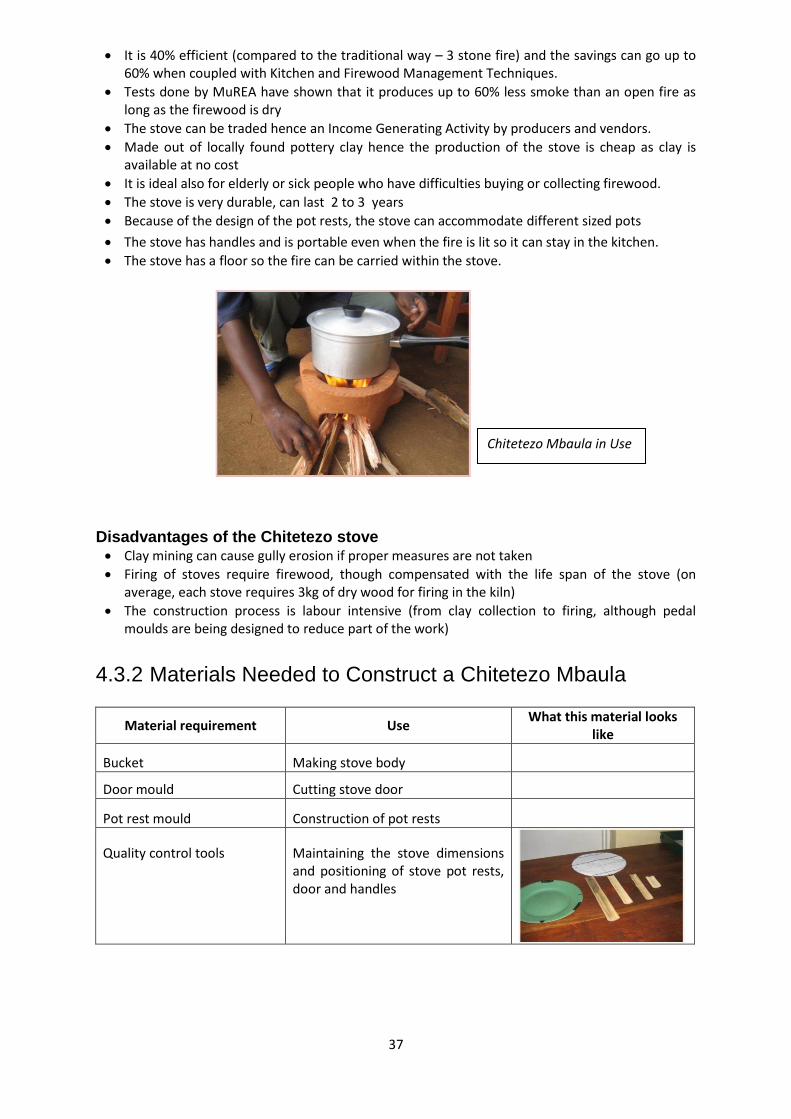
37
It is 40% efficient (compared to the traditional way – 3 stone fire) and the savings can go up to 60% when coupled with Kitchen and Firewood Management Techniques.
Tests done by MuREA have shown that it produces up to 60% less smoke than an open fire as long as the firewood is dry
The stove can be traded hence an Income Generating Activity by producers and vendors.
Made out of locally found pottery clay hence the production of the stove is cheap as clay is available at no cost
It is ideal also for elderly or sick people who have difficulties buying or collecting firewood.
The stove is very durable, can last 2 to 3 years
Because of the design of the pot rests, the stove can accommodate different sized pots
The stove has handles and is portable even when the fire is lit so it can stay in the kitchen.
The stove has a floor so the fire can be carried within the stove.
Disadvantages of the Chitetezo stove Clay mining can cause gully erosion if proper measures are not taken
Firing of stoves require firewood, though compensated with the life span of the stove (on average, each stove requires 3kg of dry wood for firing in the kiln)
The construction process is labour intensive (from clay collection to firing, although pedal moulds are being designed to reduce part of the work)
4.3.2 Materials Needed to Construct a Chitetezo Mbaula
Material requirement Use What this material looks
like
Bucket Making stove body
Door mould Cutting stove door
Pot rest mould Construction of pot rests
Quality control tools Maintaining the stove dimensions and positioning of stove pot rests, door and handles
Chitetezo Mbaula in Use
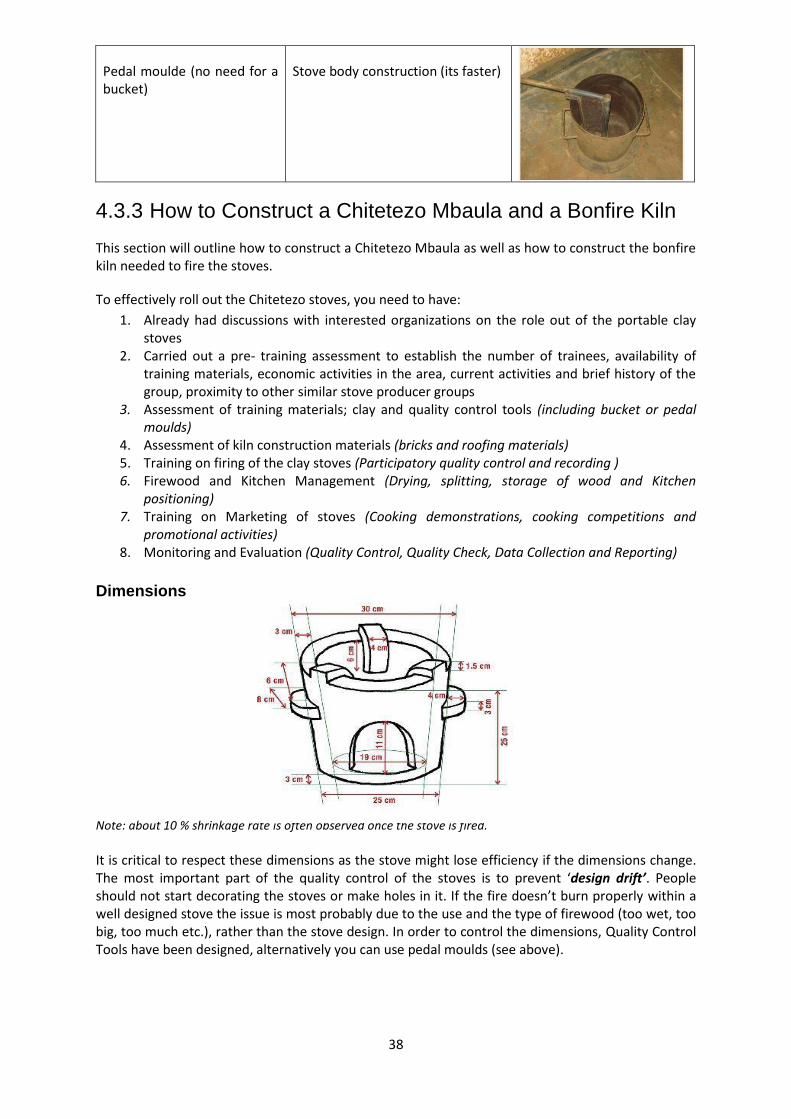
38
Pedal moulde (no need for a bucket)
Stove body construction (its faster)
4.3.3 How to Construct a Chitetezo Mbaula and a Bonfire Kiln
This section will outline how to construct a Chitetezo Mbaula as well as how to construct the bonfire kiln needed to fire the stoves.
To effectively roll out the Chitetezo stoves, you need to have:
1. Already had discussions with interested organizations on the role out of the portable clay stoves
2. Carried out a pre- training assessment to establish the number of trainees, availability of training materials, economic activities in the area, current activities and brief history of the group, proximity to other similar stove producer groups
3. Assessment of training materials; clay and quality control tools (including bucket or pedal moulds)
4. Assessment of kiln construction materials (bricks and roofing materials) 5. Training on firing of the clay stoves (Participatory quality control and recording ) 6. Firewood and Kitchen Management (Drying, splitting, storage of wood and Kitchen
positioning) 7. Training on Marketing of stoves (Cooking demonstrations, cooking competitions and
promotional activities) 8. Monitoring and Evaluation (Quality Control, Quality Check, Data Collection and Reporting)
Dimensions Note: about 10 % shrinkage rate is often observed once the stove is fired.
It is critical to respect these dimensions as the stove might lose efficiency if the dimensions change. The most important part of the quality control of the stoves is to prevent ‘design drift’. People should not start decorating the stoves or make holes in it. If the fire doesn’t burn properly within a well designed stove the issue is most probably due to the use and the type of firewood (too wet, too big, too much etc.), rather than the stove design. In order to control the dimensions, Quality Control Tools have been designed, alternatively you can use pedal moulds (see above).
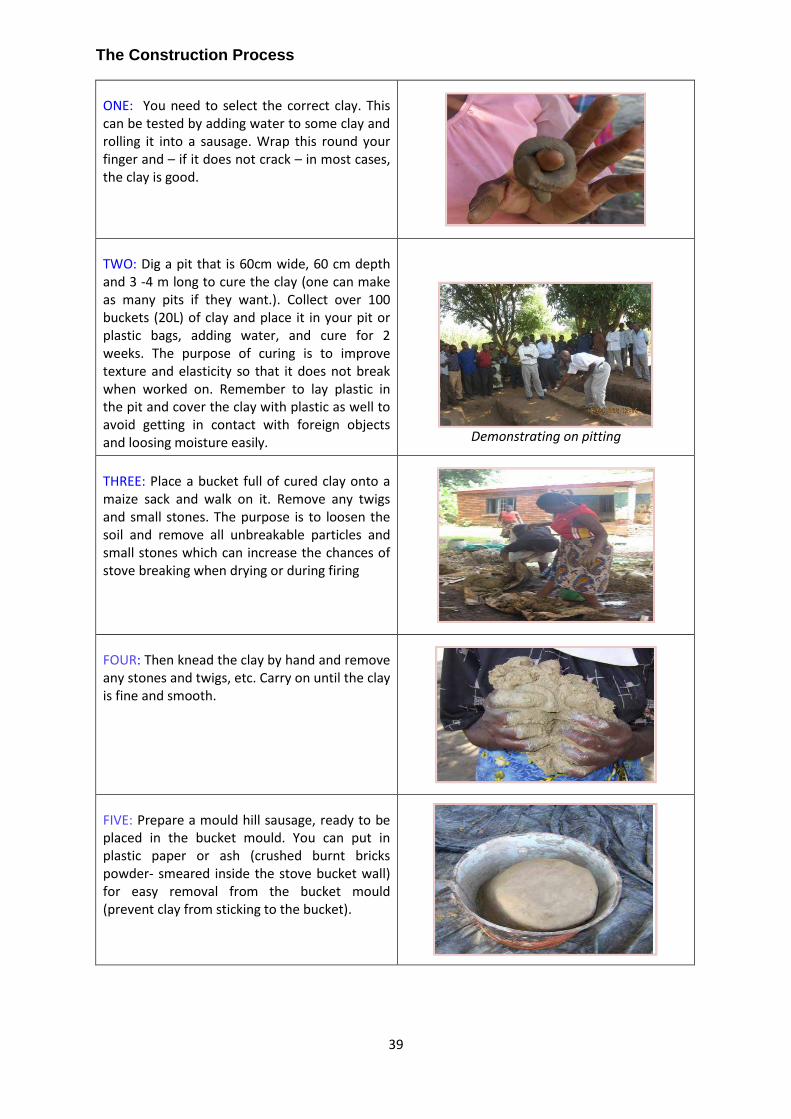
39
The Construction Process
ONE: You need to select the correct clay. This can be tested by adding water to some clay and rolling it into a sausage. Wrap this round your finger and – if it does not crack – in most cases, the clay is good.
TWO: Dig a pit that is 60cm wide, 60 cm depth and 3 -4 m long to cure the clay (one can make as many pits if they want.). Collect over 100 buckets (20L) of clay and place it in your pit or plastic bags, adding water, and cure for 2 weeks. The purpose of curing is to improve texture and elasticity so that it does not break when worked on. Remember to lay plastic in the pit and cover the clay with plastic as well to avoid getting in contact with foreign objects and loosing moisture easily.
Demonstrating on pitting
THREE: Place a bucket full of cured clay onto a maize sack and walk on it. Remove any twigs and small stones. The purpose is to loosen the soil and remove all unbreakable particles and small stones which can increase the chances of stove breaking when drying or during firing
FOUR: Then knead the clay by hand and remove any stones and twigs, etc. Carry on until the clay is fine and smooth.
FIVE: Prepare a mould hill sausage, ready to be placed in the bucket mould. You can put in plastic paper or ash (crushed burnt bricks powder- smeared inside the stove bucket wall) for easy removal from the bucket mould (prevent clay from sticking to the bucket).
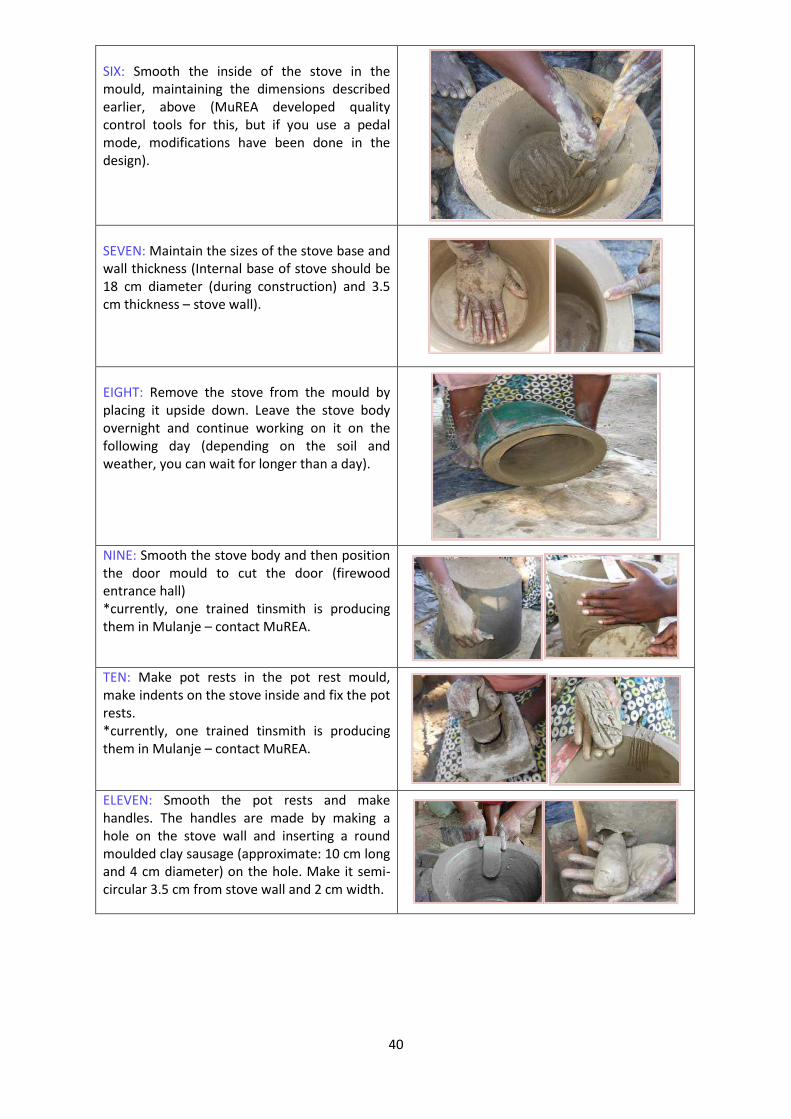
40
SIX: Smooth the inside of the stove in the mould, maintaining the dimensions described earlier, above (MuREA developed quality control tools for this, but if you use a pedal mode, modifications have been done in the design).
SEVEN: Maintain the sizes of the stove base and wall thickness (Internal base of stove should be 18 cm diameter (during construction) and 3.5 cm thickness – stove wall).
EIGHT: Remove the stove from the mould by placing it upside down. Leave the stove body overnight and continue working on it on the following day (depending on the soil and weather, you can wait for longer than a day).
NINE: Smooth the stove body and then position the door mould to cut the door (firewood entrance hall) *currently, one trained tinsmith is producing them in Mulanje – contact MuREA.
TEN: Make pot rests in the pot rest mould, make indents on the stove inside and fix the pot rests. *currently, one trained tinsmith is producing them in Mulanje – contact MuREA.
ELEVEN: Smooth the pot rests and make handles. The handles are made by making a hole on the stove wall and inserting a round moulded clay sausage (approximate: 10 cm long and 4 cm diameter) on the hole. Make it semi-circular 3.5 cm from stove wall and 2 cm width.
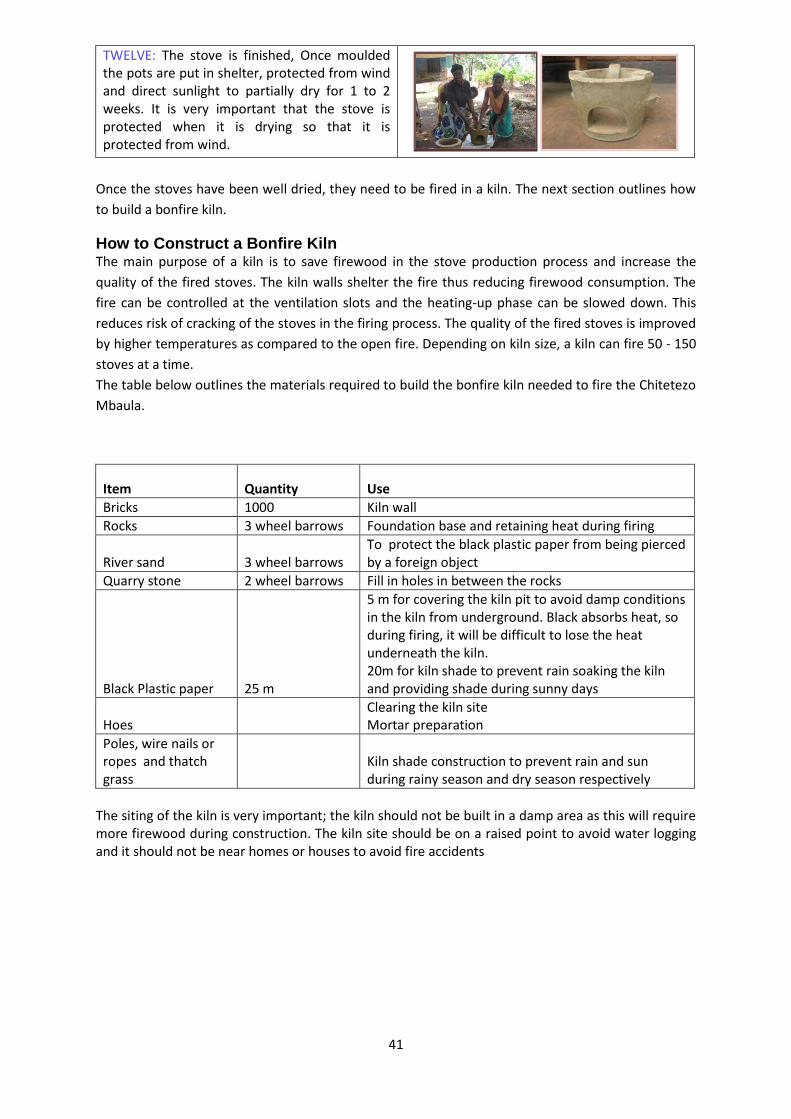
41
TWELVE: The stove is finished, Once moulded the pots are put in shelter, protected from wind and direct sunlight to partially dry for 1 to 2 weeks. It is very important that the stove is protected when it is drying so that it is protected from wind.
Once the stoves have been well dried, they need to be fired in a kiln. The next section outlines how
to build a bonfire kiln.
How to Construct a Bonfire Kiln The main purpose of a kiln is to save firewood in the stove production process and increase the
quality of the fired stoves. The kiln walls shelter the fire thus reducing firewood consumption. The
fire can be controlled at the ventilation slots and the heating-up phase can be slowed down. This
reduces risk of cracking of the stoves in the firing process. The quality of the fired stoves is improved
by higher temperatures as compared to the open fire. Depending on kiln size, a kiln can fire 50 - 150
stoves at a time.
The table below outlines the materials required to build the bonfire kiln needed to fire the Chitetezo
Mbaula.
Item Quantity Use
Bricks 1000 Kiln wall
Rocks 3 wheel barrows Foundation base and retaining heat during firing
River sand 3 wheel barrows To protect the black plastic paper from being pierced by a foreign object
Quarry stone 2 wheel barrows Fill in holes in between the rocks
Black Plastic paper 25 m
5 m for covering the kiln pit to avoid damp conditions in the kiln from underground. Black absorbs heat, so during firing, it will be difficult to lose the heat underneath the kiln. 20m for kiln shade to prevent rain soaking the kiln and providing shade during sunny days
Hoes Clearing the kiln site Mortar preparation
Poles, wire nails or ropes and thatch grass
Kiln shade construction to prevent rain and sun during rainy season and dry season respectively
The siting of the kiln is very important; the kiln should not be built in a damp area as this will require more firewood during construction. The kiln site should be on a raised point to avoid water logging and it should not be near homes or houses to avoid fire accidents
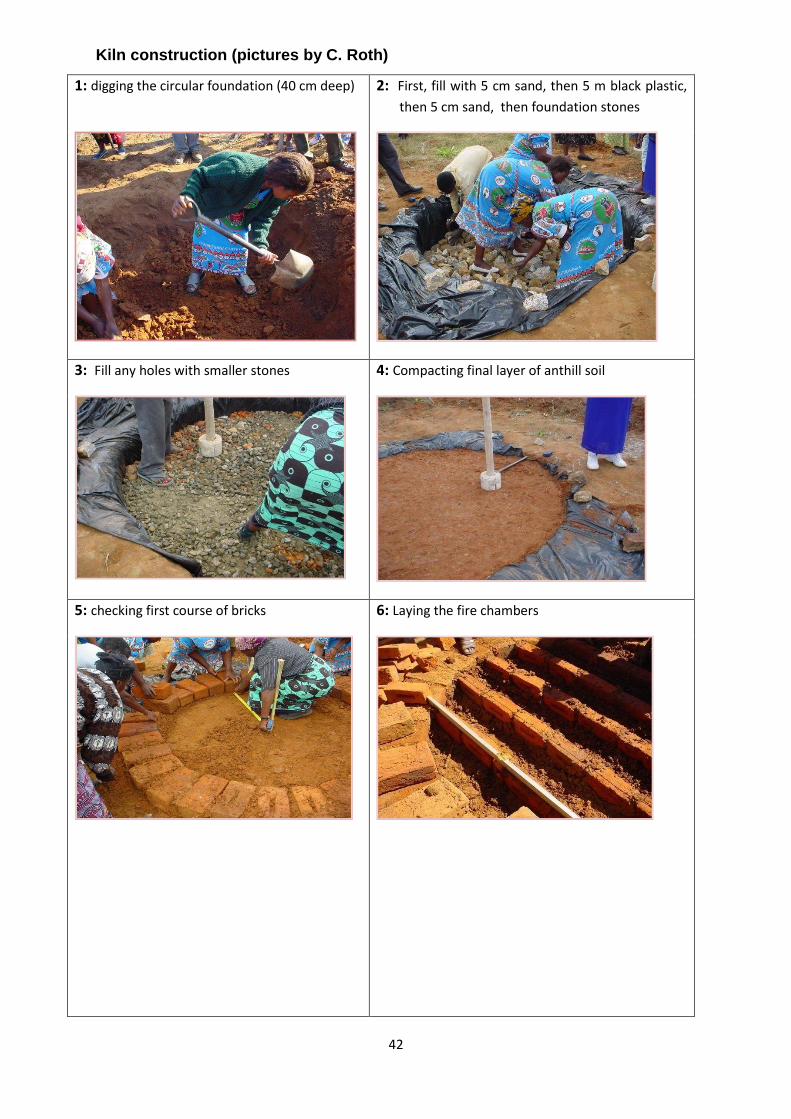
42
Kiln construction (pictures by C. Roth)
1: digging the circular foundation (40 cm deep) 2: First, fill with 5 cm sand, then 5 m black plastic,
then 5 cm sand, then foundation stones
3: Fill any holes with smaller stones 4: Compacting final layer of anthill soil
5: checking first course of bricks 6: Laying the fire chambers
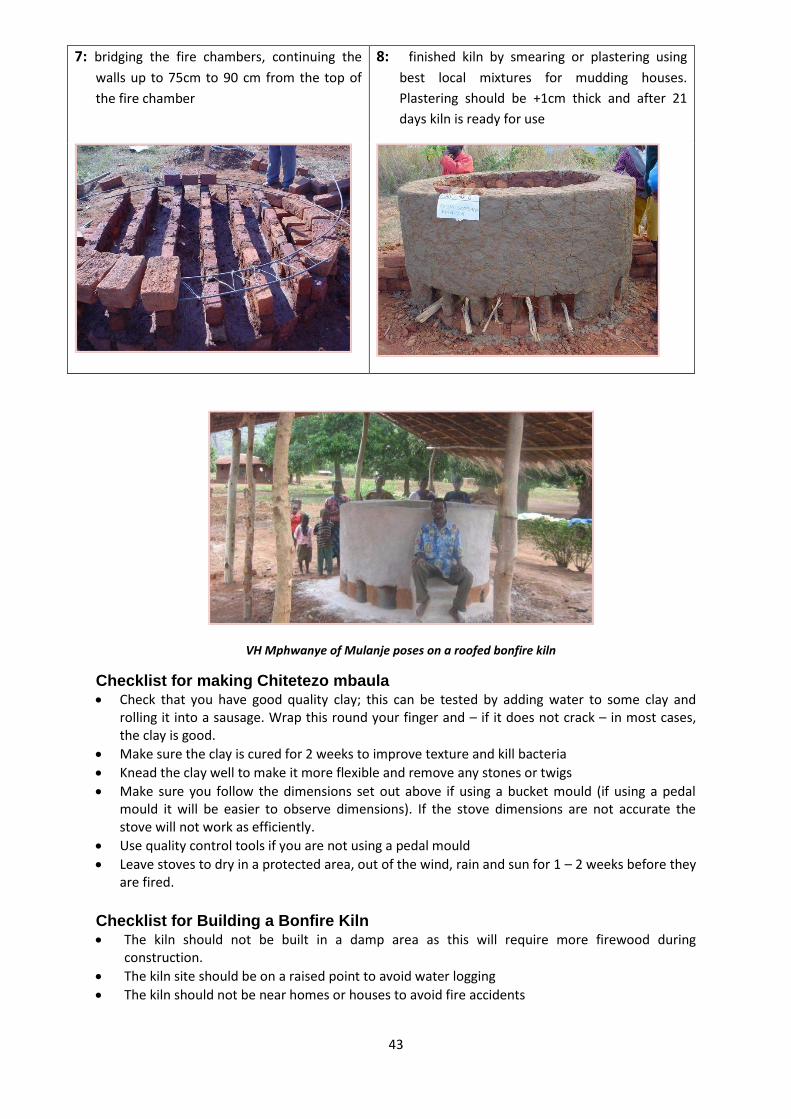
43
7: bridging the fire chambers, continuing the
walls up to 75cm to 90 cm from the top of
the fire chamber
8: finished kiln by smearing or plastering using
best local mixtures for mudding houses.
Plastering should be +1cm thick and after 21
days kiln is ready for use
VH Mphwanye of Mulanje poses on a roofed bonfire kiln
Checklist for making Chitetezo mbaula Check that you have good quality clay; this can be tested by adding water to some clay and
rolling it into a sausage. Wrap this round your finger and – if it does not crack – in most cases, the clay is good.
Make sure the clay is cured for 2 weeks to improve texture and kill bacteria
Knead the clay well to make it more flexible and remove any stones or twigs
Make sure you follow the dimensions set out above if using a bucket mould (if using a pedal mould it will be easier to observe dimensions). If the stove dimensions are not accurate the stove will not work as efficiently.
Use quality control tools if you are not using a pedal mould
Leave stoves to dry in a protected area, out of the wind, rain and sun for 1 – 2 weeks before they are fired.
Checklist for Building a Bonfire Kiln The kiln should not be built in a damp area as this will require more firewood during
construction.
The kiln site should be on a raised point to avoid water logging
The kiln should not be near homes or houses to avoid fire accidents
44
After each firing inspect the kiln for any firebox wall bricks that are beginning to sink and any joints which have become loose or fallen out. Re-plaster the kiln regularly.
4.3.4 Problem Solving for a Chitetezo Mbaula and Bonfire Kiln
PROBLEM POSSIBLE CAUSE POSSIBLE SOLUTION
Stoves on the kiln floor are cracking
Firing process too fast Cold draughts
Reduce stocking rate Close firebox doors During firing.
Stoves cracking during construction
Clay not properly processed Poor storage
Proper processing of clay Store in cool dry place and cover with rags
Stove cracking at first use
Too much fire initially First day use of stove, start with a small fire Leave the stove in the sun for about 5 – 6 hrs before lighting the fire
Under firing
Damp kiln
Ensure that the kiln floor is above ground level and is provided with a damp-proof layer Shelter the kiln.
Clay is not properly prepared
Allow clay to mature for several weeks before use and add sand to the clay
Stoves over fired Clay is too pure Add fine sawdust or fine chopped grass.
Stoves crack during firing
Clay is too dense Firing process is too fast Cold draughts Stoves damaged due to mishandling of wet liners Air holes in liners Fast cooling rate
Add fine sawdust or fine chopped grass to the fire so that there are low flames. Reduce stocking rate Close firebox doors during firing. Use boards to carry liners. This must be done with care Wedge clay to remove air bubbles before moulding Seal the cracks and firebox doors
One of the most common reasons for stoves cracking is poor quality control during the production.
Problem Solving for Building a Bonfire Kiln Dome collapsing/cracking
Unstable dome Make the dome higher
Wall cracking
Thermal expansion in joints and bricks Joints in line Using the kiln before it is dry
Repair the cracks Rearrange the joints After construction, allow the kiln to dry for at least 21 days
Explosions Damp liners Dry liners in the sun before firing. (liners are small pottery materials that are fired together with stoves to make sure the space between stoves in the kiln is bridged for proper firing)
High fuel consumption
Wet fuel-wood Waste as flames flow out of the kiln chamber. Weak joint
Use dry wood Replace and repair the joints
Firebox mortar falling off
Over-firing Reduce fuel-wood Consumption rate
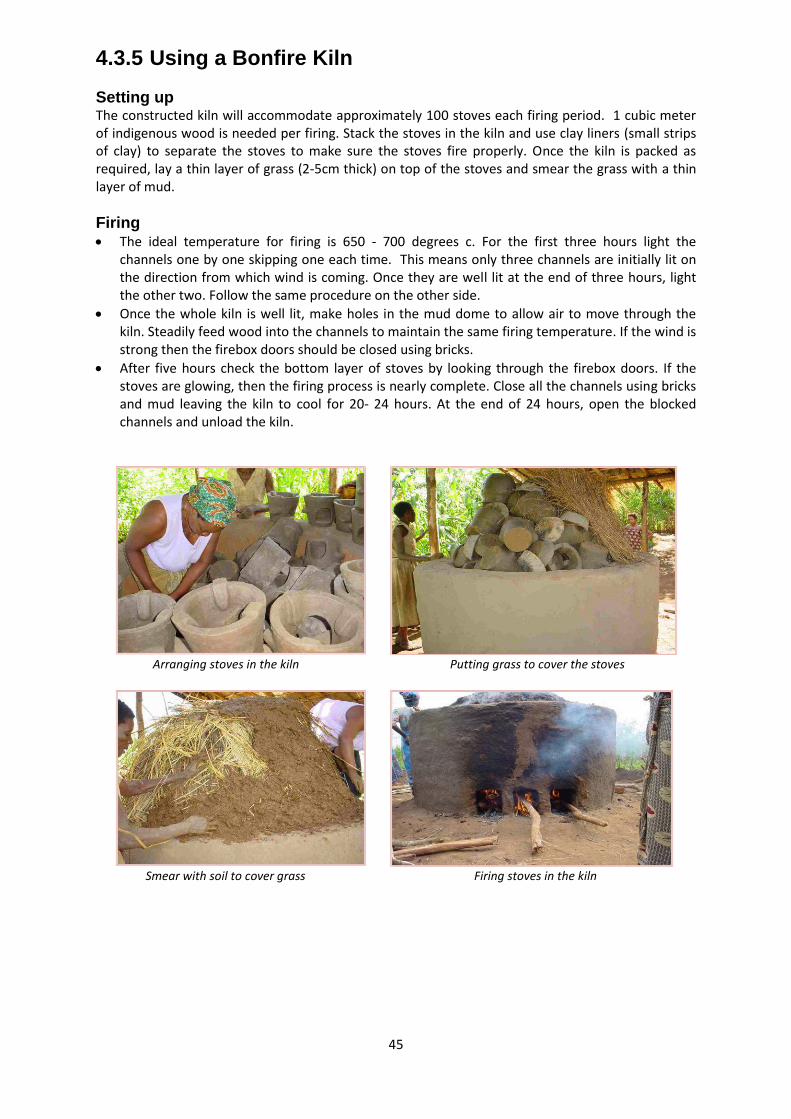
45
4.3.5 Using a Bonfire Kiln
Setting up The constructed kiln will accommodate approximately 100 stoves each firing period. 1 cubic meter of indigenous wood is needed per firing. Stack the stoves in the kiln and use clay liners (small strips of clay) to separate the stoves to make sure the stoves fire properly. Once the kiln is packed as required, lay a thin layer of grass (2-5cm thick) on top of the stoves and smear the grass with a thin layer of mud.
Firing The ideal temperature for firing is 650 - 700 degrees c. For the first three hours light the
channels one by one skipping one each time. This means only three channels are initially lit on the direction from which wind is coming. Once they are well lit at the end of three hours, light the other two. Follow the same procedure on the other side.
Once the whole kiln is well lit, make holes in the mud dome to allow air to move through the kiln. Steadily feed wood into the channels to maintain the same firing temperature. If the wind is strong then the firebox doors should be closed using bricks.
After five hours check the bottom layer of stoves by looking through the firebox doors. If the stoves are glowing, then the firing process is nearly complete. Close all the channels using bricks and mud leaving the kiln to cool for 20- 24 hours. At the end of 24 hours, open the blocked channels and unload the kiln.
Arranging stoves in the kiln Putting grass to cover the stoves
Smear with soil to cover grass Firing stoves in the kiln

46
4.4 Fuel Efficient Stove Comparison The last 3 sections have presented a lot of information on stoves so the table below has been put together to allow for an easy comparison of the stoves and their advantages and disadvantages.
Stove type and a summary of their advantages and disadvantages Esperanza Changu Changu Chitetezo Mbaula Fixed stove Fixed Stove Portable Stove (has handles
and can even be moved when the fire is burning)
Reduces firewood consumption by 55%
Reduces firewood consumption by 66%
Reduces firewood consumption by 40%
Need to pay for specialist bricks (and the transport of these bricks)
Construction materials are free Construction materials for the stove are free but there are costs for building the kiln.
Requires a specially trained artisan to produce
Low technology product that does not necessarily require a trained artisan
Production of the stove is labour intensive as clay needs to be collected, stove needs to be made by a trained producer, stove needs to be dried and then fired in a kiln.
More expensive to buy Cheap to buy Cheap to buy Covered in cement so it is splashproof
Not waterproof as made of mud
Not waterproof as made of clay
Can heat one pot at a time Can fit 2 pots so is useful for cooking one pot of nsima and one pot of relish at the same time
Can heat one pot at a time.
The previous 3 sections have reviewed how to reduce firewood consumption through using a
fuel efficient stove. You can reduce your firewood consumption further using tips outlined in
Chapter 10 (sections 10 and 11). You can also reduce firewood consumption further through
using a fireless cooker will now be explained.

47
4.5 The Fireless Cooker
4.5.1 Introduction When food is cooked on a fuel efficient stove and then placed in a fireless cooker, significant firewood reductions can be made. Some food takes a long time to cook, particularly legumes (e.g. beans) which can take up to 5 hours of cooking before they are ready for consumption. Many households can no longer afford the cost of firewood these preparations require and so stop eating them. As a consequence, a lot of readily available protein at household level is not eaten but sold off. The fuel consumption in the process of food preparation on a fire is not constant. A lot of wood is required to heat up the content of a cooking pot but once it is boiling, it only takes a little energy to maintain the temperature at boiling point. Once the content of the pot has to be heated to boiling point it can then be kept on simmering level with only a small flame provided the pot has a lid on it. Some foods such as rice or green paw paw do not require stirring and therefore the lid can be kept on the pot for the entire cooking period. If you open the lid of the pot and stir the content, the temperature goes down quickly and more fuel is needed to get it back to boiling level. In a fireless cooker, once the contents have reached boiling point you remove them from the fire and you wrap the cooking pot in an insulating cover (heat retainer = fireless cooker) which prevents the heat from leaving the pot. The simmering process of the meal continues inside the insulated wrapping. No further external heat supply is required. Based on the experience of the cook with cooking times of the specific foods, the food stays in the heat retainer (fireless cooker) until it is served.
Food can be kept warm even for up to 6 hours if people come back late home from the field or the market. It is not advisable to keep the food longer than six hours as it might promote the growth of microorganisms in the food which may put health at risk.
The underlying principle of insulation is that air does not conduct heat as well as solid metal (e.g. a cooking pot), water or soil. The more insulated pockets of air you can create between the cooking pot and the outside, the more heat will be retained inside the pot. The mobile fireless cooker enables the owner to use it at any place while the fixed ones are fixed
The mobile fireless cooker The fixed fireless cooker The Advantages of Using a Fireless Cooker
Saving firewood The preparation times for food depend on many factors such as outside temperature, heat of the fire, size of the pieces in the pot, variety of the crops, quantities prepared etc. It is therefore not possible to give specific information for boiling times and simmering times. The figures in the next table are based on food quantities for one family of 5 members (Dr C. Messinger and C. Roth, 2005).

48
Food Type
Traditional boiling time on fire
Preparation in fireless cooker
Saving boiling time on fire
Boiling time on fire
Simmering time in fireless cooker
Legumes like Beans, Peas etc.
4 hours (=240 minutes)
15-45 minutes (depending on bean type)
3 – 4 hours (180- 240 minutes)
225-195 minutes
(Sweet) potato, cassava, yam, bananas etc. 45 minutes 5 minutes 45 minutes 40 minutes
Green pawpaw 40 minutes 5 minutes 45 minutes 35 minutes
Rice 30 minutes 2 minutes 35 minutes 28 minutes
Chicken, meat 90 minutes 15–20 minutes 2.5 hours 70 minutes
As a general rough estimation, when using a fireless cooker the boiling time can be reduced to 10% of the traditional boiling time. The simmering time in the fireless cooker should be at least the same time as the total traditional boiling time.
How to cook rice with the fireless cooker: Measure the rice you want to cook with a cup or any other container. Then measure the water that you need to cook the rice so that it comes out well done. This amount of water can vary a little bit depending on the type of rice you are using, as broken rice will normally absorb more water than a hard-boiling long-grain rice. The amount of water will also depend on how you prepare it before.
Cooking: If you wash the rice before cooking - then measure 1, 5 cups (parts) of water for every cup (part) of rice that you have measured.
If you have clean rice and you don’t wash it, then you measure 2 cups (parts) of water for every cup (part) of rice that you have measured.
Make sure that if you have filled the cup up to the brim with rice, you also fill the water up to the same level in the cup. To find out the suitable amount of water it takes a bit of experimenting.
Select a cooking pot with a lid that closes well and that fits into your fireless cooker.
Take the quantity of water you measured and bring it to the boil in the way you usually do it (with oil, salt, whatever other spices or condiments you want to add). If you add the rice once it is boiling, you wait until is starting to boil again and then count 2 minutes (TWO minutes only). Then remove the cooking pot from the fire and put it into the fireless cooker.
Then cover the pot tightly with the cushion-cover of the fireless cooker. Keep checking the outside of the fireless cooker, if the outside feels warm, it means that the insulation material is too thin and heat is escaping from the cooking pot. You will later on have to fix the filling of the insulation material in the areas where the heat was escaping. After 30 to 35 minutes the rice should be done.
Apart from the fuel saving due to the reduced boiling time, even the initial heating time can be reduced. Cooking in the fireless cooker requires less liquid as evaporation is reduced. Hence less water has to be heated up to the boiling point.

49
Less wastage of food Food cannot get burned in the fireless cooker as it is off the flames while simmering. Hence, the danger of spoiling food with too much heat is avoided.
Less labour required for food preparation When boiling food for several hours, one person must permanently control the fire. This demands a lot of labour which could be used otherwise in the garden, field or other household work if the food would be simmering in the fireless cooker. This is important particularly if labour shortage is an issue (e.g. female headed households). This is very useful for care givers to patients that have HIV and AIDS as it allows care givers to have more time with the patient
Reduced loss of nutrients in the preparation process Some nutrients get destroyed if they are exposed to high temperatures for too long. Cooking temperatures are lower in the fireless cooker so that vitamins that are sensitive to heat like Vitamin A and C are preserved. This is also particularly useful for care givers looking after patients with HIV and AIDS as it ensures that patients get maximum nutrition from their food.
Health and Safety It reduces the time spent at the fire and thus reduces the exposure to smoke, which leads to
decreased risk of respiratory and eye infections
As the pot spends less time on the fire there is a reduced chance of burns or fires.
Disadvantages of Using a Fireless Cooker
You need to be organised to prepare the meal well in advance of when you will eat
If poorly constructed heat will be lost and your food will not cook. 4.5.2 Materials Needed to Construct a Fireless Cooker
Insulation: You can use dry grass (hay), dry banana leaves, maize stems, vetivar grass, cotton wool, newspaper (if scrambled and not too compressed), old pieces of blankets etc. – the choice is yours. Avoid using unevenly dried or wet materials as they absorb heat from the heated pot. By using local materials, the fireless cooker can be constructed at no cost at all. Don’t forget to build a top cover for the lid! Otherwise the heat disappears through the top.
Cover: Whatever insulation material you use it is important to cover that “insulation” with a dry, clean cloth so that no loose particles of the insulation materials will fall into the cooking pot.
Container: This insulating material has to be fixed in a container. This can be a hole in the ground (if dry), a carton box, a clay structure or an old basket or rusty bucket. The container must be big enough for the cooking pot plus two layers of insulation material (a good way to measure this is the width of the cooking pot plus one hand width on either side).
There are many possibilities how to construct a fireless cooker. In general, fireless cookers can be mobile assets or a fixed structure in the kitchen.
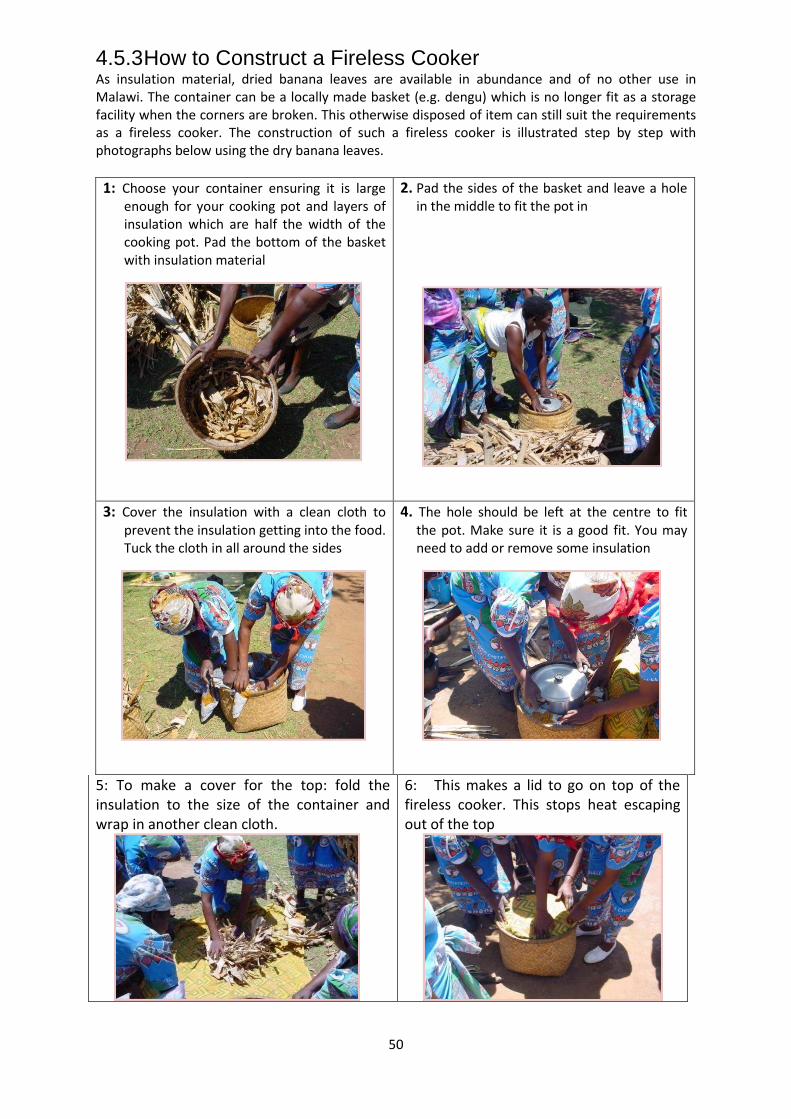
50
4.5.3 How to Construct a Fireless Cooker As insulation material, dried banana leaves are available in abundance and of no other use in Malawi. The container can be a locally made basket (e.g. dengu) which is no longer fit as a storage facility when the corners are broken. This otherwise disposed of item can still suit the requirements as a fireless cooker. The construction of such a fireless cooker is illustrated step by step with photographs below using the dry banana leaves.
1: Choose your container ensuring it is large enough for your cooking pot and layers of insulation which are half the width of the cooking pot. Pad the bottom of the basket with insulation material
2. Pad the sides of the basket and leave a hole in the middle to fit the pot in
3: Cover the insulation with a clean cloth to prevent the insulation getting into the food. Tuck the cloth in all around the sides
4. The hole should be left at the centre to fit the pot. Make sure it is a good fit. You may need to add or remove some insulation
5: To make a cover for the top: fold the insulation to the size of the container and wrap in another clean cloth.
6: This makes a lid to go on top of the fireless cooker. This stops heat escaping out of the top
51
Installation Checklist for Fireless Cookers Materials used as insulators should be very dry to avoid conducting heat.
The same sized pot used during construction of the fireless cooker should be the only size of pot to be used in that particular fireless cooker.
Observe the boiling time on the fire and the simmering time in the fireless cooker to avoid under cooking and over cooking respectively.
4.5.4 Problem Solving with Fireless Cookers
Problem How to fix
1 Food not properly cooked
3 Observe time of simmering 4 Fireless cooker has air pockets, need
compressing 5 Pot too big or small to match the fireless
cooker 6 Fireless cooker construction materials are wet
or evenly dried 7 Time from taking pot from the fire into the
fireless cooker should be as short as possible to avoid heat loss.
Note: There has not been an incidence of fireless cooker catching fire unless you are careless with fire.
Chapter 4 has so far explained how to reduce firewood consumption through the use of
different models of fuel efficient stoves and a fireless cooker. The next three sections will
examine how you can substitute different materials for firewood to provide energy for
cooking and heating in the home: biomass briquettes, biogas and solar thermal systems.
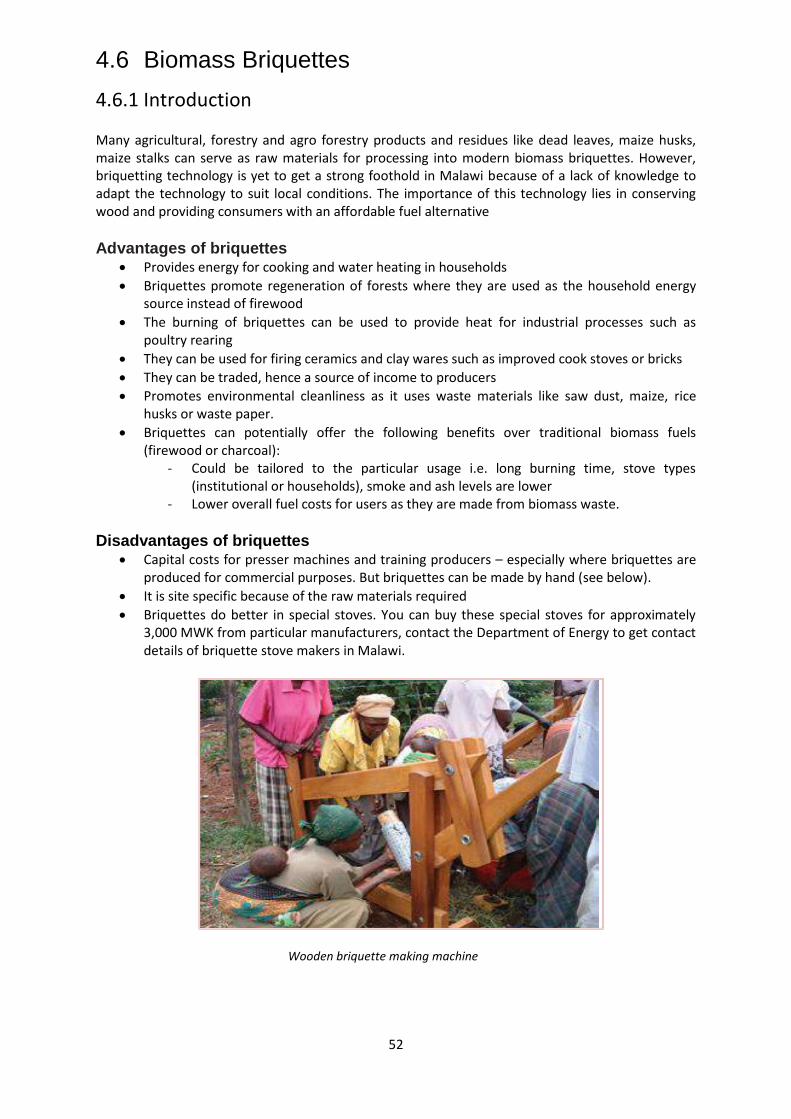
52
4.6 Biomass Briquettes
4.6.1 Introduction
Many agricultural, forestry and agro forestry products and residues like dead leaves, maize husks, maize stalks can serve as raw materials for processing into modern biomass briquettes. However, briquetting technology is yet to get a strong foothold in Malawi because of a lack of knowledge to adapt the technology to suit local conditions. The importance of this technology lies in conserving wood and providing consumers with an affordable fuel alternative
Advantages of briquettes Provides energy for cooking and water heating in households
Briquettes promote regeneration of forests where they are used as the household energy source instead of firewood
The burning of briquettes can be used to provide heat for industrial processes such as poultry rearing
They can be used for firing ceramics and clay wares such as improved cook stoves or bricks
They can be traded, hence a source of income to producers
Promotes environmental cleanliness as it uses waste materials like saw dust, maize, rice husks or waste paper.
Briquettes can potentially offer the following benefits over traditional biomass fuels (firewood or charcoal):
- Could be tailored to the particular usage i.e. long burning time, stove types (institutional or households), smoke and ash levels are lower
- Lower overall fuel costs for users as they are made from biomass waste.
Disadvantages of briquettes Capital costs for presser machines and training producers – especially where briquettes are
produced for commercial purposes. But briquettes can be made by hand (see below).
It is site specific because of the raw materials required
Briquettes do better in special stoves. You can buy these special stoves for approximately 3,000 MWK from particular manufacturers, contact the Department of Energy to get contact details of briquette stove makers in Malawi.
Wooden briquette making machine

53
4.6.2 Materials Required to Make Biomass Briquettes Briquettes are made from raw materials that are compacted into a mould. Briquettes could be different shapes and sizes depending on the mould. The appearance, burning characteristics of briquettes depends on the type of feedstock, the level of compactness and the mould used. To make briquettes you need:
Presser Machine: The pressers can be made out of wood or steel and are produced by the Malawi Industrial Research and Technology Development Centre (MIRTDC) but you can make briquettes by hand if you do not have a machine (see below)
Drum or pail: for soaking the waste products Pounding mortar and Pestle: for pounding the soaked waste products Waste paper or agricultural residues: the raw materials for briquettes Saw dust or rice husks: binding material.
*except for the presser machine, the rest are materials that can be found locally
4.6.3 How to Construct Biomass Briquettes
i. Collect the waste paper or agricultural residues. A common feedstock to use is charcoal dust (particles of charcoal too fine to be sold) but other combustible material can potentially be used too, including: saw dust, bagasse, coffee husks, maize cobs, wheat/beans/barley straws and charcoal dust. For one to produce quality briquettes, a number of factors need to be taken into considerations such as: moisture content (high moisture affects drying period or briquette will not burn well in the stove), calorific value (high calories of a feed stock make the briquette burn easily and faster which is good, but it will not last as long) of the feedstock, smoke levels and ash content as detailed below:
Typical ash content
Feedstock Amount of ash produced
Corn cobs Low – 1.2%
Saw dust Low – 1.3%
Bagasse Low - 1.8%
Ground nut shell Medium - - 6.0 %
Rice husk High – 22.4%
This table shows the amount of ash produced per given unit of feedstock commonly found in Malawi – the higher the percentage of ash being produced the lower the quality of the fire and the briquette. Feedstock needs to be mixed to improve on ash content. Each community will need to judge on balancing the mixture and availability of raw materials in your area. Discussing feedstock availability in the area would be a good topic of discussion for a facilitator.
ii. Sorting/sieving: All unwanted materials or large biomass waste are removed to ensure that all the feedstock is of the required size. For example, the raw sawdust you collect could contain unwanted larger pieces of wood. These can be sieved out.
iii. Shred biomass materials into small pieces: The biomass materials are chopped into small pieces so as to enhance their workability and compactness of the briquette. The process is dependent on the type of biomass feedstock. For example, coffee husks and saw dust would not require shredding but materials such as groundnut waste, bagasse, wheat straws, barley and maize straws and cobs would need to be chopped into small sizes. In the case of carbonised biomass, the materials would need to be ground into small pieces after they have been carbonised.
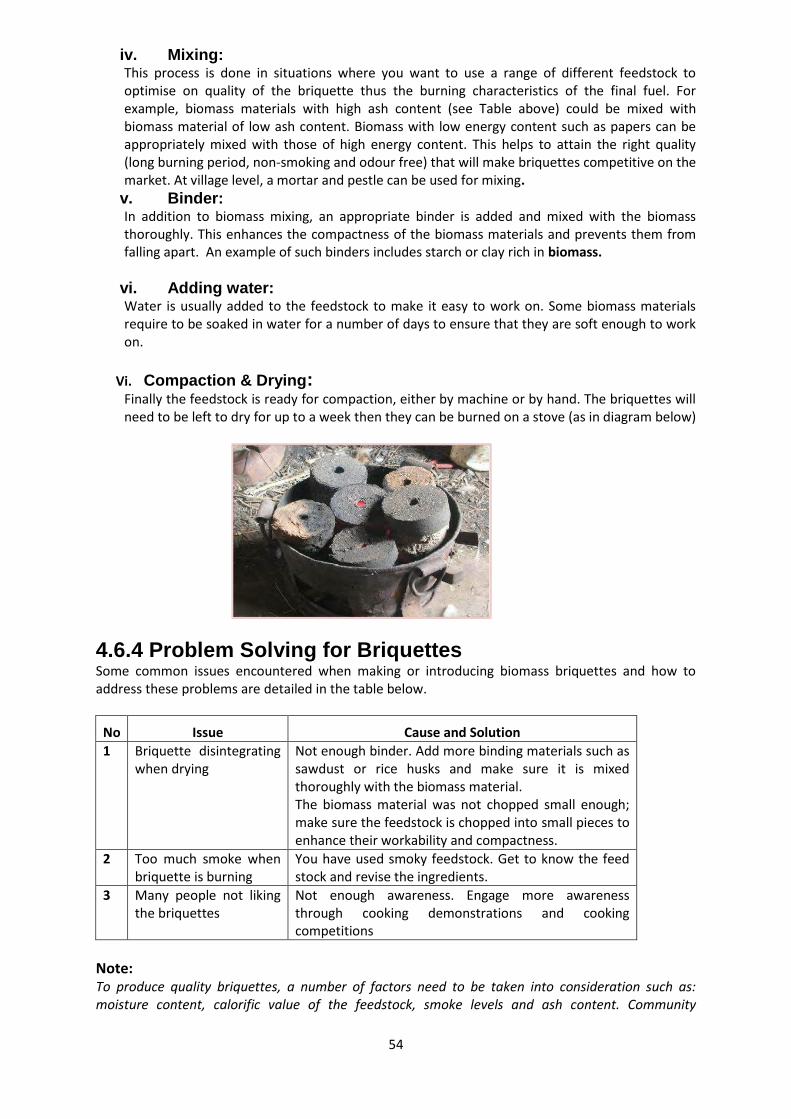
54
iv. Mixing: This process is done in situations where you want to use a range of different feedstock to optimise on quality of the briquette thus the burning characteristics of the final fuel. For example, biomass materials with high ash content (see Table above) could be mixed with biomass material of low ash content. Biomass with low energy content such as papers can be appropriately mixed with those of high energy content. This helps to attain the right quality (long burning period, non-smoking and odour free) that will make briquettes competitive on the market. At village level, a mortar and pestle can be used for mixing.
v. Binder: In addition to biomass mixing, an appropriate binder is added and mixed with the biomass thoroughly. This enhances the compactness of the biomass materials and prevents them from falling apart. An example of such binders includes starch or clay rich in biomass.
vi. Adding water: Water is usually added to the feedstock to make it easy to work on. Some biomass materials require to be soaked in water for a number of days to ensure that they are soft enough to work on.
Vi. Compaction & Drying: Finally the feedstock is ready for compaction, either by machine or by hand. The briquettes will need to be left to dry for up to a week then they can be burned on a stove (as in diagram below)
4.6.4 Problem Solving for Briquettes Some common issues encountered when making or introducing biomass briquettes and how to address these problems are detailed in the table below.
No Issue Cause and Solution 1 Briquette disintegrating
when drying Not enough binder. Add more binding materials such as sawdust or rice husks and make sure it is mixed thoroughly with the biomass material. The biomass material was not chopped small enough; make sure the feedstock is chopped into small pieces to enhance their workability and compactness.
2 Too much smoke when briquette is burning
You have used smoky feedstock. Get to know the feed stock and revise the ingredients.
3 Many people not liking the briquettes
Not enough awareness. Engage more awareness through cooking demonstrations and cooking competitions
Note: To produce quality briquettes, a number of factors need to be taken into consideration such as: moisture content, calorific value of the feedstock, smoke levels and ash content. Community

55
members have indigenous knowledge on the calorific value a feed stock (how combustible it can be), how smoky and the amount of ash produced. So it is important that Facilitators of briquette production trainings engage communities more to make sure there is a right mixture of ingredients and product becomes user friendly so that the technology is acceptable.
4.6.5 Briquette Manufacturers in Malawi There are many groups trained in the production and marketing of briquettes in Malawi but the technology has faced challenges in terms of promotion and marketing. This has resulted in most of the trained groups failing to commercialize and eventually stopping briquette production. However, some groups are still producing them and an updated data base can be sourced through the Department of Energy Affairs. Other organizations involved in rolling out the technology include MuREA, the Polytechnic in Blantyre (Che musa group in Chemusa township) PAMET, MANASO, IGPWP – EU in Zomba. Other groups trained include Che Lifa in Blantyre, Mkonya wa Abambo in Zomba, Mapanga CBO in Thyolo and Kanyika Club for the Disabled in Mzuzu (contact Magret Sichali on 00265888369279).
4.7 Biogas
4.7.1 Introduction
Another means of reducing firewood consumption is to use biogas for cooking food and space heating. This section describes biogas system theory, design, construction and operation principles that are most appropriate to the resources and needs of rural communities in Malawi. A simple gas stove can be constructed using quarry stones and cement mortar with the necessary pipework from the biogas plant being installed by a trained professional (see image of a gas stove below). There is a short film of Kamuzunguzeni Zgambo village at Ekwendeni Community Based Childcare Center using biogas for cooking. If you are viewing this document online, you can see a video of this biogas cooker being used here:
Mov04196.wmv
Adoption of biogas digesters that use organic waste in Malawi has been slow due to many factors including the handling of cow dung by men and for religious reasons.
In some districts in Malawi where there are many cows these cows are highly regarded as a source of wealth and social status. There is a local belief that to qualify to marry, a man must own sufficient cows, and this is judged from the number of cattle and cattle droppings in a kraal/ shed. However, even though dung is regarded as a necessary asset in homes, it is never handled by men. The compound cleaning and all other use of cow dung is exclusively done by women. Therefore, the target market for a biogas digester should be the women of the household.
Left: A photo of a
householder using a
stove made from
quarry stones and
cement. The gas
being used for
cooking is from
biogas
Right: A short film of
biogas at Ekwendeni
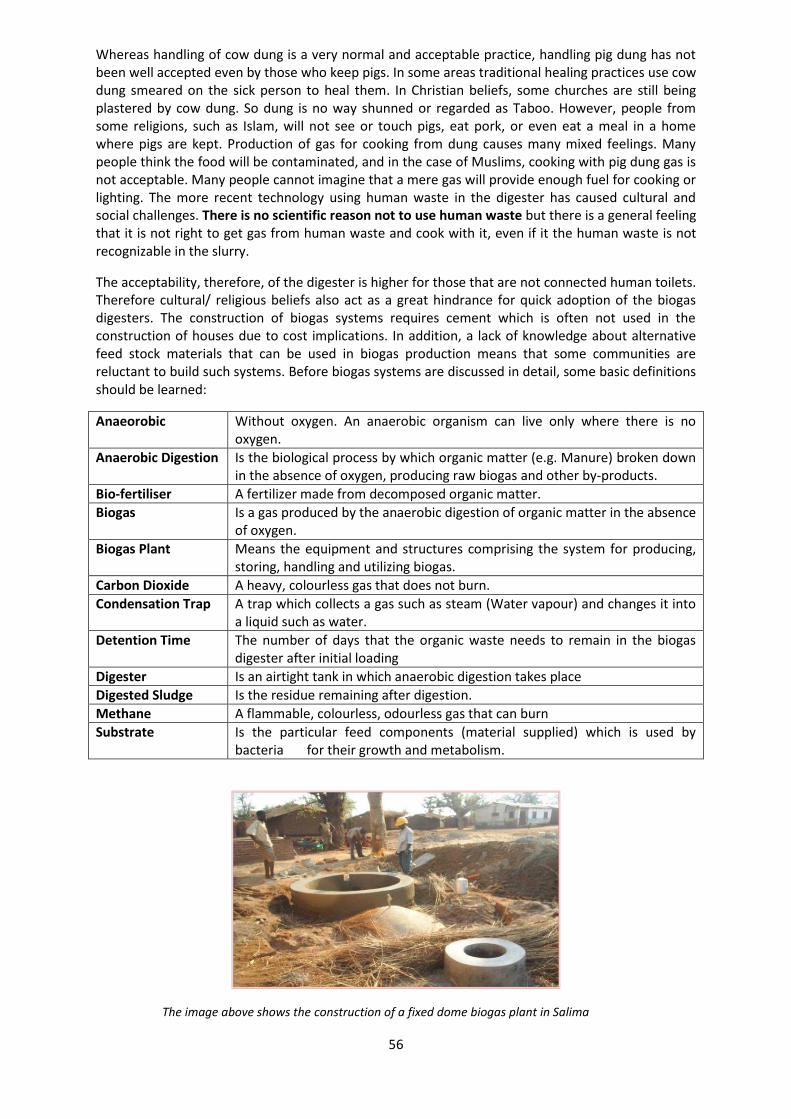
56
Whereas handling of cow dung is a very normal and acceptable practice, handling pig dung has not been well accepted even by those who keep pigs. In some areas traditional healing practices use cow dung smeared on the sick person to heal them. In Christian beliefs, some churches are still being plastered by cow dung. So dung is no way shunned or regarded as Taboo. However, people from some religions, such as Islam, will not see or touch pigs, eat pork, or even eat a meal in a home where pigs are kept. Production of gas for cooking from dung causes many mixed feelings. Many people think the food will be contaminated, and in the case of Muslims, cooking with pig dung gas is not acceptable. Many people cannot imagine that a mere gas will provide enough fuel for cooking or lighting. The more recent technology using human waste in the digester has caused cultural and social challenges. There is no scientific reason not to use human waste but there is a general feeling that it is not right to get gas from human waste and cook with it, even if it the human waste is not recognizable in the slurry.
The acceptability, therefore, of the digester is higher for those that are not connected human toilets. Therefore cultural/ religious beliefs also act as a great hindrance for quick adoption of the biogas digesters. The construction of biogas systems requires cement which is often not used in the construction of houses due to cost implications. In addition, a lack of knowledge about alternative feed stock materials that can be used in biogas production means that some communities are reluctant to build such systems. Before biogas systems are discussed in detail, some basic definitions should be learned:
Anaeorobic Without oxygen. An anaerobic organism can live only where there is no oxygen.
Anaerobic Digestion Is the biological process by which organic matter (e.g. Manure) broken down in the absence of oxygen, producing raw biogas and other by-products.
Bio-fertiliser A fertilizer made from decomposed organic matter.
Biogas Is a gas produced by the anaerobic digestion of organic matter in the absence of oxygen.
Biogas Plant Means the equipment and structures comprising the system for producing, storing, handling and utilizing biogas.
Carbon Dioxide A heavy, colourless gas that does not burn.
Condensation Trap A trap which collects a gas such as steam (Water vapour) and changes it into a liquid such as water.
Detention Time The number of days that the organic waste needs to remain in the biogas digester after initial loading
Digester Is an airtight tank in which anaerobic digestion takes place
Digested Sludge Is the residue remaining after digestion.
Methane A flammable, colourless, odourless gas that can burn
Substrate Is the particular feed components (material supplied) which is used by bacteria for their growth and metabolism.
The image above shows the construction of a fixed dome biogas plant in Salima
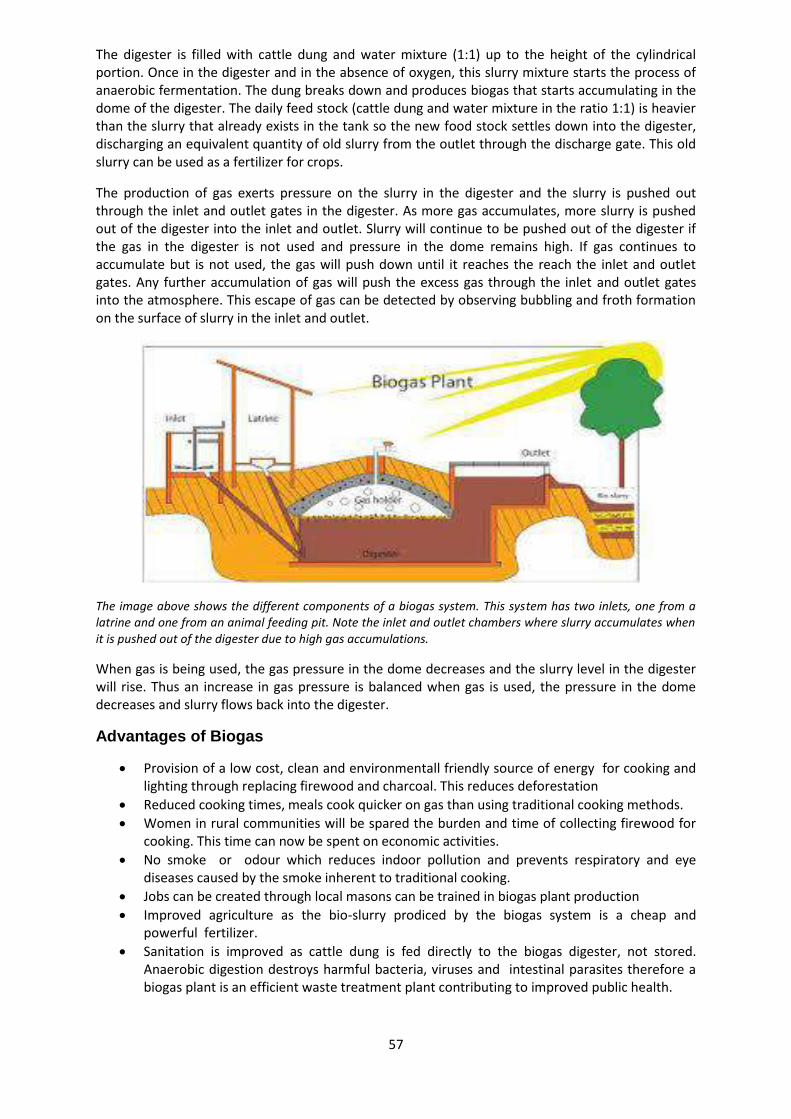
57
The digester is filled with cattle dung and water mixture (1:1) up to the height of the cylindrical portion. Once in the digester and in the absence of oxygen, this slurry mixture starts the process of anaerobic fermentation. The dung breaks down and produces biogas that starts accumulating in the dome of the digester. The daily feed stock (cattle dung and water mixture in the ratio 1:1) is heavier than the slurry that already exists in the tank so the new food stock settles down into the digester, discharging an equivalent quantity of old slurry from the outlet through the discharge gate. This old slurry can be used as a fertilizer for crops.
The production of gas exerts pressure on the slurry in the digester and the slurry is pushed out through the inlet and outlet gates in the digester. As more gas accumulates, more slurry is pushed out of the digester into the inlet and outlet. Slurry will continue to be pushed out of the digester if the gas in the digester is not used and pressure in the dome remains high. If gas continues to accumulate but is not used, the gas will push down until it reaches the reach the inlet and outlet gates. Any further accumulation of gas will push the excess gas through the inlet and outlet gates into the atmosphere. This escape of gas can be detected by observing bubbling and froth formation on the surface of slurry in the inlet and outlet.
The image above shows the different components of a biogas system. This system has two inlets, one from a latrine and one from an animal feeding pit. Note the inlet and outlet chambers where slurry accumulates when it is pushed out of the digester due to high gas accumulations.
When gas is being used, the gas pressure in the dome decreases and the slurry level in the digester will rise. Thus an increase in gas pressure is balanced when gas is used, the pressure in the dome decreases and slurry flows back into the digester.
Advantages of Biogas
Provision of a low cost, clean and environmentall friendly source of energy for cooking and lighting through replacing firewood and charcoal. This reduces deforestation
Reduced cooking times, meals cook quicker on gas than using traditional cooking methods.
Women in rural communities will be spared the burden and time of collecting firewood for cooking. This time can now be spent on economic activities.
No smoke or odour which reduces indoor pollution and prevents respiratory and eye diseases caused by the smoke inherent to traditional cooking.
Jobs can be created through local masons can be trained in biogas plant production
Improved agriculture as the bio-slurry prodiced by the biogas system is a cheap and powerful fertilizer.
Sanitation is improved as cattle dung is fed directly to the biogas digester, not stored. Anaerobic digestion destroys harmful bacteria, viruses and intestinal parasites therefore a biogas plant is an efficient waste treatment plant contributing to improved public health.
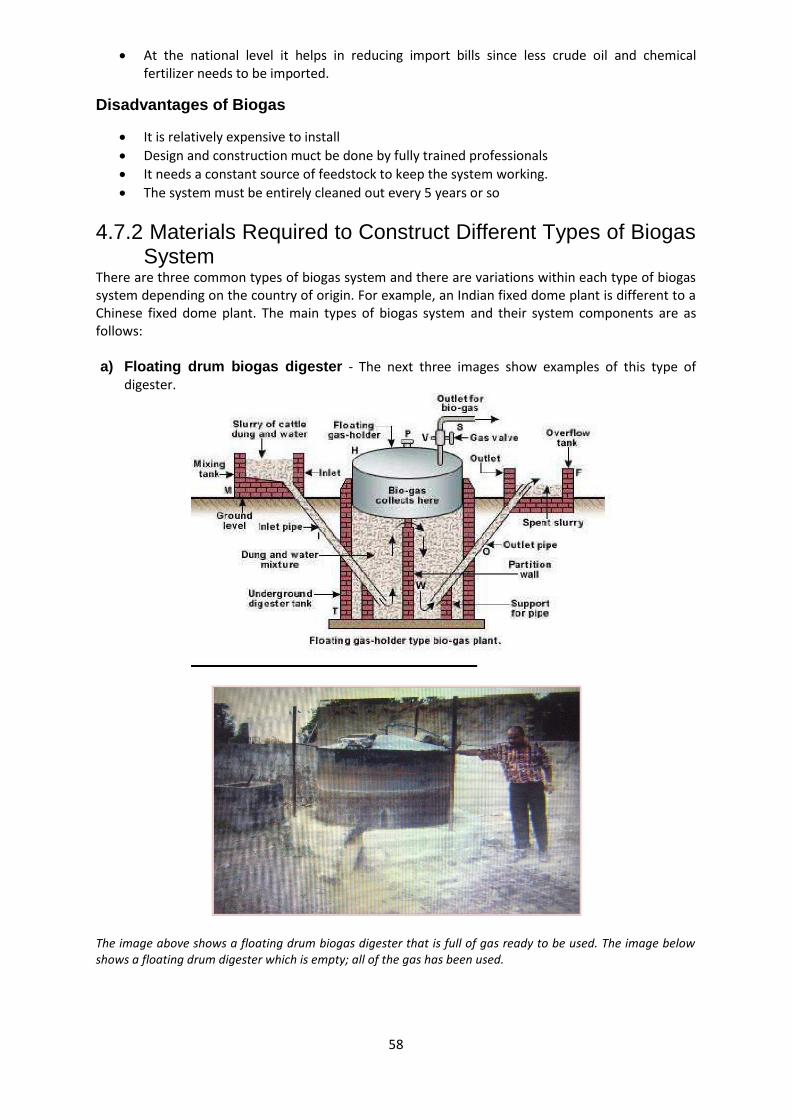
58
At the national level it helps in reducing import bills since less crude oil and chemical fertilizer needs to be imported.
Disadvantages of Biogas
It is relatively expensive to install
Design and construction muct be done by fully trained professionals
It needs a constant source of feedstock to keep the system working.
The system must be entirely cleaned out every 5 years or so
4.7.2 Materials Required to Construct Different Types of Biogas System
There are three common types of biogas system and there are variations within each type of biogas system depending on the country of origin. For example, an Indian fixed dome plant is different to a Chinese fixed dome plant. The main types of biogas system and their system components are as follows: a) Floating drum biogas digester - The next three images show examples of this type of
digester.
The image above shows a floating drum biogas digester that is full of gas ready to be used. The image below shows a floating drum digester which is empty; all of the gas has been used.

59
The table below outlines some models of floating drum biogas digesters and outlines if they are used in Malawi.
Type Remarks Use in Malawi KVIC Model With a cylindrical digester, the oldest and
most widespread floating drum biogas plant in India.
One at Magomero though not working.
GANESH Model
Made of angular steel and plastic foil. Not common, not in Malawi.
Floating –Drum plant
Made of pre-fabricated reinforced concrete compound units.
Used in Malawi e.g. Phwezi Girls, Magomero Community Dev.
b) Fixed Dome Biomass Plant - This type of biogas design consists of a digester pit lined with
bricks and a permanent concrete roof placed over it. Soil is piled on top of the roof in order to assist in containing the gas produced; it collects in the dome and displaces some of the slurry from the digester pit to the effluent chamber. The slurry flows from the influent chamber into the digester pit during part of the construction and cleaning is solely through the slurry influent and effluent chambers. This fixed dome biogas plant design is commonly used in Malawi because: It uses local materials and can be made locally. It can create jobs through employing local masons and labour. It can be understood, controlled and maintained by people who are not experts. There is uniform gas increase production. It has a longer life span. It is environmental friendly. It cannot be stolen. Mixing the substrate is easy
The following two pictures are examples of a fixed dome biogas plant.

60
These two figures demonstrate the flow of feed stock through a fixed dome digester
The table below outlines some models of fixed drum biogas systems and outlines if they are used in Malawi.
Type Description Remarks Chinese Fixed Dome
Is the archetype of all fixed dome plants Used in Malawi but not working.
Janata Model
Was the first fixed –dome design in India as a response to the Chinese fixed dome plant.
Most common used in Malawi
Deenbandhu The successor of the Janata plant in India, with improved design. It is more crack-proof and uses fewer building materials than the Janata design. With a hemisphere digester.
Constructed at Magomero.
CAMARTEC Model
Has a simplified structure of a hemispherical dome shell based on a rigid foundation ring only and a calculated joint of fractions the so –called weak/ strong ring. It was developed in the late 80s in Tanzania.
Not common.
c) Flexible Balloon Biogas System - This type of biogas system consists of a long cylindrical
plastic bag that is placed in a trench lined with masonry, compacted sand or mud. The slurry fills the lower 2/3 of the bag and the gas collects above it. As the biogas is used up, the bag collapses behaving like a balloon. The edges of the bag are held to the edges of the trench with clips or poles passing through loops in the plastic bag. The following two pictures are illustrations of a balloon biogas digester.There are no manufacturers of this type of biogas plant in Malawi. Parts are difficult to import and therefore maintenance of such a system can be

61
difficult. So whilst the system is cheap, this style of biogas system is not recommended for Malawi.
These images show balloon digesters which is full of gas and ready to use
For each of the biogas digester types listed above, some key questions for community groups to consider before starting building a biogas system are outlined below:
The fermentation tank should be designed to hold about 50 days of feed material.
The following standard relationships are mostly used in order to size the biogas units mainly based on a zero grazed cow (a cow which is contained and therefore all dung can be used):
- 1 kg of cow dung is mixed into 1.8 litres of slurry. - 1 Cow produces an average of 10kgs of dung per day. - 1 kg of cow dung produces 0.062 M3 of methane gas. - 1 Person requires (0.34-0.42) M3 of methane gas per day. - 1 Pig well fed fully grown produces 2.0 kgs of fresh dung per day. - 1 M3 Biogas plant produces 35 cubic feet gas per day.
The size of the inlet and outlet must be designed that they can together accommodate the amount of slurry that is pushed out of the digester when the maximum volume of gas is generated.
The opening for the outlet chamber, the discharge gate, is at the level at which the maximum allowable working pressure is developed. This means that when the maximum pressure of gas is reached, the gas pushes the slurry down to the level of the discharge gate, and the excess gas escapes through the outlet.
The upper level of the discharge gate is generally at about half the height of the cylindrical portion of the digester.
The dome is designed to accommodate up to 60% of the gas generation capacity and is structurally designed to withstand the maximum working pressure with a reasonable factor of safety.
Do not install a larger biogas plant if you don’t have sufficient cattle dung or other feed stock
Do not install a biogas plant at a great distance from the point of gas utilization (this saves the cost of the pipeline)
Do not install the plant under a tree, inside the house or in another shady place.
Do not make sludge drying bed pit more than 1.0 meter (3 ft.) deep.
Having gone through the three principle types of biogas digester, we will now compare the three types in the table overleaf.
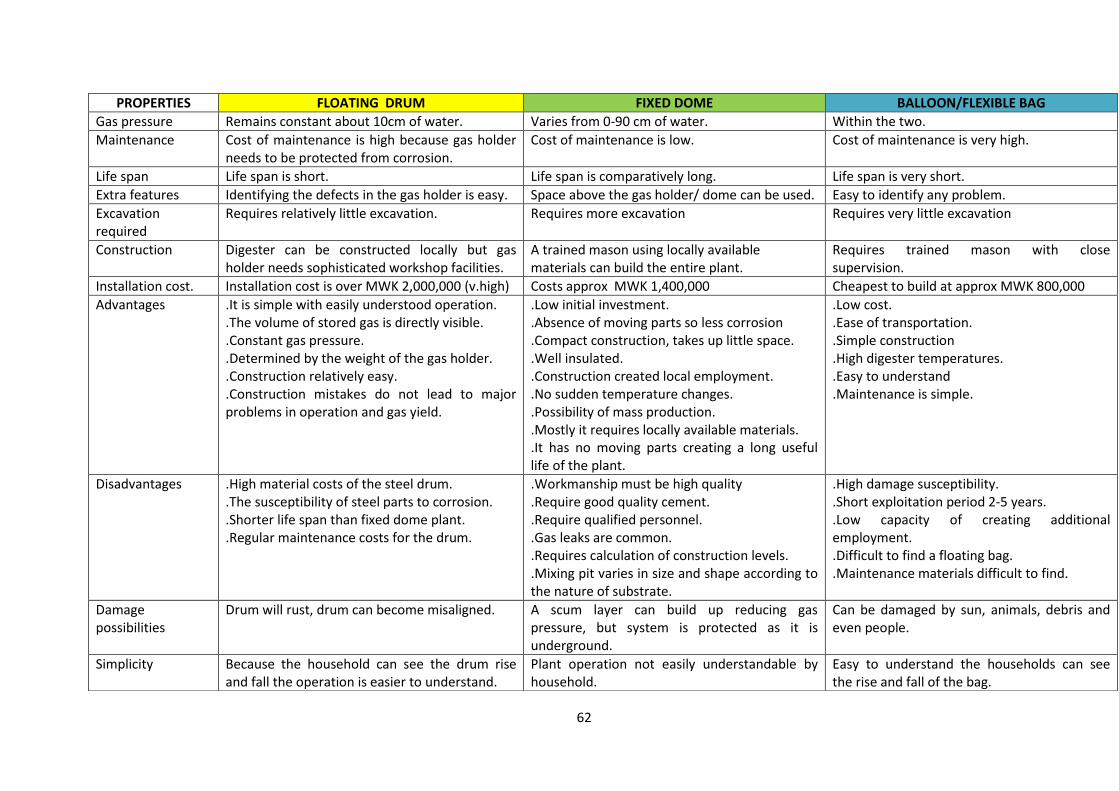
62
PROPERTIES FLOATING DRUM FIXED DOME BALLOON/FLEXIBLE BAG Gas pressure Remains constant about 10cm of water. Varies from 0-90 cm of water. Within the two. Maintenance Cost of maintenance is high because gas holder
needs to be protected from corrosion. Cost of maintenance is low. Cost of maintenance is very high.
Life span Life span is short. Life span is comparatively long. Life span is very short. Extra features Identifying the defects in the gas holder is easy. Space above the gas holder/ dome can be used. Easy to identify any problem. Excavation required
Requires relatively little excavation. Requires more excavation Requires very little excavation
Construction Digester can be constructed locally but gas holder needs sophisticated workshop facilities.
A trained mason using locally available materials can build the entire plant.
Requires trained mason with close supervision.
Installation cost. Installation cost is over MWK 2,000,000 (v.high) Costs approx MWK 1,400,000 Cheapest to build at approx MWK 800,000 Advantages .It is simple with easily understood operation.
.The volume of stored gas is directly visible.
.Constant gas pressure.
.Determined by the weight of the gas holder.
.Construction relatively easy.
.Construction mistakes do not lead to major problems in operation and gas yield.
.Low initial investment.
.Absence of moving parts so less corrosion
.Compact construction, takes up little space.
.Well insulated.
.Construction created local employment.
.No sudden temperature changes.
.Possibility of mass production.
.Mostly it requires locally available materials.
.It has no moving parts creating a long useful life of the plant.
.Low cost.
.Ease of transportation.
.Simple construction
.High digester temperatures.
.Easy to understand
.Maintenance is simple.
Disadvantages .High material costs of the steel drum. .The susceptibility of steel parts to corrosion. .Shorter life span than fixed dome plant. .Regular maintenance costs for the drum.
.Workmanship must be high quality
.Require good quality cement.
.Require qualified personnel.
.Gas leaks are common.
.Requires calculation of construction levels.
.Mixing pit varies in size and shape according to the nature of substrate.
.High damage susceptibility.
.Short exploitation period 2-5 years.
.Low capacity of creating additional employment. .Difficult to find a floating bag. .Maintenance materials difficult to find.
Damage possibilities
Drum will rust, drum can become misaligned. A scum layer can build up reducing gas pressure, but system is protected as it is underground.
Can be damaged by sun, animals, debris and even people.
Simplicity Because the household can see the drum rise and fall the operation is easier to understand.
Plant operation not easily understandable by household.
Easy to understand the households can see the rise and fall of the bag.
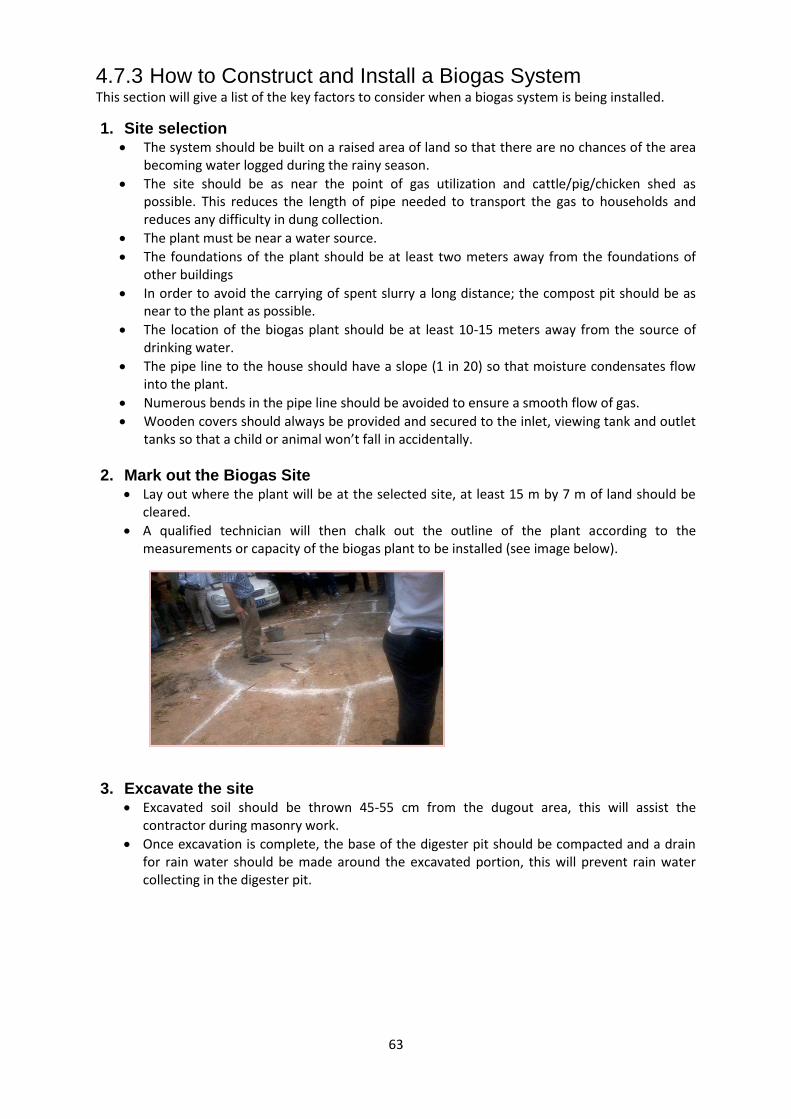
63
4.7.3 How to Construct and Install a Biogas System This section will give a list of the key factors to consider when a biogas system is being installed.
1. Site selection The system should be built on a raised area of land so that there are no chances of the area
becoming water logged during the rainy season.
The site should be as near the point of gas utilization and cattle/pig/chicken shed as possible. This reduces the length of pipe needed to transport the gas to households and reduces any difficulty in dung collection.
The plant must be near a water source.
The foundations of the plant should be at least two meters away from the foundations of other buildings
In order to avoid the carrying of spent slurry a long distance; the compost pit should be as near to the plant as possible.
The location of the biogas plant should be at least 10-15 meters away from the source of drinking water.
The pipe line to the house should have a slope (1 in 20) so that moisture condensates flow into the plant.
Numerous bends in the pipe line should be avoided to ensure a smooth flow of gas.
Wooden covers should always be provided and secured to the inlet, viewing tank and outlet tanks so that a child or animal won’t fall in accidentally.
2. Mark out the Biogas Site Lay out where the plant will be at the selected site, at least 15 m by 7 m of land should be
cleared.
A qualified technician will then chalk out the outline of the plant according to the measurements or capacity of the biogas plant to be installed (see image below).
3. Excavate the site Excavated soil should be thrown 45-55 cm from the dugout area, this will assist the
contractor during masonry work.
Once excavation is complete, the base of the digester pit should be compacted and a drain for rain water should be made around the excavated portion, this will prevent rain water collecting in the digester pit.

64
An image showing the excavation work after lay out
4. Construct Biogas Digester Now that the site is excavated, the construction can begin. All biogas systems have 5 components which are outlined below
Foundation The raw materials used for laying foundations are: cement, coarse sand (20mm to 40 mm in
size), fine sand, and stone ballast in the ratio 1:3:6 for wet soil, 1:4:8 for dry soil or other conditions.
The foundation needs to be strong to make sure it can support the weight of the whole system, even when it is full of slurry and gas.
The foundation must not allow percolation or leakage of water.
The foundation should be made level and well compacted before laying cement concrete.
The compacted ground is overlaid with sand, cement, bricks, quarry and then concrete to prevent water from percolating through.
Digester The digester is made up of cylindrical wall made of sand, cement, quarry stones and bricks.
The digester takes in feeding material through a PVC pipe on one side, on the other side, there is a small rectangular opening for the outflow of slurry / used dung.
Left: Biogas digester foundation being built. Right: Digester walls being built.
Dome
This is the cover of the digester (fermentation tank) and is a critical part of the digester
The crown of the dome must coincide with the vertical axis of the biogas plant.
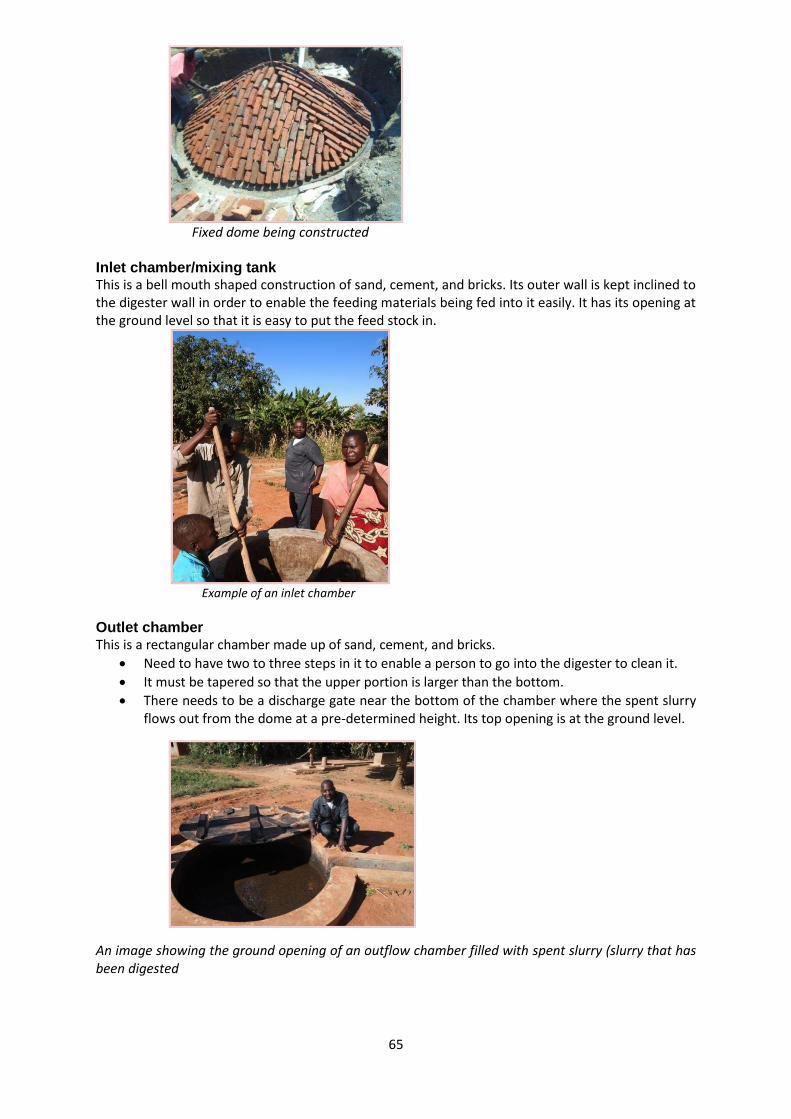
65
Fixed dome being constructed Inlet chamber/mixing tank This is a bell mouth shaped construction of sand, cement, and bricks. Its outer wall is kept inclined to the digester wall in order to enable the feeding materials being fed into it easily. It has its opening at the ground level so that it is easy to put the feed stock in.
Example of an inlet chamber
Outlet chamber This is a rectangular chamber made up of sand, cement, and bricks.
Need to have two to three steps in it to enable a person to go into the digester to clean it.
It must be tapered so that the upper portion is larger than the bottom.
There needs to be a discharge gate near the bottom of the chamber where the spent slurry flows out from the dome at a pre-determined height. Its top opening is at the ground level.
An image showing the ground opening of an outflow chamber filled with spent slurry (slurry that has been digested
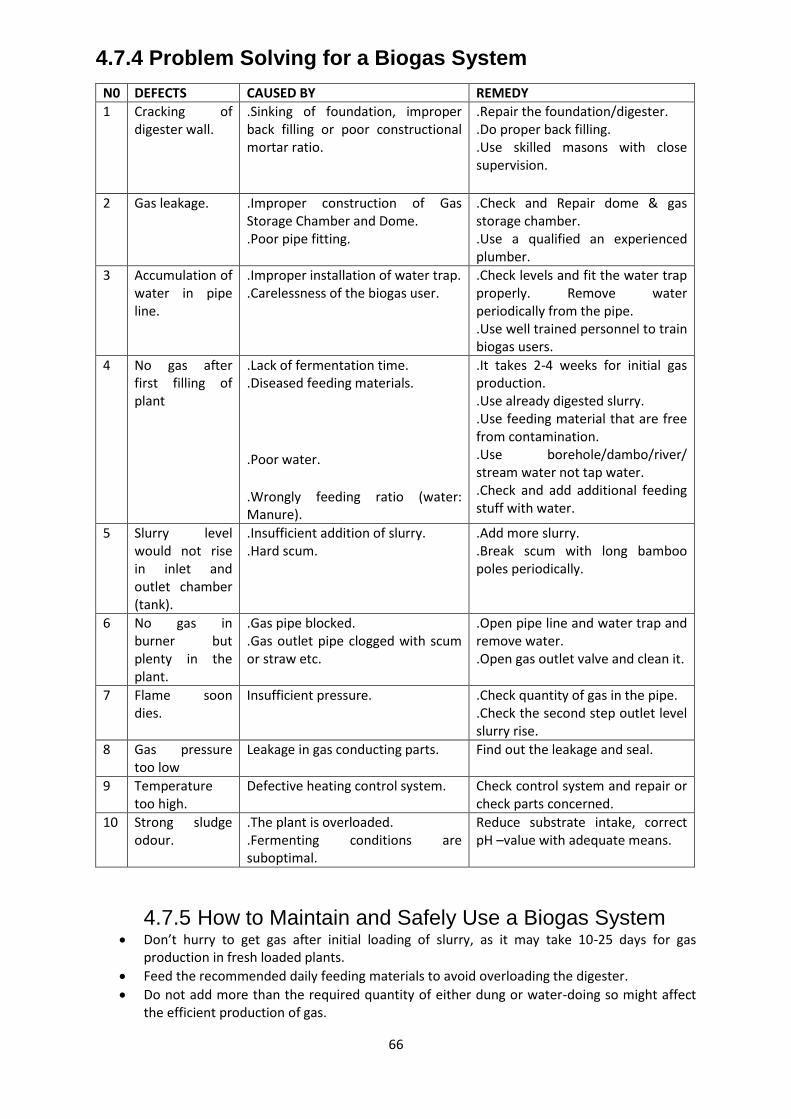
66
4.7.4 Problem Solving for a Biogas System
N0 DEFECTS CAUSED BY REMEDY 1 Cracking of
digester wall. .Sinking of foundation, improper back filling or poor constructional mortar ratio.
.Repair the foundation/digester.
.Do proper back filling.
.Use skilled masons with close supervision.
2 Gas leakage. .Improper construction of Gas Storage Chamber and Dome. .Poor pipe fitting.
.Check and Repair dome & gas storage chamber. .Use a qualified an experienced plumber.
3 Accumulation of water in pipe line.
.Improper installation of water trap.
.Carelessness of the biogas user. .Check levels and fit the water trap properly. Remove water periodically from the pipe. .Use well trained personnel to train biogas users.
4 No gas after first filling of plant
.Lack of fermentation time.
.Diseased feeding materials. .Poor water. .Wrongly feeding ratio (water: Manure).
.It takes 2-4 weeks for initial gas production. .Use already digested slurry. .Use feeding material that are free from contamination. .Use borehole/dambo/river/ stream water not tap water. .Check and add additional feeding stuff with water.
5 Slurry level would not rise in inlet and outlet chamber (tank).
.Insufficient addition of slurry.
.Hard scum. .Add more slurry. .Break scum with long bamboo poles periodically.
6 No gas in burner but plenty in the plant.
.Gas pipe blocked.
.Gas outlet pipe clogged with scum or straw etc.
.Open pipe line and water trap and remove water. .Open gas outlet valve and clean it.
7 Flame soon dies.
Insufficient pressure. .Check quantity of gas in the pipe. .Check the second step outlet level slurry rise.
8 Gas pressure too low
Leakage in gas conducting parts. Find out the leakage and seal.
9 Temperature too high.
Defective heating control system. Check control system and repair or check parts concerned.
10 Strong sludge odour.
.The plant is overloaded.
.Fermenting conditions are suboptimal.
Reduce substrate intake, correct pH –value with adequate means.
4.7.5 How to Maintain and Safely Use a Biogas System Don’t hurry to get gas after initial loading of slurry, as it may take 10-25 days for gas
production in fresh loaded plants.
Feed the recommended daily feeding materials to avoid overloading the digester.
Do not add more than the required quantity of either dung or water-doing so might affect the efficient production of gas.
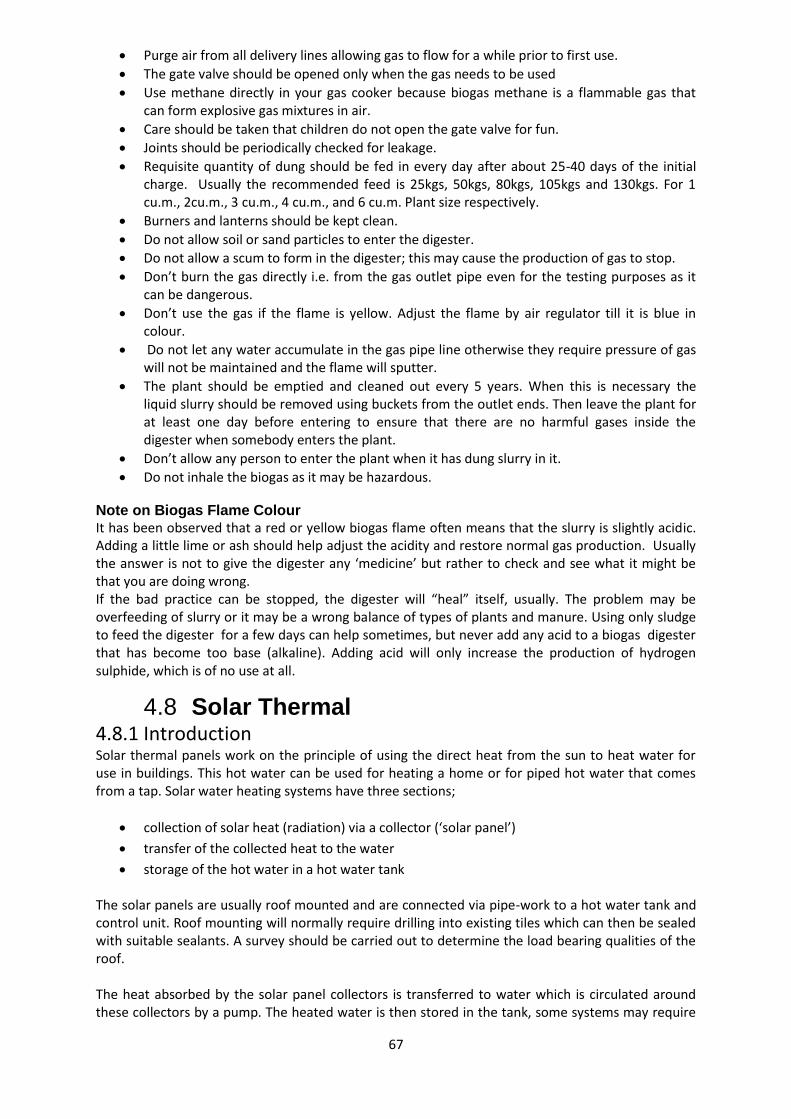
67
Purge air from all delivery lines allowing gas to flow for a while prior to first use.
The gate valve should be opened only when the gas needs to be used
Use methane directly in your gas cooker because biogas methane is a flammable gas that can form explosive gas mixtures in air.
Care should be taken that children do not open the gate valve for fun.
Joints should be periodically checked for leakage.
Requisite quantity of dung should be fed in every day after about 25-40 days of the initial charge. Usually the recommended feed is 25kgs, 50kgs, 80kgs, 105kgs and 130kgs. For 1 cu.m., 2cu.m., 3 cu.m., 4 cu.m., and 6 cu.m. Plant size respectively.
Burners and lanterns should be kept clean.
Do not allow soil or sand particles to enter the digester.
Do not allow a scum to form in the digester; this may cause the production of gas to stop.
Don’t burn the gas directly i.e. from the gas outlet pipe even for the testing purposes as it can be dangerous.
Don’t use the gas if the flame is yellow. Adjust the flame by air regulator till it is blue in colour.
Do not let any water accumulate in the gas pipe line otherwise they require pressure of gas will not be maintained and the flame will sputter.
The plant should be emptied and cleaned out every 5 years. When this is necessary the liquid slurry should be removed using buckets from the outlet ends. Then leave the plant for at least one day before entering to ensure that there are no harmful gases inside the digester when somebody enters the plant.
Don’t allow any person to enter the plant when it has dung slurry in it.
Do not inhale the biogas as it may be hazardous.
Note on Biogas Flame Colour It has been observed that a red or yellow biogas flame often means that the slurry is slightly acidic. Adding a little lime or ash should help adjust the acidity and restore normal gas production. Usually the answer is not to give the digester any ‘medicine’ but rather to check and see what it might be that you are doing wrong. If the bad practice can be stopped, the digester will “heal” itself, usually. The problem may be overfeeding of slurry or it may be a wrong balance of types of plants and manure. Using only sludge to feed the digester for a few days can help sometimes, but never add any acid to a biogas digester that has become too base (alkaline). Adding acid will only increase the production of hydrogen sulphide, which is of no use at all.
4.8 Solar Thermal 4.8.1 Introduction Solar thermal panels work on the principle of using the direct heat from the sun to heat water for use in buildings. This hot water can be used for heating a home or for piped hot water that comes from a tap. Solar water heating systems have three sections;
collection of solar heat (radiation) via a collector (‘solar panel’)
transfer of the collected heat to the water
storage of the hot water in a hot water tank The solar panels are usually roof mounted and are connected via pipe-work to a hot water tank and control unit. Roof mounting will normally require drilling into existing tiles which can then be sealed with suitable sealants. A survey should be carried out to determine the load bearing qualities of the roof. The heat absorbed by the solar panel collectors is transferred to water which is circulated around these collectors by a pump. The heated water is then stored in the tank, some systems may require

68
the replacement of your existing hot water tank. When the levels of sunlight are low or demand for domestic hot water is high, an electric immersion heater in the water tank is used to boost water temperature. For public installations it is necessary to ensure that the hot water in the tank reaches 62o C to prevent Legionnaire’s Disease. There are two main types of solar panel – evacuated tube and flat plate collector. Advantages of Solar Thermal
Hot water can be gained without the need to light a fire and indoor smoke
Reduced need for wood fuel as water can be heated from the sun
Can be a simple system if you install thermosyphonic system (see next page)
Relatively easy to install
Could be ground mounted if there is a safe space to have them on the ground. Disadvantages of Solar Thermal
Can be expensive to install
Performance is weather related, no sun = no warm water!
Need regular maintenance
Can require a strong and stable roof which is not shaded.
You will need a hot water tank to store hot water
4.8.2 Materials Required to Construct Types of Solar Thermal System
Solar thermal systems fit into three main categories, evacuated tubes, flat plate collectors and thermosyphonic. The main materials involved in these systems are outlined below. Evacuated tubes works so that there are twin tubes with a vacuum between the tubes – and the inner one is normally coated in a material that absorbs heat well. The vacuum is heated by radiation from the sun which is then transferred to the inner tube and from there to an inner pipe network which works to heat water (see diagram below)
Evacuated tubes are:
Generally more expensive than Flat Plate.
Good for areas where there is low amounts of sunshine.
Sometimes be affected by high winds Flat plate collectors are generally cheaper than evacuated tube collectors, as their manufacturing process is cheaper. The standard flat plate collector consists of a system that has a collector sitting behind a highly absorptive panel. This collects the heat via a heat absorbing fluid and the water is heated by closed loop system in the hot water tank (see diagram overleaf). Flat plate collectors are:
Relatively cheap compared to Evacuated Tubes.
Good for areas that have a lot of sunshine.
Deemed to be more stable for windier locations
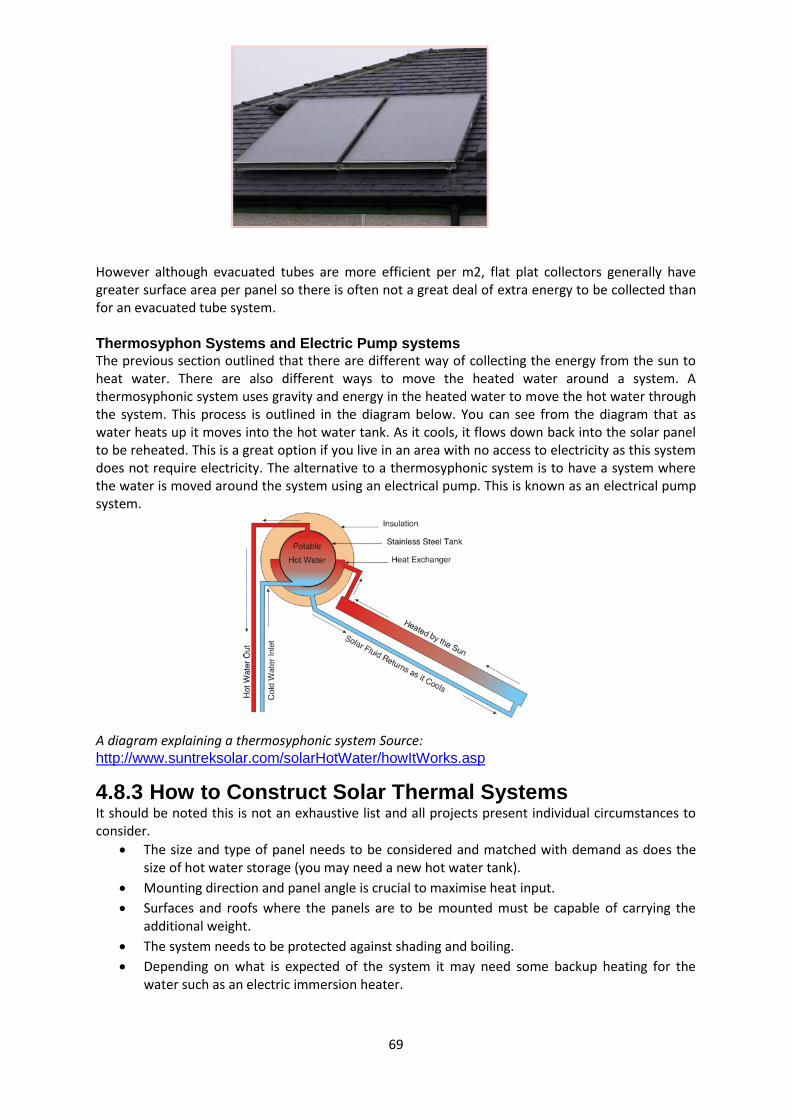
69
However although evacuated tubes are more efficient per m2, flat plat collectors generally have greater surface area per panel so there is often not a great deal of extra energy to be collected than for an evacuated tube system.
Thermosyphon Systems and Electric Pump systems The previous section outlined that there are different way of collecting the energy from the sun to heat water. There are also different ways to move the heated water around a system. A thermosyphonic system uses gravity and energy in the heated water to move the hot water through the system. This process is outlined in the diagram below. You can see from the diagram that as water heats up it moves into the hot water tank. As it cools, it flows down back into the solar panel to be reheated. This is a great option if you live in an area with no access to electricity as this system does not require electricity. The alternative to a thermosyphonic system is to have a system where the water is moved around the system using an electrical pump. This is known as an electrical pump system.
A diagram explaining a thermosyphonic system Source: http://www.suntreksolar.com/solarHotWater/howItWorks.asp
4.8.3 How to Construct Solar Thermal Systems It should be noted this is not an exhaustive list and all projects present individual circumstances to consider.
The size and type of panel needs to be considered and matched with demand as does the size of hot water storage (you may need a new hot water tank).
Mounting direction and panel angle is crucial to maximise heat input.
Surfaces and roofs where the panels are to be mounted must be capable of carrying the additional weight.
The system needs to be protected against shading and boiling.
Depending on what is expected of the system it may need some backup heating for the water such as an electric immersion heater.

70
Remember the amount of water heated will change throughout the year as sunlight levels change.
4.8.4 Problem Solving for Solar Thermal Systems If pressure in the system drops, check that none of the system fluid has leaked from joints.
This fluid has a strong smell so you should be able to notice this.
If no hot water is being produced or the solar pipework is cold (when the pump is running) AND IT IS SUNNY, then you should call the installer.
If panels become cracked, turn off the system and contact your installer to get it repaired
Chapter 4 has focussed on reducing firewood consumption and substituting other materials for
firewood. The next technologies that will be discussed in Chapter 5 can all be used to generate
electricity in Malawi: Solar PV; Solar Lanterns; Wind and Hydroelectricity.
71
Chapter 5
TECHNOLOGIES FOR ELECTRICITY GENERATION There are two types of electric current - direct current (DC) and alternating current (AC). If the current flows in only one direction it is called direct current, or DC. Batteries, solar cells, hydroelectric systems and wind turbines all supply DC electricity. If the current constantly changes direction it is called alternating current, or AC. Mains electricity is an AC supply. Most household appliances use AC electricity so DC electricity generated by renewable sources needs to be converted from DC to AC so that it can be used in the home. This task is done by an invertor; the role of the invertor is discussed in more detail in this next section.
5.1 Solar Photovoltaic (PV) Systems
5.1.1 Introduction Solar photovoltaic (PV) systems convert sunlight directly into electricity. Solar PV produces no pollution, has an expected life of at least 20 years and requires little maintenance. Small off-grid photovoltaic systems of less than a few kilowatts are ideally suited to the conditions that prevail in rural areas in Malawi, and are now technically proven, commercially available and in many places economically viable. There a number of solar PV systems in Malawi at a range of sizes. PV systems are most applicable for remote power supply and are most likely to be appropriate in: o High and consistent levels of sunshine o Low power requirements (a few Watts to a few kW) o No available grid electricity o Poor availability or quality of alternative fuels o High reliability of supply needed (e.g. hospitals, potable and irrigation water supply)
Small household photovoltaic systems can be a 40-80 Wp total power used to charge a 12 volt battery from which lights, televisions, radios or a fan can be powered. Running costs are mainly related to the life of the system components since there are no recurring fuel costs. Solar energy can be used for heating, drying, evaporating, and generating electricity. The major challenge with solar technology is that it can be difficult to provide sufficient power for high current electrical devices such as motors. Therefore application is limited to smaller electrical appliances with low current drive. Popular applications for Solar PV systems include: Telecommunications: Mountain-top microwave repeaters, powering transceivers for communications between rural health centres, security posts and other institutional buildings in the central urban areas Health care: Vaccine refrigeration and lighting systems improve health care e.g night-time medical treatment for accident victims, injections and child birth. Attracts medical staff to work in rural areas Household energy Systems: PV systems are ideal for all types of houses, including non- permanent and grass-thatched houses. Small household photovoltaic systems can be used to charge a 12 volt battery from which fluorescent lights, DC television, radio and a fan can be powered. Advantages of a Solar PV system
No fuel requirements No pollution It has a long life span
The technology is reliable
Low running and maintenance costs
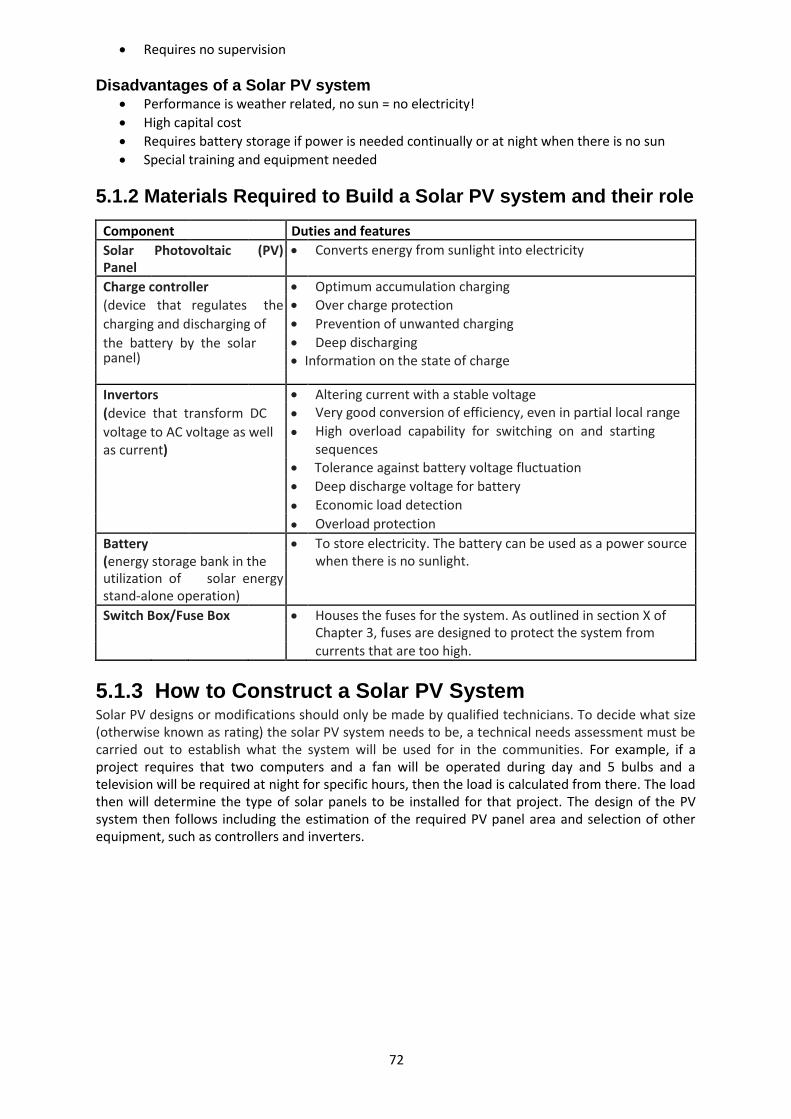
72
Requires no supervision Disadvantages of a Solar PV system
Performance is weather related, no sun = no electricity! High capital cost
Requires battery storage if power is needed continually or at night when there is no sun
Special training and equipment needed 5.1.2 Materials Required to Build a Solar PV system and their role
Component Duties and features
Solar Photovoltaic (PV) Converts energy from sunlight into electricity
Panel
Charge controller Optimum accumulation charging
(device that regulates the Over charge protection
charging and discharging of Prevention of unwanted charging
the battery by the solar Deep discharging
panel) Information on the state of charge
Invertors Altering current with a stable voltage
(device that transform DC Very good conversion of efficiency, even in partial local range
voltage to AC voltage as well High overload capability for switching on and starting
as current) sequences
Tolerance against battery voltage fluctuation
Deep discharge voltage for battery
Economic load detection
Overload protection
Battery To store electricity. The battery can be used as a power source
(energy storage bank in the when there is no sunlight.
utilization of solar energy
stand-alone operation)
Switch Box/Fuse Box Houses the fuses for the system. As outlined in section X of
Chapter 3, fuses are designed to protect the system from
currents that are too high.
5.1.3 How to Construct a Solar PV System Solar PV designs or modifications should only be made by qualified technicians. To decide what size (otherwise known as rating) the solar PV system needs to be, a technical needs assessment must be carried out to establish what the system will be used for in the communities. For example, if a project requires that two computers and a fan will be operated during day and 5 bulbs and a television will be required at night for specific hours, then the load is calculated from there. The load then will determine the type of solar panels to be installed for that project. The design of the PV system then follows including the estimation of the required PV panel area and selection of other equipment, such as controllers and inverters.

73
This diagram shows how the
different components of a
solar PV system fit together.
Note that this diagram has a
connection to the grid (8) and
a backup generator (9). These
two items are not essential in
a Solar PV system. Source: http://zodiacenergy.co m/solar- energy/photovoltaic- solar-power-system/
The next step will be to get quotes from installers. When requesting a quotation for a solar PV
system you will need to write a technical specification which should include information on:
1. The lighting and power requirements of your system i.e. the demand 2. The building layouts 3. Any budget constraints you may have
Once the quote is received, it is advisable to check that the quote answers all points raised in the technical specification. If you need support with this, speak with your local development worker. When selecting PV equipment, the following criteria should be considered: Technical viability - System must be able to perform to the required level. Check exactly which components are included in the system (e.g. batteries). Mounting direction and panel angle is absolutely crucial to maximise electrical output. PV Panels can be mounted on roofs or on the top of a building or on the ground depending on particular circumstances. Costs - Take account of all system component costs, including transport to site, installation, operation and maintenance. The capital cost of equipment purchase and installation can be high. Experience of the manufacturer - Look at other systems in the area installed by that manufacturer and make sure that the system is guaranteed for at least 2 years. It is also important to check that the installer is MERA accredited (see Chapter 9) Practical considerations - Think about transportation, availability of local service and spares, training etc. Remember that actual electricity generated from PV can be low Scoping Checklist for a Solar PV system
Make sure the size of the system is designed based on the need for electricity. For example, if a project requires that two computers and a fan will be operated during day and 5 bulbs and a television will be required at night for specific hours, then the load is calculated from there. The load then will determine the type of solar panels to be installed for that project.
Think about where panels will go, if they are to be roof mounted, check the roof is strong
enough. It is advisable to reinforce the roof if it is weak otherwise replace the whole roof if it poses any risks. The extra weight from the panels could cause accidents to occur causing property damage wounding the occupants, even fatally.
Make sure the installer is MERA accredited, this is essential in making sure the system is
built in a way which will last for many years and that good quality systems are installed. For
74
more information on MERA see Chapter 9.
Get quotes from MERA accredited installers. To get a quote write out the technical specification of the system which should include information on:
- The lighting and power requirements of your system i.e. the demand - The building layouts - Any budget constraints you may have (remember to include transportation costs in budget)
Get a reference from other organisations that have used that installer.
Think about the location of the installer, are they close enough that they can easily carry out repairs?
Installing a Solar PV System This section provides a selection of top tips for installing solar PV panels. It should be noted this is not an exhaustive list and all projects present individual circumstances to consider. What to be aware of in terms of system components is outlined below:
Make sure materials for installation are good quality and available in the correct quantity
Determine the position where the solar panels will be mounted on the roof. The orientation of the solar panels results in different radiation levels but as a general guide, Malawi solar panels should be at the angle of 30degrees and should face north by the help of a compass.
Make sure that the solar panels are not shaded by any objects, clear all tall trees around or
consider changing position of the panels. If necessary, panels can be mounted on the ground.
Ensure a trained technician is on site to carry out installation works
Use electrical wiring lay out diagrams to assist in positioning of important electrical components such batteries, inverters etc
Make sure that PV array frames and mountings are compatible with wind strength and
direction
Where possible, install a maintenance free battery. These are more expensive but last much longer and a more durable that other batteries.
Batteries When designing and installing a solar PV system, one of the most important components is the battery. It is one of the components that most commonly fails and some thought must be put into which battery is selected. How to select the right battery Selection of batteries depends on a large numbers of factors and will be influenced by system management and climatic conditions. It can be difficult to make generalizations about which type of battery is best for which typical applications as the reliable requirement can be the deciding factors. Batteries for use in a standalone PV system (See Chapter 5 section 5 for more information on types of renewable system) should have the following features: o good price / performance ratio o low maintenance requirements (maintenance free batteries such as Raylite deep cycle
batteries which are supplied by Solair Corporations) o low self discharge and high energy efficiency o high storage and power density (space requirements and light) o vibration resistance (for mobile use or transportation) o Protection against health and environment hazards to be recycled.
No storage system fulfils all the stated requirements to the same extent. You should decide which qualities re most important for your system and find the correct battery that fits with this. You can discuss these needs with your installer.
75
Installation checklist for a Solar PV System
Components should be good quality and available in the correct quantity
The orientation of the solar panels results in different radiation levels but as a general guide, Malawi solar panels should be at the angle of 30degrees and should face north by the help of a compass.
Make sure that the solar panels are not shaded by any objects (If necessary, panels can be
mounted on the ground) Ensure a trained technician is on site to carry out installation works
Use electrical wiring lay out diagrams to assist in positioning of important electrical
components such batteries, inverters etc
Make sure that PV array frames and mountings are compatible with wind strength and direction
Where possible, install a maintenance free battery. These are more expensive but last
much longer and a more durable that other batteries.
5.1.4 Problem Solving for a Solar PV system This section will discuss some of the most common issues with solar PV systems and how to fix them. At the end of this section in 5.1.5 there is a table detailing the estimated lifespan of all of the components in a solar PV system as well as estimated costs for repairing the system. This should help communities plan when they will need to replace certain items and how much they need to save. Loose wires Loose connections are not desirable in an electrical system because they cause drops in the voltage which might affect the efficiency of the system. Before this is repaired, each component of the system should be isolated. This would involve switching off circuit breakers to and from the battery bank and the solar panels. Then loose wires can be fixed properly through being tightened using a spanner. Be careful not to touch the positive and negative side of the wires together as this will make a spark and could damage the system. Avoid the touching the positive and negative wires together because this will cause sparks that can damage the whole system. Members of the community energy committee should undergo basic energy training when the system is installed so that they are confident and competent at fixing loose wires. Have a practice doing this when the installer is there so that you understand what to do if the situation arises. If you are not confident in this, or the problem on the system is too complex for a member of the community to fix, then an expert can be called to rectify the problem. Indicator lights on batteries/inverters and charge controllers. The indicator lights on the solar PV system are a method of monitoring the technical performance of the system. For example when the battery is fully charged (Green) or when the battery is completely drained (Red). In this way, preventive maintenance can be carried out on the system by the community or trained professional. Indicator lights and their meanings will be different on different makes and models of equipment. It is therefore very important that when the system is installed, members of the Energy Committee are trained on what the indicator lights mean on these pieces of equipment and what action needs to be taken when these lights come on. Make sure that when this training is being given, somebody writes this information down. However, if the problem is recurrent and complex, the community has always been advised to seek help from trained professional. Batteries To ensure your battery stays healthy, do not leave the battery discharged for several days and always use a charge controller to regulate battery voltage. This will cause a permanent loss of
76
capacity. Another cause of battery failure is environmental conditions. Temperature has a significant effect on batteries and they must be stored under shelter, protected from rain and kept as cool as
possible. Anecdotal evidence shows that every 5 0C above 25
0C will shorten the life span of a
battery by approximately 1 year. When there is not enough sun, the battery will not charge. If it is NOT a maintenance free battery, when the battery is not charged, it is advisable to always check the status of battery indicators and the electrolyte level. If the battery is showing RED indicator then it has completely discharged. In this case the community must check the electrolyte level and fill the right amount of distilled water. If the battery still does not charge after this then the community is advised to dispose of the battery. Batteries should be periodically maintained to ensure that it lasts. For example if you don’t have a maintenance free battery check the battery electrolyte on monthly basis and refill distilled water as needed. Also clean off any battery acid that spills out of the battery. Moreover, coat the battery posts with appropriate seal like petroleum jelly or grease. However, to avoid these issues, it is recommended to use sealed deep cycle acid batteries (such as Raylite) for remote locations because they do not need distilled water to be refilled. They do not freeze or spill and can be mounted in any position despite the fact that they are expensive. Fuse A fuse is a low resistance resistor which protects your system from currents that are too high for the system. It is normally made up of a thin strip of wire in a case, when too much current flows through this wire; the wire breaks and breaks the electrical circuit therefore saving your system from being damaged by currents that are too high. If you notice that a fuse has broken, i.e. the wire has snapped, this means that the electrical circuit will be broken and the system will not work. You therefore need to replace the fuse. However, if you are frequently replacing the fuse, this may be an indicator that there is an issue with your system (i.e. the current is frequently too high) and it is advisable that you seek help from a trained professional. The first step in changing fuses is to switch off the power supply. Then identify the right type of fuse that has blown off (i.e. the rating & fuse category). Ask installers if they can write down what type of fuses your system uses and if they have some spare ones to leave with you. It is also good to ask installers where you can buy new fuses, people who repair radios might have the correct fuse for your system. If you are not confident with how to change a fuse, do not attempt this. This is because it is very easy to replace wrong types of fuses on the system and this can lead into malfunctioning of the entire system. Light Bulbs There are different types of light bulb which you can use that will last for different amounts of time (see Chapter 10). Light bulbs will stop working after a time (length of time dependent on the quality and type of bulb). To change the bulb, turn off the light bulb and replace the bulb with one that has the same Wattage as the one you have removed. This is important so that the light bulb does not unbalance the system. Repair and Maintenance Checklist for a Solar PV System There is not much regular maintenance that needs to be carried out on a solar PV system however there are a few basic checks that you can do to ensure your system is working properly and halt problems in advance.
Electronic parts should be checked once to twice a year for split wires, cracks or damage in order to increase useful life. If there are problems, report them to your installer.
To fix loose wires, turn off the system switching off circuit breakers to and from the
battery bank and the solar panels. Then loose wires can be fixed properly through being tightened using a spanner. Be careful not to touch the positive and negative side of the wires together as this will make a spark and could damage the system.

77
Make sure that the installer gives you training on what different indicator lights mean and what to do when lights come on.
Check the panels for cracks, chips, de-lamination, fogged glazing, water leaks and discoloration. If any obvious defects are found, it is important to note their location in the system logbook, so they can be monitored in the future in case further deterioration affects the modules’ output.
Batteries Do not leave batteries uncharged for several days, this will decrease their effectiveness. Check for any electrolyte leak, cracks in the batteries, or corrosion at the battery terminals or connectors. Maintenance free batteries should need very little maintenance but all batteries should be clean, dry and free of electrolyte and corrosion residue. Corrosion at battery terminals is seen as a white coating around the battery terminals. Cleaning should be done once monthly.
For batteries that need maintenance, check the cell electrolyte level for correct acid volume once a month. It is important that the cells should be watered back to the original acid level (if they are this type of battery.
If a fuse has gone in the system, switch off the power supply then replace fuse with the correct type of fuse. If you are not confident with how to change a fuse, do not attempt this. This is because it is very easy to replace wrong types of fuses on the system and this can lead into malfunctioning of the entire system.
To replace a light bulb, turn off the light bulb and replace the bulb with one that has the same Wattage as the one you have removed. This is important so that the light bulb does not unbalance the system.
Remove dust from the inverter and charge controller using a dry cloth. Ensure that all the indicators such as LED lights are working and that the wires leading to and from this device are not loose. Note that the charge controller should indicate that the system is charging when the sun is shining. If not, contact a trained professional for advice.
Inspect panel boxes to ensure that they have not become a home for rodents and insects.
Switches should not spark when turned on or off. If damage is found, consult with the installer as soon as possible.
The table overleaf shows the estimated lifespan for different components of a solar PV system along with the anticipated cost of replacing components. This table may be helpful for communities trying to plan how much money they need to save for maintenance of their Solar PV system and will be essential for business planning (see Chapter 7 for more information on Business Planning.
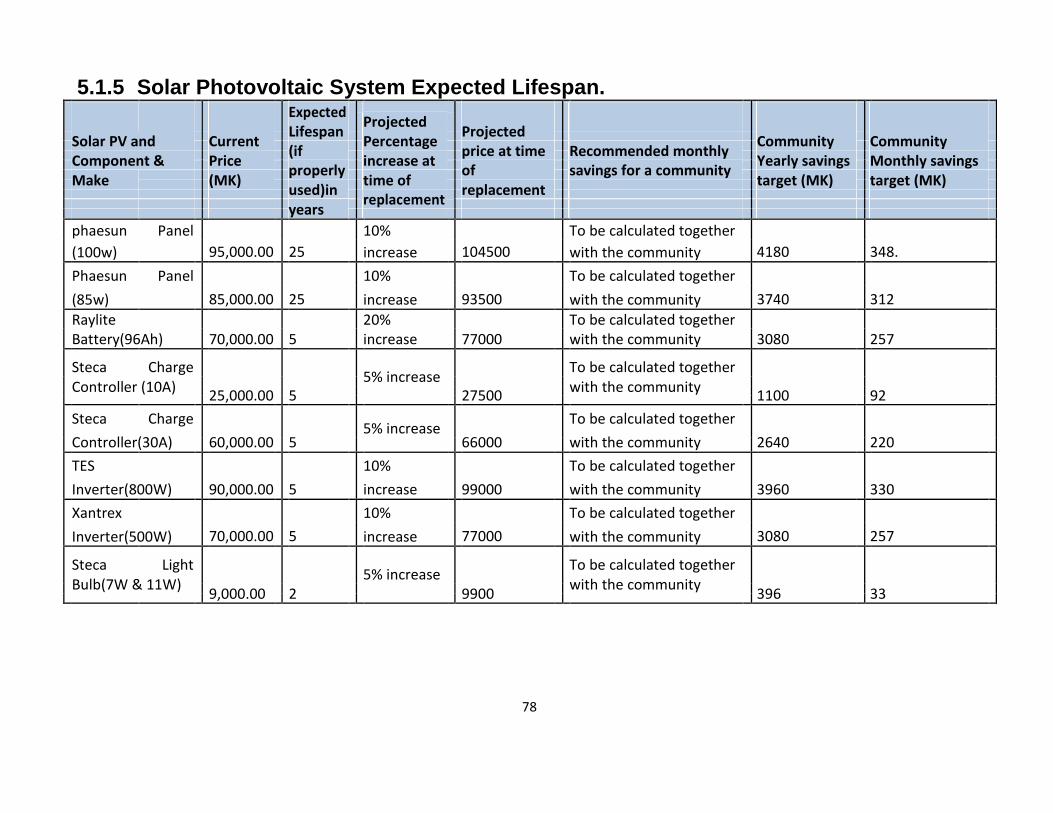
78
5.1.5 Solar Photovoltaic System Expected Lifespan. Expected
Projected
Lifespan Projected
Solar PV and Current Percentage Community Community
(if price at time Recommended monthly
Component & Price increase at Yearly savings Monthly savings
properly of savings for a community
Make (MK) time of target (MK) target (MK)
used)in replacement
replacement
years
phaesun Panel 10% To be calculated together
(100w) 95,000.00 25 increase 104500 with the community 4180 348.
Phaesun Panel 10% To be calculated together
(85w) 85,000.00 25 increase 93500 with the community 3740 312
Raylite 20% To be calculated together
Battery(96Ah) 70,000.00 5 increase 77000 with the community 3080 257
Steca Charge 5% increase
To be calculated together
Controller (10A) with the community
25,000.00 5 27500 1100 92
Steca Charge 5% increase
To be calculated together
Controller(30A) 60,000.00 5
66000
with the community 2640
220
TES 10% To be calculated together
Inverter(800W) 90,000.00 5 increase 99000 with the community 3960 330
Xantrex 10% To be calculated together
Inverter(500W) 70,000.00 5 increase 77000 with the community 3080 257
Steca Light 5% increase
To be calculated together
Bulb(7W & 11W) with the community
9,000.00 2 9900 396 33
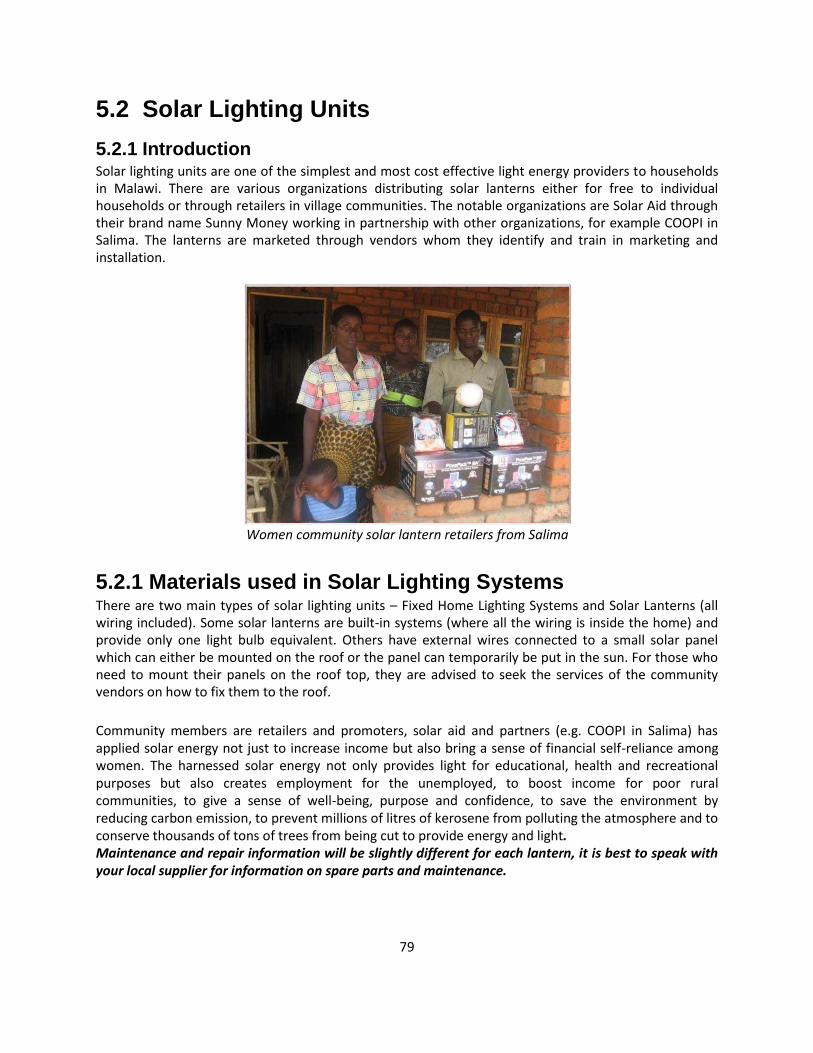
79
5.2 Solar Lighting Units 5.2.1 Introduction Solar lighting units are one of the simplest and most cost effective light energy providers to households in Malawi. There are various organizations distributing solar lanterns either for free to individual households or through retailers in village communities. The notable organizations are Solar Aid through their brand name Sunny Money working in partnership with other organizations, for example COOPI in Salima. The lanterns are marketed through vendors whom they identify and train in marketing and installation.
Women community solar lantern retailers from Salima
5.2.1 Materials used in Solar Lighting Systems There are two main types of solar lighting units – Fixed Home Lighting Systems and Solar Lanterns (all wiring included). Some solar lanterns are built-in systems (where all the wiring is inside the home) and provide only one light bulb equivalent. Others have external wires connected to a small solar panel which can either be mounted on the roof or the panel can temporarily be put in the sun. For those who need to mount their panels on the roof top, they are advised to seek the services of the community vendors on how to fix them to the roof. Community members are retailers and promoters, solar aid and partners (e.g. COOPI in Salima) has applied solar energy not just to increase income but also bring a sense of financial self-reliance among women. The harnessed solar energy not only provides light for educational, health and recreational purposes but also creates employment for the unemployed, to boost income for poor rural communities, to give a sense of well-being, purpose and confidence, to save the environment by reducing carbon emission, to prevent millions of litres of kerosene from polluting the atmosphere and to conserve thousands of tons of trees from being cut to provide energy and light. Maintenance and repair information will be slightly different for each lantern, it is best to speak with your local supplier for information on spare parts and maintenance.
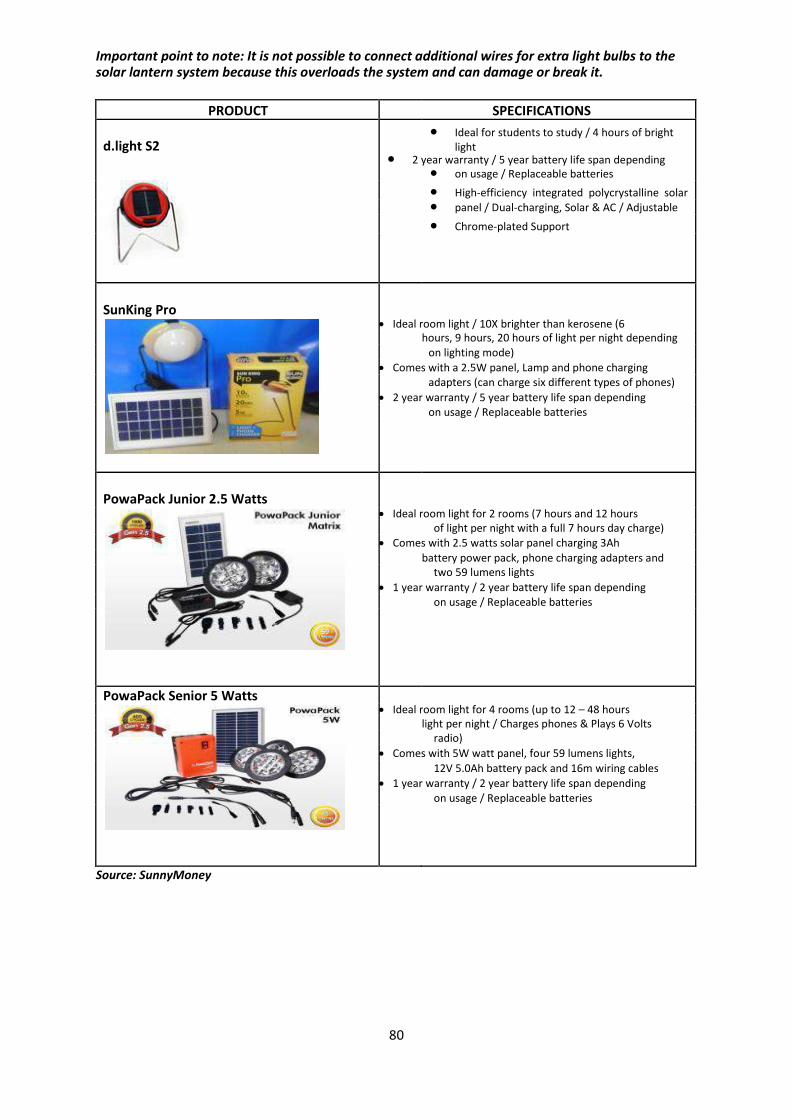
80
Important point to note: It is not possible to connect additional wires for extra light bulbs to the solar lantern system because this overloads the system and can damage or break it.
PRODUCT SPECIFICATIONS
d.light S2 Ideal for students to study / 4 hours of bright
light 2 year warranty / 5 year battery life span depending on usage / Replaceable batteries High-efficiency integrated polycrystalline solar panel / Dual-charging, Solar & AC / Adjustable Chrome-plated Support
SunKing Pro Ideal room light / 10X brighter than kerosene (6 hours, 9 hours, 20 hours of light per night depending on lighting mode) Comes with a 2.5W panel, Lamp and phone charging adapters (can charge six different types of phones) 2 year warranty / 5 year battery life span depending on usage / Replaceable batteries
PowaPack Junior 2.5 Watts Ideal room light for 2 rooms (7 hours and 12 hours of light per night with a full 7 hours day charge) Comes with 2.5 watts solar panel charging 3Ah battery power pack, phone charging adapters and two 59 lumens lights 1 year warranty / 2 year battery life span depending on usage / Replaceable batteries
PowaPack Senior 5 Watts
Ideal room light for 4 rooms (up to 12 – 48 hours light per night / Charges phones & Plays 6 Volts radio) Comes with 5W watt panel, four 59 lumens lights, 12V 5.0Ah battery pack and 16m wiring cables 1 year warranty / 2 year battery life span depending on usage / Replaceable batteries
Source: SunnyMoney
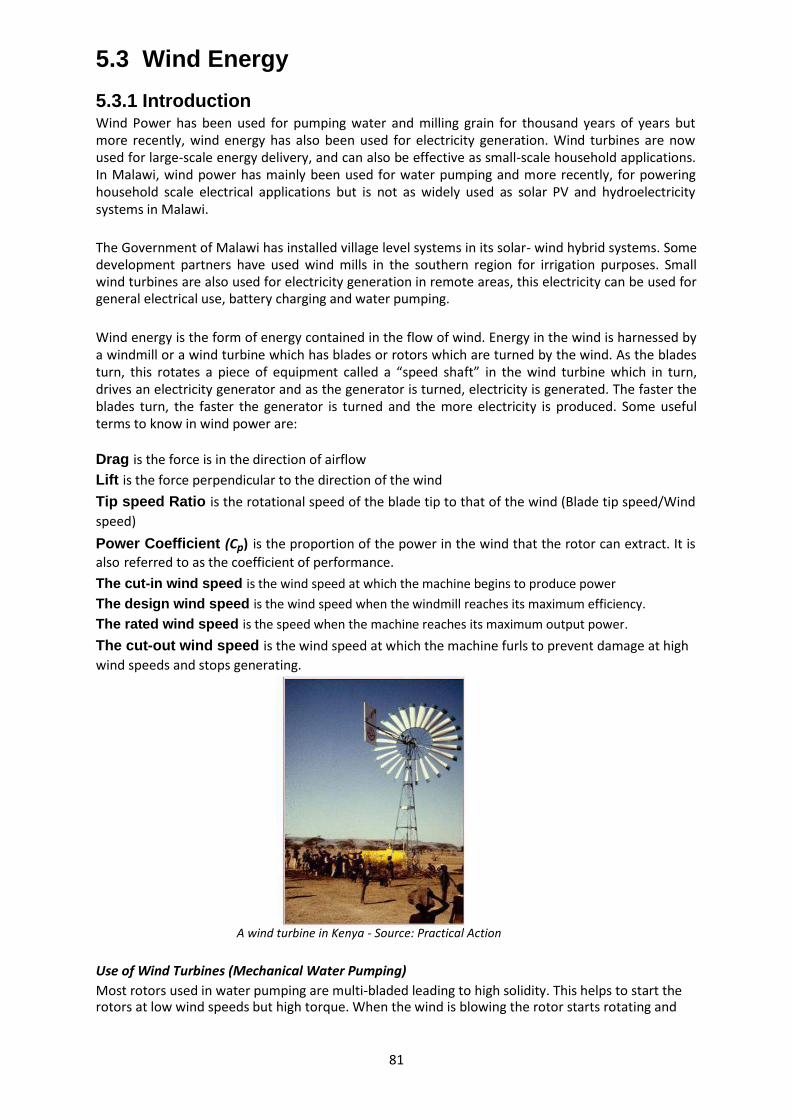
81
5.3 Wind Energy 5.3.1 Introduction Wind Power has been used for pumping water and milling grain for thousand years of years but more recently, wind energy has also been used for electricity generation. Wind turbines are now used for large-scale energy delivery, and can also be effective as small-scale household applications. In Malawi, wind power has mainly been used for water pumping and more recently, for powering household scale electrical applications but is not as widely used as solar PV and hydroelectricity systems in Malawi. The Government of Malawi has installed village level systems in its solar- wind hybrid systems. Some development partners have used wind mills in the southern region for irrigation purposes. Small wind turbines are also used for electricity generation in remote areas, this electricity can be used for general electrical use, battery charging and water pumping. Wind energy is the form of energy contained in the flow of wind. Energy in the wind is harnessed by a windmill or a wind turbine which has blades or rotors which are turned by the wind. As the blades turn, this rotates a piece of equipment called a “speed shaft” in the wind turbine which in turn, drives an electricity generator and as the generator is turned, electricity is generated. The faster the blades turn, the faster the generator is turned and the more electricity is produced. Some useful terms to know in wind power are: Drag is the force is in the direction of airflow Lift is the force perpendicular to the direction of the wind Tip speed Ratio is the rotational speed of the blade tip to that of the wind (Blade tip speed/Wind speed) Power Coefficient (Cp) is the proportion of the power in the wind that the rotor can extract. It is
also referred to as the coefficient of performance. The cut-in wind speed is the wind speed at which the machine begins to produce power The design wind speed is the wind speed when the windmill reaches its maximum efficiency. The rated wind speed is the speed when the machine reaches its maximum output power. The cut-out wind speed is the wind speed at which the machine furls to prevent damage at high wind speeds and stops generating.
A wind turbine in Kenya - Source: Practical Action Use of Wind Turbines (Mechanical Water Pumping) Most rotors used in water pumping are multi-bladed leading to high solidity. This helps to start the rotors at low wind speeds but high torque. When the wind is blowing the rotor starts rotating and
82
through the reciprocating mechanism, the energy is transferred down to the pump which could be submerged in a borehole or surface mounted. Most windmills like small wind turbines have vanes which help them to go in the direction of the wind. At extreme wind speeds the vane detaches itself from the main axis causing the rotor to go in the direction of the wind. Considering the variability of the wind, it is necessary to match the wind power with the water requirement or proper storage sizing. Unfortunately most installed water pumping systems do not operate effectively due to wrong positioning and a mismatch between water requirement and the wind power. Use of Wind Turbines (Electricity Generation): Electricity generation using wind power in Malawi has been more on the micro scale level ranging from below 400watts up to just above 10Kw. The emphasis in this chapter will be on small scale technologies as applied in Malawi, but it is worth mentioning that as part of the MREAP programme, Sgurr Energy, one of the MREAP project partners have carried out a wind resource mapping exercise in Malawi to understand where the most appropriate sites for larger scale wind developments might be. You can find more information on their reports here http://www.strath.ac.uk/eee/energymalawi/windenergyfeasibility/ The Advantages of Wind Power
Wind power is relatively often cheaper than the cost of grid extensions for isolated remote consumers.
Wind power can be used in almost every location in Malawi if there is enough wind (see
page 84 for information on how to measure wind speed)
It is relatively clean as opposed to using fossil fuel powered systems for either irrigation or electrical application.
Wind water pumping has improved access to portable water supply in drought prone areas.
Disadvantages of Wind Power
Most systems in Malawi are installed without any wind assessment due to lack of accurate wind data
Most of the installations use imitation turbines leading to blades rupturing in most sites.
Most wind systems will need a large number of batteries in series and most batteries used have a short life span.
Poor mounting heights and locations have rendered most systems idle
Electric water pumping without dump loads leads to frequent burning of generators.
Complexity of the projects can make system maintenance by a community difficult.
Cases of noise pollution have been reported but those of killing birds have not been reported.
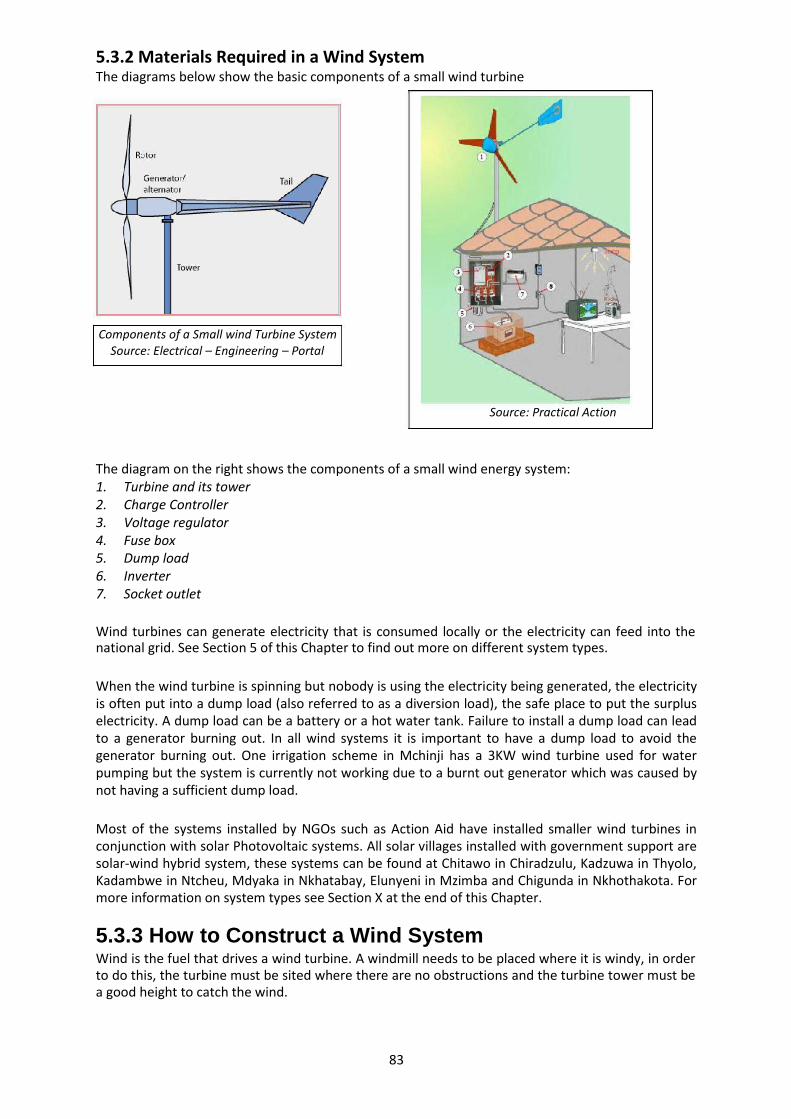
83
5.3.2 Materials Required in a Wind System The diagrams below show the basic components of a small wind turbine Components of a Small wind Turbine System
Source: Electrical – Engineering – Portal
Source: Practical Action
The diagram on the right shows the components of a small wind energy system: 1. Turbine and its tower 2. Charge Controller 3. Voltage regulator 4. Fuse box 5. Dump load 6. Inverter 7. Socket outlet
Wind turbines can generate electricity that is consumed locally or the electricity can feed into the national grid. See Section 5 of this Chapter to find out more on different system types. When the wind turbine is spinning but nobody is using the electricity being generated, the electricity is often put into a dump load (also referred to as a diversion load), the safe place to put the surplus electricity. A dump load can be a battery or a hot water tank. Failure to install a dump load can lead to a generator burning out. In all wind systems it is important to have a dump load to avoid the generator burning out. One irrigation scheme in Mchinji has a 3KW wind turbine used for water pumping but the system is currently not working due to a burnt out generator which was caused by not having a sufficient dump load. Most of the systems installed by NGOs such as Action Aid have installed smaller wind turbines in conjunction with solar Photovoltaic systems. All solar villages installed with government support are solar-wind hybrid system, these systems can be found at Chitawo in Chiradzulu, Kadzuwa in Thyolo, Kadambwe in Ntcheu, Mdyaka in Nkhatabay, Elunyeni in Mzimba and Chigunda in Nkhothakota. For more information on system types see Section X at the end of this Chapter.
5.3.3 How to Construct a Wind System Wind is the fuel that drives a wind turbine. A windmill needs to be placed where it is windy, in order to do this, the turbine must be sited where there are no obstructions and the turbine tower must be a good height to catch the wind.
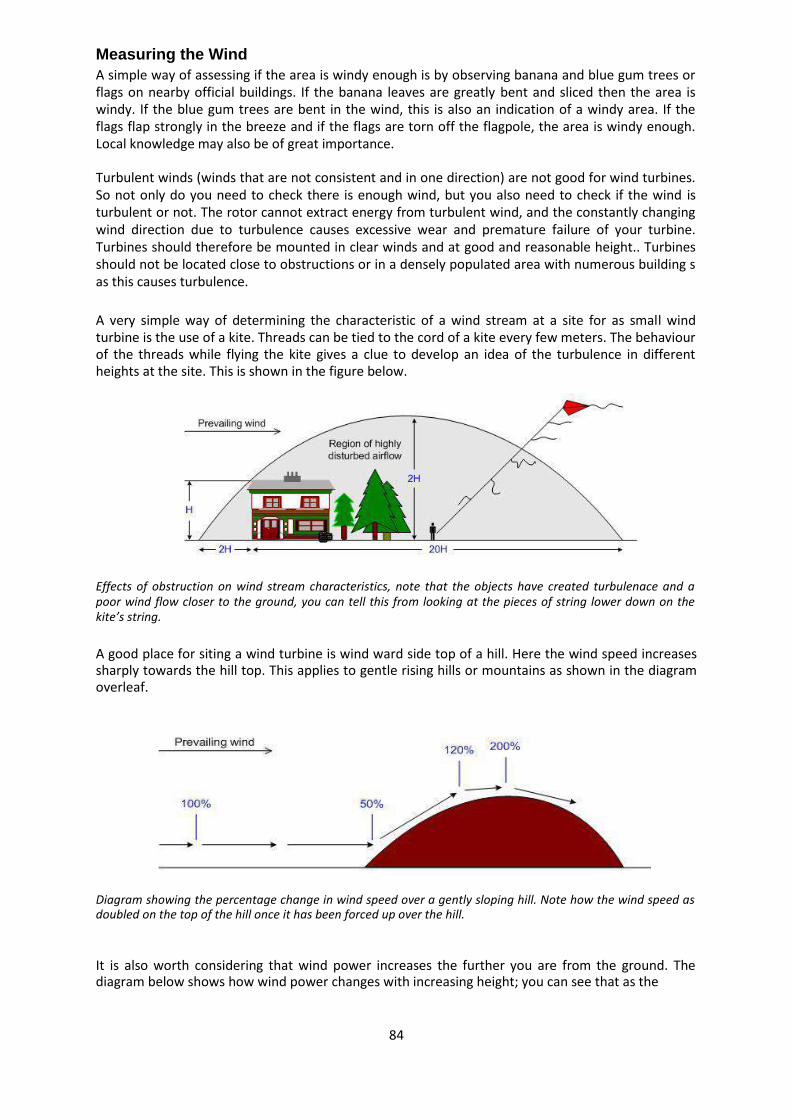
84
Measuring the Wind A simple way of assessing if the area is windy enough is by observing banana and blue gum trees or flags on nearby official buildings. If the banana leaves are greatly bent and sliced then the area is windy. If the blue gum trees are bent in the wind, this is also an indication of a windy area. If the flags flap strongly in the breeze and if the flags are torn off the flagpole, the area is windy enough. Local knowledge may also be of great importance. Turbulent winds (winds that are not consistent and in one direction) are not good for wind turbines. So not only do you need to check there is enough wind, but you also need to check if the wind is turbulent or not. The rotor cannot extract energy from turbulent wind, and the constantly changing wind direction due to turbulence causes excessive wear and premature failure of your turbine. Turbines should therefore be mounted in clear winds and at good and reasonable height.. Turbines should not be located close to obstructions or in a densely populated area with numerous building s as this causes turbulence. A very simple way of determining the characteristic of a wind stream at a site for as small wind turbine is the use of a kite. Threads can be tied to the cord of a kite every few meters. The behaviour of the threads while flying the kite gives a clue to develop an idea of the turbulence in different heights at the site. This is shown in the figure below.
Effects of obstruction on wind stream characteristics, note that the objects have created turbulenace and a poor wind flow closer to the ground, you can tell this from looking at the pieces of string lower down on the kite’s string. A good place for siting a wind turbine is wind ward side top of a hill. Here the wind speed increases sharply towards the hill top. This applies to gentle rising hills or mountains as shown in the diagram overleaf. Diagram showing the percentage change in wind speed over a gently sloping hill. Note how the wind speed as doubled on the top of the hill once it has been forced up over the hill. It is also worth considering that wind power increases the further you are from the ground. The diagram below shows how wind power changes with increasing height; you can see that as the
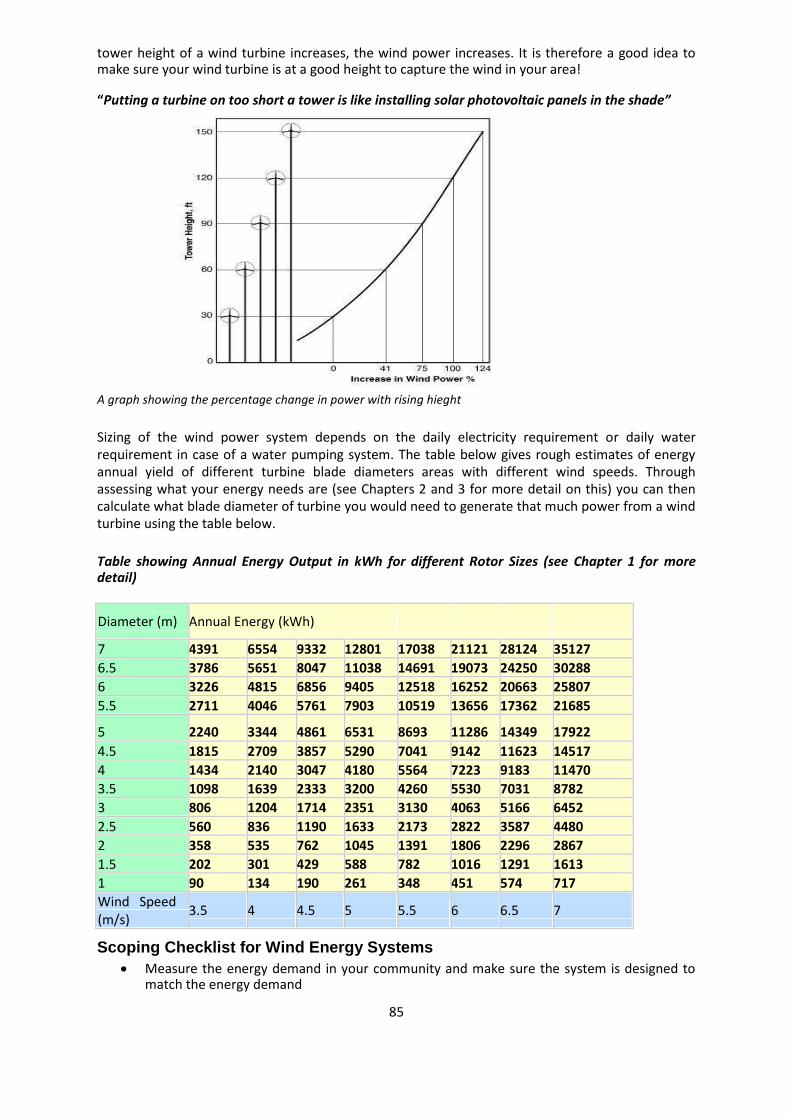
85
tower height of a wind turbine increases, the wind power increases. It is therefore a good idea to make sure your wind turbine is at a good height to capture the wind in your area! “Putting a turbine on too short a tower is like installing solar photovoltaic panels in the shade” A graph showing the percentage change in power with rising hieght Sizing of the wind power system depends on the daily electricity requirement or daily water requirement in case of a water pumping system. The table below gives rough estimates of energy annual yield of different turbine blade diameters areas with different wind speeds. Through assessing what your energy needs are (see Chapters 2 and 3 for more detail on this) you can then calculate what blade diameter of turbine you would need to generate that much power from a wind turbine using the table below. Table showing Annual Energy Output in kWh for different Rotor Sizes (see Chapter 1 for more detail)
Diameter (m) Annual Energy (kWh)
7 4391 6554 9332 12801 17038 21121 28124 35127
6.5 3786 5651 8047 11038 14691 19073 24250 30288
6 3226 4815 6856 9405 12518 16252 20663 25807
5.5 2711 4046 5761 7903 10519 13656 17362 21685
5 2240 3344 4861 6531 8693 11286 14349 17922
4.5 1815 2709 3857 5290 7041 9142 11623 14517
4 1434 2140 3047 4180 5564 7223 9183 11470
3.5 1098 1639 2333 3200 4260 5530 7031 8782
3 806 1204 1714 2351 3130 4063 5166 6452
2.5 560 836 1190 1633 2173 2822 3587 4480
2 358 535 762 1045 1391 1806 2296 2867
1.5 202 301 429 588 782 1016 1291 1613
1 90 134 190 261 348 451 574 717
Wind Speed 3.5 4 4.5 5 5.5 6 6.5 7
(m/s)
Scoping Checklist for Wind Energy Systems Measure the energy demand in your community and make sure the system is designed to
match the energy demand
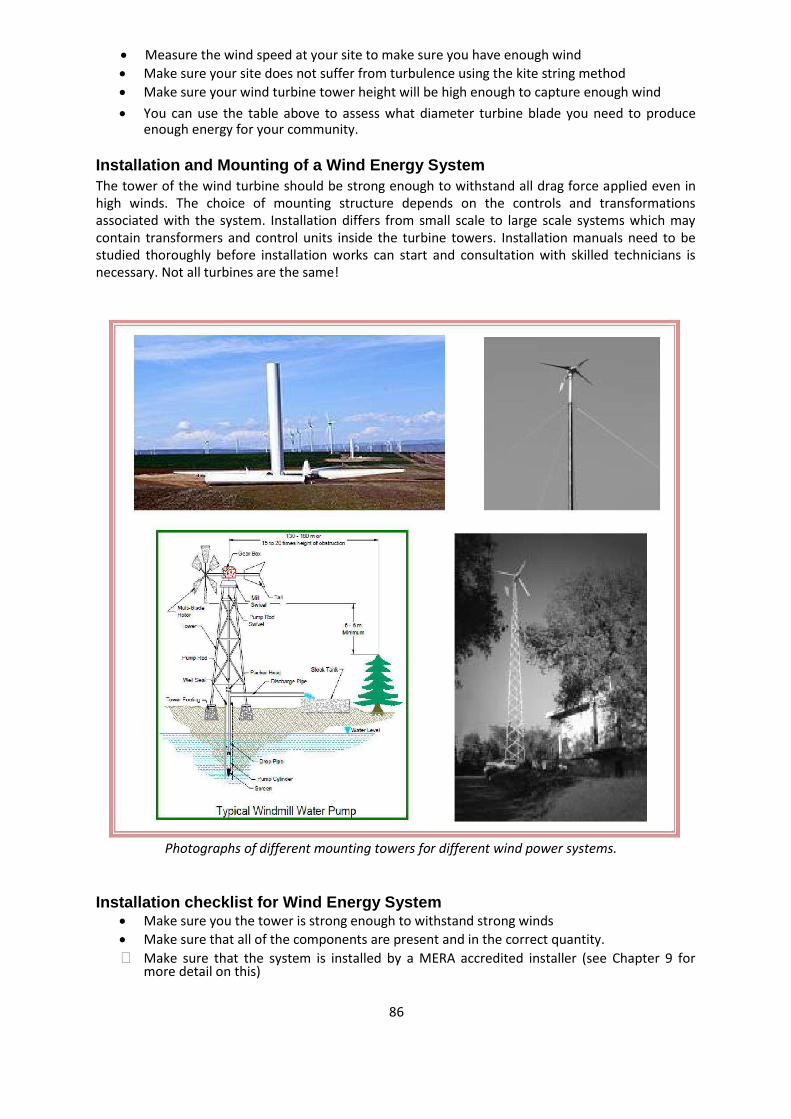
86
Measure the wind speed at your site to make sure you have enough wind
Make sure your site does not suffer from turbulence using the kite string method
Make sure your wind turbine tower height will be high enough to capture enough wind
You can use the table above to assess what diameter turbine blade you need to produce enough energy for your community.
Installation and Mounting of a Wind Energy System The tower of the wind turbine should be strong enough to withstand all drag force applied even in high winds. The choice of mounting structure depends on the controls and transformations associated with the system. Installation differs from small scale to large scale systems which may contain transformers and control units inside the turbine towers. Installation manuals need to be studied thoroughly before installation works can start and consultation with skilled technicians is necessary. Not all turbines are the same!
Photographs of different mounting towers for different wind power systems.
Installation checklist for Wind Energy System
Make sure you the tower is strong enough to withstand strong winds
Make sure that all of the components are present and in the correct quantity.
Make sure that the system is installed by a MERA accredited installer (see Chapter 9 for more detail on this)
87
5.3.4 Problem Solving for a Wind Energy System In wind pumping systems, the most common problem is the cut out mechanism. When the
windmills have gone to cut out, the users are not taught on how to re-engage the wind turbine which leads to long waits for the supplier to come and reset the wind turbine. During this time there will be no water for irrigation and domestic application. It is essential that the installer demonstrates how to carry this out so that communities fully understand the process.
Low production in water pumping projects can be a problem due to poor location and wind turbine heights that are too low. To fix this problem it is important that the system is designed by a fully trained installer and inspected before installation and commissioning is done.
In electric systems the most reported issue is battery failure. It is not clear why such massive battery failures occur in wind systems. For more information on how to select a good quality battery, see Section 5.1.3 and 5.1.4 of this Chapter.
The other common problem with small wind turbines in Malawi is that the blades of the turbines frequently break. This is probably due to poor blade construction or lack of provision of effective dump load on no load condition. As is the case with batteries, there is a need for a thorough investigation as to why the turbines fail to stall in high winds.
5.4 Hydroelectric Energy
5.4.1 Introduction Water flowing downhill contains a lot of energy which can be converted to mechanical power or electricity if it is harnessed. Hydropower is the term used to describe electricity generation from water from rivers and includes various technologies that generate different amounts of power. Hydropower is a clean and renewable energy that provides the best sources of generating electricity and mechanical energy. In Malawi, 98% of the electricity generated by ESCOM and which feeds into the National Grid comes from hydro power mainly from plants located along the Shire River. There is a long history of hydroelectricity system in Malawi with some systems on tea estates in Mulanje being over 70 years old! The use of hydro power dates back many years with the first examples being small and simple machines such as water wheels used for maize mills and other activities. Hydropower systems harness the Potential Energy in water by using water to turn a turbine. As the turbine is turned by the water, this turns a generator. As the generator rotates it generates electromagnetic force that produces electricity. The best geographical areas for exploiting hydro power are those where there are steep rivers flowing all year round, for example hilly areas or mountain ranges and their foothills with high rainfall. Hydro power projects require careful assessment and design by an experienced technical person. The amount of power generated from a hydroelectric scheme depends on two variables namely the water flow rate and the height difference between the level of water at intake and that at the turbine; this is technically referred to as the ‘head’. There two types of MHS dependent on the water abstraction arrangement at the water intake. Run-of-the river MHS is one that does not have any water reservoir or storage capacity and abstracts water whereas a Diversion type MHS is where water is diverted from the river into a channel and/or penstock system. Micro hydro sites can be connected to the grid or they can be part of an off-grid system (see section 5 at the end of this chapter for more information on system types). Advantages of Hydroelectricity
It is a mature technology with a long history
A micro hydro scheme has a lower per unit cost than other technologies

88
It is a scalable technology, you can generate as low as 200W to thousands of Megawatts (MW)
It can generate single or three phase power for an off-grid system
Uses local materials for most of the works
It is a very efficient way of generating electricity.
It has a longer service life in excess of 25 years Disadvantages of Hydroelectricity
They require long implementation periods both in the pre-investments and investment stages
High capital cost
You need a specific site; the terrain needs to have a steep gradient with rivers that flow all year.
Moving parts require frequent maintenance
The turbine is not manufactured in Malawi so needs to be imported Hydroelectricity systems are classified into different categories based on their installed capacity (power range). Different parts of the world classify them differently. The table below indicates common classifications adopted by USA and Europe.
FROM TO Name APPLICATIONS Less than 10KW Pico Hydro Single household or small community of 50 households
for light electricity use e.g. lighting 10 KW 100 Micro Hydro Small to medium sized community. Support industrial
KW and commercial applications (e.g. a Maize mill is either rated at 18.5 kW or 11.5kW so a 100KW scheme would support up to three 18.5 kW maize mills plus other uses)
100 KW 1MW Mini Hydro These are usually grid connected or support relatively large load (e.g. a factory)
1 MW 10 Small Hydro Systems of this size are often connected to the MW electricity grid (e.g. Wovwe has three 1.5MW systems) but can also be used to power mining requiring less than 10MW e.g. Kayerekera Uranium mine is reported to have an electricity demand of 10MW.
10 MW 100M Medium Systems of this size are normally grid connected. ESCOM W Hydro Plant Power Plants fall within this range Nkula A and B are 64MW.
Greater than 100 Large Hydro Systems of this size are connected to the electricity grid MW Plant 5.4.2 Materials Required in Micro Hydro Schemes At the community scale in Malawi, the most appropriate size of scheme is likely to be micro hydro. The rest of this chapter will discuss micro hydro schemes (MHS). Most micro hydro schemes will have the components depicted in the figure overleaf.
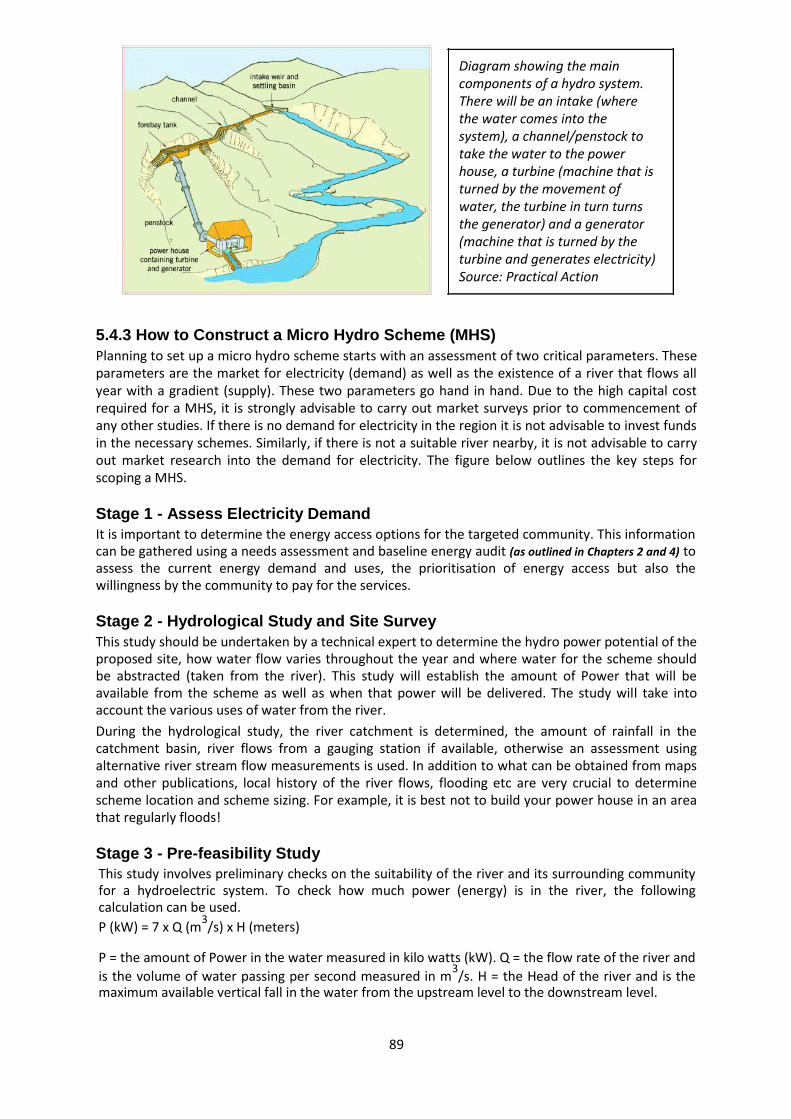
89
Diagram showing the main components of a hydro system. There will be an intake (where the water comes into the system), a channel/penstock to take the water to the power house, a turbine (machine that is turned by the movement of water, the turbine in turn turns the generator) and a generator (machine that is turned by the turbine and generates electricity) Source: Practical Action
5.4.3 How to Construct a Micro Hydro Scheme (MHS) Planning to set up a micro hydro scheme starts with an assessment of two critical parameters. These parameters are the market for electricity (demand) as well as the existence of a river that flows all year with a gradient (supply). These two parameters go hand in hand. Due to the high capital cost required for a MHS, it is strongly advisable to carry out market surveys prior to commencement of any other studies. If there is no demand for electricity in the region it is not advisable to invest funds in the necessary schemes. Similarly, if there is not a suitable river nearby, it is not advisable to carry out market research into the demand for electricity. The figure below outlines the key steps for scoping a MHS. Stage 1 - Assess Electricity Demand It is important to determine the energy access options for the targeted community. This information can be gathered using a needs assessment and baseline energy audit (as outlined in Chapters 2 and 4) to assess the current energy demand and uses, the prioritisation of energy access but also the willingness by the community to pay for the services. Stage 2 - Hydrological Study and Site Survey This study should be undertaken by a technical expert to determine the hydro power potential of the proposed site, how water flow varies throughout the year and where water for the scheme should be abstracted (taken from the river). This study will establish the amount of Power that will be available from the scheme as well as when that power will be delivered. The study will take into account the various uses of water from the river. During the hydrological study, the river catchment is determined, the amount of rainfall in the catchment basin, river flows from a gauging station if available, otherwise an assessment using alternative river stream flow measurements is used. In addition to what can be obtained from maps and other publications, local history of the river flows, flooding etc are very crucial to determine scheme location and scheme sizing. For example, it is best not to build your power house in an area that regularly floods! Stage 3 - Pre-feasibility Study This study involves preliminary checks on the suitability of the river and its surrounding community for a hydroelectric system. To check how much power (energy) is in the river, the following calculation can be used. P (kW) = 7 x Q (m
3/s) x H (meters)
P = the amount of Power in the water measured in kilo watts (kW). Q = the flow rate of the river and
is the volume of water passing per second measured in m3/s. H = the Head of the river and is the
maximum available vertical fall in the water from the upstream level to the downstream level.
90
If you would like more information on how to assess the potential power of a river there is a useful guide published by the British Hydropower Association which can be accessed here http://www.british-hydro.org/Useful%20Information/mini_hydro_guide . The studies are not detailed but could be used for the preparation of funding proposals. This is essentially a quick cost study of a range of design options and rural energy sources. It could involve the comparison of costs of grid extension to micro hydro installations. Stage 4 - Full Feasibility This is a follow up of the Pre-feasibility studies. Once there has been an agreement on one of the design options presented in the pre-feasibility study report, then detailed engineering calculations and costing can commence. The technical designs that will be carried out include civil works design, electro-mechanical equipment and transmission and distribution of electricity. A full feasibility study, a financial study is also commissioned that also includes an assessment of how much the hydroelectric system will cost to operate and maintain It is described that one of the golden rules in MHS studies is that “Operation and Maintenance first, Economics and plant factor second, engineering design last”. This is important to allow the design philosophy to meet requirements during operations and maintenance. For example, if the scheme will be community managed then simplicity is a key factor in the choice of design options. The technical design of the scheme should be tailored to suit the level of skills available for operation and maintenance. Scoping Checklist for Hydroelectric Systems
1. Is there demand for the electricity? What is the required demand from the catchment at present and in future? What will be the energy distribution model? Is the connection through mini-grid or through battery charging from single source?
2. Is there a suitable river that flows all year round? What are the catchment characteristics? Let technical experts measure the flows (Q), head (H) and calculate Power (P) that could be generated.
3. How does the power compare to the demand? If supply and demand does not match, you will need to be careful about how to design your system and be clear on what the priorities are
4. Carry out a full feasibility study including civil works design, electromechanical equipment, transmission and distribution of electricity, a financial study and an estimate of the operating and maintenance costs.
Installing a Hydroelectric System The installation of a hydroelectric system requires a lot of engineering and equipment to be installed. It will be important that all components are of good quality and are present in the correct quantity for installation. Many parts for hydroelectricity systems in Malawi need to be imported from Zimbabwe or other southern African nations so make sure you allow enough time for the parts to arrive. Water rights, legislation and commissioning Water abstraction is subject to the Water Resources Act (1999) and there is a need to check for clearance and/or a permit. The rights and permits are obtainable from the Water Resources Board under the Ministry of Water. The first point of contact regarding this is the District Water Officer. The Water Resources Management Policy and Strategies (1998) realises the need to use water wisely through monitoring, assessment, planning, conservation and protection and allocation of water as a resource. Furthermore, under the Environment Management Act (1996), micro hydro schemes fall under the prescribed list of projects which require a mandatory full Environmental Impact Assessment. EIA is under the jurisdiction of the Environmental Affairs Department. A pico hydro scheme would not require an EIA but will need environmental screening to ascertain its environmental impacts.
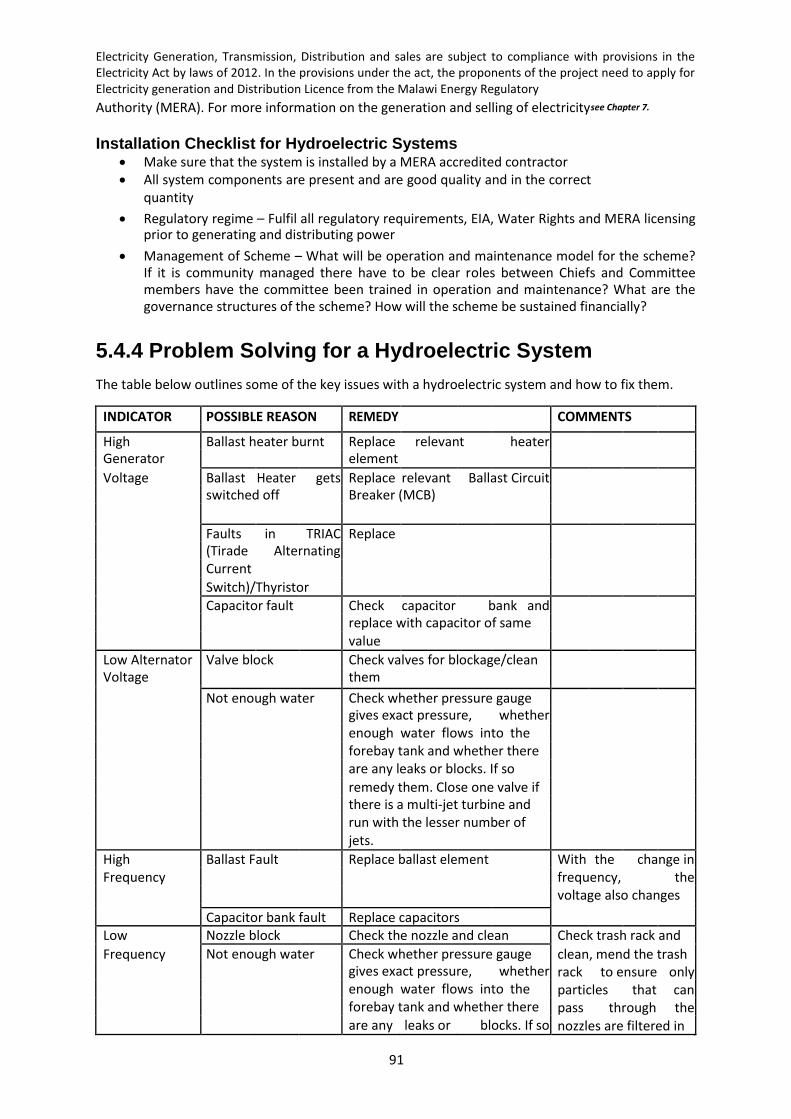
91
Electricity Generation, Transmission, Distribution and sales are subject to compliance with provisions in the Electricity Act by laws of 2012. In the provisions under the act, the proponents of the project need to apply for Electricity generation and Distribution Licence from the Malawi Energy Regulatory Authority (MERA). For more information on the generation and selling of electricity Installation Checklist for Hydroelectric Systems
Make sure that the system is installed by a MERA accredited contractor All system components are present and are good quality and in the correct
quantity
Regulatory regime – Fulfil all regulatory requirements, EIA, Water Rights and MERA licensing prior to generating and distributing power
Management of Scheme – What will be operation and maintenance model for the scheme?
If it is community managed there have to be clear roles between Chiefs and Committee members have the committee been trained in operation and maintenance? What are the governance structures of the scheme? How will the scheme be sustained financially?
5.4.4 Problem Solving for a Hydroelectric System The table below outlines some of the key issues with a hydroelectric system and how to fix them.
INDICATOR POSSIBLE REASON REMEDY COMMENTS
High Ballast heater burnt Replace relevant heater Generator element Voltage Ballast Heater gets Replace relevant Ballast Circuit
switched off Breaker (MCB) Faults in TRIAC Replace (Tirade Alternating Current Switch)/Thyristor Capacitor fault Check capacitor bank and replace with capacitor of same value
Low Alternator Valve block Check valves for blockage/clean Voltage them
Not enough water Check whether pressure gauge gives exact pressure, whether enough water flows into the forebay tank and whether there are any leaks or blocks. If so remedy them. Close one valve if there is a multi-jet turbine and run with the lesser number of jets.
High Ballast Fault Replace ballast element With the change in Frequency frequency, the
voltage also changes
Capacitor bank fault Replace capacitors Low Nozzle block Check the nozzle and clean Check trash rack and Frequency Not enough water Check whether pressure gauge clean, mend the trash
gives exact pressure, whether rack to ensure only enough water flows into the particles that can forebay tank and whether there pass through the are any leaks or blocks. If so nozzles are filtered in
see Chapter 7.
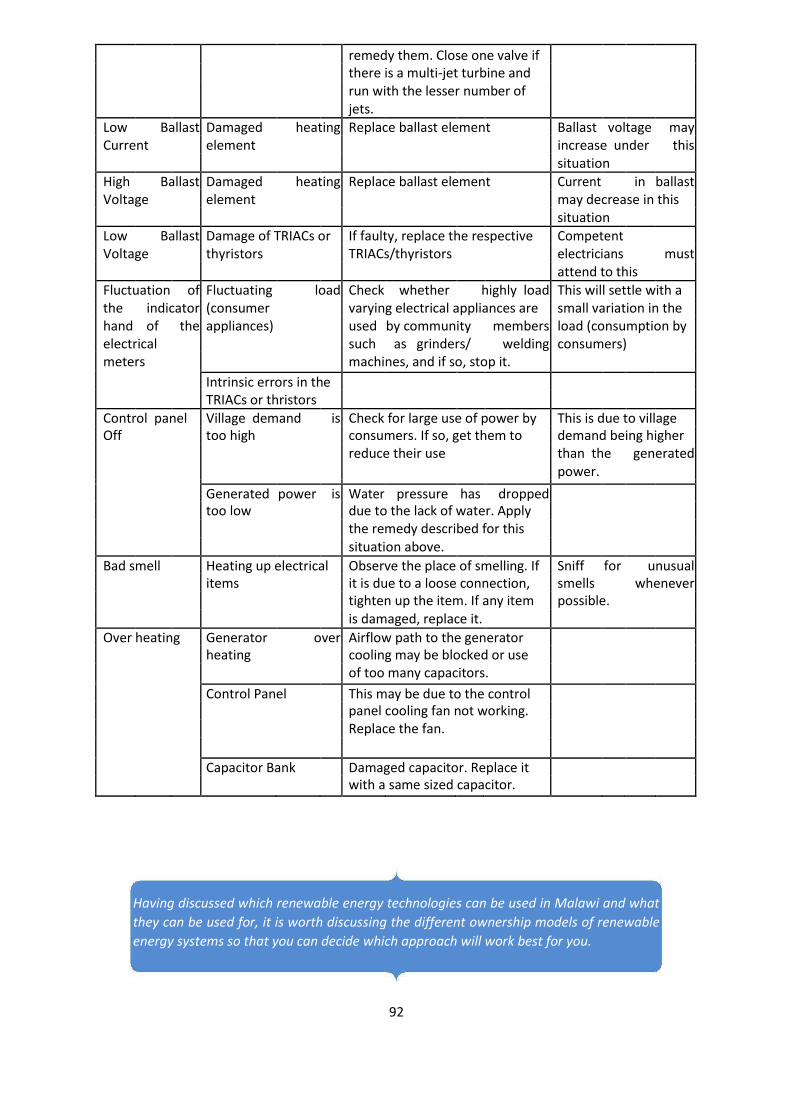
92
remedy them. Close one valve if there is a multi-jet turbine and run with the lesser number of jets.
Low Ballast Damaged heating Replace ballast element Ballast voltage may Current element increase under this
situation High Ballast Damaged heating Replace ballast element Current in ballast Voltage element may decrease in this
situation Low Ballast Damage of TRIACs or If faulty, replace the respective Competent Voltage thyristors TRIACs/thyristors electricians must
attend to this Fluctuation of Fluctuating load Check whether highly load This will settle with a the indicator (consumer varying electrical appliances are small variation in the hand of the appliances) used by community members load (consumption by electrical such as grinders/ welding consumers) meters machines, and if so, stop it.
Intrinsic errors in the TRIACs or thristors
Control panel Village demand is Check for large use of power by This is due to village Off too high consumers. If so, get them to demand being higher
reduce their use than the generated power.
Generated power is Water pressure has dropped too low due to the lack of water. Apply the remedy described for this situation above.
Bad smell Heating up electrical Observe the place of smelling. If Sniff for unusual items it is due to a loose connection, smells whenever tighten up the item. If any item possible. is damaged, replace it.
Over heating Generator over Airflow path to the generator heating cooling may be blocked or use of too many capacitors.
Control Panel This may be due to the control panel cooling fan not working. Replace the fan. Capacitor Bank Damaged capacitor. Replace it with a same sized capacitor.
Having discussed which renewable energy technologies can be used in Malawi and what
they can be used for, it is worth discussing the different ownership models of renewable
energy systems so that you can decide which approach will work best for you.
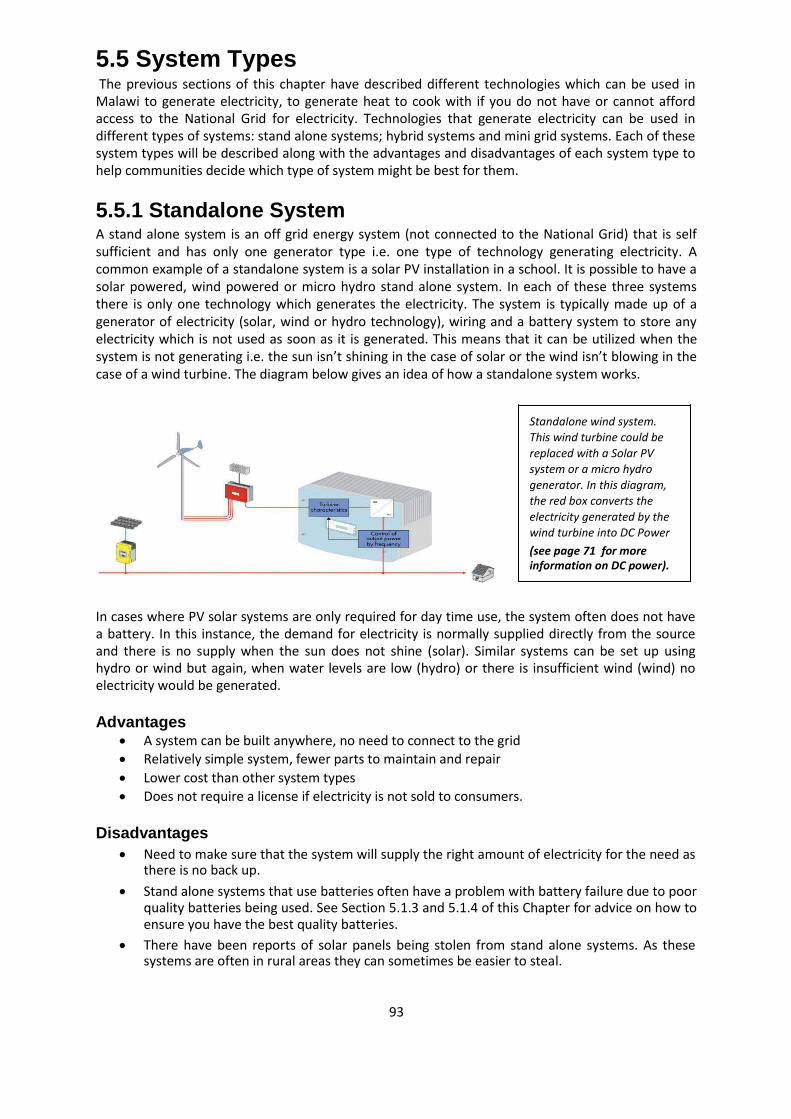
93
5.5 System Types The previous sections of this chapter have described different technologies which can be used in
Malawi to generate electricity, to generate heat to cook with if you do not have or cannot afford access to the National Grid for electricity. Technologies that generate electricity can be used in different types of systems: stand alone systems; hybrid systems and mini grid systems. Each of these system types will be described along with the advantages and disadvantages of each system type to help communities decide which type of system might be best for them.
5.5.1 Standalone System A stand alone system is an off grid energy system (not connected to the National Grid) that is self sufficient and has only one generator type i.e. one type of technology generating electricity. A common example of a standalone system is a solar PV installation in a school. It is possible to have a solar powered, wind powered or micro hydro stand alone system. In each of these three systems there is only one technology which generates the electricity. The system is typically made up of a generator of electricity (solar, wind or hydro technology), wiring and a battery system to store any electricity which is not used as soon as it is generated. This means that it can be utilized when the system is not generating i.e. the sun isn’t shining in the case of solar or the wind isn’t blowing in the case of a wind turbine. The diagram below gives an idea of how a standalone system works.
Standalone wind system.
This wind turbine could be
replaced with a Solar PV
system or a micro hydro
generator. In this diagram,
the red box converts the
electricity generated by the
wind turbine into DC Power (see page 71 for more information on DC power).
In cases where PV solar systems are only required for day time use, the system often does not have a battery. In this instance, the demand for electricity is normally supplied directly from the source and there is no supply when the sun does not shine (solar). Similar systems can be set up using hydro or wind but again, when water levels are low (hydro) or there is insufficient wind (wind) no electricity would be generated. Advantages
A system can be built anywhere, no need to connect to the grid
Relatively simple system, fewer parts to maintain and repair Lower cost than other system types
Does not require a license if electricity is not sold to consumers.
Disadvantages
Need to make sure that the system will supply the right amount of electricity for the need as there is no back up.
Stand alone systems that use batteries often have a problem with battery failure due to poor
quality batteries being used. See Section 5.1.3 and 5.1.4 of this Chapter for advice on how to ensure you have the best quality batteries.
There have been reports of solar panels being stolen from stand alone systems. As these
systems are often in rural areas they can sometimes be easier to steal.
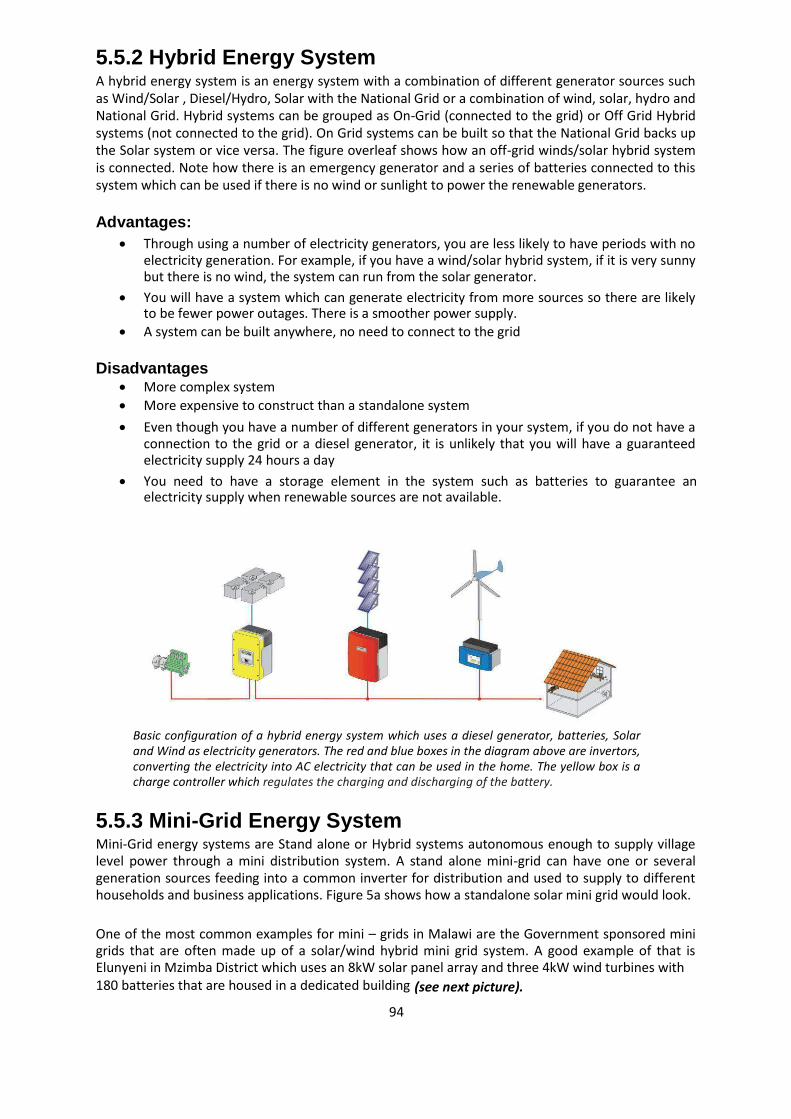
94
5.5.2 Hybrid Energy System A hybrid energy system is an energy system with a combination of different generator sources such as Wind/Solar , Diesel/Hydro, Solar with the National Grid or a combination of wind, solar, hydro and National Grid. Hybrid systems can be grouped as On-Grid (connected to the grid) or Off Grid Hybrid systems (not connected to the grid). On Grid systems can be built so that the National Grid backs up the Solar system or vice versa. The figure overleaf shows how an off-grid winds/solar hybrid system is connected. Note how there is an emergency generator and a series of batteries connected to this system which can be used if there is no wind or sunlight to power the renewable generators. Advantages:
Through using a number of electricity generators, you are less likely to have periods with no electricity generation. For example, if you have a wind/solar hybrid system, if it is very sunny but there is no wind, the system can run from the solar generator.
You will have a system which can generate electricity from more sources so there are likely
to be fewer power outages. There is a smoother power supply. A system can be built anywhere, no need to connect to the grid
Disadvantages
More complex system
More expensive to construct than a standalone system
Even though you have a number of different generators in your system, if you do not have a connection to the grid or a diesel generator, it is unlikely that you will have a guaranteed electricity supply 24 hours a day
You need to have a storage element in the system such as batteries to guarantee an
electricity supply when renewable sources are not available.
Basic configuration of a hybrid energy system which uses a diesel generator, batteries, Solar and Wind as electricity generators. The red and blue boxes in the diagram above are invertors, converting the electricity into AC electricity that can be used in the home. The yellow box is a charge controller which regulates the charging and discharging of the battery.
5.5.3 Mini-Grid Energy System Mini-Grid energy systems are Stand alone or Hybrid systems autonomous enough to supply village level power through a mini distribution system. A stand alone mini-grid can have one or several generation sources feeding into a common inverter for distribution and used to supply to different households and business applications. Figure 5a shows how a standalone solar mini grid would look. One of the most common examples for mini – grids in Malawi are the Government sponsored mini grids that are often made up of a solar/wind hybrid mini grid system. A good example of that is Elunyeni in Mzimba District which uses an 8kW solar panel array and three 4kW wind turbines with 180 batteries that are housed in a dedicated building (see next picture).
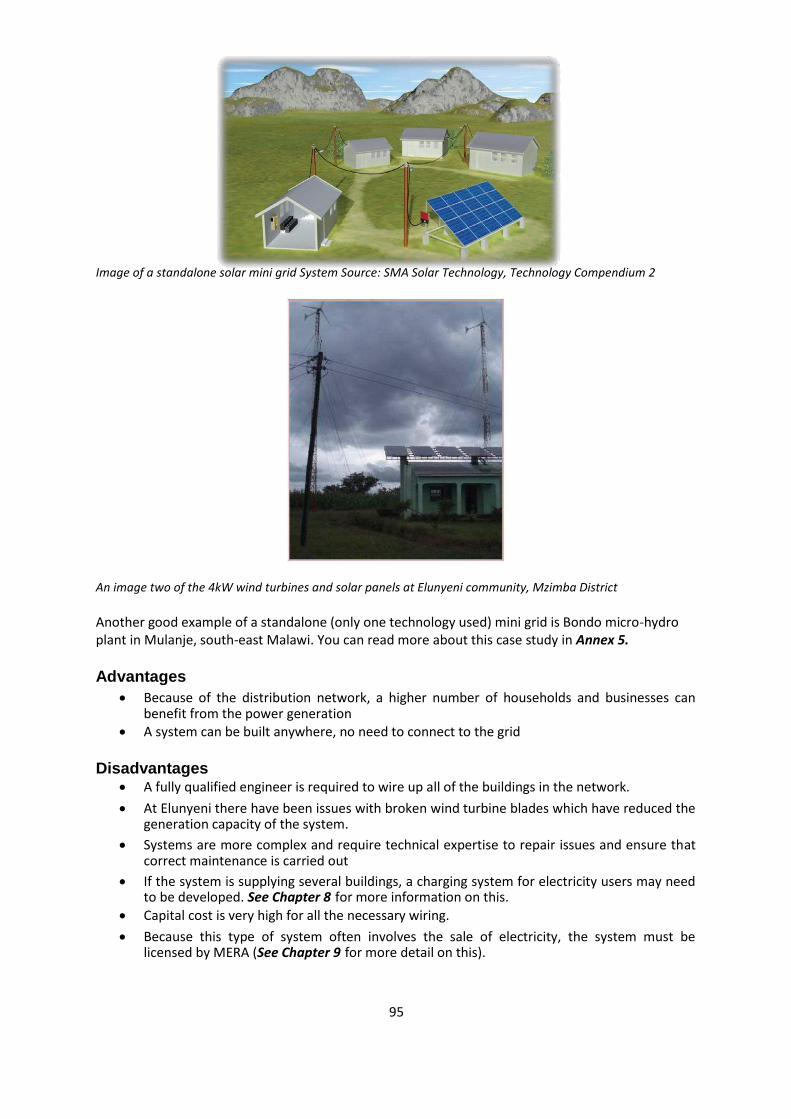
95
Image of a standalone solar mini grid System Source: SMA Solar Technology, Technology Compendium 2 An image two of the 4kW wind turbines and solar panels at Elunyeni community, Mzimba District Another good example of a standalone (only one technology used) mini grid is Bondo micro-hydro plant in Mulanje, south-east Malawi. You can read more about this case study in Annex 5. Advantages
Because of the distribution network, a higher number of households and businesses can benefit from the power generation
A system can be built anywhere, no need to connect to the grid
Disadvantages
A fully qualified engineer is required to wire up all of the buildings in the network.
At Elunyeni there have been issues with broken wind turbine blades which have reduced the generation capacity of the system.
Systems are more complex and require technical expertise to repair issues and ensure that
correct maintenance is carried out
If the system is supplying several buildings, a charging system for electricity users may need to be developed. See Chapter 8 for more information on this.
Capital cost is very high for all the necessary wiring.
Because this type of system often involves the sale of electricity, the system must be licensed by MERA (See Chapter 9 for more detail on this).
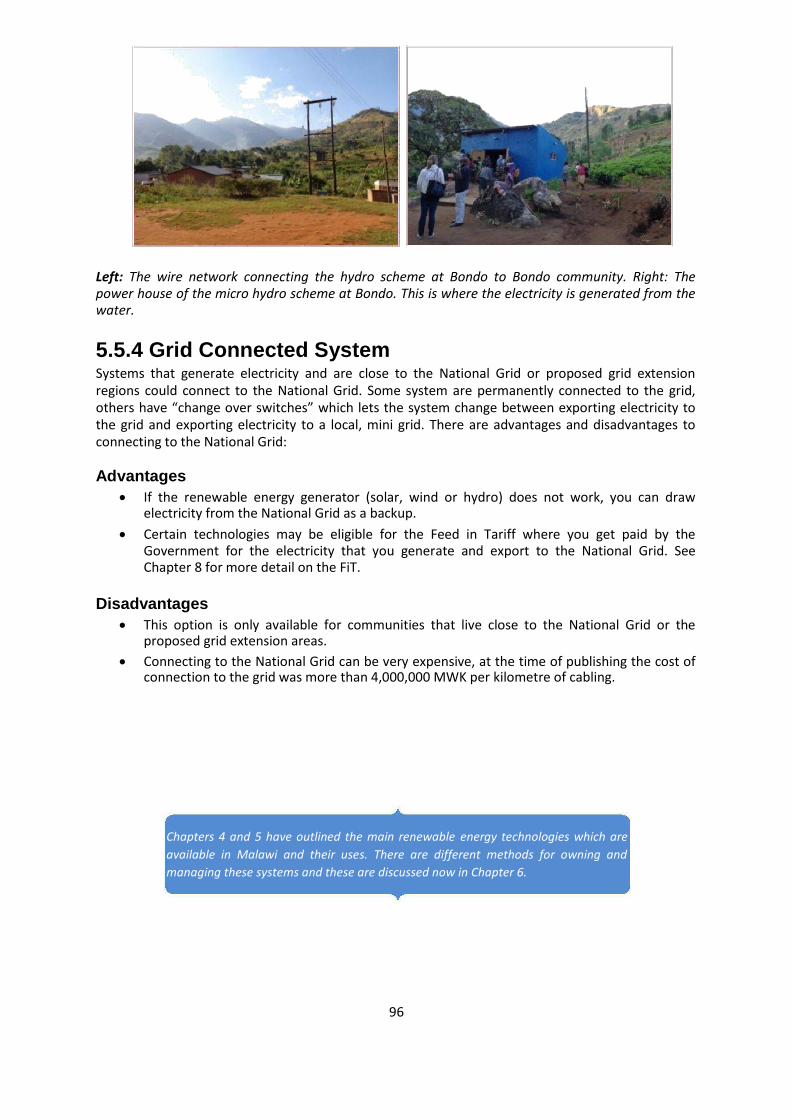
96
Left: The wire network connecting the hydro scheme at Bondo to Bondo community. Right: The power house of the micro hydro scheme at Bondo. This is where the electricity is generated from the water.
5.5.4 Grid Connected System Systems that generate electricity and are close to the National Grid or proposed grid extension regions could connect to the National Grid. Some system are permanently connected to the grid, others have “change over switches” which lets the system change between exporting electricity to the grid and exporting electricity to a local, mini grid. There are advantages and disadvantages to connecting to the National Grid: Advantages
If the renewable energy generator (solar, wind or hydro) does not work, you can draw electricity from the National Grid as a backup.
Certain technologies may be eligible for the Feed in Tariff where you get paid by the
Government for the electricity that you generate and export to the National Grid. See Chapter 8 for more detail on the FiT.
Disadvantages
This option is only available for communities that live close to the National Grid or the proposed grid extension areas.
Connecting to the National Grid can be very expensive, at the time of publishing the cost of
connection to the grid was more than 4,000,000 MWK per kilometre of cabling.
Chapters 4 and 5 have outlined the main renewable energy technologies which are
available in Malawi and their uses. There are different methods for owning and
managing these systems and these are discussed now in Chapter 6.
97
Chapter 6
OWNERSHIP MODELS Renewable Energy Projects need to be managed for self sustenance. Ownership models vary with circumstances on the ground; as such there is no ownership model which is superior to another. The key is to choose the appropriate model for your situation. Different ownership models have different names but it is the approach and practice which matters most. In this section, we look at four ownership models that are used in Malawi.
6.1 Community ownership model In the community ownership model, the need and motivation to develop a renewable energy project often comes from the community themselves. Throughout the initiation and development of the project, the community members are consulted through participatory approaches and are central in the decision making process. The project is operated and maintained by the community for the community who elect a committee to oversee the day to day management and security of the facility (see Section 2.6 of Chapter 2 and Section 3 of this Chapter for more information on this). Extensive training and capacity building will need to be done with the community to ensure that they have the necessary skills and confidence to operate the systems themselves (more detail on this is given in Sections 3.1 and 3.2 of Chapter 2 and Chapter 7, Section 2). External support is often provided for setting up of the structure and then transferring ownership of the project to the community. One of the key reasons for community owned projects failing is that there insufficient funds are raised to cover the operating and maintenance costs of the system. If this ownership model is adopted, it is essential that income generating ideas are implemented by the community to ensure a sufficient maintenance fund is built up. Examples of community owned renewable energy projects can be seen in Annex 5 and a template for developing a business plan for renewable energy system is in Annex 6. Advantages of community ownership model:
It brings confidence to the village community to look after their facility. The community benefits from training in how to manage and operate the system
The community contribution in terms of labour, materials and some finance ensure
that the community feel ownership of the project and are more likely to be committed to maintaining the system.
Confidence and skills gained through developing a renewable energy project may
lead to the community developing other projects themselves. Disadvantages include:
Group may need a lot of training and capacity building. Group dynamics issues might affect sustainability of the energy facility. Time consuming and costly to set up sustainability structures
Investment is often based on humanitarian assistance / improving the social welfare
hence replication is not guaranteed.
6.2 Private Ownership Model The private ownership model involves a number of members or an individual that owns a project and runs it like a private enterprise or a company. The owners can register their enterprise and can access a loan to support their project. Under their corporate social responsibility policies, some privately owned projects carry out development work in their area of operation. Depending on what
98
is stipulated in their license, management of the energy facility is entirely the responsibility of the company. A good example of a private ownership model includes micro hydro schemes constructed and run by private estates or individuals owning a solar water pump for irrigation.
The advantages of a private ownership model include The owner(s) are business oriented, hence they can guard the facility and
sustainability is guaranteed Easy to access a loan facility to expand their business.
Easy to mobilise resources because financial capital is available
It offers employment opportunities.
The disadvantages include
High capital requirement in the absence of community contribution
Less capacity building for the community
Community has less control over the nature of the development in their area Less community benefit
6.3 Community - Private Ownership Model In some instances, the community might enter into partnership with a private enterprise to run and
manage an energy facility as a social enterprise1. In this way, there is a mutual understanding
between the two parties on a win – win basis. Each party has a commitment to make and fulfil its obligations. The two parties might agree for one party to build, operate and then transfer (B-O-T), or entirely agree to co-exist. A good example is Mulanje Electricity Generation Authority (MEGA) which is a social business that will manage the generation and distribution of power generated by hydroelectricity schemes on Mulanje Mountain including the Bondo hydro scheme which you can see in Annex 5. You can read more about MEGA here: http://businessinnovationfacility.org/page/mega-commercialising-micro-hydro-power-in-malawi The advantages of community – private ownership model include
The community contribution is key to sustainability and replication of the technology.
Partnering with a private business brings confidence for the community to invest and to look after the facility.
Skills and knowledge from the private company can be transferred to the community
The disadvantages of this model include the following
There needs to be a clear understanding between the two parties from the outset on the roles and responsibilities of both parties. Without this, issues around group dynamics may undermine the sustainability of the energy facility.
Time consuming and costly to set up sustainability structures because it requires more
consultations.
For the models 1 and 3 listed above, it is wise to set up an energy committee to ensure that that there is a dedicated group of people that are responsible for the day to day running of a renewable energy project. It is important that the energy committee is made up of people that represent different sectors of the community and if possible, have specific skills that are relevant to the project and are needed on the committee. More information on the process of setting up an energy committee is outlined in Chapter 2, Section 2.6. 1Social enterprises are businesses that make their money from selling goods and services but they reinvest
their profits back into the business or the local community.
99
Once this energy committee has been set up it is good practice to assess what training the energy committee members will need to allow them to fulfil their roles in managing and operating the type of project in their community. Basic training that most community groups may need include village savings and loans, leadership, community management and renewable energy technologies. Additional training may be necessary to ensure that members of the committee have sufficient training to manage and operate the project. More detail about what topics to include in these trainings can be found in Chapter 2, Sections 3.1 and 3.2 If possible it is a good idea for community groups that will have some role in operating or managing a renewable energy project to visit other established projects to learn from their peers. Groups involved in the CEDP have found these “Learning Journeys” very useful. Learning Journeys allow learning to be passed on as well as building a support network and are also discussed in Chapter 2, Section 3.3
6.4 Government Ownership Model In this model the Government is responsible for the management of the energy facility. Most of the
energy facilities in government institutions fall under this government ownership model as
proprietor of the facility. The main idea behind establishing this type of energy facility is to improve
the welfare of the people in the area of the energy facility through provision of energy. Examples of
this type of project might include: solar water pumping to improve sanitation for a public school,
solar lighting systems for police road blocks and lighting systems for health centres. Sometimes the
community surrounding the energy facility forms a committee to look after the facility but the
facility is the property of government.
The advantages of government ownership model include:
Sustainability is guaranteed because the facility receives support from the community and government.
It gives confidence to the community to look after the public property.
The disadvantages of Government Ownership model are:
Investment is more on humanitarian assistance / improving the social welfare hence replication is not guaranteed.
Chapter 6 reviewed the different types of ownership models for renewable energy
systems in Malawi. Chapter 7 will examine how Development Workers can make sure
that all systems are sustainable and can continue to operate for many years.
100
Chapter 7
ENSURING THE SUSTAINABILITY OF RENEWABLE ENERGY PROJECTS Many renewable energy projects fail to sustain themselves after project financiers have pulled out or the project has phased out. For example in Malawi, missionaries have built mini hydro systems which could not be sustained once the missionaries left. The reasons for project failure vary but one underlying factor is the lack of thought on the exit strategies and insufficient training and capacity building within the communities to ensure sustainability. The term “sustainable” means different things to different people but when discussing renewable energy projects; we mean that the system can carry on without doing harm. When looking at sustainability of renewable energy projects, three areas need to be critically analyzed to ensure project sustainability: environmental; social and economic factors. It is also vital that lessons are learned from earlier experiences and so a Monitoring and Evaluation M&E) strategy should be implemented as the project is designed. The sustainability of a project should be interwoven in the project design and implementation. This chapter will examine measures which can be implemented to ensure that projects are sustainable and can continue to work well after funders or installers have left.
7.1 Economic sustainability Some of the most common causes for community led renewable energy systems to fail include:
1. Communities having no plan for generating an income to build up a maintenance fund for the system
2. A system component breaks and there are insufficient funds to replace the broken component
3. Nobody within the community is trained at basic system maintenance so a professional must be called out for basic maintenance at great expense
Many systems in Malawi have experienced the issues outlined above and have failed, many systems in Malawi are therefore not economically viable and it is essential that measures are put in place to prevent economic sustainability being an issue. A key activity in ensuring economic sustainability is that a business plan is put together for every project that is being developed so that sufficient funds are available to purchase replacement parts. There are templates for Business Plans for specific project types in Annex 6. These templates should help to guide you through what your costs might be, what your income might be and how much you need to save for your system to be economically sustainable. Some key points to consider when business planning are:
How often will certain parts of the system break and how much do replacement parts cost? There is guidance on this for Solar PV systems on page 78.
Will there be ongoing operational costs such as the employment of a security guard to
protect the system?
What activities can you undertake to generate an income to fund the above items? For example, from a solar PV system, can you use surplus electricity to charge mobile phones, run a cinema or a maize mill? How much will it cost to set up this activity and how much will can you charge for this activity?
Another means of improving economic sustainability of a project is to ensure that when the system is designed and installed, this is done by MERA accredited companies who have significant experience in their field. A poorly designed system which is made up of poor quality parts will
101
require a lot of money to fix and to maintain. It is very important that your system is well designed and that good quality parts are used. For more information on what questions to ask when designing and installing renewable energy systems
7.2 Social sustainability
Renewable energy projects need to be socially sustainable. This means that the community should be able to continue managing and operating the system after the funders and implementers have left. For sustainability to be guaranteed, a number of factors need to be addressed.
o The system must address a basic human need in the community such as lack of lighting in a school, a long distance to maize mills or a clean water source. If the system does not address an issue in the community and it is not needed it is less likely that the community will maintain the system and the system will fail.
o The development process must fully involve the community that the project will take place in, this is essential for making sure that the community feels that they own the project as community members are more likely to support a project that they feel is theirs. Several methods can be used to engage with the community including community meetings, public hearings, field trips and printed materials such as the secondary toolkit. Some of the specific objectives of involving the community include:
Informing the community and local authorities (see sections 1.2 – 1.4 in Chapter 2 for more detail on this). This also gives a great opportunity for obtaining local and traditional knowledge
Ensuring that community members who will be involved in the operation and maintenance of the scheme have clearly defined roles and understand their responsibilities.
Providing an opportunity for those otherwise unrepresented to present their views and values therefore allowing more sensitive consideration of mitigation measures and trade – offs;
Providing those involved with planning the proposal with an opportunity to ensure that the benefits are maximized and that no major impacts have been overlooked;
Ensuring that the community has undergone sufficient training and capacity building to manage the systems themselves (this is discussed in section 3.2 of the table in Chapter 2)
Providing an opportunity for the public to influence project design in a positive manner by allowing input on project alternatives;
Enter social contracts with the communities to make sure there are checks and balances during the project life time. Such contracts should include group constitution where areas of committee procedure are clearly spelt out.
Providing better transparency and accountability in decision making
Reducing conflict through the early identification of contentious issues.
Gender disparities need to be addressed to make sure there is equality. Ignoring gender has sometimes resulted in not meeting the needs of the whole community and the project not being taken up by intended beneficiaries.
7.3 Environmental sustainability Malawi is endowed with a range of both renewable and non-renewable resources which require prudent managing. The 1994 National Environmental Action Plan highlighted numerous major environmental issues in Malawi which have arisen due to numerous factors. These issues include soil erosion, deforestation and water resource degradation. It is important to realise that projects must be environmentally sustainable because a project is not likely to succeed if it has effects which are damaging the local environment through affecting or depleting natural resources
see Chapters 4 and 5.
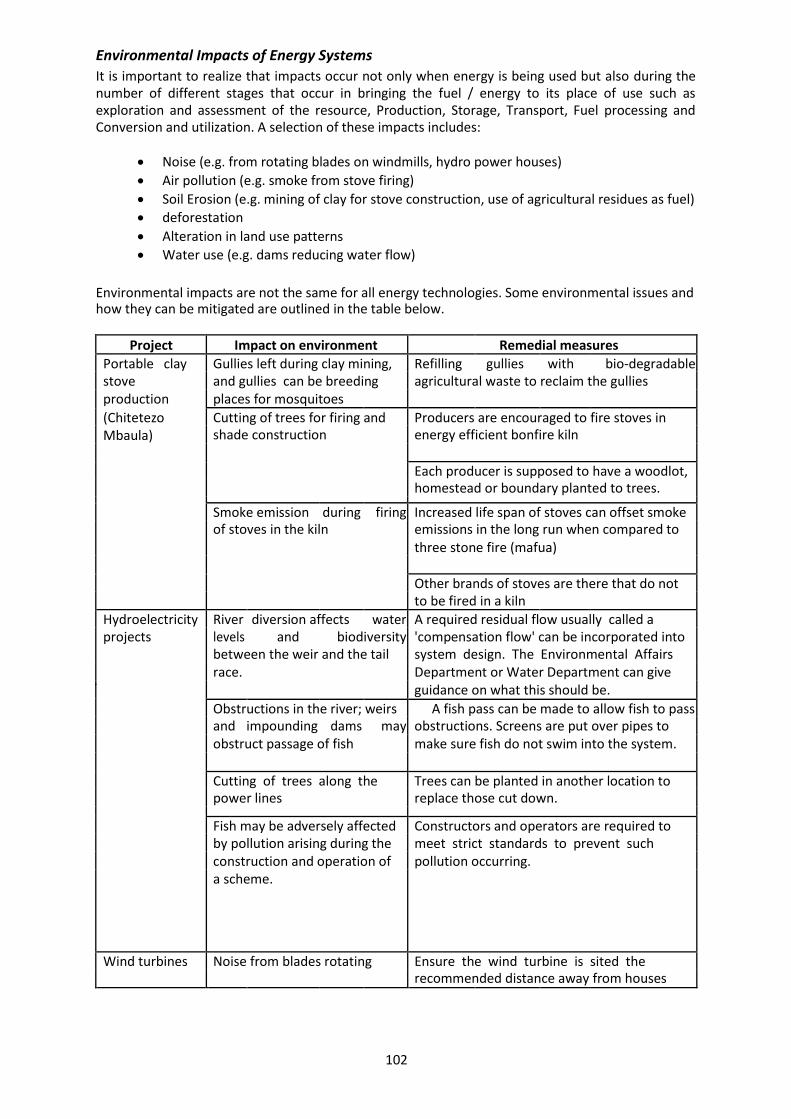
102
Environmental Impacts of Energy Systems It is important to realize that impacts occur not only when energy is being used but also during the number of different stages that occur in bringing the fuel / energy to its place of use such as exploration and assessment of the resource, Production, Storage, Transport, Fuel processing and Conversion and utilization. A selection of these impacts includes:
Noise (e.g. from rotating blades on windmills, hydro power houses)
Air pollution (e.g. smoke from stove firing)
Soil Erosion (e.g. mining of clay for stove construction, use of agricultural residues as fuel)
deforestation Alteration in land use patterns
Water use (e.g. dams reducing water flow)
Environmental impacts are not the same for all energy technologies. Some environmental issues and how they can be mitigated are outlined in the table below.
Project Impact on environment Remedial measures Portable clay Gullies left during clay mining, Refilling gullies with bio-degradable stove and gullies can be breeding agricultural waste to reclaim the gullies production places for mosquitoes (Chitetezo Cutting of trees for firing and Producers are encouraged to fire stoves in Mbaula) shade construction energy efficient bonfire kiln
Each producer is supposed to have a woodlot, homestead or boundary planted to trees.
Smoke emission during firing Increased life span of stoves can offset smoke of stoves in the kiln emissions in the long run when compared to three stone fire (mafua) Other brands of stoves are there that do not to be fired in a kiln
Hydroelectricity River diversion affects water A required residual flow usually called a projects levels and biodiversity 'compensation flow' can be incorporated into
between the weir and the tail system design. The Environmental Affairs race. Department or Water Department can give guidance on what this should be. Obstructions in the river; weirs A fish pass can be made to allow fish to pass and impounding dams may obstructions. Screens are put over pipes to obstruct passage of fish make sure fish do not swim into the system. Cutting of trees along the Trees can be planted in another location to power lines replace those cut down.
Fish may be adversely affected Constructors and operators are required to by pollution arising during the meet strict standards to prevent such construction and operation of pollution occurring. a scheme.
Wind turbines Noise from blades rotating Ensure the wind turbine is sited the
recommended distance away from houses
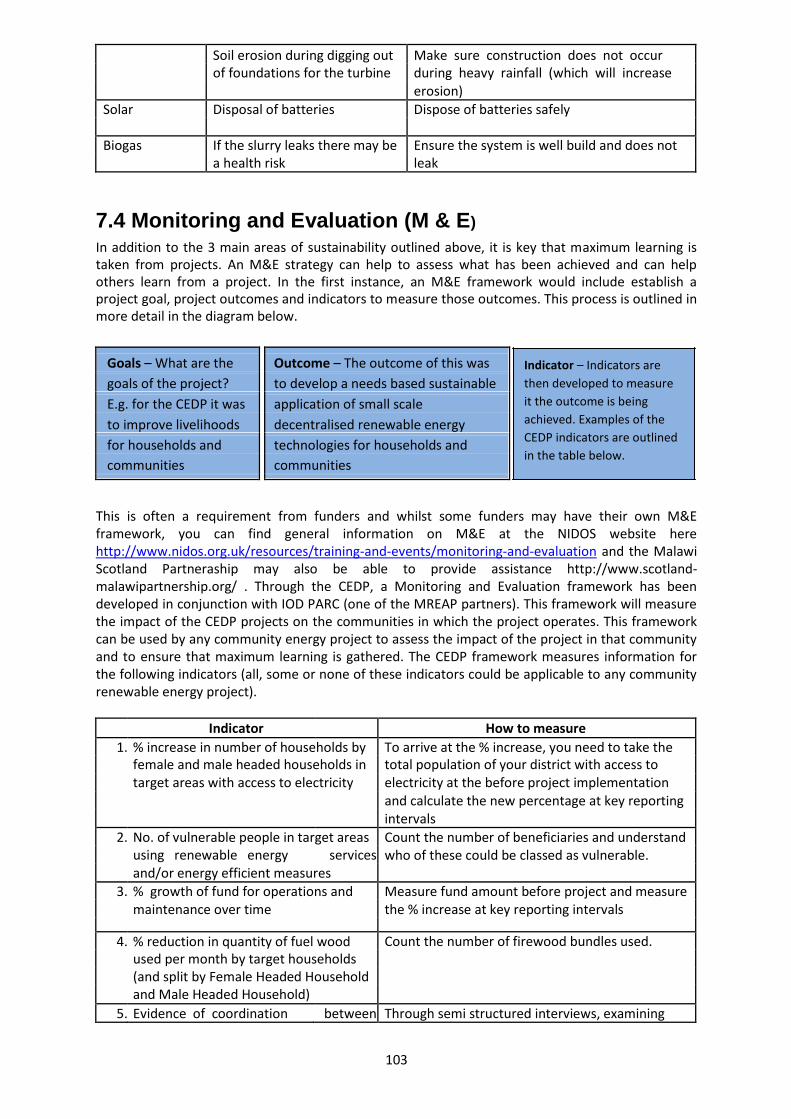
103
Soil erosion during digging out Make sure construction does not occur of foundations for the turbine during heavy rainfall (which will increase erosion)
Solar Disposal of batteries Dispose of batteries safely
Biogas If the slurry leaks there may be Ensure the system is well build and does not a health risk leak
7.4 Monitoring and Evaluation (M & E) In addition to the 3 main areas of sustainability outlined above, it is key that maximum learning is taken from projects. An M&E strategy can help to assess what has been achieved and can help others learn from a project. In the first instance, an M&E framework would include establish a project goal, project outcomes and indicators to measure those outcomes. This process is outlined in more detail in the diagram below.
Goals – What are the Outcome – The outcome of this was goals of the project? to develop a needs based sustainable E.g. for the CEDP it was application of small scale to improve livelihoods decentralised renewable energy for households and technologies for households and communities communities
Indicator – Indicators are
then developed to measure
it the outcome is being
achieved. Examples of the
CEDP indicators are outlined
in the table below.
This is often a requirement from funders and whilst some funders may have their own M&E framework, you can find general information on M&E at the NIDOS website here http://www.nidos.org.uk/resources/training-and-events/monitoring-and-evaluation and the Malawi Scotland Partneraship may also be able to provide assistance http://www.scotland-malawipartnership.org/ . Through the CEDP, a Monitoring and Evaluation framework has been developed in conjunction with IOD PARC (one of the MREAP partners). This framework will measure the impact of the CEDP projects on the communities in which the project operates. This framework can be used by any community energy project to assess the impact of the project in that community and to ensure that maximum learning is gathered. The CEDP framework measures information for the following indicators (all, some or none of these indicators could be applicable to any community renewable energy project). Indicator How to measure
1. % increase in number of households by To arrive at the % increase, you need to take the female and male headed households in total population of your district with access to target areas with access to electricity electricity at the before project implementation and calculate the new percentage at key reporting intervals
2. No. of vulnerable people in target areas Count the number of beneficiaries and understand using renewable energy services who of these could be classed as vulnerable. and/or energy efficient measures
3. % growth of fund for operations and Measure fund amount before project and measure maintenance over time the % increase at key reporting intervals
4. % reduction in quantity of fuel wood Count the number of firewood bundles used. used per month by target households (and split by Female Headed Household and Male Headed Household)
5. Evidence of coordination between Through semi structured interviews, examining
104
existing structures and existing meeting minutes and focus group discussions, committees note down evidence
6. Energy Expenditure (including initial Note down these costs at the household level capital purchases and ongoing fees) broken down into types (wood, charcoal, kerosene, dry-cell batteries, electricity monthly fees, etc.) at household and community level
7. Increased retention of school teachers Count number of teachers and workers and health clinic workers (qualifications also) before communication
/selection of village for RET system, once selected and then with RET system installed the experience over the short term Once the indicators have been selected by the Development Worker it is important that the full M&E process and why M&E is important is explained to the community. In particular to explain that M&E is important as gathers information on what is working, what isn’t working and to understand why things don’t work. It is also important to discuss with the community what they will need to measure, decide who will carry out the measurement, how often data will be collected, how they will measure it and where data will be recorded. Once this has been outlined, it will be important to make sure that the questions in the needs assessment and in the energy audit capture information that can be used as a “baseline”. Baseline The baseline information tells you what the situation was BEFORE a project is installed. It is vital to have accurate baseline information as this acts as a reference point to compare later results. For example, you can compare the number of bundles of firewood used per household BEFORE fuel efficient stoves arrived in a community with the number of bundles of firewood used per household AFTER fuel efficient stoves have been used. In this way a Development Worker can accurately measure the impact that your project is having in the community. Baseline information can be collected using a focus group discussions, semi structured interview or a community score card approach. Details of these data collection methods are outlined in Annex 4. Monthly reporting Development Workers should visit the community regularly (for example on a monthly basis) to record data against the indicators. In this way it will be possible to measure the impact of the project. Milestone reports At key milestones (perhaps after 6 months and after 12 months of monitoring data has been collected), the monitoring data that has been collected should be analysed to assess what the impact of the projects have been. Checklist on sustainability When looking at sustainability of renewable energy projects, three areas need to be critically
analyzed: environmental, social and economic factors. For a project to be environmentally sustainable, negative environmental impacts should be
minimised. A project which has serious impacts on the environment is unlikely to succeed. For a project to be socially sustainable, it must address a need in the community e.g. provide
lighting for a health centre. The project development process must also include the community from the very first steps.
For a project to be economically sustainable, the community must have sufficient funds to
replace broken parts. This will ensure projects will be far less reliant on external funders or NGOs.

105
A business plan (as in Annex 6) can help communities to plan their income generating activities to make sure they have enough money to maintain and repair the system.
Ensure that you have a robust M&E framework in place so that you can measure the impact of the project and assess what is working and what is not.
Chapter 7 outlined key steps that a Development Worker can undertake to make sure
that systems are sustainable and can continue to operate for many years. One way that
systems that generate electricity can make themselves more sustainable is to sell
electricity to the community. The key steps to consider for this are outlined below in
Chapter 8. Chapter 8

106
GENERATING AND SELLING ELECTRICITY The aim of generating electricity is to give power to communities and for some projects, it will be necessary to charge households and businesses for the electricity that they use. This chapter will outline the key steps if you are developing a project which will supply electricity to households and businesses and different methods for charging for that electricity provision. 8.1 Key Steps to Consider What is the Energy Need in the Community? The key step prior to installation of a power plant is to undertake an energy demand survey to establish the level of power requirements and how energy is used in the community e.g. lighting, cooking or productive uses. There is more information on how to assess energy needs in Chapters 2 and 3. Charging for electricity is often essential for establishing a sustainable scheme that will generate enough revenue to support its operation and maintenance needs but before looking at charging mechanisms, the community should determine the type of organisational model that will operate and manage the project. Which Governance Model to Choose? There are different models for selling electricity to communities and the right model for you to use to charge for electricity generated will depend on the governance model that has been adopted. There are a variety of governance models that are being employed in the management of schemes such as:
1. Business Model through a limited company– where a private company is set up and operates as a social business. An example of this is MEGA (see Chapter 6 section 3 for more detail on MEGA)
2. Community Co-operative – A co-operative is an organisation that is owned and run by and for the members of the cooperative. This is a model where people in the community opt to become a member of the co-operative and all members get an equal say and share of the profits but training may be required for some groups.
3. Community Trust – In this instance the nominated group from the community is responsible for the management of the scheme. This ensures good community input but the management committee may require training
4. Private Company – In this model you are assured of expertise but there may be little opportunity for the community to input into the charging structure.
Each governance structure has its advantages and disadvantages but setting up a private business and running it as a social enterprise with community ownership and professional management is often a better suited model as it allows for local input and ownership whilst the necessary skills and expertise are on hand from professional management. A formal registration of the organisation must be obtained and licences obtained for Electricity Generation, Distribution and Sales (see Chapter 9 for more information on how to obtain these licenses). Ensure Community Involvement As outlined in Chapters 2 and 7 it is essential that the community is involved from the very beginning of a project. An ideal case is that the community itself takes the initiative and proposes the construction of an Electricity Scheme (see Chapter 7, Section 2 for more detail on how to ensure community involvement) In some systems the community may wish to take over ownership of the system and responsibility
for its operation. In this instance it is preferable that an already existing organization should be used
(e.g. a farmers’ cooperative). It is important that roles are clearly defined such as operational staff
that is responsible for the operation of the system, a book keeper to organise the finances of the
107
project with optional positions of a head of management and a secretary. Ideally, suitable candidates
should be recruited from within the community to continue confidence and capacity building within
the community with appropriate training and capacity building given to staff. 8.2 How to Meter Locally Generated Electricity Once a suitable operating body is in place, the community will need to consider how to sell their electricity. There are a number of different methods of charging for electricity. The common approaches and their key strengths are listed below: Standard kWh meter:
Is a device which is installed in the home and counts how many units of electricity you use. It is considered as a fair method, but costs are higher for the hardware and the meter reading. In Malawi it is known as a ‘post-paid’ meter. The use of these meters attracts a monthly fixed fee in addition to the charge per kWh used in the month.
Digital kWh meter: Is a digital device that is installed in the home to count how many units of electricity are being used? It can measure time and amount related tariffs, but it is expensive to install and technically complex to read and arrange billing.
Pre-paid systems: Involve a community buying electricity “credits” in advance which are put into the system. This system is considered to be fair, transparent and simple as no meter readings are needed but the systems can be expensive to install. The household with a pre-paid metering system only pays for the electricity units purchased, there is no monthly charge. Once the pre-purchased units are exhausted, power to the house is cut.
Current Limiter: Limits the amount of electricity delivered to a property at a time determined by the operator of the electricity system. There is no meter reading, the system is very cheap, but there is a danger of fraud and theft. The household also has little control over how much electricity is delivered to the home.
Flat rate: In this system, electricity is provided to households at a flat rate. There is no meter installed and there are no hardware costs. However, there is a need for social control to prevent wastage of electricity and there is an increased risk of higher peaks of electricity use in the community as there are no limits on energy use. One way of mitigating higher peak usage is for households to pay for batteries that are charged by the system at a business centre provided by the enterprise for households in the vicinity.
8.3 Research Existing Tariff Prices for a Unit of Electricity For each of the charging methods listed above, a tariff or charge per unit of electricity will have to be calculated. The normal tariffs for power schemes on mini grids have two components:
1. A connection fee 2. A per kWh unit charge for every unit of electricity used.

108
The connection fee serves as revenue to cater for initial overhead costs for post paid systems. MEGA (which has been discussed in Chapter 6), is proposing to use the following charges for connection fees and per unit kWh charge.
Connection Fee Electricity Tariff
Gross fee (incl VAT @ Net fee Gross tariff (incl VAT @ Net
VAT) VAT) tariff
16.50% (excl 16.50% (excl
VAT) VAT)
MWK US$ US$ MWK US$ US$
Community
Assets - - - -
Household 3,400 9.32 1.32 8.00 40.15 0.110 0.016 0.094
Business 4,500 12.33 1.75 10.58 71.18 0.195 0.028 0.167
To sell electricity sustainably the selling price of each unit must exceed the cost of producing a unit of electricity. Any proposed tariff should take into consideration the willingness of the community to pay. Rural communities often cannot afford to pay the initial investment by themselves and sometimes depend on subsidies. The approach is usually to limit the subsidy/grant financing for the investment through provision of community contributions in cash or in kind to increase a sense of ownership. However, paying subsidies to cover operating costs is counter –productive and is not a sustainable solution to covering operational costs. The electricity unit cost is also a function of the generation capacity of the plant, load (Capacity) factor,
design life, investment and operation and maintenance (OM) costs. The OM costs will need to be expressed as present values (PV) which take into consideration the time value for money. Money spent
today is generally worth more than the same amount spent 20 years in future. The present values take into consideration inflation and interest rates commonly called cost of borrowing or discounted rate. Each electricity generating scheme has a service (design) period which is used in the economic analysis of the viability of the electricity generation and distribution business. The tariff system should also fix regular tariff increases (e.g. yearly) in order to compensate for price increases of spare parts, inflation and currency devaluation. To fix an appropriate tariff, all expected future expenditures must be considered as illustrated in the following table
System Cost % of revenues to be assigned
Salaries for all staff 30 - 40%
Expenditures for daily routine O&M (tools, small spare parts,
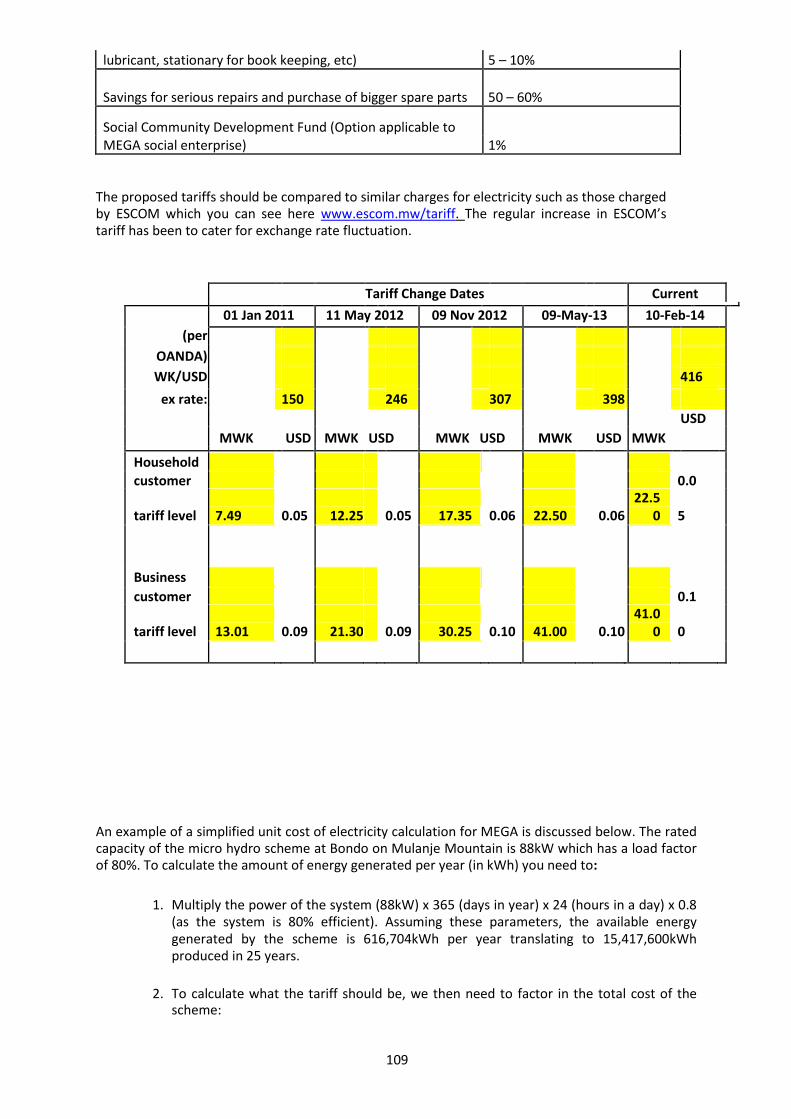
109
lubricant, stationary for book keeping, etc) 5 – 10%
Savings for serious repairs and purchase of bigger spare parts 50 – 60%
Social Community Development Fund (Option applicable to MEGA social enterprise) 1%
The proposed tariffs should be compared to similar charges for electricity such as those charged by ESCOM which you can see here www.escom.mw/tariff. The regular increase in ESCOM’s tariff has been to cater for exchange rate fluctuation.
Tariff Change Dates Current
01 Jan 2011 11 May 2012 09 Nov 2012 09-May-13 10-Feb-14
(per
OANDA)
WK/USD 416
ex rate:
150
246
307
398
USD
MWK USD MWK USD MWK USD MWK USD MWK
Household
customer 0.0
tariff level 7.49 0.05 12.25 0.05 17.35 0.06 22.50 0.06 22.5
0 5
Business
customer 0.1
tariff level 13.01 0.09 21.30 0.09 30.25 0.10 41.00 0.10 41.0
0 0
An example of a simplified unit cost of electricity calculation for MEGA is discussed below. The rated capacity of the micro hydro scheme at Bondo on Mulanje Mountain is 88kW which has a load factor of 80%. To calculate the amount of energy generated per year (in kWh) you need to:
1. Multiply the power of the system (88kW) x 365 (days in year) x 24 (hours in a day) x 0.8 (as the system is 80% efficient). Assuming these parameters, the available energy generated by the scheme is 616,704kWh per year translating to 15,417,600kWh produced in 25 years.
2. To calculate what the tariff should be, we then need to factor in the total cost of the
scheme:
110
The Investment cost for the scheme is US$406,000 with an annual estimated OM cost of $12,808. The total cost of the system is therefore $406,000 + ($12,808 x 25 years of operation) = $762,200. (Expression of the OM costs in US$ dollars is to ensure figures are not subject to fluctuation and inflation)
3. To calculate the electricity cost unit price, divide the total cost of the system ($762,200)
by the total potential kWh that the system can be produce over 25 years (15,417,600kWh) = US$0.05 or 5 cents per unit of electricity translating to K19.07 per kWh at the prevailing exchange rate of K416/US$. 406000
However, once the system at Bondo was operational, energy use at Bondo was only 5,845,000 kWh.
Therefore the total cost of $762,200 needs to be divided by the amount used (5,845,000 kWh). This
therefore gives a Load factor of 38% with the cost of one unit of electricity being approx
US$0.13/kWh or approximately 54MWK. 8.4 How to Use the Load Factor to Calculate an Appropriate Tariff In order to calculate the correct electricity tariff you need to know the Load (capacity) factor of an electricity generator. This is the ratio of its actual output to its potential output if the system could operate at full capacity indefinitely. To calculate the capacity factor, take the total amount of energy the plant produced during a period of time and divide by the amount of energy the plant would have produced at full capacity. Capacity factors vary greatly depending on the type of fuel that is used and the design of the plant. The table below shows the average capacity factors of different types of electricity generating systems.
Plant Type Typical Load
Factor
Combined Cycle gas turbine Stations 62%
Nuclear Power Plants 60%
Coal-fired power plants 42%
Hydro electric power stations 35%
Wind power plants 27%
Photovoltaic Power Stations 8%
The load factors are lower than 100% [i.e. the scheme is not working at the full capacity for 100% of
the time) due to utilisation of the electricity by consumers who might only need lighting for 4 hours
out of 24 hours, due to unavailability of the energy source during the year or day (Wind and PV), or
the system might be shut down for repairs and maintenance].
14
111
8.5 Economic Opportunities for Developing New Businesses Income generation through productive use of energy improves consumers’ ability to pay.
Through access to an electricity supply, new economic opportunities will be available for
communities such as maize mills, home cinemas and phone charging stations and higher tariffs
can be paid for productive end uses or businesses to help cover the OM costs of a system.
Electricity generation and distribution through mini-grid systems offers a great business
opportunity to social entrepreneurs and NGOs. However, private entrepreneurs may get better
returns for investment in electricity generation through grid connection where you are eligible
for Feed in Tariffs (FiT), a subsidy designed to encourage the development of renewable energy
projects. The investor would need to submit an Expression of Interest (EoI) to MERA for the
Feed in tariff Committee to review. Once approved, the independent power producer would be
expected to sign a Power Purchase Agreement with the Power Utility Company (ESCOM). For
more information on the FiT please see Chapter 9 and Annex 2. 8.6 Licensing and Regulations for Generating and Selling Electricity For any group who wish to generate and sell electricity locally there are regulations which need to be kept to and licenses which should be obtained. Full details are given in Chapter 9 but to summarise, anybody who:
1. Generates electricity for sale and/or 2. Operates a distribution network for supply of electricity
Must contact MERA to obtain the necessary licenses (See Chapter 8 for more detail on this) Summary of key Points When Generating and Selling Electricity 1. Make sure you have an appropriate governance structure in place to manage and operate
the system 2. Chose the correct metering hardware for homes 3. Calculate a tariff price which will cover the cost of generating the electricity. To do this:
a) Know how much is fair is charge, compare with existing tariffs e.g. ESCOM
b) Calculate the load factor of the generator c) Calculate the total cost of the system, make sure you include operating and
maintenance costs d) Divide the cost of the system by the number of kWh produced over a 25 year period.
This will give you the cost of producing one kWh of electricity
It is important to note that you may need to refine the energy tariff when you see how much energy is used. You will need to divide the total cost of the system by the number of units of electricity actually sold to make sure you cover costs.

112
Chapter 8 has discussed the key points for Development Workers and community groups
to be aware of if you are planning on generating and selling electricity, a methodology
for calculating a fair price to charge for your electricity and some of the relevant licenses
that you will need to apply for. Chapter 9 will now discuss the main licensing and
regulations that apply to renewable energy in Malawi in more detail.
113
Chapter 9
LICENSING AND REGULATIONS The Malawi Energy Policy (MEP) of 2003 and the energy laws of 2004 paved the way for the establishment of a sector wide regulator, Malawi Energy Regulatory Authority (MERA) which has powers to regulate the activities of the energy industry in accordance with the Energy Laws. 9.1 Energy Regulation Act 2004 and MERA This Act resulted in the establishment of a MERA to regulate the energy sector, to define the functions and powers of the Energy Regulatory Authority, to provide for licensing of energy undertakings, and for matters connected therewith and incidental thereto. The Malawi Energy Regulatory Authority (MERA) was established in 2008 as an independent energy sector regulator. Some of MERA’s key activities include:
Receive and process license applications for energy undertakings;
Grant, revoke or amend licenses under the Act and Energy Laws
Approve tariffs and prices of energy sales and services;
Monitor and enforce compliance by licensees with licensing conditions granted under the Act and the Energy Laws;
Prescribe and collect fees, charges, levies or rates under this Act and Energy Laws;
In conjunction with other relevant agencies, formulate measures to minimize the environmental impact of the exploitation, production, transportation, storage, supply and use of energy and enforce such measures by the inclusion of appropriate conditions to licenses held by energy undertakings; and
Promote the exploitation of renewable energy resources.
In order to successfully promote renewable energy technologies in the country, MERA certifies and registers companies that are involved in renewable energy systems. Only certified renewable energy companies are legally allowed to install renewable energy technologies. The importance of using MERA certified companies is as follows:
Quality assurance to customers.
Assurance of after sales services.
Records keeping of renewable installations for easy tracking in case of theft.
As of December 2013, MERA had certified 31 renewable energy companies. This list is updated yearly and you can see the most up to date list of these companies at the time of going to print in Annex 3. To get an updated version of this list, you can contact MERA directly using these details: The Chief Executive Malawi Energy Regulatory Authority (MERA) Private Bag B-496 LILONGWE 3Telephone: +265 1 927 920/1/4Fax: +265 1 772 666
114
9.2 Electricity Act 2004 The Electricity Act was enacted to make provisions for the regulation of the generation, transmission, wheeling distribution, sale, importation and exportation, use and safety of electricity and for matters connected therewith or incidental thereto. It is important to note that all electricity supply activities are carried out under a license in Malawi as stipulated in this Act. Under this Act, MERA broadly has two mandates: (1) to determine whether any person is carrying on or engaging in any activity for the supply of electricity; and (2) to order any person not holding a license and who is required to apply for and hold a license under this Act to cease carrying on or be engaged in any activity in the generation, transmission, importation, exportation or distribution of electricity. You are required to have a license for the following activities:
generation of electricity for sale operation of a transmission network operation of a distribution network for supply of electricity Importation of electricity into Malawi Exportation of electricity out of Malawi
If a community group is looking to undertake any activities listed above, it will be important to contact MERA to assess whether there are any licensing implications for their planned activity. Since most community owned renewable energy systems do not fall under the categories above, the majority will not require any license. If you are unsure, contact MERA at the address at the top of this page. 9.3 Feed-in Tariffs Recognizing the potential of the renewable sources to enhance the country’s electricity supply capacity, the Malawi Government through MERA has developed the Malawi Feed-In Tariff Policy. The formulation of this policy which is specifically for small hydro, wind, solar, biomass, biogas, and geothermal will encourage and boost the development of renewable energy sources in the country. A Renewable Energy Feed-in-Tariff (REFIT) allows power producers to sell renewable energy generated electricity to a distributor at a pre-determined fixed tariff for a given period of time. See Annex 2 for implementing procedures of feed in tariff. It is important to note that a project is only eligible for FIT only when connected to the electricity grid At the time of going to print the FiT rates had not been finalised but to get more detail on this,
contact the MERA office. There are different scales of generation eligible for FIT as follows:1
Small hydro power plants up to a capacity of 10MW
Individual solar power plants whose generation capacity is equal to or greater than 500kW but does
not exceed 10MW Individual biomass power plants whose generation capacity is above 500kW but does not exceed 100MW Individual wind power plants whose generation capacity is above 500kW and does not exceed 50MW
1GOM 2013, Malawi Feed In Tariff Policy, MERA, Lilongwe
115
9.4 Financial and Fiscal Incentives In order to boost investments in the energy sector, the following incentives have been established to promote private sector investment in the sector:
Duty, Excise and VAT exemption for importation of goods for use in electricity generation and distribution being plant, machinery, equipment and electricity supply meters;
Duty, Excise and VAT exemption for importation of goods for electric motors, generators,
and generating sets for industrial user; and
Duty, Excise and VAT exemption for importation of goods for renewable energy sources such as wind-mill engines, solar panels, solar batteries
9.5 Grid Code In Malawi the National grid is owned by ESCOM and the term Grid Code is widely used to refer to a set of documents that legally establishes technical and other requirements for the connection to and use of an electrical system by parties other than the owning electric utility in a manner that will ensure reliable, efficient, and safe operation. Malawi has elected to establish a Grid Code to govern the technical and operational relationships between all the parties. The Grid Code will provide the following assurances:
To MERA, the assurance that the service-providers operate according to the respective license conditions
To customers, the assurance that service-providers operate transparently and provide non-
discriminatory to their defined services
To service-providers, the assurance that customers will honour their mutual Grid Code obligations and that there is industry agreement on these
9.6 Standard Power Purchase Agreements Power Purchase Agreements (PPAs) are contracts between two parties, one who generates electricity for the
purpose of selling and one who is looking to purchase electricity. There are different forms of PPA which are
differentiated by the source of energy harnessed (solar, wind, etc.). This section will be useful to communities
who are looking to sell their electricity to households. For more information on this see Chapter 8 Under a PPA, the seller is often the developer and owner of the technology that generates electricity. The seller may also be someone who buys electricity from another supplier for resale. Under these circumstances, another PPA may be established but will usually contain similar contractual agreements as already proclaimed in the original PPA, with the exception of some pricing mechanisms that would be redefined. The PPA is often regarded as the central document in the development of independent electricity generating stations/power plants, and is key to obtaining project financing for the project. Under the PPA model, the PPA provider would secure funding for the project, maintain and monitor the energy production, and sell the electricity to the transmission licensee at a contractual price for the term of the contract. Most PPAs generally last between 5 and 25 years. In some renewable energy contracts, the host has the option to purchase the generating equipment from the PPA provider at the end of the term, may renew the contract with different terms, or can request that the equipment be removed. One of the key benefits of the PPA is that by clearly defining the output of the generating station (such as a solar electric system) and the credit of its associated revenue streams, a PPA can be used by the PPA provider to raise non-recourse financing from a banker other financing counterparty.
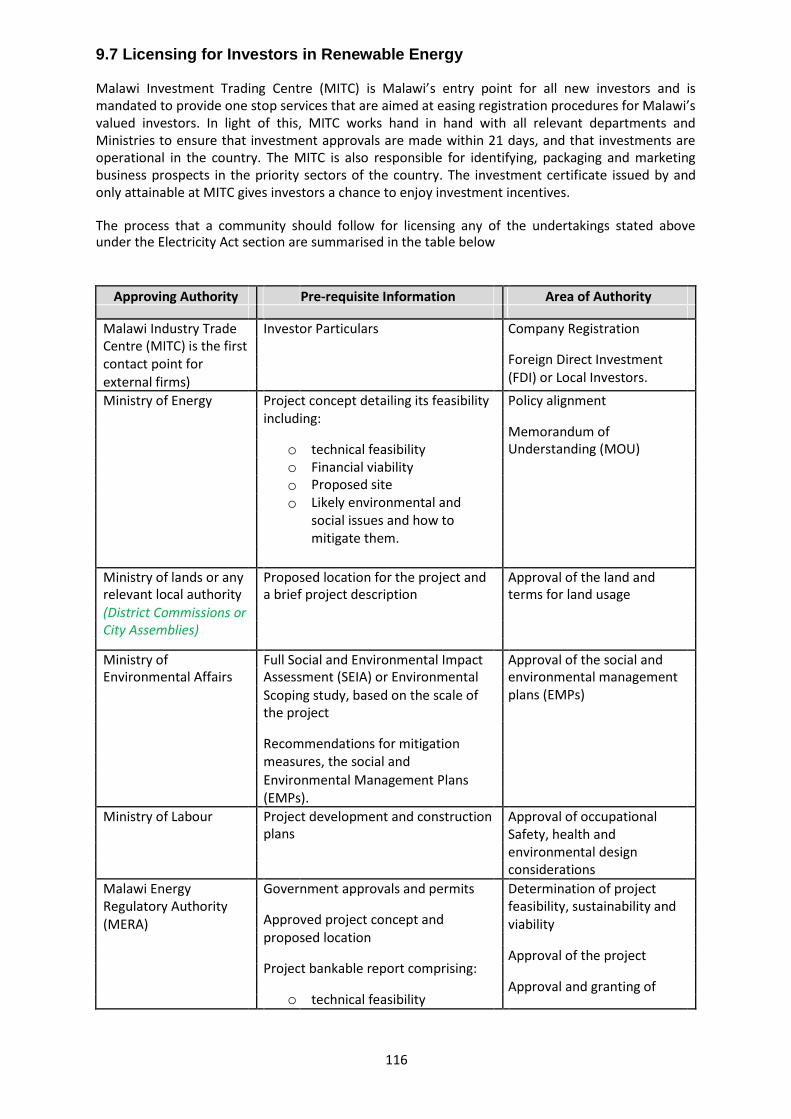
116
9.7 Licensing for Investors in Renewable Energy Malawi Investment Trading Centre (MITC) is Malawi’s entry point for all new investors and is mandated to provide one stop services that are aimed at easing registration procedures for Malawi’s valued investors. In light of this, MITC works hand in hand with all relevant departments and Ministries to ensure that investment approvals are made within 21 days, and that investments are operational in the country. The MITC is also responsible for identifying, packaging and marketing business prospects in the priority sectors of the country. The investment certificate issued by and only attainable at MITC gives investors a chance to enjoy investment incentives. The process that a community should follow for licensing any of the undertakings stated above under the Electricity Act section are summarised in the table below
Approving Authority Pre-requisite Information Area of Authority
Malawi Industry Trade Investor Particulars Company Registration
Centre (MITC) is the first Foreign Direct Investment
contact point for
(FDI) or Local Investors.
external firms)
Ministry of Energy Project concept detailing its feasibility Policy alignment
including: Memorandum of
o technical feasibility Understanding (MOU)
o Financial viability
o Proposed site
o Likely environmental and
social issues and how to
mitigate them.
Ministry of lands or any Proposed location for the project and Approval of the land and
relevant local authority a brief project description terms for land usage
(District Commissions or
City Assemblies)
Ministry of Full Social and Environmental Impact Approval of the social and
Environmental Affairs Assessment (SEIA) or Environmental environmental management
Scoping study, based on the scale of plans (EMPs)
the project
Recommendations for mitigation
measures, the social and
Environmental Management Plans
(EMPs).
Ministry of Labour Project development and construction Approval of occupational
plans Safety, health and
environmental design
considerations
Malawi Energy Government approvals and permits Determination of project
Regulatory Authority Approved project concept and
feasibility, sustainability and
(MERA) viability
proposed location
Project bankable report comprising:
Approval of the project
o technical feasibility
Approval and granting of
117
o Financial viability respective licences. o Approved recommendations for management plans to mitigate environmental and social issues o Energy supply contracts with agreed Power Purchase Agreements (PPA)
Tariffs proposals based on the PPAs and discussions with potential energy users Project justification (sustainability)
Investment Program
Business Plans
So far the toolkit has gone through the community energy development process, different
technologies and when they can be used, different system types and ownership models, how to
make sure your system is sustainable as well as detail on selling electricity and the necessary
licenses you need to have. Chapter 10, the last Chapter, will look at important messages for a
Development Worker to give to a community that has recently gained access to electricity as well
as general tips on how to use energy efficiently

118
Chapter 10
LIVING WITH ELECTRICITY AND EFFICIENT ENERGY USE When electricity first arrives in a community it is a time of great excitement and opportunity. However, it is important that community members are aware that electricity can be very dangerous and must be treated with respect. Health and safety with energy (including electricity, wood and fires) will be discussed before going on to examine how to make energy efficient choices and tips on how to use fuel wood and manage your kitchen to efficiently use fuel wood. 10.1 Health and Safety with Electricity
Get an experienced electrical wiring contractor to wire your house Switch the plug off before pulling it out
Do not pull hard on the cord to avoid breaking the wires
Do not put many appliances in one plug socket – use a series plug with trip switches Do not connect electrical appliances to the light socket
Keep cords away from stoves and heaters to prevent them from getting burnt
Never try to fix an appliance while it is still plugged in
Mend damaged cords with insulation tape
Switch the light off before changing the light bulb Cover uncovered plug sockets with a safety plug
Never touch electric appliance with wet hands. You will get an electric shock if you so
this Never fill an electric kettle when it is switched on
Never use electrical appliances in the bathroom or near water to avoid electric shock
when electricity touches the water
Do not use water to put out an electric fire if the mains are not switched off to avoid getting shock.
How to wire a plug – only do this if you are confident
o Blue wire to left, brown to right green /yellow to top – that’s the earthing (see
diagram overleaf). For more information on how to wire a plug see http://www.bbc.co.uk/schools/gcsebitesize/science/add_aqa_pre_2011/electricity/ mainselectrev1.shtml
o It is safer to use three pin plugs than two, at the three pin plug earth wire provides a path for excess current to be discharged into the ground.

119
Dealing with Electric shocks
- Switch the electricity off at the mains switch – make sure you cover hands with dry rubber gloves or layers of dry news papers so you don’t get an electric chock.
- Push the patient away from the electricity source by using a dry wooden broom stick or chair
- Call a doctor, ambulance or emergency service immediately 10.2 Health and Safety with Charcoal and Firewood Smoke causes lung problems and asthma in young children. To reduce charcoal and firewood smoke you can;
Make sure that windows are open. Chimneys can also be important in taking out smoke.
Put a ceiling in the house, this will keep the heat in so you have to use less charcoal and wood for heating. Make sure you open windows to let smoke out.
Using a fuel efficient stove or a fireless cooker (see Chapter 4) rather than the three stone
method will reduce access to open burning flames and therefore reduce fire accidents in the home.
10.3 Preventing Fires at Home Place paraffin stoves and lamps on flat surfaces and where they cannot be knocked over Do not leave a burning stove unattended.
Use a paraffin lamp (as the flame is protected) and always use candle holder which cannot
be knocked over Teach children how to be safe with and put out fires.
How to extinguish a fire
Keep a bucket of sand or near the house in case of fire. Never pour water on paraffin or oil that has caught alight, this will make the fire worse.
Put a lid on the pot if the oil is on fire and wait for the fire to go out.
Stop, drop and roll over if your clothes are on fire to suffocate the flames. Running will just make your clothes burn the more. To treat a burn, keep the burn in cold water for ten minutes (this will cool the burned skin and reduce damage) and take the person to the nearest clinic. Now that we have discussed health and safety with energy in the home we will now look at how to decide which energy choice is right for you. 10.4 Energy Choices The costs don’t stop when we buy an appliance and take it home. Costs extend to our health, our safety and the environment. Unhealthy energy sources like firewood and charcoal cause respiratory diseases by releasing toxic fumes and particulate matter which creates health care costs for the household and for society. Fires caused by three stone fires can create huge costs for communities. Poorer households often prefer fuels and appliances which are multi functional. For example three stone stoves and charcoal stoves cook and can heat the home, heat water and are the social heart of the home. These factors may outweigh choosing fuels which are healthier or more expensive but we should always be aware of hidden costs in appliances. This next section will outline how to make a decision on energy use.

120
How to Weigh Up Affordability with Safety and Durability Most poor households are dependent on energy sources which are inconvenient, unhealthy and expensive. This lack of choice is often exacerbated by the need to make short term decisions due to unpredictable incomes. Access to electricity does not mean that poor households are released from the problems associated with fuels like wood or paraffin. For economic, social and cultural reasons, the majority of households which have electricity continue to use a range of fuels for different energy uses. This pattern of multiple fuel use is sensible as no one fuel is best for all energy uses. The diagram below is a good way of comparing how much energy one hour of different household activities use. You can see that heating water for one hour uses the most energy and lighting for one hour uses the least energy. It is important to remember this when you are thinking about energy use at home.
W A T E R H E A T I N G
H O M E H E A T I N G C O O K I N G
R E F R I G I R A T I O N SMALL SERVICES
MEDIA LIGHTING
To help you make a choice about which option is right for you for cooking, you can answer the questions in the table below. You can use this table as a template.
Factors to consider when Chitetezo Hot Three Gas Fireless choosing a cooking Mbaula plate stone fire ring cooker appliance What does the stove cost? How long will it last? How much does it cost to make one meal on the stove Does the stove make fumes or smoke? Is the stove safe to use? Can the stove do more than one thing? Which stove is a good choice? (rank)
Looking at energy use more generally, a number of questions need to be asked to help work out what the best energy choice is for you:
Is the energy source accessible? It is of no use to recommend electricity or buy electrical appliances for homes that are not electrified. Gas cannot be an option either if there is no gas filling outlets nearby. Think about what fuel sources are available for you and then match appliances you buy to the source of energy available to you.

121
Are the appliances and energy costs affordable?
Energy sources that seem cheaper may be expensive to use. For instance, use of kerosene / paraffin seems cheaper because it can be bought in small quantities, but paraffin stoves are inefficient and paraffin lamps are an expensive form of lighting. The same with appliances – cheap appliances generally do not last very long. For example incandescent light bulbs are cheaper but energy saving bulbs last 8 time longer and are often better value for money
Is it safe to use this kind of energy? Firewood and charcoal can be a good source of energy for most rural and urban households in Malawi but firewood produces smoke and charcoal use can be dangerous when used indoor with no windows opened. Incidences of death caused by charcoal stoves have been reported.
Can the energy source and appliances be used for more than one purpose? Wood energy efficient stoves can be used for heating water, space heating and cooking at the same time whereas an electric hotplate, which is sometimes cheaper to buy can only be used for cooking.
Can the energy source be owned and controlled locally? Solar, wind, hydro, wood energy and small biogas plants can be owned by communities unlike fossil fuels like paraffin which is controlled by big companies. Prices from locally produced resources are often cheaper than those owned and controlled by large companies. Now that we have gone over some general points about how to make an energy choice, we will go through some specific areas where energy is needed and offer information to help make good choices in these areas. 10.5 Lighting the Home Electric lighting is often the best option as it is safer than an open flame such as in kerosene, paraffin
stoves or burning grass. Incandescent bulbs are the cheapest bulbs but they need to e replaced
more often and use more energy when they are on. Compact fluorescent light bulbs (CFLs) have a
relatively high cost making them too costly for low income households to consider. However,
because the CFLs use less energy, they cost less to run and will save money over time. The following
table shows how different lighting options compare:
How this type of lighting... ...compares with this type of lighting
100 W incandescent bulb = 75 candles
(clean but not as long lasting)
= 12 paraffin lamps
= 1 gas lamp
20 W CFL = 100 W incandescent
(clean and long lasting)
7W CFL = 40 W incandescent
11 W CFL = 60 W incandescent
15 W CFL = 75 W incandescent
CFL (how do they work) Incandescent bulbs
Electrons emitted from the filament excite the As a result of its resistance to the flow of
mercury vapour contained in the tube. This electrical current, a wire is heated so that
releases invisible ultra violet rays which are it glows. A lot of heat is wastefully created
converted to visible light by the fluorescent in this way
powders that coat the inside of the tube. As
these bulbs contain mercury vapour, safe
disposal is very important

122
Note – The W in the table above refers to the Watts and is the unit for how bright the light bulb is. See earlier in the section for a description of what a Watt is.
Replace old incandescent bulbs with new Compact Fluorescent Bulbs (CFL) when you can afford to
NATURAL LIGHTING IS BEST. If you are building a house, make sure you get the most
benefit from sunlight. Position your house well and have enough windows Limit usage of lights and avoid using double bulbs in small rooms
Turn off lights when you leave the room and train your kids to do the same.
Use proper candle holders to prevent fires Batteries can be very expensive but some appliances such as wind up and solar torches have rechargeable batteries so normal batteries are not needed if you have access to electricity or other forms of energy to recharge your batteries. Some wind up torches have a small power outlet which can provide electricity for a portable radio, some solar and wind up radios which include a torch and can also be used to charge up phones. 10.6 Heating the Home Charcoal and firewood are the most commonly used energy sources used for space heating in most Malawian homes. They are attractive cost-wise and because they have multiple uses (charcoal and firewood stoves can be used for cooking, boiling water and heating at the same time). However, these stoves have issues including smoke and fumes from wood burning affecting respiratory health, especially when a fire is lit inside the home without a chimney. Electric bar space heaters are available, these are safer than an open fire but they are expensive to buy and run. Keep the doors and windows closed at sunset to keep the day’s warmth inside the house.
Do not use oven to heat your room or house, it is dangerous. Use a fuel efficient stove to reduce your wood consumption (and see Chapter 4 for more
information on stoves and how to reduce firewood consumption). Installing a ceiling and then insulate the ceiling with reed mats will reduce heat loss and help to
keep your home cool in summer. Use extra clothes and blankets to keep warm and reduce heat use
Only heat the room you are using, turn off the heater when you leave the room.
Close curtain, blinds and doors to keep the warmth inside the room you are heating Floors of stone or concrete will collect the sun’s heat during the day and release it at night.
10.7 Refrigeration Fridges can be used in households for keeping food cool or in health centres to keep vaccines and medical supplies cool as part of the cold chain. The best choice for a fridge is an electric, CFC-free fridge (CFC = Chlorofluorocarbons used for cooling). CFC gases in the cooling system of older fridges damage the ozone layer (the use of CFCs is now banned). Non electrified buildings must choose between fridges which run on gas or paraffin. Gas is relatively expensive but more convenient and effective, while paraffin is cheaper but has health and safety disadvantages. For food, evaporation fridges can be simply made by placing a wet cloth over a box or over a food item and placing it in a draft. The cloth can be kept wet by placing edges in water. Electric fridges are far cheaper and safer than gas and paraffin.
Chest freezers are more efficient than upright as the cold does not * drop out* when the
freezer is opened. A full fridge uses less energy than an empty fridge. Keep bottles of cold water in your fridge as
they will hold on to the cold. Don’t open your fridge too often as cold air is lost when you open the door and the fridge has to
work harder. Make sure the rubber seal of your fridge is in good condition to avoid cold air escaping
The better the fridge’s insulation, the more efficient it will be.
Keep fridges and freezers inside, where it is shady
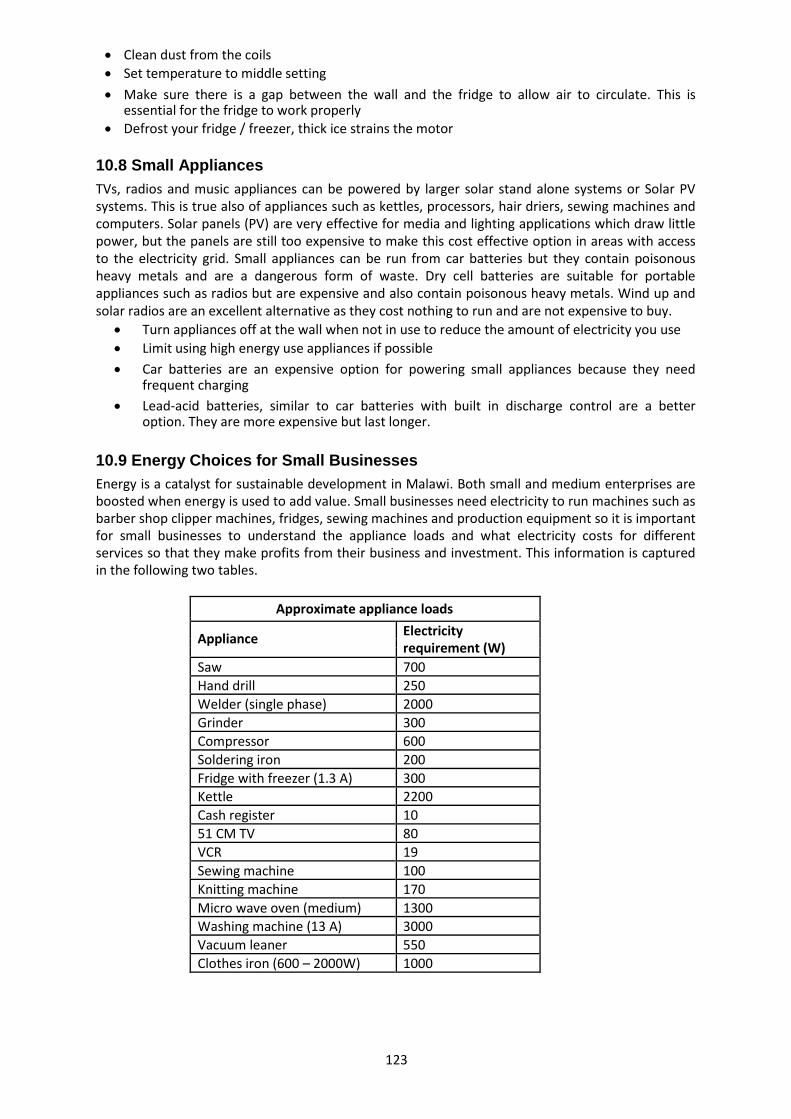
123
Clean dust from the coils
Set temperature to middle setting Make sure there is a gap between the wall and the fridge to allow air to circulate. This is
essential for the fridge to work properly Defrost your fridge / freezer, thick ice strains the motor
10.8 Small Appliances TVs, radios and music appliances can be powered by larger solar stand alone systems or Solar PV systems. This is true also of appliances such as kettles, processors, hair driers, sewing machines and computers. Solar panels (PV) are very effective for media and lighting applications which draw little power, but the panels are still too expensive to make this cost effective option in areas with access to the electricity grid. Small appliances can be run from car batteries but they contain poisonous heavy metals and are a dangerous form of waste. Dry cell batteries are suitable for portable appliances such as radios but are expensive and also contain poisonous heavy metals. Wind up and solar radios are an excellent alternative as they cost nothing to run and are not expensive to buy.
Turn appliances off at the wall when not in use to reduce the amount of electricity you use
Limit using high energy use appliances if possible
Car batteries are an expensive option for powering small appliances because they need frequent charging
Lead-acid batteries, similar to car batteries with built in discharge control are a better
option. They are more expensive but last longer.
10.9 Energy Choices for Small Businesses Energy is a catalyst for sustainable development in Malawi. Both small and medium enterprises are boosted when energy is used to add value. Small businesses need electricity to run machines such as barber shop clipper machines, fridges, sewing machines and production equipment so it is important for small businesses to understand the appliance loads and what electricity costs for different services so that they make profits from their business and investment. This information is captured in the following two tables.
Approximate appliance loads
Appliance Electricity
requirement (W)
Saw 700
Hand drill 250
Welder (single phase) 2000
Grinder 300
Compressor 600
Soldering iron 200
Fridge with freezer (1.3 A) 300
Kettle 2200
Cash register 10
51 CM TV 80
VCR 19
Sewing machine 100
Knitting machine 170
Micro wave oven (medium) 1300
Washing machine (13 A) 3000
Vacuum leaner 550
Clothes iron (600 – 2000W) 1000

124
The table overleaf outlines different appliances used in the home or in a small business, the voltage (how much energy they use), how often you would use the appliance per day (on average) and the average cost per day in MWK. You can see that geysers, heaters, cookers and ovens cost the most to use and so householders should be aware of this so that they can plan their electricity use accordingly
Electricity costs for different services
Equipment (voltage) Length of usage Approximate cost
per day (MK)
Geyser – 2500 W
5 hrs per day 375
Heater – 1600 W About 4 hrs a day 192
Two plate cooker About 2 hrs a day 120
– 2000 W
Oven (normal size) 1 hr a day 75
– 2500 W
Fridge – 300 W 3 hrs a day 27
Kettle – 2200W ½ hr a day 10.8
Lights (3 bulbs) 60 W 6 hrs a day 15
Iron – 1000 W ½ hrs a day 15
TV (colour) – 80 W 4 hrs a day 9.6
Sewing machine – 3 hrs a day 9
100W
Radio – 6 W
5 hrs a day 0.9
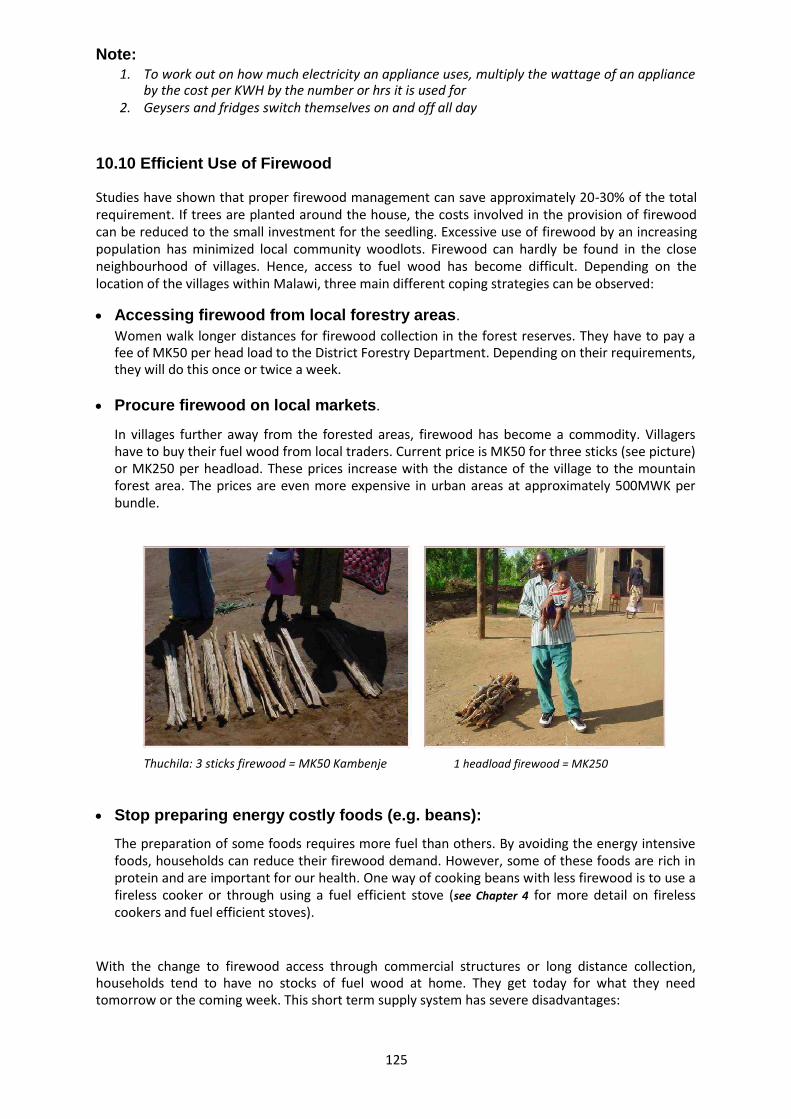
125
Note: 1. To work out on how much electricity an appliance uses, multiply the wattage of an appliance
by the cost per KWH by the number or hrs it is used for 2. Geysers and fridges switch themselves on and off all day
10.10 Efficient Use of Firewood Studies have shown that proper firewood management can save approximately 20-30% of the total requirement. If trees are planted around the house, the costs involved in the provision of firewood can be reduced to the small investment for the seedling. Excessive use of firewood by an increasing population has minimized local community woodlots. Firewood can hardly be found in the close neighbourhood of villages. Hence, access to fuel wood has become difficult. Depending on the location of the villages within Malawi, three main different coping strategies can be observed: Accessing firewood from local forestry areas.
Women walk longer distances for firewood collection in the forest reserves. They have to pay a fee of MK50 per head load to the District Forestry Department. Depending on their requirements, they will do this once or twice a week.
Procure firewood on local markets.
In villages further away from the forested areas, firewood has become a commodity. Villagers have to buy their fuel wood from local traders. Current price is MK50 for three sticks (see picture) or MK250 per headload. These prices increase with the distance of the village to the mountain forest area. The prices are even more expensive in urban areas at approximately 500MWK per bundle.
Thuchila: 3 sticks firewood = MK50 Kambenje 1 headload firewood = MK250 Stop preparing energy costly foods (e.g. beans):
The preparation of some foods requires more fuel than others. By avoiding the energy intensive foods, households can reduce their firewood demand. However, some of these foods are rich in protein and are important for our health. One way of cooking beans with less firewood is to use a fireless cooker or through using a fuel efficient stove (see Chapter 4 for more detail on fireless cookers and fuel efficient stoves).
With the change to firewood access through commercial structures or long distance collection, households tend to have no stocks of fuel wood at home. They get today for what they need tomorrow or the coming week. This short term supply system has severe disadvantages:

126
Loss of energy: Freshly collected firewood contains a lot of water which means that the wood does not burn efficiently. If you buy wood on a short term basis and do not let it dry, the wet wood that you burn will not burn as efficiently as if you had let it dry and burned the wood when it was dry.
Smoke: Freshly collected firewood develops a lot of smoke when burned which is a health hazard.
Since firewood is a commodity, this requires that households start to use this resource as efficiently as possible. There are several ways to use firewood more efficiently:
1. Better storage and preparation of firewood. 2. Better firewood handling in the stove 3. Plant trees at home for the generation of firewood
1. Better storage and preparation of firewood Households are using more fresh wood in their kitchens which leads to wasting fuel and creating a lot of smoke. The following recommended practices can help households to make more efficient use of firewood and avoid smoking fires. Recommendation 1: Use smaller pieces of firewood Cut your firewood into smaller pieces (e.g. 1 foot long, 2 fingers thick). Smaller pieces of wood take less time to dry and dry more efficiently. Smaller pieces burn better, because they have a bigger surface and better contact with the air that is necessary for the burning process. You can adjust the firewood input to the fire more easily if you use smaller pieces instead of bigger logs and therefore you can optimize the use and avoid wastage. Make sure you use all parts of a tree, not only the big branches or the stem. Even small twigs can be used and these may be easier to transport for sick or elderly people. Recommendation 2: Dry firewood well in the bright sun Let the firewood dry in the bright sun or inside your kitchen for at least several days. Freshly cut wood contains a lot of water. If you burn wet wood, you use energy to dry the wood. If you let the sun do that work of drying, the full energy content of the firewood can be used to heat what is in the pot. Dry firewood also burns cleaner and causes less smoke. This is a benefit because smoke increases the risk of respiratory infections and eye infections for anybody who is close to the stove.
Recommendation 3: Store firewood in a dry place Store the dried firewood under a waterproof shelter, guarded from rain and splash water. Ideally leave firewood to dry in a warm and dry place such as your kitchen for at least two months. If you store the firewood in your kitchen, it is always at hand when you need it. The drying process continues even if the firewood is stacked. Many households might not be able to afford sufficient firewood to allow some of it enough time to dry. The solution is to use the firewood saved through the application of the new skills to build up a bigger stock over a certain period of time 2. Better firewood handling in the stove
You can prepare with the same amount of dried firewood very different quantities of food. It all depends how efficiently you manage your fire while you are cooking. Here are some recommended practices compiled that can assist households to improve the use of their firewood.

127
Recommendation 1: Start the fire with 3 sticks of firewood only Use your usual method to light a fire, but try not to put more than 3 sticks of firewood in the stove. If you use a stove, it will take a bit of time until the stove is hot. During the heat-up phase the stove will absorb heat from the fire. Once it is hot, the fire will burn well and the stove will not ‘steal’ more heat from the fire, but the heat will go mainly to your pot. For heating up the stove in this initial phase, 3 sticks are enough. By restricting the number of sticks at the beginning, you can avoid wasting surplus firewood. Recommendation 2: Once the fire is going, remove surplus firewood When the fire is well established and the food is boiling, take a stick out of the fire and put it aside next to the stove, add more wood only when you need more heat. When you cook food that takes quite a long time to cook such as beans, during the simmering phase sometimes even one stick of firewood is enough to maintain the slow heat. This “slow heat” also prevents the food from burning. By “feeding” the fire with the right amount of firewood, you can minimize the use of firewood. Recommendation 3: Keep firewood that is not completely burnt after cooking for further food preparations When you remove the pot from the fire, take the remaining firewood out of the stove, extinguish the flames and keep the firewood for the next time you cook. Make sure it is cool before you put it next to things that might catch fire. This means that wood that would have been burned is saved for the next time you cook. 3. Firewood production through private woodlots at homes
Many farmers are aware that trees can be planted and raised but land becomes the limiting factor. Live fencing, boundary planting and other agro forestry interventions are important in making sure there are multiple benefits from small pieces of land without negatively affecting another crop. Forestry and Agriculture Extension workers could be approached for further assistance on fast growing tree species such as sena spectabilis (known as Cassia), sena siamea (known as Siamese senna) and albizia lebbeck (known as Lebbeck). They too can assist in training the community groups on local seed collection techniques, nursery establishment and development. Some organizations like Mulanje Mountain Conservation Trust and MuREA have Youth Groups in Phalombe and Mulanje who raise seedlings for sale and provide free to institutions like schools. The District Forestry Offices have data on seedling production sites in their respective districts and they can help in sourcing seed as well as seedlings. 10.11 Efficient Kitchen Management Techniques A series of cooking demonstrations have been conducted in Malawi on the comparison of firewood consumption between households that did not use kitchen management techniques and those that did. On the bases of the test results (number of sticks consumed in both preparations), the average indicates that you can save up to 20% of firewood through good kitchen management (depending on the current way of kitchen management). Many households do not use their firewood efficiently in the cooking process; wood is wasted because of unsuitable cooking procedures. Since wood is becoming more difficult to access and more expensive, households need to use this resource as efficiently as possible. You can do this through:
1. A planned approach to cooking 2. Efficient management of the fire during the cooking process 3. Use the remaining heat of the stove when you have finished cooking.
Each of these approaches will be discussed in turn below. 1. A planned approach to cooking Recommendation 1: Have all ingredients and tools together before you start the fire

128
Plan ahead and think about what you need. Get all the utensils you need, all the raw ingredients and make sure all ingredients are prepared before you start the fire. If you concentrate on the cooking and you keep the time the fire is burning as short as possible, you will need less firewood. Recommendation 2: Cut all ingredients into small pieces Don’t boil a big potato or cassava root in one piece, cut it up into smaller pieces. Smaller pieces cook quicker than bigger pieces, because the surface exposed to the hot water is bigger. You can also soak dry food (cassava and legumes) overnight before you cook it so that it becomes softer Reducing the cooking time reduces the amount of wood needed for the fire. Recommendation 3: Use your stove for one continuous longer period rather than for several
shorter times Cook all dishes of a meal on the same stove one after the other. Don’t let the stove get cold in between and don’t have two fires burning at the same time. Every time you start the fire in a stove some energy will be used to heat up the stove. When the stove cools down after the fire is out, the heat retained in the stove goes into the environment with no use. If you cook all the dishes of a meal consecutively on the same stove while it is already hot, you save this extra bit of firewood that is otherwise needed to heat the stove up again. Avoid unnecessary reheating of food and cook for all household members at the same time. Plan your preparation time in accordance with the time people want to eat. Thus food can be taken directly from the stove without reheating. Recommendation 4: If you will mix food after cooking, cook it together in the same pot at the
same time Example: instead of boiling cassava and pigeon peas separately, start with boiling the pigeon peas, than add the cassava later on in the same pot. Cooking food together in the same pot reduces the time the fire is burning and therefore reduces the consumption of firewood. Mixed meals containing various different ingredients help to achieve a balanced diet. One-pot-dishes are often more nutritious than nsima with relish. 2. Efficient management of fire in the cooking process Recommendation 1: Don’t waste timeonce the fire is started Concentrate on cooking and don’t get distracted chatting with your neighbour when the fire is started! Recommendation 2: Cook food in the smallest possible amount of liquid Use just enough liquid for the food that it can get steamed. Most of the food does not need to be ‘floating’ in boiling water. Using less liquid means that you have to bring less water to boiling point so you need less firewood.
Recommendation 3: Prevent surplus steam from escaping Keep a lid on the pot to keep the heat and the steam in the pot. When steam escapes, some heat
escapes and you will need more firewood to maintain the pot at cooking temperature. A build up of
steam inside the pot helps to cook the food quicker.
Recommendation 4: Monitor the heat of the fire As soon as the food is boiling, take out one stick of firewood. When the food has reached boiling
point, no more increase in heat is needed. During the simmering phase when the stove is already
hot, other fuel like agricultural residues (maize cobs, pigeon pea stalks etc.) can be used to
substitute firewood Even maize husks that don’t ignite easily can be burned if you use a stove with a
sheltered fire chamber.

129
Recommendation 5: Do not overcook food Monitor the cooking process closely by testing regularly if the food is already cooked. Reducing the
cooking time reduces the time the fire burns and reduces the consumption of firewood. Shortening
the cooking time will help to preserve the maximum amount of Vitamins as too much heat destroys
vitamins.
3 Use the remaining heat of the stove after cooking food Instead of using extra firewood only to warm up water for bathing you can make use of the retained
heat in the stove and save firewood for other purposes. If the timing is not right, think about
possibilities to change your time schedule. You can have warm water for bathing or washing without
extra firewood used.
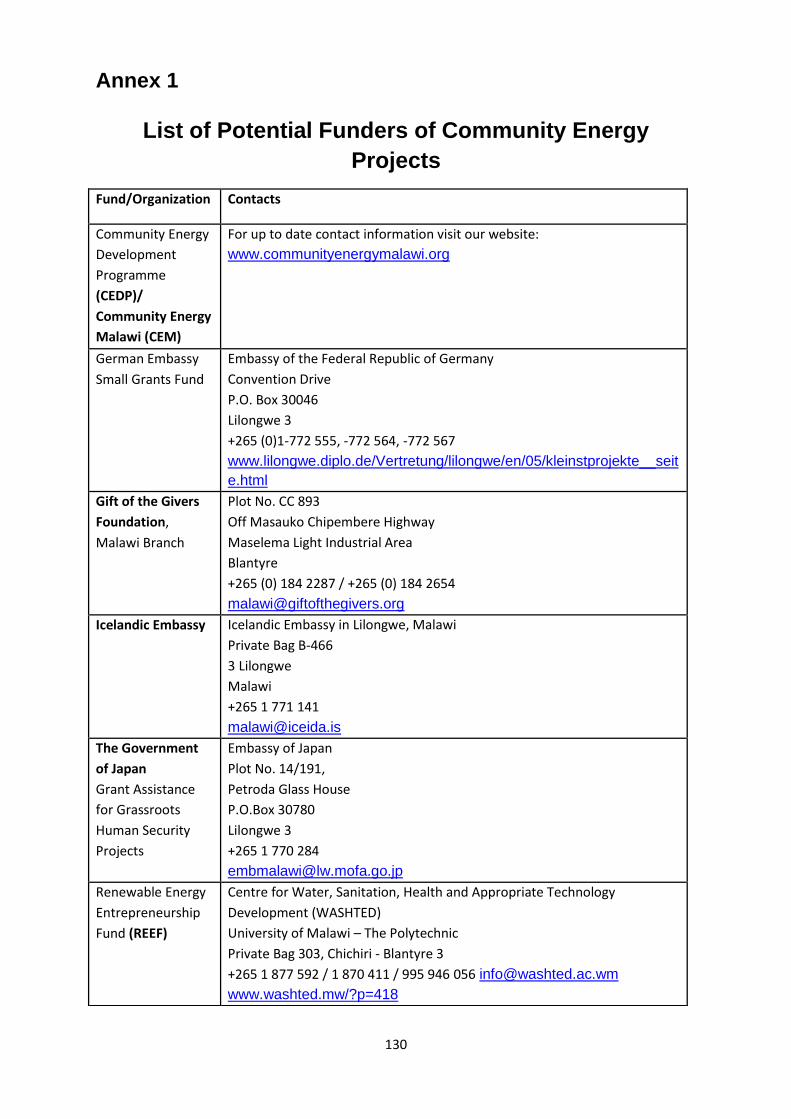
130
Annex 1
List of Potential Funders of Community Energy Projects
Fund/Organization Contacts
Community Energy
Development
Programme
(CEDP)/
Community Energy
Malawi (CEM)
For up to date contact information visit our website:
www.communityenergymalawi.org
German Embassy
Small Grants Fund
Embassy of the Federal Republic of Germany
Convention Drive
P.O. Box 30046
Lilongwe 3
+265 (0)1-772 555, -772 564, -772 567
www.lilongwe.diplo.de/Vertretung/lilongwe/en/05/kleinstprojekte__seite.html
Gift of the Givers
Foundation,
Malawi Branch
Plot No. CC 893
Off Masauko Chipembere Highway
Maselema Light Industrial Area
Blantyre
+265 (0) 184 2287 / +265 (0) 184 2654
Icelandic Embassy Icelandic Embassy in Lilongwe, Malawi
Private Bag B-466
3 Lilongwe
Malawi
+265 1 771 141
The Government
of Japan
Grant Assistance
for Grassroots
Human Security
Projects
Embassy of Japan
Plot No. 14/191,
Petroda Glass House
P.O.Box 30780
Lilongwe 3
+265 1 770 284
Renewable Energy
Entrepreneurship
Fund (REEF)
Centre for Water, Sanitation, Health and Appropriate Technology
Development (WASHTED)
University of Malawi – The Polytechnic
Private Bag 303, Chichiri - Blantyre 3
+265 1 877 592 / 1 870 411 / 995 946 056 [email protected]
www.washted.mw/?p=418
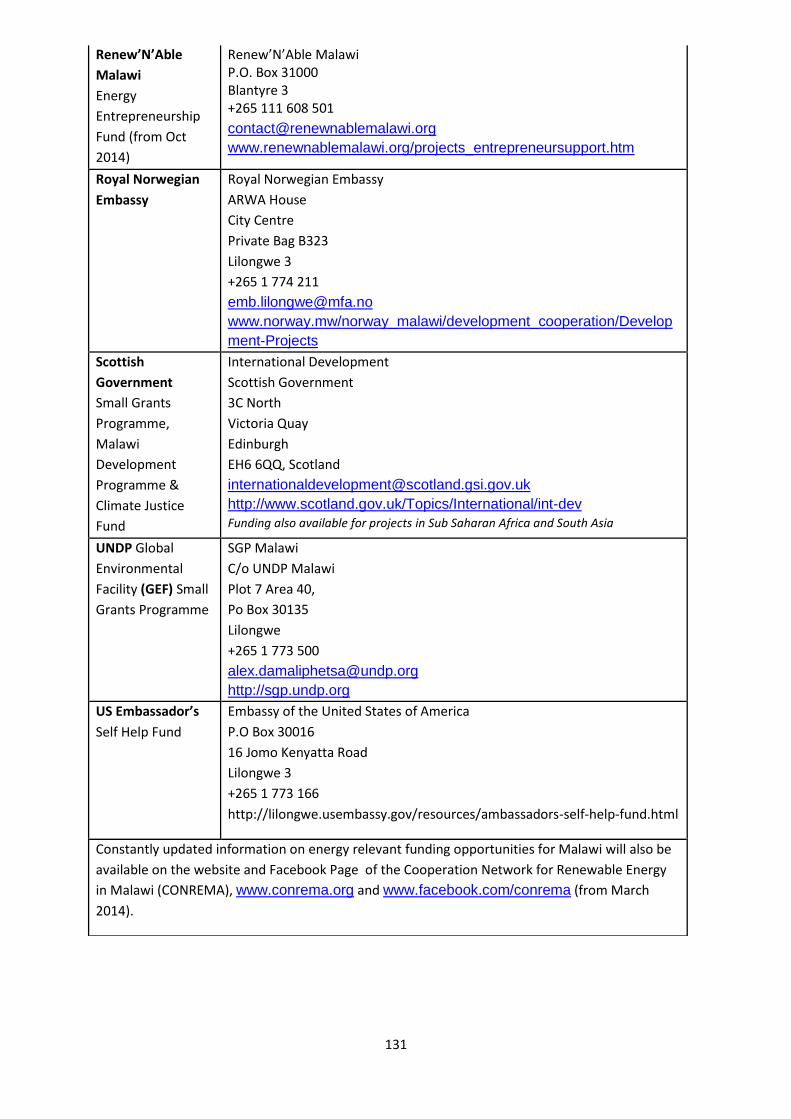
131
Renew’N’Able
Malawi
Energy
Entrepreneurship
Fund (from Oct
2014)
Renew’N’Able Malawi P.O. Box 31000 Blantyre 3 +265 111 608 501
[email protected] www.renewnablemalawi.org/projects_entrepreneursupport.htm
Royal Norwegian
Embassy
Royal Norwegian Embassy
ARWA House
City Centre
Private Bag B323
Lilongwe 3
+265 1 774 211
[email protected] www.norway.mw/norway_malawi/development_cooperation/Development-Projects
Scottish
Government
Small Grants
Programme,
Malawi
Development
Programme &
Climate Justice
Fund
International Development
Scottish Government
3C North
Victoria Quay
Edinburgh
EH6 6QQ, Scotland
[email protected] http://www.scotland.gov.uk/Topics/International/int-dev Funding also available for projects in Sub Saharan Africa and South Asia
UNDP Global
Environmental
Facility (GEF) Small
Grants Programme
SGP Malawi
C/o UNDP Malawi
Plot 7 Area 40,
Po Box 30135
Lilongwe
+265 1 773 500
[email protected] http://sgp.undp.org
US Embassador’s
Self Help Fund
Embassy of the United States of America
P.O Box 30016
16 Jomo Kenyatta Road
Lilongwe 3
+265 1 773 166
http://lilongwe.usembassy.gov/resources/ambassadors-self-help-fund.html
Constantly updated information on energy relevant funding opportunities for Malawi will also be
available on the website and Facebook Page of the Cooperation Network for Renewable Energy
in Malawi (CONREMA), www.conrema.org and www.facebook.com/conrema (from March
2014).

132
Annex 2 Topham Sukasuka, Government of Malawi
Implementation Procedures for the Feed in Tariff
As outlined in Chapter 8, the Feed in Tariff (FiT) represents an opportunity for grid-connected
renewable energy projects to receive a subsidy from the Government of Malawi. In order to apply
for the FiT you should adhere to the following procedures:
a) Private investors who wish to become power producers shall send an expression of interest (EOI)
to MERA (see page 110 for contact details). The EOI shall include preliminary information such as the
renewable energy source to be used, location in the country where the power plant is to be located,
proposed installed capacity, indicative tariff, expected duration of plant development and any other
information that the private investors wishes to disclose to facilitate decision making.
b) A Feed-in-Tariff Committee comprising representatives of MERA, the Ministry of Energy and
Mining, Department of Energy Affairs and the grid operator (ESCOM) will review the EOI. The
purpose of the review is to determine how the proposed power plant can be integrated into the
national power development plan and estimate suitability of proposed power plant location for
interconnection including interconnection facilities and costs.
c) The results of the review shall be communicated to the private investor by the Feed-in -Tariff
Committee within three months from the date of receipt of the EOI. The EOI may be accepted or
rejected and where it is rejected, the reason for the rejection shall be provided.
d) Where the EOI is accepted and no further studies are required, the applicant shall be asked to
provide a detailed proposal describing the technical and financial viability of the project and
proposed financing arrangements.
e) Where the EOI is accepted, the applicant shall be notified and given non-renewable rights of first
refusal for the use of the same technology for power generation at the same location for a period of
two years.
f) Where the EOI is accepted and further studies need to be carried out to determine project
viability, the applicant shall be given 12 months to carry out and conclude the studies. Progress
report shall be provided to the Feed-in-Tariff Committee after 6 months. Where the 6 months
progress report shows that the project is not viable within the feed-in tariffs, the a project shall be
abandoned and the rights of refusal will lapse.
g) Where the detailed proposal received under (d) or feasibility studies carried out under (e)
confirms that the project is viable within the feed-in tariffs, the applicant shall be given another 6
months to conclude the studies and project development including engineering design, financing
arrangements, and PPA (standard) negotiations with the grid operators etc.
h) Construction works of all projects to be implemented under the Feed-in-Tariff system shall
commence within 6 months from the date of the signing of the PPA. The project shall be completed
and commissioned within a period of 24 months from the date of the signing of the PPA.
*At the time of publication the rates for the FiT were not known. To get up to date information on this,
contact MERA (see details in Chapter 9 section 9.1)*
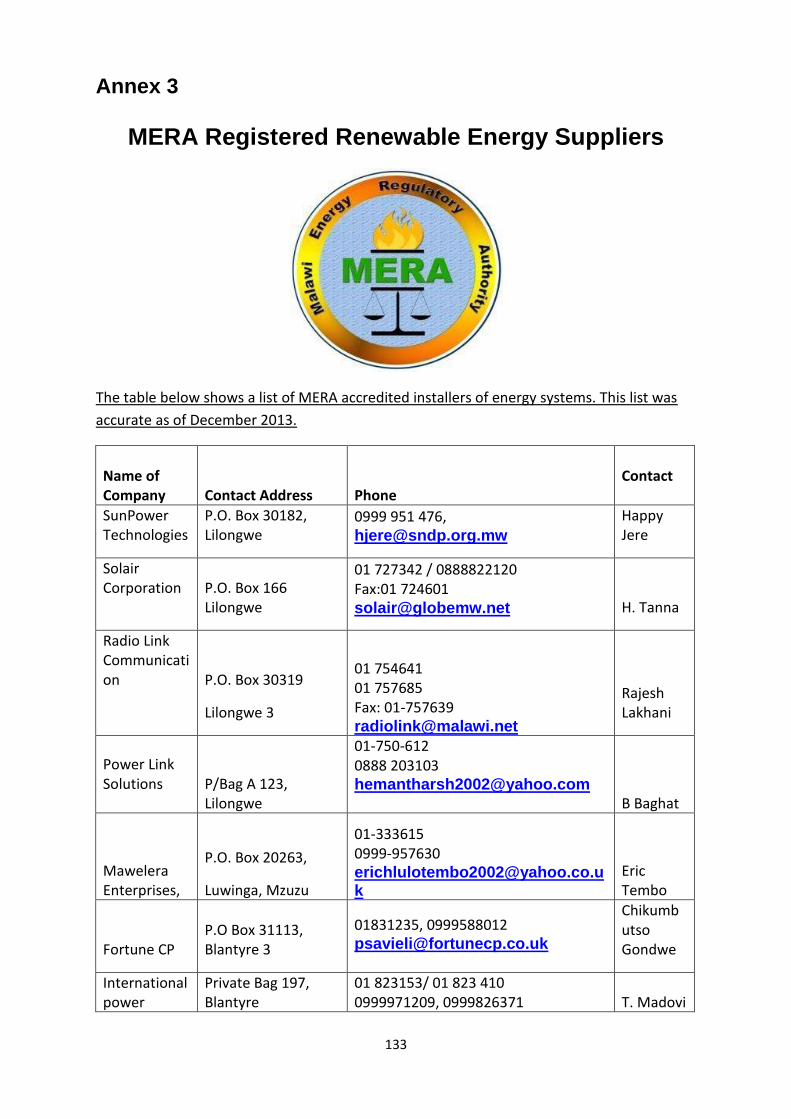
133
Annex 3
MERA Registered Renewable Energy Suppliers
The table below shows a list of MERA accredited installers of energy systems. This list was
accurate as of December 2013.
Name of Company
Contact Address
Phone
Contact
SunPower Technologies
P.O. Box 30182, Lilongwe
0999 951 476, [email protected]
Happy Jere
Solair Corporation
P.O. Box 166 Lilongwe
01 727342 / 0888822120 Fax:01 724601 [email protected] H. Tanna
Radio Link Communication
P.O. Box 30319
Lilongwe 3
01 754641 01 757685 Fax: 01-757639 [email protected]
Rajesh Lakhani
Power Link Solutions
P/Bag A 123, Lilongwe
01-750-612 0888 203103 [email protected] B Baghat
Mawelera Enterprises,
P.O. Box 20263,
Luwinga, Mzuzu
01-333615 0999-957630 [email protected]
Eric Tembo
Fortune CP P.O Box 31113, Blantyre 3
01831235, 0999588012 [email protected]
Chikumbutso Gondwe
International power
Private Bag 197, Blantyre
01 823153/ 01 823 410 0999971209, 0999826371 T. Madovi
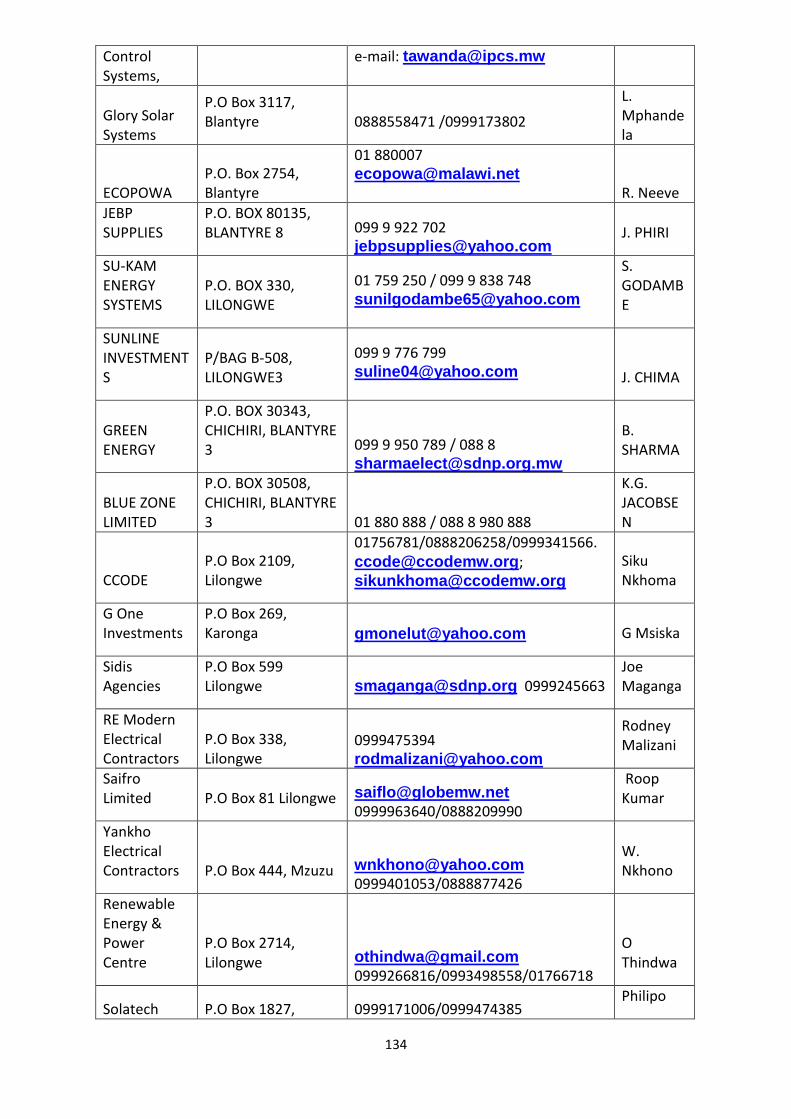
134
Control Systems,
e-mail: [email protected]
Glory Solar Systems
P.O Box 3117, Blantyre 0888558471 /0999173802
L. Mphandela
ECOPOWA P.O. Box 2754, Blantyre
01 880007 [email protected] R. Neeve
JEBP SUPPLIES
P.O. BOX 80135, BLANTYRE 8 099 9 922 702
[email protected] J. PHIRI
SU-KAM ENERGY SYSTEMS
P.O. BOX 330, LILONGWE
01 759 250 / 099 9 838 748 [email protected]
S. GODAMBE
SUNLINE INVESTMENTS
P/BAG B-508, LILONGWE3
099 9 776 799 [email protected]
J. CHIMA
GREEN ENERGY
P.O. BOX 30343, CHICHIRI, BLANTYRE 3 099 9 950 789 / 088 8
B. SHARMA
BLUE ZONE LIMITED
P.O. BOX 30508, CHICHIRI, BLANTYRE 3 01 880 888 / 088 8 980 888
K.G. JACOBSEN
CCODE P.O Box 2109, Lilongwe
01756781/0888206258/0999341566. [email protected]; [email protected]
Siku Nkhoma
G One Investments
P.O Box 269, Karonga [email protected] G Msiska
Sidis Agencies
P.O Box 599 Lilongwe [email protected] 0999245663
Joe Maganga
RE Modern Electrical Contractors
P.O Box 338, Lilongwe
0999475394 [email protected]
Rodney Malizani
Saifro Limited P.O Box 81 Lilongwe [email protected]
0999963640/0888209990
Roop Kumar
Yankho Electrical Contractors P.O Box 444, Mzuzu [email protected]
0999401053/0888877426
W. Nkhono
Renewable Energy & Power Centre
P.O Box 2714, Lilongwe [email protected]
0999266816/0993498558/01766718
O Thindwa
Solatech P.O Box 1827, 0999171006/0999474385 Philipo

135
MHK Distributors
Blantyre [email protected]@solateck.com
Competent Electrical & Solar Contractors
P.O Box 105, Mzuzu 0888517011 / 0999469867
[email protected] Rodney Kaunga
DAC Electrical Engineering
C/o P.O Box 20140, Luwinga, Mzuzu
0888523244 / 0995664044 / 01320955 [email protected]
Deught Chilapondwa
Global Electrical & Solar Ltd
Northgate Acade Ginnery Corner P.O Box 1202, Blantyre
01870553 / 0999823882
Andrew Nkoloma
Kesi Electrical & Refrigeration &Solar
0999352346 / 0888352346 [email protected]
Sidney Kazambe
Mwafika Electrical Services
P.O Box 20035, Lilongwe 2 0888852249 / 0999369253
Peter Mikundi
Sonlite Electrical
Contractors, A3 next to OIBM, P.O Box 30182, Lilongwe 3
0999375103 [email protected]
Francis Kambala
Barloworld Equipment,
Ali Hassa Mwinyi Road, P.O Box 30643, Blantyre 01870666
P Khamula
Hanya Electrical Contractors,
Senga bay Road, P.O Box 482, Salima 0999312472
A.K Electrical and Solar Contractors, P/Bag 209, Mzuzu 0888697293
Austin Gondwe

136
Annex 4
This Annex contains information on how to collect data for needs assessments and baseline
energy surveys. This information is taken from IODPARC, one of the MREAP partners.
Data Collection Methods
Semi-Structured Interviews What is a semi-structured interview?
A semi-structured interview is a qualitative method of inquiry that combines a pre-determined set of
open questions (questions that prompt discussion) with the opportunity for the interviewer to
explore particular themes or responses further. A semi-structured interview does not limit
respondents to a set of pre-determined answers (unlike a structured questionnaire).
Semi-structured interviews are used to understand how interventions work and how they could be
improved. It also allows respondents to discuss and raise issues that you may not have considered.
Semi-structured interviews sit halfway between a structured survey and an unstructured
conversation. Semi-structured interviews are particularly useful for collecting information on
people's ideas, opinions, or experiences. They are often used during needs assessment, program
design or evaluation. Semi-structured interviews should not be used to collect numerical
information, such as the number of households with a bed net, or the number of farmers using
fertiliser. In that case a quantitative survey would be better.
Unfortunately they are often done in a rush without proper planning and analysis. The result can be
a pile of interview notes that don't contain the information you need, or simply repeat the same
points over and over without adding anything new. To avoid this scenario follow these steps for
doing great semi-structured interviews.
Consider ethical issues: Although it might seem like you're just sitting down to have a chat with some stakeholders, a semi-
structured interview is actually a research tool and so you need to consider the ethical implications.
You should always ask for informed consent and explain the purpose of the interview and how the
information will be used. In some cases the consent could be done verbally, and in other cases you
may need to have written consent.
You also need to consider who will be doing the interview (including if there is a translator), and
whether they are suitable for the topic being discussed. In some cultures it may not be appropriate
for men or women to discuss particular topics. It also wouldn't be appropriate to have field staff
interview participants about the effectiveness of the activities they run, as the participants may feel
pressure to give positive answers.
Requirements for conducting semi-structured interviews:
A pre-prepared and pre-tested question guide, in the local language where necessary
A note book or voice recorder.
Semi-structured interviews should last no more than an hour.

137
How to conduct a semi-structured interview:
1) Prepare an interview guide:
By definition, a semi-structured interview needs to have some structure, although that structure
should be flexible. This flexible structure is normally provided by an interview guide that lists the
key questions for the interview. The interviewer is normally free to add questions or change the
order if necessary.
When preparing an interview guide:
Write the interview questions in the local language first: If you're a native English speaker, it can be tempting to write the interview questions in English first and then translate them into the local language (either in advance or during the interview). As with survey questions this can lead to a whole range of misunderstandings and confusion that could make your interview results useless. Where possible write the questions in the local language first and then translate them into English or another language.
Include space for demographic information: It's helpful to include some space at the start of the interview guide to record key demographic information about the interviewee. This could include their sex, age, position, location, and their name (unless the interview is confidential). This information will be helpful during the analysis and report writing later on.
Use open ended questions: The purpose of an interview is to understand people's ideas, opinions and experiences. These are best captured using questions that don't have a fixed set of answers, such as “What are your views on X?” or “How do you feel about Y?” If you find yourself writing multiple choice questions then reconsider whether you should actually be doing a survey.
It is important that you phrase questions in a way that gets respondents to provide detailed
answers, rather than simple ‘Yes’ or ‘No’ answers.
Examples of questions include:
How did you get to find out about this project?
What is your involvement in this project? What are the strengths and weaknesses of the
project?
How has the project changed the way you live/ your community lives?
How do you use the new information (or skills) in your day-to-day life?
What hurdles remain to you being able to take action?
How would other people benefit from this project?
Do you think the changes as a result of this project will continue?
What other types of projects should be implemented to build on this one?
It is good to have a set of questions at hand, but the interviewer also needs to also be prepared to
expand or probe on the pre-determined questions as the need arises. This is the essence of
qualitative interviews.
Provide a section for the interviewer's observations and opinions:
One of the most common problems with semi-structured interviews done by program staff is that
the interviewer mixes in their personal opinions when they are taking notes. Sometimes it can be

138
difficult to tell what the real opinion of the interviewee was compared to the interviewer. One of
the best ways to prevent this is to provide a separate space at the end of the form where the
interviewer can put their own subjective opinions (e.g. “the chief was present so I don't think she
gave accurate answers”, “I think the reason she said the activity wasn't useful is because lunch
wasn't provided”).
Test the guide and train the interviewers:
It is important to pre-test and pilot a survey questionnaire to make sure your interview guide
works in practice. Pre-testing can also be used as an opportunity for training the interviewers. It's
usually better to train them using real interviews, rather than just running through the questions
together at the office.
2) Sampling and who to interview:
Interview as many people as necessary to find out what you need to know
One of the most common questions asked about interviews is how big the sample size should be.
There is no correct answer to this question because it depends on what you need to know.
One method that is often used is to choose a range of people with different backgrounds and
positions (e.g. some poor, some rich, some old, some young, some men, some women, some
community members, some community leaders, etc.). Then to keep interviewing people until I'm
no longer getting any new information.
You also might find the semi-structured interviews might be the best method for interviewing
authorities and leaders but that focus groups might be better for group and community settings.
3) In the interview:
Begin with a welcome and introduction. Make sure that you are clear as to what information you want to obtain. It is important that you are clear as to who you want to speak to, how you will collect the information (recording, notes etc.) and what will be done with the information. Inform people as to whether the interviews and the content are anonymous or not and whether what they say will directly be attributable to them. If recording the interview, it is important that you gain consent. Depending on your organisation’s policies, you may need to obtain written consent.
If you are using a translator then make sure you rehearse the key questions with them beforehand, as well as any follow-up questions you are likely to ask. They should have a copy of the interview guide written in the local language. When conducting the interview sit in a triangle shape so that all three of you can see each other easily.
Listen to the answers and ask follow-up questions: When you're conducting an interview, one of the most important skills is to listen to the interviewee's answers closely. You can then use the answers to ask follow-up questions in order to get more useful information.
For example:
Primary Question: “What did you think of ……?”
139
Answer: “It was good”
Secondary Question: “Why was it good? Can you give me some examples/ more detail…?”
This can be one of the most difficult skills for field staff to learn, particularly if they are used to
doing fully structured surveys where no creativity is required. It can be useful to include some
suggested follow-up questions in the interview guide. The most common follow-up questions
should become obvious during the pre-testing.
Recording answers can be done through taking notes (or audio-recording if available). Taking notes keeps the interviewer involved in the process. Taking notes allows the interviewer to highlight key points to probe further,
Record key quotes word-for-word: Often the interviewer just takes hand written notes on the interview guide form. However, one of the dangers of this is that the original “voice” of the interviewee will be lost. So even if the interviewer is handwriting notes during the interview, it's still very important to try and write the key quotes word-for-word in the language they were said in.
Deciding when to end an interview may depend on a number of factors. For example, the interviewer may feel that they have exhausted their questions, and that they are no longer getting new information, or if the respondent seems tired or has other commitments to attend to. A good practice is for the interviewer to summarise the key points that they feel the respondent has provided, as this provides the respondent with a final chance to expand or clarify any points. It is important to finally thank the respondent for their time, and provide them with the interviewer’s contact details.
4) Analysis and making sense of the data:
Use the results to write contrasting stories or identify common themes: There are two basic ways
to analyse and report interview data – you can use it to write stories or to identify common
themes. Writing stories is particularly useful when you're doing an evaluation.
Use the interviews to identify people who have different ideas about how successful the program
was. For example, in a micro-enterprise program find one person whose business was very
successful, one who had a moderately successful business, and one whose business failed. Then
use the interviews to tell their individual stories, including direct quotes from them.
The alternative method is to have a group of people look at all the interviews to identify the
common themes. A common theme is something that is said repeatedly by different interviewees.
For example, in a training program many people might have said that the training sessions are too
long. This would be a theme. Once you've identified all the themes you can describe them in your
report.
Further information:
http://policy-practice.oxfam.org.uk/publications/conducting-semi-structured-interviews-252993
http://www.sociology.org.uk/methfi.pdf
http://www.fao.org/docrep/x5307e/x5307e08.htm
140
Focus Groups
What are focus groups? A focus group is where a group of people (from around 4 to 12) are asked questions about their
experiences and opinions on particular topics. Focus groups provide valuable qualitative information
on the strengths and weaknesses of a project, based on the viewpoint of the participants (or other
stakeholders). As such, the process can provide some valuable learning to evaluate, to improve
further phases of a program, or to design a new program or vision for future initiatives.
Focus groups are led by a facilitator and a semi-structured interview process to prompt discussion
amongst a group of people. The facilitator or other participants can pursue ideas generated by the
group. The facilitator can draw out motivations, feelings, and values behind verbalisations through
skilful probing and restating responses. Participants stimulate each other in an exchange of ideas
that may not emerge in individual interviews or surveys.
Focus groups should not be confused with community meetings, group discussions with leaders or
government officials, or informal brainstorming as they must be designed, structured and
moderated. The responses generated from focus groups cannot be added up and used as
quantitative data.
The group can be representative of the beneficiaries or an intervention, or they may represent
subsets of the beneficiaries if you are looking to identify how different groups have experienced a
certain intervention (for example in a school lighting intervention, focus groups could be conducted
with teachers, parents or pupils, or a combination).
The strength of Focus groups relies on allowing the participants to agree or disagree with each other
so that it provides an insight into how a group thinks about an issue, about the range of opinion and
ideas, and the inconsistencies and variation that exists in a particular community in terms of beliefs
and their experiences and practices.
Advantages of using focus groups:
Provides valuable information to explore the impact a project has had on a community
Provides valuable information on the context of participants and stakeholders on taking part in a project.
Focus groups can be used as an effective tool for getting the views of people who might not participate in larger meetings (i.e. women, children etc.). The outputs from focus group meetings can be presented to larger group meetings, giving a "voice" to those in the community who are unable to speak up in a larger meeting.
Requirements for conducting focus groups:
A facilitator to lead the discussion, prompt participants and to ensure everyone can participate
A pre-prepared guide of the topics you wish the focus group to cover
Around 90 minutes should be sufficient for most focus groups.
Someone to take notes of what is discussed in the session
141
How to conduct a focus group:
1) Developing Questions for your focus group:
Think about the questions for your discussion guide. An important step in preparing for the focus group interview is the development of a set of questions which encourage participants to respond and solicit the information needed from the group.
Good questions sound conversational and natural. They are usually short, open-ended, and one-dimensional (they ask only one question at a time). What is it you want to know? Are the questions the same for everyone? How can the questions be adapted to different groups?
For example, there are five general types of questions used in focus group interviews:
Opening questions are used to get people talking and feeling comfortable. They should be easy to answer, but should not emphasise differences among group members. Example: Tell us your name and how long you have been participating in the intervention/project.
Introductory questions are used to get the group to start thinking about the topic at hand. They help focus the conversation. Example: How was it that you became involved with the intervention/project? Or How were the beneficiaries of the project chosen?
Transition questions provide a link between the introductory questions and the key questions. They typically ask participants to go into more depth than introductory questions. Example: Think back to when you first became involved with the intervention/project, what were your first impressions/expectations?
Key questions focus on the major areas of concern. The majority of the time is devoted to discussions of these questions. Example: In what way is your life different because of your participation in the intervention/project? What changes have you seen in your community? Increased incomes? Health or educational outcomes? Reduced time spent collecting wood etc.? Negative, positive, expected and unexpected outcomes and impacts? Which of these changes have been the most significant? What has been the biggest change you have observed in your community?
Ending questions bring the session to closure. Example: Is there anything we should have talked about, but didn’t?
The specific order in which the questions are asked is called the questioning route. A good questioning route has an easy beginning, flows logically and naturally from one question to another, and moves from the general to the specific. It is important to estimate the time required to exhaust the discussion on each question. These time estimates can be used to help manage the focus group discussion.
2) Consider the composition of your planned focus group:
Who are the key stakeholders? Who is it you need to hear from? How many groups will you need and how is it best to divide these groups? For example, For example, is it best to conduct focus groups with different sections of the community separately (i.e. pupils, teachers, parents, local authorities)?
Be aware of the context, protocols and dynamics of the group/community, and the importance of allowing everyone an opportunity to participate. Consider that there may be factions of a community (women for example) who are unable or unwilling to speak up. Separate meetings with these people can be held, and their perspectives as a whole
142
brought back to the larger meetings. Are women likely to participate in the focus groups if there are men present? Is it more appropriate to have single sex groups?
3) Arrange a convenient time and place for the focus group.
Remember that people have different time constraints, e.g. women may not be available to attend at the same time as men or that there might be times of the year when large numbers of the community are busy.
4) Ensure the group is sat in a circle or horseshoe shape so that they can see each other and interact during the focus group.
5) Start the focus group with a general welcome and be clear about the purpose of the focus group and the kind of topics you would like to discuss. It might be helpful to use an icebreaker as a way of getting everyone talking. Set some ‘ground rules’ for the focus group discussion, such as listening to other people, respecting everyone’s opinion, and not having one person dominate the conversation.
6) A crucial element of successful focus groups is effective facilitation. As a facilitator:
You must ensure even participation, careful wording of the key questions, maintain a neutral attitude and appearance, and summarise the session to reflect the opinions evenly and fairly.
Effective facilitation requires preparation, mental discipline and skill in facilitating group interaction. But first and foremost, facilitators must believe that all participants have something to contribute to the discussion, regardless of their education levels, experiences, or backgrounds. Facilitators must listen attentively with sensitivity and try to understand the perspective of each participant. Lack of respect or interest is quickly transmitted to participants and results in reduced participation.
Be sure to look at participants when they are talking and demonstrate active listening techniques (nodding, eye contact) with empathy and positive regard for participants.
Refrain from expressing personal views; you are there to gather the views and experiences of the participants and your own perceptions and opinions on the intervention should not be part of the discussion or influence it.
Be aware that it is easy for focus groups to go ‘off topic’ and that it is your role as facilitator to guide the discussion so as to get the information and evidence needed.
The community or group may put the facilitator in a position of "expert" and expect them to carry the whole meeting. Develop methods that foster participation.
Do not ask leading questions or assume you know in advance what results might come from the focus group discussion. Prompt and facilitate discussion but do not put words in people’s mouths.
An important technique for facilitating focus groups is the pause and the probe.
The pause is simply a period of silence after the question is asked. Although a five-second
pause may seem awkward to the inexperienced moderator, it is usually successful in
encouraging a response from the group. There is usually some group member who is willing to
143
break the silence. The probe is simply a question or statement which encourages group
members to add to or elaborate on something which was said. Here are some examples of
probes.
Would you explain further?
Would you give me an example of what you mean?
Would you say more?
Can you please clarify?
Is there anything else?
You must have enough authority to keep the meeting on track, but enough sensitivity to include as many people in the discussions as possible.
Ask participants to reflect on what they are telling you, for example, when highlighting changes they have observed in their community “Was this a positive or negative change?”, “Do you think this change will continue?”
In your summary at the end of the session, sum –up in general terms what has been said, e.g.: “We have discussed the cook stoves people have received today and the impact they have had on people’s lives people. We have discussed changes in (health/incomes/time-use etc.) and in general, people are….”
A detailed report should be prepared after the session is finished. Any observations during the session should be noted and included in the report.
7) Data Analysis: Data analysis consists of examining, categorizing, tabulating or otherwise recombining the
“evidence” collected during the focus group to address the initial propositions of the study.
The purpose of the study drives the analysis. The sources of information that are used in the
analysis are the note takers notes or the facilitator’s notes and memory.
Analysis of focus group data involves three steps:
Indexing, Management, and Interpretation:
• Indexing
Involves reading a transcript or notes and assigning codes or “labels” to each piece of relevant
information. Often codes are written in margins. The codes or labels link together pieces of
text which represent a common viewpoint or perspective related to one of the key questions
or central purposes of the study.
• Management
Collecting together all of the extracts of text which have been allocated the same code or
label. Three management methods are typically used. One method is to cut apart individual
responses and use piles to cluster similar extracts. Another method is to use a word processor
to “cut” and “paste” extracts. There is also the option of using software specifically designed
for analysis of qualitative data.
• Interpretation
One technique is analytic induction. This technique involves development of a summary

144
statement which is true of each extract or piece of text in the pile or group. These statements
often become key themes which are communicated in reports of the “study.”
After the analysis is completed, a written report of the study is often prepared and discussed
with key stakeholders. In the summary of the findings, data is frequently organized around the
initial questions which were to answered by the focus group study. It is typical to discuss
several key themes which emerged for each question.
Further Information:
A simple and useful starting point, with a basic description of the use and methodology of focus
groups for project evaluation purposes, can be seen at:
http://www.ucc.ie/hfrg/projects/respect/urmethods/focus.htm.
Textbooks for conducting focus groups are available, such as:
Krueger, R.A. (1988) Focus Groups: A practical guide for applied research. Sage, UK.
Morgan, D.L. (1988) Focus Group as Qualitative Research. Sage, UK.
Stewart, D.W. and Shamdasani, P.N. (1990) Focus Groups: Theory and Practices. Sage, UK.
There are a number of sites that provide detailed step-by-step guides on how to conduct FGD for
research and education purposes. These include:
http://www.soc.surrey.ac.uk/sru/SRU19.html http://www.mapnp.org/library/evaluatn/focusgrp.htm
http://www.scu.edu.au/schools/gcm/ar/arp/focus.html http://www.unu.edu/unupress /food2/UIN03E/uin03e03.htm
http://edf5481-01.fa02.fsu.edu/Guide6.html
Most Significant Change Tool What is MSC?
The Most significant change (MSC) is a participatory monitoring and evaluation technique which
involves collecting, discussing and selecting stories about the significant changes that people
experience as a result of programmes. It contributes to evaluation because it provides data on the
impact and outcomes of a project that can help to assess the performance of a programme as
whole; positive, negative, intended and unintended outcomes.
It involves people at different levels of an organisation discussing the stories and then selecting the
stories they consider most significant. The designated staff analyses and discusses the stories
gathered and search for project impacts. Once these impacts have been identified, stakeholders can
sit together and read the stories and discuss the value of the reported impacts. This process aims to
promote ongoing dialogue and learning about programmes and how they can be improved to better
meet their aims.
It is participatory because many project stakeholders are involved both in deciding the sorts of
changes to be recorded and in analysing the data collected. It is a form of monitoring because it
occurs throughout the program cycle and provides information to help people manage the program.
It contributes to evaluation because it provides data on impact and outcomes that can be used to
help assess the performance of the program as a whole.

145
Essentially, the process involves the collection of significant change (SC) stories emanating from the
field level, and the systematic selection of the most significant of these stories by panels of
designated stakeholders or staff. The designated staff and stakeholders are initially involved by
‘searching’ for project impact. Once changes have been captured, selected groups of people sit
down together, read the stories aloud and have regular and often in-depth discussions about the
value of these reported changes, and which they think is most significant of all. In large programs
there may multiple levels at which SC stories are pooled and then is elected. When the technique is
implemented successfully, whole teams of people begin to focus their attention on program impact.
Advantages of MSC:
It is a good means of identifying unexpected changes or where there may not yet be agreements between stakeholders on what outcomes are the most important.
It is a good way to clearly identify the most important impacts of a programme upon beneficiaries, and where outcomes and impacts might vary widely across beneficiaries.
It is a participatory form of monitoring that requires less ‘technical’ evaluation expertise than other methodologies. Compared to other monitoring approaches, it is easy to communicate across cultures and everyone can tell stories about impacts they think were important.
It encourages analysis as well as data collection because people have to explain why they believe one change is more important than another.
It can be used to monitor and evaluate bottom-up initiatives that do not have predefined outcomes against which to evaluate.
It goes beyond numbers and counting and can deliver a rich picture of the organisational, social and economic developments that have occurred as a result of a programme.
When not to use MSC:
MSC is not meant to be used as a stand-alone methodology. However, MSC combines well with
other evaluation methods such as short surveys and focus group discussions. MSC should not be
used to measure predefined indicators, especially ones which need to be counted (as you have for
your MREAP project), but it can help you to gather wider information about the impact of the
project, beyond the set indicators.
Requirements for using MSC:
A person to lead and coordinate the MSC process
People to collect stories. This can involve having one or two people collecting stories, or getting participants to record stories from one another. Alternatively, you could ask people to write their own stories.
Ways to record stories of change - digital voice recorder, or film (remember that you must seek all participant’s approval prior to recording) or notepaper/template. You can also complement this by photography or images of change, taken by the storytellers.
A document tracking sheet to record who has provided a story, and what stories are classified as most significant.

146
How to use the MSC methodology:
1) The first step in MSC is engaging stakeholders with the process and ensuring their commitment in participating. This is where you should introduce the MSC process to all the stakeholders and clarify its purpose. It is important to also consider who the best people are involved in the project to collect stories from.
2) The next step is for stakeholders to identify the ‘domains of change’ to be monitored- for example ‘changes in people’s lives’, ‘changes in people’s health’. These domains are not precisely defined as performance indicators would be, but are deliberately left loose to be defined by the actual users. The third step is to decide how frequently to monitor changes taking place in these domains.
3) SC stories are collected from those most directly involved, such as participants and field staff. The stories are gathered by asking a simple question such as: ‘during the last month, in your opinion, what was the most significant change that took place for participants in the programme?’ It is initially up to respondents to allocate a domain category to their stories. In addition to this, respondents are encouraged to report why they consider a particular change to be the most significant.
4) The stories are then analysed and filtered up through the levels of authority typically found within an organisation or programme. Each level of the hierarchy reviews a series of stories sent to them by the level below and selects the single most significant account of change within each of the domains. Each group then sends the selected stories up to the next level of the programme hierarchy, and the number of stories is whittled down through a systematic and transparent process. Every time stories are selected, the criteria used to select them are recorded and fed back to all interested stakeholders, so that each subsequent round of story collection and selection is informed by feedback from previous rounds. The organisation is effectively recording and adjusting the direction of its attention – and the criteria it uses for valuing the events it sees there.
After this process has been underway for some time, perhaps a year, a document is produced including all stories selected at the uppermost organisational level in each domain of change over the given period. The stories are accompanied by the reasons for selection. The programme funders are asked to assess the stories in the document and select those which best represent the sort of outcomes they wish to fund. They are also asked to document the reasons for their choice. This information is fed back to project managers.
5) The selected stories can then be verified by visiting the sites where the described events
took place. The purpose of this is twofold: to check that stories have been reported
accurately and honestly, and to provide an opportunity to gather more detailed
information about events seen as especially significant. If conducted some time after the
event, a visit also offers a chance to see what has happened since the event was first
documented.
The next step is quantification, which can take place at two stages. When an account of change
is first described, it is possible to include quantitative information as well as qualitative
information. It is also possible to quantify the extent to which the most significant changes

147
identified in one location have taken place in other locations within a specific period. The next
step after quantification is monitoring the monitoring system itself, which can include looking
at who participated and how they affected the contents, and analysing how often different
types of changes are reported. The final step is to revise the design of the MSC process to take
into account what has been learned as a direct result of using it and from analysing its use.
In sum, the kernel of the MSC process is a question along the lines of: ‘Looking back over the
last month, what do you think was the most significant change in [particular domain of
change]?’ A similar question is posed when the answers to the first question are examined by
another group of participants: ‘From among all these significant changes, what do you think
was the most significant change of all?’
Further Information:
Davies, R. and J. Dart (2005) The ‘Most Significant Change’ (MSC) Technique; A Guide to Its
Use, see: www.mande.co.uk/docs/MSCGuide.pdf.
MSC website and mailing list, see: http://groups.yahoo.com/group/MostSignificantChanges.
Hovland, I. (2005) Successful Communication: A Toolkit for Reseachers and Civil Society
Organisations, ODI Working Paper 227, London: ODI.
Significant Change Story Template You can use and modify this template to collect the change stories for your project. This template
could either be used by an interviewer as a prompt, or by participants to write down stories.
Alternatively, the template could also be used as a prompt to collect audio or video recording of
stories
Sample Template for MSC interview:
Name (optional) or first name only
Male / Female
Age group: 15 – 34 35 – 54 55 plus
Domain:
TITLE OF STORY
(can completed after story telling session)
1. Tell me how you (the storyteller) first became involved with this project and what
your involvement in the project was:
2. From your point of view, describe a story that best describes the most significant
change that has resulted from your involvement in this project:
3. Why was this story significant for you?
4. What have been the challenges/opportunities as a result of this project?
5. What worked/ did not work well?
6. What have you learnt?
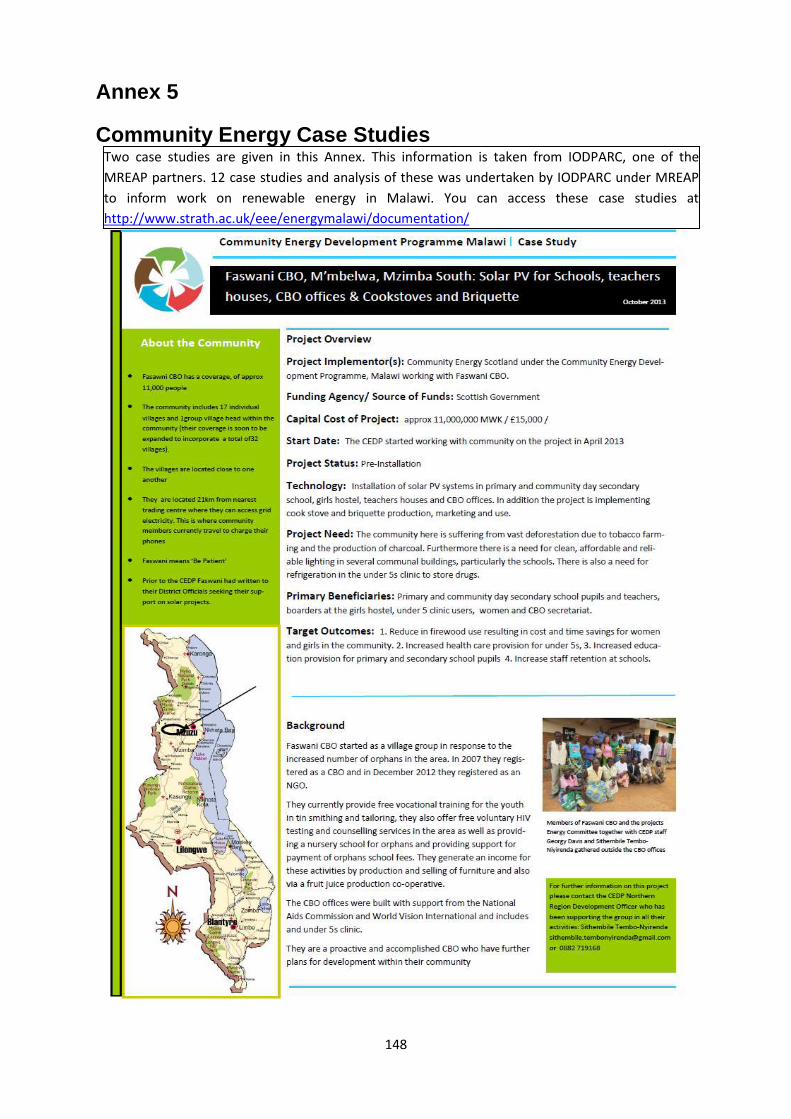
148
Annex 5 Community Energy Case Studies
Two case studies are given in this Annex. This information is taken from IODPARC, one of the
MREAP partners. 12 case studies and analysis of these was undertaken by IODPARC under MREAP
to inform work on renewable energy in Malawi. You can access these case studies at
http://www.strath.ac.uk/eee/energymalawi/documentation/
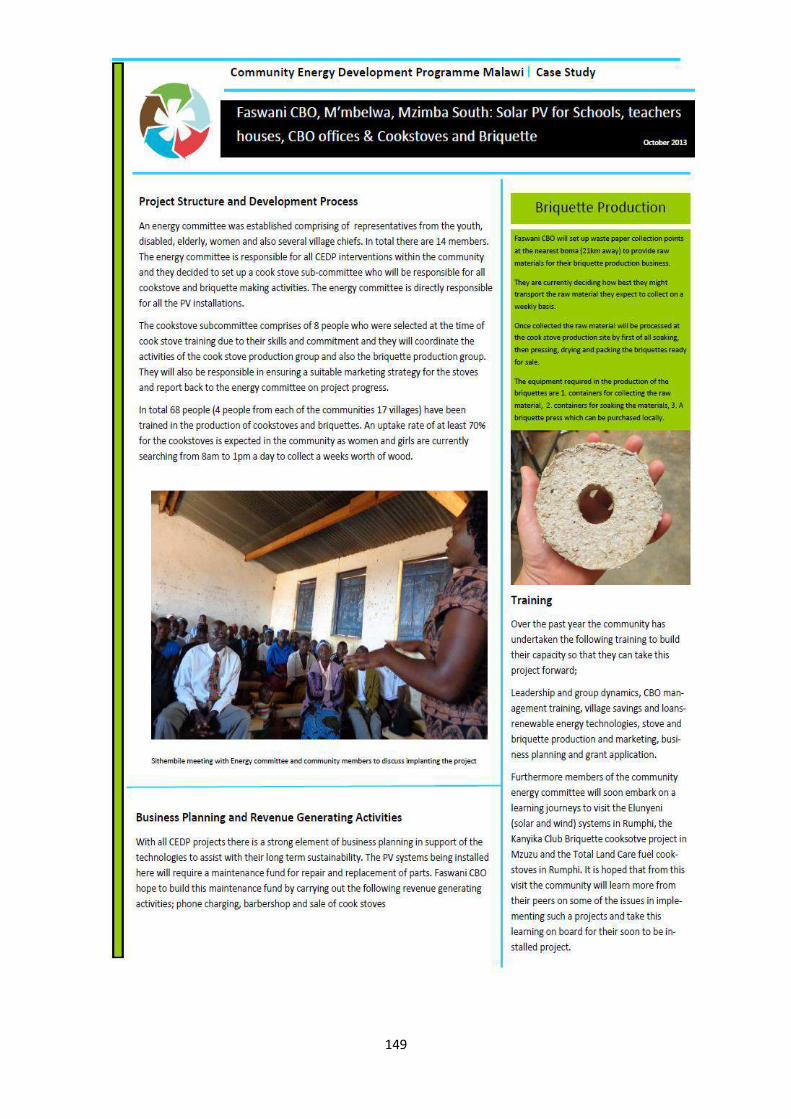
149
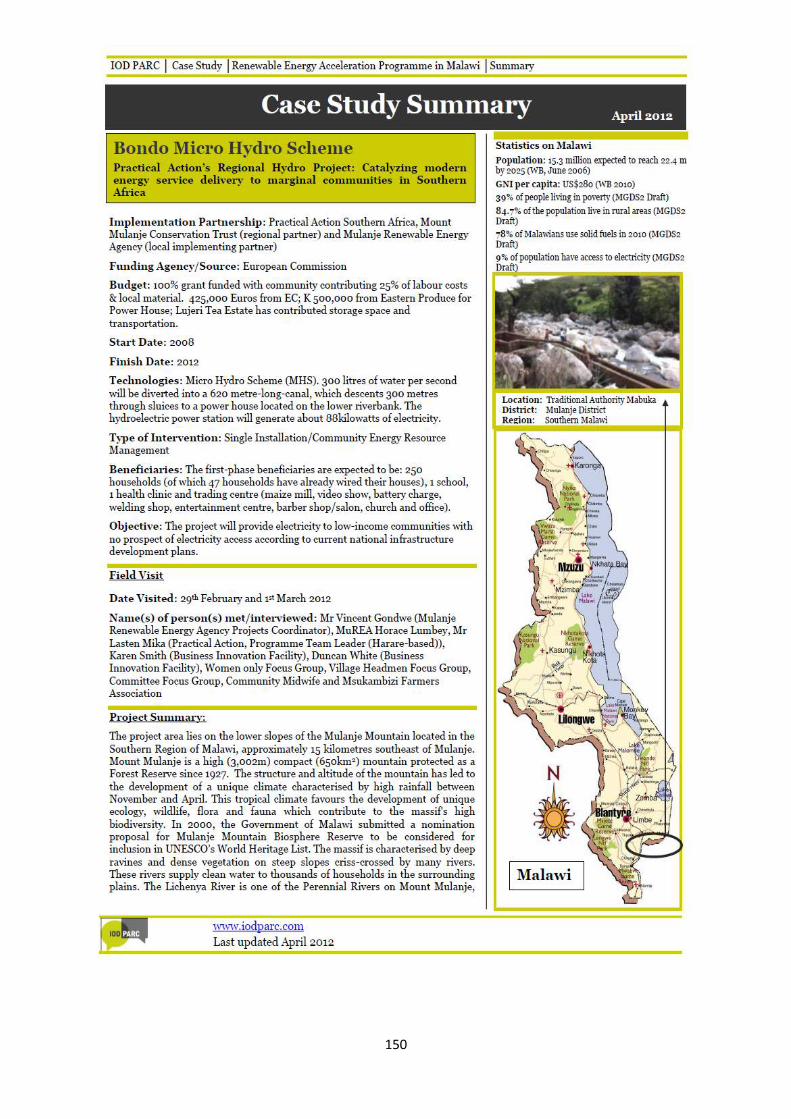
150
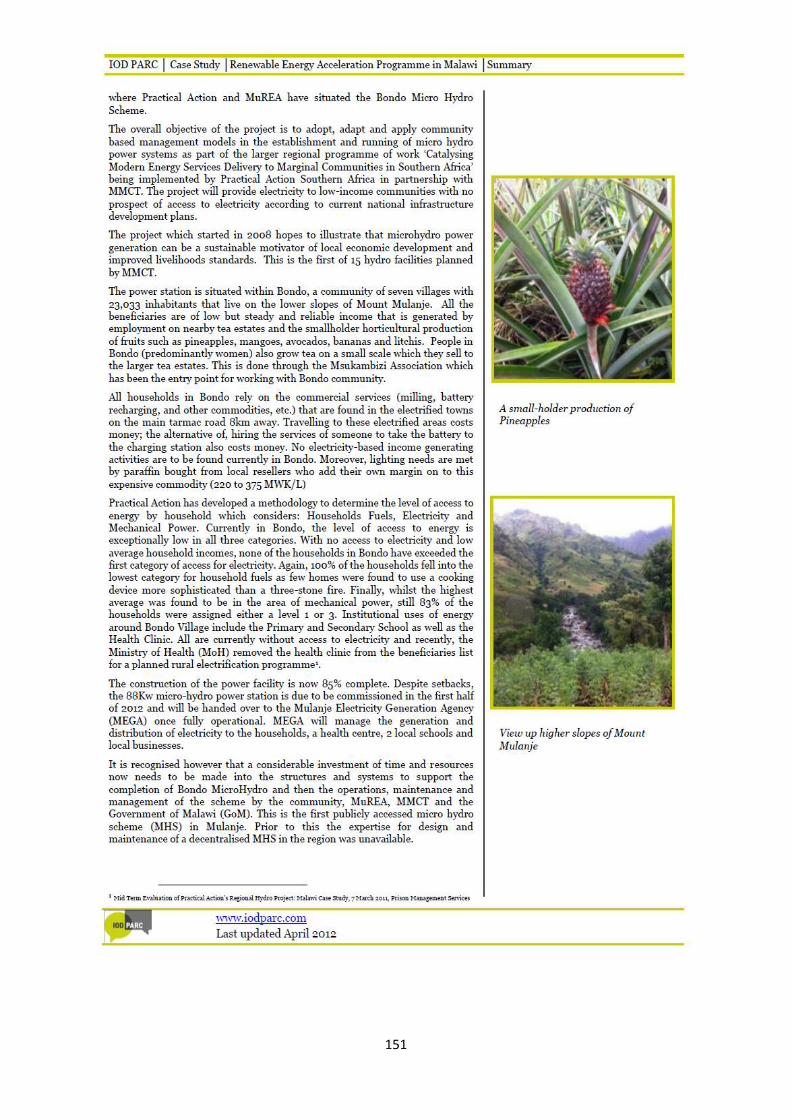
151
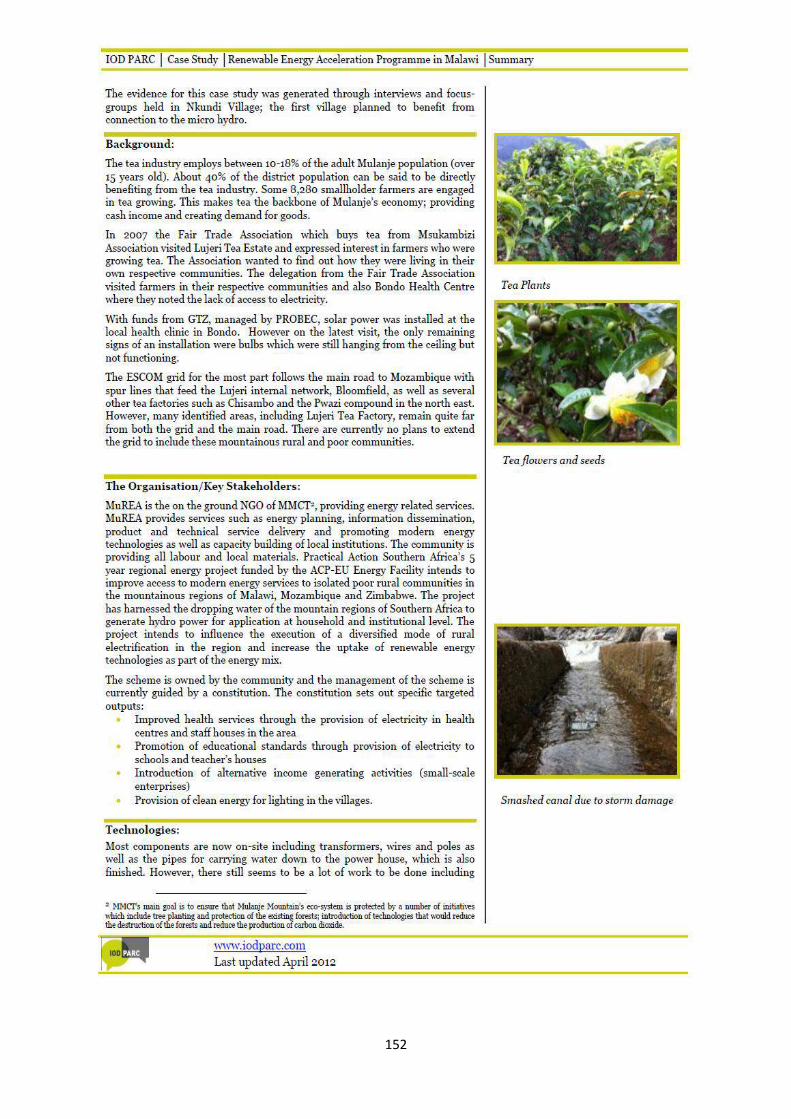
152
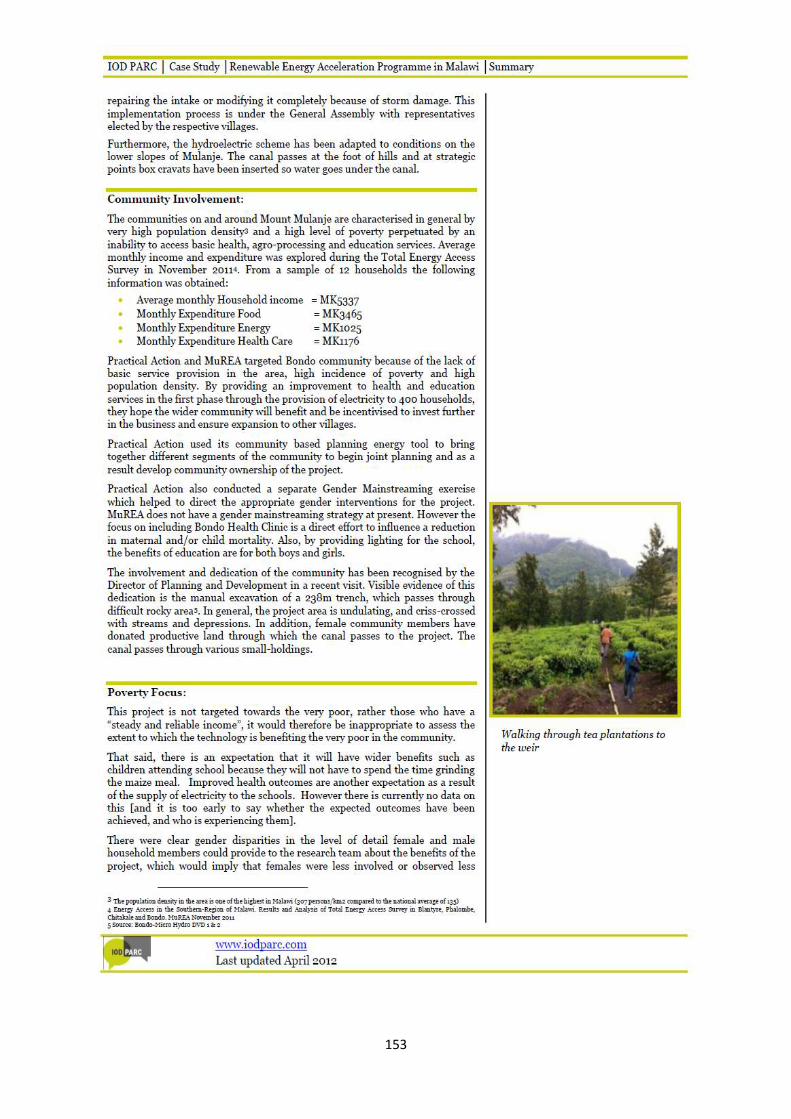
153
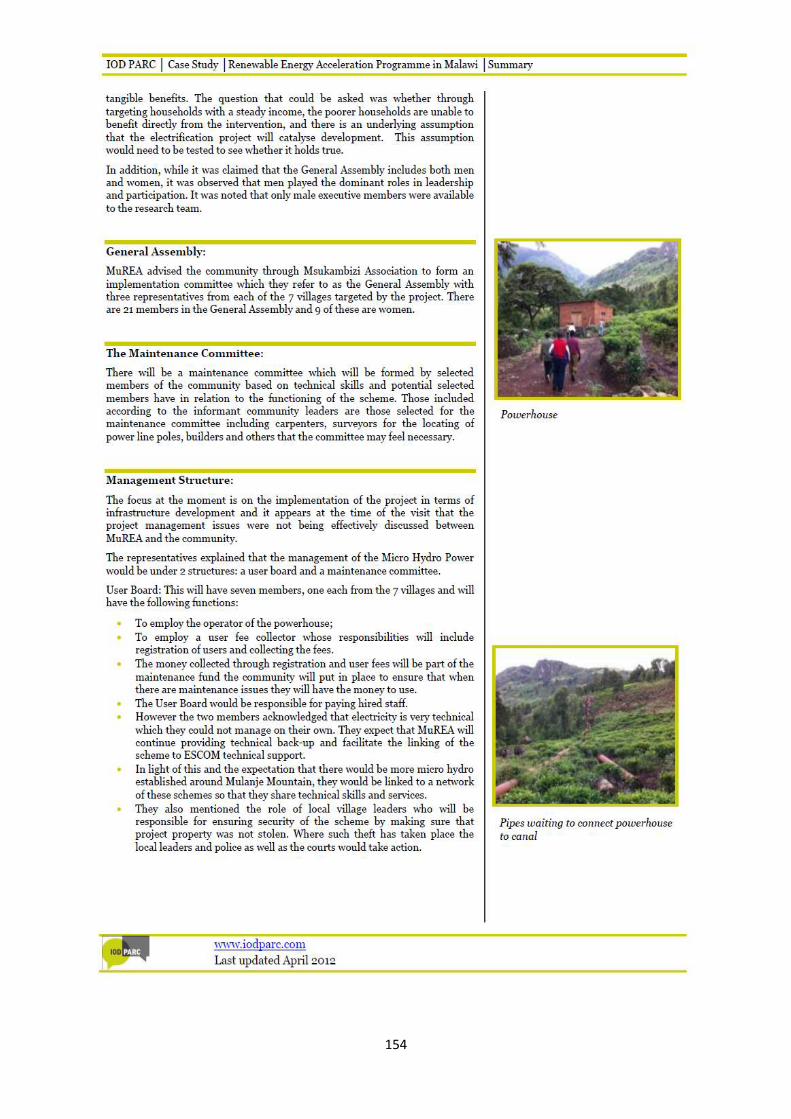
154
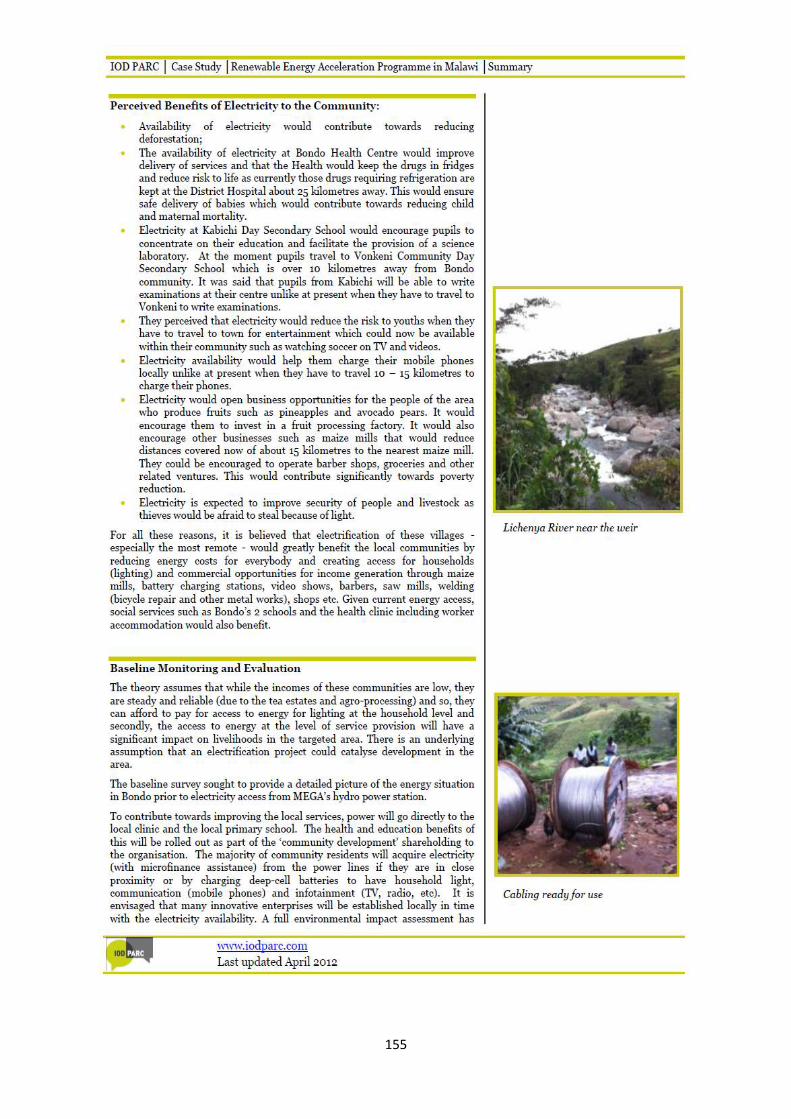
155
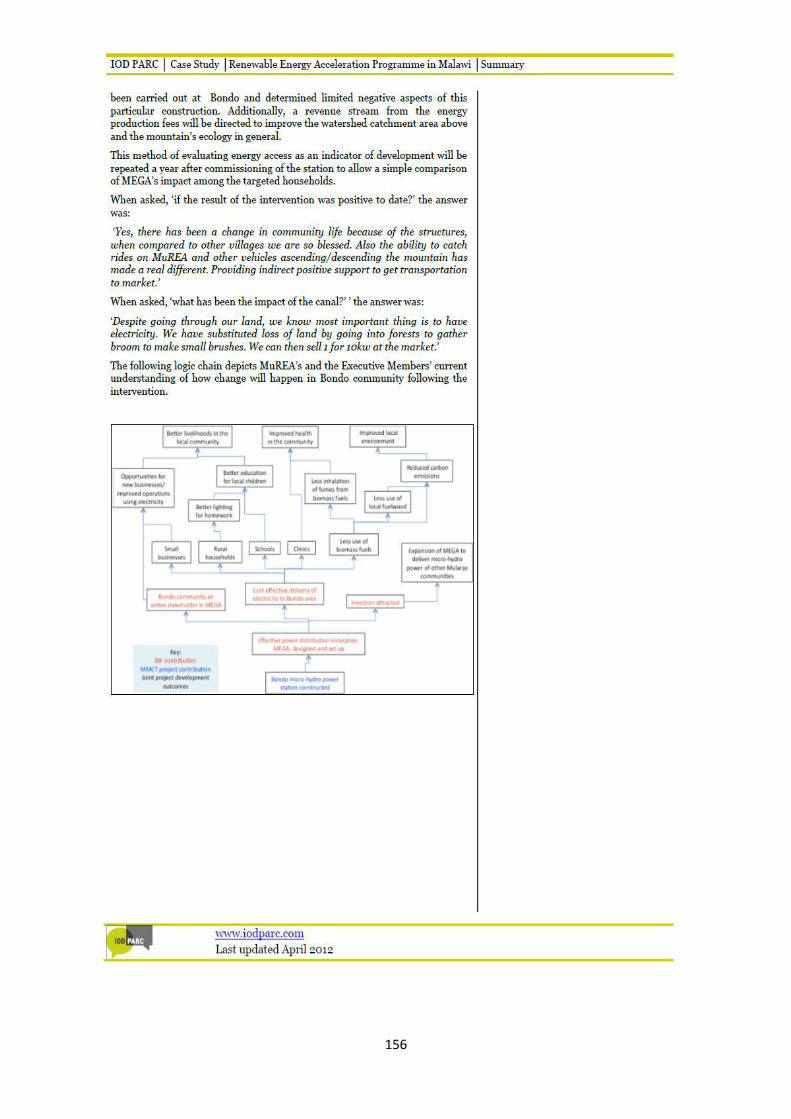
156
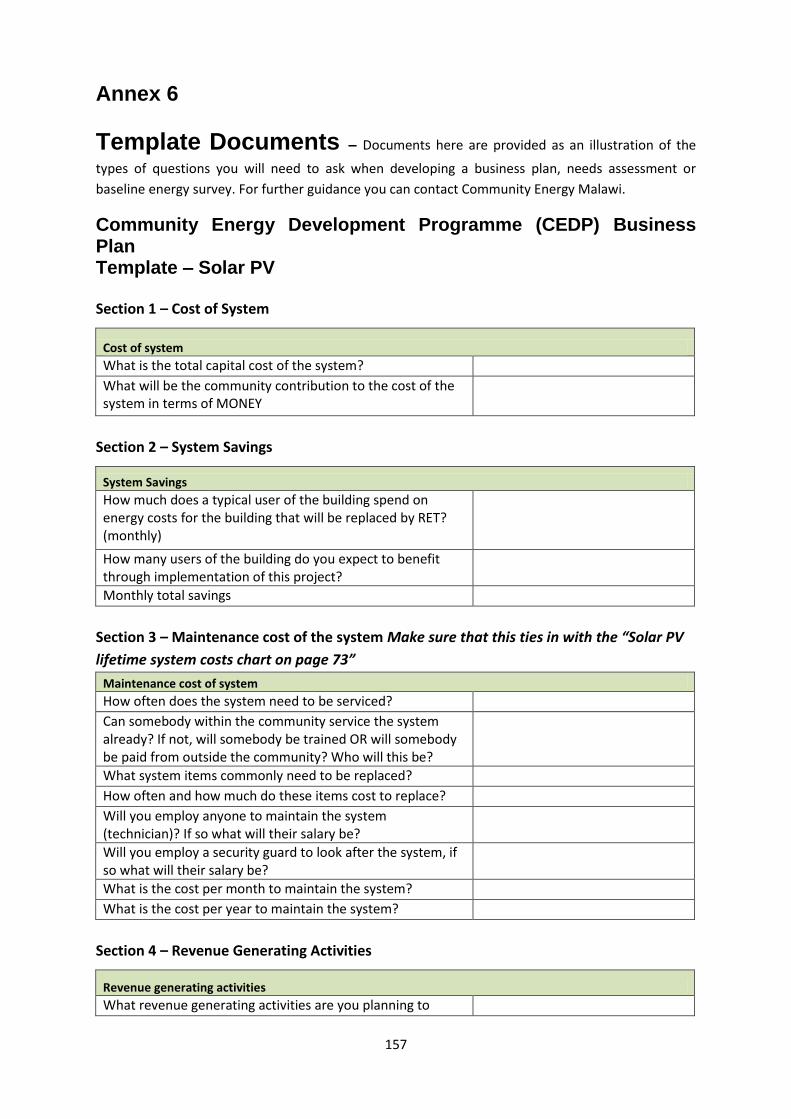
157
Annex 6
Template Documents – Documents here are provided as an illustration of the
types of questions you will need to ask when developing a business plan, needs assessment or
baseline energy survey. For further guidance you can contact Community Energy Malawi.
Community Energy Development Programme (CEDP) Business Plan Template – Solar PV
Section 1 – Cost of System
Cost of system
What is the total capital cost of the system? What will be the community contribution to the cost of the system in terms of MONEY
Section 2 – System Savings
System Savings How much does a typical user of the building spend on energy costs for the building that will be replaced by RET? (monthly)
How many users of the building do you expect to benefit through implementation of this project?
Monthly total savings
Section 3 – Maintenance cost of the system Make sure that this ties in with the “Solar PV
lifetime system costs chart on page 73”
Maintenance cost of system How often does the system need to be serviced? Can somebody within the community service the system already? If not, will somebody be trained OR will somebody be paid from outside the community? Who will this be?
What system items commonly need to be replaced? How often and how much do these items cost to replace? Will you employ anyone to maintain the system (technician)? If so what will their salary be?
Will you employ a security guard to look after the system, if so what will their salary be?
What is the cost per month to maintain the system? What is the cost per year to maintain the system?
Section 4 – Revenue Generating Activities
Revenue generating activities What revenue generating activities are you planning to

158
maintain your system? This could be more than one e.g. phone charging, providing big screen entertainment, barber shop, sale of cook stoves or solar lanterns. Who will manage these activities? Will they receive a salary and if so how much will it be?
4.1 Income Generating Idea 1
Income generating activity (for sale of cook stoves please refer to other sheet):
How much will it cost to set up these activities? Where will funds come from for this? (rent of TV, rent of water, clippers, charging points)
Are there any risks associated with this activity? If so, how can you minimise this risk?
How much power is used for this activity (if power is used)? Price per service provided:
Expected number of sales of the service per week What will be the expected average income for this revenue generating activity? (monthly)
4.2 Income Generating Idea 2
Income generating activity (for sale of cook stoves please refer to other sheet):
How much will it cost to set up these activities? Where will funds come from for this? (rent of TV, rent of water, clippers, charging points)
Are there any risks associated with this activity? If so, how can you minimise this risk?
How much power is used for this activity (if power is used)? Cost per service provided: Expected number of sales of the service per week What will be the expected average income for this revenue generating activity? (monthly
4.3 Income Generating Idea 3
Income generating activity (for sale of cook stoves please refer to other sheet):
How much will it cost to set up these activities? Where will funds come from for this? (rent of TV, rent of water, clippers, charging points)
Are there any risks associated with this activity? If so, how can you minimise this risk?
How much power is used for this activity (if power is used)? Cost per service provided: Expected number of sales of the service per week What will be the expected average income for this revenue
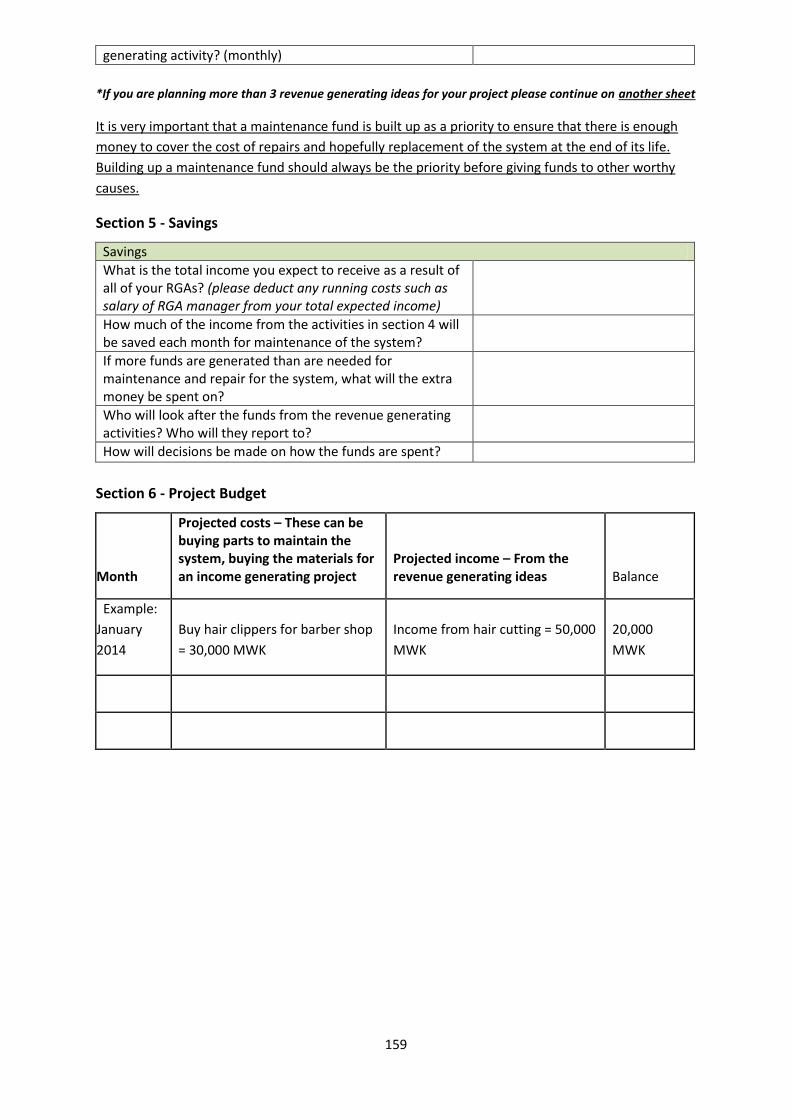
159
generating activity? (monthly)
*If you are planning more than 3 revenue generating ideas for your project please continue on another sheet
It is very important that a maintenance fund is built up as a priority to ensure that there is enough
money to cover the cost of repairs and hopefully replacement of the system at the end of its life.
Building up a maintenance fund should always be the priority before giving funds to other worthy
causes.
Section 5 - Savings
Savings What is the total income you expect to receive as a result of all of your RGAs? (please deduct any running costs such as salary of RGA manager from your total expected income)
How much of the income from the activities in section 4 will be saved each month for maintenance of the system?
If more funds are generated than are needed for maintenance and repair for the system, what will the extra money be spent on?
Who will look after the funds from the revenue generating activities? Who will they report to?
How will decisions be made on how the funds are spent?
Section 6 - Project Budget
Month
Projected costs – These can be buying parts to maintain the system, buying the materials for an income generating project
Projected income – From the revenue generating ideas Balance
Example:
January
2014
Buy hair clippers for barber shop
= 30,000 MWK
Income from hair cutting = 50,000
MWK
20,000
MWK
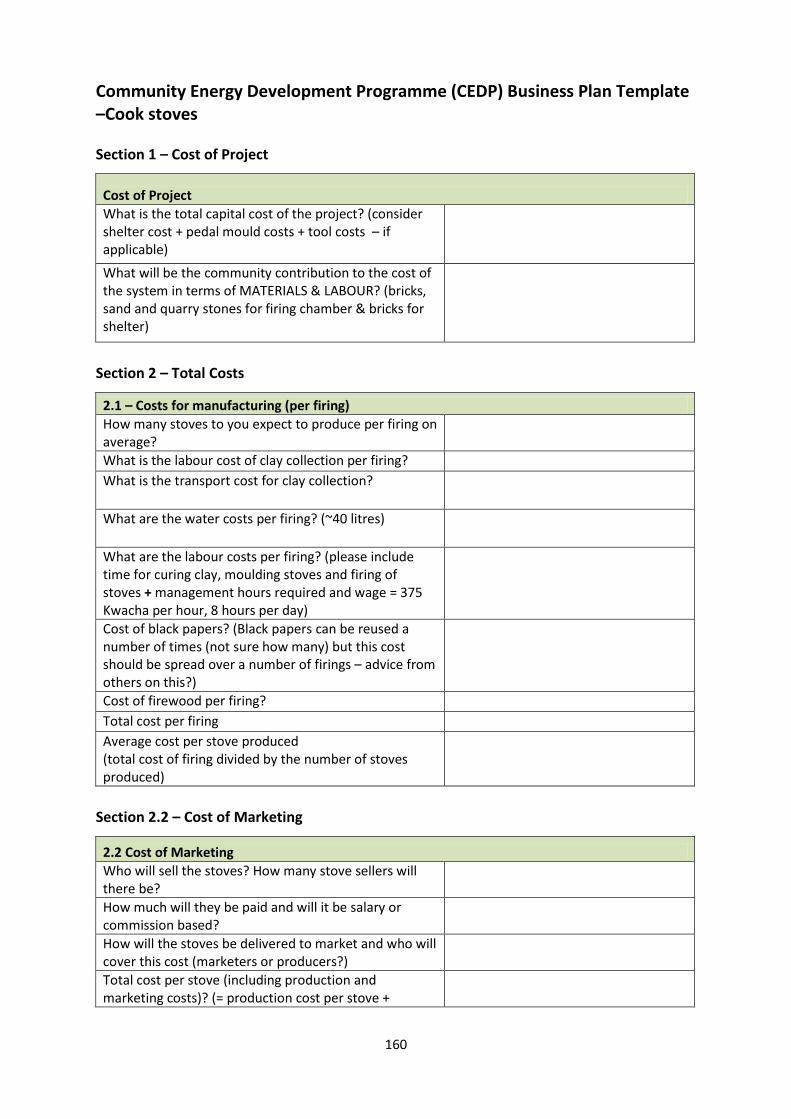
160
Community Energy Development Programme (CEDP) Business Plan Template –Cook stoves
Section 1 – Cost of Project
Cost of Project What is the total capital cost of the project? (consider shelter cost + pedal mould costs + tool costs – if applicable)
What will be the community contribution to the cost of the system in terms of MATERIALS & LABOUR? (bricks, sand and quarry stones for firing chamber & bricks for shelter)
Section 2 – Total Costs
2.1 – Costs for manufacturing (per firing) How many stoves to you expect to produce per firing on average?
What is the labour cost of clay collection per firing? What is the transport cost for clay collection?
What are the water costs per firing? (~40 litres)
What are the labour costs per firing? (please include time for curing clay, moulding stoves and firing of stoves + management hours required and wage = 375 Kwacha per hour, 8 hours per day)
Cost of black papers? (Black papers can be reused a number of times (not sure how many) but this cost should be spread over a number of firings – advice from others on this?)
Cost of firewood per firing? Total cost per firing Average cost per stove produced (total cost of firing divided by the number of stoves produced)
Section 2.2 – Cost of Marketing
2.2 Cost of Marketing Who will sell the stoves? How many stove sellers will there be?
How much will they be paid and will it be salary or commission based?
How will the stoves be delivered to market and who will cover this cost (marketers or producers?)
Total cost per stove (including production and marketing costs)? (= production cost per stove +

161
marketing cost per stove)
Section 3 – Total Income
Total Income Selling price of stove Total profit per stove sold (price you would sell stove - total cost per stove produced and sold)
Section 4 – Market Demand
Market Demand How many households are in your catchment area? How many of these do you expect to sell a stove to (%) What are the total numbers of stoves you expect to sell?
What is the total profit you will make in your catchment area (cost per stove x number of stoves)
Have you considered other markets for your stoves? If so please name them here together with how you plan to sell to these markets
Section 5 – System Savings
System Savings What % of fuel savings are expected as a result of this technology?
Weekly savings – Cost MWK
Weekly savings - Kg wood fuel
Weekly savings - Time
Section 6 – Fund Management
Fund Management Who will manage the funds from the stove sales? Profits from the cook stoves should be split between the producer group and the energy committee. In this way, funds from selling the stoves can be used for the maintenance fund for the solar system. What % of profits will go to the stove production group? What % of profits will go to the energy committee for the maintenance fund for the solar system?
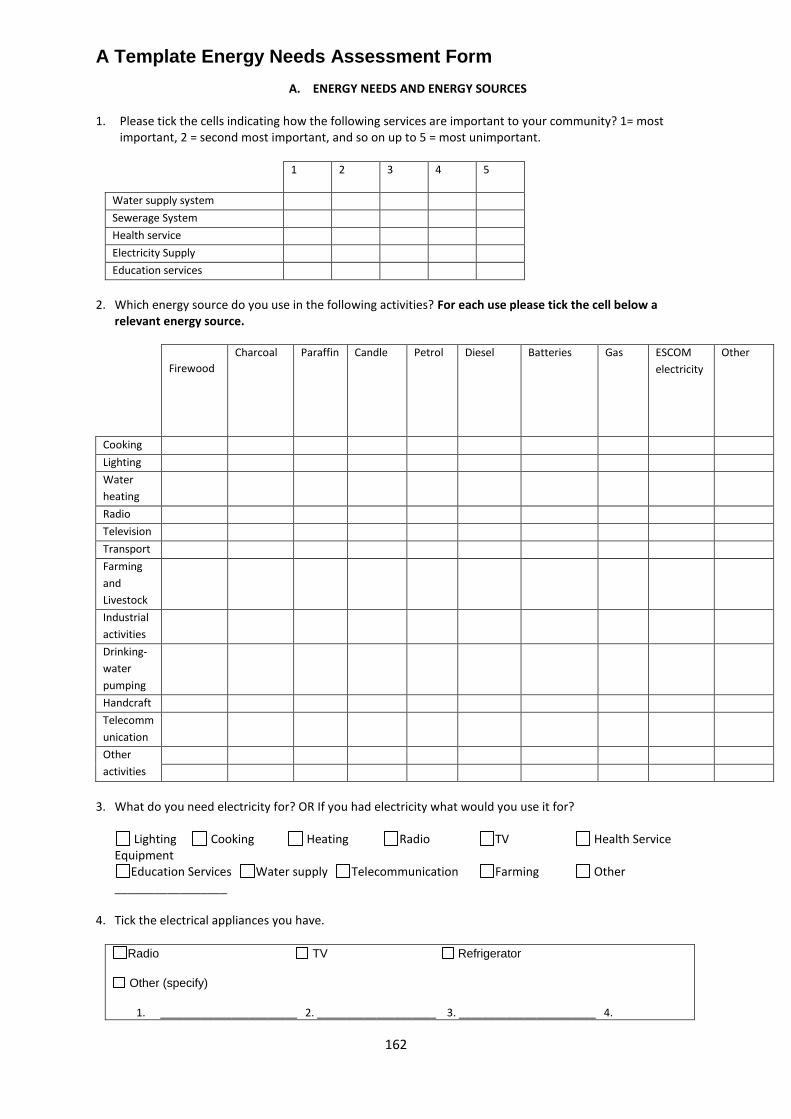
162
A Template Energy Needs Assessment Form
A. ENERGY NEEDS AND ENERGY SOURCES
1. Please tick the cells indicating how the following services are important to your community? 1= most important, 2 = second most important, and so on up to 5 = most unimportant.
1 2 3 4 5
Water supply system
Sewerage System
Health service
Electricity Supply
Education services
2. Which energy source do you use in the following activities? For each use please tick the cell below a
relevant energy source.
Firewood
Charcoal Paraffin Candle Petrol Diesel Batteries Gas ESCOM
electricity
Other
Cooking
Lighting
Water
heating
Radio
Television
Transport
Farming
and
Livestock
Industrial
activities
Drinking-
water
pumping
Handcraft
Telecomm
unication
Other
activities
3. What do you need electricity for? OR If you had electricity what would you use it for?
Lighting Cooking Heating Radio TV Health Service
Equipment Education Services Water supply Telecommunication Farming Other
_________________
4. Tick the electrical appliances you have.
Radio TV Refrigerator
Other (specify)
1. _______________________ 2. ____________________ 3. _______________________ 4.

163
_______________________
5. State the electrical appliances you plan to have.
Appliance When do you expect to have the appliances?
___________________________________
__________________________________
___________________________________
________________________________ _________________________________
_______________________________
6. How much of the energy sources do you use per month on the activities indicated on the left column?
Firewood Charcoal Paraffin Candle Petrol Diesel Batteries Gas Other
Cooking
Lighting
Water heating
Radio
Television
Transport
Farming and
Livestock
Industrial activities
Drinking- water
pumping
Handcraft
Telecommunication
Other activities
7. Please write down how much you spend per month on the following energy sources.
Firewood Charcoal Paraffin Candles Petrol Diesel Batteries Gas ESCOM
electricity
Other
(specify)
8. Which of the following activities that require energy indicated on the left column is most important to you?
1= most important; level of importance can be repeated. Please tick the cell of importance against each activity.
1 2 3 4 5 6 7 8 9 10
Cooking
Lighting
Water heating
Radio
Television
Transport
Farming and Livestock
Industrial activities
Drinking- water pumping
Handcraft
Telecommunication

164
Other activities
9. If you use firewood, please indicate how you source the firewood.
Collect for free from a local woodlot Buy from private sellers
Collect from local woodlot and also buy from private sellers N/A
10. If you collect firewood, how many days a week do you go out to collect firewood?
1 day 2 days 3 days 4 days 5 days 6 days
7 days N/A
Please state the hours you spend (including travelling time) collecting firewood each day you go out _______________
11. Please write down the times you use artificial lighting in your premises. Write your responses in the spaces
provided.
September to March
Time lights are switched ON in the evening
_________
Time lights are switched OFF in the evening
_________
Time lights are switched ON in the morning
_________
Time lights are switched OFF in the morning
_________
April to August
Time lights are switched ON in the evening
___________
Time lights are switched OFF in the evening
__________
Time lights are switched ON in the morning
__________
Time lights are switched OFF in the morning
__________
12. Explain what you do not like about your current energy technologies/sources?
What is not likeable
Firewood
Charcoal
Paraffin
Candles
Batteries
Gas
Petrol
Diesel
ESCOM electricity
13. Explain what you like about your current energy technologies/sources.
What is likeable
Firewood
Charcoal
Paraffin
Candles
Batteries
Gas
Petrol
Diesel
ESCOM electricity

165
14. Would you still use your current energy sources (e.g. firewood for cooking) if you had other energy sources
e.g. electricity Yes No
15. What can make you not abandon your current energy technologies/sources?
Why energy source/technology cannot be abandoned
Firewood
Charcoal
Paraffin
Candles
Batteries
Gas
Petrol
Diesel
ESCOM electricity
16. How satisfied are you with the energy sources you use for the following activities.
Very dissatisfied Dissatisfied Satisfied Very satisfied
Cooking
Lighting
Water heating
Radio
Television
Transport
Farming and Livestock
Industrial activities
Drinking- water pumping
Handcraft
Telecommunication
Other activities
17. State the quantity of hot water required per day for your household or institution
___________________________ B. SOCIOECONOMICS
18. Please indicate the crops you grow and their respective annual production.
Crop type Annual production Comments on uses and market outlets
Maize ________________ ________________________________ Cassava ________________ ________________________________ Rice ________________ ________________________________ Other (specify) ________________ ________________________________ N/A 19. Please tick the animals you tame. Please write numbers in the spaces provided.
Goat ______ Ducks ________ Pigs __________ Cattle______
Pigeon______ Sheep_______ Chicken______ Dogs__________ Other (specify) _______
N/A

166
Comments on uses and market outlets: _____________________________________________________________________________________________ _____________________________________________________________________________________________
20. Please indicate which of the following services you have access to.
Microfinance Institutions Banks Cooperatives Others (specify)
21. Have you received any loan in the past 12 months
Yes No Reason:
______________________________________________________
22. Please indicate if you have access to loans for energy supply. Yes No
23. Please state profitable business enterprises in your area. ____________________________________________________________________________
24. Write down the business enterprise you do or you would want to engage in. Current business enterprise ____________________ Desired business enterprise ________________________ 25. State any technical skills in your household or institution.
Carpentry Tinsmith Motor vehicle mechanics Electrician Other (specify)___________
26. How satisfied are you with your income to cover for your food requirements
Very dissatisfied Dissatisfied Satisfied Very satisfied N/A
27. How satisfied are you and your family with the following services in your area.
Very dissatisfied Dissatisfied Satisfied Very satisfied
Education services
Health services
Water supply
Electricity supply
28. Please indicate if you have ever felt under financial pressure to pay for your energy bills / costs.
Yes No N/A
29. State how much you would be comfortable to spend on energy bills per month (cooking, heating, lighting,
TV, radioetc. except transport). K __________________________________
30. State how much you would be comfortable to spend at once at a maximum towards purchasing an energy system (e.g. solar PV system, diesel generator etc.). K_____________________
31. State the number of household members (living in the house) or institution members who have the following education qualifications.
Education level Number of members with this level of education Primary school ________________________________________________________

167
Secondary school ________________________________________________________ Tertiary ________________________________________________________ None ________________________________________________________
32. Please indicate if you own a piece of farmland. Yes No N/A Comment on ownership______________
33. Please indicate the ownership of your property. Private Family Rented Government Comment on structure materials: Floor_____________ Roof_____________________ Walls______________________
34. Please indicate if you consider emigrating from the Island. Yes No N/A
Give a reason _____________________________________________________________________
35. Please indicate your employment status. Fulltime paid employment Farmer Business person/institution Casual
labourer
36. Please state your annual income from the following activities.
C. Sate the number of rooms (including living rooms/meeting rooms, kitchen, toilet, etc.) in the house/institution buildings __________________________________________________________________________________________WATER SOURCES
37. Where do you get water for your daily activities from? Private water point by utility company River Public borehole Public water point by utility company Lake Private borehole Others __________________
38. How much water do you use per day? __________________ Comment on proportions for major uses.___________________________________________________________
D. COMMUNITY PARTICIPATION
39. Are there people in the community who participate in meetings about energy? Yes No
40. Do women participate in decision making in the community?
Yes No
41. What is your opinion about security in the community? Good Acceptable Bad
42. Please tick on whose behalf you are completing the questionnaire.
Household Institution (specify e.g. School) ______________________
Comments about respondent: Sex ____________Position in Family/institution__________________ Education level__________________________ Who else was present ______________________
Thank you for taking part in the survey.
Amount
Animal-farming income
Crop-farming income
Employment/piece works income
Business-enterprise income
Aid
Others

168
Template Baseline Energy Survey for a PV System for a Health Centre
Project number
District
Traditional Authority
GVH
Community name
Group represented (men, women, child headed, key informant, widow’s, ...)
Name of data collector
Date
1. Name of the respondent....................................................................
2. Name of Health Facility..............................................................
3. Name of Village and GVH.........................................................................
4. Name of TA.....................................................................
5. Position of the respondent................................................................
6. Sex of the respondent
Male......................1
Female.................2
7. Age of the respondent:...............years
8. How long have you been a head of this institution/ member of health committee/ traditional leader/
been accessing services at this institution?...........................years
9. What is the overall population of beneficiaries for this institution?
10. Name the villages that benefit from this health facility.
11. What kind of health services are provided at this health facility?
12. What kind of energy related challenges do people (you, if it is the beneficiary) face when accessing
health services at this facility?
13. Have you ever discussed these challenges as service providers/health committee/community?
Yes (1)...............No (2)
14. If yes, what were the proposed solutions to the challenges?
15. How do you currently light the Health Centre/Post?
No Products No of Hours used per day
No lighting – daylight only
Kerosene lanterns
Candles
Light bulbs
Battery powered torch
Solar powered torch
Other (specify)
16. How do you currently light staff houses?
No Products No of Hours used per day
Kerosene lanterns
Candles
Light bulbs
Battery powered torch
Solar powered torch
Other (specify)
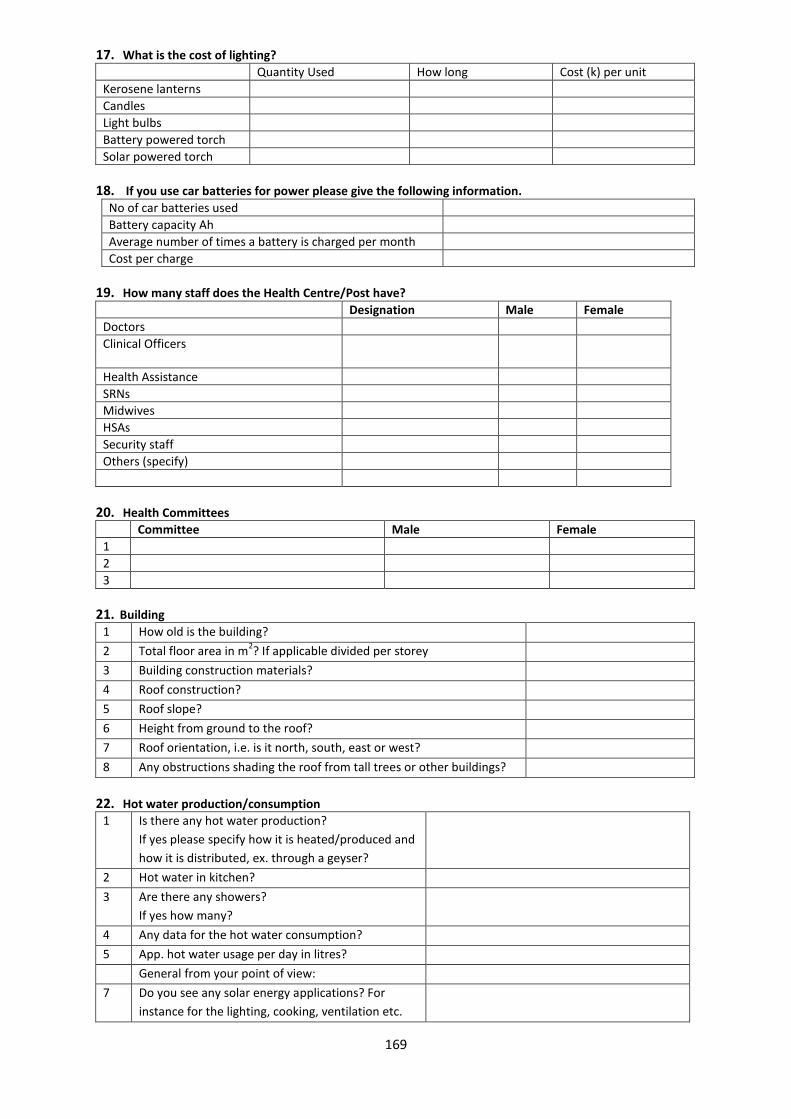
169
17. What is the cost of lighting?
Quantity Used How long Cost (k) per unit
Kerosene lanterns
Candles
Light bulbs
Battery powered torch
Solar powered torch
18. If you use car batteries for power please give the following information.
No of car batteries used
Battery capacity Ah
Average number of times a battery is charged per month
Cost per charge
19. How many staff does the Health Centre/Post have?
Designation Male Female
Doctors
Clinical Officers
Health Assistance
SRNs
Midwives
HSAs
Security staff
Others (specify)
20. Health Committees
Committee Male Female
1
2
3
21. Building
1 How old is the building?
2 Total floor area in m2? If applicable divided per storey
3 Building construction materials?
4 Roof construction?
5 Roof slope?
6 Height from ground to the roof?
7 Roof orientation, i.e. is it north, south, east or west?
8 Any obstructions shading the roof from tall trees or other buildings?
22. Hot water production/consumption
1 Is there any hot water production?
If yes please specify how it is heated/produced and
how it is distributed, ex. through a geyser?
2 Hot water in kitchen?
3 Are there any showers?
If yes how many?
4 Any data for the hot water consumption?
5 App. hot water usage per day in litres?
General from your point of view:
7 Do you see any solar energy applications? For
instance for the lighting, cooking, ventilation etc.

170
8 Have you at anytime been looking at the
possibilities for using alternative energy sources,
such as solar thermal for hot water production,
solar PV for lighting or other alternatives?
Please specify.
Any other remarks?
23. Surveyor’s general impression o/observation of staff and Patients awareness of renewable energy
24. Any other comments

171

172