Embed Size (px)
Citation preview
Toyota/Lexus A340E, A340F‘00-Later, V6 & V8 ZIP KIT®
PART NUMBER A340-LATE-ZIP QUICK GUIDE
©2019 Sonnax Transmission Company, Inc. • A Marmon / Berkshire Hathaway Company A340-LATE-ZIP-Guide 10-15-19
800-843-2600 • 802-463-9722 • F: 802-463-4059 • www.sonnax.com Page 1
Parts are labeled here in order of installation. See other side of sheet for details on kit contents.
installation Diagram
In addition to general rebuilding tips and technical information, the technical booklet included in this kit contains vacuum testing and additional repair options for higher mileage units or for repairing specific complaints which are beyond the scope of this kit.
NOTE: Type 4 EPC-style valve body is shown. Parts will fit in the same locations in a throttle cable-style and Type 3 EPC-style valve body except where noted.
25
21 1
Upper Valve BodyType 4 Shown
3
9
10
9*
Lower Valve BodyType 4 Shown
* Not used on Type 3 valve bodies.
CAUTION: If replacing an OE sleeve with NO dot or three dots, use Sonnax EPC valve
with flat on large spool diameter.
If replacing an OE sleeve with two dots, use Sonnax EPC valve with flat on small spool diameter.
Discard the Sonnax EPC valve that is not used.
6
Flat on large spool diameter.
Flat on small spool diameter.
7
4
6
8
2
• If replacing an OE sleeve with two or three dots, do NOT add shims.
• If replacing an OE sleeve with no dots, add shims.
6 8
NOTE: Detailed instructions are included on page 8 of installation and testing booklet.
10These checkballs
may or may not
belong!
CAUTION! Note the location of OE checkballs during
disassembly! Usage of checkballs vary greatly!
10

©2019 Sonnax Transmission Company, Inc. • A Marmon / Berkshire Hathaway Company A340-LATE-ZIP-Guide 10-15-19
800-843-2600 • 802-463-9722 • F: 802-463-4059 • www.sonnax.com Page 2
Kit Contents & Installation Steps
Toyota/Lexus A340E, A340F‘00-Later, V6 & V8 ZIP KIT®
Quick Guide
Step Replace OE End Plugs Secondary Regulator Valve, Reverse Control Valve* *(Type 4 Valve Body Only)
Packaging Pocket 1
• End Plugs, Large (2) • O-Rings (4) 2 extra
Step Replace OE End Plugs 1-2, 2-3 & 3-4 Shift Valves
Packaging Pocket 2
• End Plugs, Medium (3) • O-Rings (5) 2 extra
Step Replace OE End Plug 2nd Coast Modulator Valve
Packaging Pocket 3
• End Plug, Small • O-Rings (2) 1 extra
Step Replace OE End Plug Accumulator Control Valve
Packaging Pocket 4
• End Plug, Extra Large • O-Rings (2) 1 extra
Step Replace OE Lockup Assembly
Packaging Pocket 5
• Valve • Sleeve
Step Select Correct Replacement EPC Boost Valve
Look at end of the OE boost sleeve for number of identification dots. If replacing an OE sleeve with NO dots or three dots, use the Sonnax EPC boost valve with flat on large spool diameter. If replacing an OE sleeve with two dots, use the Sonnax EPC boost valve with flat on small spool diameter. (See page 8 of Installation & Testing Booklet for more details.)
Packaging Pocket 6
• EPC Boost Valve Flat on Large Spool Dia. (for no/three ID dots)
• EPC Boost Valve Flat on Small Spool Dia. (for two ID dots)
1
2
3
4
5
6
Step Assemble Boost AssemblyPlace small reverse valve into sleeve. Place selected EPC boost valve from step 6 into sleeve, smaller diameter first. Place cutback
boost valve into sleeve with longer stem facing outboard.
Packaging Pocket 7
• Boost Sleeve• Reverse Boost Valve• Cutback Boost Valve
Step Pressure Regulator Valve Shims
Look at the end of OE boost sleeve for the number of identification dots. If replacing an OE sleeve with two or three dots, do NOT add
shim. If replacing an OE sleeve with no dots, add both shims. Shims should be added, if used, between the OE washer and pressure regulator valve. (See page 8 of installation and testing booklet for more details.)
Packaging Pocket 8
• Shim, .015" thick • Shim, .032" thick
Step Replace OE Large Checkballs
See checkball caution notes on page 1.
Packaging Pocket 9
• Checkballs, Large .250" dia. (2)
Step Replace OE Small Checkballs
See checkball caution notes on page 1.
Packaging Pocket 10
• Checkballs, Small .218" dia. (9)
NOTE: These items also are available separately;
Steps 1, 2, 3 & 4 Part No. 97741-19K Steps 6, 7 & 8 Part No. 97741-01K
The parts listed here may be protected by patent number 8,955,533.
7
8
9
10
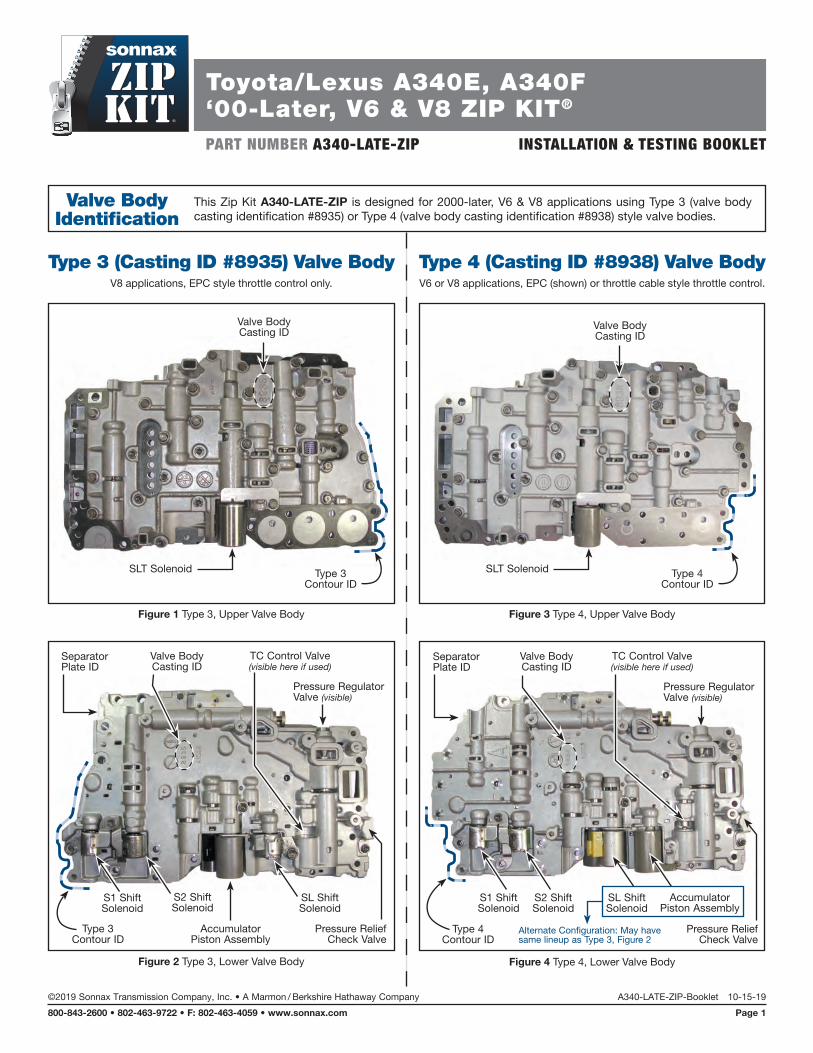
Valve Body Identification
This Zip Kit A340-LATE-ZIP is designed for 2000-later, V6 & V8 applications using Type 3 (valve body casting identification #8935) or Type 4 (valve body casting identification #8938) style valve bodies.
Type 3 (Casting ID #8935) Valve BodyV8 applications, EPC style throttle control only.
Type 4 (Casting ID #8938) Valve BodyV6 or V8 applications, EPC (shown) or throttle cable style throttle control.
Figure 1 Type 3, Upper Valve Body
Valve Body Casting ID
Type 3 Contour ID
SLT Solenoid
Figure 3 Type 4, Upper Valve Body
Valve Body Casting ID
Type 4 Contour ID
SLT Solenoid
Figure 2 Type 3, Lower Valve Body
Valve Body Casting ID
Pressure Relief Check Valve
Type 3 Contour ID
S1 Shift Solenoid
SeparatorPlate ID
Pressure Regulator Valve (visible)
S2 Shift Solenoid
SL Shift Solenoid
AccumulatorPiston Assembly
TC Control Valve (visible here if used)
Figure 4 Type 4, Lower Valve Body
Valve Body Casting ID
Pressure Relief Check Valve
Type 4 Contour ID
S1 Shift Solenoid
SeparatorPlate ID
Pressure Regulator Valve (visible)
S2 Shift Solenoid
TC Control Valve (visible here if used)
Alternate Configuration: May have same lineup as Type 3, Figure 2
SL Shift Solenoid
AccumulatorPiston Assembly
Toyota/Lexus A340E, A340F‘00-Later, V6 & V8 ZIP KIT®
PART NUMBER A340-LATE-ZIP INSTALLATION & TESTING BOOKLET
©2019 Sonnax Transmission Company, Inc. • A Marmon / Berkshire Hathaway Company A340-LATE-ZIP-Booklet 10-15-19
800-843-2600 • 802-463-9722 • F: 802-463-4059 • www.sonnax.com Page 1
Type 3 (Casting ID #8935) Valve BodyV8 applications, EPC style throttle control only.
Type 4 (Casting ID #8938) Valve BodyV6 or V8 applications, EPC (shown) or throttle cable style throttle control.
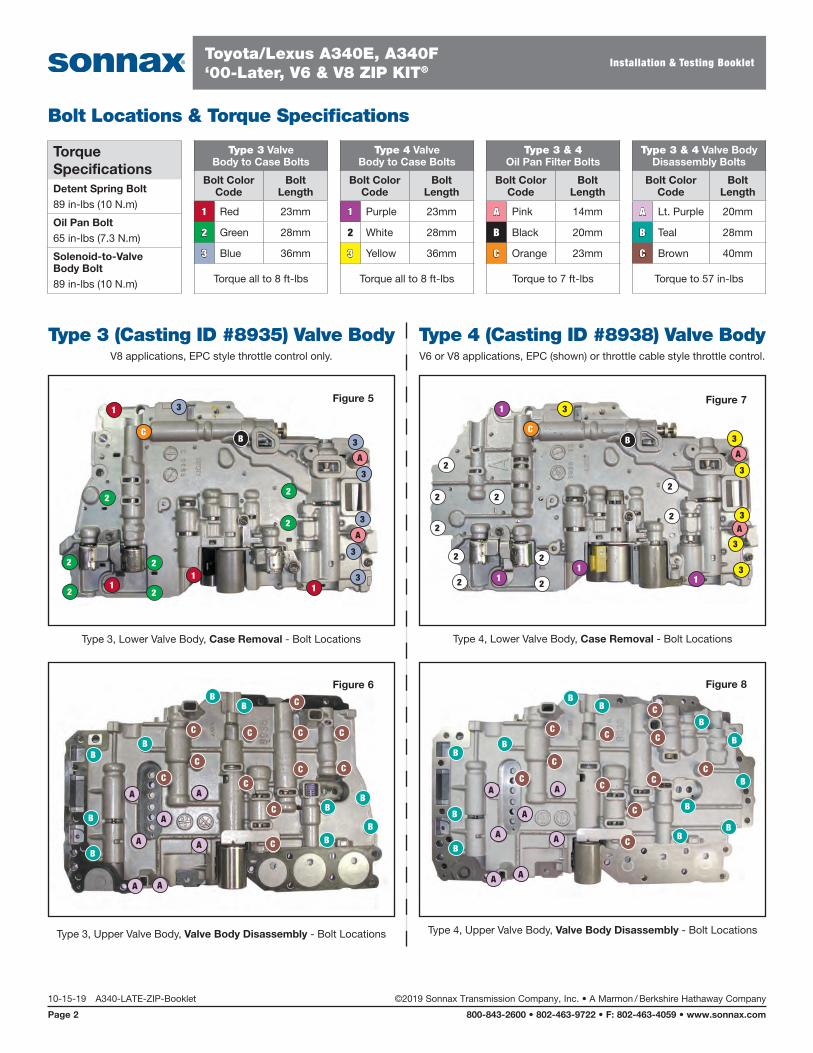
Torque SpecificationsDetent Spring Bolt89 in-lbs (10 N.m)
Oil Pan Bolt65 in-lbs (7.3 N.m)
Solenoid-to-Valve Body Bolt 89 in-lbs (10 N.m)
Type 3 Valve Body to Case Bolts
Bolt Color Code
Bolt Length
1 Red 23mm
2 Green 28mm
3 Blue 36mm
Torque all to 8 ft-lbs
Type 4 Valve Body to Case Bolts
Bolt Color Code
Bolt Length
1 Purple 23mm
2 White 28mm
3 Yellow 36mm
Torque all to 8 ft-lbs
Type 3 & 4 Oil Pan Filter Bolts
Bolt Color Code
Bolt Length
A Pink 14mm
B Black 20mm
C Orange 23mm
Torque to 7 ft-lbs
Type 3 & 4 Valve Body Disassembly Bolts
Bolt Color Code
Bolt Length
A Lt. Purple 20mm
B Teal 28mm
C Brown 40mm
Torque to 57 in-lbs
Bolt Locations & Torque Specifications
Type 3, Lower Valve Body, Case Removal - Bolt Locations
1
A
3
3
3
3
3
3
2
2
2
2
2
2
2
1
11
A
BC
Figure 5
Type 4, Lower Valve Body, Case Removal - Bolt Locations
1
A
3
2
2
2
2
2
2
1
11
A
BC
2
22
2
3
3
3
3
3
Figure 7
Type 3, Upper Valve Body, Valve Body Disassembly - Bolt Locations
C
A
B
B
BB
BB
B
BB
BA
A A
A
A
A
C
C
C
C
C C
C C
C
C
C
Figure 6
Type 4, Upper Valve Body, Valve Body Disassembly - Bolt Locations
CA
B
B
BB
BB
B
B
B
BA
A A
A
A
A
C
C
C
C
C
CC
C
C
C
B
B
Figure 8
10-15-19 A340-LATE-ZIP-Booklet ©2019 Sonnax Transmission Company, Inc. • A Marmon / Berkshire Hathaway Company
Page 2 800-843-2600 • 802-463-9722 • F: 802-463-4059 • www.sonnax.com
Toyota/Lexus A340E, A340F‘00-Later, V6 & V8 ZIP KIT®
Installation & Testing Booklet

Clutch & Band Application Chart
Selector Position - Gear C0 C1 C2 B0 B1 B2 B3 F0 F1 F2
Park ON
Reverse ON ON ON ON
Neutral ON
D-1st Gear ON ON ON ON
D-2nd Gear ON ON ON ON ON
D-3rd Gear ON ON ON ON ON
D-Overdrive ON ON ON ON
2-1st Gear ON ON ON ON
2-2nd Gear ON ON ON ON ON ON
2-2nd Gear ON ON ON ON ON
Low-1st Gear ON ON ON ON ON
Low-2nd Gear ON ON ON ON ON ON
Figure 9 Shift Solenoid Chart
Selector Position - Gear
Shift Solenoid S1
Shift Solenoid S2
D - 1st Gear ON Off
D - 2nd Gear ON ON
D - 3rd Gear Off ON
D - Overdrive Off Off
2 - 1st Gear ON Off
2 - 2nd Gear ON ON
2 - 3rd Gear Off ON
Low - 1st Gear ON Off
Low - 2nd Gear ON ON
Figure 10
Solenoid Malfunctioning Shift Strategies
Selector Position - Normal Gear
Shift Solenoid S1 (A)Malfunctioning
Shift Solenoid S2 (B)Malfunctioning
Both Solenoids Malfunctioning
S1 (A)
S2 (B) Gear S1
(A)S2 (B) Gear
Gear When selector position in manually operated
D-1st Gear X ON 3rd ON X 1st Overdrive
D-2nd Gear X ON 3rd Off X O/D Overdrive
D-3rd Gear X ON 3rd Off X O/D Overdrive
D-Overdrive X Off O/D Off X O/D Overdrive
2-1st Gear X ON 3rd ON X 1st 3rd
2-2nd Gear X ON 3rd Off X 3rd 3rd
2-2nd Gear X ON 3rd Off X 3rd 3rd
Low-1st Gear X Off 1st ON X 1st 1st
Low-2nd Gear X ON 2nd ON X 1st 1st
Figure 12
Solenoid Diagnostic Trouble Chart
DTC Description
P0750 Shift Solenoid S1 (A)/S2 (B) Malfunction
P0753 Shift Solenoid S1 (A)/S2 (B) Electrical Malfunction
P0755 Shift Solenoid S1 (A)/S2 (B) Malfunction
P0758 Shift Solenoid S1 (A)/S2 (B) Electrical Malfunction
P0770 Shift Solenoid SL (E) Malfunction
P0773 Shift Solenoid SL (E) Electrical Malfunction
Figure 11
Shift StrategiesThe computer (ECM) controls the ON/Off combina-tion of the shift solenoids S1 (A) and S2 (B) to shift between 1st gear and overdrive (O/D). If an electri-cal failure occurs in one of these two solenoids, the computer continues to control the other solenoid to allow the vehicle to operate as smoothly as possible while in Fail Safe mode. The ECM also turns off the SL (E) solenoid during Fail Safe. Should both solenoids S1 (A) and S2 (B) fail, shifting must be done manually. Figures 11 and 12 give typical solenoid codes and sole-noid malfunctioning shift strategies.
To test shift solenoids S1 (A), S2 (B) or SL (E) for sticking, force 71 psi of compressed air into the snout (Figure 13, arrow); it should not leak. Energizing the solenoids should cause them to open and allow air flow. Resistance on these three shift solenoids should be 11–15 ohm at 68˚F, and resistance on the SLT solenoid should be 5.0–5.6 ohm at 68˚F.
Some valve bodies have an accumulator piston assem-bly (Figure 14) that can be mistaken for a solenoid. This is actually an accumulator for lockup and should be checked to ensure the piston can move freely.
Figure 14
Figure 13
©2019 Sonnax Transmission Company, Inc. • A Marmon / Berkshire Hathaway Company A340-LATE-ZIP-Booklet 10-15-19
800-843-2600 • 802-463-9722 • F: 802-463-4059 • www.sonnax.com Page 3
Toyota/Lexus A340E, A340F‘00-Later, V6 & V8 ZIP KIT®
Installation & Testing Booklet
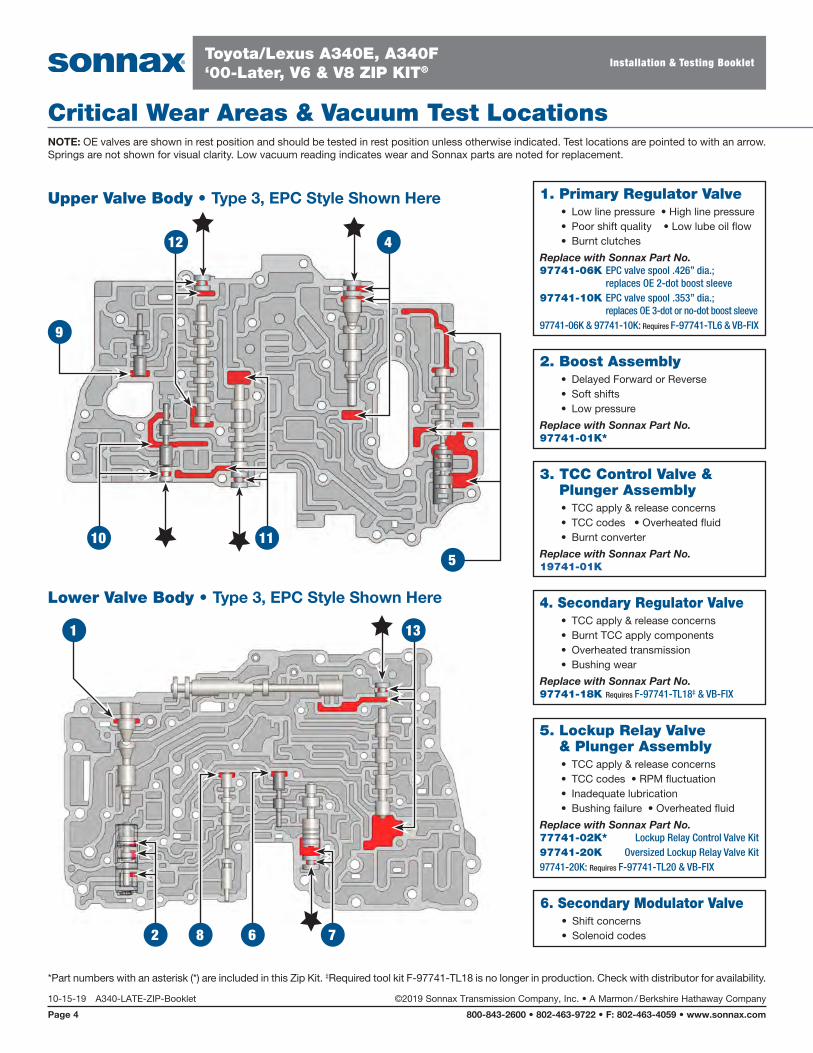
Critical Wear Areas & Vacuum Test Locations NOTE: OE valves are shown in rest position and should be tested in rest position unless otherwise indicated. Test locations are pointed to with an arrow. Springs are not shown for visual clarity. Low vacuum reading indicates wear and Sonnax parts are noted for replacement.
*Part numbers with an asterisk (*) are included in this Zip Kit. ‡Required tool kit F-97741-TL18 is no longer in production. Check with distributor for availability.
1. Primary Regulator Valve• Low line pressure • High line pressure• Poor shift quality • Low lube oil flow• Burnt clutches
Replace with Sonnax Part No.97741-06K EPC valve spool .426” dia.;
replaces OE 2-dot boost sleeve97741-10K EPC valve spool .353” dia.;
replaces OE 3-dot or no-dot boost sleeve97741-06K & 97741-10K: Requires F-97741-TL6 & VB-FIX
2. Boost Assembly• Delayed Forward or Reverse• Soft shifts• Low pressure
Replace with Sonnax Part No.97741-01K*
3. TCC Control Valve & Plunger Assembly• TCC apply & release concerns• TCC codes • Overheated fluid• Burnt converter
Replace with Sonnax Part No.19741-01K
5. Lockup Relay Valve & Plunger Assembly• TCC apply & release concerns• TCC codes • RPM fluctuation• Inadequate lubrication• Bushing failure • Overheated fluid
Replace with Sonnax Part No.77741-02K* Lockup Relay Control Valve Kit97741-20K Oversized Lockup Relay Valve Kit97741-20K: Requires F-97741-TL20 & VB-FIX
6. Secondary Modulator Valve• Shift concerns• Solenoid codes
Lower Valve Body • Type 3, EPC Style Shown Here 4. Secondary Regulator Valve• TCC apply & release concerns• Burnt TCC apply components• Overheated transmission• Bushing wear
Replace with Sonnax Part No.97741-18K Requires F-97741-TL18‡ & VB-FIX
Upper Valve Body • Type 3, EPC Style Shown Here
5
4
9
1110
12
13
78 62
1
10-15-19 A340-LATE-ZIP-Booklet ©2019 Sonnax Transmission Company, Inc. • A Marmon / Berkshire Hathaway Company
Page 4 800-843-2600 • 802-463-9722 • F: 802-463-4059 • www.sonnax.com
Toyota/Lexus A340E, A340F‘00-Later, V6 & V8 ZIP KIT®
Installation & Testing Booklet
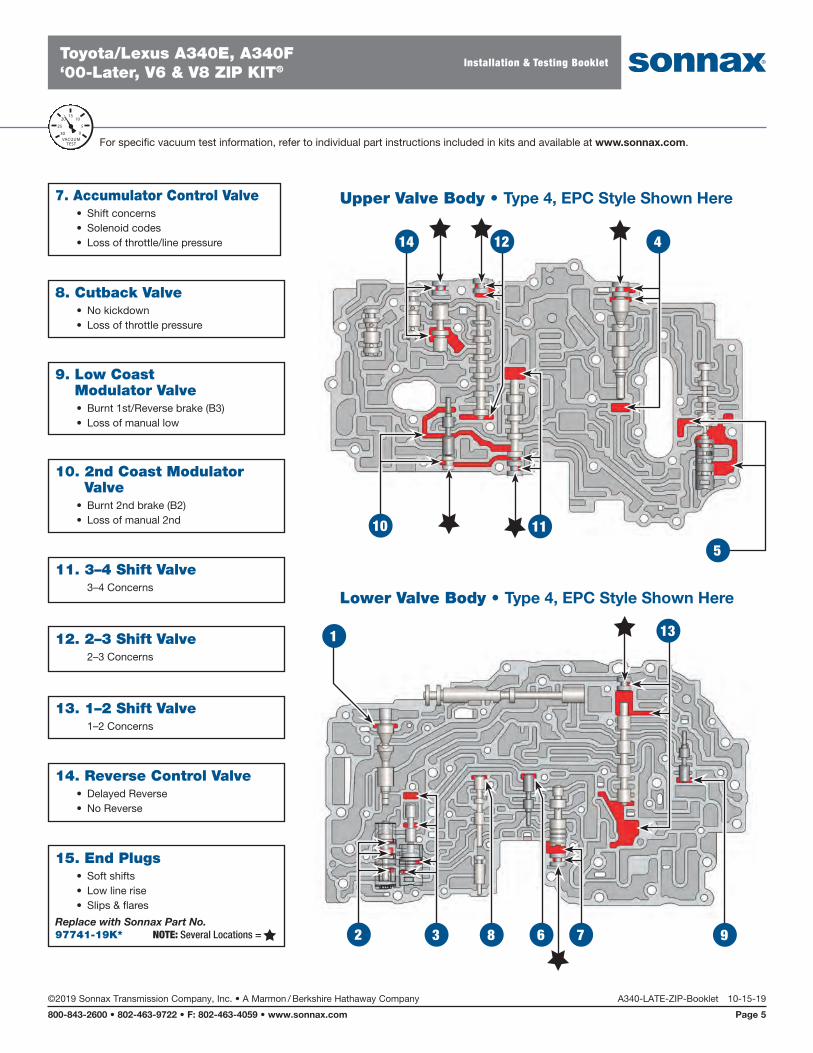
For specific vacuum test information, refer to individual part instructions included in kits and available at www.sonnax.com.
20
25
15
0
10
5
30VACUUMTEST
7. Accumulator Control Valve• Shift concerns• Solenoid codes• Loss of throttle/line pressure
8. Cutback Valve• No kickdown• Loss of throttle pressure
9. Low Coast Modulator Valve• Burnt 1st/Reverse brake (B3)• Loss of manual low
10. 2nd Coast Modulator Valve
• Burnt 2nd brake (B2)• Loss of manual 2nd
11. 3–4 Shift Valve 3–4 Concerns
14. Reverse Control Valve• Delayed Reverse• No Reverse
15. End Plugs• Soft shifts• Low line rise• Slips & flares
Replace with Sonnax Part No.97741-19K* NOTE: Several Locations =
12. 2–3 Shift Valve 2–3 Concerns
13. 1–2 Shift Valve 1–2 Concerns
Lower Valve Body • Type 4, EPC Style Shown Here
Upper Valve Body • Type 4, EPC Style Shown Here
5
412
10 11
14
13
78 6
1
2 3 9
©2019 Sonnax Transmission Company, Inc. • A Marmon / Berkshire Hathaway Company A340-LATE-ZIP-Booklet 10-15-19
800-843-2600 • 802-463-9722 • F: 802-463-4059 • www.sonnax.com Page 5
Toyota/Lexus A340E, A340F‘00-Later, V6 & V8 ZIP KIT®
Installation & Testing Booklet

206 205
204
201
202
203
207
NOTE: Filters should be installed into the separator plate during assembly. The open end of the filter snaps into the plate opening.
OE Exploded ViewUpper & Lower Valve Body • Type 3, EPC Style Shown HereNOTE: Depending upon vehicle application, the OE springs shown may not be present.
Lower Valve Body Descriptions
I.D. No. Description201 Accumulator Control Valve
202 Secondary Modulator Valve
203 Cutback Valve
204Primary Regulator Valve & Boost Assembly
205 Converter Limit Valve
206 Manual Valve
207 1–2 Shift Valve
Lower Valve Body - Type 3
Upper Valve Body - Type 3
106
105
104
101
102
103
.250" dia.
.090" dia. Orifice
.150" dia. Orifice
Separator Plate
Upper Valve Body Descriptions
I.D. No. Description
101Lockup Relay Valve & Plunger Assembly
102 3–4 Shift Valve
103 2nd Coast Modulator Valve
104 Low Coast Modulator Valve
105 2–3 Shift Valve
106 Secondary Regulator Valve
Checkball Cautions & Notes
• Care should be taken during disassembly. Note location of checkballs as usage varies greatly!
• When determining when a checkball is required, the circuit orifice in the separator plate over that location will be about .090" dia. When no ball is required, the orifice will be about .150" dia.
• All checkballs are .218" dia. except where noted (.250" dia.).
10-15-19 A340-LATE-ZIP-Booklet ©2019 Sonnax Transmission Company, Inc. • A Marmon / Berkshire Hathaway Company
Page 6 800-843-2600 • 802-463-9722 • F: 802-463-4059 • www.sonnax.com
Toyota/Lexus A340E, A340F‘00-Later, V6 & V8 ZIP KIT®
Installation & Testing Booklet

Upper & Lower Valve Body • Type 4, EPC Style Shown HereNOTES: Depending upon vehicle application, the OE springs shown may not be present. Slight wormtrack difference and valve components will vary in throttle cable style valve bodies.
206
205
204**
201
202
203
209
208
207
Large Filter
Teardrop Filter
Small Filter
Lower Valve Body Descriptions
I.D. No. Description201 Accumulator Control Valve
202 Secondary Modulator Valve
203 Cutback Valve
204**TCC Control Valve & Plunger Assembly
205Primary Regulator Valve & Boost Assembly
206 Converter Limit Valve
207 Manual Valve
208 1–2 Shift Valve
209 Low Coast Modulator Valve**Not in all applications
Lower Valve Body - Type 4
108
106
101
103
102
104*
105*
107
.250" dia.
.090" dia. Orifice
.150" dia. OrificeSeparator
Plate
Upper Valve Body Descriptions
I.D. No. Description
101Lockup Relay Valve & Plunger Assembly
102 3–4 Shift Valve
103 2nd Coast Modulator Valve
104* Check Valve
105* Check Valve
106 Reverse Control Valve
107 2–3 Shift Valve
108 Secondary Regulator Valve*Not in throttle cable style.
Upper Valve Body - Type 4
Please review Checkball
Cautions & Notes as well as Filter Note on page 6 as they apply to both Type 3 & Type 4 valve bodies.
©2019 Sonnax Transmission Company, Inc. • A Marmon / Berkshire Hathaway Company A340-LATE-ZIP-Booklet 10-15-19
800-843-2600 • 802-463-9722 • F: 802-463-4059 • www.sonnax.com Page 7
Toyota/Lexus A340E, A340F‘00-Later, V6 & V8 ZIP KIT®
Installation & Testing Booklet
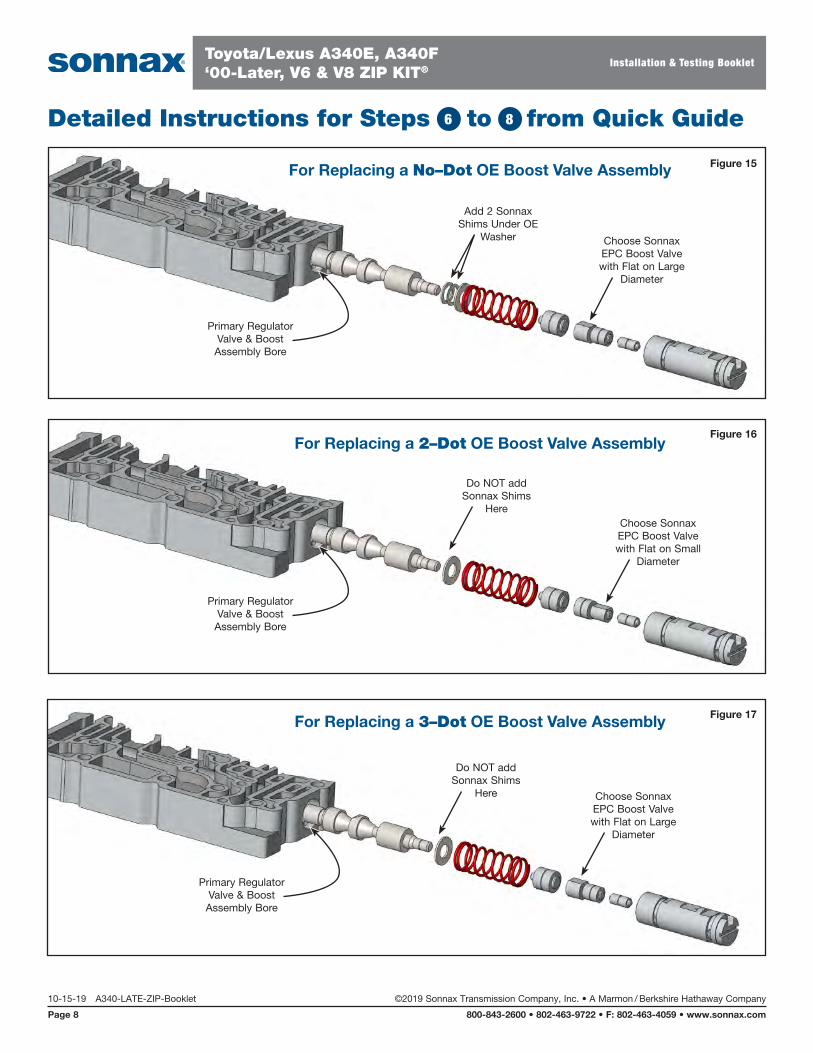
Detailed Instructions for Steps to from Quick Guide6 8
For Replacing a No–Dot OE Boost Valve Assembly
Add 2 Sonnax Shims Under OE
Washer Choose Sonnax EPC Boost Valve with Flat on Large
Diameter
Primary Regulator Valve & Boost Assembly Bore
Figure 15
For Replacing a 2–Dot OE Boost Valve Assembly
Do NOT add Sonnax Shims
HereChoose Sonnax EPC Boost Valve with Flat on Small
Diameter
Primary Regulator Valve & Boost Assembly Bore
Figure 16
For Replacing a 3–Dot OE Boost Valve Assembly
Do NOT add Sonnax Shims
Here Choose Sonnax EPC Boost Valve with Flat on Large
Diameter
Primary Regulator Valve & Boost Assembly Bore
Figure 17
10-15-19 A340-LATE-ZIP-Booklet ©2019 Sonnax Transmission Company, Inc. • A Marmon / Berkshire Hathaway Company
Page 8 800-843-2600 • 802-463-9722 • F: 802-463-4059 • www.sonnax.com
Toyota/Lexus A340E, A340F‘00-Later, V6 & V8 ZIP KIT®
Installation & Testing Booklet