Embed Size (px)
Citation preview
Register yournew device onMyBosch now andget free benefitsbosch-homecomwelcome
Washing machineWUU24T73ES
[en] User manual and installationinstructions
en
2
Table of contents1 Safety 411 General information 412 Intended use 413 Restriction on user group 414 Safe installation 515 Safe use 716 Safe cleaning and mainten-
ance 9
2 Preventing material damage 10
3 Environmental protection andsaving energy 11
31 Disposing of packaging 1132 Save energy and conserve
resources 1133 Energy saving mode 11
4 Installation and connection 1241 Unpacking the appliance 1242 Contents of package 1343 Requirements for the install-
ation location 1344 Removing the transit bolts 1445 Connecting the appliance 1646 Aligning the appliance 1747 Connecting the appliance to
the electricity supply 17
5 Familiarising yourself withyour appliance 18
51 Appliance 1852 Detergent drawer 1953 Controls 19
6 Display 20
7 Buttons 23
8 Programmes 24
9 Accessories 31
10 Before using for thefirst time 31
101 Starting an empty washingcycle 31
11 Laundry 32111 Preparing the laundry 32112 Sorting laundry 33113 Degrees of soiling 33114 Care symbols on the care
labels 34
12 Detergents and careproducts 34
121 Detergent recommendation 34122 Detergent dosage 35
13 Basic operation 36131 Switching on the appliance 36132 Setting a programme 36133 Adjusting the programme
settings 36134 Loading laundry 36135 Using a measuring aid for
liquid detergent 37136 Use the measuring aid for
liquid detergent 37137 Adding detergent and care
product 38138 Starting the programme 38139 Adjusting the Ready in
time before the programmestarts 38
1310 Soaking laundry 381311 Adding laundry 381312 Cancelling the pro-
gramme 391313 Resuming the programme
when the programmestatus is Rinse Hold 39
1314 Unloading the laundry 391315 Switching off the appli-
ance 39
en
3
14 Childproof lock 40141 Activating the childproof
lock 40142 Deactivating the childproof
lock 40
15 Basic settings 41151 Overview of the basic set-
tings 41152 Changing the basic set-
tings 42
16 Cleaning and servicing 42161 Tips on appliance care 42162 Cleaning the drum 42163 Cleaning the detergent
drawer 42164 Descaling 43165 Cleaning the drain pump 44166 Cleaning the water outlet
hose at the siphon 46167 Clean the water inlet filters 47
17 Troubleshooting 49
18 Transportation storage anddisposal 57
181 Removing the appliance 57182 Inserting the transit bolts 57183 Using the appliance again 58184 Disposing of old appliance 58
19 Customer Service 59191 Product number (E-Nr) and
production number (FD) 59
20 Consumption values 60
21 Technical specifications 61
enemspSafety
4
1 Safety
Observe the following safety instructions
11 General information
iexcl Read this instruction manual carefullyiexcl Keep the instruction manual and the product information safe
for future reference or for the next owneriexcl Do not connect the appliance if it has been damaged in transit
12 Intended useOnly use this applianceiexcl For washing machine-washable fabrics and hand-washable wool
in accordance with the care labeliexcl With tap water and commercially available detergents and care
products suitable for washing machinesiexcl In private households and in enclosed spaces in a domestic en-
vironmentiexcl Up to an altitude of max 4000 m above sea level
13 Restriction on user groupThis appliance may be used by children aged 8 or over and bypeople who have reduced physical sensory or mental abilities orinadequate experience andor knowledge provided that they aresupervised or have been instructed on how to use the appliancesafely and have understood the resulting dangersChildren must not play with the applianceCleaning and user maintenance must not be performed by chil-dren unless they are being supervisedKeep children under the age of 3 years and pets away from theappliance
Safetyemspen
5
14 Safe installationTake note of the safety instructions when installing the appliance
WARNING ‒ Risk of electric shockImproper installation is dangerous Connect and operate the appliance only in accordance with the
specifications on the rating plate Connect the appliance to a power supply with alternating cur-
rent only via a properly installed socket with earthing The protective conductor system of the domestic electrical in-
stallation must be properly installed The installation must havea sufficiently large cross section When using a residual current circuit breaker only use a type
with the mark Never equip the appliance with an external switching device
eg a timer or remote control When the appliance is installed the mains plug of the power
cord must be freely accessible If free access is not possible anall-pole isolating switch must be installed in the permanent elec-trical installation according to the installation regulations When installing the appliance check that the power cable is not
trapped or damagedIf the insulation of the power cord is damaged this is dangerous Never let the power cord come into contact with hot appliance
parts or heat sources Never let the power cord come into contact with sharp points or
edges Never kink crush or modify the power cord
WARNING ‒ Risk of fireIt is dangerous to use an extended power cord and non-approvedadapters Do not use extension cables or multiple socket strips If the power cord is too short contact Customer Service Only use adapters approved by the manufacturer
enemspSafety
6
WARNING ‒ Risk of injuryThe high weight of the appliance may result in injury when lifted Do not lift the appliance on your ownIf this appliance is not correctly installed in a washer-dryer stackthe installed appliance may fall Only stack the dryer on a washing machine using the connec-
tion kit from the dryer manufacturer No other installationmethod is permitted Do not install the appliance in a washer-dryer stack if the dryer
manufacturer does not offer a suitable connection kit Do not install appliances from different manufacturers and with
varying depths and widths in a washer-dryer stack Do not install a washer-dryer stack on a platform the appli-
ances may tip over
WARNING ‒ Risk of suffocationChildren may put packaging material over their heads or wrapthemselves up in it and suffocate Keep packaging material away from children Do not let children play with packaging material
CAUTION ‒ Risk of injuryThe appliance may vibrate or move when in use Place the appliance on a clean even solid surface Align the appliance using the appliance feet and a spirit levelIf hoses and power cords have been laid incorrectly this causes atripping hazard Lay hoses and power cords in such a way that there is no risk
of trippingIf the appliance is moved by holding onto protruding componentssuch as the appliance door the parts may break off Do not move the appliance by holding onto protruding parts
CAUTION ‒ Risk of cuttingTouching sharp edges on the appliance may lead to cuts Do not touch the sharp edges on the appliance
Safetyemspen
7
Wear protective gloves when installing and transporting the ap-pliance
15 Safe use
WARNING ‒ Risk of electric shockIf the appliance or the power cord is damaged this is dangerous Never operate a damaged appliance Never pull on the power cord to unplug the appliance Always
unplug the appliance at the mains If the appliance or the power cord is damaged immediately un-
plug the power cord or switch off the fuse in the fuse box andturn off the water tap Call customer services rarr Page 59An ingress of moisture can cause an electric shock Only use the appliance in enclosed spaces Never expose the appliance to intense heat or humidity Do not use steam- or high-pressure cleaners hoses or sprays
to clean the appliance
WARNING ‒ Risk of harm to healthChildren can lock themselves in the appliance thereby puttingtheir lives at risk Do not install the appliance behind a door as this may obstruct
the appliance door or prevent it from opening With redundant appliances unplug the power cord Then cut
through the cord and damage the lock on the appliance doorbeyond repair so that the appliance door will no longer close
WARNING ‒ Risk of suffocationChildren may breathe in or swallow small parts causing them tosuffocate Keep small parts away from children Do not let children play with small parts
enemspSafety
8
WARNING ‒ Risk of poisoningDetergents and care products may result in poisoning if con-sumed If accidentally swallowed seek medical advice Keep detergents and care products out of the reach of children
WARNING ‒ Risk of explosionLaundry that has been pretreated with cleaning agents that con-tain solvents may cause an explosion in the appliance Rinse pretreated laundry thoroughly with water before washing
CAUTION ‒ Risk of injuryThe covering plate may break if you stand on or climb onto theappliance Do not stand on or climb onto the applianceThe appliance may tip over if you sit on or lean against the opendoor Do not sit on or lean against the appliance door Do not place any objects on the appliance doorReaching into the drum while it is still turning may cause hand in-juries Wait for the drum to come to a complete stop before reaching
inside
CAUTION ‒ Risk of burnsWhen washing at high temperatures the glass in the appliancedoor becomes hot Do not touch the appliance door when it is hot Keep children away from the appliance door when it is hot
CAUTION ‒ Risk of scaldingWhen you wash at high temperatures the detergent solution getshot Do not touch the hot detergent solution
Safetyemspen
9
CAUTION ‒ Risk of chemical burnsIf the detergent drawer is opened detergent and care productsmay spray out from the appliance Contact with eyes or skin maycause irritation Rinse eyes andor skin thoroughly with clean water if they come
into contact with detergents or care products If accidentally swallowed seek medical advice Keep detergents and care products out of the reach of children
16 Safe cleaning and maintenanceTake note of the safety instructions when cleaning and performingmaintenance work on the appliance
WARNING ‒ Risk of electric shockIncorrect repairs are dangerous Repairs to the appliance should only be carried out by trained
specialist staff Only use genuine spare parts when repairing the appliance If the power cord of this appliance is damaged it must be re-
placed by the manufacturer the manufacturers Customer Ser-vice or a similarly qualified person in order to prevent any risk
An ingress of moisture can cause an electric shock Do not use steam- or high-pressure cleaners hoses or sprays
to clean the appliance
WARNING ‒ Risk of injuryThe use of non-original spare parts and non-original accessoriesis dangerous Only use the manufacturers original spare parts and original ac-
cessories
WARNING ‒ Risk of poisoningPoisonous fumes may be given off if you use cleaning agents thatcontain solvents Do not use cleaning agents that contain solvents
enemspPreventing material damage
10
Preventing material damage
2 Preventing materialdamage
Preventing material damage
Follow these instructions to avoid ma-terial damage and damage to the ap-pliance
ATTENTIONThe functionality of the appliancemay be impaired if you use thewrong quantity of fabric softener de-tergent care product or cleaningagent Follow the dosage recommenda-
tions from the manufacturerExceeding the maximum load capa-city impairs the function of the appli-ance Observe the maximum load capa-
city for each programme and donot exceed it rarr Programmes Page 24
The appliance is secured for trans-portation using transit bolts Transitbolts which have not been removedmay result in material damage anddamage to the appliance Before starting up the appliance
remove the transit bolts completelyand keep them in a safe place
Before transport fit the transit boltsfully in order to prevent damage intransit
Material damage may be caused ifthe water inlet hose is connected in-correctly Tighten the screw connections on
the water inlet until they are hand-tight
Ideally connect the water inlethose directly to the water tapwithout any additional connectingelements such as adapters exten-sions valves or similar
Ensure that the inner diameter ofthe water tap is at least 17 mm
Make sure that the length of thethread on the connection to thewater tap is at least 10 mm
If the water pressure is too high ortoo low the appliance may not beable to operate properly Ensure that the water pressure in
the water supply system is at least100 kPa (1 bar) and max1000 kPa (10 bar)
If the water pressure exceeds themaximum value specified a pres-sure-reducing valve must be in-stalled between the drinking waterconnection and the hose set of theappliance
Do not connect the appliance tothe mixer tap of an unpressurisedhot-water boiler
Modified or damaged water hosesmay result in material damage anddamage to the appliance Never kink crush modify or cut
through water hoses Only use the water hoses supplied
with the appliance or genuinespare hoses
Never re-use water hoses thathave been used before
Operating the appliance using waterthat is dirty or too hot may cause ma-terial damage Only operate the appliance with
cold mains waterUnsuitable cleaning products maydamage the surfaces of the appli-ance Do not use harsh or abrasive de-
tergents Do not use cleaning products with
a high alcohol content Do not use hard scouring pads or
cleaning sponges Clean the appliance with nothing
but water and a soft damp cloth
Environmental protection and saving energyemspen
11
Remove all detergent residuespray residue or other residues im-mediately if they come into contactwith the appliance
Environmental protection and saving energy
3 Environmental protec-tion and saving energy
Environmental protection and saving energy
31 Disposing of packagingThe packaging materials are environ-mentally compatible and can be re-cycled Sort the individual components by
type and dispose of them separ-ately
32 Save energy and con-serve resources
If you follow these instructions yourappliance will use less electricity andless water
Choose programmes with low tem-peratures and longer wash times anduse maximum load capacityrarr Page 24a Energy consumption and water
consumption is most efficient
Use the economy programme set-tingsa If you adjust the programme set-
tings for a programme the displayshows the expected consumption
Add rarr Page 35 detergent based onthe laundrys degree of soilinga For light to normal soiling a smal-
ler amount of detergent is suffi-cient Observe the dosage recom-mendation from the detergentmanufacturer
Reduce the washing temperature forlightly and normally soiled laundrya At low temperatures the appliance
consumes less energy For light tonormal soiling lower temperaturesthan indicated on the care labelare also sufficient
Set the maximum spin speed if youwant to dry the laundry in a tumbledryer afterwardsa The drier the laundry the shorter
the programme duration when dry-ing which in turn reduces energyconsumption A higher spin speedreduces the residual moisture inthe laundry and increases thevolume of the spin noise
Wash the laundry without prewasha Washing with prewash increases
the programme duration and in-creases energy and water con-sumption
The appliance has a continuousautomatic load adjustment functiona Depending on the type of fabric
and load capacity the continuousautomatic load adjustment func-tion optimally adjusts the waterconsumption and programme dur-ation
33 Energy saving modeIf you do not use the appliance for anextended period it automaticallyswitches to energy-saving mode Alldisplays go out and InicioPausa +Carga flashesEnergy-saving mode ends when youuse the appliance again eg if youopen or close the door
enemspInstallation and connection
12
Installation and connection
4 Installation and con-nection
Installation and connection
41 Unpacking the applianceNote Please read the information inthe Safety rarr Page 4 and Preventingmaterial damage rarr Page 10 sectionsto ensure that you use the appliancesafely
ATTENTIONObjects remaining in the drum thatare not designed for operation withthe appliance may cause materialdamage and damage to the appli-ance Remove these objects along with
all supplied accessories from thedrum before starting the appliance
1 Remove any packaging and pro-tective covers completely from theapplianceFor the environmentally friendlydisposal of the packaging materi-als observe the information on thetopic of rarr Disposing of packagingPage 11
2 Check the appliance for visibledamage
3 Open the door rarr Basic operation Page 36
4 Remove the accessory from thedrum
5 Close the door
Installation and connectionemspen
13
42 Contents of packageAfter unpacking all parts check for any damage in transit and completeness ofthe delivery
1 2 3
4
1 Washing machine
2 Accompanying documents
3 Water inlet hose
4 Cover caps
43 Requirements for the in-stallation location
Note Please read the information inthe Safety rarr Page 4 and Preventingmaterial damage rarr Page 10 sectionsto ensure that you use the appliancesafely
WARNINGRisk of electric shockThe appliance contains live partsTouching live parts is dangerous Do not operate the appliance
without a cover cap
WARNINGRisk of injuryWhen using the appliance on a basethe appliance may tip over Always secure the feet of the appli-
ance to a base using the manufac-turers fixing brackets rarr Page 31before using the appliance for thefirst time
enemspInstallation and connection
14
ATTENTIONIf the appliance is installed in areasexposed to frost or outdoors frozenresidual water may damage the appli-ance and frozen hoses may crack orsplit Do not install or operate this appli-
ance anywhere that is liable to ex-perience frost andor outdoors
The appliance underwent a functiontest before leaving the factory andmay therefore contain residual wa-ter This residual water may leak outif the appliance is tilted at an anglegreater than 40deg Tilt the appliance carefully
Installation loca-tion
Requirements
On a base Secure the appli-ance with fixingbracketsrarr Page 31
On a woodenjoist floor
Place the appli-ance on a water-resistant woodenboard which isscrewed tightly tothe floor Thewooden boardshould be atleast 30 mmthick
Installation loca-tion
Requirements
In a kitchen unit iexcl A niche widthof 60 cm is re-quired
iexcl Only install theappliance un-derneath acontinuousworktop that issecurely con-nected to adja-cent cabinets
Note If the cov-ering plate is re-moved the metalcovering plate rarr AccessoriesPage 31 mustbe secured be-fore installation
On a wall Do not trap thehoses betweenthe wall and theappliance
44 Removing the transitbolts
The appliance is secured for trans-portation using transit bolts on therear of the applianceNotesiexcl Please read the information in the
Safety rarr Page 4 and Preventingmaterial damage rarr Page 10 sec-tions to ensure that you use theappliance safely
iexcl Keep the transit bolts screws andsleeves in a safe place for futuretransport rarr Page 57
Installation and connectionemspen
15
1 Pull the hoses out of the holders
2 Unscrew and remove all fourscrews for the transit bolts with aWAF 13 wrench
3 Pull the power cord out of theholder
4 Remove the four sleeves
5 Put on the four cover caps
6 Press down on the four covercaps
enemspInstallation and connection
16
45 Connecting the applianceConnecting the water inlet hoseNoteiexcl Please read the information in the
Safety rarr Page 4 and Preventingmaterial damage rarr Page 10 sec-tions to ensure that you use theappliance safely
1 Connect the water inlet hose
2
1
2 Connect the water inlet hose to atap (264 mm = 34)
frac34˝min
min
10 mm
17 mm
3 Open the water tap carefully andcheck that the connection pointsare tight
Water outlet connection typesThis information is intended to helpyou to connect this appliance to thewater outlet
Note Please read the information inthe Safety rarr Page 4 and Preventingmaterial damage rarr Page 10 sectionsto ensure that you use the appliancesafely
ATTENTIONWhen draining the water outlet hoseis subject to water pressure and maycome loose from the installed con-nection point Secure the water outlet hose
against unintentional loosening
Note Observe the draining heightsThe maximum draining height is100 cm
Drainage into asiphon
Secure the con-nection point witha (24ndash40 mm)hose clamp
Drainage into awashbasin
Fix and securethe water outletusing an elbowrarr Page 31
Drainage into aplastic pipe withrubber sleeve orinto a gully
Fix and securethe water outletusing an elbowrarr Page 31
Installation and connectionemspen
17
46 Aligning the applianceIn order to reduce noise and vibra-tion and to prevent the appliancefrom moving align the appliance cor-rectlyNote Please read the information inthe Safety rarr Page 4 and Preventingmaterial damage rarr Page 10 sectionsto ensure that you use the appliancesafely1 Loosen the lock nuts using a WAF
17 wrench by turning it in a clock-wise direction
2 To align the appliance turn the ap-pliance feet Check that the appli-ance is level using a spirit level
All appliance feet must stand firmlyon the ground
3 Screw the lock nuts tightly againstthe housing using a WAF 17wrench
In doing so hold the foot tight anddo not adjust its height
47 Connecting the applianceto the electricity supply
Note Please read the information inthe Safety rarr Page 4 and Preventingmaterial damage rarr Page 10 sectionsto ensure that you use the appliancesafely1 Insert the mains plug of the appli-
ances power cable in a socketnearbyThe connection details of the appli-ance can be found under Tech-nical data rarr Page 61
2 Check the mains plug is insertedproperly
enemspFamiliarising yourself with your appliance
18
Familiarising yourself with your appliance
5 Familiarising yourself with your applianceFamiliarising yourself with your appliance
51 ApplianceYou can find an overview of the parts of your appliance here
1
2
4 73 6
88
5
On certain models specific details such as the colour and shape may differfrom those pictured
1 Maintenance flap for the drainpump rarr Page 44
2 Door
3 Detergent drawer rarr Page 19
4 Controls rarr Page 19
5 Covering plate
6 Water outlet hose rarr Page 16
7 Power cord rarr Page 17
8 Transit bolts rarr Page 14
Familiarising yourself with your applianceemspen
19
52 Detergent drawer
2
3
1
4
1 Measuring aid for liquid deter-gent rarr Using a measuring aid forliquid detergent Page 37
2 Compartment IIiexcl Detergent for main washiexcl Water softeneriexcl Bleachiexcl Stain remover
3 Compartment iexcl Fabric softeneriexcl Liquid starchiexcl Waterproofing agent
4 Compartment Iiexcl Detergent for prewashiexcl Hygiene detergent
53 ControlsYou can use the control panel to configure all functions of your appliance andto obtain information about the operating status
2 3
1 1
4
1 Programmes rarr Page 24
2 Programme selectorrarr Page 36
3 Display rarr Page 20
4 Buttons rarr Page 23
enemspDisplay
20
Display
6 DisplayDisplay
The display shows the current settings options or relevant information
Display Designation Description040 1 Programme dura-
tionprogrammetime remaining
Approximate expected programme dura-tion or programme time remaining
10h 1 Ready in time The programme end has been set and theremaining number of hours is displayed rarr Buttons Page 23
9 kg 1 Recommendedload
The maximum load capacity for the selec-ted programme in kg
ndash ndash ndash ndash -1200
Spin speed Set spin speed in rpm rarr Buttons Page 230= No final spin only drainingndash ndash ndash ndash Rinse Hold no draining
ndash 90 Temperature Set temperature in degC rarr Buttons Page 23
(cold)StartPause Start cancel or pause
iexcl Lights up The programme is runningand can be cancelled or paused
iexcl Flashes The programme can be star-ted or continued
Wash Programme status1 Example
Displayemspen
21
Display Designation DescriptionRinse Programme statusSpin Programme status
ndash ndash ndash ndash Rinse Hold Programme statusEnd End of pro-
grammeProgramme status
Childproof lock iexcl lights up The childproof lock is activ-ated
iexcl flashes The childproof lock is activatedand the appliance has been operated rarr Deactivating the childproof lockPage 40
Prewash Prewash is activated rarr Buttons Page 23
Water Plus andRinse Plus
Wash with more water and a rinse cycle isactivated rarr Buttons Page 23
SpeedPerfect Short wash activated rarr Buttons Page 23
1 Energy consump-tion
Energy consumption for the selected pro-grammeiexcl Low energy consumptioniexcl High energy consumption
Reminder to cleanthe drum
Flashes Drum is dirty Run the Limp tam-bor programme for cleaning and caringfor the drum and the outer tub rarr Cleaning the drum Page 42
Voltage controlsystem
Flashes The automatic voltage controlsystem detects impermissible voltagedrops This will pause the programmeNote The programme will continue whenthe voltage is permissible again
Voltage controlsystem
Flashes The programme has beenpaused because of impermissible voltagedrops The voltage is permissible againand the programme will continueNote The programme duration is exten-ded
1 Example
enemspDisplay
22
Display Designation DescriptionDoor iexcl Lights up The door is locked and can-
not be openediexcl Flashes The door is not closed prop-
erlyiexcl Off The door is unlocked and can be
openedTap iexcl No water pressure
iexcl The water pressure is too lowE35 -10 1 Error Error code error display signal1 Example
Buttonsemspen
23
Buttons
7 ButtonsButtons
The selection of programme settings depends on the programme that is setYou can see the selection options for each programme in the overview for rarr Programmes Page 24
Button Selection DescriptionInicioPausa +Carga (StartPause + Reload)
iexcl Startiexcl Canceliexcl Pause
Start cancel or pause the pro-gramme
SpeedPerfect iexcl Activateiexcl Deactivate
Activate or deactivate a short washingprogrammeNote Energy consumption increasesThe washing result is not affected bythis
Termin (ReadyIn)
1ndash24 hours Set the programme endThe programme duration is already in-cluded in the set number of hoursOnce the programme has started theprogramme duration is displayed
Temp degC (Tem-perature)
ndash 90 degC Adjust the temperature in degC
Centrif (Spin) ndash ndash ndash ndash - 1200 Adjust the spin speed or activate ndash ndash ndash ndash (Rinse Hold)If ndash ndash ndash ndash is selected the water is notdrained at the end of the washingcycle and the spin cycle is deactiv-ated The laundry remains in the waterused for rinsing
3 seg (ChildLock 3 sec)
iexcl Activateiexcl Deactivate
Activate or deactivate the childprooflockDisable the control panel to preventunwanted or accidental operationIf the childproof lock is activated andthe appliance has been switched offthe childproof lock remains activated rarr Childproof lock Page 40
Prelav (Pre-wash)
iexcl Activateiexcl Deactivate
Activate or deactivate prewash egfor washing heavily soiled laundry
Extra (ExtraRinse)
iexcl Activateiexcl Deactivate
Activate or deactivate a washing pro-gramme with more water and an addi-tional rinse cycleRecommended for particularly sensit-ive skin or in regions with very softwater
enemspProgrammes
24
Programmes 8 P
rogr
amm
esProgrammes B
elow
is a
n ov
ervi
ew o
f the
pro
gram
mes
You
can
find
info
rmat
ion
on the
load
and
on
the
adju
stab
le p
ro-
gram
me
optio
ns
Tip
The
laun
dry
s ca
re la
bels
pro
vide
you
with
add
ition
al in
form
atio
n on
pro
gram
me
sele
ctio
n
rarr
Car
e sy
mbo
ls o
n th
e ca
re la
bels
Pa
ge 3
4
Pro
gram
me
Des
crip
tion
Max load (kg)
Pro
gram
me
sett
ings
Max temperature (degC)
Max spin speed(rpm) 1
SpeedPerfect
Extra
Centrif ndash ndash ndash ndash(Rinse Hold)
Prelav
Alg
odoacuten
Al-
godatilde
o (
Cot
tons
)W
ash
hard
-wea
ring
item
s m
ade
from
cotto
n li
nen
or b
lend
ed fa
bric
sA
lso
suita
ble
as a
sho
rt p
rogr
amm
efo
r no
rmal
ly s
oile
d la
undr
y w
hen
you
activ
ate
Spe
edPer
fect
I
f Spe
ed-
Per
fect
is
act
ivat
ed t
he m
ax-
imum
load
cap
acity
is r
educ
ed to
5 k
g
990
1200
Alg
odoacuten
Col
orA
l-go
datildeo
Cor
(
Cot
-to
ns C
olou
r)
Was
h ha
rd-w
earin
g ite
ms
mad
e from
cotto
n li
nen
or b
lend
ed fa
bric
sEne
rgy-
savi
ng p
rogr
amm
e
9
90
1200
ndash
1Pro
gram
me
setti
ng
Programmesemspen
25
Pro
gram
me
Des
crip
tion
Max load (kg)
Pro
gram
me
sett
ings
Max temperature (degC)
Max spin speed(rpm) 1
SpeedPerfect
Extra
Centrif ndash ndash ndash ndash(Rinse Hold)
Prelav
Not
e T
o sa
ve e
nerg
y the
act
ual
was
hing
tem
pera
ture
may
dev
iate
from
the
set
was
hing
tem
pera
ture
Th
e w
ashi
ng p
erfo
rman
ce m
eets
lega
l req
uire
men
ts
Eco
40-6
0W
ash
item
s m
ade
from
cot
ton
line
nor
ble
nded
fabr
ics
Not
e T
extil
es w
hich
can
be
was
hed
from
40 deg
C
up
to 6
0 deg
C
as
per
the
care
sym
bol c
an b
e w
ashe
dto
geth
er
The
was
hing
per
form
ance
cor
res-
pond
s to
the
bes
t po
ssib
le w
ashi
ngpe
rfor
man
ce c
lass
acc
ordi
ng to
the
lega
l req
uire
men
ts
For
this
pro
gram
me
the
was
hing
tem
pera
ture
is a
utom
atic
ally
adj
uste
dde
pend
ing
on the
load
siz
e in
ord
erto
ach
ieve
the
bes
t po
ssib
le e
nerg
y
9
ndash
1200
ndash
1Pro
gram
me
setti
ng
enemspProgrammes
26
Pro
gram
me
Des
crip
tion
Max load (kg)
Pro
gram
me
sett
ings
Max temperature (degC)
Max spin speed(rpm) 1
SpeedPerfect
Extra
Centrif ndash ndash ndash ndash(Rinse Hold)
Prelav
effic
ienc
y w
ith the
bes
t po
ssib
lew
ashi
ng r
esul
t You
can
not ch
ange
the
was
hing
tem
pera
ture
Sin
teacutetic
os
(Eas
yC
are)
Was
h ite
ms
mad
e from
syn
thet
ic o
rbl
ende
d fa
bric
s4
60
1200
Mix
(
Mix
edFa
bric
s)W
ash
item
s m
ade
from
cot
ton
line
nor
syn
thet
ic o
r bl
ende
d fa
bric
sSui
tabl
e fo
r lig
htly
soi
led
laun
dry
460
1200
Del
icad
oSed
a (D
elic
ate
Silk
)W
ash
delic
ate
was
habl
e ite
ms
mad
efrom
silk
vis
cose
and
syn
thet
ics
Use
a d
eter
gent
tha
t is
sui
tabl
e fo
rde
licat
es o
r si
lk
Not
e W
ash
espe
cial
ly d
elic
ate
item
sor
item
s w
ith h
ooks
eye
lets
or
clip
sin
a m
esh
laun
dry
bag
2
40
800
ndash
1Pro
gram
me
setti
ng
Programmesemspen
27
Pro
gram
me
Des
crip
tion
Max load (kg)
Pro
gram
me
sett
ings
Max temperature (degC)
Max spin speed(rpm) 1
SpeedPerfect
Extra
Centrif ndash ndash ndash ndash(Rinse Hold)
Prelav
Lan
aLatilde
s (W
ool)
Han
d- o
r m
achi
ne-w
asha
ble
item
sth
at a
re m
ade
from
woo
l or
cont
ain
woo
lTo
pre
vent
the
laun
dry
from
shr
ink-
ing
the
dru
m m
oves
the
item
s ve
ryge
ntly
with
long
pau
ses
Use
a d
eter
gent
tha
t is
sui
tabl
e fo
rw
ool
2
40
800
ndash
ndash
ndash
(R
inse
)R
inse
s an
d th
en s
pins
the
laun
dry
and
then
dra
ins
the
wat
er
ndashndash
1200
ndash
ndash
(
Spi
nD
rain
)Spi
ns a
nd d
rain
s th
e w
ater
If
you
only
wan
t to
dra
in the
wat
er
activ
ate
0 T
he la
undr
y is
not
spu
n
ndash
ndash
1200
ndash
ndash
ndash
ndash
Rop
a os
cura
R
oupa
esc
ura
(Dar
k W
ash)
Was
h da
rk-c
olou
red
and
colo
ur-in
-te
nse
item
s m
ade
from
cot
ton
orea
sy-c
are
fabr
ic e
g j
eans
Tu
rn la
undr
y in
side
-out
bef
ore
was
h-in
gU
se li
quid
det
erge
nt
4
40
1200
1Pro
gram
me
setti
ng
enemspProgrammes
28
Pro
gram
me
Des
crip
tion
Max load (kg)
Pro
gram
me
sett
ings
Max temperature (degC)
Max spin speed(rpm) 1
SpeedPerfect
Extra
Centrif ndash ndash ndash ndash(Rinse Hold)
Prelav
Plu
mas
Pen
as
(Dow
n)W
ash
pillo
ws
duv
ets
or c
loth
ing
stuf
fed
with
dow
n an
d fil
lings
with
synt
hetic
fibr
es
Was
h la
rge
item
s se
para
tely
U
se a
det
erge
nt tha
t is
sui
tabl
e fo
rdo
wn
or d
elic
ates
U
se s
parin
gly
Do
not us
e fa
bric
sof
tene
rN
ote
To
prev
ent ex
cess
ive
foam
ing
rem
ove
air
from
laun
dry
item
s by
rolli
ng the
m u
p be
fore
you
was
hth
em
2
60
1200
ndash
ndash
Lim
p tam
bor
(Dru
m C
lean
)C
lean
ing
and
carin
g fo
r th
e dr
um
Use
thi
s pr
ogra
mm
e in
the
follo
win
gca
ses
iexclB
efor
e us
ing
the
appl
ianc
e fo
r th
efir
st tim
eiexcl
If yo
u re
gula
rly w
ash
at tem
pera
t-ur
es o
f 40 deg
C o
r lo
wer
ndash
ndash
1200
ndash
ndash
ndash
ndash
1Pro
gram
me
setti
ng
Programmesemspen
29
Pro
gram
me
Des
crip
tion
Max load (kg)
Pro
gram
me
sett
ings
Max temperature (degC)
Max spin speed(rpm) 1
SpeedPerfect
Extra
Centrif ndash ndash ndash ndash(Rinse Hold)
Prelav
iexclA
fter
a pr
olon
ged
perio
d of
non
-us
eU
se w
ashi
ng p
owde
r or
a d
eter
gent
cont
aini
ng b
leac
hH
alve
the
am
ount
of d
eter
gent
to
avoi
d fo
amin
gD
o no
t us
e fa
bric
sof
tene
rD
o no
t us
e liq
uid
dete
rgen
t or
det
er-
gent
tha
t is
inte
nded
for
woo
llens
or
delic
ates
N
ote
The
dru
m c
lean
ing
indi
cato
rw
ill fl
ash
to r
emin
d yo
u if
you
have
not us
ed a
pro
gram
me
at 6
0 deg
C o
rhi
gher
for
a lo
ng tim
eC
amis
asB
lusa
s (S
hirts
Blo
uses
)W
ash
non-
iron
shirt
s an
d bl
ouse
sm
ade
from
cot
ton
line
n s
ynth
etic
or
blen
ded
fabr
ics
Not
e U
se the
Del
icad
oSed
a pr
o-gr
amm
e to
was
h sh
irts
and
blou
ses
mad
e from
silk
or
delic
ate
fabr
ics
2
60
800
ndash
1Pro
gram
me
setti
ng
enemspProgrammes
30
Pro
gram
me
Des
crip
tion
Max load (kg)
Pro
gram
me
sett
ings
Max temperature (degC)
Max spin speed(rpm) 1
SpeedPerfect
Extra
Centrif ndash ndash ndash ndash(Rinse Hold)
Prelav
Spo
rt
Was
h sp
orts
and
leis
ure
item
s m
ade
from
syn
thet
ic fi
bres
mic
rofib
re o
rfle
ece
Use
a d
eter
gent
tha
t is
sui
tabl
e fo
rsp
orts
item
sD
o no
t us
e fa
bric
sof
tene
rTi
p U
se the
Sin
teacutetic
os
prog
ram
me
to w
ash
heav
ily s
oile
d la
undr
y
2
40
800
ndash
Raacutep
ido
153
0m
in
(Sup
erQ
uick
153
0 m
in)
Was
h ite
ms
mad
e from
cot
ton
syn
-th
etic
or
blen
ded
fabr
ics
Sho
rt p
rogr
amm
e fo
r sm
all i
tem
s of
light
ly s
oile
d la
undr
yTh
e pr
ogra
mm
e du
ratio
n is
app
rox
30 m
inut
es
If yo
u w
ish
to r
educ
e th
e pr
ogra
mm
edu
ratio
n to
15 m
inut
es a
ctiv
ate
Spe
edPer
fect
T
he m
axim
umlo
ad is
red
uced
to
2 k
g
4
40
1200
ndash
1Pro
gram
me
setti
ng
Accessoriesemspen
31
Accessories
9 AccessoriesAccessories
Use original accessories These have been made especially for your appliance
Use Order numberWater inlet hose exten-sion
Extend the water inlethose for cold water orAquaStop (approx 250m)
WMZ2381
Fixing brackets Improves the stability ofthe appliance
WMZ2200
Longer water inlet hose Replace the standardwater inlet hose with alonger hose (220 m)
00353925
Elbow Secure the water outlethose in place
00655300
Liquid detergent insert Measure liquid deter-gent
00605740
Metal covering plate Metal covering plate forinstalling the applianceunder a high worktop
WMZ20430
Before using for the first time
10 Before using for thefirst time
Before using for the first time
Prepare the appliance for use
101 Starting an empty wash-ing cycle
Your appliance was inspected thor-oughly before leaving the factory Toremove any residual water run thefirst wash cycle without any laundryNote Please read the information inthe Safety rarr Page 4 and Preventingmaterial damage rarr Page 10 sectionsto ensure that you use the appliancesafely
1 Turn the programme selector toLimp tambor
2 Close the door
enemspLaundry
32
3 Pull out the detergent drawer
4 Pour approx 1 litre of tap waterinto compartment II
5 Pour washing powder into com-partment II
To prevent foaming use only halfof the amount of detergent recom-mended by the detergent manufac-turer for light soiling Do not usedetergent suitable for woollens ordelicates
6 Push in the detergent drawer
7 Press InicioPausa + Carga (StartPause + Reload) to start theprogramme
a The display shows the remainingprogramme duration
a After the programme has endedthe display shows End
8 Start the first wash cycle or set theprogramme selector to to switchoff the appliance rarr Basic operation Page 36
Laundry
11 LaundryLaundry
111 Preparing the laundryNote Please read the information inthe Safety rarr Page 4 and Preventingmaterial damage rarr Page 10 sectionsto ensure that you use the appliancesafely
ATTENTIONObjects remaining in the laundry maydamage the laundry and the drum Remove all items from any pock-
ets in your laundry before usingthe appliance
To protect your appliance and thelaundry prepare the laundry be-forehandndash Empty any pockets
Laundryemspen
33
ndash Brush sand out of all collars andpockets
ndash Close bed covers and cushioncovers
ndash Close all zips Velcro fastenershooks and eyes
ndash Tie cloth belts apron stringsetc together or use a laundrybag
ndash Remove curtain hooks and leadstrips or use a mesh laundrybag
ndash Use a mesh laundry bag forsmall items of laundry such aschildrens socks
ndash Some stubborn or dried-in stainscan be removed by washingseveral times
ndash Wash large and small items oflaundry together
ndash Do not rub fresh stains but dabthem with soapy water
ndash Separate items of laundry andshake them out
112 Sorting laundryNote Please read the information inthe Safety rarr Page 4 and Preventingmaterial damage rarr Page 10 sectionsto ensure that you use the appliancesafely To improve washing results and
prevent discolouration sort thelaundry according to the followingcriteria before washingndash Type of fabric and fibre
Wash laundry of the sametype of fabric and fibre to-gether
ndash Care symbols on the care labelsrarr Page 34
ndash Description of the programmesrarr Page 24
ndash Whitesndash Colours
Wash new coloured itemsseparately the first time youwash them
113 Degrees of soiling
Degree of soiling Soiling ExamplesLight iexcl No dirt or stains are vis-
ibleiexcl Laundry has absorbed
odours
Light summer clothing orsports clothing that hasbeen worn for a just a fewhours
Normal Dirt or light stains are vis-ible
iexcl T-shirts shirts or blousesare sweat-soaked orhave been worn a fewtimes
iexcl Towels or bedding thathas been used for up toone week
Heavy Dirt or stains are clearlyvisible
Tea towels baby items orwork clothing
enemspDetergents and care products
34
114 Care symbols on the care labels
Washing care symbols
Symbol Washing process Recommended pro-gramme
Normal Cotton Gentle Easy-Care Particularly gentle DelicatesSilk for
washing by handHand wash WoolNot suitable for machine-washing ndash
Detergents and care products
12 Detergents and careproducts
Detergents and care products
Note Please read the information inthe Safety rarr Page 4 and Preventingmaterial damage rarr Page 10 sectionsto ensure that you use the appliancesafelyThe manufacturers instructions foruse and dosage can be found on thepackaging
Notesiexcl Only use liquid detergents that are
self-flowingiexcl Do not mix different liquid deter-
gentsiexcl Do not mix detergent and fabric
softeneriexcl Do not use products that have ex-
pired or are highly congealediexcl Do not use products containing
solvents caustic agents or volatilesubstances (eg bleach)
iexcl Use dyes sparingly as salt maydamage stainless steel
iexcl Do not use bleaching agents in theappliance
121 Detergent recommendation
Detergent Fabrics Pro-gramme
Temperature
Standard detergentwith optical brighten-ers
Heat-resistant whitefabrics made fromcotton or linen
Cotton From cold up to90 degC
Detergent for colourswithout bleach or op-tical brighteners
Coloured fabricsmade from linen orcotton
Cotton From cold up to60 degC
Detergent for col-oursdelicates withoutoptical brighteners
Coloured fabricsmade from easy-carefabrics or syntheticmaterials
Easy-Care From cold up to60 degC
Detergents and care productsemspen
35
Detergent Fabrics Pro-gramme
Temperature
Detergent for delic-ates
Delicate fine textilessilk or viscose
DelicatesSilk
From cold up to40 degC
Detergent for wool-lens
Wool Wool From cold up to40 degC
Tip Visit wwwcleanrighteu to findfurther information on detergentscare products and cleaning agentsfor domestic use
122 Detergent dosageThe detergent dosage depends oniexcl The amount of laundryiexcl Degree of soilingiexcl Water hardness
You can find out how hard yourwater is from your local water com-pany or measure it yourself usinga water hardness tester
Water hardness
Hardness range Total hardness in mmoll
German degrees in degdH
soft (I) 0ndash15 0ndash84medium (II) 15ndash 25 84ndash14hard (III) over 25 over 14
Example of a manufacturersinstructions for detergentThese example values refer to astandard load of 4ndash5 kg
Soiling Light Normal HeavyWater hardness Softmedium 40 ml 55 ml 80 mlWater hardness Hardveryhard
55 ml 80 ml 105 ml
The dosages can be found on themanufacturers packagingiexcl Adjust the dosage to the actual
load
enemspBasic operation
36
Basic operation
13 Basic operationBasic operation
131 Switching on the appli-ance
Turn the programme selector to aprogramme
132 Setting a programme1 Set the programme selector to the
required programme rarr Programmes Page 24
2 If necessary adjust the pro-gramme settings rarr Page 36
133 Adjusting the pro-gramme settings
Requirement A programme hasbeen set rarr Setting a programme Page 36
Adjust the programme settings rarr Programmes Page 24
Note The programme settings arenot saved permanently for the pro-gramme
134 Loading laundryNotesiexcl Please read the information in the
Safety rarr Page 4 and Preventingmaterial damage rarr Page 10 sec-tions to ensure that you use theappliance safely
iexcl To prevent creasing take note ofthe maximum load for the rarr Programmes Page 24
Requirement The laundry is pre-pared and sortedrarr Laundry Page 321 Open the door
Make sure that the drum is empty2 Load the laundry unfolded into the
drum3 Close the door
Ensure that there is no laundrytrapped in the door
Basic operationemspen
37
135 Using a measuring aidfor liquid detergent
If you order the measuring aid as anaccessory you must use the measur-ing aid1 Pull out the detergent drawer
2 Press down on the insert and re-move the detergent drawer
1
2
3 Insert the measuring aid
4 Insert the detergent drawer
136 Use the measuring aidfor liquid detergent
To add liquid detergent you can usea measuring aid in the detergentdrawer1 Pull out the detergent drawer2 Slide the measuring aid forwards
3 Fold the measuring aid down andclick it into place
enemspBasic operation
38
4 Push in the detergent drawer
137 Adding detergent andcare product
Notesiexcl Please read the information in the
Safety rarr Page 4 and Preventingmaterial damage rarr Page 10 sec-tions to ensure that you use theappliance safely
iexcl Do not use the measuring aid forliquid detergent for gel detergentswashing powder or if Prewash orReady in time are activated
Requirement Find out the optimumdosage for detergent and careproduct rarr Page 341 Pull out the detergent drawer2 Pour in detergent
rarr Detergent drawer Page 193 If required add the care product4 Push in the detergent drawer
138 Starting the programmeNote If you want to change the timeuntil the programme ends set theReady in time first Press InicioPausa + Carga a The drum rotates and load detec-
tion takes place This can take upto 2 minutes after which waterenters the drum
a The display shows either the pro-gramme duration or the Ready intime
a After the programme has endedthe display shows End
139 Adjusting the Ready intime before the pro-gramme starts
You can readjust the selected Readyin time before the programme starts1 Press InicioPausa + Carga 2 Press Termin repeatedly until
the display indicates the desiredReady in time
3 Press InicioPausa + Carga
1310 Soaking laundryNote No additional detergent is re-quired The washing solution is thenused for washing1 Start the programme2 To pause the programme after ap-
prox 10 minutes press InicioPausa + Carga
3 To resume the programme afterthe desired soaking time pressInicioPausa + Carga
1311 Adding laundryNote Please read the information inthe Safety rarr Page 4 and Preventingmaterial damage rarr Page 10 sectionsto ensure that you use the appliancesafely1 Press InicioPausa + Carga
The appliance is paused andchecks whether it is possible toadd or remove laundry Take noteof the programme status
2 Add or remove laundry3 Close the door4 Press InicioPausa + Carga
Basic operationemspen
39
1312 Cancelling the pro-gramme
Once the programme has startedyou can cancel it at any timeNote Please read the information inthe Safety rarr Page 4 and Preventingmaterial damage rarr Page 10 sectionsto ensure that you use the appliancesafely1 Press InicioPausa + Carga 2 Open the door
The appliance door remainslocked for safety reasons if thetemperature and water levels arehighndash If the temperature is high start
the programmendash If the water level is high Start
the or programme3 Remove the laundry
1313 Resuming the pro-gramme when the pro-gramme status is RinseHold
1 Set the or programme2 Press InicioPausa + Carga
1314 Unloading the laundryNote Please read the information inthe Safety rarr Page 4 and Preventingmaterial damage rarr Page 10 sectionsto ensure that you use the appliancesafely1 Open the door
2 Remove the laundry
1315 Switching off the appli-ance
1 Turn the programme selector to
2 Turn off the tap3 Wipe the rubber gasket dry and re-
move any foreign objects
4 Leave the door and detergentdrawer open so that residual watercan evaporate
enemspChildproof lock
40
Childproof lock
14 Childproof lockChildproof lock
Secure your appliance against beingoperated unintentionally using thecontrols
141 Activating the childprooflock
Press and hold the two 3 segbuttons for approx 3 seconds
a The display shows a The controls are lockeda The childproof lock remains active
even after the appliance has beenswitched off
142 Deactivating the child-proof lock
Requirement To deactivate thechildproof lock the appliance mustbe switched on Press and hold the two 3 seg
buttons for approx 3 secondsa goes out in the display
Basic settingsemspen
41
Basic settings
15 Basic settingsBasic settings
You can configure the appliance to meet your needs
151 Overview of the basic settingsBelow is an overview of the basic settings on your appliance
Basic setting Programmeposition
Value Description
End signal 2 0 (off)1 (quiet)2 (me-dium)3 (loud)4 (veryloud)
Set the volume of the signal at theend of the programme
Button signal 3 0 (off)1 (quiet)2 (me-dium)3 (loud)4 (veryloud)
The volume of the audible signalemitted when the buttons arepressed
Drum cleaningreminder
4 ONOFF
Activate or deactivate the re-minder to clean the drum
enemspCleaning and servicing
42
152 Changing the basic set-tings
1 Set the programme selector to po-sition 1
2 Press InicioPausa + Carga and at the same time turn theprogramme selector to position 2
a The display shows the currentvalue
3 Set the programme selector to therequired position
4 To change the value press Ter-min
5 To save the changes switch offthe appliance
Cleaning and servicing
16 Cleaning and servi-cing
Cleaning and servicing
To keep your appliance working effi-ciently for a long time it is importantto clean and maintain it carefully
161 Tips on appliance careWipe down thehousing and thecontrol panelwith nothing butwater and adamp cloth
This ensures theparts of the appli-ance will remainclean and hy-gienic
Remove all de-tergent residuespray residue orother residuesimmediately
Fresh depositsare easier to re-move withoutleaving anyresidue
Keep the appli-ance door anddetergent draweropen after use
This allows theresidual water todry reducingodours in the ap-pliance
162 Cleaning the drum
CAUTIONRisk of injuryPermanently washing at low temper-atures and a lack of ventilation forthe appliance may damage the drumand cause injury Regularly run a programme for
cleaning the drum or wash at tem-peratures of at least 60 degC
Leave the appliance to dry afterevery operation with the dooropen and leave the detergentdrawer to dry
Run the Limp tambor pro-gramme without laundryAdd washing powder
163 Cleaning the detergentdrawer
Note Please read the information inthe Safety rarr Page 4 and Preventingmaterial damage rarr Page 10 sectionsto ensure that you use the appliancesafely1 Pull out the detergent drawer
Cleaning and servicingemspen
43
2 Press down on the insert and re-move the detergent drawer
1
2
3 Press out the insert upwards frombelow
4 Clean the detergent drawer and in-sert with water and a brush andthen dry them
5 Fit the insert and lock it into place
6 Cleaning the opening for the deter-gent drawer
7 Push in the detergent drawer
164 Descaling
ATTENTIONThe use of unsuitable descalingagents eg for coffee machines maydamage the appliance For this appliance only use de-
scaling agents that are availablefrom the manufacturers website orour after-sales service
enemspCleaning and servicing
44
165 Cleaning the drain pumpClean the drain pump in the event offaults eg blockages or rattlingnoises
Emptying the drain pumpNote Please read the information inthe Safety rarr Page 4 and Preventingmaterial damage rarr Page 10 sectionsto ensure that you use the appliancesafely1 Turn off the water tap2 Switch off the appliance3 Disconnect the appliances mains
plug from the power supply4 Open the maintenance flap
5 Remove the maintenance flap
6 Slide a sufficiently large receptacleunder the opening
7 Take the drain hose out of theholder
Cleaning and servicingemspen
45
8 CAUTION - Risk of scaldingWhen you wash at high temperat-ures the detergent solution getshot
Do not touch the hot detergentsolutionTo allow the detergent solution toflow out into the container removethe sealing cap
9 Firmly press on the sealing cap
10 Insert the drain hose into theholder
Cleaning the drain pumpNote Please read the information inthe Safety rarr Page 4 and Preventingmaterial damage rarr Page 10 sectionsto ensure that you use the appliancesafelyRequirement The drain pump isempty rarr Page 441 Since water may remain in the
drain pump remove the pump capcarefully
2 Clean the interior the thread onthe pump cap and the pump hous-ing
3 Make sure that the impeller in thedrain pump can be rotated
enemspCleaning and servicing
46
4 Insert the pump cap and screw iton as far as it will go
90deg
The handle on the pump cap mustbe in a vertical position
5 Close the maintenance flap
Before the next washTo prevent unused detergent fromflowing straight into the outlet in thenext wash run the programmeafter you have emptied the drainpump1 Turn on the tap2 Insert the mains plug3 Switch on the appliance4 Pour 1 litre of water into compart-
ment II5 Start the programme
166 Cleaning the water outlethose at the siphon
1 Switch off the appliance2 Disconnect the appliances mains
plug from the power supply
3 Loosen the hose clamp and care-fully remove the water outlet hose
Residual water may leak out4 Clean the water outlet hose and si-
phon connecting piece
5 Reattach the water outlet hose andsecure the connection point usingthe hose clamp
Cleaning and servicingemspen
47
167 Clean the water inlet fil-ters
Emptying the water inlet hose1 Turn off the tap2 Set a programme except for
or 3 Start the programme and leave it
to run for approx 40 seconds4 Switch off the appliance5 Disconnect the appliances mains
plug from the power supply
Cleaning the filter on the tapNote Please read the information inthe Safety rarr Page 4 and Preventingmaterial damage rarr Page 10 sectionsto ensure that you use the appliancesafelyRequirement The water inlet hose isempty1 Remove the water inlet hose from
the tap
2 Clean the filter with a small brush
3 Connect the water inlet hose andcheck for leaks
Cleaning the filter on theapplianceNote Please read the information inthe Safety rarr Page 4 and Preventingmaterial damage rarr Page 10 sectionsto ensure that you use the appliancesafelyRequirement The water inlet hose isempty rarr Emptying the water inlet hosePage 47
enemspCleaning and servicing
48
1 Disconnect the hose from the rearof the appliance
1
2
2 Use pliers to remove the filter
3 Clean the filter with a small brush
4 Reinsert the filter
5 Connect the hose and check forleaks
2
1
Troubleshootingemspen
49
Troubleshooting
17 TroubleshootingTroubleshooting
You can rectify minor faults on your appliance yourself Read the troubleshoot-ing information before contacting after-sales service This will avoid unneces-sary costs
WARNINGRisk of electric shockIncorrect repairs are dangerous Repairs to the appliance should only be carried out by trained specialist
staff Only use genuine spare parts when repairing the appliance If the power cord of this appliance is damaged it must be replaced by the
manufacturer the manufacturers Customer Service or a similarly qualifiedperson in order to prevent any risk
Fault Cause and troubleshootingThe display goes outand InicioPausa +Carga flashes
Energy-saving mode is active Press any buttona The symbol lights up again
E36 -10 Drain pipe or water outlet hose is blocked Clean the drain pipe and the water outlet hose
Drain pipe or water drain hose is caught or jammed Ensure that the drain pipe and water drain hose are
not kinked or trapped
Drain pump is blocked rarr Cleaning the drain pump Page 44
The water outlet hose is connected too high Install the water outlet hose at a maximum height of
1 metre
Detergent dosage is too high Immediate measure Mix one tablespoon of fabric
softener with 05 litres of water and pour the mix-ture into the left-hand compartment (not for outdoorclothing sportswear or items stuffed with down)
Reduce the amount of detergent for the next wash-ing cycle with the same load
Unapproved extension installed on the water drainhose Remove any unapproved extensions from the water
hose Connecting the appliance
E36 -25 -26 Drain pump is blocked rarr Cleaning the drain pump Page 44
enemspTroubleshooting
50
Fault Cause and troubleshootingThe water pressure is lowNo remedial action possibleThe filters in the water inflow are blocked Clean the filters in the water inflow rarr Page 47
The tap is turned off Turn on the tap
The water inlet hose is kinked or jammed Ensure that the water inlet hose is not kinked or
jammed
flashes The automatic voltage control system detects an un-authorised voltage under-usage No remedial action possible
Note If the power supply is stable the programmecontinues to run as normalVoltage under-usage may cause extension of a pro-grammeNo remedial action possible
flashes Voltage under-usage may cause extension of a pro-grammeNo remedial action possible
lights up The temperature is too high Wait until the temperature has dropped rarr Cancelling the programme Page 39
Water level is too high Start the programme
Laundry is caught in the door1 Open the door again2 Remove any trapped laundry3 Close the door4 Press InicioPausa + Carga to start the pro-
gramme
flashes Door is not closed1 Close the door2 Press InicioPausa + Carga to start the pro-
gramme
All other error codes Malfunction Call the after-sales service
rarr Customer Service Page 59
Troubleshootingemspen
51
Fault Cause and troubleshootingThe appliance is notworking
The mains plug of the power cord is not plugged in Connect the appliance to the power supply
The circuit breaker is faulty Check the circuit breaker in the fuse box
There has been a power cut Check whether the lighting in your kitchen or other
appliances are working
The programme doesnot start
You have not pressed InicioPausa + Carga Press InicioPausa + Carga
Door is not closed1 Close the door2 Press InicioPausa + Carga to start the pro-
gramme
Childproof lock is activated rarr Deactivating the childproof lock Page 40
Termin is activated Check whether Termin is activated
rarr Buttons Page 23
Laundry is caught in the door1 Open the door again2 Remove any trapped laundry3 Close the door4 Press InicioPausa + Carga to start the pro-
gramme
The door cannotbe opened
ndash ndash ndash ndash is activated Continue the programme by selecting or and
pressing InicioPausa + Carga rarr Resuming the programme when the programmestatus is Rinse Hold Page 39
The temperature is too high Wait until the temperature has dropped rarr Cancelling the programme Page 39
Water level is too high Start the programme
Power failure Open the door using the emergency release
rarr Emergency release Page 57
The water is not drain-ing
Drain pipe or water outlet hose is blocked Clean the drain pipe and the water outlet hose
enemspTroubleshooting
52
Fault Cause and troubleshootingThe water is not drain-ing
Drain pipe or water drain hose is caught or jammed Ensure that the drain pipe and water drain hose are
not kinked or trapped
Drain pump is blocked rarr Cleaning the drain pump Page 44
ndash ndash ndash ndash is activated Continue the programme by selecting or and
pressing InicioPausa + Carga rarr Resuming the programme when the programmestatus is Rinse Hold Page 39
The water outlet hose is connected too high Install the water outlet hose at a maximum height of
1 metre
Detergent dosage is too high Immediate measure Mix one tablespoon of fabric
softener with 05 litres of water and pour the mix-ture into the left-hand compartment (not for outdoorclothing sportswear or items stuffed with down)
Reduce the amount of detergent for the next wash-ing cycle with the same load
Unapproved extension installed on the water drainhose Remove any unapproved extensions from the water
hose Connecting the appliance
Water is not flowingin Detergent is notbeing dispensed
You have not pressed InicioPausa + Carga Press InicioPausa + Carga
The filters in the water inflow are blocked Clean the filters in the water inflow rarr Page 47
The tap is turned off Turn on the tap
The water inlet hose is kinked or jammed Ensure that the water inlet hose is not kinked or
jammed
The spin cycle runsseveral times
The unbalanced load detection system eliminates animbalance by repeatedly redistributing the laundry Not a fault ndash no action required
Note When loading where possible place large andsmall items of laundry together in the drum Differentsized items of laundry distribute themselves betterduring the spin cycle
Troubleshootingemspen
53
Fault Cause and troubleshootingThe programme dura-tion changes duringthe wash cycle
The programme operation is optimised electronicallyThis may change the programme duration Not a fault ndash no action required
The unbalanced load detection system eliminates animbalance by repeatedly redistributing the laundry Not a fault ndash no action required
Note When loading where possible place large andsmall items of laundry together in the drum Differentsized items of laundry distribute themselves betterduring the spin cycleFoam detection system switches on a rinse cycle iffoam build-up is too high Not a fault ndash no action required
No water is visible inthe drum
Water is below the visible area Not a fault ndash no action required Do not add any extra water to the appliance while it
is operating
Drum jerks after theprogramme starts
This is caused by an internal motor test Not a fault ndash no action required
Residual water ispresent in the com-partment
Insert in compartment is blocked rarr Cleaning the detergent drawer Page 42
Vibrations and move-ment of the appliancewhilst spinning
Appliance is not correctly aligned Aligning the appliance
The appliance feet are not fixed Secure the appliance feet Aligning the appliance
Transit bolts have not been removed Removing the transit bolts
Drum does not turnwater does not flow in
Load detection is active Not a fault ndash no action required
Note The load detection can take up to two minutesHeavy foam build-up Detergent dosage is too high
Immediate measure Mix one tablespoon of fabricsoftener with 05 litres of water and pour the mix-ture into the left-hand compartment (not for outdoorclothing sportswear or items stuffed with down)
Reduce the amount of detergent for the next wash-ing cycle with the same load
enemspTroubleshooting
54
Fault Cause and troubleshootingHigh spin speed notreached
A low spin speed is selected The next time you run a wash cycle set a higher
spin speed
Unbalance load detection system is using a reducedspin speed to eliminate an unbalance Redistribute the laundry in the drum
Note Where possible mix large and small items inthe drum Different sized items of laundry distributethemselves better during the spin cycle Start the programme
The spin programmedoes not start
Drain pipe or water outlet hose is blocked Clean the drain pipe and the water outlet hose
Drain pipe or water drain hose is caught or jammed Ensure that the drain pipe and water drain hose are
not kinked or trapped
The unbalanced load detection system has interruptedthe spin cycle because the laundry is unevenly distrib-uted Redistribute the laundry in the drum
Note Where possible mix large and small items inthe drum Different sized items of laundry distributethemselves better during the spin cycle Start the programme
Rushing hissingnoise
Water is flushed under pressure into the detergentdrawer Not a fault ndash normal operating noise
Loud noises duringthe spin cycle
Appliance is not correctly aligned Aligning the appliance
The appliance feet are not fixed Secure the appliance feet Aligning the appliance
Transit bolts have not been removed Removing the transit bolts
Banging noises rat-tling in the drainpump
Foreign bodies have got into the drain pump rarr Cleaning the drain pump Page 44
Slurping rhythmicalsuction noise
The drain pump is active the detergent solution ispumped out Not a fault ndash normal operating noise
Troubleshootingemspen
55
Fault Cause and troubleshootingCreasing The spin speed is too high
The next time you run a wash cycle set a lowerspin speed
The load is too large The next time you run a wash cycle reduce the
amount of laundry being loaded
The wrong programme is selected for the type of fab-ric Select the programmes that are suitable for the
type of fabric rarr Programmes Page 24
Detergent or fabricsoftener drips off theseal and collects onthe door or in the sealfold
Too much detergentfabric softener in the detergentdrawer When dosing liquid detergent and fabric softener
observe the marking in the detergent drawer anddo not dose above this
The spin result is notsatisfactory The laun-dry is too wettoodamp
A low spin speed is selected The next time you run a wash cycle set a higher
spin speed Start the programme
Drain pipe or water outlet hose is blocked Clean the drain pipe and the water outlet hose
Drain pipe or water drain hose is caught or jammed Ensure that the drain pipe and water drain hose are
not kinked or trapped
The unbalanced load detection system has interruptedthe spin cycle because the laundry is unevenly distrib-uted Redistribute the laundry in the drum
Note Where possible mix large and small items inthe drum Different sized items of laundry distributethemselves better during the spin cycle Start the programme
Unbalance load detection system is using a reducedspin speed to eliminate an unbalance Redistribute the laundry in the drum
Note Where possible mix large and small items inthe drum Different sized items of laundry distributethemselves better during the spin cycle Start the programme
enemspTroubleshooting
56
Fault Cause and troubleshootingDetergent residue onthe damp washing
Detergents may contain water-insoluble substancesthat deposit on the laundry Start the programme
Detergent residue onthe dry laundry
Detergents may contain water-insoluble substancesthat deposit on the laundry Brush out the laundry after washing and drying
Water is leaking out atthe water inlet hose
Water inlet hose is not correctlysecurely connected1 Connect the water supply hose correctly Connect-
ing the water inlet hose2 Tighten the screw connection
Water is leaking out atthe water outlet hose
The water outlet hose is damaged Replace the damaged water outlet hose
Water outlet hose is not connected correctly Connect the water outlet hose correctly Water out-
let connection types
Odours have formedin the appliance
Humidity and detergent residue may promote theformation of bacteria rarr Cleaning the drum Page 42 If you are not using the appliance leave the door
and detergent drawer open so that residual watercan evaporate
Transportation storage and disposalemspen
57
171 Emergency releaseReleasing the doorRequirement The drain pump isempty rarr Page 441 ATTENTION Escaping water may
cause material damage Do not open the door if you can
see water through the glassPull the emergency release down-wards with a tool and release
a The door lock is released2 Insert the maintenance flap and
lock it into place3 Close the maintenance flap
Transportation storage and disposal
18 Transportation stor-age and disposal
Transportation storage and disposal
You can find out here how to prepareyour appliance for transportation andstorage You will also find out how todispose of old appliances
181 Removing the appliance1 Turn off the tap2 rarr Emptying the water inlet hose
Page 473 Switch off the appliance4 Unplug the appliances mains plug
5 Drain the remaining detergentsolution rarr Cleaning the drain pumpPage 44
6 Detach the hoses
182 Inserting the transitbolts
Secure the appliance for transporta-tion using transit bolts in order to pre-vent damage1 Remove the four cover caps
‒ If necessary use a screwdriverto remove the cover caps
Keep the cover caps2 Insert the four sleeves
enemspTransportation storage and disposal
58
3 Insert all screws into the fourtransit bolts and tighten slightly
4 Insert the power cord into theholder and tighten all fourscrews for the transit bolts with aWAF 13 wrench
5 Insert the hose into holder
183 Using the applianceagain
1 Remove the transit bolts
2 Pour approx 1 litre of water intocompartment II in the detergentdrawer
3 Start the programmea The unused detergent cannot flow
straight into the outlet during thenext wash
184 Disposing of old appli-ance
Valuable raw materials can be re-used by recycling
WARNINGRisk of harm to healthChildren can lock themselves in theappliance thereby putting their livesat risk Do not install the appliance behind
a door as this may obstruct the ap-pliance door or prevent it fromopening
With redundant appliances unplugthe power cord Then cut throughthe cord and damage the lock onthe appliance door beyond repairso that the appliance door will nolonger close
1 Unplug the appliance from themains
2 Cut through the power cord3 Dispose of the appliance in an en-
vironmentally friendly mannerInformation about current disposalmethods are available from yourspecialist dealer or local authority
This appliance is la-belled in accordancewith European Directive201219EU concerningused electrical and elec-
Customer Serviceemspen
59
tronic appliances (wasteelectrical and electronicequipment - WEEE)The guideline determ-ines the framework forthe return and recyclingof used appliances asapplicable throughoutthe EU
Customer Service
19 Customer ServiceCustomer Service
If you have any queries on use areunable to rectify faults on the appli-ance yourself or if your applianceneeds to be repaired contact Cus-tomer ServiceYou can solve many problems your-self by consulting the information ontroubleshooting in these instructionsor on our website If this is not thecase contact our after-sales serviceWith any warranty claims we willmake sure that your appliance is re-paired by trained after-sales techni-cians using genuine spare parts in-cluding after the manufacturers war-ranty has expiredFunction-relevant genuine spare partsaccording to the corresponding Eco-design Order can be obtained fromCustomer Service for a period of atleast 10 years from the date onwhich your appliance was placed onthe market within the European Eco-nomic AreaNote Under the terms of the manu-facturers warranty the use of Cus-tomer Service is free of chargeDetailed information on the warrantyperiod and terms of warranty in yourcountry is available from our after-sales service your retailer or on ourwebsite
If you contact Customer Service youwill require the product number (E-Nr) and the production number (FD)of your applianceThe contact details for Customer Ser-vice can be found in the enclosedCustomer Service directory or on ourwebsite
191 Product number (E-Nr)and production number(FD)
You can find the product number (E-Nr) and the production number (FD)on the appliances rating plateDepending on the model the ratingplate is locatediexcl On the inside of the dooriexcl On the inside of the maintenance
flapiexcl On the rear of the applianceMake a note of your appliances de-tails and the Customer Service tele-phone number to find them againquickly
enemspConsumption values
60
Consumption values
20 Consumption valuesConsumption values
The following information is provided in accordance with the EU EcodesignRegulation The values given for programs other than the Eco 40-60 are indicat-ive only and were determined in accordance with the applicable standardEN60456
Programme Load(kg)
Pro-gramme dura-tion(hrmin)1
Energycon-sump-tion(kWhcycle)1
Watercon-sump-tion (lcycle)1
Max-imumtemper-ature(degC) 5mins1
Spinspeed(rpm)1
Resid-ualmois-ture()1
Eco 40-602 90 337 1245 610 50 1166 5000Eco 40-602 45 252 0590 450 33 1200 5000Eco 40-602 25 233 0195 300 24 1200 5400AlgodoacutenAl-godatildeo 20 degC
90 328 0370 900 23 1200 5400
AlgodoacutenAl-godatildeo 40 degC
90 328 1350 900 45 1200 5400
AlgodoacutenAl-godatildeo 60 degC
90 328 1450 900 55 1200 5400
AlgodoacutenAl-godatildeo 40 degC + Pre-lav
90 358 1400 1020 45 1200 5400
Sinteacuteticos 40 degC
40 228 0780 610 44 1200 2700
Mix 40 degC 40 059 0620 440 41 1200 5600 LanaLatildes
30 degC20 040 0200 400 22 800 2500
1 Due to the influence of water pressure hardness and inlet temperature am-bient temperature type amount and soiling of laundry detergent used fluc-tuations in the power supply and the selected additional functions the actualvalues may deviate from the stated values
2 Test programme in accordance with the EU Ecodesign Directive and the EUEnergy Labelling Regulation with cold water (15 degC)
Technical specificationsemspen
61
Technical specifications
21 Technical specifica-tions
Technical specifications
Facts and figures for your appliancecan be found here
Appliance height 850 cmAppliance width 598 cmAppliance depth 590 cmWeight 80 kg1
Maximum load 9 kgMains voltage 220 - 240 V
50 Hz Minimum in-
stallation protec-tion
10 A
Rated power 2300 WPower consump-tion
iexcl Off mode010 W
iexcl Left-on mode050 W
Water pressure iexcl Minimum100 kPa(1 bar)
iexcl Maximum1000 kPa(10 bar)
Length of the wa-ter inlet hose
150 cm
Length of the wa-ter outlet hose
150 cm
Length of thepower cord
160 cm
1 Depending on the appliance spe-cifications
More information about your modelcan be found online at httpsen-ergylabelbsh-groupcom1 This webaddress is linked to the official EUEPREL product database At the time
of printing its web address had notyet been published Please then fol-low the instructions on searching formodels The model identifier is madeup of the characters before the slashin the product number (E-Nr) on therating plate Alternatively you canalso find the model identifier in thefirst line of the EU energy label
1 Only applies to countries in the European Economic Area
Thank you for buying aBosch Home Appliance
Register your new device on MyBosch now and profit directly from
bull Expert tips amp tricks for your appliancebull Warranty extension optionsbull Discounts for accessories amp spare-partsbull Digital manual and all appliance data at handbull Easy access to Bosch Home Appliances Service
Free and easy registration ndash also on mobile phoneswwwbosch-homecomwelcome
Looking for help Youll find it here
Expert advice for your Bosch home appliances help with problems or a repair from Bosch experts Find out everything about the many ways Bosch can support you wwwbosch-homecomservice Contact data of all countries are listed in the attached service direct-ory
90016102699001610269emsp(010219)en
Robert Bosch Hausgeraumlte GmbHCarl-Wery-Straszlige 3481739 MuumlnchenGERMANYwwwbosch-homecom
Valid within Great BritainImported to Great Britain byBSH Home Appliances LtdGrand Union HouseOld Wolverton RoadWolverton Milton KeynesMK12 5PTUnited Kingdom
en
2
Table of contents1 Safety 411 General information 412 Intended use 413 Restriction on user group 414 Safe installation 515 Safe use 716 Safe cleaning and mainten-
ance 9
2 Preventing material damage 10
3 Environmental protection andsaving energy 11
31 Disposing of packaging 1132 Save energy and conserve
resources 1133 Energy saving mode 11
4 Installation and connection 1241 Unpacking the appliance 1242 Contents of package 1343 Requirements for the install-
ation location 1344 Removing the transit bolts 1445 Connecting the appliance 1646 Aligning the appliance 1747 Connecting the appliance to
the electricity supply 17
5 Familiarising yourself withyour appliance 18
51 Appliance 1852 Detergent drawer 1953 Controls 19
6 Display 20
7 Buttons 23
8 Programmes 24
9 Accessories 31
10 Before using for thefirst time 31
101 Starting an empty washingcycle 31
11 Laundry 32111 Preparing the laundry 32112 Sorting laundry 33113 Degrees of soiling 33114 Care symbols on the care
labels 34
12 Detergents and careproducts 34
121 Detergent recommendation 34122 Detergent dosage 35
13 Basic operation 36131 Switching on the appliance 36132 Setting a programme 36133 Adjusting the programme
settings 36134 Loading laundry 36135 Using a measuring aid for
liquid detergent 37136 Use the measuring aid for
liquid detergent 37137 Adding detergent and care
product 38138 Starting the programme 38139 Adjusting the Ready in
time before the programmestarts 38
1310 Soaking laundry 381311 Adding laundry 381312 Cancelling the pro-
gramme 391313 Resuming the programme
when the programmestatus is Rinse Hold 39
1314 Unloading the laundry 391315 Switching off the appli-
ance 39
en
3
14 Childproof lock 40141 Activating the childproof
lock 40142 Deactivating the childproof
lock 40
15 Basic settings 41151 Overview of the basic set-
tings 41152 Changing the basic set-
tings 42
16 Cleaning and servicing 42161 Tips on appliance care 42162 Cleaning the drum 42163 Cleaning the detergent
drawer 42164 Descaling 43165 Cleaning the drain pump 44166 Cleaning the water outlet
hose at the siphon 46167 Clean the water inlet filters 47
17 Troubleshooting 49
18 Transportation storage anddisposal 57
181 Removing the appliance 57182 Inserting the transit bolts 57183 Using the appliance again 58184 Disposing of old appliance 58
19 Customer Service 59191 Product number (E-Nr) and
production number (FD) 59
20 Consumption values 60
21 Technical specifications 61
enemspSafety
4
1 Safety
Observe the following safety instructions
11 General information
iexcl Read this instruction manual carefullyiexcl Keep the instruction manual and the product information safe
for future reference or for the next owneriexcl Do not connect the appliance if it has been damaged in transit
12 Intended useOnly use this applianceiexcl For washing machine-washable fabrics and hand-washable wool
in accordance with the care labeliexcl With tap water and commercially available detergents and care
products suitable for washing machinesiexcl In private households and in enclosed spaces in a domestic en-
vironmentiexcl Up to an altitude of max 4000 m above sea level
13 Restriction on user groupThis appliance may be used by children aged 8 or over and bypeople who have reduced physical sensory or mental abilities orinadequate experience andor knowledge provided that they aresupervised or have been instructed on how to use the appliancesafely and have understood the resulting dangersChildren must not play with the applianceCleaning and user maintenance must not be performed by chil-dren unless they are being supervisedKeep children under the age of 3 years and pets away from theappliance
Safetyemspen
5
14 Safe installationTake note of the safety instructions when installing the appliance
WARNING ‒ Risk of electric shockImproper installation is dangerous Connect and operate the appliance only in accordance with the
specifications on the rating plate Connect the appliance to a power supply with alternating cur-
rent only via a properly installed socket with earthing The protective conductor system of the domestic electrical in-
stallation must be properly installed The installation must havea sufficiently large cross section When using a residual current circuit breaker only use a type
with the mark Never equip the appliance with an external switching device
eg a timer or remote control When the appliance is installed the mains plug of the power
cord must be freely accessible If free access is not possible anall-pole isolating switch must be installed in the permanent elec-trical installation according to the installation regulations When installing the appliance check that the power cable is not
trapped or damagedIf the insulation of the power cord is damaged this is dangerous Never let the power cord come into contact with hot appliance
parts or heat sources Never let the power cord come into contact with sharp points or
edges Never kink crush or modify the power cord
WARNING ‒ Risk of fireIt is dangerous to use an extended power cord and non-approvedadapters Do not use extension cables or multiple socket strips If the power cord is too short contact Customer Service Only use adapters approved by the manufacturer
enemspSafety
6
WARNING ‒ Risk of injuryThe high weight of the appliance may result in injury when lifted Do not lift the appliance on your ownIf this appliance is not correctly installed in a washer-dryer stackthe installed appliance may fall Only stack the dryer on a washing machine using the connec-
tion kit from the dryer manufacturer No other installationmethod is permitted Do not install the appliance in a washer-dryer stack if the dryer
manufacturer does not offer a suitable connection kit Do not install appliances from different manufacturers and with
varying depths and widths in a washer-dryer stack Do not install a washer-dryer stack on a platform the appli-
ances may tip over
WARNING ‒ Risk of suffocationChildren may put packaging material over their heads or wrapthemselves up in it and suffocate Keep packaging material away from children Do not let children play with packaging material
CAUTION ‒ Risk of injuryThe appliance may vibrate or move when in use Place the appliance on a clean even solid surface Align the appliance using the appliance feet and a spirit levelIf hoses and power cords have been laid incorrectly this causes atripping hazard Lay hoses and power cords in such a way that there is no risk
of trippingIf the appliance is moved by holding onto protruding componentssuch as the appliance door the parts may break off Do not move the appliance by holding onto protruding parts
CAUTION ‒ Risk of cuttingTouching sharp edges on the appliance may lead to cuts Do not touch the sharp edges on the appliance
Safetyemspen
7
Wear protective gloves when installing and transporting the ap-pliance
15 Safe use
WARNING ‒ Risk of electric shockIf the appliance or the power cord is damaged this is dangerous Never operate a damaged appliance Never pull on the power cord to unplug the appliance Always
unplug the appliance at the mains If the appliance or the power cord is damaged immediately un-
plug the power cord or switch off the fuse in the fuse box andturn off the water tap Call customer services rarr Page 59An ingress of moisture can cause an electric shock Only use the appliance in enclosed spaces Never expose the appliance to intense heat or humidity Do not use steam- or high-pressure cleaners hoses or sprays
to clean the appliance
WARNING ‒ Risk of harm to healthChildren can lock themselves in the appliance thereby puttingtheir lives at risk Do not install the appliance behind a door as this may obstruct
the appliance door or prevent it from opening With redundant appliances unplug the power cord Then cut
through the cord and damage the lock on the appliance doorbeyond repair so that the appliance door will no longer close
WARNING ‒ Risk of suffocationChildren may breathe in or swallow small parts causing them tosuffocate Keep small parts away from children Do not let children play with small parts
enemspSafety
8
WARNING ‒ Risk of poisoningDetergents and care products may result in poisoning if con-sumed If accidentally swallowed seek medical advice Keep detergents and care products out of the reach of children
WARNING ‒ Risk of explosionLaundry that has been pretreated with cleaning agents that con-tain solvents may cause an explosion in the appliance Rinse pretreated laundry thoroughly with water before washing
CAUTION ‒ Risk of injuryThe covering plate may break if you stand on or climb onto theappliance Do not stand on or climb onto the applianceThe appliance may tip over if you sit on or lean against the opendoor Do not sit on or lean against the appliance door Do not place any objects on the appliance doorReaching into the drum while it is still turning may cause hand in-juries Wait for the drum to come to a complete stop before reaching
inside
CAUTION ‒ Risk of burnsWhen washing at high temperatures the glass in the appliancedoor becomes hot Do not touch the appliance door when it is hot Keep children away from the appliance door when it is hot
CAUTION ‒ Risk of scaldingWhen you wash at high temperatures the detergent solution getshot Do not touch the hot detergent solution
Safetyemspen
9
CAUTION ‒ Risk of chemical burnsIf the detergent drawer is opened detergent and care productsmay spray out from the appliance Contact with eyes or skin maycause irritation Rinse eyes andor skin thoroughly with clean water if they come
into contact with detergents or care products If accidentally swallowed seek medical advice Keep detergents and care products out of the reach of children
16 Safe cleaning and maintenanceTake note of the safety instructions when cleaning and performingmaintenance work on the appliance
WARNING ‒ Risk of electric shockIncorrect repairs are dangerous Repairs to the appliance should only be carried out by trained
specialist staff Only use genuine spare parts when repairing the appliance If the power cord of this appliance is damaged it must be re-
placed by the manufacturer the manufacturers Customer Ser-vice or a similarly qualified person in order to prevent any risk
An ingress of moisture can cause an electric shock Do not use steam- or high-pressure cleaners hoses or sprays
to clean the appliance
WARNING ‒ Risk of injuryThe use of non-original spare parts and non-original accessoriesis dangerous Only use the manufacturers original spare parts and original ac-
cessories
WARNING ‒ Risk of poisoningPoisonous fumes may be given off if you use cleaning agents thatcontain solvents Do not use cleaning agents that contain solvents
enemspPreventing material damage
10
Preventing material damage
2 Preventing materialdamage
Preventing material damage
Follow these instructions to avoid ma-terial damage and damage to the ap-pliance
ATTENTIONThe functionality of the appliancemay be impaired if you use thewrong quantity of fabric softener de-tergent care product or cleaningagent Follow the dosage recommenda-
tions from the manufacturerExceeding the maximum load capa-city impairs the function of the appli-ance Observe the maximum load capa-
city for each programme and donot exceed it rarr Programmes Page 24
The appliance is secured for trans-portation using transit bolts Transitbolts which have not been removedmay result in material damage anddamage to the appliance Before starting up the appliance
remove the transit bolts completelyand keep them in a safe place
Before transport fit the transit boltsfully in order to prevent damage intransit
Material damage may be caused ifthe water inlet hose is connected in-correctly Tighten the screw connections on
the water inlet until they are hand-tight
Ideally connect the water inlethose directly to the water tapwithout any additional connectingelements such as adapters exten-sions valves or similar
Ensure that the inner diameter ofthe water tap is at least 17 mm
Make sure that the length of thethread on the connection to thewater tap is at least 10 mm
If the water pressure is too high ortoo low the appliance may not beable to operate properly Ensure that the water pressure in
the water supply system is at least100 kPa (1 bar) and max1000 kPa (10 bar)
If the water pressure exceeds themaximum value specified a pres-sure-reducing valve must be in-stalled between the drinking waterconnection and the hose set of theappliance
Do not connect the appliance tothe mixer tap of an unpressurisedhot-water boiler
Modified or damaged water hosesmay result in material damage anddamage to the appliance Never kink crush modify or cut
through water hoses Only use the water hoses supplied
with the appliance or genuinespare hoses
Never re-use water hoses thathave been used before
Operating the appliance using waterthat is dirty or too hot may cause ma-terial damage Only operate the appliance with
cold mains waterUnsuitable cleaning products maydamage the surfaces of the appli-ance Do not use harsh or abrasive de-
tergents Do not use cleaning products with
a high alcohol content Do not use hard scouring pads or
cleaning sponges Clean the appliance with nothing
but water and a soft damp cloth
Environmental protection and saving energyemspen
11
Remove all detergent residuespray residue or other residues im-mediately if they come into contactwith the appliance
Environmental protection and saving energy
3 Environmental protec-tion and saving energy
Environmental protection and saving energy
31 Disposing of packagingThe packaging materials are environ-mentally compatible and can be re-cycled Sort the individual components by
type and dispose of them separ-ately
32 Save energy and con-serve resources
If you follow these instructions yourappliance will use less electricity andless water
Choose programmes with low tem-peratures and longer wash times anduse maximum load capacityrarr Page 24a Energy consumption and water
consumption is most efficient
Use the economy programme set-tingsa If you adjust the programme set-
tings for a programme the displayshows the expected consumption
Add rarr Page 35 detergent based onthe laundrys degree of soilinga For light to normal soiling a smal-
ler amount of detergent is suffi-cient Observe the dosage recom-mendation from the detergentmanufacturer
Reduce the washing temperature forlightly and normally soiled laundrya At low temperatures the appliance
consumes less energy For light tonormal soiling lower temperaturesthan indicated on the care labelare also sufficient
Set the maximum spin speed if youwant to dry the laundry in a tumbledryer afterwardsa The drier the laundry the shorter
the programme duration when dry-ing which in turn reduces energyconsumption A higher spin speedreduces the residual moisture inthe laundry and increases thevolume of the spin noise
Wash the laundry without prewasha Washing with prewash increases
the programme duration and in-creases energy and water con-sumption
The appliance has a continuousautomatic load adjustment functiona Depending on the type of fabric
and load capacity the continuousautomatic load adjustment func-tion optimally adjusts the waterconsumption and programme dur-ation
33 Energy saving modeIf you do not use the appliance for anextended period it automaticallyswitches to energy-saving mode Alldisplays go out and InicioPausa +Carga flashesEnergy-saving mode ends when youuse the appliance again eg if youopen or close the door
enemspInstallation and connection
12
Installation and connection
4 Installation and con-nection
Installation and connection
41 Unpacking the applianceNote Please read the information inthe Safety rarr Page 4 and Preventingmaterial damage rarr Page 10 sectionsto ensure that you use the appliancesafely
ATTENTIONObjects remaining in the drum thatare not designed for operation withthe appliance may cause materialdamage and damage to the appli-ance Remove these objects along with
all supplied accessories from thedrum before starting the appliance
1 Remove any packaging and pro-tective covers completely from theapplianceFor the environmentally friendlydisposal of the packaging materi-als observe the information on thetopic of rarr Disposing of packagingPage 11
2 Check the appliance for visibledamage
3 Open the door rarr Basic operation Page 36
4 Remove the accessory from thedrum
5 Close the door
Installation and connectionemspen
13
42 Contents of packageAfter unpacking all parts check for any damage in transit and completeness ofthe delivery
1 2 3
4
1 Washing machine
2 Accompanying documents
3 Water inlet hose
4 Cover caps
43 Requirements for the in-stallation location
Note Please read the information inthe Safety rarr Page 4 and Preventingmaterial damage rarr Page 10 sectionsto ensure that you use the appliancesafely
WARNINGRisk of electric shockThe appliance contains live partsTouching live parts is dangerous Do not operate the appliance
without a cover cap
WARNINGRisk of injuryWhen using the appliance on a basethe appliance may tip over Always secure the feet of the appli-
ance to a base using the manufac-turers fixing brackets rarr Page 31before using the appliance for thefirst time
enemspInstallation and connection
14
ATTENTIONIf the appliance is installed in areasexposed to frost or outdoors frozenresidual water may damage the appli-ance and frozen hoses may crack orsplit Do not install or operate this appli-
ance anywhere that is liable to ex-perience frost andor outdoors
The appliance underwent a functiontest before leaving the factory andmay therefore contain residual wa-ter This residual water may leak outif the appliance is tilted at an anglegreater than 40deg Tilt the appliance carefully
Installation loca-tion
Requirements
On a base Secure the appli-ance with fixingbracketsrarr Page 31
On a woodenjoist floor
Place the appli-ance on a water-resistant woodenboard which isscrewed tightly tothe floor Thewooden boardshould be atleast 30 mmthick
Installation loca-tion
Requirements
In a kitchen unit iexcl A niche widthof 60 cm is re-quired
iexcl Only install theappliance un-derneath acontinuousworktop that issecurely con-nected to adja-cent cabinets
Note If the cov-ering plate is re-moved the metalcovering plate rarr AccessoriesPage 31 mustbe secured be-fore installation
On a wall Do not trap thehoses betweenthe wall and theappliance
44 Removing the transitbolts
The appliance is secured for trans-portation using transit bolts on therear of the applianceNotesiexcl Please read the information in the
Safety rarr Page 4 and Preventingmaterial damage rarr Page 10 sec-tions to ensure that you use theappliance safely
iexcl Keep the transit bolts screws andsleeves in a safe place for futuretransport rarr Page 57
Installation and connectionemspen
15
1 Pull the hoses out of the holders
2 Unscrew and remove all fourscrews for the transit bolts with aWAF 13 wrench
3 Pull the power cord out of theholder
4 Remove the four sleeves
5 Put on the four cover caps
6 Press down on the four covercaps
enemspInstallation and connection
16
45 Connecting the applianceConnecting the water inlet hoseNoteiexcl Please read the information in the
Safety rarr Page 4 and Preventingmaterial damage rarr Page 10 sec-tions to ensure that you use theappliance safely
1 Connect the water inlet hose
2
1
2 Connect the water inlet hose to atap (264 mm = 34)
frac34˝min
min
10 mm
17 mm
3 Open the water tap carefully andcheck that the connection pointsare tight
Water outlet connection typesThis information is intended to helpyou to connect this appliance to thewater outlet
Note Please read the information inthe Safety rarr Page 4 and Preventingmaterial damage rarr Page 10 sectionsto ensure that you use the appliancesafely
ATTENTIONWhen draining the water outlet hoseis subject to water pressure and maycome loose from the installed con-nection point Secure the water outlet hose
against unintentional loosening
Note Observe the draining heightsThe maximum draining height is100 cm
Drainage into asiphon
Secure the con-nection point witha (24ndash40 mm)hose clamp
Drainage into awashbasin
Fix and securethe water outletusing an elbowrarr Page 31
Drainage into aplastic pipe withrubber sleeve orinto a gully
Fix and securethe water outletusing an elbowrarr Page 31
Installation and connectionemspen
17
46 Aligning the applianceIn order to reduce noise and vibra-tion and to prevent the appliancefrom moving align the appliance cor-rectlyNote Please read the information inthe Safety rarr Page 4 and Preventingmaterial damage rarr Page 10 sectionsto ensure that you use the appliancesafely1 Loosen the lock nuts using a WAF
17 wrench by turning it in a clock-wise direction
2 To align the appliance turn the ap-pliance feet Check that the appli-ance is level using a spirit level
All appliance feet must stand firmlyon the ground
3 Screw the lock nuts tightly againstthe housing using a WAF 17wrench
In doing so hold the foot tight anddo not adjust its height
47 Connecting the applianceto the electricity supply
Note Please read the information inthe Safety rarr Page 4 and Preventingmaterial damage rarr Page 10 sectionsto ensure that you use the appliancesafely1 Insert the mains plug of the appli-
ances power cable in a socketnearbyThe connection details of the appli-ance can be found under Tech-nical data rarr Page 61
2 Check the mains plug is insertedproperly
enemspFamiliarising yourself with your appliance
18
Familiarising yourself with your appliance
5 Familiarising yourself with your applianceFamiliarising yourself with your appliance
51 ApplianceYou can find an overview of the parts of your appliance here
1
2
4 73 6
88
5
On certain models specific details such as the colour and shape may differfrom those pictured
1 Maintenance flap for the drainpump rarr Page 44
2 Door
3 Detergent drawer rarr Page 19
4 Controls rarr Page 19
5 Covering plate
6 Water outlet hose rarr Page 16
7 Power cord rarr Page 17
8 Transit bolts rarr Page 14
Familiarising yourself with your applianceemspen
19
52 Detergent drawer
2
3
1
4
1 Measuring aid for liquid deter-gent rarr Using a measuring aid forliquid detergent Page 37
2 Compartment IIiexcl Detergent for main washiexcl Water softeneriexcl Bleachiexcl Stain remover
3 Compartment iexcl Fabric softeneriexcl Liquid starchiexcl Waterproofing agent
4 Compartment Iiexcl Detergent for prewashiexcl Hygiene detergent
53 ControlsYou can use the control panel to configure all functions of your appliance andto obtain information about the operating status
2 3
1 1
4
1 Programmes rarr Page 24
2 Programme selectorrarr Page 36
3 Display rarr Page 20
4 Buttons rarr Page 23
enemspDisplay
20
Display
6 DisplayDisplay
The display shows the current settings options or relevant information
Display Designation Description040 1 Programme dura-
tionprogrammetime remaining
Approximate expected programme dura-tion or programme time remaining
10h 1 Ready in time The programme end has been set and theremaining number of hours is displayed rarr Buttons Page 23
9 kg 1 Recommendedload
The maximum load capacity for the selec-ted programme in kg
ndash ndash ndash ndash -1200
Spin speed Set spin speed in rpm rarr Buttons Page 230= No final spin only drainingndash ndash ndash ndash Rinse Hold no draining
ndash 90 Temperature Set temperature in degC rarr Buttons Page 23
(cold)StartPause Start cancel or pause
iexcl Lights up The programme is runningand can be cancelled or paused
iexcl Flashes The programme can be star-ted or continued
Wash Programme status1 Example
Displayemspen
21
Display Designation DescriptionRinse Programme statusSpin Programme status
ndash ndash ndash ndash Rinse Hold Programme statusEnd End of pro-
grammeProgramme status
Childproof lock iexcl lights up The childproof lock is activ-ated
iexcl flashes The childproof lock is activatedand the appliance has been operated rarr Deactivating the childproof lockPage 40
Prewash Prewash is activated rarr Buttons Page 23
Water Plus andRinse Plus
Wash with more water and a rinse cycle isactivated rarr Buttons Page 23
SpeedPerfect Short wash activated rarr Buttons Page 23
1 Energy consump-tion
Energy consumption for the selected pro-grammeiexcl Low energy consumptioniexcl High energy consumption
Reminder to cleanthe drum
Flashes Drum is dirty Run the Limp tam-bor programme for cleaning and caringfor the drum and the outer tub rarr Cleaning the drum Page 42
Voltage controlsystem
Flashes The automatic voltage controlsystem detects impermissible voltagedrops This will pause the programmeNote The programme will continue whenthe voltage is permissible again
Voltage controlsystem
Flashes The programme has beenpaused because of impermissible voltagedrops The voltage is permissible againand the programme will continueNote The programme duration is exten-ded
1 Example
enemspDisplay
22
Display Designation DescriptionDoor iexcl Lights up The door is locked and can-
not be openediexcl Flashes The door is not closed prop-
erlyiexcl Off The door is unlocked and can be
openedTap iexcl No water pressure
iexcl The water pressure is too lowE35 -10 1 Error Error code error display signal1 Example
Buttonsemspen
23
Buttons
7 ButtonsButtons
The selection of programme settings depends on the programme that is setYou can see the selection options for each programme in the overview for rarr Programmes Page 24
Button Selection DescriptionInicioPausa +Carga (StartPause + Reload)
iexcl Startiexcl Canceliexcl Pause
Start cancel or pause the pro-gramme
SpeedPerfect iexcl Activateiexcl Deactivate
Activate or deactivate a short washingprogrammeNote Energy consumption increasesThe washing result is not affected bythis
Termin (ReadyIn)
1ndash24 hours Set the programme endThe programme duration is already in-cluded in the set number of hoursOnce the programme has started theprogramme duration is displayed
Temp degC (Tem-perature)
ndash 90 degC Adjust the temperature in degC
Centrif (Spin) ndash ndash ndash ndash - 1200 Adjust the spin speed or activate ndash ndash ndash ndash (Rinse Hold)If ndash ndash ndash ndash is selected the water is notdrained at the end of the washingcycle and the spin cycle is deactiv-ated The laundry remains in the waterused for rinsing
3 seg (ChildLock 3 sec)
iexcl Activateiexcl Deactivate
Activate or deactivate the childprooflockDisable the control panel to preventunwanted or accidental operationIf the childproof lock is activated andthe appliance has been switched offthe childproof lock remains activated rarr Childproof lock Page 40
Prelav (Pre-wash)
iexcl Activateiexcl Deactivate
Activate or deactivate prewash egfor washing heavily soiled laundry
Extra (ExtraRinse)
iexcl Activateiexcl Deactivate
Activate or deactivate a washing pro-gramme with more water and an addi-tional rinse cycleRecommended for particularly sensit-ive skin or in regions with very softwater
enemspProgrammes
24
Programmes 8 P
rogr
amm
esProgrammes B
elow
is a
n ov
ervi
ew o
f the
pro
gram
mes
You
can
find
info
rmat
ion
on the
load
and
on
the
adju
stab
le p
ro-
gram
me
optio
ns
Tip
The
laun
dry
s ca
re la
bels
pro
vide
you
with
add
ition
al in
form
atio
n on
pro
gram
me
sele
ctio
n
rarr
Car
e sy
mbo
ls o
n th
e ca
re la
bels
Pa
ge 3
4
Pro
gram
me
Des
crip
tion
Max load (kg)
Pro
gram
me
sett
ings
Max temperature (degC)
Max spin speed(rpm) 1
SpeedPerfect
Extra
Centrif ndash ndash ndash ndash(Rinse Hold)
Prelav
Alg
odoacuten
Al-
godatilde
o (
Cot
tons
)W
ash
hard
-wea
ring
item
s m
ade
from
cotto
n li
nen
or b
lend
ed fa
bric
sA
lso
suita
ble
as a
sho
rt p
rogr
amm
efo
r no
rmal
ly s
oile
d la
undr
y w
hen
you
activ
ate
Spe
edPer
fect
I
f Spe
ed-
Per
fect
is
act
ivat
ed t
he m
ax-
imum
load
cap
acity
is r
educ
ed to
5 k
g
990
1200
Alg
odoacuten
Col
orA
l-go
datildeo
Cor
(
Cot
-to
ns C
olou
r)
Was
h ha
rd-w
earin
g ite
ms
mad
e from
cotto
n li
nen
or b
lend
ed fa
bric
sEne
rgy-
savi
ng p
rogr
amm
e
9
90
1200
ndash
1Pro
gram
me
setti
ng
Programmesemspen
25
Pro
gram
me
Des
crip
tion
Max load (kg)
Pro
gram
me
sett
ings
Max temperature (degC)
Max spin speed(rpm) 1
SpeedPerfect
Extra
Centrif ndash ndash ndash ndash(Rinse Hold)
Prelav
Not
e T
o sa
ve e
nerg
y the
act
ual
was
hing
tem
pera
ture
may
dev
iate
from
the
set
was
hing
tem
pera
ture
Th
e w
ashi
ng p
erfo
rman
ce m
eets
lega
l req
uire
men
ts
Eco
40-6
0W
ash
item
s m
ade
from
cot
ton
line
nor
ble
nded
fabr
ics
Not
e T
extil
es w
hich
can
be
was
hed
from
40 deg
C
up
to 6
0 deg
C
as
per
the
care
sym
bol c
an b
e w
ashe
dto
geth
er
The
was
hing
per
form
ance
cor
res-
pond
s to
the
bes
t po
ssib
le w
ashi
ngpe
rfor
man
ce c
lass
acc
ordi
ng to
the
lega
l req
uire
men
ts
For
this
pro
gram
me
the
was
hing
tem
pera
ture
is a
utom
atic
ally
adj
uste
dde
pend
ing
on the
load
siz
e in
ord
erto
ach
ieve
the
bes
t po
ssib
le e
nerg
y
9
ndash
1200
ndash
1Pro
gram
me
setti
ng
enemspProgrammes
26
Pro
gram
me
Des
crip
tion
Max load (kg)
Pro
gram
me
sett
ings
Max temperature (degC)
Max spin speed(rpm) 1
SpeedPerfect
Extra
Centrif ndash ndash ndash ndash(Rinse Hold)
Prelav
effic
ienc
y w
ith the
bes
t po
ssib
lew
ashi
ng r
esul
t You
can
not ch
ange
the
was
hing
tem
pera
ture
Sin
teacutetic
os
(Eas
yC
are)
Was
h ite
ms
mad
e from
syn
thet
ic o
rbl
ende
d fa
bric
s4
60
1200
Mix
(
Mix
edFa
bric
s)W
ash
item
s m
ade
from
cot
ton
line
nor
syn
thet
ic o
r bl
ende
d fa
bric
sSui
tabl
e fo
r lig
htly
soi
led
laun
dry
460
1200
Del
icad
oSed
a (D
elic
ate
Silk
)W
ash
delic
ate
was
habl
e ite
ms
mad
efrom
silk
vis
cose
and
syn
thet
ics
Use
a d
eter
gent
tha
t is
sui
tabl
e fo
rde
licat
es o
r si
lk
Not
e W
ash
espe
cial
ly d
elic
ate
item
sor
item
s w
ith h
ooks
eye
lets
or
clip
sin
a m
esh
laun
dry
bag
2
40
800
ndash
1Pro
gram
me
setti
ng
Programmesemspen
27
Pro
gram
me
Des
crip
tion
Max load (kg)
Pro
gram
me
sett
ings
Max temperature (degC)
Max spin speed(rpm) 1
SpeedPerfect
Extra
Centrif ndash ndash ndash ndash(Rinse Hold)
Prelav
Lan
aLatilde
s (W
ool)
Han
d- o
r m
achi
ne-w
asha
ble
item
sth
at a
re m
ade
from
woo
l or
cont
ain
woo
lTo
pre
vent
the
laun
dry
from
shr
ink-
ing
the
dru
m m
oves
the
item
s ve
ryge
ntly
with
long
pau
ses
Use
a d
eter
gent
tha
t is
sui
tabl
e fo
rw
ool
2
40
800
ndash
ndash
ndash
(R
inse
)R
inse
s an
d th
en s
pins
the
laun
dry
and
then
dra
ins
the
wat
er
ndashndash
1200
ndash
ndash
(
Spi
nD
rain
)Spi
ns a
nd d
rain
s th
e w
ater
If
you
only
wan
t to
dra
in the
wat
er
activ
ate
0 T
he la
undr
y is
not
spu
n
ndash
ndash
1200
ndash
ndash
ndash
ndash
Rop
a os
cura
R
oupa
esc
ura
(Dar
k W
ash)
Was
h da
rk-c
olou
red
and
colo
ur-in
-te
nse
item
s m
ade
from
cot
ton
orea
sy-c
are
fabr
ic e
g j
eans
Tu
rn la
undr
y in
side
-out
bef
ore
was
h-in
gU
se li
quid
det
erge
nt
4
40
1200
1Pro
gram
me
setti
ng
enemspProgrammes
28
Pro
gram
me
Des
crip
tion
Max load (kg)
Pro
gram
me
sett
ings
Max temperature (degC)
Max spin speed(rpm) 1
SpeedPerfect
Extra
Centrif ndash ndash ndash ndash(Rinse Hold)
Prelav
Plu
mas
Pen
as
(Dow
n)W
ash
pillo
ws
duv
ets
or c
loth
ing
stuf
fed
with
dow
n an
d fil
lings
with
synt
hetic
fibr
es
Was
h la
rge
item
s se
para
tely
U
se a
det
erge
nt tha
t is
sui
tabl
e fo
rdo
wn
or d
elic
ates
U
se s
parin
gly
Do
not us
e fa
bric
sof
tene
rN
ote
To
prev
ent ex
cess
ive
foam
ing
rem
ove
air
from
laun
dry
item
s by
rolli
ng the
m u
p be
fore
you
was
hth
em
2
60
1200
ndash
ndash
Lim
p tam
bor
(Dru
m C
lean
)C
lean
ing
and
carin
g fo
r th
e dr
um
Use
thi
s pr
ogra
mm
e in
the
follo
win
gca
ses
iexclB
efor
e us
ing
the
appl
ianc
e fo
r th
efir
st tim
eiexcl
If yo
u re
gula
rly w
ash
at tem
pera
t-ur
es o
f 40 deg
C o
r lo
wer
ndash
ndash
1200
ndash
ndash
ndash
ndash
1Pro
gram
me
setti
ng
Programmesemspen
29
Pro
gram
me
Des
crip
tion
Max load (kg)
Pro
gram
me
sett
ings
Max temperature (degC)
Max spin speed(rpm) 1
SpeedPerfect
Extra
Centrif ndash ndash ndash ndash(Rinse Hold)
Prelav
iexclA
fter
a pr
olon
ged
perio
d of
non
-us
eU
se w
ashi
ng p
owde
r or
a d
eter
gent
cont
aini
ng b
leac
hH
alve
the
am
ount
of d
eter
gent
to
avoi
d fo
amin
gD
o no
t us
e fa
bric
sof
tene
rD
o no
t us
e liq
uid
dete
rgen
t or
det
er-
gent
tha
t is
inte
nded
for
woo
llens
or
delic
ates
N
ote
The
dru
m c
lean
ing
indi
cato
rw
ill fl
ash
to r
emin
d yo
u if
you
have
not us
ed a
pro
gram
me
at 6
0 deg
C o
rhi
gher
for
a lo
ng tim
eC
amis
asB
lusa
s (S
hirts
Blo
uses
)W
ash
non-
iron
shirt
s an
d bl
ouse
sm
ade
from
cot
ton
line
n s
ynth
etic
or
blen
ded
fabr
ics
Not
e U
se the
Del
icad
oSed
a pr
o-gr
amm
e to
was
h sh
irts
and
blou
ses
mad
e from
silk
or
delic
ate
fabr
ics
2
60
800
ndash
1Pro
gram
me
setti
ng
enemspProgrammes
30
Pro
gram
me
Des
crip
tion
Max load (kg)
Pro
gram
me
sett
ings
Max temperature (degC)
Max spin speed(rpm) 1
SpeedPerfect
Extra
Centrif ndash ndash ndash ndash(Rinse Hold)
Prelav
Spo
rt
Was
h sp
orts
and
leis
ure
item
s m
ade
from
syn
thet
ic fi
bres
mic
rofib
re o
rfle
ece
Use
a d
eter
gent
tha
t is
sui
tabl
e fo
rsp
orts
item
sD
o no
t us
e fa
bric
sof
tene
rTi
p U
se the
Sin
teacutetic
os
prog
ram
me
to w
ash
heav
ily s
oile
d la
undr
y
2
40
800
ndash
Raacutep
ido
153
0m
in
(Sup
erQ
uick
153
0 m
in)
Was
h ite
ms
mad
e from
cot
ton
syn
-th
etic
or
blen
ded
fabr
ics
Sho
rt p
rogr
amm
e fo
r sm
all i
tem
s of
light
ly s
oile
d la
undr
yTh
e pr
ogra
mm
e du
ratio
n is
app
rox
30 m
inut
es
If yo
u w
ish
to r
educ
e th
e pr
ogra
mm
edu
ratio
n to
15 m
inut
es a
ctiv
ate
Spe
edPer
fect
T
he m
axim
umlo
ad is
red
uced
to
2 k
g
4
40
1200
ndash
1Pro
gram
me
setti
ng
Accessoriesemspen
31
Accessories
9 AccessoriesAccessories
Use original accessories These have been made especially for your appliance
Use Order numberWater inlet hose exten-sion
Extend the water inlethose for cold water orAquaStop (approx 250m)
WMZ2381
Fixing brackets Improves the stability ofthe appliance
WMZ2200
Longer water inlet hose Replace the standardwater inlet hose with alonger hose (220 m)
00353925
Elbow Secure the water outlethose in place
00655300
Liquid detergent insert Measure liquid deter-gent
00605740
Metal covering plate Metal covering plate forinstalling the applianceunder a high worktop
WMZ20430
Before using for the first time
10 Before using for thefirst time
Before using for the first time
Prepare the appliance for use
101 Starting an empty wash-ing cycle
Your appliance was inspected thor-oughly before leaving the factory Toremove any residual water run thefirst wash cycle without any laundryNote Please read the information inthe Safety rarr Page 4 and Preventingmaterial damage rarr Page 10 sectionsto ensure that you use the appliancesafely
1 Turn the programme selector toLimp tambor
2 Close the door
enemspLaundry
32
3 Pull out the detergent drawer
4 Pour approx 1 litre of tap waterinto compartment II
5 Pour washing powder into com-partment II
To prevent foaming use only halfof the amount of detergent recom-mended by the detergent manufac-turer for light soiling Do not usedetergent suitable for woollens ordelicates
6 Push in the detergent drawer
7 Press InicioPausa + Carga (StartPause + Reload) to start theprogramme
a The display shows the remainingprogramme duration
a After the programme has endedthe display shows End
8 Start the first wash cycle or set theprogramme selector to to switchoff the appliance rarr Basic operation Page 36
Laundry
11 LaundryLaundry
111 Preparing the laundryNote Please read the information inthe Safety rarr Page 4 and Preventingmaterial damage rarr Page 10 sectionsto ensure that you use the appliancesafely
ATTENTIONObjects remaining in the laundry maydamage the laundry and the drum Remove all items from any pock-
ets in your laundry before usingthe appliance
To protect your appliance and thelaundry prepare the laundry be-forehandndash Empty any pockets
Laundryemspen
33
ndash Brush sand out of all collars andpockets
ndash Close bed covers and cushioncovers
ndash Close all zips Velcro fastenershooks and eyes
ndash Tie cloth belts apron stringsetc together or use a laundrybag
ndash Remove curtain hooks and leadstrips or use a mesh laundrybag
ndash Use a mesh laundry bag forsmall items of laundry such aschildrens socks
ndash Some stubborn or dried-in stainscan be removed by washingseveral times
ndash Wash large and small items oflaundry together
ndash Do not rub fresh stains but dabthem with soapy water
ndash Separate items of laundry andshake them out
112 Sorting laundryNote Please read the information inthe Safety rarr Page 4 and Preventingmaterial damage rarr Page 10 sectionsto ensure that you use the appliancesafely To improve washing results and
prevent discolouration sort thelaundry according to the followingcriteria before washingndash Type of fabric and fibre
Wash laundry of the sametype of fabric and fibre to-gether
ndash Care symbols on the care labelsrarr Page 34
ndash Description of the programmesrarr Page 24
ndash Whitesndash Colours
Wash new coloured itemsseparately the first time youwash them
113 Degrees of soiling
Degree of soiling Soiling ExamplesLight iexcl No dirt or stains are vis-
ibleiexcl Laundry has absorbed
odours
Light summer clothing orsports clothing that hasbeen worn for a just a fewhours
Normal Dirt or light stains are vis-ible
iexcl T-shirts shirts or blousesare sweat-soaked orhave been worn a fewtimes
iexcl Towels or bedding thathas been used for up toone week
Heavy Dirt or stains are clearlyvisible
Tea towels baby items orwork clothing
enemspDetergents and care products
34
114 Care symbols on the care labels
Washing care symbols
Symbol Washing process Recommended pro-gramme
Normal Cotton Gentle Easy-Care Particularly gentle DelicatesSilk for
washing by handHand wash WoolNot suitable for machine-washing ndash
Detergents and care products
12 Detergents and careproducts
Detergents and care products
Note Please read the information inthe Safety rarr Page 4 and Preventingmaterial damage rarr Page 10 sectionsto ensure that you use the appliancesafelyThe manufacturers instructions foruse and dosage can be found on thepackaging
Notesiexcl Only use liquid detergents that are
self-flowingiexcl Do not mix different liquid deter-
gentsiexcl Do not mix detergent and fabric
softeneriexcl Do not use products that have ex-
pired or are highly congealediexcl Do not use products containing
solvents caustic agents or volatilesubstances (eg bleach)
iexcl Use dyes sparingly as salt maydamage stainless steel
iexcl Do not use bleaching agents in theappliance
121 Detergent recommendation
Detergent Fabrics Pro-gramme
Temperature
Standard detergentwith optical brighten-ers
Heat-resistant whitefabrics made fromcotton or linen
Cotton From cold up to90 degC
Detergent for colourswithout bleach or op-tical brighteners
Coloured fabricsmade from linen orcotton
Cotton From cold up to60 degC
Detergent for col-oursdelicates withoutoptical brighteners
Coloured fabricsmade from easy-carefabrics or syntheticmaterials
Easy-Care From cold up to60 degC
Detergents and care productsemspen
35
Detergent Fabrics Pro-gramme
Temperature
Detergent for delic-ates
Delicate fine textilessilk or viscose
DelicatesSilk
From cold up to40 degC
Detergent for wool-lens
Wool Wool From cold up to40 degC
Tip Visit wwwcleanrighteu to findfurther information on detergentscare products and cleaning agentsfor domestic use
122 Detergent dosageThe detergent dosage depends oniexcl The amount of laundryiexcl Degree of soilingiexcl Water hardness
You can find out how hard yourwater is from your local water com-pany or measure it yourself usinga water hardness tester
Water hardness
Hardness range Total hardness in mmoll
German degrees in degdH
soft (I) 0ndash15 0ndash84medium (II) 15ndash 25 84ndash14hard (III) over 25 over 14
Example of a manufacturersinstructions for detergentThese example values refer to astandard load of 4ndash5 kg
Soiling Light Normal HeavyWater hardness Softmedium 40 ml 55 ml 80 mlWater hardness Hardveryhard
55 ml 80 ml 105 ml
The dosages can be found on themanufacturers packagingiexcl Adjust the dosage to the actual
load
enemspBasic operation
36
Basic operation
13 Basic operationBasic operation
131 Switching on the appli-ance
Turn the programme selector to aprogramme
132 Setting a programme1 Set the programme selector to the
required programme rarr Programmes Page 24
2 If necessary adjust the pro-gramme settings rarr Page 36
133 Adjusting the pro-gramme settings
Requirement A programme hasbeen set rarr Setting a programme Page 36
Adjust the programme settings rarr Programmes Page 24
Note The programme settings arenot saved permanently for the pro-gramme
134 Loading laundryNotesiexcl Please read the information in the
Safety rarr Page 4 and Preventingmaterial damage rarr Page 10 sec-tions to ensure that you use theappliance safely
iexcl To prevent creasing take note ofthe maximum load for the rarr Programmes Page 24
Requirement The laundry is pre-pared and sortedrarr Laundry Page 321 Open the door
Make sure that the drum is empty2 Load the laundry unfolded into the
drum3 Close the door
Ensure that there is no laundrytrapped in the door
Basic operationemspen
37
135 Using a measuring aidfor liquid detergent
If you order the measuring aid as anaccessory you must use the measur-ing aid1 Pull out the detergent drawer
2 Press down on the insert and re-move the detergent drawer
1
2
3 Insert the measuring aid
4 Insert the detergent drawer
136 Use the measuring aidfor liquid detergent
To add liquid detergent you can usea measuring aid in the detergentdrawer1 Pull out the detergent drawer2 Slide the measuring aid forwards
3 Fold the measuring aid down andclick it into place
enemspBasic operation
38
4 Push in the detergent drawer
137 Adding detergent andcare product
Notesiexcl Please read the information in the
Safety rarr Page 4 and Preventingmaterial damage rarr Page 10 sec-tions to ensure that you use theappliance safely
iexcl Do not use the measuring aid forliquid detergent for gel detergentswashing powder or if Prewash orReady in time are activated
Requirement Find out the optimumdosage for detergent and careproduct rarr Page 341 Pull out the detergent drawer2 Pour in detergent
rarr Detergent drawer Page 193 If required add the care product4 Push in the detergent drawer
138 Starting the programmeNote If you want to change the timeuntil the programme ends set theReady in time first Press InicioPausa + Carga a The drum rotates and load detec-
tion takes place This can take upto 2 minutes after which waterenters the drum
a The display shows either the pro-gramme duration or the Ready intime
a After the programme has endedthe display shows End
139 Adjusting the Ready intime before the pro-gramme starts
You can readjust the selected Readyin time before the programme starts1 Press InicioPausa + Carga 2 Press Termin repeatedly until
the display indicates the desiredReady in time
3 Press InicioPausa + Carga
1310 Soaking laundryNote No additional detergent is re-quired The washing solution is thenused for washing1 Start the programme2 To pause the programme after ap-
prox 10 minutes press InicioPausa + Carga
3 To resume the programme afterthe desired soaking time pressInicioPausa + Carga
1311 Adding laundryNote Please read the information inthe Safety rarr Page 4 and Preventingmaterial damage rarr Page 10 sectionsto ensure that you use the appliancesafely1 Press InicioPausa + Carga
The appliance is paused andchecks whether it is possible toadd or remove laundry Take noteof the programme status
2 Add or remove laundry3 Close the door4 Press InicioPausa + Carga
Basic operationemspen
39
1312 Cancelling the pro-gramme
Once the programme has startedyou can cancel it at any timeNote Please read the information inthe Safety rarr Page 4 and Preventingmaterial damage rarr Page 10 sectionsto ensure that you use the appliancesafely1 Press InicioPausa + Carga 2 Open the door
The appliance door remainslocked for safety reasons if thetemperature and water levels arehighndash If the temperature is high start
the programmendash If the water level is high Start
the or programme3 Remove the laundry
1313 Resuming the pro-gramme when the pro-gramme status is RinseHold
1 Set the or programme2 Press InicioPausa + Carga
1314 Unloading the laundryNote Please read the information inthe Safety rarr Page 4 and Preventingmaterial damage rarr Page 10 sectionsto ensure that you use the appliancesafely1 Open the door
2 Remove the laundry
1315 Switching off the appli-ance
1 Turn the programme selector to
2 Turn off the tap3 Wipe the rubber gasket dry and re-
move any foreign objects
4 Leave the door and detergentdrawer open so that residual watercan evaporate
enemspChildproof lock
40
Childproof lock
14 Childproof lockChildproof lock
Secure your appliance against beingoperated unintentionally using thecontrols
141 Activating the childprooflock
Press and hold the two 3 segbuttons for approx 3 seconds
a The display shows a The controls are lockeda The childproof lock remains active
even after the appliance has beenswitched off
142 Deactivating the child-proof lock
Requirement To deactivate thechildproof lock the appliance mustbe switched on Press and hold the two 3 seg
buttons for approx 3 secondsa goes out in the display
Basic settingsemspen
41
Basic settings
15 Basic settingsBasic settings
You can configure the appliance to meet your needs
151 Overview of the basic settingsBelow is an overview of the basic settings on your appliance
Basic setting Programmeposition
Value Description
End signal 2 0 (off)1 (quiet)2 (me-dium)3 (loud)4 (veryloud)
Set the volume of the signal at theend of the programme
Button signal 3 0 (off)1 (quiet)2 (me-dium)3 (loud)4 (veryloud)
The volume of the audible signalemitted when the buttons arepressed
Drum cleaningreminder
4 ONOFF
Activate or deactivate the re-minder to clean the drum
enemspCleaning and servicing
42
152 Changing the basic set-tings
1 Set the programme selector to po-sition 1
2 Press InicioPausa + Carga and at the same time turn theprogramme selector to position 2
a The display shows the currentvalue
3 Set the programme selector to therequired position
4 To change the value press Ter-min
5 To save the changes switch offthe appliance
Cleaning and servicing
16 Cleaning and servi-cing
Cleaning and servicing
To keep your appliance working effi-ciently for a long time it is importantto clean and maintain it carefully
161 Tips on appliance careWipe down thehousing and thecontrol panelwith nothing butwater and adamp cloth
This ensures theparts of the appli-ance will remainclean and hy-gienic
Remove all de-tergent residuespray residue orother residuesimmediately
Fresh depositsare easier to re-move withoutleaving anyresidue
Keep the appli-ance door anddetergent draweropen after use
This allows theresidual water todry reducingodours in the ap-pliance
162 Cleaning the drum
CAUTIONRisk of injuryPermanently washing at low temper-atures and a lack of ventilation forthe appliance may damage the drumand cause injury Regularly run a programme for
cleaning the drum or wash at tem-peratures of at least 60 degC
Leave the appliance to dry afterevery operation with the dooropen and leave the detergentdrawer to dry
Run the Limp tambor pro-gramme without laundryAdd washing powder
163 Cleaning the detergentdrawer
Note Please read the information inthe Safety rarr Page 4 and Preventingmaterial damage rarr Page 10 sectionsto ensure that you use the appliancesafely1 Pull out the detergent drawer
Cleaning and servicingemspen
43
2 Press down on the insert and re-move the detergent drawer
1
2
3 Press out the insert upwards frombelow
4 Clean the detergent drawer and in-sert with water and a brush andthen dry them
5 Fit the insert and lock it into place
6 Cleaning the opening for the deter-gent drawer
7 Push in the detergent drawer
164 Descaling
ATTENTIONThe use of unsuitable descalingagents eg for coffee machines maydamage the appliance For this appliance only use de-
scaling agents that are availablefrom the manufacturers website orour after-sales service
enemspCleaning and servicing
44
165 Cleaning the drain pumpClean the drain pump in the event offaults eg blockages or rattlingnoises
Emptying the drain pumpNote Please read the information inthe Safety rarr Page 4 and Preventingmaterial damage rarr Page 10 sectionsto ensure that you use the appliancesafely1 Turn off the water tap2 Switch off the appliance3 Disconnect the appliances mains
plug from the power supply4 Open the maintenance flap
5 Remove the maintenance flap
6 Slide a sufficiently large receptacleunder the opening
7 Take the drain hose out of theholder
Cleaning and servicingemspen
45
8 CAUTION - Risk of scaldingWhen you wash at high temperat-ures the detergent solution getshot
Do not touch the hot detergentsolutionTo allow the detergent solution toflow out into the container removethe sealing cap
9 Firmly press on the sealing cap
10 Insert the drain hose into theholder
Cleaning the drain pumpNote Please read the information inthe Safety rarr Page 4 and Preventingmaterial damage rarr Page 10 sectionsto ensure that you use the appliancesafelyRequirement The drain pump isempty rarr Page 441 Since water may remain in the
drain pump remove the pump capcarefully
2 Clean the interior the thread onthe pump cap and the pump hous-ing
3 Make sure that the impeller in thedrain pump can be rotated
enemspCleaning and servicing
46
4 Insert the pump cap and screw iton as far as it will go
90deg
The handle on the pump cap mustbe in a vertical position
5 Close the maintenance flap
Before the next washTo prevent unused detergent fromflowing straight into the outlet in thenext wash run the programmeafter you have emptied the drainpump1 Turn on the tap2 Insert the mains plug3 Switch on the appliance4 Pour 1 litre of water into compart-
ment II5 Start the programme
166 Cleaning the water outlethose at the siphon
1 Switch off the appliance2 Disconnect the appliances mains
plug from the power supply
3 Loosen the hose clamp and care-fully remove the water outlet hose
Residual water may leak out4 Clean the water outlet hose and si-
phon connecting piece
5 Reattach the water outlet hose andsecure the connection point usingthe hose clamp
Cleaning and servicingemspen
47
167 Clean the water inlet fil-ters
Emptying the water inlet hose1 Turn off the tap2 Set a programme except for
or 3 Start the programme and leave it
to run for approx 40 seconds4 Switch off the appliance5 Disconnect the appliances mains
plug from the power supply
Cleaning the filter on the tapNote Please read the information inthe Safety rarr Page 4 and Preventingmaterial damage rarr Page 10 sectionsto ensure that you use the appliancesafelyRequirement The water inlet hose isempty1 Remove the water inlet hose from
the tap
2 Clean the filter with a small brush
3 Connect the water inlet hose andcheck for leaks
Cleaning the filter on theapplianceNote Please read the information inthe Safety rarr Page 4 and Preventingmaterial damage rarr Page 10 sectionsto ensure that you use the appliancesafelyRequirement The water inlet hose isempty rarr Emptying the water inlet hosePage 47
enemspCleaning and servicing
48
1 Disconnect the hose from the rearof the appliance
1
2
2 Use pliers to remove the filter
3 Clean the filter with a small brush
4 Reinsert the filter
5 Connect the hose and check forleaks
2
1
Troubleshootingemspen
49
Troubleshooting
17 TroubleshootingTroubleshooting
You can rectify minor faults on your appliance yourself Read the troubleshoot-ing information before contacting after-sales service This will avoid unneces-sary costs
WARNINGRisk of electric shockIncorrect repairs are dangerous Repairs to the appliance should only be carried out by trained specialist
staff Only use genuine spare parts when repairing the appliance If the power cord of this appliance is damaged it must be replaced by the
manufacturer the manufacturers Customer Service or a similarly qualifiedperson in order to prevent any risk
Fault Cause and troubleshootingThe display goes outand InicioPausa +Carga flashes
Energy-saving mode is active Press any buttona The symbol lights up again
E36 -10 Drain pipe or water outlet hose is blocked Clean the drain pipe and the water outlet hose
Drain pipe or water drain hose is caught or jammed Ensure that the drain pipe and water drain hose are
not kinked or trapped
Drain pump is blocked rarr Cleaning the drain pump Page 44
The water outlet hose is connected too high Install the water outlet hose at a maximum height of
1 metre
Detergent dosage is too high Immediate measure Mix one tablespoon of fabric
softener with 05 litres of water and pour the mix-ture into the left-hand compartment (not for outdoorclothing sportswear or items stuffed with down)
Reduce the amount of detergent for the next wash-ing cycle with the same load
Unapproved extension installed on the water drainhose Remove any unapproved extensions from the water
hose Connecting the appliance
E36 -25 -26 Drain pump is blocked rarr Cleaning the drain pump Page 44
enemspTroubleshooting
50
Fault Cause and troubleshootingThe water pressure is lowNo remedial action possibleThe filters in the water inflow are blocked Clean the filters in the water inflow rarr Page 47
The tap is turned off Turn on the tap
The water inlet hose is kinked or jammed Ensure that the water inlet hose is not kinked or
jammed
flashes The automatic voltage control system detects an un-authorised voltage under-usage No remedial action possible
Note If the power supply is stable the programmecontinues to run as normalVoltage under-usage may cause extension of a pro-grammeNo remedial action possible
flashes Voltage under-usage may cause extension of a pro-grammeNo remedial action possible
lights up The temperature is too high Wait until the temperature has dropped rarr Cancelling the programme Page 39
Water level is too high Start the programme
Laundry is caught in the door1 Open the door again2 Remove any trapped laundry3 Close the door4 Press InicioPausa + Carga to start the pro-
gramme
flashes Door is not closed1 Close the door2 Press InicioPausa + Carga to start the pro-
gramme
All other error codes Malfunction Call the after-sales service
rarr Customer Service Page 59
Troubleshootingemspen
51
Fault Cause and troubleshootingThe appliance is notworking
The mains plug of the power cord is not plugged in Connect the appliance to the power supply
The circuit breaker is faulty Check the circuit breaker in the fuse box
There has been a power cut Check whether the lighting in your kitchen or other
appliances are working
The programme doesnot start
You have not pressed InicioPausa + Carga Press InicioPausa + Carga
Door is not closed1 Close the door2 Press InicioPausa + Carga to start the pro-
gramme
Childproof lock is activated rarr Deactivating the childproof lock Page 40
Termin is activated Check whether Termin is activated
rarr Buttons Page 23
Laundry is caught in the door1 Open the door again2 Remove any trapped laundry3 Close the door4 Press InicioPausa + Carga to start the pro-
gramme
The door cannotbe opened
ndash ndash ndash ndash is activated Continue the programme by selecting or and
pressing InicioPausa + Carga rarr Resuming the programme when the programmestatus is Rinse Hold Page 39
The temperature is too high Wait until the temperature has dropped rarr Cancelling the programme Page 39
Water level is too high Start the programme
Power failure Open the door using the emergency release
rarr Emergency release Page 57
The water is not drain-ing
Drain pipe or water outlet hose is blocked Clean the drain pipe and the water outlet hose
enemspTroubleshooting
52
Fault Cause and troubleshootingThe water is not drain-ing
Drain pipe or water drain hose is caught or jammed Ensure that the drain pipe and water drain hose are
not kinked or trapped
Drain pump is blocked rarr Cleaning the drain pump Page 44
ndash ndash ndash ndash is activated Continue the programme by selecting or and
pressing InicioPausa + Carga rarr Resuming the programme when the programmestatus is Rinse Hold Page 39
The water outlet hose is connected too high Install the water outlet hose at a maximum height of
1 metre
Detergent dosage is too high Immediate measure Mix one tablespoon of fabric
softener with 05 litres of water and pour the mix-ture into the left-hand compartment (not for outdoorclothing sportswear or items stuffed with down)
Reduce the amount of detergent for the next wash-ing cycle with the same load
Unapproved extension installed on the water drainhose Remove any unapproved extensions from the water
hose Connecting the appliance
Water is not flowingin Detergent is notbeing dispensed
You have not pressed InicioPausa + Carga Press InicioPausa + Carga
The filters in the water inflow are blocked Clean the filters in the water inflow rarr Page 47
The tap is turned off Turn on the tap
The water inlet hose is kinked or jammed Ensure that the water inlet hose is not kinked or
jammed
The spin cycle runsseveral times
The unbalanced load detection system eliminates animbalance by repeatedly redistributing the laundry Not a fault ndash no action required
Note When loading where possible place large andsmall items of laundry together in the drum Differentsized items of laundry distribute themselves betterduring the spin cycle
Troubleshootingemspen
53
Fault Cause and troubleshootingThe programme dura-tion changes duringthe wash cycle
The programme operation is optimised electronicallyThis may change the programme duration Not a fault ndash no action required
The unbalanced load detection system eliminates animbalance by repeatedly redistributing the laundry Not a fault ndash no action required
Note When loading where possible place large andsmall items of laundry together in the drum Differentsized items of laundry distribute themselves betterduring the spin cycleFoam detection system switches on a rinse cycle iffoam build-up is too high Not a fault ndash no action required
No water is visible inthe drum
Water is below the visible area Not a fault ndash no action required Do not add any extra water to the appliance while it
is operating
Drum jerks after theprogramme starts
This is caused by an internal motor test Not a fault ndash no action required
Residual water ispresent in the com-partment
Insert in compartment is blocked rarr Cleaning the detergent drawer Page 42
Vibrations and move-ment of the appliancewhilst spinning
Appliance is not correctly aligned Aligning the appliance
The appliance feet are not fixed Secure the appliance feet Aligning the appliance
Transit bolts have not been removed Removing the transit bolts
Drum does not turnwater does not flow in
Load detection is active Not a fault ndash no action required
Note The load detection can take up to two minutesHeavy foam build-up Detergent dosage is too high
Immediate measure Mix one tablespoon of fabricsoftener with 05 litres of water and pour the mix-ture into the left-hand compartment (not for outdoorclothing sportswear or items stuffed with down)
Reduce the amount of detergent for the next wash-ing cycle with the same load
enemspTroubleshooting
54
Fault Cause and troubleshootingHigh spin speed notreached
A low spin speed is selected The next time you run a wash cycle set a higher
spin speed
Unbalance load detection system is using a reducedspin speed to eliminate an unbalance Redistribute the laundry in the drum
Note Where possible mix large and small items inthe drum Different sized items of laundry distributethemselves better during the spin cycle Start the programme
The spin programmedoes not start
Drain pipe or water outlet hose is blocked Clean the drain pipe and the water outlet hose
Drain pipe or water drain hose is caught or jammed Ensure that the drain pipe and water drain hose are
not kinked or trapped
The unbalanced load detection system has interruptedthe spin cycle because the laundry is unevenly distrib-uted Redistribute the laundry in the drum
Note Where possible mix large and small items inthe drum Different sized items of laundry distributethemselves better during the spin cycle Start the programme
Rushing hissingnoise
Water is flushed under pressure into the detergentdrawer Not a fault ndash normal operating noise
Loud noises duringthe spin cycle
Appliance is not correctly aligned Aligning the appliance
The appliance feet are not fixed Secure the appliance feet Aligning the appliance
Transit bolts have not been removed Removing the transit bolts
Banging noises rat-tling in the drainpump
Foreign bodies have got into the drain pump rarr Cleaning the drain pump Page 44
Slurping rhythmicalsuction noise
The drain pump is active the detergent solution ispumped out Not a fault ndash normal operating noise
Troubleshootingemspen
55
Fault Cause and troubleshootingCreasing The spin speed is too high
The next time you run a wash cycle set a lowerspin speed
The load is too large The next time you run a wash cycle reduce the
amount of laundry being loaded
The wrong programme is selected for the type of fab-ric Select the programmes that are suitable for the
type of fabric rarr Programmes Page 24
Detergent or fabricsoftener drips off theseal and collects onthe door or in the sealfold
Too much detergentfabric softener in the detergentdrawer When dosing liquid detergent and fabric softener
observe the marking in the detergent drawer anddo not dose above this
The spin result is notsatisfactory The laun-dry is too wettoodamp
A low spin speed is selected The next time you run a wash cycle set a higher
spin speed Start the programme
Drain pipe or water outlet hose is blocked Clean the drain pipe and the water outlet hose
Drain pipe or water drain hose is caught or jammed Ensure that the drain pipe and water drain hose are
not kinked or trapped
The unbalanced load detection system has interruptedthe spin cycle because the laundry is unevenly distrib-uted Redistribute the laundry in the drum
Note Where possible mix large and small items inthe drum Different sized items of laundry distributethemselves better during the spin cycle Start the programme
Unbalance load detection system is using a reducedspin speed to eliminate an unbalance Redistribute the laundry in the drum
Note Where possible mix large and small items inthe drum Different sized items of laundry distributethemselves better during the spin cycle Start the programme
enemspTroubleshooting
56
Fault Cause and troubleshootingDetergent residue onthe damp washing
Detergents may contain water-insoluble substancesthat deposit on the laundry Start the programme
Detergent residue onthe dry laundry
Detergents may contain water-insoluble substancesthat deposit on the laundry Brush out the laundry after washing and drying
Water is leaking out atthe water inlet hose
Water inlet hose is not correctlysecurely connected1 Connect the water supply hose correctly Connect-
ing the water inlet hose2 Tighten the screw connection
Water is leaking out atthe water outlet hose
The water outlet hose is damaged Replace the damaged water outlet hose
Water outlet hose is not connected correctly Connect the water outlet hose correctly Water out-
let connection types
Odours have formedin the appliance
Humidity and detergent residue may promote theformation of bacteria rarr Cleaning the drum Page 42 If you are not using the appliance leave the door
and detergent drawer open so that residual watercan evaporate
Transportation storage and disposalemspen
57
171 Emergency releaseReleasing the doorRequirement The drain pump isempty rarr Page 441 ATTENTION Escaping water may
cause material damage Do not open the door if you can
see water through the glassPull the emergency release down-wards with a tool and release
a The door lock is released2 Insert the maintenance flap and
lock it into place3 Close the maintenance flap
Transportation storage and disposal
18 Transportation stor-age and disposal
Transportation storage and disposal
You can find out here how to prepareyour appliance for transportation andstorage You will also find out how todispose of old appliances
181 Removing the appliance1 Turn off the tap2 rarr Emptying the water inlet hose
Page 473 Switch off the appliance4 Unplug the appliances mains plug
5 Drain the remaining detergentsolution rarr Cleaning the drain pumpPage 44
6 Detach the hoses
182 Inserting the transitbolts
Secure the appliance for transporta-tion using transit bolts in order to pre-vent damage1 Remove the four cover caps
‒ If necessary use a screwdriverto remove the cover caps
Keep the cover caps2 Insert the four sleeves
enemspTransportation storage and disposal
58
3 Insert all screws into the fourtransit bolts and tighten slightly
4 Insert the power cord into theholder and tighten all fourscrews for the transit bolts with aWAF 13 wrench
5 Insert the hose into holder
183 Using the applianceagain
1 Remove the transit bolts
2 Pour approx 1 litre of water intocompartment II in the detergentdrawer
3 Start the programmea The unused detergent cannot flow
straight into the outlet during thenext wash
184 Disposing of old appli-ance
Valuable raw materials can be re-used by recycling
WARNINGRisk of harm to healthChildren can lock themselves in theappliance thereby putting their livesat risk Do not install the appliance behind
a door as this may obstruct the ap-pliance door or prevent it fromopening
With redundant appliances unplugthe power cord Then cut throughthe cord and damage the lock onthe appliance door beyond repairso that the appliance door will nolonger close
1 Unplug the appliance from themains
2 Cut through the power cord3 Dispose of the appliance in an en-
vironmentally friendly mannerInformation about current disposalmethods are available from yourspecialist dealer or local authority
This appliance is la-belled in accordancewith European Directive201219EU concerningused electrical and elec-
Customer Serviceemspen
59
tronic appliances (wasteelectrical and electronicequipment - WEEE)The guideline determ-ines the framework forthe return and recyclingof used appliances asapplicable throughoutthe EU
Customer Service
19 Customer ServiceCustomer Service
If you have any queries on use areunable to rectify faults on the appli-ance yourself or if your applianceneeds to be repaired contact Cus-tomer ServiceYou can solve many problems your-self by consulting the information ontroubleshooting in these instructionsor on our website If this is not thecase contact our after-sales serviceWith any warranty claims we willmake sure that your appliance is re-paired by trained after-sales techni-cians using genuine spare parts in-cluding after the manufacturers war-ranty has expiredFunction-relevant genuine spare partsaccording to the corresponding Eco-design Order can be obtained fromCustomer Service for a period of atleast 10 years from the date onwhich your appliance was placed onthe market within the European Eco-nomic AreaNote Under the terms of the manu-facturers warranty the use of Cus-tomer Service is free of chargeDetailed information on the warrantyperiod and terms of warranty in yourcountry is available from our after-sales service your retailer or on ourwebsite
If you contact Customer Service youwill require the product number (E-Nr) and the production number (FD)of your applianceThe contact details for Customer Ser-vice can be found in the enclosedCustomer Service directory or on ourwebsite
191 Product number (E-Nr)and production number(FD)
You can find the product number (E-Nr) and the production number (FD)on the appliances rating plateDepending on the model the ratingplate is locatediexcl On the inside of the dooriexcl On the inside of the maintenance
flapiexcl On the rear of the applianceMake a note of your appliances de-tails and the Customer Service tele-phone number to find them againquickly
enemspConsumption values
60
Consumption values
20 Consumption valuesConsumption values
The following information is provided in accordance with the EU EcodesignRegulation The values given for programs other than the Eco 40-60 are indicat-ive only and were determined in accordance with the applicable standardEN60456
Programme Load(kg)
Pro-gramme dura-tion(hrmin)1
Energycon-sump-tion(kWhcycle)1
Watercon-sump-tion (lcycle)1
Max-imumtemper-ature(degC) 5mins1
Spinspeed(rpm)1
Resid-ualmois-ture()1
Eco 40-602 90 337 1245 610 50 1166 5000Eco 40-602 45 252 0590 450 33 1200 5000Eco 40-602 25 233 0195 300 24 1200 5400AlgodoacutenAl-godatildeo 20 degC
90 328 0370 900 23 1200 5400
AlgodoacutenAl-godatildeo 40 degC
90 328 1350 900 45 1200 5400
AlgodoacutenAl-godatildeo 60 degC
90 328 1450 900 55 1200 5400
AlgodoacutenAl-godatildeo 40 degC + Pre-lav
90 358 1400 1020 45 1200 5400
Sinteacuteticos 40 degC
40 228 0780 610 44 1200 2700
Mix 40 degC 40 059 0620 440 41 1200 5600 LanaLatildes
30 degC20 040 0200 400 22 800 2500
1 Due to the influence of water pressure hardness and inlet temperature am-bient temperature type amount and soiling of laundry detergent used fluc-tuations in the power supply and the selected additional functions the actualvalues may deviate from the stated values
2 Test programme in accordance with the EU Ecodesign Directive and the EUEnergy Labelling Regulation with cold water (15 degC)
Technical specificationsemspen
61
Technical specifications
21 Technical specifica-tions
Technical specifications
Facts and figures for your appliancecan be found here
Appliance height 850 cmAppliance width 598 cmAppliance depth 590 cmWeight 80 kg1
Maximum load 9 kgMains voltage 220 - 240 V
50 Hz Minimum in-
stallation protec-tion
10 A
Rated power 2300 WPower consump-tion
iexcl Off mode010 W
iexcl Left-on mode050 W
Water pressure iexcl Minimum100 kPa(1 bar)
iexcl Maximum1000 kPa(10 bar)
Length of the wa-ter inlet hose
150 cm
Length of the wa-ter outlet hose
150 cm
Length of thepower cord
160 cm
1 Depending on the appliance spe-cifications
More information about your modelcan be found online at httpsen-ergylabelbsh-groupcom1 This webaddress is linked to the official EUEPREL product database At the time
of printing its web address had notyet been published Please then fol-low the instructions on searching formodels The model identifier is madeup of the characters before the slashin the product number (E-Nr) on therating plate Alternatively you canalso find the model identifier in thefirst line of the EU energy label
1 Only applies to countries in the European Economic Area
Thank you for buying aBosch Home Appliance
Register your new device on MyBosch now and profit directly from
bull Expert tips amp tricks for your appliancebull Warranty extension optionsbull Discounts for accessories amp spare-partsbull Digital manual and all appliance data at handbull Easy access to Bosch Home Appliances Service
Free and easy registration ndash also on mobile phoneswwwbosch-homecomwelcome
Looking for help Youll find it here
Expert advice for your Bosch home appliances help with problems or a repair from Bosch experts Find out everything about the many ways Bosch can support you wwwbosch-homecomservice Contact data of all countries are listed in the attached service direct-ory
90016102699001610269emsp(010219)en
Robert Bosch Hausgeraumlte GmbHCarl-Wery-Straszlige 3481739 MuumlnchenGERMANYwwwbosch-homecom
Valid within Great BritainImported to Great Britain byBSH Home Appliances LtdGrand Union HouseOld Wolverton RoadWolverton Milton KeynesMK12 5PTUnited Kingdom
en
3
14 Childproof lock 40141 Activating the childproof
lock 40142 Deactivating the childproof
lock 40
15 Basic settings 41151 Overview of the basic set-
tings 41152 Changing the basic set-
tings 42
16 Cleaning and servicing 42161 Tips on appliance care 42162 Cleaning the drum 42163 Cleaning the detergent
drawer 42164 Descaling 43165 Cleaning the drain pump 44166 Cleaning the water outlet
hose at the siphon 46167 Clean the water inlet filters 47
17 Troubleshooting 49
18 Transportation storage anddisposal 57
181 Removing the appliance 57182 Inserting the transit bolts 57183 Using the appliance again 58184 Disposing of old appliance 58
19 Customer Service 59191 Product number (E-Nr) and
production number (FD) 59
20 Consumption values 60
21 Technical specifications 61
enemspSafety
4
1 Safety
Observe the following safety instructions
11 General information
iexcl Read this instruction manual carefullyiexcl Keep the instruction manual and the product information safe
for future reference or for the next owneriexcl Do not connect the appliance if it has been damaged in transit
12 Intended useOnly use this applianceiexcl For washing machine-washable fabrics and hand-washable wool
in accordance with the care labeliexcl With tap water and commercially available detergents and care
products suitable for washing machinesiexcl In private households and in enclosed spaces in a domestic en-
vironmentiexcl Up to an altitude of max 4000 m above sea level
13 Restriction on user groupThis appliance may be used by children aged 8 or over and bypeople who have reduced physical sensory or mental abilities orinadequate experience andor knowledge provided that they aresupervised or have been instructed on how to use the appliancesafely and have understood the resulting dangersChildren must not play with the applianceCleaning and user maintenance must not be performed by chil-dren unless they are being supervisedKeep children under the age of 3 years and pets away from theappliance
Safetyemspen
5
14 Safe installationTake note of the safety instructions when installing the appliance
WARNING ‒ Risk of electric shockImproper installation is dangerous Connect and operate the appliance only in accordance with the
specifications on the rating plate Connect the appliance to a power supply with alternating cur-
rent only via a properly installed socket with earthing The protective conductor system of the domestic electrical in-
stallation must be properly installed The installation must havea sufficiently large cross section When using a residual current circuit breaker only use a type
with the mark Never equip the appliance with an external switching device
eg a timer or remote control When the appliance is installed the mains plug of the power
cord must be freely accessible If free access is not possible anall-pole isolating switch must be installed in the permanent elec-trical installation according to the installation regulations When installing the appliance check that the power cable is not
trapped or damagedIf the insulation of the power cord is damaged this is dangerous Never let the power cord come into contact with hot appliance
parts or heat sources Never let the power cord come into contact with sharp points or
edges Never kink crush or modify the power cord
WARNING ‒ Risk of fireIt is dangerous to use an extended power cord and non-approvedadapters Do not use extension cables or multiple socket strips If the power cord is too short contact Customer Service Only use adapters approved by the manufacturer
enemspSafety
6
WARNING ‒ Risk of injuryThe high weight of the appliance may result in injury when lifted Do not lift the appliance on your ownIf this appliance is not correctly installed in a washer-dryer stackthe installed appliance may fall Only stack the dryer on a washing machine using the connec-
tion kit from the dryer manufacturer No other installationmethod is permitted Do not install the appliance in a washer-dryer stack if the dryer
manufacturer does not offer a suitable connection kit Do not install appliances from different manufacturers and with
varying depths and widths in a washer-dryer stack Do not install a washer-dryer stack on a platform the appli-
ances may tip over
WARNING ‒ Risk of suffocationChildren may put packaging material over their heads or wrapthemselves up in it and suffocate Keep packaging material away from children Do not let children play with packaging material
CAUTION ‒ Risk of injuryThe appliance may vibrate or move when in use Place the appliance on a clean even solid surface Align the appliance using the appliance feet and a spirit levelIf hoses and power cords have been laid incorrectly this causes atripping hazard Lay hoses and power cords in such a way that there is no risk
of trippingIf the appliance is moved by holding onto protruding componentssuch as the appliance door the parts may break off Do not move the appliance by holding onto protruding parts
CAUTION ‒ Risk of cuttingTouching sharp edges on the appliance may lead to cuts Do not touch the sharp edges on the appliance
Safetyemspen
7
Wear protective gloves when installing and transporting the ap-pliance
15 Safe use
WARNING ‒ Risk of electric shockIf the appliance or the power cord is damaged this is dangerous Never operate a damaged appliance Never pull on the power cord to unplug the appliance Always
unplug the appliance at the mains If the appliance or the power cord is damaged immediately un-
plug the power cord or switch off the fuse in the fuse box andturn off the water tap Call customer services rarr Page 59An ingress of moisture can cause an electric shock Only use the appliance in enclosed spaces Never expose the appliance to intense heat or humidity Do not use steam- or high-pressure cleaners hoses or sprays
to clean the appliance
WARNING ‒ Risk of harm to healthChildren can lock themselves in the appliance thereby puttingtheir lives at risk Do not install the appliance behind a door as this may obstruct
the appliance door or prevent it from opening With redundant appliances unplug the power cord Then cut
through the cord and damage the lock on the appliance doorbeyond repair so that the appliance door will no longer close
WARNING ‒ Risk of suffocationChildren may breathe in or swallow small parts causing them tosuffocate Keep small parts away from children Do not let children play with small parts
enemspSafety
8
WARNING ‒ Risk of poisoningDetergents and care products may result in poisoning if con-sumed If accidentally swallowed seek medical advice Keep detergents and care products out of the reach of children
WARNING ‒ Risk of explosionLaundry that has been pretreated with cleaning agents that con-tain solvents may cause an explosion in the appliance Rinse pretreated laundry thoroughly with water before washing
CAUTION ‒ Risk of injuryThe covering plate may break if you stand on or climb onto theappliance Do not stand on or climb onto the applianceThe appliance may tip over if you sit on or lean against the opendoor Do not sit on or lean against the appliance door Do not place any objects on the appliance doorReaching into the drum while it is still turning may cause hand in-juries Wait for the drum to come to a complete stop before reaching
inside
CAUTION ‒ Risk of burnsWhen washing at high temperatures the glass in the appliancedoor becomes hot Do not touch the appliance door when it is hot Keep children away from the appliance door when it is hot
CAUTION ‒ Risk of scaldingWhen you wash at high temperatures the detergent solution getshot Do not touch the hot detergent solution
Safetyemspen
9
CAUTION ‒ Risk of chemical burnsIf the detergent drawer is opened detergent and care productsmay spray out from the appliance Contact with eyes or skin maycause irritation Rinse eyes andor skin thoroughly with clean water if they come
into contact with detergents or care products If accidentally swallowed seek medical advice Keep detergents and care products out of the reach of children
16 Safe cleaning and maintenanceTake note of the safety instructions when cleaning and performingmaintenance work on the appliance
WARNING ‒ Risk of electric shockIncorrect repairs are dangerous Repairs to the appliance should only be carried out by trained
specialist staff Only use genuine spare parts when repairing the appliance If the power cord of this appliance is damaged it must be re-
placed by the manufacturer the manufacturers Customer Ser-vice or a similarly qualified person in order to prevent any risk
An ingress of moisture can cause an electric shock Do not use steam- or high-pressure cleaners hoses or sprays
to clean the appliance
WARNING ‒ Risk of injuryThe use of non-original spare parts and non-original accessoriesis dangerous Only use the manufacturers original spare parts and original ac-
cessories
WARNING ‒ Risk of poisoningPoisonous fumes may be given off if you use cleaning agents thatcontain solvents Do not use cleaning agents that contain solvents
enemspPreventing material damage
10
Preventing material damage
2 Preventing materialdamage
Preventing material damage
Follow these instructions to avoid ma-terial damage and damage to the ap-pliance
ATTENTIONThe functionality of the appliancemay be impaired if you use thewrong quantity of fabric softener de-tergent care product or cleaningagent Follow the dosage recommenda-
tions from the manufacturerExceeding the maximum load capa-city impairs the function of the appli-ance Observe the maximum load capa-
city for each programme and donot exceed it rarr Programmes Page 24
The appliance is secured for trans-portation using transit bolts Transitbolts which have not been removedmay result in material damage anddamage to the appliance Before starting up the appliance
remove the transit bolts completelyand keep them in a safe place
Before transport fit the transit boltsfully in order to prevent damage intransit
Material damage may be caused ifthe water inlet hose is connected in-correctly Tighten the screw connections on
the water inlet until they are hand-tight
Ideally connect the water inlethose directly to the water tapwithout any additional connectingelements such as adapters exten-sions valves or similar
Ensure that the inner diameter ofthe water tap is at least 17 mm
Make sure that the length of thethread on the connection to thewater tap is at least 10 mm
If the water pressure is too high ortoo low the appliance may not beable to operate properly Ensure that the water pressure in
the water supply system is at least100 kPa (1 bar) and max1000 kPa (10 bar)
If the water pressure exceeds themaximum value specified a pres-sure-reducing valve must be in-stalled between the drinking waterconnection and the hose set of theappliance
Do not connect the appliance tothe mixer tap of an unpressurisedhot-water boiler
Modified or damaged water hosesmay result in material damage anddamage to the appliance Never kink crush modify or cut
through water hoses Only use the water hoses supplied
with the appliance or genuinespare hoses
Never re-use water hoses thathave been used before
Operating the appliance using waterthat is dirty or too hot may cause ma-terial damage Only operate the appliance with
cold mains waterUnsuitable cleaning products maydamage the surfaces of the appli-ance Do not use harsh or abrasive de-
tergents Do not use cleaning products with
a high alcohol content Do not use hard scouring pads or
cleaning sponges Clean the appliance with nothing
but water and a soft damp cloth
Environmental protection and saving energyemspen
11
Remove all detergent residuespray residue or other residues im-mediately if they come into contactwith the appliance
Environmental protection and saving energy
3 Environmental protec-tion and saving energy
Environmental protection and saving energy
31 Disposing of packagingThe packaging materials are environ-mentally compatible and can be re-cycled Sort the individual components by
type and dispose of them separ-ately
32 Save energy and con-serve resources
If you follow these instructions yourappliance will use less electricity andless water
Choose programmes with low tem-peratures and longer wash times anduse maximum load capacityrarr Page 24a Energy consumption and water
consumption is most efficient
Use the economy programme set-tingsa If you adjust the programme set-
tings for a programme the displayshows the expected consumption
Add rarr Page 35 detergent based onthe laundrys degree of soilinga For light to normal soiling a smal-
ler amount of detergent is suffi-cient Observe the dosage recom-mendation from the detergentmanufacturer
Reduce the washing temperature forlightly and normally soiled laundrya At low temperatures the appliance
consumes less energy For light tonormal soiling lower temperaturesthan indicated on the care labelare also sufficient
Set the maximum spin speed if youwant to dry the laundry in a tumbledryer afterwardsa The drier the laundry the shorter
the programme duration when dry-ing which in turn reduces energyconsumption A higher spin speedreduces the residual moisture inthe laundry and increases thevolume of the spin noise
Wash the laundry without prewasha Washing with prewash increases
the programme duration and in-creases energy and water con-sumption
The appliance has a continuousautomatic load adjustment functiona Depending on the type of fabric
and load capacity the continuousautomatic load adjustment func-tion optimally adjusts the waterconsumption and programme dur-ation
33 Energy saving modeIf you do not use the appliance for anextended period it automaticallyswitches to energy-saving mode Alldisplays go out and InicioPausa +Carga flashesEnergy-saving mode ends when youuse the appliance again eg if youopen or close the door
enemspInstallation and connection
12
Installation and connection
4 Installation and con-nection
Installation and connection
41 Unpacking the applianceNote Please read the information inthe Safety rarr Page 4 and Preventingmaterial damage rarr Page 10 sectionsto ensure that you use the appliancesafely
ATTENTIONObjects remaining in the drum thatare not designed for operation withthe appliance may cause materialdamage and damage to the appli-ance Remove these objects along with
all supplied accessories from thedrum before starting the appliance
1 Remove any packaging and pro-tective covers completely from theapplianceFor the environmentally friendlydisposal of the packaging materi-als observe the information on thetopic of rarr Disposing of packagingPage 11
2 Check the appliance for visibledamage
3 Open the door rarr Basic operation Page 36
4 Remove the accessory from thedrum
5 Close the door
Installation and connectionemspen
13
42 Contents of packageAfter unpacking all parts check for any damage in transit and completeness ofthe delivery
1 2 3
4
1 Washing machine
2 Accompanying documents
3 Water inlet hose
4 Cover caps
43 Requirements for the in-stallation location
Note Please read the information inthe Safety rarr Page 4 and Preventingmaterial damage rarr Page 10 sectionsto ensure that you use the appliancesafely
WARNINGRisk of electric shockThe appliance contains live partsTouching live parts is dangerous Do not operate the appliance
without a cover cap
WARNINGRisk of injuryWhen using the appliance on a basethe appliance may tip over Always secure the feet of the appli-
ance to a base using the manufac-turers fixing brackets rarr Page 31before using the appliance for thefirst time
enemspInstallation and connection
14
ATTENTIONIf the appliance is installed in areasexposed to frost or outdoors frozenresidual water may damage the appli-ance and frozen hoses may crack orsplit Do not install or operate this appli-
ance anywhere that is liable to ex-perience frost andor outdoors
The appliance underwent a functiontest before leaving the factory andmay therefore contain residual wa-ter This residual water may leak outif the appliance is tilted at an anglegreater than 40deg Tilt the appliance carefully
Installation loca-tion
Requirements
On a base Secure the appli-ance with fixingbracketsrarr Page 31
On a woodenjoist floor
Place the appli-ance on a water-resistant woodenboard which isscrewed tightly tothe floor Thewooden boardshould be atleast 30 mmthick
Installation loca-tion
Requirements
In a kitchen unit iexcl A niche widthof 60 cm is re-quired
iexcl Only install theappliance un-derneath acontinuousworktop that issecurely con-nected to adja-cent cabinets
Note If the cov-ering plate is re-moved the metalcovering plate rarr AccessoriesPage 31 mustbe secured be-fore installation
On a wall Do not trap thehoses betweenthe wall and theappliance
44 Removing the transitbolts
The appliance is secured for trans-portation using transit bolts on therear of the applianceNotesiexcl Please read the information in the
Safety rarr Page 4 and Preventingmaterial damage rarr Page 10 sec-tions to ensure that you use theappliance safely
iexcl Keep the transit bolts screws andsleeves in a safe place for futuretransport rarr Page 57
Installation and connectionemspen
15
1 Pull the hoses out of the holders
2 Unscrew and remove all fourscrews for the transit bolts with aWAF 13 wrench
3 Pull the power cord out of theholder
4 Remove the four sleeves
5 Put on the four cover caps
6 Press down on the four covercaps
enemspInstallation and connection
16
45 Connecting the applianceConnecting the water inlet hoseNoteiexcl Please read the information in the
Safety rarr Page 4 and Preventingmaterial damage rarr Page 10 sec-tions to ensure that you use theappliance safely
1 Connect the water inlet hose
2
1
2 Connect the water inlet hose to atap (264 mm = 34)
frac34˝min
min
10 mm
17 mm
3 Open the water tap carefully andcheck that the connection pointsare tight
Water outlet connection typesThis information is intended to helpyou to connect this appliance to thewater outlet
Note Please read the information inthe Safety rarr Page 4 and Preventingmaterial damage rarr Page 10 sectionsto ensure that you use the appliancesafely
ATTENTIONWhen draining the water outlet hoseis subject to water pressure and maycome loose from the installed con-nection point Secure the water outlet hose
against unintentional loosening
Note Observe the draining heightsThe maximum draining height is100 cm
Drainage into asiphon
Secure the con-nection point witha (24ndash40 mm)hose clamp
Drainage into awashbasin
Fix and securethe water outletusing an elbowrarr Page 31
Drainage into aplastic pipe withrubber sleeve orinto a gully
Fix and securethe water outletusing an elbowrarr Page 31
Installation and connectionemspen
17
46 Aligning the applianceIn order to reduce noise and vibra-tion and to prevent the appliancefrom moving align the appliance cor-rectlyNote Please read the information inthe Safety rarr Page 4 and Preventingmaterial damage rarr Page 10 sectionsto ensure that you use the appliancesafely1 Loosen the lock nuts using a WAF
17 wrench by turning it in a clock-wise direction
2 To align the appliance turn the ap-pliance feet Check that the appli-ance is level using a spirit level
All appliance feet must stand firmlyon the ground
3 Screw the lock nuts tightly againstthe housing using a WAF 17wrench
In doing so hold the foot tight anddo not adjust its height
47 Connecting the applianceto the electricity supply
Note Please read the information inthe Safety rarr Page 4 and Preventingmaterial damage rarr Page 10 sectionsto ensure that you use the appliancesafely1 Insert the mains plug of the appli-
ances power cable in a socketnearbyThe connection details of the appli-ance can be found under Tech-nical data rarr Page 61
2 Check the mains plug is insertedproperly
enemspFamiliarising yourself with your appliance
18
Familiarising yourself with your appliance
5 Familiarising yourself with your applianceFamiliarising yourself with your appliance
51 ApplianceYou can find an overview of the parts of your appliance here
1
2
4 73 6
88
5
On certain models specific details such as the colour and shape may differfrom those pictured
1 Maintenance flap for the drainpump rarr Page 44
2 Door
3 Detergent drawer rarr Page 19
4 Controls rarr Page 19
5 Covering plate
6 Water outlet hose rarr Page 16
7 Power cord rarr Page 17
8 Transit bolts rarr Page 14
Familiarising yourself with your applianceemspen
19
52 Detergent drawer
2
3
1
4
1 Measuring aid for liquid deter-gent rarr Using a measuring aid forliquid detergent Page 37
2 Compartment IIiexcl Detergent for main washiexcl Water softeneriexcl Bleachiexcl Stain remover
3 Compartment iexcl Fabric softeneriexcl Liquid starchiexcl Waterproofing agent
4 Compartment Iiexcl Detergent for prewashiexcl Hygiene detergent
53 ControlsYou can use the control panel to configure all functions of your appliance andto obtain information about the operating status
2 3
1 1
4
1 Programmes rarr Page 24
2 Programme selectorrarr Page 36
3 Display rarr Page 20
4 Buttons rarr Page 23
enemspDisplay
20
Display
6 DisplayDisplay
The display shows the current settings options or relevant information
Display Designation Description040 1 Programme dura-
tionprogrammetime remaining
Approximate expected programme dura-tion or programme time remaining
10h 1 Ready in time The programme end has been set and theremaining number of hours is displayed rarr Buttons Page 23
9 kg 1 Recommendedload
The maximum load capacity for the selec-ted programme in kg
ndash ndash ndash ndash -1200
Spin speed Set spin speed in rpm rarr Buttons Page 230= No final spin only drainingndash ndash ndash ndash Rinse Hold no draining
ndash 90 Temperature Set temperature in degC rarr Buttons Page 23
(cold)StartPause Start cancel or pause
iexcl Lights up The programme is runningand can be cancelled or paused
iexcl Flashes The programme can be star-ted or continued
Wash Programme status1 Example
Displayemspen
21
Display Designation DescriptionRinse Programme statusSpin Programme status
ndash ndash ndash ndash Rinse Hold Programme statusEnd End of pro-
grammeProgramme status
Childproof lock iexcl lights up The childproof lock is activ-ated
iexcl flashes The childproof lock is activatedand the appliance has been operated rarr Deactivating the childproof lockPage 40
Prewash Prewash is activated rarr Buttons Page 23
Water Plus andRinse Plus
Wash with more water and a rinse cycle isactivated rarr Buttons Page 23
SpeedPerfect Short wash activated rarr Buttons Page 23
1 Energy consump-tion
Energy consumption for the selected pro-grammeiexcl Low energy consumptioniexcl High energy consumption
Reminder to cleanthe drum
Flashes Drum is dirty Run the Limp tam-bor programme for cleaning and caringfor the drum and the outer tub rarr Cleaning the drum Page 42
Voltage controlsystem
Flashes The automatic voltage controlsystem detects impermissible voltagedrops This will pause the programmeNote The programme will continue whenthe voltage is permissible again
Voltage controlsystem
Flashes The programme has beenpaused because of impermissible voltagedrops The voltage is permissible againand the programme will continueNote The programme duration is exten-ded
1 Example
enemspDisplay
22
Display Designation DescriptionDoor iexcl Lights up The door is locked and can-
not be openediexcl Flashes The door is not closed prop-
erlyiexcl Off The door is unlocked and can be
openedTap iexcl No water pressure
iexcl The water pressure is too lowE35 -10 1 Error Error code error display signal1 Example
Buttonsemspen
23
Buttons
7 ButtonsButtons
The selection of programme settings depends on the programme that is setYou can see the selection options for each programme in the overview for rarr Programmes Page 24
Button Selection DescriptionInicioPausa +Carga (StartPause + Reload)
iexcl Startiexcl Canceliexcl Pause
Start cancel or pause the pro-gramme
SpeedPerfect iexcl Activateiexcl Deactivate
Activate or deactivate a short washingprogrammeNote Energy consumption increasesThe washing result is not affected bythis
Termin (ReadyIn)
1ndash24 hours Set the programme endThe programme duration is already in-cluded in the set number of hoursOnce the programme has started theprogramme duration is displayed
Temp degC (Tem-perature)
ndash 90 degC Adjust the temperature in degC
Centrif (Spin) ndash ndash ndash ndash - 1200 Adjust the spin speed or activate ndash ndash ndash ndash (Rinse Hold)If ndash ndash ndash ndash is selected the water is notdrained at the end of the washingcycle and the spin cycle is deactiv-ated The laundry remains in the waterused for rinsing
3 seg (ChildLock 3 sec)
iexcl Activateiexcl Deactivate
Activate or deactivate the childprooflockDisable the control panel to preventunwanted or accidental operationIf the childproof lock is activated andthe appliance has been switched offthe childproof lock remains activated rarr Childproof lock Page 40
Prelav (Pre-wash)
iexcl Activateiexcl Deactivate
Activate or deactivate prewash egfor washing heavily soiled laundry
Extra (ExtraRinse)
iexcl Activateiexcl Deactivate
Activate or deactivate a washing pro-gramme with more water and an addi-tional rinse cycleRecommended for particularly sensit-ive skin or in regions with very softwater
enemspProgrammes
24
Programmes 8 P
rogr
amm
esProgrammes B
elow
is a
n ov
ervi
ew o
f the
pro
gram
mes
You
can
find
info
rmat
ion
on the
load
and
on
the
adju
stab
le p
ro-
gram
me
optio
ns
Tip
The
laun
dry
s ca
re la
bels
pro
vide
you
with
add
ition
al in
form
atio
n on
pro
gram
me
sele
ctio
n
rarr
Car
e sy
mbo
ls o
n th
e ca
re la
bels
Pa
ge 3
4
Pro
gram
me
Des
crip
tion
Max load (kg)
Pro
gram
me
sett
ings
Max temperature (degC)
Max spin speed(rpm) 1
SpeedPerfect
Extra
Centrif ndash ndash ndash ndash(Rinse Hold)
Prelav
Alg
odoacuten
Al-
godatilde
o (
Cot
tons
)W
ash
hard
-wea
ring
item
s m
ade
from
cotto
n li
nen
or b
lend
ed fa
bric
sA
lso
suita
ble
as a
sho
rt p
rogr
amm
efo
r no
rmal
ly s
oile
d la
undr
y w
hen
you
activ
ate
Spe
edPer
fect
I
f Spe
ed-
Per
fect
is
act
ivat
ed t
he m
ax-
imum
load
cap
acity
is r
educ
ed to
5 k
g
990
1200
Alg
odoacuten
Col
orA
l-go
datildeo
Cor
(
Cot
-to
ns C
olou
r)
Was
h ha
rd-w
earin
g ite
ms
mad
e from
cotto
n li
nen
or b
lend
ed fa
bric
sEne
rgy-
savi
ng p
rogr
amm
e
9
90
1200
ndash
1Pro
gram
me
setti
ng
Programmesemspen
25
Pro
gram
me
Des
crip
tion
Max load (kg)
Pro
gram
me
sett
ings
Max temperature (degC)
Max spin speed(rpm) 1
SpeedPerfect
Extra
Centrif ndash ndash ndash ndash(Rinse Hold)
Prelav
Not
e T
o sa
ve e
nerg
y the
act
ual
was
hing
tem
pera
ture
may
dev
iate
from
the
set
was
hing
tem
pera
ture
Th
e w
ashi
ng p
erfo
rman
ce m
eets
lega
l req
uire
men
ts
Eco
40-6
0W
ash
item
s m
ade
from
cot
ton
line
nor
ble
nded
fabr
ics
Not
e T
extil
es w
hich
can
be
was
hed
from
40 deg
C
up
to 6
0 deg
C
as
per
the
care
sym
bol c
an b
e w
ashe
dto
geth
er
The
was
hing
per
form
ance
cor
res-
pond
s to
the
bes
t po
ssib
le w
ashi
ngpe
rfor
man
ce c
lass
acc
ordi
ng to
the
lega
l req
uire
men
ts
For
this
pro
gram
me
the
was
hing
tem
pera
ture
is a
utom
atic
ally
adj
uste
dde
pend
ing
on the
load
siz
e in
ord
erto
ach
ieve
the
bes
t po
ssib
le e
nerg
y
9
ndash
1200
ndash
1Pro
gram
me
setti
ng
enemspProgrammes
26
Pro
gram
me
Des
crip
tion
Max load (kg)
Pro
gram
me
sett
ings
Max temperature (degC)
Max spin speed(rpm) 1
SpeedPerfect
Extra
Centrif ndash ndash ndash ndash(Rinse Hold)
Prelav
effic
ienc
y w
ith the
bes
t po
ssib
lew
ashi
ng r
esul
t You
can
not ch
ange
the
was
hing
tem
pera
ture
Sin
teacutetic
os
(Eas
yC
are)
Was
h ite
ms
mad
e from
syn
thet
ic o
rbl
ende
d fa
bric
s4
60
1200
Mix
(
Mix
edFa
bric
s)W
ash
item
s m
ade
from
cot
ton
line
nor
syn
thet
ic o
r bl
ende
d fa
bric
sSui
tabl
e fo
r lig
htly
soi
led
laun
dry
460
1200
Del
icad
oSed
a (D
elic
ate
Silk
)W
ash
delic
ate
was
habl
e ite
ms
mad
efrom
silk
vis
cose
and
syn
thet
ics
Use
a d
eter
gent
tha
t is
sui
tabl
e fo
rde
licat
es o
r si
lk
Not
e W
ash
espe
cial
ly d
elic
ate
item
sor
item
s w
ith h
ooks
eye
lets
or
clip
sin
a m
esh
laun
dry
bag
2
40
800
ndash
1Pro
gram
me
setti
ng
Programmesemspen
27
Pro
gram
me
Des
crip
tion
Max load (kg)
Pro
gram
me
sett
ings
Max temperature (degC)
Max spin speed(rpm) 1
SpeedPerfect
Extra
Centrif ndash ndash ndash ndash(Rinse Hold)
Prelav
Lan
aLatilde
s (W
ool)
Han
d- o
r m
achi
ne-w
asha
ble
item
sth
at a
re m
ade
from
woo
l or
cont
ain
woo
lTo
pre
vent
the
laun
dry
from
shr
ink-
ing
the
dru
m m
oves
the
item
s ve
ryge
ntly
with
long
pau
ses
Use
a d
eter
gent
tha
t is
sui
tabl
e fo
rw
ool
2
40
800
ndash
ndash
ndash
(R
inse
)R
inse
s an
d th
en s
pins
the
laun
dry
and
then
dra
ins
the
wat
er
ndashndash
1200
ndash
ndash
(
Spi
nD
rain
)Spi
ns a
nd d
rain
s th
e w
ater
If
you
only
wan
t to
dra
in the
wat
er
activ
ate
0 T
he la
undr
y is
not
spu
n
ndash
ndash
1200
ndash
ndash
ndash
ndash
Rop
a os
cura
R
oupa
esc
ura
(Dar
k W
ash)
Was
h da
rk-c
olou
red
and
colo
ur-in
-te
nse
item
s m
ade
from
cot
ton
orea
sy-c
are
fabr
ic e
g j
eans
Tu
rn la
undr
y in
side
-out
bef
ore
was
h-in
gU
se li
quid
det
erge
nt
4
40
1200
1Pro
gram
me
setti
ng
enemspProgrammes
28
Pro
gram
me
Des
crip
tion
Max load (kg)
Pro
gram
me
sett
ings
Max temperature (degC)
Max spin speed(rpm) 1
SpeedPerfect
Extra
Centrif ndash ndash ndash ndash(Rinse Hold)
Prelav
Plu
mas
Pen
as
(Dow
n)W
ash
pillo
ws
duv
ets
or c
loth
ing
stuf
fed
with
dow
n an
d fil
lings
with
synt
hetic
fibr
es
Was
h la
rge
item
s se
para
tely
U
se a
det
erge
nt tha
t is
sui
tabl
e fo
rdo
wn
or d
elic
ates
U
se s
parin
gly
Do
not us
e fa
bric
sof
tene
rN
ote
To
prev
ent ex
cess
ive
foam
ing
rem
ove
air
from
laun
dry
item
s by
rolli
ng the
m u
p be
fore
you
was
hth
em
2
60
1200
ndash
ndash
Lim
p tam
bor
(Dru
m C
lean
)C
lean
ing
and
carin
g fo
r th
e dr
um
Use
thi
s pr
ogra
mm
e in
the
follo
win
gca
ses
iexclB
efor
e us
ing
the
appl
ianc
e fo
r th
efir
st tim
eiexcl
If yo
u re
gula
rly w
ash
at tem
pera
t-ur
es o
f 40 deg
C o
r lo
wer
ndash
ndash
1200
ndash
ndash
ndash
ndash
1Pro
gram
me
setti
ng
Programmesemspen
29
Pro
gram
me
Des
crip
tion
Max load (kg)
Pro
gram
me
sett
ings
Max temperature (degC)
Max spin speed(rpm) 1
SpeedPerfect
Extra
Centrif ndash ndash ndash ndash(Rinse Hold)
Prelav
iexclA
fter
a pr
olon
ged
perio
d of
non
-us
eU
se w
ashi
ng p
owde
r or
a d
eter
gent
cont
aini
ng b
leac
hH
alve
the
am
ount
of d
eter
gent
to
avoi
d fo
amin
gD
o no
t us
e fa
bric
sof
tene
rD
o no
t us
e liq
uid
dete
rgen
t or
det
er-
gent
tha
t is
inte
nded
for
woo
llens
or
delic
ates
N
ote
The
dru
m c
lean
ing
indi
cato
rw
ill fl
ash
to r
emin
d yo
u if
you
have
not us
ed a
pro
gram
me
at 6
0 deg
C o
rhi
gher
for
a lo
ng tim
eC
amis
asB
lusa
s (S
hirts
Blo
uses
)W
ash
non-
iron
shirt
s an
d bl
ouse
sm
ade
from
cot
ton
line
n s
ynth
etic
or
blen
ded
fabr
ics
Not
e U
se the
Del
icad
oSed
a pr
o-gr
amm
e to
was
h sh
irts
and
blou
ses
mad
e from
silk
or
delic
ate
fabr
ics
2
60
800
ndash
1Pro
gram
me
setti
ng
enemspProgrammes
30
Pro
gram
me
Des
crip
tion
Max load (kg)
Pro
gram
me
sett
ings
Max temperature (degC)
Max spin speed(rpm) 1
SpeedPerfect
Extra
Centrif ndash ndash ndash ndash(Rinse Hold)
Prelav
Spo
rt
Was
h sp
orts
and
leis
ure
item
s m
ade
from
syn
thet
ic fi
bres
mic
rofib
re o
rfle
ece
Use
a d
eter
gent
tha
t is
sui
tabl
e fo
rsp
orts
item
sD
o no
t us
e fa
bric
sof
tene
rTi
p U
se the
Sin
teacutetic
os
prog
ram
me
to w
ash
heav
ily s
oile
d la
undr
y
2
40
800
ndash
Raacutep
ido
153
0m
in
(Sup
erQ
uick
153
0 m
in)
Was
h ite
ms
mad
e from
cot
ton
syn
-th
etic
or
blen
ded
fabr
ics
Sho
rt p
rogr
amm
e fo
r sm
all i
tem
s of
light
ly s
oile
d la
undr
yTh
e pr
ogra
mm
e du
ratio
n is
app
rox
30 m
inut
es
If yo
u w
ish
to r
educ
e th
e pr
ogra
mm
edu
ratio
n to
15 m
inut
es a
ctiv
ate
Spe
edPer
fect
T
he m
axim
umlo
ad is
red
uced
to
2 k
g
4
40
1200
ndash
1Pro
gram
me
setti
ng
Accessoriesemspen
31
Accessories
9 AccessoriesAccessories
Use original accessories These have been made especially for your appliance
Use Order numberWater inlet hose exten-sion
Extend the water inlethose for cold water orAquaStop (approx 250m)
WMZ2381
Fixing brackets Improves the stability ofthe appliance
WMZ2200
Longer water inlet hose Replace the standardwater inlet hose with alonger hose (220 m)
00353925
Elbow Secure the water outlethose in place
00655300
Liquid detergent insert Measure liquid deter-gent
00605740
Metal covering plate Metal covering plate forinstalling the applianceunder a high worktop
WMZ20430
Before using for the first time
10 Before using for thefirst time
Before using for the first time
Prepare the appliance for use
101 Starting an empty wash-ing cycle
Your appliance was inspected thor-oughly before leaving the factory Toremove any residual water run thefirst wash cycle without any laundryNote Please read the information inthe Safety rarr Page 4 and Preventingmaterial damage rarr Page 10 sectionsto ensure that you use the appliancesafely
1 Turn the programme selector toLimp tambor
2 Close the door
enemspLaundry
32
3 Pull out the detergent drawer
4 Pour approx 1 litre of tap waterinto compartment II
5 Pour washing powder into com-partment II
To prevent foaming use only halfof the amount of detergent recom-mended by the detergent manufac-turer for light soiling Do not usedetergent suitable for woollens ordelicates
6 Push in the detergent drawer
7 Press InicioPausa + Carga (StartPause + Reload) to start theprogramme
a The display shows the remainingprogramme duration
a After the programme has endedthe display shows End
8 Start the first wash cycle or set theprogramme selector to to switchoff the appliance rarr Basic operation Page 36
Laundry
11 LaundryLaundry
111 Preparing the laundryNote Please read the information inthe Safety rarr Page 4 and Preventingmaterial damage rarr Page 10 sectionsto ensure that you use the appliancesafely
ATTENTIONObjects remaining in the laundry maydamage the laundry and the drum Remove all items from any pock-
ets in your laundry before usingthe appliance
To protect your appliance and thelaundry prepare the laundry be-forehandndash Empty any pockets
Laundryemspen
33
ndash Brush sand out of all collars andpockets
ndash Close bed covers and cushioncovers
ndash Close all zips Velcro fastenershooks and eyes
ndash Tie cloth belts apron stringsetc together or use a laundrybag
ndash Remove curtain hooks and leadstrips or use a mesh laundrybag
ndash Use a mesh laundry bag forsmall items of laundry such aschildrens socks
ndash Some stubborn or dried-in stainscan be removed by washingseveral times
ndash Wash large and small items oflaundry together
ndash Do not rub fresh stains but dabthem with soapy water
ndash Separate items of laundry andshake them out
112 Sorting laundryNote Please read the information inthe Safety rarr Page 4 and Preventingmaterial damage rarr Page 10 sectionsto ensure that you use the appliancesafely To improve washing results and
prevent discolouration sort thelaundry according to the followingcriteria before washingndash Type of fabric and fibre
Wash laundry of the sametype of fabric and fibre to-gether
ndash Care symbols on the care labelsrarr Page 34
ndash Description of the programmesrarr Page 24
ndash Whitesndash Colours
Wash new coloured itemsseparately the first time youwash them
113 Degrees of soiling
Degree of soiling Soiling ExamplesLight iexcl No dirt or stains are vis-
ibleiexcl Laundry has absorbed
odours
Light summer clothing orsports clothing that hasbeen worn for a just a fewhours
Normal Dirt or light stains are vis-ible
iexcl T-shirts shirts or blousesare sweat-soaked orhave been worn a fewtimes
iexcl Towels or bedding thathas been used for up toone week
Heavy Dirt or stains are clearlyvisible
Tea towels baby items orwork clothing
enemspDetergents and care products
34
114 Care symbols on the care labels
Washing care symbols
Symbol Washing process Recommended pro-gramme
Normal Cotton Gentle Easy-Care Particularly gentle DelicatesSilk for
washing by handHand wash WoolNot suitable for machine-washing ndash
Detergents and care products
12 Detergents and careproducts
Detergents and care products
Note Please read the information inthe Safety rarr Page 4 and Preventingmaterial damage rarr Page 10 sectionsto ensure that you use the appliancesafelyThe manufacturers instructions foruse and dosage can be found on thepackaging
Notesiexcl Only use liquid detergents that are
self-flowingiexcl Do not mix different liquid deter-
gentsiexcl Do not mix detergent and fabric
softeneriexcl Do not use products that have ex-
pired or are highly congealediexcl Do not use products containing
solvents caustic agents or volatilesubstances (eg bleach)
iexcl Use dyes sparingly as salt maydamage stainless steel
iexcl Do not use bleaching agents in theappliance
121 Detergent recommendation
Detergent Fabrics Pro-gramme
Temperature
Standard detergentwith optical brighten-ers
Heat-resistant whitefabrics made fromcotton or linen
Cotton From cold up to90 degC
Detergent for colourswithout bleach or op-tical brighteners
Coloured fabricsmade from linen orcotton
Cotton From cold up to60 degC
Detergent for col-oursdelicates withoutoptical brighteners
Coloured fabricsmade from easy-carefabrics or syntheticmaterials
Easy-Care From cold up to60 degC
Detergents and care productsemspen
35
Detergent Fabrics Pro-gramme
Temperature
Detergent for delic-ates
Delicate fine textilessilk or viscose
DelicatesSilk
From cold up to40 degC
Detergent for wool-lens
Wool Wool From cold up to40 degC
Tip Visit wwwcleanrighteu to findfurther information on detergentscare products and cleaning agentsfor domestic use
122 Detergent dosageThe detergent dosage depends oniexcl The amount of laundryiexcl Degree of soilingiexcl Water hardness
You can find out how hard yourwater is from your local water com-pany or measure it yourself usinga water hardness tester
Water hardness
Hardness range Total hardness in mmoll
German degrees in degdH
soft (I) 0ndash15 0ndash84medium (II) 15ndash 25 84ndash14hard (III) over 25 over 14
Example of a manufacturersinstructions for detergentThese example values refer to astandard load of 4ndash5 kg
Soiling Light Normal HeavyWater hardness Softmedium 40 ml 55 ml 80 mlWater hardness Hardveryhard
55 ml 80 ml 105 ml
The dosages can be found on themanufacturers packagingiexcl Adjust the dosage to the actual
load
enemspBasic operation
36
Basic operation
13 Basic operationBasic operation
131 Switching on the appli-ance
Turn the programme selector to aprogramme
132 Setting a programme1 Set the programme selector to the
required programme rarr Programmes Page 24
2 If necessary adjust the pro-gramme settings rarr Page 36
133 Adjusting the pro-gramme settings
Requirement A programme hasbeen set rarr Setting a programme Page 36
Adjust the programme settings rarr Programmes Page 24
Note The programme settings arenot saved permanently for the pro-gramme
134 Loading laundryNotesiexcl Please read the information in the
Safety rarr Page 4 and Preventingmaterial damage rarr Page 10 sec-tions to ensure that you use theappliance safely
iexcl To prevent creasing take note ofthe maximum load for the rarr Programmes Page 24
Requirement The laundry is pre-pared and sortedrarr Laundry Page 321 Open the door
Make sure that the drum is empty2 Load the laundry unfolded into the
drum3 Close the door
Ensure that there is no laundrytrapped in the door
Basic operationemspen
37
135 Using a measuring aidfor liquid detergent
If you order the measuring aid as anaccessory you must use the measur-ing aid1 Pull out the detergent drawer
2 Press down on the insert and re-move the detergent drawer
1
2
3 Insert the measuring aid
4 Insert the detergent drawer
136 Use the measuring aidfor liquid detergent
To add liquid detergent you can usea measuring aid in the detergentdrawer1 Pull out the detergent drawer2 Slide the measuring aid forwards
3 Fold the measuring aid down andclick it into place
enemspBasic operation
38
4 Push in the detergent drawer
137 Adding detergent andcare product
Notesiexcl Please read the information in the
Safety rarr Page 4 and Preventingmaterial damage rarr Page 10 sec-tions to ensure that you use theappliance safely
iexcl Do not use the measuring aid forliquid detergent for gel detergentswashing powder or if Prewash orReady in time are activated
Requirement Find out the optimumdosage for detergent and careproduct rarr Page 341 Pull out the detergent drawer2 Pour in detergent
rarr Detergent drawer Page 193 If required add the care product4 Push in the detergent drawer
138 Starting the programmeNote If you want to change the timeuntil the programme ends set theReady in time first Press InicioPausa + Carga a The drum rotates and load detec-
tion takes place This can take upto 2 minutes after which waterenters the drum
a The display shows either the pro-gramme duration or the Ready intime
a After the programme has endedthe display shows End
139 Adjusting the Ready intime before the pro-gramme starts
You can readjust the selected Readyin time before the programme starts1 Press InicioPausa + Carga 2 Press Termin repeatedly until
the display indicates the desiredReady in time
3 Press InicioPausa + Carga
1310 Soaking laundryNote No additional detergent is re-quired The washing solution is thenused for washing1 Start the programme2 To pause the programme after ap-
prox 10 minutes press InicioPausa + Carga
3 To resume the programme afterthe desired soaking time pressInicioPausa + Carga
1311 Adding laundryNote Please read the information inthe Safety rarr Page 4 and Preventingmaterial damage rarr Page 10 sectionsto ensure that you use the appliancesafely1 Press InicioPausa + Carga
The appliance is paused andchecks whether it is possible toadd or remove laundry Take noteof the programme status
2 Add or remove laundry3 Close the door4 Press InicioPausa + Carga
Basic operationemspen
39
1312 Cancelling the pro-gramme
Once the programme has startedyou can cancel it at any timeNote Please read the information inthe Safety rarr Page 4 and Preventingmaterial damage rarr Page 10 sectionsto ensure that you use the appliancesafely1 Press InicioPausa + Carga 2 Open the door
The appliance door remainslocked for safety reasons if thetemperature and water levels arehighndash If the temperature is high start
the programmendash If the water level is high Start
the or programme3 Remove the laundry
1313 Resuming the pro-gramme when the pro-gramme status is RinseHold
1 Set the or programme2 Press InicioPausa + Carga
1314 Unloading the laundryNote Please read the information inthe Safety rarr Page 4 and Preventingmaterial damage rarr Page 10 sectionsto ensure that you use the appliancesafely1 Open the door
2 Remove the laundry
1315 Switching off the appli-ance
1 Turn the programme selector to
2 Turn off the tap3 Wipe the rubber gasket dry and re-
move any foreign objects
4 Leave the door and detergentdrawer open so that residual watercan evaporate
enemspChildproof lock
40
Childproof lock
14 Childproof lockChildproof lock
Secure your appliance against beingoperated unintentionally using thecontrols
141 Activating the childprooflock
Press and hold the two 3 segbuttons for approx 3 seconds
a The display shows a The controls are lockeda The childproof lock remains active
even after the appliance has beenswitched off
142 Deactivating the child-proof lock
Requirement To deactivate thechildproof lock the appliance mustbe switched on Press and hold the two 3 seg
buttons for approx 3 secondsa goes out in the display
Basic settingsemspen
41
Basic settings
15 Basic settingsBasic settings
You can configure the appliance to meet your needs
151 Overview of the basic settingsBelow is an overview of the basic settings on your appliance
Basic setting Programmeposition
Value Description
End signal 2 0 (off)1 (quiet)2 (me-dium)3 (loud)4 (veryloud)
Set the volume of the signal at theend of the programme
Button signal 3 0 (off)1 (quiet)2 (me-dium)3 (loud)4 (veryloud)
The volume of the audible signalemitted when the buttons arepressed
Drum cleaningreminder
4 ONOFF
Activate or deactivate the re-minder to clean the drum
enemspCleaning and servicing
42
152 Changing the basic set-tings
1 Set the programme selector to po-sition 1
2 Press InicioPausa + Carga and at the same time turn theprogramme selector to position 2
a The display shows the currentvalue
3 Set the programme selector to therequired position
4 To change the value press Ter-min
5 To save the changes switch offthe appliance
Cleaning and servicing
16 Cleaning and servi-cing
Cleaning and servicing
To keep your appliance working effi-ciently for a long time it is importantto clean and maintain it carefully
161 Tips on appliance careWipe down thehousing and thecontrol panelwith nothing butwater and adamp cloth
This ensures theparts of the appli-ance will remainclean and hy-gienic
Remove all de-tergent residuespray residue orother residuesimmediately
Fresh depositsare easier to re-move withoutleaving anyresidue
Keep the appli-ance door anddetergent draweropen after use
This allows theresidual water todry reducingodours in the ap-pliance
162 Cleaning the drum
CAUTIONRisk of injuryPermanently washing at low temper-atures and a lack of ventilation forthe appliance may damage the drumand cause injury Regularly run a programme for
cleaning the drum or wash at tem-peratures of at least 60 degC
Leave the appliance to dry afterevery operation with the dooropen and leave the detergentdrawer to dry
Run the Limp tambor pro-gramme without laundryAdd washing powder
163 Cleaning the detergentdrawer
Note Please read the information inthe Safety rarr Page 4 and Preventingmaterial damage rarr Page 10 sectionsto ensure that you use the appliancesafely1 Pull out the detergent drawer
Cleaning and servicingemspen
43
2 Press down on the insert and re-move the detergent drawer
1
2
3 Press out the insert upwards frombelow
4 Clean the detergent drawer and in-sert with water and a brush andthen dry them
5 Fit the insert and lock it into place
6 Cleaning the opening for the deter-gent drawer
7 Push in the detergent drawer
164 Descaling
ATTENTIONThe use of unsuitable descalingagents eg for coffee machines maydamage the appliance For this appliance only use de-
scaling agents that are availablefrom the manufacturers website orour after-sales service
enemspCleaning and servicing
44
165 Cleaning the drain pumpClean the drain pump in the event offaults eg blockages or rattlingnoises
Emptying the drain pumpNote Please read the information inthe Safety rarr Page 4 and Preventingmaterial damage rarr Page 10 sectionsto ensure that you use the appliancesafely1 Turn off the water tap2 Switch off the appliance3 Disconnect the appliances mains
plug from the power supply4 Open the maintenance flap
5 Remove the maintenance flap
6 Slide a sufficiently large receptacleunder the opening
7 Take the drain hose out of theholder
Cleaning and servicingemspen
45
8 CAUTION - Risk of scaldingWhen you wash at high temperat-ures the detergent solution getshot
Do not touch the hot detergentsolutionTo allow the detergent solution toflow out into the container removethe sealing cap
9 Firmly press on the sealing cap
10 Insert the drain hose into theholder
Cleaning the drain pumpNote Please read the information inthe Safety rarr Page 4 and Preventingmaterial damage rarr Page 10 sectionsto ensure that you use the appliancesafelyRequirement The drain pump isempty rarr Page 441 Since water may remain in the
drain pump remove the pump capcarefully
2 Clean the interior the thread onthe pump cap and the pump hous-ing
3 Make sure that the impeller in thedrain pump can be rotated
enemspCleaning and servicing
46
4 Insert the pump cap and screw iton as far as it will go
90deg
The handle on the pump cap mustbe in a vertical position
5 Close the maintenance flap
Before the next washTo prevent unused detergent fromflowing straight into the outlet in thenext wash run the programmeafter you have emptied the drainpump1 Turn on the tap2 Insert the mains plug3 Switch on the appliance4 Pour 1 litre of water into compart-
ment II5 Start the programme
166 Cleaning the water outlethose at the siphon
1 Switch off the appliance2 Disconnect the appliances mains
plug from the power supply
3 Loosen the hose clamp and care-fully remove the water outlet hose
Residual water may leak out4 Clean the water outlet hose and si-
phon connecting piece
5 Reattach the water outlet hose andsecure the connection point usingthe hose clamp
Cleaning and servicingemspen
47
167 Clean the water inlet fil-ters
Emptying the water inlet hose1 Turn off the tap2 Set a programme except for
or 3 Start the programme and leave it
to run for approx 40 seconds4 Switch off the appliance5 Disconnect the appliances mains
plug from the power supply
Cleaning the filter on the tapNote Please read the information inthe Safety rarr Page 4 and Preventingmaterial damage rarr Page 10 sectionsto ensure that you use the appliancesafelyRequirement The water inlet hose isempty1 Remove the water inlet hose from
the tap
2 Clean the filter with a small brush
3 Connect the water inlet hose andcheck for leaks
Cleaning the filter on theapplianceNote Please read the information inthe Safety rarr Page 4 and Preventingmaterial damage rarr Page 10 sectionsto ensure that you use the appliancesafelyRequirement The water inlet hose isempty rarr Emptying the water inlet hosePage 47
enemspCleaning and servicing
48
1 Disconnect the hose from the rearof the appliance
1
2
2 Use pliers to remove the filter
3 Clean the filter with a small brush
4 Reinsert the filter
5 Connect the hose and check forleaks
2
1
Troubleshootingemspen
49
Troubleshooting
17 TroubleshootingTroubleshooting
You can rectify minor faults on your appliance yourself Read the troubleshoot-ing information before contacting after-sales service This will avoid unneces-sary costs
WARNINGRisk of electric shockIncorrect repairs are dangerous Repairs to the appliance should only be carried out by trained specialist
staff Only use genuine spare parts when repairing the appliance If the power cord of this appliance is damaged it must be replaced by the
manufacturer the manufacturers Customer Service or a similarly qualifiedperson in order to prevent any risk
Fault Cause and troubleshootingThe display goes outand InicioPausa +Carga flashes
Energy-saving mode is active Press any buttona The symbol lights up again
E36 -10 Drain pipe or water outlet hose is blocked Clean the drain pipe and the water outlet hose
Drain pipe or water drain hose is caught or jammed Ensure that the drain pipe and water drain hose are
not kinked or trapped
Drain pump is blocked rarr Cleaning the drain pump Page 44
The water outlet hose is connected too high Install the water outlet hose at a maximum height of
1 metre
Detergent dosage is too high Immediate measure Mix one tablespoon of fabric
softener with 05 litres of water and pour the mix-ture into the left-hand compartment (not for outdoorclothing sportswear or items stuffed with down)
Reduce the amount of detergent for the next wash-ing cycle with the same load
Unapproved extension installed on the water drainhose Remove any unapproved extensions from the water
hose Connecting the appliance
E36 -25 -26 Drain pump is blocked rarr Cleaning the drain pump Page 44
enemspTroubleshooting
50
Fault Cause and troubleshootingThe water pressure is lowNo remedial action possibleThe filters in the water inflow are blocked Clean the filters in the water inflow rarr Page 47
The tap is turned off Turn on the tap
The water inlet hose is kinked or jammed Ensure that the water inlet hose is not kinked or
jammed
flashes The automatic voltage control system detects an un-authorised voltage under-usage No remedial action possible
Note If the power supply is stable the programmecontinues to run as normalVoltage under-usage may cause extension of a pro-grammeNo remedial action possible
flashes Voltage under-usage may cause extension of a pro-grammeNo remedial action possible
lights up The temperature is too high Wait until the temperature has dropped rarr Cancelling the programme Page 39
Water level is too high Start the programme
Laundry is caught in the door1 Open the door again2 Remove any trapped laundry3 Close the door4 Press InicioPausa + Carga to start the pro-
gramme
flashes Door is not closed1 Close the door2 Press InicioPausa + Carga to start the pro-
gramme
All other error codes Malfunction Call the after-sales service
rarr Customer Service Page 59
Troubleshootingemspen
51
Fault Cause and troubleshootingThe appliance is notworking
The mains plug of the power cord is not plugged in Connect the appliance to the power supply
The circuit breaker is faulty Check the circuit breaker in the fuse box
There has been a power cut Check whether the lighting in your kitchen or other
appliances are working
The programme doesnot start
You have not pressed InicioPausa + Carga Press InicioPausa + Carga
Door is not closed1 Close the door2 Press InicioPausa + Carga to start the pro-
gramme
Childproof lock is activated rarr Deactivating the childproof lock Page 40
Termin is activated Check whether Termin is activated
rarr Buttons Page 23
Laundry is caught in the door1 Open the door again2 Remove any trapped laundry3 Close the door4 Press InicioPausa + Carga to start the pro-
gramme
The door cannotbe opened
ndash ndash ndash ndash is activated Continue the programme by selecting or and
pressing InicioPausa + Carga rarr Resuming the programme when the programmestatus is Rinse Hold Page 39
The temperature is too high Wait until the temperature has dropped rarr Cancelling the programme Page 39
Water level is too high Start the programme
Power failure Open the door using the emergency release
rarr Emergency release Page 57
The water is not drain-ing
Drain pipe or water outlet hose is blocked Clean the drain pipe and the water outlet hose
enemspTroubleshooting
52
Fault Cause and troubleshootingThe water is not drain-ing
Drain pipe or water drain hose is caught or jammed Ensure that the drain pipe and water drain hose are
not kinked or trapped
Drain pump is blocked rarr Cleaning the drain pump Page 44
ndash ndash ndash ndash is activated Continue the programme by selecting or and
pressing InicioPausa + Carga rarr Resuming the programme when the programmestatus is Rinse Hold Page 39
The water outlet hose is connected too high Install the water outlet hose at a maximum height of
1 metre
Detergent dosage is too high Immediate measure Mix one tablespoon of fabric
softener with 05 litres of water and pour the mix-ture into the left-hand compartment (not for outdoorclothing sportswear or items stuffed with down)
Reduce the amount of detergent for the next wash-ing cycle with the same load
Unapproved extension installed on the water drainhose Remove any unapproved extensions from the water
hose Connecting the appliance
Water is not flowingin Detergent is notbeing dispensed
You have not pressed InicioPausa + Carga Press InicioPausa + Carga
The filters in the water inflow are blocked Clean the filters in the water inflow rarr Page 47
The tap is turned off Turn on the tap
The water inlet hose is kinked or jammed Ensure that the water inlet hose is not kinked or
jammed
The spin cycle runsseveral times
The unbalanced load detection system eliminates animbalance by repeatedly redistributing the laundry Not a fault ndash no action required
Note When loading where possible place large andsmall items of laundry together in the drum Differentsized items of laundry distribute themselves betterduring the spin cycle
Troubleshootingemspen
53
Fault Cause and troubleshootingThe programme dura-tion changes duringthe wash cycle
The programme operation is optimised electronicallyThis may change the programme duration Not a fault ndash no action required
The unbalanced load detection system eliminates animbalance by repeatedly redistributing the laundry Not a fault ndash no action required
Note When loading where possible place large andsmall items of laundry together in the drum Differentsized items of laundry distribute themselves betterduring the spin cycleFoam detection system switches on a rinse cycle iffoam build-up is too high Not a fault ndash no action required
No water is visible inthe drum
Water is below the visible area Not a fault ndash no action required Do not add any extra water to the appliance while it
is operating
Drum jerks after theprogramme starts
This is caused by an internal motor test Not a fault ndash no action required
Residual water ispresent in the com-partment
Insert in compartment is blocked rarr Cleaning the detergent drawer Page 42
Vibrations and move-ment of the appliancewhilst spinning
Appliance is not correctly aligned Aligning the appliance
The appliance feet are not fixed Secure the appliance feet Aligning the appliance
Transit bolts have not been removed Removing the transit bolts
Drum does not turnwater does not flow in
Load detection is active Not a fault ndash no action required
Note The load detection can take up to two minutesHeavy foam build-up Detergent dosage is too high
Immediate measure Mix one tablespoon of fabricsoftener with 05 litres of water and pour the mix-ture into the left-hand compartment (not for outdoorclothing sportswear or items stuffed with down)
Reduce the amount of detergent for the next wash-ing cycle with the same load
enemspTroubleshooting
54
Fault Cause and troubleshootingHigh spin speed notreached
A low spin speed is selected The next time you run a wash cycle set a higher
spin speed
Unbalance load detection system is using a reducedspin speed to eliminate an unbalance Redistribute the laundry in the drum
Note Where possible mix large and small items inthe drum Different sized items of laundry distributethemselves better during the spin cycle Start the programme
The spin programmedoes not start
Drain pipe or water outlet hose is blocked Clean the drain pipe and the water outlet hose
Drain pipe or water drain hose is caught or jammed Ensure that the drain pipe and water drain hose are
not kinked or trapped
The unbalanced load detection system has interruptedthe spin cycle because the laundry is unevenly distrib-uted Redistribute the laundry in the drum
Note Where possible mix large and small items inthe drum Different sized items of laundry distributethemselves better during the spin cycle Start the programme
Rushing hissingnoise
Water is flushed under pressure into the detergentdrawer Not a fault ndash normal operating noise
Loud noises duringthe spin cycle
Appliance is not correctly aligned Aligning the appliance
The appliance feet are not fixed Secure the appliance feet Aligning the appliance
Transit bolts have not been removed Removing the transit bolts
Banging noises rat-tling in the drainpump
Foreign bodies have got into the drain pump rarr Cleaning the drain pump Page 44
Slurping rhythmicalsuction noise
The drain pump is active the detergent solution ispumped out Not a fault ndash normal operating noise
Troubleshootingemspen
55
Fault Cause and troubleshootingCreasing The spin speed is too high
The next time you run a wash cycle set a lowerspin speed
The load is too large The next time you run a wash cycle reduce the
amount of laundry being loaded
The wrong programme is selected for the type of fab-ric Select the programmes that are suitable for the
type of fabric rarr Programmes Page 24
Detergent or fabricsoftener drips off theseal and collects onthe door or in the sealfold
Too much detergentfabric softener in the detergentdrawer When dosing liquid detergent and fabric softener
observe the marking in the detergent drawer anddo not dose above this
The spin result is notsatisfactory The laun-dry is too wettoodamp
A low spin speed is selected The next time you run a wash cycle set a higher
spin speed Start the programme
Drain pipe or water outlet hose is blocked Clean the drain pipe and the water outlet hose
Drain pipe or water drain hose is caught or jammed Ensure that the drain pipe and water drain hose are
not kinked or trapped
The unbalanced load detection system has interruptedthe spin cycle because the laundry is unevenly distrib-uted Redistribute the laundry in the drum
Note Where possible mix large and small items inthe drum Different sized items of laundry distributethemselves better during the spin cycle Start the programme
Unbalance load detection system is using a reducedspin speed to eliminate an unbalance Redistribute the laundry in the drum
Note Where possible mix large and small items inthe drum Different sized items of laundry distributethemselves better during the spin cycle Start the programme
enemspTroubleshooting
56
Fault Cause and troubleshootingDetergent residue onthe damp washing
Detergents may contain water-insoluble substancesthat deposit on the laundry Start the programme
Detergent residue onthe dry laundry
Detergents may contain water-insoluble substancesthat deposit on the laundry Brush out the laundry after washing and drying
Water is leaking out atthe water inlet hose
Water inlet hose is not correctlysecurely connected1 Connect the water supply hose correctly Connect-
ing the water inlet hose2 Tighten the screw connection
Water is leaking out atthe water outlet hose
The water outlet hose is damaged Replace the damaged water outlet hose
Water outlet hose is not connected correctly Connect the water outlet hose correctly Water out-
let connection types
Odours have formedin the appliance
Humidity and detergent residue may promote theformation of bacteria rarr Cleaning the drum Page 42 If you are not using the appliance leave the door
and detergent drawer open so that residual watercan evaporate
Transportation storage and disposalemspen
57
171 Emergency releaseReleasing the doorRequirement The drain pump isempty rarr Page 441 ATTENTION Escaping water may
cause material damage Do not open the door if you can
see water through the glassPull the emergency release down-wards with a tool and release
a The door lock is released2 Insert the maintenance flap and
lock it into place3 Close the maintenance flap
Transportation storage and disposal
18 Transportation stor-age and disposal
Transportation storage and disposal
You can find out here how to prepareyour appliance for transportation andstorage You will also find out how todispose of old appliances
181 Removing the appliance1 Turn off the tap2 rarr Emptying the water inlet hose
Page 473 Switch off the appliance4 Unplug the appliances mains plug
5 Drain the remaining detergentsolution rarr Cleaning the drain pumpPage 44
6 Detach the hoses
182 Inserting the transitbolts
Secure the appliance for transporta-tion using transit bolts in order to pre-vent damage1 Remove the four cover caps
‒ If necessary use a screwdriverto remove the cover caps
Keep the cover caps2 Insert the four sleeves
enemspTransportation storage and disposal
58
3 Insert all screws into the fourtransit bolts and tighten slightly
4 Insert the power cord into theholder and tighten all fourscrews for the transit bolts with aWAF 13 wrench
5 Insert the hose into holder
183 Using the applianceagain
1 Remove the transit bolts
2 Pour approx 1 litre of water intocompartment II in the detergentdrawer
3 Start the programmea The unused detergent cannot flow
straight into the outlet during thenext wash
184 Disposing of old appli-ance
Valuable raw materials can be re-used by recycling
WARNINGRisk of harm to healthChildren can lock themselves in theappliance thereby putting their livesat risk Do not install the appliance behind
a door as this may obstruct the ap-pliance door or prevent it fromopening
With redundant appliances unplugthe power cord Then cut throughthe cord and damage the lock onthe appliance door beyond repairso that the appliance door will nolonger close
1 Unplug the appliance from themains
2 Cut through the power cord3 Dispose of the appliance in an en-
vironmentally friendly mannerInformation about current disposalmethods are available from yourspecialist dealer or local authority
This appliance is la-belled in accordancewith European Directive201219EU concerningused electrical and elec-
Customer Serviceemspen
59
tronic appliances (wasteelectrical and electronicequipment - WEEE)The guideline determ-ines the framework forthe return and recyclingof used appliances asapplicable throughoutthe EU
Customer Service
19 Customer ServiceCustomer Service
If you have any queries on use areunable to rectify faults on the appli-ance yourself or if your applianceneeds to be repaired contact Cus-tomer ServiceYou can solve many problems your-self by consulting the information ontroubleshooting in these instructionsor on our website If this is not thecase contact our after-sales serviceWith any warranty claims we willmake sure that your appliance is re-paired by trained after-sales techni-cians using genuine spare parts in-cluding after the manufacturers war-ranty has expiredFunction-relevant genuine spare partsaccording to the corresponding Eco-design Order can be obtained fromCustomer Service for a period of atleast 10 years from the date onwhich your appliance was placed onthe market within the European Eco-nomic AreaNote Under the terms of the manu-facturers warranty the use of Cus-tomer Service is free of chargeDetailed information on the warrantyperiod and terms of warranty in yourcountry is available from our after-sales service your retailer or on ourwebsite
If you contact Customer Service youwill require the product number (E-Nr) and the production number (FD)of your applianceThe contact details for Customer Ser-vice can be found in the enclosedCustomer Service directory or on ourwebsite
191 Product number (E-Nr)and production number(FD)
You can find the product number (E-Nr) and the production number (FD)on the appliances rating plateDepending on the model the ratingplate is locatediexcl On the inside of the dooriexcl On the inside of the maintenance
flapiexcl On the rear of the applianceMake a note of your appliances de-tails and the Customer Service tele-phone number to find them againquickly
enemspConsumption values
60
Consumption values
20 Consumption valuesConsumption values
The following information is provided in accordance with the EU EcodesignRegulation The values given for programs other than the Eco 40-60 are indicat-ive only and were determined in accordance with the applicable standardEN60456
Programme Load(kg)
Pro-gramme dura-tion(hrmin)1
Energycon-sump-tion(kWhcycle)1
Watercon-sump-tion (lcycle)1
Max-imumtemper-ature(degC) 5mins1
Spinspeed(rpm)1
Resid-ualmois-ture()1
Eco 40-602 90 337 1245 610 50 1166 5000Eco 40-602 45 252 0590 450 33 1200 5000Eco 40-602 25 233 0195 300 24 1200 5400AlgodoacutenAl-godatildeo 20 degC
90 328 0370 900 23 1200 5400
AlgodoacutenAl-godatildeo 40 degC
90 328 1350 900 45 1200 5400
AlgodoacutenAl-godatildeo 60 degC
90 328 1450 900 55 1200 5400
AlgodoacutenAl-godatildeo 40 degC + Pre-lav
90 358 1400 1020 45 1200 5400
Sinteacuteticos 40 degC
40 228 0780 610 44 1200 2700
Mix 40 degC 40 059 0620 440 41 1200 5600 LanaLatildes
30 degC20 040 0200 400 22 800 2500
1 Due to the influence of water pressure hardness and inlet temperature am-bient temperature type amount and soiling of laundry detergent used fluc-tuations in the power supply and the selected additional functions the actualvalues may deviate from the stated values
2 Test programme in accordance with the EU Ecodesign Directive and the EUEnergy Labelling Regulation with cold water (15 degC)
Technical specificationsemspen
61
Technical specifications
21 Technical specifica-tions
Technical specifications
Facts and figures for your appliancecan be found here
Appliance height 850 cmAppliance width 598 cmAppliance depth 590 cmWeight 80 kg1
Maximum load 9 kgMains voltage 220 - 240 V
50 Hz Minimum in-
stallation protec-tion
10 A
Rated power 2300 WPower consump-tion
iexcl Off mode010 W
iexcl Left-on mode050 W
Water pressure iexcl Minimum100 kPa(1 bar)
iexcl Maximum1000 kPa(10 bar)
Length of the wa-ter inlet hose
150 cm
Length of the wa-ter outlet hose
150 cm
Length of thepower cord
160 cm
1 Depending on the appliance spe-cifications
More information about your modelcan be found online at httpsen-ergylabelbsh-groupcom1 This webaddress is linked to the official EUEPREL product database At the time
of printing its web address had notyet been published Please then fol-low the instructions on searching formodels The model identifier is madeup of the characters before the slashin the product number (E-Nr) on therating plate Alternatively you canalso find the model identifier in thefirst line of the EU energy label
1 Only applies to countries in the European Economic Area
Thank you for buying aBosch Home Appliance
Register your new device on MyBosch now and profit directly from
bull Expert tips amp tricks for your appliancebull Warranty extension optionsbull Discounts for accessories amp spare-partsbull Digital manual and all appliance data at handbull Easy access to Bosch Home Appliances Service
Free and easy registration ndash also on mobile phoneswwwbosch-homecomwelcome
Looking for help Youll find it here
Expert advice for your Bosch home appliances help with problems or a repair from Bosch experts Find out everything about the many ways Bosch can support you wwwbosch-homecomservice Contact data of all countries are listed in the attached service direct-ory
90016102699001610269emsp(010219)en
Robert Bosch Hausgeraumlte GmbHCarl-Wery-Straszlige 3481739 MuumlnchenGERMANYwwwbosch-homecom
Valid within Great BritainImported to Great Britain byBSH Home Appliances LtdGrand Union HouseOld Wolverton RoadWolverton Milton KeynesMK12 5PTUnited Kingdom
enemspSafety
4
1 Safety
Observe the following safety instructions
11 General information
iexcl Read this instruction manual carefullyiexcl Keep the instruction manual and the product information safe
for future reference or for the next owneriexcl Do not connect the appliance if it has been damaged in transit
12 Intended useOnly use this applianceiexcl For washing machine-washable fabrics and hand-washable wool
in accordance with the care labeliexcl With tap water and commercially available detergents and care
products suitable for washing machinesiexcl In private households and in enclosed spaces in a domestic en-
vironmentiexcl Up to an altitude of max 4000 m above sea level
13 Restriction on user groupThis appliance may be used by children aged 8 or over and bypeople who have reduced physical sensory or mental abilities orinadequate experience andor knowledge provided that they aresupervised or have been instructed on how to use the appliancesafely and have understood the resulting dangersChildren must not play with the applianceCleaning and user maintenance must not be performed by chil-dren unless they are being supervisedKeep children under the age of 3 years and pets away from theappliance
Safetyemspen
5
14 Safe installationTake note of the safety instructions when installing the appliance
WARNING ‒ Risk of electric shockImproper installation is dangerous Connect and operate the appliance only in accordance with the
specifications on the rating plate Connect the appliance to a power supply with alternating cur-
rent only via a properly installed socket with earthing The protective conductor system of the domestic electrical in-
stallation must be properly installed The installation must havea sufficiently large cross section When using a residual current circuit breaker only use a type
with the mark Never equip the appliance with an external switching device
eg a timer or remote control When the appliance is installed the mains plug of the power
cord must be freely accessible If free access is not possible anall-pole isolating switch must be installed in the permanent elec-trical installation according to the installation regulations When installing the appliance check that the power cable is not
trapped or damagedIf the insulation of the power cord is damaged this is dangerous Never let the power cord come into contact with hot appliance
parts or heat sources Never let the power cord come into contact with sharp points or
edges Never kink crush or modify the power cord
WARNING ‒ Risk of fireIt is dangerous to use an extended power cord and non-approvedadapters Do not use extension cables or multiple socket strips If the power cord is too short contact Customer Service Only use adapters approved by the manufacturer
enemspSafety
6
WARNING ‒ Risk of injuryThe high weight of the appliance may result in injury when lifted Do not lift the appliance on your ownIf this appliance is not correctly installed in a washer-dryer stackthe installed appliance may fall Only stack the dryer on a washing machine using the connec-
tion kit from the dryer manufacturer No other installationmethod is permitted Do not install the appliance in a washer-dryer stack if the dryer
manufacturer does not offer a suitable connection kit Do not install appliances from different manufacturers and with
varying depths and widths in a washer-dryer stack Do not install a washer-dryer stack on a platform the appli-
ances may tip over
WARNING ‒ Risk of suffocationChildren may put packaging material over their heads or wrapthemselves up in it and suffocate Keep packaging material away from children Do not let children play with packaging material
CAUTION ‒ Risk of injuryThe appliance may vibrate or move when in use Place the appliance on a clean even solid surface Align the appliance using the appliance feet and a spirit levelIf hoses and power cords have been laid incorrectly this causes atripping hazard Lay hoses and power cords in such a way that there is no risk
of trippingIf the appliance is moved by holding onto protruding componentssuch as the appliance door the parts may break off Do not move the appliance by holding onto protruding parts
CAUTION ‒ Risk of cuttingTouching sharp edges on the appliance may lead to cuts Do not touch the sharp edges on the appliance
Safetyemspen
7
Wear protective gloves when installing and transporting the ap-pliance
15 Safe use
WARNING ‒ Risk of electric shockIf the appliance or the power cord is damaged this is dangerous Never operate a damaged appliance Never pull on the power cord to unplug the appliance Always
unplug the appliance at the mains If the appliance or the power cord is damaged immediately un-
plug the power cord or switch off the fuse in the fuse box andturn off the water tap Call customer services rarr Page 59An ingress of moisture can cause an electric shock Only use the appliance in enclosed spaces Never expose the appliance to intense heat or humidity Do not use steam- or high-pressure cleaners hoses or sprays
to clean the appliance
WARNING ‒ Risk of harm to healthChildren can lock themselves in the appliance thereby puttingtheir lives at risk Do not install the appliance behind a door as this may obstruct
the appliance door or prevent it from opening With redundant appliances unplug the power cord Then cut
through the cord and damage the lock on the appliance doorbeyond repair so that the appliance door will no longer close
WARNING ‒ Risk of suffocationChildren may breathe in or swallow small parts causing them tosuffocate Keep small parts away from children Do not let children play with small parts
enemspSafety
8
WARNING ‒ Risk of poisoningDetergents and care products may result in poisoning if con-sumed If accidentally swallowed seek medical advice Keep detergents and care products out of the reach of children
WARNING ‒ Risk of explosionLaundry that has been pretreated with cleaning agents that con-tain solvents may cause an explosion in the appliance Rinse pretreated laundry thoroughly with water before washing
CAUTION ‒ Risk of injuryThe covering plate may break if you stand on or climb onto theappliance Do not stand on or climb onto the applianceThe appliance may tip over if you sit on or lean against the opendoor Do not sit on or lean against the appliance door Do not place any objects on the appliance doorReaching into the drum while it is still turning may cause hand in-juries Wait for the drum to come to a complete stop before reaching
inside
CAUTION ‒ Risk of burnsWhen washing at high temperatures the glass in the appliancedoor becomes hot Do not touch the appliance door when it is hot Keep children away from the appliance door when it is hot
CAUTION ‒ Risk of scaldingWhen you wash at high temperatures the detergent solution getshot Do not touch the hot detergent solution
Safetyemspen
9
CAUTION ‒ Risk of chemical burnsIf the detergent drawer is opened detergent and care productsmay spray out from the appliance Contact with eyes or skin maycause irritation Rinse eyes andor skin thoroughly with clean water if they come
into contact with detergents or care products If accidentally swallowed seek medical advice Keep detergents and care products out of the reach of children
16 Safe cleaning and maintenanceTake note of the safety instructions when cleaning and performingmaintenance work on the appliance
WARNING ‒ Risk of electric shockIncorrect repairs are dangerous Repairs to the appliance should only be carried out by trained
specialist staff Only use genuine spare parts when repairing the appliance If the power cord of this appliance is damaged it must be re-
placed by the manufacturer the manufacturers Customer Ser-vice or a similarly qualified person in order to prevent any risk
An ingress of moisture can cause an electric shock Do not use steam- or high-pressure cleaners hoses or sprays
to clean the appliance
WARNING ‒ Risk of injuryThe use of non-original spare parts and non-original accessoriesis dangerous Only use the manufacturers original spare parts and original ac-
cessories
WARNING ‒ Risk of poisoningPoisonous fumes may be given off if you use cleaning agents thatcontain solvents Do not use cleaning agents that contain solvents
enemspPreventing material damage
10
Preventing material damage
2 Preventing materialdamage
Preventing material damage
Follow these instructions to avoid ma-terial damage and damage to the ap-pliance
ATTENTIONThe functionality of the appliancemay be impaired if you use thewrong quantity of fabric softener de-tergent care product or cleaningagent Follow the dosage recommenda-
tions from the manufacturerExceeding the maximum load capa-city impairs the function of the appli-ance Observe the maximum load capa-
city for each programme and donot exceed it rarr Programmes Page 24
The appliance is secured for trans-portation using transit bolts Transitbolts which have not been removedmay result in material damage anddamage to the appliance Before starting up the appliance
remove the transit bolts completelyand keep them in a safe place
Before transport fit the transit boltsfully in order to prevent damage intransit
Material damage may be caused ifthe water inlet hose is connected in-correctly Tighten the screw connections on
the water inlet until they are hand-tight
Ideally connect the water inlethose directly to the water tapwithout any additional connectingelements such as adapters exten-sions valves or similar
Ensure that the inner diameter ofthe water tap is at least 17 mm
Make sure that the length of thethread on the connection to thewater tap is at least 10 mm
If the water pressure is too high ortoo low the appliance may not beable to operate properly Ensure that the water pressure in
the water supply system is at least100 kPa (1 bar) and max1000 kPa (10 bar)
If the water pressure exceeds themaximum value specified a pres-sure-reducing valve must be in-stalled between the drinking waterconnection and the hose set of theappliance
Do not connect the appliance tothe mixer tap of an unpressurisedhot-water boiler
Modified or damaged water hosesmay result in material damage anddamage to the appliance Never kink crush modify or cut
through water hoses Only use the water hoses supplied
with the appliance or genuinespare hoses
Never re-use water hoses thathave been used before
Operating the appliance using waterthat is dirty or too hot may cause ma-terial damage Only operate the appliance with
cold mains waterUnsuitable cleaning products maydamage the surfaces of the appli-ance Do not use harsh or abrasive de-
tergents Do not use cleaning products with
a high alcohol content Do not use hard scouring pads or
cleaning sponges Clean the appliance with nothing
but water and a soft damp cloth
Environmental protection and saving energyemspen
11
Remove all detergent residuespray residue or other residues im-mediately if they come into contactwith the appliance
Environmental protection and saving energy
3 Environmental protec-tion and saving energy
Environmental protection and saving energy
31 Disposing of packagingThe packaging materials are environ-mentally compatible and can be re-cycled Sort the individual components by
type and dispose of them separ-ately
32 Save energy and con-serve resources
If you follow these instructions yourappliance will use less electricity andless water
Choose programmes with low tem-peratures and longer wash times anduse maximum load capacityrarr Page 24a Energy consumption and water
consumption is most efficient
Use the economy programme set-tingsa If you adjust the programme set-
tings for a programme the displayshows the expected consumption
Add rarr Page 35 detergent based onthe laundrys degree of soilinga For light to normal soiling a smal-
ler amount of detergent is suffi-cient Observe the dosage recom-mendation from the detergentmanufacturer
Reduce the washing temperature forlightly and normally soiled laundrya At low temperatures the appliance
consumes less energy For light tonormal soiling lower temperaturesthan indicated on the care labelare also sufficient
Set the maximum spin speed if youwant to dry the laundry in a tumbledryer afterwardsa The drier the laundry the shorter
the programme duration when dry-ing which in turn reduces energyconsumption A higher spin speedreduces the residual moisture inthe laundry and increases thevolume of the spin noise
Wash the laundry without prewasha Washing with prewash increases
the programme duration and in-creases energy and water con-sumption
The appliance has a continuousautomatic load adjustment functiona Depending on the type of fabric
and load capacity the continuousautomatic load adjustment func-tion optimally adjusts the waterconsumption and programme dur-ation
33 Energy saving modeIf you do not use the appliance for anextended period it automaticallyswitches to energy-saving mode Alldisplays go out and InicioPausa +Carga flashesEnergy-saving mode ends when youuse the appliance again eg if youopen or close the door
enemspInstallation and connection
12
Installation and connection
4 Installation and con-nection
Installation and connection
41 Unpacking the applianceNote Please read the information inthe Safety rarr Page 4 and Preventingmaterial damage rarr Page 10 sectionsto ensure that you use the appliancesafely
ATTENTIONObjects remaining in the drum thatare not designed for operation withthe appliance may cause materialdamage and damage to the appli-ance Remove these objects along with
all supplied accessories from thedrum before starting the appliance
1 Remove any packaging and pro-tective covers completely from theapplianceFor the environmentally friendlydisposal of the packaging materi-als observe the information on thetopic of rarr Disposing of packagingPage 11
2 Check the appliance for visibledamage
3 Open the door rarr Basic operation Page 36
4 Remove the accessory from thedrum
5 Close the door
Installation and connectionemspen
13
42 Contents of packageAfter unpacking all parts check for any damage in transit and completeness ofthe delivery
1 2 3
4
1 Washing machine
2 Accompanying documents
3 Water inlet hose
4 Cover caps
43 Requirements for the in-stallation location
Note Please read the information inthe Safety rarr Page 4 and Preventingmaterial damage rarr Page 10 sectionsto ensure that you use the appliancesafely
WARNINGRisk of electric shockThe appliance contains live partsTouching live parts is dangerous Do not operate the appliance
without a cover cap
WARNINGRisk of injuryWhen using the appliance on a basethe appliance may tip over Always secure the feet of the appli-
ance to a base using the manufac-turers fixing brackets rarr Page 31before using the appliance for thefirst time
enemspInstallation and connection
14
ATTENTIONIf the appliance is installed in areasexposed to frost or outdoors frozenresidual water may damage the appli-ance and frozen hoses may crack orsplit Do not install or operate this appli-
ance anywhere that is liable to ex-perience frost andor outdoors
The appliance underwent a functiontest before leaving the factory andmay therefore contain residual wa-ter This residual water may leak outif the appliance is tilted at an anglegreater than 40deg Tilt the appliance carefully
Installation loca-tion
Requirements
On a base Secure the appli-ance with fixingbracketsrarr Page 31
On a woodenjoist floor
Place the appli-ance on a water-resistant woodenboard which isscrewed tightly tothe floor Thewooden boardshould be atleast 30 mmthick
Installation loca-tion
Requirements
In a kitchen unit iexcl A niche widthof 60 cm is re-quired
iexcl Only install theappliance un-derneath acontinuousworktop that issecurely con-nected to adja-cent cabinets
Note If the cov-ering plate is re-moved the metalcovering plate rarr AccessoriesPage 31 mustbe secured be-fore installation
On a wall Do not trap thehoses betweenthe wall and theappliance
44 Removing the transitbolts
The appliance is secured for trans-portation using transit bolts on therear of the applianceNotesiexcl Please read the information in the
Safety rarr Page 4 and Preventingmaterial damage rarr Page 10 sec-tions to ensure that you use theappliance safely
iexcl Keep the transit bolts screws andsleeves in a safe place for futuretransport rarr Page 57
Installation and connectionemspen
15
1 Pull the hoses out of the holders
2 Unscrew and remove all fourscrews for the transit bolts with aWAF 13 wrench
3 Pull the power cord out of theholder
4 Remove the four sleeves
5 Put on the four cover caps
6 Press down on the four covercaps
enemspInstallation and connection
16
45 Connecting the applianceConnecting the water inlet hoseNoteiexcl Please read the information in the
Safety rarr Page 4 and Preventingmaterial damage rarr Page 10 sec-tions to ensure that you use theappliance safely
1 Connect the water inlet hose
2
1
2 Connect the water inlet hose to atap (264 mm = 34)
frac34˝min
min
10 mm
17 mm
3 Open the water tap carefully andcheck that the connection pointsare tight
Water outlet connection typesThis information is intended to helpyou to connect this appliance to thewater outlet
Note Please read the information inthe Safety rarr Page 4 and Preventingmaterial damage rarr Page 10 sectionsto ensure that you use the appliancesafely
ATTENTIONWhen draining the water outlet hoseis subject to water pressure and maycome loose from the installed con-nection point Secure the water outlet hose
against unintentional loosening
Note Observe the draining heightsThe maximum draining height is100 cm
Drainage into asiphon
Secure the con-nection point witha (24ndash40 mm)hose clamp
Drainage into awashbasin
Fix and securethe water outletusing an elbowrarr Page 31
Drainage into aplastic pipe withrubber sleeve orinto a gully
Fix and securethe water outletusing an elbowrarr Page 31
Installation and connectionemspen
17
46 Aligning the applianceIn order to reduce noise and vibra-tion and to prevent the appliancefrom moving align the appliance cor-rectlyNote Please read the information inthe Safety rarr Page 4 and Preventingmaterial damage rarr Page 10 sectionsto ensure that you use the appliancesafely1 Loosen the lock nuts using a WAF
17 wrench by turning it in a clock-wise direction
2 To align the appliance turn the ap-pliance feet Check that the appli-ance is level using a spirit level
All appliance feet must stand firmlyon the ground
3 Screw the lock nuts tightly againstthe housing using a WAF 17wrench
In doing so hold the foot tight anddo not adjust its height
47 Connecting the applianceto the electricity supply
Note Please read the information inthe Safety rarr Page 4 and Preventingmaterial damage rarr Page 10 sectionsto ensure that you use the appliancesafely1 Insert the mains plug of the appli-
ances power cable in a socketnearbyThe connection details of the appli-ance can be found under Tech-nical data rarr Page 61
2 Check the mains plug is insertedproperly
enemspFamiliarising yourself with your appliance
18
Familiarising yourself with your appliance
5 Familiarising yourself with your applianceFamiliarising yourself with your appliance
51 ApplianceYou can find an overview of the parts of your appliance here
1
2
4 73 6
88
5
On certain models specific details such as the colour and shape may differfrom those pictured
1 Maintenance flap for the drainpump rarr Page 44
2 Door
3 Detergent drawer rarr Page 19
4 Controls rarr Page 19
5 Covering plate
6 Water outlet hose rarr Page 16
7 Power cord rarr Page 17
8 Transit bolts rarr Page 14
Familiarising yourself with your applianceemspen
19
52 Detergent drawer
2
3
1
4
1 Measuring aid for liquid deter-gent rarr Using a measuring aid forliquid detergent Page 37
2 Compartment IIiexcl Detergent for main washiexcl Water softeneriexcl Bleachiexcl Stain remover
3 Compartment iexcl Fabric softeneriexcl Liquid starchiexcl Waterproofing agent
4 Compartment Iiexcl Detergent for prewashiexcl Hygiene detergent
53 ControlsYou can use the control panel to configure all functions of your appliance andto obtain information about the operating status
2 3
1 1
4
1 Programmes rarr Page 24
2 Programme selectorrarr Page 36
3 Display rarr Page 20
4 Buttons rarr Page 23
enemspDisplay
20
Display
6 DisplayDisplay
The display shows the current settings options or relevant information
Display Designation Description040 1 Programme dura-
tionprogrammetime remaining
Approximate expected programme dura-tion or programme time remaining
10h 1 Ready in time The programme end has been set and theremaining number of hours is displayed rarr Buttons Page 23
9 kg 1 Recommendedload
The maximum load capacity for the selec-ted programme in kg
ndash ndash ndash ndash -1200
Spin speed Set spin speed in rpm rarr Buttons Page 230= No final spin only drainingndash ndash ndash ndash Rinse Hold no draining
ndash 90 Temperature Set temperature in degC rarr Buttons Page 23
(cold)StartPause Start cancel or pause
iexcl Lights up The programme is runningand can be cancelled or paused
iexcl Flashes The programme can be star-ted or continued
Wash Programme status1 Example
Displayemspen
21
Display Designation DescriptionRinse Programme statusSpin Programme status
ndash ndash ndash ndash Rinse Hold Programme statusEnd End of pro-
grammeProgramme status
Childproof lock iexcl lights up The childproof lock is activ-ated
iexcl flashes The childproof lock is activatedand the appliance has been operated rarr Deactivating the childproof lockPage 40
Prewash Prewash is activated rarr Buttons Page 23
Water Plus andRinse Plus
Wash with more water and a rinse cycle isactivated rarr Buttons Page 23
SpeedPerfect Short wash activated rarr Buttons Page 23
1 Energy consump-tion
Energy consumption for the selected pro-grammeiexcl Low energy consumptioniexcl High energy consumption
Reminder to cleanthe drum
Flashes Drum is dirty Run the Limp tam-bor programme for cleaning and caringfor the drum and the outer tub rarr Cleaning the drum Page 42
Voltage controlsystem
Flashes The automatic voltage controlsystem detects impermissible voltagedrops This will pause the programmeNote The programme will continue whenthe voltage is permissible again
Voltage controlsystem
Flashes The programme has beenpaused because of impermissible voltagedrops The voltage is permissible againand the programme will continueNote The programme duration is exten-ded
1 Example
enemspDisplay
22
Display Designation DescriptionDoor iexcl Lights up The door is locked and can-
not be openediexcl Flashes The door is not closed prop-
erlyiexcl Off The door is unlocked and can be
openedTap iexcl No water pressure
iexcl The water pressure is too lowE35 -10 1 Error Error code error display signal1 Example
Buttonsemspen
23
Buttons
7 ButtonsButtons
The selection of programme settings depends on the programme that is setYou can see the selection options for each programme in the overview for rarr Programmes Page 24
Button Selection DescriptionInicioPausa +Carga (StartPause + Reload)
iexcl Startiexcl Canceliexcl Pause
Start cancel or pause the pro-gramme
SpeedPerfect iexcl Activateiexcl Deactivate
Activate or deactivate a short washingprogrammeNote Energy consumption increasesThe washing result is not affected bythis
Termin (ReadyIn)
1ndash24 hours Set the programme endThe programme duration is already in-cluded in the set number of hoursOnce the programme has started theprogramme duration is displayed
Temp degC (Tem-perature)
ndash 90 degC Adjust the temperature in degC
Centrif (Spin) ndash ndash ndash ndash - 1200 Adjust the spin speed or activate ndash ndash ndash ndash (Rinse Hold)If ndash ndash ndash ndash is selected the water is notdrained at the end of the washingcycle and the spin cycle is deactiv-ated The laundry remains in the waterused for rinsing
3 seg (ChildLock 3 sec)
iexcl Activateiexcl Deactivate
Activate or deactivate the childprooflockDisable the control panel to preventunwanted or accidental operationIf the childproof lock is activated andthe appliance has been switched offthe childproof lock remains activated rarr Childproof lock Page 40
Prelav (Pre-wash)
iexcl Activateiexcl Deactivate
Activate or deactivate prewash egfor washing heavily soiled laundry
Extra (ExtraRinse)
iexcl Activateiexcl Deactivate
Activate or deactivate a washing pro-gramme with more water and an addi-tional rinse cycleRecommended for particularly sensit-ive skin or in regions with very softwater
enemspProgrammes
24
Programmes 8 P
rogr
amm
esProgrammes B
elow
is a
n ov
ervi
ew o
f the
pro
gram
mes
You
can
find
info
rmat
ion
on the
load
and
on
the
adju
stab
le p
ro-
gram
me
optio
ns
Tip
The
laun
dry
s ca
re la
bels
pro
vide
you
with
add
ition
al in
form
atio
n on
pro
gram
me
sele
ctio
n
rarr
Car
e sy
mbo
ls o
n th
e ca
re la
bels
Pa
ge 3
4
Pro
gram
me
Des
crip
tion
Max load (kg)
Pro
gram
me
sett
ings
Max temperature (degC)
Max spin speed(rpm) 1
SpeedPerfect
Extra
Centrif ndash ndash ndash ndash(Rinse Hold)
Prelav
Alg
odoacuten
Al-
godatilde
o (
Cot
tons
)W
ash
hard
-wea
ring
item
s m
ade
from
cotto
n li
nen
or b
lend
ed fa
bric
sA
lso
suita
ble
as a
sho
rt p
rogr
amm
efo
r no
rmal
ly s
oile
d la
undr
y w
hen
you
activ
ate
Spe
edPer
fect
I
f Spe
ed-
Per
fect
is
act
ivat
ed t
he m
ax-
imum
load
cap
acity
is r
educ
ed to
5 k
g
990
1200
Alg
odoacuten
Col
orA
l-go
datildeo
Cor
(
Cot
-to
ns C
olou
r)
Was
h ha
rd-w
earin
g ite
ms
mad
e from
cotto
n li
nen
or b
lend
ed fa
bric
sEne
rgy-
savi
ng p
rogr
amm
e
9
90
1200
ndash
1Pro
gram
me
setti
ng
Programmesemspen
25
Pro
gram
me
Des
crip
tion
Max load (kg)
Pro
gram
me
sett
ings
Max temperature (degC)
Max spin speed(rpm) 1
SpeedPerfect
Extra
Centrif ndash ndash ndash ndash(Rinse Hold)
Prelav
Not
e T
o sa
ve e
nerg
y the
act
ual
was
hing
tem
pera
ture
may
dev
iate
from
the
set
was
hing
tem
pera
ture
Th
e w
ashi
ng p
erfo
rman
ce m
eets
lega
l req
uire
men
ts
Eco
40-6
0W
ash
item
s m
ade
from
cot
ton
line
nor
ble
nded
fabr
ics
Not
e T
extil
es w
hich
can
be
was
hed
from
40 deg
C
up
to 6
0 deg
C
as
per
the
care
sym
bol c
an b
e w
ashe
dto
geth
er
The
was
hing
per
form
ance
cor
res-
pond
s to
the
bes
t po
ssib
le w
ashi
ngpe
rfor
man
ce c
lass
acc
ordi
ng to
the
lega
l req
uire
men
ts
For
this
pro
gram
me
the
was
hing
tem
pera
ture
is a
utom
atic
ally
adj
uste
dde
pend
ing
on the
load
siz
e in
ord
erto
ach
ieve
the
bes
t po
ssib
le e
nerg
y
9
ndash
1200
ndash
1Pro
gram
me
setti
ng
enemspProgrammes
26
Pro
gram
me
Des
crip
tion
Max load (kg)
Pro
gram
me
sett
ings
Max temperature (degC)
Max spin speed(rpm) 1
SpeedPerfect
Extra
Centrif ndash ndash ndash ndash(Rinse Hold)
Prelav
effic
ienc
y w
ith the
bes
t po
ssib
lew
ashi
ng r
esul
t You
can
not ch
ange
the
was
hing
tem
pera
ture
Sin
teacutetic
os
(Eas
yC
are)
Was
h ite
ms
mad
e from
syn
thet
ic o
rbl
ende
d fa
bric
s4
60
1200
Mix
(
Mix
edFa
bric
s)W
ash
item
s m
ade
from
cot
ton
line
nor
syn
thet
ic o
r bl
ende
d fa
bric
sSui
tabl
e fo
r lig
htly
soi
led
laun
dry
460
1200
Del
icad
oSed
a (D
elic
ate
Silk
)W
ash
delic
ate
was
habl
e ite
ms
mad
efrom
silk
vis
cose
and
syn
thet
ics
Use
a d
eter
gent
tha
t is
sui
tabl
e fo
rde
licat
es o
r si
lk
Not
e W
ash
espe
cial
ly d
elic
ate
item
sor
item
s w
ith h
ooks
eye
lets
or
clip
sin
a m
esh
laun
dry
bag
2
40
800
ndash
1Pro
gram
me
setti
ng
Programmesemspen
27
Pro
gram
me
Des
crip
tion
Max load (kg)
Pro
gram
me
sett
ings
Max temperature (degC)
Max spin speed(rpm) 1
SpeedPerfect
Extra
Centrif ndash ndash ndash ndash(Rinse Hold)
Prelav
Lan
aLatilde
s (W
ool)
Han
d- o
r m
achi
ne-w
asha
ble
item
sth
at a
re m
ade
from
woo
l or
cont
ain
woo
lTo
pre
vent
the
laun
dry
from
shr
ink-
ing
the
dru
m m
oves
the
item
s ve
ryge
ntly
with
long
pau
ses
Use
a d
eter
gent
tha
t is
sui
tabl
e fo
rw
ool
2
40
800
ndash
ndash
ndash
(R
inse
)R
inse
s an
d th
en s
pins
the
laun
dry
and
then
dra
ins
the
wat
er
ndashndash
1200
ndash
ndash
(
Spi
nD
rain
)Spi
ns a
nd d
rain
s th
e w
ater
If
you
only
wan
t to
dra
in the
wat
er
activ
ate
0 T
he la
undr
y is
not
spu
n
ndash
ndash
1200
ndash
ndash
ndash
ndash
Rop
a os
cura
R
oupa
esc
ura
(Dar
k W
ash)
Was
h da
rk-c
olou
red
and
colo
ur-in
-te
nse
item
s m
ade
from
cot
ton
orea
sy-c
are
fabr
ic e
g j
eans
Tu
rn la
undr
y in
side
-out
bef
ore
was
h-in
gU
se li
quid
det
erge
nt
4
40
1200
1Pro
gram
me
setti
ng
enemspProgrammes
28
Pro
gram
me
Des
crip
tion
Max load (kg)
Pro
gram
me
sett
ings
Max temperature (degC)
Max spin speed(rpm) 1
SpeedPerfect
Extra
Centrif ndash ndash ndash ndash(Rinse Hold)
Prelav
Plu
mas
Pen
as
(Dow
n)W
ash
pillo
ws
duv
ets
or c
loth
ing
stuf
fed
with
dow
n an
d fil
lings
with
synt
hetic
fibr
es
Was
h la
rge
item
s se
para
tely
U
se a
det
erge
nt tha
t is
sui
tabl
e fo
rdo
wn
or d
elic
ates
U
se s
parin
gly
Do
not us
e fa
bric
sof
tene
rN
ote
To
prev
ent ex
cess
ive
foam
ing
rem
ove
air
from
laun
dry
item
s by
rolli
ng the
m u
p be
fore
you
was
hth
em
2
60
1200
ndash
ndash
Lim
p tam
bor
(Dru
m C
lean
)C
lean
ing
and
carin
g fo
r th
e dr
um
Use
thi
s pr
ogra
mm
e in
the
follo
win
gca
ses
iexclB
efor
e us
ing
the
appl
ianc
e fo
r th
efir
st tim
eiexcl
If yo
u re
gula
rly w
ash
at tem
pera
t-ur
es o
f 40 deg
C o
r lo
wer
ndash
ndash
1200
ndash
ndash
ndash
ndash
1Pro
gram
me
setti
ng
Programmesemspen
29
Pro
gram
me
Des
crip
tion
Max load (kg)
Pro
gram
me
sett
ings
Max temperature (degC)
Max spin speed(rpm) 1
SpeedPerfect
Extra
Centrif ndash ndash ndash ndash(Rinse Hold)
Prelav
iexclA
fter
a pr
olon
ged
perio
d of
non
-us
eU
se w
ashi
ng p
owde
r or
a d
eter
gent
cont
aini
ng b
leac
hH
alve
the
am
ount
of d
eter
gent
to
avoi
d fo
amin
gD
o no
t us
e fa
bric
sof
tene
rD
o no
t us
e liq
uid
dete
rgen
t or
det
er-
gent
tha
t is
inte
nded
for
woo
llens
or
delic
ates
N
ote
The
dru
m c
lean
ing
indi
cato
rw
ill fl
ash
to r
emin
d yo
u if
you
have
not us
ed a
pro
gram
me
at 6
0 deg
C o
rhi
gher
for
a lo
ng tim
eC
amis
asB
lusa
s (S
hirts
Blo
uses
)W
ash
non-
iron
shirt
s an
d bl
ouse
sm
ade
from
cot
ton
line
n s
ynth
etic
or
blen
ded
fabr
ics
Not
e U
se the
Del
icad
oSed
a pr
o-gr
amm
e to
was
h sh
irts
and
blou
ses
mad
e from
silk
or
delic
ate
fabr
ics
2
60
800
ndash
1Pro
gram
me
setti
ng
enemspProgrammes
30
Pro
gram
me
Des
crip
tion
Max load (kg)
Pro
gram
me
sett
ings
Max temperature (degC)
Max spin speed(rpm) 1
SpeedPerfect
Extra
Centrif ndash ndash ndash ndash(Rinse Hold)
Prelav
Spo
rt
Was
h sp
orts
and
leis
ure
item
s m
ade
from
syn
thet
ic fi
bres
mic
rofib
re o
rfle
ece
Use
a d
eter
gent
tha
t is
sui
tabl
e fo
rsp
orts
item
sD
o no
t us
e fa
bric
sof
tene
rTi
p U
se the
Sin
teacutetic
os
prog
ram
me
to w
ash
heav
ily s
oile
d la
undr
y
2
40
800
ndash
Raacutep
ido
153
0m
in
(Sup
erQ
uick
153
0 m
in)
Was
h ite
ms
mad
e from
cot
ton
syn
-th
etic
or
blen
ded
fabr
ics
Sho
rt p
rogr
amm
e fo
r sm
all i
tem
s of
light
ly s
oile
d la
undr
yTh
e pr
ogra
mm
e du
ratio
n is
app
rox
30 m
inut
es
If yo
u w
ish
to r
educ
e th
e pr
ogra
mm
edu
ratio
n to
15 m
inut
es a
ctiv
ate
Spe
edPer
fect
T
he m
axim
umlo
ad is
red
uced
to
2 k
g
4
40
1200
ndash
1Pro
gram
me
setti
ng
Accessoriesemspen
31
Accessories
9 AccessoriesAccessories
Use original accessories These have been made especially for your appliance
Use Order numberWater inlet hose exten-sion
Extend the water inlethose for cold water orAquaStop (approx 250m)
WMZ2381
Fixing brackets Improves the stability ofthe appliance
WMZ2200
Longer water inlet hose Replace the standardwater inlet hose with alonger hose (220 m)
00353925
Elbow Secure the water outlethose in place
00655300
Liquid detergent insert Measure liquid deter-gent
00605740
Metal covering plate Metal covering plate forinstalling the applianceunder a high worktop
WMZ20430
Before using for the first time
10 Before using for thefirst time
Before using for the first time
Prepare the appliance for use
101 Starting an empty wash-ing cycle
Your appliance was inspected thor-oughly before leaving the factory Toremove any residual water run thefirst wash cycle without any laundryNote Please read the information inthe Safety rarr Page 4 and Preventingmaterial damage rarr Page 10 sectionsto ensure that you use the appliancesafely
1 Turn the programme selector toLimp tambor
2 Close the door
enemspLaundry
32
3 Pull out the detergent drawer
4 Pour approx 1 litre of tap waterinto compartment II
5 Pour washing powder into com-partment II
To prevent foaming use only halfof the amount of detergent recom-mended by the detergent manufac-turer for light soiling Do not usedetergent suitable for woollens ordelicates
6 Push in the detergent drawer
7 Press InicioPausa + Carga (StartPause + Reload) to start theprogramme
a The display shows the remainingprogramme duration
a After the programme has endedthe display shows End
8 Start the first wash cycle or set theprogramme selector to to switchoff the appliance rarr Basic operation Page 36
Laundry
11 LaundryLaundry
111 Preparing the laundryNote Please read the information inthe Safety rarr Page 4 and Preventingmaterial damage rarr Page 10 sectionsto ensure that you use the appliancesafely
ATTENTIONObjects remaining in the laundry maydamage the laundry and the drum Remove all items from any pock-
ets in your laundry before usingthe appliance
To protect your appliance and thelaundry prepare the laundry be-forehandndash Empty any pockets
Laundryemspen
33
ndash Brush sand out of all collars andpockets
ndash Close bed covers and cushioncovers
ndash Close all zips Velcro fastenershooks and eyes
ndash Tie cloth belts apron stringsetc together or use a laundrybag
ndash Remove curtain hooks and leadstrips or use a mesh laundrybag
ndash Use a mesh laundry bag forsmall items of laundry such aschildrens socks
ndash Some stubborn or dried-in stainscan be removed by washingseveral times
ndash Wash large and small items oflaundry together
ndash Do not rub fresh stains but dabthem with soapy water
ndash Separate items of laundry andshake them out
112 Sorting laundryNote Please read the information inthe Safety rarr Page 4 and Preventingmaterial damage rarr Page 10 sectionsto ensure that you use the appliancesafely To improve washing results and
prevent discolouration sort thelaundry according to the followingcriteria before washingndash Type of fabric and fibre
Wash laundry of the sametype of fabric and fibre to-gether
ndash Care symbols on the care labelsrarr Page 34
ndash Description of the programmesrarr Page 24
ndash Whitesndash Colours
Wash new coloured itemsseparately the first time youwash them
113 Degrees of soiling
Degree of soiling Soiling ExamplesLight iexcl No dirt or stains are vis-
ibleiexcl Laundry has absorbed
odours
Light summer clothing orsports clothing that hasbeen worn for a just a fewhours
Normal Dirt or light stains are vis-ible
iexcl T-shirts shirts or blousesare sweat-soaked orhave been worn a fewtimes
iexcl Towels or bedding thathas been used for up toone week
Heavy Dirt or stains are clearlyvisible
Tea towels baby items orwork clothing
enemspDetergents and care products
34
114 Care symbols on the care labels
Washing care symbols
Symbol Washing process Recommended pro-gramme
Normal Cotton Gentle Easy-Care Particularly gentle DelicatesSilk for
washing by handHand wash WoolNot suitable for machine-washing ndash
Detergents and care products
12 Detergents and careproducts
Detergents and care products
Note Please read the information inthe Safety rarr Page 4 and Preventingmaterial damage rarr Page 10 sectionsto ensure that you use the appliancesafelyThe manufacturers instructions foruse and dosage can be found on thepackaging
Notesiexcl Only use liquid detergents that are
self-flowingiexcl Do not mix different liquid deter-
gentsiexcl Do not mix detergent and fabric
softeneriexcl Do not use products that have ex-
pired or are highly congealediexcl Do not use products containing
solvents caustic agents or volatilesubstances (eg bleach)
iexcl Use dyes sparingly as salt maydamage stainless steel
iexcl Do not use bleaching agents in theappliance
121 Detergent recommendation
Detergent Fabrics Pro-gramme
Temperature
Standard detergentwith optical brighten-ers
Heat-resistant whitefabrics made fromcotton or linen
Cotton From cold up to90 degC
Detergent for colourswithout bleach or op-tical brighteners
Coloured fabricsmade from linen orcotton
Cotton From cold up to60 degC
Detergent for col-oursdelicates withoutoptical brighteners
Coloured fabricsmade from easy-carefabrics or syntheticmaterials
Easy-Care From cold up to60 degC
Detergents and care productsemspen
35
Detergent Fabrics Pro-gramme
Temperature
Detergent for delic-ates
Delicate fine textilessilk or viscose
DelicatesSilk
From cold up to40 degC
Detergent for wool-lens
Wool Wool From cold up to40 degC
Tip Visit wwwcleanrighteu to findfurther information on detergentscare products and cleaning agentsfor domestic use
122 Detergent dosageThe detergent dosage depends oniexcl The amount of laundryiexcl Degree of soilingiexcl Water hardness
You can find out how hard yourwater is from your local water com-pany or measure it yourself usinga water hardness tester
Water hardness
Hardness range Total hardness in mmoll
German degrees in degdH
soft (I) 0ndash15 0ndash84medium (II) 15ndash 25 84ndash14hard (III) over 25 over 14
Example of a manufacturersinstructions for detergentThese example values refer to astandard load of 4ndash5 kg
Soiling Light Normal HeavyWater hardness Softmedium 40 ml 55 ml 80 mlWater hardness Hardveryhard
55 ml 80 ml 105 ml
The dosages can be found on themanufacturers packagingiexcl Adjust the dosage to the actual
load
enemspBasic operation
36
Basic operation
13 Basic operationBasic operation
131 Switching on the appli-ance
Turn the programme selector to aprogramme
132 Setting a programme1 Set the programme selector to the
required programme rarr Programmes Page 24
2 If necessary adjust the pro-gramme settings rarr Page 36
133 Adjusting the pro-gramme settings
Requirement A programme hasbeen set rarr Setting a programme Page 36
Adjust the programme settings rarr Programmes Page 24
Note The programme settings arenot saved permanently for the pro-gramme
134 Loading laundryNotesiexcl Please read the information in the
Safety rarr Page 4 and Preventingmaterial damage rarr Page 10 sec-tions to ensure that you use theappliance safely
iexcl To prevent creasing take note ofthe maximum load for the rarr Programmes Page 24
Requirement The laundry is pre-pared and sortedrarr Laundry Page 321 Open the door
Make sure that the drum is empty2 Load the laundry unfolded into the
drum3 Close the door
Ensure that there is no laundrytrapped in the door
Basic operationemspen
37
135 Using a measuring aidfor liquid detergent
If you order the measuring aid as anaccessory you must use the measur-ing aid1 Pull out the detergent drawer
2 Press down on the insert and re-move the detergent drawer
1
2
3 Insert the measuring aid
4 Insert the detergent drawer
136 Use the measuring aidfor liquid detergent
To add liquid detergent you can usea measuring aid in the detergentdrawer1 Pull out the detergent drawer2 Slide the measuring aid forwards
3 Fold the measuring aid down andclick it into place
enemspBasic operation
38
4 Push in the detergent drawer
137 Adding detergent andcare product
Notesiexcl Please read the information in the
Safety rarr Page 4 and Preventingmaterial damage rarr Page 10 sec-tions to ensure that you use theappliance safely
iexcl Do not use the measuring aid forliquid detergent for gel detergentswashing powder or if Prewash orReady in time are activated
Requirement Find out the optimumdosage for detergent and careproduct rarr Page 341 Pull out the detergent drawer2 Pour in detergent
rarr Detergent drawer Page 193 If required add the care product4 Push in the detergent drawer
138 Starting the programmeNote If you want to change the timeuntil the programme ends set theReady in time first Press InicioPausa + Carga a The drum rotates and load detec-
tion takes place This can take upto 2 minutes after which waterenters the drum
a The display shows either the pro-gramme duration or the Ready intime
a After the programme has endedthe display shows End
139 Adjusting the Ready intime before the pro-gramme starts
You can readjust the selected Readyin time before the programme starts1 Press InicioPausa + Carga 2 Press Termin repeatedly until
the display indicates the desiredReady in time
3 Press InicioPausa + Carga
1310 Soaking laundryNote No additional detergent is re-quired The washing solution is thenused for washing1 Start the programme2 To pause the programme after ap-
prox 10 minutes press InicioPausa + Carga
3 To resume the programme afterthe desired soaking time pressInicioPausa + Carga
1311 Adding laundryNote Please read the information inthe Safety rarr Page 4 and Preventingmaterial damage rarr Page 10 sectionsto ensure that you use the appliancesafely1 Press InicioPausa + Carga
The appliance is paused andchecks whether it is possible toadd or remove laundry Take noteof the programme status
2 Add or remove laundry3 Close the door4 Press InicioPausa + Carga
Basic operationemspen
39
1312 Cancelling the pro-gramme
Once the programme has startedyou can cancel it at any timeNote Please read the information inthe Safety rarr Page 4 and Preventingmaterial damage rarr Page 10 sectionsto ensure that you use the appliancesafely1 Press InicioPausa + Carga 2 Open the door
The appliance door remainslocked for safety reasons if thetemperature and water levels arehighndash If the temperature is high start
the programmendash If the water level is high Start
the or programme3 Remove the laundry
1313 Resuming the pro-gramme when the pro-gramme status is RinseHold
1 Set the or programme2 Press InicioPausa + Carga
1314 Unloading the laundryNote Please read the information inthe Safety rarr Page 4 and Preventingmaterial damage rarr Page 10 sectionsto ensure that you use the appliancesafely1 Open the door
2 Remove the laundry
1315 Switching off the appli-ance
1 Turn the programme selector to
2 Turn off the tap3 Wipe the rubber gasket dry and re-
move any foreign objects
4 Leave the door and detergentdrawer open so that residual watercan evaporate
enemspChildproof lock
40
Childproof lock
14 Childproof lockChildproof lock
Secure your appliance against beingoperated unintentionally using thecontrols
141 Activating the childprooflock
Press and hold the two 3 segbuttons for approx 3 seconds
a The display shows a The controls are lockeda The childproof lock remains active
even after the appliance has beenswitched off
142 Deactivating the child-proof lock
Requirement To deactivate thechildproof lock the appliance mustbe switched on Press and hold the two 3 seg
buttons for approx 3 secondsa goes out in the display
Basic settingsemspen
41
Basic settings
15 Basic settingsBasic settings
You can configure the appliance to meet your needs
151 Overview of the basic settingsBelow is an overview of the basic settings on your appliance
Basic setting Programmeposition
Value Description
End signal 2 0 (off)1 (quiet)2 (me-dium)3 (loud)4 (veryloud)
Set the volume of the signal at theend of the programme
Button signal 3 0 (off)1 (quiet)2 (me-dium)3 (loud)4 (veryloud)
The volume of the audible signalemitted when the buttons arepressed
Drum cleaningreminder
4 ONOFF
Activate or deactivate the re-minder to clean the drum
enemspCleaning and servicing
42
152 Changing the basic set-tings
1 Set the programme selector to po-sition 1
2 Press InicioPausa + Carga and at the same time turn theprogramme selector to position 2
a The display shows the currentvalue
3 Set the programme selector to therequired position
4 To change the value press Ter-min
5 To save the changes switch offthe appliance
Cleaning and servicing
16 Cleaning and servi-cing
Cleaning and servicing
To keep your appliance working effi-ciently for a long time it is importantto clean and maintain it carefully
161 Tips on appliance careWipe down thehousing and thecontrol panelwith nothing butwater and adamp cloth
This ensures theparts of the appli-ance will remainclean and hy-gienic
Remove all de-tergent residuespray residue orother residuesimmediately
Fresh depositsare easier to re-move withoutleaving anyresidue
Keep the appli-ance door anddetergent draweropen after use
This allows theresidual water todry reducingodours in the ap-pliance
162 Cleaning the drum
CAUTIONRisk of injuryPermanently washing at low temper-atures and a lack of ventilation forthe appliance may damage the drumand cause injury Regularly run a programme for
cleaning the drum or wash at tem-peratures of at least 60 degC
Leave the appliance to dry afterevery operation with the dooropen and leave the detergentdrawer to dry
Run the Limp tambor pro-gramme without laundryAdd washing powder
163 Cleaning the detergentdrawer
Note Please read the information inthe Safety rarr Page 4 and Preventingmaterial damage rarr Page 10 sectionsto ensure that you use the appliancesafely1 Pull out the detergent drawer
Cleaning and servicingemspen
43
2 Press down on the insert and re-move the detergent drawer
1
2
3 Press out the insert upwards frombelow
4 Clean the detergent drawer and in-sert with water and a brush andthen dry them
5 Fit the insert and lock it into place
6 Cleaning the opening for the deter-gent drawer
7 Push in the detergent drawer
164 Descaling
ATTENTIONThe use of unsuitable descalingagents eg for coffee machines maydamage the appliance For this appliance only use de-
scaling agents that are availablefrom the manufacturers website orour after-sales service
enemspCleaning and servicing
44
165 Cleaning the drain pumpClean the drain pump in the event offaults eg blockages or rattlingnoises
Emptying the drain pumpNote Please read the information inthe Safety rarr Page 4 and Preventingmaterial damage rarr Page 10 sectionsto ensure that you use the appliancesafely1 Turn off the water tap2 Switch off the appliance3 Disconnect the appliances mains
plug from the power supply4 Open the maintenance flap
5 Remove the maintenance flap
6 Slide a sufficiently large receptacleunder the opening
7 Take the drain hose out of theholder
Cleaning and servicingemspen
45
8 CAUTION - Risk of scaldingWhen you wash at high temperat-ures the detergent solution getshot
Do not touch the hot detergentsolutionTo allow the detergent solution toflow out into the container removethe sealing cap
9 Firmly press on the sealing cap
10 Insert the drain hose into theholder
Cleaning the drain pumpNote Please read the information inthe Safety rarr Page 4 and Preventingmaterial damage rarr Page 10 sectionsto ensure that you use the appliancesafelyRequirement The drain pump isempty rarr Page 441 Since water may remain in the
drain pump remove the pump capcarefully
2 Clean the interior the thread onthe pump cap and the pump hous-ing
3 Make sure that the impeller in thedrain pump can be rotated
enemspCleaning and servicing
46
4 Insert the pump cap and screw iton as far as it will go
90deg
The handle on the pump cap mustbe in a vertical position
5 Close the maintenance flap
Before the next washTo prevent unused detergent fromflowing straight into the outlet in thenext wash run the programmeafter you have emptied the drainpump1 Turn on the tap2 Insert the mains plug3 Switch on the appliance4 Pour 1 litre of water into compart-
ment II5 Start the programme
166 Cleaning the water outlethose at the siphon
1 Switch off the appliance2 Disconnect the appliances mains
plug from the power supply
3 Loosen the hose clamp and care-fully remove the water outlet hose
Residual water may leak out4 Clean the water outlet hose and si-
phon connecting piece
5 Reattach the water outlet hose andsecure the connection point usingthe hose clamp
Cleaning and servicingemspen
47
167 Clean the water inlet fil-ters
Emptying the water inlet hose1 Turn off the tap2 Set a programme except for
or 3 Start the programme and leave it
to run for approx 40 seconds4 Switch off the appliance5 Disconnect the appliances mains
plug from the power supply
Cleaning the filter on the tapNote Please read the information inthe Safety rarr Page 4 and Preventingmaterial damage rarr Page 10 sectionsto ensure that you use the appliancesafelyRequirement The water inlet hose isempty1 Remove the water inlet hose from
the tap
2 Clean the filter with a small brush
3 Connect the water inlet hose andcheck for leaks
Cleaning the filter on theapplianceNote Please read the information inthe Safety rarr Page 4 and Preventingmaterial damage rarr Page 10 sectionsto ensure that you use the appliancesafelyRequirement The water inlet hose isempty rarr Emptying the water inlet hosePage 47
enemspCleaning and servicing
48
1 Disconnect the hose from the rearof the appliance
1
2
2 Use pliers to remove the filter
3 Clean the filter with a small brush
4 Reinsert the filter
5 Connect the hose and check forleaks
2
1
Troubleshootingemspen
49
Troubleshooting
17 TroubleshootingTroubleshooting
You can rectify minor faults on your appliance yourself Read the troubleshoot-ing information before contacting after-sales service This will avoid unneces-sary costs
WARNINGRisk of electric shockIncorrect repairs are dangerous Repairs to the appliance should only be carried out by trained specialist
staff Only use genuine spare parts when repairing the appliance If the power cord of this appliance is damaged it must be replaced by the
manufacturer the manufacturers Customer Service or a similarly qualifiedperson in order to prevent any risk
Fault Cause and troubleshootingThe display goes outand InicioPausa +Carga flashes
Energy-saving mode is active Press any buttona The symbol lights up again
E36 -10 Drain pipe or water outlet hose is blocked Clean the drain pipe and the water outlet hose
Drain pipe or water drain hose is caught or jammed Ensure that the drain pipe and water drain hose are
not kinked or trapped
Drain pump is blocked rarr Cleaning the drain pump Page 44
The water outlet hose is connected too high Install the water outlet hose at a maximum height of
1 metre
Detergent dosage is too high Immediate measure Mix one tablespoon of fabric
softener with 05 litres of water and pour the mix-ture into the left-hand compartment (not for outdoorclothing sportswear or items stuffed with down)
Reduce the amount of detergent for the next wash-ing cycle with the same load
Unapproved extension installed on the water drainhose Remove any unapproved extensions from the water
hose Connecting the appliance
E36 -25 -26 Drain pump is blocked rarr Cleaning the drain pump Page 44
enemspTroubleshooting
50
Fault Cause and troubleshootingThe water pressure is lowNo remedial action possibleThe filters in the water inflow are blocked Clean the filters in the water inflow rarr Page 47
The tap is turned off Turn on the tap
The water inlet hose is kinked or jammed Ensure that the water inlet hose is not kinked or
jammed
flashes The automatic voltage control system detects an un-authorised voltage under-usage No remedial action possible
Note If the power supply is stable the programmecontinues to run as normalVoltage under-usage may cause extension of a pro-grammeNo remedial action possible
flashes Voltage under-usage may cause extension of a pro-grammeNo remedial action possible
lights up The temperature is too high Wait until the temperature has dropped rarr Cancelling the programme Page 39
Water level is too high Start the programme
Laundry is caught in the door1 Open the door again2 Remove any trapped laundry3 Close the door4 Press InicioPausa + Carga to start the pro-
gramme
flashes Door is not closed1 Close the door2 Press InicioPausa + Carga to start the pro-
gramme
All other error codes Malfunction Call the after-sales service
rarr Customer Service Page 59
Troubleshootingemspen
51
Fault Cause and troubleshootingThe appliance is notworking
The mains plug of the power cord is not plugged in Connect the appliance to the power supply
The circuit breaker is faulty Check the circuit breaker in the fuse box
There has been a power cut Check whether the lighting in your kitchen or other
appliances are working
The programme doesnot start
You have not pressed InicioPausa + Carga Press InicioPausa + Carga
Door is not closed1 Close the door2 Press InicioPausa + Carga to start the pro-
gramme
Childproof lock is activated rarr Deactivating the childproof lock Page 40
Termin is activated Check whether Termin is activated
rarr Buttons Page 23
Laundry is caught in the door1 Open the door again2 Remove any trapped laundry3 Close the door4 Press InicioPausa + Carga to start the pro-
gramme
The door cannotbe opened
ndash ndash ndash ndash is activated Continue the programme by selecting or and
pressing InicioPausa + Carga rarr Resuming the programme when the programmestatus is Rinse Hold Page 39
The temperature is too high Wait until the temperature has dropped rarr Cancelling the programme Page 39
Water level is too high Start the programme
Power failure Open the door using the emergency release
rarr Emergency release Page 57
The water is not drain-ing
Drain pipe or water outlet hose is blocked Clean the drain pipe and the water outlet hose
enemspTroubleshooting
52
Fault Cause and troubleshootingThe water is not drain-ing
Drain pipe or water drain hose is caught or jammed Ensure that the drain pipe and water drain hose are
not kinked or trapped
Drain pump is blocked rarr Cleaning the drain pump Page 44
ndash ndash ndash ndash is activated Continue the programme by selecting or and
pressing InicioPausa + Carga rarr Resuming the programme when the programmestatus is Rinse Hold Page 39
The water outlet hose is connected too high Install the water outlet hose at a maximum height of
1 metre
Detergent dosage is too high Immediate measure Mix one tablespoon of fabric
softener with 05 litres of water and pour the mix-ture into the left-hand compartment (not for outdoorclothing sportswear or items stuffed with down)
Reduce the amount of detergent for the next wash-ing cycle with the same load
Unapproved extension installed on the water drainhose Remove any unapproved extensions from the water
hose Connecting the appliance
Water is not flowingin Detergent is notbeing dispensed
You have not pressed InicioPausa + Carga Press InicioPausa + Carga
The filters in the water inflow are blocked Clean the filters in the water inflow rarr Page 47
The tap is turned off Turn on the tap
The water inlet hose is kinked or jammed Ensure that the water inlet hose is not kinked or
jammed
The spin cycle runsseveral times
The unbalanced load detection system eliminates animbalance by repeatedly redistributing the laundry Not a fault ndash no action required
Note When loading where possible place large andsmall items of laundry together in the drum Differentsized items of laundry distribute themselves betterduring the spin cycle
Troubleshootingemspen
53
Fault Cause and troubleshootingThe programme dura-tion changes duringthe wash cycle
The programme operation is optimised electronicallyThis may change the programme duration Not a fault ndash no action required
The unbalanced load detection system eliminates animbalance by repeatedly redistributing the laundry Not a fault ndash no action required
Note When loading where possible place large andsmall items of laundry together in the drum Differentsized items of laundry distribute themselves betterduring the spin cycleFoam detection system switches on a rinse cycle iffoam build-up is too high Not a fault ndash no action required
No water is visible inthe drum
Water is below the visible area Not a fault ndash no action required Do not add any extra water to the appliance while it
is operating
Drum jerks after theprogramme starts
This is caused by an internal motor test Not a fault ndash no action required
Residual water ispresent in the com-partment
Insert in compartment is blocked rarr Cleaning the detergent drawer Page 42
Vibrations and move-ment of the appliancewhilst spinning
Appliance is not correctly aligned Aligning the appliance
The appliance feet are not fixed Secure the appliance feet Aligning the appliance
Transit bolts have not been removed Removing the transit bolts
Drum does not turnwater does not flow in
Load detection is active Not a fault ndash no action required
Note The load detection can take up to two minutesHeavy foam build-up Detergent dosage is too high
Immediate measure Mix one tablespoon of fabricsoftener with 05 litres of water and pour the mix-ture into the left-hand compartment (not for outdoorclothing sportswear or items stuffed with down)
Reduce the amount of detergent for the next wash-ing cycle with the same load
enemspTroubleshooting
54
Fault Cause and troubleshootingHigh spin speed notreached
A low spin speed is selected The next time you run a wash cycle set a higher
spin speed
Unbalance load detection system is using a reducedspin speed to eliminate an unbalance Redistribute the laundry in the drum
Note Where possible mix large and small items inthe drum Different sized items of laundry distributethemselves better during the spin cycle Start the programme
The spin programmedoes not start
Drain pipe or water outlet hose is blocked Clean the drain pipe and the water outlet hose
Drain pipe or water drain hose is caught or jammed Ensure that the drain pipe and water drain hose are
not kinked or trapped
The unbalanced load detection system has interruptedthe spin cycle because the laundry is unevenly distrib-uted Redistribute the laundry in the drum
Note Where possible mix large and small items inthe drum Different sized items of laundry distributethemselves better during the spin cycle Start the programme
Rushing hissingnoise
Water is flushed under pressure into the detergentdrawer Not a fault ndash normal operating noise
Loud noises duringthe spin cycle
Appliance is not correctly aligned Aligning the appliance
The appliance feet are not fixed Secure the appliance feet Aligning the appliance
Transit bolts have not been removed Removing the transit bolts
Banging noises rat-tling in the drainpump
Foreign bodies have got into the drain pump rarr Cleaning the drain pump Page 44
Slurping rhythmicalsuction noise
The drain pump is active the detergent solution ispumped out Not a fault ndash normal operating noise
Troubleshootingemspen
55
Fault Cause and troubleshootingCreasing The spin speed is too high
The next time you run a wash cycle set a lowerspin speed
The load is too large The next time you run a wash cycle reduce the
amount of laundry being loaded
The wrong programme is selected for the type of fab-ric Select the programmes that are suitable for the
type of fabric rarr Programmes Page 24
Detergent or fabricsoftener drips off theseal and collects onthe door or in the sealfold
Too much detergentfabric softener in the detergentdrawer When dosing liquid detergent and fabric softener
observe the marking in the detergent drawer anddo not dose above this
The spin result is notsatisfactory The laun-dry is too wettoodamp
A low spin speed is selected The next time you run a wash cycle set a higher
spin speed Start the programme
Drain pipe or water outlet hose is blocked Clean the drain pipe and the water outlet hose
Drain pipe or water drain hose is caught or jammed Ensure that the drain pipe and water drain hose are
not kinked or trapped
The unbalanced load detection system has interruptedthe spin cycle because the laundry is unevenly distrib-uted Redistribute the laundry in the drum
Note Where possible mix large and small items inthe drum Different sized items of laundry distributethemselves better during the spin cycle Start the programme
Unbalance load detection system is using a reducedspin speed to eliminate an unbalance Redistribute the laundry in the drum
Note Where possible mix large and small items inthe drum Different sized items of laundry distributethemselves better during the spin cycle Start the programme
enemspTroubleshooting
56
Fault Cause and troubleshootingDetergent residue onthe damp washing
Detergents may contain water-insoluble substancesthat deposit on the laundry Start the programme
Detergent residue onthe dry laundry
Detergents may contain water-insoluble substancesthat deposit on the laundry Brush out the laundry after washing and drying
Water is leaking out atthe water inlet hose
Water inlet hose is not correctlysecurely connected1 Connect the water supply hose correctly Connect-
ing the water inlet hose2 Tighten the screw connection
Water is leaking out atthe water outlet hose
The water outlet hose is damaged Replace the damaged water outlet hose
Water outlet hose is not connected correctly Connect the water outlet hose correctly Water out-
let connection types
Odours have formedin the appliance
Humidity and detergent residue may promote theformation of bacteria rarr Cleaning the drum Page 42 If you are not using the appliance leave the door
and detergent drawer open so that residual watercan evaporate
Transportation storage and disposalemspen
57
171 Emergency releaseReleasing the doorRequirement The drain pump isempty rarr Page 441 ATTENTION Escaping water may
cause material damage Do not open the door if you can
see water through the glassPull the emergency release down-wards with a tool and release
a The door lock is released2 Insert the maintenance flap and
lock it into place3 Close the maintenance flap
Transportation storage and disposal
18 Transportation stor-age and disposal
Transportation storage and disposal
You can find out here how to prepareyour appliance for transportation andstorage You will also find out how todispose of old appliances
181 Removing the appliance1 Turn off the tap2 rarr Emptying the water inlet hose
Page 473 Switch off the appliance4 Unplug the appliances mains plug
5 Drain the remaining detergentsolution rarr Cleaning the drain pumpPage 44
6 Detach the hoses
182 Inserting the transitbolts
Secure the appliance for transporta-tion using transit bolts in order to pre-vent damage1 Remove the four cover caps
‒ If necessary use a screwdriverto remove the cover caps
Keep the cover caps2 Insert the four sleeves
enemspTransportation storage and disposal
58
3 Insert all screws into the fourtransit bolts and tighten slightly
4 Insert the power cord into theholder and tighten all fourscrews for the transit bolts with aWAF 13 wrench
5 Insert the hose into holder
183 Using the applianceagain
1 Remove the transit bolts
2 Pour approx 1 litre of water intocompartment II in the detergentdrawer
3 Start the programmea The unused detergent cannot flow
straight into the outlet during thenext wash
184 Disposing of old appli-ance
Valuable raw materials can be re-used by recycling
WARNINGRisk of harm to healthChildren can lock themselves in theappliance thereby putting their livesat risk Do not install the appliance behind
a door as this may obstruct the ap-pliance door or prevent it fromopening
With redundant appliances unplugthe power cord Then cut throughthe cord and damage the lock onthe appliance door beyond repairso that the appliance door will nolonger close
1 Unplug the appliance from themains
2 Cut through the power cord3 Dispose of the appliance in an en-
vironmentally friendly mannerInformation about current disposalmethods are available from yourspecialist dealer or local authority
This appliance is la-belled in accordancewith European Directive201219EU concerningused electrical and elec-
Customer Serviceemspen
59
tronic appliances (wasteelectrical and electronicequipment - WEEE)The guideline determ-ines the framework forthe return and recyclingof used appliances asapplicable throughoutthe EU
Customer Service
19 Customer ServiceCustomer Service
If you have any queries on use areunable to rectify faults on the appli-ance yourself or if your applianceneeds to be repaired contact Cus-tomer ServiceYou can solve many problems your-self by consulting the information ontroubleshooting in these instructionsor on our website If this is not thecase contact our after-sales serviceWith any warranty claims we willmake sure that your appliance is re-paired by trained after-sales techni-cians using genuine spare parts in-cluding after the manufacturers war-ranty has expiredFunction-relevant genuine spare partsaccording to the corresponding Eco-design Order can be obtained fromCustomer Service for a period of atleast 10 years from the date onwhich your appliance was placed onthe market within the European Eco-nomic AreaNote Under the terms of the manu-facturers warranty the use of Cus-tomer Service is free of chargeDetailed information on the warrantyperiod and terms of warranty in yourcountry is available from our after-sales service your retailer or on ourwebsite
If you contact Customer Service youwill require the product number (E-Nr) and the production number (FD)of your applianceThe contact details for Customer Ser-vice can be found in the enclosedCustomer Service directory or on ourwebsite
191 Product number (E-Nr)and production number(FD)
You can find the product number (E-Nr) and the production number (FD)on the appliances rating plateDepending on the model the ratingplate is locatediexcl On the inside of the dooriexcl On the inside of the maintenance
flapiexcl On the rear of the applianceMake a note of your appliances de-tails and the Customer Service tele-phone number to find them againquickly
enemspConsumption values
60
Consumption values
20 Consumption valuesConsumption values
The following information is provided in accordance with the EU EcodesignRegulation The values given for programs other than the Eco 40-60 are indicat-ive only and were determined in accordance with the applicable standardEN60456
Programme Load(kg)
Pro-gramme dura-tion(hrmin)1
Energycon-sump-tion(kWhcycle)1
Watercon-sump-tion (lcycle)1
Max-imumtemper-ature(degC) 5mins1
Spinspeed(rpm)1
Resid-ualmois-ture()1
Eco 40-602 90 337 1245 610 50 1166 5000Eco 40-602 45 252 0590 450 33 1200 5000Eco 40-602 25 233 0195 300 24 1200 5400AlgodoacutenAl-godatildeo 20 degC
90 328 0370 900 23 1200 5400
AlgodoacutenAl-godatildeo 40 degC
90 328 1350 900 45 1200 5400
AlgodoacutenAl-godatildeo 60 degC
90 328 1450 900 55 1200 5400
AlgodoacutenAl-godatildeo 40 degC + Pre-lav
90 358 1400 1020 45 1200 5400
Sinteacuteticos 40 degC
40 228 0780 610 44 1200 2700
Mix 40 degC 40 059 0620 440 41 1200 5600 LanaLatildes
30 degC20 040 0200 400 22 800 2500
1 Due to the influence of water pressure hardness and inlet temperature am-bient temperature type amount and soiling of laundry detergent used fluc-tuations in the power supply and the selected additional functions the actualvalues may deviate from the stated values
2 Test programme in accordance with the EU Ecodesign Directive and the EUEnergy Labelling Regulation with cold water (15 degC)
Technical specificationsemspen
61
Technical specifications
21 Technical specifica-tions
Technical specifications
Facts and figures for your appliancecan be found here
Appliance height 850 cmAppliance width 598 cmAppliance depth 590 cmWeight 80 kg1
Maximum load 9 kgMains voltage 220 - 240 V
50 Hz Minimum in-
stallation protec-tion
10 A
Rated power 2300 WPower consump-tion
iexcl Off mode010 W
iexcl Left-on mode050 W
Water pressure iexcl Minimum100 kPa(1 bar)
iexcl Maximum1000 kPa(10 bar)
Length of the wa-ter inlet hose
150 cm
Length of the wa-ter outlet hose
150 cm
Length of thepower cord
160 cm
1 Depending on the appliance spe-cifications
More information about your modelcan be found online at httpsen-ergylabelbsh-groupcom1 This webaddress is linked to the official EUEPREL product database At the time
of printing its web address had notyet been published Please then fol-low the instructions on searching formodels The model identifier is madeup of the characters before the slashin the product number (E-Nr) on therating plate Alternatively you canalso find the model identifier in thefirst line of the EU energy label
1 Only applies to countries in the European Economic Area
Thank you for buying aBosch Home Appliance
Register your new device on MyBosch now and profit directly from
bull Expert tips amp tricks for your appliancebull Warranty extension optionsbull Discounts for accessories amp spare-partsbull Digital manual and all appliance data at handbull Easy access to Bosch Home Appliances Service
Free and easy registration ndash also on mobile phoneswwwbosch-homecomwelcome
Looking for help Youll find it here
Expert advice for your Bosch home appliances help with problems or a repair from Bosch experts Find out everything about the many ways Bosch can support you wwwbosch-homecomservice Contact data of all countries are listed in the attached service direct-ory
90016102699001610269emsp(010219)en
Robert Bosch Hausgeraumlte GmbHCarl-Wery-Straszlige 3481739 MuumlnchenGERMANYwwwbosch-homecom
Valid within Great BritainImported to Great Britain byBSH Home Appliances LtdGrand Union HouseOld Wolverton RoadWolverton Milton KeynesMK12 5PTUnited Kingdom
Safetyemspen
5
14 Safe installationTake note of the safety instructions when installing the appliance
WARNING ‒ Risk of electric shockImproper installation is dangerous Connect and operate the appliance only in accordance with the
specifications on the rating plate Connect the appliance to a power supply with alternating cur-
rent only via a properly installed socket with earthing The protective conductor system of the domestic electrical in-
stallation must be properly installed The installation must havea sufficiently large cross section When using a residual current circuit breaker only use a type
with the mark Never equip the appliance with an external switching device
eg a timer or remote control When the appliance is installed the mains plug of the power
cord must be freely accessible If free access is not possible anall-pole isolating switch must be installed in the permanent elec-trical installation according to the installation regulations When installing the appliance check that the power cable is not
trapped or damagedIf the insulation of the power cord is damaged this is dangerous Never let the power cord come into contact with hot appliance
parts or heat sources Never let the power cord come into contact with sharp points or
edges Never kink crush or modify the power cord
WARNING ‒ Risk of fireIt is dangerous to use an extended power cord and non-approvedadapters Do not use extension cables or multiple socket strips If the power cord is too short contact Customer Service Only use adapters approved by the manufacturer
enemspSafety
6
WARNING ‒ Risk of injuryThe high weight of the appliance may result in injury when lifted Do not lift the appliance on your ownIf this appliance is not correctly installed in a washer-dryer stackthe installed appliance may fall Only stack the dryer on a washing machine using the connec-
tion kit from the dryer manufacturer No other installationmethod is permitted Do not install the appliance in a washer-dryer stack if the dryer
manufacturer does not offer a suitable connection kit Do not install appliances from different manufacturers and with
varying depths and widths in a washer-dryer stack Do not install a washer-dryer stack on a platform the appli-
ances may tip over
WARNING ‒ Risk of suffocationChildren may put packaging material over their heads or wrapthemselves up in it and suffocate Keep packaging material away from children Do not let children play with packaging material
CAUTION ‒ Risk of injuryThe appliance may vibrate or move when in use Place the appliance on a clean even solid surface Align the appliance using the appliance feet and a spirit levelIf hoses and power cords have been laid incorrectly this causes atripping hazard Lay hoses and power cords in such a way that there is no risk
of trippingIf the appliance is moved by holding onto protruding componentssuch as the appliance door the parts may break off Do not move the appliance by holding onto protruding parts
CAUTION ‒ Risk of cuttingTouching sharp edges on the appliance may lead to cuts Do not touch the sharp edges on the appliance
Safetyemspen
7
Wear protective gloves when installing and transporting the ap-pliance
15 Safe use
WARNING ‒ Risk of electric shockIf the appliance or the power cord is damaged this is dangerous Never operate a damaged appliance Never pull on the power cord to unplug the appliance Always
unplug the appliance at the mains If the appliance or the power cord is damaged immediately un-
plug the power cord or switch off the fuse in the fuse box andturn off the water tap Call customer services rarr Page 59An ingress of moisture can cause an electric shock Only use the appliance in enclosed spaces Never expose the appliance to intense heat or humidity Do not use steam- or high-pressure cleaners hoses or sprays
to clean the appliance
WARNING ‒ Risk of harm to healthChildren can lock themselves in the appliance thereby puttingtheir lives at risk Do not install the appliance behind a door as this may obstruct
the appliance door or prevent it from opening With redundant appliances unplug the power cord Then cut
through the cord and damage the lock on the appliance doorbeyond repair so that the appliance door will no longer close
WARNING ‒ Risk of suffocationChildren may breathe in or swallow small parts causing them tosuffocate Keep small parts away from children Do not let children play with small parts
enemspSafety
8
WARNING ‒ Risk of poisoningDetergents and care products may result in poisoning if con-sumed If accidentally swallowed seek medical advice Keep detergents and care products out of the reach of children
WARNING ‒ Risk of explosionLaundry that has been pretreated with cleaning agents that con-tain solvents may cause an explosion in the appliance Rinse pretreated laundry thoroughly with water before washing
CAUTION ‒ Risk of injuryThe covering plate may break if you stand on or climb onto theappliance Do not stand on or climb onto the applianceThe appliance may tip over if you sit on or lean against the opendoor Do not sit on or lean against the appliance door Do not place any objects on the appliance doorReaching into the drum while it is still turning may cause hand in-juries Wait for the drum to come to a complete stop before reaching
inside
CAUTION ‒ Risk of burnsWhen washing at high temperatures the glass in the appliancedoor becomes hot Do not touch the appliance door when it is hot Keep children away from the appliance door when it is hot
CAUTION ‒ Risk of scaldingWhen you wash at high temperatures the detergent solution getshot Do not touch the hot detergent solution
Safetyemspen
9
CAUTION ‒ Risk of chemical burnsIf the detergent drawer is opened detergent and care productsmay spray out from the appliance Contact with eyes or skin maycause irritation Rinse eyes andor skin thoroughly with clean water if they come
into contact with detergents or care products If accidentally swallowed seek medical advice Keep detergents and care products out of the reach of children
16 Safe cleaning and maintenanceTake note of the safety instructions when cleaning and performingmaintenance work on the appliance
WARNING ‒ Risk of electric shockIncorrect repairs are dangerous Repairs to the appliance should only be carried out by trained
specialist staff Only use genuine spare parts when repairing the appliance If the power cord of this appliance is damaged it must be re-
placed by the manufacturer the manufacturers Customer Ser-vice or a similarly qualified person in order to prevent any risk
An ingress of moisture can cause an electric shock Do not use steam- or high-pressure cleaners hoses or sprays
to clean the appliance
WARNING ‒ Risk of injuryThe use of non-original spare parts and non-original accessoriesis dangerous Only use the manufacturers original spare parts and original ac-
cessories
WARNING ‒ Risk of poisoningPoisonous fumes may be given off if you use cleaning agents thatcontain solvents Do not use cleaning agents that contain solvents
enemspPreventing material damage
10
Preventing material damage
2 Preventing materialdamage
Preventing material damage
Follow these instructions to avoid ma-terial damage and damage to the ap-pliance
ATTENTIONThe functionality of the appliancemay be impaired if you use thewrong quantity of fabric softener de-tergent care product or cleaningagent Follow the dosage recommenda-
tions from the manufacturerExceeding the maximum load capa-city impairs the function of the appli-ance Observe the maximum load capa-
city for each programme and donot exceed it rarr Programmes Page 24
The appliance is secured for trans-portation using transit bolts Transitbolts which have not been removedmay result in material damage anddamage to the appliance Before starting up the appliance
remove the transit bolts completelyand keep them in a safe place
Before transport fit the transit boltsfully in order to prevent damage intransit
Material damage may be caused ifthe water inlet hose is connected in-correctly Tighten the screw connections on
the water inlet until they are hand-tight
Ideally connect the water inlethose directly to the water tapwithout any additional connectingelements such as adapters exten-sions valves or similar
Ensure that the inner diameter ofthe water tap is at least 17 mm
Make sure that the length of thethread on the connection to thewater tap is at least 10 mm
If the water pressure is too high ortoo low the appliance may not beable to operate properly Ensure that the water pressure in
the water supply system is at least100 kPa (1 bar) and max1000 kPa (10 bar)
If the water pressure exceeds themaximum value specified a pres-sure-reducing valve must be in-stalled between the drinking waterconnection and the hose set of theappliance
Do not connect the appliance tothe mixer tap of an unpressurisedhot-water boiler
Modified or damaged water hosesmay result in material damage anddamage to the appliance Never kink crush modify or cut
through water hoses Only use the water hoses supplied
with the appliance or genuinespare hoses
Never re-use water hoses thathave been used before
Operating the appliance using waterthat is dirty or too hot may cause ma-terial damage Only operate the appliance with
cold mains waterUnsuitable cleaning products maydamage the surfaces of the appli-ance Do not use harsh or abrasive de-
tergents Do not use cleaning products with
a high alcohol content Do not use hard scouring pads or
cleaning sponges Clean the appliance with nothing
but water and a soft damp cloth
Environmental protection and saving energyemspen
11
Remove all detergent residuespray residue or other residues im-mediately if they come into contactwith the appliance
Environmental protection and saving energy
3 Environmental protec-tion and saving energy
Environmental protection and saving energy
31 Disposing of packagingThe packaging materials are environ-mentally compatible and can be re-cycled Sort the individual components by
type and dispose of them separ-ately
32 Save energy and con-serve resources
If you follow these instructions yourappliance will use less electricity andless water
Choose programmes with low tem-peratures and longer wash times anduse maximum load capacityrarr Page 24a Energy consumption and water
consumption is most efficient
Use the economy programme set-tingsa If you adjust the programme set-
tings for a programme the displayshows the expected consumption
Add rarr Page 35 detergent based onthe laundrys degree of soilinga For light to normal soiling a smal-
ler amount of detergent is suffi-cient Observe the dosage recom-mendation from the detergentmanufacturer
Reduce the washing temperature forlightly and normally soiled laundrya At low temperatures the appliance
consumes less energy For light tonormal soiling lower temperaturesthan indicated on the care labelare also sufficient
Set the maximum spin speed if youwant to dry the laundry in a tumbledryer afterwardsa The drier the laundry the shorter
the programme duration when dry-ing which in turn reduces energyconsumption A higher spin speedreduces the residual moisture inthe laundry and increases thevolume of the spin noise
Wash the laundry without prewasha Washing with prewash increases
the programme duration and in-creases energy and water con-sumption
The appliance has a continuousautomatic load adjustment functiona Depending on the type of fabric
and load capacity the continuousautomatic load adjustment func-tion optimally adjusts the waterconsumption and programme dur-ation
33 Energy saving modeIf you do not use the appliance for anextended period it automaticallyswitches to energy-saving mode Alldisplays go out and InicioPausa +Carga flashesEnergy-saving mode ends when youuse the appliance again eg if youopen or close the door
enemspInstallation and connection
12
Installation and connection
4 Installation and con-nection
Installation and connection
41 Unpacking the applianceNote Please read the information inthe Safety rarr Page 4 and Preventingmaterial damage rarr Page 10 sectionsto ensure that you use the appliancesafely
ATTENTIONObjects remaining in the drum thatare not designed for operation withthe appliance may cause materialdamage and damage to the appli-ance Remove these objects along with
all supplied accessories from thedrum before starting the appliance
1 Remove any packaging and pro-tective covers completely from theapplianceFor the environmentally friendlydisposal of the packaging materi-als observe the information on thetopic of rarr Disposing of packagingPage 11
2 Check the appliance for visibledamage
3 Open the door rarr Basic operation Page 36
4 Remove the accessory from thedrum
5 Close the door
Installation and connectionemspen
13
42 Contents of packageAfter unpacking all parts check for any damage in transit and completeness ofthe delivery
1 2 3
4
1 Washing machine
2 Accompanying documents
3 Water inlet hose
4 Cover caps
43 Requirements for the in-stallation location
Note Please read the information inthe Safety rarr Page 4 and Preventingmaterial damage rarr Page 10 sectionsto ensure that you use the appliancesafely
WARNINGRisk of electric shockThe appliance contains live partsTouching live parts is dangerous Do not operate the appliance
without a cover cap
WARNINGRisk of injuryWhen using the appliance on a basethe appliance may tip over Always secure the feet of the appli-
ance to a base using the manufac-turers fixing brackets rarr Page 31before using the appliance for thefirst time
enemspInstallation and connection
14
ATTENTIONIf the appliance is installed in areasexposed to frost or outdoors frozenresidual water may damage the appli-ance and frozen hoses may crack orsplit Do not install or operate this appli-
ance anywhere that is liable to ex-perience frost andor outdoors
The appliance underwent a functiontest before leaving the factory andmay therefore contain residual wa-ter This residual water may leak outif the appliance is tilted at an anglegreater than 40deg Tilt the appliance carefully
Installation loca-tion
Requirements
On a base Secure the appli-ance with fixingbracketsrarr Page 31
On a woodenjoist floor
Place the appli-ance on a water-resistant woodenboard which isscrewed tightly tothe floor Thewooden boardshould be atleast 30 mmthick
Installation loca-tion
Requirements
In a kitchen unit iexcl A niche widthof 60 cm is re-quired
iexcl Only install theappliance un-derneath acontinuousworktop that issecurely con-nected to adja-cent cabinets
Note If the cov-ering plate is re-moved the metalcovering plate rarr AccessoriesPage 31 mustbe secured be-fore installation
On a wall Do not trap thehoses betweenthe wall and theappliance
44 Removing the transitbolts
The appliance is secured for trans-portation using transit bolts on therear of the applianceNotesiexcl Please read the information in the
Safety rarr Page 4 and Preventingmaterial damage rarr Page 10 sec-tions to ensure that you use theappliance safely
iexcl Keep the transit bolts screws andsleeves in a safe place for futuretransport rarr Page 57
Installation and connectionemspen
15
1 Pull the hoses out of the holders
2 Unscrew and remove all fourscrews for the transit bolts with aWAF 13 wrench
3 Pull the power cord out of theholder
4 Remove the four sleeves
5 Put on the four cover caps
6 Press down on the four covercaps
enemspInstallation and connection
16
45 Connecting the applianceConnecting the water inlet hoseNoteiexcl Please read the information in the
Safety rarr Page 4 and Preventingmaterial damage rarr Page 10 sec-tions to ensure that you use theappliance safely
1 Connect the water inlet hose
2
1
2 Connect the water inlet hose to atap (264 mm = 34)
frac34˝min
min
10 mm
17 mm
3 Open the water tap carefully andcheck that the connection pointsare tight
Water outlet connection typesThis information is intended to helpyou to connect this appliance to thewater outlet
Note Please read the information inthe Safety rarr Page 4 and Preventingmaterial damage rarr Page 10 sectionsto ensure that you use the appliancesafely
ATTENTIONWhen draining the water outlet hoseis subject to water pressure and maycome loose from the installed con-nection point Secure the water outlet hose
against unintentional loosening
Note Observe the draining heightsThe maximum draining height is100 cm
Drainage into asiphon
Secure the con-nection point witha (24ndash40 mm)hose clamp
Drainage into awashbasin
Fix and securethe water outletusing an elbowrarr Page 31
Drainage into aplastic pipe withrubber sleeve orinto a gully
Fix and securethe water outletusing an elbowrarr Page 31
Installation and connectionemspen
17
46 Aligning the applianceIn order to reduce noise and vibra-tion and to prevent the appliancefrom moving align the appliance cor-rectlyNote Please read the information inthe Safety rarr Page 4 and Preventingmaterial damage rarr Page 10 sectionsto ensure that you use the appliancesafely1 Loosen the lock nuts using a WAF
17 wrench by turning it in a clock-wise direction
2 To align the appliance turn the ap-pliance feet Check that the appli-ance is level using a spirit level
All appliance feet must stand firmlyon the ground
3 Screw the lock nuts tightly againstthe housing using a WAF 17wrench
In doing so hold the foot tight anddo not adjust its height
47 Connecting the applianceto the electricity supply
Note Please read the information inthe Safety rarr Page 4 and Preventingmaterial damage rarr Page 10 sectionsto ensure that you use the appliancesafely1 Insert the mains plug of the appli-
ances power cable in a socketnearbyThe connection details of the appli-ance can be found under Tech-nical data rarr Page 61
2 Check the mains plug is insertedproperly
enemspFamiliarising yourself with your appliance
18
Familiarising yourself with your appliance
5 Familiarising yourself with your applianceFamiliarising yourself with your appliance
51 ApplianceYou can find an overview of the parts of your appliance here
1
2
4 73 6
88
5
On certain models specific details such as the colour and shape may differfrom those pictured
1 Maintenance flap for the drainpump rarr Page 44
2 Door
3 Detergent drawer rarr Page 19
4 Controls rarr Page 19
5 Covering plate
6 Water outlet hose rarr Page 16
7 Power cord rarr Page 17
8 Transit bolts rarr Page 14
Familiarising yourself with your applianceemspen
19
52 Detergent drawer
2
3
1
4
1 Measuring aid for liquid deter-gent rarr Using a measuring aid forliquid detergent Page 37
2 Compartment IIiexcl Detergent for main washiexcl Water softeneriexcl Bleachiexcl Stain remover
3 Compartment iexcl Fabric softeneriexcl Liquid starchiexcl Waterproofing agent
4 Compartment Iiexcl Detergent for prewashiexcl Hygiene detergent
53 ControlsYou can use the control panel to configure all functions of your appliance andto obtain information about the operating status
2 3
1 1
4
1 Programmes rarr Page 24
2 Programme selectorrarr Page 36
3 Display rarr Page 20
4 Buttons rarr Page 23
enemspDisplay
20
Display
6 DisplayDisplay
The display shows the current settings options or relevant information
Display Designation Description040 1 Programme dura-
tionprogrammetime remaining
Approximate expected programme dura-tion or programme time remaining
10h 1 Ready in time The programme end has been set and theremaining number of hours is displayed rarr Buttons Page 23
9 kg 1 Recommendedload
The maximum load capacity for the selec-ted programme in kg
ndash ndash ndash ndash -1200
Spin speed Set spin speed in rpm rarr Buttons Page 230= No final spin only drainingndash ndash ndash ndash Rinse Hold no draining
ndash 90 Temperature Set temperature in degC rarr Buttons Page 23
(cold)StartPause Start cancel or pause
iexcl Lights up The programme is runningand can be cancelled or paused
iexcl Flashes The programme can be star-ted or continued
Wash Programme status1 Example
Displayemspen
21
Display Designation DescriptionRinse Programme statusSpin Programme status
ndash ndash ndash ndash Rinse Hold Programme statusEnd End of pro-
grammeProgramme status
Childproof lock iexcl lights up The childproof lock is activ-ated
iexcl flashes The childproof lock is activatedand the appliance has been operated rarr Deactivating the childproof lockPage 40
Prewash Prewash is activated rarr Buttons Page 23
Water Plus andRinse Plus
Wash with more water and a rinse cycle isactivated rarr Buttons Page 23
SpeedPerfect Short wash activated rarr Buttons Page 23
1 Energy consump-tion
Energy consumption for the selected pro-grammeiexcl Low energy consumptioniexcl High energy consumption
Reminder to cleanthe drum
Flashes Drum is dirty Run the Limp tam-bor programme for cleaning and caringfor the drum and the outer tub rarr Cleaning the drum Page 42
Voltage controlsystem
Flashes The automatic voltage controlsystem detects impermissible voltagedrops This will pause the programmeNote The programme will continue whenthe voltage is permissible again
Voltage controlsystem
Flashes The programme has beenpaused because of impermissible voltagedrops The voltage is permissible againand the programme will continueNote The programme duration is exten-ded
1 Example
enemspDisplay
22
Display Designation DescriptionDoor iexcl Lights up The door is locked and can-
not be openediexcl Flashes The door is not closed prop-
erlyiexcl Off The door is unlocked and can be
openedTap iexcl No water pressure
iexcl The water pressure is too lowE35 -10 1 Error Error code error display signal1 Example
Buttonsemspen
23
Buttons
7 ButtonsButtons
The selection of programme settings depends on the programme that is setYou can see the selection options for each programme in the overview for rarr Programmes Page 24
Button Selection DescriptionInicioPausa +Carga (StartPause + Reload)
iexcl Startiexcl Canceliexcl Pause
Start cancel or pause the pro-gramme
SpeedPerfect iexcl Activateiexcl Deactivate
Activate or deactivate a short washingprogrammeNote Energy consumption increasesThe washing result is not affected bythis
Termin (ReadyIn)
1ndash24 hours Set the programme endThe programme duration is already in-cluded in the set number of hoursOnce the programme has started theprogramme duration is displayed
Temp degC (Tem-perature)
ndash 90 degC Adjust the temperature in degC
Centrif (Spin) ndash ndash ndash ndash - 1200 Adjust the spin speed or activate ndash ndash ndash ndash (Rinse Hold)If ndash ndash ndash ndash is selected the water is notdrained at the end of the washingcycle and the spin cycle is deactiv-ated The laundry remains in the waterused for rinsing
3 seg (ChildLock 3 sec)
iexcl Activateiexcl Deactivate
Activate or deactivate the childprooflockDisable the control panel to preventunwanted or accidental operationIf the childproof lock is activated andthe appliance has been switched offthe childproof lock remains activated rarr Childproof lock Page 40
Prelav (Pre-wash)
iexcl Activateiexcl Deactivate
Activate or deactivate prewash egfor washing heavily soiled laundry
Extra (ExtraRinse)
iexcl Activateiexcl Deactivate
Activate or deactivate a washing pro-gramme with more water and an addi-tional rinse cycleRecommended for particularly sensit-ive skin or in regions with very softwater
enemspProgrammes
24
Programmes 8 P
rogr
amm
esProgrammes B
elow
is a
n ov
ervi
ew o
f the
pro
gram
mes
You
can
find
info
rmat
ion
on the
load
and
on
the
adju
stab
le p
ro-
gram
me
optio
ns
Tip
The
laun
dry
s ca
re la
bels
pro
vide
you
with
add
ition
al in
form
atio
n on
pro
gram
me
sele
ctio
n
rarr
Car
e sy
mbo
ls o
n th
e ca
re la
bels
Pa
ge 3
4
Pro
gram
me
Des
crip
tion
Max load (kg)
Pro
gram
me
sett
ings
Max temperature (degC)
Max spin speed(rpm) 1
SpeedPerfect
Extra
Centrif ndash ndash ndash ndash(Rinse Hold)
Prelav
Alg
odoacuten
Al-
godatilde
o (
Cot
tons
)W
ash
hard
-wea
ring
item
s m
ade
from
cotto
n li
nen
or b
lend
ed fa
bric
sA
lso
suita
ble
as a
sho
rt p
rogr
amm
efo
r no
rmal
ly s
oile
d la
undr
y w
hen
you
activ
ate
Spe
edPer
fect
I
f Spe
ed-
Per
fect
is
act
ivat
ed t
he m
ax-
imum
load
cap
acity
is r
educ
ed to
5 k
g
990
1200
Alg
odoacuten
Col
orA
l-go
datildeo
Cor
(
Cot
-to
ns C
olou
r)
Was
h ha
rd-w
earin
g ite
ms
mad
e from
cotto
n li
nen
or b
lend
ed fa
bric
sEne
rgy-
savi
ng p
rogr
amm
e
9
90
1200
ndash
1Pro
gram
me
setti
ng
Programmesemspen
25
Pro
gram
me
Des
crip
tion
Max load (kg)
Pro
gram
me
sett
ings
Max temperature (degC)
Max spin speed(rpm) 1
SpeedPerfect
Extra
Centrif ndash ndash ndash ndash(Rinse Hold)
Prelav
Not
e T
o sa
ve e
nerg
y the
act
ual
was
hing
tem
pera
ture
may
dev
iate
from
the
set
was
hing
tem
pera
ture
Th
e w
ashi
ng p
erfo
rman
ce m
eets
lega
l req
uire
men
ts
Eco
40-6
0W
ash
item
s m
ade
from
cot
ton
line
nor
ble
nded
fabr
ics
Not
e T
extil
es w
hich
can
be
was
hed
from
40 deg
C
up
to 6
0 deg
C
as
per
the
care
sym
bol c
an b
e w
ashe
dto
geth
er
The
was
hing
per
form
ance
cor
res-
pond
s to
the
bes
t po
ssib
le w
ashi
ngpe
rfor
man
ce c
lass
acc
ordi
ng to
the
lega
l req
uire
men
ts
For
this
pro
gram
me
the
was
hing
tem
pera
ture
is a
utom
atic
ally
adj
uste
dde
pend
ing
on the
load
siz
e in
ord
erto
ach
ieve
the
bes
t po
ssib
le e
nerg
y
9
ndash
1200
ndash
1Pro
gram
me
setti
ng
enemspProgrammes
26
Pro
gram
me
Des
crip
tion
Max load (kg)
Pro
gram
me
sett
ings
Max temperature (degC)
Max spin speed(rpm) 1
SpeedPerfect
Extra
Centrif ndash ndash ndash ndash(Rinse Hold)
Prelav
effic
ienc
y w
ith the
bes
t po
ssib
lew
ashi
ng r
esul
t You
can
not ch
ange
the
was
hing
tem
pera
ture
Sin
teacutetic
os
(Eas
yC
are)
Was
h ite
ms
mad
e from
syn
thet
ic o
rbl
ende
d fa
bric
s4
60
1200
Mix
(
Mix
edFa
bric
s)W
ash
item
s m
ade
from
cot
ton
line
nor
syn
thet
ic o
r bl
ende
d fa
bric
sSui
tabl
e fo
r lig
htly
soi
led
laun
dry
460
1200
Del
icad
oSed
a (D
elic
ate
Silk
)W
ash
delic
ate
was
habl
e ite
ms
mad
efrom
silk
vis
cose
and
syn
thet
ics
Use
a d
eter
gent
tha
t is
sui
tabl
e fo
rde
licat
es o
r si
lk
Not
e W
ash
espe
cial
ly d
elic
ate
item
sor
item
s w
ith h
ooks
eye
lets
or
clip
sin
a m
esh
laun
dry
bag
2
40
800
ndash
1Pro
gram
me
setti
ng
Programmesemspen
27
Pro
gram
me
Des
crip
tion
Max load (kg)
Pro
gram
me
sett
ings
Max temperature (degC)
Max spin speed(rpm) 1
SpeedPerfect
Extra
Centrif ndash ndash ndash ndash(Rinse Hold)
Prelav
Lan
aLatilde
s (W
ool)
Han
d- o
r m
achi
ne-w
asha
ble
item
sth
at a
re m
ade
from
woo
l or
cont
ain
woo
lTo
pre
vent
the
laun
dry
from
shr
ink-
ing
the
dru
m m
oves
the
item
s ve
ryge
ntly
with
long
pau
ses
Use
a d
eter
gent
tha
t is
sui
tabl
e fo
rw
ool
2
40
800
ndash
ndash
ndash
(R
inse
)R
inse
s an
d th
en s
pins
the
laun
dry
and
then
dra
ins
the
wat
er
ndashndash
1200
ndash
ndash
(
Spi
nD
rain
)Spi
ns a
nd d
rain
s th
e w
ater
If
you
only
wan
t to
dra
in the
wat
er
activ
ate
0 T
he la
undr
y is
not
spu
n
ndash
ndash
1200
ndash
ndash
ndash
ndash
Rop
a os
cura
R
oupa
esc
ura
(Dar
k W
ash)
Was
h da
rk-c
olou
red
and
colo
ur-in
-te
nse
item
s m
ade
from
cot
ton
orea
sy-c
are
fabr
ic e
g j
eans
Tu
rn la
undr
y in
side
-out
bef
ore
was
h-in
gU
se li
quid
det
erge
nt
4
40
1200
1Pro
gram
me
setti
ng
enemspProgrammes
28
Pro
gram
me
Des
crip
tion
Max load (kg)
Pro
gram
me
sett
ings
Max temperature (degC)
Max spin speed(rpm) 1
SpeedPerfect
Extra
Centrif ndash ndash ndash ndash(Rinse Hold)
Prelav
Plu
mas
Pen
as
(Dow
n)W
ash
pillo
ws
duv
ets
or c
loth
ing
stuf
fed
with
dow
n an
d fil
lings
with
synt
hetic
fibr
es
Was
h la
rge
item
s se
para
tely
U
se a
det
erge
nt tha
t is
sui
tabl
e fo
rdo
wn
or d
elic
ates
U
se s
parin
gly
Do
not us
e fa
bric
sof
tene
rN
ote
To
prev
ent ex
cess
ive
foam
ing
rem
ove
air
from
laun
dry
item
s by
rolli
ng the
m u
p be
fore
you
was
hth
em
2
60
1200
ndash
ndash
Lim
p tam
bor
(Dru
m C
lean
)C
lean
ing
and
carin
g fo
r th
e dr
um
Use
thi
s pr
ogra
mm
e in
the
follo
win
gca
ses
iexclB
efor
e us
ing
the
appl
ianc
e fo
r th
efir
st tim
eiexcl
If yo
u re
gula
rly w
ash
at tem
pera
t-ur
es o
f 40 deg
C o
r lo
wer
ndash
ndash
1200
ndash
ndash
ndash
ndash
1Pro
gram
me
setti
ng
Programmesemspen
29
Pro
gram
me
Des
crip
tion
Max load (kg)
Pro
gram
me
sett
ings
Max temperature (degC)
Max spin speed(rpm) 1
SpeedPerfect
Extra
Centrif ndash ndash ndash ndash(Rinse Hold)
Prelav
iexclA
fter
a pr
olon
ged
perio
d of
non
-us
eU
se w
ashi
ng p
owde
r or
a d
eter
gent
cont
aini
ng b
leac
hH
alve
the
am
ount
of d
eter
gent
to
avoi
d fo
amin
gD
o no
t us
e fa
bric
sof
tene
rD
o no
t us
e liq
uid
dete
rgen
t or
det
er-
gent
tha
t is
inte
nded
for
woo
llens
or
delic
ates
N
ote
The
dru
m c
lean
ing
indi
cato
rw
ill fl
ash
to r
emin
d yo
u if
you
have
not us
ed a
pro
gram
me
at 6
0 deg
C o
rhi
gher
for
a lo
ng tim
eC
amis
asB
lusa
s (S
hirts
Blo
uses
)W
ash
non-
iron
shirt
s an
d bl
ouse
sm
ade
from
cot
ton
line
n s
ynth
etic
or
blen
ded
fabr
ics
Not
e U
se the
Del
icad
oSed
a pr
o-gr
amm
e to
was
h sh
irts
and
blou
ses
mad
e from
silk
or
delic
ate
fabr
ics
2
60
800
ndash
1Pro
gram
me
setti
ng
enemspProgrammes
30
Pro
gram
me
Des
crip
tion
Max load (kg)
Pro
gram
me
sett
ings
Max temperature (degC)
Max spin speed(rpm) 1
SpeedPerfect
Extra
Centrif ndash ndash ndash ndash(Rinse Hold)
Prelav
Spo
rt
Was
h sp
orts
and
leis
ure
item
s m
ade
from
syn
thet
ic fi
bres
mic
rofib
re o
rfle
ece
Use
a d
eter
gent
tha
t is
sui
tabl
e fo
rsp
orts
item
sD
o no
t us
e fa
bric
sof
tene
rTi
p U
se the
Sin
teacutetic
os
prog
ram
me
to w
ash
heav
ily s
oile
d la
undr
y
2
40
800
ndash
Raacutep
ido
153
0m
in
(Sup
erQ
uick
153
0 m
in)
Was
h ite
ms
mad
e from
cot
ton
syn
-th
etic
or
blen
ded
fabr
ics
Sho
rt p
rogr
amm
e fo
r sm
all i
tem
s of
light
ly s
oile
d la
undr
yTh
e pr
ogra
mm
e du
ratio
n is
app
rox
30 m
inut
es
If yo
u w
ish
to r
educ
e th
e pr
ogra
mm
edu
ratio
n to
15 m
inut
es a
ctiv
ate
Spe
edPer
fect
T
he m
axim
umlo
ad is
red
uced
to
2 k
g
4
40
1200
ndash
1Pro
gram
me
setti
ng
Accessoriesemspen
31
Accessories
9 AccessoriesAccessories
Use original accessories These have been made especially for your appliance
Use Order numberWater inlet hose exten-sion
Extend the water inlethose for cold water orAquaStop (approx 250m)
WMZ2381
Fixing brackets Improves the stability ofthe appliance
WMZ2200
Longer water inlet hose Replace the standardwater inlet hose with alonger hose (220 m)
00353925
Elbow Secure the water outlethose in place
00655300
Liquid detergent insert Measure liquid deter-gent
00605740
Metal covering plate Metal covering plate forinstalling the applianceunder a high worktop
WMZ20430
Before using for the first time
10 Before using for thefirst time
Before using for the first time
Prepare the appliance for use
101 Starting an empty wash-ing cycle
Your appliance was inspected thor-oughly before leaving the factory Toremove any residual water run thefirst wash cycle without any laundryNote Please read the information inthe Safety rarr Page 4 and Preventingmaterial damage rarr Page 10 sectionsto ensure that you use the appliancesafely
1 Turn the programme selector toLimp tambor
2 Close the door
enemspLaundry
32
3 Pull out the detergent drawer
4 Pour approx 1 litre of tap waterinto compartment II
5 Pour washing powder into com-partment II
To prevent foaming use only halfof the amount of detergent recom-mended by the detergent manufac-turer for light soiling Do not usedetergent suitable for woollens ordelicates
6 Push in the detergent drawer
7 Press InicioPausa + Carga (StartPause + Reload) to start theprogramme
a The display shows the remainingprogramme duration
a After the programme has endedthe display shows End
8 Start the first wash cycle or set theprogramme selector to to switchoff the appliance rarr Basic operation Page 36
Laundry
11 LaundryLaundry
111 Preparing the laundryNote Please read the information inthe Safety rarr Page 4 and Preventingmaterial damage rarr Page 10 sectionsto ensure that you use the appliancesafely
ATTENTIONObjects remaining in the laundry maydamage the laundry and the drum Remove all items from any pock-
ets in your laundry before usingthe appliance
To protect your appliance and thelaundry prepare the laundry be-forehandndash Empty any pockets
Laundryemspen
33
ndash Brush sand out of all collars andpockets
ndash Close bed covers and cushioncovers
ndash Close all zips Velcro fastenershooks and eyes
ndash Tie cloth belts apron stringsetc together or use a laundrybag
ndash Remove curtain hooks and leadstrips or use a mesh laundrybag
ndash Use a mesh laundry bag forsmall items of laundry such aschildrens socks
ndash Some stubborn or dried-in stainscan be removed by washingseveral times
ndash Wash large and small items oflaundry together
ndash Do not rub fresh stains but dabthem with soapy water
ndash Separate items of laundry andshake them out
112 Sorting laundryNote Please read the information inthe Safety rarr Page 4 and Preventingmaterial damage rarr Page 10 sectionsto ensure that you use the appliancesafely To improve washing results and
prevent discolouration sort thelaundry according to the followingcriteria before washingndash Type of fabric and fibre
Wash laundry of the sametype of fabric and fibre to-gether
ndash Care symbols on the care labelsrarr Page 34
ndash Description of the programmesrarr Page 24
ndash Whitesndash Colours
Wash new coloured itemsseparately the first time youwash them
113 Degrees of soiling
Degree of soiling Soiling ExamplesLight iexcl No dirt or stains are vis-
ibleiexcl Laundry has absorbed
odours
Light summer clothing orsports clothing that hasbeen worn for a just a fewhours
Normal Dirt or light stains are vis-ible
iexcl T-shirts shirts or blousesare sweat-soaked orhave been worn a fewtimes
iexcl Towels or bedding thathas been used for up toone week
Heavy Dirt or stains are clearlyvisible
Tea towels baby items orwork clothing
enemspDetergents and care products
34
114 Care symbols on the care labels
Washing care symbols
Symbol Washing process Recommended pro-gramme
Normal Cotton Gentle Easy-Care Particularly gentle DelicatesSilk for
washing by handHand wash WoolNot suitable for machine-washing ndash
Detergents and care products
12 Detergents and careproducts
Detergents and care products
Note Please read the information inthe Safety rarr Page 4 and Preventingmaterial damage rarr Page 10 sectionsto ensure that you use the appliancesafelyThe manufacturers instructions foruse and dosage can be found on thepackaging
Notesiexcl Only use liquid detergents that are
self-flowingiexcl Do not mix different liquid deter-
gentsiexcl Do not mix detergent and fabric
softeneriexcl Do not use products that have ex-
pired or are highly congealediexcl Do not use products containing
solvents caustic agents or volatilesubstances (eg bleach)
iexcl Use dyes sparingly as salt maydamage stainless steel
iexcl Do not use bleaching agents in theappliance
121 Detergent recommendation
Detergent Fabrics Pro-gramme
Temperature
Standard detergentwith optical brighten-ers
Heat-resistant whitefabrics made fromcotton or linen
Cotton From cold up to90 degC
Detergent for colourswithout bleach or op-tical brighteners
Coloured fabricsmade from linen orcotton
Cotton From cold up to60 degC
Detergent for col-oursdelicates withoutoptical brighteners
Coloured fabricsmade from easy-carefabrics or syntheticmaterials
Easy-Care From cold up to60 degC
Detergents and care productsemspen
35
Detergent Fabrics Pro-gramme
Temperature
Detergent for delic-ates
Delicate fine textilessilk or viscose
DelicatesSilk
From cold up to40 degC
Detergent for wool-lens
Wool Wool From cold up to40 degC
Tip Visit wwwcleanrighteu to findfurther information on detergentscare products and cleaning agentsfor domestic use
122 Detergent dosageThe detergent dosage depends oniexcl The amount of laundryiexcl Degree of soilingiexcl Water hardness
You can find out how hard yourwater is from your local water com-pany or measure it yourself usinga water hardness tester
Water hardness
Hardness range Total hardness in mmoll
German degrees in degdH
soft (I) 0ndash15 0ndash84medium (II) 15ndash 25 84ndash14hard (III) over 25 over 14
Example of a manufacturersinstructions for detergentThese example values refer to astandard load of 4ndash5 kg
Soiling Light Normal HeavyWater hardness Softmedium 40 ml 55 ml 80 mlWater hardness Hardveryhard
55 ml 80 ml 105 ml
The dosages can be found on themanufacturers packagingiexcl Adjust the dosage to the actual
load
enemspBasic operation
36
Basic operation
13 Basic operationBasic operation
131 Switching on the appli-ance
Turn the programme selector to aprogramme
132 Setting a programme1 Set the programme selector to the
required programme rarr Programmes Page 24
2 If necessary adjust the pro-gramme settings rarr Page 36
133 Adjusting the pro-gramme settings
Requirement A programme hasbeen set rarr Setting a programme Page 36
Adjust the programme settings rarr Programmes Page 24
Note The programme settings arenot saved permanently for the pro-gramme
134 Loading laundryNotesiexcl Please read the information in the
Safety rarr Page 4 and Preventingmaterial damage rarr Page 10 sec-tions to ensure that you use theappliance safely
iexcl To prevent creasing take note ofthe maximum load for the rarr Programmes Page 24
Requirement The laundry is pre-pared and sortedrarr Laundry Page 321 Open the door
Make sure that the drum is empty2 Load the laundry unfolded into the
drum3 Close the door
Ensure that there is no laundrytrapped in the door
Basic operationemspen
37
135 Using a measuring aidfor liquid detergent
If you order the measuring aid as anaccessory you must use the measur-ing aid1 Pull out the detergent drawer
2 Press down on the insert and re-move the detergent drawer
1
2
3 Insert the measuring aid
4 Insert the detergent drawer
136 Use the measuring aidfor liquid detergent
To add liquid detergent you can usea measuring aid in the detergentdrawer1 Pull out the detergent drawer2 Slide the measuring aid forwards
3 Fold the measuring aid down andclick it into place
enemspBasic operation
38
4 Push in the detergent drawer
137 Adding detergent andcare product
Notesiexcl Please read the information in the
Safety rarr Page 4 and Preventingmaterial damage rarr Page 10 sec-tions to ensure that you use theappliance safely
iexcl Do not use the measuring aid forliquid detergent for gel detergentswashing powder or if Prewash orReady in time are activated
Requirement Find out the optimumdosage for detergent and careproduct rarr Page 341 Pull out the detergent drawer2 Pour in detergent
rarr Detergent drawer Page 193 If required add the care product4 Push in the detergent drawer
138 Starting the programmeNote If you want to change the timeuntil the programme ends set theReady in time first Press InicioPausa + Carga a The drum rotates and load detec-
tion takes place This can take upto 2 minutes after which waterenters the drum
a The display shows either the pro-gramme duration or the Ready intime
a After the programme has endedthe display shows End
139 Adjusting the Ready intime before the pro-gramme starts
You can readjust the selected Readyin time before the programme starts1 Press InicioPausa + Carga 2 Press Termin repeatedly until
the display indicates the desiredReady in time
3 Press InicioPausa + Carga
1310 Soaking laundryNote No additional detergent is re-quired The washing solution is thenused for washing1 Start the programme2 To pause the programme after ap-
prox 10 minutes press InicioPausa + Carga
3 To resume the programme afterthe desired soaking time pressInicioPausa + Carga
1311 Adding laundryNote Please read the information inthe Safety rarr Page 4 and Preventingmaterial damage rarr Page 10 sectionsto ensure that you use the appliancesafely1 Press InicioPausa + Carga
The appliance is paused andchecks whether it is possible toadd or remove laundry Take noteof the programme status
2 Add or remove laundry3 Close the door4 Press InicioPausa + Carga
Basic operationemspen
39
1312 Cancelling the pro-gramme
Once the programme has startedyou can cancel it at any timeNote Please read the information inthe Safety rarr Page 4 and Preventingmaterial damage rarr Page 10 sectionsto ensure that you use the appliancesafely1 Press InicioPausa + Carga 2 Open the door
The appliance door remainslocked for safety reasons if thetemperature and water levels arehighndash If the temperature is high start
the programmendash If the water level is high Start
the or programme3 Remove the laundry
1313 Resuming the pro-gramme when the pro-gramme status is RinseHold
1 Set the or programme2 Press InicioPausa + Carga
1314 Unloading the laundryNote Please read the information inthe Safety rarr Page 4 and Preventingmaterial damage rarr Page 10 sectionsto ensure that you use the appliancesafely1 Open the door
2 Remove the laundry
1315 Switching off the appli-ance
1 Turn the programme selector to
2 Turn off the tap3 Wipe the rubber gasket dry and re-
move any foreign objects
4 Leave the door and detergentdrawer open so that residual watercan evaporate
enemspChildproof lock
40
Childproof lock
14 Childproof lockChildproof lock
Secure your appliance against beingoperated unintentionally using thecontrols
141 Activating the childprooflock
Press and hold the two 3 segbuttons for approx 3 seconds
a The display shows a The controls are lockeda The childproof lock remains active
even after the appliance has beenswitched off
142 Deactivating the child-proof lock
Requirement To deactivate thechildproof lock the appliance mustbe switched on Press and hold the two 3 seg
buttons for approx 3 secondsa goes out in the display
Basic settingsemspen
41
Basic settings
15 Basic settingsBasic settings
You can configure the appliance to meet your needs
151 Overview of the basic settingsBelow is an overview of the basic settings on your appliance
Basic setting Programmeposition
Value Description
End signal 2 0 (off)1 (quiet)2 (me-dium)3 (loud)4 (veryloud)
Set the volume of the signal at theend of the programme
Button signal 3 0 (off)1 (quiet)2 (me-dium)3 (loud)4 (veryloud)
The volume of the audible signalemitted when the buttons arepressed
Drum cleaningreminder
4 ONOFF
Activate or deactivate the re-minder to clean the drum
enemspCleaning and servicing
42
152 Changing the basic set-tings
1 Set the programme selector to po-sition 1
2 Press InicioPausa + Carga and at the same time turn theprogramme selector to position 2
a The display shows the currentvalue
3 Set the programme selector to therequired position
4 To change the value press Ter-min
5 To save the changes switch offthe appliance
Cleaning and servicing
16 Cleaning and servi-cing
Cleaning and servicing
To keep your appliance working effi-ciently for a long time it is importantto clean and maintain it carefully
161 Tips on appliance careWipe down thehousing and thecontrol panelwith nothing butwater and adamp cloth
This ensures theparts of the appli-ance will remainclean and hy-gienic
Remove all de-tergent residuespray residue orother residuesimmediately
Fresh depositsare easier to re-move withoutleaving anyresidue
Keep the appli-ance door anddetergent draweropen after use
This allows theresidual water todry reducingodours in the ap-pliance
162 Cleaning the drum
CAUTIONRisk of injuryPermanently washing at low temper-atures and a lack of ventilation forthe appliance may damage the drumand cause injury Regularly run a programme for
cleaning the drum or wash at tem-peratures of at least 60 degC
Leave the appliance to dry afterevery operation with the dooropen and leave the detergentdrawer to dry
Run the Limp tambor pro-gramme without laundryAdd washing powder
163 Cleaning the detergentdrawer
Note Please read the information inthe Safety rarr Page 4 and Preventingmaterial damage rarr Page 10 sectionsto ensure that you use the appliancesafely1 Pull out the detergent drawer
Cleaning and servicingemspen
43
2 Press down on the insert and re-move the detergent drawer
1
2
3 Press out the insert upwards frombelow
4 Clean the detergent drawer and in-sert with water and a brush andthen dry them
5 Fit the insert and lock it into place
6 Cleaning the opening for the deter-gent drawer
7 Push in the detergent drawer
164 Descaling
ATTENTIONThe use of unsuitable descalingagents eg for coffee machines maydamage the appliance For this appliance only use de-
scaling agents that are availablefrom the manufacturers website orour after-sales service
enemspCleaning and servicing
44
165 Cleaning the drain pumpClean the drain pump in the event offaults eg blockages or rattlingnoises
Emptying the drain pumpNote Please read the information inthe Safety rarr Page 4 and Preventingmaterial damage rarr Page 10 sectionsto ensure that you use the appliancesafely1 Turn off the water tap2 Switch off the appliance3 Disconnect the appliances mains
plug from the power supply4 Open the maintenance flap
5 Remove the maintenance flap
6 Slide a sufficiently large receptacleunder the opening
7 Take the drain hose out of theholder
Cleaning and servicingemspen
45
8 CAUTION - Risk of scaldingWhen you wash at high temperat-ures the detergent solution getshot
Do not touch the hot detergentsolutionTo allow the detergent solution toflow out into the container removethe sealing cap
9 Firmly press on the sealing cap
10 Insert the drain hose into theholder
Cleaning the drain pumpNote Please read the information inthe Safety rarr Page 4 and Preventingmaterial damage rarr Page 10 sectionsto ensure that you use the appliancesafelyRequirement The drain pump isempty rarr Page 441 Since water may remain in the
drain pump remove the pump capcarefully
2 Clean the interior the thread onthe pump cap and the pump hous-ing
3 Make sure that the impeller in thedrain pump can be rotated
enemspCleaning and servicing
46
4 Insert the pump cap and screw iton as far as it will go
90deg
The handle on the pump cap mustbe in a vertical position
5 Close the maintenance flap
Before the next washTo prevent unused detergent fromflowing straight into the outlet in thenext wash run the programmeafter you have emptied the drainpump1 Turn on the tap2 Insert the mains plug3 Switch on the appliance4 Pour 1 litre of water into compart-
ment II5 Start the programme
166 Cleaning the water outlethose at the siphon
1 Switch off the appliance2 Disconnect the appliances mains
plug from the power supply
3 Loosen the hose clamp and care-fully remove the water outlet hose
Residual water may leak out4 Clean the water outlet hose and si-
phon connecting piece
5 Reattach the water outlet hose andsecure the connection point usingthe hose clamp
Cleaning and servicingemspen
47
167 Clean the water inlet fil-ters
Emptying the water inlet hose1 Turn off the tap2 Set a programme except for
or 3 Start the programme and leave it
to run for approx 40 seconds4 Switch off the appliance5 Disconnect the appliances mains
plug from the power supply
Cleaning the filter on the tapNote Please read the information inthe Safety rarr Page 4 and Preventingmaterial damage rarr Page 10 sectionsto ensure that you use the appliancesafelyRequirement The water inlet hose isempty1 Remove the water inlet hose from
the tap
2 Clean the filter with a small brush
3 Connect the water inlet hose andcheck for leaks
Cleaning the filter on theapplianceNote Please read the information inthe Safety rarr Page 4 and Preventingmaterial damage rarr Page 10 sectionsto ensure that you use the appliancesafelyRequirement The water inlet hose isempty rarr Emptying the water inlet hosePage 47
enemspCleaning and servicing
48
1 Disconnect the hose from the rearof the appliance
1
2
2 Use pliers to remove the filter
3 Clean the filter with a small brush
4 Reinsert the filter
5 Connect the hose and check forleaks
2
1
Troubleshootingemspen
49
Troubleshooting
17 TroubleshootingTroubleshooting
You can rectify minor faults on your appliance yourself Read the troubleshoot-ing information before contacting after-sales service This will avoid unneces-sary costs
WARNINGRisk of electric shockIncorrect repairs are dangerous Repairs to the appliance should only be carried out by trained specialist
staff Only use genuine spare parts when repairing the appliance If the power cord of this appliance is damaged it must be replaced by the
manufacturer the manufacturers Customer Service or a similarly qualifiedperson in order to prevent any risk
Fault Cause and troubleshootingThe display goes outand InicioPausa +Carga flashes
Energy-saving mode is active Press any buttona The symbol lights up again
E36 -10 Drain pipe or water outlet hose is blocked Clean the drain pipe and the water outlet hose
Drain pipe or water drain hose is caught or jammed Ensure that the drain pipe and water drain hose are
not kinked or trapped
Drain pump is blocked rarr Cleaning the drain pump Page 44
The water outlet hose is connected too high Install the water outlet hose at a maximum height of
1 metre
Detergent dosage is too high Immediate measure Mix one tablespoon of fabric
softener with 05 litres of water and pour the mix-ture into the left-hand compartment (not for outdoorclothing sportswear or items stuffed with down)
Reduce the amount of detergent for the next wash-ing cycle with the same load
Unapproved extension installed on the water drainhose Remove any unapproved extensions from the water
hose Connecting the appliance
E36 -25 -26 Drain pump is blocked rarr Cleaning the drain pump Page 44
enemspTroubleshooting
50
Fault Cause and troubleshootingThe water pressure is lowNo remedial action possibleThe filters in the water inflow are blocked Clean the filters in the water inflow rarr Page 47
The tap is turned off Turn on the tap
The water inlet hose is kinked or jammed Ensure that the water inlet hose is not kinked or
jammed
flashes The automatic voltage control system detects an un-authorised voltage under-usage No remedial action possible
Note If the power supply is stable the programmecontinues to run as normalVoltage under-usage may cause extension of a pro-grammeNo remedial action possible
flashes Voltage under-usage may cause extension of a pro-grammeNo remedial action possible
lights up The temperature is too high Wait until the temperature has dropped rarr Cancelling the programme Page 39
Water level is too high Start the programme
Laundry is caught in the door1 Open the door again2 Remove any trapped laundry3 Close the door4 Press InicioPausa + Carga to start the pro-
gramme
flashes Door is not closed1 Close the door2 Press InicioPausa + Carga to start the pro-
gramme
All other error codes Malfunction Call the after-sales service
rarr Customer Service Page 59
Troubleshootingemspen
51
Fault Cause and troubleshootingThe appliance is notworking
The mains plug of the power cord is not plugged in Connect the appliance to the power supply
The circuit breaker is faulty Check the circuit breaker in the fuse box
There has been a power cut Check whether the lighting in your kitchen or other
appliances are working
The programme doesnot start
You have not pressed InicioPausa + Carga Press InicioPausa + Carga
Door is not closed1 Close the door2 Press InicioPausa + Carga to start the pro-
gramme
Childproof lock is activated rarr Deactivating the childproof lock Page 40
Termin is activated Check whether Termin is activated
rarr Buttons Page 23
Laundry is caught in the door1 Open the door again2 Remove any trapped laundry3 Close the door4 Press InicioPausa + Carga to start the pro-
gramme
The door cannotbe opened
ndash ndash ndash ndash is activated Continue the programme by selecting or and
pressing InicioPausa + Carga rarr Resuming the programme when the programmestatus is Rinse Hold Page 39
The temperature is too high Wait until the temperature has dropped rarr Cancelling the programme Page 39
Water level is too high Start the programme
Power failure Open the door using the emergency release
rarr Emergency release Page 57
The water is not drain-ing
Drain pipe or water outlet hose is blocked Clean the drain pipe and the water outlet hose
enemspTroubleshooting
52
Fault Cause and troubleshootingThe water is not drain-ing
Drain pipe or water drain hose is caught or jammed Ensure that the drain pipe and water drain hose are
not kinked or trapped
Drain pump is blocked rarr Cleaning the drain pump Page 44
ndash ndash ndash ndash is activated Continue the programme by selecting or and
pressing InicioPausa + Carga rarr Resuming the programme when the programmestatus is Rinse Hold Page 39
The water outlet hose is connected too high Install the water outlet hose at a maximum height of
1 metre
Detergent dosage is too high Immediate measure Mix one tablespoon of fabric
softener with 05 litres of water and pour the mix-ture into the left-hand compartment (not for outdoorclothing sportswear or items stuffed with down)
Reduce the amount of detergent for the next wash-ing cycle with the same load
Unapproved extension installed on the water drainhose Remove any unapproved extensions from the water
hose Connecting the appliance
Water is not flowingin Detergent is notbeing dispensed
You have not pressed InicioPausa + Carga Press InicioPausa + Carga
The filters in the water inflow are blocked Clean the filters in the water inflow rarr Page 47
The tap is turned off Turn on the tap
The water inlet hose is kinked or jammed Ensure that the water inlet hose is not kinked or
jammed
The spin cycle runsseveral times
The unbalanced load detection system eliminates animbalance by repeatedly redistributing the laundry Not a fault ndash no action required
Note When loading where possible place large andsmall items of laundry together in the drum Differentsized items of laundry distribute themselves betterduring the spin cycle
Troubleshootingemspen
53
Fault Cause and troubleshootingThe programme dura-tion changes duringthe wash cycle
The programme operation is optimised electronicallyThis may change the programme duration Not a fault ndash no action required
The unbalanced load detection system eliminates animbalance by repeatedly redistributing the laundry Not a fault ndash no action required
Note When loading where possible place large andsmall items of laundry together in the drum Differentsized items of laundry distribute themselves betterduring the spin cycleFoam detection system switches on a rinse cycle iffoam build-up is too high Not a fault ndash no action required
No water is visible inthe drum
Water is below the visible area Not a fault ndash no action required Do not add any extra water to the appliance while it
is operating
Drum jerks after theprogramme starts
This is caused by an internal motor test Not a fault ndash no action required
Residual water ispresent in the com-partment
Insert in compartment is blocked rarr Cleaning the detergent drawer Page 42
Vibrations and move-ment of the appliancewhilst spinning
Appliance is not correctly aligned Aligning the appliance
The appliance feet are not fixed Secure the appliance feet Aligning the appliance
Transit bolts have not been removed Removing the transit bolts
Drum does not turnwater does not flow in
Load detection is active Not a fault ndash no action required
Note The load detection can take up to two minutesHeavy foam build-up Detergent dosage is too high
Immediate measure Mix one tablespoon of fabricsoftener with 05 litres of water and pour the mix-ture into the left-hand compartment (not for outdoorclothing sportswear or items stuffed with down)
Reduce the amount of detergent for the next wash-ing cycle with the same load
enemspTroubleshooting
54
Fault Cause and troubleshootingHigh spin speed notreached
A low spin speed is selected The next time you run a wash cycle set a higher
spin speed
Unbalance load detection system is using a reducedspin speed to eliminate an unbalance Redistribute the laundry in the drum
Note Where possible mix large and small items inthe drum Different sized items of laundry distributethemselves better during the spin cycle Start the programme
The spin programmedoes not start
Drain pipe or water outlet hose is blocked Clean the drain pipe and the water outlet hose
Drain pipe or water drain hose is caught or jammed Ensure that the drain pipe and water drain hose are
not kinked or trapped
The unbalanced load detection system has interruptedthe spin cycle because the laundry is unevenly distrib-uted Redistribute the laundry in the drum
Note Where possible mix large and small items inthe drum Different sized items of laundry distributethemselves better during the spin cycle Start the programme
Rushing hissingnoise
Water is flushed under pressure into the detergentdrawer Not a fault ndash normal operating noise
Loud noises duringthe spin cycle
Appliance is not correctly aligned Aligning the appliance
The appliance feet are not fixed Secure the appliance feet Aligning the appliance
Transit bolts have not been removed Removing the transit bolts
Banging noises rat-tling in the drainpump
Foreign bodies have got into the drain pump rarr Cleaning the drain pump Page 44
Slurping rhythmicalsuction noise
The drain pump is active the detergent solution ispumped out Not a fault ndash normal operating noise
Troubleshootingemspen
55
Fault Cause and troubleshootingCreasing The spin speed is too high
The next time you run a wash cycle set a lowerspin speed
The load is too large The next time you run a wash cycle reduce the
amount of laundry being loaded
The wrong programme is selected for the type of fab-ric Select the programmes that are suitable for the
type of fabric rarr Programmes Page 24
Detergent or fabricsoftener drips off theseal and collects onthe door or in the sealfold
Too much detergentfabric softener in the detergentdrawer When dosing liquid detergent and fabric softener
observe the marking in the detergent drawer anddo not dose above this
The spin result is notsatisfactory The laun-dry is too wettoodamp
A low spin speed is selected The next time you run a wash cycle set a higher
spin speed Start the programme
Drain pipe or water outlet hose is blocked Clean the drain pipe and the water outlet hose
Drain pipe or water drain hose is caught or jammed Ensure that the drain pipe and water drain hose are
not kinked or trapped
The unbalanced load detection system has interruptedthe spin cycle because the laundry is unevenly distrib-uted Redistribute the laundry in the drum
Note Where possible mix large and small items inthe drum Different sized items of laundry distributethemselves better during the spin cycle Start the programme
Unbalance load detection system is using a reducedspin speed to eliminate an unbalance Redistribute the laundry in the drum
Note Where possible mix large and small items inthe drum Different sized items of laundry distributethemselves better during the spin cycle Start the programme
enemspTroubleshooting
56
Fault Cause and troubleshootingDetergent residue onthe damp washing
Detergents may contain water-insoluble substancesthat deposit on the laundry Start the programme
Detergent residue onthe dry laundry
Detergents may contain water-insoluble substancesthat deposit on the laundry Brush out the laundry after washing and drying
Water is leaking out atthe water inlet hose
Water inlet hose is not correctlysecurely connected1 Connect the water supply hose correctly Connect-
ing the water inlet hose2 Tighten the screw connection
Water is leaking out atthe water outlet hose
The water outlet hose is damaged Replace the damaged water outlet hose
Water outlet hose is not connected correctly Connect the water outlet hose correctly Water out-
let connection types
Odours have formedin the appliance
Humidity and detergent residue may promote theformation of bacteria rarr Cleaning the drum Page 42 If you are not using the appliance leave the door
and detergent drawer open so that residual watercan evaporate
Transportation storage and disposalemspen
57
171 Emergency releaseReleasing the doorRequirement The drain pump isempty rarr Page 441 ATTENTION Escaping water may
cause material damage Do not open the door if you can
see water through the glassPull the emergency release down-wards with a tool and release
a The door lock is released2 Insert the maintenance flap and
lock it into place3 Close the maintenance flap
Transportation storage and disposal
18 Transportation stor-age and disposal
Transportation storage and disposal
You can find out here how to prepareyour appliance for transportation andstorage You will also find out how todispose of old appliances
181 Removing the appliance1 Turn off the tap2 rarr Emptying the water inlet hose
Page 473 Switch off the appliance4 Unplug the appliances mains plug
5 Drain the remaining detergentsolution rarr Cleaning the drain pumpPage 44
6 Detach the hoses
182 Inserting the transitbolts
Secure the appliance for transporta-tion using transit bolts in order to pre-vent damage1 Remove the four cover caps
‒ If necessary use a screwdriverto remove the cover caps
Keep the cover caps2 Insert the four sleeves
enemspTransportation storage and disposal
58
3 Insert all screws into the fourtransit bolts and tighten slightly
4 Insert the power cord into theholder and tighten all fourscrews for the transit bolts with aWAF 13 wrench
5 Insert the hose into holder
183 Using the applianceagain
1 Remove the transit bolts
2 Pour approx 1 litre of water intocompartment II in the detergentdrawer
3 Start the programmea The unused detergent cannot flow
straight into the outlet during thenext wash
184 Disposing of old appli-ance
Valuable raw materials can be re-used by recycling
WARNINGRisk of harm to healthChildren can lock themselves in theappliance thereby putting their livesat risk Do not install the appliance behind
a door as this may obstruct the ap-pliance door or prevent it fromopening
With redundant appliances unplugthe power cord Then cut throughthe cord and damage the lock onthe appliance door beyond repairso that the appliance door will nolonger close
1 Unplug the appliance from themains
2 Cut through the power cord3 Dispose of the appliance in an en-
vironmentally friendly mannerInformation about current disposalmethods are available from yourspecialist dealer or local authority
This appliance is la-belled in accordancewith European Directive201219EU concerningused electrical and elec-
Customer Serviceemspen
59
tronic appliances (wasteelectrical and electronicequipment - WEEE)The guideline determ-ines the framework forthe return and recyclingof used appliances asapplicable throughoutthe EU
Customer Service
19 Customer ServiceCustomer Service
If you have any queries on use areunable to rectify faults on the appli-ance yourself or if your applianceneeds to be repaired contact Cus-tomer ServiceYou can solve many problems your-self by consulting the information ontroubleshooting in these instructionsor on our website If this is not thecase contact our after-sales serviceWith any warranty claims we willmake sure that your appliance is re-paired by trained after-sales techni-cians using genuine spare parts in-cluding after the manufacturers war-ranty has expiredFunction-relevant genuine spare partsaccording to the corresponding Eco-design Order can be obtained fromCustomer Service for a period of atleast 10 years from the date onwhich your appliance was placed onthe market within the European Eco-nomic AreaNote Under the terms of the manu-facturers warranty the use of Cus-tomer Service is free of chargeDetailed information on the warrantyperiod and terms of warranty in yourcountry is available from our after-sales service your retailer or on ourwebsite
If you contact Customer Service youwill require the product number (E-Nr) and the production number (FD)of your applianceThe contact details for Customer Ser-vice can be found in the enclosedCustomer Service directory or on ourwebsite
191 Product number (E-Nr)and production number(FD)
You can find the product number (E-Nr) and the production number (FD)on the appliances rating plateDepending on the model the ratingplate is locatediexcl On the inside of the dooriexcl On the inside of the maintenance
flapiexcl On the rear of the applianceMake a note of your appliances de-tails and the Customer Service tele-phone number to find them againquickly
enemspConsumption values
60
Consumption values
20 Consumption valuesConsumption values
The following information is provided in accordance with the EU EcodesignRegulation The values given for programs other than the Eco 40-60 are indicat-ive only and were determined in accordance with the applicable standardEN60456
Programme Load(kg)
Pro-gramme dura-tion(hrmin)1
Energycon-sump-tion(kWhcycle)1
Watercon-sump-tion (lcycle)1
Max-imumtemper-ature(degC) 5mins1
Spinspeed(rpm)1
Resid-ualmois-ture()1
Eco 40-602 90 337 1245 610 50 1166 5000Eco 40-602 45 252 0590 450 33 1200 5000Eco 40-602 25 233 0195 300 24 1200 5400AlgodoacutenAl-godatildeo 20 degC
90 328 0370 900 23 1200 5400
AlgodoacutenAl-godatildeo 40 degC
90 328 1350 900 45 1200 5400
AlgodoacutenAl-godatildeo 60 degC
90 328 1450 900 55 1200 5400
AlgodoacutenAl-godatildeo 40 degC + Pre-lav
90 358 1400 1020 45 1200 5400
Sinteacuteticos 40 degC
40 228 0780 610 44 1200 2700
Mix 40 degC 40 059 0620 440 41 1200 5600 LanaLatildes
30 degC20 040 0200 400 22 800 2500
1 Due to the influence of water pressure hardness and inlet temperature am-bient temperature type amount and soiling of laundry detergent used fluc-tuations in the power supply and the selected additional functions the actualvalues may deviate from the stated values
2 Test programme in accordance with the EU Ecodesign Directive and the EUEnergy Labelling Regulation with cold water (15 degC)
Technical specificationsemspen
61
Technical specifications
21 Technical specifica-tions
Technical specifications
Facts and figures for your appliancecan be found here
Appliance height 850 cmAppliance width 598 cmAppliance depth 590 cmWeight 80 kg1
Maximum load 9 kgMains voltage 220 - 240 V
50 Hz Minimum in-
stallation protec-tion
10 A
Rated power 2300 WPower consump-tion
iexcl Off mode010 W
iexcl Left-on mode050 W
Water pressure iexcl Minimum100 kPa(1 bar)
iexcl Maximum1000 kPa(10 bar)
Length of the wa-ter inlet hose
150 cm
Length of the wa-ter outlet hose
150 cm
Length of thepower cord
160 cm
1 Depending on the appliance spe-cifications
More information about your modelcan be found online at httpsen-ergylabelbsh-groupcom1 This webaddress is linked to the official EUEPREL product database At the time
of printing its web address had notyet been published Please then fol-low the instructions on searching formodels The model identifier is madeup of the characters before the slashin the product number (E-Nr) on therating plate Alternatively you canalso find the model identifier in thefirst line of the EU energy label
1 Only applies to countries in the European Economic Area
Thank you for buying aBosch Home Appliance
Register your new device on MyBosch now and profit directly from
bull Expert tips amp tricks for your appliancebull Warranty extension optionsbull Discounts for accessories amp spare-partsbull Digital manual and all appliance data at handbull Easy access to Bosch Home Appliances Service
Free and easy registration ndash also on mobile phoneswwwbosch-homecomwelcome
Looking for help Youll find it here
Expert advice for your Bosch home appliances help with problems or a repair from Bosch experts Find out everything about the many ways Bosch can support you wwwbosch-homecomservice Contact data of all countries are listed in the attached service direct-ory
90016102699001610269emsp(010219)en
Robert Bosch Hausgeraumlte GmbHCarl-Wery-Straszlige 3481739 MuumlnchenGERMANYwwwbosch-homecom
Valid within Great BritainImported to Great Britain byBSH Home Appliances LtdGrand Union HouseOld Wolverton RoadWolverton Milton KeynesMK12 5PTUnited Kingdom
enemspSafety
6
WARNING ‒ Risk of injuryThe high weight of the appliance may result in injury when lifted Do not lift the appliance on your ownIf this appliance is not correctly installed in a washer-dryer stackthe installed appliance may fall Only stack the dryer on a washing machine using the connec-
tion kit from the dryer manufacturer No other installationmethod is permitted Do not install the appliance in a washer-dryer stack if the dryer
manufacturer does not offer a suitable connection kit Do not install appliances from different manufacturers and with
varying depths and widths in a washer-dryer stack Do not install a washer-dryer stack on a platform the appli-
ances may tip over
WARNING ‒ Risk of suffocationChildren may put packaging material over their heads or wrapthemselves up in it and suffocate Keep packaging material away from children Do not let children play with packaging material
CAUTION ‒ Risk of injuryThe appliance may vibrate or move when in use Place the appliance on a clean even solid surface Align the appliance using the appliance feet and a spirit levelIf hoses and power cords have been laid incorrectly this causes atripping hazard Lay hoses and power cords in such a way that there is no risk
of trippingIf the appliance is moved by holding onto protruding componentssuch as the appliance door the parts may break off Do not move the appliance by holding onto protruding parts
CAUTION ‒ Risk of cuttingTouching sharp edges on the appliance may lead to cuts Do not touch the sharp edges on the appliance
Safetyemspen
7
Wear protective gloves when installing and transporting the ap-pliance
15 Safe use
WARNING ‒ Risk of electric shockIf the appliance or the power cord is damaged this is dangerous Never operate a damaged appliance Never pull on the power cord to unplug the appliance Always
unplug the appliance at the mains If the appliance or the power cord is damaged immediately un-
plug the power cord or switch off the fuse in the fuse box andturn off the water tap Call customer services rarr Page 59An ingress of moisture can cause an electric shock Only use the appliance in enclosed spaces Never expose the appliance to intense heat or humidity Do not use steam- or high-pressure cleaners hoses or sprays
to clean the appliance
WARNING ‒ Risk of harm to healthChildren can lock themselves in the appliance thereby puttingtheir lives at risk Do not install the appliance behind a door as this may obstruct
the appliance door or prevent it from opening With redundant appliances unplug the power cord Then cut
through the cord and damage the lock on the appliance doorbeyond repair so that the appliance door will no longer close
WARNING ‒ Risk of suffocationChildren may breathe in or swallow small parts causing them tosuffocate Keep small parts away from children Do not let children play with small parts
enemspSafety
8
WARNING ‒ Risk of poisoningDetergents and care products may result in poisoning if con-sumed If accidentally swallowed seek medical advice Keep detergents and care products out of the reach of children
WARNING ‒ Risk of explosionLaundry that has been pretreated with cleaning agents that con-tain solvents may cause an explosion in the appliance Rinse pretreated laundry thoroughly with water before washing
CAUTION ‒ Risk of injuryThe covering plate may break if you stand on or climb onto theappliance Do not stand on or climb onto the applianceThe appliance may tip over if you sit on or lean against the opendoor Do not sit on or lean against the appliance door Do not place any objects on the appliance doorReaching into the drum while it is still turning may cause hand in-juries Wait for the drum to come to a complete stop before reaching
inside
CAUTION ‒ Risk of burnsWhen washing at high temperatures the glass in the appliancedoor becomes hot Do not touch the appliance door when it is hot Keep children away from the appliance door when it is hot
CAUTION ‒ Risk of scaldingWhen you wash at high temperatures the detergent solution getshot Do not touch the hot detergent solution
Safetyemspen
9
CAUTION ‒ Risk of chemical burnsIf the detergent drawer is opened detergent and care productsmay spray out from the appliance Contact with eyes or skin maycause irritation Rinse eyes andor skin thoroughly with clean water if they come
into contact with detergents or care products If accidentally swallowed seek medical advice Keep detergents and care products out of the reach of children
16 Safe cleaning and maintenanceTake note of the safety instructions when cleaning and performingmaintenance work on the appliance
WARNING ‒ Risk of electric shockIncorrect repairs are dangerous Repairs to the appliance should only be carried out by trained
specialist staff Only use genuine spare parts when repairing the appliance If the power cord of this appliance is damaged it must be re-
placed by the manufacturer the manufacturers Customer Ser-vice or a similarly qualified person in order to prevent any risk
An ingress of moisture can cause an electric shock Do not use steam- or high-pressure cleaners hoses or sprays
to clean the appliance
WARNING ‒ Risk of injuryThe use of non-original spare parts and non-original accessoriesis dangerous Only use the manufacturers original spare parts and original ac-
cessories
WARNING ‒ Risk of poisoningPoisonous fumes may be given off if you use cleaning agents thatcontain solvents Do not use cleaning agents that contain solvents
enemspPreventing material damage
10
Preventing material damage
2 Preventing materialdamage
Preventing material damage
Follow these instructions to avoid ma-terial damage and damage to the ap-pliance
ATTENTIONThe functionality of the appliancemay be impaired if you use thewrong quantity of fabric softener de-tergent care product or cleaningagent Follow the dosage recommenda-
tions from the manufacturerExceeding the maximum load capa-city impairs the function of the appli-ance Observe the maximum load capa-
city for each programme and donot exceed it rarr Programmes Page 24
The appliance is secured for trans-portation using transit bolts Transitbolts which have not been removedmay result in material damage anddamage to the appliance Before starting up the appliance
remove the transit bolts completelyand keep them in a safe place
Before transport fit the transit boltsfully in order to prevent damage intransit
Material damage may be caused ifthe water inlet hose is connected in-correctly Tighten the screw connections on
the water inlet until they are hand-tight
Ideally connect the water inlethose directly to the water tapwithout any additional connectingelements such as adapters exten-sions valves or similar
Ensure that the inner diameter ofthe water tap is at least 17 mm
Make sure that the length of thethread on the connection to thewater tap is at least 10 mm
If the water pressure is too high ortoo low the appliance may not beable to operate properly Ensure that the water pressure in
the water supply system is at least100 kPa (1 bar) and max1000 kPa (10 bar)
If the water pressure exceeds themaximum value specified a pres-sure-reducing valve must be in-stalled between the drinking waterconnection and the hose set of theappliance
Do not connect the appliance tothe mixer tap of an unpressurisedhot-water boiler
Modified or damaged water hosesmay result in material damage anddamage to the appliance Never kink crush modify or cut
through water hoses Only use the water hoses supplied
with the appliance or genuinespare hoses
Never re-use water hoses thathave been used before
Operating the appliance using waterthat is dirty or too hot may cause ma-terial damage Only operate the appliance with
cold mains waterUnsuitable cleaning products maydamage the surfaces of the appli-ance Do not use harsh or abrasive de-
tergents Do not use cleaning products with
a high alcohol content Do not use hard scouring pads or
cleaning sponges Clean the appliance with nothing
but water and a soft damp cloth
Environmental protection and saving energyemspen
11
Remove all detergent residuespray residue or other residues im-mediately if they come into contactwith the appliance
Environmental protection and saving energy
3 Environmental protec-tion and saving energy
Environmental protection and saving energy
31 Disposing of packagingThe packaging materials are environ-mentally compatible and can be re-cycled Sort the individual components by
type and dispose of them separ-ately
32 Save energy and con-serve resources
If you follow these instructions yourappliance will use less electricity andless water
Choose programmes with low tem-peratures and longer wash times anduse maximum load capacityrarr Page 24a Energy consumption and water
consumption is most efficient
Use the economy programme set-tingsa If you adjust the programme set-
tings for a programme the displayshows the expected consumption
Add rarr Page 35 detergent based onthe laundrys degree of soilinga For light to normal soiling a smal-
ler amount of detergent is suffi-cient Observe the dosage recom-mendation from the detergentmanufacturer
Reduce the washing temperature forlightly and normally soiled laundrya At low temperatures the appliance
consumes less energy For light tonormal soiling lower temperaturesthan indicated on the care labelare also sufficient
Set the maximum spin speed if youwant to dry the laundry in a tumbledryer afterwardsa The drier the laundry the shorter
the programme duration when dry-ing which in turn reduces energyconsumption A higher spin speedreduces the residual moisture inthe laundry and increases thevolume of the spin noise
Wash the laundry without prewasha Washing with prewash increases
the programme duration and in-creases energy and water con-sumption
The appliance has a continuousautomatic load adjustment functiona Depending on the type of fabric
and load capacity the continuousautomatic load adjustment func-tion optimally adjusts the waterconsumption and programme dur-ation
33 Energy saving modeIf you do not use the appliance for anextended period it automaticallyswitches to energy-saving mode Alldisplays go out and InicioPausa +Carga flashesEnergy-saving mode ends when youuse the appliance again eg if youopen or close the door
enemspInstallation and connection
12
Installation and connection
4 Installation and con-nection
Installation and connection
41 Unpacking the applianceNote Please read the information inthe Safety rarr Page 4 and Preventingmaterial damage rarr Page 10 sectionsto ensure that you use the appliancesafely
ATTENTIONObjects remaining in the drum thatare not designed for operation withthe appliance may cause materialdamage and damage to the appli-ance Remove these objects along with
all supplied accessories from thedrum before starting the appliance
1 Remove any packaging and pro-tective covers completely from theapplianceFor the environmentally friendlydisposal of the packaging materi-als observe the information on thetopic of rarr Disposing of packagingPage 11
2 Check the appliance for visibledamage
3 Open the door rarr Basic operation Page 36
4 Remove the accessory from thedrum
5 Close the door
Installation and connectionemspen
13
42 Contents of packageAfter unpacking all parts check for any damage in transit and completeness ofthe delivery
1 2 3
4
1 Washing machine
2 Accompanying documents
3 Water inlet hose
4 Cover caps
43 Requirements for the in-stallation location
Note Please read the information inthe Safety rarr Page 4 and Preventingmaterial damage rarr Page 10 sectionsto ensure that you use the appliancesafely
WARNINGRisk of electric shockThe appliance contains live partsTouching live parts is dangerous Do not operate the appliance
without a cover cap
WARNINGRisk of injuryWhen using the appliance on a basethe appliance may tip over Always secure the feet of the appli-
ance to a base using the manufac-turers fixing brackets rarr Page 31before using the appliance for thefirst time
enemspInstallation and connection
14
ATTENTIONIf the appliance is installed in areasexposed to frost or outdoors frozenresidual water may damage the appli-ance and frozen hoses may crack orsplit Do not install or operate this appli-
ance anywhere that is liable to ex-perience frost andor outdoors
The appliance underwent a functiontest before leaving the factory andmay therefore contain residual wa-ter This residual water may leak outif the appliance is tilted at an anglegreater than 40deg Tilt the appliance carefully
Installation loca-tion
Requirements
On a base Secure the appli-ance with fixingbracketsrarr Page 31
On a woodenjoist floor
Place the appli-ance on a water-resistant woodenboard which isscrewed tightly tothe floor Thewooden boardshould be atleast 30 mmthick
Installation loca-tion
Requirements
In a kitchen unit iexcl A niche widthof 60 cm is re-quired
iexcl Only install theappliance un-derneath acontinuousworktop that issecurely con-nected to adja-cent cabinets
Note If the cov-ering plate is re-moved the metalcovering plate rarr AccessoriesPage 31 mustbe secured be-fore installation
On a wall Do not trap thehoses betweenthe wall and theappliance
44 Removing the transitbolts
The appliance is secured for trans-portation using transit bolts on therear of the applianceNotesiexcl Please read the information in the
Safety rarr Page 4 and Preventingmaterial damage rarr Page 10 sec-tions to ensure that you use theappliance safely
iexcl Keep the transit bolts screws andsleeves in a safe place for futuretransport rarr Page 57
Installation and connectionemspen
15
1 Pull the hoses out of the holders
2 Unscrew and remove all fourscrews for the transit bolts with aWAF 13 wrench
3 Pull the power cord out of theholder
4 Remove the four sleeves
5 Put on the four cover caps
6 Press down on the four covercaps
enemspInstallation and connection
16
45 Connecting the applianceConnecting the water inlet hoseNoteiexcl Please read the information in the
Safety rarr Page 4 and Preventingmaterial damage rarr Page 10 sec-tions to ensure that you use theappliance safely
1 Connect the water inlet hose
2
1
2 Connect the water inlet hose to atap (264 mm = 34)
frac34˝min
min
10 mm
17 mm
3 Open the water tap carefully andcheck that the connection pointsare tight
Water outlet connection typesThis information is intended to helpyou to connect this appliance to thewater outlet
Note Please read the information inthe Safety rarr Page 4 and Preventingmaterial damage rarr Page 10 sectionsto ensure that you use the appliancesafely
ATTENTIONWhen draining the water outlet hoseis subject to water pressure and maycome loose from the installed con-nection point Secure the water outlet hose
against unintentional loosening
Note Observe the draining heightsThe maximum draining height is100 cm
Drainage into asiphon
Secure the con-nection point witha (24ndash40 mm)hose clamp
Drainage into awashbasin
Fix and securethe water outletusing an elbowrarr Page 31
Drainage into aplastic pipe withrubber sleeve orinto a gully
Fix and securethe water outletusing an elbowrarr Page 31
Installation and connectionemspen
17
46 Aligning the applianceIn order to reduce noise and vibra-tion and to prevent the appliancefrom moving align the appliance cor-rectlyNote Please read the information inthe Safety rarr Page 4 and Preventingmaterial damage rarr Page 10 sectionsto ensure that you use the appliancesafely1 Loosen the lock nuts using a WAF
17 wrench by turning it in a clock-wise direction
2 To align the appliance turn the ap-pliance feet Check that the appli-ance is level using a spirit level
All appliance feet must stand firmlyon the ground
3 Screw the lock nuts tightly againstthe housing using a WAF 17wrench
In doing so hold the foot tight anddo not adjust its height
47 Connecting the applianceto the electricity supply
Note Please read the information inthe Safety rarr Page 4 and Preventingmaterial damage rarr Page 10 sectionsto ensure that you use the appliancesafely1 Insert the mains plug of the appli-
ances power cable in a socketnearbyThe connection details of the appli-ance can be found under Tech-nical data rarr Page 61
2 Check the mains plug is insertedproperly
enemspFamiliarising yourself with your appliance
18
Familiarising yourself with your appliance
5 Familiarising yourself with your applianceFamiliarising yourself with your appliance
51 ApplianceYou can find an overview of the parts of your appliance here
1
2
4 73 6
88
5
On certain models specific details such as the colour and shape may differfrom those pictured
1 Maintenance flap for the drainpump rarr Page 44
2 Door
3 Detergent drawer rarr Page 19
4 Controls rarr Page 19
5 Covering plate
6 Water outlet hose rarr Page 16
7 Power cord rarr Page 17
8 Transit bolts rarr Page 14
Familiarising yourself with your applianceemspen
19
52 Detergent drawer
2
3
1
4
1 Measuring aid for liquid deter-gent rarr Using a measuring aid forliquid detergent Page 37
2 Compartment IIiexcl Detergent for main washiexcl Water softeneriexcl Bleachiexcl Stain remover
3 Compartment iexcl Fabric softeneriexcl Liquid starchiexcl Waterproofing agent
4 Compartment Iiexcl Detergent for prewashiexcl Hygiene detergent
53 ControlsYou can use the control panel to configure all functions of your appliance andto obtain information about the operating status
2 3
1 1
4
1 Programmes rarr Page 24
2 Programme selectorrarr Page 36
3 Display rarr Page 20
4 Buttons rarr Page 23
enemspDisplay
20
Display
6 DisplayDisplay
The display shows the current settings options or relevant information
Display Designation Description040 1 Programme dura-
tionprogrammetime remaining
Approximate expected programme dura-tion or programme time remaining
10h 1 Ready in time The programme end has been set and theremaining number of hours is displayed rarr Buttons Page 23
9 kg 1 Recommendedload
The maximum load capacity for the selec-ted programme in kg
ndash ndash ndash ndash -1200
Spin speed Set spin speed in rpm rarr Buttons Page 230= No final spin only drainingndash ndash ndash ndash Rinse Hold no draining
ndash 90 Temperature Set temperature in degC rarr Buttons Page 23
(cold)StartPause Start cancel or pause
iexcl Lights up The programme is runningand can be cancelled or paused
iexcl Flashes The programme can be star-ted or continued
Wash Programme status1 Example
Displayemspen
21
Display Designation DescriptionRinse Programme statusSpin Programme status
ndash ndash ndash ndash Rinse Hold Programme statusEnd End of pro-
grammeProgramme status
Childproof lock iexcl lights up The childproof lock is activ-ated
iexcl flashes The childproof lock is activatedand the appliance has been operated rarr Deactivating the childproof lockPage 40
Prewash Prewash is activated rarr Buttons Page 23
Water Plus andRinse Plus
Wash with more water and a rinse cycle isactivated rarr Buttons Page 23
SpeedPerfect Short wash activated rarr Buttons Page 23
1 Energy consump-tion
Energy consumption for the selected pro-grammeiexcl Low energy consumptioniexcl High energy consumption
Reminder to cleanthe drum
Flashes Drum is dirty Run the Limp tam-bor programme for cleaning and caringfor the drum and the outer tub rarr Cleaning the drum Page 42
Voltage controlsystem
Flashes The automatic voltage controlsystem detects impermissible voltagedrops This will pause the programmeNote The programme will continue whenthe voltage is permissible again
Voltage controlsystem
Flashes The programme has beenpaused because of impermissible voltagedrops The voltage is permissible againand the programme will continueNote The programme duration is exten-ded
1 Example
enemspDisplay
22
Display Designation DescriptionDoor iexcl Lights up The door is locked and can-
not be openediexcl Flashes The door is not closed prop-
erlyiexcl Off The door is unlocked and can be
openedTap iexcl No water pressure
iexcl The water pressure is too lowE35 -10 1 Error Error code error display signal1 Example
Buttonsemspen
23
Buttons
7 ButtonsButtons
The selection of programme settings depends on the programme that is setYou can see the selection options for each programme in the overview for rarr Programmes Page 24
Button Selection DescriptionInicioPausa +Carga (StartPause + Reload)
iexcl Startiexcl Canceliexcl Pause
Start cancel or pause the pro-gramme
SpeedPerfect iexcl Activateiexcl Deactivate
Activate or deactivate a short washingprogrammeNote Energy consumption increasesThe washing result is not affected bythis
Termin (ReadyIn)
1ndash24 hours Set the programme endThe programme duration is already in-cluded in the set number of hoursOnce the programme has started theprogramme duration is displayed
Temp degC (Tem-perature)
ndash 90 degC Adjust the temperature in degC
Centrif (Spin) ndash ndash ndash ndash - 1200 Adjust the spin speed or activate ndash ndash ndash ndash (Rinse Hold)If ndash ndash ndash ndash is selected the water is notdrained at the end of the washingcycle and the spin cycle is deactiv-ated The laundry remains in the waterused for rinsing
3 seg (ChildLock 3 sec)
iexcl Activateiexcl Deactivate
Activate or deactivate the childprooflockDisable the control panel to preventunwanted or accidental operationIf the childproof lock is activated andthe appliance has been switched offthe childproof lock remains activated rarr Childproof lock Page 40
Prelav (Pre-wash)
iexcl Activateiexcl Deactivate
Activate or deactivate prewash egfor washing heavily soiled laundry
Extra (ExtraRinse)
iexcl Activateiexcl Deactivate
Activate or deactivate a washing pro-gramme with more water and an addi-tional rinse cycleRecommended for particularly sensit-ive skin or in regions with very softwater
enemspProgrammes
24
Programmes 8 P
rogr
amm
esProgrammes B
elow
is a
n ov
ervi
ew o
f the
pro
gram
mes
You
can
find
info
rmat
ion
on the
load
and
on
the
adju
stab
le p
ro-
gram
me
optio
ns
Tip
The
laun
dry
s ca
re la
bels
pro
vide
you
with
add
ition
al in
form
atio
n on
pro
gram
me
sele
ctio
n
rarr
Car
e sy
mbo
ls o
n th
e ca
re la
bels
Pa
ge 3
4
Pro
gram
me
Des
crip
tion
Max load (kg)
Pro
gram
me
sett
ings
Max temperature (degC)
Max spin speed(rpm) 1
SpeedPerfect
Extra
Centrif ndash ndash ndash ndash(Rinse Hold)
Prelav
Alg
odoacuten
Al-
godatilde
o (
Cot
tons
)W
ash
hard
-wea
ring
item
s m
ade
from
cotto
n li
nen
or b
lend
ed fa
bric
sA
lso
suita
ble
as a
sho
rt p
rogr
amm
efo
r no
rmal
ly s
oile
d la
undr
y w
hen
you
activ
ate
Spe
edPer
fect
I
f Spe
ed-
Per
fect
is
act
ivat
ed t
he m
ax-
imum
load
cap
acity
is r
educ
ed to
5 k
g
990
1200
Alg
odoacuten
Col
orA
l-go
datildeo
Cor
(
Cot
-to
ns C
olou
r)
Was
h ha
rd-w
earin
g ite
ms
mad
e from
cotto
n li
nen
or b
lend
ed fa
bric
sEne
rgy-
savi
ng p
rogr
amm
e
9
90
1200
ndash
1Pro
gram
me
setti
ng
Programmesemspen
25
Pro
gram
me
Des
crip
tion
Max load (kg)
Pro
gram
me
sett
ings
Max temperature (degC)
Max spin speed(rpm) 1
SpeedPerfect
Extra
Centrif ndash ndash ndash ndash(Rinse Hold)
Prelav
Not
e T
o sa
ve e
nerg
y the
act
ual
was
hing
tem
pera
ture
may
dev
iate
from
the
set
was
hing
tem
pera
ture
Th
e w
ashi
ng p
erfo
rman
ce m
eets
lega
l req
uire
men
ts
Eco
40-6
0W
ash
item
s m
ade
from
cot
ton
line
nor
ble
nded
fabr
ics
Not
e T
extil
es w
hich
can
be
was
hed
from
40 deg
C
up
to 6
0 deg
C
as
per
the
care
sym
bol c
an b
e w
ashe
dto
geth
er
The
was
hing
per
form
ance
cor
res-
pond
s to
the
bes
t po
ssib
le w
ashi
ngpe
rfor
man
ce c
lass
acc
ordi
ng to
the
lega
l req
uire
men
ts
For
this
pro
gram
me
the
was
hing
tem
pera
ture
is a
utom
atic
ally
adj
uste
dde
pend
ing
on the
load
siz
e in
ord
erto
ach
ieve
the
bes
t po
ssib
le e
nerg
y
9
ndash
1200
ndash
1Pro
gram
me
setti
ng
enemspProgrammes
26
Pro
gram
me
Des
crip
tion
Max load (kg)
Pro
gram
me
sett
ings
Max temperature (degC)
Max spin speed(rpm) 1
SpeedPerfect
Extra
Centrif ndash ndash ndash ndash(Rinse Hold)
Prelav
effic
ienc
y w
ith the
bes
t po
ssib
lew
ashi
ng r
esul
t You
can
not ch
ange
the
was
hing
tem
pera
ture
Sin
teacutetic
os
(Eas
yC
are)
Was
h ite
ms
mad
e from
syn
thet
ic o
rbl
ende
d fa
bric
s4
60
1200
Mix
(
Mix
edFa
bric
s)W
ash
item
s m
ade
from
cot
ton
line
nor
syn
thet
ic o
r bl
ende
d fa
bric
sSui
tabl
e fo
r lig
htly
soi
led
laun
dry
460
1200
Del
icad
oSed
a (D
elic
ate
Silk
)W
ash
delic
ate
was
habl
e ite
ms
mad
efrom
silk
vis
cose
and
syn
thet
ics
Use
a d
eter
gent
tha
t is
sui
tabl
e fo
rde
licat
es o
r si
lk
Not
e W
ash
espe
cial
ly d
elic
ate
item
sor
item
s w
ith h
ooks
eye
lets
or
clip
sin
a m
esh
laun
dry
bag
2
40
800
ndash
1Pro
gram
me
setti
ng
Programmesemspen
27
Pro
gram
me
Des
crip
tion
Max load (kg)
Pro
gram
me
sett
ings
Max temperature (degC)
Max spin speed(rpm) 1
SpeedPerfect
Extra
Centrif ndash ndash ndash ndash(Rinse Hold)
Prelav
Lan
aLatilde
s (W
ool)
Han
d- o
r m
achi
ne-w
asha
ble
item
sth
at a
re m
ade
from
woo
l or
cont
ain
woo
lTo
pre
vent
the
laun
dry
from
shr
ink-
ing
the
dru
m m
oves
the
item
s ve
ryge
ntly
with
long
pau
ses
Use
a d
eter
gent
tha
t is
sui
tabl
e fo
rw
ool
2
40
800
ndash
ndash
ndash
(R
inse
)R
inse
s an
d th
en s
pins
the
laun
dry
and
then
dra
ins
the
wat
er
ndashndash
1200
ndash
ndash
(
Spi
nD
rain
)Spi
ns a
nd d
rain
s th
e w
ater
If
you
only
wan
t to
dra
in the
wat
er
activ
ate
0 T
he la
undr
y is
not
spu
n
ndash
ndash
1200
ndash
ndash
ndash
ndash
Rop
a os
cura
R
oupa
esc
ura
(Dar
k W
ash)
Was
h da
rk-c
olou
red
and
colo
ur-in
-te
nse
item
s m
ade
from
cot
ton
orea
sy-c
are
fabr
ic e
g j
eans
Tu
rn la
undr
y in
side
-out
bef
ore
was
h-in
gU
se li
quid
det
erge
nt
4
40
1200
1Pro
gram
me
setti
ng
enemspProgrammes
28
Pro
gram
me
Des
crip
tion
Max load (kg)
Pro
gram
me
sett
ings
Max temperature (degC)
Max spin speed(rpm) 1
SpeedPerfect
Extra
Centrif ndash ndash ndash ndash(Rinse Hold)
Prelav
Plu
mas
Pen
as
(Dow
n)W
ash
pillo
ws
duv
ets
or c
loth
ing
stuf
fed
with
dow
n an
d fil
lings
with
synt
hetic
fibr
es
Was
h la
rge
item
s se
para
tely
U
se a
det
erge
nt tha
t is
sui
tabl
e fo
rdo
wn
or d
elic
ates
U
se s
parin
gly
Do
not us
e fa
bric
sof
tene
rN
ote
To
prev
ent ex
cess
ive
foam
ing
rem
ove
air
from
laun
dry
item
s by
rolli
ng the
m u
p be
fore
you
was
hth
em
2
60
1200
ndash
ndash
Lim
p tam
bor
(Dru
m C
lean
)C
lean
ing
and
carin
g fo
r th
e dr
um
Use
thi
s pr
ogra
mm
e in
the
follo
win
gca
ses
iexclB
efor
e us
ing
the
appl
ianc
e fo
r th
efir
st tim
eiexcl
If yo
u re
gula
rly w
ash
at tem
pera
t-ur
es o
f 40 deg
C o
r lo
wer
ndash
ndash
1200
ndash
ndash
ndash
ndash
1Pro
gram
me
setti
ng
Programmesemspen
29
Pro
gram
me
Des
crip
tion
Max load (kg)
Pro
gram
me
sett
ings
Max temperature (degC)
Max spin speed(rpm) 1
SpeedPerfect
Extra
Centrif ndash ndash ndash ndash(Rinse Hold)
Prelav
iexclA
fter
a pr
olon
ged
perio
d of
non
-us
eU
se w
ashi
ng p
owde
r or
a d
eter
gent
cont
aini
ng b
leac
hH
alve
the
am
ount
of d
eter
gent
to
avoi
d fo
amin
gD
o no
t us
e fa
bric
sof
tene
rD
o no
t us
e liq
uid
dete
rgen
t or
det
er-
gent
tha
t is
inte
nded
for
woo
llens
or
delic
ates
N
ote
The
dru
m c
lean
ing
indi
cato
rw
ill fl
ash
to r
emin
d yo
u if
you
have
not us
ed a
pro
gram
me
at 6
0 deg
C o
rhi
gher
for
a lo
ng tim
eC
amis
asB
lusa
s (S
hirts
Blo
uses
)W
ash
non-
iron
shirt
s an
d bl
ouse
sm
ade
from
cot
ton
line
n s
ynth
etic
or
blen
ded
fabr
ics
Not
e U
se the
Del
icad
oSed
a pr
o-gr
amm
e to
was
h sh
irts
and
blou
ses
mad
e from
silk
or
delic
ate
fabr
ics
2
60
800
ndash
1Pro
gram
me
setti
ng
enemspProgrammes
30
Pro
gram
me
Des
crip
tion
Max load (kg)
Pro
gram
me
sett
ings
Max temperature (degC)
Max spin speed(rpm) 1
SpeedPerfect
Extra
Centrif ndash ndash ndash ndash(Rinse Hold)
Prelav
Spo
rt
Was
h sp
orts
and
leis
ure
item
s m
ade
from
syn
thet
ic fi
bres
mic
rofib
re o
rfle
ece
Use
a d
eter
gent
tha
t is
sui
tabl
e fo
rsp
orts
item
sD
o no
t us
e fa
bric
sof
tene
rTi
p U
se the
Sin
teacutetic
os
prog
ram
me
to w
ash
heav
ily s
oile
d la
undr
y
2
40
800
ndash
Raacutep
ido
153
0m
in
(Sup
erQ
uick
153
0 m
in)
Was
h ite
ms
mad
e from
cot
ton
syn
-th
etic
or
blen
ded
fabr
ics
Sho
rt p
rogr
amm
e fo
r sm
all i
tem
s of
light
ly s
oile
d la
undr
yTh
e pr
ogra
mm
e du
ratio
n is
app
rox
30 m
inut
es
If yo
u w
ish
to r
educ
e th
e pr
ogra
mm
edu
ratio
n to
15 m
inut
es a
ctiv
ate
Spe
edPer
fect
T
he m
axim
umlo
ad is
red
uced
to
2 k
g
4
40
1200
ndash
1Pro
gram
me
setti
ng
Accessoriesemspen
31
Accessories
9 AccessoriesAccessories
Use original accessories These have been made especially for your appliance
Use Order numberWater inlet hose exten-sion
Extend the water inlethose for cold water orAquaStop (approx 250m)
WMZ2381
Fixing brackets Improves the stability ofthe appliance
WMZ2200
Longer water inlet hose Replace the standardwater inlet hose with alonger hose (220 m)
00353925
Elbow Secure the water outlethose in place
00655300
Liquid detergent insert Measure liquid deter-gent
00605740
Metal covering plate Metal covering plate forinstalling the applianceunder a high worktop
WMZ20430
Before using for the first time
10 Before using for thefirst time
Before using for the first time
Prepare the appliance for use
101 Starting an empty wash-ing cycle
Your appliance was inspected thor-oughly before leaving the factory Toremove any residual water run thefirst wash cycle without any laundryNote Please read the information inthe Safety rarr Page 4 and Preventingmaterial damage rarr Page 10 sectionsto ensure that you use the appliancesafely
1 Turn the programme selector toLimp tambor
2 Close the door
enemspLaundry
32
3 Pull out the detergent drawer
4 Pour approx 1 litre of tap waterinto compartment II
5 Pour washing powder into com-partment II
To prevent foaming use only halfof the amount of detergent recom-mended by the detergent manufac-turer for light soiling Do not usedetergent suitable for woollens ordelicates
6 Push in the detergent drawer
7 Press InicioPausa + Carga (StartPause + Reload) to start theprogramme
a The display shows the remainingprogramme duration
a After the programme has endedthe display shows End
8 Start the first wash cycle or set theprogramme selector to to switchoff the appliance rarr Basic operation Page 36
Laundry
11 LaundryLaundry
111 Preparing the laundryNote Please read the information inthe Safety rarr Page 4 and Preventingmaterial damage rarr Page 10 sectionsto ensure that you use the appliancesafely
ATTENTIONObjects remaining in the laundry maydamage the laundry and the drum Remove all items from any pock-
ets in your laundry before usingthe appliance
To protect your appliance and thelaundry prepare the laundry be-forehandndash Empty any pockets
Laundryemspen
33
ndash Brush sand out of all collars andpockets
ndash Close bed covers and cushioncovers
ndash Close all zips Velcro fastenershooks and eyes
ndash Tie cloth belts apron stringsetc together or use a laundrybag
ndash Remove curtain hooks and leadstrips or use a mesh laundrybag
ndash Use a mesh laundry bag forsmall items of laundry such aschildrens socks
ndash Some stubborn or dried-in stainscan be removed by washingseveral times
ndash Wash large and small items oflaundry together
ndash Do not rub fresh stains but dabthem with soapy water
ndash Separate items of laundry andshake them out
112 Sorting laundryNote Please read the information inthe Safety rarr Page 4 and Preventingmaterial damage rarr Page 10 sectionsto ensure that you use the appliancesafely To improve washing results and
prevent discolouration sort thelaundry according to the followingcriteria before washingndash Type of fabric and fibre
Wash laundry of the sametype of fabric and fibre to-gether
ndash Care symbols on the care labelsrarr Page 34
ndash Description of the programmesrarr Page 24
ndash Whitesndash Colours
Wash new coloured itemsseparately the first time youwash them
113 Degrees of soiling
Degree of soiling Soiling ExamplesLight iexcl No dirt or stains are vis-
ibleiexcl Laundry has absorbed
odours
Light summer clothing orsports clothing that hasbeen worn for a just a fewhours
Normal Dirt or light stains are vis-ible
iexcl T-shirts shirts or blousesare sweat-soaked orhave been worn a fewtimes
iexcl Towels or bedding thathas been used for up toone week
Heavy Dirt or stains are clearlyvisible
Tea towels baby items orwork clothing
enemspDetergents and care products
34
114 Care symbols on the care labels
Washing care symbols
Symbol Washing process Recommended pro-gramme
Normal Cotton Gentle Easy-Care Particularly gentle DelicatesSilk for
washing by handHand wash WoolNot suitable for machine-washing ndash
Detergents and care products
12 Detergents and careproducts
Detergents and care products
Note Please read the information inthe Safety rarr Page 4 and Preventingmaterial damage rarr Page 10 sectionsto ensure that you use the appliancesafelyThe manufacturers instructions foruse and dosage can be found on thepackaging
Notesiexcl Only use liquid detergents that are
self-flowingiexcl Do not mix different liquid deter-
gentsiexcl Do not mix detergent and fabric
softeneriexcl Do not use products that have ex-
pired or are highly congealediexcl Do not use products containing
solvents caustic agents or volatilesubstances (eg bleach)
iexcl Use dyes sparingly as salt maydamage stainless steel
iexcl Do not use bleaching agents in theappliance
121 Detergent recommendation
Detergent Fabrics Pro-gramme
Temperature
Standard detergentwith optical brighten-ers
Heat-resistant whitefabrics made fromcotton or linen
Cotton From cold up to90 degC
Detergent for colourswithout bleach or op-tical brighteners
Coloured fabricsmade from linen orcotton
Cotton From cold up to60 degC
Detergent for col-oursdelicates withoutoptical brighteners
Coloured fabricsmade from easy-carefabrics or syntheticmaterials
Easy-Care From cold up to60 degC
Detergents and care productsemspen
35
Detergent Fabrics Pro-gramme
Temperature
Detergent for delic-ates
Delicate fine textilessilk or viscose
DelicatesSilk
From cold up to40 degC
Detergent for wool-lens
Wool Wool From cold up to40 degC
Tip Visit wwwcleanrighteu to findfurther information on detergentscare products and cleaning agentsfor domestic use
122 Detergent dosageThe detergent dosage depends oniexcl The amount of laundryiexcl Degree of soilingiexcl Water hardness
You can find out how hard yourwater is from your local water com-pany or measure it yourself usinga water hardness tester
Water hardness
Hardness range Total hardness in mmoll
German degrees in degdH
soft (I) 0ndash15 0ndash84medium (II) 15ndash 25 84ndash14hard (III) over 25 over 14
Example of a manufacturersinstructions for detergentThese example values refer to astandard load of 4ndash5 kg
Soiling Light Normal HeavyWater hardness Softmedium 40 ml 55 ml 80 mlWater hardness Hardveryhard
55 ml 80 ml 105 ml
The dosages can be found on themanufacturers packagingiexcl Adjust the dosage to the actual
load
enemspBasic operation
36
Basic operation
13 Basic operationBasic operation
131 Switching on the appli-ance
Turn the programme selector to aprogramme
132 Setting a programme1 Set the programme selector to the
required programme rarr Programmes Page 24
2 If necessary adjust the pro-gramme settings rarr Page 36
133 Adjusting the pro-gramme settings
Requirement A programme hasbeen set rarr Setting a programme Page 36
Adjust the programme settings rarr Programmes Page 24
Note The programme settings arenot saved permanently for the pro-gramme
134 Loading laundryNotesiexcl Please read the information in the
Safety rarr Page 4 and Preventingmaterial damage rarr Page 10 sec-tions to ensure that you use theappliance safely
iexcl To prevent creasing take note ofthe maximum load for the rarr Programmes Page 24
Requirement The laundry is pre-pared and sortedrarr Laundry Page 321 Open the door
Make sure that the drum is empty2 Load the laundry unfolded into the
drum3 Close the door
Ensure that there is no laundrytrapped in the door
Basic operationemspen
37
135 Using a measuring aidfor liquid detergent
If you order the measuring aid as anaccessory you must use the measur-ing aid1 Pull out the detergent drawer
2 Press down on the insert and re-move the detergent drawer
1
2
3 Insert the measuring aid
4 Insert the detergent drawer
136 Use the measuring aidfor liquid detergent
To add liquid detergent you can usea measuring aid in the detergentdrawer1 Pull out the detergent drawer2 Slide the measuring aid forwards
3 Fold the measuring aid down andclick it into place
enemspBasic operation
38
4 Push in the detergent drawer
137 Adding detergent andcare product
Notesiexcl Please read the information in the
Safety rarr Page 4 and Preventingmaterial damage rarr Page 10 sec-tions to ensure that you use theappliance safely
iexcl Do not use the measuring aid forliquid detergent for gel detergentswashing powder or if Prewash orReady in time are activated
Requirement Find out the optimumdosage for detergent and careproduct rarr Page 341 Pull out the detergent drawer2 Pour in detergent
rarr Detergent drawer Page 193 If required add the care product4 Push in the detergent drawer
138 Starting the programmeNote If you want to change the timeuntil the programme ends set theReady in time first Press InicioPausa + Carga a The drum rotates and load detec-
tion takes place This can take upto 2 minutes after which waterenters the drum
a The display shows either the pro-gramme duration or the Ready intime
a After the programme has endedthe display shows End
139 Adjusting the Ready intime before the pro-gramme starts
You can readjust the selected Readyin time before the programme starts1 Press InicioPausa + Carga 2 Press Termin repeatedly until
the display indicates the desiredReady in time
3 Press InicioPausa + Carga
1310 Soaking laundryNote No additional detergent is re-quired The washing solution is thenused for washing1 Start the programme2 To pause the programme after ap-
prox 10 minutes press InicioPausa + Carga
3 To resume the programme afterthe desired soaking time pressInicioPausa + Carga
1311 Adding laundryNote Please read the information inthe Safety rarr Page 4 and Preventingmaterial damage rarr Page 10 sectionsto ensure that you use the appliancesafely1 Press InicioPausa + Carga
The appliance is paused andchecks whether it is possible toadd or remove laundry Take noteof the programme status
2 Add or remove laundry3 Close the door4 Press InicioPausa + Carga
Basic operationemspen
39
1312 Cancelling the pro-gramme
Once the programme has startedyou can cancel it at any timeNote Please read the information inthe Safety rarr Page 4 and Preventingmaterial damage rarr Page 10 sectionsto ensure that you use the appliancesafely1 Press InicioPausa + Carga 2 Open the door
The appliance door remainslocked for safety reasons if thetemperature and water levels arehighndash If the temperature is high start
the programmendash If the water level is high Start
the or programme3 Remove the laundry
1313 Resuming the pro-gramme when the pro-gramme status is RinseHold
1 Set the or programme2 Press InicioPausa + Carga
1314 Unloading the laundryNote Please read the information inthe Safety rarr Page 4 and Preventingmaterial damage rarr Page 10 sectionsto ensure that you use the appliancesafely1 Open the door
2 Remove the laundry
1315 Switching off the appli-ance
1 Turn the programme selector to
2 Turn off the tap3 Wipe the rubber gasket dry and re-
move any foreign objects
4 Leave the door and detergentdrawer open so that residual watercan evaporate
enemspChildproof lock
40
Childproof lock
14 Childproof lockChildproof lock
Secure your appliance against beingoperated unintentionally using thecontrols
141 Activating the childprooflock
Press and hold the two 3 segbuttons for approx 3 seconds
a The display shows a The controls are lockeda The childproof lock remains active
even after the appliance has beenswitched off
142 Deactivating the child-proof lock
Requirement To deactivate thechildproof lock the appliance mustbe switched on Press and hold the two 3 seg
buttons for approx 3 secondsa goes out in the display
Basic settingsemspen
41
Basic settings
15 Basic settingsBasic settings
You can configure the appliance to meet your needs
151 Overview of the basic settingsBelow is an overview of the basic settings on your appliance
Basic setting Programmeposition
Value Description
End signal 2 0 (off)1 (quiet)2 (me-dium)3 (loud)4 (veryloud)
Set the volume of the signal at theend of the programme
Button signal 3 0 (off)1 (quiet)2 (me-dium)3 (loud)4 (veryloud)
The volume of the audible signalemitted when the buttons arepressed
Drum cleaningreminder
4 ONOFF
Activate or deactivate the re-minder to clean the drum
enemspCleaning and servicing
42
152 Changing the basic set-tings
1 Set the programme selector to po-sition 1
2 Press InicioPausa + Carga and at the same time turn theprogramme selector to position 2
a The display shows the currentvalue
3 Set the programme selector to therequired position
4 To change the value press Ter-min
5 To save the changes switch offthe appliance
Cleaning and servicing
16 Cleaning and servi-cing
Cleaning and servicing
To keep your appliance working effi-ciently for a long time it is importantto clean and maintain it carefully
161 Tips on appliance careWipe down thehousing and thecontrol panelwith nothing butwater and adamp cloth
This ensures theparts of the appli-ance will remainclean and hy-gienic
Remove all de-tergent residuespray residue orother residuesimmediately
Fresh depositsare easier to re-move withoutleaving anyresidue
Keep the appli-ance door anddetergent draweropen after use
This allows theresidual water todry reducingodours in the ap-pliance
162 Cleaning the drum
CAUTIONRisk of injuryPermanently washing at low temper-atures and a lack of ventilation forthe appliance may damage the drumand cause injury Regularly run a programme for
cleaning the drum or wash at tem-peratures of at least 60 degC
Leave the appliance to dry afterevery operation with the dooropen and leave the detergentdrawer to dry
Run the Limp tambor pro-gramme without laundryAdd washing powder
163 Cleaning the detergentdrawer
Note Please read the information inthe Safety rarr Page 4 and Preventingmaterial damage rarr Page 10 sectionsto ensure that you use the appliancesafely1 Pull out the detergent drawer
Cleaning and servicingemspen
43
2 Press down on the insert and re-move the detergent drawer
1
2
3 Press out the insert upwards frombelow
4 Clean the detergent drawer and in-sert with water and a brush andthen dry them
5 Fit the insert and lock it into place
6 Cleaning the opening for the deter-gent drawer
7 Push in the detergent drawer
164 Descaling
ATTENTIONThe use of unsuitable descalingagents eg for coffee machines maydamage the appliance For this appliance only use de-
scaling agents that are availablefrom the manufacturers website orour after-sales service
enemspCleaning and servicing
44
165 Cleaning the drain pumpClean the drain pump in the event offaults eg blockages or rattlingnoises
Emptying the drain pumpNote Please read the information inthe Safety rarr Page 4 and Preventingmaterial damage rarr Page 10 sectionsto ensure that you use the appliancesafely1 Turn off the water tap2 Switch off the appliance3 Disconnect the appliances mains
plug from the power supply4 Open the maintenance flap
5 Remove the maintenance flap
6 Slide a sufficiently large receptacleunder the opening
7 Take the drain hose out of theholder
Cleaning and servicingemspen
45
8 CAUTION - Risk of scaldingWhen you wash at high temperat-ures the detergent solution getshot
Do not touch the hot detergentsolutionTo allow the detergent solution toflow out into the container removethe sealing cap
9 Firmly press on the sealing cap
10 Insert the drain hose into theholder
Cleaning the drain pumpNote Please read the information inthe Safety rarr Page 4 and Preventingmaterial damage rarr Page 10 sectionsto ensure that you use the appliancesafelyRequirement The drain pump isempty rarr Page 441 Since water may remain in the
drain pump remove the pump capcarefully
2 Clean the interior the thread onthe pump cap and the pump hous-ing
3 Make sure that the impeller in thedrain pump can be rotated
enemspCleaning and servicing
46
4 Insert the pump cap and screw iton as far as it will go
90deg
The handle on the pump cap mustbe in a vertical position
5 Close the maintenance flap
Before the next washTo prevent unused detergent fromflowing straight into the outlet in thenext wash run the programmeafter you have emptied the drainpump1 Turn on the tap2 Insert the mains plug3 Switch on the appliance4 Pour 1 litre of water into compart-
ment II5 Start the programme
166 Cleaning the water outlethose at the siphon
1 Switch off the appliance2 Disconnect the appliances mains
plug from the power supply
3 Loosen the hose clamp and care-fully remove the water outlet hose
Residual water may leak out4 Clean the water outlet hose and si-
phon connecting piece
5 Reattach the water outlet hose andsecure the connection point usingthe hose clamp
Cleaning and servicingemspen
47
167 Clean the water inlet fil-ters
Emptying the water inlet hose1 Turn off the tap2 Set a programme except for
or 3 Start the programme and leave it
to run for approx 40 seconds4 Switch off the appliance5 Disconnect the appliances mains
plug from the power supply
Cleaning the filter on the tapNote Please read the information inthe Safety rarr Page 4 and Preventingmaterial damage rarr Page 10 sectionsto ensure that you use the appliancesafelyRequirement The water inlet hose isempty1 Remove the water inlet hose from
the tap
2 Clean the filter with a small brush
3 Connect the water inlet hose andcheck for leaks
Cleaning the filter on theapplianceNote Please read the information inthe Safety rarr Page 4 and Preventingmaterial damage rarr Page 10 sectionsto ensure that you use the appliancesafelyRequirement The water inlet hose isempty rarr Emptying the water inlet hosePage 47
enemspCleaning and servicing
48
1 Disconnect the hose from the rearof the appliance
1
2
2 Use pliers to remove the filter
3 Clean the filter with a small brush
4 Reinsert the filter
5 Connect the hose and check forleaks
2
1
Troubleshootingemspen
49
Troubleshooting
17 TroubleshootingTroubleshooting
You can rectify minor faults on your appliance yourself Read the troubleshoot-ing information before contacting after-sales service This will avoid unneces-sary costs
WARNINGRisk of electric shockIncorrect repairs are dangerous Repairs to the appliance should only be carried out by trained specialist
staff Only use genuine spare parts when repairing the appliance If the power cord of this appliance is damaged it must be replaced by the
manufacturer the manufacturers Customer Service or a similarly qualifiedperson in order to prevent any risk
Fault Cause and troubleshootingThe display goes outand InicioPausa +Carga flashes
Energy-saving mode is active Press any buttona The symbol lights up again
E36 -10 Drain pipe or water outlet hose is blocked Clean the drain pipe and the water outlet hose
Drain pipe or water drain hose is caught or jammed Ensure that the drain pipe and water drain hose are
not kinked or trapped
Drain pump is blocked rarr Cleaning the drain pump Page 44
The water outlet hose is connected too high Install the water outlet hose at a maximum height of
1 metre
Detergent dosage is too high Immediate measure Mix one tablespoon of fabric
softener with 05 litres of water and pour the mix-ture into the left-hand compartment (not for outdoorclothing sportswear or items stuffed with down)
Reduce the amount of detergent for the next wash-ing cycle with the same load
Unapproved extension installed on the water drainhose Remove any unapproved extensions from the water
hose Connecting the appliance
E36 -25 -26 Drain pump is blocked rarr Cleaning the drain pump Page 44
enemspTroubleshooting
50
Fault Cause and troubleshootingThe water pressure is lowNo remedial action possibleThe filters in the water inflow are blocked Clean the filters in the water inflow rarr Page 47
The tap is turned off Turn on the tap
The water inlet hose is kinked or jammed Ensure that the water inlet hose is not kinked or
jammed
flashes The automatic voltage control system detects an un-authorised voltage under-usage No remedial action possible
Note If the power supply is stable the programmecontinues to run as normalVoltage under-usage may cause extension of a pro-grammeNo remedial action possible
flashes Voltage under-usage may cause extension of a pro-grammeNo remedial action possible
lights up The temperature is too high Wait until the temperature has dropped rarr Cancelling the programme Page 39
Water level is too high Start the programme
Laundry is caught in the door1 Open the door again2 Remove any trapped laundry3 Close the door4 Press InicioPausa + Carga to start the pro-
gramme
flashes Door is not closed1 Close the door2 Press InicioPausa + Carga to start the pro-
gramme
All other error codes Malfunction Call the after-sales service
rarr Customer Service Page 59
Troubleshootingemspen
51
Fault Cause and troubleshootingThe appliance is notworking
The mains plug of the power cord is not plugged in Connect the appliance to the power supply
The circuit breaker is faulty Check the circuit breaker in the fuse box
There has been a power cut Check whether the lighting in your kitchen or other
appliances are working
The programme doesnot start
You have not pressed InicioPausa + Carga Press InicioPausa + Carga
Door is not closed1 Close the door2 Press InicioPausa + Carga to start the pro-
gramme
Childproof lock is activated rarr Deactivating the childproof lock Page 40
Termin is activated Check whether Termin is activated
rarr Buttons Page 23
Laundry is caught in the door1 Open the door again2 Remove any trapped laundry3 Close the door4 Press InicioPausa + Carga to start the pro-
gramme
The door cannotbe opened
ndash ndash ndash ndash is activated Continue the programme by selecting or and
pressing InicioPausa + Carga rarr Resuming the programme when the programmestatus is Rinse Hold Page 39
The temperature is too high Wait until the temperature has dropped rarr Cancelling the programme Page 39
Water level is too high Start the programme
Power failure Open the door using the emergency release
rarr Emergency release Page 57
The water is not drain-ing
Drain pipe or water outlet hose is blocked Clean the drain pipe and the water outlet hose
enemspTroubleshooting
52
Fault Cause and troubleshootingThe water is not drain-ing
Drain pipe or water drain hose is caught or jammed Ensure that the drain pipe and water drain hose are
not kinked or trapped
Drain pump is blocked rarr Cleaning the drain pump Page 44
ndash ndash ndash ndash is activated Continue the programme by selecting or and
pressing InicioPausa + Carga rarr Resuming the programme when the programmestatus is Rinse Hold Page 39
The water outlet hose is connected too high Install the water outlet hose at a maximum height of
1 metre
Detergent dosage is too high Immediate measure Mix one tablespoon of fabric
softener with 05 litres of water and pour the mix-ture into the left-hand compartment (not for outdoorclothing sportswear or items stuffed with down)
Reduce the amount of detergent for the next wash-ing cycle with the same load
Unapproved extension installed on the water drainhose Remove any unapproved extensions from the water
hose Connecting the appliance
Water is not flowingin Detergent is notbeing dispensed
You have not pressed InicioPausa + Carga Press InicioPausa + Carga
The filters in the water inflow are blocked Clean the filters in the water inflow rarr Page 47
The tap is turned off Turn on the tap
The water inlet hose is kinked or jammed Ensure that the water inlet hose is not kinked or
jammed
The spin cycle runsseveral times
The unbalanced load detection system eliminates animbalance by repeatedly redistributing the laundry Not a fault ndash no action required
Note When loading where possible place large andsmall items of laundry together in the drum Differentsized items of laundry distribute themselves betterduring the spin cycle
Troubleshootingemspen
53
Fault Cause and troubleshootingThe programme dura-tion changes duringthe wash cycle
The programme operation is optimised electronicallyThis may change the programme duration Not a fault ndash no action required
The unbalanced load detection system eliminates animbalance by repeatedly redistributing the laundry Not a fault ndash no action required
Note When loading where possible place large andsmall items of laundry together in the drum Differentsized items of laundry distribute themselves betterduring the spin cycleFoam detection system switches on a rinse cycle iffoam build-up is too high Not a fault ndash no action required
No water is visible inthe drum
Water is below the visible area Not a fault ndash no action required Do not add any extra water to the appliance while it
is operating
Drum jerks after theprogramme starts
This is caused by an internal motor test Not a fault ndash no action required
Residual water ispresent in the com-partment
Insert in compartment is blocked rarr Cleaning the detergent drawer Page 42
Vibrations and move-ment of the appliancewhilst spinning
Appliance is not correctly aligned Aligning the appliance
The appliance feet are not fixed Secure the appliance feet Aligning the appliance
Transit bolts have not been removed Removing the transit bolts
Drum does not turnwater does not flow in
Load detection is active Not a fault ndash no action required
Note The load detection can take up to two minutesHeavy foam build-up Detergent dosage is too high
Immediate measure Mix one tablespoon of fabricsoftener with 05 litres of water and pour the mix-ture into the left-hand compartment (not for outdoorclothing sportswear or items stuffed with down)
Reduce the amount of detergent for the next wash-ing cycle with the same load
enemspTroubleshooting
54
Fault Cause and troubleshootingHigh spin speed notreached
A low spin speed is selected The next time you run a wash cycle set a higher
spin speed
Unbalance load detection system is using a reducedspin speed to eliminate an unbalance Redistribute the laundry in the drum
Note Where possible mix large and small items inthe drum Different sized items of laundry distributethemselves better during the spin cycle Start the programme
The spin programmedoes not start
Drain pipe or water outlet hose is blocked Clean the drain pipe and the water outlet hose
Drain pipe or water drain hose is caught or jammed Ensure that the drain pipe and water drain hose are
not kinked or trapped
The unbalanced load detection system has interruptedthe spin cycle because the laundry is unevenly distrib-uted Redistribute the laundry in the drum
Note Where possible mix large and small items inthe drum Different sized items of laundry distributethemselves better during the spin cycle Start the programme
Rushing hissingnoise
Water is flushed under pressure into the detergentdrawer Not a fault ndash normal operating noise
Loud noises duringthe spin cycle
Appliance is not correctly aligned Aligning the appliance
The appliance feet are not fixed Secure the appliance feet Aligning the appliance
Transit bolts have not been removed Removing the transit bolts
Banging noises rat-tling in the drainpump
Foreign bodies have got into the drain pump rarr Cleaning the drain pump Page 44
Slurping rhythmicalsuction noise
The drain pump is active the detergent solution ispumped out Not a fault ndash normal operating noise
Troubleshootingemspen
55
Fault Cause and troubleshootingCreasing The spin speed is too high
The next time you run a wash cycle set a lowerspin speed
The load is too large The next time you run a wash cycle reduce the
amount of laundry being loaded
The wrong programme is selected for the type of fab-ric Select the programmes that are suitable for the
type of fabric rarr Programmes Page 24
Detergent or fabricsoftener drips off theseal and collects onthe door or in the sealfold
Too much detergentfabric softener in the detergentdrawer When dosing liquid detergent and fabric softener
observe the marking in the detergent drawer anddo not dose above this
The spin result is notsatisfactory The laun-dry is too wettoodamp
A low spin speed is selected The next time you run a wash cycle set a higher
spin speed Start the programme
Drain pipe or water outlet hose is blocked Clean the drain pipe and the water outlet hose
Drain pipe or water drain hose is caught or jammed Ensure that the drain pipe and water drain hose are
not kinked or trapped
The unbalanced load detection system has interruptedthe spin cycle because the laundry is unevenly distrib-uted Redistribute the laundry in the drum
Note Where possible mix large and small items inthe drum Different sized items of laundry distributethemselves better during the spin cycle Start the programme
Unbalance load detection system is using a reducedspin speed to eliminate an unbalance Redistribute the laundry in the drum
Note Where possible mix large and small items inthe drum Different sized items of laundry distributethemselves better during the spin cycle Start the programme
enemspTroubleshooting
56
Fault Cause and troubleshootingDetergent residue onthe damp washing
Detergents may contain water-insoluble substancesthat deposit on the laundry Start the programme
Detergent residue onthe dry laundry
Detergents may contain water-insoluble substancesthat deposit on the laundry Brush out the laundry after washing and drying
Water is leaking out atthe water inlet hose
Water inlet hose is not correctlysecurely connected1 Connect the water supply hose correctly Connect-
ing the water inlet hose2 Tighten the screw connection
Water is leaking out atthe water outlet hose
The water outlet hose is damaged Replace the damaged water outlet hose
Water outlet hose is not connected correctly Connect the water outlet hose correctly Water out-
let connection types
Odours have formedin the appliance
Humidity and detergent residue may promote theformation of bacteria rarr Cleaning the drum Page 42 If you are not using the appliance leave the door
and detergent drawer open so that residual watercan evaporate
Transportation storage and disposalemspen
57
171 Emergency releaseReleasing the doorRequirement The drain pump isempty rarr Page 441 ATTENTION Escaping water may
cause material damage Do not open the door if you can
see water through the glassPull the emergency release down-wards with a tool and release
a The door lock is released2 Insert the maintenance flap and
lock it into place3 Close the maintenance flap
Transportation storage and disposal
18 Transportation stor-age and disposal
Transportation storage and disposal
You can find out here how to prepareyour appliance for transportation andstorage You will also find out how todispose of old appliances
181 Removing the appliance1 Turn off the tap2 rarr Emptying the water inlet hose
Page 473 Switch off the appliance4 Unplug the appliances mains plug
5 Drain the remaining detergentsolution rarr Cleaning the drain pumpPage 44
6 Detach the hoses
182 Inserting the transitbolts
Secure the appliance for transporta-tion using transit bolts in order to pre-vent damage1 Remove the four cover caps
‒ If necessary use a screwdriverto remove the cover caps
Keep the cover caps2 Insert the four sleeves
enemspTransportation storage and disposal
58
3 Insert all screws into the fourtransit bolts and tighten slightly
4 Insert the power cord into theholder and tighten all fourscrews for the transit bolts with aWAF 13 wrench
5 Insert the hose into holder
183 Using the applianceagain
1 Remove the transit bolts
2 Pour approx 1 litre of water intocompartment II in the detergentdrawer
3 Start the programmea The unused detergent cannot flow
straight into the outlet during thenext wash
184 Disposing of old appli-ance
Valuable raw materials can be re-used by recycling
WARNINGRisk of harm to healthChildren can lock themselves in theappliance thereby putting their livesat risk Do not install the appliance behind
a door as this may obstruct the ap-pliance door or prevent it fromopening
With redundant appliances unplugthe power cord Then cut throughthe cord and damage the lock onthe appliance door beyond repairso that the appliance door will nolonger close
1 Unplug the appliance from themains
2 Cut through the power cord3 Dispose of the appliance in an en-
vironmentally friendly mannerInformation about current disposalmethods are available from yourspecialist dealer or local authority
This appliance is la-belled in accordancewith European Directive201219EU concerningused electrical and elec-
Customer Serviceemspen
59
tronic appliances (wasteelectrical and electronicequipment - WEEE)The guideline determ-ines the framework forthe return and recyclingof used appliances asapplicable throughoutthe EU
Customer Service
19 Customer ServiceCustomer Service
If you have any queries on use areunable to rectify faults on the appli-ance yourself or if your applianceneeds to be repaired contact Cus-tomer ServiceYou can solve many problems your-self by consulting the information ontroubleshooting in these instructionsor on our website If this is not thecase contact our after-sales serviceWith any warranty claims we willmake sure that your appliance is re-paired by trained after-sales techni-cians using genuine spare parts in-cluding after the manufacturers war-ranty has expiredFunction-relevant genuine spare partsaccording to the corresponding Eco-design Order can be obtained fromCustomer Service for a period of atleast 10 years from the date onwhich your appliance was placed onthe market within the European Eco-nomic AreaNote Under the terms of the manu-facturers warranty the use of Cus-tomer Service is free of chargeDetailed information on the warrantyperiod and terms of warranty in yourcountry is available from our after-sales service your retailer or on ourwebsite
If you contact Customer Service youwill require the product number (E-Nr) and the production number (FD)of your applianceThe contact details for Customer Ser-vice can be found in the enclosedCustomer Service directory or on ourwebsite
191 Product number (E-Nr)and production number(FD)
You can find the product number (E-Nr) and the production number (FD)on the appliances rating plateDepending on the model the ratingplate is locatediexcl On the inside of the dooriexcl On the inside of the maintenance
flapiexcl On the rear of the applianceMake a note of your appliances de-tails and the Customer Service tele-phone number to find them againquickly
enemspConsumption values
60
Consumption values
20 Consumption valuesConsumption values
The following information is provided in accordance with the EU EcodesignRegulation The values given for programs other than the Eco 40-60 are indicat-ive only and were determined in accordance with the applicable standardEN60456
Programme Load(kg)
Pro-gramme dura-tion(hrmin)1
Energycon-sump-tion(kWhcycle)1
Watercon-sump-tion (lcycle)1
Max-imumtemper-ature(degC) 5mins1
Spinspeed(rpm)1
Resid-ualmois-ture()1
Eco 40-602 90 337 1245 610 50 1166 5000Eco 40-602 45 252 0590 450 33 1200 5000Eco 40-602 25 233 0195 300 24 1200 5400AlgodoacutenAl-godatildeo 20 degC
90 328 0370 900 23 1200 5400
AlgodoacutenAl-godatildeo 40 degC
90 328 1350 900 45 1200 5400
AlgodoacutenAl-godatildeo 60 degC
90 328 1450 900 55 1200 5400
AlgodoacutenAl-godatildeo 40 degC + Pre-lav
90 358 1400 1020 45 1200 5400
Sinteacuteticos 40 degC
40 228 0780 610 44 1200 2700
Mix 40 degC 40 059 0620 440 41 1200 5600 LanaLatildes
30 degC20 040 0200 400 22 800 2500
1 Due to the influence of water pressure hardness and inlet temperature am-bient temperature type amount and soiling of laundry detergent used fluc-tuations in the power supply and the selected additional functions the actualvalues may deviate from the stated values
2 Test programme in accordance with the EU Ecodesign Directive and the EUEnergy Labelling Regulation with cold water (15 degC)
Technical specificationsemspen
61
Technical specifications
21 Technical specifica-tions
Technical specifications
Facts and figures for your appliancecan be found here
Appliance height 850 cmAppliance width 598 cmAppliance depth 590 cmWeight 80 kg1
Maximum load 9 kgMains voltage 220 - 240 V
50 Hz Minimum in-
stallation protec-tion
10 A
Rated power 2300 WPower consump-tion
iexcl Off mode010 W
iexcl Left-on mode050 W
Water pressure iexcl Minimum100 kPa(1 bar)
iexcl Maximum1000 kPa(10 bar)
Length of the wa-ter inlet hose
150 cm
Length of the wa-ter outlet hose
150 cm
Length of thepower cord
160 cm
1 Depending on the appliance spe-cifications
More information about your modelcan be found online at httpsen-ergylabelbsh-groupcom1 This webaddress is linked to the official EUEPREL product database At the time
of printing its web address had notyet been published Please then fol-low the instructions on searching formodels The model identifier is madeup of the characters before the slashin the product number (E-Nr) on therating plate Alternatively you canalso find the model identifier in thefirst line of the EU energy label
1 Only applies to countries in the European Economic Area
Thank you for buying aBosch Home Appliance
Register your new device on MyBosch now and profit directly from
bull Expert tips amp tricks for your appliancebull Warranty extension optionsbull Discounts for accessories amp spare-partsbull Digital manual and all appliance data at handbull Easy access to Bosch Home Appliances Service
Free and easy registration ndash also on mobile phoneswwwbosch-homecomwelcome
Looking for help Youll find it here
Expert advice for your Bosch home appliances help with problems or a repair from Bosch experts Find out everything about the many ways Bosch can support you wwwbosch-homecomservice Contact data of all countries are listed in the attached service direct-ory
90016102699001610269emsp(010219)en
Robert Bosch Hausgeraumlte GmbHCarl-Wery-Straszlige 3481739 MuumlnchenGERMANYwwwbosch-homecom
Valid within Great BritainImported to Great Britain byBSH Home Appliances LtdGrand Union HouseOld Wolverton RoadWolverton Milton KeynesMK12 5PTUnited Kingdom
Safetyemspen
7
Wear protective gloves when installing and transporting the ap-pliance
15 Safe use
WARNING ‒ Risk of electric shockIf the appliance or the power cord is damaged this is dangerous Never operate a damaged appliance Never pull on the power cord to unplug the appliance Always
unplug the appliance at the mains If the appliance or the power cord is damaged immediately un-
plug the power cord or switch off the fuse in the fuse box andturn off the water tap Call customer services rarr Page 59An ingress of moisture can cause an electric shock Only use the appliance in enclosed spaces Never expose the appliance to intense heat or humidity Do not use steam- or high-pressure cleaners hoses or sprays
to clean the appliance
WARNING ‒ Risk of harm to healthChildren can lock themselves in the appliance thereby puttingtheir lives at risk Do not install the appliance behind a door as this may obstruct
the appliance door or prevent it from opening With redundant appliances unplug the power cord Then cut
through the cord and damage the lock on the appliance doorbeyond repair so that the appliance door will no longer close
WARNING ‒ Risk of suffocationChildren may breathe in or swallow small parts causing them tosuffocate Keep small parts away from children Do not let children play with small parts
enemspSafety
8
WARNING ‒ Risk of poisoningDetergents and care products may result in poisoning if con-sumed If accidentally swallowed seek medical advice Keep detergents and care products out of the reach of children
WARNING ‒ Risk of explosionLaundry that has been pretreated with cleaning agents that con-tain solvents may cause an explosion in the appliance Rinse pretreated laundry thoroughly with water before washing
CAUTION ‒ Risk of injuryThe covering plate may break if you stand on or climb onto theappliance Do not stand on or climb onto the applianceThe appliance may tip over if you sit on or lean against the opendoor Do not sit on or lean against the appliance door Do not place any objects on the appliance doorReaching into the drum while it is still turning may cause hand in-juries Wait for the drum to come to a complete stop before reaching
inside
CAUTION ‒ Risk of burnsWhen washing at high temperatures the glass in the appliancedoor becomes hot Do not touch the appliance door when it is hot Keep children away from the appliance door when it is hot
CAUTION ‒ Risk of scaldingWhen you wash at high temperatures the detergent solution getshot Do not touch the hot detergent solution
Safetyemspen
9
CAUTION ‒ Risk of chemical burnsIf the detergent drawer is opened detergent and care productsmay spray out from the appliance Contact with eyes or skin maycause irritation Rinse eyes andor skin thoroughly with clean water if they come
into contact with detergents or care products If accidentally swallowed seek medical advice Keep detergents and care products out of the reach of children
16 Safe cleaning and maintenanceTake note of the safety instructions when cleaning and performingmaintenance work on the appliance
WARNING ‒ Risk of electric shockIncorrect repairs are dangerous Repairs to the appliance should only be carried out by trained
specialist staff Only use genuine spare parts when repairing the appliance If the power cord of this appliance is damaged it must be re-
placed by the manufacturer the manufacturers Customer Ser-vice or a similarly qualified person in order to prevent any risk
An ingress of moisture can cause an electric shock Do not use steam- or high-pressure cleaners hoses or sprays
to clean the appliance
WARNING ‒ Risk of injuryThe use of non-original spare parts and non-original accessoriesis dangerous Only use the manufacturers original spare parts and original ac-
cessories
WARNING ‒ Risk of poisoningPoisonous fumes may be given off if you use cleaning agents thatcontain solvents Do not use cleaning agents that contain solvents
enemspPreventing material damage
10
Preventing material damage
2 Preventing materialdamage
Preventing material damage
Follow these instructions to avoid ma-terial damage and damage to the ap-pliance
ATTENTIONThe functionality of the appliancemay be impaired if you use thewrong quantity of fabric softener de-tergent care product or cleaningagent Follow the dosage recommenda-
tions from the manufacturerExceeding the maximum load capa-city impairs the function of the appli-ance Observe the maximum load capa-
city for each programme and donot exceed it rarr Programmes Page 24
The appliance is secured for trans-portation using transit bolts Transitbolts which have not been removedmay result in material damage anddamage to the appliance Before starting up the appliance
remove the transit bolts completelyand keep them in a safe place
Before transport fit the transit boltsfully in order to prevent damage intransit
Material damage may be caused ifthe water inlet hose is connected in-correctly Tighten the screw connections on
the water inlet until they are hand-tight
Ideally connect the water inlethose directly to the water tapwithout any additional connectingelements such as adapters exten-sions valves or similar
Ensure that the inner diameter ofthe water tap is at least 17 mm
Make sure that the length of thethread on the connection to thewater tap is at least 10 mm
If the water pressure is too high ortoo low the appliance may not beable to operate properly Ensure that the water pressure in
the water supply system is at least100 kPa (1 bar) and max1000 kPa (10 bar)
If the water pressure exceeds themaximum value specified a pres-sure-reducing valve must be in-stalled between the drinking waterconnection and the hose set of theappliance
Do not connect the appliance tothe mixer tap of an unpressurisedhot-water boiler
Modified or damaged water hosesmay result in material damage anddamage to the appliance Never kink crush modify or cut
through water hoses Only use the water hoses supplied
with the appliance or genuinespare hoses
Never re-use water hoses thathave been used before
Operating the appliance using waterthat is dirty or too hot may cause ma-terial damage Only operate the appliance with
cold mains waterUnsuitable cleaning products maydamage the surfaces of the appli-ance Do not use harsh or abrasive de-
tergents Do not use cleaning products with
a high alcohol content Do not use hard scouring pads or
cleaning sponges Clean the appliance with nothing
but water and a soft damp cloth
Environmental protection and saving energyemspen
11
Remove all detergent residuespray residue or other residues im-mediately if they come into contactwith the appliance
Environmental protection and saving energy
3 Environmental protec-tion and saving energy
Environmental protection and saving energy
31 Disposing of packagingThe packaging materials are environ-mentally compatible and can be re-cycled Sort the individual components by
type and dispose of them separ-ately
32 Save energy and con-serve resources
If you follow these instructions yourappliance will use less electricity andless water
Choose programmes with low tem-peratures and longer wash times anduse maximum load capacityrarr Page 24a Energy consumption and water
consumption is most efficient
Use the economy programme set-tingsa If you adjust the programme set-
tings for a programme the displayshows the expected consumption
Add rarr Page 35 detergent based onthe laundrys degree of soilinga For light to normal soiling a smal-
ler amount of detergent is suffi-cient Observe the dosage recom-mendation from the detergentmanufacturer
Reduce the washing temperature forlightly and normally soiled laundrya At low temperatures the appliance
consumes less energy For light tonormal soiling lower temperaturesthan indicated on the care labelare also sufficient
Set the maximum spin speed if youwant to dry the laundry in a tumbledryer afterwardsa The drier the laundry the shorter
the programme duration when dry-ing which in turn reduces energyconsumption A higher spin speedreduces the residual moisture inthe laundry and increases thevolume of the spin noise
Wash the laundry without prewasha Washing with prewash increases
the programme duration and in-creases energy and water con-sumption
The appliance has a continuousautomatic load adjustment functiona Depending on the type of fabric
and load capacity the continuousautomatic load adjustment func-tion optimally adjusts the waterconsumption and programme dur-ation
33 Energy saving modeIf you do not use the appliance for anextended period it automaticallyswitches to energy-saving mode Alldisplays go out and InicioPausa +Carga flashesEnergy-saving mode ends when youuse the appliance again eg if youopen or close the door
enemspInstallation and connection
12
Installation and connection
4 Installation and con-nection
Installation and connection
41 Unpacking the applianceNote Please read the information inthe Safety rarr Page 4 and Preventingmaterial damage rarr Page 10 sectionsto ensure that you use the appliancesafely
ATTENTIONObjects remaining in the drum thatare not designed for operation withthe appliance may cause materialdamage and damage to the appli-ance Remove these objects along with
all supplied accessories from thedrum before starting the appliance
1 Remove any packaging and pro-tective covers completely from theapplianceFor the environmentally friendlydisposal of the packaging materi-als observe the information on thetopic of rarr Disposing of packagingPage 11
2 Check the appliance for visibledamage
3 Open the door rarr Basic operation Page 36
4 Remove the accessory from thedrum
5 Close the door
Installation and connectionemspen
13
42 Contents of packageAfter unpacking all parts check for any damage in transit and completeness ofthe delivery
1 2 3
4
1 Washing machine
2 Accompanying documents
3 Water inlet hose
4 Cover caps
43 Requirements for the in-stallation location
Note Please read the information inthe Safety rarr Page 4 and Preventingmaterial damage rarr Page 10 sectionsto ensure that you use the appliancesafely
WARNINGRisk of electric shockThe appliance contains live partsTouching live parts is dangerous Do not operate the appliance
without a cover cap
WARNINGRisk of injuryWhen using the appliance on a basethe appliance may tip over Always secure the feet of the appli-
ance to a base using the manufac-turers fixing brackets rarr Page 31before using the appliance for thefirst time
enemspInstallation and connection
14
ATTENTIONIf the appliance is installed in areasexposed to frost or outdoors frozenresidual water may damage the appli-ance and frozen hoses may crack orsplit Do not install or operate this appli-
ance anywhere that is liable to ex-perience frost andor outdoors
The appliance underwent a functiontest before leaving the factory andmay therefore contain residual wa-ter This residual water may leak outif the appliance is tilted at an anglegreater than 40deg Tilt the appliance carefully
Installation loca-tion
Requirements
On a base Secure the appli-ance with fixingbracketsrarr Page 31
On a woodenjoist floor
Place the appli-ance on a water-resistant woodenboard which isscrewed tightly tothe floor Thewooden boardshould be atleast 30 mmthick
Installation loca-tion
Requirements
In a kitchen unit iexcl A niche widthof 60 cm is re-quired
iexcl Only install theappliance un-derneath acontinuousworktop that issecurely con-nected to adja-cent cabinets
Note If the cov-ering plate is re-moved the metalcovering plate rarr AccessoriesPage 31 mustbe secured be-fore installation
On a wall Do not trap thehoses betweenthe wall and theappliance
44 Removing the transitbolts
The appliance is secured for trans-portation using transit bolts on therear of the applianceNotesiexcl Please read the information in the
Safety rarr Page 4 and Preventingmaterial damage rarr Page 10 sec-tions to ensure that you use theappliance safely
iexcl Keep the transit bolts screws andsleeves in a safe place for futuretransport rarr Page 57
Installation and connectionemspen
15
1 Pull the hoses out of the holders
2 Unscrew and remove all fourscrews for the transit bolts with aWAF 13 wrench
3 Pull the power cord out of theholder
4 Remove the four sleeves
5 Put on the four cover caps
6 Press down on the four covercaps
enemspInstallation and connection
16
45 Connecting the applianceConnecting the water inlet hoseNoteiexcl Please read the information in the
Safety rarr Page 4 and Preventingmaterial damage rarr Page 10 sec-tions to ensure that you use theappliance safely
1 Connect the water inlet hose
2
1
2 Connect the water inlet hose to atap (264 mm = 34)
frac34˝min
min
10 mm
17 mm
3 Open the water tap carefully andcheck that the connection pointsare tight
Water outlet connection typesThis information is intended to helpyou to connect this appliance to thewater outlet
Note Please read the information inthe Safety rarr Page 4 and Preventingmaterial damage rarr Page 10 sectionsto ensure that you use the appliancesafely
ATTENTIONWhen draining the water outlet hoseis subject to water pressure and maycome loose from the installed con-nection point Secure the water outlet hose
against unintentional loosening
Note Observe the draining heightsThe maximum draining height is100 cm
Drainage into asiphon
Secure the con-nection point witha (24ndash40 mm)hose clamp
Drainage into awashbasin
Fix and securethe water outletusing an elbowrarr Page 31
Drainage into aplastic pipe withrubber sleeve orinto a gully
Fix and securethe water outletusing an elbowrarr Page 31
Installation and connectionemspen
17
46 Aligning the applianceIn order to reduce noise and vibra-tion and to prevent the appliancefrom moving align the appliance cor-rectlyNote Please read the information inthe Safety rarr Page 4 and Preventingmaterial damage rarr Page 10 sectionsto ensure that you use the appliancesafely1 Loosen the lock nuts using a WAF
17 wrench by turning it in a clock-wise direction
2 To align the appliance turn the ap-pliance feet Check that the appli-ance is level using a spirit level
All appliance feet must stand firmlyon the ground
3 Screw the lock nuts tightly againstthe housing using a WAF 17wrench
In doing so hold the foot tight anddo not adjust its height
47 Connecting the applianceto the electricity supply
Note Please read the information inthe Safety rarr Page 4 and Preventingmaterial damage rarr Page 10 sectionsto ensure that you use the appliancesafely1 Insert the mains plug of the appli-
ances power cable in a socketnearbyThe connection details of the appli-ance can be found under Tech-nical data rarr Page 61
2 Check the mains plug is insertedproperly
enemspFamiliarising yourself with your appliance
18
Familiarising yourself with your appliance
5 Familiarising yourself with your applianceFamiliarising yourself with your appliance
51 ApplianceYou can find an overview of the parts of your appliance here
1
2
4 73 6
88
5
On certain models specific details such as the colour and shape may differfrom those pictured
1 Maintenance flap for the drainpump rarr Page 44
2 Door
3 Detergent drawer rarr Page 19
4 Controls rarr Page 19
5 Covering plate
6 Water outlet hose rarr Page 16
7 Power cord rarr Page 17
8 Transit bolts rarr Page 14
Familiarising yourself with your applianceemspen
19
52 Detergent drawer
2
3
1
4
1 Measuring aid for liquid deter-gent rarr Using a measuring aid forliquid detergent Page 37
2 Compartment IIiexcl Detergent for main washiexcl Water softeneriexcl Bleachiexcl Stain remover
3 Compartment iexcl Fabric softeneriexcl Liquid starchiexcl Waterproofing agent
4 Compartment Iiexcl Detergent for prewashiexcl Hygiene detergent
53 ControlsYou can use the control panel to configure all functions of your appliance andto obtain information about the operating status
2 3
1 1
4
1 Programmes rarr Page 24
2 Programme selectorrarr Page 36
3 Display rarr Page 20
4 Buttons rarr Page 23
enemspDisplay
20
Display
6 DisplayDisplay
The display shows the current settings options or relevant information
Display Designation Description040 1 Programme dura-
tionprogrammetime remaining
Approximate expected programme dura-tion or programme time remaining
10h 1 Ready in time The programme end has been set and theremaining number of hours is displayed rarr Buttons Page 23
9 kg 1 Recommendedload
The maximum load capacity for the selec-ted programme in kg
ndash ndash ndash ndash -1200
Spin speed Set spin speed in rpm rarr Buttons Page 230= No final spin only drainingndash ndash ndash ndash Rinse Hold no draining
ndash 90 Temperature Set temperature in degC rarr Buttons Page 23
(cold)StartPause Start cancel or pause
iexcl Lights up The programme is runningand can be cancelled or paused
iexcl Flashes The programme can be star-ted or continued
Wash Programme status1 Example
Displayemspen
21
Display Designation DescriptionRinse Programme statusSpin Programme status
ndash ndash ndash ndash Rinse Hold Programme statusEnd End of pro-
grammeProgramme status
Childproof lock iexcl lights up The childproof lock is activ-ated
iexcl flashes The childproof lock is activatedand the appliance has been operated rarr Deactivating the childproof lockPage 40
Prewash Prewash is activated rarr Buttons Page 23
Water Plus andRinse Plus
Wash with more water and a rinse cycle isactivated rarr Buttons Page 23
SpeedPerfect Short wash activated rarr Buttons Page 23
1 Energy consump-tion
Energy consumption for the selected pro-grammeiexcl Low energy consumptioniexcl High energy consumption
Reminder to cleanthe drum
Flashes Drum is dirty Run the Limp tam-bor programme for cleaning and caringfor the drum and the outer tub rarr Cleaning the drum Page 42
Voltage controlsystem
Flashes The automatic voltage controlsystem detects impermissible voltagedrops This will pause the programmeNote The programme will continue whenthe voltage is permissible again
Voltage controlsystem
Flashes The programme has beenpaused because of impermissible voltagedrops The voltage is permissible againand the programme will continueNote The programme duration is exten-ded
1 Example
enemspDisplay
22
Display Designation DescriptionDoor iexcl Lights up The door is locked and can-
not be openediexcl Flashes The door is not closed prop-
erlyiexcl Off The door is unlocked and can be
openedTap iexcl No water pressure
iexcl The water pressure is too lowE35 -10 1 Error Error code error display signal1 Example
Buttonsemspen
23
Buttons
7 ButtonsButtons
The selection of programme settings depends on the programme that is setYou can see the selection options for each programme in the overview for rarr Programmes Page 24
Button Selection DescriptionInicioPausa +Carga (StartPause + Reload)
iexcl Startiexcl Canceliexcl Pause
Start cancel or pause the pro-gramme
SpeedPerfect iexcl Activateiexcl Deactivate
Activate or deactivate a short washingprogrammeNote Energy consumption increasesThe washing result is not affected bythis
Termin (ReadyIn)
1ndash24 hours Set the programme endThe programme duration is already in-cluded in the set number of hoursOnce the programme has started theprogramme duration is displayed
Temp degC (Tem-perature)
ndash 90 degC Adjust the temperature in degC
Centrif (Spin) ndash ndash ndash ndash - 1200 Adjust the spin speed or activate ndash ndash ndash ndash (Rinse Hold)If ndash ndash ndash ndash is selected the water is notdrained at the end of the washingcycle and the spin cycle is deactiv-ated The laundry remains in the waterused for rinsing
3 seg (ChildLock 3 sec)
iexcl Activateiexcl Deactivate
Activate or deactivate the childprooflockDisable the control panel to preventunwanted or accidental operationIf the childproof lock is activated andthe appliance has been switched offthe childproof lock remains activated rarr Childproof lock Page 40
Prelav (Pre-wash)
iexcl Activateiexcl Deactivate
Activate or deactivate prewash egfor washing heavily soiled laundry
Extra (ExtraRinse)
iexcl Activateiexcl Deactivate
Activate or deactivate a washing pro-gramme with more water and an addi-tional rinse cycleRecommended for particularly sensit-ive skin or in regions with very softwater
enemspProgrammes
24
Programmes 8 P
rogr
amm
esProgrammes B
elow
is a
n ov
ervi
ew o
f the
pro
gram
mes
You
can
find
info
rmat
ion
on the
load
and
on
the
adju
stab
le p
ro-
gram
me
optio
ns
Tip
The
laun
dry
s ca
re la
bels
pro
vide
you
with
add
ition
al in
form
atio
n on
pro
gram
me
sele
ctio
n
rarr
Car
e sy
mbo
ls o
n th
e ca
re la
bels
Pa
ge 3
4
Pro
gram
me
Des
crip
tion
Max load (kg)
Pro
gram
me
sett
ings
Max temperature (degC)
Max spin speed(rpm) 1
SpeedPerfect
Extra
Centrif ndash ndash ndash ndash(Rinse Hold)
Prelav
Alg
odoacuten
Al-
godatilde
o (
Cot
tons
)W
ash
hard
-wea
ring
item
s m
ade
from
cotto
n li
nen
or b
lend
ed fa
bric
sA
lso
suita
ble
as a
sho
rt p
rogr
amm
efo
r no
rmal
ly s
oile
d la
undr
y w
hen
you
activ
ate
Spe
edPer
fect
I
f Spe
ed-
Per
fect
is
act
ivat
ed t
he m
ax-
imum
load
cap
acity
is r
educ
ed to
5 k
g
990
1200
Alg
odoacuten
Col
orA
l-go
datildeo
Cor
(
Cot
-to
ns C
olou
r)
Was
h ha
rd-w
earin
g ite
ms
mad
e from
cotto
n li
nen
or b
lend
ed fa
bric
sEne
rgy-
savi
ng p
rogr
amm
e
9
90
1200
ndash
1Pro
gram
me
setti
ng
Programmesemspen
25
Pro
gram
me
Des
crip
tion
Max load (kg)
Pro
gram
me
sett
ings
Max temperature (degC)
Max spin speed(rpm) 1
SpeedPerfect
Extra
Centrif ndash ndash ndash ndash(Rinse Hold)
Prelav
Not
e T
o sa
ve e
nerg
y the
act
ual
was
hing
tem
pera
ture
may
dev
iate
from
the
set
was
hing
tem
pera
ture
Th
e w
ashi
ng p
erfo
rman
ce m
eets
lega
l req
uire
men
ts
Eco
40-6
0W
ash
item
s m
ade
from
cot
ton
line
nor
ble
nded
fabr
ics
Not
e T
extil
es w
hich
can
be
was
hed
from
40 deg
C
up
to 6
0 deg
C
as
per
the
care
sym
bol c
an b
e w
ashe
dto
geth
er
The
was
hing
per
form
ance
cor
res-
pond
s to
the
bes
t po
ssib
le w
ashi
ngpe
rfor
man
ce c
lass
acc
ordi
ng to
the
lega
l req
uire
men
ts
For
this
pro
gram
me
the
was
hing
tem
pera
ture
is a
utom
atic
ally
adj
uste
dde
pend
ing
on the
load
siz
e in
ord
erto
ach
ieve
the
bes
t po
ssib
le e
nerg
y
9
ndash
1200
ndash
1Pro
gram
me
setti
ng
enemspProgrammes
26
Pro
gram
me
Des
crip
tion
Max load (kg)
Pro
gram
me
sett
ings
Max temperature (degC)
Max spin speed(rpm) 1
SpeedPerfect
Extra
Centrif ndash ndash ndash ndash(Rinse Hold)
Prelav
effic
ienc
y w
ith the
bes
t po
ssib
lew
ashi
ng r
esul
t You
can
not ch
ange
the
was
hing
tem
pera
ture
Sin
teacutetic
os
(Eas
yC
are)
Was
h ite
ms
mad
e from
syn
thet
ic o
rbl
ende
d fa
bric
s4
60
1200
Mix
(
Mix
edFa
bric
s)W
ash
item
s m
ade
from
cot
ton
line
nor
syn
thet
ic o
r bl
ende
d fa
bric
sSui
tabl
e fo
r lig
htly
soi
led
laun
dry
460
1200
Del
icad
oSed
a (D
elic
ate
Silk
)W
ash
delic
ate
was
habl
e ite
ms
mad
efrom
silk
vis
cose
and
syn
thet
ics
Use
a d
eter
gent
tha
t is
sui
tabl
e fo
rde
licat
es o
r si
lk
Not
e W
ash
espe
cial
ly d
elic
ate
item
sor
item
s w
ith h
ooks
eye
lets
or
clip
sin
a m
esh
laun
dry
bag
2
40
800
ndash
1Pro
gram
me
setti
ng
Programmesemspen
27
Pro
gram
me
Des
crip
tion
Max load (kg)
Pro
gram
me
sett
ings
Max temperature (degC)
Max spin speed(rpm) 1
SpeedPerfect
Extra
Centrif ndash ndash ndash ndash(Rinse Hold)
Prelav
Lan
aLatilde
s (W
ool)
Han
d- o
r m
achi
ne-w
asha
ble
item
sth
at a
re m
ade
from
woo
l or
cont
ain
woo
lTo
pre
vent
the
laun
dry
from
shr
ink-
ing
the
dru
m m
oves
the
item
s ve
ryge
ntly
with
long
pau
ses
Use
a d
eter
gent
tha
t is
sui
tabl
e fo
rw
ool
2
40
800
ndash
ndash
ndash
(R
inse
)R
inse
s an
d th
en s
pins
the
laun
dry
and
then
dra
ins
the
wat
er
ndashndash
1200
ndash
ndash
(
Spi
nD
rain
)Spi
ns a
nd d
rain
s th
e w
ater
If
you
only
wan
t to
dra
in the
wat
er
activ
ate
0 T
he la
undr
y is
not
spu
n
ndash
ndash
1200
ndash
ndash
ndash
ndash
Rop
a os
cura
R
oupa
esc
ura
(Dar
k W
ash)
Was
h da
rk-c
olou
red
and
colo
ur-in
-te
nse
item
s m
ade
from
cot
ton
orea
sy-c
are
fabr
ic e
g j
eans
Tu
rn la
undr
y in
side
-out
bef
ore
was
h-in
gU
se li
quid
det
erge
nt
4
40
1200
1Pro
gram
me
setti
ng
enemspProgrammes
28
Pro
gram
me
Des
crip
tion
Max load (kg)
Pro
gram
me
sett
ings
Max temperature (degC)
Max spin speed(rpm) 1
SpeedPerfect
Extra
Centrif ndash ndash ndash ndash(Rinse Hold)
Prelav
Plu
mas
Pen
as
(Dow
n)W
ash
pillo
ws
duv
ets
or c
loth
ing
stuf
fed
with
dow
n an
d fil
lings
with
synt
hetic
fibr
es
Was
h la
rge
item
s se
para
tely
U
se a
det
erge
nt tha
t is
sui
tabl
e fo
rdo
wn
or d
elic
ates
U
se s
parin
gly
Do
not us
e fa
bric
sof
tene
rN
ote
To
prev
ent ex
cess
ive
foam
ing
rem
ove
air
from
laun
dry
item
s by
rolli
ng the
m u
p be
fore
you
was
hth
em
2
60
1200
ndash
ndash
Lim
p tam
bor
(Dru
m C
lean
)C
lean
ing
and
carin
g fo
r th
e dr
um
Use
thi
s pr
ogra
mm
e in
the
follo
win
gca
ses
iexclB
efor
e us
ing
the
appl
ianc
e fo
r th
efir
st tim
eiexcl
If yo
u re
gula
rly w
ash
at tem
pera
t-ur
es o
f 40 deg
C o
r lo
wer
ndash
ndash
1200
ndash
ndash
ndash
ndash
1Pro
gram
me
setti
ng
Programmesemspen
29
Pro
gram
me
Des
crip
tion
Max load (kg)
Pro
gram
me
sett
ings
Max temperature (degC)
Max spin speed(rpm) 1
SpeedPerfect
Extra
Centrif ndash ndash ndash ndash(Rinse Hold)
Prelav
iexclA
fter
a pr
olon
ged
perio
d of
non
-us
eU
se w
ashi
ng p
owde
r or
a d
eter
gent
cont
aini
ng b
leac
hH
alve
the
am
ount
of d
eter
gent
to
avoi
d fo
amin
gD
o no
t us
e fa
bric
sof
tene
rD
o no
t us
e liq
uid
dete
rgen
t or
det
er-
gent
tha
t is
inte
nded
for
woo
llens
or
delic
ates
N
ote
The
dru
m c
lean
ing
indi
cato
rw
ill fl
ash
to r
emin
d yo
u if
you
have
not us
ed a
pro
gram
me
at 6
0 deg
C o
rhi
gher
for
a lo
ng tim
eC
amis
asB
lusa
s (S
hirts
Blo
uses
)W
ash
non-
iron
shirt
s an
d bl
ouse
sm
ade
from
cot
ton
line
n s
ynth
etic
or
blen
ded
fabr
ics
Not
e U
se the
Del
icad
oSed
a pr
o-gr
amm
e to
was
h sh
irts
and
blou
ses
mad
e from
silk
or
delic
ate
fabr
ics
2
60
800
ndash
1Pro
gram
me
setti
ng
enemspProgrammes
30
Pro
gram
me
Des
crip
tion
Max load (kg)
Pro
gram
me
sett
ings
Max temperature (degC)
Max spin speed(rpm) 1
SpeedPerfect
Extra
Centrif ndash ndash ndash ndash(Rinse Hold)
Prelav
Spo
rt
Was
h sp
orts
and
leis
ure
item
s m
ade
from
syn
thet
ic fi
bres
mic
rofib
re o
rfle
ece
Use
a d
eter
gent
tha
t is
sui
tabl
e fo
rsp
orts
item
sD
o no
t us
e fa
bric
sof
tene
rTi
p U
se the
Sin
teacutetic
os
prog
ram
me
to w
ash
heav
ily s
oile
d la
undr
y
2
40
800
ndash
Raacutep
ido
153
0m
in
(Sup
erQ
uick
153
0 m
in)
Was
h ite
ms
mad
e from
cot
ton
syn
-th
etic
or
blen
ded
fabr
ics
Sho
rt p
rogr
amm
e fo
r sm
all i
tem
s of
light
ly s
oile
d la
undr
yTh
e pr
ogra
mm
e du
ratio
n is
app
rox
30 m
inut
es
If yo
u w
ish
to r
educ
e th
e pr
ogra
mm
edu
ratio
n to
15 m
inut
es a
ctiv
ate
Spe
edPer
fect
T
he m
axim
umlo
ad is
red
uced
to
2 k
g
4
40
1200
ndash
1Pro
gram
me
setti
ng
Accessoriesemspen
31
Accessories
9 AccessoriesAccessories
Use original accessories These have been made especially for your appliance
Use Order numberWater inlet hose exten-sion
Extend the water inlethose for cold water orAquaStop (approx 250m)
WMZ2381
Fixing brackets Improves the stability ofthe appliance
WMZ2200
Longer water inlet hose Replace the standardwater inlet hose with alonger hose (220 m)
00353925
Elbow Secure the water outlethose in place
00655300
Liquid detergent insert Measure liquid deter-gent
00605740
Metal covering plate Metal covering plate forinstalling the applianceunder a high worktop
WMZ20430
Before using for the first time
10 Before using for thefirst time
Before using for the first time
Prepare the appliance for use
101 Starting an empty wash-ing cycle
Your appliance was inspected thor-oughly before leaving the factory Toremove any residual water run thefirst wash cycle without any laundryNote Please read the information inthe Safety rarr Page 4 and Preventingmaterial damage rarr Page 10 sectionsto ensure that you use the appliancesafely
1 Turn the programme selector toLimp tambor
2 Close the door
enemspLaundry
32
3 Pull out the detergent drawer
4 Pour approx 1 litre of tap waterinto compartment II
5 Pour washing powder into com-partment II
To prevent foaming use only halfof the amount of detergent recom-mended by the detergent manufac-turer for light soiling Do not usedetergent suitable for woollens ordelicates
6 Push in the detergent drawer
7 Press InicioPausa + Carga (StartPause + Reload) to start theprogramme
a The display shows the remainingprogramme duration
a After the programme has endedthe display shows End
8 Start the first wash cycle or set theprogramme selector to to switchoff the appliance rarr Basic operation Page 36
Laundry
11 LaundryLaundry
111 Preparing the laundryNote Please read the information inthe Safety rarr Page 4 and Preventingmaterial damage rarr Page 10 sectionsto ensure that you use the appliancesafely
ATTENTIONObjects remaining in the laundry maydamage the laundry and the drum Remove all items from any pock-
ets in your laundry before usingthe appliance
To protect your appliance and thelaundry prepare the laundry be-forehandndash Empty any pockets
Laundryemspen
33
ndash Brush sand out of all collars andpockets
ndash Close bed covers and cushioncovers
ndash Close all zips Velcro fastenershooks and eyes
ndash Tie cloth belts apron stringsetc together or use a laundrybag
ndash Remove curtain hooks and leadstrips or use a mesh laundrybag
ndash Use a mesh laundry bag forsmall items of laundry such aschildrens socks
ndash Some stubborn or dried-in stainscan be removed by washingseveral times
ndash Wash large and small items oflaundry together
ndash Do not rub fresh stains but dabthem with soapy water
ndash Separate items of laundry andshake them out
112 Sorting laundryNote Please read the information inthe Safety rarr Page 4 and Preventingmaterial damage rarr Page 10 sectionsto ensure that you use the appliancesafely To improve washing results and
prevent discolouration sort thelaundry according to the followingcriteria before washingndash Type of fabric and fibre
Wash laundry of the sametype of fabric and fibre to-gether
ndash Care symbols on the care labelsrarr Page 34
ndash Description of the programmesrarr Page 24
ndash Whitesndash Colours
Wash new coloured itemsseparately the first time youwash them
113 Degrees of soiling
Degree of soiling Soiling ExamplesLight iexcl No dirt or stains are vis-
ibleiexcl Laundry has absorbed
odours
Light summer clothing orsports clothing that hasbeen worn for a just a fewhours
Normal Dirt or light stains are vis-ible
iexcl T-shirts shirts or blousesare sweat-soaked orhave been worn a fewtimes
iexcl Towels or bedding thathas been used for up toone week
Heavy Dirt or stains are clearlyvisible
Tea towels baby items orwork clothing
enemspDetergents and care products
34
114 Care symbols on the care labels
Washing care symbols
Symbol Washing process Recommended pro-gramme
Normal Cotton Gentle Easy-Care Particularly gentle DelicatesSilk for
washing by handHand wash WoolNot suitable for machine-washing ndash
Detergents and care products
12 Detergents and careproducts
Detergents and care products
Note Please read the information inthe Safety rarr Page 4 and Preventingmaterial damage rarr Page 10 sectionsto ensure that you use the appliancesafelyThe manufacturers instructions foruse and dosage can be found on thepackaging
Notesiexcl Only use liquid detergents that are
self-flowingiexcl Do not mix different liquid deter-
gentsiexcl Do not mix detergent and fabric
softeneriexcl Do not use products that have ex-
pired or are highly congealediexcl Do not use products containing
solvents caustic agents or volatilesubstances (eg bleach)
iexcl Use dyes sparingly as salt maydamage stainless steel
iexcl Do not use bleaching agents in theappliance
121 Detergent recommendation
Detergent Fabrics Pro-gramme
Temperature
Standard detergentwith optical brighten-ers
Heat-resistant whitefabrics made fromcotton or linen
Cotton From cold up to90 degC
Detergent for colourswithout bleach or op-tical brighteners
Coloured fabricsmade from linen orcotton
Cotton From cold up to60 degC
Detergent for col-oursdelicates withoutoptical brighteners
Coloured fabricsmade from easy-carefabrics or syntheticmaterials
Easy-Care From cold up to60 degC
Detergents and care productsemspen
35
Detergent Fabrics Pro-gramme
Temperature
Detergent for delic-ates
Delicate fine textilessilk or viscose
DelicatesSilk
From cold up to40 degC
Detergent for wool-lens
Wool Wool From cold up to40 degC
Tip Visit wwwcleanrighteu to findfurther information on detergentscare products and cleaning agentsfor domestic use
122 Detergent dosageThe detergent dosage depends oniexcl The amount of laundryiexcl Degree of soilingiexcl Water hardness
You can find out how hard yourwater is from your local water com-pany or measure it yourself usinga water hardness tester
Water hardness
Hardness range Total hardness in mmoll
German degrees in degdH
soft (I) 0ndash15 0ndash84medium (II) 15ndash 25 84ndash14hard (III) over 25 over 14
Example of a manufacturersinstructions for detergentThese example values refer to astandard load of 4ndash5 kg
Soiling Light Normal HeavyWater hardness Softmedium 40 ml 55 ml 80 mlWater hardness Hardveryhard
55 ml 80 ml 105 ml
The dosages can be found on themanufacturers packagingiexcl Adjust the dosage to the actual
load
enemspBasic operation
36
Basic operation
13 Basic operationBasic operation
131 Switching on the appli-ance
Turn the programme selector to aprogramme
132 Setting a programme1 Set the programme selector to the
required programme rarr Programmes Page 24
2 If necessary adjust the pro-gramme settings rarr Page 36
133 Adjusting the pro-gramme settings
Requirement A programme hasbeen set rarr Setting a programme Page 36
Adjust the programme settings rarr Programmes Page 24
Note The programme settings arenot saved permanently for the pro-gramme
134 Loading laundryNotesiexcl Please read the information in the
Safety rarr Page 4 and Preventingmaterial damage rarr Page 10 sec-tions to ensure that you use theappliance safely
iexcl To prevent creasing take note ofthe maximum load for the rarr Programmes Page 24
Requirement The laundry is pre-pared and sortedrarr Laundry Page 321 Open the door
Make sure that the drum is empty2 Load the laundry unfolded into the
drum3 Close the door
Ensure that there is no laundrytrapped in the door
Basic operationemspen
37
135 Using a measuring aidfor liquid detergent
If you order the measuring aid as anaccessory you must use the measur-ing aid1 Pull out the detergent drawer
2 Press down on the insert and re-move the detergent drawer
1
2
3 Insert the measuring aid
4 Insert the detergent drawer
136 Use the measuring aidfor liquid detergent
To add liquid detergent you can usea measuring aid in the detergentdrawer1 Pull out the detergent drawer2 Slide the measuring aid forwards
3 Fold the measuring aid down andclick it into place
enemspBasic operation
38
4 Push in the detergent drawer
137 Adding detergent andcare product
Notesiexcl Please read the information in the
Safety rarr Page 4 and Preventingmaterial damage rarr Page 10 sec-tions to ensure that you use theappliance safely
iexcl Do not use the measuring aid forliquid detergent for gel detergentswashing powder or if Prewash orReady in time are activated
Requirement Find out the optimumdosage for detergent and careproduct rarr Page 341 Pull out the detergent drawer2 Pour in detergent
rarr Detergent drawer Page 193 If required add the care product4 Push in the detergent drawer
138 Starting the programmeNote If you want to change the timeuntil the programme ends set theReady in time first Press InicioPausa + Carga a The drum rotates and load detec-
tion takes place This can take upto 2 minutes after which waterenters the drum
a The display shows either the pro-gramme duration or the Ready intime
a After the programme has endedthe display shows End
139 Adjusting the Ready intime before the pro-gramme starts
You can readjust the selected Readyin time before the programme starts1 Press InicioPausa + Carga 2 Press Termin repeatedly until
the display indicates the desiredReady in time
3 Press InicioPausa + Carga
1310 Soaking laundryNote No additional detergent is re-quired The washing solution is thenused for washing1 Start the programme2 To pause the programme after ap-
prox 10 minutes press InicioPausa + Carga
3 To resume the programme afterthe desired soaking time pressInicioPausa + Carga
1311 Adding laundryNote Please read the information inthe Safety rarr Page 4 and Preventingmaterial damage rarr Page 10 sectionsto ensure that you use the appliancesafely1 Press InicioPausa + Carga
The appliance is paused andchecks whether it is possible toadd or remove laundry Take noteof the programme status
2 Add or remove laundry3 Close the door4 Press InicioPausa + Carga
Basic operationemspen
39
1312 Cancelling the pro-gramme
Once the programme has startedyou can cancel it at any timeNote Please read the information inthe Safety rarr Page 4 and Preventingmaterial damage rarr Page 10 sectionsto ensure that you use the appliancesafely1 Press InicioPausa + Carga 2 Open the door
The appliance door remainslocked for safety reasons if thetemperature and water levels arehighndash If the temperature is high start
the programmendash If the water level is high Start
the or programme3 Remove the laundry
1313 Resuming the pro-gramme when the pro-gramme status is RinseHold
1 Set the or programme2 Press InicioPausa + Carga
1314 Unloading the laundryNote Please read the information inthe Safety rarr Page 4 and Preventingmaterial damage rarr Page 10 sectionsto ensure that you use the appliancesafely1 Open the door
2 Remove the laundry
1315 Switching off the appli-ance
1 Turn the programme selector to
2 Turn off the tap3 Wipe the rubber gasket dry and re-
move any foreign objects
4 Leave the door and detergentdrawer open so that residual watercan evaporate
enemspChildproof lock
40
Childproof lock
14 Childproof lockChildproof lock
Secure your appliance against beingoperated unintentionally using thecontrols
141 Activating the childprooflock
Press and hold the two 3 segbuttons for approx 3 seconds
a The display shows a The controls are lockeda The childproof lock remains active
even after the appliance has beenswitched off
142 Deactivating the child-proof lock
Requirement To deactivate thechildproof lock the appliance mustbe switched on Press and hold the two 3 seg
buttons for approx 3 secondsa goes out in the display
Basic settingsemspen
41
Basic settings
15 Basic settingsBasic settings
You can configure the appliance to meet your needs
151 Overview of the basic settingsBelow is an overview of the basic settings on your appliance
Basic setting Programmeposition
Value Description
End signal 2 0 (off)1 (quiet)2 (me-dium)3 (loud)4 (veryloud)
Set the volume of the signal at theend of the programme
Button signal 3 0 (off)1 (quiet)2 (me-dium)3 (loud)4 (veryloud)
The volume of the audible signalemitted when the buttons arepressed
Drum cleaningreminder
4 ONOFF
Activate or deactivate the re-minder to clean the drum
enemspCleaning and servicing
42
152 Changing the basic set-tings
1 Set the programme selector to po-sition 1
2 Press InicioPausa + Carga and at the same time turn theprogramme selector to position 2
a The display shows the currentvalue
3 Set the programme selector to therequired position
4 To change the value press Ter-min
5 To save the changes switch offthe appliance
Cleaning and servicing
16 Cleaning and servi-cing
Cleaning and servicing
To keep your appliance working effi-ciently for a long time it is importantto clean and maintain it carefully
161 Tips on appliance careWipe down thehousing and thecontrol panelwith nothing butwater and adamp cloth
This ensures theparts of the appli-ance will remainclean and hy-gienic
Remove all de-tergent residuespray residue orother residuesimmediately
Fresh depositsare easier to re-move withoutleaving anyresidue
Keep the appli-ance door anddetergent draweropen after use
This allows theresidual water todry reducingodours in the ap-pliance
162 Cleaning the drum
CAUTIONRisk of injuryPermanently washing at low temper-atures and a lack of ventilation forthe appliance may damage the drumand cause injury Regularly run a programme for
cleaning the drum or wash at tem-peratures of at least 60 degC
Leave the appliance to dry afterevery operation with the dooropen and leave the detergentdrawer to dry
Run the Limp tambor pro-gramme without laundryAdd washing powder
163 Cleaning the detergentdrawer
Note Please read the information inthe Safety rarr Page 4 and Preventingmaterial damage rarr Page 10 sectionsto ensure that you use the appliancesafely1 Pull out the detergent drawer
Cleaning and servicingemspen
43
2 Press down on the insert and re-move the detergent drawer
1
2
3 Press out the insert upwards frombelow
4 Clean the detergent drawer and in-sert with water and a brush andthen dry them
5 Fit the insert and lock it into place
6 Cleaning the opening for the deter-gent drawer
7 Push in the detergent drawer
164 Descaling
ATTENTIONThe use of unsuitable descalingagents eg for coffee machines maydamage the appliance For this appliance only use de-
scaling agents that are availablefrom the manufacturers website orour after-sales service
enemspCleaning and servicing
44
165 Cleaning the drain pumpClean the drain pump in the event offaults eg blockages or rattlingnoises
Emptying the drain pumpNote Please read the information inthe Safety rarr Page 4 and Preventingmaterial damage rarr Page 10 sectionsto ensure that you use the appliancesafely1 Turn off the water tap2 Switch off the appliance3 Disconnect the appliances mains
plug from the power supply4 Open the maintenance flap
5 Remove the maintenance flap
6 Slide a sufficiently large receptacleunder the opening
7 Take the drain hose out of theholder
Cleaning and servicingemspen
45
8 CAUTION - Risk of scaldingWhen you wash at high temperat-ures the detergent solution getshot
Do not touch the hot detergentsolutionTo allow the detergent solution toflow out into the container removethe sealing cap
9 Firmly press on the sealing cap
10 Insert the drain hose into theholder
Cleaning the drain pumpNote Please read the information inthe Safety rarr Page 4 and Preventingmaterial damage rarr Page 10 sectionsto ensure that you use the appliancesafelyRequirement The drain pump isempty rarr Page 441 Since water may remain in the
drain pump remove the pump capcarefully
2 Clean the interior the thread onthe pump cap and the pump hous-ing
3 Make sure that the impeller in thedrain pump can be rotated
enemspCleaning and servicing
46
4 Insert the pump cap and screw iton as far as it will go
90deg
The handle on the pump cap mustbe in a vertical position
5 Close the maintenance flap
Before the next washTo prevent unused detergent fromflowing straight into the outlet in thenext wash run the programmeafter you have emptied the drainpump1 Turn on the tap2 Insert the mains plug3 Switch on the appliance4 Pour 1 litre of water into compart-
ment II5 Start the programme
166 Cleaning the water outlethose at the siphon
1 Switch off the appliance2 Disconnect the appliances mains
plug from the power supply
3 Loosen the hose clamp and care-fully remove the water outlet hose
Residual water may leak out4 Clean the water outlet hose and si-
phon connecting piece
5 Reattach the water outlet hose andsecure the connection point usingthe hose clamp
Cleaning and servicingemspen
47
167 Clean the water inlet fil-ters
Emptying the water inlet hose1 Turn off the tap2 Set a programme except for
or 3 Start the programme and leave it
to run for approx 40 seconds4 Switch off the appliance5 Disconnect the appliances mains
plug from the power supply
Cleaning the filter on the tapNote Please read the information inthe Safety rarr Page 4 and Preventingmaterial damage rarr Page 10 sectionsto ensure that you use the appliancesafelyRequirement The water inlet hose isempty1 Remove the water inlet hose from
the tap
2 Clean the filter with a small brush
3 Connect the water inlet hose andcheck for leaks
Cleaning the filter on theapplianceNote Please read the information inthe Safety rarr Page 4 and Preventingmaterial damage rarr Page 10 sectionsto ensure that you use the appliancesafelyRequirement The water inlet hose isempty rarr Emptying the water inlet hosePage 47
enemspCleaning and servicing
48
1 Disconnect the hose from the rearof the appliance
1
2
2 Use pliers to remove the filter
3 Clean the filter with a small brush
4 Reinsert the filter
5 Connect the hose and check forleaks
2
1
Troubleshootingemspen
49
Troubleshooting
17 TroubleshootingTroubleshooting
You can rectify minor faults on your appliance yourself Read the troubleshoot-ing information before contacting after-sales service This will avoid unneces-sary costs
WARNINGRisk of electric shockIncorrect repairs are dangerous Repairs to the appliance should only be carried out by trained specialist
staff Only use genuine spare parts when repairing the appliance If the power cord of this appliance is damaged it must be replaced by the
manufacturer the manufacturers Customer Service or a similarly qualifiedperson in order to prevent any risk
Fault Cause and troubleshootingThe display goes outand InicioPausa +Carga flashes
Energy-saving mode is active Press any buttona The symbol lights up again
E36 -10 Drain pipe or water outlet hose is blocked Clean the drain pipe and the water outlet hose
Drain pipe or water drain hose is caught or jammed Ensure that the drain pipe and water drain hose are
not kinked or trapped
Drain pump is blocked rarr Cleaning the drain pump Page 44
The water outlet hose is connected too high Install the water outlet hose at a maximum height of
1 metre
Detergent dosage is too high Immediate measure Mix one tablespoon of fabric
softener with 05 litres of water and pour the mix-ture into the left-hand compartment (not for outdoorclothing sportswear or items stuffed with down)
Reduce the amount of detergent for the next wash-ing cycle with the same load
Unapproved extension installed on the water drainhose Remove any unapproved extensions from the water
hose Connecting the appliance
E36 -25 -26 Drain pump is blocked rarr Cleaning the drain pump Page 44
enemspTroubleshooting
50
Fault Cause and troubleshootingThe water pressure is lowNo remedial action possibleThe filters in the water inflow are blocked Clean the filters in the water inflow rarr Page 47
The tap is turned off Turn on the tap
The water inlet hose is kinked or jammed Ensure that the water inlet hose is not kinked or
jammed
flashes The automatic voltage control system detects an un-authorised voltage under-usage No remedial action possible
Note If the power supply is stable the programmecontinues to run as normalVoltage under-usage may cause extension of a pro-grammeNo remedial action possible
flashes Voltage under-usage may cause extension of a pro-grammeNo remedial action possible
lights up The temperature is too high Wait until the temperature has dropped rarr Cancelling the programme Page 39
Water level is too high Start the programme
Laundry is caught in the door1 Open the door again2 Remove any trapped laundry3 Close the door4 Press InicioPausa + Carga to start the pro-
gramme
flashes Door is not closed1 Close the door2 Press InicioPausa + Carga to start the pro-
gramme
All other error codes Malfunction Call the after-sales service
rarr Customer Service Page 59
Troubleshootingemspen
51
Fault Cause and troubleshootingThe appliance is notworking
The mains plug of the power cord is not plugged in Connect the appliance to the power supply
The circuit breaker is faulty Check the circuit breaker in the fuse box
There has been a power cut Check whether the lighting in your kitchen or other
appliances are working
The programme doesnot start
You have not pressed InicioPausa + Carga Press InicioPausa + Carga
Door is not closed1 Close the door2 Press InicioPausa + Carga to start the pro-
gramme
Childproof lock is activated rarr Deactivating the childproof lock Page 40
Termin is activated Check whether Termin is activated
rarr Buttons Page 23
Laundry is caught in the door1 Open the door again2 Remove any trapped laundry3 Close the door4 Press InicioPausa + Carga to start the pro-
gramme
The door cannotbe opened
ndash ndash ndash ndash is activated Continue the programme by selecting or and
pressing InicioPausa + Carga rarr Resuming the programme when the programmestatus is Rinse Hold Page 39
The temperature is too high Wait until the temperature has dropped rarr Cancelling the programme Page 39
Water level is too high Start the programme
Power failure Open the door using the emergency release
rarr Emergency release Page 57
The water is not drain-ing
Drain pipe or water outlet hose is blocked Clean the drain pipe and the water outlet hose
enemspTroubleshooting
52
Fault Cause and troubleshootingThe water is not drain-ing
Drain pipe or water drain hose is caught or jammed Ensure that the drain pipe and water drain hose are
not kinked or trapped
Drain pump is blocked rarr Cleaning the drain pump Page 44
ndash ndash ndash ndash is activated Continue the programme by selecting or and
pressing InicioPausa + Carga rarr Resuming the programme when the programmestatus is Rinse Hold Page 39
The water outlet hose is connected too high Install the water outlet hose at a maximum height of
1 metre
Detergent dosage is too high Immediate measure Mix one tablespoon of fabric
softener with 05 litres of water and pour the mix-ture into the left-hand compartment (not for outdoorclothing sportswear or items stuffed with down)
Reduce the amount of detergent for the next wash-ing cycle with the same load
Unapproved extension installed on the water drainhose Remove any unapproved extensions from the water
hose Connecting the appliance
Water is not flowingin Detergent is notbeing dispensed
You have not pressed InicioPausa + Carga Press InicioPausa + Carga
The filters in the water inflow are blocked Clean the filters in the water inflow rarr Page 47
The tap is turned off Turn on the tap
The water inlet hose is kinked or jammed Ensure that the water inlet hose is not kinked or
jammed
The spin cycle runsseveral times
The unbalanced load detection system eliminates animbalance by repeatedly redistributing the laundry Not a fault ndash no action required
Note When loading where possible place large andsmall items of laundry together in the drum Differentsized items of laundry distribute themselves betterduring the spin cycle
Troubleshootingemspen
53
Fault Cause and troubleshootingThe programme dura-tion changes duringthe wash cycle
The programme operation is optimised electronicallyThis may change the programme duration Not a fault ndash no action required
The unbalanced load detection system eliminates animbalance by repeatedly redistributing the laundry Not a fault ndash no action required
Note When loading where possible place large andsmall items of laundry together in the drum Differentsized items of laundry distribute themselves betterduring the spin cycleFoam detection system switches on a rinse cycle iffoam build-up is too high Not a fault ndash no action required
No water is visible inthe drum
Water is below the visible area Not a fault ndash no action required Do not add any extra water to the appliance while it
is operating
Drum jerks after theprogramme starts
This is caused by an internal motor test Not a fault ndash no action required
Residual water ispresent in the com-partment
Insert in compartment is blocked rarr Cleaning the detergent drawer Page 42
Vibrations and move-ment of the appliancewhilst spinning
Appliance is not correctly aligned Aligning the appliance
The appliance feet are not fixed Secure the appliance feet Aligning the appliance
Transit bolts have not been removed Removing the transit bolts
Drum does not turnwater does not flow in
Load detection is active Not a fault ndash no action required
Note The load detection can take up to two minutesHeavy foam build-up Detergent dosage is too high
Immediate measure Mix one tablespoon of fabricsoftener with 05 litres of water and pour the mix-ture into the left-hand compartment (not for outdoorclothing sportswear or items stuffed with down)
Reduce the amount of detergent for the next wash-ing cycle with the same load
enemspTroubleshooting
54
Fault Cause and troubleshootingHigh spin speed notreached
A low spin speed is selected The next time you run a wash cycle set a higher
spin speed
Unbalance load detection system is using a reducedspin speed to eliminate an unbalance Redistribute the laundry in the drum
Note Where possible mix large and small items inthe drum Different sized items of laundry distributethemselves better during the spin cycle Start the programme
The spin programmedoes not start
Drain pipe or water outlet hose is blocked Clean the drain pipe and the water outlet hose
Drain pipe or water drain hose is caught or jammed Ensure that the drain pipe and water drain hose are
not kinked or trapped
The unbalanced load detection system has interruptedthe spin cycle because the laundry is unevenly distrib-uted Redistribute the laundry in the drum
Note Where possible mix large and small items inthe drum Different sized items of laundry distributethemselves better during the spin cycle Start the programme
Rushing hissingnoise
Water is flushed under pressure into the detergentdrawer Not a fault ndash normal operating noise
Loud noises duringthe spin cycle
Appliance is not correctly aligned Aligning the appliance
The appliance feet are not fixed Secure the appliance feet Aligning the appliance
Transit bolts have not been removed Removing the transit bolts
Banging noises rat-tling in the drainpump
Foreign bodies have got into the drain pump rarr Cleaning the drain pump Page 44
Slurping rhythmicalsuction noise
The drain pump is active the detergent solution ispumped out Not a fault ndash normal operating noise
Troubleshootingemspen
55
Fault Cause and troubleshootingCreasing The spin speed is too high
The next time you run a wash cycle set a lowerspin speed
The load is too large The next time you run a wash cycle reduce the
amount of laundry being loaded
The wrong programme is selected for the type of fab-ric Select the programmes that are suitable for the
type of fabric rarr Programmes Page 24
Detergent or fabricsoftener drips off theseal and collects onthe door or in the sealfold
Too much detergentfabric softener in the detergentdrawer When dosing liquid detergent and fabric softener
observe the marking in the detergent drawer anddo not dose above this
The spin result is notsatisfactory The laun-dry is too wettoodamp
A low spin speed is selected The next time you run a wash cycle set a higher
spin speed Start the programme
Drain pipe or water outlet hose is blocked Clean the drain pipe and the water outlet hose
Drain pipe or water drain hose is caught or jammed Ensure that the drain pipe and water drain hose are
not kinked or trapped
The unbalanced load detection system has interruptedthe spin cycle because the laundry is unevenly distrib-uted Redistribute the laundry in the drum
Note Where possible mix large and small items inthe drum Different sized items of laundry distributethemselves better during the spin cycle Start the programme
Unbalance load detection system is using a reducedspin speed to eliminate an unbalance Redistribute the laundry in the drum
Note Where possible mix large and small items inthe drum Different sized items of laundry distributethemselves better during the spin cycle Start the programme
enemspTroubleshooting
56
Fault Cause and troubleshootingDetergent residue onthe damp washing
Detergents may contain water-insoluble substancesthat deposit on the laundry Start the programme
Detergent residue onthe dry laundry
Detergents may contain water-insoluble substancesthat deposit on the laundry Brush out the laundry after washing and drying
Water is leaking out atthe water inlet hose
Water inlet hose is not correctlysecurely connected1 Connect the water supply hose correctly Connect-
ing the water inlet hose2 Tighten the screw connection
Water is leaking out atthe water outlet hose
The water outlet hose is damaged Replace the damaged water outlet hose
Water outlet hose is not connected correctly Connect the water outlet hose correctly Water out-
let connection types
Odours have formedin the appliance
Humidity and detergent residue may promote theformation of bacteria rarr Cleaning the drum Page 42 If you are not using the appliance leave the door
and detergent drawer open so that residual watercan evaporate
Transportation storage and disposalemspen
57
171 Emergency releaseReleasing the doorRequirement The drain pump isempty rarr Page 441 ATTENTION Escaping water may
cause material damage Do not open the door if you can
see water through the glassPull the emergency release down-wards with a tool and release
a The door lock is released2 Insert the maintenance flap and
lock it into place3 Close the maintenance flap
Transportation storage and disposal
18 Transportation stor-age and disposal
Transportation storage and disposal
You can find out here how to prepareyour appliance for transportation andstorage You will also find out how todispose of old appliances
181 Removing the appliance1 Turn off the tap2 rarr Emptying the water inlet hose
Page 473 Switch off the appliance4 Unplug the appliances mains plug
5 Drain the remaining detergentsolution rarr Cleaning the drain pumpPage 44
6 Detach the hoses
182 Inserting the transitbolts
Secure the appliance for transporta-tion using transit bolts in order to pre-vent damage1 Remove the four cover caps
‒ If necessary use a screwdriverto remove the cover caps
Keep the cover caps2 Insert the four sleeves
enemspTransportation storage and disposal
58
3 Insert all screws into the fourtransit bolts and tighten slightly
4 Insert the power cord into theholder and tighten all fourscrews for the transit bolts with aWAF 13 wrench
5 Insert the hose into holder
183 Using the applianceagain
1 Remove the transit bolts
2 Pour approx 1 litre of water intocompartment II in the detergentdrawer
3 Start the programmea The unused detergent cannot flow
straight into the outlet during thenext wash
184 Disposing of old appli-ance
Valuable raw materials can be re-used by recycling
WARNINGRisk of harm to healthChildren can lock themselves in theappliance thereby putting their livesat risk Do not install the appliance behind
a door as this may obstruct the ap-pliance door or prevent it fromopening
With redundant appliances unplugthe power cord Then cut throughthe cord and damage the lock onthe appliance door beyond repairso that the appliance door will nolonger close
1 Unplug the appliance from themains
2 Cut through the power cord3 Dispose of the appliance in an en-
vironmentally friendly mannerInformation about current disposalmethods are available from yourspecialist dealer or local authority
This appliance is la-belled in accordancewith European Directive201219EU concerningused electrical and elec-
Customer Serviceemspen
59
tronic appliances (wasteelectrical and electronicequipment - WEEE)The guideline determ-ines the framework forthe return and recyclingof used appliances asapplicable throughoutthe EU
Customer Service
19 Customer ServiceCustomer Service
If you have any queries on use areunable to rectify faults on the appli-ance yourself or if your applianceneeds to be repaired contact Cus-tomer ServiceYou can solve many problems your-self by consulting the information ontroubleshooting in these instructionsor on our website If this is not thecase contact our after-sales serviceWith any warranty claims we willmake sure that your appliance is re-paired by trained after-sales techni-cians using genuine spare parts in-cluding after the manufacturers war-ranty has expiredFunction-relevant genuine spare partsaccording to the corresponding Eco-design Order can be obtained fromCustomer Service for a period of atleast 10 years from the date onwhich your appliance was placed onthe market within the European Eco-nomic AreaNote Under the terms of the manu-facturers warranty the use of Cus-tomer Service is free of chargeDetailed information on the warrantyperiod and terms of warranty in yourcountry is available from our after-sales service your retailer or on ourwebsite
If you contact Customer Service youwill require the product number (E-Nr) and the production number (FD)of your applianceThe contact details for Customer Ser-vice can be found in the enclosedCustomer Service directory or on ourwebsite
191 Product number (E-Nr)and production number(FD)
You can find the product number (E-Nr) and the production number (FD)on the appliances rating plateDepending on the model the ratingplate is locatediexcl On the inside of the dooriexcl On the inside of the maintenance
flapiexcl On the rear of the applianceMake a note of your appliances de-tails and the Customer Service tele-phone number to find them againquickly
enemspConsumption values
60
Consumption values
20 Consumption valuesConsumption values
The following information is provided in accordance with the EU EcodesignRegulation The values given for programs other than the Eco 40-60 are indicat-ive only and were determined in accordance with the applicable standardEN60456
Programme Load(kg)
Pro-gramme dura-tion(hrmin)1
Energycon-sump-tion(kWhcycle)1
Watercon-sump-tion (lcycle)1
Max-imumtemper-ature(degC) 5mins1
Spinspeed(rpm)1
Resid-ualmois-ture()1
Eco 40-602 90 337 1245 610 50 1166 5000Eco 40-602 45 252 0590 450 33 1200 5000Eco 40-602 25 233 0195 300 24 1200 5400AlgodoacutenAl-godatildeo 20 degC
90 328 0370 900 23 1200 5400
AlgodoacutenAl-godatildeo 40 degC
90 328 1350 900 45 1200 5400
AlgodoacutenAl-godatildeo 60 degC
90 328 1450 900 55 1200 5400
AlgodoacutenAl-godatildeo 40 degC + Pre-lav
90 358 1400 1020 45 1200 5400
Sinteacuteticos 40 degC
40 228 0780 610 44 1200 2700
Mix 40 degC 40 059 0620 440 41 1200 5600 LanaLatildes
30 degC20 040 0200 400 22 800 2500
1 Due to the influence of water pressure hardness and inlet temperature am-bient temperature type amount and soiling of laundry detergent used fluc-tuations in the power supply and the selected additional functions the actualvalues may deviate from the stated values
2 Test programme in accordance with the EU Ecodesign Directive and the EUEnergy Labelling Regulation with cold water (15 degC)
Technical specificationsemspen
61
Technical specifications
21 Technical specifica-tions
Technical specifications
Facts and figures for your appliancecan be found here
Appliance height 850 cmAppliance width 598 cmAppliance depth 590 cmWeight 80 kg1
Maximum load 9 kgMains voltage 220 - 240 V
50 Hz Minimum in-
stallation protec-tion
10 A
Rated power 2300 WPower consump-tion
iexcl Off mode010 W
iexcl Left-on mode050 W
Water pressure iexcl Minimum100 kPa(1 bar)
iexcl Maximum1000 kPa(10 bar)
Length of the wa-ter inlet hose
150 cm
Length of the wa-ter outlet hose
150 cm
Length of thepower cord
160 cm
1 Depending on the appliance spe-cifications
More information about your modelcan be found online at httpsen-ergylabelbsh-groupcom1 This webaddress is linked to the official EUEPREL product database At the time
of printing its web address had notyet been published Please then fol-low the instructions on searching formodels The model identifier is madeup of the characters before the slashin the product number (E-Nr) on therating plate Alternatively you canalso find the model identifier in thefirst line of the EU energy label
1 Only applies to countries in the European Economic Area
Thank you for buying aBosch Home Appliance
Register your new device on MyBosch now and profit directly from
bull Expert tips amp tricks for your appliancebull Warranty extension optionsbull Discounts for accessories amp spare-partsbull Digital manual and all appliance data at handbull Easy access to Bosch Home Appliances Service
Free and easy registration ndash also on mobile phoneswwwbosch-homecomwelcome
Looking for help Youll find it here
Expert advice for your Bosch home appliances help with problems or a repair from Bosch experts Find out everything about the many ways Bosch can support you wwwbosch-homecomservice Contact data of all countries are listed in the attached service direct-ory
90016102699001610269emsp(010219)en
Robert Bosch Hausgeraumlte GmbHCarl-Wery-Straszlige 3481739 MuumlnchenGERMANYwwwbosch-homecom
Valid within Great BritainImported to Great Britain byBSH Home Appliances LtdGrand Union HouseOld Wolverton RoadWolverton Milton KeynesMK12 5PTUnited Kingdom
enemspInstallation and connection
12
Installation and connection
4 Installation and con-nection
Installation and connection
41 Unpacking the applianceNote Please read the information inthe Safety rarr Page 4 and Preventingmaterial damage rarr Page 10 sectionsto ensure that you use the appliancesafely
ATTENTIONObjects remaining in the drum thatare not designed for operation withthe appliance may cause materialdamage and damage to the appli-ance Remove these objects along with
all supplied accessories from thedrum before starting the appliance
1 Remove any packaging and pro-tective covers completely from theapplianceFor the environmentally friendlydisposal of the packaging materi-als observe the information on thetopic of rarr Disposing of packagingPage 11
2 Check the appliance for visibledamage
3 Open the door rarr Basic operation Page 36
4 Remove the accessory from thedrum
5 Close the door
Installation and connectionemspen
13
42 Contents of packageAfter unpacking all parts check for any damage in transit and completeness ofthe delivery
1 2 3
4
1 Washing machine
2 Accompanying documents
3 Water inlet hose
4 Cover caps
43 Requirements for the in-stallation location
Note Please read the information inthe Safety rarr Page 4 and Preventingmaterial damage rarr Page 10 sectionsto ensure that you use the appliancesafely
WARNINGRisk of electric shockThe appliance contains live partsTouching live parts is dangerous Do not operate the appliance
without a cover cap
WARNINGRisk of injuryWhen using the appliance on a basethe appliance may tip over Always secure the feet of the appli-
ance to a base using the manufac-turers fixing brackets rarr Page 31before using the appliance for thefirst time
enemspInstallation and connection
14
ATTENTIONIf the appliance is installed in areasexposed to frost or outdoors frozenresidual water may damage the appli-ance and frozen hoses may crack orsplit Do not install or operate this appli-
ance anywhere that is liable to ex-perience frost andor outdoors
The appliance underwent a functiontest before leaving the factory andmay therefore contain residual wa-ter This residual water may leak outif the appliance is tilted at an anglegreater than 40deg Tilt the appliance carefully
Installation loca-tion
Requirements
On a base Secure the appli-ance with fixingbracketsrarr Page 31
On a woodenjoist floor
Place the appli-ance on a water-resistant woodenboard which isscrewed tightly tothe floor Thewooden boardshould be atleast 30 mmthick
Installation loca-tion
Requirements
In a kitchen unit iexcl A niche widthof 60 cm is re-quired
iexcl Only install theappliance un-derneath acontinuousworktop that issecurely con-nected to adja-cent cabinets
Note If the cov-ering plate is re-moved the metalcovering plate rarr AccessoriesPage 31 mustbe secured be-fore installation
On a wall Do not trap thehoses betweenthe wall and theappliance
44 Removing the transitbolts
The appliance is secured for trans-portation using transit bolts on therear of the applianceNotesiexcl Please read the information in the
Safety rarr Page 4 and Preventingmaterial damage rarr Page 10 sec-tions to ensure that you use theappliance safely
iexcl Keep the transit bolts screws andsleeves in a safe place for futuretransport rarr Page 57
Installation and connectionemspen
15
1 Pull the hoses out of the holders
2 Unscrew and remove all fourscrews for the transit bolts with aWAF 13 wrench
3 Pull the power cord out of theholder
4 Remove the four sleeves
5 Put on the four cover caps
6 Press down on the four covercaps
enemspInstallation and connection
16
45 Connecting the applianceConnecting the water inlet hoseNoteiexcl Please read the information in the
Safety rarr Page 4 and Preventingmaterial damage rarr Page 10 sec-tions to ensure that you use theappliance safely
1 Connect the water inlet hose
2
1
2 Connect the water inlet hose to atap (264 mm = 34)
frac34˝min
min
10 mm
17 mm
3 Open the water tap carefully andcheck that the connection pointsare tight
Water outlet connection typesThis information is intended to helpyou to connect this appliance to thewater outlet
Note Please read the information inthe Safety rarr Page 4 and Preventingmaterial damage rarr Page 10 sectionsto ensure that you use the appliancesafely
ATTENTIONWhen draining the water outlet hoseis subject to water pressure and maycome loose from the installed con-nection point Secure the water outlet hose
against unintentional loosening
Note Observe the draining heightsThe maximum draining height is100 cm
Drainage into asiphon
Secure the con-nection point witha (24ndash40 mm)hose clamp
Drainage into awashbasin
Fix and securethe water outletusing an elbowrarr Page 31
Drainage into aplastic pipe withrubber sleeve orinto a gully
Fix and securethe water outletusing an elbowrarr Page 31
Installation and connectionemspen
17
46 Aligning the applianceIn order to reduce noise and vibra-tion and to prevent the appliancefrom moving align the appliance cor-rectlyNote Please read the information inthe Safety rarr Page 4 and Preventingmaterial damage rarr Page 10 sectionsto ensure that you use the appliancesafely1 Loosen the lock nuts using a WAF
17 wrench by turning it in a clock-wise direction
2 To align the appliance turn the ap-pliance feet Check that the appli-ance is level using a spirit level
All appliance feet must stand firmlyon the ground
3 Screw the lock nuts tightly againstthe housing using a WAF 17wrench
In doing so hold the foot tight anddo not adjust its height
47 Connecting the applianceto the electricity supply
Note Please read the information inthe Safety rarr Page 4 and Preventingmaterial damage rarr Page 10 sectionsto ensure that you use the appliancesafely1 Insert the mains plug of the appli-
ances power cable in a socketnearbyThe connection details of the appli-ance can be found under Tech-nical data rarr Page 61
2 Check the mains plug is insertedproperly
enemspFamiliarising yourself with your appliance
18
Familiarising yourself with your appliance
5 Familiarising yourself with your applianceFamiliarising yourself with your appliance
51 ApplianceYou can find an overview of the parts of your appliance here
1
2
4 73 6
88
5
On certain models specific details such as the colour and shape may differfrom those pictured
1 Maintenance flap for the drainpump rarr Page 44
2 Door
3 Detergent drawer rarr Page 19
4 Controls rarr Page 19
5 Covering plate
6 Water outlet hose rarr Page 16
7 Power cord rarr Page 17
8 Transit bolts rarr Page 14
Familiarising yourself with your applianceemspen
19
52 Detergent drawer
2
3
1
4
1 Measuring aid for liquid deter-gent rarr Using a measuring aid forliquid detergent Page 37
2 Compartment IIiexcl Detergent for main washiexcl Water softeneriexcl Bleachiexcl Stain remover
3 Compartment iexcl Fabric softeneriexcl Liquid starchiexcl Waterproofing agent
4 Compartment Iiexcl Detergent for prewashiexcl Hygiene detergent
53 ControlsYou can use the control panel to configure all functions of your appliance andto obtain information about the operating status
2 3
1 1
4
1 Programmes rarr Page 24
2 Programme selectorrarr Page 36
3 Display rarr Page 20
4 Buttons rarr Page 23
enemspDisplay
20
Display
6 DisplayDisplay
The display shows the current settings options or relevant information
Display Designation Description040 1 Programme dura-
tionprogrammetime remaining
Approximate expected programme dura-tion or programme time remaining
10h 1 Ready in time The programme end has been set and theremaining number of hours is displayed rarr Buttons Page 23
9 kg 1 Recommendedload
The maximum load capacity for the selec-ted programme in kg
ndash ndash ndash ndash -1200
Spin speed Set spin speed in rpm rarr Buttons Page 230= No final spin only drainingndash ndash ndash ndash Rinse Hold no draining
ndash 90 Temperature Set temperature in degC rarr Buttons Page 23
(cold)StartPause Start cancel or pause
iexcl Lights up The programme is runningand can be cancelled or paused
iexcl Flashes The programme can be star-ted or continued
Wash Programme status1 Example
Displayemspen
21
Display Designation DescriptionRinse Programme statusSpin Programme status
ndash ndash ndash ndash Rinse Hold Programme statusEnd End of pro-
grammeProgramme status
Childproof lock iexcl lights up The childproof lock is activ-ated
iexcl flashes The childproof lock is activatedand the appliance has been operated rarr Deactivating the childproof lockPage 40
Prewash Prewash is activated rarr Buttons Page 23
Water Plus andRinse Plus
Wash with more water and a rinse cycle isactivated rarr Buttons Page 23
SpeedPerfect Short wash activated rarr Buttons Page 23
1 Energy consump-tion
Energy consumption for the selected pro-grammeiexcl Low energy consumptioniexcl High energy consumption
Reminder to cleanthe drum
Flashes Drum is dirty Run the Limp tam-bor programme for cleaning and caringfor the drum and the outer tub rarr Cleaning the drum Page 42
Voltage controlsystem
Flashes The automatic voltage controlsystem detects impermissible voltagedrops This will pause the programmeNote The programme will continue whenthe voltage is permissible again
Voltage controlsystem
Flashes The programme has beenpaused because of impermissible voltagedrops The voltage is permissible againand the programme will continueNote The programme duration is exten-ded
1 Example
enemspDisplay
22
Display Designation DescriptionDoor iexcl Lights up The door is locked and can-
not be openediexcl Flashes The door is not closed prop-
erlyiexcl Off The door is unlocked and can be
openedTap iexcl No water pressure
iexcl The water pressure is too lowE35 -10 1 Error Error code error display signal1 Example
Buttonsemspen
23
Buttons
7 ButtonsButtons
The selection of programme settings depends on the programme that is setYou can see the selection options for each programme in the overview for rarr Programmes Page 24
Button Selection DescriptionInicioPausa +Carga (StartPause + Reload)
iexcl Startiexcl Canceliexcl Pause
Start cancel or pause the pro-gramme
SpeedPerfect iexcl Activateiexcl Deactivate
Activate or deactivate a short washingprogrammeNote Energy consumption increasesThe washing result is not affected bythis
Termin (ReadyIn)
1ndash24 hours Set the programme endThe programme duration is already in-cluded in the set number of hoursOnce the programme has started theprogramme duration is displayed
Temp degC (Tem-perature)
ndash 90 degC Adjust the temperature in degC
Centrif (Spin) ndash ndash ndash ndash - 1200 Adjust the spin speed or activate ndash ndash ndash ndash (Rinse Hold)If ndash ndash ndash ndash is selected the water is notdrained at the end of the washingcycle and the spin cycle is deactiv-ated The laundry remains in the waterused for rinsing
3 seg (ChildLock 3 sec)
iexcl Activateiexcl Deactivate
Activate or deactivate the childprooflockDisable the control panel to preventunwanted or accidental operationIf the childproof lock is activated andthe appliance has been switched offthe childproof lock remains activated rarr Childproof lock Page 40
Prelav (Pre-wash)
iexcl Activateiexcl Deactivate
Activate or deactivate prewash egfor washing heavily soiled laundry
Extra (ExtraRinse)
iexcl Activateiexcl Deactivate
Activate or deactivate a washing pro-gramme with more water and an addi-tional rinse cycleRecommended for particularly sensit-ive skin or in regions with very softwater
enemspProgrammes
24
Programmes 8 P
rogr
amm
esProgrammes B
elow
is a
n ov
ervi
ew o
f the
pro
gram
mes
You
can
find
info
rmat
ion
on the
load
and
on
the
adju
stab
le p
ro-
gram
me
optio
ns
Tip
The
laun
dry
s ca
re la
bels
pro
vide
you
with
add
ition
al in
form
atio
n on
pro
gram
me
sele
ctio
n
rarr
Car
e sy
mbo
ls o
n th
e ca
re la
bels
Pa
ge 3
4
Pro
gram
me
Des
crip
tion
Max load (kg)
Pro
gram
me
sett
ings
Max temperature (degC)
Max spin speed(rpm) 1
SpeedPerfect
Extra
Centrif ndash ndash ndash ndash(Rinse Hold)
Prelav
Alg
odoacuten
Al-
godatilde
o (
Cot
tons
)W
ash
hard
-wea
ring
item
s m
ade
from
cotto
n li
nen
or b
lend
ed fa
bric
sA
lso
suita
ble
as a
sho
rt p
rogr
amm
efo
r no
rmal
ly s
oile
d la
undr
y w
hen
you
activ
ate
Spe
edPer
fect
I
f Spe
ed-
Per
fect
is
act
ivat
ed t
he m
ax-
imum
load
cap
acity
is r
educ
ed to
5 k
g
990
1200
Alg
odoacuten
Col
orA
l-go
datildeo
Cor
(
Cot
-to
ns C
olou
r)
Was
h ha
rd-w
earin
g ite
ms
mad
e from
cotto
n li
nen
or b
lend
ed fa
bric
sEne
rgy-
savi
ng p
rogr
amm
e
9
90
1200
ndash
1Pro
gram
me
setti
ng
Programmesemspen
25
Pro
gram
me
Des
crip
tion
Max load (kg)
Pro
gram
me
sett
ings
Max temperature (degC)
Max spin speed(rpm) 1
SpeedPerfect
Extra
Centrif ndash ndash ndash ndash(Rinse Hold)
Prelav
Not
e T
o sa
ve e
nerg
y the
act
ual
was
hing
tem
pera
ture
may
dev
iate
from
the
set
was
hing
tem
pera
ture
Th
e w
ashi
ng p
erfo
rman
ce m
eets
lega
l req
uire
men
ts
Eco
40-6
0W
ash
item
s m
ade
from
cot
ton
line
nor
ble
nded
fabr
ics
Not
e T
extil
es w
hich
can
be
was
hed
from
40 deg
C
up
to 6
0 deg
C
as
per
the
care
sym
bol c
an b
e w
ashe
dto
geth
er
The
was
hing
per
form
ance
cor
res-
pond
s to
the
bes
t po
ssib
le w
ashi
ngpe
rfor
man
ce c
lass
acc
ordi
ng to
the
lega
l req
uire
men
ts
For
this
pro
gram
me
the
was
hing
tem
pera
ture
is a
utom
atic
ally
adj
uste
dde
pend
ing
on the
load
siz
e in
ord
erto
ach
ieve
the
bes
t po
ssib
le e
nerg
y
9
ndash
1200
ndash
1Pro
gram
me
setti
ng
enemspProgrammes
26
Pro
gram
me
Des
crip
tion
Max load (kg)
Pro
gram
me
sett
ings
Max temperature (degC)
Max spin speed(rpm) 1
SpeedPerfect
Extra
Centrif ndash ndash ndash ndash(Rinse Hold)
Prelav
effic
ienc
y w
ith the
bes
t po
ssib
lew
ashi
ng r
esul
t You
can
not ch
ange
the
was
hing
tem
pera
ture
Sin
teacutetic
os
(Eas
yC
are)
Was
h ite
ms
mad
e from
syn
thet
ic o
rbl
ende
d fa
bric
s4
60
1200
Mix
(
Mix
edFa
bric
s)W
ash
item
s m
ade
from
cot
ton
line
nor
syn
thet
ic o
r bl
ende
d fa
bric
sSui
tabl
e fo
r lig
htly
soi
led
laun
dry
460
1200
Del
icad
oSed
a (D
elic
ate
Silk
)W
ash
delic
ate
was
habl
e ite
ms
mad
efrom
silk
vis
cose
and
syn
thet
ics
Use
a d
eter
gent
tha
t is
sui
tabl
e fo
rde
licat
es o
r si
lk
Not
e W
ash
espe
cial
ly d
elic
ate
item
sor
item
s w
ith h
ooks
eye
lets
or
clip
sin
a m
esh
laun
dry
bag
2
40
800
ndash
1Pro
gram
me
setti
ng
Programmesemspen
27
Pro
gram
me
Des
crip
tion
Max load (kg)
Pro
gram
me
sett
ings
Max temperature (degC)
Max spin speed(rpm) 1
SpeedPerfect
Extra
Centrif ndash ndash ndash ndash(Rinse Hold)
Prelav
Lan
aLatilde
s (W
ool)
Han
d- o
r m
achi
ne-w
asha
ble
item
sth
at a
re m
ade
from
woo
l or
cont
ain
woo
lTo
pre
vent
the
laun
dry
from
shr
ink-
ing
the
dru
m m
oves
the
item
s ve
ryge
ntly
with
long
pau
ses
Use
a d
eter
gent
tha
t is
sui
tabl
e fo
rw
ool
2
40
800
ndash
ndash
ndash
(R
inse
)R
inse
s an
d th
en s
pins
the
laun
dry
and
then
dra
ins
the
wat
er
ndashndash
1200
ndash
ndash
(
Spi
nD
rain
)Spi
ns a
nd d
rain
s th
e w
ater
If
you
only
wan
t to
dra
in the
wat
er
activ
ate
0 T
he la
undr
y is
not
spu
n
ndash
ndash
1200
ndash
ndash
ndash
ndash
Rop
a os
cura
R
oupa
esc
ura
(Dar
k W
ash)
Was
h da
rk-c
olou
red
and
colo
ur-in
-te
nse
item
s m
ade
from
cot
ton
orea
sy-c
are
fabr
ic e
g j
eans
Tu
rn la
undr
y in
side
-out
bef
ore
was
h-in
gU
se li
quid
det
erge
nt
4
40
1200
1Pro
gram
me
setti
ng
enemspProgrammes
28
Pro
gram
me
Des
crip
tion
Max load (kg)
Pro
gram
me
sett
ings
Max temperature (degC)
Max spin speed(rpm) 1
SpeedPerfect
Extra
Centrif ndash ndash ndash ndash(Rinse Hold)
Prelav
Plu
mas
Pen
as
(Dow
n)W
ash
pillo
ws
duv
ets
or c
loth
ing
stuf
fed
with
dow
n an
d fil
lings
with
synt
hetic
fibr
es
Was
h la
rge
item
s se
para
tely
U
se a
det
erge
nt tha
t is
sui
tabl
e fo
rdo
wn
or d
elic
ates
U
se s
parin
gly
Do
not us
e fa
bric
sof
tene
rN
ote
To
prev
ent ex
cess
ive
foam
ing
rem
ove
air
from
laun
dry
item
s by
rolli
ng the
m u
p be
fore
you
was
hth
em
2
60
1200
ndash
ndash
Lim
p tam
bor
(Dru
m C
lean
)C
lean
ing
and
carin
g fo
r th
e dr
um
Use
thi
s pr
ogra
mm
e in
the
follo
win
gca
ses
iexclB
efor
e us
ing
the
appl
ianc
e fo
r th
efir
st tim
eiexcl
If yo
u re
gula
rly w
ash
at tem
pera
t-ur
es o
f 40 deg
C o
r lo
wer
ndash
ndash
1200
ndash
ndash
ndash
ndash
1Pro
gram
me
setti
ng
Programmesemspen
29
Pro
gram
me
Des
crip
tion
Max load (kg)
Pro
gram
me
sett
ings
Max temperature (degC)
Max spin speed(rpm) 1
SpeedPerfect
Extra
Centrif ndash ndash ndash ndash(Rinse Hold)
Prelav
iexclA
fter
a pr
olon
ged
perio
d of
non
-us
eU
se w
ashi
ng p
owde
r or
a d
eter
gent
cont
aini
ng b
leac
hH
alve
the
am
ount
of d
eter
gent
to
avoi
d fo
amin
gD
o no
t us
e fa
bric
sof
tene
rD
o no
t us
e liq
uid
dete
rgen
t or
det
er-
gent
tha
t is
inte
nded
for
woo
llens
or
delic
ates
N
ote
The
dru
m c
lean
ing
indi
cato
rw
ill fl
ash
to r
emin
d yo
u if
you
have
not us
ed a
pro
gram
me
at 6
0 deg
C o
rhi
gher
for
a lo
ng tim
eC
amis
asB
lusa
s (S
hirts
Blo
uses
)W
ash
non-
iron
shirt
s an
d bl
ouse
sm
ade
from
cot
ton
line
n s
ynth
etic
or
blen
ded
fabr
ics
Not
e U
se the
Del
icad
oSed
a pr
o-gr
amm
e to
was
h sh
irts
and
blou
ses
mad
e from
silk
or
delic
ate
fabr
ics
2
60
800
ndash
1Pro
gram
me
setti
ng
enemspProgrammes
30
Pro
gram
me
Des
crip
tion
Max load (kg)
Pro
gram
me
sett
ings
Max temperature (degC)
Max spin speed(rpm) 1
SpeedPerfect
Extra
Centrif ndash ndash ndash ndash(Rinse Hold)
Prelav
Spo
rt
Was
h sp
orts
and
leis
ure
item
s m
ade
from
syn
thet
ic fi
bres
mic
rofib
re o
rfle
ece
Use
a d
eter
gent
tha
t is
sui
tabl
e fo
rsp
orts
item
sD
o no
t us
e fa
bric
sof
tene
rTi
p U
se the
Sin
teacutetic
os
prog
ram
me
to w
ash
heav
ily s
oile
d la
undr
y
2
40
800
ndash
Raacutep
ido
153
0m
in
(Sup
erQ
uick
153
0 m
in)
Was
h ite
ms
mad
e from
cot
ton
syn
-th
etic
or
blen
ded
fabr
ics
Sho
rt p
rogr
amm
e fo
r sm
all i
tem
s of
light
ly s
oile
d la
undr
yTh
e pr
ogra
mm
e du
ratio
n is
app
rox
30 m
inut
es
If yo
u w
ish
to r
educ
e th
e pr
ogra
mm
edu
ratio
n to
15 m
inut
es a
ctiv
ate
Spe
edPer
fect
T
he m
axim
umlo
ad is
red
uced
to
2 k
g
4
40
1200
ndash
1Pro
gram
me
setti
ng
Accessoriesemspen
31
Accessories
9 AccessoriesAccessories
Use original accessories These have been made especially for your appliance
Use Order numberWater inlet hose exten-sion
Extend the water inlethose for cold water orAquaStop (approx 250m)
WMZ2381
Fixing brackets Improves the stability ofthe appliance
WMZ2200
Longer water inlet hose Replace the standardwater inlet hose with alonger hose (220 m)
00353925
Elbow Secure the water outlethose in place
00655300
Liquid detergent insert Measure liquid deter-gent
00605740
Metal covering plate Metal covering plate forinstalling the applianceunder a high worktop
WMZ20430
Before using for the first time
10 Before using for thefirst time
Before using for the first time
Prepare the appliance for use
101 Starting an empty wash-ing cycle
Your appliance was inspected thor-oughly before leaving the factory Toremove any residual water run thefirst wash cycle without any laundryNote Please read the information inthe Safety rarr Page 4 and Preventingmaterial damage rarr Page 10 sectionsto ensure that you use the appliancesafely
1 Turn the programme selector toLimp tambor
2 Close the door
enemspLaundry
32
3 Pull out the detergent drawer
4 Pour approx 1 litre of tap waterinto compartment II
5 Pour washing powder into com-partment II
To prevent foaming use only halfof the amount of detergent recom-mended by the detergent manufac-turer for light soiling Do not usedetergent suitable for woollens ordelicates
6 Push in the detergent drawer
7 Press InicioPausa + Carga (StartPause + Reload) to start theprogramme
a The display shows the remainingprogramme duration
a After the programme has endedthe display shows End
8 Start the first wash cycle or set theprogramme selector to to switchoff the appliance rarr Basic operation Page 36
Laundry
11 LaundryLaundry
111 Preparing the laundryNote Please read the information inthe Safety rarr Page 4 and Preventingmaterial damage rarr Page 10 sectionsto ensure that you use the appliancesafely
ATTENTIONObjects remaining in the laundry maydamage the laundry and the drum Remove all items from any pock-
ets in your laundry before usingthe appliance
To protect your appliance and thelaundry prepare the laundry be-forehandndash Empty any pockets
Laundryemspen
33
ndash Brush sand out of all collars andpockets
ndash Close bed covers and cushioncovers
ndash Close all zips Velcro fastenershooks and eyes
ndash Tie cloth belts apron stringsetc together or use a laundrybag
ndash Remove curtain hooks and leadstrips or use a mesh laundrybag
ndash Use a mesh laundry bag forsmall items of laundry such aschildrens socks
ndash Some stubborn or dried-in stainscan be removed by washingseveral times
ndash Wash large and small items oflaundry together
ndash Do not rub fresh stains but dabthem with soapy water
ndash Separate items of laundry andshake them out
112 Sorting laundryNote Please read the information inthe Safety rarr Page 4 and Preventingmaterial damage rarr Page 10 sectionsto ensure that you use the appliancesafely To improve washing results and
prevent discolouration sort thelaundry according to the followingcriteria before washingndash Type of fabric and fibre
Wash laundry of the sametype of fabric and fibre to-gether
ndash Care symbols on the care labelsrarr Page 34
ndash Description of the programmesrarr Page 24
ndash Whitesndash Colours
Wash new coloured itemsseparately the first time youwash them
113 Degrees of soiling
Degree of soiling Soiling ExamplesLight iexcl No dirt or stains are vis-
ibleiexcl Laundry has absorbed
odours
Light summer clothing orsports clothing that hasbeen worn for a just a fewhours
Normal Dirt or light stains are vis-ible
iexcl T-shirts shirts or blousesare sweat-soaked orhave been worn a fewtimes
iexcl Towels or bedding thathas been used for up toone week
Heavy Dirt or stains are clearlyvisible
Tea towels baby items orwork clothing
enemspDetergents and care products
34
114 Care symbols on the care labels
Washing care symbols
Symbol Washing process Recommended pro-gramme
Normal Cotton Gentle Easy-Care Particularly gentle DelicatesSilk for
washing by handHand wash WoolNot suitable for machine-washing ndash
Detergents and care products
12 Detergents and careproducts
Detergents and care products
Note Please read the information inthe Safety rarr Page 4 and Preventingmaterial damage rarr Page 10 sectionsto ensure that you use the appliancesafelyThe manufacturers instructions foruse and dosage can be found on thepackaging
Notesiexcl Only use liquid detergents that are
self-flowingiexcl Do not mix different liquid deter-
gentsiexcl Do not mix detergent and fabric
softeneriexcl Do not use products that have ex-
pired or are highly congealediexcl Do not use products containing
solvents caustic agents or volatilesubstances (eg bleach)
iexcl Use dyes sparingly as salt maydamage stainless steel
iexcl Do not use bleaching agents in theappliance
121 Detergent recommendation
Detergent Fabrics Pro-gramme
Temperature
Standard detergentwith optical brighten-ers
Heat-resistant whitefabrics made fromcotton or linen
Cotton From cold up to90 degC
Detergent for colourswithout bleach or op-tical brighteners
Coloured fabricsmade from linen orcotton
Cotton From cold up to60 degC
Detergent for col-oursdelicates withoutoptical brighteners
Coloured fabricsmade from easy-carefabrics or syntheticmaterials
Easy-Care From cold up to60 degC
Detergents and care productsemspen
35
Detergent Fabrics Pro-gramme
Temperature
Detergent for delic-ates
Delicate fine textilessilk or viscose
DelicatesSilk
From cold up to40 degC
Detergent for wool-lens
Wool Wool From cold up to40 degC
Tip Visit wwwcleanrighteu to findfurther information on detergentscare products and cleaning agentsfor domestic use
122 Detergent dosageThe detergent dosage depends oniexcl The amount of laundryiexcl Degree of soilingiexcl Water hardness
You can find out how hard yourwater is from your local water com-pany or measure it yourself usinga water hardness tester
Water hardness
Hardness range Total hardness in mmoll
German degrees in degdH
soft (I) 0ndash15 0ndash84medium (II) 15ndash 25 84ndash14hard (III) over 25 over 14
Example of a manufacturersinstructions for detergentThese example values refer to astandard load of 4ndash5 kg
Soiling Light Normal HeavyWater hardness Softmedium 40 ml 55 ml 80 mlWater hardness Hardveryhard
55 ml 80 ml 105 ml
The dosages can be found on themanufacturers packagingiexcl Adjust the dosage to the actual
load
enemspBasic operation
36
Basic operation
13 Basic operationBasic operation
131 Switching on the appli-ance
Turn the programme selector to aprogramme
132 Setting a programme1 Set the programme selector to the
required programme rarr Programmes Page 24
2 If necessary adjust the pro-gramme settings rarr Page 36
133 Adjusting the pro-gramme settings
Requirement A programme hasbeen set rarr Setting a programme Page 36
Adjust the programme settings rarr Programmes Page 24
Note The programme settings arenot saved permanently for the pro-gramme
134 Loading laundryNotesiexcl Please read the information in the
Safety rarr Page 4 and Preventingmaterial damage rarr Page 10 sec-tions to ensure that you use theappliance safely
iexcl To prevent creasing take note ofthe maximum load for the rarr Programmes Page 24
Requirement The laundry is pre-pared and sortedrarr Laundry Page 321 Open the door
Make sure that the drum is empty2 Load the laundry unfolded into the
drum3 Close the door
Ensure that there is no laundrytrapped in the door
Basic operationemspen
37
135 Using a measuring aidfor liquid detergent
If you order the measuring aid as anaccessory you must use the measur-ing aid1 Pull out the detergent drawer
2 Press down on the insert and re-move the detergent drawer
1
2
3 Insert the measuring aid
4 Insert the detergent drawer
136 Use the measuring aidfor liquid detergent
To add liquid detergent you can usea measuring aid in the detergentdrawer1 Pull out the detergent drawer2 Slide the measuring aid forwards
3 Fold the measuring aid down andclick it into place
enemspBasic operation
38
4 Push in the detergent drawer
137 Adding detergent andcare product
Notesiexcl Please read the information in the
Safety rarr Page 4 and Preventingmaterial damage rarr Page 10 sec-tions to ensure that you use theappliance safely
iexcl Do not use the measuring aid forliquid detergent for gel detergentswashing powder or if Prewash orReady in time are activated
Requirement Find out the optimumdosage for detergent and careproduct rarr Page 341 Pull out the detergent drawer2 Pour in detergent
rarr Detergent drawer Page 193 If required add the care product4 Push in the detergent drawer
138 Starting the programmeNote If you want to change the timeuntil the programme ends set theReady in time first Press InicioPausa + Carga a The drum rotates and load detec-
tion takes place This can take upto 2 minutes after which waterenters the drum
a The display shows either the pro-gramme duration or the Ready intime
a After the programme has endedthe display shows End
139 Adjusting the Ready intime before the pro-gramme starts
You can readjust the selected Readyin time before the programme starts1 Press InicioPausa + Carga 2 Press Termin repeatedly until
the display indicates the desiredReady in time
3 Press InicioPausa + Carga
1310 Soaking laundryNote No additional detergent is re-quired The washing solution is thenused for washing1 Start the programme2 To pause the programme after ap-
prox 10 minutes press InicioPausa + Carga
3 To resume the programme afterthe desired soaking time pressInicioPausa + Carga
1311 Adding laundryNote Please read the information inthe Safety rarr Page 4 and Preventingmaterial damage rarr Page 10 sectionsto ensure that you use the appliancesafely1 Press InicioPausa + Carga
The appliance is paused andchecks whether it is possible toadd or remove laundry Take noteof the programme status
2 Add or remove laundry3 Close the door4 Press InicioPausa + Carga
Basic operationemspen
39
1312 Cancelling the pro-gramme
Once the programme has startedyou can cancel it at any timeNote Please read the information inthe Safety rarr Page 4 and Preventingmaterial damage rarr Page 10 sectionsto ensure that you use the appliancesafely1 Press InicioPausa + Carga 2 Open the door
The appliance door remainslocked for safety reasons if thetemperature and water levels arehighndash If the temperature is high start
the programmendash If the water level is high Start
the or programme3 Remove the laundry
1313 Resuming the pro-gramme when the pro-gramme status is RinseHold
1 Set the or programme2 Press InicioPausa + Carga
1314 Unloading the laundryNote Please read the information inthe Safety rarr Page 4 and Preventingmaterial damage rarr Page 10 sectionsto ensure that you use the appliancesafely1 Open the door
2 Remove the laundry
1315 Switching off the appli-ance
1 Turn the programme selector to
2 Turn off the tap3 Wipe the rubber gasket dry and re-
move any foreign objects
4 Leave the door and detergentdrawer open so that residual watercan evaporate
enemspChildproof lock
40
Childproof lock
14 Childproof lockChildproof lock
Secure your appliance against beingoperated unintentionally using thecontrols
141 Activating the childprooflock
Press and hold the two 3 segbuttons for approx 3 seconds
a The display shows a The controls are lockeda The childproof lock remains active
even after the appliance has beenswitched off
142 Deactivating the child-proof lock
Requirement To deactivate thechildproof lock the appliance mustbe switched on Press and hold the two 3 seg
buttons for approx 3 secondsa goes out in the display
Basic settingsemspen
41
Basic settings
15 Basic settingsBasic settings
You can configure the appliance to meet your needs
151 Overview of the basic settingsBelow is an overview of the basic settings on your appliance
Basic setting Programmeposition
Value Description
End signal 2 0 (off)1 (quiet)2 (me-dium)3 (loud)4 (veryloud)
Set the volume of the signal at theend of the programme
Button signal 3 0 (off)1 (quiet)2 (me-dium)3 (loud)4 (veryloud)
The volume of the audible signalemitted when the buttons arepressed
Drum cleaningreminder
4 ONOFF
Activate or deactivate the re-minder to clean the drum
enemspCleaning and servicing
42
152 Changing the basic set-tings
1 Set the programme selector to po-sition 1
2 Press InicioPausa + Carga and at the same time turn theprogramme selector to position 2
a The display shows the currentvalue
3 Set the programme selector to therequired position
4 To change the value press Ter-min
5 To save the changes switch offthe appliance
Cleaning and servicing
16 Cleaning and servi-cing
Cleaning and servicing
To keep your appliance working effi-ciently for a long time it is importantto clean and maintain it carefully
161 Tips on appliance careWipe down thehousing and thecontrol panelwith nothing butwater and adamp cloth
This ensures theparts of the appli-ance will remainclean and hy-gienic
Remove all de-tergent residuespray residue orother residuesimmediately
Fresh depositsare easier to re-move withoutleaving anyresidue
Keep the appli-ance door anddetergent draweropen after use
This allows theresidual water todry reducingodours in the ap-pliance
162 Cleaning the drum
CAUTIONRisk of injuryPermanently washing at low temper-atures and a lack of ventilation forthe appliance may damage the drumand cause injury Regularly run a programme for
cleaning the drum or wash at tem-peratures of at least 60 degC
Leave the appliance to dry afterevery operation with the dooropen and leave the detergentdrawer to dry
Run the Limp tambor pro-gramme without laundryAdd washing powder
163 Cleaning the detergentdrawer
Note Please read the information inthe Safety rarr Page 4 and Preventingmaterial damage rarr Page 10 sectionsto ensure that you use the appliancesafely1 Pull out the detergent drawer
Cleaning and servicingemspen
43
2 Press down on the insert and re-move the detergent drawer
1
2
3 Press out the insert upwards frombelow
4 Clean the detergent drawer and in-sert with water and a brush andthen dry them
5 Fit the insert and lock it into place
6 Cleaning the opening for the deter-gent drawer
7 Push in the detergent drawer
164 Descaling
ATTENTIONThe use of unsuitable descalingagents eg for coffee machines maydamage the appliance For this appliance only use de-
scaling agents that are availablefrom the manufacturers website orour after-sales service
enemspCleaning and servicing
44
165 Cleaning the drain pumpClean the drain pump in the event offaults eg blockages or rattlingnoises
Emptying the drain pumpNote Please read the information inthe Safety rarr Page 4 and Preventingmaterial damage rarr Page 10 sectionsto ensure that you use the appliancesafely1 Turn off the water tap2 Switch off the appliance3 Disconnect the appliances mains
plug from the power supply4 Open the maintenance flap
5 Remove the maintenance flap
6 Slide a sufficiently large receptacleunder the opening
7 Take the drain hose out of theholder
Cleaning and servicingemspen
45
8 CAUTION - Risk of scaldingWhen you wash at high temperat-ures the detergent solution getshot
Do not touch the hot detergentsolutionTo allow the detergent solution toflow out into the container removethe sealing cap
9 Firmly press on the sealing cap
10 Insert the drain hose into theholder
Cleaning the drain pumpNote Please read the information inthe Safety rarr Page 4 and Preventingmaterial damage rarr Page 10 sectionsto ensure that you use the appliancesafelyRequirement The drain pump isempty rarr Page 441 Since water may remain in the
drain pump remove the pump capcarefully
2 Clean the interior the thread onthe pump cap and the pump hous-ing
3 Make sure that the impeller in thedrain pump can be rotated
enemspCleaning and servicing
46
4 Insert the pump cap and screw iton as far as it will go
90deg
The handle on the pump cap mustbe in a vertical position
5 Close the maintenance flap
Before the next washTo prevent unused detergent fromflowing straight into the outlet in thenext wash run the programmeafter you have emptied the drainpump1 Turn on the tap2 Insert the mains plug3 Switch on the appliance4 Pour 1 litre of water into compart-
ment II5 Start the programme
166 Cleaning the water outlethose at the siphon
1 Switch off the appliance2 Disconnect the appliances mains
plug from the power supply
3 Loosen the hose clamp and care-fully remove the water outlet hose
Residual water may leak out4 Clean the water outlet hose and si-
phon connecting piece
5 Reattach the water outlet hose andsecure the connection point usingthe hose clamp
Cleaning and servicingemspen
47
167 Clean the water inlet fil-ters
Emptying the water inlet hose1 Turn off the tap2 Set a programme except for
or 3 Start the programme and leave it
to run for approx 40 seconds4 Switch off the appliance5 Disconnect the appliances mains
plug from the power supply
Cleaning the filter on the tapNote Please read the information inthe Safety rarr Page 4 and Preventingmaterial damage rarr Page 10 sectionsto ensure that you use the appliancesafelyRequirement The water inlet hose isempty1 Remove the water inlet hose from
the tap
2 Clean the filter with a small brush
3 Connect the water inlet hose andcheck for leaks
Cleaning the filter on theapplianceNote Please read the information inthe Safety rarr Page 4 and Preventingmaterial damage rarr Page 10 sectionsto ensure that you use the appliancesafelyRequirement The water inlet hose isempty rarr Emptying the water inlet hosePage 47
enemspCleaning and servicing
48
1 Disconnect the hose from the rearof the appliance
1
2
2 Use pliers to remove the filter
3 Clean the filter with a small brush
4 Reinsert the filter
5 Connect the hose and check forleaks
2
1
Troubleshootingemspen
49
Troubleshooting
17 TroubleshootingTroubleshooting
You can rectify minor faults on your appliance yourself Read the troubleshoot-ing information before contacting after-sales service This will avoid unneces-sary costs
WARNINGRisk of electric shockIncorrect repairs are dangerous Repairs to the appliance should only be carried out by trained specialist
staff Only use genuine spare parts when repairing the appliance If the power cord of this appliance is damaged it must be replaced by the
manufacturer the manufacturers Customer Service or a similarly qualifiedperson in order to prevent any risk
Fault Cause and troubleshootingThe display goes outand InicioPausa +Carga flashes
Energy-saving mode is active Press any buttona The symbol lights up again
E36 -10 Drain pipe or water outlet hose is blocked Clean the drain pipe and the water outlet hose
Drain pipe or water drain hose is caught or jammed Ensure that the drain pipe and water drain hose are
not kinked or trapped
Drain pump is blocked rarr Cleaning the drain pump Page 44
The water outlet hose is connected too high Install the water outlet hose at a maximum height of
1 metre
Detergent dosage is too high Immediate measure Mix one tablespoon of fabric
softener with 05 litres of water and pour the mix-ture into the left-hand compartment (not for outdoorclothing sportswear or items stuffed with down)
Reduce the amount of detergent for the next wash-ing cycle with the same load
Unapproved extension installed on the water drainhose Remove any unapproved extensions from the water
hose Connecting the appliance
E36 -25 -26 Drain pump is blocked rarr Cleaning the drain pump Page 44
enemspTroubleshooting
50
Fault Cause and troubleshootingThe water pressure is lowNo remedial action possibleThe filters in the water inflow are blocked Clean the filters in the water inflow rarr Page 47
The tap is turned off Turn on the tap
The water inlet hose is kinked or jammed Ensure that the water inlet hose is not kinked or
jammed
flashes The automatic voltage control system detects an un-authorised voltage under-usage No remedial action possible
Note If the power supply is stable the programmecontinues to run as normalVoltage under-usage may cause extension of a pro-grammeNo remedial action possible
flashes Voltage under-usage may cause extension of a pro-grammeNo remedial action possible
lights up The temperature is too high Wait until the temperature has dropped rarr Cancelling the programme Page 39
Water level is too high Start the programme
Laundry is caught in the door1 Open the door again2 Remove any trapped laundry3 Close the door4 Press InicioPausa + Carga to start the pro-
gramme
flashes Door is not closed1 Close the door2 Press InicioPausa + Carga to start the pro-
gramme
All other error codes Malfunction Call the after-sales service
rarr Customer Service Page 59
Troubleshootingemspen
51
Fault Cause and troubleshootingThe appliance is notworking
The mains plug of the power cord is not plugged in Connect the appliance to the power supply
The circuit breaker is faulty Check the circuit breaker in the fuse box
There has been a power cut Check whether the lighting in your kitchen or other
appliances are working
The programme doesnot start
You have not pressed InicioPausa + Carga Press InicioPausa + Carga
Door is not closed1 Close the door2 Press InicioPausa + Carga to start the pro-
gramme
Childproof lock is activated rarr Deactivating the childproof lock Page 40
Termin is activated Check whether Termin is activated
rarr Buttons Page 23
Laundry is caught in the door1 Open the door again2 Remove any trapped laundry3 Close the door4 Press InicioPausa + Carga to start the pro-
gramme
The door cannotbe opened
ndash ndash ndash ndash is activated Continue the programme by selecting or and
pressing InicioPausa + Carga rarr Resuming the programme when the programmestatus is Rinse Hold Page 39
The temperature is too high Wait until the temperature has dropped rarr Cancelling the programme Page 39
Water level is too high Start the programme
Power failure Open the door using the emergency release
rarr Emergency release Page 57
The water is not drain-ing
Drain pipe or water outlet hose is blocked Clean the drain pipe and the water outlet hose
enemspTroubleshooting
52
Fault Cause and troubleshootingThe water is not drain-ing
Drain pipe or water drain hose is caught or jammed Ensure that the drain pipe and water drain hose are
not kinked or trapped
Drain pump is blocked rarr Cleaning the drain pump Page 44
ndash ndash ndash ndash is activated Continue the programme by selecting or and
pressing InicioPausa + Carga rarr Resuming the programme when the programmestatus is Rinse Hold Page 39
The water outlet hose is connected too high Install the water outlet hose at a maximum height of
1 metre
Detergent dosage is too high Immediate measure Mix one tablespoon of fabric
softener with 05 litres of water and pour the mix-ture into the left-hand compartment (not for outdoorclothing sportswear or items stuffed with down)
Reduce the amount of detergent for the next wash-ing cycle with the same load
Unapproved extension installed on the water drainhose Remove any unapproved extensions from the water
hose Connecting the appliance
Water is not flowingin Detergent is notbeing dispensed
You have not pressed InicioPausa + Carga Press InicioPausa + Carga
The filters in the water inflow are blocked Clean the filters in the water inflow rarr Page 47
The tap is turned off Turn on the tap
The water inlet hose is kinked or jammed Ensure that the water inlet hose is not kinked or
jammed
The spin cycle runsseveral times
The unbalanced load detection system eliminates animbalance by repeatedly redistributing the laundry Not a fault ndash no action required
Note When loading where possible place large andsmall items of laundry together in the drum Differentsized items of laundry distribute themselves betterduring the spin cycle
Troubleshootingemspen
53
Fault Cause and troubleshootingThe programme dura-tion changes duringthe wash cycle
The programme operation is optimised electronicallyThis may change the programme duration Not a fault ndash no action required
The unbalanced load detection system eliminates animbalance by repeatedly redistributing the laundry Not a fault ndash no action required
Note When loading where possible place large andsmall items of laundry together in the drum Differentsized items of laundry distribute themselves betterduring the spin cycleFoam detection system switches on a rinse cycle iffoam build-up is too high Not a fault ndash no action required
No water is visible inthe drum
Water is below the visible area Not a fault ndash no action required Do not add any extra water to the appliance while it
is operating
Drum jerks after theprogramme starts
This is caused by an internal motor test Not a fault ndash no action required
Residual water ispresent in the com-partment
Insert in compartment is blocked rarr Cleaning the detergent drawer Page 42
Vibrations and move-ment of the appliancewhilst spinning
Appliance is not correctly aligned Aligning the appliance
The appliance feet are not fixed Secure the appliance feet Aligning the appliance
Transit bolts have not been removed Removing the transit bolts
Drum does not turnwater does not flow in
Load detection is active Not a fault ndash no action required
Note The load detection can take up to two minutesHeavy foam build-up Detergent dosage is too high
Immediate measure Mix one tablespoon of fabricsoftener with 05 litres of water and pour the mix-ture into the left-hand compartment (not for outdoorclothing sportswear or items stuffed with down)
Reduce the amount of detergent for the next wash-ing cycle with the same load
enemspTroubleshooting
54
Fault Cause and troubleshootingHigh spin speed notreached
A low spin speed is selected The next time you run a wash cycle set a higher
spin speed
Unbalance load detection system is using a reducedspin speed to eliminate an unbalance Redistribute the laundry in the drum
Note Where possible mix large and small items inthe drum Different sized items of laundry distributethemselves better during the spin cycle Start the programme
The spin programmedoes not start
Drain pipe or water outlet hose is blocked Clean the drain pipe and the water outlet hose
Drain pipe or water drain hose is caught or jammed Ensure that the drain pipe and water drain hose are
not kinked or trapped
The unbalanced load detection system has interruptedthe spin cycle because the laundry is unevenly distrib-uted Redistribute the laundry in the drum
Note Where possible mix large and small items inthe drum Different sized items of laundry distributethemselves better during the spin cycle Start the programme
Rushing hissingnoise
Water is flushed under pressure into the detergentdrawer Not a fault ndash normal operating noise
Loud noises duringthe spin cycle
Appliance is not correctly aligned Aligning the appliance
The appliance feet are not fixed Secure the appliance feet Aligning the appliance
Transit bolts have not been removed Removing the transit bolts
Banging noises rat-tling in the drainpump
Foreign bodies have got into the drain pump rarr Cleaning the drain pump Page 44
Slurping rhythmicalsuction noise
The drain pump is active the detergent solution ispumped out Not a fault ndash normal operating noise
Troubleshootingemspen
55
Fault Cause and troubleshootingCreasing The spin speed is too high
The next time you run a wash cycle set a lowerspin speed
The load is too large The next time you run a wash cycle reduce the
amount of laundry being loaded
The wrong programme is selected for the type of fab-ric Select the programmes that are suitable for the
type of fabric rarr Programmes Page 24
Detergent or fabricsoftener drips off theseal and collects onthe door or in the sealfold
Too much detergentfabric softener in the detergentdrawer When dosing liquid detergent and fabric softener
observe the marking in the detergent drawer anddo not dose above this
The spin result is notsatisfactory The laun-dry is too wettoodamp
A low spin speed is selected The next time you run a wash cycle set a higher
spin speed Start the programme
Drain pipe or water outlet hose is blocked Clean the drain pipe and the water outlet hose
Drain pipe or water drain hose is caught or jammed Ensure that the drain pipe and water drain hose are
not kinked or trapped
The unbalanced load detection system has interruptedthe spin cycle because the laundry is unevenly distrib-uted Redistribute the laundry in the drum
Note Where possible mix large and small items inthe drum Different sized items of laundry distributethemselves better during the spin cycle Start the programme
Unbalance load detection system is using a reducedspin speed to eliminate an unbalance Redistribute the laundry in the drum
Note Where possible mix large and small items inthe drum Different sized items of laundry distributethemselves better during the spin cycle Start the programme
enemspTroubleshooting
56
Fault Cause and troubleshootingDetergent residue onthe damp washing
Detergents may contain water-insoluble substancesthat deposit on the laundry Start the programme
Detergent residue onthe dry laundry
Detergents may contain water-insoluble substancesthat deposit on the laundry Brush out the laundry after washing and drying
Water is leaking out atthe water inlet hose
Water inlet hose is not correctlysecurely connected1 Connect the water supply hose correctly Connect-
ing the water inlet hose2 Tighten the screw connection
Water is leaking out atthe water outlet hose
The water outlet hose is damaged Replace the damaged water outlet hose
Water outlet hose is not connected correctly Connect the water outlet hose correctly Water out-
let connection types
Odours have formedin the appliance
Humidity and detergent residue may promote theformation of bacteria rarr Cleaning the drum Page 42 If you are not using the appliance leave the door
and detergent drawer open so that residual watercan evaporate
Transportation storage and disposalemspen
57
171 Emergency releaseReleasing the doorRequirement The drain pump isempty rarr Page 441 ATTENTION Escaping water may
cause material damage Do not open the door if you can
see water through the glassPull the emergency release down-wards with a tool and release
a The door lock is released2 Insert the maintenance flap and
lock it into place3 Close the maintenance flap
Transportation storage and disposal
18 Transportation stor-age and disposal
Transportation storage and disposal
You can find out here how to prepareyour appliance for transportation andstorage You will also find out how todispose of old appliances
181 Removing the appliance1 Turn off the tap2 rarr Emptying the water inlet hose
Page 473 Switch off the appliance4 Unplug the appliances mains plug
5 Drain the remaining detergentsolution rarr Cleaning the drain pumpPage 44
6 Detach the hoses
182 Inserting the transitbolts
Secure the appliance for transporta-tion using transit bolts in order to pre-vent damage1 Remove the four cover caps
‒ If necessary use a screwdriverto remove the cover caps
Keep the cover caps2 Insert the four sleeves
enemspTransportation storage and disposal
58
3 Insert all screws into the fourtransit bolts and tighten slightly
4 Insert the power cord into theholder and tighten all fourscrews for the transit bolts with aWAF 13 wrench
5 Insert the hose into holder
183 Using the applianceagain
1 Remove the transit bolts
2 Pour approx 1 litre of water intocompartment II in the detergentdrawer
3 Start the programmea The unused detergent cannot flow
straight into the outlet during thenext wash
184 Disposing of old appli-ance
Valuable raw materials can be re-used by recycling
WARNINGRisk of harm to healthChildren can lock themselves in theappliance thereby putting their livesat risk Do not install the appliance behind
a door as this may obstruct the ap-pliance door or prevent it fromopening
With redundant appliances unplugthe power cord Then cut throughthe cord and damage the lock onthe appliance door beyond repairso that the appliance door will nolonger close
1 Unplug the appliance from themains
2 Cut through the power cord3 Dispose of the appliance in an en-
vironmentally friendly mannerInformation about current disposalmethods are available from yourspecialist dealer or local authority
This appliance is la-belled in accordancewith European Directive201219EU concerningused electrical and elec-
Customer Serviceemspen
59
tronic appliances (wasteelectrical and electronicequipment - WEEE)The guideline determ-ines the framework forthe return and recyclingof used appliances asapplicable throughoutthe EU
Customer Service
19 Customer ServiceCustomer Service
If you have any queries on use areunable to rectify faults on the appli-ance yourself or if your applianceneeds to be repaired contact Cus-tomer ServiceYou can solve many problems your-self by consulting the information ontroubleshooting in these instructionsor on our website If this is not thecase contact our after-sales serviceWith any warranty claims we willmake sure that your appliance is re-paired by trained after-sales techni-cians using genuine spare parts in-cluding after the manufacturers war-ranty has expiredFunction-relevant genuine spare partsaccording to the corresponding Eco-design Order can be obtained fromCustomer Service for a period of atleast 10 years from the date onwhich your appliance was placed onthe market within the European Eco-nomic AreaNote Under the terms of the manu-facturers warranty the use of Cus-tomer Service is free of chargeDetailed information on the warrantyperiod and terms of warranty in yourcountry is available from our after-sales service your retailer or on ourwebsite
If you contact Customer Service youwill require the product number (E-Nr) and the production number (FD)of your applianceThe contact details for Customer Ser-vice can be found in the enclosedCustomer Service directory or on ourwebsite
191 Product number (E-Nr)and production number(FD)
You can find the product number (E-Nr) and the production number (FD)on the appliances rating plateDepending on the model the ratingplate is locatediexcl On the inside of the dooriexcl On the inside of the maintenance
flapiexcl On the rear of the applianceMake a note of your appliances de-tails and the Customer Service tele-phone number to find them againquickly
enemspConsumption values
60
Consumption values
20 Consumption valuesConsumption values
The following information is provided in accordance with the EU EcodesignRegulation The values given for programs other than the Eco 40-60 are indicat-ive only and were determined in accordance with the applicable standardEN60456
Programme Load(kg)
Pro-gramme dura-tion(hrmin)1
Energycon-sump-tion(kWhcycle)1
Watercon-sump-tion (lcycle)1
Max-imumtemper-ature(degC) 5mins1
Spinspeed(rpm)1
Resid-ualmois-ture()1
Eco 40-602 90 337 1245 610 50 1166 5000Eco 40-602 45 252 0590 450 33 1200 5000Eco 40-602 25 233 0195 300 24 1200 5400AlgodoacutenAl-godatildeo 20 degC
90 328 0370 900 23 1200 5400
AlgodoacutenAl-godatildeo 40 degC
90 328 1350 900 45 1200 5400
AlgodoacutenAl-godatildeo 60 degC
90 328 1450 900 55 1200 5400
AlgodoacutenAl-godatildeo 40 degC + Pre-lav
90 358 1400 1020 45 1200 5400
Sinteacuteticos 40 degC
40 228 0780 610 44 1200 2700
Mix 40 degC 40 059 0620 440 41 1200 5600 LanaLatildes
30 degC20 040 0200 400 22 800 2500
1 Due to the influence of water pressure hardness and inlet temperature am-bient temperature type amount and soiling of laundry detergent used fluc-tuations in the power supply and the selected additional functions the actualvalues may deviate from the stated values
2 Test programme in accordance with the EU Ecodesign Directive and the EUEnergy Labelling Regulation with cold water (15 degC)
Technical specificationsemspen
61
Technical specifications
21 Technical specifica-tions
Technical specifications
Facts and figures for your appliancecan be found here
Appliance height 850 cmAppliance width 598 cmAppliance depth 590 cmWeight 80 kg1
Maximum load 9 kgMains voltage 220 - 240 V
50 Hz Minimum in-
stallation protec-tion
10 A
Rated power 2300 WPower consump-tion
iexcl Off mode010 W
iexcl Left-on mode050 W
Water pressure iexcl Minimum100 kPa(1 bar)
iexcl Maximum1000 kPa(10 bar)
Length of the wa-ter inlet hose
150 cm
Length of the wa-ter outlet hose
150 cm
Length of thepower cord
160 cm
1 Depending on the appliance spe-cifications
More information about your modelcan be found online at httpsen-ergylabelbsh-groupcom1 This webaddress is linked to the official EUEPREL product database At the time
of printing its web address had notyet been published Please then fol-low the instructions on searching formodels The model identifier is madeup of the characters before the slashin the product number (E-Nr) on therating plate Alternatively you canalso find the model identifier in thefirst line of the EU energy label
1 Only applies to countries in the European Economic Area
Thank you for buying aBosch Home Appliance
Register your new device on MyBosch now and profit directly from
bull Expert tips amp tricks for your appliancebull Warranty extension optionsbull Discounts for accessories amp spare-partsbull Digital manual and all appliance data at handbull Easy access to Bosch Home Appliances Service
Free and easy registration ndash also on mobile phoneswwwbosch-homecomwelcome
Looking for help Youll find it here
Expert advice for your Bosch home appliances help with problems or a repair from Bosch experts Find out everything about the many ways Bosch can support you wwwbosch-homecomservice Contact data of all countries are listed in the attached service direct-ory
90016102699001610269emsp(010219)en
Robert Bosch Hausgeraumlte GmbHCarl-Wery-Straszlige 3481739 MuumlnchenGERMANYwwwbosch-homecom
Valid within Great BritainImported to Great Britain byBSH Home Appliances LtdGrand Union HouseOld Wolverton RoadWolverton Milton KeynesMK12 5PTUnited Kingdom
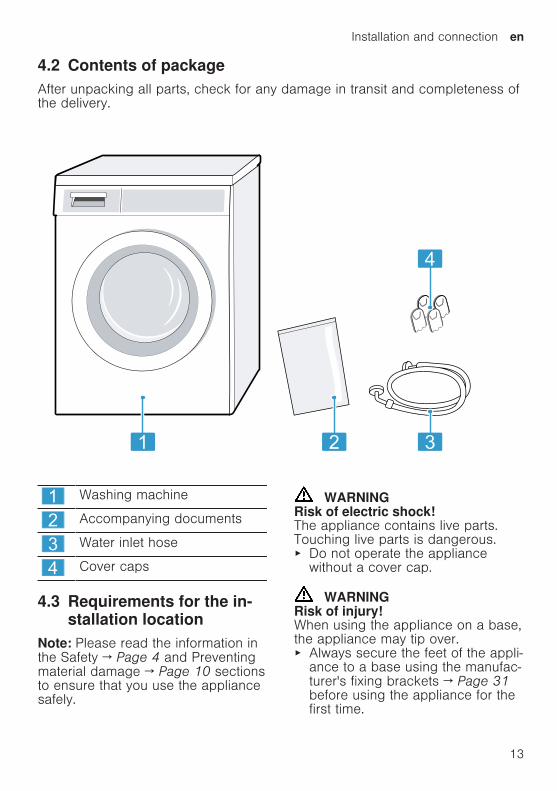
Installation and connectionemspen
13
42 Contents of packageAfter unpacking all parts check for any damage in transit and completeness ofthe delivery
1 2 3
4
1 Washing machine
2 Accompanying documents
3 Water inlet hose
4 Cover caps
43 Requirements for the in-stallation location
Note Please read the information inthe Safety rarr Page 4 and Preventingmaterial damage rarr Page 10 sectionsto ensure that you use the appliancesafely
WARNINGRisk of electric shockThe appliance contains live partsTouching live parts is dangerous Do not operate the appliance
without a cover cap
WARNINGRisk of injuryWhen using the appliance on a basethe appliance may tip over Always secure the feet of the appli-
ance to a base using the manufac-turers fixing brackets rarr Page 31before using the appliance for thefirst time
enemspInstallation and connection
14
ATTENTIONIf the appliance is installed in areasexposed to frost or outdoors frozenresidual water may damage the appli-ance and frozen hoses may crack orsplit Do not install or operate this appli-
ance anywhere that is liable to ex-perience frost andor outdoors
The appliance underwent a functiontest before leaving the factory andmay therefore contain residual wa-ter This residual water may leak outif the appliance is tilted at an anglegreater than 40deg Tilt the appliance carefully
Installation loca-tion
Requirements
On a base Secure the appli-ance with fixingbracketsrarr Page 31
On a woodenjoist floor
Place the appli-ance on a water-resistant woodenboard which isscrewed tightly tothe floor Thewooden boardshould be atleast 30 mmthick
Installation loca-tion
Requirements
In a kitchen unit iexcl A niche widthof 60 cm is re-quired
iexcl Only install theappliance un-derneath acontinuousworktop that issecurely con-nected to adja-cent cabinets
Note If the cov-ering plate is re-moved the metalcovering plate rarr AccessoriesPage 31 mustbe secured be-fore installation
On a wall Do not trap thehoses betweenthe wall and theappliance
44 Removing the transitbolts
The appliance is secured for trans-portation using transit bolts on therear of the applianceNotesiexcl Please read the information in the
Safety rarr Page 4 and Preventingmaterial damage rarr Page 10 sec-tions to ensure that you use theappliance safely
iexcl Keep the transit bolts screws andsleeves in a safe place for futuretransport rarr Page 57
Installation and connectionemspen
15
1 Pull the hoses out of the holders
2 Unscrew and remove all fourscrews for the transit bolts with aWAF 13 wrench
3 Pull the power cord out of theholder
4 Remove the four sleeves
5 Put on the four cover caps
6 Press down on the four covercaps
enemspInstallation and connection
16
45 Connecting the applianceConnecting the water inlet hoseNoteiexcl Please read the information in the
Safety rarr Page 4 and Preventingmaterial damage rarr Page 10 sec-tions to ensure that you use theappliance safely
1 Connect the water inlet hose
2
1
2 Connect the water inlet hose to atap (264 mm = 34)
frac34˝min
min
10 mm
17 mm
3 Open the water tap carefully andcheck that the connection pointsare tight
Water outlet connection typesThis information is intended to helpyou to connect this appliance to thewater outlet
Note Please read the information inthe Safety rarr Page 4 and Preventingmaterial damage rarr Page 10 sectionsto ensure that you use the appliancesafely
ATTENTIONWhen draining the water outlet hoseis subject to water pressure and maycome loose from the installed con-nection point Secure the water outlet hose
against unintentional loosening
Note Observe the draining heightsThe maximum draining height is100 cm
Drainage into asiphon
Secure the con-nection point witha (24ndash40 mm)hose clamp
Drainage into awashbasin
Fix and securethe water outletusing an elbowrarr Page 31
Drainage into aplastic pipe withrubber sleeve orinto a gully
Fix and securethe water outletusing an elbowrarr Page 31
Installation and connectionemspen
17
46 Aligning the applianceIn order to reduce noise and vibra-tion and to prevent the appliancefrom moving align the appliance cor-rectlyNote Please read the information inthe Safety rarr Page 4 and Preventingmaterial damage rarr Page 10 sectionsto ensure that you use the appliancesafely1 Loosen the lock nuts using a WAF
17 wrench by turning it in a clock-wise direction
2 To align the appliance turn the ap-pliance feet Check that the appli-ance is level using a spirit level
All appliance feet must stand firmlyon the ground
3 Screw the lock nuts tightly againstthe housing using a WAF 17wrench
In doing so hold the foot tight anddo not adjust its height
47 Connecting the applianceto the electricity supply
Note Please read the information inthe Safety rarr Page 4 and Preventingmaterial damage rarr Page 10 sectionsto ensure that you use the appliancesafely1 Insert the mains plug of the appli-
ances power cable in a socketnearbyThe connection details of the appli-ance can be found under Tech-nical data rarr Page 61
2 Check the mains plug is insertedproperly
enemspFamiliarising yourself with your appliance
18
Familiarising yourself with your appliance
5 Familiarising yourself with your applianceFamiliarising yourself with your appliance
51 ApplianceYou can find an overview of the parts of your appliance here
1
2
4 73 6
88
5
On certain models specific details such as the colour and shape may differfrom those pictured
1 Maintenance flap for the drainpump rarr Page 44
2 Door
3 Detergent drawer rarr Page 19
4 Controls rarr Page 19
5 Covering plate
6 Water outlet hose rarr Page 16
7 Power cord rarr Page 17
8 Transit bolts rarr Page 14
Familiarising yourself with your applianceemspen
19
52 Detergent drawer
2
3
1
4
1 Measuring aid for liquid deter-gent rarr Using a measuring aid forliquid detergent Page 37
2 Compartment IIiexcl Detergent for main washiexcl Water softeneriexcl Bleachiexcl Stain remover
3 Compartment iexcl Fabric softeneriexcl Liquid starchiexcl Waterproofing agent
4 Compartment Iiexcl Detergent for prewashiexcl Hygiene detergent
53 ControlsYou can use the control panel to configure all functions of your appliance andto obtain information about the operating status
2 3
1 1
4
1 Programmes rarr Page 24
2 Programme selectorrarr Page 36
3 Display rarr Page 20
4 Buttons rarr Page 23
enemspDisplay
20
Display
6 DisplayDisplay
The display shows the current settings options or relevant information
Display Designation Description040 1 Programme dura-
tionprogrammetime remaining
Approximate expected programme dura-tion or programme time remaining
10h 1 Ready in time The programme end has been set and theremaining number of hours is displayed rarr Buttons Page 23
9 kg 1 Recommendedload
The maximum load capacity for the selec-ted programme in kg
ndash ndash ndash ndash -1200
Spin speed Set spin speed in rpm rarr Buttons Page 230= No final spin only drainingndash ndash ndash ndash Rinse Hold no draining
ndash 90 Temperature Set temperature in degC rarr Buttons Page 23
(cold)StartPause Start cancel or pause
iexcl Lights up The programme is runningand can be cancelled or paused
iexcl Flashes The programme can be star-ted or continued
Wash Programme status1 Example
Displayemspen
21
Display Designation DescriptionRinse Programme statusSpin Programme status
ndash ndash ndash ndash Rinse Hold Programme statusEnd End of pro-
grammeProgramme status
Childproof lock iexcl lights up The childproof lock is activ-ated
iexcl flashes The childproof lock is activatedand the appliance has been operated rarr Deactivating the childproof lockPage 40
Prewash Prewash is activated rarr Buttons Page 23
Water Plus andRinse Plus
Wash with more water and a rinse cycle isactivated rarr Buttons Page 23
SpeedPerfect Short wash activated rarr Buttons Page 23
1 Energy consump-tion
Energy consumption for the selected pro-grammeiexcl Low energy consumptioniexcl High energy consumption
Reminder to cleanthe drum
Flashes Drum is dirty Run the Limp tam-bor programme for cleaning and caringfor the drum and the outer tub rarr Cleaning the drum Page 42
Voltage controlsystem
Flashes The automatic voltage controlsystem detects impermissible voltagedrops This will pause the programmeNote The programme will continue whenthe voltage is permissible again
Voltage controlsystem
Flashes The programme has beenpaused because of impermissible voltagedrops The voltage is permissible againand the programme will continueNote The programme duration is exten-ded
1 Example
enemspDisplay
22
Display Designation DescriptionDoor iexcl Lights up The door is locked and can-
not be openediexcl Flashes The door is not closed prop-
erlyiexcl Off The door is unlocked and can be
openedTap iexcl No water pressure
iexcl The water pressure is too lowE35 -10 1 Error Error code error display signal1 Example
Buttonsemspen
23
Buttons
7 ButtonsButtons
The selection of programme settings depends on the programme that is setYou can see the selection options for each programme in the overview for rarr Programmes Page 24
Button Selection DescriptionInicioPausa +Carga (StartPause + Reload)
iexcl Startiexcl Canceliexcl Pause
Start cancel or pause the pro-gramme
SpeedPerfect iexcl Activateiexcl Deactivate
Activate or deactivate a short washingprogrammeNote Energy consumption increasesThe washing result is not affected bythis
Termin (ReadyIn)
1ndash24 hours Set the programme endThe programme duration is already in-cluded in the set number of hoursOnce the programme has started theprogramme duration is displayed
Temp degC (Tem-perature)
ndash 90 degC Adjust the temperature in degC
Centrif (Spin) ndash ndash ndash ndash - 1200 Adjust the spin speed or activate ndash ndash ndash ndash (Rinse Hold)If ndash ndash ndash ndash is selected the water is notdrained at the end of the washingcycle and the spin cycle is deactiv-ated The laundry remains in the waterused for rinsing
3 seg (ChildLock 3 sec)
iexcl Activateiexcl Deactivate
Activate or deactivate the childprooflockDisable the control panel to preventunwanted or accidental operationIf the childproof lock is activated andthe appliance has been switched offthe childproof lock remains activated rarr Childproof lock Page 40
Prelav (Pre-wash)
iexcl Activateiexcl Deactivate
Activate or deactivate prewash egfor washing heavily soiled laundry
Extra (ExtraRinse)
iexcl Activateiexcl Deactivate
Activate or deactivate a washing pro-gramme with more water and an addi-tional rinse cycleRecommended for particularly sensit-ive skin or in regions with very softwater
enemspProgrammes
24
Programmes 8 P
rogr
amm
esProgrammes B
elow
is a
n ov
ervi
ew o
f the
pro
gram
mes
You
can
find
info
rmat
ion
on the
load
and
on
the
adju
stab
le p
ro-
gram
me
optio
ns
Tip
The
laun
dry
s ca
re la
bels
pro
vide
you
with
add
ition
al in
form
atio
n on
pro
gram
me
sele
ctio
n
rarr
Car
e sy
mbo
ls o
n th
e ca
re la
bels
Pa
ge 3
4
Pro
gram
me
Des
crip
tion
Max load (kg)
Pro
gram
me
sett
ings
Max temperature (degC)
Max spin speed(rpm) 1
SpeedPerfect
Extra
Centrif ndash ndash ndash ndash(Rinse Hold)
Prelav
Alg
odoacuten
Al-
godatilde
o (
Cot
tons
)W
ash
hard
-wea
ring
item
s m
ade
from
cotto
n li
nen
or b
lend
ed fa
bric
sA
lso
suita
ble
as a
sho
rt p
rogr
amm
efo
r no
rmal
ly s
oile
d la
undr
y w
hen
you
activ
ate
Spe
edPer
fect
I
f Spe
ed-
Per
fect
is
act
ivat
ed t
he m
ax-
imum
load
cap
acity
is r
educ
ed to
5 k
g
990
1200
Alg
odoacuten
Col
orA
l-go
datildeo
Cor
(
Cot
-to
ns C
olou
r)
Was
h ha
rd-w
earin
g ite
ms
mad
e from
cotto
n li
nen
or b
lend
ed fa
bric
sEne
rgy-
savi
ng p
rogr
amm
e
9
90
1200
ndash
1Pro
gram
me
setti
ng
Programmesemspen
25
Pro
gram
me
Des
crip
tion
Max load (kg)
Pro
gram
me
sett
ings
Max temperature (degC)
Max spin speed(rpm) 1
SpeedPerfect
Extra
Centrif ndash ndash ndash ndash(Rinse Hold)
Prelav
Not
e T
o sa
ve e
nerg
y the
act
ual
was
hing
tem
pera
ture
may
dev
iate
from
the
set
was
hing
tem
pera
ture
Th
e w
ashi
ng p
erfo
rman
ce m
eets
lega
l req
uire
men
ts
Eco
40-6
0W
ash
item
s m
ade
from
cot
ton
line
nor
ble
nded
fabr
ics
Not
e T
extil
es w
hich
can
be
was
hed
from
40 deg
C
up
to 6
0 deg
C
as
per
the
care
sym
bol c
an b
e w
ashe
dto
geth
er
The
was
hing
per
form
ance
cor
res-
pond
s to
the
bes
t po
ssib
le w
ashi
ngpe
rfor
man
ce c
lass
acc
ordi
ng to
the
lega
l req
uire
men
ts
For
this
pro
gram
me
the
was
hing
tem
pera
ture
is a
utom
atic
ally
adj
uste
dde
pend
ing
on the
load
siz
e in
ord
erto
ach
ieve
the
bes
t po
ssib
le e
nerg
y
9
ndash
1200
ndash
1Pro
gram
me
setti
ng
enemspProgrammes
26
Pro
gram
me
Des
crip
tion
Max load (kg)
Pro
gram
me
sett
ings
Max temperature (degC)
Max spin speed(rpm) 1
SpeedPerfect
Extra
Centrif ndash ndash ndash ndash(Rinse Hold)
Prelav
effic
ienc
y w
ith the
bes
t po
ssib
lew
ashi
ng r
esul
t You
can
not ch
ange
the
was
hing
tem
pera
ture
Sin
teacutetic
os
(Eas
yC
are)
Was
h ite
ms
mad
e from
syn
thet
ic o
rbl
ende
d fa
bric
s4
60
1200
Mix
(
Mix
edFa
bric
s)W
ash
item
s m
ade
from
cot
ton
line
nor
syn
thet
ic o
r bl
ende
d fa
bric
sSui
tabl
e fo
r lig
htly
soi
led
laun
dry
460
1200
Del
icad
oSed
a (D
elic
ate
Silk
)W
ash
delic
ate
was
habl
e ite
ms
mad
efrom
silk
vis
cose
and
syn
thet
ics
Use
a d
eter
gent
tha
t is
sui
tabl
e fo
rde
licat
es o
r si
lk
Not
e W
ash
espe
cial
ly d
elic
ate
item
sor
item
s w
ith h
ooks
eye
lets
or
clip
sin
a m
esh
laun
dry
bag
2
40
800
ndash
1Pro
gram
me
setti
ng
Programmesemspen
27
Pro
gram
me
Des
crip
tion
Max load (kg)
Pro
gram
me
sett
ings
Max temperature (degC)
Max spin speed(rpm) 1
SpeedPerfect
Extra
Centrif ndash ndash ndash ndash(Rinse Hold)
Prelav
Lan
aLatilde
s (W
ool)
Han
d- o
r m
achi
ne-w
asha
ble
item
sth
at a
re m
ade
from
woo
l or
cont
ain
woo
lTo
pre
vent
the
laun
dry
from
shr
ink-
ing
the
dru
m m
oves
the
item
s ve
ryge
ntly
with
long
pau
ses
Use
a d
eter
gent
tha
t is
sui
tabl
e fo
rw
ool
2
40
800
ndash
ndash
ndash
(R
inse
)R
inse
s an
d th
en s
pins
the
laun
dry
and
then
dra
ins
the
wat
er
ndashndash
1200
ndash
ndash
(
Spi
nD
rain
)Spi
ns a
nd d
rain
s th
e w
ater
If
you
only
wan
t to
dra
in the
wat
er
activ
ate
0 T
he la
undr
y is
not
spu
n
ndash
ndash
1200
ndash
ndash
ndash
ndash
Rop
a os
cura
R
oupa
esc
ura
(Dar
k W
ash)
Was
h da
rk-c
olou
red
and
colo
ur-in
-te
nse
item
s m
ade
from
cot
ton
orea
sy-c
are
fabr
ic e
g j
eans
Tu
rn la
undr
y in
side
-out
bef
ore
was
h-in
gU
se li
quid
det
erge
nt
4
40
1200
1Pro
gram
me
setti
ng
enemspProgrammes
28
Pro
gram
me
Des
crip
tion
Max load (kg)
Pro
gram
me
sett
ings
Max temperature (degC)
Max spin speed(rpm) 1
SpeedPerfect
Extra
Centrif ndash ndash ndash ndash(Rinse Hold)
Prelav
Plu
mas
Pen
as
(Dow
n)W
ash
pillo
ws
duv
ets
or c
loth
ing
stuf
fed
with
dow
n an
d fil
lings
with
synt
hetic
fibr
es
Was
h la
rge
item
s se
para
tely
U
se a
det
erge
nt tha
t is
sui
tabl
e fo
rdo
wn
or d
elic
ates
U
se s
parin
gly
Do
not us
e fa
bric
sof
tene
rN
ote
To
prev
ent ex
cess
ive
foam
ing
rem
ove
air
from
laun
dry
item
s by
rolli
ng the
m u
p be
fore
you
was
hth
em
2
60
1200
ndash
ndash
Lim
p tam
bor
(Dru
m C
lean
)C
lean
ing
and
carin
g fo
r th
e dr
um
Use
thi
s pr
ogra
mm
e in
the
follo
win
gca
ses
iexclB
efor
e us
ing
the
appl
ianc
e fo
r th
efir
st tim
eiexcl
If yo
u re
gula
rly w
ash
at tem
pera
t-ur
es o
f 40 deg
C o
r lo
wer
ndash
ndash
1200
ndash
ndash
ndash
ndash
1Pro
gram
me
setti
ng
Programmesemspen
29
Pro
gram
me
Des
crip
tion
Max load (kg)
Pro
gram
me
sett
ings
Max temperature (degC)
Max spin speed(rpm) 1
SpeedPerfect
Extra
Centrif ndash ndash ndash ndash(Rinse Hold)
Prelav
iexclA
fter
a pr
olon
ged
perio
d of
non
-us
eU
se w
ashi
ng p
owde
r or
a d
eter
gent
cont
aini
ng b
leac
hH
alve
the
am
ount
of d
eter
gent
to
avoi
d fo
amin
gD
o no
t us
e fa
bric
sof
tene
rD
o no
t us
e liq
uid
dete
rgen
t or
det
er-
gent
tha
t is
inte
nded
for
woo
llens
or
delic
ates
N
ote
The
dru
m c
lean
ing
indi
cato
rw
ill fl
ash
to r
emin
d yo
u if
you
have
not us
ed a
pro
gram
me
at 6
0 deg
C o
rhi
gher
for
a lo
ng tim
eC
amis
asB
lusa
s (S
hirts
Blo
uses
)W
ash
non-
iron
shirt
s an
d bl
ouse
sm
ade
from
cot
ton
line
n s
ynth
etic
or
blen
ded
fabr
ics
Not
e U
se the
Del
icad
oSed
a pr
o-gr
amm
e to
was
h sh
irts
and
blou
ses
mad
e from
silk
or
delic
ate
fabr
ics
2
60
800
ndash
1Pro
gram
me
setti
ng
enemspProgrammes
30
Pro
gram
me
Des
crip
tion
Max load (kg)
Pro
gram
me
sett
ings
Max temperature (degC)
Max spin speed(rpm) 1
SpeedPerfect
Extra
Centrif ndash ndash ndash ndash(Rinse Hold)
Prelav
Spo
rt
Was
h sp
orts
and
leis
ure
item
s m
ade
from
syn
thet
ic fi
bres
mic
rofib
re o
rfle
ece
Use
a d
eter
gent
tha
t is
sui
tabl
e fo
rsp
orts
item
sD
o no
t us
e fa
bric
sof
tene
rTi
p U
se the
Sin
teacutetic
os
prog
ram
me
to w
ash
heav
ily s
oile
d la
undr
y
2
40
800
ndash
Raacutep
ido
153
0m
in
(Sup
erQ
uick
153
0 m
in)
Was
h ite
ms
mad
e from
cot
ton
syn
-th
etic
or
blen
ded
fabr
ics
Sho
rt p
rogr
amm
e fo
r sm
all i
tem
s of
light
ly s
oile
d la
undr
yTh
e pr
ogra
mm
e du
ratio
n is
app
rox
30 m
inut
es
If yo
u w
ish
to r
educ
e th
e pr
ogra
mm
edu
ratio
n to
15 m
inut
es a
ctiv
ate
Spe
edPer
fect
T
he m
axim
umlo
ad is
red
uced
to
2 k
g
4
40
1200
ndash
1Pro
gram
me
setti
ng
Accessoriesemspen
31
Accessories
9 AccessoriesAccessories
Use original accessories These have been made especially for your appliance
Use Order numberWater inlet hose exten-sion
Extend the water inlethose for cold water orAquaStop (approx 250m)
WMZ2381
Fixing brackets Improves the stability ofthe appliance
WMZ2200
Longer water inlet hose Replace the standardwater inlet hose with alonger hose (220 m)
00353925
Elbow Secure the water outlethose in place
00655300
Liquid detergent insert Measure liquid deter-gent
00605740
Metal covering plate Metal covering plate forinstalling the applianceunder a high worktop
WMZ20430
Before using for the first time
10 Before using for thefirst time
Before using for the first time
Prepare the appliance for use
101 Starting an empty wash-ing cycle
Your appliance was inspected thor-oughly before leaving the factory Toremove any residual water run thefirst wash cycle without any laundryNote Please read the information inthe Safety rarr Page 4 and Preventingmaterial damage rarr Page 10 sectionsto ensure that you use the appliancesafely
1 Turn the programme selector toLimp tambor
2 Close the door
enemspLaundry
32
3 Pull out the detergent drawer
4 Pour approx 1 litre of tap waterinto compartment II
5 Pour washing powder into com-partment II
To prevent foaming use only halfof the amount of detergent recom-mended by the detergent manufac-turer for light soiling Do not usedetergent suitable for woollens ordelicates
6 Push in the detergent drawer
7 Press InicioPausa + Carga (StartPause + Reload) to start theprogramme
a The display shows the remainingprogramme duration
a After the programme has endedthe display shows End
8 Start the first wash cycle or set theprogramme selector to to switchoff the appliance rarr Basic operation Page 36
Laundry
11 LaundryLaundry
111 Preparing the laundryNote Please read the information inthe Safety rarr Page 4 and Preventingmaterial damage rarr Page 10 sectionsto ensure that you use the appliancesafely
ATTENTIONObjects remaining in the laundry maydamage the laundry and the drum Remove all items from any pock-
ets in your laundry before usingthe appliance
To protect your appliance and thelaundry prepare the laundry be-forehandndash Empty any pockets
Laundryemspen
33
ndash Brush sand out of all collars andpockets
ndash Close bed covers and cushioncovers
ndash Close all zips Velcro fastenershooks and eyes
ndash Tie cloth belts apron stringsetc together or use a laundrybag
ndash Remove curtain hooks and leadstrips or use a mesh laundrybag
ndash Use a mesh laundry bag forsmall items of laundry such aschildrens socks
ndash Some stubborn or dried-in stainscan be removed by washingseveral times
ndash Wash large and small items oflaundry together
ndash Do not rub fresh stains but dabthem with soapy water
ndash Separate items of laundry andshake them out
112 Sorting laundryNote Please read the information inthe Safety rarr Page 4 and Preventingmaterial damage rarr Page 10 sectionsto ensure that you use the appliancesafely To improve washing results and
prevent discolouration sort thelaundry according to the followingcriteria before washingndash Type of fabric and fibre
Wash laundry of the sametype of fabric and fibre to-gether
ndash Care symbols on the care labelsrarr Page 34
ndash Description of the programmesrarr Page 24
ndash Whitesndash Colours
Wash new coloured itemsseparately the first time youwash them
113 Degrees of soiling
Degree of soiling Soiling ExamplesLight iexcl No dirt or stains are vis-
ibleiexcl Laundry has absorbed
odours
Light summer clothing orsports clothing that hasbeen worn for a just a fewhours
Normal Dirt or light stains are vis-ible
iexcl T-shirts shirts or blousesare sweat-soaked orhave been worn a fewtimes
iexcl Towels or bedding thathas been used for up toone week
Heavy Dirt or stains are clearlyvisible
Tea towels baby items orwork clothing
enemspDetergents and care products
34
114 Care symbols on the care labels
Washing care symbols
Symbol Washing process Recommended pro-gramme
Normal Cotton Gentle Easy-Care Particularly gentle DelicatesSilk for
washing by handHand wash WoolNot suitable for machine-washing ndash
Detergents and care products
12 Detergents and careproducts
Detergents and care products
Note Please read the information inthe Safety rarr Page 4 and Preventingmaterial damage rarr Page 10 sectionsto ensure that you use the appliancesafelyThe manufacturers instructions foruse and dosage can be found on thepackaging
Notesiexcl Only use liquid detergents that are
self-flowingiexcl Do not mix different liquid deter-
gentsiexcl Do not mix detergent and fabric
softeneriexcl Do not use products that have ex-
pired or are highly congealediexcl Do not use products containing
solvents caustic agents or volatilesubstances (eg bleach)
iexcl Use dyes sparingly as salt maydamage stainless steel
iexcl Do not use bleaching agents in theappliance
121 Detergent recommendation
Detergent Fabrics Pro-gramme
Temperature
Standard detergentwith optical brighten-ers
Heat-resistant whitefabrics made fromcotton or linen
Cotton From cold up to90 degC
Detergent for colourswithout bleach or op-tical brighteners
Coloured fabricsmade from linen orcotton
Cotton From cold up to60 degC
Detergent for col-oursdelicates withoutoptical brighteners
Coloured fabricsmade from easy-carefabrics or syntheticmaterials
Easy-Care From cold up to60 degC
Detergents and care productsemspen
35
Detergent Fabrics Pro-gramme
Temperature
Detergent for delic-ates
Delicate fine textilessilk or viscose
DelicatesSilk
From cold up to40 degC
Detergent for wool-lens
Wool Wool From cold up to40 degC
Tip Visit wwwcleanrighteu to findfurther information on detergentscare products and cleaning agentsfor domestic use
122 Detergent dosageThe detergent dosage depends oniexcl The amount of laundryiexcl Degree of soilingiexcl Water hardness
You can find out how hard yourwater is from your local water com-pany or measure it yourself usinga water hardness tester
Water hardness
Hardness range Total hardness in mmoll
German degrees in degdH
soft (I) 0ndash15 0ndash84medium (II) 15ndash 25 84ndash14hard (III) over 25 over 14
Example of a manufacturersinstructions for detergentThese example values refer to astandard load of 4ndash5 kg
Soiling Light Normal HeavyWater hardness Softmedium 40 ml 55 ml 80 mlWater hardness Hardveryhard
55 ml 80 ml 105 ml
The dosages can be found on themanufacturers packagingiexcl Adjust the dosage to the actual
load
enemspBasic operation
36
Basic operation
13 Basic operationBasic operation
131 Switching on the appli-ance
Turn the programme selector to aprogramme
132 Setting a programme1 Set the programme selector to the
required programme rarr Programmes Page 24
2 If necessary adjust the pro-gramme settings rarr Page 36
133 Adjusting the pro-gramme settings
Requirement A programme hasbeen set rarr Setting a programme Page 36
Adjust the programme settings rarr Programmes Page 24
Note The programme settings arenot saved permanently for the pro-gramme
134 Loading laundryNotesiexcl Please read the information in the
Safety rarr Page 4 and Preventingmaterial damage rarr Page 10 sec-tions to ensure that you use theappliance safely
iexcl To prevent creasing take note ofthe maximum load for the rarr Programmes Page 24
Requirement The laundry is pre-pared and sortedrarr Laundry Page 321 Open the door
Make sure that the drum is empty2 Load the laundry unfolded into the
drum3 Close the door
Ensure that there is no laundrytrapped in the door
Basic operationemspen
37
135 Using a measuring aidfor liquid detergent
If you order the measuring aid as anaccessory you must use the measur-ing aid1 Pull out the detergent drawer
2 Press down on the insert and re-move the detergent drawer
1
2
3 Insert the measuring aid
4 Insert the detergent drawer
136 Use the measuring aidfor liquid detergent
To add liquid detergent you can usea measuring aid in the detergentdrawer1 Pull out the detergent drawer2 Slide the measuring aid forwards
3 Fold the measuring aid down andclick it into place
enemspBasic operation
38
4 Push in the detergent drawer
137 Adding detergent andcare product
Notesiexcl Please read the information in the
Safety rarr Page 4 and Preventingmaterial damage rarr Page 10 sec-tions to ensure that you use theappliance safely
iexcl Do not use the measuring aid forliquid detergent for gel detergentswashing powder or if Prewash orReady in time are activated
Requirement Find out the optimumdosage for detergent and careproduct rarr Page 341 Pull out the detergent drawer2 Pour in detergent
rarr Detergent drawer Page 193 If required add the care product4 Push in the detergent drawer
138 Starting the programmeNote If you want to change the timeuntil the programme ends set theReady in time first Press InicioPausa + Carga a The drum rotates and load detec-
tion takes place This can take upto 2 minutes after which waterenters the drum
a The display shows either the pro-gramme duration or the Ready intime
a After the programme has endedthe display shows End
139 Adjusting the Ready intime before the pro-gramme starts
You can readjust the selected Readyin time before the programme starts1 Press InicioPausa + Carga 2 Press Termin repeatedly until
the display indicates the desiredReady in time
3 Press InicioPausa + Carga
1310 Soaking laundryNote No additional detergent is re-quired The washing solution is thenused for washing1 Start the programme2 To pause the programme after ap-
prox 10 minutes press InicioPausa + Carga
3 To resume the programme afterthe desired soaking time pressInicioPausa + Carga
1311 Adding laundryNote Please read the information inthe Safety rarr Page 4 and Preventingmaterial damage rarr Page 10 sectionsto ensure that you use the appliancesafely1 Press InicioPausa + Carga
The appliance is paused andchecks whether it is possible toadd or remove laundry Take noteof the programme status
2 Add or remove laundry3 Close the door4 Press InicioPausa + Carga
Basic operationemspen
39
1312 Cancelling the pro-gramme
Once the programme has startedyou can cancel it at any timeNote Please read the information inthe Safety rarr Page 4 and Preventingmaterial damage rarr Page 10 sectionsto ensure that you use the appliancesafely1 Press InicioPausa + Carga 2 Open the door
The appliance door remainslocked for safety reasons if thetemperature and water levels arehighndash If the temperature is high start
the programmendash If the water level is high Start
the or programme3 Remove the laundry
1313 Resuming the pro-gramme when the pro-gramme status is RinseHold
1 Set the or programme2 Press InicioPausa + Carga
1314 Unloading the laundryNote Please read the information inthe Safety rarr Page 4 and Preventingmaterial damage rarr Page 10 sectionsto ensure that you use the appliancesafely1 Open the door
2 Remove the laundry
1315 Switching off the appli-ance
1 Turn the programme selector to
2 Turn off the tap3 Wipe the rubber gasket dry and re-
move any foreign objects
4 Leave the door and detergentdrawer open so that residual watercan evaporate
enemspChildproof lock
40
Childproof lock
14 Childproof lockChildproof lock
Secure your appliance against beingoperated unintentionally using thecontrols
141 Activating the childprooflock
Press and hold the two 3 segbuttons for approx 3 seconds
a The display shows a The controls are lockeda The childproof lock remains active
even after the appliance has beenswitched off
142 Deactivating the child-proof lock
Requirement To deactivate thechildproof lock the appliance mustbe switched on Press and hold the two 3 seg
buttons for approx 3 secondsa goes out in the display
Basic settingsemspen
41
Basic settings
15 Basic settingsBasic settings
You can configure the appliance to meet your needs
151 Overview of the basic settingsBelow is an overview of the basic settings on your appliance
Basic setting Programmeposition
Value Description
End signal 2 0 (off)1 (quiet)2 (me-dium)3 (loud)4 (veryloud)
Set the volume of the signal at theend of the programme
Button signal 3 0 (off)1 (quiet)2 (me-dium)3 (loud)4 (veryloud)
The volume of the audible signalemitted when the buttons arepressed
Drum cleaningreminder
4 ONOFF
Activate or deactivate the re-minder to clean the drum
enemspCleaning and servicing
42
152 Changing the basic set-tings
1 Set the programme selector to po-sition 1
2 Press InicioPausa + Carga and at the same time turn theprogramme selector to position 2
a The display shows the currentvalue
3 Set the programme selector to therequired position
4 To change the value press Ter-min
5 To save the changes switch offthe appliance
Cleaning and servicing
16 Cleaning and servi-cing
Cleaning and servicing
To keep your appliance working effi-ciently for a long time it is importantto clean and maintain it carefully
161 Tips on appliance careWipe down thehousing and thecontrol panelwith nothing butwater and adamp cloth
This ensures theparts of the appli-ance will remainclean and hy-gienic
Remove all de-tergent residuespray residue orother residuesimmediately
Fresh depositsare easier to re-move withoutleaving anyresidue
Keep the appli-ance door anddetergent draweropen after use
This allows theresidual water todry reducingodours in the ap-pliance
162 Cleaning the drum
CAUTIONRisk of injuryPermanently washing at low temper-atures and a lack of ventilation forthe appliance may damage the drumand cause injury Regularly run a programme for
cleaning the drum or wash at tem-peratures of at least 60 degC
Leave the appliance to dry afterevery operation with the dooropen and leave the detergentdrawer to dry
Run the Limp tambor pro-gramme without laundryAdd washing powder
163 Cleaning the detergentdrawer
Note Please read the information inthe Safety rarr Page 4 and Preventingmaterial damage rarr Page 10 sectionsto ensure that you use the appliancesafely1 Pull out the detergent drawer
Cleaning and servicingemspen
43
2 Press down on the insert and re-move the detergent drawer
1
2
3 Press out the insert upwards frombelow
4 Clean the detergent drawer and in-sert with water and a brush andthen dry them
5 Fit the insert and lock it into place
6 Cleaning the opening for the deter-gent drawer
7 Push in the detergent drawer
164 Descaling
ATTENTIONThe use of unsuitable descalingagents eg for coffee machines maydamage the appliance For this appliance only use de-
scaling agents that are availablefrom the manufacturers website orour after-sales service
enemspCleaning and servicing
44
165 Cleaning the drain pumpClean the drain pump in the event offaults eg blockages or rattlingnoises
Emptying the drain pumpNote Please read the information inthe Safety rarr Page 4 and Preventingmaterial damage rarr Page 10 sectionsto ensure that you use the appliancesafely1 Turn off the water tap2 Switch off the appliance3 Disconnect the appliances mains
plug from the power supply4 Open the maintenance flap
5 Remove the maintenance flap
6 Slide a sufficiently large receptacleunder the opening
7 Take the drain hose out of theholder
Cleaning and servicingemspen
45
8 CAUTION - Risk of scaldingWhen you wash at high temperat-ures the detergent solution getshot
Do not touch the hot detergentsolutionTo allow the detergent solution toflow out into the container removethe sealing cap
9 Firmly press on the sealing cap
10 Insert the drain hose into theholder
Cleaning the drain pumpNote Please read the information inthe Safety rarr Page 4 and Preventingmaterial damage rarr Page 10 sectionsto ensure that you use the appliancesafelyRequirement The drain pump isempty rarr Page 441 Since water may remain in the
drain pump remove the pump capcarefully
2 Clean the interior the thread onthe pump cap and the pump hous-ing
3 Make sure that the impeller in thedrain pump can be rotated
enemspCleaning and servicing
46
4 Insert the pump cap and screw iton as far as it will go
90deg
The handle on the pump cap mustbe in a vertical position
5 Close the maintenance flap
Before the next washTo prevent unused detergent fromflowing straight into the outlet in thenext wash run the programmeafter you have emptied the drainpump1 Turn on the tap2 Insert the mains plug3 Switch on the appliance4 Pour 1 litre of water into compart-
ment II5 Start the programme
166 Cleaning the water outlethose at the siphon
1 Switch off the appliance2 Disconnect the appliances mains
plug from the power supply
3 Loosen the hose clamp and care-fully remove the water outlet hose
Residual water may leak out4 Clean the water outlet hose and si-
phon connecting piece
5 Reattach the water outlet hose andsecure the connection point usingthe hose clamp
Cleaning and servicingemspen
47
167 Clean the water inlet fil-ters
Emptying the water inlet hose1 Turn off the tap2 Set a programme except for
or 3 Start the programme and leave it
to run for approx 40 seconds4 Switch off the appliance5 Disconnect the appliances mains
plug from the power supply
Cleaning the filter on the tapNote Please read the information inthe Safety rarr Page 4 and Preventingmaterial damage rarr Page 10 sectionsto ensure that you use the appliancesafelyRequirement The water inlet hose isempty1 Remove the water inlet hose from
the tap
2 Clean the filter with a small brush
3 Connect the water inlet hose andcheck for leaks
Cleaning the filter on theapplianceNote Please read the information inthe Safety rarr Page 4 and Preventingmaterial damage rarr Page 10 sectionsto ensure that you use the appliancesafelyRequirement The water inlet hose isempty rarr Emptying the water inlet hosePage 47
enemspCleaning and servicing
48
1 Disconnect the hose from the rearof the appliance
1
2
2 Use pliers to remove the filter
3 Clean the filter with a small brush
4 Reinsert the filter
5 Connect the hose and check forleaks
2
1
Troubleshootingemspen
49
Troubleshooting
17 TroubleshootingTroubleshooting
You can rectify minor faults on your appliance yourself Read the troubleshoot-ing information before contacting after-sales service This will avoid unneces-sary costs
WARNINGRisk of electric shockIncorrect repairs are dangerous Repairs to the appliance should only be carried out by trained specialist
staff Only use genuine spare parts when repairing the appliance If the power cord of this appliance is damaged it must be replaced by the
manufacturer the manufacturers Customer Service or a similarly qualifiedperson in order to prevent any risk
Fault Cause and troubleshootingThe display goes outand InicioPausa +Carga flashes
Energy-saving mode is active Press any buttona The symbol lights up again
E36 -10 Drain pipe or water outlet hose is blocked Clean the drain pipe and the water outlet hose
Drain pipe or water drain hose is caught or jammed Ensure that the drain pipe and water drain hose are
not kinked or trapped
Drain pump is blocked rarr Cleaning the drain pump Page 44
The water outlet hose is connected too high Install the water outlet hose at a maximum height of
1 metre
Detergent dosage is too high Immediate measure Mix one tablespoon of fabric
softener with 05 litres of water and pour the mix-ture into the left-hand compartment (not for outdoorclothing sportswear or items stuffed with down)
Reduce the amount of detergent for the next wash-ing cycle with the same load
Unapproved extension installed on the water drainhose Remove any unapproved extensions from the water
hose Connecting the appliance
E36 -25 -26 Drain pump is blocked rarr Cleaning the drain pump Page 44
enemspTroubleshooting
50
Fault Cause and troubleshootingThe water pressure is lowNo remedial action possibleThe filters in the water inflow are blocked Clean the filters in the water inflow rarr Page 47
The tap is turned off Turn on the tap
The water inlet hose is kinked or jammed Ensure that the water inlet hose is not kinked or
jammed
flashes The automatic voltage control system detects an un-authorised voltage under-usage No remedial action possible
Note If the power supply is stable the programmecontinues to run as normalVoltage under-usage may cause extension of a pro-grammeNo remedial action possible
flashes Voltage under-usage may cause extension of a pro-grammeNo remedial action possible
lights up The temperature is too high Wait until the temperature has dropped rarr Cancelling the programme Page 39
Water level is too high Start the programme
Laundry is caught in the door1 Open the door again2 Remove any trapped laundry3 Close the door4 Press InicioPausa + Carga to start the pro-
gramme
flashes Door is not closed1 Close the door2 Press InicioPausa + Carga to start the pro-
gramme
All other error codes Malfunction Call the after-sales service
rarr Customer Service Page 59
Troubleshootingemspen
51
Fault Cause and troubleshootingThe appliance is notworking
The mains plug of the power cord is not plugged in Connect the appliance to the power supply
The circuit breaker is faulty Check the circuit breaker in the fuse box
There has been a power cut Check whether the lighting in your kitchen or other
appliances are working
The programme doesnot start
You have not pressed InicioPausa + Carga Press InicioPausa + Carga
Door is not closed1 Close the door2 Press InicioPausa + Carga to start the pro-
gramme
Childproof lock is activated rarr Deactivating the childproof lock Page 40
Termin is activated Check whether Termin is activated
rarr Buttons Page 23
Laundry is caught in the door1 Open the door again2 Remove any trapped laundry3 Close the door4 Press InicioPausa + Carga to start the pro-
gramme
The door cannotbe opened
ndash ndash ndash ndash is activated Continue the programme by selecting or and
pressing InicioPausa + Carga rarr Resuming the programme when the programmestatus is Rinse Hold Page 39
The temperature is too high Wait until the temperature has dropped rarr Cancelling the programme Page 39
Water level is too high Start the programme
Power failure Open the door using the emergency release
rarr Emergency release Page 57
The water is not drain-ing
Drain pipe or water outlet hose is blocked Clean the drain pipe and the water outlet hose
enemspTroubleshooting
52
Fault Cause and troubleshootingThe water is not drain-ing
Drain pipe or water drain hose is caught or jammed Ensure that the drain pipe and water drain hose are
not kinked or trapped
Drain pump is blocked rarr Cleaning the drain pump Page 44
ndash ndash ndash ndash is activated Continue the programme by selecting or and
pressing InicioPausa + Carga rarr Resuming the programme when the programmestatus is Rinse Hold Page 39
The water outlet hose is connected too high Install the water outlet hose at a maximum height of
1 metre
Detergent dosage is too high Immediate measure Mix one tablespoon of fabric
softener with 05 litres of water and pour the mix-ture into the left-hand compartment (not for outdoorclothing sportswear or items stuffed with down)
Reduce the amount of detergent for the next wash-ing cycle with the same load
Unapproved extension installed on the water drainhose Remove any unapproved extensions from the water
hose Connecting the appliance
Water is not flowingin Detergent is notbeing dispensed
You have not pressed InicioPausa + Carga Press InicioPausa + Carga
The filters in the water inflow are blocked Clean the filters in the water inflow rarr Page 47
The tap is turned off Turn on the tap
The water inlet hose is kinked or jammed Ensure that the water inlet hose is not kinked or
jammed
The spin cycle runsseveral times
The unbalanced load detection system eliminates animbalance by repeatedly redistributing the laundry Not a fault ndash no action required
Note When loading where possible place large andsmall items of laundry together in the drum Differentsized items of laundry distribute themselves betterduring the spin cycle
Troubleshootingemspen
53
Fault Cause and troubleshootingThe programme dura-tion changes duringthe wash cycle
The programme operation is optimised electronicallyThis may change the programme duration Not a fault ndash no action required
The unbalanced load detection system eliminates animbalance by repeatedly redistributing the laundry Not a fault ndash no action required
Note When loading where possible place large andsmall items of laundry together in the drum Differentsized items of laundry distribute themselves betterduring the spin cycleFoam detection system switches on a rinse cycle iffoam build-up is too high Not a fault ndash no action required
No water is visible inthe drum
Water is below the visible area Not a fault ndash no action required Do not add any extra water to the appliance while it
is operating
Drum jerks after theprogramme starts
This is caused by an internal motor test Not a fault ndash no action required
Residual water ispresent in the com-partment
Insert in compartment is blocked rarr Cleaning the detergent drawer Page 42
Vibrations and move-ment of the appliancewhilst spinning
Appliance is not correctly aligned Aligning the appliance
The appliance feet are not fixed Secure the appliance feet Aligning the appliance
Transit bolts have not been removed Removing the transit bolts
Drum does not turnwater does not flow in
Load detection is active Not a fault ndash no action required
Note The load detection can take up to two minutesHeavy foam build-up Detergent dosage is too high
Immediate measure Mix one tablespoon of fabricsoftener with 05 litres of water and pour the mix-ture into the left-hand compartment (not for outdoorclothing sportswear or items stuffed with down)
Reduce the amount of detergent for the next wash-ing cycle with the same load
enemspTroubleshooting
54
Fault Cause and troubleshootingHigh spin speed notreached
A low spin speed is selected The next time you run a wash cycle set a higher
spin speed
Unbalance load detection system is using a reducedspin speed to eliminate an unbalance Redistribute the laundry in the drum
Note Where possible mix large and small items inthe drum Different sized items of laundry distributethemselves better during the spin cycle Start the programme
The spin programmedoes not start
Drain pipe or water outlet hose is blocked Clean the drain pipe and the water outlet hose
Drain pipe or water drain hose is caught or jammed Ensure that the drain pipe and water drain hose are
not kinked or trapped
The unbalanced load detection system has interruptedthe spin cycle because the laundry is unevenly distrib-uted Redistribute the laundry in the drum
Note Where possible mix large and small items inthe drum Different sized items of laundry distributethemselves better during the spin cycle Start the programme
Rushing hissingnoise
Water is flushed under pressure into the detergentdrawer Not a fault ndash normal operating noise
Loud noises duringthe spin cycle
Appliance is not correctly aligned Aligning the appliance
The appliance feet are not fixed Secure the appliance feet Aligning the appliance
Transit bolts have not been removed Removing the transit bolts
Banging noises rat-tling in the drainpump
Foreign bodies have got into the drain pump rarr Cleaning the drain pump Page 44
Slurping rhythmicalsuction noise
The drain pump is active the detergent solution ispumped out Not a fault ndash normal operating noise
Troubleshootingemspen
55
Fault Cause and troubleshootingCreasing The spin speed is too high
The next time you run a wash cycle set a lowerspin speed
The load is too large The next time you run a wash cycle reduce the
amount of laundry being loaded
The wrong programme is selected for the type of fab-ric Select the programmes that are suitable for the
type of fabric rarr Programmes Page 24
Detergent or fabricsoftener drips off theseal and collects onthe door or in the sealfold
Too much detergentfabric softener in the detergentdrawer When dosing liquid detergent and fabric softener
observe the marking in the detergent drawer anddo not dose above this
The spin result is notsatisfactory The laun-dry is too wettoodamp
A low spin speed is selected The next time you run a wash cycle set a higher
spin speed Start the programme
Drain pipe or water outlet hose is blocked Clean the drain pipe and the water outlet hose
Drain pipe or water drain hose is caught or jammed Ensure that the drain pipe and water drain hose are
not kinked or trapped
The unbalanced load detection system has interruptedthe spin cycle because the laundry is unevenly distrib-uted Redistribute the laundry in the drum
Note Where possible mix large and small items inthe drum Different sized items of laundry distributethemselves better during the spin cycle Start the programme
Unbalance load detection system is using a reducedspin speed to eliminate an unbalance Redistribute the laundry in the drum
Note Where possible mix large and small items inthe drum Different sized items of laundry distributethemselves better during the spin cycle Start the programme
enemspTroubleshooting
56
Fault Cause and troubleshootingDetergent residue onthe damp washing
Detergents may contain water-insoluble substancesthat deposit on the laundry Start the programme
Detergent residue onthe dry laundry
Detergents may contain water-insoluble substancesthat deposit on the laundry Brush out the laundry after washing and drying
Water is leaking out atthe water inlet hose
Water inlet hose is not correctlysecurely connected1 Connect the water supply hose correctly Connect-
ing the water inlet hose2 Tighten the screw connection
Water is leaking out atthe water outlet hose
The water outlet hose is damaged Replace the damaged water outlet hose
Water outlet hose is not connected correctly Connect the water outlet hose correctly Water out-
let connection types
Odours have formedin the appliance
Humidity and detergent residue may promote theformation of bacteria rarr Cleaning the drum Page 42 If you are not using the appliance leave the door
and detergent drawer open so that residual watercan evaporate
Transportation storage and disposalemspen
57
171 Emergency releaseReleasing the doorRequirement The drain pump isempty rarr Page 441 ATTENTION Escaping water may
cause material damage Do not open the door if you can
see water through the glassPull the emergency release down-wards with a tool and release
a The door lock is released2 Insert the maintenance flap and
lock it into place3 Close the maintenance flap
Transportation storage and disposal
18 Transportation stor-age and disposal
Transportation storage and disposal
You can find out here how to prepareyour appliance for transportation andstorage You will also find out how todispose of old appliances
181 Removing the appliance1 Turn off the tap2 rarr Emptying the water inlet hose
Page 473 Switch off the appliance4 Unplug the appliances mains plug
5 Drain the remaining detergentsolution rarr Cleaning the drain pumpPage 44
6 Detach the hoses
182 Inserting the transitbolts
Secure the appliance for transporta-tion using transit bolts in order to pre-vent damage1 Remove the four cover caps
‒ If necessary use a screwdriverto remove the cover caps
Keep the cover caps2 Insert the four sleeves
enemspTransportation storage and disposal
58
3 Insert all screws into the fourtransit bolts and tighten slightly
4 Insert the power cord into theholder and tighten all fourscrews for the transit bolts with aWAF 13 wrench
5 Insert the hose into holder
183 Using the applianceagain
1 Remove the transit bolts
2 Pour approx 1 litre of water intocompartment II in the detergentdrawer
3 Start the programmea The unused detergent cannot flow
straight into the outlet during thenext wash
184 Disposing of old appli-ance
Valuable raw materials can be re-used by recycling
WARNINGRisk of harm to healthChildren can lock themselves in theappliance thereby putting their livesat risk Do not install the appliance behind
a door as this may obstruct the ap-pliance door or prevent it fromopening
With redundant appliances unplugthe power cord Then cut throughthe cord and damage the lock onthe appliance door beyond repairso that the appliance door will nolonger close
1 Unplug the appliance from themains
2 Cut through the power cord3 Dispose of the appliance in an en-
vironmentally friendly mannerInformation about current disposalmethods are available from yourspecialist dealer or local authority
This appliance is la-belled in accordancewith European Directive201219EU concerningused electrical and elec-
Customer Serviceemspen
59
tronic appliances (wasteelectrical and electronicequipment - WEEE)The guideline determ-ines the framework forthe return and recyclingof used appliances asapplicable throughoutthe EU
Customer Service
19 Customer ServiceCustomer Service
If you have any queries on use areunable to rectify faults on the appli-ance yourself or if your applianceneeds to be repaired contact Cus-tomer ServiceYou can solve many problems your-self by consulting the information ontroubleshooting in these instructionsor on our website If this is not thecase contact our after-sales serviceWith any warranty claims we willmake sure that your appliance is re-paired by trained after-sales techni-cians using genuine spare parts in-cluding after the manufacturers war-ranty has expiredFunction-relevant genuine spare partsaccording to the corresponding Eco-design Order can be obtained fromCustomer Service for a period of atleast 10 years from the date onwhich your appliance was placed onthe market within the European Eco-nomic AreaNote Under the terms of the manu-facturers warranty the use of Cus-tomer Service is free of chargeDetailed information on the warrantyperiod and terms of warranty in yourcountry is available from our after-sales service your retailer or on ourwebsite
If you contact Customer Service youwill require the product number (E-Nr) and the production number (FD)of your applianceThe contact details for Customer Ser-vice can be found in the enclosedCustomer Service directory or on ourwebsite
191 Product number (E-Nr)and production number(FD)
You can find the product number (E-Nr) and the production number (FD)on the appliances rating plateDepending on the model the ratingplate is locatediexcl On the inside of the dooriexcl On the inside of the maintenance
flapiexcl On the rear of the applianceMake a note of your appliances de-tails and the Customer Service tele-phone number to find them againquickly
enemspConsumption values
60
Consumption values
20 Consumption valuesConsumption values
The following information is provided in accordance with the EU EcodesignRegulation The values given for programs other than the Eco 40-60 are indicat-ive only and were determined in accordance with the applicable standardEN60456
Programme Load(kg)
Pro-gramme dura-tion(hrmin)1
Energycon-sump-tion(kWhcycle)1
Watercon-sump-tion (lcycle)1
Max-imumtemper-ature(degC) 5mins1
Spinspeed(rpm)1
Resid-ualmois-ture()1
Eco 40-602 90 337 1245 610 50 1166 5000Eco 40-602 45 252 0590 450 33 1200 5000Eco 40-602 25 233 0195 300 24 1200 5400AlgodoacutenAl-godatildeo 20 degC
90 328 0370 900 23 1200 5400
AlgodoacutenAl-godatildeo 40 degC
90 328 1350 900 45 1200 5400
AlgodoacutenAl-godatildeo 60 degC
90 328 1450 900 55 1200 5400
AlgodoacutenAl-godatildeo 40 degC + Pre-lav
90 358 1400 1020 45 1200 5400
Sinteacuteticos 40 degC
40 228 0780 610 44 1200 2700
Mix 40 degC 40 059 0620 440 41 1200 5600 LanaLatildes
30 degC20 040 0200 400 22 800 2500
1 Due to the influence of water pressure hardness and inlet temperature am-bient temperature type amount and soiling of laundry detergent used fluc-tuations in the power supply and the selected additional functions the actualvalues may deviate from the stated values
2 Test programme in accordance with the EU Ecodesign Directive and the EUEnergy Labelling Regulation with cold water (15 degC)
Technical specificationsemspen
61
Technical specifications
21 Technical specifica-tions
Technical specifications
Facts and figures for your appliancecan be found here
Appliance height 850 cmAppliance width 598 cmAppliance depth 590 cmWeight 80 kg1
Maximum load 9 kgMains voltage 220 - 240 V
50 Hz Minimum in-
stallation protec-tion
10 A
Rated power 2300 WPower consump-tion
iexcl Off mode010 W
iexcl Left-on mode050 W
Water pressure iexcl Minimum100 kPa(1 bar)
iexcl Maximum1000 kPa(10 bar)
Length of the wa-ter inlet hose
150 cm
Length of the wa-ter outlet hose
150 cm
Length of thepower cord
160 cm
1 Depending on the appliance spe-cifications
More information about your modelcan be found online at httpsen-ergylabelbsh-groupcom1 This webaddress is linked to the official EUEPREL product database At the time
of printing its web address had notyet been published Please then fol-low the instructions on searching formodels The model identifier is madeup of the characters before the slashin the product number (E-Nr) on therating plate Alternatively you canalso find the model identifier in thefirst line of the EU energy label
1 Only applies to countries in the European Economic Area
Thank you for buying aBosch Home Appliance
Register your new device on MyBosch now and profit directly from
bull Expert tips amp tricks for your appliancebull Warranty extension optionsbull Discounts for accessories amp spare-partsbull Digital manual and all appliance data at handbull Easy access to Bosch Home Appliances Service
Free and easy registration ndash also on mobile phoneswwwbosch-homecomwelcome
Looking for help Youll find it here
Expert advice for your Bosch home appliances help with problems or a repair from Bosch experts Find out everything about the many ways Bosch can support you wwwbosch-homecomservice Contact data of all countries are listed in the attached service direct-ory
90016102699001610269emsp(010219)en
Robert Bosch Hausgeraumlte GmbHCarl-Wery-Straszlige 3481739 MuumlnchenGERMANYwwwbosch-homecom
Valid within Great BritainImported to Great Britain byBSH Home Appliances LtdGrand Union HouseOld Wolverton RoadWolverton Milton KeynesMK12 5PTUnited Kingdom
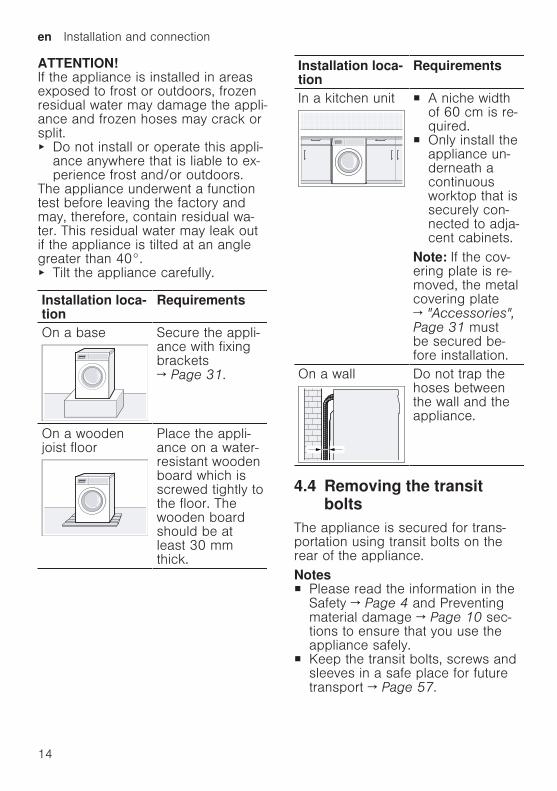
enemspInstallation and connection
14
ATTENTIONIf the appliance is installed in areasexposed to frost or outdoors frozenresidual water may damage the appli-ance and frozen hoses may crack orsplit Do not install or operate this appli-
ance anywhere that is liable to ex-perience frost andor outdoors
The appliance underwent a functiontest before leaving the factory andmay therefore contain residual wa-ter This residual water may leak outif the appliance is tilted at an anglegreater than 40deg Tilt the appliance carefully
Installation loca-tion
Requirements
On a base Secure the appli-ance with fixingbracketsrarr Page 31
On a woodenjoist floor
Place the appli-ance on a water-resistant woodenboard which isscrewed tightly tothe floor Thewooden boardshould be atleast 30 mmthick
Installation loca-tion
Requirements
In a kitchen unit iexcl A niche widthof 60 cm is re-quired
iexcl Only install theappliance un-derneath acontinuousworktop that issecurely con-nected to adja-cent cabinets
Note If the cov-ering plate is re-moved the metalcovering plate rarr AccessoriesPage 31 mustbe secured be-fore installation
On a wall Do not trap thehoses betweenthe wall and theappliance
44 Removing the transitbolts
The appliance is secured for trans-portation using transit bolts on therear of the applianceNotesiexcl Please read the information in the
Safety rarr Page 4 and Preventingmaterial damage rarr Page 10 sec-tions to ensure that you use theappliance safely
iexcl Keep the transit bolts screws andsleeves in a safe place for futuretransport rarr Page 57
Installation and connectionemspen
15
1 Pull the hoses out of the holders
2 Unscrew and remove all fourscrews for the transit bolts with aWAF 13 wrench
3 Pull the power cord out of theholder
4 Remove the four sleeves
5 Put on the four cover caps
6 Press down on the four covercaps
enemspInstallation and connection
16
45 Connecting the applianceConnecting the water inlet hoseNoteiexcl Please read the information in the
Safety rarr Page 4 and Preventingmaterial damage rarr Page 10 sec-tions to ensure that you use theappliance safely
1 Connect the water inlet hose
2
1
2 Connect the water inlet hose to atap (264 mm = 34)
frac34˝min
min
10 mm
17 mm
3 Open the water tap carefully andcheck that the connection pointsare tight
Water outlet connection typesThis information is intended to helpyou to connect this appliance to thewater outlet
Note Please read the information inthe Safety rarr Page 4 and Preventingmaterial damage rarr Page 10 sectionsto ensure that you use the appliancesafely
ATTENTIONWhen draining the water outlet hoseis subject to water pressure and maycome loose from the installed con-nection point Secure the water outlet hose
against unintentional loosening
Note Observe the draining heightsThe maximum draining height is100 cm
Drainage into asiphon
Secure the con-nection point witha (24ndash40 mm)hose clamp
Drainage into awashbasin
Fix and securethe water outletusing an elbowrarr Page 31
Drainage into aplastic pipe withrubber sleeve orinto a gully
Fix and securethe water outletusing an elbowrarr Page 31
Installation and connectionemspen
17
46 Aligning the applianceIn order to reduce noise and vibra-tion and to prevent the appliancefrom moving align the appliance cor-rectlyNote Please read the information inthe Safety rarr Page 4 and Preventingmaterial damage rarr Page 10 sectionsto ensure that you use the appliancesafely1 Loosen the lock nuts using a WAF
17 wrench by turning it in a clock-wise direction
2 To align the appliance turn the ap-pliance feet Check that the appli-ance is level using a spirit level
All appliance feet must stand firmlyon the ground
3 Screw the lock nuts tightly againstthe housing using a WAF 17wrench
In doing so hold the foot tight anddo not adjust its height
47 Connecting the applianceto the electricity supply
Note Please read the information inthe Safety rarr Page 4 and Preventingmaterial damage rarr Page 10 sectionsto ensure that you use the appliancesafely1 Insert the mains plug of the appli-
ances power cable in a socketnearbyThe connection details of the appli-ance can be found under Tech-nical data rarr Page 61
2 Check the mains plug is insertedproperly
enemspFamiliarising yourself with your appliance
18
Familiarising yourself with your appliance
5 Familiarising yourself with your applianceFamiliarising yourself with your appliance
51 ApplianceYou can find an overview of the parts of your appliance here
1
2
4 73 6
88
5
On certain models specific details such as the colour and shape may differfrom those pictured
1 Maintenance flap for the drainpump rarr Page 44
2 Door
3 Detergent drawer rarr Page 19
4 Controls rarr Page 19
5 Covering plate
6 Water outlet hose rarr Page 16
7 Power cord rarr Page 17
8 Transit bolts rarr Page 14
Familiarising yourself with your applianceemspen
19
52 Detergent drawer
2
3
1
4
1 Measuring aid for liquid deter-gent rarr Using a measuring aid forliquid detergent Page 37
2 Compartment IIiexcl Detergent for main washiexcl Water softeneriexcl Bleachiexcl Stain remover
3 Compartment iexcl Fabric softeneriexcl Liquid starchiexcl Waterproofing agent
4 Compartment Iiexcl Detergent for prewashiexcl Hygiene detergent
53 ControlsYou can use the control panel to configure all functions of your appliance andto obtain information about the operating status
2 3
1 1
4
1 Programmes rarr Page 24
2 Programme selectorrarr Page 36
3 Display rarr Page 20
4 Buttons rarr Page 23
enemspDisplay
20
Display
6 DisplayDisplay
The display shows the current settings options or relevant information
Display Designation Description040 1 Programme dura-
tionprogrammetime remaining
Approximate expected programme dura-tion or programme time remaining
10h 1 Ready in time The programme end has been set and theremaining number of hours is displayed rarr Buttons Page 23
9 kg 1 Recommendedload
The maximum load capacity for the selec-ted programme in kg
ndash ndash ndash ndash -1200
Spin speed Set spin speed in rpm rarr Buttons Page 230= No final spin only drainingndash ndash ndash ndash Rinse Hold no draining
ndash 90 Temperature Set temperature in degC rarr Buttons Page 23
(cold)StartPause Start cancel or pause
iexcl Lights up The programme is runningand can be cancelled or paused
iexcl Flashes The programme can be star-ted or continued
Wash Programme status1 Example
Displayemspen
21
Display Designation DescriptionRinse Programme statusSpin Programme status
ndash ndash ndash ndash Rinse Hold Programme statusEnd End of pro-
grammeProgramme status
Childproof lock iexcl lights up The childproof lock is activ-ated
iexcl flashes The childproof lock is activatedand the appliance has been operated rarr Deactivating the childproof lockPage 40
Prewash Prewash is activated rarr Buttons Page 23
Water Plus andRinse Plus
Wash with more water and a rinse cycle isactivated rarr Buttons Page 23
SpeedPerfect Short wash activated rarr Buttons Page 23
1 Energy consump-tion
Energy consumption for the selected pro-grammeiexcl Low energy consumptioniexcl High energy consumption
Reminder to cleanthe drum
Flashes Drum is dirty Run the Limp tam-bor programme for cleaning and caringfor the drum and the outer tub rarr Cleaning the drum Page 42
Voltage controlsystem
Flashes The automatic voltage controlsystem detects impermissible voltagedrops This will pause the programmeNote The programme will continue whenthe voltage is permissible again
Voltage controlsystem
Flashes The programme has beenpaused because of impermissible voltagedrops The voltage is permissible againand the programme will continueNote The programme duration is exten-ded
1 Example
enemspDisplay
22
Display Designation DescriptionDoor iexcl Lights up The door is locked and can-
not be openediexcl Flashes The door is not closed prop-
erlyiexcl Off The door is unlocked and can be
openedTap iexcl No water pressure
iexcl The water pressure is too lowE35 -10 1 Error Error code error display signal1 Example
Buttonsemspen
23
Buttons
7 ButtonsButtons
The selection of programme settings depends on the programme that is setYou can see the selection options for each programme in the overview for rarr Programmes Page 24
Button Selection DescriptionInicioPausa +Carga (StartPause + Reload)
iexcl Startiexcl Canceliexcl Pause
Start cancel or pause the pro-gramme
SpeedPerfect iexcl Activateiexcl Deactivate
Activate or deactivate a short washingprogrammeNote Energy consumption increasesThe washing result is not affected bythis
Termin (ReadyIn)
1ndash24 hours Set the programme endThe programme duration is already in-cluded in the set number of hoursOnce the programme has started theprogramme duration is displayed
Temp degC (Tem-perature)
ndash 90 degC Adjust the temperature in degC
Centrif (Spin) ndash ndash ndash ndash - 1200 Adjust the spin speed or activate ndash ndash ndash ndash (Rinse Hold)If ndash ndash ndash ndash is selected the water is notdrained at the end of the washingcycle and the spin cycle is deactiv-ated The laundry remains in the waterused for rinsing
3 seg (ChildLock 3 sec)
iexcl Activateiexcl Deactivate
Activate or deactivate the childprooflockDisable the control panel to preventunwanted or accidental operationIf the childproof lock is activated andthe appliance has been switched offthe childproof lock remains activated rarr Childproof lock Page 40
Prelav (Pre-wash)
iexcl Activateiexcl Deactivate
Activate or deactivate prewash egfor washing heavily soiled laundry
Extra (ExtraRinse)
iexcl Activateiexcl Deactivate
Activate or deactivate a washing pro-gramme with more water and an addi-tional rinse cycleRecommended for particularly sensit-ive skin or in regions with very softwater
enemspProgrammes
24
Programmes 8 P
rogr
amm
esProgrammes B
elow
is a
n ov
ervi
ew o
f the
pro
gram
mes
You
can
find
info
rmat
ion
on the
load
and
on
the
adju
stab
le p
ro-
gram
me
optio
ns
Tip
The
laun
dry
s ca
re la
bels
pro
vide
you
with
add
ition
al in
form
atio
n on
pro
gram
me
sele
ctio
n
rarr
Car
e sy
mbo
ls o
n th
e ca
re la
bels
Pa
ge 3
4
Pro
gram
me
Des
crip
tion
Max load (kg)
Pro
gram
me
sett
ings
Max temperature (degC)
Max spin speed(rpm) 1
SpeedPerfect
Extra
Centrif ndash ndash ndash ndash(Rinse Hold)
Prelav
Alg
odoacuten
Al-
godatilde
o (
Cot
tons
)W
ash
hard
-wea
ring
item
s m
ade
from
cotto
n li
nen
or b
lend
ed fa
bric
sA
lso
suita
ble
as a
sho
rt p
rogr
amm
efo
r no
rmal
ly s
oile
d la
undr
y w
hen
you
activ
ate
Spe
edPer
fect
I
f Spe
ed-
Per
fect
is
act
ivat
ed t
he m
ax-
imum
load
cap
acity
is r
educ
ed to
5 k
g
990
1200
Alg
odoacuten
Col
orA
l-go
datildeo
Cor
(
Cot
-to
ns C
olou
r)
Was
h ha
rd-w
earin
g ite
ms
mad
e from
cotto
n li
nen
or b
lend
ed fa
bric
sEne
rgy-
savi
ng p
rogr
amm
e
9
90
1200
ndash
1Pro
gram
me
setti
ng
Programmesemspen
25
Pro
gram
me
Des
crip
tion
Max load (kg)
Pro
gram
me
sett
ings
Max temperature (degC)
Max spin speed(rpm) 1
SpeedPerfect
Extra
Centrif ndash ndash ndash ndash(Rinse Hold)
Prelav
Not
e T
o sa
ve e
nerg
y the
act
ual
was
hing
tem
pera
ture
may
dev
iate
from
the
set
was
hing
tem
pera
ture
Th
e w
ashi
ng p
erfo
rman
ce m
eets
lega
l req
uire
men
ts
Eco
40-6
0W
ash
item
s m
ade
from
cot
ton
line
nor
ble
nded
fabr
ics
Not
e T
extil
es w
hich
can
be
was
hed
from
40 deg
C
up
to 6
0 deg
C
as
per
the
care
sym
bol c
an b
e w
ashe
dto
geth
er
The
was
hing
per
form
ance
cor
res-
pond
s to
the
bes
t po
ssib
le w
ashi
ngpe
rfor
man
ce c
lass
acc
ordi
ng to
the
lega
l req
uire
men
ts
For
this
pro
gram
me
the
was
hing
tem
pera
ture
is a
utom
atic
ally
adj
uste
dde
pend
ing
on the
load
siz
e in
ord
erto
ach
ieve
the
bes
t po
ssib
le e
nerg
y
9
ndash
1200
ndash
1Pro
gram
me
setti
ng
enemspProgrammes
26
Pro
gram
me
Des
crip
tion
Max load (kg)
Pro
gram
me
sett
ings
Max temperature (degC)
Max spin speed(rpm) 1
SpeedPerfect
Extra
Centrif ndash ndash ndash ndash(Rinse Hold)
Prelav
effic
ienc
y w
ith the
bes
t po
ssib
lew
ashi
ng r
esul
t You
can
not ch
ange
the
was
hing
tem
pera
ture
Sin
teacutetic
os
(Eas
yC
are)
Was
h ite
ms
mad
e from
syn
thet
ic o
rbl
ende
d fa
bric
s4
60
1200
Mix
(
Mix
edFa
bric
s)W
ash
item
s m
ade
from
cot
ton
line
nor
syn
thet
ic o
r bl
ende
d fa
bric
sSui
tabl
e fo
r lig
htly
soi
led
laun
dry
460
1200
Del
icad
oSed
a (D
elic
ate
Silk
)W
ash
delic
ate
was
habl
e ite
ms
mad
efrom
silk
vis
cose
and
syn
thet
ics
Use
a d
eter
gent
tha
t is
sui
tabl
e fo
rde
licat
es o
r si
lk
Not
e W
ash
espe
cial
ly d
elic
ate
item
sor
item
s w
ith h
ooks
eye
lets
or
clip
sin
a m
esh
laun
dry
bag
2
40
800
ndash
1Pro
gram
me
setti
ng
Programmesemspen
27
Pro
gram
me
Des
crip
tion
Max load (kg)
Pro
gram
me
sett
ings
Max temperature (degC)
Max spin speed(rpm) 1
SpeedPerfect
Extra
Centrif ndash ndash ndash ndash(Rinse Hold)
Prelav
Lan
aLatilde
s (W
ool)
Han
d- o
r m
achi
ne-w
asha
ble
item
sth
at a
re m
ade
from
woo
l or
cont
ain
woo
lTo
pre
vent
the
laun
dry
from
shr
ink-
ing
the
dru
m m
oves
the
item
s ve
ryge
ntly
with
long
pau
ses
Use
a d
eter
gent
tha
t is
sui
tabl
e fo
rw
ool
2
40
800
ndash
ndash
ndash
(R
inse
)R
inse
s an
d th
en s
pins
the
laun
dry
and
then
dra
ins
the
wat
er
ndashndash
1200
ndash
ndash
(
Spi
nD
rain
)Spi
ns a
nd d
rain
s th
e w
ater
If
you
only
wan
t to
dra
in the
wat
er
activ
ate
0 T
he la
undr
y is
not
spu
n
ndash
ndash
1200
ndash
ndash
ndash
ndash
Rop
a os
cura
R
oupa
esc
ura
(Dar
k W
ash)
Was
h da
rk-c
olou
red
and
colo
ur-in
-te
nse
item
s m
ade
from
cot
ton
orea
sy-c
are
fabr
ic e
g j
eans
Tu
rn la
undr
y in
side
-out
bef
ore
was
h-in
gU
se li
quid
det
erge
nt
4
40
1200
1Pro
gram
me
setti
ng
enemspProgrammes
28
Pro
gram
me
Des
crip
tion
Max load (kg)
Pro
gram
me
sett
ings
Max temperature (degC)
Max spin speed(rpm) 1
SpeedPerfect
Extra
Centrif ndash ndash ndash ndash(Rinse Hold)
Prelav
Plu
mas
Pen
as
(Dow
n)W
ash
pillo
ws
duv
ets
or c
loth
ing
stuf
fed
with
dow
n an
d fil
lings
with
synt
hetic
fibr
es
Was
h la
rge
item
s se
para
tely
U
se a
det
erge
nt tha
t is
sui
tabl
e fo
rdo
wn
or d
elic
ates
U
se s
parin
gly
Do
not us
e fa
bric
sof
tene
rN
ote
To
prev
ent ex
cess
ive
foam
ing
rem
ove
air
from
laun
dry
item
s by
rolli
ng the
m u
p be
fore
you
was
hth
em
2
60
1200
ndash
ndash
Lim
p tam
bor
(Dru
m C
lean
)C
lean
ing
and
carin
g fo
r th
e dr
um
Use
thi
s pr
ogra
mm
e in
the
follo
win
gca
ses
iexclB
efor
e us
ing
the
appl
ianc
e fo
r th
efir
st tim
eiexcl
If yo
u re
gula
rly w
ash
at tem
pera
t-ur
es o
f 40 deg
C o
r lo
wer
ndash
ndash
1200
ndash
ndash
ndash
ndash
1Pro
gram
me
setti
ng
Programmesemspen
29
Pro
gram
me
Des
crip
tion
Max load (kg)
Pro
gram
me
sett
ings
Max temperature (degC)
Max spin speed(rpm) 1
SpeedPerfect
Extra
Centrif ndash ndash ndash ndash(Rinse Hold)
Prelav
iexclA
fter
a pr
olon
ged
perio
d of
non
-us
eU
se w
ashi
ng p
owde
r or
a d
eter
gent
cont
aini
ng b
leac
hH
alve
the
am
ount
of d
eter
gent
to
avoi
d fo
amin
gD
o no
t us
e fa
bric
sof
tene
rD
o no
t us
e liq
uid
dete
rgen
t or
det
er-
gent
tha
t is
inte
nded
for
woo
llens
or
delic
ates
N
ote
The
dru
m c
lean
ing
indi
cato
rw
ill fl
ash
to r
emin
d yo
u if
you
have
not us
ed a
pro
gram
me
at 6
0 deg
C o
rhi
gher
for
a lo
ng tim
eC
amis
asB
lusa
s (S
hirts
Blo
uses
)W
ash
non-
iron
shirt
s an
d bl
ouse
sm
ade
from
cot
ton
line
n s
ynth
etic
or
blen
ded
fabr
ics
Not
e U
se the
Del
icad
oSed
a pr
o-gr
amm
e to
was
h sh
irts
and
blou
ses
mad
e from
silk
or
delic
ate
fabr
ics
2
60
800
ndash
1Pro
gram
me
setti
ng
enemspProgrammes
30
Pro
gram
me
Des
crip
tion
Max load (kg)
Pro
gram
me
sett
ings
Max temperature (degC)
Max spin speed(rpm) 1
SpeedPerfect
Extra
Centrif ndash ndash ndash ndash(Rinse Hold)
Prelav
Spo
rt
Was
h sp
orts
and
leis
ure
item
s m
ade
from
syn
thet
ic fi
bres
mic
rofib
re o
rfle
ece
Use
a d
eter
gent
tha
t is
sui
tabl
e fo
rsp
orts
item
sD
o no
t us
e fa
bric
sof
tene
rTi
p U
se the
Sin
teacutetic
os
prog
ram
me
to w
ash
heav
ily s
oile
d la
undr
y
2
40
800
ndash
Raacutep
ido
153
0m
in
(Sup
erQ
uick
153
0 m
in)
Was
h ite
ms
mad
e from
cot
ton
syn
-th
etic
or
blen
ded
fabr
ics
Sho
rt p
rogr
amm
e fo
r sm
all i
tem
s of
light
ly s
oile
d la
undr
yTh
e pr
ogra
mm
e du
ratio
n is
app
rox
30 m
inut
es
If yo
u w
ish
to r
educ
e th
e pr
ogra
mm
edu
ratio
n to
15 m
inut
es a
ctiv
ate
Spe
edPer
fect
T
he m
axim
umlo
ad is
red
uced
to
2 k
g
4
40
1200
ndash
1Pro
gram
me
setti
ng
Accessoriesemspen
31
Accessories
9 AccessoriesAccessories
Use original accessories These have been made especially for your appliance
Use Order numberWater inlet hose exten-sion
Extend the water inlethose for cold water orAquaStop (approx 250m)
WMZ2381
Fixing brackets Improves the stability ofthe appliance
WMZ2200
Longer water inlet hose Replace the standardwater inlet hose with alonger hose (220 m)
00353925
Elbow Secure the water outlethose in place
00655300
Liquid detergent insert Measure liquid deter-gent
00605740
Metal covering plate Metal covering plate forinstalling the applianceunder a high worktop
WMZ20430
Before using for the first time
10 Before using for thefirst time
Before using for the first time
Prepare the appliance for use
101 Starting an empty wash-ing cycle
Your appliance was inspected thor-oughly before leaving the factory Toremove any residual water run thefirst wash cycle without any laundryNote Please read the information inthe Safety rarr Page 4 and Preventingmaterial damage rarr Page 10 sectionsto ensure that you use the appliancesafely
1 Turn the programme selector toLimp tambor
2 Close the door
enemspLaundry
32
3 Pull out the detergent drawer
4 Pour approx 1 litre of tap waterinto compartment II
5 Pour washing powder into com-partment II
To prevent foaming use only halfof the amount of detergent recom-mended by the detergent manufac-turer for light soiling Do not usedetergent suitable for woollens ordelicates
6 Push in the detergent drawer
7 Press InicioPausa + Carga (StartPause + Reload) to start theprogramme
a The display shows the remainingprogramme duration
a After the programme has endedthe display shows End
8 Start the first wash cycle or set theprogramme selector to to switchoff the appliance rarr Basic operation Page 36
Laundry
11 LaundryLaundry
111 Preparing the laundryNote Please read the information inthe Safety rarr Page 4 and Preventingmaterial damage rarr Page 10 sectionsto ensure that you use the appliancesafely
ATTENTIONObjects remaining in the laundry maydamage the laundry and the drum Remove all items from any pock-
ets in your laundry before usingthe appliance
To protect your appliance and thelaundry prepare the laundry be-forehandndash Empty any pockets
Laundryemspen
33
ndash Brush sand out of all collars andpockets
ndash Close bed covers and cushioncovers
ndash Close all zips Velcro fastenershooks and eyes
ndash Tie cloth belts apron stringsetc together or use a laundrybag
ndash Remove curtain hooks and leadstrips or use a mesh laundrybag
ndash Use a mesh laundry bag forsmall items of laundry such aschildrens socks
ndash Some stubborn or dried-in stainscan be removed by washingseveral times
ndash Wash large and small items oflaundry together
ndash Do not rub fresh stains but dabthem with soapy water
ndash Separate items of laundry andshake them out
112 Sorting laundryNote Please read the information inthe Safety rarr Page 4 and Preventingmaterial damage rarr Page 10 sectionsto ensure that you use the appliancesafely To improve washing results and
prevent discolouration sort thelaundry according to the followingcriteria before washingndash Type of fabric and fibre
Wash laundry of the sametype of fabric and fibre to-gether
ndash Care symbols on the care labelsrarr Page 34
ndash Description of the programmesrarr Page 24
ndash Whitesndash Colours
Wash new coloured itemsseparately the first time youwash them
113 Degrees of soiling
Degree of soiling Soiling ExamplesLight iexcl No dirt or stains are vis-
ibleiexcl Laundry has absorbed
odours
Light summer clothing orsports clothing that hasbeen worn for a just a fewhours
Normal Dirt or light stains are vis-ible
iexcl T-shirts shirts or blousesare sweat-soaked orhave been worn a fewtimes
iexcl Towels or bedding thathas been used for up toone week
Heavy Dirt or stains are clearlyvisible
Tea towels baby items orwork clothing
enemspDetergents and care products
34
114 Care symbols on the care labels
Washing care symbols
Symbol Washing process Recommended pro-gramme
Normal Cotton Gentle Easy-Care Particularly gentle DelicatesSilk for
washing by handHand wash WoolNot suitable for machine-washing ndash
Detergents and care products
12 Detergents and careproducts
Detergents and care products
Note Please read the information inthe Safety rarr Page 4 and Preventingmaterial damage rarr Page 10 sectionsto ensure that you use the appliancesafelyThe manufacturers instructions foruse and dosage can be found on thepackaging
Notesiexcl Only use liquid detergents that are
self-flowingiexcl Do not mix different liquid deter-
gentsiexcl Do not mix detergent and fabric
softeneriexcl Do not use products that have ex-
pired or are highly congealediexcl Do not use products containing
solvents caustic agents or volatilesubstances (eg bleach)
iexcl Use dyes sparingly as salt maydamage stainless steel
iexcl Do not use bleaching agents in theappliance
121 Detergent recommendation
Detergent Fabrics Pro-gramme
Temperature
Standard detergentwith optical brighten-ers
Heat-resistant whitefabrics made fromcotton or linen
Cotton From cold up to90 degC
Detergent for colourswithout bleach or op-tical brighteners
Coloured fabricsmade from linen orcotton
Cotton From cold up to60 degC
Detergent for col-oursdelicates withoutoptical brighteners
Coloured fabricsmade from easy-carefabrics or syntheticmaterials
Easy-Care From cold up to60 degC
Detergents and care productsemspen
35
Detergent Fabrics Pro-gramme
Temperature
Detergent for delic-ates
Delicate fine textilessilk or viscose
DelicatesSilk
From cold up to40 degC
Detergent for wool-lens
Wool Wool From cold up to40 degC
Tip Visit wwwcleanrighteu to findfurther information on detergentscare products and cleaning agentsfor domestic use
122 Detergent dosageThe detergent dosage depends oniexcl The amount of laundryiexcl Degree of soilingiexcl Water hardness
You can find out how hard yourwater is from your local water com-pany or measure it yourself usinga water hardness tester
Water hardness
Hardness range Total hardness in mmoll
German degrees in degdH
soft (I) 0ndash15 0ndash84medium (II) 15ndash 25 84ndash14hard (III) over 25 over 14
Example of a manufacturersinstructions for detergentThese example values refer to astandard load of 4ndash5 kg
Soiling Light Normal HeavyWater hardness Softmedium 40 ml 55 ml 80 mlWater hardness Hardveryhard
55 ml 80 ml 105 ml
The dosages can be found on themanufacturers packagingiexcl Adjust the dosage to the actual
load
enemspBasic operation
36
Basic operation
13 Basic operationBasic operation
131 Switching on the appli-ance
Turn the programme selector to aprogramme
132 Setting a programme1 Set the programme selector to the
required programme rarr Programmes Page 24
2 If necessary adjust the pro-gramme settings rarr Page 36
133 Adjusting the pro-gramme settings
Requirement A programme hasbeen set rarr Setting a programme Page 36
Adjust the programme settings rarr Programmes Page 24
Note The programme settings arenot saved permanently for the pro-gramme
134 Loading laundryNotesiexcl Please read the information in the
Safety rarr Page 4 and Preventingmaterial damage rarr Page 10 sec-tions to ensure that you use theappliance safely
iexcl To prevent creasing take note ofthe maximum load for the rarr Programmes Page 24
Requirement The laundry is pre-pared and sortedrarr Laundry Page 321 Open the door
Make sure that the drum is empty2 Load the laundry unfolded into the
drum3 Close the door
Ensure that there is no laundrytrapped in the door
Basic operationemspen
37
135 Using a measuring aidfor liquid detergent
If you order the measuring aid as anaccessory you must use the measur-ing aid1 Pull out the detergent drawer
2 Press down on the insert and re-move the detergent drawer
1
2
3 Insert the measuring aid
4 Insert the detergent drawer
136 Use the measuring aidfor liquid detergent
To add liquid detergent you can usea measuring aid in the detergentdrawer1 Pull out the detergent drawer2 Slide the measuring aid forwards
3 Fold the measuring aid down andclick it into place
enemspBasic operation
38
4 Push in the detergent drawer
137 Adding detergent andcare product
Notesiexcl Please read the information in the
Safety rarr Page 4 and Preventingmaterial damage rarr Page 10 sec-tions to ensure that you use theappliance safely
iexcl Do not use the measuring aid forliquid detergent for gel detergentswashing powder or if Prewash orReady in time are activated
Requirement Find out the optimumdosage for detergent and careproduct rarr Page 341 Pull out the detergent drawer2 Pour in detergent
rarr Detergent drawer Page 193 If required add the care product4 Push in the detergent drawer
138 Starting the programmeNote If you want to change the timeuntil the programme ends set theReady in time first Press InicioPausa + Carga a The drum rotates and load detec-
tion takes place This can take upto 2 minutes after which waterenters the drum
a The display shows either the pro-gramme duration or the Ready intime
a After the programme has endedthe display shows End
139 Adjusting the Ready intime before the pro-gramme starts
You can readjust the selected Readyin time before the programme starts1 Press InicioPausa + Carga 2 Press Termin repeatedly until
the display indicates the desiredReady in time
3 Press InicioPausa + Carga
1310 Soaking laundryNote No additional detergent is re-quired The washing solution is thenused for washing1 Start the programme2 To pause the programme after ap-
prox 10 minutes press InicioPausa + Carga
3 To resume the programme afterthe desired soaking time pressInicioPausa + Carga
1311 Adding laundryNote Please read the information inthe Safety rarr Page 4 and Preventingmaterial damage rarr Page 10 sectionsto ensure that you use the appliancesafely1 Press InicioPausa + Carga
The appliance is paused andchecks whether it is possible toadd or remove laundry Take noteof the programme status
2 Add or remove laundry3 Close the door4 Press InicioPausa + Carga
Basic operationemspen
39
1312 Cancelling the pro-gramme
Once the programme has startedyou can cancel it at any timeNote Please read the information inthe Safety rarr Page 4 and Preventingmaterial damage rarr Page 10 sectionsto ensure that you use the appliancesafely1 Press InicioPausa + Carga 2 Open the door
The appliance door remainslocked for safety reasons if thetemperature and water levels arehighndash If the temperature is high start
the programmendash If the water level is high Start
the or programme3 Remove the laundry
1313 Resuming the pro-gramme when the pro-gramme status is RinseHold
1 Set the or programme2 Press InicioPausa + Carga
1314 Unloading the laundryNote Please read the information inthe Safety rarr Page 4 and Preventingmaterial damage rarr Page 10 sectionsto ensure that you use the appliancesafely1 Open the door
2 Remove the laundry
1315 Switching off the appli-ance
1 Turn the programme selector to
2 Turn off the tap3 Wipe the rubber gasket dry and re-
move any foreign objects
4 Leave the door and detergentdrawer open so that residual watercan evaporate
enemspChildproof lock
40
Childproof lock
14 Childproof lockChildproof lock
Secure your appliance against beingoperated unintentionally using thecontrols
141 Activating the childprooflock
Press and hold the two 3 segbuttons for approx 3 seconds
a The display shows a The controls are lockeda The childproof lock remains active
even after the appliance has beenswitched off
142 Deactivating the child-proof lock
Requirement To deactivate thechildproof lock the appliance mustbe switched on Press and hold the two 3 seg
buttons for approx 3 secondsa goes out in the display
Basic settingsemspen
41
Basic settings
15 Basic settingsBasic settings
You can configure the appliance to meet your needs
151 Overview of the basic settingsBelow is an overview of the basic settings on your appliance
Basic setting Programmeposition
Value Description
End signal 2 0 (off)1 (quiet)2 (me-dium)3 (loud)4 (veryloud)
Set the volume of the signal at theend of the programme
Button signal 3 0 (off)1 (quiet)2 (me-dium)3 (loud)4 (veryloud)
The volume of the audible signalemitted when the buttons arepressed
Drum cleaningreminder
4 ONOFF
Activate or deactivate the re-minder to clean the drum
enemspCleaning and servicing
42
152 Changing the basic set-tings
1 Set the programme selector to po-sition 1
2 Press InicioPausa + Carga and at the same time turn theprogramme selector to position 2
a The display shows the currentvalue
3 Set the programme selector to therequired position
4 To change the value press Ter-min
5 To save the changes switch offthe appliance
Cleaning and servicing
16 Cleaning and servi-cing
Cleaning and servicing
To keep your appliance working effi-ciently for a long time it is importantto clean and maintain it carefully
161 Tips on appliance careWipe down thehousing and thecontrol panelwith nothing butwater and adamp cloth
This ensures theparts of the appli-ance will remainclean and hy-gienic
Remove all de-tergent residuespray residue orother residuesimmediately
Fresh depositsare easier to re-move withoutleaving anyresidue
Keep the appli-ance door anddetergent draweropen after use
This allows theresidual water todry reducingodours in the ap-pliance
162 Cleaning the drum
CAUTIONRisk of injuryPermanently washing at low temper-atures and a lack of ventilation forthe appliance may damage the drumand cause injury Regularly run a programme for
cleaning the drum or wash at tem-peratures of at least 60 degC
Leave the appliance to dry afterevery operation with the dooropen and leave the detergentdrawer to dry
Run the Limp tambor pro-gramme without laundryAdd washing powder
163 Cleaning the detergentdrawer
Note Please read the information inthe Safety rarr Page 4 and Preventingmaterial damage rarr Page 10 sectionsto ensure that you use the appliancesafely1 Pull out the detergent drawer
Cleaning and servicingemspen
43
2 Press down on the insert and re-move the detergent drawer
1
2
3 Press out the insert upwards frombelow
4 Clean the detergent drawer and in-sert with water and a brush andthen dry them
5 Fit the insert and lock it into place
6 Cleaning the opening for the deter-gent drawer
7 Push in the detergent drawer
164 Descaling
ATTENTIONThe use of unsuitable descalingagents eg for coffee machines maydamage the appliance For this appliance only use de-
scaling agents that are availablefrom the manufacturers website orour after-sales service
enemspCleaning and servicing
44
165 Cleaning the drain pumpClean the drain pump in the event offaults eg blockages or rattlingnoises
Emptying the drain pumpNote Please read the information inthe Safety rarr Page 4 and Preventingmaterial damage rarr Page 10 sectionsto ensure that you use the appliancesafely1 Turn off the water tap2 Switch off the appliance3 Disconnect the appliances mains
plug from the power supply4 Open the maintenance flap
5 Remove the maintenance flap
6 Slide a sufficiently large receptacleunder the opening
7 Take the drain hose out of theholder
Cleaning and servicingemspen
45
8 CAUTION - Risk of scaldingWhen you wash at high temperat-ures the detergent solution getshot
Do not touch the hot detergentsolutionTo allow the detergent solution toflow out into the container removethe sealing cap
9 Firmly press on the sealing cap
10 Insert the drain hose into theholder
Cleaning the drain pumpNote Please read the information inthe Safety rarr Page 4 and Preventingmaterial damage rarr Page 10 sectionsto ensure that you use the appliancesafelyRequirement The drain pump isempty rarr Page 441 Since water may remain in the
drain pump remove the pump capcarefully
2 Clean the interior the thread onthe pump cap and the pump hous-ing
3 Make sure that the impeller in thedrain pump can be rotated
enemspCleaning and servicing
46
4 Insert the pump cap and screw iton as far as it will go
90deg
The handle on the pump cap mustbe in a vertical position
5 Close the maintenance flap
Before the next washTo prevent unused detergent fromflowing straight into the outlet in thenext wash run the programmeafter you have emptied the drainpump1 Turn on the tap2 Insert the mains plug3 Switch on the appliance4 Pour 1 litre of water into compart-
ment II5 Start the programme
166 Cleaning the water outlethose at the siphon
1 Switch off the appliance2 Disconnect the appliances mains
plug from the power supply
3 Loosen the hose clamp and care-fully remove the water outlet hose
Residual water may leak out4 Clean the water outlet hose and si-
phon connecting piece
5 Reattach the water outlet hose andsecure the connection point usingthe hose clamp
Cleaning and servicingemspen
47
167 Clean the water inlet fil-ters
Emptying the water inlet hose1 Turn off the tap2 Set a programme except for
or 3 Start the programme and leave it
to run for approx 40 seconds4 Switch off the appliance5 Disconnect the appliances mains
plug from the power supply
Cleaning the filter on the tapNote Please read the information inthe Safety rarr Page 4 and Preventingmaterial damage rarr Page 10 sectionsto ensure that you use the appliancesafelyRequirement The water inlet hose isempty1 Remove the water inlet hose from
the tap
2 Clean the filter with a small brush
3 Connect the water inlet hose andcheck for leaks
Cleaning the filter on theapplianceNote Please read the information inthe Safety rarr Page 4 and Preventingmaterial damage rarr Page 10 sectionsto ensure that you use the appliancesafelyRequirement The water inlet hose isempty rarr Emptying the water inlet hosePage 47
enemspCleaning and servicing
48
1 Disconnect the hose from the rearof the appliance
1
2
2 Use pliers to remove the filter
3 Clean the filter with a small brush
4 Reinsert the filter
5 Connect the hose and check forleaks
2
1
Troubleshootingemspen
49
Troubleshooting
17 TroubleshootingTroubleshooting
You can rectify minor faults on your appliance yourself Read the troubleshoot-ing information before contacting after-sales service This will avoid unneces-sary costs
WARNINGRisk of electric shockIncorrect repairs are dangerous Repairs to the appliance should only be carried out by trained specialist
staff Only use genuine spare parts when repairing the appliance If the power cord of this appliance is damaged it must be replaced by the
manufacturer the manufacturers Customer Service or a similarly qualifiedperson in order to prevent any risk
Fault Cause and troubleshootingThe display goes outand InicioPausa +Carga flashes
Energy-saving mode is active Press any buttona The symbol lights up again
E36 -10 Drain pipe or water outlet hose is blocked Clean the drain pipe and the water outlet hose
Drain pipe or water drain hose is caught or jammed Ensure that the drain pipe and water drain hose are
not kinked or trapped
Drain pump is blocked rarr Cleaning the drain pump Page 44
The water outlet hose is connected too high Install the water outlet hose at a maximum height of
1 metre
Detergent dosage is too high Immediate measure Mix one tablespoon of fabric
softener with 05 litres of water and pour the mix-ture into the left-hand compartment (not for outdoorclothing sportswear or items stuffed with down)
Reduce the amount of detergent for the next wash-ing cycle with the same load
Unapproved extension installed on the water drainhose Remove any unapproved extensions from the water
hose Connecting the appliance
E36 -25 -26 Drain pump is blocked rarr Cleaning the drain pump Page 44
enemspTroubleshooting
50
Fault Cause and troubleshootingThe water pressure is lowNo remedial action possibleThe filters in the water inflow are blocked Clean the filters in the water inflow rarr Page 47
The tap is turned off Turn on the tap
The water inlet hose is kinked or jammed Ensure that the water inlet hose is not kinked or
jammed
flashes The automatic voltage control system detects an un-authorised voltage under-usage No remedial action possible
Note If the power supply is stable the programmecontinues to run as normalVoltage under-usage may cause extension of a pro-grammeNo remedial action possible
flashes Voltage under-usage may cause extension of a pro-grammeNo remedial action possible
lights up The temperature is too high Wait until the temperature has dropped rarr Cancelling the programme Page 39
Water level is too high Start the programme
Laundry is caught in the door1 Open the door again2 Remove any trapped laundry3 Close the door4 Press InicioPausa + Carga to start the pro-
gramme
flashes Door is not closed1 Close the door2 Press InicioPausa + Carga to start the pro-
gramme
All other error codes Malfunction Call the after-sales service
rarr Customer Service Page 59
Troubleshootingemspen
51
Fault Cause and troubleshootingThe appliance is notworking
The mains plug of the power cord is not plugged in Connect the appliance to the power supply
The circuit breaker is faulty Check the circuit breaker in the fuse box
There has been a power cut Check whether the lighting in your kitchen or other
appliances are working
The programme doesnot start
You have not pressed InicioPausa + Carga Press InicioPausa + Carga
Door is not closed1 Close the door2 Press InicioPausa + Carga to start the pro-
gramme
Childproof lock is activated rarr Deactivating the childproof lock Page 40
Termin is activated Check whether Termin is activated
rarr Buttons Page 23
Laundry is caught in the door1 Open the door again2 Remove any trapped laundry3 Close the door4 Press InicioPausa + Carga to start the pro-
gramme
The door cannotbe opened
ndash ndash ndash ndash is activated Continue the programme by selecting or and
pressing InicioPausa + Carga rarr Resuming the programme when the programmestatus is Rinse Hold Page 39
The temperature is too high Wait until the temperature has dropped rarr Cancelling the programme Page 39
Water level is too high Start the programme
Power failure Open the door using the emergency release
rarr Emergency release Page 57
The water is not drain-ing
Drain pipe or water outlet hose is blocked Clean the drain pipe and the water outlet hose
enemspTroubleshooting
52
Fault Cause and troubleshootingThe water is not drain-ing
Drain pipe or water drain hose is caught or jammed Ensure that the drain pipe and water drain hose are
not kinked or trapped
Drain pump is blocked rarr Cleaning the drain pump Page 44
ndash ndash ndash ndash is activated Continue the programme by selecting or and
pressing InicioPausa + Carga rarr Resuming the programme when the programmestatus is Rinse Hold Page 39
The water outlet hose is connected too high Install the water outlet hose at a maximum height of
1 metre
Detergent dosage is too high Immediate measure Mix one tablespoon of fabric
softener with 05 litres of water and pour the mix-ture into the left-hand compartment (not for outdoorclothing sportswear or items stuffed with down)
Reduce the amount of detergent for the next wash-ing cycle with the same load
Unapproved extension installed on the water drainhose Remove any unapproved extensions from the water
hose Connecting the appliance
Water is not flowingin Detergent is notbeing dispensed
You have not pressed InicioPausa + Carga Press InicioPausa + Carga
The filters in the water inflow are blocked Clean the filters in the water inflow rarr Page 47
The tap is turned off Turn on the tap
The water inlet hose is kinked or jammed Ensure that the water inlet hose is not kinked or
jammed
The spin cycle runsseveral times
The unbalanced load detection system eliminates animbalance by repeatedly redistributing the laundry Not a fault ndash no action required
Note When loading where possible place large andsmall items of laundry together in the drum Differentsized items of laundry distribute themselves betterduring the spin cycle
Troubleshootingemspen
53
Fault Cause and troubleshootingThe programme dura-tion changes duringthe wash cycle
The programme operation is optimised electronicallyThis may change the programme duration Not a fault ndash no action required
The unbalanced load detection system eliminates animbalance by repeatedly redistributing the laundry Not a fault ndash no action required
Note When loading where possible place large andsmall items of laundry together in the drum Differentsized items of laundry distribute themselves betterduring the spin cycleFoam detection system switches on a rinse cycle iffoam build-up is too high Not a fault ndash no action required
No water is visible inthe drum
Water is below the visible area Not a fault ndash no action required Do not add any extra water to the appliance while it
is operating
Drum jerks after theprogramme starts
This is caused by an internal motor test Not a fault ndash no action required
Residual water ispresent in the com-partment
Insert in compartment is blocked rarr Cleaning the detergent drawer Page 42
Vibrations and move-ment of the appliancewhilst spinning
Appliance is not correctly aligned Aligning the appliance
The appliance feet are not fixed Secure the appliance feet Aligning the appliance
Transit bolts have not been removed Removing the transit bolts
Drum does not turnwater does not flow in
Load detection is active Not a fault ndash no action required
Note The load detection can take up to two minutesHeavy foam build-up Detergent dosage is too high
Immediate measure Mix one tablespoon of fabricsoftener with 05 litres of water and pour the mix-ture into the left-hand compartment (not for outdoorclothing sportswear or items stuffed with down)
Reduce the amount of detergent for the next wash-ing cycle with the same load
enemspTroubleshooting
54
Fault Cause and troubleshootingHigh spin speed notreached
A low spin speed is selected The next time you run a wash cycle set a higher
spin speed
Unbalance load detection system is using a reducedspin speed to eliminate an unbalance Redistribute the laundry in the drum
Note Where possible mix large and small items inthe drum Different sized items of laundry distributethemselves better during the spin cycle Start the programme
The spin programmedoes not start
Drain pipe or water outlet hose is blocked Clean the drain pipe and the water outlet hose
Drain pipe or water drain hose is caught or jammed Ensure that the drain pipe and water drain hose are
not kinked or trapped
The unbalanced load detection system has interruptedthe spin cycle because the laundry is unevenly distrib-uted Redistribute the laundry in the drum
Note Where possible mix large and small items inthe drum Different sized items of laundry distributethemselves better during the spin cycle Start the programme
Rushing hissingnoise
Water is flushed under pressure into the detergentdrawer Not a fault ndash normal operating noise
Loud noises duringthe spin cycle
Appliance is not correctly aligned Aligning the appliance
The appliance feet are not fixed Secure the appliance feet Aligning the appliance
Transit bolts have not been removed Removing the transit bolts
Banging noises rat-tling in the drainpump
Foreign bodies have got into the drain pump rarr Cleaning the drain pump Page 44
Slurping rhythmicalsuction noise
The drain pump is active the detergent solution ispumped out Not a fault ndash normal operating noise
Troubleshootingemspen
55
Fault Cause and troubleshootingCreasing The spin speed is too high
The next time you run a wash cycle set a lowerspin speed
The load is too large The next time you run a wash cycle reduce the
amount of laundry being loaded
The wrong programme is selected for the type of fab-ric Select the programmes that are suitable for the
type of fabric rarr Programmes Page 24
Detergent or fabricsoftener drips off theseal and collects onthe door or in the sealfold
Too much detergentfabric softener in the detergentdrawer When dosing liquid detergent and fabric softener
observe the marking in the detergent drawer anddo not dose above this
The spin result is notsatisfactory The laun-dry is too wettoodamp
A low spin speed is selected The next time you run a wash cycle set a higher
spin speed Start the programme
Drain pipe or water outlet hose is blocked Clean the drain pipe and the water outlet hose
Drain pipe or water drain hose is caught or jammed Ensure that the drain pipe and water drain hose are
not kinked or trapped
The unbalanced load detection system has interruptedthe spin cycle because the laundry is unevenly distrib-uted Redistribute the laundry in the drum
Note Where possible mix large and small items inthe drum Different sized items of laundry distributethemselves better during the spin cycle Start the programme
Unbalance load detection system is using a reducedspin speed to eliminate an unbalance Redistribute the laundry in the drum
Note Where possible mix large and small items inthe drum Different sized items of laundry distributethemselves better during the spin cycle Start the programme
enemspTroubleshooting
56
Fault Cause and troubleshootingDetergent residue onthe damp washing
Detergents may contain water-insoluble substancesthat deposit on the laundry Start the programme
Detergent residue onthe dry laundry
Detergents may contain water-insoluble substancesthat deposit on the laundry Brush out the laundry after washing and drying
Water is leaking out atthe water inlet hose
Water inlet hose is not correctlysecurely connected1 Connect the water supply hose correctly Connect-
ing the water inlet hose2 Tighten the screw connection
Water is leaking out atthe water outlet hose
The water outlet hose is damaged Replace the damaged water outlet hose
Water outlet hose is not connected correctly Connect the water outlet hose correctly Water out-
let connection types
Odours have formedin the appliance
Humidity and detergent residue may promote theformation of bacteria rarr Cleaning the drum Page 42 If you are not using the appliance leave the door
and detergent drawer open so that residual watercan evaporate
Transportation storage and disposalemspen
57
171 Emergency releaseReleasing the doorRequirement The drain pump isempty rarr Page 441 ATTENTION Escaping water may
cause material damage Do not open the door if you can
see water through the glassPull the emergency release down-wards with a tool and release
a The door lock is released2 Insert the maintenance flap and
lock it into place3 Close the maintenance flap
Transportation storage and disposal
18 Transportation stor-age and disposal
Transportation storage and disposal
You can find out here how to prepareyour appliance for transportation andstorage You will also find out how todispose of old appliances
181 Removing the appliance1 Turn off the tap2 rarr Emptying the water inlet hose
Page 473 Switch off the appliance4 Unplug the appliances mains plug
5 Drain the remaining detergentsolution rarr Cleaning the drain pumpPage 44
6 Detach the hoses
182 Inserting the transitbolts
Secure the appliance for transporta-tion using transit bolts in order to pre-vent damage1 Remove the four cover caps
‒ If necessary use a screwdriverto remove the cover caps
Keep the cover caps2 Insert the four sleeves
enemspTransportation storage and disposal
58
3 Insert all screws into the fourtransit bolts and tighten slightly
4 Insert the power cord into theholder and tighten all fourscrews for the transit bolts with aWAF 13 wrench
5 Insert the hose into holder
183 Using the applianceagain
1 Remove the transit bolts
2 Pour approx 1 litre of water intocompartment II in the detergentdrawer
3 Start the programmea The unused detergent cannot flow
straight into the outlet during thenext wash
184 Disposing of old appli-ance
Valuable raw materials can be re-used by recycling
WARNINGRisk of harm to healthChildren can lock themselves in theappliance thereby putting their livesat risk Do not install the appliance behind
a door as this may obstruct the ap-pliance door or prevent it fromopening
With redundant appliances unplugthe power cord Then cut throughthe cord and damage the lock onthe appliance door beyond repairso that the appliance door will nolonger close
1 Unplug the appliance from themains
2 Cut through the power cord3 Dispose of the appliance in an en-
vironmentally friendly mannerInformation about current disposalmethods are available from yourspecialist dealer or local authority
This appliance is la-belled in accordancewith European Directive201219EU concerningused electrical and elec-
Customer Serviceemspen
59
tronic appliances (wasteelectrical and electronicequipment - WEEE)The guideline determ-ines the framework forthe return and recyclingof used appliances asapplicable throughoutthe EU
Customer Service
19 Customer ServiceCustomer Service
If you have any queries on use areunable to rectify faults on the appli-ance yourself or if your applianceneeds to be repaired contact Cus-tomer ServiceYou can solve many problems your-self by consulting the information ontroubleshooting in these instructionsor on our website If this is not thecase contact our after-sales serviceWith any warranty claims we willmake sure that your appliance is re-paired by trained after-sales techni-cians using genuine spare parts in-cluding after the manufacturers war-ranty has expiredFunction-relevant genuine spare partsaccording to the corresponding Eco-design Order can be obtained fromCustomer Service for a period of atleast 10 years from the date onwhich your appliance was placed onthe market within the European Eco-nomic AreaNote Under the terms of the manu-facturers warranty the use of Cus-tomer Service is free of chargeDetailed information on the warrantyperiod and terms of warranty in yourcountry is available from our after-sales service your retailer or on ourwebsite
If you contact Customer Service youwill require the product number (E-Nr) and the production number (FD)of your applianceThe contact details for Customer Ser-vice can be found in the enclosedCustomer Service directory or on ourwebsite
191 Product number (E-Nr)and production number(FD)
You can find the product number (E-Nr) and the production number (FD)on the appliances rating plateDepending on the model the ratingplate is locatediexcl On the inside of the dooriexcl On the inside of the maintenance
flapiexcl On the rear of the applianceMake a note of your appliances de-tails and the Customer Service tele-phone number to find them againquickly
enemspConsumption values
60
Consumption values
20 Consumption valuesConsumption values
The following information is provided in accordance with the EU EcodesignRegulation The values given for programs other than the Eco 40-60 are indicat-ive only and were determined in accordance with the applicable standardEN60456
Programme Load(kg)
Pro-gramme dura-tion(hrmin)1
Energycon-sump-tion(kWhcycle)1
Watercon-sump-tion (lcycle)1
Max-imumtemper-ature(degC) 5mins1
Spinspeed(rpm)1
Resid-ualmois-ture()1
Eco 40-602 90 337 1245 610 50 1166 5000Eco 40-602 45 252 0590 450 33 1200 5000Eco 40-602 25 233 0195 300 24 1200 5400AlgodoacutenAl-godatildeo 20 degC
90 328 0370 900 23 1200 5400
AlgodoacutenAl-godatildeo 40 degC
90 328 1350 900 45 1200 5400
AlgodoacutenAl-godatildeo 60 degC
90 328 1450 900 55 1200 5400
AlgodoacutenAl-godatildeo 40 degC + Pre-lav
90 358 1400 1020 45 1200 5400
Sinteacuteticos 40 degC
40 228 0780 610 44 1200 2700
Mix 40 degC 40 059 0620 440 41 1200 5600 LanaLatildes
30 degC20 040 0200 400 22 800 2500
1 Due to the influence of water pressure hardness and inlet temperature am-bient temperature type amount and soiling of laundry detergent used fluc-tuations in the power supply and the selected additional functions the actualvalues may deviate from the stated values
2 Test programme in accordance with the EU Ecodesign Directive and the EUEnergy Labelling Regulation with cold water (15 degC)
Technical specificationsemspen
61
Technical specifications
21 Technical specifica-tions
Technical specifications
Facts and figures for your appliancecan be found here
Appliance height 850 cmAppliance width 598 cmAppliance depth 590 cmWeight 80 kg1
Maximum load 9 kgMains voltage 220 - 240 V
50 Hz Minimum in-
stallation protec-tion
10 A
Rated power 2300 WPower consump-tion
iexcl Off mode010 W
iexcl Left-on mode050 W
Water pressure iexcl Minimum100 kPa(1 bar)
iexcl Maximum1000 kPa(10 bar)
Length of the wa-ter inlet hose
150 cm
Length of the wa-ter outlet hose
150 cm
Length of thepower cord
160 cm
1 Depending on the appliance spe-cifications
More information about your modelcan be found online at httpsen-ergylabelbsh-groupcom1 This webaddress is linked to the official EUEPREL product database At the time
of printing its web address had notyet been published Please then fol-low the instructions on searching formodels The model identifier is madeup of the characters before the slashin the product number (E-Nr) on therating plate Alternatively you canalso find the model identifier in thefirst line of the EU energy label
1 Only applies to countries in the European Economic Area
Thank you for buying aBosch Home Appliance
Register your new device on MyBosch now and profit directly from
bull Expert tips amp tricks for your appliancebull Warranty extension optionsbull Discounts for accessories amp spare-partsbull Digital manual and all appliance data at handbull Easy access to Bosch Home Appliances Service
Free and easy registration ndash also on mobile phoneswwwbosch-homecomwelcome
Looking for help Youll find it here
Expert advice for your Bosch home appliances help with problems or a repair from Bosch experts Find out everything about the many ways Bosch can support you wwwbosch-homecomservice Contact data of all countries are listed in the attached service direct-ory
90016102699001610269emsp(010219)en
Robert Bosch Hausgeraumlte GmbHCarl-Wery-Straszlige 3481739 MuumlnchenGERMANYwwwbosch-homecom
Valid within Great BritainImported to Great Britain byBSH Home Appliances LtdGrand Union HouseOld Wolverton RoadWolverton Milton KeynesMK12 5PTUnited Kingdom
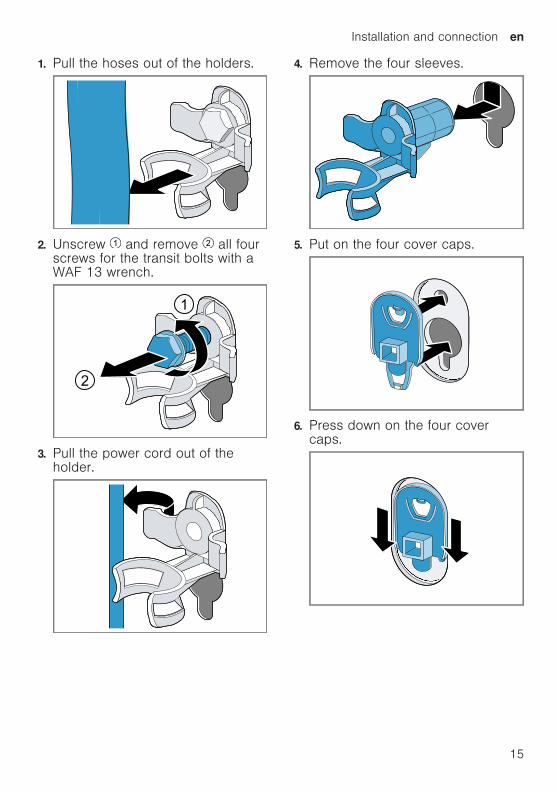
Installation and connectionemspen
15
1 Pull the hoses out of the holders
2 Unscrew and remove all fourscrews for the transit bolts with aWAF 13 wrench
3 Pull the power cord out of theholder
4 Remove the four sleeves
5 Put on the four cover caps
6 Press down on the four covercaps
enemspInstallation and connection
16
45 Connecting the applianceConnecting the water inlet hoseNoteiexcl Please read the information in the
Safety rarr Page 4 and Preventingmaterial damage rarr Page 10 sec-tions to ensure that you use theappliance safely
1 Connect the water inlet hose
2
1
2 Connect the water inlet hose to atap (264 mm = 34)
frac34˝min
min
10 mm
17 mm
3 Open the water tap carefully andcheck that the connection pointsare tight
Water outlet connection typesThis information is intended to helpyou to connect this appliance to thewater outlet
Note Please read the information inthe Safety rarr Page 4 and Preventingmaterial damage rarr Page 10 sectionsto ensure that you use the appliancesafely
ATTENTIONWhen draining the water outlet hoseis subject to water pressure and maycome loose from the installed con-nection point Secure the water outlet hose
against unintentional loosening
Note Observe the draining heightsThe maximum draining height is100 cm
Drainage into asiphon
Secure the con-nection point witha (24ndash40 mm)hose clamp
Drainage into awashbasin
Fix and securethe water outletusing an elbowrarr Page 31
Drainage into aplastic pipe withrubber sleeve orinto a gully
Fix and securethe water outletusing an elbowrarr Page 31
Installation and connectionemspen
17
46 Aligning the applianceIn order to reduce noise and vibra-tion and to prevent the appliancefrom moving align the appliance cor-rectlyNote Please read the information inthe Safety rarr Page 4 and Preventingmaterial damage rarr Page 10 sectionsto ensure that you use the appliancesafely1 Loosen the lock nuts using a WAF
17 wrench by turning it in a clock-wise direction
2 To align the appliance turn the ap-pliance feet Check that the appli-ance is level using a spirit level
All appliance feet must stand firmlyon the ground
3 Screw the lock nuts tightly againstthe housing using a WAF 17wrench
In doing so hold the foot tight anddo not adjust its height
47 Connecting the applianceto the electricity supply
Note Please read the information inthe Safety rarr Page 4 and Preventingmaterial damage rarr Page 10 sectionsto ensure that you use the appliancesafely1 Insert the mains plug of the appli-
ances power cable in a socketnearbyThe connection details of the appli-ance can be found under Tech-nical data rarr Page 61
2 Check the mains plug is insertedproperly
enemspFamiliarising yourself with your appliance
18
Familiarising yourself with your appliance
5 Familiarising yourself with your applianceFamiliarising yourself with your appliance
51 ApplianceYou can find an overview of the parts of your appliance here
1
2
4 73 6
88
5
On certain models specific details such as the colour and shape may differfrom those pictured
1 Maintenance flap for the drainpump rarr Page 44
2 Door
3 Detergent drawer rarr Page 19
4 Controls rarr Page 19
5 Covering plate
6 Water outlet hose rarr Page 16
7 Power cord rarr Page 17
8 Transit bolts rarr Page 14
Familiarising yourself with your applianceemspen
19
52 Detergent drawer
2
3
1
4
1 Measuring aid for liquid deter-gent rarr Using a measuring aid forliquid detergent Page 37
2 Compartment IIiexcl Detergent for main washiexcl Water softeneriexcl Bleachiexcl Stain remover
3 Compartment iexcl Fabric softeneriexcl Liquid starchiexcl Waterproofing agent
4 Compartment Iiexcl Detergent for prewashiexcl Hygiene detergent
53 ControlsYou can use the control panel to configure all functions of your appliance andto obtain information about the operating status
2 3
1 1
4
1 Programmes rarr Page 24
2 Programme selectorrarr Page 36
3 Display rarr Page 20
4 Buttons rarr Page 23
enemspDisplay
20
Display
6 DisplayDisplay
The display shows the current settings options or relevant information
Display Designation Description040 1 Programme dura-
tionprogrammetime remaining
Approximate expected programme dura-tion or programme time remaining
10h 1 Ready in time The programme end has been set and theremaining number of hours is displayed rarr Buttons Page 23
9 kg 1 Recommendedload
The maximum load capacity for the selec-ted programme in kg
ndash ndash ndash ndash -1200
Spin speed Set spin speed in rpm rarr Buttons Page 230= No final spin only drainingndash ndash ndash ndash Rinse Hold no draining
ndash 90 Temperature Set temperature in degC rarr Buttons Page 23
(cold)StartPause Start cancel or pause
iexcl Lights up The programme is runningand can be cancelled or paused
iexcl Flashes The programme can be star-ted or continued
Wash Programme status1 Example
Displayemspen
21
Display Designation DescriptionRinse Programme statusSpin Programme status
ndash ndash ndash ndash Rinse Hold Programme statusEnd End of pro-
grammeProgramme status
Childproof lock iexcl lights up The childproof lock is activ-ated
iexcl flashes The childproof lock is activatedand the appliance has been operated rarr Deactivating the childproof lockPage 40
Prewash Prewash is activated rarr Buttons Page 23
Water Plus andRinse Plus
Wash with more water and a rinse cycle isactivated rarr Buttons Page 23
SpeedPerfect Short wash activated rarr Buttons Page 23
1 Energy consump-tion
Energy consumption for the selected pro-grammeiexcl Low energy consumptioniexcl High energy consumption
Reminder to cleanthe drum
Flashes Drum is dirty Run the Limp tam-bor programme for cleaning and caringfor the drum and the outer tub rarr Cleaning the drum Page 42
Voltage controlsystem
Flashes The automatic voltage controlsystem detects impermissible voltagedrops This will pause the programmeNote The programme will continue whenthe voltage is permissible again
Voltage controlsystem
Flashes The programme has beenpaused because of impermissible voltagedrops The voltage is permissible againand the programme will continueNote The programme duration is exten-ded
1 Example
enemspDisplay
22
Display Designation DescriptionDoor iexcl Lights up The door is locked and can-
not be openediexcl Flashes The door is not closed prop-
erlyiexcl Off The door is unlocked and can be
openedTap iexcl No water pressure
iexcl The water pressure is too lowE35 -10 1 Error Error code error display signal1 Example
Buttonsemspen
23
Buttons
7 ButtonsButtons
The selection of programme settings depends on the programme that is setYou can see the selection options for each programme in the overview for rarr Programmes Page 24
Button Selection DescriptionInicioPausa +Carga (StartPause + Reload)
iexcl Startiexcl Canceliexcl Pause
Start cancel or pause the pro-gramme
SpeedPerfect iexcl Activateiexcl Deactivate
Activate or deactivate a short washingprogrammeNote Energy consumption increasesThe washing result is not affected bythis
Termin (ReadyIn)
1ndash24 hours Set the programme endThe programme duration is already in-cluded in the set number of hoursOnce the programme has started theprogramme duration is displayed
Temp degC (Tem-perature)
ndash 90 degC Adjust the temperature in degC
Centrif (Spin) ndash ndash ndash ndash - 1200 Adjust the spin speed or activate ndash ndash ndash ndash (Rinse Hold)If ndash ndash ndash ndash is selected the water is notdrained at the end of the washingcycle and the spin cycle is deactiv-ated The laundry remains in the waterused for rinsing
3 seg (ChildLock 3 sec)
iexcl Activateiexcl Deactivate
Activate or deactivate the childprooflockDisable the control panel to preventunwanted or accidental operationIf the childproof lock is activated andthe appliance has been switched offthe childproof lock remains activated rarr Childproof lock Page 40
Prelav (Pre-wash)
iexcl Activateiexcl Deactivate
Activate or deactivate prewash egfor washing heavily soiled laundry
Extra (ExtraRinse)
iexcl Activateiexcl Deactivate
Activate or deactivate a washing pro-gramme with more water and an addi-tional rinse cycleRecommended for particularly sensit-ive skin or in regions with very softwater
enemspProgrammes
24
Programmes 8 P
rogr
amm
esProgrammes B
elow
is a
n ov
ervi
ew o
f the
pro
gram
mes
You
can
find
info
rmat
ion
on the
load
and
on
the
adju
stab
le p
ro-
gram
me
optio
ns
Tip
The
laun
dry
s ca
re la
bels
pro
vide
you
with
add
ition
al in
form
atio
n on
pro
gram
me
sele
ctio
n
rarr
Car
e sy
mbo
ls o
n th
e ca
re la
bels
Pa
ge 3
4
Pro
gram
me
Des
crip
tion
Max load (kg)
Pro
gram
me
sett
ings
Max temperature (degC)
Max spin speed(rpm) 1
SpeedPerfect
Extra
Centrif ndash ndash ndash ndash(Rinse Hold)
Prelav
Alg
odoacuten
Al-
godatilde
o (
Cot
tons
)W
ash
hard
-wea
ring
item
s m
ade
from
cotto
n li
nen
or b
lend
ed fa
bric
sA
lso
suita
ble
as a
sho
rt p
rogr
amm
efo
r no
rmal
ly s
oile
d la
undr
y w
hen
you
activ
ate
Spe
edPer
fect
I
f Spe
ed-
Per
fect
is
act
ivat
ed t
he m
ax-
imum
load
cap
acity
is r
educ
ed to
5 k
g
990
1200
Alg
odoacuten
Col
orA
l-go
datildeo
Cor
(
Cot
-to
ns C
olou
r)
Was
h ha
rd-w
earin
g ite
ms
mad
e from
cotto
n li
nen
or b
lend
ed fa
bric
sEne
rgy-
savi
ng p
rogr
amm
e
9
90
1200
ndash
1Pro
gram
me
setti
ng
Programmesemspen
25
Pro
gram
me
Des
crip
tion
Max load (kg)
Pro
gram
me
sett
ings
Max temperature (degC)
Max spin speed(rpm) 1
SpeedPerfect
Extra
Centrif ndash ndash ndash ndash(Rinse Hold)
Prelav
Not
e T
o sa
ve e
nerg
y the
act
ual
was
hing
tem
pera
ture
may
dev
iate
from
the
set
was
hing
tem
pera
ture
Th
e w
ashi
ng p
erfo
rman
ce m
eets
lega
l req
uire
men
ts
Eco
40-6
0W
ash
item
s m
ade
from
cot
ton
line
nor
ble
nded
fabr
ics
Not
e T
extil
es w
hich
can
be
was
hed
from
40 deg
C
up
to 6
0 deg
C
as
per
the
care
sym
bol c
an b
e w
ashe
dto
geth
er
The
was
hing
per
form
ance
cor
res-
pond
s to
the
bes
t po
ssib
le w
ashi
ngpe
rfor
man
ce c
lass
acc
ordi
ng to
the
lega
l req
uire
men
ts
For
this
pro
gram
me
the
was
hing
tem
pera
ture
is a
utom
atic
ally
adj
uste
dde
pend
ing
on the
load
siz
e in
ord
erto
ach
ieve
the
bes
t po
ssib
le e
nerg
y
9
ndash
1200
ndash
1Pro
gram
me
setti
ng
enemspProgrammes
26
Pro
gram
me
Des
crip
tion
Max load (kg)
Pro
gram
me
sett
ings
Max temperature (degC)
Max spin speed(rpm) 1
SpeedPerfect
Extra
Centrif ndash ndash ndash ndash(Rinse Hold)
Prelav
effic
ienc
y w
ith the
bes
t po
ssib
lew
ashi
ng r
esul
t You
can
not ch
ange
the
was
hing
tem
pera
ture
Sin
teacutetic
os
(Eas
yC
are)
Was
h ite
ms
mad
e from
syn
thet
ic o
rbl
ende
d fa
bric
s4
60
1200
Mix
(
Mix
edFa
bric
s)W
ash
item
s m
ade
from
cot
ton
line
nor
syn
thet
ic o
r bl
ende
d fa
bric
sSui
tabl
e fo
r lig
htly
soi
led
laun
dry
460
1200
Del
icad
oSed
a (D
elic
ate
Silk
)W
ash
delic
ate
was
habl
e ite
ms
mad
efrom
silk
vis
cose
and
syn
thet
ics
Use
a d
eter
gent
tha
t is
sui
tabl
e fo
rde
licat
es o
r si
lk
Not
e W
ash
espe
cial
ly d
elic
ate
item
sor
item
s w
ith h
ooks
eye
lets
or
clip
sin
a m
esh
laun
dry
bag
2
40
800
ndash
1Pro
gram
me
setti
ng
Programmesemspen
27
Pro
gram
me
Des
crip
tion
Max load (kg)
Pro
gram
me
sett
ings
Max temperature (degC)
Max spin speed(rpm) 1
SpeedPerfect
Extra
Centrif ndash ndash ndash ndash(Rinse Hold)
Prelav
Lan
aLatilde
s (W
ool)
Han
d- o
r m
achi
ne-w
asha
ble
item
sth
at a
re m
ade
from
woo
l or
cont
ain
woo
lTo
pre
vent
the
laun
dry
from
shr
ink-
ing
the
dru
m m
oves
the
item
s ve
ryge
ntly
with
long
pau
ses
Use
a d
eter
gent
tha
t is
sui
tabl
e fo
rw
ool
2
40
800
ndash
ndash
ndash
(R
inse
)R
inse
s an
d th
en s
pins
the
laun
dry
and
then
dra
ins
the
wat
er
ndashndash
1200
ndash
ndash
(
Spi
nD
rain
)Spi
ns a
nd d
rain
s th
e w
ater
If
you
only
wan
t to
dra
in the
wat
er
activ
ate
0 T
he la
undr
y is
not
spu
n
ndash
ndash
1200
ndash
ndash
ndash
ndash
Rop
a os
cura
R
oupa
esc
ura
(Dar
k W
ash)
Was
h da
rk-c
olou
red
and
colo
ur-in
-te
nse
item
s m
ade
from
cot
ton
orea
sy-c
are
fabr
ic e
g j
eans
Tu
rn la
undr
y in
side
-out
bef
ore
was
h-in
gU
se li
quid
det
erge
nt
4
40
1200
1Pro
gram
me
setti
ng
enemspProgrammes
28
Pro
gram
me
Des
crip
tion
Max load (kg)
Pro
gram
me
sett
ings
Max temperature (degC)
Max spin speed(rpm) 1
SpeedPerfect
Extra
Centrif ndash ndash ndash ndash(Rinse Hold)
Prelav
Plu
mas
Pen
as
(Dow
n)W
ash
pillo
ws
duv
ets
or c
loth
ing
stuf
fed
with
dow
n an
d fil
lings
with
synt
hetic
fibr
es
Was
h la
rge
item
s se
para
tely
U
se a
det
erge
nt tha
t is
sui
tabl
e fo
rdo
wn
or d
elic
ates
U
se s
parin
gly
Do
not us
e fa
bric
sof
tene
rN
ote
To
prev
ent ex
cess
ive
foam
ing
rem
ove
air
from
laun
dry
item
s by
rolli
ng the
m u
p be
fore
you
was
hth
em
2
60
1200
ndash
ndash
Lim
p tam
bor
(Dru
m C
lean
)C
lean
ing
and
carin
g fo
r th
e dr
um
Use
thi
s pr
ogra
mm
e in
the
follo
win
gca
ses
iexclB
efor
e us
ing
the
appl
ianc
e fo
r th
efir
st tim
eiexcl
If yo
u re
gula
rly w
ash
at tem
pera
t-ur
es o
f 40 deg
C o
r lo
wer
ndash
ndash
1200
ndash
ndash
ndash
ndash
1Pro
gram
me
setti
ng
Programmesemspen
29
Pro
gram
me
Des
crip
tion
Max load (kg)
Pro
gram
me
sett
ings
Max temperature (degC)
Max spin speed(rpm) 1
SpeedPerfect
Extra
Centrif ndash ndash ndash ndash(Rinse Hold)
Prelav
iexclA
fter
a pr
olon
ged
perio
d of
non
-us
eU
se w
ashi
ng p
owde
r or
a d
eter
gent
cont
aini
ng b
leac
hH
alve
the
am
ount
of d
eter
gent
to
avoi
d fo
amin
gD
o no
t us
e fa
bric
sof
tene
rD
o no
t us
e liq
uid
dete
rgen
t or
det
er-
gent
tha
t is
inte
nded
for
woo
llens
or
delic
ates
N
ote
The
dru
m c
lean
ing
indi
cato
rw
ill fl
ash
to r
emin
d yo
u if
you
have
not us
ed a
pro
gram
me
at 6
0 deg
C o
rhi
gher
for
a lo
ng tim
eC
amis
asB
lusa
s (S
hirts
Blo
uses
)W
ash
non-
iron
shirt
s an
d bl
ouse
sm
ade
from
cot
ton
line
n s
ynth
etic
or
blen
ded
fabr
ics
Not
e U
se the
Del
icad
oSed
a pr
o-gr
amm
e to
was
h sh
irts
and
blou
ses
mad
e from
silk
or
delic
ate
fabr
ics
2
60
800
ndash
1Pro
gram
me
setti
ng
enemspProgrammes
30
Pro
gram
me
Des
crip
tion
Max load (kg)
Pro
gram
me
sett
ings
Max temperature (degC)
Max spin speed(rpm) 1
SpeedPerfect
Extra
Centrif ndash ndash ndash ndash(Rinse Hold)
Prelav
Spo
rt
Was
h sp
orts
and
leis
ure
item
s m
ade
from
syn
thet
ic fi
bres
mic
rofib
re o
rfle
ece
Use
a d
eter
gent
tha
t is
sui
tabl
e fo
rsp
orts
item
sD
o no
t us
e fa
bric
sof
tene
rTi
p U
se the
Sin
teacutetic
os
prog
ram
me
to w
ash
heav
ily s
oile
d la
undr
y
2
40
800
ndash
Raacutep
ido
153
0m
in
(Sup
erQ
uick
153
0 m
in)
Was
h ite
ms
mad
e from
cot
ton
syn
-th
etic
or
blen
ded
fabr
ics
Sho
rt p
rogr
amm
e fo
r sm
all i
tem
s of
light
ly s
oile
d la
undr
yTh
e pr
ogra
mm
e du
ratio
n is
app
rox
30 m
inut
es
If yo
u w
ish
to r
educ
e th
e pr
ogra
mm
edu
ratio
n to
15 m
inut
es a
ctiv
ate
Spe
edPer
fect
T
he m
axim
umlo
ad is
red
uced
to
2 k
g
4
40
1200
ndash
1Pro
gram
me
setti
ng
Accessoriesemspen
31
Accessories
9 AccessoriesAccessories
Use original accessories These have been made especially for your appliance
Use Order numberWater inlet hose exten-sion
Extend the water inlethose for cold water orAquaStop (approx 250m)
WMZ2381
Fixing brackets Improves the stability ofthe appliance
WMZ2200
Longer water inlet hose Replace the standardwater inlet hose with alonger hose (220 m)
00353925
Elbow Secure the water outlethose in place
00655300
Liquid detergent insert Measure liquid deter-gent
00605740
Metal covering plate Metal covering plate forinstalling the applianceunder a high worktop
WMZ20430
Before using for the first time
10 Before using for thefirst time
Before using for the first time
Prepare the appliance for use
101 Starting an empty wash-ing cycle
Your appliance was inspected thor-oughly before leaving the factory Toremove any residual water run thefirst wash cycle without any laundryNote Please read the information inthe Safety rarr Page 4 and Preventingmaterial damage rarr Page 10 sectionsto ensure that you use the appliancesafely
1 Turn the programme selector toLimp tambor
2 Close the door
enemspLaundry
32
3 Pull out the detergent drawer
4 Pour approx 1 litre of tap waterinto compartment II
5 Pour washing powder into com-partment II
To prevent foaming use only halfof the amount of detergent recom-mended by the detergent manufac-turer for light soiling Do not usedetergent suitable for woollens ordelicates
6 Push in the detergent drawer
7 Press InicioPausa + Carga (StartPause + Reload) to start theprogramme
a The display shows the remainingprogramme duration
a After the programme has endedthe display shows End
8 Start the first wash cycle or set theprogramme selector to to switchoff the appliance rarr Basic operation Page 36
Laundry
11 LaundryLaundry
111 Preparing the laundryNote Please read the information inthe Safety rarr Page 4 and Preventingmaterial damage rarr Page 10 sectionsto ensure that you use the appliancesafely
ATTENTIONObjects remaining in the laundry maydamage the laundry and the drum Remove all items from any pock-
ets in your laundry before usingthe appliance
To protect your appliance and thelaundry prepare the laundry be-forehandndash Empty any pockets
Laundryemspen
33
ndash Brush sand out of all collars andpockets
ndash Close bed covers and cushioncovers
ndash Close all zips Velcro fastenershooks and eyes
ndash Tie cloth belts apron stringsetc together or use a laundrybag
ndash Remove curtain hooks and leadstrips or use a mesh laundrybag
ndash Use a mesh laundry bag forsmall items of laundry such aschildrens socks
ndash Some stubborn or dried-in stainscan be removed by washingseveral times
ndash Wash large and small items oflaundry together
ndash Do not rub fresh stains but dabthem with soapy water
ndash Separate items of laundry andshake them out
112 Sorting laundryNote Please read the information inthe Safety rarr Page 4 and Preventingmaterial damage rarr Page 10 sectionsto ensure that you use the appliancesafely To improve washing results and
prevent discolouration sort thelaundry according to the followingcriteria before washingndash Type of fabric and fibre
Wash laundry of the sametype of fabric and fibre to-gether
ndash Care symbols on the care labelsrarr Page 34
ndash Description of the programmesrarr Page 24
ndash Whitesndash Colours
Wash new coloured itemsseparately the first time youwash them
113 Degrees of soiling
Degree of soiling Soiling ExamplesLight iexcl No dirt or stains are vis-
ibleiexcl Laundry has absorbed
odours
Light summer clothing orsports clothing that hasbeen worn for a just a fewhours
Normal Dirt or light stains are vis-ible
iexcl T-shirts shirts or blousesare sweat-soaked orhave been worn a fewtimes
iexcl Towels or bedding thathas been used for up toone week
Heavy Dirt or stains are clearlyvisible
Tea towels baby items orwork clothing
enemspDetergents and care products
34
114 Care symbols on the care labels
Washing care symbols
Symbol Washing process Recommended pro-gramme
Normal Cotton Gentle Easy-Care Particularly gentle DelicatesSilk for
washing by handHand wash WoolNot suitable for machine-washing ndash
Detergents and care products
12 Detergents and careproducts
Detergents and care products
Note Please read the information inthe Safety rarr Page 4 and Preventingmaterial damage rarr Page 10 sectionsto ensure that you use the appliancesafelyThe manufacturers instructions foruse and dosage can be found on thepackaging
Notesiexcl Only use liquid detergents that are
self-flowingiexcl Do not mix different liquid deter-
gentsiexcl Do not mix detergent and fabric
softeneriexcl Do not use products that have ex-
pired or are highly congealediexcl Do not use products containing
solvents caustic agents or volatilesubstances (eg bleach)
iexcl Use dyes sparingly as salt maydamage stainless steel
iexcl Do not use bleaching agents in theappliance
121 Detergent recommendation
Detergent Fabrics Pro-gramme
Temperature
Standard detergentwith optical brighten-ers
Heat-resistant whitefabrics made fromcotton or linen
Cotton From cold up to90 degC
Detergent for colourswithout bleach or op-tical brighteners
Coloured fabricsmade from linen orcotton
Cotton From cold up to60 degC
Detergent for col-oursdelicates withoutoptical brighteners
Coloured fabricsmade from easy-carefabrics or syntheticmaterials
Easy-Care From cold up to60 degC
Detergents and care productsemspen
35
Detergent Fabrics Pro-gramme
Temperature
Detergent for delic-ates
Delicate fine textilessilk or viscose
DelicatesSilk
From cold up to40 degC
Detergent for wool-lens
Wool Wool From cold up to40 degC
Tip Visit wwwcleanrighteu to findfurther information on detergentscare products and cleaning agentsfor domestic use
122 Detergent dosageThe detergent dosage depends oniexcl The amount of laundryiexcl Degree of soilingiexcl Water hardness
You can find out how hard yourwater is from your local water com-pany or measure it yourself usinga water hardness tester
Water hardness
Hardness range Total hardness in mmoll
German degrees in degdH
soft (I) 0ndash15 0ndash84medium (II) 15ndash 25 84ndash14hard (III) over 25 over 14
Example of a manufacturersinstructions for detergentThese example values refer to astandard load of 4ndash5 kg
Soiling Light Normal HeavyWater hardness Softmedium 40 ml 55 ml 80 mlWater hardness Hardveryhard
55 ml 80 ml 105 ml
The dosages can be found on themanufacturers packagingiexcl Adjust the dosage to the actual
load
enemspBasic operation
36
Basic operation
13 Basic operationBasic operation
131 Switching on the appli-ance
Turn the programme selector to aprogramme
132 Setting a programme1 Set the programme selector to the
required programme rarr Programmes Page 24
2 If necessary adjust the pro-gramme settings rarr Page 36
133 Adjusting the pro-gramme settings
Requirement A programme hasbeen set rarr Setting a programme Page 36
Adjust the programme settings rarr Programmes Page 24
Note The programme settings arenot saved permanently for the pro-gramme
134 Loading laundryNotesiexcl Please read the information in the
Safety rarr Page 4 and Preventingmaterial damage rarr Page 10 sec-tions to ensure that you use theappliance safely
iexcl To prevent creasing take note ofthe maximum load for the rarr Programmes Page 24
Requirement The laundry is pre-pared and sortedrarr Laundry Page 321 Open the door
Make sure that the drum is empty2 Load the laundry unfolded into the
drum3 Close the door
Ensure that there is no laundrytrapped in the door
Basic operationemspen
37
135 Using a measuring aidfor liquid detergent
If you order the measuring aid as anaccessory you must use the measur-ing aid1 Pull out the detergent drawer
2 Press down on the insert and re-move the detergent drawer
1
2
3 Insert the measuring aid
4 Insert the detergent drawer
136 Use the measuring aidfor liquid detergent
To add liquid detergent you can usea measuring aid in the detergentdrawer1 Pull out the detergent drawer2 Slide the measuring aid forwards
3 Fold the measuring aid down andclick it into place
enemspBasic operation
38
4 Push in the detergent drawer
137 Adding detergent andcare product
Notesiexcl Please read the information in the
Safety rarr Page 4 and Preventingmaterial damage rarr Page 10 sec-tions to ensure that you use theappliance safely
iexcl Do not use the measuring aid forliquid detergent for gel detergentswashing powder or if Prewash orReady in time are activated
Requirement Find out the optimumdosage for detergent and careproduct rarr Page 341 Pull out the detergent drawer2 Pour in detergent
rarr Detergent drawer Page 193 If required add the care product4 Push in the detergent drawer
138 Starting the programmeNote If you want to change the timeuntil the programme ends set theReady in time first Press InicioPausa + Carga a The drum rotates and load detec-
tion takes place This can take upto 2 minutes after which waterenters the drum
a The display shows either the pro-gramme duration or the Ready intime
a After the programme has endedthe display shows End
139 Adjusting the Ready intime before the pro-gramme starts
You can readjust the selected Readyin time before the programme starts1 Press InicioPausa + Carga 2 Press Termin repeatedly until
the display indicates the desiredReady in time
3 Press InicioPausa + Carga
1310 Soaking laundryNote No additional detergent is re-quired The washing solution is thenused for washing1 Start the programme2 To pause the programme after ap-
prox 10 minutes press InicioPausa + Carga
3 To resume the programme afterthe desired soaking time pressInicioPausa + Carga
1311 Adding laundryNote Please read the information inthe Safety rarr Page 4 and Preventingmaterial damage rarr Page 10 sectionsto ensure that you use the appliancesafely1 Press InicioPausa + Carga
The appliance is paused andchecks whether it is possible toadd or remove laundry Take noteof the programme status
2 Add or remove laundry3 Close the door4 Press InicioPausa + Carga
Basic operationemspen
39
1312 Cancelling the pro-gramme
Once the programme has startedyou can cancel it at any timeNote Please read the information inthe Safety rarr Page 4 and Preventingmaterial damage rarr Page 10 sectionsto ensure that you use the appliancesafely1 Press InicioPausa + Carga 2 Open the door
The appliance door remainslocked for safety reasons if thetemperature and water levels arehighndash If the temperature is high start
the programmendash If the water level is high Start
the or programme3 Remove the laundry
1313 Resuming the pro-gramme when the pro-gramme status is RinseHold
1 Set the or programme2 Press InicioPausa + Carga
1314 Unloading the laundryNote Please read the information inthe Safety rarr Page 4 and Preventingmaterial damage rarr Page 10 sectionsto ensure that you use the appliancesafely1 Open the door
2 Remove the laundry
1315 Switching off the appli-ance
1 Turn the programme selector to
2 Turn off the tap3 Wipe the rubber gasket dry and re-
move any foreign objects
4 Leave the door and detergentdrawer open so that residual watercan evaporate
enemspChildproof lock
40
Childproof lock
14 Childproof lockChildproof lock
Secure your appliance against beingoperated unintentionally using thecontrols
141 Activating the childprooflock
Press and hold the two 3 segbuttons for approx 3 seconds
a The display shows a The controls are lockeda The childproof lock remains active
even after the appliance has beenswitched off
142 Deactivating the child-proof lock
Requirement To deactivate thechildproof lock the appliance mustbe switched on Press and hold the two 3 seg
buttons for approx 3 secondsa goes out in the display
Basic settingsemspen
41
Basic settings
15 Basic settingsBasic settings
You can configure the appliance to meet your needs
151 Overview of the basic settingsBelow is an overview of the basic settings on your appliance
Basic setting Programmeposition
Value Description
End signal 2 0 (off)1 (quiet)2 (me-dium)3 (loud)4 (veryloud)
Set the volume of the signal at theend of the programme
Button signal 3 0 (off)1 (quiet)2 (me-dium)3 (loud)4 (veryloud)
The volume of the audible signalemitted when the buttons arepressed
Drum cleaningreminder
4 ONOFF
Activate or deactivate the re-minder to clean the drum
enemspCleaning and servicing
42
152 Changing the basic set-tings
1 Set the programme selector to po-sition 1
2 Press InicioPausa + Carga and at the same time turn theprogramme selector to position 2
a The display shows the currentvalue
3 Set the programme selector to therequired position
4 To change the value press Ter-min
5 To save the changes switch offthe appliance
Cleaning and servicing
16 Cleaning and servi-cing
Cleaning and servicing
To keep your appliance working effi-ciently for a long time it is importantto clean and maintain it carefully
161 Tips on appliance careWipe down thehousing and thecontrol panelwith nothing butwater and adamp cloth
This ensures theparts of the appli-ance will remainclean and hy-gienic
Remove all de-tergent residuespray residue orother residuesimmediately
Fresh depositsare easier to re-move withoutleaving anyresidue
Keep the appli-ance door anddetergent draweropen after use
This allows theresidual water todry reducingodours in the ap-pliance
162 Cleaning the drum
CAUTIONRisk of injuryPermanently washing at low temper-atures and a lack of ventilation forthe appliance may damage the drumand cause injury Regularly run a programme for
cleaning the drum or wash at tem-peratures of at least 60 degC
Leave the appliance to dry afterevery operation with the dooropen and leave the detergentdrawer to dry
Run the Limp tambor pro-gramme without laundryAdd washing powder
163 Cleaning the detergentdrawer
Note Please read the information inthe Safety rarr Page 4 and Preventingmaterial damage rarr Page 10 sectionsto ensure that you use the appliancesafely1 Pull out the detergent drawer
Cleaning and servicingemspen
43
2 Press down on the insert and re-move the detergent drawer
1
2
3 Press out the insert upwards frombelow
4 Clean the detergent drawer and in-sert with water and a brush andthen dry them
5 Fit the insert and lock it into place
6 Cleaning the opening for the deter-gent drawer
7 Push in the detergent drawer
164 Descaling
ATTENTIONThe use of unsuitable descalingagents eg for coffee machines maydamage the appliance For this appliance only use de-
scaling agents that are availablefrom the manufacturers website orour after-sales service
enemspCleaning and servicing
44
165 Cleaning the drain pumpClean the drain pump in the event offaults eg blockages or rattlingnoises
Emptying the drain pumpNote Please read the information inthe Safety rarr Page 4 and Preventingmaterial damage rarr Page 10 sectionsto ensure that you use the appliancesafely1 Turn off the water tap2 Switch off the appliance3 Disconnect the appliances mains
plug from the power supply4 Open the maintenance flap
5 Remove the maintenance flap
6 Slide a sufficiently large receptacleunder the opening
7 Take the drain hose out of theholder
Cleaning and servicingemspen
45
8 CAUTION - Risk of scaldingWhen you wash at high temperat-ures the detergent solution getshot
Do not touch the hot detergentsolutionTo allow the detergent solution toflow out into the container removethe sealing cap
9 Firmly press on the sealing cap
10 Insert the drain hose into theholder
Cleaning the drain pumpNote Please read the information inthe Safety rarr Page 4 and Preventingmaterial damage rarr Page 10 sectionsto ensure that you use the appliancesafelyRequirement The drain pump isempty rarr Page 441 Since water may remain in the
drain pump remove the pump capcarefully
2 Clean the interior the thread onthe pump cap and the pump hous-ing
3 Make sure that the impeller in thedrain pump can be rotated
enemspCleaning and servicing
46
4 Insert the pump cap and screw iton as far as it will go
90deg
The handle on the pump cap mustbe in a vertical position
5 Close the maintenance flap
Before the next washTo prevent unused detergent fromflowing straight into the outlet in thenext wash run the programmeafter you have emptied the drainpump1 Turn on the tap2 Insert the mains plug3 Switch on the appliance4 Pour 1 litre of water into compart-
ment II5 Start the programme
166 Cleaning the water outlethose at the siphon
1 Switch off the appliance2 Disconnect the appliances mains
plug from the power supply
3 Loosen the hose clamp and care-fully remove the water outlet hose
Residual water may leak out4 Clean the water outlet hose and si-
phon connecting piece
5 Reattach the water outlet hose andsecure the connection point usingthe hose clamp
Cleaning and servicingemspen
47
167 Clean the water inlet fil-ters
Emptying the water inlet hose1 Turn off the tap2 Set a programme except for
or 3 Start the programme and leave it
to run for approx 40 seconds4 Switch off the appliance5 Disconnect the appliances mains
plug from the power supply
Cleaning the filter on the tapNote Please read the information inthe Safety rarr Page 4 and Preventingmaterial damage rarr Page 10 sectionsto ensure that you use the appliancesafelyRequirement The water inlet hose isempty1 Remove the water inlet hose from
the tap
2 Clean the filter with a small brush
3 Connect the water inlet hose andcheck for leaks
Cleaning the filter on theapplianceNote Please read the information inthe Safety rarr Page 4 and Preventingmaterial damage rarr Page 10 sectionsto ensure that you use the appliancesafelyRequirement The water inlet hose isempty rarr Emptying the water inlet hosePage 47
enemspCleaning and servicing
48
1 Disconnect the hose from the rearof the appliance
1
2
2 Use pliers to remove the filter
3 Clean the filter with a small brush
4 Reinsert the filter
5 Connect the hose and check forleaks
2
1
Troubleshootingemspen
49
Troubleshooting
17 TroubleshootingTroubleshooting
You can rectify minor faults on your appliance yourself Read the troubleshoot-ing information before contacting after-sales service This will avoid unneces-sary costs
WARNINGRisk of electric shockIncorrect repairs are dangerous Repairs to the appliance should only be carried out by trained specialist
staff Only use genuine spare parts when repairing the appliance If the power cord of this appliance is damaged it must be replaced by the
manufacturer the manufacturers Customer Service or a similarly qualifiedperson in order to prevent any risk
Fault Cause and troubleshootingThe display goes outand InicioPausa +Carga flashes
Energy-saving mode is active Press any buttona The symbol lights up again
E36 -10 Drain pipe or water outlet hose is blocked Clean the drain pipe and the water outlet hose
Drain pipe or water drain hose is caught or jammed Ensure that the drain pipe and water drain hose are
not kinked or trapped
Drain pump is blocked rarr Cleaning the drain pump Page 44
The water outlet hose is connected too high Install the water outlet hose at a maximum height of
1 metre
Detergent dosage is too high Immediate measure Mix one tablespoon of fabric
softener with 05 litres of water and pour the mix-ture into the left-hand compartment (not for outdoorclothing sportswear or items stuffed with down)
Reduce the amount of detergent for the next wash-ing cycle with the same load
Unapproved extension installed on the water drainhose Remove any unapproved extensions from the water
hose Connecting the appliance
E36 -25 -26 Drain pump is blocked rarr Cleaning the drain pump Page 44
enemspTroubleshooting
50
Fault Cause and troubleshootingThe water pressure is lowNo remedial action possibleThe filters in the water inflow are blocked Clean the filters in the water inflow rarr Page 47
The tap is turned off Turn on the tap
The water inlet hose is kinked or jammed Ensure that the water inlet hose is not kinked or
jammed
flashes The automatic voltage control system detects an un-authorised voltage under-usage No remedial action possible
Note If the power supply is stable the programmecontinues to run as normalVoltage under-usage may cause extension of a pro-grammeNo remedial action possible
flashes Voltage under-usage may cause extension of a pro-grammeNo remedial action possible
lights up The temperature is too high Wait until the temperature has dropped rarr Cancelling the programme Page 39
Water level is too high Start the programme
Laundry is caught in the door1 Open the door again2 Remove any trapped laundry3 Close the door4 Press InicioPausa + Carga to start the pro-
gramme
flashes Door is not closed1 Close the door2 Press InicioPausa + Carga to start the pro-
gramme
All other error codes Malfunction Call the after-sales service
rarr Customer Service Page 59
Troubleshootingemspen
51
Fault Cause and troubleshootingThe appliance is notworking
The mains plug of the power cord is not plugged in Connect the appliance to the power supply
The circuit breaker is faulty Check the circuit breaker in the fuse box
There has been a power cut Check whether the lighting in your kitchen or other
appliances are working
The programme doesnot start
You have not pressed InicioPausa + Carga Press InicioPausa + Carga
Door is not closed1 Close the door2 Press InicioPausa + Carga to start the pro-
gramme
Childproof lock is activated rarr Deactivating the childproof lock Page 40
Termin is activated Check whether Termin is activated
rarr Buttons Page 23
Laundry is caught in the door1 Open the door again2 Remove any trapped laundry3 Close the door4 Press InicioPausa + Carga to start the pro-
gramme
The door cannotbe opened
ndash ndash ndash ndash is activated Continue the programme by selecting or and
pressing InicioPausa + Carga rarr Resuming the programme when the programmestatus is Rinse Hold Page 39
The temperature is too high Wait until the temperature has dropped rarr Cancelling the programme Page 39
Water level is too high Start the programme
Power failure Open the door using the emergency release
rarr Emergency release Page 57
The water is not drain-ing
Drain pipe or water outlet hose is blocked Clean the drain pipe and the water outlet hose
enemspTroubleshooting
52
Fault Cause and troubleshootingThe water is not drain-ing
Drain pipe or water drain hose is caught or jammed Ensure that the drain pipe and water drain hose are
not kinked or trapped
Drain pump is blocked rarr Cleaning the drain pump Page 44
ndash ndash ndash ndash is activated Continue the programme by selecting or and
pressing InicioPausa + Carga rarr Resuming the programme when the programmestatus is Rinse Hold Page 39
The water outlet hose is connected too high Install the water outlet hose at a maximum height of
1 metre
Detergent dosage is too high Immediate measure Mix one tablespoon of fabric
softener with 05 litres of water and pour the mix-ture into the left-hand compartment (not for outdoorclothing sportswear or items stuffed with down)
Reduce the amount of detergent for the next wash-ing cycle with the same load
Unapproved extension installed on the water drainhose Remove any unapproved extensions from the water
hose Connecting the appliance
Water is not flowingin Detergent is notbeing dispensed
You have not pressed InicioPausa + Carga Press InicioPausa + Carga
The filters in the water inflow are blocked Clean the filters in the water inflow rarr Page 47
The tap is turned off Turn on the tap
The water inlet hose is kinked or jammed Ensure that the water inlet hose is not kinked or
jammed
The spin cycle runsseveral times
The unbalanced load detection system eliminates animbalance by repeatedly redistributing the laundry Not a fault ndash no action required
Note When loading where possible place large andsmall items of laundry together in the drum Differentsized items of laundry distribute themselves betterduring the spin cycle
Troubleshootingemspen
53
Fault Cause and troubleshootingThe programme dura-tion changes duringthe wash cycle
The programme operation is optimised electronicallyThis may change the programme duration Not a fault ndash no action required
The unbalanced load detection system eliminates animbalance by repeatedly redistributing the laundry Not a fault ndash no action required
Note When loading where possible place large andsmall items of laundry together in the drum Differentsized items of laundry distribute themselves betterduring the spin cycleFoam detection system switches on a rinse cycle iffoam build-up is too high Not a fault ndash no action required
No water is visible inthe drum
Water is below the visible area Not a fault ndash no action required Do not add any extra water to the appliance while it
is operating
Drum jerks after theprogramme starts
This is caused by an internal motor test Not a fault ndash no action required
Residual water ispresent in the com-partment
Insert in compartment is blocked rarr Cleaning the detergent drawer Page 42
Vibrations and move-ment of the appliancewhilst spinning
Appliance is not correctly aligned Aligning the appliance
The appliance feet are not fixed Secure the appliance feet Aligning the appliance
Transit bolts have not been removed Removing the transit bolts
Drum does not turnwater does not flow in
Load detection is active Not a fault ndash no action required
Note The load detection can take up to two minutesHeavy foam build-up Detergent dosage is too high
Immediate measure Mix one tablespoon of fabricsoftener with 05 litres of water and pour the mix-ture into the left-hand compartment (not for outdoorclothing sportswear or items stuffed with down)
Reduce the amount of detergent for the next wash-ing cycle with the same load
enemspTroubleshooting
54
Fault Cause and troubleshootingHigh spin speed notreached
A low spin speed is selected The next time you run a wash cycle set a higher
spin speed
Unbalance load detection system is using a reducedspin speed to eliminate an unbalance Redistribute the laundry in the drum
Note Where possible mix large and small items inthe drum Different sized items of laundry distributethemselves better during the spin cycle Start the programme
The spin programmedoes not start
Drain pipe or water outlet hose is blocked Clean the drain pipe and the water outlet hose
Drain pipe or water drain hose is caught or jammed Ensure that the drain pipe and water drain hose are
not kinked or trapped
The unbalanced load detection system has interruptedthe spin cycle because the laundry is unevenly distrib-uted Redistribute the laundry in the drum
Note Where possible mix large and small items inthe drum Different sized items of laundry distributethemselves better during the spin cycle Start the programme
Rushing hissingnoise
Water is flushed under pressure into the detergentdrawer Not a fault ndash normal operating noise
Loud noises duringthe spin cycle
Appliance is not correctly aligned Aligning the appliance
The appliance feet are not fixed Secure the appliance feet Aligning the appliance
Transit bolts have not been removed Removing the transit bolts
Banging noises rat-tling in the drainpump
Foreign bodies have got into the drain pump rarr Cleaning the drain pump Page 44
Slurping rhythmicalsuction noise
The drain pump is active the detergent solution ispumped out Not a fault ndash normal operating noise
Troubleshootingemspen
55
Fault Cause and troubleshootingCreasing The spin speed is too high
The next time you run a wash cycle set a lowerspin speed
The load is too large The next time you run a wash cycle reduce the
amount of laundry being loaded
The wrong programme is selected for the type of fab-ric Select the programmes that are suitable for the
type of fabric rarr Programmes Page 24
Detergent or fabricsoftener drips off theseal and collects onthe door or in the sealfold
Too much detergentfabric softener in the detergentdrawer When dosing liquid detergent and fabric softener
observe the marking in the detergent drawer anddo not dose above this
The spin result is notsatisfactory The laun-dry is too wettoodamp
A low spin speed is selected The next time you run a wash cycle set a higher
spin speed Start the programme
Drain pipe or water outlet hose is blocked Clean the drain pipe and the water outlet hose
Drain pipe or water drain hose is caught or jammed Ensure that the drain pipe and water drain hose are
not kinked or trapped
The unbalanced load detection system has interruptedthe spin cycle because the laundry is unevenly distrib-uted Redistribute the laundry in the drum
Note Where possible mix large and small items inthe drum Different sized items of laundry distributethemselves better during the spin cycle Start the programme
Unbalance load detection system is using a reducedspin speed to eliminate an unbalance Redistribute the laundry in the drum
Note Where possible mix large and small items inthe drum Different sized items of laundry distributethemselves better during the spin cycle Start the programme
enemspTroubleshooting
56
Fault Cause and troubleshootingDetergent residue onthe damp washing
Detergents may contain water-insoluble substancesthat deposit on the laundry Start the programme
Detergent residue onthe dry laundry
Detergents may contain water-insoluble substancesthat deposit on the laundry Brush out the laundry after washing and drying
Water is leaking out atthe water inlet hose
Water inlet hose is not correctlysecurely connected1 Connect the water supply hose correctly Connect-
ing the water inlet hose2 Tighten the screw connection
Water is leaking out atthe water outlet hose
The water outlet hose is damaged Replace the damaged water outlet hose
Water outlet hose is not connected correctly Connect the water outlet hose correctly Water out-
let connection types
Odours have formedin the appliance
Humidity and detergent residue may promote theformation of bacteria rarr Cleaning the drum Page 42 If you are not using the appliance leave the door
and detergent drawer open so that residual watercan evaporate
Transportation storage and disposalemspen
57
171 Emergency releaseReleasing the doorRequirement The drain pump isempty rarr Page 441 ATTENTION Escaping water may
cause material damage Do not open the door if you can
see water through the glassPull the emergency release down-wards with a tool and release
a The door lock is released2 Insert the maintenance flap and
lock it into place3 Close the maintenance flap
Transportation storage and disposal
18 Transportation stor-age and disposal
Transportation storage and disposal
You can find out here how to prepareyour appliance for transportation andstorage You will also find out how todispose of old appliances
181 Removing the appliance1 Turn off the tap2 rarr Emptying the water inlet hose
Page 473 Switch off the appliance4 Unplug the appliances mains plug
5 Drain the remaining detergentsolution rarr Cleaning the drain pumpPage 44
6 Detach the hoses
182 Inserting the transitbolts
Secure the appliance for transporta-tion using transit bolts in order to pre-vent damage1 Remove the four cover caps
‒ If necessary use a screwdriverto remove the cover caps
Keep the cover caps2 Insert the four sleeves
enemspTransportation storage and disposal
58
3 Insert all screws into the fourtransit bolts and tighten slightly
4 Insert the power cord into theholder and tighten all fourscrews for the transit bolts with aWAF 13 wrench
5 Insert the hose into holder
183 Using the applianceagain
1 Remove the transit bolts
2 Pour approx 1 litre of water intocompartment II in the detergentdrawer
3 Start the programmea The unused detergent cannot flow
straight into the outlet during thenext wash
184 Disposing of old appli-ance
Valuable raw materials can be re-used by recycling
WARNINGRisk of harm to healthChildren can lock themselves in theappliance thereby putting their livesat risk Do not install the appliance behind
a door as this may obstruct the ap-pliance door or prevent it fromopening
With redundant appliances unplugthe power cord Then cut throughthe cord and damage the lock onthe appliance door beyond repairso that the appliance door will nolonger close
1 Unplug the appliance from themains
2 Cut through the power cord3 Dispose of the appliance in an en-
vironmentally friendly mannerInformation about current disposalmethods are available from yourspecialist dealer or local authority
This appliance is la-belled in accordancewith European Directive201219EU concerningused electrical and elec-
Customer Serviceemspen
59
tronic appliances (wasteelectrical and electronicequipment - WEEE)The guideline determ-ines the framework forthe return and recyclingof used appliances asapplicable throughoutthe EU
Customer Service
19 Customer ServiceCustomer Service
If you have any queries on use areunable to rectify faults on the appli-ance yourself or if your applianceneeds to be repaired contact Cus-tomer ServiceYou can solve many problems your-self by consulting the information ontroubleshooting in these instructionsor on our website If this is not thecase contact our after-sales serviceWith any warranty claims we willmake sure that your appliance is re-paired by trained after-sales techni-cians using genuine spare parts in-cluding after the manufacturers war-ranty has expiredFunction-relevant genuine spare partsaccording to the corresponding Eco-design Order can be obtained fromCustomer Service for a period of atleast 10 years from the date onwhich your appliance was placed onthe market within the European Eco-nomic AreaNote Under the terms of the manu-facturers warranty the use of Cus-tomer Service is free of chargeDetailed information on the warrantyperiod and terms of warranty in yourcountry is available from our after-sales service your retailer or on ourwebsite
If you contact Customer Service youwill require the product number (E-Nr) and the production number (FD)of your applianceThe contact details for Customer Ser-vice can be found in the enclosedCustomer Service directory or on ourwebsite
191 Product number (E-Nr)and production number(FD)
You can find the product number (E-Nr) and the production number (FD)on the appliances rating plateDepending on the model the ratingplate is locatediexcl On the inside of the dooriexcl On the inside of the maintenance
flapiexcl On the rear of the applianceMake a note of your appliances de-tails and the Customer Service tele-phone number to find them againquickly
enemspConsumption values
60
Consumption values
20 Consumption valuesConsumption values
The following information is provided in accordance with the EU EcodesignRegulation The values given for programs other than the Eco 40-60 are indicat-ive only and were determined in accordance with the applicable standardEN60456
Programme Load(kg)
Pro-gramme dura-tion(hrmin)1
Energycon-sump-tion(kWhcycle)1
Watercon-sump-tion (lcycle)1
Max-imumtemper-ature(degC) 5mins1
Spinspeed(rpm)1
Resid-ualmois-ture()1
Eco 40-602 90 337 1245 610 50 1166 5000Eco 40-602 45 252 0590 450 33 1200 5000Eco 40-602 25 233 0195 300 24 1200 5400AlgodoacutenAl-godatildeo 20 degC
90 328 0370 900 23 1200 5400
AlgodoacutenAl-godatildeo 40 degC
90 328 1350 900 45 1200 5400
AlgodoacutenAl-godatildeo 60 degC
90 328 1450 900 55 1200 5400
AlgodoacutenAl-godatildeo 40 degC + Pre-lav
90 358 1400 1020 45 1200 5400
Sinteacuteticos 40 degC
40 228 0780 610 44 1200 2700
Mix 40 degC 40 059 0620 440 41 1200 5600 LanaLatildes
30 degC20 040 0200 400 22 800 2500
1 Due to the influence of water pressure hardness and inlet temperature am-bient temperature type amount and soiling of laundry detergent used fluc-tuations in the power supply and the selected additional functions the actualvalues may deviate from the stated values
2 Test programme in accordance with the EU Ecodesign Directive and the EUEnergy Labelling Regulation with cold water (15 degC)
Technical specificationsemspen
61
Technical specifications
21 Technical specifica-tions
Technical specifications
Facts and figures for your appliancecan be found here
Appliance height 850 cmAppliance width 598 cmAppliance depth 590 cmWeight 80 kg1
Maximum load 9 kgMains voltage 220 - 240 V
50 Hz Minimum in-
stallation protec-tion
10 A
Rated power 2300 WPower consump-tion
iexcl Off mode010 W
iexcl Left-on mode050 W
Water pressure iexcl Minimum100 kPa(1 bar)
iexcl Maximum1000 kPa(10 bar)
Length of the wa-ter inlet hose
150 cm
Length of the wa-ter outlet hose
150 cm
Length of thepower cord
160 cm
1 Depending on the appliance spe-cifications
More information about your modelcan be found online at httpsen-ergylabelbsh-groupcom1 This webaddress is linked to the official EUEPREL product database At the time
of printing its web address had notyet been published Please then fol-low the instructions on searching formodels The model identifier is madeup of the characters before the slashin the product number (E-Nr) on therating plate Alternatively you canalso find the model identifier in thefirst line of the EU energy label
1 Only applies to countries in the European Economic Area
Thank you for buying aBosch Home Appliance
Register your new device on MyBosch now and profit directly from
bull Expert tips amp tricks for your appliancebull Warranty extension optionsbull Discounts for accessories amp spare-partsbull Digital manual and all appliance data at handbull Easy access to Bosch Home Appliances Service
Free and easy registration ndash also on mobile phoneswwwbosch-homecomwelcome
Looking for help Youll find it here
Expert advice for your Bosch home appliances help with problems or a repair from Bosch experts Find out everything about the many ways Bosch can support you wwwbosch-homecomservice Contact data of all countries are listed in the attached service direct-ory
90016102699001610269emsp(010219)en
Robert Bosch Hausgeraumlte GmbHCarl-Wery-Straszlige 3481739 MuumlnchenGERMANYwwwbosch-homecom
Valid within Great BritainImported to Great Britain byBSH Home Appliances LtdGrand Union HouseOld Wolverton RoadWolverton Milton KeynesMK12 5PTUnited Kingdom
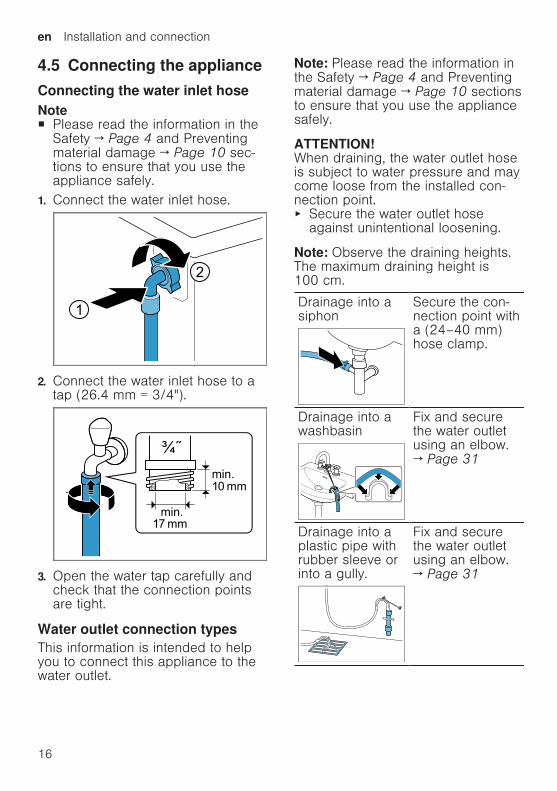
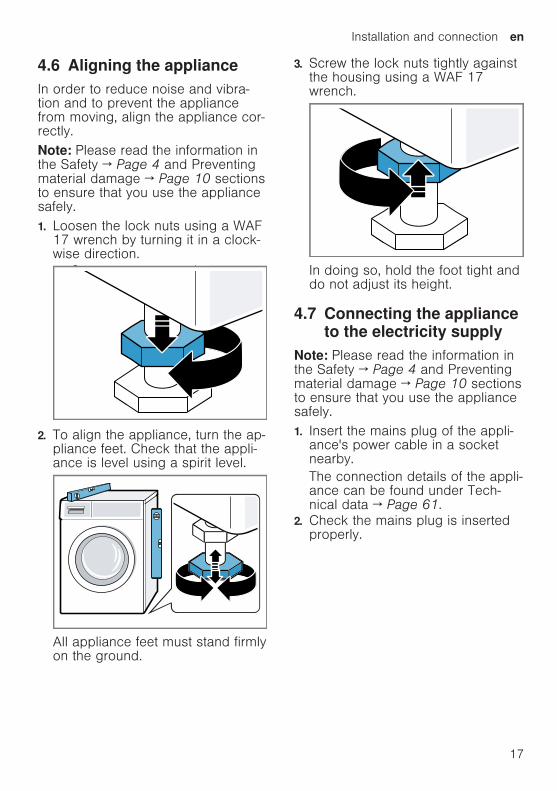
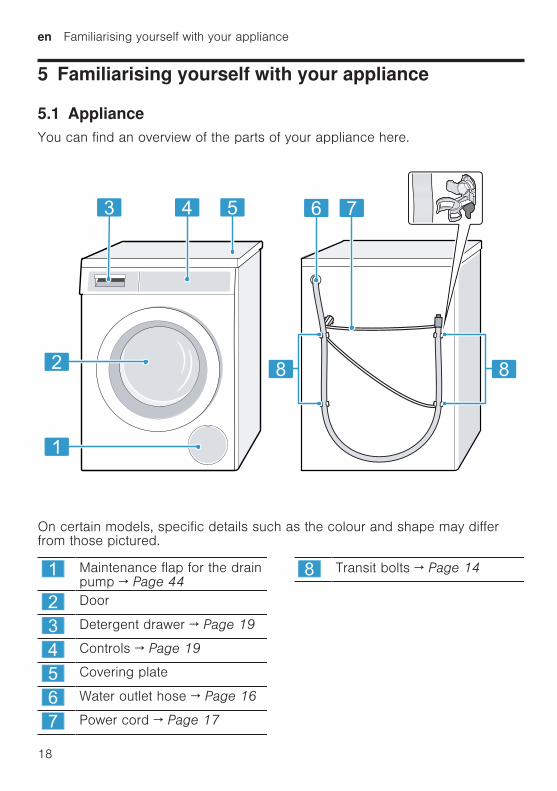
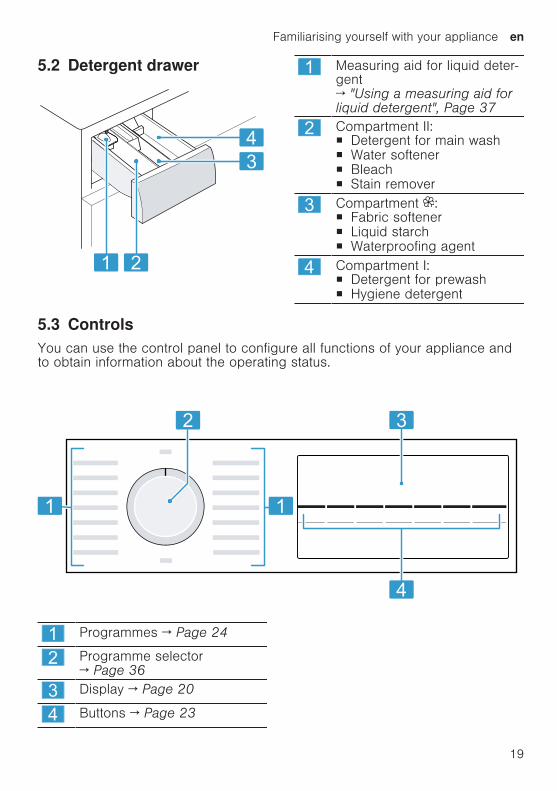
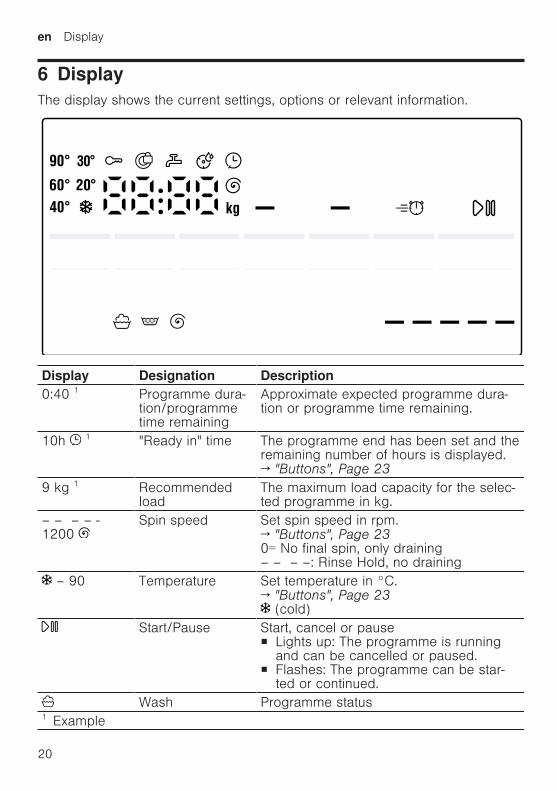
enemspDisplay
20
Display
6 DisplayDisplay
The display shows the current settings options or relevant information
Display Designation Description040 1 Programme dura-
tionprogrammetime remaining
Approximate expected programme dura-tion or programme time remaining
10h 1 Ready in time The programme end has been set and theremaining number of hours is displayed rarr Buttons Page 23
9 kg 1 Recommendedload
The maximum load capacity for the selec-ted programme in kg
ndash ndash ndash ndash -1200
Spin speed Set spin speed in rpm rarr Buttons Page 230= No final spin only drainingndash ndash ndash ndash Rinse Hold no draining
ndash 90 Temperature Set temperature in degC rarr Buttons Page 23
(cold)StartPause Start cancel or pause
iexcl Lights up The programme is runningand can be cancelled or paused
iexcl Flashes The programme can be star-ted or continued
Wash Programme status1 Example
Displayemspen
21
Display Designation DescriptionRinse Programme statusSpin Programme status
ndash ndash ndash ndash Rinse Hold Programme statusEnd End of pro-
grammeProgramme status
Childproof lock iexcl lights up The childproof lock is activ-ated
iexcl flashes The childproof lock is activatedand the appliance has been operated rarr Deactivating the childproof lockPage 40
Prewash Prewash is activated rarr Buttons Page 23
Water Plus andRinse Plus
Wash with more water and a rinse cycle isactivated rarr Buttons Page 23
SpeedPerfect Short wash activated rarr Buttons Page 23
1 Energy consump-tion
Energy consumption for the selected pro-grammeiexcl Low energy consumptioniexcl High energy consumption
Reminder to cleanthe drum
Flashes Drum is dirty Run the Limp tam-bor programme for cleaning and caringfor the drum and the outer tub rarr Cleaning the drum Page 42
Voltage controlsystem
Flashes The automatic voltage controlsystem detects impermissible voltagedrops This will pause the programmeNote The programme will continue whenthe voltage is permissible again
Voltage controlsystem
Flashes The programme has beenpaused because of impermissible voltagedrops The voltage is permissible againand the programme will continueNote The programme duration is exten-ded
1 Example
enemspDisplay
22
Display Designation DescriptionDoor iexcl Lights up The door is locked and can-
not be openediexcl Flashes The door is not closed prop-
erlyiexcl Off The door is unlocked and can be
openedTap iexcl No water pressure
iexcl The water pressure is too lowE35 -10 1 Error Error code error display signal1 Example
Buttonsemspen
23
Buttons
7 ButtonsButtons
The selection of programme settings depends on the programme that is setYou can see the selection options for each programme in the overview for rarr Programmes Page 24
Button Selection DescriptionInicioPausa +Carga (StartPause + Reload)
iexcl Startiexcl Canceliexcl Pause
Start cancel or pause the pro-gramme
SpeedPerfect iexcl Activateiexcl Deactivate
Activate or deactivate a short washingprogrammeNote Energy consumption increasesThe washing result is not affected bythis
Termin (ReadyIn)
1ndash24 hours Set the programme endThe programme duration is already in-cluded in the set number of hoursOnce the programme has started theprogramme duration is displayed
Temp degC (Tem-perature)
ndash 90 degC Adjust the temperature in degC
Centrif (Spin) ndash ndash ndash ndash - 1200 Adjust the spin speed or activate ndash ndash ndash ndash (Rinse Hold)If ndash ndash ndash ndash is selected the water is notdrained at the end of the washingcycle and the spin cycle is deactiv-ated The laundry remains in the waterused for rinsing
3 seg (ChildLock 3 sec)
iexcl Activateiexcl Deactivate
Activate or deactivate the childprooflockDisable the control panel to preventunwanted or accidental operationIf the childproof lock is activated andthe appliance has been switched offthe childproof lock remains activated rarr Childproof lock Page 40
Prelav (Pre-wash)
iexcl Activateiexcl Deactivate
Activate or deactivate prewash egfor washing heavily soiled laundry
Extra (ExtraRinse)
iexcl Activateiexcl Deactivate
Activate or deactivate a washing pro-gramme with more water and an addi-tional rinse cycleRecommended for particularly sensit-ive skin or in regions with very softwater
enemspProgrammes
24
Programmes 8 P
rogr
amm
esProgrammes B
elow
is a
n ov
ervi
ew o
f the
pro
gram
mes
You
can
find
info
rmat
ion
on the
load
and
on
the
adju
stab
le p
ro-
gram
me
optio
ns
Tip
The
laun
dry
s ca
re la
bels
pro
vide
you
with
add
ition
al in
form
atio
n on
pro
gram
me
sele
ctio
n
rarr
Car
e sy
mbo
ls o
n th
e ca
re la
bels
Pa
ge 3
4
Pro
gram
me
Des
crip
tion
Max load (kg)
Pro
gram
me
sett
ings
Max temperature (degC)
Max spin speed(rpm) 1
SpeedPerfect
Extra
Centrif ndash ndash ndash ndash(Rinse Hold)
Prelav
Alg
odoacuten
Al-
godatilde
o (
Cot
tons
)W
ash
hard
-wea
ring
item
s m
ade
from
cotto
n li
nen
or b
lend
ed fa
bric
sA
lso
suita
ble
as a
sho
rt p
rogr
amm
efo
r no
rmal
ly s
oile
d la
undr
y w
hen
you
activ
ate
Spe
edPer
fect
I
f Spe
ed-
Per
fect
is
act
ivat
ed t
he m
ax-
imum
load
cap
acity
is r
educ
ed to
5 k
g
990
1200
Alg
odoacuten
Col
orA
l-go
datildeo
Cor
(
Cot
-to
ns C
olou
r)
Was
h ha
rd-w
earin
g ite
ms
mad
e from
cotto
n li
nen
or b
lend
ed fa
bric
sEne
rgy-
savi
ng p
rogr
amm
e
9
90
1200
ndash
1Pro
gram
me
setti
ng
Programmesemspen
25
Pro
gram
me
Des
crip
tion
Max load (kg)
Pro
gram
me
sett
ings
Max temperature (degC)
Max spin speed(rpm) 1
SpeedPerfect
Extra
Centrif ndash ndash ndash ndash(Rinse Hold)
Prelav
Not
e T
o sa
ve e
nerg
y the
act
ual
was
hing
tem
pera
ture
may
dev
iate
from
the
set
was
hing
tem
pera
ture
Th
e w
ashi
ng p
erfo
rman
ce m
eets
lega
l req
uire
men
ts
Eco
40-6
0W
ash
item
s m
ade
from
cot
ton
line
nor
ble
nded
fabr
ics
Not
e T
extil
es w
hich
can
be
was
hed
from
40 deg
C
up
to 6
0 deg
C
as
per
the
care
sym
bol c
an b
e w
ashe
dto
geth
er
The
was
hing
per
form
ance
cor
res-
pond
s to
the
bes
t po
ssib
le w
ashi
ngpe
rfor
man
ce c
lass
acc
ordi
ng to
the
lega
l req
uire
men
ts
For
this
pro
gram
me
the
was
hing
tem
pera
ture
is a
utom
atic
ally
adj
uste
dde
pend
ing
on the
load
siz
e in
ord
erto
ach
ieve
the
bes
t po
ssib
le e
nerg
y
9
ndash
1200
ndash
1Pro
gram
me
setti
ng
enemspProgrammes
26
Pro
gram
me
Des
crip
tion
Max load (kg)
Pro
gram
me
sett
ings
Max temperature (degC)
Max spin speed(rpm) 1
SpeedPerfect
Extra
Centrif ndash ndash ndash ndash(Rinse Hold)
Prelav
effic
ienc
y w
ith the
bes
t po
ssib
lew
ashi
ng r
esul
t You
can
not ch
ange
the
was
hing
tem
pera
ture
Sin
teacutetic
os
(Eas
yC
are)
Was
h ite
ms
mad
e from
syn
thet
ic o
rbl
ende
d fa
bric
s4
60
1200
Mix
(
Mix
edFa
bric
s)W
ash
item
s m
ade
from
cot
ton
line
nor
syn
thet
ic o
r bl
ende
d fa
bric
sSui
tabl
e fo
r lig
htly
soi
led
laun
dry
460
1200
Del
icad
oSed
a (D
elic
ate
Silk
)W
ash
delic
ate
was
habl
e ite
ms
mad
efrom
silk
vis
cose
and
syn
thet
ics
Use
a d
eter
gent
tha
t is
sui
tabl
e fo
rde
licat
es o
r si
lk
Not
e W
ash
espe
cial
ly d
elic
ate
item
sor
item
s w
ith h
ooks
eye
lets
or
clip
sin
a m
esh
laun
dry
bag
2
40
800
ndash
1Pro
gram
me
setti
ng
Programmesemspen
27
Pro
gram
me
Des
crip
tion
Max load (kg)
Pro
gram
me
sett
ings
Max temperature (degC)
Max spin speed(rpm) 1
SpeedPerfect
Extra
Centrif ndash ndash ndash ndash(Rinse Hold)
Prelav
Lan
aLatilde
s (W
ool)
Han
d- o
r m
achi
ne-w
asha
ble
item
sth
at a
re m
ade
from
woo
l or
cont
ain
woo
lTo
pre
vent
the
laun
dry
from
shr
ink-
ing
the
dru
m m
oves
the
item
s ve
ryge
ntly
with
long
pau
ses
Use
a d
eter
gent
tha
t is
sui
tabl
e fo
rw
ool
2
40
800
ndash
ndash
ndash
(R
inse
)R
inse
s an
d th
en s
pins
the
laun
dry
and
then
dra
ins
the
wat
er
ndashndash
1200
ndash
ndash
(
Spi
nD
rain
)Spi
ns a
nd d
rain
s th
e w
ater
If
you
only
wan
t to
dra
in the
wat
er
activ
ate
0 T
he la
undr
y is
not
spu
n
ndash
ndash
1200
ndash
ndash
ndash
ndash
Rop
a os
cura
R
oupa
esc
ura
(Dar
k W
ash)
Was
h da
rk-c
olou
red
and
colo
ur-in
-te
nse
item
s m
ade
from
cot
ton
orea
sy-c
are
fabr
ic e
g j
eans
Tu
rn la
undr
y in
side
-out
bef
ore
was
h-in
gU
se li
quid
det
erge
nt
4
40
1200
1Pro
gram
me
setti
ng
enemspProgrammes
28
Pro
gram
me
Des
crip
tion
Max load (kg)
Pro
gram
me
sett
ings
Max temperature (degC)
Max spin speed(rpm) 1
SpeedPerfect
Extra
Centrif ndash ndash ndash ndash(Rinse Hold)
Prelav
Plu
mas
Pen
as
(Dow
n)W
ash
pillo
ws
duv
ets
or c
loth
ing
stuf
fed
with
dow
n an
d fil
lings
with
synt
hetic
fibr
es
Was
h la
rge
item
s se
para
tely
U
se a
det
erge
nt tha
t is
sui
tabl
e fo
rdo
wn
or d
elic
ates
U
se s
parin
gly
Do
not us
e fa
bric
sof
tene
rN
ote
To
prev
ent ex
cess
ive
foam
ing
rem
ove
air
from
laun
dry
item
s by
rolli
ng the
m u
p be
fore
you
was
hth
em
2
60
1200
ndash
ndash
Lim
p tam
bor
(Dru
m C
lean
)C
lean
ing
and
carin
g fo
r th
e dr
um
Use
thi
s pr
ogra
mm
e in
the
follo
win
gca
ses
iexclB
efor
e us
ing
the
appl
ianc
e fo
r th
efir
st tim
eiexcl
If yo
u re
gula
rly w
ash
at tem
pera
t-ur
es o
f 40 deg
C o
r lo
wer
ndash
ndash
1200
ndash
ndash
ndash
ndash
1Pro
gram
me
setti
ng
Programmesemspen
29
Pro
gram
me
Des
crip
tion
Max load (kg)
Pro
gram
me
sett
ings
Max temperature (degC)
Max spin speed(rpm) 1
SpeedPerfect
Extra
Centrif ndash ndash ndash ndash(Rinse Hold)
Prelav
iexclA
fter
a pr
olon
ged
perio
d of
non
-us
eU
se w
ashi
ng p
owde
r or
a d
eter
gent
cont
aini
ng b
leac
hH
alve
the
am
ount
of d
eter
gent
to
avoi
d fo
amin
gD
o no
t us
e fa
bric
sof
tene
rD
o no
t us
e liq
uid
dete
rgen
t or
det
er-
gent
tha
t is
inte
nded
for
woo
llens
or
delic
ates
N
ote
The
dru
m c
lean
ing
indi
cato
rw
ill fl
ash
to r
emin
d yo
u if
you
have
not us
ed a
pro
gram
me
at 6
0 deg
C o
rhi
gher
for
a lo
ng tim
eC
amis
asB
lusa
s (S
hirts
Blo
uses
)W
ash
non-
iron
shirt
s an
d bl
ouse
sm
ade
from
cot
ton
line
n s
ynth
etic
or
blen
ded
fabr
ics
Not
e U
se the
Del
icad
oSed
a pr
o-gr
amm
e to
was
h sh
irts
and
blou
ses
mad
e from
silk
or
delic
ate
fabr
ics
2
60
800
ndash
1Pro
gram
me
setti
ng
enemspProgrammes
30
Pro
gram
me
Des
crip
tion
Max load (kg)
Pro
gram
me
sett
ings
Max temperature (degC)
Max spin speed(rpm) 1
SpeedPerfect
Extra
Centrif ndash ndash ndash ndash(Rinse Hold)
Prelav
Spo
rt
Was
h sp
orts
and
leis
ure
item
s m
ade
from
syn
thet
ic fi
bres
mic
rofib
re o
rfle
ece
Use
a d
eter
gent
tha
t is
sui
tabl
e fo
rsp
orts
item
sD
o no
t us
e fa
bric
sof
tene
rTi
p U
se the
Sin
teacutetic
os
prog
ram
me
to w
ash
heav
ily s
oile
d la
undr
y
2
40
800
ndash
Raacutep
ido
153
0m
in
(Sup
erQ
uick
153
0 m
in)
Was
h ite
ms
mad
e from
cot
ton
syn
-th
etic
or
blen
ded
fabr
ics
Sho
rt p
rogr
amm
e fo
r sm
all i
tem
s of
light
ly s
oile
d la
undr
yTh
e pr
ogra
mm
e du
ratio
n is
app
rox
30 m
inut
es
If yo
u w
ish
to r
educ
e th
e pr
ogra
mm
edu
ratio
n to
15 m
inut
es a
ctiv
ate
Spe
edPer
fect
T
he m
axim
umlo
ad is
red
uced
to
2 k
g
4
40
1200
ndash
1Pro
gram
me
setti
ng
Accessoriesemspen
31
Accessories
9 AccessoriesAccessories
Use original accessories These have been made especially for your appliance
Use Order numberWater inlet hose exten-sion
Extend the water inlethose for cold water orAquaStop (approx 250m)
WMZ2381
Fixing brackets Improves the stability ofthe appliance
WMZ2200
Longer water inlet hose Replace the standardwater inlet hose with alonger hose (220 m)
00353925
Elbow Secure the water outlethose in place
00655300
Liquid detergent insert Measure liquid deter-gent
00605740
Metal covering plate Metal covering plate forinstalling the applianceunder a high worktop
WMZ20430
Before using for the first time
10 Before using for thefirst time
Before using for the first time
Prepare the appliance for use
101 Starting an empty wash-ing cycle
Your appliance was inspected thor-oughly before leaving the factory Toremove any residual water run thefirst wash cycle without any laundryNote Please read the information inthe Safety rarr Page 4 and Preventingmaterial damage rarr Page 10 sectionsto ensure that you use the appliancesafely
1 Turn the programme selector toLimp tambor
2 Close the door
enemspLaundry
32
3 Pull out the detergent drawer
4 Pour approx 1 litre of tap waterinto compartment II
5 Pour washing powder into com-partment II
To prevent foaming use only halfof the amount of detergent recom-mended by the detergent manufac-turer for light soiling Do not usedetergent suitable for woollens ordelicates
6 Push in the detergent drawer
7 Press InicioPausa + Carga (StartPause + Reload) to start theprogramme
a The display shows the remainingprogramme duration
a After the programme has endedthe display shows End
8 Start the first wash cycle or set theprogramme selector to to switchoff the appliance rarr Basic operation Page 36
Laundry
11 LaundryLaundry
111 Preparing the laundryNote Please read the information inthe Safety rarr Page 4 and Preventingmaterial damage rarr Page 10 sectionsto ensure that you use the appliancesafely
ATTENTIONObjects remaining in the laundry maydamage the laundry and the drum Remove all items from any pock-
ets in your laundry before usingthe appliance
To protect your appliance and thelaundry prepare the laundry be-forehandndash Empty any pockets
Laundryemspen
33
ndash Brush sand out of all collars andpockets
ndash Close bed covers and cushioncovers
ndash Close all zips Velcro fastenershooks and eyes
ndash Tie cloth belts apron stringsetc together or use a laundrybag
ndash Remove curtain hooks and leadstrips or use a mesh laundrybag
ndash Use a mesh laundry bag forsmall items of laundry such aschildrens socks
ndash Some stubborn or dried-in stainscan be removed by washingseveral times
ndash Wash large and small items oflaundry together
ndash Do not rub fresh stains but dabthem with soapy water
ndash Separate items of laundry andshake them out
112 Sorting laundryNote Please read the information inthe Safety rarr Page 4 and Preventingmaterial damage rarr Page 10 sectionsto ensure that you use the appliancesafely To improve washing results and
prevent discolouration sort thelaundry according to the followingcriteria before washingndash Type of fabric and fibre
Wash laundry of the sametype of fabric and fibre to-gether
ndash Care symbols on the care labelsrarr Page 34
ndash Description of the programmesrarr Page 24
ndash Whitesndash Colours
Wash new coloured itemsseparately the first time youwash them
113 Degrees of soiling
Degree of soiling Soiling ExamplesLight iexcl No dirt or stains are vis-
ibleiexcl Laundry has absorbed
odours
Light summer clothing orsports clothing that hasbeen worn for a just a fewhours
Normal Dirt or light stains are vis-ible
iexcl T-shirts shirts or blousesare sweat-soaked orhave been worn a fewtimes
iexcl Towels or bedding thathas been used for up toone week
Heavy Dirt or stains are clearlyvisible
Tea towels baby items orwork clothing
enemspDetergents and care products
34
114 Care symbols on the care labels
Washing care symbols
Symbol Washing process Recommended pro-gramme
Normal Cotton Gentle Easy-Care Particularly gentle DelicatesSilk for
washing by handHand wash WoolNot suitable for machine-washing ndash
Detergents and care products
12 Detergents and careproducts
Detergents and care products
Note Please read the information inthe Safety rarr Page 4 and Preventingmaterial damage rarr Page 10 sectionsto ensure that you use the appliancesafelyThe manufacturers instructions foruse and dosage can be found on thepackaging
Notesiexcl Only use liquid detergents that are
self-flowingiexcl Do not mix different liquid deter-
gentsiexcl Do not mix detergent and fabric
softeneriexcl Do not use products that have ex-
pired or are highly congealediexcl Do not use products containing
solvents caustic agents or volatilesubstances (eg bleach)
iexcl Use dyes sparingly as salt maydamage stainless steel
iexcl Do not use bleaching agents in theappliance
121 Detergent recommendation
Detergent Fabrics Pro-gramme
Temperature
Standard detergentwith optical brighten-ers
Heat-resistant whitefabrics made fromcotton or linen
Cotton From cold up to90 degC
Detergent for colourswithout bleach or op-tical brighteners
Coloured fabricsmade from linen orcotton
Cotton From cold up to60 degC
Detergent for col-oursdelicates withoutoptical brighteners
Coloured fabricsmade from easy-carefabrics or syntheticmaterials
Easy-Care From cold up to60 degC
Detergents and care productsemspen
35
Detergent Fabrics Pro-gramme
Temperature
Detergent for delic-ates
Delicate fine textilessilk or viscose
DelicatesSilk
From cold up to40 degC
Detergent for wool-lens
Wool Wool From cold up to40 degC
Tip Visit wwwcleanrighteu to findfurther information on detergentscare products and cleaning agentsfor domestic use
122 Detergent dosageThe detergent dosage depends oniexcl The amount of laundryiexcl Degree of soilingiexcl Water hardness
You can find out how hard yourwater is from your local water com-pany or measure it yourself usinga water hardness tester
Water hardness
Hardness range Total hardness in mmoll
German degrees in degdH
soft (I) 0ndash15 0ndash84medium (II) 15ndash 25 84ndash14hard (III) over 25 over 14
Example of a manufacturersinstructions for detergentThese example values refer to astandard load of 4ndash5 kg
Soiling Light Normal HeavyWater hardness Softmedium 40 ml 55 ml 80 mlWater hardness Hardveryhard
55 ml 80 ml 105 ml
The dosages can be found on themanufacturers packagingiexcl Adjust the dosage to the actual
load
enemspBasic operation
36
Basic operation
13 Basic operationBasic operation
131 Switching on the appli-ance
Turn the programme selector to aprogramme
132 Setting a programme1 Set the programme selector to the
required programme rarr Programmes Page 24
2 If necessary adjust the pro-gramme settings rarr Page 36
133 Adjusting the pro-gramme settings
Requirement A programme hasbeen set rarr Setting a programme Page 36
Adjust the programme settings rarr Programmes Page 24
Note The programme settings arenot saved permanently for the pro-gramme
134 Loading laundryNotesiexcl Please read the information in the
Safety rarr Page 4 and Preventingmaterial damage rarr Page 10 sec-tions to ensure that you use theappliance safely
iexcl To prevent creasing take note ofthe maximum load for the rarr Programmes Page 24
Requirement The laundry is pre-pared and sortedrarr Laundry Page 321 Open the door
Make sure that the drum is empty2 Load the laundry unfolded into the
drum3 Close the door
Ensure that there is no laundrytrapped in the door
Basic operationemspen
37
135 Using a measuring aidfor liquid detergent
If you order the measuring aid as anaccessory you must use the measur-ing aid1 Pull out the detergent drawer
2 Press down on the insert and re-move the detergent drawer
1
2
3 Insert the measuring aid
4 Insert the detergent drawer
136 Use the measuring aidfor liquid detergent
To add liquid detergent you can usea measuring aid in the detergentdrawer1 Pull out the detergent drawer2 Slide the measuring aid forwards
3 Fold the measuring aid down andclick it into place
enemspBasic operation
38
4 Push in the detergent drawer
137 Adding detergent andcare product
Notesiexcl Please read the information in the
Safety rarr Page 4 and Preventingmaterial damage rarr Page 10 sec-tions to ensure that you use theappliance safely
iexcl Do not use the measuring aid forliquid detergent for gel detergentswashing powder or if Prewash orReady in time are activated
Requirement Find out the optimumdosage for detergent and careproduct rarr Page 341 Pull out the detergent drawer2 Pour in detergent
rarr Detergent drawer Page 193 If required add the care product4 Push in the detergent drawer
138 Starting the programmeNote If you want to change the timeuntil the programme ends set theReady in time first Press InicioPausa + Carga a The drum rotates and load detec-
tion takes place This can take upto 2 minutes after which waterenters the drum
a The display shows either the pro-gramme duration or the Ready intime
a After the programme has endedthe display shows End
139 Adjusting the Ready intime before the pro-gramme starts
You can readjust the selected Readyin time before the programme starts1 Press InicioPausa + Carga 2 Press Termin repeatedly until
the display indicates the desiredReady in time
3 Press InicioPausa + Carga
1310 Soaking laundryNote No additional detergent is re-quired The washing solution is thenused for washing1 Start the programme2 To pause the programme after ap-
prox 10 minutes press InicioPausa + Carga
3 To resume the programme afterthe desired soaking time pressInicioPausa + Carga
1311 Adding laundryNote Please read the information inthe Safety rarr Page 4 and Preventingmaterial damage rarr Page 10 sectionsto ensure that you use the appliancesafely1 Press InicioPausa + Carga
The appliance is paused andchecks whether it is possible toadd or remove laundry Take noteof the programme status
2 Add or remove laundry3 Close the door4 Press InicioPausa + Carga
Basic operationemspen
39
1312 Cancelling the pro-gramme
Once the programme has startedyou can cancel it at any timeNote Please read the information inthe Safety rarr Page 4 and Preventingmaterial damage rarr Page 10 sectionsto ensure that you use the appliancesafely1 Press InicioPausa + Carga 2 Open the door
The appliance door remainslocked for safety reasons if thetemperature and water levels arehighndash If the temperature is high start
the programmendash If the water level is high Start
the or programme3 Remove the laundry
1313 Resuming the pro-gramme when the pro-gramme status is RinseHold
1 Set the or programme2 Press InicioPausa + Carga
1314 Unloading the laundryNote Please read the information inthe Safety rarr Page 4 and Preventingmaterial damage rarr Page 10 sectionsto ensure that you use the appliancesafely1 Open the door
2 Remove the laundry
1315 Switching off the appli-ance
1 Turn the programme selector to
2 Turn off the tap3 Wipe the rubber gasket dry and re-
move any foreign objects
4 Leave the door and detergentdrawer open so that residual watercan evaporate
enemspChildproof lock
40
Childproof lock
14 Childproof lockChildproof lock
Secure your appliance against beingoperated unintentionally using thecontrols
141 Activating the childprooflock
Press and hold the two 3 segbuttons for approx 3 seconds
a The display shows a The controls are lockeda The childproof lock remains active
even after the appliance has beenswitched off
142 Deactivating the child-proof lock
Requirement To deactivate thechildproof lock the appliance mustbe switched on Press and hold the two 3 seg
buttons for approx 3 secondsa goes out in the display
Basic settingsemspen
41
Basic settings
15 Basic settingsBasic settings
You can configure the appliance to meet your needs
151 Overview of the basic settingsBelow is an overview of the basic settings on your appliance
Basic setting Programmeposition
Value Description
End signal 2 0 (off)1 (quiet)2 (me-dium)3 (loud)4 (veryloud)
Set the volume of the signal at theend of the programme
Button signal 3 0 (off)1 (quiet)2 (me-dium)3 (loud)4 (veryloud)
The volume of the audible signalemitted when the buttons arepressed
Drum cleaningreminder
4 ONOFF
Activate or deactivate the re-minder to clean the drum
enemspCleaning and servicing
42
152 Changing the basic set-tings
1 Set the programme selector to po-sition 1
2 Press InicioPausa + Carga and at the same time turn theprogramme selector to position 2
a The display shows the currentvalue
3 Set the programme selector to therequired position
4 To change the value press Ter-min
5 To save the changes switch offthe appliance
Cleaning and servicing
16 Cleaning and servi-cing
Cleaning and servicing
To keep your appliance working effi-ciently for a long time it is importantto clean and maintain it carefully
161 Tips on appliance careWipe down thehousing and thecontrol panelwith nothing butwater and adamp cloth
This ensures theparts of the appli-ance will remainclean and hy-gienic
Remove all de-tergent residuespray residue orother residuesimmediately
Fresh depositsare easier to re-move withoutleaving anyresidue
Keep the appli-ance door anddetergent draweropen after use
This allows theresidual water todry reducingodours in the ap-pliance
162 Cleaning the drum
CAUTIONRisk of injuryPermanently washing at low temper-atures and a lack of ventilation forthe appliance may damage the drumand cause injury Regularly run a programme for
cleaning the drum or wash at tem-peratures of at least 60 degC
Leave the appliance to dry afterevery operation with the dooropen and leave the detergentdrawer to dry
Run the Limp tambor pro-gramme without laundryAdd washing powder
163 Cleaning the detergentdrawer
Note Please read the information inthe Safety rarr Page 4 and Preventingmaterial damage rarr Page 10 sectionsto ensure that you use the appliancesafely1 Pull out the detergent drawer
Cleaning and servicingemspen
43
2 Press down on the insert and re-move the detergent drawer
1
2
3 Press out the insert upwards frombelow
4 Clean the detergent drawer and in-sert with water and a brush andthen dry them
5 Fit the insert and lock it into place
6 Cleaning the opening for the deter-gent drawer
7 Push in the detergent drawer
164 Descaling
ATTENTIONThe use of unsuitable descalingagents eg for coffee machines maydamage the appliance For this appliance only use de-
scaling agents that are availablefrom the manufacturers website orour after-sales service
enemspCleaning and servicing
44
165 Cleaning the drain pumpClean the drain pump in the event offaults eg blockages or rattlingnoises
Emptying the drain pumpNote Please read the information inthe Safety rarr Page 4 and Preventingmaterial damage rarr Page 10 sectionsto ensure that you use the appliancesafely1 Turn off the water tap2 Switch off the appliance3 Disconnect the appliances mains
plug from the power supply4 Open the maintenance flap
5 Remove the maintenance flap
6 Slide a sufficiently large receptacleunder the opening
7 Take the drain hose out of theholder
Cleaning and servicingemspen
45
8 CAUTION - Risk of scaldingWhen you wash at high temperat-ures the detergent solution getshot
Do not touch the hot detergentsolutionTo allow the detergent solution toflow out into the container removethe sealing cap
9 Firmly press on the sealing cap
10 Insert the drain hose into theholder
Cleaning the drain pumpNote Please read the information inthe Safety rarr Page 4 and Preventingmaterial damage rarr Page 10 sectionsto ensure that you use the appliancesafelyRequirement The drain pump isempty rarr Page 441 Since water may remain in the
drain pump remove the pump capcarefully
2 Clean the interior the thread onthe pump cap and the pump hous-ing
3 Make sure that the impeller in thedrain pump can be rotated
enemspCleaning and servicing
46
4 Insert the pump cap and screw iton as far as it will go
90deg
The handle on the pump cap mustbe in a vertical position
5 Close the maintenance flap
Before the next washTo prevent unused detergent fromflowing straight into the outlet in thenext wash run the programmeafter you have emptied the drainpump1 Turn on the tap2 Insert the mains plug3 Switch on the appliance4 Pour 1 litre of water into compart-
ment II5 Start the programme
166 Cleaning the water outlethose at the siphon
1 Switch off the appliance2 Disconnect the appliances mains
plug from the power supply
3 Loosen the hose clamp and care-fully remove the water outlet hose
Residual water may leak out4 Clean the water outlet hose and si-
phon connecting piece
5 Reattach the water outlet hose andsecure the connection point usingthe hose clamp
Cleaning and servicingemspen
47
167 Clean the water inlet fil-ters
Emptying the water inlet hose1 Turn off the tap2 Set a programme except for
or 3 Start the programme and leave it
to run for approx 40 seconds4 Switch off the appliance5 Disconnect the appliances mains
plug from the power supply
Cleaning the filter on the tapNote Please read the information inthe Safety rarr Page 4 and Preventingmaterial damage rarr Page 10 sectionsto ensure that you use the appliancesafelyRequirement The water inlet hose isempty1 Remove the water inlet hose from
the tap
2 Clean the filter with a small brush
3 Connect the water inlet hose andcheck for leaks
Cleaning the filter on theapplianceNote Please read the information inthe Safety rarr Page 4 and Preventingmaterial damage rarr Page 10 sectionsto ensure that you use the appliancesafelyRequirement The water inlet hose isempty rarr Emptying the water inlet hosePage 47
enemspCleaning and servicing
48
1 Disconnect the hose from the rearof the appliance
1
2
2 Use pliers to remove the filter
3 Clean the filter with a small brush
4 Reinsert the filter
5 Connect the hose and check forleaks
2
1
Troubleshootingemspen
49
Troubleshooting
17 TroubleshootingTroubleshooting
You can rectify minor faults on your appliance yourself Read the troubleshoot-ing information before contacting after-sales service This will avoid unneces-sary costs
WARNINGRisk of electric shockIncorrect repairs are dangerous Repairs to the appliance should only be carried out by trained specialist
staff Only use genuine spare parts when repairing the appliance If the power cord of this appliance is damaged it must be replaced by the
manufacturer the manufacturers Customer Service or a similarly qualifiedperson in order to prevent any risk
Fault Cause and troubleshootingThe display goes outand InicioPausa +Carga flashes
Energy-saving mode is active Press any buttona The symbol lights up again
E36 -10 Drain pipe or water outlet hose is blocked Clean the drain pipe and the water outlet hose
Drain pipe or water drain hose is caught or jammed Ensure that the drain pipe and water drain hose are
not kinked or trapped
Drain pump is blocked rarr Cleaning the drain pump Page 44
The water outlet hose is connected too high Install the water outlet hose at a maximum height of
1 metre
Detergent dosage is too high Immediate measure Mix one tablespoon of fabric
softener with 05 litres of water and pour the mix-ture into the left-hand compartment (not for outdoorclothing sportswear or items stuffed with down)
Reduce the amount of detergent for the next wash-ing cycle with the same load
Unapproved extension installed on the water drainhose Remove any unapproved extensions from the water
hose Connecting the appliance
E36 -25 -26 Drain pump is blocked rarr Cleaning the drain pump Page 44
enemspTroubleshooting
50
Fault Cause and troubleshootingThe water pressure is lowNo remedial action possibleThe filters in the water inflow are blocked Clean the filters in the water inflow rarr Page 47
The tap is turned off Turn on the tap
The water inlet hose is kinked or jammed Ensure that the water inlet hose is not kinked or
jammed
flashes The automatic voltage control system detects an un-authorised voltage under-usage No remedial action possible
Note If the power supply is stable the programmecontinues to run as normalVoltage under-usage may cause extension of a pro-grammeNo remedial action possible
flashes Voltage under-usage may cause extension of a pro-grammeNo remedial action possible
lights up The temperature is too high Wait until the temperature has dropped rarr Cancelling the programme Page 39
Water level is too high Start the programme
Laundry is caught in the door1 Open the door again2 Remove any trapped laundry3 Close the door4 Press InicioPausa + Carga to start the pro-
gramme
flashes Door is not closed1 Close the door2 Press InicioPausa + Carga to start the pro-
gramme
All other error codes Malfunction Call the after-sales service
rarr Customer Service Page 59
Troubleshootingemspen
51
Fault Cause and troubleshootingThe appliance is notworking
The mains plug of the power cord is not plugged in Connect the appliance to the power supply
The circuit breaker is faulty Check the circuit breaker in the fuse box
There has been a power cut Check whether the lighting in your kitchen or other
appliances are working
The programme doesnot start
You have not pressed InicioPausa + Carga Press InicioPausa + Carga
Door is not closed1 Close the door2 Press InicioPausa + Carga to start the pro-
gramme
Childproof lock is activated rarr Deactivating the childproof lock Page 40
Termin is activated Check whether Termin is activated
rarr Buttons Page 23
Laundry is caught in the door1 Open the door again2 Remove any trapped laundry3 Close the door4 Press InicioPausa + Carga to start the pro-
gramme
The door cannotbe opened
ndash ndash ndash ndash is activated Continue the programme by selecting or and
pressing InicioPausa + Carga rarr Resuming the programme when the programmestatus is Rinse Hold Page 39
The temperature is too high Wait until the temperature has dropped rarr Cancelling the programme Page 39
Water level is too high Start the programme
Power failure Open the door using the emergency release
rarr Emergency release Page 57
The water is not drain-ing
Drain pipe or water outlet hose is blocked Clean the drain pipe and the water outlet hose
enemspTroubleshooting
52
Fault Cause and troubleshootingThe water is not drain-ing
Drain pipe or water drain hose is caught or jammed Ensure that the drain pipe and water drain hose are
not kinked or trapped
Drain pump is blocked rarr Cleaning the drain pump Page 44
ndash ndash ndash ndash is activated Continue the programme by selecting or and
pressing InicioPausa + Carga rarr Resuming the programme when the programmestatus is Rinse Hold Page 39
The water outlet hose is connected too high Install the water outlet hose at a maximum height of
1 metre
Detergent dosage is too high Immediate measure Mix one tablespoon of fabric
softener with 05 litres of water and pour the mix-ture into the left-hand compartment (not for outdoorclothing sportswear or items stuffed with down)
Reduce the amount of detergent for the next wash-ing cycle with the same load
Unapproved extension installed on the water drainhose Remove any unapproved extensions from the water
hose Connecting the appliance
Water is not flowingin Detergent is notbeing dispensed
You have not pressed InicioPausa + Carga Press InicioPausa + Carga
The filters in the water inflow are blocked Clean the filters in the water inflow rarr Page 47
The tap is turned off Turn on the tap
The water inlet hose is kinked or jammed Ensure that the water inlet hose is not kinked or
jammed
The spin cycle runsseveral times
The unbalanced load detection system eliminates animbalance by repeatedly redistributing the laundry Not a fault ndash no action required
Note When loading where possible place large andsmall items of laundry together in the drum Differentsized items of laundry distribute themselves betterduring the spin cycle
Troubleshootingemspen
53
Fault Cause and troubleshootingThe programme dura-tion changes duringthe wash cycle
The programme operation is optimised electronicallyThis may change the programme duration Not a fault ndash no action required
The unbalanced load detection system eliminates animbalance by repeatedly redistributing the laundry Not a fault ndash no action required
Note When loading where possible place large andsmall items of laundry together in the drum Differentsized items of laundry distribute themselves betterduring the spin cycleFoam detection system switches on a rinse cycle iffoam build-up is too high Not a fault ndash no action required
No water is visible inthe drum
Water is below the visible area Not a fault ndash no action required Do not add any extra water to the appliance while it
is operating
Drum jerks after theprogramme starts
This is caused by an internal motor test Not a fault ndash no action required
Residual water ispresent in the com-partment
Insert in compartment is blocked rarr Cleaning the detergent drawer Page 42
Vibrations and move-ment of the appliancewhilst spinning
Appliance is not correctly aligned Aligning the appliance
The appliance feet are not fixed Secure the appliance feet Aligning the appliance
Transit bolts have not been removed Removing the transit bolts
Drum does not turnwater does not flow in
Load detection is active Not a fault ndash no action required
Note The load detection can take up to two minutesHeavy foam build-up Detergent dosage is too high
Immediate measure Mix one tablespoon of fabricsoftener with 05 litres of water and pour the mix-ture into the left-hand compartment (not for outdoorclothing sportswear or items stuffed with down)
Reduce the amount of detergent for the next wash-ing cycle with the same load
enemspTroubleshooting
54
Fault Cause and troubleshootingHigh spin speed notreached
A low spin speed is selected The next time you run a wash cycle set a higher
spin speed
Unbalance load detection system is using a reducedspin speed to eliminate an unbalance Redistribute the laundry in the drum
Note Where possible mix large and small items inthe drum Different sized items of laundry distributethemselves better during the spin cycle Start the programme
The spin programmedoes not start
Drain pipe or water outlet hose is blocked Clean the drain pipe and the water outlet hose
Drain pipe or water drain hose is caught or jammed Ensure that the drain pipe and water drain hose are
not kinked or trapped
The unbalanced load detection system has interruptedthe spin cycle because the laundry is unevenly distrib-uted Redistribute the laundry in the drum
Note Where possible mix large and small items inthe drum Different sized items of laundry distributethemselves better during the spin cycle Start the programme
Rushing hissingnoise
Water is flushed under pressure into the detergentdrawer Not a fault ndash normal operating noise
Loud noises duringthe spin cycle
Appliance is not correctly aligned Aligning the appliance
The appliance feet are not fixed Secure the appliance feet Aligning the appliance
Transit bolts have not been removed Removing the transit bolts
Banging noises rat-tling in the drainpump
Foreign bodies have got into the drain pump rarr Cleaning the drain pump Page 44
Slurping rhythmicalsuction noise
The drain pump is active the detergent solution ispumped out Not a fault ndash normal operating noise
Troubleshootingemspen
55
Fault Cause and troubleshootingCreasing The spin speed is too high
The next time you run a wash cycle set a lowerspin speed
The load is too large The next time you run a wash cycle reduce the
amount of laundry being loaded
The wrong programme is selected for the type of fab-ric Select the programmes that are suitable for the
type of fabric rarr Programmes Page 24
Detergent or fabricsoftener drips off theseal and collects onthe door or in the sealfold
Too much detergentfabric softener in the detergentdrawer When dosing liquid detergent and fabric softener
observe the marking in the detergent drawer anddo not dose above this
The spin result is notsatisfactory The laun-dry is too wettoodamp
A low spin speed is selected The next time you run a wash cycle set a higher
spin speed Start the programme
Drain pipe or water outlet hose is blocked Clean the drain pipe and the water outlet hose
Drain pipe or water drain hose is caught or jammed Ensure that the drain pipe and water drain hose are
not kinked or trapped
The unbalanced load detection system has interruptedthe spin cycle because the laundry is unevenly distrib-uted Redistribute the laundry in the drum
Note Where possible mix large and small items inthe drum Different sized items of laundry distributethemselves better during the spin cycle Start the programme
Unbalance load detection system is using a reducedspin speed to eliminate an unbalance Redistribute the laundry in the drum
Note Where possible mix large and small items inthe drum Different sized items of laundry distributethemselves better during the spin cycle Start the programme
enemspTroubleshooting
56
Fault Cause and troubleshootingDetergent residue onthe damp washing
Detergents may contain water-insoluble substancesthat deposit on the laundry Start the programme
Detergent residue onthe dry laundry
Detergents may contain water-insoluble substancesthat deposit on the laundry Brush out the laundry after washing and drying
Water is leaking out atthe water inlet hose
Water inlet hose is not correctlysecurely connected1 Connect the water supply hose correctly Connect-
ing the water inlet hose2 Tighten the screw connection
Water is leaking out atthe water outlet hose
The water outlet hose is damaged Replace the damaged water outlet hose
Water outlet hose is not connected correctly Connect the water outlet hose correctly Water out-
let connection types
Odours have formedin the appliance
Humidity and detergent residue may promote theformation of bacteria rarr Cleaning the drum Page 42 If you are not using the appliance leave the door
and detergent drawer open so that residual watercan evaporate
Transportation storage and disposalemspen
57
171 Emergency releaseReleasing the doorRequirement The drain pump isempty rarr Page 441 ATTENTION Escaping water may
cause material damage Do not open the door if you can
see water through the glassPull the emergency release down-wards with a tool and release
a The door lock is released2 Insert the maintenance flap and
lock it into place3 Close the maintenance flap
Transportation storage and disposal
18 Transportation stor-age and disposal
Transportation storage and disposal
You can find out here how to prepareyour appliance for transportation andstorage You will also find out how todispose of old appliances
181 Removing the appliance1 Turn off the tap2 rarr Emptying the water inlet hose
Page 473 Switch off the appliance4 Unplug the appliances mains plug
5 Drain the remaining detergentsolution rarr Cleaning the drain pumpPage 44
6 Detach the hoses
182 Inserting the transitbolts
Secure the appliance for transporta-tion using transit bolts in order to pre-vent damage1 Remove the four cover caps
‒ If necessary use a screwdriverto remove the cover caps
Keep the cover caps2 Insert the four sleeves
enemspTransportation storage and disposal
58
3 Insert all screws into the fourtransit bolts and tighten slightly
4 Insert the power cord into theholder and tighten all fourscrews for the transit bolts with aWAF 13 wrench
5 Insert the hose into holder
183 Using the applianceagain
1 Remove the transit bolts
2 Pour approx 1 litre of water intocompartment II in the detergentdrawer
3 Start the programmea The unused detergent cannot flow
straight into the outlet during thenext wash
184 Disposing of old appli-ance
Valuable raw materials can be re-used by recycling
WARNINGRisk of harm to healthChildren can lock themselves in theappliance thereby putting their livesat risk Do not install the appliance behind
a door as this may obstruct the ap-pliance door or prevent it fromopening
With redundant appliances unplugthe power cord Then cut throughthe cord and damage the lock onthe appliance door beyond repairso that the appliance door will nolonger close
1 Unplug the appliance from themains
2 Cut through the power cord3 Dispose of the appliance in an en-
vironmentally friendly mannerInformation about current disposalmethods are available from yourspecialist dealer or local authority
This appliance is la-belled in accordancewith European Directive201219EU concerningused electrical and elec-
Customer Serviceemspen
59
tronic appliances (wasteelectrical and electronicequipment - WEEE)The guideline determ-ines the framework forthe return and recyclingof used appliances asapplicable throughoutthe EU
Customer Service
19 Customer ServiceCustomer Service
If you have any queries on use areunable to rectify faults on the appli-ance yourself or if your applianceneeds to be repaired contact Cus-tomer ServiceYou can solve many problems your-self by consulting the information ontroubleshooting in these instructionsor on our website If this is not thecase contact our after-sales serviceWith any warranty claims we willmake sure that your appliance is re-paired by trained after-sales techni-cians using genuine spare parts in-cluding after the manufacturers war-ranty has expiredFunction-relevant genuine spare partsaccording to the corresponding Eco-design Order can be obtained fromCustomer Service for a period of atleast 10 years from the date onwhich your appliance was placed onthe market within the European Eco-nomic AreaNote Under the terms of the manu-facturers warranty the use of Cus-tomer Service is free of chargeDetailed information on the warrantyperiod and terms of warranty in yourcountry is available from our after-sales service your retailer or on ourwebsite
If you contact Customer Service youwill require the product number (E-Nr) and the production number (FD)of your applianceThe contact details for Customer Ser-vice can be found in the enclosedCustomer Service directory or on ourwebsite
191 Product number (E-Nr)and production number(FD)
You can find the product number (E-Nr) and the production number (FD)on the appliances rating plateDepending on the model the ratingplate is locatediexcl On the inside of the dooriexcl On the inside of the maintenance
flapiexcl On the rear of the applianceMake a note of your appliances de-tails and the Customer Service tele-phone number to find them againquickly
enemspConsumption values
60
Consumption values
20 Consumption valuesConsumption values
The following information is provided in accordance with the EU EcodesignRegulation The values given for programs other than the Eco 40-60 are indicat-ive only and were determined in accordance with the applicable standardEN60456
Programme Load(kg)
Pro-gramme dura-tion(hrmin)1
Energycon-sump-tion(kWhcycle)1
Watercon-sump-tion (lcycle)1
Max-imumtemper-ature(degC) 5mins1
Spinspeed(rpm)1
Resid-ualmois-ture()1
Eco 40-602 90 337 1245 610 50 1166 5000Eco 40-602 45 252 0590 450 33 1200 5000Eco 40-602 25 233 0195 300 24 1200 5400AlgodoacutenAl-godatildeo 20 degC
90 328 0370 900 23 1200 5400
AlgodoacutenAl-godatildeo 40 degC
90 328 1350 900 45 1200 5400
AlgodoacutenAl-godatildeo 60 degC
90 328 1450 900 55 1200 5400
AlgodoacutenAl-godatildeo 40 degC + Pre-lav
90 358 1400 1020 45 1200 5400
Sinteacuteticos 40 degC
40 228 0780 610 44 1200 2700
Mix 40 degC 40 059 0620 440 41 1200 5600 LanaLatildes
30 degC20 040 0200 400 22 800 2500
1 Due to the influence of water pressure hardness and inlet temperature am-bient temperature type amount and soiling of laundry detergent used fluc-tuations in the power supply and the selected additional functions the actualvalues may deviate from the stated values
2 Test programme in accordance with the EU Ecodesign Directive and the EUEnergy Labelling Regulation with cold water (15 degC)
Technical specificationsemspen
61
Technical specifications
21 Technical specifica-tions
Technical specifications
Facts and figures for your appliancecan be found here
Appliance height 850 cmAppliance width 598 cmAppliance depth 590 cmWeight 80 kg1
Maximum load 9 kgMains voltage 220 - 240 V
50 Hz Minimum in-
stallation protec-tion
10 A
Rated power 2300 WPower consump-tion
iexcl Off mode010 W
iexcl Left-on mode050 W
Water pressure iexcl Minimum100 kPa(1 bar)
iexcl Maximum1000 kPa(10 bar)
Length of the wa-ter inlet hose
150 cm
Length of the wa-ter outlet hose
150 cm
Length of thepower cord
160 cm
1 Depending on the appliance spe-cifications
More information about your modelcan be found online at httpsen-ergylabelbsh-groupcom1 This webaddress is linked to the official EUEPREL product database At the time
of printing its web address had notyet been published Please then fol-low the instructions on searching formodels The model identifier is madeup of the characters before the slashin the product number (E-Nr) on therating plate Alternatively you canalso find the model identifier in thefirst line of the EU energy label
1 Only applies to countries in the European Economic Area
Thank you for buying aBosch Home Appliance
Register your new device on MyBosch now and profit directly from
bull Expert tips amp tricks for your appliancebull Warranty extension optionsbull Discounts for accessories amp spare-partsbull Digital manual and all appliance data at handbull Easy access to Bosch Home Appliances Service
Free and easy registration ndash also on mobile phoneswwwbosch-homecomwelcome
Looking for help Youll find it here
Expert advice for your Bosch home appliances help with problems or a repair from Bosch experts Find out everything about the many ways Bosch can support you wwwbosch-homecomservice Contact data of all countries are listed in the attached service direct-ory
90016102699001610269emsp(010219)en
Robert Bosch Hausgeraumlte GmbHCarl-Wery-Straszlige 3481739 MuumlnchenGERMANYwwwbosch-homecom
Valid within Great BritainImported to Great Britain byBSH Home Appliances LtdGrand Union HouseOld Wolverton RoadWolverton Milton KeynesMK12 5PTUnited Kingdom
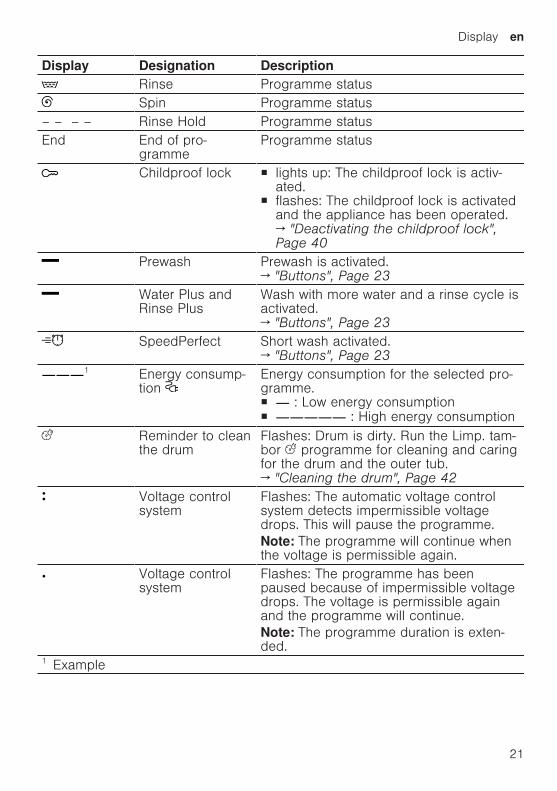
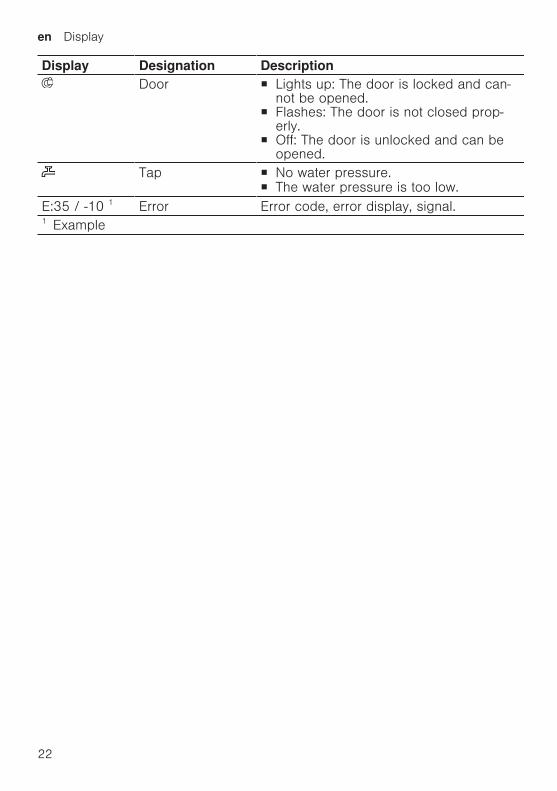
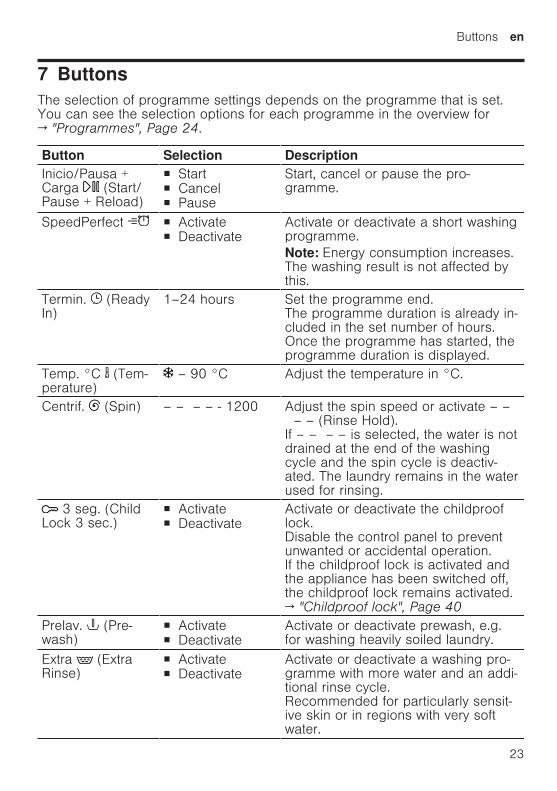
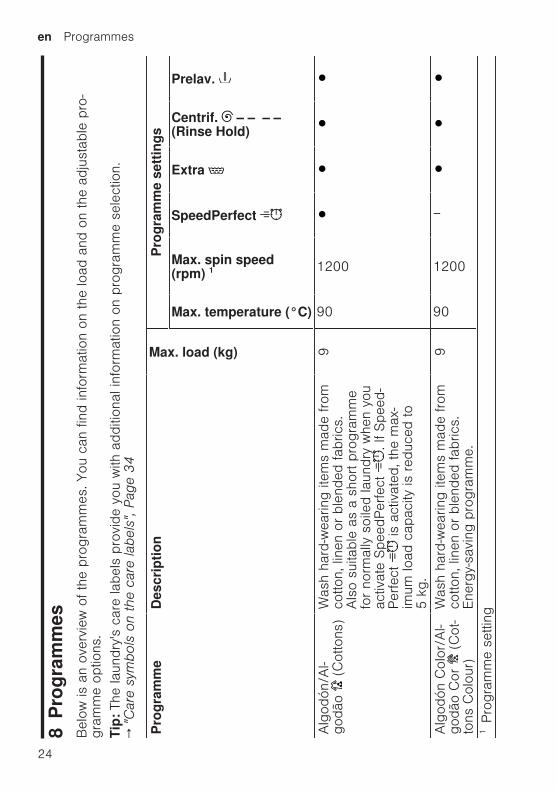
enemspProgrammes
24
Programmes 8 P
rogr
amm
esProgrammes B
elow
is a
n ov
ervi
ew o
f the
pro
gram
mes
You
can
find
info
rmat
ion
on the
load
and
on
the
adju
stab
le p
ro-
gram
me
optio
ns
Tip
The
laun
dry
s ca
re la
bels
pro
vide
you
with
add
ition
al in
form
atio
n on
pro
gram
me
sele
ctio
n
rarr
Car
e sy
mbo
ls o
n th
e ca
re la
bels
Pa
ge 3
4
Pro
gram
me
Des
crip
tion
Max load (kg)
Pro
gram
me
sett
ings
Max temperature (degC)
Max spin speed(rpm) 1
SpeedPerfect
Extra
Centrif ndash ndash ndash ndash(Rinse Hold)
Prelav
Alg
odoacuten
Al-
godatilde
o (
Cot
tons
)W
ash
hard
-wea
ring
item
s m
ade
from
cotto
n li
nen
or b
lend
ed fa
bric
sA
lso
suita
ble
as a
sho
rt p
rogr
amm
efo
r no
rmal
ly s
oile
d la
undr
y w
hen
you
activ
ate
Spe
edPer
fect
I
f Spe
ed-
Per
fect
is
act
ivat
ed t
he m
ax-
imum
load
cap
acity
is r
educ
ed to
5 k
g
990
1200
Alg
odoacuten
Col
orA
l-go
datildeo
Cor
(
Cot
-to
ns C
olou
r)
Was
h ha
rd-w
earin
g ite
ms
mad
e from
cotto
n li
nen
or b
lend
ed fa
bric
sEne
rgy-
savi
ng p
rogr
amm
e
9
90
1200
ndash
1Pro
gram
me
setti
ng
Programmesemspen
25
Pro
gram
me
Des
crip
tion
Max load (kg)
Pro
gram
me
sett
ings
Max temperature (degC)
Max spin speed(rpm) 1
SpeedPerfect
Extra
Centrif ndash ndash ndash ndash(Rinse Hold)
Prelav
Not
e T
o sa
ve e
nerg
y the
act
ual
was
hing
tem
pera
ture
may
dev
iate
from
the
set
was
hing
tem
pera
ture
Th
e w
ashi
ng p
erfo
rman
ce m
eets
lega
l req
uire
men
ts
Eco
40-6
0W
ash
item
s m
ade
from
cot
ton
line
nor
ble
nded
fabr
ics
Not
e T
extil
es w
hich
can
be
was
hed
from
40 deg
C
up
to 6
0 deg
C
as
per
the
care
sym
bol c
an b
e w
ashe
dto
geth
er
The
was
hing
per
form
ance
cor
res-
pond
s to
the
bes
t po
ssib
le w
ashi
ngpe
rfor
man
ce c
lass
acc
ordi
ng to
the
lega
l req
uire
men
ts
For
this
pro
gram
me
the
was
hing
tem
pera
ture
is a
utom
atic
ally
adj
uste
dde
pend
ing
on the
load
siz
e in
ord
erto
ach
ieve
the
bes
t po
ssib
le e
nerg
y
9
ndash
1200
ndash
1Pro
gram
me
setti
ng
enemspProgrammes
26
Pro
gram
me
Des
crip
tion
Max load (kg)
Pro
gram
me
sett
ings
Max temperature (degC)
Max spin speed(rpm) 1
SpeedPerfect
Extra
Centrif ndash ndash ndash ndash(Rinse Hold)
Prelav
effic
ienc
y w
ith the
bes
t po
ssib
lew
ashi
ng r
esul
t You
can
not ch
ange
the
was
hing
tem
pera
ture
Sin
teacutetic
os
(Eas
yC
are)
Was
h ite
ms
mad
e from
syn
thet
ic o
rbl
ende
d fa
bric
s4
60
1200
Mix
(
Mix
edFa
bric
s)W
ash
item
s m
ade
from
cot
ton
line
nor
syn
thet
ic o
r bl
ende
d fa
bric
sSui
tabl
e fo
r lig
htly
soi
led
laun
dry
460
1200
Del
icad
oSed
a (D
elic
ate
Silk
)W
ash
delic
ate
was
habl
e ite
ms
mad
efrom
silk
vis
cose
and
syn
thet
ics
Use
a d
eter
gent
tha
t is
sui
tabl
e fo
rde
licat
es o
r si
lk
Not
e W
ash
espe
cial
ly d
elic
ate
item
sor
item
s w
ith h
ooks
eye
lets
or
clip
sin
a m
esh
laun
dry
bag
2
40
800
ndash
1Pro
gram
me
setti
ng
Programmesemspen
27
Pro
gram
me
Des
crip
tion
Max load (kg)
Pro
gram
me
sett
ings
Max temperature (degC)
Max spin speed(rpm) 1
SpeedPerfect
Extra
Centrif ndash ndash ndash ndash(Rinse Hold)
Prelav
Lan
aLatilde
s (W
ool)
Han
d- o
r m
achi
ne-w
asha
ble
item
sth
at a
re m
ade
from
woo
l or
cont
ain
woo
lTo
pre
vent
the
laun
dry
from
shr
ink-
ing
the
dru
m m
oves
the
item
s ve
ryge
ntly
with
long
pau
ses
Use
a d
eter
gent
tha
t is
sui
tabl
e fo
rw
ool
2
40
800
ndash
ndash
ndash
(R
inse
)R
inse
s an
d th
en s
pins
the
laun
dry
and
then
dra
ins
the
wat
er
ndashndash
1200
ndash
ndash
(
Spi
nD
rain
)Spi
ns a
nd d
rain
s th
e w
ater
If
you
only
wan
t to
dra
in the
wat
er
activ
ate
0 T
he la
undr
y is
not
spu
n
ndash
ndash
1200
ndash
ndash
ndash
ndash
Rop
a os
cura
R
oupa
esc
ura
(Dar
k W
ash)
Was
h da
rk-c
olou
red
and
colo
ur-in
-te
nse
item
s m
ade
from
cot
ton
orea
sy-c
are
fabr
ic e
g j
eans
Tu
rn la
undr
y in
side
-out
bef
ore
was
h-in
gU
se li
quid
det
erge
nt
4
40
1200
1Pro
gram
me
setti
ng
enemspProgrammes
28
Pro
gram
me
Des
crip
tion
Max load (kg)
Pro
gram
me
sett
ings
Max temperature (degC)
Max spin speed(rpm) 1
SpeedPerfect
Extra
Centrif ndash ndash ndash ndash(Rinse Hold)
Prelav
Plu
mas
Pen
as
(Dow
n)W
ash
pillo
ws
duv
ets
or c
loth
ing
stuf
fed
with
dow
n an
d fil
lings
with
synt
hetic
fibr
es
Was
h la
rge
item
s se
para
tely
U
se a
det
erge
nt tha
t is
sui
tabl
e fo
rdo
wn
or d
elic
ates
U
se s
parin
gly
Do
not us
e fa
bric
sof
tene
rN
ote
To
prev
ent ex
cess
ive
foam
ing
rem
ove
air
from
laun
dry
item
s by
rolli
ng the
m u
p be
fore
you
was
hth
em
2
60
1200
ndash
ndash
Lim
p tam
bor
(Dru
m C
lean
)C
lean
ing
and
carin
g fo
r th
e dr
um
Use
thi
s pr
ogra
mm
e in
the
follo
win
gca
ses
iexclB
efor
e us
ing
the
appl
ianc
e fo
r th
efir
st tim
eiexcl
If yo
u re
gula
rly w
ash
at tem
pera
t-ur
es o
f 40 deg
C o
r lo
wer
ndash
ndash
1200
ndash
ndash
ndash
ndash
1Pro
gram
me
setti
ng
Programmesemspen
29
Pro
gram
me
Des
crip
tion
Max load (kg)
Pro
gram
me
sett
ings
Max temperature (degC)
Max spin speed(rpm) 1
SpeedPerfect
Extra
Centrif ndash ndash ndash ndash(Rinse Hold)
Prelav
iexclA
fter
a pr
olon
ged
perio
d of
non
-us
eU
se w
ashi
ng p
owde
r or
a d
eter
gent
cont
aini
ng b
leac
hH
alve
the
am
ount
of d
eter
gent
to
avoi
d fo
amin
gD
o no
t us
e fa
bric
sof
tene
rD
o no
t us
e liq
uid
dete
rgen
t or
det
er-
gent
tha
t is
inte
nded
for
woo
llens
or
delic
ates
N
ote
The
dru
m c
lean
ing
indi
cato
rw
ill fl
ash
to r
emin
d yo
u if
you
have
not us
ed a
pro
gram
me
at 6
0 deg
C o
rhi
gher
for
a lo
ng tim
eC
amis
asB
lusa
s (S
hirts
Blo
uses
)W
ash
non-
iron
shirt
s an
d bl
ouse
sm
ade
from
cot
ton
line
n s
ynth
etic
or
blen
ded
fabr
ics
Not
e U
se the
Del
icad
oSed
a pr
o-gr
amm
e to
was
h sh
irts
and
blou
ses
mad
e from
silk
or
delic
ate
fabr
ics
2
60
800
ndash
1Pro
gram
me
setti
ng
enemspProgrammes
30
Pro
gram
me
Des
crip
tion
Max load (kg)
Pro
gram
me
sett
ings
Max temperature (degC)
Max spin speed(rpm) 1
SpeedPerfect
Extra
Centrif ndash ndash ndash ndash(Rinse Hold)
Prelav
Spo
rt
Was
h sp
orts
and
leis
ure
item
s m
ade
from
syn
thet
ic fi
bres
mic
rofib
re o
rfle
ece
Use
a d
eter
gent
tha
t is
sui
tabl
e fo
rsp
orts
item
sD
o no
t us
e fa
bric
sof
tene
rTi
p U
se the
Sin
teacutetic
os
prog
ram
me
to w
ash
heav
ily s
oile
d la
undr
y
2
40
800
ndash
Raacutep
ido
153
0m
in
(Sup
erQ
uick
153
0 m
in)
Was
h ite
ms
mad
e from
cot
ton
syn
-th
etic
or
blen
ded
fabr
ics
Sho
rt p
rogr
amm
e fo
r sm
all i
tem
s of
light
ly s
oile
d la
undr
yTh
e pr
ogra
mm
e du
ratio
n is
app
rox
30 m
inut
es
If yo
u w
ish
to r
educ
e th
e pr
ogra
mm
edu
ratio
n to
15 m
inut
es a
ctiv
ate
Spe
edPer
fect
T
he m
axim
umlo
ad is
red
uced
to
2 k
g
4
40
1200
ndash
1Pro
gram
me
setti
ng
Accessoriesemspen
31
Accessories
9 AccessoriesAccessories
Use original accessories These have been made especially for your appliance
Use Order numberWater inlet hose exten-sion
Extend the water inlethose for cold water orAquaStop (approx 250m)
WMZ2381
Fixing brackets Improves the stability ofthe appliance
WMZ2200
Longer water inlet hose Replace the standardwater inlet hose with alonger hose (220 m)
00353925
Elbow Secure the water outlethose in place
00655300
Liquid detergent insert Measure liquid deter-gent
00605740
Metal covering plate Metal covering plate forinstalling the applianceunder a high worktop
WMZ20430
Before using for the first time
10 Before using for thefirst time
Before using for the first time
Prepare the appliance for use
101 Starting an empty wash-ing cycle
Your appliance was inspected thor-oughly before leaving the factory Toremove any residual water run thefirst wash cycle without any laundryNote Please read the information inthe Safety rarr Page 4 and Preventingmaterial damage rarr Page 10 sectionsto ensure that you use the appliancesafely
1 Turn the programme selector toLimp tambor
2 Close the door
enemspLaundry
32
3 Pull out the detergent drawer
4 Pour approx 1 litre of tap waterinto compartment II
5 Pour washing powder into com-partment II
To prevent foaming use only halfof the amount of detergent recom-mended by the detergent manufac-turer for light soiling Do not usedetergent suitable for woollens ordelicates
6 Push in the detergent drawer
7 Press InicioPausa + Carga (StartPause + Reload) to start theprogramme
a The display shows the remainingprogramme duration
a After the programme has endedthe display shows End
8 Start the first wash cycle or set theprogramme selector to to switchoff the appliance rarr Basic operation Page 36
Laundry
11 LaundryLaundry
111 Preparing the laundryNote Please read the information inthe Safety rarr Page 4 and Preventingmaterial damage rarr Page 10 sectionsto ensure that you use the appliancesafely
ATTENTIONObjects remaining in the laundry maydamage the laundry and the drum Remove all items from any pock-
ets in your laundry before usingthe appliance
To protect your appliance and thelaundry prepare the laundry be-forehandndash Empty any pockets
Laundryemspen
33
ndash Brush sand out of all collars andpockets
ndash Close bed covers and cushioncovers
ndash Close all zips Velcro fastenershooks and eyes
ndash Tie cloth belts apron stringsetc together or use a laundrybag
ndash Remove curtain hooks and leadstrips or use a mesh laundrybag
ndash Use a mesh laundry bag forsmall items of laundry such aschildrens socks
ndash Some stubborn or dried-in stainscan be removed by washingseveral times
ndash Wash large and small items oflaundry together
ndash Do not rub fresh stains but dabthem with soapy water
ndash Separate items of laundry andshake them out
112 Sorting laundryNote Please read the information inthe Safety rarr Page 4 and Preventingmaterial damage rarr Page 10 sectionsto ensure that you use the appliancesafely To improve washing results and
prevent discolouration sort thelaundry according to the followingcriteria before washingndash Type of fabric and fibre
Wash laundry of the sametype of fabric and fibre to-gether
ndash Care symbols on the care labelsrarr Page 34
ndash Description of the programmesrarr Page 24
ndash Whitesndash Colours
Wash new coloured itemsseparately the first time youwash them
113 Degrees of soiling
Degree of soiling Soiling ExamplesLight iexcl No dirt or stains are vis-
ibleiexcl Laundry has absorbed
odours
Light summer clothing orsports clothing that hasbeen worn for a just a fewhours
Normal Dirt or light stains are vis-ible
iexcl T-shirts shirts or blousesare sweat-soaked orhave been worn a fewtimes
iexcl Towels or bedding thathas been used for up toone week
Heavy Dirt or stains are clearlyvisible
Tea towels baby items orwork clothing
enemspDetergents and care products
34
114 Care symbols on the care labels
Washing care symbols
Symbol Washing process Recommended pro-gramme
Normal Cotton Gentle Easy-Care Particularly gentle DelicatesSilk for
washing by handHand wash WoolNot suitable for machine-washing ndash
Detergents and care products
12 Detergents and careproducts
Detergents and care products
Note Please read the information inthe Safety rarr Page 4 and Preventingmaterial damage rarr Page 10 sectionsto ensure that you use the appliancesafelyThe manufacturers instructions foruse and dosage can be found on thepackaging
Notesiexcl Only use liquid detergents that are
self-flowingiexcl Do not mix different liquid deter-
gentsiexcl Do not mix detergent and fabric
softeneriexcl Do not use products that have ex-
pired or are highly congealediexcl Do not use products containing
solvents caustic agents or volatilesubstances (eg bleach)
iexcl Use dyes sparingly as salt maydamage stainless steel
iexcl Do not use bleaching agents in theappliance
121 Detergent recommendation
Detergent Fabrics Pro-gramme
Temperature
Standard detergentwith optical brighten-ers
Heat-resistant whitefabrics made fromcotton or linen
Cotton From cold up to90 degC
Detergent for colourswithout bleach or op-tical brighteners
Coloured fabricsmade from linen orcotton
Cotton From cold up to60 degC
Detergent for col-oursdelicates withoutoptical brighteners
Coloured fabricsmade from easy-carefabrics or syntheticmaterials
Easy-Care From cold up to60 degC
Detergents and care productsemspen
35
Detergent Fabrics Pro-gramme
Temperature
Detergent for delic-ates
Delicate fine textilessilk or viscose
DelicatesSilk
From cold up to40 degC
Detergent for wool-lens
Wool Wool From cold up to40 degC
Tip Visit wwwcleanrighteu to findfurther information on detergentscare products and cleaning agentsfor domestic use
122 Detergent dosageThe detergent dosage depends oniexcl The amount of laundryiexcl Degree of soilingiexcl Water hardness
You can find out how hard yourwater is from your local water com-pany or measure it yourself usinga water hardness tester
Water hardness
Hardness range Total hardness in mmoll
German degrees in degdH
soft (I) 0ndash15 0ndash84medium (II) 15ndash 25 84ndash14hard (III) over 25 over 14
Example of a manufacturersinstructions for detergentThese example values refer to astandard load of 4ndash5 kg
Soiling Light Normal HeavyWater hardness Softmedium 40 ml 55 ml 80 mlWater hardness Hardveryhard
55 ml 80 ml 105 ml
The dosages can be found on themanufacturers packagingiexcl Adjust the dosage to the actual
load
enemspBasic operation
36
Basic operation
13 Basic operationBasic operation
131 Switching on the appli-ance
Turn the programme selector to aprogramme
132 Setting a programme1 Set the programme selector to the
required programme rarr Programmes Page 24
2 If necessary adjust the pro-gramme settings rarr Page 36
133 Adjusting the pro-gramme settings
Requirement A programme hasbeen set rarr Setting a programme Page 36
Adjust the programme settings rarr Programmes Page 24
Note The programme settings arenot saved permanently for the pro-gramme
134 Loading laundryNotesiexcl Please read the information in the
Safety rarr Page 4 and Preventingmaterial damage rarr Page 10 sec-tions to ensure that you use theappliance safely
iexcl To prevent creasing take note ofthe maximum load for the rarr Programmes Page 24
Requirement The laundry is pre-pared and sortedrarr Laundry Page 321 Open the door
Make sure that the drum is empty2 Load the laundry unfolded into the
drum3 Close the door
Ensure that there is no laundrytrapped in the door
Basic operationemspen
37
135 Using a measuring aidfor liquid detergent
If you order the measuring aid as anaccessory you must use the measur-ing aid1 Pull out the detergent drawer
2 Press down on the insert and re-move the detergent drawer
1
2
3 Insert the measuring aid
4 Insert the detergent drawer
136 Use the measuring aidfor liquid detergent
To add liquid detergent you can usea measuring aid in the detergentdrawer1 Pull out the detergent drawer2 Slide the measuring aid forwards
3 Fold the measuring aid down andclick it into place
enemspBasic operation
38
4 Push in the detergent drawer
137 Adding detergent andcare product
Notesiexcl Please read the information in the
Safety rarr Page 4 and Preventingmaterial damage rarr Page 10 sec-tions to ensure that you use theappliance safely
iexcl Do not use the measuring aid forliquid detergent for gel detergentswashing powder or if Prewash orReady in time are activated
Requirement Find out the optimumdosage for detergent and careproduct rarr Page 341 Pull out the detergent drawer2 Pour in detergent
rarr Detergent drawer Page 193 If required add the care product4 Push in the detergent drawer
138 Starting the programmeNote If you want to change the timeuntil the programme ends set theReady in time first Press InicioPausa + Carga a The drum rotates and load detec-
tion takes place This can take upto 2 minutes after which waterenters the drum
a The display shows either the pro-gramme duration or the Ready intime
a After the programme has endedthe display shows End
139 Adjusting the Ready intime before the pro-gramme starts
You can readjust the selected Readyin time before the programme starts1 Press InicioPausa + Carga 2 Press Termin repeatedly until
the display indicates the desiredReady in time
3 Press InicioPausa + Carga
1310 Soaking laundryNote No additional detergent is re-quired The washing solution is thenused for washing1 Start the programme2 To pause the programme after ap-
prox 10 minutes press InicioPausa + Carga
3 To resume the programme afterthe desired soaking time pressInicioPausa + Carga
1311 Adding laundryNote Please read the information inthe Safety rarr Page 4 and Preventingmaterial damage rarr Page 10 sectionsto ensure that you use the appliancesafely1 Press InicioPausa + Carga
The appliance is paused andchecks whether it is possible toadd or remove laundry Take noteof the programme status
2 Add or remove laundry3 Close the door4 Press InicioPausa + Carga
Basic operationemspen
39
1312 Cancelling the pro-gramme
Once the programme has startedyou can cancel it at any timeNote Please read the information inthe Safety rarr Page 4 and Preventingmaterial damage rarr Page 10 sectionsto ensure that you use the appliancesafely1 Press InicioPausa + Carga 2 Open the door
The appliance door remainslocked for safety reasons if thetemperature and water levels arehighndash If the temperature is high start
the programmendash If the water level is high Start
the or programme3 Remove the laundry
1313 Resuming the pro-gramme when the pro-gramme status is RinseHold
1 Set the or programme2 Press InicioPausa + Carga
1314 Unloading the laundryNote Please read the information inthe Safety rarr Page 4 and Preventingmaterial damage rarr Page 10 sectionsto ensure that you use the appliancesafely1 Open the door
2 Remove the laundry
1315 Switching off the appli-ance
1 Turn the programme selector to
2 Turn off the tap3 Wipe the rubber gasket dry and re-
move any foreign objects
4 Leave the door and detergentdrawer open so that residual watercan evaporate
enemspChildproof lock
40
Childproof lock
14 Childproof lockChildproof lock
Secure your appliance against beingoperated unintentionally using thecontrols
141 Activating the childprooflock
Press and hold the two 3 segbuttons for approx 3 seconds
a The display shows a The controls are lockeda The childproof lock remains active
even after the appliance has beenswitched off
142 Deactivating the child-proof lock
Requirement To deactivate thechildproof lock the appliance mustbe switched on Press and hold the two 3 seg
buttons for approx 3 secondsa goes out in the display
Basic settingsemspen
41
Basic settings
15 Basic settingsBasic settings
You can configure the appliance to meet your needs
151 Overview of the basic settingsBelow is an overview of the basic settings on your appliance
Basic setting Programmeposition
Value Description
End signal 2 0 (off)1 (quiet)2 (me-dium)3 (loud)4 (veryloud)
Set the volume of the signal at theend of the programme
Button signal 3 0 (off)1 (quiet)2 (me-dium)3 (loud)4 (veryloud)
The volume of the audible signalemitted when the buttons arepressed
Drum cleaningreminder
4 ONOFF
Activate or deactivate the re-minder to clean the drum
enemspCleaning and servicing
42
152 Changing the basic set-tings
1 Set the programme selector to po-sition 1
2 Press InicioPausa + Carga and at the same time turn theprogramme selector to position 2
a The display shows the currentvalue
3 Set the programme selector to therequired position
4 To change the value press Ter-min
5 To save the changes switch offthe appliance
Cleaning and servicing
16 Cleaning and servi-cing
Cleaning and servicing
To keep your appliance working effi-ciently for a long time it is importantto clean and maintain it carefully
161 Tips on appliance careWipe down thehousing and thecontrol panelwith nothing butwater and adamp cloth
This ensures theparts of the appli-ance will remainclean and hy-gienic
Remove all de-tergent residuespray residue orother residuesimmediately
Fresh depositsare easier to re-move withoutleaving anyresidue
Keep the appli-ance door anddetergent draweropen after use
This allows theresidual water todry reducingodours in the ap-pliance
162 Cleaning the drum
CAUTIONRisk of injuryPermanently washing at low temper-atures and a lack of ventilation forthe appliance may damage the drumand cause injury Regularly run a programme for
cleaning the drum or wash at tem-peratures of at least 60 degC
Leave the appliance to dry afterevery operation with the dooropen and leave the detergentdrawer to dry
Run the Limp tambor pro-gramme without laundryAdd washing powder
163 Cleaning the detergentdrawer
Note Please read the information inthe Safety rarr Page 4 and Preventingmaterial damage rarr Page 10 sectionsto ensure that you use the appliancesafely1 Pull out the detergent drawer
Cleaning and servicingemspen
43
2 Press down on the insert and re-move the detergent drawer
1
2
3 Press out the insert upwards frombelow
4 Clean the detergent drawer and in-sert with water and a brush andthen dry them
5 Fit the insert and lock it into place
6 Cleaning the opening for the deter-gent drawer
7 Push in the detergent drawer
164 Descaling
ATTENTIONThe use of unsuitable descalingagents eg for coffee machines maydamage the appliance For this appliance only use de-
scaling agents that are availablefrom the manufacturers website orour after-sales service
enemspCleaning and servicing
44
165 Cleaning the drain pumpClean the drain pump in the event offaults eg blockages or rattlingnoises
Emptying the drain pumpNote Please read the information inthe Safety rarr Page 4 and Preventingmaterial damage rarr Page 10 sectionsto ensure that you use the appliancesafely1 Turn off the water tap2 Switch off the appliance3 Disconnect the appliances mains
plug from the power supply4 Open the maintenance flap
5 Remove the maintenance flap
6 Slide a sufficiently large receptacleunder the opening
7 Take the drain hose out of theholder
Cleaning and servicingemspen
45
8 CAUTION - Risk of scaldingWhen you wash at high temperat-ures the detergent solution getshot
Do not touch the hot detergentsolutionTo allow the detergent solution toflow out into the container removethe sealing cap
9 Firmly press on the sealing cap
10 Insert the drain hose into theholder
Cleaning the drain pumpNote Please read the information inthe Safety rarr Page 4 and Preventingmaterial damage rarr Page 10 sectionsto ensure that you use the appliancesafelyRequirement The drain pump isempty rarr Page 441 Since water may remain in the
drain pump remove the pump capcarefully
2 Clean the interior the thread onthe pump cap and the pump hous-ing
3 Make sure that the impeller in thedrain pump can be rotated
enemspCleaning and servicing
46
4 Insert the pump cap and screw iton as far as it will go
90deg
The handle on the pump cap mustbe in a vertical position
5 Close the maintenance flap
Before the next washTo prevent unused detergent fromflowing straight into the outlet in thenext wash run the programmeafter you have emptied the drainpump1 Turn on the tap2 Insert the mains plug3 Switch on the appliance4 Pour 1 litre of water into compart-
ment II5 Start the programme
166 Cleaning the water outlethose at the siphon
1 Switch off the appliance2 Disconnect the appliances mains
plug from the power supply
3 Loosen the hose clamp and care-fully remove the water outlet hose
Residual water may leak out4 Clean the water outlet hose and si-
phon connecting piece
5 Reattach the water outlet hose andsecure the connection point usingthe hose clamp
Cleaning and servicingemspen
47
167 Clean the water inlet fil-ters
Emptying the water inlet hose1 Turn off the tap2 Set a programme except for
or 3 Start the programme and leave it
to run for approx 40 seconds4 Switch off the appliance5 Disconnect the appliances mains
plug from the power supply
Cleaning the filter on the tapNote Please read the information inthe Safety rarr Page 4 and Preventingmaterial damage rarr Page 10 sectionsto ensure that you use the appliancesafelyRequirement The water inlet hose isempty1 Remove the water inlet hose from
the tap
2 Clean the filter with a small brush
3 Connect the water inlet hose andcheck for leaks
Cleaning the filter on theapplianceNote Please read the information inthe Safety rarr Page 4 and Preventingmaterial damage rarr Page 10 sectionsto ensure that you use the appliancesafelyRequirement The water inlet hose isempty rarr Emptying the water inlet hosePage 47
enemspCleaning and servicing
48
1 Disconnect the hose from the rearof the appliance
1
2
2 Use pliers to remove the filter
3 Clean the filter with a small brush
4 Reinsert the filter
5 Connect the hose and check forleaks
2
1
Troubleshootingemspen
49
Troubleshooting
17 TroubleshootingTroubleshooting
You can rectify minor faults on your appliance yourself Read the troubleshoot-ing information before contacting after-sales service This will avoid unneces-sary costs
WARNINGRisk of electric shockIncorrect repairs are dangerous Repairs to the appliance should only be carried out by trained specialist
staff Only use genuine spare parts when repairing the appliance If the power cord of this appliance is damaged it must be replaced by the
manufacturer the manufacturers Customer Service or a similarly qualifiedperson in order to prevent any risk
Fault Cause and troubleshootingThe display goes outand InicioPausa +Carga flashes
Energy-saving mode is active Press any buttona The symbol lights up again
E36 -10 Drain pipe or water outlet hose is blocked Clean the drain pipe and the water outlet hose
Drain pipe or water drain hose is caught or jammed Ensure that the drain pipe and water drain hose are
not kinked or trapped
Drain pump is blocked rarr Cleaning the drain pump Page 44
The water outlet hose is connected too high Install the water outlet hose at a maximum height of
1 metre
Detergent dosage is too high Immediate measure Mix one tablespoon of fabric
softener with 05 litres of water and pour the mix-ture into the left-hand compartment (not for outdoorclothing sportswear or items stuffed with down)
Reduce the amount of detergent for the next wash-ing cycle with the same load
Unapproved extension installed on the water drainhose Remove any unapproved extensions from the water
hose Connecting the appliance
E36 -25 -26 Drain pump is blocked rarr Cleaning the drain pump Page 44
enemspTroubleshooting
50
Fault Cause and troubleshootingThe water pressure is lowNo remedial action possibleThe filters in the water inflow are blocked Clean the filters in the water inflow rarr Page 47
The tap is turned off Turn on the tap
The water inlet hose is kinked or jammed Ensure that the water inlet hose is not kinked or
jammed
flashes The automatic voltage control system detects an un-authorised voltage under-usage No remedial action possible
Note If the power supply is stable the programmecontinues to run as normalVoltage under-usage may cause extension of a pro-grammeNo remedial action possible
flashes Voltage under-usage may cause extension of a pro-grammeNo remedial action possible
lights up The temperature is too high Wait until the temperature has dropped rarr Cancelling the programme Page 39
Water level is too high Start the programme
Laundry is caught in the door1 Open the door again2 Remove any trapped laundry3 Close the door4 Press InicioPausa + Carga to start the pro-
gramme
flashes Door is not closed1 Close the door2 Press InicioPausa + Carga to start the pro-
gramme
All other error codes Malfunction Call the after-sales service
rarr Customer Service Page 59
Troubleshootingemspen
51
Fault Cause and troubleshootingThe appliance is notworking
The mains plug of the power cord is not plugged in Connect the appliance to the power supply
The circuit breaker is faulty Check the circuit breaker in the fuse box
There has been a power cut Check whether the lighting in your kitchen or other
appliances are working
The programme doesnot start
You have not pressed InicioPausa + Carga Press InicioPausa + Carga
Door is not closed1 Close the door2 Press InicioPausa + Carga to start the pro-
gramme
Childproof lock is activated rarr Deactivating the childproof lock Page 40
Termin is activated Check whether Termin is activated
rarr Buttons Page 23
Laundry is caught in the door1 Open the door again2 Remove any trapped laundry3 Close the door4 Press InicioPausa + Carga to start the pro-
gramme
The door cannotbe opened
ndash ndash ndash ndash is activated Continue the programme by selecting or and
pressing InicioPausa + Carga rarr Resuming the programme when the programmestatus is Rinse Hold Page 39
The temperature is too high Wait until the temperature has dropped rarr Cancelling the programme Page 39
Water level is too high Start the programme
Power failure Open the door using the emergency release
rarr Emergency release Page 57
The water is not drain-ing
Drain pipe or water outlet hose is blocked Clean the drain pipe and the water outlet hose
enemspTroubleshooting
52
Fault Cause and troubleshootingThe water is not drain-ing
Drain pipe or water drain hose is caught or jammed Ensure that the drain pipe and water drain hose are
not kinked or trapped
Drain pump is blocked rarr Cleaning the drain pump Page 44
ndash ndash ndash ndash is activated Continue the programme by selecting or and
pressing InicioPausa + Carga rarr Resuming the programme when the programmestatus is Rinse Hold Page 39
The water outlet hose is connected too high Install the water outlet hose at a maximum height of
1 metre
Detergent dosage is too high Immediate measure Mix one tablespoon of fabric
softener with 05 litres of water and pour the mix-ture into the left-hand compartment (not for outdoorclothing sportswear or items stuffed with down)
Reduce the amount of detergent for the next wash-ing cycle with the same load
Unapproved extension installed on the water drainhose Remove any unapproved extensions from the water
hose Connecting the appliance
Water is not flowingin Detergent is notbeing dispensed
You have not pressed InicioPausa + Carga Press InicioPausa + Carga
The filters in the water inflow are blocked Clean the filters in the water inflow rarr Page 47
The tap is turned off Turn on the tap
The water inlet hose is kinked or jammed Ensure that the water inlet hose is not kinked or
jammed
The spin cycle runsseveral times
The unbalanced load detection system eliminates animbalance by repeatedly redistributing the laundry Not a fault ndash no action required
Note When loading where possible place large andsmall items of laundry together in the drum Differentsized items of laundry distribute themselves betterduring the spin cycle
Troubleshootingemspen
53
Fault Cause and troubleshootingThe programme dura-tion changes duringthe wash cycle
The programme operation is optimised electronicallyThis may change the programme duration Not a fault ndash no action required
The unbalanced load detection system eliminates animbalance by repeatedly redistributing the laundry Not a fault ndash no action required
Note When loading where possible place large andsmall items of laundry together in the drum Differentsized items of laundry distribute themselves betterduring the spin cycleFoam detection system switches on a rinse cycle iffoam build-up is too high Not a fault ndash no action required
No water is visible inthe drum
Water is below the visible area Not a fault ndash no action required Do not add any extra water to the appliance while it
is operating
Drum jerks after theprogramme starts
This is caused by an internal motor test Not a fault ndash no action required
Residual water ispresent in the com-partment
Insert in compartment is blocked rarr Cleaning the detergent drawer Page 42
Vibrations and move-ment of the appliancewhilst spinning
Appliance is not correctly aligned Aligning the appliance
The appliance feet are not fixed Secure the appliance feet Aligning the appliance
Transit bolts have not been removed Removing the transit bolts
Drum does not turnwater does not flow in
Load detection is active Not a fault ndash no action required
Note The load detection can take up to two minutesHeavy foam build-up Detergent dosage is too high
Immediate measure Mix one tablespoon of fabricsoftener with 05 litres of water and pour the mix-ture into the left-hand compartment (not for outdoorclothing sportswear or items stuffed with down)
Reduce the amount of detergent for the next wash-ing cycle with the same load
enemspTroubleshooting
54
Fault Cause and troubleshootingHigh spin speed notreached
A low spin speed is selected The next time you run a wash cycle set a higher
spin speed
Unbalance load detection system is using a reducedspin speed to eliminate an unbalance Redistribute the laundry in the drum
Note Where possible mix large and small items inthe drum Different sized items of laundry distributethemselves better during the spin cycle Start the programme
The spin programmedoes not start
Drain pipe or water outlet hose is blocked Clean the drain pipe and the water outlet hose
Drain pipe or water drain hose is caught or jammed Ensure that the drain pipe and water drain hose are
not kinked or trapped
The unbalanced load detection system has interruptedthe spin cycle because the laundry is unevenly distrib-uted Redistribute the laundry in the drum
Note Where possible mix large and small items inthe drum Different sized items of laundry distributethemselves better during the spin cycle Start the programme
Rushing hissingnoise
Water is flushed under pressure into the detergentdrawer Not a fault ndash normal operating noise
Loud noises duringthe spin cycle
Appliance is not correctly aligned Aligning the appliance
The appliance feet are not fixed Secure the appliance feet Aligning the appliance
Transit bolts have not been removed Removing the transit bolts
Banging noises rat-tling in the drainpump
Foreign bodies have got into the drain pump rarr Cleaning the drain pump Page 44
Slurping rhythmicalsuction noise
The drain pump is active the detergent solution ispumped out Not a fault ndash normal operating noise
Troubleshootingemspen
55
Fault Cause and troubleshootingCreasing The spin speed is too high
The next time you run a wash cycle set a lowerspin speed
The load is too large The next time you run a wash cycle reduce the
amount of laundry being loaded
The wrong programme is selected for the type of fab-ric Select the programmes that are suitable for the
type of fabric rarr Programmes Page 24
Detergent or fabricsoftener drips off theseal and collects onthe door or in the sealfold
Too much detergentfabric softener in the detergentdrawer When dosing liquid detergent and fabric softener
observe the marking in the detergent drawer anddo not dose above this
The spin result is notsatisfactory The laun-dry is too wettoodamp
A low spin speed is selected The next time you run a wash cycle set a higher
spin speed Start the programme
Drain pipe or water outlet hose is blocked Clean the drain pipe and the water outlet hose
Drain pipe or water drain hose is caught or jammed Ensure that the drain pipe and water drain hose are
not kinked or trapped
The unbalanced load detection system has interruptedthe spin cycle because the laundry is unevenly distrib-uted Redistribute the laundry in the drum
Note Where possible mix large and small items inthe drum Different sized items of laundry distributethemselves better during the spin cycle Start the programme
Unbalance load detection system is using a reducedspin speed to eliminate an unbalance Redistribute the laundry in the drum
Note Where possible mix large and small items inthe drum Different sized items of laundry distributethemselves better during the spin cycle Start the programme
enemspTroubleshooting
56
Fault Cause and troubleshootingDetergent residue onthe damp washing
Detergents may contain water-insoluble substancesthat deposit on the laundry Start the programme
Detergent residue onthe dry laundry
Detergents may contain water-insoluble substancesthat deposit on the laundry Brush out the laundry after washing and drying
Water is leaking out atthe water inlet hose
Water inlet hose is not correctlysecurely connected1 Connect the water supply hose correctly Connect-
ing the water inlet hose2 Tighten the screw connection
Water is leaking out atthe water outlet hose
The water outlet hose is damaged Replace the damaged water outlet hose
Water outlet hose is not connected correctly Connect the water outlet hose correctly Water out-
let connection types
Odours have formedin the appliance
Humidity and detergent residue may promote theformation of bacteria rarr Cleaning the drum Page 42 If you are not using the appliance leave the door
and detergent drawer open so that residual watercan evaporate
Transportation storage and disposalemspen
57
171 Emergency releaseReleasing the doorRequirement The drain pump isempty rarr Page 441 ATTENTION Escaping water may
cause material damage Do not open the door if you can
see water through the glassPull the emergency release down-wards with a tool and release
a The door lock is released2 Insert the maintenance flap and
lock it into place3 Close the maintenance flap
Transportation storage and disposal
18 Transportation stor-age and disposal
Transportation storage and disposal
You can find out here how to prepareyour appliance for transportation andstorage You will also find out how todispose of old appliances
181 Removing the appliance1 Turn off the tap2 rarr Emptying the water inlet hose
Page 473 Switch off the appliance4 Unplug the appliances mains plug
5 Drain the remaining detergentsolution rarr Cleaning the drain pumpPage 44
6 Detach the hoses
182 Inserting the transitbolts
Secure the appliance for transporta-tion using transit bolts in order to pre-vent damage1 Remove the four cover caps
‒ If necessary use a screwdriverto remove the cover caps
Keep the cover caps2 Insert the four sleeves
enemspTransportation storage and disposal
58
3 Insert all screws into the fourtransit bolts and tighten slightly
4 Insert the power cord into theholder and tighten all fourscrews for the transit bolts with aWAF 13 wrench
5 Insert the hose into holder
183 Using the applianceagain
1 Remove the transit bolts
2 Pour approx 1 litre of water intocompartment II in the detergentdrawer
3 Start the programmea The unused detergent cannot flow
straight into the outlet during thenext wash
184 Disposing of old appli-ance
Valuable raw materials can be re-used by recycling
WARNINGRisk of harm to healthChildren can lock themselves in theappliance thereby putting their livesat risk Do not install the appliance behind
a door as this may obstruct the ap-pliance door or prevent it fromopening
With redundant appliances unplugthe power cord Then cut throughthe cord and damage the lock onthe appliance door beyond repairso that the appliance door will nolonger close
1 Unplug the appliance from themains
2 Cut through the power cord3 Dispose of the appliance in an en-
vironmentally friendly mannerInformation about current disposalmethods are available from yourspecialist dealer or local authority
This appliance is la-belled in accordancewith European Directive201219EU concerningused electrical and elec-
Customer Serviceemspen
59
tronic appliances (wasteelectrical and electronicequipment - WEEE)The guideline determ-ines the framework forthe return and recyclingof used appliances asapplicable throughoutthe EU
Customer Service
19 Customer ServiceCustomer Service
If you have any queries on use areunable to rectify faults on the appli-ance yourself or if your applianceneeds to be repaired contact Cus-tomer ServiceYou can solve many problems your-self by consulting the information ontroubleshooting in these instructionsor on our website If this is not thecase contact our after-sales serviceWith any warranty claims we willmake sure that your appliance is re-paired by trained after-sales techni-cians using genuine spare parts in-cluding after the manufacturers war-ranty has expiredFunction-relevant genuine spare partsaccording to the corresponding Eco-design Order can be obtained fromCustomer Service for a period of atleast 10 years from the date onwhich your appliance was placed onthe market within the European Eco-nomic AreaNote Under the terms of the manu-facturers warranty the use of Cus-tomer Service is free of chargeDetailed information on the warrantyperiod and terms of warranty in yourcountry is available from our after-sales service your retailer or on ourwebsite
If you contact Customer Service youwill require the product number (E-Nr) and the production number (FD)of your applianceThe contact details for Customer Ser-vice can be found in the enclosedCustomer Service directory or on ourwebsite
191 Product number (E-Nr)and production number(FD)
You can find the product number (E-Nr) and the production number (FD)on the appliances rating plateDepending on the model the ratingplate is locatediexcl On the inside of the dooriexcl On the inside of the maintenance
flapiexcl On the rear of the applianceMake a note of your appliances de-tails and the Customer Service tele-phone number to find them againquickly
enemspConsumption values
60
Consumption values
20 Consumption valuesConsumption values
The following information is provided in accordance with the EU EcodesignRegulation The values given for programs other than the Eco 40-60 are indicat-ive only and were determined in accordance with the applicable standardEN60456
Programme Load(kg)
Pro-gramme dura-tion(hrmin)1
Energycon-sump-tion(kWhcycle)1
Watercon-sump-tion (lcycle)1
Max-imumtemper-ature(degC) 5mins1
Spinspeed(rpm)1
Resid-ualmois-ture()1
Eco 40-602 90 337 1245 610 50 1166 5000Eco 40-602 45 252 0590 450 33 1200 5000Eco 40-602 25 233 0195 300 24 1200 5400AlgodoacutenAl-godatildeo 20 degC
90 328 0370 900 23 1200 5400
AlgodoacutenAl-godatildeo 40 degC
90 328 1350 900 45 1200 5400
AlgodoacutenAl-godatildeo 60 degC
90 328 1450 900 55 1200 5400
AlgodoacutenAl-godatildeo 40 degC + Pre-lav
90 358 1400 1020 45 1200 5400
Sinteacuteticos 40 degC
40 228 0780 610 44 1200 2700
Mix 40 degC 40 059 0620 440 41 1200 5600 LanaLatildes
30 degC20 040 0200 400 22 800 2500
1 Due to the influence of water pressure hardness and inlet temperature am-bient temperature type amount and soiling of laundry detergent used fluc-tuations in the power supply and the selected additional functions the actualvalues may deviate from the stated values
2 Test programme in accordance with the EU Ecodesign Directive and the EUEnergy Labelling Regulation with cold water (15 degC)
Technical specificationsemspen
61
Technical specifications
21 Technical specifica-tions
Technical specifications
Facts and figures for your appliancecan be found here
Appliance height 850 cmAppliance width 598 cmAppliance depth 590 cmWeight 80 kg1
Maximum load 9 kgMains voltage 220 - 240 V
50 Hz Minimum in-
stallation protec-tion
10 A
Rated power 2300 WPower consump-tion
iexcl Off mode010 W
iexcl Left-on mode050 W
Water pressure iexcl Minimum100 kPa(1 bar)
iexcl Maximum1000 kPa(10 bar)
Length of the wa-ter inlet hose
150 cm
Length of the wa-ter outlet hose
150 cm
Length of thepower cord
160 cm
1 Depending on the appliance spe-cifications
More information about your modelcan be found online at httpsen-ergylabelbsh-groupcom1 This webaddress is linked to the official EUEPREL product database At the time
of printing its web address had notyet been published Please then fol-low the instructions on searching formodels The model identifier is madeup of the characters before the slashin the product number (E-Nr) on therating plate Alternatively you canalso find the model identifier in thefirst line of the EU energy label
1 Only applies to countries in the European Economic Area
Thank you for buying aBosch Home Appliance
Register your new device on MyBosch now and profit directly from
bull Expert tips amp tricks for your appliancebull Warranty extension optionsbull Discounts for accessories amp spare-partsbull Digital manual and all appliance data at handbull Easy access to Bosch Home Appliances Service
Free and easy registration ndash also on mobile phoneswwwbosch-homecomwelcome
Looking for help Youll find it here
Expert advice for your Bosch home appliances help with problems or a repair from Bosch experts Find out everything about the many ways Bosch can support you wwwbosch-homecomservice Contact data of all countries are listed in the attached service direct-ory
90016102699001610269emsp(010219)en
Robert Bosch Hausgeraumlte GmbHCarl-Wery-Straszlige 3481739 MuumlnchenGERMANYwwwbosch-homecom
Valid within Great BritainImported to Great Britain byBSH Home Appliances LtdGrand Union HouseOld Wolverton RoadWolverton Milton KeynesMK12 5PTUnited Kingdom
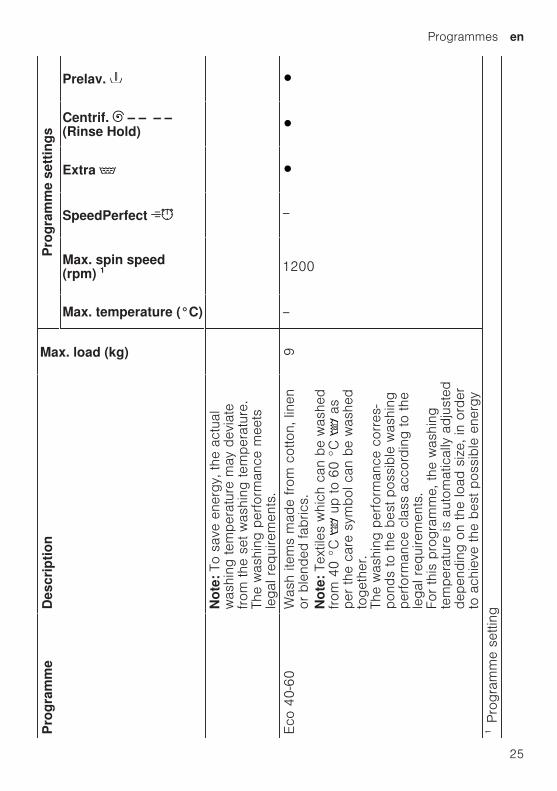
Programmesemspen
25
Pro
gram
me
Des
crip
tion
Max load (kg)
Pro
gram
me
sett
ings
Max temperature (degC)
Max spin speed(rpm) 1
SpeedPerfect
Extra
Centrif ndash ndash ndash ndash(Rinse Hold)
Prelav
Not
e T
o sa
ve e
nerg
y the
act
ual
was
hing
tem
pera
ture
may
dev
iate
from
the
set
was
hing
tem
pera
ture
Th
e w
ashi
ng p
erfo
rman
ce m
eets
lega
l req
uire
men
ts
Eco
40-6
0W
ash
item
s m
ade
from
cot
ton
line
nor
ble
nded
fabr
ics
Not
e T
extil
es w
hich
can
be
was
hed
from
40 deg
C
up
to 6
0 deg
C
as
per
the
care
sym
bol c
an b
e w
ashe
dto
geth
er
The
was
hing
per
form
ance
cor
res-
pond
s to
the
bes
t po
ssib
le w
ashi
ngpe
rfor
man
ce c
lass
acc
ordi
ng to
the
lega
l req
uire
men
ts
For
this
pro
gram
me
the
was
hing
tem
pera
ture
is a
utom
atic
ally
adj
uste
dde
pend
ing
on the
load
siz
e in
ord
erto
ach
ieve
the
bes
t po
ssib
le e
nerg
y
9
ndash
1200
ndash
1Pro
gram
me
setti
ng
enemspProgrammes
26
Pro
gram
me
Des
crip
tion
Max load (kg)
Pro
gram
me
sett
ings
Max temperature (degC)
Max spin speed(rpm) 1
SpeedPerfect
Extra
Centrif ndash ndash ndash ndash(Rinse Hold)
Prelav
effic
ienc
y w
ith the
bes
t po
ssib
lew
ashi
ng r
esul
t You
can
not ch
ange
the
was
hing
tem
pera
ture
Sin
teacutetic
os
(Eas
yC
are)
Was
h ite
ms
mad
e from
syn
thet
ic o
rbl
ende
d fa
bric
s4
60
1200
Mix
(
Mix
edFa
bric
s)W
ash
item
s m
ade
from
cot
ton
line
nor
syn
thet
ic o
r bl
ende
d fa
bric
sSui
tabl
e fo
r lig
htly
soi
led
laun
dry
460
1200
Del
icad
oSed
a (D
elic
ate
Silk
)W
ash
delic
ate
was
habl
e ite
ms
mad
efrom
silk
vis
cose
and
syn
thet
ics
Use
a d
eter
gent
tha
t is
sui
tabl
e fo
rde
licat
es o
r si
lk
Not
e W
ash
espe
cial
ly d
elic
ate
item
sor
item
s w
ith h
ooks
eye
lets
or
clip
sin
a m
esh
laun
dry
bag
2
40
800
ndash
1Pro
gram
me
setti
ng
Programmesemspen
27
Pro
gram
me
Des
crip
tion
Max load (kg)
Pro
gram
me
sett
ings
Max temperature (degC)
Max spin speed(rpm) 1
SpeedPerfect
Extra
Centrif ndash ndash ndash ndash(Rinse Hold)
Prelav
Lan
aLatilde
s (W
ool)
Han
d- o
r m
achi
ne-w
asha
ble
item
sth
at a
re m
ade
from
woo
l or
cont
ain
woo
lTo
pre
vent
the
laun
dry
from
shr
ink-
ing
the
dru
m m
oves
the
item
s ve
ryge
ntly
with
long
pau
ses
Use
a d
eter
gent
tha
t is
sui
tabl
e fo
rw
ool
2
40
800
ndash
ndash
ndash
(R
inse
)R
inse
s an
d th
en s
pins
the
laun
dry
and
then
dra
ins
the
wat
er
ndashndash
1200
ndash
ndash
(
Spi
nD
rain
)Spi
ns a
nd d
rain
s th
e w
ater
If
you
only
wan
t to
dra
in the
wat
er
activ
ate
0 T
he la
undr
y is
not
spu
n
ndash
ndash
1200
ndash
ndash
ndash
ndash
Rop
a os
cura
R
oupa
esc
ura
(Dar
k W
ash)
Was
h da
rk-c
olou
red
and
colo
ur-in
-te
nse
item
s m
ade
from
cot
ton
orea
sy-c
are
fabr
ic e
g j
eans
Tu
rn la
undr
y in
side
-out
bef
ore
was
h-in
gU
se li
quid
det
erge
nt
4
40
1200
1Pro
gram
me
setti
ng
enemspProgrammes
28
Pro
gram
me
Des
crip
tion
Max load (kg)
Pro
gram
me
sett
ings
Max temperature (degC)
Max spin speed(rpm) 1
SpeedPerfect
Extra
Centrif ndash ndash ndash ndash(Rinse Hold)
Prelav
Plu
mas
Pen
as
(Dow
n)W
ash
pillo
ws
duv
ets
or c
loth
ing
stuf
fed
with
dow
n an
d fil
lings
with
synt
hetic
fibr
es
Was
h la
rge
item
s se
para
tely
U
se a
det
erge
nt tha
t is
sui
tabl
e fo
rdo
wn
or d
elic
ates
U
se s
parin
gly
Do
not us
e fa
bric
sof
tene
rN
ote
To
prev
ent ex
cess
ive
foam
ing
rem
ove
air
from
laun
dry
item
s by
rolli
ng the
m u
p be
fore
you
was
hth
em
2
60
1200
ndash
ndash
Lim
p tam
bor
(Dru
m C
lean
)C
lean
ing
and
carin
g fo
r th
e dr
um
Use
thi
s pr
ogra
mm
e in
the
follo
win
gca
ses
iexclB
efor
e us
ing
the
appl
ianc
e fo
r th
efir
st tim
eiexcl
If yo
u re
gula
rly w
ash
at tem
pera
t-ur
es o
f 40 deg
C o
r lo
wer
ndash
ndash
1200
ndash
ndash
ndash
ndash
1Pro
gram
me
setti
ng
Programmesemspen
29
Pro
gram
me
Des
crip
tion
Max load (kg)
Pro
gram
me
sett
ings
Max temperature (degC)
Max spin speed(rpm) 1
SpeedPerfect
Extra
Centrif ndash ndash ndash ndash(Rinse Hold)
Prelav
iexclA
fter
a pr
olon
ged
perio
d of
non
-us
eU
se w
ashi
ng p
owde
r or
a d
eter
gent
cont
aini
ng b
leac
hH
alve
the
am
ount
of d
eter
gent
to
avoi
d fo
amin
gD
o no
t us
e fa
bric
sof
tene
rD
o no
t us
e liq
uid
dete
rgen
t or
det
er-
gent
tha
t is
inte
nded
for
woo
llens
or
delic
ates
N
ote
The
dru
m c
lean
ing
indi
cato
rw
ill fl
ash
to r
emin
d yo
u if
you
have
not us
ed a
pro
gram
me
at 6
0 deg
C o
rhi
gher
for
a lo
ng tim
eC
amis
asB
lusa
s (S
hirts
Blo
uses
)W
ash
non-
iron
shirt
s an
d bl
ouse
sm
ade
from
cot
ton
line
n s
ynth
etic
or
blen
ded
fabr
ics
Not
e U
se the
Del
icad
oSed
a pr
o-gr
amm
e to
was
h sh
irts
and
blou
ses
mad
e from
silk
or
delic
ate
fabr
ics
2
60
800
ndash
1Pro
gram
me
setti
ng
enemspProgrammes
30
Pro
gram
me
Des
crip
tion
Max load (kg)
Pro
gram
me
sett
ings
Max temperature (degC)
Max spin speed(rpm) 1
SpeedPerfect
Extra
Centrif ndash ndash ndash ndash(Rinse Hold)
Prelav
Spo
rt
Was
h sp
orts
and
leis
ure
item
s m
ade
from
syn
thet
ic fi
bres
mic
rofib
re o
rfle
ece
Use
a d
eter
gent
tha
t is
sui
tabl
e fo
rsp
orts
item
sD
o no
t us
e fa
bric
sof
tene
rTi
p U
se the
Sin
teacutetic
os
prog
ram
me
to w
ash
heav
ily s
oile
d la
undr
y
2
40
800
ndash
Raacutep
ido
153
0m
in
(Sup
erQ
uick
153
0 m
in)
Was
h ite
ms
mad
e from
cot
ton
syn
-th
etic
or
blen
ded
fabr
ics
Sho
rt p
rogr
amm
e fo
r sm
all i
tem
s of
light
ly s
oile
d la
undr
yTh
e pr
ogra
mm
e du
ratio
n is
app
rox
30 m
inut
es
If yo
u w
ish
to r
educ
e th
e pr
ogra
mm
edu
ratio
n to
15 m
inut
es a
ctiv
ate
Spe
edPer
fect
T
he m
axim
umlo
ad is
red
uced
to
2 k
g
4
40
1200
ndash
1Pro
gram
me
setti
ng
Accessoriesemspen
31
Accessories
9 AccessoriesAccessories
Use original accessories These have been made especially for your appliance
Use Order numberWater inlet hose exten-sion
Extend the water inlethose for cold water orAquaStop (approx 250m)
WMZ2381
Fixing brackets Improves the stability ofthe appliance
WMZ2200
Longer water inlet hose Replace the standardwater inlet hose with alonger hose (220 m)
00353925
Elbow Secure the water outlethose in place
00655300
Liquid detergent insert Measure liquid deter-gent
00605740
Metal covering plate Metal covering plate forinstalling the applianceunder a high worktop
WMZ20430
Before using for the first time
10 Before using for thefirst time
Before using for the first time
Prepare the appliance for use
101 Starting an empty wash-ing cycle
Your appliance was inspected thor-oughly before leaving the factory Toremove any residual water run thefirst wash cycle without any laundryNote Please read the information inthe Safety rarr Page 4 and Preventingmaterial damage rarr Page 10 sectionsto ensure that you use the appliancesafely
1 Turn the programme selector toLimp tambor
2 Close the door
enemspLaundry
32
3 Pull out the detergent drawer
4 Pour approx 1 litre of tap waterinto compartment II
5 Pour washing powder into com-partment II
To prevent foaming use only halfof the amount of detergent recom-mended by the detergent manufac-turer for light soiling Do not usedetergent suitable for woollens ordelicates
6 Push in the detergent drawer
7 Press InicioPausa + Carga (StartPause + Reload) to start theprogramme
a The display shows the remainingprogramme duration
a After the programme has endedthe display shows End
8 Start the first wash cycle or set theprogramme selector to to switchoff the appliance rarr Basic operation Page 36
Laundry
11 LaundryLaundry
111 Preparing the laundryNote Please read the information inthe Safety rarr Page 4 and Preventingmaterial damage rarr Page 10 sectionsto ensure that you use the appliancesafely
ATTENTIONObjects remaining in the laundry maydamage the laundry and the drum Remove all items from any pock-
ets in your laundry before usingthe appliance
To protect your appliance and thelaundry prepare the laundry be-forehandndash Empty any pockets
Laundryemspen
33
ndash Brush sand out of all collars andpockets
ndash Close bed covers and cushioncovers
ndash Close all zips Velcro fastenershooks and eyes
ndash Tie cloth belts apron stringsetc together or use a laundrybag
ndash Remove curtain hooks and leadstrips or use a mesh laundrybag
ndash Use a mesh laundry bag forsmall items of laundry such aschildrens socks
ndash Some stubborn or dried-in stainscan be removed by washingseveral times
ndash Wash large and small items oflaundry together
ndash Do not rub fresh stains but dabthem with soapy water
ndash Separate items of laundry andshake them out
112 Sorting laundryNote Please read the information inthe Safety rarr Page 4 and Preventingmaterial damage rarr Page 10 sectionsto ensure that you use the appliancesafely To improve washing results and
prevent discolouration sort thelaundry according to the followingcriteria before washingndash Type of fabric and fibre
Wash laundry of the sametype of fabric and fibre to-gether
ndash Care symbols on the care labelsrarr Page 34
ndash Description of the programmesrarr Page 24
ndash Whitesndash Colours
Wash new coloured itemsseparately the first time youwash them
113 Degrees of soiling
Degree of soiling Soiling ExamplesLight iexcl No dirt or stains are vis-
ibleiexcl Laundry has absorbed
odours
Light summer clothing orsports clothing that hasbeen worn for a just a fewhours
Normal Dirt or light stains are vis-ible
iexcl T-shirts shirts or blousesare sweat-soaked orhave been worn a fewtimes
iexcl Towels or bedding thathas been used for up toone week
Heavy Dirt or stains are clearlyvisible
Tea towels baby items orwork clothing
enemspDetergents and care products
34
114 Care symbols on the care labels
Washing care symbols
Symbol Washing process Recommended pro-gramme
Normal Cotton Gentle Easy-Care Particularly gentle DelicatesSilk for
washing by handHand wash WoolNot suitable for machine-washing ndash
Detergents and care products
12 Detergents and careproducts
Detergents and care products
Note Please read the information inthe Safety rarr Page 4 and Preventingmaterial damage rarr Page 10 sectionsto ensure that you use the appliancesafelyThe manufacturers instructions foruse and dosage can be found on thepackaging
Notesiexcl Only use liquid detergents that are
self-flowingiexcl Do not mix different liquid deter-
gentsiexcl Do not mix detergent and fabric
softeneriexcl Do not use products that have ex-
pired or are highly congealediexcl Do not use products containing
solvents caustic agents or volatilesubstances (eg bleach)
iexcl Use dyes sparingly as salt maydamage stainless steel
iexcl Do not use bleaching agents in theappliance
121 Detergent recommendation
Detergent Fabrics Pro-gramme
Temperature
Standard detergentwith optical brighten-ers
Heat-resistant whitefabrics made fromcotton or linen
Cotton From cold up to90 degC
Detergent for colourswithout bleach or op-tical brighteners
Coloured fabricsmade from linen orcotton
Cotton From cold up to60 degC
Detergent for col-oursdelicates withoutoptical brighteners
Coloured fabricsmade from easy-carefabrics or syntheticmaterials
Easy-Care From cold up to60 degC
Detergents and care productsemspen
35
Detergent Fabrics Pro-gramme
Temperature
Detergent for delic-ates
Delicate fine textilessilk or viscose
DelicatesSilk
From cold up to40 degC
Detergent for wool-lens
Wool Wool From cold up to40 degC
Tip Visit wwwcleanrighteu to findfurther information on detergentscare products and cleaning agentsfor domestic use
122 Detergent dosageThe detergent dosage depends oniexcl The amount of laundryiexcl Degree of soilingiexcl Water hardness
You can find out how hard yourwater is from your local water com-pany or measure it yourself usinga water hardness tester
Water hardness
Hardness range Total hardness in mmoll
German degrees in degdH
soft (I) 0ndash15 0ndash84medium (II) 15ndash 25 84ndash14hard (III) over 25 over 14
Example of a manufacturersinstructions for detergentThese example values refer to astandard load of 4ndash5 kg
Soiling Light Normal HeavyWater hardness Softmedium 40 ml 55 ml 80 mlWater hardness Hardveryhard
55 ml 80 ml 105 ml
The dosages can be found on themanufacturers packagingiexcl Adjust the dosage to the actual
load
enemspBasic operation
36
Basic operation
13 Basic operationBasic operation
131 Switching on the appli-ance
Turn the programme selector to aprogramme
132 Setting a programme1 Set the programme selector to the
required programme rarr Programmes Page 24
2 If necessary adjust the pro-gramme settings rarr Page 36
133 Adjusting the pro-gramme settings
Requirement A programme hasbeen set rarr Setting a programme Page 36
Adjust the programme settings rarr Programmes Page 24
Note The programme settings arenot saved permanently for the pro-gramme
134 Loading laundryNotesiexcl Please read the information in the
Safety rarr Page 4 and Preventingmaterial damage rarr Page 10 sec-tions to ensure that you use theappliance safely
iexcl To prevent creasing take note ofthe maximum load for the rarr Programmes Page 24
Requirement The laundry is pre-pared and sortedrarr Laundry Page 321 Open the door
Make sure that the drum is empty2 Load the laundry unfolded into the
drum3 Close the door
Ensure that there is no laundrytrapped in the door
Basic operationemspen
37
135 Using a measuring aidfor liquid detergent
If you order the measuring aid as anaccessory you must use the measur-ing aid1 Pull out the detergent drawer
2 Press down on the insert and re-move the detergent drawer
1
2
3 Insert the measuring aid
4 Insert the detergent drawer
136 Use the measuring aidfor liquid detergent
To add liquid detergent you can usea measuring aid in the detergentdrawer1 Pull out the detergent drawer2 Slide the measuring aid forwards
3 Fold the measuring aid down andclick it into place
enemspBasic operation
38
4 Push in the detergent drawer
137 Adding detergent andcare product
Notesiexcl Please read the information in the
Safety rarr Page 4 and Preventingmaterial damage rarr Page 10 sec-tions to ensure that you use theappliance safely
iexcl Do not use the measuring aid forliquid detergent for gel detergentswashing powder or if Prewash orReady in time are activated
Requirement Find out the optimumdosage for detergent and careproduct rarr Page 341 Pull out the detergent drawer2 Pour in detergent
rarr Detergent drawer Page 193 If required add the care product4 Push in the detergent drawer
138 Starting the programmeNote If you want to change the timeuntil the programme ends set theReady in time first Press InicioPausa + Carga a The drum rotates and load detec-
tion takes place This can take upto 2 minutes after which waterenters the drum
a The display shows either the pro-gramme duration or the Ready intime
a After the programme has endedthe display shows End
139 Adjusting the Ready intime before the pro-gramme starts
You can readjust the selected Readyin time before the programme starts1 Press InicioPausa + Carga 2 Press Termin repeatedly until
the display indicates the desiredReady in time
3 Press InicioPausa + Carga
1310 Soaking laundryNote No additional detergent is re-quired The washing solution is thenused for washing1 Start the programme2 To pause the programme after ap-
prox 10 minutes press InicioPausa + Carga
3 To resume the programme afterthe desired soaking time pressInicioPausa + Carga
1311 Adding laundryNote Please read the information inthe Safety rarr Page 4 and Preventingmaterial damage rarr Page 10 sectionsto ensure that you use the appliancesafely1 Press InicioPausa + Carga
The appliance is paused andchecks whether it is possible toadd or remove laundry Take noteof the programme status
2 Add or remove laundry3 Close the door4 Press InicioPausa + Carga
Basic operationemspen
39
1312 Cancelling the pro-gramme
Once the programme has startedyou can cancel it at any timeNote Please read the information inthe Safety rarr Page 4 and Preventingmaterial damage rarr Page 10 sectionsto ensure that you use the appliancesafely1 Press InicioPausa + Carga 2 Open the door
The appliance door remainslocked for safety reasons if thetemperature and water levels arehighndash If the temperature is high start
the programmendash If the water level is high Start
the or programme3 Remove the laundry
1313 Resuming the pro-gramme when the pro-gramme status is RinseHold
1 Set the or programme2 Press InicioPausa + Carga
1314 Unloading the laundryNote Please read the information inthe Safety rarr Page 4 and Preventingmaterial damage rarr Page 10 sectionsto ensure that you use the appliancesafely1 Open the door
2 Remove the laundry
1315 Switching off the appli-ance
1 Turn the programme selector to
2 Turn off the tap3 Wipe the rubber gasket dry and re-
move any foreign objects
4 Leave the door and detergentdrawer open so that residual watercan evaporate
enemspChildproof lock
40
Childproof lock
14 Childproof lockChildproof lock
Secure your appliance against beingoperated unintentionally using thecontrols
141 Activating the childprooflock
Press and hold the two 3 segbuttons for approx 3 seconds
a The display shows a The controls are lockeda The childproof lock remains active
even after the appliance has beenswitched off
142 Deactivating the child-proof lock
Requirement To deactivate thechildproof lock the appliance mustbe switched on Press and hold the two 3 seg
buttons for approx 3 secondsa goes out in the display
Basic settingsemspen
41
Basic settings
15 Basic settingsBasic settings
You can configure the appliance to meet your needs
151 Overview of the basic settingsBelow is an overview of the basic settings on your appliance
Basic setting Programmeposition
Value Description
End signal 2 0 (off)1 (quiet)2 (me-dium)3 (loud)4 (veryloud)
Set the volume of the signal at theend of the programme
Button signal 3 0 (off)1 (quiet)2 (me-dium)3 (loud)4 (veryloud)
The volume of the audible signalemitted when the buttons arepressed
Drum cleaningreminder
4 ONOFF
Activate or deactivate the re-minder to clean the drum
enemspCleaning and servicing
42
152 Changing the basic set-tings
1 Set the programme selector to po-sition 1
2 Press InicioPausa + Carga and at the same time turn theprogramme selector to position 2
a The display shows the currentvalue
3 Set the programme selector to therequired position
4 To change the value press Ter-min
5 To save the changes switch offthe appliance
Cleaning and servicing
16 Cleaning and servi-cing
Cleaning and servicing
To keep your appliance working effi-ciently for a long time it is importantto clean and maintain it carefully
161 Tips on appliance careWipe down thehousing and thecontrol panelwith nothing butwater and adamp cloth
This ensures theparts of the appli-ance will remainclean and hy-gienic
Remove all de-tergent residuespray residue orother residuesimmediately
Fresh depositsare easier to re-move withoutleaving anyresidue
Keep the appli-ance door anddetergent draweropen after use
This allows theresidual water todry reducingodours in the ap-pliance
162 Cleaning the drum
CAUTIONRisk of injuryPermanently washing at low temper-atures and a lack of ventilation forthe appliance may damage the drumand cause injury Regularly run a programme for
cleaning the drum or wash at tem-peratures of at least 60 degC
Leave the appliance to dry afterevery operation with the dooropen and leave the detergentdrawer to dry
Run the Limp tambor pro-gramme without laundryAdd washing powder
163 Cleaning the detergentdrawer
Note Please read the information inthe Safety rarr Page 4 and Preventingmaterial damage rarr Page 10 sectionsto ensure that you use the appliancesafely1 Pull out the detergent drawer
Cleaning and servicingemspen
43
2 Press down on the insert and re-move the detergent drawer
1
2
3 Press out the insert upwards frombelow
4 Clean the detergent drawer and in-sert with water and a brush andthen dry them
5 Fit the insert and lock it into place
6 Cleaning the opening for the deter-gent drawer
7 Push in the detergent drawer
164 Descaling
ATTENTIONThe use of unsuitable descalingagents eg for coffee machines maydamage the appliance For this appliance only use de-
scaling agents that are availablefrom the manufacturers website orour after-sales service
enemspCleaning and servicing
44
165 Cleaning the drain pumpClean the drain pump in the event offaults eg blockages or rattlingnoises
Emptying the drain pumpNote Please read the information inthe Safety rarr Page 4 and Preventingmaterial damage rarr Page 10 sectionsto ensure that you use the appliancesafely1 Turn off the water tap2 Switch off the appliance3 Disconnect the appliances mains
plug from the power supply4 Open the maintenance flap
5 Remove the maintenance flap
6 Slide a sufficiently large receptacleunder the opening
7 Take the drain hose out of theholder
Cleaning and servicingemspen
45
8 CAUTION - Risk of scaldingWhen you wash at high temperat-ures the detergent solution getshot
Do not touch the hot detergentsolutionTo allow the detergent solution toflow out into the container removethe sealing cap
9 Firmly press on the sealing cap
10 Insert the drain hose into theholder
Cleaning the drain pumpNote Please read the information inthe Safety rarr Page 4 and Preventingmaterial damage rarr Page 10 sectionsto ensure that you use the appliancesafelyRequirement The drain pump isempty rarr Page 441 Since water may remain in the
drain pump remove the pump capcarefully
2 Clean the interior the thread onthe pump cap and the pump hous-ing
3 Make sure that the impeller in thedrain pump can be rotated
enemspCleaning and servicing
46
4 Insert the pump cap and screw iton as far as it will go
90deg
The handle on the pump cap mustbe in a vertical position
5 Close the maintenance flap
Before the next washTo prevent unused detergent fromflowing straight into the outlet in thenext wash run the programmeafter you have emptied the drainpump1 Turn on the tap2 Insert the mains plug3 Switch on the appliance4 Pour 1 litre of water into compart-
ment II5 Start the programme
166 Cleaning the water outlethose at the siphon
1 Switch off the appliance2 Disconnect the appliances mains
plug from the power supply
3 Loosen the hose clamp and care-fully remove the water outlet hose
Residual water may leak out4 Clean the water outlet hose and si-
phon connecting piece
5 Reattach the water outlet hose andsecure the connection point usingthe hose clamp
Cleaning and servicingemspen
47
167 Clean the water inlet fil-ters
Emptying the water inlet hose1 Turn off the tap2 Set a programme except for
or 3 Start the programme and leave it
to run for approx 40 seconds4 Switch off the appliance5 Disconnect the appliances mains
plug from the power supply
Cleaning the filter on the tapNote Please read the information inthe Safety rarr Page 4 and Preventingmaterial damage rarr Page 10 sectionsto ensure that you use the appliancesafelyRequirement The water inlet hose isempty1 Remove the water inlet hose from
the tap
2 Clean the filter with a small brush
3 Connect the water inlet hose andcheck for leaks
Cleaning the filter on theapplianceNote Please read the information inthe Safety rarr Page 4 and Preventingmaterial damage rarr Page 10 sectionsto ensure that you use the appliancesafelyRequirement The water inlet hose isempty rarr Emptying the water inlet hosePage 47
enemspCleaning and servicing
48
1 Disconnect the hose from the rearof the appliance
1
2
2 Use pliers to remove the filter
3 Clean the filter with a small brush
4 Reinsert the filter
5 Connect the hose and check forleaks
2
1
Troubleshootingemspen
49
Troubleshooting
17 TroubleshootingTroubleshooting
You can rectify minor faults on your appliance yourself Read the troubleshoot-ing information before contacting after-sales service This will avoid unneces-sary costs
WARNINGRisk of electric shockIncorrect repairs are dangerous Repairs to the appliance should only be carried out by trained specialist
staff Only use genuine spare parts when repairing the appliance If the power cord of this appliance is damaged it must be replaced by the
manufacturer the manufacturers Customer Service or a similarly qualifiedperson in order to prevent any risk
Fault Cause and troubleshootingThe display goes outand InicioPausa +Carga flashes
Energy-saving mode is active Press any buttona The symbol lights up again
E36 -10 Drain pipe or water outlet hose is blocked Clean the drain pipe and the water outlet hose
Drain pipe or water drain hose is caught or jammed Ensure that the drain pipe and water drain hose are
not kinked or trapped
Drain pump is blocked rarr Cleaning the drain pump Page 44
The water outlet hose is connected too high Install the water outlet hose at a maximum height of
1 metre
Detergent dosage is too high Immediate measure Mix one tablespoon of fabric
softener with 05 litres of water and pour the mix-ture into the left-hand compartment (not for outdoorclothing sportswear or items stuffed with down)
Reduce the amount of detergent for the next wash-ing cycle with the same load
Unapproved extension installed on the water drainhose Remove any unapproved extensions from the water
hose Connecting the appliance
E36 -25 -26 Drain pump is blocked rarr Cleaning the drain pump Page 44
enemspTroubleshooting
50
Fault Cause and troubleshootingThe water pressure is lowNo remedial action possibleThe filters in the water inflow are blocked Clean the filters in the water inflow rarr Page 47
The tap is turned off Turn on the tap
The water inlet hose is kinked or jammed Ensure that the water inlet hose is not kinked or
jammed
flashes The automatic voltage control system detects an un-authorised voltage under-usage No remedial action possible
Note If the power supply is stable the programmecontinues to run as normalVoltage under-usage may cause extension of a pro-grammeNo remedial action possible
flashes Voltage under-usage may cause extension of a pro-grammeNo remedial action possible
lights up The temperature is too high Wait until the temperature has dropped rarr Cancelling the programme Page 39
Water level is too high Start the programme
Laundry is caught in the door1 Open the door again2 Remove any trapped laundry3 Close the door4 Press InicioPausa + Carga to start the pro-
gramme
flashes Door is not closed1 Close the door2 Press InicioPausa + Carga to start the pro-
gramme
All other error codes Malfunction Call the after-sales service
rarr Customer Service Page 59
Troubleshootingemspen
51
Fault Cause and troubleshootingThe appliance is notworking
The mains plug of the power cord is not plugged in Connect the appliance to the power supply
The circuit breaker is faulty Check the circuit breaker in the fuse box
There has been a power cut Check whether the lighting in your kitchen or other
appliances are working
The programme doesnot start
You have not pressed InicioPausa + Carga Press InicioPausa + Carga
Door is not closed1 Close the door2 Press InicioPausa + Carga to start the pro-
gramme
Childproof lock is activated rarr Deactivating the childproof lock Page 40
Termin is activated Check whether Termin is activated
rarr Buttons Page 23
Laundry is caught in the door1 Open the door again2 Remove any trapped laundry3 Close the door4 Press InicioPausa + Carga to start the pro-
gramme
The door cannotbe opened
ndash ndash ndash ndash is activated Continue the programme by selecting or and
pressing InicioPausa + Carga rarr Resuming the programme when the programmestatus is Rinse Hold Page 39
The temperature is too high Wait until the temperature has dropped rarr Cancelling the programme Page 39
Water level is too high Start the programme
Power failure Open the door using the emergency release
rarr Emergency release Page 57
The water is not drain-ing
Drain pipe or water outlet hose is blocked Clean the drain pipe and the water outlet hose
enemspTroubleshooting
52
Fault Cause and troubleshootingThe water is not drain-ing
Drain pipe or water drain hose is caught or jammed Ensure that the drain pipe and water drain hose are
not kinked or trapped
Drain pump is blocked rarr Cleaning the drain pump Page 44
ndash ndash ndash ndash is activated Continue the programme by selecting or and
pressing InicioPausa + Carga rarr Resuming the programme when the programmestatus is Rinse Hold Page 39
The water outlet hose is connected too high Install the water outlet hose at a maximum height of
1 metre
Detergent dosage is too high Immediate measure Mix one tablespoon of fabric
softener with 05 litres of water and pour the mix-ture into the left-hand compartment (not for outdoorclothing sportswear or items stuffed with down)
Reduce the amount of detergent for the next wash-ing cycle with the same load
Unapproved extension installed on the water drainhose Remove any unapproved extensions from the water
hose Connecting the appliance
Water is not flowingin Detergent is notbeing dispensed
You have not pressed InicioPausa + Carga Press InicioPausa + Carga
The filters in the water inflow are blocked Clean the filters in the water inflow rarr Page 47
The tap is turned off Turn on the tap
The water inlet hose is kinked or jammed Ensure that the water inlet hose is not kinked or
jammed
The spin cycle runsseveral times
The unbalanced load detection system eliminates animbalance by repeatedly redistributing the laundry Not a fault ndash no action required
Note When loading where possible place large andsmall items of laundry together in the drum Differentsized items of laundry distribute themselves betterduring the spin cycle
Troubleshootingemspen
53
Fault Cause and troubleshootingThe programme dura-tion changes duringthe wash cycle
The programme operation is optimised electronicallyThis may change the programme duration Not a fault ndash no action required
The unbalanced load detection system eliminates animbalance by repeatedly redistributing the laundry Not a fault ndash no action required
Note When loading where possible place large andsmall items of laundry together in the drum Differentsized items of laundry distribute themselves betterduring the spin cycleFoam detection system switches on a rinse cycle iffoam build-up is too high Not a fault ndash no action required
No water is visible inthe drum
Water is below the visible area Not a fault ndash no action required Do not add any extra water to the appliance while it
is operating
Drum jerks after theprogramme starts
This is caused by an internal motor test Not a fault ndash no action required
Residual water ispresent in the com-partment
Insert in compartment is blocked rarr Cleaning the detergent drawer Page 42
Vibrations and move-ment of the appliancewhilst spinning
Appliance is not correctly aligned Aligning the appliance
The appliance feet are not fixed Secure the appliance feet Aligning the appliance
Transit bolts have not been removed Removing the transit bolts
Drum does not turnwater does not flow in
Load detection is active Not a fault ndash no action required
Note The load detection can take up to two minutesHeavy foam build-up Detergent dosage is too high
Immediate measure Mix one tablespoon of fabricsoftener with 05 litres of water and pour the mix-ture into the left-hand compartment (not for outdoorclothing sportswear or items stuffed with down)
Reduce the amount of detergent for the next wash-ing cycle with the same load
enemspTroubleshooting
54
Fault Cause and troubleshootingHigh spin speed notreached
A low spin speed is selected The next time you run a wash cycle set a higher
spin speed
Unbalance load detection system is using a reducedspin speed to eliminate an unbalance Redistribute the laundry in the drum
Note Where possible mix large and small items inthe drum Different sized items of laundry distributethemselves better during the spin cycle Start the programme
The spin programmedoes not start
Drain pipe or water outlet hose is blocked Clean the drain pipe and the water outlet hose
Drain pipe or water drain hose is caught or jammed Ensure that the drain pipe and water drain hose are
not kinked or trapped
The unbalanced load detection system has interruptedthe spin cycle because the laundry is unevenly distrib-uted Redistribute the laundry in the drum
Note Where possible mix large and small items inthe drum Different sized items of laundry distributethemselves better during the spin cycle Start the programme
Rushing hissingnoise
Water is flushed under pressure into the detergentdrawer Not a fault ndash normal operating noise
Loud noises duringthe spin cycle
Appliance is not correctly aligned Aligning the appliance
The appliance feet are not fixed Secure the appliance feet Aligning the appliance
Transit bolts have not been removed Removing the transit bolts
Banging noises rat-tling in the drainpump
Foreign bodies have got into the drain pump rarr Cleaning the drain pump Page 44
Slurping rhythmicalsuction noise
The drain pump is active the detergent solution ispumped out Not a fault ndash normal operating noise
Troubleshootingemspen
55
Fault Cause and troubleshootingCreasing The spin speed is too high
The next time you run a wash cycle set a lowerspin speed
The load is too large The next time you run a wash cycle reduce the
amount of laundry being loaded
The wrong programme is selected for the type of fab-ric Select the programmes that are suitable for the
type of fabric rarr Programmes Page 24
Detergent or fabricsoftener drips off theseal and collects onthe door or in the sealfold
Too much detergentfabric softener in the detergentdrawer When dosing liquid detergent and fabric softener
observe the marking in the detergent drawer anddo not dose above this
The spin result is notsatisfactory The laun-dry is too wettoodamp
A low spin speed is selected The next time you run a wash cycle set a higher
spin speed Start the programme
Drain pipe or water outlet hose is blocked Clean the drain pipe and the water outlet hose
Drain pipe or water drain hose is caught or jammed Ensure that the drain pipe and water drain hose are
not kinked or trapped
The unbalanced load detection system has interruptedthe spin cycle because the laundry is unevenly distrib-uted Redistribute the laundry in the drum
Note Where possible mix large and small items inthe drum Different sized items of laundry distributethemselves better during the spin cycle Start the programme
Unbalance load detection system is using a reducedspin speed to eliminate an unbalance Redistribute the laundry in the drum
Note Where possible mix large and small items inthe drum Different sized items of laundry distributethemselves better during the spin cycle Start the programme
enemspTroubleshooting
56
Fault Cause and troubleshootingDetergent residue onthe damp washing
Detergents may contain water-insoluble substancesthat deposit on the laundry Start the programme
Detergent residue onthe dry laundry
Detergents may contain water-insoluble substancesthat deposit on the laundry Brush out the laundry after washing and drying
Water is leaking out atthe water inlet hose
Water inlet hose is not correctlysecurely connected1 Connect the water supply hose correctly Connect-
ing the water inlet hose2 Tighten the screw connection
Water is leaking out atthe water outlet hose
The water outlet hose is damaged Replace the damaged water outlet hose
Water outlet hose is not connected correctly Connect the water outlet hose correctly Water out-
let connection types
Odours have formedin the appliance
Humidity and detergent residue may promote theformation of bacteria rarr Cleaning the drum Page 42 If you are not using the appliance leave the door
and detergent drawer open so that residual watercan evaporate
Transportation storage and disposalemspen
57
171 Emergency releaseReleasing the doorRequirement The drain pump isempty rarr Page 441 ATTENTION Escaping water may
cause material damage Do not open the door if you can
see water through the glassPull the emergency release down-wards with a tool and release
a The door lock is released2 Insert the maintenance flap and
lock it into place3 Close the maintenance flap
Transportation storage and disposal
18 Transportation stor-age and disposal
Transportation storage and disposal
You can find out here how to prepareyour appliance for transportation andstorage You will also find out how todispose of old appliances
181 Removing the appliance1 Turn off the tap2 rarr Emptying the water inlet hose
Page 473 Switch off the appliance4 Unplug the appliances mains plug
5 Drain the remaining detergentsolution rarr Cleaning the drain pumpPage 44
6 Detach the hoses
182 Inserting the transitbolts
Secure the appliance for transporta-tion using transit bolts in order to pre-vent damage1 Remove the four cover caps
‒ If necessary use a screwdriverto remove the cover caps
Keep the cover caps2 Insert the four sleeves
enemspTransportation storage and disposal
58
3 Insert all screws into the fourtransit bolts and tighten slightly
4 Insert the power cord into theholder and tighten all fourscrews for the transit bolts with aWAF 13 wrench
5 Insert the hose into holder
183 Using the applianceagain
1 Remove the transit bolts
2 Pour approx 1 litre of water intocompartment II in the detergentdrawer
3 Start the programmea The unused detergent cannot flow
straight into the outlet during thenext wash
184 Disposing of old appli-ance
Valuable raw materials can be re-used by recycling
WARNINGRisk of harm to healthChildren can lock themselves in theappliance thereby putting their livesat risk Do not install the appliance behind
a door as this may obstruct the ap-pliance door or prevent it fromopening
With redundant appliances unplugthe power cord Then cut throughthe cord and damage the lock onthe appliance door beyond repairso that the appliance door will nolonger close
1 Unplug the appliance from themains
2 Cut through the power cord3 Dispose of the appliance in an en-
vironmentally friendly mannerInformation about current disposalmethods are available from yourspecialist dealer or local authority
This appliance is la-belled in accordancewith European Directive201219EU concerningused electrical and elec-
Customer Serviceemspen
59
tronic appliances (wasteelectrical and electronicequipment - WEEE)The guideline determ-ines the framework forthe return and recyclingof used appliances asapplicable throughoutthe EU
Customer Service
19 Customer ServiceCustomer Service
If you have any queries on use areunable to rectify faults on the appli-ance yourself or if your applianceneeds to be repaired contact Cus-tomer ServiceYou can solve many problems your-self by consulting the information ontroubleshooting in these instructionsor on our website If this is not thecase contact our after-sales serviceWith any warranty claims we willmake sure that your appliance is re-paired by trained after-sales techni-cians using genuine spare parts in-cluding after the manufacturers war-ranty has expiredFunction-relevant genuine spare partsaccording to the corresponding Eco-design Order can be obtained fromCustomer Service for a period of atleast 10 years from the date onwhich your appliance was placed onthe market within the European Eco-nomic AreaNote Under the terms of the manu-facturers warranty the use of Cus-tomer Service is free of chargeDetailed information on the warrantyperiod and terms of warranty in yourcountry is available from our after-sales service your retailer or on ourwebsite
If you contact Customer Service youwill require the product number (E-Nr) and the production number (FD)of your applianceThe contact details for Customer Ser-vice can be found in the enclosedCustomer Service directory or on ourwebsite
191 Product number (E-Nr)and production number(FD)
You can find the product number (E-Nr) and the production number (FD)on the appliances rating plateDepending on the model the ratingplate is locatediexcl On the inside of the dooriexcl On the inside of the maintenance
flapiexcl On the rear of the applianceMake a note of your appliances de-tails and the Customer Service tele-phone number to find them againquickly
enemspConsumption values
60
Consumption values
20 Consumption valuesConsumption values
The following information is provided in accordance with the EU EcodesignRegulation The values given for programs other than the Eco 40-60 are indicat-ive only and were determined in accordance with the applicable standardEN60456
Programme Load(kg)
Pro-gramme dura-tion(hrmin)1
Energycon-sump-tion(kWhcycle)1
Watercon-sump-tion (lcycle)1
Max-imumtemper-ature(degC) 5mins1
Spinspeed(rpm)1
Resid-ualmois-ture()1
Eco 40-602 90 337 1245 610 50 1166 5000Eco 40-602 45 252 0590 450 33 1200 5000Eco 40-602 25 233 0195 300 24 1200 5400AlgodoacutenAl-godatildeo 20 degC
90 328 0370 900 23 1200 5400
AlgodoacutenAl-godatildeo 40 degC
90 328 1350 900 45 1200 5400
AlgodoacutenAl-godatildeo 60 degC
90 328 1450 900 55 1200 5400
AlgodoacutenAl-godatildeo 40 degC + Pre-lav
90 358 1400 1020 45 1200 5400
Sinteacuteticos 40 degC
40 228 0780 610 44 1200 2700
Mix 40 degC 40 059 0620 440 41 1200 5600 LanaLatildes
30 degC20 040 0200 400 22 800 2500
1 Due to the influence of water pressure hardness and inlet temperature am-bient temperature type amount and soiling of laundry detergent used fluc-tuations in the power supply and the selected additional functions the actualvalues may deviate from the stated values
2 Test programme in accordance with the EU Ecodesign Directive and the EUEnergy Labelling Regulation with cold water (15 degC)
Technical specificationsemspen
61
Technical specifications
21 Technical specifica-tions
Technical specifications
Facts and figures for your appliancecan be found here
Appliance height 850 cmAppliance width 598 cmAppliance depth 590 cmWeight 80 kg1
Maximum load 9 kgMains voltage 220 - 240 V
50 Hz Minimum in-
stallation protec-tion
10 A
Rated power 2300 WPower consump-tion
iexcl Off mode010 W
iexcl Left-on mode050 W
Water pressure iexcl Minimum100 kPa(1 bar)
iexcl Maximum1000 kPa(10 bar)
Length of the wa-ter inlet hose
150 cm
Length of the wa-ter outlet hose
150 cm
Length of thepower cord
160 cm
1 Depending on the appliance spe-cifications
More information about your modelcan be found online at httpsen-ergylabelbsh-groupcom1 This webaddress is linked to the official EUEPREL product database At the time
of printing its web address had notyet been published Please then fol-low the instructions on searching formodels The model identifier is madeup of the characters before the slashin the product number (E-Nr) on therating plate Alternatively you canalso find the model identifier in thefirst line of the EU energy label
1 Only applies to countries in the European Economic Area
Thank you for buying aBosch Home Appliance
Register your new device on MyBosch now and profit directly from
bull Expert tips amp tricks for your appliancebull Warranty extension optionsbull Discounts for accessories amp spare-partsbull Digital manual and all appliance data at handbull Easy access to Bosch Home Appliances Service
Free and easy registration ndash also on mobile phoneswwwbosch-homecomwelcome
Looking for help Youll find it here
Expert advice for your Bosch home appliances help with problems or a repair from Bosch experts Find out everything about the many ways Bosch can support you wwwbosch-homecomservice Contact data of all countries are listed in the attached service direct-ory
90016102699001610269emsp(010219)en
Robert Bosch Hausgeraumlte GmbHCarl-Wery-Straszlige 3481739 MuumlnchenGERMANYwwwbosch-homecom
Valid within Great BritainImported to Great Britain byBSH Home Appliances LtdGrand Union HouseOld Wolverton RoadWolverton Milton KeynesMK12 5PTUnited Kingdom
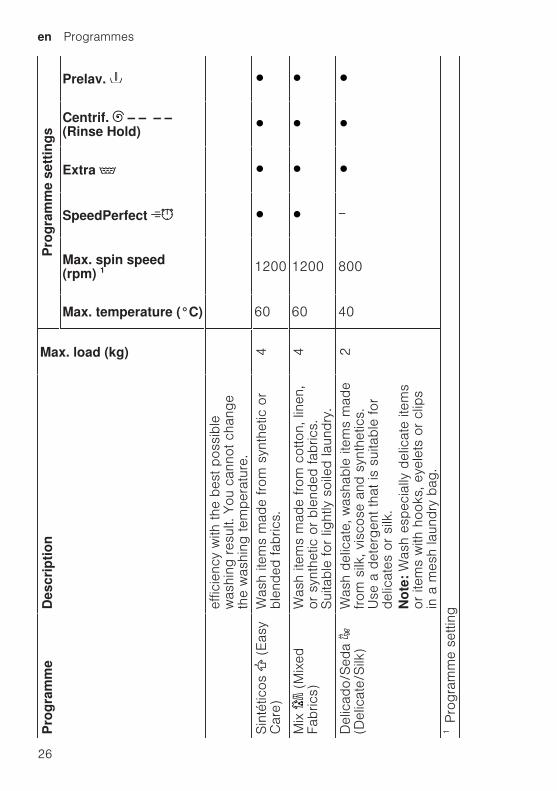
enemspProgrammes
26
Pro
gram
me
Des
crip
tion
Max load (kg)
Pro
gram
me
sett
ings
Max temperature (degC)
Max spin speed(rpm) 1
SpeedPerfect
Extra
Centrif ndash ndash ndash ndash(Rinse Hold)
Prelav
effic
ienc
y w
ith the
bes
t po
ssib
lew
ashi
ng r
esul
t You
can
not ch
ange
the
was
hing
tem
pera
ture
Sin
teacutetic
os
(Eas
yC
are)
Was
h ite
ms
mad
e from
syn
thet
ic o
rbl
ende
d fa
bric
s4
60
1200
Mix
(
Mix
edFa
bric
s)W
ash
item
s m
ade
from
cot
ton
line
nor
syn
thet
ic o
r bl
ende
d fa
bric
sSui
tabl
e fo
r lig
htly
soi
led
laun
dry
460
1200
Del
icad
oSed
a (D
elic
ate
Silk
)W
ash
delic
ate
was
habl
e ite
ms
mad
efrom
silk
vis
cose
and
syn
thet
ics
Use
a d
eter
gent
tha
t is
sui
tabl
e fo
rde
licat
es o
r si
lk
Not
e W
ash
espe
cial
ly d
elic
ate
item
sor
item
s w
ith h
ooks
eye
lets
or
clip
sin
a m
esh
laun
dry
bag
2
40
800
ndash
1Pro
gram
me
setti
ng
Programmesemspen
27
Pro
gram
me
Des
crip
tion
Max load (kg)
Pro
gram
me
sett
ings
Max temperature (degC)
Max spin speed(rpm) 1
SpeedPerfect
Extra
Centrif ndash ndash ndash ndash(Rinse Hold)
Prelav
Lan
aLatilde
s (W
ool)
Han
d- o
r m
achi
ne-w
asha
ble
item
sth
at a
re m
ade
from
woo
l or
cont
ain
woo
lTo
pre
vent
the
laun
dry
from
shr
ink-
ing
the
dru
m m
oves
the
item
s ve
ryge
ntly
with
long
pau
ses
Use
a d
eter
gent
tha
t is
sui
tabl
e fo
rw
ool
2
40
800
ndash
ndash
ndash
(R
inse
)R
inse
s an
d th
en s
pins
the
laun
dry
and
then
dra
ins
the
wat
er
ndashndash
1200
ndash
ndash
(
Spi
nD
rain
)Spi
ns a
nd d
rain
s th
e w
ater
If
you
only
wan
t to
dra
in the
wat
er
activ
ate
0 T
he la
undr
y is
not
spu
n
ndash
ndash
1200
ndash
ndash
ndash
ndash
Rop
a os
cura
R
oupa
esc
ura
(Dar
k W
ash)
Was
h da
rk-c
olou
red
and
colo
ur-in
-te
nse
item
s m
ade
from
cot
ton
orea
sy-c
are
fabr
ic e
g j
eans
Tu
rn la
undr
y in
side
-out
bef
ore
was
h-in
gU
se li
quid
det
erge
nt
4
40
1200
1Pro
gram
me
setti
ng
enemspProgrammes
28
Pro
gram
me
Des
crip
tion
Max load (kg)
Pro
gram
me
sett
ings
Max temperature (degC)
Max spin speed(rpm) 1
SpeedPerfect
Extra
Centrif ndash ndash ndash ndash(Rinse Hold)
Prelav
Plu
mas
Pen
as
(Dow
n)W
ash
pillo
ws
duv
ets
or c
loth
ing
stuf
fed
with
dow
n an
d fil
lings
with
synt
hetic
fibr
es
Was
h la
rge
item
s se
para
tely
U
se a
det
erge
nt tha
t is
sui
tabl
e fo
rdo
wn
or d
elic
ates
U
se s
parin
gly
Do
not us
e fa
bric
sof
tene
rN
ote
To
prev
ent ex
cess
ive
foam
ing
rem
ove
air
from
laun
dry
item
s by
rolli
ng the
m u
p be
fore
you
was
hth
em
2
60
1200
ndash
ndash
Lim
p tam
bor
(Dru
m C
lean
)C
lean
ing
and
carin
g fo
r th
e dr
um
Use
thi
s pr
ogra
mm
e in
the
follo
win
gca
ses
iexclB
efor
e us
ing
the
appl
ianc
e fo
r th
efir
st tim
eiexcl
If yo
u re
gula
rly w
ash
at tem
pera
t-ur
es o
f 40 deg
C o
r lo
wer
ndash
ndash
1200
ndash
ndash
ndash
ndash
1Pro
gram
me
setti
ng
Programmesemspen
29
Pro
gram
me
Des
crip
tion
Max load (kg)
Pro
gram
me
sett
ings
Max temperature (degC)
Max spin speed(rpm) 1
SpeedPerfect
Extra
Centrif ndash ndash ndash ndash(Rinse Hold)
Prelav
iexclA
fter
a pr
olon
ged
perio
d of
non
-us
eU
se w
ashi
ng p
owde
r or
a d
eter
gent
cont
aini
ng b
leac
hH
alve
the
am
ount
of d
eter
gent
to
avoi
d fo
amin
gD
o no
t us
e fa
bric
sof
tene
rD
o no
t us
e liq
uid
dete
rgen
t or
det
er-
gent
tha
t is
inte
nded
for
woo
llens
or
delic
ates
N
ote
The
dru
m c
lean
ing
indi
cato
rw
ill fl
ash
to r
emin
d yo
u if
you
have
not us
ed a
pro
gram
me
at 6
0 deg
C o
rhi
gher
for
a lo
ng tim
eC
amis
asB
lusa
s (S
hirts
Blo
uses
)W
ash
non-
iron
shirt
s an
d bl
ouse
sm
ade
from
cot
ton
line
n s
ynth
etic
or
blen
ded
fabr
ics
Not
e U
se the
Del
icad
oSed
a pr
o-gr
amm
e to
was
h sh
irts
and
blou
ses
mad
e from
silk
or
delic
ate
fabr
ics
2
60
800
ndash
1Pro
gram
me
setti
ng
enemspProgrammes
30
Pro
gram
me
Des
crip
tion
Max load (kg)
Pro
gram
me
sett
ings
Max temperature (degC)
Max spin speed(rpm) 1
SpeedPerfect
Extra
Centrif ndash ndash ndash ndash(Rinse Hold)
Prelav
Spo
rt
Was
h sp
orts
and
leis
ure
item
s m
ade
from
syn
thet
ic fi
bres
mic
rofib
re o
rfle
ece
Use
a d
eter
gent
tha
t is
sui
tabl
e fo
rsp
orts
item
sD
o no
t us
e fa
bric
sof
tene
rTi
p U
se the
Sin
teacutetic
os
prog
ram
me
to w
ash
heav
ily s
oile
d la
undr
y
2
40
800
ndash
Raacutep
ido
153
0m
in
(Sup
erQ
uick
153
0 m
in)
Was
h ite
ms
mad
e from
cot
ton
syn
-th
etic
or
blen
ded
fabr
ics
Sho
rt p
rogr
amm
e fo
r sm
all i
tem
s of
light
ly s
oile
d la
undr
yTh
e pr
ogra
mm
e du
ratio
n is
app
rox
30 m
inut
es
If yo
u w
ish
to r
educ
e th
e pr
ogra
mm
edu
ratio
n to
15 m
inut
es a
ctiv
ate
Spe
edPer
fect
T
he m
axim
umlo
ad is
red
uced
to
2 k
g
4
40
1200
ndash
1Pro
gram
me
setti
ng
Accessoriesemspen
31
Accessories
9 AccessoriesAccessories
Use original accessories These have been made especially for your appliance
Use Order numberWater inlet hose exten-sion
Extend the water inlethose for cold water orAquaStop (approx 250m)
WMZ2381
Fixing brackets Improves the stability ofthe appliance
WMZ2200
Longer water inlet hose Replace the standardwater inlet hose with alonger hose (220 m)
00353925
Elbow Secure the water outlethose in place
00655300
Liquid detergent insert Measure liquid deter-gent
00605740
Metal covering plate Metal covering plate forinstalling the applianceunder a high worktop
WMZ20430
Before using for the first time
10 Before using for thefirst time
Before using for the first time
Prepare the appliance for use
101 Starting an empty wash-ing cycle
Your appliance was inspected thor-oughly before leaving the factory Toremove any residual water run thefirst wash cycle without any laundryNote Please read the information inthe Safety rarr Page 4 and Preventingmaterial damage rarr Page 10 sectionsto ensure that you use the appliancesafely
1 Turn the programme selector toLimp tambor
2 Close the door
enemspLaundry
32
3 Pull out the detergent drawer
4 Pour approx 1 litre of tap waterinto compartment II
5 Pour washing powder into com-partment II
To prevent foaming use only halfof the amount of detergent recom-mended by the detergent manufac-turer for light soiling Do not usedetergent suitable for woollens ordelicates
6 Push in the detergent drawer
7 Press InicioPausa + Carga (StartPause + Reload) to start theprogramme
a The display shows the remainingprogramme duration
a After the programme has endedthe display shows End
8 Start the first wash cycle or set theprogramme selector to to switchoff the appliance rarr Basic operation Page 36
Laundry
11 LaundryLaundry
111 Preparing the laundryNote Please read the information inthe Safety rarr Page 4 and Preventingmaterial damage rarr Page 10 sectionsto ensure that you use the appliancesafely
ATTENTIONObjects remaining in the laundry maydamage the laundry and the drum Remove all items from any pock-
ets in your laundry before usingthe appliance
To protect your appliance and thelaundry prepare the laundry be-forehandndash Empty any pockets
Laundryemspen
33
ndash Brush sand out of all collars andpockets
ndash Close bed covers and cushioncovers
ndash Close all zips Velcro fastenershooks and eyes
ndash Tie cloth belts apron stringsetc together or use a laundrybag
ndash Remove curtain hooks and leadstrips or use a mesh laundrybag
ndash Use a mesh laundry bag forsmall items of laundry such aschildrens socks
ndash Some stubborn or dried-in stainscan be removed by washingseveral times
ndash Wash large and small items oflaundry together
ndash Do not rub fresh stains but dabthem with soapy water
ndash Separate items of laundry andshake them out
112 Sorting laundryNote Please read the information inthe Safety rarr Page 4 and Preventingmaterial damage rarr Page 10 sectionsto ensure that you use the appliancesafely To improve washing results and
prevent discolouration sort thelaundry according to the followingcriteria before washingndash Type of fabric and fibre
Wash laundry of the sametype of fabric and fibre to-gether
ndash Care symbols on the care labelsrarr Page 34
ndash Description of the programmesrarr Page 24
ndash Whitesndash Colours
Wash new coloured itemsseparately the first time youwash them
113 Degrees of soiling
Degree of soiling Soiling ExamplesLight iexcl No dirt or stains are vis-
ibleiexcl Laundry has absorbed
odours
Light summer clothing orsports clothing that hasbeen worn for a just a fewhours
Normal Dirt or light stains are vis-ible
iexcl T-shirts shirts or blousesare sweat-soaked orhave been worn a fewtimes
iexcl Towels or bedding thathas been used for up toone week
Heavy Dirt or stains are clearlyvisible
Tea towels baby items orwork clothing
enemspDetergents and care products
34
114 Care symbols on the care labels
Washing care symbols
Symbol Washing process Recommended pro-gramme
Normal Cotton Gentle Easy-Care Particularly gentle DelicatesSilk for
washing by handHand wash WoolNot suitable for machine-washing ndash
Detergents and care products
12 Detergents and careproducts
Detergents and care products
Note Please read the information inthe Safety rarr Page 4 and Preventingmaterial damage rarr Page 10 sectionsto ensure that you use the appliancesafelyThe manufacturers instructions foruse and dosage can be found on thepackaging
Notesiexcl Only use liquid detergents that are
self-flowingiexcl Do not mix different liquid deter-
gentsiexcl Do not mix detergent and fabric
softeneriexcl Do not use products that have ex-
pired or are highly congealediexcl Do not use products containing
solvents caustic agents or volatilesubstances (eg bleach)
iexcl Use dyes sparingly as salt maydamage stainless steel
iexcl Do not use bleaching agents in theappliance
121 Detergent recommendation
Detergent Fabrics Pro-gramme
Temperature
Standard detergentwith optical brighten-ers
Heat-resistant whitefabrics made fromcotton or linen
Cotton From cold up to90 degC
Detergent for colourswithout bleach or op-tical brighteners
Coloured fabricsmade from linen orcotton
Cotton From cold up to60 degC
Detergent for col-oursdelicates withoutoptical brighteners
Coloured fabricsmade from easy-carefabrics or syntheticmaterials
Easy-Care From cold up to60 degC
Detergents and care productsemspen
35
Detergent Fabrics Pro-gramme
Temperature
Detergent for delic-ates
Delicate fine textilessilk or viscose
DelicatesSilk
From cold up to40 degC
Detergent for wool-lens
Wool Wool From cold up to40 degC
Tip Visit wwwcleanrighteu to findfurther information on detergentscare products and cleaning agentsfor domestic use
122 Detergent dosageThe detergent dosage depends oniexcl The amount of laundryiexcl Degree of soilingiexcl Water hardness
You can find out how hard yourwater is from your local water com-pany or measure it yourself usinga water hardness tester
Water hardness
Hardness range Total hardness in mmoll
German degrees in degdH
soft (I) 0ndash15 0ndash84medium (II) 15ndash 25 84ndash14hard (III) over 25 over 14
Example of a manufacturersinstructions for detergentThese example values refer to astandard load of 4ndash5 kg
Soiling Light Normal HeavyWater hardness Softmedium 40 ml 55 ml 80 mlWater hardness Hardveryhard
55 ml 80 ml 105 ml
The dosages can be found on themanufacturers packagingiexcl Adjust the dosage to the actual
load
enemspBasic operation
36
Basic operation
13 Basic operationBasic operation
131 Switching on the appli-ance
Turn the programme selector to aprogramme
132 Setting a programme1 Set the programme selector to the
required programme rarr Programmes Page 24
2 If necessary adjust the pro-gramme settings rarr Page 36
133 Adjusting the pro-gramme settings
Requirement A programme hasbeen set rarr Setting a programme Page 36
Adjust the programme settings rarr Programmes Page 24
Note The programme settings arenot saved permanently for the pro-gramme
134 Loading laundryNotesiexcl Please read the information in the
Safety rarr Page 4 and Preventingmaterial damage rarr Page 10 sec-tions to ensure that you use theappliance safely
iexcl To prevent creasing take note ofthe maximum load for the rarr Programmes Page 24
Requirement The laundry is pre-pared and sortedrarr Laundry Page 321 Open the door
Make sure that the drum is empty2 Load the laundry unfolded into the
drum3 Close the door
Ensure that there is no laundrytrapped in the door
Basic operationemspen
37
135 Using a measuring aidfor liquid detergent
If you order the measuring aid as anaccessory you must use the measur-ing aid1 Pull out the detergent drawer
2 Press down on the insert and re-move the detergent drawer
1
2
3 Insert the measuring aid
4 Insert the detergent drawer
136 Use the measuring aidfor liquid detergent
To add liquid detergent you can usea measuring aid in the detergentdrawer1 Pull out the detergent drawer2 Slide the measuring aid forwards
3 Fold the measuring aid down andclick it into place
enemspBasic operation
38
4 Push in the detergent drawer
137 Adding detergent andcare product
Notesiexcl Please read the information in the
Safety rarr Page 4 and Preventingmaterial damage rarr Page 10 sec-tions to ensure that you use theappliance safely
iexcl Do not use the measuring aid forliquid detergent for gel detergentswashing powder or if Prewash orReady in time are activated
Requirement Find out the optimumdosage for detergent and careproduct rarr Page 341 Pull out the detergent drawer2 Pour in detergent
rarr Detergent drawer Page 193 If required add the care product4 Push in the detergent drawer
138 Starting the programmeNote If you want to change the timeuntil the programme ends set theReady in time first Press InicioPausa + Carga a The drum rotates and load detec-
tion takes place This can take upto 2 minutes after which waterenters the drum
a The display shows either the pro-gramme duration or the Ready intime
a After the programme has endedthe display shows End
139 Adjusting the Ready intime before the pro-gramme starts
You can readjust the selected Readyin time before the programme starts1 Press InicioPausa + Carga 2 Press Termin repeatedly until
the display indicates the desiredReady in time
3 Press InicioPausa + Carga
1310 Soaking laundryNote No additional detergent is re-quired The washing solution is thenused for washing1 Start the programme2 To pause the programme after ap-
prox 10 minutes press InicioPausa + Carga
3 To resume the programme afterthe desired soaking time pressInicioPausa + Carga
1311 Adding laundryNote Please read the information inthe Safety rarr Page 4 and Preventingmaterial damage rarr Page 10 sectionsto ensure that you use the appliancesafely1 Press InicioPausa + Carga
The appliance is paused andchecks whether it is possible toadd or remove laundry Take noteof the programme status
2 Add or remove laundry3 Close the door4 Press InicioPausa + Carga
Basic operationemspen
39
1312 Cancelling the pro-gramme
Once the programme has startedyou can cancel it at any timeNote Please read the information inthe Safety rarr Page 4 and Preventingmaterial damage rarr Page 10 sectionsto ensure that you use the appliancesafely1 Press InicioPausa + Carga 2 Open the door
The appliance door remainslocked for safety reasons if thetemperature and water levels arehighndash If the temperature is high start
the programmendash If the water level is high Start
the or programme3 Remove the laundry
1313 Resuming the pro-gramme when the pro-gramme status is RinseHold
1 Set the or programme2 Press InicioPausa + Carga
1314 Unloading the laundryNote Please read the information inthe Safety rarr Page 4 and Preventingmaterial damage rarr Page 10 sectionsto ensure that you use the appliancesafely1 Open the door
2 Remove the laundry
1315 Switching off the appli-ance
1 Turn the programme selector to
2 Turn off the tap3 Wipe the rubber gasket dry and re-
move any foreign objects
4 Leave the door and detergentdrawer open so that residual watercan evaporate
enemspChildproof lock
40
Childproof lock
14 Childproof lockChildproof lock
Secure your appliance against beingoperated unintentionally using thecontrols
141 Activating the childprooflock
Press and hold the two 3 segbuttons for approx 3 seconds
a The display shows a The controls are lockeda The childproof lock remains active
even after the appliance has beenswitched off
142 Deactivating the child-proof lock
Requirement To deactivate thechildproof lock the appliance mustbe switched on Press and hold the two 3 seg
buttons for approx 3 secondsa goes out in the display
Basic settingsemspen
41
Basic settings
15 Basic settingsBasic settings
You can configure the appliance to meet your needs
151 Overview of the basic settingsBelow is an overview of the basic settings on your appliance
Basic setting Programmeposition
Value Description
End signal 2 0 (off)1 (quiet)2 (me-dium)3 (loud)4 (veryloud)
Set the volume of the signal at theend of the programme
Button signal 3 0 (off)1 (quiet)2 (me-dium)3 (loud)4 (veryloud)
The volume of the audible signalemitted when the buttons arepressed
Drum cleaningreminder
4 ONOFF
Activate or deactivate the re-minder to clean the drum
enemspCleaning and servicing
42
152 Changing the basic set-tings
1 Set the programme selector to po-sition 1
2 Press InicioPausa + Carga and at the same time turn theprogramme selector to position 2
a The display shows the currentvalue
3 Set the programme selector to therequired position
4 To change the value press Ter-min
5 To save the changes switch offthe appliance
Cleaning and servicing
16 Cleaning and servi-cing
Cleaning and servicing
To keep your appliance working effi-ciently for a long time it is importantto clean and maintain it carefully
161 Tips on appliance careWipe down thehousing and thecontrol panelwith nothing butwater and adamp cloth
This ensures theparts of the appli-ance will remainclean and hy-gienic
Remove all de-tergent residuespray residue orother residuesimmediately
Fresh depositsare easier to re-move withoutleaving anyresidue
Keep the appli-ance door anddetergent draweropen after use
This allows theresidual water todry reducingodours in the ap-pliance
162 Cleaning the drum
CAUTIONRisk of injuryPermanently washing at low temper-atures and a lack of ventilation forthe appliance may damage the drumand cause injury Regularly run a programme for
cleaning the drum or wash at tem-peratures of at least 60 degC
Leave the appliance to dry afterevery operation with the dooropen and leave the detergentdrawer to dry
Run the Limp tambor pro-gramme without laundryAdd washing powder
163 Cleaning the detergentdrawer
Note Please read the information inthe Safety rarr Page 4 and Preventingmaterial damage rarr Page 10 sectionsto ensure that you use the appliancesafely1 Pull out the detergent drawer
Cleaning and servicingemspen
43
2 Press down on the insert and re-move the detergent drawer
1
2
3 Press out the insert upwards frombelow
4 Clean the detergent drawer and in-sert with water and a brush andthen dry them
5 Fit the insert and lock it into place
6 Cleaning the opening for the deter-gent drawer
7 Push in the detergent drawer
164 Descaling
ATTENTIONThe use of unsuitable descalingagents eg for coffee machines maydamage the appliance For this appliance only use de-
scaling agents that are availablefrom the manufacturers website orour after-sales service
enemspCleaning and servicing
44
165 Cleaning the drain pumpClean the drain pump in the event offaults eg blockages or rattlingnoises
Emptying the drain pumpNote Please read the information inthe Safety rarr Page 4 and Preventingmaterial damage rarr Page 10 sectionsto ensure that you use the appliancesafely1 Turn off the water tap2 Switch off the appliance3 Disconnect the appliances mains
plug from the power supply4 Open the maintenance flap
5 Remove the maintenance flap
6 Slide a sufficiently large receptacleunder the opening
7 Take the drain hose out of theholder
Cleaning and servicingemspen
45
8 CAUTION - Risk of scaldingWhen you wash at high temperat-ures the detergent solution getshot
Do not touch the hot detergentsolutionTo allow the detergent solution toflow out into the container removethe sealing cap
9 Firmly press on the sealing cap
10 Insert the drain hose into theholder
Cleaning the drain pumpNote Please read the information inthe Safety rarr Page 4 and Preventingmaterial damage rarr Page 10 sectionsto ensure that you use the appliancesafelyRequirement The drain pump isempty rarr Page 441 Since water may remain in the
drain pump remove the pump capcarefully
2 Clean the interior the thread onthe pump cap and the pump hous-ing
3 Make sure that the impeller in thedrain pump can be rotated
enemspCleaning and servicing
46
4 Insert the pump cap and screw iton as far as it will go
90deg
The handle on the pump cap mustbe in a vertical position
5 Close the maintenance flap
Before the next washTo prevent unused detergent fromflowing straight into the outlet in thenext wash run the programmeafter you have emptied the drainpump1 Turn on the tap2 Insert the mains plug3 Switch on the appliance4 Pour 1 litre of water into compart-
ment II5 Start the programme
166 Cleaning the water outlethose at the siphon
1 Switch off the appliance2 Disconnect the appliances mains
plug from the power supply
3 Loosen the hose clamp and care-fully remove the water outlet hose
Residual water may leak out4 Clean the water outlet hose and si-
phon connecting piece
5 Reattach the water outlet hose andsecure the connection point usingthe hose clamp
Cleaning and servicingemspen
47
167 Clean the water inlet fil-ters
Emptying the water inlet hose1 Turn off the tap2 Set a programme except for
or 3 Start the programme and leave it
to run for approx 40 seconds4 Switch off the appliance5 Disconnect the appliances mains
plug from the power supply
Cleaning the filter on the tapNote Please read the information inthe Safety rarr Page 4 and Preventingmaterial damage rarr Page 10 sectionsto ensure that you use the appliancesafelyRequirement The water inlet hose isempty1 Remove the water inlet hose from
the tap
2 Clean the filter with a small brush
3 Connect the water inlet hose andcheck for leaks
Cleaning the filter on theapplianceNote Please read the information inthe Safety rarr Page 4 and Preventingmaterial damage rarr Page 10 sectionsto ensure that you use the appliancesafelyRequirement The water inlet hose isempty rarr Emptying the water inlet hosePage 47
enemspCleaning and servicing
48
1 Disconnect the hose from the rearof the appliance
1
2
2 Use pliers to remove the filter
3 Clean the filter with a small brush
4 Reinsert the filter
5 Connect the hose and check forleaks
2
1
Troubleshootingemspen
49
Troubleshooting
17 TroubleshootingTroubleshooting
You can rectify minor faults on your appliance yourself Read the troubleshoot-ing information before contacting after-sales service This will avoid unneces-sary costs
WARNINGRisk of electric shockIncorrect repairs are dangerous Repairs to the appliance should only be carried out by trained specialist
staff Only use genuine spare parts when repairing the appliance If the power cord of this appliance is damaged it must be replaced by the
manufacturer the manufacturers Customer Service or a similarly qualifiedperson in order to prevent any risk
Fault Cause and troubleshootingThe display goes outand InicioPausa +Carga flashes
Energy-saving mode is active Press any buttona The symbol lights up again
E36 -10 Drain pipe or water outlet hose is blocked Clean the drain pipe and the water outlet hose
Drain pipe or water drain hose is caught or jammed Ensure that the drain pipe and water drain hose are
not kinked or trapped
Drain pump is blocked rarr Cleaning the drain pump Page 44
The water outlet hose is connected too high Install the water outlet hose at a maximum height of
1 metre
Detergent dosage is too high Immediate measure Mix one tablespoon of fabric
softener with 05 litres of water and pour the mix-ture into the left-hand compartment (not for outdoorclothing sportswear or items stuffed with down)
Reduce the amount of detergent for the next wash-ing cycle with the same load
Unapproved extension installed on the water drainhose Remove any unapproved extensions from the water
hose Connecting the appliance
E36 -25 -26 Drain pump is blocked rarr Cleaning the drain pump Page 44
enemspTroubleshooting
50
Fault Cause and troubleshootingThe water pressure is lowNo remedial action possibleThe filters in the water inflow are blocked Clean the filters in the water inflow rarr Page 47
The tap is turned off Turn on the tap
The water inlet hose is kinked or jammed Ensure that the water inlet hose is not kinked or
jammed
flashes The automatic voltage control system detects an un-authorised voltage under-usage No remedial action possible
Note If the power supply is stable the programmecontinues to run as normalVoltage under-usage may cause extension of a pro-grammeNo remedial action possible
flashes Voltage under-usage may cause extension of a pro-grammeNo remedial action possible
lights up The temperature is too high Wait until the temperature has dropped rarr Cancelling the programme Page 39
Water level is too high Start the programme
Laundry is caught in the door1 Open the door again2 Remove any trapped laundry3 Close the door4 Press InicioPausa + Carga to start the pro-
gramme
flashes Door is not closed1 Close the door2 Press InicioPausa + Carga to start the pro-
gramme
All other error codes Malfunction Call the after-sales service
rarr Customer Service Page 59
Troubleshootingemspen
51
Fault Cause and troubleshootingThe appliance is notworking
The mains plug of the power cord is not plugged in Connect the appliance to the power supply
The circuit breaker is faulty Check the circuit breaker in the fuse box
There has been a power cut Check whether the lighting in your kitchen or other
appliances are working
The programme doesnot start
You have not pressed InicioPausa + Carga Press InicioPausa + Carga
Door is not closed1 Close the door2 Press InicioPausa + Carga to start the pro-
gramme
Childproof lock is activated rarr Deactivating the childproof lock Page 40
Termin is activated Check whether Termin is activated
rarr Buttons Page 23
Laundry is caught in the door1 Open the door again2 Remove any trapped laundry3 Close the door4 Press InicioPausa + Carga to start the pro-
gramme
The door cannotbe opened
ndash ndash ndash ndash is activated Continue the programme by selecting or and
pressing InicioPausa + Carga rarr Resuming the programme when the programmestatus is Rinse Hold Page 39
The temperature is too high Wait until the temperature has dropped rarr Cancelling the programme Page 39
Water level is too high Start the programme
Power failure Open the door using the emergency release
rarr Emergency release Page 57
The water is not drain-ing
Drain pipe or water outlet hose is blocked Clean the drain pipe and the water outlet hose
enemspTroubleshooting
52
Fault Cause and troubleshootingThe water is not drain-ing
Drain pipe or water drain hose is caught or jammed Ensure that the drain pipe and water drain hose are
not kinked or trapped
Drain pump is blocked rarr Cleaning the drain pump Page 44
ndash ndash ndash ndash is activated Continue the programme by selecting or and
pressing InicioPausa + Carga rarr Resuming the programme when the programmestatus is Rinse Hold Page 39
The water outlet hose is connected too high Install the water outlet hose at a maximum height of
1 metre
Detergent dosage is too high Immediate measure Mix one tablespoon of fabric
softener with 05 litres of water and pour the mix-ture into the left-hand compartment (not for outdoorclothing sportswear or items stuffed with down)
Reduce the amount of detergent for the next wash-ing cycle with the same load
Unapproved extension installed on the water drainhose Remove any unapproved extensions from the water
hose Connecting the appliance
Water is not flowingin Detergent is notbeing dispensed
You have not pressed InicioPausa + Carga Press InicioPausa + Carga
The filters in the water inflow are blocked Clean the filters in the water inflow rarr Page 47
The tap is turned off Turn on the tap
The water inlet hose is kinked or jammed Ensure that the water inlet hose is not kinked or
jammed
The spin cycle runsseveral times
The unbalanced load detection system eliminates animbalance by repeatedly redistributing the laundry Not a fault ndash no action required
Note When loading where possible place large andsmall items of laundry together in the drum Differentsized items of laundry distribute themselves betterduring the spin cycle
Troubleshootingemspen
53
Fault Cause and troubleshootingThe programme dura-tion changes duringthe wash cycle
The programme operation is optimised electronicallyThis may change the programme duration Not a fault ndash no action required
The unbalanced load detection system eliminates animbalance by repeatedly redistributing the laundry Not a fault ndash no action required
Note When loading where possible place large andsmall items of laundry together in the drum Differentsized items of laundry distribute themselves betterduring the spin cycleFoam detection system switches on a rinse cycle iffoam build-up is too high Not a fault ndash no action required
No water is visible inthe drum
Water is below the visible area Not a fault ndash no action required Do not add any extra water to the appliance while it
is operating
Drum jerks after theprogramme starts
This is caused by an internal motor test Not a fault ndash no action required
Residual water ispresent in the com-partment
Insert in compartment is blocked rarr Cleaning the detergent drawer Page 42
Vibrations and move-ment of the appliancewhilst spinning
Appliance is not correctly aligned Aligning the appliance
The appliance feet are not fixed Secure the appliance feet Aligning the appliance
Transit bolts have not been removed Removing the transit bolts
Drum does not turnwater does not flow in
Load detection is active Not a fault ndash no action required
Note The load detection can take up to two minutesHeavy foam build-up Detergent dosage is too high
Immediate measure Mix one tablespoon of fabricsoftener with 05 litres of water and pour the mix-ture into the left-hand compartment (not for outdoorclothing sportswear or items stuffed with down)
Reduce the amount of detergent for the next wash-ing cycle with the same load
enemspTroubleshooting
54
Fault Cause and troubleshootingHigh spin speed notreached
A low spin speed is selected The next time you run a wash cycle set a higher
spin speed
Unbalance load detection system is using a reducedspin speed to eliminate an unbalance Redistribute the laundry in the drum
Note Where possible mix large and small items inthe drum Different sized items of laundry distributethemselves better during the spin cycle Start the programme
The spin programmedoes not start
Drain pipe or water outlet hose is blocked Clean the drain pipe and the water outlet hose
Drain pipe or water drain hose is caught or jammed Ensure that the drain pipe and water drain hose are
not kinked or trapped
The unbalanced load detection system has interruptedthe spin cycle because the laundry is unevenly distrib-uted Redistribute the laundry in the drum
Note Where possible mix large and small items inthe drum Different sized items of laundry distributethemselves better during the spin cycle Start the programme
Rushing hissingnoise
Water is flushed under pressure into the detergentdrawer Not a fault ndash normal operating noise
Loud noises duringthe spin cycle
Appliance is not correctly aligned Aligning the appliance
The appliance feet are not fixed Secure the appliance feet Aligning the appliance
Transit bolts have not been removed Removing the transit bolts
Banging noises rat-tling in the drainpump
Foreign bodies have got into the drain pump rarr Cleaning the drain pump Page 44
Slurping rhythmicalsuction noise
The drain pump is active the detergent solution ispumped out Not a fault ndash normal operating noise
Troubleshootingemspen
55
Fault Cause and troubleshootingCreasing The spin speed is too high
The next time you run a wash cycle set a lowerspin speed
The load is too large The next time you run a wash cycle reduce the
amount of laundry being loaded
The wrong programme is selected for the type of fab-ric Select the programmes that are suitable for the
type of fabric rarr Programmes Page 24
Detergent or fabricsoftener drips off theseal and collects onthe door or in the sealfold
Too much detergentfabric softener in the detergentdrawer When dosing liquid detergent and fabric softener
observe the marking in the detergent drawer anddo not dose above this
The spin result is notsatisfactory The laun-dry is too wettoodamp
A low spin speed is selected The next time you run a wash cycle set a higher
spin speed Start the programme
Drain pipe or water outlet hose is blocked Clean the drain pipe and the water outlet hose
Drain pipe or water drain hose is caught or jammed Ensure that the drain pipe and water drain hose are
not kinked or trapped
The unbalanced load detection system has interruptedthe spin cycle because the laundry is unevenly distrib-uted Redistribute the laundry in the drum
Note Where possible mix large and small items inthe drum Different sized items of laundry distributethemselves better during the spin cycle Start the programme
Unbalance load detection system is using a reducedspin speed to eliminate an unbalance Redistribute the laundry in the drum
Note Where possible mix large and small items inthe drum Different sized items of laundry distributethemselves better during the spin cycle Start the programme
enemspTroubleshooting
56
Fault Cause and troubleshootingDetergent residue onthe damp washing
Detergents may contain water-insoluble substancesthat deposit on the laundry Start the programme
Detergent residue onthe dry laundry
Detergents may contain water-insoluble substancesthat deposit on the laundry Brush out the laundry after washing and drying
Water is leaking out atthe water inlet hose
Water inlet hose is not correctlysecurely connected1 Connect the water supply hose correctly Connect-
ing the water inlet hose2 Tighten the screw connection
Water is leaking out atthe water outlet hose
The water outlet hose is damaged Replace the damaged water outlet hose
Water outlet hose is not connected correctly Connect the water outlet hose correctly Water out-
let connection types
Odours have formedin the appliance
Humidity and detergent residue may promote theformation of bacteria rarr Cleaning the drum Page 42 If you are not using the appliance leave the door
and detergent drawer open so that residual watercan evaporate
Transportation storage and disposalemspen
57
171 Emergency releaseReleasing the doorRequirement The drain pump isempty rarr Page 441 ATTENTION Escaping water may
cause material damage Do not open the door if you can
see water through the glassPull the emergency release down-wards with a tool and release
a The door lock is released2 Insert the maintenance flap and
lock it into place3 Close the maintenance flap
Transportation storage and disposal
18 Transportation stor-age and disposal
Transportation storage and disposal
You can find out here how to prepareyour appliance for transportation andstorage You will also find out how todispose of old appliances
181 Removing the appliance1 Turn off the tap2 rarr Emptying the water inlet hose
Page 473 Switch off the appliance4 Unplug the appliances mains plug
5 Drain the remaining detergentsolution rarr Cleaning the drain pumpPage 44
6 Detach the hoses
182 Inserting the transitbolts
Secure the appliance for transporta-tion using transit bolts in order to pre-vent damage1 Remove the four cover caps
‒ If necessary use a screwdriverto remove the cover caps
Keep the cover caps2 Insert the four sleeves
enemspTransportation storage and disposal
58
3 Insert all screws into the fourtransit bolts and tighten slightly
4 Insert the power cord into theholder and tighten all fourscrews for the transit bolts with aWAF 13 wrench
5 Insert the hose into holder
183 Using the applianceagain
1 Remove the transit bolts
2 Pour approx 1 litre of water intocompartment II in the detergentdrawer
3 Start the programmea The unused detergent cannot flow
straight into the outlet during thenext wash
184 Disposing of old appli-ance
Valuable raw materials can be re-used by recycling
WARNINGRisk of harm to healthChildren can lock themselves in theappliance thereby putting their livesat risk Do not install the appliance behind
a door as this may obstruct the ap-pliance door or prevent it fromopening
With redundant appliances unplugthe power cord Then cut throughthe cord and damage the lock onthe appliance door beyond repairso that the appliance door will nolonger close
1 Unplug the appliance from themains
2 Cut through the power cord3 Dispose of the appliance in an en-
vironmentally friendly mannerInformation about current disposalmethods are available from yourspecialist dealer or local authority
This appliance is la-belled in accordancewith European Directive201219EU concerningused electrical and elec-
Customer Serviceemspen
59
tronic appliances (wasteelectrical and electronicequipment - WEEE)The guideline determ-ines the framework forthe return and recyclingof used appliances asapplicable throughoutthe EU
Customer Service
19 Customer ServiceCustomer Service
If you have any queries on use areunable to rectify faults on the appli-ance yourself or if your applianceneeds to be repaired contact Cus-tomer ServiceYou can solve many problems your-self by consulting the information ontroubleshooting in these instructionsor on our website If this is not thecase contact our after-sales serviceWith any warranty claims we willmake sure that your appliance is re-paired by trained after-sales techni-cians using genuine spare parts in-cluding after the manufacturers war-ranty has expiredFunction-relevant genuine spare partsaccording to the corresponding Eco-design Order can be obtained fromCustomer Service for a period of atleast 10 years from the date onwhich your appliance was placed onthe market within the European Eco-nomic AreaNote Under the terms of the manu-facturers warranty the use of Cus-tomer Service is free of chargeDetailed information on the warrantyperiod and terms of warranty in yourcountry is available from our after-sales service your retailer or on ourwebsite
If you contact Customer Service youwill require the product number (E-Nr) and the production number (FD)of your applianceThe contact details for Customer Ser-vice can be found in the enclosedCustomer Service directory or on ourwebsite
191 Product number (E-Nr)and production number(FD)
You can find the product number (E-Nr) and the production number (FD)on the appliances rating plateDepending on the model the ratingplate is locatediexcl On the inside of the dooriexcl On the inside of the maintenance
flapiexcl On the rear of the applianceMake a note of your appliances de-tails and the Customer Service tele-phone number to find them againquickly
enemspConsumption values
60
Consumption values
20 Consumption valuesConsumption values
The following information is provided in accordance with the EU EcodesignRegulation The values given for programs other than the Eco 40-60 are indicat-ive only and were determined in accordance with the applicable standardEN60456
Programme Load(kg)
Pro-gramme dura-tion(hrmin)1
Energycon-sump-tion(kWhcycle)1
Watercon-sump-tion (lcycle)1
Max-imumtemper-ature(degC) 5mins1
Spinspeed(rpm)1
Resid-ualmois-ture()1
Eco 40-602 90 337 1245 610 50 1166 5000Eco 40-602 45 252 0590 450 33 1200 5000Eco 40-602 25 233 0195 300 24 1200 5400AlgodoacutenAl-godatildeo 20 degC
90 328 0370 900 23 1200 5400
AlgodoacutenAl-godatildeo 40 degC
90 328 1350 900 45 1200 5400
AlgodoacutenAl-godatildeo 60 degC
90 328 1450 900 55 1200 5400
AlgodoacutenAl-godatildeo 40 degC + Pre-lav
90 358 1400 1020 45 1200 5400
Sinteacuteticos 40 degC
40 228 0780 610 44 1200 2700
Mix 40 degC 40 059 0620 440 41 1200 5600 LanaLatildes
30 degC20 040 0200 400 22 800 2500
1 Due to the influence of water pressure hardness and inlet temperature am-bient temperature type amount and soiling of laundry detergent used fluc-tuations in the power supply and the selected additional functions the actualvalues may deviate from the stated values
2 Test programme in accordance with the EU Ecodesign Directive and the EUEnergy Labelling Regulation with cold water (15 degC)
Technical specificationsemspen
61
Technical specifications
21 Technical specifica-tions
Technical specifications
Facts and figures for your appliancecan be found here
Appliance height 850 cmAppliance width 598 cmAppliance depth 590 cmWeight 80 kg1
Maximum load 9 kgMains voltage 220 - 240 V
50 Hz Minimum in-
stallation protec-tion
10 A
Rated power 2300 WPower consump-tion
iexcl Off mode010 W
iexcl Left-on mode050 W
Water pressure iexcl Minimum100 kPa(1 bar)
iexcl Maximum1000 kPa(10 bar)
Length of the wa-ter inlet hose
150 cm
Length of the wa-ter outlet hose
150 cm
Length of thepower cord
160 cm
1 Depending on the appliance spe-cifications
More information about your modelcan be found online at httpsen-ergylabelbsh-groupcom1 This webaddress is linked to the official EUEPREL product database At the time
of printing its web address had notyet been published Please then fol-low the instructions on searching formodels The model identifier is madeup of the characters before the slashin the product number (E-Nr) on therating plate Alternatively you canalso find the model identifier in thefirst line of the EU energy label
1 Only applies to countries in the European Economic Area
Thank you for buying aBosch Home Appliance
Register your new device on MyBosch now and profit directly from
bull Expert tips amp tricks for your appliancebull Warranty extension optionsbull Discounts for accessories amp spare-partsbull Digital manual and all appliance data at handbull Easy access to Bosch Home Appliances Service
Free and easy registration ndash also on mobile phoneswwwbosch-homecomwelcome
Looking for help Youll find it here
Expert advice for your Bosch home appliances help with problems or a repair from Bosch experts Find out everything about the many ways Bosch can support you wwwbosch-homecomservice Contact data of all countries are listed in the attached service direct-ory
90016102699001610269emsp(010219)en
Robert Bosch Hausgeraumlte GmbHCarl-Wery-Straszlige 3481739 MuumlnchenGERMANYwwwbosch-homecom
Valid within Great BritainImported to Great Britain byBSH Home Appliances LtdGrand Union HouseOld Wolverton RoadWolverton Milton KeynesMK12 5PTUnited Kingdom
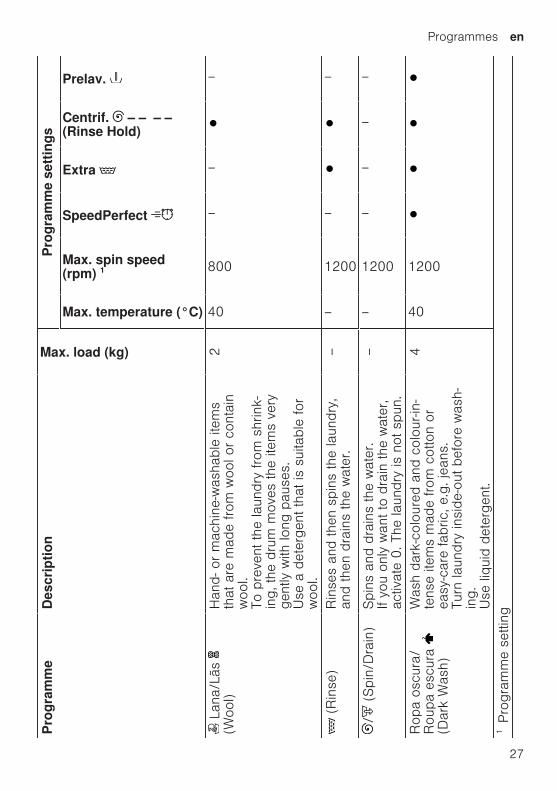
Programmesemspen
27
Pro
gram
me
Des
crip
tion
Max load (kg)
Pro
gram
me
sett
ings
Max temperature (degC)
Max spin speed(rpm) 1
SpeedPerfect
Extra
Centrif ndash ndash ndash ndash(Rinse Hold)
Prelav
Lan
aLatilde
s (W
ool)
Han
d- o
r m
achi
ne-w
asha
ble
item
sth
at a
re m
ade
from
woo
l or
cont
ain
woo
lTo
pre
vent
the
laun
dry
from
shr
ink-
ing
the
dru
m m
oves
the
item
s ve
ryge
ntly
with
long
pau
ses
Use
a d
eter
gent
tha
t is
sui
tabl
e fo
rw
ool
2
40
800
ndash
ndash
ndash
(R
inse
)R
inse
s an
d th
en s
pins
the
laun
dry
and
then
dra
ins
the
wat
er
ndashndash
1200
ndash
ndash
(
Spi
nD
rain
)Spi
ns a
nd d
rain
s th
e w
ater
If
you
only
wan
t to
dra
in the
wat
er
activ
ate
0 T
he la
undr
y is
not
spu
n
ndash
ndash
1200
ndash
ndash
ndash
ndash
Rop
a os
cura
R
oupa
esc
ura
(Dar
k W
ash)
Was
h da
rk-c
olou
red
and
colo
ur-in
-te
nse
item
s m
ade
from
cot
ton
orea
sy-c
are
fabr
ic e
g j
eans
Tu
rn la
undr
y in
side
-out
bef
ore
was
h-in
gU
se li
quid
det
erge
nt
4
40
1200
1Pro
gram
me
setti
ng
enemspProgrammes
28
Pro
gram
me
Des
crip
tion
Max load (kg)
Pro
gram
me
sett
ings
Max temperature (degC)
Max spin speed(rpm) 1
SpeedPerfect
Extra
Centrif ndash ndash ndash ndash(Rinse Hold)
Prelav
Plu
mas
Pen
as
(Dow
n)W
ash
pillo
ws
duv
ets
or c
loth
ing
stuf
fed
with
dow
n an
d fil
lings
with
synt
hetic
fibr
es
Was
h la
rge
item
s se
para
tely
U
se a
det
erge
nt tha
t is
sui
tabl
e fo
rdo
wn
or d
elic
ates
U
se s
parin
gly
Do
not us
e fa
bric
sof
tene
rN
ote
To
prev
ent ex
cess
ive
foam
ing
rem
ove
air
from
laun
dry
item
s by
rolli
ng the
m u
p be
fore
you
was
hth
em
2
60
1200
ndash
ndash
Lim
p tam
bor
(Dru
m C
lean
)C
lean
ing
and
carin
g fo
r th
e dr
um
Use
thi
s pr
ogra
mm
e in
the
follo
win
gca
ses
iexclB
efor
e us
ing
the
appl
ianc
e fo
r th
efir
st tim
eiexcl
If yo
u re
gula
rly w
ash
at tem
pera
t-ur
es o
f 40 deg
C o
r lo
wer
ndash
ndash
1200
ndash
ndash
ndash
ndash
1Pro
gram
me
setti
ng
Programmesemspen
29
Pro
gram
me
Des
crip
tion
Max load (kg)
Pro
gram
me
sett
ings
Max temperature (degC)
Max spin speed(rpm) 1
SpeedPerfect
Extra
Centrif ndash ndash ndash ndash(Rinse Hold)
Prelav
iexclA
fter
a pr
olon
ged
perio
d of
non
-us
eU
se w
ashi
ng p
owde
r or
a d
eter
gent
cont
aini
ng b
leac
hH
alve
the
am
ount
of d
eter
gent
to
avoi
d fo
amin
gD
o no
t us
e fa
bric
sof
tene
rD
o no
t us
e liq
uid
dete
rgen
t or
det
er-
gent
tha
t is
inte
nded
for
woo
llens
or
delic
ates
N
ote
The
dru
m c
lean
ing
indi
cato
rw
ill fl
ash
to r
emin
d yo
u if
you
have
not us
ed a
pro
gram
me
at 6
0 deg
C o
rhi
gher
for
a lo
ng tim
eC
amis
asB
lusa
s (S
hirts
Blo
uses
)W
ash
non-
iron
shirt
s an
d bl
ouse
sm
ade
from
cot
ton
line
n s
ynth
etic
or
blen
ded
fabr
ics
Not
e U
se the
Del
icad
oSed
a pr
o-gr
amm
e to
was
h sh
irts
and
blou
ses
mad
e from
silk
or
delic
ate
fabr
ics
2
60
800
ndash
1Pro
gram
me
setti
ng
enemspProgrammes
30
Pro
gram
me
Des
crip
tion
Max load (kg)
Pro
gram
me
sett
ings
Max temperature (degC)
Max spin speed(rpm) 1
SpeedPerfect
Extra
Centrif ndash ndash ndash ndash(Rinse Hold)
Prelav
Spo
rt
Was
h sp
orts
and
leis
ure
item
s m
ade
from
syn
thet
ic fi
bres
mic
rofib
re o
rfle
ece
Use
a d
eter
gent
tha
t is
sui
tabl
e fo
rsp
orts
item
sD
o no
t us
e fa
bric
sof
tene
rTi
p U
se the
Sin
teacutetic
os
prog
ram
me
to w
ash
heav
ily s
oile
d la
undr
y
2
40
800
ndash
Raacutep
ido
153
0m
in
(Sup
erQ
uick
153
0 m
in)
Was
h ite
ms
mad
e from
cot
ton
syn
-th
etic
or
blen
ded
fabr
ics
Sho
rt p
rogr
amm
e fo
r sm
all i
tem
s of
light
ly s
oile
d la
undr
yTh
e pr
ogra
mm
e du
ratio
n is
app
rox
30 m
inut
es
If yo
u w
ish
to r
educ
e th
e pr
ogra
mm
edu
ratio
n to
15 m
inut
es a
ctiv
ate
Spe
edPer
fect
T
he m
axim
umlo
ad is
red
uced
to
2 k
g
4
40
1200
ndash
1Pro
gram
me
setti
ng
Accessoriesemspen
31
Accessories
9 AccessoriesAccessories
Use original accessories These have been made especially for your appliance
Use Order numberWater inlet hose exten-sion
Extend the water inlethose for cold water orAquaStop (approx 250m)
WMZ2381
Fixing brackets Improves the stability ofthe appliance
WMZ2200
Longer water inlet hose Replace the standardwater inlet hose with alonger hose (220 m)
00353925
Elbow Secure the water outlethose in place
00655300
Liquid detergent insert Measure liquid deter-gent
00605740
Metal covering plate Metal covering plate forinstalling the applianceunder a high worktop
WMZ20430
Before using for the first time
10 Before using for thefirst time
Before using for the first time
Prepare the appliance for use
101 Starting an empty wash-ing cycle
Your appliance was inspected thor-oughly before leaving the factory Toremove any residual water run thefirst wash cycle without any laundryNote Please read the information inthe Safety rarr Page 4 and Preventingmaterial damage rarr Page 10 sectionsto ensure that you use the appliancesafely
1 Turn the programme selector toLimp tambor
2 Close the door
enemspLaundry
32
3 Pull out the detergent drawer
4 Pour approx 1 litre of tap waterinto compartment II
5 Pour washing powder into com-partment II
To prevent foaming use only halfof the amount of detergent recom-mended by the detergent manufac-turer for light soiling Do not usedetergent suitable for woollens ordelicates
6 Push in the detergent drawer
7 Press InicioPausa + Carga (StartPause + Reload) to start theprogramme
a The display shows the remainingprogramme duration
a After the programme has endedthe display shows End
8 Start the first wash cycle or set theprogramme selector to to switchoff the appliance rarr Basic operation Page 36
Laundry
11 LaundryLaundry
111 Preparing the laundryNote Please read the information inthe Safety rarr Page 4 and Preventingmaterial damage rarr Page 10 sectionsto ensure that you use the appliancesafely
ATTENTIONObjects remaining in the laundry maydamage the laundry and the drum Remove all items from any pock-
ets in your laundry before usingthe appliance
To protect your appliance and thelaundry prepare the laundry be-forehandndash Empty any pockets
Laundryemspen
33
ndash Brush sand out of all collars andpockets
ndash Close bed covers and cushioncovers
ndash Close all zips Velcro fastenershooks and eyes
ndash Tie cloth belts apron stringsetc together or use a laundrybag
ndash Remove curtain hooks and leadstrips or use a mesh laundrybag
ndash Use a mesh laundry bag forsmall items of laundry such aschildrens socks
ndash Some stubborn or dried-in stainscan be removed by washingseveral times
ndash Wash large and small items oflaundry together
ndash Do not rub fresh stains but dabthem with soapy water
ndash Separate items of laundry andshake them out
112 Sorting laundryNote Please read the information inthe Safety rarr Page 4 and Preventingmaterial damage rarr Page 10 sectionsto ensure that you use the appliancesafely To improve washing results and
prevent discolouration sort thelaundry according to the followingcriteria before washingndash Type of fabric and fibre
Wash laundry of the sametype of fabric and fibre to-gether
ndash Care symbols on the care labelsrarr Page 34
ndash Description of the programmesrarr Page 24
ndash Whitesndash Colours
Wash new coloured itemsseparately the first time youwash them
113 Degrees of soiling
Degree of soiling Soiling ExamplesLight iexcl No dirt or stains are vis-
ibleiexcl Laundry has absorbed
odours
Light summer clothing orsports clothing that hasbeen worn for a just a fewhours
Normal Dirt or light stains are vis-ible
iexcl T-shirts shirts or blousesare sweat-soaked orhave been worn a fewtimes
iexcl Towels or bedding thathas been used for up toone week
Heavy Dirt or stains are clearlyvisible
Tea towels baby items orwork clothing
enemspDetergents and care products
34
114 Care symbols on the care labels
Washing care symbols
Symbol Washing process Recommended pro-gramme
Normal Cotton Gentle Easy-Care Particularly gentle DelicatesSilk for
washing by handHand wash WoolNot suitable for machine-washing ndash
Detergents and care products
12 Detergents and careproducts
Detergents and care products
Note Please read the information inthe Safety rarr Page 4 and Preventingmaterial damage rarr Page 10 sectionsto ensure that you use the appliancesafelyThe manufacturers instructions foruse and dosage can be found on thepackaging
Notesiexcl Only use liquid detergents that are
self-flowingiexcl Do not mix different liquid deter-
gentsiexcl Do not mix detergent and fabric
softeneriexcl Do not use products that have ex-
pired or are highly congealediexcl Do not use products containing
solvents caustic agents or volatilesubstances (eg bleach)
iexcl Use dyes sparingly as salt maydamage stainless steel
iexcl Do not use bleaching agents in theappliance
121 Detergent recommendation
Detergent Fabrics Pro-gramme
Temperature
Standard detergentwith optical brighten-ers
Heat-resistant whitefabrics made fromcotton or linen
Cotton From cold up to90 degC
Detergent for colourswithout bleach or op-tical brighteners
Coloured fabricsmade from linen orcotton
Cotton From cold up to60 degC
Detergent for col-oursdelicates withoutoptical brighteners
Coloured fabricsmade from easy-carefabrics or syntheticmaterials
Easy-Care From cold up to60 degC
Detergents and care productsemspen
35
Detergent Fabrics Pro-gramme
Temperature
Detergent for delic-ates
Delicate fine textilessilk or viscose
DelicatesSilk
From cold up to40 degC
Detergent for wool-lens
Wool Wool From cold up to40 degC
Tip Visit wwwcleanrighteu to findfurther information on detergentscare products and cleaning agentsfor domestic use
122 Detergent dosageThe detergent dosage depends oniexcl The amount of laundryiexcl Degree of soilingiexcl Water hardness
You can find out how hard yourwater is from your local water com-pany or measure it yourself usinga water hardness tester
Water hardness
Hardness range Total hardness in mmoll
German degrees in degdH
soft (I) 0ndash15 0ndash84medium (II) 15ndash 25 84ndash14hard (III) over 25 over 14
Example of a manufacturersinstructions for detergentThese example values refer to astandard load of 4ndash5 kg
Soiling Light Normal HeavyWater hardness Softmedium 40 ml 55 ml 80 mlWater hardness Hardveryhard
55 ml 80 ml 105 ml
The dosages can be found on themanufacturers packagingiexcl Adjust the dosage to the actual
load
enemspBasic operation
36
Basic operation
13 Basic operationBasic operation
131 Switching on the appli-ance
Turn the programme selector to aprogramme
132 Setting a programme1 Set the programme selector to the
required programme rarr Programmes Page 24
2 If necessary adjust the pro-gramme settings rarr Page 36
133 Adjusting the pro-gramme settings
Requirement A programme hasbeen set rarr Setting a programme Page 36
Adjust the programme settings rarr Programmes Page 24
Note The programme settings arenot saved permanently for the pro-gramme
134 Loading laundryNotesiexcl Please read the information in the
Safety rarr Page 4 and Preventingmaterial damage rarr Page 10 sec-tions to ensure that you use theappliance safely
iexcl To prevent creasing take note ofthe maximum load for the rarr Programmes Page 24
Requirement The laundry is pre-pared and sortedrarr Laundry Page 321 Open the door
Make sure that the drum is empty2 Load the laundry unfolded into the
drum3 Close the door
Ensure that there is no laundrytrapped in the door
Basic operationemspen
37
135 Using a measuring aidfor liquid detergent
If you order the measuring aid as anaccessory you must use the measur-ing aid1 Pull out the detergent drawer
2 Press down on the insert and re-move the detergent drawer
1
2
3 Insert the measuring aid
4 Insert the detergent drawer
136 Use the measuring aidfor liquid detergent
To add liquid detergent you can usea measuring aid in the detergentdrawer1 Pull out the detergent drawer2 Slide the measuring aid forwards
3 Fold the measuring aid down andclick it into place
enemspBasic operation
38
4 Push in the detergent drawer
137 Adding detergent andcare product
Notesiexcl Please read the information in the
Safety rarr Page 4 and Preventingmaterial damage rarr Page 10 sec-tions to ensure that you use theappliance safely
iexcl Do not use the measuring aid forliquid detergent for gel detergentswashing powder or if Prewash orReady in time are activated
Requirement Find out the optimumdosage for detergent and careproduct rarr Page 341 Pull out the detergent drawer2 Pour in detergent
rarr Detergent drawer Page 193 If required add the care product4 Push in the detergent drawer
138 Starting the programmeNote If you want to change the timeuntil the programme ends set theReady in time first Press InicioPausa + Carga a The drum rotates and load detec-
tion takes place This can take upto 2 minutes after which waterenters the drum
a The display shows either the pro-gramme duration or the Ready intime
a After the programme has endedthe display shows End
139 Adjusting the Ready intime before the pro-gramme starts
You can readjust the selected Readyin time before the programme starts1 Press InicioPausa + Carga 2 Press Termin repeatedly until
the display indicates the desiredReady in time
3 Press InicioPausa + Carga
1310 Soaking laundryNote No additional detergent is re-quired The washing solution is thenused for washing1 Start the programme2 To pause the programme after ap-
prox 10 minutes press InicioPausa + Carga
3 To resume the programme afterthe desired soaking time pressInicioPausa + Carga
1311 Adding laundryNote Please read the information inthe Safety rarr Page 4 and Preventingmaterial damage rarr Page 10 sectionsto ensure that you use the appliancesafely1 Press InicioPausa + Carga
The appliance is paused andchecks whether it is possible toadd or remove laundry Take noteof the programme status
2 Add or remove laundry3 Close the door4 Press InicioPausa + Carga
Basic operationemspen
39
1312 Cancelling the pro-gramme
Once the programme has startedyou can cancel it at any timeNote Please read the information inthe Safety rarr Page 4 and Preventingmaterial damage rarr Page 10 sectionsto ensure that you use the appliancesafely1 Press InicioPausa + Carga 2 Open the door
The appliance door remainslocked for safety reasons if thetemperature and water levels arehighndash If the temperature is high start
the programmendash If the water level is high Start
the or programme3 Remove the laundry
1313 Resuming the pro-gramme when the pro-gramme status is RinseHold
1 Set the or programme2 Press InicioPausa + Carga
1314 Unloading the laundryNote Please read the information inthe Safety rarr Page 4 and Preventingmaterial damage rarr Page 10 sectionsto ensure that you use the appliancesafely1 Open the door
2 Remove the laundry
1315 Switching off the appli-ance
1 Turn the programme selector to
2 Turn off the tap3 Wipe the rubber gasket dry and re-
move any foreign objects
4 Leave the door and detergentdrawer open so that residual watercan evaporate
enemspChildproof lock
40
Childproof lock
14 Childproof lockChildproof lock
Secure your appliance against beingoperated unintentionally using thecontrols
141 Activating the childprooflock
Press and hold the two 3 segbuttons for approx 3 seconds
a The display shows a The controls are lockeda The childproof lock remains active
even after the appliance has beenswitched off
142 Deactivating the child-proof lock
Requirement To deactivate thechildproof lock the appliance mustbe switched on Press and hold the two 3 seg
buttons for approx 3 secondsa goes out in the display
Basic settingsemspen
41
Basic settings
15 Basic settingsBasic settings
You can configure the appliance to meet your needs
151 Overview of the basic settingsBelow is an overview of the basic settings on your appliance
Basic setting Programmeposition
Value Description
End signal 2 0 (off)1 (quiet)2 (me-dium)3 (loud)4 (veryloud)
Set the volume of the signal at theend of the programme
Button signal 3 0 (off)1 (quiet)2 (me-dium)3 (loud)4 (veryloud)
The volume of the audible signalemitted when the buttons arepressed
Drum cleaningreminder
4 ONOFF
Activate or deactivate the re-minder to clean the drum
enemspCleaning and servicing
42
152 Changing the basic set-tings
1 Set the programme selector to po-sition 1
2 Press InicioPausa + Carga and at the same time turn theprogramme selector to position 2
a The display shows the currentvalue
3 Set the programme selector to therequired position
4 To change the value press Ter-min
5 To save the changes switch offthe appliance
Cleaning and servicing
16 Cleaning and servi-cing
Cleaning and servicing
To keep your appliance working effi-ciently for a long time it is importantto clean and maintain it carefully
161 Tips on appliance careWipe down thehousing and thecontrol panelwith nothing butwater and adamp cloth
This ensures theparts of the appli-ance will remainclean and hy-gienic
Remove all de-tergent residuespray residue orother residuesimmediately
Fresh depositsare easier to re-move withoutleaving anyresidue
Keep the appli-ance door anddetergent draweropen after use
This allows theresidual water todry reducingodours in the ap-pliance
162 Cleaning the drum
CAUTIONRisk of injuryPermanently washing at low temper-atures and a lack of ventilation forthe appliance may damage the drumand cause injury Regularly run a programme for
cleaning the drum or wash at tem-peratures of at least 60 degC
Leave the appliance to dry afterevery operation with the dooropen and leave the detergentdrawer to dry
Run the Limp tambor pro-gramme without laundryAdd washing powder
163 Cleaning the detergentdrawer
Note Please read the information inthe Safety rarr Page 4 and Preventingmaterial damage rarr Page 10 sectionsto ensure that you use the appliancesafely1 Pull out the detergent drawer
Cleaning and servicingemspen
43
2 Press down on the insert and re-move the detergent drawer
1
2
3 Press out the insert upwards frombelow
4 Clean the detergent drawer and in-sert with water and a brush andthen dry them
5 Fit the insert and lock it into place
6 Cleaning the opening for the deter-gent drawer
7 Push in the detergent drawer
164 Descaling
ATTENTIONThe use of unsuitable descalingagents eg for coffee machines maydamage the appliance For this appliance only use de-
scaling agents that are availablefrom the manufacturers website orour after-sales service
enemspCleaning and servicing
44
165 Cleaning the drain pumpClean the drain pump in the event offaults eg blockages or rattlingnoises
Emptying the drain pumpNote Please read the information inthe Safety rarr Page 4 and Preventingmaterial damage rarr Page 10 sectionsto ensure that you use the appliancesafely1 Turn off the water tap2 Switch off the appliance3 Disconnect the appliances mains
plug from the power supply4 Open the maintenance flap
5 Remove the maintenance flap
6 Slide a sufficiently large receptacleunder the opening
7 Take the drain hose out of theholder
Cleaning and servicingemspen
45
8 CAUTION - Risk of scaldingWhen you wash at high temperat-ures the detergent solution getshot
Do not touch the hot detergentsolutionTo allow the detergent solution toflow out into the container removethe sealing cap
9 Firmly press on the sealing cap
10 Insert the drain hose into theholder
Cleaning the drain pumpNote Please read the information inthe Safety rarr Page 4 and Preventingmaterial damage rarr Page 10 sectionsto ensure that you use the appliancesafelyRequirement The drain pump isempty rarr Page 441 Since water may remain in the
drain pump remove the pump capcarefully
2 Clean the interior the thread onthe pump cap and the pump hous-ing
3 Make sure that the impeller in thedrain pump can be rotated
enemspCleaning and servicing
46
4 Insert the pump cap and screw iton as far as it will go
90deg
The handle on the pump cap mustbe in a vertical position
5 Close the maintenance flap
Before the next washTo prevent unused detergent fromflowing straight into the outlet in thenext wash run the programmeafter you have emptied the drainpump1 Turn on the tap2 Insert the mains plug3 Switch on the appliance4 Pour 1 litre of water into compart-
ment II5 Start the programme
166 Cleaning the water outlethose at the siphon
1 Switch off the appliance2 Disconnect the appliances mains
plug from the power supply
3 Loosen the hose clamp and care-fully remove the water outlet hose
Residual water may leak out4 Clean the water outlet hose and si-
phon connecting piece
5 Reattach the water outlet hose andsecure the connection point usingthe hose clamp
Cleaning and servicingemspen
47
167 Clean the water inlet fil-ters
Emptying the water inlet hose1 Turn off the tap2 Set a programme except for
or 3 Start the programme and leave it
to run for approx 40 seconds4 Switch off the appliance5 Disconnect the appliances mains
plug from the power supply
Cleaning the filter on the tapNote Please read the information inthe Safety rarr Page 4 and Preventingmaterial damage rarr Page 10 sectionsto ensure that you use the appliancesafelyRequirement The water inlet hose isempty1 Remove the water inlet hose from
the tap
2 Clean the filter with a small brush
3 Connect the water inlet hose andcheck for leaks
Cleaning the filter on theapplianceNote Please read the information inthe Safety rarr Page 4 and Preventingmaterial damage rarr Page 10 sectionsto ensure that you use the appliancesafelyRequirement The water inlet hose isempty rarr Emptying the water inlet hosePage 47
enemspCleaning and servicing
48
1 Disconnect the hose from the rearof the appliance
1
2
2 Use pliers to remove the filter
3 Clean the filter with a small brush
4 Reinsert the filter
5 Connect the hose and check forleaks
2
1
Troubleshootingemspen
49
Troubleshooting
17 TroubleshootingTroubleshooting
You can rectify minor faults on your appliance yourself Read the troubleshoot-ing information before contacting after-sales service This will avoid unneces-sary costs
WARNINGRisk of electric shockIncorrect repairs are dangerous Repairs to the appliance should only be carried out by trained specialist
staff Only use genuine spare parts when repairing the appliance If the power cord of this appliance is damaged it must be replaced by the
manufacturer the manufacturers Customer Service or a similarly qualifiedperson in order to prevent any risk
Fault Cause and troubleshootingThe display goes outand InicioPausa +Carga flashes
Energy-saving mode is active Press any buttona The symbol lights up again
E36 -10 Drain pipe or water outlet hose is blocked Clean the drain pipe and the water outlet hose
Drain pipe or water drain hose is caught or jammed Ensure that the drain pipe and water drain hose are
not kinked or trapped
Drain pump is blocked rarr Cleaning the drain pump Page 44
The water outlet hose is connected too high Install the water outlet hose at a maximum height of
1 metre
Detergent dosage is too high Immediate measure Mix one tablespoon of fabric
softener with 05 litres of water and pour the mix-ture into the left-hand compartment (not for outdoorclothing sportswear or items stuffed with down)
Reduce the amount of detergent for the next wash-ing cycle with the same load
Unapproved extension installed on the water drainhose Remove any unapproved extensions from the water
hose Connecting the appliance
E36 -25 -26 Drain pump is blocked rarr Cleaning the drain pump Page 44
enemspTroubleshooting
50
Fault Cause and troubleshootingThe water pressure is lowNo remedial action possibleThe filters in the water inflow are blocked Clean the filters in the water inflow rarr Page 47
The tap is turned off Turn on the tap
The water inlet hose is kinked or jammed Ensure that the water inlet hose is not kinked or
jammed
flashes The automatic voltage control system detects an un-authorised voltage under-usage No remedial action possible
Note If the power supply is stable the programmecontinues to run as normalVoltage under-usage may cause extension of a pro-grammeNo remedial action possible
flashes Voltage under-usage may cause extension of a pro-grammeNo remedial action possible
lights up The temperature is too high Wait until the temperature has dropped rarr Cancelling the programme Page 39
Water level is too high Start the programme
Laundry is caught in the door1 Open the door again2 Remove any trapped laundry3 Close the door4 Press InicioPausa + Carga to start the pro-
gramme
flashes Door is not closed1 Close the door2 Press InicioPausa + Carga to start the pro-
gramme
All other error codes Malfunction Call the after-sales service
rarr Customer Service Page 59
Troubleshootingemspen
51
Fault Cause and troubleshootingThe appliance is notworking
The mains plug of the power cord is not plugged in Connect the appliance to the power supply
The circuit breaker is faulty Check the circuit breaker in the fuse box
There has been a power cut Check whether the lighting in your kitchen or other
appliances are working
The programme doesnot start
You have not pressed InicioPausa + Carga Press InicioPausa + Carga
Door is not closed1 Close the door2 Press InicioPausa + Carga to start the pro-
gramme
Childproof lock is activated rarr Deactivating the childproof lock Page 40
Termin is activated Check whether Termin is activated
rarr Buttons Page 23
Laundry is caught in the door1 Open the door again2 Remove any trapped laundry3 Close the door4 Press InicioPausa + Carga to start the pro-
gramme
The door cannotbe opened
ndash ndash ndash ndash is activated Continue the programme by selecting or and
pressing InicioPausa + Carga rarr Resuming the programme when the programmestatus is Rinse Hold Page 39
The temperature is too high Wait until the temperature has dropped rarr Cancelling the programme Page 39
Water level is too high Start the programme
Power failure Open the door using the emergency release
rarr Emergency release Page 57
The water is not drain-ing
Drain pipe or water outlet hose is blocked Clean the drain pipe and the water outlet hose
enemspTroubleshooting
52
Fault Cause and troubleshootingThe water is not drain-ing
Drain pipe or water drain hose is caught or jammed Ensure that the drain pipe and water drain hose are
not kinked or trapped
Drain pump is blocked rarr Cleaning the drain pump Page 44
ndash ndash ndash ndash is activated Continue the programme by selecting or and
pressing InicioPausa + Carga rarr Resuming the programme when the programmestatus is Rinse Hold Page 39
The water outlet hose is connected too high Install the water outlet hose at a maximum height of
1 metre
Detergent dosage is too high Immediate measure Mix one tablespoon of fabric
softener with 05 litres of water and pour the mix-ture into the left-hand compartment (not for outdoorclothing sportswear or items stuffed with down)
Reduce the amount of detergent for the next wash-ing cycle with the same load
Unapproved extension installed on the water drainhose Remove any unapproved extensions from the water
hose Connecting the appliance
Water is not flowingin Detergent is notbeing dispensed
You have not pressed InicioPausa + Carga Press InicioPausa + Carga
The filters in the water inflow are blocked Clean the filters in the water inflow rarr Page 47
The tap is turned off Turn on the tap
The water inlet hose is kinked or jammed Ensure that the water inlet hose is not kinked or
jammed
The spin cycle runsseveral times
The unbalanced load detection system eliminates animbalance by repeatedly redistributing the laundry Not a fault ndash no action required
Note When loading where possible place large andsmall items of laundry together in the drum Differentsized items of laundry distribute themselves betterduring the spin cycle
Troubleshootingemspen
53
Fault Cause and troubleshootingThe programme dura-tion changes duringthe wash cycle
The programme operation is optimised electronicallyThis may change the programme duration Not a fault ndash no action required
The unbalanced load detection system eliminates animbalance by repeatedly redistributing the laundry Not a fault ndash no action required
Note When loading where possible place large andsmall items of laundry together in the drum Differentsized items of laundry distribute themselves betterduring the spin cycleFoam detection system switches on a rinse cycle iffoam build-up is too high Not a fault ndash no action required
No water is visible inthe drum
Water is below the visible area Not a fault ndash no action required Do not add any extra water to the appliance while it
is operating
Drum jerks after theprogramme starts
This is caused by an internal motor test Not a fault ndash no action required
Residual water ispresent in the com-partment
Insert in compartment is blocked rarr Cleaning the detergent drawer Page 42
Vibrations and move-ment of the appliancewhilst spinning
Appliance is not correctly aligned Aligning the appliance
The appliance feet are not fixed Secure the appliance feet Aligning the appliance
Transit bolts have not been removed Removing the transit bolts
Drum does not turnwater does not flow in
Load detection is active Not a fault ndash no action required
Note The load detection can take up to two minutesHeavy foam build-up Detergent dosage is too high
Immediate measure Mix one tablespoon of fabricsoftener with 05 litres of water and pour the mix-ture into the left-hand compartment (not for outdoorclothing sportswear or items stuffed with down)
Reduce the amount of detergent for the next wash-ing cycle with the same load
enemspTroubleshooting
54
Fault Cause and troubleshootingHigh spin speed notreached
A low spin speed is selected The next time you run a wash cycle set a higher
spin speed
Unbalance load detection system is using a reducedspin speed to eliminate an unbalance Redistribute the laundry in the drum
Note Where possible mix large and small items inthe drum Different sized items of laundry distributethemselves better during the spin cycle Start the programme
The spin programmedoes not start
Drain pipe or water outlet hose is blocked Clean the drain pipe and the water outlet hose
Drain pipe or water drain hose is caught or jammed Ensure that the drain pipe and water drain hose are
not kinked or trapped
The unbalanced load detection system has interruptedthe spin cycle because the laundry is unevenly distrib-uted Redistribute the laundry in the drum
Note Where possible mix large and small items inthe drum Different sized items of laundry distributethemselves better during the spin cycle Start the programme
Rushing hissingnoise
Water is flushed under pressure into the detergentdrawer Not a fault ndash normal operating noise
Loud noises duringthe spin cycle
Appliance is not correctly aligned Aligning the appliance
The appliance feet are not fixed Secure the appliance feet Aligning the appliance
Transit bolts have not been removed Removing the transit bolts
Banging noises rat-tling in the drainpump
Foreign bodies have got into the drain pump rarr Cleaning the drain pump Page 44
Slurping rhythmicalsuction noise
The drain pump is active the detergent solution ispumped out Not a fault ndash normal operating noise
Troubleshootingemspen
55
Fault Cause and troubleshootingCreasing The spin speed is too high
The next time you run a wash cycle set a lowerspin speed
The load is too large The next time you run a wash cycle reduce the
amount of laundry being loaded
The wrong programme is selected for the type of fab-ric Select the programmes that are suitable for the
type of fabric rarr Programmes Page 24
Detergent or fabricsoftener drips off theseal and collects onthe door or in the sealfold
Too much detergentfabric softener in the detergentdrawer When dosing liquid detergent and fabric softener
observe the marking in the detergent drawer anddo not dose above this
The spin result is notsatisfactory The laun-dry is too wettoodamp
A low spin speed is selected The next time you run a wash cycle set a higher
spin speed Start the programme
Drain pipe or water outlet hose is blocked Clean the drain pipe and the water outlet hose
Drain pipe or water drain hose is caught or jammed Ensure that the drain pipe and water drain hose are
not kinked or trapped
The unbalanced load detection system has interruptedthe spin cycle because the laundry is unevenly distrib-uted Redistribute the laundry in the drum
Note Where possible mix large and small items inthe drum Different sized items of laundry distributethemselves better during the spin cycle Start the programme
Unbalance load detection system is using a reducedspin speed to eliminate an unbalance Redistribute the laundry in the drum
Note Where possible mix large and small items inthe drum Different sized items of laundry distributethemselves better during the spin cycle Start the programme
enemspTroubleshooting
56
Fault Cause and troubleshootingDetergent residue onthe damp washing
Detergents may contain water-insoluble substancesthat deposit on the laundry Start the programme
Detergent residue onthe dry laundry
Detergents may contain water-insoluble substancesthat deposit on the laundry Brush out the laundry after washing and drying
Water is leaking out atthe water inlet hose
Water inlet hose is not correctlysecurely connected1 Connect the water supply hose correctly Connect-
ing the water inlet hose2 Tighten the screw connection
Water is leaking out atthe water outlet hose
The water outlet hose is damaged Replace the damaged water outlet hose
Water outlet hose is not connected correctly Connect the water outlet hose correctly Water out-
let connection types
Odours have formedin the appliance
Humidity and detergent residue may promote theformation of bacteria rarr Cleaning the drum Page 42 If you are not using the appliance leave the door
and detergent drawer open so that residual watercan evaporate
Transportation storage and disposalemspen
57
171 Emergency releaseReleasing the doorRequirement The drain pump isempty rarr Page 441 ATTENTION Escaping water may
cause material damage Do not open the door if you can
see water through the glassPull the emergency release down-wards with a tool and release
a The door lock is released2 Insert the maintenance flap and
lock it into place3 Close the maintenance flap
Transportation storage and disposal
18 Transportation stor-age and disposal
Transportation storage and disposal
You can find out here how to prepareyour appliance for transportation andstorage You will also find out how todispose of old appliances
181 Removing the appliance1 Turn off the tap2 rarr Emptying the water inlet hose
Page 473 Switch off the appliance4 Unplug the appliances mains plug
5 Drain the remaining detergentsolution rarr Cleaning the drain pumpPage 44
6 Detach the hoses
182 Inserting the transitbolts
Secure the appliance for transporta-tion using transit bolts in order to pre-vent damage1 Remove the four cover caps
‒ If necessary use a screwdriverto remove the cover caps
Keep the cover caps2 Insert the four sleeves
enemspTransportation storage and disposal
58
3 Insert all screws into the fourtransit bolts and tighten slightly
4 Insert the power cord into theholder and tighten all fourscrews for the transit bolts with aWAF 13 wrench
5 Insert the hose into holder
183 Using the applianceagain
1 Remove the transit bolts
2 Pour approx 1 litre of water intocompartment II in the detergentdrawer
3 Start the programmea The unused detergent cannot flow
straight into the outlet during thenext wash
184 Disposing of old appli-ance
Valuable raw materials can be re-used by recycling
WARNINGRisk of harm to healthChildren can lock themselves in theappliance thereby putting their livesat risk Do not install the appliance behind
a door as this may obstruct the ap-pliance door or prevent it fromopening
With redundant appliances unplugthe power cord Then cut throughthe cord and damage the lock onthe appliance door beyond repairso that the appliance door will nolonger close
1 Unplug the appliance from themains
2 Cut through the power cord3 Dispose of the appliance in an en-
vironmentally friendly mannerInformation about current disposalmethods are available from yourspecialist dealer or local authority
This appliance is la-belled in accordancewith European Directive201219EU concerningused electrical and elec-
Customer Serviceemspen
59
tronic appliances (wasteelectrical and electronicequipment - WEEE)The guideline determ-ines the framework forthe return and recyclingof used appliances asapplicable throughoutthe EU
Customer Service
19 Customer ServiceCustomer Service
If you have any queries on use areunable to rectify faults on the appli-ance yourself or if your applianceneeds to be repaired contact Cus-tomer ServiceYou can solve many problems your-self by consulting the information ontroubleshooting in these instructionsor on our website If this is not thecase contact our after-sales serviceWith any warranty claims we willmake sure that your appliance is re-paired by trained after-sales techni-cians using genuine spare parts in-cluding after the manufacturers war-ranty has expiredFunction-relevant genuine spare partsaccording to the corresponding Eco-design Order can be obtained fromCustomer Service for a period of atleast 10 years from the date onwhich your appliance was placed onthe market within the European Eco-nomic AreaNote Under the terms of the manu-facturers warranty the use of Cus-tomer Service is free of chargeDetailed information on the warrantyperiod and terms of warranty in yourcountry is available from our after-sales service your retailer or on ourwebsite
If you contact Customer Service youwill require the product number (E-Nr) and the production number (FD)of your applianceThe contact details for Customer Ser-vice can be found in the enclosedCustomer Service directory or on ourwebsite
191 Product number (E-Nr)and production number(FD)
You can find the product number (E-Nr) and the production number (FD)on the appliances rating plateDepending on the model the ratingplate is locatediexcl On the inside of the dooriexcl On the inside of the maintenance
flapiexcl On the rear of the applianceMake a note of your appliances de-tails and the Customer Service tele-phone number to find them againquickly
enemspConsumption values
60
Consumption values
20 Consumption valuesConsumption values
The following information is provided in accordance with the EU EcodesignRegulation The values given for programs other than the Eco 40-60 are indicat-ive only and were determined in accordance with the applicable standardEN60456
Programme Load(kg)
Pro-gramme dura-tion(hrmin)1
Energycon-sump-tion(kWhcycle)1
Watercon-sump-tion (lcycle)1
Max-imumtemper-ature(degC) 5mins1
Spinspeed(rpm)1
Resid-ualmois-ture()1
Eco 40-602 90 337 1245 610 50 1166 5000Eco 40-602 45 252 0590 450 33 1200 5000Eco 40-602 25 233 0195 300 24 1200 5400AlgodoacutenAl-godatildeo 20 degC
90 328 0370 900 23 1200 5400
AlgodoacutenAl-godatildeo 40 degC
90 328 1350 900 45 1200 5400
AlgodoacutenAl-godatildeo 60 degC
90 328 1450 900 55 1200 5400
AlgodoacutenAl-godatildeo 40 degC + Pre-lav
90 358 1400 1020 45 1200 5400
Sinteacuteticos 40 degC
40 228 0780 610 44 1200 2700
Mix 40 degC 40 059 0620 440 41 1200 5600 LanaLatildes
30 degC20 040 0200 400 22 800 2500
1 Due to the influence of water pressure hardness and inlet temperature am-bient temperature type amount and soiling of laundry detergent used fluc-tuations in the power supply and the selected additional functions the actualvalues may deviate from the stated values
2 Test programme in accordance with the EU Ecodesign Directive and the EUEnergy Labelling Regulation with cold water (15 degC)
Technical specificationsemspen
61
Technical specifications
21 Technical specifica-tions
Technical specifications
Facts and figures for your appliancecan be found here
Appliance height 850 cmAppliance width 598 cmAppliance depth 590 cmWeight 80 kg1
Maximum load 9 kgMains voltage 220 - 240 V
50 Hz Minimum in-
stallation protec-tion
10 A
Rated power 2300 WPower consump-tion
iexcl Off mode010 W
iexcl Left-on mode050 W
Water pressure iexcl Minimum100 kPa(1 bar)
iexcl Maximum1000 kPa(10 bar)
Length of the wa-ter inlet hose
150 cm
Length of the wa-ter outlet hose
150 cm
Length of thepower cord
160 cm
1 Depending on the appliance spe-cifications
More information about your modelcan be found online at httpsen-ergylabelbsh-groupcom1 This webaddress is linked to the official EUEPREL product database At the time
of printing its web address had notyet been published Please then fol-low the instructions on searching formodels The model identifier is madeup of the characters before the slashin the product number (E-Nr) on therating plate Alternatively you canalso find the model identifier in thefirst line of the EU energy label
1 Only applies to countries in the European Economic Area
Thank you for buying aBosch Home Appliance
Register your new device on MyBosch now and profit directly from
bull Expert tips amp tricks for your appliancebull Warranty extension optionsbull Discounts for accessories amp spare-partsbull Digital manual and all appliance data at handbull Easy access to Bosch Home Appliances Service
Free and easy registration ndash also on mobile phoneswwwbosch-homecomwelcome
Looking for help Youll find it here
Expert advice for your Bosch home appliances help with problems or a repair from Bosch experts Find out everything about the many ways Bosch can support you wwwbosch-homecomservice Contact data of all countries are listed in the attached service direct-ory
90016102699001610269emsp(010219)en
Robert Bosch Hausgeraumlte GmbHCarl-Wery-Straszlige 3481739 MuumlnchenGERMANYwwwbosch-homecom
Valid within Great BritainImported to Great Britain byBSH Home Appliances LtdGrand Union HouseOld Wolverton RoadWolverton Milton KeynesMK12 5PTUnited Kingdom
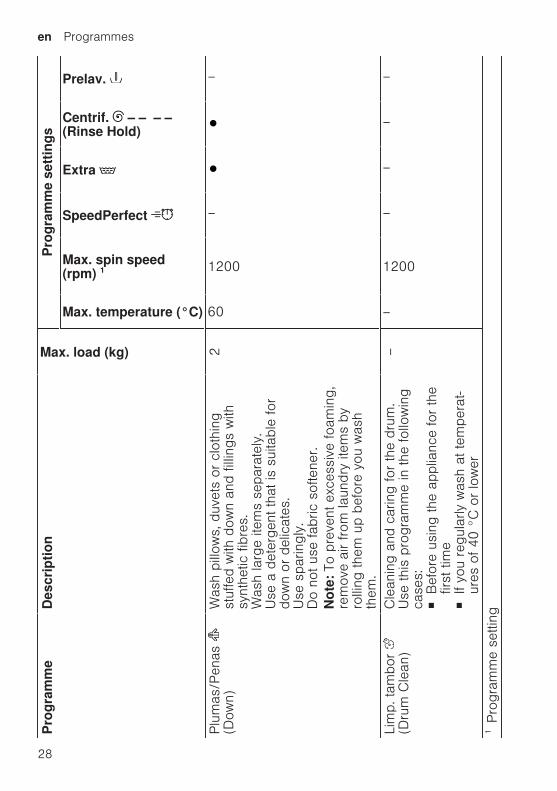
enemspProgrammes
28
Pro
gram
me
Des
crip
tion
Max load (kg)
Pro
gram
me
sett
ings
Max temperature (degC)
Max spin speed(rpm) 1
SpeedPerfect
Extra
Centrif ndash ndash ndash ndash(Rinse Hold)
Prelav
Plu
mas
Pen
as
(Dow
n)W
ash
pillo
ws
duv
ets
or c
loth
ing
stuf
fed
with
dow
n an
d fil
lings
with
synt
hetic
fibr
es
Was
h la
rge
item
s se
para
tely
U
se a
det
erge
nt tha
t is
sui
tabl
e fo
rdo
wn
or d
elic
ates
U
se s
parin
gly
Do
not us
e fa
bric
sof
tene
rN
ote
To
prev
ent ex
cess
ive
foam
ing
rem
ove
air
from
laun
dry
item
s by
rolli
ng the
m u
p be
fore
you
was
hth
em
2
60
1200
ndash
ndash
Lim
p tam
bor
(Dru
m C
lean
)C
lean
ing
and
carin
g fo
r th
e dr
um
Use
thi
s pr
ogra
mm
e in
the
follo
win
gca
ses
iexclB
efor
e us
ing
the
appl
ianc
e fo
r th
efir
st tim
eiexcl
If yo
u re
gula
rly w
ash
at tem
pera
t-ur
es o
f 40 deg
C o
r lo
wer
ndash
ndash
1200
ndash
ndash
ndash
ndash
1Pro
gram
me
setti
ng
Programmesemspen
29
Pro
gram
me
Des
crip
tion
Max load (kg)
Pro
gram
me
sett
ings
Max temperature (degC)
Max spin speed(rpm) 1
SpeedPerfect
Extra
Centrif ndash ndash ndash ndash(Rinse Hold)
Prelav
iexclA
fter
a pr
olon
ged
perio
d of
non
-us
eU
se w
ashi
ng p
owde
r or
a d
eter
gent
cont
aini
ng b
leac
hH
alve
the
am
ount
of d
eter
gent
to
avoi
d fo
amin
gD
o no
t us
e fa
bric
sof
tene
rD
o no
t us
e liq
uid
dete
rgen
t or
det
er-
gent
tha
t is
inte
nded
for
woo
llens
or
delic
ates
N
ote
The
dru
m c
lean
ing
indi
cato
rw
ill fl
ash
to r
emin
d yo
u if
you
have
not us
ed a
pro
gram
me
at 6
0 deg
C o
rhi
gher
for
a lo
ng tim
eC
amis
asB
lusa
s (S
hirts
Blo
uses
)W
ash
non-
iron
shirt
s an
d bl
ouse
sm
ade
from
cot
ton
line
n s
ynth
etic
or
blen
ded
fabr
ics
Not
e U
se the
Del
icad
oSed
a pr
o-gr
amm
e to
was
h sh
irts
and
blou
ses
mad
e from
silk
or
delic
ate
fabr
ics
2
60
800
ndash
1Pro
gram
me
setti
ng
enemspProgrammes
30
Pro
gram
me
Des
crip
tion
Max load (kg)
Pro
gram
me
sett
ings
Max temperature (degC)
Max spin speed(rpm) 1
SpeedPerfect
Extra
Centrif ndash ndash ndash ndash(Rinse Hold)
Prelav
Spo
rt
Was
h sp
orts
and
leis
ure
item
s m
ade
from
syn
thet
ic fi
bres
mic
rofib
re o
rfle
ece
Use
a d
eter
gent
tha
t is
sui
tabl
e fo
rsp
orts
item
sD
o no
t us
e fa
bric
sof
tene
rTi
p U
se the
Sin
teacutetic
os
prog
ram
me
to w
ash
heav
ily s
oile
d la
undr
y
2
40
800
ndash
Raacutep
ido
153
0m
in
(Sup
erQ
uick
153
0 m
in)
Was
h ite
ms
mad
e from
cot
ton
syn
-th
etic
or
blen
ded
fabr
ics
Sho
rt p
rogr
amm
e fo
r sm
all i
tem
s of
light
ly s
oile
d la
undr
yTh
e pr
ogra
mm
e du
ratio
n is
app
rox
30 m
inut
es
If yo
u w
ish
to r
educ
e th
e pr
ogra
mm
edu
ratio
n to
15 m
inut
es a
ctiv
ate
Spe
edPer
fect
T
he m
axim
umlo
ad is
red
uced
to
2 k
g
4
40
1200
ndash
1Pro
gram
me
setti
ng
Accessoriesemspen
31
Accessories
9 AccessoriesAccessories
Use original accessories These have been made especially for your appliance
Use Order numberWater inlet hose exten-sion
Extend the water inlethose for cold water orAquaStop (approx 250m)
WMZ2381
Fixing brackets Improves the stability ofthe appliance
WMZ2200
Longer water inlet hose Replace the standardwater inlet hose with alonger hose (220 m)
00353925
Elbow Secure the water outlethose in place
00655300
Liquid detergent insert Measure liquid deter-gent
00605740
Metal covering plate Metal covering plate forinstalling the applianceunder a high worktop
WMZ20430
Before using for the first time
10 Before using for thefirst time
Before using for the first time
Prepare the appliance for use
101 Starting an empty wash-ing cycle
Your appliance was inspected thor-oughly before leaving the factory Toremove any residual water run thefirst wash cycle without any laundryNote Please read the information inthe Safety rarr Page 4 and Preventingmaterial damage rarr Page 10 sectionsto ensure that you use the appliancesafely
1 Turn the programme selector toLimp tambor
2 Close the door
enemspLaundry
32
3 Pull out the detergent drawer
4 Pour approx 1 litre of tap waterinto compartment II
5 Pour washing powder into com-partment II
To prevent foaming use only halfof the amount of detergent recom-mended by the detergent manufac-turer for light soiling Do not usedetergent suitable for woollens ordelicates
6 Push in the detergent drawer
7 Press InicioPausa + Carga (StartPause + Reload) to start theprogramme
a The display shows the remainingprogramme duration
a After the programme has endedthe display shows End
8 Start the first wash cycle or set theprogramme selector to to switchoff the appliance rarr Basic operation Page 36
Laundry
11 LaundryLaundry
111 Preparing the laundryNote Please read the information inthe Safety rarr Page 4 and Preventingmaterial damage rarr Page 10 sectionsto ensure that you use the appliancesafely
ATTENTIONObjects remaining in the laundry maydamage the laundry and the drum Remove all items from any pock-
ets in your laundry before usingthe appliance
To protect your appliance and thelaundry prepare the laundry be-forehandndash Empty any pockets
Laundryemspen
33
ndash Brush sand out of all collars andpockets
ndash Close bed covers and cushioncovers
ndash Close all zips Velcro fastenershooks and eyes
ndash Tie cloth belts apron stringsetc together or use a laundrybag
ndash Remove curtain hooks and leadstrips or use a mesh laundrybag
ndash Use a mesh laundry bag forsmall items of laundry such aschildrens socks
ndash Some stubborn or dried-in stainscan be removed by washingseveral times
ndash Wash large and small items oflaundry together
ndash Do not rub fresh stains but dabthem with soapy water
ndash Separate items of laundry andshake them out
112 Sorting laundryNote Please read the information inthe Safety rarr Page 4 and Preventingmaterial damage rarr Page 10 sectionsto ensure that you use the appliancesafely To improve washing results and
prevent discolouration sort thelaundry according to the followingcriteria before washingndash Type of fabric and fibre
Wash laundry of the sametype of fabric and fibre to-gether
ndash Care symbols on the care labelsrarr Page 34
ndash Description of the programmesrarr Page 24
ndash Whitesndash Colours
Wash new coloured itemsseparately the first time youwash them
113 Degrees of soiling
Degree of soiling Soiling ExamplesLight iexcl No dirt or stains are vis-
ibleiexcl Laundry has absorbed
odours
Light summer clothing orsports clothing that hasbeen worn for a just a fewhours
Normal Dirt or light stains are vis-ible
iexcl T-shirts shirts or blousesare sweat-soaked orhave been worn a fewtimes
iexcl Towels or bedding thathas been used for up toone week
Heavy Dirt or stains are clearlyvisible
Tea towels baby items orwork clothing
enemspDetergents and care products
34
114 Care symbols on the care labels
Washing care symbols
Symbol Washing process Recommended pro-gramme
Normal Cotton Gentle Easy-Care Particularly gentle DelicatesSilk for
washing by handHand wash WoolNot suitable for machine-washing ndash
Detergents and care products
12 Detergents and careproducts
Detergents and care products
Note Please read the information inthe Safety rarr Page 4 and Preventingmaterial damage rarr Page 10 sectionsto ensure that you use the appliancesafelyThe manufacturers instructions foruse and dosage can be found on thepackaging
Notesiexcl Only use liquid detergents that are
self-flowingiexcl Do not mix different liquid deter-
gentsiexcl Do not mix detergent and fabric
softeneriexcl Do not use products that have ex-
pired or are highly congealediexcl Do not use products containing
solvents caustic agents or volatilesubstances (eg bleach)
iexcl Use dyes sparingly as salt maydamage stainless steel
iexcl Do not use bleaching agents in theappliance
121 Detergent recommendation
Detergent Fabrics Pro-gramme
Temperature
Standard detergentwith optical brighten-ers
Heat-resistant whitefabrics made fromcotton or linen
Cotton From cold up to90 degC
Detergent for colourswithout bleach or op-tical brighteners
Coloured fabricsmade from linen orcotton
Cotton From cold up to60 degC
Detergent for col-oursdelicates withoutoptical brighteners
Coloured fabricsmade from easy-carefabrics or syntheticmaterials
Easy-Care From cold up to60 degC
Detergents and care productsemspen
35
Detergent Fabrics Pro-gramme
Temperature
Detergent for delic-ates
Delicate fine textilessilk or viscose
DelicatesSilk
From cold up to40 degC
Detergent for wool-lens
Wool Wool From cold up to40 degC
Tip Visit wwwcleanrighteu to findfurther information on detergentscare products and cleaning agentsfor domestic use
122 Detergent dosageThe detergent dosage depends oniexcl The amount of laundryiexcl Degree of soilingiexcl Water hardness
You can find out how hard yourwater is from your local water com-pany or measure it yourself usinga water hardness tester
Water hardness
Hardness range Total hardness in mmoll
German degrees in degdH
soft (I) 0ndash15 0ndash84medium (II) 15ndash 25 84ndash14hard (III) over 25 over 14
Example of a manufacturersinstructions for detergentThese example values refer to astandard load of 4ndash5 kg
Soiling Light Normal HeavyWater hardness Softmedium 40 ml 55 ml 80 mlWater hardness Hardveryhard
55 ml 80 ml 105 ml
The dosages can be found on themanufacturers packagingiexcl Adjust the dosage to the actual
load
enemspBasic operation
36
Basic operation
13 Basic operationBasic operation
131 Switching on the appli-ance
Turn the programme selector to aprogramme
132 Setting a programme1 Set the programme selector to the
required programme rarr Programmes Page 24
2 If necessary adjust the pro-gramme settings rarr Page 36
133 Adjusting the pro-gramme settings
Requirement A programme hasbeen set rarr Setting a programme Page 36
Adjust the programme settings rarr Programmes Page 24
Note The programme settings arenot saved permanently for the pro-gramme
134 Loading laundryNotesiexcl Please read the information in the
Safety rarr Page 4 and Preventingmaterial damage rarr Page 10 sec-tions to ensure that you use theappliance safely
iexcl To prevent creasing take note ofthe maximum load for the rarr Programmes Page 24
Requirement The laundry is pre-pared and sortedrarr Laundry Page 321 Open the door
Make sure that the drum is empty2 Load the laundry unfolded into the
drum3 Close the door
Ensure that there is no laundrytrapped in the door
Basic operationemspen
37
135 Using a measuring aidfor liquid detergent
If you order the measuring aid as anaccessory you must use the measur-ing aid1 Pull out the detergent drawer
2 Press down on the insert and re-move the detergent drawer
1
2
3 Insert the measuring aid
4 Insert the detergent drawer
136 Use the measuring aidfor liquid detergent
To add liquid detergent you can usea measuring aid in the detergentdrawer1 Pull out the detergent drawer2 Slide the measuring aid forwards
3 Fold the measuring aid down andclick it into place
enemspBasic operation
38
4 Push in the detergent drawer
137 Adding detergent andcare product
Notesiexcl Please read the information in the
Safety rarr Page 4 and Preventingmaterial damage rarr Page 10 sec-tions to ensure that you use theappliance safely
iexcl Do not use the measuring aid forliquid detergent for gel detergentswashing powder or if Prewash orReady in time are activated
Requirement Find out the optimumdosage for detergent and careproduct rarr Page 341 Pull out the detergent drawer2 Pour in detergent
rarr Detergent drawer Page 193 If required add the care product4 Push in the detergent drawer
138 Starting the programmeNote If you want to change the timeuntil the programme ends set theReady in time first Press InicioPausa + Carga a The drum rotates and load detec-
tion takes place This can take upto 2 minutes after which waterenters the drum
a The display shows either the pro-gramme duration or the Ready intime
a After the programme has endedthe display shows End
139 Adjusting the Ready intime before the pro-gramme starts
You can readjust the selected Readyin time before the programme starts1 Press InicioPausa + Carga 2 Press Termin repeatedly until
the display indicates the desiredReady in time
3 Press InicioPausa + Carga
1310 Soaking laundryNote No additional detergent is re-quired The washing solution is thenused for washing1 Start the programme2 To pause the programme after ap-
prox 10 minutes press InicioPausa + Carga
3 To resume the programme afterthe desired soaking time pressInicioPausa + Carga
1311 Adding laundryNote Please read the information inthe Safety rarr Page 4 and Preventingmaterial damage rarr Page 10 sectionsto ensure that you use the appliancesafely1 Press InicioPausa + Carga
The appliance is paused andchecks whether it is possible toadd or remove laundry Take noteof the programme status
2 Add or remove laundry3 Close the door4 Press InicioPausa + Carga
Basic operationemspen
39
1312 Cancelling the pro-gramme
Once the programme has startedyou can cancel it at any timeNote Please read the information inthe Safety rarr Page 4 and Preventingmaterial damage rarr Page 10 sectionsto ensure that you use the appliancesafely1 Press InicioPausa + Carga 2 Open the door
The appliance door remainslocked for safety reasons if thetemperature and water levels arehighndash If the temperature is high start
the programmendash If the water level is high Start
the or programme3 Remove the laundry
1313 Resuming the pro-gramme when the pro-gramme status is RinseHold
1 Set the or programme2 Press InicioPausa + Carga
1314 Unloading the laundryNote Please read the information inthe Safety rarr Page 4 and Preventingmaterial damage rarr Page 10 sectionsto ensure that you use the appliancesafely1 Open the door
2 Remove the laundry
1315 Switching off the appli-ance
1 Turn the programme selector to
2 Turn off the tap3 Wipe the rubber gasket dry and re-
move any foreign objects
4 Leave the door and detergentdrawer open so that residual watercan evaporate
enemspChildproof lock
40
Childproof lock
14 Childproof lockChildproof lock
Secure your appliance against beingoperated unintentionally using thecontrols
141 Activating the childprooflock
Press and hold the two 3 segbuttons for approx 3 seconds
a The display shows a The controls are lockeda The childproof lock remains active
even after the appliance has beenswitched off
142 Deactivating the child-proof lock
Requirement To deactivate thechildproof lock the appliance mustbe switched on Press and hold the two 3 seg
buttons for approx 3 secondsa goes out in the display
Basic settingsemspen
41
Basic settings
15 Basic settingsBasic settings
You can configure the appliance to meet your needs
151 Overview of the basic settingsBelow is an overview of the basic settings on your appliance
Basic setting Programmeposition
Value Description
End signal 2 0 (off)1 (quiet)2 (me-dium)3 (loud)4 (veryloud)
Set the volume of the signal at theend of the programme
Button signal 3 0 (off)1 (quiet)2 (me-dium)3 (loud)4 (veryloud)
The volume of the audible signalemitted when the buttons arepressed
Drum cleaningreminder
4 ONOFF
Activate or deactivate the re-minder to clean the drum
enemspCleaning and servicing
42
152 Changing the basic set-tings
1 Set the programme selector to po-sition 1
2 Press InicioPausa + Carga and at the same time turn theprogramme selector to position 2
a The display shows the currentvalue
3 Set the programme selector to therequired position
4 To change the value press Ter-min
5 To save the changes switch offthe appliance
Cleaning and servicing
16 Cleaning and servi-cing
Cleaning and servicing
To keep your appliance working effi-ciently for a long time it is importantto clean and maintain it carefully
161 Tips on appliance careWipe down thehousing and thecontrol panelwith nothing butwater and adamp cloth
This ensures theparts of the appli-ance will remainclean and hy-gienic
Remove all de-tergent residuespray residue orother residuesimmediately
Fresh depositsare easier to re-move withoutleaving anyresidue
Keep the appli-ance door anddetergent draweropen after use
This allows theresidual water todry reducingodours in the ap-pliance
162 Cleaning the drum
CAUTIONRisk of injuryPermanently washing at low temper-atures and a lack of ventilation forthe appliance may damage the drumand cause injury Regularly run a programme for
cleaning the drum or wash at tem-peratures of at least 60 degC
Leave the appliance to dry afterevery operation with the dooropen and leave the detergentdrawer to dry
Run the Limp tambor pro-gramme without laundryAdd washing powder
163 Cleaning the detergentdrawer
Note Please read the information inthe Safety rarr Page 4 and Preventingmaterial damage rarr Page 10 sectionsto ensure that you use the appliancesafely1 Pull out the detergent drawer
Cleaning and servicingemspen
43
2 Press down on the insert and re-move the detergent drawer
1
2
3 Press out the insert upwards frombelow
4 Clean the detergent drawer and in-sert with water and a brush andthen dry them
5 Fit the insert and lock it into place
6 Cleaning the opening for the deter-gent drawer
7 Push in the detergent drawer
164 Descaling
ATTENTIONThe use of unsuitable descalingagents eg for coffee machines maydamage the appliance For this appliance only use de-
scaling agents that are availablefrom the manufacturers website orour after-sales service
enemspCleaning and servicing
44
165 Cleaning the drain pumpClean the drain pump in the event offaults eg blockages or rattlingnoises
Emptying the drain pumpNote Please read the information inthe Safety rarr Page 4 and Preventingmaterial damage rarr Page 10 sectionsto ensure that you use the appliancesafely1 Turn off the water tap2 Switch off the appliance3 Disconnect the appliances mains
plug from the power supply4 Open the maintenance flap
5 Remove the maintenance flap
6 Slide a sufficiently large receptacleunder the opening
7 Take the drain hose out of theholder
Cleaning and servicingemspen
45
8 CAUTION - Risk of scaldingWhen you wash at high temperat-ures the detergent solution getshot
Do not touch the hot detergentsolutionTo allow the detergent solution toflow out into the container removethe sealing cap
9 Firmly press on the sealing cap
10 Insert the drain hose into theholder
Cleaning the drain pumpNote Please read the information inthe Safety rarr Page 4 and Preventingmaterial damage rarr Page 10 sectionsto ensure that you use the appliancesafelyRequirement The drain pump isempty rarr Page 441 Since water may remain in the
drain pump remove the pump capcarefully
2 Clean the interior the thread onthe pump cap and the pump hous-ing
3 Make sure that the impeller in thedrain pump can be rotated
enemspCleaning and servicing
46
4 Insert the pump cap and screw iton as far as it will go
90deg
The handle on the pump cap mustbe in a vertical position
5 Close the maintenance flap
Before the next washTo prevent unused detergent fromflowing straight into the outlet in thenext wash run the programmeafter you have emptied the drainpump1 Turn on the tap2 Insert the mains plug3 Switch on the appliance4 Pour 1 litre of water into compart-
ment II5 Start the programme
166 Cleaning the water outlethose at the siphon
1 Switch off the appliance2 Disconnect the appliances mains
plug from the power supply
3 Loosen the hose clamp and care-fully remove the water outlet hose
Residual water may leak out4 Clean the water outlet hose and si-
phon connecting piece
5 Reattach the water outlet hose andsecure the connection point usingthe hose clamp
Cleaning and servicingemspen
47
167 Clean the water inlet fil-ters
Emptying the water inlet hose1 Turn off the tap2 Set a programme except for
or 3 Start the programme and leave it
to run for approx 40 seconds4 Switch off the appliance5 Disconnect the appliances mains
plug from the power supply
Cleaning the filter on the tapNote Please read the information inthe Safety rarr Page 4 and Preventingmaterial damage rarr Page 10 sectionsto ensure that you use the appliancesafelyRequirement The water inlet hose isempty1 Remove the water inlet hose from
the tap
2 Clean the filter with a small brush
3 Connect the water inlet hose andcheck for leaks
Cleaning the filter on theapplianceNote Please read the information inthe Safety rarr Page 4 and Preventingmaterial damage rarr Page 10 sectionsto ensure that you use the appliancesafelyRequirement The water inlet hose isempty rarr Emptying the water inlet hosePage 47
enemspCleaning and servicing
48
1 Disconnect the hose from the rearof the appliance
1
2
2 Use pliers to remove the filter
3 Clean the filter with a small brush
4 Reinsert the filter
5 Connect the hose and check forleaks
2
1
Troubleshootingemspen
49
Troubleshooting
17 TroubleshootingTroubleshooting
You can rectify minor faults on your appliance yourself Read the troubleshoot-ing information before contacting after-sales service This will avoid unneces-sary costs
WARNINGRisk of electric shockIncorrect repairs are dangerous Repairs to the appliance should only be carried out by trained specialist
staff Only use genuine spare parts when repairing the appliance If the power cord of this appliance is damaged it must be replaced by the
manufacturer the manufacturers Customer Service or a similarly qualifiedperson in order to prevent any risk
Fault Cause and troubleshootingThe display goes outand InicioPausa +Carga flashes
Energy-saving mode is active Press any buttona The symbol lights up again
E36 -10 Drain pipe or water outlet hose is blocked Clean the drain pipe and the water outlet hose
Drain pipe or water drain hose is caught or jammed Ensure that the drain pipe and water drain hose are
not kinked or trapped
Drain pump is blocked rarr Cleaning the drain pump Page 44
The water outlet hose is connected too high Install the water outlet hose at a maximum height of
1 metre
Detergent dosage is too high Immediate measure Mix one tablespoon of fabric
softener with 05 litres of water and pour the mix-ture into the left-hand compartment (not for outdoorclothing sportswear or items stuffed with down)
Reduce the amount of detergent for the next wash-ing cycle with the same load
Unapproved extension installed on the water drainhose Remove any unapproved extensions from the water
hose Connecting the appliance
E36 -25 -26 Drain pump is blocked rarr Cleaning the drain pump Page 44
enemspTroubleshooting
50
Fault Cause and troubleshootingThe water pressure is lowNo remedial action possibleThe filters in the water inflow are blocked Clean the filters in the water inflow rarr Page 47
The tap is turned off Turn on the tap
The water inlet hose is kinked or jammed Ensure that the water inlet hose is not kinked or
jammed
flashes The automatic voltage control system detects an un-authorised voltage under-usage No remedial action possible
Note If the power supply is stable the programmecontinues to run as normalVoltage under-usage may cause extension of a pro-grammeNo remedial action possible
flashes Voltage under-usage may cause extension of a pro-grammeNo remedial action possible
lights up The temperature is too high Wait until the temperature has dropped rarr Cancelling the programme Page 39
Water level is too high Start the programme
Laundry is caught in the door1 Open the door again2 Remove any trapped laundry3 Close the door4 Press InicioPausa + Carga to start the pro-
gramme
flashes Door is not closed1 Close the door2 Press InicioPausa + Carga to start the pro-
gramme
All other error codes Malfunction Call the after-sales service
rarr Customer Service Page 59
Troubleshootingemspen
51
Fault Cause and troubleshootingThe appliance is notworking
The mains plug of the power cord is not plugged in Connect the appliance to the power supply
The circuit breaker is faulty Check the circuit breaker in the fuse box
There has been a power cut Check whether the lighting in your kitchen or other
appliances are working
The programme doesnot start
You have not pressed InicioPausa + Carga Press InicioPausa + Carga
Door is not closed1 Close the door2 Press InicioPausa + Carga to start the pro-
gramme
Childproof lock is activated rarr Deactivating the childproof lock Page 40
Termin is activated Check whether Termin is activated
rarr Buttons Page 23
Laundry is caught in the door1 Open the door again2 Remove any trapped laundry3 Close the door4 Press InicioPausa + Carga to start the pro-
gramme
The door cannotbe opened
ndash ndash ndash ndash is activated Continue the programme by selecting or and
pressing InicioPausa + Carga rarr Resuming the programme when the programmestatus is Rinse Hold Page 39
The temperature is too high Wait until the temperature has dropped rarr Cancelling the programme Page 39
Water level is too high Start the programme
Power failure Open the door using the emergency release
rarr Emergency release Page 57
The water is not drain-ing
Drain pipe or water outlet hose is blocked Clean the drain pipe and the water outlet hose
enemspTroubleshooting
52
Fault Cause and troubleshootingThe water is not drain-ing
Drain pipe or water drain hose is caught or jammed Ensure that the drain pipe and water drain hose are
not kinked or trapped
Drain pump is blocked rarr Cleaning the drain pump Page 44
ndash ndash ndash ndash is activated Continue the programme by selecting or and
pressing InicioPausa + Carga rarr Resuming the programme when the programmestatus is Rinse Hold Page 39
The water outlet hose is connected too high Install the water outlet hose at a maximum height of
1 metre
Detergent dosage is too high Immediate measure Mix one tablespoon of fabric
softener with 05 litres of water and pour the mix-ture into the left-hand compartment (not for outdoorclothing sportswear or items stuffed with down)
Reduce the amount of detergent for the next wash-ing cycle with the same load
Unapproved extension installed on the water drainhose Remove any unapproved extensions from the water
hose Connecting the appliance
Water is not flowingin Detergent is notbeing dispensed
You have not pressed InicioPausa + Carga Press InicioPausa + Carga
The filters in the water inflow are blocked Clean the filters in the water inflow rarr Page 47
The tap is turned off Turn on the tap
The water inlet hose is kinked or jammed Ensure that the water inlet hose is not kinked or
jammed
The spin cycle runsseveral times
The unbalanced load detection system eliminates animbalance by repeatedly redistributing the laundry Not a fault ndash no action required
Note When loading where possible place large andsmall items of laundry together in the drum Differentsized items of laundry distribute themselves betterduring the spin cycle
Troubleshootingemspen
53
Fault Cause and troubleshootingThe programme dura-tion changes duringthe wash cycle
The programme operation is optimised electronicallyThis may change the programme duration Not a fault ndash no action required
The unbalanced load detection system eliminates animbalance by repeatedly redistributing the laundry Not a fault ndash no action required
Note When loading where possible place large andsmall items of laundry together in the drum Differentsized items of laundry distribute themselves betterduring the spin cycleFoam detection system switches on a rinse cycle iffoam build-up is too high Not a fault ndash no action required
No water is visible inthe drum
Water is below the visible area Not a fault ndash no action required Do not add any extra water to the appliance while it
is operating
Drum jerks after theprogramme starts
This is caused by an internal motor test Not a fault ndash no action required
Residual water ispresent in the com-partment
Insert in compartment is blocked rarr Cleaning the detergent drawer Page 42
Vibrations and move-ment of the appliancewhilst spinning
Appliance is not correctly aligned Aligning the appliance
The appliance feet are not fixed Secure the appliance feet Aligning the appliance
Transit bolts have not been removed Removing the transit bolts
Drum does not turnwater does not flow in
Load detection is active Not a fault ndash no action required
Note The load detection can take up to two minutesHeavy foam build-up Detergent dosage is too high
Immediate measure Mix one tablespoon of fabricsoftener with 05 litres of water and pour the mix-ture into the left-hand compartment (not for outdoorclothing sportswear or items stuffed with down)
Reduce the amount of detergent for the next wash-ing cycle with the same load
enemspTroubleshooting
54
Fault Cause and troubleshootingHigh spin speed notreached
A low spin speed is selected The next time you run a wash cycle set a higher
spin speed
Unbalance load detection system is using a reducedspin speed to eliminate an unbalance Redistribute the laundry in the drum
Note Where possible mix large and small items inthe drum Different sized items of laundry distributethemselves better during the spin cycle Start the programme
The spin programmedoes not start
Drain pipe or water outlet hose is blocked Clean the drain pipe and the water outlet hose
Drain pipe or water drain hose is caught or jammed Ensure that the drain pipe and water drain hose are
not kinked or trapped
The unbalanced load detection system has interruptedthe spin cycle because the laundry is unevenly distrib-uted Redistribute the laundry in the drum
Note Where possible mix large and small items inthe drum Different sized items of laundry distributethemselves better during the spin cycle Start the programme
Rushing hissingnoise
Water is flushed under pressure into the detergentdrawer Not a fault ndash normal operating noise
Loud noises duringthe spin cycle
Appliance is not correctly aligned Aligning the appliance
The appliance feet are not fixed Secure the appliance feet Aligning the appliance
Transit bolts have not been removed Removing the transit bolts
Banging noises rat-tling in the drainpump
Foreign bodies have got into the drain pump rarr Cleaning the drain pump Page 44
Slurping rhythmicalsuction noise
The drain pump is active the detergent solution ispumped out Not a fault ndash normal operating noise
Troubleshootingemspen
55
Fault Cause and troubleshootingCreasing The spin speed is too high
The next time you run a wash cycle set a lowerspin speed
The load is too large The next time you run a wash cycle reduce the
amount of laundry being loaded
The wrong programme is selected for the type of fab-ric Select the programmes that are suitable for the
type of fabric rarr Programmes Page 24
Detergent or fabricsoftener drips off theseal and collects onthe door or in the sealfold
Too much detergentfabric softener in the detergentdrawer When dosing liquid detergent and fabric softener
observe the marking in the detergent drawer anddo not dose above this
The spin result is notsatisfactory The laun-dry is too wettoodamp
A low spin speed is selected The next time you run a wash cycle set a higher
spin speed Start the programme
Drain pipe or water outlet hose is blocked Clean the drain pipe and the water outlet hose
Drain pipe or water drain hose is caught or jammed Ensure that the drain pipe and water drain hose are
not kinked or trapped
The unbalanced load detection system has interruptedthe spin cycle because the laundry is unevenly distrib-uted Redistribute the laundry in the drum
Note Where possible mix large and small items inthe drum Different sized items of laundry distributethemselves better during the spin cycle Start the programme
Unbalance load detection system is using a reducedspin speed to eliminate an unbalance Redistribute the laundry in the drum
Note Where possible mix large and small items inthe drum Different sized items of laundry distributethemselves better during the spin cycle Start the programme
enemspTroubleshooting
56
Fault Cause and troubleshootingDetergent residue onthe damp washing
Detergents may contain water-insoluble substancesthat deposit on the laundry Start the programme
Detergent residue onthe dry laundry
Detergents may contain water-insoluble substancesthat deposit on the laundry Brush out the laundry after washing and drying
Water is leaking out atthe water inlet hose
Water inlet hose is not correctlysecurely connected1 Connect the water supply hose correctly Connect-
ing the water inlet hose2 Tighten the screw connection
Water is leaking out atthe water outlet hose
The water outlet hose is damaged Replace the damaged water outlet hose
Water outlet hose is not connected correctly Connect the water outlet hose correctly Water out-
let connection types
Odours have formedin the appliance
Humidity and detergent residue may promote theformation of bacteria rarr Cleaning the drum Page 42 If you are not using the appliance leave the door
and detergent drawer open so that residual watercan evaporate
Transportation storage and disposalemspen
57
171 Emergency releaseReleasing the doorRequirement The drain pump isempty rarr Page 441 ATTENTION Escaping water may
cause material damage Do not open the door if you can
see water through the glassPull the emergency release down-wards with a tool and release
a The door lock is released2 Insert the maintenance flap and
lock it into place3 Close the maintenance flap
Transportation storage and disposal
18 Transportation stor-age and disposal
Transportation storage and disposal
You can find out here how to prepareyour appliance for transportation andstorage You will also find out how todispose of old appliances
181 Removing the appliance1 Turn off the tap2 rarr Emptying the water inlet hose
Page 473 Switch off the appliance4 Unplug the appliances mains plug
5 Drain the remaining detergentsolution rarr Cleaning the drain pumpPage 44
6 Detach the hoses
182 Inserting the transitbolts
Secure the appliance for transporta-tion using transit bolts in order to pre-vent damage1 Remove the four cover caps
‒ If necessary use a screwdriverto remove the cover caps
Keep the cover caps2 Insert the four sleeves
enemspTransportation storage and disposal
58
3 Insert all screws into the fourtransit bolts and tighten slightly
4 Insert the power cord into theholder and tighten all fourscrews for the transit bolts with aWAF 13 wrench
5 Insert the hose into holder
183 Using the applianceagain
1 Remove the transit bolts
2 Pour approx 1 litre of water intocompartment II in the detergentdrawer
3 Start the programmea The unused detergent cannot flow
straight into the outlet during thenext wash
184 Disposing of old appli-ance
Valuable raw materials can be re-used by recycling
WARNINGRisk of harm to healthChildren can lock themselves in theappliance thereby putting their livesat risk Do not install the appliance behind
a door as this may obstruct the ap-pliance door or prevent it fromopening
With redundant appliances unplugthe power cord Then cut throughthe cord and damage the lock onthe appliance door beyond repairso that the appliance door will nolonger close
1 Unplug the appliance from themains
2 Cut through the power cord3 Dispose of the appliance in an en-
vironmentally friendly mannerInformation about current disposalmethods are available from yourspecialist dealer or local authority
This appliance is la-belled in accordancewith European Directive201219EU concerningused electrical and elec-
Customer Serviceemspen
59
tronic appliances (wasteelectrical and electronicequipment - WEEE)The guideline determ-ines the framework forthe return and recyclingof used appliances asapplicable throughoutthe EU
Customer Service
19 Customer ServiceCustomer Service
If you have any queries on use areunable to rectify faults on the appli-ance yourself or if your applianceneeds to be repaired contact Cus-tomer ServiceYou can solve many problems your-self by consulting the information ontroubleshooting in these instructionsor on our website If this is not thecase contact our after-sales serviceWith any warranty claims we willmake sure that your appliance is re-paired by trained after-sales techni-cians using genuine spare parts in-cluding after the manufacturers war-ranty has expiredFunction-relevant genuine spare partsaccording to the corresponding Eco-design Order can be obtained fromCustomer Service for a period of atleast 10 years from the date onwhich your appliance was placed onthe market within the European Eco-nomic AreaNote Under the terms of the manu-facturers warranty the use of Cus-tomer Service is free of chargeDetailed information on the warrantyperiod and terms of warranty in yourcountry is available from our after-sales service your retailer or on ourwebsite
If you contact Customer Service youwill require the product number (E-Nr) and the production number (FD)of your applianceThe contact details for Customer Ser-vice can be found in the enclosedCustomer Service directory or on ourwebsite
191 Product number (E-Nr)and production number(FD)
You can find the product number (E-Nr) and the production number (FD)on the appliances rating plateDepending on the model the ratingplate is locatediexcl On the inside of the dooriexcl On the inside of the maintenance
flapiexcl On the rear of the applianceMake a note of your appliances de-tails and the Customer Service tele-phone number to find them againquickly
enemspConsumption values
60
Consumption values
20 Consumption valuesConsumption values
The following information is provided in accordance with the EU EcodesignRegulation The values given for programs other than the Eco 40-60 are indicat-ive only and were determined in accordance with the applicable standardEN60456
Programme Load(kg)
Pro-gramme dura-tion(hrmin)1
Energycon-sump-tion(kWhcycle)1
Watercon-sump-tion (lcycle)1
Max-imumtemper-ature(degC) 5mins1
Spinspeed(rpm)1
Resid-ualmois-ture()1
Eco 40-602 90 337 1245 610 50 1166 5000Eco 40-602 45 252 0590 450 33 1200 5000Eco 40-602 25 233 0195 300 24 1200 5400AlgodoacutenAl-godatildeo 20 degC
90 328 0370 900 23 1200 5400
AlgodoacutenAl-godatildeo 40 degC
90 328 1350 900 45 1200 5400
AlgodoacutenAl-godatildeo 60 degC
90 328 1450 900 55 1200 5400
AlgodoacutenAl-godatildeo 40 degC + Pre-lav
90 358 1400 1020 45 1200 5400
Sinteacuteticos 40 degC
40 228 0780 610 44 1200 2700
Mix 40 degC 40 059 0620 440 41 1200 5600 LanaLatildes
30 degC20 040 0200 400 22 800 2500
1 Due to the influence of water pressure hardness and inlet temperature am-bient temperature type amount and soiling of laundry detergent used fluc-tuations in the power supply and the selected additional functions the actualvalues may deviate from the stated values
2 Test programme in accordance with the EU Ecodesign Directive and the EUEnergy Labelling Regulation with cold water (15 degC)
Technical specificationsemspen
61
Technical specifications
21 Technical specifica-tions
Technical specifications
Facts and figures for your appliancecan be found here
Appliance height 850 cmAppliance width 598 cmAppliance depth 590 cmWeight 80 kg1
Maximum load 9 kgMains voltage 220 - 240 V
50 Hz Minimum in-
stallation protec-tion
10 A
Rated power 2300 WPower consump-tion
iexcl Off mode010 W
iexcl Left-on mode050 W
Water pressure iexcl Minimum100 kPa(1 bar)
iexcl Maximum1000 kPa(10 bar)
Length of the wa-ter inlet hose
150 cm
Length of the wa-ter outlet hose
150 cm
Length of thepower cord
160 cm
1 Depending on the appliance spe-cifications
More information about your modelcan be found online at httpsen-ergylabelbsh-groupcom1 This webaddress is linked to the official EUEPREL product database At the time
of printing its web address had notyet been published Please then fol-low the instructions on searching formodels The model identifier is madeup of the characters before the slashin the product number (E-Nr) on therating plate Alternatively you canalso find the model identifier in thefirst line of the EU energy label
1 Only applies to countries in the European Economic Area
Thank you for buying aBosch Home Appliance
Register your new device on MyBosch now and profit directly from
bull Expert tips amp tricks for your appliancebull Warranty extension optionsbull Discounts for accessories amp spare-partsbull Digital manual and all appliance data at handbull Easy access to Bosch Home Appliances Service
Free and easy registration ndash also on mobile phoneswwwbosch-homecomwelcome
Looking for help Youll find it here
Expert advice for your Bosch home appliances help with problems or a repair from Bosch experts Find out everything about the many ways Bosch can support you wwwbosch-homecomservice Contact data of all countries are listed in the attached service direct-ory
90016102699001610269emsp(010219)en
Robert Bosch Hausgeraumlte GmbHCarl-Wery-Straszlige 3481739 MuumlnchenGERMANYwwwbosch-homecom
Valid within Great BritainImported to Great Britain byBSH Home Appliances LtdGrand Union HouseOld Wolverton RoadWolverton Milton KeynesMK12 5PTUnited Kingdom
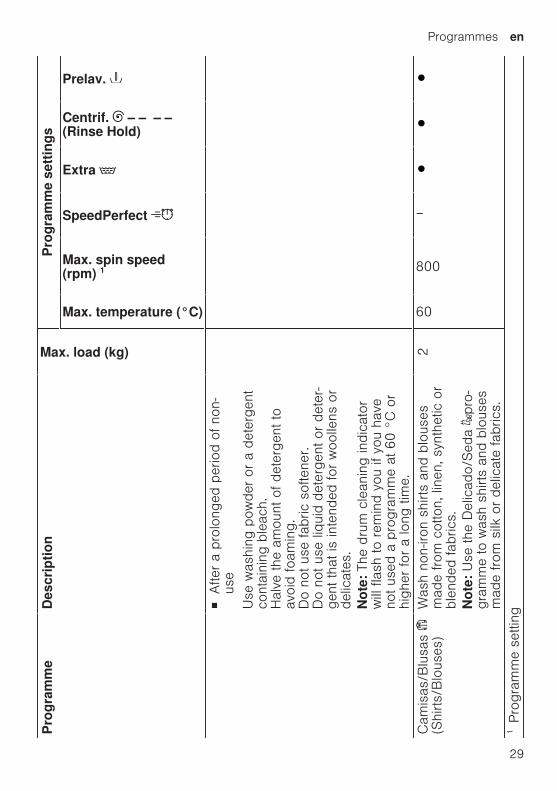
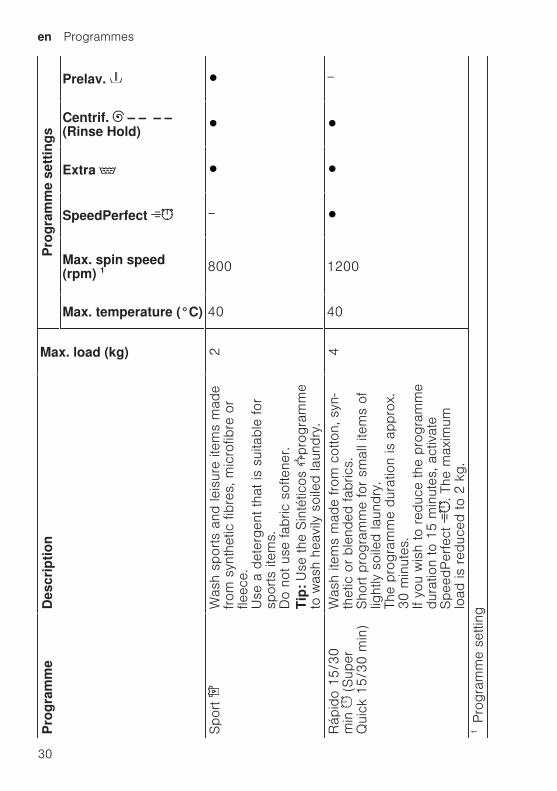
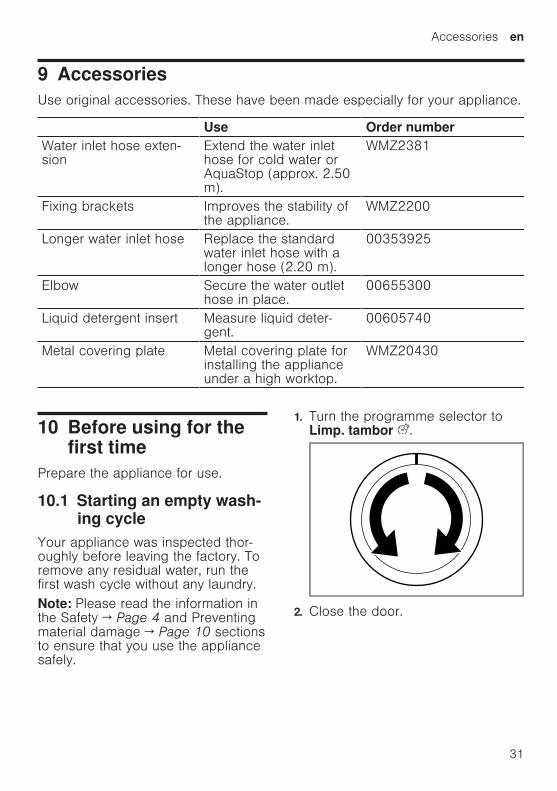
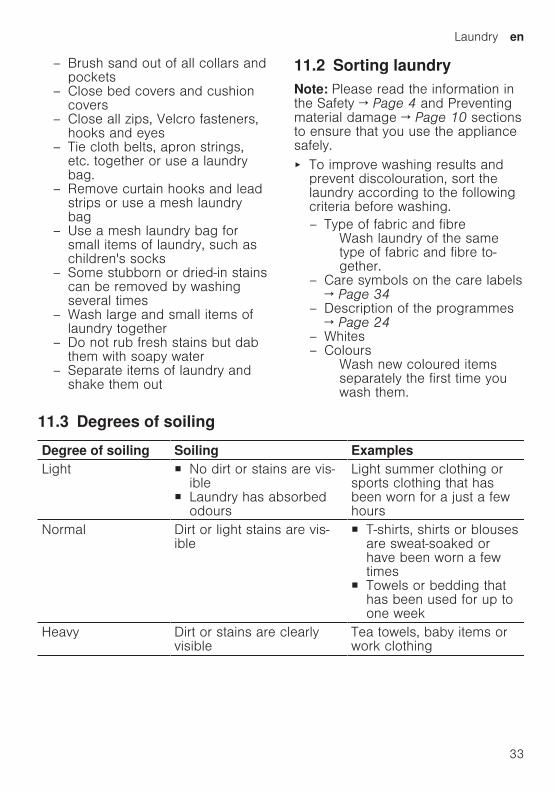
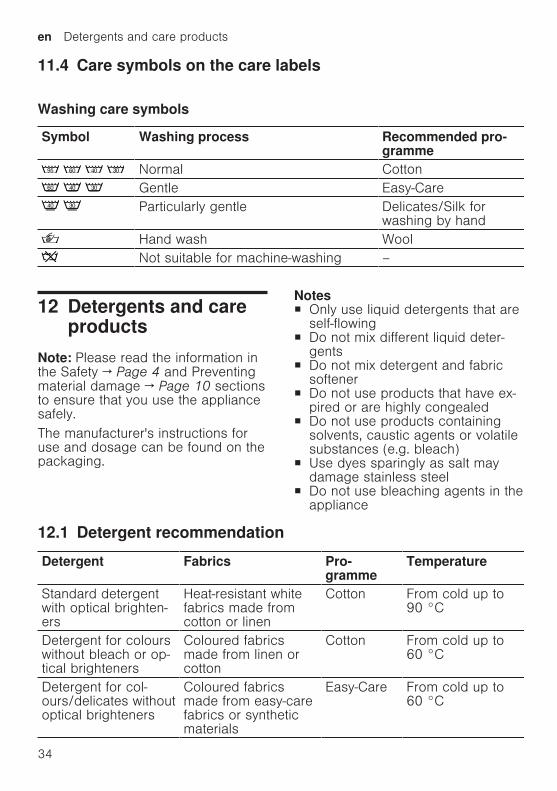
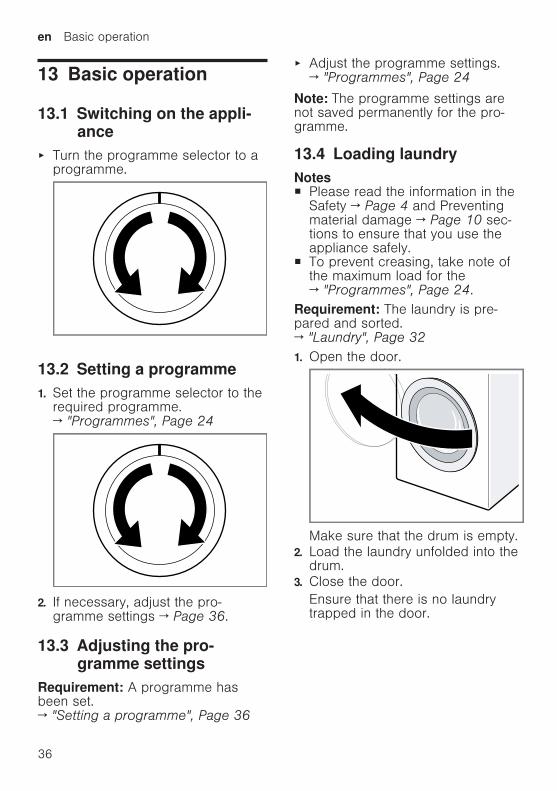
enemspBasic operation
36
Basic operation
13 Basic operationBasic operation
131 Switching on the appli-ance
Turn the programme selector to aprogramme
132 Setting a programme1 Set the programme selector to the
required programme rarr Programmes Page 24
2 If necessary adjust the pro-gramme settings rarr Page 36
133 Adjusting the pro-gramme settings
Requirement A programme hasbeen set rarr Setting a programme Page 36
Adjust the programme settings rarr Programmes Page 24
Note The programme settings arenot saved permanently for the pro-gramme
134 Loading laundryNotesiexcl Please read the information in the
Safety rarr Page 4 and Preventingmaterial damage rarr Page 10 sec-tions to ensure that you use theappliance safely
iexcl To prevent creasing take note ofthe maximum load for the rarr Programmes Page 24
Requirement The laundry is pre-pared and sortedrarr Laundry Page 321 Open the door
Make sure that the drum is empty2 Load the laundry unfolded into the
drum3 Close the door
Ensure that there is no laundrytrapped in the door
Basic operationemspen
37
135 Using a measuring aidfor liquid detergent
If you order the measuring aid as anaccessory you must use the measur-ing aid1 Pull out the detergent drawer
2 Press down on the insert and re-move the detergent drawer
1
2
3 Insert the measuring aid
4 Insert the detergent drawer
136 Use the measuring aidfor liquid detergent
To add liquid detergent you can usea measuring aid in the detergentdrawer1 Pull out the detergent drawer2 Slide the measuring aid forwards
3 Fold the measuring aid down andclick it into place
enemspBasic operation
38
4 Push in the detergent drawer
137 Adding detergent andcare product
Notesiexcl Please read the information in the
Safety rarr Page 4 and Preventingmaterial damage rarr Page 10 sec-tions to ensure that you use theappliance safely
iexcl Do not use the measuring aid forliquid detergent for gel detergentswashing powder or if Prewash orReady in time are activated
Requirement Find out the optimumdosage for detergent and careproduct rarr Page 341 Pull out the detergent drawer2 Pour in detergent
rarr Detergent drawer Page 193 If required add the care product4 Push in the detergent drawer
138 Starting the programmeNote If you want to change the timeuntil the programme ends set theReady in time first Press InicioPausa + Carga a The drum rotates and load detec-
tion takes place This can take upto 2 minutes after which waterenters the drum
a The display shows either the pro-gramme duration or the Ready intime
a After the programme has endedthe display shows End
139 Adjusting the Ready intime before the pro-gramme starts
You can readjust the selected Readyin time before the programme starts1 Press InicioPausa + Carga 2 Press Termin repeatedly until
the display indicates the desiredReady in time
3 Press InicioPausa + Carga
1310 Soaking laundryNote No additional detergent is re-quired The washing solution is thenused for washing1 Start the programme2 To pause the programme after ap-
prox 10 minutes press InicioPausa + Carga
3 To resume the programme afterthe desired soaking time pressInicioPausa + Carga
1311 Adding laundryNote Please read the information inthe Safety rarr Page 4 and Preventingmaterial damage rarr Page 10 sectionsto ensure that you use the appliancesafely1 Press InicioPausa + Carga
The appliance is paused andchecks whether it is possible toadd or remove laundry Take noteof the programme status
2 Add or remove laundry3 Close the door4 Press InicioPausa + Carga
Basic operationemspen
39
1312 Cancelling the pro-gramme
Once the programme has startedyou can cancel it at any timeNote Please read the information inthe Safety rarr Page 4 and Preventingmaterial damage rarr Page 10 sectionsto ensure that you use the appliancesafely1 Press InicioPausa + Carga 2 Open the door
The appliance door remainslocked for safety reasons if thetemperature and water levels arehighndash If the temperature is high start
the programmendash If the water level is high Start
the or programme3 Remove the laundry
1313 Resuming the pro-gramme when the pro-gramme status is RinseHold
1 Set the or programme2 Press InicioPausa + Carga
1314 Unloading the laundryNote Please read the information inthe Safety rarr Page 4 and Preventingmaterial damage rarr Page 10 sectionsto ensure that you use the appliancesafely1 Open the door
2 Remove the laundry
1315 Switching off the appli-ance
1 Turn the programme selector to
2 Turn off the tap3 Wipe the rubber gasket dry and re-
move any foreign objects
4 Leave the door and detergentdrawer open so that residual watercan evaporate
enemspChildproof lock
40
Childproof lock
14 Childproof lockChildproof lock
Secure your appliance against beingoperated unintentionally using thecontrols
141 Activating the childprooflock
Press and hold the two 3 segbuttons for approx 3 seconds
a The display shows a The controls are lockeda The childproof lock remains active
even after the appliance has beenswitched off
142 Deactivating the child-proof lock
Requirement To deactivate thechildproof lock the appliance mustbe switched on Press and hold the two 3 seg
buttons for approx 3 secondsa goes out in the display
Basic settingsemspen
41
Basic settings
15 Basic settingsBasic settings
You can configure the appliance to meet your needs
151 Overview of the basic settingsBelow is an overview of the basic settings on your appliance
Basic setting Programmeposition
Value Description
End signal 2 0 (off)1 (quiet)2 (me-dium)3 (loud)4 (veryloud)
Set the volume of the signal at theend of the programme
Button signal 3 0 (off)1 (quiet)2 (me-dium)3 (loud)4 (veryloud)
The volume of the audible signalemitted when the buttons arepressed
Drum cleaningreminder
4 ONOFF
Activate or deactivate the re-minder to clean the drum
enemspCleaning and servicing
42
152 Changing the basic set-tings
1 Set the programme selector to po-sition 1
2 Press InicioPausa + Carga and at the same time turn theprogramme selector to position 2
a The display shows the currentvalue
3 Set the programme selector to therequired position
4 To change the value press Ter-min
5 To save the changes switch offthe appliance
Cleaning and servicing
16 Cleaning and servi-cing
Cleaning and servicing
To keep your appliance working effi-ciently for a long time it is importantto clean and maintain it carefully
161 Tips on appliance careWipe down thehousing and thecontrol panelwith nothing butwater and adamp cloth
This ensures theparts of the appli-ance will remainclean and hy-gienic
Remove all de-tergent residuespray residue orother residuesimmediately
Fresh depositsare easier to re-move withoutleaving anyresidue
Keep the appli-ance door anddetergent draweropen after use
This allows theresidual water todry reducingodours in the ap-pliance
162 Cleaning the drum
CAUTIONRisk of injuryPermanently washing at low temper-atures and a lack of ventilation forthe appliance may damage the drumand cause injury Regularly run a programme for
cleaning the drum or wash at tem-peratures of at least 60 degC
Leave the appliance to dry afterevery operation with the dooropen and leave the detergentdrawer to dry
Run the Limp tambor pro-gramme without laundryAdd washing powder
163 Cleaning the detergentdrawer
Note Please read the information inthe Safety rarr Page 4 and Preventingmaterial damage rarr Page 10 sectionsto ensure that you use the appliancesafely1 Pull out the detergent drawer
Cleaning and servicingemspen
43
2 Press down on the insert and re-move the detergent drawer
1
2
3 Press out the insert upwards frombelow
4 Clean the detergent drawer and in-sert with water and a brush andthen dry them
5 Fit the insert and lock it into place
6 Cleaning the opening for the deter-gent drawer
7 Push in the detergent drawer
164 Descaling
ATTENTIONThe use of unsuitable descalingagents eg for coffee machines maydamage the appliance For this appliance only use de-
scaling agents that are availablefrom the manufacturers website orour after-sales service
enemspCleaning and servicing
44
165 Cleaning the drain pumpClean the drain pump in the event offaults eg blockages or rattlingnoises
Emptying the drain pumpNote Please read the information inthe Safety rarr Page 4 and Preventingmaterial damage rarr Page 10 sectionsto ensure that you use the appliancesafely1 Turn off the water tap2 Switch off the appliance3 Disconnect the appliances mains
plug from the power supply4 Open the maintenance flap
5 Remove the maintenance flap
6 Slide a sufficiently large receptacleunder the opening
7 Take the drain hose out of theholder
Cleaning and servicingemspen
45
8 CAUTION - Risk of scaldingWhen you wash at high temperat-ures the detergent solution getshot
Do not touch the hot detergentsolutionTo allow the detergent solution toflow out into the container removethe sealing cap
9 Firmly press on the sealing cap
10 Insert the drain hose into theholder
Cleaning the drain pumpNote Please read the information inthe Safety rarr Page 4 and Preventingmaterial damage rarr Page 10 sectionsto ensure that you use the appliancesafelyRequirement The drain pump isempty rarr Page 441 Since water may remain in the
drain pump remove the pump capcarefully
2 Clean the interior the thread onthe pump cap and the pump hous-ing
3 Make sure that the impeller in thedrain pump can be rotated
enemspCleaning and servicing
46
4 Insert the pump cap and screw iton as far as it will go
90deg
The handle on the pump cap mustbe in a vertical position
5 Close the maintenance flap
Before the next washTo prevent unused detergent fromflowing straight into the outlet in thenext wash run the programmeafter you have emptied the drainpump1 Turn on the tap2 Insert the mains plug3 Switch on the appliance4 Pour 1 litre of water into compart-
ment II5 Start the programme
166 Cleaning the water outlethose at the siphon
1 Switch off the appliance2 Disconnect the appliances mains
plug from the power supply
3 Loosen the hose clamp and care-fully remove the water outlet hose
Residual water may leak out4 Clean the water outlet hose and si-
phon connecting piece
5 Reattach the water outlet hose andsecure the connection point usingthe hose clamp
Cleaning and servicingemspen
47
167 Clean the water inlet fil-ters
Emptying the water inlet hose1 Turn off the tap2 Set a programme except for
or 3 Start the programme and leave it
to run for approx 40 seconds4 Switch off the appliance5 Disconnect the appliances mains
plug from the power supply
Cleaning the filter on the tapNote Please read the information inthe Safety rarr Page 4 and Preventingmaterial damage rarr Page 10 sectionsto ensure that you use the appliancesafelyRequirement The water inlet hose isempty1 Remove the water inlet hose from
the tap
2 Clean the filter with a small brush
3 Connect the water inlet hose andcheck for leaks
Cleaning the filter on theapplianceNote Please read the information inthe Safety rarr Page 4 and Preventingmaterial damage rarr Page 10 sectionsto ensure that you use the appliancesafelyRequirement The water inlet hose isempty rarr Emptying the water inlet hosePage 47
enemspCleaning and servicing
48
1 Disconnect the hose from the rearof the appliance
1
2
2 Use pliers to remove the filter
3 Clean the filter with a small brush
4 Reinsert the filter
5 Connect the hose and check forleaks
2
1
Troubleshootingemspen
49
Troubleshooting
17 TroubleshootingTroubleshooting
You can rectify minor faults on your appliance yourself Read the troubleshoot-ing information before contacting after-sales service This will avoid unneces-sary costs
WARNINGRisk of electric shockIncorrect repairs are dangerous Repairs to the appliance should only be carried out by trained specialist
staff Only use genuine spare parts when repairing the appliance If the power cord of this appliance is damaged it must be replaced by the
manufacturer the manufacturers Customer Service or a similarly qualifiedperson in order to prevent any risk
Fault Cause and troubleshootingThe display goes outand InicioPausa +Carga flashes
Energy-saving mode is active Press any buttona The symbol lights up again
E36 -10 Drain pipe or water outlet hose is blocked Clean the drain pipe and the water outlet hose
Drain pipe or water drain hose is caught or jammed Ensure that the drain pipe and water drain hose are
not kinked or trapped
Drain pump is blocked rarr Cleaning the drain pump Page 44
The water outlet hose is connected too high Install the water outlet hose at a maximum height of
1 metre
Detergent dosage is too high Immediate measure Mix one tablespoon of fabric
softener with 05 litres of water and pour the mix-ture into the left-hand compartment (not for outdoorclothing sportswear or items stuffed with down)
Reduce the amount of detergent for the next wash-ing cycle with the same load
Unapproved extension installed on the water drainhose Remove any unapproved extensions from the water
hose Connecting the appliance
E36 -25 -26 Drain pump is blocked rarr Cleaning the drain pump Page 44
enemspTroubleshooting
50
Fault Cause and troubleshootingThe water pressure is lowNo remedial action possibleThe filters in the water inflow are blocked Clean the filters in the water inflow rarr Page 47
The tap is turned off Turn on the tap
The water inlet hose is kinked or jammed Ensure that the water inlet hose is not kinked or
jammed
flashes The automatic voltage control system detects an un-authorised voltage under-usage No remedial action possible
Note If the power supply is stable the programmecontinues to run as normalVoltage under-usage may cause extension of a pro-grammeNo remedial action possible
flashes Voltage under-usage may cause extension of a pro-grammeNo remedial action possible
lights up The temperature is too high Wait until the temperature has dropped rarr Cancelling the programme Page 39
Water level is too high Start the programme
Laundry is caught in the door1 Open the door again2 Remove any trapped laundry3 Close the door4 Press InicioPausa + Carga to start the pro-
gramme
flashes Door is not closed1 Close the door2 Press InicioPausa + Carga to start the pro-
gramme
All other error codes Malfunction Call the after-sales service
rarr Customer Service Page 59
Troubleshootingemspen
51
Fault Cause and troubleshootingThe appliance is notworking
The mains plug of the power cord is not plugged in Connect the appliance to the power supply
The circuit breaker is faulty Check the circuit breaker in the fuse box
There has been a power cut Check whether the lighting in your kitchen or other
appliances are working
The programme doesnot start
You have not pressed InicioPausa + Carga Press InicioPausa + Carga
Door is not closed1 Close the door2 Press InicioPausa + Carga to start the pro-
gramme
Childproof lock is activated rarr Deactivating the childproof lock Page 40
Termin is activated Check whether Termin is activated
rarr Buttons Page 23
Laundry is caught in the door1 Open the door again2 Remove any trapped laundry3 Close the door4 Press InicioPausa + Carga to start the pro-
gramme
The door cannotbe opened
ndash ndash ndash ndash is activated Continue the programme by selecting or and
pressing InicioPausa + Carga rarr Resuming the programme when the programmestatus is Rinse Hold Page 39
The temperature is too high Wait until the temperature has dropped rarr Cancelling the programme Page 39
Water level is too high Start the programme
Power failure Open the door using the emergency release
rarr Emergency release Page 57
The water is not drain-ing
Drain pipe or water outlet hose is blocked Clean the drain pipe and the water outlet hose
enemspTroubleshooting
52
Fault Cause and troubleshootingThe water is not drain-ing
Drain pipe or water drain hose is caught or jammed Ensure that the drain pipe and water drain hose are
not kinked or trapped
Drain pump is blocked rarr Cleaning the drain pump Page 44
ndash ndash ndash ndash is activated Continue the programme by selecting or and
pressing InicioPausa + Carga rarr Resuming the programme when the programmestatus is Rinse Hold Page 39
The water outlet hose is connected too high Install the water outlet hose at a maximum height of
1 metre
Detergent dosage is too high Immediate measure Mix one tablespoon of fabric
softener with 05 litres of water and pour the mix-ture into the left-hand compartment (not for outdoorclothing sportswear or items stuffed with down)
Reduce the amount of detergent for the next wash-ing cycle with the same load
Unapproved extension installed on the water drainhose Remove any unapproved extensions from the water
hose Connecting the appliance
Water is not flowingin Detergent is notbeing dispensed
You have not pressed InicioPausa + Carga Press InicioPausa + Carga
The filters in the water inflow are blocked Clean the filters in the water inflow rarr Page 47
The tap is turned off Turn on the tap
The water inlet hose is kinked or jammed Ensure that the water inlet hose is not kinked or
jammed
The spin cycle runsseveral times
The unbalanced load detection system eliminates animbalance by repeatedly redistributing the laundry Not a fault ndash no action required
Note When loading where possible place large andsmall items of laundry together in the drum Differentsized items of laundry distribute themselves betterduring the spin cycle
Troubleshootingemspen
53
Fault Cause and troubleshootingThe programme dura-tion changes duringthe wash cycle
The programme operation is optimised electronicallyThis may change the programme duration Not a fault ndash no action required
The unbalanced load detection system eliminates animbalance by repeatedly redistributing the laundry Not a fault ndash no action required
Note When loading where possible place large andsmall items of laundry together in the drum Differentsized items of laundry distribute themselves betterduring the spin cycleFoam detection system switches on a rinse cycle iffoam build-up is too high Not a fault ndash no action required
No water is visible inthe drum
Water is below the visible area Not a fault ndash no action required Do not add any extra water to the appliance while it
is operating
Drum jerks after theprogramme starts
This is caused by an internal motor test Not a fault ndash no action required
Residual water ispresent in the com-partment
Insert in compartment is blocked rarr Cleaning the detergent drawer Page 42
Vibrations and move-ment of the appliancewhilst spinning
Appliance is not correctly aligned Aligning the appliance
The appliance feet are not fixed Secure the appliance feet Aligning the appliance
Transit bolts have not been removed Removing the transit bolts
Drum does not turnwater does not flow in
Load detection is active Not a fault ndash no action required
Note The load detection can take up to two minutesHeavy foam build-up Detergent dosage is too high
Immediate measure Mix one tablespoon of fabricsoftener with 05 litres of water and pour the mix-ture into the left-hand compartment (not for outdoorclothing sportswear or items stuffed with down)
Reduce the amount of detergent for the next wash-ing cycle with the same load
enemspTroubleshooting
54
Fault Cause and troubleshootingHigh spin speed notreached
A low spin speed is selected The next time you run a wash cycle set a higher
spin speed
Unbalance load detection system is using a reducedspin speed to eliminate an unbalance Redistribute the laundry in the drum
Note Where possible mix large and small items inthe drum Different sized items of laundry distributethemselves better during the spin cycle Start the programme
The spin programmedoes not start
Drain pipe or water outlet hose is blocked Clean the drain pipe and the water outlet hose
Drain pipe or water drain hose is caught or jammed Ensure that the drain pipe and water drain hose are
not kinked or trapped
The unbalanced load detection system has interruptedthe spin cycle because the laundry is unevenly distrib-uted Redistribute the laundry in the drum
Note Where possible mix large and small items inthe drum Different sized items of laundry distributethemselves better during the spin cycle Start the programme
Rushing hissingnoise
Water is flushed under pressure into the detergentdrawer Not a fault ndash normal operating noise
Loud noises duringthe spin cycle
Appliance is not correctly aligned Aligning the appliance
The appliance feet are not fixed Secure the appliance feet Aligning the appliance
Transit bolts have not been removed Removing the transit bolts
Banging noises rat-tling in the drainpump
Foreign bodies have got into the drain pump rarr Cleaning the drain pump Page 44
Slurping rhythmicalsuction noise
The drain pump is active the detergent solution ispumped out Not a fault ndash normal operating noise
Troubleshootingemspen
55
Fault Cause and troubleshootingCreasing The spin speed is too high
The next time you run a wash cycle set a lowerspin speed
The load is too large The next time you run a wash cycle reduce the
amount of laundry being loaded
The wrong programme is selected for the type of fab-ric Select the programmes that are suitable for the
type of fabric rarr Programmes Page 24
Detergent or fabricsoftener drips off theseal and collects onthe door or in the sealfold
Too much detergentfabric softener in the detergentdrawer When dosing liquid detergent and fabric softener
observe the marking in the detergent drawer anddo not dose above this
The spin result is notsatisfactory The laun-dry is too wettoodamp
A low spin speed is selected The next time you run a wash cycle set a higher
spin speed Start the programme
Drain pipe or water outlet hose is blocked Clean the drain pipe and the water outlet hose
Drain pipe or water drain hose is caught or jammed Ensure that the drain pipe and water drain hose are
not kinked or trapped
The unbalanced load detection system has interruptedthe spin cycle because the laundry is unevenly distrib-uted Redistribute the laundry in the drum
Note Where possible mix large and small items inthe drum Different sized items of laundry distributethemselves better during the spin cycle Start the programme
Unbalance load detection system is using a reducedspin speed to eliminate an unbalance Redistribute the laundry in the drum
Note Where possible mix large and small items inthe drum Different sized items of laundry distributethemselves better during the spin cycle Start the programme
enemspTroubleshooting
56
Fault Cause and troubleshootingDetergent residue onthe damp washing
Detergents may contain water-insoluble substancesthat deposit on the laundry Start the programme
Detergent residue onthe dry laundry
Detergents may contain water-insoluble substancesthat deposit on the laundry Brush out the laundry after washing and drying
Water is leaking out atthe water inlet hose
Water inlet hose is not correctlysecurely connected1 Connect the water supply hose correctly Connect-
ing the water inlet hose2 Tighten the screw connection
Water is leaking out atthe water outlet hose
The water outlet hose is damaged Replace the damaged water outlet hose
Water outlet hose is not connected correctly Connect the water outlet hose correctly Water out-
let connection types
Odours have formedin the appliance
Humidity and detergent residue may promote theformation of bacteria rarr Cleaning the drum Page 42 If you are not using the appliance leave the door
and detergent drawer open so that residual watercan evaporate
Transportation storage and disposalemspen
57
171 Emergency releaseReleasing the doorRequirement The drain pump isempty rarr Page 441 ATTENTION Escaping water may
cause material damage Do not open the door if you can
see water through the glassPull the emergency release down-wards with a tool and release
a The door lock is released2 Insert the maintenance flap and
lock it into place3 Close the maintenance flap
Transportation storage and disposal
18 Transportation stor-age and disposal
Transportation storage and disposal
You can find out here how to prepareyour appliance for transportation andstorage You will also find out how todispose of old appliances
181 Removing the appliance1 Turn off the tap2 rarr Emptying the water inlet hose
Page 473 Switch off the appliance4 Unplug the appliances mains plug
5 Drain the remaining detergentsolution rarr Cleaning the drain pumpPage 44
6 Detach the hoses
182 Inserting the transitbolts
Secure the appliance for transporta-tion using transit bolts in order to pre-vent damage1 Remove the four cover caps
‒ If necessary use a screwdriverto remove the cover caps
Keep the cover caps2 Insert the four sleeves
enemspTransportation storage and disposal
58
3 Insert all screws into the fourtransit bolts and tighten slightly
4 Insert the power cord into theholder and tighten all fourscrews for the transit bolts with aWAF 13 wrench
5 Insert the hose into holder
183 Using the applianceagain
1 Remove the transit bolts
2 Pour approx 1 litre of water intocompartment II in the detergentdrawer
3 Start the programmea The unused detergent cannot flow
straight into the outlet during thenext wash
184 Disposing of old appli-ance
Valuable raw materials can be re-used by recycling
WARNINGRisk of harm to healthChildren can lock themselves in theappliance thereby putting their livesat risk Do not install the appliance behind
a door as this may obstruct the ap-pliance door or prevent it fromopening
With redundant appliances unplugthe power cord Then cut throughthe cord and damage the lock onthe appliance door beyond repairso that the appliance door will nolonger close
1 Unplug the appliance from themains
2 Cut through the power cord3 Dispose of the appliance in an en-
vironmentally friendly mannerInformation about current disposalmethods are available from yourspecialist dealer or local authority
This appliance is la-belled in accordancewith European Directive201219EU concerningused electrical and elec-
Customer Serviceemspen
59
tronic appliances (wasteelectrical and electronicequipment - WEEE)The guideline determ-ines the framework forthe return and recyclingof used appliances asapplicable throughoutthe EU
Customer Service
19 Customer ServiceCustomer Service
If you have any queries on use areunable to rectify faults on the appli-ance yourself or if your applianceneeds to be repaired contact Cus-tomer ServiceYou can solve many problems your-self by consulting the information ontroubleshooting in these instructionsor on our website If this is not thecase contact our after-sales serviceWith any warranty claims we willmake sure that your appliance is re-paired by trained after-sales techni-cians using genuine spare parts in-cluding after the manufacturers war-ranty has expiredFunction-relevant genuine spare partsaccording to the corresponding Eco-design Order can be obtained fromCustomer Service for a period of atleast 10 years from the date onwhich your appliance was placed onthe market within the European Eco-nomic AreaNote Under the terms of the manu-facturers warranty the use of Cus-tomer Service is free of chargeDetailed information on the warrantyperiod and terms of warranty in yourcountry is available from our after-sales service your retailer or on ourwebsite
If you contact Customer Service youwill require the product number (E-Nr) and the production number (FD)of your applianceThe contact details for Customer Ser-vice can be found in the enclosedCustomer Service directory or on ourwebsite
191 Product number (E-Nr)and production number(FD)
You can find the product number (E-Nr) and the production number (FD)on the appliances rating plateDepending on the model the ratingplate is locatediexcl On the inside of the dooriexcl On the inside of the maintenance
flapiexcl On the rear of the applianceMake a note of your appliances de-tails and the Customer Service tele-phone number to find them againquickly
enemspConsumption values
60
Consumption values
20 Consumption valuesConsumption values
The following information is provided in accordance with the EU EcodesignRegulation The values given for programs other than the Eco 40-60 are indicat-ive only and were determined in accordance with the applicable standardEN60456
Programme Load(kg)
Pro-gramme dura-tion(hrmin)1
Energycon-sump-tion(kWhcycle)1
Watercon-sump-tion (lcycle)1
Max-imumtemper-ature(degC) 5mins1
Spinspeed(rpm)1
Resid-ualmois-ture()1
Eco 40-602 90 337 1245 610 50 1166 5000Eco 40-602 45 252 0590 450 33 1200 5000Eco 40-602 25 233 0195 300 24 1200 5400AlgodoacutenAl-godatildeo 20 degC
90 328 0370 900 23 1200 5400
AlgodoacutenAl-godatildeo 40 degC
90 328 1350 900 45 1200 5400
AlgodoacutenAl-godatildeo 60 degC
90 328 1450 900 55 1200 5400
AlgodoacutenAl-godatildeo 40 degC + Pre-lav
90 358 1400 1020 45 1200 5400
Sinteacuteticos 40 degC
40 228 0780 610 44 1200 2700
Mix 40 degC 40 059 0620 440 41 1200 5600 LanaLatildes
30 degC20 040 0200 400 22 800 2500
1 Due to the influence of water pressure hardness and inlet temperature am-bient temperature type amount and soiling of laundry detergent used fluc-tuations in the power supply and the selected additional functions the actualvalues may deviate from the stated values
2 Test programme in accordance with the EU Ecodesign Directive and the EUEnergy Labelling Regulation with cold water (15 degC)
Technical specificationsemspen
61
Technical specifications
21 Technical specifica-tions
Technical specifications
Facts and figures for your appliancecan be found here
Appliance height 850 cmAppliance width 598 cmAppliance depth 590 cmWeight 80 kg1
Maximum load 9 kgMains voltage 220 - 240 V
50 Hz Minimum in-
stallation protec-tion
10 A
Rated power 2300 WPower consump-tion
iexcl Off mode010 W
iexcl Left-on mode050 W
Water pressure iexcl Minimum100 kPa(1 bar)
iexcl Maximum1000 kPa(10 bar)
Length of the wa-ter inlet hose
150 cm
Length of the wa-ter outlet hose
150 cm
Length of thepower cord
160 cm
1 Depending on the appliance spe-cifications
More information about your modelcan be found online at httpsen-ergylabelbsh-groupcom1 This webaddress is linked to the official EUEPREL product database At the time
of printing its web address had notyet been published Please then fol-low the instructions on searching formodels The model identifier is madeup of the characters before the slashin the product number (E-Nr) on therating plate Alternatively you canalso find the model identifier in thefirst line of the EU energy label
1 Only applies to countries in the European Economic Area
Thank you for buying aBosch Home Appliance
Register your new device on MyBosch now and profit directly from
bull Expert tips amp tricks for your appliancebull Warranty extension optionsbull Discounts for accessories amp spare-partsbull Digital manual and all appliance data at handbull Easy access to Bosch Home Appliances Service
Free and easy registration ndash also on mobile phoneswwwbosch-homecomwelcome
Looking for help Youll find it here
Expert advice for your Bosch home appliances help with problems or a repair from Bosch experts Find out everything about the many ways Bosch can support you wwwbosch-homecomservice Contact data of all countries are listed in the attached service direct-ory
90016102699001610269emsp(010219)en
Robert Bosch Hausgeraumlte GmbHCarl-Wery-Straszlige 3481739 MuumlnchenGERMANYwwwbosch-homecom
Valid within Great BritainImported to Great Britain byBSH Home Appliances LtdGrand Union HouseOld Wolverton RoadWolverton Milton KeynesMK12 5PTUnited Kingdom
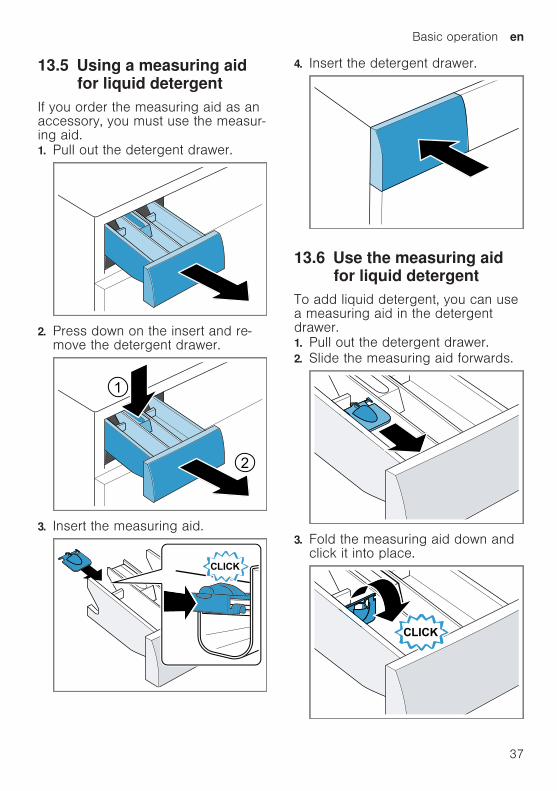
Basic operationemspen
37
135 Using a measuring aidfor liquid detergent
If you order the measuring aid as anaccessory you must use the measur-ing aid1 Pull out the detergent drawer
2 Press down on the insert and re-move the detergent drawer
1
2
3 Insert the measuring aid
4 Insert the detergent drawer
136 Use the measuring aidfor liquid detergent
To add liquid detergent you can usea measuring aid in the detergentdrawer1 Pull out the detergent drawer2 Slide the measuring aid forwards
3 Fold the measuring aid down andclick it into place
enemspBasic operation
38
4 Push in the detergent drawer
137 Adding detergent andcare product
Notesiexcl Please read the information in the
Safety rarr Page 4 and Preventingmaterial damage rarr Page 10 sec-tions to ensure that you use theappliance safely
iexcl Do not use the measuring aid forliquid detergent for gel detergentswashing powder or if Prewash orReady in time are activated
Requirement Find out the optimumdosage for detergent and careproduct rarr Page 341 Pull out the detergent drawer2 Pour in detergent
rarr Detergent drawer Page 193 If required add the care product4 Push in the detergent drawer
138 Starting the programmeNote If you want to change the timeuntil the programme ends set theReady in time first Press InicioPausa + Carga a The drum rotates and load detec-
tion takes place This can take upto 2 minutes after which waterenters the drum
a The display shows either the pro-gramme duration or the Ready intime
a After the programme has endedthe display shows End
139 Adjusting the Ready intime before the pro-gramme starts
You can readjust the selected Readyin time before the programme starts1 Press InicioPausa + Carga 2 Press Termin repeatedly until
the display indicates the desiredReady in time
3 Press InicioPausa + Carga
1310 Soaking laundryNote No additional detergent is re-quired The washing solution is thenused for washing1 Start the programme2 To pause the programme after ap-
prox 10 minutes press InicioPausa + Carga
3 To resume the programme afterthe desired soaking time pressInicioPausa + Carga
1311 Adding laundryNote Please read the information inthe Safety rarr Page 4 and Preventingmaterial damage rarr Page 10 sectionsto ensure that you use the appliancesafely1 Press InicioPausa + Carga
The appliance is paused andchecks whether it is possible toadd or remove laundry Take noteof the programme status
2 Add or remove laundry3 Close the door4 Press InicioPausa + Carga
Basic operationemspen
39
1312 Cancelling the pro-gramme
Once the programme has startedyou can cancel it at any timeNote Please read the information inthe Safety rarr Page 4 and Preventingmaterial damage rarr Page 10 sectionsto ensure that you use the appliancesafely1 Press InicioPausa + Carga 2 Open the door
The appliance door remainslocked for safety reasons if thetemperature and water levels arehighndash If the temperature is high start
the programmendash If the water level is high Start
the or programme3 Remove the laundry
1313 Resuming the pro-gramme when the pro-gramme status is RinseHold
1 Set the or programme2 Press InicioPausa + Carga
1314 Unloading the laundryNote Please read the information inthe Safety rarr Page 4 and Preventingmaterial damage rarr Page 10 sectionsto ensure that you use the appliancesafely1 Open the door
2 Remove the laundry
1315 Switching off the appli-ance
1 Turn the programme selector to
2 Turn off the tap3 Wipe the rubber gasket dry and re-
move any foreign objects
4 Leave the door and detergentdrawer open so that residual watercan evaporate
enemspChildproof lock
40
Childproof lock
14 Childproof lockChildproof lock
Secure your appliance against beingoperated unintentionally using thecontrols
141 Activating the childprooflock
Press and hold the two 3 segbuttons for approx 3 seconds
a The display shows a The controls are lockeda The childproof lock remains active
even after the appliance has beenswitched off
142 Deactivating the child-proof lock
Requirement To deactivate thechildproof lock the appliance mustbe switched on Press and hold the two 3 seg
buttons for approx 3 secondsa goes out in the display
Basic settingsemspen
41
Basic settings
15 Basic settingsBasic settings
You can configure the appliance to meet your needs
151 Overview of the basic settingsBelow is an overview of the basic settings on your appliance
Basic setting Programmeposition
Value Description
End signal 2 0 (off)1 (quiet)2 (me-dium)3 (loud)4 (veryloud)
Set the volume of the signal at theend of the programme
Button signal 3 0 (off)1 (quiet)2 (me-dium)3 (loud)4 (veryloud)
The volume of the audible signalemitted when the buttons arepressed
Drum cleaningreminder
4 ONOFF
Activate or deactivate the re-minder to clean the drum
enemspCleaning and servicing
42
152 Changing the basic set-tings
1 Set the programme selector to po-sition 1
2 Press InicioPausa + Carga and at the same time turn theprogramme selector to position 2
a The display shows the currentvalue
3 Set the programme selector to therequired position
4 To change the value press Ter-min
5 To save the changes switch offthe appliance
Cleaning and servicing
16 Cleaning and servi-cing
Cleaning and servicing
To keep your appliance working effi-ciently for a long time it is importantto clean and maintain it carefully
161 Tips on appliance careWipe down thehousing and thecontrol panelwith nothing butwater and adamp cloth
This ensures theparts of the appli-ance will remainclean and hy-gienic
Remove all de-tergent residuespray residue orother residuesimmediately
Fresh depositsare easier to re-move withoutleaving anyresidue
Keep the appli-ance door anddetergent draweropen after use
This allows theresidual water todry reducingodours in the ap-pliance
162 Cleaning the drum
CAUTIONRisk of injuryPermanently washing at low temper-atures and a lack of ventilation forthe appliance may damage the drumand cause injury Regularly run a programme for
cleaning the drum or wash at tem-peratures of at least 60 degC
Leave the appliance to dry afterevery operation with the dooropen and leave the detergentdrawer to dry
Run the Limp tambor pro-gramme without laundryAdd washing powder
163 Cleaning the detergentdrawer
Note Please read the information inthe Safety rarr Page 4 and Preventingmaterial damage rarr Page 10 sectionsto ensure that you use the appliancesafely1 Pull out the detergent drawer
Cleaning and servicingemspen
43
2 Press down on the insert and re-move the detergent drawer
1
2
3 Press out the insert upwards frombelow
4 Clean the detergent drawer and in-sert with water and a brush andthen dry them
5 Fit the insert and lock it into place
6 Cleaning the opening for the deter-gent drawer
7 Push in the detergent drawer
164 Descaling
ATTENTIONThe use of unsuitable descalingagents eg for coffee machines maydamage the appliance For this appliance only use de-
scaling agents that are availablefrom the manufacturers website orour after-sales service
enemspCleaning and servicing
44
165 Cleaning the drain pumpClean the drain pump in the event offaults eg blockages or rattlingnoises
Emptying the drain pumpNote Please read the information inthe Safety rarr Page 4 and Preventingmaterial damage rarr Page 10 sectionsto ensure that you use the appliancesafely1 Turn off the water tap2 Switch off the appliance3 Disconnect the appliances mains
plug from the power supply4 Open the maintenance flap
5 Remove the maintenance flap
6 Slide a sufficiently large receptacleunder the opening
7 Take the drain hose out of theholder
Cleaning and servicingemspen
45
8 CAUTION - Risk of scaldingWhen you wash at high temperat-ures the detergent solution getshot
Do not touch the hot detergentsolutionTo allow the detergent solution toflow out into the container removethe sealing cap
9 Firmly press on the sealing cap
10 Insert the drain hose into theholder
Cleaning the drain pumpNote Please read the information inthe Safety rarr Page 4 and Preventingmaterial damage rarr Page 10 sectionsto ensure that you use the appliancesafelyRequirement The drain pump isempty rarr Page 441 Since water may remain in the
drain pump remove the pump capcarefully
2 Clean the interior the thread onthe pump cap and the pump hous-ing
3 Make sure that the impeller in thedrain pump can be rotated
enemspCleaning and servicing
46
4 Insert the pump cap and screw iton as far as it will go
90deg
The handle on the pump cap mustbe in a vertical position
5 Close the maintenance flap
Before the next washTo prevent unused detergent fromflowing straight into the outlet in thenext wash run the programmeafter you have emptied the drainpump1 Turn on the tap2 Insert the mains plug3 Switch on the appliance4 Pour 1 litre of water into compart-
ment II5 Start the programme
166 Cleaning the water outlethose at the siphon
1 Switch off the appliance2 Disconnect the appliances mains
plug from the power supply
3 Loosen the hose clamp and care-fully remove the water outlet hose
Residual water may leak out4 Clean the water outlet hose and si-
phon connecting piece
5 Reattach the water outlet hose andsecure the connection point usingthe hose clamp
Cleaning and servicingemspen
47
167 Clean the water inlet fil-ters
Emptying the water inlet hose1 Turn off the tap2 Set a programme except for
or 3 Start the programme and leave it
to run for approx 40 seconds4 Switch off the appliance5 Disconnect the appliances mains
plug from the power supply
Cleaning the filter on the tapNote Please read the information inthe Safety rarr Page 4 and Preventingmaterial damage rarr Page 10 sectionsto ensure that you use the appliancesafelyRequirement The water inlet hose isempty1 Remove the water inlet hose from
the tap
2 Clean the filter with a small brush
3 Connect the water inlet hose andcheck for leaks
Cleaning the filter on theapplianceNote Please read the information inthe Safety rarr Page 4 and Preventingmaterial damage rarr Page 10 sectionsto ensure that you use the appliancesafelyRequirement The water inlet hose isempty rarr Emptying the water inlet hosePage 47
enemspCleaning and servicing
48
1 Disconnect the hose from the rearof the appliance
1
2
2 Use pliers to remove the filter
3 Clean the filter with a small brush
4 Reinsert the filter
5 Connect the hose and check forleaks
2
1
Troubleshootingemspen
49
Troubleshooting
17 TroubleshootingTroubleshooting
You can rectify minor faults on your appliance yourself Read the troubleshoot-ing information before contacting after-sales service This will avoid unneces-sary costs
WARNINGRisk of electric shockIncorrect repairs are dangerous Repairs to the appliance should only be carried out by trained specialist
staff Only use genuine spare parts when repairing the appliance If the power cord of this appliance is damaged it must be replaced by the
manufacturer the manufacturers Customer Service or a similarly qualifiedperson in order to prevent any risk
Fault Cause and troubleshootingThe display goes outand InicioPausa +Carga flashes
Energy-saving mode is active Press any buttona The symbol lights up again
E36 -10 Drain pipe or water outlet hose is blocked Clean the drain pipe and the water outlet hose
Drain pipe or water drain hose is caught or jammed Ensure that the drain pipe and water drain hose are
not kinked or trapped
Drain pump is blocked rarr Cleaning the drain pump Page 44
The water outlet hose is connected too high Install the water outlet hose at a maximum height of
1 metre
Detergent dosage is too high Immediate measure Mix one tablespoon of fabric
softener with 05 litres of water and pour the mix-ture into the left-hand compartment (not for outdoorclothing sportswear or items stuffed with down)
Reduce the amount of detergent for the next wash-ing cycle with the same load
Unapproved extension installed on the water drainhose Remove any unapproved extensions from the water
hose Connecting the appliance
E36 -25 -26 Drain pump is blocked rarr Cleaning the drain pump Page 44
enemspTroubleshooting
50
Fault Cause and troubleshootingThe water pressure is lowNo remedial action possibleThe filters in the water inflow are blocked Clean the filters in the water inflow rarr Page 47
The tap is turned off Turn on the tap
The water inlet hose is kinked or jammed Ensure that the water inlet hose is not kinked or
jammed
flashes The automatic voltage control system detects an un-authorised voltage under-usage No remedial action possible
Note If the power supply is stable the programmecontinues to run as normalVoltage under-usage may cause extension of a pro-grammeNo remedial action possible
flashes Voltage under-usage may cause extension of a pro-grammeNo remedial action possible
lights up The temperature is too high Wait until the temperature has dropped rarr Cancelling the programme Page 39
Water level is too high Start the programme
Laundry is caught in the door1 Open the door again2 Remove any trapped laundry3 Close the door4 Press InicioPausa + Carga to start the pro-
gramme
flashes Door is not closed1 Close the door2 Press InicioPausa + Carga to start the pro-
gramme
All other error codes Malfunction Call the after-sales service
rarr Customer Service Page 59
Troubleshootingemspen
51
Fault Cause and troubleshootingThe appliance is notworking
The mains plug of the power cord is not plugged in Connect the appliance to the power supply
The circuit breaker is faulty Check the circuit breaker in the fuse box
There has been a power cut Check whether the lighting in your kitchen or other
appliances are working
The programme doesnot start
You have not pressed InicioPausa + Carga Press InicioPausa + Carga
Door is not closed1 Close the door2 Press InicioPausa + Carga to start the pro-
gramme
Childproof lock is activated rarr Deactivating the childproof lock Page 40
Termin is activated Check whether Termin is activated
rarr Buttons Page 23
Laundry is caught in the door1 Open the door again2 Remove any trapped laundry3 Close the door4 Press InicioPausa + Carga to start the pro-
gramme
The door cannotbe opened
ndash ndash ndash ndash is activated Continue the programme by selecting or and
pressing InicioPausa + Carga rarr Resuming the programme when the programmestatus is Rinse Hold Page 39
The temperature is too high Wait until the temperature has dropped rarr Cancelling the programme Page 39
Water level is too high Start the programme
Power failure Open the door using the emergency release
rarr Emergency release Page 57
The water is not drain-ing
Drain pipe or water outlet hose is blocked Clean the drain pipe and the water outlet hose
enemspTroubleshooting
52
Fault Cause and troubleshootingThe water is not drain-ing
Drain pipe or water drain hose is caught or jammed Ensure that the drain pipe and water drain hose are
not kinked or trapped
Drain pump is blocked rarr Cleaning the drain pump Page 44
ndash ndash ndash ndash is activated Continue the programme by selecting or and
pressing InicioPausa + Carga rarr Resuming the programme when the programmestatus is Rinse Hold Page 39
The water outlet hose is connected too high Install the water outlet hose at a maximum height of
1 metre
Detergent dosage is too high Immediate measure Mix one tablespoon of fabric
softener with 05 litres of water and pour the mix-ture into the left-hand compartment (not for outdoorclothing sportswear or items stuffed with down)
Reduce the amount of detergent for the next wash-ing cycle with the same load
Unapproved extension installed on the water drainhose Remove any unapproved extensions from the water
hose Connecting the appliance
Water is not flowingin Detergent is notbeing dispensed
You have not pressed InicioPausa + Carga Press InicioPausa + Carga
The filters in the water inflow are blocked Clean the filters in the water inflow rarr Page 47
The tap is turned off Turn on the tap
The water inlet hose is kinked or jammed Ensure that the water inlet hose is not kinked or
jammed
The spin cycle runsseveral times
The unbalanced load detection system eliminates animbalance by repeatedly redistributing the laundry Not a fault ndash no action required
Note When loading where possible place large andsmall items of laundry together in the drum Differentsized items of laundry distribute themselves betterduring the spin cycle
Troubleshootingemspen
53
Fault Cause and troubleshootingThe programme dura-tion changes duringthe wash cycle
The programme operation is optimised electronicallyThis may change the programme duration Not a fault ndash no action required
The unbalanced load detection system eliminates animbalance by repeatedly redistributing the laundry Not a fault ndash no action required
Note When loading where possible place large andsmall items of laundry together in the drum Differentsized items of laundry distribute themselves betterduring the spin cycleFoam detection system switches on a rinse cycle iffoam build-up is too high Not a fault ndash no action required
No water is visible inthe drum
Water is below the visible area Not a fault ndash no action required Do not add any extra water to the appliance while it
is operating
Drum jerks after theprogramme starts
This is caused by an internal motor test Not a fault ndash no action required
Residual water ispresent in the com-partment
Insert in compartment is blocked rarr Cleaning the detergent drawer Page 42
Vibrations and move-ment of the appliancewhilst spinning
Appliance is not correctly aligned Aligning the appliance
The appliance feet are not fixed Secure the appliance feet Aligning the appliance
Transit bolts have not been removed Removing the transit bolts
Drum does not turnwater does not flow in
Load detection is active Not a fault ndash no action required
Note The load detection can take up to two minutesHeavy foam build-up Detergent dosage is too high
Immediate measure Mix one tablespoon of fabricsoftener with 05 litres of water and pour the mix-ture into the left-hand compartment (not for outdoorclothing sportswear or items stuffed with down)
Reduce the amount of detergent for the next wash-ing cycle with the same load
enemspTroubleshooting
54
Fault Cause and troubleshootingHigh spin speed notreached
A low spin speed is selected The next time you run a wash cycle set a higher
spin speed
Unbalance load detection system is using a reducedspin speed to eliminate an unbalance Redistribute the laundry in the drum
Note Where possible mix large and small items inthe drum Different sized items of laundry distributethemselves better during the spin cycle Start the programme
The spin programmedoes not start
Drain pipe or water outlet hose is blocked Clean the drain pipe and the water outlet hose
Drain pipe or water drain hose is caught or jammed Ensure that the drain pipe and water drain hose are
not kinked or trapped
The unbalanced load detection system has interruptedthe spin cycle because the laundry is unevenly distrib-uted Redistribute the laundry in the drum
Note Where possible mix large and small items inthe drum Different sized items of laundry distributethemselves better during the spin cycle Start the programme
Rushing hissingnoise
Water is flushed under pressure into the detergentdrawer Not a fault ndash normal operating noise
Loud noises duringthe spin cycle
Appliance is not correctly aligned Aligning the appliance
The appliance feet are not fixed Secure the appliance feet Aligning the appliance
Transit bolts have not been removed Removing the transit bolts
Banging noises rat-tling in the drainpump
Foreign bodies have got into the drain pump rarr Cleaning the drain pump Page 44
Slurping rhythmicalsuction noise
The drain pump is active the detergent solution ispumped out Not a fault ndash normal operating noise
Troubleshootingemspen
55
Fault Cause and troubleshootingCreasing The spin speed is too high
The next time you run a wash cycle set a lowerspin speed
The load is too large The next time you run a wash cycle reduce the
amount of laundry being loaded
The wrong programme is selected for the type of fab-ric Select the programmes that are suitable for the
type of fabric rarr Programmes Page 24
Detergent or fabricsoftener drips off theseal and collects onthe door or in the sealfold
Too much detergentfabric softener in the detergentdrawer When dosing liquid detergent and fabric softener
observe the marking in the detergent drawer anddo not dose above this
The spin result is notsatisfactory The laun-dry is too wettoodamp
A low spin speed is selected The next time you run a wash cycle set a higher
spin speed Start the programme
Drain pipe or water outlet hose is blocked Clean the drain pipe and the water outlet hose
Drain pipe or water drain hose is caught or jammed Ensure that the drain pipe and water drain hose are
not kinked or trapped
The unbalanced load detection system has interruptedthe spin cycle because the laundry is unevenly distrib-uted Redistribute the laundry in the drum
Note Where possible mix large and small items inthe drum Different sized items of laundry distributethemselves better during the spin cycle Start the programme
Unbalance load detection system is using a reducedspin speed to eliminate an unbalance Redistribute the laundry in the drum
Note Where possible mix large and small items inthe drum Different sized items of laundry distributethemselves better during the spin cycle Start the programme
enemspTroubleshooting
56
Fault Cause and troubleshootingDetergent residue onthe damp washing
Detergents may contain water-insoluble substancesthat deposit on the laundry Start the programme
Detergent residue onthe dry laundry
Detergents may contain water-insoluble substancesthat deposit on the laundry Brush out the laundry after washing and drying
Water is leaking out atthe water inlet hose
Water inlet hose is not correctlysecurely connected1 Connect the water supply hose correctly Connect-
ing the water inlet hose2 Tighten the screw connection
Water is leaking out atthe water outlet hose
The water outlet hose is damaged Replace the damaged water outlet hose
Water outlet hose is not connected correctly Connect the water outlet hose correctly Water out-
let connection types
Odours have formedin the appliance
Humidity and detergent residue may promote theformation of bacteria rarr Cleaning the drum Page 42 If you are not using the appliance leave the door
and detergent drawer open so that residual watercan evaporate
Transportation storage and disposalemspen
57
171 Emergency releaseReleasing the doorRequirement The drain pump isempty rarr Page 441 ATTENTION Escaping water may
cause material damage Do not open the door if you can
see water through the glassPull the emergency release down-wards with a tool and release
a The door lock is released2 Insert the maintenance flap and
lock it into place3 Close the maintenance flap
Transportation storage and disposal
18 Transportation stor-age and disposal
Transportation storage and disposal
You can find out here how to prepareyour appliance for transportation andstorage You will also find out how todispose of old appliances
181 Removing the appliance1 Turn off the tap2 rarr Emptying the water inlet hose
Page 473 Switch off the appliance4 Unplug the appliances mains plug
5 Drain the remaining detergentsolution rarr Cleaning the drain pumpPage 44
6 Detach the hoses
182 Inserting the transitbolts
Secure the appliance for transporta-tion using transit bolts in order to pre-vent damage1 Remove the four cover caps
‒ If necessary use a screwdriverto remove the cover caps
Keep the cover caps2 Insert the four sleeves
enemspTransportation storage and disposal
58
3 Insert all screws into the fourtransit bolts and tighten slightly
4 Insert the power cord into theholder and tighten all fourscrews for the transit bolts with aWAF 13 wrench
5 Insert the hose into holder
183 Using the applianceagain
1 Remove the transit bolts
2 Pour approx 1 litre of water intocompartment II in the detergentdrawer
3 Start the programmea The unused detergent cannot flow
straight into the outlet during thenext wash
184 Disposing of old appli-ance
Valuable raw materials can be re-used by recycling
WARNINGRisk of harm to healthChildren can lock themselves in theappliance thereby putting their livesat risk Do not install the appliance behind
a door as this may obstruct the ap-pliance door or prevent it fromopening
With redundant appliances unplugthe power cord Then cut throughthe cord and damage the lock onthe appliance door beyond repairso that the appliance door will nolonger close
1 Unplug the appliance from themains
2 Cut through the power cord3 Dispose of the appliance in an en-
vironmentally friendly mannerInformation about current disposalmethods are available from yourspecialist dealer or local authority
This appliance is la-belled in accordancewith European Directive201219EU concerningused electrical and elec-
Customer Serviceemspen
59
tronic appliances (wasteelectrical and electronicequipment - WEEE)The guideline determ-ines the framework forthe return and recyclingof used appliances asapplicable throughoutthe EU
Customer Service
19 Customer ServiceCustomer Service
If you have any queries on use areunable to rectify faults on the appli-ance yourself or if your applianceneeds to be repaired contact Cus-tomer ServiceYou can solve many problems your-self by consulting the information ontroubleshooting in these instructionsor on our website If this is not thecase contact our after-sales serviceWith any warranty claims we willmake sure that your appliance is re-paired by trained after-sales techni-cians using genuine spare parts in-cluding after the manufacturers war-ranty has expiredFunction-relevant genuine spare partsaccording to the corresponding Eco-design Order can be obtained fromCustomer Service for a period of atleast 10 years from the date onwhich your appliance was placed onthe market within the European Eco-nomic AreaNote Under the terms of the manu-facturers warranty the use of Cus-tomer Service is free of chargeDetailed information on the warrantyperiod and terms of warranty in yourcountry is available from our after-sales service your retailer or on ourwebsite
If you contact Customer Service youwill require the product number (E-Nr) and the production number (FD)of your applianceThe contact details for Customer Ser-vice can be found in the enclosedCustomer Service directory or on ourwebsite
191 Product number (E-Nr)and production number(FD)
You can find the product number (E-Nr) and the production number (FD)on the appliances rating plateDepending on the model the ratingplate is locatediexcl On the inside of the dooriexcl On the inside of the maintenance
flapiexcl On the rear of the applianceMake a note of your appliances de-tails and the Customer Service tele-phone number to find them againquickly
enemspConsumption values
60
Consumption values
20 Consumption valuesConsumption values
The following information is provided in accordance with the EU EcodesignRegulation The values given for programs other than the Eco 40-60 are indicat-ive only and were determined in accordance with the applicable standardEN60456
Programme Load(kg)
Pro-gramme dura-tion(hrmin)1
Energycon-sump-tion(kWhcycle)1
Watercon-sump-tion (lcycle)1
Max-imumtemper-ature(degC) 5mins1
Spinspeed(rpm)1
Resid-ualmois-ture()1
Eco 40-602 90 337 1245 610 50 1166 5000Eco 40-602 45 252 0590 450 33 1200 5000Eco 40-602 25 233 0195 300 24 1200 5400AlgodoacutenAl-godatildeo 20 degC
90 328 0370 900 23 1200 5400
AlgodoacutenAl-godatildeo 40 degC
90 328 1350 900 45 1200 5400
AlgodoacutenAl-godatildeo 60 degC
90 328 1450 900 55 1200 5400
AlgodoacutenAl-godatildeo 40 degC + Pre-lav
90 358 1400 1020 45 1200 5400
Sinteacuteticos 40 degC
40 228 0780 610 44 1200 2700
Mix 40 degC 40 059 0620 440 41 1200 5600 LanaLatildes
30 degC20 040 0200 400 22 800 2500
1 Due to the influence of water pressure hardness and inlet temperature am-bient temperature type amount and soiling of laundry detergent used fluc-tuations in the power supply and the selected additional functions the actualvalues may deviate from the stated values
2 Test programme in accordance with the EU Ecodesign Directive and the EUEnergy Labelling Regulation with cold water (15 degC)
Technical specificationsemspen
61
Technical specifications
21 Technical specifica-tions
Technical specifications
Facts and figures for your appliancecan be found here
Appliance height 850 cmAppliance width 598 cmAppliance depth 590 cmWeight 80 kg1
Maximum load 9 kgMains voltage 220 - 240 V
50 Hz Minimum in-
stallation protec-tion
10 A
Rated power 2300 WPower consump-tion
iexcl Off mode010 W
iexcl Left-on mode050 W
Water pressure iexcl Minimum100 kPa(1 bar)
iexcl Maximum1000 kPa(10 bar)
Length of the wa-ter inlet hose
150 cm
Length of the wa-ter outlet hose
150 cm
Length of thepower cord
160 cm
1 Depending on the appliance spe-cifications
More information about your modelcan be found online at httpsen-ergylabelbsh-groupcom1 This webaddress is linked to the official EUEPREL product database At the time
of printing its web address had notyet been published Please then fol-low the instructions on searching formodels The model identifier is madeup of the characters before the slashin the product number (E-Nr) on therating plate Alternatively you canalso find the model identifier in thefirst line of the EU energy label
1 Only applies to countries in the European Economic Area
Thank you for buying aBosch Home Appliance
Register your new device on MyBosch now and profit directly from
bull Expert tips amp tricks for your appliancebull Warranty extension optionsbull Discounts for accessories amp spare-partsbull Digital manual and all appliance data at handbull Easy access to Bosch Home Appliances Service
Free and easy registration ndash also on mobile phoneswwwbosch-homecomwelcome
Looking for help Youll find it here
Expert advice for your Bosch home appliances help with problems or a repair from Bosch experts Find out everything about the many ways Bosch can support you wwwbosch-homecomservice Contact data of all countries are listed in the attached service direct-ory
90016102699001610269emsp(010219)en
Robert Bosch Hausgeraumlte GmbHCarl-Wery-Straszlige 3481739 MuumlnchenGERMANYwwwbosch-homecom
Valid within Great BritainImported to Great Britain byBSH Home Appliances LtdGrand Union HouseOld Wolverton RoadWolverton Milton KeynesMK12 5PTUnited Kingdom
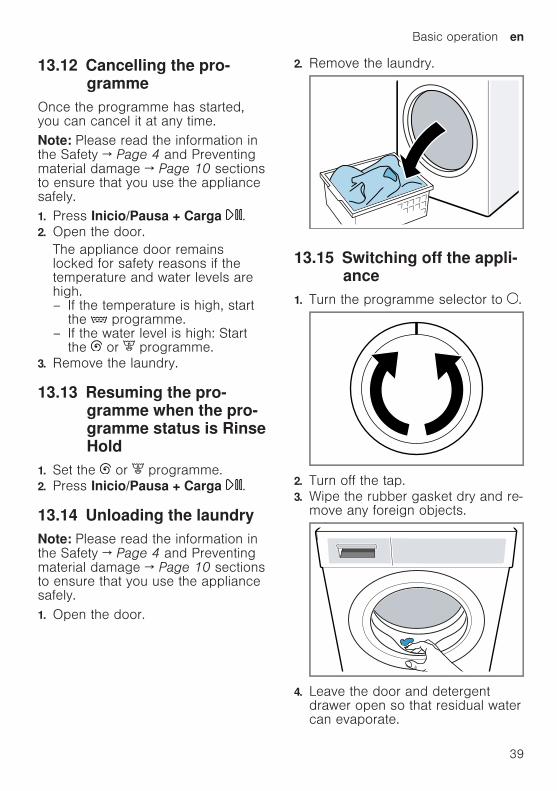
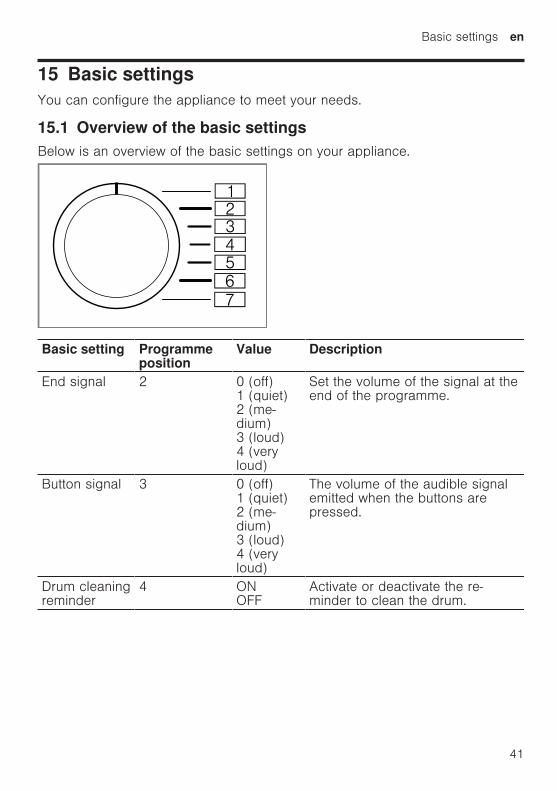

enemspCleaning and servicing
42
152 Changing the basic set-tings
1 Set the programme selector to po-sition 1
2 Press InicioPausa + Carga and at the same time turn theprogramme selector to position 2
a The display shows the currentvalue
3 Set the programme selector to therequired position
4 To change the value press Ter-min
5 To save the changes switch offthe appliance
Cleaning and servicing
16 Cleaning and servi-cing
Cleaning and servicing
To keep your appliance working effi-ciently for a long time it is importantto clean and maintain it carefully
161 Tips on appliance careWipe down thehousing and thecontrol panelwith nothing butwater and adamp cloth
This ensures theparts of the appli-ance will remainclean and hy-gienic
Remove all de-tergent residuespray residue orother residuesimmediately
Fresh depositsare easier to re-move withoutleaving anyresidue
Keep the appli-ance door anddetergent draweropen after use
This allows theresidual water todry reducingodours in the ap-pliance
162 Cleaning the drum
CAUTIONRisk of injuryPermanently washing at low temper-atures and a lack of ventilation forthe appliance may damage the drumand cause injury Regularly run a programme for
cleaning the drum or wash at tem-peratures of at least 60 degC
Leave the appliance to dry afterevery operation with the dooropen and leave the detergentdrawer to dry
Run the Limp tambor pro-gramme without laundryAdd washing powder
163 Cleaning the detergentdrawer
Note Please read the information inthe Safety rarr Page 4 and Preventingmaterial damage rarr Page 10 sectionsto ensure that you use the appliancesafely1 Pull out the detergent drawer
Cleaning and servicingemspen
43
2 Press down on the insert and re-move the detergent drawer
1
2
3 Press out the insert upwards frombelow
4 Clean the detergent drawer and in-sert with water and a brush andthen dry them
5 Fit the insert and lock it into place
6 Cleaning the opening for the deter-gent drawer
7 Push in the detergent drawer
164 Descaling
ATTENTIONThe use of unsuitable descalingagents eg for coffee machines maydamage the appliance For this appliance only use de-
scaling agents that are availablefrom the manufacturers website orour after-sales service
enemspCleaning and servicing
44
165 Cleaning the drain pumpClean the drain pump in the event offaults eg blockages or rattlingnoises
Emptying the drain pumpNote Please read the information inthe Safety rarr Page 4 and Preventingmaterial damage rarr Page 10 sectionsto ensure that you use the appliancesafely1 Turn off the water tap2 Switch off the appliance3 Disconnect the appliances mains
plug from the power supply4 Open the maintenance flap
5 Remove the maintenance flap
6 Slide a sufficiently large receptacleunder the opening
7 Take the drain hose out of theholder
Cleaning and servicingemspen
45
8 CAUTION - Risk of scaldingWhen you wash at high temperat-ures the detergent solution getshot
Do not touch the hot detergentsolutionTo allow the detergent solution toflow out into the container removethe sealing cap
9 Firmly press on the sealing cap
10 Insert the drain hose into theholder
Cleaning the drain pumpNote Please read the information inthe Safety rarr Page 4 and Preventingmaterial damage rarr Page 10 sectionsto ensure that you use the appliancesafelyRequirement The drain pump isempty rarr Page 441 Since water may remain in the
drain pump remove the pump capcarefully
2 Clean the interior the thread onthe pump cap and the pump hous-ing
3 Make sure that the impeller in thedrain pump can be rotated
enemspCleaning and servicing
46
4 Insert the pump cap and screw iton as far as it will go
90deg
The handle on the pump cap mustbe in a vertical position
5 Close the maintenance flap
Before the next washTo prevent unused detergent fromflowing straight into the outlet in thenext wash run the programmeafter you have emptied the drainpump1 Turn on the tap2 Insert the mains plug3 Switch on the appliance4 Pour 1 litre of water into compart-
ment II5 Start the programme
166 Cleaning the water outlethose at the siphon
1 Switch off the appliance2 Disconnect the appliances mains
plug from the power supply
3 Loosen the hose clamp and care-fully remove the water outlet hose
Residual water may leak out4 Clean the water outlet hose and si-
phon connecting piece
5 Reattach the water outlet hose andsecure the connection point usingthe hose clamp
Cleaning and servicingemspen
47
167 Clean the water inlet fil-ters
Emptying the water inlet hose1 Turn off the tap2 Set a programme except for
or 3 Start the programme and leave it
to run for approx 40 seconds4 Switch off the appliance5 Disconnect the appliances mains
plug from the power supply
Cleaning the filter on the tapNote Please read the information inthe Safety rarr Page 4 and Preventingmaterial damage rarr Page 10 sectionsto ensure that you use the appliancesafelyRequirement The water inlet hose isempty1 Remove the water inlet hose from
the tap
2 Clean the filter with a small brush
3 Connect the water inlet hose andcheck for leaks
Cleaning the filter on theapplianceNote Please read the information inthe Safety rarr Page 4 and Preventingmaterial damage rarr Page 10 sectionsto ensure that you use the appliancesafelyRequirement The water inlet hose isempty rarr Emptying the water inlet hosePage 47
enemspCleaning and servicing
48
1 Disconnect the hose from the rearof the appliance
1
2
2 Use pliers to remove the filter
3 Clean the filter with a small brush
4 Reinsert the filter
5 Connect the hose and check forleaks
2
1
Troubleshootingemspen
49
Troubleshooting
17 TroubleshootingTroubleshooting
You can rectify minor faults on your appliance yourself Read the troubleshoot-ing information before contacting after-sales service This will avoid unneces-sary costs
WARNINGRisk of electric shockIncorrect repairs are dangerous Repairs to the appliance should only be carried out by trained specialist
staff Only use genuine spare parts when repairing the appliance If the power cord of this appliance is damaged it must be replaced by the
manufacturer the manufacturers Customer Service or a similarly qualifiedperson in order to prevent any risk
Fault Cause and troubleshootingThe display goes outand InicioPausa +Carga flashes
Energy-saving mode is active Press any buttona The symbol lights up again
E36 -10 Drain pipe or water outlet hose is blocked Clean the drain pipe and the water outlet hose
Drain pipe or water drain hose is caught or jammed Ensure that the drain pipe and water drain hose are
not kinked or trapped
Drain pump is blocked rarr Cleaning the drain pump Page 44
The water outlet hose is connected too high Install the water outlet hose at a maximum height of
1 metre
Detergent dosage is too high Immediate measure Mix one tablespoon of fabric
softener with 05 litres of water and pour the mix-ture into the left-hand compartment (not for outdoorclothing sportswear or items stuffed with down)
Reduce the amount of detergent for the next wash-ing cycle with the same load
Unapproved extension installed on the water drainhose Remove any unapproved extensions from the water
hose Connecting the appliance
E36 -25 -26 Drain pump is blocked rarr Cleaning the drain pump Page 44
enemspTroubleshooting
50
Fault Cause and troubleshootingThe water pressure is lowNo remedial action possibleThe filters in the water inflow are blocked Clean the filters in the water inflow rarr Page 47
The tap is turned off Turn on the tap
The water inlet hose is kinked or jammed Ensure that the water inlet hose is not kinked or
jammed
flashes The automatic voltage control system detects an un-authorised voltage under-usage No remedial action possible
Note If the power supply is stable the programmecontinues to run as normalVoltage under-usage may cause extension of a pro-grammeNo remedial action possible
flashes Voltage under-usage may cause extension of a pro-grammeNo remedial action possible
lights up The temperature is too high Wait until the temperature has dropped rarr Cancelling the programme Page 39
Water level is too high Start the programme
Laundry is caught in the door1 Open the door again2 Remove any trapped laundry3 Close the door4 Press InicioPausa + Carga to start the pro-
gramme
flashes Door is not closed1 Close the door2 Press InicioPausa + Carga to start the pro-
gramme
All other error codes Malfunction Call the after-sales service
rarr Customer Service Page 59
Troubleshootingemspen
51
Fault Cause and troubleshootingThe appliance is notworking
The mains plug of the power cord is not plugged in Connect the appliance to the power supply
The circuit breaker is faulty Check the circuit breaker in the fuse box
There has been a power cut Check whether the lighting in your kitchen or other
appliances are working
The programme doesnot start
You have not pressed InicioPausa + Carga Press InicioPausa + Carga
Door is not closed1 Close the door2 Press InicioPausa + Carga to start the pro-
gramme
Childproof lock is activated rarr Deactivating the childproof lock Page 40
Termin is activated Check whether Termin is activated
rarr Buttons Page 23
Laundry is caught in the door1 Open the door again2 Remove any trapped laundry3 Close the door4 Press InicioPausa + Carga to start the pro-
gramme
The door cannotbe opened
ndash ndash ndash ndash is activated Continue the programme by selecting or and
pressing InicioPausa + Carga rarr Resuming the programme when the programmestatus is Rinse Hold Page 39
The temperature is too high Wait until the temperature has dropped rarr Cancelling the programme Page 39
Water level is too high Start the programme
Power failure Open the door using the emergency release
rarr Emergency release Page 57
The water is not drain-ing
Drain pipe or water outlet hose is blocked Clean the drain pipe and the water outlet hose
enemspTroubleshooting
52
Fault Cause and troubleshootingThe water is not drain-ing
Drain pipe or water drain hose is caught or jammed Ensure that the drain pipe and water drain hose are
not kinked or trapped
Drain pump is blocked rarr Cleaning the drain pump Page 44
ndash ndash ndash ndash is activated Continue the programme by selecting or and
pressing InicioPausa + Carga rarr Resuming the programme when the programmestatus is Rinse Hold Page 39
The water outlet hose is connected too high Install the water outlet hose at a maximum height of
1 metre
Detergent dosage is too high Immediate measure Mix one tablespoon of fabric
softener with 05 litres of water and pour the mix-ture into the left-hand compartment (not for outdoorclothing sportswear or items stuffed with down)
Reduce the amount of detergent for the next wash-ing cycle with the same load
Unapproved extension installed on the water drainhose Remove any unapproved extensions from the water
hose Connecting the appliance
Water is not flowingin Detergent is notbeing dispensed
You have not pressed InicioPausa + Carga Press InicioPausa + Carga
The filters in the water inflow are blocked Clean the filters in the water inflow rarr Page 47
The tap is turned off Turn on the tap
The water inlet hose is kinked or jammed Ensure that the water inlet hose is not kinked or
jammed
The spin cycle runsseveral times
The unbalanced load detection system eliminates animbalance by repeatedly redistributing the laundry Not a fault ndash no action required
Note When loading where possible place large andsmall items of laundry together in the drum Differentsized items of laundry distribute themselves betterduring the spin cycle
Troubleshootingemspen
53
Fault Cause and troubleshootingThe programme dura-tion changes duringthe wash cycle
The programme operation is optimised electronicallyThis may change the programme duration Not a fault ndash no action required
The unbalanced load detection system eliminates animbalance by repeatedly redistributing the laundry Not a fault ndash no action required
Note When loading where possible place large andsmall items of laundry together in the drum Differentsized items of laundry distribute themselves betterduring the spin cycleFoam detection system switches on a rinse cycle iffoam build-up is too high Not a fault ndash no action required
No water is visible inthe drum
Water is below the visible area Not a fault ndash no action required Do not add any extra water to the appliance while it
is operating
Drum jerks after theprogramme starts
This is caused by an internal motor test Not a fault ndash no action required
Residual water ispresent in the com-partment
Insert in compartment is blocked rarr Cleaning the detergent drawer Page 42
Vibrations and move-ment of the appliancewhilst spinning
Appliance is not correctly aligned Aligning the appliance
The appliance feet are not fixed Secure the appliance feet Aligning the appliance
Transit bolts have not been removed Removing the transit bolts
Drum does not turnwater does not flow in
Load detection is active Not a fault ndash no action required
Note The load detection can take up to two minutesHeavy foam build-up Detergent dosage is too high
Immediate measure Mix one tablespoon of fabricsoftener with 05 litres of water and pour the mix-ture into the left-hand compartment (not for outdoorclothing sportswear or items stuffed with down)
Reduce the amount of detergent for the next wash-ing cycle with the same load
enemspTroubleshooting
54
Fault Cause and troubleshootingHigh spin speed notreached
A low spin speed is selected The next time you run a wash cycle set a higher
spin speed
Unbalance load detection system is using a reducedspin speed to eliminate an unbalance Redistribute the laundry in the drum
Note Where possible mix large and small items inthe drum Different sized items of laundry distributethemselves better during the spin cycle Start the programme
The spin programmedoes not start
Drain pipe or water outlet hose is blocked Clean the drain pipe and the water outlet hose
Drain pipe or water drain hose is caught or jammed Ensure that the drain pipe and water drain hose are
not kinked or trapped
The unbalanced load detection system has interruptedthe spin cycle because the laundry is unevenly distrib-uted Redistribute the laundry in the drum
Note Where possible mix large and small items inthe drum Different sized items of laundry distributethemselves better during the spin cycle Start the programme
Rushing hissingnoise
Water is flushed under pressure into the detergentdrawer Not a fault ndash normal operating noise
Loud noises duringthe spin cycle
Appliance is not correctly aligned Aligning the appliance
The appliance feet are not fixed Secure the appliance feet Aligning the appliance
Transit bolts have not been removed Removing the transit bolts
Banging noises rat-tling in the drainpump
Foreign bodies have got into the drain pump rarr Cleaning the drain pump Page 44
Slurping rhythmicalsuction noise
The drain pump is active the detergent solution ispumped out Not a fault ndash normal operating noise
Troubleshootingemspen
55
Fault Cause and troubleshootingCreasing The spin speed is too high
The next time you run a wash cycle set a lowerspin speed
The load is too large The next time you run a wash cycle reduce the
amount of laundry being loaded
The wrong programme is selected for the type of fab-ric Select the programmes that are suitable for the
type of fabric rarr Programmes Page 24
Detergent or fabricsoftener drips off theseal and collects onthe door or in the sealfold
Too much detergentfabric softener in the detergentdrawer When dosing liquid detergent and fabric softener
observe the marking in the detergent drawer anddo not dose above this
The spin result is notsatisfactory The laun-dry is too wettoodamp
A low spin speed is selected The next time you run a wash cycle set a higher
spin speed Start the programme
Drain pipe or water outlet hose is blocked Clean the drain pipe and the water outlet hose
Drain pipe or water drain hose is caught or jammed Ensure that the drain pipe and water drain hose are
not kinked or trapped
The unbalanced load detection system has interruptedthe spin cycle because the laundry is unevenly distrib-uted Redistribute the laundry in the drum
Note Where possible mix large and small items inthe drum Different sized items of laundry distributethemselves better during the spin cycle Start the programme
Unbalance load detection system is using a reducedspin speed to eliminate an unbalance Redistribute the laundry in the drum
Note Where possible mix large and small items inthe drum Different sized items of laundry distributethemselves better during the spin cycle Start the programme
enemspTroubleshooting
56
Fault Cause and troubleshootingDetergent residue onthe damp washing
Detergents may contain water-insoluble substancesthat deposit on the laundry Start the programme
Detergent residue onthe dry laundry
Detergents may contain water-insoluble substancesthat deposit on the laundry Brush out the laundry after washing and drying
Water is leaking out atthe water inlet hose
Water inlet hose is not correctlysecurely connected1 Connect the water supply hose correctly Connect-
ing the water inlet hose2 Tighten the screw connection
Water is leaking out atthe water outlet hose
The water outlet hose is damaged Replace the damaged water outlet hose
Water outlet hose is not connected correctly Connect the water outlet hose correctly Water out-
let connection types
Odours have formedin the appliance
Humidity and detergent residue may promote theformation of bacteria rarr Cleaning the drum Page 42 If you are not using the appliance leave the door
and detergent drawer open so that residual watercan evaporate
Transportation storage and disposalemspen
57
171 Emergency releaseReleasing the doorRequirement The drain pump isempty rarr Page 441 ATTENTION Escaping water may
cause material damage Do not open the door if you can
see water through the glassPull the emergency release down-wards with a tool and release
a The door lock is released2 Insert the maintenance flap and
lock it into place3 Close the maintenance flap
Transportation storage and disposal
18 Transportation stor-age and disposal
Transportation storage and disposal
You can find out here how to prepareyour appliance for transportation andstorage You will also find out how todispose of old appliances
181 Removing the appliance1 Turn off the tap2 rarr Emptying the water inlet hose
Page 473 Switch off the appliance4 Unplug the appliances mains plug
5 Drain the remaining detergentsolution rarr Cleaning the drain pumpPage 44
6 Detach the hoses
182 Inserting the transitbolts
Secure the appliance for transporta-tion using transit bolts in order to pre-vent damage1 Remove the four cover caps
‒ If necessary use a screwdriverto remove the cover caps
Keep the cover caps2 Insert the four sleeves
enemspTransportation storage and disposal
58
3 Insert all screws into the fourtransit bolts and tighten slightly
4 Insert the power cord into theholder and tighten all fourscrews for the transit bolts with aWAF 13 wrench
5 Insert the hose into holder
183 Using the applianceagain
1 Remove the transit bolts
2 Pour approx 1 litre of water intocompartment II in the detergentdrawer
3 Start the programmea The unused detergent cannot flow
straight into the outlet during thenext wash
184 Disposing of old appli-ance
Valuable raw materials can be re-used by recycling
WARNINGRisk of harm to healthChildren can lock themselves in theappliance thereby putting their livesat risk Do not install the appliance behind
a door as this may obstruct the ap-pliance door or prevent it fromopening
With redundant appliances unplugthe power cord Then cut throughthe cord and damage the lock onthe appliance door beyond repairso that the appliance door will nolonger close
1 Unplug the appliance from themains
2 Cut through the power cord3 Dispose of the appliance in an en-
vironmentally friendly mannerInformation about current disposalmethods are available from yourspecialist dealer or local authority
This appliance is la-belled in accordancewith European Directive201219EU concerningused electrical and elec-
Customer Serviceemspen
59
tronic appliances (wasteelectrical and electronicequipment - WEEE)The guideline determ-ines the framework forthe return and recyclingof used appliances asapplicable throughoutthe EU
Customer Service
19 Customer ServiceCustomer Service
If you have any queries on use areunable to rectify faults on the appli-ance yourself or if your applianceneeds to be repaired contact Cus-tomer ServiceYou can solve many problems your-self by consulting the information ontroubleshooting in these instructionsor on our website If this is not thecase contact our after-sales serviceWith any warranty claims we willmake sure that your appliance is re-paired by trained after-sales techni-cians using genuine spare parts in-cluding after the manufacturers war-ranty has expiredFunction-relevant genuine spare partsaccording to the corresponding Eco-design Order can be obtained fromCustomer Service for a period of atleast 10 years from the date onwhich your appliance was placed onthe market within the European Eco-nomic AreaNote Under the terms of the manu-facturers warranty the use of Cus-tomer Service is free of chargeDetailed information on the warrantyperiod and terms of warranty in yourcountry is available from our after-sales service your retailer or on ourwebsite
If you contact Customer Service youwill require the product number (E-Nr) and the production number (FD)of your applianceThe contact details for Customer Ser-vice can be found in the enclosedCustomer Service directory or on ourwebsite
191 Product number (E-Nr)and production number(FD)
You can find the product number (E-Nr) and the production number (FD)on the appliances rating plateDepending on the model the ratingplate is locatediexcl On the inside of the dooriexcl On the inside of the maintenance
flapiexcl On the rear of the applianceMake a note of your appliances de-tails and the Customer Service tele-phone number to find them againquickly
enemspConsumption values
60
Consumption values
20 Consumption valuesConsumption values
The following information is provided in accordance with the EU EcodesignRegulation The values given for programs other than the Eco 40-60 are indicat-ive only and were determined in accordance with the applicable standardEN60456
Programme Load(kg)
Pro-gramme dura-tion(hrmin)1
Energycon-sump-tion(kWhcycle)1
Watercon-sump-tion (lcycle)1
Max-imumtemper-ature(degC) 5mins1
Spinspeed(rpm)1
Resid-ualmois-ture()1
Eco 40-602 90 337 1245 610 50 1166 5000Eco 40-602 45 252 0590 450 33 1200 5000Eco 40-602 25 233 0195 300 24 1200 5400AlgodoacutenAl-godatildeo 20 degC
90 328 0370 900 23 1200 5400
AlgodoacutenAl-godatildeo 40 degC
90 328 1350 900 45 1200 5400
AlgodoacutenAl-godatildeo 60 degC
90 328 1450 900 55 1200 5400
AlgodoacutenAl-godatildeo 40 degC + Pre-lav
90 358 1400 1020 45 1200 5400
Sinteacuteticos 40 degC
40 228 0780 610 44 1200 2700
Mix 40 degC 40 059 0620 440 41 1200 5600 LanaLatildes
30 degC20 040 0200 400 22 800 2500
1 Due to the influence of water pressure hardness and inlet temperature am-bient temperature type amount and soiling of laundry detergent used fluc-tuations in the power supply and the selected additional functions the actualvalues may deviate from the stated values
2 Test programme in accordance with the EU Ecodesign Directive and the EUEnergy Labelling Regulation with cold water (15 degC)
Technical specificationsemspen
61
Technical specifications
21 Technical specifica-tions
Technical specifications
Facts and figures for your appliancecan be found here
Appliance height 850 cmAppliance width 598 cmAppliance depth 590 cmWeight 80 kg1
Maximum load 9 kgMains voltage 220 - 240 V
50 Hz Minimum in-
stallation protec-tion
10 A
Rated power 2300 WPower consump-tion
iexcl Off mode010 W
iexcl Left-on mode050 W
Water pressure iexcl Minimum100 kPa(1 bar)
iexcl Maximum1000 kPa(10 bar)
Length of the wa-ter inlet hose
150 cm
Length of the wa-ter outlet hose
150 cm
Length of thepower cord
160 cm
1 Depending on the appliance spe-cifications
More information about your modelcan be found online at httpsen-ergylabelbsh-groupcom1 This webaddress is linked to the official EUEPREL product database At the time
of printing its web address had notyet been published Please then fol-low the instructions on searching formodels The model identifier is madeup of the characters before the slashin the product number (E-Nr) on therating plate Alternatively you canalso find the model identifier in thefirst line of the EU energy label
1 Only applies to countries in the European Economic Area
Thank you for buying aBosch Home Appliance
Register your new device on MyBosch now and profit directly from
bull Expert tips amp tricks for your appliancebull Warranty extension optionsbull Discounts for accessories amp spare-partsbull Digital manual and all appliance data at handbull Easy access to Bosch Home Appliances Service
Free and easy registration ndash also on mobile phoneswwwbosch-homecomwelcome
Looking for help Youll find it here
Expert advice for your Bosch home appliances help with problems or a repair from Bosch experts Find out everything about the many ways Bosch can support you wwwbosch-homecomservice Contact data of all countries are listed in the attached service direct-ory
90016102699001610269emsp(010219)en
Robert Bosch Hausgeraumlte GmbHCarl-Wery-Straszlige 3481739 MuumlnchenGERMANYwwwbosch-homecom
Valid within Great BritainImported to Great Britain byBSH Home Appliances LtdGrand Union HouseOld Wolverton RoadWolverton Milton KeynesMK12 5PTUnited Kingdom
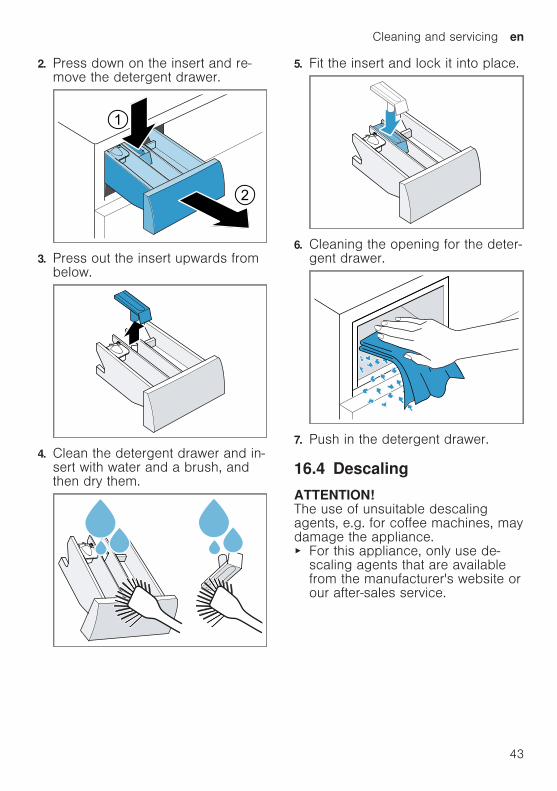
Cleaning and servicingemspen
43
2 Press down on the insert and re-move the detergent drawer
1
2
3 Press out the insert upwards frombelow
4 Clean the detergent drawer and in-sert with water and a brush andthen dry them
5 Fit the insert and lock it into place
6 Cleaning the opening for the deter-gent drawer
7 Push in the detergent drawer
164 Descaling
ATTENTIONThe use of unsuitable descalingagents eg for coffee machines maydamage the appliance For this appliance only use de-
scaling agents that are availablefrom the manufacturers website orour after-sales service
enemspCleaning and servicing
44
165 Cleaning the drain pumpClean the drain pump in the event offaults eg blockages or rattlingnoises
Emptying the drain pumpNote Please read the information inthe Safety rarr Page 4 and Preventingmaterial damage rarr Page 10 sectionsto ensure that you use the appliancesafely1 Turn off the water tap2 Switch off the appliance3 Disconnect the appliances mains
plug from the power supply4 Open the maintenance flap
5 Remove the maintenance flap
6 Slide a sufficiently large receptacleunder the opening
7 Take the drain hose out of theholder
Cleaning and servicingemspen
45
8 CAUTION - Risk of scaldingWhen you wash at high temperat-ures the detergent solution getshot
Do not touch the hot detergentsolutionTo allow the detergent solution toflow out into the container removethe sealing cap
9 Firmly press on the sealing cap
10 Insert the drain hose into theholder
Cleaning the drain pumpNote Please read the information inthe Safety rarr Page 4 and Preventingmaterial damage rarr Page 10 sectionsto ensure that you use the appliancesafelyRequirement The drain pump isempty rarr Page 441 Since water may remain in the
drain pump remove the pump capcarefully
2 Clean the interior the thread onthe pump cap and the pump hous-ing
3 Make sure that the impeller in thedrain pump can be rotated
enemspCleaning and servicing
46
4 Insert the pump cap and screw iton as far as it will go
90deg
The handle on the pump cap mustbe in a vertical position
5 Close the maintenance flap
Before the next washTo prevent unused detergent fromflowing straight into the outlet in thenext wash run the programmeafter you have emptied the drainpump1 Turn on the tap2 Insert the mains plug3 Switch on the appliance4 Pour 1 litre of water into compart-
ment II5 Start the programme
166 Cleaning the water outlethose at the siphon
1 Switch off the appliance2 Disconnect the appliances mains
plug from the power supply
3 Loosen the hose clamp and care-fully remove the water outlet hose
Residual water may leak out4 Clean the water outlet hose and si-
phon connecting piece
5 Reattach the water outlet hose andsecure the connection point usingthe hose clamp
Cleaning and servicingemspen
47
167 Clean the water inlet fil-ters
Emptying the water inlet hose1 Turn off the tap2 Set a programme except for
or 3 Start the programme and leave it
to run for approx 40 seconds4 Switch off the appliance5 Disconnect the appliances mains
plug from the power supply
Cleaning the filter on the tapNote Please read the information inthe Safety rarr Page 4 and Preventingmaterial damage rarr Page 10 sectionsto ensure that you use the appliancesafelyRequirement The water inlet hose isempty1 Remove the water inlet hose from
the tap
2 Clean the filter with a small brush
3 Connect the water inlet hose andcheck for leaks
Cleaning the filter on theapplianceNote Please read the information inthe Safety rarr Page 4 and Preventingmaterial damage rarr Page 10 sectionsto ensure that you use the appliancesafelyRequirement The water inlet hose isempty rarr Emptying the water inlet hosePage 47
enemspCleaning and servicing
48
1 Disconnect the hose from the rearof the appliance
1
2
2 Use pliers to remove the filter
3 Clean the filter with a small brush
4 Reinsert the filter
5 Connect the hose and check forleaks
2
1
Troubleshootingemspen
49
Troubleshooting
17 TroubleshootingTroubleshooting
You can rectify minor faults on your appliance yourself Read the troubleshoot-ing information before contacting after-sales service This will avoid unneces-sary costs
WARNINGRisk of electric shockIncorrect repairs are dangerous Repairs to the appliance should only be carried out by trained specialist
staff Only use genuine spare parts when repairing the appliance If the power cord of this appliance is damaged it must be replaced by the
manufacturer the manufacturers Customer Service or a similarly qualifiedperson in order to prevent any risk
Fault Cause and troubleshootingThe display goes outand InicioPausa +Carga flashes
Energy-saving mode is active Press any buttona The symbol lights up again
E36 -10 Drain pipe or water outlet hose is blocked Clean the drain pipe and the water outlet hose
Drain pipe or water drain hose is caught or jammed Ensure that the drain pipe and water drain hose are
not kinked or trapped
Drain pump is blocked rarr Cleaning the drain pump Page 44
The water outlet hose is connected too high Install the water outlet hose at a maximum height of
1 metre
Detergent dosage is too high Immediate measure Mix one tablespoon of fabric
softener with 05 litres of water and pour the mix-ture into the left-hand compartment (not for outdoorclothing sportswear or items stuffed with down)
Reduce the amount of detergent for the next wash-ing cycle with the same load
Unapproved extension installed on the water drainhose Remove any unapproved extensions from the water
hose Connecting the appliance
E36 -25 -26 Drain pump is blocked rarr Cleaning the drain pump Page 44
enemspTroubleshooting
50
Fault Cause and troubleshootingThe water pressure is lowNo remedial action possibleThe filters in the water inflow are blocked Clean the filters in the water inflow rarr Page 47
The tap is turned off Turn on the tap
The water inlet hose is kinked or jammed Ensure that the water inlet hose is not kinked or
jammed
flashes The automatic voltage control system detects an un-authorised voltage under-usage No remedial action possible
Note If the power supply is stable the programmecontinues to run as normalVoltage under-usage may cause extension of a pro-grammeNo remedial action possible
flashes Voltage under-usage may cause extension of a pro-grammeNo remedial action possible
lights up The temperature is too high Wait until the temperature has dropped rarr Cancelling the programme Page 39
Water level is too high Start the programme
Laundry is caught in the door1 Open the door again2 Remove any trapped laundry3 Close the door4 Press InicioPausa + Carga to start the pro-
gramme
flashes Door is not closed1 Close the door2 Press InicioPausa + Carga to start the pro-
gramme
All other error codes Malfunction Call the after-sales service
rarr Customer Service Page 59
Troubleshootingemspen
51
Fault Cause and troubleshootingThe appliance is notworking
The mains plug of the power cord is not plugged in Connect the appliance to the power supply
The circuit breaker is faulty Check the circuit breaker in the fuse box
There has been a power cut Check whether the lighting in your kitchen or other
appliances are working
The programme doesnot start
You have not pressed InicioPausa + Carga Press InicioPausa + Carga
Door is not closed1 Close the door2 Press InicioPausa + Carga to start the pro-
gramme
Childproof lock is activated rarr Deactivating the childproof lock Page 40
Termin is activated Check whether Termin is activated
rarr Buttons Page 23
Laundry is caught in the door1 Open the door again2 Remove any trapped laundry3 Close the door4 Press InicioPausa + Carga to start the pro-
gramme
The door cannotbe opened
ndash ndash ndash ndash is activated Continue the programme by selecting or and
pressing InicioPausa + Carga rarr Resuming the programme when the programmestatus is Rinse Hold Page 39
The temperature is too high Wait until the temperature has dropped rarr Cancelling the programme Page 39
Water level is too high Start the programme
Power failure Open the door using the emergency release
rarr Emergency release Page 57
The water is not drain-ing
Drain pipe or water outlet hose is blocked Clean the drain pipe and the water outlet hose
enemspTroubleshooting
52
Fault Cause and troubleshootingThe water is not drain-ing
Drain pipe or water drain hose is caught or jammed Ensure that the drain pipe and water drain hose are
not kinked or trapped
Drain pump is blocked rarr Cleaning the drain pump Page 44
ndash ndash ndash ndash is activated Continue the programme by selecting or and
pressing InicioPausa + Carga rarr Resuming the programme when the programmestatus is Rinse Hold Page 39
The water outlet hose is connected too high Install the water outlet hose at a maximum height of
1 metre
Detergent dosage is too high Immediate measure Mix one tablespoon of fabric
softener with 05 litres of water and pour the mix-ture into the left-hand compartment (not for outdoorclothing sportswear or items stuffed with down)
Reduce the amount of detergent for the next wash-ing cycle with the same load
Unapproved extension installed on the water drainhose Remove any unapproved extensions from the water
hose Connecting the appliance
Water is not flowingin Detergent is notbeing dispensed
You have not pressed InicioPausa + Carga Press InicioPausa + Carga
The filters in the water inflow are blocked Clean the filters in the water inflow rarr Page 47
The tap is turned off Turn on the tap
The water inlet hose is kinked or jammed Ensure that the water inlet hose is not kinked or
jammed
The spin cycle runsseveral times
The unbalanced load detection system eliminates animbalance by repeatedly redistributing the laundry Not a fault ndash no action required
Note When loading where possible place large andsmall items of laundry together in the drum Differentsized items of laundry distribute themselves betterduring the spin cycle
Troubleshootingemspen
53
Fault Cause and troubleshootingThe programme dura-tion changes duringthe wash cycle
The programme operation is optimised electronicallyThis may change the programme duration Not a fault ndash no action required
The unbalanced load detection system eliminates animbalance by repeatedly redistributing the laundry Not a fault ndash no action required
Note When loading where possible place large andsmall items of laundry together in the drum Differentsized items of laundry distribute themselves betterduring the spin cycleFoam detection system switches on a rinse cycle iffoam build-up is too high Not a fault ndash no action required
No water is visible inthe drum
Water is below the visible area Not a fault ndash no action required Do not add any extra water to the appliance while it
is operating
Drum jerks after theprogramme starts
This is caused by an internal motor test Not a fault ndash no action required
Residual water ispresent in the com-partment
Insert in compartment is blocked rarr Cleaning the detergent drawer Page 42
Vibrations and move-ment of the appliancewhilst spinning
Appliance is not correctly aligned Aligning the appliance
The appliance feet are not fixed Secure the appliance feet Aligning the appliance
Transit bolts have not been removed Removing the transit bolts
Drum does not turnwater does not flow in
Load detection is active Not a fault ndash no action required
Note The load detection can take up to two minutesHeavy foam build-up Detergent dosage is too high
Immediate measure Mix one tablespoon of fabricsoftener with 05 litres of water and pour the mix-ture into the left-hand compartment (not for outdoorclothing sportswear or items stuffed with down)
Reduce the amount of detergent for the next wash-ing cycle with the same load
enemspTroubleshooting
54
Fault Cause and troubleshootingHigh spin speed notreached
A low spin speed is selected The next time you run a wash cycle set a higher
spin speed
Unbalance load detection system is using a reducedspin speed to eliminate an unbalance Redistribute the laundry in the drum
Note Where possible mix large and small items inthe drum Different sized items of laundry distributethemselves better during the spin cycle Start the programme
The spin programmedoes not start
Drain pipe or water outlet hose is blocked Clean the drain pipe and the water outlet hose
Drain pipe or water drain hose is caught or jammed Ensure that the drain pipe and water drain hose are
not kinked or trapped
The unbalanced load detection system has interruptedthe spin cycle because the laundry is unevenly distrib-uted Redistribute the laundry in the drum
Note Where possible mix large and small items inthe drum Different sized items of laundry distributethemselves better during the spin cycle Start the programme
Rushing hissingnoise
Water is flushed under pressure into the detergentdrawer Not a fault ndash normal operating noise
Loud noises duringthe spin cycle
Appliance is not correctly aligned Aligning the appliance
The appliance feet are not fixed Secure the appliance feet Aligning the appliance
Transit bolts have not been removed Removing the transit bolts
Banging noises rat-tling in the drainpump
Foreign bodies have got into the drain pump rarr Cleaning the drain pump Page 44
Slurping rhythmicalsuction noise
The drain pump is active the detergent solution ispumped out Not a fault ndash normal operating noise
Troubleshootingemspen
55
Fault Cause and troubleshootingCreasing The spin speed is too high
The next time you run a wash cycle set a lowerspin speed
The load is too large The next time you run a wash cycle reduce the
amount of laundry being loaded
The wrong programme is selected for the type of fab-ric Select the programmes that are suitable for the
type of fabric rarr Programmes Page 24
Detergent or fabricsoftener drips off theseal and collects onthe door or in the sealfold
Too much detergentfabric softener in the detergentdrawer When dosing liquid detergent and fabric softener
observe the marking in the detergent drawer anddo not dose above this
The spin result is notsatisfactory The laun-dry is too wettoodamp
A low spin speed is selected The next time you run a wash cycle set a higher
spin speed Start the programme
Drain pipe or water outlet hose is blocked Clean the drain pipe and the water outlet hose
Drain pipe or water drain hose is caught or jammed Ensure that the drain pipe and water drain hose are
not kinked or trapped
The unbalanced load detection system has interruptedthe spin cycle because the laundry is unevenly distrib-uted Redistribute the laundry in the drum
Note Where possible mix large and small items inthe drum Different sized items of laundry distributethemselves better during the spin cycle Start the programme
Unbalance load detection system is using a reducedspin speed to eliminate an unbalance Redistribute the laundry in the drum
Note Where possible mix large and small items inthe drum Different sized items of laundry distributethemselves better during the spin cycle Start the programme
enemspTroubleshooting
56
Fault Cause and troubleshootingDetergent residue onthe damp washing
Detergents may contain water-insoluble substancesthat deposit on the laundry Start the programme
Detergent residue onthe dry laundry
Detergents may contain water-insoluble substancesthat deposit on the laundry Brush out the laundry after washing and drying
Water is leaking out atthe water inlet hose
Water inlet hose is not correctlysecurely connected1 Connect the water supply hose correctly Connect-
ing the water inlet hose2 Tighten the screw connection
Water is leaking out atthe water outlet hose
The water outlet hose is damaged Replace the damaged water outlet hose
Water outlet hose is not connected correctly Connect the water outlet hose correctly Water out-
let connection types
Odours have formedin the appliance
Humidity and detergent residue may promote theformation of bacteria rarr Cleaning the drum Page 42 If you are not using the appliance leave the door
and detergent drawer open so that residual watercan evaporate
Transportation storage and disposalemspen
57
171 Emergency releaseReleasing the doorRequirement The drain pump isempty rarr Page 441 ATTENTION Escaping water may
cause material damage Do not open the door if you can
see water through the glassPull the emergency release down-wards with a tool and release
a The door lock is released2 Insert the maintenance flap and
lock it into place3 Close the maintenance flap
Transportation storage and disposal
18 Transportation stor-age and disposal
Transportation storage and disposal
You can find out here how to prepareyour appliance for transportation andstorage You will also find out how todispose of old appliances
181 Removing the appliance1 Turn off the tap2 rarr Emptying the water inlet hose
Page 473 Switch off the appliance4 Unplug the appliances mains plug
5 Drain the remaining detergentsolution rarr Cleaning the drain pumpPage 44
6 Detach the hoses
182 Inserting the transitbolts
Secure the appliance for transporta-tion using transit bolts in order to pre-vent damage1 Remove the four cover caps
‒ If necessary use a screwdriverto remove the cover caps
Keep the cover caps2 Insert the four sleeves
enemspTransportation storage and disposal
58
3 Insert all screws into the fourtransit bolts and tighten slightly
4 Insert the power cord into theholder and tighten all fourscrews for the transit bolts with aWAF 13 wrench
5 Insert the hose into holder
183 Using the applianceagain
1 Remove the transit bolts
2 Pour approx 1 litre of water intocompartment II in the detergentdrawer
3 Start the programmea The unused detergent cannot flow
straight into the outlet during thenext wash
184 Disposing of old appli-ance
Valuable raw materials can be re-used by recycling
WARNINGRisk of harm to healthChildren can lock themselves in theappliance thereby putting their livesat risk Do not install the appliance behind
a door as this may obstruct the ap-pliance door or prevent it fromopening
With redundant appliances unplugthe power cord Then cut throughthe cord and damage the lock onthe appliance door beyond repairso that the appliance door will nolonger close
1 Unplug the appliance from themains
2 Cut through the power cord3 Dispose of the appliance in an en-
vironmentally friendly mannerInformation about current disposalmethods are available from yourspecialist dealer or local authority
This appliance is la-belled in accordancewith European Directive201219EU concerningused electrical and elec-
Customer Serviceemspen
59
tronic appliances (wasteelectrical and electronicequipment - WEEE)The guideline determ-ines the framework forthe return and recyclingof used appliances asapplicable throughoutthe EU
Customer Service
19 Customer ServiceCustomer Service
If you have any queries on use areunable to rectify faults on the appli-ance yourself or if your applianceneeds to be repaired contact Cus-tomer ServiceYou can solve many problems your-self by consulting the information ontroubleshooting in these instructionsor on our website If this is not thecase contact our after-sales serviceWith any warranty claims we willmake sure that your appliance is re-paired by trained after-sales techni-cians using genuine spare parts in-cluding after the manufacturers war-ranty has expiredFunction-relevant genuine spare partsaccording to the corresponding Eco-design Order can be obtained fromCustomer Service for a period of atleast 10 years from the date onwhich your appliance was placed onthe market within the European Eco-nomic AreaNote Under the terms of the manu-facturers warranty the use of Cus-tomer Service is free of chargeDetailed information on the warrantyperiod and terms of warranty in yourcountry is available from our after-sales service your retailer or on ourwebsite
If you contact Customer Service youwill require the product number (E-Nr) and the production number (FD)of your applianceThe contact details for Customer Ser-vice can be found in the enclosedCustomer Service directory or on ourwebsite
191 Product number (E-Nr)and production number(FD)
You can find the product number (E-Nr) and the production number (FD)on the appliances rating plateDepending on the model the ratingplate is locatediexcl On the inside of the dooriexcl On the inside of the maintenance
flapiexcl On the rear of the applianceMake a note of your appliances de-tails and the Customer Service tele-phone number to find them againquickly
enemspConsumption values
60
Consumption values
20 Consumption valuesConsumption values
The following information is provided in accordance with the EU EcodesignRegulation The values given for programs other than the Eco 40-60 are indicat-ive only and were determined in accordance with the applicable standardEN60456
Programme Load(kg)
Pro-gramme dura-tion(hrmin)1
Energycon-sump-tion(kWhcycle)1
Watercon-sump-tion (lcycle)1
Max-imumtemper-ature(degC) 5mins1
Spinspeed(rpm)1
Resid-ualmois-ture()1
Eco 40-602 90 337 1245 610 50 1166 5000Eco 40-602 45 252 0590 450 33 1200 5000Eco 40-602 25 233 0195 300 24 1200 5400AlgodoacutenAl-godatildeo 20 degC
90 328 0370 900 23 1200 5400
AlgodoacutenAl-godatildeo 40 degC
90 328 1350 900 45 1200 5400
AlgodoacutenAl-godatildeo 60 degC
90 328 1450 900 55 1200 5400
AlgodoacutenAl-godatildeo 40 degC + Pre-lav
90 358 1400 1020 45 1200 5400
Sinteacuteticos 40 degC
40 228 0780 610 44 1200 2700
Mix 40 degC 40 059 0620 440 41 1200 5600 LanaLatildes
30 degC20 040 0200 400 22 800 2500
1 Due to the influence of water pressure hardness and inlet temperature am-bient temperature type amount and soiling of laundry detergent used fluc-tuations in the power supply and the selected additional functions the actualvalues may deviate from the stated values
2 Test programme in accordance with the EU Ecodesign Directive and the EUEnergy Labelling Regulation with cold water (15 degC)
Technical specificationsemspen
61
Technical specifications
21 Technical specifica-tions
Technical specifications
Facts and figures for your appliancecan be found here
Appliance height 850 cmAppliance width 598 cmAppliance depth 590 cmWeight 80 kg1
Maximum load 9 kgMains voltage 220 - 240 V
50 Hz Minimum in-
stallation protec-tion
10 A
Rated power 2300 WPower consump-tion
iexcl Off mode010 W
iexcl Left-on mode050 W
Water pressure iexcl Minimum100 kPa(1 bar)
iexcl Maximum1000 kPa(10 bar)
Length of the wa-ter inlet hose
150 cm
Length of the wa-ter outlet hose
150 cm
Length of thepower cord
160 cm
1 Depending on the appliance spe-cifications
More information about your modelcan be found online at httpsen-ergylabelbsh-groupcom1 This webaddress is linked to the official EUEPREL product database At the time
of printing its web address had notyet been published Please then fol-low the instructions on searching formodels The model identifier is madeup of the characters before the slashin the product number (E-Nr) on therating plate Alternatively you canalso find the model identifier in thefirst line of the EU energy label
1 Only applies to countries in the European Economic Area
Thank you for buying aBosch Home Appliance
Register your new device on MyBosch now and profit directly from
bull Expert tips amp tricks for your appliancebull Warranty extension optionsbull Discounts for accessories amp spare-partsbull Digital manual and all appliance data at handbull Easy access to Bosch Home Appliances Service
Free and easy registration ndash also on mobile phoneswwwbosch-homecomwelcome
Looking for help Youll find it here
Expert advice for your Bosch home appliances help with problems or a repair from Bosch experts Find out everything about the many ways Bosch can support you wwwbosch-homecomservice Contact data of all countries are listed in the attached service direct-ory
90016102699001610269emsp(010219)en
Robert Bosch Hausgeraumlte GmbHCarl-Wery-Straszlige 3481739 MuumlnchenGERMANYwwwbosch-homecom
Valid within Great BritainImported to Great Britain byBSH Home Appliances LtdGrand Union HouseOld Wolverton RoadWolverton Milton KeynesMK12 5PTUnited Kingdom
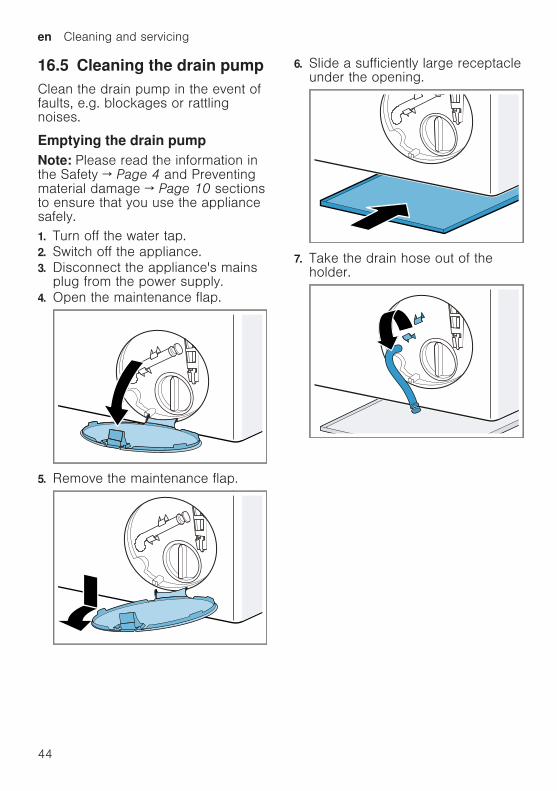
enemspCleaning and servicing
44
165 Cleaning the drain pumpClean the drain pump in the event offaults eg blockages or rattlingnoises
Emptying the drain pumpNote Please read the information inthe Safety rarr Page 4 and Preventingmaterial damage rarr Page 10 sectionsto ensure that you use the appliancesafely1 Turn off the water tap2 Switch off the appliance3 Disconnect the appliances mains
plug from the power supply4 Open the maintenance flap
5 Remove the maintenance flap
6 Slide a sufficiently large receptacleunder the opening
7 Take the drain hose out of theholder
Cleaning and servicingemspen
45
8 CAUTION - Risk of scaldingWhen you wash at high temperat-ures the detergent solution getshot
Do not touch the hot detergentsolutionTo allow the detergent solution toflow out into the container removethe sealing cap
9 Firmly press on the sealing cap
10 Insert the drain hose into theholder
Cleaning the drain pumpNote Please read the information inthe Safety rarr Page 4 and Preventingmaterial damage rarr Page 10 sectionsto ensure that you use the appliancesafelyRequirement The drain pump isempty rarr Page 441 Since water may remain in the
drain pump remove the pump capcarefully
2 Clean the interior the thread onthe pump cap and the pump hous-ing
3 Make sure that the impeller in thedrain pump can be rotated
enemspCleaning and servicing
46
4 Insert the pump cap and screw iton as far as it will go
90deg
The handle on the pump cap mustbe in a vertical position
5 Close the maintenance flap
Before the next washTo prevent unused detergent fromflowing straight into the outlet in thenext wash run the programmeafter you have emptied the drainpump1 Turn on the tap2 Insert the mains plug3 Switch on the appliance4 Pour 1 litre of water into compart-
ment II5 Start the programme
166 Cleaning the water outlethose at the siphon
1 Switch off the appliance2 Disconnect the appliances mains
plug from the power supply
3 Loosen the hose clamp and care-fully remove the water outlet hose
Residual water may leak out4 Clean the water outlet hose and si-
phon connecting piece
5 Reattach the water outlet hose andsecure the connection point usingthe hose clamp
Cleaning and servicingemspen
47
167 Clean the water inlet fil-ters
Emptying the water inlet hose1 Turn off the tap2 Set a programme except for
or 3 Start the programme and leave it
to run for approx 40 seconds4 Switch off the appliance5 Disconnect the appliances mains
plug from the power supply
Cleaning the filter on the tapNote Please read the information inthe Safety rarr Page 4 and Preventingmaterial damage rarr Page 10 sectionsto ensure that you use the appliancesafelyRequirement The water inlet hose isempty1 Remove the water inlet hose from
the tap
2 Clean the filter with a small brush
3 Connect the water inlet hose andcheck for leaks
Cleaning the filter on theapplianceNote Please read the information inthe Safety rarr Page 4 and Preventingmaterial damage rarr Page 10 sectionsto ensure that you use the appliancesafelyRequirement The water inlet hose isempty rarr Emptying the water inlet hosePage 47
enemspCleaning and servicing
48
1 Disconnect the hose from the rearof the appliance
1
2
2 Use pliers to remove the filter
3 Clean the filter with a small brush
4 Reinsert the filter
5 Connect the hose and check forleaks
2
1
Troubleshootingemspen
49
Troubleshooting
17 TroubleshootingTroubleshooting
You can rectify minor faults on your appliance yourself Read the troubleshoot-ing information before contacting after-sales service This will avoid unneces-sary costs
WARNINGRisk of electric shockIncorrect repairs are dangerous Repairs to the appliance should only be carried out by trained specialist
staff Only use genuine spare parts when repairing the appliance If the power cord of this appliance is damaged it must be replaced by the
manufacturer the manufacturers Customer Service or a similarly qualifiedperson in order to prevent any risk
Fault Cause and troubleshootingThe display goes outand InicioPausa +Carga flashes
Energy-saving mode is active Press any buttona The symbol lights up again
E36 -10 Drain pipe or water outlet hose is blocked Clean the drain pipe and the water outlet hose
Drain pipe or water drain hose is caught or jammed Ensure that the drain pipe and water drain hose are
not kinked or trapped
Drain pump is blocked rarr Cleaning the drain pump Page 44
The water outlet hose is connected too high Install the water outlet hose at a maximum height of
1 metre
Detergent dosage is too high Immediate measure Mix one tablespoon of fabric
softener with 05 litres of water and pour the mix-ture into the left-hand compartment (not for outdoorclothing sportswear or items stuffed with down)
Reduce the amount of detergent for the next wash-ing cycle with the same load
Unapproved extension installed on the water drainhose Remove any unapproved extensions from the water
hose Connecting the appliance
E36 -25 -26 Drain pump is blocked rarr Cleaning the drain pump Page 44
enemspTroubleshooting
50
Fault Cause and troubleshootingThe water pressure is lowNo remedial action possibleThe filters in the water inflow are blocked Clean the filters in the water inflow rarr Page 47
The tap is turned off Turn on the tap
The water inlet hose is kinked or jammed Ensure that the water inlet hose is not kinked or
jammed
flashes The automatic voltage control system detects an un-authorised voltage under-usage No remedial action possible
Note If the power supply is stable the programmecontinues to run as normalVoltage under-usage may cause extension of a pro-grammeNo remedial action possible
flashes Voltage under-usage may cause extension of a pro-grammeNo remedial action possible
lights up The temperature is too high Wait until the temperature has dropped rarr Cancelling the programme Page 39
Water level is too high Start the programme
Laundry is caught in the door1 Open the door again2 Remove any trapped laundry3 Close the door4 Press InicioPausa + Carga to start the pro-
gramme
flashes Door is not closed1 Close the door2 Press InicioPausa + Carga to start the pro-
gramme
All other error codes Malfunction Call the after-sales service
rarr Customer Service Page 59
Troubleshootingemspen
51
Fault Cause and troubleshootingThe appliance is notworking
The mains plug of the power cord is not plugged in Connect the appliance to the power supply
The circuit breaker is faulty Check the circuit breaker in the fuse box
There has been a power cut Check whether the lighting in your kitchen or other
appliances are working
The programme doesnot start
You have not pressed InicioPausa + Carga Press InicioPausa + Carga
Door is not closed1 Close the door2 Press InicioPausa + Carga to start the pro-
gramme
Childproof lock is activated rarr Deactivating the childproof lock Page 40
Termin is activated Check whether Termin is activated
rarr Buttons Page 23
Laundry is caught in the door1 Open the door again2 Remove any trapped laundry3 Close the door4 Press InicioPausa + Carga to start the pro-
gramme
The door cannotbe opened
ndash ndash ndash ndash is activated Continue the programme by selecting or and
pressing InicioPausa + Carga rarr Resuming the programme when the programmestatus is Rinse Hold Page 39
The temperature is too high Wait until the temperature has dropped rarr Cancelling the programme Page 39
Water level is too high Start the programme
Power failure Open the door using the emergency release
rarr Emergency release Page 57
The water is not drain-ing
Drain pipe or water outlet hose is blocked Clean the drain pipe and the water outlet hose
enemspTroubleshooting
52
Fault Cause and troubleshootingThe water is not drain-ing
Drain pipe or water drain hose is caught or jammed Ensure that the drain pipe and water drain hose are
not kinked or trapped
Drain pump is blocked rarr Cleaning the drain pump Page 44
ndash ndash ndash ndash is activated Continue the programme by selecting or and
pressing InicioPausa + Carga rarr Resuming the programme when the programmestatus is Rinse Hold Page 39
The water outlet hose is connected too high Install the water outlet hose at a maximum height of
1 metre
Detergent dosage is too high Immediate measure Mix one tablespoon of fabric
softener with 05 litres of water and pour the mix-ture into the left-hand compartment (not for outdoorclothing sportswear or items stuffed with down)
Reduce the amount of detergent for the next wash-ing cycle with the same load
Unapproved extension installed on the water drainhose Remove any unapproved extensions from the water
hose Connecting the appliance
Water is not flowingin Detergent is notbeing dispensed
You have not pressed InicioPausa + Carga Press InicioPausa + Carga
The filters in the water inflow are blocked Clean the filters in the water inflow rarr Page 47
The tap is turned off Turn on the tap
The water inlet hose is kinked or jammed Ensure that the water inlet hose is not kinked or
jammed
The spin cycle runsseveral times
The unbalanced load detection system eliminates animbalance by repeatedly redistributing the laundry Not a fault ndash no action required
Note When loading where possible place large andsmall items of laundry together in the drum Differentsized items of laundry distribute themselves betterduring the spin cycle
Troubleshootingemspen
53
Fault Cause and troubleshootingThe programme dura-tion changes duringthe wash cycle
The programme operation is optimised electronicallyThis may change the programme duration Not a fault ndash no action required
The unbalanced load detection system eliminates animbalance by repeatedly redistributing the laundry Not a fault ndash no action required
Note When loading where possible place large andsmall items of laundry together in the drum Differentsized items of laundry distribute themselves betterduring the spin cycleFoam detection system switches on a rinse cycle iffoam build-up is too high Not a fault ndash no action required
No water is visible inthe drum
Water is below the visible area Not a fault ndash no action required Do not add any extra water to the appliance while it
is operating
Drum jerks after theprogramme starts
This is caused by an internal motor test Not a fault ndash no action required
Residual water ispresent in the com-partment
Insert in compartment is blocked rarr Cleaning the detergent drawer Page 42
Vibrations and move-ment of the appliancewhilst spinning
Appliance is not correctly aligned Aligning the appliance
The appliance feet are not fixed Secure the appliance feet Aligning the appliance
Transit bolts have not been removed Removing the transit bolts
Drum does not turnwater does not flow in
Load detection is active Not a fault ndash no action required
Note The load detection can take up to two minutesHeavy foam build-up Detergent dosage is too high
Immediate measure Mix one tablespoon of fabricsoftener with 05 litres of water and pour the mix-ture into the left-hand compartment (not for outdoorclothing sportswear or items stuffed with down)
Reduce the amount of detergent for the next wash-ing cycle with the same load
enemspTroubleshooting
54
Fault Cause and troubleshootingHigh spin speed notreached
A low spin speed is selected The next time you run a wash cycle set a higher
spin speed
Unbalance load detection system is using a reducedspin speed to eliminate an unbalance Redistribute the laundry in the drum
Note Where possible mix large and small items inthe drum Different sized items of laundry distributethemselves better during the spin cycle Start the programme
The spin programmedoes not start
Drain pipe or water outlet hose is blocked Clean the drain pipe and the water outlet hose
Drain pipe or water drain hose is caught or jammed Ensure that the drain pipe and water drain hose are
not kinked or trapped
The unbalanced load detection system has interruptedthe spin cycle because the laundry is unevenly distrib-uted Redistribute the laundry in the drum
Note Where possible mix large and small items inthe drum Different sized items of laundry distributethemselves better during the spin cycle Start the programme
Rushing hissingnoise
Water is flushed under pressure into the detergentdrawer Not a fault ndash normal operating noise
Loud noises duringthe spin cycle
Appliance is not correctly aligned Aligning the appliance
The appliance feet are not fixed Secure the appliance feet Aligning the appliance
Transit bolts have not been removed Removing the transit bolts
Banging noises rat-tling in the drainpump
Foreign bodies have got into the drain pump rarr Cleaning the drain pump Page 44
Slurping rhythmicalsuction noise
The drain pump is active the detergent solution ispumped out Not a fault ndash normal operating noise
Troubleshootingemspen
55
Fault Cause and troubleshootingCreasing The spin speed is too high
The next time you run a wash cycle set a lowerspin speed
The load is too large The next time you run a wash cycle reduce the
amount of laundry being loaded
The wrong programme is selected for the type of fab-ric Select the programmes that are suitable for the
type of fabric rarr Programmes Page 24
Detergent or fabricsoftener drips off theseal and collects onthe door or in the sealfold
Too much detergentfabric softener in the detergentdrawer When dosing liquid detergent and fabric softener
observe the marking in the detergent drawer anddo not dose above this
The spin result is notsatisfactory The laun-dry is too wettoodamp
A low spin speed is selected The next time you run a wash cycle set a higher
spin speed Start the programme
Drain pipe or water outlet hose is blocked Clean the drain pipe and the water outlet hose
Drain pipe or water drain hose is caught or jammed Ensure that the drain pipe and water drain hose are
not kinked or trapped
The unbalanced load detection system has interruptedthe spin cycle because the laundry is unevenly distrib-uted Redistribute the laundry in the drum
Note Where possible mix large and small items inthe drum Different sized items of laundry distributethemselves better during the spin cycle Start the programme
Unbalance load detection system is using a reducedspin speed to eliminate an unbalance Redistribute the laundry in the drum
Note Where possible mix large and small items inthe drum Different sized items of laundry distributethemselves better during the spin cycle Start the programme
enemspTroubleshooting
56
Fault Cause and troubleshootingDetergent residue onthe damp washing
Detergents may contain water-insoluble substancesthat deposit on the laundry Start the programme
Detergent residue onthe dry laundry
Detergents may contain water-insoluble substancesthat deposit on the laundry Brush out the laundry after washing and drying
Water is leaking out atthe water inlet hose
Water inlet hose is not correctlysecurely connected1 Connect the water supply hose correctly Connect-
ing the water inlet hose2 Tighten the screw connection
Water is leaking out atthe water outlet hose
The water outlet hose is damaged Replace the damaged water outlet hose
Water outlet hose is not connected correctly Connect the water outlet hose correctly Water out-
let connection types
Odours have formedin the appliance
Humidity and detergent residue may promote theformation of bacteria rarr Cleaning the drum Page 42 If you are not using the appliance leave the door
and detergent drawer open so that residual watercan evaporate
Transportation storage and disposalemspen
57
171 Emergency releaseReleasing the doorRequirement The drain pump isempty rarr Page 441 ATTENTION Escaping water may
cause material damage Do not open the door if you can
see water through the glassPull the emergency release down-wards with a tool and release
a The door lock is released2 Insert the maintenance flap and
lock it into place3 Close the maintenance flap
Transportation storage and disposal
18 Transportation stor-age and disposal
Transportation storage and disposal
You can find out here how to prepareyour appliance for transportation andstorage You will also find out how todispose of old appliances
181 Removing the appliance1 Turn off the tap2 rarr Emptying the water inlet hose
Page 473 Switch off the appliance4 Unplug the appliances mains plug
5 Drain the remaining detergentsolution rarr Cleaning the drain pumpPage 44
6 Detach the hoses
182 Inserting the transitbolts
Secure the appliance for transporta-tion using transit bolts in order to pre-vent damage1 Remove the four cover caps
‒ If necessary use a screwdriverto remove the cover caps
Keep the cover caps2 Insert the four sleeves
enemspTransportation storage and disposal
58
3 Insert all screws into the fourtransit bolts and tighten slightly
4 Insert the power cord into theholder and tighten all fourscrews for the transit bolts with aWAF 13 wrench
5 Insert the hose into holder
183 Using the applianceagain
1 Remove the transit bolts
2 Pour approx 1 litre of water intocompartment II in the detergentdrawer
3 Start the programmea The unused detergent cannot flow
straight into the outlet during thenext wash
184 Disposing of old appli-ance
Valuable raw materials can be re-used by recycling
WARNINGRisk of harm to healthChildren can lock themselves in theappliance thereby putting their livesat risk Do not install the appliance behind
a door as this may obstruct the ap-pliance door or prevent it fromopening
With redundant appliances unplugthe power cord Then cut throughthe cord and damage the lock onthe appliance door beyond repairso that the appliance door will nolonger close
1 Unplug the appliance from themains
2 Cut through the power cord3 Dispose of the appliance in an en-
vironmentally friendly mannerInformation about current disposalmethods are available from yourspecialist dealer or local authority
This appliance is la-belled in accordancewith European Directive201219EU concerningused electrical and elec-
Customer Serviceemspen
59
tronic appliances (wasteelectrical and electronicequipment - WEEE)The guideline determ-ines the framework forthe return and recyclingof used appliances asapplicable throughoutthe EU
Customer Service
19 Customer ServiceCustomer Service
If you have any queries on use areunable to rectify faults on the appli-ance yourself or if your applianceneeds to be repaired contact Cus-tomer ServiceYou can solve many problems your-self by consulting the information ontroubleshooting in these instructionsor on our website If this is not thecase contact our after-sales serviceWith any warranty claims we willmake sure that your appliance is re-paired by trained after-sales techni-cians using genuine spare parts in-cluding after the manufacturers war-ranty has expiredFunction-relevant genuine spare partsaccording to the corresponding Eco-design Order can be obtained fromCustomer Service for a period of atleast 10 years from the date onwhich your appliance was placed onthe market within the European Eco-nomic AreaNote Under the terms of the manu-facturers warranty the use of Cus-tomer Service is free of chargeDetailed information on the warrantyperiod and terms of warranty in yourcountry is available from our after-sales service your retailer or on ourwebsite
If you contact Customer Service youwill require the product number (E-Nr) and the production number (FD)of your applianceThe contact details for Customer Ser-vice can be found in the enclosedCustomer Service directory or on ourwebsite
191 Product number (E-Nr)and production number(FD)
You can find the product number (E-Nr) and the production number (FD)on the appliances rating plateDepending on the model the ratingplate is locatediexcl On the inside of the dooriexcl On the inside of the maintenance
flapiexcl On the rear of the applianceMake a note of your appliances de-tails and the Customer Service tele-phone number to find them againquickly
enemspConsumption values
60
Consumption values
20 Consumption valuesConsumption values
The following information is provided in accordance with the EU EcodesignRegulation The values given for programs other than the Eco 40-60 are indicat-ive only and were determined in accordance with the applicable standardEN60456
Programme Load(kg)
Pro-gramme dura-tion(hrmin)1
Energycon-sump-tion(kWhcycle)1
Watercon-sump-tion (lcycle)1
Max-imumtemper-ature(degC) 5mins1
Spinspeed(rpm)1
Resid-ualmois-ture()1
Eco 40-602 90 337 1245 610 50 1166 5000Eco 40-602 45 252 0590 450 33 1200 5000Eco 40-602 25 233 0195 300 24 1200 5400AlgodoacutenAl-godatildeo 20 degC
90 328 0370 900 23 1200 5400
AlgodoacutenAl-godatildeo 40 degC
90 328 1350 900 45 1200 5400
AlgodoacutenAl-godatildeo 60 degC
90 328 1450 900 55 1200 5400
AlgodoacutenAl-godatildeo 40 degC + Pre-lav
90 358 1400 1020 45 1200 5400
Sinteacuteticos 40 degC
40 228 0780 610 44 1200 2700
Mix 40 degC 40 059 0620 440 41 1200 5600 LanaLatildes
30 degC20 040 0200 400 22 800 2500
1 Due to the influence of water pressure hardness and inlet temperature am-bient temperature type amount and soiling of laundry detergent used fluc-tuations in the power supply and the selected additional functions the actualvalues may deviate from the stated values
2 Test programme in accordance with the EU Ecodesign Directive and the EUEnergy Labelling Regulation with cold water (15 degC)
Technical specificationsemspen
61
Technical specifications
21 Technical specifica-tions
Technical specifications
Facts and figures for your appliancecan be found here
Appliance height 850 cmAppliance width 598 cmAppliance depth 590 cmWeight 80 kg1
Maximum load 9 kgMains voltage 220 - 240 V
50 Hz Minimum in-
stallation protec-tion
10 A
Rated power 2300 WPower consump-tion
iexcl Off mode010 W
iexcl Left-on mode050 W
Water pressure iexcl Minimum100 kPa(1 bar)
iexcl Maximum1000 kPa(10 bar)
Length of the wa-ter inlet hose
150 cm
Length of the wa-ter outlet hose
150 cm
Length of thepower cord
160 cm
1 Depending on the appliance spe-cifications
More information about your modelcan be found online at httpsen-ergylabelbsh-groupcom1 This webaddress is linked to the official EUEPREL product database At the time
of printing its web address had notyet been published Please then fol-low the instructions on searching formodels The model identifier is madeup of the characters before the slashin the product number (E-Nr) on therating plate Alternatively you canalso find the model identifier in thefirst line of the EU energy label
1 Only applies to countries in the European Economic Area
Thank you for buying aBosch Home Appliance
Register your new device on MyBosch now and profit directly from
bull Expert tips amp tricks for your appliancebull Warranty extension optionsbull Discounts for accessories amp spare-partsbull Digital manual and all appliance data at handbull Easy access to Bosch Home Appliances Service
Free and easy registration ndash also on mobile phoneswwwbosch-homecomwelcome
Looking for help Youll find it here
Expert advice for your Bosch home appliances help with problems or a repair from Bosch experts Find out everything about the many ways Bosch can support you wwwbosch-homecomservice Contact data of all countries are listed in the attached service direct-ory
90016102699001610269emsp(010219)en
Robert Bosch Hausgeraumlte GmbHCarl-Wery-Straszlige 3481739 MuumlnchenGERMANYwwwbosch-homecom
Valid within Great BritainImported to Great Britain byBSH Home Appliances LtdGrand Union HouseOld Wolverton RoadWolverton Milton KeynesMK12 5PTUnited Kingdom
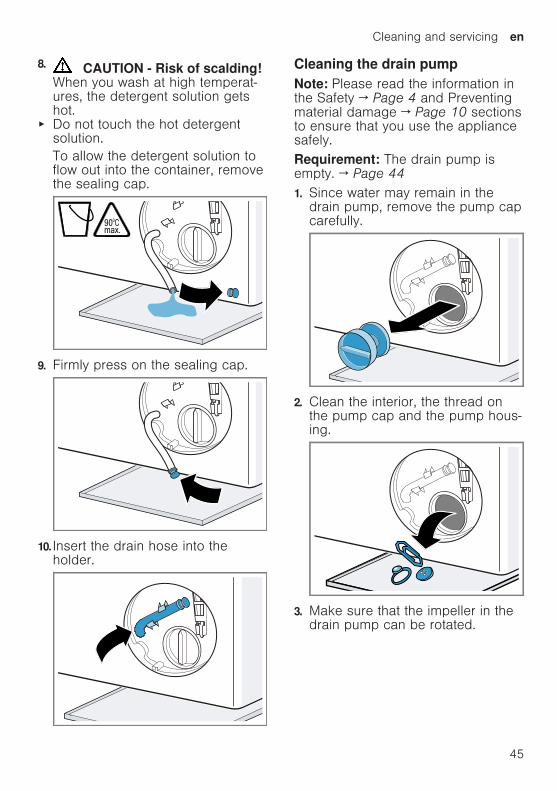
Cleaning and servicingemspen
45
8 CAUTION - Risk of scaldingWhen you wash at high temperat-ures the detergent solution getshot
Do not touch the hot detergentsolutionTo allow the detergent solution toflow out into the container removethe sealing cap
9 Firmly press on the sealing cap
10 Insert the drain hose into theholder
Cleaning the drain pumpNote Please read the information inthe Safety rarr Page 4 and Preventingmaterial damage rarr Page 10 sectionsto ensure that you use the appliancesafelyRequirement The drain pump isempty rarr Page 441 Since water may remain in the
drain pump remove the pump capcarefully
2 Clean the interior the thread onthe pump cap and the pump hous-ing
3 Make sure that the impeller in thedrain pump can be rotated
enemspCleaning and servicing
46
4 Insert the pump cap and screw iton as far as it will go
90deg
The handle on the pump cap mustbe in a vertical position
5 Close the maintenance flap
Before the next washTo prevent unused detergent fromflowing straight into the outlet in thenext wash run the programmeafter you have emptied the drainpump1 Turn on the tap2 Insert the mains plug3 Switch on the appliance4 Pour 1 litre of water into compart-
ment II5 Start the programme
166 Cleaning the water outlethose at the siphon
1 Switch off the appliance2 Disconnect the appliances mains
plug from the power supply
3 Loosen the hose clamp and care-fully remove the water outlet hose
Residual water may leak out4 Clean the water outlet hose and si-
phon connecting piece
5 Reattach the water outlet hose andsecure the connection point usingthe hose clamp
Cleaning and servicingemspen
47
167 Clean the water inlet fil-ters
Emptying the water inlet hose1 Turn off the tap2 Set a programme except for
or 3 Start the programme and leave it
to run for approx 40 seconds4 Switch off the appliance5 Disconnect the appliances mains
plug from the power supply
Cleaning the filter on the tapNote Please read the information inthe Safety rarr Page 4 and Preventingmaterial damage rarr Page 10 sectionsto ensure that you use the appliancesafelyRequirement The water inlet hose isempty1 Remove the water inlet hose from
the tap
2 Clean the filter with a small brush
3 Connect the water inlet hose andcheck for leaks
Cleaning the filter on theapplianceNote Please read the information inthe Safety rarr Page 4 and Preventingmaterial damage rarr Page 10 sectionsto ensure that you use the appliancesafelyRequirement The water inlet hose isempty rarr Emptying the water inlet hosePage 47
enemspCleaning and servicing
48
1 Disconnect the hose from the rearof the appliance
1
2
2 Use pliers to remove the filter
3 Clean the filter with a small brush
4 Reinsert the filter
5 Connect the hose and check forleaks
2
1
Troubleshootingemspen
49
Troubleshooting
17 TroubleshootingTroubleshooting
You can rectify minor faults on your appliance yourself Read the troubleshoot-ing information before contacting after-sales service This will avoid unneces-sary costs
WARNINGRisk of electric shockIncorrect repairs are dangerous Repairs to the appliance should only be carried out by trained specialist
staff Only use genuine spare parts when repairing the appliance If the power cord of this appliance is damaged it must be replaced by the
manufacturer the manufacturers Customer Service or a similarly qualifiedperson in order to prevent any risk
Fault Cause and troubleshootingThe display goes outand InicioPausa +Carga flashes
Energy-saving mode is active Press any buttona The symbol lights up again
E36 -10 Drain pipe or water outlet hose is blocked Clean the drain pipe and the water outlet hose
Drain pipe or water drain hose is caught or jammed Ensure that the drain pipe and water drain hose are
not kinked or trapped
Drain pump is blocked rarr Cleaning the drain pump Page 44
The water outlet hose is connected too high Install the water outlet hose at a maximum height of
1 metre
Detergent dosage is too high Immediate measure Mix one tablespoon of fabric
softener with 05 litres of water and pour the mix-ture into the left-hand compartment (not for outdoorclothing sportswear or items stuffed with down)
Reduce the amount of detergent for the next wash-ing cycle with the same load
Unapproved extension installed on the water drainhose Remove any unapproved extensions from the water
hose Connecting the appliance
E36 -25 -26 Drain pump is blocked rarr Cleaning the drain pump Page 44
enemspTroubleshooting
50
Fault Cause and troubleshootingThe water pressure is lowNo remedial action possibleThe filters in the water inflow are blocked Clean the filters in the water inflow rarr Page 47
The tap is turned off Turn on the tap
The water inlet hose is kinked or jammed Ensure that the water inlet hose is not kinked or
jammed
flashes The automatic voltage control system detects an un-authorised voltage under-usage No remedial action possible
Note If the power supply is stable the programmecontinues to run as normalVoltage under-usage may cause extension of a pro-grammeNo remedial action possible
flashes Voltage under-usage may cause extension of a pro-grammeNo remedial action possible
lights up The temperature is too high Wait until the temperature has dropped rarr Cancelling the programme Page 39
Water level is too high Start the programme
Laundry is caught in the door1 Open the door again2 Remove any trapped laundry3 Close the door4 Press InicioPausa + Carga to start the pro-
gramme
flashes Door is not closed1 Close the door2 Press InicioPausa + Carga to start the pro-
gramme
All other error codes Malfunction Call the after-sales service
rarr Customer Service Page 59
Troubleshootingemspen
51
Fault Cause and troubleshootingThe appliance is notworking
The mains plug of the power cord is not plugged in Connect the appliance to the power supply
The circuit breaker is faulty Check the circuit breaker in the fuse box
There has been a power cut Check whether the lighting in your kitchen or other
appliances are working
The programme doesnot start
You have not pressed InicioPausa + Carga Press InicioPausa + Carga
Door is not closed1 Close the door2 Press InicioPausa + Carga to start the pro-
gramme
Childproof lock is activated rarr Deactivating the childproof lock Page 40
Termin is activated Check whether Termin is activated
rarr Buttons Page 23
Laundry is caught in the door1 Open the door again2 Remove any trapped laundry3 Close the door4 Press InicioPausa + Carga to start the pro-
gramme
The door cannotbe opened
ndash ndash ndash ndash is activated Continue the programme by selecting or and
pressing InicioPausa + Carga rarr Resuming the programme when the programmestatus is Rinse Hold Page 39
The temperature is too high Wait until the temperature has dropped rarr Cancelling the programme Page 39
Water level is too high Start the programme
Power failure Open the door using the emergency release
rarr Emergency release Page 57
The water is not drain-ing
Drain pipe or water outlet hose is blocked Clean the drain pipe and the water outlet hose
enemspTroubleshooting
52
Fault Cause and troubleshootingThe water is not drain-ing
Drain pipe or water drain hose is caught or jammed Ensure that the drain pipe and water drain hose are
not kinked or trapped
Drain pump is blocked rarr Cleaning the drain pump Page 44
ndash ndash ndash ndash is activated Continue the programme by selecting or and
pressing InicioPausa + Carga rarr Resuming the programme when the programmestatus is Rinse Hold Page 39
The water outlet hose is connected too high Install the water outlet hose at a maximum height of
1 metre
Detergent dosage is too high Immediate measure Mix one tablespoon of fabric
softener with 05 litres of water and pour the mix-ture into the left-hand compartment (not for outdoorclothing sportswear or items stuffed with down)
Reduce the amount of detergent for the next wash-ing cycle with the same load
Unapproved extension installed on the water drainhose Remove any unapproved extensions from the water
hose Connecting the appliance
Water is not flowingin Detergent is notbeing dispensed
You have not pressed InicioPausa + Carga Press InicioPausa + Carga
The filters in the water inflow are blocked Clean the filters in the water inflow rarr Page 47
The tap is turned off Turn on the tap
The water inlet hose is kinked or jammed Ensure that the water inlet hose is not kinked or
jammed
The spin cycle runsseveral times
The unbalanced load detection system eliminates animbalance by repeatedly redistributing the laundry Not a fault ndash no action required
Note When loading where possible place large andsmall items of laundry together in the drum Differentsized items of laundry distribute themselves betterduring the spin cycle
Troubleshootingemspen
53
Fault Cause and troubleshootingThe programme dura-tion changes duringthe wash cycle
The programme operation is optimised electronicallyThis may change the programme duration Not a fault ndash no action required
The unbalanced load detection system eliminates animbalance by repeatedly redistributing the laundry Not a fault ndash no action required
Note When loading where possible place large andsmall items of laundry together in the drum Differentsized items of laundry distribute themselves betterduring the spin cycleFoam detection system switches on a rinse cycle iffoam build-up is too high Not a fault ndash no action required
No water is visible inthe drum
Water is below the visible area Not a fault ndash no action required Do not add any extra water to the appliance while it
is operating
Drum jerks after theprogramme starts
This is caused by an internal motor test Not a fault ndash no action required
Residual water ispresent in the com-partment
Insert in compartment is blocked rarr Cleaning the detergent drawer Page 42
Vibrations and move-ment of the appliancewhilst spinning
Appliance is not correctly aligned Aligning the appliance
The appliance feet are not fixed Secure the appliance feet Aligning the appliance
Transit bolts have not been removed Removing the transit bolts
Drum does not turnwater does not flow in
Load detection is active Not a fault ndash no action required
Note The load detection can take up to two minutesHeavy foam build-up Detergent dosage is too high
Immediate measure Mix one tablespoon of fabricsoftener with 05 litres of water and pour the mix-ture into the left-hand compartment (not for outdoorclothing sportswear or items stuffed with down)
Reduce the amount of detergent for the next wash-ing cycle with the same load
enemspTroubleshooting
54
Fault Cause and troubleshootingHigh spin speed notreached
A low spin speed is selected The next time you run a wash cycle set a higher
spin speed
Unbalance load detection system is using a reducedspin speed to eliminate an unbalance Redistribute the laundry in the drum
Note Where possible mix large and small items inthe drum Different sized items of laundry distributethemselves better during the spin cycle Start the programme
The spin programmedoes not start
Drain pipe or water outlet hose is blocked Clean the drain pipe and the water outlet hose
Drain pipe or water drain hose is caught or jammed Ensure that the drain pipe and water drain hose are
not kinked or trapped
The unbalanced load detection system has interruptedthe spin cycle because the laundry is unevenly distrib-uted Redistribute the laundry in the drum
Note Where possible mix large and small items inthe drum Different sized items of laundry distributethemselves better during the spin cycle Start the programme
Rushing hissingnoise
Water is flushed under pressure into the detergentdrawer Not a fault ndash normal operating noise
Loud noises duringthe spin cycle
Appliance is not correctly aligned Aligning the appliance
The appliance feet are not fixed Secure the appliance feet Aligning the appliance
Transit bolts have not been removed Removing the transit bolts
Banging noises rat-tling in the drainpump
Foreign bodies have got into the drain pump rarr Cleaning the drain pump Page 44
Slurping rhythmicalsuction noise
The drain pump is active the detergent solution ispumped out Not a fault ndash normal operating noise
Troubleshootingemspen
55
Fault Cause and troubleshootingCreasing The spin speed is too high
The next time you run a wash cycle set a lowerspin speed
The load is too large The next time you run a wash cycle reduce the
amount of laundry being loaded
The wrong programme is selected for the type of fab-ric Select the programmes that are suitable for the
type of fabric rarr Programmes Page 24
Detergent or fabricsoftener drips off theseal and collects onthe door or in the sealfold
Too much detergentfabric softener in the detergentdrawer When dosing liquid detergent and fabric softener
observe the marking in the detergent drawer anddo not dose above this
The spin result is notsatisfactory The laun-dry is too wettoodamp
A low spin speed is selected The next time you run a wash cycle set a higher
spin speed Start the programme
Drain pipe or water outlet hose is blocked Clean the drain pipe and the water outlet hose
Drain pipe or water drain hose is caught or jammed Ensure that the drain pipe and water drain hose are
not kinked or trapped
The unbalanced load detection system has interruptedthe spin cycle because the laundry is unevenly distrib-uted Redistribute the laundry in the drum
Note Where possible mix large and small items inthe drum Different sized items of laundry distributethemselves better during the spin cycle Start the programme
Unbalance load detection system is using a reducedspin speed to eliminate an unbalance Redistribute the laundry in the drum
Note Where possible mix large and small items inthe drum Different sized items of laundry distributethemselves better during the spin cycle Start the programme
enemspTroubleshooting
56
Fault Cause and troubleshootingDetergent residue onthe damp washing
Detergents may contain water-insoluble substancesthat deposit on the laundry Start the programme
Detergent residue onthe dry laundry
Detergents may contain water-insoluble substancesthat deposit on the laundry Brush out the laundry after washing and drying
Water is leaking out atthe water inlet hose
Water inlet hose is not correctlysecurely connected1 Connect the water supply hose correctly Connect-
ing the water inlet hose2 Tighten the screw connection
Water is leaking out atthe water outlet hose
The water outlet hose is damaged Replace the damaged water outlet hose
Water outlet hose is not connected correctly Connect the water outlet hose correctly Water out-
let connection types
Odours have formedin the appliance
Humidity and detergent residue may promote theformation of bacteria rarr Cleaning the drum Page 42 If you are not using the appliance leave the door
and detergent drawer open so that residual watercan evaporate
Transportation storage and disposalemspen
57
171 Emergency releaseReleasing the doorRequirement The drain pump isempty rarr Page 441 ATTENTION Escaping water may
cause material damage Do not open the door if you can
see water through the glassPull the emergency release down-wards with a tool and release
a The door lock is released2 Insert the maintenance flap and
lock it into place3 Close the maintenance flap
Transportation storage and disposal
18 Transportation stor-age and disposal
Transportation storage and disposal
You can find out here how to prepareyour appliance for transportation andstorage You will also find out how todispose of old appliances
181 Removing the appliance1 Turn off the tap2 rarr Emptying the water inlet hose
Page 473 Switch off the appliance4 Unplug the appliances mains plug
5 Drain the remaining detergentsolution rarr Cleaning the drain pumpPage 44
6 Detach the hoses
182 Inserting the transitbolts
Secure the appliance for transporta-tion using transit bolts in order to pre-vent damage1 Remove the four cover caps
‒ If necessary use a screwdriverto remove the cover caps
Keep the cover caps2 Insert the four sleeves
enemspTransportation storage and disposal
58
3 Insert all screws into the fourtransit bolts and tighten slightly
4 Insert the power cord into theholder and tighten all fourscrews for the transit bolts with aWAF 13 wrench
5 Insert the hose into holder
183 Using the applianceagain
1 Remove the transit bolts
2 Pour approx 1 litre of water intocompartment II in the detergentdrawer
3 Start the programmea The unused detergent cannot flow
straight into the outlet during thenext wash
184 Disposing of old appli-ance
Valuable raw materials can be re-used by recycling
WARNINGRisk of harm to healthChildren can lock themselves in theappliance thereby putting their livesat risk Do not install the appliance behind
a door as this may obstruct the ap-pliance door or prevent it fromopening
With redundant appliances unplugthe power cord Then cut throughthe cord and damage the lock onthe appliance door beyond repairso that the appliance door will nolonger close
1 Unplug the appliance from themains
2 Cut through the power cord3 Dispose of the appliance in an en-
vironmentally friendly mannerInformation about current disposalmethods are available from yourspecialist dealer or local authority
This appliance is la-belled in accordancewith European Directive201219EU concerningused electrical and elec-
Customer Serviceemspen
59
tronic appliances (wasteelectrical and electronicequipment - WEEE)The guideline determ-ines the framework forthe return and recyclingof used appliances asapplicable throughoutthe EU
Customer Service
19 Customer ServiceCustomer Service
If you have any queries on use areunable to rectify faults on the appli-ance yourself or if your applianceneeds to be repaired contact Cus-tomer ServiceYou can solve many problems your-self by consulting the information ontroubleshooting in these instructionsor on our website If this is not thecase contact our after-sales serviceWith any warranty claims we willmake sure that your appliance is re-paired by trained after-sales techni-cians using genuine spare parts in-cluding after the manufacturers war-ranty has expiredFunction-relevant genuine spare partsaccording to the corresponding Eco-design Order can be obtained fromCustomer Service for a period of atleast 10 years from the date onwhich your appliance was placed onthe market within the European Eco-nomic AreaNote Under the terms of the manu-facturers warranty the use of Cus-tomer Service is free of chargeDetailed information on the warrantyperiod and terms of warranty in yourcountry is available from our after-sales service your retailer or on ourwebsite
If you contact Customer Service youwill require the product number (E-Nr) and the production number (FD)of your applianceThe contact details for Customer Ser-vice can be found in the enclosedCustomer Service directory or on ourwebsite
191 Product number (E-Nr)and production number(FD)
You can find the product number (E-Nr) and the production number (FD)on the appliances rating plateDepending on the model the ratingplate is locatediexcl On the inside of the dooriexcl On the inside of the maintenance
flapiexcl On the rear of the applianceMake a note of your appliances de-tails and the Customer Service tele-phone number to find them againquickly
enemspConsumption values
60
Consumption values
20 Consumption valuesConsumption values
The following information is provided in accordance with the EU EcodesignRegulation The values given for programs other than the Eco 40-60 are indicat-ive only and were determined in accordance with the applicable standardEN60456
Programme Load(kg)
Pro-gramme dura-tion(hrmin)1
Energycon-sump-tion(kWhcycle)1
Watercon-sump-tion (lcycle)1
Max-imumtemper-ature(degC) 5mins1
Spinspeed(rpm)1
Resid-ualmois-ture()1
Eco 40-602 90 337 1245 610 50 1166 5000Eco 40-602 45 252 0590 450 33 1200 5000Eco 40-602 25 233 0195 300 24 1200 5400AlgodoacutenAl-godatildeo 20 degC
90 328 0370 900 23 1200 5400
AlgodoacutenAl-godatildeo 40 degC
90 328 1350 900 45 1200 5400
AlgodoacutenAl-godatildeo 60 degC
90 328 1450 900 55 1200 5400
AlgodoacutenAl-godatildeo 40 degC + Pre-lav
90 358 1400 1020 45 1200 5400
Sinteacuteticos 40 degC
40 228 0780 610 44 1200 2700
Mix 40 degC 40 059 0620 440 41 1200 5600 LanaLatildes
30 degC20 040 0200 400 22 800 2500
1 Due to the influence of water pressure hardness and inlet temperature am-bient temperature type amount and soiling of laundry detergent used fluc-tuations in the power supply and the selected additional functions the actualvalues may deviate from the stated values
2 Test programme in accordance with the EU Ecodesign Directive and the EUEnergy Labelling Regulation with cold water (15 degC)
Technical specificationsemspen
61
Technical specifications
21 Technical specifica-tions
Technical specifications
Facts and figures for your appliancecan be found here
Appliance height 850 cmAppliance width 598 cmAppliance depth 590 cmWeight 80 kg1
Maximum load 9 kgMains voltage 220 - 240 V
50 Hz Minimum in-
stallation protec-tion
10 A
Rated power 2300 WPower consump-tion
iexcl Off mode010 W
iexcl Left-on mode050 W
Water pressure iexcl Minimum100 kPa(1 bar)
iexcl Maximum1000 kPa(10 bar)
Length of the wa-ter inlet hose
150 cm
Length of the wa-ter outlet hose
150 cm
Length of thepower cord
160 cm
1 Depending on the appliance spe-cifications
More information about your modelcan be found online at httpsen-ergylabelbsh-groupcom1 This webaddress is linked to the official EUEPREL product database At the time
of printing its web address had notyet been published Please then fol-low the instructions on searching formodels The model identifier is madeup of the characters before the slashin the product number (E-Nr) on therating plate Alternatively you canalso find the model identifier in thefirst line of the EU energy label
1 Only applies to countries in the European Economic Area
Thank you for buying aBosch Home Appliance
Register your new device on MyBosch now and profit directly from
bull Expert tips amp tricks for your appliancebull Warranty extension optionsbull Discounts for accessories amp spare-partsbull Digital manual and all appliance data at handbull Easy access to Bosch Home Appliances Service
Free and easy registration ndash also on mobile phoneswwwbosch-homecomwelcome
Looking for help Youll find it here
Expert advice for your Bosch home appliances help with problems or a repair from Bosch experts Find out everything about the many ways Bosch can support you wwwbosch-homecomservice Contact data of all countries are listed in the attached service direct-ory
90016102699001610269emsp(010219)en
Robert Bosch Hausgeraumlte GmbHCarl-Wery-Straszlige 3481739 MuumlnchenGERMANYwwwbosch-homecom
Valid within Great BritainImported to Great Britain byBSH Home Appliances LtdGrand Union HouseOld Wolverton RoadWolverton Milton KeynesMK12 5PTUnited Kingdom
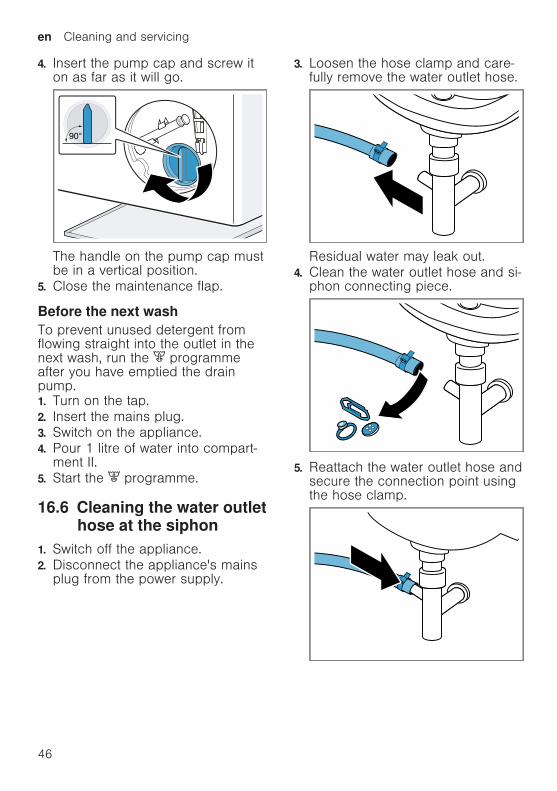
enemspCleaning and servicing
46
4 Insert the pump cap and screw iton as far as it will go
90deg
The handle on the pump cap mustbe in a vertical position
5 Close the maintenance flap
Before the next washTo prevent unused detergent fromflowing straight into the outlet in thenext wash run the programmeafter you have emptied the drainpump1 Turn on the tap2 Insert the mains plug3 Switch on the appliance4 Pour 1 litre of water into compart-
ment II5 Start the programme
166 Cleaning the water outlethose at the siphon
1 Switch off the appliance2 Disconnect the appliances mains
plug from the power supply
3 Loosen the hose clamp and care-fully remove the water outlet hose
Residual water may leak out4 Clean the water outlet hose and si-
phon connecting piece
5 Reattach the water outlet hose andsecure the connection point usingthe hose clamp
Cleaning and servicingemspen
47
167 Clean the water inlet fil-ters
Emptying the water inlet hose1 Turn off the tap2 Set a programme except for
or 3 Start the programme and leave it
to run for approx 40 seconds4 Switch off the appliance5 Disconnect the appliances mains
plug from the power supply
Cleaning the filter on the tapNote Please read the information inthe Safety rarr Page 4 and Preventingmaterial damage rarr Page 10 sectionsto ensure that you use the appliancesafelyRequirement The water inlet hose isempty1 Remove the water inlet hose from
the tap
2 Clean the filter with a small brush
3 Connect the water inlet hose andcheck for leaks
Cleaning the filter on theapplianceNote Please read the information inthe Safety rarr Page 4 and Preventingmaterial damage rarr Page 10 sectionsto ensure that you use the appliancesafelyRequirement The water inlet hose isempty rarr Emptying the water inlet hosePage 47
enemspCleaning and servicing
48
1 Disconnect the hose from the rearof the appliance
1
2
2 Use pliers to remove the filter
3 Clean the filter with a small brush
4 Reinsert the filter
5 Connect the hose and check forleaks
2
1
Troubleshootingemspen
49
Troubleshooting
17 TroubleshootingTroubleshooting
You can rectify minor faults on your appliance yourself Read the troubleshoot-ing information before contacting after-sales service This will avoid unneces-sary costs
WARNINGRisk of electric shockIncorrect repairs are dangerous Repairs to the appliance should only be carried out by trained specialist
staff Only use genuine spare parts when repairing the appliance If the power cord of this appliance is damaged it must be replaced by the
manufacturer the manufacturers Customer Service or a similarly qualifiedperson in order to prevent any risk
Fault Cause and troubleshootingThe display goes outand InicioPausa +Carga flashes
Energy-saving mode is active Press any buttona The symbol lights up again
E36 -10 Drain pipe or water outlet hose is blocked Clean the drain pipe and the water outlet hose
Drain pipe or water drain hose is caught or jammed Ensure that the drain pipe and water drain hose are
not kinked or trapped
Drain pump is blocked rarr Cleaning the drain pump Page 44
The water outlet hose is connected too high Install the water outlet hose at a maximum height of
1 metre
Detergent dosage is too high Immediate measure Mix one tablespoon of fabric
softener with 05 litres of water and pour the mix-ture into the left-hand compartment (not for outdoorclothing sportswear or items stuffed with down)
Reduce the amount of detergent for the next wash-ing cycle with the same load
Unapproved extension installed on the water drainhose Remove any unapproved extensions from the water
hose Connecting the appliance
E36 -25 -26 Drain pump is blocked rarr Cleaning the drain pump Page 44
enemspTroubleshooting
50
Fault Cause and troubleshootingThe water pressure is lowNo remedial action possibleThe filters in the water inflow are blocked Clean the filters in the water inflow rarr Page 47
The tap is turned off Turn on the tap
The water inlet hose is kinked or jammed Ensure that the water inlet hose is not kinked or
jammed
flashes The automatic voltage control system detects an un-authorised voltage under-usage No remedial action possible
Note If the power supply is stable the programmecontinues to run as normalVoltage under-usage may cause extension of a pro-grammeNo remedial action possible
flashes Voltage under-usage may cause extension of a pro-grammeNo remedial action possible
lights up The temperature is too high Wait until the temperature has dropped rarr Cancelling the programme Page 39
Water level is too high Start the programme
Laundry is caught in the door1 Open the door again2 Remove any trapped laundry3 Close the door4 Press InicioPausa + Carga to start the pro-
gramme
flashes Door is not closed1 Close the door2 Press InicioPausa + Carga to start the pro-
gramme
All other error codes Malfunction Call the after-sales service
rarr Customer Service Page 59
Troubleshootingemspen
51
Fault Cause and troubleshootingThe appliance is notworking
The mains plug of the power cord is not plugged in Connect the appliance to the power supply
The circuit breaker is faulty Check the circuit breaker in the fuse box
There has been a power cut Check whether the lighting in your kitchen or other
appliances are working
The programme doesnot start
You have not pressed InicioPausa + Carga Press InicioPausa + Carga
Door is not closed1 Close the door2 Press InicioPausa + Carga to start the pro-
gramme
Childproof lock is activated rarr Deactivating the childproof lock Page 40
Termin is activated Check whether Termin is activated
rarr Buttons Page 23
Laundry is caught in the door1 Open the door again2 Remove any trapped laundry3 Close the door4 Press InicioPausa + Carga to start the pro-
gramme
The door cannotbe opened
ndash ndash ndash ndash is activated Continue the programme by selecting or and
pressing InicioPausa + Carga rarr Resuming the programme when the programmestatus is Rinse Hold Page 39
The temperature is too high Wait until the temperature has dropped rarr Cancelling the programme Page 39
Water level is too high Start the programme
Power failure Open the door using the emergency release
rarr Emergency release Page 57
The water is not drain-ing
Drain pipe or water outlet hose is blocked Clean the drain pipe and the water outlet hose
enemspTroubleshooting
52
Fault Cause and troubleshootingThe water is not drain-ing
Drain pipe or water drain hose is caught or jammed Ensure that the drain pipe and water drain hose are
not kinked or trapped
Drain pump is blocked rarr Cleaning the drain pump Page 44
ndash ndash ndash ndash is activated Continue the programme by selecting or and
pressing InicioPausa + Carga rarr Resuming the programme when the programmestatus is Rinse Hold Page 39
The water outlet hose is connected too high Install the water outlet hose at a maximum height of
1 metre
Detergent dosage is too high Immediate measure Mix one tablespoon of fabric
softener with 05 litres of water and pour the mix-ture into the left-hand compartment (not for outdoorclothing sportswear or items stuffed with down)
Reduce the amount of detergent for the next wash-ing cycle with the same load
Unapproved extension installed on the water drainhose Remove any unapproved extensions from the water
hose Connecting the appliance
Water is not flowingin Detergent is notbeing dispensed
You have not pressed InicioPausa + Carga Press InicioPausa + Carga
The filters in the water inflow are blocked Clean the filters in the water inflow rarr Page 47
The tap is turned off Turn on the tap
The water inlet hose is kinked or jammed Ensure that the water inlet hose is not kinked or
jammed
The spin cycle runsseveral times
The unbalanced load detection system eliminates animbalance by repeatedly redistributing the laundry Not a fault ndash no action required
Note When loading where possible place large andsmall items of laundry together in the drum Differentsized items of laundry distribute themselves betterduring the spin cycle
Troubleshootingemspen
53
Fault Cause and troubleshootingThe programme dura-tion changes duringthe wash cycle
The programme operation is optimised electronicallyThis may change the programme duration Not a fault ndash no action required
The unbalanced load detection system eliminates animbalance by repeatedly redistributing the laundry Not a fault ndash no action required
Note When loading where possible place large andsmall items of laundry together in the drum Differentsized items of laundry distribute themselves betterduring the spin cycleFoam detection system switches on a rinse cycle iffoam build-up is too high Not a fault ndash no action required
No water is visible inthe drum
Water is below the visible area Not a fault ndash no action required Do not add any extra water to the appliance while it
is operating
Drum jerks after theprogramme starts
This is caused by an internal motor test Not a fault ndash no action required
Residual water ispresent in the com-partment
Insert in compartment is blocked rarr Cleaning the detergent drawer Page 42
Vibrations and move-ment of the appliancewhilst spinning
Appliance is not correctly aligned Aligning the appliance
The appliance feet are not fixed Secure the appliance feet Aligning the appliance
Transit bolts have not been removed Removing the transit bolts
Drum does not turnwater does not flow in
Load detection is active Not a fault ndash no action required
Note The load detection can take up to two minutesHeavy foam build-up Detergent dosage is too high
Immediate measure Mix one tablespoon of fabricsoftener with 05 litres of water and pour the mix-ture into the left-hand compartment (not for outdoorclothing sportswear or items stuffed with down)
Reduce the amount of detergent for the next wash-ing cycle with the same load
enemspTroubleshooting
54
Fault Cause and troubleshootingHigh spin speed notreached
A low spin speed is selected The next time you run a wash cycle set a higher
spin speed
Unbalance load detection system is using a reducedspin speed to eliminate an unbalance Redistribute the laundry in the drum
Note Where possible mix large and small items inthe drum Different sized items of laundry distributethemselves better during the spin cycle Start the programme
The spin programmedoes not start
Drain pipe or water outlet hose is blocked Clean the drain pipe and the water outlet hose
Drain pipe or water drain hose is caught or jammed Ensure that the drain pipe and water drain hose are
not kinked or trapped
The unbalanced load detection system has interruptedthe spin cycle because the laundry is unevenly distrib-uted Redistribute the laundry in the drum
Note Where possible mix large and small items inthe drum Different sized items of laundry distributethemselves better during the spin cycle Start the programme
Rushing hissingnoise
Water is flushed under pressure into the detergentdrawer Not a fault ndash normal operating noise
Loud noises duringthe spin cycle
Appliance is not correctly aligned Aligning the appliance
The appliance feet are not fixed Secure the appliance feet Aligning the appliance
Transit bolts have not been removed Removing the transit bolts
Banging noises rat-tling in the drainpump
Foreign bodies have got into the drain pump rarr Cleaning the drain pump Page 44
Slurping rhythmicalsuction noise
The drain pump is active the detergent solution ispumped out Not a fault ndash normal operating noise
Troubleshootingemspen
55
Fault Cause and troubleshootingCreasing The spin speed is too high
The next time you run a wash cycle set a lowerspin speed
The load is too large The next time you run a wash cycle reduce the
amount of laundry being loaded
The wrong programme is selected for the type of fab-ric Select the programmes that are suitable for the
type of fabric rarr Programmes Page 24
Detergent or fabricsoftener drips off theseal and collects onthe door or in the sealfold
Too much detergentfabric softener in the detergentdrawer When dosing liquid detergent and fabric softener
observe the marking in the detergent drawer anddo not dose above this
The spin result is notsatisfactory The laun-dry is too wettoodamp
A low spin speed is selected The next time you run a wash cycle set a higher
spin speed Start the programme
Drain pipe or water outlet hose is blocked Clean the drain pipe and the water outlet hose
Drain pipe or water drain hose is caught or jammed Ensure that the drain pipe and water drain hose are
not kinked or trapped
The unbalanced load detection system has interruptedthe spin cycle because the laundry is unevenly distrib-uted Redistribute the laundry in the drum
Note Where possible mix large and small items inthe drum Different sized items of laundry distributethemselves better during the spin cycle Start the programme
Unbalance load detection system is using a reducedspin speed to eliminate an unbalance Redistribute the laundry in the drum
Note Where possible mix large and small items inthe drum Different sized items of laundry distributethemselves better during the spin cycle Start the programme
enemspTroubleshooting
56
Fault Cause and troubleshootingDetergent residue onthe damp washing
Detergents may contain water-insoluble substancesthat deposit on the laundry Start the programme
Detergent residue onthe dry laundry
Detergents may contain water-insoluble substancesthat deposit on the laundry Brush out the laundry after washing and drying
Water is leaking out atthe water inlet hose
Water inlet hose is not correctlysecurely connected1 Connect the water supply hose correctly Connect-
ing the water inlet hose2 Tighten the screw connection
Water is leaking out atthe water outlet hose
The water outlet hose is damaged Replace the damaged water outlet hose
Water outlet hose is not connected correctly Connect the water outlet hose correctly Water out-
let connection types
Odours have formedin the appliance
Humidity and detergent residue may promote theformation of bacteria rarr Cleaning the drum Page 42 If you are not using the appliance leave the door
and detergent drawer open so that residual watercan evaporate
Transportation storage and disposalemspen
57
171 Emergency releaseReleasing the doorRequirement The drain pump isempty rarr Page 441 ATTENTION Escaping water may
cause material damage Do not open the door if you can
see water through the glassPull the emergency release down-wards with a tool and release
a The door lock is released2 Insert the maintenance flap and
lock it into place3 Close the maintenance flap
Transportation storage and disposal
18 Transportation stor-age and disposal
Transportation storage and disposal
You can find out here how to prepareyour appliance for transportation andstorage You will also find out how todispose of old appliances
181 Removing the appliance1 Turn off the tap2 rarr Emptying the water inlet hose
Page 473 Switch off the appliance4 Unplug the appliances mains plug
5 Drain the remaining detergentsolution rarr Cleaning the drain pumpPage 44
6 Detach the hoses
182 Inserting the transitbolts
Secure the appliance for transporta-tion using transit bolts in order to pre-vent damage1 Remove the four cover caps
‒ If necessary use a screwdriverto remove the cover caps
Keep the cover caps2 Insert the four sleeves
enemspTransportation storage and disposal
58
3 Insert all screws into the fourtransit bolts and tighten slightly
4 Insert the power cord into theholder and tighten all fourscrews for the transit bolts with aWAF 13 wrench
5 Insert the hose into holder
183 Using the applianceagain
1 Remove the transit bolts
2 Pour approx 1 litre of water intocompartment II in the detergentdrawer
3 Start the programmea The unused detergent cannot flow
straight into the outlet during thenext wash
184 Disposing of old appli-ance
Valuable raw materials can be re-used by recycling
WARNINGRisk of harm to healthChildren can lock themselves in theappliance thereby putting their livesat risk Do not install the appliance behind
a door as this may obstruct the ap-pliance door or prevent it fromopening
With redundant appliances unplugthe power cord Then cut throughthe cord and damage the lock onthe appliance door beyond repairso that the appliance door will nolonger close
1 Unplug the appliance from themains
2 Cut through the power cord3 Dispose of the appliance in an en-
vironmentally friendly mannerInformation about current disposalmethods are available from yourspecialist dealer or local authority
This appliance is la-belled in accordancewith European Directive201219EU concerningused electrical and elec-
Customer Serviceemspen
59
tronic appliances (wasteelectrical and electronicequipment - WEEE)The guideline determ-ines the framework forthe return and recyclingof used appliances asapplicable throughoutthe EU
Customer Service
19 Customer ServiceCustomer Service
If you have any queries on use areunable to rectify faults on the appli-ance yourself or if your applianceneeds to be repaired contact Cus-tomer ServiceYou can solve many problems your-self by consulting the information ontroubleshooting in these instructionsor on our website If this is not thecase contact our after-sales serviceWith any warranty claims we willmake sure that your appliance is re-paired by trained after-sales techni-cians using genuine spare parts in-cluding after the manufacturers war-ranty has expiredFunction-relevant genuine spare partsaccording to the corresponding Eco-design Order can be obtained fromCustomer Service for a period of atleast 10 years from the date onwhich your appliance was placed onthe market within the European Eco-nomic AreaNote Under the terms of the manu-facturers warranty the use of Cus-tomer Service is free of chargeDetailed information on the warrantyperiod and terms of warranty in yourcountry is available from our after-sales service your retailer or on ourwebsite
If you contact Customer Service youwill require the product number (E-Nr) and the production number (FD)of your applianceThe contact details for Customer Ser-vice can be found in the enclosedCustomer Service directory or on ourwebsite
191 Product number (E-Nr)and production number(FD)
You can find the product number (E-Nr) and the production number (FD)on the appliances rating plateDepending on the model the ratingplate is locatediexcl On the inside of the dooriexcl On the inside of the maintenance
flapiexcl On the rear of the applianceMake a note of your appliances de-tails and the Customer Service tele-phone number to find them againquickly
enemspConsumption values
60
Consumption values
20 Consumption valuesConsumption values
The following information is provided in accordance with the EU EcodesignRegulation The values given for programs other than the Eco 40-60 are indicat-ive only and were determined in accordance with the applicable standardEN60456
Programme Load(kg)
Pro-gramme dura-tion(hrmin)1
Energycon-sump-tion(kWhcycle)1
Watercon-sump-tion (lcycle)1
Max-imumtemper-ature(degC) 5mins1
Spinspeed(rpm)1
Resid-ualmois-ture()1
Eco 40-602 90 337 1245 610 50 1166 5000Eco 40-602 45 252 0590 450 33 1200 5000Eco 40-602 25 233 0195 300 24 1200 5400AlgodoacutenAl-godatildeo 20 degC
90 328 0370 900 23 1200 5400
AlgodoacutenAl-godatildeo 40 degC
90 328 1350 900 45 1200 5400
AlgodoacutenAl-godatildeo 60 degC
90 328 1450 900 55 1200 5400
AlgodoacutenAl-godatildeo 40 degC + Pre-lav
90 358 1400 1020 45 1200 5400
Sinteacuteticos 40 degC
40 228 0780 610 44 1200 2700
Mix 40 degC 40 059 0620 440 41 1200 5600 LanaLatildes
30 degC20 040 0200 400 22 800 2500
1 Due to the influence of water pressure hardness and inlet temperature am-bient temperature type amount and soiling of laundry detergent used fluc-tuations in the power supply and the selected additional functions the actualvalues may deviate from the stated values
2 Test programme in accordance with the EU Ecodesign Directive and the EUEnergy Labelling Regulation with cold water (15 degC)
Technical specificationsemspen
61
Technical specifications
21 Technical specifica-tions
Technical specifications
Facts and figures for your appliancecan be found here
Appliance height 850 cmAppliance width 598 cmAppliance depth 590 cmWeight 80 kg1
Maximum load 9 kgMains voltage 220 - 240 V
50 Hz Minimum in-
stallation protec-tion
10 A
Rated power 2300 WPower consump-tion
iexcl Off mode010 W
iexcl Left-on mode050 W
Water pressure iexcl Minimum100 kPa(1 bar)
iexcl Maximum1000 kPa(10 bar)
Length of the wa-ter inlet hose
150 cm
Length of the wa-ter outlet hose
150 cm
Length of thepower cord
160 cm
1 Depending on the appliance spe-cifications
More information about your modelcan be found online at httpsen-ergylabelbsh-groupcom1 This webaddress is linked to the official EUEPREL product database At the time
of printing its web address had notyet been published Please then fol-low the instructions on searching formodels The model identifier is madeup of the characters before the slashin the product number (E-Nr) on therating plate Alternatively you canalso find the model identifier in thefirst line of the EU energy label
1 Only applies to countries in the European Economic Area
Thank you for buying aBosch Home Appliance
Register your new device on MyBosch now and profit directly from
bull Expert tips amp tricks for your appliancebull Warranty extension optionsbull Discounts for accessories amp spare-partsbull Digital manual and all appliance data at handbull Easy access to Bosch Home Appliances Service
Free and easy registration ndash also on mobile phoneswwwbosch-homecomwelcome
Looking for help Youll find it here
Expert advice for your Bosch home appliances help with problems or a repair from Bosch experts Find out everything about the many ways Bosch can support you wwwbosch-homecomservice Contact data of all countries are listed in the attached service direct-ory
90016102699001610269emsp(010219)en
Robert Bosch Hausgeraumlte GmbHCarl-Wery-Straszlige 3481739 MuumlnchenGERMANYwwwbosch-homecom
Valid within Great BritainImported to Great Britain byBSH Home Appliances LtdGrand Union HouseOld Wolverton RoadWolverton Milton KeynesMK12 5PTUnited Kingdom
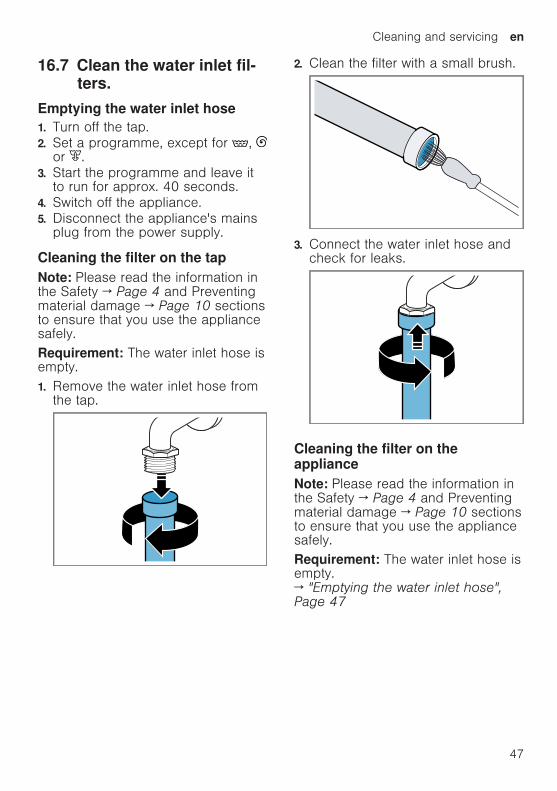
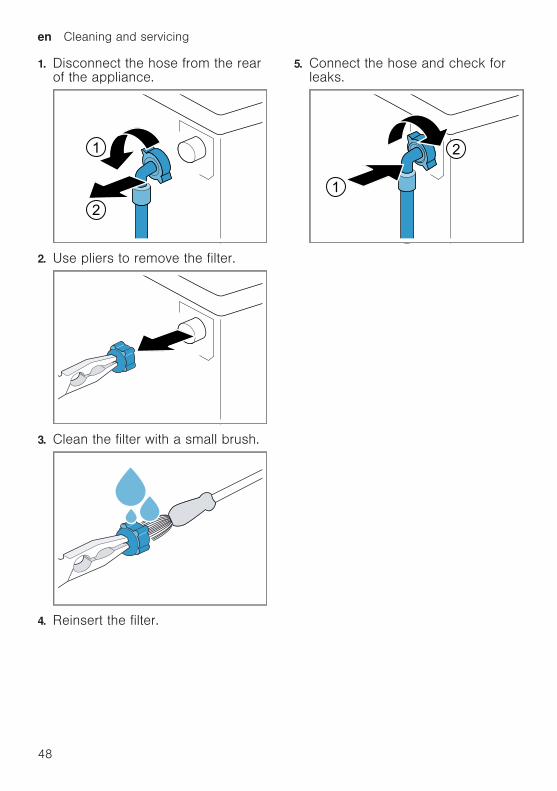
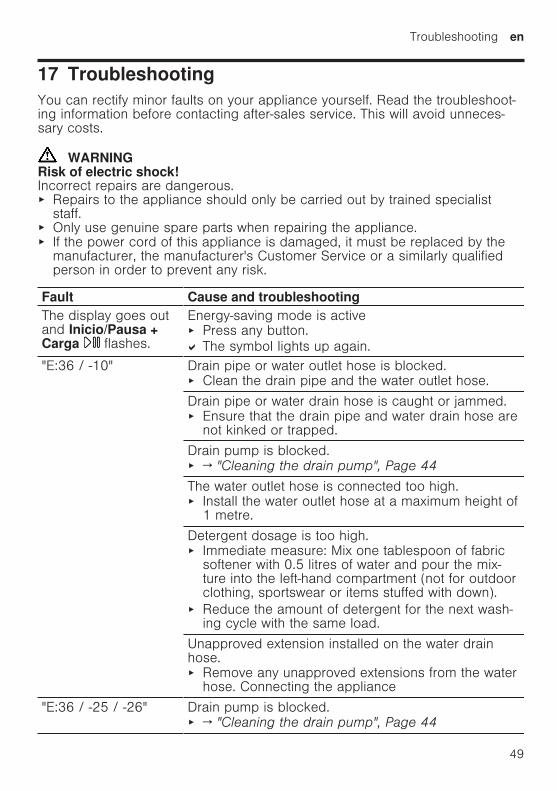
Troubleshootingemspen
49
Troubleshooting
17 TroubleshootingTroubleshooting
You can rectify minor faults on your appliance yourself Read the troubleshoot-ing information before contacting after-sales service This will avoid unneces-sary costs
WARNINGRisk of electric shockIncorrect repairs are dangerous Repairs to the appliance should only be carried out by trained specialist
staff Only use genuine spare parts when repairing the appliance If the power cord of this appliance is damaged it must be replaced by the
manufacturer the manufacturers Customer Service or a similarly qualifiedperson in order to prevent any risk
Fault Cause and troubleshootingThe display goes outand InicioPausa +Carga flashes
Energy-saving mode is active Press any buttona The symbol lights up again
E36 -10 Drain pipe or water outlet hose is blocked Clean the drain pipe and the water outlet hose
Drain pipe or water drain hose is caught or jammed Ensure that the drain pipe and water drain hose are
not kinked or trapped
Drain pump is blocked rarr Cleaning the drain pump Page 44
The water outlet hose is connected too high Install the water outlet hose at a maximum height of
1 metre
Detergent dosage is too high Immediate measure Mix one tablespoon of fabric
softener with 05 litres of water and pour the mix-ture into the left-hand compartment (not for outdoorclothing sportswear or items stuffed with down)
Reduce the amount of detergent for the next wash-ing cycle with the same load
Unapproved extension installed on the water drainhose Remove any unapproved extensions from the water
hose Connecting the appliance
E36 -25 -26 Drain pump is blocked rarr Cleaning the drain pump Page 44
enemspTroubleshooting
50
Fault Cause and troubleshootingThe water pressure is lowNo remedial action possibleThe filters in the water inflow are blocked Clean the filters in the water inflow rarr Page 47
The tap is turned off Turn on the tap
The water inlet hose is kinked or jammed Ensure that the water inlet hose is not kinked or
jammed
flashes The automatic voltage control system detects an un-authorised voltage under-usage No remedial action possible
Note If the power supply is stable the programmecontinues to run as normalVoltage under-usage may cause extension of a pro-grammeNo remedial action possible
flashes Voltage under-usage may cause extension of a pro-grammeNo remedial action possible
lights up The temperature is too high Wait until the temperature has dropped rarr Cancelling the programme Page 39
Water level is too high Start the programme
Laundry is caught in the door1 Open the door again2 Remove any trapped laundry3 Close the door4 Press InicioPausa + Carga to start the pro-
gramme
flashes Door is not closed1 Close the door2 Press InicioPausa + Carga to start the pro-
gramme
All other error codes Malfunction Call the after-sales service
rarr Customer Service Page 59
Troubleshootingemspen
51
Fault Cause and troubleshootingThe appliance is notworking
The mains plug of the power cord is not plugged in Connect the appliance to the power supply
The circuit breaker is faulty Check the circuit breaker in the fuse box
There has been a power cut Check whether the lighting in your kitchen or other
appliances are working
The programme doesnot start
You have not pressed InicioPausa + Carga Press InicioPausa + Carga
Door is not closed1 Close the door2 Press InicioPausa + Carga to start the pro-
gramme
Childproof lock is activated rarr Deactivating the childproof lock Page 40
Termin is activated Check whether Termin is activated
rarr Buttons Page 23
Laundry is caught in the door1 Open the door again2 Remove any trapped laundry3 Close the door4 Press InicioPausa + Carga to start the pro-
gramme
The door cannotbe opened
ndash ndash ndash ndash is activated Continue the programme by selecting or and
pressing InicioPausa + Carga rarr Resuming the programme when the programmestatus is Rinse Hold Page 39
The temperature is too high Wait until the temperature has dropped rarr Cancelling the programme Page 39
Water level is too high Start the programme
Power failure Open the door using the emergency release
rarr Emergency release Page 57
The water is not drain-ing
Drain pipe or water outlet hose is blocked Clean the drain pipe and the water outlet hose
enemspTroubleshooting
52
Fault Cause and troubleshootingThe water is not drain-ing
Drain pipe or water drain hose is caught or jammed Ensure that the drain pipe and water drain hose are
not kinked or trapped
Drain pump is blocked rarr Cleaning the drain pump Page 44
ndash ndash ndash ndash is activated Continue the programme by selecting or and
pressing InicioPausa + Carga rarr Resuming the programme when the programmestatus is Rinse Hold Page 39
The water outlet hose is connected too high Install the water outlet hose at a maximum height of
1 metre
Detergent dosage is too high Immediate measure Mix one tablespoon of fabric
softener with 05 litres of water and pour the mix-ture into the left-hand compartment (not for outdoorclothing sportswear or items stuffed with down)
Reduce the amount of detergent for the next wash-ing cycle with the same load
Unapproved extension installed on the water drainhose Remove any unapproved extensions from the water
hose Connecting the appliance
Water is not flowingin Detergent is notbeing dispensed
You have not pressed InicioPausa + Carga Press InicioPausa + Carga
The filters in the water inflow are blocked Clean the filters in the water inflow rarr Page 47
The tap is turned off Turn on the tap
The water inlet hose is kinked or jammed Ensure that the water inlet hose is not kinked or
jammed
The spin cycle runsseveral times
The unbalanced load detection system eliminates animbalance by repeatedly redistributing the laundry Not a fault ndash no action required
Note When loading where possible place large andsmall items of laundry together in the drum Differentsized items of laundry distribute themselves betterduring the spin cycle
Troubleshootingemspen
53
Fault Cause and troubleshootingThe programme dura-tion changes duringthe wash cycle
The programme operation is optimised electronicallyThis may change the programme duration Not a fault ndash no action required
The unbalanced load detection system eliminates animbalance by repeatedly redistributing the laundry Not a fault ndash no action required
Note When loading where possible place large andsmall items of laundry together in the drum Differentsized items of laundry distribute themselves betterduring the spin cycleFoam detection system switches on a rinse cycle iffoam build-up is too high Not a fault ndash no action required
No water is visible inthe drum
Water is below the visible area Not a fault ndash no action required Do not add any extra water to the appliance while it
is operating
Drum jerks after theprogramme starts
This is caused by an internal motor test Not a fault ndash no action required
Residual water ispresent in the com-partment
Insert in compartment is blocked rarr Cleaning the detergent drawer Page 42
Vibrations and move-ment of the appliancewhilst spinning
Appliance is not correctly aligned Aligning the appliance
The appliance feet are not fixed Secure the appliance feet Aligning the appliance
Transit bolts have not been removed Removing the transit bolts
Drum does not turnwater does not flow in
Load detection is active Not a fault ndash no action required
Note The load detection can take up to two minutesHeavy foam build-up Detergent dosage is too high
Immediate measure Mix one tablespoon of fabricsoftener with 05 litres of water and pour the mix-ture into the left-hand compartment (not for outdoorclothing sportswear or items stuffed with down)
Reduce the amount of detergent for the next wash-ing cycle with the same load
enemspTroubleshooting
54
Fault Cause and troubleshootingHigh spin speed notreached
A low spin speed is selected The next time you run a wash cycle set a higher
spin speed
Unbalance load detection system is using a reducedspin speed to eliminate an unbalance Redistribute the laundry in the drum
Note Where possible mix large and small items inthe drum Different sized items of laundry distributethemselves better during the spin cycle Start the programme
The spin programmedoes not start
Drain pipe or water outlet hose is blocked Clean the drain pipe and the water outlet hose
Drain pipe or water drain hose is caught or jammed Ensure that the drain pipe and water drain hose are
not kinked or trapped
The unbalanced load detection system has interruptedthe spin cycle because the laundry is unevenly distrib-uted Redistribute the laundry in the drum
Note Where possible mix large and small items inthe drum Different sized items of laundry distributethemselves better during the spin cycle Start the programme
Rushing hissingnoise
Water is flushed under pressure into the detergentdrawer Not a fault ndash normal operating noise
Loud noises duringthe spin cycle
Appliance is not correctly aligned Aligning the appliance
The appliance feet are not fixed Secure the appliance feet Aligning the appliance
Transit bolts have not been removed Removing the transit bolts
Banging noises rat-tling in the drainpump
Foreign bodies have got into the drain pump rarr Cleaning the drain pump Page 44
Slurping rhythmicalsuction noise
The drain pump is active the detergent solution ispumped out Not a fault ndash normal operating noise
Troubleshootingemspen
55
Fault Cause and troubleshootingCreasing The spin speed is too high
The next time you run a wash cycle set a lowerspin speed
The load is too large The next time you run a wash cycle reduce the
amount of laundry being loaded
The wrong programme is selected for the type of fab-ric Select the programmes that are suitable for the
type of fabric rarr Programmes Page 24
Detergent or fabricsoftener drips off theseal and collects onthe door or in the sealfold
Too much detergentfabric softener in the detergentdrawer When dosing liquid detergent and fabric softener
observe the marking in the detergent drawer anddo not dose above this
The spin result is notsatisfactory The laun-dry is too wettoodamp
A low spin speed is selected The next time you run a wash cycle set a higher
spin speed Start the programme
Drain pipe or water outlet hose is blocked Clean the drain pipe and the water outlet hose
Drain pipe or water drain hose is caught or jammed Ensure that the drain pipe and water drain hose are
not kinked or trapped
The unbalanced load detection system has interruptedthe spin cycle because the laundry is unevenly distrib-uted Redistribute the laundry in the drum
Note Where possible mix large and small items inthe drum Different sized items of laundry distributethemselves better during the spin cycle Start the programme
Unbalance load detection system is using a reducedspin speed to eliminate an unbalance Redistribute the laundry in the drum
Note Where possible mix large and small items inthe drum Different sized items of laundry distributethemselves better during the spin cycle Start the programme
enemspTroubleshooting
56
Fault Cause and troubleshootingDetergent residue onthe damp washing
Detergents may contain water-insoluble substancesthat deposit on the laundry Start the programme
Detergent residue onthe dry laundry
Detergents may contain water-insoluble substancesthat deposit on the laundry Brush out the laundry after washing and drying
Water is leaking out atthe water inlet hose
Water inlet hose is not correctlysecurely connected1 Connect the water supply hose correctly Connect-
ing the water inlet hose2 Tighten the screw connection
Water is leaking out atthe water outlet hose
The water outlet hose is damaged Replace the damaged water outlet hose
Water outlet hose is not connected correctly Connect the water outlet hose correctly Water out-
let connection types
Odours have formedin the appliance
Humidity and detergent residue may promote theformation of bacteria rarr Cleaning the drum Page 42 If you are not using the appliance leave the door
and detergent drawer open so that residual watercan evaporate
Transportation storage and disposalemspen
57
171 Emergency releaseReleasing the doorRequirement The drain pump isempty rarr Page 441 ATTENTION Escaping water may
cause material damage Do not open the door if you can
see water through the glassPull the emergency release down-wards with a tool and release
a The door lock is released2 Insert the maintenance flap and
lock it into place3 Close the maintenance flap
Transportation storage and disposal
18 Transportation stor-age and disposal
Transportation storage and disposal
You can find out here how to prepareyour appliance for transportation andstorage You will also find out how todispose of old appliances
181 Removing the appliance1 Turn off the tap2 rarr Emptying the water inlet hose
Page 473 Switch off the appliance4 Unplug the appliances mains plug
5 Drain the remaining detergentsolution rarr Cleaning the drain pumpPage 44
6 Detach the hoses
182 Inserting the transitbolts
Secure the appliance for transporta-tion using transit bolts in order to pre-vent damage1 Remove the four cover caps
‒ If necessary use a screwdriverto remove the cover caps
Keep the cover caps2 Insert the four sleeves
enemspTransportation storage and disposal
58
3 Insert all screws into the fourtransit bolts and tighten slightly
4 Insert the power cord into theholder and tighten all fourscrews for the transit bolts with aWAF 13 wrench
5 Insert the hose into holder
183 Using the applianceagain
1 Remove the transit bolts
2 Pour approx 1 litre of water intocompartment II in the detergentdrawer
3 Start the programmea The unused detergent cannot flow
straight into the outlet during thenext wash
184 Disposing of old appli-ance
Valuable raw materials can be re-used by recycling
WARNINGRisk of harm to healthChildren can lock themselves in theappliance thereby putting their livesat risk Do not install the appliance behind
a door as this may obstruct the ap-pliance door or prevent it fromopening
With redundant appliances unplugthe power cord Then cut throughthe cord and damage the lock onthe appliance door beyond repairso that the appliance door will nolonger close
1 Unplug the appliance from themains
2 Cut through the power cord3 Dispose of the appliance in an en-
vironmentally friendly mannerInformation about current disposalmethods are available from yourspecialist dealer or local authority
This appliance is la-belled in accordancewith European Directive201219EU concerningused electrical and elec-
Customer Serviceemspen
59
tronic appliances (wasteelectrical and electronicequipment - WEEE)The guideline determ-ines the framework forthe return and recyclingof used appliances asapplicable throughoutthe EU
Customer Service
19 Customer ServiceCustomer Service
If you have any queries on use areunable to rectify faults on the appli-ance yourself or if your applianceneeds to be repaired contact Cus-tomer ServiceYou can solve many problems your-self by consulting the information ontroubleshooting in these instructionsor on our website If this is not thecase contact our after-sales serviceWith any warranty claims we willmake sure that your appliance is re-paired by trained after-sales techni-cians using genuine spare parts in-cluding after the manufacturers war-ranty has expiredFunction-relevant genuine spare partsaccording to the corresponding Eco-design Order can be obtained fromCustomer Service for a period of atleast 10 years from the date onwhich your appliance was placed onthe market within the European Eco-nomic AreaNote Under the terms of the manu-facturers warranty the use of Cus-tomer Service is free of chargeDetailed information on the warrantyperiod and terms of warranty in yourcountry is available from our after-sales service your retailer or on ourwebsite
If you contact Customer Service youwill require the product number (E-Nr) and the production number (FD)of your applianceThe contact details for Customer Ser-vice can be found in the enclosedCustomer Service directory or on ourwebsite
191 Product number (E-Nr)and production number(FD)
You can find the product number (E-Nr) and the production number (FD)on the appliances rating plateDepending on the model the ratingplate is locatediexcl On the inside of the dooriexcl On the inside of the maintenance
flapiexcl On the rear of the applianceMake a note of your appliances de-tails and the Customer Service tele-phone number to find them againquickly
enemspConsumption values
60
Consumption values
20 Consumption valuesConsumption values
The following information is provided in accordance with the EU EcodesignRegulation The values given for programs other than the Eco 40-60 are indicat-ive only and were determined in accordance with the applicable standardEN60456
Programme Load(kg)
Pro-gramme dura-tion(hrmin)1
Energycon-sump-tion(kWhcycle)1
Watercon-sump-tion (lcycle)1
Max-imumtemper-ature(degC) 5mins1
Spinspeed(rpm)1
Resid-ualmois-ture()1
Eco 40-602 90 337 1245 610 50 1166 5000Eco 40-602 45 252 0590 450 33 1200 5000Eco 40-602 25 233 0195 300 24 1200 5400AlgodoacutenAl-godatildeo 20 degC
90 328 0370 900 23 1200 5400
AlgodoacutenAl-godatildeo 40 degC
90 328 1350 900 45 1200 5400
AlgodoacutenAl-godatildeo 60 degC
90 328 1450 900 55 1200 5400
AlgodoacutenAl-godatildeo 40 degC + Pre-lav
90 358 1400 1020 45 1200 5400
Sinteacuteticos 40 degC
40 228 0780 610 44 1200 2700
Mix 40 degC 40 059 0620 440 41 1200 5600 LanaLatildes
30 degC20 040 0200 400 22 800 2500
1 Due to the influence of water pressure hardness and inlet temperature am-bient temperature type amount and soiling of laundry detergent used fluc-tuations in the power supply and the selected additional functions the actualvalues may deviate from the stated values
2 Test programme in accordance with the EU Ecodesign Directive and the EUEnergy Labelling Regulation with cold water (15 degC)
Technical specificationsemspen
61
Technical specifications
21 Technical specifica-tions
Technical specifications
Facts and figures for your appliancecan be found here
Appliance height 850 cmAppliance width 598 cmAppliance depth 590 cmWeight 80 kg1
Maximum load 9 kgMains voltage 220 - 240 V
50 Hz Minimum in-
stallation protec-tion
10 A
Rated power 2300 WPower consump-tion
iexcl Off mode010 W
iexcl Left-on mode050 W
Water pressure iexcl Minimum100 kPa(1 bar)
iexcl Maximum1000 kPa(10 bar)
Length of the wa-ter inlet hose
150 cm
Length of the wa-ter outlet hose
150 cm
Length of thepower cord
160 cm
1 Depending on the appliance spe-cifications
More information about your modelcan be found online at httpsen-ergylabelbsh-groupcom1 This webaddress is linked to the official EUEPREL product database At the time
of printing its web address had notyet been published Please then fol-low the instructions on searching formodels The model identifier is madeup of the characters before the slashin the product number (E-Nr) on therating plate Alternatively you canalso find the model identifier in thefirst line of the EU energy label
1 Only applies to countries in the European Economic Area
Thank you for buying aBosch Home Appliance
Register your new device on MyBosch now and profit directly from
bull Expert tips amp tricks for your appliancebull Warranty extension optionsbull Discounts for accessories amp spare-partsbull Digital manual and all appliance data at handbull Easy access to Bosch Home Appliances Service
Free and easy registration ndash also on mobile phoneswwwbosch-homecomwelcome
Looking for help Youll find it here
Expert advice for your Bosch home appliances help with problems or a repair from Bosch experts Find out everything about the many ways Bosch can support you wwwbosch-homecomservice Contact data of all countries are listed in the attached service direct-ory
90016102699001610269emsp(010219)en
Robert Bosch Hausgeraumlte GmbHCarl-Wery-Straszlige 3481739 MuumlnchenGERMANYwwwbosch-homecom
Valid within Great BritainImported to Great Britain byBSH Home Appliances LtdGrand Union HouseOld Wolverton RoadWolverton Milton KeynesMK12 5PTUnited Kingdom
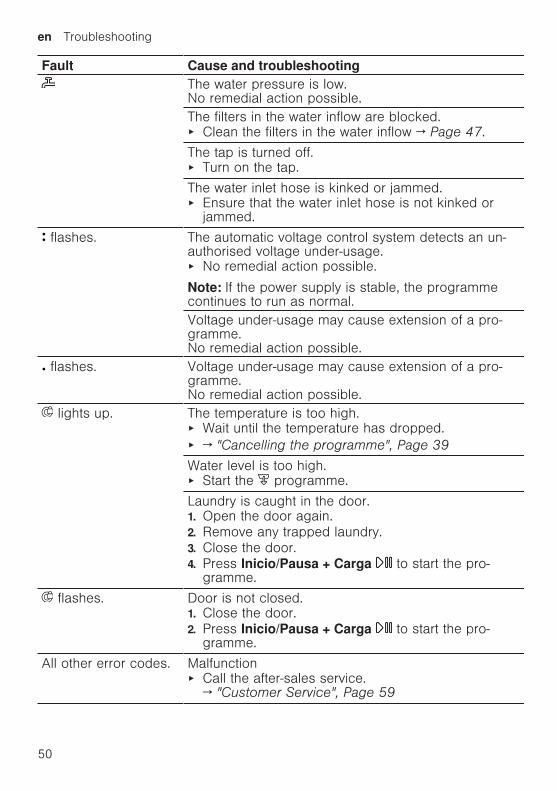
enemspTroubleshooting
50
Fault Cause and troubleshootingThe water pressure is lowNo remedial action possibleThe filters in the water inflow are blocked Clean the filters in the water inflow rarr Page 47
The tap is turned off Turn on the tap
The water inlet hose is kinked or jammed Ensure that the water inlet hose is not kinked or
jammed
flashes The automatic voltage control system detects an un-authorised voltage under-usage No remedial action possible
Note If the power supply is stable the programmecontinues to run as normalVoltage under-usage may cause extension of a pro-grammeNo remedial action possible
flashes Voltage under-usage may cause extension of a pro-grammeNo remedial action possible
lights up The temperature is too high Wait until the temperature has dropped rarr Cancelling the programme Page 39
Water level is too high Start the programme
Laundry is caught in the door1 Open the door again2 Remove any trapped laundry3 Close the door4 Press InicioPausa + Carga to start the pro-
gramme
flashes Door is not closed1 Close the door2 Press InicioPausa + Carga to start the pro-
gramme
All other error codes Malfunction Call the after-sales service
rarr Customer Service Page 59
Troubleshootingemspen
51
Fault Cause and troubleshootingThe appliance is notworking
The mains plug of the power cord is not plugged in Connect the appliance to the power supply
The circuit breaker is faulty Check the circuit breaker in the fuse box
There has been a power cut Check whether the lighting in your kitchen or other
appliances are working
The programme doesnot start
You have not pressed InicioPausa + Carga Press InicioPausa + Carga
Door is not closed1 Close the door2 Press InicioPausa + Carga to start the pro-
gramme
Childproof lock is activated rarr Deactivating the childproof lock Page 40
Termin is activated Check whether Termin is activated
rarr Buttons Page 23
Laundry is caught in the door1 Open the door again2 Remove any trapped laundry3 Close the door4 Press InicioPausa + Carga to start the pro-
gramme
The door cannotbe opened
ndash ndash ndash ndash is activated Continue the programme by selecting or and
pressing InicioPausa + Carga rarr Resuming the programme when the programmestatus is Rinse Hold Page 39
The temperature is too high Wait until the temperature has dropped rarr Cancelling the programme Page 39
Water level is too high Start the programme
Power failure Open the door using the emergency release
rarr Emergency release Page 57
The water is not drain-ing
Drain pipe or water outlet hose is blocked Clean the drain pipe and the water outlet hose
enemspTroubleshooting
52
Fault Cause and troubleshootingThe water is not drain-ing
Drain pipe or water drain hose is caught or jammed Ensure that the drain pipe and water drain hose are
not kinked or trapped
Drain pump is blocked rarr Cleaning the drain pump Page 44
ndash ndash ndash ndash is activated Continue the programme by selecting or and
pressing InicioPausa + Carga rarr Resuming the programme when the programmestatus is Rinse Hold Page 39
The water outlet hose is connected too high Install the water outlet hose at a maximum height of
1 metre
Detergent dosage is too high Immediate measure Mix one tablespoon of fabric
softener with 05 litres of water and pour the mix-ture into the left-hand compartment (not for outdoorclothing sportswear or items stuffed with down)
Reduce the amount of detergent for the next wash-ing cycle with the same load
Unapproved extension installed on the water drainhose Remove any unapproved extensions from the water
hose Connecting the appliance
Water is not flowingin Detergent is notbeing dispensed
You have not pressed InicioPausa + Carga Press InicioPausa + Carga
The filters in the water inflow are blocked Clean the filters in the water inflow rarr Page 47
The tap is turned off Turn on the tap
The water inlet hose is kinked or jammed Ensure that the water inlet hose is not kinked or
jammed
The spin cycle runsseveral times
The unbalanced load detection system eliminates animbalance by repeatedly redistributing the laundry Not a fault ndash no action required
Note When loading where possible place large andsmall items of laundry together in the drum Differentsized items of laundry distribute themselves betterduring the spin cycle
Troubleshootingemspen
53
Fault Cause and troubleshootingThe programme dura-tion changes duringthe wash cycle
The programme operation is optimised electronicallyThis may change the programme duration Not a fault ndash no action required
The unbalanced load detection system eliminates animbalance by repeatedly redistributing the laundry Not a fault ndash no action required
Note When loading where possible place large andsmall items of laundry together in the drum Differentsized items of laundry distribute themselves betterduring the spin cycleFoam detection system switches on a rinse cycle iffoam build-up is too high Not a fault ndash no action required
No water is visible inthe drum
Water is below the visible area Not a fault ndash no action required Do not add any extra water to the appliance while it
is operating
Drum jerks after theprogramme starts
This is caused by an internal motor test Not a fault ndash no action required
Residual water ispresent in the com-partment
Insert in compartment is blocked rarr Cleaning the detergent drawer Page 42
Vibrations and move-ment of the appliancewhilst spinning
Appliance is not correctly aligned Aligning the appliance
The appliance feet are not fixed Secure the appliance feet Aligning the appliance
Transit bolts have not been removed Removing the transit bolts
Drum does not turnwater does not flow in
Load detection is active Not a fault ndash no action required
Note The load detection can take up to two minutesHeavy foam build-up Detergent dosage is too high
Immediate measure Mix one tablespoon of fabricsoftener with 05 litres of water and pour the mix-ture into the left-hand compartment (not for outdoorclothing sportswear or items stuffed with down)
Reduce the amount of detergent for the next wash-ing cycle with the same load
enemspTroubleshooting
54
Fault Cause and troubleshootingHigh spin speed notreached
A low spin speed is selected The next time you run a wash cycle set a higher
spin speed
Unbalance load detection system is using a reducedspin speed to eliminate an unbalance Redistribute the laundry in the drum
Note Where possible mix large and small items inthe drum Different sized items of laundry distributethemselves better during the spin cycle Start the programme
The spin programmedoes not start
Drain pipe or water outlet hose is blocked Clean the drain pipe and the water outlet hose
Drain pipe or water drain hose is caught or jammed Ensure that the drain pipe and water drain hose are
not kinked or trapped
The unbalanced load detection system has interruptedthe spin cycle because the laundry is unevenly distrib-uted Redistribute the laundry in the drum
Note Where possible mix large and small items inthe drum Different sized items of laundry distributethemselves better during the spin cycle Start the programme
Rushing hissingnoise
Water is flushed under pressure into the detergentdrawer Not a fault ndash normal operating noise
Loud noises duringthe spin cycle
Appliance is not correctly aligned Aligning the appliance
The appliance feet are not fixed Secure the appliance feet Aligning the appliance
Transit bolts have not been removed Removing the transit bolts
Banging noises rat-tling in the drainpump
Foreign bodies have got into the drain pump rarr Cleaning the drain pump Page 44
Slurping rhythmicalsuction noise
The drain pump is active the detergent solution ispumped out Not a fault ndash normal operating noise
Troubleshootingemspen
55
Fault Cause and troubleshootingCreasing The spin speed is too high
The next time you run a wash cycle set a lowerspin speed
The load is too large The next time you run a wash cycle reduce the
amount of laundry being loaded
The wrong programme is selected for the type of fab-ric Select the programmes that are suitable for the
type of fabric rarr Programmes Page 24
Detergent or fabricsoftener drips off theseal and collects onthe door or in the sealfold
Too much detergentfabric softener in the detergentdrawer When dosing liquid detergent and fabric softener
observe the marking in the detergent drawer anddo not dose above this
The spin result is notsatisfactory The laun-dry is too wettoodamp
A low spin speed is selected The next time you run a wash cycle set a higher
spin speed Start the programme
Drain pipe or water outlet hose is blocked Clean the drain pipe and the water outlet hose
Drain pipe or water drain hose is caught or jammed Ensure that the drain pipe and water drain hose are
not kinked or trapped
The unbalanced load detection system has interruptedthe spin cycle because the laundry is unevenly distrib-uted Redistribute the laundry in the drum
Note Where possible mix large and small items inthe drum Different sized items of laundry distributethemselves better during the spin cycle Start the programme
Unbalance load detection system is using a reducedspin speed to eliminate an unbalance Redistribute the laundry in the drum
Note Where possible mix large and small items inthe drum Different sized items of laundry distributethemselves better during the spin cycle Start the programme
enemspTroubleshooting
56
Fault Cause and troubleshootingDetergent residue onthe damp washing
Detergents may contain water-insoluble substancesthat deposit on the laundry Start the programme
Detergent residue onthe dry laundry
Detergents may contain water-insoluble substancesthat deposit on the laundry Brush out the laundry after washing and drying
Water is leaking out atthe water inlet hose
Water inlet hose is not correctlysecurely connected1 Connect the water supply hose correctly Connect-
ing the water inlet hose2 Tighten the screw connection
Water is leaking out atthe water outlet hose
The water outlet hose is damaged Replace the damaged water outlet hose
Water outlet hose is not connected correctly Connect the water outlet hose correctly Water out-
let connection types
Odours have formedin the appliance
Humidity and detergent residue may promote theformation of bacteria rarr Cleaning the drum Page 42 If you are not using the appliance leave the door
and detergent drawer open so that residual watercan evaporate
Transportation storage and disposalemspen
57
171 Emergency releaseReleasing the doorRequirement The drain pump isempty rarr Page 441 ATTENTION Escaping water may
cause material damage Do not open the door if you can
see water through the glassPull the emergency release down-wards with a tool and release
a The door lock is released2 Insert the maintenance flap and
lock it into place3 Close the maintenance flap
Transportation storage and disposal
18 Transportation stor-age and disposal
Transportation storage and disposal
You can find out here how to prepareyour appliance for transportation andstorage You will also find out how todispose of old appliances
181 Removing the appliance1 Turn off the tap2 rarr Emptying the water inlet hose
Page 473 Switch off the appliance4 Unplug the appliances mains plug
5 Drain the remaining detergentsolution rarr Cleaning the drain pumpPage 44
6 Detach the hoses
182 Inserting the transitbolts
Secure the appliance for transporta-tion using transit bolts in order to pre-vent damage1 Remove the four cover caps
‒ If necessary use a screwdriverto remove the cover caps
Keep the cover caps2 Insert the four sleeves
enemspTransportation storage and disposal
58
3 Insert all screws into the fourtransit bolts and tighten slightly
4 Insert the power cord into theholder and tighten all fourscrews for the transit bolts with aWAF 13 wrench
5 Insert the hose into holder
183 Using the applianceagain
1 Remove the transit bolts
2 Pour approx 1 litre of water intocompartment II in the detergentdrawer
3 Start the programmea The unused detergent cannot flow
straight into the outlet during thenext wash
184 Disposing of old appli-ance
Valuable raw materials can be re-used by recycling
WARNINGRisk of harm to healthChildren can lock themselves in theappliance thereby putting their livesat risk Do not install the appliance behind
a door as this may obstruct the ap-pliance door or prevent it fromopening
With redundant appliances unplugthe power cord Then cut throughthe cord and damage the lock onthe appliance door beyond repairso that the appliance door will nolonger close
1 Unplug the appliance from themains
2 Cut through the power cord3 Dispose of the appliance in an en-
vironmentally friendly mannerInformation about current disposalmethods are available from yourspecialist dealer or local authority
This appliance is la-belled in accordancewith European Directive201219EU concerningused electrical and elec-
Customer Serviceemspen
59
tronic appliances (wasteelectrical and electronicequipment - WEEE)The guideline determ-ines the framework forthe return and recyclingof used appliances asapplicable throughoutthe EU
Customer Service
19 Customer ServiceCustomer Service
If you have any queries on use areunable to rectify faults on the appli-ance yourself or if your applianceneeds to be repaired contact Cus-tomer ServiceYou can solve many problems your-self by consulting the information ontroubleshooting in these instructionsor on our website If this is not thecase contact our after-sales serviceWith any warranty claims we willmake sure that your appliance is re-paired by trained after-sales techni-cians using genuine spare parts in-cluding after the manufacturers war-ranty has expiredFunction-relevant genuine spare partsaccording to the corresponding Eco-design Order can be obtained fromCustomer Service for a period of atleast 10 years from the date onwhich your appliance was placed onthe market within the European Eco-nomic AreaNote Under the terms of the manu-facturers warranty the use of Cus-tomer Service is free of chargeDetailed information on the warrantyperiod and terms of warranty in yourcountry is available from our after-sales service your retailer or on ourwebsite
If you contact Customer Service youwill require the product number (E-Nr) and the production number (FD)of your applianceThe contact details for Customer Ser-vice can be found in the enclosedCustomer Service directory or on ourwebsite
191 Product number (E-Nr)and production number(FD)
You can find the product number (E-Nr) and the production number (FD)on the appliances rating plateDepending on the model the ratingplate is locatediexcl On the inside of the dooriexcl On the inside of the maintenance
flapiexcl On the rear of the applianceMake a note of your appliances de-tails and the Customer Service tele-phone number to find them againquickly
enemspConsumption values
60
Consumption values
20 Consumption valuesConsumption values
The following information is provided in accordance with the EU EcodesignRegulation The values given for programs other than the Eco 40-60 are indicat-ive only and were determined in accordance with the applicable standardEN60456
Programme Load(kg)
Pro-gramme dura-tion(hrmin)1
Energycon-sump-tion(kWhcycle)1
Watercon-sump-tion (lcycle)1
Max-imumtemper-ature(degC) 5mins1
Spinspeed(rpm)1
Resid-ualmois-ture()1
Eco 40-602 90 337 1245 610 50 1166 5000Eco 40-602 45 252 0590 450 33 1200 5000Eco 40-602 25 233 0195 300 24 1200 5400AlgodoacutenAl-godatildeo 20 degC
90 328 0370 900 23 1200 5400
AlgodoacutenAl-godatildeo 40 degC
90 328 1350 900 45 1200 5400
AlgodoacutenAl-godatildeo 60 degC
90 328 1450 900 55 1200 5400
AlgodoacutenAl-godatildeo 40 degC + Pre-lav
90 358 1400 1020 45 1200 5400
Sinteacuteticos 40 degC
40 228 0780 610 44 1200 2700
Mix 40 degC 40 059 0620 440 41 1200 5600 LanaLatildes
30 degC20 040 0200 400 22 800 2500
1 Due to the influence of water pressure hardness and inlet temperature am-bient temperature type amount and soiling of laundry detergent used fluc-tuations in the power supply and the selected additional functions the actualvalues may deviate from the stated values
2 Test programme in accordance with the EU Ecodesign Directive and the EUEnergy Labelling Regulation with cold water (15 degC)
Technical specificationsemspen
61
Technical specifications
21 Technical specifica-tions
Technical specifications
Facts and figures for your appliancecan be found here
Appliance height 850 cmAppliance width 598 cmAppliance depth 590 cmWeight 80 kg1
Maximum load 9 kgMains voltage 220 - 240 V
50 Hz Minimum in-
stallation protec-tion
10 A
Rated power 2300 WPower consump-tion
iexcl Off mode010 W
iexcl Left-on mode050 W
Water pressure iexcl Minimum100 kPa(1 bar)
iexcl Maximum1000 kPa(10 bar)
Length of the wa-ter inlet hose
150 cm
Length of the wa-ter outlet hose
150 cm
Length of thepower cord
160 cm
1 Depending on the appliance spe-cifications
More information about your modelcan be found online at httpsen-ergylabelbsh-groupcom1 This webaddress is linked to the official EUEPREL product database At the time
of printing its web address had notyet been published Please then fol-low the instructions on searching formodels The model identifier is madeup of the characters before the slashin the product number (E-Nr) on therating plate Alternatively you canalso find the model identifier in thefirst line of the EU energy label
1 Only applies to countries in the European Economic Area
Thank you for buying aBosch Home Appliance
Register your new device on MyBosch now and profit directly from
bull Expert tips amp tricks for your appliancebull Warranty extension optionsbull Discounts for accessories amp spare-partsbull Digital manual and all appliance data at handbull Easy access to Bosch Home Appliances Service
Free and easy registration ndash also on mobile phoneswwwbosch-homecomwelcome
Looking for help Youll find it here
Expert advice for your Bosch home appliances help with problems or a repair from Bosch experts Find out everything about the many ways Bosch can support you wwwbosch-homecomservice Contact data of all countries are listed in the attached service direct-ory
90016102699001610269emsp(010219)en
Robert Bosch Hausgeraumlte GmbHCarl-Wery-Straszlige 3481739 MuumlnchenGERMANYwwwbosch-homecom
Valid within Great BritainImported to Great Britain byBSH Home Appliances LtdGrand Union HouseOld Wolverton RoadWolverton Milton KeynesMK12 5PTUnited Kingdom
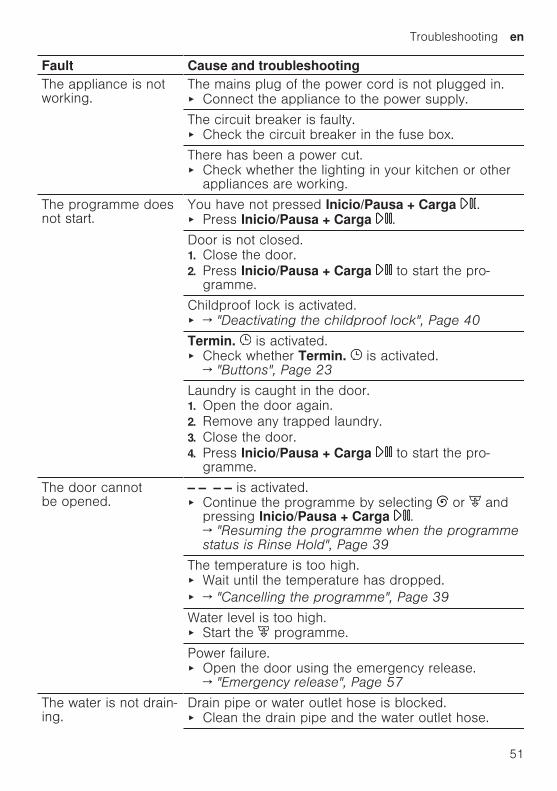
Troubleshootingemspen
51
Fault Cause and troubleshootingThe appliance is notworking
The mains plug of the power cord is not plugged in Connect the appliance to the power supply
The circuit breaker is faulty Check the circuit breaker in the fuse box
There has been a power cut Check whether the lighting in your kitchen or other
appliances are working
The programme doesnot start
You have not pressed InicioPausa + Carga Press InicioPausa + Carga
Door is not closed1 Close the door2 Press InicioPausa + Carga to start the pro-
gramme
Childproof lock is activated rarr Deactivating the childproof lock Page 40
Termin is activated Check whether Termin is activated
rarr Buttons Page 23
Laundry is caught in the door1 Open the door again2 Remove any trapped laundry3 Close the door4 Press InicioPausa + Carga to start the pro-
gramme
The door cannotbe opened
ndash ndash ndash ndash is activated Continue the programme by selecting or and
pressing InicioPausa + Carga rarr Resuming the programme when the programmestatus is Rinse Hold Page 39
The temperature is too high Wait until the temperature has dropped rarr Cancelling the programme Page 39
Water level is too high Start the programme
Power failure Open the door using the emergency release
rarr Emergency release Page 57
The water is not drain-ing
Drain pipe or water outlet hose is blocked Clean the drain pipe and the water outlet hose
enemspTroubleshooting
52
Fault Cause and troubleshootingThe water is not drain-ing
Drain pipe or water drain hose is caught or jammed Ensure that the drain pipe and water drain hose are
not kinked or trapped
Drain pump is blocked rarr Cleaning the drain pump Page 44
ndash ndash ndash ndash is activated Continue the programme by selecting or and
pressing InicioPausa + Carga rarr Resuming the programme when the programmestatus is Rinse Hold Page 39
The water outlet hose is connected too high Install the water outlet hose at a maximum height of
1 metre
Detergent dosage is too high Immediate measure Mix one tablespoon of fabric
softener with 05 litres of water and pour the mix-ture into the left-hand compartment (not for outdoorclothing sportswear or items stuffed with down)
Reduce the amount of detergent for the next wash-ing cycle with the same load
Unapproved extension installed on the water drainhose Remove any unapproved extensions from the water
hose Connecting the appliance
Water is not flowingin Detergent is notbeing dispensed
You have not pressed InicioPausa + Carga Press InicioPausa + Carga
The filters in the water inflow are blocked Clean the filters in the water inflow rarr Page 47
The tap is turned off Turn on the tap
The water inlet hose is kinked or jammed Ensure that the water inlet hose is not kinked or
jammed
The spin cycle runsseveral times
The unbalanced load detection system eliminates animbalance by repeatedly redistributing the laundry Not a fault ndash no action required
Note When loading where possible place large andsmall items of laundry together in the drum Differentsized items of laundry distribute themselves betterduring the spin cycle
Troubleshootingemspen
53
Fault Cause and troubleshootingThe programme dura-tion changes duringthe wash cycle
The programme operation is optimised electronicallyThis may change the programme duration Not a fault ndash no action required
The unbalanced load detection system eliminates animbalance by repeatedly redistributing the laundry Not a fault ndash no action required
Note When loading where possible place large andsmall items of laundry together in the drum Differentsized items of laundry distribute themselves betterduring the spin cycleFoam detection system switches on a rinse cycle iffoam build-up is too high Not a fault ndash no action required
No water is visible inthe drum
Water is below the visible area Not a fault ndash no action required Do not add any extra water to the appliance while it
is operating
Drum jerks after theprogramme starts
This is caused by an internal motor test Not a fault ndash no action required
Residual water ispresent in the com-partment
Insert in compartment is blocked rarr Cleaning the detergent drawer Page 42
Vibrations and move-ment of the appliancewhilst spinning
Appliance is not correctly aligned Aligning the appliance
The appliance feet are not fixed Secure the appliance feet Aligning the appliance
Transit bolts have not been removed Removing the transit bolts
Drum does not turnwater does not flow in
Load detection is active Not a fault ndash no action required
Note The load detection can take up to two minutesHeavy foam build-up Detergent dosage is too high
Immediate measure Mix one tablespoon of fabricsoftener with 05 litres of water and pour the mix-ture into the left-hand compartment (not for outdoorclothing sportswear or items stuffed with down)
Reduce the amount of detergent for the next wash-ing cycle with the same load
enemspTroubleshooting
54
Fault Cause and troubleshootingHigh spin speed notreached
A low spin speed is selected The next time you run a wash cycle set a higher
spin speed
Unbalance load detection system is using a reducedspin speed to eliminate an unbalance Redistribute the laundry in the drum
Note Where possible mix large and small items inthe drum Different sized items of laundry distributethemselves better during the spin cycle Start the programme
The spin programmedoes not start
Drain pipe or water outlet hose is blocked Clean the drain pipe and the water outlet hose
Drain pipe or water drain hose is caught or jammed Ensure that the drain pipe and water drain hose are
not kinked or trapped
The unbalanced load detection system has interruptedthe spin cycle because the laundry is unevenly distrib-uted Redistribute the laundry in the drum
Note Where possible mix large and small items inthe drum Different sized items of laundry distributethemselves better during the spin cycle Start the programme
Rushing hissingnoise
Water is flushed under pressure into the detergentdrawer Not a fault ndash normal operating noise
Loud noises duringthe spin cycle
Appliance is not correctly aligned Aligning the appliance
The appliance feet are not fixed Secure the appliance feet Aligning the appliance
Transit bolts have not been removed Removing the transit bolts
Banging noises rat-tling in the drainpump
Foreign bodies have got into the drain pump rarr Cleaning the drain pump Page 44
Slurping rhythmicalsuction noise
The drain pump is active the detergent solution ispumped out Not a fault ndash normal operating noise
Troubleshootingemspen
55
Fault Cause and troubleshootingCreasing The spin speed is too high
The next time you run a wash cycle set a lowerspin speed
The load is too large The next time you run a wash cycle reduce the
amount of laundry being loaded
The wrong programme is selected for the type of fab-ric Select the programmes that are suitable for the
type of fabric rarr Programmes Page 24
Detergent or fabricsoftener drips off theseal and collects onthe door or in the sealfold
Too much detergentfabric softener in the detergentdrawer When dosing liquid detergent and fabric softener
observe the marking in the detergent drawer anddo not dose above this
The spin result is notsatisfactory The laun-dry is too wettoodamp
A low spin speed is selected The next time you run a wash cycle set a higher
spin speed Start the programme
Drain pipe or water outlet hose is blocked Clean the drain pipe and the water outlet hose
Drain pipe or water drain hose is caught or jammed Ensure that the drain pipe and water drain hose are
not kinked or trapped
The unbalanced load detection system has interruptedthe spin cycle because the laundry is unevenly distrib-uted Redistribute the laundry in the drum
Note Where possible mix large and small items inthe drum Different sized items of laundry distributethemselves better during the spin cycle Start the programme
Unbalance load detection system is using a reducedspin speed to eliminate an unbalance Redistribute the laundry in the drum
Note Where possible mix large and small items inthe drum Different sized items of laundry distributethemselves better during the spin cycle Start the programme
enemspTroubleshooting
56
Fault Cause and troubleshootingDetergent residue onthe damp washing
Detergents may contain water-insoluble substancesthat deposit on the laundry Start the programme
Detergent residue onthe dry laundry
Detergents may contain water-insoluble substancesthat deposit on the laundry Brush out the laundry after washing and drying
Water is leaking out atthe water inlet hose
Water inlet hose is not correctlysecurely connected1 Connect the water supply hose correctly Connect-
ing the water inlet hose2 Tighten the screw connection
Water is leaking out atthe water outlet hose
The water outlet hose is damaged Replace the damaged water outlet hose
Water outlet hose is not connected correctly Connect the water outlet hose correctly Water out-
let connection types
Odours have formedin the appliance
Humidity and detergent residue may promote theformation of bacteria rarr Cleaning the drum Page 42 If you are not using the appliance leave the door
and detergent drawer open so that residual watercan evaporate
Transportation storage and disposalemspen
57
171 Emergency releaseReleasing the doorRequirement The drain pump isempty rarr Page 441 ATTENTION Escaping water may
cause material damage Do not open the door if you can
see water through the glassPull the emergency release down-wards with a tool and release
a The door lock is released2 Insert the maintenance flap and
lock it into place3 Close the maintenance flap
Transportation storage and disposal
18 Transportation stor-age and disposal
Transportation storage and disposal
You can find out here how to prepareyour appliance for transportation andstorage You will also find out how todispose of old appliances
181 Removing the appliance1 Turn off the tap2 rarr Emptying the water inlet hose
Page 473 Switch off the appliance4 Unplug the appliances mains plug
5 Drain the remaining detergentsolution rarr Cleaning the drain pumpPage 44
6 Detach the hoses
182 Inserting the transitbolts
Secure the appliance for transporta-tion using transit bolts in order to pre-vent damage1 Remove the four cover caps
‒ If necessary use a screwdriverto remove the cover caps
Keep the cover caps2 Insert the four sleeves
enemspTransportation storage and disposal
58
3 Insert all screws into the fourtransit bolts and tighten slightly
4 Insert the power cord into theholder and tighten all fourscrews for the transit bolts with aWAF 13 wrench
5 Insert the hose into holder
183 Using the applianceagain
1 Remove the transit bolts
2 Pour approx 1 litre of water intocompartment II in the detergentdrawer
3 Start the programmea The unused detergent cannot flow
straight into the outlet during thenext wash
184 Disposing of old appli-ance
Valuable raw materials can be re-used by recycling
WARNINGRisk of harm to healthChildren can lock themselves in theappliance thereby putting their livesat risk Do not install the appliance behind
a door as this may obstruct the ap-pliance door or prevent it fromopening
With redundant appliances unplugthe power cord Then cut throughthe cord and damage the lock onthe appliance door beyond repairso that the appliance door will nolonger close
1 Unplug the appliance from themains
2 Cut through the power cord3 Dispose of the appliance in an en-
vironmentally friendly mannerInformation about current disposalmethods are available from yourspecialist dealer or local authority
This appliance is la-belled in accordancewith European Directive201219EU concerningused electrical and elec-
Customer Serviceemspen
59
tronic appliances (wasteelectrical and electronicequipment - WEEE)The guideline determ-ines the framework forthe return and recyclingof used appliances asapplicable throughoutthe EU
Customer Service
19 Customer ServiceCustomer Service
If you have any queries on use areunable to rectify faults on the appli-ance yourself or if your applianceneeds to be repaired contact Cus-tomer ServiceYou can solve many problems your-self by consulting the information ontroubleshooting in these instructionsor on our website If this is not thecase contact our after-sales serviceWith any warranty claims we willmake sure that your appliance is re-paired by trained after-sales techni-cians using genuine spare parts in-cluding after the manufacturers war-ranty has expiredFunction-relevant genuine spare partsaccording to the corresponding Eco-design Order can be obtained fromCustomer Service for a period of atleast 10 years from the date onwhich your appliance was placed onthe market within the European Eco-nomic AreaNote Under the terms of the manu-facturers warranty the use of Cus-tomer Service is free of chargeDetailed information on the warrantyperiod and terms of warranty in yourcountry is available from our after-sales service your retailer or on ourwebsite
If you contact Customer Service youwill require the product number (E-Nr) and the production number (FD)of your applianceThe contact details for Customer Ser-vice can be found in the enclosedCustomer Service directory or on ourwebsite
191 Product number (E-Nr)and production number(FD)
You can find the product number (E-Nr) and the production number (FD)on the appliances rating plateDepending on the model the ratingplate is locatediexcl On the inside of the dooriexcl On the inside of the maintenance
flapiexcl On the rear of the applianceMake a note of your appliances de-tails and the Customer Service tele-phone number to find them againquickly
enemspConsumption values
60
Consumption values
20 Consumption valuesConsumption values
The following information is provided in accordance with the EU EcodesignRegulation The values given for programs other than the Eco 40-60 are indicat-ive only and were determined in accordance with the applicable standardEN60456
Programme Load(kg)
Pro-gramme dura-tion(hrmin)1
Energycon-sump-tion(kWhcycle)1
Watercon-sump-tion (lcycle)1
Max-imumtemper-ature(degC) 5mins1
Spinspeed(rpm)1
Resid-ualmois-ture()1
Eco 40-602 90 337 1245 610 50 1166 5000Eco 40-602 45 252 0590 450 33 1200 5000Eco 40-602 25 233 0195 300 24 1200 5400AlgodoacutenAl-godatildeo 20 degC
90 328 0370 900 23 1200 5400
AlgodoacutenAl-godatildeo 40 degC
90 328 1350 900 45 1200 5400
AlgodoacutenAl-godatildeo 60 degC
90 328 1450 900 55 1200 5400
AlgodoacutenAl-godatildeo 40 degC + Pre-lav
90 358 1400 1020 45 1200 5400
Sinteacuteticos 40 degC
40 228 0780 610 44 1200 2700
Mix 40 degC 40 059 0620 440 41 1200 5600 LanaLatildes
30 degC20 040 0200 400 22 800 2500
1 Due to the influence of water pressure hardness and inlet temperature am-bient temperature type amount and soiling of laundry detergent used fluc-tuations in the power supply and the selected additional functions the actualvalues may deviate from the stated values
2 Test programme in accordance with the EU Ecodesign Directive and the EUEnergy Labelling Regulation with cold water (15 degC)
Technical specificationsemspen
61
Technical specifications
21 Technical specifica-tions
Technical specifications
Facts and figures for your appliancecan be found here
Appliance height 850 cmAppliance width 598 cmAppliance depth 590 cmWeight 80 kg1
Maximum load 9 kgMains voltage 220 - 240 V
50 Hz Minimum in-
stallation protec-tion
10 A
Rated power 2300 WPower consump-tion
iexcl Off mode010 W
iexcl Left-on mode050 W
Water pressure iexcl Minimum100 kPa(1 bar)
iexcl Maximum1000 kPa(10 bar)
Length of the wa-ter inlet hose
150 cm
Length of the wa-ter outlet hose
150 cm
Length of thepower cord
160 cm
1 Depending on the appliance spe-cifications
More information about your modelcan be found online at httpsen-ergylabelbsh-groupcom1 This webaddress is linked to the official EUEPREL product database At the time
of printing its web address had notyet been published Please then fol-low the instructions on searching formodels The model identifier is madeup of the characters before the slashin the product number (E-Nr) on therating plate Alternatively you canalso find the model identifier in thefirst line of the EU energy label
1 Only applies to countries in the European Economic Area
Thank you for buying aBosch Home Appliance
Register your new device on MyBosch now and profit directly from
bull Expert tips amp tricks for your appliancebull Warranty extension optionsbull Discounts for accessories amp spare-partsbull Digital manual and all appliance data at handbull Easy access to Bosch Home Appliances Service
Free and easy registration ndash also on mobile phoneswwwbosch-homecomwelcome
Looking for help Youll find it here
Expert advice for your Bosch home appliances help with problems or a repair from Bosch experts Find out everything about the many ways Bosch can support you wwwbosch-homecomservice Contact data of all countries are listed in the attached service direct-ory
90016102699001610269emsp(010219)en
Robert Bosch Hausgeraumlte GmbHCarl-Wery-Straszlige 3481739 MuumlnchenGERMANYwwwbosch-homecom
Valid within Great BritainImported to Great Britain byBSH Home Appliances LtdGrand Union HouseOld Wolverton RoadWolverton Milton KeynesMK12 5PTUnited Kingdom
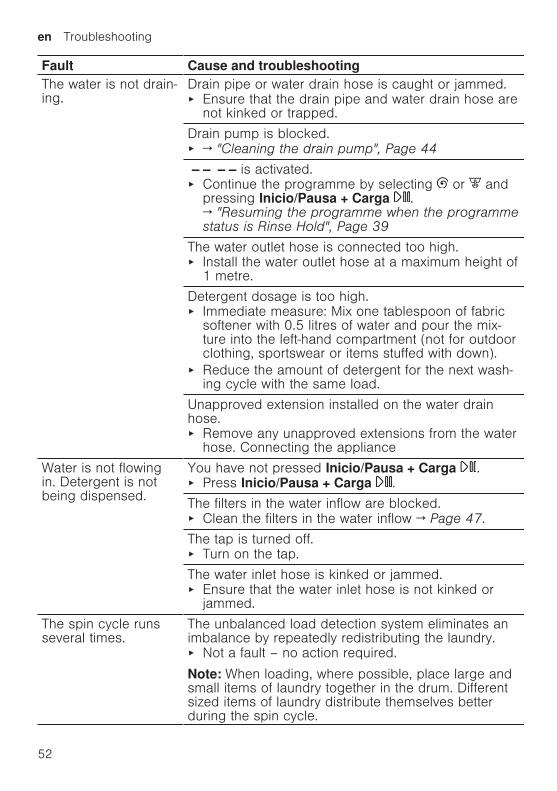
enemspTroubleshooting
52
Fault Cause and troubleshootingThe water is not drain-ing
Drain pipe or water drain hose is caught or jammed Ensure that the drain pipe and water drain hose are
not kinked or trapped
Drain pump is blocked rarr Cleaning the drain pump Page 44
ndash ndash ndash ndash is activated Continue the programme by selecting or and
pressing InicioPausa + Carga rarr Resuming the programme when the programmestatus is Rinse Hold Page 39
The water outlet hose is connected too high Install the water outlet hose at a maximum height of
1 metre
Detergent dosage is too high Immediate measure Mix one tablespoon of fabric
softener with 05 litres of water and pour the mix-ture into the left-hand compartment (not for outdoorclothing sportswear or items stuffed with down)
Reduce the amount of detergent for the next wash-ing cycle with the same load
Unapproved extension installed on the water drainhose Remove any unapproved extensions from the water
hose Connecting the appliance
Water is not flowingin Detergent is notbeing dispensed
You have not pressed InicioPausa + Carga Press InicioPausa + Carga
The filters in the water inflow are blocked Clean the filters in the water inflow rarr Page 47
The tap is turned off Turn on the tap
The water inlet hose is kinked or jammed Ensure that the water inlet hose is not kinked or
jammed
The spin cycle runsseveral times
The unbalanced load detection system eliminates animbalance by repeatedly redistributing the laundry Not a fault ndash no action required
Note When loading where possible place large andsmall items of laundry together in the drum Differentsized items of laundry distribute themselves betterduring the spin cycle
Troubleshootingemspen
53
Fault Cause and troubleshootingThe programme dura-tion changes duringthe wash cycle
The programme operation is optimised electronicallyThis may change the programme duration Not a fault ndash no action required
The unbalanced load detection system eliminates animbalance by repeatedly redistributing the laundry Not a fault ndash no action required
Note When loading where possible place large andsmall items of laundry together in the drum Differentsized items of laundry distribute themselves betterduring the spin cycleFoam detection system switches on a rinse cycle iffoam build-up is too high Not a fault ndash no action required
No water is visible inthe drum
Water is below the visible area Not a fault ndash no action required Do not add any extra water to the appliance while it
is operating
Drum jerks after theprogramme starts
This is caused by an internal motor test Not a fault ndash no action required
Residual water ispresent in the com-partment
Insert in compartment is blocked rarr Cleaning the detergent drawer Page 42
Vibrations and move-ment of the appliancewhilst spinning
Appliance is not correctly aligned Aligning the appliance
The appliance feet are not fixed Secure the appliance feet Aligning the appliance
Transit bolts have not been removed Removing the transit bolts
Drum does not turnwater does not flow in
Load detection is active Not a fault ndash no action required
Note The load detection can take up to two minutesHeavy foam build-up Detergent dosage is too high
Immediate measure Mix one tablespoon of fabricsoftener with 05 litres of water and pour the mix-ture into the left-hand compartment (not for outdoorclothing sportswear or items stuffed with down)
Reduce the amount of detergent for the next wash-ing cycle with the same load
enemspTroubleshooting
54
Fault Cause and troubleshootingHigh spin speed notreached
A low spin speed is selected The next time you run a wash cycle set a higher
spin speed
Unbalance load detection system is using a reducedspin speed to eliminate an unbalance Redistribute the laundry in the drum
Note Where possible mix large and small items inthe drum Different sized items of laundry distributethemselves better during the spin cycle Start the programme
The spin programmedoes not start
Drain pipe or water outlet hose is blocked Clean the drain pipe and the water outlet hose
Drain pipe or water drain hose is caught or jammed Ensure that the drain pipe and water drain hose are
not kinked or trapped
The unbalanced load detection system has interruptedthe spin cycle because the laundry is unevenly distrib-uted Redistribute the laundry in the drum
Note Where possible mix large and small items inthe drum Different sized items of laundry distributethemselves better during the spin cycle Start the programme
Rushing hissingnoise
Water is flushed under pressure into the detergentdrawer Not a fault ndash normal operating noise
Loud noises duringthe spin cycle
Appliance is not correctly aligned Aligning the appliance
The appliance feet are not fixed Secure the appliance feet Aligning the appliance
Transit bolts have not been removed Removing the transit bolts
Banging noises rat-tling in the drainpump
Foreign bodies have got into the drain pump rarr Cleaning the drain pump Page 44
Slurping rhythmicalsuction noise
The drain pump is active the detergent solution ispumped out Not a fault ndash normal operating noise
Troubleshootingemspen
55
Fault Cause and troubleshootingCreasing The spin speed is too high
The next time you run a wash cycle set a lowerspin speed
The load is too large The next time you run a wash cycle reduce the
amount of laundry being loaded
The wrong programme is selected for the type of fab-ric Select the programmes that are suitable for the
type of fabric rarr Programmes Page 24
Detergent or fabricsoftener drips off theseal and collects onthe door or in the sealfold
Too much detergentfabric softener in the detergentdrawer When dosing liquid detergent and fabric softener
observe the marking in the detergent drawer anddo not dose above this
The spin result is notsatisfactory The laun-dry is too wettoodamp
A low spin speed is selected The next time you run a wash cycle set a higher
spin speed Start the programme
Drain pipe or water outlet hose is blocked Clean the drain pipe and the water outlet hose
Drain pipe or water drain hose is caught or jammed Ensure that the drain pipe and water drain hose are
not kinked or trapped
The unbalanced load detection system has interruptedthe spin cycle because the laundry is unevenly distrib-uted Redistribute the laundry in the drum
Note Where possible mix large and small items inthe drum Different sized items of laundry distributethemselves better during the spin cycle Start the programme
Unbalance load detection system is using a reducedspin speed to eliminate an unbalance Redistribute the laundry in the drum
Note Where possible mix large and small items inthe drum Different sized items of laundry distributethemselves better during the spin cycle Start the programme
enemspTroubleshooting
56
Fault Cause and troubleshootingDetergent residue onthe damp washing
Detergents may contain water-insoluble substancesthat deposit on the laundry Start the programme
Detergent residue onthe dry laundry
Detergents may contain water-insoluble substancesthat deposit on the laundry Brush out the laundry after washing and drying
Water is leaking out atthe water inlet hose
Water inlet hose is not correctlysecurely connected1 Connect the water supply hose correctly Connect-
ing the water inlet hose2 Tighten the screw connection
Water is leaking out atthe water outlet hose
The water outlet hose is damaged Replace the damaged water outlet hose
Water outlet hose is not connected correctly Connect the water outlet hose correctly Water out-
let connection types
Odours have formedin the appliance
Humidity and detergent residue may promote theformation of bacteria rarr Cleaning the drum Page 42 If you are not using the appliance leave the door
and detergent drawer open so that residual watercan evaporate
Transportation storage and disposalemspen
57
171 Emergency releaseReleasing the doorRequirement The drain pump isempty rarr Page 441 ATTENTION Escaping water may
cause material damage Do not open the door if you can
see water through the glassPull the emergency release down-wards with a tool and release
a The door lock is released2 Insert the maintenance flap and
lock it into place3 Close the maintenance flap
Transportation storage and disposal
18 Transportation stor-age and disposal
Transportation storage and disposal
You can find out here how to prepareyour appliance for transportation andstorage You will also find out how todispose of old appliances
181 Removing the appliance1 Turn off the tap2 rarr Emptying the water inlet hose
Page 473 Switch off the appliance4 Unplug the appliances mains plug
5 Drain the remaining detergentsolution rarr Cleaning the drain pumpPage 44
6 Detach the hoses
182 Inserting the transitbolts
Secure the appliance for transporta-tion using transit bolts in order to pre-vent damage1 Remove the four cover caps
‒ If necessary use a screwdriverto remove the cover caps
Keep the cover caps2 Insert the four sleeves
enemspTransportation storage and disposal
58
3 Insert all screws into the fourtransit bolts and tighten slightly
4 Insert the power cord into theholder and tighten all fourscrews for the transit bolts with aWAF 13 wrench
5 Insert the hose into holder
183 Using the applianceagain
1 Remove the transit bolts
2 Pour approx 1 litre of water intocompartment II in the detergentdrawer
3 Start the programmea The unused detergent cannot flow
straight into the outlet during thenext wash
184 Disposing of old appli-ance
Valuable raw materials can be re-used by recycling
WARNINGRisk of harm to healthChildren can lock themselves in theappliance thereby putting their livesat risk Do not install the appliance behind
a door as this may obstruct the ap-pliance door or prevent it fromopening
With redundant appliances unplugthe power cord Then cut throughthe cord and damage the lock onthe appliance door beyond repairso that the appliance door will nolonger close
1 Unplug the appliance from themains
2 Cut through the power cord3 Dispose of the appliance in an en-
vironmentally friendly mannerInformation about current disposalmethods are available from yourspecialist dealer or local authority
This appliance is la-belled in accordancewith European Directive201219EU concerningused electrical and elec-
Customer Serviceemspen
59
tronic appliances (wasteelectrical and electronicequipment - WEEE)The guideline determ-ines the framework forthe return and recyclingof used appliances asapplicable throughoutthe EU
Customer Service
19 Customer ServiceCustomer Service
If you have any queries on use areunable to rectify faults on the appli-ance yourself or if your applianceneeds to be repaired contact Cus-tomer ServiceYou can solve many problems your-self by consulting the information ontroubleshooting in these instructionsor on our website If this is not thecase contact our after-sales serviceWith any warranty claims we willmake sure that your appliance is re-paired by trained after-sales techni-cians using genuine spare parts in-cluding after the manufacturers war-ranty has expiredFunction-relevant genuine spare partsaccording to the corresponding Eco-design Order can be obtained fromCustomer Service for a period of atleast 10 years from the date onwhich your appliance was placed onthe market within the European Eco-nomic AreaNote Under the terms of the manu-facturers warranty the use of Cus-tomer Service is free of chargeDetailed information on the warrantyperiod and terms of warranty in yourcountry is available from our after-sales service your retailer or on ourwebsite
If you contact Customer Service youwill require the product number (E-Nr) and the production number (FD)of your applianceThe contact details for Customer Ser-vice can be found in the enclosedCustomer Service directory or on ourwebsite
191 Product number (E-Nr)and production number(FD)
You can find the product number (E-Nr) and the production number (FD)on the appliances rating plateDepending on the model the ratingplate is locatediexcl On the inside of the dooriexcl On the inside of the maintenance
flapiexcl On the rear of the applianceMake a note of your appliances de-tails and the Customer Service tele-phone number to find them againquickly
enemspConsumption values
60
Consumption values
20 Consumption valuesConsumption values
The following information is provided in accordance with the EU EcodesignRegulation The values given for programs other than the Eco 40-60 are indicat-ive only and were determined in accordance with the applicable standardEN60456
Programme Load(kg)
Pro-gramme dura-tion(hrmin)1
Energycon-sump-tion(kWhcycle)1
Watercon-sump-tion (lcycle)1
Max-imumtemper-ature(degC) 5mins1
Spinspeed(rpm)1
Resid-ualmois-ture()1
Eco 40-602 90 337 1245 610 50 1166 5000Eco 40-602 45 252 0590 450 33 1200 5000Eco 40-602 25 233 0195 300 24 1200 5400AlgodoacutenAl-godatildeo 20 degC
90 328 0370 900 23 1200 5400
AlgodoacutenAl-godatildeo 40 degC
90 328 1350 900 45 1200 5400
AlgodoacutenAl-godatildeo 60 degC
90 328 1450 900 55 1200 5400
AlgodoacutenAl-godatildeo 40 degC + Pre-lav
90 358 1400 1020 45 1200 5400
Sinteacuteticos 40 degC
40 228 0780 610 44 1200 2700
Mix 40 degC 40 059 0620 440 41 1200 5600 LanaLatildes
30 degC20 040 0200 400 22 800 2500
1 Due to the influence of water pressure hardness and inlet temperature am-bient temperature type amount and soiling of laundry detergent used fluc-tuations in the power supply and the selected additional functions the actualvalues may deviate from the stated values
2 Test programme in accordance with the EU Ecodesign Directive and the EUEnergy Labelling Regulation with cold water (15 degC)
Technical specificationsemspen
61
Technical specifications
21 Technical specifica-tions
Technical specifications
Facts and figures for your appliancecan be found here
Appliance height 850 cmAppliance width 598 cmAppliance depth 590 cmWeight 80 kg1
Maximum load 9 kgMains voltage 220 - 240 V
50 Hz Minimum in-
stallation protec-tion
10 A
Rated power 2300 WPower consump-tion
iexcl Off mode010 W
iexcl Left-on mode050 W
Water pressure iexcl Minimum100 kPa(1 bar)
iexcl Maximum1000 kPa(10 bar)
Length of the wa-ter inlet hose
150 cm
Length of the wa-ter outlet hose
150 cm
Length of thepower cord
160 cm
1 Depending on the appliance spe-cifications
More information about your modelcan be found online at httpsen-ergylabelbsh-groupcom1 This webaddress is linked to the official EUEPREL product database At the time
of printing its web address had notyet been published Please then fol-low the instructions on searching formodels The model identifier is madeup of the characters before the slashin the product number (E-Nr) on therating plate Alternatively you canalso find the model identifier in thefirst line of the EU energy label
1 Only applies to countries in the European Economic Area
Thank you for buying aBosch Home Appliance
Register your new device on MyBosch now and profit directly from
bull Expert tips amp tricks for your appliancebull Warranty extension optionsbull Discounts for accessories amp spare-partsbull Digital manual and all appliance data at handbull Easy access to Bosch Home Appliances Service
Free and easy registration ndash also on mobile phoneswwwbosch-homecomwelcome
Looking for help Youll find it here
Expert advice for your Bosch home appliances help with problems or a repair from Bosch experts Find out everything about the many ways Bosch can support you wwwbosch-homecomservice Contact data of all countries are listed in the attached service direct-ory
90016102699001610269emsp(010219)en
Robert Bosch Hausgeraumlte GmbHCarl-Wery-Straszlige 3481739 MuumlnchenGERMANYwwwbosch-homecom
Valid within Great BritainImported to Great Britain byBSH Home Appliances LtdGrand Union HouseOld Wolverton RoadWolverton Milton KeynesMK12 5PTUnited Kingdom
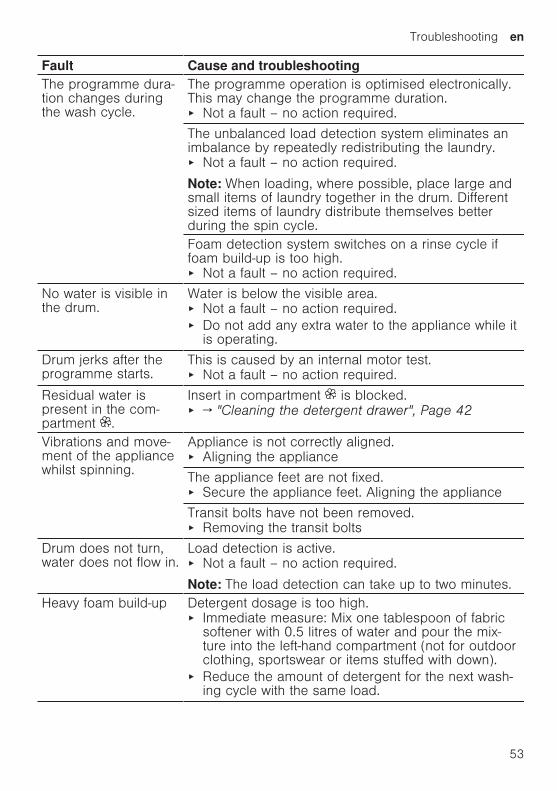
Troubleshootingemspen
53
Fault Cause and troubleshootingThe programme dura-tion changes duringthe wash cycle
The programme operation is optimised electronicallyThis may change the programme duration Not a fault ndash no action required
The unbalanced load detection system eliminates animbalance by repeatedly redistributing the laundry Not a fault ndash no action required
Note When loading where possible place large andsmall items of laundry together in the drum Differentsized items of laundry distribute themselves betterduring the spin cycleFoam detection system switches on a rinse cycle iffoam build-up is too high Not a fault ndash no action required
No water is visible inthe drum
Water is below the visible area Not a fault ndash no action required Do not add any extra water to the appliance while it
is operating
Drum jerks after theprogramme starts
This is caused by an internal motor test Not a fault ndash no action required
Residual water ispresent in the com-partment
Insert in compartment is blocked rarr Cleaning the detergent drawer Page 42
Vibrations and move-ment of the appliancewhilst spinning
Appliance is not correctly aligned Aligning the appliance
The appliance feet are not fixed Secure the appliance feet Aligning the appliance
Transit bolts have not been removed Removing the transit bolts
Drum does not turnwater does not flow in
Load detection is active Not a fault ndash no action required
Note The load detection can take up to two minutesHeavy foam build-up Detergent dosage is too high
Immediate measure Mix one tablespoon of fabricsoftener with 05 litres of water and pour the mix-ture into the left-hand compartment (not for outdoorclothing sportswear or items stuffed with down)
Reduce the amount of detergent for the next wash-ing cycle with the same load
enemspTroubleshooting
54
Fault Cause and troubleshootingHigh spin speed notreached
A low spin speed is selected The next time you run a wash cycle set a higher
spin speed
Unbalance load detection system is using a reducedspin speed to eliminate an unbalance Redistribute the laundry in the drum
Note Where possible mix large and small items inthe drum Different sized items of laundry distributethemselves better during the spin cycle Start the programme
The spin programmedoes not start
Drain pipe or water outlet hose is blocked Clean the drain pipe and the water outlet hose
Drain pipe or water drain hose is caught or jammed Ensure that the drain pipe and water drain hose are
not kinked or trapped
The unbalanced load detection system has interruptedthe spin cycle because the laundry is unevenly distrib-uted Redistribute the laundry in the drum
Note Where possible mix large and small items inthe drum Different sized items of laundry distributethemselves better during the spin cycle Start the programme
Rushing hissingnoise
Water is flushed under pressure into the detergentdrawer Not a fault ndash normal operating noise
Loud noises duringthe spin cycle
Appliance is not correctly aligned Aligning the appliance
The appliance feet are not fixed Secure the appliance feet Aligning the appliance
Transit bolts have not been removed Removing the transit bolts
Banging noises rat-tling in the drainpump
Foreign bodies have got into the drain pump rarr Cleaning the drain pump Page 44
Slurping rhythmicalsuction noise
The drain pump is active the detergent solution ispumped out Not a fault ndash normal operating noise
Troubleshootingemspen
55
Fault Cause and troubleshootingCreasing The spin speed is too high
The next time you run a wash cycle set a lowerspin speed
The load is too large The next time you run a wash cycle reduce the
amount of laundry being loaded
The wrong programme is selected for the type of fab-ric Select the programmes that are suitable for the
type of fabric rarr Programmes Page 24
Detergent or fabricsoftener drips off theseal and collects onthe door or in the sealfold
Too much detergentfabric softener in the detergentdrawer When dosing liquid detergent and fabric softener
observe the marking in the detergent drawer anddo not dose above this
The spin result is notsatisfactory The laun-dry is too wettoodamp
A low spin speed is selected The next time you run a wash cycle set a higher
spin speed Start the programme
Drain pipe or water outlet hose is blocked Clean the drain pipe and the water outlet hose
Drain pipe or water drain hose is caught or jammed Ensure that the drain pipe and water drain hose are
not kinked or trapped
The unbalanced load detection system has interruptedthe spin cycle because the laundry is unevenly distrib-uted Redistribute the laundry in the drum
Note Where possible mix large and small items inthe drum Different sized items of laundry distributethemselves better during the spin cycle Start the programme
Unbalance load detection system is using a reducedspin speed to eliminate an unbalance Redistribute the laundry in the drum
Note Where possible mix large and small items inthe drum Different sized items of laundry distributethemselves better during the spin cycle Start the programme
enemspTroubleshooting
56
Fault Cause and troubleshootingDetergent residue onthe damp washing
Detergents may contain water-insoluble substancesthat deposit on the laundry Start the programme
Detergent residue onthe dry laundry
Detergents may contain water-insoluble substancesthat deposit on the laundry Brush out the laundry after washing and drying
Water is leaking out atthe water inlet hose
Water inlet hose is not correctlysecurely connected1 Connect the water supply hose correctly Connect-
ing the water inlet hose2 Tighten the screw connection
Water is leaking out atthe water outlet hose
The water outlet hose is damaged Replace the damaged water outlet hose
Water outlet hose is not connected correctly Connect the water outlet hose correctly Water out-
let connection types
Odours have formedin the appliance
Humidity and detergent residue may promote theformation of bacteria rarr Cleaning the drum Page 42 If you are not using the appliance leave the door
and detergent drawer open so that residual watercan evaporate
Transportation storage and disposalemspen
57
171 Emergency releaseReleasing the doorRequirement The drain pump isempty rarr Page 441 ATTENTION Escaping water may
cause material damage Do not open the door if you can
see water through the glassPull the emergency release down-wards with a tool and release
a The door lock is released2 Insert the maintenance flap and
lock it into place3 Close the maintenance flap
Transportation storage and disposal
18 Transportation stor-age and disposal
Transportation storage and disposal
You can find out here how to prepareyour appliance for transportation andstorage You will also find out how todispose of old appliances
181 Removing the appliance1 Turn off the tap2 rarr Emptying the water inlet hose
Page 473 Switch off the appliance4 Unplug the appliances mains plug
5 Drain the remaining detergentsolution rarr Cleaning the drain pumpPage 44
6 Detach the hoses
182 Inserting the transitbolts
Secure the appliance for transporta-tion using transit bolts in order to pre-vent damage1 Remove the four cover caps
‒ If necessary use a screwdriverto remove the cover caps
Keep the cover caps2 Insert the four sleeves
enemspTransportation storage and disposal
58
3 Insert all screws into the fourtransit bolts and tighten slightly
4 Insert the power cord into theholder and tighten all fourscrews for the transit bolts with aWAF 13 wrench
5 Insert the hose into holder
183 Using the applianceagain
1 Remove the transit bolts
2 Pour approx 1 litre of water intocompartment II in the detergentdrawer
3 Start the programmea The unused detergent cannot flow
straight into the outlet during thenext wash
184 Disposing of old appli-ance
Valuable raw materials can be re-used by recycling
WARNINGRisk of harm to healthChildren can lock themselves in theappliance thereby putting their livesat risk Do not install the appliance behind
a door as this may obstruct the ap-pliance door or prevent it fromopening
With redundant appliances unplugthe power cord Then cut throughthe cord and damage the lock onthe appliance door beyond repairso that the appliance door will nolonger close
1 Unplug the appliance from themains
2 Cut through the power cord3 Dispose of the appliance in an en-
vironmentally friendly mannerInformation about current disposalmethods are available from yourspecialist dealer or local authority
This appliance is la-belled in accordancewith European Directive201219EU concerningused electrical and elec-
Customer Serviceemspen
59
tronic appliances (wasteelectrical and electronicequipment - WEEE)The guideline determ-ines the framework forthe return and recyclingof used appliances asapplicable throughoutthe EU
Customer Service
19 Customer ServiceCustomer Service
If you have any queries on use areunable to rectify faults on the appli-ance yourself or if your applianceneeds to be repaired contact Cus-tomer ServiceYou can solve many problems your-self by consulting the information ontroubleshooting in these instructionsor on our website If this is not thecase contact our after-sales serviceWith any warranty claims we willmake sure that your appliance is re-paired by trained after-sales techni-cians using genuine spare parts in-cluding after the manufacturers war-ranty has expiredFunction-relevant genuine spare partsaccording to the corresponding Eco-design Order can be obtained fromCustomer Service for a period of atleast 10 years from the date onwhich your appliance was placed onthe market within the European Eco-nomic AreaNote Under the terms of the manu-facturers warranty the use of Cus-tomer Service is free of chargeDetailed information on the warrantyperiod and terms of warranty in yourcountry is available from our after-sales service your retailer or on ourwebsite
If you contact Customer Service youwill require the product number (E-Nr) and the production number (FD)of your applianceThe contact details for Customer Ser-vice can be found in the enclosedCustomer Service directory or on ourwebsite
191 Product number (E-Nr)and production number(FD)
You can find the product number (E-Nr) and the production number (FD)on the appliances rating plateDepending on the model the ratingplate is locatediexcl On the inside of the dooriexcl On the inside of the maintenance
flapiexcl On the rear of the applianceMake a note of your appliances de-tails and the Customer Service tele-phone number to find them againquickly
enemspConsumption values
60
Consumption values
20 Consumption valuesConsumption values
The following information is provided in accordance with the EU EcodesignRegulation The values given for programs other than the Eco 40-60 are indicat-ive only and were determined in accordance with the applicable standardEN60456
Programme Load(kg)
Pro-gramme dura-tion(hrmin)1
Energycon-sump-tion(kWhcycle)1
Watercon-sump-tion (lcycle)1
Max-imumtemper-ature(degC) 5mins1
Spinspeed(rpm)1
Resid-ualmois-ture()1
Eco 40-602 90 337 1245 610 50 1166 5000Eco 40-602 45 252 0590 450 33 1200 5000Eco 40-602 25 233 0195 300 24 1200 5400AlgodoacutenAl-godatildeo 20 degC
90 328 0370 900 23 1200 5400
AlgodoacutenAl-godatildeo 40 degC
90 328 1350 900 45 1200 5400
AlgodoacutenAl-godatildeo 60 degC
90 328 1450 900 55 1200 5400
AlgodoacutenAl-godatildeo 40 degC + Pre-lav
90 358 1400 1020 45 1200 5400
Sinteacuteticos 40 degC
40 228 0780 610 44 1200 2700
Mix 40 degC 40 059 0620 440 41 1200 5600 LanaLatildes
30 degC20 040 0200 400 22 800 2500
1 Due to the influence of water pressure hardness and inlet temperature am-bient temperature type amount and soiling of laundry detergent used fluc-tuations in the power supply and the selected additional functions the actualvalues may deviate from the stated values
2 Test programme in accordance with the EU Ecodesign Directive and the EUEnergy Labelling Regulation with cold water (15 degC)
Technical specificationsemspen
61
Technical specifications
21 Technical specifica-tions
Technical specifications
Facts and figures for your appliancecan be found here
Appliance height 850 cmAppliance width 598 cmAppliance depth 590 cmWeight 80 kg1
Maximum load 9 kgMains voltage 220 - 240 V
50 Hz Minimum in-
stallation protec-tion
10 A
Rated power 2300 WPower consump-tion
iexcl Off mode010 W
iexcl Left-on mode050 W
Water pressure iexcl Minimum100 kPa(1 bar)
iexcl Maximum1000 kPa(10 bar)
Length of the wa-ter inlet hose
150 cm
Length of the wa-ter outlet hose
150 cm
Length of thepower cord
160 cm
1 Depending on the appliance spe-cifications
More information about your modelcan be found online at httpsen-ergylabelbsh-groupcom1 This webaddress is linked to the official EUEPREL product database At the time
of printing its web address had notyet been published Please then fol-low the instructions on searching formodels The model identifier is madeup of the characters before the slashin the product number (E-Nr) on therating plate Alternatively you canalso find the model identifier in thefirst line of the EU energy label
1 Only applies to countries in the European Economic Area
Thank you for buying aBosch Home Appliance
Register your new device on MyBosch now and profit directly from
bull Expert tips amp tricks for your appliancebull Warranty extension optionsbull Discounts for accessories amp spare-partsbull Digital manual and all appliance data at handbull Easy access to Bosch Home Appliances Service
Free and easy registration ndash also on mobile phoneswwwbosch-homecomwelcome
Looking for help Youll find it here
Expert advice for your Bosch home appliances help with problems or a repair from Bosch experts Find out everything about the many ways Bosch can support you wwwbosch-homecomservice Contact data of all countries are listed in the attached service direct-ory
90016102699001610269emsp(010219)en
Robert Bosch Hausgeraumlte GmbHCarl-Wery-Straszlige 3481739 MuumlnchenGERMANYwwwbosch-homecom
Valid within Great BritainImported to Great Britain byBSH Home Appliances LtdGrand Union HouseOld Wolverton RoadWolverton Milton KeynesMK12 5PTUnited Kingdom
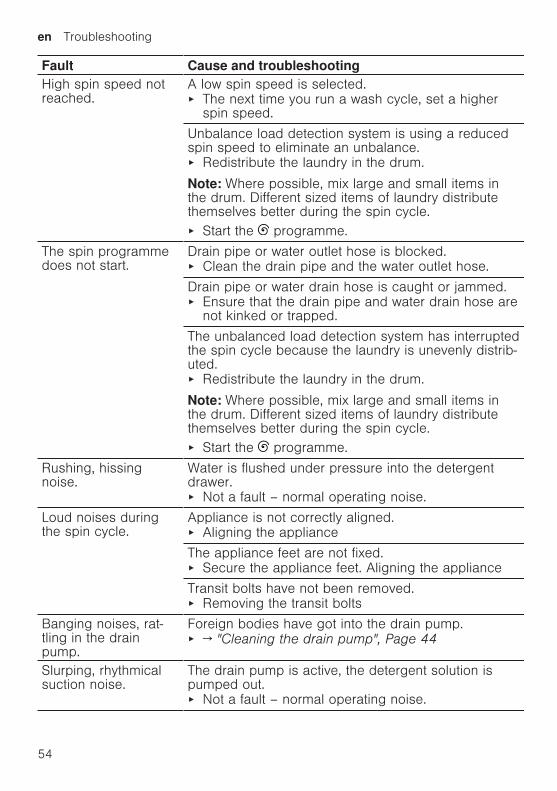
enemspTroubleshooting
54
Fault Cause and troubleshootingHigh spin speed notreached
A low spin speed is selected The next time you run a wash cycle set a higher
spin speed
Unbalance load detection system is using a reducedspin speed to eliminate an unbalance Redistribute the laundry in the drum
Note Where possible mix large and small items inthe drum Different sized items of laundry distributethemselves better during the spin cycle Start the programme
The spin programmedoes not start
Drain pipe or water outlet hose is blocked Clean the drain pipe and the water outlet hose
Drain pipe or water drain hose is caught or jammed Ensure that the drain pipe and water drain hose are
not kinked or trapped
The unbalanced load detection system has interruptedthe spin cycle because the laundry is unevenly distrib-uted Redistribute the laundry in the drum
Note Where possible mix large and small items inthe drum Different sized items of laundry distributethemselves better during the spin cycle Start the programme
Rushing hissingnoise
Water is flushed under pressure into the detergentdrawer Not a fault ndash normal operating noise
Loud noises duringthe spin cycle
Appliance is not correctly aligned Aligning the appliance
The appliance feet are not fixed Secure the appliance feet Aligning the appliance
Transit bolts have not been removed Removing the transit bolts
Banging noises rat-tling in the drainpump
Foreign bodies have got into the drain pump rarr Cleaning the drain pump Page 44
Slurping rhythmicalsuction noise
The drain pump is active the detergent solution ispumped out Not a fault ndash normal operating noise
Troubleshootingemspen
55
Fault Cause and troubleshootingCreasing The spin speed is too high
The next time you run a wash cycle set a lowerspin speed
The load is too large The next time you run a wash cycle reduce the
amount of laundry being loaded
The wrong programme is selected for the type of fab-ric Select the programmes that are suitable for the
type of fabric rarr Programmes Page 24
Detergent or fabricsoftener drips off theseal and collects onthe door or in the sealfold
Too much detergentfabric softener in the detergentdrawer When dosing liquid detergent and fabric softener
observe the marking in the detergent drawer anddo not dose above this
The spin result is notsatisfactory The laun-dry is too wettoodamp
A low spin speed is selected The next time you run a wash cycle set a higher
spin speed Start the programme
Drain pipe or water outlet hose is blocked Clean the drain pipe and the water outlet hose
Drain pipe or water drain hose is caught or jammed Ensure that the drain pipe and water drain hose are
not kinked or trapped
The unbalanced load detection system has interruptedthe spin cycle because the laundry is unevenly distrib-uted Redistribute the laundry in the drum
Note Where possible mix large and small items inthe drum Different sized items of laundry distributethemselves better during the spin cycle Start the programme
Unbalance load detection system is using a reducedspin speed to eliminate an unbalance Redistribute the laundry in the drum
Note Where possible mix large and small items inthe drum Different sized items of laundry distributethemselves better during the spin cycle Start the programme
enemspTroubleshooting
56
Fault Cause and troubleshootingDetergent residue onthe damp washing
Detergents may contain water-insoluble substancesthat deposit on the laundry Start the programme
Detergent residue onthe dry laundry
Detergents may contain water-insoluble substancesthat deposit on the laundry Brush out the laundry after washing and drying
Water is leaking out atthe water inlet hose
Water inlet hose is not correctlysecurely connected1 Connect the water supply hose correctly Connect-
ing the water inlet hose2 Tighten the screw connection
Water is leaking out atthe water outlet hose
The water outlet hose is damaged Replace the damaged water outlet hose
Water outlet hose is not connected correctly Connect the water outlet hose correctly Water out-
let connection types
Odours have formedin the appliance
Humidity and detergent residue may promote theformation of bacteria rarr Cleaning the drum Page 42 If you are not using the appliance leave the door
and detergent drawer open so that residual watercan evaporate
Transportation storage and disposalemspen
57
171 Emergency releaseReleasing the doorRequirement The drain pump isempty rarr Page 441 ATTENTION Escaping water may
cause material damage Do not open the door if you can
see water through the glassPull the emergency release down-wards with a tool and release
a The door lock is released2 Insert the maintenance flap and
lock it into place3 Close the maintenance flap
Transportation storage and disposal
18 Transportation stor-age and disposal
Transportation storage and disposal
You can find out here how to prepareyour appliance for transportation andstorage You will also find out how todispose of old appliances
181 Removing the appliance1 Turn off the tap2 rarr Emptying the water inlet hose
Page 473 Switch off the appliance4 Unplug the appliances mains plug
5 Drain the remaining detergentsolution rarr Cleaning the drain pumpPage 44
6 Detach the hoses
182 Inserting the transitbolts
Secure the appliance for transporta-tion using transit bolts in order to pre-vent damage1 Remove the four cover caps
‒ If necessary use a screwdriverto remove the cover caps
Keep the cover caps2 Insert the four sleeves
enemspTransportation storage and disposal
58
3 Insert all screws into the fourtransit bolts and tighten slightly
4 Insert the power cord into theholder and tighten all fourscrews for the transit bolts with aWAF 13 wrench
5 Insert the hose into holder
183 Using the applianceagain
1 Remove the transit bolts
2 Pour approx 1 litre of water intocompartment II in the detergentdrawer
3 Start the programmea The unused detergent cannot flow
straight into the outlet during thenext wash
184 Disposing of old appli-ance
Valuable raw materials can be re-used by recycling
WARNINGRisk of harm to healthChildren can lock themselves in theappliance thereby putting their livesat risk Do not install the appliance behind
a door as this may obstruct the ap-pliance door or prevent it fromopening
With redundant appliances unplugthe power cord Then cut throughthe cord and damage the lock onthe appliance door beyond repairso that the appliance door will nolonger close
1 Unplug the appliance from themains
2 Cut through the power cord3 Dispose of the appliance in an en-
vironmentally friendly mannerInformation about current disposalmethods are available from yourspecialist dealer or local authority
This appliance is la-belled in accordancewith European Directive201219EU concerningused electrical and elec-
Customer Serviceemspen
59
tronic appliances (wasteelectrical and electronicequipment - WEEE)The guideline determ-ines the framework forthe return and recyclingof used appliances asapplicable throughoutthe EU
Customer Service
19 Customer ServiceCustomer Service
If you have any queries on use areunable to rectify faults on the appli-ance yourself or if your applianceneeds to be repaired contact Cus-tomer ServiceYou can solve many problems your-self by consulting the information ontroubleshooting in these instructionsor on our website If this is not thecase contact our after-sales serviceWith any warranty claims we willmake sure that your appliance is re-paired by trained after-sales techni-cians using genuine spare parts in-cluding after the manufacturers war-ranty has expiredFunction-relevant genuine spare partsaccording to the corresponding Eco-design Order can be obtained fromCustomer Service for a period of atleast 10 years from the date onwhich your appliance was placed onthe market within the European Eco-nomic AreaNote Under the terms of the manu-facturers warranty the use of Cus-tomer Service is free of chargeDetailed information on the warrantyperiod and terms of warranty in yourcountry is available from our after-sales service your retailer or on ourwebsite
If you contact Customer Service youwill require the product number (E-Nr) and the production number (FD)of your applianceThe contact details for Customer Ser-vice can be found in the enclosedCustomer Service directory or on ourwebsite
191 Product number (E-Nr)and production number(FD)
You can find the product number (E-Nr) and the production number (FD)on the appliances rating plateDepending on the model the ratingplate is locatediexcl On the inside of the dooriexcl On the inside of the maintenance
flapiexcl On the rear of the applianceMake a note of your appliances de-tails and the Customer Service tele-phone number to find them againquickly
enemspConsumption values
60
Consumption values
20 Consumption valuesConsumption values
The following information is provided in accordance with the EU EcodesignRegulation The values given for programs other than the Eco 40-60 are indicat-ive only and were determined in accordance with the applicable standardEN60456
Programme Load(kg)
Pro-gramme dura-tion(hrmin)1
Energycon-sump-tion(kWhcycle)1
Watercon-sump-tion (lcycle)1
Max-imumtemper-ature(degC) 5mins1
Spinspeed(rpm)1
Resid-ualmois-ture()1
Eco 40-602 90 337 1245 610 50 1166 5000Eco 40-602 45 252 0590 450 33 1200 5000Eco 40-602 25 233 0195 300 24 1200 5400AlgodoacutenAl-godatildeo 20 degC
90 328 0370 900 23 1200 5400
AlgodoacutenAl-godatildeo 40 degC
90 328 1350 900 45 1200 5400
AlgodoacutenAl-godatildeo 60 degC
90 328 1450 900 55 1200 5400
AlgodoacutenAl-godatildeo 40 degC + Pre-lav
90 358 1400 1020 45 1200 5400
Sinteacuteticos 40 degC
40 228 0780 610 44 1200 2700
Mix 40 degC 40 059 0620 440 41 1200 5600 LanaLatildes
30 degC20 040 0200 400 22 800 2500
1 Due to the influence of water pressure hardness and inlet temperature am-bient temperature type amount and soiling of laundry detergent used fluc-tuations in the power supply and the selected additional functions the actualvalues may deviate from the stated values
2 Test programme in accordance with the EU Ecodesign Directive and the EUEnergy Labelling Regulation with cold water (15 degC)
Technical specificationsemspen
61
Technical specifications
21 Technical specifica-tions
Technical specifications
Facts and figures for your appliancecan be found here
Appliance height 850 cmAppliance width 598 cmAppliance depth 590 cmWeight 80 kg1
Maximum load 9 kgMains voltage 220 - 240 V
50 Hz Minimum in-
stallation protec-tion
10 A
Rated power 2300 WPower consump-tion
iexcl Off mode010 W
iexcl Left-on mode050 W
Water pressure iexcl Minimum100 kPa(1 bar)
iexcl Maximum1000 kPa(10 bar)
Length of the wa-ter inlet hose
150 cm
Length of the wa-ter outlet hose
150 cm
Length of thepower cord
160 cm
1 Depending on the appliance spe-cifications
More information about your modelcan be found online at httpsen-ergylabelbsh-groupcom1 This webaddress is linked to the official EUEPREL product database At the time
of printing its web address had notyet been published Please then fol-low the instructions on searching formodels The model identifier is madeup of the characters before the slashin the product number (E-Nr) on therating plate Alternatively you canalso find the model identifier in thefirst line of the EU energy label
1 Only applies to countries in the European Economic Area
Thank you for buying aBosch Home Appliance
Register your new device on MyBosch now and profit directly from
bull Expert tips amp tricks for your appliancebull Warranty extension optionsbull Discounts for accessories amp spare-partsbull Digital manual and all appliance data at handbull Easy access to Bosch Home Appliances Service
Free and easy registration ndash also on mobile phoneswwwbosch-homecomwelcome
Looking for help Youll find it here
Expert advice for your Bosch home appliances help with problems or a repair from Bosch experts Find out everything about the many ways Bosch can support you wwwbosch-homecomservice Contact data of all countries are listed in the attached service direct-ory
90016102699001610269emsp(010219)en
Robert Bosch Hausgeraumlte GmbHCarl-Wery-Straszlige 3481739 MuumlnchenGERMANYwwwbosch-homecom
Valid within Great BritainImported to Great Britain byBSH Home Appliances LtdGrand Union HouseOld Wolverton RoadWolverton Milton KeynesMK12 5PTUnited Kingdom
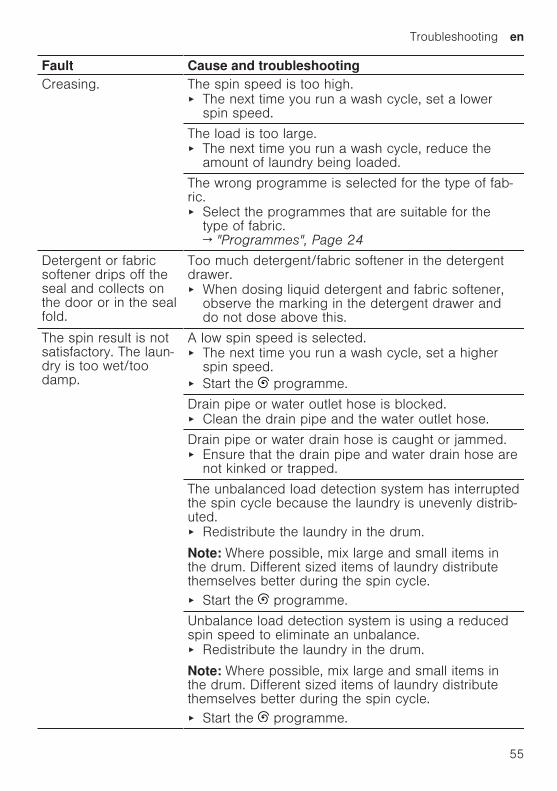
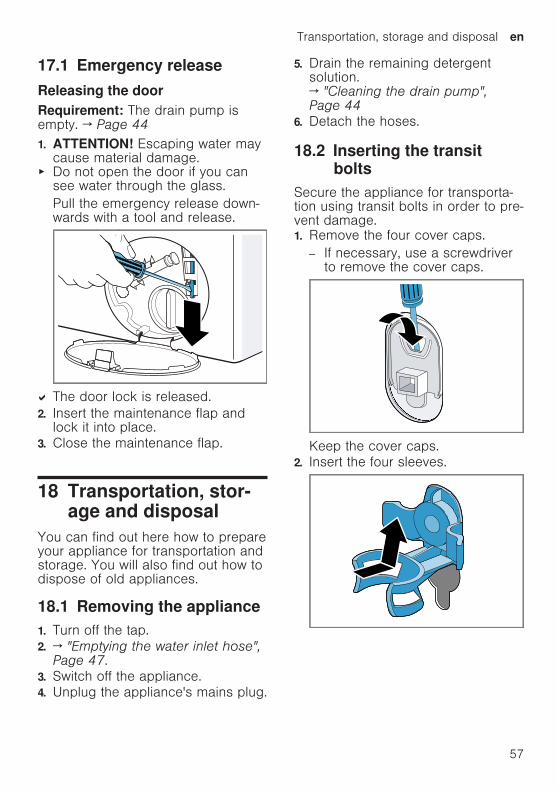
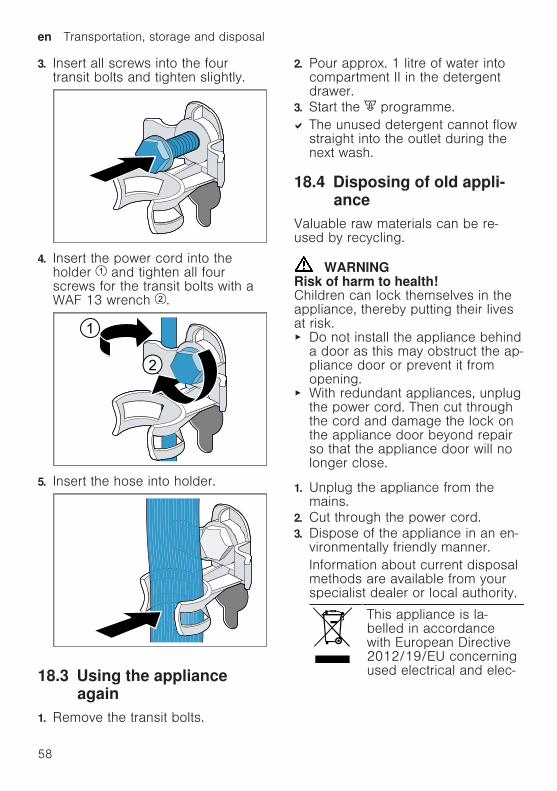
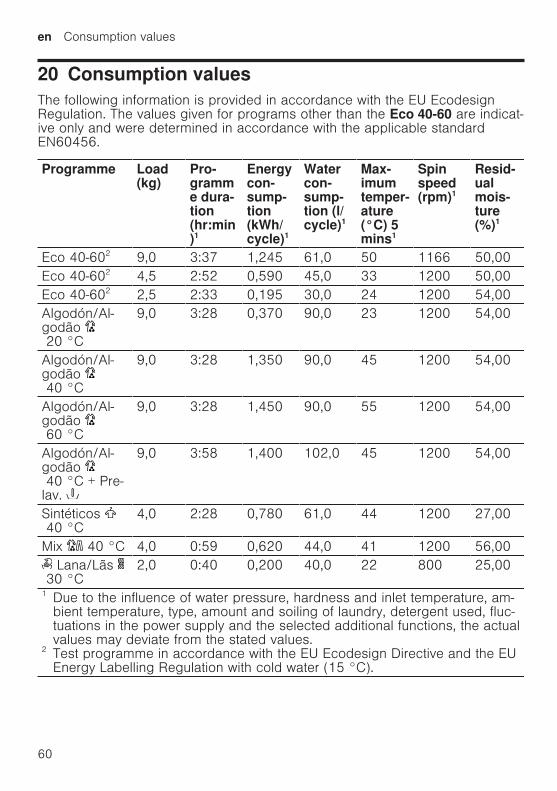
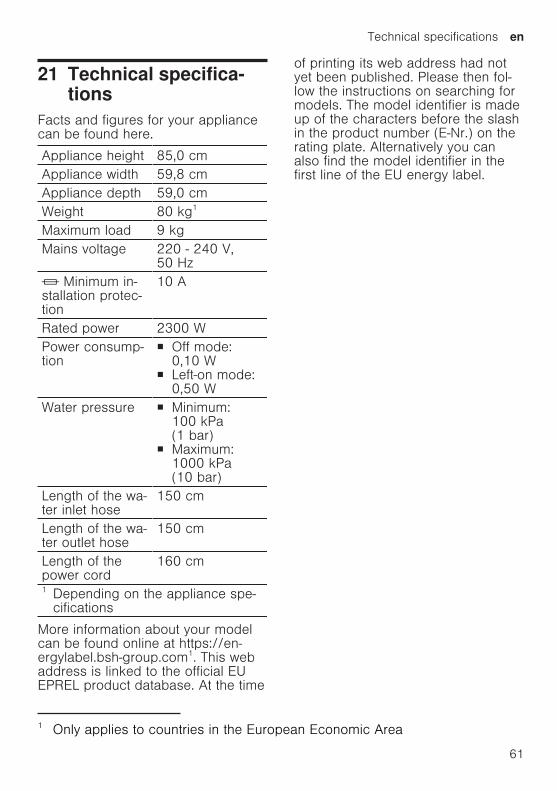


