Embed Size (px)
Citation preview

WSO2 Application Server, version 5.3.0
1
WSO2 ApplicationServerDocumentation
Version 5.3.0
WSO2 Application Server, version 5.3.0
Copyright © WSO2 Inc. 2014 2
Table of Contents1. Working with AS Tooling . . . . . . . . . . . . . . . . . . . . . . . . . . . . . . . . . . . . . . . . . . . . . . . . . . . . . . . . . . . . . . . 7
1.1 Installing the AS Tooling Plug-In . . . . . . . . . . . . . . . . . . . . . . . . . . . . . . . . . . . . . . . . . . . . . . . . . . . . . 71.2 Creating an Axis2 Project . . . . . . . . . . . . . . . . . . . . . . . . . . . . . . . . . . . . . . . . . . . . . . . . . . . . . . . . . . 111.3 Creating a Web Application . . . . . . . . . . . . . . . . . . . . . . . . . . . . . . . . . . . . . . . . . . . . . . . . . . . . . . . . . 151.4 Creating JAX-WS and JAX-RS Service Projects . . . . . . . . . . . . . . . . . . . . . . . . . . . . . . . . . . . . . . . . . 20
2. WSO2 Application Server Documentation . . . . . . . . . . . . . . . . . . . . . . . . . . . . . . . . . . . . . . . . . . . . . . . . . . 232.1 About WSO2 AS . . . . . . . . . . . . . . . . . . . . . . . . . . . . . . . . . . . . . . . . . . . . . . . . . . . . . . . . . . . . . . . . . 24
2.1.1 Introducing AS . . . . . . . . . . . . . . . . . . . . . . . . . . . . . . . . . . . . . . . . . . . . . . . . . . . . . . . . . . . . . . 252.1.2 Features . . . . . . . . . . . . . . . . . . . . . . . . . . . . . . . . . . . . . . . . . . . . . . . . . . . . . . . . . . . . . . . . . . . 272.1.3 Architecture . . . . . . . . . . . . . . . . . . . . . . . . . . . . . . . . . . . . . . . . . . . . . . . . . . . . . . . . . . . . . . . . . 292.1.4 About this Release . . . . . . . . . . . . . . . . . . . . . . . . . . . . . . . . . . . . . . . . . . . . . . . . . . . . . . . . . . . 32
2.2 Getting Started . . . . . . . . . . . . . . . . . . . . . . . . . . . . . . . . . . . . . . . . . . . . . . . . . . . . . . . . . . . . . . . . . . . 322.2.1 Quick Start Guide . . . . . . . . . . . . . . . . . . . . . . . . . . . . . . . . . . . . . . . . . . . . . . . . . . . . . . . . . . . . 332.2.2 Downloading the Product . . . . . . . . . . . . . . . . . . . . . . . . . . . . . . . . . . . . . . . . . . . . . . . . . . . . . . 382.2.3 Installation Prerequisites . . . . . . . . . . . . . . . . . . . . . . . . . . . . . . . . . . . . . . . . . . . . . . . . . . . . . . . 382.2.4 Installing the Product . . . . . . . . . . . . . . . . . . . . . . . . . . . . . . . . . . . . . . . . . . . . . . . . . . . . . . . . . 40
2.2.4.1 Installing on Linux or OS X . . . . . . . . . . . . . . . . . . . . . . . . . . . . . . . . . . . . . . . . . . . . . . . . 402.2.4.2 Installing on Solaris . . . . . . . . . . . . . . . . . . . . . . . . . . . . . . . . . . . . . . . . . . . . . . . . . . . . . . 422.2.4.3 Installing on Windows . . . . . . . . . . . . . . . . . . . . . . . . . . . . . . . . . . . . . . . . . . . . . . . . . . . . 442.2.4.4 Installing as a Windows Service . . . . . . . . . . . . . . . . . . . . . . . . . . . . . . . . . . . . . . . . . . . . 472.2.4.5 Installing as a Linux Service . . . . . . . . . . . . . . . . . . . . . . . . . . . . . . . . . . . . . . . . . . . . . . . 54
2.2.5 Running the Product . . . . . . . . . . . . . . . . . . . . . . . . . . . . . . . . . . . . . . . . . . . . . . . . . . . . . . . . . . 562.3 User Guide . . . . . . . . . . . . . . . . . . . . . . . . . . . . . . . . . . . . . . . . . . . . . . . . . . . . . . . . . . . . . . . . . . . . . . 61
2.3.1 Application Development and Deployment . . . . . . . . . . . . . . . . . . . . . . . . . . . . . . . . . . . . . . . . . 622.3.1.1 Developing Web Applications . . . . . . . . . . . . . . . . . . . . . . . . . . . . . . . . . . . . . . . . . . . . . . 63
2.3.1.1.1 JAX-WS and JAX-RS Support . . . . . . . . . . . . . . . . . . . . . . . . . . . . . . . . . . . . . . . . . 652.3.1.1.2 Developing JAX-RS Applications . . . . . . . . . . . . . . . . . . . . . . . . . . . . . . . . . . . . . . . 652.3.1.1.3 Developing JAX-WS Applications . . . . . . . . . . . . . . . . . . . . . . . . . . . . . . . . . . . . . . . 722.3.1.1.4 Versioning Web Applications . . . . . . . . . . . . . . . . . . . . . . . . . . . . . . . . . . . . . . . . . . 78
2.3.1.2 Developing Jaggery Applications . . . . . . . . . . . . . . . . . . . . . . . . . . . . . . . . . . . . . . . . . . . . 792.3.1.3 Deploying Applications in AS . . . . . . . . . . . . . . . . . . . . . . . . . . . . . . . . . . . . . . . . . . . . . . . 792.3.1.4 Managing and Monitoring Applications . . . . . . . . . . . . . . . . . . . . . . . . . . . . . . . . . . . . . . . 82
2.3.1.4.1 Using the Application Dashboard . . . . . . . . . . . . . . . . . . . . . . . . . . . . . . . . . . . . . . . 822.3.1.4.2 Web Application Statistics Monitoring with BAM . . . . . . . . . . . . . . . . . . . . . . . . . . . . 86
2.3.2 Services Development and Deployment . . . . . . . . . . . . . . . . . . . . . . . . . . . . . . . . . . . . . . . . . . . 912.3.2.1 Deploying Axis2 Services . . . . . . . . . . . . . . . . . . . . . . . . . . . . . . . . . . . . . . . . . . . . . . . . . 922.3.2.2 Deploying JAR Services . . . . . . . . . . . . . . . . . . . . . . . . . . . . . . . . . . . . . . . . . . . . . . . . . . 942.3.2.3 Deploying Spring Services . . . . . . . . . . . . . . . . . . . . . . . . . . . . . . . . . . . . . . . . . . . . . . . . . 96
2.4 Samples . . . . . . . . . . . . . . . . . . . . . . . . . . . . . . . . . . . . . . . . . . . . . . . . . . . . . . . . . . . . . . . . . . . . . . . . 992.4.1 Deploying your First Custom Web Application . . . . . . . . . . . . . . . . . . . . . . . . . . . . . . . . . . . . . . 1002.4.2 The Entitlement Servlet Filter Sample . . . . . . . . . . . . . . . . . . . . . . . . . . . . . . . . . . . . . . . . . . . . 1012.4.3 JAX-RS Samples . . . . . . . . . . . . . . . . . . . . . . . . . . . . . . . . . . . . . . . . . . . . . . . . . . . . . . . . . . . . 104
2.4.3.1 Building and Running JAX-RS Samples . . . . . . . . . . . . . . . . . . . . . . . . . . . . . . . . . . . . . . 1042.4.3.2 JAX-RS Basics . . . . . . . . . . . . . . . . . . . . . . . . . . . . . . . . . . . . . . . . . . . . . . . . . . . . . . . . . 1062.4.3.3 JAX-RS Advanced . . . . . . . . . . . . . . . . . . . . . . . . . . . . . . . . . . . . . . . . . . . . . . . . . . . . . . . 1072.4.3.4 JAX-RS Sample on Content Negotiation . . . . . . . . . . . . . . . . . . . . . . . . . . . . . . . . . . . . . . 110
2.4.4 JAX-WS Samples . . . . . . . . . . . . . . . . . . . . . . . . . . . . . . . . . . . . . . . . . . . . . . . . . . . . . . . . . . . . 111

WSO2 Application Server, version 5.3.0
Copyright © WSO2 Inc. 2014 3
2.4.4.1 Building and Running JAX-WS Samples . . . . . . . . . . . . . . . . . . . . . . . . . . . . . . . . . . . . . . 1122.4.4.2 Asynchronous Invocation . . . . . . . . . . . . . . . . . . . . . . . . . . . . . . . . . . . . . . . . . . . . . . . . . . 1132.4.4.3 Build and Invoke a Service Using a WSDL . . . . . . . . . . . . . . . . . . . . . . . . . . . . . . . . . . . . 1142.4.4.4 Develop Services in Code-First Approach . . . . . . . . . . . . . . . . . . . . . . . . . . . . . . . . . . . . . 1152.4.4.5 JAX-WS Handlers . . . . . . . . . . . . . . . . . . . . . . . . . . . . . . . . . . . . . . . . . . . . . . . . . . . . . . . 1152.4.4.6 MTOM Sample for SWA and XOP . . . . . . . . . . . . . . . . . . . . . . . . . . . . . . . . . . . . . . . . . . . 1162.4.4.7 WS-Security Sample on Signature and Encryption . . . . . . . . . . . . . . . . . . . . . . . . . . . . . . 1162.4.4.8 WS-Security Sample on UsernameToken and Timestamp . . . . . . . . . . . . . . . . . . . . . . . . 116
2.4.5 Jaggery Samples . . . . . . . . . . . . . . . . . . . . . . . . . . . . . . . . . . . . . . . . . . . . . . . . . . . . . . . . . . . . 1172.4.5.1 Building Jaggery Samples . . . . . . . . . . . . . . . . . . . . . . . . . . . . . . . . . . . . . . . . . . . . . . . . . 1172.4.5.2 Available Jaggery Samples . . . . . . . . . . . . . . . . . . . . . . . . . . . . . . . . . . . . . . . . . . . . . . . . 118
2.4.6 WebSockets Sample . . . . . . . . . . . . . . . . . . . . . . . . . . . . . . . . . . . . . . . . . . . . . . . . . . . . . . . . . 1182.4.7 SSO Sample . . . . . . . . . . . . . . . . . . . . . . . . . . . . . . . . . . . . . . . . . . . . . . . . . . . . . . . . . . . . . . . . 119
2.5 Configuration Guide . . . . . . . . . . . . . . . . . . . . . . . . . . . . . . . . . . . . . . . . . . . . . . . . . . . . . . . . . . . . . . . 1212.5.1 Clustered Deployment . . . . . . . . . . . . . . . . . . . . . . . . . . . . . . . . . . . . . . . . . . . . . . . . . . . . . . . . 1222.5.2 Working with Databases . . . . . . . . . . . . . . . . . . . . . . . . . . . . . . . . . . . . . . . . . . . . . . . . . . . . . . . 122
2.5.2.1 Setting up the Physical Database . . . . . . . . . . . . . . . . . . . . . . . . . . . . . . . . . . . . . . . . . . . 1222.5.2.1.1 Setting up a MySQL Cluster . . . . . . . . . . . . . . . . . . . . . . . . . . . . . . . . . . . . . . . . . . . 1232.5.2.1.2 Setting up Derby . . . . . . . . . . . . . . . . . . . . . . . . . . . . . . . . . . . . . . . . . . . . . . . . . . . . 1232.5.2.1.3 Setting up H2 . . . . . . . . . . . . . . . . . . . . . . . . . . . . . . . . . . . . . . . . . . . . . . . . . . . . . . 1302.5.2.1.4 Setting up IBM DB2 . . . . . . . . . . . . . . . . . . . . . . . . . . . . . . . . . . . . . . . . . . . . . . . . . 1382.5.2.1.5 Setting up IBM Informix . . . . . . . . . . . . . . . . . . . . . . . . . . . . . . . . . . . . . . . . . . . . . . 1442.5.2.1.6 Setting up Microsoft SQL . . . . . . . . . . . . . . . . . . . . . . . . . . . . . . . . . . . . . . . . . . . . . 1472.5.2.1.7 Setting up MySQL . . . . . . . . . . . . . . . . . . . . . . . . . . . . . . . . . . . . . . . . . . . . . . . . . . . 1512.5.2.1.8 Setting up OpenEdge . . . . . . . . . . . . . . . . . . . . . . . . . . . . . . . . . . . . . . . . . . . . . . . . 1552.5.2.1.9 Setting up Oracle . . . . . . . . . . . . . . . . . . . . . . . . . . . . . . . . . . . . . . . . . . . . . . . . . . . 1592.5.2.1.10 Setting up Oracle RAC . . . . . . . . . . . . . . . . . . . . . . . . . . . . . . . . . . . . . . . . . . . . . . 1632.5.2.1.11 Setting up PostgreSQL . . . . . . . . . . . . . . . . . . . . . . . . . . . . . . . . . . . . . . . . . . . . . . 1672.5.2.1.12 Setting up MariaDB . . . . . . . . . . . . . . . . . . . . . . . . . . . . . . . . . . . . . . . . . . . . . . . . 171
2.5.2.2 Managing Datasources . . . . . . . . . . . . . . . . . . . . . . . . . . . . . . . . . . . . . . . . . . . . . . . . . . . 1752.5.2.2.1 Configuring an RDBMS Datasource . . . . . . . . . . . . . . . . . . . . . . . . . . . . . . . . . . . . . 1762.5.2.2.2 Configuring a Custom Datasource . . . . . . . . . . . . . . . . . . . . . . . . . . . . . . . . . . . . . . 185
2.5.3 Working with the Registry . . . . . . . . . . . . . . . . . . . . . . . . . . . . . . . . . . . . . . . . . . . . . . . . . . . . . . 1872.5.3.1 Introduction to Registry . . . . . . . . . . . . . . . . . . . . . . . . . . . . . . . . . . . . . . . . . . . . . . . . . . . 1882.5.3.2 Managing the Registry . . . . . . . . . . . . . . . . . . . . . . . . . . . . . . . . . . . . . . . . . . . . . . . . . . . . 188
2.5.3.2.1 Managing Breadcrumb . . . . . . . . . . . . . . . . . . . . . . . . . . . . . . . . . . . . . . . . . . . . . . . 1892.5.3.2.2 Managing Metadata . . . . . . . . . . . . . . . . . . . . . . . . . . . . . . . . . . . . . . . . . . . . . . . . . 1902.5.3.2.3 Managing Properties . . . . . . . . . . . . . . . . . . . . . . . . . . . . . . . . . . . . . . . . . . . . . . . . . 1932.5.3.2.4 Managing Entries and Content . . . . . . . . . . . . . . . . . . . . . . . . . . . . . . . . . . . . . . . . . 1952.5.3.2.5 Managing Role Permissions . . . . . . . . . . . . . . . . . . . . . . . . . . . . . . . . . . . . . . . . . . . 202
2.5.3.3 Searching the Registry . . . . . . . . . . . . . . . . . . . . . . . . . . . . . . . . . . . . . . . . . . . . . . . . . . . 2032.5.3.4 Setting up the Registry Space . . . . . . . . . . . . . . . . . . . . . . . . . . . . . . . . . . . . . . . . . . . . . . 205
2.5.3.4.1 All Partitions in a Single Server . . . . . . . . . . . . . . . . . . . . . . . . . . . . . . . . . . . . . . . . 2062.5.3.4.2 Config and Governance Partitions in a Remote Registry . . . . . . . . . . . . . . . . . . . . . 2072.5.3.4.3 Governance Partition in a Remote Registry . . . . . . . . . . . . . . . . . . . . . . . . . . . . . . . 2122.5.3.4.4 Config and Governance Partitions in Separate Nodes . . . . . . . . . . . . . . . . . . . . . . . 2182.5.3.4.5 Using WS-Discovery in Governance Registry . . . . . . . . . . . . . . . . . . . . . . . . . . . . . 229
2.5.4 Working with Transports . . . . . . . . . . . . . . . . . . . . . . . . . . . . . . . . . . . . . . . . . . . . . . . . . . . . . . . 2302.5.4.1 Introduction to Transports . . . . . . . . . . . . . . . . . . . . . . . . . . . . . . . . . . . . . . . . . . . . . . . . . 2312.5.4.2 AS Transports . . . . . . . . . . . . . . . . . . . . . . . . . . . . . . . . . . . . . . . . . . . . . . . . . . . . . . . . . . 231

WSO2 Application Server, version 5.3.0
Copyright © WSO2 Inc. 2014 4
2.5.4.2.1 HTTP Servlet Transport . . . . . . . . . . . . . . . . . . . . . . . . . . . . . . . . . . . . . . . . . . . . . . 2312.5.4.2.2 HTTPS Servlet Transport . . . . . . . . . . . . . . . . . . . . . . . . . . . . . . . . . . . . . . . . . . . . . 2362.5.4.2.3 MailTo Transport . . . . . . . . . . . . . . . . . . . . . . . . . . . . . . . . . . . . . . . . . . . . . . . . . . . . 2372.5.4.2.4 JMS Transport . . . . . . . . . . . . . . . . . . . . . . . . . . . . . . . . . . . . . . . . . . . . . . . . . . . . . 2392.5.4.2.5 TCP Transport . . . . . . . . . . . . . . . . . . . . . . . . . . . . . . . . . . . . . . . . . . . . . . . . . . . . . 2432.5.4.2.6 Local Transport . . . . . . . . . . . . . . . . . . . . . . . . . . . . . . . . . . . . . . . . . . . . . . . . . . . . . 2442.5.4.2.7 UDP Transport . . . . . . . . . . . . . . . . . . . . . . . . . . . . . . . . . . . . . . . . . . . . . . . . . . . . . 245
2.5.4.3 Configuring Transports Globally . . . . . . . . . . . . . . . . . . . . . . . . . . . . . . . . . . . . . . . . . . . . 2452.5.5 Working with Security . . . . . . . . . . . . . . . . . . . . . . . . . . . . . . . . . . . . . . . . . . . . . . . . . . . . . . . . . 2492.5.6 Working with Multiple Tenants . . . . . . . . . . . . . . . . . . . . . . . . . . . . . . . . . . . . . . . . . . . . . . . . . . 250
2.5.6.1 Managing Tenants . . . . . . . . . . . . . . . . . . . . . . . . . . . . . . . . . . . . . . . . . . . . . . . . . . . . . . . 2502.5.6.2 Multitenant Architecture . . . . . . . . . . . . . . . . . . . . . . . . . . . . . . . . . . . . . . . . . . . . . . . . . . . 2512.5.6.3 Tenant-aware Load Balancing Using the WSO2 Elastic Load Balancer . . . . . . . . . . . . . . 254
2.5.7 Working with Logs . . . . . . . . . . . . . . . . . . . . . . . . . . . . . . . . . . . . . . . . . . . . . . . . . . . . . . . . . . . 2562.5.7.1 Configure Logging using the Management Console . . . . . . . . . . . . . . . . . . . . . . . . . . . . . 2572.5.7.2 HTTP Access Logging . . . . . . . . . . . . . . . . . . . . . . . . . . . . . . . . . . . . . . . . . . . . . . . . . . . . 2602.5.7.3 Configure Logging using Config Files . . . . . . . . . . . . . . . . . . . . . . . . . . . . . . . . . . . . . . . . 263
2.5.8 Tuning Performance . . . . . . . . . . . . . . . . . . . . . . . . . . . . . . . . . . . . . . . . . . . . . . . . . . . . . . . . . . 2642.5.9 JNDI Resources . . . . . . . . . . . . . . . . . . . . . . . . . . . . . . . . . . . . . . . . . . . . . . . . . . . . . . . . . . . . . 268
2.5.9.1 Carbon JNDI Resources . . . . . . . . . . . . . . . . . . . . . . . . . . . . . . . . . . . . . . . . . . . . . . . . . . 2682.5.9.2 Exposing Datasources as JNDI Resources . . . . . . . . . . . . . . . . . . . . . . . . . . . . . . . . . . . . 270
2.6 Administration Guide . . . . . . . . . . . . . . . . . . . . . . . . . . . . . . . . . . . . . . . . . . . . . . . . . . . . . . . . . . . . . . 2752.6.1 Working with Users, Roles and Permissions . . . . . . . . . . . . . . . . . . . . . . . . . . . . . . . . . . . . . . . 276
2.6.1.1 Introduction to User Management . . . . . . . . . . . . . . . . . . . . . . . . . . . . . . . . . . . . . . . . . . . 2762.6.1.2 Configuring the User Realm . . . . . . . . . . . . . . . . . . . . . . . . . . . . . . . . . . . . . . . . . . . . . . . 279
2.6.1.2.1 Configuring the System Administrator . . . . . . . . . . . . . . . . . . . . . . . . . . . . . . . . . . . 2802.6.1.2.2 Configuring the Authorization Manager . . . . . . . . . . . . . . . . . . . . . . . . . . . . . . . . . . 2822.6.1.2.3 Configuring User Stores . . . . . . . . . . . . . . . . . . . . . . . . . . . . . . . . . . . . . . . . . . . . . . 284
2.6.1.3 Managing Users, Roles and Permissions . . . . . . . . . . . . . . . . . . . . . . . . . . . . . . . . . . . . . 3182.6.1.3.1 Changing a Password . . . . . . . . . . . . . . . . . . . . . . . . . . . . . . . . . . . . . . . . . . . . . . . . 3192.6.1.3.2 Configuring Roles . . . . . . . . . . . . . . . . . . . . . . . . . . . . . . . . . . . . . . . . . . . . . . . . . . . 3202.6.1.3.3 Configuring Users . . . . . . . . . . . . . . . . . . . . . . . . . . . . . . . . . . . . . . . . . . . . . . . . . . . 322
2.6.2 Working with Features . . . . . . . . . . . . . . . . . . . . . . . . . . . . . . . . . . . . . . . . . . . . . . . . . . . . . . . . 3252.6.2.1 Managing the Feature Repository . . . . . . . . . . . . . . . . . . . . . . . . . . . . . . . . . . . . . . . . . . . 3262.6.2.2 Installing Features . . . . . . . . . . . . . . . . . . . . . . . . . . . . . . . . . . . . . . . . . . . . . . . . . . . . . . . 327
2.6.2.2.1 Feature Categorization . . . . . . . . . . . . . . . . . . . . . . . . . . . . . . . . . . . . . . . . . . . . . . . 3292.6.2.3 Uninstalling Features . . . . . . . . . . . . . . . . . . . . . . . . . . . . . . . . . . . . . . . . . . . . . . . . . . . . . 3342.6.2.4 Converting the Product into a Back-end/Front-end Server . . . . . . . . . . . . . . . . . . . . . . . . 3352.6.2.5 Recovering from Unsuccessful Feature Installation . . . . . . . . . . . . . . . . . . . . . . . . . . . . . 336
2.6.3 Monitoring the Application Server . . . . . . . . . . . . . . . . . . . . . . . . . . . . . . . . . . . . . . . . . . . . . . . . 3382.6.3.1 Collecting Data Statistics of Services . . . . . . . . . . . . . . . . . . . . . . . . . . . . . . . . . . . . . . . . 3382.6.3.2 Monitoring Logs . . . . . . . . . . . . . . . . . . . . . . . . . . . . . . . . . . . . . . . . . . . . . . . . . . . . . . . . . 341
2.6.3.2.1 Application Logs . . . . . . . . . . . . . . . . . . . . . . . . . . . . . . . . . . . . . . . . . . . . . . . . . . . . 3422.6.3.2.2 System Logs . . . . . . . . . . . . . . . . . . . . . . . . . . . . . . . . . . . . . . . . . . . . . . . . . . . . . . . 344
2.6.3.3 Monitoring Performance Statistics . . . . . . . . . . . . . . . . . . . . . . . . . . . . . . . . . . . . . . . . . . . 3462.6.3.4 Monitoring SOAP Messages . . . . . . . . . . . . . . . . . . . . . . . . . . . . . . . . . . . . . . . . . . . . . . . 3552.6.3.5 Monitoring Message Flows . . . . . . . . . . . . . . . . . . . . . . . . . . . . . . . . . . . . . . . . . . . . . . . . 3572.6.3.6 Monitoring Messages with TCPMon . . . . . . . . . . . . . . . . . . . . . . . . . . . . . . . . . . . . . . . . . 3592.6.3.7 JMX-Based Monitoring . . . . . . . . . . . . . . . . . . . . . . . . . . . . . . . . . . . . . . . . . . . . . . . . . . . . 363
2.6.4 Working with Composite Applications . . . . . . . . . . . . . . . . . . . . . . . . . . . . . . . . . . . . . . . . . . . . . 364

WSO2 Application Server, version 5.3.0
Copyright © WSO2 Inc. 2014 5
2.6.4.1 Introduction to Composite Applications . . . . . . . . . . . . . . . . . . . . . . . . . . . . . . . . . . . . . . . 3642.6.4.2 Creating and Deploying a Composite Application . . . . . . . . . . . . . . . . . . . . . . . . . . . . . . . 3652.6.4.3 Deleting Composite Applications . . . . . . . . . . . . . . . . . . . . . . . . . . . . . . . . . . . . . . . . . . . . 3662.6.4.4 Managing Server Roles . . . . . . . . . . . . . . . . . . . . . . . . . . . . . . . . . . . . . . . . . . . . . . . . . . . 367
2.6.5 Running the Product on a Preferred Profile . . . . . . . . . . . . . . . . . . . . . . . . . . . . . . . . . . . . . . . . 3692.6.6 Migrating the Application Server . . . . . . . . . . . . . . . . . . . . . . . . . . . . . . . . . . . . . . . . . . . . . . . . . 3702.6.7 Calling Admin Services from Apps . . . . . . . . . . . . . . . . . . . . . . . . . . . . . . . . . . . . . . . . . . . . . . . 3712.6.8 Working with Applications . . . . . . . . . . . . . . . . . . . . . . . . . . . . . . . . . . . . . . . . . . . . . . . . . . . . . . 375
2.6.8.1 Configuring Applications for AS . . . . . . . . . . . . . . . . . . . . . . . . . . . . . . . . . . . . . . . . . . . . . 3762.6.8.2 Configuring Runtime Environments . . . . . . . . . . . . . . . . . . . . . . . . . . . . . . . . . . . . . . . . . . 3782.6.8.3 Customize Logging for Web Applications . . . . . . . . . . . . . . . . . . . . . . . . . . . . . . . . . . . . . 3812.6.8.4 HTTP Session Management . . . . . . . . . . . . . . . . . . . . . . . . . . . . . . . . . . . . . . . . . . . . . . . 3832.6.8.5 Setting up Virtual Hosts . . . . . . . . . . . . . . . . . . . . . . . . . . . . . . . . . . . . . . . . . . . . . . . . . . . 3852.6.8.6 Using SSO with Web Applications . . . . . . . . . . . . . . . . . . . . . . . . . . . . . . . . . . . . . . . . . . . 3872.6.8.7 Enable XACML Fine Grained Authorization for Web Apps . . . . . . . . . . . . . . . . . . . . . . . . 3902.6.8.8 Enabling Java EE 6 Web Profile . . . . . . . . . . . . . . . . . . . . . . . . . . . . . . . . . . . . . . . . . . . . 395
2.6.9 Working with Services . . . . . . . . . . . . . . . . . . . . . . . . . . . . . . . . . . . . . . . . . . . . . . . . . . . . . . . . 3962.6.9.1 Creating an Axis2 Module . . . . . . . . . . . . . . . . . . . . . . . . . . . . . . . . . . . . . . . . . . . . . . . . . 3962.6.9.2 Deploying Axis2 Modules . . . . . . . . . . . . . . . . . . . . . . . . . . . . . . . . . . . . . . . . . . . . . . . . . 4032.6.9.3 Managing Dependencies and Common Libraries . . . . . . . . . . . . . . . . . . . . . . . . . . . . . . . 404
2.6.9.3.1 Class Loading for Web Services . . . . . . . . . . . . . . . . . . . . . . . . . . . . . . . . . . . . . . . . 4052.6.9.3.2 Uploading Shared Axis2 Artifacts . . . . . . . . . . . . . . . . . . . . . . . . . . . . . . . . . . . . . . . 4072.6.9.3.3 Restarting the Axis2 Configuration . . . . . . . . . . . . . . . . . . . . . . . . . . . . . . . . . . . . . . 4092.6.9.3.4 Deleting Common Axis2 Libraries . . . . . . . . . . . . . . . . . . . . . . . . . . . . . . . . . . . . . . . 409
2.6.10 Upgrading from a Previous Release . . . . . . . . . . . . . . . . . . . . . . . . . . . . . . . . . . . . . . . . . . . . 4102.7 Developer Guide . . . . . . . . . . . . . . . . . . . . . . . . . . . . . . . . . . . . . . . . . . . . . . . . . . . . . . . . . . . . . . . . . 415
2.7.1 Working with the Source Code . . . . . . . . . . . . . . . . . . . . . . . . . . . . . . . . . . . . . . . . . . . . . . . . . . 4162.7.2 Basic Registry API Knowledge . . . . . . . . . . . . . . . . . . . . . . . . . . . . . . . . . . . . . . . . . . . . . . . . . . 416
2.7.2.1 Adding a Resource with API . . . . . . . . . . . . . . . . . . . . . . . . . . . . . . . . . . . . . . . . . . . . . . . 4162.7.2.2 Creating a Resource from a Given URL . . . . . . . . . . . . . . . . . . . . . . . . . . . . . . . . . . . . . . 4172.7.2.3 Checking for the Existence of a Resource . . . . . . . . . . . . . . . . . . . . . . . . . . . . . . . . . . . . . 4172.7.2.4 Deleting a Resource . . . . . . . . . . . . . . . . . . . . . . . . . . . . . . . . . . . . . . . . . . . . . . . . . . . . . 4182.7.2.5 Managing Commenting . . . . . . . . . . . . . . . . . . . . . . . . . . . . . . . . . . . . . . . . . . . . . . . . . . . 4182.7.2.6 Managing Ratings . . . . . . . . . . . . . . . . . . . . . . . . . . . . . . . . . . . . . . . . . . . . . . . . . . . . . . . 4192.7.2.7 Managing Tags of a Resource . . . . . . . . . . . . . . . . . . . . . . . . . . . . . . . . . . . . . . . . . . . . . . 4192.7.2.8 Managing Versions of a Resource . . . . . . . . . . . . . . . . . . . . . . . . . . . . . . . . . . . . . . . . . . . 4202.7.2.9 Reading a Resource . . . . . . . . . . . . . . . . . . . . . . . . . . . . . . . . . . . . . . . . . . . . . . . . . . . . . 4212.7.2.10 Renaming a Resource . . . . . . . . . . . . . . . . . . . . . . . . . . . . . . . . . . . . . . . . . . . . . . . . . . . 4212.7.2.11 Retrieving Metadata of a Resource . . . . . . . . . . . . . . . . . . . . . . . . . . . . . . . . . . . . . . . . . 4222.7.2.12 Moving and Copying a Resource . . . . . . . . . . . . . . . . . . . . . . . . . . . . . . . . . . . . . . . . . . 4222.7.2.13 Managing Relationships of a Resource . . . . . . . . . . . . . . . . . . . . . . . . . . . . . . . . . . . . . . 4222.7.2.14 Executing a Query . . . . . . . . . . . . . . . . . . . . . . . . . . . . . . . . . . . . . . . . . . . . . . . . . . . . . . 4232.7.2.15 Searching for Content . . . . . . . . . . . . . . . . . . . . . . . . . . . . . . . . . . . . . . . . . . . . . . . . . . . 4232.7.2.16 Retrieving Logs . . . . . . . . . . . . . . . . . . . . . . . . . . . . . . . . . . . . . . . . . . . . . . . . . . . . . . . . 4242.7.2.17 Managing Aspects . . . . . . . . . . . . . . . . . . . . . . . . . . . . . . . . . . . . . . . . . . . . . . . . . . . . . . 4242.7.2.18 Managing Symbolic Links . . . . . . . . . . . . . . . . . . . . . . . . . . . . . . . . . . . . . . . . . . . . . . . . 425
2.7.3 CarbonContext API . . . . . . . . . . . . . . . . . . . . . . . . . . . . . . . . . . . . . . . . . . . . . . . . . . . . . . . . . . . 4262.7.4 WSO2 Patch Application Process . . . . . . . . . . . . . . . . . . . . . . . . . . . . . . . . . . . . . . . . . . . . . . . 4322.7.5 Customizing the Management Console . . . . . . . . . . . . . . . . . . . . . . . . . . . . . . . . . . . . . . . . . . . 4342.7.6 Enabling SPI Fly Support . . . . . . . . . . . . . . . . . . . . . . . . . . . . . . . . . . . . . . . . . . . . . . . . . . . . . . 436
WSO2 Application Server, version 5.3.0
Copyright © WSO2 Inc. 2014 6
2.7.7 Java Documentation . . . . . . . . . . . . . . . . . . . . . . . . . . . . . . . . . . . . . . . . . . . . . . . . . . . . . . . . . . 4372.8 Reference Guide . . . . . . . . . . . . . . . . . . . . . . . . . . . . . . . . . . . . . . . . . . . . . . . . . . . . . . . . . . . . . . . . . 437
2.8.1 Configuration Files . . . . . . . . . . . . . . . . . . . . . . . . . . . . . . . . . . . . . . . . . . . . . . . . . . . . . . . . . . . 4382.8.1.1 Configuring axis2.xml . . . . . . . . . . . . . . . . . . . . . . . . . . . . . . . . . . . . . . . . . . . . . . . . . . . . 4382.8.1.2 Configuring carbon.xml . . . . . . . . . . . . . . . . . . . . . . . . . . . . . . . . . . . . . . . . . . . . . . . . . . . 4492.8.1.3 Configuring catalina-server.xml . . . . . . . . . . . . . . . . . . . . . . . . . . . . . . . . . . . . . . . . . . . . . 4552.8.1.4 Configuring identity.xml . . . . . . . . . . . . . . . . . . . . . . . . . . . . . . . . . . . . . . . . . . . . . . . . . . . 4662.8.1.5 Configuring master-datasources.xml . . . . . . . . . . . . . . . . . . . . . . . . . . . . . . . . . . . . . . . . . 4712.8.1.6 Configuring registry.xml . . . . . . . . . . . . . . . . . . . . . . . . . . . . . . . . . . . . . . . . . . . . . . . . . . . 4732.8.1.7 Configuring user-mgt.xml . . . . . . . . . . . . . . . . . . . . . . . . . . . . . . . . . . . . . . . . . . . . . . . . . . 4762.8.1.8 Configuring config-validation.xml . . . . . . . . . . . . . . . . . . . . . . . . . . . . . . . . . . . . . . . . . . . . 4772.8.1.9 Configuring sso-sp-config.properties . . . . . . . . . . . . . . . . . . . . . . . . . . . . . . . . . . . . . . . . . 480
2.8.2 Changing the Default Ports . . . . . . . . . . . . . . . . . . . . . . . . . . . . . . . . . . . . . . . . . . . . . . . . . . . . . 4832.8.3 Tools . . . . . . . . . . . . . . . . . . . . . . . . . . . . . . . . . . . . . . . . . . . . . . . . . . . . . . . . . . . . . . . . . . . . . . 483
2.8.3.1 Try It Tool . . . . . . . . . . . . . . . . . . . . . . . . . . . . . . . . . . . . . . . . . . . . . . . . . . . . . . . . . . . . . . 4842.8.3.2 Generate Java Code for WSDL . . . . . . . . . . . . . . . . . . . . . . . . . . . . . . . . . . . . . . . . . . . . . 4882.8.3.3 Generate WSDL for Java Code . . . . . . . . . . . . . . . . . . . . . . . . . . . . . . . . . . . . . . . . . . . . . 4902.8.3.4 Validating a WSDL . . . . . . . . . . . . . . . . . . . . . . . . . . . . . . . . . . . . . . . . . . . . . . . . . . . . . . . 4922.8.3.5 JavaScript Scraping Assistant . . . . . . . . . . . . . . . . . . . . . . . . . . . . . . . . . . . . . . . . . . . . . . 4932.8.3.6 JavaScript Stub Generator . . . . . . . . . . . . . . . . . . . . . . . . . . . . . . . . . . . . . . . . . . . . . . . . 4962.8.3.7 Tools of the Carbon Platform . . . . . . . . . . . . . . . . . . . . . . . . . . . . . . . . . . . . . . . . . . . . . . . 498
2.8.3.7.1 Capturing the State of the System in Error Situations . . . . . . . . . . . . . . . . . . . . . . . 4982.8.3.7.2 Changing User Passwords in the Carbon Database . . . . . . . . . . . . . . . . . . . . . . . . 4992.8.3.7.3 Encrypting and Decrypting Simple Texts . . . . . . . . . . . . . . . . . . . . . . . . . . . . . . . . . 5002.8.3.7.4 View and Resend Messages . . . . . . . . . . . . . . . . . . . . . . . . . . . . . . . . . . . . . . . . . . 501
2.8.4 Lazy Loading of Tenants and Artifacts . . . . . . . . . . . . . . . . . . . . . . . . . . . . . . . . . . . . . . . . . . . . 5062.8.5 Product Startup Options . . . . . . . . . . . . . . . . . . . . . . . . . . . . . . . . . . . . . . . . . . . . . . . . . . . . . . . 507
2.9 FAQ . . . . . . . . . . . . . . . . . . . . . . . . . . . . . . . . . . . . . . . . . . . . . . . . . . . . . . . . . . . . . . . . . . . . . . . . . . . 5082.10 Getting Support . . . . . . . . . . . . . . . . . . . . . . . . . . . . . . . . . . . . . . . . . . . . . . . . . . . . . . . . . . . . . . . . . 5092.11 Glossary . . . . . . . . . . . . . . . . . . . . . . . . . . . . . . . . . . . . . . . . . . . . . . . . . . . . . . . . . . . . . . . . . . . . . . 5102.12 Site Map . . . . . . . . . . . . . . . . . . . . . . . . . . . . . . . . . . . . . . . . . . . . . . . . . . . . . . . . . . . . . . . . . . . . . . 513

WSO2 Application Server, version 5.3.0
Copyright © WSO2 Inc. 2014 7
Working with AS ToolingThis section walks you through how to install the AS tooling plug-in, based on WSO2 Developer Studio Kernel, usingwhich you can create and manage AS artifacts.
Installing the AS Tooling Plug-InCreating an Axis2 ProjectCreating a Web ApplicationCreating JAX-WS and JAX-RS Service Projects

WSO2 Application Server, version 5.3.0
Copyright © WSO2 Inc. 2014 8
1. 2. 3.
4.
Installing the AS Tooling Plug-In
The AS tooling plug-in is based on , which gives the capabilities WSO2 Developer Studio Kernel of a completeEclipse-based development environment for the AS. You can develop services, features and artifacts and managetheir links and dependencies through a simplified graphical editor.
There are 3 ways to install the tooling plug-in. The following two methods require you to install Eclipse Luna in your system, if you do not have it already:separately
Install the plug-in on Eclipse Luna using the P2 URLInstall the plug-in on Eclipse Luna using the P2.zip file
The third method uses a complete plug-in , so that you do not have toinstallation with pre-packaged Eclipseinstall Eclipse separately:
Install the plug-in with pre-packaged Eclipse
Install the plug-in on Eclipse Luna using the P2 URL
Make sure you have installed.Eclipse IDE for Java EE Developers (Luna SR2)Open Eclipse and click .Help > Install New SoftwareOn the dialog box that appears, click .Add
Give as the name and Appserver Tool http://product-dist.wso2.com/p2/developer-studio-
You can install multiple on top of the same Eclipse instance.WSO2 product plug-ins

WSO2 Application Server, version 5.3.0
Copyright © WSO2 Inc. 2014 9
4.
5.
6.
7.
8.
as the location and click .kernel/4.0.0/appserver-tools/releases/ OK
Select all the check boxes and click .Next
Read and accept the license agreements and click .Finish
If a security warning appears saying that the authenticity or validity of the software cannot be established,click .OK
Restart Eclipse to complete the installation.
Install the plug-in on Eclipse Luna using the P2 file.zip
When installing multiple in the same Eclipse instance, you do not need toWSO2 product plug-insselect the Developer Studio Kernel check boxes each time.

WSO2 Application Server, version 5.3.0
Copyright © WSO2 Inc. 2014 10
1. 2.
3. 4.
5.
6. 7. 8.
9.
10.
Make sure you have installed.Eclipse IDE for Java EE Developers (Luna SR2)Download the P2 file from .zip http://product-dist.wso2.com/products/developer-studio-f
./4.0.0/wso2-developer-studio-for-appserver_4.0.0.zipor-appserverOpen Eclipse and click Help > Install New Software.On the dialog box that appears, click Add.
Give as the name and click . Appserver Tool Archive
Navigate to the downloaded file and click ..zip OKSelect all the check boxes and click .NextRead and accept the license agreements and click .Finish
If a security warning appears saying that the authenticity or validity of the software cannot be established,click .OK
Restart Eclipse to complete the installation.

WSO2 Application Server, version 5.3.0
Copyright © WSO2 Inc. 2014 11
Install the plug-in with pre-packaged Eclipse
Download the distribution according to your operating system from http://product-dist.wso2.com/product./4.0.0/wso2-developer-studio-for-appserver_4.0.0.zips/developer-studio-for-appserver

WSO2 Application Server, version 5.3.0
Copyright © WSO2 Inc. 2014 12
1.
2. 1. 2. 3.
4.
Creating an Axis2 Project
You can create an Axis2 project for use with the .Application Server
Creating an Axis2 service project
You can create a new, empty project and develop the service as a Java class inside the project, or create the projectand service in one step using an existing WSDL file.
To create an empty service project:
On the Developer Studio Dashboard, click , leave the first option selected, and click Axis2 Service Project N.ext
The Create New Axis2 Service dialog box appears.
Do the following:Type a unique name for the project.Specify the package and class name.Optionally specify the location where you want to save the project (or leave the default locationspecified).

WSO2 Application Server, version 5.3.0
Copyright © WSO2 Inc. 2014 13
2.
4. 3.
4.
5.
6. 1. 2.
1.
Optionally specify the working set, if any, that you want to include in this project.A Maven POM file will be generated automatically for this project. If you want to include parent POMinformation in the file from another project in this workspace, click , select the Next Specify Parent from
check box, and then select the parent project.WorkspaceClick . FinishThe project is created, and the service class is open in the editor.Create a method in the service class. For example:
Generate the WSDL as follows:Right-click the project and choose .Generate WSDLSpecify the location and name for the file and click .OK
The WSDL file is generated and appears in the editor.
To create a service project from a WSDL:
On the Developer Studio Dashboard, click , click the option to create the project from aAxis2 Service ProjectWSDL, and click .Next

WSO2 Application Server, version 5.3.0
Copyright © WSO2 Inc. 2014 14
1.
2.
3.
4.
1. 2. 3.
4.
Browse to the WSDL file, specify a name for the project, and then optionally specify the location and workingsets as described in the previous steps.Optionally click and modify the Axis2 options. NextFor more information on Axis2 configuration, see: http://axis.apache.org/axis2/java/core/docs/adv-userguide.htmlClick .Finish
The project is created with all the generated stubs created from the WSDL you specified.
Creating an Axis2 web service client
You can create an Axis2 client project to generate client classes from a WSDL.
On the Developer Studio Dashboard, click .Generate Axis2 Web Service ClientSpecify the WSDL, and click .NextSpecify the src folder where you want to create the client and click . If you want to create a new projectNextfor this client, click and enter the required information.Create a new ProjectConfigure the Axis2 options and click .FinishFor more information on Axis2 configuration, see: http://axis.apache.org/axis2/java/core/docs/adv-userguide.html
WSO2 Application Server, version 5.3.0
Copyright © WSO2 Inc. 2014 15
1. 2. 3.
4.
1. 2.
The client classes are created in the source folder you specified.
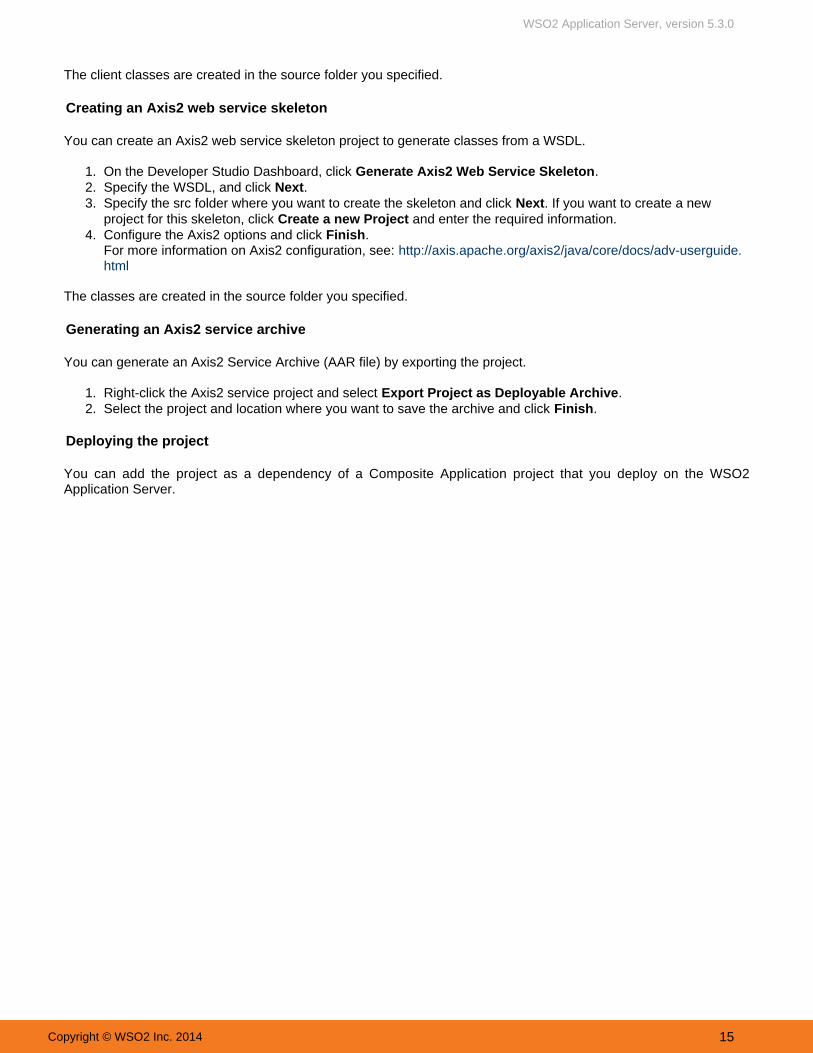
Creating an Axis2 web service skeleton
You can create an Axis2 web service skeleton project to generate classes from a WSDL.
On the Developer Studio Dashboard, click .Generate Axis2 Web Service SkeletonSpecify the WSDL, and click .NextSpecify the src folder where you want to create the skeleton and click . If you want to create a newNextproject for this skeleton, click and enter the required information.Create a new ProjectConfigure the Axis2 options and click .FinishFor more information on Axis2 configuration, see: http://axis.apache.org/axis2/java/core/docs/adv-userguide.html
The classes are created in the source folder you specified.
Generating an Axis2 service archive
You can generate an Axis2 Service Archive (AAR file) by exporting the project.
Right-click the Axis2 service project and select .Export Project as Deployable ArchiveSelect the project and location where you want to save the archive and click .Finish
Deploying the project
You can add the project as a dependency of a Composite Application project that you deploy on the WSO2Application Server.

WSO2 Application Server, version 5.3.0
Copyright © WSO2 Inc. 2014 16
1.
2. 3.
Creating a Web Application
You can use Developer Studio to create a web application (webapp), which you can host on the .Application ServerYou can or from a WAR file.create a new webapp import an existing webapp
Creating a new webapp
Follow these steps to create a new webapp. Alternatively, you can .import an existing webapp
Open the Developer Studio Dashboard (click ) and click Developer Studio -> Open Dashboard Web.Application
Select and click .Create New Web Application NextType a unique name for the webapp project, and then either leave the default location, or clear the check boxto specify a new location where you want to create the project.
As you create the webapp, you can configure facets, runtimes, an EAR project, and the context root. Forinformation on these concepts, see the topic on creating a dynamic web project in the Eclipse help (click Hel
and search for "dynamic web project").p -> Help Contents

WSO2 Application Server, version 5.3.0
Copyright © WSO2 Inc. 2014 17
3.
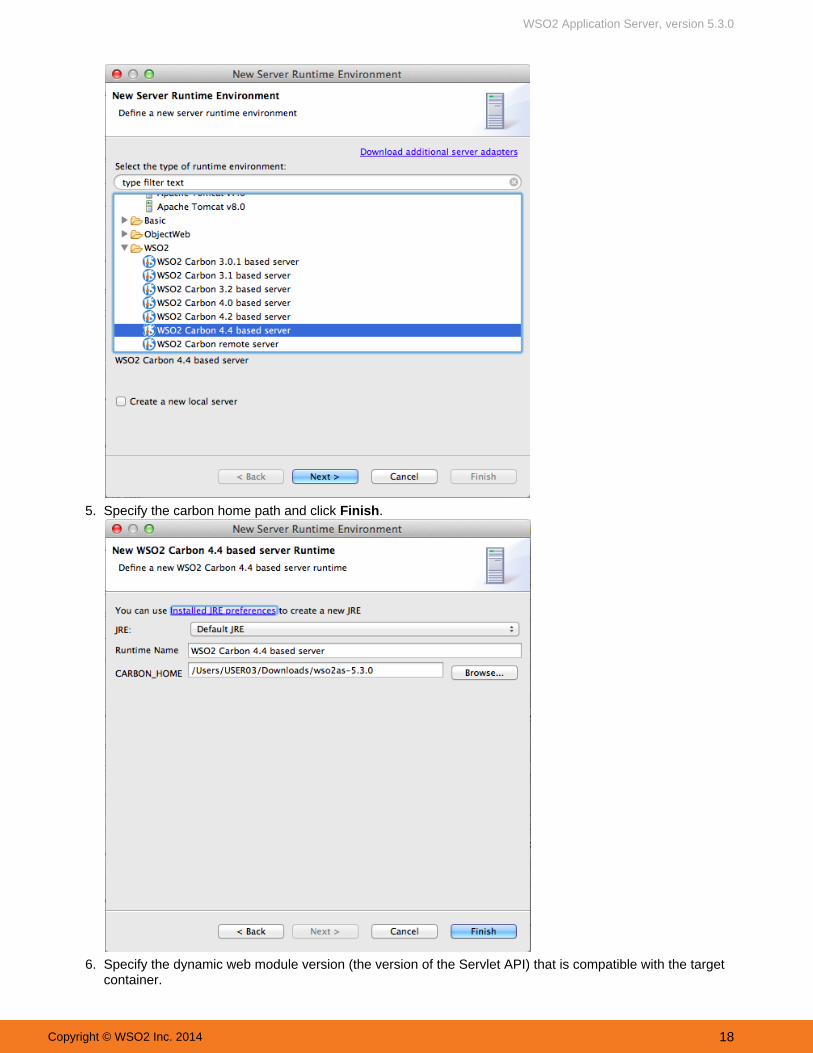
4. Specify the server runtime environment (the container in which the webapp will run). To enable the webapp torun with WSO2 Carbon products, click , expand the WSO2 folder and select the version ofNew RuntimeCarbon.
WSO2 Application Server, version 5.3.0
Copyright © WSO2 Inc. 2014 18
4.
5.
6.
7.
Specify the carbon home path and click .Finish
Specify the dynamic web module version (the version of the Servlet API) that is compatible with the targetcontainer.

WSO2 Application Server, version 5.3.0
Copyright © WSO2 Inc. 2014 19
7.
8. 9.
10. 11.
1.
2. 3.
Specify the configuration you want to use as the starting configuration for this webapp. To modify the facetsand limit the runtimes that this project is compatible with, click .ModifyOptionally add this project to an Enterprise Archive file (EAR) and working sets.Click and either leave the default web module settings or configure the settings as needed.Next,Click and optionally configure the Maven settings.NextClick .Finish
The new webapp project has now been created in the workspace. You can export this webapp to a web archive(WAR) file by right-clicking the project and choosing . You can then import it into another projectExport -> War Fileor environment.
Importing an existing webapp
Follow these steps to import an existing webapp from a WAR file. Alternatively, you can .create a new webapp
Open the Developer Studio Dashboard (click ) and click Developer Studio -> Open Dashboard Web.Application
Select and click .Import Web Application NextSpecify the WAR file by typing its full path name or clicking and navigating to the file.Browse

WSO2 Application Server, version 5.3.0
Copyright © WSO2 Inc. 2014 20
3.
4. 5.
Click if you want to specify Maven information.NextClick .Finish
WSO2 Application Server, version 5.3.0
Copyright © WSO2 Inc. 2014 21
1.
2. 1. 2. 3.
4. 3.
4.
1.
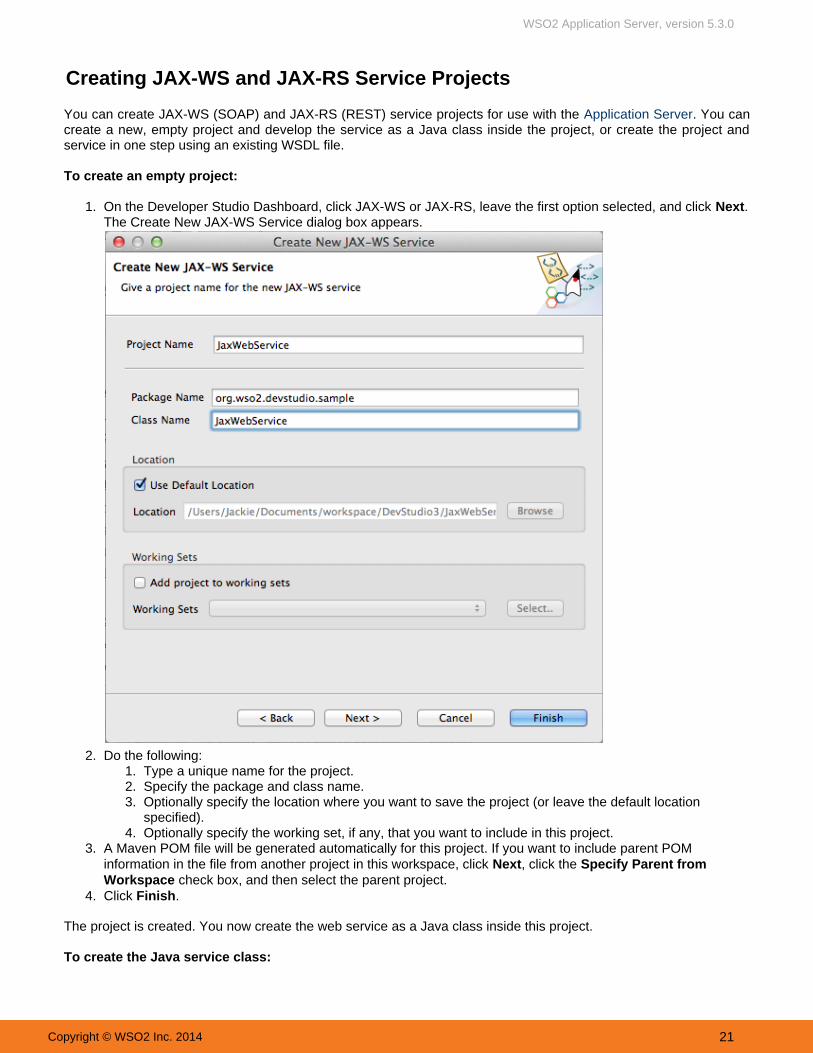
Creating JAX-WS and JAX-RS Service Projects
You can create JAX-WS (SOAP) and JAX-RS (REST) service projects for use with the . You canApplication Servercreate a new, empty project and develop the service as a Java class inside the project, or create the project andservice in one step using an existing WSDL file.
To create an empty project:
On the Developer Studio Dashboard, click JAX-WS or JAX-RS, leave the first option selected, and click .NextThe Create New JAX-WS Service dialog box appears.
Do the following:Type a unique name for the project.Specify the package and class name.Optionally specify the location where you want to save the project (or leave the default locationspecified).Optionally specify the working set, if any, that you want to include in this project.
A Maven POM file will be generated automatically for this project. If you want to include parent POMinformation in the file from another project in this workspace, click , click the Next Specify Parent from
check box, and then select the parent project.WorkspaceClick .Finish
The project is created. You now create the web service as a Java class inside this project.
To create the Java service class:

WSO2 Application Server, version 5.3.0
Copyright © WSO2 Inc. 2014 22
1.
2.
1.
2.
Right-click the project you just created, and then choose or New -> JAX-WS Service Class New -> JAX-RS.Service Class
The New JAX-WS Class dialog box appears.
Specify the information for the bean class and optionally the interface class, and then click .Finish
The classes are created inside the project.
To create a project and service from a WSDL:
On the Developer Studio Dashboard, click JAX-WS or JAX-RS, click the option to create the project from aWSDL, and click .NextEnter a name for the project, browse to the WSDL file, and specify the CXF home and a custom packagename.You can download the and extract it. The location where you extract it is your CXFCXF Binary DistributionHome.
The service class has been generated and contains the public endpoint interface described by the WSDL withoutthe implementation. You now develop the service implementation class inside the project.
You can export the project as a web application (WAR) file or you can add it as dependency of aComposite Application project that you deploy on the WSO2 Application Server. To create a deployable archive

WSO2 Application Server, version 5.3.0
Copyright © WSO2 Inc. 2014 23
(WAR), right-click the project, select , and choose the destination location.Export Project as Deployable Archive

WSO2 Application Server, version 5.3.0
Copyright © WSO2 Inc. 2014 24
WSO2 Application Server DocumentationWelcome to the (AS) 5.3.0 documentation! The WSO2 AS is a lean, 100% open source,WSO2 Application Servercloud-enabled, multi-tenant platform for developing, hosting and maintaining various types of Web services and Webapplications .
Following are the key sections in the documentation that you should read to get up and running quickly. You canalso browse the topics in the table of contents or search for a specific term or phrase. To download a PDF of thisdocument or a selected part of it, click here (only generate one PDF at a time). You can also use this link to exportto HTML or XML.
About WSO2 AS
The topics in this section introduceApplication Server (AS), includingthe business cases it solves, itsfeatures, architecture and how toget help or get involved.
Getting Started
Provides instructions fordownloading and installing WSO2AS and accessing its features.
User Guide
Explores the features andfunctionality of the ApplicationServer, solution development,testing, debugging and deployment.
Samples
Real-life business use cases of theproduct.
Configuration Guide
Explores different options tocustomize Application Serveraccording to user-specific needs.
Administration Guide
Describes all aspects ofadministering the AS, includingdeployment, user management, andmore.
Developer Guide
This section has useful developerinformation on CarbonContext APIsand building the product fromsource.

WSO2 Application Server, version 5.3.0
Copyright © WSO2 Inc. 2014 25
About WSO2 AS
The topics in this section introduce you to WSO2 Application Server, including the business cases it solves, itsfeatures, and architecture.
Introducing ASFeaturesArchitectureAbout this Release
Introducing AS
The following topics describe the application server's evolution, its place in SOA with an introduction to the WSO2Application Server.
What is an Application ServerEvolution of Application ServersThe WSO2 Application ServerThe WSO2 Application Server in context of SOA
What is an Application Server
An Application Server (AS) is a software program which accommodates the hosting, deployment and managementof various applications. It is released under Apache Software License Version 2.0, one of the most business-friendly
Residing in the middle tier between an organization’s database layer and thelicenses available today.user-interaction layer, an application server facilitates communication and connection between the front and backtiers.
For example, if a user triggers a particular control in a user interface, like clicking , it typically invokes aSubmitservice deployed in the application server. The deployed service or application defines the course of actions thatneed to be taken when the button is clicked. Few possibilities are data retrieval from the database and manipulationbefore presenting to the end-user or invoking other services as defined in the application’s business logic. Theseoperations are typically handled by an application server.
In addition to business logic implementation, application servers also centrally manage most reusable operationslike security, monitoring, governance, high-availability etc. Separation and central management of an organization’spool of applications and services are key reasons for the wide acceptance and adoption of application servers indistributed enterprise architectures today.
Evolution of Application Servers
The application server concept emerged in early client-server environments. The term was originally used todifferentiate servers that hosted databases and related services from file/print servers.
The client-server architecture was introduced back then to address some of the drawbacks of the file-serverarchitecture, where file servers acted as mere shared storages and performed no logical processing. In contrast, theclient-server environment had a server which hosted the database and performed related operations (similar to anapplication server). Many clients shared the server. End-user interaction was handled by the client computerswhereas logical processing was cooperatively shared between clients and the server.
In a typical client-server environment, application developers had to write most of the program code for operationssuch as database interactions, client request management, session management and security, in addition to theactual business logic. Since every developer had to write similar code for common functionalities, packaging and

WSO2 Application Server, version 5.3.0
Copyright © WSO2 Inc. 2014 26
hosting them in a centrally-accessible server increased reusability and reduced the overhead. This triggered theemergence of the 3-tier (or N-tier) architecture, with reusable functionalities instilled in application servers in middletier/s. This enables developers to focus simply on an application’s business logic implementation.
Application server functionality has enormously expanded over the years. Nowadays, most enterprises have 3-tiered(or N-tiered) distributed architectures with Web-enabled applications and services hosted and managed inapplication servers.
The WSO2 Application Server
WSO2 Application Server is a lean, open source, high-performant application server with Web application and Webservices deployment and management capabilities.
It is fully open source and developed based on the lean, component-based WSO2 Carbon platform. It utilizesApache Tomcat and is capable of hosting any kind of Web application deployable in Tomcat. Users can simply andeffectively create, consume and manage their applications and services in a unified manner through the ApplicationServer's "Management Console" user-interface.
Unlike many over-bloated, proprietary solutions, WSO2 has created a new platform that cuts out unnecessarylayers, supporting the full WS-* stack in a simple, clean, lightweight model. It is reliable, scalable and supportssecure communication and transactional integration based on the concept of loose coupling. Web applicationsinherit features such as authentication/authorization and user management from the WSO2 Carbon platform.
The WSO2 Application Server brings together a number of open source projects into a single, seamless,easy-to-use offering. Instead of having you download different parts of the Apache Web services stack separatelyand assemble them, WSO2 has already done that for you. With WSO2 AS, you get a single, integrated packagewith lots of additional features, which are inherited from the powerful WSO2 Carbon platform. The WSO2 ApplicationServer utilizes Apache WS* stack and REST protocol features, provides enterprise-class security features, JAX-WSsupport, governance, monitoring, clustering, high-availability, load balancing, tracing, logging and more.
WSO2 has positioned the application server product in 3 different phases. Currently in use is the WSO2 ApplicationServer, which is the successor of WSO2 Web Services Application Server (WSAS). WSO2 WSAS was launched in2008 with its predecessor being WSO2 Tungsten.
The WSO2 Application Server in context of SOA
An enterprise’s application servers are typically accessed by a variety of heterogeneous clients, within a LAN andover the Internet. Modern-day enterprises acknowledge the advantages of building Web-enabled applications onWeb service interfaces. Web services have also become the fundamental building block of a service orientedarchitecture (SOA) implementation.
As a result, the WSO2 Application Server is designed to be portable and interacts with the outside usingplatform-agnostic technologies such as XML/SOAP messaging. This gives clients access to an enterprise’sapplications and services irrespective of their infrastructures.

WSO2 Application Server, version 5.3.0
Copyright © WSO2 Inc. 2014 27
The WSO2 Application Server has extensive Web service management capabilities, which makes it ideal for SOAimplementations. It utilizes Apache WS-* stack for Web services related functionalities along with Axis2 componentssuch as Rampart, Sandesha2, Neethi etc. It also offers the unique capability to run Web applications and Webservices on the same server and manage them simply through a unified graphical console.
WSO2 Application Server supports deployment of different types of services such as spring, jar, axis2 and JAX-WS.Service type depends on the way the service is developed. However, finally all services are deployed within theAxis2 engine and all features will be available for all service types.
Features
WSO2 Application Server has the key features listed below. For the relevant versions of the applications used asfeatures, see .Compatibility of WSO2 Products
Feature Description
Java EE 6 Web Profile support Application Server (AS) 5.3.0 supports Java EE 6, which uses ApacheTomEE. To use this feature in AS 5.3.0, you have to configure a new runtimecalled "Javaee". With this new runtime, you will be allowed to deploy Java EEweb apps in AS.
See the topic on for instructions on how toenabling Java EE 6 Web Profileenable the JavaEE 6 Web profile for your server.
WebSocket support for webapplications
Starting from version 5.3.0, WSO2 AS provides support for Websocket 1.1 APIas defined by the JSR-356 specification. This is provided by Apache Tomcat,which is embedded in AS. See the following on howsample demonstrationweb sockets work in AS 5.3.0.

WSO2 Application Server, version 5.3.0
Copyright © WSO2 Inc. 2014 28
Apache Aries SPI Fly The WSO2 Carbon platform integrates ‘Apache Aries SPI Fly’, which providesOSGi support for JRE SPI mechanisms.
See the topic on for details.enabling SPI Fly support
Publishing web applicationstatistics from AS to BAM
The Application Server (AS) previously had the capability of onlymonitoring statistics through WSO2's Business Activity Monitor (BAM).However, now the Application Server has the capability of monitoring webapplication statistics as well using BAM.
See the topic on for details.web application statistics monitoring with BAM
Support for multiple ASmodes/profiles
Multi-profile support allows the user to run the product pack in a preferredprofile. The available profiles are:
Web Application ProfileAxis2 Service ProfileJaggery Profile
Distributed Cachingimplementation based onHazelcast
Cluster wide distributed caching is supported by using Hazelcastimplementation. Thereby, the caching API, response caching etc. can be usedin a distributed manner.
Clustering support for HighAvailability and High Scalability
You can install multiple instances of WSO2 products in a cluster to ensure thatif one instance becomes unavailable or is experiencing high traffic, anotherinstance will seamlessly handle the requests. Starting from AS 5.2.1, weprovide clustering support through Hazelcast. For more information see, Clust
.ered Deployment
Secondary user store support Secondary user stores can be dynamically configured via the ApplicationServer UI. In addition, users are allowed to configure their own user stores,out-of-the-box.
CarbonContext API This is an API for developers to access certain core services (such as registry,caching and more) from the Carbon runtime.
Support for Servlet 3, JSP 2.2,EL 2.2, JSTL 1.2 specifications
Full JAX-WS 2.2 and JAX-RS2.0 specification support
WSO2 AS provides out-of-the-box support for JAX-WS 2.2 and JAX-RS 2.0specifications via CXF.
Integration of Jaggery Jaggery is a server side scripting framework. It allows you to write web appsand HTTP-focused web services for all aspects of the application: front-end,communication, server-side logic and persistence in pure Javascript.

WSO2 Application Server, version 5.3.0
Copyright © WSO2 Inc. 2014 29
Multi-tenant support forstandalone deployment
In addition to the ability of creating tenants in cloud deployments, the user cancreate and use tenants in standalone mode as well.
100% Apache Tomcatcompliance
WSO2 Application Server is based on Apache Tomcat and is compliant withTomcat.
Lazy loading for tenants Lazy loading support for tenants allows you to load the tenants on request. Forexample, the tenant is loaded when a tenant user is logged in, and a webapplication/service request is sent to a tenant's artifact. This starts the servermuch faster, due to efficient memory usage, since all the tenants and itsartifacts are not loaded at a given time.
Lazy loading for webapplications and services
This allows the user to load the web applications and web services only whenit's being requested. This starts the server faster, due to efficient memoryusage, since all the artifacts are not loaded at a given time.
Tooling support Application Server related artifacts can be easily generated using WSO2Developer Studio, which is an Eclipse plugin.
JMX and Web interface basedmonitoring and management
By default, JMX is enabled in WSO2 Carbon. Therefore, the WSO2 Application Server facilitates JMX-based monitoring. Some of the monitoring
and management capabilities available in the Application Server'sManagement Console are also exposed via JMX.
WS-* and REST support WSO2 Application Server (AS) supports most of the WS specificationsincluding WS-Security, WS-Trust, WS-Policy, WS-Secure Conversation,WS-Reliable Messaging, WS-Discovery etc. AS also includes support forREST Web services via JAX-RS and WSDL 2.0
UI, command line, andIDE-based tools for Web serviceand Web applicationdevelopment
You can develop Web services (such as, Axis2 etc.) and Web applications(such as, JAX-WS, JAX-RS and generic webapps) via Developer Studio,which is an Eclipse plugin.
Equinox P2 based provisioningsupport
The user can install/update/uninstall features to/from a WSO2 Carbon-basedproducts with WSO2 Carbon.
WSDL2Java/Java2WSDL/WSDL1.1, and UI-based try it (invokeany remote Web service),TCPMon
The WSO2 Application Server ships these tools since these are very useful forweb service developers.
Architecture

WSO2 Application Server, version 5.3.0
Copyright © WSO2 Inc. 2014 30
1.
2.
3.
4. 5.
The WSO2 Application Server has Apache Axis2 framework as its core and is distributed under Apache License 2.0.It has full support for Apache Tomcat, which is the underlying Web application container and can be installedstandalone or on top of Tomcat, WebSphere, WebLogic, Jboss or as part of a Java EE compliant servlet container.
Because the WSO2 Application Server is part of WSO2 Carbon, the component-based middleware platform, itconsists of a set of pluggable components. Developers have the choice to deploy only the required components andleave unwanted functionality which adds to the bulk.
The diagram below describes WSO2 Application Server architecture from a messaging perspective.
Different Web channels such as client applications or mobile phones, communicate with an enterprise'sapplication server through the Internet or a private network. These Web channels typically use XML/SOAP orREST messages. The "transport" in the message receiver’s end manages concurrent connections and listens to messagescontacting the application server via a particular protocol. For example, an “HTTP transport listener” detectsXML/SOAP messages communicated in the HTTP protocol.A transport which detects a message identifies if it needs any additional processing, also known as Quality of
(QoS) operationsService such as security checks. The transport then sends the message through a message pipe containing handlers to take care of the additional processing.
Once the message has gone through the message pipe, it is passed on to the Message Receiver.The Message Receiver determines the Web Service that needs to be invoked out of the services deployed inthe application server and executes it.
This is how a message sent from a Web channel communicates with the Application Server and invokes a Web Service. Similarly, Web Application clients can call Web applications deployed inside the Application Server directly
through Tomcat transports (HTTP/S).
All these components can be managed and monitored through 's the WSO2 Application Server ManagementConsole.
Application server components
The following scheme visually presents the component-based architecture of the WSO2 Application Server.
The diagram shows how a message propagates through a typical WSO2 Application Server implementationbut the functionality is not limited to what is depicted here.
WSO2 Application Server, version 5.3.0
Copyright © WSO2 Inc. 2014 31
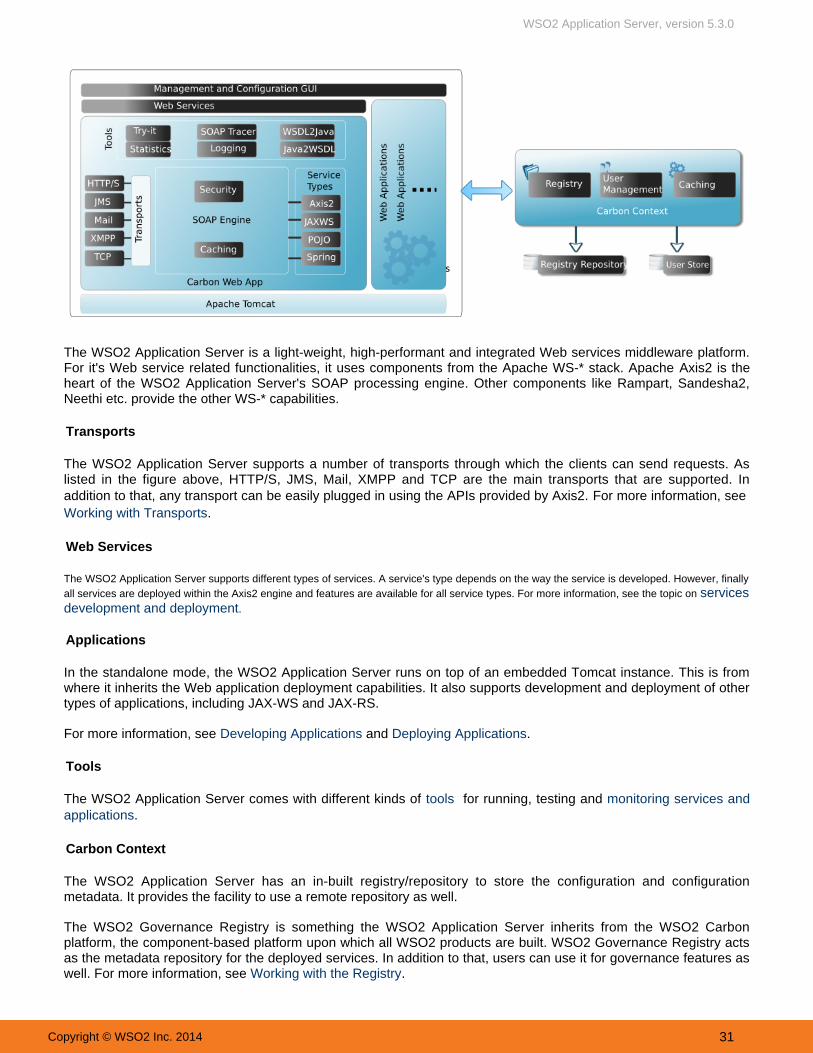
The WSO2 Application Server is a light-weight, high-performant and integrated Web services middleware platform.For it's Web service related functionalities, it uses components from the Apache WS-* stack. Apache Axis2 is theheart of the WSO2 Application Server's SOAP processing engine. Other components like Rampart, Sandesha2,Neethi etc. provide the other WS-* capabilities.
Transports
The WSO2 Application Server supports a number of transports through which the clients can send requests. Aslisted in the figure above, HTTP/S, JMS, Mail, XMPP and TCP are the main transports that are supported. Inaddition to that, any transport can be easily plugged in using the APIs provided by Axis2. For more information, see Working with Transports.
Web Services
The WSO2 Application Server supports different types of services. A service's type depends on the way the service is developed. However, finallyall services are deployed within the Axis2 engine and features are available for all service types. For more information, see the topic on services
.development and deployment
Applications
In the standalone mode, the WSO2 Application Server runs on top of an embedded Tomcat instance. This is fromwhere it inherits the Web application deployment capabilities. It also supports development and deployment of othertypes of applications, including JAX-WS and JAX-RS.
For more information, see and .Developing Applications Deploying Applications
Tools
The WSO2 Application Server comes with different kinds of for running, testing and tools monitoring services andapplications.
Carbon Context
The WSO2 Application Server has an in-built registry/repository to store the configuration and configurationmetadata. It provides the facility to use a remote repository as well.
The WSO2 Governance Registry is something the WSO2 Application Server inherits from the WSO2 Carbonplatform, the component-based platform upon which all WSO2 products are built. WSO2 Governance Registry actsas the metadata repository for the deployed services. In addition to that, users can use it for governance features aswell. For more information, see . Working with the Registry

WSO2 Application Server, version 5.3.0
Copyright © WSO2 Inc. 2014 32
In addition, the Application Server can be deployed on other Application servers (as a Webapp) like WebSphere,WebLogic and Jboss as well.
About this Release
What is new in this release
The 5.3.0 (WSO2 AS 5.3.0) is the successor of version 5.2.1. WSO2 Application Server version It contains severalnew features and bug fixes. Given below is the list of new features enabled in WSO2 AS 5.3.0.
Supporting Java EE 6 web profile, which enables the Java EE runtime environment. See this forlinkdocumentation.Supporting Java Web Sockets 1.0 API. See the following on how web sockets work insample demonstrationAS 5.3.0.Possibility to enable virtual hosts, which allows you to deploy applications in multiple domains. See this folinkr documentation.Possibility to manage sessions of web applications by enabling session persistence. See this forlinkdocumentation.Possibility to enable the Single Sign On functionality for applications. See this for documentation.linkIntegration with Apache Aries SPI Fly, which supports OSGi JRE SPI. See this for documentation.linkPossibility to discover JAX-RS/JAX-WS applications (deployed in AS 5.3.0) using WSO2 GovernanceRegistry. Note that this feature will be deprecated in future. See this for documentation.link
Removed features
The data services feature is removed from WSO2 AS 5.3.0. Therefore, the following functionality is no longeravailable in WSO2 AS:
Creating, uploading and generating data services.Scheduling tasks for data services.
Compatible versions
WSO2 AS 5.3.0 is based WSO2 Carbon 4.4.1 and is expected to be compatible with any of the WSO2 products thatare based on any Carbon 4.4.x version. If you get any compatibility issues, please . Forcontact the WSO2 teaminformation on third-party software requirements with AS 5.3.0, see Installation Prerequisites. For more informationon the products in each Carbon platform release, see the Release Matrix.
Fixed issues
For the list of fixed issues, go to .WSO2 Application Server 5.3.0 - Fixed Issues
Known issues
For the list of known issues, go to .WSO2 Application Server 5.3.0 - Known Issues
If required, you can add this feature to your WSO2 AS 5.3.0 product pack from the WSO2 feature repositoryusing the instructions given .here

WSO2 Application Server, version 5.3.0
Copyright © WSO2 Inc. 2014 33
Getting Started
The section provides instructions to download, install, run, and get started quickly with the WSO2 ApplicationServer.
Quick Start GuideDownloading the ProductInstallation PrerequisitesInstalling the ProductRunning the Product
Quick Start Guide
The purpose of this guide is to get you started on deploying applications in WSO2 Application Server (WSO2 AS) asquickly as possible. See the following topics for details:
Introduction and key conceptsInstalling and setting up WSO2 ASDeploying and managing your first application
Step 1: Deploying an applicationStep 2: Running the applicationStep 3: Monitoring the application
Deep diving into the Application Server
Introduction and key concepts
WSO2 Application Server (WSO2 AS) is a complete solution for hosting, deploying and managing applications andservices. It lies as the middle tier between the backend (database layer) and the front end (consumers of WSO2 AS)of a system. The following diagram depicts how consumers (web channels and client applications) connect to ana p p l i c a t i o n d e p l o y e d i n W S O 2 A S :
The main function of WSO2 AS is to that are designed to perform certain tasks, such asdeploy applications retrieving data from a database and manipulating the data. External Web channels connect to the Web applications
deployed in the AS to consume the services performed by the applications. For example, if a user triggers a control in a Web channel (like clicking Submit), it sends a message to the application deployed in the AS. The application
deployed in the AS defines the course of actions that need to be taken to serve the Web channel (such as retrievingdata from the database and presenting it to the end-user).
WSO2 AS also comes with a list of features to help you deploy and manage Web applications easily and securely.You get the required configurations already bundled and built in the binary distribution. You can use it to startdeploying applications and services immediately. When you use the AS in a production environment, you can

WSO2 Application Server, version 5.3.0
Copyright © WSO2 Inc. 2014 34
1. 2.
1. 2.
1.
2.
3.
4.
5.
6.
7.
enhance the configurations in order to obtain a more robust system that caters to your requirements.
Installing and setting up WSO2 AS
Follow the steps given below to download WSO2 DSS.
Download WSO2 AS from .hereExtract the zip file to a location in your computer. This location will be referred to as from hereon.<AS_HOME>
Before you start the server, the following prerequisites should be in place:
Ensure that you have JDK 7/8 installed in your computer.You must set your environment variable to point to the directory where the Java Development KitJAVA_HOME(JDK) is installed on the computer.
WSO2 AS is now installed with the required settings.
Deploying and managing your first application
Let's deploy a sample Web application called and expose it to an external Web channel. HelloWorldWebapp
Step 1: Deploying an application
You are now ready to deploy your first application in WSO2 AS. You will be using the sample Web application (Hell) for this demonstration.oWorldApp Follow the steps given below.
Download the sample Web application from and save it to a location in yourHelloWorldWebapp herecomputer.Open a terminal and navigate to the <AS_HOME>/bin directory and execute the AS startup script using oneof the following commands:
On Windows: wso2server.batOn Linux: sh wso2server.sh
When the product is started, the URL of the Management Console will be shown in the terminal as follows:INFO {org.wso2.carbon.ui.internal.CarbonUIServiceComponent} - Mgt Console URL
: https: //10.100.5.65:9443/carbon/Copy this URL to your browser to open the Management Console.
Log in to the Management Console using the default administrator credentials: admin/admin.
In the left navigator, go to the tab and click under the menu.Main Web Applications Add
T h e p a g e o p e n s .U p l o a d W e b A p p l i c a t i o n s

WSO2 Application Server, version 5.3.0
Copyright © WSO2 Inc. 2014 35
7.
1.
2.
8.
1. 2. 3.
4.
5.
Click and browse for the WAR file of the application.Choose File HelloWorldWebapp
Enter a version for the Web application in the field. We will used '1.0.0' as the first version ofVersionthis application.
Once the file is uploaded successfully, click The Web applicationApplications -> List. HelloWorldWebapp
will be listed in the page as shown below.Running Applications
You have deployed a sample Web application in the server. Let's run it.
Step 2: Running the application
Follow the steps below to connect to the application that you deployed in the previous step.
In the Management Console, click to open the page.Applications -> List Running Applications See that the Web application is listed as an application deployed in the server. HelloWorldWebappClick the link associated with the Web application that you deployedGo To URL HelloWorldWebappearlier. Now that you have the URL of the application deployed in WSO2 AS, you can connect to the application fromany external Web channel such as your browser.The application opens in your browser as shown below.
Step 3: Monitoring the application
By versioning the WAR file, you can add more applications with the same name later. Readmore about versioning of Web applications from .here

WSO2 Application Server, version 5.3.0
Copyright © WSO2 Inc. 2014 36
1.
2.
1.
2.
3.
The Management Console of WSO2 AS allows you to access the statistics of a running server instance usingApplication Dashboards. Follow the steps given below.
Click in the left navigator of the Management Console to open the Applications -> List Running page.Applications
Click the HelloWorldWebapp application that is listed there. This will take you to the dashboard dedicated
for the application.You will see the following information displayed on the dashboard:
The Application Details panel will show all the general information about the Web application.
The Session Statistics panel will show all the statistical information about the user sessions of theapplications. It also provides a graphical view of the average system response time.
In the Statistics panel, you will find the following statistics of a running web application. Note that these statistics are not applicable to Jaggery applications.
Request Count - Total number of requests received to web applications.Response Count - Total number of responses served by the web applications.
Fault Count - Total number of requests that triggered faults.
Maximum Response Time - Maximum time required to serve a request
Minimum Response Time - Minimum time required to serve a request
Average Response Time - Average time required to serve a request.

WSO2 Application Server, version 5.3.0
Copyright © WSO2 Inc. 2014 37
2.
3.
Deep diving into the Application Server
If you have followed the use case given above, you should now be familiar with using the management console ofWSO2 AS and it's basic functionality. WSO2 AS comes with many features that you can configure to support yourenterprise requirements. Listed below are some of the more advance features that you can use when you manageapplications in WSO2 AS.
Enabling SaaS mode and CORS for your applications. See this for instructions.linkCustomizing logging management for your applications. See this for instructions.linkDeploying multiple domains in a single server instance by configuring virtual hosts. See this forlinkinstructions.Using Single-Sign-On with SAML for your web applications by integrating with WSO2 Identity Server. See this
for instructions.linkUsing XACML fine grained authorization for your web applications by integrating with WSO2 IdentityServer. See this for instructions.linkConfiguring class loading for your web applications using separate runtime environments. See this forlinkinstructions.
For more in-depth information about WSO2 AS see the following links:

WSO2 Application Server, version 5.3.0
Copyright © WSO2 Inc. 2014 38
1. 2.
3.
User Guide: Explains the various types of web applications and how they can be deployed in WSO2 AS. Configuration Guide: Explains the various configuration options that are available for your product, such asenhancing , support, management, management etc.Security Multitenancy Logging DatabaseAdministration Guide: Explains how you can further enhance the features of your product.
Downloading the Product
Follow the instructions below to download WSO2 AS. You can also download and .build the source code
In your Web browser, go to .http://wso2.com/products/application-server/Click the button in the upper right-hand corner of the page to download the version. ToDownload latestdownload an older version, click the link and then select the version that you want.Previous ReleasesEnter the required details in the form, and click .Download
The binary distribution contains the AS binary files for both MS Windows and Linux operating systems, compressedinto a single ZIP file. This distribution is recommended for many users.
After downloading the binary distribution, go to for instructions on installing the necessaryInstallation Prerequisitessupporting applications.
Installation Prerequisites
Prior to installing any WSO2 Carbon-based product, it is necessary to have the appropriate prerequisite softwareinstalled on your system. Verify that the computer has the supported operating system and development platformsbefore starting the installation.
System requirements
Memory~ 2 GB minimum~ 512 MB heap size. This is generally sufficient toprocess typical SOAP messages but the requirements vary with larger message sizes and the number ofmessages processed concurrently.
Disk~ 1 GB, excluding space allocated for log files anddatabases.
Environment compatibility
WSO2 Application Server, version 5.3.0
Copyright © WSO2 Inc. 2014 39
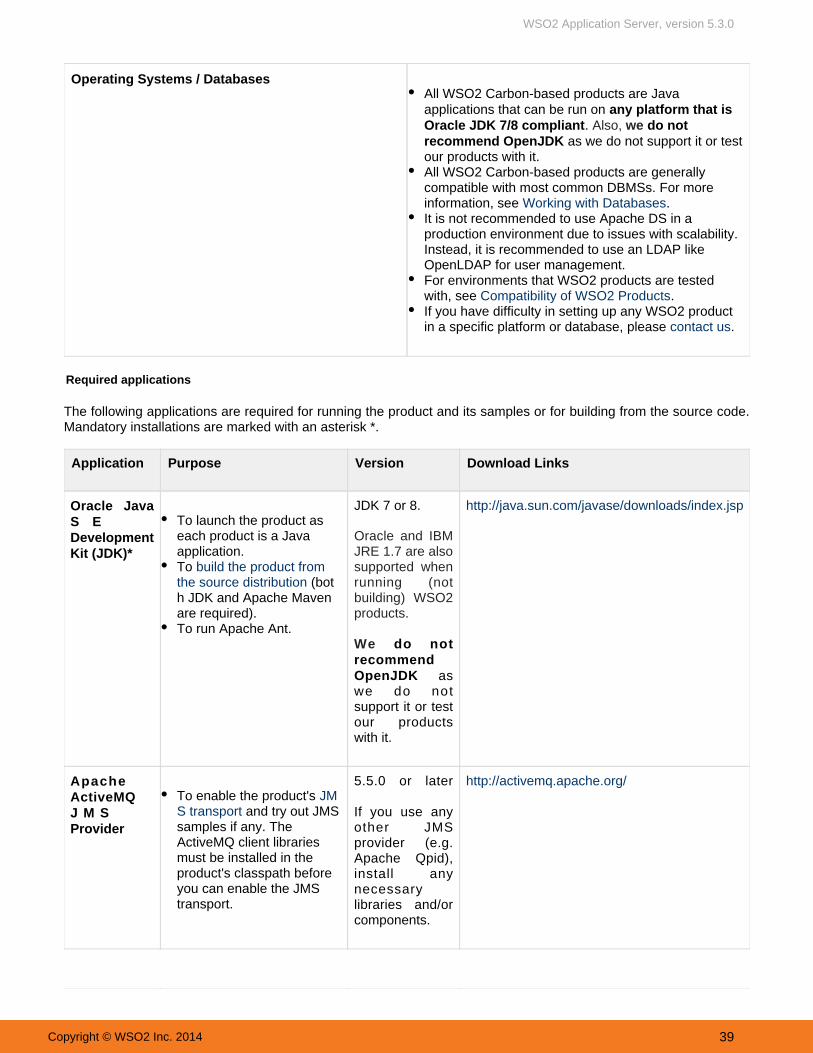
Operating Systems / DatabasesAll WSO2 Carbon-based products are Javaapplications that can be run on any platform that is
. Oracle JDK 7/8 compliant Also, we do not as we do not support it or testrecommend OpenJDK
our products with it.All WSO2 Carbon-based products are generally
with most common DBMSs. compatible For moreinformation, see Working with Databases.It is not recommended to use Apache DS in aproduction environment due to issues with scalability.Instead, it is recommended to use an LDAP likeOpenLDAP for user management.For environments that WSO2 products are testedwith, see .Compatibility of WSO2 ProductsIf you have difficulty in setting up any WSO2 productin a specific platform or database, .please contact us
Required applications
The following applications are required for running the product and its samples or for building from the source code.Mandatory installations are marked with an asterisk *.
Application Purpose Version Download Links
Oracle JavaS EDevelopmentKit (JDK)*
To launch the product aseach product is a Javaapplication.To build the product from
(botthe source distributionh JDK and Apache Mavenare required).To run Apache Ant.
JDK 7 or 8.
Oracle and IBMJRE 1.7 are alsosupported whenrunning (notbuilding) WSO2products.
We do notrecommend
asOpenJDKwe do notsupport it or testour productswith it.
http://java.sun.com/javase/downloads/index.jsp
ApacheActiveMQ J M SProvider
To enable the product's JM and try out JMSS transport
samples if any. TheActiveMQ client librariesmust be installed in theproduct's classpath beforeyou can enable the JMStransport.
5.5.0 or later
If you use anyother JMSprovider (e.g.Apache Qpid),install anynecessarylibraries and/orcomponents.
http://activemq.apache.org/

WSO2 Application Server, version 5.3.0
Copyright © WSO2 Inc. 2014 40
GitDownload the source codeand build the product from
.the source distribution
Linux - http://git-scm.com/download/linuxWindows - http://git-scm.com/download/win
Apache AntTo compile and run the pro
.duct samples
1.7.0 or later http://ant.apache.org/
ApacheMaven To build the product from
(botthe source distributionh JDK and Apache Mavenare required). If you areinstalling by downloadingand extracting the binarydistribution instead ofbuilding from the sourcecode, you do need tonotinstall Maven.
3.0.x http://maven.apache.org/
W e bBrowser To access the product's Ma
. nagement Console TheWeb Browser must beJavaScript enabled to takefull advantage of theManagement console.
NOTE: On Windows Server2003, you must not gobelow the medium securitylevel in Internet Explorer6.x.
You are now ready to install WSO2 AS. Click one of the following links for instructions:
Installing on Linux or OS XInstalling on SolarisInstalling on WindowsInstalling as a Windows Service
Installing the Product
Installing WSO2 AS is very fast and easy. Before you begin, be sure you have met the , andinstallation prerequisitesthen follow the installation instructions as given below.
Installing on Linux or OS XInstalling on SolarisInstalling on WindowsInstalling as a Windows ServiceInstalling as a Linux Service
Installing on Linux or OS X

WSO2 Application Server, version 5.3.0
Copyright © WSO2 Inc. 2014 41
1. 2.
1. 2.
1.
2.
3.
Follow the instructions below to install the required applications and WSO2 AS on Linux or Mac OS X.
Install the required applications
Establish an SSH connection to the Linux machine or log in on the text Linux console.Be sure your system meets the Installation Prerequisites. Java Development Kit (JDK) is essential to run the
product.
Installing the product
If you have not done so already, download the latest version of AS as described in Downloading the Product.Extract the archive file to a dedicated directory for the product, which will hereafter be referred to as <AS_HOM
.E>
Setting JAVA_HOME
You must set your environment variable to point to the directory where the Java Development Kit (JDK)JAVA_HOMEis installed on the computer.
In your home directory, open the BASHRC file in your favourite Linux text editor, such as vi, emacs, pico ormcedit.Add the following two lines at the bottom of the file, replacing with the actual/usr/java/jdk1.6.0_25 directory where the JDK is installed.
export JAVA_HOME=/usr/java/jdk1.6.0_25export PATH=${JAVA_HOME}/bin:${PATH}
The file should now look like this:
Save the file.
Before you begin, to find out if this version of the product is fully testedplease see our compatibility matrixon Linux or OS X.
Environment variables are global system variables accessible by all the processes running under theoperating system.
If you do not know how to work with text editors in a Linux SSH session, run the following command:

WSO2 Application Server, version 5.3.0
Copyright © WSO2 Inc. 2014 42
3.
4. To verify that the variable is set correctly, execute the following command:JAVA_HOME
echo $JAVA_HOME
The system returns the JDK installation path.
Setting system properties
If you need to set additional system properties when the server starts, you can take the following approaches:
Set the properties from a scriptSetting your system properties in the startup script is ideal, because it ensures that you set the propertiesevery time you start the server. To avoid having to modify the script each time you upgrade, the bestapproach is to create your own startup script that wraps the WSO2 startup script and adds the properties youwant to set, rather than editing the WSO2 startup script directly.Set the properties from an external registryIf you want to access properties from an external registry, you could create Java code that reads theproperties at runtime from that registry. Be sure to store sensitive data such as, username and password toconnect to the registry in a properties file, instead of in the Java code and secure the properties file with thesecure vault. Read about secure vault in the .section on security
You are now ready to .run the product
Installing on Solaris
cat >> .bashrc
Paste the string from the clipboard and press "Ctrl+D".
SUSE LinuxWhen using SUSE Linux, it ignores and only looks at the file. This/etc/resolv.conf /etc/hostsmeans that the server will throw an exception on startup if you have not specified anything besideslocalhost. To avoid this error, add the following line above in the file127.0.0.1 localhost /etc/hosts: <ip_address> <machine_name> localhost.
Before you begin, to find out if this version of the product is fully tested on Solaris. please see our compatibility matrix

WSO2 Application Server, version 5.3.0
Copyright © WSO2 Inc. 2014 43
1. 2.
1.
2.
1. 2.
3.
Follow the instructions below to install the required applications and the product on Solaris.
Installing the supporting applications
Establish an SSH connection to the Solaris machine or log in on the text console.Be sure your system meets the . Installation Prerequisites Java Development Kit (JDK) is essential to run theproduct.
Installing the product
If you have not done so already, download the latest version of the product as described in Downloading the Product.
Extract the archive file to a dedicated directory for the product, which will hereafter be referred to as <PRODUC.T_HOME>
Setting JAVA_HOME
You must set your environment variable to point to the directory where the Java Development Kit (JDK)JAVA_HOMEis installed on the computer.
In your home directory, open the BASHRC file in your favorite text editor, such as vi, emacs, pico or mcedit.Add the following two lines at the bottom of the file, replacing with the actual/usr/java/jdk1.6.0_25directory where the JDK is installed.
export JAVA_HOME=/usr/java/jdk1.6.0_25export PATH=${JAVA_HOME}/bin:${PATH}
The file should now look like this:
Save the file.
Environment variables are global system variables accessible by all the processes running under theoperating system.
If you do not know how to work with text editors in an SSH session, run the following command:
cat >> .bashrc
Paste the string from the clipboard and press "Ctrl+D."
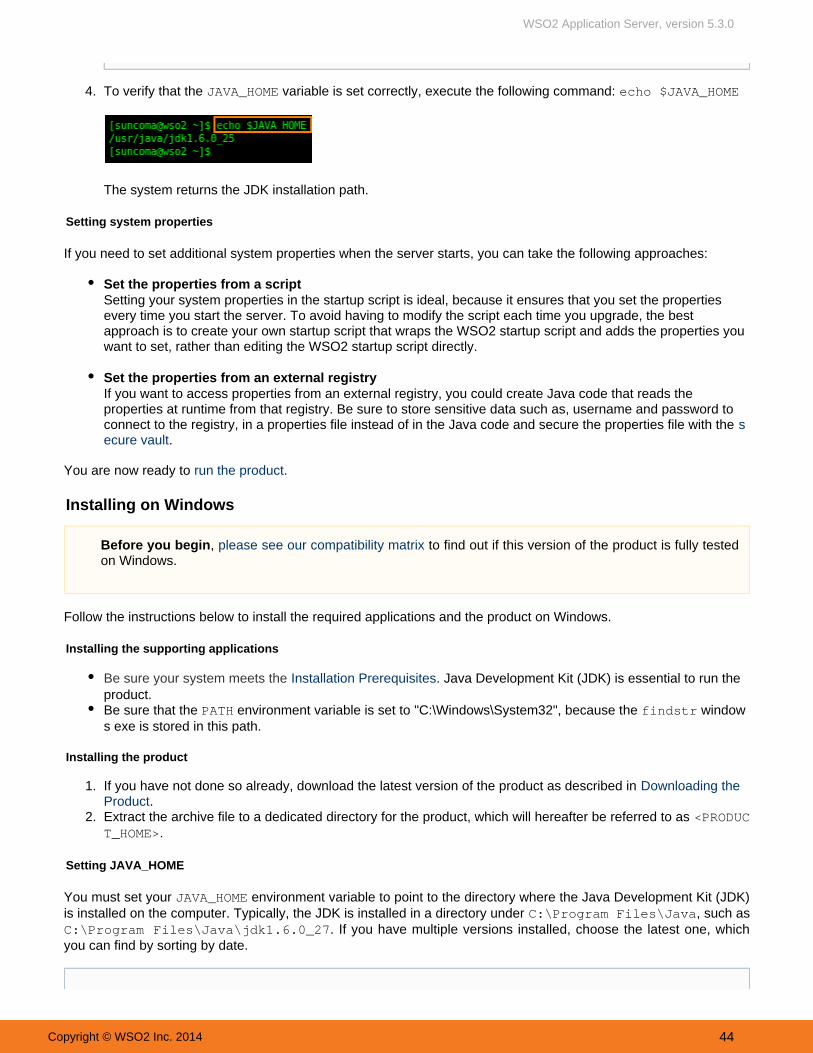
WSO2 Application Server, version 5.3.0
Copyright © WSO2 Inc. 2014 44
3.
4.
1.
2.
To verify that the variable is set correctly, execute the following command: JAVA_HOME echo $JAVA_HOME
The system returns the JDK installation path.
Setting system properties
If you need to set additional system properties when the server starts, you can take the following approaches:
Set the properties from a scriptSetting your system properties in the startup script is ideal, because it ensures that you set the propertiesevery time you start the server. To avoid having to modify the script each time you upgrade, the bestapproach is to create your own startup script that wraps the WSO2 startup script and adds the properties youwant to set, rather than editing the WSO2 startup script directly. Set the properties from an external registryIf you want to access properties from an external registry, you could create Java code that reads theproperties at runtime from that registry. Be sure to store sensitive data such as, username and password toconnect to the registry, in a properties file instead of in the Java code and secure the properties file with the s
.ecure vault
You are now ready to .run the product
Installing on Windows
Follow the instructions below to install the required applications and the product on Windows.
Installing the supporting applications
Be sure your system meets the . Installation Prerequisites Java Development Kit (JDK) is essential to run theproduct.Be sure that the environment variable is set to PATH "C:\Windows\System32", because the windowfindstrs exe is stored in this path.
Installing the product
If you have not done so already, download the latest version of the product as described in Downloading theProduct.Extract the archive file to a dedicated directory for the product, which will hereafter be referred to as <PRODUC
.T_HOME>
Setting JAVA_HOME
You must set your environment variable to point to the directory where the Java Development Kit (JDK)JAVA_HOMEis installed on the computer. Typically, the JDK is installed in a directory under , such asC:\Program Files\Java
. If you have multiple versions installed, choose the latest one, which\jdk1.6.0_27C:\Program Files\Javayou can find by sorting by date.
Before you begin, to find out if this version of the product is fully testedplease see our compatibility matrixon Windows.

WSO2 Application Server, version 5.3.0
Copyright © WSO2 Inc. 2014 45
1.
2.
You can set using the system properties, as described below. Alternatively, if you just want to set JAVA_HOME JAVA temporarily in the current command prompt window, . _HOME set it at the command prompt
Setting JAVA_HOME using the System Properties
Right-click the "My Computer" icon on the desktop and choose .Properties
In the System Properties window, click the tab, and then click the button.Advanced Environment Variables
Environment variables are global system variables accessible by all the processes running under theoperating system. You can define an environment variable as a system variable, which applies to all users,or as a user variable, which applies only to the user who is currently logged in.

WSO2 Application Server, version 5.3.0
Copyright © WSO2 Inc. 2014 46
2.
3.
4.
5.
Click the button under "System variables" (for all users) or under "User variables" (just for the user whoNew is currently logged in).
Enter the following information:In the "Variable name" field, enter: JAVA_HOMEIn the "Variable value" field, enter the installation path of the Java Development Kit, such as: c:\Prog
ram Files\Java jdk1.6.0_27Click .OK
The variable is now set and will apply to any subsequent command prompt windows you open. If youJAVA_HOMEhave existing command prompt windows running, you must close and reopen them for the variable toJAVA_HOMEtake effect, or manually set the variable in those command prompt windows as described in the nextJAVA_HOMEsection. To verify that the variable is set correctly, open a command window (from the menu, clickJAVA_HOME Start
, and then type and click ) and execute the following command:Run CMD Enter

WSO2 Application Server, version 5.3.0
Copyright © WSO2 Inc. 2014 47
1.
2.
set JAVA_HOME
The system returns the JDK installation path.
Setting JAVA_HOME temporarily using the Windows command prompt (CMD)
You can temporarily set the environment variable within a Windows command prompt window (CMD).JAVA_HOMEThis is useful when you have an existing command prompt window running and you do not want to restart it.
In the command prompt window, enter the following command where is the<JDK_INSTALLATION_PATH>JDK installation directory and press : Enterset JAVA_HOME=<JDK_INSTALLATION_PATH>
For example:
set JAVA_HOME=c:\Program Files\java\jdk1.6.0_27
The variable is now set for the current CMD session only.JAVA_HOME
To verify that the variable is set correctly, execute the following command:JAVA_HOME
set JAVA_HOME
The system returns the JDK installation path.
Setting system properties
If you need to set additional system properties when the server starts, you can take the following approaches:
Set the properties from a script Setting your system properties in the startup script is ideal, because it ensures that you set the propertiesevery time you start the server. To avoid having to modify the script each time you upgrade, the bestapproach is to create your own startup script that wraps the WSO2 startup script and add the properties youwant to set, rather than editing the WSO2 startup script directly. Set the properties from an external registryIf you want to access properties from an external registry, you could create Java code that reads theproperties at runtime from that registry. Be sure to store sensitive data such as, username and password toconnect to the registry in a properties file, instead of in the Java code and secure the properties file with the s
.ecure vault
You are now ready to .run the product
Installing as a Windows Service
WSO2 Carbon and any Carbon-based product can be run as a Windows service as described in the followingsections:
PrerequisitesSetting up the YAJSW wrapper configuration fileSetting up CARBON_HOMERunning the product in console modeWorking with the WSO2CARBON service
Prerequisites

WSO2 Application Server, version 5.3.0
Copyright © WSO2 Inc. 2014 48
Install JDK 1.6.24 or later or 1.7.* and set up the environment variable.JAVA_HOMEDownload and install a service wrapper library to use for running your WSO2 product as a Windows service.WSO2 recommends Yet Another Java Service Wrapper (YAJSW) version 11.03, and several WSO2 productsprovide a default wrapper.conf file in their <PRODUCT_HOME>/bin/yajsw/ directory. The instructionsbelow describe how to set up this file.
Setting up the YAJSW wrapper configuration file
The configuration file used for wrapping Java Applications by YAJSW is , which is located in the wrapper.conf <Y directory and in the directory of many WSO2 products.AJSW_HOME>/conf/ <PRODUCT_HOME>/bin/yajsw/
Following is the minimal configuration for running a WSO2 product as a Windows service. Openwrapper.confyour file, set its properties as follows, and save it in directory.wrapper.conf <YAJSW_HOME>/conf/
Minimal wrapper.conf configuration
#********************************************************************# working directory#********************************************************************wrapper.working.dir=${carbon_home}\\# Java Main class. # YAJSW: default is "org.rzo.yajsw.app.WrapperJVMMain" # DO NOT SET THIS PROPERTY UNLESS YOU HAVE YOUR OWN IMPLEMENTATION# wrapper.java.mainclass=#********************************************************************# tmp folder# yajsw creates temporary files named in_.. out_.. err_.. jna..# per default these are placed in jna.tmpdir.# jna.tmpdir is set in setenv batch file to <yajsw>/tmp#********************************************************************wrapper.tmp.path = ${jna_tmpdir}#********************************************************************# Application main class or native executable# One of the following properties MUST be defined#********************************************************************# Java Application main classwrapper.java.app.mainclass=org.wso2.carbon.bootstrap.Bootstrap# Log Level for console output. (See docs for log levels)wrapper.console.loglevel=INFO# Log file to use for wrapper output logging.wrapper.logfile=${wrapper_home}\/log\/wrapper.log# Format of output for the log file. (See docs for formats)#wrapper.logfile.format=LPTM# Log Level for log file output. (See docs for log levels)#wrapper.logfile.loglevel=INFO# Maximum size that the log file will be allowed to grow to before# the log is rolled. Size is specified in bytes. The default value# of 0, disables log rolling by size. May abbreviate with the 'k' (kB) or# 'm' (mB) suffix. For example: 10m = 10 megabytes.# If wrapper.logfile does not contain the string ROLLNUM it will be
If you want to set additional properties from an external registry at runtime, store sensitive information likeusernames and passwords for connecting to the registry in a properties file and secure it with .secure vault

WSO2 Application Server, version 5.3.0
Copyright © WSO2 Inc. 2014 49
automatically added as suffix of the file namewrapper.logfile.maxsize=10m# Maximum number of rolled log files which will be allowed before old# files are deleted. The default value of 0 implies no limit.wrapper.logfile.maxfiles=10# Title to use when running as a consolewrapper.console.title="WSO2 Carbon"#********************************************************************# Wrapper Windows Service and Posix Daemon Properties#********************************************************************# Name of the servicewrapper.ntservice.name="WSO2CARBON"# Display name of the servicewrapper.ntservice.displayname="WSO2 Carbon"# Description of the servicewrapper.ntservice.description="Carbon Kernel"#********************************************************************# Wrapper System Tray Properties#********************************************************************# enable system traywrapper.tray = true# TCP/IP port. If none is defined multicast discovery is used to find theport# Set the port in case multicast is not possible.wrapper.tray.port = 15002#********************************************************************# Exit Code Properties# Restart on non zero exit code#********************************************************************wrapper.on_exit.0=SHUTDOWNwrapper.on_exit.default=RESTART#********************************************************************# Trigger actions on console output#********************************************************************# On Exception show message in system traywrapper.filter.trigger.0=Exceptionwrapper.filter.script.0=scripts\/trayMessage.gvwrapper.filter.script.0.args=Exception#********************************************************************# genConfig: further Properties generated by genConfig#********************************************************************placeHolderSoGenPropsComeHere=wrapper.java.command = ${java_home}\\bin\\javawrapper.java.classpath.1 = ${java_home}\\lib\\tools.jarwrapper.java.classpath.2 = ${carbon_home}\\bin\\*.jarwrapper.app.parameter.1 = org.wso2.carbon.bootstrap.Bootstrapwrapper.app.parameter.2 = RUNwrapper.java.additional.1 =-Xbootclasspath\/a:${carbon_home}\\lib\\xboot\\*.jarwrapper.java.additional.2 = -Xms256mwrapper.java.additional.3 = -Xmx1024mwrapper.java.additional.4 = -XX:MaxPermSize=256mwrapper.java.additional.5 = -XX:+HeapDumpOnOutOfMemoryError

WSO2 Application Server, version 5.3.0
Copyright © WSO2 Inc. 2014 50
wrapper.java.additional.6 =-XX:HeapDumpPath=${carbon_home}\\repository\\logs\\heap-dump.hprofwrapper.java.additional.7 = -Dcom.sun.management.jmxremotewrapper.java.additional.8 =-Djava.endorsed.dirs=${carbon_home}\\lib\\endorsed;${java_home}\\jre\\lib\\endorsedwrapper.java.additional.9 = -Dcarbon.registry.root=\/wrapper.java.additional.10 = -Dcarbon.home=${carbon_home}wrapper.java.additional.11 = -Dwso2.server.standalone=truewrapper.java.additional.12 = -Djava.command=${java_home}\\bin\\javawrapper.java.additional.13 = -Djava.io.tmpdir=${carbon_home}\\tmpwrapper.java.additional.14 = -Dcatalina.base=${carbon_home}\\lib\\tomcat wrapper.java.additional.15 =-Djava.util.logging.config.file=${carbon_home}\\repository\\conf\\log4j.propertieswrapper.java.additional.16 =-Dcarbon.config.dir.path=${carbon_home}\\repository\\conf wrapper.java.additional.17 =-Dcarbon.logs.path=${carbon_home}\\repository\\logs wrapper.java.additional.18 =-Dcomponents.repo=${carbon_home}\\repository\\components\\pluginswrapper.java.additional.19 =-Dconf.location=${carbon_home}\\repository\\conf wrapper.java.additional.20 =-Dcom.atomikos.icatch.file=${carbon_home}\\lib\\transactions.propertieswrapper.java.additional.21 = -Dcom.atomikos.icatch.hide_init_file_path=true
wrapper.java.additional.22 =-Dorg.apache.jasper.runtime.BodyContentImpl.LIMIT_BUFFER=true wrapper.java.additional.23 =

WSO2 Application Server, version 5.3.0
Copyright © WSO2 Inc. 2014 51
1.
2.
-Dcom.sun.jndi.ldap.connect.pool.authentication=simplewrapper.java.additional.24 = -Dcom.sun.jndi.ldap.connect.pool.timeout=3000 wrapper.java.additional.25 = -Dorg.terracotta.quartz.skipUpdateCheck=true
Setting up CARBON_HOME
Extract the Carbon-based product that you want to run as a Windows service, and then set the Windowsenvironment variable to the extracted product directory location. For example, if you want to run ESBCARBON_HOME4.5.0 as a Windows service, you would set to the extracted directory.CARBON_HOME wso2esb-4.5.0
Running the product in console mode
You will now verify that YAJSW is configured correctly for running the Carbon-based product as a Windows service.
Open a Windows command prompt and go to the directory. For example:<YAJSW_HOME>/bat/
cd C:\Documents and Settings\yajsw_home\bat
Start the wrapper in console mode using the following command:
runConsole.bat
For example:
If the configurations are set properly for YAJSW, you will see console output similar to the following and can nowaccess the WSO2 management console from your web browser via .https://localhost:9443/carbon

WSO2 Application Server, version 5.3.0
Copyright © WSO2 Inc. 2014 52
Working with the WSO2CARBON service
To install the Carbon-based product as a Windows service, execute the following command in the <YAJSW_HOME>/ directory:bat/
installService.bat
The console will display a message confirming that the WSO2CARBON service was installed.
To start the service, execute the following command in the same console window:
startService.bat
The console will display a message confirming that the WSO2CARBON service was started.

WSO2 Application Server, version 5.3.0
Copyright © WSO2 Inc. 2014 53
To stop the service, execute the following command in the same console window:
stopService.bat
The console will display a message confirming that the WSO2CARBON service has stopped.
To uninstall the service, execute the following command in the same console window:
uninstallService.bat
The console will display a message confirming that the WSO2CARBON service was removed.

WSO2 Application Server, version 5.3.0
Copyright © WSO2 Inc. 2014 54
1.
Installing as a Linux Service
Follow the sections below to run a WSO2 product as a Linux service:
PrerequisitesSetting up CARBON_HOMERunning the product as a Linux service
Prerequisites
Install JDK 1.6.24 or later or 1.7.* and set up the environment variable. JAVA_HOME
Setting up CARBON_HOME
Extract the WSO2 product to a preferred directory in your machine and set the environment variable CARBON_HOMEto the extracted directory location.
Running the product as a Linux service
To run the product as a service, create a startup script and add it to the boot sequence. The basic structure ofthe startup script has three parts (i.e., start, stop and restart) as follows:

WSO2 Application Server, version 5.3.0
Copyright © WSO2 Inc. 2014 55
1.
2.
#!/bin/bash case “$1 instart) echo “Starting the Service”;;stop) echo “Stopping the Service”;;restart) echo “Restarting the Service”;;*) echo $”Usage: $0 {start|stop|restart}”exit 1esac
Given below is a sample startup script. can vary depending on the WSO2 product's<PRODUCT_HOME>directory.
#! /bin/shexport JAVA_HOME="/usr/lib/jvm/jdk1.7.0_07"
startcmd='<PRODUCT_HOME>/bin/wso2server.sh start > /dev/null &'restartcmd='<PRODUCT_HOME>/bin/wso2server.sh restart > /dev/null &'stopcmd='<PRODUCT_HOME>/bin/wso2server.sh stop > /dev/null &'
case "$1" instart) echo "Starting the WSO2 Server ..." su -c "${startcmd}" user1;;restart) echo "Re-starting the WSO2 Server ..." su -c "${restartcmd}" user1;;stop) echo "Stopping the WSO2 Server ..." su -c "${stopcmd}" user1;;*) echo "Usage: $0 {start|stop|restart}"exit 1esac
For example, In the above script, the server is started as a user by the name user1 rather than the root user. su -c "${startcmd}" user1
Add the script to directory./etc/init.d/
WSO2 Application Server, version 5.3.0
Copyright © WSO2 Inc. 2014 56
2.
3.
4.
Install the startup script to respective runlevels using the command . update-rc.d For example, give thefollowing command for the sample script shown in step1:
sudo update-rc.d prodserver defaults
The option in the above command makes the service to start in runlevels 2,3,4 and 5 and to stopdefaultsin runlevels 0,1 and 6.
A is a mode of operation in Linux (or any Unix-style operating system). There are several runlevelsrunlevelin a Linux server and each of these runlevels is represented by a single digit integer. Each runleveldesignates a different system configuration and allows access to a different combination of processes.
You can now start, stop and restart the server using service <service name> {start|stop|restart } command. You will be prompted for the password of the user (or root) who was used to start the service.
Running the Product
To run WSO2 products, you start the product server at the command line. You can then access the managementconsole to configure and manage the product.
Before you beginStarting the ServerAccessing the Management ConsoleStopping the Server
Before you begin
Before you start the server, note the following:
The file in the directory contains aconfig-validation.xml <PRODUCT_HOME>/repository/conf/etclist of recommended system parameters, which are validated against your system when the server starts.See for details on modifying these parameters before starting the server.Configuring config-validation.xmlThe Management Console uses the default , which is configured in the HTTP-NIO transport catalina-serv
file in the directory. This transport must beer.xml <PRODUCT_HOME>/repository/conf/tomcatproperly configured in this file for the Management Console to be accessible.
Starting the Server
To start the server, you run the script (on Windows) or (on Linux/Solaris) fromwso2server.bat wso2server.shthe folder. Alternatively, you can install and run the server as a .bin Windows service
If you want to keep the scripts in a location other than , you can add a symbolic folder/etc/init.d/link to the script in and keep the actual script in a separate location. Say your script/etc/init.d/name is prodserver and it is in folder, then the commands for adding a link to /opt/WSO2/ /etc/in
is as follows:it.d/
Make executable: sudo chmod a+x /opt/WSO2/prodserver
Add a link to :/etc/init.d/ sudo ln -snf /opt/WSO2/prodserver/etc/init.d/prodserver

WSO2 Application Server, version 5.3.0
Copyright © WSO2 Inc. 2014 57
1.
2.
Open a command prompt:On Windows, choose , type at the prompt, and press Enter.Start -> Run cmdOn Linux/Solaris, establish a SSH connection to the server or log into the text Linux console.
Execute one of the following commands, where is the directory where you installed the<PRODUCT_HOME>product distribution:
OS Command
On Windows <PRODUCT_HOME>\bin\wso2server.bat--run
On Linux/Solaris sh <PRODUCT_HOME>/bin/wso2server.sh
The operation log appears. When the product server is running, the log displays the message "WSO2 Carbonstarted in 'n' seconds".
Accessing the Management Console
Once the server has started, you can run the Management Console by opening a Web browser and typing in themanagement console's URL. The URL is displayed as the last line in the start script's console and log. For example:
To start and stop the server in the background mode of Linux, run wso2server.sh start and wso2server.sh stop commands.
Starting the server as a Worker Node:If you want to provide access to the production environment without allowing any user group(including admin) to log in to the management console, you must start the product as a workernode. You can enable the worker node for your product in two ways:
1. Use the -DworkerNode startup command when you start the product as shown below:
On Windows: <PRODUCT_HOME>\bin\wso2server.bat --run -DworkerNodeOn Linux/Solaris: sh <PRODUCT_HOME>/bin/wso2server.sh -DworkerNode
2.You can set permanently set the system property to 'true' in your product startup-DworkerNode
script. When you execute the product startup script, the worker profile will be started automatically.
'-DworkerNode=false'
Note that this profile only consists of the back-end features of the Application Server and does notinclude stubs or any UI features. However, in WSO2 AS, if you require any stubs to be activated inaddition to the back-end features when you run the worker profile, you can manually add the relevantJARs to the web application's folder before starting the server.lib For information about otherprofiles available for AS, see Running the Product on a Preferred Profile.
If you want to check any additional options available to be used with the startup commands, type -he after the command, such as: lp sh <PRODUCT_HOME>/bin/wso2server.sh -help.

WSO2 Application Server, version 5.3.0
Copyright © WSO2 Inc. 2014 58
The URL should be in the following format: https://<Server Host>:9443/carbon
You can use this URL to access the Management Console on this computer from any other computer connected tothe Internet or LAN. When accessing the Management Console from the same server where it's installed, you cantype "localhost" instead of the IP address: https://localhost:9443/carbon
At the sign-in screen, sign in to the Management Console using as both the username and password.adminYou can then use the Management Console to manage the product. The tabs and menu items in thenavigation pane on the left may vary depending on the features you have installed. For example, following isthe Management Console for WSO2 Carbon:
To view information about a particular page, click the , or click the link in the top right corner of that pageHelp link to open this documentation for full information on managing the product.Docs
When the Management Console Sign-in page appears, the web browser will typically display an"insecure connection" message, which requires your confirmation before you can continue.
The Management Console is based on the HTTPS protocol, which is a combination of HTTP andSSL protocols. This protocol is generally used to encrypt the traffic from the client to server forsecurity reasons. The certificate it works with is used for encryption only, and does not prove theserver identity, so when you try to access the Management Console, a warning of untrustedconnection is usually displayed. To continue working with this certificate, some steps should be takento "accept" the certificate before access to the site is permitted. If you are using the Mozilla Firefoxbrowser, this usually occurs only on the first access to the server, after which the certificate is storedin the browser database and marked as trusted. However, with other browsers the insecureconnection warning might be displayed every time you access the server.
This scenario is suitable for testing purposes, or for running the program on the company's internalnetworks. If you want to make the Management Console available to external users, yourorganization should obtain a certificate signed by a well-known certificate authority, which verifies thatthe server actually has the name it is accessed by and that this server belongs to the givenorganization.

WSO2 Application Server, version 5.3.0
Copyright © WSO2 Inc. 2014 59
If you leave the Management Console unattended, the session will time out. The default timeout value is 15minutes, but you can change this in the <PRODUCT_HOME>/repository/conf/tomcat/carbon/WEB-IN
file as follows: F/web.xml
<session-config> <session-timeout>15</session-timeout></session-config>
Restricting access to the managementconsole and web applications:You can restrict access to the management console of your product by binding the managementconsole with selected IP addresses. Note that you can either restrict access to the managementconsole only, or you can restrict access to all web applications in your server as explained below.

WSO2 Application Server, version 5.3.0
Copyright © WSO2 Inc. 2014 60
To control access only to the management console, add the IP addresses to the <PRODUCT_H file as follows:OME>/repository/conf/tomcat/carbon/META-INF/context.xml
<ValveclassName="org.apache.catalina.valves.RemoteAddrValve"allow="<IP-address-01>|<IP-address-02>|<IP-address-03>"/>
The Tomcat valve defined in this file will only apply to the CarbonRemoteAddrValvemanagement console, and thereby all outside requests to the management console will beblocked.
To control access to all web applications deployed in your server, add the IP addresses to the file as follows:<PRODUCT_HOME>/repository/conf/context.xml
<ValveclassName="org.apache.catalina.valves.RemoteAddrValve"allow="<IP-address-01>|<IP-address-02>|<IP-address-03>"/>
The Tomcat valve defined in this file will apply to each web applicationRemoteAddrValvehosted on the Carbon server. Therefore, all outside requests to any web application will beblocked.
You can also restrict access to particular servlets in a web application by adding a RemoteAddress Filter to the file (stored in the web.xml <PRODUCT_HOME>/repository/conf/tom
directory), and by mapping that filter to the servlet url. In the Remote Address Filter thatcat/you add, you can specify the IP addresses that should be allowed to access the servlet.
The following example from a web.xml file illustrates how access to the management page (/c) is granted only to one IP address:arbon/admin/login.jsp
<filter> <filter-name>Remote Address Filter</filter-name> <filter-class>org.apache.catalina.filters.RemoteAddrFilter</filter-class> <init-param> <param-name>allow</param-name> <param-value>127.0.01</param-value> </init-param></filter>
<filter-mapping> <filter-name>Remote Address Filter</filter-name> <url-pattern>/carbon/admin/login.jsp</url-pattern></filter-mapping>
Any configurations (including valves) defined in the Note: <PRODUCT_HOME>/repository/conf/tomcat/catalina-serv file applies to all web applications and is globally available across server, regardless of host or cluster. er.xml See the official
Tomcat documentation for more information about using remote host filters.

WSO2 Application Server, version 5.3.0
Copyright © WSO2 Inc. 2014 61
Stopping the Server
To stop the server, press in the command window, or click the link in the navigation paneCtrl+C Shutdown/Restartin the Management Console.
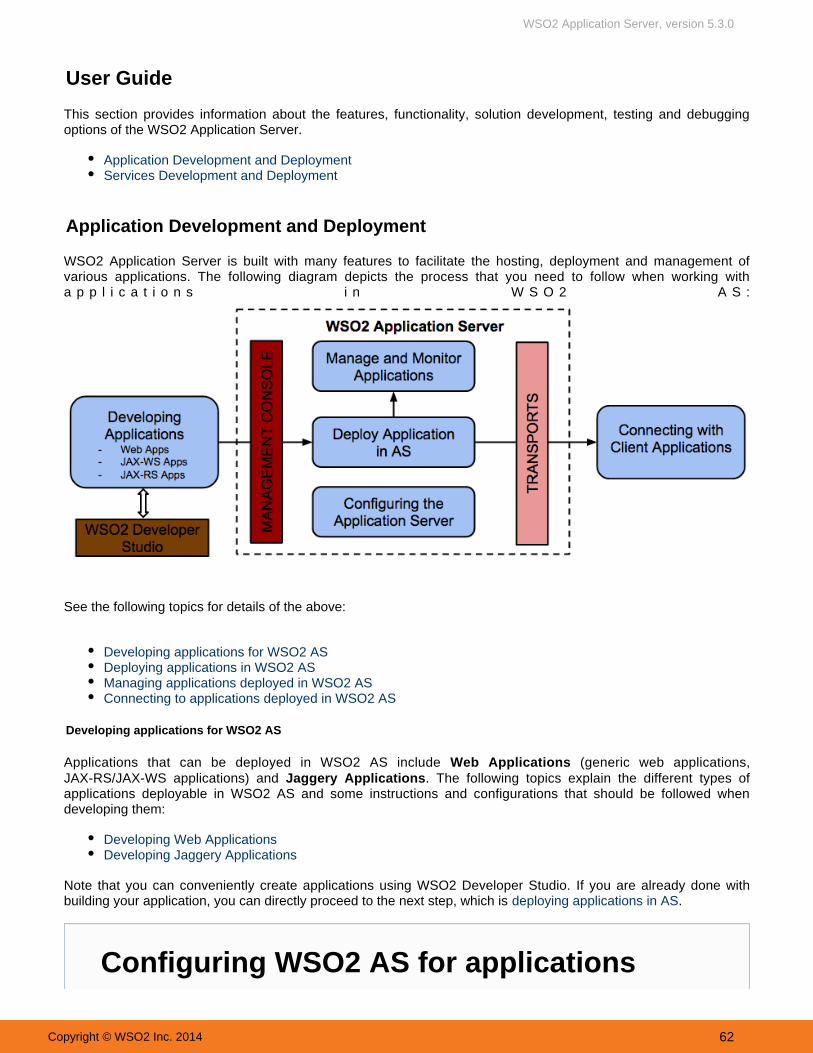
WSO2 Application Server, version 5.3.0
Copyright © WSO2 Inc. 2014 62
User Guide
This section provides information about the features, functionality, solution development, testing and debuggingoptions of the WSO2 Application Server.
Application Development and DeploymentServices Development and Deployment
Application Development and Deployment
WSO2 Application Server is built with many features to facilitate the hosting, deployment and management ofvarious applications. The following diagram depicts the process that you need to follow when working witha p p l i c a t i o n s i n W S O 2 A S :
See the following topics for details of the above:
Developing applications for WSO2 ASDeploying applications in WSO2 ASManaging applications deployed in WSO2 ASConnecting to applications deployed in WSO2 AS
Developing applications for WSO2 AS
Applications that can be deployed in WSO2 AS include (generic web applications,Web ApplicationsJAX-RS/JAX-WS applications) and .Jaggery Applications The following topics explain the different types ofapplications deployable in WSO2 AS and some instructions and configurations that should be followed whendeveloping them:
Developing Web ApplicationsDeveloping Jaggery Applications
Note that you can conveniently create applications using WSO2 Developer Studio. If you are already done withbuilding your application, you can directly proceed to the next step, which is deploying applications in AS.
Configuring WSO2 AS for applications

WSO2 Application Server, version 5.3.0
Copyright © WSO2 Inc. 2014 63
1.
Deploying applications in WSO2 AS
Once you are done with developing your application, you can easily deploy it in WSO2 AS using the managementconsole. See the topic on for step-by-step instructions.deploying applications in AS
Managing applications deployed in WSO2 AS
In the management console of WSO2 AS, you will find a separate dashboard for each of the deployed applicationsfor monitoring statistics. You can also use WSO2 BAM with WSO2 AS, for more advanced monitoring capabilities.See the topic on for detailed information.managing and monitoring applications in AS
Connecting to applications deployed in WSO2 AS
WSO2 AS supports a variety of for connecting with applications deployed in AS. transports Among these, the HTTP and HTTPS servlet transports are used by the applications hosted on AS,to connect with other clients and
applications.
By default WSO2 AS is configured with the message listener and message sender implementations that arenecessary for sending and receiving messages through the HTTP/HTTPS protocol.The transport receiver of the HTTP protocol is implemented in the Carbon Core component.The transport sender is implemented as a Tomcat connector in the file catalina-server.xml (stored in
.the <PRODUCT_HOME>/repository/conf/tomcat/ folder)
Developing Web Applications
Web components packaged in Web Application Archives (WAR) can be deployed in WSO2 AS as web applications.This includes any generic web application, JAX-RS/JAX-WS application or Spring application that is packaged intoWAR files. For more information on WAR files, please refer to http://ant.apache.org/manual/Tasks/war.html.
The following topics explains these different types of web applications deployable in AS, and how they should bedeveloped for WSO2 AS:
Generic web applicationsJAX-RS/JAX-WS applicationsSpring applications
Generic web applications
Once you have developed your web application, see that the following is in place before you build the .war file:
The hierarchical directory structure ofThe class files and the web.xml file should be in the archive directory.
the web archive for a generic web application is shown below.
WSO2 AS inherits many features from the Carbon platform, which allows you the flexibility of configuringyour server to provide the necessary support for your web applications. See the section on working with web
in the to find information on the server settings that will directly apply toapplications administration guideyour applications.
Note that it is not allowed to have Web applications named ' '.t.war

WSO2 Application Server, version 5.3.0
Copyright © WSO2 Inc. 2014 64
1.
2.
3.
HellowWorld.war index.html *.jsp WEB-INF/ web.xml lib/ classes/ META-INF/ images/
If you want to configure your web application by enabling SaaS mode or CORS, see the topic on Configuring.Applications for AS
If you want to use more advanced configurations for your web application, such as enabling Single Sign On(SSO), enabling fine grained authorization using XACML, see the topic.Working with Applications
JAX-RS/JAX-WS applications
JAX-WS and JAX-RS are popular Java APIs for implementing XML-based web applications and RESTful webapplications respectively. WSO2 AS uses Apache CXF as the framework for deploying and managingJAX-WS/JAX-RS web applications. You can easily develop JAX-WS/JAX-RS web applications using WSO2Developer Studio.
The following topics explain in detail how you can use the JAX-WS/JAX-RS specifications to develop and secureyour applications:
Developing JAX-RS ApplicationsDeveloping JAX-WS Applications
Spring applications
See the following topics for information:
Spring dependencies
Only the following subset of the spring packages (Spring Framework version 3.1.0) are delivered with AS:org.springframework.ws spring-xml (version : 2.0.3.RELEASE)org.springframework spring-core (version : 3.1.0)org.springframework spring-beans (version : 3.1.0)org.springframework spring-context (version : 3.1.0)org.springframework spring-web (version : 3.1.0)
If the application needs any other spring packages, they need to be deployed with the application itself.Projects that are built with Spring 2.5 or higher versions will be backward compatible with delivered version ofSpring Framework. However, it is recommended to build your application with Spring 3.1.0before deployment.If the application is based on a higher version of the Spring framework, then that version needs to bedeployed with the application. The framework which is deployed with the application will be given the priorityin the run time.
CXF environment
The following sub packages of Spring 3.0.7 are shipped with the Application Server CXF environment. spring-aopspring-asm

WSO2 Application Server, version 5.3.0
Copyright © WSO2 Inc. 2014 65
spring-beansspring-contextspring-corespring-expressionspring-web
If the user wants to upgrade the Spring versions, one of the following actions can be carried out: Remove existing Spring JARs from the directory and replace<product_home>/lib/runtimes/cxf them with the new JARs.Include the required JARs inside the directory of the application and deploy it in the WEB-INF/lib Tomc
runtime environment.at
If you want to use more advanced configurations for your web application, such as enabling Single Sign On (SSO),enabling fine grained authorization using XACML, enabling SaaS mode or CORS; see the Working with Applications topic for instructions.
JAX-WS and JAX-RS Support
JAX-WS and JAX-RS services are supported in WSO2 AS by the Apache CXF framework as explained below. Toenable this framework, the following feature should be installed in your product.
WSO2 Carbon - JAX-WS/JAX-RS Webapp Management FeatureName:Identifier: org.wso2.carbon.jaxws.webapp.mgt.feature.group
Note that this feature is enabled in WSO2 AS by default.
For information on how these services are implemented and deployed in AS, see the following topics: Developing, and .JAX-WS services Developing JAX-RS services Deploying Applications in AS
CXF framework in WSO2 AS
CXF ( ) is an open source services framework for developing services using JAX-WS andhttp://cxf.apache.orgJAX-RS (including other APIs). There are numerous benefits of using the Apache CXF framework for web servicedevelopment. In addition to JAX-WS and JAX-RS, Apache CXF also supports Spring integration and a variety ofweb service specifications, including WS-Addressing, WS-Policy, WS-ReliableMessaging and WS-Security. It alsocomes with a business-friendly Apache license.
WSO2 Application Server had the ability to host CXF-based applications in previously releases as well. However,because of the integration that now comes with this feature, there is more flexibility and you can use features of theCarbon platform within CXF applications. Further, this feature enables CXF users to directly deploy their webapplications in a running Carbon instance in a few easy steps. That is, you do not have to provide any CXF librariessince they are already provided by the WSO2 Carbon OSGi environment. The user only has to focus on thebusiness logic of the applications while the Carbon platform takes care of deployment.
In addition to the significant ease in hosting and managing, CXF-based applications deployed in a Carbon instanceautomatically inherits all the underlying capabilities of the platform. Some of them are listed below.
Ability to use the Carbon user store through CarbonContext.Ability to use WSO2 Registry APIs through CarbonContext.Fine-grained authorization through WSO2 Identity Server features.All benefits inherited from OSGi.User-friendly management console for web application management.Hot-deployment and hot-update of CXF-based web applications.
Developing JAX-RS Applications
JAX-RS is an annotation-driven Java API that can be used for exposing Java beans as HTTP based services. Forexample, RESTful web applications are developed using JAX-RS annotations to define the resources exposed bythe service. Web applications developed using JAX-RS annotations consist of the following qualities:

WSO2 Application Server, version 5.3.0
Copyright © WSO2 Inc. 2014 66
Use of HTTP/S transport protocols for message transfer.The content that is transported by a JAX-RS web service can be in any format, e.g., XML, JSON, TEXT etc.Security can be enabled for a JAX-RS web application either at the HTTP Header level, or by using TLSprotocol.
See the following topics for information on JAX-RS applications in WSO2 AS:
Working with JAX-RS annotationsConfiguring JAX-RS applications for AS
Securing JAX-RS applicationsOther configuration options
Building JAX-RS applications for AS
Working with JAX-RS annotations
JAX-RS annotations are defined in JSR 311. They are also a way of mapping Java with HTTP requests. Forexample, @GET, @PUT, @POST, @DELETE and @HEAD are JAX-RS annotations that directly map to HTTPrequests by the same name. See the official Java documentation, for details about JAX-RS annotations and RESTfu
.l web services
Shown below is an example of a simple web application that uses the following JAX-RS annotations: @Path,@GET, @Consumes and @Produces.
@Path("/hello")public class HelloWorldService { @GET @Consumes("text/plain") @Produces("text/xml") @Path("/{user}") public String hello(@PathParam("user") String user) { }}
In this example, the @GET annotation is used to specify how the web application should respond to HTTP GETrequests coming from a client. The @Consumes annotation determines the media type that the web service canaccept from the client and the @Produces annotation determines the media type that the web service can return tothe client in response to the request.
Configuring JAX-RS applications for AS
The following sections explain some of the configuration options that are available for JAX-RS applications:
Securing JAX-RS applicationsOther configuration options
Securing JAX-RS applications
When you define JAX-RS applications, you can enable authentication and authorization for your application basedon the users and roles that are defined in the AS user store. This is done by using the @RolesAllowed annotation inyour web service to map user roles that are already defined in the user store.
Use to easily develop your JAX-WS/JAX-RS Application. It will generate theWSO2 Developer Studioneeded Web application structure and you only have to concentrate on annotations and the business logic.

WSO2 Application Server, version 5.3.0
Copyright © WSO2 Inc. 2014 67
1.
2.
The following steps demonstrate how a JAX-RS application is secured by filtering the users that can access theservice:
For authentication, you should first enable the basic-auth security constraint in the web.xml file of your web
application. In AS, web applications are authenticated against the Carbon user stores. The Working with section explains how user stores are set up and configured. By default, WSO2Users, Roles and Permissions
Carbon products come with a default JDBC-based user store, and do not use (whichtomcat-users.xmlcomes by default with Apache Tomcat). This allows the web application to be authenticated against userstores such as LDAP, ActiveDirectory etc. So, when you set BASIC auth as a security-constraint via web.xm
l, the users will be authenticated against the users and roles set in a Carbon user store. See the following
example:
<security-constraint> <web-resource-collection> <web-resource-name>CXF Jax-RS security</web-resource-name> <url-pattern>/services/*</url-pattern> </web-resource-collection> <auth-constraint> <role-name>admin</role-name> <role-name>newrole</role-name> </auth-constraint></security-constraint>
You must add a cxf interceptor in the file. cxf-servlet.xml The roles you set using the @RolesAllowedannotation is authorized by CXF using the request interceptor, org.apache.cxf.interceptor.securit
. CXF receives the underlying container’s SecurityContext for thisy.SecureAnnotationsInterceptor
task. Since we have set the Carbon user store as the default user realm, CXF will use that. See the followingexample:

WSO2 Application Server, version 5.3.0
Copyright © WSO2 Inc. 2014 68
2.
3.
<!-- The SecureAnnotationsInterceptor honors the @RolesAllowed,@PermitAll and @DenyAll annotations -->
<bean id="authorizationInterceptor" class="org.apache.cxf.interceptor.security.SecureAnnotationsInterceptor"> <property name="securedObject" ref="serviceBean"/> </bean><jaxrs:server id="customerService" address="/customers">
<!-- set the interceptor for the jaxrs:server for in-bound messages toauthorize the user --> <jaxrs:inInterceptors> <ref bean="authorizationInterceptor"/> </jaxrs:inInterceptors> <jaxrs:serviceBeans> <ref bean="serviceBean"/> </jaxrs:serviceBeans>
Then, you can go ahead and add the relevant annotation to the needed resource methods in your JAX-RSresource class. See the following examples:
@RolesAllowed annotation: The required roles for authentication and authorization should bespecified for the application. In the example given below, only the users with the “admin” role will beable to access the resource method, "getCustomer".
@GET @RolesAllowed("admin") @Produces("application/xml") @Path("/customers/{id}/") public Customer getCustomer(@PathParam("id") String id) { System.out.println("----invoking getCustomer, Customerid is: " + id);long idNumber = Long.parseLong(id);Customer c =customers.get(idNumber); return c;}
annotation: Block all users in the user store from accessing the service.@DenyAll

WSO2 Application Server, version 5.3.0
Copyright © WSO2 Inc. 2014 69
3.
4.
@DenyAll @Path("/orders/{orderId}/") public Order getOrder(@PathParam("orderId") String orderId) { System.out.println("----invoking getOrder, Order id is: "+ orderId); long idNumber = Long.parseLong(orderId); Order c = orders.get(idNumber); return c; }
annotation: Allows all users in the user store to access the service.@PermitAll
@PermitAll @Path("/orders/{orderId}/") public Order getOrder(@PathParam("orderId") String orderId) { System.out.println("----invoking getOrder, Order id is: "+ orderId); long idNumber = Long.parseLong(orderId); Order c = orders.get(idNumber); return c; }
The annotations such as @RolesAllowed comes from the jsr250-api Common Annotations library. This is notshipped with WSO2 AS by default. So, you need to either include this library in your web application, ordirectly copy it to the AS. Since this is for a CXF JAX-RS application, you may copy this library to <AS_HOME>
folder. The Maven dependency information for jsr250-api library is as follows:/lib/runtimes/cxf/
<dependency> <groupId>javax.annotation</groupId> <artifactId>jsr250-api</artifactId> <version>1.0</version></dependency>
Shown below is a sample security configuration ( file and file) for a JAX-RS service.web.xml cxf-servlet.xml
Sample web.xml file:

WSO2 Application Server, version 5.3.0
Copyright © WSO2 Inc. 2014 70
<web-app version="2.5" xmlns="http://java.sun.com/xml/ns/javaee" xmlns:xsi="http://www.w3.org/2001/XMLSchema-instance" xsi:schemaLocation="http://java.sun.com/xml/ns/javaee http://java.sun.com/xml/ns/javaee/web-app_2_5.xsd"> <display-name>JAX-WS/JAX-RS Webapp</display-name> <servlet> <servlet-name>JAXServlet</servlet-name> <display-name>JAX-WS/JAX-RS Servlet</display-name> <description>JAX-WS/JAX-RS Endpoint</description> <servlet-class> org.apache.cxf.transport.servlet.CXFServlet </servlet-class> <init-param> <param-name>service-list-stylesheet</param-name> <param-value>servicelist.css</param-value> </init-param> <load-on-startup>1</load-on-startup> </servlet> <servlet-mapping> <servlet-name>JAXServlet</servlet-name> <url-pattern>/services/*</url-pattern> </servlet-mapping> <session-config> <session-timeout>60</session-timeout> </session-config><security-constraint> <web-resource-collection> <web-resource-name>CXF Jax-RS security</web-resource-name> <url-pattern>/services/*</url-pattern> </web-resource-collection> <auth-constraint> <role-name>admin</role-name> <role-name>newrole</role-name> </auth-constraint></security-constraint><login-config> <auth-method>BASIC</auth-method> <realm-name>default</realm-name></login-config> </web-app>
Sample cxf-servlet.xml file:

WSO2 Application Server, version 5.3.0
Copyright © WSO2 Inc. 2014 71
<beans xmlns="http://www.springframework.org/schema/beans" xmlns:xsi="http://www.w3.org/2001/XMLSchema-instance" xmlns:jaxrs="http://cxf.apache.org/jaxrs" xsi:schemaLocation=" http://www.springframework.org/schema/beanshttp://www.springframework.org/schema/beans/spring-beans-2.0.xsd http://cxf.apache.org/jaxrshttp://cxf.apache.org/schemas/jaxrs.xsd"> <bean id="serviceBean" class="demo.jaxrs.server.CustomerService"/> <!-- The SecureAnnotationsInterceptor honors the @RolesAllowed,@PermitAll and @DenyAll annotations --> <bean id="authorizationInterceptor" class="org.apache.cxf.interceptor.security.SecureAnnotationsInterceptor"> <property name="securedObject" ref="serviceBean"/> </bean> <jaxrs:server id="customerService" address="/customers"> <!-- set the interceptor for the jaxrs:server for in-bound messagesto authorize the user --> <jaxrs:inInterceptors> <ref bean="authorizationInterceptor"/> </jaxrs:inInterceptors> <jaxrs:serviceBeans> <ref bean="serviceBean"/> </jaxrs:serviceBeans> </jaxrs:server></beans>
Other configuration options
If you want to enable SaaS mode or CORS for your web applications see . Configuring Applications for ASIf you want to use more advanced configurations for your web application, such as enabling Single Sign On(SSO), enabling fine grained authorization using XACML, see the topics listed under Working withApplications.
Building JAX-RS applications for AS
JAX-WS and JAX-RS applications can be bundled in a CXF application. Given below is the general folder structureof a CXF application. However, this can change depending on your application.
Please see the instructions on , which explains how you can add theclass loading for web applicationswebapp-classloading.xml file to your web app. This XML is a custom file implemented by WSO2 to give flexibility inclassloading. You must have this file in order to deploy JAX-WS and JAX-RS applications, because the CXF runtimeis not visible to the webapps by default.

WSO2 Application Server, version 5.3.0
Copyright © WSO2 Inc. 2014 72
HellowService.war WEB-INF/ web.xml cxf-servlet.xml wsdl lib/ classes/ META-INF/ webapp-classloading.xml
Developing JAX-WS Applications
JAX-WS is the Java API for XML-Based Web Services. It provides a simple method of developing Web applicationswith a high level of portability and is defined using Java annotations without any deployment descriptors. JAX-WS2.0 specification ( ) http://jcp.org/aboutJava/communityprocess/mrel/jsr224/index3.html is defined on top of the JAX-R
PC 1.1 (http://jcp.org/aboutJava/communityprocess/final/jsr101/index2.html), which defines a standard set of APIsfor RPC oriented Web applications for Java. RPC is not widely used anymore. JAX-WS also delegates all data
binding aspects to JAXB (http://jcp.org/aboutJava/communityprocess/mrel/jsr222/index2.html).
JAX-WS development is dependent on Java annotations defined in JSR-181 (Web Services Metadata for the JavaPlatform), JAX-WS and JAXB. These annotations are used to let the JAX-WS runtime know about the nature of theWeb application interface. The developer can customize the Web application interface using annotations and buildthe service according to his requirements.
Working with JAX-WS annotationsJava to WSDL Development Model with JAX-WSWSDL to Java Development Model with JAX-WS
Configuration JAX-WS applications for ASBuilding JAX-WS applications for AS
Working with JAX-WS annotations
Listed below are the most important annotations and their member-value pairs.
@WebService
Used to mark a Java class when implementing a Web service or to mark a Java interface as defining a Web serviceinterface.
name - Name of the wsdl:portType in WSDL 1.1 (http://www.w3.org/TR/wsdl).targetNamespace - The XML namespace used for the WSDLserviceName - Name of the wsdl:service in WSDL 1.1. This is not allowed on endpoint interfaces.portName - Name of the wsdl:port in WSDL 1.1. This is not allowed on endpoint interfaces.wsdlLocation - A URL which points to an already existing WSDLendpointInterface - Complete name of the endpoint interface, when the interface and the implementation are
separated. This is not allowed on endpoint interfaces.
@WebMethod
Use to easily develop your JAX-WS/JAX-RS Application. It will generate theWSO2 Developer Studioneeded Web application structure and you only have to concentrate on annotations and the business logic.

WSO2 Application Server, version 5.3.0
Copyright © WSO2 Inc. 2014 73
Used to customize a method which is exposed as a Web service operation.
operationName - Name of the wsdl:operation matching the particular methodaction - The action for this operationexclude - Used to leave a method out of the Web Service interface
@Oneway
This annotation can be used to indicate that the given method maps to a one way operation. It has only an inputmessage and no output message.
@WebParam
Used to customize the mapping of an individual method parameter to a Web service message part and XMLelement.
name - Name of the parameter. This property relates to the style (document or rpc) of the operation.partName - Name of the wsdl:part which represents this parametertargetNamespace - XML namespace for this parameterheader - If true, the parameter is pulled from a message header rather than the message body
@WebResult
Used to customize the mapping of the return value to a Web service message part and XML element.
name - Name of the return value. This property relates to the style (document or rpc) of the operation.partName - Name of the wsdl:part which represents the return valuetargetNamespace - XML namespace for the return valueheader - If true, the return value is in a message header, rather than the message body
@SOAPBinding
Specifies the mapping of the Web service onto the SOAP message protocol.
style - DOCUMENT or RPCuse - LITERAL or ENCODEDparameterStyle - WRAPPED or BARE
JAX-WS 2.x supports the following combinations:
DOCUMENT/LITERAL/WRAPPED (default)DOCUMENT/LITERAL/BARERPC/LITERAL/WRAPPED
There are two main Web service development models. They are:
Java to WSDL (code first) approachWSDL to Java (contract first) approach
Java to WSDL Development Model with JAX-WS
In this approach, development starts from the code or the service implementation and the Web application enginegenerates the WSDL for the developer. The developer can write his POJO service and use annotations to controlthe structure of the WSDL. The JAX-WS runtime generates the WSDL according to these annotations used. Theadvantage of using annotations is that the Web application implementation can be changed without affecting thegenerated WSDL contract. Therefore, JAX-WS is the standard development technique when it comes to POJOdevelopment.
Some sample POJO services using JAX-WS are as follows:
Sample 1:

WSO2 Application Server, version 5.3.0
Copyright © WSO2 Inc. 2014 74
This simple example uses the @WebService annotation to convert a simple POJO into a Web application. Whenyou use this annotation, all the public methods in the class become operations in the application by default. If youwant to exclude a particular method, you have to specify it using the 'exclude' property of the @WebMethodannotation. Also, if some method should be mapped into a one way operation, you have to use the @Onewayannotation. The sample code of this POJO is as follows:
package org.wso2.jaxws.sample01;
import javax.jws.WebService;import javax.jws.Oneway;import javax.jws.WebMethod;
@WebServicepublic class SimpleSample {
public String echo(String echoInput) { return echoInput; }
@Oneway public void ping(String pingInput) { System.out.println("Ping : " + pingInput); }
@WebMethod(exclude = true) public String hideMethod(String hideInput) { return "Hiding : " + hideInput; }}
Sample 2:
This sample service (StudentMarksService) contains two operations called 'computeAverage' and'computeHighestMarks'. Both these methods get a Student object as a parameter. The sample code is as follows,showing how you can customize the WSDL service interface using annotations.
StudentMraksService.java class
package org.wso2.jaxws.sample02;
import javax.jws.WebService;import javax.jws.WebMethod;import javax.jws.WebParam;import javax.jws.WebResult;import javax.jws.soap.SOAPBinding;
@WebService( name = "StudentMarks", serviceName = "StudentMarksService", targetNamespace = "http://wso2.org/jaxws/sample02")@SOAPBinding(

WSO2 Application Server, version 5.3.0
Copyright © WSO2 Inc. 2014 75
style = SOAPBinding.Style.DOCUMENT, use = SOAPBinding.Use.LITERAL, parameterStyle = SOAPBinding.ParameterStyle.WRAPPED)
public class StudentMarksService {
@WebMethod( operationName = "computeAverage", action = "urn:getAverage" ) @WebResult( name = "average", targetNamespace = "http://wso2.org/jaxws/sample02" ) public double getAverage( @WebParam(name = "student", targetNamespace ="http://wso2.org/jaxws/sample02") Student student) {
double totalMarks = 0; for (int i = 0; i < student.getMarks().length; i++) { totalMarks += student.getMarks()[i]; } return totalMarks / student.getMarks().length; }
@WebMethod( operationName = "computeHighestMarks", action = "urn:getHighestMarks" ) @WebResult( name = "highest", targetNamespace = "http://wso2.org/jaxws/sample02" ) public int getHighestMarks( @WebParam(name = "student", targetNamespace ="http://wso2.org/jaxws/sample02") Student student) {
int highest = 0, temp; for (int i = 0; i < student.getMarks().length; i++) { temp = student.getMarks()[i]; if (temp > highest) { highest = temp; } } return highest;

WSO2 Application Server, version 5.3.0
Copyright © WSO2 Inc. 2014 76
}}
Student.java class
package org.wso2.jaxws.sample02;
public class Student {
private String name; private int age; private int[] marks;
public String getName() { return name; }
public void setName(String name) { this.name = name; }
public int getAge() { return age; }
public void setAge(int age) { this.age = age; }
public int[] getMarks() { return marks; }
public void setMarks(int[] marks) { this.marks = marks; }}
You can simply compile these sample classes, create .jar archives and deploy them in a running Carbon instance.
WSDL to Java Development Model with JAX-WS
In this method, the WSDL contract is used to generate the application's skeleton and other binding classes throughthe usage of some WSDL to Java tool (Look under the Tools section for more information). The tool generates theService Endpoint Interface (SEI) and the JAXB binding classes according to the WSDL and the schema. Servicedeveloper only has to write the application class by implementing the SEI.
A WSDL to Java sample using JAX-WS is as follows:
Sample 1:

WSO2 Application Server, version 5.3.0
Copyright © WSO2 Inc. 2014 77
The same "StudentMarksService" mentioned above is used here.
First, generate the code using some WSDL to Java tool. Create a folder (Ex: wsdl2java) to place your generated source files. Next step is to write the application implementation class. Use some IDE (e.g., Developer Studio) and
create a project using the generated classes. Then write the application class by implementing the SEI. Use the@WebService annotation to map the properties according to your WSDL and make sure you point to your WSDL fileusing the 'wsdlLocation' property. Service class is as follow:
package org.wso2.jaxws.sample02.service;
import org.wso2.jaxws.sample02.StudentMarksPort;import org.wso2.jaxws.sample02.Student;
import javax.jws.WebService;
@WebService( serviceName = "StudentMarksService", portName = "StudentMarksPort", targetNamespace = "http://wso2.org/jaxws/sample02", endpointInterface = "org.wso2.jaxws.sample02.StudentMarksPort", wsdlLocation = "StudentMarksService.wsdl")public class StudentMarksImpl implements StudentMarksPort {
public double computeAverage(Student student) { double totalMarks = 0; for (int i = 0; i < student.getMarks().size(); i++) { totalMarks += student.getMarks().get(i); } return totalMarks / student.getMarks().size(); }
public int computeHighestMarks(Student student) { int highest = 0, temp; for (int i = 0; i < student.getMarks().size(); i++) { temp = student.getMarks().get(i); if (temp > highest) { highest = temp; } } return highest; }}
Compile your project and create the archive to be deployed. Note that you have to include your WSDL file at.jarthe root level of your archive..jar
For more information on these operation styles, see the following articles on non JAX-WS contract-firstdevelopment with Apache Axis2.
Contract First Development with Axis2 (Part 1)Contract First Development with Axis2 (Part 2)
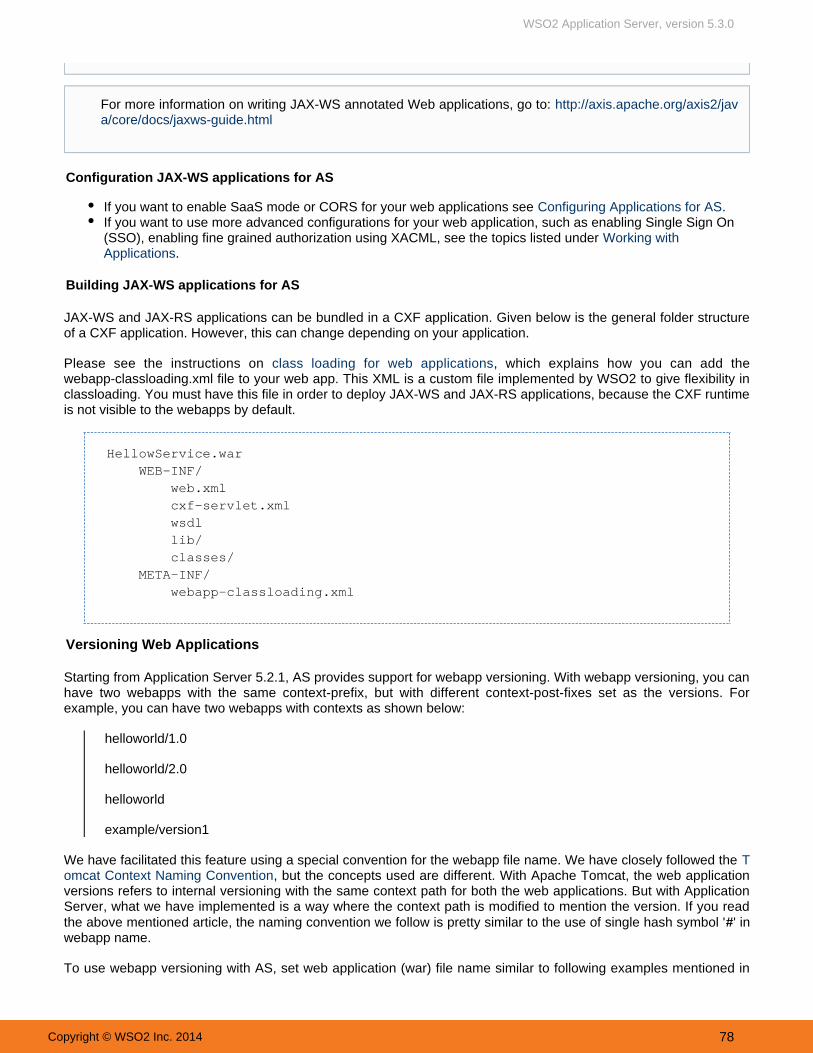
WSO2 Application Server, version 5.3.0
Copyright © WSO2 Inc. 2014 78
Configuration JAX-WS applications for AS
If you want to enable SaaS mode or CORS for your web applications see . Configuring Applications for ASIf you want to use more advanced configurations for your web application, such as enabling Single Sign On(SSO), enabling fine grained authorization using XACML, see the topics listed under Working withApplications.
Building JAX-WS applications for AS
JAX-WS and JAX-RS applications can be bundled in a CXF application. Given below is the general folder structureof a CXF application. However, this can change depending on your application.
Please see the instructions on , which explains how you can add theclass loading for web applicationswebapp-classloading.xml file to your web app. This XML is a custom file implemented by WSO2 to give flexibility inclassloading. You must have this file in order to deploy JAX-WS and JAX-RS applications, because the CXF runtimeis not visible to the webapps by default.
HellowService.war WEB-INF/ web.xml cxf-servlet.xml wsdl lib/ classes/ META-INF/ webapp-classloading.xml
Versioning Web Applications
Starting from Application Server 5.2.1, AS provides support for webapp versioning. With webapp versioning, you canhave two webapps with the same context-prefix, but with different context-post-fixes set as the versions. Forexample, you can have two webapps with contexts as shown below:
helloworld/1.0
helloworld/2.0
helloworld
example/version1
We have facilitated this feature using a special convention for the webapp file name. We have closely followed the T, but the concepts used are different. With Apache Tomcat, the web applicationomcat Context Naming Convention
versions refers to internal versioning with the same context path for both the web applications. But with ApplicationServer, what we have implemented is a way where the context path is modified to mention the version. If you readthe above mentioned article, the naming convention we follow is pretty similar to the use of single hash symbol ' ' in#webapp name.
To use webapp versioning with AS, set web application (war) file name similar to following examples mentioned in
For more information on writing JAX-WS annotated Web applications, go to: http://axis.apache.org/axis2/java/core/docs/jaxws-guide.html

WSO2 Application Server, version 5.3.0
Copyright © WSO2 Inc. 2014 79
the table. The version part is treated as a String for flexibility.
Webapp File Name Context Path
helloworld#1.0.war helloworld/1.0
helloworld.war helloworld
example#version1.war example/version1
Developing Jaggery Applications
Jaggery is a framework to write Web applications and HTTP-focused Web services purely in Java Script, for allaspects of the application: front-end, server-side logic, communication and persistence. It is 100% open source and delivered under Apache license 2.0.
There is a myriad of different front-end and back-end technologies with multiple levels of data communicationinvolved in Web development today. The biggest challenge in working with a pool of different technologies ispreserving information integrity and consistency when it is passed through and converted from one technology toanother. Jaggery successfully addresses most of these challenges.
The most powerful use case of Jaggery is handling any part of a Web application development through a singleJavaScript framework - a single language and a single data format. This eliminates mismatches across differentlayers introduced by data conversion, and enables to create both applications and APIs at the same time, bridgingthe gap between Web applications and HTTP-focused Web services.
Given below are some of the main features and capabilities of Jaggery.
Jaggery is developed on top of the component-based WSO2 Carbon platform, which is the award-winningenterprise run-time for application and Web service hosting. It consists of just the right set of componentsrequired for efficient functioning. As a result, Jaggery is .lean and lightweightBecause of its architecture, Jaggery can be easily provisioned by plugging in additionalcomponent-basedcomponents.Jaggery is extremely . Most JavaScript application development mechanisms restrictagile and flexibledevelopers to a framework-specific structure or pattern, demanding an additional learning curve. In contrast,Jaggery does not require adherence to a specific Web development standard or procedure. Users have theflexibility to write their scripts any way they want and simply execute on the Jaggery deployment enginewithout compilation or any kind of pre-processing. Development is as simple as writing your script and justdropping into the Jaggery framework for auto-deployment. Jaggery smoothly and seamlessly decouplesdevelopers from the framework, allowing them to simply concentrate on the business logic.Jaggery . Clients can instantly send JSON information to the server and thetalks smoothly in JSONapplication is capable of understanding the data format.Jaggery has and pattern matching libraries. Being able to handle URLembedded URL pattern recognitionpatterns is a useful feature in Web application and API development.In-built capability to communicate with databases such as embedded H2, MySQL, Oracle etc.Jaggery scripts can be executed through a shell, which assists debugging.
Developing Jaggery applications
For more information on Jaggery, a quick-start guide, samples, documentation and hands-on experience of thisevolving product, go to http://jaggeryjs.org.
Configuration Jaggery applications for AS
If you want to enable SaaS mode or CORS for your applications, see . Configuring Applications for AS
Deploying Applications in AS

WSO2 Application Server, version 5.3.0
Copyright © WSO2 Inc. 2014 80
1.
2.
3.
WSO2 Application Server is a program for hosting, deploying and managing various applications. See Application for an overview of the process. Once you have developed the required applications,Development and Deployment
you can deploy them in AS using the management console as explained in the following instructions.
First, start WSO2 Application Server and log in to the management console. You can then deploy your applicationsusing the menu in the tab on the navigator:Manage/Applications Main
The following topics explain how different types of applications should be deployed in AS:
Deploying web applications Deploying Jaggery applications
Deploying web applications
This topic explains the steps that you have to follow in order to deploy web applications as web archive files (WARfiles). These include various types of web applications, such as generic web applications, JAX-RS/JAX-WSapplications as well as Spring applications.
Follow the instructions below to upload a Web archive file to Application Server.
Log in to the product's management console and click under in theWeb Applications Applicationsnavigator. The screen appears. Upload Web Applications
Browse and select your Web archive file.
, note that the support for web application deployment in AS is provided by the followingBefore you beginfeatures, which are installed in AS by default:
The capability to deploy and manage generic web applications is provided by the following feature:
Name: WSO2 Carbon - Webapp Management Feature Identifier: org.wso2.carbon.webapp.mgt.feature.group
The capability to deploy and manage JAX-RS/JAX-WS web applications is provided by the followingfeature:
WSO2 Carbon - JAX-WS/JAX-RS Webapp Management FeatureName: org.wso2.carbon.jaxws.webapp.mgt.feature.group Identifier:

WSO2 Application Server, version 5.3.0
Copyright © WSO2 Inc. 2014 81
3.
4.
5.
6.
If you are logged in as the super tenant, you can select the host for your web application. In the aboveexample, the host is the default 'localhost'. If you have configured in you AS, other domains willvirtual hostsbe listed in addition to 'localhost'. This means that you can deploy the same application in multiple domains.You can use the plus sign ('+') to add multiple web applications.
Click . Upload If the file is uploaded successfully, a message appears prompting you to refresh the page.C l i c k .O K
The .war f i le wil l be l isted in the page.Running Applications
Deploying Jaggery applications
This topic explains the steps that you have to follow in order to deploy Jaggery applications in AS.
If the Web application is faulty, a 'Faulty Web Application Groups' link will appear in the Running page. You can click the link to view the errors.Applications
Instead of using the management console, you can manually place the .war file containing all the requiredfiles in the <PRODUCT_HOME>/repository/deployment/server/webapps/ directory. These archivefiles will be deployed as web applications when the server starts.
WSO2 supports the deployment of Jaggery applications based on Apache Tomcat through the followingfeature in the WSO2 feature repository:
N a m e : W S O 2 C a r b o n - J a g g e r y S e r v e r F e a t u r e Identifier: org.wso2.carbon.jaggery.server.feature.group
The Jaggery application management feature is bundled in AS (version 5.0.0 onwards) by default.

WSO2 Application Server, version 5.3.0
Copyright © WSO2 Inc. 2014 82
1.
2. 3.
4.
5.
Follow the instructions below to deploy the file in a running Carbon instance.
Before deploying a Jaggery application through the management console, bundle it as a '.zip' archive with allthe resources and third-party libraries related to Jaggery applications.Log in to the product's management console. Click under the menu.Add Jaggery ApplicationsThe page appears. Upload Jaggery Applications Select your file and click .Upload
If youwant to add multiple services at the same time, click on the '+' sign next to .BrowseIf the Jaggery application was deployed successfully, a message appears confirming the deployment andopens the page. For example,Running Applications
If the Jaggery application is faulty, a "Faulty Jaggery Application Groups" link will appear. You can click thelink to view the errors.
Managing and Monitoring Applications
WSO2 products provide a range of monitoring tools to analyse statistics related to web applications(JAX-WS/JAX-RS/WebApps). The application dashboards available on the management console of WSO2 ASallows you to access the statistics of a running WSO2 AS instance. You can further extend the monitoringcapabilities using the toolboxes in WSO2 BAM. See the topics below for details.
Using the Application DashboardWeb Application Statistics Monitoring with BAM
Using the Application Dashboard
Every application that is deployed in WSO2 AS has a dedicated dashboard for the management and monitoring of
Instead of using the Management Console, you can manually place the file in .zip <PRODUCT_HOME>/rep and it will be deployed. Instead of creating a zip file, youository/deployment/server/jaggeryapps
can also add the resource files such as style sheets, images, java scripts etc. in the said location (preferablywithin a folder) along with the index.jag file. The files will be auto deployed.

WSO2 Application Server, version 5.3.0
Copyright © WSO2 Inc. 2014 83
1. 2. 3.
an application. See the following topics for detailed information:
Accessing an Application DashboardUsing the Application Dashboard
Viewing the application detailsViewing session statisticsManaging session operationsEnabling BAM statistics monitoring for the applicationMonitoring application statistics
Accessing an Application Dashboard
Follow the instructions below to access the dashboard of an application.
Log in to the product's management console.On the menu, under , click . The page appears.Main Applications List Running ApplicationsSelect an application and click on it to access its dashboard.
Click this link to see an example of an Application Dashboard

WSO2 Application Server, version 5.3.0
Copyright © WSO2 Inc. 2014 84
3.
Using the Application Dashboard
The following topics explains the various panels that are available on the application dashboard and how they canbe used:
Viewing the application detailsViewing session statisticsManaging session operationsEnabling BAM statistics monitoring for the applicationMonitoring application statistics
Viewing the application details
The panel provides general information about the application, such as the Context, the name ofApplication Detailsthe application, the file type, the status of the application (started or stopped) etc.
Viewing session statistics
The panel provides statistical information about the user sessions of the applications. It alsoSession Statisticsprovides a graphical view of the average system response time.
Managing session operations
The panel allows you to manage the running session of an application by performing the followingOperationsoperations:
Expire sessions - If you enter a value for session expiry in minutes and click all sessionsExpire sessions,

WSO2 Application Server, version 5.3.0
Copyright © WSO2 Inc. 2014 85
of the application that have been idle for the given number of minutes or more will be expired. Expire All Sessions - When you click this link, all existing sessions of the application will be expired.Reload - This option allows you to reload the application. For example, after doing some modification to theapplication's business logic, it can be reloaded to the Application Server.Stop - This option allows you to stop the application running. If the web application is currently not running,then its section has only the options.Operations Start
Enabling BAM statistics monitoring for the application
In the panel, you will find the option, which is used to enable applicationServices Enable BAM Statisticsmonitoring via WSO2 BAM. Note that in addition to this check box, there are other configurations that you mustcomplete in order to use the BAM statistics monitoring feature for your application. For the complete instructions,see .Web Application Statistics Monitoring with BAM
Monitoring application statistics
In the panel, you will find the following statistics of a running web application. Note that these statisticsStatisticsare not applicable to applications.Jaggery
Request Count - Total number of requests received to web applications.
Response Count - Total number of responses served by the web applications.
Fault Count - Total number of requests that triggered faults.
Maximum Response Time - Maximum time required to serve a request
Minimum Response Time - Minimum time required to serve a request
Average Response Time - Average time required to serve a request.

WSO2 Application Server, version 5.3.0
Copyright © WSO2 Inc. 2014 86
This statistics monitoring functionality is provided by the following feature:
N a m e : W S O 2 C a r b o n - S t a t i s t i c s F e a t u r e : org.wso2.carbon.system.statistics.feature.groupIdentifier
Web Application Statistics Monitoring with BAM
WSO2 BAM is a monitoring tool, which performs the task of aggregating, analyzing and presenting informationabout business activities. Thereby, BAM can be used with AS in order to effectively monitor the statistics of webapplications in AS.
To use BAM with AS, you must first configure the AS settings that allow web application data from AS to bepublished in BAM. Also, each web application in AS, which you want to monitor in BAM should be individuallyconfigured to allow data publishing in BAM. In BAM, the default toolbox is dedicated forbam_webapp_statisticsmonitoring the web applications.
Configuring web application statistics monitoring with BAMViewing the web application statistics
Note that the statistics available on the management console of AS are only valid for each running sessionof the server. That is, if you restart the server, the statistics shown on the management console will reset.Therefore, if you want to have persistent statistics of web applications, you must use WSO2 BAM for
.monitoring statistics

WSO2 Application Server, version 5.3.0
Copyright © WSO2 Inc. 2014 87
1.
1.
2.
2.
1. 2.
1. 2.
1.
2.
3.
Configuring web application statistics monitoring with BAM
Perform the following steps to ensure that you have the necessary configurations for monitoring web applicationstatistics with BAM:
Step 1: Start the Application ServerStep 2: Start the Business Activity MonitorStep 3: Configure the Application Server (AS)Step 4: Configuring the web application that need monitoringStep 5: Configure the Business Activity Monitor (BAM)Step 6: Invoke the web application that has enabled statistics monitoringStep 7: Schedule or execute the webapp statistics
Step 1: Start the Application Server
To start the application server for web application monitoring with BAM:
Do the following changes to the given files before you start AS.
Go to < folder and open . AS_HOME>/repository/conf/ carbon.xmlLook for and change it to .<offset>0</offset> 1
Go to <AS_HOME>/repository/conf/etc/ folder and open bam.xml .
Look for <WebappDataPublishing>disable</WebappDataPublishing> and enable it.Start the Application Server. For more information, see .Starting the server
Step 2: Start the Business Activity Monitor
To start BAM and to setup databases for statistics:
Start BAM. For more information, see .Starting the serverIf you need to change the database that stores statistic data, do the following;
Create a database.Configure the database in <BAM_HOME>/repository/conf/datasources/master-datasourc
es.xml as WSO2BAM_DATASOURCE .
Step 3: Configure the Application Server (AS)
To configure the AS for publishing statistics in BAM:
Log in and open the AS management console.
Go to the tab and click .Configure Webapp Data Publishing
Select the check box.Enable webapp stats
Note that web app data publishing settings need to be configured separately for the tenants.

WSO2 Application Server, version 5.3.0
Copyright © WSO2 Inc. 2014 88
3.
4.
5.
6. 7. 8.
1. 2.
1. 2.
Leave the Stream Name, Version, Nick Name, Description as it is. These are the default values from the bam toolbox._webapp_statistics
Enter the Receiver URL. This refers to the Thrift URL, which is normally . If you need to use SSL for this, the URL willtcp://{host}:7611be . If you change the offset of the BAM server to 1, both ports will be incremented by 1tcps://{host}:7711(7612, 7712).Enter the Cassandra Username. Enter the Cassandra Password.Click to successfully configure the AS for Data publishing to BAM.Update
Step 4: Configuring the web application that need monitoring
Once you have configured your AS with a BAM tool box for monitoring statistics, you must enable monitoring oneach of the web applications that you want to monitor. Use either one of the following approaches to configure theweb application before deploying.
Enable monitoring via the UIEnable monitoring via web.xml
Enable monitoring via the UI
On the tab, under the menu, click .Main Applications ListClick the link for the respective web application.ContextThe selected application dashboard will appear.
Note that if you change any of the details relevant to the toolbox, e.g., stream name, version etc, youmust accordingly modify the hive script of the toolbox in BAM.
The UI configurations has precedence over configurations. As a result, if you disable web appweb.xmlstatistics monitoring from the UI, the configurations in the will not work.web.xml

WSO2 Application Server, version 5.3.0
Copyright © WSO2 Inc. 2014 89
2.
3. Click to enable BAM statistics.Activate
Enable monitoring via web.xml
Add the following context parameters to the file corresponding to your web application.web.xml
<context-param> <param-name>enable.statistics</param-name> <param-value>true</param-value></context-param>
Step 5: Configure the Business Activity Monitor (BAM)
In the previous steps, we have configured the web applications in AS as required for monitoring with BAM. Now,

WSO2 Application Server, version 5.3.0
Copyright © WSO2 Inc. 2014 90
1.
2.
3.
4.
1.
2.
3.
4.
1. 2. 3.
1.
2.
3.
follow the steps given below to install and set up the toolbox in BAM.
Login and open the management console of BAM.
On the Main menu, under BAM Toolbox, click Add.
Select the option and enter the following URL: ToolBox From URL http://product-dist.wso2.com/downloads/.business-activity-monitor/tool-boxes/2.5.0/WebApps_Stats_Monitoring.tbox
Click . Refresh after a few seconds to see if the toolbox is installed.Install
Step 6: Invoke the web application that has enabled statistics monitoring
To invoke the web application in AS:
Login and open the AS management console.
On the menu, under the caption, click . Main Applications List
Cl ick the respec t i ve web app l i ca t ion con tex t l i nk .The application dashboard will appear.
Click the web application services link (e.g., ). /jaxrs_basic/services
Step 7: Schedule or execute the webapp statistics
To execute the statistics on BAM:
Login and open the BAM management console.On the menu, under The Main , click . Analytics List webapp statistics will be displayed.Execute the webapp statistics or schedule its running sequence.
Viewing the web application statistics
To view the statistics with the web statistics on BAM:
On the menu of the BAM management console, click .Main Dashboard
Login to the dashboard using "admin" as the username and password.
Select the Server, Tenant and Web App to view web application statistics via the BAM Dashboard.
This is the URL of the WebApps_Stats_Monitoring toolbox (default toolbox for web application datamonitoring). Note that all the toolboxes are hosted in the .product web site for WSO2 BAM
If you have changed any details corresponding to the toolbox when you configured the AS (see thestep on configuring AS), you must change the hive script of the toolbox according to those changes.

WSO2 Application Server, version 5.3.0
Copyright © WSO2 Inc. 2014 91
3.
Services Development and Deployment
Services of various types (Axis2 services, JAR services and Spring services) can be deployed in WSO2 AS easilyby using the management console. See the following topics for more information:
Axis2 servicesSpring servicesEngaging global modules for servicesDeploying services in AS
Axis2 services
An Axis2 archive file is just a .jar file with a specific directory structure as shown below.
Test.aar
META-INF
services.xml
Test.class
To learn how to create an Axis2 service using WSO2 Developer Studio, refer to: http://markmail.org/download.xqy?id=tsctqe7x5rnwexls&number=1To learn how to create an Axis2 service using Eclipse, refer to: http://wso2.org/library/tutorials/create-axis2-web-service-in-3-steps-using-eclipse
Spring services
To develop a simple Spring service, you have to provide a Spring file, which has a .jar file containingcontext.xmlthe bean classes. Given below is an example of a simple Spring file specifying a particular bean withcontext.xml

WSO2 Application Server, version 5.3.0
Copyright © WSO2 Inc. 2014 92
an ID and a class name found in the .jar file.
<?xml version="1.0" encoding="UTF-8"?> <!DOCTYPE beans PUBLIC "-//SPRING//DTD BEAN//EN""http://www.springframework.org/dtd/spring-beans.dtd"> <beans> <bean id="SimpleEchoBean" class="org.wso2.test.EchoBean"> </bean> </beans>
The Echo Bean for this example is shown below. It can contain any type of service implementation.
package org.wso2.test; /*** Example EchoBean***/
public class EchoBean { public String echoString(String input) { return input; }
public int echoInt(int input) { return input; }}
Engaging global modules for services
With Axis2, you can use modules to extend the functions of services deployed in your server. See the followingtopics for detailed information on how you can create axis2 modules, add them to the server and engage them foryour services.
Creating an Axis2 ModuleDeploying Axis2 Modules
Deploying services in AS
See the following topics for step-by-step instructions on how to deploy services in WSO2 AS:
Deploying Axis2 ServicesDeploying JAR ServicesDeploying Spring Services
Deploying Axis2 Services
All WSO2 products come with Axis2 capabilities, which allows you to deploy services as archive files. An Axis2Service is deployed in your product in the form of an Axis2 archive file (.aar), which has all the service-relatedresources, service classes, and third-party libraries bundled together .
For more information, refer to http://axis.apache.org/axis2/java/core/docs/spring.html

WSO2 Application Server, version 5.3.0
Copyright © WSO2 Inc. 2014 93
1.
2.
3.
4.
Once you have developed the Axis2 service, you can upload the .aar file to a running WSO2 AS instance as shownbelow.
Log in to the management console and select Main -> Services .-> Add -> AAR Service
The Add Service Archives page appears. Select your .aar file and click . Upload For example,
Service HierarchySpecifying a service hierarchy is optional. It allows you to customize your service endpoint reference. If thebusiness logic of the same service changes over time, you can maintain multiple versions of the service byusing service hierarchy at deployment.
For example, consider a service named Version. If the service hierarchy is not mentioned, then the serviceendpoint reference is ../services/Version. With service hierarchy specified, for example as 1.0.0, the endpointreference is ../services/1.0.0/Version. Specifying a hierarchy is important if you want to manage servicesseparately. If the file is uploaded successfully, a message appears prompting you to refresh the page. Click OK.
Refresh the Deployed Services page in the management console to view the newly added service.
If the service is faulty, a " Faulty Service Groups" link will appear. You can click the link to view theerrors.

WSO2 Application Server, version 5.3.0
Copyright © WSO2 Inc. 2014 94
4.
1.
2.
Deploying JAR Services
Follow the instructions below to deploy a Jar service in a running WSO2 AS instance.
Log on to the product's management console and select Main -> Services .-> Add -> Jar Service
The Add Jar Service page opens. The Artifact and Service Group Name fields are mandatory. Others areoptional.
Service HierarchySpecifying a service hierarchy is optional. It allows you to customize your service endpointreference. If the business logic of the same service changes over time, you can maintain multiple versions ofthe service by using service hierarchy at deployment.
The file name of the archive is always used as the service name unless you have a different name attributedto the service file. For example, if the name of the archive file is Test.aar, then the name of the service willbe Test.
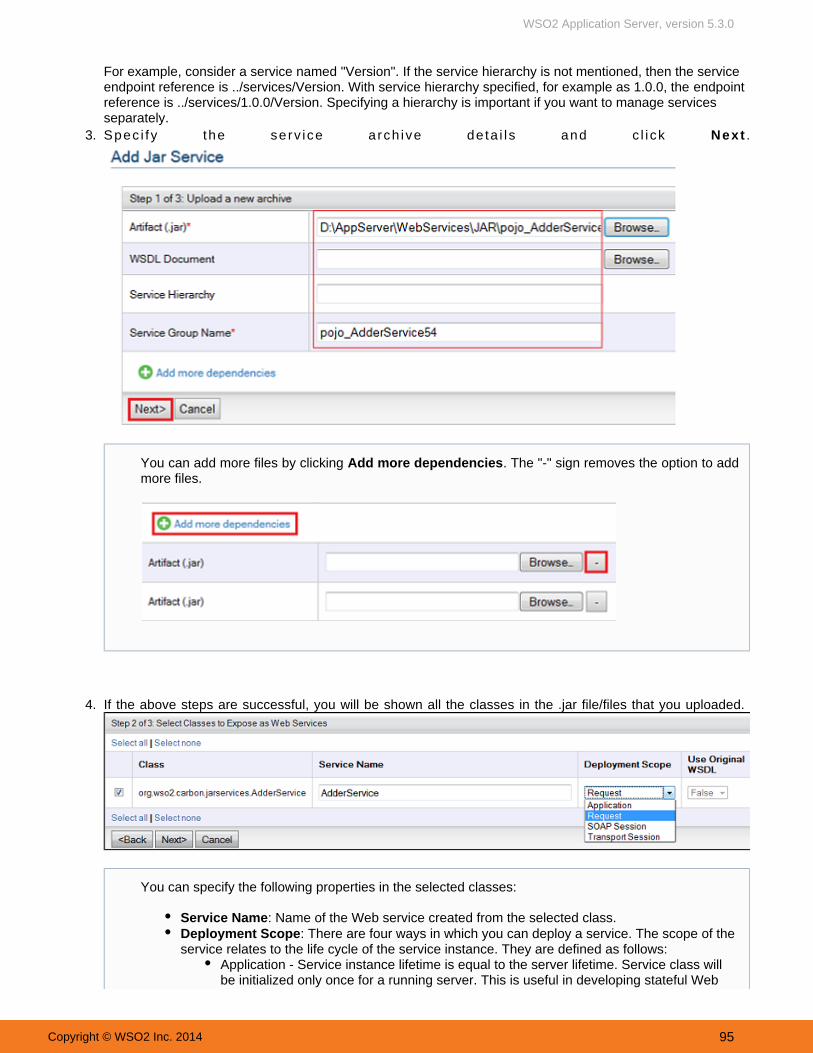
WSO2 Application Server, version 5.3.0
Copyright © WSO2 Inc. 2014 95
2.
3.
4.
For example, consider a service named "Version". If the service hierarchy is not mentioned, then the service endpoint reference is ../services/Version. With service hierarchy specified, for example as 1.0.0, the endpoint
reference is ../services/1.0.0/Version. Specifying a hierarchy is important if you want to manage servicesseparately.Spec i fy the serv ice a rch ive de ta i l s and c l i ck Next .
If the above steps are successful, you will be shown all the classes in the .jar file/files that you uploaded.
You can add more files by clicking . The "-" sign removes the option to addAdd more dependenciesmore files.
You can specify the following properties in the selected classes:
Service Name: Name of the Web service created from the selected class.Deployment Scope: There are four ways in which you can deploy a service. The scope of theservice relates to the life cycle of the service instance. They are defined as follows:
Application - Service instance lifetime is equal to the server lifetime. Service class willbe initialized only once for a running server. This is useful in developing stateful Web

WSO2 Application Server, version 5.3.0
Copyright © WSO2 Inc. 2014 96
4.
5.
6.
7.
8.
Select one or more classes to be exposed as Web services and click Next.
You will be shown the set of classes selected along with the operations in each of those classes. All methodsare selected by default. Deselect the ones you do not wish to expose as Web service operations and click Finish.
If the file is uploaded successfully, a message appears prompting you to refresh the page. ClickOK.
Refresh the Deployed Services page in the product's management console to view the newly added servicelisted.
Deploying Spring Services
services.Request - Service class is initialized for each and every request.SOAP Session - Axis2 supports a SOAP session using a SOAP specific cookie. Here,the service instance lifetime is equal to the lifetime of the SOAP session.Transport Session - Service instance lifetime is equal to the lifetime of the transportsession.
Use Original WSDL: Determines whether or not to use the original WSDL in the servicearchive. This property can only be specified if you have already uploaded a WSDL in theabove steps. If this is set to 'False', then the WSDL will be generated since it is not specifiedearlier.

WSO2 Application Server, version 5.3.0
Copyright © WSO2 Inc. 2014 97
1.
2.
To develop a simple Spring service, you have to provide a Spring file, which has a .jar file containingcontext.xmlthe bean classes. Given below is an example of a simple Spring file specifying a particular bean withcontext.xmlan ID and a class name found in the .jar file.
<?xml version="1.0" encoding="UTF-8"?> <!DOCTYPE beans PUBLIC "-//SPRING//DTD BEAN//EN""http://www.springframework.org/dtd/spring-beans.dtd"> <beans> <bean id="SimpleEchoBean" class="org.wso2.test.EchoBean"> </bean> </beans>
The Echo Bean for this example is shown below. It can contain any type of service implementation.
package org.wso2.test; /*** Example EchoBean***/
public class EchoBean { public String echoString(String input) { return input; }
public int echoInt(int input) { return input; }}
Deploying Spring Services
Follow the instructions below to deploy a Spring service to a running WSO2 AS instance.
Log on to the product's management console and select Main -> Service .-> Add -> Spring Service
In the window that appears, specify the relevant files and click . For example,Add Spring Service Upload
For more information, refer to http://axis.apache.org/axis2/java/core/docs/spring.html

WSO2 Application Server, version 5.3.0
Copyright © WSO2 Inc. 2014 98
2.
3.
S e r v i c e H i e r a r c h ySpecifying a service hierarchy is optional. It allows you to customize your service endpoint reference. If thebusiness logic of the same service changes over time, you can maintain multiple versions of the service byu s i n g s e r v i c e h i e r a r c h y a t d e p l o y m e n t .
For example, consider a service named "SpringTest". If the service hierarchy is not mentioned, then theservice endpoint reference is ../services/SpringTest. With service hierarchy specified, for example as 1.0.0,the endpoint reference is ../services/1.0.0/SpringTest. Specifying a hierarchy is important if you want tom a n a g e s e r v i c e s s e p a r a t e l y .
If the files are not faulty, the Select Beans to Deploy page appears.
Select the check box associated with the the beans you want to expose as Web services and click Include G.enerate
If the beans specified in the spring file are mentioned in the .jar file, they will becontext.xmldisplayed on this page.

WSO2 Application Server, version 5.3.0
Copyright © WSO2 Inc. 2014 99
3.
4.
5.
If the generation is successful, a message appears prompting you to refresh the page. Click .OK
Refresh the page in your product's management console to view the newly addedDeployed Servicesservices listed.
If your service implementation depends on any third-party libraries, you can copy them to the <AS_HOME>/r epository/components/extensions directory and restart the server to get your service started.

WSO2 Application Server, version 5.3.0
Copyright © WSO2 Inc. 2014 100
1.
2.
3. 4.
Samples
This section discusses the following use cases of the product.
Deploying your First Custom Web ApplicationThe Entitlement Servlet Filter SampleJAX-RS SamplesJAX-WS SamplesJaggery SamplesWebSockets SampleSSO Sample
Deploying your First Custom Web Application
The WSO2 Application Server supports Apache Tomcat based Web application deployment. All you need to do is tobundle your Web application as a archive with all your Web application related resources and all third-party.warlibraries, and then deploy the archive. This sample demonstrates how you can get started quickly with WSO2Application Server, by deploying your custom web application.
You can use Maven or Apache Ant to deploy the applications as follows:
Using Maven to deploy applicationsUsing Apache Ant to deploy applications
Using Maven to deploy applications
Follow the steps given below before you build and run the sample.
Open a command prompt and navigate to the base directory of the sample (i.e., <PRODUCT_HOME>\sample).s\HelloWorldWebapp
Build the demo and create a WAR file using the following command.
mvn clean install
This will create the sample webapp WAR file (wso2appserver-samples-hello-webapp-1.0.war file) in the targ
folder of the et <AS_HOME>/samples/<sample-name> directory.
Start the WSO2 Application Server by following the instructions in .Running the ProductYou can deploy the web app in two ways:
Manually copy the WAR file to the direc<AS_HOME>/repository/deployment/server/webapps
tory.Deploy the WAR file you created in step 2 using the management console as detailed .here
Using Apache Ant to deploy applications
Apache Maven 3 is recommended to build the samples.
WSO2 Application Server, version 5.3.0
Copyright © WSO2 Inc. 2014 101
1. 2.
3.
1.
2.
You can find the sample discussed here in the directory.<AS_HOME>/samples/HelloWorldWebapp
The steps are as follows:
Run the WSO2 Application Server. For instructions see, .Running the ProductIn a command prompt , swi tch to the samples d i rectory .For example, in Windows:
cd <AS_HOME>\samples\HelloWorldWebapp
Enter the following command:
ant
This will copy the sample webapp (wso2appserver-samples-hello-webapp-1.0.war file) in to<AS_HOME>/repository/deployment/server/webapps/ directory. If you log into the Application Server, you willsee the deployed webapp on the R . screenunning Applications
Related Links
JAX-RS SamplesJAX-WS SamplesJaggery Samples
The Entitlement Servlet Filter SampleThis sample demonstrates how fine grained authorization is enabled and used for web applications. Read moreabout in web applications.XACML fine grained authorization
PrerequisitesBuilding the SampleRunning the sample
Prerequisites
Before you start an instance of WSO2 IS, be sure that the port offset is given as "1" in the file.carbon.xml
You need Apache Ant 1.6.2 or higher to build the sample.
In this sample we create a Web App with Entitlement Servlet Filter engaged. All the dependencies arepacked in to the lib. So this sample can be run in any other webapp container. You have to simply host theWeb App in the container and edit the to give the URL of the web application. Thereafter, you canpom.xml check the functionality.
The configurations in the file of the sample web app should match the configurations inweb.xmlyour running IS instance. For example, if you have changed the value in the remoteServiceUrl we
of the sample (stored in sample b.xml directory's <AS_HOME>/samples/EntitlementFilter/s folder), you must .webapp/WEB-INFrc/main/ change the IS portoffset accordingly

WSO2 Application Server, version 5.3.0
Copyright © WSO2 Inc. 2014 102
2. 3.
1.
2.
1.
2.
Start an instance of WSO2 Identity Server.Import the sample XACML policy stored in the <AS_HOME>/samples/EntitlementFilter/src/main/r
directory to IS using the management console.esources
Building the Sample
The base directory of this sample has the file which is used to build the necessary Web App and tobuild.xmldeploy it in WSO2 App Server.
Run the relevant command to deploy the web app:
Using Maven
Create a WAR file for the sample using the following command:
mvn clean install
Deploy the generated WAR file on WSO2 AS with the related logs on the console:
mvn -Pdeploy
Using Ant
ant
Start the Application Server and access the Management Console. Go to the webapp service listing page. You willsee the deployed service.
Running the sample
You have to run the run-client.sh or run-client.bat script. It has all the arguments and classpaths configured torun the sample.In the console it will show the result for several Entitlement Decision Scenarios. Following output will beshown in the console if you run the sample correctly:
***********Starting the Entitlement Servlet Filter Sample************
Sending Request For a Web Page Which Requires AuthorizationSubject : adminResource : /Entitlement_Sample_WebApp/protected.jspAction : GETEnvironment : Not Specified***Response BEGIN ***<html><head><title>Protected Page</title></head><body>Only Authorized Users Can View This</body></html>***Response END ***
Sending Request For a Web Page Which Not Requires Authorization

WSO2 Application Server, version 5.3.0
Copyright © WSO2 Inc. 2014 103
2.
Subject : adminResource : /Entitlement_Sample_WebApp/index.jspAction : GETEnvironment : Not Specified***Response BEGIN ***<html><head><title>Index Page</title></head><body>Anybody Can Access This Page....</body></html>
***Response END ***
Sending Request For a Web Page Which Requires Authorization with FalseSubject NAMESubject : andunslgResource : /Entitlement_Sample_WebApp/protected.jspAction : GETEnvironment : Not Specified***Response BEGIN ***Server returned HTTP response code: 401 for URL:http://localhost:9763/Entitlement_Sample_WebApp/protected.jsp***Response END ***
Sending Request For a Web Page Which Requires Authorization with FalseActionSubject : adminResource : /Entitlement_Sample_WebApp/protected.jspAction : POSTEnvironment : Not Specified***Response BEGIN ***<html><head><title>Protected Page</title></head><body>Only Authorized Users Can View This</body></html>***Response END ***
Sending Request For a Web Page Which Requires Authorization But Policyis not definedSubject : adminResource : /Entitlement_Sample_WebApp/other.jspAction : GETEnvironment : Not Specified***Response BEGIN ***<html><head><title>Index Page</title></head><body>Anybody Can Access This Page....</body></html>

WSO2 Application Server, version 5.3.0
Copyright © WSO2 Inc. 2014 104
2.
1.
2.
3.
4.
5.
***Response END ***
***********Ending the Entitlement Servlet Filter Sample************
JAX-RS Samples
Building and Running JAX-RS SamplesJAX-RS BasicsJAX-RS AdvancedJAX-RS Sample on Content Negotiation
Building and Running JAX-RS Samples
Using Maven
Follow the steps given below before you build and run the sample:
Open the sample folder in your product pack using a command line and go to the <PRODUCT_HOME>\sampl directory. The folders for Jax-rs samples are listed here:es\Jaxws-Jaxrs\<JAX-RS-Sample-Folder> J
.AX-RS Sample FolderBuild the demo and create a WAR file using the following command.
mvn clean install
Deploy the generated WAR file in WSO2 AS with the related logs on the console using the followingcommand:
mvn -Pdeploy
This command will copy the WAR file to the dir<AS_HOME>/repository/deployment/server/webappsectory.
Start the WSO2 Application Server by executing one of the following commands, where i<PRODUCT_HOME>s the directory where you installed the product distribution:
OS Command
On Windows <PRODUCT_HOME>\bin\wso2server.bat--run
On Linux/Solaris sh <PRODUCT_HOME>/bin/wso2server.sh
Log in to the management console and click on the menu, under . ThisList Main Manage/Applications
Apache Maven 3 is recommended to build the samples.

WSO2 Application Server, version 5.3.0
Copyright © WSO2 Inc. 2014 105
5.
6.
1.
2.
3. 4.
1.
2.
opens the page. The deployed applications will be listed here.Running Applications
You can open the required web application by clicking the action.Find Services
Using Apache Ant
Open the sample folder in your product pack using a command line and go to the <PRODUCT_HOME>\sampl directory. The folders for Jax-rs samples are listed here:es\Jaxws-Jaxrs\<JAX-RS-Sample-Folder> J
.AX-RS Sample Folder
To deploy the sample, run the following command:
ant
Start the Application Server and log in to the management console.You can run the sample in two ways:
Log in to the management console. On the menu, under , click toMain Manage/Applications Listopen the page. The deployed applications will be listed here. Running ApplicationsUsing the command line, go the JAX-RS sample directory and execute the following command:
OS Command
On Windows run-client.bat
On Linux/Solaris sh run-client.sh
The results of the sample will show on the command line.
JAX-RS Sample Folder
Sample JAX-RS Sample Folder
JAX-RS Basics jaxrs_basic
If you want to remove the target directory, run the following command inside the <PRODUCT_HOME>\sampl directory:es\Jaxrs-Jaxrs\<JAX-RS-Sample-Folder>
mvn clean
You need 1.6.2 or higher to build the samples.Apache Ant
For different options, run:
sh run-client.sh -help

WSO2 Application Server, version 5.3.0
Copyright © WSO2 Inc. 2014 106
1. 2.
1.
2.
3.
4.
5.
JAX-RS Advanced jaxrs_starbucks_service
JAX-RS Sample on Content Negotiation jaxrs_content_negotiation
JAX-RS Basics
This sample demonstrates a basic REST-based Web Services using JAX-RS (JSR-311).
Building the sample Running the sample
Building the sample
Open a command line, and navigate to the directory.<AS_HOME>/samples/Jaxws-Jaxrs\jaxrs_basicRun the relevant command to deploy the web app:
Using Maven
Create a WAR file for the sample using the following command:
mvn clean install
Deploy the generated WAR file on WSO2 AS with the related logs on the console:
mvn -Pdeploy
Using Ant
ant
Start the WSO2 Application Server by executing one of the following commands, where i<PRODUCT_HOME>s the directory where you installed the product distribution:
OS Command
On Windows <PRODUCT_HOME>\bin\wso2server.bat--run
On Linux/Solaris sh <PRODUCT_HOME>/bin/wso2server.sh
Log in to the management console and click on the menu, under . ThisList Main Manage/Applicationsopens the page. The deployed applications will be listed here.Running Applications
You can open the required web application by clicking the action.Find Services
Running the sample
You can invoke the JAX-RS web application as shown below.

WSO2 Application Server, version 5.3.0
Copyright © WSO2 Inc. 2014 107
1.
Get the customer instance for customer ID 123 by sending an HTTP GET request to http://localhost:9763/jaxr/customers/123s_basic/services/customers/customerservice . The XML document returns the following:
<Customer> <id>123</id> <name>John</name></Customer>
Get the an HTTP GET request to product 323 that belongs to order 223 by sending http://localhost:9763/jaxrs/orders/223/products/323_basic/services/customers/customerservice . The XML document returns the
following:
<Product> <description>product 323</description> <id>323</id></Product>
Add the customer named Jack by sending an HTTP POST request to http://localhost:9763/jaxrs_basic/servic/customerses/customers/customerservice as shown below.
<Customer> <name>Jack</name></Customer>
Update the customer with ID 123 as shown below by sending an HTTP PUT request to http://localhost:9763/j/customers.axrs_basic/services/customers/customerservice/customers
<Customer> <id>123</id> <name>John</name></Customer>
The client code demonstrates how to send HTTP GET/POST/PUT/DELETE requests; whereas, the server codedemonstrates how to build a RESTful endpoint through JAX-RS (JSR-311) APIs.
JAX-RS Advanced
This sample shows some advanced functionalities of REST-based Web Services using JAX-RS (JSR-311). Pleasenote that this sample was called jaxrs_sample_02 in the AS 5.1.0 release. It has been renamed to provide betterclarity.
Building the sample Running the sample
Building the sample
Open a command line, and navigate to the <AS_HOME>\samples\Jaxws-Jaxrs\jaxrs_starbucks_se

WSO2 Application Server, version 5.3.0
Copyright © WSO2 Inc. 2014 108
1.
2.
1.
2.
3.
4.
5.
directory.rviceRun the relevant command to deploy the web app:
Using Maven
Create a WAR file for the sample using the following command:
mvn clean install
Deploy the generated WAR file on WSO2 AS with the related logs on the console:
mvn -Pdeploy
Using Ant
ant
Start the WSO2 Application Server by executing one of the following commands, where i<PRODUCT_HOME>s the directory where you installed the product distribution:
OS Command
On Windows <PRODUCT_HOME>\bin\wso2server.bat--run
On Linux/Solaris sh <PRODUCT_HOME>/bin/wso2server.sh
Log in to the management console and click on the menu, under . ThisList Main Manage/Applicationsopens the page. The deployed applications will be listed here.Running Applications
You can open the required web application by clicking the action.Find Services
Running the sample
This JAX-RS webapp provides following services:
A RESTful Starbucks outlet service is provided on URL http://localhost:9763/jaxrs_starbucks_service/service (say serviceURL).s/Starbucks_Outlet_Service Users access this URI to perform operations of drink orders.
A HTTP GET request to URL ${serviceURL}/orders/123 returns a drink order added with the generated id
:123. The JSON document returns

WSO2 Application Server, version 5.3.0
Copyright © WSO2 Inc. 2014 109
{ "Order":{ "orderId":"123", "drinkName":"Vanilla Flavored Coffee", "additions":"Milk", "locked":false }}
A HTTP POST request to URL ${serviceURL}/orders adds an order. with the following data
<Order> <drinkName>Mocha Flavored Coffee</drinkName> <additions>Caramel</additions></Order>
An id for this order is generated at server-side and returned in the response. The response body looks likethe following in JSON format.
{"Order":{ "additions":"Caramel", "drinkName":"Mocha Flavored Coffee", "locked":false, "orderId":"ee1a9ec2-c8a5-4afe-8585-74df591f9990"}}
A HTTP PUT request to URL ${serviceURL}/orders with the following data, where the 'orderId' is set to theone received in the response body when the order was added:
{ "Order":{ "orderId":"ee1a9ec2-c8a5-4afe-8585-74df591f9990", "additions":"Chocolate Chip Cookies" }}
It updates the 'additions' of the order "ee1a9ec2-c8a5-4afe-8585-74df591f9990" from "Caramel" to"Chocolate Chip Cookies". The response will be in XML-format as follows.

WSO2 Application Server, version 5.3.0
Copyright © WSO2 Inc. 2014 110
1.
2.
1.
2.
3.
<?xml version="1.0" encoding="UTF-8" standalone="yes"?> <Order> <additions>Chocolate Chip Cookies</additions> <drinkName>Full Leaf Green Tea</drinkName> <locked>true</locked> <orderId>ee1a9ec2-c8a5-4afe-8585-74df591f9990</orderId> </Order>
A HTTP DELETE request to URL ${serviceURL}/orders/ee1a9ec2-c8a5-4afe-8585-74df591f9990 with anempty request body will delete the order details of order "ee1a9ec2-c8a5-4afe-8585-74df591f9990".
The client code demonstrates how to send HTTP GET/POST/PUT/DELETE requests whereas the server codedemonstrates how to build a RESTful endpoint through JAX-RS (JSR-311) APIs.
JAX-RS Sample on Content Negotiation
This sample demonstrates how to implement content negotiation in the Application Server. Content negotiation is amechanism which allows to maintain multiple representations of the same resource, and serve the particularrepresentation relevant to a given request and what the requesting server needs.
Building the sample Running the sample
Building the sample
Open a command line, and navigate to the < >/samples/Jaxws-Jaxrs/AS_HOME jaxrs_content_nego directory.tiation
Run the relevant command to deploy the web app:Using Maven
Create a WAR file for the sample using the following command:
mvn clean install
Deploy the generated WAR file on WSO2 AS with the related logs on the console:
mvn -Pdeploy
Using Ant
ant
Start the WSO2 Application Server by executing one of the following commands, where i<PRODUCT_HOME>s the directory where you installed the product distribution:
OS Command

WSO2 Application Server, version 5.3.0
Copyright © WSO2 Inc. 2014 111
3.
4.
5.
On Windows <PRODUCT_HOME>\bin\wso2server.bat--run
On Linux/Solaris sh <PRODUCT_HOME>/bin/wso2server.sh
Log in to the management console and click on the menu, under . ThisList Main Manage/Applicationsopens the page. The deployed applications will be listed here.Running Applications
You can open the required web application by clicking the action.Find Services
Running the sample
A RESTful customer service is provided on URL .http://localhost:9763/jaxrs_content_negotiation/services/ Usersaccess this URL to operate on a customer. The REST server provides the following services:
An HTTP GET request to URL http://localhost:9763/jaxrs_content_negotiation/services/customers/customers ervice/customers/123 with "accept header" set to "application/xml" returns a customer instance in XML format
. The XML document returns:
<Customer> <id>123</id> <name>John</name></Customer>
An HTTP GET request to URL http://localhost:9763/jaxrs_content_negotiation/services/customers/customers ervice/customers/123 with "accept header" set to "application/json" returns a customer instance in JSON form
at. The JSON document returns:
{"Customer":{"id":"123","name":"John"}}
An HTTP GET request to URL http://localhost:9763/jaxrs_content_negotiation/services/customers/customers ervice/customers/123 without setting "accept header" explicitly, returns a customer instance in XML format.
This is because the accept header will be absent from the request when using HTTP Client. In that case, theCXF will treat the "Accept" content type as "*/*". The XML document returns:
<Customer> <id>123</id> <name>John</name></Customer>
JAX-WS Samples
Building and Running JAX-WS SamplesAsynchronous InvocationBuild and Invoke a Service Using a WSDLDevelop Services in Code-First ApproachJAX-WS HandlersMTOM Sample for SWA and XOPWS-Security Sample on Signature and EncryptionWS-Security Sample on UsernameToken and Timestamp

WSO2 Application Server, version 5.3.0
Copyright © WSO2 Inc. 2014 112
1.
2.
3.
4.
5.
6.
Building and Running JAX-WS Samples
Using Maven
Follow the steps given below before you build and run the sample:
Open the sample folder in your product pack using a command line and go to the <PRODUCT_HOME>\sampl directory. The folders for Jax-ws samples are listed here:es\Jaxws-Jaxrs\<JAX-WS-Sample-Folder> J
.AX-WS Sample FolderBuild the demo and create a WAR file using the following command.
mvn clean install
Deploy the generated WAR file in WSO2 AS with the related logs on the console using the followingcommand:
mvn -Pdeploy
This command will copy the WAR file to the <AS_HOME>/repository/deployment/server/webapps directory.
Start the WSO2 Application Server by executing one of the following commands, where i<PRODUCT_HOME>s the directory where you installed the product distribution:
OS Command
On Windows <PRODUCT_HOME>\bin\wso2server.bat--run
On Linux/Solaris sh <PRODUCT_HOME>/bin/wso2server.sh
Log in to the management console and click on the menu, under . ThisList Main Manage/Applicationsopens the page. The deployed applications will be listed here.Running Applications
You can open the required web application by clicking the action.Find Services
Using Apache Ant
If you want to remove the target directory, run the following command inside the <PRODUCT_HOME>\samples\Jaxws-Jaxrs\<JAX-WS-Sample-Folder> directory:
run mvn clean
You need 1.6.2 or higher to build the samples.Apache Ant

WSO2 Application Server, version 5.3.0
Copyright © WSO2 Inc. 2014 113
1.
2.
3. 4.
1.
2.
Open the sample folder in your product pack using a command line and go to the <PRODUCT_HOME>\sampl directory. The folders for Jax-rs samples are listed here:es\Jaxws-Jaxrs\<JAX-WS-Sample-Folder> J
.AX-WS Sample Folder
To deploy the sample, run the following command:
ant
Start the Application Server and log in to the management console.You can run the sample in two ways:
Log in to the management console. On the menu, under , click toMain Manage/Applications Listopen the page. The deployed applications will be listed here. Running ApplicationsUsing the command line, go the JAX-WS sample directory and execute the following command:
OS Command
On Windows run-client.bat
On Linux/Solaris sh run-client.sh
The results of the sample will show on the command line.
JAX-WS Sample Folder
Sample JAX-WS Sample Folder
Asynchronous Invocation async_jaxws
Build and Invoke a Service Using a WSDL wsdl_first_jaxws
Develop Services in Code-First Approach java_first_jaxws
JAX-WS Handlers handlers_jaxws
MTOM Sample for SWA and XOP mtom_jaxws
WS-Security Sample on Signature and Encryption sign_encrypt _jaxws
WS-Security Sample on UsernameToken and Timestamp ws_security\ut
For different options, run:
sh run-client.sh -help

WSO2 Application Server, version 5.3.0
Copyright © WSO2 Inc. 2014 114
Asynchronous Invocation
This sample illustrates the use of JAX-WS asynchronous invocation model using Document/Literal Style.
The asynchronous model allows client threads to continue after making a two-way invocation, without being blockedwhile awaiting a response from the server. Once the response is available, it is delivered to the client applicationasynchronously, using one of two alternative approaches as follows:
Callback: the client application implements the "javax.xml.ws.AsyncHandler" interface to accept notification of.the response availability
Polling: the client application periodically polls a "javax.xml.ws.Response" instance to check if the response is.available
This Sample illustrates both approaches. Additional methods are generated on the Service Endpoint Interface (SEI) to provide this asynchrony, named by convention with the suffix "Async". As many applications will not require this
functionality, the asynchronous variants of the SEI methods are omitted by default to avoid loading the SEI withunnecessary baggage. In order to enable generation of these methods, a bindings file (wsdl/async_bindings.xml) ispassed to the wsdl2java generator.
Building and running the sample
This sample can be found at < >\samples\Jaxws-Jaxrs\AS_HOME async_jaxws
For information on building and running the sample, see .Building and Running JAX-WS Samples
Build and Invoke a Service Using a WSDL
This sample demonstrates how to build and call a Web service using a given WSDL file. This approach is alsocalled contract-first.
This Sample mainly addresses SOAP over HTTP in Document/Literal or Document/Literal wrapped style. For other transports or styles the configuration may look different.
This sample consists of three sections as follows:
. Creating the server and client code stubs from the WSDL.Service implementation
.Client implementation
Code generation
Code generation in Maven is done using the cxf-codegen-plugin. For infomation, refer to http://cxf.apache.org/docs/. Code generation is activated using a binding.xml file. In this case, themaven-cxf-codegen-plugin-wsdl-to-java.html
normal java Date is used for and xsd:DateTime. If this is not present, the XMLGregorianCalendar will bexsd:dateu s e d .
For more information on , refer to the JAX-WS 2.0 specification here: asynchronous invocation http://jcp.org/ aboutJava/communityprocess/pfd/jsr224/index.html)
For more information on contact-first Web services, refer to: http://cxf.apache.org/docs/defining-contract-first-webservices-with-wsdl-generation-from-java.html

WSO2 Application Server, version 5.3.0
Copyright © WSO2 Inc. 2014 115
Another common use of the binding file is to generate asynchronous stubs. The line hasjaxws:enableAsyncMappingto be uncommented to use this. More information about the binding file can be found here:
.http://jax-ws.java.net/jax-ws-20-fcs/docs/customizations.html
Service implementation
The service is implemented in the class CustomerServiceImpl, which simply implements the previously-generatedservice interface. The method getCustomersByName demonstrates how a query function looks like. The idea is tosearch and return all customers with the given name. If the searched name is null, the method returns an exceptionto indicate that no matching customer was found. (In a real implementation, a list of zero objects can typically beused). For any other name, the method returns a list of two customer objects. The number of objects can beincreased to test how fast CXF works for larger data.
Client implementation
The main client code lives in the class CustomerServiceTester, which needs a proxy to the service anddemonstrates some calls and their expected outcome using junit assertions.
The first call is a request getCustomersByName for all customers with name "Smith" and the result is checked.Then, the same method is called with the invalid name "None". In this case a NoSuchCustomerException isexpected. The third call shows that the one way method updateCustomer will return instantly even if the servicen e e d s s o m e t i m e t o p r o c e s s t h e r e q u e s t .
The classes CustomerServiceClient and CustomerServiceSpringClient show how to get a service proxy usingJAX-WS and how to wire it to your business class (in this case, CustomerServiceTester).
Building and running the sample
This sample can be found at < >\samples\Jaxws-Jaxrs\AS_HOME wsdl_first_jaxws
For information on building and running the sample, see .Building and Running JAX-WS Samples
Develop Services in Code-First Approach
This sample demonstrates how to develop a service using the code-first approach using JAX-WS APIs and jsr-181.
Building and running the sample
This sample can be found at < >\samples\Jaxws-Jaxrs\AS_HOME java_first_jaxws
For information on building and running the sample, see .Building and Running JAX-WS Samples
JAX-WS Handlers
This sample demonstrates how JAX-WS handlers are used in the WSO2 Application Server. The server uses aSOAP protocol handler, which logs incoming and outgoing messages to the console. The server code registers ahandler using the @HandlerChain annotation within the service implementation class. In this sample,LoggingHandler is the SOAPHandler that logs the entire SOAP message content to stdout.
1.
2.
If you have a EPR location other than , edithttp://localhost:9763/java_first_jaxws/services/hello_worldthe run-client script.Prior to running the client, it is recommended to confirm that the generated WSDL (http://{ip}:{port}/jav
) a_first_jaxws/services/hello_world?wsdl can be seen from a web browser.

WSO2 Application Server, version 5.3.0
Copyright © WSO2 Inc. 2014 116
The client includes a logical handler that checks the parameters on outbound requests and short-circuits theinvocation in certain circumstances. This handler is specified programmatically.
Building and running the sample
This sample can be found at < >\samples\Jaxws-Jaxrs\AS_HOME handlers_jaxws
For information on building and running the sample, see .Building and Running JAX-WS Samples
When specifying the handler file path in the annotation, the complete path@HandlerChain from root should be given as:
@HandlerChain(file = "/demo/handlers/common/demo_handlers.xml")
Relative paths such as " " do not render in WSO2 Carbon. The full package../common/demo_handlers.xmlhierarchy should be used.
MTOM Sample for SWA and XOP
This sample demonstrates the use of a SOAP message with an attachment and XML-binary optimized packaging.
Building and running the sample
This sample can be found at < >\samples\Jaxws-Jaxrs\AS_HOME mtom_jaxws
For information on building and running the sample, see .Building and Running JAX-WS Samples
WS-Security Sample on Signature and Encryption
This sample shows how WS-Security support can be enabled in JAX-WS.
WS-Security can be configured to the Client and Server endpoints by adding WSS4JInterceptors. Both Server and Client can be configured for outgoing and incoming interceptors. Various actions like, Timestamp, UsernameToken,
Signature, Encryption, etc., can be applied to the interceptors by passing appropriate configuration properties.
The logging feature is used to log the inbound and outbound SOAP messages and display these to the console. Inall other respects, this sample is based on the basic hello_world sample.
The samples in this directory use STRONG encryption. The default encryption algorithms included in a JRE are notadequate for these samples.
Building and running the sample
This sample can be found at < >\samples\Jaxws-Jaxrs\ws_security\AS_HOME sign_encrypt_jaxws
For information on building and running the sample, see .Building and Running JAX-WS Samples
WS-Security Sample on UsernameToken and Timestamp
For the sample, the Java Cryptography Extension (JCE), Unlimited Strength Jurisdiction Policy Files available on Oracle's JDK download page must be installed from here: (http://www.oracle.com/technetwork/j
); otherwise, there will be errors on .ava/javase/downloads/index.html invalid key lengths

WSO2 Application Server, version 5.3.0
Copyright © WSO2 Inc. 2014 117
1.
2.
This sample demonstrates how WS-Security support in JAX-WS services is enabled.
WS-Security can be configured to the client and server endpoints by adding WSS4JInterceptors. Both server and client can be configured for outgoing and incoming interceptors. Various actions like, Timestamp, UsernameToken,
Signature, Encryption, etc., can be applied to the interceptors by passing appropriate configuration properties.
The logging feature is used to log the inbound and outbound SOAP messages and display these to the console. In all other respects, this sample is based on the basic hello_world sample.
The samples in this directory use STRONG encryption. The default encryption algorithms included in a JRE are not
adequate for these samples.
Building and running the sample
This sample can be found at < >\samples\Jaxws-Jaxrs\AS_HOME ws_security\ut
For information on building and running the sample, see .Building and Running JAX-WS Samples
Jaggery Samples
The Jaggery samples, demonstrate some functionality of Jaggery deployed as Jaggery applications in the WSO2Web Service Application Server.
The following sections describe each Jaggery sample and also how to build the samples:
Building Jaggery SamplesAvailable Jaggery Samples
Building Jaggery Samples
The steps are as follows:
Run the WSO2 Application Server by executing one of the following commands, where is<PRODUCT_HOME>the directory where you installed the product distribution:
OS Command
On Windows <PRODUCT_HOME>\bin\wso2server.bat--run
On Linux/Solaris sh <PRODUCT_HOME>/bin/wso2server.sh
In a command prompt , swi tch to the samples d i rectory: For example, in Windows:
For the sample, the Java Cryptography Extension (JCE), Unlimited Strength Jurisdiction Policy Files available on Oracle's JDK download page must be installed from here: (http://www.oracle.com/technetwork/j
); otherwise, there will be errors on .ava/javase/downloads/index.html invalid key lengths
You need 1.6.2 or higher to build the samples.Apache Ant

WSO2 Application Server, version 5.3.0
Copyright © WSO2 Inc. 2014 118
2.
3.
cd <PRODUCT_HOME>\samples\jaggerySamples\
Enter the following command:
ant
This will copy the directories into d<PRODUCT_HOME>/repository/deployment/server/jaggeryappsirectory. If you log into the Application Server, you will see the deployed jaggery applications on the Running
screen.Application
Available Jaggery Samples
Coffee ShopTaskMasterFreshometerJaggery Documentation
Coffee Shop
The coffee shop sample will explain RESTful application features with Jaggery. It is a nice client end-user interfacewhere the user can make an order for coffee. There are seven main REST calls that happen in this application withPUT, POST, GET and DELETE. This sample contains a database connection, URL mapping and web request inJaggery.
TaskMaster
The TaskMaster is a task manager application which makes use of the session in Jaggery. The tasks are saved andcan be viewed via the main page.
Freshometer
The Fresh-o-meter application allows you to search for any movie title, and retrieve its information (Cast, MoviePoster, Release year, Plot and rating) as well as related videos from YouTube. It acts as a central movie informationsearch engine. The user needs to be online to be able to use this application.
Jaggery Documentation
The Documentation section of the jaggery site runs on Jaggery. It is the centralized and in-depth area to viewdescriptions, demos and samples and try out jaggery code. The documentation site also includes downloads andsample apps.
WebSockets Sample
WSO2 AS 5.3.0 supports WebSocket 1.1 API as defined by the JSR-356 specification. This is provided by ApacheTomcat, which is embedded in AS. You can run the following sample web application to see how WebSockets workin AS.
Note that you do not need additional configurations on AS server-level to enable Websocket support for webapplications.

WSO2 Application Server, version 5.3.0
Copyright © WSO2 Inc. 2014 119
1.
2.
3.
4.
1.
1.
2. 3.
1. 2.
Running the sample
The "Example" sample is deployed in AS by default. You can run this sample as explained below.
Start WSO2 Application Server.
Log in to the management console and click under to open the paList Applications Running Applicationsge.
The "example" sample will be listed as a web application. Click to open the webGo to URL application. Alternatively, you can directly point your browser to the URL of this sample, which is http://localho
. Note that the port number in the URL needs to be updated if you have set a port offset forst:9763/example/the server in the file.<AS_HOME>/repository/conf/carbon.xml
When you open the URL, click examples. Websocket The following samples will be listed:
Echo example: This sample echoes whatever the message you send to the server via websocket.There are several websocket endpoints listed here to illustrate three different mechanisms thatimplement websocket services.
programmatic API - Invoking a Websocket endpoint that is registered programmatically. This isthe interface-driven approach where the developer implements the javax.websocket.Endpo
int interface to create the service.
annotation API (basic) - Invoking a websocket service that is defined using java annotations.This is the annotation-driven approach where the developer interacts with the websocketlifecycle events via annotated POJOs.
annotation API (stream) - This also follows the annotation-driven approach, and the messagessent from the server are streamed.
Chat example: This simulates a standard chat application. In this application, the messages receivedare broadcast to all the users that are connected to this websocket service.Multiplayer snake exampleMultiplayer drawboard example
SSO Sample
This sample will demonstrate how SAML SSO can be used to log in to web applications deployed in WSO2Application Server. Go to for more information about using SSO with web applications.this link
Before you begin:
Ensure that and are both installed in your system.WSO2 Application Server WSO2 Identity ServerThe following server configurations should be completed for WSO2 AS and WSO2 IS. The instructions aregiven .here
Generic SSO configurations should be included in the file stored insso-sp-config.properties
the directory.<AS_HOME>/repository/conf/security/
Register SSO service providers in WSO2 IS for each web application.Update the IS and AS hostnames in the <AS>/repository/conf/security/sso-sp-config.p
file and the roperties file.<IS_HOME>/repository/conf/identity.xml
In WSO2 IS, update the resident IDP provider Entity Id.

WSO2 Application Server, version 5.3.0
Copyright © WSO2 Inc. 2014 120
2.
1. 2.
1.
2.
3.
4. 5. 6.
7.
1. 2.
3. 4.
Enable the SSOValve in the file<AS_HOME>/repository/conf/tomcat/catalina-server.xmlof AS.
Building the sample
Open a command line, and navigate to the directory.<AS_HOME>/samples/SSOValveSample/bar-appRun the relevant command to deploy the web app:
Using Maven
Create a WAR file for the sample using the following command:
mvn clean install
Deploy the generated WAR file on WSO2 AS with the related logs on the console:
mvn -Pdeploy
Using Ant
ant
This will deploy the web application in AS.bar-appIn the same way, navigate to the directory and deploy<AS_HOME>/samples/SSOValveSample/foo-appthe web application.foo-appStart the Application Server and log in to the management console. You will find the and web applications listed in the page.bar-app foo-app Running ApplicationsStart WSO2 Identity Server.
Now you can run the samples as explained below.
Running the sample
Go to the page of AS.Running ApplicationsClick for the bar-app web application. You will be directed to the following page, which allows youGo to URLto log into the web application through WSO2 IS:
Sign in to access the application.Now, go back to the page and click for the foo-app web application. NoteRunning Applications Go to URLthat you will be automatically logged in to the web application without any need to enter credentials.

WSO2 Application Server, version 5.3.0
Copyright © WSO2 Inc. 2014 121

WSO2 Application Server, version 5.3.0
Copyright © WSO2 Inc. 2014 122
Configuration Guide
This section explores different options to customize the WSO2 Application Server according to user-specific needs.
Clustered DeploymentWorking with DatabasesWorking with the RegistryWorking with TransportsWorking with SecurityWorking with Multiple TenantsWorking with LogsTuning PerformanceJNDI Resources
Clustered Deployment
You can install multiple instances of WSO2 products in a cluster to ensure that if one instance becomes unavailableor is experiencing high traffic, another instance will seamlessly handle the requests. See the documentation on clust
for comprehensive details.ering WSO2 Application Server
Working with Databases
The default databases that WSO2 products uses to store registry, user manager and product-specific data are theH2 databases in as follows:<PRODUCT_Home>/repository/database
WSO2CARBON_DB.h2.db: used to store registry and user manager data
These embedded H2 databases are suitable for development, testing, and some production environments. For mostproduction environments, however, we recommend you to use an industry-standard RDBMS such as Oracle,PostgreSQL, MySQL, MS SQL, etc.
You can use the scripts provided with WSO2 products to install and configure several other types of relationaldatabases, including MySQL, IBM DB2, Oracle, and more.
Setting up the Physical DatabaseManaging Datasources
Setting up the Physical Database
The topics in this section describe how to use scripts in folder to set up each type<PRODUCT_HOME>/dbscripts/of physical database.
Setting up a MySQL ClusterSetting up DerbySetting up H2Setting up IBM DB2Setting up IBM InformixSetting up Microsoft SQLSetting up MySQLSetting up OpenEdgeSetting up OracleSetting up Oracle RACSetting up PostgreSQLSetting up MariaDB

WSO2 Application Server, version 5.3.0
Copyright © WSO2 Inc. 2014 123
1. 2.
1.
Setting up a MySQL Cluster
For instructions on setting up any WSO2 product with a MySQL cluster, see , which is published in thethis articleWSO2 library.
Setting up Derby
You can set up either an embedded Derby database or a remote one according to the information given below:
Setting up Embedded DerbySetting up Remote Derby
Setting up Embedded Derby
The following sections describe how to replace the default H2 databases with embedded Derby:
Setting up the databaseSetting up the driversSetting up datasource configurationsCreating database tables
Setting up the database
Follow the steps below to set up an embedded Derby database:
Download .Apache DerbyInstall Apache Derby on your computer.
Setting up the drivers
Copy , , and from the < to the <derby.jar derbyclient.jar derbynet.jar DERBY_HOME>/lib/ directory directory (the classpath of the WSO2 Carbon webPRODUCT_HOME>/repository/components/extensions/
application).
Setting up datasource configurations
A datasource is used to establish the connection to a database. By default, datasource is usedWSO2_CARBON_DBto connect to the default H2 database, which stores registry and user management data. After setting up theEmbedded Derby database to replace the default H2 database, either change the default configurations of the WSO2
, or to point it to the new database as explained below. datasource_CARBON_DB configure a new datasource
Changing the default WSO2_CARBON_DB datasource
Follow the steps below to change the type of the default datasource.WSO2_CARBON_DB
Edit the default datasource configuration in the < PRODUCT_HOME>/repository/conf/datasources/m a file as shown below.ster-datasources.xml
For instructions on installing Apache Derby, see the .Apache Derby documentation

WSO2 Application Server, version 5.3.0
Copyright © WSO2 Inc. 2014 124
1.
<datasource> <name>WSO2_CARBON_DB</name> <description>The datasource used for registry and usermanager</description> <jndiConfig> <name>jdbc/WSO2CarbonDB</name> </jndiConfig> <definition type="RDBMS"> <configuration> <url>jdbc:derby://localhost:1527/db;create=true</url> <username>regadmin</username> <password>regadmin</password> <driverClassName>org.apache.derby.jdbc.EmbeddedDriver</driverClassName> <maxActive>80</maxActive> <maxWait>60000</maxWait> <minIdle>5</minIdle> <testOnBorrow>true</testOnBorrow> <validationQuery>SELECT 1</validationQuery> <validationInterval>30000</validationInterval> <defaultAutoCommit>false</defaultAutoCommit> </configuration> </definition></datasource>
The elements in the above configuration are described below:
Element Description
url The URL of the database. The default port for a DB2 instance is 50000.
username and password
The name and password of the database user
driverClassName The class name of the database driver
maxActive The maximum number of active connections that can be allocated at the sametime from this pool. Enter any negative value to denote an unlimited number ofactive connections
maxWait The maximum number of milliseconds that the pool will wait (when there are noavailable connections) for a connection to be returned before throwing anexception. You can enter zero or a negative value to wait indefinitely.
minIdle The minimum number of active connections that can remain idle in the pool withoutextra ones being created, or enter zero to create none.
testOnBorrow The indication of whether objects will be validated before being borrowed from thepool. If the object fails to validate, it will be dropped from the pool, and anotherattempt will be made to borrow another.

WSO2 Application Server, version 5.3.0
Copyright © WSO2 Inc. 2014 125
1.
1.
2.
3.
1.
validationQuery The SQL query that will be used to validate connections from this pool beforereturning them to the caller.
validationInterval The indication to avoid excess validation, and only run validation at the most, at thisfrequency (time in milliseconds). If a connection is due for validation, but has beenvalidated previously within this interval, it will not be validated again.
defaultAutoCommit This property is not applicable to the Carbon database in WSO2 productsbecause auto committing is usually handled at the code level, i.e., the default autocommit configuration specified for the RDBMS driver will be effective instead of thisproperty element. Typically, auto committingis enabled for an RDBMS drivers bydefault.
When auto committing is enabled, each SQL statement will be committed to thedatabase as an individual transaction, as opposed to committing multiplestatements as a single transaction.
Configuring new datasources to manage registry or user management data
Follow the steps below to configure new datasources to point to the new databases you create to manage registryand/or user management data separately.
Add a new datasource with similar configurations as the above to the < datasourceWSO2_CARBON_DB PRODU file. Change its elementsCT_HOME>/repository/conf/datasources/ master-datasources.xml
with your custom values. For instructions, see Setting up datasource configurations.If you are setting up a separate database to store registry-related data, update the following configurations inthe < file.PRODUCT_HOME>/repository/conf/ registry.xml
<dbConfig name="wso2registry"> <dataSource>jdbc/MY_DATASOURCE_NAME</dataSource></dbConfig>
If you are setting up a separate database to store user management data, update the following configurationsin the < file.PRODUCT_HOME>/repository/conf/ user-mgt.xml
<Configuration> <Property name="dataSource">jdbc/MY_DATASOURCE_NAME</Property></Configuration>
Creating database tables
You can create database tables by executing the database scripts as follows:
Run the tool located in the directory as illustrated below:ij <DERBY_HOME>/bin/
For more information on other parameters that can be defined in the <PRODUCT_HOME>/repositor file, see .y/conf/datasources/ master-datasources.xml Tomcat JDBC Connection Pool

WSO2 Application Server, version 5.3.0
Copyright © WSO2 Inc. 2014 126
1.
2.
3.
4.
5.
6.
Create the database and connect to it using the following command inside the prompt:ij
connect 'jdbc:derby:repository/database/WSO2CARBON_DB;create=true';
Exit from the the tool by typing the command.ij exit
exit;
Log in to the tool with the username and password that you set in and :ij registry.xml user-mgt.xmlconnect 'jdbc:derby:repository/database/WSO2CARBON_DB' user 'regadmin' password'regadmin';Use the scripts given in the following locations to create the database tables:
To create tables for the , run the belowregistry and user manager database ( )WSO2CARBON_DBcommand:
run '<PRODUCT_HOME>/dbscripts/derby.sql';
Restart the server.
Setting up Remote Derby
The following sections describe how to replace the default H2 databases with a remote Derby database:
Setting up the database
Replace the database file path in the above command with the full path to your database.
Now the product is running using the embedded Apache Derby database.
You can create database tables automatically by using the when starting the product for the first time -D parameter as follows:setup
For Windows: <PRODUCT_HOME>/bin/wso2server.bat -Dsetup
For Linux: <PRODUCT_HOME>/bin/wso2server.sh -Dsetup
The product is configured to run using an embedded Apache Derby database.
In contrast to setting up with remote Derby, when setting up with the embedded mode, set the databasedriver name (the element) to the value driverClassName org.apache.derby.jdbc.EmbeddedDrive
and the database URL (the element) to the database directory location relative to the installation. Inr urlthe above sample configuration, it is inside the directory.<DERBY_HOME>/WSO2_CARBON_DB/

WSO2 Application Server, version 5.3.0
Copyright © WSO2 Inc. 2014 127
1. 2.
3.
1.
Setting up the driversSetting up datasource configurationsCreating database tables
Setting up the database
Follow the steps below to set up a remote Derby database.
Download .Apache DerbyInstall Apache Derby on your computer.
Go to the / directory and run the Derby network server start script. Usually it is named <DERBY_HOME>/bin s.tartNetworkServer
Setting up the drivers
Copy , , and from the < directory to the <derby.jar derbyclient.jar derbynet.jar DERBY_HOME>/lib/ PR directory (the classpath of the Carbon webODUCT_HOME>/repository/components/extensions/
application).
Setting up datasource configurations
A datasource is used to establish the connection to a database. By default, datasource is usedWSO2_CARBON_DBto connect to the default H2 database, which stores registry and user management data. After setting up theRemote Derby database to replace the default H2 database, either change the default configurations of the WSO2_C
, or to point it to the new database as explained below. datasourceARBON_DB configure a new datasource
Changing the default WSO2_CARBON_DB datasource
Follow the steps below to change the type of the default datasource.WSO2_CARBON_DB
Edit the default datasource configuration in the <PRODUCT_HOME>/repository/conf/datasources/mas file as shown below.ter-datasources.xml
For instructions on installing Apache Derby, see the .Apache Derby documentation

WSO2 Application Server, version 5.3.0
Copyright © WSO2 Inc. 2014 128
1.
<datasource> <name>WSO2_CARBON_DB</name> <description>The datasource used for registry and usermanager</description> <jndiConfig> <name>jdbc/WSO2CarbonDB</name> </jndiConfig> <definition type="RDBMS"> <configuration> <url>jdbc:derby://localhost:1527/db;create=true</url> <username>regadmin</username> <password>regadmin</password> <driverClassName>org.apache.derby.jdbc.ClientDriver</driverClassName> <maxActive>80</maxActive> <maxWait>60000</maxWait> <minIdle>5</minIdle> <testOnBorrow>true</testOnBorrow> <validationQuery>SELECT 1</validationQuery> <validationInterval>30000</validationInterval> <defaultAutoCommit>false</defaultAutoCommit> </configuration> </definition></datasource>
The elements in the above configuration are described below:
Element Description
url The URL of the database. The default port for a DB2 instance is 50000.
username and password
The name and password of the database user
driverClassName The class name of the database driver
maxActive The maximum number of active connections that can be allocated at the sametime from this pool. Enter any negative value to denote an unlimited number ofactive connections.
maxWait The maximum number of milliseconds that the pool will wait (when there are noavailable connections) for a connection to be returned before throwing anexception. You can enter zero or a negative value to wait indefinitely.
minIdle The minimum number of active connections that can remain idle in the pool withoutextra ones being created, or enter zero to create none.
testOnBorrow The indication of whether objects will be validated before being borrowed from thepool. If the object fails to validate, it will be dropped from the pool, and anotherattempt will be made to borrow another.
validationQuery The SQL query that will be used to validate connections from this pool beforereturning them to the caller.
WSO2 Application Server, version 5.3.0
Copyright © WSO2 Inc. 2014 129
1.
1.
2.
3.
1.
validationInterval The indication to avoid excess validation, and only run validation at the most, at thisfrequency (time in milliseconds). If a connection is due for validation, but has beenvalidated previously within this interval, it will not be validated again.
defaultAutoCommit This property is not applicable to the Carbon database in WSO2 productsbecause auto committing is usually handled at the code level, i.e., the default autocommit configuration specified for the RDBMS driver will be effective instead of thisproperty element. Typically, auto committing is enabled for an RDBMS drivers bydefault.
When auto committing is enabled, each SQL statement will be committed to thedatabase as an individual transaction, as opposed to committing multiplestatements as a single transaction.
Configuring new datasources to manage registry or user management data
Follow the steps below to configure new datasources to point to the new databases you create to manage registryand/or user management data separately.
Add a new datasource with similar configurations as the above to the < datasourceWSO2_CARBON_DB PRODU file . Change its elementsCT_HOME>/repository/conf/datasources/ master-datasources.xml
with your custom values. For instructions, see Setting up datasource configurations.If you are setting up a separate database to store registry-related data, update the following configurations inthe < file.PRODUCT_HOME>/repository/conf/ registry.xml
<dbConfig name="wso2registry"> <dataSource>jdbc/MY_DATASOURCE_NAME</dataSource></dbConfig>
If you are setting up a separate database to store user management data, update the following configurationsin the < file.PRODUCT_HOME>/repository/conf/ user-mgt.xml
<Configuration> <Property name="dataSource">jdbc/MY_DATASOURCE_NAME</Property></Configuration>
Creating database tables
You can create database tables by executing the following script(s):
Run the tool located in the directory.ij <DERBY_HOME>/bin/
For more information on other parameters that can be defined in the <PRODUCT_HOME>/reposito file, see .ry/conf/datasources/ master-datasources.xml Tomcat JDBC Connection Pool
In contrast to setting up with embedded Derby, in the remote registry you set the database drivername (the element) to the value and thedriverName org.apache.derby.jdbc.ClientDriverdatabase URL (the element) to the database remote location.url

WSO2 Application Server, version 5.3.0
Copyright © WSO2 Inc. 2014 130
1.
2.
3.
4.
5.
6.
Create the database and connect to it using the following command inside the prompt:ij
connect'jdbc:derby://localhost:1527/db;user=regadmin;password=regadmin;create=true';
Exit from the tool by typing the command as follows:ij exitexit;Log in to the tool with the username and password you just used to create the database.ij
connect 'jdbc:derby://localhost:1527/db' user 'regadmin' password 'regadmin';
You can create database tables manually by executing the following scripts.
To create tables in the registry and user manager database ( ), use the below script:WSO2CARBON_DB
run '<PRODUCT_HOME>/dbscripts/derby.sql';
Restart the server.
Setting up H2
You can set up either an embedded H2 database or a remote one using the instructions given below:
Setting up Embedded H2Setting up Remote H2
Setting up Embedded H2
The following sections describe how to replace the default H2 databases with Embedded H2:
Setting up the databaseSetting up the driversSetting up datasource configurationsCreating database tables
Replace the database file path, user name, and password in the above command to suit yourrequirements.
You can create database tables automatically by usingwhen starting the product for the first timethe parameter as follows:-Dsetup
For Windows: <PRODUCT_HOME>/bin/wso2server.bat -Dsetup
For Linux: <PRODUCT_HOME>/bin/wso2server.sh -Dsetup
The product is now configured to run using a remote Apache Derby database.

WSO2 Application Server, version 5.3.0
Copyright © WSO2 Inc. 2014 131
1.
2.
1.
Setting up the database
Download and install the H2 database engine in your computer.
Setting up the drivers
WSO2 currently ships H2 database engine version h2-1.2.140.* and its related H2 database driver. If you want touse a different H2 database driver, take the following steps:
Delete the following H2 database-related JAR file, which is shipped with WSO2 products:<PRODUCT_HOME>/repository/components/plugins/h2-database-engine_1.2.140.wso2v3.jarFind the JAR file of the new H2 database driver ( , where is the H2<H2_HOME>/bin/h2-*.jar <H2_HOME>installation directory) and copy it to your WSO2 product's <PRODUCT_HOME>/repository/components/l
directory.ib/
Setting up datasource configurations
A datasource is used to establish the connection to a database. By default, datasource is usedWSO2_CARBON_DBto connect to the default H2database, which stores registry and user management data. After setting up theEmbedded H2 database to replace the default H2 database, either change the default configurations of the WSO2_C
, or to point it to the new database as explained below. datasourceARBON_DB configure a new datasource
Changing the default WSO2_CARBON_DB datasource
Follow the steps below to change the type of the default datasource.WSO2_CARBON_DB
Edit the default datasource configuration in the < PRODUCT_HOME>/repository/conf/datasources/m a file as shown below.ster-datasources.xml
For instructions on installing DB2 Express-C, see H2 installation guide.

WSO2 Application Server, version 5.3.0
Copyright © WSO2 Inc. 2014 132
1.
<datasource> <name>WSO2_CARBON_DB</name> <description>The datasource used for registry and usermanager</description> <jndiConfig> <name>jdbc/WSO2CarbonDB</name> </jndiConfig> <definition type="RDBMS"> <configuration> <url>jdbc:h2:repository/database/WSO2CARBON_DB;DB_CLOSE_ON_EXIT=FALSE;LOCK_TIMEOUT=60000</url> <username>wso2carbon</username> <password>wso2carbon</password> <driverClassName>org.h2.Driver</driverClassName> <maxActive>50</maxActive> <maxWait>60000</maxWait> <minIdle>5</minIdle> <testOnBorrow>true</testOnBorrow> <validationQuery>SELECT 1</validationQuery> <validationInterval>30000</validationInterval> <defaultAutoCommit>false</defaultAutoCommit> </configuration> </definition></datasource>
The elements in the above configuration are described below:
Element Description
url The URL of the database. The default port for a DB2 instance is 50000.
username and password
The name and password of the database user
driverClassName The class name of the database driver
maxActive The maximum number of active connections that can be allocated at the sametime from this pool. Enter any negative value to denote an unlimited number ofactive connections.
maxWait The maximum number of milliseconds that the pool will wait (when there are noavailable connections) for a connection to be returned before throwing anexception. You can enter zero or a negative value to wait indefinitely.
minIdle The minimum number of active connections that can remain idle in the pool withoutextra ones being created, or enter zero to create none.
testOnBorrow The indication of whether objects will be validated before being borrowed from thepool. If the object fails to validate, it will be dropped from the pool, and anotherattempt will be made to borrow another.

WSO2 Application Server, version 5.3.0
Copyright © WSO2 Inc. 2014 133
1.
1.
2.
3.
validationQuery The SQL query that will be used to validate connections from this pool beforereturning them to the caller.
validationInterval The indication to avoid excess validation, and only run validation at the most, at thisfrequency (time in milliseconds). If a connection is due for validation, but has beenvalidated previously within this interval, it will not be validated again.
defaultAutoCommit This property is not applicable to the Carbon database in WSO2 productsbecause auto committing is usually handled at the code level, i.e., the default autocommit configuration specified for the RDBMS driver will be effective instead of thisproperty element. Typically, auto committing is enabled for an RDBMS drivers bydefault.
When auto committing is enabled, each SQL statement will be committed to thedatabase as an individual transaction, as opposed to committing multiplestatements as a single transaction.
Configuring new datasources to manage registry or user management data
Follow the steps below to configure new datasources to point to the new databases you create to manage registryand/or user management data separately.
Add a new datasource with similar configurations as the above to the < datasourceWSO2_CARBON_DB PRODU file. CT_HOME>/repository/conf/datasources/ master-datasources.xml Change its elements
For instructions, see with your custom values. Setting up datasource configurations.If you are setting up a separate database to store registry-related data, update the following configurations inthe < file.PRODUCT_HOME>/repository/conf/ registry.xml
<dbConfig name="wso2registry"> <dataSource>jdbc/MY_DATASOURCE_NAME</dataSource></dbConfig>
If you are setting up a separate database to store user management data, update the following configurationsin the < file.PRODUCT_HOME>/repository/conf/ user-mgt.xml
<Configuration> <Property name="dataSource">jdbc/MY_DATASOURCE_NAME</Property></Configuration>
Creating database tables
To create the database tables, connect to the database that you created earlier and run the following scripts inthe H2 shell or web console:
To create tables in the registry and user manager database ( ), use the below script:WSO2CARBON_DB
For more information on other parameters that can be defined in the <PRODUCT_HOME>/repositor file, see .y/conf/datasources/ master-datasources.xml Tomcat JDBC Connection Pool

WSO2 Application Server, version 5.3.0
Copyright © WSO2 Inc. 2014 134
1. 2. 3. 4. 5.
1.
2.
<PRODUCT_HOME>/dbscripts/h2.sql
Follow the steps below to run the script in Web console:
Run the command to start the Web console../h2.shCopy the script text from the SQL file.Paste it into the console.Click .RunRestart the server.
Setting up Remote H2
The following sections describe how to replace the default H2 databases with Remote H2:
Setting up the remote H2 databaseSetting up the driversSetting up datasource configurationsCreating database tables
Setting up the remote H2 database
Follow the steps below to set up a Remote H2: database.
Download and install the H2 database engine on your computer as follows.
Go to the < directory and run the H2 network server starting script as follows, where <H2_HOME>/bin/ H2_H is the H2 installation directory:OME>
You can create database tables automatically by usingwhen starting the product for the first timethe parameter as follows:-Dsetup
For Windows: <PRODUCT_HOME>/bin/wso2server.bat -Dsetup
For Linux: <PRODUCT_HOME>/bin/wso2server.sh -Dsetup
For instructions on installing, see the .H2 installation guide

WSO2 Application Server, version 5.3.0
Copyright © WSO2 Inc. 2014 135
2.
3.
4.
1.
2.
1.
Run the H2 database server with the following commands:For Linux:$ ./h2.sh
For Windows:$ h2.bat
Click to open a web browser containing a client application, which you use to connect to aStart Browser database. If a database does not already exist by the name you provided in the text box, H2 willJDBC URLautomatically create a database.
Setting up the drivers
WSO2 currently ships H2 database engine version h2-1.2.140.* and its related H2 database driver. If you want touse a different H2 database driver, take the following steps:
Delete the following H2 database-related JAR file, which is shipped with WSO2 products:<PRODUCT_HOME>/repository/components/plugins/h2-database-engine_1.2.140.wso2v3.jarFind the JAR file of the new H2 database driver ( , where is the H2<H2_HOME>/bin/h2-*.jar <H2_HOME>installation directory) and copy it to your WSO2 product's <PRODUCT_HOME>/repository/components/l
directory.ib/
Setting up datasource configurations
A datasource is used to establish the connection to a database. By default, datasource is usedWSO2_CARBON_DBto connect to the default H2 database, which stores registry and user management data. After setting up theRemote H2 database to replace the default H2 database, either change the default configurations of the WSO2_CAR
, or to point it to the new database as explained below. datasourceBON_DB configure a new datasource
Changing the default WSO2_CARBON_DB datasource
Follow the steps below to change the type of the default datasource.WSO2_CARBON_DB
Edit the default datasource configuration in the < PRODUCT_HOME>/repository/conf/datasources/m a file as shown below.ster-datasources.xml
The script starts the database engine and opens a pop-up window.
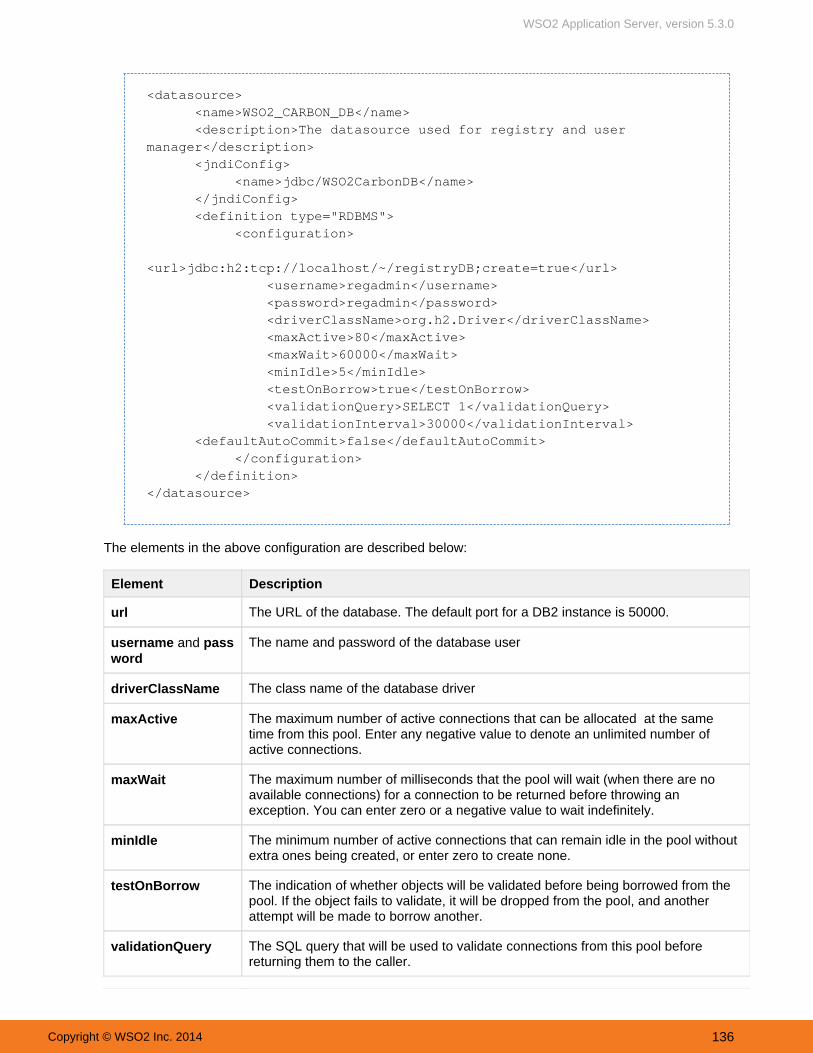
WSO2 Application Server, version 5.3.0
Copyright © WSO2 Inc. 2014 136
1.
<datasource> <name>WSO2_CARBON_DB</name> <description>The datasource used for registry and usermanager</description> <jndiConfig> <name>jdbc/WSO2CarbonDB</name> </jndiConfig> <definition type="RDBMS"> <configuration> <url>jdbc:h2:tcp://localhost/~/registryDB;create=true</url> <username>regadmin</username> <password>regadmin</password> <driverClassName>org.h2.Driver</driverClassName> <maxActive>80</maxActive> <maxWait>60000</maxWait> <minIdle>5</minIdle> <testOnBorrow>true</testOnBorrow> <validationQuery>SELECT 1</validationQuery> <validationInterval>30000</validationInterval> <defaultAutoCommit>false</defaultAutoCommit> </configuration> </definition></datasource>
The elements in the above configuration are described below:
Element Description
url The URL of the database. The default port for a DB2 instance is 50000.
username and password
The name and password of the database user
driverClassName The class name of the database driver
maxActive The maximum number of active connections that can be allocated at the sametime from this pool. Enter any negative value to denote an unlimited number ofactive connections.
maxWait The maximum number of milliseconds that the pool will wait (when there are noavailable connections) for a connection to be returned before throwing anexception. You can enter zero or a negative value to wait indefinitely.
minIdle The minimum number of active connections that can remain idle in the pool withoutextra ones being created, or enter zero to create none.
testOnBorrow The indication of whether objects will be validated before being borrowed from thepool. If the object fails to validate, it will be dropped from the pool, and anotherattempt will be made to borrow another.
validationQuery The SQL query that will be used to validate connections from this pool beforereturning them to the caller.

WSO2 Application Server, version 5.3.0
Copyright © WSO2 Inc. 2014 137
1.
1.
2.
3.
validationInterval The indication to avoid excess validation, and only run validation at the most, at thisfrequency (time in milliseconds). If a connection is due for validation, but has beenvalidated previously within this interval, it will not be validated again.
defaultAutoCommit This property is not applicable to the Carbon database in WSO2 productsbecause auto committing is usually handled at the code level, i.e., the default autocommit configuration specified for the RDBMS driver will be effective instead of thisproperty element. Typically, auto committing is enabled for an RDBMS drivers bydefault.
When auto committing is enabled, each SQL statement will be committed to thedatabase as an individual transaction, as opposed to committing multiplestatements as a single transaction.
Configuring new datasources to manage registry or user management data
Follow the steps below to configure new datasources to point to the new databases you create to manage registryand/or user management data separately.
Add a new datasource with similar configurations as the above to the < datasourceWSO2_CARBON_DB PRODU file. Change its elementsCT_HOME>/repository/conf/datasources/ master-datasources.xml
with your custom values. For instructions, see Setting up datasource configurations.If you are setting up a separate database to store registry-related data, update the following configurations inthe < file.PRODUCT_HOME>/repository/conf/ registry.xml
<dbConfig name="wso2registry"> <dataSource>jdbc/MY_DATASOURCE_NAME</dataSource></dbConfig>
If you are setting up a separate database to store user management data, update the following configurationsin the < file.PRODUCT_HOME>/repository/conf/ user-mgt.xml
<Configuration> <Property name="dataSource">jdbc/MY_DATASOURCE_NAME</Property></Configuration>
Creating database tables
To create the database tables, connect to the database that you created earlier and run the following scripts in H2shell or web console:
To create tables in the registry and user manager database ( ), use the below script:WSO2CARBON_DB
<PRODUCT_HOME>/dbscripts/h2.sql
For more information on other parameters that can be defined in the <PRODUCT_HOME>/repositor file, see .y/conf/datasources/ master-datasources.xml Tomcat JDBC Connection Pool

WSO2 Application Server, version 5.3.0
Copyright © WSO2 Inc. 2014 138
1. 2. 3. 4.
5.
Follow the steps below to run the script in Web console:
Run the command to start the Web console../h2.shCopy the script text from the SQL file.Paste it into the console.Click .Run
Restart the server.
Setting up IBM DB2
The following sections describe how to replace the default H2 databases with IBM DB2:
PrerequisitesSetting up the database and usersSetting up DB2 JDBC driversSetting up datasource configurationsCreating database tables
Prerequisites
You can create database tables automatically by usingwhen starting the product for the first timethe parameter as follows:-Dsetup
For Windows: <PRODUCT_HOME>/bin/wso2server.bat -Dsetup
For Linux: <PRODUCT_HOME>/bin/wso2server.sh -Dsetup

WSO2 Application Server, version 5.3.0
Copyright © WSO2 Inc. 2014 139
1. 2.
3.
4.
1.
2.
Download the latest version of and install it on your computer.DB2 Express-C
Setting up the database and users
Create the database using either or as described below.DB2 command processor DB2 control center
Using the DB2 command processor
Run DB2 console and execute the command in CLI to open DB2.db2startCreate the database using the following command: create database <DB_NAME>Before issuing a SQL statement, establish the connection to the database using the following command:connect to <DB_NAME> user <USER_ID> using <PASSWORD>Grant required permissions for users as follows:
connect to DB_NAMEgrant <AUTHORITY> on database to user <USER_ID>
For example:
Using the DB2 control center
Open the DB2 control center using the command as follows:db2cc
Right-click in the control center tree (inside the object browser), click , andAll Databases Create Databasethen click and follow the steps in the wizard. Standard Create New Database
For instructions on installing DB2 Express-C, see this .ebook
For more information on DB2 commands, see the .DB2 Express-C Guide
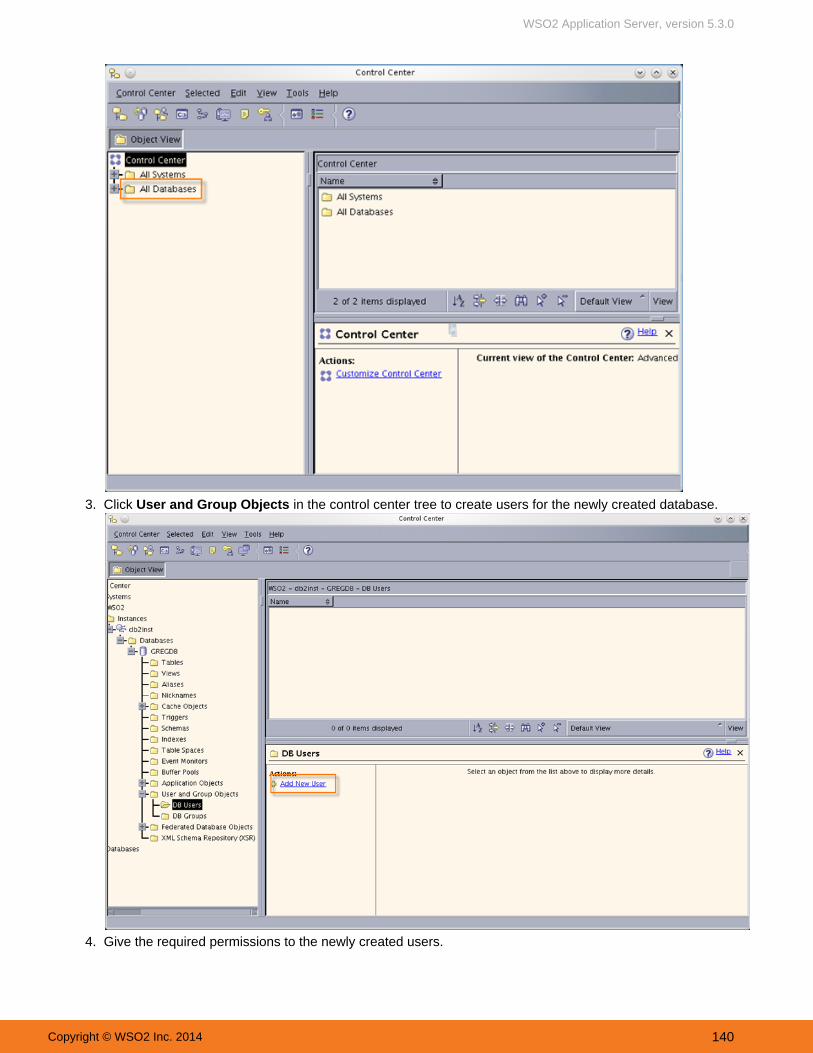
WSO2 Application Server, version 5.3.0
Copyright © WSO2 Inc. 2014 140
2.
3.
4.
Click in the control center tree to create users for the newly created database. User and Group Objects
Give the required permissions to the newly created users.

WSO2 Application Server, version 5.3.0
Copyright © WSO2 Inc. 2014 141
4.
Setting up DB2 JDBC drivers
Copy the DB2 JDBC drivers ( and ) from db2jcc.jar db2jcc_license_c0u.jar <DB2_HOME>/SQLLIB/java/directory to the directory.<PRODUCT_HOME>/repository/components/lib/
Setting up datasource configurations
A datasource is used to establish the connection to a database. By default, datasource is usedWSO2_CARBON_DBto connect to the default H2 database, which stores registry and user management data. After setting up the IBMDB2 database to replace the default H2 database, either change the default configurations of the WSO2_CARBON_DB
, or to point it to the new database as explained below. datasource configure a new datasource
Changing the default WSO2_CARBON_DB datasource
<DB2_HOME> refers to the installation directory of DB2 Express-C, and < refers to thePRODUCT _HOME>directory where you run the WSO2 product instance.
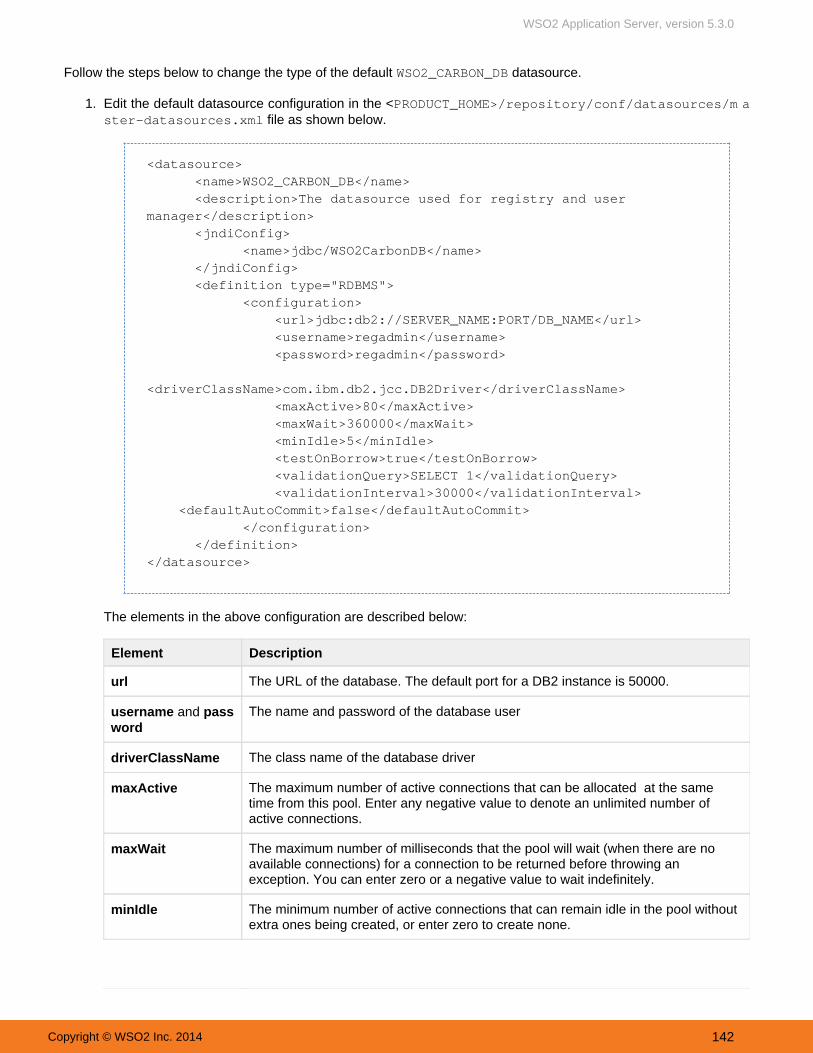
WSO2 Application Server, version 5.3.0
Copyright © WSO2 Inc. 2014 142
1.
Follow the steps below to change the type of the default datasource.WSO2_CARBON_DB
Edit the default datasource configuration in the < PRODUCT_HOME>/repository/conf/datasources/m a file as shown below.ster-datasources.xml
<datasource> <name>WSO2_CARBON_DB</name> <description>The datasource used for registry and usermanager</description> <jndiConfig> <name>jdbc/WSO2CarbonDB</name> </jndiConfig> <definition type="RDBMS"> <configuration> <url>jdbc:db2://SERVER_NAME:PORT/DB_NAME</url> <username>regadmin</username> <password>regadmin</password> <driverClassName>com.ibm.db2.jcc.DB2Driver</driverClassName> <maxActive>80</maxActive> <maxWait>360000</maxWait> <minIdle>5</minIdle> <testOnBorrow>true</testOnBorrow> <validationQuery>SELECT 1</validationQuery> <validationInterval>30000</validationInterval> <defaultAutoCommit>false</defaultAutoCommit> </configuration> </definition></datasource>
The elements in the above configuration are described below:
Element Description
url The URL of the database. The default port for a DB2 instance is 50000.
username and password
The name and password of the database user
driverClassName The class name of the database driver
maxActive The maximum number of active connections that can be allocated at the sametime from this pool. Enter any negative value to denote an unlimited number ofactive connections.
maxWait The maximum number of milliseconds that the pool will wait (when there are noavailable connections) for a connection to be returned before throwing anexception. You can enter zero or a negative value to wait indefinitely.
minIdle The minimum number of active connections that can remain idle in the pool withoutextra ones being created, or enter zero to create none.

WSO2 Application Server, version 5.3.0
Copyright © WSO2 Inc. 2014 143
1.
1.
2.
3.
testOnBorrow The indication of whether objects will be validated before being borrowed from thepool. If the object fails to validate, it will be dropped from the pool, and anotherattempt will be made to borrow another.
validationQuery The SQL query that will be used to validate connections from this pool beforereturning them to the caller.
validationInterval The indication to avoid excess validation, and only run validation at the most, at thisfrequency (time in milliseconds). If a connection is due for validation, but has beenvalidated previously within this interval, it will not be validated again.
defaultAutoCommit This property is not applicable to the Carbon database in WSO2 productsbecause auto committing is usually handled at the code level, i.e., the default autocommit configuration specified for the RDBMS driver will be effective instead of thisproperty element. Typically, auto committing is enabled for an RDBMS drivers bydefault.
When auto committing is enabled, each SQL statement will be committed to thedatabase as an individual transaction, as opposed to committing multiplestatements as a single transaction.
Configuring new datasources to manage registry or user management data
Follow the steps below to configure new datasources to point to the new databases you create to manage registryand/or user management data separately.
Add a new datasource with similar configurations as the above to the < datasourceWSO2_CARBON_DB PROD file. Change its elementsUCT_HOME>/repository/conf/datasources/ master-datasources.xml
with your custom values. For instructions, see Setting up datasource configurations.If you are setting up a separate database to store registry-related data, update the following configurations inthe < file.PRODUCT_HOME>/repository/conf/ registry.xml
<dbConfig name="wso2registry"> <dataSource>jdbc/MY_DATASOURCE_NAME</dataSource></dbConfig>
If you are setting up a separate database to store user management data, update the following configurationsin the < file.PRODUCT_HOME>/repository/conf/ user-mgt.xml
<Configuration> <Property name="dataSource">jdbc/MY_DATASOURCE_NAME</Property></Configuration>
Creating database tables
To create the database tables, connect to the database that you created earlier and run the following scripts in the
For more information on other parameters that can be defined in the <PRODUCT_HOME>/repositor file, see .y/conf/datasources/ master-datasources.xml Tomcat JDBC Connection Pool

WSO2 Application Server, version 5.3.0
Copyright © WSO2 Inc. 2014 144
1.
2.
DB2 Express-C command editor.
To create tables in the registry and user manager database ( ), use the below script:WSO2CARBON_DB
<PRODUCT_HOME>/dbscripts/db2.sql
Restart the server.
Setting up IBM Informix
The following sections describe how to replace the default H2 databases with IBM Informix:
PrerequisitesCreating the databaseSetting up Informix JDBC driversSetting up datasource configurationsCreating database tables
Prerequisites
Download the latest version of and install it on your computer.IBM Informix
Creating the database
Create the database and users in Informix. For instructions on creating the database and users, see Informixproduct documentation.
You can create database tables automatically by using the when starting the product for the first time -D parameter as follows:setup
For Windows: <PRODUCT_HOME>/bin/wso2server.bat -Dsetup
For Linux: <PRODUCT_HOME>/bin/wso2server.sh -Dsetup
Do the following changes to the default database when creating the Informix database.
Use page size as 4K or higher when creating the dbspace as shown in the following command (i.e.denoted by ) : -k 4 onspaces -c -S testspace4 -p-k 4/usr/informix/logdir/data5.dat -o 100 -s 3000000Add the following system environment variables.
export DB_LOCALE=en_US.UTF-8export CLIENT_LOCALE=en_US.UTF-8
Create a sbspace other than the dbspace by executing the following command: onspaces -c -Stestspace4 -k 4 -p /usr/informix/logdir/data5.dat -o 100 -s 3000000Add the following entry to the file, andreplace the given<INFORMIX_HOME>/etc/onconfig example sbspace name (i.e. ) with your sbspace name: testspace4 SBSPACENAME testspace4

WSO2 Application Server, version 5.3.0
Copyright © WSO2 Inc. 2014 145
1.
Setting up Informix JDBC drivers
Download the Informix JDBC drivers and copy them to your WSO2 product's <PRODUCT_HOME>/repository/codirectory.mponents/lib/
Setting up datasource configurations
A datasource is used to establish the connection to a database. By default, datasource is usedWSO2_CARBON_DBto connect to the default H2 database, which stores registry and user management data. After setting up the IBMInformix database to replace the default H2 database, either change the default configurations of the WSO2_CARBON
, or to point it to the new database as explained below. datasource_DB configure a new datasource
Changing the default WSO2_CARBON_DB datasource
Follow the steps below to change the type of the default datasource.WSO2_CARBON_DB
Edit the default datasource configuration in the < PRODUCT_HOME>/repository/conf/datasources/m a file as shown below.ster-datasources.xml
<datasource> <name>WSO2AM_DB</name> <description>The datasource used for API Managerdatabase</description> <jndiConfig> <name>jdbc/WSO2AM_DB</name> </jndiConfig> <definition type="RDBMS"> <configuration> <!-- IP ADDRESS AND PORT OF DB SERVER --> <url>jdbc:informix-sqli://localhost:1533/AM_DB;CLIENT_LOCALE=en_US.utf8;DB_LOCALE=en_us.utf8;IFX_USE_STRENC=true;</url> <username>wso2carbon</username> <password>wso2carbon</password> <driverClassName>com.informix.jdbc.IfxDriver</driverClassName> <maxActive>80</maxActive> <maxWait>60000</maxWait> <testOnBorrow>true</testOnBorrow> <validationQuery>SELECT 1</validationQuery> <validationInterval>30000</validationInterval> <defaultAutoCommit>false</defaultAutoCommit> </configuration> </definition> </datasource>
The elements in the above configuration are described below:
Use Informix JDBC driver version 3.70.JC8, 4.10.JC2 or higher.
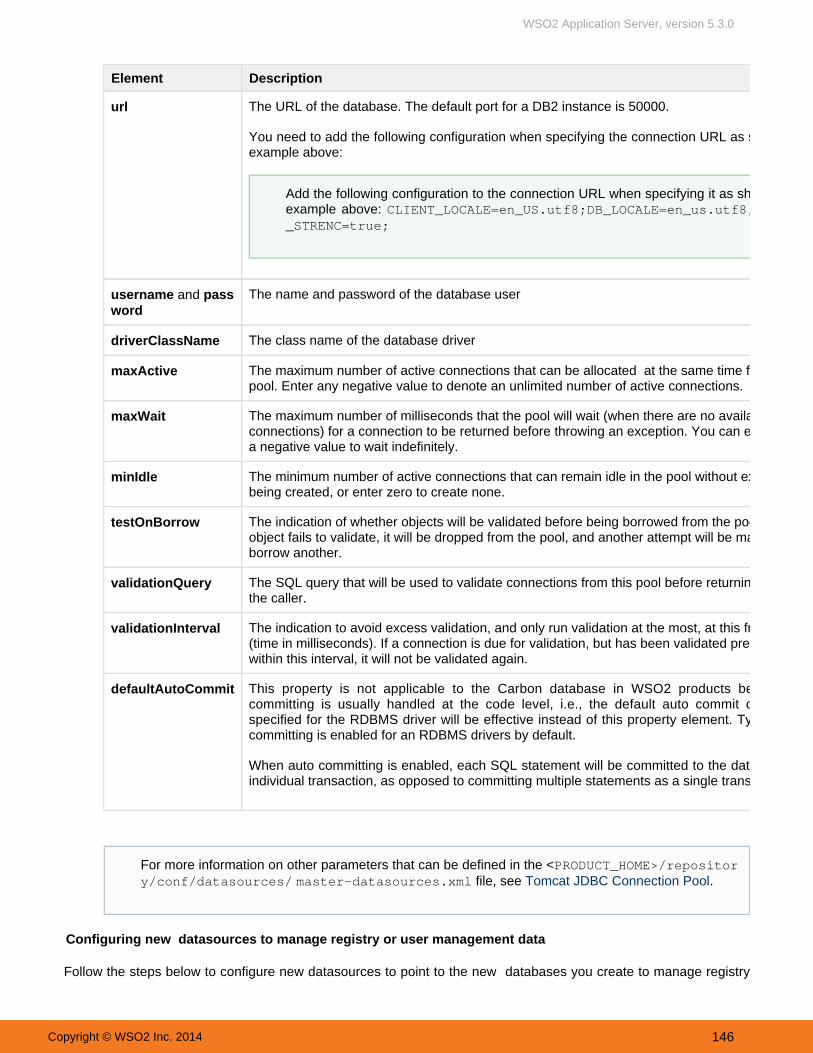
WSO2 Application Server, version 5.3.0
Copyright © WSO2 Inc. 2014 146
1.
Element Description
url The URL of the database. The default port for a DB2 instance is 50000.
You need to add the following configuration when specifying the connection URL as shown in theexample above:
username and password
The name and password of the database user
driverClassName The class name of the database driver
maxActive The maximum number of active connections that can be allocated at the same time from thispool. Enter any negative value to denote an unlimited number of active connections.
maxWait The maximum number of milliseconds that the pool will wait (when there are no availableconnections) for a connection to be returned before throwing an exception. You can enter zero ora negative value to wait indefinitely.
minIdle The minimum number of active connections that can remain idle in the pool without extra onesbeing created, or enter zero to create none.
testOnBorrow The indication of whether objects will be validated before being borrowed from the pool. If theobject fails to validate, it will be dropped from the pool, and another attempt will be made toborrow another.
validationQuery The SQL query that will be used to validate connections from this pool before returning them tothe caller.
validationInterval The indication to avoid excess validation, and only run validation at the most, at this frequency(time in milliseconds). If a connection is due for validation, but has been validated previouslywithin this interval, it will not be validated again.
defaultAutoCommit This property is not applicable to the Carbon database in WSO2 products because autocommitting is usually handled at the code level, i.e., the default auto commit configurationspecified for the RDBMS driver will be effective instead of this property element. Typically, autocommitting is enabled for an RDBMS drivers by default.
When auto committing is enabled, each SQL statement will be committed to the database as anindividual transaction, as opposed to committing multiple statements as a single transaction.
Configuring new datasources to manage registry or user management data
Follow the steps below to configure new datasources to point to the new databases you create to manage registry
Add the following configuration to the connection URL when specifying it as shown in theexample above: CLIENT_LOCALE=en_US.utf8;DB_LOCALE=en_us.utf8;IFX_USE_STRENC=true;
For more information on other parameters that can be defined in the <PRODUCT_HOME>/repositor file, see .y/conf/datasources/ master-datasources.xml Tomcat JDBC Connection Pool

WSO2 Application Server, version 5.3.0
Copyright © WSO2 Inc. 2014 147
1.
2.
3.
1.
2.
and/or user management data separately.
Add a new datasource with similar configurations as the above to the < datasourceWSO2_CARBON_DB PRODU file . Change its elementsCT_HOME>/repository/conf/datasources/ master-datasources.xml
with your custom values. For instructions, see Setting up datasource configurations.If you are setting up a separate database to store registry-related data, update the following configurations inthe < file.PRODUCT_HOME>/repository/conf/ registry.xml
<dbConfig name="wso2registry"> <dataSource>jdbc/MY_DATASOURCE_NAME</dataSource></dbConfig>
If you are setting up a separate database to store user management data, update the following configurationsin the < file.PRODUCT_HOME>/repository/conf/ user-mgt.xml
<Configuration> <Property name="dataSource">jdbc/MY_DATASOURCE_NAME</Property></Configuration>
Creating database tables
To create the database tables, connect to the database that you created earlier and run the following scripts.
To create tables in the registry and user manager database ( ), use the below script:WSO2CARBON_DB
<PRODUCT_HOME>/dbscripts/informix.sql
Restart the server.
Setting up Microsoft SQL
The following sections describe how to replace the default H2 database with MS SQL:
Setting up the database and usersSetting up the JDBC driverSetting up datasource configurationsCreating the database tables
Setting up the database and users
You can create database tables automatically by usingwhen starting the product for the first timethe parameter as follows:-Dsetup
For Windows: <PRODUCT_HOME>/bin/wso2server.bat -Dsetup
For Linux: <PRODUCT_HOME>/bin/wso2server.sh -Dsetup

WSO2 Application Server, version 5.3.0
Copyright © WSO2 Inc. 2014 148
1. 2. 3. 4.
5.
6.
7.
1. 2. 3.
1.
Follow the steps below to set up the Microsoft SQL database and users.
Enable TCP/IP
In the start menu, click and launch Programs Microsoft SQL Server 2005.Click , and then click . Configuration Tools SQL Server Configuration ManagerEnable and disable from protocols of your Microsoft SQL server.TCP/IP Named PipesDouble click to open the TCP/IP properties window, and set to on the tab.TCP/IP Listen All Yes Protocol
On the tab, disable by leaving it blank and give a valid TCP port, so thatIP Address TCP Dynamic PortsMicrosoft SQL server will listen on that port.
Similarly, enable TCP/IP from and disable . Also checkSQL Native Client Configuration Named Pipeswhether the port is set correctly to 1433.Restart Microsoft SQL Server.
Create the database and user
Open Microsoft SQL Management Studio to create a database and user.Click from the menu, and specify all the options to create a new database.New Database DatabaseClick from the menu, and specify all the necessary options.New Login Logins
Grant permissions
Assign newly created users the required grants/permissions to log in, create tables, and insert, index, select, update,and delete data in tables in the newly created database, as the minimum set of SQL server permissions.
Setting up the JDBC driver
Download and copy the sqljdbc4 Microsoft SQL JDBC driver file to the WSO2 product's <PRODUCT_HOME>/reposi directory. Use as the tory/components/lib/ com.microsoft.sqlserver.jdbc.SQLServerDriver <driv
in your datasource configuration in erClassName> <PRODUCT_HOME>/repository/conf/datasources/mast
file.er-datasources.xml
Setting up datasource configurations
A datasource is used to establish the connection to a database. By default, datasource is usedWSO2_CARBON_DBto connect to the default H2 database, which stores registry and user management data. After setting up theMicrosoft SQL database to replace the default H2 database, either change the default configurations of the WSO2_C
, or to point it to the new database as explained below. datasourceARBON_DB configure a new datasource
Changing the default WSO2_CARBON_DB datasource
Follow the steps below to change the type of the default datasource.WSO2_CARBON_DB
Edit the default datasource configuration in the < PRODUCT_HOME>/repository/conf/datasources/m a file as shown below.ster-datasources.xml
The best practice is to use port 1433, because you can use it in order processing services.

WSO2 Application Server, version 5.3.0
Copyright © WSO2 Inc. 2014 149
1.
<datasource> <name>WSO2_CARBON_DB</name> <description>The datasource used for registry and usermanager</description> <jndiConfig> <name>jdbc/WSO2CarbonDB</name> </jndiConfig> <definition type="RDBMS"> <configuration> <url>jdbc:sqlserver://<IP>:1433;databaseName=wso2greg</url> <username>regadmin</username> <password>regadmin</password> <driverClassName>com.microsoft.sqlserver.jdbc.SQLServerDriver</driverClassName> <maxActive>80</maxActive> <maxWait>60000</maxWait> <testOnBorrow>true</testOnBorrow> <validationQuery>SELECT 1</validationQuery> <validationInterval>30000</validationInterval> <defaultAutoCommit>false</defaultAutoCommit> </configuration> </definition></datasource>
The elements in the above configuration are described below:
Element Description
url The URL of the database. Change the with the IP of the server. The best<IP>practice is to use port 1433, because you can use it in order processing services.
username and password
The name and password of the database user
driverClassName The class name of the database driver
maxActive The maximum number of active connections that can be allocated at the sametime from this pool. Enter any negative value to denote an unlimited number ofactive connections.
maxWait The maximum number of milliseconds that the pool will wait (when there are noavailable connections) for a connection to be returned before throwing anexception. You can enter zero or a negative value to wait indefinitely.
minIdle The minimum number of active connections that can remain idle in the pool withoutextra ones being created, or enter zero to create none.
testOnBorrow The indication of whether objects will be validated before being borrowed from thepool. If the object fails to validate, it will be dropped from the pool, and anotherattempt will be made to borrow another.

WSO2 Application Server, version 5.3.0
Copyright © WSO2 Inc. 2014 150
1.
1.
2.
3.
1.
validationQuery The SQL query that will be used to validate connections from this pool beforereturning them to the caller.
validationInterval The indication to avoid excess validation, and only run validation at the most, at thisfrequency (time in milliseconds). If a connection is due for validation, but has beenvalidated previously within this interval, it will not be validated again.
defaultAutoCommit This property is not applicable to the Carbon database in WSO2 productsbecause auto committing is usually handled at the code level, i.e., the default autocommit configuration specified for the RDBMS driver will be effective instead of thisproperty element. Typically, auto committing is enabled for an RDBMS drivers bydefault.
When auto committing is enabled, each SQL statement will be committed to thedatabase as an individual transaction, as opposed to committing multiplestatements as a single transaction.
Configuring new datasources to manage registry or user management data
Follow the steps below to configure new datasources to point to the new databases you create to manage registryand/or user management data separately.
Add a new datasource with similar configurations as the above to the < datasourceWSO2_CARBON_DB PRODU file. Change its elementsCT_HOME>/repository/conf/datasources/ master-datasources.xml
with your custom values. For instructions, see Setting up datasource configurations.If you are setting up a separate database to store registry-related data, update the following configurations inthe < file.PRODUCT_HOME>/repository/conf/ registry.xml
<dbConfig name="wso2registry"> <dataSource>jdbc/MY_DATASOURCE_NAME</dataSource></dbConfig>
If you are setting up a separate database to store user management data, update the following configurationsin the < file.PRODUCT_HOME>/repository/conf/ user-mgt.xml
<Configuration> <Property name="dataSource">jdbc/MY_DATASOURCE_NAME</Property></Configuration>
Creating the database tables
To create the database tables, connect to the database that you created earlier and run the following scripts.
To create tables in the registry and user manager database ( ), use the below script:WSO2CARBON_DB
For more information on other parameters that can be defined in the <PRODUCT_HOME>/repositordatasources/ file, see .y/conf/ master-datasources.xml Tomcat JDBC Connection Pool

WSO2 Application Server, version 5.3.0
Copyright © WSO2 Inc. 2014 151
1.
2.
1.
2.
3.
4.
5.
<PRODUCT_HOME>/dbscripts/mssql.sql
Restart the server.
Setting up MySQL
The following sections describe how to replace the default H2 databases with MySQL:
Setting up the database and usersSetting up the driversSetting up datasource configurationsCreating database tablesChanging the registry/user management databases
Setting up the database and users
Follow the steps below to set up a MySQL database:
Download and install MySQL on your computer using the following command:
sudo apt-get install mysql-server mysql-client
Start the MySQL service using the following command:
sudo /etc/init.d/mysql start
Log in to the MySQL client as the root user (or any other user with database creation privileges).
mysql -u root -p
Enter the password when prompted.
In the MySQL command prompt, create the database using the following command:
create database regdb;
You can create database tables automatically by usingwhen starting the product for the first timethe parameter as follows:-Dsetup
For Windows: <PRODUCT_HOME>/bin/wso2server.bat -Dsetup
For Linux: <PRODUCT_HOME>/bin/wso2server.sh -Dsetup
For instructions on installing MySQL on MAC OS, go to .Homebrew
In most systems, there is no default root password. Press the Enter key without typing anything if youhave not changed the default root password.

WSO2 Application Server, version 5.3.0
Copyright © WSO2 Inc. 2014 152
5.
6.
7.
8.
1.
Give authorization of the database to the regadmin user as follows:
GRANT ALL ON regdb.* TO regadmin@localhost IDENTIFIED BY "regadmin";
Once you have finalized the permissions, reload all the privileges by executing the following command:
FLUSH PRIVILEGES;
Log out from the MySQL prompt by executing the following command:
quit;
Setting up the drivers
Download the MySQL Java connector , and copy it to the <JAR file PRODUCT_HOME>/repository/components/ directory.lib/
Setting up datasource configurations
A datasource is used to establish the connection to a database. By default, datasource is usedWSO2_CARBON_DBto connect to the default H2 database, which stores registry and user management data. After setting up theMySQL database to replace the default H2 database, either change the default configurations of the WSO2_CARBON
, or to point it to the new database as explained below. datasource_DB configure a new datasource
Changing the default WSO2_CARBON_DB datasource
Follow the steps below to change the type of the default datasource.WSO2_CARBON_DB
Edit the default datasource configuration in the <PRODUCT_HOME>/repository/conf/datasources/mas file as shown below.ter-datasources.xml
For users of Microsoft Windows, when creating the database in MySQL, it is important to specify thecharacter set as latin1. Failure to do this may result in an error (error code: 1709) when starting yourcluster. This error occurs in certain versions of MySQL (5.6.x), and is related to the UTF-8 encoding.MySQL originally used the latin1 character set by default, which stored characters in a 2-bytesequence. However, in recent versions, MySQL defaults to UTF-8 to be friendlier to internationalusers. Hence, you must use latin1 as the character set as indicated below in the database creationcommands to avoid this problem. Note that this may result in issues with non-latin characters (likeHebrew, Japanese, etc.). The database creation command should be as follows:
mysql> create database <DATABASE_NAME> character set latin1;
For users of other operating systems, the standard database creation commands will suffice. Forthese operating systems, the database creation command should be as follows:.
mysql> create database <DATABASE_NAME>;
1.
2. 3.
4.
Tip: Be sure to use the connector version that is supported by the MySQL version you use. If you comeacross any issues due to version incompatibility, follow the steps below:
Shut down the server and remove all existing connectors from <PRODUCT_HOME>/repository/co and .mponents/lib <PRODUCT_HOME>/repository/components/dropins
Download the connector JAR that is compatible with your current MySQL version.Copy the JAR file . Files will be copiedonly to <PRODUCT_HOME>/repository/components/libautomatically to the dropins folder at the server startup.Start the server with the - parameter as .Dsetup sh wso2server.sh -Dsetup

WSO2 Application Server, version 5.3.0
Copyright © WSO2 Inc. 2014 153
1.
<datasource> <name>WSO2_CARBON_DB</name> <description>The datasource used for registry and usermanager</description> <jndiConfig> <name>jdbc/WSO2CarbonDB</name> </jndiConfig> <definition type="RDBMS"> <configuration> <url>jdbc:mysql://localhost:3306/regdb</url> <username>regadmin</username> <password>regadmin</password> <driverClassName>com.mysql.jdbc.Driver</driverClassName> <maxActive>80</maxActive> <maxWait>60000</maxWait> <minIdle>5</minIdle> <testOnBorrow>true</testOnBorrow> <validationQuery>SELECT 1</validationQuery> <validationInterval>30000</validationInterval> <defaultAutoCommit>false</defaultAutoCommit> </configuration> </definition></datasource>
The elements in the above configuration are described below:
Element Description
url The URL of the database. The default port for MySQL is 3306
username and password
The name and password of the database user
driverClassName The class name of the database driver
maxActive The maximum number of active connections that can be allocated at the sametime from this pool. Enter any negative value to denote an unlimited number ofactive connections.
maxWait The maximum number of milliseconds that the pool will wait (when there are noavailable connections) for a connection to be returned before throwing anexception. You can enter zero or a negative value to wait indefinitely.
minIdle The minimum number of active connections that can remain idle in the pool withoutextra ones being created, or enter zero to create none.
testOnBorrow The indication of whether objects will be validated before being borrowed from thepool. If the object fails to validate, it will be dropped from the pool, and anotherattempt will be made to borrow another.
Do not change the datasource name in the below configurations.WSO2_CARBON_DB

WSO2 Application Server, version 5.3.0
Copyright © WSO2 Inc. 2014 154
1.
1.
2.
3.
1.
validationQuery The SQL query that will be used to validate connections from this pool beforereturning them to the caller.
validationInterval The indication to avoid excess validation, and only run validation at the most, at thisfrequency (time in milliseconds). If a connection is due for validation, but has beenvalidated previously within this interval, it will not be validated again.
defaultAutoCommit This property is not applicable to the Carbon database in WSO2 productsbecause auto committing is usually handled at the code level, i.e., the default autocommit configuration specified for the RDBMS driver will be effective instead of thisproperty element. Typically, auto committing is enabled for an RDBMS drivers bydefault.
When auto committing is enabled, each SQL statement will be committed to thedatabase as an individual transaction, as opposed to committing multiplestatements as a single transaction.
Configuring new datasources to manage registry or user management data
Follow the steps below to configure new datasources to point to the new databases you create to manage registryand/or user management data separately.
Add a new datasource with similar configurations as the above to the < datasourceWSO2_CARBON_DB PRODUChange its elements with your custom values. ForCT_HOME>/repository/conf/datasources/.
instructions, see Setting up datasource configurations.If you are setting up a separate database to store registry-related data, update the following configurations inthe < file.PRODUCT_HOME>/repository/conf/ registry.xml
<dbConfig name="wso2registry"> <dataSource>jdbc/MY_DATASOURCE_NAME</dataSource></dbConfig>
If you are setting up a separate database to store user management data, update the following configurationsin the < file.PRODUCT_HOME>/repository/conf/ user-mgt.xml
<Configuration> <Property name="dataSource">jdbc/MY_DATASOURCE_NAME</Property></Configuration>
Creating database tables
To create the database tables, connect to the database that you created earlier and run the following scripts
To create tables in the registry and user manager database ( ), use the below script:WSO2CARBON_DB
For more information on other parameters that can be defined in the <PRODUCT_HOME>/repositodatasources/ file, see .ry/conf/ master-datasources.xml Tomcat JDBC Connection Pool
You may have to enter the password for each command when prompted.

WSO2 Application Server, version 5.3.0
Copyright © WSO2 Inc. 2014 155
1.
2.
1.
1. 2. 3. 4.
mysql -u regadmin -p -Dregdb < '<PRODUCT_HOME>/dbscripts/mysql.sql';
Restart the server.
Changing the registry/user management databases
If you change the database that comes by default or set up a separate database for registry or user managementrelated data, follow the below instructions.
Add the datasource to the < PRODUCT_HOME>/repository/conf/datasources/ master-datasource file . Change its elements with your custom values. For instructions, see s.xml Setting up datasource
configurations.
Setting up OpenEdge
The following sections describe how to replace the default H2 databases with OpenEdge (OE):
Setting up the database and usersSetting up the driversSetting up datasource configurationsCreating database tables
Setting up the database and users
Follow the steps below to set up an OpenEdge (OE) database.
Download and install OpenEdge on you computer.Go to the directory and use the script to set up the environment variables. <OE_HOME>/bin/ proenv
Add to the environment variable.<OE_HOME>/java/prosp.jar CLASSPATH
Create an empty database using the script as follows. This script creates a database by copying anprodb
existing database provided with the installation.
If you are using MySQL version 5.7 or later, use the following script instead:
mysql -u regadmin -p -Dregdb < '<PRODUCT_HOME>/dbscripts/mysql5.7.sql';
If you prefer to populate MySQL 5.7 or later with the -Dsetup command, rename to mysql5.7.sql mysql.sql.
You can create database tables automatically by usingwhen starting the product for the first timethe parameter as follows:-Dsetup
For Windows: <PRODUCT_HOME>/bin/wso2server.bat -Dsetup
For Linux: <PRODUCT_HOME>/bin/wso2server.sh -Dsetup

WSO2 Application Server, version 5.3.0
Copyright © WSO2 Inc. 2014 156
4.
5.
6.
7.
8.
1.
prodb CARBON_DB <OE-installation-directory>/empty8
Start the database using the script as follows. Provide the database name and a port asproserve
arguments to this script using the and parameters.-db -S
proserve -db CARBON_DB -S 6767
Use the script to start the default SQL explorer that comes with the OpenEdge installation. Connectsqlexp
to the database you just created by using the and parameters as follows:-db -S
sqlexp -db CARBON_DB -S 6767
Use the following commands to create a user and grant that user the required permissions to the database:
CREATE USER 'wso2carbon','wso2carbon';GRANT dba,resource TO 'wso2carbon';COMMIT;
Log out from the SQL explorer by typing the following command: exit
Setting up the drivers
Copy the file to your WSO2 product's <OE_HOME>/java/openedge.jar <PRODUCT_HOME>/repository/comp directory. onents/lib/
Setting up datasource configurations
A datasource is used to establish the connection to a database. By default, datasource is usedWSO2_CARBON_DBto connect to the default H2 database, which stores registry and user management data. After setting up theOpenEdge database to replace the default H2 database, either change the default configurations of the WSO2_CARB
, or to point it to the new database as explained below. datasourceON_DB configure a new datasource
Changing the default WSO2_CARBON_DB datasource
Follow the steps below to change the type of the default datasource.WSO2_CARBON_DB
Edit the default datasource configuration in the < PRODUCT_HOME>/repository/conf/datasources/m a file as shown below.ster-datasources.xml

WSO2 Application Server, version 5.3.0
Copyright © WSO2 Inc. 2014 157
1.
<datasource> <name>WSO2_CARBON_DB</name> <description>The datasource used for registry and usermanager</description> <jndiConfig> <name>jdbc/WSO2CarbonDB</name> </jndiConfig> <definition type="RDBMS"> <configuration> <url>jdbc:datadirect:openedge://localhost:6767;databaseName=CARBON_DB</url> <username>regadmin</username> <password>regadmin</password> <driverClassName>com.ddtek.jdbc.openedge.OpenEdgeDriver</driverClassName> <maxActive>80</maxActive> <maxWait>60000</maxWait> <minIdle>5</minIdle> <testOnBorrow>true</testOnBorrow> <validationQuery>SELECT 1</validationQuery> <validationInterval>30000</validationInterval> <defaultAutoCommit>false</defaultAutoCommit> </configuration> </definition></datasource>
The elements in the above configuration are described below:
Element Description
url The URL of the database. The default port for a DB2 instance is 50000.
username and password
The name and password of the database user
driverClassName The class name of the database driver
maxActive The maximum number of active connections that can be allocated at the sametime from this pool. Enter any negative value to denote an unlimited number ofactive connections.
maxWait The maximum number of milliseconds that the pool will wait (when there are noavailable connections) for a connection to be returned before throwing anexception. You can enter zero or a negative value to wait indefinitely.
minIdle The minimum number of active connections that can remain idle in the pool withoutextra ones being created, or enter zero to create none.
testOnBorrow The indication of whether objects will be validated before being borrowed from thepool. If the object fails to validate, it will be dropped from the pool, and anotherattempt will be made to borrow another.

WSO2 Application Server, version 5.3.0
Copyright © WSO2 Inc. 2014 158
1.
1.
2.
3.
validationQuery The SQL query that will be used to validate connections from this pool beforereturning them to the caller.
validationInterval The indication to avoid excess validation, and only run validation at the most, at thisfrequency (time in milliseconds). If a connection is due for validation, but has beenvalidated previously within this interval, it will not be validated again.
defaultAutoCommit This property is not applicable to the Carbon database in WSO2 productsbecause auto committing is usually handled at the code level, i.e., the default autocommit configuration specified for the RDBMS driver will be effective instead of thisproperty element. Typically, auto committing is enabled for an RDBMS drivers bydefault.
When auto committing is enabled, each SQL statement will be committed to thedatabase as an individual transaction, as opposed to committing multiplestatements as a single transaction.
Configuring new datasources to manage registry or user management data
Follow the steps below to configure new datasources to point to the new databases you create to manage registryand/or user management data separately.
Add a new datasource with similar configurations as the above to the < datasourceWSO2_CARBON_DB PRODU file. Change its elementsCT_HOME>/repository/conf/datasources/ master-datasources.xml
with your custom values. For instructions, see Setting up datasource configurations.If you are setting up a separate database to store registry-related data, update the following configurations inthe < file.PRODUCT_HOME>/repository/conf/ registry.xml
<dbConfig name="wso2registry"> <dataSource>jdbc/MY_DATASOURCE_NAME</dataSource></dbConfig>
If you are setting up a separate database to store user management data, update the following configurationsin the < file.PRODUCT_HOME>/repository/conf/ user-mgt.xml
<Configuration> <Property name="dataSource">jdbc/MY_DATASOURCE_NAME</Property></Configuration>
Creating database tables
To create the database tables, connect to the database that you created earlier and run the following scripts
To create tables in the registry and user manager database ( ), use the below script:WSO2CARBON_DB
For more information on other parameters that can be defined in the <PRODUCT _HOME>/reposito file, see .ry/conf/datasources/ master-datasources.xml Tomcat JDBC Connection Pool

WSO2 Application Server, version 5.3.0
Copyright © WSO2 Inc. 2014 159
1.
2. 3.
4.
5.
1.
2.
3.
4.
5.
<PRODUCT_HOME>/dbscripts/openedge.sql
Follow the steps below to create the database tables by executing the scripts.
Modify the OpenEdge script provided with the product to create the tables manually. Make a backup of the <P script under the name .RODUCT_HOME>/dbscripts/openedge.sql openedge_manual.sql
Replace all the "/" symbols in the script with the ";" symbol.openedge_manual.sqlAt the end of the script, add the following line and save the script:openedge_manual.sql
COMMIT;
Run the modified script using the SQL explorer as follows:
sqlexp -db CARBON_DB -S 6767 -user wso2carbon -password wso2carbon<PRODUCT_HOME>/dbscripts/openedge_manual.sql
Restart the server.
Setting up Oracle
The following sections describe how to replace the default H2 databases with Oracle:
Setting up the database and usersSetting up the JDBC driverSetting up datasource configurationsCreating the database tables
Setting up the database and users
Follow the steps below to set up a Oracle database.
Create a new database by using the Oracle database configuration assistant (dbca) or manually.
Make the necessary changes in the Oracle and files in order to definetnsnames.ora listner.oraaddresses of the databases for establishing connections to the newly created database.
After configuring the files, start the Oracle instance using the following command:.ora
$ sudo /etc/init.d/oracle-xe restart
Connect to Oracle using SQL*Plus as SYSDBA as follows:
$ ./$<ORACLE_HOME>/config/scripts/sqlplus.sh sysadm/password as SYSDBA
Connect to the instance with the username and password using the following command:
You can create database tables automatically by usingwhen starting the product for the first timethe parameter as follows:-Dsetup
For Windows: <PRODUCT_HOME>/bin/wso2server.bat -Dsetup
For Linux: <PRODUCT_HOME>/bin/wso2server.sh -Dsetup

WSO2 Application Server, version 5.3.0
Copyright © WSO2 Inc. 2014 160
5.
6.
7.
1.
2.
1.
$ connect
As SYSDBA, create a database user and grant privileges to the user as shown below:
Create user <USER_NAME> identified by password account unlock;grant connect to <USER_NAME>;grant create session, create table, create sequence, create trigger to<USER_NAME>;alter user <USER_NAME> quota <SPACE_QUOTA_SIZE_IN_MEGABYTES> on'<TABLE_SPACE_NAME>';commit;
Exit from the SQL*Plus session by executing the command.quit
Setting up the JDBC driver
Copy the Oracle JDBC libraries (for example, < to the <ORACLE_HOME/jdbc/lib/ojdbc14.jar) PRODUC directory.T_HOME>/repository/components/lib/
Remove the old database driver from the direct<PRODUCT_HOME>/repository/components/dropins/ory.
Setting up datasource configurations
A datasource is used to establish the connection to a database. By default, datasource is usedWSO2_CARBON_DBto connect to the default H2 database, which stores registry and user management data. After setting up the Oracledatabase to replace the default H2 database, either change the default configurations of the dataWSO2_CARBON_DB
, or to point it to the new database as explained below.source configure a new datasource
Changing the default WSO2_CARBON_DB datasource
Follow the steps below to change the type of the default datasource.WSO2_CARBON_DB
Edit the default datasource configuration in the < PRODUCT_HOME>/repository/conf/datasources/m a file as shown below.ster-datasources.xml
If you get a error when using the with WSO2 servers, set timezone region not found ojdbc6.jarthe Java property as follows: export JAVA_OPTS="-Duser.timezone='+05:30'"
The value of this property should be the GMT difference of the country. If it is necessary to set this propertypermanently, define it inside the as a new property.wso2server.sh JAVA_OPT

WSO2 Application Server, version 5.3.0
Copyright © WSO2 Inc. 2014 161
1.
<datasource> <name>WSO2_CARBON_DB</name> <description>The datasource used for registry and usermanager</description> <jndiConfig> <name>jdbc/WSO2CarbonDB</name> </jndiConfig> <definition type="RDBMS"> <configuration> <url>jdbc:oracle:thin:@SERVER_NAME:PORT/DB_NAME</url> <username>regadmin</username> <password>regadmin</password> <driverClassName>oracle.jdbc.driver.OracleDriver</driverClassName> <maxActive>80</maxActive> <maxWait>60000</maxWait> <minIdle>5</minIdle> <testOnBorrow>true</testOnBorrow> <validationQuery>SELECT 1 FROM DUAL</validationQuery> <validationInterval>30000</validationInterval> <defaultAutoCommit>false</defaultAutoCommit> </configuration> </definition></datasource>
The elements in the above configuration are described below:
Element Description
url The URL of the database. The default port for a DB2 instance is 50000.
username and password
The name and password of the database user
driverClassName The class name of the database driver
maxActive The maximum number of active connections that can be allocated at the sametime from this pool. Enter any negative value to denote an unlimited number ofactive connections.
maxWait The maximum number of milliseconds that the pool will wait (when there are noavailable connections) for a connection to be returned before throwing anexception. You can enter zero or a negative value to wait indefinitely.
minIdle The minimum number of active connections that can remain idle in the pool withoutextra ones being created, or enter zero to create none.
testOnBorrow The indication of whether objects will be validated before being borrowed from thepool. If the object fails to validate, it will be dropped from the pool, and anotherattempt will be made to borrow another.
validationQuery The SQL query that will be used to validate connections from this pool beforereturning them to the caller.

WSO2 Application Server, version 5.3.0
Copyright © WSO2 Inc. 2014 162
1.
1.
2.
3.
1.
validationInterval The indication to avoid excess validation, and only run validation at the most, at thisfrequency (time in milliseconds). If a connection is due for validation, but has beenvalidated previously within this interval, it will not be validated again.
defaultAutoCommit This property is not applicable to the Carbon database in WSO2 productsbecause auto committing is usually handled at the code level, i.e., the default autocommit configuration specified for the RDBMS driver will be effective instead of thisproperty element. Typically, auto committing is enabled for an RDBMS drivers bydefault.
When auto committing is enabled, each SQL statement will be committed to thedatabase as an individual transaction, as opposed to committing multiplestatements as a single transaction.
Configuring new datasources to manage registry or user management data
Follow the steps below to configure new datasources to point to the new databases you create to manage registryand/or user management data separately.
Add a new datasource with similar configurations as the above to the < datasourceWSO2_CARBON_DB PRODU file. Change its elementsCT_HOME>/repository/conf/datasources/ master-datasources.xml
with your custom values. For instructions, see Setting up datasource configurations.If you are setting up a separate database to store registry-related data, update the following configurations inthe < file.PRODUCT_HOME>/repository/conf/ registry.xml
<dbConfig name="wso2registry"> <dataSource>jdbc/MY_DATASOURCE_NAME</dataSource></dbConfig>
If you are setting up a separate database to store user management data, update the following configurationsin the < file.PRODUCT_HOME>/repository/conf/ user-mgt.xml
<Configuration> <Property name="dataSource">jdbc/MY_DATASOURCE_NAME</Property></Configuration>
Creating the database tables
To create the database tables, connect to the database that you created earlier and run the following scripts inSQL*Plus:
To create tables in the registry and user manager database ( ), use the below script:WSO2CARBON_DB
The default port for Oracle is 1521.
For more information on other parameters that can be defined in the <PRODUCT_HOME>/repositor file, see .y/conf/datasources/ master-datasources.xml Tomcat JDBC Connection Pool

WSO2 Application Server, version 5.3.0
Copyright © WSO2 Inc. 2014 163
1.
2.
1.
2.
SQL> @$<PRODUCT_HOME>/dbscripts/oracle.sql
Restart the server.
Setting up Oracle RAC
The following sections describe how to replace the default H2 databases with Oracle RAC:
Setting up the database and usersSetting up the JDBC driverSetting up datasource configurationsCreating the database tables
Oracle Real Application Clusters (RAC) is an option for the Oracle Database for clustering and high availability inOracle database environments. In the Oracle RAC environment, some of the commands used in areoracle.sqlconsidered inefficient. Therefore, the product has a separate SQL script for Oracle RAC. Theoracle_rac.sqlOracle RAC-friendly script is located in the folder together with other scripts.dbscripts .sql
Setting up the database and users
Follow the steps below to set up an Oracle RAC database.
Set environment variables < , , and with the corresponding values ORACLE_HOME> PATH ORACLE_SID /ora, , and as follows:cle/app/oracle/product/11.2.0/dbhome_1 $PATH:<ORACLE_HOME>/bin orcl1
Connect to Oracle using SQL*Plus as SYSDBA.
You can create database tables automatically by usingwhen starting the product for the first timethe parameter as follows:-Dsetup
For Windows: <PRODUCT_HOME>/bin/wso2server.bat -Dsetup
For Linux: <PRODUCT_HOME>/bin/wso2server.sh -Dsetup
To test products on Oracle RAC, rename to before running .oracle_rac.sql oracle.sql -Dsetup

WSO2 Application Server, version 5.3.0
Copyright © WSO2 Inc. 2014 164
2.
3.
4.
Create a database user and grant privileges to the user as shown below:
Create user <USER_NAME> identified by password account unlock;grant connect to <USER_NAME>;grant create session, create table, create sequence, create trigger to<USER_NAME>;alter user <USER_NAME> quota <SPACE_QUOTA_SIZE_IN_MEGABYTES> on'<TABLE_SPACE_NAME>';commit;
Exit from the SQL*Plus session by executing the command.quit
Setting up the JDBC driver
Copy the Oracle JDBC libraries (for example, the file) to the <ORACLE_HOME>/jdbc/lib/ojdbc14.jar <PRODU directory. CT_HOME>/repository/components/lib/
Remove the old database driver from the direc<PRODUCT_HOME>/repository/components/dropins/tory when you upgrade the database driver.

WSO2 Application Server, version 5.3.0
Copyright © WSO2 Inc. 2014 165
1.
Setting up datasource configurations
A datasource is used to establish the connection to a database. By default, datasource is usedWSO2_CARBON_DBto connect to the default H2 database, which stores registry and user management data. After setting up the OracleRAC database to replace the default H2 database, either change the default configurations of the WSO2_CARBON_D
, or to point it to the new database as explained below. datasourceB configure a new datasource
Changing the default WSO2_CARBON_DB datasource
Follow the steps below to change the type of the default datasource.WSO2_CARBON_DB
Edit the default datasource configuration in the < PRODUCT_HOME>/repository/conf/datasources/m a file as shown below.ster-datasources.xml
<datasource> <name>WSO2_CARBON_DB</name> <description>The datasource used for registry and usermanager</description> <jndiConfig> <name>jdbc/WSO2CarbonDB</name> </jndiConfig> <definition type="RDBMS"> <configuration> <url>jdbc:oracle:thin:@(DESCRIPTION=(LOAD_BALANCE=on) (ADDRESS=(PROTOCOL=TCP)(HOST=racnode1) (PORT=1521)) (ADDRESS=(PROTOCOL=TCP)(HOST=racnode2) (PORT=1521)) (CONNECT_DATA=(SERVICE_NAME=rac)))</url> <username>regadmin</username> <password>regadmin</password> <driverClassName>oracle.jdbc.driver.OracleDriver</driverClassName> <maxActive>80</maxActive> <maxWait>60000</maxWait> <minIdle>5</minIdle> <testOnBorrow>true</testOnBorrow> <validationQuery>SELECT 1 FROM DUAL</validationQuery> <validationInterval>30000</validationInterval> <defaultAutoCommit>false</defaultAutoCommit> </configuration> </definition></datasource>
The elements in the above configuration are described below:
Element Description
url The URL of the database. The default port for a DB2 instance is 50000.
username and password
The name and password of the database user
driverClassName The class name of the database driver

WSO2 Application Server, version 5.3.0
Copyright © WSO2 Inc. 2014 166
1.
1.
2.
3.
maxActive The maximum number of active connections that can be allocated at the sametime from this pool. Enter any negative value to denote an unlimited number ofactive connections.
maxWait The maximum number of milliseconds that the pool will wait (when there are noavailable connections) for a connection to be returned before throwing anexception. You can enter zero or a negative value to wait indefinitely.
minIdle The minimum number of active connections that can remain idle in the pool withoutextra ones being created, or enter zero to create none.
testOnBorrow The indication of whether objects will be validated before being borrowed from thepool. If the object fails to validate, it will be dropped from the pool, and anotherattempt will be made to borrow another.
validationQuery The SQL query that will be used to validate connections from this pool beforereturning them to the caller.
validationInterval The indication to avoid excess validation, and only run validation at the most, at thisfrequency (time in milliseconds). If a connection is due for validation, but has beenvalidated previously within this interval, it will not be validated again.
defaultAutoCommit This property is not applicable to the Carbon database in WSO2 productsbecause auto committing is usually handled at the code level, i.e., the default autocommit configuration specified for the RDBMS driver will be effective instead of thisproperty element. Typically, auto committing is enabled for an RDBMS drivers bydefault.
When auto committing is enabled, each SQL statement will be committed to thedatabase as an individual transaction, as opposed to committing multiplestatements as a single transaction.
Configuring new datasources to manage registry or user management data
Follow the steps below to configure new datasources to point to the new databases you create to manage registryand/or user management data separately.
Add a new datasource with similar configurations as the above to the < datasourceWSO2_CARBON_DB PRODU file. Change its elementsCT_HOME>/repository/conf/datasources/ master-datasources.xml
with your custom values. For instructions, see Setting up datasource configurations.If you are setting up a separate database to store registry-related data, update the following configurations inthe < file.PRODUCT_HOME>/repository/conf/ registry.xml
<dbConfig name="wso2registry"> <dataSource>jdbc/MY_DATASOURCE_NAME</dataSource></dbConfig>
If you are setting up a separate database to store user management data, update the following configurationsin the < file.PRODUCT_HOME>/repository/conf/ user-mgt.xml
For more information on other parameters that can be defined in the <PRODUCT_HOME>/repositor file, see .y/conf/datasources/ master-datasources.xml Tomcat JDBC Connection Pool

WSO2 Application Server, version 5.3.0
Copyright © WSO2 Inc. 2014 167
3.
1.
2.
1.
2.
3. 4.
<Configuration> <Property name="dataSource">jdbc/MY_DATASOURCE_NAME</Property></Configuration>
Creating the database tables
To create the database tables, connect to the database that you created earlier and run the following scripts inSQL*Plus:
To create tables in the registry and user manager database ( ), use the below script:WSO2CARBON_DB
SQL> @$<PRODUCT_HOME>/dbscripts/oracle.sql
Restart the server.
Setting up PostgreSQL
The following sections describe how to replace the default H2 databases with PostgreSQL:
Setting up the database and login roleSetting up the driversSetting up datasource configurationsCreating database tables
Setting up the database and login role
Follow the steps below to set up a PostgreSQL database.
Install PostgreSQL on your computer as follows:
Start the PostgreSQL service using the following command:
Create a database and the login role from a GUI using the .PGAdminIII toolTo connect PGAdminIII to a PostgreSQL database server, locate the server from the object browser,right-click the client, and click . This will show you the databases, tablespaces, and login roles as Connectfollows:
You can create database tables automatically by usingwhen starting the product for the first timethe parameter as follows:-Dsetup
For Windows: <PRODUCT_HOME>/bin/wso2server.bat -Dsetup
For Linux: <PRODUCT_HOME>/bin/wso2server.sh -Dsetup

WSO2 Application Server, version 5.3.0
Copyright © WSO2 Inc. 2014 168
4.
5. 6. 7.
8. 9.
1. 2.
1.
To create a database, click in the tree (inside the object browser), and click .Databases New DatabaseIn the dialog box, give a name to the database (for example: gregdb) and click . New Database OKTo create a login role, click in the tree (inside the object browser), and click .Login Roles New Login RoleEnter the role name and a password.
Optionally enter other policies, such as the expiration time for the login and the connection limit.Click to finish creating the login role.OK
Setting up the drivers
Download the .PostgreSQL JDBC4 driverCopy the driver to your WSO2 product's < directory. PRODUCT_HOME>/repository/components/lib
Setting up datasource configurations
A datasource is used to establish the connection to a database. By default, datasource is usedWSO2_CARBON_DBto connect to the default H2 database, which stores registry and user management data. After setting up thePostgreSQL database to replace the default H2 database, either change the default configurations of the WSO2_CAR
, or to point it to the new database as explained below. datasourceBON_DB configure a new datasource
Changing the default WSO2_CARBON_DB datasource
Follow the steps below to change the type of the default datasource.WSO2_CARBON_DB
These values will be used in the product configurations as described in the following sections. In thesample configuration, will be used as both the role name and the password.gregadmin

WSO2 Application Server, version 5.3.0
Copyright © WSO2 Inc. 2014 169
1. Edit the default datasource configuration in the <PRODUCT_HOME>/repository/conf/datasources/ma file as shown below.ster-datasources.xml
<datasource> <name>WSO2_CARBON_DB</name> <description>The datasource used for registry and usermanager</description> <jndiConfig> <name>jdbc/WSO2CarbonDB</name> </jndiConfig> <definition type="RDBMS"> <configuration> <url>jdbc:postgresql://localhost:5432/gregdb</url> <username>regadmin</username> <password>regadmin</password> <driverClassName>org.postgresql.Driver</driverClassName> <maxActive>80</maxActive> <maxWait>60000</maxWait> <minIdle>5</minIdle> <testOnBorrow>true</testOnBorrow> <defaultAutoCommit>true</defaultAutoCommit> <validationQuery>SELECT 1</validationQuery> <validationInterval>30000</validationInterval> </configuration> </definition></datasource>
The elements in the above configuration are described below:
Element Description
url The URL of the database. The default port for a PostgreSQL instance is 5432.
username and password
The name and password of the database user.
driverClassName The class name of the database driver.
maxActive The maximum number of active connections that can be allocated at the sametime from this pool. Enter any negative value to denote an unlimited number ofactive connections.
maxWait The maximum number of milliseconds that the pool will wait (when there are noavailable connections) for a connection to be returned before throwing anexception. You can enter zero or a negative value to wait indefinitely.
minIdle The minimum number of active connections that can remain idle in the pool withoutextra ones being created, or enter zero to create none.

WSO2 Application Server, version 5.3.0
Copyright © WSO2 Inc. 2014 170
1.
1.
2.
3.
1.
testOnBorrow Whether objects will be validated before being borrowed from the pool. If the objectfails to validate, it will be dropped from the pool, and another attempt will be madeto borrow another.
validationInterval The indication to avoid excess validation, and only run validation at the most, at thisfrequency (time in milliseconds). If a connection is due for validation, but has beenvalidated previously within this interval, it will not be validated again.
defaultAutoCommit Whether to commit database changes automatically or not. This property is notapplicable to the Carbon database in WSO2 products because auto committing isusually handled at the code level, i.e., the default auto commit configurationspecified for the RDBMS driver will be effective instead of this property element.Typically, auto committing is enabled for an RDBMS drivers by default.
When auto committing is enabled, each SQL statement will be committed to thedatabase as an individual transaction, as opposed to committing multiplestatements as a single transaction.
Configuring new datasources to manage registry or user management data
Follow the steps below to configure new datasources to point to the new databases you create to manage registryand/or user management data separately.
Add a new datasource with similar configurations as the above to the < datasourceWSO2_CARBON_DB PROD file. Change its elementsUCT_HOME>/repository/conf/datasources/ master-datasources.xml
with your custom values. For instructions, see .Setting up datasource configurations
If you are setting up a separate database to store registry-related data, update the following configurations inthe < file.PRODUCT_HOME>/repository/conf/ registry.xml
<dbConfig name="wso2registry"> <dataSource>jdbc/MY_DATASOURCE_NAME</dataSource></dbConfig>
If you are setting up a separate database to store user management data, update the following configurationsin the < file.PRODUCT_HOME>/repository/conf/ user-mgt.xml
<Configuration> <Property name="dataSource">jdbc/MY_DATASOURCE_NAME</Property></Configuration>
Creating database tables
To create the database tables, connect to the database that you created earlier and run the following scripts.
For more information on other parameters that can be defined in the <PRODUCT_HOME>/repositor file, see .y/conf/datasources/master-datasources.xml Tomcat JDBC Connection Pool

WSO2 Application Server, version 5.3.0
Copyright © WSO2 Inc. 2014 171
1.
2.
1.
2.
3.
4.
To create tables in the registry and user manager database ( ), use the below script:WSO2CARBON_DB
<PRODUCT_HOME>/dbscripts/postgresql.sql
Restart the server.
Setting up MariaDB
The following sections describe how to replace the default H2 databases with MariaDB, which is a drop-inreplacement for MySQL:
Setting up the database and usersSetting up the driversSetting up datasource configurationsCreating database tables
Setting up the database and users
Follow the steps below to set up MariaDB. See for information on the MariaDB versions that weTested DBMSshave tested the WSO2 products with.
Download, install and start MariaDB on your computer. See .https://downloads.mariadb.org/
Log in to MariaDB as the root user (or any other user with database creation privileges).
mysql -u root -p
Enter the password when prompted.
In the MySQL command prompt, create the database using the following command:
You can create database tables automatically by usingwhen starting the product for the first timethe parameter as follows:-Dsetup
For Windows: <PRODUCT_HOME>/bin/wso2server.bat -Dsetup
For Linux: <PRODUCT_HOME>/bin/wso2server.sh -Dsetup
You can install MariaDB standalone or as a galera cluster for high availability. Database clustering isindependent of WSO2 product clustering. For more information on setting up a galera cluster, see theMariaDB Galera Cluster documentation.
For instructions on installing MariaDB on MAC OS, go to .Homebrew
In most systems, there is no default root password. Press the Enter key without typing anything if youhave not changed the default root password.

WSO2 Application Server, version 5.3.0
Copyright © WSO2 Inc. 2014 172
4.
5.
6.
7.
1.
create database regdb;
Give authorization of the database to the regadmin user as follows:
GRANT ALL ON regdb.* TO regadmin@localhost IDENTIFIED BY "regadmin";
Once you have finalized the permissions, reload all the privileges by executing the following command:
FLUSH PRIVILEGES;
Log out from the MySQL prompt by executing the following command:
quit;
Setting up the drivers
Download the MySQL Java connector , and copy it to the <JAR file PRODUCT_HOME>/repository/components/ directory.lib/
Setting up datasource configurations
A datasource is used to establish the connection to a database. By default, datasource is usedWSO2_CARBON_DBto connect to the default H2 database, which stores registry and user management data. After setting up theMariaDB database to replace the default H2 database, either change the default configurations of the WSO2_CARBO
, or to point it to the new database as explained below. datasourceN_DB configure a new datasource
Changing the default WSO2_CARBON_DB datasource
Follow the steps below to change the type of the default datasource.WSO2_CARBON_DB
Edit the default datasource configuration in the < PRODUCT_HOME>/repository/conf/datasources/m a file as shown below.ster-datasources.xml
Note that you must use the MySQL connector that is compatible with your MariaDB version. For example, is compatible with MariaDB version 10.0.20. See mysql-connector -java-5.1.36-bi n.jar Tested
for information on which version of a WSO2 product has been tested for compatibility with whichDBMSsversion of MariaDB and MySQL connector.
Do not change the datasource name in the below configuration.WSO2_CARBON_DB

WSO2 Application Server, version 5.3.0
Copyright © WSO2 Inc. 2014 173
1.
<datasource> <name>WSO2_CARBON_DB</name> <description>The datasource used for registry and usermanager</description> <jndiConfig> <name>jdbc/WSO2CarbonDB</name> </jndiConfig> <definition type="RDBMS"> <configuration> <url>jdbc:mysql://localhost:3306/regdb</url> <username>regadmin</username> <password>regadmin</password> <defaultAutoCommit>false</defaultAutoCommit> <driverClassName>com.mysql.jdbc.Driver</driverClassName> <maxActive>80</maxActive> <maxWait>60000</maxWait> <minIdle>5</minIdle> <testOnBorrow>true</testOnBorrow> <validationQuery>SELECT 1</validationQuery> <validationInterval>30000</validationInterval> <defaultAutoCommit>false</defaultAutoCommit> </configuration> </definition></datasource>
The elements in the above configuration are described below:
Element Description
url The URL of the database. The default port for MariaDB is 3306
username and password
The name and password of the database user
driverClassName The class name of the database driver
maxActive The maximum number of active connections that can be allocated at the sametime from this pool. Enter any negative value to denote an unlimited number ofactive connections.
maxWait The maximum number of milliseconds that the pool will wait (when there are noavailable connections) for a connection to be returned before throwing anexception. You can enter zero or a negative value to wait indefinitely.
minIdle The minimum number of active connections that can remain idle in the pool withoutextra ones being created, or enter zero to create none.
testOnBorrow The indication of whether objects will be validated before being borrowed from thepool. If the object fails to validate, it will be dropped from the pool, and anotherattempt will be made to borrow another.

WSO2 Application Server, version 5.3.0
Copyright © WSO2 Inc. 2014 174
1.
1.
2.
3.
1.
validationQuery The SQL query that will be used to validate connections from this pool beforereturning them to the caller.
validationInterval The indication to avoid excess validation, and only run validation at the most, at thisfrequency (time in milliseconds). If a connection is due for validation, but has beenvalidated previously within this interval, it will not be validated again.
defaultAutoCommit This property is not applicable to the Carbon database in WSO2 productsbecause auto committing is usually handled at the code level, i.e., the default autocommit configuration specified for the RDBMS driver will be effective instead of thisproperty element. Typically, auto committing is enabled for an RDBMS drivers bydefault.
When auto committing is enabled, each SQL statement will be committed to thedatabase as an individual transaction, as opposed to committing multiplestatements as a single transaction.
Configuring new datasources to manage registry or user management data
Follow the steps below to configure new datasources to point to the new databases you create to manage registryand/or user management data separately.
Add a new datasource with similar configurations as the above to the < datasource WSO2_CARBON_DB PROD file . Change its elementsUCT_HOME>/repository/conf/datasources/ master-datasources.xml
with your custom values. For instructions, see Setting up datasource configurations.If you are setting up a separate database to store registry-related data, update the following configurations inthe < PRODUCT_HOME>/repository/conf/
<dbConfig name="wso2registry"> <dataSource>jdbc/MY_DATASOURCE_NAME</dataSource></dbConfig>
If you are setting up a separate database to store user management data, update the following configurationsin the < file.PRODUCT_HOME>/repository/conf/ user-mgt.xml
<Configuration> <Property name="dataSource">jdbc/MY_DATASOURCE_NAME</Property></Configuration>
Creating database tables
To create the database tables, connect to the database that you created earlier and run the following scripts.
To create tables in the registry and user manager database ( ), use the below script:WSO2CARBON_DB
For more information on other parameters that can be defined in the <PRODUCT_HOME>/repositordatasources/ file, see .y/conf/ master-datasources.xml Tomcat JDBC Connection Pool

WSO2 Application Server, version 5.3.0
Copyright © WSO2 Inc. 2014 175
1.
2.
mysql -u regadmin -p -Dregdb < '<PRODUCT_HOME>/dbscripts/mysql.sql';
Restart the server.
Managing Datasources
A datasource provides information that a server can use to connect to a database or to an external data store. Thetopics given below explain the ways in which new datasources can be created and edited in WSO2 products.
Creating datasources using the management consoleCreating datasources using configuration filesEditing datasource information
Creating datasources using the management console
The following feature in the WSO2 Feature Repository allows you to manage datasources using the managementconsole of your product:
Name: WSO2 Carbon - da tasource management fea tu re Identifier: org.wso2.carbon.datasource.feature.group
If this feature is not included in your product by default, you can install it using the section ofWorking with Featuresthis documentation. With this feature, you can add any RDBMS datasource or your own custom datasources usingthe management console, which can later be edited or deleted for your product instance if required. Note that alldatasources created using the management console are saved to the registry of your product. The steps for creatingdatasources are discussed in the following topics:
Configuring an RDBMS DatasourceConfiguring a Custom Datasource
Creating datasources using configuration files
In all WSO2 products, you also have the option of creating datasources be simply creating a configuration file withthe datasource information and storing it in the directory. <PRODUCT_HOME>/repository/conf/datasources/For example, all WSO2 products are shipped with the default WSO2_CARBON_DB database, and the datasourcethat is used to connect to this database is defined in the file stored in the master-datasources.xml datasourc
folder. You can also create your own custom datasources by creating configuration files and storing them in theessame folder. For example, see the file. The datasources defined using configurationcustom-datasources.xmlfiles can be viewed using the management console if the datasource management feature is installed.
You may have to enter the password for each command when prompted.
You can create database tables automatically by usingwhen starting the product for the first timethe parameter as follows:-Dsetup
For Windows: <PRODUCT_HOME>/bin/wso2server.bat -Dsetup
For Linux: <PRODUCT_HOME>/bin/wso2server.sh -Dsetup

WSO2 Application Server, version 5.3.0
Copyright © WSO2 Inc. 2014 176
1.
2.
Editing datasource information
After datasources are created (either using the management console or by creating a separate configuration file),you can access them by clicking on the tab of the management console as shown below. Data Sources Configure
You can also edit and delete the datasources that are saved in the registry (i.e. datasources created using themanagement console). However, you cannot edit or delete the datasources that are added using configuration filesin the directory using the management console. For<PRODUCT_HOME>/repository/conf/datasources/example, to modify the default datasource, you have to change the <WSO2_CARBON_DB> master-datasources.
file.xml
Configuring an RDBMS Datasource
Follow the steps given below to create RDBMS for your product server. RDBMS datasources allow youdatasourcesto service enable data from relational databases.
Log in to the management console of your product and click on the tab. TheData Sources Configuredatasources that are already created will be listed.Click to open the following screen:Add Data Source
When adding an RDBMS datasource, be sure to copy the JDBC driver JAR file for your database to <PROD.UCT_HOME>/repository/components/lib

WSO2 Application Server, version 5.3.0
Copyright © WSO2 Inc. 2014 177
2.
3. 4.
5.
6.
Select 'RDBMS' for the field to define an RDBMS configuration.Data Source TypeEnter values for the remaining fields as explained below.
Name: Name of the datasource (must be a unique value).Data Source Provider: Specify the datasource provider.Driver: The class name of the JDBC driver to use. URL: The connection URL to pass to the JDBC driver to establish the connectionUser Name: The connection user name to pass to the JDBC driver to establish the connectionPassword: The connection password to pass to the JDBC driver to establish the connectionExpose as a JNDI Data Souce: Allows you to specify the JNDI data source.Data Source Configuration Parameters: Allows you to specify the datasource connection poolparameters when creating an RDBMS datasource
Be sure to copy the JDBC driver relevant to the database engine to the <PRODUCT_HOME>/repository/co and directories. For example, ifmponents/dropins <PRODUCT_HOME>/repository/components/lib
you are using MySQL, you would specify as the driver and would copy com.mysql.jdbc.Driver mysql-c to these directories. If you do not copy the driver to these directoriesonnector-java-5.XX-bin.jar
when you create the datasource, you will get an exception similar to "Cannot load JDBC driver classcom.mysql.jdbc.Driver".After creating datasources, they appear on the page. If required, you can Data Sources edit or delete them by clicking Edit or Delete.
Configuring a JNDI Datasource
Java Naming and Directory Interface (JNDI) is a Java application programming interface (API) that provides namingand directory functionality for Java software clients to discover and look up data and objects via a name. It helpsdecouple object creation from the object look-up. When you have registered a datasource with JNDI, others candiscover it through a JNDI look-up and use it. Click to display the JNDI fields asExpose as a JNDI Data Sourceshown below.
This is the default RDBMS datasource configuration provided by WSO2. You can also write your ownRDBMS configuration by selecting the option.custom datasource

WSO2 Application Server, version 5.3.0
Copyright © WSO2 Inc. 2014 178
Following are descriptions of the JNDI fields:
Name: Name of the JNDI datasource that will be visible to others in object look-upUse Data Source Factory: To make the datasource accessible from an external environment, you must usea data source factory. When this option is selected, a reference object will be created with the defineddatasource properties. The data source factory will create the datasource instance based on the values of thereference object when accessing the datasource from an external environment. In the datasourceconfiguration, this is set as follows: <jndiConfig useDataSourceFactory="true">JNDI Properties: Properties related to the JNDI datasource (such as password). When you select this option,set the following properties:
java.naming.factory.initial: Selects the registry service provider as the initial contextjava.naming.provider.url: Specifies the location of the registry when the registry is being usedas the initial context
Configuring the Datasource Provider
A datasource provider connects to a source of data such as a database, accesses its data, and returns the results ofthe access queries. When creating an RDBMS datasource, you can use the default provider or link to an externalprovider.
Default datasource provider
To use the default datasource provider, select , and then enter the connection properties Driver, URL, UserdefaultName, and Password as follows:

WSO2 Application Server, version 5.3.0
Copyright © WSO2 Inc. 2014 179
External datasource provider
If you need to add a datasource supported by an external provider class such as com.mysql.jdbc.jdbc2.optio, select , click , and then enter the name and valuenal.MysqlXADataSource External Data Source Add Property
of each connection property you need to configure. Following is an example datasource for an external datasourceprovider.
Configuring the Datasource Connection Pool Parameters
When the server processes a database operation, it spawns a database connection from an associated datasource.After using this connection, the server returns it to the pool of connections. This is called datasource connection
and is a recommended way to gain more performance/throughput in the system. In datasource connectionpoolingpooling, the physical connection is not dropped with the database server unless it becomes stale or the datasourceconnection is closed.
RDBMS datasources in WSO2 products use Tomcat JDBC connection pool ( ).org.apache.tomcat.jdbc.poolIt is common to all components that access databases for data persistence, such as the registry, user management(if configured against a JDBC userstore), etc.

WSO2 Application Server, version 5.3.0
Copyright © WSO2 Inc. 2014 180
You can configure the datasource connection pool parameters, such as how long a connection is persisted in thepool, using the datasource configuration parameters section that appears in the management console when creatinga datasource. Click and expand the option as shown below:
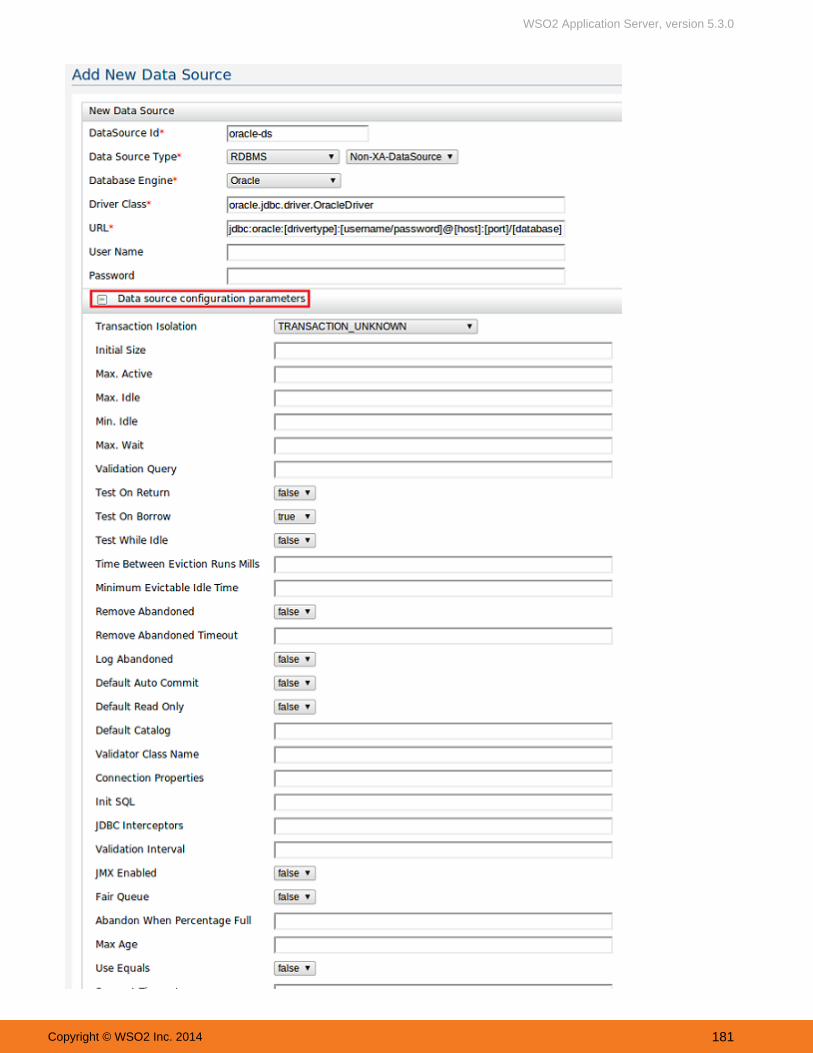
WSO2 Application Server, version 5.3.0
Copyright © WSO2 Inc. 2014 181

WSO2 Application Server, version 5.3.0
Copyright © WSO2 Inc. 2014 182
Following are descriptions of the parameters you can configure. For more details on datasource configurationparameters, see and the .Tomcat JDBC Connection Pooling DBCP configuration guide
ParameterName
Description
TransactionIsolation
The default TransactionIsolation state of connections created by this pool.
TRANSACTION_UNKNOWNTRANSACTION_NONETRANSACTION_READ_COMMITTEDTRANSACTION_READ_UNCOMMITTEDTRANSACTION_REPEATABLE_READTRANSACTION_SERIALIZABLE
Initial Size (int)
The initial number of connections created when the pool is started. Default value is 0.
Max. Active (int)
The maximum number of active connections that can be allocated from this pool at the same time.The default value is 100.
Max. Idle (int)
The maximum number of connections that should be kept in the pool at all times. Default value is 8.Idle connections are checked periodically (if enabled) and connections that have been idle forlonger than minEvictableIdleTimeMillis will be released. (also see )testWhileIdle
Min. Idle (int)
The minimum number of established connections that should be kept in the pool at all times. Theconnection pool can shrink below this number if validation queries fail. Default value is 0. (also see t
)estWhileIdle
Max. Wait (int)
Maximum number of milliseconds that the pool waits (when there are no available connections) fora connection to be returned before throwing an exception. Default value is 30000 (30 seconds).
The default values of the following parameters might not be optimal for the specific hardware/serverconfigurations in your environment. We recommend you to carry out load tests in your environment to tunethem accordingly.

WSO2 Application Server, version 5.3.0
Copyright © WSO2 Inc. 2014 183
ValidationQuery
(String)
The SQL query used to validate connections from this pool before returning them to the caller. Ifspecified, this query does not have to return any data, it just can't throw a SQLException. Thedefault value is null. Example values are SELECT 1(mysql), select 1 from dual(oracle), SELECT1(MS Sql Server).
Test OnReturn
(boolean)
Used to indicate if objects will be validated before returned to the pool. NOTE - for a true value tohave any effect, the validationQuery parameter must be set to a non-null string. The default value isfalse.
Test OnBorrow
(boolean)
Used to indicate if objects will be validated before borrowed from the pool. If the object fails tovalidate, it will be dropped from the pool, and we will attempt to borrow another. NOTE - for a truevalue to have any effect, the validationQuery parameter must be set to a non-null string. In order tohave a more efficient validation, see . Default value is false.validationInterval
Test WhileIdle
(boolean)
The indication of whether objects will be validated by the idle object evictor (if any). If an object failsto validate, it will be dropped from the pool. NOTE - for a true value to have any effect, the validatio
parameter must be set to a non-null string. The default value is false and this property hasnQueryto be set in order for the pool cleaner/test thread to run (also see ).timeBetweenEvictionRunsMillis
TimeBetweenEvictionRuns Mills
(int)
The number of milliseconds to sleep between runs of the idle connection validation/cleaner thread.This value should not be set under 1 second. It dictates how often we check for idle, abandonedconnections, and how often we validate idle connections. The default value is 5000 (5 seconds).
MinimumEvictableIdle Time
(int)
The minimum amount of time an object may sit idle in the pool before it is eligible for eviction. Thedefault value is 60000 (60 seconds).
RemoveAbandoned
(boolean)
Flag to remove abandoned connections if they exceed the . If set to trueremoveAbandonedTimouta connection is considered abandoned and eligible for removal if it has been in use longer than theremoveAbandonedTimeout Setting this to true can recover db connections from applications thatfail to close a connection. See also logAbandoned. The default value is false.
RemoveAbandonedTimeout
(int) Timeout in seconds before an abandoned(in use) connection can be removed. The defaultvalue is 60 (60 seconds). The value should be set to the longest running query your applicationsmight have.
LogAbandoned
(boolean) Flag to log stack traces for application code which abandoned a Connection. Logging ofabandoned Connections adds overhead for every Connection borrow because a stack trace has tobe generated. The default value is false.

WSO2 Application Server, version 5.3.0
Copyright © WSO2 Inc. 2014 184
AutoCommit
(boolean) The default auto-commit state of connections created by this pool. If not set, default isJDBC driver default (If not set then the setAutoCommit method will not be called.)
DefaultRead Only
(boolean) The default read-only state of connections created by this pool. If not set then thesetReadOnly method will not be called. (Some drivers don't support read only mode, ex: Informix)
DefaultCatalog
(String) The default catalog of connections created by this pool.
ValidatorClassName
(String) The name of a class which implements the org.apache.tomcat.jdbc.pool.Validator interfaceand provides a no-arg constructor (may be implicit). If specified, the class will be used to create aValidator instance which is then used instead of any validation query to validate connections. Thedefault value is null. An example value is com.mycompany.project.SimpleValidator.
ConnectionProperties
(String) The connection properties that will be sent to our JDBC driver when establishing newconnections. Format of the string must be [propertyName=property;]* NOTE - The "user" and"password" properties will be passed explicitly, so they do not need to be included here. The defaultvalue is null.
Init SQL The ability to run a SQL statement exactly once, when the connection is created.
JDBCInterceptors
Flexible and pluggable interceptors to create any customizations around the pool, the queryexecution and the result set handling.
ValidationInterval
(long) avoid excess validation, only run validation at most at this frequency - time in milliseconds. Ifa connection is due for validation, but has been validated previously within this interval, it will not bevalidated again. The default value is 30000 (30 seconds).
JMXEnabled
(boolean) Register the pool with JMX or not. The default value is true.
Fair Queue (boolean) Set to true if you wish that calls to getConnection should be treated fairly in a true FIFOfashion. This uses the org.apache.tomcat.jdbc.pool.FairBlockingQueue implementation for the listof the idle connections. The default value is true. This flag is required when you want to useasynchronous connection retrieval. Setting this flag ensures that threads receive connections in theorder they arrive. During performance tests, there is a very large difference in how locks and lockwaiting is implemented. When fairQueue=true there is a decision making process based on whatoperating system the system is running. If the system is running on Linux (property os.name=Linux.To disable this Linux specific behavior and still use the fair queue, simply add the propertyorg.apache.tomcat.jdbc.pool.FairBlockingQueue.ignoreOS=true to your system properties beforethe connection pool classes are loaded.
AbandonWhenPercentageFull
(int) Connections that have been abandoned (timed out) wont get closed and reported up unlessthe number of connections in use are above the percentage defined byabandonWhenPercentageFull. The value should be between 0-100. The default value is 0, whichimplies that connections are eligible for closure as soon as removeAbandonedTimeout has beenreached.
Max Age (long) Time in milliseconds to keep this connection. When a connection is returned to the pool, thepool will check to see if the now - time-when-connected > maxAge has been reached, and if so, itcloses the connection rather than returning it to the pool. The default value is 0, which implies thatconnections will be left open and no age check will be done upon returning the connection to thepool.
Use Equals (boolean) Set to true if you wish the ProxyConnection class to use String.equals and set to falsewhen you wish to use == when comparing method names. This property does not apply to addedinterceptors as those are configured individually. The default value is true.

WSO2 Application Server, version 5.3.0
Copyright © WSO2 Inc. 2014 185
SuspectTimeout
(int) Timeout value in seconds. Default value is 0. Similar to to the removeAbandonedTimeout valuebut instead of treating the connection as abandoned, and potentially closing the connection, thissimply logs the warning if logAbandoned is set to true. If this value is equal or less than 0, nosuspect checking will be performed. Suspect checking only takes place if the timeout value is largerthan 0 and the connection was not abandoned or if abandon check is disabled. If a connection issuspect a WARN message gets logged and a JMX notification gets sent once.
AlternateUser NameAllowed
(boolean) By default, the jdbc-pool will ignore the DataSource.getConnection(username,password)call, and simply return a previously pooled connection under the globally configured propertiesusername and password, for performance reasons.
The pool can however be configured to allow use of different credentials each time a connection isrequested. To enable the functionality described in theDataSource.getConnection(username,password) call, simply set the propertyalternateUsernameAllowed to true. Should you request a connection with the credentialsuser1/password1 and the connection was previously connected using different user2/password2,the connection will be closed, and reopened with the requested credentials. This way, the pool sizeis still managed on a global level, and not on a per schema level. The default value is false.
Configuring a Custom Datasource
This topic explains the purpose of using custom datasources and how you can define custom datasourceimplementations using the management console. Alternatively, you can simply create datasources using the default
configuration provided in WSO2 products.RDBMS
About custom datasourcesCreating custom datasources
About custom datasources
Custom datasources allows you to define your own datasource implementation. There are two options for writing acustom datasource, and these two options cover most of the common business use cases as follows:
Custom tabular datasources: Used to represent data in tables, where a set of named tables contain datarows that can be queried later. A tabular datasource is typically associated with an SQL data services query.This is done by internally using our own SQL parser to execute SQL against the custom datasource. You canuse the interface to implementorg.wso2.carbon.dataservices.core.custom.datasource.TabularDataBasedDStabular datasources. For a sample implementation of a tabular custom datasource, see org.wso2.carbon.data
. Also, this is supported in Carbon datasources withservices.core.custom.datasource.InMemoryDataSourcethe following datasource reader implementation: org.wso2.carbon.dataservices.core.custom.dat
.asource.CustomTabularDataSourceReaderCustom query datasources: Used when the datasource has some form of query expressionsupport. Custom query datasources are implemented using the org.wso2.carbon.dataservices.core.custom.d
interface. You can create any non-tabular datasource using theatasource.CustomQueryBasedDSquery-based approach. Even if the target datasource does not have a query expression format, you cancreate your own. For example, you can support any NoSQL type datasource this way. For a sampleimplementation of a query-based custom datasource, see org.wso2.carbon.dataservices.core.custom.dataso
. This is supported in Carbon datasources with the following datasource readerurce.EchoDataSourceimplementation: org.wso2.carbon.dataservices.core.custom.datasource.CustomQueryData
. SourceReader
SamplesInMemoryDSSample is a sample data service (shipped with DSS by default), which contains both

WSO2 Application Server, version 5.3.0
Copyright © WSO2 Inc. 2014 186
1.
2.
3. 4.
5. 6.
Creating custom datasources
You can create custom data sources as shown below.
Go to the tab on the management console and click to open the scrConfigure Data Sources Data Sourceseen.Then click . The following screen will open:Add Data Source
Enter "Custom" as the datasource type.In the field, enter "DS_CUSTOM_TABULAR" (to store data in tables) orCustom Data Source Type"DS_CUSTOM_QUERY" (to store non-tabular data accessed through a query).In the and fields, enter a unique name for the datasource.Name DescriptionIn the section, specify the xml configuration of the datasource. See the examples given below.Configuration
XML configuration for a custom tabular datasource (DS_CUSTOM_TABULAR type):
datasource implementations ( and ) explained above. See aInMemoryDataSource EchoDataSourcedemonstration of this sample .hereAlso, you can find a sample configuration file containing the in the InMemoryDSSample <PRODUCT_
file.HOME>\repository\conf\datasources\custom-datasources.xml

WSO2 Application Server, version 5.3.0
Copyright © WSO2 Inc. 2014 187
6.
<configuration> <customDataSourceClass>org.wso2.carbon.dataservices.core.custom.datasource.InMemoryDataSource</customDataSourceClass> <customDataSourceProps> <propertyname="inmemory_datasource_schema">{Vehicles:[ID,Model,Classification,Year]}</property> <property name="inmemory_datasource_records"> {Vehicles:[["S10_1678","Harley Davidson UltimateChopper","Motorcycles","1969"], ["S10_1949","Alpine Renault 1300","ClassicCars","1952"], ["S10_2016","Moto Guzzi1100i","Motorcycles","1996"], ["S10_4698","Harley-Davidson Eagle DragBike","Motorcycles","2003"], ["S10_4757","Alfa Romeo GTA","ClassicCars","1972"], ["S10_4962","LanciaA Delta 16V","ClassicCars","1962"], ["S12_1099","Ford Mustang","ClassicCars","1968"], ["S12_1108","Ferrari Enzo","ClassicCars","2001"]]} </property> </customDataSourceProps></configuration>
XML configuration for a custom query datasource (DS_CUSTOM_QUERY):
<configuration> <customDataSourceClass>org.wso2.carbon.dataservices.core.custom.datasource.EchoDataSource</customDataSourceClass> <customDataSourceProps> <property name="p1">val1</property> <property name="p2">val2</property> </customDataSourceProps></configuration>
In the "init" methods of all custom datasources, user-supplied properties will be parsed to initialize the datasourceaccordingly. Also, a property named "__DATASOURCE_ID__", which contains a UUID to uniquely identify thecurrent datasource, will be passed. This can be used by custom datasource authors to identify the datasourcesaccordingly, such as datasource instances communicating within a server cluster for data synchronization.
After creating datasources, they appear on the page. You can as needed byData Sources edit and delete themclicking the or links.Edit Delete
Working with the Registry

WSO2 Application Server, version 5.3.0
Copyright © WSO2 Inc. 2014 188
This chapter contains the following information:
Introduction to RegistryManaging the RegistrySearching the RegistrySetting up the Registry Space
Introduction to Registry
A registry is a content store and a metadata repository. Various SOA artifacts such as services, WSDLs andconfiguration files can be stored in a registry, keyed by unique paths. A path is similar to a Unix file path. In WSO2products, all configurations pertaining to modules, logging, security, datasources and other service groups arestored in the registry by default.
The Registry kernel of WSO2 products provide the basic registry and repository functionality and contains threemajor partitions as follows:
Local Data Repository - Used to store settings/metadata specific to the product. This registry is not intendedto be shared among multiple servers.Configuration Registry - Used to store product-specific configurations. These configurations can be sharedacross multiple instances of the same product like a cluster.Governance Registry - Used to store user-specified metadata and resources and can be shared across anorganization.
These registry instances are mounted to a single top level registry to provide a single, unified view. Mount points ofthe three registries are /_system/local, /_system/config and /_system/governance respectively. You can browse thecontents of the registry used by the product through its management console as shown below.
All WSO2 products use the services provided by the Registry kernel to establish their own registry space, which isutilized for storing data and persisting configurations. Here are some of the features provided by the WSO2 Registryinterface:
Provides the facility to organize resources into collections.Maintains multiple versions of resources.Manages social aspects such as rating of resources.AtomPub interfaces to publish, view and manage resources from remote or non-Java clients.

WSO2 Application Server, version 5.3.0
Copyright © WSO2 Inc. 2014 189
Managing the Registry
Follow the instructions below to access the registry user interface.
1. Log on to the product's Management Console and select Browse under Registry.
2. The Browse page appears.
Components of Registry User Interface
Breadcrumb - Shows the current directory hierarchy.Metadata - Shows metadata for the resource/collection.Properties - Shows properties for the resource/collection.Entries - Shows the contents of the resource/collection.Permissions - Shows the defined role permissions to use the resource/collection.
Managing Breadcrumb
Use the breadcrumb to navigate backward in the current branch of the directory path by clicking on a directory namein the breadcrumb.
1. In the Browse window, click the Tree View tab to see the branch.
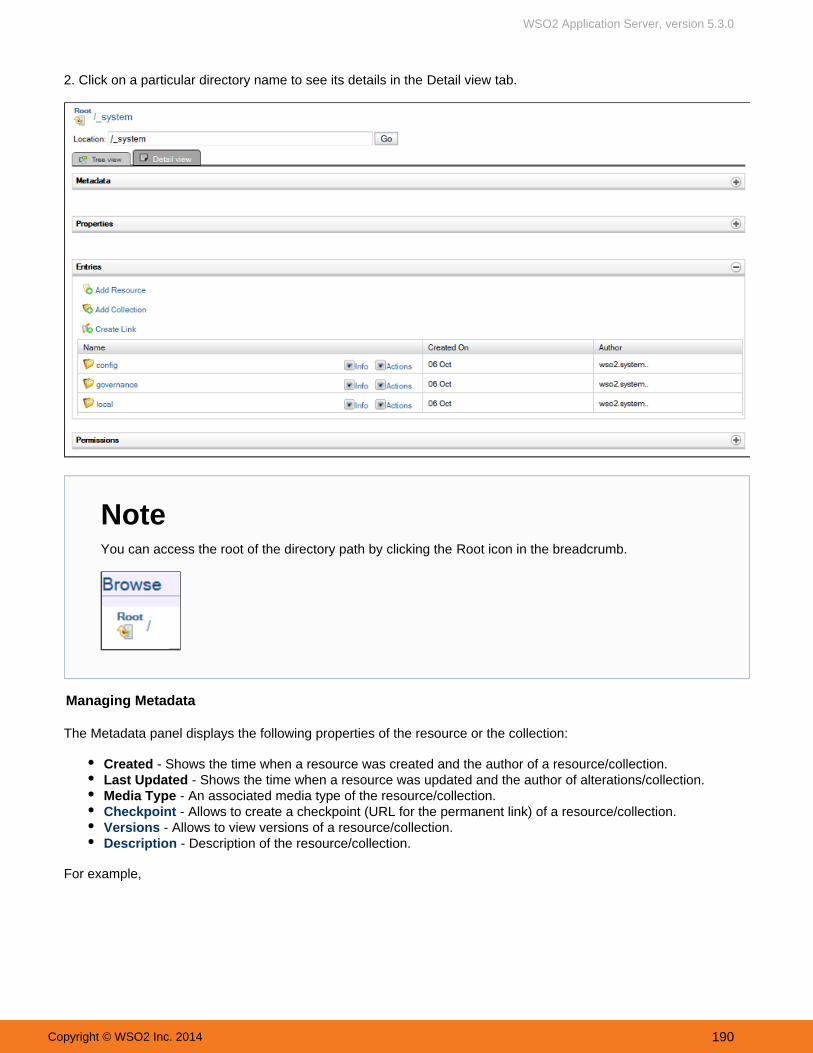
WSO2 Application Server, version 5.3.0
Copyright © WSO2 Inc. 2014 190
2. Click on a particular directory name to see its details in the Detail view tab.
Managing Metadata
The Metadata panel displays the following properties of the resource or the collection:
Created - Shows the time when a resource was created and the author of a resource/collection.Last Updated - Shows the time when a resource was updated and the author of alterations/collection.Media Type - An associated media type of the resource/collection.Checkpoint - Allows to create a checkpoint (URL for the permanent link) of a resource/collection.Versions - Allows to view versions of a resource/collection.Description - Description of the resource/collection.
For example,
NoteYou can access the root of the directory path by clicking the Root icon in the breadcrumb.

WSO2 Application Server, version 5.3.0
Copyright © WSO2 Inc. 2014 191
Checkpoint Creation
1. To create a checkpoint, click on the Create Checkpoint link.
2. If the checkpoint was successfully created, a message will be displayed. Click OK.
Viewing Versions
1. Click on the View versions link.

WSO2 Application Server, version 5.3.0
Copyright © WSO2 Inc. 2014 192
2. The Versions page appears.
Version - Shows the number of a resource/collection version.Last Modified Date - Shows the last date of updating.Last Modified By - Shows the author of alterations.Actions
Details - Allows to get to the Browse page of a particular resource/collection version.
Restore - Allows to restore a resource/collection version.
Editing Description
1. To edit a description of a resource/collection, click on the Edit link.

WSO2 Application Server, version 5.3.0
Copyright © WSO2 Inc. 2014 193
2. Edit the description of a resource/collection in the text area and click Save.
Managing Properties
The Properties panel displays the properties of the currently selected resource or collection. New properties can be added, while existing properties can be edited or deleted.
Adding a Property
1. To add a property, click on the Add New Property link.
2. In the Add New Property panel, enter a unique name of a property and its value. Click Add.

WSO2 Application Server, version 5.3.0
Copyright © WSO2 Inc. 2014 194
Editing a Property
1. Click on the Edit link of a particular property in the Action column.
2. Edit the name and the value of a property in the active fields and click Save.
Deleting a Property
1. To delete a property, click on the Delete link of a certain property in the Action column.
2. Confirm your request by clicking Yes.

WSO2 Application Server, version 5.3.0
Copyright © WSO2 Inc. 2014 195
Managing Entries and Content
If the currently selected entity is a collection, the panel is called the and shows the childContent Entries panelentries under that collection. It provides details of each entry. An entry can be either another collection or aresource. Here you can also add a new resource, add a new collection and create links.
If the currently selected entity is a resource, the provides a user interface through which one canContent paneldisplay, edit, upload, and download the content.
The Entries Panel
The following information is given as shown in the example screenshot below.
Add ResourceAdd CollectionCreate LinkChild Resources - The list of child entries provides the following information:
Name - The name of a child resource.Created On - The date when a child resource was created.
Author - The author who created a child resource.
You can also see the detailed information about the resource by clicking on the icon. The following informationInfois available as shown in the example screenshot below.
Media TypeFeedRating
To see the available actions over a resource, click on the icon.Actions

WSO2 Application Server, version 5.3.0
Copyright © WSO2 Inc. 2014 196
The following actions over the resources are available:
Rename - Allows to rename a resource.Move - Allows to move a resource to a new directory.Delete - Allows to delete a resource.Copy - Allows to copy a resource to a specified directory.
Renaming a Resource
1. To rename a resource, click and enter a new name to the field.Rename
2. Click on the button to save a new name of a resource.Rename
Moving a Resource
1. To move a resource to a new directory, click and specify .Move Destination Path
2. Click .Move
Deleting a Resource
1. To delete a resource, click and confirm your request by clicking in the message that appears if theDelete Yesresource is deleted successfully.
TipAll these options are available not for all the resources.
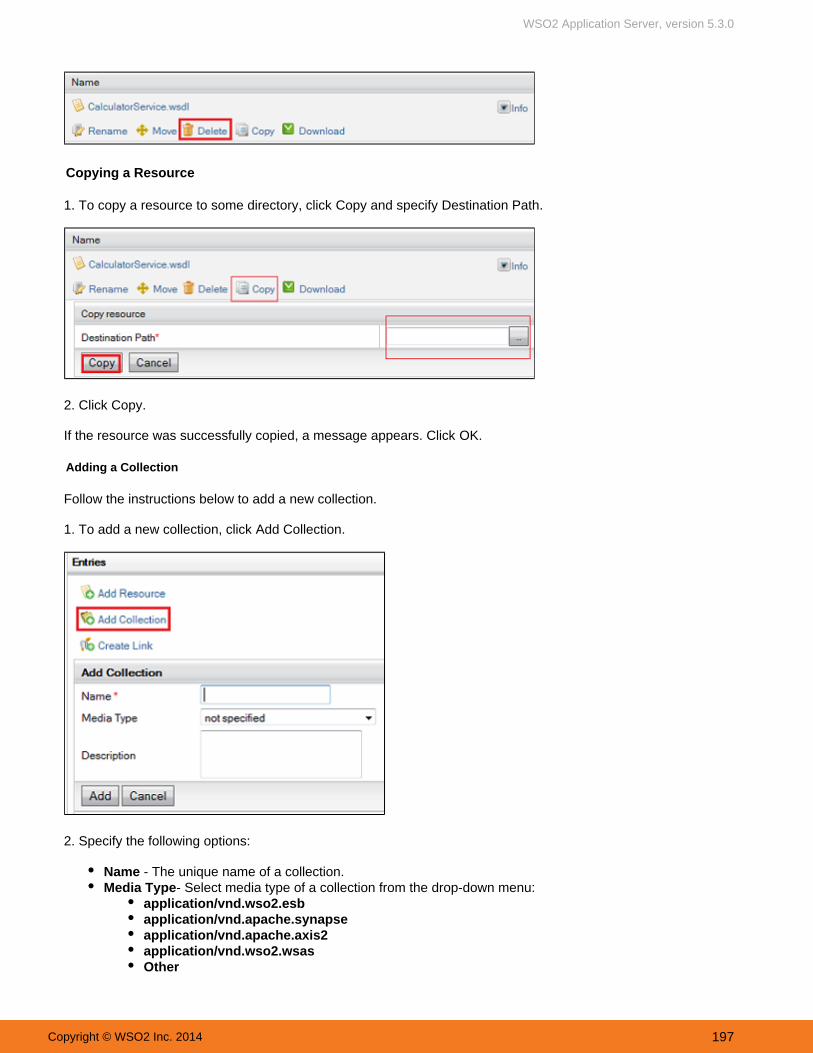
WSO2 Application Server, version 5.3.0
Copyright © WSO2 Inc. 2014 197
Copying a Resource
1. To copy a resource to some directory, click and specify .Copy Destination Path
2. Click .Copy
If the resource was successfully copied, a message appears. Click .OK
Adding a Collection
Follow the instructions below to add a new collection.
1. To add a new collection, click .Add Collection
2. Specify the following options:
Name - The unique name of a collection.Media Type- Select media type of a collection from the drop-down menu:
application/vnd.wso2.esbapplication/vnd.apache.synapseapplication/vnd.apache.axis2application/vnd.wso2.wsasOther

WSO2 Application Server, version 5.3.0
Copyright © WSO2 Inc. 2014 198
Description - A brief description of a collection.
3. Click .Add
Adding a Resource
You can add a resource to a certain collection for more convenient usage of the Registry.
Follow the instructions below to add a new child entry to a collection.
1. To add a new resource, click on the Add Resource link.
2. In the Add Resource panel, select Method from the drop-down menu.
The following methods are available:
Upload content from fileImport content from URLCreate Text contentCreate custom content
Uploading Content from File
1. If this method was selected, specify the following options:
File - The path of a file to fetch content (XML, WSDL, JAR etc.) Use the button to upload a file.BrowseName - The unique name of a resource.Media type Can add a configured media type or leave this unspecified to enforce the default media type.-Description - The description of a resource.
2. Click once the information is added as shown in the example below.Add

WSO2 Application Server, version 5.3.0
Copyright © WSO2 Inc. 2014 199
Importing Content from URL
1. If this method was selected, specify the following options:
URL - The full URL of the resource to fetch content from URL.Name - The unique name of a resource.Media type - Can add a configured media type or leave this unspecified to enforce the default media type.Description - The description of a resource.
2. Click Add once the information is added.
Text Content Creation
1. If this method was selected, specify the following options:
Name - The unique name of a resource.Media type - Can add a configured media type or leave this unspecified to enforce the default media type.Description - The description of a resource.Content - The resource content. You can use either Rich Text Editor or Plain Text Editor to enter.
2. Click Add once the information is added.

WSO2 Application Server, version 5.3.0
Copyright © WSO2 Inc. 2014 200
Custom Content Creation
1. If this method was selected, choose the Media Type from the drop-down menu and click Create Content.
Media Types
Each collection and resource created and stored on the repository has an associated media type. However, you alsohave the option to leave this unspecified enforcing the default media type. There are two main ways to configuremedia types for resources.
The first method is by means of a one-time configuration, which can be done by modifying the "mime.types"file found in \etc<PRODUCT_HOME>\repository\conf directory. This can be done just once before theinitial start-up of the serverThe second method is to configure the media types via the server administration console. The first methoddoes not apply for collections, and the only available mechanism is to configure the media types via theserver administration console.
Initially the system contains the media types defined in the mime.types file will be available for resources and a setof default media types will be available for collections.
Managing media types for resources can be done via the server administration console, by editing the properties ofthe collection. This collection contains two resources, collection and custom.ui. To/system/mime.types/index

WSO2 Application Server, version 5.3.0
Copyright © WSO2 Inc. 2014 201
manage media types of collections and custom user interfaces, edit the properties of these two resources.
Link Creation
Follow the instructions below to create a link on a resource/collection.
1. Symbolic links and Remote links can be created in a similar way to adding a normal resource. To add a link, click in the panel.Create Link Entries
2. Select a link to add from the drop-down menu.
A Symbolic Link
When adding a Symbolic link, enter a name for the link and the path of an existing resource or collection which isbeing linked. It creates a link to the particular resource.
A Remote Link
You can mount a collection in a remotely-deployed registry instance to your registry instance by adding a Remotelink. Provide a name for the Remote link in the name field. Choose the instance to which you are going to mount andgive the path of the remote collection which you need to mount for the path field, or else the root collection will bemounted.

WSO2 Application Server, version 5.3.0
Copyright © WSO2 Inc. 2014 202
Managing Role Permissions
The Permissions panel shows the defined role permissions, allows to add new role permissions and edit existingones.
Adding New Role Permissions
1. In the New Role Permission pane, select a role to set a permission.
2. Select an action from the drop-down menu. The following actions are available:
ReadWriteDeleteAuthorize

WSO2 Application Server, version 5.3.0
Copyright © WSO2 Inc. 2014 203
3. Select whether to allow the action the selected role or deny.
4. Click on the Add Permission button.
5. A new permission appears in the Defined Role Permissions list.
Editing Role Permissions
1. You can also edit the defined role permissions using the check boxes in the Defined Role Permissions list.
2. After editing the permissions, click on the Apply All Permissions button to save the alterations.
Searching the Registry
All resources found in the Registry can be searched through the product's Management Console. Search can berefined by resource name, created date range, updated date range, tags, comments, property name, property value,media type etc.

WSO2 Application Server, version 5.3.0
Copyright © WSO2 Inc. 2014 204
Follow the instructions below to find a necessary resource in the Registry.
1. Log on to the product's Management Console and select Metadata under Registry.
2. The Search window appears.
TipTo search for matches containing a specific pattern, use the "%" symbol.

WSO2 Application Server, version 5.3.0
Copyright © WSO2 Inc. 2014 205
The search can be refined by:
Resource NameCreated Date Range - The date when a resource was created.Updated Date Range - The date when a resource was updated.Update Author - The author of a resource updating.Create Author - The author of a resource creation.TagsCommentsProperty NameProperty ValueMedia Type
3. Fill the search criteria and click on the Search button. The results are displayed in the Search Results window.
Setting up the Registry Space
WSO2 Carbon is the base platform for all WSO2 products and its Registry kernel provides the basic registry andrepository functionality. Products based on Carbon use the services provided by the Registry kernel to establishtheir own registry spaces utilized for storing data and persisting configuration. Here are some of the featuresprovided by the WSO2 Registry interface:
Provides the facility to organize resources into collections.Maintains multiple versions of resources.Manages social aspects such as rating of resources.AtomPub interfaces to publish, view and manage resources from remote or non-Java clients.
Registry partitions
The Registry space provided to each product contains three major partitions.
: Used to store configuration and runtime data that is local to the server. This partition isLocal Repositorynot to be shared with multiple servers and can be browsed under /_system/local in the registry browser.
: Used to store product-specific configuration. This partition can be shared acrossConfiguration Repositorymultiple instances of the same product. (eg: sharing ESB configuration across a ESB cluster) and can be
TipCreated or updated dates can be either entered in the format of MM/DD/YYYY or picked from the calenderinterface provided.

WSO2 Application Server, version 5.3.0
Copyright © WSO2 Inc. 2014 206
browsed under /_system/config in the registry browser. : Used to store configuration and data that are shared across the whole platform.Governance Repository
This typically includes services, service descriptions, endpoints or datasources and can be browsed under/_system/governance in the registry browser.
Setting up the partitions
Any WSO2 Carbon-based product has the following options when configuring and using a registry space:
Use the registry space shipped by default with the product.Use a remote registry instance/s for the registry partitions that can be shared across multiple WSO2
Carbon-based product instances.
This guide explains the second option using WSO2 Governance Registry as the remote registry instance. Two of thethree partitions can be shared across multiple product instances in a typical production environment. Therefore, wecan identify four main deployment strategies for the three partitions as follows.
All Partitions in a Single ServerConfig and Governance Partitions in a Remote RegistryGovernance Partition in a Remote RegistryConfig and Governance Partitions in Separate Nodes
In all of the above four sections, any of the WSO2 products can be mounted to a remote WSO2 Governanceas that is theRegistry (G-Reg) instance. Examples discussed here use JDBC based configuration model
recommended approach for a production deployment setup.
All Partitions in a Single Server
Strategy 1: Local Registry
Figure 1: All registry partitions in a single server instance.
The entire registry space is local in a single server instance and not shared. This is the default setup in WSO2products. This strategy is recommended for a stand-alone deployment of a single product instance, but can also beused if there are two or more instances of a product that do not need to share data or configurations among them.
Default setup:These registry instances are mounted to a single top level registry to provide a single, unified view. Mountpoints of the three registries are /_system/local, /_system/config and /_system/governance respectively. Youcan browse the contents of the registry used by the product through its management console.
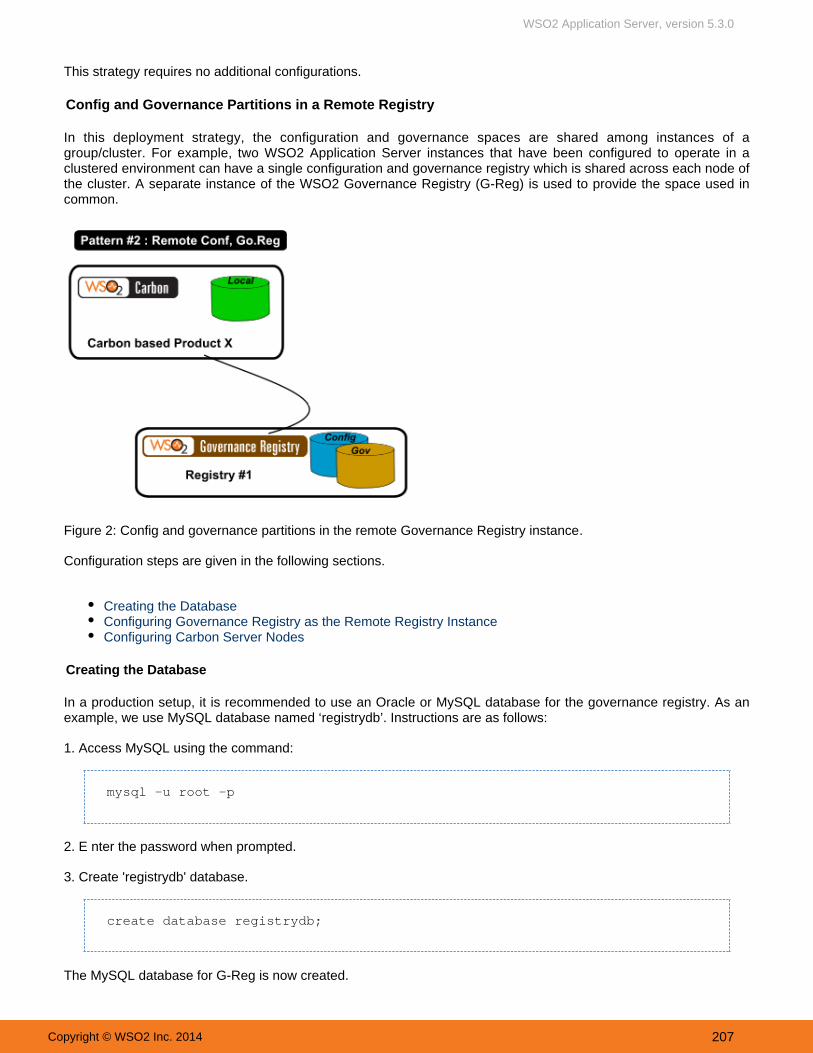
WSO2 Application Server, version 5.3.0
Copyright © WSO2 Inc. 2014 207
This strategy requires no additional configurations.
Config and Governance Partitions in a Remote Registry
In this deployment strategy, the configuration and governance spaces are shared among instances of agroup/cluster. For example, two WSO2 Application Server instances that have been configured to operate in aclustered environment can have a single configuration and governance registry which is shared across each node ofthe cluster. A separate instance of the WSO2 Governance Registry (G-Reg) is used to provide the space used incommon.
Figure 2: .Config and governance partitions in the remote Governance Registry instance
Configuration steps are given in the following sections.
Creating the DatabaseConfiguring Governance Registry as the Remote Registry InstanceConfiguring Carbon Server Nodes
Creating the Database
In a production setup, it is recommended to use an Oracle or MySQL database for the governance registry. As an example, we use MySQL database named ‘ ’. Instructions are as follows:registrydb
1. Access MySQL the command:using
mysql -u root -p
nter the password when prompted. 2. E
Create ' ' database.3. registrydb
create database registrydb;
The MySQL database for G-Reg is now created.

WSO2 Application Server, version 5.3.0
Copyright © WSO2 Inc. 2014 208
Configuring Governance Registry as the Remote Registry Instance
Database configurations are stored in master- xml file$CARBON_HOME/repository/conf/ /datasources datasources .for all carbon servers. By default, all WSO2 products use the H2 database. Since Governance Registry inin-builtthis example is using a MySQL database named ' ', registrydb the master- xml file needs to bedatasources .configured so that the used for the registry and user manager in is the saiddatasource Governance Registry
MySQL database.
1. Download and extract WSO2 Governance Registry distribution from http://wso2.com/products/governance-registr y.
2. Navigate to $G-REG_HOME/repository/conf/ /master- xml file where isdatasources datasources . G-REG_HOMEthe Governance Registry distribution home. Replace the existing WSO2_CARBON_DB with thedatasourcefollowing configuration:
<datasource> <name>WSO2_CARBON_DB</name> <description>The datasource used for registry and usermanager</description> <jndiConfig> <name>jdbc/WSO2CarbonDB</name> </jndiConfig> <definition type="RDBMS"> <configuration> <url>jdbc:mysql://x.x.x.x:3306/registrydb</url> <username>root</username> <password>root</password> <driverClassName>com.mysql.jdbc.Driver</driverClassName> <maxActive>50</maxActive> <maxWait>60000</maxWait> <testOnBorrow>true</testOnBorrow> <validationQuery>SELECT 1</validationQuery> <validationInterval>30000</validationInterval> </configuration> </definition></datasource>
Change the values of the following elements according to your environment.
< > URL of the MySQL database.url : < > and <password> : .username username and password of the databasemySQL< > : .validationQuery Validate and test the health of the DB connection< >validationInterval .: specified time intervals at which the DB connection validations should run
3. Navigate to /repository/conf/axis2/axis2.xml $G-REG_HOME file in all Carbon-based product instances to beconnected the remote registry, and enable clustering with the following configuration.with hazelcast
<clusteringclass="org.wso2.carbon.core.clustering.hazelcast.HazelcastClusteringAgent"enable="true">

WSO2 Application Server, version 5.3.0
Copyright © WSO2 Inc. 2014 209
The above configuration is required only when caching is enabled for the Carbon server instances and <enableCach > parameter is set to true. This provides cache invalidation the event of any updates on the registry resources.e at
4. Copy the ' JDBC connector jar mySQL ' ( ) tohttp://dev.mysql.com/downloads/connector/j/5.1.htmlG-REG_HOME/repository/components/lib directory.
5. Start the Governance Registry server with - so that all the required tables are created in the database. ForDsetupexample, in Linux
sh wso2server.sh -Dsetup
The server is now running with all required user and registry tables for the serverGovernance Registry manager also created in ‘ ’ database.registrydb
Configuring Carbon Server Nodes
Now that the shared registry is configured, let's take a look at the configuration of Carbon server nodes that use theshared, remote registry.
1. Download and extract the relevant WSO2 product distribution from the 'Products' menu of . Inhttps://wso2.comthis example, we use two server instances (of any product) by the names CARBON-Node1 and CARBON-Node2.
2. We use the same used for Governance Registry above as the registry space of datasource Carbon-basedproduct instances.
Configure Filemaster- datasources . xml
3. Configure $CARBON where is the_HOME/repository/conf/ /master- xmldatasource datasources . CARBON _HOMEdistribution home of any WSO2 Carbon-based product you downloaded in step 1. Then, add the following datasourc
for the registry space.e

WSO2 Application Server, version 5.3.0
Copyright © WSO2 Inc. 2014 210
<datasource> <name>WSO2_CARBON_DB_GREG</name> <description>The datasource used for registry and usermanager</description> <jndiConfig> <name>jdbc/WSO2CarbonDB_GREG</name> </jndiConfig> <definition type="RDBMS"> <configuration> <url>jdbc:mysql://x.x.x.x:3306/registrydb</url> <username>root</username> <password>root</password> <driverClassName>com.mysql.jdbc.Driver</driverClassName> <maxActive>50</maxActive> <maxWait>60000</maxWait> <testOnBorrow>true</testOnBorrow> <validationQuery>SELECT 1</validationQuery> <validationInterval>30000</validationInterval> </configuration> </definition></datasource>
Change the values of the relevant elements accordingly.
Configuring registry.xml File
4. Navigate to $CARBON_ HOME/repository/conf/registry.xm l file and specify the following configurations for bothserver instances setup in step 1.
Add a new config to the configuration done in step 3 above. For example,db datasource
<dbConfig name="remote_registry"> <dataSource>jdbc/WSO2CarbonDB_GREG</dataSource></dbConfig>
Specify the remote Governance Registry instance with the following configuration:
<remoteInstance url="https://x.x.x.x:9443/registry"> <id>instanceid</id> <dbConfig>remote_registry</dbConfig> <cacheId>root@jdbc:mysql://x.x.x.x:3306/registrydb</cacheId> <readOnly>false</readOnly> <enableCache>true</enableCache> <registryRoot>/</registryRoot></remoteInstance>
Change the values of the following elements according to your environment.

WSO2 Application Server, version 5.3.0
Copyright © WSO2 Inc. 2014 211
< url> :remoteInstance URL of the remote G-Reg instance.< > : dbConfig The name specified the registry database configuration.dbConfig for< > : cacheId This provides information on where the cache resource resides.< > : enableCache Whether caching is enabled on the Carbon server instance.
Define the registry partitions using the remote Governance Registry instance. In this deployment strategy, we aremounting the config and governance partitions of the Carbon-based product instances to the remote GovernanceRegistry instance. This is graphically represented in Figure 2 at the beginning.
<mount path="/_system/config" overwrite="true"> <instanceId>instanceid</instanceId> <targetPath>/_system/nodes</targetPath></mount><mount path="/_system/governance" overwrite="true"> <instanceId>instanceid</instanceId> <targetPath>/_system/governance</targetPath></mount>
path mount : Registry collection of Carbon server instance that needs to be mounted overwrite mount : Defines if an existing collection/resource at the given path should be overwritten or not.
Possible are:vales true - The existing collection/resource in the specified location will always be deleted and overwritten
with the resource/s in the remote registry instance. - The resource/s will not be overwritten. An error will be logged if a resource exists at thefalse existing
location. virtual - If the existing location has a resource/collection, it will be preserved but virtual view of the
remote registry resource/s can be viewed. The original resource/collection can be viewed once theremote registry configuration is removed.
path target : Path to the remote Governance Registry instance where the registry collection is mounted.
Configuring axis2.xml File
1. Navigate to $CARBON _HOME/repository/conf/axis2/axis2.xml file where is the distributionCARBON _HOMEEnable carbon clustering byhome of any WSO2 Carbon-based products to be connected the remote registry. with
copying the following configuration to all Carbon server instances:
<clusteringclass="org.wso2.carbon.core.clustering.hazelcast.HazelcastClusteringAgent"enable="true">
2. Copy 'MySQL JDBC connector jar' ( http://dev.mysql.com/downloads/connector/j/5.1.html) to $ G-REG_HOME/repository/components/lib in both Carbon server instances.
3. Start both servers and note the log entries that indicate successful mounting to the remote Governance Registryinstance. For example,
The above configuration is needed only when caching is enabled in the server instances and < > parameter set to true.enableCacheClustering enables cache invalidation in configured nodes at the event of any changes to the registry resources by any of the Carbonserver nodes in the deployment setup.

WSO2 Application Server, version 5.3.0
Copyright © WSO2 Inc. 2014 212
4. Navigate to the registry browser in the Carbon management console and note the config and governanceserver'spartitions indicating successful mounting to the remote registry instance. For example,
Governance Partition in a Remote Registry
In this deployment strategy, only the governance partition is shared among instances of a group/cluster. Forexample, a WSO2 Application Server instance and a WSO2 ESB instance that have been configured to operate in aclustered environment can have a single governance registry which is shared across each node of the cluster. Aseparate instance of the WSO2 Governance Registry (G-Reg) is used to provide the space used in common.

WSO2 Application Server, version 5.3.0
Copyright © WSO2 Inc. 2014 213
1.
2. 3.
1.
2.
Figure 3: .Governance partition in the remote Governance Registry instance
Configuration steps are given in the following sections.
Creating the databaseConfiguring the Governance Registry instanceConfiguring the Carbon server nodes
Creating the database
In a production setup, it is recommended to use an Oracle or MySQL database for the governance registry. As an example, we use MySQL database named ‘registrydb’. Instructions are as follows:
Access MySQL using the command:
mysql -u root -p
nter the password when prompted.ECreate 'registrydb' database.
create database registrydb;
The MySQL database for G-Reg is now created.
Configuring the Governance Registry instance
Database configurations are stored in master-datasources.xml file$PRODUCT_HOME/repository/conf/datasources/for all carbon servers. By default, all WSO2 products use the in-built H2 database. Since Governance Registry inthis example is using a MySQL database named 'registrydb', the master-datasources.xml file needs to be configuredso that the datasource used for the registry and user manager in is the said MySQL database. Governance Registry
Download and extract WSO2 Governance Registry distribution from http://wso2.com/products/governance-re gistry.
Navigate to $G-REG_HOME/repository/conf/datasources/master-datasources.xml file where iG-REG_HOMEs the Governance Registry distribution home. Replace the existing WSO2_CARBON_DB datasource with thefollowing configuration:
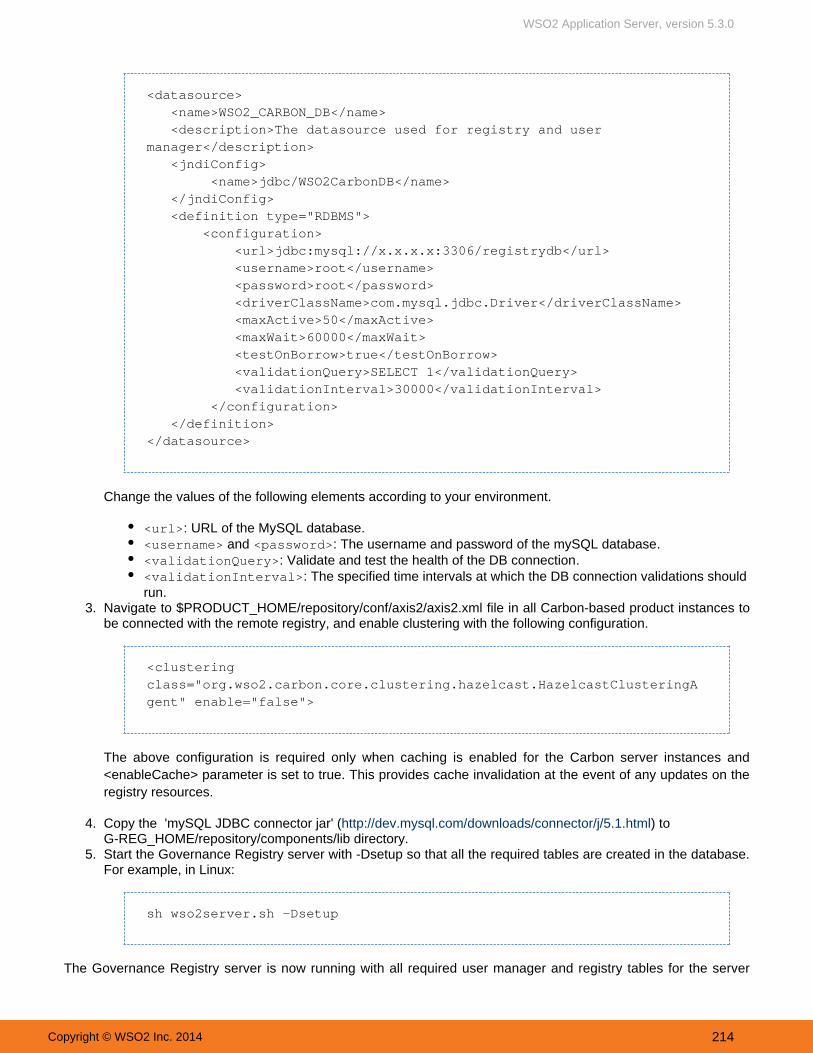
WSO2 Application Server, version 5.3.0
Copyright © WSO2 Inc. 2014 214
2.
3.
4.
5.
<datasource> <name>WSO2_CARBON_DB</name> <description>The datasource used for registry and usermanager</description> <jndiConfig> <name>jdbc/WSO2CarbonDB</name> </jndiConfig> <definition type="RDBMS"> <configuration> <url>jdbc:mysql://x.x.x.x:3306/registrydb</url> <username>root</username> <password>root</password> <driverClassName>com.mysql.jdbc.Driver</driverClassName> <maxActive>50</maxActive> <maxWait>60000</maxWait> <testOnBorrow>true</testOnBorrow> <validationQuery>SELECT 1</validationQuery> <validationInterval>30000</validationInterval> </configuration> </definition></datasource>
Change the values of the following elements according to your environment.
<url>: URL of the MySQL database.<username> and : The .<password> username and password of the mySQL database<validationQuery>: .Validate and test the health of the DB connection<validationInterval>: The specified time intervals at which the DB connection validations should
.runNavigate to /repository/conf/axis2/axis2.xml $PRODUCT_HOME file in all Carbon-based product instances tobe connected with the remote registry, and enable clustering with the following configuration.
<clusteringclass="org.wso2.carbon.core.clustering.hazelcast.HazelcastClusteringAgent" enable="false">
The above configuration is required only when caching is enabled for the Carbon server instances and<enableCache> parameter is set to true. This provides cache invalidation at the event of any updates on theregistry resources.
Copy the 'mySQL JDBC connector jar ' ( ) tohttp://dev.mysql.com/downloads/connector/j/5.1.htmlG-REG_HOME/repository/components/lib directory.Start the Governance Registry server with -Dsetup so that all the required tables are created in the database.For example, in Linux:
sh wso2server.sh -Dsetup
The server is now running with all required user manager and registry tables for the serverGovernance Registry

WSO2 Application Server, version 5.3.0
Copyright © WSO2 Inc. 2014 215
1.
2.
3.
4.
also created in ‘registrydb’ database.
Configuring the Carbon server nodes
Now that the shared registry is configured, let's take a look at the configuration of Carbon server nodes that use theshared, remote registry.
Download and extract the relevant WSO2 product distribution from the 'Products' menu of .https://wso2.comIn this example, we use two server instances (of any product) by the names CARBON-Node1 andCARBON-Node2 and the configuration is given for one server instance. Similar steps apply to the otherserver instance as well.We use the same datasource used for Governance Registry above as the registry space of Carbon-basedproduct instances.Configure $PRODUCT_HOME/repository/conf/datasource/master-datasources.xml where PRODUCT_HOME is the distribution home of any WSO2 Carbon-based product you downloaded in step 1. Then, add the
following datasource for the registry space.
Configuring master-datasource.xml
<datasource> <name>WSO2_CARBON_DB_GREG</name> <description>The datasource used for registry and usermanager</description> <jndiConfig> <name>jdbc/WSO2CarbonDB_GREG</name> </jndiConfig> <definition type="RDBMS"> <configuration> <url>jdbc:mysql://x.x.x.x:3306/registrydb</url> <username>root</username> <password>root</password> <driverClassName>com.mysql.jdbc.Driver</driverClassName> <maxActive>50</maxActive> <maxWait>60000</maxWait> <testOnBorrow>true</testOnBorrow> <validationQuery>SELECT 1</validationQuery> <validationInterval>30000</validationInterval> </configuration> </definition></datasource>
Change the values of the relevant elements accordingly.
Navigate to $PRODUCT_HOME/repository/conf/registry.xm l file and specify the following configurations forb o t h s e r v e r i n s t a n c e s s e t u p i n s t e p 1 .
Add a new db config to the datasource configuration done in step 3 above. For example:

WSO2 Application Server, version 5.3.0
Copyright © WSO2 Inc. 2014 216
4.
Configuring registry.xml file
<dbConfig name="remote_registry"> <dataSource>jdbc/WSO2CarbonDB_GREG</dataSource></dbConfig>
Specify the remote Governance Registry instance with the following configuration:
<remoteInstance url="https://x.x.x.x:9443/registry"> <id>instanceid</id> <dbConfig>remote_registry</dbConfig> <cacheId>root@jdbc:mysql://x.x.x.x:3306/registrydb</cacheId> <readOnly>false</readOnly> <enableCache>true</enableCache> <registryRoot>/</registryRoot></remoteInstance>
Change the values of the following elements according to your environment.
:<remoteInstance url> URL of the remote G-Reg instance.
: <dbConfig> The dbConfig name specified for the registry database configuration.: <cacheId> This provides information on where the cache resource resides.
: <enableCache> Whether caching is enabled on the Carbon server instance.
Define the registry partitions using the remote Governance Registry instance. In this deployment strategy, weare mounting the governance partition of the Carbon-based product instances to the remote GovernanceRegistry instance. This is graphically represented in Figure 3 at the beginning of this page.
In terms of Atom and WS this is mandatory, as this URL is used to connect to the remoteinstance. In the case of JDBC it is not mandatory but it is required for certain features such asAtom Feeds and Subscriptions available for the repository. Subscriptions for other componentsof the ESB (for example), are not affected by this parameter.
In the case of a remote mount, the content actually resides remotely and can be updated frommultiple destinations. It is important that all of these updates are globally available. Due to this,subscriptions and atom feeds are managed/generated from a single location (i.e., the registryto which you mount to). So, if you need to use these features available in G-Reg/ESB, thenyou need to have G-Reg up and running and also a proper URL in this field.
In most instances, features such as Atom Feeds and Subscriptions available for theRepository are not required. In such cases, it is best to provide a value like "https://localhost:9443/registry" for this parameter - since the schema validation expects theexistence of this parameter though it does not actually need to point to a running instance ofWSO2 Governance Registry.

WSO2 Application Server, version 5.3.0
Copyright © WSO2 Inc. 2014 217
4.
5.
6.
7.
<mount path="/_system/governance" overwrite="true"> <instanceId>instanceid</instanceId> <targetPath>/_system/governance</targetPath></mount>
mount path : Registry collection of Carbon server instance that needs to be mountedmount overwrite : Defines if an existing collection/resource at the given path should be overwritten ornot. Possible vales are:
true - The existing collection/resource in the specified location will always be deleted andoverwritten with the resource/s in the remote registry instance. false - The resource/s will not be overwritten. An error will be logged if a resource exists at the existing location.virtual - If the existing location has a resource/collection, it will be preserved but virtual view ofthe remote registry resource/s can be viewed. The original resource/collection can be viewedonce the remote registry configuration is removed.
target path : Path to the remote Governance Registry instance where the registry collection is mounted.
Navigate to $PRODUCT_HOME/repository/conf/axis2/axis2.xml file where is thePRODUCT_HOME Enabledistribution home of any WSO2 Carbon-based products to be connected with the remote registry.
carbon clustering by copying the following configuration to all Carbon server instances:
Configuring axis2.xml file
<clusteringclass="org.wso2.carbon.core.clustering.hazelcast.HazelcastClusteringAgent" enable="false">
Copy 'MySQL JDBC connector jar' (http://dev.mysql.com/downloads/connector/j/5.1.html) to$PRODUCT_HOME/repository/components/lib in both Carbon server instances.Start both servers and note the log entries that indicate successful mounting to the remote GovernanceRegistry instance. Also navigate to the registry browser in the Carbon server's management console and notethe governance partition indicating successful mounting to the remote registry instance.
Create a new datasource in master-datasources.xml.
The above configuration is needed only when caching is enabled in the server instances and<enableCache> parameter set to true. Clustering enables cache invalidation in configured nodes atthe event of any changes to the registry resources by any of the Carbon server nodes in thedeployment setup.
For large deployments it is recommended to have separate databases for config registry per product. Followthe configurations as below for such deployments.

WSO2 Application Server, version 5.3.0
Copyright © WSO2 Inc. 2014 218
<datasource> <name>WSO2_CARBON_AS_CONFIG</name> <description>The datasource used for registry and usermanager</description> <jndiConfig> <name>jdbc/as_config</name> </jndiConfig> <definition type="RDBMS"> <configuration> <url>jdbc:mysql://x.x.x.x:3306/registrydb</url> <username>root</username> <password>root</password> <driverClassName>com.mysql.jdbc.Driver</driverClassName> <maxActive>50</maxActive> <maxWait>60000</maxWait> <testOnBorrow>true</testOnBorrow> <validationQuery>SELECT 1</validationQuery> <validationInterval>30000</validationInterval> </configuration> </definition></datasource>
Navigate to $PRODUCT_HOME/repository/conf/registry.xm l file and specify the following configurations.
<!-- config db --><dbConfig name="config"><dataSource>jdbc/as_config</dataSource></dbConfig>
<remoteInstance url="https://localhost:9443/registry"><id>config</id><dbConfig>config</dbConfig><readOnly>false</readOnly><registryRoot>/</registryRoot><enableCache>true</enableCache><cacheId>root@jdbc:mysql://10.45.67.89:3306/as_config</cacheId></remoteInstance>
Config and Governance Partitions in Separate Nodes
In this deployment strategy, let's assume 2 clusters of Carbon-based product Foo and Carbon-based product Barthat share a governance registry space by the name G-Reg 1. In addition, the product Foo cluster shares aconfiguration registry space by the name G-Reg 2 and the product Bar cluster shares a configuration registry spaceby the name G-Reg 3.

WSO2 Application Server, version 5.3.0
Copyright © WSO2 Inc. 2014 219
Figure 4: Config and governance partitions in separate registry instances.
Configuration steps are given in the following sections.
Creating the Database Configuring the Remote Registry Instances Configuring the Foo Product Cluster Configuring the Bar Product Cluster
Creating the Database
In a production setup, it is recommended to use an Oracle or MySQL database for the governance registry. As anexample, we use MySQL database named ‘registrydb’. Instructions are as follows:
1. Access MySQL using the command:
mysql -u root -p
2. Enter the password when prompted.
3. Create 'registrydb' database.
create database registrydb;
The MySQL database for G-Reg 1 is now created. Similarly create 'registrydb2' and 'registrydb3' as the MySQLdatabases for G-Reg 2 and G-Reg 3 respectively.
Configuring the Remote Registry Instances
Database configurations are stored in the <GREG_HOME>/repository/conf/datasources/master-datasou file for all carbon servers. By default, all WSO2 products use the in-built H2 database. Since therces.xml
Governance Registry nodes (G-Reg 1, G-Reg 2 and G-Reg 3) in this example are using MySQL databases

WSO2 Application Server, version 5.3.0
Copyright © WSO2 Inc. 2014 220
('registrydb', 'registrydb2' and 'registrydb3' respectively), the file of each node needsmaster-datasources.xmlto be configured so that the datasources used for the registry, user manager and configuration partitions inGovernance Registry are the said MySQL databases.
1. Download and extract WSO2 Governance Registry distribution from http://wso2.com/products/governance-registr y.
2. First, navigate to the file<GREG_HOME>/repository/conf/datasources/master-datasources.xmlwhere GREG_HOME is the distribution home of Governance Registry of G-Reg 1. Replace the existing WSO2_CARB
datasource with the following configuration:ON_DB
<datasource> <name>WSO2_CARBON_DB</name> <description>The datasource used for registry and usermanager</description> <jndiConfig> <name>jdbc/WSO2CarbonDB</name> </jndiConfig> <definition type="RDBMS"> <configuration> <url>jdbc:mysql://10.20.30.41:3306/registrydb</url> <username>root</username> <password>root</password> <driverClassName>com.mysql.jdbc.Driver</driverClassName> <maxActive>50</maxActive> <maxWait>60000</maxWait> <testOnBorrow>true</testOnBorrow> <validationQuery>SELECT 1</validationQuery> <validationInterval>30000</validationInterval> </configuration> </definition></datasource>
Change the values of the following elements according to your environment.
<url>: URL of the MySQL database.<username> and <password>: Username and password of the mySQL database.<validationQuery>: Validate and test the health of the DB connection.<validationInterval>: Specified time intervals at which the DB connection validations should run.
3. Similarly, replace the existing datasource in G-Reg 2 with the following:WSO2_CARBON_DB

WSO2 Application Server, version 5.3.0
Copyright © WSO2 Inc. 2014 221
<datasource> <name>WSO2_CARBON_DB</name> <description>The datasource used for registry and usermanager</description> <jndiConfig> <name>jdbc/WSO2CarbonDB</name> </jndiConfig> <definition type="RDBMS"> <configuration> <url>jdbc:mysql://10.20.30.42:3306/registrydb2</url> <username>root</username> <password>root</password> <driverClassName>com.mysql.jdbc.Driver</driverClassName> <maxActive>50</maxActive> <maxWait>60000</maxWait> <testOnBorrow>true</testOnBorrow> <validationQuery>SELECT 1</validationQuery> <validationInterval>30000</validationInterval> </configuration> </definition></datasource>
4. Repeat the same for G-Reg 3 as follows.
<datasource> <name>WSO2_CARBON_DB</name> <description>The datasource used for registry and usermanager</description> <jndiConfig> <name>jdbc/WSO2CarbonDB</name> </jndiConfig> <definition type="RDBMS"> <configuration> <url>jdbc:mysql://10.20.30.43:3306/registrydb3</url> <username>root</username> <password>root</password> <driverClassName>com.mysql.jdbc.Driver</driverClassName> <maxActive>50</maxActive> <maxWait>60000</maxWait> <testOnBorrow>true</testOnBorrow> <validationQuery>SELECT 1</validationQuery> <validationInterval>30000</validationInterval> </configuration> </definition></datasource>
5. Navigate to the file in all instances and enable<GREG_HOME>/repository/conf/axis2/axis2.xmlclustering with the following configuration.

WSO2 Application Server, version 5.3.0
Copyright © WSO2 Inc. 2014 222
<clusteringclass="org.wso2.carbon.core.clustering.hazelcast.HazelcastClusteringAgent"enable="true">
The above configuration is required only when caching is enabled for the Carbon server instances and the <enable parameter is set to true. This provides cache invalidation at the event of any updates on the registryCache>
resources.
6. Copy the 'mySQL JDBC connector jar' ( ) to the http://dev.mysql.com/downloads/connector/j/5.1.html <GREG_HOM directory in G-Reg 1, G-Reg 2 and G-Reg 3.E>/repository/components/lib
7. Start the Governance Registry servers with -Dsetup so that all the required tables will be created in thedatabases. For example, in Linux
sh wso2server.sh -Dsetup
The Governance Registry server instances are now running with all required user manager and registry tables forthe server created in ‘registrydb’, ‘registrydb1’ and ‘registrydb2’ databases.
Configuring the Foo Product Cluster
Now that the shared registry nodes are configured, let's take a look at the configuration of Carbon server clustersthat share the remote registry instances. Namely, Foo product cluster shares G-Reg 1 and G-Reg 2 while Barproduct cluster shares G-Reg 1 and G-Reg 3.
Include the following configurations in the master node of Foo product cluster.
Configure ilemaster- fdatasources.xml
1. Configure where <PRODUCT_HOME>/repository/conf/datasource/master-datasources.xml <PRODU is the distribution home of any WSO2 Carbon-based product. Then, add the following datasource for theCT_HOME>
registry space.

WSO2 Application Server, version 5.3.0
Copyright © WSO2 Inc. 2014 223
<datasource> <name>WSO2_CARBON_DB_GREG</name> <description>The datasource used for registry and usermanager</description> <jndiConfig> <name>jdbc/WSO2CarbonDB_GREG</name> </jndiConfig> <definition type="RDBMS"> <configuration> <url>jdbc:mysql://10.20.30.41:3306/registrydb</url> <username>root</username> <password>root</password> <driverClassName>com.mysql.jdbc.Driver</driverClassName> <maxActive>50</maxActive> <maxWait>60000</maxWait> <testOnBorrow>true</testOnBorrow> <validationQuery>SELECT 1</validationQuery> <validationInterval>30000</validationInterval> </configuration> </definition></datasource>
<datasource> <name>WSO2_CARBON_DB_GREG_CONFIG</name> <description>The datasource used for configurationpartition</description> <jndiConfig> <name>jdbc/WSO2CarbonDB_GREG_CONFIG</name> </jndiConfig> <definition type="RDBMS"> <configuration> <url>jdbc:mysql://10.20.30.42:3306/registrydb2</url> <username>root</username> <password>root</password> <driverClassName>com.mysql.jdbc.Driver</driverClassName> <maxActive>50</maxActive> <maxWait>60000</maxWait> <testOnBorrow>true</testOnBorrow> <validationQuery>SELECT 1</validationQuery> <validationInterval>30000</validationInterval> </configuration> </definition></datasource>
Change the values of the relevant elements according to your environment.
Configuring registry.xml file
2. Navigate to the <GREG_HOME>/repository/conf/registry.xm file and specify the followinglconfigurations.

WSO2 Application Server, version 5.3.0
Copyright © WSO2 Inc. 2014 224
Add a new config to the configuration done in step 1 above. For example,db datasource
<dbConfig name="governance_registry"> <dataSource>jdbc/WSO2CarbonDB_GREG</dataSource></dbConfig><dbConfig name="config_registry"> <dataSource>jdbc/WSO2CarbonDB_GREG_CONFIG</dataSource></dbConfig>
Specify the remote Governance Registry instance with the following configuration:
<remoteInstance url="https://10.20.30.41:9443/registry"> <id>governanceRegistryInstance</id> <dbConfig>governance_registry</dbConfig> <cacheId>root@jdbc:mysql://10.20.30.42:3306/registrydb</cacheId> <readOnly>false</readOnly> <enableCache>true</enableCache> <registryRoot>/</registryRoot></remoteInstance>
<remoteInstance url="https://10.20.30.42:9443/registry"> <id>configRegistryInstance</id> <dbConfig>config_registry</dbConfig> <cacheId>root@jdbc:mysql://10.20.30.42:3306/registrydb2</cacheId> <readOnly>false</readOnly> <enableCache>true</enableCache> <registryRoot>/</registryRoot></remoteInstance>
Change the values of the following elements according to your environment.
<remoteInstance url> : URL of the remote G-Reg instance.<dbConfig> : The dbConfig name specified for the registry database configuration.<cacheId> : This provides information on where the cache resource resides.<enableCache> : Whether caching is enabled on the Carbon server instance.
Define the registry partitions using the remote Governance Registry instance.
When adding the corresponding configuration to the file of a slave node, set registry.xml < >treadOnly. This is the only configuration change.rue</ >readOnly

WSO2 Application Server, version 5.3.0
Copyright © WSO2 Inc. 2014 225
<mount path="/_system/config" overwrite="true"> <instanceId>configRegistryInstance</instanceId> <targetPath>/_system/nodes</targetPath></mount><mount path="/_system/governance" overwrite="true"> <instanceId>governanceRegistryInstance</instanceId> <targetPath>/_system/governance</targetPath></mount>
mount path: Registry collection of Carbon server instance that needs to be mountedmount overwrite: Defines if an existing collection/resource at the given path should be overwritten or not.Possible values are:
true - The existing collection/resource in the specified location will always be deleted and overwrittenwith the resource/s in the remote registry instance. false - The resource/s will not be overwritten. An error will be logged if a resource exists at the existinglocation.virtual - If the existing location has a resource/collection, it will be preserved but virtual view of theremote registry resource/s can be viewed. The original resource/collection can be viewed once theremote registry configuration is removed.
target path: Path to the remote Governance Registry instance where the registry collection is mounted.
Configuring axis2.xml file
3. Navigate to the file and enable clustering by<PRODUCT_HOME/repository/conf/axis2/axis2.xml>copying the following configuration to all Carbon server instances:
<clusteringclass="org.wso2.carbon.core.clustering.hazelcast.HazelcastClusteringAgent"enable="true">
4. Copy 'MySQL JDBC connector jar' ( to http://dev.mysql.com/downloads/connector/j/5.1.html) <GREG_HOME>/rep in Carbon server instances of Foo product cluster.ository/components/lib
Configuring the Bar Product Cluster
The instructions here are similar to that of the Foo product cluster discussed above. The difference is that Barproduct cluster shares G-Reg 1 (Governance space) and G-Reg 3 (Config space) remote registry spaces whereasFoo product cluster shares G-Reg 1 and G-Reg 2 (Config space).
Include the following configurations in the master node of Foo product cluster.
Configure ilemaster- fdatasources. xml
1. Configure the where <PRODUCT_HOME> file/repository/conf/ /master- xmldatasource datasources. <is the distribution home of any WSO2 Carbon-based product. Then, add the following fPRODUCT_HOME> datasource
or the registry space.
The above configuration is needed only when caching is enabled in the server instances and when the parameter is<enableCache>set to true. Clustering enables cache invalidation in configured nodes at the event of any changes to the registry resources by any ofthe Carbon server nodes in the deployment setup.

WSO2 Application Server, version 5.3.0
Copyright © WSO2 Inc. 2014 226
<datasource> <name>WSO2_CARBON_DB_GREG</name> <description>The datasource used for registry and usermanager</description> <jndiConfig> <name>jdbc/WSO2CarbonDB_GREG</name> </jndiConfig> <definition type="RDBMS"> <configuration> <url>jdbc:mysql://10.20.30.41:3306/registrydb</url> <username>root</username> <password>root</password> <driverClassName>com.mysql.jdbc.Driver</driverClassName> <maxActive>50</maxActive> <maxWait>60000</maxWait> <testOnBorrow>true</testOnBorrow> <validationQuery>SELECT 1</validationQuery> <validationInterval>30000</validationInterval> </configuration> </definition></datasource>
<datasource> <name>WSO2_CARBON_DB_GREG_CONFIG</name> <description>The datasource used for configurationpartition</description> <jndiConfig> <name>jdbc/WSO2CarbonDB_GREG_CONFIG</name> </jndiConfig> <definition type="RDBMS"> <configuration> <url>jdbc:mysql://10.20.30.43:3306/registrydb2</url> <username>root</username> <password>root</password> <driverClassName>com.mysql.jdbc.Driver</driverClassName> <maxActive>50</maxActive> <maxWait>60000</maxWait> <testOnBorrow>true</testOnBorrow> <validationQuery>SELECT 1</validationQuery> <validationInterval>30000</validationInterval> </configuration> </definition></datasource>
Change the values of the relevant elements according to your environment.
Configuring registry.xml file
2. Navigate to the file and specify the following<GREG_HOME>/repository/conf/registry.xmlconfigurations.

WSO2 Application Server, version 5.3.0
Copyright © WSO2 Inc. 2014 227
Add a new db config to the datasource configuration done in step 1 above. For example,
<dbConfig name="governance_registry"> <dataSource>jdbc/WSO2CarbonDB_GREG</dataSource></dbConfig><dbConfig name="config_registry"> <dataSource>jdbc/WSO2CarbonDB_GREG_CONFIG</dataSource></dbConfig>
Specify the remote Governance Registry instance with the following configuration:
<remoteInstance url="https://10.20.30.41:9443/registry"> <id>governanceRegistryInstance</id> <dbConfig>governance_registry</dbConfig> <cacheId>root@jdbc:mysql://10.20.30.42:3306/registrydb</cacheId> <readOnly>false</readOnly> <enableCache>true</enableCache> <registryRoot>/</registryRoot></remoteInstance>
<remoteInstance url="https://10.20.30.43:9443/registry"> <id>configRegistryInstance</id> <dbConfig>config_registry</dbConfig> <cacheId>root@jdbc:mysql://10.20.30.42:3306/registrydb2</cacheId> <readOnly>false</readOnly> <enableCache>true</enableCache> <registryRoot>/</registryRoot></remoteInstance>
Change the values of the following elements according to your environment.
<remoteInstance url>: URL of the remote G-Reg instance.<dbConfig> :The dbConfig name specified for the registry database configuration.<cacheId>: This provides information on where the cache resource resides.<enableCache>: Whether caching is enabled on the Carbon server instance.
Define the registry partitions using the remote Governance Registry instance.
When adding the corresponding configuration to the file of a slave node, set registry.xml < >treadOnly. This is the only configuration change.rue</ >readOnly

WSO2 Application Server, version 5.3.0
Copyright © WSO2 Inc. 2014 228
<mount path="/_system/config" overwrite="true"> <instanceId>configRegistryInstance</instanceId> <targetPath>/_system/nodes</targetPath></mount><mount path="/_system/governance" overwrite="true"> <instanceId>governanceRegistryInstance</instanceId> <targetPath>/_system/governance</targetPath></mount>
mount path: Registry collection of Carbon server instance that needs to be mountedmount overwrite: Defines if an existing collection/resource at the given path should be overwritten or not.Possible values are:
true - The existing collection/resource in the specified location will always be deleted and overwrittenwith the resource/s in the remote registry instance. false - The resource/s will not be overwritten. An error will be logged if a resource exists at the existinglocation.virtual - If the existing location has a resource/collection, it will be preserved but virtual view of theremote registry resource/s can be viewed. The original resource/collection can be viewed once theremote registry configuration is removed.
target path: Path to the remote Governance Registry instance where the registry collection is mounted.
Configuring axis2.xml file
3. Navigate to the file and enable clustering by<PRODUCT_HOME>/repository/conf/axis2/axis2.xmlcopying the following configuration to all Carbon server instances:
<clusteringclass="org.wso2.carbon.core.clustering.hazelcast.HazelcastClusteringAgent"enable="false">
4. Copy 'MySQL JDBC connector jar' ( to http://dev.mysql.com/downloads/connector/j/5.1.html) <GREG_HOME>/rep in Carbon server instances of Bar product cluster.ository/components/lib
5. Start both clusters and note the log entries that indicate successful mounting to the remote Governance Registrynodes.
6. Navigate to the registry browser in the Carbon server's management console of a selected node and note theconfig and governance partitions indicating successful mounting to the remote registry instances.
Create a new datasource in the file.master-datasources.xml
The above configuration is needed only when caching is enabled in the server instances and when the parameter is<enableCache>set to true. Clustering enables cache invalidation in configured nodes at the event of any changes to the registry resources by any ofthe Carbon server nodes in the deployment setup.
For large deployments it is recommended to have separate databases for config registry per product. Followthe configurations as below for such deployments.

WSO2 Application Server, version 5.3.0
Copyright © WSO2 Inc. 2014 229
<datasource> <name>WSO2_CARBON_AS_CONFIG</name> <description>The datasource used for registry and usermanager</description> <jndiConfig> <name>jdbc/as_config</name> </jndiConfig> <definition type="RDBMS"> <configuration> <url>jdbc:mysql://x.x.x.x:3306/registrydb</url> <username>root</username> <password>root</password> <driverClassName>com.mysql.jdbc.Driver</driverClassName> <maxActive>50</maxActive> <maxWait>60000</maxWait> <testOnBorrow>true</testOnBorrow> <validationQuery>SELECT 1</validationQuery> <validationInterval>30000</validationInterval> </configuration> </definition></datasource>
Navigate to the file and specify the following<PRODUCT_HOME>/repository/conf/registry.xmlconfigurations.
<!-- config db --><dbConfig name="config"><dataSource>jdbc/as_config</dataSource></dbConfig>
<remoteInstance url="https://localhost:9443/registry"><id>config</id><dbConfig>config</dbConfig><readOnly>false</readOnly><registryRoot>/</registryRoot><enableCache>true</enableCache><cacheId>root@jdbc:mysql://10.45.67.89:3306/as_config</cacheId></remoteInstance>
Using WS-Discovery in Governance Registry
WSO2 Governance Registry has the capability to discover the services via ws-discovery and store the discoveredservices and related metadata. If you have set up WSO2 Governance Registry as a remote governance registry foryour application, you have the option of configuring your server to use the governance registry as a WS-Discoveryproxy. Any WS-Discovery compliant web services hosting server (E.g.: Axis2/JAX-WS/JAX-RS) can be configured touse Governance Registry as a WS-Discovery proxy, which would discover any deployed services for governingpurposes such as LifeCycle Management.
The following instructions explain how to discover JAX-WS/JAX-RS web services in WSO2 Application Server using

WSO2 Application Server, version 5.3.0
Copyright © WSO2 Inc. 2014 230
1.
2.
3.
4.
5.
WS-Discovery in the WSO2 Governance Registry:
Add the following property to the file of WSO2 AS to configure WSO2 Governance Registryaxis2.xml(GReg) to work as a WS-Discovery proxy. In this example, the value of the parameter is the endpoint of the"DiscoveryProxy" service, which is deployed in Governance Registry to discover services.
<parametername="DiscoveryProxy">https://localhost:9443/services/DiscoveryProxy</parameter>
If required, you can define scopes and the metadata version as a in the <context-param> WEB-INF/web. scopes and .xml If the metadata version are not defined, the default version will be effective.
The following configuration adds the scope:http://wso2.com/as
<context-param> <param-name>Scopes</param-name> <param-value>http://wso2.com/as</param-value></context-param>
The following configuration adds the metadata version:
<context-param> <param-name>MetadataVersion</param-name> <param-value>100</param-value> </context-param>
Start the two products (WSO2 Governance Registry and WSO2 Application Server) following the instructions. in Running the Product
Log in to the management console of WSO2 AS and add a JAX-WS service (E.g. java_first_jaxws.war). Theservice would be displayed on the service list. Now, log in to the management console of WSO2 Governance Registry and go to the menu. TheServicesservice list will display the services that were deployed in Application Server.
This means that Governance Registry has discovered all the web services deployed in Application Server andstored them in Governance Registry. Now these service endpoints can be used from Governance Registry forvarious purposes.
Working with Transports
Note that you must add a port offset in the fil<PRODUCT_HOME>/repository/conf/carbon.xmle to ensure that both products are not using the same port.
The name of this service will be shown as the web application name followed by the name of serviceavailable in the web application. For example, if .war has a service called hello_world,java_first_jaxwsthen the service will be listed as java_first_jaxws_hello_world.

WSO2 Application Server, version 5.3.0
Copyright © WSO2 Inc. 2014 231
This chapter contains the following information:
Introduction to TransportsAS TransportsConfiguring Transports Globally
Introduction to Transports
WSO2 Carbon is the base platform on which all WSO2 Java products are developed. Built on OSGi, WSO2 Carbonencapsulates all major SOA functionality. It supports a variety of transports which make Carbon-based productscapable of receiving and sending messages over a multitude of transport and application-level protocols. Thisfunctionality is implemented mainly in the Carbon core, which combines a set of transport-specific components toload, enable, manage and persist transport related functionality and configurations.
All transports currently supported by WSO2 Carbon are directly or indirectly based on the Apache Axis2 transportsframework. This framework provides two main interfaces for each transport implementation.
org.apache.axis2.transport.TransportListener - Implementations of this interface should specify howincoming messages are received and processed before handing them over to the Axis2 engine for furtherprocessing.org.apache.axis2.transport.TransportSender - Implementations of this interface should specify how amessage can be sent out from the Axis2 engine.
Each transport implementation generally contains a transport receiver/listener and a transport sender, since theyuse the interfaces above. The Axis2 transport framework enables the user to configure, enable and managetransport listeners and senders independent to each other, without having to restart the server. For example, onemay enable only the JMS transport sender without having to enable JMS transport listener.
The transport management capability of WSO2 Carbon is provided by the following feature in the WSO2 featurerepository:
Name : WSO2 Carbon - T ranspor t Management Fea tu re .mgt.f .Identifier: org.wso2.carbon.t ransport eature group
If transport management capability is not included in your product by default, you can add it by installing the abovefeature using the instructions given in section . Feature Management
AS Transports
WSO2 AS supports a variety of transports which makes WSO2 AS capable of receiving and sending messages overa multitude of transport and application level protocols.
The following transport implementations are supported:
HTTP Servlet TransportHTTPS Servlet TransportMailTo TransportJMS TransportTCP TransportLocal TransportUDP Transport
The links discuss these transport implementations in detail, highlighting the configuration parameters associatedwith them. For more information on configuring transports, see .Working with Transports
HTTP Servlet Transport

WSO2 Application Server, version 5.3.0
Copyright © WSO2 Inc. 2014 232
The transport receiver implementation of the HTTP transport is available in the Carbon core component. Thetransport sender implementation comes from the Tomcat http connector. This transport is shipped with WSO2Carbon and all WSO2 Carbon-based products that use this transport as the default transport, except WSO2ESB. By default, we use non-blocking Tomcat Java connector, org.apache.coyote.http11.Http11NioProtocol.
HTTP servlet transport should be configured in the <PRODUCT_HOME>/repository/conf/tomcat/catalina- file by configuring the connector parameters given below. The transport class that should be specifiedserver.xml
i n t h e f i l e i s catalina-server.xml <Connector
protocol="org.apache.coyote.http11.Http11NioProtocol"/>.
Transport Connector Parameters
ParameterName
Description Required PossibleValues
DefaultValue
port The port number on which this transport receiver should listen forincoming messages.
Yes Apositiveintegerless than65535
proxyPort When used, this transport listener will accept messages arrivingthrough a HTTP proxy server which listens on the specified proxyport. Apache mod_proxy should be enabled in the proxy server.All the WSDLs generated will contain the proxy port value as thelistener port.
No Apositiveintegerless than65535
Parameter Name Description PossibleValues
DefaultValue
port The port over which this transport receiver listens for incoming messages.
A positiveinteger lessthan 65535
9763 forH T T PConnector
9443 forHTTPSConnector
This is a non-blocking HTTP transport implementation, which means that I/O the threads does not getblocked while received messages are processed.Although the file contains configurations for HTTP/S transports by default, they are notaxis2.xmlused by WSO2 products. Instead, the products use the HTTP/S transport configurations inTomcat-level; therefore, changing the HTTP/S configurations in the file has no effect.axis2.xml
In the transport parameter tables, the literals displayed in italics under the "Possible Values" column shouldbe considered as fixed literal constant values. Those values can be directly put into the transportconfigurations.

WSO2 Application Server, version 5.3.0
Copyright © WSO2 Inc. 2014 233
redirectPort If this Connector is supporting non-SSL requests, and arequest is received for which a matching <security-constraint> requires SSL transport, Catalina willautomatically redirect the request to the port numberspecified here.
A positiveinteger lessthan 65535
9443
bindOnInit Controls when the socket used by the connector isbound. By default it is bound when the connector isinitiated and unbound when the connector is destroyed.If set to false, the socket will be bound when theconnector is started and unbound when it is stopped.
false
proxyPort When used, this transport listener will accept messagesarriving through a HTTP proxy server which listens onthe specified proxy port. Apache should bemod_proxyenabled on the proxy server. All the WSDLs generatedwill contain the proxy port value as the listener port.
A positiveinteger lessthan 65535
maxHttpHeaderSize The maximum size of the HTTP request and responseh e a d e r in bytes.
A positiveinteger
4096
acceptorThreadCount The number of threads to be used to acceptconnections. Increase this value on a multi CPUmachine, although you would never really need morethan 2. Also, with a lot of non keep alive connections,you might want to increase this value as well.
2
maxThreads The maximum number of worker threads created by thereceiver to handle incoming requests. This parameterlargely determines the number of concurrentconnections that can be handled by the transport.
A positiveinteger
40
minSpareThreads The minimum number of threads always kept running. Ifnot specified, the default will be used.
50
enableLookups Use this parameter to enable DNS lookups in order toreturn the actual host name of the remote client.Disabling DNS lookups at transport level generallyimproves performance. By default, DNS lookups aredisabled.
true, false false
disableUploadTimeout This flag allows the servlet container to use a different,longer connection timeout while a servlet is beingexecuted, which in the end allows either the servlet alonger amount of time to complete its execution, or alonger timeout during data upload.
true, false true
connectionUploadTimeout Specifies the timeout, in milliseconds, to use while adata upload is in progress. This only takes effect if disableUploadTimeout is set to false.

WSO2 Application Server, version 5.3.0
Copyright © WSO2 Inc. 2014 234
clientAuth Set to true if you want the SSL stack to require a validcertificate chain from the client before accepting aconnection. Set to want if you want the SSL stack torequest a client Certificate, but not fail if one is notpresent. A false value (which is the default) will notrequire a certificate chain unless the client requests aresource protected by a security constraint that usesCLIENT-CERT authentication.
true, false,want
false
maxKeepAliveRequests The maximum number of HTTP requests which can bepipelined until the connection is closed by the server.Setting this attribute to 1 will disable HTTP/1.0keep-alive, as well as HTTP/1.1 keep-alive andpipelining. Setting this to -1 will allow an unlimitedamount of pipelined or keep-alive HTTP requests.
-1 or anypositiveinteger
100
acceptCount The maximum queue length for incoming connectionrequests when all possible request processing threadsare in use. Any requests received when the queue is fullwill be refused.
A positiveinteger
10
server Overrides the Server header for the http response. Ifset, the value for this attribute overrides the Tomcatdefault and any Server header set by a web application.If not set, any value specified by the application is used.
Any string WSO2CarbonServer
compression The may use HTTP/1.1 GZIP compressionConnectorin an attempt to save server bandwidth.
The acceptable values for the parameter is "off" (disablecompression), "on" (allow compression, which causestext data to be compressed), "force" (forcescompression in all cases), or a numerical integer value(which is equivalent to "on", but specifies the minimumamount of data before the output is compressed). If thecontent-length is not known and compression is set to"on" or more aggressive, the output will also becompressed. If not specified, this attribute is set to "off".
on, off,force
on
compressionMinSize If is set to "on" then this attribute may becompressionused to specify the minimum amount of data before theoutput is compressed.
A positiveinteger
2048
noCompressionUserAgents Indicate a list of regular expressions matchinguser-agents of HTTP clients for which compressionshould not be used, because these clients, althoughthey do advertise support for the feature, have a brokenimplementation.
A commaseparatedl is t o f regularexpressions
emptystring

WSO2 Application Server, version 5.3.0
Copyright © WSO2 Inc. 2014 235
1.
compressableMimeType Use this parameter to indicate a list of MIME types forwhich HTTP compression may be used.
A commaseparatedl is t o f valid mimetypes
text/html, text/xml,text/plain
URIEncoding This specifies the character encoding used to decodethe URI bytes, after %xx decoding the URL.
URIencoding Character setname
ISO-8859-1
This servlet transport implementation can be further tuned up using the following parameters.
This is only a subset of all the supported parameters. The servlet HTTP transport uses the org.apache.catalina.conn implementation from Apache Tomcat. So the servlet HTTP transport actually accepts anyector.Connector
parameter accepted by the connector implementation. For a complete list of supported parameters, see Apache.Tomcat's connector configuration reference
Transport Sender Parameters
Parameter Name Description Requried PossibleValues
DefaultValue
PROTOCOL The version of HTTP protocol to be used for outgoingmessages.
No HTTP/1.0,HTTP/1.1
HTTP/1.1
Transfer-Encoding Effective only when the HTTP version is 1.1 (i.e. thevalue of the PROTOCOL parameter should beHTTP/1.1). Use this parameter to enable chunkingsupport for the transport sender.
No chunked N o tChunked
SocketTimeout The socket timeout value in milliseconds, for out boundconnections.
No A positiveinteger
60000ms
ConnectionTimeout The connection timeout value in milliseconds, for outbound connections.
No A positiveinteger
60000ms
OmitSOAP12Action Set this parameter to "true" if you need to disable thesoapaction for SOAP 1.2 messages.
No true, false false
Defining multiple tomcat connectors
You have the option of defining multiple tomcat connectors in the file. Note that when youcatalina-server.xmldefine multiple connectors, all the endpoints of the applications deployed in your WSO2 server will still be exposedthrough all the connector ports. However, you can configure your load balancer to ensure that only the relevantapplications are exposed through the required connector port.
Therefore, you can use multiple connectors to strictly separate the applications deployed in your server as explainedbelow.
See the example given below where two connectors are defined in the file.catalina-server.xml

WSO2 Application Server, version 5.3.0
Copyright © WSO2 Inc. 2014 236
1.
2.
<!-- Connector using port 9763 --> <Connector protocol="org.apache.coyote.http11.Http11NioProtocol" port="9763" ...... ....../><!-- Connector using port 9764 --> <Connector protocol="org.apache.coyote.http11.Http11NioProtocol" port="9764" ...... ....../>
Configure your load balancer so that the relevant applications are exposed through the required connectorport.
HTTPS Servlet Transport
Similar to the HTTP transport, the HTTPS transport consists of a receiver implementation which comes from theCarbon core component and a sender implementation which comes from the Tomcat http connector. In fact, thistransport uses exactly the same transport sender implementation as the . The transport receiverHTTP transport implementation of the HTTP transport is available in the Carbon core component. The transport senderimplementation comes from the Tomcat http connector. This transport is shipped with WSO2 Carbon and all WSO2Carbon-based products, which use this transport as the default transport, except WSO2 ESB. By default, we usenon-blocking Tomcat Java connector, org.apache.coyo te.http11.Http11NioProtocol.
HTTPS servlet transport should be configured in the <PRODUCT_HOME>/repository/conf/tomcat/catalina file, same as with the HTTP servlet transport. The transport class that should be specified in the -server.xml cat
f i l e i s as f o l l ows : alina-server.xml <Connector. protocol="org.apache.coyote.http11.Http11NioProtocol"/>
Transport connector parameters
In addition to the configuration parameters supported by the , HTTPS servlet transportHTTP servlet transportsupports the following configuration parameters:
ParameterName
Description PossibleValues
DefaultValue
sslProtocol Transport level security protocol to be used. TLS, SSL TLS
Although the file contains configurations for HTTP/S transports by default, they are not used byaxis2.xmlWSO2 products. Instead, the products use the HTTP/S transport configurations in Tomcat-level; therefore,changing the HTTP/S configurations in the file has no effect.axis2.xml
In the transport parameter tables, the literals displayed in italics under the "Possible Values" column shouldbe considered as fixed literal constant values. Those values can be directly put in transport configurations.

WSO2 Application Server, version 5.3.0
Copyright © WSO2 Inc. 2014 237
enableLookups Set to true if you want calls to request.getRemoteHost() toperform DNS lookups in order to return the actual host name of the remote
client. Set to false to skip the DNS lookup and return the IP address inString form instead (thereby improving performance).
true,false
clientAuth Set to if you want the SSL stack to require a valid certificate chaintruefrom the client before accepting a connection. Set to if you want thewantSSL stack to request a client Certificate, but not fail if one isn't presented.A value (which is the default) will not require a certificate chainfalseunless the client requests a resource protected by a security constraintthat uses authentication.CLIENT-CERT
true,false
scheme Set this attribute to the name of the protocol you wish to have returned bycalls to .request.getScheme()
http, https
secure Set this attribute to true if you wish to have calls to request.isSecu re() to return true for requests received by this Connector. You would
want this on an SSL Connector or a non SSL connector that is receivingdata from a SSL accelerator, like a crypto card, a SSL appliance or even awebserver.
true,false
SSLEnabled Use this attribute to enable SSL traffic on a connector. To turn on SSLhandshake/encryption/decryption on a connector set this value to .trueWhen turning this value you will want to set the and the true scheme se
attributes as well to pass the correct and cure request.getScheme() values to the servlets. For more information see, request.isSecure()
.SSL Support
true,false
keystoreFile Path to the keystore which should be used for encryption/decryption. A validfile patht o akeystorefile
keypass Password to access the specified keystore. A validpassword
Similar to the servlet HTTP transport, this transport is also based on Apache Tomcat's connector implementation. oFr a complete list of supported parameters, see .Tomcat connector configuration reference
Defining multiple tomcat connectors
You have the option of defining multiple HTTPS connectors in the file in the same way ascatalina-server.xmlfor HTTP connectors. See for more information.HTTP servlet transport
MailTo Transport
The polling MailTo transport supports sending messages (E-Mail) over SMTP and receiving messages over POP3or IMAP. This transport implementation is available as a module of the WS-Commons Transports project. Thereceiver and sender classes that should be included in the Carbon configuration to enable the MailTo transport are o
and rg.apache.axis2.transport.mail.MailTransportListener org.apache.axis2.transport.mai respectively. The JAR consisting of the transport implementation is named l.MailTransportSender axis2-tra
.nsport-mail.jar
The mail transport receiver should be configured at service level. That is each service configuration should explicitlystate the mail transport receiver configuration. This is required to enable different services to receive mails over
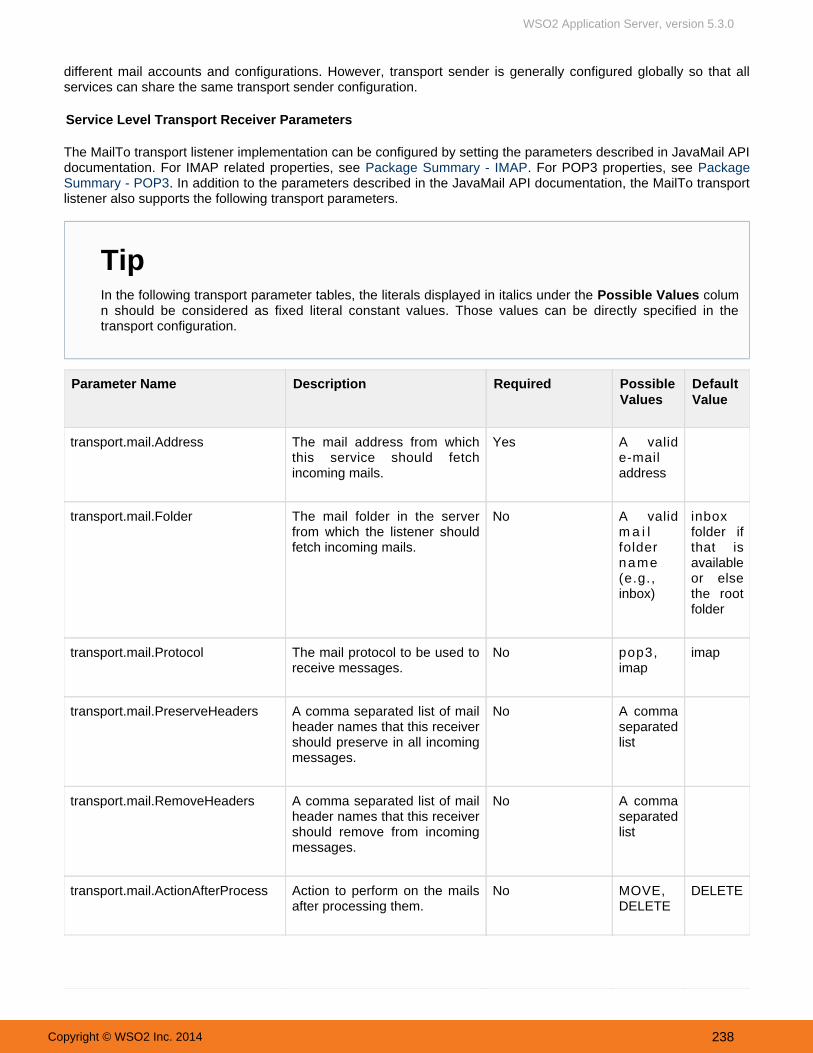
WSO2 Application Server, version 5.3.0
Copyright © WSO2 Inc. 2014 238
different mail accounts and configurations. However, transport sender is generally configured globally so that allservices can share the same transport sender configuration.
Service Level Transport Receiver Parameters
The MailTo transport listener implementation can be configured by setting the parameters described in JavaMail APIdocumentation. For IMAP related properties, see . For POP3 properties, see Package Summary - IMAP Package
. In addition to the parameters described in the JavaMail API documentation, the MailTo transportSummary - POP3listener also supports the following transport parameters.
Parameter Name Description Required PossibleValues
DefaultValue
transport.mail.Address The mail address from whichthis service should fetchincoming mails.
Yes A valide-mailaddress
transport.mail.Folder The mail folder in the serverfrom which the listener shouldfetch incoming mails.
No A validm a i lfoldername(e.g.,inbox)
inboxfolder ifthat isavailableor elsethe rootfolder
transport.mail.Protocol The mail protocol to be used toreceive messages.
No pop3,imap
imap
transport.mail.PreserveHeaders A comma separated list of mailheader names that this receivershould preserve in all incomingmessages.
No A commaseparatedlist
transport.mail.RemoveHeaders A comma separated list of mailheader names that this receivershould remove from incomingmessages.
No A commaseparatedlist
transport.mail.ActionAfterProcess Action to perform on the mailsafter processing them.
No MOVE,DELETE
DELETE
TipIn the following transport parameter tables, the literals displayed in italics under the columPossible Valuesn should be considered as fixed literal constant values. Those values can be directly specified in thetransport configuration.

WSO2 Application Server, version 5.3.0
Copyright © WSO2 Inc. 2014 239
transport.mail.ActionAfterFailure Action to perform on the mailsafter a failure occurs whileprocessing them.
No MOVE,DELETE
DELETE
transport.mail.MoveAfterProcess Folder to move the mails afterprocessing them.
Required ifActionAfterProcessis MOVE
A validm a i lfoldername
transport.mail.MoveAfterFailure Folder to move the mails afterencountering a failure.
Required ifActionAfterFailureis MOVE
A validm a i lfoldername
transport.mail.ProcessInParallel Whether the receiver shouldincoming mails in parallel or not(works only if the mail protocolsupports that - for example,IMAP).
No true, false false
transport.ConcurrentPollingAllowed Whether the receiver shouldpoll for multiple messagesconcurrently.
No true, false false
transport.mail.MaxRetryCount Maximum number of retryoperations to be performedwhen fetching incoming mails.
Yes A positiveinteger
transport.mail.ReconnectTimeout The reconnect timeout inmilliseconds to be used whenfetching incoming mails.
Yes A positiveinteger
Global Transport Sender Parameters
For a list of parameters supported by the MailTo transport sender, see . In addition to thePackage Summary - SMTPparameters described there, the MailTo transport sender supports the following parameters.
Parameter Name Description Required PossibleValues
DefaultValue
transport.mail.SMTPBccAddresses If one or more e-mail addresses need tobe specified as BCC addresses foroutgoing mails, this parameter can beused.
No A commaseparatedl ist ofe-mailaddresses
transport.mail.Format Format of the outgoing mail. No Text, Multipart
Text

WSO2 Application Server, version 5.3.0
Copyright © WSO2 Inc. 2014 240
JMS Transport
JMS (Java Message Service) transport implementation also comes from the WS-Commons Transports project. Allthe relevant classes are packed into the and the following classes actaxis2-transport-jms-<version>.jaras the transport receiver and the sender respectively.
org.apache.axis2.transport.jms.JMSListenerorg.apache.axis2.transport.jms.JMSSender
The JMS transport implementation requires an active JMS server instance to be able to receive and sendmessages. We recommend using Apache ActiveMQ JMS server, but other implementations such as Apache Qpidand Tibco are also supported. You also need to put the client JARs for your JMS server in Carbon classpath. Incase of Apache ActiveMQ, you need to put the following JARs in the classpath:
activemq-core.jargeronimo-j2ee-management_1.0_spec-1.0.jargeronimo-jms_1.1_spec-1.1.1.jar
These JAR files can be obtained by downloading the latest version of Apache ActiveMQ (version 5.2.0 isrecommended). Extract the downloaded archive and find the required dependencies in the $ACTIVEMQ_HOME/libdirectory. You need to copy these JAR files over to directory for$CARBON_HOME/repository/components/libCarbon to be able to pick them up at runtime.
Configuration parameters for JMS receiver and the sender are XML fragments that represent JMS connectionfactories. A typical JMS parameter configuration would look like this:
<parameter name="myTopicConnectionFactory"> <parametername="java.naming.factory.initial">org.apache.activemq.jndi.ActiveMQInitialContextFactory</parameter> <parametername="java.naming.provider.url">tcp://localhost:61616</parameter> <parametername="transport.jms.ConnectionFactoryJNDIName">TopicConnectionFactory</parameter> <parametername="transport.jms.ConnectionFactoryType">topic</parameter></parameter>
This is a bare minimal JMS connection factory configuration, which consists of four connection factory parameters.JMS connection factory parameters are described in detail below.
JMS Connection Factory Parameters
Parameter Name Description Requried Possible Values
In transport parameter tables, literals displayed in italic mode under the "Possible Values" column should beconsidered as fixed literal constant values. Those values can be directly put in transport configurations.

WSO2 Application Server, version 5.3.0
Copyright © WSO2 Inc. 2014 241
java.naming.factory.initial JNDI initial context factory class. The class mustimplement the java.naming.spi.InitialCo
interface.ntextFactory
Yes A valid class name
java.naming.provider.url URL of the JNDI provider. Yes A valid URL
java.naming.security.principal JNDI Username. No
java.naming.security.credentials JNDI password. No
transport.Transactionality Desired mode of transactionality. No none, local, jta
transport.UserTxnJNDIName JNDI name to be used to require user transaction. No
transport.CacheUserTxn Whether caching for user transactions should beenabled or not.
No true, false
transport.jms.SessionTransacted Whether the JMS session should be transacted ornot.
No true, false
transport.jms.SessionAcknowledgement JMS session acknowledgment mode. No AUTO_ACKNOWLEDGE,CLIENT_ACKNOWLEDGE,DUPS_OK_ACKNOWLEDGE,SESSION_TRANSACTED
transport.jms.ConnectionFactoryJNDIName The JNDI name of the connection factory. Yes
transport.jms.ConnectionFactoryType Type of the connection factory. No queue, topic
transport.jms.JMSSpecVersion JMS API version. No 1.1, 1.0.2b
transport.jms.UserName The JMS connection username. No
transport.jms.Password The JMS connection password. No
transport.jms.Destination The JNDI name of the destination. No
transport.jms.DestinationType Type of the destination. No queue, topic
transport.jms.DefaultReplyDestination JNDI name of the default reply destination. No
transport.jms.DefaultReplyDestinationType Type of the reply destination. No queue, topic

WSO2 Application Server, version 5.3.0
Copyright © WSO2 Inc. 2014 242
transport.jms.MessageSelector Message selector implementation. No
transport.jms.SubscriptionDurable Whether the connection factory is subscriptiondurable or not.
No true, false
transport.jms.DurableSubscriberName Name of the durable subscriber. Yes if thesubscriptiondurable isturned on
transport.jms.PubSubNoLocal Whether the messages should be published bythe same connection they were received.
No true, false
transport.jms.CacheLevel JMS resource cache level. No none, connection, session,consumer, producer, auto
transport.jms.ReceiveTimeout Time to wait for a JMS message during polling.Set this parameter value to a negative integer towait indefinitely. Set to zero to prevent waiting.
No Number of milliseconds towait
transport.jms.ConcurrentConsumers Number of concurrent threads to be started toconsume messages when polling.
No Any positive integer - Fortopics this must be always 1
transport.jms.MaxConcurrentConsumers Maximum number of concurrent threads to useduring polling.
No Any positive integer - Fortopics this must be always 1
transport.jms.IdleTaskLimit The number of idle runs per thread before it diesout.
No Any positive integer
transport.jms.MaxMessagesPerTask The maximum number of successful messagereceipts per thread.
No Any positive integer - Use -1to indicate infinity
transport.jms.InitialReconnectDuration Initial reconnection attempts duration inmilliseconds.
No Any positive integer
transport.jms.ReconnectProgressFactor Factor by which the reconnection duration will beincreased.
No Any positive integer
transport.jms.MaxReconnectDuration Maximum reconnection duration in milliseconds. No
JMS transport implementation has some parameters that should be configured at service level, in other words inservice XML files of individual services.
Service Level JMS Configuration Parameters

WSO2 Application Server, version 5.3.0
Copyright © WSO2 Inc. 2014 243
Parameter Name Description Requried Possible Values DefaultValue
transport.jms.ConnectionFactory Name of the JMS connectionfactory the service should use.
No A name of an alreadydefined connectionfactory
default
transport.jms.PublishEPR JMS EPR to be published in theWSDL.
No A JMS EPR
TCP Transport
The TCP transport is implemented in the Apache WS-Commons Transport project. All the classes required for theTCP transport are packed into the bundle named . The following classes actaxis2-transport-tcp-<version>as the transport receiver and sender respectively:
org.apache.axis2.transport.tcp.TCPServer org.apache.axis2.transport.tcp.TCPTransportSender
The following topics explain the process of installing the TCP transport in WSO2 AS:
Step 1: Deploying the required bundlesStep 2: Enabling the TCP transport in the product configurationsStep 3: Restart the server
Step 1: Deploying the required bundles
In order to use this transport, the OSGi bundle should be added to theaxis2-transport-tcp-<version>server. This can be done in two ways:
Install the that is available in the WSO2 feature repository. See the instructions for TCP transport feature inst.alling features
Alternatively, you can manually download the axis2-transport-tcp-<version> bundle from here and
add it to the <AS_HOME>/repository/components/dropins directory.
Step 2: Enabling the TCP transport in the product configurations
To enable the TCP transport, open the <AS_HOME>/repository/conf/axis2.xml file and add the following
transport receiver/sender configurations:
Note that there is a separate feature repository for each Carbon release. You will find all therepositories listed . Therefore, when you install a feature for your product version, make sure tohereuse the feature version that is relevant to your product version.

WSO2 Application Server, version 5.3.0
Copyright © WSO2 Inc. 2014 244
<transportReceiver name="tcp"> <parameter name="transport.tcp.port">6060</parameter></transportReceiver>
<transportSender name="tcp"/>
Given below are the parameters that can be used in the file when you configure the 'transport receiver'.axis2.xmlNote that the TCP transport sender does not accept any configuration parameters as of now.
Parameter Name Description Required PossibleValues
DefaultValue
transport.tcp.port The port on which the TCP servershould listen for incoming messages.
No A positiveinteger less than65535.
8000
transport.tcp.hostname The host name of the server to bedisplayed in WSDLs etc.
No A valid hostname or an IPaddress.
Step 3: Restart the server
Restart the server after completing the above steps to enable the TCP transport.
Local Transport
Apache Axis2's local transport implementation is used to make internal service calls and transfer data within theAxis2 instance. The following class implements the sender API:
org.apache.axis2.transport.local.LocalTransportSender
The transport does not have a receiver implementation as of now.
It provides an opportunity for fast in-VM service call.
Configuring a Local Transport with WSO2 Products
Shown below is how to configure a local transport with any WSO2 Carbon-based product.
1. In the carbon.xml file at location <PRODUCT_HOME>/repository/conf, an endpoint is available as follows bydefault.
<ServerURL>local:/${carbon.context}/services/</ServerURL>
2. In the axis2.xml file at location <PRODUCT_HOME>/repository/conf/axis2, there is a transport sender named
To use this transport, configure an endpoints with the prefix. For example, to make an in-VM calllocal://to the HelloService, use . local://HelloService

WSO2 Application Server, version 5.3.0
Copyright © WSO2 Inc. 2014 245
'local' specified as follows:
<transportSender name="local"class="org.apache.axis2.transport.local.LocalTransportSender"/>
It has to be replaced with the following sender/receiver pair.
<transportReceiver name="local"class="org.wso2.carbon.core.transports.local.CarbonLocalTransportReceiver"/><transportSender name="local"class="org.wso2.carbon.core.transports.local.CarbonLocalTransportSender"/>
For more information about transports, refer to . Working with Transports
UDP Transport
The UDP transport implementation is in the Apache WS-Commons Transports project. The following classesimplement the Axis2 transport listener and sender APIs respectively.
org.apache.axis2.transport.udp.UDPListenerorg.apache.axis2.transport.udp.UDPSender
The axis2-transport-udp.jar archive file contains the above implementation classes.
To enable the UDP transport for samples, simple open the file repository/conf/axis2.xml in a text editor and add thefollowing transport configurations. UDP transport component is shipped with the WSO2 ESB by default.
<transportReceiver name="udp"/> <transportSender name="udp"/>
If you wish to use the sample Axis2 client to send UDP messages, you have to uncomment the UDP transportsender configuration in the samples/axis2Client/client_repo/conf/axis2.xml file.
Configuring Transports Globally
Transports can be configured and enabled in a global-level or a service-level. Globally enabled and configuredtransports effect all services deployed in a running Carbon instance. The following methods can be used toconfigure and enable transports globally:
Using axis2.xml fileUsing catalina-server.xml file
Using axis2.xml file
WSO2 Carbon and all Carbon-based products are shipped with a configuration file named . This XMLaxis2.xmlconfiguration file can be found at directory. This is similar to the <CARBON_HOME>/ repository/conf/axis2 ax
file that ships with and . It contains the global configuration for WSO2is2.xml Apache Axis2 Apache Synapse

WSO2 Application Server, version 5.3.0
Copyright © WSO2 Inc. 2014 246
Carbon and the Carbon-based products. The configuration generally includes configuration details foraxis2.xmlmodules, phases, handlers, global configuration parameters and transports. The elements <transportReceiver>and are used to configure transport listeners and senders respectively. In the fil<transportSender> axis2.xmle that comes with WSO2 Carbon or any Carbon-based product, some transports are already configured andenabled by default, including the HTTP and HTTPS transports.
Given below is an example JMS file. transport receiver configuration in the axis2.xml
<transportReceiver name="jms"class="org.apache.axis2.transport.jms.JMSListener"> <parameter name="myTopicConnectionFactory"> <parametername="java.naming.factory.initial">org.apache.activemq.jndi.ActiveMQInitialContextFactory</parameter> <parametername="java.naming.provider.url">tcp://localhost:61616</parameter> <parametername="transport.jms.ConnectionFactoryJNDIName">TopicConnectionFactory</parameter> </parameter> <parameter name="myQueueConnectionFactory"> <parametername="java.naming.factory.initial">org.apache.activemq.jndi.ActiveMQInitialContextFactory</parameter> <parametername="java.naming.provider.url">tcp://localhost:61616</parameter> <parametername="transport.jms.ConnectionFactoryJNDIName">QueueConnectionFactory</parameter> </parameter> <parameter name="default"> <parametername="java.naming.factory.initial">org.apache.activemq.jndi.ActiveMQInitialContextFactory</parameter> <parametername="java.naming.provider.url">tcp://localhost:61616</parameter> <parametername="transport.jms.ConnectionFactoryJNDIName">QueueConnectionFactory</parameter> </parameter></transportReceiver>
The <transportReceiver> element has the following attributes and sub-elements:
WSO2 products do not use the HTTP/S servlet transport configurations that are in the axis2.xml file.Instead, they use Tomcat-level servlet transports, which are used by the management console in<PRODUCT_HOME>/repository/conf/tomcat/catalina-server.xml file.
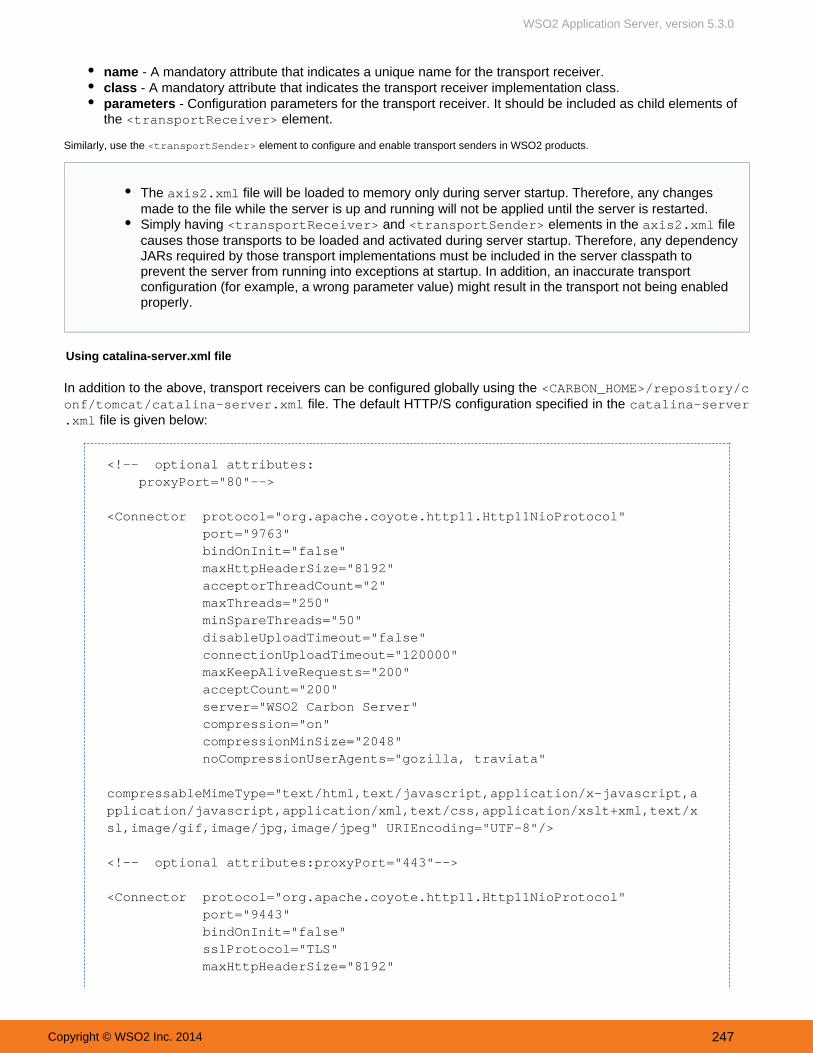
WSO2 Application Server, version 5.3.0
Copyright © WSO2 Inc. 2014 247
name - A mandatory attribute that indicates a unique name for the transport receiver. class - A mandatory attribute that indicates the transport receiver implementation class.
parameters - Configuration parameters for the transport receiver. It should be included as child elements of the element.<transportReceiver>
Similarly, use the <transportSender> element to configure and enable transport senders in WSO2 products.
Using catalina-server.xml file
In addition to the above, transport receivers can be configured globally using the <CARBON_HOME>/repository/c file. The default HTTP/S configuration specified in the onf/tomcat/catalina-server.xml catalina-server
file is given below:.xml
<!-- optional attributes: proxyPort="80"-->
<Connector protocol="org.apache.coyote.http11.Http11NioProtocol" port="9763" bindOnInit="false" maxHttpHeaderSize="8192" acceptorThreadCount="2" maxThreads="250" minSpareThreads="50" disableUploadTimeout="false" connectionUploadTimeout="120000" maxKeepAliveRequests="200" acceptCount="200" server="WSO2 Carbon Server" compression="on" compressionMinSize="2048" noCompressionUserAgents="gozilla, traviata" compressableMimeType="text/html,text/javascript,application/x-javascript,application/javascript,application/xml,text/css,application/xslt+xml,text/xsl,image/gif,image/jpg,image/jpeg" URIEncoding="UTF-8"/> <!-- optional attributes:proxyPort="443"-->
<Connector protocol="org.apache.coyote.http11.Http11NioProtocol" port="9443" bindOnInit="false" sslProtocol="TLS" maxHttpHeaderSize="8192"
The axis2.xml file will be loaded to memory only during server startup. Therefore, any changesmade to the file while the server is up and running will not be applied until the server is restarted.Simply having and elements in the file<transportReceiver> <transportSender> axis2.xmlcauses those transports to be loaded and activated during server startup. Therefore, any dependencyJARs required by those transport implementations must be included in the server classpath toprevent the server from running into exceptions at startup. In addition, an inaccurate transportconfiguration (for example, a wrong parameter value) might result in the transport not being enabledproperly.
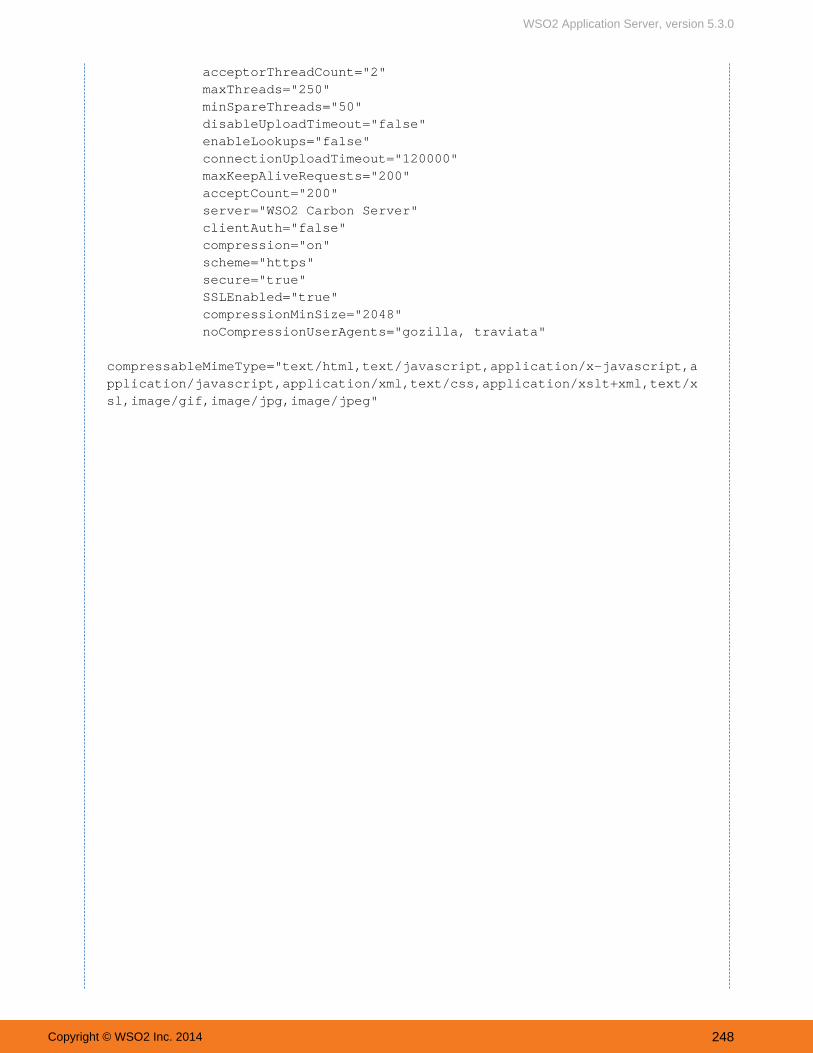
WSO2 Application Server, version 5.3.0
Copyright © WSO2 Inc. 2014 248
acceptorThreadCount="2" maxThreads="250" minSpareThreads="50" disableUploadTimeout="false" enableLookups="false" connectionUploadTimeout="120000" maxKeepAliveRequests="200" acceptCount="200" server="WSO2 Carbon Server" clientAuth="false" compression="on" scheme="https" secure="true" SSLEnabled="true" compressionMinSize="2048" noCompressionUserAgents="gozilla, traviata" compressableMimeType="text/html,text/javascript,application/x-javascript,application/javascript,application/xml,text/css,application/xslt+xml,text/xsl,image/gif,image/jpg,image/jpeg"

WSO2 Application Server, version 5.3.0
Copyright © WSO2 Inc. 2014 249
keystoreFile="${carbon.home}/repository/resources/security/wso2carbon.jks" keystorePass="wso2carbon" URIEncoding="UTF-8"/>
Currently only the default servlet transports of Carbon can be configured using the catalina-server.xml file.
Working with Security
This section explains how you can set up the security configurations in your application server.
After you install WSO2 AS, it is recommended to change the default security settings according to the requirementsof your production environment. Since AS is built on top of the WSO2 Carbon Kernel (version 4.4.1), the mainsecurity configurations applicable to AS are inherited from the Carbon kernel.
You can find detailed information on how to configure security in your AS as explained below.
Configuration Description
Configuringtransport-levelsecurity
WSO2 products support a variety of transports that make them capable of receiving and sendingmessages over a multitude of transport and application-level protocols. By default, most of theWSO2 products come with the HTTP transport. The transport receiver implementation of theHTTP transport is available in Carbon. The transport sender implementation comes from theTomcat HTTP connector, which is configured in the <AS_HOME>/repository/conf/tomcat
file./catalina-server.xml
This also covers how you can protect your system from common security attacks. For example,'Poodle' is a bug in the SSL version 3 protocol, which exposes critical data encrypted betweenclients and servers. 'Logjam' is a security threat (man-in-the-middle attack), which is caused byweak ciphers. These security vulnerabilities can be avoided by configuring transport-levelsecurity.
For more information on securing the HTTP transport, see the topic on configuring transport in the WSO2 Carbon documentation.level security
Configuringkeystores
A keystore is a repository that stores the cryptographic keys and certificates. These artifacts areused for encrypting sensitive information, and establishing trust between your server and outsideparties that connect to your server.
All WSO2 products come with a default keystore ( ). In a productionwso2carbon.jksenvironment, it is recommended to replace it with a new keystore. You can also configuremultiple keystores for different purposes.
See the following in the WSO2 Carbon documentation:
Learn .how public key encryption and keystores are usedLearn and replace the default one.how to create new keystoresLearn to use the relevant keystore for differenthow configuration files should be updatedpurposes.
For more details on config parameters, go to http://tomcat.apache.org/tomcat-7.0-doc/config/http.html

WSO2 Application Server, version 5.3.0
Copyright © WSO2 Inc. 2014 250
1.
2.
Securingsensitivepasswords
As a secure vault implementation is available in all WSO2 products, you can encrypt thesensitive data such as passwords in configuration files using the Cipher tool.
See the following in the WSO2 Carbon documentation:
How the secure vault is implemented in WSO2 products.How to encrypt passwords using the Cipher tool.How to resolve encrypted passwords.
EnablingJAVA securitymanager
See the topic on in the WSO2 Carbon documentation forenabling JAVA security managerdetails on how to prevent untrusted code from manipulating your system.
Working with Multiple Tenants
The goal of multitenancy is to maximize resource sharing by allowing multiple users (tenants) to log in and use asingle server/cluster at the same time, in a tenant-isolated manner. That is, each user is given the experience ofusing his/her own server, rather than a shared environment. Multitenancy ensures optimal performance of thesystem's resources such as memory and hardware and also secures each tenant's personal data.
You can register tenant domains using the Management Console of WSO2 products.
This section covers the following topics:
Managing TenantsMultitenant ArchitectureTenant-aware Load Balancing Using the WSO2 Elastic Load Balancer
Managing Tenants
You can add a new tenant in the management console and then view it by following the procedure below. In order toadd a new tenant, you should be logged in as a super user.
Click in the tab of your product's management console.Add New Tenant Configure
Enter the tenant information in screen as follows, and click .Register A New Organization Save
ParameterName
Description
Domain The domain name for the organization, which should be unique (e.g., abc.com). This is usedas a unique identifier for your domain. You can use it to log into the admin console to beredirected to your specific tenant. The domain is also used in URLs to distinguish one tenantfrom another.

WSO2 Application Server, version 5.3.0
Copyright © WSO2 Inc. 2014 251
2.
3.
SelectUsagePlan forTenant
The usage plan defines limitations (such as number of users, bandwidth etc.) for the tenant.
FirstName/Last Name
The name of the tenant admin.
AdminUsername
The login username of the tenant admin. The username always ends with the domain name(e.g., ) [email protected]
AdminPassword
The password used to log in using the admin username specified.
AdminPassword(Repeat)
Repeat the password to confirm.
Email The email address of the admin.
After saving, the newly added tenant appears in the page as shown below. ClickTenants List View Tenants in the tab of the management console to see information of all the tenants that currently exist inConfigurethe system. If you want to view only tenants of a specific domain, enter the domain name in the Enter the
parameter and click .Tenant Domain Find
Multitenant Architecture
The multi tenant architecture of WSO2 products allows you to deploy Web applications, Web services, ESBmediators, mashups etc. in an environment that supports the following:
Tenant isolation: Each tenant has its own domain, which the other tenants cannot access.Data isolation: Each tenant can manage its data securely in an isolated manner. Execution isolation: Each tenant can carry out business processes and workflows independent of the othertenants. No action of a tenant is triggered or inhibited by another tenant.Performance Isolation: No tenant has an impact on the performance of another tenant.
Architecture
A tenant is an isolated domain. The users within this domain can manage their own data and perform their own
transactions without being affected by actions carried out in other domains.
These domains are allocated server space from the complete server space of a WSO2 product instance which isreferred to as the ..super tenant
The super tenant as well as each individual tenant has its own configuration and context module.
Each tenant has its own security domain. A domain has a set of users, and permissions for those users to accessresources. Thus, a tenant is restricted by the users and permissions of the domain assigned to it. The artifact

WSO2 Application Server, version 5.3.0
Copyright © WSO2 Inc. 2014 252
repositories of the tenants are separated from each other.
An individual tenant can carry out the following activities within the boundaries of its own configuration and contextmodule:
Deploying artifactsApplying securityUser managementData managementRequest throttlingResponse caching
WSO2 Carbon provides a number of Admin services which have special privileges to manage the server. Theseadmin services are deployed in the super tenant. Other tenants can make use of these admin services to managetheir deployment. The admin services operate in a tenant aware fashion. Thus, privileges and restrictions that applyto any client using an admin service are taken into account.
Resource sharing
WSO2 Carbon supports the following methods for sharing resources among tenants:
Private Jet mode: This method allows the load of a tenant ID to be deployed in a single tenant mode. Asingle tenant is allocated an entire service cluster. The purpose of this approach is to allow special privileges(such as priority processing and improved performance) to a tenant.Separation at hardware level: This method allows different tenants to share a common set of resources, buteach tenant has to run its own operating system. This approach helps to achieve a high level of isolation, butit also incurs a high overhead cost.Separation at JVM level: This method allows tenants to share the same operating system. This is done byenabling each tenant to run a separate JVM instance in the operating system.Native : This method involves allowing all the tenants to share a single JVM instance. Thismultitenancymethod minimises the overhead cost.
Lazy loading
Lazy loading is a design pattern used specifically in cloud deployments to prolong the initialization of an object orartifact until it is requested by a tenant or an internal process.
Tenants

WSO2 Application Server, version 5.3.0
Copyright © WSO2 Inc. 2014 253
Lazy loading of tenants is a feature that is built into all WSO2 products. This feature ensures that all the tenants arenot loaded at the time the server starts in an environment with multiple tenants. Instead, they are loaded only whena request is made to a particular tenant. If a tenant is not utilized for a certain period of time (30 minutes by default),it will be unloaded from the memory.
You can change the default time period allowed for tenant inactiveness by adding -Dtenant.idle.time=<time_ . in_minutes> java property to the startup scrip of the product ( /wso2server.sh file for Linux and wso2server.
bat for Windows) as shown below.
JAVA_OPTS \ -Dtenant.idle.time=30 \
Artifacts
Lazy loading of artifacts is a feature that is used by some WSO2 products, which can be enabled in the <PRODUCT file._HOME>/repository/conf/carbon.xml The deployer that handles lazy loading of artifacts is called the GhostDep
. A flag to enable or disable the is shown below. This is set to by default becauseloyer Ghost Deployer falsethe works only with the HTTP/S transports. Therefore, if other transports are used, the Ghost Deployer Ghost
does not have to be enabled.Deployer
<GhostDeployment> <Enabled>false</Enabled> <PartialUpdate>false</PartialUpdate></GhostDeployment>
When a stand-alone WSO2 product instance is started with lazy loading enabled, its services, applications and otherartifacts are not deployed immediately. They are first loaded in the Ghost form and the actual artifact is deployedonly when a request for the artifact is made. In addition, if an artifact has not been utilized for a certain period oftime, it will be unloaded from the memory.
When lazy loading of artifacts is enabled for PaaS deployments, lazy loading applies both for tenants as well as atenant artifacts. As a result, lazy loading is applicable on both levels for a tenant in a cloud environment. Therefore,the associated performance improvements and resource utilization efficiencies are optimal.
Restrictions
The following restrictions are imposed to ensure that each individual tenant has the required level of isolation andmaintains fine grained security control over its own services without affecting the other tenants.
Only the super tenant can modify its own configuration. In addition, it can add, view and delete tenants.When a tenant logs into the system, it can only access artifacts deployed under its own configuration. Onetenant cannot manipulate the code of another tenant.The super admin or tenant admin can add user stores to their own domain. Dynamic configurations arepossible only for secondary user stores and the primary user store is not configurable at run time. This isbecause primary user stores are available for all tenants and allowing changes to the configuration at runtime can lead to instability of the system. Therefore, the primary user store is treated as a static property inthe implementation and it should be configured prior to run time.A tenants code cannot invoke sensitive server side functionality. This is achieved via Java security.Tenants share the transports provided by the system. They are not allowed to create their own transports.
Request dispatching
This section describes how the multi tenancy architecture described above works in a request dispatching scenario.

WSO2 Application Server, version 5.3.0
Copyright © WSO2 Inc. 2014 254
When a Carbon server receives a request, the message is first received by the handlers and dispatchers defined forthe server configuration (i.e. super tenant). The server configuration may include handlers that implement crosstenant policies and Service Level Agreement (SLA) management. For example, a priority based dispatcher can beapplied at this stage to offer differentiated qualities of service to different clients. Once the relevant handlers anddispatchers are applied, the request is sent to the tenant to which it is addressed. Then the message dispatchersand handlers specific to that tenant will be applied.
The following example further illustrates how message dispatching is carried out in a multi tenant server.
For example, two tenants named foo.com and bar.com may deploy a service named MyService. When this serviceis hosted on the two tenants, they would have the following URLs.
http://example.com/t/foo.com/services/MyServicehttp://example.com/t/bar.com/services/MyService
The name of the tenant in the URL allows the tenant to be identified when the Carbon server receives a messagewhich is addressed to a specific client. Alternatively, you may configure a CNAME record in DNS (Domain NameSystem) as an alias for this information.
If a request is addressed to the service hosted by , the message handlers and dispatchers ofMyService foo.comthe super tenant will be applied and the tenant will be identified by the tenant name in the URL. Then thefoo.comrequest will be sent to where it will be processed.foo.com
Scaling
The multi tenancy architecture described above mainly refers to a scenario where a single instance of a Carbonserver acts as a single multi tenant node. In a situation where a very high load of requests are handled, you mayneed multiple multi tenant nodes. In order to operate with multiple multi tenant nodes, you need load balancing. Theload balancer you use also needs to be tenant-aware.
Tenant-aware Load Balancing Using the WSO2 Elastic Load Balancer
Tenant partitioning is required in a clustered deployment to be able to scale to large numbers of tenants. There canbe multiple clusters for a single service and each cluster would have a subset of tenants as illustrated in the diagrambelow. In such situations, the load balancers need to be tenant aware in order to route the requests to the requiredtenant clusters. They also need to be service aware since it is the service clusters which are partitioned according tothe clients.
The following example further illustrates how this is achieved in WSO2 Elastic Load Balancer (ELB).
WSO2 Elastic Load Balancer is currently retired.

WSO2 Application Server, version 5.3.0
Copyright © WSO2 Inc. 2014 255
A request sent to a load balancer has the following host header to identify the cluster domain:
https://appserver.cloud-test. wso2.com/carbon.as1.domain/carbon/admin/login.jsp
In this URL:
appserver.cloud-test.wso2.com is the service domain which allows the load balancer to identify theservice.carbon.as1.domain.com is the tenant domain which allows the load balancer to identify the tenant.
Services are configured with their cluster domains and tenant ranges in the in ELB_HOME/repository/conf/loafile. These cluster domains and tenant ranges are picked by the load balancer when it loads. dbalancer.conf
The following is a sample configuration of the loadbalancer.conf file.

WSO2 Application Server, version 5.3.0
Copyright © WSO2 Inc. 2014 256
appserver {# multiple hosts should be separated by a comma.hosts appserver.cloud-test.wso2.com; domains {carbon.as1.domain {tenant_range 1-100;}carbon.as2.domain {tenant_range 101-200;}}}
In the above configuration, there is a host address which maps to the application server service. If required, you canenter multiple host addresses separated by commas.
There are two cluster domains defined in the configuration. The cluster domain named iscarbon.as1.domainused to load the range of tenants with IDs 1-100. The other cluster domain named is used tocarbon.as2.domainload the tenants with IDs 101-200.
If the tenant ID of is 22, the request will be directed to the cluster.abc.com Carbon.AS1.domain
Working with Logs
Logging is one of the most important aspects of a production-grade server. A properly configured logging system isvital for identifying errors, security threats and usage patterns. All WSO2 products are shipped with the log4j loggingcapabilities, which generates administrative activities and server side logs. The log4j.properties file, whichgoverns how logging is performed by the server can be found in the <PRODUCT_HOME>/repository/conf directory.
Note that in addition to the logs from libraries that use Log4j, all logs from libraries (such as, Tomcat, Hazelcast andmore) that use Java logging framework are also visible in the same log files. That is, when Java logging is enabledin Carbon, only the Log4j appenders will write to the log files. If the Java Logging Handlers have logs, these logs willbe delegated to the log events of the corresponding Log4j appenders. A Pub/Sub registry pattern implementationhas been used in the latter mentioned scenario to plug the handlers and appenders. The following default log4jappenders in the file are used for this implementation:log4j.properties
org.wso2.carbon.logging.appenders.CarbonConsoleAppenderorg.wso2.carbon.logging.appenders.CarbonDailyRollingFileAppender
For more information on appenders, loggers, their log levels and logging, see .http://logging.apache.org/log4j
Logging functionality is provided by the following feature in the WSO2 feature repository:
Name : WSO2 Ca rbon - Logg ing Managemen t Fea tu re Identifier : org.wso2.carbon.logging.mgt.feature.group
If the above feature is not bundled in your product by default, you can install it using the instructions given in the Working with Features section.
Configuring products for logging

WSO2 Application Server, version 5.3.0
Copyright © WSO2 Inc. 2014 257
Given below are ways to configure log4j files:
Manually editing the filelog4j.properties .Configure logging through the management console. These changes will apply at run time.
The latter is recommended because all changes made to log4j through the management console persist in theWSO2 Registry. Therefore, those changes will be available after the server restarts. Changes that you make to thelogging configuration via the management console will get priority over what is defined in the actual log4j.proper
file. ties However, if you modify the file and restart the server, the earlier log4j configurationlog4j.propertiesthat persisted in the registry will be overwritten. There is also an option in the management console to restore theoriginal log4j configuration from the log4j.properties file.
Managing log growth
Log growth can be managed by the following configurations in the <PRODUCT_HOME>/repository/conf/log4j file..properties
Configurable log rotation: By default, log rotation is on a daily basis.Log rotation based on time as opposed to size: This helps to inspect the events that occurred during aspecific time.Log files are archived to maximise the use of space.
The based logging mechanism uses appenders to append all the log messages into a file. That is, at thelog4j-end of the log rotation period, a new file will be created with the appended logs and archived. The name of thearchived log file will always contain the date on which the file is archived.
Viewing logs
In each product, users can configure and adjust the logging levels for each type of activity/ transactions. There areseveral ways to view system and application logs of a running Carbon instance.
Through the Management Console. See for details.Monitoring LogsThrough the log files that are stored in the folder. This folder<PRODUCT_HOME>/repository/logscontains current logs in a log file with a date stamp. Older logs are archived in the file.wso2carbon.logThrough the command prompt/shell terminal that opens when you run the " "/"wso2server.bat wso2serve
" files to start the Carbon server.r.sh
See the following topics for information about logging:
Configure Logging using the Management ConsoleHTTP Access LoggingConfigure Logging using Config Files
Configure Logging using the Management Console
In most systems, logging properties should be specified before the server starts and cannot be changed while it isrunning. However, logging properties of a running Carbon instance can be changed through its managementconsole, while the server is up and running.
There are three important components when configuring log4j. They are Loggers, Appenders, and Layouts. TheLogging Management feature of WSO2, allows you to change these parameters globally as well as individually at

WSO2 Application Server, version 5.3.0
Copyright © WSO2 Inc. 2014 258
1. 2.
3.
4.
run time. When you change the parameters using the Management Console, first the server stores new values inthe database and then changes the appropriate components in the logging framework, enabling the loggingproperties to be updated immediately.
To configure logging properties of the system and application logs of a Carbon server at run time:
Log on to the management console of your product and go to -> in the navigator.Configure LoggingThe window appears.Logging Configuration
If you select the check box, all the modifications will persist and theyPersist All Configurations Changeswill be available even after the server restarts.The Logging Configuration window consists of three sections, which you can use to configure the layoutand the amount of information about the system activity that you want to receive. The following topics
describes each of these settings:
Global Log4J ConfigurationConfigure Log4J Appenders Configure Log4J Loggers
Global Log4J Configuration

WSO2 Application Server, version 5.3.0
Copyright © WSO2 Inc. 2014 259
This section allows you to assign a single log level and log pattern to all loggers.
Log Level - Severity of the message. Reflects a minimum level that the logger requires. You can view the .hierarchy of levels
Log Pattern - Defines the output format of the log file. This is the layout pattern which describes the logmessage format
If you click , the Registry will be overwritten by logging configurations specified in the Restore Defaults log4j.pro. fileperties
Configure Log4J Appenders
This section allows you to configure appenders individually. Log4j allows logging requests to print to multipledestinations. These output destinations are called 'Appenders'. You can attach several appenders to one logger.
Name -The name of an appender. By default, a WSO2 product server is entered in this field with thefollowing log appenders configured;
CARBON_CONSOLE - Logs to the console when the server is running. CARBON_LOGFILE - Writes the logs to <PRODUCT_HOME>/repository/logs/wso2carbon.log
. CARBON MEMORY_
CARBON_SYS_LOG - Allow to separate the software that generates messages, from the system thatstores them and the software that reports and analyzes them.CARBON_TRACE_LOGFILE
Log pattern - Defines the output format of the log file. Sys Log Host - The IP address of the system log server. The syslog server is a dedicated log server for
many applications. It runs in a particular TCP port in a separate machine, which can be identified by an IPaddress.
- The log message type sent to the system log server.Facility Threshold - Filters log entries based on their level. For example, threshold set to 'WARN' will allow the log
entry to pass into appender. If its level is 'WARN', 'ERROR' or 'FATAL', other entries will be discarded. This isthe minimum log level at which you can log a message.
The available categories of logs you can view:
TRACE - Designates fine-grained informational events than DEBUG. DEBUG - Designates fine-grained informational events that are most useful to debug an application.

WSO2 Application Server, version 5.3.0
Copyright © WSO2 Inc. 2014 260
INFO - Designates informational messages that highlight the progress of the application at coarse-grainedlevel.
WARN - Designates potentially harmful situations. ERROR - Designates error events that might still allow the application to continue running.
FATAL - Designates very severe error events that will presumably lead the application to abort.
Configure Log4J Loggers
A Logger is an object used to log messages for a specific system or application component. Loggers are normallynamed using a hierarchical dot-separated namespace and have a 'child-parent' relationship. For example, the loggernamed 'root.sv' is a parent of the logger named 'root.sv.sf' and a child of 'root'.
When the server starts for the first time, all the loggers initially listed in the file appear on thelog4j.propertieslogger name list. This section allows you to browse through all these loggers, define a log level and switch on/offadditivity to any of them. After editing, the logging properties are read only from the database.
Logger - The name of a logger. Parent Logger - The name of a parent logger.
Level - Allows to select level (threshold) from the drop-down menu. After you specify the level for a certainlogger, a log request for that logger will only be enabled if its level is equal or higher to the logger’s level. If agiven logger is not assigned a level, then it inherits one from its closest ancestor with an assigned level. Refer
hierarchy of levels to above. Additivity - Allows to inherit all the appenders of the parent Logger if set as 'True'.
HTTP Access Logging
HTTP Requests/Responses are logged in the access log(s) and are helpful to monitor your application's usageactivities, such as the persons who access it, how many hits it receives, what the errors are etc. This information isuseful for troubleshooting. As the runtime of WSO2 products are based on Apache Tomcat, you can use the Acces
variable in Tomcat 7 as explained below to configure HTTP access logs in WSO2 products. Ins_Log_Valveaddition, you can customize the access logs based on the supported . Access Log Valve attributes
Configuring HTTP access logging
To configure HTTP access logs:
In this section, loggers can be filtered by the first characters (use the button) of by aStarts Withcombination of characters (use the button).Contains
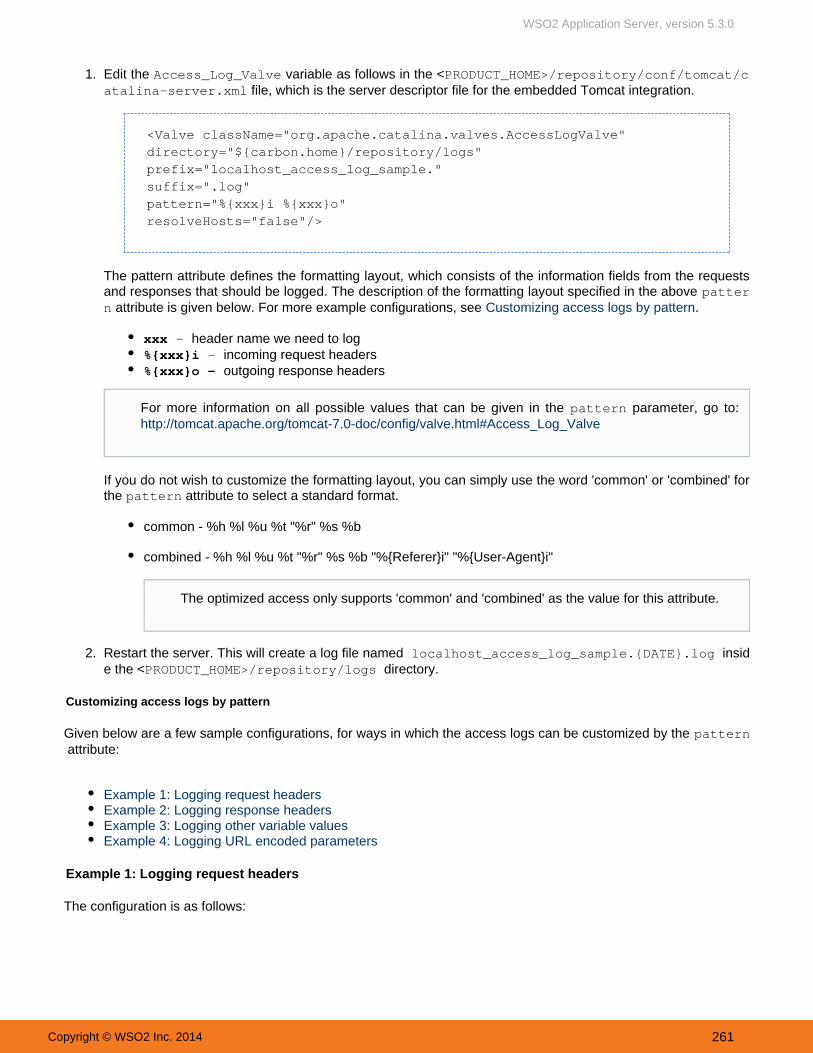
WSO2 Application Server, version 5.3.0
Copyright © WSO2 Inc. 2014 261
1.
2.
Edit the variable as follows in the <Access_Log_Valve PRODUCT_HOME>/repository/conf/tomcat/c file, which is the server descriptor file for the embedded Tomcat integration.atalina-server.xml
<Valve className="org.apache.catalina.valves.AccessLogValve"directory="${carbon.home}/repository/logs"prefix="localhost_access_log_sample."suffix=".log"pattern="%{xxx}i %{xxx}o"resolveHosts="false"/>
The pattern attribute defines the formatting layout, which consists of the information fields from the requestsand responses that should be logged. The description of the formatting layout specified in the above patter
attribute is given below. For more example configurations, see .n Customizing access logs by pattern
- xxx header name we need to log- %{xxx}i incoming request headers
%{xxx}o - outgoing response headers
If you do not wish to customize the formatting layout, you can simply use the word 'common' or 'combined' forthe attribute to select a standard format. pattern
common - %h %l %u %t "%r" %s %b
combined - %h %l %u %t "%r" %s %b "%{Referer}i" "%{User-Agent}i"
Restart the server. This will create a log file named insidlocalhost_access_log_sample.{DATE}.loge the < directory.PRODUCT_HOME>/repository/logs
Customizing access logs by pattern
Given below are a few sample configurations, for ways in which the access logs can be customized by the pattern attribute:
Example 1: Logging request headersExample 2: Logging response headersExample 3: Logging other variable valuesExample 4: Logging URL encoded parameters
Example 1: Logging request headers
The configuration is as follows:
For more information on all possible values that can be given in the parameter, go to:patternhttp://tomcat.apache.org/tomcat-7.0-doc/config/valve.html#Access_Log_Valve
The optimized access only supports 'common' and 'combined' as the value for this attribute.
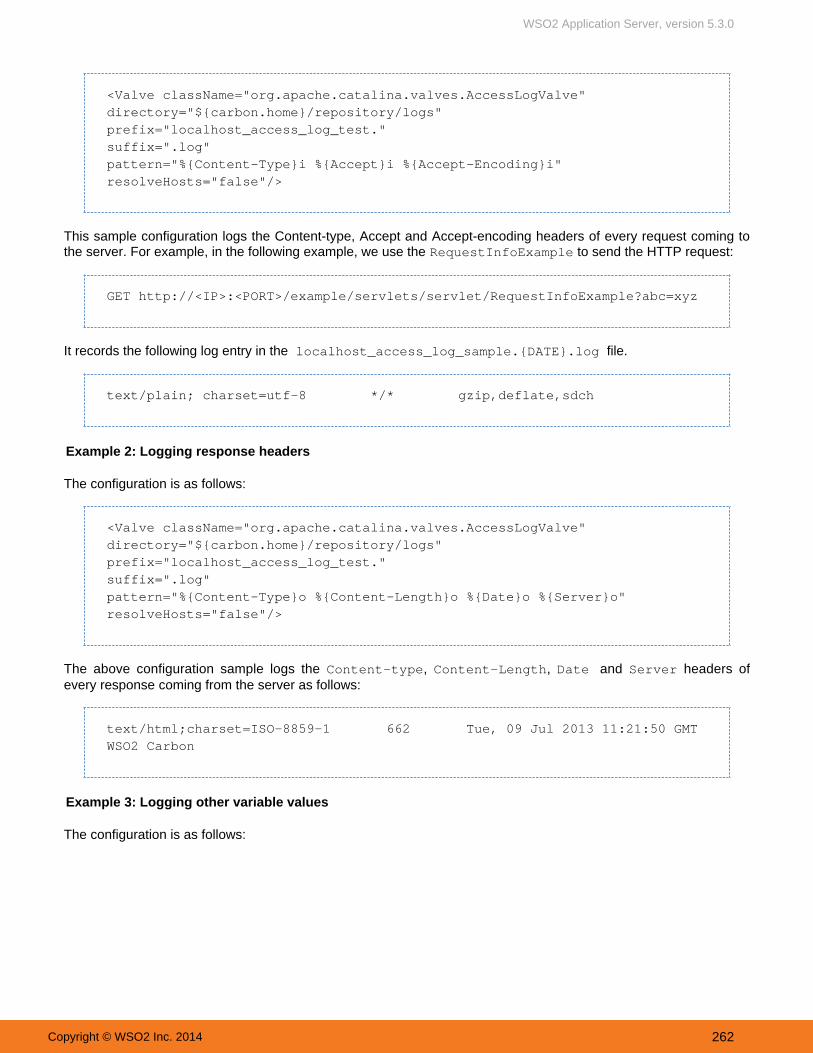
WSO2 Application Server, version 5.3.0
Copyright © WSO2 Inc. 2014 262
<Valve className="org.apache.catalina.valves.AccessLogValve"directory="${carbon.home}/repository/logs"prefix="localhost_access_log_test."suffix=".log"pattern="%{Content-Type}i %{Accept}i %{Accept-Encoding}i"resolveHosts="false"/>
This sample configuration logs the Content-type, Accept and Accept-encoding headers of every request coming tothe server. For example, in the following example, we use the to send the HTTP request:RequestInfoExample
GET http://<IP>:<PORT>/example/servlets/servlet/RequestInfoExample?abc=xyz
It records the following log entry in the localhost_access_log_sample.{DATE}.log file.
text/plain; charset=utf-8 */* gzip,deflate,sdch
Example 2: Logging response headers
The configuration is as follows:
<Valve className="org.apache.catalina.valves.AccessLogValve"directory="${carbon.home}/repository/logs"prefix="localhost_access_log_test."suffix=".log"pattern="%{Content-Type}o %{Content-Length}o %{Date}o %{Server}o"resolveHosts="false"/>
The above configuration sample logs the , , Content-type Content-Length Date and Server headers of every response coming from the server as follows:
text/html;charset=ISO-8859-1 662 Tue, 09 Jul 2013 11:21:50 GMT WSO2 Carbon
Example 3: Logging other variable values
The configuration is as follows:

WSO2 Application Server, version 5.3.0
Copyright © WSO2 Inc. 2014 263
<Valve className="org.apache.catalina.valves.AccessLogValve"directory="${carbon.home}/repository/logs"prefix="localhost_access_log_test."suffix=".log"pattern="%r %q %h"resolveHosts="false"/>
The above sample configuration logs the f irst line of the request (method and request URI), query string (prepended with a '?' if it exists) and remote hostname (or IP) of every request coming to the server as follows.
“GET /example/servlets/servlet/RequestInfoExample?abc=xyz HTTP/1.1” ?abc=xyz 10.100.0.67
Example 4: Logging URL encoded parameters
You cannot use the to log URL encoded parameters. However, you can use the AccessLogValve ExtendedAcce attribute for this purpose. In this example only two values (namely, and ) aressLogValve className pattern
modified from the previous configuration.
The configuration is as follows:
<Valve className="org.apache.catalina.valves.ExtendedAccessLogValve" directory="${carbon.home}/repository/logs"prefix="localhost_access_log_extended."suffix=".log"pattern="x-P(param1) x-P(param2)"resolveHosts="false"/>
Send the POST request together with the URL encoded values such as = param1 value1 and = asparam2 value2follows:
POST http://<IP>:<PORT>/example/servlets/servlet/RequestInfoExample
The above sample configuration logs the following:
'value1' 'value2'
Configure Logging using Config Files
All WSO2 products are shipped with the log4j logging capabilities, which generates administrative activities andserver side logs. There are two ways of configuring how logging works in your server: by using the management
or by manually updating the configuration files.console
Given below are some instructions on how to configure logging using configuration files in WSO2 AS.

WSO2 Application Server, version 5.3.0
Copyright © WSO2 Inc. 2014 264
Updating the log4j.properties fileUpdating the log levels for JavaEE
Updating the log4j.properties file
The log4j.properties file, which governs how logging is performed by the server can be found in the <PRODUCT_HOME>/repository/conf directory. All the logging configurations that you enable using the managementconsole can be manually configured in this configuration file.
Updating the log levels for JavaEE
From AS 5.3.0 onwards, you can in your server. Thereby, if you want to change the logenable JavaEE as a runtimelevels of web apps deployed in the JavaEE runtime, you need to configure the relevant log levels in the <AS_HOME>
file. The default levels given in this file are as follows:/repository/conf/etc/logging-bridge.properties
OpenEJB.level = WARNINGOpenEJB.options.level = WARNINGOpenEJB.server.level = WARNINGOpenEJB.startup.level = WARNINGOpenEJB.startup.service.level = WARNINGOpenEJB.startup.config.level = WARNINGOpenEJB.hsql.level = INFOOpenEJB.rs.level = INFOOpenEJB.ws.level = INFOOpenEJB.tomcat.level = INFOCORBA-Adapter.level = WARNINGTransaction.level = WARNINGorg.apache.activemq.level = SEVEREorg.apache.geronimo.level = SEVEREopenjpa.level = WARNINGOpenEJB.cdi.level = WARNINGorg.apache.webbeans.level = WARNINGorg.apache.openejb.level = WARNING
Tuning Performance
This section describes some recommended performance tuning configurations to optimize WSO2 AS. It assumesthat you have set up WSO2 AS on a server running Unix/Linux, which is recommended for a production deployment.
OS-Level SettingsJVM SettingsJDBC Pool Configuration
ImportantPerformance tuning requires you to modify important system files, which affect all programs runningon the server. We recommend you to familiarize yourself with these files using Unix/Linuxdocumentation before editing them.The parameter values we discuss below are just examples. They might not be the optimal values forthe specific hardware configurations in your environment. We recommend that you carry out loadtests on your environment to tune the AS accordingly.

WSO2 Application Server, version 5.3.0
Copyright © WSO2 Inc. 2014 265
1.
2.
3.
OS-Level Settings
To optimize network and OS performance, configure the following settings in file of/etc/sysctl.confLinux. These settings specify a larger port range, a more effective TCP connection timeout value, and anumber of other important parameters at the OS-level.
net.ipv4.tcp_fin_timeout = 30fs.file-max = 2097152net.ipv4.tcp_tw_recycle = 1net.ipv4.tcp_tw_reuse = 1net.core.rmem_default = 524288net.core.wmem_default = 524288net.core.rmem_max = 67108864net.core.wmem_max = 67108864net.ipv4.tcp_rmem = 4096 87380 16777216net.ipv4.tcp_wmem = 4096 65536 16777216net.ipv4.ip_local_port_range = 1024 65535
To alter the number of allowed open files for system users, configure the following settings in/etc/security/limits.conf file of Linux.
* soft nofile 4096* hard nofile 65535
Optimal values for these parameters depend on the environment.
To alter the maximum number of processes your user is allowed to run at a given time, configure thefollowing settings in file of Linux (be sure to include the leading */etc/security/limits.confcharacter). Each carbon server instance you run would require upto 1024 threads (with default thread poolconfiguration). Therefore, you need to increase the nproc value by 1024 per each carbon server (both hardand soft).
* soft nproc 20000* hard nproc 20000
JVM Settings
If one or more worker nodes in a clustered deployment require access to the management console, you need toincrease the entity expansion limit in the file (for windows) or the <AS_HOME>/bin/wso2server.bat <AS_HOME>
file (for Linux/Solaris) as show below. The default entity expansion limit is 64000./bin/wso2server.sh
When we have the localhost port range configuration lower bound to 1024, there is a possibility thatsome processes may pick the ports which are already used by WSO2 servers. Therefore, it's good toincrease the lower bound as sufficient for production, e.g., 10,000.
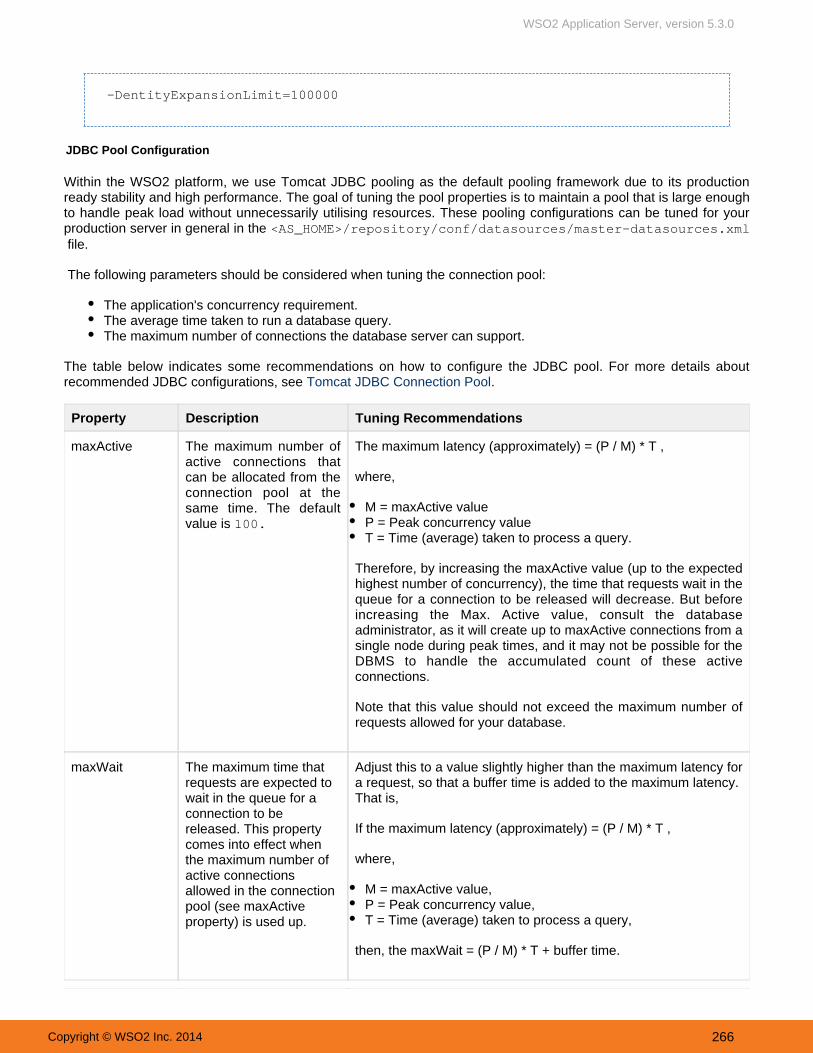
WSO2 Application Server, version 5.3.0
Copyright © WSO2 Inc. 2014 266
-DentityExpansionLimit=100000
JDBC Pool Configuration
Within the WSO2 platform, we use Tomcat JDBC pooling as the default pooling framework due to its productionready stability and high performance. The goal of tuning the pool properties is to maintain a pool that is large enoughto handle peak load without unnecessarily utilising resources. These pooling configurations can be tuned for yourproduction server in general in the <AS_HOME>/repository/conf/datasources/master-datasources.xml file.
The following parameters should be considered when tuning the connection pool:
The application's concurrency requirement.The average time taken to run a database query.The maximum number of connections the database server can support.
The table below indicates some recommendations on how to configure the JDBC pool. For more details aboutrecommended JDBC configurations, see . Tomcat JDBC Connection Pool
Property Description Tuning Recommendations
maxActive The maximum number ofactive connections thatcan be allocated from theconnection pool at thesame time. The defaultvalue is 100.
The maximum latency (approximately) = (P / M) * T ,
where,
M = maxActive valueP = Peak concurrency valueT = Time (average) taken to process a query.
Therefore, by increasing the maxActive value (up to the expectedhighest number of concurrency), the time that requests wait in thequeue for a connection to be released will decrease. But beforeincreasing the Max. Active value, consult the databaseadministrator, as it will create up to maxActive connections from asingle node during peak times, and it may not be possible for theDBMS to handle the accumulated count of these activeconnections.
Note that this value should not exceed the maximum number ofrequests allowed for your database.
maxWait The maximum time thatrequests are expected towait in the queue for aconnection to bereleased. This propertycomes into effect whenthe maximum number ofactive connectionsallowed in the connectionpool (see maxActiveproperty) is used up.
Adjust this to a value slightly higher than the maximum latency fora request, so that a buffer time is added to the maximum latency. That is,
If the maximum latency (approximately) = (P / M) * T ,
,where
M = maxActive value,P = Peak concurrency value,T = Time (average) taken to process a query,
, the then maxWait = (P / M) * T + buffer time.

WSO2 Application Server, version 5.3.0
Copyright © WSO2 Inc. 2014 267
minIdle The minimum number ofconnections that canremain idle in the pool,without extra ones beingcreated. The connectionpool can shrink below thisnumber if validationqueries fail. Default valueis 0.
This value should be similar or near to the average number ofrequests that will be received by the server at the same time.With this setting, you can avoid having to open and close newconnections every time a request is received by the server.
maxIdle The maximum number ofconnections that canremain idle in the pool.
The value should be less than the maxActive value. For highperformance, tune maxIdle to match the number of average,concurrent requests to the pool. If this value is set to a largevalue, the pool will contain unnecessary idle connections.
testOnBorrow The indication of whetherconnection objects will bevalidated before they areborrowed from the pool. Ifthe object validation fails,the connection is droppedfrom the pool, and therewill be an attempt toborrow anotherconnection.
When the connection to the database is broken, the connectionpool does not know that the connection has been lost. As aresult, the connection pool will continue to distribute connectionsto the application until the application actually tries to use theconnection. To resolve this problem, set "Test On Borrow" to"true" and make sure that the "ValidationQuery" property is set. To increase the efficiency of connection validation and to improve
performance, validationInterval property should also beused.
validationInterval This parameter controlshow frequently a givenvalidation query isexecuted (time inmilliseconds). The defaultvalue is (3030000seconds). That is, if aconnection is due forvalidation, but has beenvalidated previously withinthis interval, it will not bevalidated again.
Deciding the value for the "validationInterval" depends on thetarget application's behavior. Therefore, selecting a value for thisproperty is a trade-off and ultimately depends on what isacceptable for the application.
If a larger value is set, the frequency of executing the ValidationQuery is low, which results in better performance. Note that thisvalue can be as high as the time it takes for your DBMS todeclare a connection as stale. For example, MySQL will keep aconnection open for as long as 8 hours, which requires thevalidation interval to be within that range. However, note that thevalidation query execution is usually fast. Therefore, even if thisvalue is only large by a few seconds, there will not be a bigpenalty on performance. Also, specially when the databaserequests have a high throughput, the negative impact onperformance is negligible. For example, a single extra validationquery run every 30 seconds is usually negligible.
If a smaller value is set, a stale connection will be identifiedquickly when it is presented. This maybe important if you needconnections repaired instantly, e.g. during a database serverrestart.
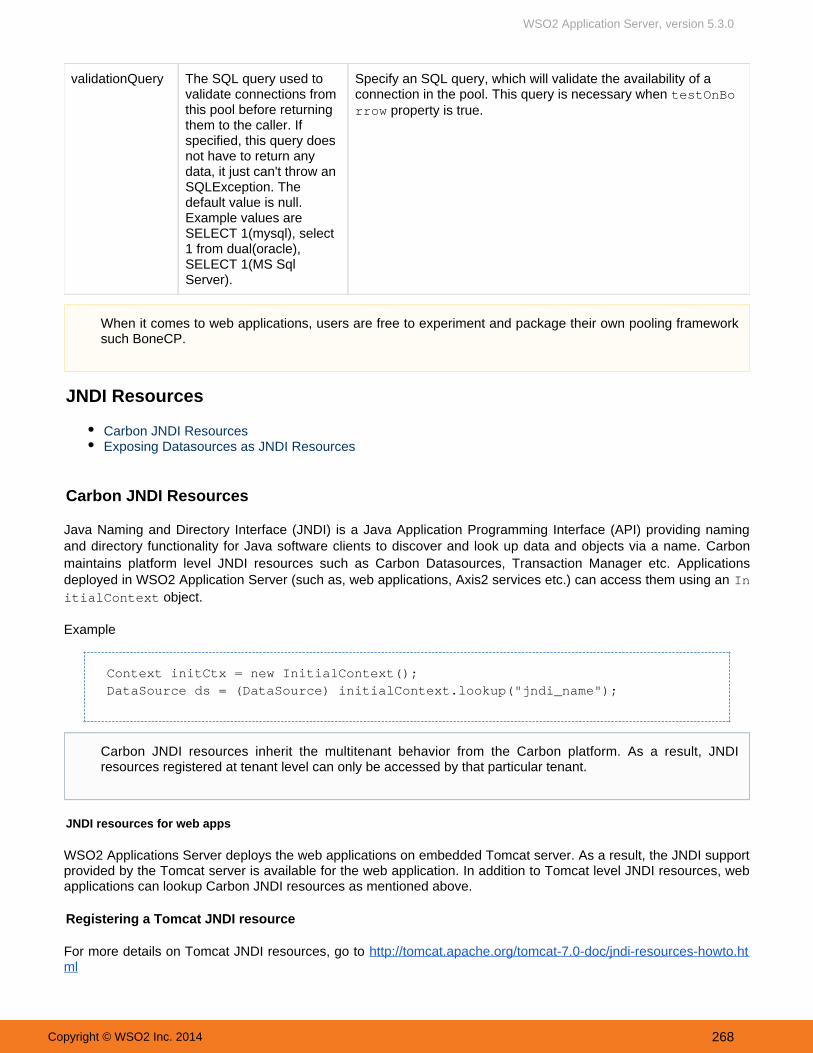
WSO2 Application Server, version 5.3.0
Copyright © WSO2 Inc. 2014 268
validationQuery The SQL query used tovalidate connections fromthis pool before returningthem to the caller. Ifspecified, this query doesnot have to return anydata, it just can't throw anSQLException. Thedefault value is null.Example values areSELECT 1(mysql), select1 from dual(oracle),SELECT 1(MS SqlServer).
Specify an SQL query, which will validate the availability of aconnection in the pool. This query is necessary when testOnBo
property is true.rrow
JNDI Resources
Carbon JNDI ResourcesExposing Datasources as JNDI Resources
Carbon JNDI Resources
Java Naming and Directory Interface (JNDI) is a Java Application Programming Interface (API) providing namingand directory functionality for Java software clients to discover and look up data and objects via a name. Carbonmaintains platform level JNDI resources such as Carbon Datasources, Transaction Manager etc. Applicationsdeployed in WSO2 Application Server (such as, web applications, Axis2 services etc.) can access them using an InitialContext object.
Example
Context initCtx = new InitialContext();DataSource ds = (DataSource) initialContext.lookup("jndi_name");
JNDI resources for web apps
WSO2 Applications Server deploys the web applications on embedded Tomcat server. As a result, the JNDI supportprovided by the Tomcat server is available for the web application. In addition to Tomcat level JNDI resources, webapplications can lookup Carbon JNDI resources as mentioned above.
Registering a Tomcat JNDI resource
For more details on Tomcat JNDI resources, go to http://tomcat.apache.org/tomcat-7.0-doc/jndi-resources-howto.html
When it comes to web applications, users are free to experiment and package their own pooling frameworksuch BoneCP.
Carbon JNDI resources inherit the multitenant behavior from the Carbon platform. As a result, JNDIresources registered at tenant level can only be accessed by that particular tenant.

WSO2 Application Server, version 5.3.0
Copyright © WSO2 Inc. 2014 269
Webapp level registering
To register a JNDI resource on webapp level, place the JNDI resource in the file of the webapp.context.xml
Since each webapp’s context is isolated from each other, this ensures that the resources will be available to thewebapp context only.
Example
<Resource name="jdbc/TestDataSource" auth="Container" type="javax.sql.DataSource"driverClassName="com.mysql.jdbc.Driver" maxActive="100" maxIdle="30" maxWait="10000" url="jdbc:mysql://localhost:3306/test_db" username="root" password="root"/>
The above example defines a database resource and its properties. You can define any number of resources.Properties of a resource should go inside its < > element.Resource
Global registering
Place resources under the < > element in Tomcat's server configuration file (GlobalNamingResources <PRODUCT in WSO2 products)._HOME>repository/conf/tomcat/catalina-server.xml
<GlobalNamingResources> <Resource name="jdbc/TestDataSource" auth="Container" type="javax.sql.DataSource"driverClassName="com.mysql.jdbc.Driver" maxActive="100" maxIdle="30" maxWait="10000" url="jdbc:mysql://localhost:3306/test_db" username="root" password="root"/></GlobalNamingResources>
Then, the resources can be referenced by linking them in the webapp's file. Global resources arecontext.xmlvisible to all webapps deployed in the server.
Example
<ResourceLink name="jdbc/TestDataSource" global="jdbc/TestDataSource" type="javax.sql.DataSource"/>
Accessing JNDI resources from web applications
Application Server 5.2.1 allows web applications to access both Tomcat and Carbon JNDI resources using an Init
Global naming resources are available for all the tenants. Web applications deployed in any tenant canaccess them by referencing them inside the web applications.

WSO2 Application Server, version 5.3.0
Copyright © WSO2 Inc. 2014 270
object. However, Tomcat level JNDI resources get the precedence over Carbon level JNDI resources.ialContextAs a result, when a lookup call is made using an object, it first looks up in the Tomcat JNDIInitialContextresources of that web app. If there are no resources bound for the given name in the Tomcat JNDI context of thatweb app, then it will look up in the Carbon JNDI context. If there is a resource bound for that name in the Carboncontext, then it will return that resource.
Accessing Tomcat JNDI resources
Application Server 5.2.1 allows web applications to access Tomcat JNDI resources in the same manner as a nativeTomcat server.
Example
Context initCtx = new InitialContext();DataSource ds = (DataSource)initialContext.lookup("java:comp/env/jdbc/TestDataSource");
Or
Context initCtx = new InitialContext(environment);Context context = (Context) initCtx.lookup("java:comp/env");DataSource ds = (DataSource) context.lookup("jdbc/TestDataSource");
Exposing Datasources as JNDI Resources
Java Naming and Directory Interface (JNDI) is a Java application programming interface (API) providing naming anddirectory functionality for Java software clients to discover and look up data and objects via a name. WSO2 Application Server supports JNDI InitialContext implementation by inheriting the JNDI implementation of Tomcat (htt
JNDI helps decouple object creation from the). p://tomcat.apache.org/tomcat-7.0-doc/jndi-resources-howto.htmlobject look-up. When you have registered a datasource with JNDI, others can discover it through a JNDI look-upand use it.
The following sections describe how to register and look up JNDI resources, and how to expose datasources asJNDI resources.
Registering JNDI ResourcesJNDI Look-upAccessing JNDI Resources within the Webapps
Registering JNDI Resources
First, register JNDI resources for webapps context. Registering can be done in two ways - webapp-level or globallevel.
Webapp-Level Registering
To register a JNDI resource on a webapp-level, place the JNDI resource in the context.xml file of the webapp. Sinceeach webapp’s context is isolated from each other, this ensures that the resources will be available to the webapp
In web applications Carbon JNDI resources are available only for lookup calls. That means methods such as will return only the list of the Tomcat level JNDI resources.listBindings()
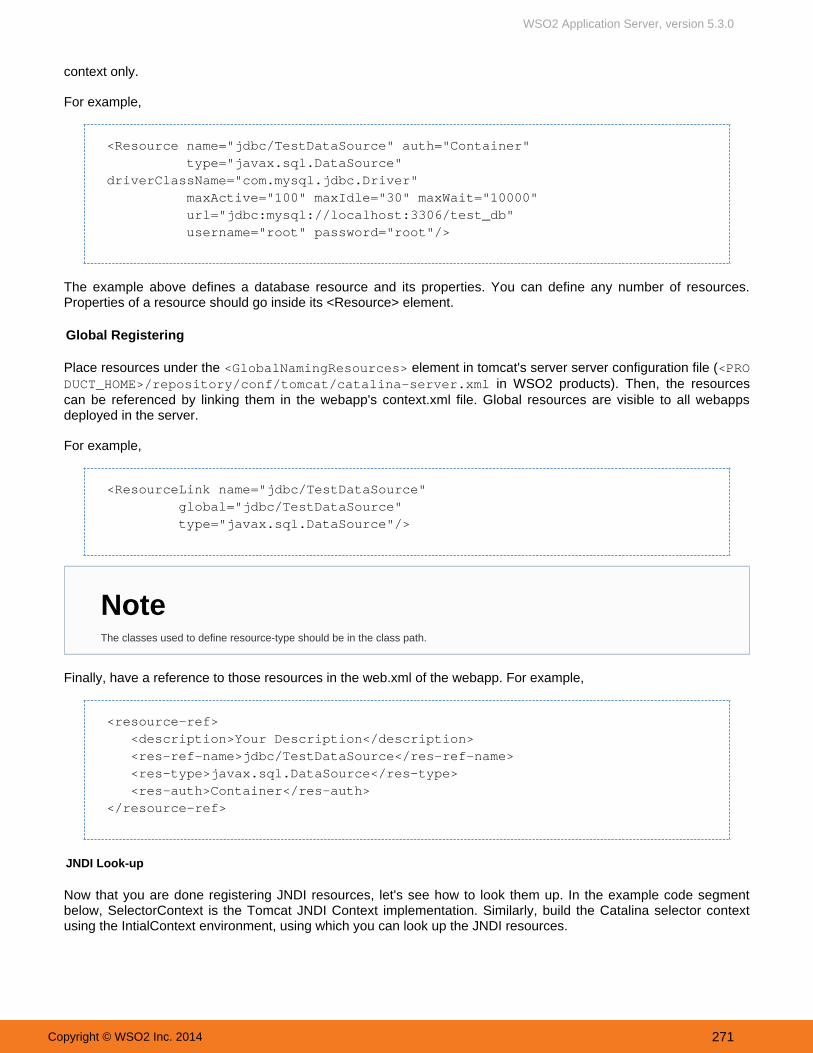
WSO2 Application Server, version 5.3.0
Copyright © WSO2 Inc. 2014 271
context only.
For example,
<Resource name="jdbc/TestDataSource" auth="Container" type="javax.sql.DataSource"driverClassName="com.mysql.jdbc.Driver" maxActive="100" maxIdle="30" maxWait="10000" url="jdbc:mysql://localhost:3306/test_db" username="root" password="root"/>
The example above defines a database resource and its properties. You can define any number of resources.Properties of a resource should go inside its <Resource> element.
Global Registering
Place resources under the element in tomcat's server server configuration file (<GlobalNamingResources> <PRO in WSO2 products). Then, the resourcesDUCT_HOME>/repository/conf/tomcat/catalina-server.xml
can be referenced by linking them in the webapp's context.xml file. Global resources are visible to all webappsdeployed in the server.
For example,
<ResourceLink name="jdbc/TestDataSource" global="jdbc/TestDataSource" type="javax.sql.DataSource"/>
Finally, have a reference to those resources in the web.xml of the webapp. For example,
<resource-ref> <description>Your Description</description> <res-ref-name>jdbc/TestDataSource</res-ref-name> <res-type>javax.sql.DataSource</res-type> <res-auth>Container</res-auth></resource-ref>
JNDI Look-up
Now that you are done registering JNDI resources, let's see how to look them up. In the example code segmentbelow, SelectorContext is the Tomcat JNDI Context implementation. Similarly, build the Catalina selector contextusing the IntialContext environment, using which you can look up the JNDI resources.
NoteThe classes used to define resource-type should be in the class path.

WSO2 Application Server, version 5.3.0
Copyright © WSO2 Inc. 2014 272
Hashtable environment = new Hashtable();environment.put("java.naming.factory.initial", "org.wso2.carbon.tomcat.jndi.CarbonJavaURLContextFactory");environment.put("java.naming.webapp.bound", true);Context initCtx = new InitialContext(environment);Context initialContext = (Context) initCtx.lookup("java:comp/env");
Once done, you can look up for the resource defined earlier. For example,
DataSource ds = (DataSource) initialContext.lookup("jdbc/TestDataSource");
Accessing JNDI Resources within the Webapps
You can expose datasources as JNDI resources from the management console of the Application Server.
Next, let's take a look at how to access these JNDI resources within the webapps that are hosted in the sameApplication Server instance. This was not possible in previous versions due to the way JNDI context isolation isimplemented for webapps at tomcat level. The implementation states that one webapp’s JNDI context cannot beaccessed by another webapp, unless the JNDI resources are registered globally. Since webapps run isolated fromeach other, their contexts will also be isolated. The JNDI context of carbon is also usually isolated from webapps.
Shown below is how the naming context factory class (i.e. org.apache.naming.java.javaURLContextFactory), whichis used as the default Initial Context Factory class in WSO2 Carbon products, is implemented:
public Context getInitialContext(Hashtable<?, ?> environment) throwsNamingException { if (ContextBindings.isThreadBound() || (ContextBindings.isClassLoaderBound())) { // Redirect the request to the bound initial context return new SelectorContext( (Hashtable<String, Object>) environment, true); }
// If the thread is not bound, return a shared writable context if (initialContext == null) { synchronized (javaURLContextFactory.class) { if (initialContext == null) { initialContext = new NamingContext( (Hashtable<String, Object>) environment, MAIN); } } }}
In order to access JNDI resources within webapps, WSO2 has written a InitialContextFactory, which extends theabove class and overrides the above methods. This new implementation of javaUrlContextFactory in WSO2 Carbonproducts does not check whether the current context is bound to a thread or class loader. It returns the JNDI of the

WSO2 Application Server, version 5.3.0
Copyright © WSO2 Inc. 2014 273
Carbon runtime.
The following segment is set as the default Initial Context Factory class in<PRODUCT_HOME>/repository/conf/carbon.xml file.
<DefaultInitialContextFactory>org.wso2.carbon.tomcat.jndi.CarbonJavaURLContextFactory</DefaultInitialContextFactory>
When you want to access the Carbon JNDI Context to lookup for Datasources, add the following JNDI Initial ContextFactory Environment property:
java.naming.factory.initial :"org.wso2.carbon.tomcat.jndi.CarbonJavaURLContextFactory"
The following steps explain how this works.
1. Log on to the product's management console and select "Datasources."
2. Click on the "Add Datasource" link in the "Datasources" page.
3. Select RDBMS as the . Provide the rest of the details accordingly. You will find an option toDatasource Typeexpose this datasource as a JNDI Datasource at the end of the screen.
In this example, we are exposing the new Datasource as .jdbc/MyCarbonDataSource

WSO2 Application Server, version 5.3.0
Copyright © WSO2 Inc. 2014 274
Name : Name of the JNDI datasource which will be visible to others in object look-up.
Use Datasource Factory : If the datasource needs to be accessed from an external environment, the"Datasource Factory" option should be used. When it is selected, a reference object is created with defineddatasource properties. When accessing the datasource from an external environment, the "DatasourceFactory" creates a datasource instance based on the values of the reference object. In the configuration, thisis set as useDataSourceFactory="true".
JNDI Properties : Properties related to the jndi datasource (username, password etc). If the "DatasourceFactory" is selected, following properties should be specified.
java.naming.factory.initial - Used to select the registry service provider as the initial context. java.naming.provider.url - Specifies the location of the registry when the registry is being used as theinitial context.
4. Click to complete. It will expose the Datasource.Save
5. The code segment below shows how to access this exposed Datasource within a webapp.

WSO2 Application Server, version 5.3.0
Copyright © WSO2 Inc. 2014 275
try { Hashtable environment = new Hashtable(); environment.put("java.naming.factory.initial","org.wso2.carbon.tomcat.jndi.CarbonJavaURLContextFactory"); Context initContext = new InitialContext(environment); Object result = initContext.lookup("jdbc/MyCarbonDataSource"); if (result != null) { // Do your work here } else { System.out.println(“Cannot find MyCarbonDataSource”); }} catch (NamingException e) { e.printStackTrace();}
In the above code segment, we create an IntialContext with the relevant environment properties. It gives the JNDIcontext of Carbon, using which you can look for any object that is bound to that context. Here you are looking jdbc/
up.MyCarbonDataSource
Similarly, you can look up any Datasource, which is exposed as a JNDI resource, from webapps.

WSO2 Application Server, version 5.3.0
Copyright © WSO2 Inc. 2014 276
Administration Guide
This section explores various product deployment and configuration options useful for system administrators.
Working with Users, Roles and PermissionsWorking with FeaturesMonitoring the Application ServerWorking with Composite ApplicationsRunning the Product on a Preferred ProfileMigrating the Application ServerCalling Admin Services from AppsWorking with ApplicationsWorking with ServicesUpgrading from a Previous Release
Working with Users, Roles and Permissions
This section contains the following information:
Introduction to User ManagementConfiguring the User RealmManaging Users, Roles and Permissions
Introduction to User Management
User management functionality is provided by default in all WSO2 Carbon-based products and is configured in the u file found in the directory. The following documentationser-mgt.xml <PRODUCT_HOME>/repository/conf/
introduces the main concepts in User Management, such as users, roles, permissions, user stores etc. and howthey are used in WSO2 products.
User management involves defining and managing users, roles, and their access levels in a system. A usermanagement dashboard or console provides system administrators with a high-level view of a system's active usersessions, their log-in statuses, the privileges of each user, and their activity in the system, enabling system adminsto make business-critical, real-time security decisions. A typical user management implementation involves a widerange of functionality such as adding/deleting users, controlling user activity through permissions, managing userroles, defining authentication policies, managing external user stores, manual/automatic log-out, and resetting userpasswords.
Any user management system has the following basic components:
Users: Users are consumers who interact with your organizational applications, databases, and othersystems. A user can be a person, a device, or another application/program within or outside of theorganization's network. Because users interact with internal systems and access data, security-consciousorganizations need to define which data and functionality each user can access by assigning permissions. Permissions: A permission is a delegation of authority or a right that is assigned to a user or a group ofusers to perform an action on a system. Permissions can be granted to or revoked from a user, user group, oruser role automatically or by a system administrator. For example, if a user has the permission to log in to asystem, the permission to log out is automatically granted as well.User roles: A is a grouping of permissions. In addition to assigning individual permissions to users,user roleadmins can create user roles and assign those roles to users. For example, you might create user rolescalled VP, Manager, and Employee, each of which has a different set of permissions, and then assign thoseroles to users based on their position in the company. Then, if you need to modify the permissions of all yourmanagers, you can simply modify the Manager user role, and all users with that role will have theirpermissions updated automatically.

WSO2 Application Server, version 5.3.0
Copyright © WSO2 Inc. 2014 277
The following diagram illustrates how the user management functionality is structured to work in WSO2 products:
User stores: A is the database where information about the users and user roles is stored,user storeincluding log-in name, password, first name, last name, and e-mail address.
This RDBMS stores information of the role-basedRDBMS (for Authentication and Authorization): permissions.
The user realm consists of the configurations required to initialise the user realm. Realm configuration: The file stored in the user-mgt.xml <PRODUCT_HOME>/repository/conf/ directory is used as the realm
This includes setting up the , the and the configuration XML. User Store Manager Authorization Manager S. These configurations are explained below. ystem Administrator
User Store Manager The User Store Manager is responsible formanaging the underlying user store. It isrepresented by the JavaUserStoreManagerinterface. There can be different User StoreManager implementations to connect with differentuser stores, but you can configure only one UserStore Manager implementation in a single userrealm (that is, a single WSO2 Carbon instance). TheUser Store Manager can be operated in bothread/write mode and read-only mode. In read-onlymode, you can only connect with an existing userstore. WSO2 products provide the following defaultUser Store Manager implementations:
JDBCUserStoreManager (read and write)LDAPUserStoreManager (read-only)ApacheDSUserStoreManager (read and write)
According to the default configuration in WSO2 products, the embedded H2 RDBMS that is shippedwith the product is used as the user store as well as the RDBMS for storing information related topermissions.

WSO2 Application Server, version 5.3.0
Copyright © WSO2 Inc. 2014 278
You can write a custom user store managerimplementation by implementing UserStoreManag
or by extending er AbstractUserStoreManager or one of the default implementations.
Using JDBCUserStoreManager
The class uses aJDBCUserStoreManagerschema that is specific to WSO2 Carbon. It containsthe following tables:
UM_USER: Contains user names and passwordsUM_ROLE: Contains role namesUM_USER_ROLE: Contains user role mappingsUM_USER_ATTRIBUTE: Contains user attributes.There can be any attribute ID and a value for thatattribute ID that is associated with a user’s profile.
You can find the full schema of these tables fromthe database script files in the <PRODUCT_HOME>/d
directory. Note that these scripts alsobscriptscontain schemas for other tables that are used foruser management and registry functions. If yourorganization contains an existing JDBC user storethat you want to use with a WSO2 product, youmust extend and write aJDBCUserStoreManagernew implementation for your user store according toyour schema.
Authorization Manager The Authorization Manager uses role-based accesscontrol (RBAC) to protect resources related to theWSO2 Carbon platform. The default implementationof the Authorization Manager is JDBCAuthorizati
, which uses a permission modelonManagerspecific to WSO2 Carbon and uses theauthorization data that is stored in tables in theJDBC database. You can replace thisimplementation with a custom implementation (forexample, if you want to use a XACML authorizationmanager) and use it with WSO2 products.

WSO2 Application Server, version 5.3.0
Copyright © WSO2 Inc. 2014 279
System Administrator The system admin user is typically the super tenantuser, who by default has permission to perform alladministration tasks in the server. The admin userwill thereby create other tenant users and defineroles with permissions. Once this is done, the othertenant users will be able to log in to their respectivetenant domains and use the server according to thepermissions that have been granted. Note that thepermissions granted to the Super Tenant usercannot be modified.
Related Topics
Configuring the User Realm: This topic explains how you can set up and configure the user managementrealm.Managing Users, Roles and Permissions: This topic explains how you can manage the Users, Roles andPermissions using the management console.
Configuring the User Realm
User management functionality is provided by default in all WSO2 Carbon-based products and is configured in the u file found in the directory. The following documentationser-mgt.xml <PRODUCT_HOME>/repository/conf/
explains the configurations that should be done in WSO2 products in order to set up the User Management module.
The complete functionality and contents of the User Management module is called a . The realmuser realmincludes the user management classes, configurations and repositories that store information. Therefore, configuringthe User Management functionality in a WSO2 product involves setting up the relevant repositories and updating therelevant configuration files.
The following diagram illustrates the required configurations and repositories:
See the following topics for instructions:
Configuring the System Administrator

WSO2 Application Server, version 5.3.0
Copyright © WSO2 Inc. 2014 280
Configuring the Authorization ManagerConfiguring User Stores
Configuring the System Administrator
User management functionality is provided by default in all WSO2 Carbon-based products and is configured in the u file found in the directory. This documentation explainsser-mgt.xml <PRODUCT_HOME>/repository/conf/
the main settings relevant to the system administrator.
The user is the super tenant that will be able to manage all other users, roles and permissions in the systemadminby using the management console of the product. Therefore, the user that should have admin permissions is
. The documentation onrequired to be stored in the primary user store when you start the system for the first timesetting up primary user stores will explain how to configure the administrator while configuring the user store. Theinformation under this topic will explain the main configurations that are relevant to setting up the systemadministrator.
Note the following key facts about the system administrator in your system:
The admin user and role is always stored in the primary user store in your system. An administrator is configured for your system by default. This user is assigned to the role,admin adminwhich has all permissions enabled. The permissions assigned to the default role cannot be modified.admin
Before you begin :
Ensure that you have a primary user store (for storing users and roles) and an RDBMS (for storing informationrelated to permissions). See the for instructions on how to set up these repositories.related documentation
Updating the administrator
The at the top of the file section<Configuration> <PRODUCT_HOME>/repository/conf/user-mgt.xmlallows you to configure the administrator user in your system as well as the RDBMS that will be used for storinginformation related to user authentication (i.e. role-based permissions).
If the primary user store is read-only, you will be using a user ID and role that already exists in the userstore, for the administrator. If the user store is read/write, you have the option of creating the administratoruser in the user store as explained below. By default, the embedded H2 database (with read/write enabled)is used for both these purposes in WSO2 products.

WSO2 Application Server, version 5.3.0
Copyright © WSO2 Inc. 2014 281
<Realm> <Configuration> <AddAdmin>true</AddAdmin> <AdminRole>admin</AdminRole> <AdminUser> <UserName>admin</UserName> <Password>admin</Password> </AdminUser> <EveryOneRoleName>everyone</EveryOneRoleName> <!-- By default users inthis role see the registry root --> <Property name=""></Property> ............... </Configuration>...</Realm>
Note the following regarding the configuration above.
Element Description
<AddAdmin> When , this element creates the admin user based on the true Adm element. It also indicates whether to create the specifiedinUser
admin user if it doesn't already exist. When connecting to anexternal read-only LDAP or Active Directory user store, this propertyneeds to be if an admin user and admin role exist within thefalseuser store. If the admin user and admin role do not exist in the userstore, this value should be , so that the role is added to thetrueuser management database. However, if the admin user is not therein the user store, we must add that user to the user store manually.If the value is set to in this case, it will generate anAddAdmin trueexception.
<AdminRole>wso2admin</AdminRole> This is the role that has all administrative privileges of the WSO2product, so all users having this role are admins of the product. Youcan provide any meaningful name for this role. This role is createdin the internal H2 database when the product starts. This role haspermission to carry out any actions related to the ManagementConsole. If the user store is read-only, this role is added to thesystem as a special internal role where users are from an externaluser store.
<AdminUser> Configures the default administrator for the WSO2 product. If theuser store is read-only, the admin user must exist in the user store or the system will not start. If the external user store is read-only, youmust select a user already existing in the external user store andadd it as the admin user that is defined in the eleme<AdminUser>nt. If the external user store is in read/write mode, and you set <Add
to , the user you specify will be automatically created.Admin> true
<UserName> This is the username of the default administrator or super tenant ofthe user store. If the user store is read-only, the admin user MUSTexist in the user store for the process to work.

WSO2 Application Server, version 5.3.0
Copyright © WSO2 Inc. 2014 282
1.
<Password> Do NOT put the password here but leave the default value. If theuser store is read-only, this element and its value are ignored. Thispassword is used only if the user store is read-write and the AddAd
value is set to .min true
<EveryOneRoleName> The name of the "everyone" role. All users in the system belong tothis role.
Related Topics
Configuring the Primary User Stores: This topic explains how the primary user store is set up and configuredfor your product.Configuring the Authorization Manager: This topic explains how the repository (RDBMS) for storingauthorization information (role-based permissions) is configured for your product.Changing a Password: This topic explains how you can change the admin password using the managementconsole of the product.
Configuring the Authorization Manager
User management functionality is provided by default in all WSO2 Carbon-based products and is configured in the u file found in the directory. This documentation explainsser-mgt.xml <PRODUCT_HOME>/repository/conf/
how to set up a repository for storing authorization information (role-based permissions) and how to change therelevant configurations.
According to the default configuration in WSO2 products, the Users, Roles and Permissions are stored in the samerepository (i.e., the default, embedded H2 database). However, you can change this configuration in such a way thatthe Users and Roles are stored in one repository (User Store) and the Permissions are stored in a separaterepository. A user store can be a typical RDBMS, an LDAP or an external Active Directory. See the forrelated topicsinformation on how user stores are configured.
The repository that stores Permissions should always be an RDBMS. The Authorization Manager configuration inthe user-mgt.xml file (stored in the directory) connects the system to this<PRODUCT_HOME>/repository/conf/RDBMS.
Follow the instructions given below to set up and configure the Authorization Manager.
Step 1: Setting up the repositoryStep 2: Updating the user realm configurations
Step 1: Setting up the repository
By default, the embedded H2 database is used for storing permissions. You can change this as follows:
Note that the password in the file is writtenuser-mgt.xmlto the primary user store when the server starts for the firsttime. Thereafter, the password will be validated from theprimary user store and not from the file.user-mgt.xmlTherefore, if you need to change the admin passwordstored in the user store, you cannot simply change thevalue in the file. To change the adminuser-mgt.xmlpassword, you must use the optionChange Passwordfrom the management console. See the forrelated topicsinstructions.

WSO2 Application Server, version 5.3.0
Copyright © WSO2 Inc. 2014 283
1. 2.
Change the default H2 database or set up another RDBMS for storing permissions.When you set up an RDBMS for your system, it is necessary to create a corresponding datasource, whichallows the system to connect to the database.
If you are replacing the default H2 database with a new RDBMS, update the master-datasource.x file (stored in the directory) with theml <PRODUCT_HOME>/repository/conf/datasources/
relevant information. Alternatively, create a new XML file with the datasource information of your new RDBMS and store it inthe same directory.<PRODUCT_HOME>/repository/conf/datasources/
Refer the for detailed information on setting up databases and configuring datasources.related topics
Step 2: Updating the user realm configurations
Once you have set up a new RDBMS and configured the datasource, the file (user realmuser-mgt.xmlconfiguration) should be updated as explained below.
Setting up the database connection
Update the datasource information using the element under . Given below are the<Property> <Configuration>properties that are set by default.
Property Name Description
dataSource This is the jndi name of the datasource that is used for referring to the datasource. Inthe following example, the jndi name of the default datasource defined in the <PRODUCT_HOME>/repository/conf/datasources/master-datasources.xml file islinked from the user-mgt.xml file.
isCascadeDeleteEnabled This property is set to 'true' by default, which enables cascade delete for theUM_USER_PERMISSION and UM_ROLE_PERMISSION tables when a permissiongets deleted from the UM_PERMISSION table. That is, if a record in the parent table isdeleted the corresponding records in the child table will be automatically deleted.
You can add more optional configurations using the element:<Property>
Property Name Description Mandatory/Optional
testOnBorrow It is recommended to set this property to 'true' so that object connections will bevalidated before being borrowed from the JDBC pool. For this property to be effective,the parameter in the validationQuery <PRODUCT_HOME>/repository/conf/da
file should be a non-string value. Thistasources/master-datasources.xmlsetting will avoid connection failures. See the section on performance tuning of WSO2products for more information.
Optional
Configuring the Authorization Manager
Shown below is how the Authorization Manager is enabled in the user-mgt.xml file.

WSO2 Application Server, version 5.3.0
Copyright © WSO2 Inc. 2014 284
<AuthorizationManagerclass="org.wso2.carbon.user.core.authorization.JDBCAuthorizationManager"> <Propertyname="AdminRoleManagementPermissions">/permission</Property> <Property name="AuthorizationCacheEnabled">true</Property></AuthorizationManager>
The class enables theorg.wso2.carbon.user.core.authorization.JDBCAuthorizationManagerAuthorization Manager for your product.The property sets the registry path where the authorizationAdminRoleManagementPermissionsinformation (role-based permissions) are stored. Note that this links to the repository that you defined in Step
.1It is recommended to enable the property in the GetAllRolesOfUserEnabled AuthorizationManageras follows:
<Property name="GetAllRolesOfUserEnabled">true</Property>
Although using the user store manager does not depend on this property, you must consider enabling this ifthere are any performance issues in your production environment. Enabling this property affects theperformance when the user logs in. This depends on the users, roles and permission stats.
By default, the rules linked to a permission (role name, action, resource) are not case sensitive. If you want tomake them case sensitive, enable the following property:
<Property name="CaseSensitiveAuthorizationRules">true</Property>
Related Topics
Configuring User Stores: This topic explains how the repositories for storing information about Users andRoles are configured.Setting Up the Physical Database: This section explains how you can set up a new RDBMS and configure itfor your system.Managing Datasources: This section explains the purpose of defining datasources and how they areconfigured for a product.
Configuring User Stores
User management functionality is provided by default in all WSO2 Carbon-based products and is configured in the u file found in the directory. This topic explains the differentser-mgt.xml <PRODUCT_HOME>/repository/conf/
types of user stores that can be configured for a WSO2 product.
The user management feature in WSO2 products allows you to maintain multiple user stores for your system thatare used to store the users and their roles. You can set up any of the following types of user stores:
JDBC user storesActive Directory user storesRead-Only LDAP user storesRead-Write LDAP user stores
The in every WSO2 product is configured in the Primary User Store use<PRODUCT_HOME>/repository/conf/ file. By default, the embedded H2 database (JDBC) that is shipped with WSO2 products is configuredr-mgt.xml

WSO2 Application Server, version 5.3.0
Copyright © WSO2 Inc. 2014 285
as the primary user store, except for WSO2 Identity Server, which has an embedded LDAP as its primary userstore. You can change the default configuration by replacing the default database according to your requirement.The primary user store is shared among all the tenants in the system.
With the user management feature, any number of can be easily set up for your systemSecondary User Storesusing the management console. This will automatically create an XML file with the configurations corresponding tothe secondary user store in the same directory. Alternatively, you can<PRODUCT_HOME>/repository/conf/manually create the configuration file and store it in this directory without using the management console.
Related TopicsSee the following topics for instructions on setting up user stores:
Configuring the Primary User StoreConfiguring Secondary User StoresWorking with Properties of User Stores
See the topic on for instructions on how to set up a repository for storingconfiguring the Authorization Managerpermissions.
Configuring the Primary User Store
User management functionality is provided by default in all WSO2 Carbon-based products and is configured in the u file found in the directory. This documentation explainsser-mgt.xml <PRODUCT_HOME>/repository/conf/
the process of setting up a primary user store for your system.
Instead of using the embedded database, you can set up a separate repository and configure it as your primary userstore. Since the user store you want to connect to might have different schemas from the ones available in theembedded user store, it needs to go through an adaptation process. WSO2 products provide the following adapters,for connecting to LDAP, Active Directory and JDBC. Thereby, these adapters enable you to authenticate users fromdifferent types of user stores.
User store manager class Description
org.wso2.carbon.user.core.ldap.ReadOnlyLDAPUserStoreManager Use to do read-only operations forReadOnlyLDAPUserStoreManagerexternal LDAP user stores.
Although, information about users and roles are stored in the repositories that we call User Stores, whichcan be of any of the types described above, the permissions attached to roles are always stored in anRDBMS. According to the default configuration in WSO2 products, the embedded H2 database is used forstoring permissions as well as users and roles. The instructions in this section explain how you can changethe default user store. See the section on for information on how toconfiguring the authorization managerset up the RDBMS for storing permissions.
The default User StoreThe primary user store that is configured by default in every WSO2 product is a JDBC user store, whichreads/writes into the internal database of the product server. By default, the internal database is H2 (exceptfor WSO2 IS, which uses an LDAP as the default user store). This database is used by the AuthorizationManager (for user authentication information) as well as the User Store Manager (for defining users androles).

WSO2 Application Server, version 5.3.0
Copyright © WSO2 Inc. 2014 286
org.wso2.carbon.user.core.ldap.ReadWriteLDAPUserStoreManager Use for external LDAP user stores to doReadWriteLDAPUserStoreManagerboth read and write operations. This is the user store configuration which isuncommented in the code in the file for WSO2 Identity Server.user-mgt.xml
org.wso2.carbon.user.core.ldap.ActiveDirectoryUserStoreManager Use to configure an Active DirectoryActiveDirectoryUserStoreManagerDomain Service (AD DS) or Active Directory Lightweight Directory Service (ADLDS). This can be used for read/write operations. If you need to use AD asonlyread-only, you must use org.wso2.carbon.user.core.ldap.ReadOnlyL
.DAPUserStoreManager
org.wso2.carbon.user.core.jdbc.JDBCUserStoreManager Use for both internal and external JDBC userJDBCUserStoreManagerstores. This is the user store configuration which is uncommented in the code inthe user-mgt.xml file for all WSO2 products, except WSO2 Identity Server(which uses the ).ReadWriteLDAPUserStoreManager
The file already has sample configurations for all of the above user stores. To enable the requireduser-mgt.xmluser store configuration, you must uncomment them in the code and comment out the ones that you do not need asexplained in the following topics.
Configuring a JDBC User StoreConfiguring a Read-Only LDAP or Active Directory User StoreConfiguring a Read-Write Active Directory User StoreConfiguring a Read-Write LDAP User Store
Configuring a JDBC User Store
User management functionality is provided by default in all WSO2 Carbon-based products and is configured in the u file found in the directory. This file is shipped with userser-mgt.xml <PRODUCT_HOME>/repository/conf/
store manager configurations for all possible user store types (JDBC, read-only LDAP/Active Directory, read-writeLDAP and read-write Active directory). The instructions given below explains how to configure an RDBMS (JDBC)as the primary user store for the WSO2 server.
When you configure a JDBC user store as the primary user store, you can either use the default configuration or youcan change it in the following ways:
You can set up two separate databases for the Authorization Manager and the User Store Manager.It is not recommended to use the default H2 database in production. Therefore, you can replace this asinstructed in the .related documentation
Therefore, before you begin, ensure that the RDBMS that you want to use as the JDBC user store is correctly set upfor your system. Then, follow the steps given below to configure a JDBC user store as the primary user store in yourproduct.
The default User StoreThe primary user store that is configured by default in every WSO2 product is a JDBC user store, whichreads/writes into the internal database of the product server. By default, the internal database is H2 for allWSO2 products excluding the Identity Server. This database is used by the Authorization Manager (for userauthentication information) as well as the User Store Manager (for defining users and roles). In the case ofthe WSO2 Identity Server, the default user store is an LDAP (Apache DS) that is shipped with the product.

WSO2 Application Server, version 5.3.0
Copyright © WSO2 Inc. 2014 287
1.
2.
Step 1: Configuring the JDBC user store managerStep 2: Updating the system administratorStep 3: Updating the datasourcesStep 4: Starting the server
Step 1: Configuring the JDBC user store manager
To configure a JDBC user store as the primary user store, you must change the sectionJDBCUserStoreManagerin the file. <PRODUCT_HOME>/repository/conf/user-mgt.xml
Uncomment the following section:
<UserStoreManagerclass="org.wso2.carbon.user.core.jdbc.JDBCUserStoreManager">
Specify the connection to the RDBMS inside the JDBC user store manager according to your requirement. For more information about user store properties, see the related documentation.
Internal JDBC User StoreExternal JDBC User Store
The following sample shows how to configure the internal RDBMS as the JDBC user store:
Before you beginIf you create the file yourself, be sure to save it in the user-mgt.xml <PRODUCT_HOME>/reposit
directory.ory/conf/The attribute for JDBC is class <UserStoreManager
.class="org.wso2.carbon.user.core.jdbc.JDBCUserStoreManager">

WSO2 Application Server, version 5.3.0
Copyright © WSO2 Inc. 2014 288
2.
<UserStoreManagerclass="org.wso2.carbon.user.core.jdbc.JDBCUserStoreManager"> <Propertyname="TenantManager">org.wso2.carbon.user.core.tenant.JDBCTenantManager</Property> <Property name="ReadOnly">false</Property> <Property name="MaxUserNameListLength">100</Property> <Property name="IsEmailUserName">false</Property> <Property name="DomainCalculation">default</Property> <Property name="PasswordDigest">SHA-256</Property> <Property name="StoreSaltedPassword">true</Property> <Property name="UserNameUniqueAcrossTenants">false</Property> <Property name="PasswordJavaRegEx">[\S]{5,30}$</Property> <Property name="PasswordJavaScriptRegEx">[\\S]{5,30}</Property> <Propertyname="UsernameJavaRegEx">^[^~!#$;%^*+={}\\|\\\\<>,\'\"]{3,30}$</Property> <Property name="UsernameJavaScriptRegEx">[\\S]{3,30}</Property> <Propertyname="RolenameJavaRegEx">^[^~!@#$;%^*+={}\\|\\\\<>,\'\"]{3,30}$</Property> <Property name="RolenameJavaScriptRegEx">[\\S]{3,30}</Property> <Property name="UserRolesCacheEnabled">true</Property></UserStoreManager>
The following sample shows how to configure an external RDBMS as the JDBC user store:
<UserStoreManagerclass="org.wso2.carbon.user.core.jdbc.JDBCUserStoreManager"> <Propertyname="TenantManager">org.wso2.carbon.user.core.tenant.JDBCTenantManager</Property> <Property name="driverName">com.mysql.jdbc.Driver</Property> <Propertyname="url">jdbc:mysql://localhost:3306/tcsdev</Property> <Property name="userName"></Property> <Property name="password"></Property> <Property name="Disabled">false</Property> <Property name="MaxUserNameListLength">100</Property> <Property name="MaxRoleNameListLength">100</Property> <Property name="UserRolesCacheEnabled">true</Property> <Property name="PasswordDigest">SHA-256</Property> <Property name="ReadGroups">true</Property> <Property name="ReadOnly">false</Property> <Property name="IsEmailUserName">false</Property> <Property name="DomainCalculation">default</Property> <Property name="StoreSaltedPassword">true</Property> <Property name="WriteGroups">false</Property> <Property name="UserNameUniqueAcrossTenants">false</Property> <Property name="PasswordJavaRegEx">^[\S]{5,30}$</Property>
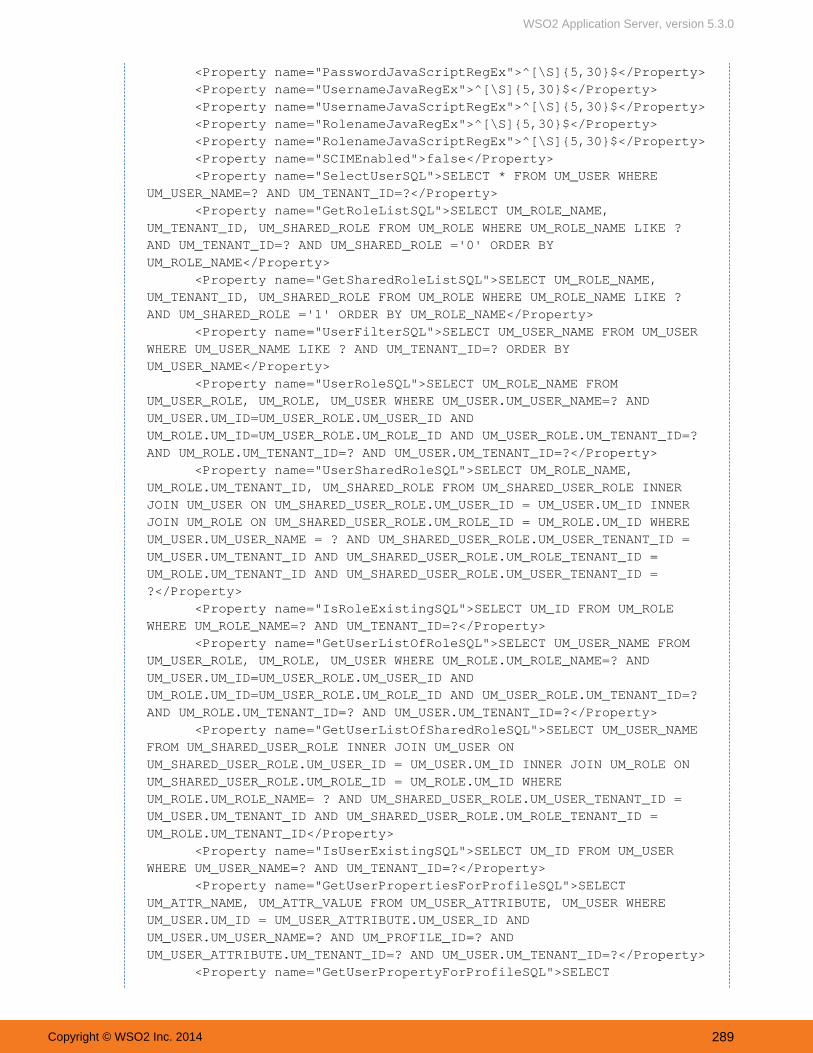
WSO2 Application Server, version 5.3.0
Copyright © WSO2 Inc. 2014 289
2.
<Property name="PasswordJavaScriptRegEx">^[\S]{5,30}$</Property> <Property name="UsernameJavaRegEx">^[\S]{5,30}$</Property> <Property name="UsernameJavaScriptRegEx">^[\S]{5,30}$</Property> <Property name="RolenameJavaRegEx">^[\S]{5,30}$</Property> <Property name="RolenameJavaScriptRegEx">^[\S]{5,30}$</Property> <Property name="SCIMEnabled">false</Property> <Property name="SelectUserSQL">SELECT * FROM UM_USER WHEREUM_USER_NAME=? AND UM_TENANT_ID=?</Property> <Property name="GetRoleListSQL">SELECT UM_ROLE_NAME,UM_TENANT_ID, UM_SHARED_ROLE FROM UM_ROLE WHERE UM_ROLE_NAME LIKE ?AND UM_TENANT_ID=? AND UM_SHARED_ROLE ='0' ORDER BYUM_ROLE_NAME</Property> <Property name="GetSharedRoleListSQL">SELECT UM_ROLE_NAME,UM_TENANT_ID, UM_SHARED_ROLE FROM UM_ROLE WHERE UM_ROLE_NAME LIKE ?AND UM_SHARED_ROLE ='1' ORDER BY UM_ROLE_NAME</Property> <Property name="UserFilterSQL">SELECT UM_USER_NAME FROM UM_USERWHERE UM_USER_NAME LIKE ? AND UM_TENANT_ID=? ORDER BYUM_USER_NAME</Property> <Property name="UserRoleSQL">SELECT UM_ROLE_NAME FROMUM_USER_ROLE, UM_ROLE, UM_USER WHERE UM_USER.UM_USER_NAME=? ANDUM_USER.UM_ID=UM_USER_ROLE.UM_USER_ID ANDUM_ROLE.UM_ID=UM_USER_ROLE.UM_ROLE_ID AND UM_USER_ROLE.UM_TENANT_ID=?AND UM_ROLE.UM_TENANT_ID=? AND UM_USER.UM_TENANT_ID=?</Property> <Property name="UserSharedRoleSQL">SELECT UM_ROLE_NAME,UM_ROLE.UM_TENANT_ID, UM_SHARED_ROLE FROM UM_SHARED_USER_ROLE INNERJOIN UM_USER ON UM_SHARED_USER_ROLE.UM_USER_ID = UM_USER.UM_ID INNERJOIN UM_ROLE ON UM_SHARED_USER_ROLE.UM_ROLE_ID = UM_ROLE.UM_ID WHEREUM_USER.UM_USER_NAME = ? AND UM_SHARED_USER_ROLE.UM_USER_TENANT_ID =UM_USER.UM_TENANT_ID AND UM_SHARED_USER_ROLE.UM_ROLE_TENANT_ID =UM_ROLE.UM_TENANT_ID AND UM_SHARED_USER_ROLE.UM_USER_TENANT_ID =?</Property> <Property name="IsRoleExistingSQL">SELECT UM_ID FROM UM_ROLEWHERE UM_ROLE_NAME=? AND UM_TENANT_ID=?</Property> <Property name="GetUserListOfRoleSQL">SELECT UM_USER_NAME FROMUM_USER_ROLE, UM_ROLE, UM_USER WHERE UM_ROLE.UM_ROLE_NAME=? ANDUM_USER.UM_ID=UM_USER_ROLE.UM_USER_ID ANDUM_ROLE.UM_ID=UM_USER_ROLE.UM_ROLE_ID AND UM_USER_ROLE.UM_TENANT_ID=?AND UM_ROLE.UM_TENANT_ID=? AND UM_USER.UM_TENANT_ID=?</Property> <Property name="GetUserListOfSharedRoleSQL">SELECT UM_USER_NAMEFROM UM_SHARED_USER_ROLE INNER JOIN UM_USER ONUM_SHARED_USER_ROLE.UM_USER_ID = UM_USER.UM_ID INNER JOIN UM_ROLE ONUM_SHARED_USER_ROLE.UM_ROLE_ID = UM_ROLE.UM_ID WHEREUM_ROLE.UM_ROLE_NAME= ? AND UM_SHARED_USER_ROLE.UM_USER_TENANT_ID =UM_USER.UM_TENANT_ID AND UM_SHARED_USER_ROLE.UM_ROLE_TENANT_ID =UM_ROLE.UM_TENANT_ID</Property> <Property name="IsUserExistingSQL">SELECT UM_ID FROM UM_USERWHERE UM_USER_NAME=? AND UM_TENANT_ID=?</Property> <Property name="GetUserPropertiesForProfileSQL">SELECTUM_ATTR_NAME, UM_ATTR_VALUE FROM UM_USER_ATTRIBUTE, UM_USER WHEREUM_USER.UM_ID = UM_USER_ATTRIBUTE.UM_USER_ID ANDUM_USER.UM_USER_NAME=? AND UM_PROFILE_ID=? ANDUM_USER_ATTRIBUTE.UM_TENANT_ID=? AND UM_USER.UM_TENANT_ID=?</Property> <Property name="GetUserPropertyForProfileSQL">SELECT

WSO2 Application Server, version 5.3.0
Copyright © WSO2 Inc. 2014 290
2.
UM_ATTR_VALUE FROM UM_USER_ATTRIBUTE, UM_USER WHERE UM_USER.UM_ID =UM_USER_ATTRIBUTE.UM_USER_ID AND UM_USER.UM_USER_NAME=? ANDUM_ATTR_NAME=? AND UM_PROFILE_ID=? ANDUM_USER_ATTRIBUTE.UM_TENANT_ID=? AND UM_USER.UM_TENANT_ID=?</Property> <Property name="GetUserLisForPropertySQL">SELECT UM_USER_NAMEFROM UM_USER, UM_USER_ATTRIBUTE WHERE UM_USER_ATTRIBUTE.UM_USER_ID =UM_USER.UM_ID AND UM_USER_ATTRIBUTE.UM_ATTR_NAME =? ANDUM_USER_ATTRIBUTE.UM_ATTR_VALUE LIKE ? ANDUM_USER_ATTRIBUTE.UM_PROFILE_ID=? AND UM_USER_ATTRIBUTE.UM_TENANT_ID=?AND UM_USER.UM_TENANT_ID=?</Property> <Property name="GetProfileNamesSQL">SELECT DISTINCTUM_PROFILE_ID FROM UM_USER_ATTRIBUTE WHERE UM_TENANT_ID=?</Property> <Property name="GetUserProfileNamesSQL">SELECT DISTINCTUM_PROFILE_ID FROM UM_USER_ATTRIBUTE WHERE UM_USER_ID=(SELECT UM_IDFROM UM_USER WHERE UM_USER_NAME=? AND UM_TENANT_ID=?) ANDUM_TENANT_ID=?</Property> <Property name="GetUserIDFromUserNameSQL">SELECT UM_ID FROMUM_USER WHERE UM_USER_NAME=? AND UM_TENANT_ID=?</Property> <Property name="GetUserNameFromTenantIDSQL">SELECT UM_USER_NAMEFROM UM_USER WHERE UM_TENANT_ID=?</Property> <Property name="GetTenantIDFromUserNameSQL">SELECT UM_TENANT_IDFROM UM_USER WHERE UM_USER_NAME=?</Property> <Property name="AddUserSQL">INSERT INTO UM_USER (UM_USER_NAME,UM_USER_PASSWORD, UM_SALT_VALUE, UM_REQUIRE_CHANGE, UM_CHANGED_TIME,UM_TENANT_ID) VALUES (?, ?, ?, ?, ?, ?)</Property> <Property name="AddUserToRoleSQL">INSERT INTO UM_USER_ROLE(UM_USER_ID, UM_ROLE_ID, UM_TENANT_ID) VALUES ((SELECT UM_ID FROMUM_USER WHERE UM_USER_NAME=? AND UM_TENANT_ID=?),(SELECT UM_ID FROMUM_ROLE WHERE UM_ROLE_NAME=? AND UM_TENANT_ID=?), ?)</Property> <Property name="AddRoleSQL">INSERT INTO UM_ROLE (UM_ROLE_NAME,UM_TENANT_ID) VALUES (?, ?)</Property> <Property name="AddSharedRoleSQL">UPDATE UM_ROLE SETUM_SHARED_ROLE = ? WHERE UM_ROLE_NAME = ? AND UM_TENANT_ID =?</Property> <Property name="AddRoleToUserSQL">INSERT INTO UM_USER_ROLE(UM_ROLE_ID, UM_USER_ID, UM_TENANT_ID) VALUES ((SELECT UM_ID FROMUM_ROLE WHERE UM_ROLE_NAME=? AND UM_TENANT_ID=?),(SELECT UM_ID FROMUM_USER WHERE UM_USER_NAME=? AND UM_TENANT_ID=?), ?)</Property> <Property name="AddSharedRoleToUserSQL">INSERT INTOUM_SHARED_USER_ROLE (UM_ROLE_ID, UM_USER_ID, UM_USER_TENANT_ID,UM_ROLE_TENANT_ID) VALUES ((SELECT UM_ID FROM UM_ROLE WHEREUM_ROLE_NAME=? AND UM_TENANT_ID=?),(SELECT UM_ID FROM UM_USER WHEREUM_USER_NAME=? AND UM_TENANT_ID=?), ?, ?)</Property> <Property name="RemoveUserFromSharedRoleSQL">DELETE FROMUM_SHARED_USER_ROLE WHERE UM_ROLE_ID=(SELECT UM_ID FROM UM_ROLEWHERE UM_ROLE_NAME=? AND UM_TENANT_ID=?) AND UM_USER_ID=(SELECT UM_IDFROM UM_USER WHERE UM_USER_NAME=? AND UM_TENANT_ID=?) ANDUM_USER_TENANT_ID=? AND UM_ROLE_TENANT_ID = ?</Property> <Property name="RemoveUserFromRoleSQL">DELETE FROM UM_USER_ROLEWHERE UM_USER_ID=(SELECT UM_ID FROM UM_USER WHERE UM_USER_NAME=? ANDUM_TENANT_ID=?) AND UM_ROLE_ID=(SELECT UM_ID FROM UM_ROLE WHEREUM_ROLE_NAME=? AND UM_TENANT_ID=?) AND UM_TENANT_ID=?</Property> <Property name="RemoveRoleFromUserSQL">DELETE FROM UM_USER_ROLE
WSO2 Application Server, version 5.3.0
Copyright © WSO2 Inc. 2014 291
2.
WHERE UM_ROLE_ID=(SELECT UM_ID FROM UM_ROLE WHERE UM_ROLE_NAME=? ANDUM_TENANT_ID=?) AND UM_USER_ID=(SELECT UM_ID FROM UM_USER WHEREUM_USER_NAME=? AND UM_TENANT_ID=?) AND UM_TENANT_ID=?</Property> <Property name="DeleteRoleSQL">DELETE FROM UM_ROLE WHEREUM_ROLE_NAME = ? AND UM_TENANT_ID=?</Property> <Property name="OnDeleteRoleRemoveUserRoleMappingSQL">DELETEFROM UM_USER_ROLE WHERE UM_ROLE_ID=(SELECT UM_ID FROM UM_ROLE WHEREUM_ROLE_NAME=? AND UM_TENANT_ID=?) AND UM_TENANT_ID=?</Property> <Property name="DeleteUserSQL">DELETE FROM UM_USER WHEREUM_USER_NAME = ? AND UM_TENANT_ID=?</Property> <Property name="OnDeleteUserRemoveUserRoleMappingSQL">DELETEFROM UM_USER_ROLE WHERE UM_USER_ID=(SELECT UM_ID FROM UM_USER WHEREUM_USER_NAME=? AND UM_TENANT_ID=?) AND UM_TENANT_ID=?</Property> <Property name="OnDeleteUserRemoveUserAttributeSQL">DELETE FROMUM_USER_ATTRIBUTE WHERE UM_USER_ID=(SELECT UM_ID FROM UM_USER WHEREUM_USER_NAME=? AND UM_TENANT_ID=?) AND UM_TENANT_ID=?</Property> <Property name="UpdateUserPasswordSQL">UPDATE UM_USER SETUM_USER_PASSWORD= ?, UM_SALT_VALUE=?, UM_REQUIRE_CHANGE=?,UM_CHANGED_TIME=? WHERE UM_USER_NAME= ? AND UM_TENANT_ID=?</Property> <Property name="UpdateRoleNameSQL">UPDATE UM_ROLE setUM_ROLE_NAME=? WHERE UM_ROLE_NAME = ? AND UM_TENANT_ID=?</Property> <Property name="AddUserPropertySQL">INSERT INTOUM_USER_ATTRIBUTE (UM_USER_ID, UM_ATTR_NAME, UM_ATTR_VALUE,UM_PROFILE_ID, UM_TENANT_ID) VALUES ((SELECT UM_ID FROM UM_USER WHEREUM_USER_NAME=? AND UM_TENANT_ID=?), ?, ?, ?, ?)</Property> <Property name="UpdateUserPropertySQL">UPDATE UM_USER_ATTRIBUTESET UM_ATTR_VALUE=? WHERE UM_USER_ID=(SELECT UM_ID FROM UM_USER WHEREUM_USER_NAME=? AND UM_TENANT_ID=?) AND UM_ATTR_NAME=? ANDUM_PROFILE_ID=? AND UM_TENANT_ID=?</Property> <Property name="DeleteUserPropertySQL">DELETE FROMUM_USER_ATTRIBUTE WHERE UM_USER_ID=(SELECT UM_ID FROM UM_USER WHEREUM_USER_NAME=? AND UM_TENANT_ID=?) AND UM_ATTR_NAME=? ANDUM_PROFILE_ID=? AND UM_TENANT_ID=?</Property> <Property name="UserNameUniqueAcrossTenantsSQL">SELECT UM_IDFROM UM_USER WHERE UM_USER_NAME=?</Property> <Property name="IsDomainExistingSQL">SELECT UM_DOMAIN_ID FROMUM_DOMAIN WHERE UM_DOMAIN_NAME=? AND UM_TENANT_ID=?</Property> <Property name="AddDomainSQL">INSERT INTO UM_DOMAIN(UM_DOMAIN_NAME, UM_TENANT_ID) VALUES (?, ?)</Property> <Property name="AddUserToRoleSQL-mssql">INSERT INTO UM_USER_ROLE(UM_USER_ID, UM_ROLE_ID, UM_TENANT_ID) SELECT (SELECT UM_ID FROMUM_USER WHERE UM_USER_NAME=? AND UM_TENANT_ID=?),(SELECT UM_ID FROMUM_ROLE WHERE UM_ROLE_NAME=? AND UM_TENANT_ID=?),(?)</Property> <Property name="AddRoleToUserSQL-mssql">INSERT INTO UM_USER_ROLE(UM_ROLE_ID, UM_USER_ID, UM_TENANT_ID) SELECT (SELECT UM_ID FROMUM_ROLE WHERE UM_ROLE_NAME=? AND UM_TENANT_ID=?),(SELECT UM_ID FROMUM_USER WHERE UM_USER_NAME=? AND UM_TENANT_ID=?), (?)</Property> <Property name="AddUserPropertySQL-mssql">INSERT INTOUM_USER_ATTRIBUTE (UM_USER_ID, UM_ATTR_NAME, UM_ATTR_VALUE,UM_PROFILE_ID, UM_TENANT_ID) SELECT (SELECT UM_ID FROM UM_USER WHEREUM_USER_NAME=? AND UM_TENANT_ID=?), (?), (?), (?), (?)</Property> <Property name="AddUserToRoleSQL-openedge">INSERT INTOUM_USER_ROLE (UM_USER_ID, UM_ROLE_ID, UM_TENANT_ID) SELECT UU.UM_ID,

WSO2 Application Server, version 5.3.0
Copyright © WSO2 Inc. 2014 292
2.
UR.UM_ID, ? FROM UM_USER UU, UM_ROLE UR WHERE UU.UM_USER_NAME=? ANDUU.UM_TENANT_ID=? AND UR.UM_ROLE_NAME=? ANDUR.UM_TENANT_ID=?</Property> <Property name="AddRoleToUserSQL-openedge">INSERT INTOUM_USER_ROLE (UM_ROLE_ID, UM_USER_ID, UM_TENANT_ID) SELECT UR.UM_ID,UU.UM_ID, ? FROM UM_ROLE UR, UM_USER UU WHERE UR.UM_ROLE_NAME=? ANDUR.UM_TENANT_ID=? AND UU.UM_USER_NAME=? ANDUU.UM_TENANT_ID=?</Property> <Property name="AddUserPropertySQL-openedge">INSERT INTOUM_USER_ATTRIBUTE (UM_USER_ID, UM_ATTR_NAME, UM_ATTR_VALUE,UM_PROFILE_ID, UM_TENANT_ID) SELECT UM_ID, ?, ?, ?, ? FROM UM_USERWHERE UM_USER_NAME=? AND UM_TENANT_ID=?</Property>

WSO2 Application Server, version 5.3.0
Copyright © WSO2 Inc. 2014 293
2.
3.
4.
<Property name="DomainName">wso2.org</Property> <Property name="Description"/></UserStoreManager>
Add the property to the UserStoreManager configuration for PasswordHashMethod JDBCUserStoreMana. For example:ger
<UserStoreManagerclass="org.wso2.carbon.user.core.jdbc.JDBCUserStoreManager"> <Property name="PasswordHashMethod">SHA</Property> ...</UserStoreManager>
The property specifies how the password should be stored. It usually has thePasswordHashMethodfollowing values:
SHA - Uses SHA digest method.MD5 - Uses MD 5 digest method.PLAIN_TEXT - Plain text passwords.
In addition, it also supports all digest methods in http://docs.oracle.com/javase/6/docs/api/java/security/Mess.ageDigest.html
If you are setting up an external JDBC user store, you need to set the following property to 'true' to be able tocreate roles in the primary user store.
<Property name="WriteGroups">false</Property>
Step 2: Updating the system administrator
The user is the super tenant that will be able to manage all other users, roles and permissions in the systemadminby using the management console of the product. Therefore, the user that should have admin permissions isrequired to be stored in the user store when you start the system for the first time. If the JDBC user store isread-only, then we need to always use a user ID that is already in the user store as the super tenant. Otherwise, ifthe JDBC user store can be written to, you have the option of creating a new admin user in the user store when youstart the system for the first time. Refer the related topics for information about the system administrator.
These two alternative configurations can be done as explained below.
If the user store is read-only, find a valid user that already resides in the RDBMS. For example, say a validusername is AdminSOA. Update the section of your configuration as shown below. You do<AdminUser>not have to update the password element as it is already set in the user store.
The sample for the external JDBC user store consists of properties pertaining to various SQLstatements. This is because the schema may be different for an external user store, and theseadjustments need to be made in order to streamline the configurations with WSO2 products.

WSO2 Application Server, version 5.3.0
Copyright © WSO2 Inc. 2014 294
1.
<AddAdmin>False</AddAdmin> <AdminRole>admin</AdminRole> <AdminUser> <UserName>AdminSOA</UserName> <Password>XXXXXX</Password> </AdminUser>
If the user store can be written to, you can add the super tenant user to the user store. Therefore, <AddAdmi should be set to as shown below.n> true
<AddAdmin>true</AddAdmin> <AdminRole>admin</AdminRole> <AdminUser> <UserName>admin</UserName> <Password>admin</Password> </AdminUser>
In the realm configuration section, set the value of the property to MultiTenantRealmConfigBuilder org.wso. For example:2.carbon.user.core.config.multitenancy.SimpleRealmConfigBuilder
<Propertyname="MultiTenantRealmConfigBuilder">org.wso2.carbon.user.core.config.multitenancy.SimpleRealmConfigBuilder</Property>
Step 3: Updating the datasources
Whenever there is an RDBMS set up for your system, it is necessary to create a corresponding datasource, whichallows the system to connect to the database. The datasource for the internal H2 database that is shipped withWSO2 products by default, is configured in the file, which is stored in the master-datasources.xml <PRODUCT_
directory. HOME>/repository/conf/datasources/ Refer the related topics for detailed information on settingup databases and configuring datasources.
There are two possible methods for updating datasources:Shown below is how the file is configured to connect to the default H2master-datasources.xmldatabase in your system. If you have replaced the default database with a new RDBMS, which you arenow using as the JDBC users store, you have to update the file with themaster-datasource.xmlrelevant information.

WSO2 Application Server, version 5.3.0
Copyright © WSO2 Inc. 2014 295
1.
2.
<datasource> <name>WSO2_CARBON_DB</name> <description>The datasource used for registry anduser manager</description> <jndiConfig> <name>jdbc/WSO2CarbonDB</name> </jndiConfig> <definition type="RDBMS"> <configuration> <url>jdbc:h2:repository/database/WSO2CARBON_DB;DB_CLOSE_ON_EXIT=FALSE;LOCK_TIMEOUT=60000</url> <username>wso2carbon</username> <password>wso2carbon</password> <driverClassName>org.h2.Driver</driverClassName> <maxActive>50</maxActive> <maxWait>60000</maxWait> <testOnBorrow>true</testOnBorrow> <validationQuery>SELECT 1</validationQuery> <validationInterval>30000</validationInterval> </configuration> </definition></datasource>
Alternatively, instead of using the master-datasource.xml file, you can also create a new XML file withthe datasource information of your new RDBMS and store it in the same <PRODUCT_HOME>/reposit
directory. ory/conf/datasources/Now, the datasource configuration and the user store manager configuration in the user-mgt.xml file shouldbe linked together. You can do this by referring to the datasource information (typically defined in the master
file) from the file as explained below.-datasources.xml user-mgt.xmlThe RDBMS that is used for storing Authorization information is configured under the <Configurati
section in the file, by adding as shownon> user-mgt.xml <Property name="dataSource">below. The following example refers to the default H2 database.
<Configuration> ....... <Property name="dataSource">jdbc/WSO2CarbonDB</Property> </Configuration>
If you are using the same RDBMS as the user store in your system, this datasource reference willsuffice.
However, if you have set up a separate RDBMS as the user store, instead of using a common RDBMSfor Authorization information as well as the user store, you must refer to the datasource configurationfrom within the User Store Manager configuration in the file by adding the user-mgt.xml <Property
property. name="dataSource">
Step 4: Starting the server

WSO2 Application Server, version 5.3.0
Copyright © WSO2 Inc. 2014 296
1.
2.
1.
Add the JDBC driver to the classpath by copying its JAR file into the <PRODUCT_HOME>/repository/comp directory. onents/lib
Start the server.
Related Topics
Setting Up the Physical Database: This section explains how you can set up a new RDBMS and configure itfor your system.Managing Datasources: This section explains the purpose of defining datasources and how they areconfigured for a product.Configuring the System Administrator: This section provides information about the system administrator user.
Properties of Primary User Stores: This section describes each of the properties used in the user-mgt.xml filefor configuring the primary user store.
Configuring a Read-Only LDAP or Active Directory User Store
User management functionality is provided by default in all WSO2 Carbon-based products and is configured in the u file found in the directory. This file is shipped with userser-mgt.xml <PRODUCT_HOME>/repository/conf/
store manager configurations for all possible user store types (JDBC, read-only LDAP/Active Directory andread-write LDAP/Active directory). The instructions given below explains how to configure a read-only LDAP orActive Directory as the primary user store for the WSO2 server.
Note that the RDBMS used in the default configuration can remain as the database used for storing Authorizationinformation.
Follow the given steps to configure a read-only LDAP/AD as the primary user store:
Step 1: Setting up the read-only LDAP/AD user store managerStep 2: Updating the system administratorStep 3: Starting the server
Step 1: Setting up the read-only LDAP/AD user store manager
Uncomment the following user store in the file:<PRODUCT_HOME>/repository/conf/user-mgt.xml< U s e r S t o r e M a n a g e r
. Also, ensureclass="org.wso2.carbon.user.core.ldap.ReadOnlyLDAPUserStoreManager">
The default User StoreThe primary user store that is configured by default in the user-mgt.xml file is a JDBC user store, whichreads/writes into the internal database of the product server. By default, the internal database is H2 for allWSO2 products excluding the Identity Server. This database is used by the Authorization Manager (for userauthentication information) as well as the User Store Manager (for defining users and roles). In the case ofthe WSO2 Identity Server, the default user store is an LDAP (Apache DS) that is shipped with the product.
Before you beginIf you create the file yourself, be sure to save it in the user-mgt.xml <PRODUCT_HOME>/reposit
directory.ory/confThe attribute for a read-only LDAP/Active Directory is class <UserStoreManagerclass="org.wso2.carbon.user.core.ldap.ReadOnlyLDAPUserStoreManager">.

WSO2 Application Server, version 5.3.0
Copyright © WSO2 Inc. 2014 297
1.
2.
that you comment out the configurations for any other user stores in the same file.
Given below is a sample for the LDAP/AD user store configuration in read-only mode. You can change thevalues to match your LDAP/AD. For descriptions of the user store properties, see the .related documentation
<UserManager> <Realm> ... <UserStoreManagerclass="org.wso2.carbon.user.core.ldap.ReadOnlyLDAPUserStoreManager"> <Propertyname="TenantManager">org.wso2.carbon.user.core.tenant.CommonHybridLDAPTenantManager</Property> <Property name="ReadOnly">true</Property> <Property name="Disabled">false</Property> <Property name="MaxUserNameListLength">100</Property> <Propertyname="ConnectionURL">ldap://localhost:10389<</Property> <Propertyname="ConnectionName">uid=admin,ou=system</Property> <Property name="ConnectionPassword">admin</Property> <Property name="PasswordHashMethod">PLAIN_TEXT</Property> <Property name="UserSearchBase">ou=system</Property> <Propertyname="UserNameListFilter">(objectClass=person)</Property> <Propertyname="UserNameSearchFilter">(&(objectClass=person)(uid=?))</Property> <Property name="UserNameAttribute">uid</Property> <Property name="ReadGroups">true</Property> <Property name="GroupSearchBase">ou=system</Property> <Propertyname="GroupNameListFilter">(objectClass=groupOfNames)</Property> <Propertyname="GroupNameSearchFilter">(&(objectClass=groupOfNames)(cn=?))</Property> <Property name="GroupNameAttribute">cn</Property> <Property name="SharedGroupNameAttribute">cn</Property> <Propertyname="SharedGroupSearchBase">ou=SharedGroups,dc=wso2,dc=org</Property>
<Propertyname="SharedGroupNameListFilter">(objectClass=groupOfNames)</Property>
<Propertyname="SharedTenantNameListFilter">(objectClass=organizationalUnit)</Property> <Property name="SharedTenantNameAttribute">ou</Property> <Propertyname="SharedTenantObjectClass">organizationalUnit</Property> <Property name="MembershipAttribute">member</Property> <Property name="UserRolesCacheEnabled">true</Property> <Property

WSO2 Application Server, version 5.3.0
Copyright © WSO2 Inc. 2014 298
2.
name="ReplaceEscapeCharactersAtUserLogin">true</Property> <Property name="MaxRoleNameListLength">100</Property> <Property name="SCIMEnabled">false</Property>

WSO2 Application Server, version 5.3.0
Copyright © WSO2 Inc. 2014 299
2.
1.
2.
3.
4.
</UserStoreManager> </Realm></UserManager>
Update the connection details to match your user store. For example:
<Property name="ConnectionURL">ldap://localhost:10389</Property>
For Active Directory, the connectionURL should have the following format:
<Property name="ConnectionURL">ldap://<ADhost-ip>:<AD_listen_port></Property>
Obtain a user who has permission to read all users/attributes and perform searches on the user storefrom your LDAP/Active Directory administrator. For example, if the privileged user is AdminLDAP andthe password is 2010#Avrudu, update the following sections of the user store configuration as shownbelow. Note that this user does NOT have to be the system administrator that you define .here
<Propertyname="ConnectionName">uid=AdminLDAP,ou=system</Property><Property name="ConnectionPassword">2010#Avrudu</Property>
Update with the directory name where the users are<Property name="UserSearchBase">stored. When LDAP searches for users, it will start from this location of the directory.
<Property name="UserSearchBase">ou=system</Property>
Set the attribute to use as the username, typically either or for LDAP. Ideally, cn uid <Property and shouldname="UserNameAttribute"> <Property name="UserNameSearchFilter">
refer to the same attribute. If you are not sure what attribute is available in your user store, check withyour LDAP/Active Directory administrator.
For example:
If you are using (secured) to connect to the Active Directory as shown below, you needldapsto import the certificate of Active Directory to the of the WSO2client-truststore.jksproduct. See the topic on configuring for information on how to add certificates to thekeystorestrust-store.
<Propertyname="ConnectionURL">ldaps://10.100.1.100:636</Property>

WSO2 Application Server, version 5.3.0
Copyright © WSO2 Inc. 2014 300
2.
4.
5.
<Property name="UserNameAttribute">uid</Property>
Set the property to 'true', if it should be allowed to read roles from this user store. WhenReadGroupsthis property is 'true', you must also specify values for the , GroupSearchBase GroupSearchFilterand properties. If the property is set to 'false', only Users canGroupNameAttribute ReadGroupsbe read from the user store. You can set the configuration to read roles from the user store by readingthe user/role mapping based on a membership (user list) or backlink attribute as shown below.
To read the user/role mapping based on a membership (This is used by the serveApacheDirectoryr and : OpenLDAP)
Enable the property.ReadGroups
<Property name="ReadGroups">true</Property>
Set the property to the directory name where the Roles are stored. That is,GroupSearchBasethe roles you create using the management console of your product will be stored in thisdirectory location. Also, when LDAP searches for users, it will start from this location of thedirectory. For example:
<Propertyname="GroupSearchBase">ou=system,CN=Users,DC=wso2,DC=test</Property>
Set the GroupSearchFilter and GroupNameAttributes. For example:
<Propertyname="GroupSearchFilter">(objectClass=groupOfNames)</Property><Property name="GroupNameAttribute">cn</Property>
Set the property as shown below:MembershipAttribute
<Property name="MembershipAttribute">member</Property>
To read roles based on a backlink attribute, use the following code snipet instead of the above:

WSO2 Application Server, version 5.3.0
Copyright © WSO2 Inc. 2014 301
2.
5.
6.
<Property name="ReadGroups">false</Property><Property name="GroupSearchBase">ou=system</Property><Propertyname="GroupSearchFilter">(objectClass=groupOfNames)</Property><Property name="GroupNameAttribute">cn</Property><Property name="MembershipAttribute">member</Property>
<Property name="BackLinksEnabled">true</Property><Property name="MembershipOfAttribute">memberOf</Property>
For Active Directory, you can use to enable<Property name="Referral">follow</Property>referrals within the user store. The AD user store may be partitioned into multiple domains. However,according to the use store configurations in the file, we are only connecting to one ofuser-mgt.xmlthe domains. Therefore, when a request for an object is received to the user store, the <Propertyname="Referral">follow</Property> property ensures that all the domains in the directory willbe searched to locate the requested object.
Step 2: Updating the system administrator
The admin user is the super tenant that will be able to manage all other users, roles and permissions in the systemby using the management console of the product. The <Configuration> section in the user-mgt.xml filecontains the super admin information. Update this configuration for the read-only LDAP/AD as explained below.
<Configuration> <AddAdmin>False</AddAdmin> <AdminRole>admin</AdminRole> <AdminUser> <UserName>AdminSOA</UserName> <Password>XXXXXX</Password> </AdminUser> ............</Configuration>
This should be set to 'False' as it will not be allowed to create users and roles in a read-only<AddAdmin>:user store.
The admin role you enter here should already exist in the read-only user store. Otherwise,<AdminRole>:you must enter an internal role, which will be saved to the internal database of the system when the systemstarts the first time.
Since we are configuring a read-only LDAP as the primary user store, the user that should<AdminUser>:have admin permissions is required to be stored in the user store when you start the system for the first time. For example, say a valid username is AdminSOA. Update the <AdminUser> section of your configuration asshown above. You do not have to update the password element as it is already set in the user store.
See the related documentation for more information about the system administrator.
Step 3: Starting the server
Start your server and try to log in as the admin user you specified. The password is the admin user's password inthe LDAP server.
Related Topics

WSO2 Application Server, version 5.3.0
Copyright © WSO2 Inc. 2014 302
1.
2.
Configuring the System Administrator: This section provides information about the system administrator user.Properties of Primary User Stores: This section describes each of the properties used in the user-mgt.xmlfile for configuring the primary user store.Setting up Keystores: This topics explains how keystores are used in WSO2 products.
Configuring a Read-Write Active Directory User Store
User management functionality is provided by default in all WSO2 Carbon-based products and is configured in the u file found in the directory. This topic provides instructionsser-mgt.xml <PRODUCT_HOME>/repository/conf/
on how to configure an external Active Directory as the primary user store for the WSO2 server, by changing thedefault configuration given in this file.
Note that the RDBMS used in the default configuration can remain as the database used for storing Authorizationinformation.
Follow the given steps to configure an external Active Directory as the primary user store:
Step 1: Setting up the external AD user store managerStep 2: Updating the system administratorStep 3: Starting the server
Step 1: Setting up the external AD user store manager
Enable the class in the ActiveDirectoryUserStoreManager <PRODUCT_HOME>/repository/conf/u file by uncommenting the code. When it is enabled, the user manager reads/writes into theser-mgt.xml
Active Directory user store.
The default configuration for the external read/write user store in the file is as given below.user-mgt.xmlChange the values according to your requirement. For more information about user store properties , see
The default User StoreThe primary user store that is configured by default in the file is a JDBC user store, whichuser-mgt.xmlreads/writes into the internal database of the product server. By default, the internal database is H2 for allWSO2 products excluding WSO2 Identity Server. This database is used by the Authorization Manager (foruser authentication information) as well as the User Store Manager (for defining users and roles). In thecase of the WSO2 Identity Server, the default user store is an LDAP (Apache DS) that is shipped with theproduct.
Before you beginIf you create the file yourself, be sure to save it in the user-mgt.xml <PRODUCT_HOME>/reposit
directory.ory/confThe attribute for an external AD is class <UserStoreManagerclass="org.wso2.carbon.user.core.ldap.ActiveDirectoryUserStoreManager">.
Note that these configurations already exist in the file so you only need touser-mgt.xmluncomment them and make the appropriate adjustments. Also ensure that you comment out theconfigurations for other user stores which you are not using.

WSO2 Application Server, version 5.3.0
Copyright © WSO2 Inc. 2014 303
2.
the related documentation .
<UserStoreManagerclass="org.wso2.carbon.user.core.ldap.ActiveDirectoryUserStoreManager"> <Propertyname="TenantManager">org.wso2.carbon.user.core.tenant.CommonHybridLDAPTenantManager</Property> <Property name="defaultRealmName">WSO2.ORG</Property> <Property name="Disabled">false</Property>
<Property name="kdcEnabled">false</Property> <Propertyname="ConnectionURL">ldaps://10.100.1.100:636</Property> <Propertyname="ConnectionName">CN=admin,CN=Users,DC=WSO2,DC=Com</Property> <Property name="ConnectionPassword">A1b2c3d4</Property> <Property name="PasswordHashMethod">PLAIN_TEXT</Property> <Propertyname="UserSearchBase">CN=Users,DC=WSO2,DC=Com</Property> <Property name="UserEntryObjectClass">user</Property> <Property name="UserNameAttribute">cn</Property> <Property name="isADLDSRole">false</Property> <Property name="userAccountControl">512</Property> <Propertyname="UserNameListFilter">(objectClass=user)</Property> <Propertyname="UserNameSearchFilter">(&(objectClass=user)(cn=?))</Property> <Propertyname="UsernameJavaRegEx">[a-zA-Z0-9._-|//]{3,30}$</Property> <Propertyname="UsernameJavaScriptRegEx">^[\S]{3,30}$</Property> <Propertyname="PasswordJavaScriptRegEx">^[\S]{5,30}$</Property> <Property name="RolenameJavaScriptRegEx">^[\S]{3,30}$</Property> <Propertyname="RolenameJavaRegEx">[a-zA-Z0-9._-|//]{3,30}$</Property> <Property name="ReadGroups">true</Property> <Property name="WriteGroups">true</Property> <Property name="EmptyRolesAllowed">true</Property> <Propertyname="GroupSearchBase">CN=Users,DC=WSO2,DC=Com</Property> <Property name="GroupEntryObjectClass">group</Property> <Property name="GroupNameAttribute">cn</Property> <Property name="SharedGroupNameAttribute">cn</Property> <Propertyname="SharedGroupSearchBase">ou=SharedGroups,dc=wso2,dc=org</Property> <Propertyname="SharedGroupEntryObjectClass">groups</Property> <Propertyname="SharedTenantNameListFilter">(object=organizationalUnit)</Property>
WSO2 Application Server, version 5.3.0
Copyright © WSO2 Inc. 2014 304
2.
<Property name="SharedTenantNameAttribute">ou</Property> <Propertyname="SharedTenantObjectClass">organizationalUnit</Property> <Property name="MembershipAttribute">member</Property> <Propertyname="GroupNameListFilter">(objectcategory=group)</Property> <Propertyname="GroupNameSearchFilter">(&(objectClass=group)(cn=?))</Property> <Property name="UserRolesCacheEnabled">true</Property> <Property name="Referral">follow</Property> <Property name="BackLinksEnabled">true</Property> <Property name="MaxRoleNameListLength">100</Property>

WSO2 Application Server, version 5.3.0
Copyright © WSO2 Inc. 2014 305
2.
3.
4.
<Property name="MaxUserNameListLength">100</Property> <Property name="SCIMEnabled">false</Property></UserStoreManager>
For Active Directory, you can use to enable<Property name="Referral">follow</Property>referrals within the user store. The AD user store may be partitioned into multiple domains. However,according to the use store configurations in the file, we are only connecting to one of theuser-mgt.xml
domains. Therefore, when a request for an object is received to the user store, the <Property name="Referral">follow</Property> property ensures that all the domains in the directory will be
s e a r c h e d t o l o c a t e t h e r e q u e s t e d o b j e c t .
Set the attribute to use as the username, typically either or for LDAP. Ideally, cn uid <Property and should refer to thename="UserNameAttribute"> <Property name="UserNameSearchFilter">
same attribute. If you are not sure what attribute is available in your user store, check with your LDAP/ActiveDirectory administrator.
When working with Active Directory;
It is best to enable the property in the GetAllRolesOfUserEnabled AuthorizationMana
as follows. See the documentation on for moreger configuring the Authorization Managerinformation.
<AuthorizationManagerclass="org.wso2.carbon.user.core.authorization.JDBCAuthorizationManager"> <Propertyname="AdminRoleManagementPermissions">/permission</Property> <Property name="AuthorizationCacheEnabled">true</Property> <Property name="GetAllRolesOfUserEnabled">true</Property></AuthorizationManager>
Although using the user store manager does not depend on this property, you must considerenabling this if there are any performance issues in your production environment. Enabling thisproperty affects the performance when the user logs in. This depends on the users, roles andp e r m i s s i o n s t a t s .
If you are using ldaps (secured) to connect to the Active Directory as shown in the example below, you need to import the certificate of Active Directory to the client-truststore.jk
s of the WSO2 product. See the topic on configuring keystores for information on how to addcertificates to the trust-store.
<Propertyname="ConnectionURL">ldaps://10.100.1.100:636</Property>

WSO2 Application Server, version 5.3.0
Copyright © WSO2 Inc. 2014 306
4.
5.
<Property name="UserNameAttribute">sAMAccountName</Property>
Set the property to 'true', if it should be allowed to read roles from this user store. When thisReadGroupsproperty is 'true', you must also specify values for the , and GroupSearchBase GroupSearchFilter Grou
properties. If the property is set to 'false', only Users can be read from thepNameAttribute ReadGroupsuser store. You can set the configuration to read roles from the user store by reading the user/role mappingbased on a membership (user list) or backlink attribute as shown below.
To read the user/role mapping based on a membership (This is used by the server and ApacheDirectory O: penLDAP)
Enable the property.ReadGroups
<Property name="ReadGroups">true</Property>
Set the property to the directory name where the Roles are stored. That is, theGroupSearchBaseroles you create using the management console of your product will be stored in this directory location.Also, when LDAP searches for users, it will start from this location of the directory. For example:
<Propertyname="GroupSearchBase">ou=system,CN=Users,DC=wso2,DC=test</Property>
Set the GroupSearchFilter and GroupNameAttributes. For example:
<Propertyname="GroupSearchFilter">(objectClass=groupOfNames)</Property><Property name="GroupNameAttribute">cn</Property>
Set the property as shown below:MembershipAttribute
<Property name="MembershipAttribute">member</Property>
To read roles based on a backlink attribute, use the following code snipet instead of the above:

WSO2 Application Server, version 5.3.0
Copyright © WSO2 Inc. 2014 307
5.
<Property name="ReadGroups">false</Property><Property name="GroupSearchBase">ou=system</Property><Propertyname="GroupSearchFilter">(objectClass=groupOfNames)</Property><Property name="GroupNameAttribute">cn</Property><Property name="MembershipAttribute">member</Property>
<Property name="BackLinksEnabled">true</Property><Property name="MembershipOfAttribute">memberOf</Property>
Step 2: Updating the system administrator
The user is the super tenant that will be able to manage all other users, roles and permissions in the systemadminby using the management console of the product. Therefore, the user that should have admin permissions isrequired to be stored in the user store when you start the system for the first time. Since the Active Directory userstore can be written to, you have the option of creating a new admin user in the user store when you start thesystem for the first time. Alternatively, you can also use a user ID that already exists in the user store. See the relate
for more information about the system administrator.d documentation
These two alternative configurations can be done as explained below.
Find a valid user that already resides in the user store. For example, say a valid username is AdminSOA.Update the section of your configuration as shown below. You do not have to update the<AdminUser>password element as it is already set in the user store.
<AddAdmin>False</AddAdmin> <AdminRole>admin</AdminRole> <AdminUser> <UserName>AdminSOA</UserName> <Password>XXXXXX</Password> </AdminUser>
Since the user store can be written to, you can add the super tenant user to the user store. Therefore, <AddA should be set to as shown below.dmin> true
<AddAdmin>true</AddAdmin> <AdminRole>admin</AdminRole> <AdminUser> <UserName>admin</UserName> <Password>admin</Password> </AdminUser>
Step 3: Starting the server
Start your server and try to log in as the admin user you specified.
Related Topics
Configuring the User Realm: This section provides information about setting up the system administrator andthe authorization manager.

WSO2 Application Server, version 5.3.0
Copyright © WSO2 Inc. 2014 308
1.
Setting up Keystores: This section explains how keystores are configured and used in a system.
Properties of Primary User Stores: This section describes each of the properties used in the user-mgt.xml filefor configuring the primary user store.
Configuring a Read-Write LDAP User Store
User management functionality is provided by default in all WSO2 Carbon-based products and is configured in the u file found in the directory. This file is shipped with userser-mgt.xml <PRODUCT_HOME>/repository/conf/
store manager configurations for all possible user store types (JDBC, read-only LDAP/Active Directory, read-writeLDAP and read-write Active directory). The instructions given below explains how to configure a read-write LDAP asthe primary user store for the WSO2 server.
Note that the RDBMS used in the default configuration can remain as the database used for storing Authorizationinformation.
Follow the given steps to configure a read-write LDAP as the primary user store:
Step 1: Setting up the read-write LDAP user store managerStep 2: Updating the system administratorStep 3: Starting the server
Step 1: Setting up the read-write LDAP user store manager
Once the above points are made note of and completed, you can start configuring your external read-write LDAP asthe primary user store.
Enable the user store manager class in the file by<ReadWriteLDAPUserStoreManager> user-mgt.xmluncommenting the relevant code. When it is enabled, the user manager reads/writes into the LDAP userstore.
The default User StoreThe primary user store that is configured by default in the user-mgt.xml file of WSO2 products is a JDBCuser store, which reads/writes into the internal database of the product server. By default, the internaldatabase is H2. This database is used by the Authorization Manager (for user authentication information) aswell as the User Store Manager (for defining users and roles). In the case of the WSO2 Identity Server, thedefault user store is an LDAP (Apache DS) that is shipped with the product.
Before you beginIf you create the file yourself, be sure to save it in the user-mgt.xml <PRODUCT_HOME>/reposit
directory.ory/confThe attribute for a read-write LDAP is class <UserStoreManagerclass="org.wso2.carbon.user.core.ldap.ReadWriteLDAPUserStoreManager">
Note that these configurations already exist in the file so you only need touser-mgt.xmluncomment them and make the appropriate adjustments. Also ensure that you comment out theconfigurations for other user stores that you are not using; in short, you can only configure oneprimary user store.

WSO2 Application Server, version 5.3.0
Copyright © WSO2 Inc. 2014 309
1.
2. The default configuration for the external read/write user store in the file is as follows. Youuser-mgt.xmlmay have to change some of these values according to your requirements. For more information about userstore properties, see the related documentation.
<UserStoreManagerclass="org.wso2.carbon.user.core.ldap.ReadWriteLDAPUserStoreManager"> <Propertyname="TenantManager">org.wso2.carbon.user.core.tenant.CommonHybridLDAPTenantManager</Property> <Propertyname="ConnectionURL">ldap://localhost:${Ports.EmbeddedLDAP.LDAPServerPort}</Property> <Property name="ConnectionName">uid=admin,ou=system</Property> <Property name="ConnectionPassword">admin</Property> <Property name="PasswordHashMethod">SHA</Property> <Property name="UserNameListFilter">(objectClass=person)</Property> <Property name="UserEntryObjectClass">wso2Person</Property> <Property name="UserSearchBase">ou=Users,dc=wso2,dc=org</Property> <Propertyname="UserNameSearchFilter">(&(objectClass=person)(uid=?))</Property> <Property name="UserNameAttribute">uid</Property> <Property name="PasswordJavaScriptRegEx">[\\S]{5,30}</Property> <Property name="UsernameJavaScriptRegEx">[\\S]{3,30}</Property> <Propertyname="UsernameJavaRegEx">^[^~!@#$;%^*+={}\\|\\\\<>,\'\"]{3,30}$</Property> <Property name="RolenameJavaScriptRegEx">[\\S]{3,30}</Property> <Propertyname="RolenameJavaRegEx">^[^~!@#$;%^*+={}\\|\\\\<>,\'\"]{3,30}$</Property> <Property name="ReadGroups">true</Property> <Property name="WriteGroups">true</Property> <Property name="EmptyRolesAllowed">true</Property> <Propertyname="GroupSearchBase">ou=Groups,dc=wso2,dc=org</Property> <Propertyname="GroupNameListFilter">(objectClass=groupOfNames)</Property> <Property name="GroupEntryObjectClass">groupOfNames</Property> <Propertyname="GroupNameSearchFilter">(&(objectClass=groupOfNames)(cn=?))</Property> <Property name="GroupNameAttribute">cn</Property> <Property name="SharedGroupNameAttribute">cn</Property> <Propertyname="SharedGroupSearchBase">ou=SharedGroups,dc=wso2,dc=org</Property> <Property name="SharedGroupEntryObjectClass">groups</Property> <Propertyname="SharedTenantNameListFilter">(object=organizationalUnit)</Property>

WSO2 Application Server, version 5.3.0
Copyright © WSO2 Inc. 2014 310
2.
<Property name="SharedTenantNameAttribute">ou</Property> <Propertyname="SharedTenantObjectClass">organizationalUnit</Property> <Property name="MembershipAttribute">member</Property> <Property name="UserRolesCacheEnabled">true</Property>

WSO2 Application Server, version 5.3.0
Copyright © WSO2 Inc. 2014 311
2.
1.
2.
3.
4.
<Propertyname="UserDNPattern">uid={0},ou=Users,dc=wso2,dc=org</Property></UserStoreManager>
To read and write to an LDAP user store, it is important to ensure that the and ReadGroups WriteGr properties in the file are set to .oups <PRODUCT_HOME>/repository/conf/user-mgt.xml true
<Property name="ReadGroups">true</Property><Property name="WriteGroups">true</Property>
Set the attribute to use as the username, typically either or for LDAP. Ideally, cn uid <Property and shouldname="UserNameAttribute"> <Property name="UserNameSearchFilter">
refer to the same attribute. If you are not sure what attribute is available in your user store, check withyour LDAP administrator.
<Property name="UserNameAttribute">uid</Property>
Specify the following properties that are relevant to connecting to the LDAP in order to perform varioustasks.
<Propertyname="ConnectionURL">ldap://localhost:${Ports.EmbeddedLDAP.LDAPServerPort}</Property><Property name="ConnectionName">uid=admin,ou=system</Property><Property name="ConnectionPassword">admin</Property>
Set the property to 'true', if it should be allowed to read roles from this user store. WhenReadGroupsthis property is 'true', you must also specify values for the , GroupSearchBase GroupSearchFilter and properties. If the property is set to 'false', only Users canGroupNameAttribute ReadGroupsbe read from the user store. You can set the configuration to read roles from the user store by readingthe user/role mapping based on a membership (user list) or backlink attribute as shown below.
To read the user/role mapping based on a membership (This is used by the serveApacheDirectoryr and : OpenLDAP)
Enable the property.ReadGroups
<Property name="ReadGroups">true</Property>
Set the property to the directory name where the Roles are stored. That is,GroupSearchBasethe roles you create using the management console of your product will be stored in thisdirectory location. Also, when LDAP searches for users, it will start from this location of thedirectory. For example:

WSO2 Application Server, version 5.3.0
Copyright © WSO2 Inc. 2014 312
2.
4.
<Propertyname="GroupSearchBase">ou=system,CN=Users,DC=wso2,DC=test</Property>
Set the GroupSearchFilter and GroupNameAttributes. For example:
<Propertyname="GroupSearchFilter">(objectClass=groupOfNames)</Property><Property name="GroupNameAttribute">cn</Property>
Set the property as shown below:MembershipAttribute
<Property name="MembershipAttribute">member</Property>
To read roles based on a backlink attribute, use the following code snipet instead of the above:
<Property name="ReadGroups">false</Property><Property name="GroupSearchBase">ou=system</Property><Propertyname="GroupSearchFilter">(objectClass=groupOfNames)</Property><Property name="GroupNameAttribute">cn</Property><Property name="MembershipAttribute">member</Property>
<Property name="BackLinksEnabled">true</Property><Property name="MembershipOfAttribute">memberOf</Property>
Step 2: Updating the system administrator
The user is the super tenant that will be able to manage all other users, roles and permissions in the systemadminby using the management console of the product. Therefore, the user that should have admin permissions isrequired to be stored in the user store when you start the system for the first time. Since the LDAP user store can bewritten to, you have the option of creating a new admin user in the user store when you start the system for the firsttime. Alternatively, you can also use a user ID that already exists in the LDAP. See the forrelated documentationinformation about the system administrator.
These two alternative configurations can be done as explained below.
If the user store is read-only, find a valid user that already resides in the user store. For example, say a validusername is AdminSOA. Update the section of your configuration as shown below. You do<AdminUser>not have to update the password element as it is already set in the user store.

WSO2 Application Server, version 5.3.0
Copyright © WSO2 Inc. 2014 313
1. 2.
<AddAdmin>False</AddAdmin> <AdminRole>admin</AdminRole> <AdminUser> <UserName>AdminSOA</UserName> <Password>XXXXXX</Password> </AdminUser>
If the user store can be written to, you can add the super tenant user to the user store. Therefore, <AddAdmi should be set to true as shown below.n>
<AddAdmin>true</AddAdmin> <AdminRole>admin</AdminRole> <AdminUser> <UserName>admin</UserName> <Password>admin</Password> </AdminUser>
Step 3: Starting the server
Start your server and try to log in as the admin user you specified in .Step 2
Related Topics
Configuring the System Administrator: This section provides information about the system administrator user.Properties of Primary User Stores: This section describes each of the properties used in the user-mgt.xmlfile for configuring the primary user store.
Configuring Secondary User Stores
The default configurations of WSO2 products have a single, embedded user store (primary user store). If required,you can configure WSO2 products to connect to several secondary user stores as well. After configuration, usersfrom different stores can log in and perform operations depending on their roles/permissions. You can also configureyour own customized user stores and connect them with the products as secondary stores.
The topics below explain how to configure secondary user stores manually or using the management console:
Configuring using the management consoleConfiguring manually
Configuring using the management console
Log in to the management console and click sub menu under menu.User Store Management ConfigureThe page opens. Initially, there are no secondary user stores.User Store Management
Before you begin:If you are setting up a database other than the default H2 that comes with the product to store userinformation, select the script relevant to your database type from the folder<PRODUCT_HOME>/dbscriptsand run it on your database. It creates the necessary tables.

WSO2 Application Server, version 5.3.0
Copyright © WSO2 Inc. 2014 314
2.
3.
4.
5.
6.
Click .Add Secondary User Store
In the User Store Manager Class list, select the type of user store you are creating:
User store manager Description
org.wso2.carbon.user.core.ldap.ReadOnlyLDAPUserStoreManager Use to do read-only operations for LDAPReadOnlyLDAPUserStoreManageruser stores.
org.wso2.carbon.user.core.ldap.ReadWriteLDAPUserStoreManager Use for LDAP user stores to do bothReadWriteLDAPUserStoreManagerread and write operations.
org.wso2.carbon.user.core.ldap.ActiveDirectoryUserStoreManager Use to configure an Active DirectoryActiveDirectoryUserStoreManagerDomain Service (AD DS) or Active Directory Lightweight Directory Service (ADLDS). This can be used for read/write operations. If you need to use AD asonlyread-only, you must use org.wso2.carbon.user.core.ldap.ReadOnlyL
.DAPUserStoreManager
org.wso2.carbon.user.core.jdbc.JDBCUserStoreManager Use for JDBC user stores. The JDBC user storeJDBCUserStoreManagercan be configured for read-only mode or read/write mode using the followingproperty: .<Property name="ReadOnly">false/true</Property>
You can also populate this drop-down list with custom user store manager implementations by adding them tothe server. A sample custom user store manager can be found in .the repository
Enter a unique domain name with no underscore (_) characters, and optionally enter a description for thisuser store.
Enter values for the properties, using the descriptions in the Descriptions column for guidance. The propertiesthat appear vary based on the user store manager class you selected, and there may be additional propertiesin an Optional or Advanced section at the bottom of the screen. See the for descriptions of userrelated topicss t o r e p r o p e r t i e s .
Note: You cannot update the at run time, so it is not visible on this page.PRIMARY user store

WSO2 Application Server, version 5.3.0
Copyright © WSO2 Inc. 2014 315
6.
7.
8.
9.
10.
11.
Ensure that all the mandatory fields are filled and a valid domain name is given and click . Add
A message appears saying that the user stores are being added.
Refresh the page after a few seconds to check the status.
If the new user store is successfully added, it will appear in the page.User Store Management
After adding to the server, you can edit the properties of the new secondary user store and enable/disable itin a dynamic manner.
Configuring manually
By default, the configuration of the primary user store is saved in the file. user-mgt.xml When you create asecondary user store using the management console as explained above, its configuration is saved to an XML filewith the same name as the domain name you specify. Alternatively, you can create this XML file manually and saveit as follows:
When you configure multiple user stores, you must igive a unique domain name to each user storen the element. If you configure a user store without specifying a domain name, the<DomainName>server throws an exception at start up.If it is the configuration of a super tenant, save the secondary user store definitions in <PRODUCT_HOM
Note: The above message does not imply that the user store is added successfully. It simply meansthat the server is attempting to add the new user store to the end of the available chain of stores.

WSO2 Application Server, version 5.3.0
Copyright © WSO2 Inc. 2014 316
directory.E>/repository/deployment/server/userstores If it is a general tenant, save the configuration in <PRODUCT_HOME>/repository/tenants/<tena
directory.ntid>/userstores The the secondary user store configuration file must have the same name as the domain with anunderscore (_) in place of the period. For example, if the domain is wso2.com, name the file as wso2_com.xml.One file only contains the definition for one user store domain.
Related topics
Properties of User Stores: This topic explains the properties that are used when defining user stores.
Working with Properties of User Stores
The following table provides descriptions of the key properties you use to configure primary user stores.
Property name Description
MaxUserNameListLength Controls the number of users listed in the user store of a WSO2 product. This is useful when you have a large number of users and don't want to list them all.Setting this property to 0 displays all users.
ConnectionURL Connection URL to the user store server. In the case of default LDAP in Carbon, the port is specified in the file, and a reference to that port iscarbon.xmlincluded in this configuration.
ConnectionName The username used to connect to the database and perform various operations. This user does not have to be an administrator in the user store or have anadministrator role in the WSO2 product that you are using, but this user MUST have permissions to read the user list and users' attributes and to performsearch operations on the user store. The value you specify is used as the DN ( ) attribute of the user. This property is mandatory.Distinguish Name
ConnectionPassword Password for the user.ConnectionName
DisplayNameAttribute This is an optional property. The Display Name Attribute is the name by which users will be listed when you search for users in the management console (Go toConfiguration -> Users tab).
PasswordHashMethod Password hash method to use when storing user entries in the user store.
UserNameListFilter Filtering criteria for listing all the user entries in the user store. This query or filter is used when doing search operations on users. In this case, the searchoperation only provides the objects created from the specified class. This query is the same as listing out all the available users in the management console.
UserEntryObjectClass Object class used to construct user entries. By default, it is a custom object class defined with the name .wso2Person
UserSearchBase DN of the context or object under which the user entries are stored in the user store. In this case, it is the "users" container. When the user store searches forusers, it will start from this location of the directory.
UserNameSearchFilter Filtering criteria used to search for a particular user entry.
Different databases have different search bases.

WSO2 Application Server, version 5.3.0
Copyright © WSO2 Inc. 2014 317
UserNameAttribute The attribute used for uniquely identifying a user entry. Users can be authenticated using their email address, UID, etc.
UsernameWithEmailJavaScriptRegEx This property defines the JavaScript regular expression pattern when the property is set to in configuration file. IfEnableEmailUserName true carbon.xmlyou need to support both email as a user name and normal user names, you can set this property as follows.
<Property name="UsernameWithEmailJavaScriptRegEx">^[\S]{3,30}$</Property>
PasswordJavaScriptRegEx Policy that defines the password format.
UsernameJavaScriptRegEx The regular expression used by the front-end components for username validation.
UsernameJavaRegEx A regular expression to validate usernames. By default, strings have a length of 5 to 30. Only non-empty characters are allowed. You can provide ranges ofalphabets, numbers and also ranges of ASCII values in the RegEx properties.
<Propertyname="UsernameJavaRegEx">[a-zA-z0-9._-|!#$%"'*-=?^`():,;~//\u00C0-\u1FFF\u2C00-\uD7FF\w]{3,30}$</Property>
RolenameJavaScriptRegEx The regular expression used by the front-end components for role name validation.
RolenameJavaRegEx A regular expression used to validate role names. By default, strings have a length of 5 to 30. Only non-empty characters are allowed.
ReadGroups Specifies whether groups should be read from the user store. If this is disabled by setting it to , none of the groups in the user store can be read, and thefalsefollowing group configurations are NOT mandatory: , , or .GroupSearchBase GroupNameListFilter GroupNameAttribute
WriteGroups Specifies whether groups should be written to user store.
EmptyRolesAllowed Specifies whether the underlying user store allows empty groups to be created. In the case of LDAP in Carbon, the schema is modified such that empty groupsare allowed to be created. Usually LDAP servers do not allow you to create empty groups.
GroupSearchBase DN of the context under which user entries are stored in the user store.
GroupSearchFilter The query used to search for groups.
GroupNameListFilter Filtering criteria for listing all the group entries in the user store. Groups are created in LDAP using the " " class. The group search operation onlygroupOfNamereturns objects created from this class.
GroupEntryObjectClass Object class used to construct group entries.
GroupNameSearchFilter Filtering criteria used to search for a particular group entry.
GroupNameAttribute Attribute used for uniquely identifying a user entry. This attribute is to be treated as the group name.
MembershipAttribute Attribute used to define members of groups.
UserRolesCacheEnabled This is to indicate whether to cache the role list of a user. By default this is set to . Set it to if the user roles are changed by external means andtrue falsethose changes should be instantly reflected in the Carbon instance.
The name of the attribute is considered as the username.

WSO2 Application Server, version 5.3.0
Copyright © WSO2 Inc. 2014 318
UserDNPattern (LDAP) The patten for the user's DN, which can be defined to improve the search. When there are many user entries in the LDAP user store, defining a UserD provides more impact on performances as the LDAP does not have to travel through the entire tree to find users.NPattern
ReplaceEscapeCharactersAtUserLogin (LDAP) If the user name has special characters it replaces it to validate the user logging in. Only " " and " " are identified as escape characters.\ \\
TenantManager Includes the location of the tenant manager.
ReadOnly (LDAP and JDBC) Indicates whether the user store of this realm operates in the user read only mode or not.
IsEmailUserName (JDBC) Indicates whether the user's email is used as their username (apply when realm operates in read-only mode).
DomainCalculation (JDBC) Can be either default or custom (this applies when the realm operates in read only mode).
PasswordDigest (JDBC) Digesting algorithm of the password. Has values such as, PLAIN_TEXT, SHA etc.
StoreSaltedPassword (JDBC) Indicates whether to salt the password.
UserNameUniqueAcrossTenants (JDBC) An attribute used for multi-tenancy.
PasswordJavaRegEx (LDAP and JDBC) A regular expression to validate passwords. By default, strings having a length between 5 to 30 with non-empty characters are allowed.
PasswordJavaScriptRegEx The regular expression used by the front-end components for password validation.
UsernameJavaRegEx A regular expression to validate usernames. By default, strings having a length 5 to 30 between with non-empty characters are allowed.
UsernameJavaScriptRegEx The regular expression used by the front-end components for username validation.
RolenameJavaRegEx A regular expression to validate role names. By default, strings having a length between 5 to 30 with non-empty characters are allowed.
RolenameJavaScriptRegEx The regular expression used by the front-end components for rolename validation.
MultiTenantRealmConfigBuilder Tenant Manager specific realm config parameter. Can be used to build different types of realms for the tenant.
SharedGroupEnabled This property is used to enable/disable the shared role functionality.
SharedGroupSearchBase Shared roles are created for other tenants to access under the mentioned DN.
SharedTenantObjectClass Object class for the shared groups created.
SharedTenantNameAttribute Name attribute for the shared group.
SharedTenantNameListFilter This is currently not used.
Managing Users, Roles and Permissions
User management functionality is provided by default in all WSO2 Carbon-based products and is configured in the u file found in the directory. The following documentationser-mgt.xml <PRODUCT_HOME>/repository/conf/
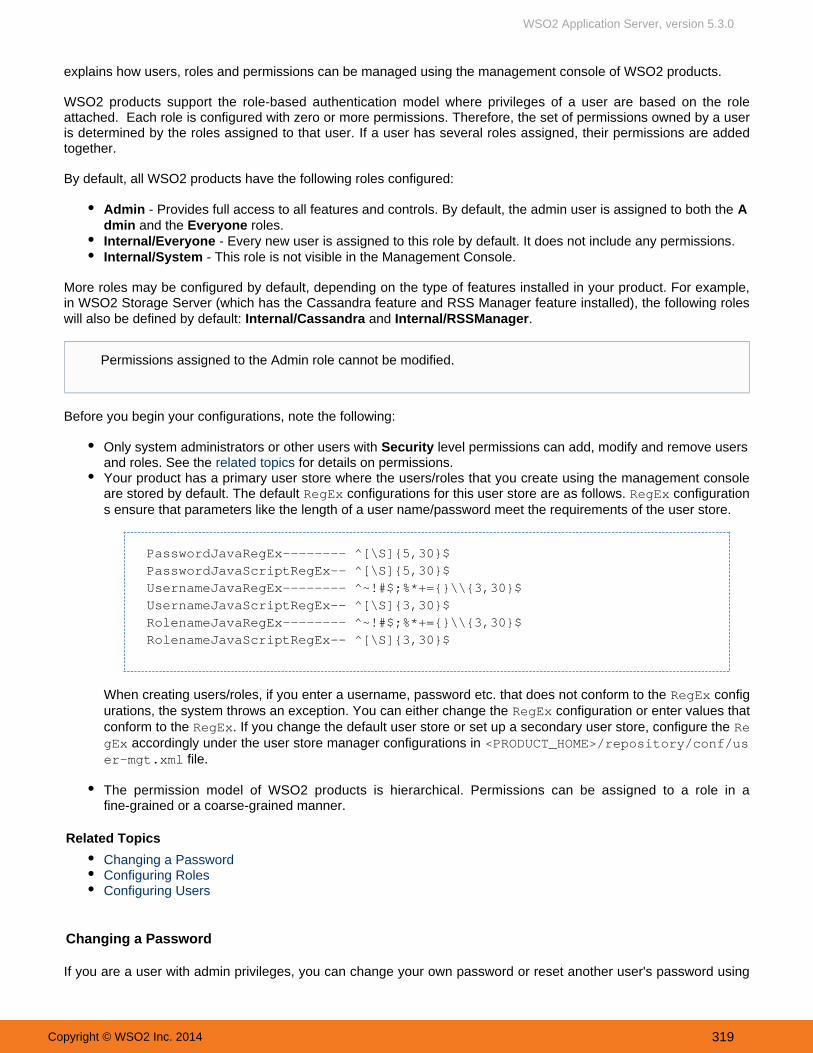
WSO2 Application Server, version 5.3.0
Copyright © WSO2 Inc. 2014 319
explains how users, roles and permissions can be managed using the management console of WSO2 products.
WSO2 products support the role-based authentication model where privileges of a user are based on the roleattached. Each role is configured with zero or more permissions. Therefore, the set of permissions owned by a useris determined by the roles assigned to that user. If a user has several roles assigned, their permissions are addedtogether.
By default, all WSO2 products have the following roles configured:
Admin - Provides full access to all features and controls. By default, the admin user is assigned to both the A and the roles.dmin Everyone
Internal/Everyone - Every new user is assigned to this role by default. It does not include any permissions.Internal/System - This role is not visible in the Management Console.
More roles may be configured by default, depending on the type of features installed in your product. For example,in WSO2 Storage Server (which has the Cassandra feature and RSS Manager feature installed), the following roleswill also be defined by default: and Internal/Cassandra .Internal/RSSManager
Before you begin your configurations, note the following:
Only system administrators or other users with level permissions can add, modify and remove usersSecurityand roles. See the for details on permissions.related topicsYour product has a primary user store where the users/roles that you create using the management consoleare stored by default. The default configurations for this user store are as follows. configurationRegEx RegExs ensure that parameters like the length of a user name/password meet the requirements of the user store.
PasswordJavaRegEx-------- ^[\S]{5,30}$PasswordJavaScriptRegEx-- ^[\S]{5,30}$UsernameJavaRegEx-------- ^~!#$;%*+={}\\{3,30}$UsernameJavaScriptRegEx-- ^[\S]{3,30}$RolenameJavaRegEx-------- ^~!#$;%*+={}\\{3,30}$RolenameJavaScriptRegEx-- ^[\S]{3,30}$
When creating users/roles, if you enter a username, password etc. that does not conform to the configRegExurations, the system throws an exception. You can either change the configuration or enter values thatRegExconform to the . If you change the default user store or set up a secondary user store, configure the RegEx Re
accordingly under the user store manager configurations in gEx <PRODUCT_HOME>/repository/conf/us file.er-mgt.xml
The permission model of WSO2 products is hierarchical. Permissions can be assigned to a role in afine-grained or a coarse-grained manner.
Related Topics
Changing a PasswordConfiguring RolesConfiguring Users
Changing a Password
If you are a user with admin privileges, you can change your own password or reset another user's password using
Permissions assigned to the Admin role cannot be modified.

WSO2 Application Server, version 5.3.0
Copyright © WSO2 Inc. 2014 320
1. 2.
3.
4.
1. 2. 3. 4.
1. 2.
3.
the the management console as explained below.
To change a user's password:
Log in to the management console of your product.On the tab, click . Configure Users and Roles
To change your own password, click , enter your current password and newChange My Passwordpassword, and click .ChangeIf you are an admin user and need to change another user's password (such as if they have forgotten theircurrent password and need you to reset it), do the following:
Click U .sersFind the user's account on the screen and click in the column.Users Change Password ActionsEnter a new temporary password and click .ChangeInform the user of their new temporary password and instruct them to log in and change it as soon aspossible.
Configuring Roles
User management functionality is provided by default in all WSO2 Carbon-based products and is configured in the u file found in the directory. The instructions given in thisser-mgt.xml <PRODUCT_HOME>/repository/conf/
topic explain how you can add and manager user roles from the management console.
Roles contain permissions for users to manage the server. You can create different roles with various combinationsof permissions and assign them to a user or a group of users. Through the Management Console, you can also editand delete an existing user role.
WSO2 supports the role-based authentication model where privileges of a user are based on the role to which it isattached. By default, WSO2 products come with the following roles:
Admin - Provides full access to all features and controls. By default, the admin user is assigned to both theAdmin and the Everyone roles.Everyone - Every new user is assigned to this role by default. It does not include any permissions by default.System - This role is not visible in the Management Console.
If a user has several assigned roles, their permissions are added together.
Adding a user role Editing or deleting a roleUpdating role names
Adding a user role
Follow the instructions below to add a user role.
Go to the tab in the management console and click .Configure Users and RolesClick . This link is only visible to users with level permissions role. By default, the admin userRoles Securityhas this permission enabled. See more information about permissions in the .related topicsClick . The following screen will open:Add New Role

WSO2 Application Server, version 5.3.0
Copyright © WSO2 Inc. 2014 321
3.
4. 1.
2. 3.
5.
6.
7.
Do the following:
In the list, specify the user store where you want to create this role. This list includes theDomainprimary user store and any other secondary user stores that are configured for your product. See the r
for information on configuring user storeselated topicsEnter a unique name for this role.Click .Next
Select the permissions that you want users with this role to have. See more information about permissions inthe related topics .Note that when you assign this role to a user, you can override the role's permissions and customize them forthe user. Select the existing users to whom this role should be assigned. You can also assign this role to users later,but if you are creating this role in an external user store that does not allow empty roles, you must assign it toat least one user. You can search for a user by name, or view all users by entering in the search field.*Click .Finish
The role is created and is listed on the page. You can now edit the role as needed.Roles
Editing or deleting a role
If you need to do modifications to a role, select the domain (user store) where the role resides, and then use therelevant links in the column on the screen: Actions Roles
Rename the roleChange the default permissions associated with this roleAssign this role to usersView the users who are assigned this roleDelete the role if you no longer need it
Updating role names
If you need to do modifications to the role names, you need to do one of the following:
Update before the first startup (recommended)Update after the product is used for sometime
Update before the first startup (recommended)
If the role is in an external user store to which you are connected in read-only mode, you will be able to viewthe existing roles but not edit or delete them. However, you can still create new editable roles.

WSO2 Application Server, version 5.3.0
Copyright © WSO2 Inc. 2014 322
1. 2.
3.
The default role names ( and ) can be changed before starting the WSO2 product by editing admin everyone <PRO. See more information about DUCT_HOME>/repository/conf/user-mgt.xml configuring the system
.administrator
<Configuration> <AdminRole>admin</AdminRole> <AdminUser> <UserName>admin</UserName> <Password>admin</Password> </AdminUser> <EveryOneRoleName>everyone</EveryOneRoleName> <!-- By default users inthis role sees the registry root --> <Property name="dataSource">jdbc/WSO2CarbonDB</Property> <Propertyname="MultiTenantRealmConfigBuilder">org.wso2.carbon.user.core.config.multitenancy.SimpleRealmConfigBuilder</Property> </Configuration>
The following are the changes that need to be made in the configurations above:
Change to .<AdminRole>admin</AdminRole> <AdminRole>administrator</AdminRole>Change to <EveryOneRoleName>everyone</EveryOneRoleName> <EveryOneRoleName>Your
.role</EveryOneRoleName>
Update after the product is used for sometime
You do not have to do this when updating before the first startup. The following steps guide you through updatingthe role names:
Do the configuration changes indicated in .the above sectionYou need to do the following user store level changes for existing users if you have changed the role namesas mentioned earlier.
If you are connected to you need to update the table withJDBCUserStoreManager UM_USER_ROLEthe existing users after changing the and role names. Also if you have changed theadmin everyonepermission of role, the has to be updated with the permissions toeveryone UM_ROLE_PERMISSIONthe new role.
If you are connected to , you need to populate the members ofReadWriteLdapUserStoreManagerthe previous admin role to the new role under the Groups.
See more information about .setting up user storesAfter the changes, restart the server.
Related Topics
Configuring the System Administrator: This section describes how the system administrator user and role isset up and configured.Configuring User Stores: This section explains how user stores (which are repositories storing informationabout Users and Roles) are set up and configured.
The schema can be located by referring to the data source defined in the user-mgt.xml file.The data source definition can be found under /<PRODUCT_HOME> repository/conf/data
.sources/master-datasources.xml

WSO2 Application Server, version 5.3.0
Copyright © WSO2 Inc. 2014 323
1. 2. 3.
4. 1.
2.
3. 5.
6.
Configuring Users
User management functionality is provided by default in all WSO2 Carbon-based products and is configured in the u file found in the directory. The instructions given in thisser-mgt.xml <PRODUCT_HOME>/repository/conf/
topic explain how you can add and manager users from the management console.
To enable users to log into the management console, you create user accounts and assign them roles, which aresets of permissions. You can add individual users or import users in bulk.
Adding a new user and assigning roles Importing usersCustomizing the user's roles and permissionsCustomizing a user's profileDeleting an existing user Related Topics
Adding a new user and assigning roles
Follow the instructions below to add a new user account and configure its role.
Go to the tab in the management console and click .Configure Users and RolesClick . This link is only visible to users with the Admin role. UsersClick . The following screen will open:Add New User
Do the following:In the list, specify the user store where you want to create this user account. This list includesDomainthe primary user store and any other secondary user stores that are configured for your product. Seethe for information on configuring user stores. related topicsEnter a unique user name and the password that the person will use to log in. By default, the passwordmust be at least five characters and should have at least one character with a capital letter, characters,numbers and special characters.Click .Next
Optionally, select the role(s) you want this user to have. If you have many roles in your system, you cansearch for them by name.Click .Finish
A new user account is created with the specified roles and is listed on the page.Users

WSO2 Application Server, version 5.3.0
Copyright © WSO2 Inc. 2014 324
1. 2. 3.
Importing users
In addition to manually adding individual users, you can import multiple users in bulk if you have exported them toacomma-separated values(.csv) file or Microsoft Excel (.xls) file. It is possible to import the and username password directly from the CSV/Excel to the product. Other user attributes can be imported only if claim URls are defined for
in the product. For example, consider that you have claim URls defined for your product as shownsuch attributesbelow. These will allow you to import the user's , , , and inemail address full name last name given name roleaddition to the and .username password
The username, password and other attributes (claim URls) that you import should be given in a CSV file as shownbelow. Note that the first line of the file will not be imported considering that it is not a username.
On the screen, click .Users Bulk Import UsersBrowse and select the file that contains the user data. Specify a default password to assign to all the users you are importing and click . This password isFinishvalid for only 24 hours, so you should inform your users that they must log in and change their passwordwithin 24 hours.
Customizing the user's roles and permissions
Each role specifies a set of permissions that the user will have when assigned to that role. After creating a user, youcan assign and remove roles for that user by clicking in the column. To see which users aAssign Roles Actionsrole is already assigned to, click next to the role.View Users
You can also customize which permissions apply to this user by clicking in the column of the View Roles Actions U screen and then selecting the permissions from each role that you want this user to have. See the sers related for information about permissions.topics
Customizing a user's profile
Each individual user has a profile that can be updated to include various details. To do this, click onUser Profilethe screen. Make the changes required and click . You can also add multiple profiles for a user.Users Update
This is only supported if you have configured your user store as a JDBCUserStoreManager. See the related for information on how JDBC user stores are configured. It is recommended to upload a maximum oftopics
500,000 users at a time. If you need to upload more users, you can upload them in separate batches of500,000 each. You can also specify the size of the file that you can upload in the <PRODUCT_HOME>/repo
file using the element. This value is in MB.sitory/conf/carbon.xml TotalFileSizeLimit
<TotalFileSizeLimit>100</TotalFileSizeLimit>
Note: You can only add new profiles if you are connected to a JDBC user store. You also need to have

WSO2 Application Server, version 5.3.0
Copyright © WSO2 Inc. 2014 325
1. 2. 3. 4.
1. 2.
3.
Do the following in order to add new profiles.
On the tab in the Management Console, click . Configure Users and RolesClick . This link is only visible to users with the Admin role. UsersClick the link.User ProfileYou can add multiple profiles using the link and create any number of profiles for your userAdd New Profileas long as the user is located in a JDBC user store.
Deleting an existing user
Follow the instructions below to delete a user.
Go to the tab in the management console and click . Configure Users and RolesClick . This link is only visible to users with level permissions. See the Users User Management related
for more information about permissions.topicsIn the list, click next to the user you want to delete, and then click to confirm the operation.Users Delete Yes
Related Topics
: This section describes how the system administrator user and role isConfiguring the System Administratorset up and configured.
: This section explains how user stores (which are repositories storing informationConfiguring User Storesabout Users and Roles) are set up and configured.
Working with Features
Each enterprise middleware product is a collection of reusable software units called features. Similarly, WSO2Application Server (AS) consists of a collection of features where a single feature is a list of components and/orother features.
Provisioning software is the act of placing an individual software application or a complete software stack onto atarget system. Provisioning WSO2 AS is installing/updating/uninstalling features to/from the Carbon base platformon top of which the entire WSO2 product stack is developed. It is also possible to easily revert to a previous featureconfiguration using the provisioning support.
Features can be easily installed to any WSO2 product using the tFeature Manager hat comes with the product.WSO2 Feature Manager is powered by Equinox P2 and allows you to connect to a remote or local P2 repository andget any feature installed into the product's runtime.
P2 can be used as a provisioning platform for any OSGi-based application. P2 has enabled easy provisioningcapabilities in WSO2 Carbon, thereby increasing the user friendliness in building customized SOA products usingthe Carbon platform. Users can download the WSO2 Carbon framework or any other WSO2 product and extendthem by simply installing various features. The WSO2 Feature Manager provides a convenient user interface toperform common provisioning operations and related repository management functions.
See also
Managing the Feature RepositoryInstalling FeaturesUninstalling FeaturesConverting the Product into a Back-end/Front-end Server
administrator privileges.
Deleting a user cannot be undone.

WSO2 Application Server, version 5.3.0
Copyright © WSO2 Inc. 2014 326
1. 2. 3.
1. 2. 3. 4.
1.
Recovering from Unsuccessful Feature Installation
Managing the Feature Repository
Accessing the available repository listAdding a repositoryEditing a repositoryEnabling/disabling a repositoryDeleting a repository
Accessing the available repository list
Log in to the product's management console.On the menu, click . The page appears.Configure Features Feature ManagementClick on the tab.Repository ManagementThe page will appear, which allows you to view or modify the feature managementManage Repositories settings.
Adding a repository
.Access the available repositories listClick .Add RepositoryProvide a convenient name for the repository being added.Enter the repository location using one of the following methods:
URL - this option is used when you are adding an external repository.Select the option.URL Enter the Equinox P2 repository URL.
Location - this option is used when you are adding a repository that you have downloaded to yourcomputer.
Select the option.LocalEnter the directory path of the repository on your local machine.
Editing a repository
The official WSO2 Carbon features are available in Equinox P2 repository at: http://dist.. WSO2 Application Server 5.2.1 is based on WSO2wso2.org/p2/carbon/releases
Carbon 4.2.0. Therefore, the P2 feature repository 4.2.0 is the earliest, compatibleversion.
Equinox P2 provides provisioning technology for OSGi-based applications such asWSO2 Carbon.

WSO2 Application Server, version 5.3.0
Copyright © WSO2 Inc. 2014 327
1. 2.
3.
1. 2.
1. 2.
1. 2.
3. 4.
5.
6.
Access the available repositories list.Click on the link, corresponding to the repository that you wish to modify. The Edit Edit Existing Repositorypage appears.Edit the repository name and click .Save
Enabling/disabling a repository
Access the available repositories list.Click on the or link associated with the repository.Enable Disable
Deleting a repository
Click the link, respective to the repository to be removed.Remove Click , to confirm your deletion request.Yes
Installing Features
The manual way of provisioning Carbon is dropping bundles and configuration files that belong to a feature. Thismethod is not recommended since it can cause errors. Besides, finding the exact set of components and configuringfiles is a complex task. Components have inter-dependencies with other components. Some components depend onspecific versions of other components.
As a result, to overcome these issues WSO2 has the integrated with Carbon. It enables user-friendlyEquinox P2provisioning capabilities by allowing users to download WSO2 Carbon or any other WSO2 product and simplyextend them by installing various features.
Follow the instructions below to install new features to any product of the WSO2 products stack:
Log into the product's Management Console.On the menu, click .Configure FeaturesThe page will appear.Feature Management Click .Available FeaturesSelect a relevant repository.If no repositories have been added or the required repository is not available, add a new repository. For moreinformation see, .Adding a Repository Some repositories contain multiple versions of features. If you are only interested in the latest versions, selectthe option.Show only the latest versionsA feature category is a logical grouping of the features that constitute a particular Carbon based product.Select the option enables you to easily view and select the entire list of featuresGroup features by categoryof a particular product at once. For more information, see .Feature Categorization
This page allows you to change the repository name only. If you want to change the URL, you need toremove the existing repository and then add the new repository.
By default, all the repositories are enabled. When you perform a provisioning operation, metadata andartifacts are searched from the enabled repositories.only
If you are on Windows, be sure to point the property in the product's startup script (-Dcarbon.home wso2s) to the product's distribution home (e.g., erver.bat -Dcarbon.home=C:\Users\VM\Desktop\wso2as
). Then, restart the server. If not, you might not be able to install features through the management-5.2.1console.

WSO2 Application Server, version 5.3.0
Copyright © WSO2 Inc. 2014 328
6.
7. 8.
9. 10. 11. 12.
13. 14.
If you do not select this option when looking for features, you will see an uncategorized, flat feature list fromwhich individual features can be selected separately.Click . The available features will be listed.Find FeaturesSelect the features you wish to install.
Click .Install Verify the feature to be installed and click . NextRead and accept the terms of the license agreement.Click .NextThe installation process starts. It may take a few minutes to download the necessary components.Once the installation process is complete, click Finish.Restart the server for the changes to take effect.Based on the newly added features, you will be able to see the additional functionalities.
Viewing feature information
To find a particular feature, you can use the search function. Enter the name of a feature (or a part of
the name) and press . Enter
This search will return only available features; excluding the ones already installed.

WSO2 Application Server, version 5.3.0
Copyright © WSO2 Inc. 2014 329
1. 2.
When features of a repository are loaded, you can install them or view the corresponding feature details.
To view feature details:
Click on the respective "+" link to navigate to the feature.Click on the corresponding More Info link. The Feature Information page appears with the followinginformation:
NameIdentifierVersionProviderDescriptionCopyrightLicense Agreement
Feature Categorization
Feature repository provided by WSO2 contains a number of features that can be installed into WSO2 Carbon basedproducts. The logically related features have been categorized in the feature repository, to make it easier for the
user to search and install the required features more effectively. These feature categories are grouped underproducts. As illustrated in the following screenshot, there are high level feature categories such as ApplicationServer and Governance Registry. Under these product based feature categories, there are another set of featurecategories based on the product features. The user has the option of installing either the whole product or only therequired features of a product. The feature categorization can be seen on the page afterAvailable Featuresselecting/adding the repository and thereafter, searching for features that are grouped by category. For moreinformation, see .Installing Features
Application Server specific features
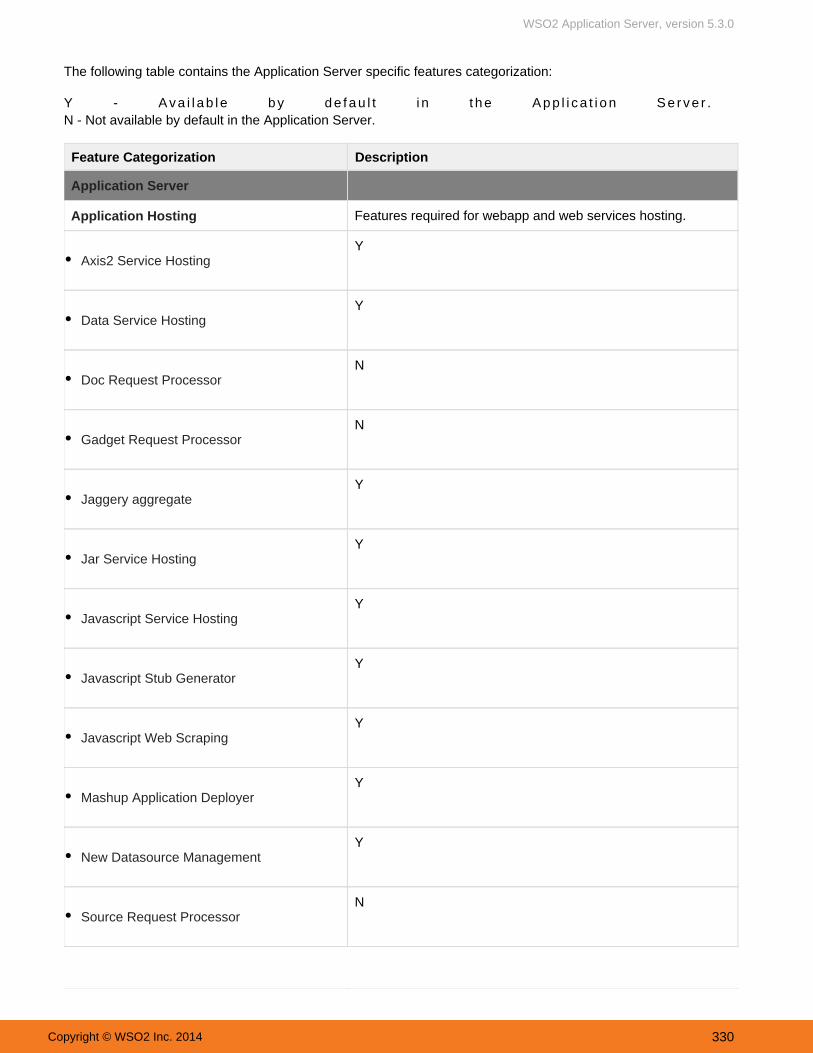
WSO2 Application Server, version 5.3.0
Copyright © WSO2 Inc. 2014 330
The following table contains the Application Server specific features categorization:
Y - A v a i l a b l e b y d e f a u l t i n t h e A p p l i c a t i o n S e r v e r . N - Not available by default in the Application Server.
Feature Categorization Description
Application Server
Application Hosting Features required for webapp and web services hosting.
Axis2 Service HostingY
Data Service HostingY
Doc Request ProcessorN
Gadget Request ProcessorN
Jaggery aggregateY
Jar Service HostingY
Javascript Service HostingY
Javascript Stub GeneratorY
Javascript Web ScrapingY
Mashup Application DeployerY
New Datasource ManagementY
Source Request ProcessorN

WSO2 Application Server, version 5.3.0
Copyright © WSO2 Inc. 2014 331
Spring Service HostingY
Webapp ManagementY
CXF Runtime EnvironmentY
Application Management Features required for artifact management.
Application ManagementY
AppServer - Utils Features
Axis2 Repository ManagementY
JAX-WS/JAX-RS Webapp ManagementY
Service ManagementY
Webapp Application DeployerY
Webapp Application ManagementY
AppServer Styles Application Server UI theme features.
AppServer - Style FeaturesY
AppServer Tools Features that provide a useful set of tools for web services.
Try itY
WSDL ToolsY
Miscellaneous Miscellaneous features.

WSO2 Application Server, version 5.3.0
Copyright © WSO2 Inc. 2014 332
Coordination CoreN
Deployment SynchronizerY
JMS Transport CoreY
Mail Transport CoreY
Mex ModuleY
ReportingN
TasksY
Transaction ManagerY
Transport ManagementY
WS-Discovery Admin UIY
WS-Discovery CoreY
Xfer ModuleY
Monitoring Features for server and deployment artifacts monitoring.
BAM Webapp Stats Data Agent AggregateY
Data Bridge - Data Publisher AggregateY
Logging ManagementY

WSO2 Application Server, version 5.3.0
Copyright © WSO2 Inc. 2014 333
Message FlowsY
SOAP TracerY
StatisticsY
Registry/Repository Registry features.
Registry CoreY
Registry Resource PropertiesY
Registry UI MenuY
Single Sign On(SAML2) Features that enables the use of Single-Sign-On to log in to AS.
Identity Provider Management AggregatedN
Tenancy Management Multi-tenant features.
Stratos AppServer - Dashboard UI FeaturesY
Stratos AppServer - Dashboard UI FeaturesY
Stratos - Common CompositeY
Stratos - Deployment FeaturesY
Stratos - Throttling AgentY
Stratos - Usage AgentY
User Management User Management features to configure users, roles etc.

WSO2 Application Server, version 5.3.0
Copyright © WSO2 Inc. 2014 334
1. 2.
3.
4.
5.
6.
Entitlement Servlet FilterY
SynapseY
User ManagementY
Application Server Runtimes (Optional) A set of runtimes that can be installed in Application Server.
J2EE Runtime EnvironmentN
CXF Runtime EnvironmentY
Uninstalling Features
Log in to the product's .Management ConsoleOn the menu, click .Configure Features
The Feature Management page appears. Click Installed Features.The page allows you to browse through the list of installed features.Installed FeaturesSelect the features that you need to uninstall. If you wish to uninstall all the features, select the Select all in
option.this page Click .UninstallA page will appear containing details of the features to be uninstalled.
V e r i f y t h e i n f o r m a t i o n a n d c l i c k . N e x tIf the uninstallation is successful, a success message appears.

WSO2 Application Server, version 5.3.0
Copyright © WSO2 Inc. 2014 335
6.
7.
1. 2.
3.
4.
5.
Click Finish and restart the server to apply the changes.
Converting the Product into a Back-end/Front-end Server
Converting to a back-end serverConverting to a front-end server
WSO2 Carbon supports back-end front-end separation, where you can manage multiple backend servers using asingle front-end server. You can convert a given product either to a backend server or to a front-end server. Thisconversion can be performed using the user interface.Feature Management
Converting to a back-end server
If you want to get only a back-end server, you have to uninstall all the front-end features as mentioned below:
Log in to the product's Management Console.On the menu, click . Configure Features
The Feature Management page will appear. Click Installed Features.The page appears.Installed FeaturesSelect "Front-end", from the option. Filtered byThis will list all the front-end features that are currently installed in the system.Press , toUninstall uninstall all the front-end features in the current installation.
If there are other features that depend on the feature that needs to be uninstalled, those dependentsub features need to be uninstalled first, before attempting to uninstall the main feature.

WSO2 Application Server, version 5.3.0
Copyright © WSO2 Inc. 2014 336
5.
1. 2.
3.
4.
5.
1. 2.
3.
4.
Converting to a front-end server
If you want to get only a front-end server, you have to uninstall all the back-end features as mentioned below:
Log in to the product's Management Console.On the menu, click . Configure FeaturesThe page will appear. Feature ManagementClick Installed Features.The page appears.Installed FeaturesSelect "Back-end", from the option. Filtered byThis will list all the back-end features that are currently installed in the system.Press , to uninstall all the back-end features in the current installation.Uninstall
Recovering from Unsuccessful Feature Installation
After installing features, if you encounter server issues or startup failures, you can revert the current configuration byrestoring a previous one using either the management console or the command line. The latter is recommended ifyou cannot start the server.
Use the following steps to check your feature installation history and revert the server back to a previousinstallation. In this recovery process, some features might get installed and some uninstalled.
Reverting using the management consoleReverting using the command line
Reverting using the management console
Log in to the management console.On the menu, click . Configure FeaturesThe Feature Management page appears. Click on the tab Installation History .
The page appears.Installation History
Click on the configuration that you wish to revert to. The actions that take place when reverting to the selected configuration is listed.

WSO2 Application Server, version 5.3.0
Copyright © WSO2 Inc. 2014 337
4.
5.
1. 2.
3.
Click , Revert to revert the current configuration to a previous configuration.
Reverting using the command line
If you cannot start the server after an unsuccessful feature installation, use the following steps to revert to a previousinstallation:
Start your product with the system property.-DosgiConsoleOnce the server is star ted, type the fo l lowing command:o s g i > g e t I n s t a l l a t i o n H i s t o r y
You will get the following list of states:
1376883697814 August 19, 2013 at 09:11:37 IST1376883697957 August 19, 2013 at 09:11:37 IST1376883700725 August 19, 2013 at 09:11:40 IST1376883701385 August 19, 2013 at 09:11:41 IST1376883704884 August 19, 2013 at 09:11:44 IST1376883712770 August 19, 2013 at 09:11:52 IST1376883715952 August 19, 2013 at 09:11:55 IST1376883743493 August 19, 2013 at 09:12:23 IST1376933879416 August 19, 2013 at 23:07:59 IST1376940017503 August 20, 2013 at 00:50:17 IST
Check what features are installed and uninstalled in a given state, by entering the following command: osgi> getInstallationHistory <timestamp>
F o r e x a m p l e :osgi> getInstallationHistory 1376933879416
The output will be as follows:

WSO2 Application Server, version 5.3.0
Copyright © WSO2 Inc. 2014 338
3.
4.
-- Installed features in this configuration
-- Uninstalled features in this configurationWSO2 Carbon - Service Management Feature 4.2.0WSO2 Stratos - Deployment Features 2.2.0WSO2 Stratos - Common Composite Feature 2.2.0WSO2 Stratos - Usage Agent Feature 2.2.0WSO2 Stratos - Throttling Agent Feature 2.2.0WSO2 Stratos AppServer - Dashboard UI Features 2.2.0WSO2 Stratos AppServer - Dashboard UI Features 2.2.0
Decide to which state you need to revert the system to, and thereafter use the following command: o s g i > r e v e r t < t i m e s t a m p >
F o r e x a m p l e : o s g i > r e v e r t 1 3 7 6 9 3 3 8 7 9 4 1 6
The output will be as follows:
Successfully reverted to 1376933879416Changes will get applied once you restart the server.
Monitoring the Application Server
This chapter contains the following information:
Collecting Data Statistics of ServicesMonitoring LogsMonitoring Performance StatisticsMonitoring SOAP MessagesMonitoring Message FlowsMonitoring Messages with TCPMonJMX-Based Monitoring
Collecting Data Statistics of Services
Service data analysis is crucial in understanding and optimizing their effective usage. For this reason, functionality tocapture and collect statistics related to service data is integrated by default into service-hosting WSO2 products
Note that some of the above statistics may not be available in some WSO2 products, depending on theavailability of the relevant feature in its distribution. If you want a particular functionality that is not bundledwith the distribution by default, you need to install the relevant feature. This can be done via the FeatureManagement page in the management console, by navigating to the Configure menu and clicking Features.

WSO2 Application Server, version 5.3.0
Copyright © WSO2 Inc. 2014 339
1.
2. 3.
such as the WSO2 Application Server (AS), WSO2 Data Services Server (DSS), WSO2 Business Process Server(BPS), WSO2 Business Rules Server (BRS) etc. Once captured, these statistics are transferred to a data analysisproduct like WSO2 Business Activity Monitor (BAM) or WSO2 Complex Event Processor for processing and derivingbusiness-critical information.
WSO2 BAM receives data events via its Thrift API. This uses a binary protocol and enables fast data transmissionbetween the service-hosting product and BAM server. BAM's Service Data Agent can be configured early so that thestatistics to be extracted from service data can be pre-defined. In the configuration panel, the user can specify theBAM server (Thrift server) related information and properties to be extracted from the service of the service-hostingproduct. The user should define the Event Stream related parameters uniquely identified by a name and a version.
See the following topics for details:
Using on-premise deployment of WSO2 ASUsing Cloud deployment of WSO2 AS
Using on-premise deployment of WSO2 AS
If you are using an on-premise deployment of WSO2 AS, the service data publishing capability is provided by thefollowing feature in the WSO2 feature repository:
Name WSO2 Carbon - : BAM Serv ice Data Agent Aggregate Identifier : org.wso2.carbon.bam.service.agent.feature.group
If it is not included in your product by default, you can add it by installing the above feature using the instructionsgiven in section, Feature Management.
Follow the instructions below to setup service data publishing in a running Carbon instance.
Before starting AS, enable service data publishing as explained below:
Go to {AS_HOME}/repository/conf/etc/ and open bam.xml.Look for <ServiceDataPublishing>disable</ServiceDataPublishing> and enable it.
Start the Application Server. For more information, see .Starting the serverLog on to the product's Management Console select "Configure -> Service Data Publishing."
When using data publisher API to publish data in a periodic manner to WSO2 BAM/CEP, the eviction timeand eviction idle time for the connections should be higher than the periodic interval. This is required tore-use the created socket connections from the pool, avoiding closure of it and creation of new connections.The default eviction period is 5.5 seconds (5500 milliseconds). If you are publishing events in a periodicinterval as more than 5.5s, you need to tune the parameter accordingly,<secureEvictionTimePeriod>in the file of the<PRODUCT_HOME>/repository/conf/data-bridge/thrift-agent-config.xmlagent in the client side, by increasing this default value.

WSO2 Application Server, version 5.3.0
Copyright © WSO2 Inc. 2014 340
3.
4.
The "Service Data Publisher Configuration" window opens. Fill it appropriately. For example,
Enable Service stats: Tick to get the act iv i ty stat ist ics. Enable Activity Service: This enables message tracing with BAM, CEP or other data analysis servers.Typically, a request is sent to an endpoint after being passed through some intermediate stages. Messagingtracing enables to track each messages and visualize the message body in each of these intermediatestages.

WSO2 Application Server, version 5.3.0
Copyright © WSO2 Inc. 2014 341
4.
Stream Definition Configuration:
: Stream Name can be any string with alpha-numeric charactersStream Name: Stream Version distinguishes different streams with the same Stream Name. Default version shouldVersion
be . 1.0.0: This is a user preferred nick name to the Stream Name in alpha-numeric charactersNick Name: A description describing about the particular stream defined by Stream Name, Stream VersionDescription
pair. Description should also consists of alpha-numeric characters.
BAM Credentials:
BAM URL: Enter the IP address of the BAM server. And the port should be the thrift port ( ex: tcp://127.0.0.1: ). You can add a comma-separated list of server URLs to ensure that load is distributed among many7611
servers and to minimize effects of a failure of one server node.
Username: Put the BAM Thrift log-in user name. Default value is .adminPassword: Put the BAM Thrift log-in password. Default value is .admin
A BAM deployment can receive events from different data agents. In order to uniquely identifyProperties:events triggering from one agent, a property can be associated with it. This feature is particularly useful inclustered environments. Click once done. Update
The service-hosting server is now ready to collect and send service data to any data analysis server like theBAM and CEP. Specific instructions to receive this data and analyze it can be found in the respectivedocumentation of the data analysis servers.
Using Cloud deployment of WSO2 AS
In a cloud deployment of WSO2 AS, it is not required to enable data publishing to BAM using the 'BAM Service DataAgent Aggregate' feature as explained above. Instead, you can simply add the BAM url to the <PRODUCT_HOME>/r
file as shown below.epository/conf/carbon.xml
<BamServerURL>https://bamhost:bamport/services/</BamServerURL>
Note that cloud deployment is enabled by the following setting in the <PRODUCT_HOME>/repository/conf/carb file:on.xml
<IsCloudDeployment>true</IsCloudDeployment>
Monitoring Logs
Note feature will be implemented from the next major release of BAM.Enable Activity Service
See the documentation on , for details on howsetting up multi receiver and load balancing data agentBAM handles load distribution using multiple servers.

WSO2 Application Server, version 5.3.0
Copyright © WSO2 Inc. 2014 342
1.
2.
The following topics describe how logs can be managed using the management console:
Application LogsSystem Logs
Application Logs
Application logs are where events invoked by an application or a program running in a system are recorded.Similarly, the Application Logs of a running Carbon instance display the log events of its deployed Web applicationsand Web services. The "Application Logs" page has been introduced as a fine-grained view of . While System Logssystem logs display log events of the entire system holistically, the application logs page allows the user to select aparticular application and view its logs only.
The log files can be retrieved in two ways:
If syslog-ng is configured, log files are taken from the remote location where the log files are hosted usingsyslog-ng server. If syslog-ng is not configured, log files are taken from the local file system (super-tenant or Stand-aloneapps).
For more information on logs and how to change log properties according to your preferences, refer to section Working with Logs.
Statistics on application logs are provided by the following feature:
Name : WSO2 Ca rbon - Logg ing Managemen t Fea tu re Identifier : org.wso2.carbon.logging.mgt.feature.group
If the above feature is not bundled in your product by default, you can install it using the instructions given in section,Feature Management.
Follow the instructions below to access statistics on Application Logs.
Log on to the product's management console and select "Monitor -> Application Logs."
The "Application Logs" page appears. This page displays logs of a selected application in a bottom-up
m a n n e r . F o r e x a m p l e ,

WSO2 Application Server, version 5.3.0
Copyright © WSO2 Inc. 2014 343
2.
3.
4.
You can see a drop-down list from which a deployed Web Services or a Web applications can be selected to view its log files.
In the "View" list, select the category of logs you want to view. The available categories are: TRACE - Trace messages. DEBUG - Debug messages.
INFO - Information messages. WARN - Warning messages. ERROR - Error messages.
FATAL - Fatal error messages.ALL - Displays all categories of logs.
For Example,
NoteThe log messages displayed on this page are obtained from a memory appender. Therefore, theseverity (log level) of the displayed log messages are equal to or higher than the threshold of thememory appender. For more information on appenders, loggers, their log levels and logging, refer to http://logging.apache.org/log4j

WSO2 Application Server, version 5.3.0
Copyright © WSO2 Inc. 2014 344
4.
5.
1.
2.
You can also find a certain log using the search function. Enter a keyword (or part of a keyword) and click"Search." When a search criteria is given, the "View" is displayed as "Custom".For example,
System Logs
The "System Logs" page displays all events of a running Carbon instance. Further, it facilitates downloading andviewing log files according to user preferences. The log files can be retrieved in two ways:
If syslog-ng is configured, log files are taken from the remote location where the log files are hosted usingsyslog-ng server. If syslog-ng is not configured, log files are taken from the local file system (super-tenant or Stand-aloneapps).
You can refer to more information about logs and how to set log properties in section . StatisticsWorking with Logson system logs are provided by the following feature:
Name : WSO2 Ca rbon - Logg ing Managemen t Fea tu re Identifier : org.wso2.carbon.logging.mgt.feature.group
If it is not bundled in your product by default, you can install the above feature using the instructions given in section .Feature Management
Follow the instructions below to access statistics on System Logs.
Log on to the product's management console and select "Monitor -> System Logs."
The "System Logs" page appears. This page displays logs in a bottom-up manner.
For example,
The location of the log files on disk is specified in the file.log4j.configuration

WSO2 Application Server, version 5.3.0
Copyright © WSO2 Inc. 2014 345
2.
3.
4.
To view old archived logs, click the "Show archived logs" tab at the bottom of the "System Logs" page.
The "Download" link can be used to download the "wso2carbon.log" file at location<PRODUCT_HOME>/repository/logs.
In the "View" list, select the category of logs you want to view. The available categories are:
TRACE - Trace messages. DEBUG - Debug messages.
INFO - Information messages. WARN - Warning messages. ERROR - Error messages.
FATAL - Fatal error messages.
NoteThe log messages displayed on this page are obtained from a memory appender. Hence, the severity(log level) of the displayed log messages are equal to or higher than the threshold of the memoryappender. For more information on appenders, loggers, their log levels and logging, refer to http://logging.apache.org/log4j

WSO2 Application Server, version 5.3.0
Copyright © WSO2 Inc. 2014 346
4.
5. You can also find a certain log using the search function. Enter a keyword (or part of a keyword) and click"Search."
Monitoring Performance Statistics
WSO2 products provide a range of access and performance statistics on the running Carbon instance as well as aservice. These statistics include information about memory availability, request count, server name, server starttime, system up time, active services, total memory, average, minimum, maximum response times etc. Statistics areaccessible through the Management Console of a running Carbon instance and the functionality is provided by thefollowing feature:
N a m e : W S O 2 C a r b o n - S t a t i s t i c s F e a t u r e Identifier: org.wso2.carbon.system.statistics.feature.group
If this feature is not bundled with the WSO2 product by default, you can install it using the instructions provided inthe .Working with Features section Once installed, the necessary menus will appear in the Management Console.Access and performance statistics are available in two levels as follows:
System Level StatisticsService Level StatisticsOperation Level Statistics
System-Level Statistics
Follow the instructions below to access system-level statistics.
1. Log on to the product's Management Console and select System Statistics from menu Monitor . For example,
NoteThe location of the log files on disk is specified in the file.log4j.configuration

WSO2 Application Server, version 5.3.0
Copyright © WSO2 Inc. 2014 347
2. The System Statistics page appears as follows.
The following information is available:
Service SummaryServer InformationResponse Time GraphMemory GraphStatistics Configuration Panel
Service Summary

WSO2 Application Server, version 5.3.0
Copyright © WSO2 Inc. 2014 348
This panel provides the following information:
Average Response Time - The average amount of time taken by the mediation channel to mediate amessage (in milliseconds).
Minimum Response Time - The least amount of time taken by the mediation channel to mediate a message(in milliseconds).
Maximum Response Time - The greatest amount of time taken by the mediation channel to mediate amessage (in milliseconds).
Total Request Count - The total number of messages received and mediated through the mediationchannel.
Total Response Count - The total number of messages send and mediated through the mediation channel. Total Fault Count - The number of messages that triggered faults while being mediated through the channel.
Active Services - The number of currently active services.
Server Information
This panel provides the following information:
Hos t - Shows the IP address of the server. Server Start Time - Shows the time when the server started.
System Up Time - Shows the time the server has been up and running. Memory Allocated - Shows the memory capacity of the server.
Memory Usage - Shows the used memory of the server.
Response Time Graph

WSO2 Application Server, version 5.3.0
Copyright © WSO2 Inc. 2014 349
This graph shows the temporal variation of the Average Response time.
Memory Graph
This graph shows the temporal variation of the server Memory.
Statistics Configuration Panel
The panel is provided to customize the display by entering values to theStatistics Configuration System Statisticsappropriate fields and clicking .Update

WSO2 Application Server, version 5.3.0
Copyright © WSO2 Inc. 2014 350
Statistics Refresh Interval (ms) - Allows to specify the interval of the statistics refresh. A smaller valuerefreshes the statistics display faster.Response Time Graph - ** Allows to specify the X and Y parameters of the Response Time graph. X-Scale(units)
X-Width (px)Memory Graph- Allows to specify the X and Y parameters of the Memory graph.
X-Scale (units)X-Width (px)
If you want to reset the previous values before submitting the page after editing, click Reset . The Restore Defaults button sets the default values in the corresponding fields.
Service-Level Statistics
In addition to system-level statistics, you can also access service-level statistics through a selected service'sdashboard. Service dashboard and management capabilities in your product are provided by the following features:
N a m e : W S O 2 C a r b o n - S e r v i c e M a n a g e m e n t F e a t u r e Identifier : org.wso2.carbon.service.mgt.feature.group
Not all WSO2 products have service management capabilities bundled in them by default. If require, you can addthe functionality by installing the above features using instructions in section Feature Management . Once installed,the necessarily functionality and menu items will appear in the Management Console.
Follow the instructions below to access service-level statistics:
1. Log on to the product's Management Console and select List from menu Web Services .
2. The Deployed Services window appears. Click on a service to access its dashboard. For example,
3. The service's dashboard appears. It contains the statistics panel in addition to others.

WSO2 Application Server, version 5.3.0
Copyright © WSO2 Inc. 2014 351
4. The Statistics panel provides the following statistical information about a service.
Request CountResponse CountFault CountMaximum Response TimeMinimum Response TimeAverage Response Time
It provides a graphical view of the average response time as follows:

WSO2 Application Server, version 5.3.0
Copyright © WSO2 Inc. 2014 352
Operation-Level Statistics
You can also access operation-level statistics of a service's operation through its dashboard. Service and operationdashboards are provided by the following features:
N a m e : W S O 2 C a r b o n - S e r v i c e M a n a g e m e n t F e a t u r e Identifier : org.wso2.carbon.service.mgt.feature.group
All WSO2 service hosting products have service management capabilities bundled in them by default. If the productyou are using does not have this capability added by default, you can add it by installing the above features using in
structions in section Feature Management . Once installed, the necessarily functionality and menu items will appearin the Management Console.
Follow the instructions below to access operation-level statistics:
1. Log on to the product's Management Console and select List from menu Web Services .
2. The Deployed Services window appears. Click on a service to access its dashboard. For example,

WSO2 Application Server, version 5.3.0
Copyright © WSO2 Inc. 2014 353
3. The Service Dashboard page appears. Click Operations in the Quality of Service Configuration panel.
4. The Operations of Service page appears. Click on a selected operation to view its Operation Dashboard.

WSO2 Application Server, version 5.3.0
Copyright © WSO2 Inc. 2014 354
5. The operation's statistics panel appears in the Operation Dashboard. For example,
6. The Statistics panel of an operation provides the same statistics shown about a service.
Request CountResponse CountFault CountMaximum Response TimeMinimum Response TimeAverage Response Time
It also provides a graphical view of the average response time.

WSO2 Application Server, version 5.3.0
Copyright © WSO2 Inc. 2014 355
Monitoring SOAP Messages
The SOAP Tracer tool provided by WSO2 shows the SOAP messages, the respective SOAP message requests andresponses when the services are deployed on the server, and the invoked operations. This functionality is providedby the following feature:
N a m e : W S O 2 C a r b o n - S O A P T r a c e r F e a t u r e Identifier : org.wso2.carbon.soaptracer.feature.group
If the above feature is not included in your product by default, you can install it using the instructions given in section.Feature Management
By default, this feature is turned off. You have to turn it on to enable tracing.
Follow the instructions below to access the SOAP Tracer.
1. Log on to the product's management console and select "Monitor -> SOAP Tracer."
2. In the drop-down menu, select "Yes."
3. The tracer will show the messages of the operations that were invoked. For example,
Turning on the SOAP Tracer feature may impose a significant performance overhead. This is because allthe SOAP messages will always be completely built (deferred building will not be done) and stored in thedatabase by WSO2 Data Services. Hence this option should be used with caution.

WSO2 Application Server, version 5.3.0
Copyright © WSO2 Inc. 2014 356
By using the SOAP Tracer, you can see the SOAP messages with their time-stamps, service name, operationinvoked and the number of requests to the server. The most recent SOAP messages are listed at the top. When aparticular SOAP message is selected, its "Request" and "Response" can be viewed.
4. Use the "Search" function to find a message. Fill in the field with a word (or a part of word) in a message and clickon the"Search button.
5. You will see the message in the "Messages" list and its full description will be shown in the "Request" or"Response" text area. For example,
NoteThis tracer does not apply to operations invoked in the admin services. They are filtered out.

WSO2 Application Server, version 5.3.0
Copyright © WSO2 Inc. 2014 357
Monitoring Message Flows
Message Flows provide graphical or textual views of the globally-engaged handlers in the system at a given time.This functionality is provided by the following feature:
N a m e : W S O 2 C a r b o n - M e s s a g e F l o w s F e a t u r e Identifier : org.wso2.carbon.message.flows.feature.group
If the above feature is not included in your product by default, you install it using the instructions given in section Fea.ture Management
Modules use handlers to engage in different message flows at defined phases. You can observe the handlersinvoked in each phase of each flow in real time. For example, the Apache/Rampart module defines handlers in thesecurity phase of each flow, which handles the security aspects of the messages that are transferred through theseflows. Therefore, if the Rampart module is engaged, you can see the Apache/Rampart handlers in the messageflows in real time.
Follow the instructions below to access the Message Flows.
1.Log on to the product's management console and select "Monitor -> Message Flows".
2. The Message Flows page with the graphical view of the message flows appears. There are four different flows

WSO2 Application Server, version 5.3.0
Copyright © WSO2 Inc. 2014 358
defined in the system:
In Flow : A correct message coming into the system. Out Flow : A correct message going out of the system.
In Fault Flow : A faulty message coming into the system. Out Fault Flow : A faulty message going out of the system.
In each flow, a message passes through a set of phases to reach the service. These phases vary according to thecurrently engaged modules within the system. The interface displays the current phases in each and every flow asshown in the diagram below.
3. In the graphical view of the message flows, click the links to get a view of the engaged handlers in each phase.For example, the figure below shows the handlers engaged in the Addressing phase at system start up.
4. You can see the text view of message flows. Click on the "Show Text View" link.

WSO2 Application Server, version 5.3.0
Copyright © WSO2 Inc. 2014 359
5. The page with the text view of message flows appears. The textual view provides the name and the fully qualifiedclasses of all handlers within each and every phase.
Monitoring Messages with TCPMon
TCPMon is a tool that can be used to view and monitor the messages passed along a TCP-based conversation.Therefore, this is a convenient tool, particularly useful for debugging when you develop Web services. TCPMon isan Apache project distributed under . Apache 2.0 License This tool is not dependent on any third party libraries. Itsuser interface is based on a swing UI and works on almost all platforms that support Java.
The most common usage of TCPMon is as an intermediary, which monitors the communication between the client(front end) and the back end server. That is, the messages sent from the client are received by the intermediaryinstead of the back end server.
Starting TCPMon

WSO2 Application Server, version 5.3.0
Copyright © WSO2 Inc. 2014 360
1. 2.
1.
2. 3. 4.
Monitoring Messages between Client and Server
Starting TCPMon
TCPMon is available in the directory of any WSO2 Carbon based product distribution.<PRODUCT_HOME>/binAlternatively, you can download TCPMon from Apache and run the tool.
Running TCPMon (from Carbon product pack)
Ensure that the following prerequisites are fulfilled in order to run TCPMon.
Install JDK 1.4 or later version.Set the variable. This setting is required only if you are using the TCPMon available in the WSO2JAVA_HOMECarbon based product pack.
To run the TCPMon available with your WSO2 Carbon product pack:
Go to directory of your product pack.<AS_HOME>/binE x e c u t e t h e f o l l o w i n g c o m m a n d t o r u n t h e t o o l .
For Windows
tcpmon.bat
For Linux
./tcpmon.sh
Running TCPMon (downloaded from Apache)
To download TCPMon from Apache and run the tool:
Download TCPMon from the following location: http://archive.apache.org/dist/ws/tcpmon/1.0/tcpmon-1.0-bin.z.ip
Extract tcpmon-1.0-bin.zip archive.Go to the build of the extracted directory to find the execution script.Execute the following command to run the tool.
For Windows
tcpmon.bat
For Linux
For information on how to set the variable, go to , select theJAVA_HOME Installing the Productinstructions relevant to your operating system and refer the 'Setting JAVA_HOME' section.

WSO2 Application Server, version 5.3.0
Copyright © WSO2 Inc. 2014 361
4.
1. 2.
3.
4.
./tcpmon.sh
Monitoring Messages between Client and Server
The following diagram depicts a typical communication between the front end client and the back end server. 80 isthe listening port of the back end server which receives the messages from the client
The following diagram depicts how TCPMon is placed between the client and the server in order to monitor themessages. 8081 is the listening port in TCPMon which receives the messages from the client instead of the backend server:
To monitor messages from client to server using TCPMon:
Start TCPMon. Follow the instructions on . Starting TCPMonGive 8081 (the listening port of TCPMon) in the field (This could be any unused port in your localListen Portmachine).Give the address of the back end server as the target hostname. For example, if you are monitoringmessages sent to , enter this web address as the hostname.www.apache.orgGive 80 as the target port, which is the listening port of www.apache.org.
As an intermediary, TCPMon only receives messages and forwards them to the back end server. Therefore,it is a safe tool to be used for debugging purposes.
Note that TCPMon cannot be used to view messages transferred over https protocol.
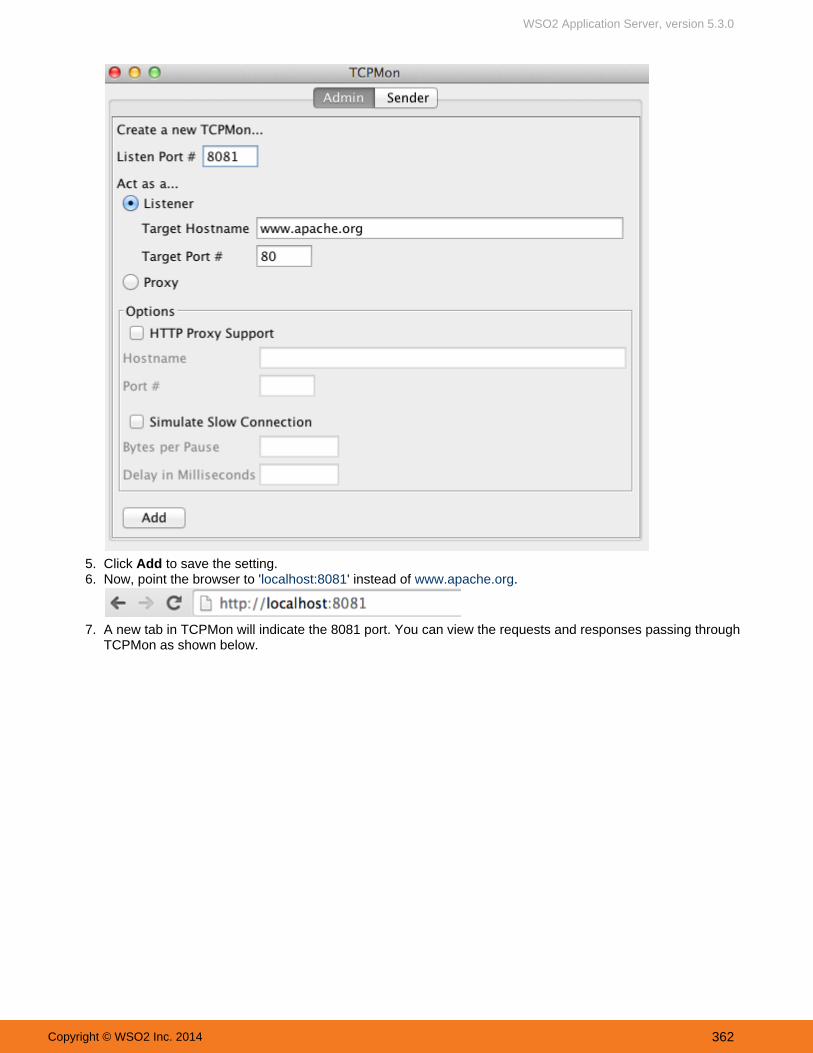
WSO2 Application Server, version 5.3.0
Copyright © WSO2 Inc. 2014 362
4.
5. 6.
7.
Click to save the setting.AddNow, point the browser to ' ' instead of .localhost:8081 www.apache.org
A new tab in TCPMon will indicate the 8081 port. You can view the requests and responses passing throughTCPMon as shown below.

WSO2 Application Server, version 5.3.0
Copyright © WSO2 Inc. 2014 363
7.
8. The options at the bottom of the screen can be used to have the messages in XML format (useful indebugging Web services), to save and resend the messages and also to switch the layout of the messagewindows.
JMX-Based Monitoring
Java Management Extensions (JMX) is a technology that lets you implement management interfaces for Javaapplications. is a JMX-compliant monitoring tool, which comes with the Java Development Kit (JDK) 1.5JConsoleor later versions. Therefore, when you use a WSO2 product, JMX is enabled by default, which allows you to monitorthe product using JConsole. When you start JConsole, the tab will show the MBeans generated for yourMBeansproduct. While some of these MBeans ( and ) are common to all WSO2 products, someServerAdmin DataSourceMBeans are specific to WSO2 AS.
Go to the WSO2 administration guide for detailed instructions on how to configure JMX for a WSO2 product,how to use JConsole for monitoring a product and for descriptions of the common MBeans used by allWSO2 products.

WSO2 Application Server, version 5.3.0
Copyright © WSO2 Inc. 2014 364
Working with Composite Applications
The topics given below explain the concept of 'Composite Applications' (C-Apps) and about how C-Apps can bedeployed and managed.
Introduction to Composite ApplicationsCreating and Deploying a Composite ApplicationDeleting Composite ApplicationsManaging Server Roles
Introduction to Composite Applications
A Composite Application (C-App) is a collection of artifacts deployable on a WSO2 product instance. C-App fileshave CAR extensions and can be deployed to different runtimes. Each runtime will only deploy the artifacts whichmatch with the role that the runtime is playing (e.g., ESB runtime will not deploy a data service in the CAR file,unless the default configuration is altered). These artifacts are usually JAVA-based or XML configurations, designeddifferently for each product in the WSO2 Carbon platform. You can deploy these artifacts to generate services.
A single WSO2 product can have numerous artifacts such as Axis2 services, dataservices, synapse configurations,endpoints, proxy services, mediators, registry resources, BPEL workflows etc. Usually, these artifacts are created ina development environment and then moved one by one into staging/production environments. Manually configuringartifacts to build up the entire solution this way is a time-consuming task. Instead, you can bundle configuration filesand artifacts in a C-App and port Web service based solutions across environments more easily. C-Apps allow youto export your entire solution as a single archive file.
A single C-App can consist of artifacts that are deployable in various different products. Therefore, when you deploya C-App in a particular WSO2 product, all its artifacts might not be deployed in that particular product instance. Tosort out which can be deployed in which, the ServerRole property is used.
Structure of a C-App
The structure of a typical C-App, contains individual directories of the artifacts and a file named ,artifacts.xmlwhich contains the metadata about the artifact content listed inside the C-App. The following code illustrates a
sample artifacts.xml file which provides in-depth details about the sample C-App and its content. This file contains the name of the C-App (in this case sampleCApp ), its version and the type of the artifact. The relevant
deployer for the artifact is identified using the artifact type; for C-Apps this is "carbon/application". In addition,

WSO2 Application Server, version 5.3.0
Copyright © WSO2 Inc. 2014 365
1. 2.
3.
4.
the artifacts.xml file also contains details about its content artifacts such as its name, version and server role ofthe artifact. The server role will be considered to recognize whether the given artifact is relevant to that running
server. If the serverRole is matched with the WSO2 product that the C-App was deployed for, then those artifacts will be deployed using the CappDeployer ; however, if the serverRole is not matched the artifact will be ignored.
Sample artifacts.xml file
The relevant deployable artifact (e.g., if its an Axis2 service the file extension used is and if it is a webapp the.aarfile extension used is ) and other relevant files needed for that specific artifact are found inside the artifact.wardirectory. This also contains an XML file named that contains the meta-data information about thatartifact.xmlartifact. This contains the artifact name, version, type of the artifact, server role and the name of the artifact file. Forexample if its an Axis2 service the type will be “ ” and for webapps the type will either be “service/axis2 web/app
” or “ ” based on the type of the webapp.lication webapp/jaxws
Sample artifact.xml files
Creating and Deploying a Composite Application
The steps below show how to use to develop individual artifacts and export them as aWSO2 Developer Studiosingle C-App artifact. You can then deploy the C-App on the WSO2 product instance. Use this method to move theconfigurations of your server from one environment to another.
See in the Developer Studio documentation to create artifacts.User GuideSee in the Developer Studio documentation to export the C-AppPackaging Artifacts Into Deployable Archivesas a Carbon Application Archive (CAR) file.
Next, you can upload the CAR file into your new product instance as follows.Log in to the product's management console and select menu under the menu.Add Applications
Select your CAR file and click .Upload
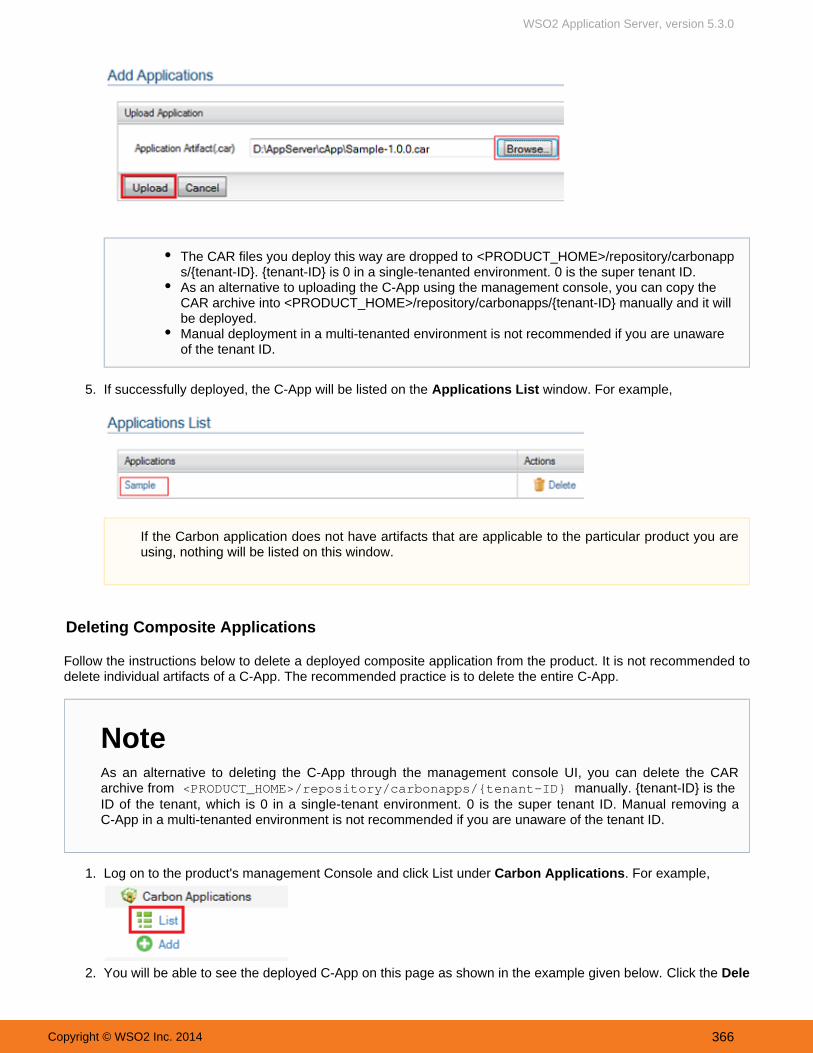
WSO2 Application Server, version 5.3.0
Copyright © WSO2 Inc. 2014 366
4.
5.
1.
2.
If successfully deployed, the C-App will be listed on the window. For example,Applications List
Deleting Composite Applications
Follow the instructions below to delete a deployed composite application from the product. It is not recommended todelete individual artifacts of a C-App. The recommended practice is to delete the entire C-App.
Log on to the product's management Console and click List under Carbon Applications. For example,
You will be able to see the deployed C-App on this page as shown in the example given below. Click the Dele
The CAR files you deploy this way are dropped to <PRODUCT_HOME>/repository/carbonapp{tenant-ID} is 0 in a single-tenanted environment. . s/{tenant-ID} 0 is the super tenant ID.
As an alternative to uploading the C-App using the management console, you can copy theCAR archive into manually and it will<PRODUCT_HOME>/repository/carbonapps/{tenant-ID}be deployed. Manual deployment in a multi-tenanted environment is not recommended if you are unawareof the tenant ID.
If the Carbon application does not have artifacts that are applicable to the particular product you areusing, nothing will be listed on this window.
NoteAs an alternative to deleting the C-App through the management console UI, you can delete the CARarchive from manually. <PRODUCT_HOME>/repository/carbonapps/{tenant-ID} {tenant-ID} is the ID of the tenant, which is 0 in a single-tenant environment. Manual removing a0 is the super tenant ID.C-App in a multi-tenanted environment is not recommended if you are unaware of the tenant ID.

WSO2 Application Server, version 5.3.0
Copyright © WSO2 Inc. 2014 367
2.
3.
link associated with a certain application to remove it permanently.te
You will be asked to confirm your request .
Managing Server Roles
A server role is a parameter that is mentioned in <PRODUCT_HOME>/repository/conf/carbon.xml file of allWSO2 products. When a C-App is being deployed, it reads the ServerRoles property from the andcarbon.xmldeploys only the resources that match the server-role value in the file. Each product has a different defaultServerRoles property as follows:
WSO2 Application Server - "ApplicationServer"WSO2 Business Activity Monitor - "BusinessActivityMonitor"WSO2 Business Process Server - "BusinessProcessServer"WSO2 Business Rules Server - "BusinessRulesServer"WSO2 Data Services Server - "DataServicesServer"WSO2 Enterprise Service Bus - "EnterpriseServiceBus"WSO2 Gadget Server - "GadgetServer"WSO2 Governance Registry - "GovernanceRegistry"WSO2 Identity Server - "IdentityServer"WSO2 Mashup Server - "MashupServer"
The following is an example list of C-App resources that map to default server roles.
ApplicationServer - foo.aar, jax-wx.warEnterpriseServiceBus - proxy.xmlBusinessProcessServer - my_bpel.zipJaggeryServer - jaggery_app.jag
In C-App development time, you can specify a server role for each and every artifact in the C-App. For example, sayyou are developing an Axis2 service and planning to deploy all your services in a single Application Server instancein the production setup. You can set the server role as .appserver1
Server Roles ManagerServer roles manager is a component to manage the server roles property for WSO2 Carbon basedproducts. Due to the functionality of the server roles manager, users do not have to manually modify the ca
to include the server-roles related to the product feature that they have added to a Carbonrbon.xmlproduct instance. The server roles manager stores both file's default product roles as well ascarbon.xmlthe user/tenant specific server roles in the configuration registry. So, when a C-App is deployed in Carbon,the C-App deployer checks for auto-mentioned server roles from the registry instead of the filecarbon.xml
.

WSO2 Application Server, version 5.3.0
Copyright © WSO2 Inc. 2014 368
1.
2.
3.
The following methods can be used to set the ServerRole:
Using the management console to set the ServerRole propertyUsing carbon.xml file to set the ServerRole propertyUsing a system property to set the ServerRole property
Using the management console to set the ServerRole property
This is the easiest and the most recommended way to configure your server roles. Follow the instructions below to add a new server role:
Log in to the management console of your product and menu under the menu.click Server Roles Configure
Click Add New Server Role, . enter the Role Name and click Add You can add any textual name as aserver role without special characters except underscore.
The newly added server role is displayed in the server roles list.
You can delete the server role using the icon associated with it.Delete
Using carbon.xml file to set the ServerRole property
Find the ServerRoles element in file. For example,<PRODUCT_HOME>/repository/conf/carbon.xml
In the server roles manager, the properties are of two types:ServerRoles
Default - All the server roles picked from that particular product instance's .carbon.xmlCustom - All other server roles added by the users.
You cannot undo a deletion once performed. Users can even delete a default server role. Oncedeleted, the server role manager will not pick up the deleted server role from the file,carbon.xmlnext time the server starts.

WSO2 Application Server, version 5.3.0
Copyright © WSO2 Inc. 2014 369
1.
2.
3.
<ServerRoles> <Role>DataServicesServer</Role></ServerRoles>
You can set multiple role elements here to specify the roles acted by the current server. For example, if you wantthis server to act as appserver1 and dataservices1 servers, configuration is as follows:
<ServerRoles> <Role>appserver1</Role> <Role>dataservices1</Role></ServerRoles>
Before setting the above, ensure that the current server has capability to deploy Axis2 services and data services.When you deploy a C-App artifact on this server, all artifacts which have the above two server roles will be deployedon the current instance. Others will be ignored.
Using a system property to set the ServerRole property
You can use the system property ServerRoles to specify the server roles that can be acted by the current productinstance. When you start the server, pass the server roles as a comma separated list. For example,
sh wso2server.sh -DserverRoles=appserver1,dataservices1
Running the Product on a Preferred ProfileWhen a WSO2 product server starts, it starts all features and related artifacts bundled in the product. Multi-profile support allows you to run theproduct on a selected profile so that only features specific to that profile along with the common features start up with the server. This enablesbetter resource utilization.
To run the product on a preferred profile:
Download the product distribution.For more information, see .Downloading the ProductOpen a command prompt:
On Windows, choose > , type at the prompt, and press Enter.Start Run cmdOn Linux/Solaris, establish a SSH connection to the server or log into the Linux console.
Execute one of the following commands to start a product on a preferred profile, where is<PRODUCT_HOME>the directory where you installed the product distribution and . For more information on the preferred profile,see .AS profiles
OS Command
On Windows <PRODUCT_HOME>\bin\wso2server.bat -Dprofile=<preferred-profile>--run
Once you use the management console to set server roles, you can't change that configuration using theother two methods. Server roles are stored in the Registry when they are configured through themanagement console. Values in the Registry are always given priority over others.

WSO2 Application Server, version 5.3.0
Copyright © WSO2 Inc. 2014 370
3.
4.
OnLinux/Solaris
sh < PRODUCT _HOME>/bin/wso2server.sh -Dprofile=<preferred-profile>
For example, in Linux/Solaris to start the Application Server with the support for Axis2 services only, type thefollowing command:
sh <PRODUCT_HOME>/bin/wso2server.sh -Dprofile=axis2service
Once the server has started, run the Management Console by opening a Web browser and typing in them a n a g e m e n t c o n s o l e ' s U R L .The URL is displayed as the last line in the start script's console and log. The URL should be in the followingformat: https://<Server Host>:9443/carbon
AS profiles
The following are the list of profiles that corresponds to the respective services/applications:
Service/Application Name Profile Name
web application webapp
Axis2 service axis2service
Jaggery jaggery
How multi-profiling works
Starting a product on a preferred profile starts only a subset of features bundled in the product. In order to identifywhat feature bundles apply to which profile, each product maintains a set of files in the bundles.info <PRODUC_HOME>/repository/components/ /configuration/org.eclipse.equinox.simpleT <profile-name>
. The files contain references to the actual bundles. Note that directories configurator bundles.info <profilin the directory path refers to the name of the profile. For example, when there is a product profile named e-name>
webapp, references to all the feature bundles required for the webapp profile to function are in a filebundles.infosaved in <PRODUCT_HOME>/repository/components/ /configuration/org.eclipse.equinox.swebapp
directory.impleconfigurator
Note that when you start the server without using a preferred profile, the server refers to the < _HOME>/rePRODUCTpository/components/ /configuration/org.eclipse.equinox.simpleconfigurator/default bun
file by default. This file contains references to all bundles in the dles.info < _HOME>/repository/coPRODUCTall the components/bundles of a product are saved. directory, which is where mponents/plugins
Migrating the Application Server
If you have multiple instances of AS and you want to move your data and configurations from one instance toanother (such as moving from development to test or production), you can create a Composite Application project(C-App) and deploy the C-App in the new environment as described in Creating and Deploying a Composite
. This approach works when the new instance you are migrating to uses the same AS release and hasApplicationthe same database versions as the previous instance.
See in the following situations:Upgrading from a Previous Release
The new environment you are migrating to has a different database version. In this case, you mustupgrade the older database.You want to upgrade from a previous AS release to a new one.
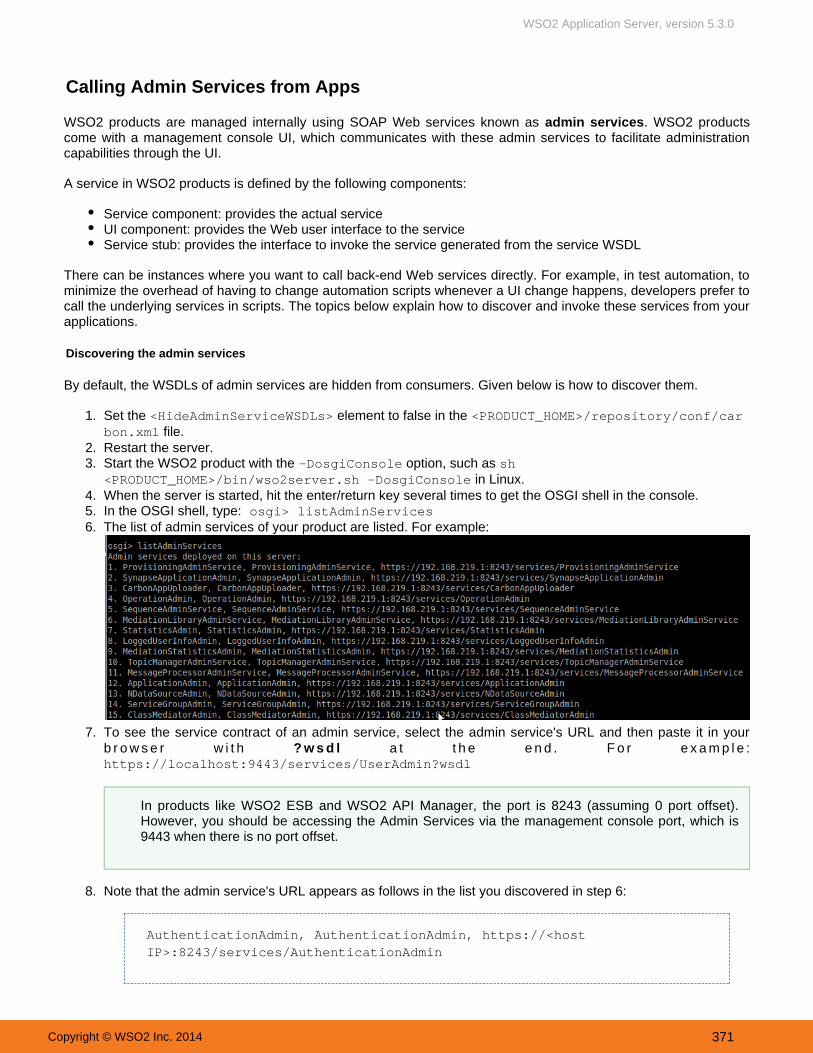
WSO2 Application Server, version 5.3.0
Copyright © WSO2 Inc. 2014 371
1.
2. 3.
4. 5. 6.
7.
8.
Calling Admin Services from Apps
WSO2 products are managed internally using SOAP Web services known as . WSO2 productsadmin servicescome with a management console UI, which communicates with these admin services to facilitate administrationcapabilities through the UI.
A service in WSO2 products is defined by the following components:
Service component: provides the actual serviceUI component: provides the Web user interface to the serviceService stub: provides the interface to invoke the service generated from the service WSDL
There can be instances where you want to call back-end Web services directly. For example, in test automation, tominimize the overhead of having to change automation scripts whenever a UI change happens, developers prefer tocall the underlying services in scripts. The topics below explain how to discover and invoke these services from yourapplications.
Discovering the admin services
By default, the WSDLs of admin services are hidden from consumers. Given below is how to discover them.
Set the element to false in the <HideAdminServiceWSDLs> <PRODUCT_HOME>/repository/conf/car file.bon.xml
Restart the server.Start the WSO2 product with the option, such as -DosgiConsole sh
in Linux.<PRODUCT_HOME>/bin/wso2server.sh -DosgiConsoleWhen the server is started, hit the enter/return key several times to get the OSGI shell in the console.In the OSGI shell, type: osgi> listAdminServicesThe list of admin services of your product are listed. For example:
To see the service contract of an admin service, select the admin service's URL and then paste it in yourb r o w s e r w i t h a t t h e e n d . F o r e x a m p l e :? w s d lhttps://localhost:9443/services/UserAdmin?wsdl
Note that the admin service's URL appears as follows in the list you discovered in step 6:
AuthenticationAdmin, AuthenticationAdmin, https://<hostIP>:8243/services/AuthenticationAdmin
In products like WSO2 ESB and WSO2 API Manager, the port is 8243 (assuming 0 port offset).However, you should be accessing the Admin Services via the management console port, which is9443 when there is no port offset.

WSO2 Application Server, version 5.3.0
Copyright © WSO2 Inc. 2014 372
1. 2.
Invoking an admin service
Admin services are secured using common types of security protocols such as HTTP basic authentication,WS-Security username token, and session based authentication to prevent anonymous invocations. For example,the Web service is secured with the HTTP basic authentication. To invoke a service, you do theUserAdminfollowing:
Authenticate yourself and get the session cookie.Generate the client stubs to access the back-end Web services.
Authenticate the user
The example code below authenticates the user and gets the session cookie:
To generate the stubs, you can write your own client program using the Axis2 client API or use an existingtool like (4.5.1 or later) or wsdl2java.SoapUI
The wsdl2java tool, which comes with WSO2 products by default hides all the complexity and presents youwith a proxy to the back-end service. The stub generation happens during the project build process withinthe Maven POM files. It uses the Maven ant run plug-in to execute the wsdl2java tool.
You can also use the Java client program given to invoke admin services. All dependency JAR filesherethat you need to run this client are found in the directory./lib

WSO2 Application Server, version 5.3.0
Copyright © WSO2 Inc. 2014 373
import org.apache.axis2.AxisFault; import org.apache.axis2.transport.http.HTTPConstants; import org.wso2.carbon.authenticator.stub.AuthenticationAdminStub; importorg.wso2.carbon.authenticator.stub.LoginAuthenticationExceptionException; importorg.wso2.carbon.authenticator.stub.LogoutAuthenticationExceptionException;
import org.apache.axis2.context.ServiceContext; import java.rmi.RemoteException; public class LoginAdminServiceClient { private final String serviceName = "AuthenticationAdmin"; private AuthenticationAdminStub authenticationAdminStub; private String endPoint; public LoginAdminServiceClient(String backEndUrl) throws AxisFault { this.endPoint = backEndUrl + "/services/" + serviceName; authenticationAdminStub = new AuthenticationAdminStub(endPoint); } public String authenticate(String userName, String password) throwsRemoteException, LoginAuthenticationExceptionException { String sessionCookie = null; if (authenticationAdminStub.login(userName, password, "localhost")){ System.out.println("Login Successful"); ServiceContext serviceContext = authenticationAdminStub. _getServiceClient().getLastOperationContext().getServiceContext(); sessionCookie = (String)serviceContext.getProperty(HTTPConstants.COOKIE_STRING); System.out.println(sessionCookie); } return sessionCookie; } public void logOut() throws RemoteException,LogoutAuthenticationExceptionException { authenticationAdminStub.logout(); } }
To resolve dependency issues, if any, add the following dependency JARs location to the class path: <PRO
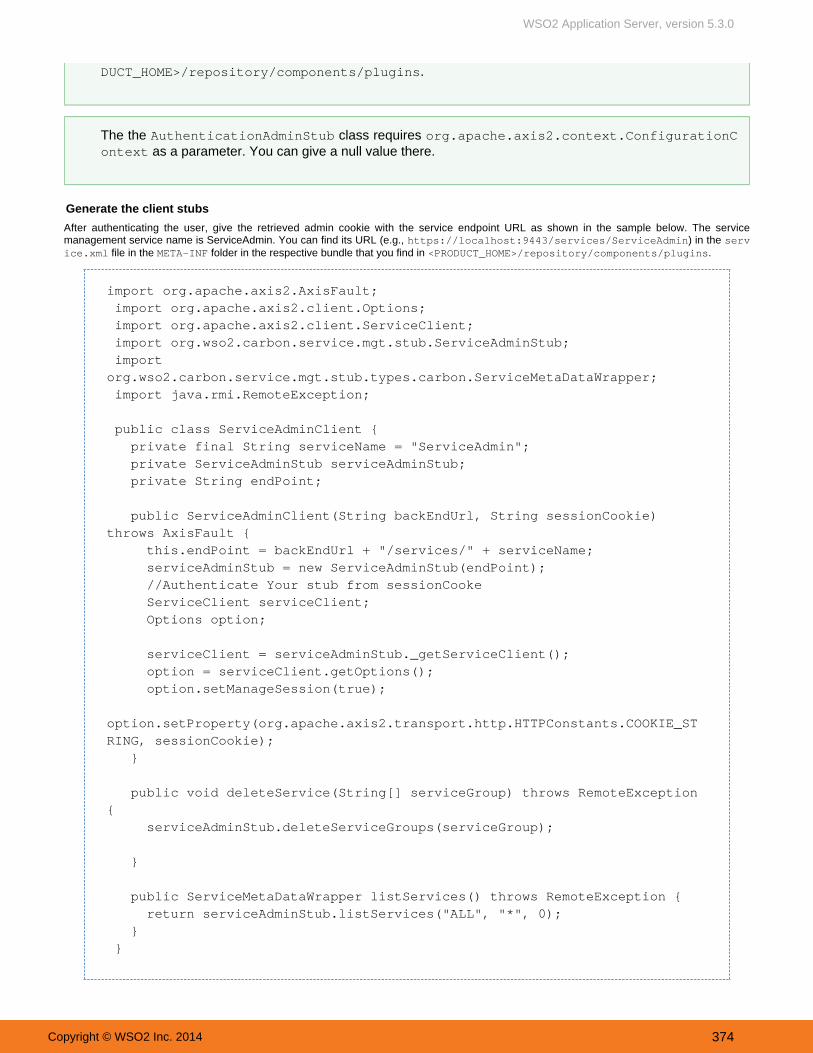
WSO2 Application Server, version 5.3.0
Copyright © WSO2 Inc. 2014 374
Generate the client stubs
After authenticating the user, give the retrieved admin cookie with the service endpoint URL as shown in the sample below. The servicemanagement service name is ServiceAdmin. You can find its URL (e.g., ) in the https://localhost:9443/services/ServiceAdmin serv
file in the folder in the respective bundle that you find in .ice.xml META-INF <PRODUCT_HOME>/repository/components/plugins
import org.apache.axis2.AxisFault; import org.apache.axis2.client.Options; import org.apache.axis2.client.ServiceClient; import org.wso2.carbon.service.mgt.stub.ServiceAdminStub; importorg.wso2.carbon.service.mgt.stub.types.carbon.ServiceMetaDataWrapper; import java.rmi.RemoteException; public class ServiceAdminClient { private final String serviceName = "ServiceAdmin"; private ServiceAdminStub serviceAdminStub; private String endPoint; public ServiceAdminClient(String backEndUrl, String sessionCookie)throws AxisFault { this.endPoint = backEndUrl + "/services/" + serviceName; serviceAdminStub = new ServiceAdminStub(endPoint); //Authenticate Your stub from sessionCooke ServiceClient serviceClient; Options option; serviceClient = serviceAdminStub._getServiceClient(); option = serviceClient.getOptions(); option.setManageSession(true); option.setProperty(org.apache.axis2.transport.http.HTTPConstants.COOKIE_STRING, sessionCookie); } public void deleteService(String[] serviceGroup) throws RemoteException{ serviceAdminStub.deleteServiceGroups(serviceGroup); } public ServiceMetaDataWrapper listServices() throws RemoteException { return serviceAdminStub.listServices("ALL", "*", 0); } }
.DUCT_HOME>/repository/components/plugins
The the class requires AuthenticationAdminStub org.apache.axis2.context.ConfigurationC as a parameter. You can give a null value there.ontext

WSO2 Application Server, version 5.3.0
Copyright © WSO2 Inc. 2014 375
The following sample code lists the back-end Web services:
importorg.wso2.carbon.authenticator.stub.LoginAuthenticationExceptionException; importorg.wso2.carbon.authenticator.stub.LogoutAuthenticationExceptionException;
import org.wso2.carbon.service.mgt.stub.types.carbon.ServiceMetaData; importorg.wso2.carbon.service.mgt.stub.types.carbon.ServiceMetaDataWrapper; import java.rmi.RemoteException; public class ListServices { public static void main(String[] args) throws RemoteException, LoginAuthenticationExceptionException, LogoutAuthenticationExceptionException { System.setProperty("javax.net.ssl.trustStore","$ESB_HOME/repository/resources/security/wso2carbon.jks"); System.setProperty("javax.net.ssl.trustStorePassword", "wso2carbon");
System.setProperty("javax.net.ssl.trustStoreType", "JKS"); String backEndUrl = "https://localhost:9443"; LoginAdminServiceClient login = newLoginAdminServiceClient(backEndUrl); String session = login.authenticate("admin", "admin"); ServiceAdminClient serviceAdminClient = newServiceAdminClient(backEndUrl, session); ServiceMetaDataWrapper serviceList =serviceAdminClient.listServices(); System.out.println("Service Names:"); for (ServiceMetaData serviceData : serviceList.getServices()) { System.out.println(serviceData.getName()); } login.logOut(); } }
Working with Applications
See the following topics for instructions on how the AS can be configured to facilitate the requirements of webapplications that are deployed:
Configuring Applications for ASConfiguring Runtime EnvironmentsCustomize Logging for Web ApplicationsHTTP Session ManagementSetting up Virtual HostsUsing SSO with Web Applications

WSO2 Application Server, version 5.3.0
Copyright © WSO2 Inc. 2014 376
1. 2.
Enable XACML Fine Grained Authorization for Web AppsEnabling Java EE 6 Web Profile
Configuring Applications for AS
The content given here explains how you can enable some optional configurations for your application. Theinstructions given here are applicable to all applications (generic web applications, JAX-RS/JAX-WS applicationsand Jaggery application) that are deployable in WSO2 AS.
Enable SaaS mode for applicationsEnabling CORS for applications
Enable SaaS mode for applications
You can enable SaaS mode for your applications by configuring the file relevant to eachMETA-INF/context.xmlweb application. This configuration allows the web application to be shared among multiple tenants.
To enable SaaS mode:
Open the file of your web application from the archive directory.META-INF/context.xmlUpdate the following section to enable/disable SaaS mode for your application:
<Context> <RealmclassName="org.wso2.carbon.tomcat.ext.realms.CarbonTomcatRealm" enableSaaS="true" saasRules="*" /></Context>
The parameter can be set to "true" or "false". The value you give for this parameter willenableSaaSdepend on the use case.
The parameter controls how the web application should be shared among tenants. ForsaasRulesexample, consider that a tenant wants to share its web application with and wso2.com, foo.com bar.com. You can change the parameter value according to the use case as shown below.
If all tenants can access this application, enter the following:
<Context> <RealmclassName="org.wso2.carbon.tomcat.ext.realms.CarbonTomcatRealm" enableSaaS="true" saasRules="*" /></Context>
If all tenants and can access this application, enter the following:except foo.com bar.com

WSO2 Application Server, version 5.3.0
Copyright © WSO2 Inc. 2014 377
2.
<Context> <RealmclassName="org.wso2.carbon.tomcat.ext.realms.CarbonTomcatRealm" enableSaaS="true" saasRules="*, !foo.com,!bar.com" /></Context>
If only and (all users) can access this application, enter the following:foo.com bar.com
<Context> <RealmclassName="org.wso2.carbon.tomcat.ext.realms.CarbonTomcatRealm" enableSaaS="true" saasRules="foo.com,bar.com" /></Context>
If only Sam and admin in tenant and all users in tenant can access thisfoo.com bar.comapplication, enter the following:
<Context> <RealmclassName="org.wso2.carbon.tomcat.ext.realms.CarbonTomcatRealm" enableSaaS="true" saasRules="foo.com;users=Sam,admin,bar.com" /></Context>
Enabling CORS for applications
If required, you can enable CORS (cross origin resource sharing) for web applications by adding the CORS filter tothe file as shown in the following example. web.xml
If you have not configured SaaS for your application as explained above, you will be warned with thefollowing message when the application is invoked: "To enable SaaS mode for the webapp,"<webapp-name>", configure the CarbonTomcatRealm in META-INF/context.xml".

WSO2 Application Server, version 5.3.0
Copyright © WSO2 Inc. 2014 378
<filter> <filter-name>CorsFilter</filter-name> <filter-class>org.apache.catalina.filters.CorsFilter</filter-class> <init-param> <param-name>cors.allowed.origins</param-name> <param-value>*</param-value> </init-param> <init-param> <param-name>cors.allowed.methods</param-name> <param-value>GET,POST,HEAD,OPTIONS,PUT,DELETE,PATCH</param-value> </init-param></filter><filter-mapping> <filter-name>CorsFilter</filter-name> <url-pattern>/*</url-pattern></filter-mapping>
The parameters used in this example are as follows:
The parameter is used to specify the web domains that should be allowed to cors.allowed.originsshare resources with the web application. The domain names should be specified as parameter values. If theparameter value is set to '*' as shown above, or if this parameter is not used at all, resource sharing will beallowed for all origins (all web domains). The parameter is used to specify the type of requests for which CORS should be cors.allowed.methodsenabled. You can list the allowed methods as parameter values.
Configuring Runtime Environments
WSO2 AS leverages a concept called runtime environments to separately maintain different runtimes for loading therelevant classes for your web applications. The WSO2 web application management feature provides the capabilityto load classes from different locations to your applications.
Most web applications that are deployed in production environments depend on external, third-party libraries fordifferent functionality. Through the WSO2 Application Server's runtime environment, you can control class loadingper server or application. The following runtimes that are available with WSO2 AS are sufficient for most users, butyou can also define your own runtimes. There are four default runtime environments available in AS 5.3.0, which areas follows:
Tomcat Environment: This is the minimal runtime, which is identical to a pure Tomcat runtime. It only hasTomcat, Servlet, JSP, EL and JSTL available in the server-level classpath. If you want additional JARs, youshould package them with the web application or place them in the Tomcat environment's extension directory.Carbon Environment: This consists of both the Tomcat environment and the WSO2 Carbon runtime. It doesnot provide CXF or Spring dependencies. If you want additional JARs, you should package them with the webapplication or place them in the WSO2 Carbon environment's extension directory.CXF Environment: This consists of the Tomcat environment, CXF and Spring. It does not provide the WSO2Carbon runtime. If you want additional JARs, you should package them with the web application or placethem in the CXF environment's lib directory.
This consists of the Javaee runtime and the WSO2 Carbon runtime. If you wantJavaee Environment:additional JARs, you should package them with the web application or place them in the Javaeeenvironment's directory.lib
See the following topics for more information:

WSO2 Application Server, version 5.3.0
Copyright © WSO2 Inc. 2014 379
Setting up the runtime environmentExtending the runtime environmentsAdding Custom Runtime EnvironmentsUpgrading Existing Runtime Environments
Setting up the runtime environment
To configure class loading, you should add the class loading configuration in a file named webapp-classloading and place it in the META-INF folder of a web application. This folder should be created inside the .xml src/main/
folder of you web application. All the artifacts related to a web application are saved in the followingwebappdirectory: <PRODUCT_HOME>/repository/deployment/server/<Web_Application_Type>/<Web_Applic
For example: .ation_Name>. <PRODUCT_HOME>/repository/deployment/server/webapps/SampleApp
The file takes the following format: webapp-classloading.xml
<Classloading xmlns="http://wso2.org/projects/as/classloading"> <Environments>{Runtime Environment Names} </Environments> </Classloading>
Shown below is the file configuration to specify as the runtimewebapp-classloading.xml CXFenvironment:
<Classloading xmlns="http://wso2.org/projects/as/classloading"> <Environments>CXF</Environments></Classloading>
You might want to access some Carbon features in a CXF application. To achieve this, specify acomma-separated list of environments in the file. The following examplewebapp-classloading.xml
specifies both and as the runtime environments:CXF Carbon
<Classloading xmlns="http://wso2.org/projects/as/classloading"> <Environments>Spring,Carbon</Environments></Classloading>
From AS 5.3.0 onwards, support is available as a feature, which allows you to enableJava EE 6 Web Profilethe Javaee runtime environment, in addition to Tomcat, Carbon and CXF runtime environments. See thetopic on for step-by-step instructions on configuring the runtime.enabling Java EE 6 Web Profile Java EE
Extending the runtime environments
This section explains how to place your external dependencies in a running server. This allows you to sharedependencies with a number of applications without packaging them with each and every application. To do this,place the common dependencies in the relevant directories given below.
In Tomcat Environment - <PRODUCT_HOME>/lib/runtimes/ext
The Carbon runtime is the default runtime in WSO2 products. If you want to use the runtime environments other than Carbon, providethe file with the correct configurations. Otherwise, the application will be deployed in the default Carbonwebapp-classloading.xmlruntime environment.

WSO2 Application Server, version 5.3.0
Copyright © WSO2 Inc. 2014 380
1.
2.
3.
In Carbon Environment - <PRODUCT_HOME>/repository/components/libIn CXF, Javaee or any Custom Environment – Use the environment's directory. For example: lib <PRODUCT_HOME>/lib/runtimes/cxf
Adding Custom Runtime Environments
To define custom runtime environments, add a new element as in the<ExclusiveEnvironments> <PRODUCT_H file. OME>/repository/conf/tomcat/webapp-classloading-environments.xml
To define a custom runtime environment for Spring:
Modify the file with the following entries.webapp-classloading-environments.xml
<ExclusiveEnvironments> <ExclusiveEnvironment> <Name>Spring</Name> <Classpath>${carbon.home}/lib/runtimes/spring/*.jar;${carbon.home}/lib/runtimes/spring/</Classpath> </ExclusiveEnvironment> </ExclusiveEnvironments>
Next, create and copy of the related Spring dependencies in the <PRODUCT_HOME>/lib/runtimes/sprin directory.g
Add the following entries to the file of each web application so that they canwebapp-classloading.xmlbe used in the Spring runtime environment defined above.
<Classloading xmlns="http://wso2.org/projects/as/classloading"> <Environments>Spring,Carbon</Environments></Classloading>
Practice caution when placing dependency files in Tomcat environment's directory as thoseextdependencies will be visible to all other environments. For example, if you place incompatible Springdependencies in the directory, it can cause problems with the<PRODUCT_HOME>/lib/runtimes/ext existing Spring dependencies in the CXF runtime environment.
If there are such incompatible dependencies, the recommended best practice is to package them with theweb application in the Tomcat environment itself. Libraries that are only used by a particular web application
directory. the can be put into <webapp_name>.war/WEB-INF/lib
1.
Note that adding custom runtime environments to your system without studying their impact can causeunfavorable results. For example, assume an Application Server (AS) instance contains the followingconfigurations.
CXF (runtime provided by AS) contains CXF 2.7.5 and Spring 3.0.7 dependencies.
Spring (custom runtime) contains Spring 3.2.1 dependencies.
If a web application consumes both of the above environments, the following problems will arise:
The web application's classpath contains dependencies from two Spring versions as 3.0.7 and 3.2.0.

WSO2 Application Server, version 5.3.0
Copyright © WSO2 Inc. 2014 381
1.
2.
Upgrading Existing Runtime Environments
The CXF runtime environment comes by default with core CXF 2.7.5 and core Spring 3.0.7 dependencies. If youwant to upgrade to a different CXF version, there are two recommendations:
Upgrade the CXF runtime environment : You can replace the existing dependent JARs in the CXF/Spring < directory with new JARs.PRODUCT_HOME>/lib/runtimes/cxf CXF/Spring
Instead of upgrading server-level CXF dependencies, you can package all the required JARs in the Web-INF directory of the web application and deploy that in the Tomcat runtime environment./lib
If you want to add optional JARs, copy them to the directorCXF/Spring <PRODUCT_HOME>/lib/runtimes/cxfy after ensuring that they are compatible with the existing JARs.
Customize Logging for Web Applications
WSO2 Application Server provides a platform for hosting and managing web applications. Multitenancy furtherallows you to maintain your own deployment area inside the server. During the development phase of a webapplication, it is necessary to see the errors published on the server console in order to troubleshoot problems anderrors.
WSO2 Application Server already provides container level logging facility. It supports most of the commonly usedlogging API's, such as log4j, common-logging, java-utils-logging, etc. Therefore, if you have inserted log statementsto your web application, you will be able to access the logs either on the product's startup console or the log filestored in the directory. The default log file configured for your product is <AS_HOME>/repository/logs/ wso2ca
. The log4j configurations for your server are specified in the file stored in the rbon.log log4j.properties <PRO
directory, which you can customize as required. See the topic on DUCT_HOME>/repository/conf/ Working with for more information.Logs
However, if it is necessary to manage customized logs for your web application individually, a customized log4j.p file should be packaged in the .war file of the web application along with the relevant libraries androperties
configurations.
Given below are the steps that you must follow in order to enable customized logging for your web application:
Create a Maven project to build the web application. Note that Apache Maven WAR Plugin is used to buildthe .war file.
Create a file inside the folder. You can simply copy the log4j.properties src/main/resources log4j
1.
2.
The Spring project does not recommend this as it will cause several classloading issues.
CXF 2.7.5 itself uses Spring 3.0.7. It is possible that a particular CXF version is not properly tested forcompliance with another version of Spring. You should study the CXF project recommendations tofind a suitable Spring version.
Class loading pattern for web applications is always child-first and this can not be changed. Therefore,location 2 is always given the highest priority when the same library exists in both locations.
Note that tenant aware logging and app-context aware logging are built using the carbon context. Therefore,to use tenant aware logging and app context aware logging, it is recommended to use the AS containerlevel logging facility without doing any customizing the individual web applications if it is there.

WSO2 Application Server, version 5.3.0
Copyright © WSO2 Inc. 2014 382
2.
3.
4.
5.
1.
2.
3.
file in the directory and do the necessary customizations..properties <AS_HOME>/repository/conf/Note that the default resource directory for all Maven projects is src/main/resources.
Add the Maven dependency for to the of the web application as shown below. This willlog4j pom.xmlpackage when the .war file is build.apache-logging-log4j.jar
<dependency> <groupId>log4j</groupId> <artifactId>log4j</artifactId> <version>1.2.17</version></dependency>
Add the following Maven dependency if you are using the commons API:
<dependency> <groupId>commons-logging</groupId> <artifactId>commons-logging</artifactId> <version>1.1.3</version></dependency>
Update the web application by adding the necessary log lines and specifying the Java classes that need to beimported. See the following example, which uses the Apache Commons API for logging:
Add the following import statements to your web application's Java classes when you need to use JCLSPI (Jakarta Commons Logging Service Provider Interface):
import org.apache.commons.logging.Log;import org.apache.commons.logging.LogFactory;
For every class in which you want to use Commons logging, you need to declare and initialize a logusing the following:
private Log log = LogFactory.getLog(ClassName.class);
To log a message to a logger use the appropriate method provided by org.apache.commons.logg as the log priority.ing.Log interface
log.info(Object message);log.debug(Object message);log.error(Object message);log.warn(Object message);
Be sure that does not<packagingExcludes>WEB-INF/lib/*.jar</packagingExcludes>exist in the of the web application.pom.xml

WSO2 Application Server, version 5.3.0
Copyright © WSO2 Inc. 2014 383
5.
6.
7. 8.
See the following simple GET method which generates logs with different priorities:Example:
import org.apache.commons.logging.Log;import org.apache.commons.logging.LogFactory;
import javax.ws.rs.GET;import javax.ws.rs.Path;
@Path("/")public class CommonsLogGenerator { private Log log = LogFactory.getLog(CommonsLogGenerator.class);
@GET @Path("/logging") public String createLogs() { log.info("INFO LOG"); log.debug("DEBUG LOG"); log.error("ERROR LOG"); log.warn("WARN LOG"); return "hello"; }}
Build the .war file using Maven. Check the following:The default resource directory for all Maven projects ( will be copied to the src/main/resources) t
and the folders in the .war file. arget/classes WEB-INF/classesThe JARs related to ( will be bundled in the follog4j ) apache-logging-log4j.jar WEB-INF/libder.The directory structure is preserved by the build process.
Start WSO2 AS and deploy the web application's .war file.Now, when you invoke the web application, the logs will be created according to the configurations youspecified in the file.log4j.properties
HTTP Session Management
In WSO2 Application Server, the HTTP sessions of web applications are handled by the underlying, embeddedtomcat instance. By default, tomcat provides two classes to manage the sessions of web applications:"StandardManager" and "PersistenceManager".
In WSO2 Application Server, "CarbonTomcatSessionManager" and "CarbonTomcatSessionPersistentManager" arethe extensions to "StandardManager" and "PersistenceManager" implementations respectively. The main feature ofthese two manager implementations is that both are tenant aware and ensures that the sessions of one tenant
1. 2.
Additionally, the following features are available in AS for managing the sessions of web applications:
In the webapp management UI, a list of all the active sessions are listed.Sessions are terminated when the session is inactive for the specified session expiry time. Sessionscan also be explicitly terminated using the management console.
Please note that this UI-based session termination still does not work in a clustered setup. The sessions willbe terminated only on the node from which the UI was loaded. Also, if you have a clustered environment,you can read more about HTTP session replication from .here

WSO2 Application Server, version 5.3.0
Copyright © WSO2 Inc. 2014 384
1.
2.
cannot be accessed by other tenants. "CarbonTomcatSessionPersistentManager" has the capability to store thecurrently active and idle sessions to a storage scheme specified by the “Store” configuration. By default, there aretwo types of stores that can be used with the "PersistanceManager". They are store and stFile-based JDBC-basedore. See the tomcat documentation for more information on these storage implementations.
You can enable (session persistence) for web applications"CarbonTomcatSessionPersistentManager" by updatingthe context.xml file stored in the <AS_HOME>/repository/conf/tomcat folder. See the following topics for
instructions:
Enabling File-based storeEnabling JDBC-based store
Enabling File-based store
Open the file and add the following to enable a File-based store with context.xml CarbonTomcatSessionPers.istentManager
<!-- File based carbon tomcat session persistence manager <ManagerclassName='org.wso2.carbon.webapp.mgt.CarbonTomcatSessionPersistentManager'> <Store className='org.apache.catalina.session.FileStore'directory='<directory-name>'/></Manager>
Enabling JDBC-based store
Set up a MySQL database and create a new table using the following SQL command:
create table tomcat_sessions ( session_id varchar(100) not null primary key, valid_session char(1) not null, max_inactive int not null, last_access bigint not null, app_name varchar(255), session_data mediumblob, KEY kapp_name(app_name));
The above table will be used by the JDBC store to swap out the sessions when required and to swap in thesession when they are loaded back into the memory during a server restart.
The following is the default configuration in the file for enabling a JDBC-based store using thecontext.xmlMySQL database.

WSO2 Application Server, version 5.3.0
Copyright © WSO2 Inc. 2014 385
2.
3.
1.
<!-- JDBC based carbon tomcat session persistence manager <ManagerclassName='org.wso2.carbon.webapp.mgt.CarbonTomcatSessionPersistentManager'> <Store className="org.apache.catalina.session.JDBCStore" driverName="com.mysql.jdbc.Driver" connectionURL="jdbc:mysql://<host-name>/tomcat?user=<user-name>&password=<password>" sessionAppCol="app_name" sessionDataCol="session_data" sessionIdCol="session_id" sessionLastAccessedCol="last_access" sessionMaxInactiveCol="max_inactive" sessionTable="tomcat_sessions" sessionValidCol="valid_session" /> </Manager>
For the database connectivity from Application Server, we need to place the relevant JDBC connector driverin the directory and start the server.<AS_HOME>/repository/components/lib
Setting up Virtual Hosts
Virtual host support is an in-built feature of Apache Tomcat that allows you to deploy multiple domains in a singleTomcat server instance. This feature allows the super tenant of your Application Server to deploy web applicationswith different domain names, which are all hosted with the same ip address. Previous releases of WSO2 ApplicationServer loads web applications to the <AS_HOME>/repository/deployment/server/webapps/ directory. Withthe new feature in WSO2 AS 5.3.0, there will be a separate folder in the <AS_HOME>/repository/deployment/server/ directory, which corresponds to each host domain created by the super tenant.
See the following topics for instructions:
Defining virtual hosts for the serverDeploying applications in virtual hosts
Defining virtual hosts for the server
To enable virtual host support and to add new hosts in WSO2 AS:
All the required hosts for your server should be added to the <AS_HOME>/repository/conf/tomcat/ca
file as explained below.talina-server.xml
The file comes with the following host enabled by default:catalina-server.xml
Note that virtual hosts can only be created and used by the super tenant. All other users will be allowed todeploy web applications to the default host configured for the product.

WSO2 Application Server, version 5.3.0
Copyright © WSO2 Inc. 2014 386
1.
2.
<Host name="localhost" unpackWARs="true" deployOnStartup="false"autoDeploy="false" appBase="${carbon.home}/repository/deployment/server/webapps"> ......</Host>
The "host name" attribute specifies the domain name while the “appBase” attribute defines the locationthat stores the web apps. Note that the "appBase" must be located inside the <AS_HOME>/reposito
In the above example, the default domain name is set to folderry/deployment/server/ . “localhost” and the location of web apps is the "webapps" folder.
You can add a new hostname with a new appBase location by adding the following to the catalina-:server.xml file
<Host name="www.vhost.com" unpackWARs="true"deployOnStartup="false" autoDeploy="false"appBase="${carbon.home}/repository/deployment/server/vhost/"> ......</Host>
Setup the DNS configuration by mapping the new host name to the preferred IP address as shown below. Ifyou are testing locally, the "hosts" file is located in the folder for linux. In a production/etc/hostsenvironment, the DNS server should be updated with the domain names accordingly.
<your-ip-address> <host-name>
(eg: 10.100.5.86 www.vhost.com)
Deploying applications in virtual hosts
The virtual hosts for your server are now configured and you can start adding web applications to any appBaselocation. Note that t Webhis enables you to deploy web applications with the same name into different appBases. apps can be added to the product in two ways:
Simply, copy the WAR file into the relevant appBase location (e.g.: add file to example.war <PRODUCT_HOM). E>/repository/deployment/server/vhost When you start WSO2 AS, the web application
(example.war) will be deployed and can be accessed through the following address: http://www.vhost.com:9763/<webapp-name>. Note that if you change the default offset value (in the <PRODUCT_HOME>/repository
file), the port number should get updated accordingly./conf/carbon.xml Use the management console of the product as shown below. You can select the host name when you add aweb app from the UI.
See the topic on for instructions on using the management console. deploying applications in AS

WSO2 Application Server, version 5.3.0
Copyright © WSO2 Inc. 2014 387
1.
Using SSO with Web Applications
Single Sign On or SSO is a popular way of managing a log-in session throughout several applications or programs.It allows users to access multiple applications through a single log-in session, without having to enter credentialsmultiple times. WSO2 provides the capability of enabling SSO for user applications via WSO2 Identity Server.
From the WSO2 Application Server perspective, SSO can be configured within multiple applications deployed inWSO2 AS, using WSO2 IS. According to normal practice, application developers need to include certain code in theapplication in order to enable SSO. The use of the SSO Valve reduces this complexity and allows applicationdevelopers to easily enable SSO for a web application deployed in WSO2 AS. With the SSO Valve, SSO can beenabled for applications with minimal configuration changes.
Configuring the servers (WSO2 AS and WSO2 IS)
The following configurations should be done in WSO2 AS:
Open the sso-sp-config.properties file, which is stored in the <AS_HOME>/repository/conf/sec directory and update the "IdPEntityId". By default, this value is set to the localhost as shown below.urity/
#IdPEntityIdSAML2.IdPEntityId=localhost
1.
2.
3.
Virtual hosts in a clustered deployment:If you have enabled deployment synchronization support in an environment of AS clusters, the webapplications that you add to any appBase location in the manager node will not be committed from themanager node to the svn repo. Therefore, the appBase locations of all the virtual hosts will also follow thesame behaviour as the default “webapps” directory. For depsync support to work in a worker/managersetup, all the nodes should have a similar configuration in the file with the relevantcatalina-server.xmlhost entries.
Manager node and a worker node with depsync enabled in a cluster.Example:
Consider that a manager node has a new host entry in addition to the default entry as follows:
<Host name="www.vhost.com" unpackWARs="true"deployOnStartup="false" autoDeploy="false"appBase="${carbon.home}/repository/deployment/server/vhost/"> ......</Host>
If the manager node deploys a webapp under the newly added host, the webapp will unpacked in the <PRODUCT_HOME> /repository/deployment/server/vhost/ location.
Due to the depsync effect, the .war file in the above location will be synced to the same location ofthe worker node. For that webapp to deploy properly and to be invoked via the same host name, boththe worker and manager nodes should follow the same configuration when adding Host entries to the
file.catalina-server.xml

WSO2 Application Server, version 5.3.0
Copyright © WSO2 Inc. 2014 388
1.
2.
3.
1.
1.
2.
2.
Register the SSO valve in WSO2 AS by appending the following in the <AS_HOME>/repository/conf/to file. Be sure to add this entry just after "CarbonStuckThreadDetectionValve".mcat/catalina-server.xml
<Valve className="org.wso2.carbon.webapp.mgt.sso.SAMLSSOValve"/>
The SSO valve is capable of handling Single Log Out redirections to the Assertion Consumer URL of the webapplication by redirecting to the root context of the web app. This capability can be turned on/off using the"handleConsumerURLAfterSLO" property in the file:sso-sp-config.properties
#Enable this if needed to automatically redirect from acs page afterSLOhandleConsumerURLAfterSLO=true
The following configurations should be done in WSO2 IS:
The respective SSO Service Providers need to be registered in WSO2 Identity Server for each webapplication.
Since the valve automatically determines the SSO issuer-id, the service provider issuer-id needs to bein the following format:
For super tenant web applications: issuer-id = webapp-nameFor tenant web applications: issuer-id = t_tenant-name_webapp-name
Examples:
When the foo.war web application is deployed for the Super Tenant, the issuer-id = foo.
When the bar.war web application is deployed in wso2.com tenant, the issuer-id =t_wso2.com_bar.
The 'Assertion Consumer URL' for the service providers should be set to the same value specified inthe file. Shown below is the URL given in the default sso-sp-config.properties sso-sp-config.properties file.
#The URL of the SAML 2.0 Assertion Consumer#SAML.ConsumerUrl=http://localhost:8080/avis.com/home.jsp
Update "IdentityProviderURL" and “EntityId” in <IS_HOME>/repository/conf/identity.xml with the
correct IS hostname.
The file is the global configuration file for generic SSOsso-sp-config.propertiesconfigurations in WSO2 AS. See the descriptions of all the properties that you can configure in thisfile from .here
Note that the parameters/values defined in the file of WSO2 ASsso-sp-config.propertiesshould correspond to the parameters defined for the service providers registered in WSO2 IS.

WSO2 Application Server, version 5.3.0
Copyright © WSO2 Inc. 2014 389
2.
3.
1.
2.
In WSO2 IS, update the resident IDP "Entity Id" with the same value as the "EntityId". Shown below is thed e f a u l t c o n f i g u r a t i o n .
Configuring the web applications
You must enable SSO for web applications by adding the following context parameter to the web application's web.xml:
<context-param> <param-name>enable.saml2.sso</param-name> <param-value>true</param-value></context-param>
Configuring SSO valve to access web applications in multiple tenants
When the SSO valve is engaged, you can allow tenants to log in to web applications that are deployed for othertenants. For example, consider that there are two tenants: "a.com" and "b.com". Tenant a.com deploys anapplication named foo.war, which needs to be accessed by tenant b.com. In order to allow this, the followingconfigurations should be in place:
Tenant b.com needs to create an SP (service provider) in WSO2 IS similar to the SP created by a.com. Notethat the SP configurations for b.com should have the same issuer id, etc. In this case issuer id for b.comwould be: t_a.com_foo.If SSO request validation is required (this is optional), tenant b.com needs to import tenant a.com's public keyinto tenant a.com's keystore. Then in the aforementioned SP configuration for the foo app, you can enablethe "Enable Signature Validation in Authentication Requests and Logout Requests" option and select thecertificate of a.com. See the topic on for more information on keystores.setting up keystores
Logging in to web applications using SSO
Note that the “EntityId” in should be the same as<IS_HOME>/repository/conf/identity.xmlthe “SAML2.IdPEntityId” defined in <AS_HOME>/repository/conf/security/sso-sp-config
..properties

WSO2 Application Server, version 5.3.0
Copyright © WSO2 Inc. 2014 390
Once you have the above configurations in place, you can simply deploy your web applications in WSO2 AS. Notethat WSO2 IS should be started and running in parallel to AS for this feature to work. You will now be able to log into the web application deployed on WSO2 AS using SSO. Try this sample for a demonstration.
Enable XACML Fine Grained Authorization for Web Apps
This section explains how you can enable fine grained authorization for your web applications by integrating withWSO2 Identity Server. See the following topics for details:
About Fine Grained AuthorizationAbout XACML policiesProviding XACML Fine Grained Authorization to WebApp RequestsSamples
About Fine Grained Authorization
When a resource (web application) is deployed in an application server, it is necessary to specify the users thatshould be granted authority to use the application. Typically, authority is granted to the user of the web applicationdepending on the type of user, resource and the action that the user performs with the resource. However, if we canuse more details from the user scenario to determine the authority that should be granted to the user, we call it Fine
. For example, in addition to the type of user, resource and the action performed on theGrained Authorizationresource, you can use fine grained criteria such as the environment, time, user's role etc., to grant authority.
Example of a fine grained authority requirement: " This document can be edited only by PersonX, who is a Teacherand between 8am to 10am in the school office premises".
About XACML policies
To evaluate such a requirement against a user request, we have to document those fine grained details of therequirement. These documents are called and is used to document this type of policies. We canPolices XACMLevaluate a user's requirements against these XACML policies using an XACML engine. canWSO2 Identity Serverbe used for this purpose. WSO2 IS has an XACML Policy Engine where users can evaluate their requests and itprovides many functionalities related to XACML Authorization.
Providing XACML Fine Grained Authorization to WebApp Requests
WSO2 Application Server, Apache Tomcat or any other web container can be used to host our web apps. If it isrequired to provide fine grained access (authority) to our Web Apps, WSO2 Identity Server can be used as the XACML Policy Decision Point (PDP). This PDP can be accessed via a web service called Entitlement Service. We usethe servlet filter named Entitlement Servlet Filter as the Policy Enforcement Point (PEP) for Web Appauthorization. This allows us the flexibility of using it in any Web App container. The Entitlement Servlet Filter usesa proxy to communicate with WSO2 Identity Server.
The following digram shows how the servlet filter receives the decision on user authority:

WSO2 Application Server, version 5.3.0
Copyright © WSO2 Inc. 2014 391
To get an entitlement decision, we need some parameters like UserName, ResourceName, Action andEnvironment. We can map the resource name to the servlet to which the request is sent. Environment will be theWebApp. Action will be the HTTP action GET, POST etc. In order to get the user name of the person who sent theWeb App request, the following Java EE authentication mechanisms are used:
• Basic Authentication
• Client Cert Authentication
• Digest Authentication
• Form Authentication
To grant authority, we have to authenticate the person. After the authentication, we can obtain the username in theservlet filter using the above mentioned methods. All the parameters can be obtained to get an entitlement decision.As shown in the diagram, when a request comes to a particular Web App which has the engaged EntitlementServlet Filter, the following parameters are obtained: UserName, ResourceName, Action and Environment. Then thePDP Proxy is initialized to communicate with WSO2 IS. After that, the parameters are sent as an XACML requestand the entitlement decision is received. Depending on the entitlement decision received, the request which hascame to the Web App is either stopped or passed.
The next critical step in this process is for the user to engage the Entitlement Servlet Filter. For that, we use theweb.xml. From this file, the servlet filter will read necessary parameters in order to initialize the communication withWSO2 IS. The following shows an example web.xml which configures the Entitlement Servlet Filter.
Example web.xml
<?xml version="1.0" encoding="UTF-8"?><web-app xmlns:xsi="http://www.w3.org/2001/XMLSchema-instance" xmlns="http://java.sun.com/xml/ns/javaee" xsi:schemaLocation="http://java.sun.com/xml/ns/javaeehttp://java.sun.com/xml/ns/javaee/web-app_2_5.xsd" id="WebApp_ID" version="2.5"> <display-name>Entitlement_Sample_WebApp</display-name>

WSO2 Application Server, version 5.3.0
Copyright © WSO2 Inc. 2014 392
<!-- The scope in which the subject would be available. Legal valuesare basicAuth, request-param, request-attribute, session --> <!-- This param is optional. If not provided would be set to defaultvalue --> <context-param> <param-name>subjectScope</param-name> <param-value>basicAuth</param-value> </context-param>
<!-- The name of the identifier by which to identify the subject --> <!-- This param is Mandatory. Should be provided --> <context-param> <param-name>subjectAttributeName</param-name> <param-value>username</param-value> </context-param>
<!-- The username to perform EntitlementService query--> <!-- This param is Mandatory. Should be provided --> <context-param> <param-name>userName</param-name> <param-value>admin</param-value> </context-param>
<!-- The password to perform EntitlementService query --> <!-- This param is Mandatory. Should be provided --> <context-param> <param-name>password</param-name> <param-value>admin</param-value> </context-param>
<!-- The URL to perform EntitlementService query--> <!-- This param is Mandatory. Should be provided in this format --> <!--If the transport type is SOAP give the url likehttps://localhost:9443/services/--> <!--If the transport type is Thrift give the url likehttps://localhost:9443/--> <context-param> <param-name>remoteServiceUrl</param-name> <param-value>https://localhost:9443/services/</param-value> </context-param>
<!-- EntitlementFilter Settings --> <filter> <filter-name>EntitlementFilter</filter-name> <filter-class>org.wso2.carbon.identity.entitlement.filter.EntitlementFilter</filter-class>
<!--Client Class that extends AbstractEntitlementServiceClient.Legal values are basicAuth, soap and thrift.Default is 'thrift'.--> <init-param> <param-name>client</param-name>

WSO2 Application Server, version 5.3.0
Copyright © WSO2 Inc. 2014 393
<param-value>basicAuth</param-value> </init-param>
<!--Decision caching at PEPProxy. Legal values are simple andcarbon.This parameter is optional. If not specified no caching is done.--> <init-param> <param-name>cacheType</param-name> <param-value>simple</param-value> </init-param>
<!--Maximum number of cached entries. Legal values are between 0and 10000 .Only works with caching.--> <init-param> <param-name>maxCacheEntries</param-name> <param-value>1000</param-value> </init-param>
<!-- Time interval for which cached entry is valid. Only works withsimple cache type. --> <init-param> <param-name>invalidationInterval</param-name> <param-value>100000</param-value> </init-param>
<!-- URL ro redirect to if authorization fails --> <!-- This param is Mandatory. Should be provided --> <init-param> <param-name>authRedirectUrl</param-name> <param-value>/index.jsp</param-value> </init-param>
<!-- This will be used if the transport type is thrift. This ismandatory --> <init-param> <param-name>thriftHost</param-name> <param-value>localhost</param-value> </init-param>
<!-- This will be used if the transport type is thrift. This isoptional. If not provided would be set to default value --> <init-param> <param-name>thriftPort</param-name> <param-value>10500</param-value> </init-param>
</filter>
<!-- Filter mappings used to configure URLs that need to be authorized --> <filter-mapping> <filter-name>EntitlementFilter</filter-name> <url-pattern>/protected.jsp</url-pattern>

WSO2 Application Server, version 5.3.0
Copyright © WSO2 Inc. 2014 394
</filter-mapping> <!-- Filter mappings used to configure URLs that need to be authorized --> <filter-mapping> <filter-name>EntitlementFilter</filter-name> <url-pattern>/other.jsp</url-pattern> </filter-mapping> <!-- Mandatory mapping that needs to be present to work with PEP cacheupdate authorization--> <filter-mapping> <filter-name>EntitlementFilter</filter-name> <url-pattern>/updateCacheAuth.do</url-pattern> <dispatcher>FORWARD</dispatcher> </filter-mapping> <servlet> <servlet-name>EntitlementCacheUpdateServlet</servlet-name> <servlet-class>org.wso2.carbon.identity.entitlement.filter.EntitlementCacheUpdateServlet </servlet-class>
<!-- HTTPS port of the web container used when redirecting requestto come over https port for cache update authentication --> <init-param> <param-name>httpsPort</param-name> <param-value>9453</param-value> </init-param>
<!-- Authentication mode for cache update. Legal values are webappand wso2is --> <init-param> <param-name>authentication</param-name> <param-value>webapp</param-value> </init-param>
<!-- Authentication page used for cache update authentication.Legal values are default and custom --> <init-param> <param-name>authenticationPage</param-name> <param-value>default</param-value> </init-param>
<!-- Authentication page URL used for cache update authentication.Works only with custom for authenticationPage --> <init-param> <param-name>authenticationPageUrl</param-name> <param-value>/updateCache.html</param-value> </init-param> </servlet> <!-- Servlet mapping needed for cache update authentication --> <servlet-mapping> <servlet-name>EntitlementCacheUpdateServlet</servlet-name>

WSO2 Application Server, version 5.3.0
Copyright © WSO2 Inc. 2014 395
1.
2.
3.
4.
1.
2.
<url-pattern>/updateCache.do</url-pattern> </servlet-mapping></web-app>
Samples
For a demonstration of this functionality, run the Entitlement Servlet sample as explained .here
Enabling Java EE 6 Web Profile
Starting from WSO2 AS 5.3.0, AS supports Java EE 6 Web Profile. This support is provided using Apache TomEE,which is a project developed at Apache Software Foundation, and is a Java EE 6 Web Profile certified stack. With
Java EEthe runtime environment, you can now deploy Java EE web applications (that uses Apache TomEE) inWSO2 AS.
The following configurations should be in place in order to use this feature:
Enabling the Java EE runtimeConfiguring TomEE
Enabling the Java EE runtime
WSO2 leverages a concept called runtime environments to maintain separate runtimes. You can enable thefollowing runtime environments in WSO2 AS: , , and .Carbon Tomcat CXF Java EE See the topic on configuring
for more descriptive information. Shown below is the configuration to specify 'Javaee' as theruntime environmentsruntime environment.
Open the file stored in the META-INF folder of your web application. Thiswebapp-classloading.xmlfolder should be created inside the folder of your web app. For example, check the src/main/webapp weba
file of a sample web application (javaee-examples) stored in the pp-classloading.xml <AS_HOME>/sam folder.ples/JavaEE-TomEE/javaee-examples/src/main/webapp/META-INF
Enter the following class loading details to enable the Java EE runtime:
<Classloading xmlns="http://wso2.org/projects/as/classloading"> <Environments>Javaee</Environments></Classloading>
You can add other runtimes in addition to Java EE, by entering a comma separated list for the <Environmen element.ts>
The support for Javaee is provided along with Apache TomEE. If you use the Javaee runtime, then TomEEshould also be configured in AS as explained below.
Configuring TomEE
The following configurations are required if the Java EE runtime is enabled for your AS as explained above. Thereare two Apache TomEE configurations:
Setting the default TomEE configurations:
Open the file located in the directory.tomee.xml <AS_HOME>/repository/conf/tomee
In this file, you can configure the Datasources, Resources etc. See the following example where the"myDerbyDatasource" datasource is configured as a resource.

WSO2 Application Server, version 5.3.0
Copyright © WSO2 Inc. 2014 396
2.
3.
1.
2.
<Resource id="myDerbyDatasource" type="DataSource"classpath="/path/to/driver.jar"> . . . .<Resource>
See the documentation on for more examples on how to configure the Apache TomEE configurations file.tomee.xml
Setting the jvm system properties that will be used by TomEE:
Open the file located in the directorysystem.properties <AS_HOME>/repository/conf/tomee.
Update the required properties. For a comprehensive list of system properties, see http://tomee.apache.org/properties-listing.html.
Working with Services
The follow topics explain the how you can create axis2 modules and use them in WSO2 AS to extend the server:
Creating an Axis2 ModuleDeploying Axis2 ModulesManaging Dependencies and Common Libraries
Creating an Axis2 Module
Axis2 provides extended support for modules. For details on modules in Axis2, refer to the . ShowArchitecture Guiden below is how a simple logging module is developed. This module contains one handler that just logs the messagethat is passed through it. Axis2 uses MAR (Module Archive) to deploy modules in Axis2.
The following steps explain the process of creating and packaging an axis2 module:
Step1: Creating the Module ImplementationStep 2: Creating the HandlersStep 3: Creating the module.xml Step 4: Updating the axis2.xml Step 5: Engaging the module
Engaging the module at service level Engaging the module at operation levelEngaging the module globally
Step 6: Packaging in a MAR (Module Archive)
Step1: Creating the Module Implementation
LoggingModule is the implementation class of the module. modules should implement the Axis2 Axis2 org.ap interface with the following methods:ache.axis2.modules.Module
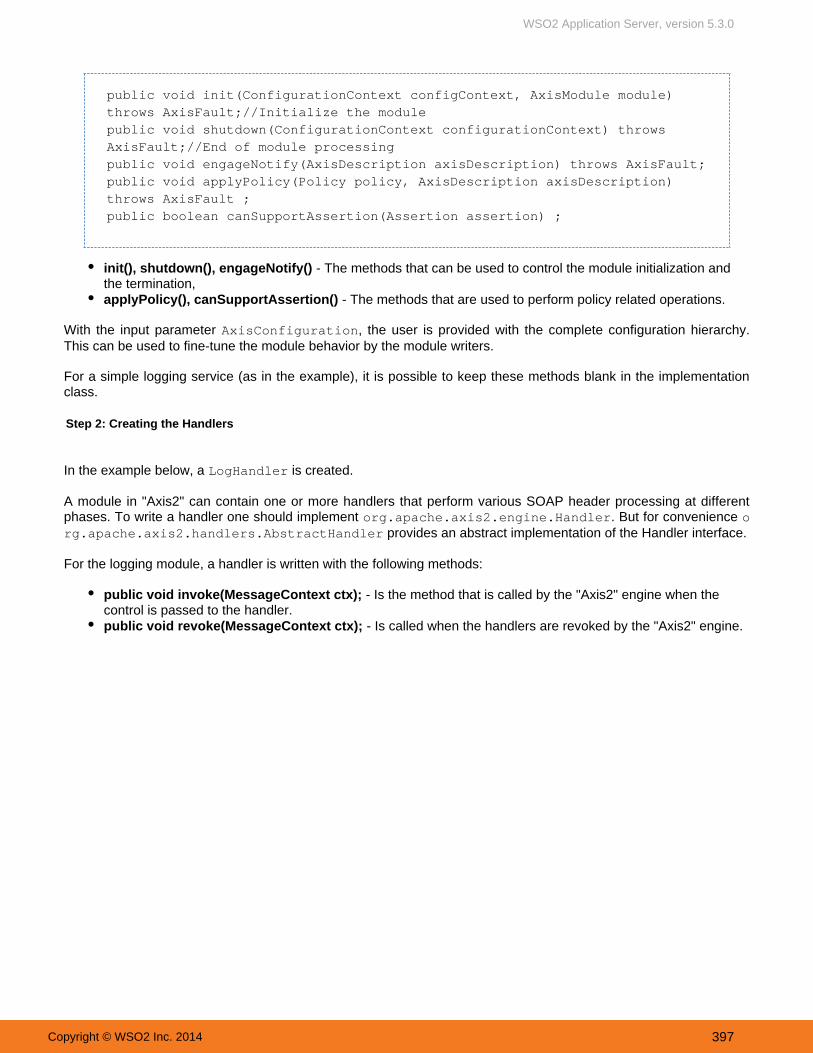
WSO2 Application Server, version 5.3.0
Copyright © WSO2 Inc. 2014 397
public void init(ConfigurationContext configContext, AxisModule module)throws AxisFault;//Initialize the modulepublic void shutdown(ConfigurationContext configurationContext) throwsAxisFault;//End of module processingpublic void engageNotify(AxisDescription axisDescription) throws AxisFault;public void applyPolicy(Policy policy, AxisDescription axisDescription)throws AxisFault ;public boolean canSupportAssertion(Assertion assertion) ;
init(), shutdown(), engageNotify() - The methods that can be used to control the module initialization andthe termination,applyPolicy(), canSupportAssertion() - The methods that are used to perform policy related operations.
With the input parameter , the user is provided with the complete configuration hierarchy.AxisConfigurationThis can be used to fine-tune the module behavior by the module writers.
For a simple logging service (as in the example), it is possible to keep these methods blank in the implementationclass.
Step 2: Creating the Handlers
In the example below, a is created.LogHandler
A module in "Axis2" can contain one or more handlers that perform various SOAP header processing at differentphases. To write a handler one should implement . But for convenience org.apache.axis2.engine.Handler o
provides an abstract implementation of the Handler interface.rg.apache.axis2.handlers.AbstractHandler
For the logging module, a handler is written with the following methods:
public void invoke(MessageContext ctx); - Is the method that is called by the "Axis2" engine when thecontrol is passed to the handler.public void revoke(MessageContext ctx); - Is called when the handlers are revoked by the "Axis2" engine.

WSO2 Application Server, version 5.3.0
Copyright © WSO2 Inc. 2014 398
public class LogHandler extends AbstractHandler implements Handler { private static final Log log = LogFactory.getLog(LogHandler.class); private String name;
public String getName() { return name; }
public InvocationResponse invoke(MessageContext msgContext) throwsAxisFault { log.info(msgContext.getEnvelope().toString()); return InvocationResponse.CONTINUE; }
public void revoke(MessageContext msgContext) { log.info(msgContext.getEnvelope().toString()); }
public void setName(String name) { this.name = name; }}
Step 3: Creating the module.xml
module.xml contains the deployment configurations for a particular module. It contains details such as theimplementation class of the module (in this example it is the class and various handlers that willLoggingModulerun in different phases). The for the logging module will be as follows:module.xml

WSO2 Application Server, version 5.3.0
Copyright © WSO2 Inc. 2014 399
<module name="logging" class="userguide.loggingmodule.LoggingModule"> <InFlow> <handler name="InFlowLogHandler"class="userguide.loggingmodule.LogHandler"> <order phase="loggingPhase" /> </handler> </InFlow>
<OutFlow> <handler name="OutFlowLogHandler"class="userguide.loggingmodule.LogHandler"> <order phase="loggingPhase"/> </handler> </OutFlow>
<OutFaultFlow> <handler name="FaultOutFlowLogHandler"class="userguide.loggingmodule.LogHandler"> <order phase="loggingPhase"/> </handler> </OutFaultFlow>
<InFaultFlow> <handler name="FaultInFlowLogHandler"class="userguide.loggingmodule.LogHandler"> <order phase="loggingPhase"/> </handler> </InFaultFlow></module>
There are four flows defined in the module.xml:
InFlow - Represents the handler chain that will run when a message is coming in.OutFlow - Represents the handler chain that will run when the message is going out.OutFaultFlow - Represents the handler chain that will run when there is a fault, and the fault is going out.InFaultFlow - Represents the handler chain that will run when there is a fault, and the fault is coming in.
The following set of tags describes the name of the handler, handler class, and the phase in which this handler isgoing to run.
handlername - Is the name given for the particular instance of this handler class.class - Is the actual implementation class for this handler. Since we are writing a logging handler, wecan reuse the same handler in all these phases. However, this may not be the same for all themodules.
orderphase - Describes the phase in which this handler runs.

WSO2 Application Server, version 5.3.0
Copyright © WSO2 Inc. 2014 400
<handler name="InFlowLogHandler"class="userguide.loggingmodule.LogHandler"><order phase="loggingPhase" /></handler>
To learn more about Phase rules, refer to the article Axis2 Execution Framework: http://www.developer.com/java/web/article.php/3529321
Step 4: Updating the axis2.xml
In this handler the is defined by the module writer. It is not a predefined handler phase, hence theloggingPhasemodule writer should introduce it to the (not the ) so that the Axis2 engine knows whereaxis2.xml services.xmlto place the handler in different flows ( , , etc.).inFlow outFlow
The following XML lines show the respective changes made to the in order to deploy the loggingaxis2.xmlmodule in the "Axis2" engine. This is an extract of the phase section of axis2.xml.
<!-- ================================================= --><!-- Phases --><!-- ================================================= -->
<phaseOrder type="inflow"> <!-- System pre defined phases --> <phase name="TransportIn"/> <phase name="PreDispatch"/> <phase name="Dispatch"class="org.apache.axis2.engine.DispatchPhase"> <handler name="AddressingBasedDispatcher" class="org.apache.axis2.dispatchers.AddressingBasedDispatcher"> <order phase="Dispatch"/> </handler>
<handler name="RequestURIBasedDispatcher" class="org.apache.axis2.dispatchers.RequestURIBasedDispatcher"> <order phase="Dispatch"/> </handler>
<handler name="SOAPActionBasedDispatcher" class="org.apache.axis2.dispatchers.SOAPActionBasedDispatcher"> <order phase="Dispatch"/> </handler>
<handler name="SOAPMessageBodyBasedDispatcher" class="org.apache.axis2.dispatchers.SOAPMessageBodyBasedDispatcher"> <order phase="Dispatch"/> </handler> <handler name="InstanceDispatcher"

WSO2 Application Server, version 5.3.0
Copyright © WSO2 Inc. 2014 401
class="org.apache.axis2.engine.InstanceDispatcher"> <order phase="PostDispatch"/> </handler> </phase>
<!-- System pre defined phases --> <!-- After Postdispatch phase module author or service author canadd any phase he wants --> <phase name="OperationInPhase"/> <phase name="loggingPhase"/> </phaseOrder>
<phaseOrder type="outflow"> <!-- user can add his own phases to this area --> <phase name="OperationOutPhase"/> <phase name="loggingPhase"/> <!--system predefined phases--> <!--these phases will run irrespective of the service--> <phase name="PolicyDetermination"/> <phase name="MessageOut"/> </phaseOrder/>
<phaseOrder type="INfaultflow"> <!-- user can add his own phases to this area --> <phase name="OperationInFaultPhase"/> <phase name="loggingPhase"/> </phaseOrder>
<phaseOrder type="Outfaultflow"> <!-- user can add his own phases to this area --> <phase name="OperationOutFaultPhase"/> <phase name="loggingPhase"/> <phase name="PolicyDetermination"/>

WSO2 Application Server, version 5.3.0
Copyright © WSO2 Inc. 2014 402
<phase name="MessageOut"/> </phaseOrder>
The custom phase is placed in all the flows, hence that phase will be called in all the messageloggingPhaseflows in the engine. Since the module is associated with this phase, the inside the module will now beLogHandlerexecuted in this phase.
Step 5: Engaging the module
Up to this point, we have created the required classes and configuration descriptions for the logging module and therequired phases. Next step is to "engage" (use) this module. You can engage the module at three levels:
Engaging the module at service level Engaging the module at operation levelEngaging the module globally
Engaging the module at service level
The following example shows how the module is engaged for the example . It is necessary to modifyMyService
the of in order to engage this module. The code for the service can be found in the services.xml MyService Ax
directory.is2_HOME/samples/userguide/src/userguide/example2
<service name="MyServiceWithModule">
<description> This is a sample Web service with a logging module engaged. </description>
<module ref="logging"/>
<parameter name="ServiceClass"locked="xsd:false">userguide.example2.MyService</parameter> <operation name="echo"> <messageReceiverclass="org.apache.axis2.receivers.RawXMLINOutMessageReceiver"/> </operation> <operation name="ping"> <messageReceiverclass="org.apache.axis2.receivers.RawXMLINOutMessageReceiver"/> </operation></service>
In this example, the service name was changed. In addition, the line was added to <module ref="logging"/> s This informs the "Axis2" engine that the module logging should be engaged for this service. Theervices.xml.
handler inside the module will be executed in their respective phases as described by the module.xml.
Engaging the module at operation level
Modules can be engaged for selected operations in a service by updating the services.xml of the service. Thefollowing example shows how the "logging" module is engaged for the operation named "listModulesForOperation"in a service.

WSO2 Application Server, version 5.3.0
Copyright © WSO2 Inc. 2014 403
<operation name="listModulesForOperation"> <parameter name="AuthorizationAction"locked="false">/permission/admin/manage/modify/service</parameter> <module ref="logging"/></operation>
Engaging the module globally
In order to globally engage modules in WSO2 products that are based on Carbon 4.4.1 or a later version, you needto update the file with the following:<AS_HOME>/repository/conf/axis2/axis2.xml
<module ref="logging"/>
Note that the "Addressing" module is engaged by default in the axis2.xml as shown below.
<module ref="addressing"/>
Step 6: Packaging in a MAR (Module Archive)
Before deploying the module, it is necessary to create the MAR file for this module. This can be done using the JARcommand and then renaming the created JAR file. Else you can find the that has already beenlogging.marcreated in the directory.Axis2_HOME/samples/userguide
Deploying Axis2 Modules
The WSO2 SOA platform inherits the capabilities of Axis2, which allows the platform to be extended using .modules After writing a module, you can add it to a Carbon server.The global modules affect all the services deployed withinthe server.
If you are deploying a module in Axis2 manually, you must create a directory with the name "modules" in the webap directory of their servlet container, and then copying the MAR file to that directory. ps/axis2/WEB-INF For more
information, refer to http://axis.apache.org/axis2/java/core/docs/modules.html
Follow the instructions below to upload a Module to the server using the management console:
The Axis2 module management capability is provided by the following feature in the WSO2 featurerepository:
Name : WSO2 Carbon - Module Management UI FeatureIdentifier: org.wso2.carbon.module.mgt.ui.feature.group
: WSO2 Carbon - Module Management Core FeatureName: org.wso2.carbon.module.mgt.server.feature.groupIdentifier
The module management UI and server features above are currently bundled in the service managementfeature given below:
: WSO2 Carbon - Serv ice Management Fea tu reName: org.wso2.carbon.service.mgt.feature.groupIdentifier

WSO2 Application Server, version 5.3.0
Copyright © WSO2 Inc. 2014 404
1.
2.
3.
4.
Log in to the product's click management console and Add under Main -> Modules.
Click Browse to select the module archive file (MAR) you want to upload. For example,
Click Upload. If the file is uploaded successfully, a message appears prompting you to restart the server to activate the module. Click OK.
When the server restarts, the module will be active and displayed on the Deployed Modules page.
Managing Dependencies and Common Libraries
This chapter contains the following information:
Class Loading for Web ServicesUploading Shared Axis2 ArtifactsRestarting the Axis2 ConfigurationDeleting Common Axis2 Libraries
The service management feature is added by default in all service hosting WSO2 middleware products. If itis not included in the product distribution you are using, you can install it by following the instructions givenin the Feature Management section.
TipUse the "+" button to upload more than one module. The "-" button removes the additional uploadoption.

WSO2 Application Server, version 5.3.0
Copyright © WSO2 Inc. 2014 405
Class Loading for Web Services
In most scenarios, web services that are deployed in production environments depend on external, third-partylibraries for different functionality. The web services deployed in WSO2 Application Server can load classes fromdifferent locations. Therefore, it is important to understand how you can place your external dependencies withinWSO2 Application Server in the manner most suitable to your requirements.
There are different kinds of services that you can deploy in WSO2 Application Server through the managementconsole. See Service Development and Deployment for more information. These deployed service archives arewritten to the relevant folder in the following location of the file system: <AS_HOME>/repository/deployment/s
. In this folder, there are separate sub folders (deployment folders) for the different types of services. Forerverexample, axis2 services are deployed in <AS_HOME>/repository/deployment/server/axis2services.
See the following topics for information on how classes are loaded to your web services and about the possibleclass loading configurations:
Classes for Web ServicesChild-first class loadingParent-first class loadingChange class loading for a particular service
Classes for Web Services
The web services deployed in your Application Server can load classes from four different locations as explainedbelow:
<PRODUCT_HOME>/ repos i to ry /components / l ibWhen a .jar file is copied to this location, it will be converted to an OSGi bundle and injected to the CarbonOSGi runtime. Any other OSGi bundle can import packages provided by the copied .jar file. We recommendusers to copy external libraries to this location when it is necessary to make the dependency available withinthe OSGi environment. For example, consider a situation where you have installed mediation features in the WSO2 Application Server and want to share the same library between a mediator and an AAR service.
<PRODUCT_HOME>/repository/deployment/server/ l ibAs mentioned above, all sub folders relevant to different service types exist in the "server" folder. So the 'lib'folder is the place to copy libraries which should be shared across different services of different service types.
You have the option to use the management console of AS in order to upload the axis2 artifacts to thisdirectory as explained . This possibility is enabled in AS by the featurehere Axis2 Repository Managementt h a t i s e n a b l e d i n A S b y d e f a u l t .
<PRODUCT_HOME>/repository/deployment/server/<deployment_folder>/libThe <deployment_folder> here is the relevant folder for the service type (For example, <axis2services>). This 'lib' folder is the place to copy libraries that should be shared across different services of the sameservice type. For example, if you have two different Axis2 services that share the same dependency, you can
If your external dependency is already an OSGi bundle, you can directly copy that bundle to <AS_HO folder and the behavior will be the same as above.ME>/repository/components/dropins
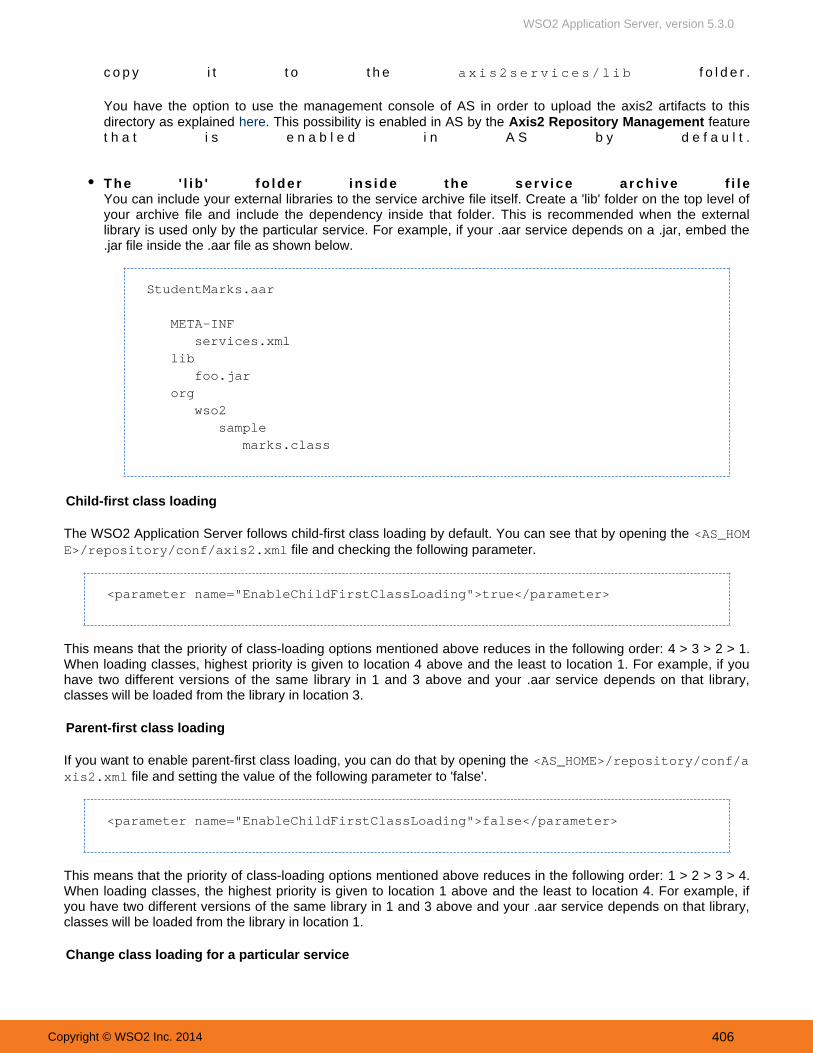
WSO2 Application Server, version 5.3.0
Copyright © WSO2 Inc. 2014 406
c o p y i t t o t h e axis2services/lib f o l d e r .
You have the option to use the management console of AS in order to upload the axis2 artifacts to thisdirectory as explained . This possibility is enabled in AS by the featurehere Axis2 Repository Managementt h a t i s e n a b l e d i n A S b y d e f a u l t .
The ' l i b ' fo lde r ins ide the se rv ice a rch ive f i l eYou can include your external libraries to the service archive file itself. Create a 'lib' folder on the top level ofyour archive file and include the dependency inside that folder. This is recommended when the externallibrary is used only by the particular service. For example, if your .aar service depends on a .jar, embed the.jar file inside the .aar file as shown below.
StudentMarks.aar
META-INF services.xml lib foo.jar org wso2 sample marks.class
Child-first class loading
The WSO2 Application Server follows child-first class loading by default. You can see that by opening the <AS_HOM file and checking the following parameter.E>/repository/conf/axis2.xml
<parameter name="EnableChildFirstClassLoading">true</parameter>
This means that the priority of class-loading options mentioned above reduces in the following order: 4 > 3 > 2 > 1.When loading classes, highest priority is given to location 4 above and the least to location 1. For example, if youhave two different versions of the same library in 1 and 3 above and your .aar service depends on that library,classes will be loaded from the library in location 3.
Parent-first class loading
If you want to enable parent-first class loading, you can do that by opening the <AS_HOME>/repository/conf/a file and setting the value of the following parameter to 'false'.xis2.xml
<parameter name="EnableChildFirstClassLoading">false</parameter>
This means that the priority of class-loading options mentioned above reduces in the following order: 1 > 2 > 3 > 4.When loading classes, the highest priority is given to location 1 above and the least to location 4. For example, ifyou have two different versions of the same library in 1 and 3 above and your .aar service depends on that library,classes will be loaded from the library in location 1.
Change class loading for a particular service

WSO2 Application Server, version 5.3.0
Copyright © WSO2 Inc. 2014 407
1. 2.
If you want a particular Axis2 service to have a different setting for the para"EnableChildFirstClassLoading"meter, you can add the above parameter to the file of the .aar file.META-INF/services.xml
<parameter name="EnableChildFirstClassLoading">false</parameter>
For example, consider that child-first class loading is enabled at server level (default setting), and therefore thepriority of class-loading options reduces in the following order: 4 > 3 > 2 > 1. In this scenario, if you have twodifferent versions of the same library in locations 1 and 4, and your service depends on the library in location 4, theclasses will be loaded for the service from the library in location 4 as specified in the META-INF/services.xml file.
Uploading Shared Axis2 Artifacts
Axis2 services can be deployed to a running Carbon instance as archive files, given that the required features areinstalled. See the section on in AS for step-by-step instructions. Some of thesedeveloping and deploying servicesAxis2 service archives may require additional libraries. As explained in the section on ,class loading for servicesthese external libraries can be applied to services at individual service level or they can be shared across multipleservices.
With the that is installed in WSO2 AS by default, you are able to directlyAxis2 Repository Management Featureupload the common libraries to the Axis2 Repository using the management console. You can also removeuploaded/shared libraries that are no longer necessary.
Follow the instructions below to upload shared libraries.
Log in to the product's management console and click under .Carbon Configure -> RepositoriesThe page opens. To upload shared libraries, click linkArtifact Dependency Manager Add dependenciesn e x t t o t h e r e l e v a n t l i b d i r e c t o r y i c o n .
You can only control the behaviour of location 4 using this method. Therefore, use this method only whenyou have embedded your libraries inside the service archive.
This uploads libraries that can be used by Axis2 artifacts that are deployed under the Parent directoryof that particular lib directory. For example, libraries uploaded to the lib directory of axis2services canalso be shared by Axis2 artifacts deployed under axis2services directory.

WSO2 Application Server, version 5.3.0
Copyright © WSO2 Inc. 2014 408
2.
3.
4.
5.
6.
The artifact upload page appears. Browse for the .jar file and click as shown below.Upload
If the file is uploaded successfully, a message will appear asking if you want to restart Axis2 Configurationnow. Click and similarly confirm the message that follows.Yes
The Axis2 configuration is restarted and the following message is displayed. Click .OK
You can see the uploaded . jar f i le in the in the l ib fo lder.

WSO2 Application Server, version 5.3.0
Copyright © WSO2 Inc. 2014 409
6.
Restarting the Axis2 Configuration
In order to load the newly uploaded common libraries, the Axis2 configuration needs to be restarted. If a restart isrequired, a message will be displayed asking you to restart the configuration.
1. Simply click the link to restart the Axis2 Configuration.
2. A message appears prompting you to confirm the restart. Click "Yes."
The restart option would be available only if the serverwas not restarted after uploading the libraries via Axis2Repository Manager.
Deleting Common Axis2 Libraries
Follow the instructions below to delete shared libraries.
1. Log on to the product's management console and select "Carbon" under "Configure -> Repositories."

WSO2 Application Server, version 5.3.0
Copyright © WSO2 Inc. 2014 410
2. The "Artifact Dependency Manager" page opens. Click the delete link associated with the artifact you want todelete.
3. Confirm the message that is prompted.
Upgrading from a Previous Release
The following steps describe how to upgrade WSO2 Application Server from version 5.2.1 to 5.3.0. To upgrade froma version older than 5.2.1, start from the documentation that was released immediately after your current releaseand upgrade incrementally. For more information on release versions, see the Release Matrix.
If you want to migrate your WSO2 AS configurations from one instance to another (such as when promoting your instance from test toproduction) using the same AS version, see .Migrating the Application Server

WSO2 Application Server, version 5.3.0
Copyright © WSO2 Inc. 2014 411
1. 2.
1.
The instructions on this page takes you through the steps for upgrading from AS 5.2.1 to AS 5.3.0. This includesupgrading the database changes as well as the configurations that should follow the upgrade.
Preparing to upgrade
The following prerequisites must be completed before upgrading:
Make a backup of the user and registry databases of AS 5.2.1
Make a backup of folder to backup the product configurations. <AS_HOME_5.2.1>
Download WSO2 Application Server 5.3.0 from http://wso2.com/products/application-server/.
Upgrading the database/registry
There are no registry and user database schema changes between AS 5.2.1 and 5.3.0. Therefore, you do not needto do any database schema migration.
Migrating the configurations
The following topics explain the configuration changes that need to be updated for AS 5.3.0:
Updating the configuration filesMigrating third party librariesMigrating the services and artifacts
Updating the configuration files
The following are the updates that need to be done to the configuration files in AS 5.3.0.
Create a new database for AS 5.3.0 and restore the backup of the old database in this new database.To connect AS 5.3.0 to the upgraded database, configure the following files:
Configure the <AS_HOME_5.3.0>/repository/conf/datasources/masterdatasources.xmlfile as shown in the following example:
You cannot rollback the upgrade process. However, It is possible to restore a backup of the previousdatabase and restart the upgrade progress.
The downtime is limited to the time taken for switching databases when in the production environment.
Note that configuration files should not be copied directly between servers.

WSO2 Application Server, version 5.3.0
Copyright © WSO2 Inc. 2014 412
2. 1.
2.
<datasource>user manager</description><name>WSO2_CARBON_DB</name><description>The datasource used for registry and<jndiConfig><name>jdbc/WSO2CarbonDB</name></jndiConfig><definition type="RDBMS"><configuration><url>jdbc:mysql://localhost:3306/<new_database></url><username>username</username><password>password</password><driverClassName>com.mysql.jdbc.Driver</driverClassName><maxActive>80</maxActive><maxWait>60000</maxWait><minIdle>5</minIdle><testOnBorrow>true</testOnBorrow><validationQuery>SELECT1</validationQuery><validationInterval>30000</validationInterval></configuration></definition></datasource>
Go to the directory and update the datasource references<AS _HOME_5.3.0>/repository/conf/in the and files to match the updated configurations in the user-mgt.xml registry.xml masterda
file. The following are sample configurations if the datasource istasources.xml“ j d b c / W S O 2 C a r b o n D B ” :
registry.xml
<dbConfig name="wso2registry"><dataSource>jdbc/WSO2CarbonDB</dataSource></dbConfig>
usermgt.xml
<UserManager><Realm><Configuration>...<Propertyname="dataSource">jdbc/WSO2CarbonDB</Property></Configuration>...</Realm></UserManager>

WSO2 Application Server, version 5.3.0
Copyright © WSO2 Inc. 2014 413
3.
1.
2.
4.
5.
6.
1.
2.
1.
2.
3.
4.
Data services feature is no longer shipped with WSO2 Application Server. If you need to use the dataservices hosting feature, you have two options:
Install the Data Services hosting feature from the . See forpublic p2-repo Installing Featuresinstructions.
Use the WSO2 Data Services Server product which can be downloaded from http://wso2.com/products/data-services-server/. See the page to check if the latest WSO2 DSS isAbout this Releasecompatible with the current AS version.
The configurations for SaaS web applications has changed in AS 5.3.0. In previous releases, SaaSconfigurations were enabled in the file of the web application by adding a context-param called web.xml carbon.enable.saas. In AS 5.3.0, SaaS is configured via the file that needs to be placedcontext.xmlunder the folder of the web application. See more details about configuring SaaS applications inMETA-INF/AS 5.3.0 from .herePrior to AS 5.3.0, the primary keystore configured in the file was used for securing transports.carbon.xmlIn AS 5.3.0, the keystore used for transports should be separately configured in the catalina-server.xmlfile.
Check for any other configurations that were done for AS 5.2.1 (based on your solutions), and update theconfiguration files in AS 5.3.0 accordingly. For example, external user stores, caching, mounting, etc.
Migrating third party libraries
If there are third party libraries used with AS 5.2.1 that you want to migrate, copy them to the following directories inAS 5.3.0 as applicable.
If you have used JDBC drivers etc, copy them to the directory<AS_HOME>/repository/components/lib.If you have used OSGi bundles such as SVNKit etc, copy them to the <AS_HOME>/repository/componen
directory. ts/dropins
Migrating the services and artifacts
You can migrate all artifacts relevant to the super tenant as well as the ordinary tenants by copying the followingdirectories from the old server to the new server.
To migrate the super tenant’s artifacts, copy the director<AS_HOME>/repository/deployment/server/y from AS 5.2.1 to AS 5.3.0.
If you are using multitenancy, copy the directory from AS 5.2.1 to AS<AS_HOME>/repository/tenants5.3.0.
Since the Axis2 Quality of Services UI to apply policies such security has been removed from themanagement console, users need to use alternative mechanisms and apply the policies for their services. ForAxis2 AAR services, the policies can be applied through the services.xml.
In AS 5.3.0, it is not possible to globally engage modules using the management console. Therefore, youneed to update the file in the directory as shownaxis2.xml <AS_HOME>/repository/conf/axis2below. You can find more information on engaging modules for axis2 services from .here
The “RegistryKeyStore” configuration in is removed.carbon.xml See the section on configuring for more information.keystores

WSO2 Application Server, version 5.3.0
Copyright © WSO2 Inc. 2014 414
4.
1.
2.
1.
2.
3. 1.
2.
3.
4.
5.
6.
7.
8.
9. 4.
1.
2.
3. 5.
1.
2.
3.
4.
<axisconfig name="AxisJava2.0"> <module ref=”addressing”/> ....</axisconfig>
Testing the upgrade
When the database upgrade scripts are executed, the following are some of the new tables that will becreated in the database:
UM_DOMAINUM_SYSTEM_USERUM_SYSTEM_ROLEUM_SYSTEM_USER_ROLE
Verify that all the required scenarios are working as expected as shown below. This confirms that theupgrade is successful.
Start the AS 5.3.0 server instance once the configurations are done.
Make sure that the server starts up fine without any errors.
Test the deployed artifacts:Log in to the management console as the super tenant.
Navigate to .Main -> Applications -> List
Verify the web application list shown there.
Invoke a web application to verify that it works.
Then, navigate to .Main -> Services -> List
Verify the services list shown there.
I n v o k e a s e r v i c e t o v e r i f y t h a t i t w o r k s .
Then, navigate to .Main -> Carbon Applications -> List
Verify the CApp list shown there.Verify that the Users and Roles are picked up:
Navigate to Configure -> Accounts & Credentials -> Users and Roles
Verify that the list of users and roles are shown correctly.
View the permissions of a chosen role, and make sure that the permissions are correct.If you are using multitenancy,
Log in to the management console using the super tenant credentials.
Navigate to .Configure -> View Tenants
Verify the tenant list shown there.
Then, log in to the system as a tenant and make sure that the log in is successful.

WSO2 Application Server, version 5.3.0
Copyright © WSO2 Inc. 2014 415

WSO2 Application Server, version 5.3.0
Copyright © WSO2 Inc. 2014 416
Developer Guide
This section describes the developer aspect of how to work with WSO2 Application Server.
Working with the Source CodeBasic Registry API KnowledgeCarbonContext APIWSO2 Patch Application ProcessCustomizing the Management ConsoleEnabling SPI Fly SupportJava Documentation
Working with the Source Code
The source code of WSO2 Application Server as well as all other WSO2 products are maintained in GitHubrepositories. If you are a developer, you can clone the source code from these Git repositories, and if required, youcan do modifications and build a customized product on your own. WSO2 invites interested parties to contributetheir changes and suggestions to WSO2.
See the documentation on for more information.working with the source code
Basic Registry API Knowledge
This section describes the basic functions of the Registry API. For example:
Reading a resource from the RegistryAdding a resource to the RegistryRenaming a resource, etc.
You can do all this through the Management Console. See to learn how to manage the AS Registry using the UI.Working with the Registry
Visit the following pages to learn more information about the basic Registry functions:
Adding a Resource with APICreating a Resource from a Given URLChecking for the Existence of a ResourceDeleting a ResourceManaging CommentingManaging RatingsManaging Tags of a ResourceManaging Versions of a ResourceReading a ResourceRenaming a ResourceRetrieving Metadata of a ResourceMoving and Copying a ResourceManaging Relationships of a ResourceExecuting a QuerySearching for ContentRetrieving LogsManaging AspectsManaging Symbolic Links
Adding a Resource with API
Add a resource to the registry instance

WSO2 Application Server, version 5.3.0
Copyright © WSO2 Inc. 2014 417
1.
2.
To add a resource to the registry instance, create a Resource object and then pass the created resource object tothe registry instance's method:put
Create a collection called /c1/c2
Collection collection = registry.newCollection();
Call the method.put
registry.put("/c1/c2", collection);
Access the created resource
If you call the method, then you will be able to access that created resource.get
Add a resource with content
To add a resource with content, create a Resource object and then set content.
Resource r1 = registry.newResource();String str = "My File Content";r1.setContent(str.getBytes());registry.put("/c1/c2/r1", r1);
Related Links
Adding a Resource - For information on adding a resource using the Management Console.
Creating a Resource from a Given URL
If a resource needs to be created with content from any given URL, the following line of code can be used to add aresource from a given URL to a suggested location. The real location to which the resource was added is returned.The should contain that a user wants to add.template_resource metadata of the resource
String real_location = registry.importResource("c1/c2/r3","http://wso2.com", template_resource);
Checking for the Existence of a Resource
We can use the following code to confirm whether the resource exists:
metadata of the resource is defined as the properties of the resource, media type of the resource, author ofthe resource, create date of the resource, last updates time of the resource, etc.

WSO2 Application Server, version 5.3.0
Copyright © WSO2 Inc. 2014 418
boolean value = registry.resourceExists("/c1/c2/r1");
If the resource does exist, a boolean value of will be returned and if it does not exist, the value istrue falsereturned.
Deleting a Resource
Additionally, you can use the registry instance to delete resources. Deleting a resource is a matter of calling the del method of the registry. For example, to delete the resource, use the following code:ete /c1/c2/r1
registry.delete("/c1/c2/r1");
Related Links
Managing Entries or Content - For information on deleting a resource using the Management Console.
Managing Commenting
Commenting on a resource | | | Edit a comment Remove a comment Retrieving comments made about a resource
Commenting on a resource
You can also comment on a resource using the registry. The following lines of code illustrate how to create acomment object and call the registry instance:
Comment c1 = new Comment();
c1.setText("This is my comment");
String commentPath = registry.addComment("/c1/c2/r2", c1);
The above lines of code will add a comment to the resource named: c1/c2/r2
Edit a comment
You can also make changes to comments you have already made using the registry instance. For this you need thepath and new text for the comment that is being added. For example, to change from "This is my comment" to "Thisis cool," do the following:
registry.editComment(commentPath, "This is cool"); // Here commentPath havea value something like "/c1/c2/r2;comment:1"
Remove a comment

WSO2 Application Server, version 5.3.0
Copyright © WSO2 Inc. 2014 419
A comment can be removed using the comment path. The following code shows how this is done:
registry.removeComment(commentpath);
Retrieving comments made about a resource
Comments about a specific resource can be retrieved using the following code:
registry.getComments("/c1/c2/r2");
Managing Ratings
Rating a resource | | Retrieving the average rating of a resource Retrieving the rating given to the resource by aparticular user
Rating a resource
To rate a resource based on our judgment, you can use the registry instance. Rating a resource can be done usingthe following line of code:
registry.rateResource("c1/c2/r2 " , 4);
Retrieving the average rating of a resource
An average of all ratings of a particular resource can be retrieved. This can be done using the following line of code:
registry.getAverageRating("c1/c2/r2");
Retrieving the rating given to the resource by a particular user
When a rating given by a particular user for a resource is needed, it can be done using the following line of code:
registry.getRating("c1/c2/r2", "wso2_admin"); // rating given for r2 bywso2 admin
Managing Tags of a Resource
Adding a tag | | | Retrieving all tags of a given resource Deleting a tag Retrieving resources with a specific tag
Adding a tag

WSO2 Application Server, version 5.3.0
Copyright © WSO2 Inc. 2014 420
You can perform tagging operations using the registry. To tag a resource, you need the resource path and thetagging words. For example, to tag a resource named as "rename resource," do the following:/c1/c2/r2
registry.applyTag("/c1/c2/r2" , "rename resource");
Retrieving all tags of a given resource
You can use the registry to retrieve tags for a given resource. It will return an array of type and you can iterateTagthe array to see the content.
Tag[] tags = registry.getTags("/c1/c2/r2");
Deleting a tag
You can remove a tag using the tag name. Use the following code:
registry.removeTag("/c1/c2/r2","rename resource");
Retrieving resources with a specific tag
Resources that have a specific tag can be retrieved using the following code:
registry.getResourcePathsWithTag("wso2");
Managing Versions of a Resource
Enabling auto versioning of resources | | | Creating versions of resources Retrieving versions of a given resource Restoring to an old version
Enabling auto versioning of resources
Resources can be automatically versioned when they are added or updated. However, this feature is disabled bydefault. It can be enabled by adding following to PRODUCT_HOME/repository/conf/registry.xml
<versionResourcesOnChange>true</versionResourcesOnChange>
Creating versions of resources
Collections are not versioned automatically due to performance considerations. However, you can create versions ofcollections or resources using the API. It is recommended that collection versions are created only for makingcheckpoints of the sub-tree you are working on. When connecting to the server from the client side, it is possible tocreate versions.

WSO2 Application Server, version 5.3.0
Copyright © WSO2 Inc. 2014 421
Use the following command to create a version of your resource/collection:
registry.createVersion("/c1/c2");
Retrieving versions of a given resource
You can list all of the versions of a given resource using the code given below. The result would be an array of Stri type, containing links to the different versions of the resource.ng
String [] versions = registry.getVersions("/c1/c2");
Restoring to an old version
Since the Registry comes with versioning, we can restore a resource to any of its versions. This can be done usingthe registry as well. In the section, we discussed how to retrieve versions forRetrieving versions of a given resourcea give resource. The following line of code demonstrates how we can restore back an old version of the registryinstance. Note that in the process of restoration, the content, properties, comments, tags, ratings, associations anddependencies will be restored, but subscriptions and permissions related to resources will not be restored.
registry.restoreVersion ("/c1/c2;version:2");
Related Links
Managing Metadata - for information on checking versions using the Management Console.
Reading a Resource
Once the Registry instance is in place (embedded registry or remote registry), navigation is straightforward. It is thesame as working with the Registry API. If we have a resource called in the Registry, you can access it/foo/c1using the Registry instance as given below:
Resource resource = registry.get("/foo/c1");
The resource object will represent the actual resource object in the Registry. However, if the resource is a collection,then the object will represent the collection.
Related Links
Managing Entries or Content - for information on how to read resources via the Management Console.
Once we have a registry instance, we do not need to pass a complete URL for all invocations. It is adequateto pass only a relative path to a resource.

WSO2 Application Server, version 5.3.0
Copyright © WSO2 Inc. 2014 422
Renaming a Resource
You can rename individual resources or collections. To rename a resource, use the following lines of code. Thesame code can be used to rename a collection as well.
registry.rename("/c1/c2/r1", "/c1/c2/r2");
The above line of code renames the resource to ./c1/c2/r1 /c1/c2/r2
Retrieving Metadata of a Resource
To retrieve metadata associated with a resource, such as author, created date, etc. We can use the registryinstance with the following line of code:
registry.getMetaData("c1/c2/r2");
Moving and Copying a Resource
Moving a resource | Copying a resource
Moving a resource
If a resource needs to be moved, the following code can be used:
registry.move("c1/c2/r3", "c1/c2/r4");
Copying a resource
If a resource needs to be copied, the following code can be used:
registry.copy("c1/c2/r3", "c1/c2/r4");
Related Links
Managing Entries or Content - For more information on moving and copying a resource via the ManagementConsole.
Managing Relationships of a Resource
Creating a relationship between two resources | | Removing a relationship between two resources Retrievingrelationships from a resource

WSO2 Application Server, version 5.3.0
Copyright © WSO2 Inc. 2014 423
Creating a relationship between two resources
A relationship (for example, dependency) can be created between two resources using the following line of code:
registry.addAssociation("c1/c2/r3", "c1/c2/r4", "depends on"); // in thiscase r3 depends on r4
Removing a relationship between two resources
A relationship can be removed between two resources using the following line of code:
registry.removeAssociation("c1/c2/r3", "c1/c2/r4", "depends on"); // inthis case r3 depends on r4
Retrieving relationships from a resource
Relationships of a resource between two resources can be retrieved using the following line of code:
registry.addAssociation("c1/c2/r3", "c1/c2/r4", "depends on"); // in thiscase r3 depends on r4 Association all[] = registry.getAllAssociations("c1/c2/r3"); // allassociations of r3String sourcePath1 = all[0].getSourcePath(); // equals to "c1/c2/r3"
Association dependsAll[] = registry.getAssociations("c1/c2/r3", "dependson"); // "depends on" associations of r3String sourcePath2 = dependsAll[0].getSourcePath(); // equals to "c1/c2/r3" Association r4Assoc[] = registry.getAssociations("c1/c2/r4", "depends on");// "depends on" associations of r3boolean hasAssociations = (r4Assoc.length == 0); // this returns true
Executing a Query
A custom query stored in the registry can be executed by giving the path of the stored query and giving a of theMaprequired parameters. For example:
registry.executeQuery("/path/to/storedQuery", parameter_map); // parametermap contains key value pairs required by the query
Searching for Content

WSO2 Application Server, version 5.3.0
Copyright © WSO2 Inc. 2014 424
A search for content can be launched by passing the required keywords as parameters in the following code:
registry.searchContent("WSO2 Application Server"); // searches throughresource content for WSO2 Application Server
Retrieving Logs
Logs can be retrieved based on username, time period, action performed, and specific resource. For this purpose,the method returns an array while the method returns a collection.getLogs getLogCollection
LogEntry[] logentries = registry.getLogs("c1/c2/r3", LogEntry.ALL, "admin",new Date(2010,4,7), new Date(2010,4,12), true);
LogEntryCollection leCollection = registry.getLogCollection("c1/c2/r3",LogEntry.ALL, "admin", new Date(2010,4,7), new Date(2010,4,12), true);
Managing Aspects
Retrieve available aspects | | | | Adding a new aspect Associating an aspect with a resource Invoking an aspect Retrie | ving actions of an aspect Removing an aspect from registry
Retrieve available aspects
The available aspects in the Registry can be retrieved through the following code. It returns a string array containingthe names of the aspects:
String[] aspects = registry.getAvailableAspects();
Adding a new aspect
An aspect is a way of associating custom behaviors with resources. The Registry is shipped with an implemented As known as by default. The following code shows how this aspect can be added to thepect SimpleLifeCycle
registry:
Aspect simpleLifeCycle = new SimpleLifeCycle();
registry.addAspect("SimpleLifeCycle", simpleLifeCycle);
Associating an aspect with a resource
An aspect can be associated with a Resource. The following code associated the to beSimpleLifeCycleassociated with a resource:

WSO2 Application Server, version 5.3.0
Copyright © WSO2 Inc. 2014 425
registry.associateAspect("c1/c2/r3", "SimpleLifeCycle");
Invoking an aspect
An aspect needs to be invoked with the appropriate actions to make use of its custom behavior. The following codeinvokes the to be associated with a resource:SimpleLifeCycle
registry.invokeAspect("c1/c2/r3", "SimpleLifeCycle",SimpleLifecycle.ACTION);
Retrieving actions of an aspect
An actions associated with an aspect with respect to a particular resource can be retrieved using the following line ofcode:
registry.getAspectActions("c1/c2/r3", "SimpleLifeCycle");
Removing an aspect from registry
An aspect can be removed from the registry with the following line of code:
registry.removeAspect("SimpleLifeCycle");
Managing Symbolic Links
Creating a symbolic link/mounting a registry | Removing a smbolic link/mount point of a registry
Creating a symbolic link/mounting a registry
A symbolic link to a registry can be created in the following manner. The same code can be used to mount a registryto a specific location. If a remote registry needs to be mounted, the same method can be used with an extraparameter.
registry.createLink("/config", "/_system/config");
registry.createLink("/config", "/_system/config","http://remote.registry.url/);
Removing a smbolic link/mount point of a registry
A symbolic link or a mount point of a registry created above can be removed using the following line of code:

WSO2 Application Server, version 5.3.0
Copyright © WSO2 Inc. 2014 426
registry.removeLink("/config");
Related Link
Link Creation - For more information on link creating via the Management Console.
CarbonContext API
PrivilegedCarbonContextObtaining the PrivilegedCarbonContext
getThreadLocalCarbonContext()Setting information into PrivilegedCarbonContext
setTenantId(int tenantId)setTenantId(int tenantId, boolean resolveTenantDomain)setUsername(String username)setTenantDomain(String tenantDomain)setTenantDomain(String tenantDomain, boolean resolveTenantId)setApplicationName(String applicationName)setUserRealm(UserRealm userRealm)setRegistry(RegistryType type, Registry registry)
Switching tenant flowsPrivilegedCarbonContext.startTenantFlow()PrivilegedCarbonContext.endTenantFlow()
Getting Information from PrivilegedCarbonContextgetTenantDomain(boolean resolve)getTenantId(boolean resolve)getRegistry(RegistryType type)Object getOSGiService(Class clazz)List<Object> getOSGiServices(Class clazz)
Miscellaneous Methodspublic static void unloadTenant(int tenantId)public static void destroyCurrentContext()
CarbonContextObtaining the CarbonContext
getThreadLocalCarbonContext()Retrieving information
public int getTenantId()String getUsername()String getTenantDomain()Registry getRegistry(RegistryType type)UserRealm getUserRealm()CarbonQueue<?> getQueue(String name)Context getJNDIContext(Hashtable properties) throws NamingExceptionContext getJNDIContext() throws NamingExceptionString[] discover(URI[] scopes)
PrivilegedCarbonContext
PrivilegedCarbonContext is a special subclass of , which allows you to perform privilegedCarbonContextoperations such as, setting the tenant ID and domain, starting or ending tenant flows and more. This class can onlybe used by Carbon components that have the permission to get hold of an instance of the PrivilegedCarbonCon
. An instance of can only be obtained using the static methods outlined below.text PrivilegedCarbonContext
Obtaining the PrivilegedCarbonContext

WSO2 Application Server, version 5.3.0
Copyright © WSO2 Inc. 2014 427
The following method has to be statically invoked, and will return an instance of PrivilegedCarbonContext.
getThreadLocalCarbonContext()
Obtains the by using data stored in the current thread: PrivilegedCarbonContext PrivilegedCarbonConte As a result, in cases like the deployers, where you can be sure that thext.getThreadLocalCarbonContext().
deployment scheduler thread would set the data, you should directly call the ThreadLocal getThreadLocalCar method. t is better to resolve the bonContext You should have an idea, under which thread you are executing. I Ca
outside that util method, as opposed to resolving the CarbonContext within the method.rbonContext
Setting information into PrivilegedCarbonContext
If the data backed by the has been created for the first time, you have to populatePrivilegedCarbonContextinformation (such as, tenant ID, tenant domain etc.) needed by the downstream code, so that the code can simplyget hold of an instance of or , and start using it. Populating thisCarbonContext PrivilegedCarbonContextdata can be done using the following setter methods.
setTenantId(int tenantId)setTenantId(int tenantId, boolean resolveTenantDomain)setUsername(String username)setTenantDomain(String tenantDomain)setTenantDomain(String tenantDomain, boolean resolveTenantId)setApplicationName(String applicationName)setUserRealm(UserRealm userRealm)setRegistry(RegistryType type, Registry registry)
setTenantId(int tenantId)
This method sets the tenant ID in the . The tenant domain corresponding to this tenant ID will notCarbonContextbe resolved.
setTenantId(int tenantId, boolean resolveTenantDomain)
This method sets the tenant ID in the . The tenant domain corresponding to this tenant ID will beCarbonContextresolved, if is set to .resolveTenantDomain true
setUsername(String username)
If there is a user logged in, this method sets that user's username in the .PrivilegedCarbonContext
setTenantDomain(String tenantDomain)
This method sets the tenant domain on this instance. This method will not automatically resolveCarbonContextthe tenant ID based on the tenant domain.
setTenantDomain(String tenantDomain, boolean resolveTenantId)
This method sets the tenant domain on this instance. If is set to , theCarbonContext resolveTenantId truetenant ID corresponding to the will be resolved internally.tenantDomain
setApplicationName(String applicationName)
This method sets the name of the webapp or service to which the request was destined.
setUserRealm(UserRealm userRealm)
This method sets the tenant specific UserRealm.

WSO2 Application Server, version 5.3.0
Copyright © WSO2 Inc. 2014 428
1.
2.
3.
4.
setRegistry(RegistryType type, Registry registry)
This method sets the tenant specific registry.
RegistryTypes
USER_CONFIGURATION - The configuration registry of the currently logged in user.USER_GOVERNANCE - The governance registry of the currently logged in user.SYSTEM_CONFIGURATION - The configuration registry of the system.LOCAL_REPOSITORY - The local repository of the system.
Switching tenant flows
During an execution flow, sometimes you will need to switch from super tenant mode to tenant mode, do some workas that tenant, and then get back to super tenant mode. In such a scenario, you will do the following:
Start the Tenant Flow.
Set the tenant ID and the tenant domain in the new CarbonContext data holder that gets created when youstart the tenant flow.
Carryout the respective action.
End the tenant flow.
Inside the method, now if you call or doSomething() CarbonContext PrivilegedCarbonContext.getThre, you will get the newly created data. The code that started the tenant flow is referred toadLocalCarbonContext
as the upstream code, and all the code that gets called after starting the tenant flow are referred to as thedownstream code. One example where you may start a tenant flow is when the super tenant runs tasks on behalf ofa tenant. In the latter mentioned instance it may have a loop; and within that loop start a tenant flow for tenants, runthe task as that tenant, get back to the super tenant mode ( ), switch back to another tenant(endTenantFlow start
), run the task of the second tenant, get back to super tenant mode, and so on.TenantFlow
Always follow the following template when you carryout the latter mentioned steps:
try{ PrivilegedCarbonContext.startTenantFlow(); PrivilegedCarbonContext privilegedCarbonContext =PrivilegedCarbonContext.getThreadLocalCarbonContext() privilegedCarbonContext.setTenantId(tenantId); privilegedCarbonContext.setTenantDomain(tenantDomain); // set other stuff like registry etc. if needed
doSomething();} finally { PrivilegedCarbonContext.endTenantFlow();}
In most situations you will not need to start a tenant flow since you will not generally switch to tenant modefrom super tenant mode.

WSO2 Application Server, version 5.3.0
Copyright © WSO2 Inc. 2014 429
PrivilegedCarbonContext.startTenantFlow()
This method starts a new tenant flow, and creates a new holder for tenant data. Thereafter, until isendTenantFlowcalled, the getCarbonContext() and methods will return the data related togetThreadLocalCarbonContext()the newly created tenant data holder. Once is called, set the tenant ID, tenant domain andstartTenantFlowother tenant specific data.
PrivilegedCarbonContext.endTenantFlow()
This methods will end the tenant flow and restore the previous .CarbonContext
The following diagram depicts during an execution of a thread, how we can start as a super tenant, then switch totenant 'x' and carryout some actions, and later switch to tenant 'y' and carryout some actions and continue.
Getting Information from PrivilegedCarbonContext
getTenantDomain(boolean resolve)getTenantId(boolean resolve)getRegistry(RegistryType type)
)Object getOSGiService(Class clazzList<Object> getOSGiServices(Class clazz)
getTenantDomain(boolean resolve)
This method retrieves the tenant domain, and if is set to , it will try to resolve the domain using theresolve truetenant ID.
getTenantId(boolean resolve)
This method retrieves the tenant ID, and if is set to , it will try to resolve the tenant ID using theresolve truetenant domain.
getRegistry(RegistryType type)
This method retrieves the Registry of the tenant of type .RegistryType
RegistryTypes
WSO2 Application Server, version 5.3.0
Copyright © WSO2 Inc. 2014 430
SYSTEM_CONFIGURATION - The system configuration registry of the tenant.SYSTEM_GOVERNANCE - The governance registry of the tenant.
Object getOSGiService(Class clazz)
This method obtains the first instance of the OSGi services found for the interface or class .clazz
List<Object> getOSGiServices(Class clazz)
This method obtai all OSGi service instances found for interface or class clazz. ns
Miscellaneous Methods
public static void unloadTenant(int tenantId)public static void destroyCurrentContext()
public static void unloadTenant(int tenantId)
This method unloads the tenant.
public static void destroyCurrentContext()
This method destroys the current ThreadLocal CarbonContext.
CarbonContext
The is designed for normal tenants to retrieve information from the Carbon runtime. In the superCarbonContexttenant mode, for this to work the relevant data has to be set so that tenants can retrieve information using the Carb
.onContext
Obtaining the CarbonContext
getThreadLocalCarbonContext()
getThreadLocalCarbonContext()
This method obtains the by using the data stored in the current thread: The CarbonContext CarbonContext.getThreadLocalCarbonContext().
Retrieving information
The following methods allow tenants to retrieve information relevant to those tenants from the Carbon runtime.
public int getTenantId()String getUsername()String getTenantDomain()Registry getRegistry(RegistryType type)
Note that this method is depreciated in Carbon 4.3.0. The new method is getOSGiService(Class clazz,Hashtable<String, String> props).
Note that this method is depreciated in Carbon 4.3.0. The new method is List<Object>getOSGiServices(Class clazz, Hashtable<String, String> props).

WSO2 Application Server, version 5.3.0
Copyright © WSO2 Inc. 2014 431
UserRealm getUserRealm()CarbonQueue<?> getQueue(String name)Context getJNDIContext(Hashtable properties) throws NamingExceptionContext getJNDIContext() throws NamingExceptionCarbonContext API String[] discover(URI[] scopes)
public int getTenantId()
This method retrieves the tenant ID.
String getUsername()
This method retrieves the tenant's username.
String getTenantDomain()
This method retrieves the tenant domain.
Registry getRegistry(RegistryType type)
This method retrieves the tenant specific registry.
Registry Types
USER_CONFIGURATION - The configuration registry of the currently logged in user.USER_GOVERNANCE - The governance registry of the currently logged in user.SYSTEM_CONFIGURATION - The configuration registry of the system.SYSTEM_GOVERNANCE - The governance registry of the system.LOCAL_REPOSITORY - The local repository of the system.
UserRealm getUserRealm()
This method retrieves the user realm of the current tenant.
CarbonQueue<?> getQueue(String name)
This method obtains a named queue instance.
Context getJNDIContext(Hashtable properties) throws NamingException
This method obtains a JNDI-context with the given initialization properties.
M e t h o d d e s c r i p t i o nproperties - the properties required to create the JNDI-context instance.
NamingException - if the operation fails, the naming exception will be thrown.
Context getJNDIContext() throws NamingException
This method obtains a JNDI-context.
M e t h o d d e s c r i p t i o n - if the operation fails, the naming exception will be thrown.NamingException
String[] discover(URI[] scopes)
This method is used to discover a set of service endpoints belonging the defined scopes. Therefore, when thismethod is executed the list of service endpoints will be returned.

WSO2 Application Server, version 5.3.0
Copyright © WSO2 Inc. 2014 432
1.
2. 1.
2.
M e t h o d d e s c r i p t i o nscopes - the scopes in which to look-up for the service.
WSO2 Patch Application Process
You apply patches to WSO2 products either as individual patches or through a service pack. A service pack isrecommended when the number of patches increase. The following sections explain the WSO2 patch applicationprocess:
Applying service packs to the KernelApplying individual patches to the KernelVerifying the patch applicationOverview of the patch application process
Applying service packs to the product
Carbon 4.2.0 Kernel supports service packs. A service pack is a collection of patches in a single pack. It containstwo elements:
The directory: lib contains all the JARs relevant to the service pack.The text file: contains the list of JARs in the service pack.servicepack_patches.txt
Follow the steps below to apply service packs to your product.
Copy the service pack file to the director<PRODUCT_HOME>/repository/components/servicepacks/y. For example, the image below shows how a new service pack named is added to thisservicepack001directory.
Start your product. The following steps will be executed:Before applying any patches, the process first creates a backup folder named patch0000 inside the <PRODUCT_HOME>/repository/components/patches/ directory, which will contain the originalcontent of the <PRODUCT_HOME>/repository/components/plugins/ directory. This stepenables you to revert back to the previous state if something goes wrong during operations.
The latest service pack in the dire<PRODUCT_HOME>/repository/components/servicepacks/ will be applied. That is, the patches in the service pack will be applied to the ctory <PRODUCT_HOME>/
Before you begin
You can download all WSO2 Carbon Kernel patches from .hereBefore you apply a patch, check its README.txt file for any configuration changes required.

WSO2 Application Server, version 5.3.0
Copyright © WSO2 Inc. 2014 433
2.
2.
3.
1. 2.
repository/components/plugins/ directory.In addition to the service pack, if there are added to the individual patches <PRODUCT_HOME>/repository/components/patches/ directory, those will also be incrementally applied to the plugins directory.
Applying individual patches to the product
You can apply each patch individually to your system as explained below. Alternatively, you can apply patches as explained above.through service packs
Copy the patches to the <PRODUCT_HOME>/repository/components/patches/ directory.Start the Carbon server. The patches will then be incrementally applied to the plugins directory.
Verifying the patch application
After the patch application process is completed, the patch verification process ensures that the latest service packand other existing patches are correctly applied to the <PRODUCT_HOME>/repository/components/plugins/folder.
All patch related logs are recorded in the <PRODUCT_HOME>/repository/logs/patches.log file.The <PRODUCT_HOME>/repository/components/patches/.metadata/prePatchedJARs.txt metafile contains the list of patched JARs and the md5 values.A list of all the applied service packs and patches are in the <PRODUCT_HOME>/repository/components/default/configuration/prePatched.txt file.
Overview of the patch application process
The metadata file available in the service pack will maintain a list of the applied patches byservice pack. Therefore, the metadata file information will be compared against the <PRODUCT_HOME>/repository/components/patches/ directory, and only the patches that werenot applied by the service pack will be incrementally applied to the plugins directory.
Before applying any patches, the process first creates a backup folder named patch0000 inside the <PRODUCT_HOME>/repository/components/patches/ directory, which will contain the originalcontent of the <PRODUCT_HOME>/repository/components/plugins/ directory. This stepenables you to revert back to the previous state if something goes wrong during operations.
Prior to Carbon 4.2.0, users were expected to apply patches by starting the server with wso2server.shou do not have to issue a special command to trigger the patch application-DapplyPatches. Now, y
process. It starts automatically if there are changes in either the <PRODUCT_HOME>/repository/components/servicepacks/ directory or the <PRODUCT_HOME>/repository/components/patches/ directory. It verifies all the latest JARs in the and directories against the JARs in the servicepacks patches
directory by comparing MD5s of JARs.plugins
Do not change the data in the <PRODUCT_HOME>/repository/components/default/configu file. The patch application process gets the pre-patched list from this fileration/prePatched.txt
and compares the list with the patches available in the and directories. Ifservicepack patchesyou change the data in this file, you will get a startup error when applying patches.

WSO2 Application Server, version 5.3.0
Copyright © WSO2 Inc. 2014 434
1.
2.
1. 2.
3.
4.
The diagram below shows how the patch application process is implemented when you start the server.
Customizing the ManagementConsole
The Management Console user interface (htt) of aps://localhost:9443/carbon
Carbon product consists of two layers:
UI inherited from WSO2 Carbon platform contains the templates, styles (css files), andimages that are stored in the core Carbon UIbundle stored in <PRODUCT_HOME>/reposit
ory/components/plugins/ org.wso2.c wherearbon.ui_<version-number>.jar
is the version of the<version-number>Carbon kernel that the product is built on. Thisbundle is responsible for the overall look andfeel of the entire Carbon platform.UI unique to each product contains all thestyles and images that override the ones incore Carbon platform. This file is in <PRODUCT_HOME>/repository/components/plugi
org.wso2.<product-name>.styles_ns/ where <version-number>.jar <version
is the version of the product.-number>
The following topics explain how to downloada Carbon product and customize its userinterface.
Setting up the development environmentCustomizing the user interfaceStarting the server
Setting up the development environment
To download and set up the productenvironment for editing, take the followingsteps.
Download your product.Extract the ZIP file into a separate folder inyour hard drive. Go to the <PRODUCT_HOME>/repository/
directory to find thecomponents/plugins/required JAR files:org.wso2.carbon.ui_<version-number
>.jarorg.wso2.<product-name>.styles_<version-number>.jar
Copy the JAR files to a separate location on your hard drive. Since the JAR files are zipped, you must unzipthem to make them editable.
You can now customize the look and feel of your product by modifying the contents of the JAR files as described inthe next section.

WSO2 Application Server, version 5.3.0
Copyright © WSO2 Inc. 2014 435
1. 2.
3.
1.
Customizing the user interface
Customizing the product interface involves changing the layout/design of the Carbon framework as well as changingthe styles and images specific to the product. The following topics explain how some of the main changes to theproduct interface can be done.
Changing the layoutChanging the styles on the Carbon frameworkChanging the product specific styles and images
Changing the layout
The layout of the Carbon framework is built using a tiles JSP tag library. The use of tiles allows us to break thepresentation of the layout into small JSP snippets that perform a specific function. For example, and header.jsp f
are the tiles corresponding to the header and footer in the layout. The file controls theooter.jsp template.jspmain layout page of the Carbon framework, which holds all the tiles together. That is, the header part in the templa
file is replaced with the tag, which refers to the te.jsp <tiles:insertAttribute name="header"/> header file. The file as well as the JSP files corresponding to the tiles are located in the .jsp template.jsp org.wso2.<
directory.product-name>.styles_<version-name>.jar/web/admin/layout/
Therefore, changing the layout of your product primarily involves changing the page (main layout template.jsppage) and the JSP files of the relevant JSP tiles.
Changing the styles on the Carbon framework
The file, which determines the styles of the Carbon framework, is located in the global.css org.wso2.carbon. directory. You can edit this file as per your requirement.ui_<version-name>.jar/web/admin/css/
Alternatively, you can apply a completely new stylesheet to your framework instead of the default stylglobal.css esheet.
To apply a new style sheet to the carbon framework:
Copy your new CSS file to this same location. Open the file located in the template.jsp org.wso2.carbon.ui_<version-name>.jar/web/admin
directory, which contains the main layout of the page and the default JavaScript libraries. /layout/Replace with the new style sheet by pointing the attribute to the newglobal.css String globalCSSstylesheet file.
//Customization of UI theming per tenant String tenantDomain = null; String globalCSS = "../admin/css/global.css"; String mainCSS = "";
Changing the product specific styles and images
The styles and images unique to your product are located in the org.wso2.<product-name>.styles_<versio folder. To modify product specific styles and images, take the following steps.n-number>.jar
Copy the necessary images to the org.wso2.<product-name>.styles_<version-number>.jar/we directory. For example, if you want to change the product banner, add the new imageb/styles/images/
Ensure that you do not change or remove the ID attributes on the files..jsp

WSO2 Application Server, version 5.3.0
Copyright © WSO2 Inc. 2014 436
1.
2.
3.
1.
2.
3.
4.
1.
file to this directory.Open the file located in the main.css org.wso2.<product-name>.styles_<version-name>.jar/w
directory.eb/styles/css/To specify a new product banner, change the attribute of background-image org.wso2.<product-name
file as follows:main.css>.styles_<version-name>.jar/web/styles/css/
/* ---------------- header styles ------------------ */div#header-div { background-image: url( ../images/newproduct-header-bg.png); height:70px;}
Starting the server
In the preceding steps, you have done the changes to the product interface after copying the JAR files to a separatelocation on your hard drive. Therefore, before you start your production server, these files must be correctly copiedback to your production environment as explained below.
Compress the contents of the and org.wso2.carbon.ui_<version-number>.jar org.wso2.<produ folders into separate ZIP files.ct-name>.styles_<product-version>.jar
Change the name of the ZIP file to and org.wso2.carbon.ui_<version-number>.jar org.wso2.<pr respectively.oduct-name>.styles_<version-number>.jar
Copy these two new JAR files to the / directory in<PRODUCT_HOME> repository/components/plugins/your product installation.Start the server.
Enabling SPI Fly Support
The WSO2 Carbon platform supports OSGi JRE SPI mechanisms by integrating ‘Apache Aries SPI Fly’, whichprovides OSGi support for JRE SPI mechanisms, including the usage of java.util.ServiceLoader, META-INF/servicesand similar methods. Developers can integrate Apache Aries SPI-Fly support by adding the relevant bundles to the
directory as explained below. <AS_HOME>/repository/components/dropins/ Since the Carbon Runtime ishigher than the OSGi 4.3 compliant framework that supports WeavingHooks, we can use either or Dynamic Staticweaving in the Application Server.
The following steps explain how SPI Fly support can be enabled for AS:
Copy the relevant bundles from to the dirApache Aries <AS_HOME>/repository/components/dropinsectory. The bundles you should copy depend on whether weaving or weaving should beDynamic Staticenabled as explained below.
For weaving, copy the following bundles:Dynamic
SPI Fly Dynamic Weaving Bundle
Aries Util
ASM
Note that the size of the images you use will affect the overall UI of your product. For example, if the heightof the product logo image exceeds 28 pixels, you must adjust the file in the main.css org.wso2.<produ
directory to ensure that the other UIct-name>.styles_<version-name>.jar/web/styles/css/elements of your product aligns with the product logo.
WSO2 Application Server, version 5.3.0
Copyright © WSO2 Inc. 2014 437
1.
2.
3.
4.
5.
For weaving, copy the following bundles:Static
SPI Fly Static Weaving Bundle
Aries UtilThese bundles will provide the necessary support for SPI Fly. Along with them, you can apply your SPIproviders and consumers to the directory.dropins
If weaving is used, it is necessary to process the consumer bundles before the provider bundles. YouStaticcan do this by executing the following command on a command line:
java -jarorg.apache.aries.spifly.static.tool-1.0.0-jar-with-dependencies.jar<provider-bundle>.jar
This command will change the bytecode of the bundle so that static weaving can be used at runtime. Note following tool is used in the above command: that the .org.apache.aries.spifly.static.tool
Start the server.
Check the console logs and you will observe the logs from the consumer bundle that invoked the SPI.
See the for samples and more information.Apache Aries documentation
Java Documentation
The Java document for describes all the classes, interfaces, and methods of the ApplicationApplication ServerServer APIs.
Sample bundles for SPI providers and consumers are given . here Even though these are the samebundles that are , we have modified the client bundle to address an provided by Aries issue with thestatic weaving bundle.

WSO2 Application Server, version 5.3.0
Copyright © WSO2 Inc. 2014 438
Reference Guide
The following topics provide reference information for working with WSO2 AS:
Configuration FilesChanging the Default PortsToolsLazy Loading of Tenants and ArtifactsProduct Startup Options
Configuration Files
The following sections provide detailed definitions for the main configuration files used in Carbon-based products.
Configuring axis2.xmlConfiguring carbon.xmlConfiguring catalina-server.xmlConfiguring identity.xmlConfiguring master-datasources.xmlConfiguring registry.xmlConfiguring user-mgt.xmlConfiguring config-validation.xmlConfiguring sso-sp-config.properties
Configuring axis2.xml
Users can change the default functionality-related configurations by editing the <PRODUCT_HOME>/repository/ conf/axis2/axis2.xml file using the information given below. This information is provided as reference for
users who are already familiar with the product features and want to know how to configure them. If you needintroductory information on a specific concept, such as message receivers and formatters, see the relevant topics inthe User Guide.
Click on the table and use the left and right arrow keys to scroll horizontally. For sample values, see the belExampleow the table.
XML Elements
XML element Attributes Description Datatype
Defaultvalue
Mandatory/Optional
<axisconfig> name The root element. Thename is defined as: name="AxisJava2.0"
Mandatory
<module> ref A globally engagedmodule. The attributerefspecifies the module name.
Mandatory

WSO2 Application Server, version 5.3.0
Copyright © WSO2 Inc. 2014 439
<parameter> name
locked
A parameter is aname-value pair. Alltop-level parameters (thosethat are directsub-elements of the rootelement) will betransformed into propertiesin AxisConfiguration andcan be accessed in therunning system. The nameattribute (required)specifies the parametername. If you set the locke
attribute to true (default isdfalse), this parameter'svalue cannot be overriddenby services and otherconfigurations.
Mandatory
<listener> class A registered listener thatwill be automaticallyinformed whenever achange occurs inAxisConfiguration, such aswhen a service or moduleis deployed or removed.The attributeclassspecifies this listener'simplementation class,which must implement theAxisObserver interface.
Registering listeners isuseful for additionalfeatures such as RSS feedgeneration, which willprovide service informationto subscribers.
Optional
<messageReceivers> The container element formessages receiverdefinitions.
Mandatory
<messageReceiver> class
mep
A message receiverdefinition. The attribclassute (required) specifies themessage receiverimplementation class. The
attribute (required)mepspecifies the messageexchange patternsupported by this messagereceiver. Each messagereceiver definition supportsonly one MEP.
Mandatory

WSO2 Application Server, version 5.3.0
Copyright © WSO2 Inc. 2014 440
<messageFormatters> The container element formessage formatterdefinitions, which are usedto serialize outgoingmessages to differentformats (such as JSON).The format for a messagecan be specified by settingthe "messageType"property in theMessageContext. It canalso be specified as aparameter in service.xml(for service-basedconfiguration) in addition toaxis2.xml (for globalconfiguration).
Optional
<messageFormatter> contentType
class
A message formatterdefinition. The contentTy
attribute specifies whichpemessage types arehandled by this formatter,and the attributeclassspecifies the formatterimplementation class.
Optional
<messageBuilders> The container element forthe message builderdefinitions, which are usedto process the raw payloadof incoming messages andconvert them to SOAP.
Optional
<messageBuilder> contentType
class
A message builderdefinition. The contentTy
attribute specifies whichpemessage types arehandled by this builder, andthe attributeclassspecifies the builderimplementation class.
Optional
<transportReceiver> name
class
A transport receiverdefinition, one for eachtransport type. The atnametribute specifies the shortname to use when referringto this transport in yourconfigurations (http, tcp,etc.), and the attribuclasste specifies the receiverimplementation class thatprovides the logic forreceiving messages via thistransport. You can specify
elements to<parameter>pass any necessaryinformation to the transport.
Mandatory

WSO2 Application Server, version 5.3.0
Copyright © WSO2 Inc. 2014 441
<transportSender> Just like <transportRec, except evier> <transpo
allows you tortSender>define transport senders,which are used to sendmessages via thetransport.
Mandatory
<phaseOrder> type Specifies the order ofphases in the executionchain of a specific type offlow (specified by the typeattribute), which can beone of the following:
InFlowOutFlowInFaultFlowOutFaultFlow
You add phases using the sub-element. In<phase>
the In phase orders, allphases before the Dispatchphase are global phasesand after Dispatch areoperation phases. In theOut phase orders, phasesbefore the MessageOutphase are global phasesand after MessageOut areoperation phases.
Mandatory
<phase> name The phase definition. The n attribute specifies theame
phase name. You can addthe sub-eleme<handler>nt to execute a specifichandler during this phase.
Mandatory
<handler> name
class
The handler (messageprocessing functionality) toexecute during this phase.Handlers are combined intochains and phases toprovide customizablefunctionality such assecurity, reliability, etc.Handlers must bemulti-thread safe andshould keep all their statein Context objects (see theorg.apache.axis2.contextpackage).
Optional
<order> phase Optional

WSO2 Application Server, version 5.3.0
Copyright © WSO2 Inc. 2014 442
<clustering> class
enable
Used to enable clustering.The attributeclassspecifies the clusteringagent class. The aenablettribute is false by default;set it to true to enableclustering.
Optional
<property> Optional
name
value
_ <members>_ The list of static orwell-known members.These entries will only bevalid if the"membershipScheme"above is set to "wka"
N/A Optional
_ <member>_ _ N/A Optional
_ <hostName>_ _ _ N/A Optional
_ <port>_ _ _ N/A Optional
_ <groupManagement>_ Enable thegroupManagement entry ifyou need to run this nodeas a cluster manager.Multiple applicationdomains with differentGroupManagementAgentimplementations can bedefined in this section.
Optional
enable FALSE
_ <applicationDomain_ _>
N/A Optional
name
port
subDomain
agent
description
Example
The following example shows excerpts from an file.axis2.xml
<?xml version="1.0" encoding="ISO-8859-1"?>...<axisconfig name="AxisJava2.0">

WSO2 Application Server, version 5.3.0
Copyright © WSO2 Inc. 2014 443
<!-- ================================================= --> <!-- Parameters --> <!-- ================================================= -->
...
<!-- If you want to enable file caching for attachments change this totrue --> <parameter name="cacheAttachments" locked="false">false</parameter> <!-- Attachment file caching location relative to CARBON_HOME --> <parameter name="attachmentDIR" locked="false">work/mtom</parameter> <!-- Attachment file cache threshold size --> <parameter name="sizeThreshold" locked="false">4000</parameter>
...
<!-- ================================================= --> <!-- Listeners --> <!-- ================================================= -->
<!-- This deployment interceptor will be called whenever before amodule is initialized or --> <!-- service is deployed --> <listenerclass="org.wso2.carbon.core.deployment.DeploymentInterceptor"/>
<!-- ================================================= --> <!-- Deployers --> <!-- ================================================= -->
<!-- Deployer for the dataservice. --> <!--<deployer extension="dbs" directory="dataservices"class="org.wso2.dataservices.DBDeployer"/>-->
<!-- Axis1 deployer for Axis2 --> <!--<deployer extension="wsdd"class="org.wso2.carbon.axis1services.Axis1Deployer"directory="axis1services"/>-->
...
<!-- ================================================= --> <!-- Message Receivers --> <!-- ================================================= -->
<!-- This is the set of default Message Receivers for the system, ifyou want to have --> <!-- message receivers for any of the other Message exchange Patterns(MEP) implement it --> <!-- and add the implementation class to here, so that you can referfrom any operation --> <!-- Note : You can override this for particular service by adding this

WSO2 Application Server, version 5.3.0
Copyright © WSO2 Inc. 2014 444
same element to the --> <!-- services.xml with your preferences --> <messageReceivers> <messageReceiver mep="http://www.w3.org/ns/wsdl/in-only" class="org.apache.axis2.rpc.receivers.RPCInOnlyMessageReceiver"/> <messageReceiver mep="http://www.w3.org/ns/wsdl/robust-in-only" class="org.apache.axis2.rpc.receivers.RPCInOnlyMessageReceiver"/> <messageReceiver mep="http://www.w3.org/ns/wsdl/in-out" class="org.apache.axis2.rpc.receivers.RPCMessageReceiver"/> </messageReceivers>
<!-- ================================================= --> <!-- Message Formatters --> <!-- ================================================= -->
<!-- Following content type to message formatter mapping can be used toimplement support --> <!-- for different message format serializations in Axis2. Thesemessage formats are --> <!-- expected to be resolved based on the content type. --> <messageFormatters> <messageFormatter contentType="application/x-www-form-urlencoded" class="org.apache.axis2.transport.http.XFormURLEncodedFormatter"/> <messageFormatter contentType="multipart/form-data" class="org.apache.axis2.transport.http.MultipartFormDataFormatter"/> <messageFormatter contentType="application/xml" class="org.apache.axis2.transport.http.ApplicationXMLFormatter"/> <messageFormatter contentType="text/xml" class="org.apache.axis2.transport.http.SOAPMessageFormatter"/> <messageFormatter contentType="application/soap+xml" class="org.apache.axis2.transport.http.SOAPMessageFormatter"/> <messageFormatter contentType="text/plain" class="org.apache.axis2.format.PlainTextFormatter"/>
...
</messageFormatters>
<!-- ================================================= --> <!-- Message Builders --> <!-- ================================================= -->
<!-- Following content type to builder mapping can be used to implementsupport for -->

WSO2 Application Server, version 5.3.0
Copyright © WSO2 Inc. 2014 445
<!-- different message formats in Axis2. These message formats areexpected to be --> <!-- resolved based on the content type. --> <messageBuilders> <messageBuilder contentType="application/xml" class="org.apache.axis2.builder.ApplicationXMLBuilder"/> <messageBuilder contentType="application/x-www-form-urlencoded" class="org.apache.synapse.commons.builders.XFormURLEncodedBuilder"/> <messageBuilder contentType="multipart/form-data" class="org.apache.axis2.builder.MultipartFormDataBuilder"/> <messageBuilder contentType="text/plain" class="org.apache.axis2.format.PlainTextBuilder"/>
...
</messageBuilders>
<!-- ================================================= --> <!-- Transport Ins (Listeners) --> <!-- ================================================= -->
<transportReceiver name="http"class="org.apache.synapse.transport.passthru.PassThroughHttpListener"> <parameter name="port" locked="false">8280</parameter> <parameter name="non-blocking" locked="false">true</parameter> <!--parameter name="bind-address" locked="false">hostname or IPaddress</parameter--> <!--parameter name="WSDLEPRPrefix"locked="false">https://apachehost:port/somepath</parameter--> <parameter name="httpGetProcessor"locked="false">org.wso2.carbon.transport.nhttp.api.PassThroughNHttpGetProcessor</parameter> <!--<parameter name="priorityConfigFile" locked="false">location ofpriority configuration file</parameter>--> </transportReceiver>
...
<!-- ================================================= --> <!-- Transport Outs (Senders) --> <!-- ================================================= -->
<transportSender name="http"class="org.apache.synapse.transport.passthru.PassThroughHttpSender"> <parameter name="non-blocking" locked="false">true</parameter> <!--<parameter name="warnOnHTTP500" locked="false">*</parameter>--> <!--parameter name="http.proxyHost"locked="false">localhost</parameter--> <!--<parameter name="http.proxyPort"locked="false">3128</parameter>-->

WSO2 Application Server, version 5.3.0
Copyright © WSO2 Inc. 2014 446
<!--<parameter name="http.nonProxyHosts"locked="false">localhost|moon|sun</parameter>--> </transportSender>
...
<!-- ================================================= --> <!-- Global Engaged Modules --> <!-- ================================================= -->
<!-- Comment this out to disable Addressing --> <module ref="addressing"/>
<!-- ================================================= --> <!-- Clustering --> <!-- ================================================= --> <!-- To enable clustering for this node, set the value of "enable"attribute of the "clustering" element to "true". The initialization of a node in the cluster ishandled by the class corresponding to the "class" attribute of the "clustering" element. Itis also responsible for getting this node to join the cluster. --> <clusteringclass="org.wso2.carbon.core.clustering.hazelcast.HazelcastClusteringAgent" enable="false">
<!-- This parameter indicates whether the cluster has to beautomatically initalized when the AxisConfiguration is built. If set to "true" theinitialization will not be done at that stage, and some other party will have to explictlyinitialize the cluster. --> <parameter name="AvoidInitiation">true</parameter>
...
<!-- The list of static or well-known members. These entries willonly be valid if the "membershipScheme" above is set to "wka" --> <members> <member> <hostName>127.0.0.1</hostName> <port>4000</port> </member> </members>

WSO2 Application Server, version 5.3.0
Copyright © WSO2 Inc. 2014 447
<!-- Enable the groupManagement entry if you need to run this node as acluster manager. Multiple application domains with different GroupManagementAgentimplementations can be defined in this section. --> <groupManagement enable="false"> <applicationDomain name="wso2.esb.domain" description="ESB group" agent="org.wso2.carbon.core.clustering.hazelcast.HazelcastGroupManagementAgent" subDomain="worker" port="2222"/> </groupManagement> </clustering>
<!-- ================================================= --> <!-- Transactions --> <!-- ================================================= -->
<!-- Uncomment and configure the following section to enabletransactions support --> <!--<transaction timeout="30000"> <parametername="java.naming.factory.initial">org.apache.activemq.jndi.ActiveMQInitialContextFactory</parameter> <parametername="java.naming.provider.url">tcp://localhost:61616</parameter> <parametername="UserTransactionJNDIName">UserTransaction</parameter> <parametername="TransactionManagerJNDIName">TransactionManager</parameter> </transaction>-->
<!-- ================================================= --> <!-- Phases --> <!-- ================================================= -->
<phaseOrder type="InFlow"> <!-- System pre defined phases --> <!-- The MsgInObservation phase is used to observe messages as soonas they are received. In this phase, we could do some things such as SOAPmessage tracing & keeping track of the time at which a particular message was received
NOTE: This should be the very first phase in this flow -->

WSO2 Application Server, version 5.3.0
Copyright © WSO2 Inc. 2014 448
<phase name="MsgInObservation"> <handler name="TraceMessageBuilderDispatchHandler" class="org.apache.synapse.transport.passthru.util.TraceMessageBuilderDispatchHandler"/> </phase> <phase name="Validation"/> <phase name="Transport"> <handler name="RequestURIBasedDispatcher" class="org.apache.axis2.dispatchers.RequestURIBasedDispatcher"> <order phase="Transport"/> </handler> <handler name="CarbonContextConfigurator" class="org.wso2.carbon.mediation.initializer.handler.CarbonContextConfigurator"/> <handler name="RelaySecuirtyMessageBuilderDispatchandler" class="org.apache.synapse.transport.passthru.util.RelaySecuirtyMessageBuilderDispatchandler"/> <handler name="SOAPActionBasedDispatcher" class="org.apache.axis2.dispatchers.SOAPActionBasedDispatcher"> <order phase="Transport"/> </handler> <!--handler name="SMTPFaultHandler" class="org.wso2.carbon.core.transports.smtp.SMTPFaultHandler"> <order phase="Transport"/> </handler--> <handler name="CacheMessageBuilderDispatchandler" class="org.wso2.carbon.mediation.initializer.handler.CacheMessageBuilderDispatchandler"/> </phase> ... </phaseOrder>
<phaseOrder type="OutFlow"> <!-- Handlers related to unified-endpoint component are added tothe UEPPhase --> <phase name="UEPPhase" /> <!-- user can add his own phases to this area --> <phase name="RMPhase"/> ...
</phaseOrder>

WSO2 Application Server, version 5.3.0
Copyright © WSO2 Inc. 2014 449
...
</axisconfig>
Configuring carbon.xml
Users can change the configurations related to the default Carbon functionality by editing the <PRODUCT_HOME>/r/epository/conf carbon.xml file using the information given below.
Click on the table and use the left and right arrow keys to scroll horizontally.
XML Elements
XML element Attribute Description Datatype
<Server>
xmlns
_<Name> Product Name. String
_<ServerKey> Machine readable unique key to identify each product. String
_<Version> Product Version. String
<HostName>_ Host name or IP address of the machine hosting thisserver e.g. www.wso2.org, 192.168.1.10 This is willbecome part of the End Point Reference of the servicesdeployed on this server instance.
String
<MgtHostName>_ Host name to be used for the Carbon managementconsole.
String
<ServerURL>_ The URL of the back end server. This is where the adminservices are hosted and will be used by the clients in thefront end server. This is required only for the Front-endserver. This is used when separating the BE server fromthe FE server.
String
<IndexPageURL>_ The URL of the index page. This is where the user will beredirected after signing in to the carbon server.
String
<ServerRoles>_ For cApp deployment, we have to identify the roles thatcan be acted by the current server. The following propertyis used for that purpose. Any number of roles can bedefined here. Regular expressions can be used in the role.Ex : <Role>.*</Role> means this server can act as anyrole.
String
__<Role>
_<BamServerURL>
<Package>_ The fully qualified name of the server. String

WSO2 Application Server, version 5.3.0
Copyright © WSO2 Inc. 2014 450
<WebContextRoot>_ Webapp context root of WSO2 Carbon. String
<RegistryHttpPort>_ In-order to get the registry http Port from the back-endwhen the default http transport is not the same.
Int
<ItemsPerPage>_ Number of items to be displayed on a managementconsole page. This is used at the backend server forpagination of various items.
Int
<InstanceMgtWSEndpoint>_ The endpoint URL of the cloud instance management Webservice.
String
<Ports>_ Ports used by this server
<Offset>__ Ports offset. This entry will set the value of the portsdefined below to the define value + Offset. e.g. Offset=2and HTTPS port=9443 will set the effective HTTPS port to9445.
Int
<JMX>__ The JMX Ports. Int
____<RMIRegistryPort> The port RMI registry is exposed. Int
____<RMIServerPort> The port RMI server should be exposed. Int
__<EmbeddedLDAP> Embedded LDAP server specific ports. Int
____<LDAPServerPort> Port which embedded LDAP server runs. Int
____<KDCServerPort> Port which KDC (Kerberos Key Distribution Center) serverruns.
Int
__<EmbeddedQpid> Embedded Qpid broker ports. Int
____<BrokerPort> Broker TCP Port. Int
____<BrokerSSLPort> SSL Port. Int
__<JNDIProviderPort> Override datasources JNDIproviderPort defined in bps.xmland datasources.properties files.
__<ThriftEntitlementReceivePort> Override receive port of thrift based entitlement service. Int
_<JNDI> JNDI Configuration. Int
__<DefaultInitialContextFactory> The fully qualified name of the default initial contextfactory.
String
_<Restrictions> The restrictions that are done to various JNDI Contexts ina Multi-tenant environment.
<AllTenants>___ Contexts that are common to all tenants. String
<UrlContexts>_____
<UrlContext>_______
<Scheme>_________

WSO2 Application Server, version 5.3.0
Copyright © WSO2 Inc. 2014 451
__<SuperTenantOnly><UrlContexts>__<UrlContext> __ _____<Scheme>__
Contexts that will be available only to the super-tenant. String
_<IsCloudDeployment> Property to determine if the server is running on a clouddeployment environment. This property should only beused to determine deployment specific details that areapplicable only in a cloud deployment, i.e when the serveris deployed *-as-a-service.
Boolean
_<EnableMetering> Property to determine whether usage data should becollected for metering purposes.
Boolean
_<MaxThreadExecutionTime> The Max time a thread should take for execution inseconds.
Int
_<GhostDeployment> A flag to enable or disable Ghost Deployer. By default thisis set to false. That is because the Ghost Deployer worksonly with the HTTP/S transports. If you are using othertransports, don't enable Ghost Deployer.
Boolean
___<Enabled> When <GhostDeployment> is enabled, the lazy loadingfeature will apply to artifacts deployed. That is, when atenant loads, only the specific artifact requested by theservice will be loaded.
___<PartialUpdate> <PartialUpdate> is a further enhancement to lazy loading when of artifacts, which applies <DeploymentSynchronizer
is enabled in a environment.> clustered
_<Axis2Config> Axis2 related configurations.
___<RepositoryLocation> Location of the Axis2 Services & Modules repository Thiscan be a directory in the local file system, or a URL. e.g. 1./home/wso2wsas/repository/ - An absolute path 2.repository - In this case, the path is relative toCARBON_HOME 3. file:///home/wso2wsas/repository/ 4.http://wso2wsas/repository/.
String
___<DeploymentUpdateInterval> Deployment update interval in seconds. This is the intervalbetween repository listener executions.
Int
___<ConfigurationFile> Location of the main Axis2 configuration descriptor file,a.k.a. axis2.xml file This can be a file on the local filesystem, or a URL e.g. 1. /home/repository/axis2.xml - Anabsolute path 2. conf/axis2.xml - In this case, the path isrelative to CARBON_HOME 3. file:///home/carbon/reposito
4. ry/axis2.xml http://repository/conf/axis2.xml
String
___<ServiceGroupContextIdleTime>
ServiceGroupContextIdleTime, which will be set inConfigurationContex for multiple clients which are going toaccess the same ServiceGroupContext Default Value is 30Sec.
String
___<ClientRepositoryLocation> This repository location is used to crete the client sideconfiguration context used by the server when callingadmin services.
String
___<clientAxis2XmlLocation> This axis2 xml is used in creating the configuration contextby the FE server calling to BE server.
String

WSO2 Application Server, version 5.3.0
Copyright © WSO2 Inc. 2014 452
___<HideAdminServiceWSDLs> If this parameter is set, the WSDL file on an admin servicewill not give the admin service WSDL. By default, thisparameter is set to "true". Note that setting this parameterto false will expose WSO2 Storage Server operationsthrough a WSDL.
String
___<HttpAdminServices> WARNING-Use With Care! Uncommenting bellowparameter would expose all AdminServices in HTTPtransport. With HTTP transport your credentials and datarouted in public channels are vulnerable for sniffingattacks. Use this parameter ONLY if your communicationchannels are confirmed to be secured by other means.
String
_<ServiceUserRoles> The default user roles which will be created when theserver is started up for the first time.
String
_<EnableEmailUserName> Enable following config to allow Emails as usernames. Boolean
_<Security> Security configurations.
__<KeyStore> KeyStore which will be used for encrypting/decryptingpasswords and other sensitive information.
String
____<Location> Keystore file location. String
____<Type> Keystore type (JKS/PKCS12 etc.) String
____<Password> Keystore password. String
____<KeyAlias> Private Key alias. String
____<KeyPassword> Private Key password. String
__<TrustStore> System wide trust-store which is used to maintain thecertificates of all the trusted parties.
String
_____<Location> Trust-store file location. String
_____<Type> Trust-store type. String
_____<Password> Trust-store password. String
__<NetworkAuthenticatorConfig> The Authenticator configuration to be used at the JVMlevel. We extend the java.net.Authenticator to make itpossible to authenticate to given servers and proxies.
String
___<Credential> String
___<Pattern> The pattern that would match a subset of URLs for whichthis authenticator would be used.
String
___<Type> The type of this authenticator. Allowed values are: 1.server 2. proxy.
String
___<Username> The username used to log in to server/proxy. String
___<Password> The password used to log in to server/proxy. String

WSO2 Application Server, version 5.3.0
Copyright © WSO2 Inc. 2014 453
__<TomcatRealm> The Tomcat realm to be used for hosted Web applications.Allowed values are; 1. UserManager 2. Memory If this isset to 'UserManager', the realm will pick users & roles fromthe system's WSO2 User Manager. If it is set to 'memory',the realm will pick users & roles fromCARBON_HOME/repository/conf/tomcat/tomcat-users.xml.
String
__<DisableTokenStore> Option to disable storing of tokens issued by STS. Boolean
__<TokenStoreClassName> Security token store class name. If this is not set, defaultclass will beorg.wso2.carbon.security.util.SecurityTokenStore
String
_<WorkDirectory> The temporary work directory. String
___<HouseKeeping> House-keeping configuration. String
___<AutoStart> True - Start House-keeping thread on server startup false -Do not start House-keeping thread on server startup. Theuser will run it manually as and when he wishes.
Boolean
___<Interval> The interval in *minutes*, between house-keeping runs. Int
___<MaxTempFileLifetime> The maximum time in *minutes*, temp files are allowed tolive in the system. Files/directories which were modifiedmore than "MaxTempFileLifetime" minutes ago will beremoved by the house-keeping task.
Int
_<FileUploadConfig> Configuration for handling different types of file upload andother file uploading related config parameters. To map allactions to a particular FileUploadExecutor, use<Action>*</Action>.
String
__<TotalFileSizeLimit> The total file upload size limit in MB. Int
__<Mapping> String
_____<Actions> String
_______<Action> String
_____<Class> String
_<HttpGetRequestProcessors> Processors which process special HTTP GET requestssuch as ?wsdl, ?policy etc. In order to plug in a processorto handle a special request, simply add an entry to thissection. The value of the Item element is the firstparameter in the query string(e.g. ?wsdl) which needsspecial processing The value of the Class element is aclass which implementsorg.wso2.carbon.transport.HttpGetRequestProcessor
String
___<Processor> String
_____<Item> String
_____<Class> String

WSO2 Application Server, version 5.3.0
Copyright © WSO2 Inc. 2014 454
_<DeploymentSynchronizer> Deployment Synchronizer Configuration. Enabled whenrunning with "svn based" dep sync. In master nodes youneed to set both AutoCommit and AutoCheckout to trueand in worker nodes set only AutoCheckout to true.
String
___<Enabled> Boolean
___<AutoCommit> Boolean
___<AutoCheckout> Boolean
___<RepositoryType> String
___<SvnUrl> String
___<SvnUser> String
___<SvnPassword> String
___<SvnUrlAppendTenantId> Boolean
_<MediationConfig> _<LoadFromRegistry>_<SaveToFile>_<Persistence> _ _<RegistryPersistence>_
Mediation persistence configurations. Only valid ifmediation features are available i.e. ESB.
String
_<ServerInitializers> Server intializing code, specified as implementationclasses of org.wso2.carbon.core.ServerInitializer. Thiscode will be run when the Carbon server is initialized.
String
___<Initializers>
_<RequireCarbonServlet> Indicates whether the Carbon Servlet is required by thesystem, and whether it should be registered.
Boolean
__<H2DatabaseConfiguration> <Property name>__
Carbon H2 OSGI Configuration By default non of theservers start. name="web" - Start the web server with theH2 Console name="webPort" - The port (default: 8082)name="webAllowOthers" - Allow other computers toconnect name="webSSL" - Use encrypted (HTTPS)connections name="tcp" - Start the TCP servername="tcpPort" - The port (default: 9092)name="tcpAllowOthers" - Allow other computers toconnect name="tcpSSL" - Use encrypted (SSL)connections name="pg" - Start the PG servername="pgPort" - The port (default: 5435)name="pgAllowOthers" - Allow other computers to connectname="trace" - Print additional trace information; for allservers name="baseDir" - The base directory for H2databases; for all servers.
String
_<StatisticsReporterDisabled> Disables the statistics reporter by default. String
__<EnableHTTPAdminConsole> Enables HTTP for WSO2 servers so that you can accessthe Admin Console via HTTP.
String
_<FeatureRepository> Default Feature Repository of WSO2 Carbon. String
___<RepositoryName> String

WSO2 Application Server, version 5.3.0
Copyright © WSO2 Inc. 2014 455
___<RepositoryURL> String
_<APIManagement> Configure API Management. String
___<Enabled> Uses the embedded API Manager by default. If you wantto use an external API Manager instance to manage APIs,configure below externalAPIManager.
Boolean
___<ExternalAPIManager> <AP___IGatewayURL> <APIPublisher____URL>
Uncomment and configure API Gateway and PublisherURLs to use external API Manager instance.
String
___<LoadAPIContextsInServerStartup>
Boolean
Configuring catalina-server.xml
Users can change the default configurations by editing the <PRODUCT_HOME>/repository/conf/tomcat/catalina-server.xml file using the information given below.
Click on the table and use the left and right arrow keys to scroll horizontally.
XML Elements
XMLelement
Attribute Description Datatype
Default value
<Server> A Server element represents theentire Catalina servlet container.Therefore, it must be the singleoutermost element in theconf/server.xml configuration file. Itsattributes represent thecharacteristics of the servletcontainer as a whole.
shutdown The command string that must bereceived via a TCP/IP connection tothe specified port number, in orderto shut down Tomcat.
String SHUTDOWN

WSO2 Application Server, version 5.3.0
Copyright © WSO2 Inc. 2014 456
port The TCP/IP port number on whichthis server waits for a shutdowncommand. Set to -1 to disable theshutdown port.
Note: Disabling the shutdown portworks well when Tomcat is startedusing Apache Commons Daemon(running as a service on Windowsor with jsvc on un*xes). It cannot beused when running Tomcat with thestandard shell scripts though, as itwill prevent shutdown.bat|.sh andcatalina.bat|.sh from stopping itgracefully.
Int 8005
_<Service> A Service element represents thecombination of one or moreConnector components that share asingle Engine component forprocessing incoming requests. Oneor more Service elements may benested inside a Server element.
name The display name of this Service,which will be included in logmessages if you utilize standardCatalina components. The name ofeach Service that is associated witha particular Server must be unique.
String Catalina
className Java class name of theimplementation to use. This classmust implement theorg.apache.catalina.Serviceinterface. If no class name isspecified, the standardimplementation will be used.
String org.wso2.carbon.tomcat.ext.service.ExtendedStandardService
__<Connector>

WSO2 Application Server, version 5.3.0
Copyright © WSO2 Inc. 2014 457
port The TCP port number on which thisConnector will create a serversocket and await incomingconnections. Your operating systemwill allow only one serverapplication to listen to a particularport number on a particular IPaddress. If the special value of 0(zero) is used, then Tomcat willselect a free port at random to usefor this connector. This is typicallyonly useful in embedded andtesting applications.
Int 9763
URIEncoding This specifies the characterencoding used to decode the URIbytes, after %xx decoding the URL.
Int UTF-8
compressableMimeType The value is a comma separatedlist of MIME types for which HTTPcompression may be used.
String text/html,text/javascript,application/x-javascript,application/javascript,application/xml,text/css,application/xslt+xml,text/xsl,image/gif,image/jpg,image/jpeg
noCompressionUserAgents The value is a regular expression(using java.util.regex) matching theuser-agent header of HTTP clientsfor which compression should notbe used, because these clients,although they do advertise supportfor the feature, have a brokenimplementation.
String gozilla, traviata
compressionMinSize If compression is set to "on" thenthis attribute may be used to specifythe minimum amount of data beforethe output is compressed.
Int 2048

WSO2 Application Server, version 5.3.0
Copyright © WSO2 Inc. 2014 458
compression The Connector may use HTTP/1.1GZIP compression in an attempt tosave server bandwidth. Theacceptable values for the parameteris "off" (disable compression), "on"(allow compression, which causestext data to be compressed), "force"(forces compression in all cases),or a numerical integer value (whichis equivalent to "on", but specifiesthe minimum amount of data beforethe output is compressed). If thecontent-length is not known andcompression is set to "on" or moreaggressive, the output will also becompressed. If not specified, thisattribute is set to "off".
Note: There is a tradeoff betweenusing compression (saving yourbandwidth) and using the sendfilefeature (saving your CPU cycles). Ifthe connector supports the sendfilefeature, e.g. the NIO connector,using sendfile will take precedenceover compression. The symptomswill be that static files greater that48 Kb will be sent uncompressed.You can turn off sendfile by settinguseSendfile attribute of theconnector, as documented below,or change the sendfile usagethreshold in the configuration of theDefaultServlet in the defaultconf/web.xml or in the web.xml ofyour web application.
String on
server Overrides the Server header for thehttp response. If set, the value forthis attribute overrides the Tomcatdefault and any Server header setby a web application. If not set, anyvalue specified by the application isused. Most often, this feature is notrequired.
String WSO2 Carbon Server
acceptCount The maximum queue length forincoming connection requests whenall possible request processingthreads are in use. Any requestsreceived when the queue is full willbe refused.
Int 200

WSO2 Application Server, version 5.3.0
Copyright © WSO2 Inc. 2014 459
maxKeepAliveRequests The maximum number of HTTPrequests which can be pipelineduntil the connection is closed by theserver. Setting this attribute to 1 willdisable HTTP/1.0 keep-alive, aswell as HTTP/1.1 keep-alive andpipelining. Setting this to -1 willallow an unlimited amount ofpipelined or keep-alive HTTPrequests.
Int 200
connectionUploadTimeout Specifies the timeout, inmilliseconds, to use while a dataupload is in progress. This onlytakes effect ifdisableUploadTimeout is set tofalse.
Int 120000
disableUploadTimeout This flag allows the servletcontainer to use a different, usuallylonger connection timeout duringdata upload.
Boolean false
minSpareThreads The minimum number of threadsalways kept running.
Int 50
maxThreads The maximum number of requestprocessing threads to be created bythis Connector, which thereforedetermines the maximum numberof simultaneous requests that canbe handled. If an executor isassociated with this connector, thisattribute is ignored as the connectorwill execute tasks using theexecutor rather than an internalthread pool.
Int 250
acceptorThreadCount The number of threads to be usedto accept connections. Increase thisvalue on a multi CPU machine,although you would never reallyneed more than 2. Also, with a lot ofnon keep alive connections, youmight want to increase this value aswell.
Int 2
maxHttpHeaderSize The maximum size of the requestand response HTTP header,specified in bytes.
Int 8192
bindOnInit Controls when the socket used bythe connector is bound. By default itis bound when the connector isinitiated and unbound when theconnector is destroyed. If set tofalse, the socket will be boundwhen the connector is started andunbound when it is stopped.
Boolean false

WSO2 Application Server, version 5.3.0
Copyright © WSO2 Inc. 2014 460
redirectPort If this Connector is supportingnon-SSL requests, and a request isreceived for which a matching<security-constraint> requires SSLtransport, Catalina will automaticallyredirect the request to the portnumber specified here.
Int 9443
protocol Sets the protocol to handleincoming traffic.
String org.apache.coyote.http11.Http11NioProtocol
SSLEnabled Use this attribute to enable SSLtraffic on a connector. To turn onSSLhandshake/encryption/decryptionon a connector set this value totrue. The default value is false.When turning this value to true youwill want to set the scheme and thesecure attributes as well to pass thecorrect request.getScheme()andrequest.isSecure() values to theservlets See SSL Support for moreinformation.
Boolean true
secure Set this attribute to true if you wishto have calls to request.isSecure()to return true for requests receivedby this Connector. You would wantthis on an SSL Connector or a nonSSL connector that is receivingdata from a SSL accelerator, like acrypto card, a SSL appliance oreven a webserver.
Boolean true
scheme Set this attribute to the name of theprotocol you wish to have returnedby calls to request.getScheme().For example, you would set thisattribute to "https" for an SSLConnector.
String https
clientAuth Set to true if you want the SSLstack to require a valid certificatechain from the client beforeaccepting a connection. Set to falseif you want the SSL stack to requesta client Certificate, but not fail if oneisn't presented. A false value willnot require a certificate chainunless the client requests aresource protected by a securityconstraint that uses CLIENT-CERTauthentication.
Boolean false

WSO2 Application Server, version 5.3.0
Copyright © WSO2 Inc. 2014 461
enableLookups Set to true if you want calls torequest.getRemoteHost() toperform DNS lookups in order toreturn the actual host name of theremote client. Set to false to skipthe DNS lookup and return the IPaddress in String form instead(thereby improving performance).By default, DNS lookups aredisabled.
Boolean false
sslProtocol The SSL protocol(s) to use (a singlevalue may enable multiple protocols- see the JVM documentation fordetails). The permitted values maybe obtained from the JVMdocumentation for the allowedvalues for algorithm when creatingan SSLContext instance e.g. OracleJava 6 and Oracle Java 7.
Note: There is overlap between thisattribute and sslEnabledProtocols.
String TLS
keystoreFile keystorePass
This setting allows you to useseparate keystore and securitycertificates for SSL connections.The location of the keystore file andthe keystore password can be givenfor these parameters. Note that bydefault, these parameters point tothe location and password of thedefault keystore in the Carbonserver.
__<Engine> The Engine element represents theentire request processingmachinery associated with aparticular Catalina Service. Itreceives and processes all requestsfrom one or more Connectors, andreturns the completed response tothe Connector for ultimatetransmission back to the client.Exactly one Engine element MUSTbe nested inside a Service element,following all of the correspondingConnector elements associatedwith this Service.
name Logical name of this Engine, usedin log and error messages. Whenusing multiple Service elements inthe same Server, each EngineMUST be assigned a unique name.
String Catalina

WSO2 Application Server, version 5.3.0
Copyright © WSO2 Inc. 2014 462
defaultHost The default host name, whichidentifies the Host that will processrequests directed to host names onthis server, but which are notconfigured in this configuration file.This name MUST match the nameattributes of one of the Hostelements nested immediatelyinside.
String localhost
___<Realm> A Realm element represents a"database" of usernames,passwords, and roles (similar toUnix groups) assigned to thoseusers. Different implementations ofRealm allow Catalina to beintegrated into environments wheresuch authentication information isalready being created andmaintained, and then utilize thatinformation to implement ContainerManaged Security as described inthe Servlet Specification.You may nest a Realm inside anyCatalina container Engine, Host, orContext). In addition, Realmsassociated with an Engine or a Hostare automatically inherited bylower-level containers, unlessexplicitly overridden.
className Java class name of theimplementation to use. This classmust implement theorg.apache.catalina.Realminterface.
String org.wso2.carbon.tomcat.ext.realms.CarbonTomcatRealm

WSO2 Application Server, version 5.3.0
Copyright © WSO2 Inc. 2014 463
___<Host> The Host element represents avirtual host, which is an associationof a network name for a server(such as "www.mycompany.com"with the particular server on whichTomcat is running. For clients to beable to connect to a Tomcat serverusing its network name, this namemust be registered in the DomainName Service (DNS) server thatmanages the Internet domain youbelong to - contact your NetworkAdministrator for more information.
In many cases, SystemAdministrators wish to associatemore than one network name (suchas www.mycompany.com andcompany.com) with the same virtualhost and applications. This can beaccomplished using the Host NameAliases feature discussed below.
One or more Host elements arenested inside an Engine element.Inside the Host element, you cannest Context elements for the webapplications associated with thisvirtual host. Exactly one of theHosts associated with each EngineMUST have a name matching thedefaultHost attribute of that Engine.
Clients normally use host names toidentify the server they wish toconnect to. This host name is alsoincluded in the HTTP requestheaders. Tomcat extracts the hostname from the HTTP headers andlooks for a Host with a matchingname. If no match is found, therequest is routed to the default host.The name of the default host doesnot have to match a DNS name(although it can) since any requestwhere the DNS name does notmatch the name of a Host elementwill be routed to the default host.

WSO2 Application Server, version 5.3.0
Copyright © WSO2 Inc. 2014 464
name Usually the network name of thisvirtual host, as registered in yourDomain Name Service server.Regardless of the case used tospecify the host name, Tomcat willconvert it to lower case internally.One of the Hosts nested within anEngine MUST have a name thatmatches the defaultHost setting forthat Engine. See Host NameAliases for information on how toassign more than one networkname to the same virtual host.
String localhost
appBase The Application Base directory forthis virtual host. This is thepathname of a directory that maycontain web applications to bedeployed on this virtual host. Youmay specify an absolute pathname,or a pathname that is relative to the$CATALINA_BASE directory. SeeAutomatic Application Deploymentfor more information on automaticrecognition and deployment of webapplications. If not specified, thedefault of webapps will be used.
String ${carbon.home}/repository/deployment/server/webapps/
autoDeploy This flag value indicates if Tomcatshould check periodically for new orupdated web applications whileTomcat is running. If true, Tomcatperiodically checks the appBaseand xmlBase directories anddeploys any new web applicationsor context XML descriptors found.Updated web applications orcontext XML descriptors will triggera reload of the web application. SeeAutomatic Application Deploymentfor more information.
Boolean false
deployOnStartup This flag value indicates if webapplications from this host shouldbe automatically deployed whenTomcat starts. See AutomaticApplication Deployment for moreinformation.
Boolean false
unpackWARs Set to true if you want webapplications that are placed in theappBase directory as webapplication archive (WAR) files tobe unpacked into a correspondingdisk directory structure, false to runsuch web applications directly froma WAR file. WAR files locatedoutside of the Host's appBase willnot be expanded.
Boolean true
____<Valve The Access Log Valve creates log

WSO2 Application Server, version 5.3.0
Copyright © WSO2 Inc. 2014 465
> files in the same format as thosecreated by standard web servers.These logs can later be analyzedby standard log analysis tools totrack page hit counts, user sessionactivity, and so on. The filesproduces by this Valve are rolledover nightly at midnight. This Valvemay be associated with anyCatalina container (Context, Host,orEngine), and will record ALLrequests processed by thatcontainer.Some requests may be handled byTomcat before they are passed to acontainer. These include redirectsfrom /foo to /foo/ and the rejectionof invalid requests. Where Tomcatcan identify the Context that wouldhave handled the request, therequest/response will be logged inthe AccessLog(s) associatedContext, Host and Engine. WhereTomcat cannot identify theContextthat would have handled therequest, e.g. in cases where theURL is invalid, Tomcat will look firstin the Engine, then the default Hostfor the Engine and finally the ROOT(or default) Context for the defaultHost for an AccessLogimplementation. Tomcat will use thefirst AccessLog implementationfound to log those requests that arerejected before they are passed toa container.
The output file will be placed in thedirectory given by the directoryattribute. The name of the file iscomposed by concatenation of theconfigured prefix, timestamp andsuffix. The format of the timestampin the file name can be set usingthe fileDateFormat attribute. Thistimestamp will be omitted if the filerotation is switched off by settingrotatable to false.
Warning: If multipleAccessLogValve instances areused, they should be configured touse different output files.
If sendfile is used, the responsebytes will be written asynchronouslyin a separate thread and the accesslog valve will not know how manybytes were actually written. In this

WSO2 Application Server, version 5.3.0
Copyright © WSO2 Inc. 2014 466
case, the number of bytes that waspassed to the sendfile thread forwriting will be recorded in theaccess log valve.
className Java class name of theimplementation to use.
String org.wso2.carbon.tomcat.ext.valves.CarbonContextCreatorValve, org.apache.catalina.valves.AccessLogValve
pattern A formatting layout identifying thevarious information fields from therequest and response to be logged,or the word common or combinedto select a standard format.
String combined
suffix The suffix added to the end of eachlog file name.
String .log
prefix The prefix added to the start ofeach log file name.
String http_access_
directory Absolute or relative path name of adirectory in which log files createdby this valve will be placed. If arelative path is specified, it isinterpreted as relative to$CATALINA_BASE. If no directoryattribute is specified, the defaultvalue is "logs" (relative to$CATALINA_BASE).
String ${carbon.home}/repository/logs
threshold Minimum duration in seconds afterwhich a thread is considered stuck.If set to 0, the detection is disabled.
Note: since the detection is done inthe background thread of theContainer (Engine, Host or Context)declaring this Valve, the thresholdshould be higher than thebackgroundProcessorDelay of thisC o n t a i n e r .
Int 600
Configuring identity.xml
Users can change the default configurations by editing the <PRODUCT_HOME>/repository/conf/identity.xml file using the information given below.
Click on the table and use the left and right arrow keys to scroll horizontally.
XML Elements
XML element Attribute Description Data type Default value
<Server>
xmlns

WSO2 Application Server, version 5.3.0
Copyright © WSO2 Inc. 2014 467
_<JDBCPersistenceManager> Identity related data sourceconfiguration.
__<DataSource>
____<Name> Include a data source name (jndiC) from the set of dataonfigName
sources defined in master-datasour.ces.xml
String N/A
___<SkipDBSchemaCreation> If the identity database is createdfrom another place and if it isrequired to skip schema initializationduring the server start up, set theproperty to "true".
Boolean FALSE
_<OpenID> OpenID related configurations.
__<OpenIDServerUrl> This is the URL that the OpenIDserver (servlet) is running in.
String N/A
__<OpenIDUserPattern> URL of the pattern that can beconfigured for the user's OpenID.
String N/A
__<OpenIDSkipUserConsent> Set to false if the users must beprompted for approval.
Boolean FALSE
__<OpenIDRememberMeExpiry> Expiry time of the OpenIDRememberMe token in minutes.
Int 0 Minutes
__<UseMultifactorAuthentication> Multifactor authenticationconfiguration.
Boolean FALSE
__<DisableOpenIDDumbMode> To enable or disable OpenID dumbmode.
Boolean FALSE
__<SessionTimeout> OpenID session timeout in seconds. Int 36000 Seconds
__<AcceptSAMLSSOLogin> Skips authentication if the validSAML2 Web SSO browser sessionis available.
Boolean FALSE
__<ClaimsRetrieverImplClass> User claim retrieving module forOpenID.
_<OAuth> OAuth related configurations.
__<AuthorizationCodeDefaultValidityPeriod>
Default validity period forAuthorization Code in seconds.
Int 300 Seconds
__<AccessTokenDefaultValidityPeriod> Default validity period for AccessToken in seconds.
Int 3600 Seconds
__<TimestampSkew> Timestamp skew in seconds. Int 300 Seconds
__<EnableOAuthCache> Enable OAuth caching. This cachehas the replication support.
Boolean TRUE

WSO2 Application Server, version 5.3.0
Copyright © WSO2 Inc. 2014 468
__<TokenPersistencePreprocessor> Configure the security measuresneeded to be done prior to storingthe token in the database, such ashashing, encrypting, etc.
String org.wso2.carbon.identity.oauth.preprocessor.PlainTokenPersistencePreprocessor
__<SupportedResponseTypes> Supported OAuth2.0 respose types.StringvalueswithCommaseparated
token, code
__<SupportedGrantTypes> Supported OAuth2.0 grant types. StringvalueswithCommaseparated
authorization_code,password,refresh_token,client_credentials,urn:ietf:params:oauth:grant-type:saml2-bearer
__<OAuthCallbackHandlers>
____<OAuthCallbackHandler> OAuth callback handler module classname.
String N/A
__<EnableAssertions> Assertions can be used to embedparameters into the access token.
______<UserName> This enables you to add the username as an additional parameter ifyou require it.
Boolean FALSE
__<EnableAccessTokenPartitioning> This should be set to true whenusing multiple user stores and keysshould be saved into different tablesaccording to the user store. Bydefault, all the application keys aresaved into the same table.UserName Assertion should be 'true'to use this.
Boolean FALSE
__<AccessTokenPartitioningDomains> This includes the user store domainnames and mapping to the new tablename. E.g., if you provide'A:foo.com', foo.com should be theuser store domain name and 'A'represents the relavant mapping ofthe token store table, i.e., tokens willbe added to a table calledIDN_OAUTH2_ACCESS_TOKEN_A.
StringvalueswithCommaseparated
N/A
__<AuthorizationContextTokenGeneration>
_____<Enabled> This mentions whether tokengeneration is enabled or not.
Boolean FALSE
_____<TokenGeneratorImplClass> Token generation class name. String org.wso2.carbon.identity.oauth2.token.JWTTokenGenerator
_____<ClaimsRetrieverImplClass> Claim retrieving class name forgenerating a token.
org.wso2.carbon.identity.oauth2.token.DefaultClaimsRetriever

WSO2 Application Server, version 5.3.0
Copyright © WSO2 Inc. 2014 469
_____<ConsumerDialectURI> Claim Dialect URI that is used forclaim retrieving.
http://wso2.org/claims
_____<SignatureAlgorithm> Signature algorithm used for sign thetoken.
SHA256withRSA
_____<AuthorizationContextTTL> Token time to live value. Long 15 Minutes
__<SAML2Grant> Configuration related to SAML2Grant type.
__<OpenIDConnect>
_____<IDTokenBuilder> IDToken generator implementationclass name.
String org.wso2.carbon.identity.openidconnect.DefaultIDTokenBuilder
_____<IDTokenIssuerID> The value of TokenIssuerID of theIDToken. This is a unique value andshould be changed according to thedeployment values.
String OIDCAuthzServer
_____<IDTokenSubjectClaim> This is the claim used as the subjectof the IDToken. You can use different claims such as http://wso2.org/claims/emailaddre
.ss
String http://wso2.org/claims/fullname
_____<IDTokenCustomClaimsCallBackHandler>
Claim callback implementation classname. This is used to return customclaims with the IDToken.
String org.wso2.carbon.identity.openidconnect.SAMLAssertionClaimsCallback
_____<IDTokenExpiration> The expiration value of the IDTokenin seconds.
Int 300 Seconds
_____<UserInfoEndpointClaimDialect> Defines which claim dialect shouldbe returned from the User Endpoint.
String http://wso2.org/claims/fullname
_____<UserInfoEndpointClaimRetriever> Defines the implemenation name ofthe class which builds the claims forthe user info endpoint's response.
String org.wso2.carbon.identity.oauth.endpoint.user.impl.UserInfoUserStoreClaimRetriever
_____<UserInfoEndpointRequestValidator>
Implemenation name of the classthat validates the user info requestagainst the specification.
String org.wso2.carbon.identity.oauth.endpoint.user.impl.UserInforRequestDefaultValidator
_____<UserInfoEndpointAccessTokenValidator>
Implementation name of the classthat validates the access token.
String org.wso2.carbon.identity.oauth.endpoint.user.impl.UserInfoISAccessTokenValidator
_____<UserInfoEndpointResponseBuilder>
Implementation name of the classthat builds the user info request.
String org.wso2.carbon.identity.oauth.endpoint.user.impl.UserInfoJSONResponseBuilder
_____<SkipUserConsent> Set to false if the users must beprompted for approval.
Boolean FALSE
__<MultifactorAuthentication>
___<XMPPSettings> XMPP setting for multifactorauthentication.
____<XMPPConfig>
______<XMPPProvider> XMPP provider name. String N/A

WSO2 Application Server, version 5.3.0
Copyright © WSO2 Inc. 2014 470
______<XMPPServer> XMPP server name. String N/A
______<XMPPPort> XMPP server's port. Int N/A
______<XMPPExt> XMPP domain. String N/A
______<XMPPUserName> User name for login to XMPP server. String N/A
______<XMPPPassword> Password for login to XMPP server. String N/A
__<SSOService>
______<IdentityProviderURL> Unique identifier for IDP. This wouldbe passed as Issuer in SAML2response.
String N/A
______<SingleLogoutRetryCount> Number of retries that must be doneif a single logout request is notreceived from the SP.
Int
______<SingleLogoutRetryInterval> Interval between two re-tries. Int 60 Seconds
______<TenantPartitioningEnabled> This would add the tenant domain asparameter into the ACS URL.
Boolean FALSE
______<SessionTimeout> Remember me session timeout inseconds.
Int 36000 Seconds
______<AttributesClaimDialect> Claim Dialect URI that is used forclaim retrieving.
Stringhttp://wso2.org/claims
______<AcceptOpenIDLogin> Skips authentication if the validOpenID login session is available.
Boolean FALSE
______<ClaimsRetrieverImplClass> Claim retrieving class name forgenerating a token.
String N/A
______<SAMLResponseValidityPeriod> SAML Token validity period inminutes.
Int 5 Minutes
______<UseAuthenticatedUserDomainCrypto>
When set to , this is useful intruetenant mode setup with olderversions of API Manager. Thisindicates that the SAML2 SSOSAML Response must be signedusing the authenticated user's tenantkeystore.
Boolean FALSE
__<EntitlementSettings>
____<ThirftBasedEntitlementConfig> Thrift transport configurations forentitlement service.
______<EnableThriftService> Enable thrift transport. Boolean FALSE
_______<ReceivePort> Thrift listening port. Int N/A
_______<ClientTimeout> Thrift session time out in seconds. Int N/A
_______<KeyStore> Thrift key store configurations usedfor SSL.

WSO2 Application Server, version 5.3.0
Copyright © WSO2 Inc. 2014 471
__________<Location> Key store location String N/A
___________<Password> Key store password String N/A
__<SCIMAuthenticators>
____<Authenticator> Defines implementations of SCIMauthenticator.
String org.wso2.carbon.identity.scim.provider.auth.BasicAuthHandler andorg.wso2.carbon.identity.scim.provider.auth.OAuthHandler
______<Property> Configuration properties of eachautenticator implementation.
String N/A
Configuring master-datasources.xml
Users can change the default configurations by editing the <PRODUCT_HOME>/repository/conf/datasources/master-datasources.xml file using the information in the following table.
XML Elements
Click on the table and use the left and right arrow keys to scroll horizontally. For sample values, see the belExampleow the table.
XML element Attribute Description Datatype
<datasources-configuration> xmlns The root element. The namespace is specified as: xmlns:svns="http://org.wso2.securevault/con
"figuration
<providers> The container element for the datasource providers.
<provider> The datasource provider, which should implement org.wso2.carbon.ndatasource.common
. The datasources follow a.spi.DataSourceReaderpluggable model in providing datasource typeimplementations using this approach.
FullyqualifiedJavaclass
<datasources> The container element for the datasources.
<datasource> The root element of a datasource.
<name> Name of the datasource. String
<description> Description of the datasource. String
<jndiConfig> The container element that allows you to expose thisdatasource as a JNDI datasource.
<name> The JNDI resource name to which this datasource willbe bound.
String

WSO2 Application Server, version 5.3.0
Copyright © WSO2 Inc. 2014 472
<environment> The container element in which you specify thefollowing JNDI properties:
java.naming.factory.initial: Selects theregistry service provider as the initial context.java.naming.provider.url: Specifies thelocation of the registry when the registry is beingused as the initial context.
FullyqualifiedJavaclass
<definition> type The container element for the data source definition.Set the type attribute to RDBMS, or to custom if you'recreating a custom type. The "RDBMS" data sourcereader expects a "configuration" element with thesub-elements listed below.
String
<configuration> The container element for the RDBMS properties.
<url> The connection URL to pass to the JDBC driver toestablish the connection.
URL
<username> The connection user name to pass to the JDBC driverto establish the connection.
String
<password> The connection password to pass to the JDBC driver toestablish the connection.
String
<driverClassName> The class name of the JDBC driver to use. FullyqualifiedJavaclass
<maxActive> The maximum number of active connections that canbe allocated from this pool at the same time.
Integer
<maxWait> Maximum number of milliseconds that the pool waits(when there are no available connections) for aconnection to be returned before throwing anexception.
Integer
<testOnBorrow> Specifies whether objects will be validated before beingborrowed from the pool. If the object fails to validate, itwill be dropped from the pool, and we will attempt toborrow another.When set to true, the parametervalidationQuerymust be set to a non-null string.
Boolean
<validationQuery> The SQL query used to validate connections from thispool before returning them to the caller. If specified,this query does not have to return any data, it just can'tthrow a SQLException. The default value is null.Example values are SELECT 1(mysql), select 1 fromdual(oracle), SELECT 1(MS Sql Server).
String
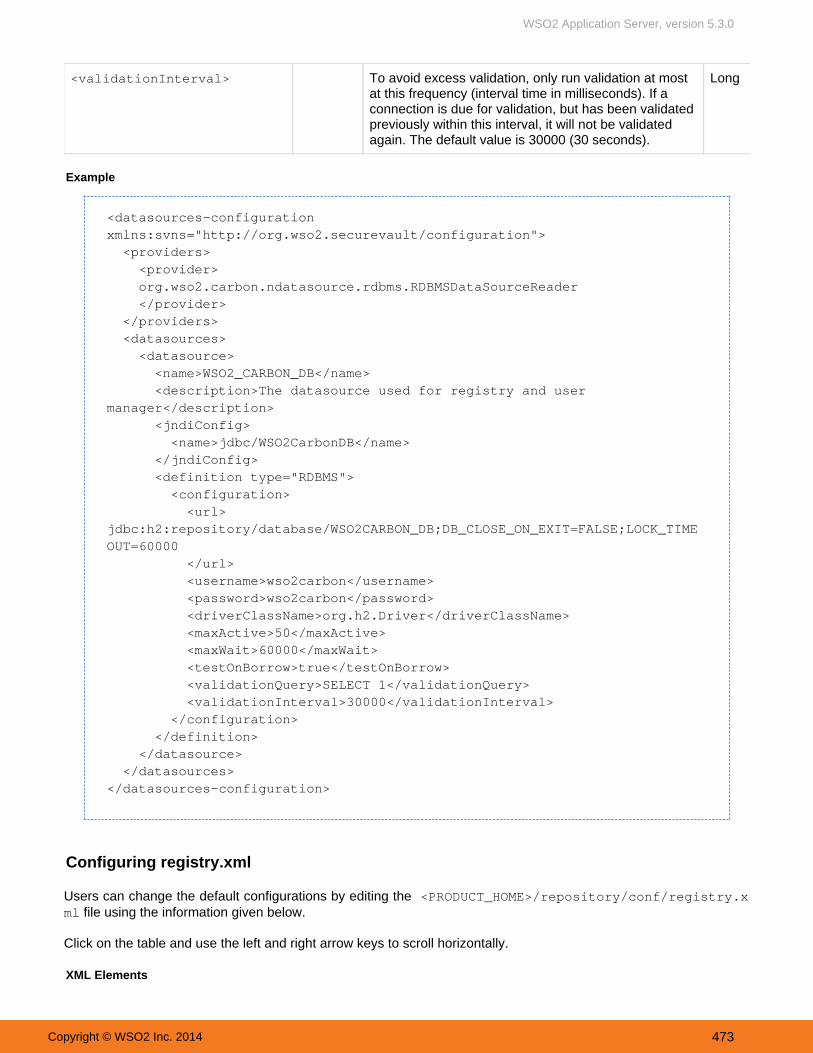
WSO2 Application Server, version 5.3.0
Copyright © WSO2 Inc. 2014 473
<validationInterval> To avoid excess validation, only run validation at mostat this frequency (interval time in milliseconds). If aconnection is due for validation, but has been validatedpreviously within this interval, it will not be validatedagain. The default value is 30000 (30 seconds).
Long
Example
<datasources-configurationxmlns:svns="http://org.wso2.securevault/configuration"> <providers> <provider> org.wso2.carbon.ndatasource.rdbms.RDBMSDataSourceReader </provider> </providers> <datasources> <datasource> <name>WSO2_CARBON_DB</name> <description>The datasource used for registry and usermanager</description> <jndiConfig> <name>jdbc/WSO2CarbonDB</name> </jndiConfig> <definition type="RDBMS"> <configuration> <url>jdbc:h2:repository/database/WSO2CARBON_DB;DB_CLOSE_ON_EXIT=FALSE;LOCK_TIMEOUT=60000 </url> <username>wso2carbon</username> <password>wso2carbon</password> <driverClassName>org.h2.Driver</driverClassName> <maxActive>50</maxActive> <maxWait>60000</maxWait> <testOnBorrow>true</testOnBorrow> <validationQuery>SELECT 1</validationQuery> <validationInterval>30000</validationInterval> </configuration> </definition> </datasource> </datasources></datasources-configuration>
Configuring registry.xml
Users can change the default configurations by editing the <PRODUCT_HOME>/repository/conf/registry.x ml file using the information given below.
Click on the table and use the left and right arrow keys to scroll horizontally.
XML Elements

WSO2 Application Server, version 5.3.0
Copyright © WSO2 Inc. 2014 474
XML element Attribute Description
<wso2registry>
__<currentDBConfig> The server can only handle one active configuration at a time. The currentDBConfig parameter defined in the registry.xml isused to specify the database configuration that is active at present. The value of the currentDBConfig parameter should be avalid name of a database configuration defined on the registry.xml file.
For more information, see the Governance Registry documentation here: http://docs.wso2.org/display/Governance501/Database+Configuration+Details
__<readOnly> To run the registry in read-only mode, set the readOnly element to true. Setting the read-only mode allows you to run animmutable instance of registry repository. This setting is valid on a global level.
For more information, see the Governance Registry documentation here: http://docs.wso2.org/display/Governance501/Registry+Configuration+Details
__<enableCache> To enable registry caching, set the enableCache element to true. Once caching is enabled, repetitive read operations will beexecuted against the cache instead of the database. This setting is valid on a global level.
__<registryRoot> The registryRoot parameter can be used to define the apparent root of the running instance of the server. This setting isvalid on a global level.
For more information, see the Governance Registry documentation here: http://docs.wso2.org/display/Governance501/Registry+Configuration+Details
__<dbConfig>
name
__ <dataSource>__
__<handler> Handlers are pluggable components, that contain custom processing logic for handling resources. All handlers extend anabstract class named Handler, which provides default implementations for resource handling methods as well as a fewu t i l i t i es use fu l f o r conc re te hand le r imp lemen ta t i ons .
Handler implementations can provide alternative behaviors for basic resource related operations, by overwriting one or moremethods in the Handler class.
For more information, see the Governance Registry documentation here: http://docs.wso2.org/display/Governance501/Handler+Configuration+Details
class
__<filter>
class
__<remoteInstance> In order to mount an external registry, you have to define the remote instance. This could use either the JDBC-basedconfiguration, the Atom-based configuration model or the WebService-based configuration model.
For more information, see the Governance Registry documentation here: http://docs.wso2.org/display/Governance501/Remote+Instance+and+Mount+Configuration+Details

WSO2 Application Server, version 5.3.0
Copyright © WSO2 Inc. 2014 475
url The URL of the remote instance.
__<ID> Remote instance ID.
__<username> Username of the remote registry login.
__<password> Password of the remote registry login.
__<dbConfig> The database configuration to use.
__<readOnly> To run the registry in read-only mode set the readOnly element to true. Setting the read-only mode allows you to run animmutable instance of registry repository. This setting is valid only for the specific remote instance.
For more information, see the Governance Registry documentation here: http://docs.wso2.org/display/Governance501/Registry+Configuration+Details
__<enableCache> To enable registry caching, set the enableCache element to true. Once caching is enabled, repetitive read operations will beexecuted against the cache instead of the database. This setting is valid only for the specific remote instance.
__<registryRoot> The registryRoot parameter can be used to define whether the apparent root of the running instance of the server. Thissetting is valid only for the specific remote instance.
For more information, see the Governance Registry documentation here: http://docs.wso2.org/display/Governance501/Registry+Configuration+Details
__<mount> Once a remote instance has been defined, a collection on the remote registry can be mounted to the local instance.
For more information, see the Governance Registry documentation here: http://docs.wso2.org/display/Governance501/Remote+Instance+and+Mount+Configuration+Details
path The path to which the mount will be added to.
overwrite Whether an existing collection at the given path would be overwritten or not.
__<instanceID> Remote instance ID.
__<targetPath> The path on the remote registry.
__<versionResourcesOnChange>
You can configure whether you want to auto-version the resources (non-collection) by setting versionResourcesOnChangeelement to true. In this configuration it will create a version for the resources whenever it is updated. For more information,see the Governance Registry documentation here: http://docs.wso2.org/display/Governance501/Configuration+for+Static+%28One-time%29+and+Auto+Versioning+Resources
__<staticConfiguration> While most configuration options can be changed after the first run of the WSO2 Governance Registry, changing the StaticConfiguration (configuration details under the staticConfiguration parameter), will not be fully effective. If you need to changeany Static Configuration and expect it to take effect, you will have to erase the contents of the database, and restart theserver passing the -Dsetup system property which will re-generate the database.
You are supposed to change the static configuration section only before loading any data to the registry. (That is before thefirst start-up.) For more information, see the Governance Registry documentation here: http://docs.wso2.org/display/Governance501/Configuration+for+Static+%28One-time%29+and+Auto+Versioning+Resources
__ <versioningProperties>__ Whether the properties are versioned when a snapshot is created.
__ <versioningComments>__ Whether the comments are versioned when a snapshot is created.
__ <versioningTags>__ Whether the tags are versioned when a snapshot is created.
__ <versioningRatings>__ Whether the ratings are versioned when a snapshot is created.

WSO2 Application Server, version 5.3.0
Copyright © WSO2 Inc. 2014 476
Configuring user-mgt.xml
Users can change the default user management functionality related configurations by editing the <PRODUCT_HOME>/repository/conf/user-mgt.xml file using the information given below.
Click on the table and use the left and right arrow keys to scroll horizontally.
XML Elements
XML element Attribute Description Datatype
Defaultvalue
Mandatory/Optional
<UserManager> User kernel configuration forCarbon server.
__<Realm> Realm configuration.
____<Configuration>
______<AddAdmin> Specifies whether the admin userand admin role will be created inthe primary user store. Thiselement enables the user to createadditional admin users in the userstore. If the element<AdminUser>does not exist in the external userstore, it will be automaticallycreated only if this property is set totrue. If the value is set to false,the given admin user and roleshould already exist in the externaluser store.
Boolean true Mandatory
_______<AdminRole> The role name that is used as anadmin role for the Carbon server.
String N/A Mandatory
________<AdminUser>
__________<UserName>
User name that is used torepresent an admin user for theCarbon server.
String N/A Mandatory
___________<Password>
Password of the admin user, If theadmin user needs to be created inthe Carbon server.
String N/A Optional
________<EveryOneRoleName>
By default, every user in the userstore is assigned to this role.
String N/A Mandatory
_________<Property> User realm configuration specificproperty values.
String N/A Mandatory

WSO2 Application Server, version 5.3.0
Copyright © WSO2 Inc. 2014 477
____<UserStoreManager>
User Store managerimplementation classes and theirconfigurations for use realm. UsetheReadOnlyLDAPUserStoreManagerto do read-only operations forexternal LDAP user stores.
To do both read and writeoperations, use theReadWriteLDAPUserStoreManagerfor external LDAP user stores.
If you wish to use an ActiveDirectory Domain Service (AD DS)or Active Directory LightweightDirectory Service (AD LDS) , usetheActiveDirectoryUserStoreManager.This can be used for both read-onlyand read/write operations.
Use JDBCUserStoreManager forboth internal and external JDBCuser stores.
String N/A Mandatory
class
______<Property> User store configuration specificproperty values. See working with
forprimary user store propertiesmore information.
String N/A Optional
____<AuthorizationManager>
Authorization managerimplementation class and itsconfiguration for user realm.
String N/A Mandatory
class
______<Property> Authorization managerconfiguration specific propertyvalues.
String N/A Optional
Configuring config-validation.xml
The file contains the recommended<PRODUCT_HOME>/repository/conf/etc/config-validation.xmlsystem configurations for a server. When you start the server, the system configurations will be validated againstthese recommendations, and warnings will be published if conflicts are found. See more details on systemrequirements for your product on , and the procedure for starting a server in Installation Prerequisites Running the
.Product
Given below are the default recommendations in the file. If required, you may changeconfig-validation.xmlsome of these recommendations on this file according to the conditions in your production environment.
System Validation
Following are the system parameter values recommended for the purpose of running a WSO2 product server.

WSO2 Application Server, version 5.3.0
Copyright © WSO2 Inc. 2014 478
Parameter Parameter Description ParameterValue
CPU Required processor speed. 800
RAM Required RAM in your environment. 2048
swap Required space in hard disk to use for virtual memory. 2048
freeDisk Free disk space required in your environment. 1024
ulimit The limit of resources per user. This value indicates the limit on the number of filedescriptors a process may have.
This property is specified in the product startup script as shown below. For example,see the product startup script for Linux: <PRODUCT_HOME>/bin/wso2server.sh:
#ulimit -n 100000
4096
If the values set for these parameters in your environment are less than the recommendations, the followingwarnings will be published when you start your server.
WARN - ValidationResultPrinter CPU speed (MHz): <systemCPU> of the system is below the recommendedminimum speed : <recommended value>WARN - ValidationResultPrinter RAM size (MB): <systemRam> of the system is below the recommendedminimum size :<recommended value>WARN - ValidationResultPrinter Swap Memory size (MB): <systemSwap> of the system is below therecommended minimum size :<recommended value>WARN - ValidationResultPrinter Maximum free Disk Space (MB): <systemDisk> of the system is below therecommended minimum size :<recommended value>WARN - ValidationResultPrinter Open files limit : <openFileLimit> of the system is below the recommendedminimum count :<recommended value>
JVM Validation
The following JVM heap size values are recommended by default in the file. config-validation.xml
Parameter Description ParameterValue
initHeapSize The initial heap size that applies if the JVM requires more memory than isallocated by default.
256
maxHeapSize The maximum heap size that applies if the JVM requires more memory thanis allocated by default.
512
maxPermGenSize The maximum heap size of the permanent generation of heap. 256
These parameters are specified in the product startup script as shown below, where, " , " and " co-Xms" -Xmx" -XX"rrespond to "initHeapSize", "maxHeapSize" and "maxPermGenSize" respectively. For example, see the productstartup script for Linux: .<PRODUCT_HOME>/bin/wso2server.sh

WSO2 Application Server, version 5.3.0
Copyright © WSO2 Inc. 2014 479
$JAVACMD \-Xms256m -Xmx1024m -XX:MaxPermSize=256m \
If these heap size values in your product startup script are less than the recommended values, the followingwarnings will be published when you start your server:
WARN - ValidationResultPrinter Initial Heap Memory (MB) : <system value> of the running JVM is set belowthe recommended minimum size :<recommended value>WARN - ValidationResultPrinter Maximum Heap Memory (MB) : <system value> of the running JVM is setbelow the recommended minimum size :<recommended value>WARN - ValidationResultPrinter Maximum PermGen space (MB) :<system value> of the running JVM is setbelow the recommended minimum size :<recommended value>
System Property Validation
According to the file, values are required to be specified for the following properties inconfig-validation.xmlyour system. Note that it is not recommended to remove this validations as these are mandatory settings.
carbon.homecarbon.config.dir.pathaxis2.home
The and properties are given in the product startup script as showncarbon.home carbon.config.dir.patchbelow. For example, see the product startup script for Linux: .<PRODUCT_HOME>/bin/wso2server.sh
$JAVA_OPTS -Dcarbon.home="$CARBON_HOME" \-Dcarbon.config.dir.path="$CARBON_HOME/repository/conf" \
The axis2.home property is given in the product startup script as shown below. For example, see the product startupscript for Linux: .<PRODUCT_HOME>/bin/wso2server.sh
# Set AXIS2_HOME. Needed for One Click JAR DownloadAXIS2_HOME=$CARBON_HOME
If the values for these properties are null in the product startup script, the following warning message will bepublished when you start the server: "Value is not set for the required system property : <property-value>".
Supported OS Validation
The product has been tested for compatibility with the following operating systems, which are listed in the config- file. Therefore, by default, the system is validated against these operating systems.validation.xml
LinuxUnixMac OSWindows Server 2003Windows XPWindows VistaWindows 7Mac OS X

WSO2 Application Server, version 5.3.0
Copyright © WSO2 Inc. 2014 480
Windows Server 2008Windows Server 2008 R2AIX
If the OS in your environment is not included in this list, the following warning message will be published when youstart the server: "WARN - ValidationResultPrinter The running OS : <value> is not a tested Operating System forrunning WSO2 Carbon."
Configuring sso-sp-config.properties
The file is the global configuration file for generic SSO configurations in AS.sso-sp-config.properties
File DetailsDescriptions of Properties
File Details
: sso-sp-configFile Name .properties: Location <PRODUCT_HOME>/repository/conf/security
Descriptions of Properties
Properties Description
EnableSAML2SSOLogin=true Use this propertyto enable usersto log in usingSAML2SSO.
EnableOpenIDLogin=false Use this propertyto enable usersto log in usingOpenID.
SkipURIs= URIs to skipauthentication.
handleConsumerURLAfterSLO=true This property isused toautomaticallyredirect theconsumer URLfrom the acspage after SLO.
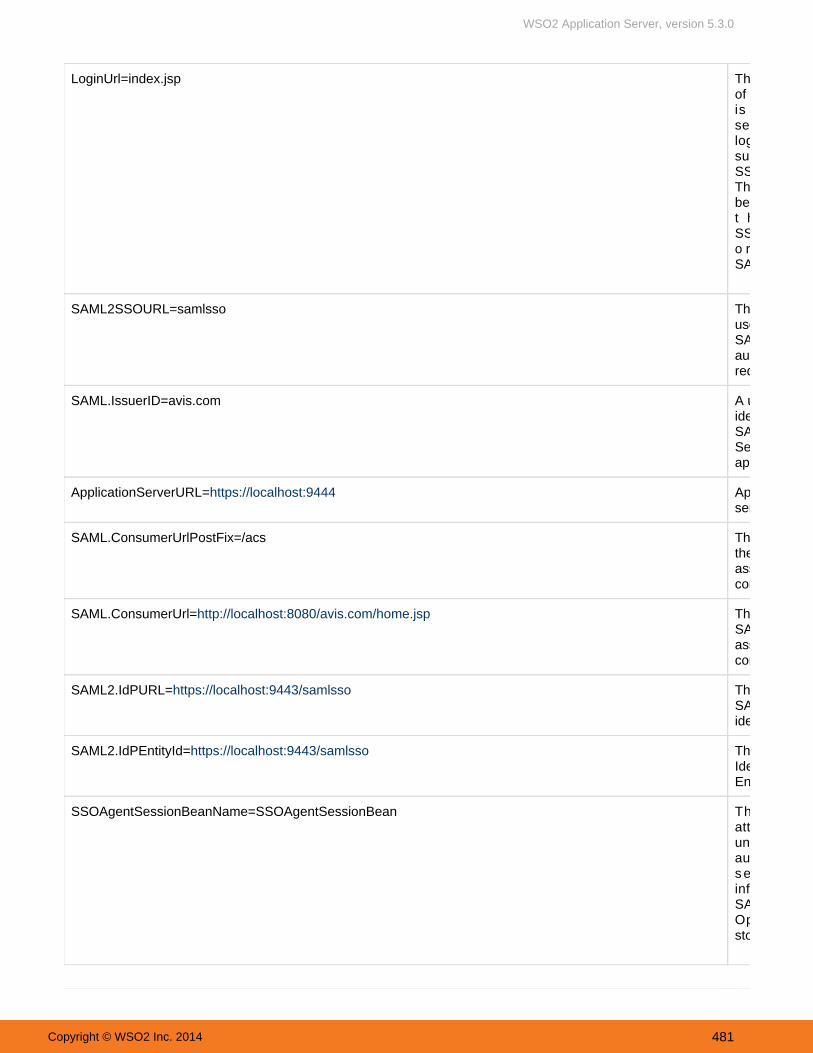
WSO2 Application Server, version 5.3.0
Copyright © WSO2 Inc. 2014 481
LoginUrl=index.jsp This is the URLof the page thatis used forselecting thelogin scheme,such as SAMLSSO or OpenID.This URL will notbe processed byt h eSSOAgentFiltero r t h eSAMLSSOValve.
SAML2SSOURL=samlsso The URL that isused for sendingSAMLSSOauthenticationrequests.
SAML.IssuerID=avis.com A uniqueidentifier for theSAML 2.0Service Providerapplication.
ApplicationServerURL=https://localhost:9444 Applicationserver URL.
SAML.ConsumerUrlPostFix=/acs The URL path ofthe SAML 2.0assertionconsumer.
SAML.ConsumerUrl=http://localhost:8080/avis.com/home.jsp The URL of theSAML 2.0assertionconsumer.
SAML2.IdPURL=https://localhost:9443/samlsso The URL of theSAML 2.0identity provider.
SAML2.IdPEntityId=https://localhost:9443/samlsso This is theIdentity ProviderEntity ID.
SSOAgentSessionBeanName=SSOAgentSessionBean This is theattribute nameunder which theauthenticateds e s s i o ninformation ofSAML SSO andOpenID arestored.

WSO2 Application Server, version 5.3.0
Copyright © WSO2 Inc. 2014 482
SAML.AttributeConsumingServiceIndex=1701087467 Identifier givenfor the serviceprovider forSAML 2.0at t r ibuteexchange.
SAML2.RelayState=index.jsp SAML relaystate.
SAML2.EnableSLO=true Specify ifSingleLogout isenabled/disabled.
SAML2.SLOURL=logout This is the URLthat is used forSLO.
SAML2.EnableResponseSigning=true This propertydetermineswhether theSAMLResponseelement issigned.
SAML2.EnableAssertionEncryption=false This propertydetermineswhether theSAMLAssertionelement isencrypted.
SAML2.EnableRequestSigning=true This propertydetermineswhether theAuthnRequestsandLogoutRequestsshould besigned.
SAML2.IsForceAuthn=false This propertydetermineswhether forceauthentication isenabled.
SAML2.IsPassiveAuthn=false This propertydetermineswhether passiveauthentication isenabled.
SAML.SSOAgentCredentialImplClass=org.wso2.carbon.identity.sso.agent.saml.SSOAgentKeyStoreCredential Customcredentials class.
SAML.KeyStorePassword=wso2carbon Password of thekeystore.

WSO2 Application Server, version 5.3.0
Copyright © WSO2 Inc. 2014 483
SAML.IdPCertAlias=wso2carbon Alias of theidentity provider'spublic certificate.
SAML.PrivateKeyAlias=wso2carbon Alias of theservice provider'sprivate key.
SAML.PrivateKeyPassword=wso2carbon Private keypassword toretrieve theprivate key usedfor signingAuthnRequesta n dLogoutRequestmessages.
SAML.Request.Query.Param=&forceAuth=true Additionalrequestparameters.
Changing the Default PortsWhen you run multiple WSO2 products, multiple instances of the same product, or multiple WSO2 product clusters on the same server or virtualmachines (VMs), you must change their default ports with an offset value to avoid port conflicts. Port offset defines the number by which all portsdefined in the runtime such as the HTTP/S ports will be changed. For example, if the default HTTP port is 9763 and the port offset is 1, theeffective HTTP port will change to 9764. For each additional WSO2 product instance, you set the port offset to a unique value.
Setting port offset for the server
The default port offset value is 0. There are two ways to set an offset to a port:
Pass the port offset to the server during startup. The following command starts the server with the default portincremented by 3:./wso2server.sh -DportOffset=3Set the Ports section of as follows:<PRODUCT_HOME>/repository/conf/carbon.xml <Offset>3</Offset>
When you set the server-level port offset in WSO2 AS as shown above, all the ports used by the server will changeautomatically. However, this may not be the case with some WSO2 products. See the documentation for yourrespective products for information on how this server-level port offset affects other ports in the server.
Tools
The following tools are available in WSO2 AS. Some of the tools are inherited from the WSO2 Carbon platform.
Try It ToolGenerate Java Code for WSDLGenerate WSDL for Java CodeValidating a WSDL
Default Ports:The list of default ports used by all WSO2 products, including WSO2 AS, is given in the administration guide of the WSO2 Carbon platform.

WSO2 Application Server, version 5.3.0
Copyright © WSO2 Inc. 2014 484
1. 2. 3.
4.
JavaScript Scraping AssistantJavaScript Stub GeneratorTools of the Carbon Platform
Try It Tool
Invoking an external service through Try ItInvoking Try It through a Axis web service's dashboardInvoking Try It through a JAX-WS application's dashboardCustomizing Try It options
Choosing endpointsViewing the service informationPrioritizing Operations
Invoking an external service through Try It
The Try It tool is provided by WSO2 as a quick and easy way to test your Axis2 or JAX-WS services using itsWSDL. You can also test any service that has a publicly-available WSDL of document/literal format as well. Try Itprovides you with a mechanism to test your WSDL by creating endpoints on the fly. It helps to test a WSDL beforeactually coding it, without the need of a third-party WSDL validator tool. This functionality is provided by the followingfeature of the WSO2 feature repository:
W S O 2 C a r b o n - T r y I t F e a t u r eN a m e : org.wso2.carbon.tryit.feature.groupIdentifier:
If the above feature is not included in your product by default, you can install it using the instructions given in section.Feature Management
Follow the instructions below to invoke the Try It tool.
Log on to the product's management console.On the menu, click .Tools Try ItType or paste the location of the WSDL.
This may be a local file system path or a web URL.
Click . Try It
The Try It tool does not support relative schema imports and WSDL imports at the moment. WSO2 willprovide this feature in a future release.
If your browser has "Pop up-Blocking" enabled, you will receive a message saying a pop up wasblocked. Allow pop ups for the current domain and try again. The available operations in the givenWSDL appears. For operations that take arguments you will see primitive argument-type fields. Thevalues specified in these fields will be passed to the operations. For no-argument operations you willonly see a button with the same name as the operation.

WSO2 Application Server, version 5.3.0
Copyright © WSO2 Inc. 2014 485
4.
5.
6. 7.
1. 2.
3.
There are two text areas on the page, each for request and response. You can switch the layout usingTry Iteither or buttons.Horizontal Vertical
Fill in the necessary parameters.Click to invoke the operation. SendThe return value immediately appears in the response text area. For more information, see Try It
.Tool#Customizing Try It options
Invoking Try It through a Axis web service's dashboard
The page is a full Ajax client and interacts with the service just as any other client would, so it is a good way toTry Itverify that a service not only works, but is reachable by its clients. However, note that the page attempts toTry Itcontact the Web service at the endpoint URL provided. If the domain or URL scheme of the service is different fromthe endpoint, the browser may impose security restrictions. In this case, the Try It falls back to using ascript-injection protocol to tunnel the Web service request. A wire trace of the communication with the browser willnot show the actual Web service messages used to communicate with the service.
In addition, since the Try It page is fully asynchronous, it doesn't block while a Web service is being invoked. Youcan invoke several operations before one of them completes (though it does not have a way to display the results ofthe same operation invoked multiple times).
The Try It tool can also be invoked from the dashboard of a selected service. Service dashboard is part of theservice management functionality provided by the following feature:
N a m e : W S O 2 C a r b o n - S e r v i c e M a n a g e m e n t F e a t u r e : org.wso2.carbon.service.mgt.feature.groupIdentifier
The above feature is bundled by default in all service-hosting WSO2 middleware products. If the product you areusing does not have this feature installed, you can do so by following the instructions given in section FeatureManagement.
Follow the instructions below to try out the WSDL of a selected service.
Log on to the product's management console.On the menu, under , click .Main Services List The page appears, which lists out all the currently active services. Deployed ServicesClick the link, respective to the selected service.Try this service

WSO2 Application Server, version 5.3.0
Copyright © WSO2 Inc. 2014 486
3.
1. 2.
3.
4.
The Try this service link is also available when viewing the respective service dashboard.
When you click the link, you will be directed to the page where the operations available forTry this serviceyour service will be displayed. When you give the parameters for the operation, a button corresponding toyour service appears. You can check whether your service provides the desired output by using this option.
and .For more information, see the steps from Step 5 to 7 Try It Tool#Customizing Try It options
Invoking Try It through a JAX-WS application's dashboard
The Try It tool can also be invoked from the dashboard of a selected JAX-WS application. dashJAX-WS applicationboard is part of the application management functionality provided by the following feature:
Name : WSO2 Ca rbon - Se rv i ce Managemen t Fea tu re Identifier : org.wso2.carbon.service.mgt.feature.group
The above feature is bundled by default in all service-hosting WSO2 middleware products. If the product you areusing does not have this feature installed, you can do so by following the instructions given in section Feature
.Management
Follow the instructions below to try out the WSDL of a selected application.
Log on to the product's management console. On the Main menu, under , click Applications List.
The Running page appears, which lists out all the currently active applications. ApplicationsClick on the respective JAX-WS application.The application dashboard will appear.Click the link.Try this serviceWhen you click the link, you will be directed to the page where the operations available forTry this serviceyour service will be displayed. When you give the parameters for the operation, a button corresponding to
The page of a service can also be invoked by appending the service's endpoint reference with theTry Itstring "tryit?". For example, http://<your-machine-ip>:<server port>/services/<service name>?tryit

WSO2 Application Server, version 5.3.0
Copyright © WSO2 Inc. 2014 487
4.
1. 2. 3.
your service appears. You can check whether your service provides the desired output by using this option. and For more information, see the steps from Step 5 to 7 Try It Tool#Customizing Try It options.
Customizing Try It options
Choosing endpoints
You can change the endpoint for the service, if there are multiple endpoints. You can also specify a customizedendpoint.
Click the " " link. Using Enpoint - ....Select a new endpoint from the list.Specify the address of the new endpoint.
Viewing the service information
To view the information about the service click on the Service Information link.
Prioritizing Operations
Use the small yellow icon with the plus (+) sign to prioritize operation.
The chosen operation is added to the Priority Operations section.

WSO2 Application Server, version 5.3.0
Copyright © WSO2 Inc. 2014 488
This will be useful when you have a lot of operations in the Try It page. In such a scenario, you can add theoperations you want into this section and switch among them easily.
Generate Java Code for WSDL
The "WSDL2Java" tool is used to generate Java code to provide or consume a Web service for a given WSDL. Youcan use this tool to develop Web services for contract first development. The tool provides many options tocustomize your code. The functionality is provided by the following feature:
N a m e : W S O 2 C a r b o n - W S D L T o o l s F e a t u r e Identifier : org.wso2.carbon.wsdl.tools.feature.group
If the above feature is not included in your product by default, you can install it using the instructions given in section.Feature Management
Follow the instructions below to use the "WSDL2Java" tool.
1. Log on to the product's management console and select "Tools -> WSDL2Java."
2. The "WSDL2Java" page appears. Fill in the fields according to your requirement. A url or path to a WSDL file ismandatory to generate the corresponding Java code. For example,

WSO2 Application Server, version 5.3.0
Copyright © WSO2 Inc. 2014 489
3. Browse and submit a WSDL file.
4. Click "Generate." The Java code will be saved in a location selected by you as a zip file.
Invoking the Tool from a Service's Dashboard
Java code can also be generated for the WSDL file of a selected service, through its dashboard. Service dashboardis part of the service management functionality provided by the following feature:
N a m e : W S O 2 C a r b o n - S e r v i c e M a n a g e m e n t F e a t u r e Identifier : org.wso2.carbon.service.mgt.feature.group
The above feature is bundled by default in all service-hosting WSO2 middleware products. If the product you areusing doesn't have this feature installed, you can do so by following the instructions given in section Feature
Management .
Follow the instructions below to invoke the WSDL2Java Tool.
1. Log on to the product's management console and select "List -> Web Services."
2. The "Deployed Services" page appears which lists out all the currently active services. Select a service and clickon it to view its dashboard. For example,
NoteEach option is described on the "WSDL2Java" user interface itself.

WSO2 Application Server, version 5.3.0
Copyright © WSO2 Inc. 2014 490
3. The service's dashboard appears. In the "Client Operations" panel, you can see the link "Generate Client."
4. Click on the "Generate Client" link to open the "WSDL2Java" page. For more instructions, refer to the steps from Step2 above.
Generate WSDL for Java Code
The Java2WSDL tool allows you to generate the WSDL for Java code that is already written to provide a Webservice. This tool helps you to develop Web services in the code first approach, where the development starts withthe code and thereafter you derive the WSDL from the source. The functionality is provided by the following feature:
N a m e : W S O 2 C a r b o n - W S D L T o o l s F e a t u r e Identifier : org.wso2.carbon.wsdl.tools.feature.group
If the above feature is not included in your product by default, you can install it using the instructions given in section.Feature Management
Follow the instructions below to use the Java2WSDL tool.
1. Log on to the product's management console and select "Tools -> Java2WSDL."

WSO2 Application Server, version 5.3.0
Copyright © WSO2 Inc. 2014 491
2. In the "Add Resources" panel, click "Browse" to locate the file you want to add. For example,
3. Enter values as required and click "Generate."
TipOnly .jar files can be added as resources. If you want to add more than one file, click the plus sign next tothe "Browse" button.
NoteEach field is described in the "Java2WSDL" user interface itself. The "class name" of the serviceimplementation is a mandatory field.

WSO2 Application Server, version 5.3.0
Copyright © WSO2 Inc. 2014 492
Validating a WSDL
The WSDL Validator tool can be used to validate a WSDL document. You can upload your WSDL or you can provide a WSDL URL. The tool validates your WSDL and prints the result in the Validation Result section. The
provided by WSDL validator functionality is the following feature:
N a m e : W S O 2 C a r b o n - W S D L T o o l s F e a t u r e Identifier : org.wso2.carbon.wsdl.tools.feature.group
If the above feature is not included in your product by default, you can install it using the instructions given in section.Feature Management
Follow the instructions below to use the WSDL Validator tool.
1. Log on to the product's management console and select "Tools -> WSDL Validator ."
2. The "WSDL Validator" page appears with the following options.
Uploading a WSDL
1. You can upload the WSDL document to be validated using the following user interface. Click the "Browse" buttonto upload a document and click on the "Validate From File" button to validate. The validation results will be shownbelow the panel. For example,
Providing a WSDL URL
1. You can provide the URL of your WSDL document to be validated using the following user interface. Click on the Validate From URL button. Validation result will be shown below the panel.

WSO2 Application Server, version 5.3.0
Copyright © WSO2 Inc. 2014 493
JavaScript Scraping Assistant
The JavaScript Scraping Assistant tool provides a menu-driven user interface to create a scraper file, which canextract the contents of a HTML page as an XML document. This functionality is provided by the following feature inthe WSO2 feature repository.
Name : WSO2 Carbon - Javascr ip t Web Scrap ing Feature Identifier : org.wso2.carbon.jsscraper.feature.group
The scraping assistant tool is bundled by default in the WSO2 Application Server and WSO2 Mashup Serverproducts. If it is not included in your product distribution, you can add it by installing the above feature using theinstructions given in section .Feature Management
Follow the instructions below to invoke the tool.
1. product's Scraping Assistant" in the "Tools" Log on to the Management Console and select " menu.
2. The "Scraping Assistant" window opens with an empty config tag.

WSO2 Application Server, version 5.3.0
Copyright © WSO2 Inc. 2014 494
3. For example,The tool's menus can be used to write the XML configuration according to your requirements.
select the "Add HTTP request" menu item.3.1
It inserts a line to retrieve a page available at a given URL as follows:
<http url="url-to-fetch" method="post"/>
Replace the "url-to-fetch" section with the URL of the page you want to fetch.
Highlight the line of code inserted before and the select the 'Convert HTML to XML' menu item. It 3.2 converts the by including the code within the following tags:HTML to XML

WSO2 Application Server, version 5.3.0
Copyright © WSO2 Inc. 2014 495
<html-to-xml outputtype="pretty"></html-to-xml>
Highlight the existing code segment and the select the 'Convert to Variable' menu item. It includes the code3.3 within the following tags:
<var-def name="variable_1"></var-def>
3.4 Optionally, use a variable name that has some semantic value, to get a completed configuration as shown in theexample below.
This example scraper configuration can be used in script as shown in the example below:3.5
function getString() { var config = <config> <var-def name="mashupSite"> <html-to-xml outputtype="pretty"> <http url="http://wso2.org/projects/mashup"method="post"/> </html-to-xml> </var-def> </config> var scraper = new Scraper(config); var result = scraper.response; return result; }
The code segment above will fetch all content from the URL. You can now modify your configuration to filter out3.6the information you don't need from this URL, or use logic within your script itself to extract the bits you need.
Scraper Host Object
The Scraper object we created before allows data to be extracted from HTML pages and presented in XML format. Itprovides a bridge to data sources that don't have XML or Web service representations at present. The scrapingcomponent wraps WebHarvest: .http://web-harvest.sourceforge.net/index.php
There are a few caveats when using the screen scraping language from within the Scraper object and within E4X,

WSO2 Application Server, version 5.3.0
Copyright © WSO2 Inc. 2014 496
as listed below:
The result of the scrape must be saved in a variable. The contents of the variable appear as a property on theScraper object.
var config = <config> <var-def name='response'> <html-to-xml> <http method='get'url='http://ww2.wso2.org/~builder/'/> </html-to-xml> </var-def> </config>;
Currently, the result comes back as a string. When the result represents XML, you have to parse it into XMLand also ensure that you remove the XML declaration. The XML constructor does not parse documents, butonly node lists, and rejects the declaration as an illegal processing instruction:
var scraper = new Scraper(config); var result = scraper.response; // strip off the XML declaration and parse as XML. var resultXML = new XML(result.substring(result.indexOf('?>') + 2)); return resultXML;
The WebHarvest language <template> instruction allows variables to be referenced, using the notation${variable-name}. The curly brackets conflict with the use of XML literals in E4X, where they cause evaluationof the enclosed data. To escape the curly brackets in E4X (so they will be interpreted by WebHarvest), usethe character entity references and for '{' and '}' respectively. { }
JavaScript Stub Generator
The easiest way to access a Web Service hosted externally is through a stub. The "JavaScript Stub Generator" is aproductivity tool enabling client code generation according to a given WSDL. Its functionality is provided by thefollowing feature in the WSO2 feature repository.
Name : WSO2 Carbon - Javascr ip t Stub Generator Feature Identifier : org.wso2.carbon.jsstubgenerator.feature.group
The stub generation functionality is bundled by default in the WSO2 Application Server and WSO2 Mashup Serverproducts. If it is not included in your product distribution, you can add it by installing the above feature using theinstructions given in section .Feature Management
Follow the instructions below to invoke the tool.
1. product's JavaScript Stub Generator" in the "Tools" Log on to the Management Console and select " menu.
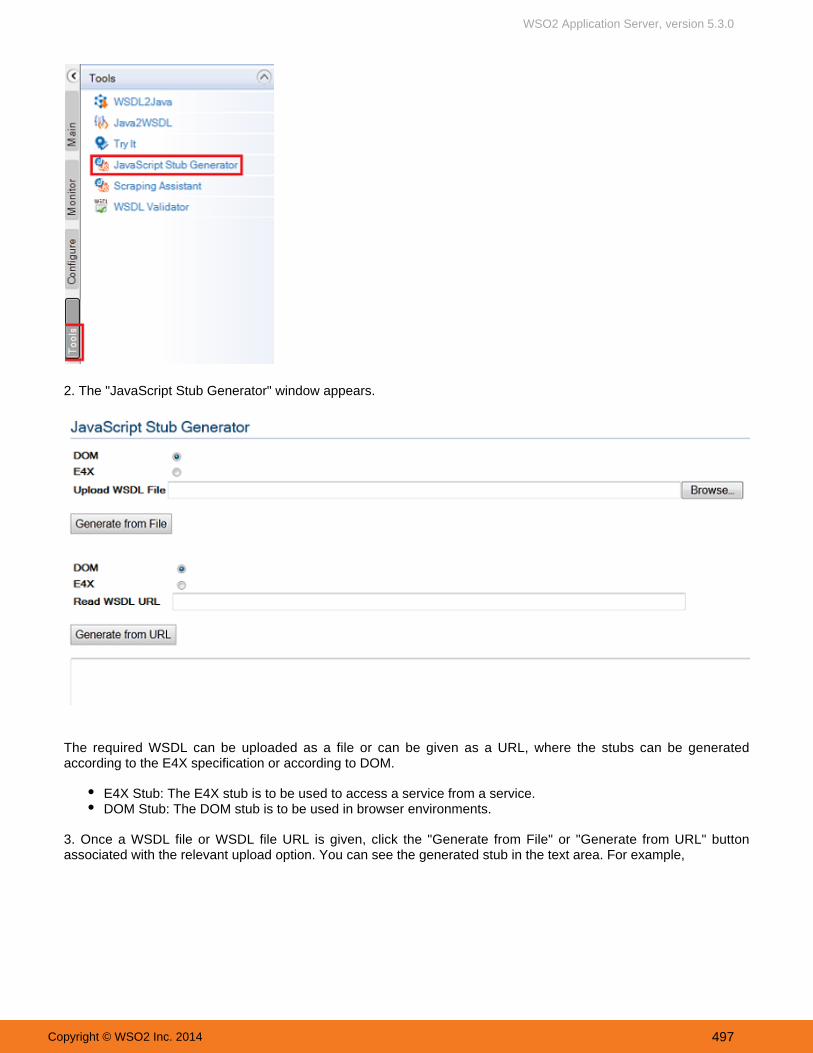
WSO2 Application Server, version 5.3.0
Copyright © WSO2 Inc. 2014 497
2. The "JavaScript Stub Generator" window appears.
The required WSDL can be uploaded as a file or can be given as a URL, where the stubs can be generatedaccording to the E4X specification or according to DOM.
E4X Stub: The E4X stub is to be used to access a service from a service.DOM Stub: The DOM stub is to be used in browser environments.
3. Once a WSDL file or WSDL file URL is given, click the "Generate from File" or "Generate from URL" buttonassociated with the relevant upload option. You can see the generated stub in the text area. For example,

WSO2 Application Server, version 5.3.0
Copyright © WSO2 Inc. 2014 498
Shown below is how this script is imported to a Mashup.
Create a new Mashup, say 'Currency' and save it. You will find a Currency.resources directory created in yourpersonal scripts directory: <PRODUCT_HOME>\repository\deployment\server\jsservices\admin. Create a new textfile in the Currency.resources directory for the stub and paste the generated stub in it. Let's assume it'convertor.stub.js'.
Edit the mashup and include an import statement to bring in your stub as follows:
Tools of the Carbon Platform
The WSO2 Carbon platform has tools by default to:
Capturing the state of the system in error situations.Changing user passwords in the Carbon database.Encrypting and decrypting simple texts.Viewing and resending messages.Securing the plain text password in carbon configuration files.
Capturing the State of the System in Error Situations
Carbondump is a tool for collecting all the necessary data from a running Carbon instance at the time of an error.The carbondump generates a zip archive with the collected data, which helps the WSO2 support team to analyzeyour system and determine the problem which caused the error. Therefore, it is recommended that you run this toolas soon as an error occurs in the Carbon instance.

WSO2 Application Server, version 5.3.0
Copyright © WSO2 Inc. 2014 499
When using the tool, you have to provide the process ID (pid) of the Carbon instance and the <PRODUCT_HOME>which is where your unzipped Carbon distribution files reside. The command takes the following format:
sh carbondump.sh [-carbonHome path] [-pid of the carbon instance]
For example,
In Linux: sh carbondump.sh -carbonHome /home/user/wso2carbon-3.0.0/ -pid5151
In Windows: carbondump.bat -carbonHome c:\wso2carbon-3.0.0\ -pid 5151
The tool captures the following information about the system:
Operating system informationOS (kernel) versionInstalled modules lists and their informationList of running tasks in the system
Memory information of the Java processJava heap memory dumpHistogram of the heapObjects waiting for finalizationJava heap summary. GC algo used, etc.Statistics on permgen space of Java heap
Information about the running Carbon instanceProduct name and versionCarbon framework version (This includes the patched version)<PRODUCT_HOME>, <JAVA_HOME>configuration fileslog filesH2 database files
Thread dumpChecksum values of all the files found in the $CARBON_HOME
Changing User Passwords in the Carbon Database
If an admin user forgets his password, he cannot retrieve it using the Management Console. In such a scenario, hasto change the password by running the chpasswd script located in folder on the machine<PRODUCT_HOME>/binthat hosts the Carbon server.
In order to change a user's password, you need to provide the following information:
The Carbon database URL: By default, WSO2 Carbon is shipped with H2 database so the default URL is
The content on this page is under review.
Before executing this script, the Carbon instance should be shut down.
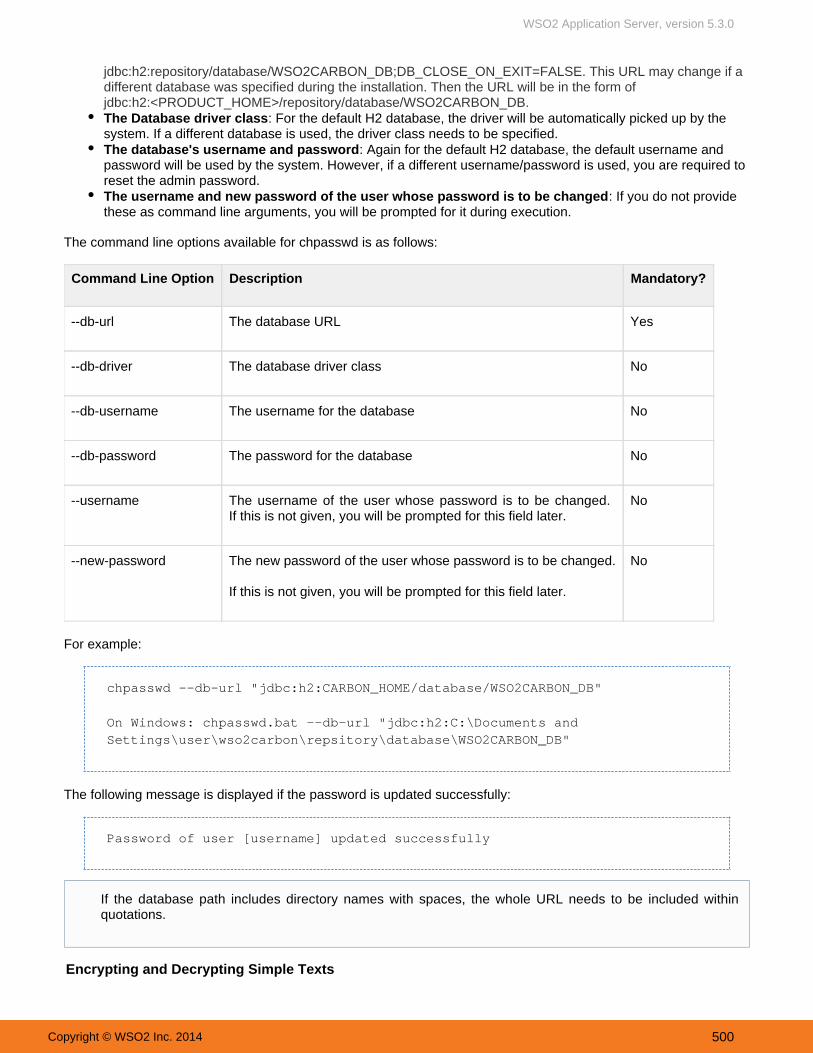
WSO2 Application Server, version 5.3.0
Copyright © WSO2 Inc. 2014 500
jdbc:h2:repository/database/WSO2CARBON_DB;DB_CLOSE_ON_EXIT=FALSE. This URL may change if adifferent database was specified during the installation. Then the URL will be in the form ofjdbc:h2:<PRODUCT_HOME>/repository/database/WSO2CARBON_DB.The Database driver class: For the default H2 database, the driver will be automatically picked up by thesystem. If a different database is used, the driver class needs to be specified.The database's username and password: Again for the default H2 database, the default username andpassword will be used by the system. However, if a different username/password is used, you are required toreset the admin password.The username and new password of the user whose password is to be changed: If you do not providethese as command line arguments, you will be prompted for it during execution.
The command line options available for chpasswd is as follows:
Command Line Option Description Mandatory?
--db-url The database URL Yes
--db-driver The database driver class No
--db-username The username for the database No
--db-password The password for the database No
--username The username of the user whose password is to be changed. If this is not given, you will be prompted for this field later.
No
--new-password The new password of the user whose password is to be changed.
If this is not given, you will be prompted for this field later.
No
For example:
chpasswd --db-url "jdbc:h2:CARBON_HOME/database/WSO2CARBON_DB"
On Windows: chpasswd.bat --db-url "jdbc:h2:C:\Documents andSettings\user\wso2carbon\repsitory\database\WSO2CARBON_DB"
The following message is displayed if the password is updated successfully:
Password of user [username] updated successfully
Encrypting and Decrypting Simple Texts
If the database path includes directory names with spaces, the whole URL needs to be included withinquotations.

WSO2 Application Server, version 5.3.0
Copyright © WSO2 Inc. 2014 501
The cipher tool encrypts and decrypts simple texts. You can launch the tool by running the ciphertool.sh andciphertool.bat scripts available at <PRODUCT_HOME>/bin directory. The arguments accepted by this tool are asfollows:
keystore - If keys are in a store , its locationstorepass - Password to access the keyStorekeypass - To get private keyalias - Alias to identify key ownerstoretype - Type of the keystore. Default is JKSkeyfile - If key is in a fileopmode - Encrypt or decrypt. Default is encryptalgorithm - Encrypt or decrypt algorithm. Default is RSAsource - Either cipher or plain text as an in-lined formoutencode - Currently base64 and used for encoding the resultinencode - Currently base64 and used to decode inputtrusted - Is KeyStore a trusted store? If this argument is provided, consider as a trusted storepassphrase - if a simple symmetric encryption using a pass phrase shall be used
For example,
ciphertool.bat -source testpass -keystoreresources/security/client-truststore.jks -storepass wso2carbon -aliaswo2carbon -outencodebase64 -trusted
View and Resend Messages
Users can view and monitor the messages passed along in a TCP-based conversation, using the TCPMon utility inthe WSO2 Carbon base platform. TCPMon is a simple and easy-to-use tool, particularly useful when developingWeb services. It is based on a swing UI and works on almost all platforms that support Java. You can find the scriptfile used to run this tool by the name tcpmon.sh or tcpmon.bat in the <PRODUCT_HOME>/bin folder. TCPMonneeds JRE 1.4 or higher to run and has no dependencies on third-party libraries.
Usage Patterns of the Tool
As an Explicit Intermediate
The most common usage of TCPMon is as an intermediary. It is called explicit since the client has to send themessages to the intermediary rather than to the original endpoint in order to monitor the messages. The followingfigure explains this concept.
In order to start TCPMon in this configuration, you have to provide the target host name and port as well as thelistening port on the Admin tab. For example,

WSO2 Application Server, version 5.3.0
Copyright © WSO2 Inc. 2014 502
Click 'Add' to open a new tab that displays the messages.

WSO2 Application Server, version 5.3.0
Copyright © WSO2 Inc. 2014 503
At this point, the requester should point to the listener port of the TCPMon instead of the original endpoint. Forexample, assume that we need to monitor all the messages that are sent to and from www.apache.org.
Step 1:
Add a listener with the host 'www.apache.org' and port 80. Set the listener to port 8080, which is any unused port inthe local machine.
Step 2:
Point the browser to localhost:8080 instead of www.apache.org.
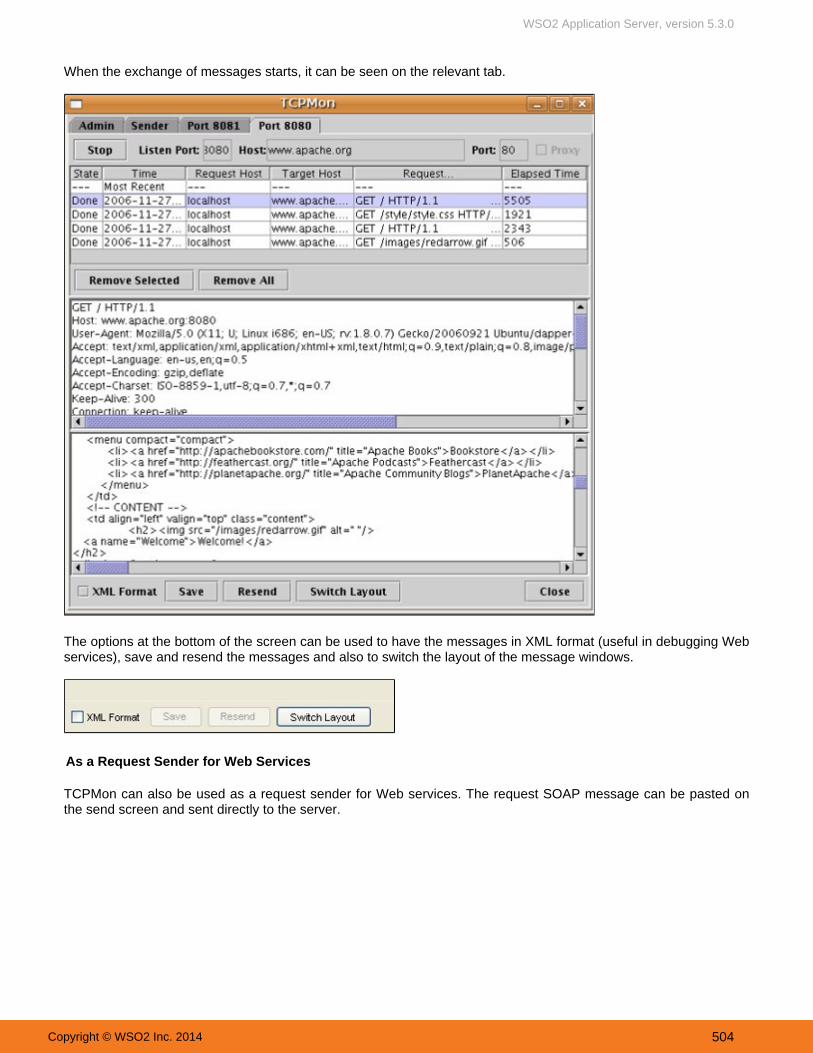
WSO2 Application Server, version 5.3.0
Copyright © WSO2 Inc. 2014 504
When the exchange of messages starts, it can be seen on the relevant tab.
The options at the bottom of the screen can be used to have the messages in XML format (useful in debugging Webservices), save and resend the messages and also to switch the layout of the message windows.
As a Request Sender for Web Services
TCPMon can also be used as a request sender for Web services. The request SOAP message can be pasted onthe send screen and sent directly to the server.
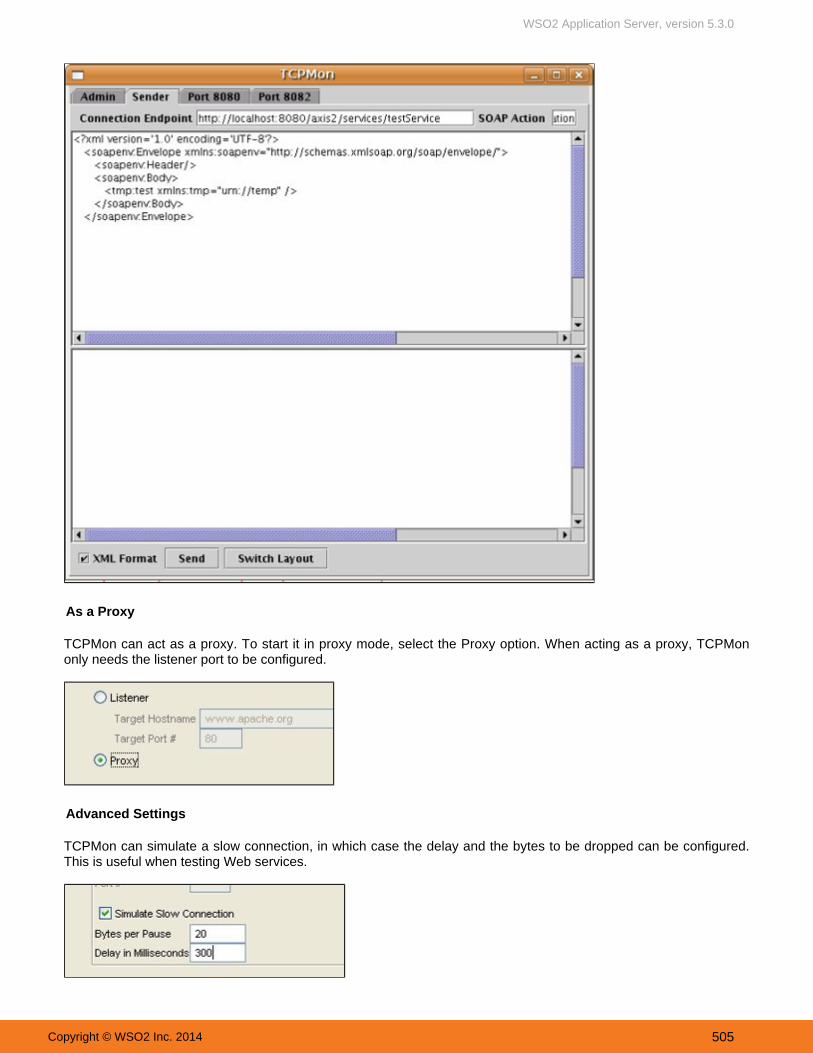
WSO2 Application Server, version 5.3.0
Copyright © WSO2 Inc. 2014 505
As a Proxy
TCPMon can act as a proxy. To start it in proxy mode, select the Proxy option. When acting as a proxy, TCPMononly needs the listener port to be configured.
Advanced Settings
TCPMon can simulate a slow connection, in which case the delay and the bytes to be dropped can be configured.This is useful when testing Web services.

WSO2 Application Server, version 5.3.0
Copyright © WSO2 Inc. 2014 506
Also, if HTTP proxy support is required, that can also be set on the admin screen.
Lazy Loading of Tenants and Artifacts
Lazy loading is a design pattern used specifically in cloud deployments to prolong the initialisation of an object or artifact until it is requested by atenant or an internal process. Lazy loading of tenants is a feature that is built into all WSO2 products, which ensures that in an environment withmultiple tenants, all tenants are not loaded at the time the server starts. Instead, they are loaded only when a request is made to a particulartenant. If a tenant is not utilised for a certain period of time, it will be unloaded from memory.
Lazy loading of deployment artifacts
Lazy loading of tenants is a default feature available in any WSO2 product instance. Additionally, the GhostDeployment configuration in the file allows users to enable lazy loading for deployment artifactscarbon.xml
as shown below. When this feature is enabled, the services, applications and other artifacts are first loaded inGhost form. The actual artifact is deployed only when a request for the artifact is made. Also, if an artifact hasnot been utilized for a certain period of time, it will be unloaded from memory. Note that this setting is notenabled by default because the Ghost Deployer works only with the HTTP/S transports. That is, if othertransports are used, we do not have to enable the Ghost Deployer.
<GhostDeployment> <Enabled>false</Enabled></GhostDeployment>
When lazy loading of artifacts is enabled for PaaS deployments, lazy loading applies both for tenants as well as atenant’s artifacts. As a result, for a tenant in a cloud environment, lazy loading is applicable on both levels.Therefore, the associated performance improvement and resource utilization efficiencies are optimal.
Lazy loading implementation
Out of four popular variants (Lazy Initialization, Virtual Proxy, Value Holder, Ghost) of the lazy loading designpattern, the "Value Holder" and "Ghost" variants are adopted and used in the lazy loading implementation inWSO2 Carbon Framework.
Use of Value HolderUse of GhostDeployer and GhostDispatcher/GhostWebappDeployerValve
Use of Value Holder
A value holder is an object, usually (but not necessarily) with a method by the name , which the clientsgetValueinvoke to obtain a reference to the real object corresponding to a parameter passed in the method. The ValueHold
variant is used at the event of loading a tenant. The called method is as follow:er
TenantAxisUtils.getTenantConfigurationContext(String tenantDomain)
The method is the equivalent of the method in the getTenantConfigurationContext getValue ValueHolde variant. It takes a as a reference and returns the , if the tenant isr tenantDomain ConfigurationContext
already loaded. If the tenant domain does not have an Axis2 , the method will return aConfigurationContextnewly created Axis2 . In both the latter mentioned methods, when loading an entire ConfigurationContext Axis
In some products such as WSO2 Application Server, lazy loading can also be enabled for deployed artifacts. See the topic on lazy for details.loading of deployment artifacts

WSO2 Application Server, version 5.3.0
Copyright © WSO2 Inc. 2014 507
, all artifacts belonging to that particular tenant are also loaded. A more efficient practice is to lazyConfigurationload those artifacts, by loading them only when it is requested by the system or a tenant. This prevents processingoverhead and unnecessary memory usage. This is where the Ghost variant of the lazy loading pattern is used.
Use of GhostDeployer and GhostDispatcher/GhostWebappDeployerValve
When the server starts, you can see all the previously deployed services and web applications listed in itsmanagement console. However, these artifacts are only the Ghost instances that maintain references to theactual Instances. that handles lazy loading of artifacts, holds a map of deployers for all artifactGhostDeployertypes.
When a new artifact is deployed, the creates a Ghost Axis2 Service containing a specialGhostDeployerparameter (Ghost Parameter) to distinguish the service as a Ghost service, and then registers that service into the A
. When a user requests for a particular service artifact, the , which is an Axis2xisConfig GhostDispatcherdispatching handler, checks the Ghost parameter added to the service to determine if it is the actual artifact or theghost form. If it is the latter, the actual deployer is called to load the actual service, the rest of the metadata from theregistry, service policies and other information regarding the artifact.
GhostWebappDeployerValve, on the other hand, is used with lazy loading for web applications. It is a Tomcatvalve that intercepts the incoming http requests, and does the same work as the in Axis2. ItGhostDispatcherintercepts the incoming web app request, checks for the Ghost parameter in the webapp and loads the actual webapplication if it is found to be in ghost form.
Product Startup Options
Given below are the options that are available when starting a WSO2 product. The product startup scripts are storedin the directory. When you execute the startup script, you can specify the relevant startup<PRODUCT_HOME>/bin/option as shown below.
sh wso2server.sh -<startup option>
Listed below are some general options that can be used for starting the server.
StartupOption
Description
-start Starts the Carbon server using "nohup" in the background. This option is not available forWindows.
-stop Stops the Carbon server process. This option is not available for Windows.
-restart Restarts the Carbon server process. This option is not available for windows.
-cleanRegistry Cleans the registry space. All registry data will be lost.Caution:
-debug <port> Starts the server in remote debugging mode. The remote debugging port should be specified.
-version Shows the version of the product that you are running.
See the topic on for detailed information on how to start a WSO2 server and access therunning a productmanagement console.

WSO2 Application Server, version 5.3.0
Copyright © WSO2 Inc. 2014 508
-help Lists all the available commands and system properties.
Listed below are some system properties that can be used when starting the server.
Startup Options Description
-DosgiConsole=[port] Starts the Carbon server with the Equinox OSGi console. If the optional 'port'parameter is provided, a telnet port will be opened.
-DosgiDebugOptions=[options-file] Starts the Carbon server with OSGi debugging enabled. Debug options areloaded from the <PRODUCT_HOME>/repository/cont/etc/osgi-debu
.g.options
-Dsetup Cleans the registry and other configurations, recreates DB, re-populates theconfiguration and starts the server. It is not recommended to use thisNote:option in a production environment. Instead, you can manually run the DBscripts directly in the database.
-DserverRoles=<roles> A comma separated list of roles used in deploying Carbon applications.
-DworkerNode This property starts the server as a worker node.
-Dprofile=<profileName> Starts the server with the specified profile, e.g., worker profile.
-Dtenant.idle.time=<time> If a tenant is idle for the specified time, the tenant will be unloaded. Thedefault tenant idle time is 30 minutes. This is required in clustered setups,which has master and worker nodes.
WSO2 Application Server, version 5.3.0
Copyright © WSO2 Inc. 2014 509
FAQ
How do you track web sessions?Under what instances are web sessions terminated?How to configure GZip encoding in AS?How can I get the <AS_HOME>/tmp directory cleared?How to protect my product server from security attacks caused by weak ciphers such as the Logjam attack(Man-in-the-Middle attack)?
How do you track web sessions?
This can be done via the webapp management UI as it show all the active sessions.
Under what instances are web sessions terminated?
Sessions are terminated when the session is inactive for the specified session expiry time. Sessions can also beexplicitly terminated using the management console. Please note that the UI based session termination is notcompatible in a clustered setup. The sessions will be terminated only on the node from which the UI was loaded.
How to configure GZip encoding in AS?
GZip can be configured using the AS_HOME/repository/conf/ tomcat/catalina-server.xml file. This file is equivalent tothe server.xml file in Apache Tomcat. The GZip can be configured for each connector in the catalina server. Theimportant attributes of the catalina server that should be configured are compression, compressionMinSize,
compressableMimeType, and noCompressionUserAgents. Go to Configuring catalina-server.xml for more details ofthese attributes.
How can I get the directory cleared?<AS_HOME>/tmp
Based on the task for , if the property is set to , all files that areHouseKeeping carbon.xml <AutoStart> truemore than 30 minutes o ld wi l l be c leared every 10 minutes.If you are running AS on Linux, you can also write a cron job to handle the clearing of contents within the <AS_HOME
directory. >/tmp
How to protect my product server from security attacks caused by weak ciphers such as the Logjam attack(Man-in-the-Middle attack)?
You can disable weak ciphers as described in the section on .disabling weak ciphers

WSO2 Application Server, version 5.3.0
Copyright © WSO2 Inc. 2014 510
Getting Support
In addition to this documentation, there are several ways to get help as you work on WSO2 products.
Explore learning resources: For tutorials, articles,whitepapers, webinars, and other learning resources,look in the menu on the .Resources WSO2 websiteFor training materials, click on the WSO2 Training Sup
menu. In products that have a visualport & Traininguser interface, click the Help link in the top right-handcorner to get help with your current task.
Try our support options: WSO2 offers a variety ofdevelopment and production support programs, rangingfrom web-based support during normal business hoursto premium 24x7 phone support. For supportinformation, see .http://wso2.com/support/
Ask questions in the user forums at http://stackoverfl. Ensure that you tag your question withow.com
appropriate keywords such as and the productWSO2name so that our team can easily find your questionsand provide answers. If you can't find an answer on theuser forum, you can email the WSO2 developmentteam directly using the relevant mailing lists describedat .http://wso2.org/mail
Report issues, submit enhancement requests, trackand comment on issues using our public bug-tracking
, and contribute samples, patches, and tips &systemtricks (see the ).WSO2 Contributor License Agreement

WSO2 Application Server, version 5.3.0
Copyright © WSO2 Inc. 2014 511
Glossary
Component | | | | | | | | Default Endpoint Endpoint Embedded Registry Instance Event Sources J2EE Keystore Mediator | | | | | | | | Port offset Proxy Services Sequence Servlet Servlet container SOAP synapse-config Directory Tasks WS-Ad
| | | dressing WSDL WSDL Endpoint WSO2 AS Management Console
Component
Components in the Carbon platform add functionality to all WSO2 Carbon-based products. For example, thestatistics component enables users to monitor system and service level statistics. A component in the Carbonplatform is made up of one or more bundles, which is the modularization unit in OSGi similar to a JAR file inOSGiJava. For example, the statistics component contains two bundles: one is the back-end bundle that collects,summarizes, and stores statistics, and the other is the front-end bundle, which presents the data to the user througha user-friendly interface. This component-based architecture of the WSO2 Carbon platform gives developersflexibility to build efficient and lean products that best suit their unique business needs simply by adding andremoving components.
Default Endpoint
A default endpoint is an endpoint defined for adding Quality of Service (QoS) and other configurations to theendpoint, which is resolved from the address of the message context.To
Endpoint
An endpoint is a specific destination for a message. It may be specified as an Address endpoint, WSDL endpoint, aFailover group, a Loadbalance group, and more. Endpoints can be added, edited, and deleted.
Embedded Registry Instance
The Embedded Registry Instance makes use of the embedded AS database. This is a H2 database and the datafiles are stored by default in the directory named . If you run the AS in theAS_HOME/repository/databaseembedded registry mode, you should be careful not to alter manually any files stored in this directory as that mightlead to database corruption or data loss.
Event Sources
An Event Source is used to define the event source and the subscription manager configuration used in the eventingimplementation of WSO2 AS. An Event Source provides a service URL that can be used to the send subscriptionsand events (events that are not required to go through a mediation flow).
J2EE
Abbreviation for "Java 2 Platform, Enterprise Edition". Now known as "Java Platform, Enterprise Edition" or "JavaEE"
Keystore
The keystore used to encrypt administrator passwords and other confidential information in Carbon is configured in file. This keystore configuration can be found under the <security>AS_HOME/repository/conf/carbon.xml
element of the file.carbon.xml
WSO2 Application Server, version 5.3.0
Copyright © WSO2 Inc. 2014 512
Mediator
A mediator is a full powered processing unit. It is a component that performs some mediation action on a messageduring the process flow. Thus, a mediator gets full access to a message at the point where it is defined to gaincontrol and could inspect the message, modify it or take an external action depending on some attributes or valuesof the current message.
Port offset
The port offset feature allows you to run multiple WSO2 products, multiple instances of a WSO2 product, or multipleWSO2 product clusters on the same server or virtual machine (VM). The port offset defines the number by which allports defined in the runtime such as the HTTP/S ports will be offset. For example, if the HTTP port is defined as9763 and the portOffset is 1, the effective HTTP port will be 9764. Therefore, for each additional WSO2 product,instance, or cluster you add to a server, set the port offset to a unique value (the default is 0).
Port offset can be passed to the server during startup as fol lows:. / w s o 2 s e r v e r . s h - D p o r t O f f s e t = 3
Alternatively, you can set it in the Ports section of <PRODUCT_HOME>/repository/conf/carbon.xml file as follows:<Offset>3</Offset>
Proxy Services
A Proxy Service is a virtual service hosted in the AS runtime. The proxy service mediates any accepted requestsand forwards them to a specified endpoint, most of the time to an actual Web Service. The responses coming backfrom the target endpoint are mediated back to the client which sent the original service request. Proxy services oftenmake references to sequences, endpoints and local entries. A proxy service can enforce various QoS requirementson a request and can be exposed over a user specified transport. Therefore they are often used to expose existingWeb Services over a different transport or a QoS configuration. For example, a proxy service can be used to exposean HTTP service over JMS or it can be used to expose an unsecured service in a secured manner usingW S - S e c u r i t y s t a n d a r d s .Unlike sequences and endpoints, which can be stored and loaded from the registry, proxy services cannot beloaded from the registry. However, a proxy service can make references to sequences and endpoints stored in theregistry.
Sequence
A Sequence element is used to define a Sequence of mediators that can be invoked later as a Sequence. If theconfiguration defines a Sequence named "main", then it is considered as the main mediation Sequence of the AS. Ifsuch a Sequence is not defined locally and a registry has been specified, the registry is looked up for a key named"main" to find the main mediator Sequence. If the user does not define a main or fault Sequence, AS will createdefault Sequences.
Servlet
A servlet is a small Java program that runs within a Web server. Servlets receive and respond to requests from Webclients, usually across HTTP, the HyperText Transfer Protocol.
Servlet container
The Servlet Container (such as Apache Tomcat) is an application that monitors a port on a given IP address.Servlets generate responses to HTTP requests. To do so, the container loads your servlet (if it is not in memory

WSO2 Application Server, version 5.3.0
Copyright © WSO2 Inc. 2014 513
already) and calls the methods defined in the interface. This is the foundation of servlet and JSP architecture.
SOAP
An XML-based, extensible message envelope format, with "bindings" to underlying protocols. The primary protocolsare HTTP and HTTPS, although bindings for others, including SMTP and XMPP, have been written.
synapse-config Directory
The Directory houses the Mediation Configuration (Synapse Configuration) of WSO2 AS andsynapse-configcontains several files and subdirectories. Usually the following set of child directories is available in thesynapse-config Directory: endpoints, event-sources, local-entries, priority-executors, proxy-services, sequences,tasks.
Tasks
A Task is a custom Java class that implements the . Task interface that defines aorg.apache.synapse.startupsingle method. Such a Task can be scheduled and managed via the AS. Thepublic void execute()scheduling information for a Task can be specified in the format or a format by the user. A Task maycron simplealso be specified as a one-time Task where required and can be used to trigger a callout or inject a message intothe AS.
WS-Addressing
WS-Addressing was originally designed as the way to convey connection state or context in SOAP messages,emulating the contextualization mechanism provided by HTTP headers in conjunction with stored cookies. Thismakes it possible to contextualize message exchanges in a similar way, independently of the transport used.
WSDL
An XML format allows service interfaces to be described along with the details of their bindings to specific protocols.It is typically used to generate server and client code and for configuration.
WSDL Endpoint
WSDL Endpoint is an endpoint definition based on a specified WSDL document. The WSDL document can bespecified either as a URI or as an inlined definition within the configuration.
WSO2 AS Management Console
WSO2 AS Management Console is a Web based control panel powered by JSP and AJAX which enables systemadministrators to interact with a running AS instance without touching any underlying configuration files. TheManagement Console allows the users to command and control proxy services, sequences, transports, local entries,registry, modules, endpoints and much more.

WSO2 Application Server, version 5.3.0
Copyright © WSO2 Inc. 2014 514
Site Map


![[1] Oracle® Retail Predictive Application Server Cloud Edition](https://img.pdfslide.net/doc/110x75/6337261cbe51cc9d720edd8b/1-oracle-retail-predictive-application-server-cloud-edition.jpg)


