Embed Size (px)
Citation preview

1. Performance Tuning . . . . . . . . . . . . . . . . . . . . . . . . . . . . . . . . . . . . . . . . . . . . . . . . . . . . . . . . . . . . . . . . . . . . . . . . . . . . . . . . . . 32. Stream Processor Documentation . . . . . . . . . . . . . . . . . . . . . . . . . . . . . . . . . . . . . . . . . . . . . . . . . . . . . . . . . . . . . . . . . . . . . . . . 6
2.1 Introducing Stream Processor . . . . . . . . . . . . . . . . . . . . . . . . . . . . . . . . . . . . . . . . . . . . . . . . . . . . . . . . . . . . . . . . . . . . . . 72.1.1 Overview . . . . . . . . . . . . . . . . . . . . . . . . . . . . . . . . . . . . . . . . . . . . . . . . . . . . . . . . . . . . . . . . . . . . . . . . . . . . . . . . . . 72.1.2 Architecture . . . . . . . . . . . . . . . . . . . . . . . . . . . . . . . . . . . . . . . . . . . . . . . . . . . . . . . . . . . . . . . . . . . . . . . . . . . . . . . . 82.1.3 About This Release . . . . . . . . . . . . . . . . . . . . . . . . . . . . . . . . . . . . . . . . . . . . . . . . . . . . . . . . . . . . . . . . . . . . . . . . . . 10
2.2 Quick Start Guide . . . . . . . . . . . . . . . . . . . . . . . . . . . . . . . . . . . . . . . . . . . . . . . . . . . . . . . . . . . . . . . . . . . . . . . . . . . . . . . . 102.3 Installation Guide . . . . . . . . . . . . . . . . . . . . . . . . . . . . . . . . . . . . . . . . . . . . . . . . . . . . . . . . . . . . . . . . . . . . . . . . . . . . . . . . 18
2.3.1 Installing the Product . . . . . . . . . . . . . . . . . . . . . . . . . . . . . . . . . . . . . . . . . . . . . . . . . . . . . . . . . . . . . . . . . . . . . . . . 182.3.1.1 Installation Prerequisites . . . . . . . . . . . . . . . . . . . . . . . . . . . . . . . . . . . . . . . . . . . . . . . . . . . . . . . . . . . . . . . . . 182.3.1.2 Installing on Linux . . . . . . . . . . . . . . . . . . . . . . . . . . . . . . . . . . . . . . . . . . . . . . . . . . . . . . . . . . . . . . . . . . . . . . 192.3.1.3 Installing on Windows . . . . . . . . . . . . . . . . . . . . . . . . . . . . . . . . . . . . . . . . . . . . . . . . . . . . . . . . . . . . . . . . . . . 202.3.1.4 Installing as a Linux Service . . . . . . . . . . . . . . . . . . . . . . . . . . . . . . . . . . . . . . . . . . . . . . . . . . . . . . . . . . . . . . 232.3.1.5 Installing as a Windows Service . . . . . . . . . . . . . . . . . . . . . . . . . . . . . . . . . . . . . . . . . . . . . . . . . . . . . . . . . . . 25
2.3.2 Running the Product . . . . . . . . . . . . . . . . . . . . . . . . . . . . . . . . . . . . . . . . . . . . . . . . . . . . . . . . . . . . . . . . . . . . . . . . . 312.3.3 Upgrading from a Previous Release . . . . . . . . . . . . . . . . . . . . . . . . . . . . . . . . . . . . . . . . . . . . . . . . . . . . . . . . . . . . . 32
2.4 Key Concepts . . . . . . . . . . . . . . . . . . . . . . . . . . . . . . . . . . . . . . . . . . . . . . . . . . . . . . . . . . . . . . . . . . . . . . . . . . . . . . . . . . . 432.5 Tutorials . . . . . . . . . . . . . . . . . . . . . . . . . . . . . . . . . . . . . . . . . . . . . . . . . . . . . . . . . . . . . . . . . . . . . . . . . . . . . . . . . . . . . . . 43
2.5.1 Creating a Simple Siddhi Application . . . . . . . . . . . . . . . . . . . . . . . . . . . . . . . . . . . . . . . . . . . . . . . . . . . . . . . . . . . . 442.5.2 Consuming Events . . . . . . . . . . . . . . . . . . . . . . . . . . . . . . . . . . . . . . . . . . . . . . . . . . . . . . . . . . . . . . . . . . . . . . . . . . 542.5.3 Pre-processing Streaming Data . . . . . . . . . . . . . . . . . . . . . . . . . . . . . . . . . . . . . . . . . . . . . . . . . . . . . . . . . . . . . . . . 592.5.4 Integrating Datastores . . . . . . . . . . . . . . . . . . . . . . . . . . . . . . . . . . . . . . . . . . . . . . . . . . . . . . . . . . . . . . . . . . . . . . . . 632.5.5 Summarizing Stream Data - Short Term . . . . . . . . . . . . . . . . . . . . . . . . . . . . . . . . . . . . . . . . . . . . . . . . . . . . . . . . . . 692.5.6 Streaming Data Summarization (Incremental Aggregation) . . . . . . . . . . . . . . . . . . . . . . . . . . . . . . . . . . . . . . . . . . . 762.5.7 Analyzing KPIs . . . . . . . . . . . . . . . . . . . . . . . . . . . . . . . . . . . . . . . . . . . . . . . . . . . . . . . . . . . . . . . . . . . . . . . . . . . . . 802.5.8 Publishing Processed Events . . . . . . . . . . . . . . . . . . . . . . . . . . . . . . . . . . . . . . . . . . . . . . . . . . . . . . . . . . . . . . . . . . 842.5.9 Correlating Simple Events . . . . . . . . . . . . . . . . . . . . . . . . . . . . . . . . . . . . . . . . . . . . . . . . . . . . . . . . . . . . . . . . . . . . 872.5.10 Correlating Events for Complex Event Processing . . . . . . . . . . . . . . . . . . . . . . . . . . . . . . . . . . . . . . . . . . . . . . . . . 902.5.11 Analyzing Trends . . . . . . . . . . . . . . . . . . . . . . . . . . . . . . . . . . . . . . . . . . . . . . . . . . . . . . . . . . . . . . . . . . . . . . . . . . 942.5.12 Making Real-time Predictions . . . . . . . . . . . . . . . . . . . . . . . . . . . . . . . . . . . . . . . . . . . . . . . . . . . . . . . . . . . . . . . . . 982.5.13 Streaming Machine Learning . . . . . . . . . . . . . . . . . . . . . . . . . . . . . . . . . . . . . . . . . . . . . . . . . . . . . . . . . . . . . . . . . 992.5.14 Detecting Anomalies . . . . . . . . . . . . . . . . . . . . . . . . . . . . . . . . . . . . . . . . . . . . . . . . . . . . . . . . . . . . . . . . . . . . . . . . 1022.5.15 Presenting Data . . . . . . . . . . . . . . . . . . . . . . . . . . . . . . . . . . . . . . . . . . . . . . . . . . . . . . . . . . . . . . . . . . . . . . . . . . . 1042.5.16 Managing Business Rules via Templates . . . . . . . . . . . . . . . . . . . . . . . . . . . . . . . . . . . . . . . . . . . . . . . . . . . . . . . . 1162.5.17 Monitoring the Stream Processor via the Status Dashboard . . . . . . . . . . . . . . . . . . . . . . . . . . . . . . . . . . . . . . . . . 1232.5.18 Performing Real-time and Periodic ETL . . . . . . . . . . . . . . . . . . . . . . . . . . . . . . . . . . . . . . . . . . . . . . . . . . . . . . . . . 129
2.6 User Guide . . . . . . . . . . . . . . . . . . . . . . . . . . . . . . . . . . . . . . . . . . . . . . . . . . . . . . . . . . . . . . . . . . . . . . . . . . . . . . . . . . . . . 1372.6.1 Understanding the Development Environment . . . . . . . . . . . . . . . . . . . . . . . . . . . . . . . . . . . . . . . . . . . . . . . . . . . . . 138
2.6.1.1 Stream Processor Studio Overview . . . . . . . . . . . . . . . . . . . . . . . . . . . . . . . . . . . . . . . . . . . . . . . . . . . . . . . . 1382.6.1.1.1 Working with the Design View . . . . . . . . . . . . . . . . . . . . . . . . . . . . . . . . . . . . . . . . . . . . . . . . . . . . . . . . 144
2.6.1.2 Creating a Siddhi Application . . . . . . . . . . . . . . . . . . . . . . . . . . . . . . . . . . . . . . . . . . . . . . . . . . . . . . . . . . . . . 1692.6.1.3 Testing a Siddhi Application . . . . . . . . . . . . . . . . . . . . . . . . . . . . . . . . . . . . . . . . . . . . . . . . . . . . . . . . . . . . . . 179
2.6.1.3.1 Simulating Events . . . . . . . . . . . . . . . . . . . . . . . . . . . . . . . . . . . . . . . . . . . . . . . . . . . . . . . . . . . . . . . . . 1812.6.1.4 Debugging a Siddhi Application . . . . . . . . . . . . . . . . . . . . . . . . . . . . . . . . . . . . . . . . . . . . . . . . . . . . . . . . . . . 2022.6.1.5 Exporting a Siddhi File . . . . . . . . . . . . . . . . . . . . . . . . . . . . . . . . . . . . . . . . . . . . . . . . . . . . . . . . . . . . . . . . . . 207
2.6.2 Developing Streaming Applications . . . . . . . . . . . . . . . . . . . . . . . . . . . . . . . . . . . . . . . . . . . . . . . . . . . . . . . . . . . . . 2082.6.2.1 Siddhi Application Overview . . . . . . . . . . . . . . . . . . . . . . . . . . . . . . . . . . . . . . . . . . . . . . . . . . . . . . . . . . . . . . 2092.6.2.2 Collecting Events . . . . . . . . . . . . . . . . . . . . . . . . . . . . . . . . . . . . . . . . . . . . . . . . . . . . . . . . . . . . . . . . . . . . . . . 2102.6.2.3 Processing Streaming Events . . . . . . . . . . . . . . . . . . . . . . . . . . . . . . . . . . . . . . . . . . . . . . . . . . . . . . . . . . . . . 2122.6.2.4 Storage Integration . . . . . . . . . . . . . . . . . . . . . . . . . . . . . . . . . . . . . . . . . . . . . . . . . . . . . . . . . . . . . . . . . . . . . 218
2.6.2.4.1 Defining Data Tables . . . . . . . . . . . . . . . . . . . . . . . . . . . . . . . . . . . . . . . . . . . . . . . . . . . . . . . . . . . . . . . 2182.6.2.4.2 Managing Stored Data via Streams . . . . . . . . . . . . . . . . . . . . . . . . . . . . . . . . . . . . . . . . . . . . . . . . . . . . 2242.6.2.4.3 Managing Stored Data via REST API . . . . . . . . . . . . . . . . . . . . . . . . . . . . . . . . . . . . . . . . . . . . . . . . . . 2292.6.2.4.4 Connecting to Stores . . . . . . . . . . . . . . . . . . . . . . . . . . . . . . . . . . . . . . . . . . . . . . . . . . . . . . . . . . . . . . . 232
2.6.2.5 Complex Event Processing . . . . . . . . . . . . . . . . . . . . . . . . . . . . . . . . . . . . . . . . . . . . . . . . . . . . . . . . . . . . . . . 2332.6.2.6 Machine Learning . . . . . . . . . . . . . . . . . . . . . . . . . . . . . . . . . . . . . . . . . . . . . . . . . . . . . . . . . . . . . . . . . . . . . . 2342.6.2.7 Incremental Analysis . . . . . . . . . . . . . . . . . . . . . . . . . . . . . . . . . . . . . . . . . . . . . . . . . . . . . . . . . . . . . . . . . . . . 2342.6.2.8 Publishing Events . . . . . . . . . . . . . . . . . . . . . . . . . . . . . . . . . . . . . . . . . . . . . . . . . . . . . . . . . . . . . . . . . . . . . . 2402.6.2.9 Converting to a Distributed Streaming Application . . . . . . . . . . . . . . . . . . . . . . . . . . . . . . . . . . . . . . . . . . . . . 241
2.6.3 Deploying Streaming Applications . . . . . . . . . . . . . . . . . . . . . . . . . . . . . . . . . . . . . . . . . . . . . . . . . . . . . . . . . . . . . . 2452.6.4 Visualizing Data . . . . . . . . . . . . . . . . . . . . . . . . . . . . . . . . . . . . . . . . . . . . . . . . . . . . . . . . . . . . . . . . . . . . . . . . . . . . 245
2.6.4.1 Designing Dashboards . . . . . . . . . . . . . . . . . . . . . . . . . . . . . . . . . . . . . . . . . . . . . . . . . . . . . . . . . . . . . . . . . . 2472.6.4.1.1 Creating New Dashboards . . . . . . . . . . . . . . . . . . . . . . . . . . . . . . . . . . . . . . . . . . . . . . . . . . . . . . . . . . 2472.6.4.1.2 Editing Dashboards . . . . . . . . . . . . . . . . . . . . . . . . . . . . . . . . . . . . . . . . . . . . . . . . . . . . . . . . . . . . . . . . 2552.6.4.1.3 Deleting Dashboards . . . . . . . . . . . . . . . . . . . . . . . . . . . . . . . . . . . . . . . . . . . . . . . . . . . . . . . . . . . . . . . 257
2.6.4.2 Viewing Dashboards . . . . . . . . . . . . . . . . . . . . . . . . . . . . . . . . . . . . . . . . . . . . . . . . . . . . . . . . . . . . . . . . . . . . 2582.6.4.3 Generating Widgets . . . . . . . . . . . . . . . . . . . . . . . . . . . . . . . . . . . . . . . . . . . . . . . . . . . . . . . . . . . . . . . . . . . . . 2602.6.4.4 Creating Custom Widgets . . . . . . . . . . . . . . . . . . . . . . . . . . . . . . . . . . . . . . . . . . . . . . . . . . . . . . . . . . . . . . . . 271
2.6.4.4.1 Consume user information within a widget . . . . . . . . . . . . . . . . . . . . . . . . . . . . . . . . . . . . . . . . . . . . . . 2782.6.4.4.2 Inter Widget Communication via the PubSub Model . . . . . . . . . . . . . . . . . . . . . . . . . . . . . . . . . . . . . . . 2782.6.4.4.3 Resolving CSS style conflicts . . . . . . . . . . . . . . . . . . . . . . . . . . . . . . . . . . . . . . . . . . . . . . . . . . . . . . . . 2802.6.4.4.4 Share dashboards with persisted widget states . . . . . . . . . . . . . . . . . . . . . . . . . . . . . . . . . . . . . . . . . . 281

2.6.4.4.5 Accessing Widget Configuration . . . . . . . . . . . . . . . . . . . . . . . . . . . . . . . . . . . . . . . . . . . . . . . . . . . . . . 2822.6.4.5 Dashboard Authorization Configuration . . . . . . . . . . . . . . . . . . . . . . . . . . . . . . . . . . . . . . . . . . . . . . . . . . . . . 2842.6.4.6 Managing Widgets . . . . . . . . . . . . . . . . . . . . . . . . . . . . . . . . . . . . . . . . . . . . . . . . . . . . . . . . . . . . . . . . . . . . . . 284
2.6.5 Working with Business Rules . . . . . . . . . . . . . . . . . . . . . . . . . . . . . . . . . . . . . . . . . . . . . . . . . . . . . . . . . . . . . . . . . . 2852.6.5.1 Creating Business Rules . . . . . . . . . . . . . . . . . . . . . . . . . . . . . . . . . . . . . . . . . . . . . . . . . . . . . . . . . . . . . . . . . 2852.6.5.2 Managing Business Rules . . . . . . . . . . . . . . . . . . . . . . . . . . . . . . . . . . . . . . . . . . . . . . . . . . . . . . . . . . . . . . . . 2922.6.5.3 Creating a Business Rule Template . . . . . . . . . . . . . . . . . . . . . . . . . . . . . . . . . . . . . . . . . . . . . . . . . . . . . . . . 2962.6.5.4 Business Rules Templates . . . . . . . . . . . . . . . . . . . . . . . . . . . . . . . . . . . . . . . . . . . . . . . . . . . . . . . . . . . . . . . 3062.6.5.5 Configuring Business Rules Manager Permissions . . . . . . . . . . . . . . . . . . . . . . . . . . . . . . . . . . . . . . . . . . . . 310
2.6.6 Monitoring Stream Processor . . . . . . . . . . . . . . . . . . . . . . . . . . . . . . . . . . . . . . . . . . . . . . . . . . . . . . . . . . . . . . . . . . 3102.6.6.1 Configuring the Status Dashboard . . . . . . . . . . . . . . . . . . . . . . . . . . . . . . . . . . . . . . . . . . . . . . . . . . . . . . . . . 3102.6.6.2 Viewing Statistics . . . . . . . . . . . . . . . . . . . . . . . . . . . . . . . . . . . . . . . . . . . . . . . . . . . . . . . . . . . . . . . . . . . . . . 319
2.6.6.2.1 Node Overview . . . . . . . . . . . . . . . . . . . . . . . . . . . . . . . . . . . . . . . . . . . . . . . . . . . . . . . . . . . . . . . . . . . 3202.6.6.2.2 App Overview . . . . . . . . . . . . . . . . . . . . . . . . . . . . . . . . . . . . . . . . . . . . . . . . . . . . . . . . . . . . . . . . . . . . 3242.6.6.2.3 Viewing Node-specific Pages . . . . . . . . . . . . . . . . . . . . . . . . . . . . . . . . . . . . . . . . . . . . . . . . . . . . . . . . 3252.6.6.2.4 Viewing Worker History . . . . . . . . . . . . . . . . . . . . . . . . . . . . . . . . . . . . . . . . . . . . . . . . . . . . . . . . . . . . . 3302.6.6.2.5 Viewing Statistics for Siddhi Applications . . . . . . . . . . . . . . . . . . . . . . . . . . . . . . . . . . . . . . . . . . . . . . . 3312.6.6.2.6 Viewing Statistics for Parent Siddhi Applications . . . . . . . . . . . . . . . . . . . . . . . . . . . . . . . . . . . . . . . . . 335
2.7 Deployment Guide . . . . . . . . . . . . . . . . . . . . . . . . . . . . . . . . . . . . . . . . . . . . . . . . . . . . . . . . . . . . . . . . . . . . . . . . . . . . . . . 3372.7.1 Minimum High Availability (HA) Deployment . . . . . . . . . . . . . . . . . . . . . . . . . . . . . . . . . . . . . . . . . . . . . . . . . . . . . . . 3372.7.2 Fully Distributed Deployment . . . . . . . . . . . . . . . . . . . . . . . . . . . . . . . . . . . . . . . . . . . . . . . . . . . . . . . . . . . . . . . . . . 3432.7.3 Multi Datacenter High Availability Deployment . . . . . . . . . . . . . . . . . . . . . . . . . . . . . . . . . . . . . . . . . . . . . . . . . . . . . 352
2.8 Samples . . . . . . . . . . . . . . . . . . . . . . . . . . . . . . . . . . . . . . . . . . . . . . . . . . . . . . . . . . . . . . . . . . . . . . . . . . . . . . . . . . . . . . . 3532.9 Stream Processor Solutions . . . . . . . . . . . . . . . . . . . . . . . . . . . . . . . . . . . . . . . . . . . . . . . . . . . . . . . . . . . . . . . . . . . . . . . . 356
2.9.1 Distributed Message Tracer . . . . . . . . . . . . . . . . . . . . . . . . . . . . . . . . . . . . . . . . . . . . . . . . . . . . . . . . . . . . . . . . . . . 3562.9.2 HTTP Analytics . . . . . . . . . . . . . . . . . . . . . . . . . . . . . . . . . . . . . . . . . . . . . . . . . . . . . . . . . . . . . . . . . . . . . . . . . . . . . 3612.9.3 Twitter Analytics . . . . . . . . . . . . . . . . . . . . . . . . . . . . . . . . . . . . . . . . . . . . . . . . . . . . . . . . . . . . . . . . . . . . . . . . . . . . 366
2.10 Admin Guide . . . . . . . . . . . . . . . . . . . . . . . . . . . . . . . . . . . . . . . . . . . . . . . . . . . . . . . . . . . . . . . . . . . . . . . . . . . . . . . . . . . 3702.10.1 Supporting Different Transports . . . . . . . . . . . . . . . . . . . . . . . . . . . . . . . . . . . . . . . . . . . . . . . . . . . . . . . . . . . . . . . 3712.10.2 Protecting Sensitive Data via the Secure Vault . . . . . . . . . . . . . . . . . . . . . . . . . . . . . . . . . . . . . . . . . . . . . . . . . . . 3732.10.3 Configuring Business Rule Deployment . . . . . . . . . . . . . . . . . . . . . . . . . . . . . . . . . . . . . . . . . . . . . . . . . . . . . . . . . 3742.10.4 Configuring Database and File System State Persistence . . . . . . . . . . . . . . . . . . . . . . . . . . . . . . . . . . . . . . . . . . . 3762.10.5 Configuring Cluster Coordination . . . . . . . . . . . . . . . . . . . . . . . . . . . . . . . . . . . . . . . . . . . . . . . . . . . . . . . . . . . . . . 3792.10.6 User Management . . . . . . . . . . . . . . . . . . . . . . . . . . . . . . . . . . . . . . . . . . . . . . . . . . . . . . . . . . . . . . . . . . . . . . . . . . 381
2.10.6.1 Introduction to User Management . . . . . . . . . . . . . . . . . . . . . . . . . . . . . . . . . . . . . . . . . . . . . . . . . . . . . . . . . 3812.10.6.2 User Management via the IdP Client Interface . . . . . . . . . . . . . . . . . . . . . . . . . . . . . . . . . . . . . . . . . . . . . . . 382
2.10.7 Working with Databases . . . . . . . . . . . . . . . . . . . . . . . . . . . . . . . . . . . . . . . . . . . . . . . . . . . . . . . . . . . . . . . . . . . . . 3862.10.7.1 Configuring Datasources . . . . . . . . . . . . . . . . . . . . . . . . . . . . . . . . . . . . . . . . . . . . . . . . . . . . . . . . . . . . . . . . 3862.10.7.2 Configuring Database Queries . . . . . . . . . . . . . . . . . . . . . . . . . . . . . . . . . . . . . . . . . . . . . . . . . . . . . . . . . . . 393
2.10.8 Authorization & Permission Model . . . . . . . . . . . . . . . . . . . . . . . . . . . . . . . . . . . . . . . . . . . . . . . . . . . . . . . . . . . . . 3942.10.8.1 Worker Runtime - REST APIs Permission Model . . . . . . . . . . . . . . . . . . . . . . . . . . . . . . . . . . . . . . . . . . . . . 3942.10.8.2 Manager Runtime - REST APIs Permission Model . . . . . . . . . . . . . . . . . . . . . . . . . . . . . . . . . . . . . . . . . . . . 396
2.10.9 General Data Protection Regulations (GDPR) for WSO2 Stream Processor . . . . . . . . . . . . . . . . . . . . . . . . . . . . . 3972.10.9.1 Removing Personally Identifiable Information via the Forget-me Tool . . . . . . . . . . . . . . . . . . . . . . . . . . . . . 3972.10.9.2 Removing References to Deleted User Identities . . . . . . . . . . . . . . . . . . . . . . . . . . . . . . . . . . . . . . . . . . . . . 3982.10.9.3 Forget-me Tool Overview . . . . . . . . . . . . . . . . . . . . . . . . . . . . . . . . . . . . . . . . . . . . . . . . . . . . . . . . . . . . . . . 3992.10.9.4 Creating GDPR Compliant Siddhi Applications . . . . . . . . . . . . . . . . . . . . . . . . . . . . . . . . . . . . . . . . . . . . . . . 400
2.10.10 Adding Third Party Non OSGi Libraries . . . . . . . . . . . . . . . . . . . . . . . . . . . . . . . . . . . . . . . . . . . . . . . . . . . . . . . . 4012.11 Reference Guide . . . . . . . . . . . . . . . . . . . . . . . . . . . . . . . . . . . . . . . . . . . . . . . . . . . . . . . . . . . . . . . . . . . . . . . . . . . . . . . . 401
2.11.1 Performance Analysis Results . . . . . . . . . . . . . . . . . . . . . . . . . . . . . . . . . . . . . . . . . . . . . . . . . . . . . . . . . . . . . . . . 4012.11.2 Configuring Default Ports . . . . . . . . . . . . . . . . . . . . . . . . . . . . . . . . . . . . . . . . . . . . . . . . . . . . . . . . . . . . . . . . . . . . 4132.11.3 Stream Processor REST API Guide . . . . . . . . . . . . . . . . . . . . . . . . . . . . . . . . . . . . . . . . . . . . . . . . . . . . . . . . . . . . 415
2.11.3.1 Public APIs . . . . . . . . . . . . . . . . . . . . . . . . . . . . . . . . . . . . . . . . . . . . . . . . . . . . . . . . . . . . . . . . . . . . . . . . . . 4162.11.3.1.1 Siddhi Application Management APIs . . . . . . . . . . . . . . . . . . . . . . . . . . . . . . . . . . . . . . . . . . . . . . . . . 4162.11.3.1.2 Event Simulation APIs . . . . . . . . . . . . . . . . . . . . . . . . . . . . . . . . . . . . . . . . . . . . . . . . . . . . . . . . . . . . . 4312.11.3.1.3 Status Monitoring APIs . . . . . . . . . . . . . . . . . . . . . . . . . . . . . . . . . . . . . . . . . . . . . . . . . . . . . . . . . . . . 4452.11.3.1.4 Dashboard APIs . . . . . . . . . . . . . . . . . . . . . . . . . . . . . . . . . . . . . . . . . . . . . . . . . . . . . . . . . . . . . . . . . 4562.11.3.1.5 Authentication APIs . . . . . . . . . . . . . . . . . . . . . . . . . . . . . . . . . . . . . . . . . . . . . . . . . . . . . . . . . . . . . . . 4602.11.3.1.6 Permission APIs . . . . . . . . . . . . . . . . . . . . . . . . . . . . . . . . . . . . . . . . . . . . . . . . . . . . . . . . . . . . . . . . . 4632.11.3.1.7 Business Rules APIs . . . . . . . . . . . . . . . . . . . . . . . . . . . . . . . . . . . . . . . . . . . . . . . . . . . . . . . . . . . . . . 4682.11.3.1.8 Store APIs . . . . . . . . . . . . . . . . . . . . . . . . . . . . . . . . . . . . . . . . . . . . . . . . . . . . . . . . . . . . . . . . . . . . . . 476
2.11.3.2 HTTP Status Codes . . . . . . . . . . . . . . . . . . . . . . . . . . . . . . . . . . . . . . . . . . . . . . . . . . . . . . . . . . . . . . . . . . . 4772.11.4 Working with Data Providers . . . . . . . . . . . . . . . . . . . . . . . . . . . . . . . . . . . . . . . . . . . . . . . . . . . . . . . . . . . . . . . . . . 478
2.12 Extending WSO2 Stream Processor . . . . . . . . . . . . . . . . . . . . . . . . . . . . . . . . . . . . . . . . . . . . . . . . . . . . . . . . . . . . . . . . 4802.12.1 Supported Extensions . . . . . . . . . . . . . . . . . . . . . . . . . . . . . . . . . . . . . . . . . . . . . . . . . . . . . . . . . . . . . . . . . . . . . . . 4802.12.2 Writing Custom Siddhi Extensions . . . . . . . . . . . . . . . . . . . . . . . . . . . . . . . . . . . . . . . . . . . . . . . . . . . . . . . . . . . . . 4802.12.3 Configuring System Parameters for Siddhi Extensions . . . . . . . . . . . . . . . . . . . . . . . . . . . . . . . . . . . . . . . . . . . . . 483
2.13 FAQ . . . . . . . . . . . . . . . . . . . . . . . . . . . . . . . . . . . . . . . . . . . . . . . . . . . . . . . . . . . . . . . . . . . . . . . . . . . . . . . . . . . . . . . . . 484
1.
2.
3.
Performance TuningThis section describes some recommended performance tuning configurations to optimize the performance of WSO2 Product SP. It assumes thatyou have set up WSO2 Product SP on a server running Unix/Linux, which is recommended for a production deployment.
OS-Level SettingsJVM settingsJDBC Pool ConfigurationSP-Level settings
Receiving eventsPublishing events
OS-Level Settings
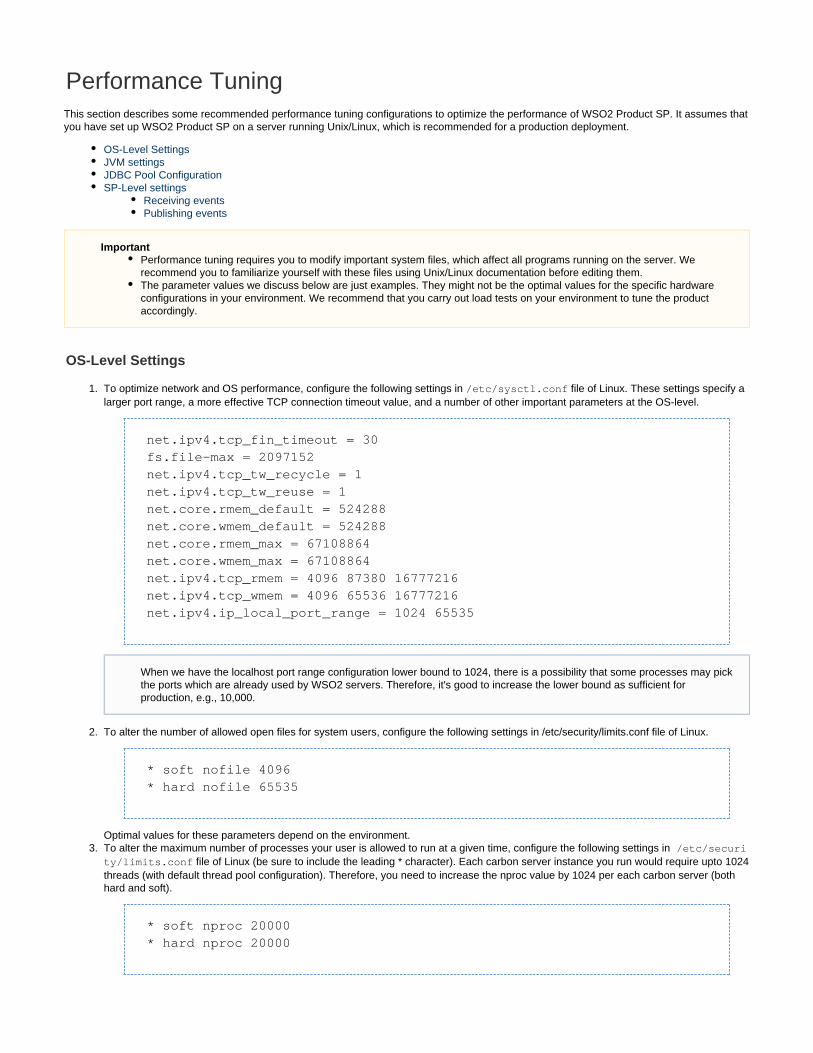
To optimize network and OS performance, configure the following settings in file of Linux. These settings specify a/etc/sysctl.conflarger port range, a more effective TCP connection timeout value, and a number of other important parameters at the OS-level.
net.ipv4.tcp_fin_timeout = 30fs.file-max = 2097152net.ipv4.tcp_tw_recycle = 1net.ipv4.tcp_tw_reuse = 1net.core.rmem_default = 524288net.core.wmem_default = 524288net.core.rmem_max = 67108864net.core.wmem_max = 67108864net.ipv4.tcp_rmem = 4096 87380 16777216net.ipv4.tcp_wmem = 4096 65536 16777216net.ipv4.ip_local_port_range = 1024 65535
To alter the number of allowed open files for system users, configure the following settings in /etc/security/limits.conf file of Linux.
* soft nofile 4096* hard nofile 65535
Optimal values for these parameters depend on the environment.To alter the maximum number of processes your user is allowed to run at a given time, configure the following settings in /etc/securi
file of Linux (be sure to include the leading * character). Each carbon server instance you run would require upto 1024ty/limits.confthreads (with default thread pool configuration). Therefore, you need to increase the nproc value by 1024 per each carbon server (bothhard and soft).
* soft nproc 20000* hard nproc 20000
ImportantPerformance tuning requires you to modify important system files, which affect all programs running on the server. Werecommend you to familiarize yourself with these files using Unix/Linux documentation before editing them.The parameter values we discuss below are just examples. They might not be the optimal values for the specific hardwareconfigurations in your environment. We recommend that you carry out load tests on your environment to tune the productaccordingly.
When we have the localhost port range configuration lower bound to 1024, there is a possibility that some processes may pickthe ports which are already used by WSO2 servers. Therefore, it's good to increase the lower bound as sufficient forproduction, e.g., 10,000.

JVM settings
When an XML element has a large number of sub-elements and the system tries to process all the sub-elements, the system can becomeunstable due to a memory overhead. This is a security risk.
To avoid this issue, you can define a maximum level of entity substitutions that the XML parser allows in the system. You do this using the entit attribute that is in the file (for Windows) or the file (fory expansion limit <SP_HOME>/bin/editor.bat <SP_HOME>/bin/editor.sh
Linux/Solaris). The default entity expansion limit is 64000.
-DentityExpansionLimit=100000
JDBC Pool Configuration
Within the WSO2 platform, we use Tomcat JDBC pooling as the default pooling framework due to its production ready stability and highperformance. The table below indicates some recommendations on how to configure the JDBC pool using the <PRODUCT_HOME>/repository
/conf/datasources/master-datasources.xml file .
Property Description Recommendation
maxActive The maximum number of active connectionsthat can be allocated from the connection poolat the same time. The default value is 100.
This value should match the maximum number of requests that can beexpected at a time in your production environment. This is to ensure that,whenever there is a sudden increase in the number of requests to theserver, all of them can be connected successfully without causing anydelays. Note that this value should not exceed the maximum number ofrequests allowed for your database.
testOnBorrow The indication of whether connection objectswill be validated before they are borrowedfrom the pool. If the object validation fails, itwill be dropped from the pool, and we willattempt to borrow another connection.
Setting this property to 'true' is recommended as it will avoid connectionrequests from failing. The property should be used ifvalidationQuerytestOnBorrow is set to true. To increase the efficiency of connectionvalidation and to improve performance, propertyvalidationIntervalshould also be used.
validationInterval To avoid excess validation, run validation atmost at this frequency (time in milliseconds).If a connection is due for validation, but hasbeen validated previously within this interval,it will not be validated again. The default valueis 30000 (30 seconds).
This time out can be as high as the time it takes for your DBMS todeclare a connection as stale. For example, MySQL will keep aconnection open for as long as 8 hours, which requires the validationinterval to be within that range. However, note that having a low value forvalidation interval will not incur a big performance penalty, speciallywhen database requests have a high throughput. For example, a singleextra validation query run every 30 seconds is usually negligible.
validationQuery The SQL query used to validate connectionsfrom this pool before returning them to thecaller. If specified, this query does not have toreturn any data, it just can't throw anSQLException. The default value is null.Example values are SELECT 1(mysql), select1 from dual(oracle), SELECT 1(MS SqlServer).
Specify an SQL query, which will validate the availability of a connectionin the pool. This query is necessary when property istestOnBorrowtrue.
SP-Level settings
Performance tuning can be tried out in the following areas at the SP level. The performance is considered in terms of throughput per second(TPS) and latency.
Receiving events
The following parameters which affect the performance relating to the databridge communication are configured in the <SP_HOME>/conf/edit under or/deployment.yaml data-bridge-config property . These configurations are common for both thrift and binary protocols.
When it comes to web applications, users are free to experiment and package their own pooling framework such BoneCP.

Property Description DefaultValue
Recommendation
workerThreads The number of threads reserved tohandle the load of events received.
10 This value should be increased if you want to increase the bythroughputreceiving a higher number of events at a given time. The number ofavailable CPU cores should be considered when specifying this value. Ifthe value specified exceeds the number of CPU cores, higher wolatencyuld occur as a result of context switching taking place more often.
maxEventBufferCapacity The maximum size allowed for the eventreceiving buffer in mega bytes. Theevent receiving buffer temporarily storesthe events received before they areforwarded to an . event stream
10 This value should be increased when there is an increase in thereceiving . When increasing the value heap memory size alsothroughputneeds to be increased accordingly.
eventBufferSize The number of messages that is allowedin the receiving queue at a given time.
2000 This value should be increased when there is an increase in thereceiving .throughput
clientTimeoutMin Session timeout value in minutes. 30 Cache that contains all the agent sessions are expired after this value isreached. This value should be increased when there is an
Publishing events
The following parameters which affect the performance relating to the Data Agents - to publish events through databridge are configured in the <S under data.agent.config property. These configurations are common for both thrift and binaryP_HOME>/conf/editor/deployment.yaml
protocols.
Property Description DefaultValue
Recommendation
queueSize The size of the queue event disruptor which handlesevents before they are published to anapplication/data store.
32768 The value specified should always be the result of an exponent with 2 asthe base. (e.g., 32768 is 215).
A higher value should be specified when a higher throughput needs to behandled. However, the increase in the load handled at a given time canreduce the speed at which the events are processed. Therefore, a lowervalue should be specified if you want to reduce the latency.
batchSize The maximum number of events in a batch sent tothe queue event disruptor at a given time.
200 This value should be assigned proportionally to the throughput of eventshandled. Greater the batch size, higher will be the number of events sentto the queue event disruptor at a given time.
corePoolSize The number of threads that will be reserved tohandle events at the time you start the CEP server.This value will increase as throughput of eventshandled increases, but it will not exceed the valuespecified for the parameter.MaxPoolSize
1 The number of available CPU cores should be taken into account whenspecifying this value. Increasing the core pool size may improve thethroughput, but latency will also be increased due to context switching.
maxPoolSize The maximum number of threads that should bereserved at any given time to handle events.
1 The number of available CPU cores should be taken into account whenspecifying this value. Increasing the maximum core pool size may improvethe throughput since more threads can be spawned to handle anincreased number of events. However, latency will also increase since ahigher number of threads would cause context switching to take placemore frequently.
For better througput you can configure the parameters as follows.

queueSize: 32768batchSize: 200corePoolSize: 1socketTimeoutMS: 30000maxPoolSize: 1keepAliveTimeInPool: 20reconnectionInterval: 30maxTransportPoolSize: 250maxIdleConnections: 250evictionTimePeriod: 5500minIdleTimeInPool: 5000secureMaxTransportPoolSize: 250secureMaxIdleConnections: 250secureEvictionTimePeriod: 5500secureMinIdleTimeInPool: 5000
For reduced latency, you can configure the parameters as follows.
<QueueSize>256</QueueSize><BatchSize>200</BatchSize><CorePoolSize>1</CorePoolSize><MaxPoolSize>1</MaxPoolSize>
Stream Processor DocumentationWSO2 Stream Processor is a Streaming SQL based, high performant, lightweight, open source stream processing platform, facilitating the
It allows you to collects events,creation of real-time, intelligent, actionable business insights, and data products for digital businesses. analyzes them in real-time, identify patterns, map their impacts, and react within milliseconds.

Get started with WSO2 SP
If you are new to using WSO2 Stream Processor, follow thesteps given below to get started:
Get familiar with WSO2 SPUnderstand the basics of the SP and its architecture.
Quick Start GuideDownload, install and run the SP in just 10 minutes.
Try out the TutorialsLearn SP functions step by step.
For additional learning resources such as webinars and white papers, go to . This is a great place for you to expand yourLibrary - Analyticsknowledge on WSO2 SP.
Deep dive into WSO2 SP
To know more about WSO2 SP use the descriptions below to find the section you need, and then browse the topics in the left navigationpanel. You can also use the box on the left to find a term or phrase in this documentation, or use the box in the top right-hand cornerSearchto search in all WSO2 product documentation.
UserGuide
AdminGuide
InstallationGuide
SiddhiQL Guide Samples
Introducing Stream Processor
WSO2 Stream Processor (WSO2 SP) is packed with features that will enable any enterprise to build streaming analytics capabilities and derivemeaningful insights out of the organization's data. It is powered by , a leading Open Source stream processing project. With strSiddhi WSO2 SP'seaming SQL capabilities and with its inbuilt editor having event simulation and debugging support it can help you to create real-time applicationsmuch faster than before. Its high performance and low footprint also lead to more agile deployment: it is the only competing product that canhandle 100K events per second in a high-availability deployment with just two commodity servers.
The topics in this section introduce WSO2 Stream Processor, including the business cases it solves, its features, and architecture.
OverviewArchitectureAbout This Release
Overview
The availability of business insights and information is a significant factor for competitive advantage in modern businesses. This allows busienssowners to make decisions in real-time. Real-time stream processing and streaming analytics is the technology that makes this a reality.
The first generation Stream Processors pose several challenges.
Complex Code Obese Deployments Slow to change

Even standard operators such as time windowsand temporal patterns require users to write
complex code. They need a lot of time and lots ofskills requiring too much time in upkeep, which
most organizations cannot afford.
Even a basic highly available deploymentrequires 5+ servers. Such deployments arecomplex, take time to setup, and are expensiveto maintain.
The fast pace of changes forces organizations toadapt. However, the complexity of the code, thelack of visibility of the processing flow, and thelack of tooling in Stream Processors stall thechange lifecycle.
WSO2 Stream Processor (SP) is a 100% open source streaming analytics and stream processing solution that allows you to build and deployapplications that collect, analyze, and present data in real-time.
Collect Analyse Act
Collects events from multiple event sourcesusing various data formats.Preprocesses by deploying at the edge.
Processes stream of events in real-timeusing Streaming SQL queries.Summarizes and correlates events inmemory and by integrating with datastores.
Notifies interesting event occurrences viaalerts and service calls.Visualizes the summarizations viadashboard.
It has the following capabilities:
Process millions of events per second in real-timeWSO2 SP is the sole analytics product in the market that facilitates high-performance analytics with only 2 nodes (minimum HA). It canprocess approximately 100,000 events per second with the ability to scale beyond with Apache Kafka.
Be updated at all times with incremental analyticsWSO2 SP replaces periodic batch operations with out-of-the-box long-running incremental processing to achieve updated analysis ateach arrival of data.
Adapt to the market faster with shortened development timeProvides analysis in a specialized, easy-to-use, Siddhi Streaming SQL language using the state-of-the-art IDE, providing agiledevelopment experience with smart editing, simulation and debugging capabilities.
Investigate the past, predict the futureGain insights using past performances, build pre-trained and online machine learning models, and perform real-time predictions to drivebusiness planning.
Enable insights into all your systemsWork out-of-the-box with popular data formats, transport protocols and connect to over 100 legacy and cloud services via connectors andagents.
Enable managers to manage their business rules and visualize outputEmpower business users to create and dynamically deploy business rules through easy to use graphical UI, and let them make betterdecisions utilizing real-time dashboards.
Build smarter devices with edge analyticsMake devices smarter by deploying WSO2 Siddhi (<2MB) for localized data analytics, and let centralized deployments such as IoTanalytics handle a massive amount of data by filtering and summarising at the edge.
Build an event-driven architecture using streaming data integrationBuild information-rich streams by connecting to diverse data streams, letting organizations to get a better overall understanding of theirdata in real-time, and to build control flows.
Architecture
Stream processing and analytics refer to collecting, analyzing and acting on events generated during business activities. This definition isparamount when designing a solution to address a real-time streaming use case. Collecting refers to the collection of data from various datasources. Analysis refers to the manipulation of data to identify interesting patterns and to extract information. Acting refers to notifying the resultsto other systems and personals and representing the analyzed data visually. Streaming data that needs to be processed or analyzed, sequentiallypasses through these sections.
The WSO2 SP architecture reflects this natural flow in its design as illustrated below.
WSO2 SP contains Siddhi as its core to collect, analyze and act on the incoming events. The following are the major components of SP.Siddhi

Stream Processor Studio/EditorPortalBusiness RulesStatus DashboardWorker Job Manager
Siddhi
Siddhi is the major component of SP which has the capability of running the stream processing and complex event processing logic. Streamprocessing logic can be scripted using a Streaming SQL language as Siddhi Application and deployed into stream processor for processing. Ithandles collection, analysis and performs actions based on the events which it receives and Siddhi Apps deployed.
Siddhi contains the following core elements:
Siddhifunctions
Siddhi core element and description
Collect Source: Sources receive events via multiple transport protocols such as HTTP, TCP, Kafka, JMS, etc., and in different dataformats such as XML, JSON, Text, Binary, etc. The events received via sources are mapped into streams for processing.
Analyze Stream: Streams represent a continuous stream of events which adheres to a defined schema.
Table: Tables represent a static set of events which adheres to a defined schema. Table can be manipulated with "insert","update", "delete", and "update or insert" operations. Events in tables can be retrieved by joining them with steams or using RESTAPI.
Window: Windows represent a set of events which adheres to a defined schema which gets emitted based on the given windowcondition. Events in windows can be retrieved by joining them with steams or using REST API.
Aggregation: Aggregations consume events from a stream and perform predefined aggregations. The results of the aggregationscan be retrieved by joining them with steams or using REST API.
Query: Queries help you process events. Queries process streams, tables, and windows and produce new streams, or updatetables or windows. A query can contain filters, windows, aggregations, joins, patterns and/or sequence operations.
Store: Stores are mapped to tables and it allows you to store events in various databases and systems such as RDBMS, ApacheCassandra, MongoDB, Apache Solr, Apache HBase, Hazelcast and many more.
Trigger: Triggers produce periodic events to a stream to achieve periodic execution of query logic.
Act Sink: Sinks publish events arriving at streams via multiple transport protocols such as HTTP, Email, TCP, Kafka, JMS, etc., bymapping the events to different data formats such as XML, JSON, Text, Binary, etc.
For more information about Siddhi, see the .Siddhi Query Guide
Stream Processor Studio/Editor
The Stream Processor Studio provides an environment for developers to build Siddhi applications with the support of syntax highlighting,auto-completion, and with integrated documentation support. It also allows them to test the application using simulations and debug theapplication to verify the processing logic.
For more information, see .Understanding the Development Environment
Portal
This is used for data visualization in WSO2 SP. The data from real-time streams and stored tables can be visualized via the portal. The portal cancontain several dashboards and widgets that can be generated and customized by users based on their requirements.
For more information, see .Visualizing Data
Business Rules
Business rules provide a mechanism for business users to manage the rules themselves. Here business users can create/edit/delete simple filtersusing a form-based interface and or predefined parameterized rules created by the developers.
For more information, see .Working with Business Rules

Status Dashboard
This lets you monitor the system in operation by getting to fine-grain details about its throughput, latency, and how much load it is handling tobetter understand and manage the environment.
For more information, see .Monitoring Stream Processor
Worker
The worker provides a lightweight stream processing server that lets you deploy and run Siddhi applications in production.
Job Manager
This is used only on , to automatically Siddhi applications on multiple Stream Processor workerfully distributed deployments deploy and manage nodes.
About This Release
WSO2 SP version 4.2.0 is the successor of version 4.1.0. It contains the following new features and enhancements.
Features
Some of the new prominent capabilities of WSO2 SP are as follows:
The enhanced design view of the Stream Processor Studio that allows you to design Siddhi applications by dragging and dropping Siddhicomponents. For more information, see Working with the Design View.Fully distrubuted setup supports the Kafka source as well as other sources.The status dashboard allows you to monitor statistics relating to distributed Siddhi Applications. For more information, see Viewing
.Statistics for Parent Siddhi ApplicationsDashboard Designer improvements. Interconnecting widgets in the Dashboard to create publisher-subscriber relationshipls.Widgets can be designed to display statistics received via a . websocket providerTracing messages via the .Message Tracer solutionAnalyzing events received via HTTP using the .HTTP Analytics solutionAnalyzing events received via Twitter using the .Twitter Analytics solution
Fixed Issues
For a list of fixed issues in this release, see WSO2 SP 4.2.0 - Fixed Issues.
Known issues
For a list of known issues in this release, see WSO2 SP 4.2.0 - Known Issues.
Quick Start Guide
WSO2 Stream Processor (SP) is a lightweight and lean, streaming SQL based stream processing platform that allows you to collect events,analyze them in real-time, identify patterns, map their impacts, and communicate the results within milliseconds. It is powered by to beSiddhiextremely high performing.
First, let's understand the following concepts that are used in this guide:
Stream Processing and Complex Event Processing Overview
Let's understand what an event is through an example. If we consider the transactions carried out via an ATM as a data stream, one withdrawalfrom it can be considered an event. This event contains data about the amount, time, account number etc. Many such transactions form a stream.

Stream processing engines allow you to create a processing graph and inject events into it. Each operator processes and sends events to nextprocessor.
A complex event is an event that summarizes, represents or denotes a set of other events. Complex Event Processing is a subset of StreamProcessing which involves analyzing multiple streams of events in real time, recognizing particular sequences or patterns across streams andinferring a business significant event from correlated events.
The stream processing capabilities of WSO2 SP allow you to capture high volume data flows and process them in real time, and present results ina streaming manner while its complex event processing capabilities detect patterns and trends for decision making via Patterns and Sequencessupported for Siddhi.
Siddhi overview
WSO2 SP uses the Siddhi query language to write the processing logic for its Siddhi applications. Siddhi can:
Accept event inputs from many different types of sourcesProcess them to generate insightsPublish them to many types of sinks.
To use Siddhi, you need to write the processing logic as a Siddhi Application in the Siddhi Streaming SQL language. After writing and starting aSiddhi application, it:

1.
Takes data one-by-one as eventsProcesses the data in each eventGenerates new high level events based on the processing done so farSends newly generated events as the output to streams.
Let's get started! You can write a simple Siddhi application to calculate the total weight with each cargo box loaded to the ship by following thesteps below.
Step 1: Create a Siddhi applicationStep 2: Simulate eventsStep 3: Edit Siddhi application to perform temporal processingStep 4: Simulate events for the edited Siddhi applicationWhat's next?
Step 1: Create a Siddhi application
Smith needs to calculate the total weight of the cargo loaded into a ship with every cargo box added. In order to generate this output for him, let'screate a Siddhi application as follows:
Access the Stream Processor Studio via the URL. http://<HOST_NAME>:<EDITOR_PORT>/editor
The Stream Processor Studio opens as shown below.
1. 2. 3. 4. 5.
Before you begin:Install version 1.8.Oracle Java SE Development Kit (JDK)Set the JAVA_HOME environment variable.Download the latest .WSO2 Stream ProcessorExtract the downloaded zip and navigate to the directory ( is the extracted directory).<SP_HOME>/bin <SP_HOME>Issue one of the following commands to start the WSO2 Stream Processor Studio.
For Windows: editor.batFor Linux: ./editor.sh
Once WSO2 SP server is successfully started, a log similar to the following is printed in the CLI.
The server log prints the Stream Processor Studio URL in the start up logs as shown below.
ScenarioIn this scenario, you are creating an application for Shipping Wave, a fictitious large scale shipping company. Smith, the cargomanager needs to keep track of the total weight of cargo loaded to a ship at any given time. Measuring the weight of a cargo box whenit is loaded to the ship is considered an event.
The default URL is http://localhost:9390/editor

1.
2.
3.
4.
5.
Enter a name for your Siddhi application. In this scenario, let's name the application as shown below.CargoWeightApp
@App:name("CargoWeightApp")
Defining the input stream. The stream needs to have a name and a schema defining the data that each incoming event should contain.The event data attributes are expressed as name and type pairs. In this example:
The name of the input stream: CargoStreamA name to refer to the data in each event: weightType of the data received as weight: int
define stream CargoStream (weight int);
Define an output stream. This has the same info as the previous definition with an additional attribute that contains thetotalWeighttotal weight calculated so far. Here, we need to add a configuration to log the events from the so that we cansink OutputStreamobserve the output values.
@sink(type='log', prefix='LOGGER')define stream OutputStream(weight int, totalWeight long);
Enter a Siddhi query that defines the following.A name for the query (i.e., )cargoWeightQueryThe input stream from which the events to be processed are taken (i.e., )CargoStreamThe data that needs to be sent to the output stream (i.e., and )weight totalWeightHow the output needs to be calculated (i.e., by calculating the sum of the weight of all the events)The stream to which the output needs to be sent (i.e., )OutputStream
This query is as follows:
A sink specifies the method of publishing streams to external systems via Siddhi. In this scenario, the sink added is of the tlogype, and it publishes output streams as logs in the CLI.

5.
6.
1.
2.
3.
@info(name='CargoWeightQuery')from CargoStreamselect weight, sum(weight) as totalWeightinsert into OutputStream;
The completed Siddhi file is as follows:
@App:name("CargoWeightApp")
define stream CargoStream (weight int);
@sink(type='log', prefix='LOGGER')define stream OutputStream(weight int, totalWeight long);
@info(name='CargoWeightQuery')from CargoStreamselect weight, sum(weight) as totalWeightinsert into OutputStream;
To save the Siddhi file, click => . This opens the dialog box. Click to save this file in the File Save Save to Workspace Save <SP_HOME> directory (which is the default location where Siddhi applications are saved)./wso2/editor/deployment/workspace
Step 2: Simulate events
The Stream Processor Studio has in-built support to simulate events. To test whether the you created works as expected, let'sCargoWeightAppsimulate some events by following the steps given below.
To start the Siddhi application, click the play button.CargoWeight
If the application is successfully started, the following is logged in the Stream Processor Studio console.
Click the following icon in the Stream Processor Studio to open the event simulation panel.
In the tab of the panel, select values as follows:Single Simulation
Field Value
Siddhi App Name CargoWeight
Stream Name CargoStream

3.
4.
5.
As a result, the atrribute of the stream is displayed as follows: Weight CargoStream
In the field, enter 1000 and click to start the Siddhi application. Then click to send the event. The event is logged inweight Start Sendthe CLI as shown below:
Send five more events with the following values.
Event No Weight
1 2000
2 1500
3 2000
4 3000
5 1000
The events are logged as follows.

5.
1.
2.
3.
Each new weight is added to the new weight. Therefore, after all six events are sent, the total weight is . 10500
Step 3: Edit Siddhi application to perform temporal processing
This section demonstrates how to carry out temporal window processing with Siddhi.
In the previous scenario, you carried out processing by having only the running sum value in-memory. No events were stored during this process.
Window processing is a method that allows us to store some events in-memory for a given period or a specific number of events so that we canperform operations such as calculating the average, maximum, etc values within them
Let's consider that Smith, the cargo manager has an additional requirement to calculate the average for the last three cargo boxes loaded eachtime a new cargo box is loaded in order to balance the weight across the ship. Here, we are considering a window that consists of three events asshown in the image below.
To achieve this, edit the Siddhi application by following the steps below:
Add a new attribute named to the definition of the stream so that each output event presents theaverageWeight OutputStreamaverage weight in addition to the weight of the new box loaded and the total weight.
define stream OutputStream(weight int, totalWeight long, averageWeightdouble);
To specify how to calculate the average weight, apply the Siddhi function to the attribute in the statement as shownavg weight selectbelow. This indicates that the average is calulated for the attribute of incoming events.weight
select weight, sum(weight) as totalWeight, avg(weight) asaverageWeight
To specify that the calculations performed by this query with each event must be applied only to the last three events received, apply alength window to the input stream as shown below.
from CargoStream#window.length(3)
This window applies to all the calculations performed for the events taken from the stream. Therefore, addingCargoStreamthis window also results in the total weight being calculated based on the last three events.

The completed query is as follows.
@info(name='CargoWeightQuery') from CargoStream#window.length(3)select weight, sum(weight) as totalWeight, avg(weight) as averageWeightinsert into OutputStream;
The complete Siddhi application is as follows.CargoWeight
@App:name("CargoWeight")
define stream CargoStream (weight int);
@sink(type='log', prefix='LOGGER')define stream OutputStream(weight int, totalWeight long, averageWeightdouble);
@info(name='CargoWeightQuery') from CargoStream#window.length(3)select weight, sum(weight) as totalWeight, avg(weight) as averageWeightinsert into OutputStream;
Step 4: Simulate events for the edited Siddhi application
In this step, let's start the edited Siddhi application and simulate the same six events that you simulated in Step 8.
Event No Weight
1 1000
2 2000
3 1500
4 2000
5 3000
6 1000
The output generated is logged as shown below.

What's next?
Learn more about Siddhi and how it can be helpful in your user scenarios: Tutorials
Learn how to develop, deploy and monitor Siddhi applications: User Guide
Installation Guide
This chapter contains the following information.
Installing the ProductRunning the ProductUpgrading from a Previous Release
Installing the Product
Installing a WSO2 product is very fast and easy. Before you begin, be sure you have met the installation prerequisites, and then follow theinstallation instructions for your platform.
Installation PrerequisitesInstalling on LinuxInstalling on WindowsInstalling as a Linux ServiceInstalling as a Windows Service
Installation Prerequisites
Prior to installing any WSO2 SP, it is necessary to have the appropriate prerequisite software installed on your system. Verify that the computerhas the supported operating system and development platforms before starting the installation.
System requirements
Physical 2 CPUs4 GB RAM for the JVMGB RAM for the OS depending on the OS type2 GB free disk space excluding the database
Virtual Machine (VM) 2 compute units minimum4 GB RAM2 GB free disk space excluding the database2 CPU units for the JVM1 CPU unit for the OS depending on the OS type
EC2 1 c5.large instance to run one WSO2 product instance.
Environment compatibility
Operating Systems / Databases All WSO2 Carbon-based products are Java applications that can be run on any platform that is . Also, as we do not support it or test our products with it. Oracle JDK 1.8* compliant we do not recommend OpenJDK All WSO2 products are generally compatible with most common DBMSs. The embedded H2 database is suitable for development, testing, and some production environments. For most enterprise production environments, however, werecommend you use an industry-standard RDBMS. We have tested the WSO2 Stream Processor with MySQL, MSSQL, and Oracle 11g. However, the Siddhi Store supports more RDBMSs. For more information, see Integrating Datastores. Additionally, we do not recommend the H2 database to be used as a user store. For more information, see and .Integrating Datastores Working with DatabasesIt is not recommended to use Apache DS in a production environment due to issues with scalability. Instead, it is recommended to use an LDAP like OpenLDAP for user management.For environments that WSO2 products are tested with, see .Compatibility of WSO2 ProductsIf you have difficulty in setting up any WSO2 product in a specific platform or database, please contact us.
Required applications
The following applications are required for running the Data Analytics Server and its samples, or for building from the source code. Mandatoryinstalls are marked with *.
Application Purpose Version Download Links

1. 2.
1. 2.
Oracle Java SEDevelopmentKit (JDK)*
To launch the product as eachproduct is a Java application.To build the product from the sourcedistribution (both JDK and ApacheMaven are required).To run Apache Ant.
1.8.* http://java.sun.com/javase/downloads/index.jsp
JDBC-compliantConnector forJava
Required as a standardized databasedriver for Java platforms anddevelopment.
1.7.0 or later http://dev.mysql.com/downloads/connector/
Apache Ant To compile and run the . product samples 1.7.0 or later http://ant.apache.org
Git Required to check out the source fromthe Git repository.
1.9.0 or later http://git-scm.com/downloads/
Apache Maven To build the product from the sourcedistribution (both JDK and Apache Mavenare required).
3.0.* http://maven.apache.org
You are now ready to install. Click one of the following links for instructions:
Installing on LinuxInstalling on Windows
Installing on Linux
Follow the instructions below to install WSO2 SP on Linux.
Installing the required applications
Establish an SSH connection to the Linux machine or log in on the text Linux console.Be sure your system meets the . Installation Prerequisites Java Development Kit (JDK) is essential to run the product.
Installing the SP
Download the latest version of the SP.Extract the archive file to a dedicated directory for the , which will hereafter be referred to as .SP <SP_HOME>
Setting up JAVA_HOME
You must set your environment variable to point to the directory where the Java Development Kit (JDK) is installed on the computer.JAVA_HOME
NoteTo launch WSO2 SP, youneed to have Oracle JDK
. You cannot launch1.8.*WSO2 SP with Oracle JDK1.7.* or lower.
Do not use JDK1.8.0_151 due toa . This issue is fixedknown issuein JDK 1.8.0_162-ea. However, us
until the lattere JDK 1.8.0_144 mentioned version is released.
We do not recommendOpenJDK as we do not support itor test our products with it.
If you are installing bydownloading and extractingthe binary distribution insteadof building from the sourcecode, you do not need toinstall Maven.
Before you begin:
See the section to find out if this version of the product has issues running on your OS due to the JDKknown incompatibilitiesversion.See the to find out if this version of the product is fully tested on your operating system.compatibility matrix
Environment variables are global system variables accessible by all the processes running under the operating system.

1. 2.
3.
4.
5.
In your home directory, open the BASHRC file in your favorite Linux text editor, such as vi, emacs, pico, or mcedit.Assuming you have JDK 1.6.0_25 in your system, add the following two lines at the bottom of the file, replacing /usr/java/jdk1.6.0_
with the actual directory where the JDK is installed.25
export JAVA_HOME=/usr/java/jdk1.6.0_25export PATH=${JAVA_HOME}/bin:${PATH}
The file should now look like this:
Save the file.
To verify that the variable is set correctly, execute the following command: JAVA_HOMEecho $JAVA_HOME
The system returns the JDK installation path.
Setting system properties
If you need to set additional system properties when the server starts, you can take the following approaches:
Set the properties from a script: Setting your system properties in the startup script is ideal, because it ensures that you set theproperties every time you start the server. To avoid having to modify the script each time you upgrade, the best approach is to createyour own startup script that wraps the WSO2 startup script and adds the properties you want to set, rather than editing the WSO2 startupscript directly.Set the properties from an external registry: If you want to access properties from an external registry, you could create Java codethat reads the properties at runtime from that registry. Be sure to store sensitive data such as username and password to connect to theregistry in a properties file instead of in the Java code and secure the properties file with the .secure vault
You are now ready to run the product .
Installing on Windows
Follow the instructions below to install SP on Windows.
If you do not know how to work with text editors in a Linux SSH session, run the following command: cat >> .bashrc
Paste the string from the clipboard and press "Ctrl+D."
When using SUSE Linux, it ignores and only looks at the file. This means that the server will throw/etc/resolv.conf /etc/hostsan exception on startup if you have not specified anything besides localhost. To avoid this error, add the following line above 127.0.0.
in the file:1 localhost /etc/hosts
<ip_address> <machine_name> localhost
Before you begin:
See the section to find out if this version of the product has issues running on your OS due to the JDKknown incompatibilitiesversion.See the to find out if this version of the product is fully tested on your operating system.compatibility matrix

1. 2.
1.
2.
Installing the required applications
Make sure your system meets the .Installation Prerequisites
Installing the SP
Download the latest version of the SP.Extract the archive file to a dedicated directory for the SP, which will hereafter be referred to as .<SP_HOME>
Setting up JAVA_HOME
You must set your environment variable to point to the directory where the Java Development Kit (JDK) is installed on the computer.JAVA_HOMETypically, the JDK is installed in a directory under If you have, such as .C:\Program Files\Java \jdk1.7.0_45C:\Program Files\Javamultiple versions installed, choose the latest one, which you can find by sorting by date.
You set up JAVA_HOME using the System Properties, as described below. Alternatively, if you just want to set JAVA_HOME temporarily for thecurrent command prompt window, set it at the command prompt .
Setting up JAVA_HOME using the system properties
Right-click the icon on the desktop and choose .My Computer Properties
In the System Properties window, click the tab, and then click the button.Advanced Environment Variables
Java Development Kit (JDK) is essential to run the product.
Environment variables are global system variables accessible by all the processes running under the operating system. You can define anenvironment variable as a system variable, which applies to all users, or as a user variable, which applies only to the user who is currentlylogged in.

2.
3.
4.
1.
Click the New button under (for all users) or under (just for the user who is currently logged in).System variables User variables
Enter the following information:In the field, enter: Variable name JAVA_HOMEIn the field, enter the installation path of the Java Development Kit, such as: Variable value c:\Program Files\Java jdk1.7.0_45
The JAVA_HOME variable is now set and will apply to any subsequent command prompt windows you open. If you have existing commandprompt windows running, you must close and reopen them for the JAVA_HOME variable to take effect, or manually set the JAVA_HOME variablein those command prompt windows as described in the next section. To verify that the variable is set correctly, open a commandJAVA_HOMEwindow (from the menu, click , and then type and click ) and execute the following command:Start Run CMD Enter
set JAVA_HOME
The system returns the JDK installation path. You are now ready to .run the product
Setting JAVA_HOME temporarily using the Windows command prompt (CMD)
You can temporarily set the environment variable within a Windows command prompt window (CMD). This is useful when you haveJAVA_HOMEan existing command prompt window running and you do not want to restart it.
In the command prompt window, enter the following command where <JDK_INSTALLATION_PATH> is the JDK installation directory and

1.
2.
3.
1.
press Enter.
set JAVA_HOME=<JDK_INSTALLATION_PATH>
For example: set JAVA_HOME=c:\Program Files\java\jdk1.7.0_45
The JAVA_HOME variable is now set for the current CMD session only.To verify that the variable is set correctly, execute the following command:JAVA_HOME
set JAVA_HOME
The system returns the JDK installation path.
Setting system properties
If you need to set additional system properties when the server starts, you can take the following approaches:
Set the properties from a script: Setting your system properties in the startup script is ideal, because it ensures that you set theproperties every time you start the server. To avoid having to modify the script each time you upgrade, the best approach is to createyour own startup script that wraps the WSO2 startup script and adds the properties you want to set, rather than editing the WSO2 startupscript directly.Set the properties from an external registry: If you want to access properties from an external registry, you could create Java codethat reads the properties at runtime from that registry. Be sure to store sensitive data such as username and password to connect to theregistry in a properties file instead of in the Java code and secure the properties file with the .secure vault
Installing the Bash Command Line features
When you install the Windows sub system for Linux(beta) feature in Windows 10, it results in a partial installation of bash Shell CommandLine. When all the bash features are not available, you may be unable to run WSO2 SP on Windows. To complete the installation, you can issuethe command from the Command Promptbash . For detailed instructions to do this, see .Windows 10 Installation Guide
You are now ready to .run the product
Installing as a Linux Service
WSO2 Carbon and any Carbon-based product can be run as a Linux service as described in the following sections:
PrerequisitesSetting up CARBON_HOMERunning the product as a Linux service
Prerequisites
Install JDK and set up the environment variable. For more information, see .JAVA_HOME Installation Prerequisites
Setting up CARBON_HOME
Extract the WSO2 product that you want to run as a Linux service and set the environment variable to the extracted productCARBON_HOMEdirectory location.
Running the product as a Linux service
To run the product as a service, create a startup script and add it to the boot sequence. The basic structure of the startup script has threeparts (i.e., start, stop and restart) as follows:
Before you begin:
See the section to find out if this version of the product has issues running on your OS due to the JDKknown incompatibilitiesversion.See the to find out if this version of the product is fully tested on your operating system.compatibility matrix

1.
2.
#!/bin/bash case “$1 instart) echo “Starting Service”;;stop) echo “Stopping Service”;;restart) echo “Restarting Service”;;*) echo $”Usage: $0 {start|stop|restart}”exit 1esac
For example, given below is a startup script written for WSO2 Application Server 5.2.0:
#! /bin/shexport JAVA_HOME="/usr/lib/jvm/jdk1.7.0_07"
startcmd='/opt/WSO2/wso2as-5.2.0/bin/wso2server.sh start > /dev/null&'restartcmd='/opt/WSO2/wso2as-5.2.0/bin/wso2server.sh restart >/dev/null &'stopcmd='/opt/WSO2/wso2as-5.2.0/bin/wso2server.sh stop > /dev/null &'
case "$1" instart) echo "Starting WSO2 Application Server ..." su -c "${startcmd}" user1;;restart) echo "Re-starting WSO2 Application Server ..." su -c "${restartcmd}" user1;;stop) echo "Stopping WSO2 Application Server ..." su -c "${stopcmd}" user1;;*) echo "Usage: $0 {start|stop|restart}"exit 1esac
For example, In the above script, the server is started as a user by the name user1 rather than the root user. su -c "${startcmd}" user1
Add the script to directory./etc/init.d/

2.
3.
4.
Install the startup script to respective runlevels using the command . update-rc.d For example, give the following command for thesample script shown in step1:
sudo update-rc.d appserver defaults
The option in the above command makes the service to start in runlevels 2,3,4 and 5 and to stop in runlevels 0,1 and 6.defaults
A is a mode of operation in Linux (or any Unix-style operating system). There are several runlevels in a Linux server and each ofrunlevelthese runlevels is represented by a single digit integer. Each runlevel designates a different system configuration and allows access to adifferent combination of processes. You can now st art, stop and restart the server using service <service name> {start|stop|restart} command. You will be
prompted for the password of the user (or root) who was used to start the service.
Installing as a Windows Service
WSO2 Carbon and any Carbon-based product can be run as a Windows service as described in the following sections:
PrerequisitesSetting up the YAJSW wrapper configuration fileSetting up CARBON_HOMERunning the product in console modeWorking with the WSO2CARBON service
Prerequisites
Install JDK and set up the environment variable. For more information, see .JAVA_HOME Installation PrerequisitesDownload and install a service wrapper library to use for running your WSO2 product as a Windows service. WSO2 recommends YetAnother Java Service Wrapper ( ) version 11.03, and several WSO2 products provide a default file in their YAJSW wrapper.conf <PROD
directory. The instructions below describe how to set up this file.UCT_HOME>/bin/yajsw/
Setting up the YAJSW wrapper configuration file
The configuration file used for wrapping Java Applications by YAJSW is , which is placed in the directorywrapper.conf <YAJSW_HOME>/conf/. Following is the minimal configuration for running a WSO2 product as a Windows service. Create a file named wrapper.conf wrapper.conf file, set its properties as follows, and save it in directory and in the directory.<YAJSW_HOME>/conf/ <SP_HOME>/bin/yajsw/
Minimal wrapper.conf configuration
#********************************************************************# working directory#********************************************************************wrapper.working.dir=${carbon_home}\\# Java Main class.
If you want to keep the scripts in a location other than , you can add a symbolic link to the script in folder/etc/init.d/ /etc and keep the actual script in a separate location. Say your script name is appserver and it is in folder,/init.d/ /opt/WSO2/
then the commands for adding a link to is as follows:/etc/init.d/
Make executable: sudo chmod a+x /opt/WSO2/appserver Add a link to :/etc/init.d/ sudo ln -snf /opt/WSO2/appserver /etc/init.d/appserver
Before you begin:
See the section to find out if this version of the product has issues running on your OS due to the JDKknown incompatibilitiesversion.See the to find out if this version of the product is fully tested on your operating system.compatibility matrix
If you want to set additional properties from an external registry at runtime, store sensitive information like usernames and passwordsfor connecting to the registry in a properties file and secure it with .secure vault

# YAJSW: default is "org.rzo.yajsw.app.WrapperJVMMain" # DO NOT SET THIS PROPERTY UNLESS YOU HAVE YOUR OWN IMPLEMENTATION# wrapper.java.mainclass=#********************************************************************# tmp folder# yajsw creates temporary files named in_.. out_.. err_.. jna..# per default these are placed in jna.tmpdir.# jna.tmpdir is set in setenv batch file to <yajsw>/tmp#********************************************************************wrapper.tmp.path = ${jna_tmpdir}#********************************************************************# Application main class or native executable# One of the following properties MUST be defined#********************************************************************# Java Application main classwrapper.java.app.mainclass=org.wso2.carbon.bootstrap.Bootstrap# Log Level for console output. (See docs for log levels)wrapper.console.loglevel=INFO# Log file to use for wrapper output logging.wrapper.logfile=${wrapper_home}\/log\/wrapper.log# Format of output for the log file. (See docs for formats)#wrapper.logfile.format=LPTM# Log Level for log file output. (See docs for log levels)#wrapper.logfile.loglevel=INFO# Maximum size that the log file will be allowed to grow to before# the log is rolled. Size is specified in bytes. The default value# of 0, disables log rolling by size. May abbreviate with the 'k' (kB) or# 'm' (mB) suffix. For example: 10m = 10 megabytes.# If wrapper.logfile does not contain the string ROLLNUM it will beautomatically added as suffix of the file namewrapper.logfile.maxsize=10m# Maximum number of rolled log files which will be allowed before old# files are deleted. The default value of 0 implies no limit.wrapper.logfile.maxfiles=10# Title to use when running as a consolewrapper.console.title="WSO2 Carbon"#********************************************************************# Wrapper Windows Service and Posix Daemon Properties#********************************************************************# Name of the servicewrapper.ntservice.name="WSO2CARBON"# Display name of the servicewrapper.ntservice.displayname="WSO2 Carbon"# Description of the servicewrapper.ntservice.description="Carbon Kernel"#********************************************************************# Wrapper System Tray Properties#********************************************************************# enable system traywrapper.tray = true# TCP/IP port. If none is defined multicast discovery is used to find theport# Set the port in case multicast is not possible.

wrapper.tray.port = 15002#********************************************************************# Exit Code Properties# Restart on non zero exit code#********************************************************************wrapper.on_exit.0=SHUTDOWNwrapper.on_exit.default=RESTART#********************************************************************# Trigger actions on console output#********************************************************************# On Exception show message in system traywrapper.filter.trigger.0=Exceptionwrapper.filter.script.0=scripts\/trayMessage.gvwrapper.filter.script.0.args=Exception#********************************************************************# genConfig: further Properties generated by genConfig#********************************************************************placeHolderSoGenPropsComeHere=wrapper.java.command = ${java_home}\\bin\\javawrapper.java.classpath.1 = ${java_home}\\lib\\tools.jarwrapper.java.classpath.2 = ${carbon_home}\\bin\\*.jarwrapper.app.parameter.1 = org.wso2.carbon.bootstrap.Bootstrapwrapper.app.parameter.2 = RUNwrapper.java.additional.1 =-Xbootclasspath\/a:${carbon_home}\\lib\\xboot\\*.jarwrapper.java.additional.2 = -Xms256mwrapper.java.additional.3 = -Xmx1024mwrapper.java.additional.4 = -XX:MaxPermSize=256mwrapper.java.additional.5 = -XX:+HeapDumpOnOutOfMemoryErrorwrapper.java.additional.6 =-XX:HeapDumpPath=${carbon_home}\\repository\\logs\\heap-dump.hprofwrapper.java.additional.7 = -Dcom.sun.management.jmxremotewrapper.java.additional.8 =-Djava.endorsed.dirs=${carbon_home}\\lib\\endorsed;${java_home}\\jre\\lib\\endorsedwrapper.java.additional.9 = -Dcarbon.registry.root=\/wrapper.java.additional.10 = -Dcarbon.home=${carbon_home}wrapper.java.additional.11 = -Dwso2.server.standalone=truewrapper.java.additional.12 = -Djava.command=${java_home}\\bin\\javawrapper.java.additional.13 = -Djava.io.tmpdir=${carbon_home}\\tmpwrapper.java.additional.14 = -Dcatalina.base=${carbon_home}\\lib\\tomcat wrapper.java.additional.15 =-Djava.util.logging.config.file=${carbon_home}\\repository\\conf\\log4j.propertieswrapper.java.additional.16 =-Dcarbon.config.dir.path=${carbon_home}\\repository\\conf wrapper.java.additional.17 =-Dcarbon.logs.path=${carbon_home}\\repository\\logs wrapper.java.additional.18 =-Dcomponents.repo=${carbon_home}\\repository\\components\\pluginswrapper.java.additional.19 =-Dconf.location=${carbon_home}\\repository\\conf wrapper.java.additional.20 =

-Dcom.atomikos.icatch.file=${carbon_home}\\lib\\transactions.propertieswrapper.java.additional.21 = -Dcom.atomikos.icatch.hide_init_file_path=true
wrapper.java.additional.22 =-Dorg.apache.jasper.runtime.BodyContentImpl.LIMIT_BUFFER=true wrapper.java.additional.23 =

1.
2.
-Dcom.sun.jndi.ldap.connect.pool.authentication=simplewrapper.java.additional.24 = -Dcom.sun.jndi.ldap.connect.pool.timeout=3000 wrapper.java.additional.25 = -Dorg.terracotta.quartz.skipUpdateCheck=true
Setting up CARBON_HOME
Extract the Carbon-based product that you want to run as a Windows service, and then set the Windows environment variable toCARBON_HOMEthe extracted product directory location. For example, if you want to run ESB 4.5.0 as a Windows service, you would set to theCARBON_HOMEextracted directory.wso2esb-4.5.0
Running the product in console mode
To verify that YAJSW is configured correctly for running the Carbon-based product as a Windows service, follow the steps below.
Open a Windows command prompt and navigate to the directory. For example:<YAJSW_HOME>/bat/
cd C:\Documents and Settings\yajsw_home\bat
Start the wrapper in console mode by issuing the following command:
runConsole.bat
For example:
If the configurations are set properly for YAJSW, you can see a console output similar to the following, and you can now access the UIs of yourproduct from your web browser via the relevant hosts and ports.

Working with the serviceWSO2CARBON
To install the Carbon-based product as a Windows service, execute the following command in the directory:<YAJSW_HOME>/bat/
installService.bat
The console displays a message confirming that the service was installed.WSO2CARBON
To start the service, execute the following command in the same console window:
startService.bat
The console displays a message confirming that the service was started.WSO2CARBON
To stop the service, execute the following command in the same console window:
stopService.bat
The console will display a message confirming that the service has stopped.WSO2CARBON

To uninstall the service, execute the following command in the same console window:
uninstallService.bat
The console will display a message confirming that the service was removed.WSO2CARBON
Running the Product
The following sections cover how to run WSO2 Stream Processor.
It has the following four profiles:
Editor: Provide the developer environment to develop the Stream Processing Application on your local machine.Worker: Lets you deploy the Stream Processing Application and run it in production. Dashboard: Lets you visualize results via the Dashboard Portal, manage stream processing logic via Business Rules, and monitor thewhole system via the Status Dashboard.Manager: Lets you deploy and manage streaming applications on a fully distributed Stream Processor deployment.
The following section demonstrates how to run each of those profiles:
Starting the Stream Processor StudioStarting a worker nodeStarting a dashboard nodeStarting a manager node
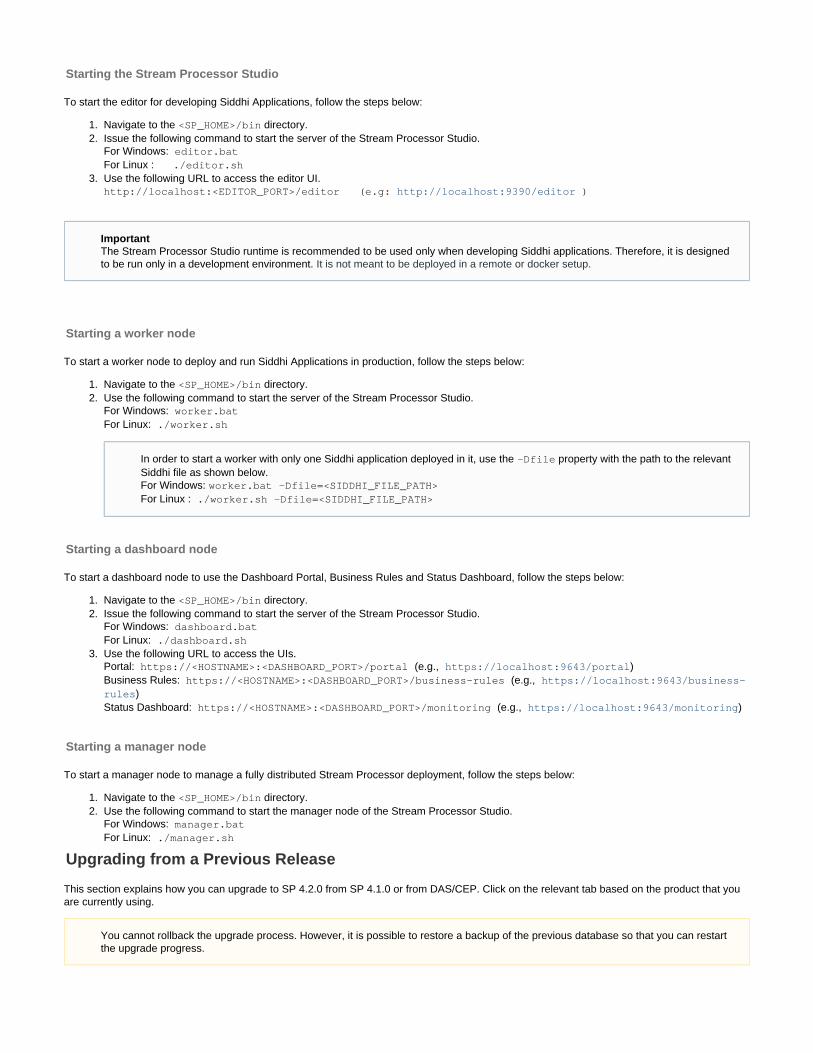
1. 2.
3.
1. 2.
1. 2.
3.
1. 2.
Starting the Stream Processor Studio
To start the editor for developing Siddhi Applications, follow the steps below:
Navigate to the directory.<SP_HOME>/binIssue the following command to start the server of the Stream Processor Studio.For Windows: editor.batFor Linux : ./editor.shUse the following URL to access the editor UI.http://localhost:<EDITOR_PORT>/editor )(e.g: http://localhost:9390/editor
Starting a worker node
To start a worker node to deploy and run Siddhi Applications in production, follow the steps below:
Navigate to the directory.<SP_HOME>/binUse the following command to start the server of the Stream Processor Studio.For Windows: worker.batFor Linux: ./worker.sh
Starting a dashboard node
To start a dashboard node to use the Dashboard Portal, Business Rules and Status Dashboard, follow the steps below:
Navigate to the directory.<SP_HOME>/binIssue the following command to start the server of the Stream Processor Studio.For Windows: dashboard.batFor Linux: ./dashboard.shUse the following URL to access the UIs. Portal: )https://<HOSTNAME>:<DASHBOARD /portal _PORT> (e.g., https://localhost:9643/portalBusiness Rules: https://<HOSTNAME>:<DASHBOARD_PORT>/business-rules (e.g., https://localhost:9643/business-
)rulesStatus Dashboard: )https://<HOSTNAME>:<DASHBOARD_PORT>/monitoring (e.g., https://localhost:9643/monitoring
Starting a manager node
To start a manager node to manage a fully distributed Stream Processor deployment, follow the steps below:
Navigate to the directory.<SP_HOME>/binUse the following command to start the manager node of the Stream Processor Studio.For Windows: manager.batFor Linux: ./ .shmanager
Upgrading from a Previous Release
This section explains how you can upgrade to SP 4.2.0 from SP 4.1.0 or from DAS/CEP. Click on the relevant tab based on the product that youare currently using.
ImportantThe Stream Processor Studio runtime is recommended to be used only when developing Siddhi applications. Therefore, it is designedto be run only in a development environment. It is not meant to be deployed in a remote or docker setup.
In order to start a worker with only one Siddhi application deployed in it, use the property with the path to the relevant-DfileSiddhi file as shown below.For Windows: worker.bat -Dfile=<SIDDHI_FILE_PATH>For Linux : ./worker.sh -Dfile=<SIDDHI_FILE_PATH>
You cannot rollback the upgrade process. However, it is possible to restore a backup of the previous database so that you can restartthe upgrade progress.

From DAS/CEPFrom SP 4.1.0
1.
2.
This section explains how to upgrade to WSO2 SP 4.2.0 from WSO2 SP 4.1.0.
Preparing to upgrade
The following prerequisites should be completed before upgrading.
Make a backup of the SP 4.1.0 database and copy the directory in order to backup the product configurations.<SP_HOME_4.1.0>
Download WSO2 SP 4.2.0 from .here
Migrating databases
To connect WSO2 SP 4.2.0 to the same databases as WSO2 SP 4.1.0 so that the persisted data can be accessed, configure the datasources in
<SP_HOME>/conf/<runtime>/deployment.yaml files similar to how they were configured in WSO2 SP 4.1.0. For the complete list of
datasources configured for WSO2 SP, see .Configuring Datasources
Migrating configurations
Check all the configurations you have made in files for WSO2 SP 4.1.0, and apply the<SP_HOME>/conf/<runtime>/deployment.yaml
same changes to WSO2 SP 4.2.0.
Migrating Siddhi applications
To migrate the Siddhi applications that you have deployed in WSO2 SP 4.1.0, follow the procedure below:
Copy all the Siddhi applications in directory.<SP_HOME_4.1.0>/wso2/worker/deployment/siddhi-files
Place the Siddhi applications you copied to the directory.<SP_HOME_4.2.0>/wso2/worker/deployment/siddhi-files
Testing the migration
Simulate a few events to the Siddhi applications deployed in SP 4.2.0 to test whether they are generating the expected results.
This section provides information on how you can upgrade from DAS/CEP to Product SP.
Overview
WSO2 DAS 3.1.0 is the predecessor of WSO2 SP 4.0.0. Similar to SP, DAS processed events via an event flow that consisted of event streams,
receivers, publishers, and execution plans. These elements of the event flow are defined separate from each other via the DAS Management
Console.
WSO2 SP defines the complete event flow within a single application created via a Siddhi file. The application is then deployed in a SP worker
node and executed at runtime. Due to this architectural difference between the two products, configurations cannot be directly migrated from DAS
to SP. Instead, they need to be recreated as explained in this section.
With WSO2 SP's streaming SQL capabilities and its inbuilt editor that has event simulation and debugging support, it can help you to create
real-time applications much faster than before. The WSO2 SP is a new product focusing on solving stream processing and complex event
processing use cases.
The deployment.yaml files must not be copied directly between servers due to certain differences in the parameters included in the
two WSO2 SP versions.

1.
2.
3.
4.
WSO2 SP uses a single file for script data collection, processing, and notification logic. The batch analytics aspect isSiddhi Streaming SQL
handled via Siddhi aggregations.
For more information about the key capabilities of WSO2 SP, see .About This Release
Deployable Artifacts
Siddhi applications are the deployable artifact type of the Stream Processor.
To use Siddhi, you need to write the processing logic as a Siddhi pplication in the language.Once a Siddhi application isSiddhi Streaming SQL
created and started, it does the following:
Takes data one-by-one as events
Processes the data per each event
Generates new high level events based on the processing carried out up to the current time
Sends newly generated events as the output to streams.
An element of Siddhi SQL can be composed together as a script in a Siddhi application. Here, each construct must be separated by a semicolon (
; ) as shown in the syntax below.
<siddhi app> : <app annotation> * ( <stream definition> | <table definition> | ... ) + ( <query> | <partition> ) + ;
The following is a sample Siddhi application named that includes a stream named and a query named Temperature-Analytics TempStream
to process the events handled by it.5minAvgQuery
@app:name('Temperature-Analytics')
define stream TempStream (deviceID long, roomNo int, temp double);
@name('5minAvgQuery')from TempStream#window.time(5 min)select roomNo, avg(temp) as avgTemp group by roomNoinsert into OutputStream;
The following are Siddhi SQL element types in your DAS setup that you can redefine in an Siddhi application
so that you can reuse them with WSO2 SP.Event Streams -> Stream Definition
Event Reciever -> Source
Event Publisher -> Sink
Event Store -> Table
Execution Plan -> Queries
Upgrading the database
Event Streams -> Stream Definition

A stream such as the stream unifies common types of events together. This enables them to be processed via queries using theirTempStream
defined attributes in a streaming manner, and allow sinks and sources to map events to/from various data formats.
When migrating event stream definitions in WSO2 DAS, you must rewrite them in the syntax followed in Siddhi applications as illustrated in the
table below.
Configuration in WSO2 CEP/DAS{ "streamId":"TempStream:1.0.0", "name": "TempStream", "version": "1.0.0", "metaData": [ { "name": "ip", "type": "STRING" } ], "correlationData": [ { "name": "id", "type": "LONG" } ], "payloadData": [ { "name": "deviceID", "type": "LONG" }, { "name": "roomNo", "type": "int" },
{ "name": "temp", "type": "DOUBLE" }
]}
Configuration in Siddhi filedefine stream TempStream(deviceID long, roomNo int,temp double);
Event Reciever -> Source
In events are received by event receivers that manage the event retrieval process. In Siddhi files deployed in WSO2SP, youWSO2 CEP/DAS,
need to configure sources instead of event receivers to receive events.

To configure a stream that consumes events via a source, add the source configuration to a stream definition by adding the annotation@source
with the required parameter values.
Configuration in WSO2 CEP/DAS<eventReceivername="test_event_receiver"statistics="disable" trace="disable"xmlns="http://wso2.org/carbon/eventreceiver"> <fromeventAdapterType="event_type"> <propertyname="static.option.key1">static_option_value1</property> <propertyname="static.option.keyN">static_option_valueN</property> </from> <mappingcustomMapping="disable"type="map_type"/> <tostreamName="testEventStream"version="1.0.0"/></eventReceiver>
Configuration in Siddhi file@source(type='source_type',static.option.key1='static_option_value1',static.option.keyN='static_option_valueN', @map(type='map_type',static.option_key1='static_option_value1',static.option.keyN='static_option_valueN', @attributes(attributeN='attribute_mapping_N',attribute1='attribute_mapping_1') ))define stream testEventStream(attribute1 Type1, attributeNTypeN);
The parameter of defines the source type that receives events. The other parameters to be configured depends on the sourcetype @source

type selected. Some of the the parameters are optional.
For detailed information about the parameters see the documentation for the relevant source.
The following is the list of source types that are currently supported:
HTTP
Kafka
TCP
In-memory
WSO2Event
JMS
File
RabbitMQ
MQTT
Event Publisher -> Sink
In WSO2 CEP/DAS, events are published via event publishers that manage the event publishing process. In Siddhi files deployed in WSO2SP,
you need to configure sinks instead of event publishers to publish events.
To configure a stream that provides events via a sink, add the sink configuration to a stream definition by adding the annotation with the@sink
required parameter values.
Configuration in WSO2 CEP/DAS<eventPublishername="httpLogger" statistics="disable"trace="disable"xmlns="http://wso2.org/carbon/eventpublisher"> <fromstreamName="org.wso2.event.sensor.stream" version="1.0.0"/> <mappingcustomMapping="disable"type="text"/> <toeventAdapterType="logger"> <propertyname="uniqueId">org.wso2.event.statistics.logger</property> </to></eventPublisher>
Configuration in Siddhi file@Sink(type = 'log', @map(type= 'text'))define stream sensorStream(sensorId int, temperaturedouble)

1.
For detailed information about the parameters see the documentation for the relevant sink.
The following is a list of currently supported sink types.
HTTP
Kafka
TCP
In-memory
WSO2Event
JMS
File
RabbitMQ
MQTT
Sink and Source Mappers
In WSO2 CEP/DAS server the supported default format for the property is configured under when Message Format Mapping Configuration cre
. In the Siddhi files, this is replaced with the parameter of the annotation that defines the map type to be used toating event receivers type @map
map the data.
Each and configuration has a mapping denoted by the annotation that converts the incoming messages format to Siddhi@source @sink @map
events.
Configuration in WSO2 CEP/DAS<mappingcustomMapping="disable"type="map_type"/>
Configuration in Siddhi file@map(type='map_type')
The other parameters to be configured depends on the mapper selected. Some of these parameters are optional. For detailed information about
the parameters see the documentation for the relevant mapper.
The following is a list of currently supported source mapping types:
WSO2Event
XML
TEXT
JSON
Binary
Key Value
Map Attributes
@attributes is an optional annotation used with the annotation to define custom mapping that replaces in@map <mapping customMapping>
the CEP/DAS server. When the annotation is not provided, each mapper assumes that the incoming events adhere to its own@attributes
default data format. By adding the annotation, you can configure mappers to extract data from the incoming message selectively,@attributes
and assign them to attributes.
There are two ways you can configure map attributes.
Defining attributes as keys and mapping content as values in the following format.

1.
2.
@attributes( attributeN='mapping_N', attribute1='mapping_1')
Defining the mapping content of all attributes in the same order as how the attributes are defined in stream definition.
@attributes( 'mapping_1', 'mapping_N')
Example
This query receives events via the source in the data format, and directs them to the stream for processing. Here the HTTP JSON InputStream
source is configured to receive events on all network interfaces at the port and on the foo context. The source is also secured viaHTTP 8080
basic authentication.
Configuration in WSO2 CEP/DAS<eventReceiver ...xmlns="http://wso2.org/carbon/eventreceiver"> <from .../> <mappingcustomMapping="enable"type="json"> <fromstreamName="sensor.stream"version="1.0.6"/> <property> <fromdataType="meta" name="time"/> <toname="meta_timestamp"type="long"/> </property> <property> <fromdataType="meta"name="meta_ispowerServed"/> <toname="meta_isPowerSaverEnabled" type="bool"/> </property> <property> <fromdataType="meta" name="id"/> <toname="meta_sensorId"type="int"/> </property> </mapping> <to ... /></eventReceiver>

Configuration in Siddhi file@source(type='http',receiver.url='http://0.0.0.0:8080/foo',is.basic.auth.enabled='true', @map(type='json'))define stream InputStream(name string, age int, countrystring);
Event Store -> Table
In CEP/DAS, event streams are persisted by creating a corresponding table in the WSO2 Data Access Layer for batch analysis. In WSO2 Stream
Processor, this functionality is replaced by e which is a stored version of an stream or a table of events. Its schema is defined via the tableTabl
definition that is similar to a stream definition.
These events are by default stored , but Siddhi also provides store extensions to work with data/events stored in various data storesin-memory
through the table abstraction.
Tables allow Siddhi to work with stored events. By defining a schema for tables, Siddhi allows them to be processed by queries using their
defined attributes with the streaming data. You can also interactively query the state of the stored events in the table.
@PrimaryKey('symbol')define table StockTable (symbol string, price float, volume long);
Indexes
Indexes allow tables to be searched/modified much faster.
Indexes are configured by including the annotation to the table definition. Each event table configuration can@Index( 'key1', 'key2' )
have 0-1 annotations. Support for the annotation and the number of attributes supported differ based on the table@Index @Index
implementations. When more then one attribute is used for index, each one of them is used to index the table for fast access of data. Indexes can
be configured together with primary keys.
Example
This query creates an indexed event table named with the attribute as the index key.RoomTypeTable roomNo
@Index('roomNo')define table RoomTypeTable (roomNo int, type string);
Execution Plan -> Queries
Queries used in DAS/CEP execution plans and Stream Processor are almost same. There are a few newly introduced features for Siddhi 4.0.0
that are used with WSO2 Stream Processor. These features are listed below.
Incremental Aggregation

Incremental aggregation allows user to retrieve the aggregate value for different time durations. That is, it allows user to obtain
aggregates such as , , , , , and ) of stream attributes for durations such as , , , etc.sum count avg min max count sec min hour
Following is an example query.
define stream TradeStream (symbol string, price double, volume long,timestamp long);
define aggregation TradeAggregation from TradeStream select symbol, avg(price) as avgPrice, sum(price) as total group by symbol aggregate by timestamp every sec ... year;
Set key word
Set keyword allows you to update selected attributes from the table.
Here, for each assignment, the attribute specified in the left must be the table attribute, and the one specified in the right can be a
stream/table attribute a mathematical operation, or other.
When the set clause is not provided, all the attributes in the table are updated. This works with the and opupdate update or insert
erations.
The following is a sample query.
FROM fooStreamSELECT roomNo, time: timestampInMilliseconds () as tsUPDATE barTable SET barTable.timestamp = ts ON barTable.room_no == roomNo AND roomNo > 2
Pattern to identify non-occurence of events
Patterns and sequences are the key features of a complex event processor to define a new complex event based on the order of one or
more raw events. A pattern can be an atomic pattern that detects the arrival of a specific event, or a complex pattern that detects the
arrival of more events in a defined order. Although patterns generally define complex events based on the order of events that arrive,
sometimes a complex event may depend on an event that should not arrive.
Usually, Siddhi pattern processors wait for the events until they arrive. Once an event arrives, the pattern processor starts looking for the
next event. When detecting events that have not arrived, the pattern processor must not wait for an infinite time period to declare the
non-arrival of the event. Therefore, a time interval to wait for the event must be defined with absent pattern operators with an exception to
the logical pattern combining an event that is expected to arrive, and an event that must not arrive beforehand.AND
Following is a sample query.
from TemperatureStream[temp > 60] -> not FireAlarmStream[active ==true] for 5 secselect 'Fire alarm not working' as messageinsert into AlertStream;
Defined Window
A defined window is a window that can be shared across multiple queries.

1.
2.
Events can be inserted to a defined window from one or more queries and it can produce output events based on the defined window
type.
The following is a sample query.
define stream TempStream(tempId string, temp double);define window OneMinTempWindow(tempId string, temp double) time(1min);
from TempStreamselect *insert into OneMinTempWindow;
Upgrading the database
WSO2 SP stores product-specific data in H2 databases by default. Those databases are located in the <PRODUCT_HOME>/wso2/<Profile>/d
directory.atabase
This embedded H2 database is suitable for development, testing, and for some production environments. However, we recommend that you use
an industry-standard RDBMS such as Oracle, PostgreSQL, MySQL, MS SQL, etc., because they are more suitable for most production
environments. Most table schemas are self generated by the feature itself. For the other table schemas you can use the scripts provided with
WSO2 SP in the directory to install and configure databases. This directory includes scripts for<SP_HOME>/wso2/<Profile>/dbscripts
Oracle, PostgreSQL, MySQL and MS SQL.
CEP database migration is direct as it only uses RDBMS tables without any properietary encoding.
DAS supports data persistance in two types of databases.
RDBMS Event tables
Analytics Tables (which also include Analytics Event Tables)
RDBMS Event table migration is straightforward because WSO2 SP suppports RDBMS.
Analytics tables migration is an indirect process where we need to convert the Analytics Tables into RDBMS tables by running Spark scripts using
the CarbonJDBC provider packed with DAS.
The following is an sample query that can be run on DAS to migrates the event table into anORG_WSO2_DAS_SAMPLE_SMART_HOME_DATA
RDBMS table.
CREATE TEMPORARY TABLE SMART_HOME_DATAUSING CarbonAnalytics OPTIONS (tableName"ORG_WSO2_DAS_SAMPLE_SMART_HOME_DATA", schema "house_id INT, metro_areaSTRING, state STRING, device_id INT, power_reading FLOAT, is_peakBOOLEAN");
CREATE TEMPORARY TABLE SMART_HOME_DATA_RDBMS using CarbonJDBC OPTIONS(dataSource "WSO2_SP_MIGRATION_DATA_STORE_DB", tableName"ORG_WSO2_DAS_SAMPLE_SMART_HOME_DATA", schema "house_id INTEGER -i, metro_area STRING, state STRING, device_id INTEGER, power_reading FLOAT,is_peak BOOLEAN");
INSERT INTO TABLE SMART_HOME_DATA_RDBMS SELECT * FROM SMART_HOME_DATA;

Key Concepts
The following are some of the concepts and terminology associated with WSO2 Stream Processor.
Streaming Analytics
Using analytical operators to orchestrate data flow, calculate analytics, and detect patterns on event data from multiple, disparate live datasources, and allowing you to build applications that sense, think, and act in real time.
Complex Event Processing (CEP)
A kind of computing in which incoming data about events is distilled into more useful, higher level “complex” event data that provides insight intowhat is happening. CEP is used for highly demanding, continuous-intelligence applications that enhance situation awareness and supportreal-time decisions.
Siddhi This is the core processing library used within WSO2 Stream Processor to handle collecting events, processing them and notifying/acting basedon the user-given Siddhi Applications.
Siddhi Streaming SQL Language
Siddhi Streaming SQL is an SQL-like language that facilitates writing stream processing and complex event processing logic. This defines howthe events received to Stream Processing should be processed.
Siddhi Application
This is scripted using the Siddhi Streaming SQL Language. This represents a single unit of execution that can be deployed independently toprocess events in real-time
Portal/Dashboard
The portal enables users to create dashboards that represent data visually to better understand the data being analyzed. The portal can containmultiple dashboards and each of these dashboards can also contain several widgets to represent different pieces of information.
Widget
This is a single visualization element that can represent data and can be reused in many dashboards.
Tutorials
This set of tutorials gives you a complete introduction to the fundamentals and most common usage scenarios of the WSO2 Stream Processor. Itis recommended to try out these tutorials in the given sequence in order to understand the functional flows better.
Creating a Simple Siddhi ApplicationConsuming EventsPre-processing Streaming DataIntegrating DatastoresSummarizing Stream Data - Short TermStreaming Data Summarization (Incremental Aggregation)Analyzing KPIsPublishing Processed EventsCorrelating Simple EventsCorrelating Events for Complex Event ProcessingAnalyzing TrendsMaking Real-time PredictionsStreaming Machine LearningDetecting AnomaliesPresenting DataManaging Business Rules via Templates

Design ViewSource View
Monitoring the Stream Processor via the Status DashboardPerforming Real-time and Periodic ETL
Creating a Simple Siddhi Application
IntroductionTutorial stepsGenerating the output
Introduction
The first tutorial introduces you to WSO2 SP and explains some of its basic concepts.
For this tutorial, let's consider a scenario where Sam, the foreman of the Sweet Factory wants a name-wise total for all the categories of sweetsproduced until now. During a given run, each Sweet Bot in the factory produces a batch of sweets and generates an event that containsinformation about the name of the sweet it produced and the quantity produced.
Individual events generated by four different worker Sweet Bots are as follows:
Input Event Sweet Bot No Item Quantity
1 1 Toffee 11
2 2 Gateau 2
3 3 Gingerbread 5
4 4 Gateau 8
The foreman expects to receive the following output from WSO2 SP if the above events are sent in the given order.
Output Event Item Quantity
1 Toffee 11
2 Gateau 2
3 Gingerbread 5
4 Gateau 10
This tutorial shows how this data is processed to generate the expected output if it is sent to WSO2 SP to be analyzed.
Tutorial steps
The Siddhi application required for this scenario can be created in two methods:
The of WSO2 Sream Processor Studio where you can write the application in Siddhi Query Language.Source ViewThe of WSO2 Stream Processor where you can design the Siddhi application in a graphical interface by dragging andDesign Viewdropping Siddhi components and linking them as required.
Click on the relevant tab to create the Siddhi application in the preferred interface.
This tutorial covers the following:
Creating a simple Siddhi ApplicationSimulating input to the Siddhi Application
1. 2.
Before you begin:Install version 1.8* and set the environment variable.Oracle Java SE Development Kit (JDK) JAVA_HOMEDownload the WSO2 SP.

1.
2.
3.
4.
5.
Let's get started!
Navigate to the directory and issue the following command to start the WSO2 Stream Processor Studio.<SP_HOME>/bin
For Windows: editor.bat
For Linux: sh editor.sh
Access the Stream Processor Studio via the URL. The Stream Processor Studio http://localhost:<EDITOR_PORT>/editor
opens as shown below.
Click to start defining a new Siddhi application. A new file opens as shown below.New
First, you need to specify the stream from which the data to be analyzed must be taken. For this tutorial, let's assume that all data to be
analyzed is sent to a stream named . Let's add a query as follows to specify that information to be processedSweetProductionStream
must be taken from the stream.SweetProductionStream
from SweetProductionStream
To specify what information needs to be extracted from the events generated by the Sweet Bots, let's add a query as follows.
The default URL is . http://localhost:9390/editor

5.
6.
7.
8.
9.
10.
a.
b.
select name, sum(amount) as totalProduction
Here, the value for the attribute of the incoming event is extracted with the same name. The sum of the values for the attribname amount
ute of incoming events is extracted as .hourlyTotal
The amounts need to be grouped according to the sweet category name. To do this, add a clause as follows.group by
group by name
The data taken from the input stream must be sent to an output stream before it is published. In this tutorial, let's name the output stream
as . This can be specified as shown below.SweetTotalStream
insert into SweetTotalStream;
The Siddhi application should now look as follows.
from SweetProductionStreamselect name, sum(amount) as totalProductiongroup by nameinsert into SweetTotalStream;
Before saving these queries as a Siddhi application, you must name your appliction. In this scenario, let's name it as asSweetTotalApp
shown below.
@App:name('SweetTotalApp')
Lets also specify a name for the queries you created as shown below to allow someone checking the Siddhi application to understand
their purpose.
@info(name='SweetTotalQuery')
The streams that you referred to in you queries need to be defined as folows.
Let's define the input stream as follows.
define stream SweetProductionStream (name string, amount long);
There are two attributes included in the schema to capture the name of the sweet category as a string value, and the amount
produced as a long value.
Let's define the output stream as follows.
@sink(type='log', prefix='Sweet Totals:')define stream SweetTotalStream(name string, totalProductionlong);

10.
b.
1.
2.
This output stream definition includes the attribute to present the name of the sweet category, and the name totalProduction
attribute to present the total production of each sweet category. In addition, there is an annotation. This represents a@sink
logger sink that outputs all the data in the output stream to which it is connected. The output is presentedSweetTotalStream
as logs that are printed in the foreman's console.
Now the Siddhi application is ready to be saved. It should look as follows.
@App:name('SweetTotalApp')
define stream SweetProductionStream (name string, amount long);
@sink(type='log', prefix='Sweet Totals:')define stream SweetTotalStream(name string, totalProduction long);
@info(name='SweetTotalQuery')from SweetProductionStreamselect name, sum(amount) as totalProductiongroup by nameinsert into SweetTotalStream;
To save this Siddhi file, click , and then click . The following dialog box appears. Click .File Save Save
As a result, this file is saved in the directory.<SP_HOME>/wso2/editor/deployment/workspace
Let's get started!
Navigate to the directory and issue the following command to start the WSO2 Stream Processor Studio.<SP_HOME>/bin
For Windows: editor.bat
For Linux: sh editor.sh
Access the Stream Processor Studio via the URL. The Stream Processor Studio http://localhost:<EDITOR_PORT>/editor
opens as shown below.
Event sinks are covered in detail in .Publishing Processed Events
The default URL is . http://localhost:9390/editor

2.
3.
4.
Click to start defining a new Siddhi application. A new file opens as shown below.New
Click Design View to open the design view of the Stream Processor Studio.

4.
5.
a.
b.
i.
ii.
First, you need to specify the stream from which the data to be analyzed must be taken. For this tutorial, let's assume that all data to be
analyzed is sent to a stream named SweetProductionStream . Let's follow the substeps below.
Drag and drop the following icon from the left pane to the grid. As a result, the form appears below theStream Configurationgrid.
Let's enter information as follows in the Stream Configuration form.
In the name field, let's enter SweetProductionStream .
The sweet bots publish the name of the sweet and the number produced in a given batch. To capture this information,
let's add two attributes to the stream as follows.
Attribute Name Attribute Tpe
name string
amount long

5.
b.
ii.
iii.
6.
a.
b.
Click to save the stream configuration.SubmitOnce the information published by the sweet bots is analyzed, the result needs to be presented as the name of the sweet and the total
produced. To achieve this, you need an output stream with a schema that captures this information. Let's define this stream as follows.
Drag and drop the stream icon to the grid again.
In the form, enter as the name of the stream. Then enter two attributes as follows.Stream Configuration SweetToatlStream
Attribute Name Attribute Tpe
name string
totalProduction long

6.
b.
c.
7.
a.
b.
c.
Click to save the stream configuration.SubmitNow the streams to capture the input and the output are ready. Now the Siddhi application you are creating needs to contain the logic
based on which the input is processed to generate the required output. In this scenario, the processing to be carried out involved
calculating the total sweet production for each sweet with each new batch. This can be achieved via a simple query. To add this query,
follow the substeps below.
The query to be added needs to project the output. Therefore, drag and drop the icon for projection queries from the left panel to
the grid.
Before defining the processing logic, you need to specify that the query needs to consider the streaSweetProductionStream
m as the input stream, and the stream as the output stream. To show this connection, draw an arrowSweetTotalsStream
from the SweetProductionStream stream to the projection query, and another arrow from the projection query to the SweetT
otalsStream stream as shown below.

7.
c.
d.
i.
ii.
e.
8.
To click the settings icon on the projection query object asopen the Query Configuration form and define the processing logic,
shown below.
The name of the sweet needs to be projected in the output with the label (same as the input stream attribute). The total onname
the other hand needs to be derived by calculating the sum for the amount of sweets produced in all the batches, and output with
the label. To do this, let's enter information in the totalProduction Query Configuration form as follows.
The output is projected with the attributes used in the output stream (i.e., the ). Therefore, in the SweetTotalStream S
section, the attributes in the elect SweetTotalStream stream are already listed under . To map the attributes in theAs
input stream (i.e., ) with the same attributes, you need to enter expressions as explainedSweetProductionStream
below.
Output Attribute Required Expression
name The values for the name attribute in the stream can be insertedSweetProductionStream
into the stream with the same attribute name. To indicate this, enter SweetTotalStream nam
in the field.e Expression
totalProduction To derive the value for the attribute, the sum of the total number producedtotalProduction
of each sweet must be calculated with each new batch produced by sweet bots> To do this,
let's specify the expression as .sum(amount)
Each output event indicating the total sweet production at the given time needs to be directed to the SweetTotalsStre
output stream in order to be published. Therefore, make sure that is selected in the field under am all events For Outpu
.tClick to save the query configuration.Save
Click the menu option, and then click . The Siddhi application you created now looks as follows in the design view.Edit Auto Allign

8.
9.
10.
11.
12.
Click . The application is displayed as follows.Source View
Before saving these queries as a Siddhi application, you must name your appliction. In this scenario, let's name it as asSweetTotalApp
shown below.
@App:name('SweetTotalApp')
Lets also specify a name for the queries you created as shown below to allow someone checking the Siddhi application to understand
their purpose.
@info(name='SweetTotalQuery')
Click the menu optIon, and then click to save the application you created. File Save The following dialog box appears. Click .Save
As a result, this file is saved in the directory.<SP_HOME>/wso2/editor/deployment/workspace
Generating the output
Let's see how the Siddhi application you created functions when it is deployed and run in WSO2 SP. For the purpose of learning, the followingfour events generated by the Sweet Bots are simulated in WSO2 SP via the Event Simulation tool.
To check whether your Siddhi application generates this output, follow the steps below:
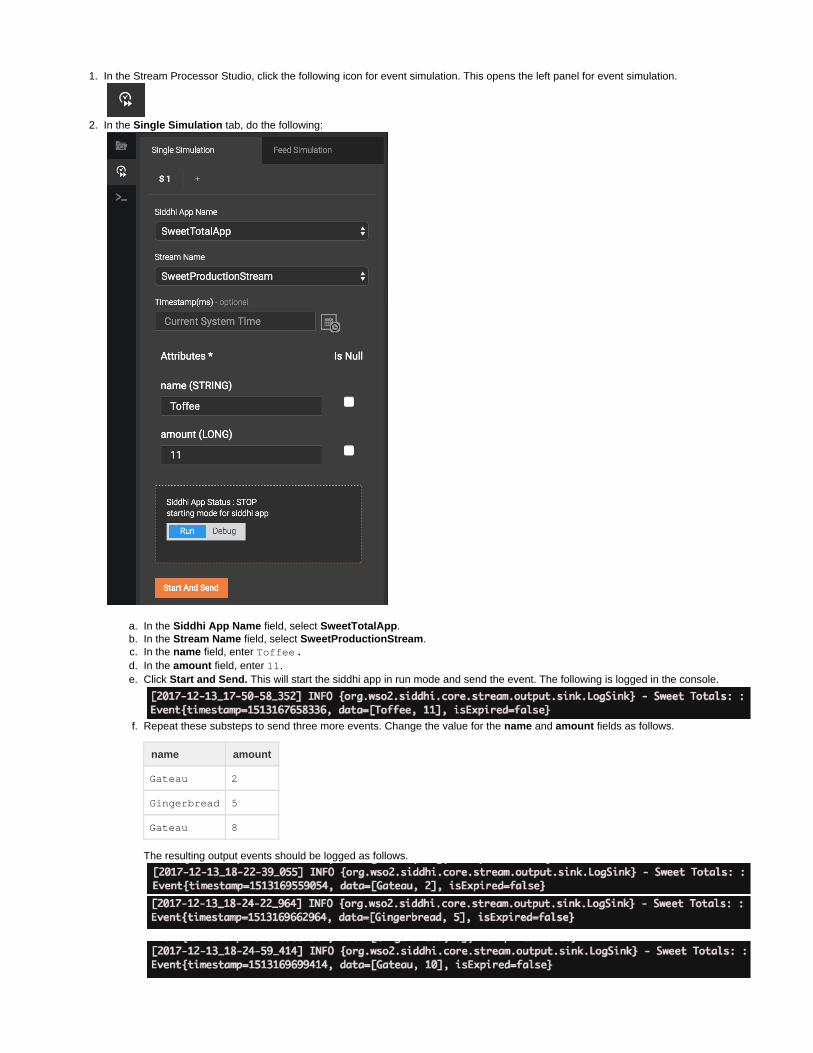
1.
2.
a. b. c. d. e.
f.
In the Stream Processor Studio, click the following icon for event simulation. This opens the left panel for event simulation.
In the tab, do the following:Single Simulation
In the field, select .Siddhi App Name SweetTotalAppIn the field, select .Stream Name SweetProductionStreamIn the field, enter name Toffee .In the field, enter .amount 11Click This will start the siddhi app in run mode and send the event. The following is logged in the console. Start and Send.
Repeat these substeps to send three more events. Change the value for the and fields as follows.name amount
name amount
Gateau 2
Gingerbread 5
Gateau 8
The resulting output events should be logged as follows.

2.
f.
1.
2.
Consuming Events
IntroductionTutorial steps
Introduction
In the previous tutorial, you covered how to create a simple Siddhi application and how to simulate virtual events to it.
In this tutorial, let's look at how events are received in a real world scenario, and how to use the event capturing framework of WSO2 SP toreceive incoming events even when their format is different to the format specified within your Siddhi application.
Let's consider a scenario where the events generated by the Sweet Bots are in the JSON format, and they are sent via HTTP calls. The managerrequires them to be received at a specific endpoint that has a specific URL.
Tutorial stepsLet's get started!
To understand the difference between receiving events with default mapping and receiving them with custom mapping, this section is divided intothe the following parts.
Configure Siddhi application to receive HTTP eventsAdd custom mapping
Configure Siddhi application to receive HTTP events
In this section, let's see how to add the required configurations to receive events via HTTP in JSON format.
Let's open the Siddhi application that you created in the previous tutorial. It currently looks as follows.SweetTotalsApp
@App:name('SweetTotalApp')
define stream SweetProductionStream (name string, amount long);
@sink(type='log', prefix='Sweet Totals:')define stream SweetTotalStream(name string, totalProduction long);
@info(name='SweetTotalQuery')from SweetProductionStreamselect name, sum(amount) as totalProductiongroup by nameinsert into SweetTotalStream;
To receive the events generated by the Sweet Bots via HTTP calls, you need an event source of the type. Let's add it as shownhttp
This tutorial covers the following topics:Event capturing with Siddhi sourcesUsing maps with sourcesCustom mappings for inbound events
Before you begin:This tutorial uses the same Siddhi application that is created and deployed in Tutorial 1: Creating and Debugging a Simple
Therefore, it is recommended that you try Tutorial 1 first.Siddhi Application.Sources are the type of extensions that are used in the WSO2 Stream Processor to indicate to the runtime that events wouldbe arriving from the defined endpoint or entity. WSO2 Stream Processor supports many different Source types out of the box,which include HTTP, TCP, Kafka etc. For more information about the sources supported for WSO2 SP, see .Collecting Events

2.
3.
4.
5.
6.
below.
@source(type='http')
The HTTP events need to be received at a specific endpoint. Let's add the URL of this endpoint to the HTTP source configuration asfollows:
@source(type='http', ='http://localhost:5005/SweetProductionEP')receiver.url
The incoming messages generated by Sweet Bots are in the JSON format. You require a mapping configuration to transform them into aformat that can be processed by WSO2 SP. Therefore, let's add an annotation for JSON mapping to the HTTP source as shown below.
@source(type='http',receiver.url='http://localhost:5005/SweetProductionEP', @map(type =
)'json')
Now the Siddhi application looks as follows.SweetTotalsApp
@App:name('SweetTotalApp')
@source(type='http',receiver.url='http://localhost:5005/SweetProductionEP', @map(type ='json'))define stream SweetProductionStream (name string, amount long);
@sink(type='log', prefix='Sweet Totals:')define stream SweetTotalStream(name string, totalProduction long);
@info(name='SweetTotalQuery')from SweetProductionStreamselect name, sum(amount) as totalProductiongroup by nameinsert into SweetTotalStream;
Save the Siddhi application. Then click the following icon to start it so that it can process the events you send.SweetTotalsApp
To see whether the Siddhi application functions as expected, let's send two events with the following information.
The input events generated by the Sweet Bots are in the JSON format. Therefore, the format is similar to the sample shown below.
{ "event": { "name": "Jaffa Cake", "amount": 10 }}
In order to send the two input events to WSO2 SP in the format shown above, issue the following two cURL commands.
For the complete list of mapping types supported for WSO2 SP, see .Collecting Events - Event Format

6.
curl -X POST \ http://localhost:5005/SweetProductionEP \ -H 'content-type: application/json' \ -d '{ "event": { "name": "Jaffa Cake", "amount": 10 }}'
curl -X POST \ http://localhost:5005/SweetProductionEP \ -H 'content-type: application/json' \ -d '{ "event": { "name": "Jaffa Cake", "amount": 15 }}'
The two events sent contains the following information.
Input Event No Name Amount
1 Jaffa Cake 10
2 Jaffa Cake 15
As a result, two output events are expected to be generated with the following information.
Output Event No Name Amount
1 Jaffa Cake 10
2 Jaffa Cake 25
This generates the following output log in the CLI.
Add custom mapping
The previous step assumes that the message body of the events generated by Sweet Bots exactly match the schema of the SweetProduction input stream that is defined in your Siddhi application. Now let's consider a scenario where the attributes of the incoming JSON eventsStream
are different to that of the input stream. Their format is as given in the sample below:

1.
2.
{ "sweet": "Jaffa Cake", "batch": { "batch id": "batch1", "count": 10 }}
From this event, you only need to extract the values for and (which is nested under ) attributes. Therefore, let's update the sweet count batch @ annotation as follows:map
To allow the Siddhi application to identify the elements that need to be extracted from the JSON message, add an annotat@attributesion to the mapping configuration as follows.
@map(type = 'json', )@attributes(...)
The JSON mapper supports . Therefore, the values for the attributes annotation can be expressions. The JsonPath JsonPath JsonPat expressions for the name of the sweet and its total production are as follows.h
Stream Attribute Name JSON Event Attribute Name JsonPath Expression
name sweet $.sweet
amount count $.batch.count
Based on the above expressions you identified, you can update the annotation as follows.JsonPath @attributes
@attributes(name = '$.sweet', amount = '$.batch.count')
Once thie above substeps are completed, the mapping configuration looks as follows.
@map(type = 'json', @attributes(name = '$.sweet', amount ='$.batch.count')
The complete Siddhi application looks as follows.

2.
3.
4.
@App:name('SweetTotalApp')
@source(type='http',receiver.url='http://localhost:5005/SweetProductionEP', @map(type ='json', @attributes(name = '$.sweet', amount = '$.batch.count')))define stream SweetProductionStream (name string, amount long);
@sink(type='log', prefix='Sweet Totals:')define stream SweetTotalStream(name string, totalProduction long);
@info(name='SweetTotalQuery')from SweetProductionStreamselect name, sum(amount) as totalProductiongroup by nameinsert into SweetTotalStream;
Let's save the changes you made to Siddhi application. Then click the following icon to start it so that it can processSweetTotalsAppthe events you send.
Now you can issue the following cURL commands to send the two incoming events as sent by the Sweet Bots.
curl -X POST \ http://localhost:5005/SweetProductionEP \ -H 'content-type: application/json' \ -d '{ "sweet": "Jaffa Cake", "batch": { "batch id": "batch1", "count": 10 }}'
curl -X POST \ http://localhost:5005/SweetProductionEP \ -H 'content-type: application/json' \ -d '{ "sweet": "Jaffa Cake", "batch": { "batch id": "batch1", "count": 15 }}'
As a result, you should see the same output in the CLI logs and you saw when you carried out step 6.

1. 2.
3.
4.
5.
a.
b.
Pre-processing Streaming Data
IntroductionTutorial steps
Introduction
In the previous tutorials, we learned how to create a simple Siddhi application and capture the events coming from external sources for analysis.This tutorial shows how to pre-process data before analyzing them.
Let's consider a scenario where the Sweet Factory foreman needs to identify events generated by Sweet Bots that match the following criteria:
The sweet category produced is either or .eclair gingerbreadThe amount produced is greater than 10.
The results generated must be presented with the name of the sweet, the total value of the batch and the currency unit. Each eclair andgingerbread costs £0.4 to produce. In addition, the production overhead per batch is £2. The currency unit is GBP.
Tutorial steps
Let's get started!
Start the WSO2 SP in the editor mode and login to the Stream Processor Studio. Then open a new Siddhi file.In this tutorial, you can use the same input stream that you have been using in all the previous tutorials where the events receive includethe sweet category name and the quantity produced. Let's add it as follows.
define stream SweetProductionStream (name string, amount long);
Let's define the output stream based on what information you require as the output. As mentioned in the introduction, this scenariorequires the output to include the name of the sweet, the value of the batch and the currency unit. Therefore, let's add an output streamnamed with an attribute for each detail mentioned.FilteredSweetStream
define stream FilteredSweetStream (name string, value double, currency string);
To process the input data and insert the results into the stream, let's add a query as follows.FilteredSweetStream
In this query, the amount produced of sweet category is multiplied by the production cost per unit, and 2 (representing the productionoverhead per batch of £2) is added to the result to derive the total production cost per batch. This is a Siddhi transformation where thevalue of an input attribute is changed while processing.
Also note that the static value is specified as the currency. This is how static values are added to data streams. Each event that goesGBPthrough this preprocessing step contains this static value for the intended attribute.The query added in the previous step outputs all the events after calculating the batch value. However, the output must consist of onlyevents where the sweet category is either or , and the amount produced is greater than 10. To achieve this, let'seclair gingerbreadadd two filters as follows.
Add a filter with the notation to specify the conditions based on which the events are filtered.[ ]
[name == "eclair"], [name == "gingerbread"], [amount > 10]
In the above step, you have specified the conditions to be met, but not how those conditions work together. You can use , and or, and operators to specify how the conditions are related.not
This tutorial covers the following concepts:Siddhi filtersTransformations and defaults
Before you begin:This tutorial reuses the source configuration that was first created and explained in . Therefore, it is recommended toConsuming Eventstry Tutorial 2 before following this tutorial.
from SweetProductionStream select name, as value, "GBP" as currency insert((amount * 0.4) + 2)into FilteredSweetStream;

5.
b.
6.
[ (name == "eclair" or name == "gingerbread") and amount > 10 ]
In this scenario, the sweet category can be or . Therefore, the operator is used to denote theeclair gingerbread orconnection between the conditions and where it indicates that either[name == "eclair"] [name == "gingerbread"]condition can apply. The must apply together with either of the first two conditions. This is indicated via the [amount > 10] an
operator.d
The query with the completed filter looks as follows.
from SweetProductionStream [(name == "eclair" or name =="gingerbread") and amount > 10]select name, ((amount * 0.4) + 2) as value, "GBP" as currencyinsert into FilteredSweetStream;
The completed Siddhi application (which you can name as ) looks as follows.SweetProductionFilteringApp
@App:name('SweetProductionFilteringApp')
@source(type='http',receiver.url='http://localhost:5005/SweetProductionEP', @map(type ='json', @attributes(name = '$.sweet', amount = '$.batch.count')))define stream SweetProductionStream (name string, amount long);
@sink(type='log', prefix='Conditionally filtered Sweets:')define stream FilteredSweetStream (name string, value double, currencystring);
from SweetProductionStream [(name == "eclair" or name =="gingerbread") and amount > 10]select name, ((amount * 0.4) + 2) as value, "GBP" as currencyinsert into FilteredSweetStream;
To see how the output is generated by this Siddhi application, let's start the application in the editor and simulate five events by issuingthe following cURL commands. Only the last two events sent match the filter conditions. Therefore, only those two events are returnedwith the pre-processed values.
curl -X POST \ http://localhost:5005/SweetProductionEP \ -H 'content-type: application/json' \ -d '{ "sweet": "Jaffa Cake", "batch": { "batch id": "batch1", "count": 10 }}'

6.
curl -X POST \ http://localhost:5005/SweetProductionEP \ -H 'content-type: application/json' \ -d '{ "sweet": "Jaffa Cake", "batch": { "batch id": "batch1", "count": 10 }}'
curl -X POST \ http://localhost:5005/SweetProductionEP \ -H 'content-type: application/json' \ -d '{ "sweet": "gingerbread", "batch": { "batch id": "batch1", "count": 10 }}'
curl -X POST \ http://localhost:5005/SweetProductionEP \ -H 'content-type: application/json' \ -d '{ "sweet": "eclair", "batch": { "batch id": "batch1", "count": 11 }}'
curl -X POST \ http://localhost:5005/SweetProductionEP \ -H 'content-type: application/json' \ -d '{ "sweet": "gingerbread", "batch": { "batch id": "batch1", "count": 12 }}'
The output is logged as follows:

6.
Only last two events are returned with the pre-processed values.
Integrating Datastores
IntroductionTutorial steps
Introduction
In the previous tutorials, you worked with events arriving in real time. Those tutorials only analyzed live events received over a specific period oftime.
In this tutorial, let's understand how live data can work in conjunction with historic data as often required in real world scenarios.
Let's consider the scenario for purchasing raw materials for the Sweet Factory. Each time a consignment of raw materials is delivered, thesupplier sends an event in JSON format to the WSO2 SP instance of the Sweet Factory. The manager wants the latest event from the supplierrecorded for report generation.
This tutorial covers the following topics:Storing real-time data for later processingCorrelating real-time data with historic dataManipulating static data based on real-time data
1. 2. 3.
4.
5. 6.
Before you begin:The user scenarios covered in this tutorial are supported by a set of extensions implemented for WSO2 SP called stores.
A store can be defined as any structure that acts as a data store for both data definition and data manipulation. Supported storeimplementations in Stream Processor 4.0 include the following:
RDBMS store (which in turn supports the following)H2MySQLOracle DatabaseMS SQL ServerPostgreSQLIBM DB2
Apache HBaseApache SolrMongoDB
For more information on integrating data stores, please see the page on .Storage Integration
In this scenario, the events generated when the supplier delivered raw materials are stored in a MySQL table named SweetFactor. You need to download and install MySQL and create this database before you try the tutorial steps.yDB
Click here for instructions to configure the database.
Download and install .MySQL ServerDownload the .MySQL JDBC driverUnzip the downloaded MySQL driver zipped archive, and copy the MySQL JDBC driver JAR (mysql-connector-jav
) into the directory.a-x.x.xx-bin.jar <SP_HOME>/libEnter the following command in a terminal/command window, where is the username you want to use tousernameaccess the databases.mysql -u username -p When prompted, specify the password you are using to access the databases with the username you specified.Add the following configuration under the section of the Data Sources Configuration <SP_HOME>/conf/editor/de
file.ployment.yaml
You need to change the values for the and parameters to the username and passwordusername passwordthat you are using to access the MySQL database.

1.
2.
3.
4.
5.
Tutorial steps
Let's get started!
Start the editor, and login to the WSO2 Stream Processor Studio. Then open a new Siddhi file to write a new Siddhi application. You canname it as .ShipmentHistoryAppThe information captured from the event sent by the supplier must include the name of the raw material, the name of the supplier and theamount of material purchased. Let's add an input stream definition as follows to capture this information.
define stream RawMaterialStream(name string, supplier string, amountdouble);
The incoming event from the supplier is in JSON format. Therefore, to convert it to the Siddhi format so that it can be processed byWSO2 Stream Processor, let's add a source configuration that includes a JSON mapping as follows.
@source(type = 'http', @map(type = 'json'))define stream RawMaterialStream(name string, supplier string, amountdouble);
Let's define an output stream as follows.
define stream ShipmentDetailsStream(name string, supplier string, amountdouble);
To forward events from the input steam to the output stream, let's add a simple query as follows.
6.
7.
- name: SweetFactoryDB description: Datasource used for Sweet Factory SupplyRecords jndiConfig: name: jdbc/SweetFactoryDB useJndiReference: true definition: type: RDBMS configuration: jdbcUrl:'jdbc:mysql://localhost:3306/SweetFactoryDB' username: root password: root driverClassName: com.mysql.jdbc.Driver maxPoolSize: 50 idleTimeout: 60000 connectionTestQuery: SELECT 1 validationTimeout: 30000 isAutoCommit: false
To create a database table named , issue the following commands from the terminal.SweetFactoryDB
mysql> create database SweetFactoryDB;mysql> use SweetFactoryDB;mysql> source <SP_HOME>/wso2/editor/dbscripts/metrics/mysql.sql;mysql> grant all on SweetFactoryDB.* TO username@localhost identified by "password";

5.
6.
7.
8.
9.
10.
from RawMaterialStreamselect name, amountinsert into ShipmentDetailsStream;
Now the Siddhi application looks as follows.
@App:name('ShipmentHistoryApp')
@source(type = 'http', @map(type = 'json'))define stream RawMaterialStream(name string, supplier string, amountdouble);
define stream ShipmentDetailsStream(name string, supplier string,amount double);
from RawMaterialStreamselect name, amountinsert into ShipmentDetailsStream;
The in its current state can only forward all the events in the to the ShipmentHistoryApp RawMaterialStream ShipmentDetails. However, you need to save the incoming events in a store instead of passing them to a stream. Therefore, let's convert theStream
output stream definition to a store definition by changing the syntax to .define stream define table
define table ShipmentDetails(name string, supplier string, amountdouble);
When the events are directed to a data store, they are not persisted, but they are stored within an in-memory table for later retrieval. Theinformation stored in-memory is no longer available once the server is restarted.Compared to a stream, a table supports a set of additional annotations that enables it to leverage on additional functionalities offered bydata stores, such as unique keys and indexes.
A unique key (also referred to as primary key) is useful for uniquely identifying records. Fields set as unique keys are allowed to haveduplicate values within the data store. Let's set a unique key using the annotation, as shown below.@PrimaryKey
@primaryKey('name')define table ShipmentDetails(name string, supplier string, amount double);
The purchase records stored in the table need to be indexed by the supplier. To do this, you need to specify that the attributesupplieris an index attribute as shown below.
The annotation is used for specifying secondary indexes. This is useful for data retrieval scenarios. If the underlying data storage@indexmechanism (e.g., RDBMS) supports secondary indexes, the fields specified here are indexed in the data store-level itself.
@primaryKey('name') @index('supplier')
define table ShipmentDetails(name string, supplier string, amount double);
Let's specify a store of the RDBMS type to the table to bind RDBMS data storage mechanisms to it.ShipmentDetails
To do this, you need to use the annotation. Similar to the and the annotations that you have already used in@store @sink @sourcethese tutorials, the properties used within the annotation vary depending on the type of the store.
@primaryKey('name') @index('supplier')
@store(type='rdbms')define table ShipmentDetails(name string, supplier string, amount double);
The Stream Processor Studio indicates a syntax error at this stage because the has an additionalShipmentDetailsStreamattribute other than the attributes included in the select clause. Ignore this error because the Siddhi application is still in anincomplete state. This error is corrected in the next steps.

10.
11.
12.
The RDBMS store has a set of properties that are required to be set in order to create the connection with the underlying DB instance.These include the JDBC URL of the database, the username, password and such. Let's add values to these properties so that the storedefinition becomes syntactically complete.
@primaryKey('name') @index('supplier')@store(type='rdbms', jdbc.url="jdbc: mysql://localhost:3306/SweetFactoryDB ",
username="root", password="root" , jdbc.driver.name ="com.mysql.jdbc.Driver")define table ShipmentDetails(name string, supplier string, amount double);
Now the updated Siddhi application is as follows:
@App:name('ShipmentHistoryApp')
@source(type = 'http', @map(type = 'json'))define stream RawMaterialStream(name string, supplier string, amountdouble);
@primaryKey('name')@index('supplier')@store(type='rdbms',jdbc.url="jdbc:mysql://localhost:3306/SweetFactoryDB",username="root", password="root" ,jdbc.driver.name="com.mysql.jdbc.Driver")define table ShipmentDetails(name string, supplier string, amountdouble);
from RawMaterialStreamselect name, supplier, amountinsert into ShipmentDetails;
The factory manager needs to see the latest shipments for each raw material. If a record for a particular raw material does not alreadyexist in the database, it must be added as a new entry. If it already exists, its previous must be overwritten by the new incoming record.
This can be considered as an update or insert scenario. In Siddhi stores, the update or insert into directive can be used for this purposein place of the normal insert into command. In order to carry out this operation, let's update the query as follows:
from RawMaterialStream select name, supplier, amount update or insert into ShipmentDetails;
In the above query, the criteria based on which Siddhi can identify whether a record already exists in the database is not specified. In thisscenario, we can specify that a record needs to be updated when the attribute (which is the primary key of the table) matches anynamepre-existing record. This can be done by adding a condition to the query as shown below.
from RawMaterialStream select name, supplier, amount
insert into ShipmentDetailson ShipmentDetailTables.name == name;
The completed query is as follows.

12.
13.
@App:name('ShipmentHistoryApp') @source(type = 'http', @map(type = 'json'))define stream RawMaterialStream(name string, supplier string, amountdouble); @primaryKey('name')@index('supplier')@store(type='rdbms',jdbc.url="jdbc:mysql://localhost:3306/SweetFactoryDB",username="root", password="root" ,jdbc.driver.name="com.mysql.jdbc.Driver")define table ShipmentDetails(name string, supplier string, amountdouble); from RawMaterialStreamselect name, supplier, amountupdate or insert into ShipmentDetailson ShipmentDetails.name == name;
To store some data in the table, issue the following cURL commands:ShipmentDetails
curl -X POST \ http://0.0.0.0:8280/ShipmentHistoryApp/RawMaterialStream \ -H 'content-type: application/json' \ -d '{ "event": { "name": "Flour", "supplier": "Acme", "amount": 460.0 }}'
curl -X POST \ http://0.0.0.0:8280/ShipmentHistoryApp/RawMaterialStream \ -H 'content-type: application/json' \ -d '{ "event": { "name": "Sugar", "supplier": "Indigo6", "amount": 272.0 }}'
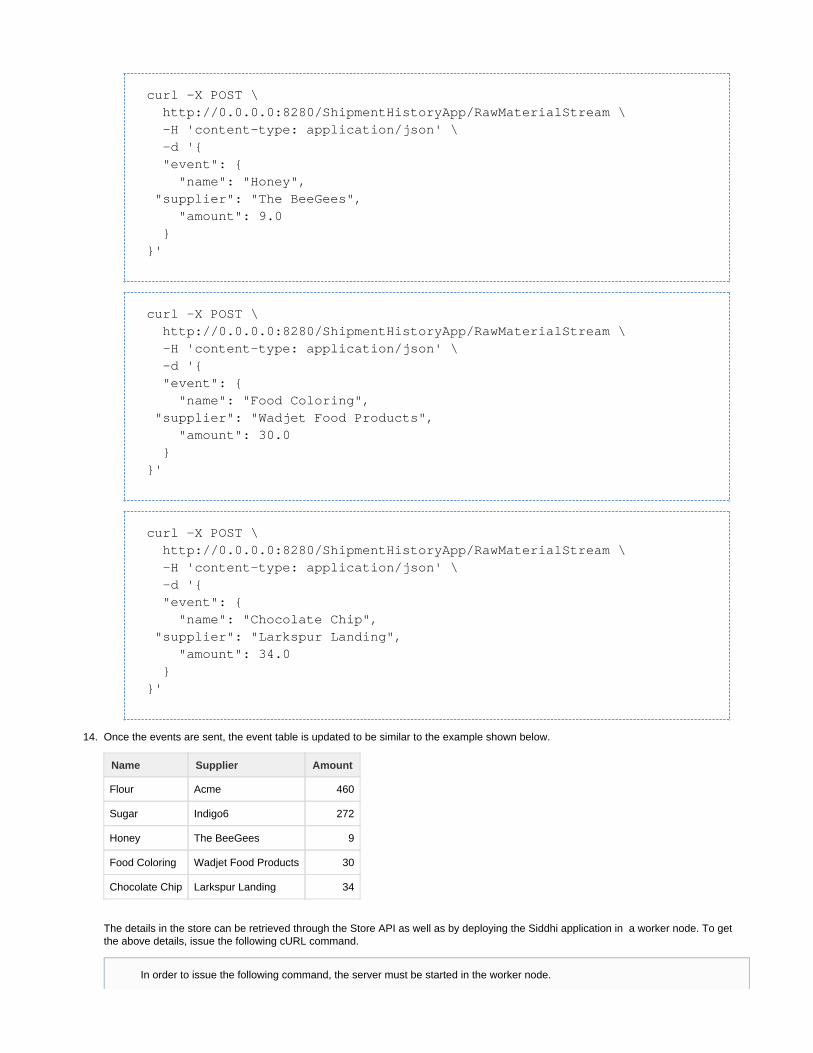
13.
14.
curl -X POST \ http://0.0.0.0:8280/ShipmentHistoryApp/RawMaterialStream \ -H 'content-type: application/json' \ -d '{ "event": { "name": "Honey", "supplier": "The BeeGees", "amount": 9.0 }}'
curl -X POST \ http://0.0.0.0:8280/ShipmentHistoryApp/RawMaterialStream \ -H 'content-type: application/json' \ -d '{ "event": { "name": "Food Coloring", "supplier": "Wadjet Food Products", "amount": 30.0 }}'
curl -X POST \ http://0.0.0.0:8280/ShipmentHistoryApp/RawMaterialStream \ -H 'content-type: application/json' \ -d '{ "event": { "name": "Chocolate Chip", "supplier": "Larkspur Landing", "amount": 34.0 }}'
Once the events are sent, the event table is updated to be similar to the example shown below.
Name Supplier Amount
Flour Acme 460
Sugar Indigo6 272
Honey The BeeGees 9
Food Coloring Wadjet Food Products 30
Chocolate Chip Larkspur Landing 34
The details in the store can be retrieved through the Store API as well as by deploying the Siddhi application in a worker node. To getthe above details, issue the following cURL command.
In order to issue the following command, the server must be started in the worker node.
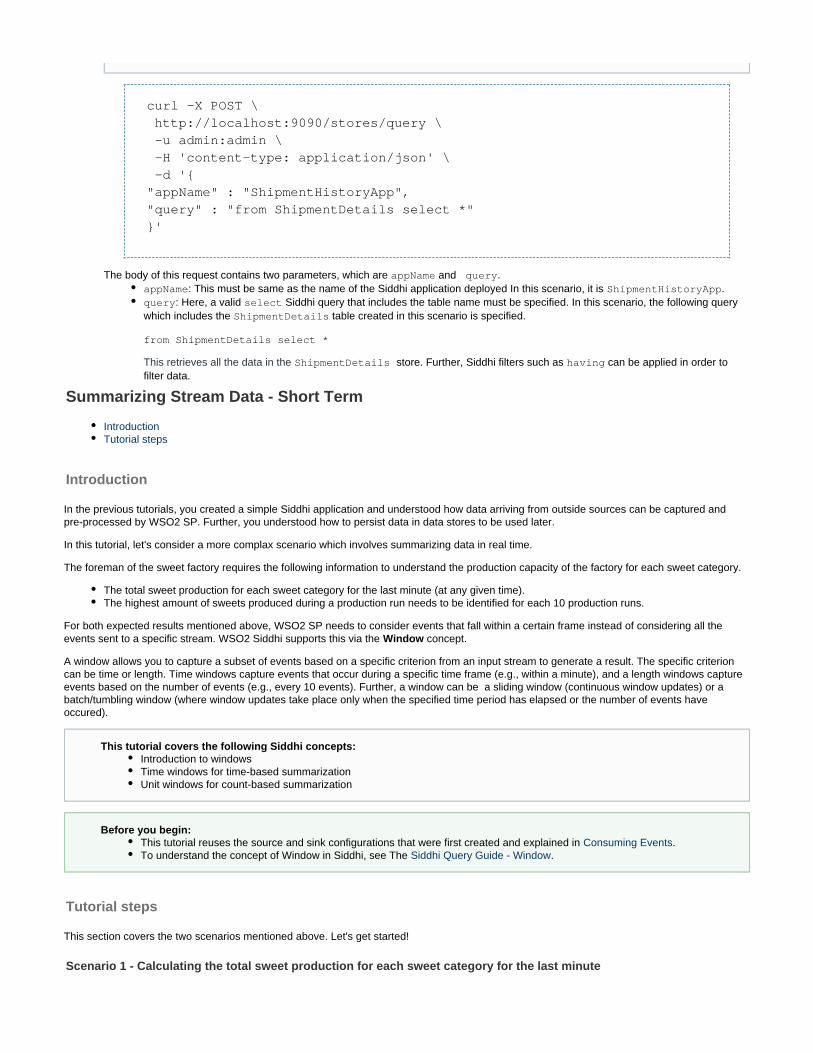
14.
curl -X POST \ http://localhost:9090/stores/query \ -u admin:admin \ -H 'content-type: application/json' \ -d '{"appName" : "ShipmentHistoryApp","query" : "from ShipmentDetails select *"}'
The body of this request contains two parameters, which are and . appName queryappName: This must be same as the name of the Siddhi application deployed In this scenario, it is .ShipmentHistoryAppquery: Here, a valid Siddhi query that includes the table name must be specified. In this scenario, the following queryselectwhich includes the table created in this scenario is specified.ShipmentDetails
from ShipmentDetails select *
This retrieves all the data in the ShipmentDetails store. Further, Siddhi filters such as can be applied in order tohavingfilter data.
Summarizing Stream Data - Short Term
IntroductionTutorial steps
Introduction
In the previous tutorials, you created a simple Siddhi application and understood how data arriving from outside sources can be captured andpre-processed by WSO2 SP. Further, you understood how to persist data in data stores to be used later.
In this tutorial, let's consider a more complax scenario which involves summarizing data in real time.
The foreman of the sweet factory requires the following information to understand the production capacity of the factory for each sweet category.
The total sweet production for each sweet category for the last minute (at any given time).The highest amount of sweets produced during a production run needs to be identified for each 10 production runs.
For both expected results mentioned above, WSO2 SP needs to consider events that fall within a certain frame instead of considering all theevents sent to a specific stream. WSO2 Siddhi supports this via the concept.Window
A window allows you to capture a subset of events based on a specific criterion from an input stream to generate a result. The specific criterioncan be time or length. Time windows capture events that occur during a specific time frame (e.g., within a minute), and a length windows captureevents based on the number of events (e.g., every 10 events). Further, a window can be a sliding window (continuous window updates) or abatch/tumbling window (where window updates take place only when the specified time period has elapsed or the number of events haveoccured).
Tutorial steps
This section covers the two scenarios mentioned above. Let's get started!
Scenario 1 - Calculating the total sweet production for each sweet category for the last minute
This tutorial covers the following Siddhi concepts:Introduction to windowsTime windows for time-based summarization
Unit windows for count-based summarization
Before you begin:This tutorial reuses the source and sink configurations that were first created and explained in .Consuming EventsTo understand the concept of Window in Siddhi, see The .Siddhi Query Guide - Window

1.
2.
3.
a.
b.
In this scenario, a Siddhi application is created to produce a time-based summarization.
Let's reuse the following input stream definition that you used in previous tutorials to capture data about the sweet production.
define stream SweetProductionStream (name string, amount long);
To output the overall production during a minute per sweet category for the past minute, let's define an output stream as follows.
define stream PastMinuteProductionStream (name string, pastMinuteTotallong);
To specify how the data must be derived from the input stream and inserted into the output stream, let's addSweetProductionStreama query as follows.
from SweetProductionStreamselect name, sum(amount) as pastMinuteTotalgroup by nameinsert into PastMinuteProductionStream;
This inserts the value for into the output stream with the same attribute name. The sum for the name PastMinuteProductionStream is calculated for all the events that have arrived, and inserted into the output stream as . The output isamount pastMinuteTotal
grouped by the name of the sweet category.The query given in the above step calculates the total produced for a sweet category based on all the events sent to the SweetProduct
input stream. However, at any given time, you need to see only the total amount produced during the last minute. To achieveionStreamthis, let's update the query as follows:
To consider only events that are within a specific time frame, let's add a window as follows.
from SweetProductionStream#windowselect name, sum(amount) as pastMinutelyTotalgroup by nameinsert into PastMinuteProductionStream;
In this scenario, the subset of events to be captured by the window is based on time and the period of time considered is oneminute. To specify this, update the window as follows.
from SweetProductionStream#window.time(1 minute)select name, sum(amount) as pastMinuteTotalgroup by nameinsert into PastMinuteProductionStream;
#window.time(1 minute) indicates that the window is a sliding window. This means that the window is of a fixed duration(i.e., 1 minute in this scenario), and it slides over incoming events to maintain this constant duration.
Once these changes are applied, the Siddhi application looks as follows.SweetTotalsApp

3.
4.
5.
@App:name('PastMinuteSweetProductionApp')
@source(type='http',receiver.url='http://localhost:5005/SweetProductionEP', @map(type ='json', @attributes(name = '$.sweet', amount = '$.batch.count')))define stream SweetProductionStream (name string, amount long);
@sink(type='log', prefix='Sweet totals over the past minute:')define stream PastMinuteProductionStream (name string, pastMinuteTotallong);
from SweetProductionStream#window.time(1 minute)select name, sum(amount) as pastMinuteTotalgroup by nameinsert into PastMinuteProductionStream;
Let's try out this Siddhi application in the Stream Processor Studio. To do this, start and access the Stream Processor Studio. Then addthe Siddhi application you created as a new file, and save it. Now you can start it by clicking thePastMinuteSweetProductionAppfollowig icon for it while it is open.
To try out the Siddhi application with the latest changes, let's send the following four cURL commands.SweetTotalsApp
curl -X POST \ http://localhost:5005/SweetProductionEP \ -H 'content-type: application/json' \ -d '{ "sweet": "Toffee", "batch": { "batch id": "batch1", "count": 11 }}'
curl -X POST \ http://localhost:5005/SweetProductionEP \ -H 'content-type: application/json' \ -d '{ "sweet": "Gateau", "batch": { "batch id": "batch1", "count": 2 }}'

5.
1.
2.
3.
4.
a.
curl -X POST \ http://localhost:5005/SweetProductionEP \ -H 'content-type: application/json' \ -d '{ "sweet": "Gingerbread", "batch": { "batch id": "batch1", "count": 5 }}'
curl -X POST \ http://localhost:5005/SweetProductionEP \ -H 'content-type: application/json' \ -d '{ "sweet": "Gateau", "batch": { "batch id": "batch1", "count": 8 }}'
This generates an output similar to the following. (Note: the Gateau amount is increased to 10)
Scenario 2 - Identifying the highest amount of sweets produced during a production run
In this scenario, let's create a new Siddhi application named to capture the highest production reported forMaximumSweetProductionAppeach sweet category during a production run, for 10 production runs.
The data arriving from the Sweet Bots is the same as in the previous scenario of this tutorial. Therefore, we can use the same inputstream definition.
define stream SweetProductionStream (name string, amount long);
The output should include the name of the sweet and the highest production total observed during the last 10 production runs. Therefore,let's define an output stream definition as follows.
define stream DetectedMaximumProductionStream (name string, maximumValue long);
To calculate the highest production total observed in a production run, the Siddhi function can be used as follows. max()
from SweetProductionStream select name, as maximumValue group by name insertmax(amount)into DetectedMaximumProductionStream;
In this scenario, the output is derived based on events that fall within a a fixed batch of 10 events. For this purpose, let's add a window asfollows:
Unlike the previous scenario, the window must be a length window and not a time window. Therefore, let's add a window andspecify that it needs to be a length window as shown below. You also need specify the exact length of the length window (10 in
The actual output may differ based on the time taken to issue the above cURL commands.

4.
a.
b.
5.
this scenario).
from SweetProductionStream select name, max(amount) as#window.length(10)maximumValue group by name insert into DetectedMaximumProductionStream;
The above configuration has added a sliding length window of 10 production runs. However, the requirement of the foreman isto calculate the maximum once per 10 production runs. Therefore, let's convert the window you added to a batch window byadding to the window configuration as shown below.Batch
from SweetProductionStream#window.lengthBatch(10)select name, max(amount) as maximumValuegroup by nameinsert into DetectedMaximumProductionStream;
The completed Siddhi application with source and sink mappings added should look as follows:
@App:name('MaximumSweetProductionApp')
@source(type='http',receiver.url='http://localhost:5005/SweetProductionEP', @map(type ='json', @attributes(name = '$.sweet', amount = '$.batch.count')))define stream SweetProductionStream (name string, amount long);
@sink(type='log', prefix='Maximum detected production over 10 runs:')define stream DetectedMaximumProductionStream (name string,maximumValue long);
from SweetProductionStream#window.lengthBatch(10)select name, max(amount) as maximumValuegroup by nameinsert into DetectedMaximumProductionStream;
To test the Siddhi application, let's start the Siddhi application in the Stream Processor Studio andMaximumSweetProductionAppsend 10 events by issuing 11 cURL commands as follows.
curl -X POST \ http://localhost:5005/SweetProductionEP \ -H 'content-type: application/json' \ -d '{ "sweet": "Jaffa Cake", "batch": { "batch id": "batch1", "count": 10 }}'

5.
curl -X POST \ http://localhost:5005/SweetProductionEP \ -H 'content-type: application/json' \ -d '{ "sweet": "Jaffa Cake", "batch": { "batch id": "batch1", "count": 15 }}'
curl -X POST \ http://localhost:5005/SweetProductionEP \ -H 'content-type: application/json' \ -d '{ "sweet": "Jaffa Cake", "batch": { "batch id": "batch1", "count": 11 }}'
curl -X POST \ http://localhost:5005/SweetProductionEP \ -H 'content-type: application/json' \ -d '{ "sweet": "Jaffa Cake", "batch": { "batch id": "batch1", "count": 12 }}'
curl -X POST \ http://localhost:5005/SweetProductionEP \ -H 'content-type: application/json' \ -d '{ "sweet": "Jaffa Cake", "batch": { "batch id": "batch1", "count": 11 }}'

5.
curl -X POST \ http://localhost:5005/SweetProductionEP \ -H 'content-type: application/json' \ -d '{ "sweet": "Jaffa Cake", "batch": { "batch id": "batch1", "count": 13 }}'
curl -X POST \ http://localhost:5005/SweetProductionEP \ -H 'content-type: application/json' \ -d '{ "sweet": "Jaffa Cake", "batch": { "batch id": "batch1", "count": 16 }}'
curl -X POST \ http://localhost:5005/SweetProductionEP \ -H 'content-type: application/json' \ -d '{ "sweet": "Jaffa Cake", "batch": { "batch id": "batch1", "count": 15 }}'
curl -X POST \ http://localhost:5005/SweetProductionEP \ -H 'content-type: application/json' \ -d '{ "sweet": "Jaffa Cake", "batch": { "batch id": "batch1", "count": 11 }}'

5.
curl -X POST \ http://localhost:5005/SweetProductionEP \ -H 'content-type: application/json' \ -d '{ "sweet": "Jaffa Cake", "batch": { "batch id": "batch1", "count": 17 }}'
This generates the following log in the console.
Streaming Data Summarization (Incremental Aggregation)
IntroductionTutorial stepsUser Scenario 2: Retrieval of data on demand
Introduction
In the previous tutorial, you looked at the Siddhi real time data summarization capabilities by calculating the total production in the pastminute.Now let's consider a more advanced scenario where you need to calculate the total value for a specific time period.
In this scenario, the foreman of the Sweet Factory needs to know the total production of Sherbet Lemon during each hour in November 2017.
It is costly to do this by recalculating the total for each and every event. What you need is a time based aggregation of the events in real time andretrieval on demand. Siddhi supports this functionality through the Incremental Aggregation concept.
Incremental Aggregation calculates the aggregated values continuously and stores them. These values can be retrieved efficiently from the storeon demand. Furthermore, Incremental Aggregators support out of order event arrival with in-memory buffers for higher accuracy.
Note that in the last event representing the last production run, the total production was 17, but the maximum detected totalproduction output is 16. This is because you have used a batch withdow, and the 11th event does not belong to the fixed batchof 10 events.
This tutorial covers the following concepts:Introduction to incremental aggregationRetrieval from incremental aggregation
1. 2. 3.
4.
5. 6.
Before you begin:In this scenario, information sent by the Sweet Bots are stored in a MySQL table named . You need to download andSweetFactoryDBinstall MySQL, and create this table before you carry out the tutorial steps.
Click here for instructions to configure the database table.
Download and install .MySQL ServerDownload the .MySQL JDBC driverUnzip the downloaded MySQL driver zipped archive, and copy the MySQL JDBC driver JAR (mysql-connector-java-
) into the directory.x.x.xx-bin.jar <SP_HOME>/libEnter the following command in a terminal/command window, where is the username you want to use tousernameaccess the databases.mysql -u username -p When prompted, specify the password you are using to access the databases with the username you specified.Add the following configuration under the section of the Data Sources Configuration <SP_HOME>/conf/editor/deplo
file.yment.yaml
You need to change the values for the and parameters to the username and passwordusername password

1.
2.
Tutorial steps
Lets get started!
User Scenario 1: Defining incremental aggregation
In this scenario, lets define an incremental aggregation to calculate the total production in an incremental manner, and store the results.
Let's define an input stream as follows based on the data received from Sweet Bots. This is the same stream definition used in theprevious tutorials to capture the name of the sweet category and the amount produced.
define stream SweetProductionStream (name string, amount long);
Now, let's define an aggregation for the input data. Here, you can assume that the foreman would like to know the production per hour,month and year for each sweet.
define aggregation SweetProductionAggregation from SweetProductionStreamselect name, sum(amount) as totalAmountgroup by nameaggregate every hour...year
6.
7.
- name: SweetFactoryDB description: Datasource used for Sweet Factory SupplyRecords jndiConfig: name: jdbc/test useJndiReference: true definition: type: RDBMS configuration: jdbcUrl: 'jdbc:mysql://localhost:3306/test' username: root password: root driverClassName: com.mysql.jdbc.Driver maxPoolSize: 50 idleTimeout: 60000 connectionTestQuery: SELECT 1 validationTimeout: 30000 isAutoCommit: false
To create a database table named , issue the following commands from the terminal.SweetFactoryDB
mysql> create database SweetFactoryDB;mysql> use SweetFactoryDB;mysql> source <SP_HOME>/wso2/editor/dbscripts/metrics/mysql.sql;mysql> grant all on SweetFactoryDB.* TO username@localhost identified by "password";
that you are using to access the MySQL database.

2.
3.
1.
This calculates the total amount per hour, day, month and year by the arrival ime of each event. Incremental Aggregation can also bedone for seconds, minutes, hours, days, months and years. However, in this sweet production scenario, aggregating by second holds noinformation value. Therefore, the sweet production is aggregated from hour to year.Now, comes the question of when the production occurs. In the above aggregation, event arrival time is the time used in aggregation.The Sweet Bots send information directly from the factory floor to the server in the same network. Therefore, we can assume that theevent arrival time is the production time.
The completed Siddhi application looks as follows.
define stream SweetProductionStream(name string, amount long);
@store(......)define aggregation SweetProductionAggregation from SweetProductionStreamselect name, sum(amount) as totalAmountgroup by nameaggregate every min...year
User Scenario 2: Retrieval of data on demand
In the previous scenario, you defined the aggregation. Now let's see how to retrieve from it. Siddhi supports this functionality through correlation ofdata. In this tutorial, you are retrieving data via aggregation joins. For more information on correlating data through joins see Siddhi Query Guide -
.Joins
First, let's define a stream to retrieve data. The foreman needs to see the hourly production of Sherbet Lemon for November 2016.Therefore, the criteria to retrieve values are as follows.
a.
b.
If you want you can be more accurate by appending the data sent by the SweetBots to include time as shown below.
First define the input stream to include a timestamp:
define stream SweetProductionStream (name string, amount long, timestamp long);
Then use the timestamp for aggregation as shown below.
SweetProductionStream.timestamp aggregate by every hour...year
For this tutorial, let's continue to use the format mentioned first instead of the format in these substeps because the timedifferences are very slight in the hourly calculations.
from SweetProductionStreamselect name, sum(amount) as totalAmountgroup by name
This part of the aggregation specifies the following:
From where the information to be processed is taken (i.e., input stream)SweetProductionStreamThe value you are aggregating. In this scenario, aggregates only the summation ofsum(amount) as totalAmountvalues. The aggregation can also be , or .minimum maximum averageThe clause is optional and can be ignored if all production must be aggregated.group by
Here, you have defined a stream to get information and aggregated a value for minutes-year.Aggregation can be stored in any type of store supported in Siddhi. For more information about the supported stores,see .Defining Data Tables
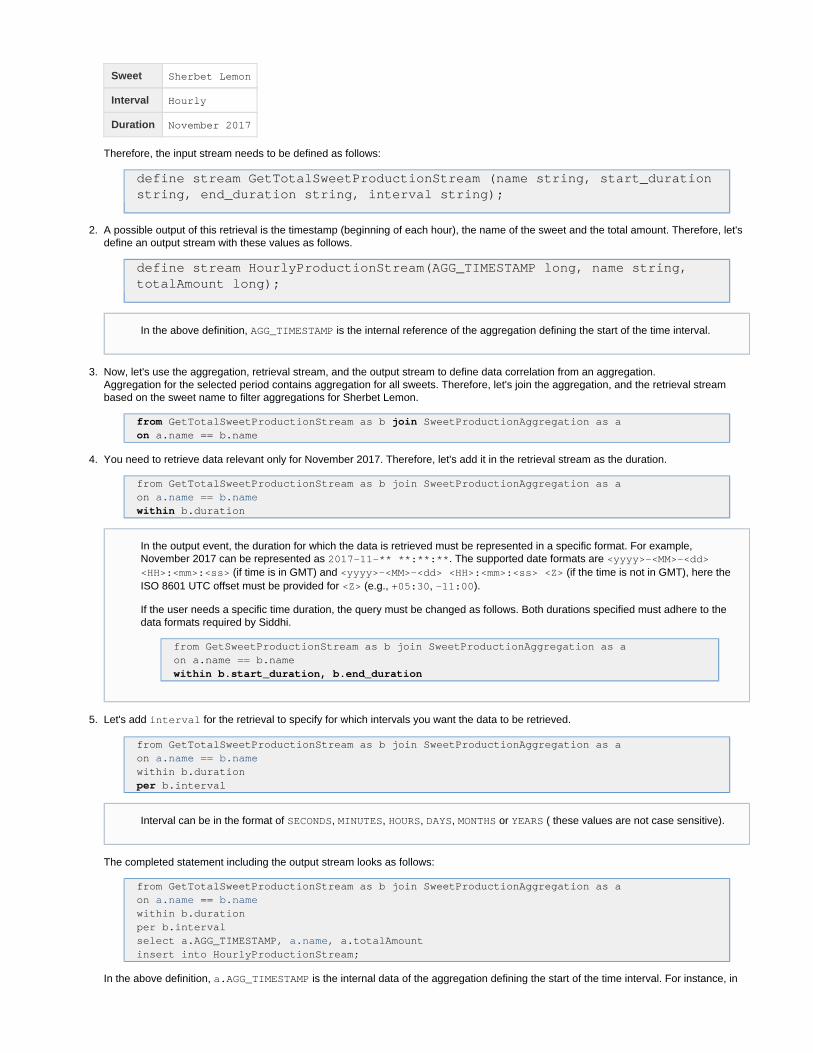
1.
2.
3.
4.
5.
Sweet Sherbet Lemon
Interval Hourly
Duration November 2017
Therefore, the input stream needs to be defined as follows:
define stream GetTotalSweetProductionStream (name string, start_durationstring, end_duration string, interval string);
A possible output of this retrieval is the timestamp (beginning of each hour), the name of the sweet and the total amount. Therefore, let'sdefine an output stream with these values as follows.
define stream HourlyProductionStream(AGG_TIMESTAMP long, name string,totalAmount long);
Now, let's use the aggregation, retrieval stream, and the output stream to define data correlation from an aggregation.Aggregation for the selected period contains aggregation for all sweets. Therefore, let's join the aggregation, and the retrieval streambased on the sweet name to filter aggregations for Sherbet Lemon.
GetTotalSweetProductionStream as b SweetProductionAggregation as afrom join a.name == b.nameon
You need to retrieve data relevant only for November 2017. Therefore, let's add it in the retrieval stream as the duration.
from GetTotalSweetProductionStream as b join SweetProductionAggregation as aon == a.name b.name
b.durationwithin
Let's add for the retrieval to specify for which intervals you want the data to be retrieved.interval
from GetTotalSweetProductionStream as b join SweetProductionAggregation as aon == a.name b.namewithin b.duration
b.intervalper
The completed statement including the output stream looks as follows:
from GetTotalSweetProductionStream as b join SweetProductionAggregation as aon == a.name b.namewithin b.durationper b.interval select a.AGG_TIMESTAMP, , a.totalAmount a.nameinsert into HourlyProductionStream;
In the above definition, is the internal data of the aggregation defining the start of the time interval. For instance, ina.AGG_TIMESTAMP
In the above definition, is the internal reference of the aggregation defining the start of the time interval.AGG_TIMESTAMP
In the output event, the duration for which the data is retrieved must be represented in a specific format. For example,November 2017 can be represented as . The supported date formats are 2017-11-** **:**:** <yyyy>-<MM>-<dd>
(if time is in GMT) and (if the time is not in GMT), here the<HH>:<mm>:<ss> <yyyy>-<MM>-<dd> <HH>:<mm>:<ss> <Z>ISO 8601 UTC offset must be provided for (e.g., , ).<Z> +05:30 -11:00
If the user needs a specific time duration, the query must be changed as follows. Both durations specified must adhere to thedata formats required by Siddhi.
from GetSweetProductionStream as b join SweetProductionAggregation as aon a.name == b.namewithin b.start_duration, b.end_duration
Interval can be in the format of , , , , or ( these values are not case sensitive).SECONDS MINUTES HOURS DAYS MONTHS YEARS

5.
1.
the November 2017 duration, there is a 24*30 hourly production aggregation. The first output event has the timestamp of the date andtime of .1st November 2017 00:00:00
The completed Siddhi application with the possible sink and source configurations is as follows.
@App:name('TotalProductionHistoryApp')@source(type = 'http', @map(type = 'json'))define stream SweetProductionStream(name string, amount long);@source(type = 'http', @map(type = 'json'))define stream GetTotalSweetProductionStream (name string, durationstring, interval string);
@sink(type='log', prefix='Hourly Production Stream')define stream HourlyProductionStream(AGG_TIMESTAMP long, name string,totalAmount long);
@index('supplier')@store(type='rdbms',jdbc.url="jdbc:mysql://localhost:3306/SweetFactoryDB",username="root", password="root" ,jdbc.driver.name="com.mysql.jdbc.Driver")define aggregation SweetProductionAggregation from SweetProductionStreamselect name, sum(amount) as totalAmountgroup by nameaggregate every hour ... year;from GetTotalSweetProductionStream as b joinSweetProductionAggregation as a on a.name == b.name within b.duration per b.interval select a.AGG_TIMESTAMP, a.name, a.totalAmount insert into HourlyProductionStream;
Analyzing KPIs
IntroductionTutorial steps
Introduction
A Key Performance Indicator (KPI) is a quantifiable metric that can be used to evaluate the success or the failure of the object beingmeasured. WSO2 SP with its real-time stream processing engine allows you perform KPI Analysis. In this tutorial, let's look at how to create aSiddhi application that performs KPI analysis.
In this scenario, the foreman wants the production per hour of each sweet to not fall below 5000 units in order to meet the customer demand. Atthe same time, he also needs to know if the production per hour of a category is over 10000 in order to identify surpluses. Let's see how to write aquery to derive this information by analyzing data sent in JSON format by the Sweet Bots on the factory floor.
This tutorial covers the following concepts:Grouping and filteringSiddhi functions

1. 2.
3.
4.
5.
Tutorial steps
In this tutorial, there are two scenarios as follows:
Detecting sweets of which the production per hour falls below 5000Detecting sweets of which the production per hour rises above 10000
Scenario 1: Detecting sweets of which the production per hour falls below 5000
Let's get started!
Start the WSO2 SP in the editor mode and login to the Stream Processor Studio. Then open a new Siddhi application.Let's revisit the following configurations that you created in Tutorial 5.
define stream SweetProductionStream (name string, amount long); define stream PastHourProductionStream (name string, pastHourTotallong); from SweetProductionStream#window.time(1 hour)select name, sum(amount) as pastHourTotalgroup by nameinsert into LowProductionStream;
Let's add these configurations to your new Siddhi application in order to edit them in a way that addresses the requirements of thisscenario.
Only events with a per-hour production that is less than 5000 need to be sent to the output stream. Therefore,LowProductionStreamadd a clause to the query as follows.having
from SweetProductionStream#window.time(1 hour) select name, sum(amount) as hourlyTotalgroup by name insert into LowProductionStream;having hourlyTotal < 5000
At present, the foreman who is receiving the output of this query cannot identify the hour to which output event applies. Therefore, youneed to add an additional attribute named to the output stream definition as shown below.currentHour
define stream LowProductionStream (name string, hourlyTotal long, );currentHour int
The exact hour to which the reported production per hour applies is not sent in the incoming events generated by the Sweet Bots. Thisneeds to be inferred by the Siddhi application. To infer the exact hour during which the specific sweet production total was calculated,let's add the currentTimeMillis() time function in Siddhi as follows:
Conditional processing using ifThenElse()
Before you begin:This tutorial reuses the following queries and configurations from other tutorials:
Sink and source configurations in .Consuming EventsThe query created in .Summarizing Stream Data - Short Term
This tutorial considers a time window of one hour instead of one minute.
For this tutorial, the output stream name which was previously is changed to PastHourProductionStream LowProductio.nStream
The having clause is added just after the statement so that all the subsequent operations arehourlyTotal < 5000 selectapplied to the filtered result.

5.
6.
7.
8.
select name, sum(amount) as hourlyTotal, currentTimeMillis() as currentHour
To specify HOUR as the unit of time to be extracted for the purpose of reporting the production totals calculated, add the time:extract () expression as shown below.
select name, sum(amount) as hourlyTotal, astime:extract(currentTimeMillis(), 'HOUR')currentHour
The working hours of the sweet factory are between 9.00AM and 5.00PM. However, the Siddhi application runs throughout the day, and(as at now) calculates the sweet production totals even for the hours during which the Sweet Bots are inactive. To avoid reporting duringnon-working hours where the production was below the target, you need to add a filter that excludes non-working hours as follows:
from SweetProductionStream#window.time(1 hour) select name, sum(amount) as hourlyTotal,time:extract(currentTimeMillis(), 'HOUR') as currentHour group by name having hourlyTotal <5000 and insert into LowProductionStream;currentHour > 9 and currentHour < 17
Apply the same source and sink configurations that you created in to complete the Siddhi application. The completed SiddhiTutorial 2application looks as follows.
@App:name('SweetProductionKPIApp')
@source(type='http',receiver.url='http://localhost:5005/SweetProductionEP', @map(type ='json', @attributes(name = '$.sweet', amount = '$.batch.count')))define stream SweetProductionStream (name string, amount long);
@sink(type='log', prefix='Low production alert:')define stream LowProductionStream (name string, hourlyTotal long,currentHour int);
from SweetProductionStream#window.time(1 hour)select name, sum(amount) as hourlyTotal,time:extract(currentTimeMillis(), 'HOUR') as currentHourgroup by namehaving hourlyTotal < 5000 and currentHour > 9 and currentHour < 17insert into LowProductionStream;
To check whether this Siddhi application works as expected, send four cURL commands as follows.
curl -X POST \ http://localhost:5005/SweetProductionEP \ -H 'content-type: application/json' \ -d '{ "sweet": "Toffee", "batch": { "batch id": "batch1", "count": 6000 }}'

8.
1.
2.
curl -X POST \ http://localhost:5005/SweetProductionEP \ -H 'content-type: application/json' \ -d '{ "sweet": "Gateau", "batch": { "batch id": "batch1", "count": 6200 }}'
curl -X POST \ http://localhost:5005/SweetProductionEP \ -H 'content-type: application/json' \ -d '{ "sweet": "Gingerbread", "batch": { "batch id": "batch1", "count": 4500 }}'
curl -X POST \ http://localhost:5005/SweetProductionEP \ -H 'content-type: application/json' \ -d '{ "sweet": "Gateau", "batch": { "batch id": "batch1", "count": 5800 }}'
The production per hour in the third event is less than 5000. This is logged in the output logs as follows.
Scenario 2 Detecting sweets of which the production per hour rises above 10000
In this scenario, events of which the per-hour production of a sweet exceeds 10000 must be marked with so that thePossible Surplusforeman identifies any surpluses that occur.
Let's get started!
In this scenario, the foreman needs to see the name of the sweet, the total produced during an hour and the hour to which the informationapplies in order to identify surpluses. Therefore, let's add an output stream definition with attributes to capture this information as follows.
define stream ProductionStatusStream (name string, hourlyTotal long,currentHour int, status string);
In this scenario, you are receiving information from the same input stream used in the previous scenario andSweetProductionStreamin previous tutorials. Let's also add the query to pick values from the input stream and add it to the SweetProductionStream Product

2.
3.
4.
output stream.ionStatusStream
from SweetProductionStream#window.time(1 hour) select name, sum(amount) as hourlyTotal,time:extract(currentTimeMillis(), 'HOUR') as currentHour, "Possible surplus" group by namehaving hourlyTotal > 10000 and currentHour > 9 and currentHour < 17 insert intoProductionStatusStream;
Here, you are using the clause as you did in the previous scenario. In this query, the events filtered are ones that are generatedhavinglater that the 9.00 AM and earlier than 5.00PM with a production during an hour that exceeds 10000.The query added in the previous step only sends the filtered events to the output stream. However, theProductionStatusStreamrequirement in this scenario is to send all the events to the output stream while events that match theProductionStatusStreamfiltering criteria are marked with . To achieve this, you can use the function that is configured asPossible Surplus ifThenElse()follows.
ifThenElse(<condition>, <valueIfTrue>, <valueIfFalse>)
Let's add a condition to the query using this function as shown below.
from SweetProductionStream#window.time(1 hour) select name, sum(amount) as hourlyTotal,time:extract(currentTimeMillis(), 'HOUR') as currentHour, ifThenElse(sum(amount) > 10000,
group by name having currentHour > 9 and currentHour <"Possible surplus", "OK") as status17 insert into ProductionStatusStream;
Here, if the production within the current hour is more than 10000, is included in the output event as the value forPossible Surplusthe attribute.status
The completed Siddhi application looks as follows.
@App:name('SweetProductionKPIApp')
@source(type='http',receiver.url='http://localhost:5005/SweetProductionEP', @map(type ='json', @attributes(name = '$.sweet', amount = '$.batch.count')))define stream SweetProductionStream (name string, amount long);
@sink(type='log', prefix='Low production alert:')define stream LowProductionStream (name string, hourlyTotal long,currentHour int);
@sink(type='log', prefix='Sweet production status:')define stream ProductionStatusStream (name string, hourlyTotal long,currentHour int, status string);
from SweetProductionStream#window.time(1 hour)select name, sum(amount) as hourlyTotal,time:extract(currentTimeMillis(), 'HOUR') as currentHour,ifThenElse(sum(amount) > 10000, "Possible surplus", "OK") as statusgroup by namehaving currentHour > 9 and currentHour < 17insert into ProductionStatusStream;
To check whether this Siddhi application works as expected, you can send the same four cURL commands you issues in the previousscenrio after you save the Siddhi application. The following output is logged.
Publishing Processed Events

1.
2.
3.
4.
a.
IntroductionTutorial steps
Introduction
In the previous tutorials, you covered how to capture events with WSO2 Stream Processor and how these events are preprocessed. In all theprevious tutorials, you published the output as logs in the console.
In this tutorial, let's look at how events can be published via WSO2 Stream Processor to external endpoints. Similar to receiving events, WSO2SP also supports many functionalities for publishing events, allowing you to publish events using different transports and in different formats.
In the previous tutorial, you wrote a query to identify the hours during which the per hour production was less than 5000. Let's consider a scenariowhere the factory foreman needs to send an email to the factory manager when there is such a shortage in the production of a sweet.
Tutorial steps
Let's get started!
Start the editor, and log in to the WSO2 Stream Processor Studio. Then open the Siddhi applicationPastHourSweetProductionAppthat you created in Tutorial 5. It already has the following queries to identify the hours during which the total production of a sweet hasbeen less than 5000.
define stream SweetProductionStream (name string, amount long);
define stream LowProductionStream (name string, hourlyTotal long, currentHour long);
from SweetProductionStream#window.time(1 hour)select name, sum(amount) as hourTotal, time:extract(currentTimeMillis(), 'HOUR') ascurrentHour group by name having hourlyTotal < 5000 and currentHour > 9 and currentHour <17 insert into LowProductionStream;
To send an email when the production of a sweet falls below 5000 during a hour, you need to configure an email sink. Let's add it to theSiddhi application as follows.
@sink(type='email');define stream LowProductionStream (name string, hourlyTotal long, currentHour long)
This sink configuration is added above the output stream definition to indicate that it is connected to thisLowProductionStreamstream. The events sent via this sink are taken from the output stream.LowProductionStreamFor the email to reach the factory manager, the sweet factory foreman needs to send it from the factory's email address which is factor
, to the factory manager's email address which is . Taking this into account,[email protected] [email protected]'s update the email sink as follows:
@sink(type='email', address='[email protected]', username='factory012',)password='secret_password', subject='Low production alert', to='[email protected]'
define stream LowProductionStream (name string, hourlyTotal long, currentHour long);
This configuration includes the following information.username: The email username of the sender. (Note: this should be without the @ and the latter part of the address.eg: @gmail.com)address: The email address of the sender.password: The email password of the sender.subject: The email password.to: The recipient's email address.
At present, the sink configuration does not have a mapping configuration (similar to what you have already defined for the HTTP eventsource). Without the mapping, this configuration only allows you to publish events in the same format in which they are sent to WSO2 SPto be processed. This format is not readable and the email sinks do not support that format. Therefore, let's add a mapping configurationby following these sub steps.
The published event must be in a format that can be read by humans. Therefore, you can add a basic mapping of the text type.
This tutorial covers the following concepts:Publishing events with Siddhi sinksCustom mappings for sinks
Before you begin:Try .Tutorial 5: Summarizing Stream Data - Short TermTo understand sink configurations and the different types of sinks supported in Siddhi, see .Publishing Events

4.
a.
b.
@map(type = 'text')
To transform the output event into a readable text message, the annotation needs to be added in the following@payloadformat.
@map(type = 'text', )@payload("Some text body")
Within the text payload, the stream variables can be specified via the placeholder so that the runtime values are{{ }}dynamically assigned. For example, if the stream has an attribute named attr1, a payload body that refers to this attribute looksas follows.
@payload("The value is "){{attr1}}
When the total production per hour falls below 5000, the following information in the output event variesThe name of the sweet categoryThe exact amount produced during the hour
The specific hour during which the total production was less than 5000
Let's compose the body of the email to be sent tothe factory manager via the annotation with a placeholder for each@payloaddetail mentioned above.
@payload("Hello,
The production of {{name}} has fallen to below 5000 units, to {{hourlyTotal}} in thepast hour (hour {{currentHour}} of the day).
This message was generated automatically.")
Now, let's look at the completed output stream definition with the sink, and with the newlines represented by the \n newlinecharacter.
@sink(type='email', address='[email protected]', username='factory012',password='secret_password', subject='Low production alert',to='[email protected]', @map(type = 'text', @payload("Hello,\n\nThe productionof {{name}} has fallen to below 5000 units, to {{hourlyTotal}} in the past hour(hour {{currentHour}} of the day).\n\nThis message was generated automatically.")))
define stream LowProductionStream (name string, hourlyTotal long, currentHour long)
The completed Siddhi application looks as follows:
Note that , and are placeholders for the attributes in the {{name}} {{hourlyTotal}} {{currentHour}} LowProd stream, to which the sink is bound.uctionStream

1.
@App:name('LowSweetProductionApp')
@source(type='http',receiver.url='http://localhost:5005/SweetProductionEP', @map(type = 'json',@attributes(name = '$.sweet', amount = '$.batch.count')))define stream SweetProductionStream (name string, amount long);
@sink(type='email', address='[email protected]',username='factory012', password='secret_password', subject='Low productionalert', to='[email protected]', @map(type = 'text',@payload("Hello,\n\nThe production of {{name}} has fallen to below 5000units, to {{hourlyTotal}} in the past hour (hour {{currentHour}} of theday).\n\nThis message was generated automatically.")))define stream LowProductionStream (name string, hourlyTotal long,currentHour int);
from SweetProductionStream#window.time(1 hour)select name, sum(amount) as hourlyTotal, time:extract(currentTimeMillis(),'HOUR') as currentHourgroup by namehaving hourlyTotal < 5000 and currentHour > 9 and currentHour < 17insert into LowProductionStream;
Correlating Simple Events
IntroductionTutorial steps
Introduction
In the previous tutorials, you covered basic Siddhi functionality including ingesting data, preprocessing, data store integration and publishingevents. In all of these tutorials, you have considered events arriving from a single source, (either data sent by the SweetBots on the factory flooror data from the suppliers of raw material).
In a real world user scenario, data from various sources need to be analyzed in tandem. This can be anything from multiple disparate entities aswell as pre-received data stored elsewhere. Hence, correlating events from multiple sources needs to be studied. Siddhi offers this functionalitythrough stream and store joins. A join can be used to match events arriving from different sources based on given criteria and then process themtogether.
To understand this concept, let's consider a scenario in the sweet factory where events are sent to denote the following:
The raw materials arriving at the factory (name of the material and the amount)The raw materials consumed per production run by all SweetBots (name and amount)
The factory needs to ensure that the production of flour and sugar does not consume more than 95% of the supply in the past hour forsustainability reasons. Any material that exceeds this limit should be recorded.
Tutorial steps
Let's get started!
Before you begin:Try Integrating Datastores.

1.
2.
3.
4.
5.
6.
7.
8.
9.
To create your Siddhi application, let's start the editor, and log in to the WSO2 Stream Processor Studio. Then open a new Siddhi file towrite a new Siddhi application.Now let's define two input streams as follows.
define stream MaterialConsumptionStream(name string, user string, amountdouble);
define stream MaterialSupplyStream(name string, supplier string, amountdouble);
The results output must include the name of the raw material, amounts of the supplied and produced material, and the name of the rawmaterial user and supplier if the threshold is reached. Let's define an output stream based on these details:
define stream MaterialThresholdAlertStream(name string, supplyAmountdouble, consumptionAmount double, user string, supplier string);
To select events from the for analysis, write a query as follows.MaterialConsumptionStream
from MaterialConsumptionStreamselect name, amount, user
Let's define an alias for the so that it can be identified more easily once you have used the joinMaterialConsumptionStreamstatement.
from MaterialConsumptionStream as c select c.name, c.amount, c.user
The same needs to be done for the .MaterialSupplyStream
from MaterialSupplyStream as s select s.name, s.amount, s.supplier
Now that we have both input streams ready, let's join both inputs together using the keyword.join
from MaterialConsumptionStream as c
MaterialSupplyStream as sjoin
To correlate the two streams, you need a common attribute in both of them. In this scenario, both streams have the name of the materialproduced. Therefore, can be used as the attribute as shown below.name
from MaterialConsumptionStream as cjoin MaterialSupplyStream as son == c.name s.name
The time period to be considered is one hour, a time window of one hour should be added to both streams as shown below.
from MaterialConsumptionStream as c#window.time(1 hour)join MaterialSupplyStream as s#window.time(1 hour)on c.name == s.name
To ensure that the consumption does not exceed 95% of the supply, you can add a query as follows.
s.amount * 0.95 < c.amount
The complete statement in a usable format looks as follows.
from MaterialConsumptionStream#window.time(1 hour) as c join MaterialSupplyStream#window.time(1 hour) as s on c.name == s.nameselect s.name, s.amount as supplyAmount, c.amount as consumptionAmount,user, suppliergroup by s.namehaving s.amount * 0.95 < c.amountinsert into MaterialThresholdAlertStream
The completed Siddhi application with source and sink configurations added looks as follows.

9.
@App:name('MaterialThresholdAlertApp')
@source(type = 'http', @map(type = 'json'))define stream MaterialConsumptionStream(name string, user string, amountdouble);
@source(type = 'http', @map(type = 'json'))define stream MaterialSupplyStream(name string, supplier string, amountdouble);
@sink(type='log', prefix='Materials that go beyond sustainabilitythreshold:')define stream MaterialThresholdAlertStream(name string, supplyAmountdouble, consumptionAmount double, user string, supplier string);
from MaterialConsumptionStream#window.time(1 hour) as c join MaterialSupplyStream#window.time(1 hour) as s on c.name == s.nameselect s.name, s.amount as supplyAmount, c.amount as consumptionAmount,user, suppliergroup by s.namehaving s.amount * 0.95 < c.amountinsert into MaterialThresholdAlertStream;
Now, if you want to correlate the events not just from streams but also with previously stored data, the store that was used for storing theevents can be used in place of either stream (but not both).
define table ShipmentDetailsTable(name string, supplier string, amount double);define stream MaterialConsumptionStream(name string, user string, amount double);
from MaterialConsumptionStream#window.time(1 hour) as cjoin ShipmentDetailsTable as son == c.name s.nameselect ...
The following is the completed Siddhi application. It contains the same query as above that uses historical data from the ShipmentDeta.ilsTable

9.
@App:name('PersistentMaterialThresholdAlertApp')
@source(type = 'http', @map(type = 'json'))define stream MaterialConsumptionStream(name string, user string,amount double);
@primaryKey('name')@index('supplier')@store(type='rdbms',jdbc.url="jdbc:mysql://localhost:3306/SweetFactoryDB",username="root", password="root" ,jdbc.driver.name="com.mysql.jdbc.Driver")define table ShipmentDetailsTable(name string, supplier string, amountdouble);
@sink(type='log', prefix='Materials that go beyond sustainabilitythreshold:')define stream MaterialThresholdAlertStream(name string, supplyAmountdouble, consumptionAmount double, user string, supplier string);
from MaterialConsumptionStream#window.time(1 hour) as c join ShipmentDetailsTable as s on c.name == s.nameselect s.name, s.amount as supplyAmount, c.amount asconsumptionAmount, user, suppliergroup by s.namehaving s.amount * 0.95 < c.amountinsert into MaterialThresholdAlertStream;
Correlating Events for Complex Event Processing
IntroductionTutorial steps
Introduction
In the previous tutorial, you looked at correlating events from multiple sources in a simple manner using joins. You used join statements betweenstreams and stores and observed how aliases can be used on streams for easy reference.
In this tutorial, let's see how event correlation can be applied to Complex Event Processing (CEP) scenarios.
Let's consider the following two scenarios in the sweet factory.
Scenario 1: The factory foreman needs to monitor the supply of materials and send an alert if there is a decrease of 10 units within 10minutes.Scenario 2: The factory foreman needs to monitor both supply and production, and send an alert if production does not start within 15minutes after the raw materials are received.
This tutorial covers the following concepts:Simple patternsLogical patterns for applying logical operations to events arriving in a temporal order
WSO2 Siddhi also supports another type of patterns known as Counting Patterns. For more information, see the Siddhi Query Guide -.Counting Pattern

1.
2.
3.
4.
Simple Siddhi patterns can be identified by the following syntax.
from (every) x -> ywithin tselect ...
This means that for events in the stream are followed by events from the stream within a time gap of , the subsequent operations arex y tcarried out.
Let's consider the following real world example to understand this.
from every (e1=MyStream) -> e2=MyStream[e1.val1 <= e2.val1] within 1 hourselect e1.val1, e2.val2insert into OutStream
In the above example, each event that arrives at the stream is checked against subsequent events arriving at the same streamMyStream(because the keyword is used) and checked against new events matching the given filter condition. This is done continuously for a timeeveryperiod of one hour. If any matching events are found, then they are sent to the output stream based on the clause.OutStream select
If the keyword is not used, then the calculation is invoked only once, when the first event arrives at the stream.every MyStream
Tutorial steps
This covers the steps for the following two user scenarios.
User Scenario 1: Detecting a decrease in supply within a set time periodUser Scenario 2: Detecting production delays after supplies are received
User Scenario 1: Detecting a decrease in supply within a set time period
Lets get started!
Let's define an input stream for the raw material supply. This can be the same input stream you defined in .Correlating Simple Events
define stream MaterialSupplyStream(name string, supplier string, amountdouble);
Now let's define an output stream as follows.
define stream MaterialSupplyStream(name string, supplier string, amountdouble);
Let's add a query to perform a simple insertion from the input stream to the output stream.
from MaterialSupplyStreamselect name, supplier, amountinsert into MaterialSupplyAlertStream;
To define a pattern to this stream so that events within a 10-minute window are considered, lets update the query as follows.
Before you begin:Try .Correlating Simple Events

4.
5.
6.
1.
from every (e1=MaterialSupplyStream) -> e2=MaterialSupplyStream within 10 minselect e1.name, e1.amount as originalAmount, e2.amount as laterAmount,e1.supplierinsert into MaterialSupplyAlertStream;
The foreman requires each event be checked against the subsequent events to see if there's a decrease in the amount by 10 units. TheSiddhi filter for this is as follows.
[e1.name == e2.name and e1.amount - e2.amount > 10]
Let's add it to the query as shown below.
from every (e1=MaterialSupplyStream) -> e2=MaterialSupplyStream[e1.name == e2.name and within 10 min select e1.name, e1.supplier, e1.amount inserte1.amount - e2.amount > 10]
into MaterialSupplyAlertStream;
To generate a more complete output, you need to add the following information to it.The name of the raw materialThe earlier amountThe later amount (which is less than the earlier detected amount by 10 units or more)The supplier whose supply has fallen below the threshold
Let's update the output stream definition as follows to include this information.
define stream MaterialSupplyAlertStream(name string, originalAmountdouble, laterAmount double, supplier string);
The completed Siddhi application is as follows.
@App:name('MaterialDecreaseDetectionApp') @source(type = 'http', @map(type = 'json'))define stream MaterialSupplyStream(name string, supplier string, amountdouble); @sink(type='log', prefix='Decrease in supply detected:')define stream MaterialSupplyAlertStream(name string, originalAmount double,laterAmount double, supplier string); from every (e1=MaterialSupplyStream) -> e2=MaterialSupplyStream[e1.name ==e2.name and e1.amount - e2.amount > 10] within 10 minselect e1.name, e1.amount as originalAmount, e2.amount as laterAmount,e1.supplierinsert into MaterialSupplyAlertStream;
User Scenario 2: Detecting production delays after supplies are received
For this user scenario, let's consider a situation where events from 2 different streams contain data. Here, you need to identify delays inproduction, which means you have to check for events not arriving at a particular stream.
Let's begin by defining input streams for both the raw material supply and the sweet production.

1.
2.
3.
4.
define stream MaterialConsumptionStream(name string, user string, amountdouble);
define stream MaterialSupplyStream(name string, supplier string, amountdouble);
The information to be output is as follows.Name of the raw materialProduction amount
To generate this output, let's define an output stream as follows.
define stream ProductionDelayAlertStream(name string, amount double);
To correlate events from the consumption and supply streams, let's define a simple pattern as follows.
from every (e1=MaterialSupplyStream) -> e2=MaterialConsumptionStream within 10 minselect e1.name, e1.amountinsert into MaterialSupplyAlertStream;
The above query you added does not currently contain a condition based on which the correlation is done. The condition to be addedneeds to consider events that have not arrived at the MaterialSupplyStream input stream instead of the new events that arrive there. To do this, you can use the logical operator as aNOTpart of a logical pattern specification as shown below.
from every (e1=MaterialSupplyStream) -> not MaterialConsumptionStream[name == ande1.name amount == e1.amount]
for 15 min select , e1.amounte1.name
insert into MaterialSupplyAlertStream;
The pattern you defined here is different to the pattern defined in User Scenario 1 in the following ways.
In this scenario, you are not defining a stream reference for the stream (i.e. similar toMaterialConsumptionStream e2=MaterialC). This is because the criterion to be met is the non-arrival of events. Therefore, you cannot check for event e2 inonsumptionStream
the non-arrival stream.
Instead of the keyword, you are using the keyword. This is because the pattern has to be terminated either by a single within for not clause (which denotes an event arriving at a different stream can terminate the clause), or a clause (which denotesand for <time>
that the wait time for events not arriving is ). More details, see the pattern in <time> not Siddhi Query Guide - Logical Patterns.
The completed Siddhi application looks as follows.

1.
@App:name('ProductionDelayDetectionApp') @source(type = 'http', @map(type = 'json'))define stream MaterialSupplyStream(name string, supplier string, amountdouble); @source(type = 'http', @map(type = 'json'))define stream MaterialConsumptionStream(name string, user string, amountdouble); @sink(type='log', prefix='Decrease in supply detected:')define stream ProductionDelayAlertStream(name string, amount double); from every (e1=MaterialSupplyStream) -> not MaterialConsumptionStream[name== e1.name and amount == e1.amount] for 15 secselect e1.name, e1.amountinsert into ProductionDelayAlertStream;
Analyzing Trends
IntroductionTutorial steps
Introduction
In the previous two tutorials, you understood how event correlation is handled through joins as well as patterns. Now, let's look at how a moreadvanced form of event processing (namely trend analysis) can be carried out with Siddhi.
The factory foreman needs to detect all the input from the Sweet Bots to detect overall decreases in the production of a sweet. For example, if theproduction of any given sweet is showing a downward trend for 10 minutes, the factory manager needs to be alerted.
Sequences are used in Siddhi for considering consecutive events for analysis. A sequence can be considered a special, more advanced form ofSiddhi pattern where only the immediate subsequent event is analyzed. In contrast, a partition can be used to analyze multiple following events.Therefore, sequences use the notation instead of -> during definition.,
The following is an sample sequence definition that considers sequential events from the stream.n stream1
from every e1=stream1, e2=stream1, e3=stream1, ... , en=stream1select ...insert into ...
Tutorial steps
Let's get started!
First, let's add the input stream that you first created in to captureSweetProductionStream Creating a Simple Siddhi Applicationinformation from the Sweet Bots.
This tutorial covers the following Siddhi concepts:Siddhi sequencesSiddhi partitions

1.
2.
3.
4.
5.
i. ii.
iii. iv.
a.
b.
c.
6.
define stream SweetProductionStream(name string, amount long);
The performance analysis needs to be done based on time. Let's also assume that each Sweet Bot is sending events with timeinformation, in the form of an additional field that denotes the UNIX. This additional field needs to be added as an attribute to the SweetP
stream as shown below.roductionStream
define stream SweetProductionStream(name string, amount long, );timestamp long
An example event (in JSON form) from a SweetBot is as follows:
{ "event": { "name": "Bonbon", "amount": 10, "timestamp": 1415463675 }}
Let's also define an output stream from which alerts are generated. The following information needs to be included in the output event.The name of the sweet of which the production is showing a downward trendHighest detected value within the 10-minute window (i.e. the initial amount based on which the checks are done)The final amount detectedThe timestamp at the end of processing
The output stream definition with this information looks as follows.
define stream DecreasingTrendAlertStream(name string, initialAmountlong, finalAmount long, timestamp long);
To enable the sequential processing of events, lets first define a simple sequence with no processing.
from every e1=SweetProductionStream, e2=SweetProductionStreamselect e1.name, e1.amount as initialAmount, e2.amount as finalAmount,e2.timestampinsert into DecreasingTrendAlertStream;
Here, you are using the comma ( ) to delimit events that you need to process in sequence.,Next, you need to define the logic for the user scenario. It requires detecting a decreasing trend within 10 minutes in the productionfigures. This can be deconstructed into the following points:
Every event has a value for the parameter.amountIf the amount value for event is , then we can say that a decreasing trend exists if the next event has a value e1 v1 e2 v
as the amount, and > .2 v1 v2The above decreasing trend has to continue for 10 minutes to be flagged for alerting.If no event with a decreasing trend (i.e., is detected within 10 minutes, no alert is generated.v1 < v2)
Let's construct a query taking the above points into consideration.Taking the two sequential events e1 and e2 into consideration, point can be converted into a filter form as follows.ii[e1.amount > e2.amount]As mentioned in point , the processing should consider a period of 10 minutes (10 * 60000 milliseconds). The filter form to doiiithis is as follows.[e2.timestamp - e2.timestamp < 10 * 60000]When the above two filter forms are combined, the following created.[e1.amount > e2.amount and (e2.timestamp - e1.timestamp) < 10 * 60000]
Let's apply this filter to the sequence, so that the above conditions are applied to the second event e2.
from every e1=SweetProductionStream, e2=SweetProductionStream [e1.amount > amount and (timestamp - e1.timestamp) < 10 * 60000]select , e1.amount as initialAmount, e2.amount as finalAmount, e2.timestampe1.nameinsert into DecreasingTrendAlertStream;
Here, you are not referring to e2's attributes as t etc. You can refer to it as because it is self evident within the filter.e2.amoun amount

6.
7.
8.
For a complete trend analysis, the pattern matching must run continuously. When an event e2 that meets the conditions you specifiedarrives, you need to make sure that matching does not stop there and that the next event is also evaluated against the same criterion. Inorder to achieve this, sequences can be specified with regular expressions. This may include symbols such as (0 or more instances), * +(one or more instances) and (zero or one instance). ?
In this scenario, you need the processing for the decreasing trend to be done continuously (for 0 or more matching events). Therefore,let's add the regular expression to the filter as shown below.*
from every e1=SweetProductionStream, e2=SweetProductionStreamselect e1.name, e1.amount as initialAmount, e2.amount as finalAmount,e2.timestampinsert into DecreasingTrendAlertStream;
Finally, you need the processing to conclude at the end of 10 minutes. This means, there should be a clause to check timestamps andmatch events th timestamps greater than 10 * 60000 of the original event. In other words, adding a filter to match timestamps greaterthan 10 minutes at the end ensures that the processing can break out of the loop described above and proceed to the output stream.
Therefore, let's define a new event that follows the initial event e1, and zero or more e2 events:e3
e3=SweetProductionStream[timestamp - e1.timestamp > 10 * 60000 ande1.amount > amount]
Let's add this to the query as follows.
from every e1=SweetProductionStream,
e2=SweetProductionStream[e1.amount > amount and (timestamp - e1.timestamp) < 10 * 60000]*,
e3=SweetProductionStream[timestamp - e1.timestamp > 10 * 60000 and e1.amount > amount]
select , e1.amount as initialAmount, e2.amount as finalAmount, e2.timestampe1.name
insert into DecreasingTrendAlertStream;
The completed query is as follows.
define stream SweetProductionStream(name string, amount long, timestamplong);
define stream DecreasingTrendAlertStream(name string, initialAmountlong, finalAmount long);
from every e1=SweetProductionStream, e2=SweetProductionStream[e1.amount > amount and (timestamp -e1.timestamp) < 10 * 60000]*,e3=SweetProductionStream[timestamp - e1.timestamp > 10 * 60000 ande1.amount > amount]select e1.name, e1.amount as initialAmount, e2.amount as finalAmount,e2.timestampinsert into DecreasingTrendAlertStream;
The Siddhi application still does not generate a product-wise decreasing trend alert. For example, the following two events arriving insuccession must be considered a valid decreasing trend.
Product Amount Timestamp
Bonbon 10 1415463675
Pretzel 7 1415474284
To address this, you need to consider the processing of each sweet as a self-contained unit instead of considering them all together. Thismeans, when processing events that contain the attribute set to a particular sweet are only matched with other events with thenamesame value for the attribute.

8.
Siddhi offers this functionality through partitions. With partitions, streams are virtually divided and incoming events are processed inisolated groups (known as partitions) that are completely independent from one another. Each partition (which can contain multipleoperations within) is tagged with a key and only processes events that match their key. For more information about partitions, see Siddhi
.Query Guide - Partition
A typical partition definition looks as follows.
partition with (myAttribute2 of MyStream )begin from MyStream select myAttribute1, myAttribute2, max(myAttribute3) asmaxAttribute3 insert into MyOutputStream;end;
Here, the partition key is , and if there are three possible values for , each of these values are consideredmyAttribute2 myAttribute2a separate partition.
For this scenario, let's define a partition with the attribute as follows so that each sweet group is considered separately based on itsnamename.
partition with (name of SweetProductionStream)begin . . .End;
Let's copy the query with partitions you created above and place it within the partition as shown below.
partition with (name of SweetProductionStream)b e g i nfrom every e1=SweetProductionStream,
e2=SweetProductionStream[e1.amount > amount and (timestamp - e1.timestamp) <10 * 60000]*,
e3=SweetProductionStream[timestamp - e1.timestamp > 10 * 60000 and e1.amount> amount]
select , e1.amount as initialAmount, e2.amount as finalAmount, e2.timestampe1.name
insert into DecreasingTrendAlertStream;end;
The completed Siddhi application looks as follows.

@App:name('DecreasingTrendAlertApp')
@source(type = 'http', @map(type = 'json'))define stream SweetProductionStream(name string, amount long, timestamplong);
@sink(type='email', address='[email protected]',username='factory416', password='secret_password', subject='Downwardproduction trend alert', to='[email protected]', @map(type = 'text',@payload("Hello,\n\nThe production of {{name}} has been displaying adecreasing trend for the past 10 minutes. The initial detected amount was{{initialAmount}} and the amount at the end of processing was{{finalAmount}}.\n\nThis message was generated automatically.")))define stream DecreasingTrendAlertStream(name string, initialAmount long,finalAmount long, timestamp long);
partition with (name of SweetProductionStream)begin from every e1=SweetProductionStream, e2=SweetProductionStream[e1.amount > amount and (timestamp - e1.timestamp)< 10 * 60000]*,e3=SweetProductionStream[timestamp - e1.timestamp > 10 * 60000 ande1.amount > amount]select e1.name, e1.amount as initialAmount, e2.amount as finalAmount,e2.timestampinsert into DecreasingTrendAlertStream;end;
Making Real-time Predictions
IntroductionTutorial steps
Introduction
In the previous tutorials, we looked at the core Siddhi functionalities including event ingestion, publishing and many forms of processing such aspreprocessing, correlation, KPI analysis, trend analysis etc.
In this tutorial, let's move on to the Machine Learning capabilities offered by WSO2 Stream Processor including real-time prediction, onlinemachine learning, anomaly detection etc. Let's look at how static real-time predictions can be made via WSO2 SP using PMML serializations.
The factory foreman of the Sweet Factory needs to predict the nature of next shipment of sugar syrup based on the shipments he has received sofar. A predictive solution has been trained with inputs, temperature and density of the latest shipment. Using these, a prediction is required onwhether the shipment received meets his requirements before it is dispatched to the factory. We can also assume that this pre-trained model isexported in PMML serialization and that it is available in the system. To build and train a model, you can use this .PMML sample
Before you begin:PMML (Predictive Model Markup Language) is a standardized serialization that is used for exporting predictive solutions (machine learningmodels). PMML works by defining the model in one system and transferring the model to a different system via an XML file. This allowspredictions to be made using events from the new system. This XML file can contain various data transformation and preprocessing steps inaddition to one or more predictive models.
In addition to PMML, TensorFlow serialization is also supported by Stream Processor for static real-time predictions. For more details, see Si.ddhi Extensions Documentation - Tensorflow

1.
2.
3.
a.
b.
c.
4.
Tutorial steps
Let's get started!
Let's add an input event stream definition to capture the events generated by the supplier before shipping the sugar syrup to the sweetfactory.
define stream SugarSyrupDataStream (temperature double, density double);
Now let's define the output stream. To include a prediction on whether the shipment will be acceptable or not in the output, this definitionmust include an attribute for the prediction as shown below.
define stream PredictedSugarSyrupDataStream (nextTemperature double, nextDensity double, de);cision boolean
As you have learnt from previous tutorials, a reading from an input stream looks similar to the following.
from SugarSyrupDataStream
For this scenario, you need to update it as follows.To enable the PMML extension, you need to add the annotation as shown below.#pmml:predict()
from SugarSyrupDataStream#pmml:predict()
To access the pre-trained PMML model via which the predictions are made, specify the path as follows.
from SugarSyrupDataStream#pmml:predict( "/home/user/decision-tree.pmml" )
Let's also add the attributes that are needed by the model for prediction.
from SugarSyrupDataStream#pmml:predict("/home/user/decision-tree.pmml", ,temperature)density
Based on the model definition, the output attributes can differ. Here, you have defined the model so that it can return a predictionon whether the shipment can be accepted, based on the given temperature and density.
Let's route this output to the output stream as shown below.
from SugarSyrupDataStream#pmml:predict("/home/user/decision-tree.pmml",temperature, density)select *insert into PredictedSugarSyrupDataStream;
The completed Siddhi application is as follows.
@App:name('SugerSyrupPredictionApp')
@source(type='http', receiver.url='http://localhost:5006/SugarSyrupEP',@map(type = 'json'))define stream SugarSyrupDataStream (temperature double, density double);
@sink(type='log', prefix='Predicted next sugar syrup shipment:')define stream PredictedSugarSyrupDataStream (nextTemperature double,nextDensity double, decision boolean);
from SugarSyrupDataStream#pmml:predict("/home/user/decision-tree.pmml",temperature, density)select *insert into PredictedSugarSyrupDataStream;

1.
2.
3.
4.
5.
6.
Streaming Machine Learning
IntroductionTutorial steps
Introduction
In the previous tutorial, we looked at how static machine learning and prediction can be done via PMML. In this tutorial, let's see how real-timeonline machine learning support is offered in Stream Processor through various mechanisms.
After the production of each sweet in the Sweet Factory, its density and volume are measured and sent to WSO2 SP. Based on this data, WSO2SP needs to predict what the produced sweet is out of 5 possibilities.
Tutorial steps
Let's get started!
The input data captured for the training phase must include the name of the sweet, its density and volume. Let's define an input streamas shown below to capture this information.
define stream ProductionTrainingStream (density double, volume double,sweetType string );
You need another input stream through which the volume and the density of the unknown sweet must be sent during the predictingphase. Let's define it as follows.
define stream SweetProductionStream (density double, volume double);
Finally, let's define an output stream to present the output of the predictions.
define stream PredictionStream (density double, volume double,prediction string, confidenceLevel double);
Now, let's write a simple query to select values from the trainer stream and write them to a temporary stream.
from ProductionTrainingStreamselect *insert into TemporaryStream;
Here, the stream is an in-memory stream with no definition and no sources/sinks. Therefore, it can be used forTemporaryStreamrouting events that are not needed elsewhere.Now, let's update the query to enable it to train the Hoeffding tree. This can be achieved by specifying the annotation to#streamingmlthe input stream, and setting its type to . Here, we can either specify whether to train the tree (HoeffdingTree updateHoeffdingTree
or to produce an output based on the learnt model ( ).) hoeffdingTreeClassifier
from ProductionTrainingStream #streamingml:updateHoeffdingTree()select *insert into TemporaryStream;
Here, the stream is an in-memory stream with no definition and no sources/sinks. Therefore, it can be used forTemporaryStreamrouting events that are not needed elsewhere.You need to add two parameters to the directive for the following.updateHoeffdingTree
The name of the model that is built or updated.The number of classes in the predicted output. e.g., if the training data can contain five types of sweets, the value for this
This tutorial covers the following concepts:A Hoeffding Classifier model is trained using real-time data to get predictions.
The other types of algorithms supported are MRulesRegressor, ClusTree, K-Means, and PerceptronClassifier.
Before you begin:The extension needs to be added to WSO2 SP.siddhi-gpl-execution-streamingml

6.
7.
8.
9.
10.
parameter must be 5 in order to indicate that there are five possible values for the attribute that is being predicted.
In addition, you can also specify the attributes in the input stream that are needed for the training operation. e.g., If you are using theattributes , , and from the stream to train the model so that it can predict the value for the attribute, you must also include the , , X Y Z K X Y
, and attributes in the trainer stream definition. The last attribute is considered as the attribute for which the prediction is needed.Z K
Taking the above into account, let's update the trainer stream definition as follows.
from ProductionTrainingStream#streamingml:updateHoeffdingTree( 'SweetTypeModel', 5, ) density, volume, sweetType
select *insert into TemporaryStream;
Now that the annotation is complete, the events going through to the stream contain the accuracy evaluation of theTemporaryStreammodel. This is not needed in the end result, and therefore, you can omit it.
Now let's consider the other end of the prediction process where the model makes predictions based on the density and volume. Let'swrite a simple query to select values from the prediction stream and direct them to the output stream.
from SweetProductionStreamselect density, volume, prediction, confidenceLevelinsert into PredictionStream;
Let's also define the second annotation to the stream to train the model based on events#streamingml SweetProductionStreamarriving (as you previously did in step 5).
from SweetProductionStream #streamingml select density, volume, prediction, confidenceLevelinsert into PredictionStream;
This time, we need to use the classifier to perform a prediction instead of training the tree. Therefore, let's add the hoeffdingTreeCla annotation instead of the ssifier annotation you previously added.updateHoeffdingTree
from SweetProductionStream#streamingml: hoeffdingTreeClassifier()select density, volume, prediction, confidenceLevelinsert into PredictionStream;
Let's specify the following parameters for the model.The name of the model to which you want to refer. You can refer to the model that you previously trained.SweetTypeModelThe stream attributes to be used for querying the model for predictions. In this scenario, you need to query by the density andthe volume of the unknown sweet.
from SweetProductionStream#streamingml:hoeffdingTreeClassifier('SweetTypeModel', density,volume)select density, volume, prediction, confidenceLevelinsert into PredictionStream;
Here, the attribute is a standard returnable from the classifier. It indicates he extent to which the generatedconfidenceLevelprediction can be accurate.
The final query (with source and sink configurations added) looks as follows.

1.
@App:name('SugerSyrupPredictionApp')
@source(type = 'http', @map(type = 'json'))define stream ProductionTrainingStream (density double, volume double,sweetType string );
@source(type = 'http', @map(type = 'json'))define stream SweetProductionStream (density double, volume double);
@sink(type='log', prefix='Predicted sweet type:')define stream PredictionStream (density double, volume double, predictionstring, confidenceLevel double);
@info(name = 'training-query')fromProductionTrainingStream#streamingml:updateHoeffdingTree('SweetTypeModel',5, density, volume, sweetType)select *insert into TemporaryStream;
@info(name = 'prediction-query')fromSweetProductionStream#streamingml:hoeffdingTreeClassifier('SweetTypeModel',density, volume)select density, volume, prediction, confidenceLevelinsert into PredictionStream;
Detecting Anomalies
IntroductionTutorial steps
Introduction
In the previous two tutorials, you looked at how machine learning can be used in conjunction with the real-time processing capabilities offered bythe Stream Processor. Now, let's consider a common use-case that is often encountered, namely anomaly detection. In this tutorial, you will lookat how the outlier function offered by the time series execution extension can be used to detect anomalies in a stream of events.
The Stream Processor offers various time series-based anomaly detection mechanisms, such as and . In addition,lengthTime outlierclustering algorithms such as and can also be used for detecting outliers.K-Means ClusTree
In this scenario, the Stream Processor receives a stream of events from the sugar syrup supplier. This stream contains information on thetemperature, density and the viscosity of the syrup supplied. The factory foreman needs to monitor the supply of sugar syrup and ensure that thedensity and the viscosity of each shipment is within an acceptable range. What is required is to have a mechanism that evaluates the viscosityreadings based on the supplied syrup shipment and produce an alert if the viscosity is not in the expected range for the given temperature anddensity. It is also required that the outlier calculation takes place for every last five shipments received so that at any given time, the detection iscarried out based on the latest events.
Tutorial steps
Let's get started!
Let's start by defining a stream for the input received from the supplier. This needs to contain the temperature, density and viscosity ofthe new shipment.
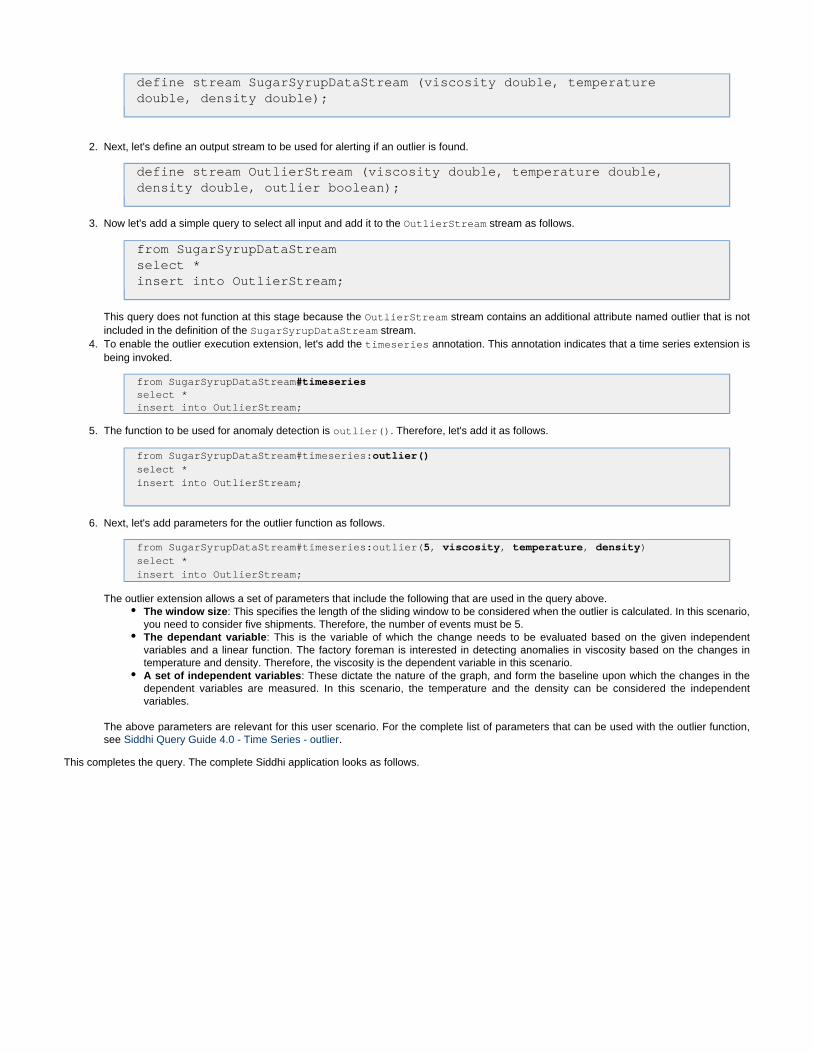
1.
2.
3.
4.
5.
6.
define stream SugarSyrupDataStream (viscosity double, temperaturedouble, density double);
Next, let's define an output stream to be used for alerting if an outlier is found.
define stream OutlierStream (viscosity double, temperature double,density double, outlier boolean);
Now let's add a simple query to select all input and add it to the stream as follows.OutlierStream
from SugarSyrupDataStreamselect *insert into OutlierStream;
This query does not function at this stage because the stream contains an additional attribute named outlier that is notOutlierStreamincluded in the definition of the stream.SugarSyrupDataStreamTo enable the outlier execution extension, let's add the annotation. This annotation indicates that a time series extension istimeseriesbeing invoked.
from SugarSyrupDataStream#timeseries select * insert into OutlierStream;
The function to be used for anomaly detection is . Therefore, let's add it as follows.outlier()
from SugarSyrupDataStream#timeseries:outlier()select *insert into OutlierStream;
Next, let's add parameters for the outlier function as follows.
from SugarSyrupDataStream#timeseries:outlier( , , , )5 viscosity temperature densityselect *insert into OutlierStream;
The outlier extension allows a set of parameters that include the following that are used in the query above.: This specifies the length of the sliding window to be considered when the outlier is calculated. In this scenario,The window size
you need to consider five shipments. Therefore, the number of events must be 5.The dependant variable: This is the variable of which the change needs to be evaluated based on the given independentvariables and a linear function. The factory foreman is interested in detecting anomalies in viscosity based on the changes intemperature and density. Therefore, the viscosity is the dependent variable in this scenario.A set of independent variables: These dictate the nature of the graph, and form the baseline upon which the changes in thedependent variables are measured. In this scenario, the temperature and the density can be considered the independentvariables.
The above parameters are relevant for this user scenario. For the complete list of parameters that can be used with the outlier function,see .Siddhi Query Guide 4.0 - Time Series - outlier
This completes the query. The complete Siddhi application looks as follows.

1.
@App:name('SugarSyrupOutlierPredictionApp')
@source(type='http', receiver.url='http://localhost:5007/SugarSyrupEP',@map(type = 'json'))define stream SugarSyrupDataStream (viscosity double, temperature double,density double);
@sink(type='log', prefix='Outlier detected in sugar syrup supply:')define stream OutlierStream (viscosity double, temperature double, densitydouble, outlier boolean);
from SugarSyrupDataStream#timeseries:outlier(5, viscosity, temperature,density)select *insert into OutlierStream;
Presenting Data
IntroductionTutorial steps
Introduction
In previous tutorials, you created Siddhi applications to analyze data using the Siddhi logic. In this tutorial, let's look at how you can present thisdata in a visual manner.
Tutorial steps
Let's get started!
After completing , you have an RDBMS table where information is saved as follows.Tutorial 4
Name Supplier Amount
Flour Acme 460
Sugar Indigo6 272
Honey The BeeGees 9
Food Coloring Wadjet Food Products 30
Chocolate Chip Larkspur Landing 34
WSO2 SP needs to identify this table. To enable this, let's add a datasource configuration as follows in the <SP_HOME>/conf/dashboa file under the => subsection.rd/deployment.yaml wso2:datasources: datasources
At the end of this tutorial, you will be able to:Create your own widget to represent data stored in an RDBMS tableCreate a dashboard to render a widgetSecure your dashboard with required permission
Before you begin:This tutorial is a continuation of . You need to complete it before you try this tutorial.Integrating DatastoresDownload the and save it in the directory.com.mysql.jdbc.Driver <SP_HOME>/lib
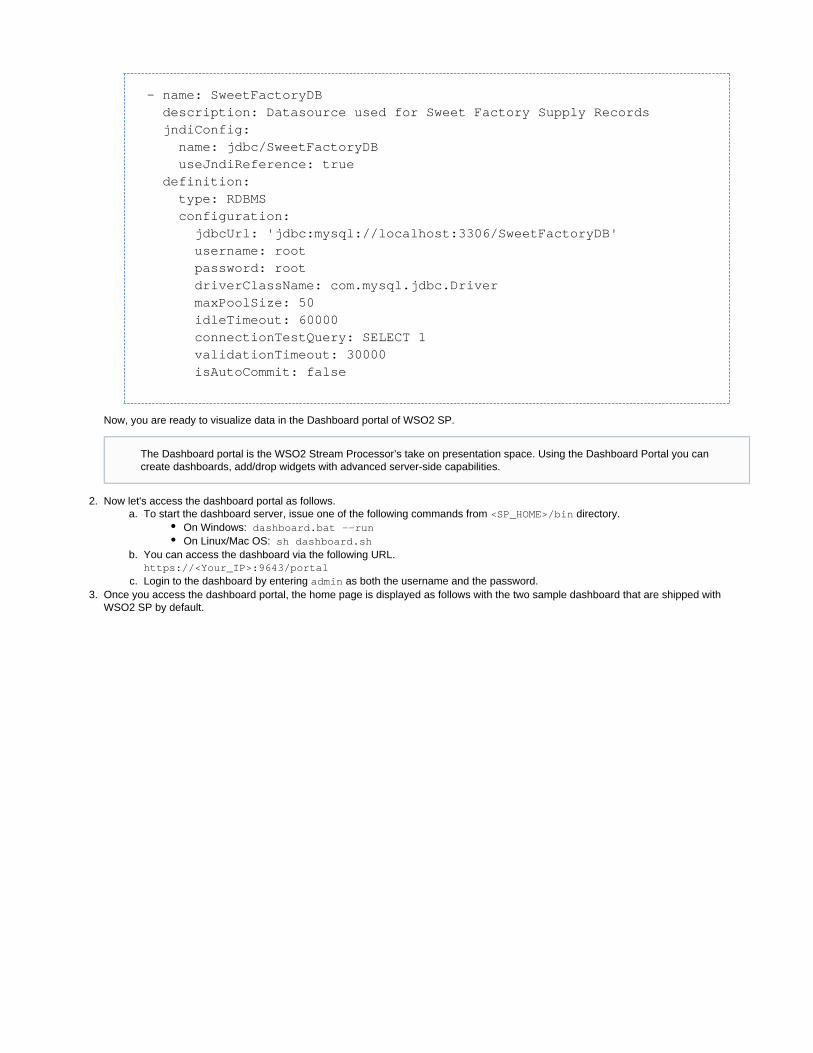
1.
2. a.
b.
c. 3.
- name: SweetFactoryDB description: Datasource used for Sweet Factory Supply Records jndiConfig: name: jdbc/SweetFactoryDB useJndiReference: true definition: type: RDBMS configuration: jdbcUrl: 'jdbc:mysql://localhost:3306/SweetFactoryDB' username: root password: root driverClassName: com.mysql.jdbc.Driver maxPoolSize: 50 idleTimeout: 60000 connectionTestQuery: SELECT 1 validationTimeout: 30000 isAutoCommit: false
Now, you are ready to visualize data in the Dashboard portal of WSO2 SP.
Now let's access the dashboard portal as follows.To start the dashboard server, issue one of the following commands from directory.<SP_HOME>/bin
On Windows: dashboard.bat --runOn Linux/Mac OS: sh dashboard.sh
You can access the dashboard via the following URL.https://<Your_IP>:9643/portalLogin to the dashboard by entering as both the username and the password.admin
Once you access the dashboard portal, the home page is displayed as follows with the two sample dashboard that are shipped withWSO2 SP by default.
The Dashboard portal is the WSO2 Stream Processor’s take on presentation space. Using the Dashboard Portal you cancreate dashboards, add/drop widgets with advanced server-side capabilities.

3.
a.
b.
Before creating a dashboard, let's create a widget as follows Click . This opens the widget generation wizard as follows.CREATE WIDGET
In the first page where you are prompted to enter a name for your widget, let's add as the name of theShipment Detailswidget.

3.
b.
c.
i.
ii.
iii.
Click to open the page for configuring the data provider. In this scenario, you are visualizing data stored in the databaseNext table you have already created. Therefore, select . RDBMS Batch Data Provider
Once you select this, you are prompted to enter more data relating to the datasource you configured in the <SP_HOME>/conf/ file.dashboard/deployment.yaml
In your datasource configuration in the file, you have entered as the datasourcedeployment.yaml SweetFactoryDBname. Therefore, you need to enter the same name in the field here.Datasource NameIn the field, you need to enter the database query you need to run in order to retrieve the data to be visualized.QueryLet's enter the following query to retrieve that data from the table.ShipmentDetailsTableselect * from ShipmentDetailsTableIn the field, enter the name of your table, which is .Table Name ShipmentDetailsTableLeave the default values unchanged in the rest of the fields. The information you entered for the data provider is asfollows.
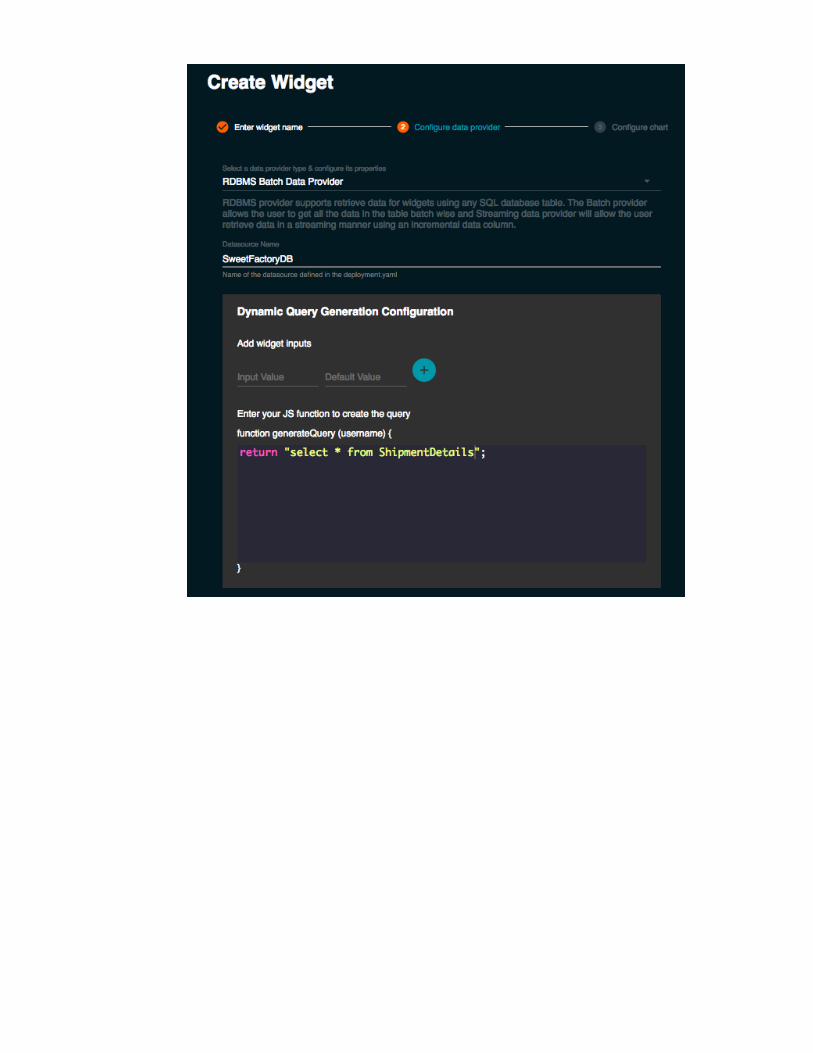
3.
c.
iii.

3.
c.
iii.
d. i.
Let's click to configure the chart following the steps below.NextIn this scenario, let's create a simple line chart to view your data. Therefore, select as theLine/Area/Bar Chart Parent chart type. You can select for the field. Leave the default values for the rest of the fields unchanged.name x axis field
For more information about the other fields to be configured for the data provider, see .Generating Widgets

3.
d. i.
ii. Before you create the chart, click to see a preview of the chart. The preview is displayed as follows.Preview

3.
d.
ii.
4. a.
b.
If you are satisfied with the preview, click to create the widget. CREATETo render the widget you created, you need a dashboard. Let's create the dashboard as follows.
The previous step brings you back to the home page of the Dashboard portal. To create the dashboard, click CREATE.DASHBOARD
In the wizard for creating dashboards that opens, enter information as follows.

4.
b.
c.
Parameter Description Example
Name of your Dashboard Enter a unique name for your dashboard. Sweet Factory
URL Enter a URL for the dashboard. sweetfactory
Description Enter a description for the dashboard. Sweet Factory Shipment Details
Click to proceed. You are directed to the home page that is created by default. Add
Click the widgets icon (marked in the image below) to open the widgets panel.

4.
c.
d. You are directed to the dashboard designer with a list of widgets displayed in the left panel. Serch for the Shipment Detailswidget that you previously created. You can either type the name of the widget in the search bar or scroll down to locate it.

4.
d.
e.
5.
To render the widget, drag and drop it to the dashboard container.Shipment Details
Now you have successfully created your dashboard.
To be redirected to the home page with the list of available dashboards, click . The Sweet Factory dashboard you created shouldPortalbe displayed there. Now you need to ensure that only the intended users are able to view your dashboard. As an owner of thedashboard, you can restrict access to the dashboard for other users. To do this, click the menu icon for your dashboard,Sweet Factoryand then click . Settings

5.
This opens the page. Enter user roles under each category of users as follows. Depending on your configuredDashboard Settingsidentity provider, the available list of roles is displayed in the drop-down list for each user type.

5.
a.
b.
c.
Owners are the most pivileged users of the dashboard. They are the only users with access to this page.Dashboard SettingsThey can also edit and view the dashboard.Editors of a dashboard can either edit the dashboard or view the dashboard. However, they do not have access to the Dashboa
page.rd SettingsViewers are the least privileged users of a dashboard. They can view the dashboard, but cannot edit it or change its settings.
Managing Business Rules via Templates
IntroductionTutorial steps
Introduction
In the previous tutorials, you covered various Siddhi concepts and created many Siddhi applications to try them out. In many scenarios, the basicoutline of the Siddhi application has been the same. For example, the sources defined for SweetBots are same across multiple Siddhiapplications. Furthermore, Siddhi application functionality can be templated so that conditions can be changed over time. Business Rules

Management dashboard is a user friendly interface that can be used to build business rules (Siddhi applications customized as per businessrequirements).
Previously (in tutorial 7), you created a Siddhi application to observe KPIs. The Factory Foreman of the Sweet Factory needs to set different KPIsfor the different categories of sweets. For this purpose, you need to template the Siddhi application for KPI analysis that you created in tutorial 7.Using this template, you can create different business rules based on sweet names, , and the start and end ofsurplusMinThresholdInputwork hours.
This tutorial covers Business Rules Management.
Before you begin:Before creating business rules, the required templates must be defined. The following is a sample template you can use in this tutorial.
Click here to view the sample template
{
"templateGroup" : {
"name" : "Sweet Production Factory",
"uuid":"sweet-production-factory",
"description" : "Analyzes productions from sweet factory",
"ruleTemplates" : [
{
"name" : "KPI Analysis" ,
"uuid" : "sweet-production-kpi-analysis",
"type" : "template",
"instanceCount" : "many",
"description" : "Key Performance Indicator analysis for Sweet Production",
"script" :
"// Validates given surplus minimum threshold
function validateAndGetSurplusMinThreshold(amount) {
if (isNaN(amount) || amount < 1) {
throw 'Minimum value for surplus should be a positive number';
}
return amount;
}
// Gets working hour in 24 hours format
function getWorkingHour(hour, amOrPm) {
// Validate given hour
if (isNaN(hour)) {
throw 'A valid number is expected for hour instead of ' + hour;
}
if (hour % 1 != 0) {
throw 'A full working hour expected instead of ' + hour;
}
if ((hour < 1) || (hour > 12)) {
throw 'Working hour should be in between 1 and 12';

}
// Convert to 24 hours format
if (amOrPm == 'AM') {
return Number(hour);
} else {
return Number(hour) + 12;
}
}
var workHoursStart = getWorkingHour('${workHoursStartInput}', '${workHoursStartAM_PM}');
var workHoursEnd = getWorkingHour('${workHoursEndInput}', '${workHoursEndAM_PM}');
var surplusMinThreshold =validateAndGetSurplusMinThreshold('${surplusMinThresholdInput}');",
"templates" : [
{ "type" : "siddhiApp",
"content" :
"@App:name('SweetProductionKPIApp')
@source(type='http', receiver.url=' ', @map(typehttp://localhost:5005/SweetProductionEP= 'json', @attributes(name = '$.sweet', amount = '$.batch.count')))
define stream SweetProductionStream (name string, amount long);
@sink(type='log', prefix='${lowProductionAlertPrefix}')
define stream LowProductionStream (name string, hourlyTotal long, currentHour int);
@sink(type='log', prefix='${sweetProductionStatusPrefix}')
define stream ProductionStatusStream (name string, hourlyTotal long, currentHour int,status string);
from SweetProductionStream#window.time(${timeInterval} hour)
select name, sum(amount) as hourlyTotal, time:extract(currentTimeMillis(), 'HOUR') ascurrentHour, ifThenElse(sum(amount) > ${surplusMinThreshold}, \"Possible surplus\", \"OK\") asstatus
group by name
having currentHour > ${workHoursStart} and currentHour < ${workHoursEnd}
insert into ProductionStatusStream;"
}
],
"properties" : {
"lowProductionAlertPrefix": {"fieldName": "Low production alert prefix", "description":"Displayed when a low production alert is logged", "defaultValue": "Low production alert:"},
"sweetProductionStatusPrefix": {"fieldName": "Sweet production status prefix","description": "Displayed when a sweet production status is logged", "defaultValue": "Sweetproduction status:"},

1.
2.
Tutorial steps
Let's get started!
To start the dashboard profile of WSO2 SP, issue one of the following commands from the directory.<SP_HOME>/binFor Windows: dashboard.batFor Linux: sh dashboard.sh
Now start the worker profile of WSO2 SP, issue one of the following commands from the directory. This is needed<SP_HOME>/bin
"timeInterval": {"fieldName": "Surplus analysis time interval (hours)", "description":"Possible surplus is analyzed per time interval", "defaultValue": "1"},
"surplusMinThresholdInput": {"fieldName": "Minimum value of a surplus", "description":"Amount above this value will be considered as surplus", "defaultValue": "10000"},
"workHoursStartInput": {"fieldName": "Working hours start at", "description": "Provide afull hour between 1-12", "defaultValue": "9"},
"workHoursStartAM_PM": {"fieldName": "Working hours start at (AM/PM)", "description":"Select one of the options", "defaultValue": "AM", "options": ["AM", "PM"]},
"workHoursEndInput": {"fieldName": "Working hours end at", "description": "Provide afull hour between 1-12.", "defaultValue": "5"},
"workHoursEndAM_PM": {"fieldName": "Working hours end at (AM/PM)", "description":"Select one of the options", "defaultValue": "PM", "options": ["AM", "PM"]}
}
}
]
}
}
This template must be placed in the directory as <SP_HOME>/wso2/dashboard/resources/businessRules/templates Sweet._Production_Factory.json
The group UUID ( ) which is in the must be added in the sweet-production-factory ruleTemplates <SP_HOME>/conf/dashbo file under the namespace as shown below.ard/deployment.yaml wso2.business.rules.manager
wso2.business.rules.manager: datasource: BUSINESS_RULES_DB # rule template wise configuration for deploying business rules deployment_configs: - #ip:port of the node localhost:9090: # uuids of rule templates which are needed to be deployed onthe node given above - sweet-production-factory # credentials for worker nodes username: admin password: admin
For more information, see .Business Rules Templates
In this tutorial, the dashboard environment is started in the same computer as the worker environment for simplicity.

2.
3.
4.
5.
when saving and deploying a business rule.For Windows: worker.batFor Linux: sh worker.sh
You can access the Business Rules dashboard via the following URL.https://localhost:9643/business-rules
Then login by specifying as both the username and the password. admin
To create a new rule that can be used for KPI analysis, let's click .CREATE
The following view opens when you click . You can observe that a business rule can be created from a business template orCREATEfrom scratch. You have already created and saved a business rules template. Therefore, let's click to create a rule fromFrom Templateit.
This step uses the default URL and credentials. If the dashboard user store is changed, use a valid credential and ensure thatthe user has valid permisions for adding and deleting workers. For more information, see .User Management
If previously defined business rules exist, they are displayed as shown in the example below. You can click to add a new+business rule.
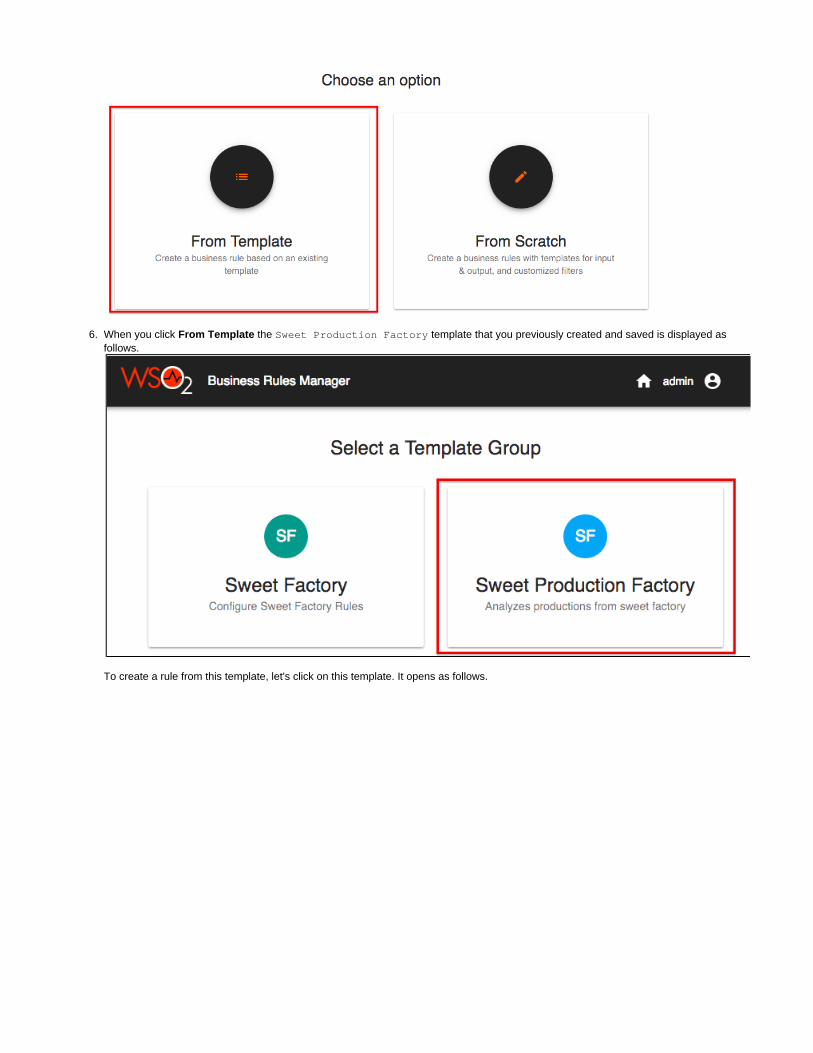
5.
6. When you click the template that you previously created and saved is displayed asFrom Template Sweet Production Factoryfollows.
To create a rule from this template, let's click on this template. It opens as follows.

6.
7.
8.
In the field, you can select the rule template.Rule Template KPI Analysis
You can enter values in the rule template that opens as shown below.
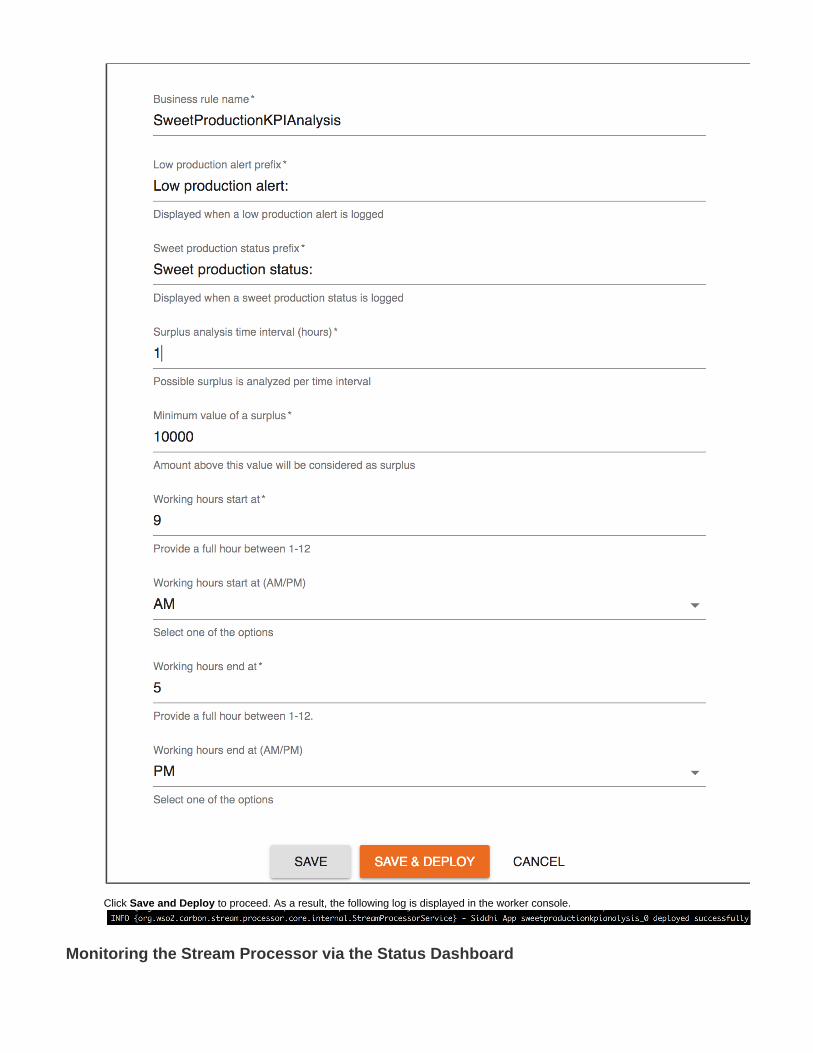
8.
Click to proceed. As a result, the following log is displayed in the worker console.Save and Deploy
Monitoring the Stream Processor via the Status Dashboard

1.
2.
3. a.
IntroductionTutorial steps
Introduction
In previous tutorials, you learnt different Siddhi concepts and created many Siddhi applications to try them out. However, those Siddhi applicationswere created in the Stream Processor Studio and they were not deployed in a production environment.
In this tutorial, let's consider a scenario where your Siddhi applications are deployed in a production environment, and in a worker profile. Thenode is configured to execute Siddhi applications, and it does not have a UI (User Interface).
The staff at the Sweet Factory need to check whether the SP nodes in which their Siddhi applications are deployed are working as expected, orwhether any Siddhi application requires performance improvements. They need a user-friendly UI in order to monitor this. For this purpose, youcan use the Monitoring Dashboard of WSO2 SP.
Tutorial steps
Let's get started!
Let's start the dashboard profile of WSO2 Stream Processor by issuing one of the following commands from the directo<SP_HOME>/binry.
For Windows: dashboard.batFor Linux: sh dashboard.sh
To access the Monitoring Dashboard, you can use the following URL. https://localhost:9643/monitoring
You can login to the dashboard by specifying as both the username and the password.admin
The following is displayed once you login.
Let's add a worker to view statistics for it. To do this, follow the substeps below.Click . This opens the following page.Add New
This tutorial covers how to use the Monitoring Dashboard.
Before you begin:Before you try out this tutorial, the worker node needs to be configured. For detailed instructions, see Monitoring Stream Processor -
.PrerequisitesThis tutorial uses the Siddhi application that you created in and updated in . Therefore, it isSweetTotalApp Tutorial 1 Tutorial 2recommended that you complete those tutorials before following this tutorial.
Here, we are using the credentials available by default to access the dashboard. If you are using a different user, make surethat it is granted the relevant permissions to add/delete workers from the dashboard. For more details, see User Management
.via the IdP Client Interface

3. a.
b. Let's add as the host and as the HTTPS port. localhost 9443
Click to proceed. As a result, the following is displayed.Add Node
To monitor a worker node (which we will run later on ), click .localhost:9443 Worker
These are the default host and port of a single node. If the worker node is not run in the same computer as thedashboard node or if it is run on a different port, change these values accordingly.

3.
b.
4.
The dashboard indicates that there is no worker running at the host and port you specified because you have not started aworker node yet.
To view an active worker, let's start a worker node by issuing one of the following commands from the directory.<SP_HOME>/bin
For Windows: worker.batFor Linux: sh worker.sh
Now, if you refresh the page of the Monitoring Dashboard, an active worker is displayed as follows.OVERVIEW
In this tutorial, you can run the worker and the dashboard in the same computer for simplicity.

4.
5.
6.
To view more information about the worker node, let's click on it. This opens a page named , displaying informationlocalhost:9443specific to the worker node you started as shown below.
Note that no information is currently displayed under and . This is becauseOverall Throughput (events/second) Siddhi Applicationsno Siddhi applications are deployed in this worker.Let's deploy and run a Siddhi application in the worker. For this purpose, you can use the that you created in SweetTotalApp Tutorial 1and updated in .Tutorial 2
Ths information is displayed in this page after a time period of about 30 seconds after opening it.
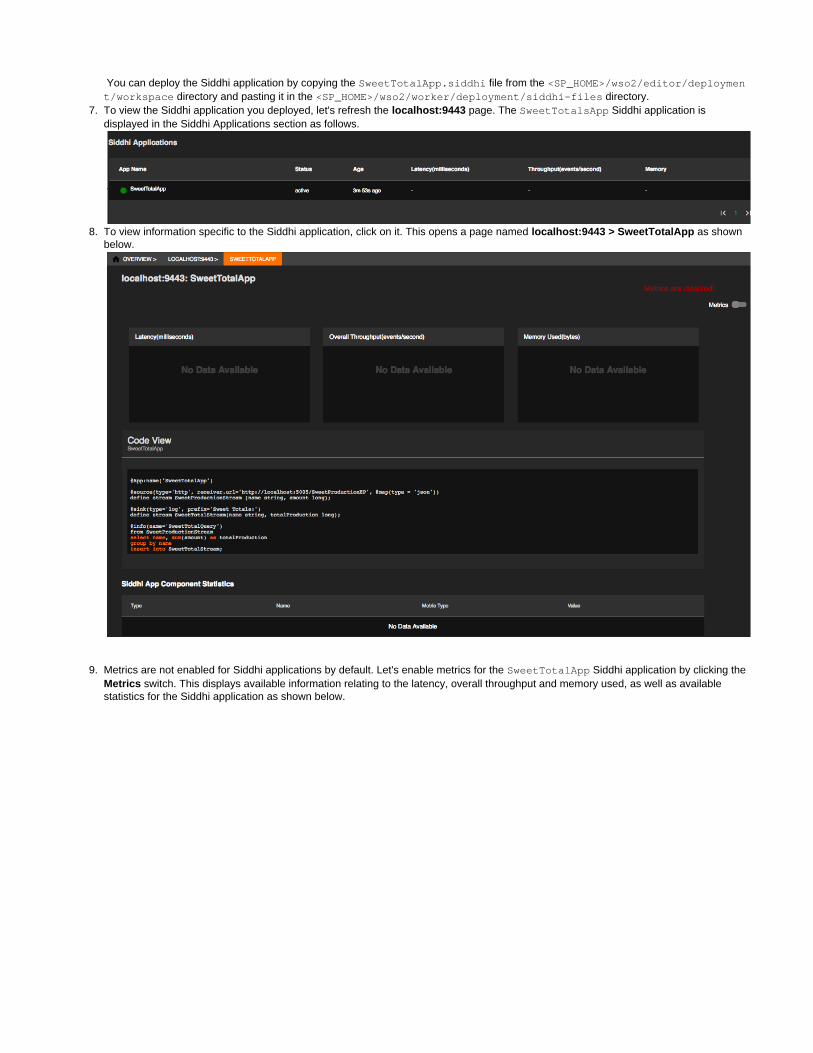
6.
7.
8.
9.
You can deploy the Siddhi application by copying the file from the SweetTotalApp.siddhi <SP_HOME>/wso2/editor/deploymen directory and pasting it in the directory.t/workspace <SP_HOME>/wso2/worker/deployment/siddhi-files
To view the Siddhi application you deployed, let's refresh the page. The Siddhi application islocalhost:9443 SweetTotalsAppdisplayed in the Siddhi Applications section as follows.
To view information specific to the Siddhi application, click on it. This opens a page named as shownlocalhost:9443 > SweetTotalApp below.
Metrics are not enabled for Siddhi applications by default. Let's enable metrics for the Siddhi application by clicking the SweetTotalApp
switch. This displays available information relating to the latency, overall throughput and memory used, as well as availableMetrics statistics for the Siddhi application as shown below.

9.
Performing Real-time and Periodic ETL
IntroductionTutorial steps
Introduction
In many real life scenarios that involve integrated entrprise, data needs to be loaded and moved from one location to another to be processed forfuture reference. This process is commonly known as Extract, Transform, and Load ( ). In this tutorial, you can learn how ETL is carried out inETLreal-time and periodically.
Let's consider that the Sweet Factory has shops distributed all over the world. In addition, there are travelling sales people who operate frommobile sweet trucks. Each sales person transactions via a system that generates JMS messages. This data needs to be saved in a database sothat it can be used later for sales analysis and financial analysis. Later, they need to be moved to other databases depending on the nature of theanalysis carried out.
Tutorial steps
This section covers two scenarios that are simple examples for performing real-time and periodic ETL in real world business scenarios.
Scenario 1: Extract data from JMS, perform a stateless transformation, and load to a database.
Once the head office of the Sweet Factory receive events with information about the sales transactions, that information needs to be cleaned andenriched via a connection with a data store. Then the enriched version of the data needs to be saved in another RDBMS store.

1.
2.
a.
b.
c.
d.
3.
a.
b.
c.
d.
Let's get started!
The sales transactions reported as JMS messages include the user ID (i.e., the ID of the salesman), the transaction amount and thelocation. Let's begin by adding the stream definition to capture this information.
define stream TrasanctionStream (userId long, transactionAmount double,location string);
Before enriching the data for further analysis, it needs to be cleaned. This involves checking for null values, and replacing them withdefault values. To do this, let's follow the steps below:
First, let's select the data you need to extract and clean. This includes the user ID, transaction amount and the location. Fortravelling sales people, specific locations are not registered in the system. As a result, no value is specified in the locationattribute of the events generated for some sales actions. To clean the data before enriching it, you need to replace the valunulle for the attribute of such events with . This can be achieved via the function of Siddhi bylocation unknown ifTenElse()including it in the clause as shown below.select
select userId, transactionAmount, ifThenElse(location is null, "UNKNOWN", location) as location
The information specified in the select clause given above is taken from the input stream that youTransactionsStreampreviously defined. To specify this, let's add a statement as follows.from
from TrasanctionStreamselect userId, transactionAmount, ifThenElse(location is null, "UNKNOWN", location) as location
Now you can add an output stream to be inferred so that the information extracted and cleaned can be directed to it.
from TrasanctionStream select userId, transactionAmount,
ifThenElse(location is null, "UNKNOWN", location) as locationinsert into CleanedTrasanctionStream;
Now you have completed the query for extracting and cleaning the information you need. You will be adding more queries to thisSiddhi application in order to enrich and load data as you proceed with this tutorial. Therefore, to make it easy for other users tounderstand this Siddhi application, let's name this query as . The completed query looks as follows.CleaningData
@info(name = ' ')CleaningData from TrasanctionStream
select userId, transactionAmount,
ifThenElse(location is null, "UNKNOWN", location) as locationinsert into CleanedTrasanctionStream;
The information you have extracted and cleaned needs to be enriched. To do this, let's create another query named asEnrichDatafollows.
You have already directed the extracted and cleaned information to the stream. Therefore,CleanedTransactionsStreamlet's specify that stream as the input stream for this query.
from CleanedTrasanctionStream
The user IDs of the registered sales people are already saved in a table known as the . To enrich the data, user IDsuserTableof the events in the stream need to be joined with the user IDs stored in the table. For this,CleanedTransactionsStreamlet's add a join query as follows.
from CleanedTrasanctionStream as c join UserTable as uon c.userId == u.userId
Now, let's include a concatenation to derive a user name ID from the first name and the last name of the sales people as follows.
select c.userId, str:concat( u.firstName, " ", u.lastName) as userName,
transactionAmount, location
The enriched data can be directed to another inferred output stream named .EnrichedTrasanctionStream

3.
d.
e.
4.
5.
from CleanedTrasanctionStream as c join UserTable as u on c.userId == u.userId
select c.userId, str:concat( u.firstName, " ", u.lastName) as userName, transactionAmount,
locationinsert into EnrichedTrasanctionStream;
Let's complete the query you created for enriching data by naming it as EnrichData.
@info(name = ' ')EnrichData from CleanedTrasanctionStream as c join UserTable as u
on c.userId == u.userIdselect c.userId, str:concat( u.firstName, " ", u.lastName) as userName, transactionAmount,
locationinsert into EnrichedTrasanctionStream;
In the Siddhi query you created, you included a join between the stream and a tableEnrichData CleanedTrasanctionStreamnamed . For this query to be executed, the definitions for both the stream and the table need to be included in the sameUserTableSiddhi application. You have already added the stream definition. Now let's add the table definition above the Siddhi queries as follows.
define stream TrasanctionStream (userId long, transactionAmount double, location string);
-- Table used to enrich data @store(type = 'rdbms', datasource = 'TRANSACTION_DATA_SOURCE')
define table UserTable (userId long, firstName string, lastName string);
@info(name = ' ')CleaningDatafrom TrasanctionStreamselect userId, transactionAmount, ifThenElse(location is null, "UNKNOWN", location) as locationinsert into CleanedTrasanctionStream;
@info(name = ' ')EnrichDatafrom CleanedTrasanctionStream as c join UserTable as uon c.userId == u.userIdselect c.userId, str:concat( u.firstName, " ", u.lastName) as userName, transactionAmount, locationinsert into EnrichedTrasanctionStream;
Let's create another table to store the enriched data as shown below.
More table definitions are added as you proceed with the tutorial. Therefore, it is useful to specify the purpose of each tabledefinition via a comment as shown below.

5.
6.
7.
-- Final table to load the data @store(type = 'rdbms' , datasource = 'TRANSACTION_DATA_SOURCE')define stream TrasanctionTable (userId long, transactionAmount double, location string);
To insert the enriched data to the table you created, let's add another Siddhi Query as follows:
@info(name = ' ')LoadDatafrom EnrichedTrasanctionStreaminsert into TransactionTable;
The transactions need to be generated via JMS in JSON format. Therefore, let's add an event sink with as the transport and asJMS JSONthe format. You can add this above the stream definition as shown below.
@sink(type = 'jms' , destination = 'transactions', factory.initial = '...', provider.url = '...',
@map(type = 'json',@attributes('$.userId', '$.transactionAmount', '$.location')))
define stream TrasanctionStream (userId long, transactionAmount double,location string);
Let's name this Siddhi application as JMS-to-DB-ETL. You can optionally add a description too. The complete Siddhi Application looks as follows:

@App:name("JMS-to-DB-ETL")@App:description("Extract data from JMS, perform stateless transformation,and load to database") -- Sample input message: {“userId”:2345, -- “transactionAmount”:456.0, -- “location”: "CA, USA”}
@sink(type = 'jms' , destination = 'transactions', factory.initial = '...', provider.url = '...', @map(type = 'json', @attributes('$.userId', '$.transactionAmount', '$.location'))) define stream TrasanctionStream (userId long, transactionAmount double, location string); -- Table used to enrich data@store(type = 'rdbms', datasource = 'TRANSACTION_DATA_SOURCE')define table UserTable (userId long, firstName string, lastName string); -- Final table to load the data@store(type = 'rdbms' , datasource = 'TRANSACTION_DATA_SOURCE')define stream TrasanctionTable (userId long, transactionAmount double, location string); @info(name = 'CleaningData')from TrasanctionStreamselect userId, transactionAmount, ifThenElse(location is null, "UNKNOWN", location) as locationinsert into CleanedTrasanctionStream; @info(name = 'EnrichData')from CleanedTrasanctionStream as c join UserTable as u on c.userId == u.userIdselect c.userId, str:concat( u.firstName, " ", u.lastName) as userName, transactionAmount, locationinsert into EnrichedTrasanctionStream; @info(name = 'LoadData')from EnrichedTrasanctionStreaminsert into TransactionTable;
Scenario 2: Extract data from a database, perform a stateful transformation, and load data to Kafka
Let's consider a scenario where the head office of the Sweet Factory needs to analyze sales by the location based on the latest transactions

1.
2.
3.
4. a.
b.
c.
5.
6.
a.
every five minutes. To do this, you need to poll the database with the sales transactions every five minutes. Before the aggregates are calculated,you also need to ensure that the database contains the latest transactions. You can perform real-time ETL vial the WSO2 Stream Processor toachieve this as shown below.
Let's get started!
The information you need to transform and load to Kafka needs to be extracted from a datastore. Therefore, let's start by adding thedefinition of this data table to the Siddhi application as follows.
-- In-memory Table to keep last processed transaction ID@primaryKey('key')define table TriggerStateTable (key string, lastProcessedId long);
Once the information is extracted and transformed, the transformed data needs to be directed to an output stream. This output streamcan be defined as follows.
define stream TranformedDataStream(transactionLocation string, totalTransactionAmount double, avgTransactionAmount double, transactionId long);
The database table needs to be polled every five minutes for the last processed ID. To this, you can compare the last processed ID witha stream in which a new event is triggered every five minutes. Therefore, let's add a trigger as follows:
define trigger TriggerStream at every 5 min;
define stream TranformedDataStream(transactionLocation string, totalTransactionAmount double, avgTransactionAmount double, transactionId long);
-- In-memory Table to keep last processed transaction ID@primaryKey('key')define table TriggerStateTable (key string, lastProcessedId long);
To collect the last processed transaction ID, you need to add a Siddhi query as follows.To extract the last processed ID, the events triggered in the stream as well as the events stored in the TriggerStream Trigge
table need to be considered. Therefore, let's add a Siddhi join to join this stream and the table as follows.rStateTable
from TriggerStream as s right outer join TriggerStateTable as t
The data collected needs to be inserted into another stream so that it can be used for further processing. Therefore, let's add the clause with an inferred stream as follows.insert into
from TriggerStream as s right outer join TriggerStateTable as tinsert into DataRetrievalStream;
Now you need to specify the condition based on which the last processed ID is selected from the joined streaTriggerStreamm and the table, and inserted into the . Let's add it as follows.TransactionTable DataRetrievalStream
from TriggerStream as s right outer join TriggerStateTable as t select ifThenElse(t.lastProcessedId is null, 0l, t.lastProcessedId )
as lastProcessedIdinsert into DataRetrievalStream;
Let's define a data store to save the transction data as follows.
-- Store table @store(type = 'rdbms' , datasource = 'TRANSACTION_DATA_SOURCE')define table TransactionTable(transactionId long, userId long, transactionAmount double, transactionLocation string);
Now you have created a query to collect the last processed IDs from a triggered stream and a table. The data is taken from two locationsvia a join. Therefore, you need to process the data collected from both to extract the last processed ID. To do this, let's create a Siddhiquery as follows.
The last processed transaction ID should be taken from the TransactionTableonly if the last processed ID in that table is later

6.
a.
b.
c.
d.
7.
a.
b.
c.
d.
8.
a.
than the last processed ID of an event in the stream. Therefore, let's join this stream and table so thatDataRetrievalStreamthe last processed ID is selected by comparing events in both.
from DataRetrievalStream as s join TransactionTable as ton s.lastProcessedId < t.transactionId
The data extracted needs to be directed to an output stream. Therefore, let's add an output stream named ExtractedDataStr that can be inferred.eam
from DataRetrievalStream as s join TransactionTable as t on s.lastProcessedId < t.transactionIdinsert into ExtractedDataStream;
Now let's select the information to be inserted into the stream from the event that is extracted as theExtractedDataStreamlast processed event.
from DataRetrievalStream as s join TransactionTable as t on s.lastProcessedId < t.transactionId
select t.transactionId, t.transactionAmount, t.transactionLocationinsert into ExtractedDataStream;
The completed query looks as follows.
@info(name = ' ')ExtractData from DataRetrievalStream as s join TransactionTable as t
on s.lastProcessedId < t.transactionId select t.transactionId, t.transactionAmount, t.transactionLocation
insert into ExtractedDataStream;
You need to update the table with the last processed ID identified after the join between the table and the stream.TriggerStateTableTo do this, let's create a Siddhi query as follows.
The information with which the table is updated is taken from the stream toTriggerStateTable ExtractedDataStreamwhich the last processed transaction is being sent every five minutes. Therefore, let's add this stream as the input stream.
from ExtractedDataStream
The event with the last processed ID may already exist in the table. In such a scenario, the existingTriggerStateTablerecord should be updated with the latest details taken from the stream. If that event does not already exist in the table, it shouldbe inserted as a new record. To indicate this, let's add an clause as follows.update or insert
from ExtractedDataStream
update or insert into TriggerStateTableon TriggerStateTable.key == "lastProcessedId";
When selecting records to be updated/inserted to the table, the unique identity by which the records are identified should be thelast processed ID. Therefore, let's add a select clause with the attribute specified as the key.lastProcessedID
from ExtractedDataStream select "lastProcessedId" as key, transactionId as lastProcessedId
update or insert into TriggerStateTableon TriggerStateTable.key == "lastProcessedId";
The completed query looks as follows.
@info(name='UpdateLastProcessedId') from ExtractedDataStream
select "lastProcessedId" as key, transactionId as lastProcessedId update or insert into TriggerStateTable
on TriggerStateTable.key == "lastProcessedId";
Now let's perform a stateful aggregation. You need to analyze sales the sales for each location by calculating the total sales and theaverage sales per location every five minutes. Let's create a Siddhi query to carry out this analysis.
Note that the query is named . It is recommended to name each query stating the purpose when thereExtractDataare multiple queries in the Siddhi application.

8.
a.
b.
c.
d.
e.
9.
The information to be analyzed is taken from the stream, and the results are inserted into an outputExtractedDataStreamstream named . Therefore, let's add the and clauses acoordingly.TransformedDataStream from insert into
from ExtractedDataStream
insert into TransformedDataStream
As mentioned, the calculations need to be done every five minutes in a tumbling manner. Therefore, let's add a time batchwindow as follows.
from ExtractedDataStream#window.timeBatch(5 min)
insert into TransformedDataStream
The attributes in the stream are , ExtractedDataStream transactionID and transactionLocation transactionAmo. The values for the unt attribute needs to be taken without any further processing. However, youtransactionLocation
need to derive the total transaction amount and the average transaction amount from the values for the atransactionAmountttribute. This can be achieved via the and Siddhi functions. Therefore, let's add the select clause as follows.sum() avg()
from ExtractedDataStream#window.timeBatch(5 min) select transactionLocation, sum(transactionAmount) as totalTransactionAmount, avg(transactionAmount) as avgTransactionAmount,
transactionIdinsert into TranformedDataStream;
The analysis is carried out to evaluate the sales by location. Therefore, let's add a group by clause to group the calculations bythe location when presenting the results.
from ExtractedDataStream#window.timeBatch(5 min) select transactionLocation, sum(transactionAmount) as totalTransactionAmount, avg(transactionAmount) as avgTransactionAmount,
transactionId group by transactionLocation
insert into TranformedDataStream;
Now let's name the query and complete it as follows.
@info(name = 'StatefulAggregation')from ExtractedDataStream#window.timeBatch(5 min)select transactionLocation, sum(transactionAmount) as totalTransactionAmount, avg(transactionAmount) as avgTransactionAmount, transactionIdgroup by transactionLocationinsert into TranformedDataStream;
The processed information needs to be published via Kafka. Therefore, let's add a Kafka sink as shown below.
-- Sink to load the data@sink(type='kafka', bootstrap.servers='...', topic='...',is.binary.message='...', @map(type='xml'))
This sink publishes data from the stream that is added as the output stream to direct the data processed byTransformedDataStreamthe Siddhi query. Therefore, let's connect the sink to that stream by adding the stream definition below it asStatefulAggregationshown below.
-- Sink to load the data@sink(type='kafka', bootstrap.servers='...', topic='...',is.binary.message='...',
@map(type='xml'))define stream TranformedDataStream(transactionLocation string, totalTransactionAmount double, avgTransactionAmount double, transactionId long);

Now let's name the Siddhi application and complete it. The completed version looks as follows.
@App:name('DB-to-Kafka-ETL')@App:description('Extract data from database, perform statefultransformation, and load data to kafka')
define trigger TriggerStream at every 5 min;-- Sink to load the data@sink(type='kafka', bootstrap.servers='...', topic='...',is.binary.message='...', @map(type='xml'))define stream TranformedDataStream(transactionLocation string, totalTransactionAmount double, avgTransactionAmount double, transactionId long);
-- Store table@store(type = 'rdbms' , datasource = 'TRANSACTION_DATA_SOURCE')define table TransactionTable(transactionId long, userId long, transactionAmount double, transactionLocation string);
-- In-memory Table to keep last processed transaction ID@primaryKey('key')define table TriggerStateTable (key string, lastProcessedId long);
@info(name = 'CollectLastProcessedId')from TriggerStream as s right outer join TriggerStateTable as tselect ifThenElse(t.lastProcessedId is null, 0l, t.lastProcessedId ) as lastProcessedIdinsert into DataRetrievalStream;
@info(name = 'ExtractData')from DataRetrievalStream as s join TransactionTable as t on s.lastProcessedId < t.transactionIdselect t.transactionId, t.transactionAmount, t.transactionLocationinsert into ExtractedDataStream;
@info(name='UpdateLastProcessedId')from ExtractedDataStreamselect "lastProcessedId" as key, transactionId as lastProcessedIdupdate or insert into TriggerStateTable on TriggerStateTable.key == "lastProcessedId";
@info(name = 'StatefulAggregation')from ExtractedDataStream#window.timeBatch(5 min)select transactionLocation, sum(transactionAmount) as totalTransactionAmount, avg(transactionAmount) as avgTransactionAmount, transactionIdgroup by transactionLocationinsert into TranformedDataStream;

1.
2.
User Guide
The section demonstrates how to use some of the important functionalities of WSO2 SP:
Understanding the Development Environment: Provides the developer relevant knowledge on how to use the Stream Processor Editorand its functionalities.Developing Streaming Applications: Provides information on how to write Stream Processing Applications using Siddhi StreamingSQL.Deploying Streaming Applications: Provides information on how a user can deploy a Stream Processing application in a productionenvironment.Visualizing Data: Explains how to create visualizations using dashboards and widgets.
: Demonstrates how developers can define templates, and how business users can create rules from thoseManaging Business Rulestemplates and manage them.Monitoring Stream Processor: Explains how to configure the Status Dashboard to monitor Stream Processor nodes.
Understanding the Development Environment
This section explains the WSO2 Stream Processor Studio which is shipped with WSO2 SP to serve as the development environment to developSiddhi applications.
Watch the following screencast for an introduction to the Stream Processor Studio.
Using Stream Processor Studio/Editor
The following topics describe how to use Stream Processor Studio/Editor to develop Siddhi stream processing applications.
Stream Processor Studio OverviewCreating a Siddhi ApplicationTesting a Siddhi ApplicationDebugging a Siddhi ApplicationExporting a Siddhi File
Using IDE Plugins
You can also develop, run and debug Siddhi stream processing applications via the Intellij IDEA Plugin.
Stream Processor Studio Overview
The Stream Processor Studio is a developer tool that is shipped with WSO2 SP to develop Siddhi applications. It allows provides two interfaces todevelop Siddhi applications
From source view: This allows you to write Siddhi applications in the Siddhi Query Language. This supports auto-completion, trackingsyntax errors and debugging.From design view:This interface visualizes the event flow of a Siddhi application, and allows you to compose the applications bydragging and dropping Siddhi components to a graph.
Once a Siddhi application is created, you can simulate events via the Stream Processor Studio to test whether it works as expected. You can alsorun the Siddhi application in the debug mode to detect errors in the Stream Processor logic.
Starting Stream Processor Studio
To start and access the Stream Processor Studio, follow the steps below:
Start the Stream Processor Studio by issuing one of the following commands from the directory.<SP_HOME>/binFor Windows: editor.batFor Linux: ./editor.sh
Access the Stream Processor Studio via the URL. The Streamhttp://localhost:<Stream_Processor_Studio_PORT>/editorProcessor Studio opens as shown below.
Welcome Page
The default URL is http://localhost:9390/editor

NewClick this to open a new untitled Siddhi file. OpenClick this to open a Siddhi file that is already saved in the folder of the Stream Processor Studio. If the file is already openedworkspacein a new tab, clicking does not open it again. The default path to the directory is Open workspace <SP_Home>/wso2/editor/deploy
.ment Try out samplesThe pre-created samples provided out of the box are listed in this section. When you click on a sample, it opens in a new tab without atitle. More SamplesClick this to view the complete list of samples in the samples directory. This allows you to access samples other than the ones hat aredisplayed by default is the section. When you click on a sample, it opens in a new tab without a title.Try out samples Quick linksThis section provides links to more resources.
Menu items
This section explains the options that are available in the , and menus.File Edit Run
File menu Items
The menu includes the following options.File

NewClick this to open a new untitled Siddhi file. Open FileClick this to open a Siddhi file that is already saved in the directory of the Stream Processor Studio. If the file is alreadyworkspaceopened in a new tab, clicking this menu item does not open it again in another tab. The default path to the directory is workspace <SP_H
.ome>/wso2/editor/deployment
When a Siddhi file is opened, its source view is displayed by default.
To view a design view where the elements of the Siddhi application are graphically represented, click . Design ViewAs a result, a graphical view of the Siddhi application is displayed as shown in the following example.

Import SampleClick this to import a sample from the samples diretory to a new tab. The sample opens in an untitled Siddhi file. Once you save it, it canbe accessed from the directory.workspace SaveClick this to save an edited or new file to the directory. workspace Save AsClick this if you want to save an existing saved file with a different name. If you click this for an untitled Siddhi file, the normal saveoperation is executed (i.e., same operation carried out when you click ).Save Import FileClick this to open a file from a system location. This file is opened in a new tab in the saved state with the same file name with which it isimported. Export FileClick this to export a saved file to a system location. This is only applicable to Siddhi application tabs that are in a saved state. Close FileClick this to close a currently active Siddhi application that is already open in a tab. Close All FilesClick this to close all the Siddhi files that are currently open. Delete FileClick this to delete the currently active Siddhi file from the directory. Only Siddhi files that are already saved can be deleted.workspace SettingsClick this to change the theme and the font size used in the Stream Processor Studio. The default theme is .Twilight
Edit menu Items
The menu includes the following options.Edit

UndoClick this to undo the last edit made to the Siddhi application that you are currently editing. Only unsaved edits can be undone. RedoClick this to redo the edit that was last undone in the Siddhi application that you are currently editing. The redo operation can be carried out only if you have not saved the Siddhi application after you undid the change. FindClick this to search for a specific string in the currently active Siddhi application tab. Find and ReplaceClick this to search for a specific string in the currently active Siddhi application tab, and replace it with another string. Reformat CodeClick this to reformat the Siddhi queries in the Siddhi application you are currently creating/editing in the .source view
Auto-AlignClick this to horizontally align all the Siddhi components in a Siddhi application that you are creating/editing in the .design view
Run menu Items
The menu includes the following options.Run
RunClick this to start the Siddhi application in the Run mode. Only saved Siddhi applications can be run.
DebugClick this to start the Siddhi application in the Debug mode. Only saved Siddhi applications can be run in this mode.
StopClick this to stop a Siddhi application that is already started in either the Run or Debug mode.
Side PanelFile Explorer
This menu option is only visible when you are working in the .source view
This menu option is only visible when you are working in the .design view
This menu option is enabled only when a Siddhi application is being created/edited in the .source view
This menu option is enabled only when a Siddhi application is being created/edited in the .source view

This provides a view of all the files saved.
Event Simulator
Simulation can be carried out in two ways:
Single SimulationFeed Simulation
For detailed information about event simulation, see .Simulating Events
Output Console

This provides feedback on various user activities carried out on the Stream Processor Studio.
Toolbar
Run iconClick this to start a currently open Siddhi application in the Run mode. This icon is enabled only for saved Siddhi applications. Debug iconClick this to start a currently open Siddhi application in the Debug mode. This icon is enabled only for saved Siddhi applications. Stop iconClick this to stop a Siddhi application that is currently running in either the Run or Debug mode. Revert iconClick this to revert the unsaved changes in the Siddhi application that is currently being created/edited.
Working with the Design View
This section provides an overview of the design view of the Stream Processor Studio.
Accesing the Design ViewAdding Siddhi componentsConnecting Siddhi components

1.
2. 3.
Saving, running and debugging Siddhi applications
Accesing the Design View
To open the design view of the Stream Processor Studio:
Start the Stream Processor Studio and log in with your credentials. For detailed instructions, see Stream Processor Studio Overview -.Starting Stream Processor Studio
Click and open a new Siddhi file, or click and open an existing Siddhi file.New OpenClick to open the Design View.Design View
The design view opens as shown in the example below. It consists of a grid to which you can drag and drop the Siddhi componentsrepresented by icons displayed in the left panel to design a Siddhi application.
Adding Siddhi components
To add a Siddhi component to the Siddhi application that you are creating/editing in the design view, click on the relevant icon in the left pane, andthen drag and drop it to the grid as demonstrated in the example below.

The following is the complete list of Siddhi components that you can add to the grid of the design view when you create a Siddhi application.
Stream
Icon
Description A stream represents a logical series of events ordered in time. For a detailed description of streams, see Siddhi Query Guide -.Stream
Form Once you add a stream component to a Siddhi application in the design view, the form appears below the grid.Define StreamTo configure the stream, following information can be specified in this form:
Stream Name A unique name for the stream. This should be specified in title caps, and without spaces (e.g., : ProductionDa).taStream
Attributes: Attributes of streams are specified as name and type pairs in the table.Attributes
Example
The above creates a stream with the following configuration:
define stream SweetProductionStream (amount double, namestring);

Source SourcesProjection queriesFilter queriesWindow queriesJoin queries
Target SinksProjection queriesFilter queriesWindow queriesJoin queries
Source
Icon
Description A source receives events in the specified transport and in the specified format. For more information, see Siddhi Query Guide -.Source
Form Once you add a source component to a Siddhi application in the design view, the Define Source form appears below the grid.To configure the event source, following information can be specified in this form:
Type: This specifies the transport type via which the events are received. The value should be entered in lower case (e.g.,t ).cpOptions: This sectionTo add this section, you need to click Properties next to Source and select the Options check box. allows you to add properties you want to configure for the selected transport. You can click to add a new option.+ OptionThe value must be entered in the format (e.g., <PROPERTY_NAME>=<'PROPERTY_VALUE'> context='SweetProducti
).onData'Properties: This sectionTo add this section, you need to click Properties next to Source and select the Map check box.specifies the format in which the events are received via the source, and allows you to define the mapping so that incomingevents can be converted to Siddhi events. The event format is specified in the field of the section in lower caseName Type(e.g., ). To configure the mapping based on the mapper type you selected, you can click next to abinary Properties Map nd select the check box and/or the check box.Type Attribute Mapping

Example
This source configuration is represented as follows in the source view.
@Source(type = 'tcp', context='SweetProductionData',@map(type='binary'))
Source No connection can start from another Siddhi component and link to a source because a source is the point from which eventsselected into the event flow of the Siddhi application start.
Target Streams
Sink
Icon
Description A sink publishes events via the specified transport and in the specified format. For more information, see Siddhi Query Guide - Sink .

Form Once you add a source component to a Siddhi application in the design view, the form appears below theSink Configurationsgrid. To configure the event sink, following information can be specified in this form:
Type: This specifies the transport via which the sink publishes processed events. The value should be entered in lowercase (e.g., log ).
: To add more properties to configure the source, you can click next to . Then select theProperties Properties Sink Option check box and/or the check box to add sink options and/or to define the mapping details as required.s Map
Options: This section allows you to add properties you want to configure for the selected transport. You can click + formatOption to add a new property. The value must be entered in the <PROPERTY_NAME>=<'PROPERTY_VALUE'>
(e.g., prefix='Sweet Totals' ).: In this section, you can add the mapping type (i.e., the format in which the event is published) in the fieldMap Name
in the sub section. If you want to add more configurations to the mapping, click next to , andType Properties Mapthen select the check box and/or check box. For more information, see Options Attribute Mappings Siddhi Query
.Guide - Sink Mapper: This can be used to add additional properties to the annotation. Options @map
: You can add attributes as key and value pairs or as single attributes.Attribute Mapping
Example
Source Streams
Target N/A
A sink cannot be followed by another Siddhi component because it represents the last stage of the event flow where the resultsof the processing carried out by the Siddhi application are communicated via the required interface.
Table
Icon
Description A table is a stored version of an stream or a table of events. For more information, see .Siddhi Query Guide - Table
Form Once you add a table component to a Siddhi application in the design view, the form appears below theTable Configurationgrid. To configure the table, following information can be specified in this form:
Name This field specifies unique name for the table. This should be specified in title caps, and without spaces (e.g., : Product).ionDataTable
Attributes: Attributes of tables are specified as name and type pairs in the table. To add a new attribute, click Attributes +Attri.bute

Example
The details entered in the above form creates a table definition as follows:Table Configuration
define table ShipmentDetails(name string, supplier string,amount double);
Source Projection queriesWindow queriesFilter queriesJoin queries
Target Projection queriesWindow queriesFilter queriesJoin queries
Window
Icon
Description This icon represents a window definition that can be shared across multiple queries. For more information, see Siddhi Query.Guide - (Defined) Window
Form Once you add a window component to a Siddhi application in the design view, the Window Configuration form appears belowthe grid. To configure the window, following information can be specified in this form:
Name: This field specifies a unique name for the window. is used for window names as a convention.PascalCaseAttributes: Attributes of windows are specified as name and type pairs in the Attributes table.
: This specifies the function of the window (i.e., the window type such as , , etc.).Function Name time length frequentThe window types supported include , , , , , , , , , time timeBatch timeLength length lengthBatch sort frequent lossyFrequent cron
, .externalTime externalTimeBatchParameters: This section allows you to define one or more parameters for the window definition based on the window typeyou entered in the field.Function Name

Example
The details entered in the above form creates a window definition as follows:Window Configuration
define window FiveMinTempWindow (roomNo int, temp double) time(5min) output all events;
Source Projection queriesWindow queriesFilter queriesJoin queries
Target Projection queriesWindow queriesFilter queriesJoin queries
Trigger
Icon
Description a trigger allows you to generate events periodically. For more information, see .Siddhi Query Guide - Trigger
Form Once you add a trigger component to a Siddhi application in the design view, the Trigger Configuration form appears belowthe grid. To configure the trigger, following information can be entered in this form:
Name: A unique name for the trigger.At: This specifies the time interval at which the events must be triggered, or the cron expression based on which they aretriggered. For more information about cron expressions, see the .quartz-scheduler
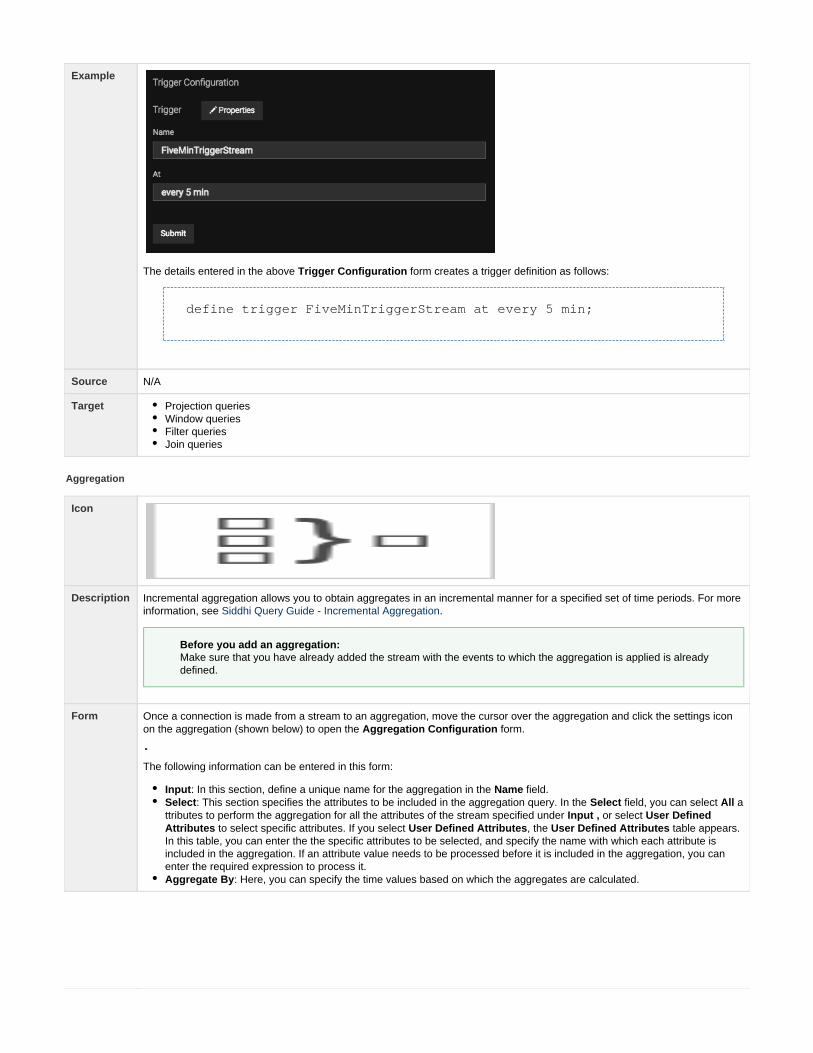
Example
The details entered in the above Trigger Configuration form creates a trigger definition as follows:
define trigger FiveMinTriggerStream at every 5 min;
Source N/A
Target Projection queriesWindow queriesFilter queriesJoin queries
Aggregation
Icon
Description Incremental aggregation allows you to obtain aggregates in an incremental manner for a specified set of time periods. For moreinformation, see .Siddhi Query Guide - Incremental Aggregation
Form Once a connection is made from a stream to an aggregation, move the cursor over the aggregation and click the settings iconon the aggregation (shown below) to open the form. Aggregation Configuration
The following information can be entered in this form:
Input: In this section, define a unique name for the aggregation in the field.NameSelect: This section specifies the attributes to be included in the aggregation query. In the field, you can select aSelect Allttributes to perform the aggregation for all the attributes of the stream specified under or select Input , User Defined
to select specific attributes. If you select , the table appears.Attributes User Defined Attributes User Defined AttributesIn this table, you can enter the the specific attributes to be selected, and specify the name with which each attribute isincluded in the aggregation. If an attribute value needs to be processed before it is included in the aggregation, you canenter the required expression to process it.Aggregate By: Here, you can specify the time values based on which the aggregates are calculated.
Before you add an aggregation:Make sure that you have already added the stream with the events to which the aggregation is applied is alreadydefined.

Example
The details entered in the above Aggregation Configuration form creates an aggregation definition as follows:
define aggregation TradeAggregation from TradeStream select symbol, avg(price) as avgPrice, sum(price) as total aggregate every seconds...years;
Source N/A
Target Join queries
Function
Icon
Description The function icon represents . It allows you to write functions in other programming languagesScript in Siddhi Query Languageand execute them within Siddhi queries. A function component in a Siddhi application is not connected to ther Siddhicomponents in the design UI. However, the configuration of one or more Query components can include a reference to it.
Form Once you add a function component to a Siddhi application in the design view, the Function Configuration appears below thegrid. To configure the function, following information can be specified in this form:
: A unique name for the function.Name: The language in which the function is written.Script Type
: The data format of the value that is generated as the output via the function.Return Value: This is a free text field to write the function in the specified script type.Script Body

Example
The details entered in the above Function Configuration form creates a function definition as follows:
define function concatFN[JAVASCRIPT] return string { var str1 = data[0]; var str2 = data[1]; var str3 = data[2]; var responce = str1 + str2 + str3; return responce;};
Projection Query
Icon
Description
This icon represents a query to project the events in an input stream to an output stream. This invoves selectng the attributes tobe included in the output, renaming attributes, introducing constant values, and using mathematical and/or logical expressions.For more information, see . Siddhi Query Guide - Query Projection
Before you add a projection query:You need to add and configure the following:
The input stream with the events to be processed by the query.The output stream to which the events processed by the query are directed.

Form Once you connect the query to an input stream (source) and an output stream (target), move the cursor over the query and clickthe settings icon on the projection query (shown below) to open the form.Query Configuration
The following information needs to be entered in this form:
Input: This section specifies the stream to be considered as the input stream with the events to which the query needs tobe applied. The input stream connected to the query as the source is automatically displayed.Select: This section specifies the attributes to be included in the output. In the field, you can select toSelect All Attributesselect all the attributes of the events, or select to select specific attributes, and the expressions toUser Defined Attributesconvert them as required to generate output events.Output: This section specifies the action to be performed on the output event. The fields to be configured in this sectionare as follows:
Operation: This field specifies the operation to be performed on the generated output event (e.g., to insertInsertevents to a selected stream/table/window).Into: This field specifies the stream/table/window in which the operation specified need to be performed.For: This field specifies whether the operation needs to be performed for all output events, only current events or foronly expired events.

Example
The details entered in the above form creates a query definition as follows:Query Configuration
from TradeStreamselect symbol, avg(price) as averagePrice, sum(amount) as totalinsert all events into OutputStream;
Source StreamsTablesTriggersWindows
Target StreamsTablesWindows
Filter Query
Icon
Description A filter query filters information in an input stream based on a given condition. For more information, see Siddhi Query Guide -.Filters

Form
Once you connect the query to an input stream (source) and an output stream (target), move the cursor over the query and clickthe settings icon on the filter query (shown below) to open the form.Query Configuration
The following information needs to be entered in this form:
Input: This section specifies the stream to be considered as the input stream with the events to which the query needs tobe applied. The input stream connected to the query as the source is automatically displayed.Select: This section specifies the attributes to be included in the output. In the field, you can select toSelect All Attributesselect all the attributes of the events, or select to select specific attributes, and the expressions toUser Defined Attributesconvert them as required to generate output events.Output: This section specifies the action to be performed on the output event. The fields to be configured in this sectionare as follows:
Operation: This field specifies the operation to be performed on the generated output event (e.g., to insertInsertevents to a selected stream/table/window).Into: This field specifies the stream/table/window in which the operation specified need to be performed.For: This field specifies whether the operation needs to be performed for all output events, only current events or foronly expired events.
Stream Handlers: This section can be used to specify the filter criterion. To do this, select in the fieFilter Stream Handlerld, and then enter the filter condition in the field.Filter Condition
Example
The details entered in the above formQuery Configuration creates a query definition with a filter as follows:
from TradeStream[sum(amount) > 10000]select symbol, avg(price) as averagePrice, sum(amount) as totalinsert all events into OutputStream;
Before you add a filter query:You need to add and configure the following:
The input stream with the events to be processed by the query.The output stream to which the events processed by the query are directed.
A Siddhi application can have multiple stream handlers. To add another stream handler, click the + Stream. Multiple functions, filters and windows can be defined within the same form as stream handlers.Handler

Source StreamsTablesTriggersWindows
Target StreamsTablesWindows
Window Query
Icon
Description
Window queries include a window to select a subset of events to be processed based on a specific criterion. For more information, see Siddhi Query Guide - (Defined) Window .
Form Once you connect the query to an input stream (source) and an output stream (target), move the cursor over the query and clickthe settings icon on the window query (shown below) to open the Query Configuration form.
Input: This section specifies the stream to be considered as the input stream with the events to which the query needs tobe applied. The input stream connected to the query as the source is automatically displayed.Select: This section specifies the attributes to be included in the output. In the field, you can select toSelect All Attributesselect all the attributes of the events, or select to select specific attributes, and the expressions toUser Defined Attributesconvert them as required to generate output events.Output: This section specifies the action to be performed on the output event. The fields to be configured in this sectionare as follows:
Operation: This field specifies the operation to be performed on the generated output event (e.g., to insertInsertevents to a selected stream/table/window).Into: This field specifies the stream/table/window in which the operation specified need to be performed.For: This field specifies whether the operation needs to be performed for all output events, only current events or foronly expired events.
Stream Handlers: This section can be used to configure the window. To do this, select in the fieWindow Stream Handlerld, and then enter information in the following fields.
Window Name: A unique name for the window.Parameter Value: This specifies a criterion based on which the window selects a subset of events to be processed.Multiple parameters can be added by clicking .+Attribute
Before you add a window query:You need to add and configure the following:
The input stream with the events to be processed by the query.The output stream to which the events processed by the query are directed.
A Siddhi application can have multiple stream handlers. To add another stream handler, click the + Stream. Multiple functions, filters and windows can be defined within the same form as stream handlers.Handler

Example
The details entered in the above form Query Configuration creates a query definition with a window as follows:
from TradeStream#window.time(1 month)select symbol, avg(price) as averagePrice, sum(amount) as totalinsert all events into OutputStream;
Source
StreamsTablesTriggersWindows
Target StreamsTablesWindows
Join Query
Icon
Description A join query derives a combined result from two streams in real-time based on a specified condition. For more information, see .Siddhi Query Guide - Join
A window query can have only one source at a given time.

Form Once you connect two Siddhi components to the join query as sources and another Siddhi component as the target, move thecursor over the join query and click the settings icon on the projection query (shown below) to open the Join Query
form.Configuration
The following information needs to be entered in this form:
Configurations common for both sources
Select: This section specifies the attributes to be included in the output. In the field, you can select toSelect All Attributesselect all the attributes of the events, or select to select specific attributes, and the expressions toUser Defined Attributesconvert them as required to generate output events.Output: This section specifies the action to be performed on the output event. The fields to be configured in this sectionare as follows:
Operation: This field specifies the operation to be performed on the generated output event (e.g., to insertInsertevents to a selected stream/table/window).Into: This field specifies the stream/table/window in which the operation specified need to be performed.For: This field specifies whether the operation needs to be performed for all output events, only current events or foronly expired events.
The stream handlers need to be separateley configured for the left source and the right source of the join.
Configurations for each source
The following configurations are entered under and . Left Source Right Source
Input: Thes section specifies the input. This can be a stream, aggregation, window or a table for each source.Stream Handlers: This section defines the functions, filters, and windows that can be included in the query to extractevents from the left/right source.
Example A join query is configured as follows:
Common configurations

Left source configuration
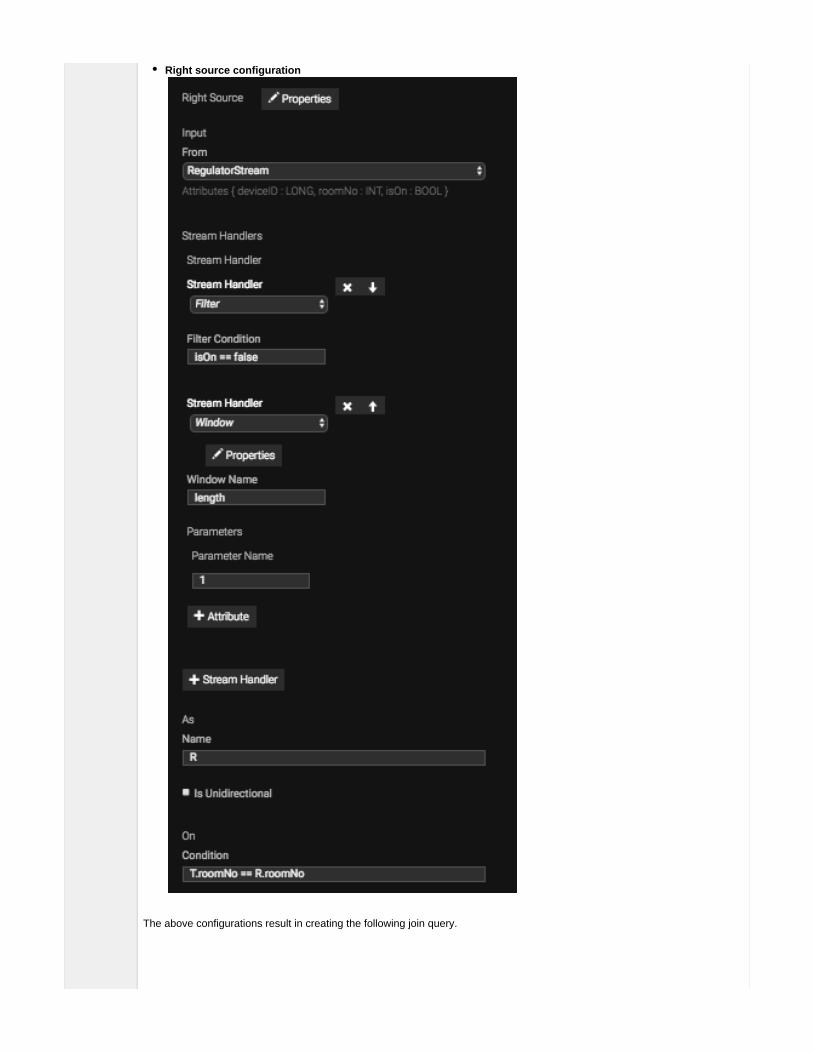
Right source configuration
The above configurations result in creating the following join query.

from TempStream[temp > 30.0]#window.time(1 min) as T join RegulatorStream[isOn == false]#window.length(1) as R on T.roomNo == R.roomNoselect T.roomNo, R.deviceID, 'start' as actioninsert into RegulatorActionStream;
Source
StreamsTablesAggregationsWindows
Target
StreamsTablesWindows
Pattern Query
Icon
Description
A pattern query detects patterns in events that arrive overtime. For more information, see .Siddhi Query Guide - Patterns
A join query must always be connected to two sources, and at least one of them must be a definedstream/trigger/window.
A join query must always be connected to a single target.
Before you add a pattern query:You need to add and configure the following:
The input stream with the events to be processed by the query.The output stream to which the events processed by the query are directed.
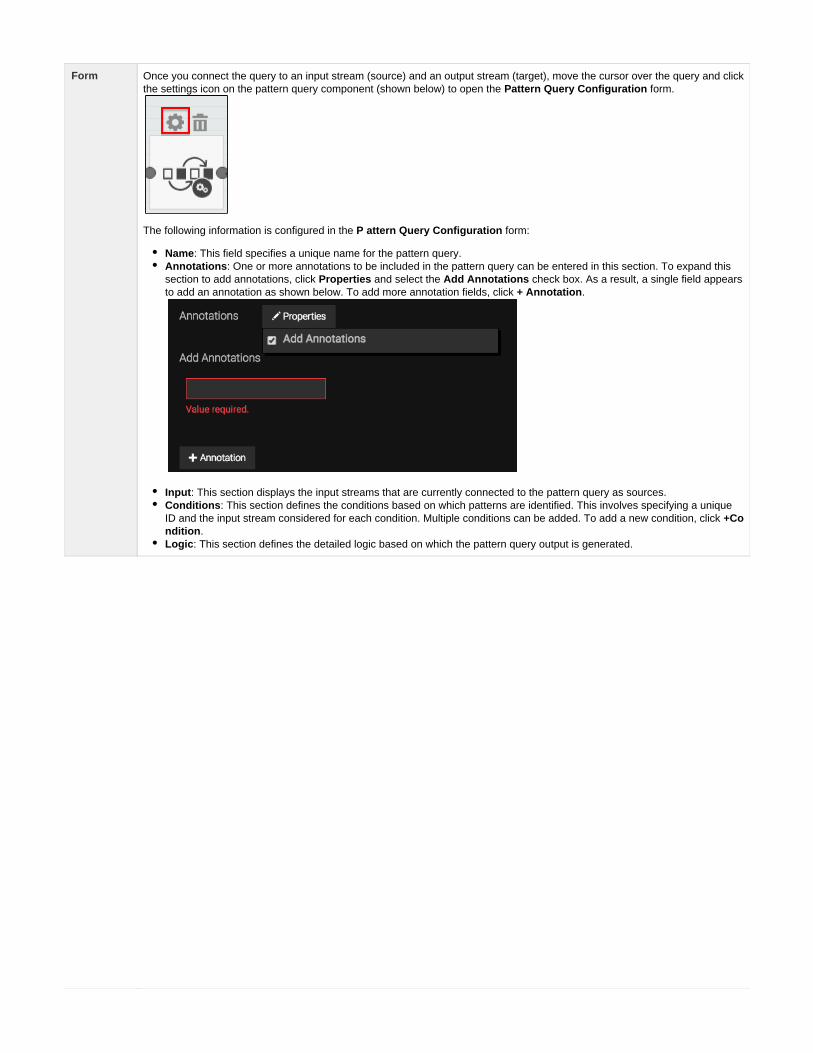
Form Once you connect the query to an input stream (source) and an output stream (target), move the cursor over the query and clickthe settings icon on the pattern query component (shown below) to open the Pattern Query Configuration form.
The following information is configured in the P attern Query Configuration form:
: This field specifies a unique name for the pattern query.Name: One or more annotations to be included in the pattern query can be entered in this section. To expand thisAnnotations
section to add annotations, click and select the check box. As a result, a single field appearsProperties Add Annotationsto add an annotation as shown below. To add more annotation fields, click .+ Annotation
: This section displays the input streams that are currently connected to the pattern query as sources.Input: This section defines the conditions based on which patterns are identified. This involves specifying a uniqueConditions
ID and the input stream considered for each condition. Multiple conditions can be added. To add a new condition, click +Co.ndition
: This section defines the detailed logic based on which the pattern query output is generated.Logic

Example
The above configuration results in creating the following query.
from every (e1=MaterialSupplyStream) -> notMaterialConsumptionStream[name == e1.name and amount ==e1.amount] for 15 secselect e1.name, e1.amountinsert into ProductionDelayAlertStream;
Source StreamsTablesTriggersWindows
Target StreamsTablesWindows

Sequence Query
Icon
Description
A sequence query detects sequences in event occurrences over time. For more information, see Siddhi Query Guide -.Sequence
Form Once you connect the query to an input stream (source) and an output stream (target), move the cursor over the query and clickthe settings icon on the sequence query component (shown below) to open the form.Sequence Query Configuration
The following information is configured in the Sequence Query Configuration form:
Name: This field specifies a unique name for the sequence query.Annotations: One or more annotations to be included in the sequence query can be entered in this section. To expand thissection to add annotations, click and select the check box. As a result, a single field appearsProperties Add Annotationsto add an annotation as shown below. To add more annotation fields, click .+ Annotation
Input: This section displays the input streams that are currently connected to the sequence query as sources.Conditions: This section defines the conditions based on which sequences are identified. This involves specifying aunique ID and the input stream considered for each condition. Multiple conditions can be added. To add a new condition,click .+ConditionLogic: This section defines the detailed logic based on which the sequence query output is generated.
Before you add a sequence query:You need to add and configure the following:
The input stream with the events to be processed by the query.The output stream to which the events processed by the query are directed.

Example
The above configuration results in creating the following query.
from every e1 = SweetProductionStream , e2 =SweetProductionStream[e1.amount > amount and (timestamp -e1.timestamp) < 10 * 60000]* , e3 =SweetProductionStream[timestamp - e1.timestamp > 10 * 60000 ande1.amount > amount] select e1.name as name, e1.amount as initialAmount, e2.amount asfinalAmount, e2.timestamp as timestamp insert into DecreasingTrendAlertStream;
Source StreamsTablesTriggersWindows
Target StreamsTablesWindows

Partitions
Icon
Description
Partitions divide streams and queries into isolated groups in order to process them in parallel and in isolation. For moreinformation, see .Siddhi Query Guide - Partition
Form Once the stream to be partitioned is connected as a source to the partition, move the cursor over the partition and click thesettings icon to open the form.Partition
In this form, you can enter expressions to convert the attributes of the stream selected to be partitioned, to create output events.
Example
The above configuration creates the following partition query.
partition with ( roomNo >= 1030 as 'serverRoom' or roomNo < 1030 and roomNo >= 330 as 'officeRoom'or roomNo < 330 as 'lobby' of TempStream)begin from TempStream#window.time(10 min) select roomNo, deviceID, avg(temp) as avgTemp insert into AreaTempStreamend;
Source Streams
Target N/A
Before you add a partition:You need to add the stream to be partitioned.

1.
Connecting Siddhi components
In order to define how the Siddhi components in a Siddhi application interact with each other to process events, you need to define connectionsbetween Siddhi components. A connection is defined by drawing an arrow from one component to another by dragging the cursor asdemonstrated below.
Saving, running and debugging Siddhi applications
To save a Siddhi application that you created in the design view, you need to switch to the source view. You also need to switch to the sourceview to run or debug a Siddhi application. For more information, see the following sections:
Stream Processor Studio OverviewDebugging a Siddhi Application
Creating a Siddhi Application
Siddhi applications are files that define the Siddhi logic to process the events sent to WSO2 SP. They are written in the uSiddhi Query Languagesing the shipped with WSO2 SP.Stream Processor Studio tool
A Siddhi file contains the following configurations:
Configuration Description
Stream A logical series of events ordered in time with a uniquely identifiable name, and set of defined attributes with specific datatypes defining its schema.
Source This consumes data from external sources (such as , , , etc) in the form of events, then converts each eventTCP Kafka HTTP(that can be in , , , etc. format) to a Siddhi event, and passes that to a stream for processing.XML JSON binary
Sink This takes events arriving at a stream, maps them to a predefined data format (such as , , etc), andXML JSON, binarypublishes them to external endpoints (such as , , , , etc).E-mail TCP Kafka HTTP
ExecutionalElement
An executional element can be one of the following:
Stateless query: Queries that only consider currently incoming events when generating an output. e.g., filtersStateful query: Queries that consider both currently incoming events as well as past events when generating an output.e.g., windows, sequences, patterns, etc. Partitions: Collections of stream definitions and Siddhi queries separated from each other within a Siddhi application forthe purpose of processing events in parallel and in isolation.
A Siddhi application can be created from the source view or the design view of the WSO2 SP Stream Processor Studio.
Creating a Siddhi application in the source view
To create a Siddhi application via the source view of the WSO2 SP Stream Processor Studio, follow the steps below:
Start WSO2 SP in the editor mode and access the Stream Processor Studio. For detailed instructions, see Starting Stream Processor. The Stream Processor Studio opens as shown below.Studio
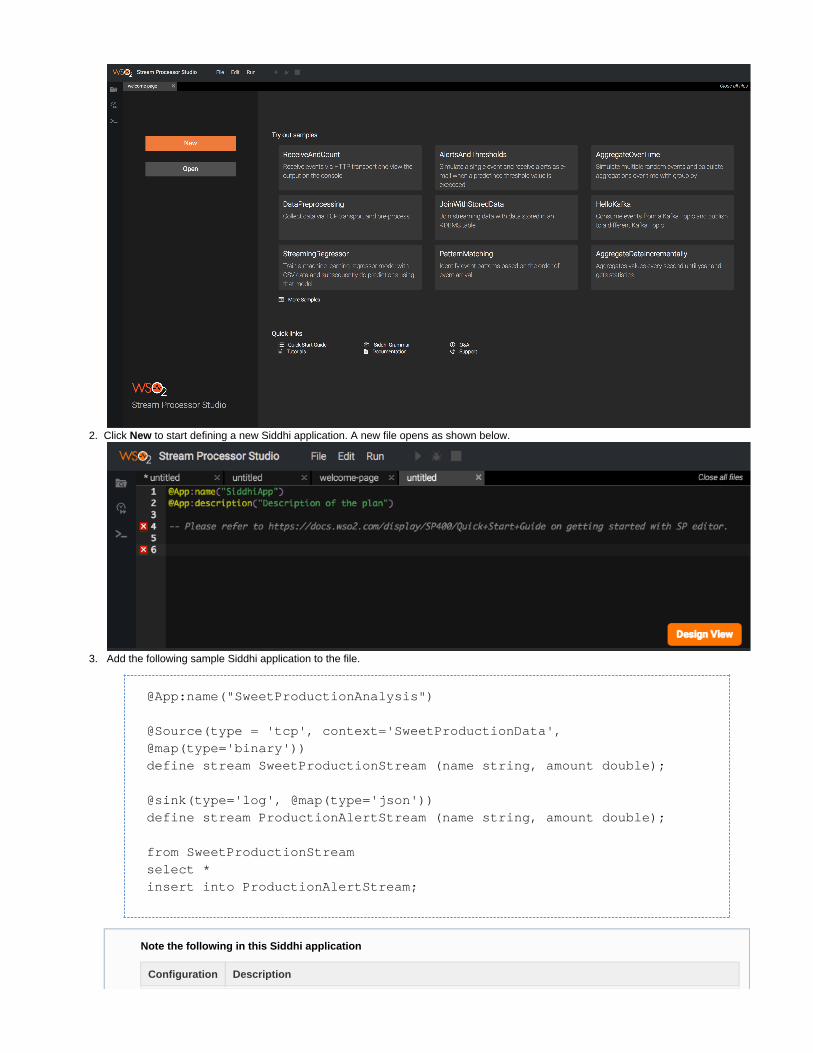
1.
2.
3.
Click to start defining a new Siddhi application. A new file opens as shown below.New
Add the following sample Siddhi application to the file.
@App:name("SweetProductionAnalysis")
@Source(type = 'tcp', context='SweetProductionData',@map(type='binary'))define stream SweetProductionStream (name string, amount double);
@sink(type='log', @map(type='json'))define stream ProductionAlertStream (name string, amount double);
from SweetProductionStreamselect *insert into ProductionAlertStream;
Note the following in this Siddhi application
Configuration Description

3.
Stream This stream contains two stream configurations:
SweetProductionStream
define stream SweetProductionStream (name string,amount double);
This is the input stream that defines the schema based on which events are selected to be processedby the Siddhi application. Events received via the source in thisSweetProductionAnalysisapplication are directed to this stream.ProductionAlertStream
define stream ProductionAlertStream (name string,amount double);
This is the output stream from which the sink configured in this application takes events to bepublished as the output.
Source@Source(type = 'tcp', context='SweetProductionData',@map(type='binary'))
This source configuration has the following sections:
@Source(type = ‘tcp’, context='SweetProductionData'
This configuration defines as the transport via which events are received to be processed by the tcp Siddhi application. SweetProductionAnalysis
@map(type='binary'))
This configuration defines the input mapping. In this scenario, Binary Mapper is used which convertsinput events into binary events and feeds them into siddhi.
Sink@sink(type='log', @map(type='json'))
This source configuration has the following sections:
@sink(type='log')
This configuration defines as the transport via which the processed events are published fromlog the output stream. Log sink simply publishes events into the console.ProductionAlertStream@map(type='json'))
This configuration defines the output mapping. Events are published with the mapping type.jsonJson mapper converts the events in the to the Json format.ProductionAlertStream
ExecutionalElements from SweetProductionStream
select *insert into ProductionAlertStream;
This is where the logic of the siddhi app is defined. In this scenario, all the events received in the SweetPr input stream are inserted into the output stream.oductionStream ProductionAlertStream

3.
4.
5. 6.
1.
To save this Siddhi application, click , and then click . By default siddhi applications are saved in the File Save <SP_HOME>/wso2/edito directory.r/deployment/workspace
To export the Siddhi application to your preferred location, click , and then click . File Export FileTo see a graphical view of the event flow you defined in your Siddhi application, click .Design View
The event flow is displayed as follows.
Creating a Siddhi application in the design view
To create a Siddhi application via the design view of the WSO2 SP Stream Processor Studio, follow the steps below:
Start WSO2 SP in the editor mode and access the Stream Processor Studio. For detailed instructions, see Starting Stream Processor. The Stream Processor Studio opens as shown below.Studio

1.
2.
3. 4.
Click to start defining a new Siddhi application. A new file opens as shown below.New
To open the design view, click .Design ViewTo define the input stream into which the events to be processed via the Siddhi application should be received, drag and drop the streamicon (shown below) into the grid.
As a result, the form appears below the grid as shown below.Stream Configuration

4.
a. b.
c.
Fill this form as follows to define a stream named with two attributes named and :SweetProductionStream name amount
In the field, enter Name SweetProductionStream.In the table, enter two attributes as follows. You can click to add a new row in the table to define a newAttributes +Attributeattribute.
Attribute Name Attribute Type
name string
amount double
Click to save the new stream definition. As a result, the stream is displayed on the grid with the Submit SweetProductionStr label as shown below.eam
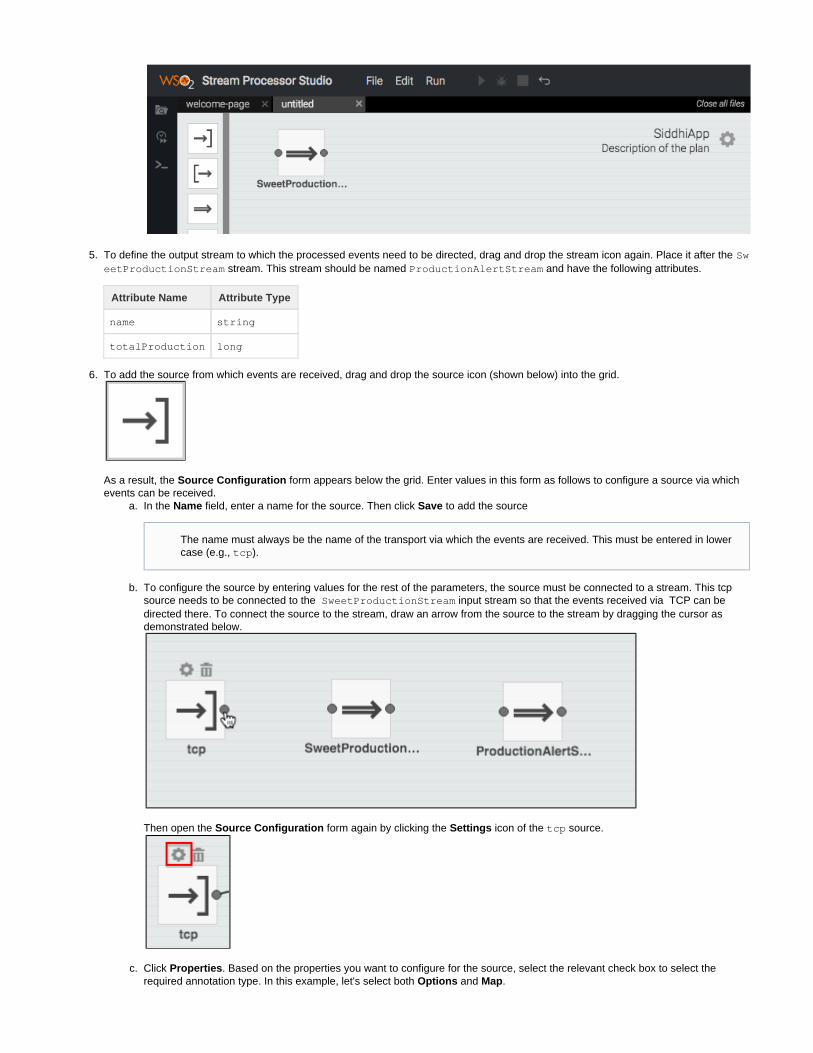
4.
c.
5.
6.
a.
b.
c.
To define the output stream to which the processed events need to be directed, drag and drop the stream icon again. Place it after the Sw
stream. This stream should be named and have the following attributes.eetProductionStream ProductionAlertStream
Attribute Name Attribute Type
name string
totalProduction long
To add the source from which events are received, drag and drop the source icon (shown below) into the grid.
As a result, the form appears below the grid. Enter values in this form as follows to configure a source via whichSource Configurationevents can be received.
In the field, enter a name for the source. Then click to add the sourceName Save
To configure the source by entering values for the rest of the parameters, the source must be connected to a stream. This tcpsource needs to be connected to the input stream so that the events received via TCP can beSweetProductionStreamdirected there. To connect the source to the stream, draw an arrow from the source to the stream by dragging the cursor asdemonstrated below.
Then open the form again by clicking the icon of the source.Source Configuration Settings tcp
Click . Based on the properties you want to configure for the source, select the relevant check box to select thePropertiesrequired annotation type. In this example, let's select both and . Options Map
The name must always be the name of the transport via which the events are received. This must be entered in lowercase (e.g., ).tcp
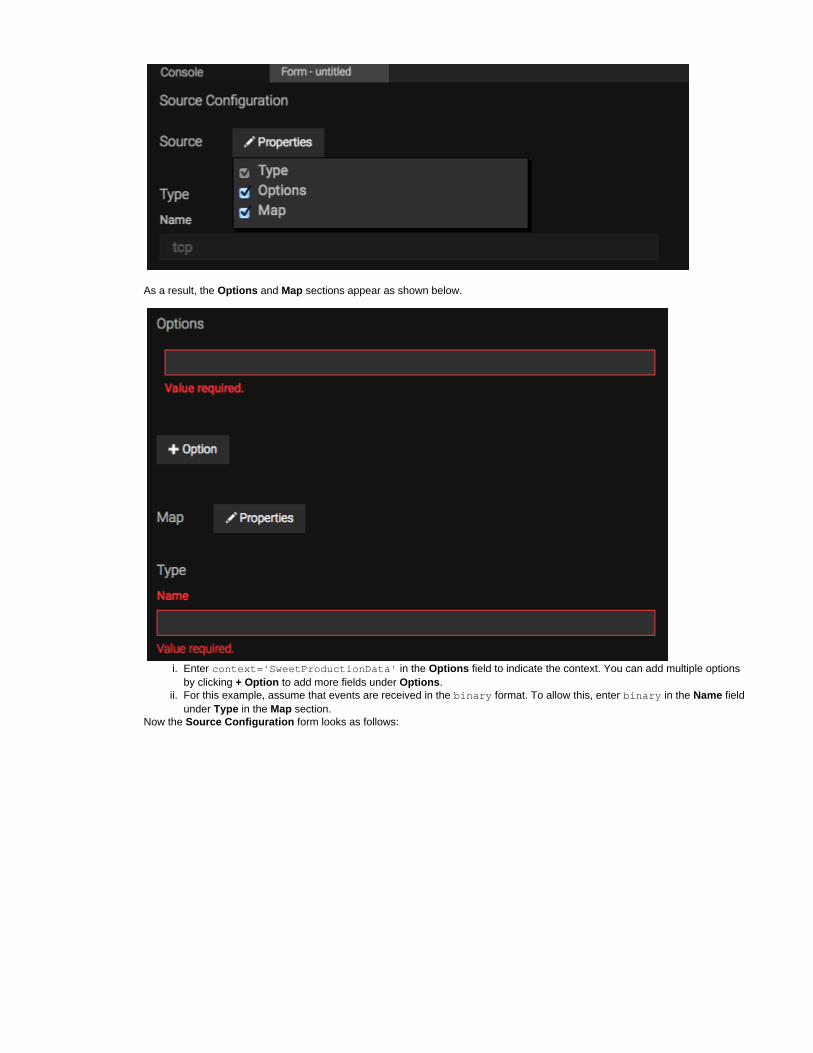
6.
c.
i.
ii.
As a result, the and sections appear as shown below. Options Map
Enter in the field to indicate the context. You can add multiple optionscontext='SweetProductionData' Optionsby clicking to add more fields under .+ Option OptionsFor this example, assume that events are received in the format. To allow this, enter in the fieldbinary binary Nameunder in the section. Type Map
Now the form looks as follows:Source Configuration

6.
c.
d. 7.
8.
9.
Click to save the source configuration.Save
To add a query that defines the execution logic, drag and drop the projection query icon (shown below) to the grid.
The query uses the events in the input stream as inputs and directs the processed events (which are itsSweetProductionStreamoutput) to the output stream. Therefore, create two connections as demonstrated below.ProductionAlertStream
To define the execution logic, move the cursor over the query in the grid, and click on the settings icon that appears.

9.
a.
b.
c.
i.
ii. iii.
d. 10.
a.
b.
11.
12.
This opens the form. Enter information in it as follows:Query Configuration
To specify that the stream is the input stream from which the events to be processed are taken,SweetProductionStreamenter it in the field in the section.Stream/Trigger InputTo define how each attribute is processed, enter the following in the table.User Defined Attributes
Expression As Purpose
name name When creating the output events, the attribute is output with the same attribute name.name
sum(amount) amount With each event that arrives in the stream, the query calculates theSweetProductionStreamsum for the attribute, and outputs the result with as the attribute value.amount amount
The output events generated need to be inserted into the output stream. To achieve this, enterProductionAlertStreaminformation in the section as follows:Output
In the field, select . This value is selected because the output events need to be inserted into the Operation Insert Prod output stream.uctionAlertStream
In the field, enter Into ProductionAlertStream.In the field, select .For all events
Click to save the entries.SaveTo add a sink to publish the output events that are directed to the output stream, drag and drop the sink iconProductionAlertStream(shown below) into the grid.
As a result, the form appears below the grid. Enter values in this form as follows to configure a sink via which eventsSink Configurationcan be published.
In the field, enter a name for the sink.Name
Click . Based on the properties you want to configure for the sink, select the relevant check box to select the requiredPropertiesannotation type. In this example, assume that the events need to be published in the format. Therefore, let's select the json Ma
check box, and enter to specify as the mapping type.p type=json jsonConnect the sink you added to the output stream by dragging and dropping the cursor from the ProductionAlertStream Productio
output stream to the sink.nAlertStreamTo allign the Siddhi components that you have added to the grid, click and then click . As a result, all the components areEdit Auto-Align
The name must always be the name of the transport via which the events are published. This must be entered in lowercase (e.g., ). log

12.
13.
14.
1. 2. 3.
horizontally aligned as shown below.
Click . The siddhi application is displayed as follows.Source View
Click and then click . The dialog box appears. In the field, enter File Save as Save to Workspace File Name SweetProductionAnaly and click .sis Save
Testing a Siddhi Application
WSO2 Stream Processor Studio allows the following tasks to be carried out to ensure that the Siddhi applications you create and deploy arevalidated before they are run in an actual production environment.
Validate Siddhi applications that are written in the Stream Processor Studio.Run Siddhi applications that were written in the Stream Processor Studio in either Run or Debug mode.Simulate events to test the Siddhi applications and analyze events that are received and sent. This allows you to analyze the status ofeach query within a Siddhi application at different execution points.
Validating a Siddhi application
To validate a Siddhi application, follow the procedure below:
Start and access the Stream Processor Studio. For detailed instructions, see .Starting Stream Processor StudioIn this example, let's use an existing sample as an example. Click on the sample to open it. ReceiveAndCountSample opens in a new tab. This sample does not have errors, and therefore, no errors are displayed in the editor. To create an error fordemonstration purposes, change the function in the query as shown below.count() query1 tocountNew()
@info(name='query1') from SweetProductionStream select as totalCount insert intocountNew()TotalCountStream;
Now, the editor indicates that there is a syntax error. If you move the cursor over the error icon, it indicates that is an invalidcountNewfunction name as shown below.

3.
1. 2. 3.
4.
a.
b.
Running or debugging a Siddhi application
You can run or debug a siddhi application to verify whether the logic you have written is correct. To start a Siddhi application in the run/debugmode, follow the procedure below:
Start and access the Stream Processor Studio. For detailed instructions, see .Starting Stream Processor Studio For this example, click the sample . It opens in a new untitled tab.existing ReceiveAndCount Save the Siddhi file sothat you can run it in the Run or Debug mode. To save it, click => . Once the file is saved, you can seeFile Savethe and menu options enables as shown below.Run DebugGo to and click . (Default saved in default workspace folder). Once saved you can see the above options are now enabled. File Save
To start the application in Run mode, click => . This logs the following output in the console.Run Run
Start the application in the Debug mode, click => . As a result, the following mesage is logged in the console. You canRun Debugalso note that another console tab is opened with debug options.

4.
b.
5.
1. 2.
3.
4.
5. 6.
To create an error for demonstration purposes, change the function in the query to , and save. Thencount() query1 countNew()click => . As a result, the following output is logged in the console.Run Run
Simulating events
This section demonstrates how to test a Siddhi application via event simulation. There are multiple methods to simulate events. In this example,you can use single simulation. For more information about all available methods, see .Simulating Events
To simulate a single event in order to check the status of your Siddhi queries, follow the procedure below:
Run the Siddhi application.ReceiveAndCountClick the following icon for event simulation.
It opens the left panel for event simulation as follows.
In the field, select the name of the application for which you want to simulate events. For this example, select Siddhi App Name Receive. AndCount
In the field, select the stream defined in the Siddhi application for which you want to simulate events. For this example,Stream Nameselect .SweetProductionStreamEnter values for the attributes of the selected stream that appear in the pane, and click .SendIn this Siddhi application, you have a sink of the type connected to the output stream. Therefore, once thelog TotalCountStreamevents are received at the input stream, a log ise printed in the output console as shown below.
Before you simulate events for a Siddhi application, you need to run or debug it. Therefore, before you try this section, see Run or.debug a Siddhi application

6.
Simulating Events
Simulating events involves simulating predefined event streams. These event stream definitions have stream attributes. You can use eventsimulator to create events by assigning values to the defined stream attributes and send them as events. This is useful for debugging andmonitoring the event receivers and publishers, execution plans and event formatters.
Function REST API
Saving a simulationconfiguration
Single Event Simulation: POST http://<SP_HOST>:<API_PORT>/simulation/singleMultiple Event Simulation: POST http://<SP_HOST>:<API_PORT>/simulation/feed
Editing a simulationconfiguration
Single Event Simulation: PUT http://<SP_HOST>:<API_PORT>/simulation/singleMultiple Event Simulation: PUT http://<SP_HOST>:<API_PORT>/simulation/feed
Deleting a simulationconfiguration
Single Event Simulation: DELETE http://<SP_HOST>:<API_PORT>/simulation/singleMultiple Event Simulation: DELETE http://<SP_HOST>:<API_PORT>/simulation/feed
Retrieving a simulationconfiguration
Single Event Simulation: GET http://<SP_HOST>:<API_PORT>/simulation/singleMultiple Event Simulation: GET http://<SP_HOST>:<API_PORT>/simulation/feed
Uploading a CSV file POST http://<SP_HOST>:<API_PORT>/simulation/feed
Editing and uploaded CSVfile
PUT -F 'file=@/{path to csv file}'http://<SP_HOST>:<API_PORT>/simulation/files/{fileName}?fileName={fileName}
Deleting an uploaded CSVfile
DELETE http://<SP_HOST>:<API_PORT>/simulation/files/{fileName}
Pausing an eventsimulation
POST http://<SP_HOST>:<API_PORT>/simulation/feed/{simulationName}/?action=pause
Resuming an eventsimulation
POST http://<SP_HOST>:<API_PORT>/simulation/feed/{simulationName}/?action=resume
Stopping an eventsimulation
DELETE http://<SP_HOST>:<API_PORT>/simulation/feed/{simulationName}
The following sections cover how events can be simulated.
Saving a simulation configurationEditing a simulation configurationDeleting a simulation configurationRetrieving a simulation configurationUploading a CSV fileEditing an uploaded CSV fileDeleting an uploaded CSV filePausing an event simulationResuming an event simulationStopping an event simulation
Saving a simulation configuration
To simulate events for WSO2 SP, you should first save the event simulator configuration in the <SP_HOME>/deployment/simulator/simula directory by sending a POST request to a REST API as described below.tionConfigs
REST API
The REST API to be called depends on the type of event simulation you are carrying out as shown in the table below.
Event Simulation Type REST API
Simulating a single event POST http://<SP_HOST>:<API_PORT>/simulation/single
Simulating a multiple events POST http:// /simulation/feed/<SP_HOST>:<API_PORT>
Sample cURL command

curl -X POST \ http://localhost:9390/simulation/feed/ \ -H 'content-type: text/plain' \ -d '{ "properties": { "simulationName": "simulationPrimitive", "startTimestamp": "", "endTimestamp": "", "noOfEvents": "", "description": "", "timeInterval": "1000" }, "sources": [ { "siddhiAppName": "TestExecutionPlan", "streamName": "FooStream", "timestampInterval": "1000", "simulationType": "RANDOM_DATA_SIMULATION", "attributeConfiguration": [ { "type": "PRIMITIVE_BASED", "primitiveType": "STRING", "length": "5" }, { "type": "PRIMITIVE_BASED", "primitiveType": "INT", "min": "0", "max": "999" } ] } ]}'
Sample output
{ "status": "CREATED", "message": "Successfully uploaded simulation configuration 'simulationPrimitive'"}
REST API response
200 if the simulation configuration is successfully saved.409 if a simulation configuration with the specified name already exists.400 if the configuration provided is not in a valid JSON format.
For descriptions of the HTTP status codes, see .HTTP Status Codes
Editing a simulation configuration
To edit a simulation configuration that is already saved, a PUT request should be sent to a REST API as explained below.

REST API
The REST API to be called depends on the type of event simulation you are carrying out as shown in the table below.
Event Simulation Type REST API
Simulating a single event PUT http://<SP_HOST>:<API_PORT>/simulation/single
Simulating a multiple events PUT http://<SP_HOST>: /simulation/feed/{feed name}<API_PORT>
Sample cURL command
curl -X PUT \ http://localhost:9390/simulation/feed/simulationPrimitive \ -H 'content-type: text/plain' \ -d '{ "properties": { "simulationName": "updatedSimulationPrimitive", "startTimestamp": "", "endTimestamp": "", "noOfEvents": "10", "description": "Updating the simulation configuration", "timeInterval": "1000" }, "sources": [ { "siddhiAppName": "TestExecutionPlan", "streamName": "FooStream", "timestampInterval": "1000", "simulationType": "RANDOM_DATA_SIMULATION", "attributeConfiguration": [ { "type": "PRIMITIVE_BASED", "primitiveType": "STRING", "length": "5" }, { "type": "PRIMITIVE_BASED", "primitiveType": "INT", "min": "0", "max": "999" } ] } ]
}'
Sample output
{ "status": "OK", "message": "Successfully updated simulation configuration 'simulationPrimitive'."}
REST API response

200 if the simulation configuration is successfully updated.404 if the file specified does not exist in the directory.<SP_HOME>/wso2/editor/deployment/simulation-configs400 if the file specified is not a CSV file, or if the file does not exist in the path specified.403 if the size of the file specified exceeds the maximum size allowed.
For descriptions of the HTTP status codes, see .HTTP Status Codes
Deleting a simulation configuration
To delete an event simulation file that is already saved in the directory, a <SP_HOME>/wso2/editor/deployment/simulation-configsDELETE request should be sent to a REST API as explained below.
REST API
The REST API to be called depends on the type of event simulation you are carrying out as shown in the table below.
Event Simulation Type REST API
Simulating a single event DELETE http://<SP_HOST>:<API_PORT>/simulation/single
Simulating a multiple events DELETE http:// : /simulation/feed/<SP_HOST> <API_PORT>
Sample cURL command
curl -X DELETE 'http://localhost:9390/simulation/feed/simulationPrimitive'
Sample output
{ "status": "OK", "message": "Successfully deleted simulation configuration 'simulationPrimitive'"}
REST API response
200 if the simulation configuration is successfully deleted.404 if the file specified does not exist in the directory.<SP_HOME>/wso2/editor/deployment/simulation-configs
For descriptions of the HTTP status codes, see .HTTP Status Codes
Retrieving a simulation configuration
To view a simulation configuration saved in the directory via the CLI, a GET<SP_HOME>/wso2/editor/deployment/simulation-configsrequest should be sent to a REST API as explained below.
REST API
The REST API to be called depends on the type of event simulation you are carrying out as shown in the table below.
Event Simulation Type REST API
Simulating a single event GET http://<SP_HOST>:<API_PORT>/simulation/single
Simulating a multiple events GET http:// /simulation/feed/<SP_HOST>:<API_PORT>
Sample cURL command
curl -X GET 'http://localhost:9390/simulation/feed/simulationPrimitive'
Sample output

{ "status": "OK", "message": "{\"Simulationconfiguration\":{\"sources\":[{\"timestampInterval\":\"1000\",\"simulationType\":\"RANDOM_DATA_SIMULATION\",\"attributeConfiguration\":[{\"length\":\"5\",\"type\":\"PRIMITIVE_BASED\",\"primitiveType\":\"STRING\"},{\"min\":\"0\",\"max\":\"999\",\"type\":\"PRIMITIVE_BASED\",\"primitiveType\":\"INT\"}],\"streamName\":\"FooStream\",\"siddhiAppName\":\"TestExecutionPlan\"}],\"properties\":{\"simulationName\":\"simulationPrimitive\",\"description\":\"Updating the simulationconfiguration\",\"timeInterval\":\"1000\",\"endTimestamp\":\"\",\"startTimestamp\":\"\",\"noOfEvents\":\"10\"}}}"}
REST API Response
200 if the simulation configuration is successfully retrieved.404 if the file specified does not exist in the directory. <SP_HOME>/wso2/editor/deployment/simulation-configs
For descriptions of the HTTP status codes, see .HTTP Status Codes
Uploading a CSV file
To simulate events from a CSV file, the required CSV file needs to exist in the <SP_HOME>/wso2/editor/deployment/csv-files directory.
REST API
A POST request should be sent to the following API.
POST http://<SP_HOST>:<API_PORT>/simulation/feed
Sample cURL command
curl -X POST \ http://localhost:9390/simulation/feed/ \ -H 'content-type: text/plain' \ -d '{ "properties": { "simulationName": "FeedSimulationTest", "startTimestamp": "", "endTimestamp": "", "noOfEvents": "", "description": "", "timeInterval": "1000" }, "sources": [ { "siddhiAppName": "TestExecutionPlan", "streamName": "FooStream", "timestampInterval": "1000", "simulationType": "CSV_SIMULATION", "fileName": "myEvents.csv", "delimiter": ",", "isOrdered": true, "indices": "0,1" } ]}'
Sample output
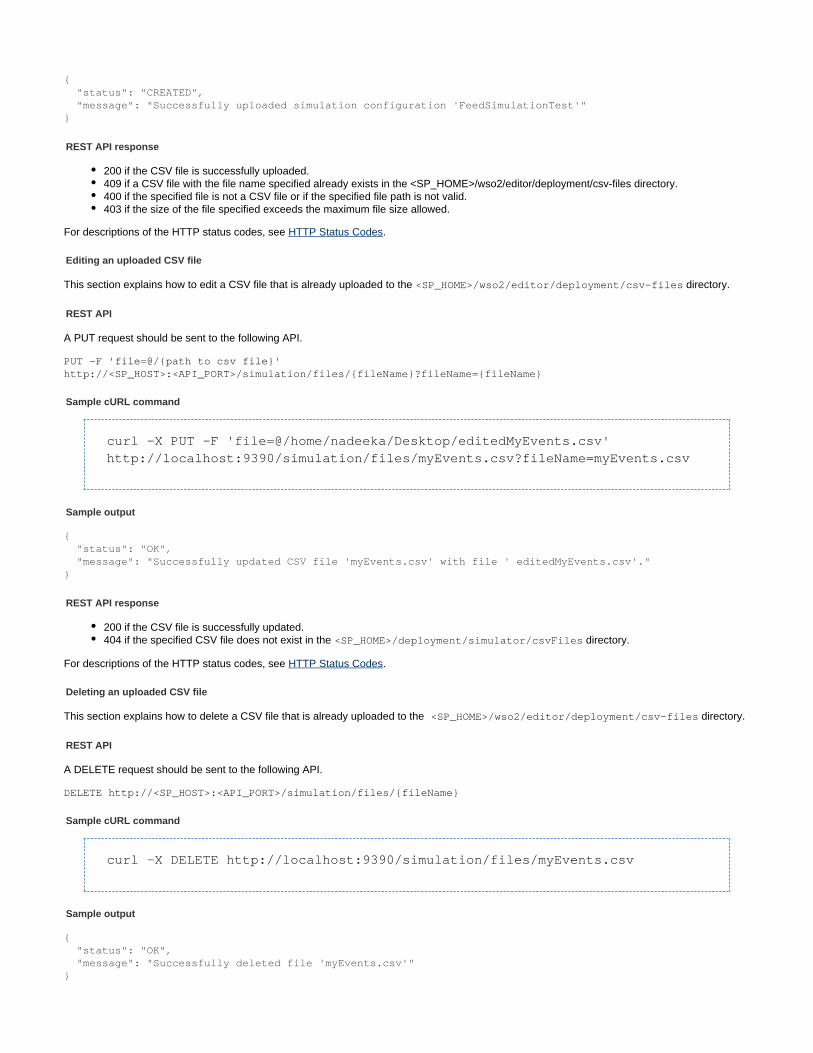
{ "status": "CREATED", "message": "Successfully uploaded simulation configuration 'FeedSimulationTest'"}
REST API response
200 if the CSV file is successfully uploaded.409 if a CSV file with the file name specified already exists in the <SP_HOME>/wso2/editor/deployment/csv-files directory.400 if the specified file is not a CSV file or if the specified file path is not valid.403 if the size of the file specified exceeds the maximum file size allowed.
For descriptions of the HTTP status codes, see .HTTP Status Codes
Editing an uploaded CSV file
This section explains how to edit a CSV file that is already uploaded to the directory.<SP_HOME>/wso2/editor/deployment/csv-files
REST API
A PUT request should be sent to the following API.
PUT -F 'file=@/{path to csv file}'http://<SP_HOST>:<API_PORT>/simulation/files/{fileName}?fileName={fileName}
Sample cURL command
curl -X PUT -F 'file=@/home/nadeeka/Desktop/editedMyEvents.csv'http://localhost:9390/simulation/files/myEvents.csv?fileName=myEvents.csv
Sample output
{ "status": "OK", "message": "Successfully updated CSV file 'myEvents.csv' with file ' editedMyEvents.csv'."}
REST API response
200 if the CSV file is successfully updated.404 if the specified CSV file does not exist in the directory.<SP_HOME>/deployment/simulator/csvFiles
For descriptions of the HTTP status codes, see .HTTP Status Codes
Deleting an uploaded CSV file
This section explains how to delete a CSV file that is already uploaded to the directory. <SP_HOME>/wso2/editor/deployment/csv-files
REST API
A DELETE request should be sent to the following API.
DELETE http://<SP_HOST>:<API_PORT>/simulation/files/{fileName}
Sample cURL command
curl -X DELETE http://localhost:9390/simulation/files/myEvents.csv
Sample output
{ "status": "OK", "message": "Successfully deleted file 'myEvents.csv'"}

REST API response
200 if the CSV file is successfully deleted.404 if the specified CSV file does not exist in the directory.<SP_HOME>/wso2/editor/deployment/csv-files
Pausing an event simulation
This section explains how to pause an event simulation that has already started.
REST API
A POST request should be sent to the following API.
POST http://<SP_HOST>:<API_PORT>/simulation/feed/{simulationName}/?action=pause
Sample cURL command
curl -X POSThttp://localhost:9390/simulation/feed/simulationPrimitive/?action=pause
Sample output
{ "status": "OK", "message": "Successfully paused event simulation 'simulationPrimitive'."}
REST API response
200 if the event simulation is successfully paused.409 if the event simulation is already paused.
Resuming an event simulation
This section explains how to resume an event simulation that has already paused.
REST API
A POST request should be sent to the following API
POST http://<SP_HOST>:<API_PORT>/simulation/feed/{ }/?action=resumesimulationName
Sample cURL command
curl -X POSThttp://localhost:9390/simulation/feed/simulationPrimitive/?action=resume
Sample output
{ "status": "OK", "message": "Successfully resumed event simulation 'simulationPrimitive'."}
REST API response
200 if the event simulation is successfully resumed.
Stopping an event simulation
This section explains how to stop an event simulation.
REST API

1.
2.
A POST request should be sent to the following API
POST http://<SP_HOST>:<API_PORT>/simulation/feed/{ }/?action=stopsimulationName
Sample cURL command
curl -X POSThttp://localhost:9390/simulation/feed/simulationPrimitive/?action=stop
Sample output
{ "status": "OK", "message": "Successfully stopped event simulation 'simulationPrimitive'."}
REST API response
200 if the event simulation is successfully stoped.
Simulating a Single Event
This section demonstrates how to simulate a single event to be processed via WSO2 SP.
Prerequisites
Before simulating events, a Siddhi application should be deployed.
Simulating an event
To simulate a single event, follow the steps given below.
Access the Stream Processor Studio via the URL. The Stream Processor Studiohttp://localhost:<EDITOR_PORT>/editoropens as shown below.
The default URL is .http://localhost:9090/editor

1.
2.
3. a. b.
c.
d. 4.
1.
Click the icon in the left pane of the editor to open the panel.Event Simulator Single Simulation
It opens the left panel for event simulation as follows.
Enter Information in the panel as described below.Single SimulationIn the field, select a currently deployed Siddhi application.Siddhi App Name In the field, select the event stream for which you want to simulate events. The list displays all the event streamsStream Namedefined in the selected Siddhi application.If you want to simulate the event for a specific time different to the current time, enter a valid timestamp in the field.TimestampTo select a timestamp, click the time and calendar icon next to the field.Timestamp
Then select the required date, hour, minute, second and millisecond. Click to select the time stamp entered. If you want toDone select the current time, you can click .NowEnter values for the attributes of the selected stream.
Click to start to send the event. The simulated event is logged similar to the sample log given below.Send
Simulating Multiple Events via CSV Files
This section explains how to generate multiple events via CSV files to be analyzed via WSO2 SP.
Prerequisites
Before simulating events, a Siddhi application should be deployed.
Simulating events
To simulate multiple events from a CSV file, follow the steps given below.
Access the Stream Processor Studio via the URL. The Stream Processor Studiohttp://localhost:<EDITOR_PORT>/editoropens as shown below.
The default URL is http://localhost:9090/editor

1.
2.
3.
4.
5. a. b. c. d.
Click the icon in the left pane of the editor.Event Simulator
In the event simulation left panel that opens, click on the tab.Feed Simulation
To create a new simulation, click . This opens the following panel.Create
Enter values for the displayed fields as follows.
In the field, enter a name for the event simulation.Simulation Name In the field, enter a description for the event simulation.DescriptionIf you want to receive events only during a specific time interval, enter that time interval in the field.Time IntervalClick if you want to enter detailed specifications to filter events from the CSV file. Then enterAdvanced Configurations

5.
d.
i.
ii.
e. f.
i.
ii.
information as follows.If you want to include only events that belong to a specific time interval in the simulation feed, enter the start time andthe end time in the and fields respectively. To select aStarting Event's Timestamp Ending Event's Timestamptimestamp, click the time and calendar icon next to the field.
Then select the required date, hour, minute, second and millisecond. Click to select the time stamp entered. If youDone want to select the current time, you can click .NowIf you want to restrict the event simulation feed to a specific number of events, enter the required number in the No of
field.EventsIn the field, select . Simulation Source CSV FileClick to open the following section. Add Simulation Source
In the field, select the required Siddhi application. Then more fields as shown below.Siddhi App Name
Enter details as follows:In the field, select the stream for which you want to simulate events. All the streams defined in the SiddhiStream NameApp you selected are available in the list.In the field, select an available CSV file. If no CSV files are currently uploaded, select from theCSV File Upload File

5.
f.
ii.
iii.
iv. 1.
2.
3.
v.
6.
1.
list. This opens the dialog box.Upload File
Click and browse for the CSV file you want to upload. Then click .Choose File UploadIn the field, enter the character you want to use in order to separate the attribute values in each row of theDelimiterCSV file.If you want to enter more detailed specificiations, click . Then enter details as follows.Advanced Configuration
To use the index value as the event timestamp, select the option. Then enter the relevantTimestamp Indexindex.If you want to increase the value of the timestamp for each new event, select the Increment event time by(ms)option. Then enter the number of milliseconds by which you want to increase the timestamp of each event.If you want the events to arrive in order based on the timestamp, select under the optiYes Timestamp Interval on.
Click to save the information relating to the CSV file. The name os the CSV file appears in the taSave Feed Simulationb in the left panel.
To simulate a CSV file that is uploaded and visible in the tab in the left panel, click on the arrow to its right. TheFeed Simulationsimulated events are logged n the output console.
Simulating Multiple Events via Databases
This section explains how to generate multiple events via databases to be analyzed via WSO2 SP.
Prerequisites
Before simulating events via databases, the following prerequisites must be completed:
A Siddhi application must be created.The database from which you want to simulate events must be already configured for WSO2 SP.
Simulating events
To simulate multiple events from a database, follow the procedure below:
Access the Stream Processor Studio via the URL. The Stream Processor Studiohttp://localhost:<EDITOR_PORT>/editoropens as shown below.
The default URL is http://localhost:9090/editor

1.
2.
3.
4.
Click the icon in the left pane of the editor.Event Simulator
Click the tab to open the panel.Feed Feed Simulation
To create a new simulation, click . This opens the following panel.Create

4.
5. a. b. c.
d.
i.
ii.
e.
Enter values for the displayed fields as follows.
In the field, enter a name for the event simulation.Simulation Name In the field, enter a description for the event simulation.DescriptionIf you want to simulate events at time intervals of a specific length, enter that length in milliseconds in the fieldTime Interval(ms).If you want to enter more advanced conditions to simulate the events, click . As a result, the followingAdvanced Configurationssection is displayed.
Then enter details as follows. If you want to include only events that belong to a specific time interval in the simulation feed, enter the start time andthe end time in the and fields respectively. To select aStarting Event's Timestamp Ending Event's Timestamptimestamp, click the time and calendar icon next to the field.
Then select the required date, hour, minute, second and millisecond. Click to select the time stamp entered. If youDone want to select the current time, you can click .NowIf you want to restrict the event simulation feed to a specific number of events, enter the required number in the No of
field.EventsIn the field, select . To connect to a new database, click to open theSimulation Source Database Add Simulation Sourcefollowing section.

5.
e.
f.
Enter information as follows:
Field Description
Siddhi AppName
Select the Siddhi Application in which the event stream for which you want to simulate events is defined.
StreamName
Select the event stream for which you want to simulate events. All the streams defined in the Siddhi Applicationyou selected are available to be selected.
DataSource
The JDBC URL to be used to access the required database.
DriverClass
The driver class name of the selected database.
Username The username that must be used to access the database.
Password The password that must be used to access the database.
Once you have entered the above information, click . If the datasource is correctly configured, theConnect to Databasefollowing is displayed to indicate that WSO2 SP can successfully connect to the database.

5.
f.
g.
h.
6.
7.
8.
1.
To use the index value as the event timestamp, select the option. Then enter the relevant index. If you wantTimestamp Indexthe vents in the CSV file to be sorted based on the timestamp, select the option under .Yes CSV File is Ordered by TimestampTo increase the timestamp of the published events, select the option. Then enter the number ofTimestamp Interval milliseconds by which you want to increase the timestamp of each event.
Click . This adds the fed simulation you created as an active simulation in the tab of the left panel as shownSave Feed Simulationbelow.
Click on the play button of this simulation to open the dialog box.Run or Debug
If you want to run the Siddhi application you previously selected and simulate events for it, select . If you want to simulate events inRunthe mode, select . Once you have selected the required mode, click . A message appears to inform youDebug Debug Start Simulationthat the feed simulation started successfully. Similarly, when the simulation is completed, a message appears to inform you that the eventsimulation has finished.
Generating Random Data
This section explains how to generate random data to be analyzed via WSO2 SP.
Prerequisites
Before simulating events, a Siddhi application should be deployed.
Simulating events
To simulate random events, follow the steps given below:
Access the Stream Processor Studio via the URL. The Stream Processor Studiohttp://localhost:<EDITOR_PORT>/editoropens as shown below.

1.
2.
3.
4.
Click the icon in the left pane of the editor.Event Simulator
Click the tab to open the panel.Feed Feed Simulation
To create a new simulation, click . This opens the following panel.Create
The default URL is http://localhost:9090/editor

4.
5. a. b. c.
d.
e. f.
g.
Enter values for the displayed fields as follows.
In the field, enter a name for the event simulation.Simulation Name In the field, enter a description for the event simulation.DescriptionIf you want to include only events that belong to a specific time interval in the simulation feed, enter the start time and the endtime in the and fields respectively. To select a timestamp, click theStarting Event's Timestamp Ending Event's Timestamptime and calendar icon next to the field.
Then select the required date, hour, minute, second and millisecond. Click to select the time stamp entered. If you want toDone select the current time, you can click .NowIf you want to restrict the event simulation feed to a specific number of events, enter the required number in the fielNo of Eventsd.If you want to receive events only during a specific time interval, enter that time interval in the field.Time IntervalIn the field, select . Simulation Source RandomIf the random simulation source from which you want to simulate events does not already exist in the pane,Feed Simulationclick to open the following section.Add New

5.
g.
h. i.
ii.
iii.
iv.
Enter information relating to the random source as follows:In the field, sSiddhi App Name elect the name of the Siddhi App with the event stream for which the events aresimulated.In the field, select Stream Name the event stream for which you want to simulate events. All the streams defined in theSiddhi Application you selected are available to be selected.In the field, enter Timestamp Interval the number of milliseconds by which you want to increase the timestamp of eachevent.To enter values for the stream attributes, follow the instructions below.
To enter a custom value for a stream attribute, select from the list. When you select thisCustom data basedvalue, data field in which the required value can be entered appears as shown in the example below.
To enter a primitive based value, select from the list. The information to be entered variesPrimitive baseddepending on the data type of the attribute. The following table explains the information you need to enter whenyou select for each data type.Primitive based
DataType
Values to enter

5.
h.
iv.
v.
STRING Specify a length in the field that appears. This results in a value of the specified lengthLengthbeing auto-generated.
FLOAT or DOUBLE
The value generated for the attribute is based on the following values specified.Min: The minimum value.Max: The maximum value.Precision: The precise value. The number of decimals included in the auto-generatedvalues are the same as that of the value specified here.
INT or LONG
The value generated for the attribute is based on the following values specified.
Min: The minimum value.Max: The maximum value.
BOOL No further information is required because and values are randomly generated.true false
To randomly assign values based on a pre-defined set of meaningful values, select from theProperty basedlist. When you select this value, a field in which the set of available values are listed appears as shown in theexample below.
To assign a regex value, select from the list.Regex basedTo enter values for the stream attributes, follow the instructions below.
To enter a custom value for a stream attribute, select from the list. When you select thisCustom data basedvalue, data field in which the required value can be entered appears as shown in the example below.
To enter a primitive based value, select from the list. The information to be entered variesPrimitive baseddepending on the data type of the attribute. The following table explains the information you need to enter whenyou select for each data type.Primitive based
DataType
Values to enter
STRING Specify a length in the field that appears. This results in a value of the specified lengthLengthbeing auto-generated.
FLOAT or DOUBLE
The value generated for the attribute is based on the following values specified.Min: The minimum value.Max: The maximum value.Precision: The precise value. The number of decimals included in the auto-generatedvalues are the same as that of the value specified here.
INT or LONG
The value generated for the attribute is based on the following values specified.
Min: The minimum value.Max: The maximum value.
BOOL No further information is required because and values are randomly generated.true false
To randomly assign values based on a pre-defined set of meaningful values, select from theProperty basedlist. When you select this value, a field in which the set of available values are listed appears as shown in theexample below.

5.
h.
v.
6. 7.
8. 9.
1. 2.
To assign a regex value, select from the list.Regex basedClick to save the simulation information. The saved random simulation appears in the tab of the left panel.Save FeedTo simulate events, click the arrow to the right os the saved simulation (shown in the example below).
The simulated events are logged in the CLI as shown in the extract below.
Click to save the simulation information. The saved random simulation appears in the tab of the left panel.Save FeedTo simulate events, click the arrow to the right os the saved simulation (shown in the example below).
The simulated events are logged in the CLI as shown in the extract below.
Debugging a Siddhi Application
WSO2 Stream Processor Studio allows debugging tasks to be carried out to ensure that the Siddhi applications you create and deploy arevalidated before they are run on an actual production environment. To debug a Siddhi application, you can run it in the debug mode, apply debugpoint and then run event simulation so that the specific debug points are analyzed.
To run a Siddhi application in the debug mode, follow the procedure below:
Start the Stream Processor Studio following the instructions in .Stream Processor Studio OverviewYou are directed to the welcome-page. In this scenario, let's use the existing sample Siddhi application named toReceiveAndCountdemostrate the debugging functionality. To open this Siddhi application, click on the sample.
A Siddhi application can be run in the debug mode only in the source view.

2.
3.
4.
5.
The Siddhi application opens in a new tab.ReceiveAndCountIn order to debug the Siddhi file, you need to first save it in the directory. To do this, click => . In theworkspace File Save Save to
dialog box that appears, click .Workspace SaveTo run the Siddhi application in the debug mode, click => .Run Debug
As a result, the following log is printed in the console.
Also, another console tab is opened with debug options as shown below.
Apply debug points for the required queries. To mark a debug point, you need to click on the left of the required line number so that it ismarked with a dot as shown in the image below.
This menu option is enabled only when the Siddhi file is saved in the directory as specified in the previous step.workspace

5.
6. Simulate one or more events for the stream in the Siddhi application. The first line that is marked as a debugSweetProductionStreampoint is highlighted as shown below when they are hit.
You can only mark lines with or statements as debug points.from insert into
For detailed instructions to simulate events, see the following sections:
Simulating a Single EventSimulating Multiple Events via CSV FilesSimulating Multiple Events via DatabasesGenerating Random Data

6.
7.
Two viewing options are provided under both and the sections of the tab for each debug point hit asEvent State Query State Debugshown above. To expand the tree and understand the details of the processed attributes and their values etc., click the following icon for the relevantquery.
When you observe the details, note that the value for in the section is null. This is because the debug point isoutputData Event Statestill at begining of the query. Also note that the value calculated via the function is sytill displayed as in the secticount() 0 Query Stateon.
The following icons are displayed in the tab of the console:Debug
Icon Description

7.
Click this to proceed from the current debug point to thenext available debug point. If there is no debug pointmarked after the current debug point, the existing debugpoint continues to be displayed in the tab.
Click this to proceed from the current debug point even ifno debug point exists after it.
Once you navigate to next debug point and see the details by clicking the plus signs as mentioned above you can further analyze theprocessed attributes and its values as shown below. Note that after the count() aggregate function, a value of 1 has been calculated.

7.
1.
2.
3.
Exporting a Siddhi File
The Siddhi files you create in the are saved in the directory byStream Processor Studio <SP_HOME>/wso2/editor/deployment/workspacedefault. If you want to save a Siddhi file in a different location, you can export it to thhe required location as explained below.
Start WSO2 SP in the editor mode and access the Stream Processor Studio. For detailed instructions, see Starting Stream Processor. The Stream Processor Studio opens as shown below.Studio
Open the Siddhi application you want to export. You can click and select a Siddhi application that is already saved in the Open <SP_HOM directory. E>/wso2/editor/deployment/workspace
Click => .File Export File

3.
4.
This opens the native file browser opens as shown below.
Browse for the required directory path and click .Save
This functionality differs based on the web browser you are using and its settings. e.g., if you have set a default download location anddisabled the feature as shown below, the file is downloaded to the default locationAsk where to save each file before downloadingwithout prompting you for any further input.

Developing Streaming Applications
The following topics cover information on writing Siddhi Streaming Applications for WSO2 Stream Processor:
Siddhi Application OverviewCollecting EventsProcessing Streaming EventsStorage IntegrationComplex Event ProcessingMachine LearningIncremental AnalysisPublishing EventsConverting to a Distributed Streaming Application
Siddhi Application Overview
A Siddhi application (.siddhi) file is the deployment artifact containing the Stream Processing logic for WSO2 Stream Processor.
The format of a Siddhi application is as follows:
@App:name("ReceiveAndCount")@App:description('Receive events via HTTP transport and view the output onthe console')
/* Sample Siddhi App block comment*/
-- Sample Siddhi App line comment
@Source(type = 'http', receiver.url='http://localhost:8006/productionStream', basic.auth.enabled='false', @map(type='json'))define stream SweetProductionStream (name string, amount double);
@sink(type='log')define stream TotalCountStream (totalCount long);
-- Count the incoming events@info(name='query1')from SweetProductionStreamselect count() as totalCountinsert into TotalCountStream;
Basic information about Siddhi applications
Following are some important things to note about Siddhi applications:
The file name of each Siddhi application must be equal to the name specified via the annotation.@App:name()e.g., In the sample Siddhi application given above, the application name is . Therefore, the Siddhi file name must be ReceiveAndCount
. ReceiveAndCount.SiddhiIt is optional to provide a description via the annotation.@App:description()The definitions of the required streams, windows, tables, triggers and aggregations need to be included before the Siddhi queries.e.g., In the above sample Siddhi file, the streams (lines 14 and 17) are defined before the queries (lines 21-23).Siddhi can infer the definition of the streams. It is not required to define all the streams. However, if annotations need to be added to astream, that stream must be defined.In the above sample, lines 4-6 nd 8 demonstrate how to nclude comments within Siddhi applications.

For more information about Siddhi applications, see Siddhi Application at Siddhi Streaming SQL Guide.
Common elements of a Siddhi application
This section explains the common types of definitions and queries that are included in Siddhi application:
Queries
Queries define the logical processing and selections that must be executed for streaming events. They consume from the pre-defined streams/windows/ tables/ aggregations, process them in a streaming manner, and insert the output to another stream, window or table. For moreinformation about Siddhi queries, see Queries at Siddhi Streaming SQL Guide.
Streams
Streams are one of the core elements of a stream processing application. A stream is a logical series of events ordered in time with a uniquelyidentifiable name and set of defined attributes with specific data types defining its schema. In Siddhi, streams are defined by giving it a name and
the set of attributes it contains. Lines 14 and 17 of the above sample are examples of defined streams. For more information on Siddhi see .streams, Streams at Siddhi Streaming SQL Guide
Tables
A table is a collection of events that can be used to store streaming data. The capability to store events in a table allows you to query for storedevents later or process them again with a different stream. The generic table concept holds here as well, however, Siddhi tables also supportnumerous table specific data manipulations such as defining primary keys, indexing, etc. For more information on Siddhi tables, see Storage
and Integration Tables at Siddhi Streaming SQL Guide.
Windows
Windows allow you to retain a collection of streaming events based on a time duration (time window), or a given number of events (length
window). It allows you to process events that fall into the defined window or expire from it. For more information on Siddhi windows, see Windo.ws at Siddhi Streaming SQL Guide
Aggregations
Aggregation allows you to aggregate streaming events for different time granularities. The time granularities supported are seconds, minutes,hours, days, months and years. Aggregations such as sum, min, avg can be calculated for the desired duration(s) via Siddhi aggregation. Formore information on Siddhi aggregations, see .Aggregations at Siddhi Streaming SQL Guide
The elements mentioned above work together in a Siddhi application to form an event flow. To understand how the elements os a Siddhiapplication are interconnected, you can view the design view of a Siddhi application. For more information, see Stream Processor Studio
.Overview
Collecting Events
The first step in stream processing is to collect the data that needs to be analyzed. Collection of data is done through Siddhi source which can bedefined via @source() annotation on a steam.
To collect data to be processed a stream should have been defined in the Siddhi Application along with the @source() annotation and deployed inWSO2 SP. Here a single SiddhiApp can contain multiple streams and each of those steams can also contain multiple @source() annotations.
Example Input Source definition as bellow.
@Source(type = 'http', receiver.url='http://localhost:8006/productionStream', basic.auth.enabled='false', @map(type='json', @attributes( name='$.name',amount='$.quantity')))define stream SweetProductionStream (name string, amount double);

The source defines the following :
Input source type: via type = 'http'Source type configurations (This is optional. I ttp source type configurations are defined via n this example h receiver.url='http://localhost:8006/productionStream', basic.auth.enabled='false')Input message format: with sub-annotation.@map()Custom attribute mapping of the input message format (optional): with optional @attributes( name='$.name',
sub-annotation ofamount='$.quantity') @map.
Source types
WSO2 SP supports following source types to receive events via corresponding transports. Click on the required source type forout of the box,instructions to configure a source to receive events via them.
HTTPKafkaTCPIn-memoryWSO2 EventEmailJMSFileRabbitMQMQTT
Event format
WSO2 Siddhi allows events to be received in multiple formats. The following formats are currently supported. Once an event is received in aspecific format, it is internally converted to a Siddhi event so that it can be processed by applying the WSO2 Siddhi logic. Click on the requiredformat for detailed information on how a source can be configured to receive events in that format.
A source can also be defined externally and referred to from several siddhi applications as shown below. Multiple sources can bedefined in the file. A can be a dashboard, editor, manager or<SP HOME>/conf/<PROFILE>/deployment.yaml <PROFILE>worker. The following is a sample configuration of a source.
siddhi:
refs: - ref: name: 'source1' type: '<store.type>' properties: <property1>: <value1> <property2>: <value2>
You can refer to a source configured in the file from a Siddhi application as<SP HOME>/conf/<PROFILE>/deployment.yamlshown in the example below.
@Source(ref='source1', basic.auth.enabled='false', @map(type='json', @attributes( name='$.name',amount='$.quantity')))define stream SweetProductionStream (name string, amount double);
For detailed instructions to configure a source, see .Siddhi Guide - Source

WSO2EventXMLTextJSONBinaryKey Value
Processing Streaming Events
Forrester defines Streaming Analytics as follows:
The stream processing capabilities of WSO2 SP allow you to capture high volume data flows and process them in real time, and present results ina streaming manner.
Following are a few stream processing capabilities of WSO2 SP.
Functions
The following functions that are shipped with Siddhi consume zero, one or more parameters from streaming events, and produce a desired valueas output. These functions are executed per event.
For more information on Siddhi functions, see Siddhi Query Guide - Functions.
More functions are available as .Siddhi Extensions
eventTimestamp: This returns the timestamp of the processed event.
eventTimeStamp example
from fooStreamselect symbol as name, eventTimestamp() as eventTimestampinsert into barStream
UUID: This generates a UUID (Universally Unique Identifier).
UUID example
from fooStreamselect UUID() as messageID, messageDetailsinsert into barStream;
default: This checks whether the value for the parameter is null, and if so, it returns the value of the parameter.attribute defaultThe function is added to queries as .default(<attribute>, <default value>)
default example
from fooStreamselect default(temp, 0.0) as temp, roomNuminsert into barStream;
cast: This converts the first parameter according to the Class Cast parameter. Incompatible arguments cause cast-toexceptions if further processed.
"Software that provides analytical operators to , , and on event data from orchestrate data flow calculate analytics detect patterns multipl to allow developers to build applications that .e, disparate live data sources sense, think, and act in real time

cast example
from fooStreamselect symbol as name, cast(temp, 'double') as tempinsert into barStream;
convert: This converts the first input parameter according to the parameterconvert-to
convert example
from fooStreamselect convert(temp, 'double') as tempinsert into barStream;
ifThenElse - Evaluates the 'condition' parameter and returns value of the 'if.expression' parameter if the condition is true, or returns valueof the 'else.expression' parameter if the condition is false. The function is given as ifThenElse(<condition>, <if.expression>,<else.expression>)
ifThenElse example
from fooStreamifThenElse(sensorValue>35,'High','Low')insert into barStream;
minimum - Returns the minimum value of the input parameters
minimum example
from fooStreamselect minimum(price1, price2, price3) as minPriceinsert into barStream;
maximum - Returns the maximum value of the input parameters. This function could be used similar to how 'minimum' function is used ina query.coalesce - Returns the value of the first input parameter that is not null. All input parameters have to be of the same type.
coalesce example
from fooStreamselect coalesce('123', null, '789') as valueinsert into barStream;
instanceOfBoolean - Returns 'true' if the input is a instance of Boolean. Otherwise returns 'false'.

instanceOfBoolean example
from fooStreamselect instanceOfBoolean(switchState) as stateinsert into barStream;
instanceOfDouble - Returns 'true' if the input is a instance of Double. Otherwise returns 'false'. This function could be used similar to how' ' function is used in a query.instanceOfBooleaninstanceOfFloat - Returns 'true' if the input is a instance of Float. Otherwise returns 'false'. This function could be used similar to how'instanceOfBoolean' function is used in a query.instanceOfInteger - Returns 'true' if the input is a instance of Integer. Otherwise returns 'false'. This function could be used similar to how'instanceOfBoolean' function is used in a query.instanceOfLong - Returns 'true' if the input is a instance of Long. Otherwise returns 'false'. This function could be used similar to how'instanceOfBoolean' function is used in a query.instanceOfString - Returns 'true' if the input is a instance of String. Otherwise returns 'false'. This function could be used similar to how'instanceOfBoolean' function is used in a query.
Filters
Filters are applied to input data received in streams to filter information based on given conditions. For more information, see Siddhi Query Guide.- Filters
e.g., Filtering cash withdrawals from an ATM machine where the withdrawal amount is greater tha $100, and the withdrawal data is between01/12/2017-15/12/2017.
Windows
Windows allow you to capture a subset of events based on a duration or number of events criterion, from an input stream for calculation. Eachinput stream can only have a maximum of one window.
Criterion - Time windows vs length windows
The subset of events can be captured based on one of the following.
Time: This involves capturing all the events that arrive during a specific time interval (e.g., writing a query that is applicable to events thatoccur during a period of 10 minutes).Length: This involves capturing a subset of events based on the number of events (e.g., writing a query applicable to each group thatconsists of 10 events).
Method of processing - Sliding windows vs batch windows
Consider 10 events that have arrived in a stream.
When a sliding length window is included in a Siddhi query, the following event groups are identified:
Events 1-5Events 2-6Events 3-7Events 4-8Events 5-9Events 6-10
When a batch window is included in a Siddhi query, the folowing event groups are identified:
Events 1-5Events 6-10
This window feature differs from the Defined Window concept elaborated due to this being specific to a single query only. If a window is to behereshared among queries, the must be usedDefined Window
For more information about windows, see .Siddhi Query Guide - Window
Aggregate Functions

Aggregation functions allow executing aggregations such as sum, avg, min, etc. on a set of events grouped by a window. If a window is notdefined, the aggregation(s) would be calculated by considering all the events arriving at a stream.
Consider the following events arriving at a stream, where the prices vary from one another.
Event 1: price = 10.00Event 2: price = 20.00Event 3: price = 30.00Event 4: price = 40.00Event 5: price = 50.00
Consider the following two queries, where sum of price is calculated based on a length window of 2, and without a window respectively
Query1: Aggregate based on length window
from fooStream#window.length(2)select sum(price) as totalPriceinsert into barStream;
Query2: Aggregate without a window
from fooStreamselect sum(price) as totalPriceinsert into barStream;
The following output would be generated for Query 1.
totalPrice = 10.00totalPrice = 30.00totalPrice = 50.00totalPrice = 70.00totalPrice = 90.00
The following output would be generated for Query 2.
totalPrice = 10.00totalPrice = 30.00totalPrice = 60.00totalPrice = 100.00totalPrice = 150.00
For more information on aggregate function, please refer to .Siddhi Query Guide - Aggregate Functions
Group By
With the group by functionality, events could be grouped based on a certain attribute, when performing aggregations.
Consider the following events, which have a symbol attribute and a price attribute.
Event 1: symbol = wso2, price = 10.00Event 2: price = 20.00symbol = wso2, Event 3: price = 30.00symbol = abc, Event 4: price = 40.00 symbol = abc, Event 5: price = 50.00 symbol = abc,
When the sum aggregation is calculated for a window of length 3, after grouping by symbol, the given output is generated
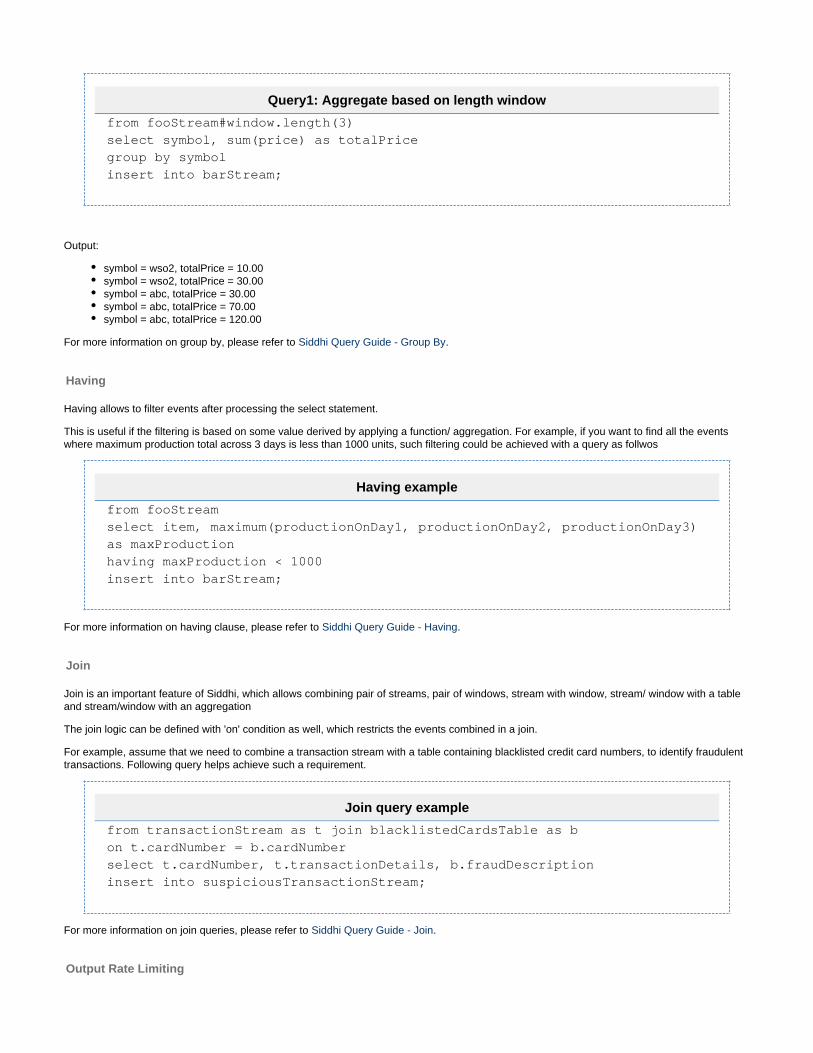
Query1: Aggregate based on length window
from fooStream#window.length(3)select symbol, sum(price) as totalPricegroup by symbolinsert into barStream;
Output:
symbol = wso2, totalPrice = 10.00symbol = wso2, totalPrice = 30.00symbol = abc, totalPrice = 30.00symbol = abc, totalPrice = 70.00symbol = abc, totalPrice = 120.00
For more information on group by, please refer to .Siddhi Query Guide - Group By
Having
Having allows to filter events after processing the select statement.
This is useful if the filtering is based on some value derived by applying a function/ aggregation. For example, if you want to find all the eventswhere maximum production total across 3 days is less than 1000 units, such filtering could be achieved with a query as follwos
Having example
from fooStreamselect item, maximum(productionOnDay1, productionOnDay2, productionOnDay3)as maxProductionhaving maxProduction < 1000insert into barStream;
For more information on having clause, please refer to .Siddhi Query Guide - Having
Join
Join is an important feature of Siddhi, which allows combining pair of streams, pair of windows, stream with window, stream/ window with a tableand stream/window with an aggregation
The join logic can be defined with 'on' condition as well, which restricts the events combined in a join.
For example, assume that we need to combine a transaction stream with a table containing blacklisted credit card numbers, to identify fraudulenttransactions. Following query helps achieve such a requirement.
Join query example
from transactionStream as t join blacklistedCardsTable as bon t.cardNumber = b.cardNumberselect t.cardNumber, t.transactionDetails, b.fraudDescriptioninsert into suspiciousTransactionStream;
For more information on join queries, please refer to .Siddhi Query Guide - Join
Output Rate Limiting

Output rate limiting allows queries to output events periodically based on a specified condition. This helps to limit continuously sending events asoutput.
For more information on output rate limiting, please refer to Siddhi Query Guide - Output Rate Limiting
Partitioning
Partitioning in Siddhi allows to logically seperate events arriving at a stream, and to process them separately, in parallel.
For example, assume that the total number of transactions per company needs to be monitored at a stock exchange. However, if all thetransactions are arriving at a single stream, we would need to logically seperate them based on the company symbol. The following exampledepicts how this can be achieved with Siddhi partitioning.
Partition example
partition with (symbol of stockStream )begin from stockStream select symbol, count() as transactionCount insert into transactionsPerSymbol;end;
Partitioning can be done based on an attribute value as above, or based on a condition. For more information on partitioning, please refer to Siddhi Query Guide - Partitioning
Trigger
Triggers could be used to get events generated by the system itself, based on some time duration.
An example for a trigger definition is as follows.
Trigger example
define trigger FiveMinTriggerStream at every 5 sec;
This would generate an event every 5 seconds. The generated event would contain an attribute of type 'Long' named 'triggered_time', reflectingthe time at which event was triggered in milliseconds (epoch time).
Trigger could be defined as a time interval, a cron job or to generate an event when Siddhi is started. For more information on triggers, pleaserefer to Siddhi Query Guide - Trigger
Script
Scripts allow to define function operations in a different programming language. An example is as follows.

Script example
define function concatFn[javascript] return string { var str1 = data[0]; var str2 = data[1]; var str3 = data[2]; var response = str1 + str2 + str3; return response;};
define stream TempStream(deviceID long, roomNo int, temp double);
from TempStreamselect concatFn(roomNo,'-',deviceID) as id, temp insert into DeviceTempStream;
For more information on scripts, please refer to Siddhi Query Guide - Script
Storage Integration
This section explains how to configure WSO2 Siddhi tables to store/retrieve and modfiy data in stream processing.
Referring to datasources
By default, a Siddhi table definition would refer to an in-memory table. If the tables are to be created in an external database, the datasourcedetails must be specified as elaborated under the 'Referring to datasources' section.
Referring to datasources
The @store annotation allows to refer to extenal datasources. A datasource could be referred to as in the following example.
@store(type="rdbms", jdbc.url="jdbc:mysql://localhost:3306/sp_samples",username="root", password="root", jdbc.driver.name="com.mysql.jdbc.Driver")define table StockTable (symbol string, price float, volume long);
Supported store implementations in Stream Processor 4.0 include the following:
RDBMS store (which in turn supports the following)H2MySQLOracle DatabaseMS SQL ServerPostgreSQLIBM DB2
Apache HBaseApache SolrMongoDB
A datasource could also be defined externally, and referred to from several siddhi applications as described under section.Connecting to Stores
More information on Storage Integration is provided under the following sections
Defining Data TablesManaging Stored Data via StreamsManaging Stored Data via REST APIConnecting to Stores
Defining Data Tables
This section explains how to configure data tables to store the events you need to persist to carry out time series aggregation.

The data handled by WSO2 Stream Processor are stored in the following two types of tables:
In-memory tables: If no store-backed tables are defined, data is stored in in-memory tables by default.Store-backed tables: These are tables that are defined by you in an external database. For a list of database types supported andinstructions to define table for different database types, see .Defining Tables for Physical Data Stores
Adding primary and index keysBoth in-memory tables and tables backed by external databases support primary and index keys. These are defined to allow stored information tobe searched and retrieved in an effective and efficient manner.
Adding primary keys
Attribute(s) within the event stream for which the event table is created can be specified as the primary key for the table. The purpose of primarykey is to ensure that the value for a selected attribute is unique for each entry in the table. This prevents the duplication of entries saved in thetable.
Primary keys are configured via the annotation. Only one @PrimaryKey annotation is allowed per event table.@PrimaryKey
When several attributes are given within Primary key annotation (e.g @PrimaryKey( 'key1', 'key2')), those attributes would act as a compositeprimary key.Syntax
@PrimaryKey('<attribute_1>')define table <event_table> (<attribute_1> <attribute_type>, <attribute_2><attribute_type>, <attribute_3> <attribute_type>);
Example
@PrimaryKey('symbol')define table StockTable (symbol string, price float, volume long);
The above configuration ensures that each entry saved in the event table should have a unique value for the attributeStockTable symbolbecause this attribute is defined as the primary key.
Adding indexes
An attribute within the event stream for which the event table is created can be specified as the primary key for the table. This allows the entriesstored within the table to be indexed by that attribute.
Indexes are configured via the annotation.@Index
An event table can have multiple attributes defined as index attributes. However, only one annotation can be added per event table.@IndexSyntax
To index by a single attribute:
@Index('<attribute_1>')define table <event_table> (<attribute_1> <attribute_type>, <attribute_2><attribute_type>, <attribute_3> <attribute_type>);
To index by multiple attributes:

@Index('<attribute_1>''<attribute_2>')define table <event_table> (<attribute_1> <attribute_type>, <attribute_2><attribute_type>, <attribute_3> <attribute_type>);
Example
@Index('symbol')define table StockTable (symbol string, price float, volume long);
The above configuration ensures that the entries stored in the event table are indexed by the attribute.StockTable symbol
Defining Tables for Physical Data Stores
This section explains how to define data tables to store data handled by WSO2 Stream Processor in physical databases. The @store annotationsyntax for defining these tables differ based on the database type as well as where the properties are defined.
The store properties(such as URL, username and password) can be defined in the following ways:
Inline definition: The data store can be defined within the Siddhi application.
As references in the deployment file: In order to do this, the store configuration needs to be defined for the relevant deploymentenvironment in the <SP_HOME>/conf/<PROFILE>/deployment.yaml file as a ref (i.e., in a separate section siddhi: and subsectionrefs:) as shown in the example below.
siddhi: refs: - ref: name: 'store1' type: 'rdbms' properties: jdbc.url:'jdbc:h2:./repository/database/ANALYTICS_EVENT_STORE' username: 'root' password: ${sec:store1.password} field.length='currentTime:100' jdbc.driver.name: 'org.h2.Driver'
Then you need to refer to that store via the annotation as in the Siddhi application as shown in the example below. @store
This method is not recommended in a production environment because is less secure compared to the other methods.
The database connection is started when a Siddhi application is deployed, and disconnected when the Siddhi application isundeployed. Therefore, this metho is not recommended if the same database is used across multiple Siddhi applications.

@Store(ref='store1')@PrimaryKey('id')@Index('houseId')define table SmartHomeTable (id string, value float, property bool,plugId int, householdId int, houseId int, currentTime string);
Using WSO2 data sources configuration: Once a data source defined in the section of the file, wso2.datasources <SP_HOME>/con the same connection can be used across different Siddhi applications. This is done by specifyingf/<PROFILE>/deployment.yaml,
the data source to which you need to connect via the annotation in the following format.@store
@Store(type='<DATABASE_TYPE>', datasource=’<carbon.datasource.name>’)
This is further illustrated by the following example.
@Store(type='rdbms', datasource=’SweetFactoryDB’)@PrimaryKey("symbol")define table FooTable (symbol string, price float, volume long);
The following database types are currently supported for WSO2 SP.
RDBMSApache HBaseApache SolrMongoDB
RDBMS
The RDBMS database types that are currently supported are as follows:
H2MySQLOracle databaseMy SQL ServerPostgreSQLIBM DB2
Query syntax
The following is the syntax for an RDBMS event table configuration:
The database connection pool is initialized at server startup, and destroyed at server shut down.
Before you begin:In order to create and use an event table to store data, the following should be completed:
The required database (MySql, MongoDB, Oracle Database, etc) should be downloaded and installed. A database instance should be started.The user IDs used to perform the required table operations should be granted the relevant privileges.The relevant JDBC Driver must be downloaded and the jar must be put in the directory. <SP_HOME>/lib

@store(type="rdbms", jdbc.url="<jdbc.url>", username="<username>",password="<password>",pool.properties="<prop1>:<val1>,<prop2>:<val2>")@PrimaryKey("col1")@IndexBy("col3")define table <table_name>(col1 datatype1, col2 datatype2, col3 datatype3);
Parameters
The following parameters are configured in the definition of an RDBMS event table.
Parameter Description Required/Optional
jdbc.url The JDBC URL via which the RDBMS data store is accessed. Required
username The username to be used to access the RDBMS data store. Required
password The password to be used to access the RDBMS data store. Required
pool.properties Any pool parameters for the database connection must be specified as key value pairs. Required
jndi.resource The name of the JNDI resource through which the connection is attempted. If this is found, thepool properties described above are not taken into account.
Optional
table.name The name of the RDBMS table created. Optional
field.length The number of characters that the values for fields of the type in the table definition mustSTRINGcontain. If this is not specified, the default number of characters specific to the database type isconsidered.
Optional
In addition to the above parameters, you can add the and annotations in the RDBMS table configuration.@primary @index
@primary : This specifies a list of comma-separated values to be treated as unique fields in the table. Each record in the table musthave a unique combination of values for the fields specified here.
@index : This specifies the fields that must be indexed at the database level. You can specify multiple values as a come-separated list.Example
The following is an example of an RDBMS table definition:
@Store(type="rdbms",jdbc.url="jdbc:h2:repository/database/ANALYTICS_EVENT_STORE",username="root", password="root",field.length="symbol:254")@PrimaryKey("symbol")define table FooTable (symbol string, price float, volume long);
Apache HBase
Query syntax
The query syntax to define an HBase table is as follows.
@Store(type="hbase", any.hbase.property="<STRING>", table.name="<STRING>",column.family.name="<STRING>")@PrimaryKey("PRIMARY_KEY")@Index("INDEX")
Parameters
The following parameters are configured in the definition of an HBase event table:

Parameter Description Required/Optional
table.name The name with which the table should be persisted in the store. If no table name is specified,the table in the store is assigned the same name as the corresponding Siddhi table.
Optional
column.family.name The name of the HBase column family from which data must be stored/referred to. Required
any.hbase.property Any property that can be specified for HBase connectivity in hbase-site.xml is also acceptedby the HBase Store implementation. The most frequently used properties are...
hbase.zookeeper.quorum - The hostname of the server in which the zookeeper node is run.
hbase.zookeeper.property.clientPort - The port of the zookeeper node.
Required
Example
@Store(type=”hbase”, table.name=”SomeTestTable”,column.family.name=”SomeCF”, hbase.zookeeper.quorum=”localhost”,hbase.zookeeper.property.clientPort=”2181”)@PrimaryKey(symbol)define table FooTable (symbol string, price float, volume long);
Apache Solr
Query syntax
The query syntax to define an SOLR table is as follows.
@PrimaryKey("id")@store(type=“solr”, url=<solr-cloud-zookeeper-url>,collection=<solr-collection-name>, base.config=<config-name>,shards=<no-of-shards>, replicas=<no-of-replicas>,schema=<schema-definition>, commit.async=true|false)define table Footable (time long, date string);
Parameters
The following parameters are configured in an SOLR table definition.
Parameter Description Required/Optional
collection The name of the solr collection/table. Required
url The URL of the zookeeper master of SOLR cloud. Required
base.config The default configuration that should be used for the SOLR schema. Optional
shards The number of shards. Optional
replica The number of replica. Optional
schema The SOLR schema definition. Optional
commit.async If this is set to , the results all the operations carried out for the table (described below) aretrueapplied at a specified time interval. If this is set to , the results of the operations are appliedfalsesoon after they are performed with the vent arrival.
e.g., If this is set to , an event selected to be inserted into the table is inserted as soon as itfalsearrives to the event stream.
N/A
Example

This query defines an SOLR table named in which a schema that consists of the two attributes (of type) and date (of the FooTable time long s type) is maintained. The values for both attributes are stored.tring
@store(type='solr', url='localhost:9983', collection='TEST1',base.config='gettingstarted', " +"shards='2', replicas='2', schema='time long stored, date string stored',commit.async='true') " +"define table Footable(time long, date string);
MongoDB
Query syntax
The following is the query syntax to define a MongoDB event table.
@Store(type="mongodb", mongodb.uri="<MONGODB CONNECTION URI>")@PrimaryKey("ATTRIBUTE_NAME")@IndexBy("<ATTRIBUTE_NAME> <SORTING ORDER> <INDEX OPTIONS>")define table <TABLE_NME> (<ATTRIBUTE1_NAME> <ATTRIBUTE1_TYPE>,<ATTRIBUTE2_NAME> <ATTRIBUTE2_TYPE>, <ATTRIBUTE3_NAME> <ATTRIBUTE3_TYPE>,...);
The parameter specifies the URI via which MongoDB user store is accessed.mongodb.uri
In addition, the following annotations are used in the MongoDB definition.
@primary : This specifies a list of comma-separated values to be treated as unique fields in the table. Each record in the table musthave a unique combination of values for the fields specified here.
@index : This specifies the fields that must be indexed at the database level. You can specify multiple values as a comma separatedlist.
Example
The following query defines a MongoDB table named with the , , and attributes. The attribute isFooTable symbol price volume symbolconsidered the primary key and it is also indexed.
@Store(type="mongodb",mongodb.uri="mongodb://admin:admin@localhost:27017/Foo?ssl=true")@PrimaryKey("symbol")@IndexBy("symbol 1 {background:true}")define table FooTable (symbol string, price float, volume long);
Managing Stored Data via Streams
This section covers how to manage stored data in event tables via streams.
Inserting recordsRetrieving recordsUpdating a tableDeleting RecordsSearching recordsInserting/updating records
Inserting records
Prerequisites
In order to insert events to a table:
General prerequisites should be completed.

The event stream from which the events to be inserted are taken should be defined.The table to which events are to be inserted should be defined. For more information, see .Defining a table
Query syntax
The following is the syntax to insert events into a table.
from <STREAM_NAME>select <ATTRIBUTE1_NAME>, <ATTRIBUTE2_NAME>, <ATTRIBUTE3_NAME> ...insert into <TABLE_NAME>;
Example
The following query inserts events from the FooStream stream to the table with the , , and attributes.FooTable symbol price volume
from FooStreamselect symbol, price, volumeinsert into FooTable;
Retrieving records
Prerequisites
In order to retrieve events from a table:
General prerequisites should be completed.The table to be read should be already defined. For more information, see .Defining a tableOne or more events should be inserted into the table. For more information, see .Inserting events
Query syntax
The following is the query syntax to retrieve events from an existing table. For more information, please refer to .Siddhi Query Guide - Join Table
from <STREAM_NAME> join <TABLE_NAME> on <CONDITION>select (<STREAM_NAME>|<TABLE_NAME>).<ATTRIBUTE1_NAME>,(<STREAM_NAME>|<TABLE_NAME>).<ATTRIBUTE2_NAME>, ...insert into <OUTPUT_STREAM>
Example
The following query joins the events with the events stored in the table. An output event is created for each matchingFooStream StockTablepair of events, and it is inserted into another stream named . OutputStream
from FooStream#window.length(1) join StockTableselect FooStream.symbol as checkSymbol, StockTable.symbol as symbol,StockTable.volume as volume insert into OutputStream
The information inserted with the output event is as follows.
Source Value of Attribute name in the output event

FooStream stream symbol attribute checkSymbol
StockTable table symbol attribute symbol
StockTable table volume attribute volume
Updating a table
This section explains how to update the selected records of an existing table.
Prerequisites
In order to update events in a table:
General prerequisites should be completed.The table to be updated should be already defined. For more information, see .Defining a tableThe event stream with the events based on which the updates are made must be already defined.One or more events should be inserted into the table. For more information, see .Inserting events
Query syntax
from <STREAM_NAME> select <ATTRIBUTE1_NAME>, <ATTRIBUTE2_NAME>, ...update <TABLE_NAME> (for <OUTPUT_EVENT_TYPE>)? set <TABLE_NAME>.<ATTRIBUTE_NAME> = (<ATTRIBUTE_NAME>|<EXPRESSION>)?,<TABLE_NAME>.<ATTRIBUTE_NAME> = (<ATTRIBUTE_NAME>|<EXPRESSION>)?, ... on <CONDITION>
Example
The following query updates the events in the table with values from the latest events of the event stream. The events inFooTable FooStreamthe table are updated only if the existing record in the table has the same value as the new event for the attribute, and a value greatersymbolthan for the attribute. 50 price
from FooStreamselect symbol, price, volumeupdate FooTable set FooTable.symbol = symbol, FooTable.price = price, FooTable.volume =volume on (FooTable.symbol == symbol and price > 50)
Methods of Updating the columns in a table
This section gives further information on methods of updating the columns in an existing table.
The value used for updating a table column can be any of the following:
A constant
FROM sensorStreamSELECT sensorId, temperature, humidityUPDATE sensorTable SET sensorTable.column_temp = 1 ON sensorId < sensorTable.column_ID
One of the attributes specified in the clauseSELECT

FROM fooStreamSELECT roomNo, time: timestampInMilliseconds() as tsUPDATE barTable SET barTable.timestamp = ts ON barTable.room_no == roomNo AND roomNo > 2
A basic arithmetic operation applied on an output attribute
FROM sensorStreamSELECT sensorId, temperature, humidityUPDATE sensorTable SET sensorTable.column_temp = temperature + 10 ON sensorId < sensorTable.column_ID
A basic arithmetic operation applied to a column value in the event table
FROM sensorStreamSELECT sensorId, temperature, humidityUPDATE sensorTable SET sensorTable.column_temp = sensorTable.column_temp + 10 ON sensorId < sensorTable.column_ID
Deleting Records
This section explains how to delete existing records in a table based on a specific condition.
Prerequisites
In order to delete selected events in a table:
General prerequisites should be completed.The table with the records to be deleted should be already defined. For more information, see .Defining a tableThe event stream with the events with which the records in the table are compared (i.e., to apply the condition based on which the eventsare deleted) must be already defined.One or more events should be inserted into the table. For more information, see .Inserting events
Query syntax
from <STREAM_NAME> select <ATTRIBUTE1_NAME>, <ATTRIBUTE2_NAME>, ...delete <TABLE_NAME> (for <OUTPUT_EVENT_TYPE>)? on <CONDITION>
Example
This query deletes the events in the RoomTypeTable table if its value for the roomNo attribute is equal to the roomNumber attribute value ofDeleteStream.

from DeleteStreamdelete RoomTypeTable on RoomTypeTable.roomNo == roomNumber;
Searching records
This section explains how to check whether a specific record exists in an event table.
Prerequisites
In order to search for a record in a table that matches a specific condition:
General prerequisites should be completed.The table to be searched should be already defined. For more information, see .Defining a tableThe event stream with the events with which the records in the table are compared (i.e., to apply the condition based on which the eventsare searched) must be already defined.One or more events should be inserted into the table. For more information, see .Inserting events
Query syntax
from <STREAM_NAME>[<CONDITION> in <TABLE_NAME>]select <ATTRIBUTE1_NAME>, <ATTRIBUTE2_NAME>, ...insert into <OUTPUT_STREAM_NAME>
Example
The following query matches events arriving from the event stream with the existing recored stored in the table. IfFooStream StockTablethe symbol attribute of an event saved in the table has the same value as the event from the stream, that event is inserted into the FooStream Ou
stream.tputStream
from FooStream[StockTable.symbol==symbol in StockTable]insert into OutputStream;
Inserting/updating records
This section explains how to update a selection of records in a table based on the new events from a specific event stream. The selection is madebased on a specific condition that matches events from the stream with events in the table. When the events from the stream have no matchingevents in the table, they are inserted into the table as new events.
Prerequisites
General prerequisites should be completed.The table for which this operations is to be performed must be already defined. For more information, see .Defining a tableThe event stream from which the events with which the records in the table are compared (i.e., to apply the condition based on which theevents are inserted/updated) must be already defined.
Query syntax
The query syntax to perform the insert/update operation for a table is as follows.

from <STREAM_NAME> select <ATTRIBUTE1_NAME>, <ATTRIBUTE2_NAME>, ...update or insert into <TABLE_NAME> (for <OUTPUT_EVENT_TYPE>)? set <TABLE_NAME>.<ATTRIBUTE_NAME> = <EXPRESSION>,<TABLE_NAME>.<ATTRIBUTE_NAME> = <EXPRESSION>, ... on <CONDITION>
Example
This query matches events from the stream with the events stored in the table. When an event in the table has theFooStream StockTablesame value for the attribute as the matching new event from the event stream, it is updated based on the new event. If a new event fromsymbolthe event stream does not have a matching event in the table (i.e., an event with the same value for the attribute), that event is insertedsymbolas a new event.
from FooStreamselect *update or insert into StockTableon StockTable.symbol == symbol
Managing Stored Data via REST API
The actions such as inserting, searching, updating, retrieving, and deleting records can be carried out by invoking the REPOST/stores/queryST API. These actions can be performed for tables as well as windows and aggregations. The following sections provide sample commands foreach action.
Inserting recordsRetrieving recordsUpdating recordsDeleting recordsInserting/updating records
Inserting records
This allows you to insert a new record to the table with the attribute values you define in the section.select
Syntax
select <attribute name>, <attribute name>, ...insert into <table>;
Sample cURL command
The following cURL command submits a query that inserts a new record with the specified attribute values to the table .RoomOccupancyTable
curl -X POST https://localhost:9443/stores/query -H "content-type:application/json" -u "admin:admin" -d '{"appName" : "RoomService", "query" : "select 10 as roomNo, 2 as peopleinsert into RoomOccupancyTable;" }' -k
Retrieving records
This store query retrieves one or more records that match a given condition from a specified table/window/aggregator.
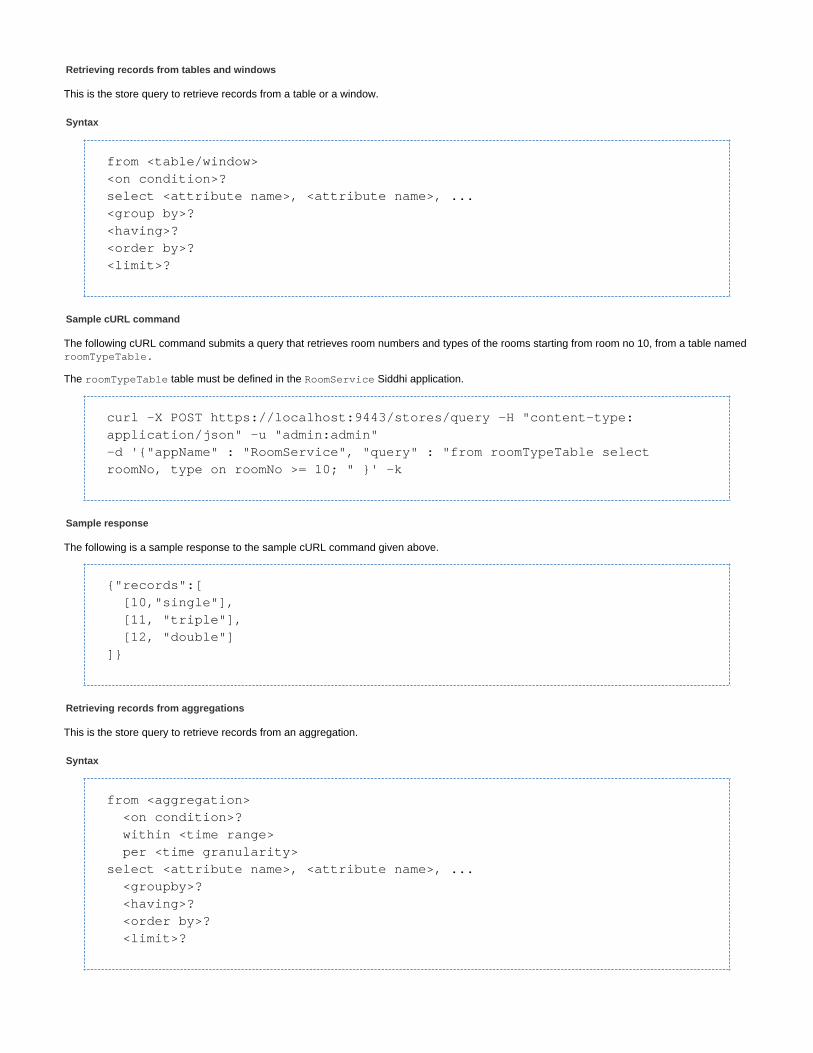
Retrieving records from tables and windows
This is the store query to retrieve records from a table or a window.
Syntax
from <table/window><on condition>? select <attribute name>, <attribute name>, ...<group by>? <having>? <order by>? <limit>?
Sample cURL command
The following cURL command submits a query that retrieves room numbers and types of the rooms starting from room no 10, from a table named roomTypeTable.
The table must be defined in the Siddhi application.roomTypeTable RoomService
curl -X POST https://localhost:9443/stores/query -H "content-type:application/json" -u "admin:admin" -d '{"appName" : "RoomService", "query" : "from roomTypeTable selectroomNo, type on roomNo >= 10; " }' -k
Sample response
The following is a sample response to the sample cURL command given above.
{"records":[ [10,"single"], [11, "triple"], [12, "double"]]}
Retrieving records from aggregations
This is the store query to retrieve records from an aggregation.
Syntax
from <aggregation> <on condition>? within <time range> per <time granularity>select <attribute name>, <attribute name>, ... <groupby>? <having>? <order by>? <limit>?

Sample cURL command
The following cURL command submits a query that retrieves average price of a stock.
curl -X POST https://localhost:9443/stores/query -H "content-type:application/json" -u "admin:admin" -d '{"appName" : "StockAggregationAnalysis", "query" : "fromTradeAggregation on symbol=='FB' within '2018-**-** +05:00' per 'hours'select AGG_TIMESTAMP, symbol, total, avgPrice" }' -k
Sample response
The following is a sample response to the sample cURL command given above.
{"records":[ [1531180800, 'FB', 10000.0, 250.0], [1531184400, 'FB', 11000.0, 260.0], [1531188000, 'FB', 9000.0, 240.0]]}
Updating records
This store query updates selected attributes stored in a specific table based on a given condition.
Syntax
select <attribute name>, <attribute name>, ...?update <table> set <table>.<attribute name> = (<attribute name>|<expression>)?,<table>.<attribute name> = (<attribute name>|<expression>)?, ... on <condition>
Sample cURL command
The following cURL command updates the room occupancy for selected records in the table, The records that areRoomOccupancyTableupdated are ones of which the roon number is greater than . The room occupancy is updated by adding to the existing value of the a10 1 peoplettribute.
curl -X POST https://localhost:9443/stores/query -H "content-type:application/json" -u "admin:admin" -d '{"appName" : "RoomService", "query": "select 10 as roomNumber, 1 as arrival update RoomTypeTable setRoomTypeTable.people = RoomTypeTable.people + arrival onRoomTypeTable.roomNo == roomNumber;" }' -k
Deleting records
This store query deletes selected records from a specified table.
Syntax

<select>? delete <table> on <conditional expresssion>
Sample cURL command
The following cURL command submits a query that deletes a record in the table named if it has value for the attributeRoomTypeTable roomNothat matches the value for the attribute of the selection that has 10 as the actual value.roomNumber
curl -X POST https://localhost:9443/stores/query -H "content-type:application/json" -u "admin:admin" -d '{"appName" : "RoomService", "query" : "select 10 as roomNumberdelete RoomTypeTable on RoomTypeTable.roomNo == roomNumber;;" }' -k
Inserting/updating records
Syntax
select <attribute name>, <attribute name>, ...update or insert into <table> set <table>.<attribute name> = <expression>, <table>.<attribute name> =<expression>, ... on <condition>
Sample cURL command
The following cURL command submits a query that attempts to update selected records in the table. The records that areRoomAssigneeTableselected to be updated are ones with room numbers that match the numbers specified in the select clause. If matching records are not found, itinserts a new record with the values provided in the select clause.
curl -X POST https://localhost:9443/stores/query -H "content-type:application/json" -u "admin:admin" -d '{"appName" : "RoomService", "query": "select 10 as roomNo, "single" as type, "abc" as assignee update orinsert into RoomAssigneeTable set RoomAssigneeTable.assignee = assignee on RoomAssigneeTable.roomNo == roomNo;" }' -k
Connecting to Stores
This section explains how to define stores to which references can be made in multiple Siddhi Applications. Please note that <PROFILE> couldrefer to dashboard, editor, manager or worker.
Defining storesReferring to storesReferring to datasources
Defining stores
Multiple stores can be defined in the file. The following is a sample configuration of a store.<SP HOME>/conf/<PROFILE>/deployment.yaml
For more information and examples for store queries, see .Siddhi Query Guide - Store Query
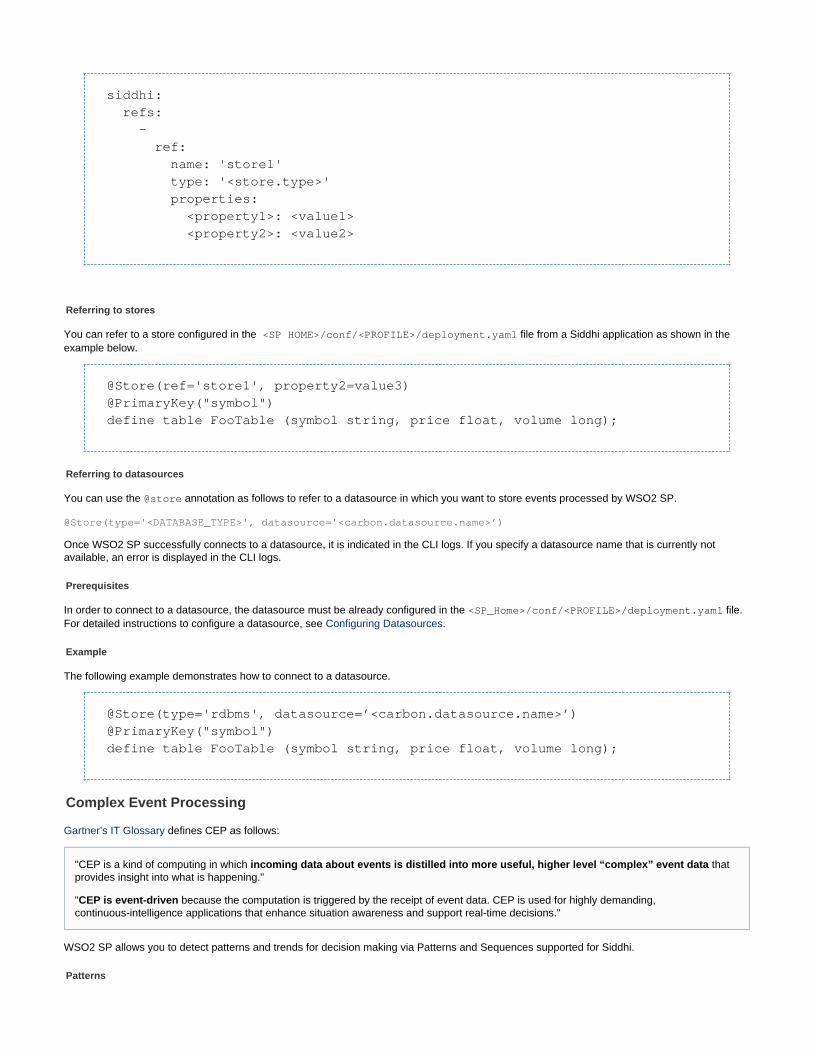
siddhi: refs: - ref: name: 'store1' type: '<store.type>' properties: <property1>: <value1> <property2>: <value2>
Referring to stores
You can refer to a store configured in the file from a Siddhi application as shown in the<SP HOME>/conf/<PROFILE>/deployment.yamlexample below.
@Store(ref='store1', property2=value3)@PrimaryKey("symbol")define table FooTable (symbol string, price float, volume long);
Referring to datasources
You can use the annotation as follows to refer to a datasource in which you want to store events processed by WSO2 SP.@store
@Store(type='<DATABASE_TYPE>', datasource=’<carbon.datasource.name>’)
Once WSO2 SP successfully connects to a datasource, it is indicated in the CLI logs. If you specify a datasource name that is currently notavailable, an error is displayed in the CLI logs.
Prerequisites
In order to connect to a datasource, the datasource must be already configured in the file.<SP_Home>/conf/<PROFILE>/deployment.yamlFor detailed instructions to configure a datasource, see .Configuring Datasources
Example
The following example demonstrates how to connect to a datasource.
@Store(type='rdbms', datasource=’<carbon.datasource.name>’)@PrimaryKey("symbol")define table FooTable (symbol string, price float, volume long);
Complex Event Processing
Gartner’s IT Glossary defines CEP as follows:
WSO2 SP allows you to detect patterns and trends for decision making via Patterns and Sequences supported for Siddhi.
Patterns
"CEP is a kind of computing in which thatincoming data about events is distilled into more useful, higher level “complex” event dataprovides insight into what is happening."
" because the computation is triggered by the receipt of event data. CEP is used for highly demanding,CEP is event-drivencontinuous-intelligence applications that enhance situation awareness and support real-time decisions."

Siddhi patterns allow you to detect patterns in the events that arrive over time. This can correlate events within a single stream or betweenmultiple streams. A pattern can be a counting pattern that allows you to match multiple events received for the same matching condition, or alogical pattern that match events that arrive in temporal order and correlate them with logical relationships.
For more information, see .Siddhi Query Guide - Patterns
Sequences
This allows you to carry out analysis based on the sequential order in which events matching certain conditions arrive. The difference betweensequences and patterns is, in Siddhi sequence, events arriving consecutively are compared based on given conditions. For patterns, events donot have to arrive in consecutive manner.
For more information, see .Siddhi Query Guide - Sequence
Machine Learning
Predictive analytics is a branch of advanced analytics that makes predictions about unknown future events. Historical data is collected to build apredictive model in order to predict the future. However, models can be outdated with time if it is not updated with new data that arrives. WSO2SP addresses this issue by supporting online machine learning algorithms that enable you to evolve your models while they are alive. A keycharacteristic of an online predictive algorithm is that the memory and time requirements of the predictive analytics process do not grow over time.
Online predictive analytics for regression, classification, and clustering problems are supported via Siddhi queries. You can update the models byproviding required data (and labels for the supervised case). You can also predict using the models by providing unseen data.
WSO2 SP keeps the state of the models in memory and persist the state time to time to recover from failures. The usage of system memory doesnot grow when new data points are detected. There are no great variations in the time taken to perform predictions and updates over time.
For detailed information about Machine Learning functionalities offered by WSO2 SP, see the documentation for the following extensions:
Streaming Machine LearningPMML ModelMachine Learning with R TesnsorFlow Model
Incremental Analysis
Incremental aggregation allows you to obtain aggregates in an incremental manner for a specified set of time periods.
This not only allows you to calculate aggregations with varied time granularity, but also allows you to access them in an interactive manner forreports, dashboards, and further processing. Its schema is defined via the aggregation definition.
This section explains how to calculate aggregates in an incremental manner for different sets of time periods, store the calculated values in a datastore and then retrieve that information.
PrerequisitesStep 1: Calculate and persist time-based aggregate valuesStep 2: Retrieve calculated and persisted aggregate valuesIncremental Aggregation Behavior in Single-node Deployment and HA Deployment
Prerequisites
In order to define a query to calculate aggregate values, a pre-defined stream must exist.
Step 1: Calculate and persist time-based aggregate values
In this example, the Siddhi application defines an aggregation named to calculate the average and sum for the price and TradeAggregation qu attributes respectively, of events arriving at the stream. These aggregates are calculated per second, minute, hour, day,antity TradeStream
month and year durations as specified by sec...year (If minute...day was given, aggregation would be done for minute, hour, day. Giving commaseparated values as is also supported. However, as per the existing implementation, we are not allowed to skip durations forevery day, monthcomma separated values. e.g. is not a valid clause since the hour duration has been skipped) Furthermore, the aggregateevery sec, min, daycalculations would be done per each symbol value due to the presence of 'group by' clause.

define stream TradeStream (symbol string, price double, quantity long,timestamp long);
@BufferSize('3')@IgnoreEventsOlderThanBuffer('true')@store(type='rdbms', jdbc.url="jdbc:mysql://localhost:3306/TestDB",username="root", password="root" ,jdbc.driver.name="com.mysql.jdbc.Driver")define aggregation TradeAggregationfrom TradeStreamselect symbol, avg(price) as avgPrice, sum(quantity) as totalgroup by symbolaggregate by timestamp every sec ... year;
In the given example, aggregation would be executed based on an external timestamp, which is reflected by the value of the 'timestamp' attribute(i.e. the event's time is determined by the 'timestamp' attribute's value). This attribute's value could either be a long value (reflecting Unixtimestamp in milliseconds) or a string value adhering to one of the following formats.
If a timezone needs to be given explicitly : (Here the ISO 8601 UTC offset must be<yyyy>-<MM>-<dd> <HH>:<mm>:<ss> <Z>provided for <Z> .For example +05:30 reflects the India Time Zone. If time is not in GMT this value must be provided)If timezone is GMT: <yyyy>-<MM>-<dd> <HH>:<mm>:<ss>
Aggregation can also be done based on the event arrival time. To achieve this, the last line of the given example must be changed as 'aggregateevery sec ... year;'
The group by clause is optional for incremental aggregation. When the group by clause is not given, all the events would be aggregated together,for each duration.
Following annotations are supported for incremental aggregation. All of these are optional. Hence, an aggregation can be defined without any ofthese annotations.
Annotation Description
@BufferSize(<positive integer>) The buffer size is a positive integer, which specifies how many older aggregations must beretained in an in-memory buffer, to handle out of order data. Default buffer size is 0. It can onlybe specified, if aggregation is based on external timestamp only (Since data being processedon event arrival time can never be out of order). Furthermore, if a buffer size is given, the mostgranular time unit for which aggregation is done must be seconds, minutes, hours or days.
Buffering is done only for the most granular duration for which aggregation is done. In thegiven example, buffering is done for the second duration. In that, 3 older aggregations wouldbe retained in an in-memory buffer. Whether an aggregation is 'old' or not is determined basedon the latest event which has arrived so far.
For example, consider the following sequence of events (i.e. 51 refers to an event belonging tothe 51st second)
event_1: 50 event_2: 51 event_3: 52 event_4: 53 event_5: 51 event_6: 53 event_7: 54 event_8: 50
Note that event_5 is an out of order event. The latest event which has arrived so far (untilevent_5) is event_4, which belongs to the 53rd second. Since the buffer size is 3, threeaggregations older than aggregation for the 53rd second would be buffered. Hence,aggregations for the 50th sec, 51st sec, and 52nd sec is buffered. Therefore, event_5 wouldbe properly aggregated together with event_2. event_6 too would be properly aggregated withevent_4. When event_7 arrives for the 54th second, that becomes the latest event. Hence,aggregation for the 50th second now expires from the buffer. Therefore when event_8 arrives,there's no corresponding aggregation for 50th second to process it with. How event_8 isaggregated is determined by the value of @IgnoreEventsOlderThanBuffer annotation. Pleaserefer to that description for further information.

@IgnoreEventsOlderThanBuffer(<trueor false>)
The default value of this annotation is 'false'. @IgnoreEventsOlderThanBuffer value can beassigned whether or not a @BufferSize is provided. If @IgnoreEventsOlderThanBuffer is notspecified or if the value is given as 'false', any out of order event, which happens to be 'older'than the buffer would be aggregated with the oldest event in the buffer. If the buffer size is notdefined (then buffer size is 0), the out of order event would be processed with the latestaggregation done for the most granular duration.
If @IgnoreEventsOlderThanBuffer value is given as 'true', any out of order event whichhappens to be outside the buffer would be ignored. When buffer size is not specified, any outof order event would be dropped.
If the example sequence of events for @BufferSize description is considered, event_8 wouldbe processed as follows when @IgnoreEventsOlderThanBuffer value is false and truerespectively.
@IgnoreEventsOlderThanBuffer('false') or :@IgnoreEventsOlderThanBuffer is not givenevent_8 would be processed with aggregation for the 51st second, as that is the oldestaggregation retained in the buffer at that time.
@IgnoreEventsOlderThanBuffer('true'): event_8 would be dropped.

@store(type=<store type>, ...) The aggregated results would be stored in the database defined by @store definition. Formore information on how to define a store, please refer to 'Configuring Event Tables to Store
' section (Please note that @PrimaryKey and @IndexBy annotations are not allowed withDataaggregation definition, as a primary key internally gets defined for this).
When a store is defined, tables corresponding to each aggregate duration would get created inthe given database. If a store is not defined, all of these tables would be in-memory tables bydefault. Giving a store definition is useful in a production environment as otherwise, allaggregations would be lost in the case of a system failure. Names of the tables created wouldbe of the format <aggregation name>_<duration>.
The following tables get created in the given example:
TradeAggregation_SECONDS
TradeAggregation_MINUTES
TradeAggregation_HOURS
TradeAggregation_DAYS
TradeAggregation_MONTHS
TradeAggregation_YEARS
Internally, the primary key of these tables would be set to AGG_TIMESTAMP attribute. Ifaggregation has the group by clause, a composite primary key of AGG_TIMESTAMP andgroup by key(s) is defined. AGG_TIMESTAMP is an internally calculated value, reflecting thetime bucket of an aggregation for a particular duration. For example, for the 'day' aggregations,AGG_TIMESTAMP = 1515110400000 reflects that it's the aggregation for the 5th of January2018 (1515110400000 is the Unix time for 2018-01-05 00:00:00).
AGG_TIMEZONE value is also stored in these tables, reflecting the timezone of theAGG_TIMESTAMP value. For aggregation based on external timestamp, a timezone could besent with the event. For event arrival time-based aggregation, timezone would be the systemtimezone.
The other values stored in the table would be aggregations and other function calculationsdone in the aggregate definition. (If it's a function calculation that is not an aggregation, theoutput value would correspond to the function calculation for the latest event for that timebucket. e.g. If a multiplication is done, the multiplication value would correspond to the latestevent's multiplication as per the duration). Please note that certain aggregations are internallystored as a collection of other aggregations. For example, the average aggregation is internallycalculated as a function of sum and count. Hence, the table would only reflect a sum and acount. The actual average would be returned when user retrieves the aggregate values asdescribed in 'Step 2'
Step 2: Retrieve calculated and persisted aggregate values
In this query, we are retrieving the aggregate values that you calculated and persisted in Step 1.
This query matches events in the stream and the aggregation that was defined in stepTradeSummaryRetrievalStream TradeAggregation1 based on the value for the attribute, and performs a join for each matching pair. Based on that join, it produces an output event(s) withsymbol
When providing aggregation names, please be mindful of the name length, since forcertain databases such as Oracle, table name length limitations exist (e.g. ForOracle it's 30 characters). Hence, the table name (<Aggregate name>_<Duration>)length must not exceed the maximum character length specified for the relevantdatabase.

1.
2. a. b. c. d. e. f.
the l, and attributes for day within the time range to . The timezonesymbo total avgPrice 2014-02-15 00:00:00 2014-03-16 00:00:00is represented by +05:30. The output would contain total and avgPrice per Symbol, for all the days falling within the given time range.
define stream TradeSummaryRetrievalStream (symbol string);
from TradeSummaryRetrievalStream as b join TradeAggregation as aon a.symbol == b.symbol within "2014-02-15 00:00:00 +05:30", "2014-03-16 00:00:00 +05:30" per "days" select a.symbol, a.total, a.avgPrice insert into TradeSummaryStream;
The condition is optional for retrieval. on
The duration could be specified in the following formats:within
within <start_time>, <end_time>: The <start_time> and <end_time> could either be string or long values. If it is a string value, theformat <yyyy>-<MM>-<dd> <HH>:<mm>:<ss> <Z> must be adhered to (<Z> represents the timezone. It could be ommitted if time is inGMT). If long values are given, those must reflect Unix timestamps (in milliseconds). within <within_duration>: The <within_duration> can only be a string value. The format of it could be one of the following
<yyyy>-**-** **:**:** <Z><yyyy>-<MM>-** **:**:** <Z><yyyy>-<MM>-<dd> **:**:** <Z><yyyy>-<MM>-<dd> <HH>:**:** <Z><yyyy>-<MM>-<dd> <HH>:<mm>:** <Z><yyyy>-<MM>-<dd> <HH>:<mm>:<ss> <Z>
The timezone <Z> can be ommitted if time is in GMT. Consider the clause, as an example. This means, within the 1st month of 2018. It's equivalent to the clause within "2018-01-** **:**:**" within "2018-01-01 00:00:00", "2018-02-01 00:00:00"
The 'per' clause defines for which time granularity, aggregations need to be retrieved. The 'per' value could be seconds, minutes, hours, days,months or years. Furthermore, this 'per' value must be a duration for which aggregation is already done as per the aggregate definition. Forexample, one is not allowed to have an aggregate by timestamp in the aggregate definition, and then attempt to retrieve every sec ... day per
since month aggregation has not been done. 'months'
Apart from providing these within and per values as constants in the query itself, the user has the capability of retrieving those values fromattributes in the incoming stream. An example is as follows.
You can retrieve the same resultant aggregate value by executing the following cURL command.
curl -X POST https://localhost:9443/stores/query -H "content-type:application/json" -u "admin:admin" -d '{"appName" : "<<Application Name>>", "query" : "<<query>>" }' -k
<<Application Name>> : This defines the application name, e.g., .AggregationTest<<query>>: This defines the query that retrieves the aggregate value.
Example
from TradeAggregation as a on a.symbol == "FB"within "2014-02-15 00:00:00 +05:30", "2014-03-16 00:00:00+05:30"per "days"
For more information, see .Managing Stored Data via REST API

define stream TradeSummaryRetrievalStream (symbol string, startTime long,endTime long, perDuration string);
from TradeSummaryRetrievalStream as b join TradeAggregation as aon a.symbol == b.symbol within b.startTime, b.endTime per b.perDuration select a.symbol, a.total, a.avgPrice insert into TradeSummaryStream;
Ultimately, the user would be produced with the aggregate values for given 'per' time granularity, which happens to be inside the durationspecified by the 'within' clause.
Incremental Aggregation Behavior in Single-node Deployment and HA Deployment
Prior to describing how Incremental Aggregation behaves in a single node and HA setup, it would be worthy to know how the aggregation isexecuted internally.
Consider an instance, where aggregation is done for second, minute and hour durations. Assume that events are arriving in the followingsequence, for the given timestamp
event 0 2018-01-01 05:59:58event 1 2018-01-01 05:59:58event 2 2018-01-01 05:59:59event 3 2018-01-01 06:00:00event 4 2018-01-01 06:00:01event 5 2018-01-01 06:00:02
Consider that no buffer has been defined (Hence buffer size is 0). When event 0 arrives, it would be initially processed at the second level. Thisaggregation would be retained in-memory, until the 58th second elapses. When event 1 arrives, since that too belongs to the 58th second (sameas event 0), event 0 and event 1 data would be aggregated together. When event 2 arrives, we would know that the 58th second has now elapsed(since event 2 has the timestamp for the 59th second). Hence the aggregation for the 58th second (that is the total aggregation for event 0 andevent 1) would be written to the <Aggregate name>_SECONDS table, and then forwarded to be processed at the minute level. At this phase, 59thsecond's data (event 2) would be processing in-memory at the second executor level. Aggregation which was forwarded would be processingin-memory for the 59th minute at minute executor level. When event 3 arrives, the 59th second's aggregation (event 2) would get expired and getwritten to <Aggregate name>_SECONDS table. It would also be forwarded to the minute executor. At the minute executor level, this forwardedaggregation (corresponding to event 2) would be aggregated in-memory, for the 59th minute. Effectively, the running in-memory aggregation atthe minute level would have an aggregation for events 0, 1 and 2 at this phase. Once event 4 arrives, aggregation for timestamp 2018-01-0106:00:00 (event 3) would be written to Aggregate name>_SECONDS table and forwarded to the minute executor. With the arrival of event 3 at theminute executor, it would identify that the 59th minute has now elapsed. Hence the aggregation for the 59th minute would be writtento <Aggregate name>_MINUTES table and then forwarded to the hour executor. The hour executor would process this forwarded aggregation forthe 5th hour. At this stage, event 4 would be processing in-memory at the second level; aggregation for event 3 would be processing in-memoryat minute level; aggregation for the 5th hour would be processing in-memory at hour level. When event 5 arrives, aggregation for event 4 wouldbe forwarded to the minute window. Hence event 3 and 4 would be aggregated together since they belong to the same minute (0th minute of the6th hour). Event 5 would be processed in-memory at the second level.
Hence the aggregation status would be as follows after all 5 events have arrived.
Please note that we can include the AGG_TIMESTAMP attribute in the select clause. If AGG_TIMESTAMP is in the select
statement, the clause could be used if the user needs to get the final aggregations inorder by AGG_TIMESTAMPascending order, based on time. Such a query would look as follows
from TradeSummaryRetrievalStream as b join TradeAggregation as aon a.symbol == b.symbol within "2014-02-15 00:00:00 +05:30", "2014-03-16 00:00:00 +05:30" per "days" select AGG_TIMESTAMP, a.symbol, a.total, a.avgPrice order by AGG_TIMESTAMP insert into TradeSummaryStream;
For detailed information about incremental aggregation, see .Siddhi Query Guide - Incremental Aggregation

1. a.
i. ii. iii. iv.
b. 2.
a. i.
b.
3. a. b.
Second level aggregation<Aggregate name>_SECONDS table
Aggregation for 2018-01-01 05:59:58 (Aggregation of event 0 and 1)Aggregation for 2018-01-01 05:59:59 (event 2)Aggregation for 2018-01-01 06:00:00 (event 3)Aggregation for 2018-01-01 06:00:01 (event 4)
Processing in-memory: Aggregation for 2018-01-01 06:00:02 (event 5)Minute level aggregation
<Aggregate name>_MINUTES table Aggregation for 2018-01-01 05:59:00 (Aggregation of event 0, 1 and 2)
Processing in-memory: Aggregation for 2018-01-01 06:00:00 (That is the 0th minute of the 6th hour. Aggregation of event 3 and4)
Hour level aggregation<Aggregate name>_HOURS table: No aggregation data is written to this tablesProcessing in-memory: Aggregation for 2018-01-01 05:00:00 (That is the 5th hour. Aggregation of event 0, 1 and 2)
Single-node Deployment
In a single node deployment, if an @store configuration is not given, the older aggregations would be stored in in-memory tables (That is<Aggregate name>_MINUTES table, etc would be in-memory tables). In such a situation, if the server fails for some reason, all the aggregationsdone so far would be lost. 'Older aggregations' refers to aggregations which are not running in-memory (aggregations which have already beencompleted for a particular second, minute, etc.)
When some DB configuration has been provided with @store annotation, the older aggregations would be stored in the defined externaldatabase. Hence, if the node fails, once we restart the server, the in-memory running aggregations would be recreated from these stored data. Inthe given example, notice how the in-memory aggregations for the Minute level can be recreated with data iii and iv in the Seconds table.Likewise, Hour in-memory aggregations can be recreated with data in the Minute table. However, this recreation can only be done for all thedurations except the most granular duration for which aggregation is done (For the given example, we cannot recreate the in-memoryaggregations for the second level, since there's no table for a prior duration).
Hence, for the given example, (when @store details are provided) if the server fails after all 5 events have arrived after we restart the server, thein-memory aggregations for minute and hour level would be recreated from table information. Effectively, only event 5 would be lost, since thatwas aggregating in-memory at the second level.
HA Deployment
Lets now explore the behavior of Incremental Analytics in an HA setup. Please refer to documentatioMinimum High Availability (HA) Deploymentn for more information regarding an HA setup and to see how we can configure one.
In a minimum HA setup, one WSO2 SP node would be active whereas the other would be passive. If the HA setup is configured properly, even if@store configuration is not provided none of the processed aggregations would be lost due to snapshotting the current state of the SP.
When a snapshot has already been created, the recreation from tables does not happen (since there's no necessity to do so). Hence, the eventscoming in after a server restart in an HA setup would be processed as in the case where no server failure occurs. That is, the details providedunder the 'info' section of 'Single-node Deployment' is not applicable here.
Publishing Events
Once data is analyzed by WSO2 SP, the resulting data is output via a selected transport to the required interface in the required data format. Inorder to output results, a Siddhi application that processes events must have one or more sinks configured in it.
A sink configuration specifies the following:
Source typesEvent format
After such a recreation, if we resend events 1 to 5, the 1st 4 events would be ignored. Only event 5 would be processed at the secondlevel. This filtering is done by checking whether the events arriving after recreating in-memory data, is newer than or equal to the expirytime of the latest event which is stored in the most granular version of tables. In the example, the most granular version of tables is<Aggregate name>_SECONDS table. The latest aggregation in the table is for 2018-01-01 06:00:01 whose expiry time is 2018-01-0106:00:02. Hence only the 5th event gets processed. After encountering at least one such event that is newer than the expiry time oflatest timestamp in the table, the decision of whether or not to process out of order events is based on the@IgnoreEventsOlderThanBuffer value.
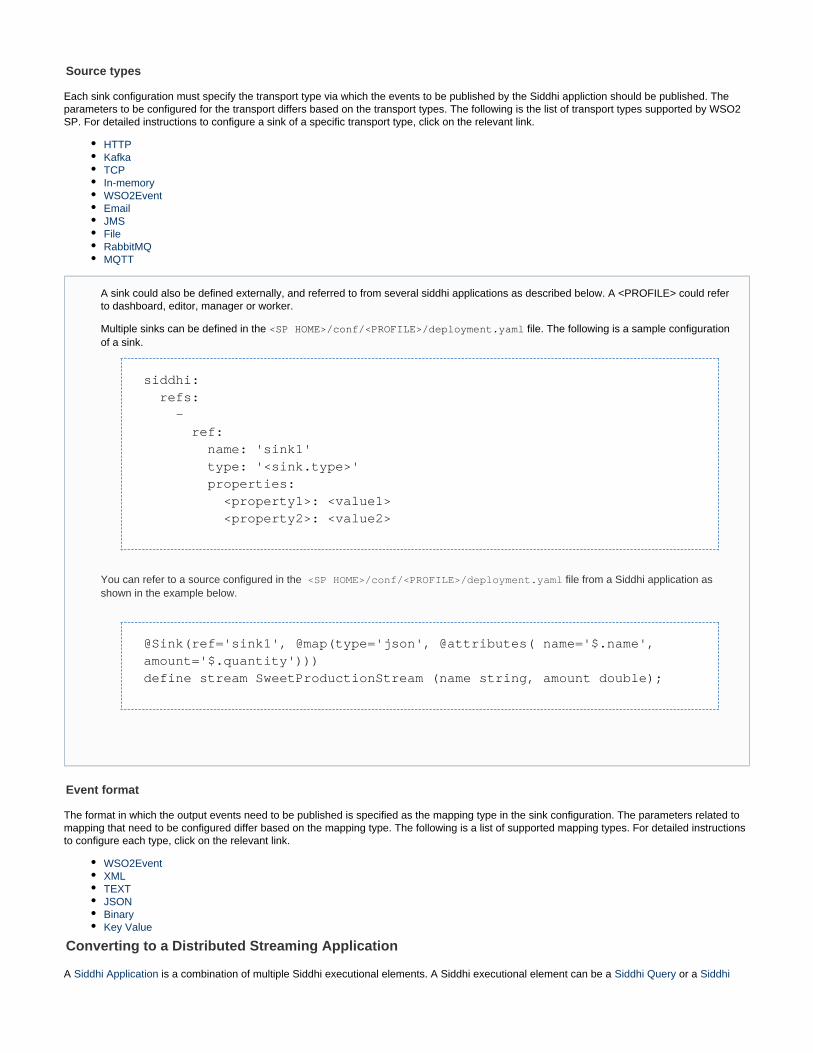
Source types
Each sink configuration must specify the transport type via which the events to be published by the Siddhi appliction should be published. Theparameters to be configured for the transport differs based on the transport types. The following is the list of transport types supported by WSO2SP. For detailed instructions to configure a sink of a specific transport type, click on the relevant link.
HTTPKafkaTCPIn-memoryWSO2EventEmailJMSFileRabbitMQMQTT
Event format
The format in which the output events need to be published is specified as the mapping type in the sink configuration. The parameters related tomapping that need to be configured differ based on the mapping type. The following is a list of supported mapping types. For detailed instructionsto configure each type, click on the relevant link.
WSO2EventXMLTEXTJSONBinaryKey Value
Converting to a Distributed Streaming Application
A is a combination of multiple Siddhi executional elements. A Siddhi executional element can be a or a Siddhi Application Siddhi Query Siddhi
A sink could also be defined externally, and referred to from several siddhi applications as described below. A <PROFILE> could referto dashboard, editor, manager or worker.
Multiple sinks can be defined in the file. The following is a sample configuration<SP HOME>/conf/<PROFILE>/deployment.yamlof a sink.
siddhi: refs: - ref: name: 'sink1' type: '<sink.type>' properties: <property1>: <value1> <property2>: <value2>
You can refer to a source configured in the file from a Siddhi application as<SP HOME>/conf/<PROFILE>/deployment.yamlshown in the example below.
@Sink(ref='sink1', @map(type='json', @attributes( name='$.name',amount='$.quantity')))define stream SweetProductionStream (name string, amount double);
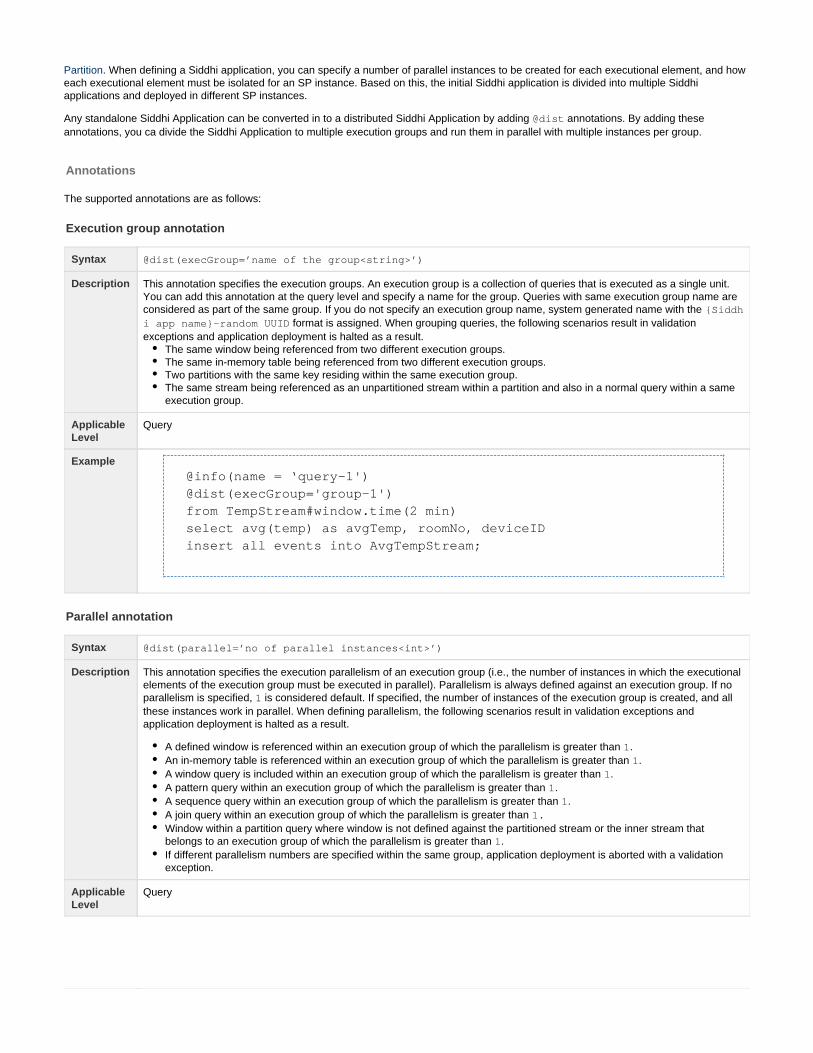
. When defining a Siddhi application, you can specify a number of parallel instances to be created for each executional element, and howPartitioneach executional element must be isolated for an SP instance. Based on this, the initial Siddhi application is divided into multiple Siddhiapplications and deployed in different SP instances.
Any standalone Siddhi Application can be converted in to a distributed Siddhi Application by adding annotations. By adding these@distannotations, you ca divide the Siddhi Application to multiple execution groups and run them in parallel with multiple instances per group.
Annotations
The supported annotations are as follows:
Execution group annotation
Syntax @dist(execGroup=’name of the group<string>’)
Description This annotation specifies the execution groups. An execution group is a collection of queries that is executed as a single unit.You can add this annotation at the query level and specify a name for the group. Queries with same execution group name areconsidered as part of the same group. If you do not specify an execution group name, system generated name with the {Siddh
format is assigned. When grouping queries, the following scenarios result in validationi app name}-random UUIDexceptions and application deployment is halted as a result.
The same window being referenced from two different execution groups.The same in-memory table being referenced from two different execution groups.Two partitions with the same key residing within the same execution group.The same stream being referenced as an unpartitioned stream within a partition and also in a normal query within a sameexecution group.
ApplicableLevel
Query
Example@info(name = ‘query-1')@dist(execGroup='group-1')from TempStream#window.time(2 min)select avg(temp) as avgTemp, roomNo, deviceIDinsert all events into AvgTempStream;
Parallel annotation
Syntax @dist(parallel=’no of parallel instances<int>’)
Description This annotation specifies the execution parallelism of an execution group (i.e., the number of instances in which the executionalelements of the execution group must be executed in parallel). Parallelism is always defined against an execution group. If noparallelism is specified, is considered default. If specified, the number of instances of the execution group is created, and all1these instances work in parallel. When defining parallelism, the following scenarios result in validation exceptions andapplication deployment is halted as a result.
A defined window is referenced within an execution group of which the parallelism is greater than .1An in-memory table is referenced within an execution group of which the parallelism is greater than .1A window query is included within an execution group of which the parallelism is greater than .1A pattern query within an execution group of which the parallelism is greater than .1A sequence query within an execution group of which the parallelism is greater than .1A join query within an execution group of which the parallelism is greater than 1.Window within a partition query where window is not defined against the partitioned stream or the inner stream thatbelongs to an execution group of which the parallelism is greater than .1If different parallelism numbers are specified within the same group, application deployment is aborted with a validationexception.
ApplicableLevel
Query

Example@info(name = ‘query-3')@dist(parallel='2')from TempStream [(roomNo >= 100 and roomNo < 110) and temp > 40]select roomNo, tempinsert into HighTempStream;
Transport channel creation annotation
Syntax @App:transportChannelCreationEnabled('true|false')
Description This annotation specifies whether Stream Processor managers are allowed to create Kafka topics that are required forapplication deployment. By default, this is set to and the topics are created when the application is deployed. If thetrueannotation is set to , you need to create the required intermediate topics before deploying the application. If the requiredfalsetopics do not exist when you deploy the application, the application deployment fails, and the deployment process is aborted.
ApplicableLevel
Application
Example@App:name('wso2-app') @App:transportChannelCreationEnabled('false')
User given source parellelism annotation
Syntax @dist(parallel='no of parallel receiver instances<int>’)
Description This specifies the number of parallel receiver instances that should be created for a user given source. In a distributeddeployment, user given sources are extracted out as separate passthrough Siddhi applications and deployed on designatedreceiver nodes. If adequate receiver nodes are not available, the deployment is aborted. If you have not specified a parallelcount, it is defaulted to . 1
ApplicableLevel
Stream
Example@source(type='inMemory', topic='stock', @map(type='json'),@dist(parallel='2'))
Example
The following is a sample distributed Siddhi application.

@App:name('wso2-app')
@Source(type=’http’,@map(type=’json),@dist(parallel=’3’))Define stream TempStream(deviceID long, roomNo int, temp double);
@Source(type=’http’,@map(type=’json),@dist(parallel=’3’))Define stream RegulatorStream(deviceID long, roomNo int, isOn bool);
@info(name = ‘query-1') @dist(execGroup='group-1')from TempStream#window.time(2 min)select avg(temp) as avgTemp, roomNo, deviceID insert all events intoAvgTempStream; @info(name = ‘query-2') @dist(execGroup='group-1')from TempStream[temp > 30.0]#window.time(1 min) as T joinRegulatorStream[isOn ==false]#window.length(1) as R on T.roomNo == R.roomNoselect T.roomNo, R.deviceID, 'start' as action insert intoRegulatorActionStream; @info(name = ‘query-3') @dist(execGroup='group-1')from every( e1=TempStream ) -> e2=TempStream[e1.roomNo==roomNo and (e1.temp+ 5) <= temp ] within 10 min select e1.roomNo, e1.temp as initialTemp,e2.temp as finalTempinsert into AlertStream; @info(name = ‘query-4') @dist(execGroup='group-2' ,parallel ='3')from TempStream [(roomNo >= 100 and roomNo < 110) and temp > 40 ] selectroomNo, temp insert into HighTempStream; @info(name = ‘query-5') @dist(execGroup='group-3' , parallel=’2’)partition with ( deviceID of TempStream )begin from TempStream#window.time(1 min) select roomNo, deviceID, temp, avg(temp) as avgTemp insert into #AvgTempStream; from #AvgTempStream[avgTemp > 20]#window.length(10) select roomNo, deviceID, max(temp) as maxTemp insert into deviceTempStream;end;
In the above Siddhi application, there are two user given sources. The execution group per source is created via a passthrough query to fetchdata from each user given source and insert into Kafka. The details of these execution groups are as follows:
Group name: wso2-app-passthrough-xxxxx: (auto generated query)Queries included wso2-app-passthrough-xxxxx-1
: Parallelism 1
There are three user-defined groups. g is defined without specifying parallelism. Therefore, the default parellelism of 1 applies.roup-1
Details of are as follows:group-1Group name: wso2-app-group-1
: query-1, query-2, query-3Queries included

1.
2.
: 1Parallelism Details of group-2 are as follows:
: Group name wso2-app-group-2: Queries included query-4
: Parallelism 3 Details of group-3 are as follows:
Group name: wso2-app-group-3: query-5Queries included
: 2Parallelism
All of these groups are deployed in worker nodes with patching parallelism as separate parallel Siddhi applications. Failure to deploy any of thegroup reults in the whole deployment being aborted.
Deploying Streaming Applications
A Siddhi application ( ) can be deployed to run that on production. .siddhi file
There are two modes deployment
Standard deployment Here we deploy Siddhi Apps in worker node (In Single node, Minimum HA Deployments)
Fully distributed deploymentHere we deploy Siddhi Apps in manager node (Only in Fully Distributed Deployment)
Refer below sections to get to know how to deploy on the above deployments:
Standard Deployment Fully Distributed Deployment
Standard Deployment
To start a worker node in single node mode, issue one of the following commands:
For Windows: worker.batFor Linux : ./worker.sh
Siddhi applications can be deployed to the worker node by using one of the following methods:
Dropping the file in to the directory before or after starting the.siddhi <SP_HOME>/wso2/worker/deployment/siddhi-files/worker node.Sending a "POST" request to with the Siddhi App included in the body of the request. Refer http://<host>:<port>/siddhi-apps S
for more information on using WSO2 Strean Processor APIs.tream Processor REST API Guide
When a Siddhi application is successfully deployed, a message similar to the following example appears in the startup logs.
To configure a Minimum HA deployment refer documentation.Minimum High Availability (HA) Deployment
Fully Distributed Deployment
To successfully set up, configure and run Siddhi applications in a fully distributed environment refer documentation.Fully Distributed Deployment
Visualizing Data
The Dashboard Portal allows you to visualize the results of the analysis carried out by WSO2 SP in graphical representations. The followingtopics explain how to start, run and work with the Dashboard Portal of WSO2 SP.
Starting the Dashboard PortalAccessing the Dashboard PortalUsing the Dashboard Portal

Starting the Dashboard Portal
To start the Dashboard Portal, run one of the following commands from the directory:<SP_HOME>/bin
On Windows: dashboard.bat --runOn Linux/Mac OS: sh dashboard.sh
Accessing the Dashboard Portal
Once the server has started, use one of the following URLs to access the Dashboard Portal:
Protocol URL Format Example
HTTP http://<SP_HOST>:<HTTP_PORT>/portal http://localhost:9290/portal
HTTPS https://<SP_HOST>:<HTTPS_PORT>/portal https://localhost:9643/portal
Using the Dashboard Portal
When you access the Dashboard Portal using one of the links given above, you will be prompted for login to the dashboard. Let's provide defaultadmin login credentials for the moment. (username : admin password : admin )
Upon successful login, following page appears with the list of dashboards that are currently available.
You can carry out the following tasks in the Dashboard Portal:
Designing DashboardsViewing DashboardsGenerating WidgetsCreating Custom WidgetsDashboard Authorization ConfigurationManaging Widgets

1. 2.
3.
Designing Dashboards
Dashboard Portal component of the Stream Processor provides the capability to create dashboards and display widgets in them. It provides adesigner view that allows you to easily design your dashboard with any layout, and with multiple pages.
The following sections describe how dashboard designers can work with dashboards using the Dashboard Portal.
Creating New DashboardsEditing DashboardsDeleting Dashboards
Creating New Dashboards
To create a new dashboard, follow the procedure below:
Start and access the WSO2 SP Dashboard Portal. For more information, see .Visualizing DataClick to open the page.+ Create a Dashboard
The following buttons appear as a result.
Click to open the wizard.Create Dashboard Dashboard DesignerIn the page, enter information as follows:Create a Dashboard
Parameter Description Example
Name of your Dashboard Enter a unique name for your dashboard. Sales Statistics
URL Enter a URL for the dashboard. sales-stats
Description Enter a description about the dashboard. Monthly Sales Statistics

3.
4.
5.
Click to save the dashboard. A Add basic dashboard is created and you are redirected to the home page of the dashboard that is createdby default.
To add a widget to this page, click the icon.Widgets
The widget list is displayed in the left panel as follows:
Widgets that you see in the left panel are a set of sample widgets that are shipped with the portal. You can generate ormanually create your own widgets and get them listed here. For more information, see and Generating Widgets Creating
.Custom Widgets

5.
6.
7.
Drag and drop a required widget in to the dashboard container as shown below.
You can click the icon on the widget container to remove a widget that is already added to the dashboard. Delete
To view the dashboard you created, click .Portal

7.
1.
The list of available dashboards opens as shown below, and the dashboard you created is included in the list.Sales Statistics
Managing Dashboard Pages
This section covers the following topics.
Adding multiple pages to a dashboardMarking a page as landing pageDeleting pages from a dashboard
Adding multiple pages to a dashboard
To add pages to a dashboard, follow the steps below:
Click in the left panel of the dashboard.Create Page
Where to go next?You can continue to add pages and widgets to the dashbard and also control access to your dashboard. For detailed instructions seethe following topics:
Managing Dashboard PagesSecuring Dashboards
If you click without further editing the dashboard, you can continue to edit this dashboard later by following theBackinstructions in .Editing Dashboards
Before you begin:Create a dashboard following the instructions in .Creating New Dashboards

1.
2. 3.
4.
A new page opens.Drag and drop widgets to the new page as described in Creating New Dashboards.Open the wizard for the dashboard again as described in . The newly added page appears inDashboard Designer Editing Dashboardsthe left panel as shown in the example below.
Click on the new page ( in the above example) to expand it. As a result, the a section appears displaying the current pageNew Page-3settings as marked in the image below.

4.
5.
1. 2.
1. 2.
Edit the page URL as required in the field. URLRepeat the above steps to add as many pages as required.
Marking a page as landing page
The landing page (also known as Home Page) of a dashboard is the page that is displayed by default when you access the dashboard. You canchange the current home page by marking a new page as the home page. To do this, follow the steps below:
Open the wizard for the relevant dashboard.Dashboard DesignerIn the left panel, click on the page you want to mark as the home page, and select the check box.Mark as Home Page
Deleting pages from a dashboard
To delete a page, follow the steps below:
Open the wizard for the relevant dashboard.Dashboard DesignerIn the left panel, click on the page you want to delete, and then click the icon.Delete

2.
1.
Securing Dashboards
By default any created dashboard will be accessible to any user who has access to Dashboard Portal. If you want to secure your dashboard, youhave to explicitly configure permissions for the dashboard.
Dashboard permissions are configured by editing dasboard settings as follows:
Log in to the WSO2 Dashboard Portal and access it. For instructions, see . The available dashboards are displayed asVisualizing Datashown below.
It is not allowed to delete the page that is currently marked as the home page. If you want to delete the current home page, you need tofirst mark a different page as the home page.

1.
2. Click the menu icon of the dashboard that you want to secure, and then click .Settings
The page opens. Here, you can assign roles for different permission levels.Dashboard Settings

2.
1.
There are three different permission levels for a given dashboard.
- Owners of a dashboard are the most privileged users of the dashboard. Only they have access to settings page onceOwnersaccess control is set. They also can edit or view the dashboard.
- Editors of a dashboard can either edit the dashboard or view the dashboard. But they don’t have access to theEditors dashboard settings page.Viewers - Viewers of a dashboard are the least privileged users of a dashboard. The can only view the dashboard and cannotedit or change the settings of a dashboard.
Depending on the configured user store, available list of roles will be populated for each permission level. Dashboard owners can set therequired roles for each of those permission levels. Each permission level can have multiple roles.
Editing Dashboards
A dashboard can be edited in the wizard. To access ths wizard for an existing dashboard, follow the steps below:Dashboard Designer
Open the menu of the dashboard by clicking its menu icon.

1.
2. Click Design.
A user who has access to edit a dashboard can do the following:
Perform page level changes such as add/remove pages, change page name/URL, change home page, etc. For more information, see Managing Dashboard PagesAdd/remove widgets from dashboard. For more information, see .Creating New DashboardsResize widget containers.
Resize widget containers
Once you have dragged an dropped a widget into a particular dashboard, the size of the widget container can be altered by dragging its bordersas demonstrated below.
The menu item is available for a given dashboard only if the user who currently logged in is an owner or an editor of theDesigndashboard, or if the dashboard is not secured. For more information, see .Securing Dashboards

1.
2.
Deleting Dashboards
To delete an existing dashboard, follow the procedure below:
Log in to the WSO2 Dashboard Portal and access it. For instructions, see . The available dashboards are displayed asVisualizing Datashown below.
Click the menu icon of the dashboard you want to delete.

2.
3.
1.
2.
Click .Delete
A message appears to confirm whether you want to proceed to delete the selected dashboard. Click to continue.YES
Viewing Dashboards
To view an existing dashboard, follow the procedure below:
Log in to the WSO2 Dashboard Portal and access it. For instructions, see . The available dashboards are displayed asVisualizing Datashown below.
Click on the dashboard you want to view. In this example, the is clicked. The home page of the dashboard opens asSales Dashboardshown in the example below.
The menu item is available for a given dashboard only if the user who currently logged is an owner of the dashboard, orDeleteif the dashboard is not secured. For more information, see .Securing Dashboards

2.
3.
4.
To view the other pages in the dashboard, open the left pane that displays the list of pages by clicking the following icon.
Then click on the relevant page in the left pane.
If you want to toggle the color theme of the dashboard, click the switch in the left pane.Light-Dark
You can click the same icon to hide the left pane.

4.
5. You also can maximize and minimize the view of the widgets in the dashboard by clicking on the maximize and minimize icons in thewidget container as shown below.
Generating Widgets
Widgets are the way to visualize your data in the dashboards. Widgets display your data or information in a selected format that you can configurethrough the Widget Generation Wizard.
Prerequisites
Before generating widgets, the following prerequisites must be completed:
The following prerequisites are required only in the following scenarios:
The data provider selected is or RDBMS Streaming Data Provider.RDBMS Batch Data ProviderIf the data provider used is and the Siddhi application makes a reference to the data source Siddhi Store Data Providerdefined in the file.deployment.yaml

1. 2.
3.
A data source must be configured for the widget. Data sources are configured in the <SP_HOME>/conf/dashboard/deployment.yam file. The following is a sample H2 data source.l
- name: SAMPLE_DB description: Sample datasource used for gadgets generation wizard jndiConfig: name: jdbc/SAMPLE_DB useJndiReference: true definition: type: RDBMS configuration: jdbcUrl:'jdbc:h2:${sys:carbon.home}/wso2/${sys:wso2.runtime}/database/SAMPLE_DB;IFEXISTS=TRUE;DB_CLOSE_ON_EXIT=FALSE;LOCK_TIMEOUT=60000;MVCC=TRUE' username: wso2carbon password: wso2carbon driverClassName: org.h2.Driver maxPoolSize: 50 idleTimeout: 60000 connectionTestQuery: SELECT 1 validationTimeout: 30000 isAutoCommit: false
Download the required JDBC driver (i.e., based on the database type you are using) and copy it to the directory. <SP_HOME>/lib
Generating a widget
To generate create a widget and display it in a dashboard, follow the steps below:
Start and access the WSO2 SP Dashboard Portal. For detailed instructions, see .Visualizing DataClick +.
Then click to open the wizard. Create Widget Create Widget
In the first page, enter a name for the new widget. In this example, let's enter as the name.Transactions
This driver must be OSGI compatible in order to be detected.

3.
4. Click . Then select a data provider for the widget. The data provider is the source from which the widget extracts information to beNextdisplayed. In this example, let's select as the data provider. RDBMS Batch Data Provider
As a result, the page is populated with the default configurations of the . Click to proceed.Sample_DB datasource Next

4.
The parameters you need to configure vary depending in the data provider you select. The following are the parameters youneed to configure for the other available data providers.
The parameters available to be configured for these data providers depend on how the data providers are configured

4.
Siddhi Store Data Provider
ParameterName
Description Example
Siddhi App The Siddhi application that stores the data to be visualizedin the Siddhi store. define stream MasterpassTransactionDataStream
(merchant_client_id string, merchant_name string,checkout_transaction_id string, card_brand_id string,card_brand_name string,card_bin long,card_holder_namestring, card_expiry_mm int,card_expiry_yyint,card_aav int,card_sli int,card_billing_address1string,card_billing_address2 string,card_billing_citystring,card_billing_subdivisionstring,card_billing_postalstring,card_billing_country string,contact_emailstring,contact_firstname string,contact_lastnamestring,contact_nationalid long,contact_genderstring,contact_dob_mm int,contact_dob_yyyyint,contact_address1 string,contact_address2string,contact_city string,contact_subdivisionstring,contact_country string,contact_postalstring,shipping_address1 string,shipping_address2string,shipping_city string,shipping_subdivisionstring,shipping_country string,shipping_postalstring,shipping_recipient_name string,wallet_idint,region string,total_usd float);
@store(type='rdbms',jdbc.url="jdbc:mysql://localhost:3306/MasterCardDB",username="root", password="root" ,jdbc.driver.name="com.mysql.jdbc.Driver") define aggregationMasterpassTransactionDataStreamByCardType from MasterpassTransactionDataStream select card_brand_name, region,sum(total_usd) as totalAmount group by card_brand_name,region aggregate every minutes ...year;
via WebSocket messages. For more information, see .Working with Data Providers
Only the siddhi event table/ aggregation definitionneeds to be added here, with applicableannotations (@store, @PrimaryKey) (Note: Foraggregation, aggregation input stream shouldalso be defined)

4.
DynamicQueryGenerationConfiguration
The javascript function which returns the query that the dataprovider needs to execute in order to get the requiredinformation from the database. This can be provided in twoways:
Static query: This involves providing a simple querywithout using any external values. Here, you do notneed to enter widget inputs.e.g. fromMasterpassTransactionDataStreamByCardTypewithin '2018-**-** **:**:**' per 'hours' select card_brand_name,region as re,sum(totalAmount) as total group byregionDynamic query(with widget inputs): This involvesadding external inputs received from publisher widgetsunder . You can click to add moreAdd widget inputs +inputs. You need to specify the default values to beused in the query if no input is received from publisherwidgets.e.g. return "fromMasterpassTransactionDataStreamByCardTypewithin " + from + "L, "+ to +"L per '" + per + "s' selectcard_brand_name,region as re,sum(totalAmount) as total group byregion";
return "fromMasterpassTransactionDataStreamByCardType within " +from + "L, "+ to +"L per '" + per + "s' selectcard_brand_name,region as re, sum(totalAmount) astotal group by region";
PublishingInterval
The frequency with which you want the data provider to polldata from the Siddhi store. The time interval is specified inseconds.
5
Websocket Provider
Parameter Name Description Example
Map Type The map type to convert the datareceived via WebSocket in order toupdate them in the widget.Supported mapping types are, xml
and .json text
xml
Topic The WebSocket topic to whichWSO2 SP needs to listen in orderto display information in the widget
topic1
This configuration is done only if the widget youare creating is a subscriber widget that uses theoutput of another widget as an input. For moreinformation, see Inter Widget Communication via
.the PubSub Model

4.
Metadata relatedto the stream
The metadata related to the stream.The attributes of the stream intowhich the events published in thewidget are received can be addedhere. The fields in the table is asfollows:
Metadata Name: The name ofthe stream attribute.Metadata Type: The metadatatype of the attribute. This canbe one of the following.
Linear: Data is received innumerical format.Ordinal: Data is receivedin string format.Time: data is received astimestamps.
The definition of the stream from which eventspublished in the widget are fetched is as follows: defi
ne stream SweetTotalStream( name string,This can be entered astotalProduction long);
metadata as shown below:
RDBMS Streaming Data Provider
ParameterName
Description Example
DatasourceName
The name of the data source from which thewidget extracts information to be displayed.
SAMPLE_DB
DynamicQueryGenerationConfiguration
The javascript function which returns thequery that the data provider needs to executein order to get the required information fromthe database. This can be provided in twoways:
Static query: This involves providing asimple query without using any externalvalues. Here, you do not need to enterwidget inputs.Dynamic query(with widget inputs):This involves adding external inputsreceived from publisher widgets under A
. You can click todd widget inputs +add more inputs. You need to specify thedefault values to be used in the query ifno input is received from publisherwidgets.
Entering a query: return "select * fromTRANSACTIONS_TABLE";
Adding widget inputs:
Table Name The name of the table from which the dataprovider must poll data.
TRANSACTIONS_TABLE
IncrementalColumn
A data column that is used by the dataprovider to identify new records.
CREDITCARDNO
PublishingInterval
The frequency with which you want the dataprovider to poll data from the database. Thetime interval is specified in seconds.
1
PurgingInterval
The frequency with which you want the dataprovider to run purging queries on thedatabase. The time interval is specified inseconds.
60
This configuration is done only ifthe widget you are creating is asubscriber widget that uses theoutput of another widget as aninput. For more information, see Inter Widget Communication via the
.PubSub Model

4.
5.
6.
Select a chart type of your choice. For this example, let's select .Line/Area/Bar Chart Parent
Configure your chart as follows:
PublishingLimit
The number of records you want the dataprovider to publish at a time.
30

6.
Select the data fields that should represent the X and Y axes of your graph. In this example, let's select for the X axisCountryand for the Y axis.AmountIf you want to do a color categorization, select the field based on which you want it to be done.If you want to design another chart within the same graph, click and configure that chart as required.Add ChartIf you want to do any advance configurations, expand the section and do the required configurations. ForAdvanced Settingsmore information about the advanced settings you can configure, see .Customizing chartsIf the chart is a publisher widget, expand the section. Then specify how the widget outputs needData Publishing Configurationto be displayed by entering the required text as shown in the example below. To add a new widget output, you can click . +
This configuration is done only if the widget is a publisher (i.e., it's output is used by one or more other widgets asinput). For more information, see Inter Widget Communication via the PubSub Model .
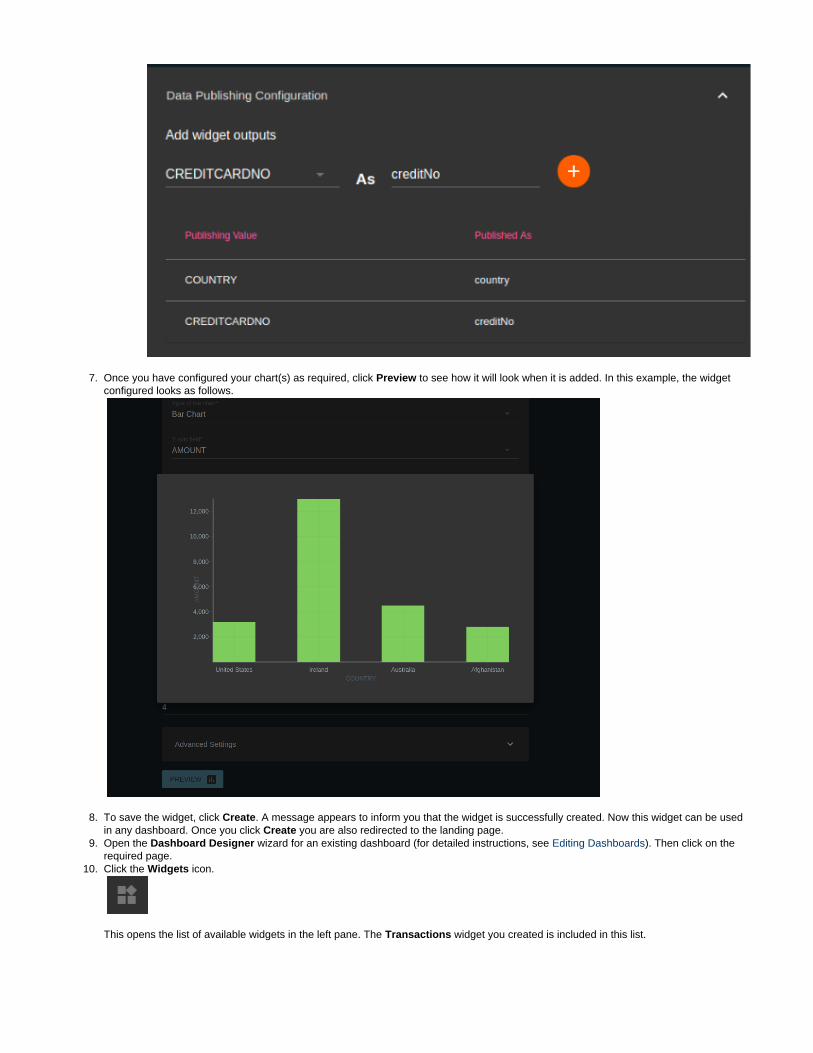
6.
7.
8.
9.
10.
Once you have configured your chart(s) as required, click to see how it will look when it is added. In this example, the widgetPreviewconfigured looks as follows.
To save the widget, click . A message appears to inform you that the widget is successfully created. Now this widget can be usedCreatein any dashboard. Once you click you are also redirected to the landing page.CreateOpen the wizard for an existing dashboard (for detailed instructions, see ). Then click on theDashboard Designer Editing Dashboardsrequired page.Click the icon.Widgets
This opens the list of available widgets in the left pane. The widget you created is included in this list.Transactions

10.
11. Drag and drop the widget to the dashboard. It is displayed in the dashboard as shown below.
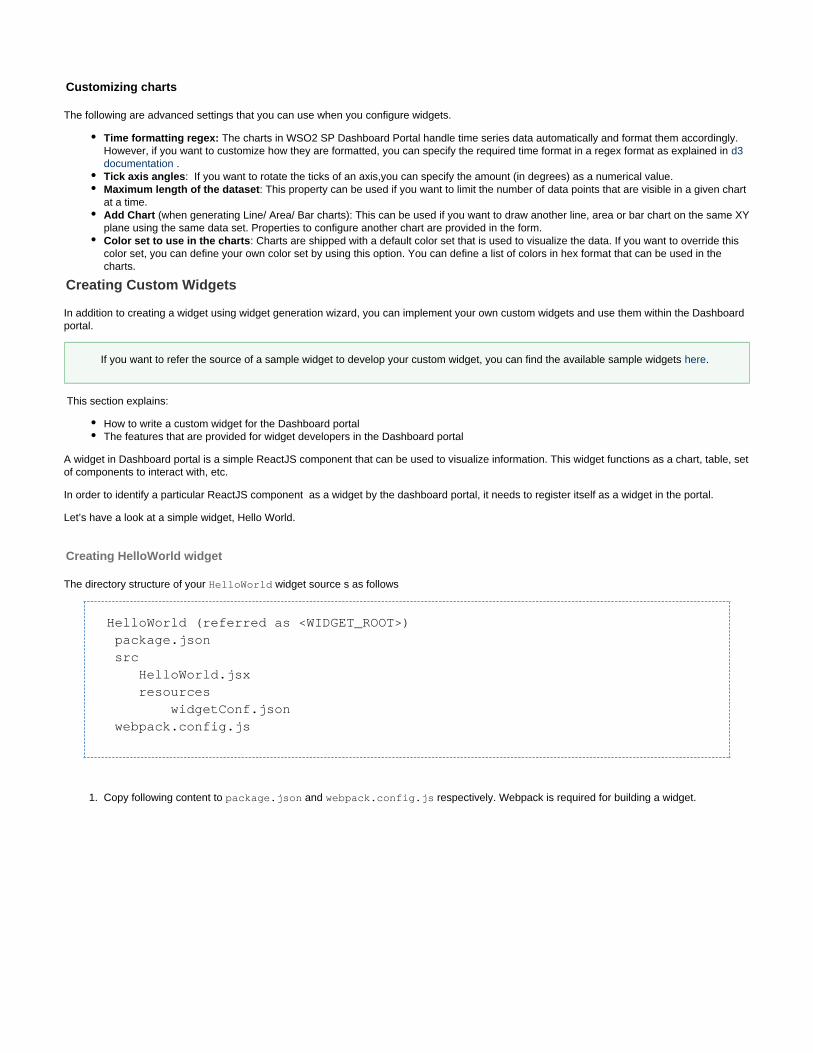
11.
1.
Customizing charts
The following are advanced settings that you can use when you configure widgets.
Time formatting regex: The charts in WSO2 SP Dashboard Portal handle time series data automatically and format them accordingly.However, if you want to customize how they are formatted, you can specify the required time format in a regex format as explained in d3
. documentationTick axis angles: If you want to rotate the ticks of an axis,you can specify the amount (in degrees) as a numerical value.Maximum length of the dataset: This property can be used if you want to limit the number of that are visible in a given chartdata pointsat a time.Add Chart (when generating Line/ Area/ Bar charts): This can be used if you want to draw another line, area or bar chart on the same XYplane using the same data set. Properties to configure another chart are provided in the form.Color set to use in the charts: Charts are shipped with a default color set that is used to visualize the data. If you want to override thiscolor set, you can define your own color set by using this option. You can define a list of colors in hex format that can be used in thecharts.
Creating Custom Widgets
In addition to creating a widget using widget generation wizard, you can implement your own custom widgets and use them within the Dashboardportal.
This section explains:
How to write a custom widget for the Dashboard portal The features that are provided for widget developers in the Dashboard portal
A widget in Dashboard portal is a simple ReactJS component that can be used to visualize information. This widget functions as a chart, table, setof components to interact with, etc.
In order to identify a particular ReactJS component as a widget by the dashboard portal, it needs to register itself as a widget in the portal.
Let’s have a look at a simple widget, Hello World.
Creating HelloWorld widget
The directory structure of your widget source s as followsHelloWorld
HelloWorld (referred as <WIDGET_ROOT>) package.json src HelloWorld.jsx resources widgetConf.json webpack.config.js
Copy following content to and respectively. Webpack is required for building a widget.package.json webpack.config.js
If you want to refer the source of a sample widget to develop your custom widget, you can find the available sample widgets here.

1.
package.json
{ "name": "hello-world-widget", "version": "1.0.0", "private": true, "dependencies": { "react": "^16.1.1", "react-dom": "^16.1.1" }, "scripts": { "build": "webpack -p" }, "devDependencies": { "webpack": "^3.5.6", "ajv": "^5.2.2", "babel-core": "^6.25.0", "babel-loader": "^7.1.1", "babel-preset-es2015": "^6.24.1", "babel-preset-react": "^6.24.1", "babel-register": "^6.26.0", "copy-webpack-plugin": "^4.2.0", "node-sass": "^4.5.3", "sass-loader": "^6.0.6" }}
webpack.config.js
const path = require('path');const webpack = require('webpack');const CopyWebpackPlugin = require('copy-webpack-plugin');
module.exports = { context: path.resolve(__dirname, './src'), entry: { index: './HelloWorld.jsx' }, output: { path: path.resolve(__dirname, './dist/HelloWorld/'), filename: 'HelloWorld.js' }, module: { loaders: [ { test: /\.html$/, use: [{loader: 'html-loader'}] }, { test: /\.js$/, exclude: /node_modules/,

1.
use: [ { loader: 'babel-loader', query: { presets: ['es2015', 'react'] } } ] }, { test:/\.(png|jpg|svg|cur|gif|eot|svg|ttf|woff|woff2)$/, use: ['url-loader'] }, { test: /\.jsx?$/, exclude: /(node_modules)/, loader: 'babel-loader', query: { presets: ['es2015', 'react'] } }, { test: /\.css$/, use: ['style-loader', 'css-loader'] }, { test: /\.scss$/, use: [{loader: 'style-loader'}, {loader:'css-loader'}, {loader: 'sass-loader'}] }
] }, plugins: [ new CopyWebpackPlugin([ {from: path.resolve(__dirname, './src/resources/')} ]) ], resolve: {

1.
2.
3.
4.
5.
6.
extensions: ['.js', '.json', '.jsx', '.scss'] }};
Now copy the following content into under directory. This contains all the logic for our widget.HelloWorld.jsx src
HelloWorld.jsx
import React, { Component } from 'react';
class HelloWorld extends Component { render() { return ( <h1>Hello, World!</h1> ); }}
global.dashboard.registerWidget('HelloWorld', HelloWorld);
Dashboard portal requires few meta information regarding the widget in order to identify it. <WIDGET_ROOT>/src/resources/widget file contains this meta information. When building the widget this configuration file gets copied into the final widget directory.Conf.json
Add the following content into the file.widgetConf.json
widgetConf.json
{ "name": "HelloWorld", "id": "HelloWorld", "thumbnailURL": "", "configs": {}}
Now the source of the widget is complete. To install the dependencies required to to build your widget, navigate to the <WIDGET_ROOT>directory and issue the following command.
npm install
Go to the directory and issue the following command to build the widget.<WIDGET_ROOT>
npm run build
Once the build is successful the final widget directory is created in the directory. Copy the <WIDGET_ROOT>/dist <WIDGET_ROOT>/di
Note that we have registered the react component as a widget in the Dashboard portal by calling the functioregisterWidgetn where the first argument is the ID you want to register your widget, and the second argument is the react component.
global.dashboard.registerWidget('HelloWorld', HelloWorld);

6.
7. 8.
1. 2. 3.
4.
directory into the st/HelloWorld <SP_HOME>/wso2/dashboards/deployment/web-ui-apps/portal/extensions/widgetsdirectory.Restart WSO2 Stream Processor.Now log in to the Dashboard portal and create a new dashboard .
You can view the newly created widget in the widget listing panel of the Dashboard Designer.HelloWorld
Now you understand how to develop a widget and get it rendered in the Dashboard portal.
Let's improve this widget to add more interactive elements to it.
Clone the WSO2 repository to your machine.carbon-dashboardsCopy the widget you created to the directory.HelloWorld carbon-dashboards/samples/widgetsTo import the channel manager to access the database, you need to use the . To do this, create a separateWidgetChannelManagerfile named as shown below.ExtendedWidget
import React from 'react';import Widget from '@wso2-dashboards/widget';import WidgetChannelManager from'../../../../components/dashboards-web-component/src/utils/dashboard-channel/WidgetChannelManager';
let widgetChannelManager = null;
export default class ExtendedWidget extends Widget {
constructor(props) { super(props); }
getWidgetChannelManager() { if(!widgetChannelManager) { widgetChannelManager=new WidgetChannelManager(); }
return widgetChannelManager; }
}
Update the file as shown below. HelloWorld.jsx
For instructions to access the Dashboard Portal, see .Visualizing Data
For instructions to create a new dashboard, see .Creating New Dashboards
The is a library that is used to create the charts in the widget named thatreact-vizgrammar module ExtendedWidgetyou previously created. To add the config, metadata and data fields of the table, you can find the required instructionsin .react-vizgrammar - Table Chart SamplesHere, is the action of the row click. console.info You can use the required function that is related to the secondwidget as the function in your implementation.handleData
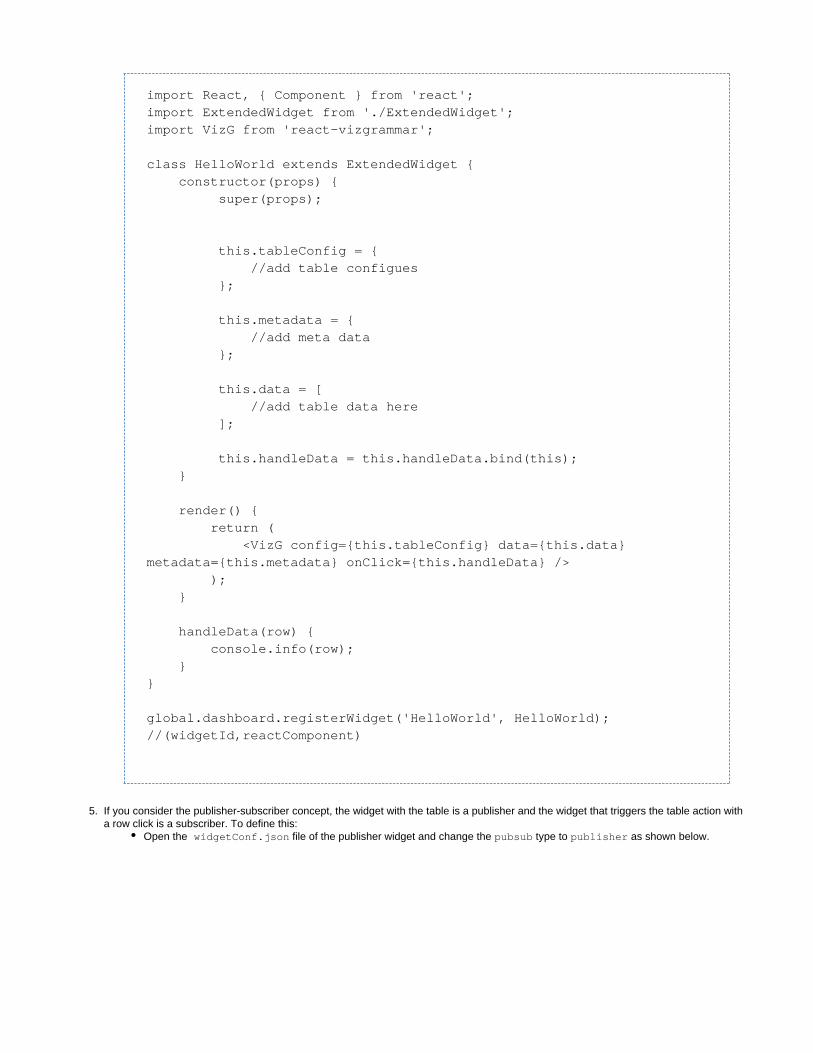
4.
5.
import React, { Component } from 'react';import ExtendedWidget from './ExtendedWidget';import VizG from 'react-vizgrammar';
class HelloWorld extends ExtendedWidget { constructor(props) { super(props);
this.tableConfig = { //add table configues };
this.metadata = { //add meta data };
this.data = [ //add table data here ];
this.handleData = this.handleData.bind(this); }
render() { return ( <VizG config={this.tableConfig} data={this.data}metadata={this.metadata} onClick={this.handleData} /> ); }
handleData(row) { console.info(row); }}
global.dashboard.registerWidget('HelloWorld', HelloWorld);//(widgetId,reactComponent)
If you consider the publisher-subscriber concept, the widget with the table is a publisher and the widget that triggers the table action witha row click is a subscriber. To define this:
Open the file of the publisher widget and change the type to as shown below. widgetConf.json pubsub publisher
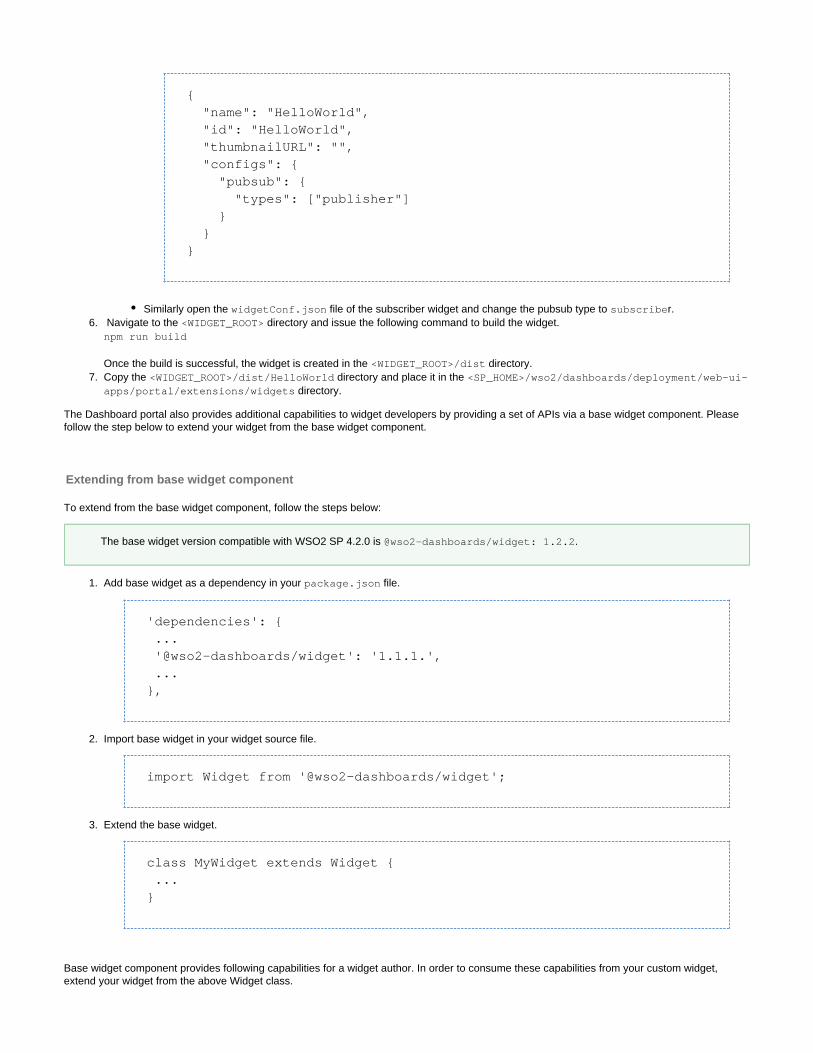
5.
6.
7.
1.
2.
3.
{ "name": "HelloWorld", "id": "HelloWorld", "thumbnailURL": "", "configs": { "pubsub": { "types": ["publisher"] } }}
Similarly open the file of the subscriber widget and change the pubsub type to r.widgetConf.json subscribe Navigate to the directory and issue the following command to build the widget.<WIDGET_ROOT>npm run build
Once the build is successful, the widget is created in the directory.<WIDGET_ROOT>/distCopy the directory and place it in the <WIDGET_ROOT>/dist/HelloWorld <SP_HOME>/wso2/dashboards/deployment/web-ui-
directory.apps/portal/extensions/widgets
The Dashboard portal also provides additional capabilities to widget developers by providing a set of APIs via a base widget component. Pleasefollow the step below to extend your widget from the base widget component.
Extending from base widget component
To extend from the base widget component, follow the steps below:
Add base widget as a dependency in your file.package.json
'dependencies': { ... '@wso2-dashboards/widget': '1.1.1.', ...},
Import base widget in your widget source file.
import Widget from '@wso2-dashboards/widget';
Extend the base widget.
class MyWidget extends Widget { ...}
Base widget component provides following capabilities for a widget author. In order to consume these capabilities from your custom widget,extend your widget from the above Widget class.
The base widget version compatible with WSO2 SP 4.2.0 is .@wso2-dashboards/widget: 1.2.2

1.
2.
1.
2.
Consume user information within a widgetInter Widget Communication via the PubSub ModelResolving CSS style conflictsShare dashboards with persisted widget statesAccessing Widget Configuration
Resolving CSS style conflicts
When creating custom widgets there is a possibility of getting styles conflicts since all the widgets are rendered within a single page. There arecertain practices a widget developer can follow to overcome this issue. To understand these practices follow " ".Resolving CSS style conflicts
Retrieving the information to be displayed
To retrieve information to be displayed in this widget via an data provider, follow the steps below (To see the available data providers see Working): with Data Providers
Access the data provider configurations in <SP_HOME>/deploment/web-ui-apps/portal/extensions/widgets/<WIDGET_NAM file as specified in .E>/widgetConf.json Accessing Widget Configuration
Use the base widget API to create the WebSocket connection. For this, you can use the following APIs:Subscribe to the endpoint
API Syntax super.getWidgetChannelManager().subscribeWidget(<Widget id>, <Call back method to handledata>, <data provider configs>)
Example . ()super getWidgetChannelManager. ( . . .subscribeWidget this props id, this handleDa
dataProviderConfigs))taReceived, ;
Unsubscribe from the endpoint
API Syntax super.getWidgetChannelManager().unsubscribeWidget(<Widget ID>);
Example super.getWidgetChannelManager(). ( . .unsubscribeWidget this props i)d ;
Consume user information within a widget
There can be a scenario where a particular widget needs to access the user information of current logged in user. For that, an API has beenintroduced to the widget developer via the base widget component.
Follow the steps mentioned below to access user information. Please note that this API currently exposes only the username of the current user.
NOTE: This guide assumes that you already have a widget which is deployable in dashboard portal.
Make sure your widget has extended from the based widget provided by the dashboard portal. If not please refer “Extending from base”.widget component
Call the following method to get the user information.
const userInfo = super.getCurrentUser();
A sample widget has been shipped with WSO2 Stream Processor named "UserInfo" to demonstrate this feature. You can find the source code ofthe sample widget at .https://github.com/wso2/carbon-dashboards/tree/v4.0.8/samples/widgets/UserInfo
Inter Widget Communication via the PubSub Model
The Dashboard Portal allows inter-widget communication via the publisher/subscriber model. In any publisher/subscriber approach the publisher(i.e., sender) sends messages without specifically targeting a subscriber (i.e., receiver). The receiver indicates that it needs to receive one ormore messages published by a particular publisher or a set of publishers.
Inter-widget communication in the Dashboard Portal is based on the same model where the dashboard itself keeps track of its publishers,subscribers, and their subscriptions. When a particular publisher publishes a message, the dashboard routes the message to its subscribersbased on the store-and-forward mechanism.

1.
2.
3.
1.
2.
3.
Implementing a publisher/subscriber widgets
To implement publisher/subscriber widgets follow the steps below.
Step 1: Create a publisher widget
Ensure that your widget is extended from the based widget provided by the dashboard portal. If not, follow the instructions in Creating.Custom Widgets - Extending from base widget component
To specify the widget as a publisher widget, add the following configuration to the file of the widget that can be foundwidgetConf.jsonin the directory.<SP_HOME>/wso2/dashboard/deployment/web-ui-apps/portal/extensions/widgets/<WIDGET_NAME>
configs: { ... pubsub: { types: ['publisher'] }, ...}
To publish a message call the following function. The message can be of any type.
super.publish('message');
Step 2: Create a subscriber widget
Ensure that your widget is extended from the based widget provided by the dashboard portal. If not, follow the instructions in Creating.Custom Widgets - Extending from base widget component
To specify the widget as a subscriber widget, add the following configuration to the file of the widget that can bewidgetConf.jsonfound in the direct<SP_HOME>/wso2/dashboard/deployment/web-ui-apps/portal/extensions/widgets/<WIDGET_NAME>ory.
configs: { ... pubsub: { types: ['subscriber'] }, ...}
Before you begin:You need to create a widget that can be deployed on the Dashboard Portal. For detailed instructions, see .Generating Widgets
For the subscriber widget, enter information for dynamic query generation to fetch information from the publisher. For moreinformation, see .Generating Widgets - Dynamic Query Generation ConfigurationFor the publisher widget, enter a data publishing configuration to specify how it should publish information. For more information, see
.Generating Widgets - Data Publishing Configuration
To demonstrate how publisher widgets are created and used, a sample widget named Publisher is shipped with WSO2 StreamProcessor. To view the source code of this widget, click .here

3.
1.
2.
3.
To subscribe to publishers call the following function.
super.subscribe((message) => { // Handle the message here.});
Wiring publishers and subscribers
Once the publishers and subscribers are implemented and added to the dashboard, the subscribers need to subscribe for inpt from the requiredpublishers. This is achieved via publisher/subscriber wiring. The following steps demonstrate how the publisher/subscriber wiring is carried out.The Publisher and Subscriber widgets that are shipped with WSO2 SP by default are used in the steps for the purpose of demonstration.
Open the Dashboard designer and drag and drop the and widgets to an existing dashboard. For detailedPublisher Subscriberinformation, see .Generating WidgetsOn the widget, click the icon in the top right corner (marked in the image below) to open the pSubscriber Subscriber Configurationsanel to the right.
In the panel, select the name of the widget that needs to be considered as the publisher of this widget. InSubscriber Configurationsthis example, let's select as shown below.Publisher
As a result, messages can be sent from the widget to the widget. If you want the subscriber widget toPublisher Subscriberunsubscribe, you can clear this check box.
Resolving CSS style conflicts
A widget developer can use CSS styles for styling the widget in different ways, such as inline styles, external stylesheet, etc.
Since a dashboard is a collection of multiple widgets each using its own set of styles, if the styling is not done correctly there is a probability offinal dashboard ending up with stylesheet conflicts.
To demonstrate how subscriber widgets are created and used, a sample widget named is shipped with WSO2 StreamSubscriberProcessor. To view the source code of this widget, click .here

1. 2.
3.
There are several approaches that we can take in order to prevent this.
Using inline styles
Inline styles are one of the safest approaches to prevent style conflicts. In this method the respective CSS styles are bound with the underlinemarkup and only affect that specific tag hence there won’t be style conflicts.
Using CSS modules
Inline styles lack in maintainability. Inability to share common styles among elements end up in a huge pile of duplicate code. This can be avoidedby using CSS as classes. But since all the widgets are rendered in the un-sandboxed environment probably there will be style conflicts.
This can be avoided by using CSS modules.
CSS modules allow to style a component via CSS stylesheet like approach, but the class names are scoped to the local ReactJS component.This is achieved by prefixing each CSS class name with a random string at the build-time. Please follow the following steps to enable CSSmodules.
For implement CSS modules webpack build system, style-loader, and the css-loader need to be installed in within the widget. Use the followingcommand to install the above modules.
Open the webpack.config.js file in the widget root directory.We need to configure the Webpack css-loader to load CSS as CSS modules. Add the following configuration into the webpack.config.jsfile.
module.exports = { ... module: { loaders: [ ... { test: /\.css$/, loader:'style-loader!css-loader?modules=true&localIndentName=[name]__[local]___[hash:base64:5]' }, ... ] ... } ...}
Now open the widget JSX file and use the CSS styles/classes defined in the external CSS file as follows.
...import styles from './MyComponent.css';
class MyComponent extends React.component { /* ... */ render() { return ( <button className={styles.myButton} /> ) } /* ... */}

1.
2.
3.
Share dashboards with persisted widget states
A dashboard can have widgets which the user can interact with. For an example, there can be a widget which the user can pick a date rangewhich resulting another set of widgets change there dataset based on the selected date range. In this kind of scenario, there needs to be a waythe user can save the current state of the dashboard or share it with someone else. In order to handle this scenario, a set of APIs has beenintroduced to the widget developer via the base widget component.
Follow the steps mentioned below to implement state persistence.
NOTE: This guide assumes that you already have a widget which is deployable in dashboard portal.
Make sure your widget has extended from the based widget provided by the dashboard portal. If not please refer “Extending from base”.widget component
Call the following method to store the state of the widget.
super.setWidgetState(key, stateObj);
Call the following method to retrieved the saved state of the widget.
const state = super.getWidgetState(key);
A sample widget has been shipped with WSO2 Stream Processor named "WidgetState" to demonstrate this feature. You can find the source codeof the sample widget at .https://github.com/wso2/carbon-dashboards/tree/v4.0.8/samples/widgets/WidgetState
Accessing Widget Configuration
This section explains how to access the configuration of a widget in the <SP_HOME>/deploment/web-ui-apps/portal/extensions/widg file.ets/<WIDGET_NAME>/widgetConf.json
By default, widget configuration file is used to store configurations of a widget namely, id, name, pub/sub information, data provider configurations.Following is a sample widget configuration from "HTTP Analytics Latency Comparison" widget.
Additional configurations can be added under the element "configs".

{ "name": "HTTP Analytics Latency Comparison", "id": "HTTPAnalyticsLatencyComparison", "thumbnailURL": "", "configs": { "pubsub": { "types": [ "subscriber" ] }, "providerConfig": { "configs":{ "type":"SiddhiStoreDataProvider", "config":{ "siddhiApp":"@App:name(\"HTTPAnalytics\") define streamRequestsStream(timestamp long, serverName string, serviceName string,serviceMethod string, responseTime double, httpResponseCode int, userAgentstring, requestIP string); define stream ProcessedRequestsStream(timestamplong, serverName string, serviceName string, serviceMethod string,responseTime double, httpRespGroup string, userAgent string, requestIPstring); @store( type=\"rdbms\",datasource=\"HTTP_ANALYTICS_DB\") definetable ServiceTable( serverName string, serviceName string);@store(type=\"rdbms\",datasource=\"HTTP_ANALYTICS_DB\") define aggregationRequestAggregation from ProcessedRequestsStream select serverName,serviceName, serviceMethod, httpRespGroup, count() as numRequests,avg(responseTime) as avgRespTime group by serverName, serviceName,serviceMethod, httpRespGroup aggregate by timestamp every sec...year;@info(name='FilterUniqueServerServiceQuery') fromRequestsStream#window.unique:first(serverName,serviceName) selectserverName, serviceName insert into ServiceTable;@info(name='HTTPResponseGroupProcessQuery') from RequestsStream selecttimestamp, serverName, serviceName, serviceMethod, responseTime,str:concat(convert(httpResponseCode/100, \"string\"), 'xx') ashttpRespGroup, userAgent, requestIP insert into ProcessedRequestsStream;", "queryData":{ "query":"from RequestAggregation{{filterCondition}} within {{from}}L, {{to}}L per \"{{per}}s\" select{{groupBy}}, {{filterBy}} avg(avgRespTime) as avgRespTime group by {{groupBy}}" }, "publishingInterval":60 } } } }}

1.
2.
To access the widget configuration, follow the steps below.
Ensure that your widget is extended from the based widget provided by the dashboard portal. If not, follow the instructions in Creating.Custom Widgets - Extending from base widget component
Call the following method to get the widget configuration information.
super.getWidgetConfiguration(this.props.widgetID) .then((message) => { //Access widget configuration from message.data }) .catch((error) => { // Handle Rest API call failure });
Dashboard Authorization Configuration
There are two levels of permission to use the SP Dashboard Portal to visualize information:
Creator: User roles with this permission level have administrative privileges over he Dashboard Portal. They are allowed to design, view,edit, or delete dashboards. They can also create, edit and delete widgets and pages for dashbaords.Viewer: User roles with this permission level are only allowed to view dashboards.
The following topics cover how to configure dashboard authorization:
PrerequisitesConfiguring permissions
Prerequisites
Before configuring Dashboard Portal permissions, the user roles to be assigned permissions must be already defined in the user store with therequired user IDs. For detailed instructions, see .User Management
Configuring permissionsThe following is a sample configuration of user roles for the Dashboard Portal. These user roles are defined in the <SP_HOME>/conf/dashboa
file under the namespace as shown below.rd/deployment.yaml wso2.dashboard.portal:
wso2.dashboard.portal: roles: creator: - name: role1 id: 1 viewer: - name: role2 id: 2
The base widget version is required to be newer than 1.2.1.
This section explains the levels of permission granted for users of the Dashboard Portal. For granting permission for individualdashboards within the portal, see .Securing Dashboards

1.
2.
Managing Widgets
Editing widgetsDeleting widgets
Editing widgets
In WSO2 Stream Processor, widgets are treated as React components, and they are available as compiled, minified codes. Therefore, the sourcecode of widgets is not human-readable. Due to this, they cannot be edited manually. To edit an existing widget, we need to get the source code,edit it and compiled again.
Editing widgets by editing the source code is not recommended because all the generated widgets are served by one central code base. Editingthis code affects all the widgets, and this may cause errors when updating the product pack via WUM
Deleting widgets
You can delete an existing widget via the following API.
DELETE https://localhost:9643/portal/apis/widgets/{id}
Working with Business Rules
In stream processing, there are common use cases for analyzing statistics that involve operations such as calculating the average, minimum,maximum etc., for different endpoints. The Business Rules Manager allows you to define templates and generate business rules from them fordifferent scenarios with common requirements.
Watch the following screencast for an introduction to WSO2 SP Business Rules.
The following topics cover how to create templates for business rules, create business rules from them and how to manage them.
Creating Business RulesManaging Business RulesCreating a Business Rule TemplateBusiness Rules TemplatesConfiguring Business Rules Manager Permissions
Creating Business Rules
This section explains how to create a business rule. A business rule can be created from a template or from scratch.
PrerequisitesCreating a business rule from a templateCreating a business rule from scratch
Prerequisites
In order to create a business rule from a template, the following prerequisites must be completed:
Both the Dashboard and Worker runtimes of the Stream Processor server must be started.The templates for business rules must be defined in a template group, and must be configured in the <SP_HOME>/conf/dashboard/deployment.yaml file. For detailed instructions, see .Business Rules Templates
Creating a business rule from a template
Creating business rules from an existing template allows you to use sources, sinks and filters already defined and assign variable values toprocess events.
To create a business rule from a template, follow the procedure below:
Go to from the terminal and start the Dashboard runtime of WSO2 SP with one of the following commands:<SP_HOME>On Windows: dashboard.bat --runOn Linux/Mac OS: ./dashboard.sh

2.
3.
4.
5. 6.
7.
Start the Worker runtime of WSO2 SP with one of the following commands:On Windows: worker.bat --runOn Linux/Mac OS: ./worker.sh
Access the Business Rule Manager via one of the following URLs.
Protocol URL Format Example
HTTP http://<SP_HOST>:<HTTP_PORT>/business-rules http://0.0.0.0:9090/business-rules
HTTPS https://<SP_HOST>:<HTTPS_PORT>/business-rules https://0.0.0.0:9443/business-rules
This opens the following:
Click to open the following page.Create
Then click to open the page where the available templates are displayed.From Template Select a Template GroupClick on the template group that contains the required template to create a rule from it. In this example, the rule is created based on atemplate in the template group that is packed with WSO2 SP by default. Therefore, click to open thisSweet Factory Sweet Factorytemplate group.
In the template group, expand the list as shown below, and click on the required template. For this example, click Rule Template Identif

7.
8. 9.
10.
11.
1.
2.
3.
4.
.y Continuous Production Decrease
If you want to change the rule template from which you want to create the rule, select the required value for the field.Rule TemplateEnter a name for the business rule in the field.Business Rule NameEnter values for the rest of the fields following the instructions in the UI.
If you want to save the rule and deploy it later, click . If you want to deploy the rule immediately, click .Save Save and Deploy
Creating a business rule from scratch
Creating a rule from scratch allows you to define the filter logic for the rule at the time of creating instead of using the filter logic already defined ina template. However, you can select the required source and sink configurations from an existing template.
To create a business rule from scratch, follow the procedure below:
Start the Dashboard Portal of WSO2 SP with one of the following commands:On Windows: dashboard.bat --runOn Linux/Mac OS: sh dashboard.sh
Start the Worker runtime of WSO2 SP with one of the following commands:On Windows: worker.bat --runOn Linux/Mac OS: ./worker.sh
Access the Business Rule Manager via one of the following URLs.
Protocol URL Format Example
HTTP http://<SP_HOST>:<HTTP_PORT>/business-rules http://0.0.0.0:9090/business-rules
HTTPS https://<SP_HOST>:<HTTPS_PORT>/business-rules https://0.0.0.0:9443/business-rules
This opens the following:
Click to open the following page, and then click . Create From Scratch
The fields displayed for the rule differ based on the template selected.

4.
5.
6.
This opens the page where the available template groups are displayed as shown in the example below.Select a Template Group
Click on the template group from which you want to select the required sources and sinks for your business rule. For this example, click S to open that template group as shown below.tock Exchange

6.
7. Click to expand the section. Then select the rule template from which the source and input configurations for the businessInput Input rule must be selected.
This displays the list of available sources and the exposed attributes of the selected template as shown below.

7.
8.
9. a. b. c.
Click to expand the section, and click to add a new filter. A table is displayed as shown below.Filters Filters +
To define a filter, follow the steps below:In the field, select the attribute based on which you want to define the filter condition.AttributeIn the field, select an operator.Operator In the field, enter the value or the attribute based on which the operator is applied to the attribute you selectedValue/Attributein step .a
e.g., If you want to filter events where the price is less than 100, select values for the fields as follows:

9.
10.
Field Value
Attribute price
Operator <
Value/Attribute 100
Once you have defined two or more filters, enter the rule logic in the field using , and conditions. The examples ofRule Logic OR AND NOThow you can use these keywords are explained in the table below.
Keyword Example
OR 1 OR 2 returns events that match either filter 1 or 2.
AND 1 AND 2 returns events that match both filters 1 and 2.
NOT NOT 1 returns events that do not match filter 1.
Click to expand the section. Then select the rule template from which the sink and output connfigurations for the businessOutput Output rule must be selected.
This displays the section for mapping configurations as shown in the example below.

10.
11.
12.
1.
2.
Select the relevant attribute names for the column. When publishing the events to which the rule is applied via the selectedInputpredefined sink, each input event you select is published with the corresponding name in the column.Output
If you want to save the rule and deploy it later, click . If you want to deploy the rule immediately, click .Save Save and Deploy
Managing Business Rules
This section covers how to view, edit, deploy and delete business rules that are created from a template.
PrerequisitesViewing business rulesEditing business rulesDeploying business rulesDeleting business rules
Prerequisites
In order to manage business rules, the following prerequisites must be completed:
One or more business rules must be already created. For instructions to create a rule, see .Creating Business RulesThe Business Rules Manager should be started and accessed by following the procedure below.
Start the Dashboard Portal of WSO2 SP with one of the following commands:On Windows: dashboard.bat --runOn Linux/Mac OS: ./dashboard.sh
The output mappings displayed differ based on the output rule template you select.

2.
3.
Start a worker node with one of the following commands:On Windows: worker.bat --runOn Linux/Mac OS: ./worker.sh
Access the Business Rule Manager via one of the following URLs.
Protocol URL Format Example
HTTP http://<SP_HOST>:<HTTP_PORT>/portal http://0.0.0.0:9443/business-rules/
HTTPS https://<SP_HOST>:<HTTPS_PORT>/portal https://0.0.0.0:9443/business-rules/
Viewing business rules
Once you start and access the Business Rules Manager, the available business rules are displayed as shown in the example below.
To view a business rule, click the icon for viewing (marked in the above image) for the relevant row. This opens the rule as shown in the examplebelow.

Editing business rules
Once you start and access the Business Rules Manager, the available business rules are displayed as shown in the example below.
To edit a business rule, click the icon for editing (marked in the above image) for the relevant row. This opens the rule as shown in the examplebelow.

Modify values for the parameters displayed as required and click .Save
Deploying business rules
To deploy an existing undeployed business rule, follow the procedure below:
To deploy a business rule, click the icon for deploying (marked in the above image) for the relevant row. As a result, a message appears to inform

1.
2.
3.
you that the rule is successfully deployed.
Deleting business rules
To delete an existing business rule, follow the procedure below:
To delete a business rule, click the icon for deleting (marked in the above image) for the relevant row. A message appears to confirm whether youwant to proceed with the deletion. Click in the message. As a result, another message appears to inform you that the rule is successfullyDeletedeleted.
Creating a Business Rule Template
To create a business template using the Business Template editor, follow the procedure below:
Go to from the terminal and <SP_HOME> Access the Stream Processor Studio via the http://<HOST_NAME>:<EDITOR_PORT>/editor URL.
On Windows: editor.bat --runOn Linux/Mac OS: ./editor.sh
Access the Business Rules Template Editor via the http://<HOST_NAME>:<PORT>/template-editor URL.
The Template Editor opens as shown below. There are two views from which you can interact and create a template group. Design view allows you to visualize a template group and interact with it. allows you to interact with a template group by typing content.Code view(For more information about template group structure, see .)Business Rules Templates
If the icon marked in the image above is not displayed for a business rule, it means that the rule is already deployed.
The default URL is http://localhost:9390/template-editor
Do not template sensitive information such as passwords in a Siddhi application or expose them directly in a Siddhi application.For detailed instructions to protect sensitive data by obfuscating them, see .Protecting Sensitive Data via the Secure Vault

3.
1.
2.
The following sections explain the two methods of creating a template group. to create a template group.Create from Design ViewCreate from code view
Create from Design View
To create a business rules template group from the design view, follow the procedure below:
Enter a UUID (Universally Unique Identifier), name and a description for the template group as follows.
Field Name
UUID sweet-factory
Name Sweet Factory
Description Analyzes Sweet Factory scenarios
Expand the first rule template that exists by default, and enter the following details. (Note that, you need to configure the deploymentnodes as explained in )Prerequisites for Business Rules

2.
3.
Field Name Value
UUID identifying-continuous-production-decrease
Name Identify Continuous Production Decrease
Description Alert factory managers if the rate of production continuously decreases for a specified time period
Type Template
Instance Count One
To include a Siddhi application template, expand the first template that is displayed by default, and enter the following Siddhi application template.

3.
4.
@App:name('SweetFactory-TrendAnalysis')
@source(type='http', @map(type='json'))define stream SweetProductionStream (name string, amount double,factoryId int);
@sink(type='log', @map(type='text', @payload("""Hi ${username},Production at Factory {{factoryId}} has gonefrom {{initalamout}} to {{finalAmount}} in ${timeInterval}seconds!""")))define stream ContinousProdReductionStream (factoryId int, initaltimelong, finalTime long, initalamout double, finalAmount double);
from SweetProductionStream#window.timeBatch(${timeInterval} sec)select factoryId, sum(amount) as amount, currentTimeMillis() as tsinsert into ProdRateStream;
partition with ( factoryId of ProdRateStream )begin from every e1=ProdRateStream, e2=ProdRateStream[ts - e1.ts <= ${timeRange} and e1.amount > amount]*, e3=ProdRateStream[ts - e1.ts >= ${timeRange} and e1.amount > amount] select e1.factoryId, e1.ts as initaltime, e3.ts as finalTime,e1.amount as initalamout, e3.amount as finalAmount insert into ContinousProdReductionStream;end;
To add variable attributes to the script, click . Add Variables
A script is a javascript that can be applied when the inputs provided by the business user who uses the template need to beprocessed before replacing the values for the template variables. e.g., If the average value is not provided, a function within thescript can derive it by calculating it from the minimum value and the maximum value provided by the business user.

4.
5. To specify the attributes that need to be considered as variables, select the relevant check boxes under . InSelect templated elementsthis example, you can select the and check boxes to to select the attributes with those names as the variablesusername timeRange
Then click to update the script with the selected variuables with auto-generated function bodies as shown below.Add Script

5.
6. Edit the script to add the required functions. In this example, let's rename to , and myFunction1(input) getUsername(email) myFu) to .nction2(input validateTimeRange(number)

6.

6.
7.
var username = getUsername('${userInputForusername}');var timeRange = validateTimeRange('${userInputFortimeRange}');/*** Extracts the username from given email* @returns Extracted username* @param email Provided email*/function getUsername(email) { if (email.match(/\S+@\S+/g)) { if (email.match(/\S+@\S+/g)[0] === email) { return email.split('@')[0]; } throw 'Invalid email address provided'; } throw 'Invalid email address provided';}
/*** Validates the given value for time range* @returns Processed input* @param input User given value*/function validateTimeRange(number) { if (!isNaN(number) && (number > 0)) { return number; } else { throw 'A positive number expected for time range'; }}
To generate properties, click against . Generate Properties
This expands the section as follows.Properties

7.
8.
9.
Enter values for the available properties as follows. For this example, let's enter values as shown in the following table.
Property Field Name Field Description Default Value
timeInterval Time interval (inseconds)
Production amounts are considered per timeinterval
6
userInputForusername Manager Email ID Email address to show in greeting [email protected]
userInputFortimeRange Time Range (inmilliseconds)
Time period in which, product amounts areanalyzed for decrease
5
To save the template, click the save icon at the top of the page.
Create from code view
When you use the code view, the same parameters for which you enter values in the design view are represented as JSON keys. For eachparameter, you can specify a value against the relevant JSON key as shown in the extract below.
A property is defined for each templated attribute (defined in the } format) so that it is self descriptive${templatedElementfor the business user who uses the template. The values configured for each property is as follows:
Field Name: The name with which the templated attribute is displayed to the business user.Field Description: A description of the property for the business user to understand its purpose.Default Value: The value assigned to the property by default. The business user can change this value if required.Options: this is an optional configuration that allows you to define a set of values for a property so that the businessuser can select the required value from a list. This is useful when the the possible value for the property is a limited setoptions.

When you update the code view with a valid template group definition, the design view is updated simultaneously as shown below.
However, if the content you enter in the code view is an invalid template group, the design view is not updated, and an error is displayed asfollows.

When an error is detected in the entered template group structure, the button is displayed with the error message.Recover
When you click , the code view is receted to the latest detected valid template group definition. At any given time, the design viewRecoverdisplays information based on the latest detected valid template group definition.
Business Rules Templates
Rule Templates are used as specifications to gain inputs from users through dynamically generated fields, for creating business rules. A templategroup is a business domain level grouping. The definition of a template looks as follows.
{ "templateGroup" : { "name" : "<Name of the template group>", "uuid":"<UUID for the template group>", "description" : "<(Optional) description for the template group>", "ruleTemplates" : [ { "name" : "<Name of the rule template>" , "uuid" : "<UUID for the rule template>", "type" : "template", "instanceCount" : "one <or> many", "description" : "<(Optional) description for the rule template>", "script" : "<(Optional) Javascript with reference to theproperties>", "templates" : [ { "type" : "siddhiApp", "content" : "<SiddhiApp_1 with ${templatedProperty_x}>" }, { "type" : "siddhiApp", "content" : "<SiddhiApp_n with ${templatedProperty_y}>" } ], "properties" : { "templatedProperty_x" : {"fieldName" : "<Field name for theproperty>", "description" : "<Description for the property>","defaultValue" : "<Default value for the property>"}, "templatedProperty_y" : {"fieldName" : "<Field name for theproperty>", "description" : "<Description for the property>","defaultValue" : "<Default value for the property>", "options" :["<option_1>", "<option_n>"]} } },
It is not recommended to add Siddhi application templates and scripts using the code view because they need to be provided as asingle line, and the possible escape characters should be handled carefully.

{ "name" : "<Name of the rule template>", "uuid" : "<UUID for the rule template>", "type" : "input", "instanceCount" : "one <or> many", "description" : "<(Optional) description for the rule template>", "script" : "<(Optional) Javascript with reference to theproperties>", "templates" : [ { "type" : "siddhiApp", "content" : "<SiddhiApp with ${templatedProperty_x}>", "exposedStreamDefinition" :"<Exposed stream definition>" } ], "properties" : { "templatedProperty_x" : {"fieldName" : "<Field name for theproperty>", "description" : "<Description for the property>","defaultValue" : "<Default value for the property>", "options" :["<option_1>", "<option_n>"]} } }, { "name" : "<Name of the rule template>", "uuid" : "<UUID for the rule template>", "type" : "output", "instanceCount" : "one <or> many", "description" : "<(Optional) description for the rule template>", "script" : "<(Optional) Javascript with reference to theproperties>", "templates" : [ { "type" : "siddhiApp", "content" : "<SiddhiApp with ${templatedProperty_x}>", "exposedStreamDefinition" :"<Exposed stream definition>" } ], "properties" : { "templatedProperty_x" : {"fieldName" : "<Field name for theproperty>", "description" : "<Description for the property>","defaultValue" : "<Default value for the property>", "options" :["<option_1>", "<option_n>"]} } }

] }}
The following parameters are configured:
Template Group basic data
The following parameters are configured under .templateGroup
Parameter Description Required/Optional
name A name for the template group Required
uuid A uniquely identifiable ID for the template group Required
description A description for the template. Optional
Rule Template details
Multiple rule templates can be defined under a . For each , the following set of parameters need to betemplateGroup ruleTemplateconfigured:
Parameter Description Required/Optional
name A name for the rule template Required
uuid A uniquely identifiable ID for the rule template Required
type The type of the rule template. Possible values are as follows:template: Used only to create an entire business rule from templateinput : Used only in creating a business rule from scratchoutput : Used only in creating a business rule from scratch
Required
instanceCount This specifies whether the business rule template can be used to create one business rule instanceor many business rule instances.
The applies per node, e.g., when the is set to , you can onlyinstanceCount instanceCount onedeploy one business rule instance per node.
Possible values are as follows:
onemany
Required

1.
2.
script The Java script to be executed on the templated fields.Developers can use this script for:
validating purposes.deriving values for a templated parameter by combining some other entered parameters
Each templated element that is going to be derived from entered parameters, has to be mentionedas a variable in the global scope of the javascript.
The entered parameters should be templated in the script itself, and will be later replaced with theirrespective entered values.
Consider the following script
/* * Validates a number and returns after adding 10to it* @throws Error when a non number is entered*/function deriveValue(value){ if( !isNan(value) ) { return value + 10; } throw "A number is required";}
var derivedValue = deriveValue(${enteredValue});
enteredValue should be defined as a property under in order to be filled by the userpropertiesand replaced later.
The derived value stored in will be then used to replace } in the derivedValue ${derivedValueSiddhiApp template.
Optional
description A brief description of the rule template. Optional
templates These are the artifacts (i.e SiddhiApps) with templated parameters, that will be instantiated withreplaced values when a business rule is created.
Required
properties You can add a field name, description, default value and possible values (optional)for the templated parameters.
Required
In the section of the file, add a configuration for the template youBusinessRules <SP_HOME>/conf/dashboard/deployment.yamlcreated as shown below.
wso2.business.rules.manager:
datasource: <datasourceName> - nodeURL1: - ruleTemplateUUID1 - ruleTemplateUUID2 nodeURL2: - ruleTemplateUUID1 - ruleTemplateUUID2

2. Save the template group as a file in the directory..json <SP_HOME>/wso2/dashboard/resources/businessRules/templates
Configuring Business Rules Manager Permissions
There are two permission levels for a business rules application:
Manager: User roles with this permission level have administrative privileges over business rules. They are allowed to create, view, edit,deploy or delete business rules.Viewer: User roles with this permission level are only allowed to view business rules.
The following topics cover how to configure Business Rules Manager permissions.
PrerequisitesConfiguring permissions
PrerequisitesBefore configuring Business Rules Manager permissions, the user roles to be assigned permissions must be already defined in the user storewith the required user IDs. For detailed instructions, see .User Management
Configuring permissions
Roles related to the Business Rules Manager need to be added under the component namespace in the wso2.business.rules.manager <S file.P_HOME>/conf/ dashboard/deployment.yaml
The following is a sample configuration of user roles for the Business Rules Manager.
wso2.business.rules.manager: roles: manager: - name: role1 id: 1 viewer: - name: role2 id: 2
Monitoring Stream Processor
The Status Dashboard of WSO2 SP allows you to monitor the metrics of a stand-alone WSO2 SP instance or a WSO2 SP cluster. This involvesmonitoring whether all processes of the WSO2 SP setup are working in a healthy manner, monitoring the current status of a SP node, andviewing metrics relating to the history of a node or the cluster. Both JVM level metrics or Siddhi application level metrics can be viewed from themonitoring dashboard.
The following sections cover how to configure the Status Dashboard and analyze statistics relating to your WSO2 SP deployment in it.
Configuring the Status DashboardViewing Statistics
Configuring the Status Dashboard
The following sections cover the configurations that need to be done in order to view statistics relating to the performance of your WSO2 SPdeployment in the status dashboard.
Assigning unique carbon IDs to nodesSetting up the databaseConfiguring metricsConfiguring cluster credentialsConfiguring permissions
Assigning unique carbon IDs to nodes
Carbon metrics uses the carbon ID as the source ID for metrics. Therefore, all the worker nodes are required to have a definedunique carbon ID

1. 2. 3.
4.
5. 6.
in the section of the file as shown in the extract below.wso2.carbon: <SP_HOME>/conf/worker/deployment.yaml
wso2.carbon: # value to uniquely identify a server id: wso2-sp # server name name: WSO2 Stream Processor # ports used by this server
Setting up the database
To monitor statistics in the Status Dashboard, you need a shared metrics database that stores the metrics of all the nodes.
Set up a database of the required type by following the steps below. In this section, a MySQL database is created as an example.
Download and install the required database type. For this example, let's download and install .MySQL ServerDownload the required database driver. For this example, download the .MySQL JDBC driverUnzip the database driver you downloaded, copy its JAR file ( in this example), and placemysql-connector-java-x.x.xx-bin.jar it in the directory.<SP_HOME>/libEnter the following command in a terminal/command window, where is the username you want to use to access theusernamedatabases.mysql -u username -p When prompted, specify the password you are using to access the databases with the username you specified.Create two databases named (to store metrics data) and (to store statistics). ToWSO2_METRICS_DB WSO2_STATUS_DASHBOARD_DBcreate MySQL tables for this example, run the following commands.
mysql> create database WSO2_METRICS_DB;mysql> use WSO2_METRICS_DB;mysql> source <SP_HOME>/wso2/editor/dbscripts/metrics/mysql.sql;mysql> grant all on WSO2_METRICS_DB.* TO username@localhost identifiedby "password";
mysql> create database WSO2_STATUS_DASHBOARD_DB;mysql> use WSO2_STATUS_DASHBOARD_DB;mysql> source <SP_HOME>/wso2/editor/dbscripts/metrics/mysql.sql;mysql> grant all on WSO2_STATUS_DASHBOARD_DB.* TO username@localhostidentified by "password";
Create two datasources named WSO2_METRICS_DB and WSO2_STATUS_DASHBOARD_DB by adding the following datasourceconfigurations under the wso2.datasources: section of the and <SP_HOME>/conf/worker/deployment.yaml <SP_HOME>/conf/da
files.shboard/deployment.yaml
You need to ensure that the carbon ID of each node is unique because it is required for the Status dashboard to identify the workernodes and display their statistics accordingly.
The Status Dashboard is only supported with H2, MySQL, MSSQL and Oracle database types. It is configured with the H2 databasetype by default. If you want to continue to use H2, skip this step.
The names of the datasources must be the same as the names of the database you created for metrics and statistics.You need to change the values for the and parameters to the username and password that you areusername passwordusing to access the MySQL database.For detailed information about datasources, see .carbon-datasources

WSO2_METRICS_DB
- name: WSO2_METRICS_DB description: The datasource used for dashboard feature jndiConfig: name: jdbc/WSO2MetricsDB definition: type: RDBMS configuration: jdbcUrl:'jdbc:mysql://localhost/WSO2_METRICS_DB?useSSL=false' username: root password: root driverClassName: com.mysql.jdbc.Driver maxPoolSize: 50 idleTimeout: 60000 connectionTestQuery: SELECT 1 validationTimeout: 30000 isAutoCommit: false
WSO2_STATUS_DASHBOARD_DB
- name: WSO2_STATUS_DASHBOARD_DB description: The datasource used for dashboard feature jndiConfig: name: jdbc/wso2_status_dashboard useJndiReference: true definition: type: RDBMS configuration: jdbcUrl:'jdbc:mysql://localhost/WSO2_STATUS_DASHBOARD_DB?useSSL=false' username: root password: root driverClassName: com.mysql.jdbc.Driver maxPoolSize: 50 idleTimeout: 60000 connectionTestQuery: SELECT 1 validationTimeout: 30000 isAutoCommit: false
The following are sample configurations for database tables when you use other database types supported.Click here to view the sample datasource configurations
DatabaseType
Metrics Datasource

MSSQLname: WSO2_METRICS_DB description: The datasource used for dashboard feature jndiConfig: name: jdbc/WSO2MetricsDB definition: type: RDBMS configuration: jdbcUrl: 'jdbc:sqlserver://localhost;databaseName=wso2_metrics' username: root password: root driverClassName: com.microsoft.sqlserver.jdbc.SQLServerDriver maxPoolSize: 50 idleTimeout: 60000 connectionTestQuery: SELECT 1 validationTimeout: 30000 isAutoCommit: false

1.
2.
3.
Oraclename: WSO2_METRICS_DB description: The datasource used for dashboard feature jndiConfig: name: jdbc/WSO2MetricsDB definition: type: RDBMS configuration: jdbcUrl: 'jdbc:oracle:thin:@localhost:1521/xe' username: root password: root driverClassName: oracle.jdbc.driver.OracleDriver maxPoolSize: 50 idleTimeout: 60000 connectionTestQuery: SELECT 1 validationTimeout: 30000 isAutoCommit: false
Configuring metrics
This section explains how to configure metrics for your status dashboard.
Configuring worker metrics
To enable metrics and to configure metric-related properties, do the following configurations in the < SP_HOME>/conf/worker/deployment.y aml file for the required nodes.
To enable Carbon metrics, set the property to under as shown below.enabled true wso2.metrics
wso2.metrics: enabled: true
To enable JDBC reporting, set the to true in the => subsection asEnable JDBC parameter wso2.metrics.jdbc: reporting:shown below. If JDBC reporting is not enabled, only real-time metrics are displayed in the first page of the Status dashboard, andinformation relating to metrics history is not displayed in the other pages of the dashboard. To render the first entry of the graph, youneed to wait for the time duration specified as the .pollingPeriod
# Enable JDBC Reporter name: JDBC enabled: false pollingPeriod: 60

3.
4.
Under wso2.metrics.jdbc , configure the following properties to clean up the database entries.
wso2.metrics.jdbc: # Data Source Configurations for JDBC Reporters dataSource: # Default Data Source Configuration - &JDBC01 # JNDI name of the data source to be used by the JDBC Reporter. # This data source should be defined in a *-datasources.xml filein conf/datasources directory. dataSourceName: java:comp/env/jdbc/WSO2MetricsDB # Schedule regular deletion of metrics data older than a setnumber of days. # It is recommended that you enable this job to ensure yourmetrics tables do not get extremely large. # Deleting data older than seven days should be sufficient. scheduledCleanup: # Enable scheduled cleanup to delete Metrics data in thedatabase. enabled: false
# The scheduled job will cleanup all data older than thespecified days daysToKeep: 7
# This is the period for each cleanup operation in seconds. scheduledCleanupPeriod: 86400
Parameter Default Value Description
dataSource &JDBC01
dataSource >dataSourceName
java:comp/env/jdbc/WSO2MetricsDB The name of the datasource used to store metricdata.
dataSource >scheduledCleanup >enabled
false If this is set to , metrics data stored in thetruedatabase is cleared at a specific time interval asscheduled.
dataSource >scheduledCleanup >daysToKeep
3 If scheduled clean-up of metric data is enabled, allmetric data in the database that are older than thenumber of days specified in this parameter aredeleted.
dataSource >scheduledCleanup >scheduledCleanupPeriod
86400 This parameter specifies the time interval inseconds at which all metric data stored in thedatabase must be cleared.
JVM metrics of which the log level is set to are not measured by default. If you need to monitor one or more of them, add theOFFrelevant metric name(s) under the => subsection as shown in the extract below. As shown below, you alsowso2.metrics: levels
need to mention log4j mode in which the metrics need to be monitored (i.e., , , , , or ).OFF INFO DEBUG TRACE ALL

4.
wso2.metrics: # Enable Metrics enabled: true jmx: # Register MBean when initializing Metrics registerMBean: true # MBean Name name: org.wso2.carbon:type=Metrics # Metrics Levels are organized from most specific to least: # OFF (most specific, no metrics) # INFO # DEBUG # TRACE (least specific, a lot of data) # ALL (least specific, all data) levels: # The root level configured for Metrics rootLevel: INFO # Metric Levels levels: jvm.buffers: 'OFF' jvm.class-loading: INFO jvm.gc: DEBUG jvm.memory: INFO
Click here to view the default metric levels supported...
Class loading
Property DefaultLevel
Description
jvm.class-loading.loaded.current INFO The gauge showing the number of classes currently loadedfor the JVM.
jvm.class-loading.loaded.current
jvm.class-loading.unloaded.total
Garbage collector
Property DefaultLevel
Description
jvm.gc.PS-MarkSweep.count DEBUG The gauge for showing the garbage collection and memory usage.Monitoring this allows you to identify memory leaks and memory trash thathave a negative impact on performance.jvm.gc.PS-MarkSweep.time
jvm.gc.PS-MarkSweep.time
jvm.gc.PS-Scavenge.time
Memory
Property DefaultLevel
Description
metric.level.jvm.gc INFO The gauge for showing the used and committed memory in WSO2SP.

4.
jvm.memory.heap.committed INFO The gauge for showing the used and committed heap in WSO2SP.
jvm.memory.heap.init
jvm.memory.heap.max
jvm.memory.heap.usage
jvm.memory.non-heap.committed INFO The gauge for showing the used code cache and used CMS PermGen in WSO2 SP.
jvm.memory.non-heap.init
jvm.memory.non-heap.max
jvm.memory.non-heap.usage
jvm.memory.non-heap.used
jvm.memory.total.committed INFO The gauge for showing the total memory currently available for theJVM.
jvm.memory.total.init
jvm.memory.total.max
jvm.memory.total.used
jvm.memory.pools OFF
jvm.memory.pools OFF
Operating system load
Property DefaultLevel
Description
jvm.os INFO The gauge for showing the current load imposed by the JVM on theoperating system.
jvm.os.cpu.load.process INFO
jvm.os.cpu.load.process
jvm.os.system.load.average
Threads
Property DefaultLevel
Description
jvm.threads.count Debug The gauge for showing the number of active and idle threadscurrently available in the JVM thread pool.
jvm.threads.daemon.count Debug The gauge for showing the number of active daemon threadscurrently available in the JVM thread pool.
jvm.threads.blocked.count OFF The gauge for showing the number of threads that are currentlyblocked in the JVM thread pool.
jvm.threads.deadlock.count OFF The gauge for showing the number of threads that are currentlydeadlocked in the JVM thread pool.
jvm.threads.new.count OFF The gauge for showing the number of new threads generated inthe JVM thread pool.
jvm.threads.runnable.count OFF The gauge for showing the number of runnable threads currentlyavailable in the JVM thread pool.
jvm.threads.terminated.count OFF The gauge for showing the number of threads terminated from theJVM thread pool since user started running the WSO2 APIManager instance.

4.
jvm.threads.timed_waiting.count OFF The gauge for showing the number of threads in theTimed_Waiting state.
jvm.threads.waiting.count OFF The gauge for showing the number of threads in the Waiting statein the JVM thread pool. One or more other threads are required toperform certain actions before these threads can proceed withtheir actions.
File descriptor details
Property DefaultLevel
Description
file.descriptor.max.count INFO The gauge for showing the number of open file descriptors and maxfile descriptors.
file.descriptor.open.count
Swap space
Property Default Level Description
swap.space.free.size INFO The gauge for showing the amount of free and total swap space in bytes.
swap.space.total.size
Configuring Siddhi application metrics
To enable Siddhi application level metrics for a Siddhi application, you need to add the annotation bellow the Siddhi@app:statisticsapplication name in the Siddhi file as shown in the example below.
@App:name('TestMetrics')@app:statistics(reporter = 'jdbc')define stream TestStream (message string);
The following are the metrics measured for a Siddhi application.
Metric Components to which the metric is applied
Latency Windows (per window.find and window.add)Mappers (per sink mapper, source mapper)Queries (per query)Tables (per table insert, find, update, updateOrInsert, delete, contains)
Throughput Windows (per window.find and window.add)Mappers (per sink mapper, source mapper)Queries (per query)Tables (per table insert, find, update, updateOrInsert, delete, contains )
Memory Queries (per query)
Buffered Events Count
Number of events at disruptor Streams (per stream)
Number of events produced/received after restart Sources (per source)Sinks (per sink)
Configuring cluster credentials
In order to access the nodes in a cluster and derive statistics, you need to maintain and share a user name and a password for each node in a SPcluster. This user name and password must be specified in the file. If you want to secure<SP_HOME>/conf/dashboard/deployment.yaml
The default level after enabling metrics is for all the meytrics listed in the following table.INFO

1.
2.
1.
2.
sensitive information such as the user name and the password, you can encrypt them via WSO2 Secure Vault.
To specify the user name and the password to access a node, define them under the section as shown inwso2.status.dashboardthe following example.
wso2.status.dashboard: workerAccessCredentials: username: 'admin' password: 'admin'
To encrypt the user name and the password you defined, define aliases for them as described in Protecting Sensitive Data via the.Secure Vault
Configuring permissions
The following are the three levels of permissions that can be granted for the users of WSO2 Stream Processor Status Dashboard.
Permission Level Granted permissions
SysAdmin Enabling/disabling metricsAdding workersDeleting workersViewing workers
Developers Adding workersDeleting workersViewing workers
Viewers Viewing workers
The in the userstore is assigned the permission level by default.admin user SysAdmin
To assign different permission levels to different roles, you can list the required roles under the relevant permission level in the wso2.status.da section of the file as shown in the extract below.shboard SP_HOME>/conf/dashboard/deployment.yaml
wso2.status.dashboard: sysAdminRoles: - role_1 developerRoles: - role_2 viewerRoles: - role_3
Viewing Statistics
To view the status dashboard, follow the procedure below:
Start the dashboard for your worker node by issuing one of the following commands: For Windows: dashboard.bat
For Linux : ./dashboard.shAccess the Status Dashboard via the following URL format.
https://localhost:<SP_DASHBOARD_PORT>/monitoring
This functionality is currently supported only for single tenant environments.
The display name of the roles given in the configuration must be present in the user store. To configure user store check, User.Management

2.
1.
e.g., https://0.0.0.0:9643/monitoring
After login this opens the Status Dashboard with the nodes that you have already added as shown in the example below.
f no nodes are displayed, add the nodes for which you wnt to view statistics by following the steps in I Worker Overview - Adding a worker.to the dashboard
For a detailed descripion of each page in this dashboard, see the following topics:
Node OverviewApp OverviewViewing Node-specific PagesViewing Worker HistoryViewing Statistics for Siddhi ApplicationsViewing Statistics for Parent Siddhi Applications
Node Overview
Once you login to the status dashboard, the nodes that are already added to the Status Dashboard are displayed as shown in the followingexample:
Adding a node to the dashboard
If no nodes are displayed, you can add the nodes for which you want to view the status by following the procedure below:
Click .ADD NEW NODE
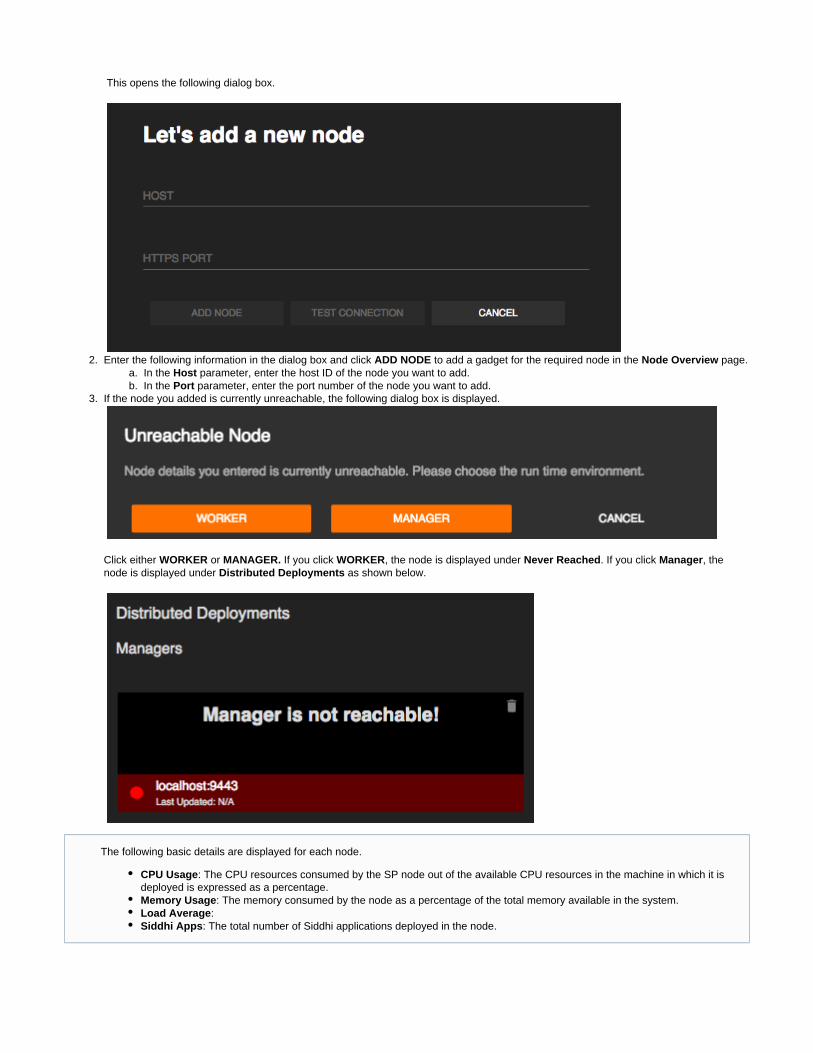
1.
2. a. b.
3.
This opens the following dialog box.
Enter the following information in the dialog box and click to add a gadget for the required node in the page.ADD NODE Node OverviewIn the parameter, enter the host ID of the node you want to add.HostIn the parameter, enter the port number of the node you want to add.Port
If the node you added is currently unreachable, the following dialog box is displayed.
Click either or If you click , the node is displayed under . If you click , theWORKER MANAGER. WORKER Never Reached Managernode is displayed under as shown below.Distributed Deployments
The following basic details are displayed for each node.
CPU Usage: The CPU resources consumed by the SP node out of the available CPU resources in the machine in which it isdeployed is expressed as a percentage.Memory Usage: The memory consumed by the node as a percentage of the total memory available in the system.Load Average:Siddhi Apps: The total number of Siddhi applications deployed in the node.

Viewing status details
The following is a list of sections displayed in the page to provide information relating to the status of the nodes.Node Overview
Distributed Deployments
View(Example)
Description The nodes that are connected in the distributed deployment are displayed under the relevant group ID in the statusdashboard (e.g., in the above example). Both managers and workers are displayed under separate labels.sp
Managers: The active manager node in the cluster is indicated by a green dot that is displayed with the host name and theport of the node. Similarly, a grey dot is displayed for passive manager nodes in the cluster.
Workers: When you add an active manager node, it automatically retrieves the worker node details that are connected withthat particular deployment. If the worker node is already registered in the Status Dashboard, you can view the metrics ofthat node as follows:
Purpose To determine whether the request load is efficiently allocated between the nodes of a cluster.To determine whether the cluster has sufficient resources to handle the load of requests.To identify the nodes connected with the particular deployment.
RecommendedAction
If there is a disparity in the CPU usage and the memory consumption of the nodes, redeploy the Siddhi applicationsbetween the nodes to balance out the workload.If the CPU and memory are fully used and and the request load is increasing, allocate more resources (e.g., morememory, more nodes, etc.).
Clustered nodes
View(Example)
Description The nodes that are clustered together in a high-availability deployment are displayed under the relevant cluster ID in theStatus Dashboard (e.g., under in the above example). The active node in the cluster (i.e., the active worker in aWSO2_A_1minimum HA cluster or the active manager in a fully distributed cluster) are indicated by a green dot that is displayed withthe hostname and the port of the node. Similarly, a grey dot is displayed for passive nodes in the cluster.
Purpose This allows you to determine the following:
Whether the request load is efficiently allocated between the nodes of a cluster.Whether the cluster has sufficient resources to handle the load of requests.
RecommendedAction
If there is a disparity in the CPU usage and the memory consumption of the nodes, redeploy the Siddhi applicationsbetween the nodes to balance out the workload.If the CPU and memory are fully used and and the request load is increasing, allocate more resources (e.g., morememory, more nodes, etc.).

Single nodes
View(Example)
Description This section displays statistics for SP servers that operate as single node setups.
Purpose This allows you to compare the performance of single nodes agaisnt each other.
RecommendedAction
If the CPU usage of a node is too high, investigate the causes for it and take corrective action (e.g., undeployunnecessary Siddhi applications).If any underutilized single nodes are identified, you can either deploy more Siddhi applications thatare currrentlydeployed in other nodes with a high request load. Alternatively, you can redeploy the Siddhi applications of theunderutilized node to other nodes, and then shut it down.
Nodes that cannot be reached
View (Example)
Description When a node is newly added to the Status dashboard and it is unavailable, it is displayed as shown in the aboveexamples.
Purpose This allows you to identify nodes that cannot be reached at specific hosts and ports.
RecommendedAction
Check whether the host and port of the node you added is correct.Check whether any authentication errors have occured for the node.
Nodes that are currently unavailable
View(Example)
Description When a node that could be viewed previously is no longer available, its status is displayed in red as shown in the exampleabove. The status displayed for such nodes is applicable for the last time at which the node had been reachable.
Purpose This allows you to identify previously available nodes that have become unreachable.
RecommendedAction
Check whether the node is inactive.Check whether any authentication errors have occured for the node.
Nodes for which metrics is disabled

View(Example)
Description When a node for which metrics is disabled is added to the Status dashboard, you can view the number of active andinactive Siddhi applications deployed in it. However, you cannot view the CPU usage, memory usage and the load average.
Purpose This allows you to identify nodes for which metrics is not enabled.
RecommendedAction
Enable metrics for the required nodes to view statistics about their status in the Status Dashboard. For instructions toenable metrics, see .Monitoring the Stream Processor - Configuring the Status Dashboard
Nodes with JMX reporting disabled
View(Example)
Description When a node with JMX reporting disabled is added to the Status dashboard, you can view the number of active and inactiveSiddhi applications deployed in it. However, you cannot view the CPU usage, memory usage and the load average.
Purpose This allows you to identify nodes for which JMX reporting is disabled
RecommendedAction
Enable JMX reporting for the required nodes to view statistics about their status in the Status Dashboard. For instructions toenable JMX reporting, see Monitoring the Stream Processor - Configuring the Status Dashboard .
Statistics trends
View(Example)
Description This dispalys the change that has taken taken place in the CPU usage, memory usage and the load average of nodes sincethe status was last viewed in the status dashboard. Positive changes are indicated in green (e.g., a decrease in the CPUusage in the above example), and egative changes are indicated in red (an increase in the memory usage and the loadaverage in the above example).
Purpose This allows you to view a summary of the performance trends of your SP clusters and single nodes.
RecommendedAction
Based on the performance trend observed, add more resources to your SP clusters/single nodes to handle more events, orshutdown one or more nodes if there is excess resources.
App Overview
When you open the WSO2 SP Status Dashboard, the Node Overview page is displayed by default. If you want to view all the Siddhi applicationsdeployed in your WSO2 SP setup, click on the tab (marked in the image below). The tab opens and all the SiddhiApp View App Overviewapplications that are currently deployed are displayed as shown in the image below.

The status is displayed in green for active Siddhi applications, and in red for inactive Siddhi applications.
If no Siddhi applications are deployed in your WSO2 SP setup, the following message is displayed.
The Siddhi applications are listed under the deployment mode in which they are deployed (i.e., , , and Single Node Deployment HA Deployment). Distributed Deployment
The following information is displayed for each Siddhi aplication.
: The name of the Siddhi application.Siddhi Application: This indicates whether the Siddhi application is currently active or inactive.Status
: The time duration that has elapsed since the Siddhi application was deployed in the SP setup.Deployed Time: The host and the port of the SP node in which the Siddhi application is displayed.Deployed Node
The purpose of this tab is to check the status of all the Siddhi applications that are currently deploed in the SP setup.
If you click on a Siddhi Application under or , information specific to that Siddhi application isSingle Node Deployment HA Deploymentdisplayed as explained in .Viewing Statistics for Siddhi Applications
If you click on the parent Siddhi application under , information specific to that parent Siddhi application is displayed asDistributed Deploymentexplained in .Viewing Statistics for Parent Siddhi Applications
If you click on a deployed node, information specific to that node is displayed as explained in .Viewing Node-specific Pages
Viewing Node-specific Pages
If your WSO2 SP setup is a distributed deployment, only the parent Siddhi applications are displayed in this tab.

When you open the WSO2 SP Status Dashboard, the Node Overview page is displayed by default. To view information specific to a selectedworker node, click on the relevant widget. This opens a separate page for the worker node as shown in the example below.
Status indicators
Thw following gadgets can be viewed for the selected worker.
Server General Details

View(Example)
Description This gadget displays general information relating to the selected worker node.
Purpose This allows you to understand the distribution of nodes in terms of the location, the time zone, operating system used etc.,and to locate them.
RecommendedAction
In a distributed set up, you can use this information to evaluate the clustered setup and make changes to optimize thebenefits of deploying WSO2 SP as a cluster (e.g., making them physically available in different locations to minimize the riskof all the nodes failing at the same time etc.).
CPU Usage
View (Example)

Description This displays the CPU usage of the selected node.
Purpose This allows you to observe the CPU usage of a selected node over time.
RecommendedAction
Identify sudden slumps in the CPU usage, and investigate the reasons (e.g., such as authentication errors that resultin requests not reaching the SP server).Identify continuous increases in the CPU usage and check whether the node is overloaded. If so, reallocate some ofthe Siddhi applications deployed in the node.
Memory Used
View(Example)
Description This displays the memory usage of the selected node.
Purpose This allows you to observe the memory usage of a selected node over time.
RecommendedAction
Identify sudden slumps in the memory usage, and investigate the reasons (e.g., a reduction in the requests recived dueto system failure).If there are continous increases in the memory usage, check whether there is an increase in the requests handled, andwhether you have enough memory resources to handle the increased demand. If not, add more memory to the node orreallocate some of the Siddhi applications deployed in the node to other nodes.
System Load Average
View(Example)
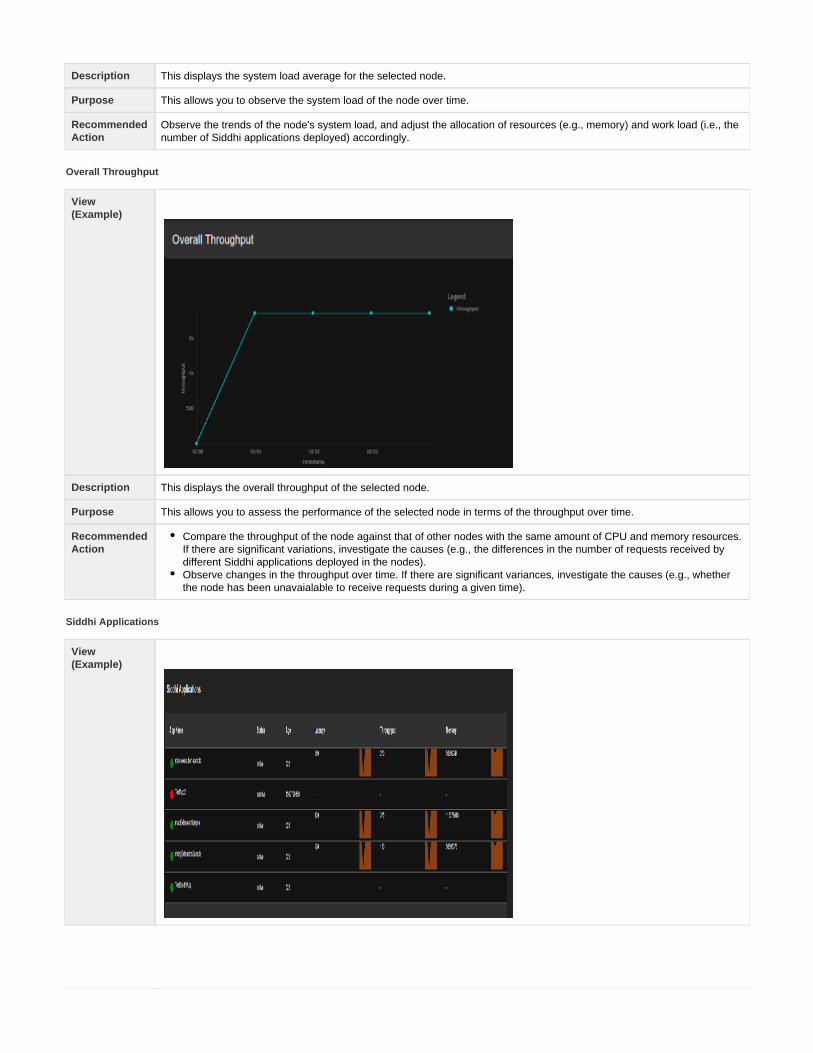
Description This displays the system load average for the selected node.
Purpose This allows you to observe the system load of the node over time.
RecommendedAction
Observe the trends of the node's system load, and adjust the allocation of resources (e.g., memory) and work load (i.e., thenumber of Siddhi applications deployed) accordingly.
Overall Throughput
View(Example)
Description This displays the overall throughput of the selected node.
Purpose This allows you to assess the performance of the selected node in terms of the throughput over time.
RecommendedAction
Compare the throughput of the node against that of other nodes with the same amount of CPU and memory resources.If there are significant variations, investigate the causes (e.g., the differences in the number of requests received bydifferent Siddhi applications deployed in the nodes).Observe changes in the throughput over time. If there are significant variances, investigate the causes (e.g., whetherthe node has been unavaialable to receive requests during a given time).
Siddhi Applications
View(Example)

1.
2. 3.
4.
5.
Description This table displays the complete list of Siddhi applications deployed in the selected node. The status is displayed in greenfor active Siddhi applications, and in red for inactive Siddhi applications. In addition, the following is displayed for eachSiddhi application:
Age: The age of the Siddhi application in milliseconds.Latency: The time (in milliseconds) taken by the Siddhi application to process one request.Throughput: The number of requests processed by the Siddhi application since it has been active.Memory: The amount of memory consumed by the Siddhi application during its current active session, expressed inmilliseconds.
Purpose This allows you to assess the performance of each Siddhi application deployed in the selected node.
RecommendedAction
Identify the inactive Siddhi applications that are required to be active and take the appropriate corrective action.Identify Siddhi applications that consume too much memory, and identify ways in which the memory usage can beoptimized (e.g., use incremental processing).
Viewing Worker History
This section explains how to view statistics relating to the performance of a selected node for a specific time interval.
Login to the Status Dashboard. For detailed instructions, see WhenMonitoring the Stream Processor - Viewing the Status Dashboard.you login, the page is displayed by default.Node OverviewClick on the required node to view information specific to that node. In the page displayed with node-specific information, click one of the following gadgets to open the page.Metrics
CPU UsageMemory UsedSystem Load AverageOverall Throughput
In the page, click the required time interval. Then the page displays statistics relating to the performance of the selected nodeMetricsapplicable to that time period.
If you want to view more details, click .More Details
As a result, the following additional information is displayed for the node for the selected time period.
CPU Usage
JVM OS as CPU

1. 2.
JVM Physical Memory
JVM Threads
JVM Swap Space
Viewing Statistics for Siddhi Applications
When you open the WSO2 SP Status Dashboard, the page is displayed by default.Node Overview
To view information specific to a selected worker node, click on the relevant gadget. This opens the .page specific to the workerTo view information specific to a Siddhi application deployed in the Siddhi node, click on the relevant Siddhi application in the SiddhiApplications table. This opens a page with information specific to the selected Siddhi application as shown in the example below.

2.
The following statistics can be viewed for an individual Siddhi Application.
Latency
View (Example)
Description This displays the latency of the selected Siddhi application. Latency is the time taken to complete processing a singleevent in the event flow.
Purpose This allows you to assess the performance of the selected Siddhi application.
RecommendedAction
If the latency of the Siddhi application is too high, check the Siddhi queries and rewrite them to optimise performance.
Overall Throughput

View(Example)
Description This shows the overall throughput of a selected Siddhi application over time.
Purpose This allows you to assess the performance of the selected Siddhi application.
RecommendedAction
If the throughput of a Siddhi application varies greatly overtime, investigate reasons for any slumps in the throughput(e.g., errors in the deployment of the application).If the throughput of the Siddhi application is lower than expected, investigate reasons, and take corrective action toimprove the throughput (e.g., check the Siddhi queries in the application and rewrite them with best practices toachieve greater efficiency in the processing of events.
Memory Used
View(Example)
Description This displays the memory usage (In MB) of a selected Siddhi application over time.
Purpose This allows you to monitor the memory consumption of individual Siddhi applications.
RecommendedAction
If there are major fluctuations in the memory consumption of a Siddhi application, investigate the reasons (e.g., Whether theSiddhi application has been inactive at any point of time).
Code View

View(Example)
Description This displays the queries defined in the Siddhi file of the application.
Purpose This allows you to check the queries of the Siddhi application if any further investigations are needed based on theobservations of its latency, throughput and the memory consumption.
RecommendedAction
Edit the Siddhi file if any changes that can improve the performance of the Siddhi application are identified.For detailed instructions to write a Siddhi application, see . |Creating a Siddhi ApplicationFor detailed information about the Siddhi logic, see the .Siddhi Query Guide
Design View
View (Example)
Description This displays the graphical view for queries defined in the Siddhi file of the application.
Purpose This allows you to check the flow of the queries of the Siddhi application in the graphical way.
Recommended Action Edit the Siddhi file if any changes that can improve the performance of the Siddhi application are identified.
Siddhi App Component Statistics

View(Example)
Description This table displays performance statistics related to different components within a selected Siddhi application (e.g., queries).The columns displayed are as follows:
Type: The type of the Siddhi application component to which the information displayed in the row applies. Thecomponent type can be queries, streams, tables, windows and aggregations. For more information, see Siddhi
.Application Overview - Common components of a Siddhi applicationName: The name of the Siddhi component within the application to which the information displayed in the row apply.Metric Type: The metric type for which the statistics are displayed. This can be either the latency (in milliseconds),throughput the number of events per second), or the amount of memory consumed (in bytes). The metric types basedon which the performance of a Siddhi component is measured depends on the component type.Attribute: The attribute to which the given value applies.Value: The value for the metric type given in the row.
Purpose This allows you to carry out a detailed analysis of the performance of a selected Siddhi application and identify componentsthat have a negative impact on the overall performance of the Siddhi application.
RecommendedAction
Identify the componets in a Siddhi application that have a negative impact on the performance, and rewrite them to improveperformance. To understand Siddhi concepts in order to rewrite the components, see the .Siddhi Query Guide
Viewing Statistics for Parent Siddhi Applications
When you open the WSO2 SP Status Dashboard, the page is displayed by default. To view information specific to an activeNode Overviewmanager, click on the required active manager node in the section. This opens a page with parent Siddhi applicationsDistributed Deploymentsdeployed in that manager node as shown in the example below.
This page provides a summary of information relating to each parent Siddhi application as described in the table below. If a parent Siddhiapplication is active, it is indicated with a green dot that appears before the name of the Siddhi application. Similarly, an orange dot is displayedfor inactive parent Siddhi applications.

Detail Description
Groups This indicates the number of execution groups of the parent Siddhi application. In the above example, the SiddhiTestingapplication has only one execution group.
ChildApps
This indicates the number of child applications of the parent Siddhi application. The number of active child applications is displayedin green, and the number of inactive child applications are displayed in red.
WorkerNodes
The number displayed in yellow indicates the total number of worker nodes in the resource cluster. In the above example, there aretwo worker nodes in the cluster.
The number displayed in green indicates the number of worker nodes in which the Siddhi application is deployed. In the aboveexample, the parent Siddhi application is deployed only in one worker node although there are two worker nodes in theTestingresource cluster.
If you click on a parent Siddhi application, detailed information is displayed as shown below.
The following are the widgets displayed.
Code View
View(Example)
Description This displays the queries defined in the Parent Siddhi file of the application.
This allows you to check the queries of the Siddhi application if any further investigations are needed based on the kafkadiagrams and performance.For detailed instructions to write a Siddhi application, see .Converting to a Distributed Streaming Application
For detailed information about the Siddhi logic, see the .Siddhi Query Guide
Purpose This allows you to check the queries of the Siddhi application if any further investigations are needed based on theobservations of the performance of the distributed cluster to which it belongs.

RecommendedAction
Edit the Siddhi file if any changes that can improve the performance of the Siddhi application are identified.For detailed instructions to write a Siddhi application, see Converting to a Distributed Streaming Application .For detailed information about the Siddhi logic, see the .Siddhi Query Guide
Distributed Siddhi App Deployment
View(Example)
Description This is a graphical representation of how Kafka topics are connected to the child Siddhi applications of the selected parent. Kafka topics are represented by boxes with red margins, and the child applications are represented by boxesSiddhi application
with blue margins.
Purpose This is displayed for you to understand how the flow of information takes place.
Child App Details
View(Example)
Description This table displays the complete list of child Siddhi applications of the selected parent Siddhi application. The status is displayedin green for active Siddhi applications, and in red for inactive Siddhi applications. In addition, the following is displayed for eachSiddhi application:
Group Name: The name of the execution group to which the child application belongs.Child App Status: This indicates whether the child application is currently active or not.Worker Node: The HTTPS host and The HTTPS port of the worker node in which the child siddhi application is deployed.
Purpose To identify the currently active child applications.
Deployment Guide
WSO2 SP is deployed by starting two or more nodes the same group ID in a cluster set up. The group ID and other configurations required for acluster set up are edited in the <SP_HOME>/conf/< >/deployment.yaml worker|manager|editor|dashboard files.
A node is considered inactive when it fails to return a heartbeat pulse twice at a specified time interval. When an inactive node is identified, it isremoved from the cluster. If that node becomes active again and rejoins the cluster, it is assigned a new ID. Therefore, at any given time, a clustermay have one or more active nodes. If all the nodes in a cluster are inactive, the cluster is considered inactive.
When a node with a specific group ID is started in a clustered setup, it registers itself as a member of the cluster identified by that group ID. If noother active node is available in that cluster, the node assigns itself as the leader of the cluster. If the leader of the cluster becomes inactive at anygiven time, an existing active node is assigned as the leader. The node assigned as the new leader is the one that acquires the database lockfirst. If a leader node that was inactive and removed from the cluster rejoins the cluster as an active member, it is not reassigned the role of theleader unless there are no other existing active nodes in that cluster (in which case, an existing node should be already functioning s the leader).
For detailed instructions to configure different types of WSO2 SP clusters, see the topics below.
Minimum High Availability (HA) DeploymentFully Distributed DeploymentMulti Datacenter High Availability Deployment
Minimum High Availability (HA) Deployment
When streaming events with WSO2 Stream Processor (SP), there is a possibility of the node running the SP instance failing due to severalunforeseeable reasons. This leads to a loss in the events being streamed until the node can be restarted. A solution for this is to use the WSO2SP in a High Availability (HA) environment where the processing of events is not halted at an unexpected failover scenario. The recommendedHA deployment for WSO2 SP is the two node minimum HA deployment, where two instances of WSO2 SP are running in parallel as depicted inthe diagram below.

1.
2.
In this minimum HA setup, one node is assigned as the active node while the other node is assigned as the passive node. Both nodes willprocess the incoming events but only the active node will be used to publish the outgoing events. In a failover scenario of the active node, thepassive node will activate and start publishing events from where the active node left off. Restarting of the terminated node will make it operate inthe passive state by syncing with the active node to maintain the HA status.
In order for the 2 node HA to work, both active and passive node must receive the same (duplicate) events. To achieve this you can follow one ofthe strategies listed below:
In each node, you deploy a Siddhi application with a distributed sink only to deliver duplicated events, and another Siddhi application toprocess and publish events.If WSO2 products are used, WSO2 data bridge can publish events to both nodesIf you use a message broker such as Kafka, both nodes can subscribe to the same topic to receive duplicate events.
Prerequisites
In order to configure a minimum HA cluster, the following prerequisites must be completed:
It is recommended to run this setup with two CPUs. Each CPU should have four cores, and 4GB memory.Two binary packs of WSO2 SP must be available.A working RDBMS instance to be used for clustering of the 2 nodes. The datasource to be shared by the nodes in the cluster must be already defined in the <SP_HOME>/conf/worker/deployment.yam
file.lDownload the MySQL connector from . Extract and find the Drop the jar to thehere mysql-connector-java-5.*.*-bin.jar. <SP
directory in both nodes. _HOME>/libIn order to retrieve the state of the Siddhi Applications deployed in the system in case of a scenario where both the nodes fail, statepersistence must be enabled for both nodes by specifying the same datasource/file location. For detailed instructions, see Configuring
.Database and File System State PersistenceA Siddhi client must be available to publish events to both the nodes in a synchronized manner where publishing of events is not stoppedwhen one receiver node goes down.
Configuring a minimum HA cluster
To configure a minimum HA cluster, follow the steps below:
For each node, enter a unique ID for the property under the section. (e.g., ). This is used to identifyid wso2.carbon id: wso2-speach node within a cluster.To allow the two nodes in the cluster to coordinate effectively, configure carbon coordination by updating the sectioncluster.configof the as follows:<SP_HOME>/conf/worker/deployment.yaml
Note that the following configurations need to be done in the file for both the WSO2<SP_HOME>/conf/worker/deployment.yamlSP nodes in the cluster.
For more information on how to set up cluster coordination refer Configuring Cluster Coordination

2.
a. b. c.
d. i. ii.
iii.
iv.
v.
3. a.
b. i.
ii.
To enable the cluster mode, set the property to enabled true.In order to cluster the two nodes together, enter the same ID as the group ID for both nodes (e.g., ).groupId: group-1Enter the ID of the class that defines the coordination strategy for the cluster as shown in the example below.e.g., coordinationStrategyClass:org.wso2.carbon.cluster.coordinator.rdbms.RDBMSCoordinationStrategyIn the section, enter information as follows:strategyConfig
For clustering of the two nodes to take placeEnter the name of the configured datasource shared by the nodes in the cluster as shown in the example below. Datahandled by the cluster are persisted here.
(A datasource with this name should be configured)datasource: WSO2_CLUSTER_DB
Following is a sample datasource configuration for a MySQL datasource that should appear under the sedataSourcesction of the section in the wso2.datasources <SP_HOME>/conf/worker/deployment.yaml . For detailedinstructions of how to configure a datasource, see .Configuring Datasources
Sample MySQL datasource
- name: WSO2_CLUSTER_DB description: The MySQL datasource used for ClusterCoordination jndiConfig: name: jdbc/WSO2ClusterDB definition: type: RDBMS configuration: jdbcUrl:'jdbc:mysql://localhost:3306/WSO2_CLUSTER_DB?useSSL=false' username: root password: root driverClassName: com.mysql.jdbc.Driver maxPoolSize: 50 idleTimeout: 60000 connectionTestQuery: SELECT 1 validationTimeout: 30000 isAutoCommit: false
Specify the time interval (in milliseconds) at which heartbeat pulse should occur for each node to indicate that it is in anactive state as shown in the example below.heartbeatInterval: 1000Specify the number of times the heartbeat pulse should be unavailable at the specified time interval in order to considera node inactive as shown in the example below. A value of two means that if a node fails to send two consecutive heartbeat pulses, it must be identified as inactive and removed from the cluster as a result.heartbeatMaxRetry: 2Specify the time interval (in milliseconds) at which each node should listen for changes that occur in the cluster asshown in the example below.eventPollingInterval: 1000
Next add the section to the file with following configurations:deployment.config <SP_HOME>/conf/worker/deployment.yamlTo enable 2 node minimum HA, set the property to as shown below.type hatype: haAdd a section named and enter the following information under it:liveSync
Set the parameter to to enable direct communication between the two nodes via REST API calls. Thisenabled trueensures that the communication between the nodes is instantanious. To specify the address to which the HTTP requests by the external client must be directed, enter the relevant host andport in the and parameters respectively as shown in the example below. advertisedHost advertisedPort
advertisedHost: localhostadvertisedPort: 9090
Listener ports are configured under the section of the listenerConfigurations wso2.transport.httpnamespace in the file. Note that in a Docker environment<SP_HOME>/conf/worker/deployment.yaml

3.
b.
ii.
iii.
c.
d.
e.
f.
g.
To enable direct communication between the nodes the user credientials of the other node should be given as follows: username: <username> # if this is node 1's configs enter node 2's username
password: <password> # if this is node 1's configs enter node 2's password
Specify the time interval (in milliseconds) at which the passive node must call the active node to update the last publishedevents as shown in the example below.
outputSyncInterval: 60000
This ensures that events are not lost if a failover takes place and the currently passive node needs to start publishing events. If li is enabled, these calls are made via REST API. If liveSync is disabled the database is used to communicate theveSync
information. When the time interval specified is shorter, the passive node is updated more frequently, and as a result, the numberof events queued as well as the number of duplicates published are reduced.Specify the time interval (in milliseconds) within which the passive node should synchronize its state with the active nodeas shown in the example given below.
stateSyncGracePeriod: 120000
Specify the maximum number of events that can be queued in the sinks of the passive node as shown in the example below.sinkQueueCapacity: 20000
When events are queued in the sinks of the passive node, it ensures that those events are published at least once.Specify the maximum number of events that can be queued in the sources of the passive node as shown in the example below.
sourceQueueCapacity: 20000The purpose of queueing events at sources is to ensure no events are dropped during state synchronization. Specify the time (in milliseconds) given to the passive node to retry a failed state synchronization for each Siddhi applicationbeing deployed as shown in the example below. retryAppSyncPeriod: 60000
deployment.config: type: ha liveSync: enabled: true advertisedHost: localhost advertisedPort: 9090 username: admin password: admin outputSyncInterval: 60000 stateSyncGracePeriod: 120000 sinkQueueCapacity: 20000 sourceQueueCapacity: 20000 retryAppSyncPeriod: 60000
Publishing events to the cluster
For your SP minimum HA deployment to function, both active and passive node must receive the same (duplicate) events. To achieve this youcan follow one of the strategies listed below:
the host and port that is mapped to these listener configurations should be given in the liveSync section.
The default set for a node is with password username admin admin
If is disabled, the state is synchronized using the persisted state. For this purpose, a value must be specifiedliveSyncfor the parameter in the section to enable periodic state persistence.intervalInMin state.persistence
An application is not deployed unless the active node provides a valid state for that application.

In each node, you deploy a Siddhi application with a distributed sink only to deliver duplicated events, and another Siddhi application toprocess and publish events.If WSO2 products are used, WSO2 data bridge can publish events to both nodesIf you use a message broker such as Kafka, both nodes can subscribe to the same topic to receive duplicate events.
Publishing to both nodes via a distributed sink
In a minimum HA cluster with two nodes that uses sources such as HTTP, the nodes an be set up with distributed sinks as shown below.
In the above setup, the following Siddhi applications are deployed in each node:
Distributor.siddhi: The single source to which the distributor listens can be an HTTP source, a JMS queue etc. that only sends one event to one consumer. In such sources, an event is removed from the source once it is sent to one consumer. As a result, another consumer cannot receive thesame data. To address this, a distributor Siddhi application functions as the single consumer to receive a specific event and then resendit to multiple other sources.
A distributor Siddhi application contains a distributed sink configuration. Events are resent to multiple other sources via this sink. Thesesinks are configured with the annotation.@distribution
Executor.siddhi: The purpose of this Siddhi application is to publish processed events.
As illustrated in the above diagram, the distributor Siddhi as distributes events to two other sources. However, because passive nodes do notpublish events, the distributor in the passive node directs the events it consumes to the buffer. This results in the events received by thedistributor of the passive node being lost. To avoid this you can enable force publishing for the distributed sink by setting the propforcePublisherty to .true
The following is a sample distributed sink configuration with force publishing enabled.
@sink(type='tcp', sync='true', @map(type='json'), @distribution( forcePublish= 'true', strategy='broadcast', @destination(url='tcp://0.0.0.0:5511/sourceStreamOne'), @destination(url='tcp://0.0.0.0:5512/sourceStreamOne') ))define stream DistributionStream (name string, amount double);
The parameter can be used only in a distributed sink configured in a minimum HA cluster.forcePublish

1.
2.
When force publishing is enabled for the distributor Siddhi application of the passive node, events received by each distributor Siddhi applictionare resent to the two other sources. This ensures that each node receives all the events sent to the cluster.
Starting the cluster
Save the required Siddhi applications in the directory in both nodes. <SP_HOME>/deployment/siddhi-files In order to ensure thatthe Siddhi applications are completely synchronized between the active and the passive node, they must be added to the siddhi-file
s directory before the server startup. However, the synchronization can take place effectively even if the Siddhi applications are addedwhile the server is running.
Start both servers by navigating to and issuing the following command:<SP_HOME>/binFor Windows: worker.batFor Linux : ./worker.sh
If the cluster is correctly configured, the following CLI logs can be viewed without any error logs:
In the active node:
[2017-10-23 08:56:57,380] INFO{org.wso2.carbon.stream.processor.core.internal.ServiceComponent} -WSO2 Stream Processor Starting in Two Node Minimum HA Deployment[2017-10-23 08:56:57,392] INFO{org.wso2.carbon.stream.processor.core.ha.HAManager} - HA Deployment:Starting up as Active Node
In the passive node:
In deploying Siddhi applications in a two node minimum HA cluster, it is recommended to use a content synchronizationmechanism since Siddhi applications must be deployed to both worker nodes. You can use a common shared file system suchas Network File System (NFS) or any other shared file system that is available. You need to mount the <SP_HOME>/deploym
directory of the two nodes to the shared file system.ent/siddhi-files
To start two WSO2 SP Nodes in the same machine, the under the listenerConfigurations wso2.transport.http na file must be updated to listen to different ports andmespace in the <SP_HOME>/conf/worker/deployment.yaml
corresponding values changed in the section. The property under the section of the sliveSync offset ports wso2.carbon ection found in should also be changed in one SP instance to avoid <SP_HOME>/conf/worker/deployment.yamlconflicts when starting both servers.

2.
[2017-10-23 08:57:39,775] INFO{org.wso2.carbon.stream.processor.core.internal.ServiceComponent} -WSO2 Stream Processor Starting in Two Node Minimum HA Deployment[2017-10-23 08:57:39,787] INFO{org.wso2.carbon.stream.processor.core.ha.HAManager} - HA Deployment:Starting up as Passive Node
Fully Distributed Deployment
IntroductionDistributed Siddhi applicationsDeployment architectureConfiguring a distributed cluster
Introduction
The most common deployment pattern for WSO2 SP is the that offers high availability with the minimumMinimum High Availability Deploymentamount of resources. However, there are a few user scenarios where the HA (High Availability) deployment is not sufficient to handle thethroughput.
The Distributed Deployment pattern is supported so that a high volume of data can be distributed among multiple SP instances instead of havingthem accumulated at a single point. It is suitable to be used in scenarios where the volume of data handled is too high to be managed in a singleSP instance or a minimum high availability deployment.
Distributed Siddhi applications
A Siddhi Application is a combination of multiple Siddhi executional elements. A Siddhi executional element can be a Siddhi Query or a SiddhiPartition. In distributed processing perspective, a collection of these execution elements is called an execution group. Execution group is thesmallest unit of execution.
Distributed processing of a Siddhi application allows users to execute multiple instances of each execution group in-parallel in multiple SPinstances.
Users can specify execution groups and the parallelism to execute them by annotating existing Siddhi applications. Following sample applicationis annotated in that manner.

@App:name('wso2-app') @info(name = ‘query-1')@dist(execGroup='group-1')from TempStream#window.time(2 min)select avg(temp) as avgTemp, roomNo, deviceIDinsert all events into AvgTempStream; @info(name = ‘query-2')@dist(execGroup='group-1')from every( e1=TempStream ) ->e2=TempStream[e1.roomNo==roomNo and (e1.temp + 5) <= temp ] within 10 minselect e1.roomNo, e1.temp as initialTemp, e2.temp as finalTempinsert into AlertStream; @info(name = ‘query-3')@dist(execGroup='group-2' ,parallel ='2')from TempStream [(roomNo >= 100 and roomNo < 110) and temp > 40 ]select roomNo, tempinsert into HighTempStream;
This sample disributed Siddhi application contains two execution groups named group-1 and group-2 (defined via eexecGroup='<GROUP_ID>'.g., ). execGroup='group-1' contains two queries named and . contains . No specific numbergroup-1 query-1 query-2 group-2 query-3of parallel instances are specified for . Therefore, only one instance is created for it at runtime by default. Two parallel instances aregroup-1specified for .group-2
The following is an illustration of how each parallel instance is created as a separate Siddhi application.

Each Siddhi application is deployed in the available resource nodes of the distributed cluster. All these Siddhi applications communicate with eachother using Kafka topics. The system creates Kafka topics representing each stream and configures the Siddhi applications to use these topics asrequired.
For detailed information, see .Converting to a Distributed Streaming Application
Deployment architecture

WSO2 Stream Processor has a component named Dashboard in the User Interface and Dashboard layer. The Dashboard allows users to viewoutput of analytics in an interactive manner. It also conveys observability information the cluster, status of the list of the applications (i.e., Siddhiapplications) currently submitted, and the status of each Stream Processor node. The JVM metrics as well as Siddhi application level metrics canbe viewed through this dashboard.
Job Manager nodes handle all the Management layer related functionalities. This layer contains two WSO2 SP Manager instances configured torun in the highly availability mode. Here, the Manager parses the distributed Siddhi application provided by the user, partitions it into multipleSiddhi applications, wires them using Kafka topics, and deploys them in the available worker nodes. Management layer also handles the effects ofthe worker nodes joining/leaving the distributed cluster by re-distributing the the Siddhi applications accordingly.
The processing layer (also known as the eesource cluster) is represented by multiple WSO2 SP Worker instances that are configured as workers.Each WSO2 SP worker instance in this layer registers itself to the Manager Cluster when it starts. These workers periodically send theirheartbeats to the Manager Cluster. This allows the Managers to identify the active worker nodes and the inactive ones. The worker nodes(resource nodes) run the Siddhi applications assigned to them by their Manager nodes. In addition, they are also capable of handling networkpartitions in a graceful manner as depicted in the following diagram.

As depicted above, a worker node periodically synchronizes its configurations and the Siddhi applications with the manager Node. If the networkget partitioned or if the manager becomes unreachable, it undeploys the applications deployed in it. By doing so, it allows the Siddhi applicationsto be rescheduled in other work nodes that are maintaining their connections with the manager nodes.
It is required to use Apache Kafka and Apache Zookeeper to configure a fully distributed SP cluster. As explained above, a Kafka cluster which isa part of the Persistence layer and the Transport layer holds all the topics that are used for communication by distributed Siddhi applications.Persistence stores of the Persistence layer can be RDBMs databases that store both configuration and system state data. Identity and accessmanagement of all the WSO2 Stream Processor nodes are handled by any OAuth Identity provider such as of the WSO2 Identity and AccessManagement(WSO2 IAM).
There are no restrictions to run WSO2 Stream Processor in the distributed mode on any environment. It can run in the distributed mode on baremetal, VMs, and containers. Here the maanager nodes are grouped in a single cluster backed by a database for correlation. Similarly, dashboardnodes can also be deployed in a separate cluster. The worker nodes on the other hand are not aware of each other. They are synchronized withmanager nodes from which they receive instructions.
Manager cluster
The manager cluster contains two or more WSO2 SP instances configured to run in the high availability mode. The manager cluster is responsiblefor parsing a user-defined distributed Siddhi application, dividing it to multiple Siddhi applications, creating the required topics and then deployingthem in the available resource nodes. The manager cluster also handles resource nodes that join/leave the distributed cluster, and re-schedulesthe Siddhi applications accordingly. Since manager nodes are deployed in a high availability mode, if and when the active manger node goesdown, another node in the manger will be elected as the cluster to handle the resource cluster.
Resource cluster
A resource cluster contains multiple WSO2 SP instances. Each instance sends a periodic heartbeat to the manager cluster so that the managersat any given time can identify the resource nodes that are active in the cluster. The resource nodes are responsible for running Siddhi applicationsassigned to them by the manager nodes. A resource node continues to run its Siddhi applications until a manager node undeploys them, or until itis no longer able to reach a manager node to send its heartbeat. If a manager node is unreachable for a specified amount of time, the resourcenode stops operating, removes its deployed Siddhi applications and waits until it can reach a manager node again.
Deployed Siddhi applications communicate among themselves via Kafka topics.
Kafka cluster
A Kafka cluster holds all the topics used by distributed Siddhi applications. All communications between execution groups take place via Kafka.You can only publish and receive data from distributed Siddhi applications via Kafka. In order to do so, you can either define a Kafka source in the

1. a. b.
c.
initial distributed Siddhi application or use the Kafka source created by distributed implementation. Note that installing Kafka and Zookeeper is aprerequisite to configure a distributed deployment.
Configuring a distributed cluster
This section explains how to configure a distributed WSO2 SP cluster.
Prerequisites
In order to configure a fully distributed HA cluster, the following prerequisites must be completed:
A WSO2 SP binary pack must be available for each node in the cluster.Each SP node should have an ID under wso2.carbon in the <SP_HOME>/conf/manager/deployment.yaml or <SP_HOME>/conf/
file depending on the cluster node being configured.worker/deployment.yamlA working RDBMS instance to be used for clustering of the manager nodes. The datasource to be shared by the nodes in the manager cluster must be already defined in the <SP_HOME>/conf/ /deploymanager
file.ment.yamlFor MySQL to work with the Stream Processor, download the MySQL connector from here, extract and find the mysql-connector-java-5.*.*-bin.jar. Drop the jar to the <SP_HOME>/lib directory in both manager nodes.In order to retrieve the state of the Siddhi Applications deployed in the system in case of a scenario where both the nodes fail, statepersistence must be enabled for all worker nodes. For detailed instructions, see Configuring Database and File System State Persistence.A Zookeeper cluster and Kafka cluster should already be started and hosts and ports should be known.
Supported Zookeeper version - 3.4.6Supported Kafka version - 2.11-0.10.0.0
For all manager and resource nodes to communicate with the Kafka broker the following kafka libs found in <KAFKA_HOME>/libs shoulI and added to directory:d be converted to OSG <SP_HOME>/libs
kafka_2.11-0.10.0.0.jarkafka-clients-0.10.0.0.jarmetrics-core-2.2.0.jarscala-parser-combinators_2.11-1.0.4.jarscala-library-2.11.8.jarzkclient-0.8.jarzookeeper-3.4.6.jar
To convert Kafka libs to OSGI,Create the source folder (eg: kafka) and copy the respective Kafka libs to the created folder.Create another folder (eg: kafka-osgi) as the destination folder to which the converted OSGI bundles will be added.Navigate to and issue the following command < /binSP_HOME>- For Linux: ./jartobundle.sh <path_to_source_folder> <path_to_destination_folder>- For Windows: ./jartobundle.bat <path_to_source_folder> <path_to_destination_folder>If converted successfully then for each lib, following messages would be shown on the terminal
- INFO: Created the OSGi bundle <kafka-lib-name>.jar for JAR file<absolute_path>/kafka/<kafka-lib-name>.jar
You can find the osgi converted libs in the destination folder. Copy them to the directory.<SP_HOME>/lib
Configuring the cluster
To configure a fully distributed HA cluster, follow the procedure below:
Configure manager nodesConfigure resource nodes
Configure manager nodes
To configure a node as a manager node, update the file as follows. The fully distributed<SP_HOME>/conf/manager/deployment.yamlcluster can have one or more manager nodes. For more information on how to set up cluster coordination see .Configuring Cluster Coordination
In the section, make the following changes.cluster.configTo enable the cluster mode, set the property to .enabled trueIn order to cluster all the manager nodes together, enter the same cluster ID as the group ID for all the nodes (e.g., groupId:
).group-1

1.
c.
2. a.
b.
c.
d.
3. a.
b.
c.
Enter the ID of the class that defines the coordination strategy for the cluster as shown in the example below.e.g., coordinationStrategyClass:org.wso2.carbon.cluster.coordinator.rdbms.RDBMSCoordinationStrategy
In the section of , enter information for the required parameters as follows.strategyConfig cluster.configEnter the ID of the datasource shared by the nodes in the cluster as shown in the example below. Data handled by the clusterare persisted here.datasource: SP_MGT_DB
Specify the time interval (in milliseconds) at which heartbeat pulse should occur within the manager cluster to indicate that amanager is in an active state as shown in the example below.heartbeatInterval: 500Specify the number of times the heartbeat pulse must be unavailable at the specified time interval in order to consider a managernode as inactive as shown in the example below. A value of four means that if a manager node fails to send four consecutiveheart beat pulses, it will be identified as unresponsive and another manager node will act as the active node in the managercluster.heartbeatMaxRetry: 4Specify the time interval (in milliseconds) at which each node should listen for changes that occur in the cluster as shown in theexample below.eventPollingInterval: 1000
In the section, enter information as follows:deployment.configIn the field, enter the type of the cluster as . type distributedtype: distributed For the parameter, specify the host and the port of the node.httpsInterface
e.g., host:localhost, port:9543Specify the time interval (in milliseconds) at which resource nodes connected to this manager should send heartbeat pulses toindicate that they are in a working state as shown in the example below.
The SP_MGT_DB datasource is configured to an h2 database by default. You must create a MySQL database andthen configure this datasource in the < file of the required manager.SP_HOME>/conf/manager/deployment.yamlThe following is a sample configuration.
- name: SP_MGT_DB description: The MySQL datasource used for ClusterCoordination # JNDI mapping of a data source jndiConfig: name: jdbc/WSO2ClusterDB # data source definition definition: # data source type type: RDBMS # data source configuration configuration: jdbcUrl:'jdbc:mysql://<host>:<port>/<database_name>?useSSL=false' username: <Username_Here> password: '<Password_Here>' driverClassName: com.mysql.jdbc.Driver maxPoolSize: 50 idleTimeout: 60000 connectionTestQuery: SELECT 1 validationTimeout: 30000 isAutoCommit: false
Host should be the IP of the network interface though which nodes are connected. (i.e LAN IP). Each node shouldhave a separate port if deployed in same physical machine.

3.
c.
d.
e.
f.
g.
1.
2.
3.
4.
e.g., heartbeatInterval: 2000Specify the number of times a resource node's heartbeat should be unavailable for the manager node to identify that theresource node as unresponsive. i.e. according to the below example, if the resource node fails to send 4 consecutive heartbeatpulses it will be recognized as unresponsive and the siddhi applications deployed in that node will be rescheduled to anotheravailable resource node.e.g., heartbeatMaxRetry: 4In the parameter, specify the minimum number of resource nodes required to operate the distributedminResourceCountsetup. Siddhi applications are not deployed when the number of available resource nodes is less than the number specified here.The default value is .1In the parameter, specify the Kafka server URLs used by the cluster as a comma separated list. bootstrapURLse.g., It should be given in the format , <host_1>:<port_1> <host_2>:<port_2>In the parameter, specify the server URL of the zookeeper of the cluster in the format given below:zooKeeperURLs<ZOOKEEPER_HOST>:<ZOOKEEPER_PORT>
The following is an example of a section configured as described above.deployment.config
deployment.config: type: distributed httpsInterface: host: 192.168.1.1 port: 9543 heartbeatInterval: 2000 heartbeatMaxRetry: 2 datasource: SP_MGT_DB # define a mysql datasource indatasources and refer it from here. minResourceCount: 1 bootstrapURLs: 192.168.1.10:9092, 192.168.1.11:9092 # onlyrequired in manager (kafka urls) zooKeeperURLs: 192.168.1.10:2181
Configure resource nodes
To configure the resource nodes for a fully distributed HA cluster, edit the <SP_HOME>/conf/worker/deployment.yaml file as follows. You have touncomment (remove the # in front of each line) the section under # Sample of deployment.config for Distributed deployment. Now start performingfollowing steps under deployment.config section.
In the field, enter the type of the cluster as . type distributed type: distributed
For the parameter, specify the host, port and the user credentials of the configuring resource node.httpsInterface
e.g., host:localhost, port:9090, username:admin, password:adminIn the parameter, enter the number of milliseconds for which the resource node must keep retrying to connectleaderRetryIntervalwith a manager node. If the time specified for this parameter elapses without the resource node connecting to a manager node, theresource node is shut down.e.g., leaderRetryInterval: 5000 In the parameter, specify the hosts, ports and user credentials of the manager nodes to which the resource noderesourceManagersmust try to connect. If there are multiple managers, a sequence must be specified.
Following is a sample deployment configuration for a resource node.
The host must be the IP of the network interface through which the nodes are connected (i.e., LAN IP). If all the nodes aredeployed in the same physical machine, each node must have a separate port.

4.
1.
2.
3.
4. a.
b.
deployment.config: type: distributed # required in both manager / resource httpsInterface: # required in both manager / resource host: 192.168.1.3 port: 9090 username: admin # username of current resource node password: admin # password of current resource node leaderRetryInterval: 10000 # only required in worker resourceManagers: # only required in worker - host: 192.168.1.1 port: 9543 username: admin # username of manager node password: admin # password of manager node - host: 192.168.1.2 port: 9543 username: admin # username of manager node password: admin # password of manager node
Starting the cluster
To start the distributed SP cluster, follow the procedure below:
Start each manager by navigating to the directory and issuing the following command:<SP_HOME>/binFor Windows: manager.batFor Linux : ./manager.shStart each worker by navigating to the directory and issuing the following command:<SP_HOME>/binFor Windows: worker.batFor Linux : ./worker.shWhen both manager and resource nodes are successfully started, the following is printed in the log entry.
INFO {org.wso2.carbon.kernel.internal.CarbonStartupHandler} - WSO2 Stream Processor startedin x sec
Siddhi applications should be deployed to the manager cluster using one of the following methods.Dropping the file in to the directory before or after.siddhi <SP_HOME>/wso2/manager/deployment/siddhi-files/starting the manager node.Sending a "POST" request to with the Siddhi App attached as a file in the requesthttp://<host>:<port>/siddhi-apps,as shown in the example below. Refer for more information on using WSO2 StreanStream Processor REST API GuideProcessor APIs.
Sample CURL request to deploy Siddhi application
curl -X POST "https://localhost:9543/siddhi-apps" -H "accept:application/json" -H "Content-Type: text/plain" [email protected] -u admin:admin -k
ImportantState persistence must be enabled for all worker nodes using a common database. For detailed instructions, see ConfiguringDatabase and File System State Persistence
ImportantTo deploy Siddhi applications in Distributed deployment it is recommended to use a content synchronization mechanism sinceSiddhi applications must be deployed to both manager nodes. You can use a common shared file system such as Network FileSystem (NFS) or any other shared file system that is available. You need to mount the <SP_HOME>/wso2/manager/deploy
directory of the two nodes to the shared file system.ment/siddhi-files/

4.
Multi Datacenter High Availability Deployment
This is a WSO2 SP deployment pattern where two identical setups of SP are run in two different datacenters for disaster recovery. The setups aretypically maintained at two different physical locations to to minimize the risk of both the datacenters failing at the same time.
Out of the two datacenters, only one datacenter publishes events. This datacenter is referred to as the active center, and the other datacenter isreferred to as the passive datacenter. If the active datacenter fails, the previously passive datacenter becomes the active datacenter and startspublishing events from where the previous datacenter stopped.
In order to run WSO2 SP in this setup, the following is required:
Requirement Purpose
StateSynchronization
In order to enable the passive datacenter to start publishing messages from where the active datacenter stopped beforefailing, both datacenters should receive the same events and process them simultaneously. Therefore, the publisher thatsend messages to this WSO2 SP setup must be configured to publish events to both the data centers.
A messagebroker
In order to achieve guarenteed delivery and other QoS (Quality of Service) characteristics such as processing each eventexactly once, ordering of events, etc., a message broker must be used. Two separate instances of the broker can bedeployed in each data center. When sending messages to this WSO2 SP setup, the publisher should send events to bothbrokers so that both datacenters build their state simultaneously. This ensures that if one datacenter fails, the messages lostas a result can be fetched from the broker of the other datacenter.
A sequencenumber foreach message
If the active datacenter fails and the currently passive datacenter has to start publishing events, you need to ensure thefollowing:
No duplicated events must be created in the recovering datacenter when it fetches the lost events from the broker in theother datacenter. Assigning a unique sequence ID to each event allows the recovering node to identify duplicatedevents, and ensure that each event is processed only once to avoid an unnecessary system overhead.When the active datacenter fails, the passive datacenter must be able to identify the messages that are not alreadypublished,. This can be achieved by assigning each event a unique sequence ID.
A refers to any clustered setup (i.e., a or a ) that has a separatedatacenter Minimum HA Deployment Fully Distributed Deploymentmessage broker configured for it.
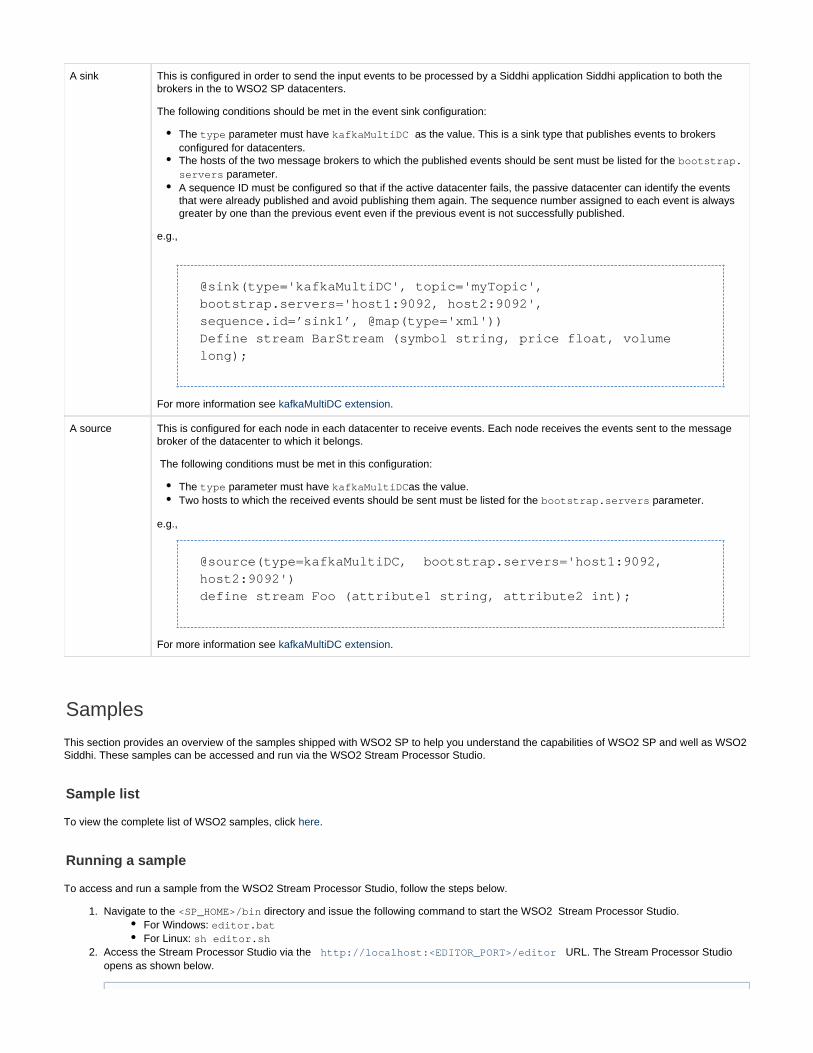
1.
2.
A sink This is configured in order to send the input events to be processed by a Siddhi application Siddhi application to both thebrokers in the to WSO2 SP datacenters.
The following conditions should be met in the event sink configuration:
The parameter must have as the value. This is a sink type that publishes events to brokerstype kafkaMultiDC configured for datacenters.The hosts of the two message brokers to which the published events should be sent must be listed for the bootstrap.
parameter.serversA sequence ID must be configured so that if the active datacenter fails, the passive datacenter can identify the eventsthat were already published and avoid publishing them again. The sequence number assigned to each event is alwaysgreater by one than the previous event even if the previous event is not successfully published.
e.g.,
@sink(type='kafkaMultiDC', topic='myTopic',bootstrap.servers='host1:9092, host2:9092', sequence.id=’sink1’, @map(type='xml')) Define stream BarStream (symbol string, price float, volumelong);
For more information see .kafkaMultiDC extension
A source This is configured for each node in each datacenter to receive events. Each node receives the events sent to the messagebroker of the datacenter to which it belongs.
The following conditions must be met in this configuration:
The parameter must have as the value.type kafkaMultiDCTwo hosts to which the received events should be sent must be listed for the parameter.bootstrap.servers
e.g.,
@source(type=kafkaMultiDC, bootstrap.servers='host1:9092,host2:9092')define stream Foo (attribute1 string, attribute2 int);
For more information see .kafkaMultiDC extension
Samples
This section provides an overview of the samples shipped with WSO2 SP to help you understand the capabilities of WSO2 SP and well as WSO2Siddhi. These samples can be accessed and run via the WSO2 Stream Processor Studio.
Sample list
To view the complete list of WSO2 samples, click .here
Running a sample
To access and run a sample from the WSO2 Stream Processor Studio, follow the steps below.
Navigate to the directory and issue the following command to start the WSO2 Stream Processor Studio.<SP_HOME>/binFor Windows: editor.batFor Linux: sh editor.sh
Access the Stream Processor Studio via the URL. The Stream Processor Studio http://localhost:<EDITOR_PORT>/editoropens as shown below.

2.
3. All the available samples can be accessed from the welcome-page. Click on the required sample to open its Siddhi application.
The default URL is . http://localhost:9390/editor
If the sample you want to try out is not visible in the default view, click . This opens the dialogMore Samples Import Samplebox where the complete list of available samples are displayed. Click on the required sample to expand it, and then click on itsSiddhi file as shown below. As a result, the Siddhi application is entered in the field. Click to open theSample Name Opensample and proceed to execute it.

3.
4.
5.
6.
To save the Siddhi application in your workspace so that you can run it, click => . This opens the dialogFile Save Save to Workspacebox. Click .SaveTo run the Siddhi application, click => . If the application has successfully started, a message similar to the following example isRun Rundisplayed in the output console.
The testing steps differ from one sample to another. Therefore, to test the Siddhi application of the required sample, follow theinstructions provided at the top of the relevant Siddhi file as comments. The following is an example.

6.
1.
Once test a sample following the given instructions, you can view the results in the output console.
Stream Processor Solutions
This section covers the solutions designed by WSO2 with the WSO2 Stream Processor. These solutions are by default, shipped with the Streamprocessor.
The following are the available solutions.
Distributed Message TracerHTTP AnalyticsTwitter Analytics
Distributed Message Tracer
The Distributed Message Tracer solution allows you to trace the list of events that belong to a message and search through its results. A messageis a single user activity that may invoke one or more services that independently generate events that are sent to WSO2 SP for processing. Inaddition, the activity itself generates an event that is considered the parent events.
e.g., When a transaction being processed passes through many subsystems, you can search through events collected from different subsystemsto check whether the transaction is completed, the subsystem at which it is currently being processed etc.
This solution allows you to set up the Message Tracers to match different scenarios.
The Distributed Message Tracer solution is packed with WSO2 SP by default. To use this solution, follow the steps below:
Step 1: Set up the Message TracerStep 2: Trace messages in the dashboard
Step 1: Set up the Message Tracer
This step involves configuring a Siddhi application in a way that allows the required details relating to activities can be captured and processed asrequired. To do this, let's define a business rule via the WSO2 SP Business Rules Manager as follows. For more information, see Creating
Business Rules .
In your terminal, navigate to the directory. Then issue one of the following commands to start the dashboard server.<SP_HOME>/binOn Windows: dashboard.bat --run
To try out the Distributed Message Tracer, you can run the sample shipped with WSO2 Stream Processor. ForMessage Tracerdetailed instructions to run a sample, see .Samples

1.
2.
3.
4.
5.
6.
7.
On Linux/Mac OS: ./dashboard.sh Start a WSO2 SP worker runtime by issuing one of the following commands from the directory.<SP_HOME>/bin
On Windows: worker.bat --runOn Linux/Mac OS: ./worker.sh
Access the Business Rules Manager via one of the following URLs.For HTTP: (e.g., )http://<SP_HOST>:<HTTP_PORT>/business-rules http://0.0.0.0:9090/business-rulesFor HTTPS: (e.g., https://<SP_HOST>:<HTTPS_PORT>/business-rules https://0.0.0.0:9443/business-rule
) sIf you do not have any business rules that are already created, click . If there are existing rules, click to create a new rule.Create +
Click to create the business rule from the business template that is already available in the Distributed Message TracerTemplatesolution.
Click on to create your business rule from the template group.Message Tracer Message Tracer
This opens the page. Message TracerTo configure the Siddhi application, select in the field.Message Tracer App Template Rule Template

7.
8.
This opens the business rules template. Message Tracer App TemplateEnter the required information in the fields of the business rules template as follows.Message Tracer App Template
Field Description
Business RuleName
A unique name for the business rule.
Span StreamDefinition
This defines the source and the stream configuration to capture the required information.
ComponentName
The module that generates the associated span. This can be constant or an attribute you included in the Span field.Stream Definition
Trace ID The name of the attribute in the that captures the ID of the trace. The trace refers to theSpan Stream Definitioncomplete tracing carried out for the activity flow. A message flow may span over multiple services. The trace ID isunique to each message flow.
Span ID The name of the attribute in the Span Stream Definition that captures the ID of the span. When the message flowspans over multiple services, the extent of the flow that relates to one of the services is identified as a single spanwith a unique ID.
BaggageItems
The name of the attribute in the to capture baggage items. Baggage items are commonSpan Stream Definitionpayloads that move across the trace.
Parent ID The name of the attribute in the Span Stream Definition that captures the parent ID of the span. This is relevantwhen an invoked service in the message flow in turn invokes another service. In this scenario, the span of the firstservice is he parent of the span of the second service.
Service Name The name of the attribute in the to capture the name of the service that generates theSpan Stream Definitionevent. The span ID displayed in the dashboard to visualize the trace is derived from the serviceMessage Tracer name. Therefore, each service needs to have a unique name. You can enter an concatenation to generate a uniqueservice name. e.g., The default value generates thestr:concat(correlation_activity_id, timestamp)service name by combining the value for the attribute (i.e., timestamp) and the message ID (i.e., trace ID).start time
Start Time The name of the attribute in the Span Stream Definition to capture the start time of the span in milliseconds.
End Time The name of the attribute in the Span Stream Definition to capture the end time of the span in milliseconds.
Tags The name of the attribute in the to capture tags. A tag is a JSON payload specific to aSpan Stream Definitionspan. You can use a concatenation via .str:concat
SpanReferences
The name of the attribute in the Span Stream Definition to capture span references.
Parent Span isDefined
This field specifies whether the needs to capture the ID of the parent span or not. Is this isSpan Stream Definition set to the parent ID is generated and assigned by the system.false
Parent SpanService Name
The name to be assigned to the parent span if the value for the Parent Span is Defined field is false. This can bea concatanation generated by Siddhi (e.g.,
str:concat(\"parent\", \"_\", e1.startTime, \"-\", e2[last].endTime).

8.
9.
10.
11.
1.
ParentOperationName
The operation name to be assigned to the parent span generated by Siddhi. This can be a concatanation (e.g., str:).concat(\"parent\", \"_\", e1.startTime, \"-\", e2[last].endTime
Parent Tags The tags specific to the parent span. This is required only if the value for the Parent Span is Defined field is falseand the parent span is generated via Siddhi.
ParentBaggageItems
The baggage items of the parent span. This is required only if the value for the Parent Span is Defined field is false and the parent span is generated via Siddhi.
Parent SpanReference
The span reference of the parent span. This is required only if the value for the Parent Span is Defined field is false and the parent span is generated via Siddhi.
ApproximateTime forCompleteTrace
This defines an approximate time duration to complete the trace. The spans that occured within this time durationare considered to determine the parent span. This is required only if the value for the fieldParent Span is Definedis .false
No of Eventsper Trace
The number of events generated in the trace. This is required to determine the parent span only if the value for the P arent Span is Defined field is false .
Parent SpanService Name
The name assigned to the parent span if the value for the Parent Span is Defined field is false . This can be aconstant value or a concatanation to derive it using the values entered for the Approximate Time for Complete
and fields (e.g., Trace No of Events per Trace str:concat("parent", "_", e1.startTime, "-",).e2[last].endTime)
Click . The rule you create is added as shown in the example below.SAVE & DEPLOY
Click +and enter another business rule from the template with the following information.Message Tracer Source Template
Field Description
BusinessRuleName
A unique name for the business rule.
SourceType
The type of the source via which events relating to activities are received.
MapType
The format in which events relating to activities are received.
SourceOptions
Here, you can enter optional properties to configure the source. The properties entered depends on the source type youselected. e.g., if the source type is , you can enter kafka topic.list='kafka_topic', partition.no.list='0',
.threading.option='single.thread
Click .SAVE & DEPLOY
Step 2: Trace messages in the dashboard
To trace activities via the dashboard, follow the procedure below:Message Tracer
Access the Dashboard Portal via one of the following URLs.

1.
2.
3.
4. a. b.
http://<SP_HOST>:<HTTP_PORT>/portal (e.g., )http://localhost:9290/portalhttps://<SP_HOST>:<HTTPS_PORT>/portal (e.g., )https://localhost:9643/portal
Log in with your credentials. The dashboard is included in the dashboard listing as shown below.Distributed Message Tracer
Click on the dashboard to open the dashboard. The widgets in the dashboard are displayed as follows.Distributed Message Tracer
To filter the information you want to view in the dashboard, do the following:In the field, select the service for which you want to view message statistics.ServiceClick on the required date range in the widget to view message statistics for the required time period. If the timeDate Rangeperiod for which you want to view statistics is not displayed in this widget, you can click and select a specific timeCustominterval.
Once you enter information to filter message statistics to be displayed, click . The available traces are displayed in the SEARCH Trac section as shown in the example below.ing List

1.
2.
Once you click on the required trace ID, information related to the trace is displayed as shown in the following example.
HTTP Analytics
HTTP Analytics is an analytics solution powered by WSO2 Stream Processor. It is packed with WSO2 Stream Processor by default. It allows youto monitor your HTTP analysis data by visualizing them in a preconfigured dashboard.
To use this solution to view HTTP analytics data in the HTTP Analytics dashboard, follow the steps below.
Step 1: Set up HTTP AnalyticsStep 2: View HTTP Analysis data
Step 1: Set up HTTP Analytics
This step involves defining a source to specify how the HTTP request events analyzed via this solution need to be captured and defining a storeto store the events to be analyzed as per your business requirement. To do this, let's define a business rule via the WSO2 SP Business RulesManager as follows. For more information, see .Creating Business Rules
In your terminal, navigate to the directory. Then issue one of the following commands to start the dashboard server.<SP_HOME>/binOn Windows: dashboard.bat --runOn Linux/Mac OS: ./dashboard.sh

2.
3.
4.
5.
6.
Start a WSO2 SP worker runtime by issuing one of the following commands from the directory.<SP_HOME>/binOn Windows: worker.bat --runOn Linux/Mac OS: ./worker.sh
Access the Business Rules Manager and log in with your credentials.URL: (e.g., )https://<SP_HOST>:<HTTPS_PORT>/business-rules https://localhost:9643/business-rulesUser Name: adminPassword: admin
If you do not have any business rules that are already created, click . If there are existing rules, click to create a new rule.Create +
Click to create the business rule from the business template that is already available in the HTTP Analytics solution.Template
Click on to create your business rule from the HTTP Analytics template group.HTTP-Analytics
This opens the page. Select the template in the field.HTTP-Analytics HTTP-Analytics-Processing RuleTemplate

6.
7.
8.
This opens the predefined fields of the template.HTTP-Analytics-ProcessingTo define the business rule, enter information in the fields displayed as follows:
Field Description Default
Business Rule Name A unique name for the business rule. N/A
Source RequestsStream Source
This specifies the source definition viawhich the HTTP events are received. Formore information about sources, see Sid
.dhi Query Guide - Source
type='http', @map(type='json')
Store for HTTPAnalytics
This specifies a store definition to storethe processed events received via HTTP.For more information about storing data,see .Siddhi Query Guide - Store Query
type="rdbms",datasource="HTTP_ANALYTICS_DB"
Use system time foraggregation
If this is set to , the system time isYesused for aggregation. If this is set to ,Nothe timestamp from the arrived event isused for aggregation.
Yes
Click . SAVE & DEPLOY
Step 2: View HTTP Analysis data
Before you begin:In order to view information in the HTTP Analytics dashboard, issue some sample cURL commands to generate events. The cURLcommands can be of the following format.
The <NAME_OF_CREATED_BUSINESS_RULE> will be the rule name in all simple case separated by "-", forexample, if you have given the rule name as "HTTP Analytics" then you should use the rule name as"http-analytics_0".
If Yes is selected for the Use system time for aggregation field when deploying the siddhi application, the eventsdo not need to have valid values for the timestamp attribute becaus<CURRENT_TIMESTAMP_IN_MILLISECOND>
or thee this value is ignored. cURL commands can be passed with 0 as the timestamp value. If is selected fNoproperty and if multiple requests are sent, ensure that timestamp is changed so that the later requests have highertimestamp value.

curl -v -X POST \ http://<HOST>:8280/<NAME_OF_CREATED_BUSINESS_RULE>_0/RequestsStream\ -H 'content-type: application/json' \ -d '{ "event": { "timestamp": <CURRENT_TIMESTAMP_IN_MILLISECOND>, "serverName": "localhost", "serviceName": "A", "serviceMethod": "GET", "responseTime": 1000.00, "httpResponseCode": 200, "userAgent": "Mozilla/5.0 (iPad; U; CPU OS 3_2_1 like Mac OS X;en-us) AppleWebKit/531.21.10 (KHTML, like Gecko) Mobile/7B405", "requestIP": "127.0.0.1" }}'
Click here for sample cURL commands:
curl -v -X POST \ http://localhost:8280/http-analytics_0/RequestsStream \ -H 'content-type: application/json' \ -d '{ "event": { "timestamp": 1528795987, "serverName": "localhost", "serviceName": "A", "serviceMethod": "GET", "responseTime": 1000.00, "httpResponseCode": 200, "userAgent": "Mozilla/5.0 (iPad; U; CPU OS 3_2_1 like Mac OSX; en-us) AppleWebKit/531.21.10 (KHTML, like Gecko) Mobile/7B405", "requestIP": "127.0.0.1" }}'

1.
2.
To view information in the HTTP Analytics dashboard, follow the procedure below:
Access the Business Rules Manager and log in with your credentials.URL: https: (e.g., )//<SP_HOST>:<HTTPS_PORT>/portal https://localhost:9643/portalUser Name: adminPassword: admin
Log in with your credentials. The dashboard is included in the dashboard listing as shown below.HTTP Analytics
curl -v -X POST \ http://localhost:8280/http-analytics_0/RequestsStream \ -H 'content-type: application/json' \ -d '{ "event": { "timestamp": 1528796173, "serverName": "localhost", "serviceName": "A", "serviceMethod": "GET", "responseTime": 1000.00, "httpResponseCode": 200, "userAgent": "Mozilla/5.0 (iPad; U; CPU OS 3_2_1 like Mac OSX; en-us) AppleWebKit/531.21.10 (KHTML, like Gecko) Mobile/7B405", "requestIP": "127.0.0.1" }}'
curl -v -X POST \ http://localhost:8280/http-analytics_0/RequestsStream \ -H 'content-type: application/json' \ -d '{ "event": { "timestamp": 1528796439, "serverName": "localhost", "serviceName": "A", "serviceMethod": "GET", "responseTime": 1000.00, "httpResponseCode": 200, "userAgent": "Mozilla/5.0 (iPad; U; CPU OS 3_2_1 like Mac OSX; en-us) AppleWebKit/531.21.10 (KHTML, like Gecko) Mobile/7B405", "requestIP": "127.0.0.1" }}'

2.
3. Click on the dashboard to open it. Information is displayed in the widgets as shown below.HTTP Analytics
Twitter Analytics
Twitter Analytics solution allows you to create a Twitter application that can be integrated into your service, and monitor the Tweets generatedfrom it. This solution is packed in WSO2 SP by default. To use this solution, follow the steps below:
Step 1: Set up the Twitter Analytics solutionStep 2: Monitor Twitter activity
Step 1: Set up the Twitter Analytics solution
This step involves setting up the Twitter Analytics solutions by defining how the execution needs to be done using information specific to yourTwitter application. In order to do this, you need to create a business rule using the predefined business rules template, Popular Tweets
shipped with this solution. For more information about Business Rules, see .Analysis, Working with Business Rules
Before you begin:

1.
2.
3.
4.
5.
6.
To create a business rule to set up the Twitter Analytics solution, follow the procedure given below:
In your terminal, navigate to the directory. Then issue one of the following commands to start the dashboard server.<SP_HOME>/binOn Windows: dashboard.bat --runOn Linux/Mac OS: ./dashboard.sh
Start a WSO2 SP worker runtime by issuing one of the following commands from the directory.<SP_HOME>/binOn Windows: worker.bat --runOn Linux/Mac OS: ./worker.sh
Access the Business Rules Manager and log in with your credentials.URL: (e.g., )https://<SP_HOST>:<HTTPS_PORT>/business-rules https://localhost:9643/business-rulesUser Name: adminPassword: admin
If you do not have any business rules that are already created, click . If there are existing rules, click to create a new rule.Create +
Click to create the business rule from the business template that is already available in the Twitter Analytics solution.Template
Click on to create your business rule from the template .Twitter Analytics Twitter Analytics
1. 2. 3. 4.
Create a Twitter application and collect the required information as follows:
Create your Twitter Application in .Twitter Application ManagementOpen the created application, and click on the Permissions tab. Select the Read and Write option and click .Update SettingsClick on the Keys And Access Tokens tab. Generate a new access token by clicking Create My Access Token.Collect following values from the Keys and Access Tokens tab:
Consumer KeyConsumer SecretAccess TokenAccess Token Secret

6.
7.
8.
9.
1.
This opens the page. Twitter AnalyticsSelect in the field.Popular Tweets Analysis Rule Template
The template opens with the template-specific fields.Popular Tweets Analysis To specify how the tweets generated by your application needs to be processed, enter information in the fields displayed as follows:
Field Description
Business Rule Name A unique name for the business rule.
Consumer Key The API key to access your Twitter application.
Consumer Secret The API secret to access your Twitter application.
Access Token The access token via which Tweets are generated from your Twitter account.
Access Token Secret The access token secret to secure the Tweets generated via the access token from your Twitter account.
Filtering Keywords The Tweets are filtered by the keywords entered in this field.
Filtering Language The Tweets are filtered by the language entered in this field.
Query The query that defines how the Tweets need to be filtered.
Count The maximum number of Tweets that should be displayed on a page at a given time.
Polling Interval The time interval (in seconds) at which the Tweets need to be polled.
Click .Save and Deploy
Step 2: Monitor Twitter activity
To monitor Twitter activity via the dashboard, follow the procedure below:Twitter Analytics

1.
2.
3.
Access the Dashboard Portal and log in with your credentials.URL: https: (e.g., )//<SP_HOST>:<HTTPS_PORT>/portal https://localhost:9643/portalUser Name: adminPassword: admin
The Twitter Analytics dashboard is included in the dashboard listing as shown below.
Click on the dashboard to open it. Information is displayed in the widgets as shown in the example below.Twitter Analytics

3.
Admin Guide
The following topics explore various product deployment scenarios and other information useful for system administrators.
Supporting Different TransportsProtecting Sensitive Data via the Secure VaultConfiguring Business Rule DeploymentConfiguring Database and File System State PersistenceConfiguring Cluster CoordinationUser ManagementWorking with Databases

1. 2.
a.
b.
c.
d. e.
3.
1.
2. 3.
a.
Authorization & Permission ModelGeneral Data Protection Regulations (GDPR) for WSO2 Stream ProcessorAdding Third Party Non OSGi Libraries
Supporting Different Transports
Follow the relevant section for the steps that need to be carried out before using the required transport to receive and publish events via WSO2SP.
Kafka transportJMS transportMQTT transportRabbitMQ transport
Kafka transport
To enable WSO2 SP to receive and publish events via the Kafka transport, follow the steps below:
Download the Kafka broker from .hereConvert and copy the Kafka client jars from the directory to the directory as follows.<KAFKA_HOME>/libs <SP_HOME>/lib
Create a directory in a preferred location in your machine and copy the following JARs to it from the direc<KAFKA_HOME>/libstory.
kafka_2.11-0.10.2.1.jarkafka-clients-0.10.2.1.jarmetrics-core-2.2.0.jarscala-library-2.11.8.jarscala-parser-combinators_2.11-1.0.4.jarzkclient-0.10.jarzookeeper-3.4.9.jar
Create another directory in a preferred location in your machine.
To convert all the Kafka jars you copied into the , issue the following command. <SOURCE_DIRECTORY>For Windows: <SP_HOME>/bin/jartobundle.bat<SOURCE_DIRECTORY_PATH> <DESTINATION_DIRECTORY_PATH>For Linux: <SP_HOME>/bin/jartobundle.sh <SOURCE_DIRECTORY_PATH> <DESTINATION_DIRECTORY_PATH>
Copy the converted files from the to the directory.<DESTINATION_DIRECTORY> <SP_HOME>/libCopy the jars that are not converted from the to the dir<SOURCE_DIRECTORY> <SP_HOME>/samples/sample-clients/libectory.
The Kafka server should be started before sending events from WSO2 SP to a Kafka consumer.
JMS transport
Follow the steps to configure the message broker:Apache ActiveMQ
Install .Apache ActiveMQ JMS
Download the from .activemq-client-5.x.x.jar hereRegister the implementation according to the OSGi JNDI spec and copy the client jar to the InitialContextFactory <SP_HOME>/li
directory as follows.bNavigate to the directory and issue the following command.SP_HOME>/bin
For Linux: ./icf-provider.sh org.apache.activemq.jndi.ActiveMQInitialContextFactory<Downloaded Jar Path>/activemq-client-5.x.x.jar <Output Jar Path>For Windows: ./icf-provider.bat org.apache.activemq.jndi.ActiveMQInitialContextFactory<Downloaded Jar Path>\activemq-client-5.x.x.jar <Output Jar Path>
This directory will be referred to as the in the next steps.SOURCE_DIRECTORY
This directory will be referred to as the in the next steps.DESTINATION_DIRECTORY
This guide uses ActiveMQ versions 5.7.0 - 5.9.0. If you want to use a later version, for instructions on the necessary changesto the configuration steps, go to .Apache ActiveMQ Documentation

3.
a.
b.
c. 4.
5.
6.
7. 8.
1. 2.
1. 2.
3.
4.
Once the client jar is successfully converted, the directory is created. This directory contains theactivemq-client-5.x.xfollowing:
activemq-client-5.x.x.jar (original jar) activemq-client-5.x.x_1.0.0.jar (OSGi-converted jar)
In addition, the following messages are logged in the terminal.
INFO: Executing 'jar uf<absolute_path>/activemq-client-5.x.x/activemq-client-5.x.x.jar-C <absolute_path>/activemq-client-5.x.x/internal/CustomBundleActivator.class' [timestamp]org.wso2.carbon.tools.spi.ICFProviderTooladdBundleActivatorHeader - INFO: Running jar to bundle conversion[timestamp]org.wso2.carbon.tools.converter.utils.BundleGeneratorUtilsconvertFromJarToBundle - INFO: Created the OSGi bundleactivemq_client_5.x.x_1.0.0.jar for JAR file<absolute_path>/activemq-client-5.x.x/activemq-client-5.x.x.jar
Copy and place it in the activemq-client-5.x.x/activemq-client-5.x.x.jar <SP_HOME>/samples/sample-clie directory.nts/lib
Copy and place it in the directory.activemq-client-5.x.x/activemq_client_5.x.x_1.0.0.jar <SP_HOME>/libCreate a directory in a preferred location in your machine and copy the following JARs to it from the directory.<ActiveMQ_HOME>/libs
hawtbuf-1.9.jargeronimo-jms_1.1_spec-1.1.1.jargeronimo-j2ee-management_1.1_spec-1.0.1.jar
Create another directory in a preferred location in your machine.
To convert all the Kafka jars you copied into the , issue the following command. <SOURCE_DIRECTORY>For Windows: <SP_HOME>/bin/jartobundle.bat <SOURCE_DIRECTORY_PATH> <DESTINATION_DIRECTORY_PATH>For Linux: <SP_HOME>/bin/jartobundle.sh <SOURCE_DIRECTORY_PATH> <DESTINATION_DIRECTORY_PATH>
Copy the converted files from the to the directory.<DESTINATION_DIRECTORY> <SP_HOME>/libCopy the jars that are not converted from the to the directory.<SOURCE_DIRECTORY> <SP_HOME>/samples/sample-clients/lib
MQTT transport
Follow the steps to configure the message broker:MQTT
Download the file from here.org.eclipse.paho.client.mqttv3-1.1.1.jar<SP_HOME>/libPlace the file you downloaded in the directory.
RabbitMQ transport
Follow the steps below to configure the RabbitMQ message broker:
Download RabbitMQ from here.Create a directory in a preferred location in your machine. This directory is referred to as at the in the rest of the<SOURCE_DIRECTORY> procedure.Copy the following files from the directory to the you created.<RabbitMQ_HOME>/plugins <SOURCE_DIRECTORY>
If required, you can provide privileges via .chmod +x icf-provider.(sh|bat)
This directory is referred to as the in the next steps.SOURCE_DIRECTORY
This directory will be referred to as the DESTINATION_DIRECTORY in the next steps.

4.
1. a.
b.
2.
Create another directory in a preferred location in your machine. This directory is referred to as the in this<DESTINATION_DIRECTORY>procedure.
Protecting Sensitive Data via the Secure Vault
WSO2 SP uses several artifacts for its functionality including deployment configurations for tuning its operation as well as deployable artifacts forextending its functionality. In each of these scenarios, there can be situations where the data specified is of a sensitive nature e.g., access tokens,passwords, etc.
The following topics cover how sensitive data can be obfuscated in both scenarios to avoid scrutiny,Securing sensitive data in deployment configurationsProtecting sensitive data in Siddhi applications
Securing sensitive data in deployment configurations
WSO2 SP offers the Cipher tool to encrypt sensitive data in deployment configurations. This tool works in conjunction with WSO2 Secure Vault toreplace sensitive data that is in plain text with an alias. The actual value is then encrypted and securely stored in the SecureVault. At runtime, theactual value is retrieved from the alias and used. For more information, see .WSO2 Secure Vault
To encrypt sensitive data to avoid scrutiny, follow the procedure below:
Open the file and enter the following information.<SP_HOME>/conf/<RUNTIME>/secrets.propertiesEnter the required sensitive data element with the value in plain text as shown in the example below.wso2.sample.password1=plainText ABC@123 Enter the alias to be used in the required configuration file instead of the actual value of sensitive data you specified in theprevious step as shown in the example below.password: ${sec:wso2.sample.password1}
To encrypt the sensitive data element and store it in the secure vault, run the Cipher tool by issuing a command similar to the followingexample for the required profile (i.e., , , or .worker manager, dashboard editor)sh <SP_HOME>/bin/ciphertool.sh -runtime worker
Protecting sensitive data in Siddhi applications
A parameter named ref is used to secure sensitive information in Siddhi applications that are deployed in WSO2 SP. For Siddhi applications thatuse storage technologies supported by , Carbon Datasources it is also possible to use Carbon datasources instead of specifying the connectionparameters directly on the Siddhi file.
Using the parameterref
Siddhi 4.0 supports the ref parameter that enables the user to specify parts of their definition outside the Siddhi App. Extensions that support thisfunctionality include:
StoresSourcesSinks
This method of securing sensitive data involves defining the store parameters required by a connection instance in the <SP_HOME>/conf/<RUNT file, and referring to those from Siddhi applications via the parameter.IME>/deployment.yaml ref
Example
In the file, some connection parameters are defined for a store named as follows:<SP_HOME>/conf/<RUNTIME>/deployment.yaml store1
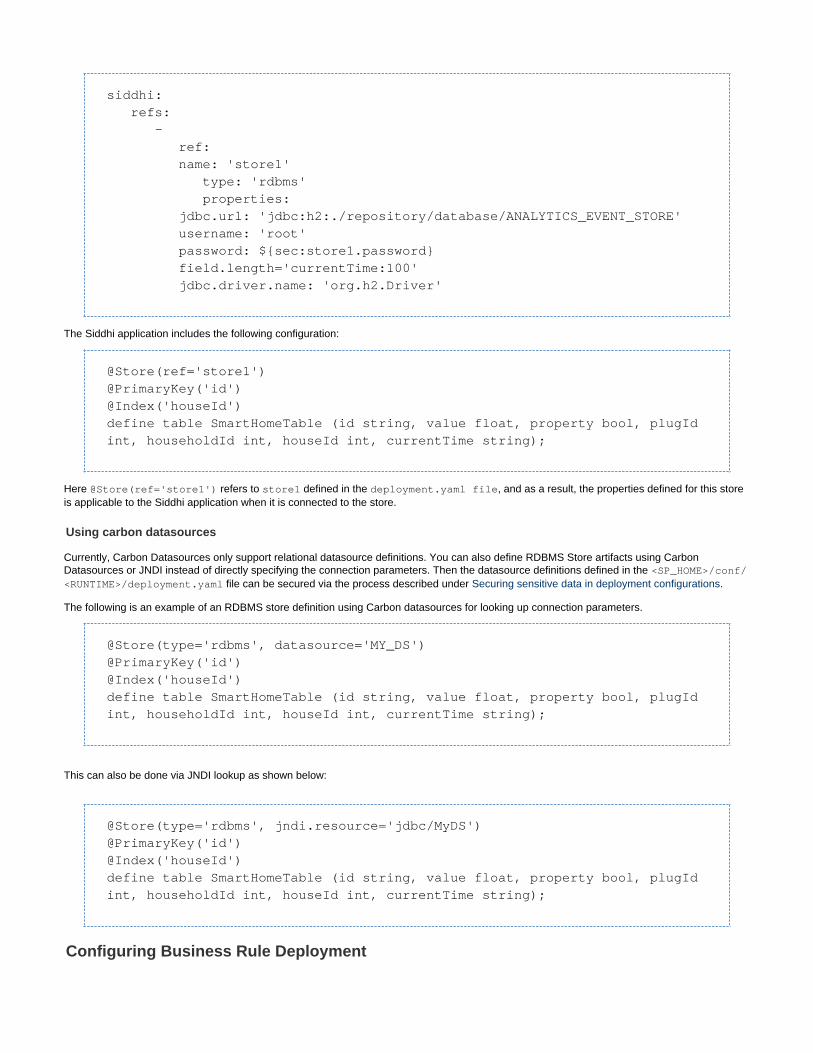
siddhi: refs: - ref: name: 'store1' type: 'rdbms' properties: jdbc.url: 'jdbc:h2:./repository/database/ANALYTICS_EVENT_STORE' username: 'root' password: ${sec:store1.password} field.length='currentTime:100' jdbc.driver.name: 'org.h2.Driver'
The Siddhi application includes the following configuration:
@Store(ref='store1')@PrimaryKey('id')@Index('houseId')define table SmartHomeTable (id string, value float, property bool, plugIdint, householdId int, houseId int, currentTime string);
Here refers to defined in the , and as a result, the properties defined for this store@Store(ref='store1') store1 deployment.yaml fileis applicable to the Siddhi application when it is connected to the store.
Using carbon datasources
Currently, Carbon Datasources only support relational datasource definitions. You can also define RDBMS Store artifacts using CarbonDatasources or JNDI instead of directly specifying the connection parameters. Then the datasource definitions defined in the <SP_HOME>/conf/
file can be secured via the process described under .<RUNTIME>/deployment.yaml Securing sensitive data in deployment configurations
The following is an example of an RDBMS store definition using Carbon datasources for looking up connection parameters.
@Store(type='rdbms', datasource='MY_DS')@PrimaryKey('id')@Index('houseId')define table SmartHomeTable (id string, value float, property bool, plugIdint, householdId int, houseId int, currentTime string);
This can also be done via JNDI lookup as shown below:
@Store(type='rdbms', jndi.resource='jdbc/MyDS')@PrimaryKey('id')@Index('houseId')define table SmartHomeTable (id string, value float, property bool, plugIdint, householdId int, houseId int, currentTime string);
Configuring Business Rule Deployment

1. 2. 3.
4.
5.
WSO2 Business Rules Manager uses ruleTemplates within templateGroups, to derive business rules from. Each ruleTemplate will have a UUID -that is used to uniquely identify itself. When a ruleTemplate is specified under a worker node; SiddhiApps derived in business rules created out ofthat ruleTemplate will be deployed in the specified worker node.
Go to the deployment.yaml file under <WSO2SP_HOME>/conf/dashboardDeployment configurations for the Business Rules Manager are specified under wso2.business.rules.managerProvide the URL(s) of worker node(s) that is/are available to deploy SiddhiApps, under deployment_configs - in theformat <HOST_NAME>:<PORT>
deployment_configs: - <NODE1_HOST_NAME>:<NODE1_PORT> - <NODE2_HOST_NAME>:<NODE2_PORT>
Eg:
deployment_configs: - localhost:9090 - 10.100.4.140:9090
List down the UUIDs of required ruleTemplates under each node such that: when a ruleTemplate is specified under a worker node,SiddhiApps derived in the business rules created out of that ruleTemplate will be deployed in that specific node.
deployment_configs: - <NODE1_HOST_NAME>:<NODE1_PORT>: - ruleTemplate1_UUID - ruleTemplate2_UUID - ruleTemplate3_UUID
Eg:
deployment_configs: - localhost:9090: - sweet-production-kpi-analysis - stock-exchange-input - stock-exchange-output
A rule template can be configured under more than one node, as long as its instanceCount is many
deployment_configs: - <NODE1_HOST_NAME>:<NODE1_PORT>: - ruleTemplate1_UUID - ruleTemplate2_UUID - ruleTemplate3_UUID - <NODE2_HOST_NAME>:<NODE2_PORT>: - ruleTemplate1_UUID - ruleTemplate3_UUID - <NODE3_HOST_NAME>:<NODE3_PORT>: - ruleTemplate2_UUID - ruleTemplate3_UUID - ruleTemplate4_UUID

5.
6.
7.
Eg:
deployment_configs: - localhost:9090: - sweet-production-kpi-analysis - stock-exchange-input - stock-exchange-output - 10.100.40.169:9090: - identifying-continuous-production-decrease - sweet-production-kpi-analysis
Notice that the rule template with UUID sweet-production-kpi-analysis has been configured under two worker nodes. So that, if abusiness rule is derived from sweet-production-kpi-analysis, the belonging SiddhiApps will be deployed in both the nodes.Specify the username & password, that are common for all the worker nodes
username: adminpassword: admin
The complete deployment configuration for Business Rules will look like the following
wso2.business.rules.manager: datasource: BUSINESS_RULES_DB deployment_configs: - localhost:9090: - stock-data-analysis - stock-exchange-input - stock-exchange-output - identifying-continuous-production-decrease - sweet-production-kpi-analysis username: admin password: admin
Configuring Database and File System State Persistence
This section explains how to prevent the loss of data that can result from a system failure by persisting the state of WSO2 SP periodically eitherinto a database system or into the file system.
Prerequisites
Before configuring database persistence, the following prerequisites must be completed.
One or more Siddhi Applications must be running in the WSO2 SP server.A working RDBMS instance that can be used for data persistence must exist.The requirements of the datasource must be already defined.

Database persistence involves updating the databases connected to WSO2 Steam Processor with the latest information relating to theevents that are being processed by WSO2 SP at a given time.
Configuring database system persistence
The supported databases are H2, MySQL, Postgres, MSSQL and Oracle. The relevant jdbc driver jar should be downloaded and added to the <S directory to prior to using database system persistence.P_HOME>/lib
To configure periodic data persistence, update the file under as<SP_HOME>/conf/worker/deployment.yaml state.persistence follows:
Parameter Purpose Required Value
enabled This enables datapersistence.
true
intervalInMin The time interval inminutes that definesthe interval in whichstate of Siddhiapplications shouldbe persisted
1
revisionsToKeep The number ofrevisions to keep inthe system. When anew persist takesplace, the oldrevisions areremoved.
3
persistenceStore The persistencestore.
org.wso2.carbon.stream.processor.core.persistence.DBPersistenceStore
config >datasource
The datasource to beused in persisting thestate. The provideddatasource should beproperly defined inthe deployment.yaml.For detailedinstructions of how toconfigure adatasource, see Conf
.iguring Datasources
WSO2_PERSISTENCE_DB (Datasource with this name should be defined inwso2.datasources)
config > table The table that shouldbe created and usedfor the persisting ofthe state.
PERSISTENCE_TABLE
The following is a sample segment of the required configurations in the file to configure<SP_HOME>/conf/worker/deployment.yamldatabase system persistence.

Sample deployment.yaml segment
state.persistence: enabled: true intervalInMin: 1 revisionsToKeep: 3 persistenceStore:org.wso2.carbon.stream.processor.core.persistence.DBPersistenceStore config: datasource: <DATASOURCE NAME> # A datasource with this name should bedefined in wso2.datasources namespace table: <TABLE NAME>
Configuring file system persistence
This section explains how to persist the states of Siddhi applications during a required time interval in the file system in order to maintainback-ups. To configure state persistence, update the file under .p as<SP_HOME>/conf/worker/deployment.yaml state ersistence follows:
Parameter Purpose Required Value
enabled This enablesdatapersistence.
true
intervalInMin The timeinterval inminutes thatdefines theinterval inwhich stateof Siddhiapplicationsshould be
persisted
1
revisionsToKeep The numberof revisionsto keep inthe system.When a newpersist takesplace, theold revisionsareremoved.
3
persistenceStore Thepersistencestore.
org.wso2.carbon.stream.processor.core.persistence.FileSystemPersistenceStore
config >location
A fullyqualifiedfolderlocation towhere therevision filesshould bepersisted.
siddhi-app-persistence

The following is a sample segment of the required configurations in the file to configure file<SP_HOME>/conf/worker/deployment.yamlsystem persistence.
Sample deployment.yaml segment
state.persistence: enabled: true intervalInMin: 1 revisionsToKeep: 2 persistenceStore:org.wso2.carbon.stream.processor.core.persistence.FileSystemPersistenceStore config: location: siddhi-app-persistence
Configuring Cluster Coordination
Multiple WSO2 SP nodes can be configured to work together by configuring a cluster coordination strategy that is used in various deploymentssuch as the . At present, cluster coordination is supported via an RDBMS instance Minimum HA Deployment and Fully Distributed Deploymentusing and RDBMS coordination strategy. Support for cluster coordination via a Zookeeper instance will be supported in the near future.
At any given time, there is a leader in an SP cluster that is arbitrarily selected among the members of the cluster. The RDBMS coordinationstrategy that is used for cluster coordination works on the concept of heartbeats where the members of the cluster periodically send heartbeatsignals via the datasource to the leader of the cluster. If the leader node does not detect a pre configured consecutive number of heartbeats froma specific node, the relevant node is removed from the cluster. Simillarly, if the leader node fails to update its heartbeat, the cluster re-elects anew leader.
Prerequisites
In order to configure a cluster, the following prerequisites must be completed:
A minimum of two binary packs of WSO2 SP must be available.A working RDBMS instance must be available to be shared among the nodes of the cluster.
Configuring the Cluster with the RDBMS coordination strategy
To configure a cluster for several nodes, the cluster.config section of the should<SP_HOME>/conf/<worker|manager>/deployment.yamlbe configured for as follows:all the nodes
Parameter Purpose Sample Values
enabled Set this value to tr to enable clusterue
coordination for thenode.
true/false
groupId The group ID isused to identify thecluster to which thenode belongs.Nodes that belongto the same clustermust be configuredwith the samegroup ID.
group-1
coordinationStrategyClass The clustering classto be used.
org.wso2.carbon.cluster.coordinator.rdbms.RDBMSCoordinationStrategy
Currently, we only support MySQL. Support for other databases will be added soon.

strategyConfig >datasource
The shareddatasource to beused in the cluster.The datasourcespecified must beproperly configuredin the deployment
file. For.yamldetailed instructionsto configure adatasource, see Configuring
.Datasources
WSO2_CARBON_DB
strategyConfig >heartbeatInterval
This value definesthe time interval inmillisecondsbetween heartbeatpulses sent bynodes to indicatethat they are stillalive within thecluster.
1000
strategyConfig >heartbeatMaxRetry
The number oftimes the heartbeatpulse can beunavailable until anode is identified asunresponsive. If anode fails to sendits heartbeat pulseto the leader of thecluster after anumber of retriesequal to the numberspecified here, thatnode is removedfrom the cluster.
2
strategyConfig >eventPollingInterval
The time interval inmillseconds atwhich a nodelistens to identifythe changeshappening withinthe cluster. Thechanges mayinclude a new nodejoining the cluster, anode beingremoved from thecluster and thecoordinatorchanged event.
1000
Following is a sample segment of the configurations needed for RDBMS coordination in the deployment.yaml

Sample deployment.yaml segment
cluster.config: enabled: true groupId: <GROUP ID> coordinationStrategyClass:org.wso2.carbon.cluster.coordinator.rdbms.RDBMSCoordinationStrategy strategyConfig: datasource: <DATASOURCE NAME> heartbeatInterval: 1000 heartbeatMaxRetry: 2 eventPollingInterval: 1000
User Management
Follwing sections includes further information and configuration steps for the user mangement in SP,Introduction to User ManagementUser Management via the IdP Client Interface
Introduction to User Management
User management is a mechanism which involves defining and managing users, roles and their access levels in a system. A user managementdashboard or console provides system administrators a holistic view of a system's active user sessions, their log-in statuses, the privileges ofeach user and their activity in the system, enabling the system to make business-critical, real-time security decisions. A typical useradministratorsmanagement implementation involves a wide range of functionality such as adding/deleting users, controlling user activity through permissions,managing user roles, defining authentication policies, managing external user stores, manual/automatic log-out, resetting user passwords etc.
Any user management system has users, roles, user stores and user permissions as .its basic components
Users
Users are consumers who interact with your organizational applications, databases or any other systems. These users can be a person, a deviceor another application/program within or outside of the organization's network. Since these users interact with internal systems and access data,the need to define which user is allowed to do what is critical to most security-conscious organizations. This is how the concept of usermanagement developed.
Permission
A permission is a 'delegation of authority' or a 'right' assigned to a user or a group of users to perform an action on a system. Permissions can begranted to or revoked from a user/user group/user role automatically or by a system administrator. For example, if a user has the permission tolog-in , then the permission to log-out is automatically implied without the need of granting it specifically.to a system
User Roles
A user role is a consolidation of several permissions. Instead of associating permissions with a user, can associate permissions withadministratora user role and assign the role to users. User roles can be reused throughout the system and prevents the overhead of granting multiplepermissions to each and every user individually.
User Store
User management in Stream Processor has the following features,
The concept of single user store, which is either local or external.File based user store as the default embedded store.Ability to connect to an external Identity Provider using SCIM2 and OAuth2 protocols.Ability to extend user authentication as per the scenario

A user store is a persistent storage where information of the users and/or user roles is stored. User information includes log-in name, password,fist name, last name, e-mail etc. It can be either file based or a database maintained within SP or externally to it. User stores used in SP differsbased on the interface(IdP Client) used to interact with the user store. By default, a file based user store maintained in the<SP_HOME>/conf/<PROFILE>/deployment.yaml file interfaced through 'Local' IdP Client is enabled.
User Management via the IdP Client Interface
In WSO2 Stream Processor, user management is carried out through the Identity Provider Client (IdP Client) interface that can be switched asrequired for the user scenario. Furthermore, a custom IdP Client can be written to encompass the required user store connection andauthentication.
IdP clients can be switched by specifying te required IdP client in the section in the auth.configs: <SP_HOME>/conf/<PROFILE>/deploym file.ent.yaml
auth.configs: # Type of the IdP Client used for the user authentication type: local
The active IdP client is by default.local
Following are the IdP Clients available for WSO2 SP:
Local IdP ClientExternal IdP Client
Local IdP Client
The local IdP Client interacts with the file-based user store that is defined in the file under <SP_HOME>/conf/<PROFILE>/deployment.yaml a namespace as follows:uth.configs
auth.configs: type: 'local' userManager: adminRole: admin userStore: users: - user: username: admin password: YWRtaW4= roles: 1 roles: - role: id: 1 displayName: admin
The above user and role is added by default.
Parameters
The parameters used in the above configurations are as follows:
If new users/roles are added and the above default user and role are also needed, the following parameters must be added to the userstore along with the added user/role.

Parameter DefaultValue
Description
userManager > adminRole admin The name of the role that has administration privileges.
userManager > userStore>
users > user > username
admin The username of the user.
userManager > userStore>
users > user > password
YWRtaW4= The encrypted password of the user.
userManager > userStore>
users > user > roles
1 A comma separated list of the IDs of the roles assigned to the user.
userManager > userStore>
roles > role > id
1 The unique ID for the role.
userManager > userStore >
roles > role > admin
admin The name of the role.
Furthermore, Local IdP Client functionality can be controlled via the properties defined in the <SP_HOME>/conf/<PROFILE>/deployment.yaml file under the namespace as shown below.auth.configs
auth.configs: type: local proerties: sessionTimeout: 3600 refreshSessionTimeout: 86400
The following are the properties that can be configured for the local IdP provider:
Property Default Value Description
properties > sessiontimeout 3600 The number of seconds for which the session is valid once the user logs in.
properties >refreshSessionTimeout
86400 The number of seconds for which the refresh token used to extend the session isvalid.
The complete default configuration of the IdP Client is as follows: local
The value specified here needs to be greater than 60 seconds becausethe system checks the user credentials and keeps extending the sessionevery minute until the session timeout is reached.

auth.configs: type: 'local' proerties: sessionTimeout: 3600 refreshSessionTimeout: 86400 userManager: adminRole: admin userStore: users: - user: username: admin password: YWRtaW4= roles: 1 roles: - role: id: 1 displayName: admin
External IdP Client
External IdP Client authenticates users by interacting with an external identity provider via OAuth2 and SCIM2 protocols. The user store ismaintained by the external identity provider. WSO2 SP authenticates by requesting an access token from the identity provider using the passwordgrant type.
The auth manager must be configured under the namespace as shown below:auth.configs
auth.configs: type: external authManager: adminRole: admin
The parameters used in the above configurations areas follows:
Parameter Default Value Description
userManager > adminRole admin The name of the role that has administration privilages.
Furthermore, external IdP client functionality can be controlled via the properties defined in the <SP_HOME>/conf/<PROFILE>/deployment.y file under the namespace as shown below.aml auth.configs
The identity provider with which WSO2 SP interacts with to authenticate users must be started before the SP server.

auth.configs: type: external properties: kmDcrUrl: https://localhost:9443/identity/connect/register kmTokenUrl: https://localhost:9443/oauth2 kmUsername: admin kmPassword: admin idpBaseUrl: https://localhost:9443/scim2 idpUsername: admin idpPassword: admin portalAppContext: portal statusDashboardAppContext: monitoring businessRulesAppContext : business-rules databaseName: WSO2_OAUTH_APP_DB cacheTimeout: 900 baseUrl: https://localhost:9643 grantType: password
The following are the properties that can be configured for the external IdP provider:
Property Default Value Description
kmDcrUrl https://localhost:9443/identity/connect/register The Dynamic Client Registration (DCR)endpoint of the key manager in the IdP.
dcrAppOwner kmUsername
kmTokenUrl https://localhost:9443/oauth2 The token endpoint of the key managerin the IdP.
kmUsername admin The username for the key manager inthe IdP.
kmPassword admin The password for the key manager inthe IdP.
idpBaseUrl https://localhost:9443/scim2 The SCIM2 endpoint of the IdP.
idpUsername admin The username for the IdP.
idpPassword admin The password for the IdP.
portalAppContext portal The application context of theDashboard Portal application in WSO2SP.
statusDashboardAppContext monitoring The application context of the StatusDashboard application in WSO2 SP.
businessRulesAppContext business-rules The application context of the BusinessRules application in WSO2 SP.
databaseName WSO2_OAUTH_APP_DB The name of the wso2.datasourceused to store the OAuth applicationcredentials
cacheTimeout 900 The cache timeout for the validityperiod of the token in seconds.
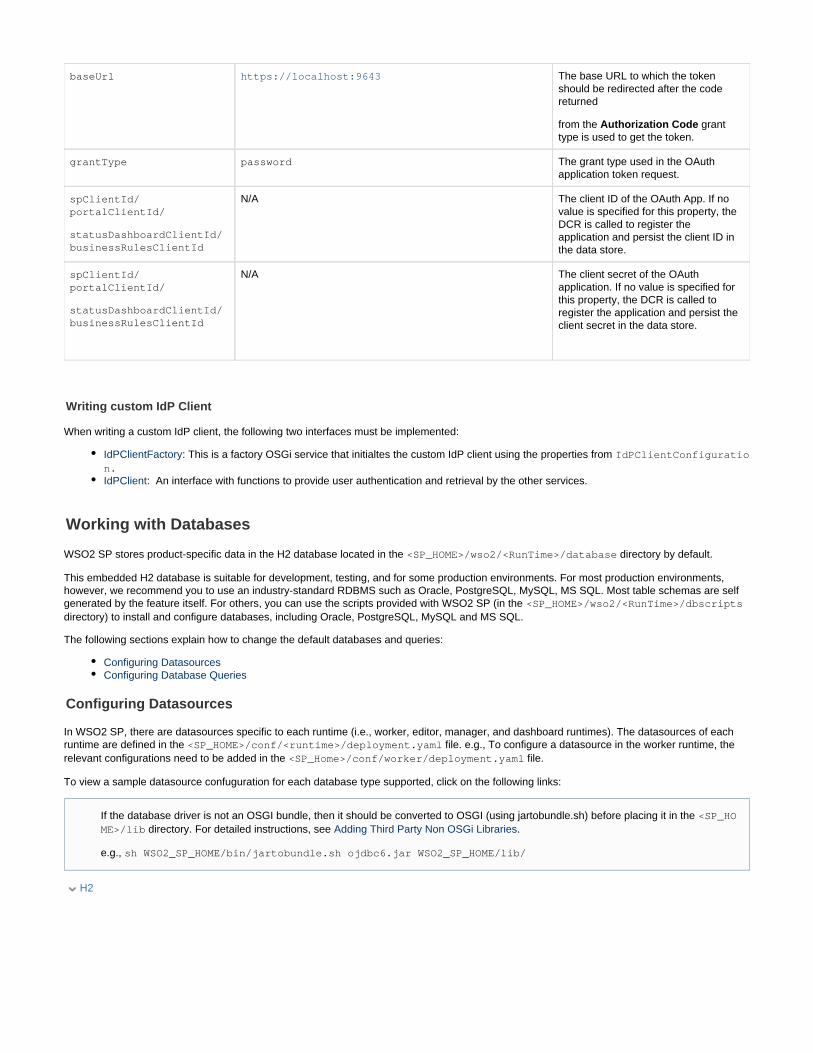
baseUrl https://localhost:9643 The base URL to which the tokenshould be redirected after the codereturned
from the grantAuthorization Codetype is used to get the token.
grantType password The grant type used in the OAuthapplication token request.
spClientId/portalClientId/
statusDashboardClientId/businessRulesClientId
N/A The client ID of the OAuth App. If novalue is specified for this property, theDCR is called to register theapplication and persist the client ID inthe data store.
spClientId/portalClientId/
statusDashboardClientId/businessRulesClientId
N/A The client secret of the OAuthapplication. If no value is specified forthis property, the DCR is called toregister the application and persist theclient secret in the data store.
Writing custom IdP Client
When writing a custom IdP client, the following two interfaces must be implemented:
IdPClientFactory: This is a factory OSGi service that initialtes the custom IdP client using the properties from IdPClientConfiguration.IdPClient: An interface with functions to provide user authentication and retrieval by the other services.
Working with Databases
WSO2 SP stores product-specific data in the H2 database located in the directory by default.<SP_HOME>/wso2/<RunTime>/database
This embedded H2 database is suitable for development, testing, and for some production environments. For most production environments,however, we recommend you to use an industry-standard RDBMS such as Oracle, PostgreSQL, MySQL, MS SQL. Most table schemas are selfgenerated by the feature itself. For others, you can use the scripts provided with WSO2 SP (in the <SP_HOME>/wso2/<RunTime>/dbscriptsdirectory) to install and configure databases, including Oracle, PostgreSQL, MySQL and MS SQL.
The following sections explain how to change the default databases and queries:
Configuring DatasourcesConfiguring Database Queries
Configuring Datasources
In WSO2 SP, there are datasources specific to each runtime (i.e., worker, editor, manager, and dashboard runtimes). The datasources of eachruntime are defined in the file. e.g., To configure a datasource in the worker runtime, the<SP_HOME>/conf/<runtime>/deployment.yamlrelevant configurations need to be added in the file. <SP_Home>/conf/worker/deployment.yaml
To view a sample datasource confuguration for each database type supported, click on the following links:
H2
If the database driver is not an OSGI bundle, then it should be converted to OSGI (using jartobundle.sh) before placing it in the <SP_HO directory. ME>/lib For detailed instructions, see Adding Third Party Non OSGi Libraries.
e.g., sh WSO2_SP_HOME/bin/jartobundle.sh ojdbc6.jar WSO2_SP_HOME/lib/

wso2.datasources: dataSources: - name: WSO2_TEST_DB description: The datasource used for test database jndiConfig: name: jdbc/WSO2_TEST_DB definition: type: RDBMS configuration: jdbcUrl:'jdbc:h2:${sys:carbon.home}/wso2/${sys:wso2.runtime}/database/testdb;IFEXISTS=TRUE;DB_CLOSE_ON_EXIT=FALSE;LOCK_TIMEOUT=60000;MVCC=TRUE' username: root password: root driverClassName: org.h2.Driver maxPoolSize: 50 idleTimeout: 60000 connectionTestQuery: SELECT 1 validationTimeout: 30000 isAutoCommit: false
MySQL
wso2.datasources: dataSources: - name: WSO2_TEST_DB description: The datasource used for test database jndiConfig: name: jdbc/WSO2_TEST_DB definition: type: RDBMS configuration: jdbcUrl: jdbc:mysql://hostname:port/testdb username: root password: root driverClassName: com.mysql.jdbc.Driver maxPoolSize: 50 idleTimeout: 60000 connectionTestQuery: SELECT 1 validationTimeout: 30000 isAutoCommit: false
POSTGRES

wso2.datasources: dataSources: - name: WSO2_TEST_DB description: The datasource used for test database jndiConfig: name: jdbc/WSO2_TEST_DB definition: type: RDBMS configuration: jdbcUrl: jdbc:postgresql://hostname:port/testdb username: root password: root driverClassName: org.postgresql.Driver maxPoolSize: 10 idleTimeout: 60000 connectionTestQuery: SELECT 1 validationTimeout: 30000 isAutoCommit: false
Oracle
There are two ways to configure this database type. If you have an SID, use this (older) format:
jdbc:oracle:thin:@[HOST][:PORT]:SID
wso2.datasources: dataSources: - name: WSO2_TEST_DB description: The datasource used for test database jndiConfig: name: jdbc/WSO2_TEST_DB definition: type: RDBMS configuration: jdbcUrl: jdbc:oracle:thin:@hostname:port:SID username: testdb password: root driverClassName: oracle.jdbc.driver.OracleDriver maxPoolSize: 50 idleTimeout: 60000 connectionTestQuery: SELECT 1 validationTimeout: 30000 isAutoCommit: false
If you have an Oracle service name, use this (newer) format:
jdbc:oracle:thin:@//[HOST][:PORT]/SERVICE

wso2.datasources: dataSources: - name: WSO2_TEST_DB description: The datasource used for test database jndiConfig: name: jdbc/WSO2_TEST_DB definition: type: RDBMS configuration: jdbcUrl: jdbc:oracle:thin:@hostname:port/SERVICE username: testdb password: root driverClassName: oracle.jdbc.driver.OracleDriver maxPoolSize: 50 idleTimeout: 60000 connectionTestQuery: SELECT 1 validationTimeout: 30000 isAutoCommit: false
MSSQL
wso2.datasources: dataSources: - name: WSO2_TEST_DB description: The datasource used for test database jndiConfig: name: jdbc/WSO2_TEST_DB definition: type: RDBMS configuration: jdbcUrl: jdbc:sqlserver://hostname:port;databaseName=testdb username: root password: root driverClassName: com.microsoft.sqlserver.jdbc.SQLServerDriver maxPoolSize: 50 idleTimeout: 60000 connectionTestQuery: SELECT 1 validationTimeout: 30000 isAutoCommit: false
The following sections explain the default datasources configured in various WSO2 SP components for different purposes, and how to changethem.
RDBMS data providerCarbon coordination Stream Processor core - persistence Stream Processor - Status Dashboard Siddhi RDBMS store Carbon Dashboards Business Rules IdP client Permission provider

RDBMS data provider
DatabaseAccess
Requirement
The RDBMS provider publishes records from RDBMS tables into generated widgets. It can also be configured to purgerecords in tables. In order to carry out these actions, this provider requires access to read and delete records in userdefined tables of the database. For more information about the RDBMS data provider, see .Generating Widgets
Required/Optional
This is required if you select a datasource when generating the widget or use existing widgets that connect to the RDBMSdata provider when you run the dashboard profile of WSO2 SP.
Default Datasource Name
SAMPLE_DB
DefaultDatabase
The default database location is .H2 <SP_HOME>/wso2/dashboard/database/SAMPLE_DB
Tables The default database shipped with a sample table named .TRANSACTION_TABLE
Schemas andQueries
The schema for the sample table is TRANSACTIONS_TABLE (creditCardNo VARCHAR(50), countryVARCHAR(50), transaction VARCHAR(50), amount INT)
The default queries can be viewed .here
TestedDatabaseTypes
H2, MySQL, Postgres, Mssql, Oracle 11g
Carbon coordination
DatabaseAccessRequirement
Carbon coordination supports zookeeper and RDBMS based coordination. In RDBMS coordination, database access isrequired for updating the heartbeats of the nodes. In addition, database access is required to update the coordinator andthe other members in the cluster. For more information, see Configuring Cluster Coordination .
Required/Optional
This is required. However, you can also use Zookeeper coordination instead of RDBMS.
Default Datasource Name
Carbon datasources is used and the name of the default datasource is .WSO2_CARBON_DB
Tables LEADER_STATUS_TABLE, , , MEMBERSHIP_EVENT_TABLE REMOVED_MEMBERS_TABLE CLUSTER_NODE_STATUS_TABLE
Schemas andQueries
Information about the default queries and the schema can be viewed .here
TestedDatabaseTypes
MySQL, Postgres, Mssql, Oracle 11g
Stream Processor core - persistence
DatabaseAccessRequirement
This involves persisting the state of Siddhi Applications periodically in the database. State persistence is enabled byselecting the class in the org.wso2.carbon.stream.processor.core.persistence.DBPersistenceStore stat
section of the file. For more information,e.persistence <SP_Home>/conf/<worker/manager>/deployment.yamlsee .Configuring Database and File System State Persistence
Required/Optional
This is optional. WSO2 is configured to persist the state of Siddhi applications by default.
DefaultDatasourceName
N/A. If state persistence is required, you need to configure the datasource in the <SP_Home>/conf/<worker/manager> file under > > ./deployment.yaml state.persistence config datasource
Tables N/A. If state persistence is required, you need to specify the table name to be used when persisting the state in the <SP_Ho file under > > .me>/conf/<worker/manager>/deployment.yaml state.persistence config table
Schemas andQueries
Information about the default queries and schema can be viewed .here

TestedDatabaseTypes
H2, MySQL, Postgres, Mssql, Oracle 11g
Stream Processor - Status Dashboard
DatabaseAccessRequirement
To display information relating to the status of your SP deployment, the Status Dashboard needs to retrive carbon metricsdata, registered SP worker details and authentication details within the cluster from the database. For more information, see
.Monitoring Stream Processor
Required/Optional
Required
DefaultDatasourceName
WSO2_STATUS_DASHBOARD_DB, WSO2_METRICS_DB
Tables , , , , METRIC_COUNTER METRIC_GAUGE METRIC_HISTOGRAM, METRIC_METER METRIC_TIMER WORKERS_CONFIGURAT, IONS WORKERS_DETAILS
Schemas andQueries
Information about the default queries and schema: https://github.com/wso2/carbon-analytics/blob/v2.0.250/components/org.wso2.carbon.status.dashboard.core/src/main/resources/queries.yaml
TestedDatabaseTypes
H2, MySQL, Mssql, Oracle 11g (Postgres is tested with Carbon-Metrics only)
Siddhi RDBMS store
DatabaseAccessRequirement
It gives the capability of creating the tables at the siddhi app runtime and access the existing tablesif a user defined carbondatasource or JNDI property in a siddhi app. Documentation can be found in https://wso2-extensions.github.io/siddhi-store-rdbms/api/4.0.15/
Required/Optional
Optional
DefaultDatasourceName
No such default Datasource. User has to create the datasource in the Siddhi app
Tables No such default tables. User has to define the tables
Schemas andQueries
Information about the default queries and schema: https://github.com/wso2-extensions/siddhi-store-rdbms/blob/v4.0.15/component/src/main/resources/rdbms-table-config.xml
TestedDatabaseTypes
H2, MySQL, Mssql, Oracle 11g, DB2, PostgreSQL
Carbon Dashboards
DatabaseAccessRequirement
Carbon Dashboard feature uses its datasource to persist the dashboard related information
Required/Optional
Optional
DefaultDatasourceName
WSO2_DASHBOARD_DB
Tables DASHBOARD_RESOURCE

Schemas andQueries
https://github.com/wso2/carbon-dashboards/tree/master/features/org.wso2.carbon.dashboards.api.feature/src/main/resources/sql
TestedDatabaseTypes
H2, MySQL
Business Rules
DatabaseAccessRequirement
Business Rules feature uses database to persist the derived business rules
Required/Optional
Mandatory
DefaultDatasourceName
BUSINESS_RULES_DB
Tables BUSINESS_RULES, RULES_TEMPLATES
Schemas andQueries
https://github.com/wso2/carbon-analytics/blob/v2.0.250/components/org.wso2.carbon.business.rules.core/src/main/resources/queries.yaml
TestedDatabaseTypes
H2, MySQL, Oracle 11g
IdP client
DatabaseAccessRequirement
IdP client access the DB layer to persist the client id and the client secret of dynamic client registration
Required/Optional
Mandatory for external IdP clients
DefaultDatasourceName
DB_AUTH_DB
Tables OAUTH_APPS
Schemas andQueries
https://github.com/wso2/carbon-analytics-common/blob/v6.0.52/components/authentication/org.wso2.carbon.analytics.idp.client/src/main/resources/queries.yaml
TestedDatabaseTypes
H2
Permission provider
DatabaseAccessRequirement
Permission provider will access the DB to persist permissions and role - permission mappings.
Required/Optional
Mandatory, default is in H2
DefaultDatasourceName
PERMISSIONS_DB
Tables PERMISSIONS, ROLE_PERMISSIONS

1.
2.
Schemas andQueries
https://github.com/wso2/carbon-analytics-common/blob/v6.0.52/components/permission-provider/org.wso2.carbon.analytics.permissions/src/main/resources/queries.yaml
TestedDatabaseTypes
H2, MySQL, Mssql, Oracle 11g
Configuring Database Queries
Database queries used in the following features and can configured for new database or override the default queries for the new databaseversion. The relevant configurations should be added to the file. <SP_Home>/conf/<Runtime>/deployment.yaml
Business RulesStatus Dashboard Dashboard RDBMS Data Provider
The following are sample database query configurations that override the MySQL default version queries in the RDBMS Data Provider Feature byMySQL new version 5.7.0 and adding new queries for new database type MariaDB with version 10.0.20 respectiveley:
wso2.rdbms.data.provider: queries: - mappings: record_delete: "DELETE FROM {{TABLE_NAME}} ORDER BY{{INCREMENTAL_COLUMN}} ASC LIMIT {{LIMIT_VALUE}}" total_record_count: "SELECT COUNT(*) FROM {{TABLE_NAME}}" record_limit: "{{CUSTOM_QUERY}} ORDER BY {{INCREMENTAL_COLUMN}} DESCLIMIT {{LIMIT_VALUE}}" record_greater_than: "SELECT * FROM ({{CUSTOM_QUERY}} ORDER BY{{INCREMENTAL_COLUMN}} DESC ) AS A_TABLE WHERE {{INCREMENTAL_COLUMN}} >{{LAST_RECORD_VALUE}}" type: MySQL version: 5.7.0 - mappings: record_delete: "DELETE FROM {{TABLE_NAME}} ORDER BY{{INCREMENTAL_COLUMN}} ASC LIMIT {{LIMIT_VALUE}}" total_record_count: "SELECT COUNT(*) FROM {{TABLE_NAME}}" record_limit: "{{CUSTOM_QUERY}} ORDER BY {{INCREMENTAL_COLUMN}} DESCLIMIT {{LIMIT_VALUE}}" record_greater_than: "SELECT * FROM ({{CUSTOM_QUERY}} ORDER BY{{INCREMENTAL_COLUMN}} DESC ) AS A_TABLE WHERE {{INCREMENTAL_COLUMN}} >{{LAST_RECORD_VALUE}}" type: MariaDB version: 10.0.20
Business Rules
To add or override database queries for Business Rules you need to configure the <SP_Home>/conf/dashboard/deployment.yaml file as indicatedin the above example:
You can find the avaialble default queries in :https://github.com/wso2/carbon-analytics/blob/v2.0.250/components/org.wso2.carbon.business.rules.core/src/main/resources/queries.yamlCopy the queries with the above structure under the ' ' namespace.wso2.business.rules.manager
Status Dashboard

1.
2.
1.
2.
1.
2.
To add or override database queries for Status Dashbord you need to configure the <SP_Home>/conf/dashboard/deployment.yaml file as indicateabove example:d in the
You can find the avaialble default queries in : https://github.com/wso2/carbon-analytics/blob/v2.0.250/components/org.wso2.carbon.status.dashboard.core/src/main/resources/queries.yamlCopy the queries with the above structure under the ' ' namespace.wso2.status.dashboard
Dashboard
To add or override database queries for Dashbord you need to configure the <SP_Home>/conf/dashboard/deployment.yaml file as indicated inabove example:the
You can find the avaialble default queries in : https://github.com/wso2/carbon-dashboards/blob/v4.0.8/components/dashboards/org.wso2.carbon.dashboards.core/src/main/resources/sql-queries.yamlCopy the queries with the above structure under the ' ' namespace.wso2.dashboard
RDBMS Data Provider
To add or override database queries for RDBMS Data Provider you need to configure the <SP_Home>/conf/dashboard/deployment.yaml file as inabove example:dicated in the
You can find the avaialble default queries in : https://github.com/wso2/carbon-analytics/blob/v2.0.250/components/org.wso2.carbon.data.provider/src/main/resources/queries.yamlCopy the queries with the above structure under the ' namespace.wso2.rdbms.data.provider'
Authorization & Permission Model
This page will provide information about the permission model of REST APIs available in each runtime of WSO2 Stream Processor. If you wantthe complete set of REST APIs which available in WSO2 SP, please find it . You can find the REST APIs for each runtime and its permissionheremodel in the below pages.
Worker Runtime - REST APIs Permission ModelManager Runtime - REST APIs Permission Model
Worker Runtime - REST APIs Permission Model
There are two sets of REST APIs available in worker runtime. Stream Processor APIs and Event Simulator APIs have following permission model.You need to have appropriate permission to invoke these APIS.
Stream Processor APIs
Method API Context Required Permission
POST /siddhi-apps PermissionString - siddhiApp.manage
AppName - SAPP
PUT /siddhi-apps PermissionString - siddhiApp.manage
AppName - SAPP
DELETE /siddhi-apps/{appName} PermissionString - siddhiApp.manage
AppName - SAPP
GET /siddhi-apps PermissionString - siddhiApp.manage or siddhiApp.view
AppName - SAPP
GET /siddhi-apps/{appName} PermissionString - siddhiApp.manage or siddhiApp.view
AppName - SAPP
Note: Please note that in order to apply the above changes, you need to restart the server runtime.

GET /siddhi-apps/{appName}/status PermissionString - siddhiApp.manage or siddhiApp.view
AppName - SAPP
POST /siddhi-apps/{appName}/backup PermissionString - siddhiApp.manage
AppName - SAPP
POST /siddhi-apps/{appName}/restore
/siddhi-apps/{appName}/restore?version=
PermissionString - siddhiApp.manage
AppName - SAPP
GET /statistics PermissionString - siddhiApp.manage or siddhiApp.view
AppName - SAPP
PUT /statistics PermissionString - siddhiApp.manage
AppName - SAPP
GET /system-details PermissionString - siddhiApp.manage or siddhiApp.view
AppName - SAPP
GET /siddhi-apps/statistics PermissionString - siddhiApp.manage or siddhiApp.view
AppName - SAPP
PUT /siddhi-apps/{appName}/statistics PermissionString - siddhiApp.manage
AppName - SAPP
PUT /siddhi-apps/statistics PermissionString - siddhiApp.manage
AppName - SAPP
Event Simulator APIs
Method API Context Required Permission
POST /simulation/single PermissionString - simulator.manage
AppName - SIM
POST /simulation/feed PermissionString - simulator.manage
AppName - SIM
GET /simulation/feed PermissionString - simulator.manage or simulator.view
AppName - SIM
PUT /simulation/feed/{simulationName} PermissionString - simulator.manage
AppName - SIM
GET /simulation/feed/{simulationName} PermissionString - simulator.manage or simulator.view
AppName - SIM
DELETE /simulation/feed/{simulationName} PermissionString - simulator.manage
AppName - SIM
POST /simulation/feed/{simulationName}?action=run PermissionString - simulator.manage
AppName - SIM
POST /simulation/feed/{simulationName}?action=pause PermissionString - simulator.manage
AppName - SIM

POST /simulation/feed/{simulationName}?action=resume PermissionString - simulator.manage
AppName - SIM
POST /simulation/feed/{simulationName}?action=stop PermissionString - simulator.manage
AppName - SIM
POST /simulation/feed/{simulationName}?action=resume PermissionString - simulator.manage
AppName - SIM
GET /simulation/feed/{simulationName}/status PermissionString - simulator.manage or simulator.view
AppName - SIM
POST /simulation/files PermissionString - simulator.manage
AppName - SIM
GET /simulation/files PermissionString - simulator.manage or simulator.view
AppName - SIM
PUT /simulation/files/{fileName} PermissionString - simulator.manage
AppName - SIM
DELETE /simulation/files/{fileName} PermissionString - simulator.manage
AppName - SIM
POST /simulation/connectToDatabase PermissionString - simulator.manage
AppName - SIM
POST /simulation/ /connectToDatabase retrieveTableNames PermissionString - simulator.manage
AppName - SIM
POST /simulation/connectToDatabase/{tableName}/retrieveColumnNames PermissionString - simulator.manage
AppName - SIM
simulator
Manager Runtime - REST APIs Permission Model
Manager runtime only have Stream Processor(Siddhi APIs) APIs and have following permission model. You need to have appropriate permissionto invoke these APIS.
Method API Context Required Permission
POST /siddhi-apps PermissionString - siddhiApp.manage
AppName - SAPP
PUT /siddhi-apps PermissionString - siddhiApp.manage
AppName - SAPP
DELETE /siddhi-apps/{appName} PermissionString - siddhiApp.manage
AppName - SAPP
GET /siddhi-apps PermissionString - siddhiApp.manage or siddhiApp.view
AppName - SAPP
GET /siddhi-apps/{appName} PermissionString - siddhiApp.manage or siddhiApp.view
AppName - SAPP
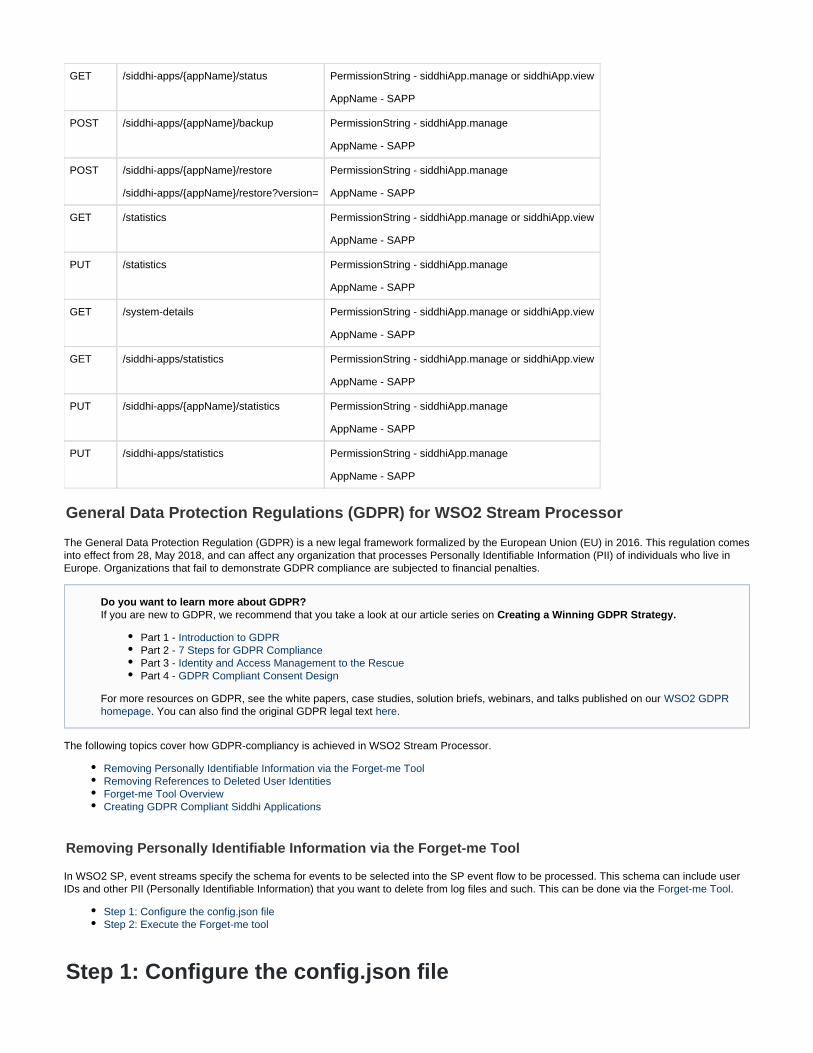
GET /siddhi-apps/{appName}/status PermissionString - siddhiApp.manage or siddhiApp.view
AppName - SAPP
POST /siddhi-apps/{appName}/backup PermissionString - siddhiApp.manage
AppName - SAPP
POST /siddhi-apps/{appName}/restore
/siddhi-apps/{appName}/restore?version=
PermissionString - siddhiApp.manage
AppName - SAPP
GET /statistics PermissionString - siddhiApp.manage or siddhiApp.view
AppName - SAPP
PUT /statistics PermissionString - siddhiApp.manage
AppName - SAPP
GET /system-details PermissionString - siddhiApp.manage or siddhiApp.view
AppName - SAPP
GET /siddhi-apps/statistics PermissionString - siddhiApp.manage or siddhiApp.view
AppName - SAPP
PUT /siddhi-apps/{appName}/statistics PermissionString - siddhiApp.manage
AppName - SAPP
PUT /siddhi-apps/statistics PermissionString - siddhiApp.manage
AppName - SAPP
General Data Protection Regulations (GDPR) for WSO2 Stream Processor
The General Data Protection Regulation (GDPR) is a new legal framework formalized by the European Union (EU) in 2016. This regulation comesinto effect from 28, May 2018, and can affect any organization that processes Personally Identifiable Information (PII) of individuals who live inEurope. Organizations that fail to demonstrate GDPR compliance are subjected to financial penalties.
The following topics cover how GDPR-compliancy is achieved in WSO2 Stream Processor.
Removing Personally Identifiable Information via the Forget-me ToolRemoving References to Deleted User IdentitiesForget-me Tool OverviewCreating GDPR Compliant Siddhi Applications
Removing Personally Identifiable Information via the Forget-me Tool
In WSO2 SP, event streams specify the schema for events to be selected into the SP event flow to be processed. This schema can include userIDs and other PII (Personally Identifiable Information) that you want to delete from log files and such. This can be done via the .Forget-me Tool
Step 1: Configure the config.json fileStep 2: Execute the Forget-me tool
Step 1: Configure the config.json file
Do you want to learn more about GDPR?If you are new to GDPR, we recommend that you take a look at our article series on Creating a Winning GDPR Strategy.
Part 1 - Introduction to GDPRPart 2 - 7 Steps for GDPR CompliancePart 3 - Identity and Access Management to the RescuePart 4 - GDPR Compliant Consent Design
For more resources on GDPR, see the white papers, case studies, solution briefs, webinars, and talks published on our WSO2 GDPR. You can also find the original GDPR legal text .homepage here

1. 2.
The specifies the locations from which<SP_HOME>/wso2/tools/identity-anonymization-tool-x.x.x/conf/config.json filepersisted data need to be removed.
The processor is specified in the configuration file of the Forget-Me tool as shown on the sample below in order to remove data withlog-filePII from the logs. If you have configured logs with PII to be saved in another location, you can add it to this list of processors.
{ "processors" : [ "log-file" ], "directories": [ { "dir": "log-config", "type": "log-file", "processor" : "log-file", "log-file-path" : "logs", "log-file-name-regex" : "(.)*" } ]}
This extract shows the default configuration of WSO2 SP. SP only saves PII in log files by default. Therefore, this configuration allows theForget-me tool to delete these logs that are saved in directory.<SP_HOME>/wso2/<PROFILE>/logs
Step 2: Execute the Forget-me tool
To execute the Forget-me tool, issue the following command pointing to the directory.<SP_HOME>
forget-me -U <USERNAME> -d <CONF_DIR> -carbon <SP_HOME>
Removing References to Deleted User Identities
This section covers how to remove references to deleted user identities in WSO2 SP by running the .Forget-me tool
Open a new terminal window and navigate to the directory. <SP_HOME>/binExecute one of the following commands depending on your operating system:
On Linux/Mac OS: ./forgetme.sh -U <username>On Windows: forgetme.bat -U <username>
Before you beginNote that this tool is designed to run in offline mode (i.e., the server should be shut down or run on another machine) in order toprevent unnecessary load to the server. If this tool runs in online mode (i.e., when the server is running), DB lock situations onthe H2 databases may occur. If you have configured any JDBC database other than the H2 database provided by default, copy the relevant JDBC driver tothe directory.<SP_HOME>/wso2/tools/identity-anonymization-tool/lib
NoteThe commands specified above use only the option, which is the only required option to run the tool. There-U <username>are several other optional command line options that you can specify based on your requirement. The supported options aredescribed in detail below.
CommandLineOption
Description Required Sample Value
U The name of the user whose identity references you want to remove. Yes -U john.doe

2.
1. 2.
Forget-me Tool Overview
The Forget-me tool is shipped with WSO2 SP by default in the directory<SP_HOME>/wso2/tools/identity-anonymization-tool-x.x.x. If required, you can change the default location of the configurations of this tool or make changes to the default configurations. You can also runthe Forget-me tool in the standalone mode.
Changing the default configurations locationChanging the default configurations of the toolRunning the Forget-me tool in the standalone mode
Changing the default configurations location
You can change the default location of the tool configurations if desired. You may want to do this if you are working with a multi-productenvironment where you want to manage configurations in a single location for ease of use. Note that this is .optional
To change the default configurations location for the embedded tool, do the following:
Open the file found inside the directory.forgetme.sh <SP_HOME>/binThe location path is the value given after within the following line. Modify the value after to change the location. -d -d
sh$CARBON_HOME/repository/components/tools/identity-anonymization-tool/bin/forget-me -d$CARBON_HOME/repository/components/tools/identity-anonymization-tool/conf -carbon $CARBON_HOME $@
Changing the default configurations of the tool
All configurations related to this tool can be found inside the directory.<SP_HOME>/wso2/tools/identity-anonymization-tool/confThe default configurations are set up as follows:
d The configuration directory to use when the tool is run. If you do not specify a value for this option, the <SP_HOME>/wso2/tools/id
directory (which is the defaultentity-anonymization-tool-x.x.x/confconfiguration directory of the tool) is used.
No -d <TOOL_HOME>/conf
T The tenant domain of the user whose identity references you want to remove. No -T acme-company
The default value is carbon.super
TID The tenant ID of the user whose identity references you want to remove. No -TID 2346
D The user store domain name of the user whose identity references you want toremove.
No -D Finance-Domain
The default value is .PRIMARY
pu The pseudonym with which the user name of the user whose identity referencesyou want to remove should be replaced. If you do not specify a pseudonymwhen you run the tool, a random UUID value is generated as the pseudonym bydefault.
No -pu “123-343-435-545-dfd-4”
carbon The CARBON HOME. This should be replaced with the variable $CARBON_HOM in directories configured in the main configuration file.E
No -carbon“/usr/bin/wso2sp/wso2sp4.1.0
If you specify a tenant domain via this option, use the option toTIDspecify the ID of which the references must be removed.
It is required to specify a tenant ID if you have specified a tenantdomain via the option.TID
The default location path is $CARBON_HOME/repository/components/tools/forget-me/conf.

Read Logs: <SP_HOME>/wso2/<PROFILE>/logs
Read Datasource: file<SP_HOME>/conf/<PROFILE>deployment.yaml
Default datasources: , , , WSO2_CARBON_DB, WSO2_METRICS_DB WSO2_PERMISSIONS_DB WSO2_DASHBOARD_DB BUSINESS_RULES, , _DB SAMPLE_DB WSO2_STATUS_DASHBOARD_DB
Log file name regex: The regex patterns defined in all the files in the <SP_HOME>/wso2/tools/identity-anonymization-tool directory are considered./conf/log-config
For information on changing these configurations, see in the Product Administration Guide.Configuring the config.json file
Running the Forget-me tool in the standalone mode
This tool can run standalone and therefore cater to multiple products. This means that if you are using multiple WSO2 products and need todelete the user's identity from all products at once, you can do so by running the tool in standalone mode.For information on how to build and run the Forget-Me tool, see in the WSO2Removing References to Deleted User Identities in WSO2 ProductsAdministration Guide.
Creating GDPR Compliant Siddhi Applications
The obfuscation/removal of such PII (Personally Identifiable Information) can be handled in WSO2 Stream Processor by Siddhi Applications thatcan either modify or remove records that contain the PII. These Siddhi Applications can be written in a way to match the original queries thatcaptured data for persistence so that the same data can be modified or removed as required. For more information about writing Siddhi Queries,see .Siddhi Query Guide
The following sections explain how obfuscation/deletion of sensitive data can be managed via Siddhi queries in a custom Siddhi applicationdeveloped based on a specific user case.
Obfuscating PIIDeleting PII
Obfuscating PII
Let's consider a Siddhi application that includes the following store definition to persist streaming data.
define table customerTable (customerId string, customerName string, entryVector int);
In this example, the customer ID is considered PII, and a customer with the ID wants that ID to be hidden in the system so that he/she cannotXXXbe personally identified with it. Therefore, you need to obfuscate the value for the attribute. This can be done by creating ancustomerIdalgorithm to create a hashed value or a pseudonym to replace a specific value for the attribute.customerId
Let's consider that such an algorithm exists (e.g., as a function named ). To invoke this function, you need to add a new query to theanonymizeSiddhi application as shown in the sample below.
define table customerTable (customerId string, customerName string, entryVector int);
define stream UpdateStream (customerId string);
from UpdateStream
select *
update customerTable
set customerTable.customerName = anonymize(customerTable.customerName)
on customerTable.customerId == XXX;
In the above Siddhi application, the query in bold is triggered when a new event is received in the stream where the value for the UpdateStream attribute is XXX. Once it is triggered, the customer ID is replaced with a pseudonym.customerId XXX
For more information about writing custom functions, see .Siddhi Query Guide - Writing Custom Extensions
Deleting PII
Let's assume that the customer ID in the scenario described above needs to be deleted. To do this, you can write a Siddhi query to delete thevalue for the attribute when is equal to as shown below.customerId XXX
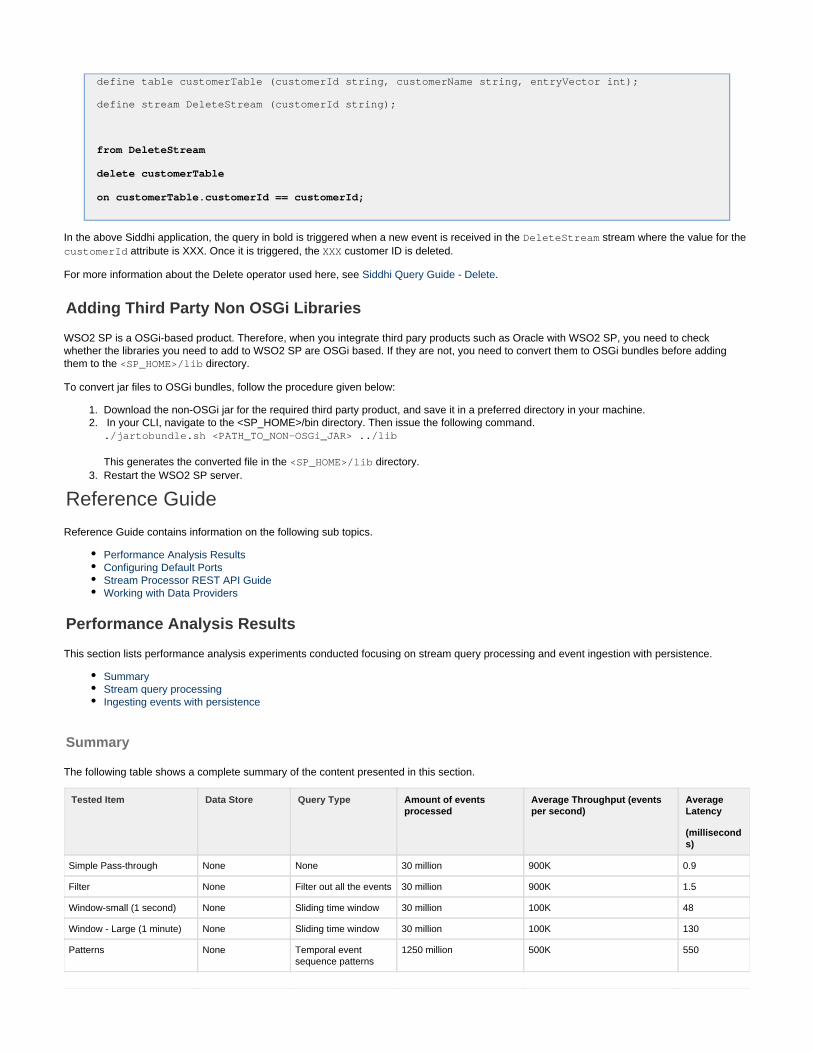
1. 2.
3.
define table customerTable (customerId string, customerName string, entryVector int);
define stream DeleteStream (customerId string);
from DeleteStream
delete customerTable
on customerTable.customerId == customerId;
In the above Siddhi application, the query in bold is triggered when a new event is received in the stream where the value for the DeleteStream attribute is XXX. Once it is triggered, the customer ID is deleted.customerId XXX
For more information about the Delete operator used here, see .Siddhi Query Guide - Delete
Adding Third Party Non OSGi Libraries
WSO2 SP is a OSGi-based product. Therefore, when you integrate third pary products such as Oracle with WSO2 SP, you need to checkwhether the libraries you need to add to WSO2 SP are OSGi based. If they are not, you need to convert them to OSGi bundles before addingthem to the directory. <SP_HOME>/lib
To convert jar files to OSGi bundles, follow the procedure given below:
Download the non-OSGi jar for the required third party product, and save it in a preferred directory in your machine. In your CLI, navigate to the <SP_HOME>/bin directory. Then issue the following command../jartobundle.sh <PATH_TO_NON-OSGi_JAR> ../lib
This generates the converted file in the directory.<SP_HOME>/libRestart the WSO2 SP server.
Reference Guide
Reference Guide contains information on the following sub topics.
Performance Analysis ResultsConfiguring Default PortsStream Processor REST API GuideWorking with Data Providers
Performance Analysis Results
This section lists performance analysis experiments conducted focusing on stream query processing and event ingestion with persistence.
SummaryStream query processingIngesting events with persistence
Summary
The following table shows a complete summary of the content presented in this section.
Tested Item Data Store Query Type Amount of eventsprocessed
Average Throughput (eventsper second)
AverageLatency
(milliseconds)
Simple Pass-through None None 30 million 900K 0.9
Filter None Filter out all the events 30 million 900K 1.5
Window-small (1 second) None Sliding time window 30 million 100K 48
Window - Large (1 minute) None Sliding time window 30 million 100K 130
Patterns None Temporal eventsequence patterns
1250 million 500K 550

Event Ingestion withPersistence
Oracle Event Store
Insert 252 million 70K 42
Update 75 million 20K 12
MS SQL EventStore
Insert 198 million 55K 44.2
Update 3.6 million 1K 4.6
MySQL EventStore
Insert 12.2 million 3.4K 2.14
Update 3 million 500 0.5
SummaryStream query processing
Scenario: Running multiple Siddhi queriesScenario: Running Siddhi Pattern query on debs-2013-grand-challenge-soccer-monitoring dataset
Ingesting events with persistenceOracle event store
Scenario 1: Insert query - Persisting 252 million events of process monitoring events in OracleScenario 2: Update Query - Updating 10 million events in Oracle Data store
Microsoft SQL server event storeScenario 1: Insert Query - Persisting 198 million process monitoring events in MS SQLScenario 2: Update Query - Updating 10 million events in MS SQL data store
MySQL event storeScenario 1: Insert Query - Persisting 12.2 million process monitoring events in MySQLScenario 2: Update Query - Updating 100K events in MySQL data store
Stream query processing
Scenario: Running multiple Siddhi queries
Infrastructure used
The experiments were carried out in two c4.2xlarge (8 vCPU, 16GB RAM, EBS storage with 1000 Mbps max dedicated bandwidth) Amazon EC2 instances.
Linux kernel 4.44, java version "1.8.0_131", JVM flags -Xmx4g -Xms2gOne node operated as a client.Another node operated as a Stream Processor node.Experiments were carried out using TCP as the transport.
Query Type Sample Query Amount of EventsProcessed
Average Throughput(events per second)
Latency (ms)
NotesEvent ingestion with persistence tests were conducted using the default Amazon RDS configurations.All the tests for event ingestion with persistence were conducted for 1 hour.Performance results were aggregated in 5000K event windows.The above table had an input rate of 1000K events per second during the first four tests.All the tests were conducted using TCP transport.

SimplePassthrough
@App:name("TCP_Benchmark")
@source(type = 'tcp',context='inputStream',@map(type='binary'))
define stream inputStream (iijtimestamplong,value float);
from inputStream
select iijtimestamp,value
insert into tempStream;
30 million 900K 0.9
Filter
@App:name("TCP_Benchmark")
@source(type = 'tcp',context='inputStream',@map(type='binary'))define stream inputStream (iijtimestamplong,value float);
from inputStream[value<=1] select iijtimestamp,value
insert into tempStream;
30 million 900K 1.5
@App:name("TCP_Benchmark")
@source(type = 'tcp',context='inputStream',@map(type=
'binary'))define stream inputStream (iijtimestamp
long,value float);
from inputStream[value<=0.5] select iijtimestamp,value
insert into tempStream;
30 million 450K 1.1
@App:name("TCP_Benchmark")
@source(type = 'tcp',context='inputStream',@map(type=
'binary'))define stream inputStream (iijtimestamp
long,value float);
from inputStream[value<=0.25] select iijtimestamp,value
insert into tempStream;
30 million 226K 0.6
Window
@App:name("TCP_Benchmark")
@source(type='tcp',context='inputStream', @map(type='binary'))
define stream inputStream (iijtimestamplong,value float);
from inputStream#window.time(1 sec) select iijtimestamp,value
insert into tempStream;
30 million 100K 48
@App:name("TCP_Benchmark")
@source(type='tcp',context='inputStream', @map(type='binary'))
define stream inputStream (iijtimestamplong,value float);
from inputStream#window.time(1 min) select iijtimestamp,value
insert into tempStream;
30 million 100K 130
Scenario: Running Siddhi Pattern query on debs-2013-grand-challenge-soccer-monitoring dataset

Infrastructure used
The experiments were carried out in two c4.2xlarge (8 vCPU, 16GB RAM, EBS storage with 1000 Mbps max dedicated bandwidth) Amazon EC2 instances.
Linux kernel 4.44, java version "1.8.0_131", JVM flags : -Xmx4g -Xms2gOne node operated as a client.Another node operated as a Stream Processor node.Experiments were carried out using TCP as the transport.
Dataset
The data used in 2013 DEBS Grand Challenge is collected by the Real-Time Locating System deployed on a football field of the NurembergStadium in Germany. Data originates from sensors located near the players’ shoes (1 sensor per leg) and in the ball (1 sensor). The goalkeeper isequipped with two additional sensors in each hand. The sensors in the players’ shoes and hands produce data at a frequency of 200Hz, while thesensor in the ball produces data at a frequency of 2000Hz. The total data rate reaches roughly 15 position events per second. Every positionevent describes the position of a given sensor in a three-dimensional coordinate system. The center of the playing field is at coordinate (0, 0, 0)for the dimensions of the playing field and the coordinates of the kickoff.
For more details about the dataset, see .DEBS 2013 Grand Challenge: Soccer monitoring
Pattern used
We created patterns for goal scoring scenario. In this scenario, the pattern matching query involves two events referrred to as and thate1 e2should occur one after the other with some preconditions being satisfied. These preconditions include the position (denoted by , , and ) andx y zthe acceleration of the ball (denoted by ). The numerical constants (such as , , etc.,) in the sample pattern matching querya_abs 29880 22560with which the values for , , and are compared correspond to the boundary points of the goal reg.x y z
Sample Siddhi App
@App:name("TCP_Benchmark")
@source(type = 'tcp', context='inputStream',@map(type='binary'))define stream innerStream(iij_timestamp long,sid int, eventtt long, xdouble, y, double, z int, v_abs double, a_abs int, vx int, vy int, vz int,ax int,ay int, az int);
from e1=innerStream[(x>29880 or x<22560) and y>-33968 and y<33965 and(sid==4 or sid ==12 or sid==10 or sid==8)] -> e2=innerStream[(x<=29898 and x>22579) and y<=-33968 and z<2440 anda_abs>=55000 and (sid==4 or sid ==12 or sid==10 or sid==8)]
select e2.sid as sid, e2.eventtt as eventtt, e2.x as x,e2.y as y, e2.z asz,e2.v_abs as v_abs,e2.a_abs as a_abs, e2.vx as vx,e2.vy as vy, e2.vz as vz, e2.ax as ax,e2.ay as ay, e2.az as az, e1.iij_timestamp asiij_timestampinsert into outputStream;
Summary Results
Throughput (events per second) 500,000
Latency (ms) 550
Ingesting events with persistence

All the event ingestion with persistence tests were conducted using the following deployment configuration.
Oracle event store
Infrastructure used
The following infrastructure was used in both scenarios:
c4.2xlarge (8 vCPU, 16GB RAM, EBS storage with 1000 Mbps max dedicated bandwidth) Amazon EC2 instances operated as the SPnode and the TCP client.
Linux kernel 4.44, java version "1.8.0_131", JVM flags : -Xmx4g -Xms2gdb.m4.2xlarge (8 vCPU, 32 GB RAM, EBS-optimized storage with 100 Mbps max dedicated bandwidth) Amazon RDS instance withOracle operated as the database node.Customized TCP client operated as the data publisher (TCP producer found in samples).Experiments were carried out using Oracle 12g.
Scenario 1: Insert query - Persisting 252 million events of process monitoring events in Oracle
This test involved persisting process monitoring events of approximately 180 bytes each. The test injected 252 million events into WSO2 StreamProcessor with a publishing TPS of 70,000 events per second during a time period of one hour.
Throughput Graph

Latency Graph
Summary Results
Throughput (events per second) 70,000
Latency (ms) 42
Scenario 2: Update Query - Updating 10 million events in Oracle Data store
The test injected events into the properly indexed Oracle Database. The test involved persisting process monitoring events of10 million approximately 180 bytes each. 75 million update queries were performed. The publishing throughput was 20,000 events per second during a timeperiod of one hour.
Throughput Graph

Latency Graph
Summary Results

Number Of Persisted Events 10 million
Throughput (events second) per 20,000
Latency (ms) 12
Microsoft SQL server event store
Infrastructure used
c4.2xlarge (8 vCPU, 16GB RAM, EBS storage with 1000 Mbps max dedicated bandwidth) Amazon EC2 instance operated as the SPnode.
Linux kernel 4.44, java version “1.8.0_131", JVM flags : -Xmx4g -Xms2gdb.m4.2xlarge (8 vCPU, 32 GB RAM, EBS-optimized storage with 100 Mbps max dedicated bandwidth) Amazon RDS instance with MSSQL Enterprise Edition 2016 operated as the database nodeCustomized TCP client operated as the data publisher (Sample TCP client found in samples).
Scenario 1: Insert Query - Persisting 198 million process monitoring events in MS SQL
This test involved persisting process monitoring events of approximately 180 bytes each. The test injected 198 million events into WSO2 StreamProcessor with a publishing throughput of 55,000 events per second during a time period of one hour.
Throughput Graph
Latency Graph

Summary Results
Throughput (event per second) 55,000
Latency (ms) 44.2
- Updating 10 million events in MS SQL data store Scenario 2: Update Query
This test injected 10 million events into the properly indexed MS SQL Database. This test involved persisting process monitoring events ofapproximately 180 bytes each. 3.6 million update queries were performed with a publishing throughput of 1000 events per second during a timeperiod of one hour.
Throughput Graph

Summary Results
Number Of Persisted Events 10 million
Throughput (events per second) 1000
Latency (ms) 4.6
MySQL event store
Infrastructure Used
c4.2xlarge (8 vCPU, 16GB RAM, EBS storage with 1000 Mbps max dedicated bandwidth) Amazon EC2 instances operated as the SPnode and the TCP client.
Linux kernel 4.44, java version "1.8.0_131", JVM flags : -Xmx4g -Xms2gdb.m4.2xlarge (8 vCPU, 32 GB RAM, EBS-optimized storage with 100 Mbps max dedicated bandwidth) Amazon RDS instance withMySQL Community Edition version 5.7 operated as the database node.Customized TCP client operated as the data publisher (TCP producer found in samples).Experiments were carried out using 5.7.19 MySQL Community Server.
Scenario 1: Insert Query - Persisting 12.2 million process monitoring events in MySQL
This test involved persisting process monitoring events of approximately 180 bytes each. The test injected 12.2 million events into WSO2 StreamProcessor with a publishing throughput of 3400 events per second during a time period of one hour.
Throughput Graph

Latency Graph
Summary Results

Throughput (events per second) 3400
Latency (ms) 2.14
Scenario 2: Update Query - Updating 100K events in MySQL data store
The test injected events into the properly indexed My SQL Database. This test involved persisting process monitoring events of100,000 approximately 180 bytes each. Three million update queries were performed with a publishing throughput of 500 events per second during a timeperiod of one hour.
Throughput Graph
Latency Graph
MySQL Upper LimitAfter about 12.2 million events are published, a sudden drop can be observed in the receiver performance. This number can beconsidered as the upper limit of MySQL event store with default settings. In order to continue receiving events without a majorperformance degradation, data should be purged periodically from the event store before it reaches the upper limit.

Summary Results
Number Of Persisted Events 100K
Throughput (events per second) 500
Latency (ms) 0.5
Configuring Default Ports
This page describes the default ports that are used for each runtime .when the port offset is 0
Common PortsWorker RuntimeManager RuntimeDashboard RuntimeEditor RuntimeClustering Ports
Distributed deployment:Manager Node:Worker Node(Resource Node):
Minimum High Availability (HA) Deployment:Worker Node:
Multi Datacenter High Availability Deployment
Common Ports
The following ports are common to all runtimes:
7611 Thrift TCP port to receive events from clients To offset the default port modifythe following configuration in the
ConclusionThe performance test results indicate that the event persistence performance of WSO2 Stream Processor is characterized by the eventstore database performance.

deployment.yaml :
databridge.config:dataReceivers:-dataReceiver:
Thrifttype: properties:tcpPort: '7611'sslPort: '7711'
7711 Thrift SSL port for secure transport, where the client is authenticated
9611 Binary TCP port to receive events from clients To offset the default port modifythe following configuration in thedeployment.yaml :
databridge.config:dataReceivers:-dataReceiver:
Binarytype: properties:tcpPort: '9611'sslPort: '9711'
9711 Binary SSL port for secure transport, where the client is authenticated
Worker Runtime
9090 HTTP netty transport
9443 HTTPS netty transport
Manager Runtime
9190 HTTP netty transport
9543 HTTPS netty transport
Dashboard Runtime
9290 HTTP netty transport
9643 HTTPS netty transport
Editor Runtime
9390 HTTP netty transport
9743 HTTPS netty transport
NoteTo overide the default netty port, modify the following properties in the deployment.yaml file (example given for editor runtime):

Clustering Ports
Ports which are required for clustering deployment:
Distributed deployment:
Manager Node:
9190 HTTP netty transport
9190 For the httpInterface parameter in , specify the port of the node. (default value taken as http nettythe cluster.config sectiontransport port)
9543 HTTPS netty transport
9092 Kafka Server bootstrapURLs Port, default port where the external kafka server start and manager communicate.
2181 Zookeeper Server zooKeeperURLs Port, default port where the external zookeeper server start and manager communicate.
Worker Node(Resource Node):
9090 HTTP netty transport
9090 For the parameter in , specify the port of the node. (default value taken as http nettyhttpInterface the cluster.config sectiontransport port)
9191 For the resourceManagers paramter in , specify the port of the recouse manager. (default value takenthe cluster.config sectionas http netty transport port of the manager node)
9443 HTTPS netty transport
Minimum High Availability (HA) Deployment:
Worker Node:
9090 HTTP netty transport
9090 For the parameter in the section, specify the port of the node. (default value taken as http netty transportadvertisedPort liveSyncport)
9443 HTTPS netty transport
Multi Datacenter High Availability Deployment
Other than the ports use in clustering setup , (i.e., a Minimum HA Deployment or a Fully Distributed Deployment) the following is required:
9092 Ports of the two separate instances of the broker deployed in eachdata center.(ex: bootstrap.servers='host1:9092,host2:9092', default where the external kafka9092
)servers start
wso2.transport.http:transportProperties:listenerConfigurations:-id: "default"
9390port: -id: "msf4j-https"
9743port:

Stream Processor REST API Guide
The following topics cover information relating to the public APIs exposed from WSO2 Stream Processor.
Public APIsHTTP Status Codes
Public APIs
The following topics list the APIs supported for WSO2 Stream processor from its Worker, Manager, Editor and Dashboard runtimes.
Siddhi Application Management APIsEvent Simulation APIsStatus Monitoring APIsDashboard APIsAuthentication APIsPermission APIsBusiness Rules APIsStore APIs
Siddhi Application Management APIs
Updating a Siddhi ApplicationDeleting a Siddhi applicationListing all active Siddhi applicationsRetrieving a specific Siddhi applicationFetching the status of a Siddhi ApplicationTaking a snapshot of a Siddhi Application Restoring a Siddhi Application via a snapshotReturning real-time statistics of a workerEnabling/disabling worker statisticsReturning general details of a workerReturning detailed statistics of all Siddhi applicationsEnabling/disabling the statistics of a specific Siddhi applicationEnabling/disabling the statistics of all Siddhi applications
Creating a Siddhi applicationOverview
Description Creates a new Siddhi Application.
API Context /siddhi-apps
HTTP Method POST
Request/Response format Request: text/plain: application/jsonResponse
Authentication Basic
Username admin
Password admin
Runtime worker/manager
curl command syntax
curl -X POST "https://localhost:9443/siddhi-apps" -H "accept:application/json" -H "Content-Type: text/plain" -d @TestSiddhiApp.siddhi -uadmin:admin -k
Sample curl command

curl -X POST "https://localhost:9443/siddhi-apps" -H "accept:application/json" -H "Content-Type: text/plain" -d @TestSiddhiApp.siddhi -uadmin:admin -k
Sample output
The response for the sample curl command given above can be one of the following.
If API request is valid and there is no existing Siddhi application with the given name, a response similar to the following is generated withresponse code 201. This response contains a location header with the path of the newly created file from product root home.
If the API request is valid, but a Siddhi application with the given name already exists, a response similar to the following is generatedwith response code 409.
{ "type": "conflict", "message": "There is a Siddhi App already exists with same name" }
If the API request is invalid due to invalid content in the Siddhi queries you have included in the request body, a response similar to thefollowing is generated is generated with response code 400.
{ "code": 800101, "type": "validation error", "message": "You have an error in your SiddhiQL at line 8:8, missingINTO at 'BarStream'" }
If the API request is valid, but an exception occured during file processing or saving, the following response is generated with responsecode 500.
{ "code": 800102, "type": "file processing error", "message": <error-message>}
Response
HTTP Status Code Possible codes are 201, 409, 400, and 500.
For descriptions of the HTTP status codes, see .HTTP Status Codes
Updating a Siddhi Application
Overview
Description Updates a Siddhi Application.

API Context /siddhi-apps
HTTP Method PUT
Request/Response format Request: text/plain: application/jsonResponse
Authentication Basic
Username admin
Password admin
Runtime worker/manager
curl command syntax
curl -X PUT "http://localhost:9090/siddhi-apps" -H "accept:application/json" -H "Content-Type: text/plain" -d@<SIDDHI_APPLICATION_NAME>.siddhi -u admin:admin -k
Sample curl command
curl -X PUT "https://localhost:9443/siddhi-apps" -H "accept:application/json" -H "Content-Type: text/plain" -d @TestSiddhiApp.siddhi -uadmin:admin -k
Sample output
If the API request is invalid due to invalid content in the Siddhi query, a response similar to the following is returned with response code400.
{ "code": 800101, "type": "validation error", "message": "You have an error in your SiddhiQL at line 8:8, missingINTO at 'BarStream'" }
If the API request is valid, but an exception occured when saving or processing files, a response similar to the following is returned withresponse code 500.
{ "code": 800102, "type": "file processing error", "message": <error-message>}
Response
HTTP Status Code Possible codes are 200, 201, 400, and 500.
For descriptions of the HTTP status codes, see .HTTP Status Codes

Deleting a Siddhi application
Overview
Description Sends the name of a Siddhi application as a URL parameter.
API Context /siddhi-apps/{appName}
HTTP Method DELETE
Request/Response format application/json
Authentication Basic
Username admin
Password admin
Runtime worker/manager
Parameter Description
Parameter Description
{appName} The name of the Siddhi application to be deleted.
curl command syntax
curl -X DELETE "http://localhost:9090/siddhi-apps/{app-name}" -H "accept:application/json" -u admin:admin -k
Sample curl command
curl -X DELETE "https://localhost:9443/siddhi-apps/TestSiddhiApp" -H"accept: application/json" -u admin:admin -k
Sample output
The respose for the sample curl command given above can be one of the following:
If the API request is valid and a Siddhi application with the given name exists, the following response is received with response code 200.
http://localhost:9090/siddhi-apps/TestExecutionPlan1
If the API request is valid, but a Siddhi application with the given name is not deployed, the following response is received with responsecode 404.

{ "type": "not found", "message": "There is no Siddhi App exist with provided name :TestExecutionPlan1" }
If the API request is valid, but an exception occured when deleting the given Siddhi application, the following response is received withresponse code 500.
{ "code": 800102, "type": "file processing error", "message": <error-message>}
If the API request is valid, but there are restricted characters in the given Siddhi application name, the following response is received withresponse code 400.
{ "code": 800101, "type": "validation error", "message": "File name contains restricted path elements . :../../siddhiApp2'" }
Response
HTTP Status Code 200, 404, 500 or 400.
For descriptions of the HTTP status codes, see .HTTP Status Codes
Listing all active Siddhi applications
Overview
Description Lists all the currently active Siddhi applications.
If the parameter is set, all the active SiddhiisActive=trueApplications are listed. If not, all the inactive Siddhi applications arelisted.
API Context /siddhi-apps
HTTP Method GET
Request/Response format Request content type: any: Response content type application/json
Authentication Basic
Username admin
Password admin
Runtime worker/manager

curl command syntax
curl -X GET "http://localhost:9090/siddhi-apps" -H "accept:application/json" -u admin:admin -k
Sample curl command
curl -X GET "https://localhost:9443/siddhi-apps?isActive=true" -H "accept:application/json" -u admin:admin -k
Sample output
Possible responses are as follows:
If the API request is valid and there are Siddhi applications deployed in your SP setup, a response similar to the following is returned withresponse code 200.
["TestExecutionPlan3", "TestExecutionPlan4"]
If the API request is valid, there are Siddhi applications deployed in your SP setup, and a query parameter is defined in the request, aresponse similar to the following is returned with response code 200. This response only contains Siddhi applications that are active.
["TestExecutionPlan3"]
If the API request is valid, but there are no Siddhi applications deployed in your SP setup, the following response is returned.
[]
Response
HTTP Status Code 200
For descriptions of the HTTP status codes, see .HTTP Status Codes
Retrieving a specific Siddhi application
Overview
Description Retrieves the given Siddhi application.
API Context /siddhi-apps/{appName}
HTTP Method GET
Request/Response format application/json
Authentication Basic
Username admin
If these conditions are met, but the parameter is set to , the response contains only inactive SiddhiisActive falseapplications.

Password admin
Runtime worker/manager
Parameter Description
Parameter Description
{appName} The name of the Siddhi application to be retrieved.
curl command syntax
curl -X GET "http://localhost:9090/siddhi-apps/{app-name}" -H "accept:application/json" -u admin:admin -k
Sample curl command
curl -X GET "https://localhost:9443/siddhi-apps/SiddhiTestApp" -H "accept:application/json" -u admin:admin -k
Sample output
The possible outputs are as follows:
If the API request is valid and a Siddhi application of the given name exists, a response similar to the following is returned with responsecode 200.
{ "content": "\n@Plan:name('TestExecutionPlan')\ndefine streamFooStream (symbol string, price float, volumelong);\n\n@source(type='inMemory', topic='symbol',@map(type='passThrough'))Define stream BarStream (symbol string, pricefloat, volume long);\n\nfrom FooStream\nselect symbol, price,volume\ninsert into BarStream;" }
If the API request is valid, but a Siddhi application of the given name is not deployed, a response similar to the following is returned withresponse code 404.
{ "type": "not found", "message": "There is no Siddhi App exist with provided name :TestExecutionPlan1" }
Response

HTTP Status Code 200 or 404
For descriptions of the HTTP status codes, see .HTTP Status Codes
Fetching the status of a Siddhi Application
Overview
Description This fetches the status of the specified Siddhi application
API Context /siddhi-apps/{appName}/status
HTTP Method GET
Request/Response format application/json
Authentication Basic
Username admin
Password admin
Runtime worker/manager
Parameter Description
Parameter Description
{appName} The name of the Siddhi application of which the status needs to be fetched.
curl command syntax
curl -X GET "http://localhost:9090/siddhi-apps/{app-file-name}/status" -H"accept: application/json" -u admin:admin -k
Sample curl command
curl -X GET "https://localhost:9443/siddhi-apps/TestSiddhiApp/status" -H"accept: application/json" -u admin:admin -k
Sample output
If the Siddhi application is active, the following is returned with response code 200.
{"status":"active"}
If the Siddhi application is inactive, the following is returned with response code 200.
{"status":"inactive"}
If the Siddhi application does not exist, but the REST API call is valid, the following is returned with the response code 404.

{ "type": "not found", "message": "There is no Siddhi App exist with provided name :TestExecutionPlan1" }
Response
HTTP Status Code 200 or 404
For descriptions of the HTTP status codes, see .HTTP Status Codes
Taking a snapshot of a Siddhi Application
Overview
Description This takes a snapshot of the specific Siddhi application.
API Context /siddhi-apps/{appName}/backup
HTTP Method POST
Request/Response format application/json
Authentication Basic
Username admin
Password admin
Runtime worker/manager
Parameter Description
Parameter Description
{appName} The name of the Siddhi application of which a snapshot needs to be taken.
curl command syntax
curl -X POST "http://localhost:9090/siddhi-apps/{appName}/backup" -H"accept: application/json" -u admin:admin -k
Sample curl command
curl -X POST "https://localhost:9443/siddhi-apps/TestSiddhiApp/backup" -H"accept: application/json" -u admin:admin -k
Sample output
The output can be one of the following:

If the API request is valid and a Siddhi application exists with the given name, an output similar to the following (i.e., with the snapshotrevision number) is returned with response code 201.
{"revision": "89489242494242"}
If the API request is valid, but no Siddhi application with the given name is deployed, an output similar to the following is returned withresponse code 404.
{ "type": "not found", "message": "There is no Siddhi App exist with provided name :TestExecutionPlan1" }
If the API request is valid, but an exception has occured when backing up the state at Siddhi level, an output similar to the following isreturned with response code 500.
{ "code": 800102, "type": "file processing error", "message": <error-message>}
Response
HTTP Status Code 201, 404, or 500.
For descriptions of the HTTP status codes, see .HTTP Status Codes
Restoring a Siddhi Application via a snapshot
Overview
Description This restores a Siddhi application using a snapshot of the same thatyou have previously taken.
API Context To restore without considering the version: /siddhi-apps/{appName}/restoreTo restore a specific version: /siddhi-apps/{appName}/restore?version=
HTTP Method POST
Request/Response format application/json
Authentication Basic
Username admin
Password admin
Runtime worker/manager
Parameter Description
In order to call this API, you need tohave already taken a snapshot of the Siddhi application to be restored. For more information aboutthe API via which the snapshow is taken, see .Taking a snapshot of a Siddhi application
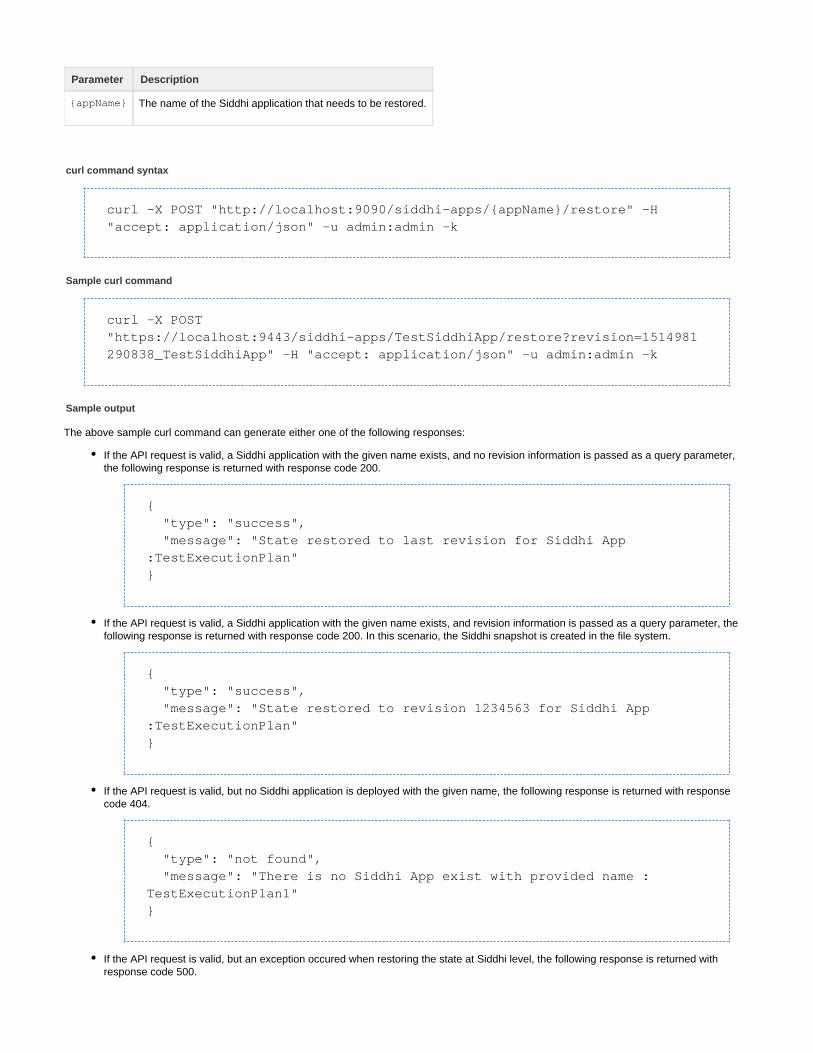
Parameter Description
{appName} The name of the Siddhi application that needs to be restored.
curl command syntax
curl -X POST "http://localhost:9090/siddhi-apps/{appName}/restore" -H"accept: application/json" -u admin:admin -k
Sample curl command
curl -X POST"https://localhost:9443/siddhi-apps/TestSiddhiApp/restore?revision=1514981290838_TestSiddhiApp" -H "accept: application/json" -u admin:admin -k
Sample output
The above sample curl command can generate either one of the following responses:
If the API request is valid, a Siddhi application with the given name exists, and no revision information is passed as a query parameter,the following response is returned with response code 200.
{ "type": "success", "message": "State restored to last revision for Siddhi App:TestExecutionPlan" }
If the API request is valid, a Siddhi application with the given name exists, and revision information is passed as a query parameter, thefollowing response is returned with response code 200. In this scenario, the Siddhi snapshot is created in the file system.
{ "type": "success", "message": "State restored to revision 1234563 for Siddhi App:TestExecutionPlan" }
If the API request is valid, but no Siddhi application is deployed with the given name, the following response is returned with responsecode 404.
{ "type": "not found", "message": "There is no Siddhi App exist with provided name :TestExecutionPlan1" }
If the API request is valid, but an exception occured when restoring the state at Siddhi level, the following response is returned withresponse code 500.

{ "code": 800102, "type": "file processing error", "message": <error-message>}
Response
HTTP Status Code 200, 404 or 500.
For descriptions of the HTTP status codes, see .HTTP Status Codes
Returning real-time statistics of a worker
Overview
Description Returns the real-time statistics of a worker.
API Context /statistics
HTTP Method GET
Request/Response format application/json
Authentication Basic
Username admin
Password admin
Runtime worker/manager
Parameter Description
curl command syntax
Sample curl command
curl -X GET "https://localhost:9443/statistics" -H "accept:application/json" -u admin:admin -k
Sample output
Response
HTTP Status Code 200 or 404
For descriptions of the HTTP status codes, see .HTTP Status Codes
Enabling/disabling worker statistics
Overview

Description Enables/diables generating statistics for worker nodes.
API Context /statistics
HTTP Method PUT
Request/Response format application/json
Authentication Basic
Username admin
Password admin
Runtime worker/manager
Parameter Description
curl command syntax
Sample curl command
curl -X PUT "https://localhost:9443/statistics" -H "accept:application/json" -H "Content-Type: application/json" -d"{“statsEnable”:”true”}" -u admin:admin -k
Sample output
Response
HTTP Status Code 200 or 404
For descriptions of the HTTP status codes, see .HTTP Status Codes
Returning general details of a worker
Overview
Description Returns general details of a worker.
API Context /system-details
HTTP Method GET
Request/Response format application/json
Authentication Basic
Username admin
Password admin
Runtime worker/manager
Parameter Description
curl command syntax

Sample curl command
curl -X GET "https://localhost:9443/system-details" -H "accept:application/json" -u admin:admin -k
Sample output
Response
HTTP Status Code 200 or 404
For descriptions of the HTTP status codes, see .HTTP Status Codes
Returning detailed statistics of all Siddhi applications
Overview
Description Returns the detailed statistics of all the Siddhi applications currentlydeployed in the SP setup.
API Context /siddhi-apps/statistics
HTTP Method GET
Request/Response format application/json
Authentication Basic
Username admin
Password admin
Runtime worker/manager
Parameter Description
curl command syntax
Sample curl command
curl -X GET "https://localhost:9443/siddhi-apps/statistics" -H "accept:application/json" -u admin:admin -k
Sample output
Response
HTTP Status Code 200 or 404
For descriptions of the HTTP status codes, see .HTTP Status Codes

Enabling/disabling the statistics of a specific Siddhi application
Overview
Description Enables/disables statistics for a specified Siddhi application.
API Context /siddhi-apps/{appName}/statistics
HTTP Method PUT
Request/Response format application/json
Authentication Basic
Username admin
Password admin
Runtime worker/manager
Parameter Description
Parameter Description
appName The name of the Siddhi application for which the Siddhi applications need to be enabled/disabled.
curl command syntax
Sample curl command
curl -X PUT "https://localhost:9443/siddhi-apps/TestSiddhiApp/statistics"-H "accept: application/json" -H "Content-Type: application/json" -d"{“statsEnable”:”true”}" -u admin:admin -k
Sample output
Response
HTTP Status Code 200 or 404
For descriptions of the HTTP status codes, see .HTTP Status Codes
Enabling/disabling the statistics of all Siddhi applications
Overview
Description Enables/disables statistics for all the Siddhi applications.
API Context /siddhi-apps/statistics
HTTP Method PUT
Request/Response format application/json
Authentication Basic
Username admin

Password admin
Runtime worker/manager
Parameter Description
curl command syntax
Sample curl command
curl -X PUT "https://localhost:9443/siddhi-apps/statistics" -H "accept:application/json" -H "Content-Type: application/json" -d"{“statsEnable”:”true”}" -u admin:admin -k
Sample output
Response
HTTP Status Code 200 or 404
For descriptions of the HTTP status codes, see .HTTP Status Codes
Event Simulation APIs
Sending a single event for simulationUploading a feed simulation configurationRetrieving all feed simulation configurationsUpdating a feed simulation configurationRetrieving a specific feed simulation configurationDeleting a feed simulation configurationRunning a feed simulation configurationPausing a feed simulationResuming a feed simulationStopping a feed simulationRetrieving a simulation configuration status by nameUploading a CSV fileFetching CSV file namesUpdating a CSV fileDeleting a CSV fileTesting a database connectionRetrieving database tablesRetrieving database table columns
Sending a single event for simulation
Overview
Description Sends a singke event for simulation.
API Context /simulation/single
HTTP Method POST
Request/Response format Request format: text/plain: Response format application/json
Authentication Basic

Username admin
Password admin
Runtime Worker (https port: 9443, http port:9090)Editor
curl command syntax
Sample curl command
curl -X POST "http://localhost:9390/simulation/single" -H "accept:application/json" -H "content-type: text/plain" -d "{ \"streamName\":\"FooStream\", \"siddhiAppName\": \"TestSiddhiApp\", \"timestamp\":\"1500319950004\", \"data\": [ \"foo\", \"bar\", \"12345\" ]}"
Sample output
Response
HTTP Status Code 200 or 404
For descriptions of the HTTP status codes, see .HTTP Status Codes
Uploading a feed simulation configuration
Overview
Description Uploads a feed simulation configuration.
API Context /simulation/feed
HTTP Method POST
Request/Response format Request format: text/plainResponse format: application/json
Authentication Basic
Username admin
Password admin
Runtime Worker (https port: 9443, http port:9090)Editor
curl command syntax
Sample curl command

curl -X POST "http://localhost:9390/simulation/feed" -H "accept:application/json" -H "content-type: text/plain" -d"{\"properties\":{\"simulationName\":\"TestFeedSimulation\",\"startTimestamp\":\"1500319950003\",\"endTimestamp\":\"1500319950009\",\"noOfEvents\":\"100\",\"description\":\"Test feedsimulator\",\"timeInterval\":\"1000\"},\"sources\":[{\"siddhiAppName\":\"TestSiddhiApp\",\"streamName\":\"FooStream\",\"timestampInterval\":\"1000\",\"simulationType\":\"CSV_SIMULATION\",\"fileName\":\"foostream.csv\",\"delimiter\":\",\",\"isOrdered\":true,\"indices\":\"0,1,2\"}]}"
Sample output
Response
HTTP Status Code 200, 403, 404, or 409.
For descriptions of the HTTP status codes, see .HTTP Status Codes
Retrieving all feed simulation configurations
Overview
Description Retrieves all feed simulation configurations.
API Context /simulation/feed
HTTP Method GET
Request/Response format application/json
Authentication Basic
Username admin
Password admin
Runtime Worker (https port: 9443, http port:9090)Editor
curl command syntax
Sample curl command
curl -X GET "http://localhost:9390/simulation/feed" -H "accept:application/json"
Sample output
Response
HTTP Status Code 200 or 404
For descriptions of the HTTP status codes, see .HTTP Status Codes

Updating a feed simulation configuration
Overview
Description Updates a feed simulation configuration.
API Context /simulation/feed/{simulationName}
HTTP Method PUT
Request/Response format Request format: text/plainResponse format: application/json
Authentication Basic
Username admin
Password admin
Runtime Worker (https port: 9443, http port:9090)Editor
Parameter Description
Parameter Description
{simulationName} The name of the simulation configuration that needs to be updated.
curl command syntax
Sample curl command
curl -X PUT "http://localhost:9390/simulation/feed/TestFeedSimulation" -H"accept: application/json" -H "content-type: text/plain" -d"{\"properties\":{\"simulationName\":\"TestFeedSimulation\",\"startTimestamp\":\"\",\"endTimestamp\":\"\",\"noOfEvents\":\"100\",\"description\":\"Test feedsimulator\",\"timeInterval\":\"1000\"},\"sources\":[{\"siddhiAppName\":\"TestSiddhiApp\",\"streamName\":\"BarStream\",\"timestampInterval\":\"1000\",\"simulationType\":\"CSV_SIMULATION\",\"fileName\":\"foostream.csv\",\"delimiter\":\",\",\"isOrdered\":true,\"indices\":\"0,1,2\"}]}"
Sample output
Response
HTTP Status Code 200 or 404
For descriptions of the HTTP status codes, see .HTTP Status Codes
Retrieving a specific feed simulation configuration
Overview

Description Retrieves a specific feed simulation configuration.
API Context /simulation/feed/{simulationName}
HTTP Method GET
Request/Response format application/json
Authentication Basic
Username admin
Password admin
Runtime Worker (https port: 9443, http port:9090)Editor
Parameter Description
Parameter Description
{simulationName} The name of the feed simulation configuration that needs to be retrieved.
curl command syntax
Sample curl command
curl -X GET "http://localhost:9390/simulation/feed/TestFeedSimulation" -H"accept: application/json"
Sample output
Response
HTTP Status Code 200 or 404
For descriptions of the HTTP status codes, see .HTTP Status Codes
Deleting a feed simulation configuration
Overview
Description Deletes a feed simulation configuration.
API Context /simulation/feed/{simulationName}
HTTP Method DELETE
Request/Response format application/json
Authentication Basic
Username admin
Password admin
Runtime Worker (https port: 9443, http port:9090)Editor

Parameter Description
Parameter Description
{simulationName} The name of the simulation configuration that needs to be deleted.
curl command syntax
Sample curl command
curl -X DELETE "http://localhost:9390/simulation/feed/TestFeedSimulation"-H "accept: application/json"
Sample output
Response
HTTP Status Code 200 or 404
For descriptions of the HTTP status codes, see .HTTP Status Codes
Running a feed simulation configuration
Overview
Description Runs a feed simulation configuration.
API Context /simulation/feed/{simulationName}?action=run
HTTP Method POST
Request/Response format application/json
Authentication Basic
Username admin
Password admin
Runtime Worker (https port: 9443, http port:9090)Editor
Parameter Description
Parameter Description
{simulationName} The name of the simulation configuration that needs to be run.
curl command syntax
Sample curl command

curl -X POST"http://localhost:9390/simulation/feed/TestFeedSimulation/?action=run" -H"accept: application/json"
Sample output
Response
HTTP Status Code 200, 403, 404, or 409
For descriptions of the HTTP status codes, see .HTTP Status Codes
Pausing a feed simulation
Overview
Description Pauses a currently active feed simulation.
API Context /simulation/feed/{simulationName}?action=pause
HTTP Method POST
Request/Response format application/json
Authentication Basic
Username admin
Password admin
Runtime Worker (https port: 9443, http port:9090)Editor
Parameter Description
Parameter Description
{simulationName} The name of the simulation configuration that needs to be run.
curl command syntax
curl -X POST"http://localhost:9390/simulation/feed/TestFeedSimulation/?action=pause" -H"accept: application/json"
Sample curl command
Sample output
Response

HTTP Status Code 200, 403, 404, or 409
For descriptions of the HTTP status codes, see .HTTP Status Codes
Resuming a feed simulation
Overview
Description Resumes a paused feed simulation.
API Context /simulation/feed/{simulationName}?action=resume
HTTP Method POST
Request/Response format application/json
Authentication Basic
Username admin
Password admin
Runtime Worker (https port: 9443, http port:9090)Editor
Parameter Description
Parameter Description
{simulationName} The name of the simulation configuration that needs to be resumed.
curl command syntax
Sample curl command
curl -X POST"http://localhost:9390/simulation/feed/TestFeedSimulation/?action=resume"-H "accept: application/json"
Sample output
Response
HTTP Status Code 200, 403, 404, or 409
For descriptions of the HTTP status codes, see .HTTP Status Codes
Stopping a feed simulation
Overview
Description Stops a currently active feed simulation.
API Context /simulation/feed/{simulationName}?action=stop
HTTP Method POST

Request/Response format application/json
Authentication Basic
Username admin
Password admin
Runtime Worker (https port: 9443, http port:9090)Editor
Parameter Description
Parameter Description
{simulationName} The name of the simulation configuration that needs to be stopped.
curl command syntax
Sample curl command
curl -X POST"http://localhost:9390/simulation/feed/TestFeedSimulation/?action=stop" -H"accept: application/json"
Sample output
Response
HTTP Status Code 200, 404, or 409.
For descriptions of the HTTP status codes, see .HTTP Status Codes
Retrieving a simulation configuration status by name
Overview
Description Retrieves the status of a given simulation configuration.
API Context /simulation/feed/{simulationName}/status
HTTP Method POST
Request/Response format application/json
Authentication Basic
Username admin
Password admin
Runtime Worker (https port: 9443, http port:9090)Editor
Parameter Description

Parameter Description
{simulationName} The name of the simulation configuration of which the status needs to be checked.
curl command syntax
Sample curl command
curl -X POST"http://localhost:9390/simulation/feed/TestFeedSimulation/?action=resume"-H "accept: application/json"
Sample output
Response
HTTP Status Code 200 or 404
For descriptions of the HTTP status codes, see .HTTP Status Codes
Uploading a CSV file
Overview
Description Uploads a CSV file for feed simulation.
API Context /simulation/files
HTTP Method GET
Request/Response format application/json
Authentication Basic
Username admin
Password admin
Runtime Worker (https port: 9443, http port:9090)Editor
curl command syntax
Sample curl command
curl -X GET"http://localhost:9390/simulation/feed/TestFeedSimulation/status" -H"accept: application/json"
Sample output

Response
HTTP Status Code 200 or 404
For descriptions of the HTTP status codes, see .HTTP Status Codes
Fetching CSV file names
Overview
Description Fetches the names of CSV files that are currently uploaded in thesystem.
API Context /simulation/files
HTTP Method GET
Request/Response format application/json
Authentication Basic
Username admin
Password admin
Runtime Worker (https port: 9443, http port:9090)Editor
curl command syntax
Sample curl command
curl -X GET "http://localhost:9390/simulation/files" -H "accept:application/json"
Sample output
Response
HTTP Status Code 200 or 404
For descriptions of the HTTP status codes, see .HTTP Status Codes
Updating a CSV file
Overview
Description Updates a CSV file that is already uploaded in the system.
API Context /simulation/files/{fileName}
HTTP Method PUT
Request/Response format
Authentication Basic
Username admin
Password admin

Runtime Worker (https port: 9443, http port:9090)Editor
Parameter Description
Parameter Description
{fileName} The name of the CSV file that needs to be updated.
curl command syntax
Sample curl command
curl -X PUT -F '[email protected]'http://localhost:9390/simulation/files/foostream.csv?fileName=foostream.csv
Sample output
Response
HTTP Status Code 200 or 404
For descriptions of the HTTP status codes, see .HTTP Status Codes
Deleting a CSV file
Overview
Description Deletes the specified CSV file.
API Context /simulation/files/{fileName}
HTTP Method DELETE
Request/Response format application/json
Authentication Basic
Username admin
Password admin
Runtime Worker (https port: 9443, http port:9090)Editor
Parameter Description
Parameter Description
{fileName} The name of the CSV file that needs to be deleted.
curl command syntax

Sample curl command
curl -X DELETE "http://localhost:9390/simulation/files/CSVTestFile.csv" -H"accept: application/json"
Sample output
Response
HTTP Status Code 200 or 404
For descriptions of the HTTP status codes, see .HTTP Status Codes
Testing a database connection
Overview
Description Tests a database connection.
API Context /simulation/connectToDatabase
HTTP Method POST
Request/Response format appliction/json
Authentication Basic
Username admin
Password admin
Runtime Worker (https port: 9443, http port:9090)Editor
curl command syntax
Sample curl command
curl -X POST "http://localhost:9090/simulation/connectToDatabase" -H"accept: application/json" -H "content-type: application/json" -d "{\"dataSourceLocation\":\"jdbc:mysql://localhost:3306/DatabaseFeedSimulation\", \"driver\":\"com.mysql.jdbc.Driver\", \"username\": \"root\", \"password\":\"password\"}"
Sample output
Response
HTTP Status Code 200 or 404
For descriptions of the HTTP status codes, see .HTTP Status Codes
Retrieving database tables

Overview
Description Retrieves database tables.
API Context /simulation/connectToDatabase/retrieveTableNames
HTTP Method POST
Request/Response format application/json
Authentication Basic
Username admin
Password admin
Runtime Worker (https port: 9443, http port:9090)Editor
curl command syntax
Sample curl command
curl -X POST"http://localhost:9090/simulation/connectToDatabase/retrieveTableNames" -H"accept: application/json" -H "content-type: application/json" -d "{\"dataSourceLocation\":\"jdbc:mysql://localhost:3306/DatabaseFeedSimulation\", \"driver\":\"com.mysql.jdbc.Driver\", \"username\": \"root\", \"password\":\"password\"}"
Sample output
Response
HTTP Status Code 200 or 404
For descriptions of the HTTP status codes, see .HTTP Status Codes
Retrieving database table columns
Overview
Description Retrieves database table columns
API Context /simulation/connectToDatabase/{tableName}/retrieveColumnNames
HTTP Method POST
Request/Response format application/JSON
Authentication Basic
Username admin
Password admin
Runtime Worker (https port: 9443, http port:9090)Editor
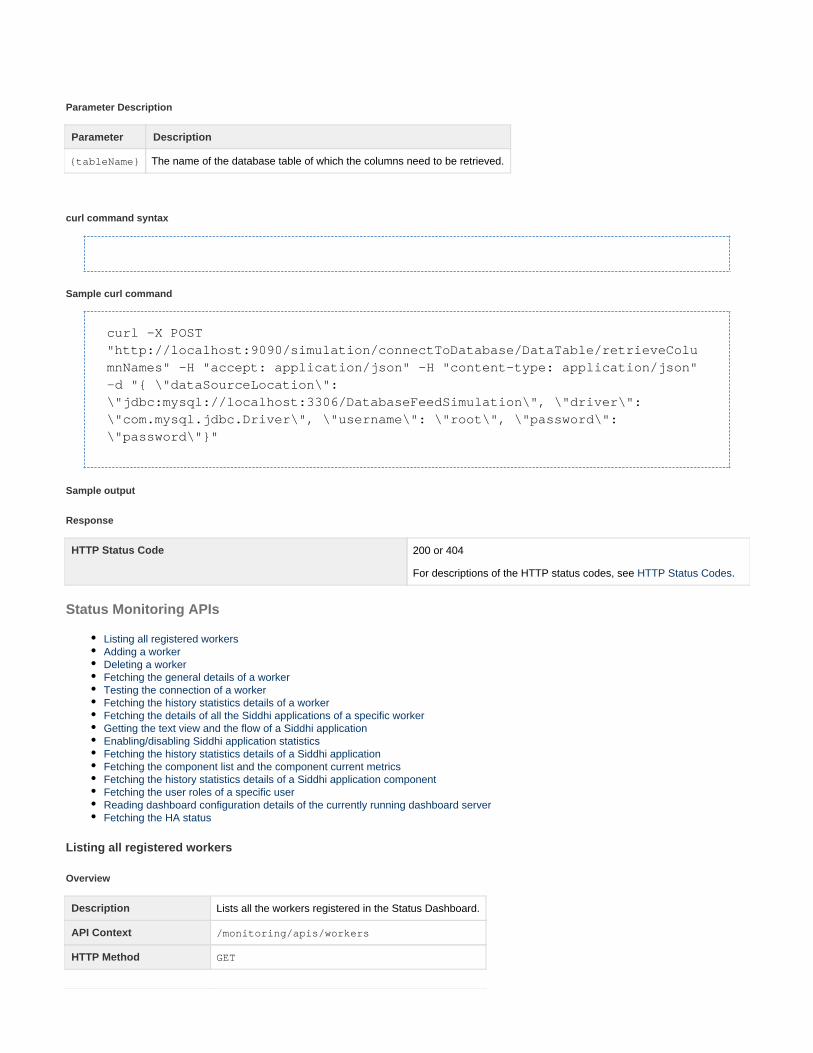
Parameter Description
Parameter Description
{tableName} The name of the database table of which the columns need to be retrieved.
curl command syntax
Sample curl command
curl -X POST"http://localhost:9090/simulation/connectToDatabase/DataTable/retrieveColumnNames" -H "accept: application/json" -H "content-type: application/json"-d "{ \"dataSourceLocation\":\"jdbc:mysql://localhost:3306/DatabaseFeedSimulation\", \"driver\":\"com.mysql.jdbc.Driver\", \"username\": \"root\", \"password\":\"password\"}"
Sample output
Response
HTTP Status Code 200 or 404
For descriptions of the HTTP status codes, see .HTTP Status Codes
Status Monitoring APIs
Listing all registered workersAdding a workerDeleting a workerFetching the general details of a workerTesting the connection of a workerFetching the history statistics details of a workerFetching the details of all the Siddhi applications of a specific workerGetting the text view and the flow of a Siddhi applicationEnabling/disabling Siddhi application statisticsFetching the history statistics details of a Siddhi applicationFetching the component list and the component current metricsFetching the history statistics details of a Siddhi application componentFetching the user roles of a specific userReading dashboard configuration details of the currently running dashboard serverFetching the HA status
Listing all registered workers
Overview
Description Lists all the workers registered in the Status Dashboard.
API Context /monitoring/apis/workers
HTTP Method GET

Request/Response format application/json
Authentication Basic
Username admin
Password admin
Runtime Dashboard
curl command syntax
Sample curl command
curl -X GET "https://localhost:9643/monitoring/apis/workers" -H "accept:application/json" -u admin:admin -k
Sample output
Response
Adding a worker
Overview
Description Adds a worker node to the Status Dashboard.
API Context /monitoring/apis/workers
HTTP Method POST
Request/Response format application/json
Authentication Basic
Username admin
Password admin
Runtime Dashboard
curl command syntax
Sample curl command
curl -X POST "https://localhost:9643/monitoring/apis/workers" -H "accept:application/json" -H "Content-Type: application/json" -d "{ \"host\":\"localhost\", \"port\": \"9443\"}" -u admin:admin -k
Sample output
Response
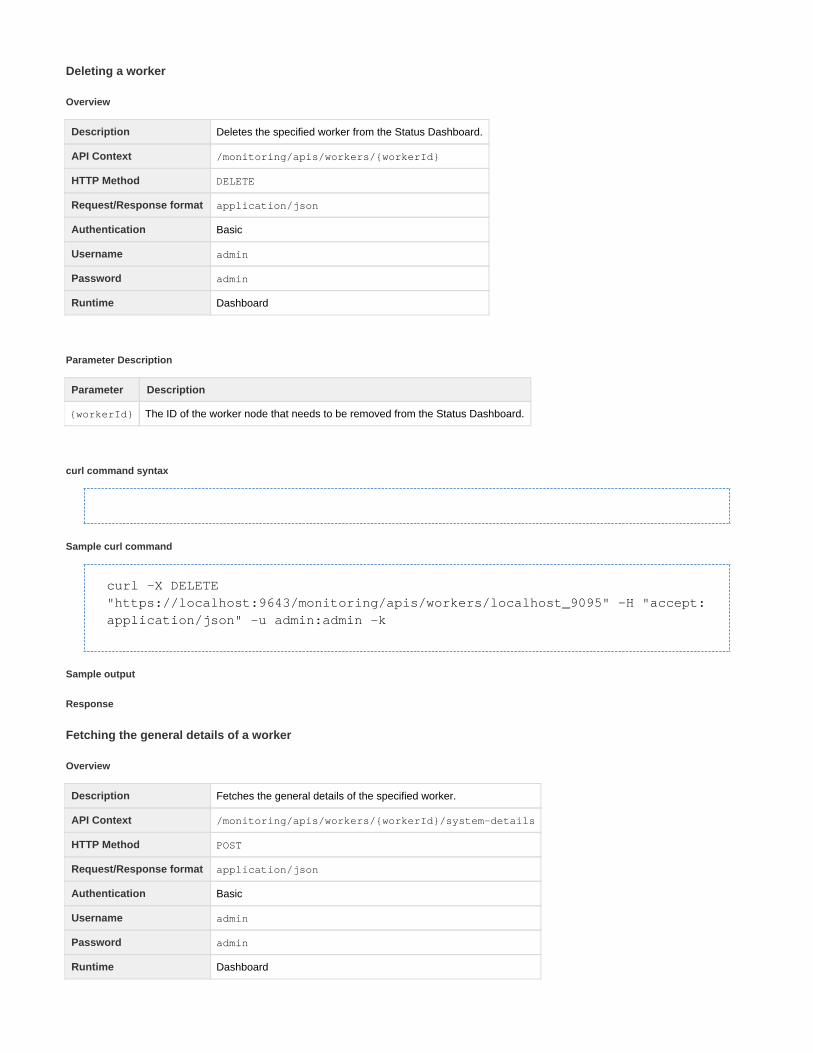
Deleting a worker
Overview
Description Deletes the specified worker from the Status Dashboard.
API Context /monitoring/apis/workers/{workerId}
HTTP Method DELETE
Request/Response format application/json
Authentication Basic
Username admin
Password admin
Runtime Dashboard
Parameter Description
Parameter Description
{workerId} The ID of the worker node that needs to be removed from the Status Dashboard.
curl command syntax
Sample curl command
curl -X DELETE"https://localhost:9643/monitoring/apis/workers/localhost_9095" -H "accept:application/json" -u admin:admin -k
Sample output
Response
Fetching the general details of a worker
Overview
Description Fetches the general details of the specified worker.
API Context /monitoring/apis/workers/{workerId}/system-details
HTTP Method POST
Request/Response format application/json
Authentication Basic
Username admin
Password admin
Runtime Dashboard

Parameter Description
Parameter Description
{workerId} The ID of the worker node of which the general details need to be fetched.
curl command syntax
Sample curl command
curl -X POST"https://localhost:9643/monitoring/apis/workers/localhost_9444/system-details" -H "accept: application/json" -u admin:admin -k
Sample output
Response
Testing the connection of a worker
Overview
Description Tests the connection of the specified user.
API Context /monitoring/apis/workers/{workerId}/status
HTTP Method POST
Request/Response format application/json
Authentication Basic
Username admin
Password admin
Runtime Dashboard
Parameter Description
Parameter Description
{workerId} The ID of the worker node of which the connection needs to be tested.
curl command syntax
Sample curl command

curl -X POST"https://localhost:9643/monitoring/apis/workers/localhost_9444/status" -H"accept: application/json" -u admin:admin -k
Sample output
Response
Fetching the history statistics details of a worker
Overview
Description Fetches the history statistics details of the specified worker.
API Context /monitoring/apis/workers/{workerId}/history?period=’2 hr’,type=cpu,memory,latency
HTTP Method GET
Request/Response format application/json
Authentication Basic
Username admin
Password admin
Runtime Dashboard
Parameter Description
Parameter Description
{workerId} The ID of the worker node of which the history statistics details need to be fetched.
curl command syntax
Sample curl command
curl -X GET"https://localhost:9643/monitoring/apis/workers/localhost_9444/history?period=5min" -H "accept: application/json" -u admin:admin -k
Sample output
Response
Fetching the details of all the Siddhi applications of a specific worker
Overview
Description Fetches details relating to all the Siddhi applications of a specificworker.
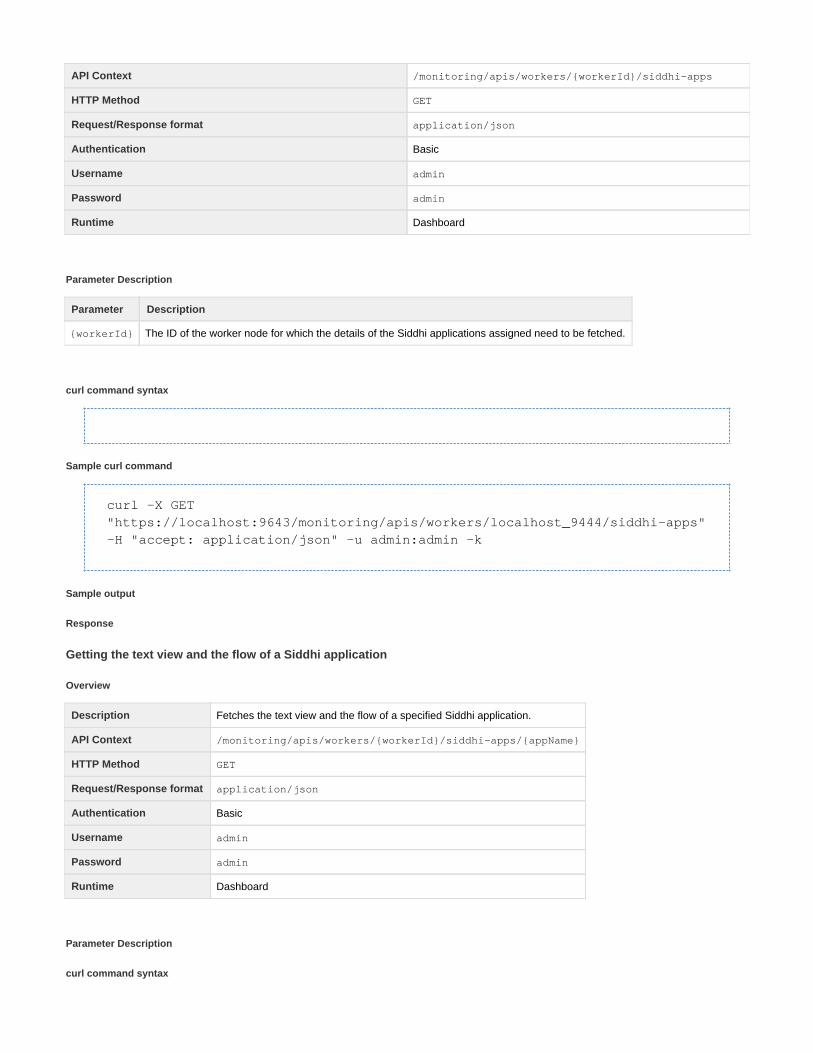
API Context /monitoring/apis/workers/{workerId}/siddhi-apps
HTTP Method GET
Request/Response format application/json
Authentication Basic
Username admin
Password admin
Runtime Dashboard
Parameter Description
Parameter Description
{workerId} The ID of the worker node for which the details of the Siddhi applications assigned need to be fetched.
curl command syntax
Sample curl command
curl -X GET"https://localhost:9643/monitoring/apis/workers/localhost_9444/siddhi-apps"-H "accept: application/json" -u admin:admin -k
Sample output
Response
Getting the text view and the flow of a Siddhi application
Overview
Description Fetches the text view and the flow of a specified Siddhi application.
API Context /monitoring/apis/workers/{workerId}/siddhi-apps/{appName}
HTTP Method GET
Request/Response format application/json
Authentication Basic
Username admin
Password admin
Runtime Dashboard
Parameter Description
curl command syntax
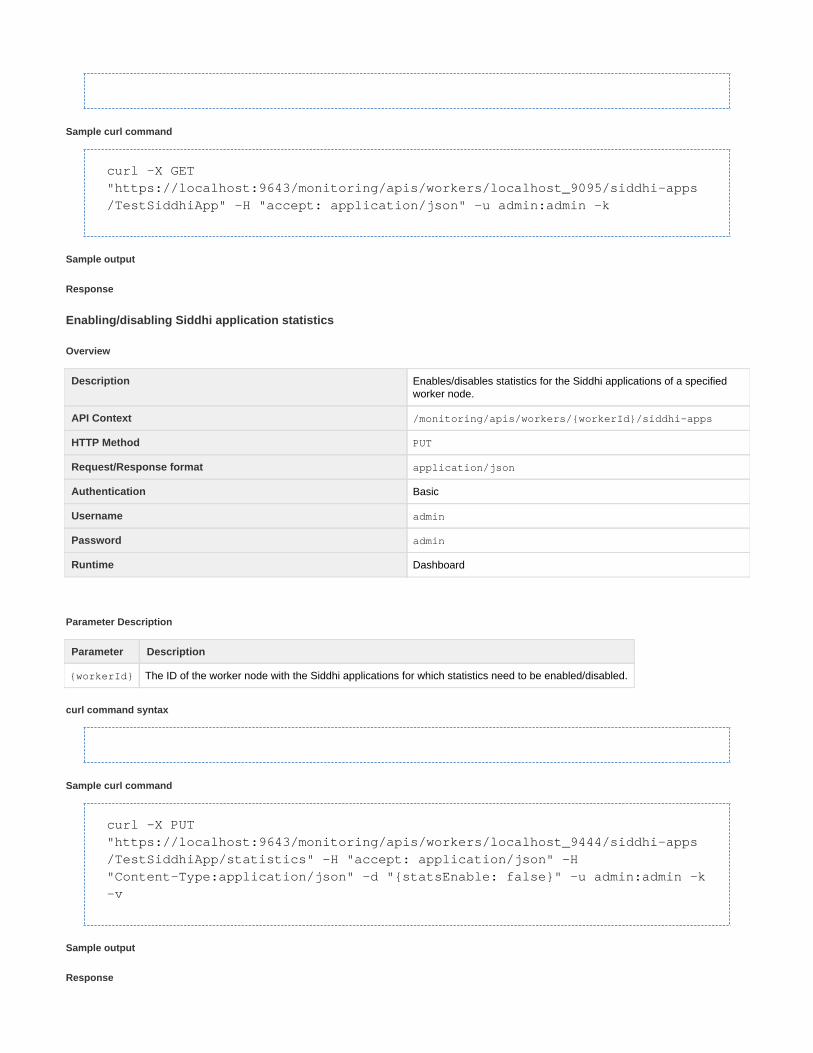
Sample curl command
curl -X GET"https://localhost:9643/monitoring/apis/workers/localhost_9095/siddhi-apps/TestSiddhiApp" -H "accept: application/json" -u admin:admin -k
Sample output
Response
Enabling/disabling Siddhi application statistics
Overview
Description Enables/disables statistics for the Siddhi applications of a specifiedworker node.
API Context /monitoring/apis/workers/{workerId}/siddhi-apps
HTTP Method PUT
Request/Response format application/json
Authentication Basic
Username admin
Password admin
Runtime Dashboard
Parameter Description
Parameter Description
{workerId} The ID of the worker node with the Siddhi applications for which statistics need to be enabled/disabled.
curl command syntax
Sample curl command
curl -X PUT"https://localhost:9643/monitoring/apis/workers/localhost_9444/siddhi-apps/TestSiddhiApp/statistics" -H "accept: application/json" -H"Content-Type:application/json" -d "{statsEnable: false}" -u admin:admin -k-v
Sample output
Response

Fetching the history statistics details of a Siddhi application
Overview
Description Fetches the history statistics details of a specified Siddhi application.
API Context /monitoring/apis/workers/{workerId}/siddhi-apps/{appName}/statistics
HTTP Method GET
Request/Response format application/json
Authentication Basic
Username admin
Password admin
Runtime Dashboard
Parameter Description
Parameter Description
{workerId} The ID of the worker node with the Siddhi application of which the history statistics details need to be fetched.
{appName} The name of the Siddhi application of which the history statistics details need to be fetched.
curl command syntax
Sample curl command
curl -X GET"https://localhost:9643/monitoring/apis/workers/localhost_9444/siddhi-apps/TestSiddhiApp/history?period=5min" -H "accept: application/json" -uadmin:admin -k
Sample output
Response
Fetching the component list and the component current metrics
Overview
Description Fetches the component list and component current metrics of a specified Siddhi application.
API Context /monitoring/apis/workers/{workerId}/siddhi-apps/{appName}/components
HTTP Method GET
Request/Response format application/json
Authentication Basic
Username admin

Password admin
Runtime Dashboard
Parameter Description
Parameter Description
{workerId} The ID of the worker node with the Siddhi application of which need to bethe component list and component current metricsfetched.
{appName} The Siddhi application of which the component list and component current metrics need to be fetched.
curl command syntax
Sample curl command
curl -X GET"https://localhost:9643/monitoring/apis/workers/localhost_9444/siddhi-apps/TestSiddhiApp/components" -H "accept: application/json" -u admin:admin -k-v
Sample output
Response
Fetching the history statistics details of a Siddhi application component
Overview
Description Fetches the history statistics details for a specified component of aspecified Siddhi application.
API Context /monitoring/apis/workers/{workerId}/siddhi-apps/{appName}/components/{componentType}/{componentId}/history?period=’2hr’,type=cpu,...
HTTP Method GET
Request/Response format application/json
Authentication Basic
Username admin
Password admin
Runtime Dashboard
Parameter Description
Parameter Description
{workerId} The ID of the worker node with the Siddhi application for which the history statistic details of a specific component needsto be fetched.

{appName} The Siddhi application with the component of which history statistics details need to be fetched.
{componentType} The type of the Siddhi component of which history statistics details need to be fetched. The component type can bequeries, streams, tables, windows and aggregations. For more information, see Siddhi Application Overview - Commoncomponents of a Siddhi application.
{componentId} The ID of the Siddhi component of which history statistics details need to be fetched.
curl command syntax
Sample curl command
curl -X GET"https://localhost:9643/monitoring/apis/workers/localhost_9444/siddhi-apps/TestSiddhiApp/components/Streams/FooStream/history?period=5min" -H"accept: application/json" -u admin:admin -k
Sample output
Response
Fetching the user roles of a specific user
Overview
Description Fetches the user roles of a specific user.
API Context /monitoring/apis/workers/roles?permissionSuffix=manager
HTTP Method GET
Request/Response format application/json
Authentication Basic
Username admin
Password admin
Runtime Dashboard
curl command syntax
Sample curl command
curl -X GET"https://localhost:9643/monitoring/apis/workers/roles?permissionSuffix=metrics.manager" -H "accept: application/json" -u admin:admin -k
Sample output
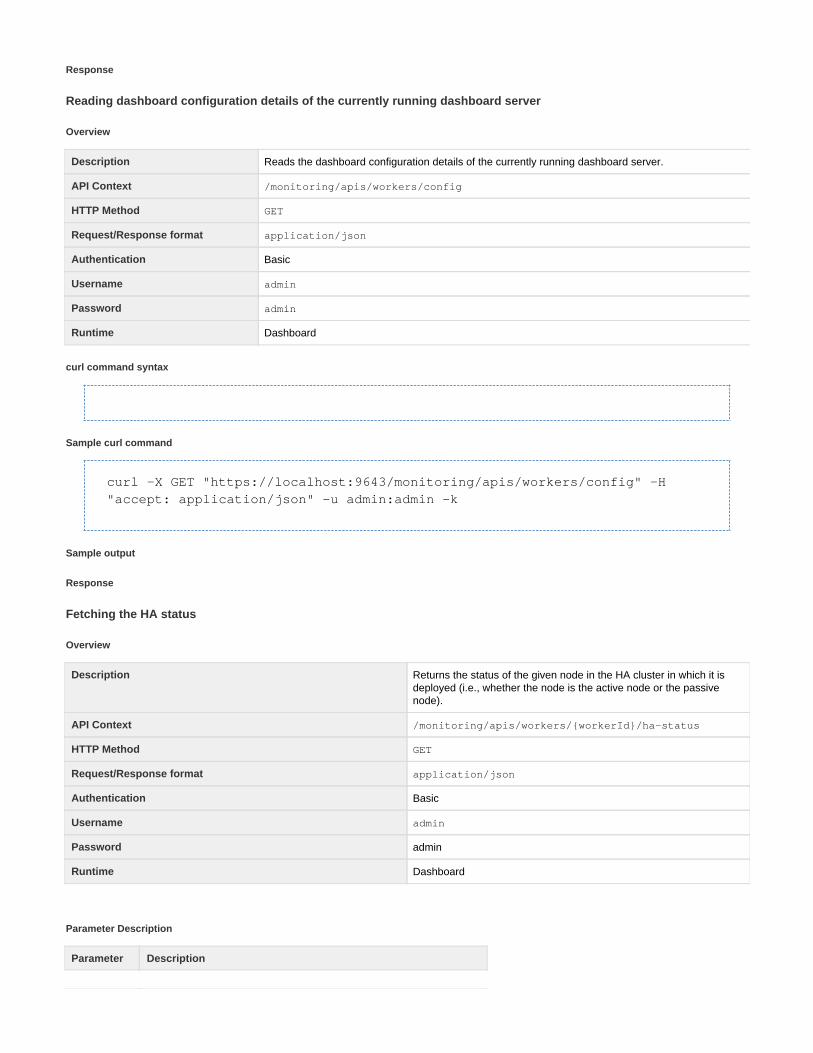
Response
Reading dashboard configuration details of the currently running dashboard server
Overview
Description Reads the dashboard configuration details of the currently running dashboard server.
API Context /monitoring/apis/workers/config
HTTP Method GET
Request/Response format application/json
Authentication Basic
Username admin
Password admin
Runtime Dashboard
curl command syntax
Sample curl command
curl -X GET "https://localhost:9643/monitoring/apis/workers/config" -H"accept: application/json" -u admin:admin -k
Sample output
Response
Fetching the HA status
Overview
Description Returns the status of the given node in the HA cluster in which it isdeployed (i.e., whether the node is the active node or the passivenode).
API Context /monitoring/apis/workers/{workerId}/ha-status
HTTP Method GET
Request/Response format application/json
Authentication Basic
Username admin
Password admin
Runtime Dashboard
Parameter Description
Parameter Description

{workerId} The ID of the worker node of which the HA status needs to be checked.
curl command syntax
Sample curl command
curl -X GET"https://localhost:9643/monitoring/apis/workers/localhost_9444/ha-status"-H "accept: application/json" -u admin:admin -k -v
Sample output
Response
Dashboard APIs
List all dashboardsSearch for dashboardsCreate dashboardsUpdate dashboardsDelete dashboardsList metadata of widgets
List all dashboards
Overview
Description Lists all the available dashboards in the current SP setup.
API Context /portal/apis/dashboards
HTTP Method GET
Request/Response Format application/json
Authentication Basic
Username admin
Password admin
Runtime Dashboard
curl command syntax
Sample curl command
curl -X GET "https://localhost:9643/portal/apis/dashboards" -H "accept:application/json" -u admin:admin -k
Sample output
Response

HTTP Status Code 200, 404, 500 or 400.
For descriptions of the HTTP status codes, see .HTTP Status Codes
Search for dashboards
Overview
Description Searches for the dashboard with the given ID.
API Context /portal/apis/dashboards/{dashboard-id}
HTTP Method GET
Request/Response Format application/json
Authentication Basic
Username admin
Password admin
Runtime Dashboard
Parameter description
Parameter Description
{dashboard-id} The ID of the dashboard to be fetched.
curl command syntax
Sample curl command
curl -X GET "https://localhost:9643/portal/apis/dashboards/salesdashboard"-H "accept: application/json" -u admin:admin -k
Sample output
Response
HTTP Status Code 200, 404, 500 or 400.
For descriptions of the HTTP status codes, see .HTTP Status Codes
Create dashboards
Overview
Description Creates a dashboard.
API Context /portal/apis/dashboards
HTTP Method POST
Request/Response Format application/json
Authentication Basic
Username admin
Password admin

Runtime Dashboard
curl command syntax
Sample curl command
curl -X POST "https://localhost:9643/portal/apis/dashboards" -H "accept:application/json" -H "Content-Type: application/json" -d"{\"url\":\"sampledashboard\",\"name\":\"SampleDashboard\",\"description\":\"This is a sampledashboard\",\"landingPage\":\"overview\",\"parentId\":\"1\",\"owner\":\"test\",\"pages\":[]}" -u admin:admin -k
Sample output
Response
HTTP Status Code 200, 404, 500 or 400.
For descriptions of the HTTP status codes, see .HTTP Status Codes
Update dashboards
Overview
Description Updates the specified dashboard.
API Context /portal/apis/dashboards/{dashboard-id}
HTTP Method PUT
Request/Response Format application/json
Authentication Basic
Username admin
Password admin
Runtime Dashboard
Parameter description
Parameter Description
{dashboard-id} The ID of the dashboard to be updated.
curl command syntax
Sample curl command

curl -X PUT "https://localhost:9643/portal/apis/dashboards/sampledashboard"-H "accept: application/json" -H "Content-Type: application/json" -d"{\"url\":\"sampledashboard\",\"name\":\"SampleDashboard\",\"description\":\"This is a sample dashboard2\",\"landingPage\":\"overview\",\"parentId\":\"1\",\"owner\":\"test\",\"pages\":[]}" -u admin:admin -k
Sample output
Response
HTTP Status Code 200, 404, 500 or 400.
For descriptions of the HTTP status codes, see .HTTP Status Codes
Delete dashboards
Overview
Description Deletes the specified dashboard.
API Context /portal/apis/dashboards/{dashboard-id}
HTTP Method DELETE
Request/Response Format application/json
Authentication Basic
Username admin
Password admin
Runtime Dashboard
Parameter description
Parameter Description
{dashboard-id} The ID of the dashboard to be deleted.
curl command syntax
Sample curl command
curl -X DELETE"https://localhost:9643/portal/apis/dashboards/sampledashboard" -H "accept:application/json" -u admin:admin -k
Sample output
Response
HTTP Status Code 200, 404, 500 or 400.
For descriptions of the HTTP status codes, see .HTTP Status Codes

List metadata of widgets
Overview
Description Lists the metadata of the widgets.
API Context /portal/apis/widgets/
HTTP Method GET
Request/Response Format application/json
Authentication Basic
Username admin
Password admin
Runtime Dashboard
curl command syntax
Sample curl command
curl -X GET "https://localhost:9643/portal/apis/widgets" -H "accept:application/json" -u admin:admin -k
Sample output
Response
HTTP Status Code 200, 404, 500 or 400.
For descriptions of the HTTP status codes, see .HTTP Status Codes
Authentication APIs
Log in to a dashboard applicationLog out of the dashboard applicationRedirect URL for login using authorization grant type
Log in to a dashboard application
Overview
Overview Logs in to the apps in dashboard runtime such as portal, monitoring orbusiness-rules app.
API Context /login/{appName}
HTTP Method POST
Request/Response Format application/x-www-form-urlencoded
Runtime Dashboard
Parameter description
Parameter Type Description Possible Values

appName Path param The application to which you need to log in. portal/monitoring/business-rules
username Body param Username for the login
password Body param Password for the login
grantType Body param Grant type used for the login password/refresh_token
authorization_code
rememberMe Body param Whether remember me function enabled false/true
curl command syntax
curl -X POST "https://analytics.wso2.com/login/{appName}" -H "accept:application/json" -H "Content-Type: application/x-www-form-urlencoded" -d"username={username}&password={password}&grantType={grantTypr}&rememberMe={rememberMe}"
Sample curl command
curl -X POST "https://localhost:9643/login/portal" -H "Content-Type: application/x-www-form-urlencoded" -d"username=admin&password=admin&grantType=password"
Sample output
{"authUser":"admin","pID":"71368eff-cc71-44ef","lID":"a60c1098-3de0-42fb","validityPeriod":3600}
Response
HTTP Status Code 200 or 404
For descriptions of the HTTP status codes, see .HTTP Status Codes
Log out of the dashboard application
Overview
Overview Logs out of the dashboard application.
API Context /logout/{appName}
HTTP Method POST
Request/Response Format application/json
Runtime Dashboard

curl command syntax
curl -X POST "https://analytics.wso2.com/logout/{appName}" -H "accept:application/json" -H "Authorzation: Bearer {access token}"
Sample curl command
curl -X POST "https://analytics.wso2.com/logout/portal" -H "accept:application/json" -H "Authorzation: Bearer 123456"
Sample output
N/A
Response
HTTP Status Code 200 or 404
For descriptions of the HTTP status codes, see .HTTP Status Codes
Redirect URL for login using authorization grant type
Overview
Overview Redirects URL by the IS in authorization grant type - OAuth2.
API Context /login/callback/{appName}
HTTP Method GET
Request/Response Format JSON
Runtime Dashbaord
Parameter description
Parameter Description
{appName} The application of which the URL needs to be redirected.
curl command syntax
Sample curl command
curl -X GET "https://localhost:9643/login/callback/portal"

Sample output
Response
HTTP Status Code 200 or 404
For descriptions of the HTTP status codes, see .HTTP Status Codes
Permission APIs
Add a permission stringGet permission ID for permission stringCheck whether a specific user role is granted a specific permissionDelete a permission string List roles with a specific permissionRevoke a specific permission for all rolesRevoke a specific permission for a specific role
Add a permission string
Overview
Description Adds a new permission string.
API Context /permissions
HTTP Method POST
Request/Response Format application/json
Authentication Basic
Username admin
Password admin
Runtime Dashboard/Worker
curl command syntax
Sample curl command
curl -X POST https://localhost:9443/permissions/ -H 'content-type:application/json' -d ' { "appName":"MON","permissionString":"MON.manager"}' -k
Sample output
Response

HTTP Status Code 200 or 404
For descriptions of the HTTP status codes, see .HTTP Status Codes
Get permission ID for permission string
Overview
Description Returns the permission ID for a given permission string.
API Context /permissions/app/{appName}
HTTP Method GET
Request/Response Format application/json
Authentication Basic
Username admin
Password admin
Runtime Dashboard/Worker
Parameter description
Parameter Description
{appName}
curl command syntax
Sample curl command
curl -X GET https://localhost:9443/permissions/app/MON
Sample output
Response
HTTP Status Code 200 or 404
For descriptions of the HTTP status codes, see .HTTP Status Codes
Check whether a specific user role is granted a specific permission
Overview
Description Checks whether the specified user role is granted a specificpermission.
API Context permissions/auth/{permissionID}/{roleName}

HTTP Method GET
Request/Response Format
Authentication
Username
Password
Runtime Dashboard/Worker
Parameter description
Parameter Description
{permissionID} The ID of a specific permission. The API checks whether this permission is granted to the specified user role.
{roleName} The ID of a specific user role. The API checks whether this user role is granted the specified permission ID.
curl command syntax
Sample curl command
curl -X GEThttps://localhost:9443/permissions/auth/8dc31fec-8364-3082-9f88-c7ca7d979873/admin
Sample output
Response
HTTP Status Code 200 or 404
For descriptions of the HTTP status codes, see .HTTP Status Codes
Delete a permission string
Overview
Description Deletes the specified permission string.
API Context /permissions/{permissionID}
HTTP Method DELETE
Request/Response Format
Authentication
Username
Password
Runtime Dashboard/Worker

Parameter description
Parameter Description
{permissionID} The ID of the permission string to be deleted.
curl command syntax
Sample curl command
curl -X DELETEhttps://localhost:9443/permissions/e9687c6f-b5b2-3216-b3bd-82e7a8e14367
Sample output
Response
HTTP Status Code 200 or 404
For descriptions of the HTTP status codes, see .HTTP Status Codes
List roles with a specific permission
Overview
Description Lists the user roles that are currently granted the specified user role.
API Context /permissions/{permissionsID}/roles
HTTP Method GET
Request/Response Format
Authentication
Username
Password
Runtime Dashboard/Worker
Parameter description
Parameter Description
{permissionsID} The ID of the permission for which the user roles need to be listed.
curl command syntax

Sample curl command
curl -X GEThttps://localhost:9443/permissions/8dc31fec-8364-3082-9f88-c7ca7d979873/roles
Sample output
Response
HTTP Status Code 200 or 404
For descriptions of the HTTP status codes, see .HTTP Status Codes
Revoke a specific permission for all roles
Overview
Description Revokes the specified permission for all the user roles.
API Context /permissions/revoke/{permissionID}
HTTP Method POST
Request/Response Format
Authentication
Username
Password
Runtime Dashboard/Worker
Parameter description
Parameter Description
{permissionID} The ID of the permission that needs to be revoked for all user roles.
curl command syntax
Sample curl command
curl -X POSThttps://localhost:9443/permissions/revoke/8dc31fec-8364-3082-9f88-c7ca7d979873
Sample output

Response
HTTP Status Code 200 or 404
For descriptions of the HTTP status codes, see .HTTP Status Codes
Revoke a specific permission for a specific role
Overview
Description Grants or revokes a permission for the specified user role. Thepermission is passed as an array in the body of the request.
API Context /permissions/roles/{roleID}?action=revoke/grant
HTTP Method POST
Request/Response Format application/json
Authentication
Username
Password
Runtime Dashboard/Worker
Parameter description
Parameter Description
{roleID} The ID of the user role for which the permission given in the request body needs to be granted or revoked.
curl command syntax
Sample curl command
curl -X POST 'https://localhost:9443/permissions/roles/admin?action=revoke'-H 'content-type: application/json' -d ' { "appName":"MON","permissionString":"MON.manager"}'
Sample output
Response
HTTP Status Code 200 or 404
For descriptions of the HTTP status codes, see .HTTP Status Codes
Business Rules APIs

Lists available business rule instancesDelete business rule with given UUIDFetch template group with the given UUIDFetch rule templates of the template group with given UUIDFetch rule template of specific UUID available under a template group with specific UUIDFetch available template groupsFetch business rule instance with given UUIDCreate and save a business ruleUpdate business rules instance with given UUID
Lists available business rule instances
Overview
Description Returns the list of business rule instances that are currently available.
API Context /business-rules/instances
HTTP Method GET
Request/Response Format
Authentication Basic
Username admin
Password admin
Runtime Dashboard
curl command syntax
Sample curl command
curl -X GET "https://localhost:9643/business-rules/instances" -uadmin:admin -k
Sample output
Response
HTTP Status Code 200 or 404
For descriptions of the HTTP status codes, see .HTTP Status Codes
Delete business rule with given UUID
Overview
Description Deletes the business rule with the given UUID.
API Context /business-rules/instances/{businessRuleInstanceID}?force-delete=false
HTTP Method DELETE

Request/Response Format application/json
Authentication Basic
Username admin
Password admin
Runtime Dashboard
Parameter description
Parameter Description
{businessRuleInstanceID} The UUID (Uniquely Identifiable ID) of the business rules instance to be deleted.
curl command syntax
Sample curl command
curl -X DELETE"https://localhost:9643/business-rules/instances/business-rule-1?force-delete=false" -H "accept: application/json" -u admin:adm
Sample output
Response
HTTP Status Code 200 or 404
For descriptions of the HTTP status codes, see .HTTP Status Codes
Fetch template group with the given UUID
Overview
Description Returns the template group that has the given UUID.
API Context /business-rules/template-groups/{templateGroupID}
HTTP Method GET
Request/Response Format
Authentication Basic
Username admin
Password admin
Runtime Dashboard
Parameter description

Parameter Description
{templateGroupID} The UUID of the template group to be fetched.
curl command syntax
Sample curl command
curl -X GET"https://localhost:9643/business-rules/template-groups/sweet-factory" -uadmin:admin -k
Sample output
Response
HTTP Status Code 200 or 404
For descriptions of the HTTP status codes, see .HTTP Status Codes
Fetch rule templates of the template group with given UUID
Overview
Description Returns the rule templates of the template group with the given UUID.
API Context /business-rules/template-groups/{templateGroupID}/templates
HTTP Method GET
Request/Response Format
Authentication Basic
Username admin
Password admin
Runtime Dashboard
Parameter description
Parameter Description
{templateGroupID} The UUID of the template group of which the rule templates need to be fetched.
curl command syntax
Sample curl command

curl -X GET"https://localhost:9643/business-rules/template-groups/sweet-factory/templates" -u admin:admin -k
Sample output
Response
HTTP Status Code 200 or 404
For descriptions of the HTTP status codes, see .HTTP Status Codes
Fetch rule template of specific UUID available under a template group with specific UUID
Overview
Description Returns the rule template with the specified UUID that is defined under the template group withthe specified UUID.
API Context /business-rules/template-groups/{templateGroupID}/templates/{ruleTemplateID}
HTTP Method GET
Request/Response Format
Authentication Basic
Username admin
Password admin
Runtime Dashboard
Parameter description
Parameter Description
{templateGroupID} The UUID of the template group from which the specified rule template needs to be retrieved.
{ruleTemplateID} The UUID of the rule template that needs to be retrieved from the specified template group.
curl command syntax
Sample curl command
curl -X GET"https://localhost:9643/business-rules/template-groups/sweet-factory/templates/identifying-continuous-production-decrease" -u admin:admin -k
Sample output

Response
HTTP Status Code 200 or 404
For descriptions of the HTTP status codes, see .HTTP Status Codes
Fetch available template groups
Overview
Description Returns all the template groups that are currently available in the SPsetup.
API Context /business-rules/template-groups
HTTP Method GET
Request/Response Format
Authentication Basic
Username admin
Password admin
Runtime Dashboard
curl command syntax
Sample curl command
curl -X GET "https://localhost:9643/business-rules/template-groups" -uadmin:admin -k
Sample output
Response
HTTP Status Code 200 or 404
For descriptions of the HTTP status codes, see .HTTP Status Codes
Fetch business rule instance with given UUID
Overview
Description Returns the business rule instance with the given UUID.
API Context /business-rules/instances/{businessRuleInstanceID}

HTTP Method GET
Request/Response Format application/json
Authentication Basic
Username admin
Password admin
Runtime Dashboard
Parameter description
Parameter Description
{businessRuleInstanceID} The UUID of the business rules instance to be fetched.
curl command syntax
Sample curl command
curl -X GET"https://localhost:9643/business-rules/instances/business-rule-1" -H"accept: application/json" -u admin:admin -k
Sample output
Response
HTTP Status Code 200 or 404
For descriptions of the HTTP status codes, see .HTTP Status Codes
Create and save a business rule
Overview
Description Creates and saves a business rule.
API Context /business-rules/instances?deploy={deploymentStatus}
HTTP Method POST
Request/Response Format application/json
Authentication Basic
Username admin
Password admin
Runtime Dashboard
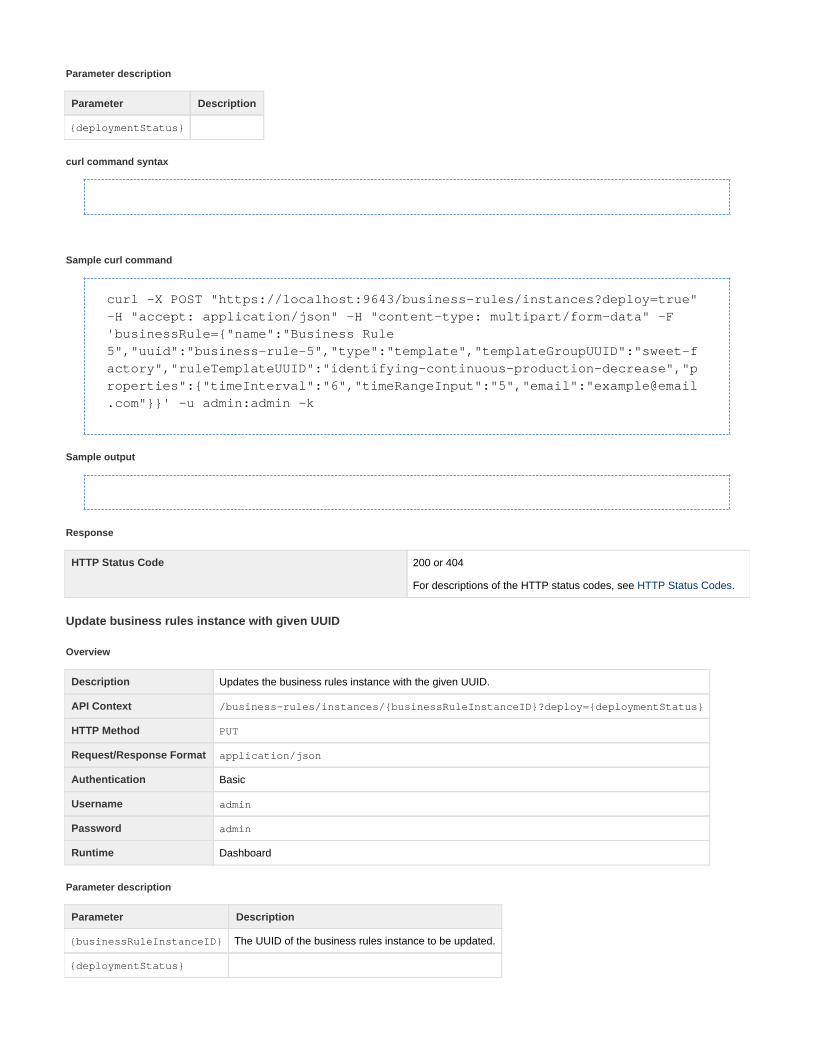
Parameter description
Parameter Description
{deploymentStatus}
curl command syntax
Sample curl command
curl -X POST "https://localhost:9643/business-rules/instances?deploy=true"-H "accept: application/json" -H "content-type: multipart/form-data" -F'businessRule={"name":"Business Rule5","uuid":"business-rule-5","type":"template","templateGroupUUID":"sweet-factory","ruleTemplateUUID":"identifying-continuous-production-decrease","properties":{"timeInterval":"6","timeRangeInput":"5","email":"[email protected]"}}' -u admin:admin -k
Sample output
Response
HTTP Status Code 200 or 404
For descriptions of the HTTP status codes, see .HTTP Status Codes
Update business rules instance with given UUID
Overview
Description Updates the business rules instance with the given UUID.
API Context /business-rules/instances/{businessRuleInstanceID}?deploy={deploymentStatus}
HTTP Method PUT
Request/Response Format application/json
Authentication Basic
Username admin
Password admin
Runtime Dashboard
Parameter description
Parameter Description
{businessRuleInstanceID} The UUID of the business rules instance to be updated.
{deploymentStatus}

curl command syntax
Sample curl command
curl -X PUT"https://localhost:9643/business-rules/instances/business-rule-5?deploy=true" -H "accept: application/json" -H "content-type: application/json" -d'{"name":"Business Rule5","uuid":"business-rule-5","type":"template","templateGroupUUID":"sweet-factory","ruleTemplateUUID":"identifying-continuous-production-decrease","properties":{"timeInterval":"9","timeRangeInput":"8","email":"[email protected]"}}' -u admin:admin -k
Sample output
Response
HTTP Status Code 200 or 404
For descriptions of the HTTP status codes, see .HTTP Status Codes
Store APIs
Query records in Siddhi store
Query records in Siddhi store
Overview
Description Queries records in the Siddhi store. For more information, see Managi.ng Stored Data via REST API
API Context /stores/query
HTTP Method POST
Request/Response Format application/json
Authentication Basic
Username admin
Password admin
Runtime Worker
curl command syntax

curl -X POST https://localhost:9443/stores/query -H "content-type:application/json" -u "admin:admin" -d '{"appName"} : "AggregationTest", "query" : "from stockAggregationselect *" }' -k
Sample curl command
curl -X POST https://localhost:9443/stores/query -H "content-type:application/json" -u "admin:admin" -d '{"appName" : "RoomService", "query": "select 10 as roomNumber, 1 as arrival update RoomTypeTable setRoomTypeTable.people = RoomTypeTable.people + arrival onRoomTypeTable.roomNo == roomNumber;" }' -k
Sample output
Response
HTTP Status Code 200 or 404
For descriptions of the HTTP status codes, see .HTTP Status Codes
HTTP Status Codes
When REST API requests are sent to carryout various actions, various HTTP status codes will be returned based on the state of the action(success or failure) and the HTTP method ( POST, GET, PUT, DELETE ) executed. The following are the definitions of the various HTTP statuscodes that are returned.
Success HTTP status codesError HTTP status codes
Success HTTP status codes
Code CodeSummary
Description
200 Ok HTTP request was successful. The output corresponding to the HTTP request will be returned. Generally used as a response to a successful GET and PUT REST API HTTP methods.
201 Created HTTP request was successfully processed and a new resource was created. Generally used as a response to a successful POST REST API HTTP method.
204 No content HTTP request was successfully processed. No content will be returned. Generally used as a response to a successful D ELETE REST API HTTP method.
202 Accepted HTTP request was accepted for processing, but the processing has not been completed. This generally occurs whenyour successful in trying to undeploy an application.
Error HTTP status codes
Code CodeSummary
Description

404 Not found Requested resource not found. Generally used as a response for unsuccessful GET and PUT REST API HTTPmethods.
409 Conflict Request could not be processed because of conflict in the request. This generally occurs when you are trying to add aresource that already exists. For example, when trying to add an auto-scaling policy that has an already existing ID.
500 Internalservererror
Server error occurred.
Working with Data Providers
Data providers are the sources from which information is fetched to be displayed in widgets. This section describes how to configure the dataproviders that are currently supported in WSO2 Stream Processor are as follows. These configurations determine the parameters that areavailable to be configured for each data provider when creating widgets via the Widget Generation wizard. For more information, see Generating
.Widgets
RDBMS Batch Data ProviderRDBMS Streaming Data ProviderSiddhi Store Data ProviderWeb Socket Provider
RDBMS Batch Data Provider
This data provider queries static tables. The following configuration is an example of an RDBMS Batch Data Provider:
"config": { "datasourceName": "Twitter_Analytics", "queryData": { "query": "select type as Sentiment, count(TweetID) as Rate fromsentiment where PARSEDATETIME(timestamp, 'yyyy-mm-dd hh:mm:ss','en') >CURRENT_TIMESTAMP()-86400 group by type" }, "tableName": "sentiment", "incrementalColumn": "Sentiment", "publishingInterval": 60}
RDBMS Streaming Data Provider
This data provider queries dynamic tables. Here, the newer records are published as soon as the table is updated. The following configuration isan example of an RDBMS Streaming Data Provider:

"configs": { "type": "RDBMSStreamingDataProvider", "config": { "datasourceName": "Twitter_Analytics", "queryData": { "query": "select id,TweetID from sentiment" }, "tableName": "sentiment", "incrementalColumn": "id", "publishingInterval": 5, "publishingLimit": 5, "purgingInterval": 6, "purgingLimit": 6, "isPurgingEnable": false } }
Siddhi Store Data Provider
This data provider runs a siddhi store query. The following configuration is an example of a Siddhi Store Data Provider:
"configs":{ "type":"SiddhiStoreDataProvider", "config":{ "siddhiApp":"@App:name(\"HTTPAnalytics\") define streamProcessedRequestsStream(timestamp long, serverName string, serviceNamestring, serviceMethod string, responseTime double, httpRespGroup string,userAgent string, requestIP string); define aggregation RequestAggregationfrom ProcessedRequestsStream select serverName, serviceName, serviceMethod,httpRespGroup, count() as numRequests, avg(responseTime) as avgRespTimegroup by serverName, serviceName, serviceMethod, httpRespGroup aggregate bytimestamp every sec...year;", "queryData":{ "query":"from RequestAggregation within\"2018-**-** **:**:**\" per \"days\" select AGG_TIMESTAMP, serverName,avg(avgRespTime) as avgRespTime" }, "publishingInterval":60 } }
Web Socket Provider
This data provider utilizes web siddhi-io-web socket sink to provide data to the clients. It creates endpoints as follows for the web socket sinks toconnect and publish information.
The Siddhi application included in this query must not contain any source configurations.

1.
wss://host:port/websocket-provider/{topic}
The following configuration is an example of a web socket data provider.
{ configs: { type: 'WebSocketProvider', config: { subscriberTopic: 'sampleStream', mapType: 'json' } }}
Extending WSO2 Stream Processor
The following topics cover the ways in which WSO2 Stream Processor can be extended.
Supported ExtensionsWriting Custom Siddhi ExtensionsConfiguring System Parameters for Siddhi Extensions
Supported Extensions
The siddhi extensions supported by default for WSO2 Stream Processor can be downloaded from the .Analytics Extensions Store
Writing Custom Siddhi Extensions
Custom extensions can be written in order to apply use case specific logic that is not available in Siddhi out of the box or as an existing extension.
There are five types of Siddhi extensions that you can write to cater your specific use cases. These extension archetypes are listed below withtheir related maven archetypes. You can use these archetypes to generate maven projects for each extension type.
siddhi-executionsiddhi-iosiddhi-mapsiddhi-scriptsiddhi-store
siddhi-execution
Siddhi-execution provides following extension types:
FunctionAggregate FunctionStream FunctionStream ProcessorWindow
You can use one or more from above mentioned extension types and implement according to your requirement. For more information about theseextension types, see .Siddhi Query Guide - Extensions
To install and implement the siddhi-io extension archetype, follow the procedure below:
Issue the following command from your CLI.
The host and port will be the host and port of the Portal Web application

1.
2.
3. 4.
1.
2.
3. 4.
mvn archetype:generate -DarchetypeGroupId=org.wso2.siddhi.extension.archetype -DarchetypeArtifactId=siddhi-archetype-execution -DarchetypeVersion=1.0.1 -DgroupId=org.wso2.extension.siddhi.execution -Dversion=1.0.0-SNAPSHOT
Enter the required execution name in the message that pops up as shown in the example below.Define value for property 'executionType': MLTo confirm that all property values are correct, type in the console. If not, press .Y NOnce you perform the above steps, a skeleton source code is created. You need to update this with the relevant extension logic. Thenbuild the source code and place the build extension jar in the directory.<SP_HOME>/lib
siddhi-io
Siddhi-io provides following extension types:
sinksource
You can use one or more from above mentioned extension types and implement according to your requirement. siddhi-io is generally used towork with IO operations as follows:
The Source extension type gets inputs to your Siddhi application.The Sink extension publishes outputs from your Siddhi application.
For more information about these extension types, see .Siddhi Query Guide - Extensions
To implement the siddhi-io extension archetype, follow the procedure below:
Issue the following command from your CLI.
mvn archetype:generate -DarchetypeGroupId=org.wso2.siddhi.extension.archetype -DarchetypeArtifactId=siddhi-archetype-io -DarchetypeVersion=1.0.1 -DgroupId=org.wso2.extension.siddhi.io -Dversion=1.0.0-SNAPSHOT
Enter the required execution name in the message that pops up as shown in the example below.
Define value for property 'typeOf_IO': httpTo confirm that all property values are correct, type in the console. If not, press .Y NOnce you perform the above steps, a skeleton source code is created. You need to update this with the relevant extension logic. Thenbuild the source code and place the build extension jar in the directory.<SP_HOME>/lib
siddhi-map
Siddhi-map provides following extension types,
Sink MapperSource Mapper
You can use one or more from above mentioned extension types and implement according to your requirement as follows.
The Source Mapper maps events to a predefined data format (such as XML, JSON, binary, etc), and publishes them to externalendpoints (such as E-mail, TCP, Kafka, HTTP, etc). The Sink Mapper also maps events to a predefined data format, but it does it at the time of publishing events from a Siddhi application.
For more information about these extension types, see .Siddhi Query Guide - Extensions
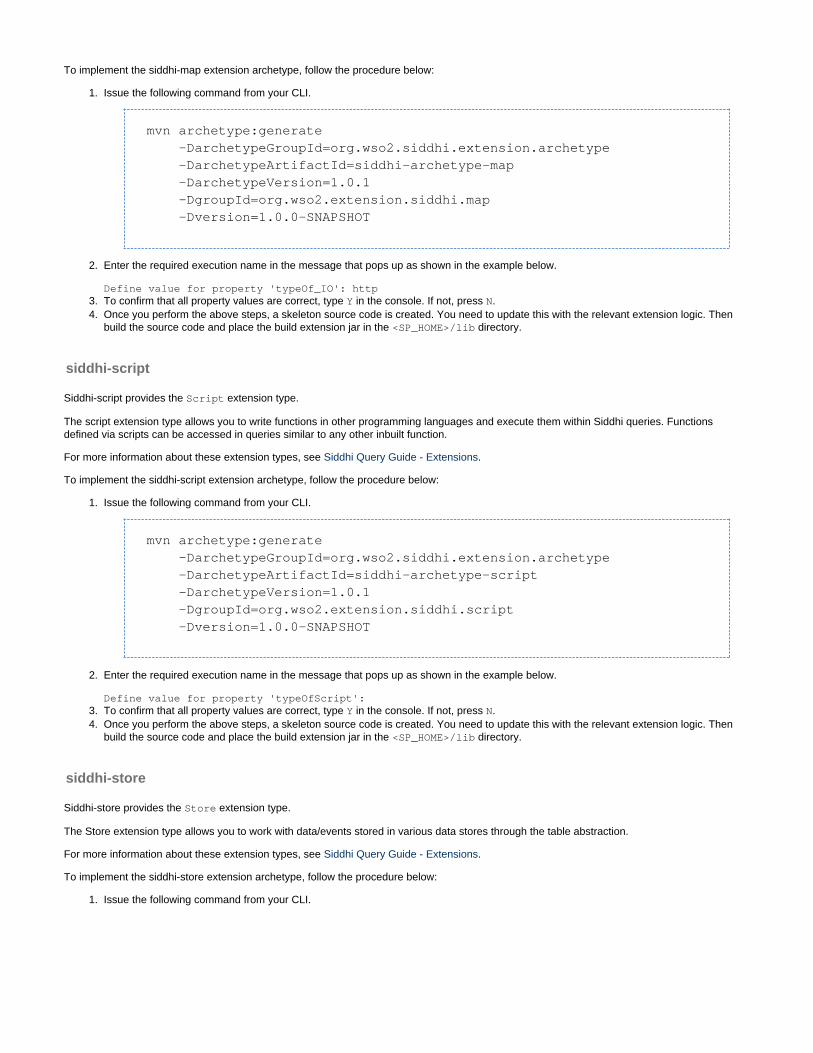
1.
2.
3. 4.
1.
2.
3. 4.
1.
To implement the siddhi-map extension archetype, follow the procedure below:
Issue the following command from your CLI.
mvn archetype:generate -DarchetypeGroupId=org.wso2.siddhi.extension.archetype -DarchetypeArtifactId=siddhi-archetype-map -DarchetypeVersion=1.0.1 -DgroupId=org.wso2.extension.siddhi.map -Dversion=1.0.0-SNAPSHOT
Enter the required execution name in the message that pops up as shown in the example below.
Define value for property 'typeOf_IO': httpTo confirm that all property values are correct, type in the console. If not, press .Y NOnce you perform the above steps, a skeleton source code is created. You need to update this with the relevant extension logic. Thenbuild the source code and place the build extension jar in the directory.<SP_HOME>/lib
siddhi-script
Siddhi-script provides the extension type.Script
The script extension type allows you to write functions in other programming languages and execute them within Siddhi queries. Functionsdefined via scripts can be accessed in queries similar to any other inbuilt function.
For more information about these extension types, see .Siddhi Query Guide - Extensions
To implement the siddhi-script extension archetype, follow the procedure below:
Issue the following command from your CLI.
mvn archetype:generate -DarchetypeGroupId=org.wso2.siddhi.extension.archetype -DarchetypeArtifactId=siddhi-archetype-script -DarchetypeVersion=1.0.1 -DgroupId=org.wso2.extension.siddhi.script -Dversion=1.0.0-SNAPSHOT
Enter the required execution name in the message that pops up as shown in the example below.
Define value for property 'typeOfScript':To confirm that all property values are correct, type in the console. If not, press .Y NOnce you perform the above steps, a skeleton source code is created. You need to update this with the relevant extension logic. Thenbuild the source code and place the build extension jar in the directory.<SP_HOME>/lib
siddhi-store
Siddhi-store provides the extension type.Store
The Store extension type allows you to work with data/events stored in various data stores through the table abstraction.
For more information about these extension types, see .Siddhi Query Guide - Extensions
To implement the siddhi-store extension archetype, follow the procedure below:
Issue the following command from your CLI.

1.
2.
3. 4.
1.
2.
3.
4.
5.
mvn archetype:generate -DarchetypeGroupId=org.wso2.siddhi.extension.archetype -DarchetypeArtifactId=siddhi-archetype-store -DarchetypeVersion=1.0.1 -DgroupId=org.wso2.extension.siddhi.store -Dversion=1.0.0-SNAPSHOT
Enter the required execution name in the message that pops up as shown in the example below.Define value for property 'storeType': RDBMSTo confirm that all property values are correct, type in the console. If not, press .Y NOnce you perform the above steps, a skeleton source code is created. You need to update this with the relevant extension logic. Thenbuild the source code and place the build extension jar in the directory.<SP_HOME>/lib
Configuring System Parameters for Siddhi Extensions
The pre-written Siddhi extensions supported by WSO2 Stream Processor are configured with default values for system parameters. If you need tooverride those values, you can refer to those extensions from the file and add the system<SP_HOME>/conf/<RUNTIME>/deployment.yamlparameters with the required values as key-value pairs. To do this, follow the procedure below:
Open the file.<SP_HOME>/conf/<RUNTIME>/deployment.yaml
The extensions belong to the Siddhi component. Therefore, to edit the Siddhi component, add a main section to the file named .siddhiThen add a subsection named to indicate that the configurations related to Siddhi extensions as shown below.extensions
siddhi: extensions:
For each separate extension you want to configure, add a sub-section named under the subsection. extension extensions
siddhi: extensions: - extension:
Under each subsection, add two key-value pairs as follows.extension
Key Value
name The name of the extension. e.g., tcp
namespace The archetype of the extension. e.g., source
Add a subsection named properties to overide the system properties. Then add the system properties with the required values as kevalue pairs. as shown below.
The can be or where Siddhi is run.<RUNTIME> worker editor
The archetypes of extensions supported are , , , , , and .source sink execution io map script store

5.
siddhi: extensions: - extension: name: [extension-name] namespace: [extension-namespace] properties: [key]: [value]
Following are examples for overriding default values for system properties.
Example 1: Defining host and port for TCP
siddhi: extensions: - extension: name: tcp namespace: source properties: host: 0.0.0.0 port: 5511
Example 2: Overwriting the default RDBMS configuration
siddhi: extensions: - extension: name: rdbms namespace: store properties: mysql.batchEnable: true mysql.batchSize: 1000 mysql.indexCreateQuery: "CREATE INDEX {{TABLE_NAME}}_INDEX ON{{TABLE_NAME}} ({{INDEX_COLUMNS}})" mysql.recordDeleteQuery: "DELETE FROM {{TABLE_NAME}}{{CONDITION}}" mysql.recordExistsQuery: "SELECT 1 FROM {{TABLE_NAME}}{{CONDITION}} LIMIT 1"
FAQ
What are the core differences between WSO2 Stream Processor and WSO2 Complex Event Processor?Can we detect events that have not occured using Siddhi?
What are the core differences between WSO2 Stream Processor and WSO2 Complex Event
Processor?
WSO2 SP can do everything that WSO2 CEP can do. WSO2 SP also has some addtional features as explained in the following table.
Attribute Sub Attribute WSO2 Complex Event Processor WSO2 Stream Processor

General Siddhi Version WSO2 CEP is powered by Siddhi 3.x. WSO2 SP is powered by Siddhi 4.x. This version ismore stable than Siddhi 3.x with improvedperformance and bug fixes.
WSO2 Carbon Version WSO2 CEP is based on WSO2 Carbon 4.x. WSO2 SP is based on WSO2 Carbon 5.x, andtherefore it is more lightweight.
Working in containerizedenvironments.
WSO2 CEP encounters certain challenges whenworking in containerized environments.
WSO2 SP is designed to be container friendly andcan carry out native distributed processing.
Configuration The main configurations (i.e., configurations thatdefine parts of the event flow such as collectinginformation, processing logic and publishing resultsetc.) are done in seperate files/UIs.
All the configurations related to an event flow arecontained within a single Siddhi application.
For more information about configuring the evnt flowin a single file, see .Creating a Siddhi Application
IncrementalAnalysis
WSO2 CEP focuses mainly on real-time processingand does not perform time series aggregations.
WSO2 SP uses the incremental analysis capabilitiesof Siddhi 4.x to perform time series aggregationswithout having to integrate with third pary platformssuch as Apache Spark.
Incremental analysis smoothly federates real-timeanalytics with batch analytics by allowing both formsof analytics to be done in the same message flow.
For more information, see . Incremental Analysis
DistributedDeployment
Scalability WSO2 CEP is less scalable compared to WSO2 SPdue to its limitted container-friendliness.
WSO2 SP is highly scalable with its containerfriendliness.
Distributed Architecture The distributed architecture of WSO2 CEP is basedon Apache Storm.
The distributed architecture of WSO2 SP is based onKafka. As a result, the distributed deployment ofWSO2 SP is more fault tolerant and it supportsexactly-once processing.
For more information about distributed deployment ofSP, see the .Deployment Guide
Multi Data CenterDeployment
WSO2 CEP does not have built-in support for multidata center deployment.
WSO2 SP has built-in support for multi data centerdeployment.
For more information about multi data centerdeployment, see Multi Datacenter High Availability
.Deployment
Tooling Query editing WSO2 CEP Management Console has a UI thatsupports only query editing.
WSO2 SP offers a richer query editing tool that alsosupports auto completion, event simulation anddebugging for Siddhi queries and more.
For more information, see Understanding the.Development Environment
Status monitoring WSO2 CEP has Carbon metric support to view onlyJVM analytics.
The Status Dashboard of WSO2 SP allows you tomonitor your SP deployment with a complete set ofstatistics related to performance, resourceconsumption etc., of Siddhi applications and JVM.
For more information, see Monitoring Stream.Processor
BusinessRuls
WSO2 CEP does not include a feature to allowbusiness users to create rules out of businesstemplates.
WSO2 SP allows you to create business rules fromtemplates.
For more information, see Working with Business.Rules
Can we detect events that have not occured using Siddhi?
This can be achieved via Siddhi. The key word tin Siddhi allows you to detect the non-occurrence ofnot <condition> for <time period>events.
For more information about this key word, see .Siddhi Query Guide - Logical Patterns
For a demonstration of how non-occuring events can be detected in a real world user scenario, see Correlating Events for Complex Event.Processing - User Scenario 2


