Embed Size (px)
Citation preview
8/2/2019 01 - manual de Moho (introducción y básicos)
http://slidepdf.com/reader/full/01-manual-de-moho-introduccion-y-basicos 1/79
INTRODUCCIÓN
Moho de Lost Marble's es un sistema de animación para crear dibujos animados en 2d. Estedocumento es el manual de usuario, y contiene información muy útil para iniciarte, así comoreferencia bien detallada de todas las características de Moho.
Si acabas de empezar a usar Moho, el mejor sitio para comenzar es con los the tutoriales. Estasección te dará una rápida visión de cómo trabaja Moho, y qué puedes hacer con él. Si has usadoMoho en el pasado, puedes ver en una rápida lectura lo que ha cambiado en esta versión.
Si ahora usas provisionalmente Moho y quieres mas información sobre características específicas oelementos de la interfaz, elige la sección que te interese de la tabla de contenidos. La sección
"Usando Moho" describe cómo realizar las tareas básicas de trabajo en Moho, mientras que la"referencia del interfaz" detalla cada elemento del menú y para qué se usa cada botón.
Finalmente, si tienes algún problema que no está contestado en este documento, por favor mira lasección Opteniendo Ayuda. Queremos hacer todo lo que podamos para hacer del uso de Mohouna experiencia divertida y productiva.
New features in Moho 5
The following is not a comprehensive list of new features, but it covers most of the major changesin version 5 that might be of interest to experienced Moho users. Most of the version 5 changeshave been made in response to users' requests, so hopefully you'll find more than a few things inthis list to be happy about.
USER INTERFACE
• more attractive• multiple windows• multiple viewport option• customizable UI colors• editing view improvements
o adjustable display quality optionso option for live display of layer masking and transparency effects
• timeline improvementso channel cycling as a new interpolation typeo soundtrack waveform displays in timelineo cycling and actions are visible in the timelineo channels can be selectively shown/hiddeno layer visibility is readily apparent in the timeline
SCRIPTING
8/2/2019 01 - manual de Moho (introducción y básicos)
http://slidepdf.com/reader/full/01-manual-de-moho-introduccion-y-basicos 2/79
• all the tools in Moho are now written in the Lua scripting language• you can write your own tools if you wish• the scripting menu contains "plugins" that are also written in Lua• scripts can access audio data to create animation based on sound
TOOL IMPROVEMENTS
• new tools: magnet, bone strength, arrow, hide edges, bending,...• hide edge tool - allows you to easily create a partial outline around a fill• auto-welding for certain tools• select shape tool can pick shapes below the top one• ability to create complex shapes without making a separate fill and outline - in fact, the
. fill and outline tools have been combined into one
IMPROVED SWF EXPORT
• better line quality, smaller files, optimizations to reduce file size• image layers can be exported, as long as they're PNG or JPEG, and don't have "complex"
. movements• gradient fill effect can be exported• variable-width lines can be exported• soundtrack can be exported if it's in MP3 format
NEW LAYER T YPES
• note layers ("sticky notes")•
3D layerso import 3D OBJ files, or use scripts to create new 3D objectso toon-rendered edgeso texture maps are supportedo can be warped using bone layers
ACTIONS
• create animation clips for a character, and re-use them as much as you want• walk cycles, facial expressions, spoken dialog, etc.
STYLES
• create styles that can be applied to multiple shapes• just change the style to change the color/line width/brush/etc. of all the affected shapes
BONE IMPROVEMENTS
• adjustable regions of bone influence• bone dynamics - automatic rubbery bone movement• switch layers are now a sub-type of bone layers• new techniques for bone binding - bone setup is now much quicker and easier
RENDERING IMPROVEMENTS
8/2/2019 01 - manual de Moho (introducción y básicos)
http://slidepdf.com/reader/full/01-manual-de-moho-introduccion-y-basicos 3/79
• ability to apply brush strokes to shape outlines• improved layer masking - more powerful and flexible• NTSC color-safe rendering option• layer blending modes• improved AVI import and export (Windows)
• red/blue stereo rendering option• maximum blur radius has been increased (this affects blur, shadows, shading, soft• edge effect, etc.) plus, the blur algorithm is really fast now, so feel free to use blurs of up .
to 256 pixels
MOHO TUTORIALS
Learning Moho
In this section, we will walk you through various aspects of using Moho. This is the perfect placeto start if you've never used Moho before. Even if you're an experienced Moho user, this version of Moho has some big changes, so we recommend reading through the tutorials again.
The best way to get started is to read all the tutorials in the Basics section in order. Each of these
tutorials builds on skills learned in the earlier ones, and one-by-one will get you up to speed withMoho's basic drawing and animation techniques. Once you're comfortable working in Moho, thenyou can move on to the other tutorial sections. You don't have to read them all (although that
probably wouldn't hurt), but choose the ones that address the specific techniques you want to learnabout.
Add Bone
While reading the tutorials, keep an eye out for pictures of tool buttons to the left of the text.
(Example: the Add Bone tool shown here.) When you are told to use a particular tool, we willshow it to the left of the main tutorial text.
Finally, all of the Moho files created or used by the tutorials have been installed along with Mohoitself. You can find them by going to the Moho program folder, and looking for the Tutorials sub-folder. If you're having trouble with a tutorial, try opening the corresponding Moho file to see whatit should look like.
Once you've finished the tutorials, you should be comfortable enough to continue on your own.However, the tutorials won't teach you how to use every feature of Moho - the rest of this manualis a reference that covers Moho's features in detail, and is recommended reading to be able to use
the full power of Moho.
8/2/2019 01 - manual de Moho (introducción y básicos)
http://slidepdf.com/reader/full/01-manual-de-moho-introduccion-y-basicos 4/79
TUTORIAL 1.1
INTRODUCCIÓN
Este ejercicio recorre las grandes características de Moho, sin ir demasiado a los detalles. La propuesta aquí, más que ofrecer una vista general de cómo trabaja Moho, es enseñarte cómo usar todas las características específicas. En este tutorial dibujaremos y animaremos un objeto simple.
Moho tiene distintos grupos de herramientas, usadas para diferentes tipos de tareas. Algunas deestas herramientas se usan para crear nuevos objetos y otras para modificar y animar objetosexistentes. Los grupos de herramientas básicas en Moho son: Dibujo, Relleno, Huesos, Capas,Cámaras y Workspace (Espacio de trabajo).
Este tutorial introduce algunas herramientas de dibujo, relleno y capas, mientras los siguientestutoriales se centran con detalle en cada uno de los grupos de herramientas.
DIBUJANDO UNA FORMA SIMPLE
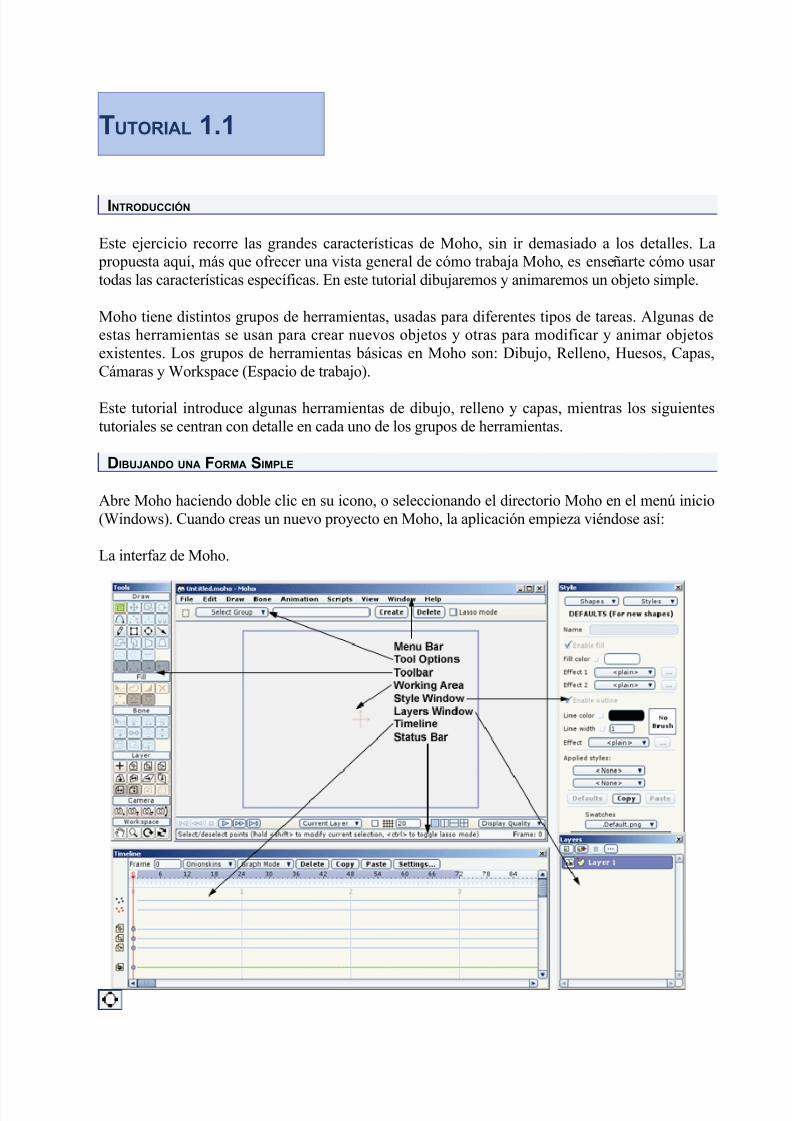
Abre Moho haciendo doble clic en su icono, o seleccionando el directorio Moho en el menú inicio(Windows). Cuando creas un nuevo proyecto en Moho, la aplicación empieza viéndose así:
La interfaz de Moho.
8/2/2019 01 - manual de Moho (introducción y básicos)
http://slidepdf.com/reader/full/01-manual-de-moho-introduccion-y-basicos 5/79
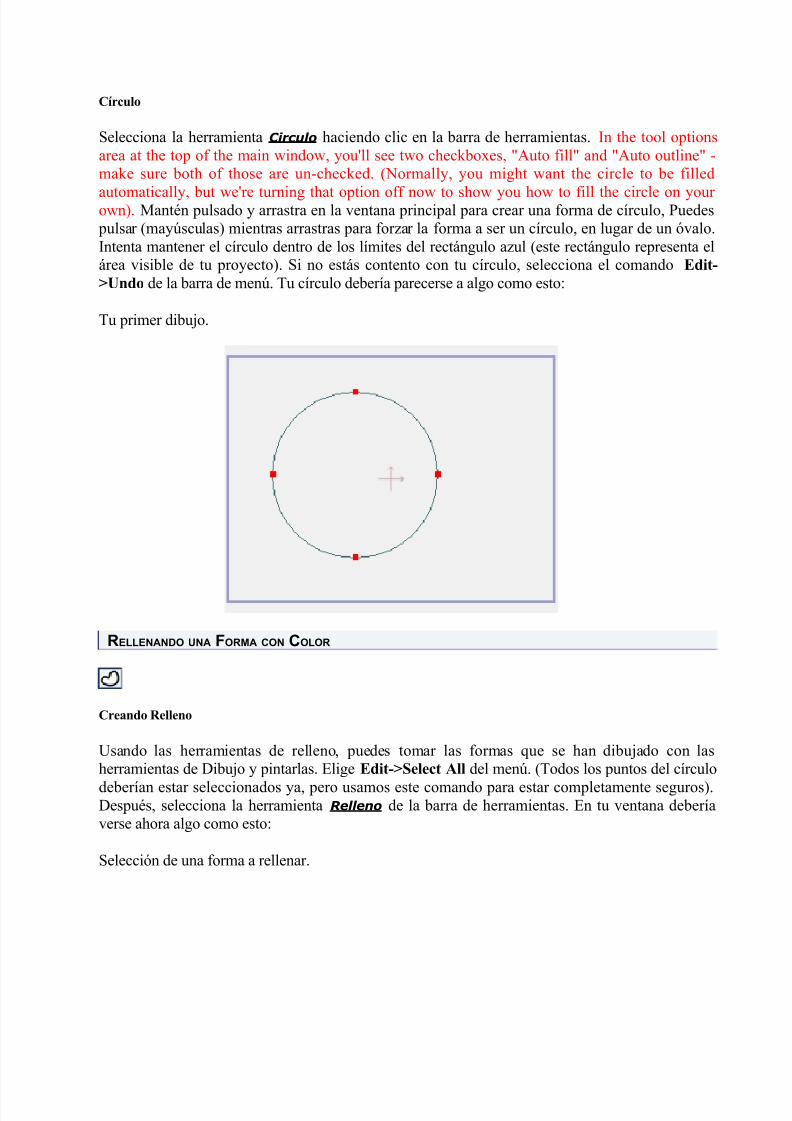
Círculo
Selecciona la herramienta Circulo haciendo clic en la barra de herramientas. In the tool optionsarea at the top of the main window, you'll see two checkboxes, "Auto fill" and "Auto outline" -make sure both of those are un-checked. (Normally, you might want the circle to be filled
automatically, but we're turning that option off now to show you how to fill the circle on your own). Mantén pulsado y arrastra en la ventana principal para crear una forma de círculo, Puedes pulsar (mayúsculas) mientras arrastras para forzar la forma a ser un círculo, en lugar de un óvalo.Intenta mantener el círculo dentro de los límites del rectángulo azul (este rectángulo representa elárea visible de tu proyecto). Si no estás contento con tu círculo, selecciona el comando Edit-
>Undo de la barra de menú. Tu círculo debería parecerse a algo como esto:
Tu primer dibujo.
RELLENANDO UNA FORMA CON COLOR
Creando Relleno
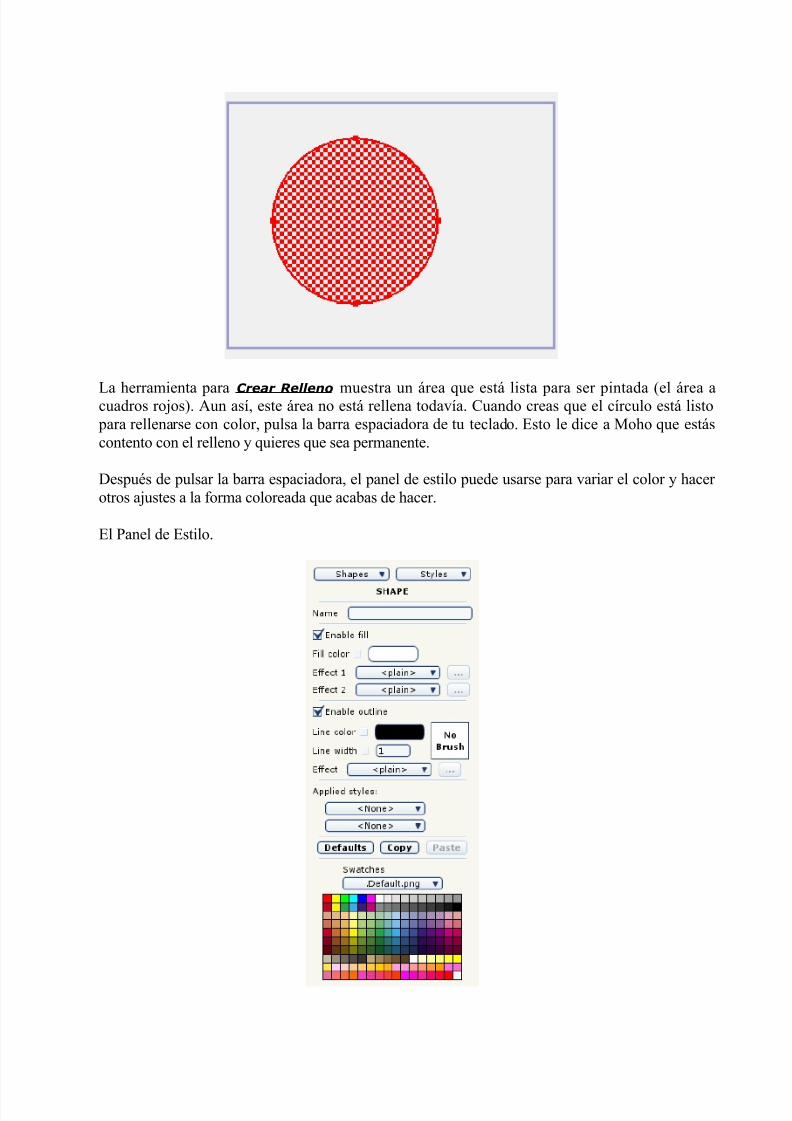
Usando las herramientas de relleno, puedes tomar las formas que se han dibujado con lasherramientas de Dibujo y pintarlas. Elige Edit->Select All del menú. (Todos los puntos del círculo
deberían estar seleccionados ya, pero usamos este comando para estar completamente seguros).Después, selecciona la herramienta Relleno de la barra de herramientas. En tu ventana deberíaverse ahora algo como esto:
Selección de una forma a rellenar.
8/2/2019 01 - manual de Moho (introducción y básicos)
http://slidepdf.com/reader/full/01-manual-de-moho-introduccion-y-basicos 6/79
La herramienta para Crear Relleno muestra un área que está lista para ser pintada (el área acuadros rojos). Aun así, este área no está rellena todavía. Cuando creas que el círculo está listo para rellenarse con color, pulsa la barra espaciadora de tu teclado. Esto le dice a Moho que estáscontento con el relleno y quieres que sea permanente.
Después de pulsar la barra espaciadora, el panel de estilo puede usarse para variar el color y hacer otros ajustes a la forma coloreada que acabas de hacer.
El Panel de Estilo.
8/2/2019 01 - manual de Moho (introducción y básicos)
http://slidepdf.com/reader/full/01-manual-de-moho-introduccion-y-basicos 7/79
Clica en el rectángulo "Fill color" para seleccionar un nuevo color para el círculo, y mueve eldeslizador a un valor de 1 para el borde de la línea. Finalmente, elige el comando File->Render dela barra de menús. Una nueva ventana se abrirá para mostrarte el estado actual de tu proyecto.Cierra la ventana cuando la hayas visto.
ANIMACIÓN SIMPLE
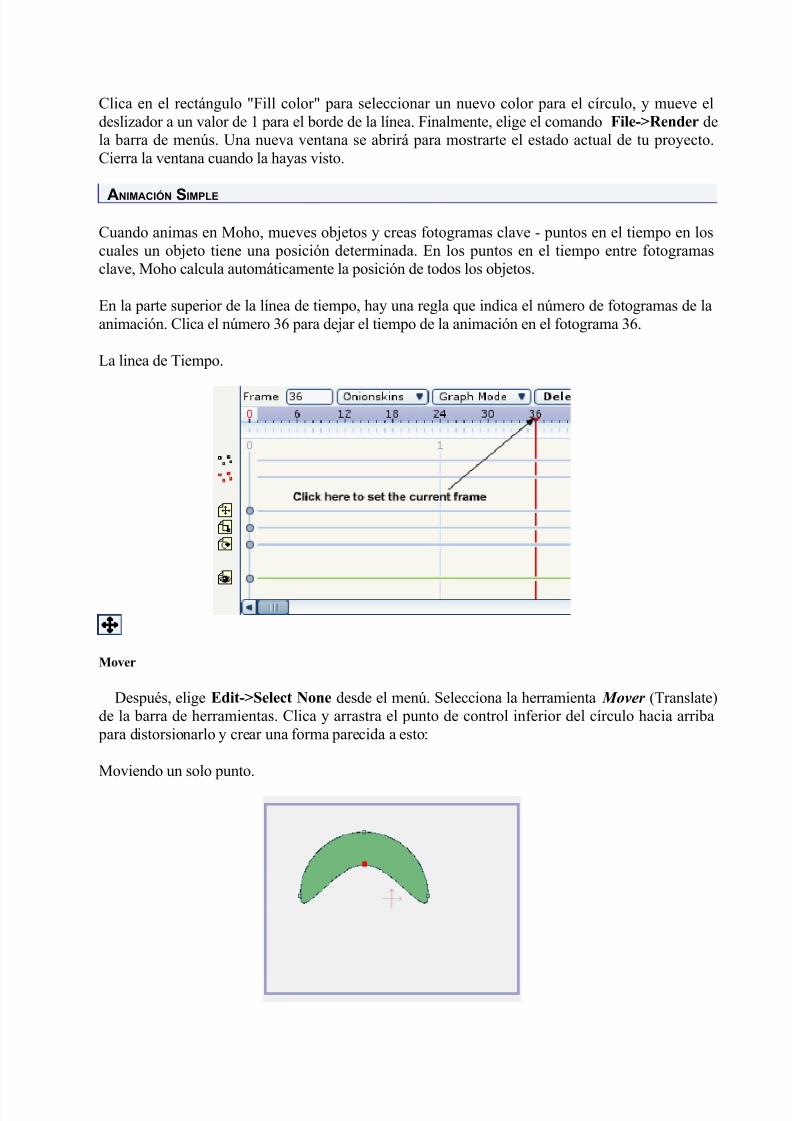
Cuando animas en Moho, mueves objetos y creas fotogramas clave - puntos en el tiempo en loscuales un objeto tiene una posición determinada. En los puntos en el tiempo entre fotogramasclave, Moho calcula automáticamente la posición de todos los objetos.
En la parte superior de la línea de tiempo, hay una regla que indica el número de fotogramas de laanimación. Clica el número 36 para dejar el tiempo de la animación en el fotograma 36.
La linea de Tiempo.
Mover
Después, elige Edit->Select None desde el menú. Selecciona la herramienta Mover (Translate)de la barra de herramientas. Clica y arrastra el punto de control inferior del círculo hacia arriba
para distorsionarlo y crear una forma parecida a esto:
Moviendo un solo punto.
8/2/2019 01 - manual de Moho (introducción y básicos)
http://slidepdf.com/reader/full/01-manual-de-moho-introduccion-y-basicos 8/79
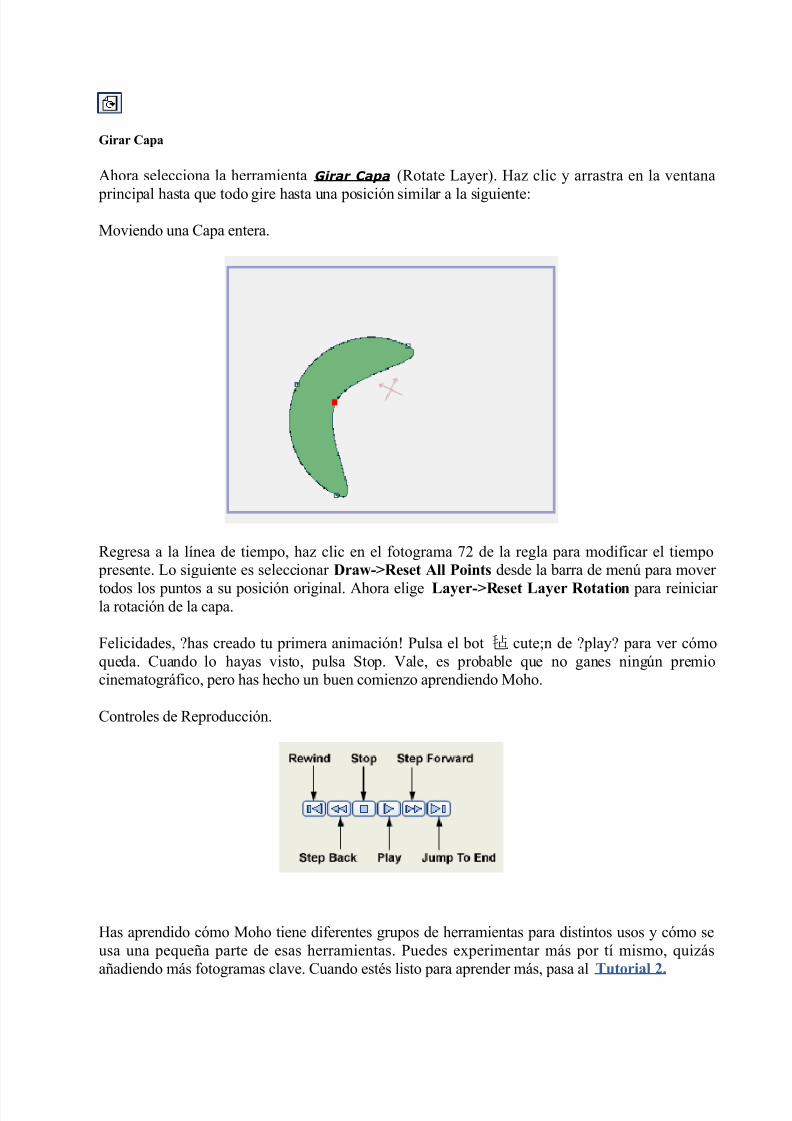
Girar Capa
Ahora selecciona la herramienta Girar Capa (Rotate Layer). Haz clic y arrastra en la ventana
principal hasta que todo gire hasta una posición similar a la siguiente:
Moviendo una Capa entera.
Regresa a la línea de tiempo, haz clic en el fotograma 72 de la regla para modificar el tiempo presente. Lo siguiente es seleccionar Draw->Reset All Points desde la barra de menú para mover
todos los puntos a su posición original. Ahora elige Layer->Reset Layer Rotation para reiniciar la rotación de la capa.
Felicidades, ?has creado tu primera animación! Pulsa el bot 毡 cute;n de ?play? para ver cómoqueda. Cuando lo hayas visto, pulsa Stop. Vale, es probable que no ganes ningún premiocinematográfico, pero has hecho un buen comienzo aprendiendo Moho.
Controles de Reproducción.
Has aprendido cómo Moho tiene diferentes grupos de herramientas para distintos usos y cómo seusa una pequeña parte de esas herramientas. Puedes experimentar más por tí mismo, quizásañadiendo más fotogramas clave. Cuando estés listo para aprender más, pasa al Tutorial 2.
8/2/2019 01 - manual de Moho (introducción y básicos)
http://slidepdf.com/reader/full/01-manual-de-moho-introduccion-y-basicos 9/79
TUTORIAL 1.2
Dibujando Formas Simples
INTRODUCCIÓN
En este tutorial aprenderás cosas sobre las herramientas de dibujo usadas en Moho. Los siguientestutoriales se basarán en los dibujos que hagas aquí, mostrándote cómo rellenarlos con color,
prepararlos para animar y hacer que se muevan.
CREANDO UN FONDO
Abre Moho pulsando dos veces en el icono. O, si Moho ya esta abierto, selecciona File->New paracrear un nuevo documento. Elige File->Project Settings... y clica en el rectángulo del Color deFondo (Background color). Elige un bonito color cielo para el fondo del proyecto. Acepta con OK cuando lo hayas hecho.
Rectángulo
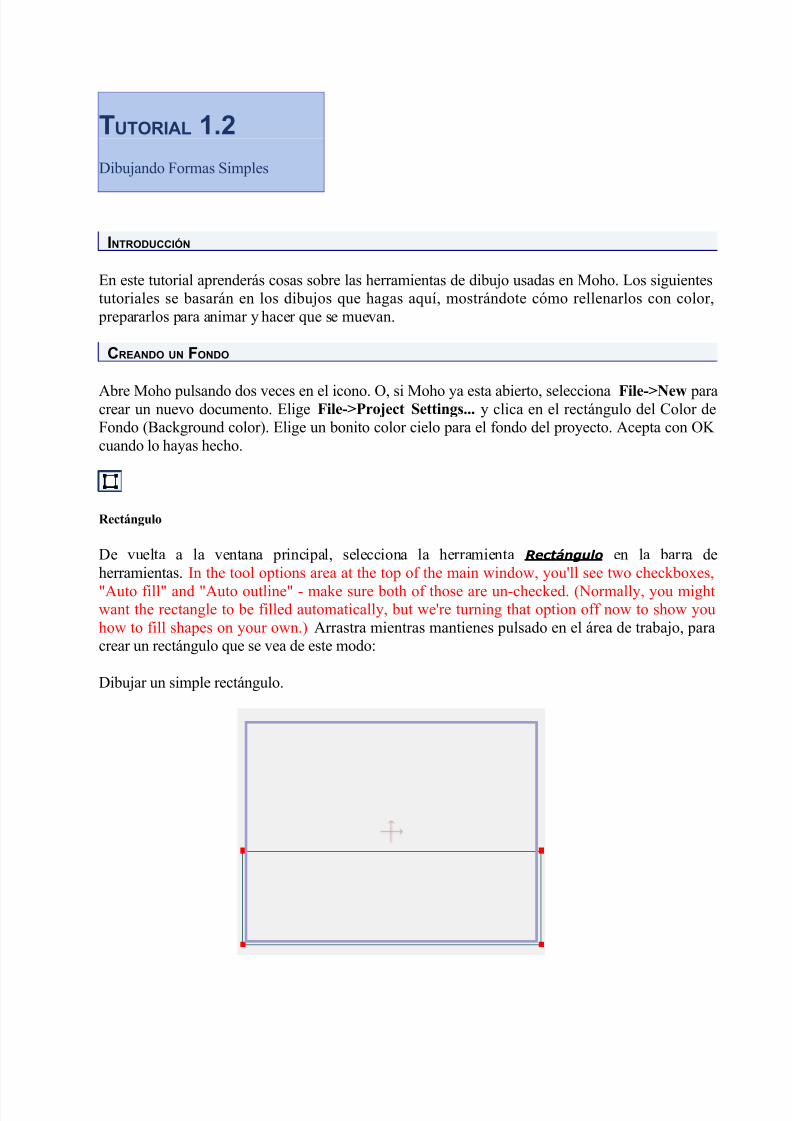
De vuelta a la ventana principal, selecciona la herramienta Rectángulo en la barra deherramientas. In the tool options area at the top of the main window, you'll see two checkboxes,
"Auto fill" and "Auto outline" - make sure both of those are un-checked. (Normally, you mightwant the rectangle to be filled automatically, but we're turning that option off now to show youhow to fill shapes on your own.) Arrastra mientras mantienes pulsado en el área de trabajo, paracrear un rectángulo que se vea de este modo:
Dibujar un simple rectángulo.

8/2/2019 01 - manual de Moho (introducción y básicos)
http://slidepdf.com/reader/full/01-manual-de-moho-introduccion-y-basicos 10/79
Añadir punto
Esta forma va a ser unas colinas redondas. Hasta ahora estas colinas parecen un poco desinfladas,
así que vamos a arreglarlas. Selecciona la herramienta Añadir punto ( Add Point ) en la barra deherramientas. Clica en el borde superior del rectángulo y arrastra el ratón hacia arriba:
Cómo añadir un punto a una forma previa.
Ahora deberías tener algo como lo que se ve en la imagen. Si no es esto lo que tienes, selecciona la
opción Edit->Undo y prueba de nuevo. Asegúrate de pulsar la línea que forma el lado superior delrectángulo y, desde allí, arrastrar hacia arriba.
Arrastrar el nuevo punto hacia arriba.
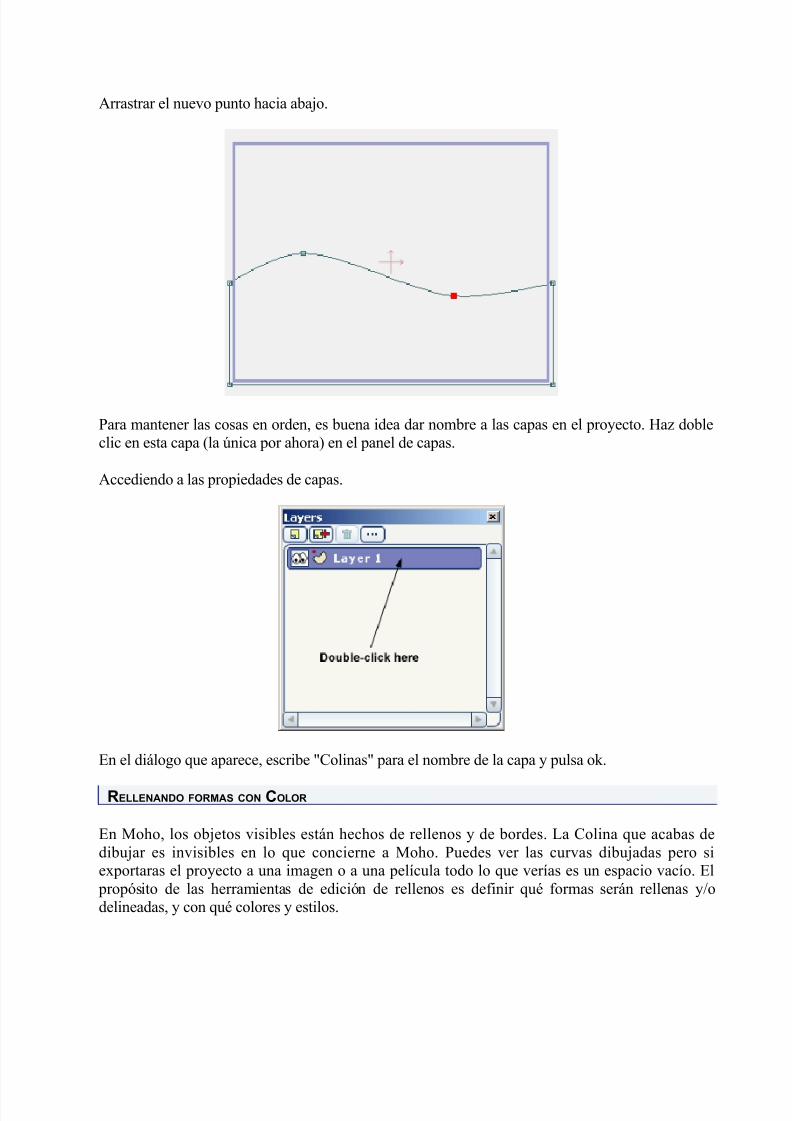
Añade otra curva a las colinas, añadiendo otro punto un poco más hacia la izquierda y arrastrando
hacia abajo:
8/2/2019 01 - manual de Moho (introducción y básicos)
http://slidepdf.com/reader/full/01-manual-de-moho-introduccion-y-basicos 11/79
Arrastrar el nuevo punto hacia abajo.
Para mantener las cosas en orden, es buena idea dar nombre a las capas en el proyecto. Haz dobleclic en esta capa (la única por ahora) en el panel de capas.
Accediendo a las propiedades de capas.
En el diálogo que aparece, escribe "Colinas" para el nombre de la capa y pulsa ok.
RELLENANDO FORMAS CON COLOR
En Moho, los objetos visibles están hechos de rellenos y de bordes. La Colina que acabas dedibujar es invisibles en lo que concierne a Moho. Puedes ver las curvas dibujadas pero siexportaras el proyecto a una imagen o a una película todo lo que verías es un espacio vacío. El
propósito de las herramientas de edición de rellenos es definir qué formas serán rellenas y/odelineadas, y con qué colores y estilos.
8/2/2019 01 - manual de Moho (introducción y básicos)
http://slidepdf.com/reader/full/01-manual-de-moho-introduccion-y-basicos 12/79
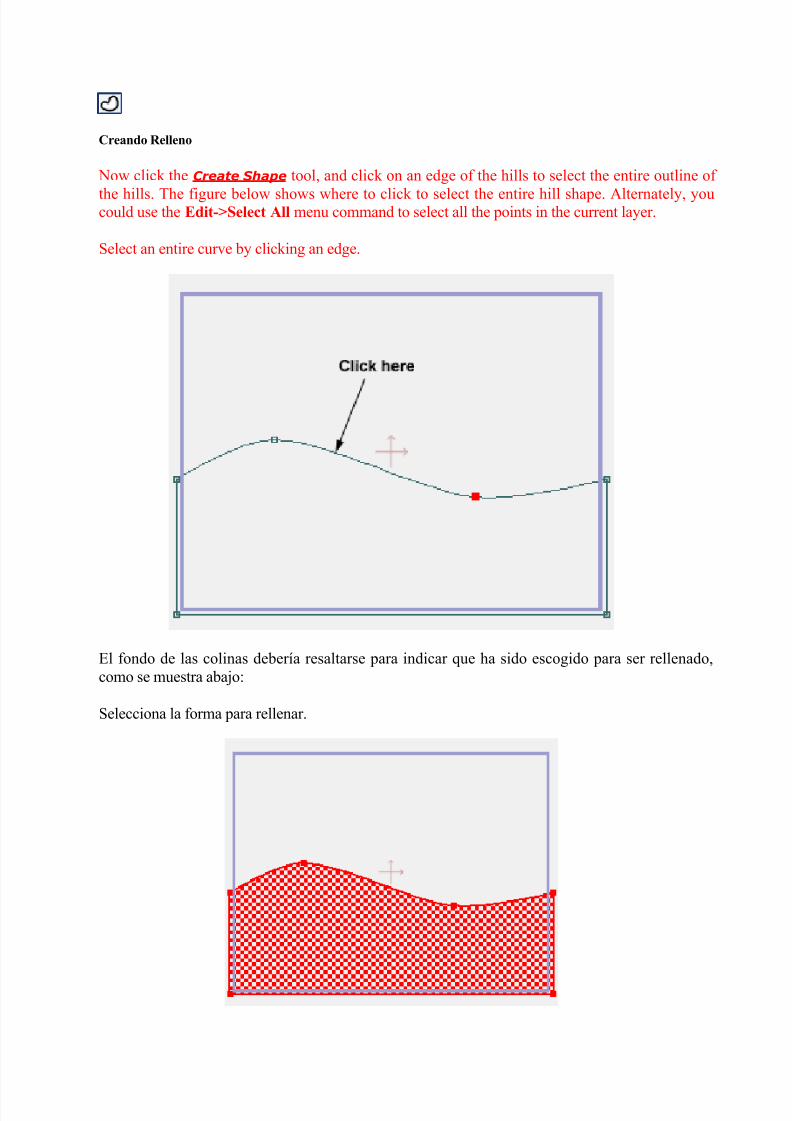
Creando Relleno
Now click the Create Shape tool, and click on an edge of the hills to select the entire outline of
the hills. The figure below shows where to click to select the entire hill shape. Alternately, youcould use the Edit->Select All menu command to select all the points in the current layer.
Select an entire curve by clicking an edge.
El fondo de las colinas debería resaltarse para indicar que ha sido escogido para ser rellenado,como se muestra abajo:
Selecciona la forma para rellenar.
8/2/2019 01 - manual de Moho (introducción y básicos)
http://slidepdf.com/reader/full/01-manual-de-moho-introduccion-y-basicos 13/79
Sin embargo, esta forma no ha sido rellenada aún. El resalte muestra que esta lista para ser rellenada - cuando se vea bien y estés listo para rellenar la forma, activa el relleno presionando latecla de espacio en el teclado. This is an important step that must not be overlooked - be sure to
press the spacebar after highlighting the shape in order to actually fill it.
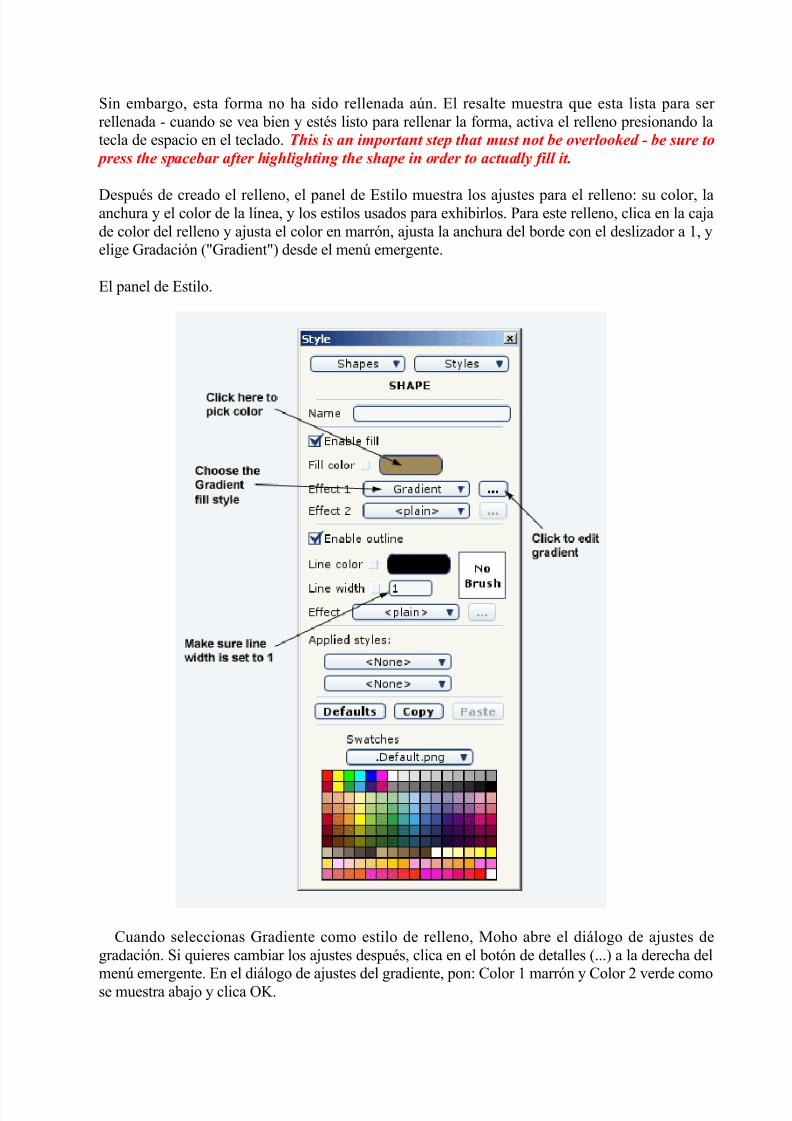
Después de creado el relleno, el panel de Estilo muestra los ajustes para el relleno: su color, laanchura y el color de la línea, y los estilos usados para exhibirlos. Para este relleno, clica en la cajade color del relleno y ajusta el color en marrón, ajusta la anchura del borde con el deslizador a 1, yelige Gradación ("Gradient") desde el menú emergente.
El panel de Estilo.
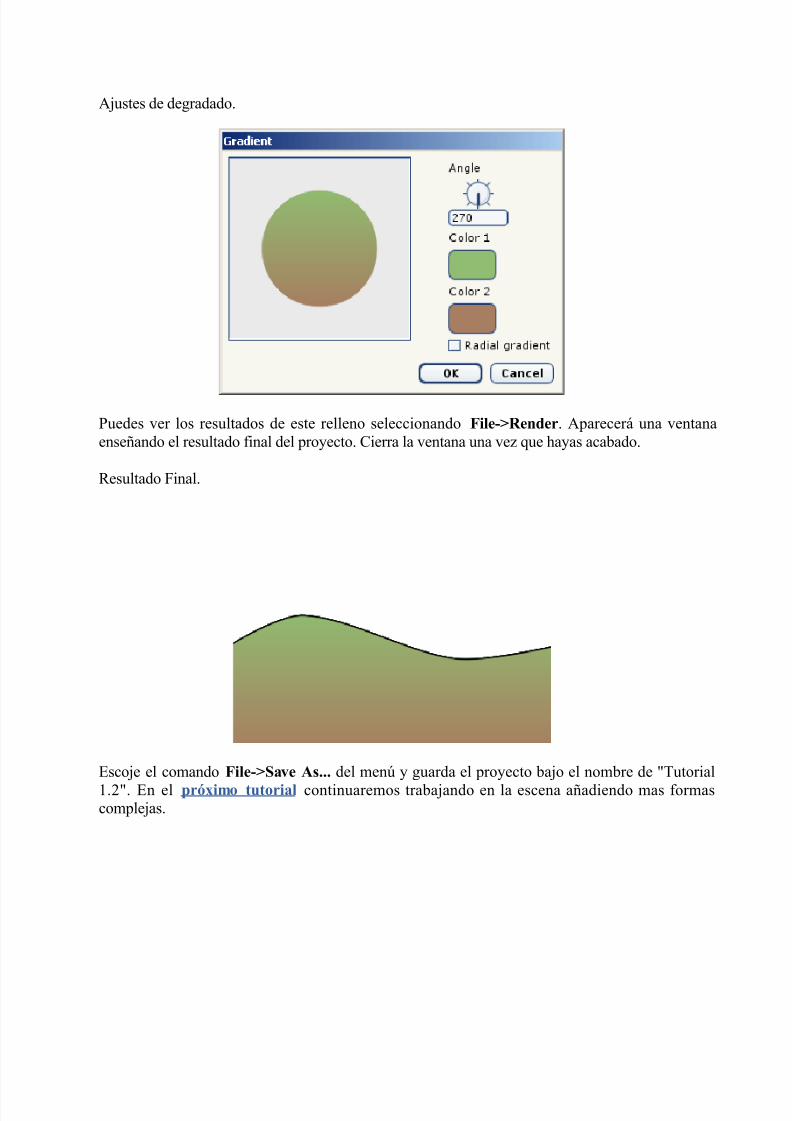
Cuando seleccionas Gradiente como estilo de relleno, Moho abre el diálogo de ajustes degradación. Si quieres cambiar los ajustes después, clica en el botón de detalles (...) a la derecha delmenú emergente. En el diálogo de ajustes del gradiente, pon: Color 1 marrón y Color 2 verde comose muestra abajo y clica OK.
8/2/2019 01 - manual de Moho (introducción y básicos)
http://slidepdf.com/reader/full/01-manual-de-moho-introduccion-y-basicos 14/79
Ajustes de degradado.
Puedes ver los resultados de este relleno seleccionando File->Render. Aparecerá una ventanaenseñando el resultado final del proyecto. Cierra la ventana una vez que hayas acabado.
Resultado Final.
Escoje el comando File->Save As... del menú y guarda el proyecto bajo el nombre de "Tutorial
1.2". En el próximo tutorial continuaremos trabajando en la escena añadiendo mas formascomplejas.
8/2/2019 01 - manual de Moho (introducción y básicos)
http://slidepdf.com/reader/full/01-manual-de-moho-introduccion-y-basicos 15/79
TUTORIAL 1.3
Dibujando Formas Complejas
INTRODUCCIÓN
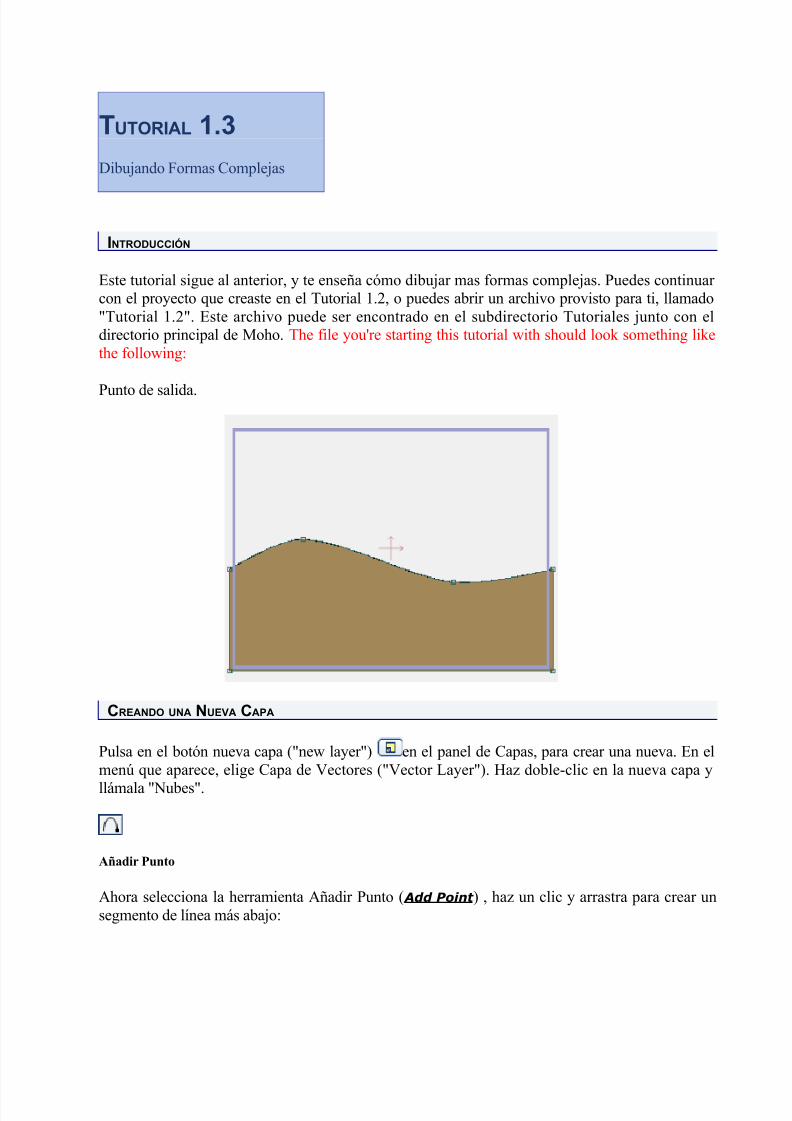
Este tutorial sigue al anterior, y te enseña cómo dibujar mas formas complejas. Puedes continuar con el proyecto que creaste en el Tutorial 1.2, o puedes abrir un archivo provisto para ti, llamado"Tutorial 1.2". Este archivo puede ser encontrado en el subdirectorio Tutoriales junto con eldirectorio principal de Moho. The file you're starting this tutorial with should look something likethe following:
Punto de salida.
CREANDO UNA NUEVA CAPA
Pulsa en el botón nueva capa ("new layer") en el panel de Capas, para crear una nueva. En elmenú que aparece, elige Capa de Vectores ("Vector Layer"). Haz doble-clic en la nueva capa y
llámala "Nubes".
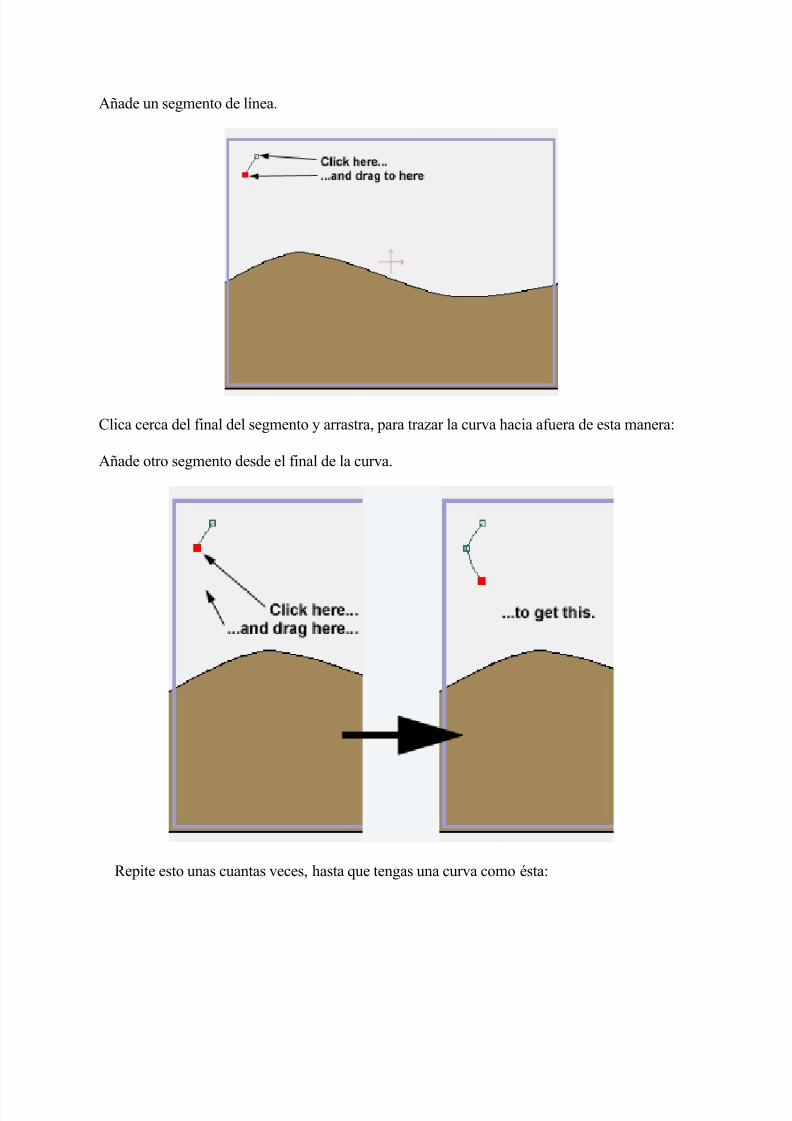
Añadir Punto
Ahora selecciona la herramienta Añadir Punto ( Add Point ) , haz un clic y arrastra para crear unsegmento de línea más abajo:
8/2/2019 01 - manual de Moho (introducción y básicos)
http://slidepdf.com/reader/full/01-manual-de-moho-introduccion-y-basicos 16/79
Añade un segmento de línea.
Clica cerca del final del segmento y arrastra, para trazar la curva hacia afuera de esta manera:
Añade otro segmento desde el final de la curva.
Repite esto unas cuantas veces, hasta que tengas una curva como ésta:
8/2/2019 01 - manual de Moho (introducción y básicos)
http://slidepdf.com/reader/full/01-manual-de-moho-introduccion-y-basicos 17/79
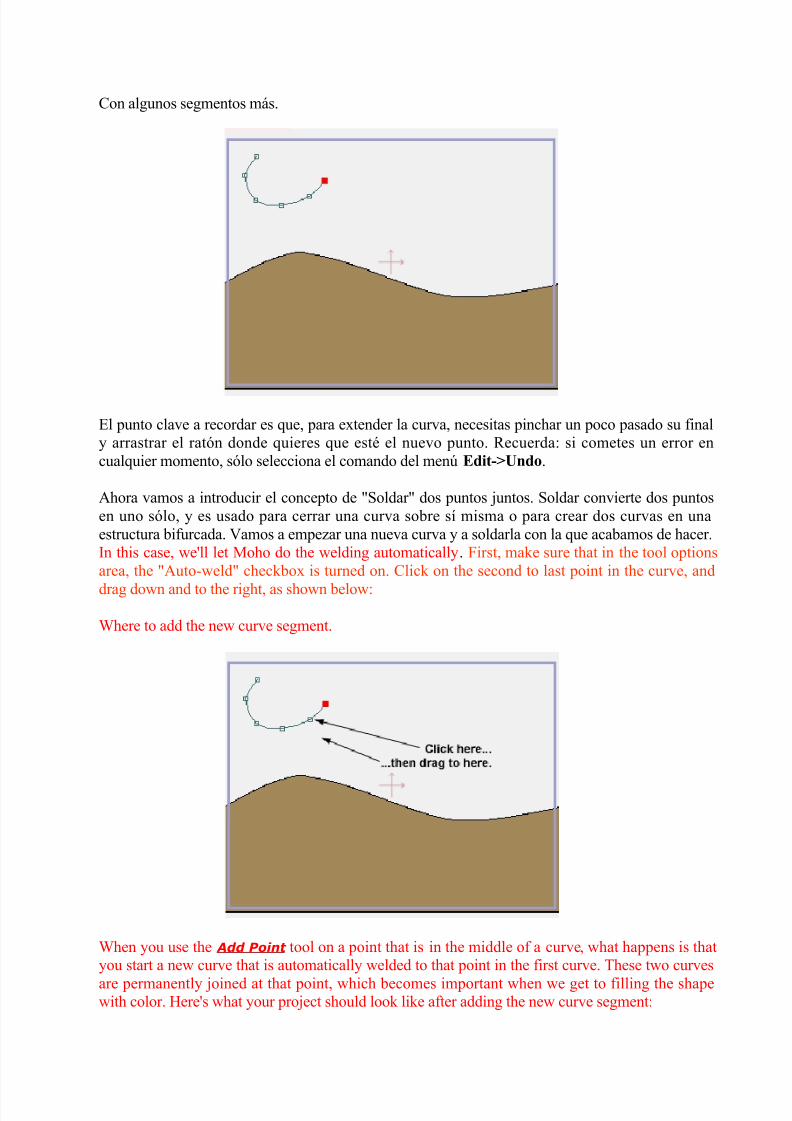
Con algunos segmentos más.
El punto clave a recordar es que, para extender la curva, necesitas pinchar un poco pasado su finaly arrastrar el ratón donde quieres que esté el nuevo punto. Recuerda: si cometes un error encualquier momento, sólo selecciona el comando del menú Edit->Undo.
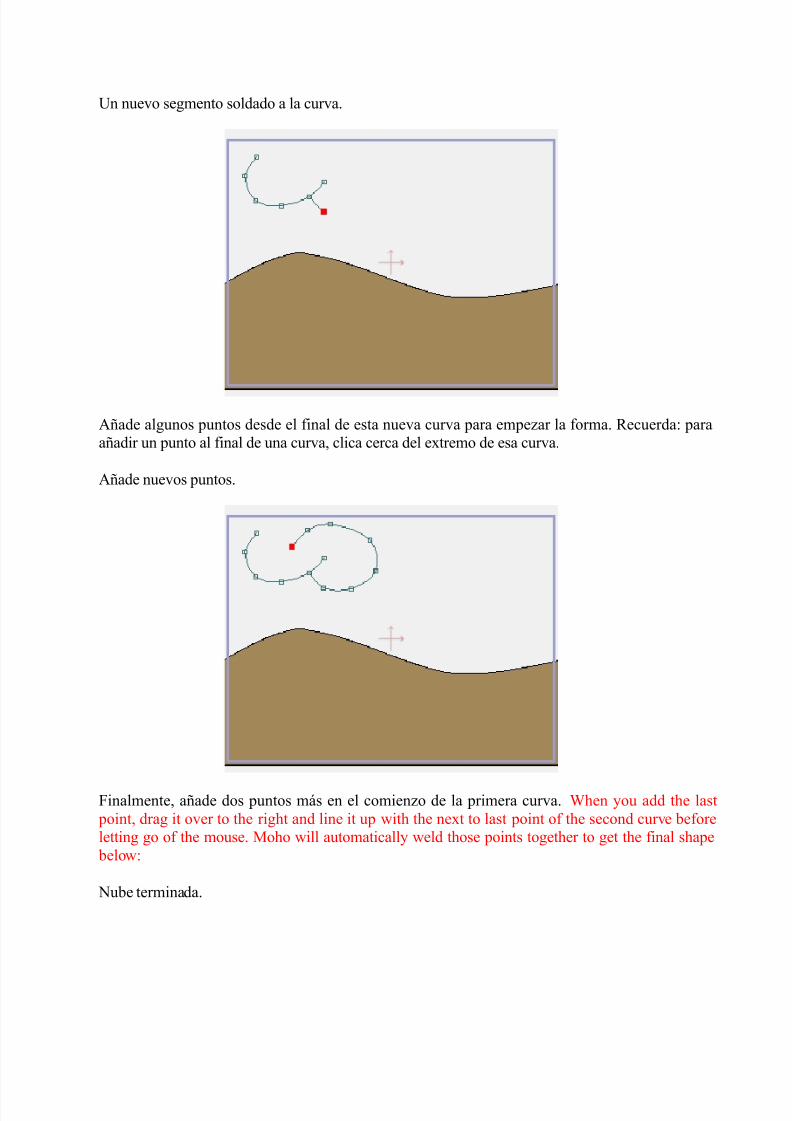
Ahora vamos a introducir el concepto de "Soldar" dos puntos juntos. Soldar convierte dos puntosen uno sólo, y es usado para cerrar una curva sobre sí misma o para crear dos curvas en unaestructura bifurcada. Vamos a empezar una nueva curva y a soldarla con la que acabamos de hacer.In this case, we'll let Moho do the welding automatically. First, make sure that in the tool optionsarea, the "Auto-weld" checkbox is turned on. Click on the second to last point in the curve, and
drag down and to the right, as shown below:
Where to add the new curve segment.
When you use the Add Point tool on a point that is in the middle of a curve, what happens is thatyou start a new curve that is automatically welded to that point in the first curve. These two curves
are permanently joined at that point, which becomes important when we get to filling the shapewith color. Here's what your project should look like after adding the new curve segment:
8/2/2019 01 - manual de Moho (introducción y básicos)
http://slidepdf.com/reader/full/01-manual-de-moho-introduccion-y-basicos 18/79
Un nuevo segmento soldado a la curva.
Añade algunos puntos desde el final de esta nueva curva para empezar la forma. Recuerda: paraañadir un punto al final de una curva, clica cerca del extremo de esa curva.
Añade nuevos puntos.
Finalmente, añade dos puntos más en el comienzo de la primera curva. When you add the last point, drag it over to the right and line it up with the next to last point of the second curve beforeletting go of the mouse. Moho will automatically weld those points together to get the final shape
below:
Nube terminada.
8/2/2019 01 - manual de Moho (introducción y básicos)
http://slidepdf.com/reader/full/01-manual-de-moho-introduccion-y-basicos 19/79
Sometimes it can be hard to follow this sequence of steps - let's take a moment to watch a movie of the cloud being created in Moho. Pay special attention to where the mouse is clicked in order toweld the two curves together.
RELLENAR LA NUBE CON COLOR
Creando Relleno
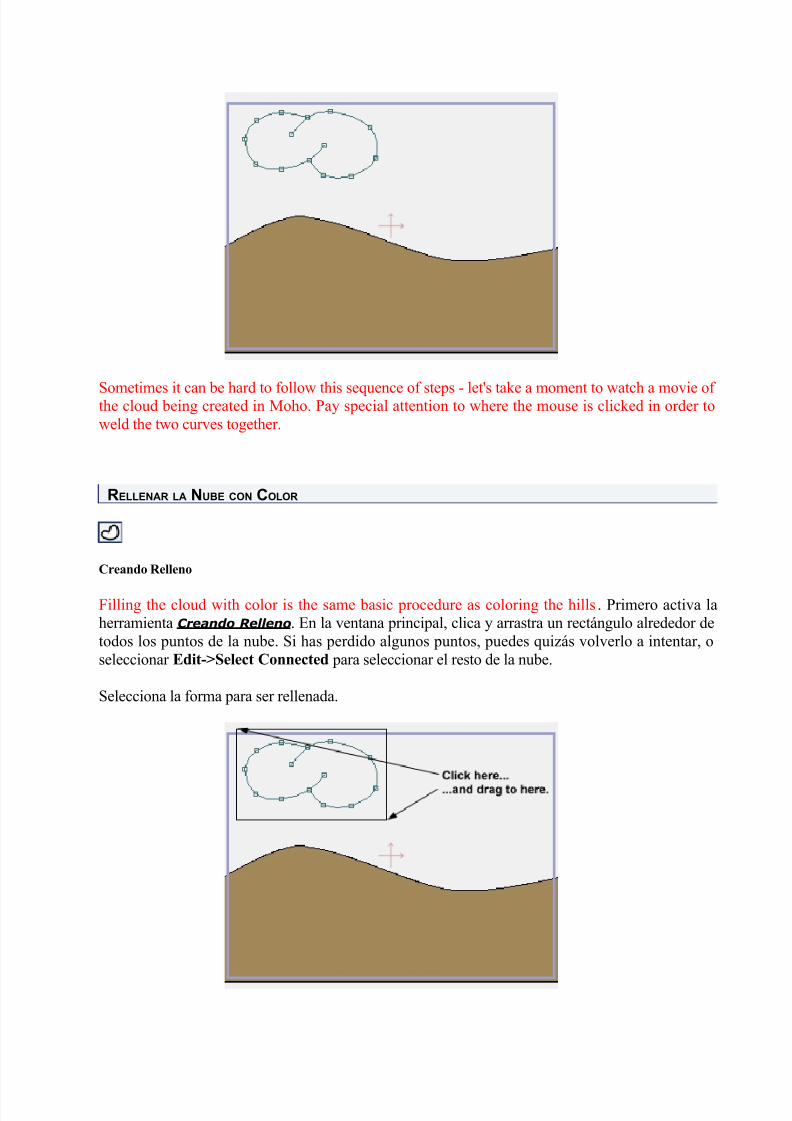
Filling the cloud with color is the same basic procedure as coloring the hills. Primero activa laherramienta Creando Relleno. En la ventana principal, clica y arrastra un rectángulo alrededor detodos los puntos de la nube. Si has perdido algunos puntos, puedes quizás volverlo a intentar, oseleccionar Edit->Select Connected para seleccionar el resto de la nube.
Selecciona la forma para ser rellenada.
8/2/2019 01 - manual de Moho (introducción y básicos)
http://slidepdf.com/reader/full/01-manual-de-moho-introduccion-y-basicos 20/79
Cuando sueltes el ratón, la nube entera debería estar seleccionada, y debería parecerse a esto:
La forma seleccionada.
Ahora el resalte se ve correcto, pulsa espacio para activar este relleno. El color de relleno por defecto es el blanco y el color del borde negro, por lo que no es necesario modificar los colores.However, we will add a line effect to make the cloud a bit softer. In the Style window, select 'SoftEdge' from the Line Effect pop-up menu. Now would be a good time to select the File->Render
command to see what your final result looks like:
The rendered cloud.
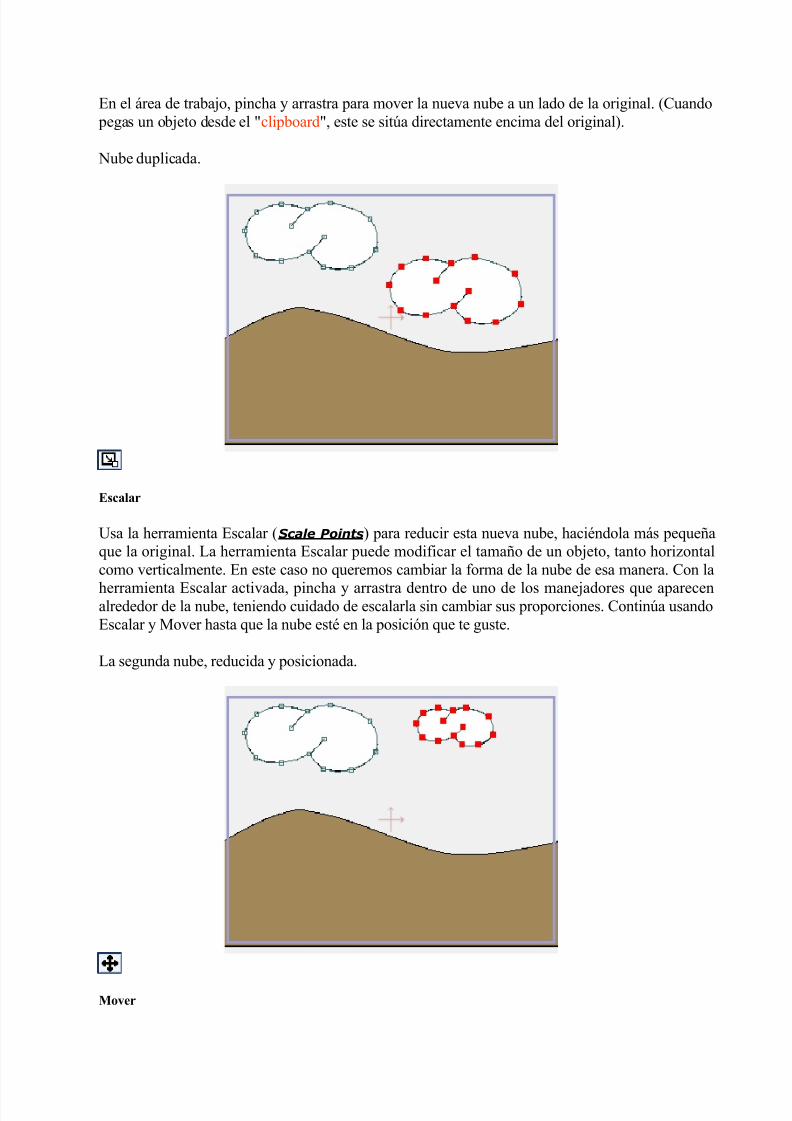
LA SEGUNDA NUBE
Mover
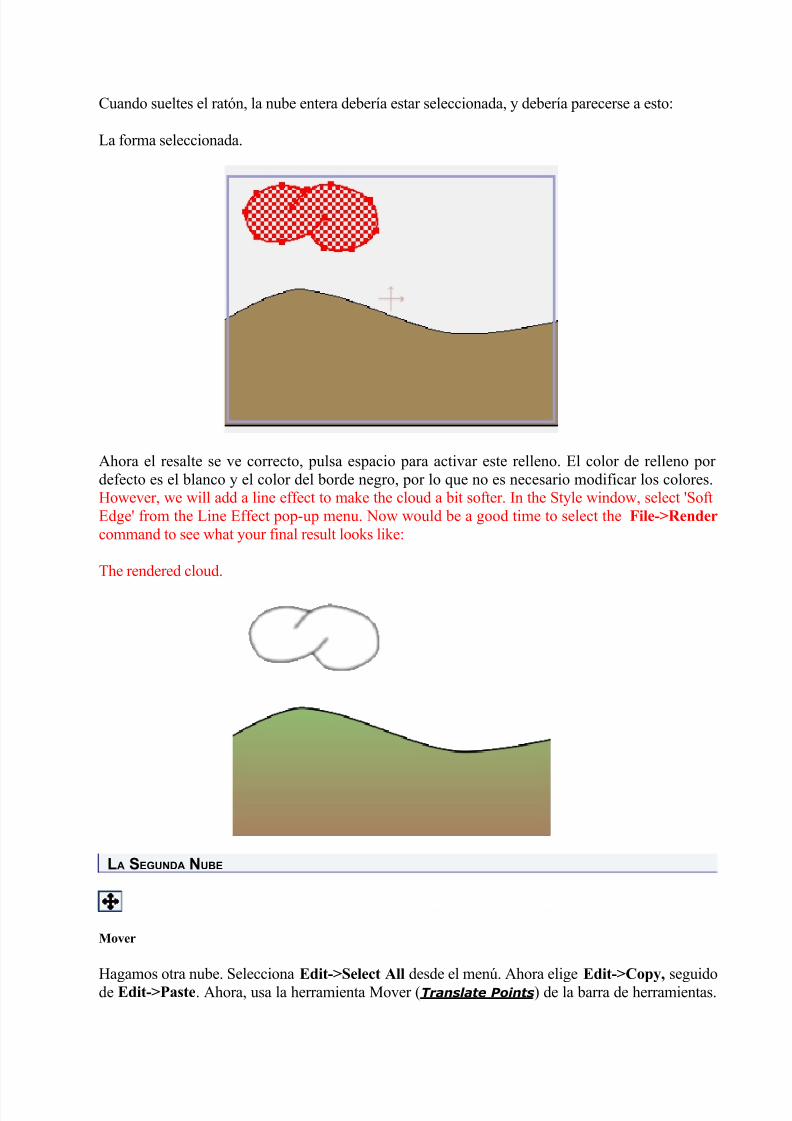
Hagamos otra nube. Selecciona Edit->Select All desde el menú. Ahora elige Edit->Copy, seguidode Edit->Paste. Ahora, usa la herramienta Mover (Translate Points) de la barra de herramientas.
8/2/2019 01 - manual de Moho (introducción y básicos)
http://slidepdf.com/reader/full/01-manual-de-moho-introduccion-y-basicos 21/79
En el área de trabajo, pincha y arrastra para mover la nueva nube a un lado de la original. (Cuando pegas un objeto desde el "clipboard", este se sitúa directamente encima del original).
Nube duplicada.
Escalar
Usa la herramienta Escalar (Scale Points) para reducir esta nueva nube, haciéndola más pequeñaque la original. La herramienta Escalar puede modificar el tamaño de un objeto, tanto horizontalcomo verticalmente. En este caso no queremos cambiar la forma de la nube de esa manera. Con la
herramienta Escalar activada, pincha y arrastra dentro de uno de los manejadores que aparecenalrededor de la nube, teniendo cuidado de escalarla sin cambiar sus proporciones. Continúa usandoEscalar y Mover hasta que la nube esté en la posición que te guste.
La segunda nube, reducida y posicionada.
Mover
8/2/2019 01 - manual de Moho (introducción y básicos)
http://slidepdf.com/reader/full/01-manual-de-moho-introduccion-y-basicos 22/79
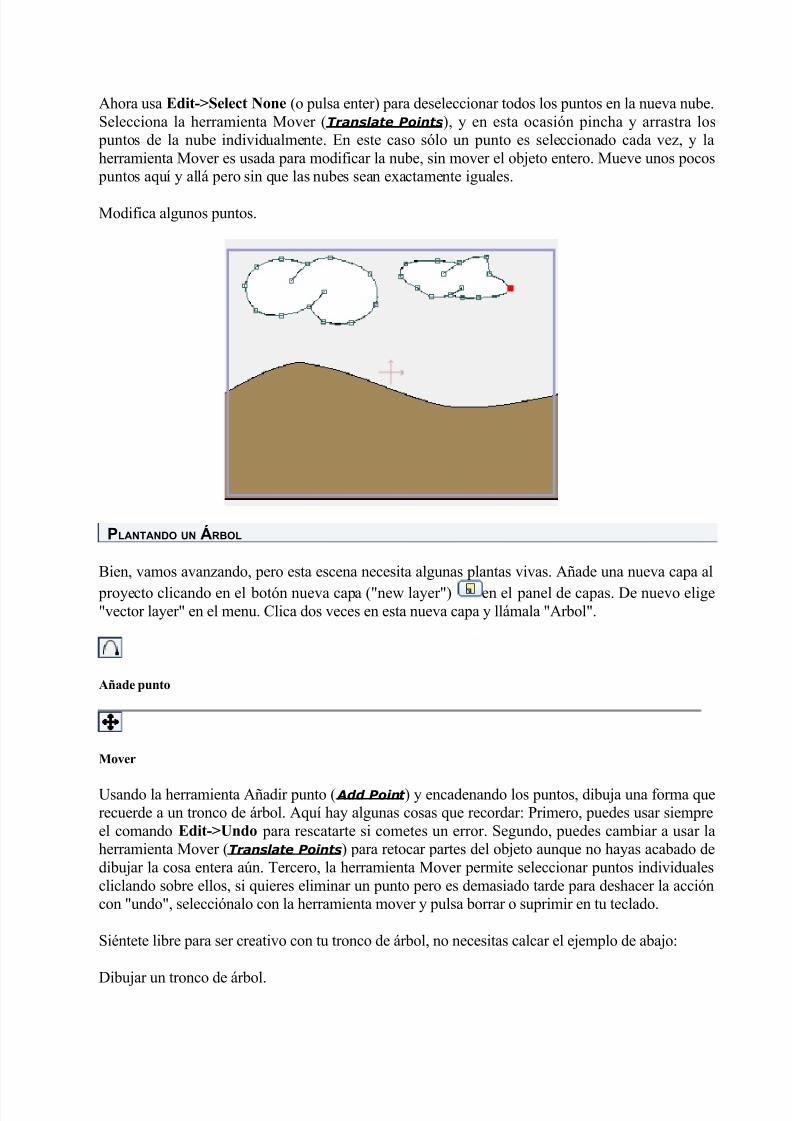
Ahora usa Edit->Select None (o pulsa enter) para deseleccionar todos los puntos en la nueva nube.Selecciona la herramienta Mover (Translate Points), y en esta ocasión pincha y arrastra los
puntos de la nube individualmente. En este caso sólo un punto es seleccionado cada vez, y laherramienta Mover es usada para modificar la nube, sin mover el objeto entero. Mueve unos pocos
puntos aquí y allá pero sin que las nubes sean exactamente iguales.
Modifica algunos puntos.
PLANTANDO UN ÁRBOL
Bien, vamos avanzando, pero esta escena necesita algunas plantas vivas. Añade una nueva capa al
proyecto clicando en el botón nueva capa ("new layer") en el panel de capas. De nuevo elige"vector layer" en el menu. Clica dos veces en esta nueva capa y llámala "Arbol".
Añade punto
Mover
Usando la herramienta Añadir punto ( Add Point ) y encadenando los puntos, dibuja una forma querecuerde a un tronco de árbol. Aquí hay algunas cosas que recordar: Primero, puedes usar siempreel comando Edit->Undo para rescatarte si cometes un error. Segundo, puedes cambiar a usar laherramienta Mover (Translate Points) para retocar partes del objeto aunque no hayas acabado dedibujar la cosa entera aún. Tercero, la herramienta Mover permite seleccionar puntos individualescliclando sobre ellos, si quieres eliminar un punto pero es demasiado tarde para deshacer la accióncon "undo", selecciónalo con la herramienta mover y pulsa borrar o suprimir en tu teclado.
Siéntete libre para ser creativo con tu tronco de árbol, no necesitas calcar el ejemplo de abajo:
Dibujar un tronco de árbol.
8/2/2019 01 - manual de Moho (introducción y básicos)
http://slidepdf.com/reader/full/01-manual-de-moho-introduccion-y-basicos 23/79
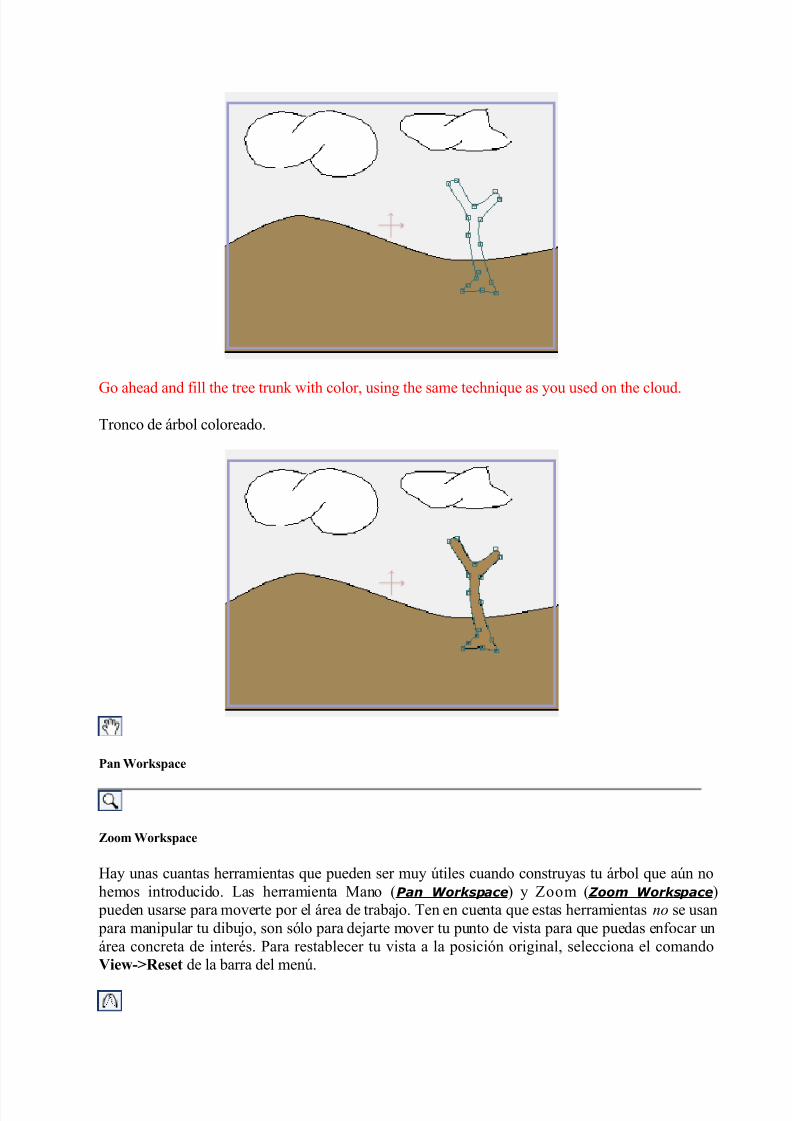
Go ahead and fill the tree trunk with color, using the same technique as you used on the cloud.
Tronco de árbol coloreado.
Pan Workspace
Zoom Workspace
Hay unas cuantas herramientas que pueden ser muy útiles cuando construyas tu árbol que aún nohemos introducido. Las herramienta Mano (Pan Workspace) y Zoom ( Zoom Workspace)
pueden usarse para moverte por el área de trabajo. Ten en cuenta que estas herramientas no se usan para manipular tu dibujo, son sólo para dejarte mover tu punto de vista para que puedas enfocar unárea concreta de interés. Para restablecer tu vista a la posición original, selecciona el comandoView->Reset de la barra del menú.
8/2/2019 01 - manual de Moho (introducción y básicos)
http://slidepdf.com/reader/full/01-manual-de-moho-introduccion-y-basicos 24/79
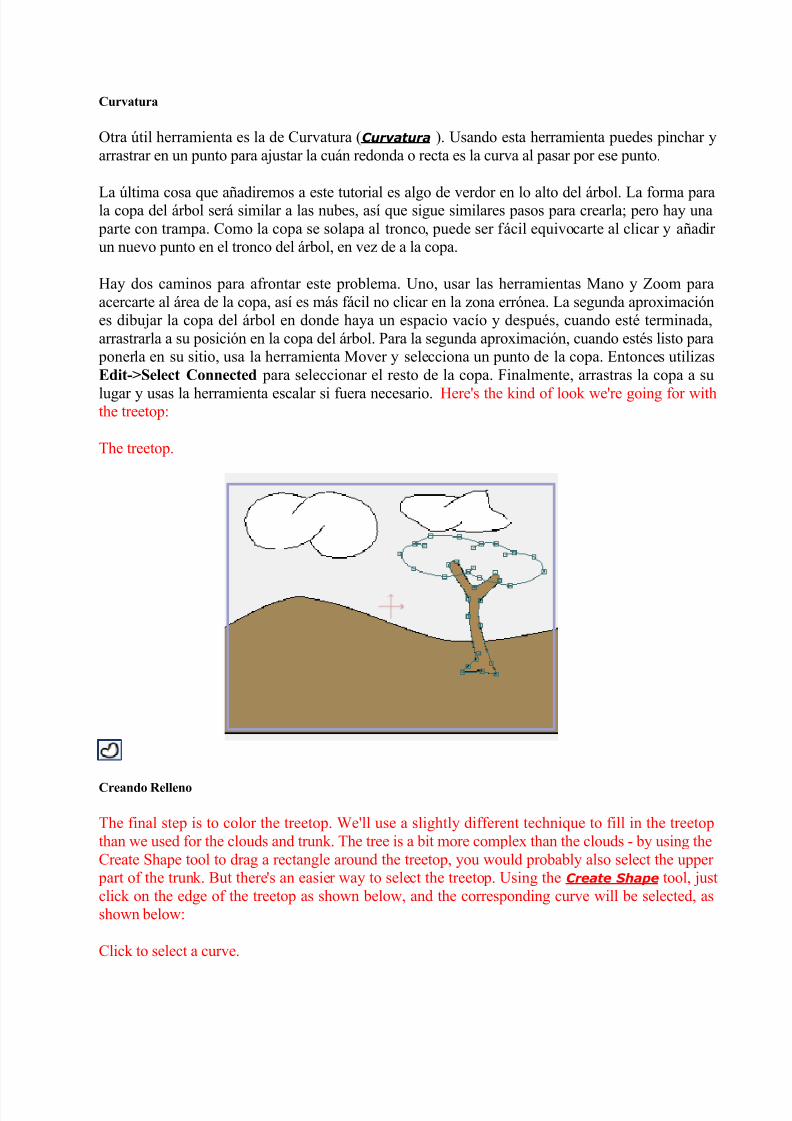
Curvatura
Otra útil herramienta es la de Curvatura (Curvatura ). Usando esta herramienta puedes pinchar yarrastrar en un punto para ajustar la cuán redonda o recta es la curva al pasar por ese punto.
La última cosa que añadiremos a este tutorial es algo de verdor en lo alto del árbol. La forma parala copa del árbol será similar a las nubes, así que sigue similares pasos para crearla; pero hay una parte con trampa. Como la copa se solapa al tronco, puede ser fácil equivocarte al clicar y añadir un nuevo punto en el tronco del árbol, en vez de a la copa.
Hay dos caminos para afrontar este problema. Uno, usar las herramientas Mano y Zoom paraacercarte al área de la copa, así es más fácil no clicar en la zona errónea. La segunda aproximaciónes dibujar la copa del árbol en donde haya un espacio vacío y después, cuando esté terminada,arrastrarla a su posición en la copa del árbol. Para la segunda aproximación, cuando estés listo para
ponerla en su sitio, usa la herramienta Mover y selecciona un punto de la copa. Entonces utilizasEdit->Select Connected para seleccionar el resto de la copa. Finalmente, arrastras la copa a su
lugar y usas la herramienta escalar si fuera necesario. Here's the kind of look we're going for withthe treetop:
The treetop.
Creando Relleno
The final step is to color the treetop. We'll use a slightly different technique to fill in the treetopthan we used for the clouds and trunk. The tree is a bit more complex than the clouds - by using theCreate Shape tool to drag a rectangle around the treetop, you would probably also select the upper
part of the trunk. But there's an easier way to select the treetop. Using the Create Shape tool, justclick on the edge of the treetop as shown below, and the corresponding curve will be selected, asshown below:
Click to select a curve.
8/2/2019 01 - manual de Moho (introducción y básicos)
http://slidepdf.com/reader/full/01-manual-de-moho-introduccion-y-basicos 25/79
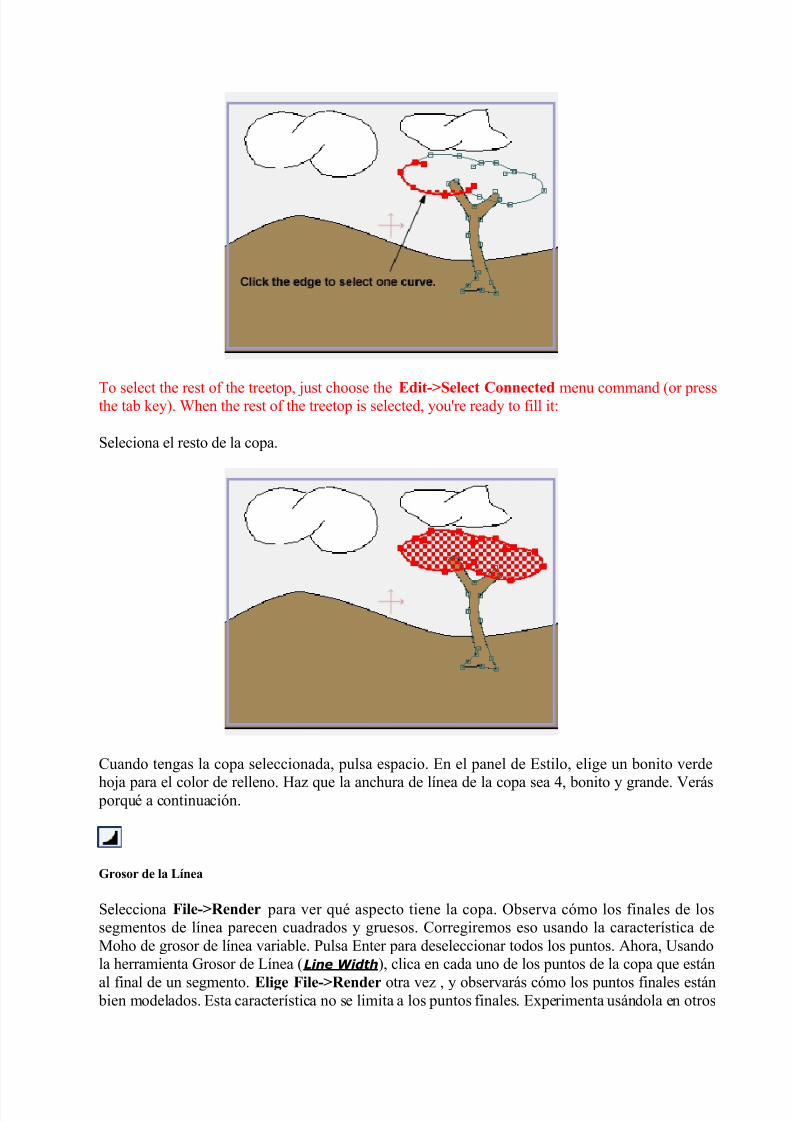
To select the rest of the treetop, just choose the Edit->Select Connected menu command (or pressthe tab key). When the rest of the treetop is selected, you're ready to fill it:
Seleciona el resto de la copa.
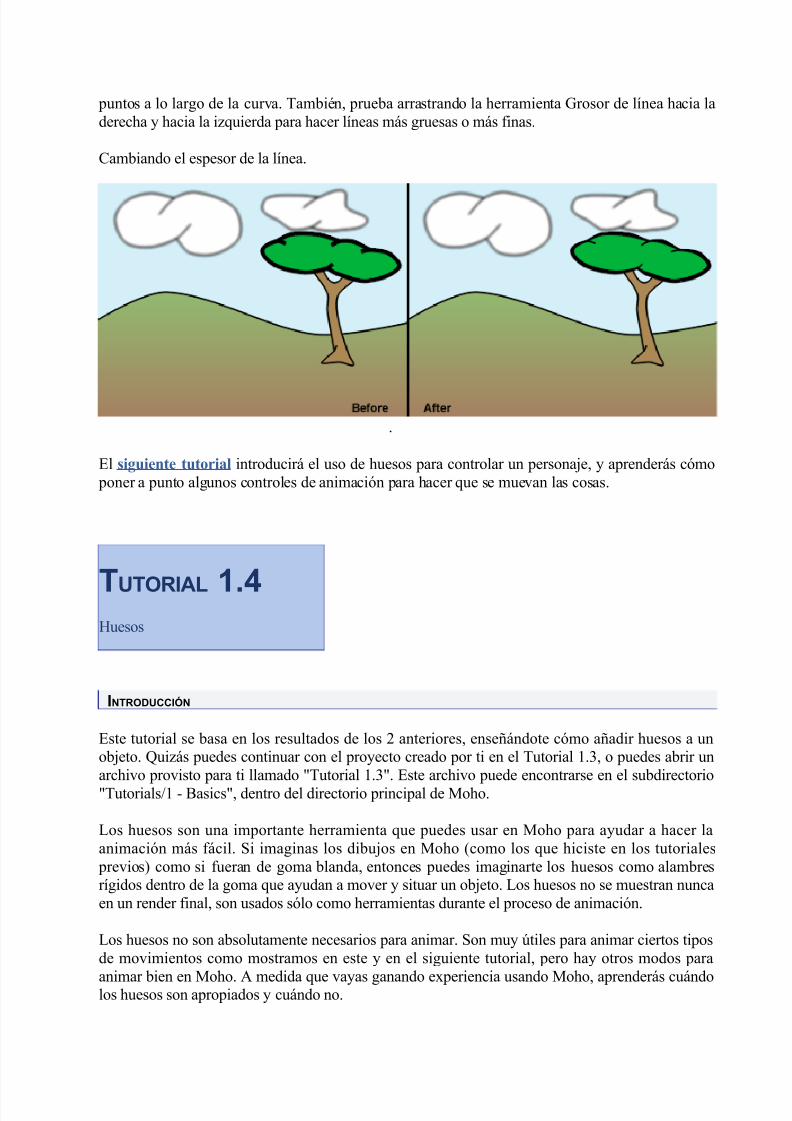
Cuando tengas la copa seleccionada, pulsa espacio. En el panel de Estilo, elige un bonito verde
hoja para el color de relleno. Haz que la anchura de línea de la copa sea 4, bonito y grande. Verás porqué a continuación.
Grosor de la Línea
Selecciona File->Render para ver qué aspecto tiene la copa. Observa cómo los finales de lossegmentos de línea parecen cuadrados y gruesos. Corregiremos eso usando la característica deMoho de grosor de línea variable. Pulsa Enter para deseleccionar todos los puntos. Ahora, Usandola herramienta Grosor de Línea (Line Width), clica en cada uno de los puntos de la copa que están
al final de un segmento. Elige File->Render otra vez , y observarás cómo los puntos finales están bien modelados. Esta característica no se limita a los puntos finales. Experimenta usándola en otros
8/2/2019 01 - manual de Moho (introducción y básicos)
http://slidepdf.com/reader/full/01-manual-de-moho-introduccion-y-basicos 26/79
puntos a lo largo de la curva. También, prueba arrastrando la herramienta Grosor de línea hacia laderecha y hacia la izquierda para hacer líneas más gruesas o más finas.
Cambiando el espesor de la línea.
.
El siguiente tutorial introducirá el uso de huesos para controlar un personaje, y aprenderás cómo poner a punto algunos controles de animación para hacer que se muevan las cosas.
TUTORIAL 1.4Huesos
INTRODUCCIÓN
Este tutorial se basa en los resultados de los 2 anteriores, enseñándote cómo añadir huesos a unobjeto. Quizás puedes continuar con el proyecto creado por ti en el Tutorial 1.3, o puedes abrir unarchivo provisto para ti llamado "Tutorial 1.3". Este archivo puede encontrarse en el subdirectorio"Tutorials/1 - Basics", dentro del directorio principal de Moho.
Los huesos son una importante herramienta que puedes usar en Moho para ayudar a hacer laanimación más fácil. Si imaginas los dibujos en Moho (como los que hiciste en los tutoriales
previos) como si fueran de goma blanda, entonces puedes imaginarte los huesos como alambresrígidos dentro de la goma que ayudan a mover y situar un objeto. Los huesos no se muestran nuncaen un render final, son usados sólo como herramientas durante el proceso de animación.
Los huesos no son absolutamente necesarios para animar. Son muy útiles para animar ciertos tiposde movimientos como mostramos en este y en el siguiente tutorial, pero hay otros modos para
animar bien en Moho. A medida que vayas ganando experiencia usando Moho, aprenderás cuándolos huesos son apropiados y cuándo no.
8/2/2019 01 - manual de Moho (introducción y básicos)
http://slidepdf.com/reader/full/01-manual-de-moho-introduccion-y-basicos 27/79
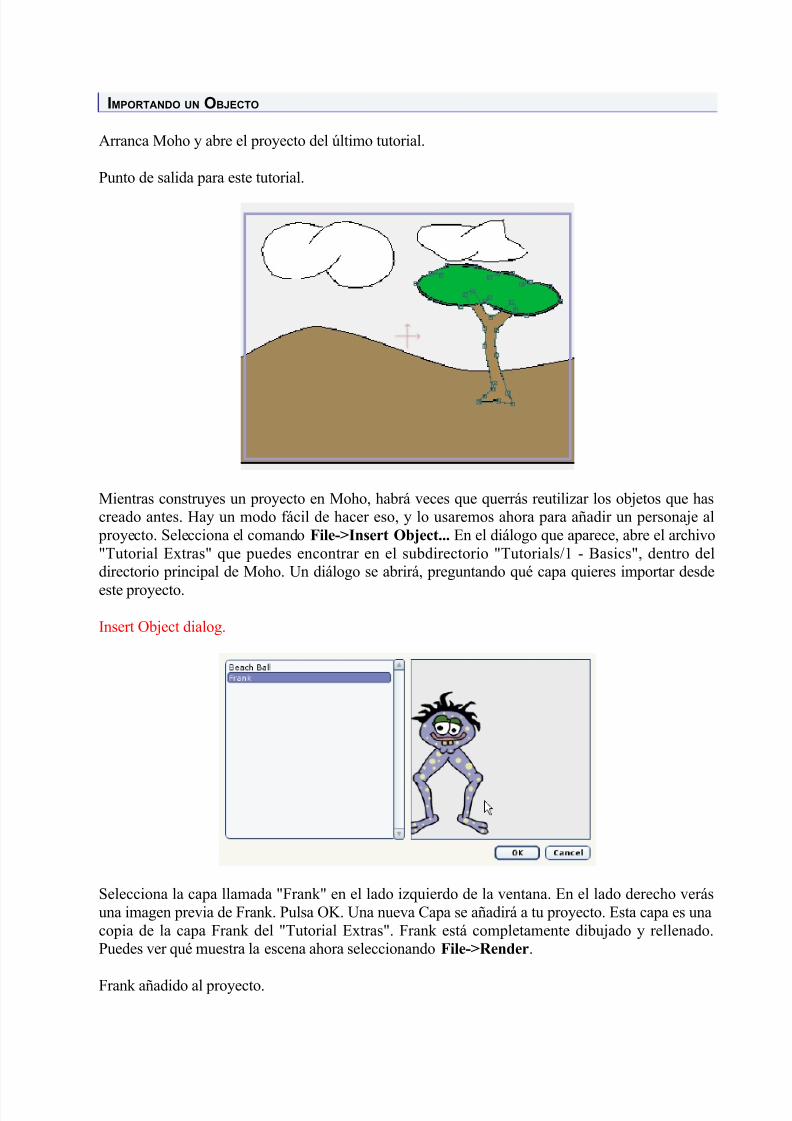
IMPORTANDO UN OBJECTO
Arranca Moho y abre el proyecto del último tutorial.
Punto de salida para este tutorial.
Mientras construyes un proyecto en Moho, habrá veces que querrás reutilizar los objetos que hascreado antes. Hay un modo fácil de hacer eso, y lo usaremos ahora para añadir un personaje al
proyecto. Selecciona el comando File->Insert Object... En el diálogo que aparece, abre el archivo"Tutorial Extras" que puedes encontrar en el subdirectorio "Tutorials/1 - Basics", dentro deldirectorio principal de Moho. Un diálogo se abrirá, preguntando qué capa quieres importar desde
este proyecto.
Insert Object dialog.
Selecciona la capa llamada "Frank" en el lado izquierdo de la ventana. En el lado derecho verásuna imagen previa de Frank. Pulsa OK. Una nueva Capa se añadirá a tu proyecto. Esta capa es unacopia de la capa Frank del "Tutorial Extras". Frank está completamente dibujado y rellenado.Puedes ver qué muestra la escena ahora seleccionando File->Render.
Frank añadido al proyecto.
8/2/2019 01 - manual de Moho (introducción y básicos)
http://slidepdf.com/reader/full/01-manual-de-moho-introduccion-y-basicos 28/79
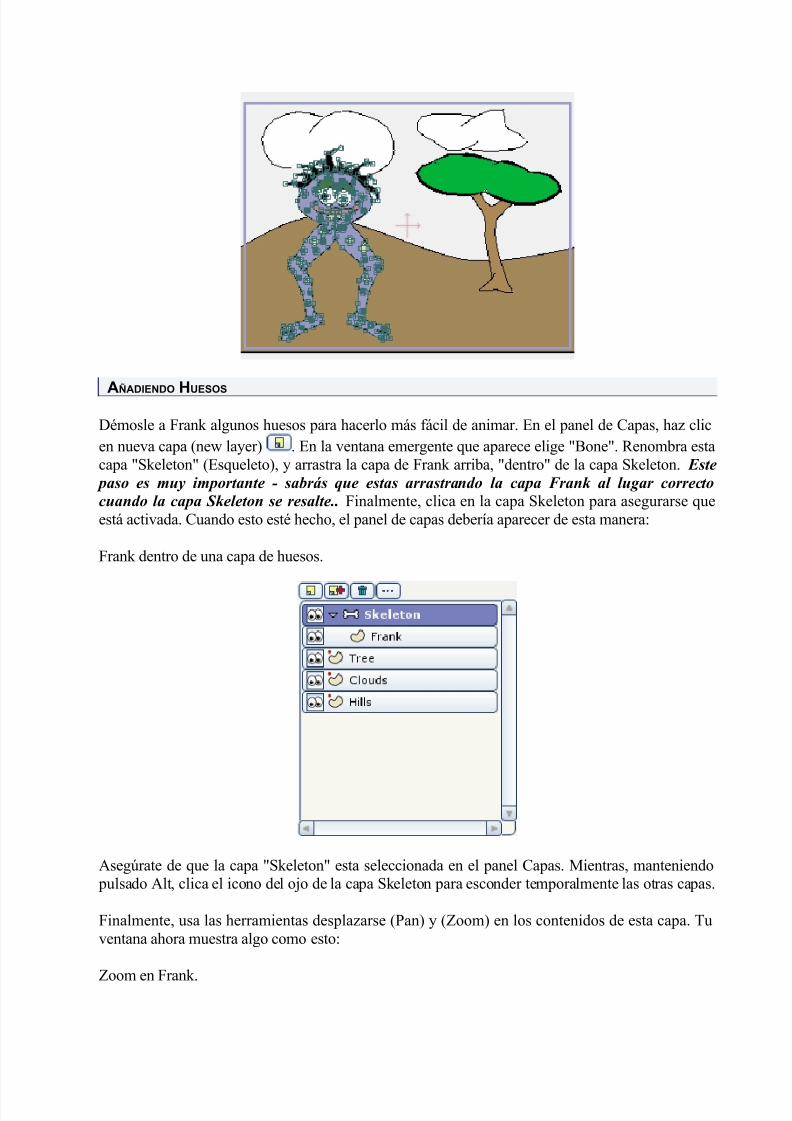
AÑADIENDO HUESOS
Démosle a Frank algunos huesos para hacerlo más fácil de animar. En el panel de Capas, haz clicen nueva capa (new layer) . En la ventana emergente que aparece elige "Bone". Renombra estacapa "Skeleton" (Esqueleto), y arrastra la capa de Frank arriba, "dentro" de la capa Skeleton. Este
paso es muy importante - sabrás que estas arrastrando la capa Frank al lugar correcto
cuando la capa Skeleton se resalte.. Finalmente, clica en la capa Skeleton para asegurarse queestá activada. Cuando esto esté hecho, el panel de capas debería aparecer de esta manera:
Frank dentro de una capa de huesos.
Asegúrate de que la capa "Skeleton" esta seleccionada en el panel Capas. Mientras, manteniendo pulsado Alt, clica el icono del ojo de la capa Skeleton para esconder temporalmente las otras capas.
Finalmente, usa las herramientas desplazarse (Pan) y (Zoom) en los contenidos de esta capa. Tuventana ahora muestra algo como esto:
Zoom en Frank.
8/2/2019 01 - manual de Moho (introducción y básicos)
http://slidepdf.com/reader/full/01-manual-de-moho-introduccion-y-basicos 29/79
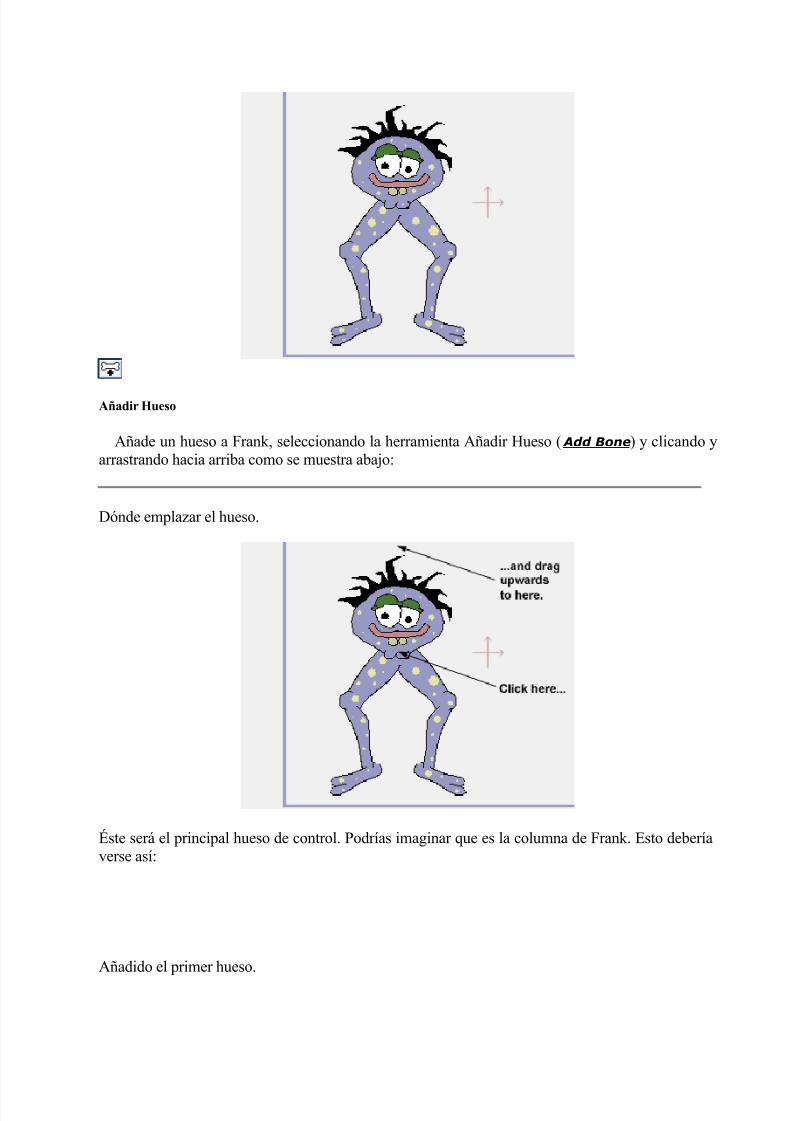
Añadir Hueso
Añade un hueso a Frank, seleccionando la herramienta Añadir Hueso ( Add Bone) y clicando yarrastrando hacia arriba como se muestra abajo:
Dónde emplazar el hueso.
Éste será el principal hueso de control. Podrías imaginar que es la columna de Frank. Esto deberíaverse así:
Añadido el primer hueso.
8/2/2019 01 - manual de Moho (introducción y básicos)
http://slidepdf.com/reader/full/01-manual-de-moho-introduccion-y-basicos 30/79
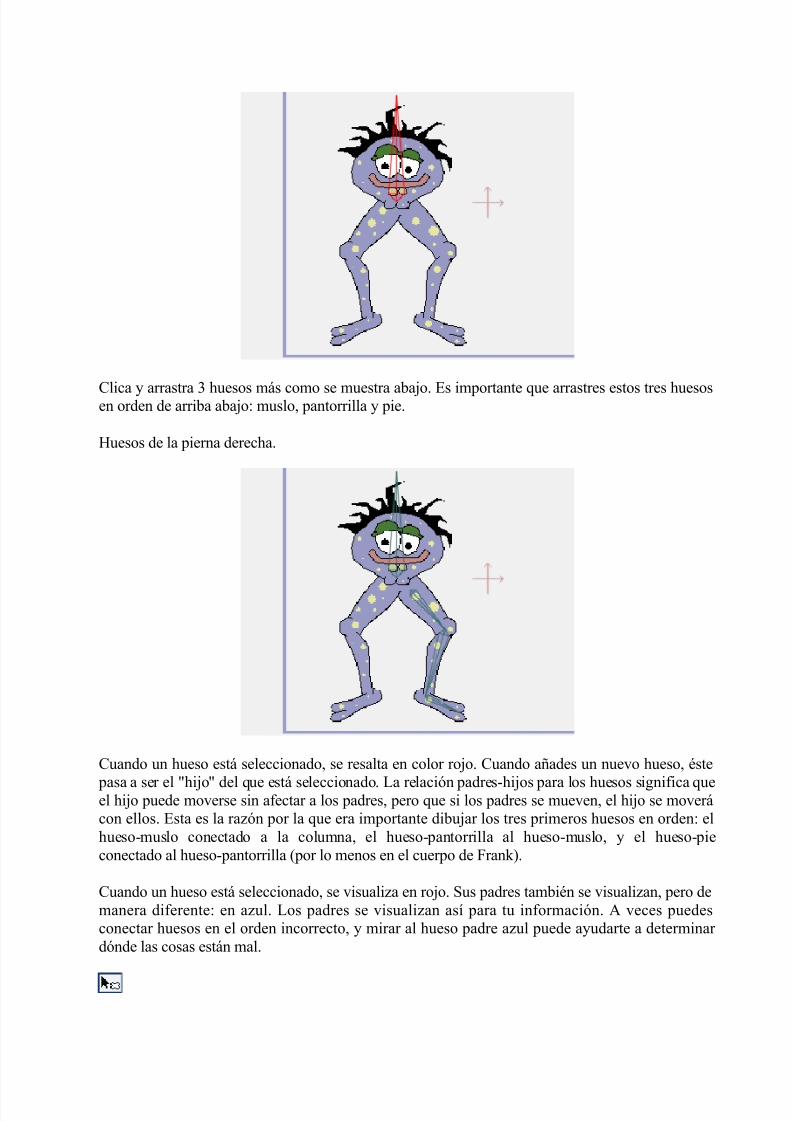
Clica y arrastra 3 huesos más como se muestra abajo. Es importante que arrastres estos tres huesosen orden de arriba abajo: muslo, pantorrilla y pie.
Huesos de la pierna derecha.
Cuando un hueso está seleccionado, se resalta en color rojo. Cuando añades un nuevo hueso, éste
pasa a ser el "hijo" del que está seleccionado. La relación padres-hijos para los huesos significa queel hijo puede moverse sin afectar a los padres, pero que si los padres se mueven, el hijo se moverácon ellos. Esta es la razón por la que era importante dibujar los tres primeros huesos en orden: elhueso-muslo conectado a la columna, el hueso-pantorrilla al hueso-muslo, y el hueso-pieconectado al hueso-pantorrilla (por lo menos en el cuerpo de Frank).
Cuando un hueso está seleccionado, se visualiza en rojo. Sus padres también se visualizan, pero demanera diferente: en azul. Los padres se visualizan así para tu información. A veces puedesconectar huesos en el orden incorrecto, y mirar al hueso padre azul puede ayudarte a determinar dónde las cosas están mal.
8/2/2019 01 - manual de Moho (introducción y básicos)
http://slidepdf.com/reader/full/01-manual-de-moho-introduccion-y-basicos 31/79
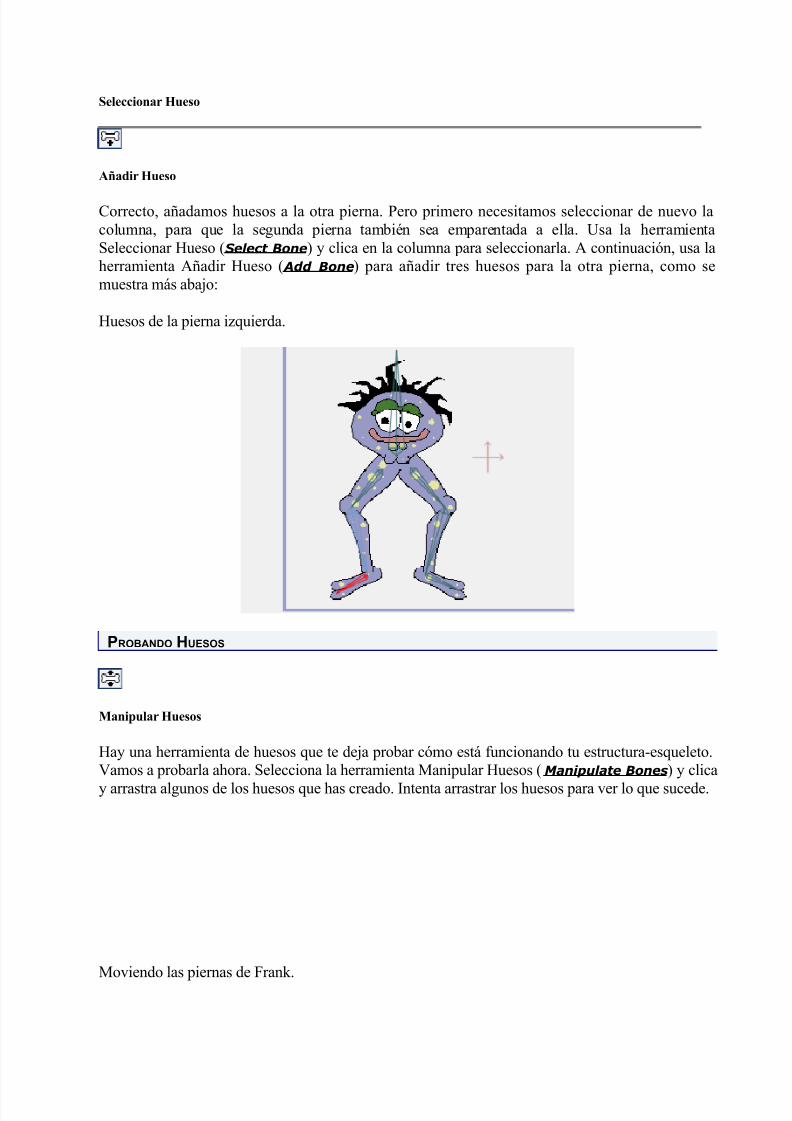
Seleccionar Hueso
Añadir Hueso
Correcto, añadamos huesos a la otra pierna. Pero primero necesitamos seleccionar de nuevo lacolumna, para que la segunda pierna también sea emparentada a ella. Usa la herramientaSeleccionar Hueso (Select Bone) y clica en la columna para seleccionarla. A continuación, usa laherramienta Añadir Hueso ( Add Bone) para añadir tres huesos para la otra pierna, como semuestra más abajo:
Huesos de la pierna izquierda.
PROBANDO HUESOS
Manipular Huesos
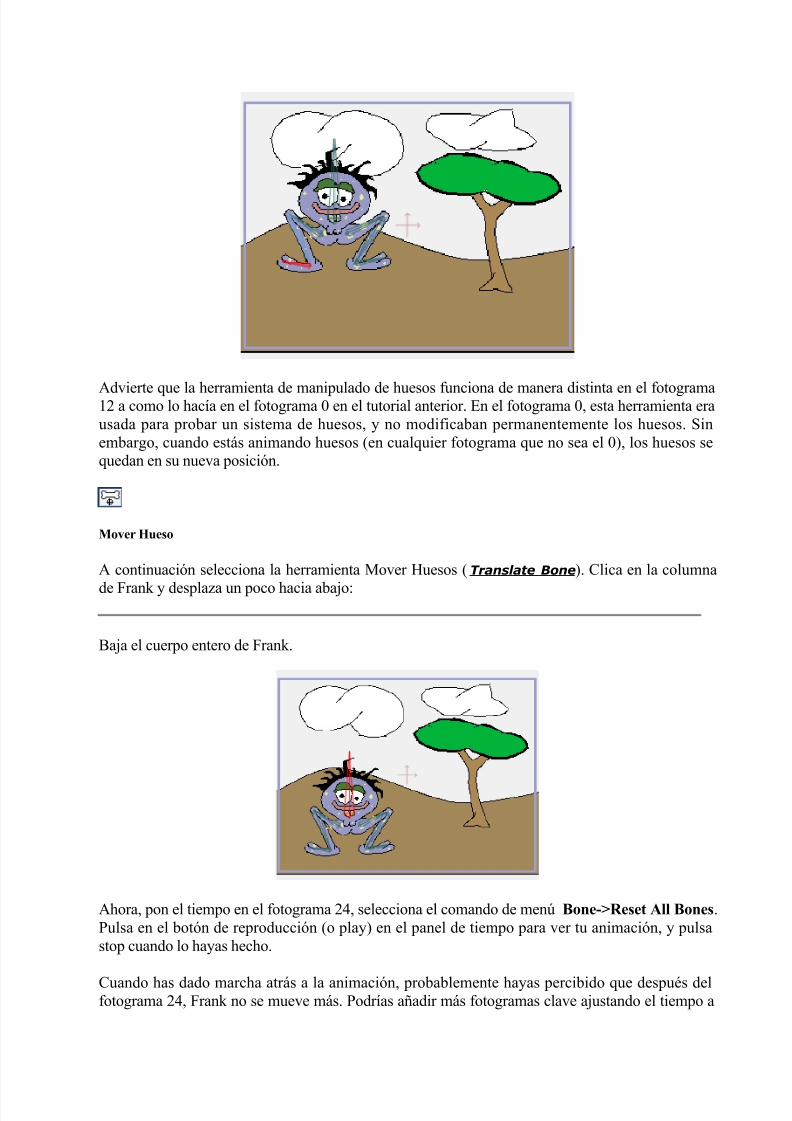
Hay una herramienta de huesos que te deja probar cómo está funcionando tu estructura-esqueleto.Vamos a probarla ahora. Selecciona la herramienta Manipular Huesos (Manipulate Bones) y clica
y arrastra algunos de los huesos que has creado. Intenta arrastrar los huesos para ver lo que sucede.
Moviendo las piernas de Frank.
8/2/2019 01 - manual de Moho (introducción y básicos)
http://slidepdf.com/reader/full/01-manual-de-moho-introduccion-y-basicos 32/79
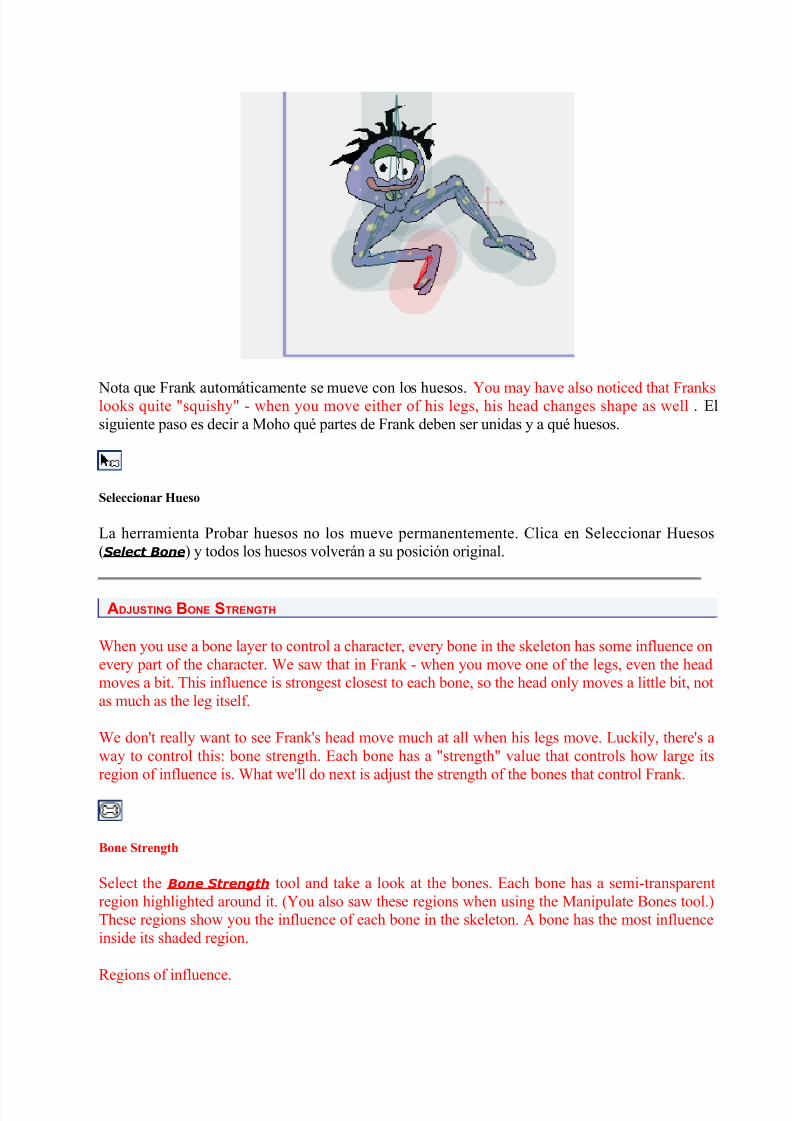
Nota que Frank automáticamente se mueve con los huesos. You may have also noticed that Frankslooks quite "squishy" - when you move either of his legs, his head changes shape as well . Elsiguiente paso es decir a Moho qué partes de Frank deben ser unidas y a qué huesos.
Seleccionar Hueso
La herramienta Probar huesos no los mueve permanentemente. Clica en Seleccionar Huesos(Select Bone) y todos los huesos volverán a su posición original.
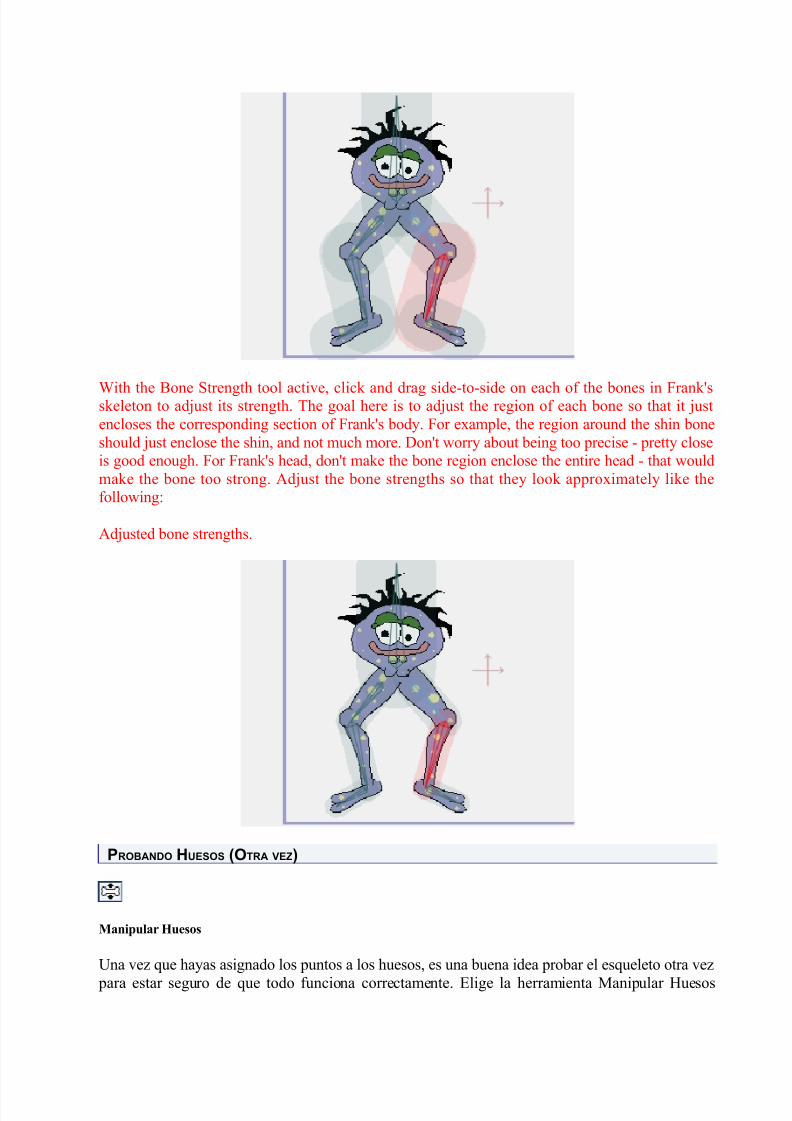
ADJUSTING BONE STRENGTH
When you use a bone layer to control a character, every bone in the skeleton has some influence onevery part of the character. We saw that in Frank - when you move one of the legs, even the headmoves a bit. This influence is strongest closest to each bone, so the head only moves a little bit, notas much as the leg itself.
We don't really want to see Frank's head move much at all when his legs move. Luckily, there's away to control this: bone strength. Each bone has a "strength" value that controls how large itsregion of influence is. What we'll do next is adjust the strength of the bones that control Frank.
Bone Strength
Select the Bone Strength tool and take a look at the bones. Each bone has a semi-transparentregion highlighted around it. (You also saw these regions when using the Manipulate Bones tool.)These regions show you the influence of each bone in the skeleton. A bone has the most influenceinside its shaded region.
Regions of influence.
8/2/2019 01 - manual de Moho (introducción y básicos)
http://slidepdf.com/reader/full/01-manual-de-moho-introduccion-y-basicos 33/79
With the Bone Strength tool active, click and drag side-to-side on each of the bones in Frank'sskeleton to adjust its strength. The goal here is to adjust the region of each bone so that it justencloses the corresponding section of Frank's body. For example, the region around the shin boneshould just enclose the shin, and not much more. Don't worry about being too precise - pretty closeis good enough. For Frank's head, don't make the bone region enclose the entire head - that wouldmake the bone too strong. Adjust the bone strengths so that they look approximately like thefollowing:
Adjusted bone strengths.
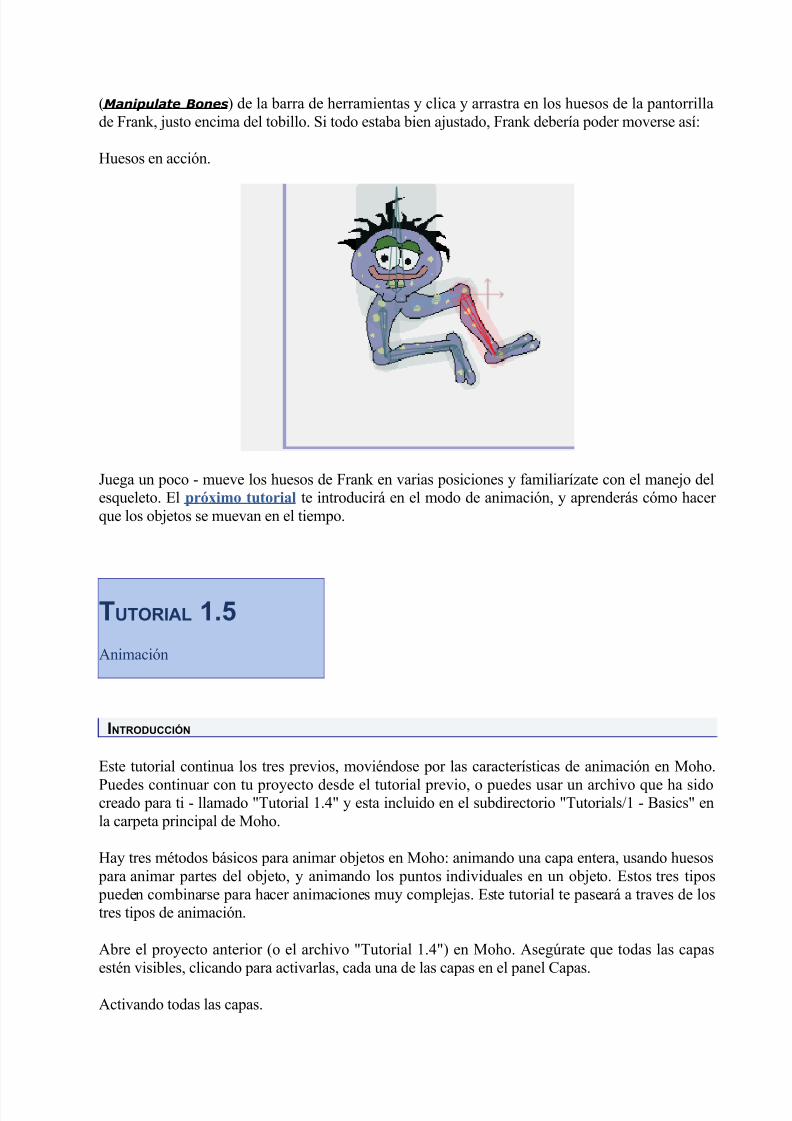
PROBANDO HUESOS (OTRA VEZ)
Manipular Huesos
Una vez que hayas asignado los puntos a los huesos, es una buena idea probar el esqueleto otra vez
para estar seguro de que todo funciona correctamente. Elige la herramienta Manipular Huesos
8/2/2019 01 - manual de Moho (introducción y básicos)
http://slidepdf.com/reader/full/01-manual-de-moho-introduccion-y-basicos 34/79
(Manipulate Bones) de la barra de herramientas y clica y arrastra en los huesos de la pantorrillade Frank, justo encima del tobillo. Si todo estaba bien ajustado, Frank debería poder moverse así:
Huesos en acción.
Juega un poco - mueve los huesos de Frank en varias posiciones y familiarízate con el manejo delesqueleto. El próximo tutorial te introducirá en el modo de animación, y aprenderás cómo hacer que los objetos se muevan en el tiempo.
TUTORIAL 1.5
Animación
INTRODUCCIÓN
Este tutorial continua los tres previos, moviéndose por las características de animación en Moho.
Puedes continuar con tu proyecto desde el tutorial previo, o puedes usar un archivo que ha sidocreado para ti - llamado "Tutorial 1.4" y esta incluido en el subdirectorio "Tutorials/1 - Basics" enla carpeta principal de Moho.
Hay tres métodos básicos para animar objetos en Moho: animando una capa entera, usando huesos para animar partes del objeto, y animando los puntos individuales en un objeto. Estos tres tipos pueden combinarse para hacer animaciones muy complejas. Este tutorial te paseará a traves de lostres tipos de animación.
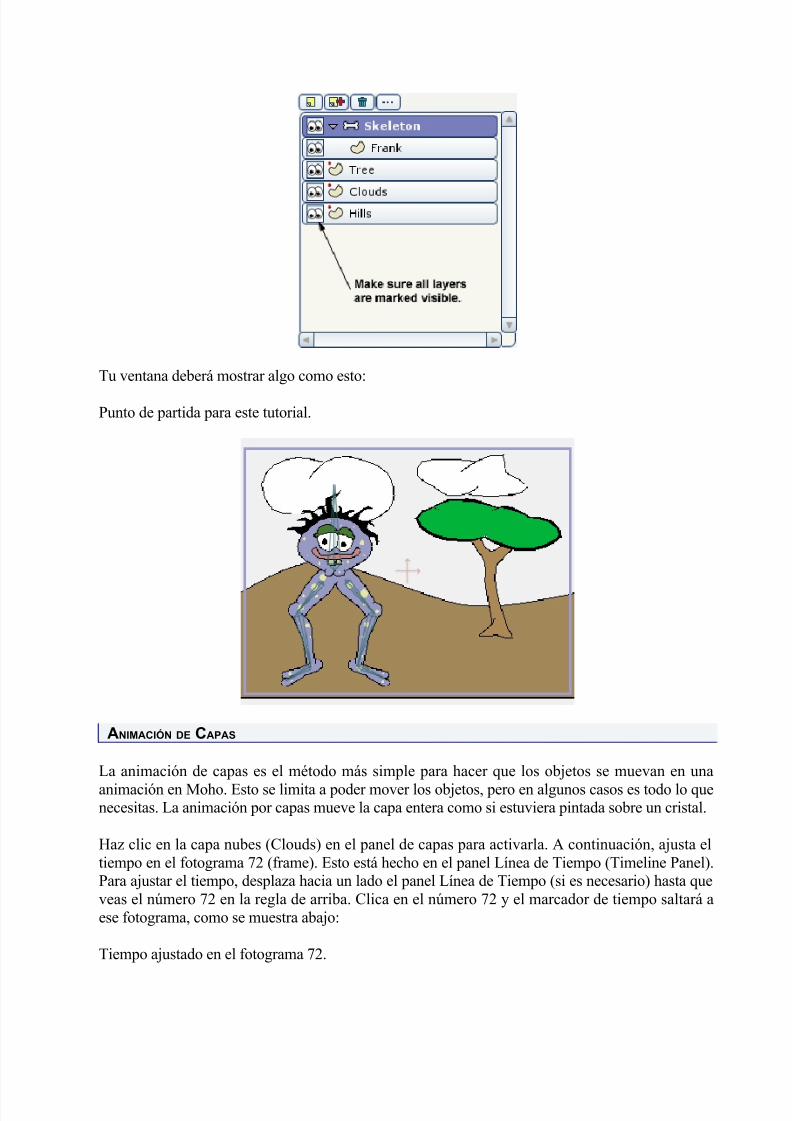
Abre el proyecto anterior (o el archivo "Tutorial 1.4") en Moho. Asegúrate que todas las capasestén visibles, clicando para activarlas, cada una de las capas en el panel Capas.
Activando todas las capas.
8/2/2019 01 - manual de Moho (introducción y básicos)
http://slidepdf.com/reader/full/01-manual-de-moho-introduccion-y-basicos 35/79
Tu ventana deberá mostrar algo como esto:
Punto de partida para este tutorial.
ANIMACIÓN DE CAPAS
La animación de capas es el método más simple para hacer que los objetos se muevan en una
animación en Moho. Esto se limita a poder mover los objetos, pero en algunos casos es todo lo quenecesitas. La animación por capas mueve la capa entera como si estuviera pintada sobre un cristal.
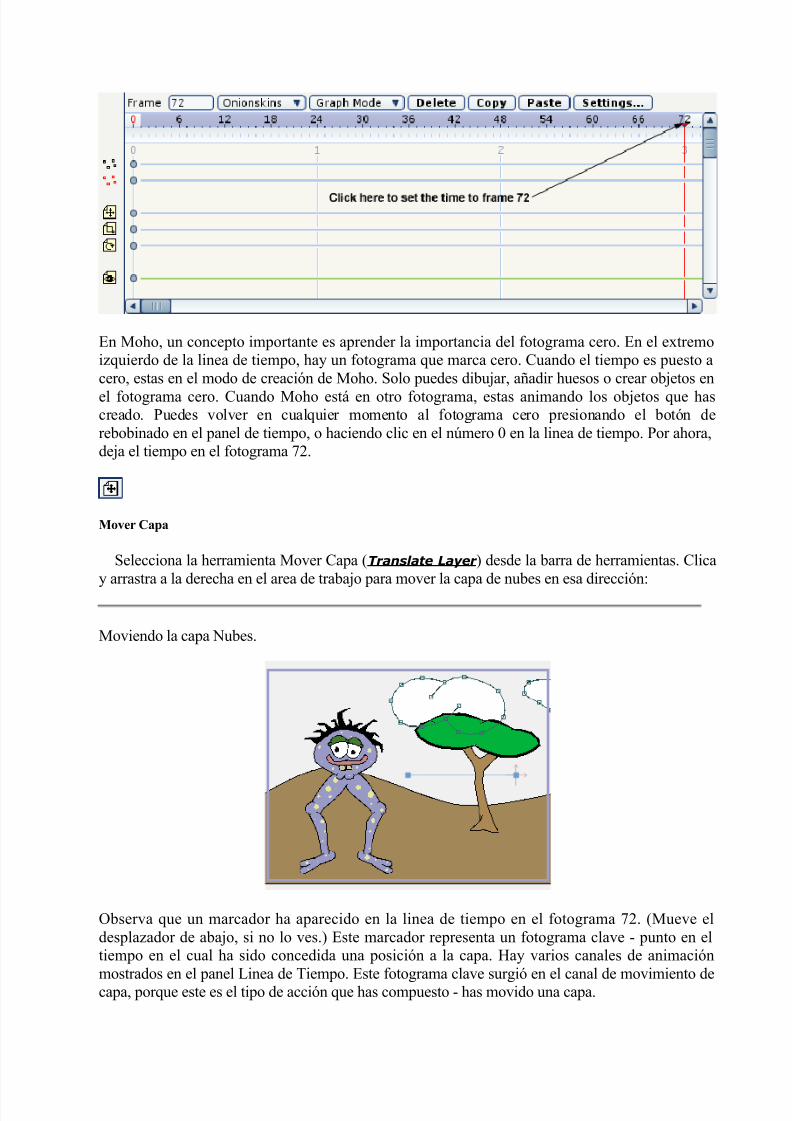
Haz clic en la capa nubes (Clouds) en el panel de capas para activarla. A continuación, ajusta eltiempo en el fotograma 72 (frame). Esto está hecho en el panel Línea de Tiempo (Timeline Panel).Para ajustar el tiempo, desplaza hacia un lado el panel Línea de Tiempo (si es necesario) hasta queveas el número 72 en la regla de arriba. Clica en el número 72 y el marcador de tiempo saltará aese fotograma, como se muestra abajo:
Tiempo ajustado en el fotograma 72.
8/2/2019 01 - manual de Moho (introducción y básicos)
http://slidepdf.com/reader/full/01-manual-de-moho-introduccion-y-basicos 36/79
En Moho, un concepto importante es aprender la importancia del fotograma cero. En el extremoizquierdo de la linea de tiempo, hay un fotograma que marca cero. Cuando el tiempo es puesto acero, estas en el modo de creación de Moho. Solo puedes dibujar, añadir huesos o crear objetos en
el fotograma cero. Cuando Moho está en otro fotograma, estas animando los objetos que hascreado. Puedes volver en cualquier momento al fotograma cero presionando el botón derebobinado en el panel de tiempo, o haciendo clic en el número 0 en la linea de tiempo. Por ahora,deja el tiempo en el fotograma 72.
Mover Capa
Selecciona la herramienta Mover Capa (Translate Layer ) desde la barra de herramientas. Clicay arrastra a la derecha en el area de trabajo para mover la capa de nubes en esa dirección:
Moviendo la capa Nubes.
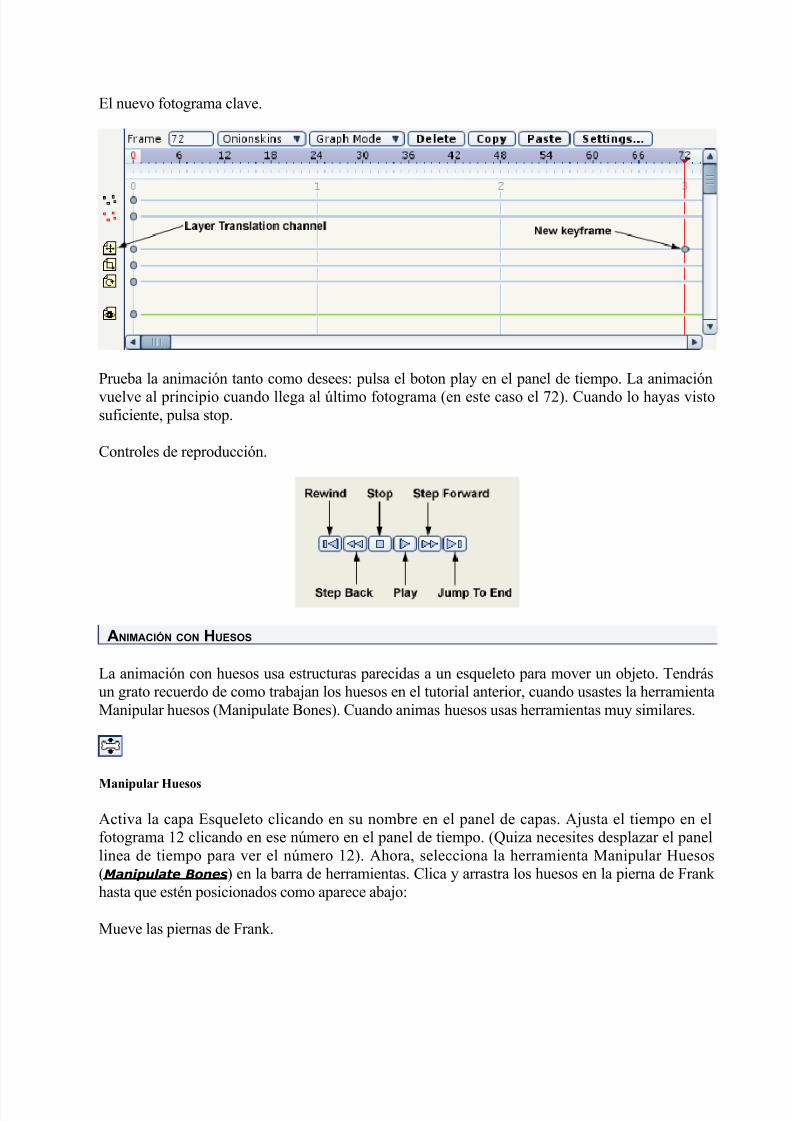
Observa que un marcador ha aparecido en la linea de tiempo en el fotograma 72. (Mueve eldesplazador de abajo, si no lo ves.) Este marcador representa un fotograma clave - punto en eltiempo en el cual ha sido concedida una posición a la capa. Hay varios canales de animaciónmostrados en el panel Linea de Tiempo. Este fotograma clave surgió en el canal de movimiento decapa, porque este es el tipo de acción que has compuesto - has movido una capa.
8/2/2019 01 - manual de Moho (introducción y básicos)
http://slidepdf.com/reader/full/01-manual-de-moho-introduccion-y-basicos 37/79
El nuevo fotograma clave.
Prueba la animación tanto como desees: pulsa el boton play en el panel de tiempo. La animación
vuelve al principio cuando llega al último fotograma (en este caso el 72). Cuando lo hayas vistosuficiente, pulsa stop.
Controles de reproducción.
ANIMACIÓN CON HUESOS
La animación con huesos usa estructuras parecidas a un esqueleto para mover un objeto. Tendrásun grato recuerdo de como trabajan los huesos en el tutorial anterior, cuando usastes la herramientaManipular huesos (Manipulate Bones). Cuando animas huesos usas herramientas muy similares.
Manipular Huesos
Activa la capa Esqueleto clicando en su nombre en el panel de capas. Ajusta el tiempo en elfotograma 12 clicando en ese número en el panel de tiempo. (Quiza necesites desplazar el panellinea de tiempo para ver el número 12). Ahora, selecciona la herramienta Manipular Huesos(Manipulate Bones) en la barra de herramientas. Clica y arrastra los huesos en la pierna de Frank hasta que estén posicionados como aparece abajo:
Mueve las piernas de Frank.
8/2/2019 01 - manual de Moho (introducción y básicos)
http://slidepdf.com/reader/full/01-manual-de-moho-introduccion-y-basicos 38/79
Advierte que la herramienta de manipulado de huesos funciona de manera distinta en el fotograma12 a como lo hacía en el fotograma 0 en el tutorial anterior. En el fotograma 0, esta herramienta erausada para probar un sistema de huesos, y no modificaban permanentemente los huesos. Sinembargo, cuando estás animando huesos (en cualquier fotograma que no sea el 0), los huesos sequedan en su nueva posición.
Mover Hueso
A continuación selecciona la herramienta Mover Huesos (Translate Bone). Clica en la columna
de Frank y desplaza un poco hacia abajo:
Baja el cuerpo entero de Frank.
Ahora, pon el tiempo en el fotograma 24, selecciona el comando de menú Bone->Reset All Bones.Pulsa en el botón de reproducción (o play) en el panel de tiempo para ver tu animación, y pulsastop cuando lo hayas hecho.
Cuando has dado marcha atrás a la animación, probablemente hayas percibido que después delfotograma 24, Frank no se mueve más. Podrías añadir más fotogramas clave ajustando el tiempo a
8/2/2019 01 - manual de Moho (introducción y básicos)
http://slidepdf.com/reader/full/01-manual-de-moho-introduccion-y-basicos 39/79
algunos fotogramas mas tarde y moviendo los huesos de Frank un poco más, pero probemos lacaracterística de looping en la animación con Moho.
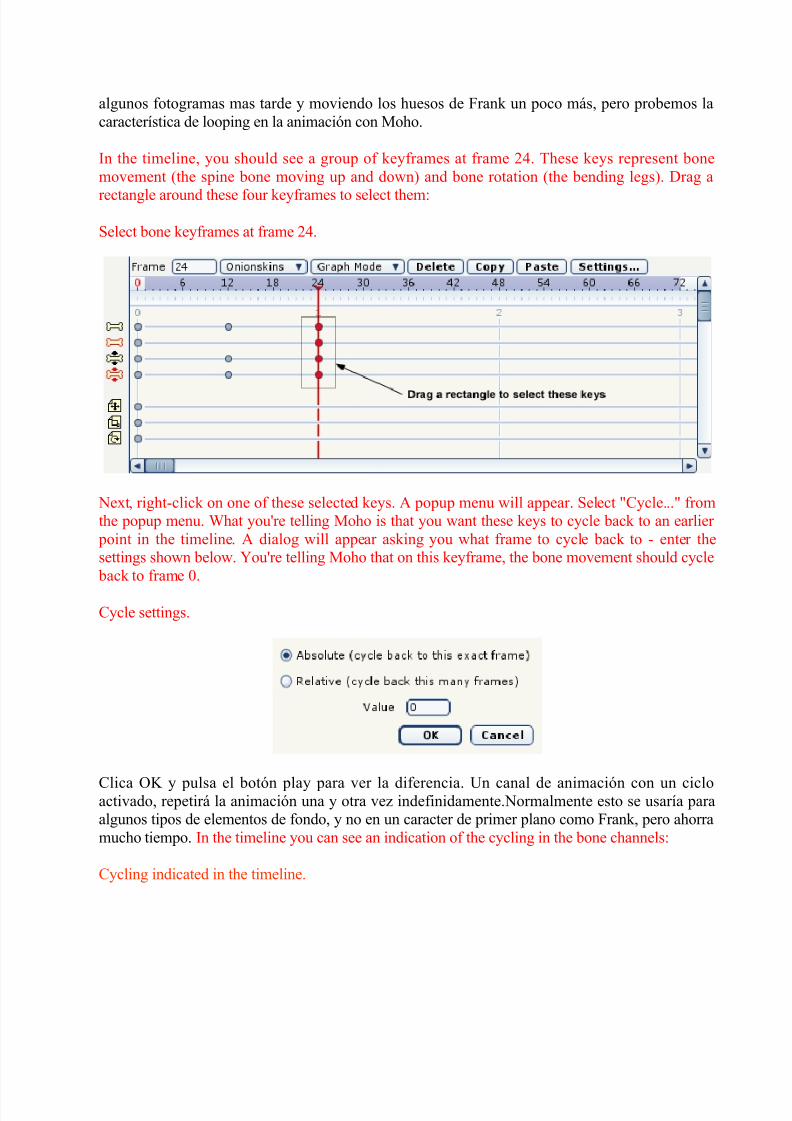
In the timeline, you should see a group of keyframes at frame 24. These keys represent bonemovement (the spine bone moving up and down) and bone rotation (the bending legs). Drag a
rectangle around these four keyframes to select them:
Select bone keyframes at frame 24.
Next, right-click on one of these selected keys. A popup menu will appear. Select "Cycle..." fromthe popup menu. What you're telling Moho is that you want these keys to cycle back to an earlier
point in the timeline. A dialog will appear asking you what frame to cycle back to - enter thesettings shown below. You're telling Moho that on this keyframe, the bone movement should cycle
back to frame 0.
Cycle settings.
Clica OK y pulsa el botón play para ver la diferencia. Un canal de animación con un cicloactivado, repetirá la animación una y otra vez indefinidamente.Normalmente esto se usaría paraalgunos tipos de elementos de fondo, y no en un caracter de primer plano como Frank, pero ahorramucho tiempo. In the timeline you can see an indication of the cycling in the bone channels:
Cycling indicated in the timeline.
8/2/2019 01 - manual de Moho (introducción y básicos)
http://slidepdf.com/reader/full/01-manual-de-moho-introduccion-y-basicos 40/79
ANIMACIÓN DE PUNTOS
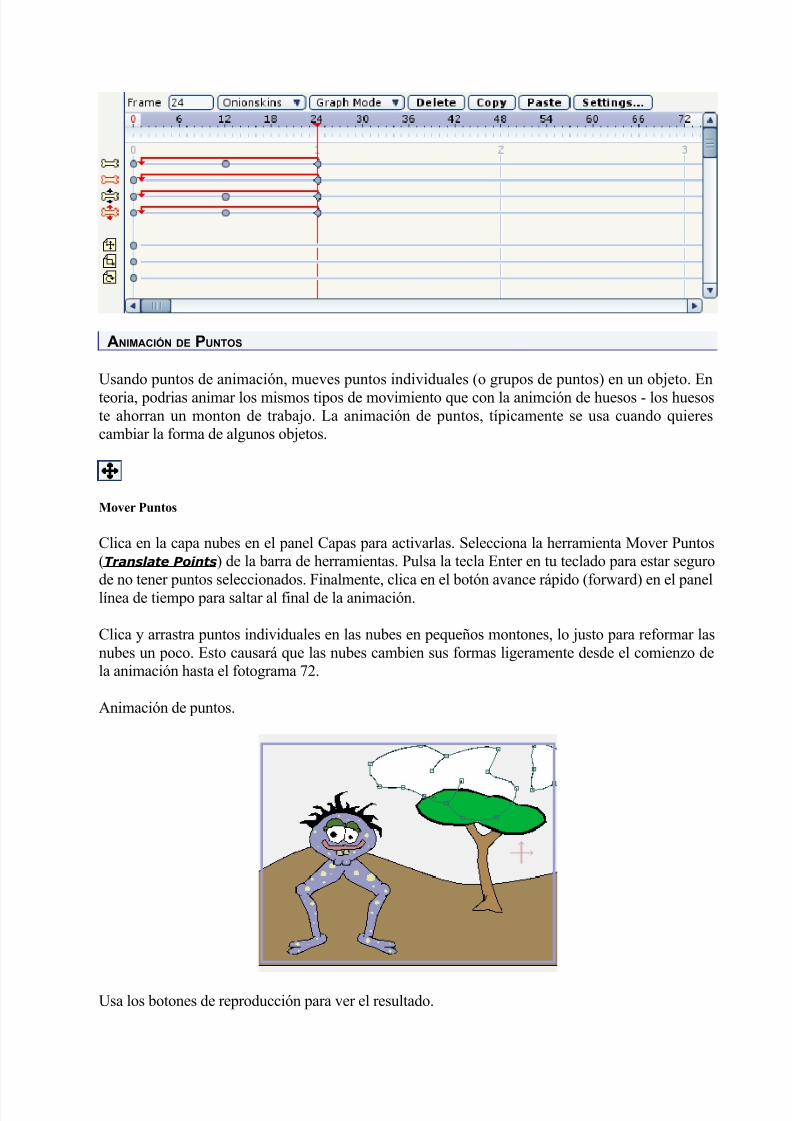
Usando puntos de animación, mueves puntos individuales (o grupos de puntos) en un objeto. En
teoria, podrias animar los mismos tipos de movimiento que con la animción de huesos - los huesoste ahorran un monton de trabajo. La animación de puntos, típicamente se usa cuando quierescambiar la forma de algunos objetos.
Mover Puntos
Clica en la capa nubes en el panel Capas para activarlas. Selecciona la herramienta Mover Puntos(Translate Points) de la barra de herramientas. Pulsa la tecla Enter en tu teclado para estar segurode no tener puntos seleccionados. Finalmente, clica en el botón avance rápido (forward) en el panellínea de tiempo para saltar al final de la animación.
Clica y arrastra puntos individuales en las nubes en pequeños montones, lo justo para reformar lasnubes un poco. Esto causará que las nubes cambien sus formas ligeramente desde el comienzo dela animación hasta el fotograma 72.
Animación de puntos.
Usa los botones de reproducción para ver el resultado.
8/2/2019 01 - manual de Moho (introducción y básicos)
http://slidepdf.com/reader/full/01-manual-de-moho-introduccion-y-basicos 41/79
IMPORTANDO ANIMACIÓN
Recuerdas cómo la capa de Frank fué importada dentro del proyecto en el tutorial prévio? Bien,capas importadas siempre pueden contener animación. Selecciona File->Insert Object.... Cuandote requiera, abre el archivo "Tutorial Extras" en la carpeta "Tutorials/1 - Basics" dentro de la
carpeta pricipal de Moho. En el diálogo que aparece, selecciona la capa Beach Ball y clica OK.
Una pelota de playa aparecerá botando en tu proyecto. Pulsa el boton play para verla. Rebota bien, pero en realidad no está en la posición adecuada. Vuelve al fotograma cero (pulsa rebobinar en lalinea de tiempo) para poner la pelota en la posición inicial.
Mover Capa
Escalar Capa
Usando la herramienta Mover (Translate Layer ), arrastra la pelota de playa a una posición mejor.Podias quiza usar la herramienta Escalar Capa (Scale Layer ) para reescalar la pelota. (Arrastra unode los manejadores de esquina de la caja de control de escala para reescalar la pelota en la misma
proporción horizotal o verticalmente). Pulsa play para ver la animación final.
Ahora tienes una preciosa compresión de como dibujar, rellenar, ajustar huesos, y animar enMoho. Toma libertad para saltar bien y empezar a trabajar con Moho. O lee mas tutoriales paraaprender más sobre las herramientas en detalle.
TUTORIAL 2.1
Welding
INTRODUCTION
When drawing in Moho's vector layers, the concept of "welding" points is very important. Thistutorials will show you examples of how (and why) points can be welded, and will go on to showyou some examples of good and bad welds you can do in Moho.
When you weld two points together in Moho, Moho really is combining those two points intoone. There are a couple reasons to do this: First, welding the two endpoints of a curve together creates a closed curve. Second, if two shapes join up at a particular point, and you want them toremain joined during an animation, then welding those points together will guarantee that those
two shapes will remain joined.
8/2/2019 01 - manual de Moho (introducción y básicos)
http://slidepdf.com/reader/full/01-manual-de-moho-introduccion-y-basicos 42/79
HOW TO WELD POINTS
Translate Points
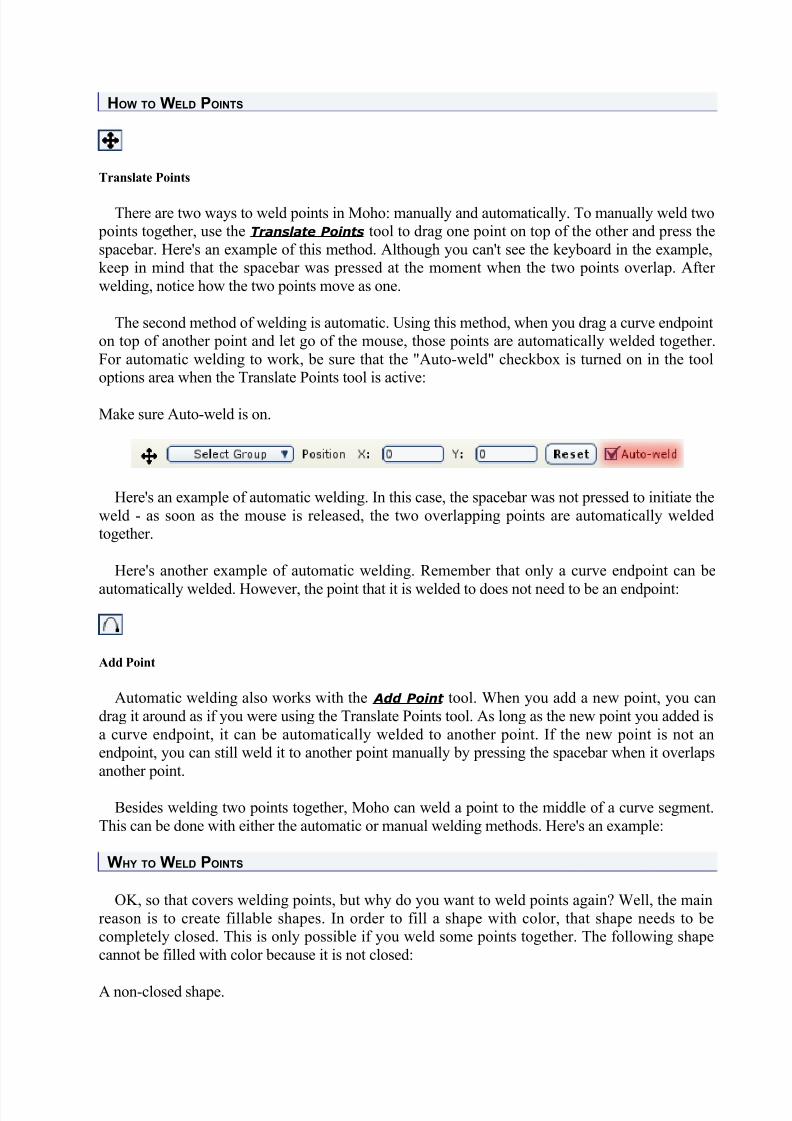
There are two ways to weld points in Moho: manually and automatically. To manually weld two points together, use the Translate Points tool to drag one point on top of the other and press thespacebar. Here's an example of this method. Although you can't see the keyboard in the example,keep in mind that the spacebar was pressed at the moment when the two points overlap. After welding, notice how the two points move as one.
The second method of welding is automatic. Using this method, when you drag a curve endpointon top of another point and let go of the mouse, those points are automatically welded together.For automatic welding to work, be sure that the "Auto-weld" checkbox is turned on in the tooloptions area when the Translate Points tool is active:
Make sure Auto-weld is on.
Here's an example of automatic welding. In this case, the spacebar was not pressed to initiate theweld - as soon as the mouse is released, the two overlapping points are automatically weldedtogether.
Here's another example of automatic welding. Remember that only a curve endpoint can be
automatically welded. However, the point that it is welded to does not need to be an endpoint:
Add Point
Automatic welding also works with the Add Point tool. When you add a new point, you candrag it around as if you were using the Translate Points tool. As long as the new point you added isa curve endpoint, it can be automatically welded to another point. If the new point is not anendpoint, you can still weld it to another point manually by pressing the spacebar when it overlapsanother point.
Besides welding two points together, Moho can weld a point to the middle of a curve segment.This can be done with either the automatic or manual welding methods. Here's an example:
WHY TO WELD POINTS
OK, so that covers welding points, but why do you want to weld points again? Well, the mainreason is to create fillable shapes. In order to fill a shape with color, that shape needs to becompletely closed. This is only possible if you weld some points together. The following shapecannot be filled with color because it is not closed:
A non-closed shape.

8/2/2019 01 - manual de Moho (introducción y básicos)
http://slidepdf.com/reader/full/01-manual-de-moho-introduccion-y-basicos 43/79
By welding the two endpoints together, we can create a closed shape that can then be filled:
A closed shape that can be filled.
EXAMPLES OF GOOD WELDING
Let's look at some examples of good welding choices. First, the following two points could bewelded to create a single, continuous curve:
Joining two curves.
The next case shows the classic case of welding a curve closed to create a fillable shape:
Closing a curve.
8/2/2019 01 - manual de Moho (introducción y básicos)
http://slidepdf.com/reader/full/01-manual-de-moho-introduccion-y-basicos 44/79
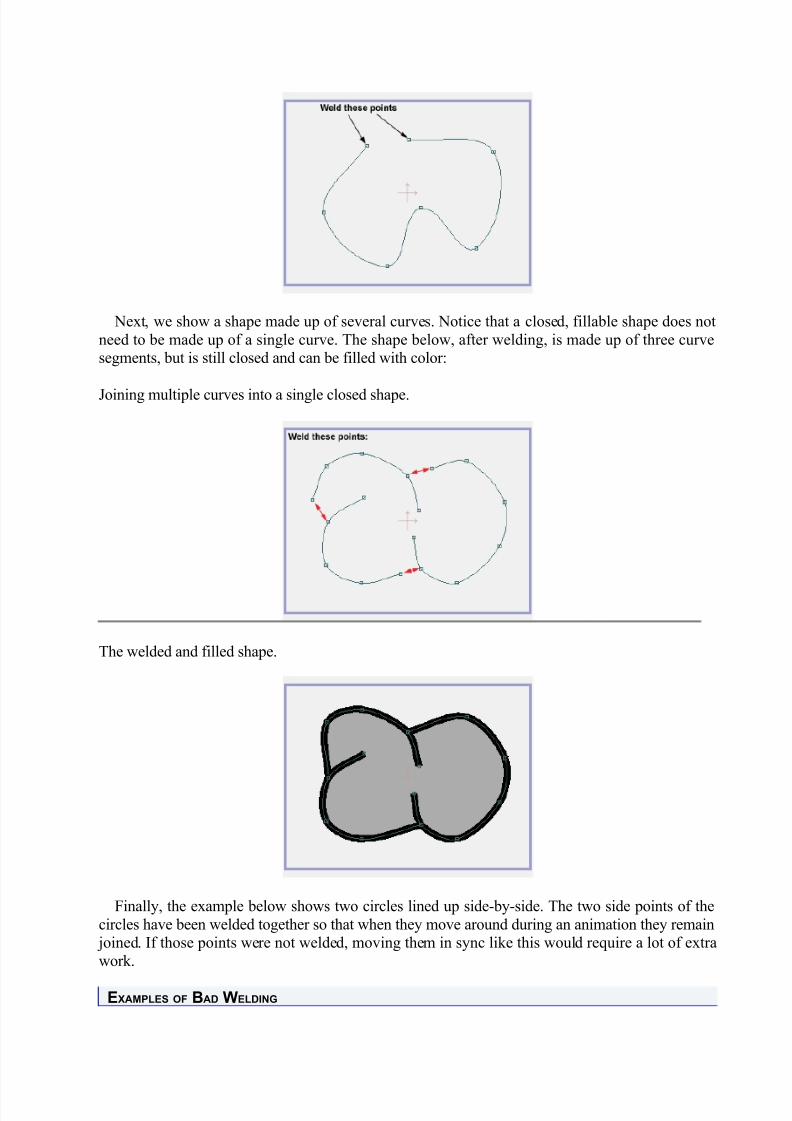
Next, we show a shape made up of several curves. Notice that a closed, fillable shape does notneed to be made up of a single curve. The shape below, after welding, is made up of three curvesegments, but is still closed and can be filled with color:
Joining multiple curves into a single closed shape.
The welded and filled shape.
Finally, the example below shows two circles lined up side-by-side. The two side points of thecircles have been welded together so that when they move around during an animation they remain
joined. If those points were not welded, moving them in sync like this would require a lot of extrawork.
EXAMPLES OF BAD WELDING
8/2/2019 01 - manual de Moho (introducción y básicos)
http://slidepdf.com/reader/full/01-manual-de-moho-introduccion-y-basicos 45/79
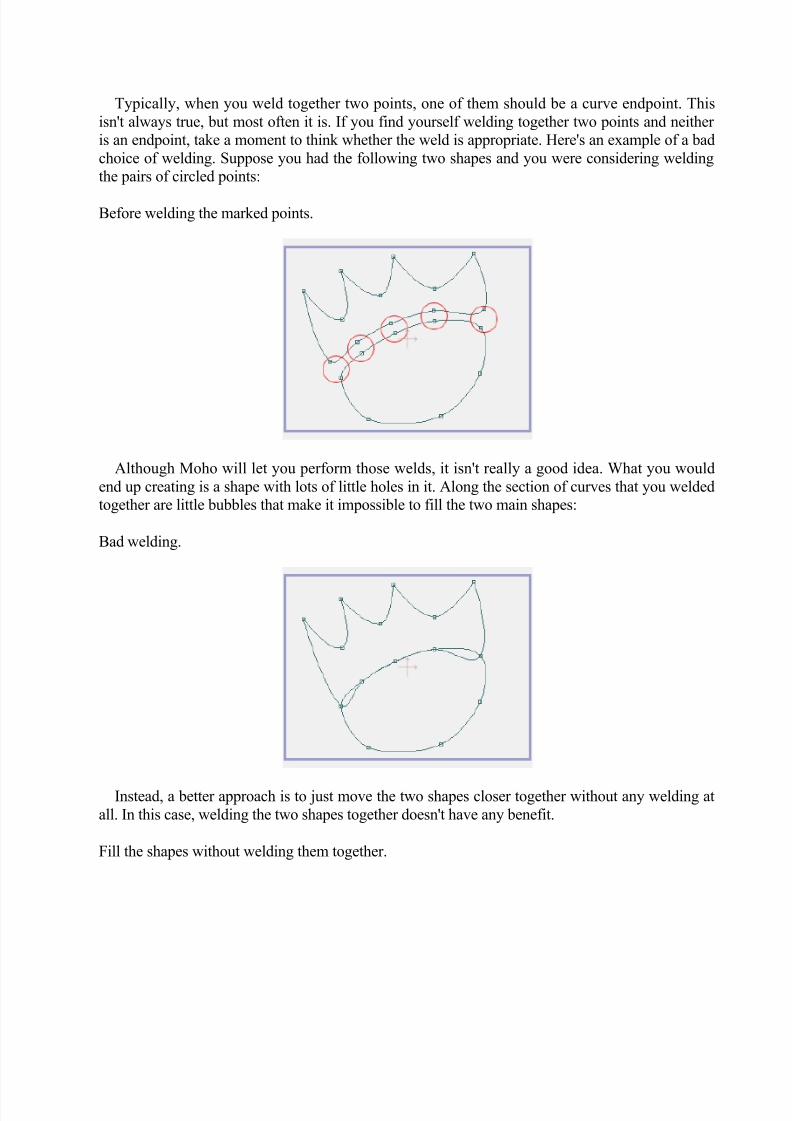
Typically, when you weld together two points, one of them should be a curve endpoint. Thisisn't always true, but most often it is. If you find yourself welding together two points and neither is an endpoint, take a moment to think whether the weld is appropriate. Here's an example of a badchoice of welding. Suppose you had the following two shapes and you were considering weldingthe pairs of circled points:
Before welding the marked points.
Although Moho will let you perform those welds, it isn't really a good idea. What you wouldend up creating is a shape with lots of little holes in it. Along the section of curves that you weldedtogether are little bubbles that make it impossible to fill the two main shapes:
Bad welding.
Instead, a better approach is to just move the two shapes closer together without any welding atall. In this case, welding the two shapes together doesn't have any benefit.
Fill the shapes without welding them together.
8/2/2019 01 - manual de Moho (introducción y básicos)
http://slidepdf.com/reader/full/01-manual-de-moho-introduccion-y-basicos 46/79
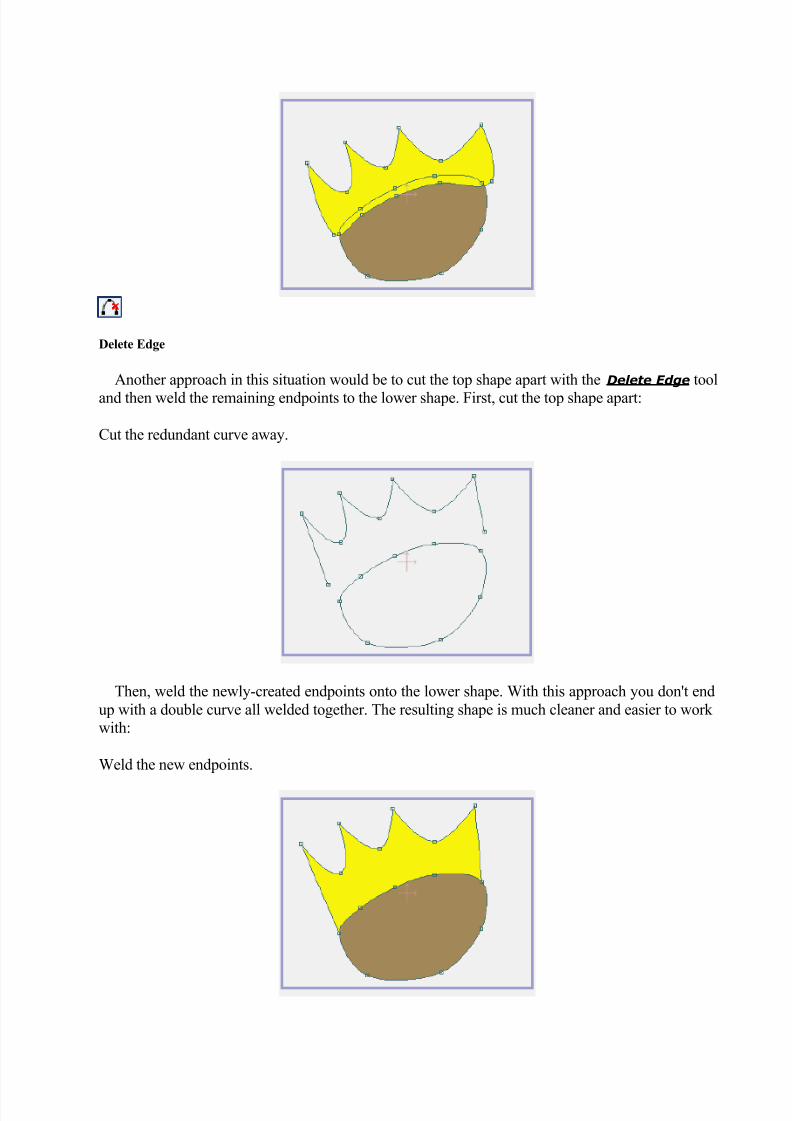
Delete Edge
Another approach in this situation would be to cut the top shape apart with the Delete Edge tool
and then weld the remaining endpoints to the lower shape. First, cut the top shape apart:
Cut the redundant curve away.
Then, weld the newly-created endpoints onto the lower shape. With this approach you don't endup with a double curve all welded together. The resulting shape is much cleaner and easier to work with:
Weld the new endpoints.
8/2/2019 01 - manual de Moho (introducción y básicos)
http://slidepdf.com/reader/full/01-manual-de-moho-introduccion-y-basicos 47/79
TUTORIAL 2.2
Drawing shapes with holes
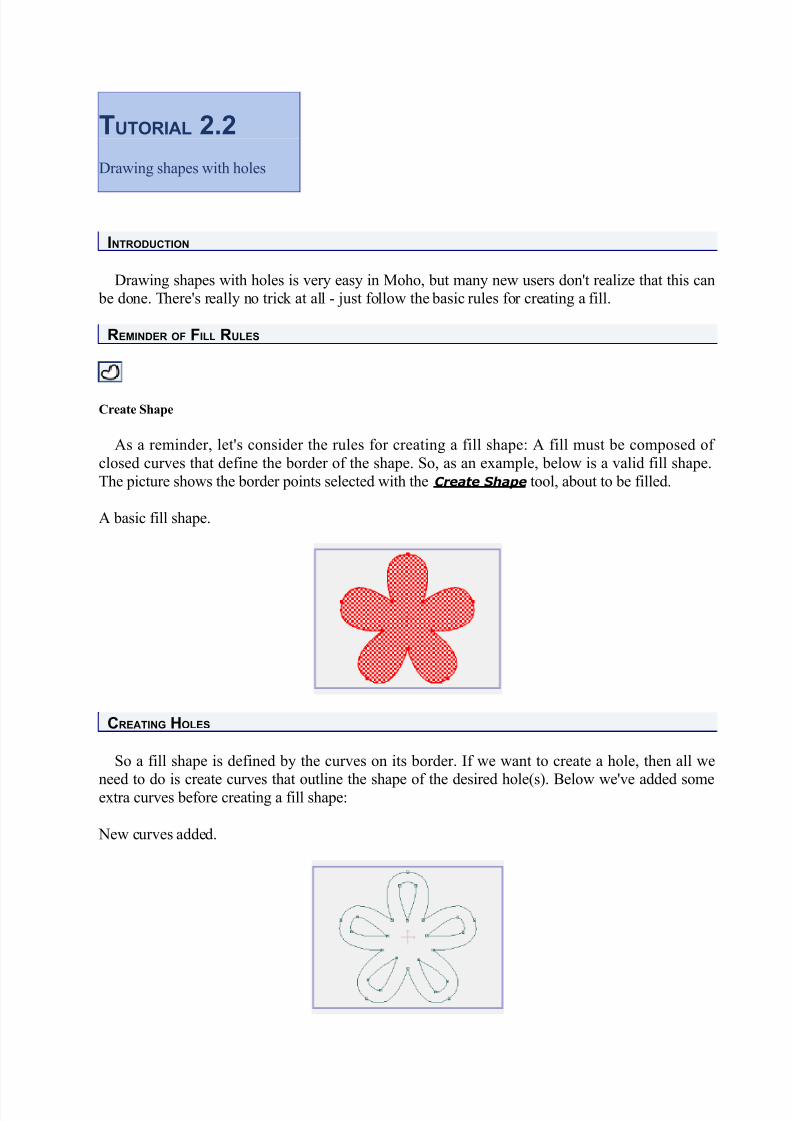
INTRODUCTION
Drawing shapes with holes is very easy in Moho, but many new users don't realize that this can be done. There's really no trick at all - just follow the basic rules for creating a fill.
REMINDER OF FILL RULES
Create Shape
As a reminder, let's consider the rules for creating a fill shape: A fill must be composed of closed curves that define the border of the shape. So, as an example, below is a valid fill shape.The picture shows the border points selected with the Create Shape tool, about to be filled.
A basic fill shape.
CREATING HOLES
So a fill shape is defined by the curves on its border. If we want to create a hole, then all we
need to do is create curves that outline the shape of the desired hole(s). Below we've added someextra curves before creating a fill shape:
New curves added.

8/2/2019 01 - manual de Moho (introducción y básicos)
http://slidepdf.com/reader/full/01-manual-de-moho-introduccion-y-basicos 48/79
Create Shape
Once you've set up curves to define the shape of the hole, all you need to do is select the outlineand the hole(s) using the Create Shape tool. Notice that Moho automatically identifies the inner curves as borders of holes in the shape. There's nothing in particular you have to do, just draw theholes and Moho will know what to do with them. When you've selected all the correct points, pressthe spacebar to finalize the shape.
Selected points for filling.
Finally, here is the resulting shape. (The Line Width tool was used to narrow the width of theoutline at the corner points.)
The finished shape.
Here's another example of a shape with a hole:
Another shape with a hole.
8/2/2019 01 - manual de Moho (introducción y básicos)
http://slidepdf.com/reader/full/01-manual-de-moho-introduccion-y-basicos 49/79
TUTORIAL 2.3
Hidden edges
INTRODUCTION
When drawing more complex objects like faces, you will often run into situations where youwant an outline to only go partway around a shape. There's an easy way to accomplish this inMoho.
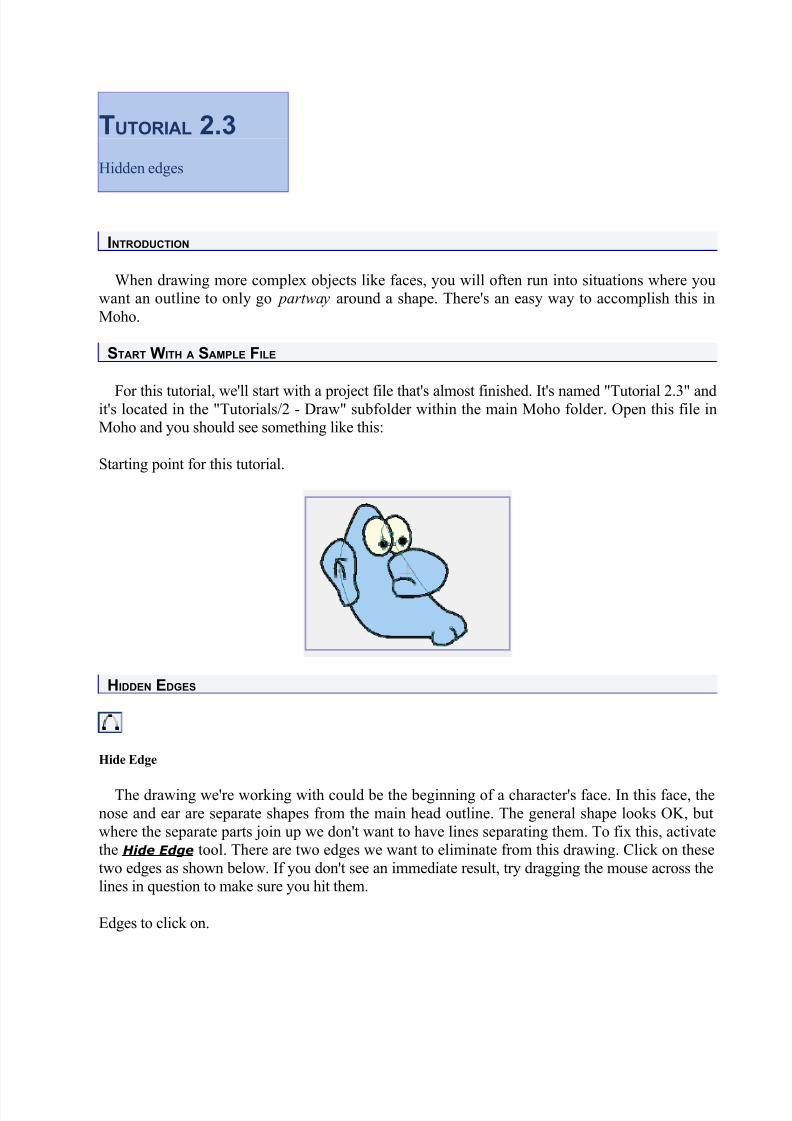
START WITH A SAMPLE FILE
For this tutorial, we'll start with a project file that's almost finished. It's named "Tutorial 2.3" andit's located in the "Tutorials/2 - Draw" subfolder within the main Moho folder. Open this file inMoho and you should see something like this:
Starting point for this tutorial.
HIDDEN EDGES
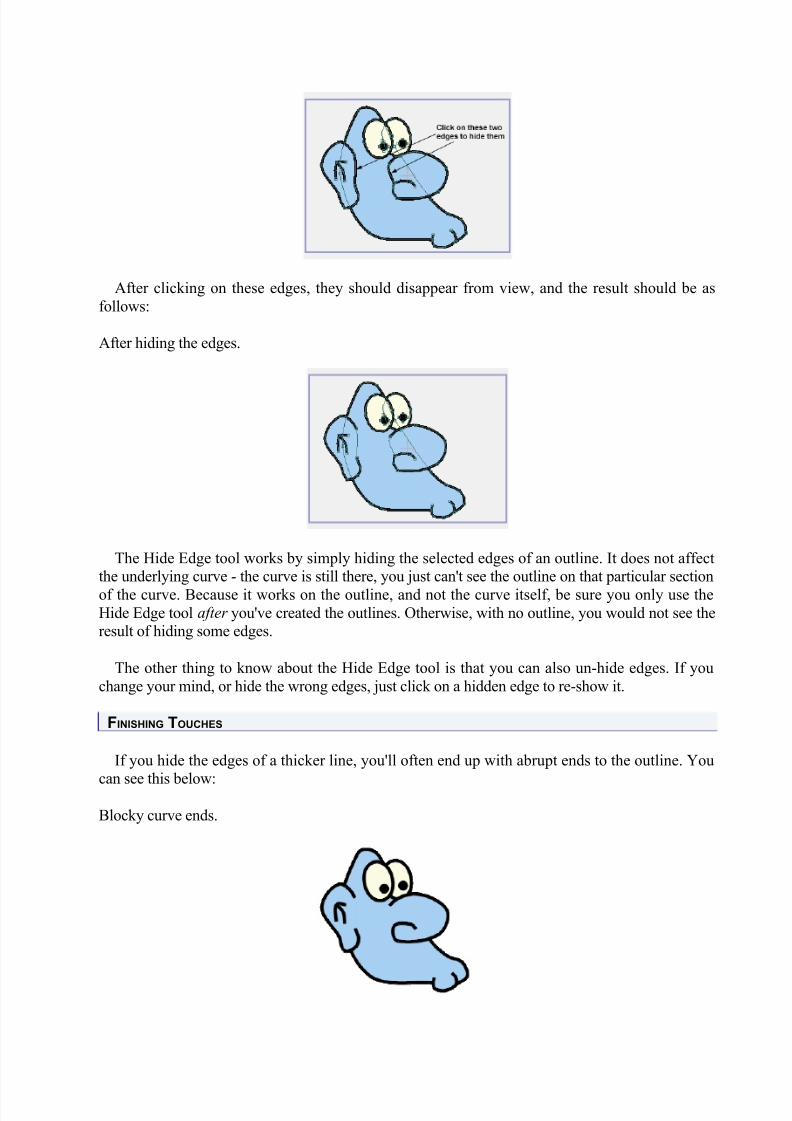
Hide Edge
The drawing we're working with could be the beginning of a character's face. In this face, thenose and ear are separate shapes from the main head outline. The general shape looks OK, butwhere the separate parts join up we don't want to have lines separating them. To fix this, activatethe Hide Edge tool. There are two edges we want to eliminate from this drawing. Click on thesetwo edges as shown below. If you don't see an immediate result, try dragging the mouse across thelines in question to make sure you hit them.
Edges to click on.
8/2/2019 01 - manual de Moho (introducción y básicos)
http://slidepdf.com/reader/full/01-manual-de-moho-introduccion-y-basicos 50/79
After clicking on these edges, they should disappear from view, and the result should be asfollows:
After hiding the edges.
The Hide Edge tool works by simply hiding the selected edges of an outline. It does not affectthe underlying curve - the curve is still there, you just can't see the outline on that particular section
of the curve. Because it works on the outline, and not the curve itself, be sure you only use theHide Edge tool after you've created the outlines. Otherwise, with no outline, you would not see theresult of hiding some edges.
The other thing to know about the Hide Edge tool is that you can also un-hide edges. If youchange your mind, or hide the wrong edges, just click on a hidden edge to re-show it.
FINISHING TOUCHES
If you hide the edges of a thicker line, you'll often end up with abrupt ends to the outline. You
can see this below:Blocky curve ends.
8/2/2019 01 - manual de Moho (introducción y básicos)
http://slidepdf.com/reader/full/01-manual-de-moho-introduccion-y-basicos 51/79
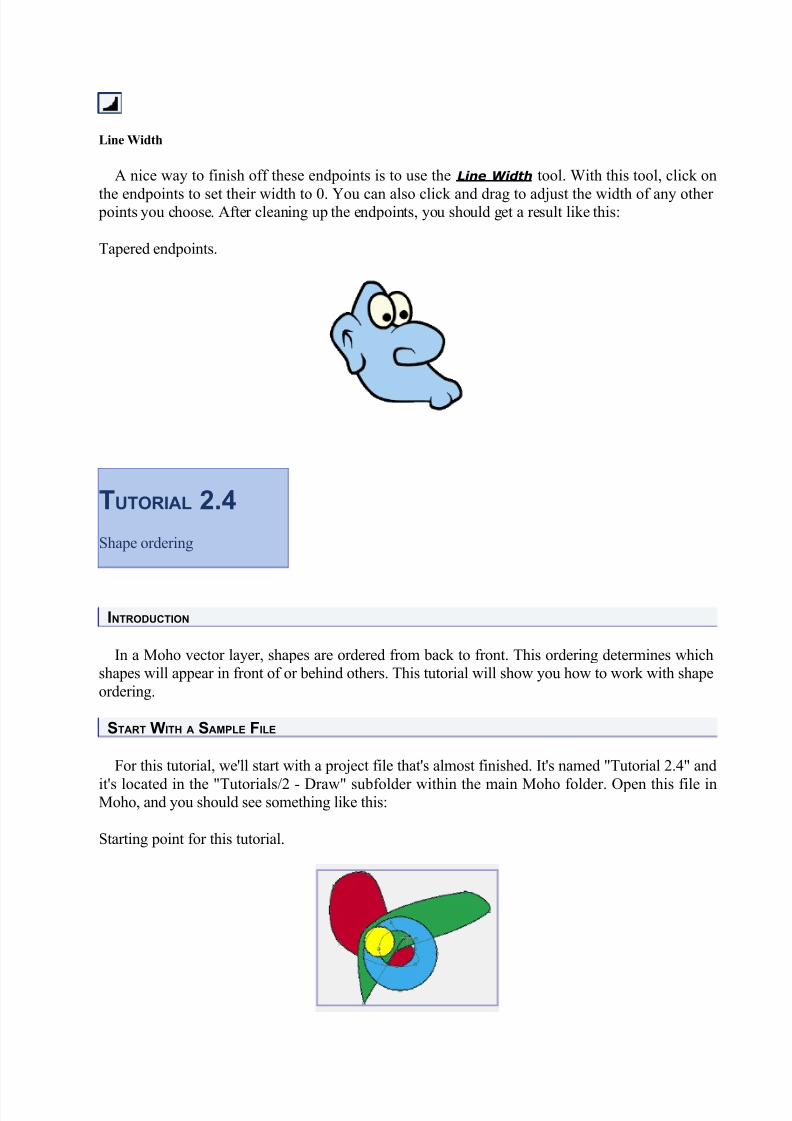
Line Width
A nice way to finish off these endpoints is to use the Line Width tool. With this tool, click on
the endpoints to set their width to 0. You can also click and drag to adjust the width of any other points you choose. After cleaning up the endpoints, you should get a result like this:
Tapered endpoints.
TUTORIAL 2.4
Shape ordering
INTRODUCTION
In a Moho vector layer, shapes are ordered from back to front. This ordering determines whichshapes will appear in front of or behind others. This tutorial will show you how to work with shapeordering.
START WITH A SAMPLE FILE
For this tutorial, we'll start with a project file that's almost finished. It's named "Tutorial 2.4" and
it's located in the "Tutorials/2 - Draw" subfolder within the main Moho folder. Open this file inMoho, and you should see something like this:
Starting point for this tutorial.
8/2/2019 01 - manual de Moho (introducción y básicos)
http://slidepdf.com/reader/full/01-manual-de-moho-introduccion-y-basicos 52/79
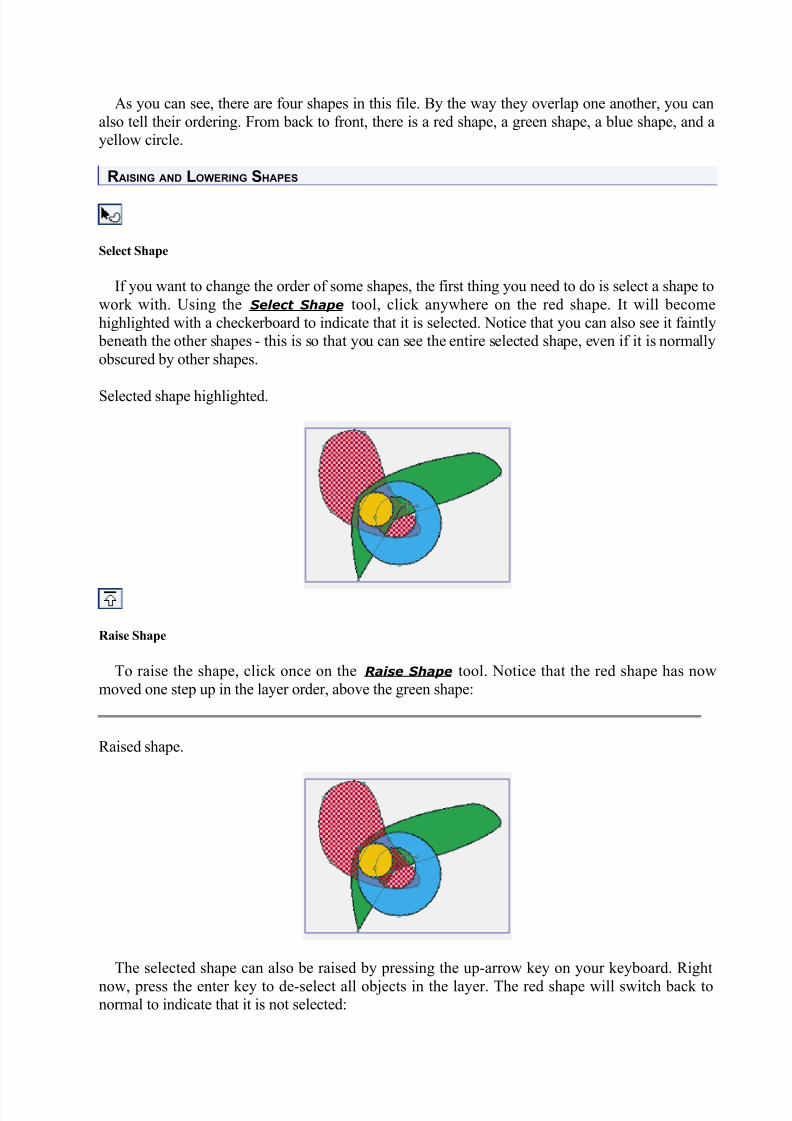
As you can see, there are four shapes in this file. By the way they overlap one another, you canalso tell their ordering. From back to front, there is a red shape, a green shape, a blue shape, and ayellow circle.
RAISING AND LOWERING SHAPES
Select Shape
If you want to change the order of some shapes, the first thing you need to do is select a shape towork with. Using the Select Shape tool, click anywhere on the red shape. It will becomehighlighted with a checkerboard to indicate that it is selected. Notice that you can also see it faintly
beneath the other shapes - this is so that you can see the entire selected shape, even if it is normallyobscured by other shapes.
Selected shape highlighted.
Raise Shape
To raise the shape, click once on the Raise Shape tool. Notice that the red shape has nowmoved one step up in the layer order, above the green shape:
Raised shape.
The selected shape can also be raised by pressing the up-arrow key on your keyboard. Right
now, press the enter key to de-select all objects in the layer. The red shape will switch back tonormal to indicate that it is not selected:

8/2/2019 01 - manual de Moho (introducción y básicos)
http://slidepdf.com/reader/full/01-manual-de-moho-introduccion-y-basicos 53/79
De-select the shape.
Select Shape
Lower Shape
Next, use the Select Shape tool and click on the blue shape to select it. Press the down-arrowkey twice or click the Lower Shape tool twice to lower the blue shape below the red shape, andthen below the green shape:
Lowered blue shape.
You can also raise a shape to the top (above all others in that layer) or lower it to the bottom
(behind all others in that layer). Select the green shape and hold down the <shift> key while pressing the up-arrow key. With a single key press, the green shape moves all the way to the top of the layer's shape order.
Raise green shape.
8/2/2019 01 - manual de Moho (introducción y básicos)
http://slidepdf.com/reader/full/01-manual-de-moho-introduccion-y-basicos 54/79
SELECTING HIDDEN SHAPES
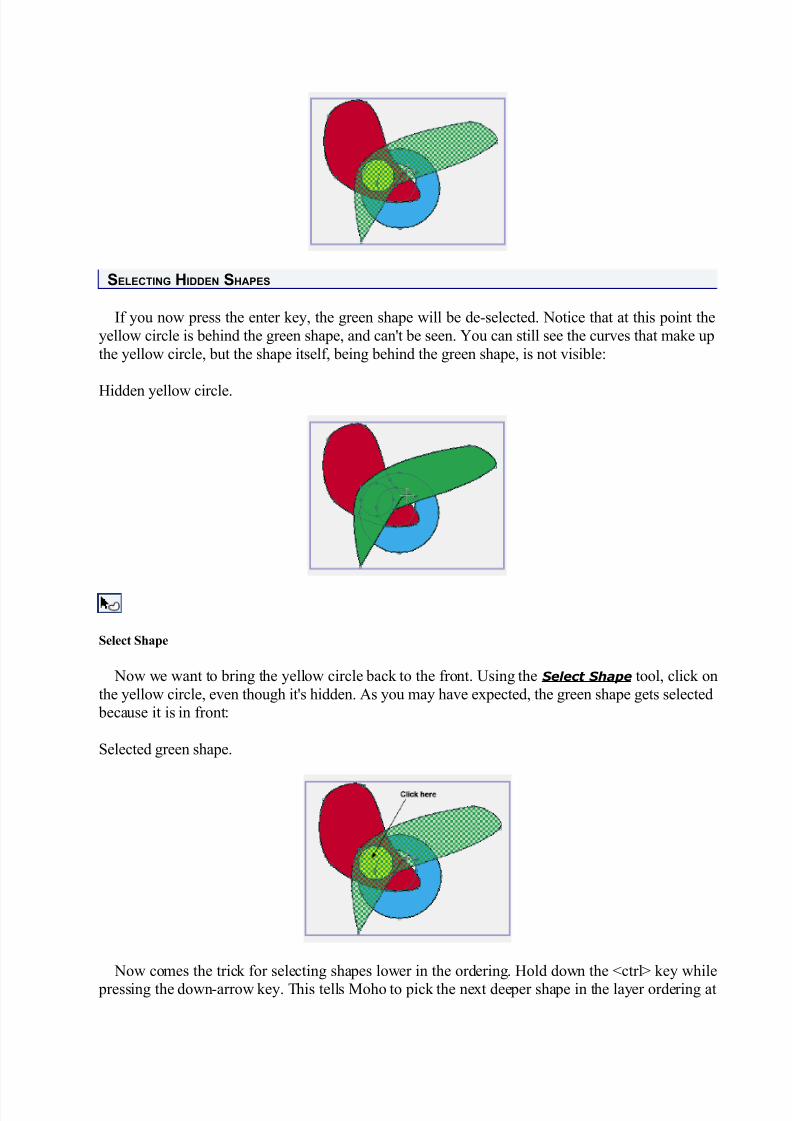
If you now press the enter key, the green shape will be de-selected. Notice that at this point theyellow circle is behind the green shape, and can't be seen. You can still see the curves that make upthe yellow circle, but the shape itself, being behind the green shape, is not visible:
Hidden yellow circle.
Select Shape
Now we want to bring the yellow circle back to the front. Using the Select Shape tool, click onthe yellow circle, even though it's hidden. As you may have expected, the green shape gets selected
because it is in front:
Selected green shape.
Now comes the trick for selecting shapes lower in the ordering. Hold down the <ctrl> key while pressing the down-arrow key. This tells Moho to pick the next deeper shape in the layer ordering at
8/2/2019 01 - manual de Moho (introducción y básicos)
http://slidepdf.com/reader/full/01-manual-de-moho-introduccion-y-basicos 55/79
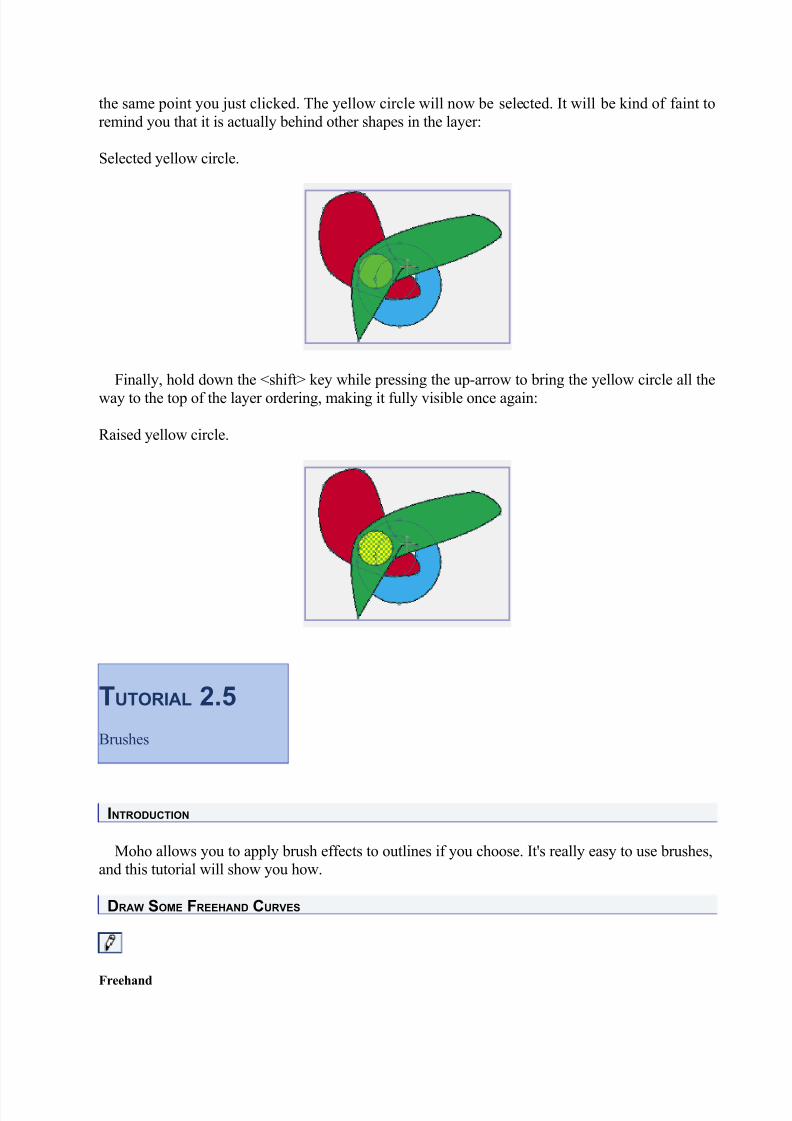
the same point you just clicked. The yellow circle will now be selected. It will be kind of faint toremind you that it is actually behind other shapes in the layer:
Selected yellow circle.
Finally, hold down the <shift> key while pressing the up-arrow to bring the yellow circle all the
way to the top of the layer ordering, making it fully visible once again:
Raised yellow circle.
TUTORIAL 2.5
Brushes
INTRODUCTION
Moho allows you to apply brush effects to outlines if you choose. It's really easy to use brushes,and this tutorial will show you how.
DRAW SOME FREEHAND CURVES
Freehand
8/2/2019 01 - manual de Moho (introducción y básicos)
http://slidepdf.com/reader/full/01-manual-de-moho-introduccion-y-basicos 56/79
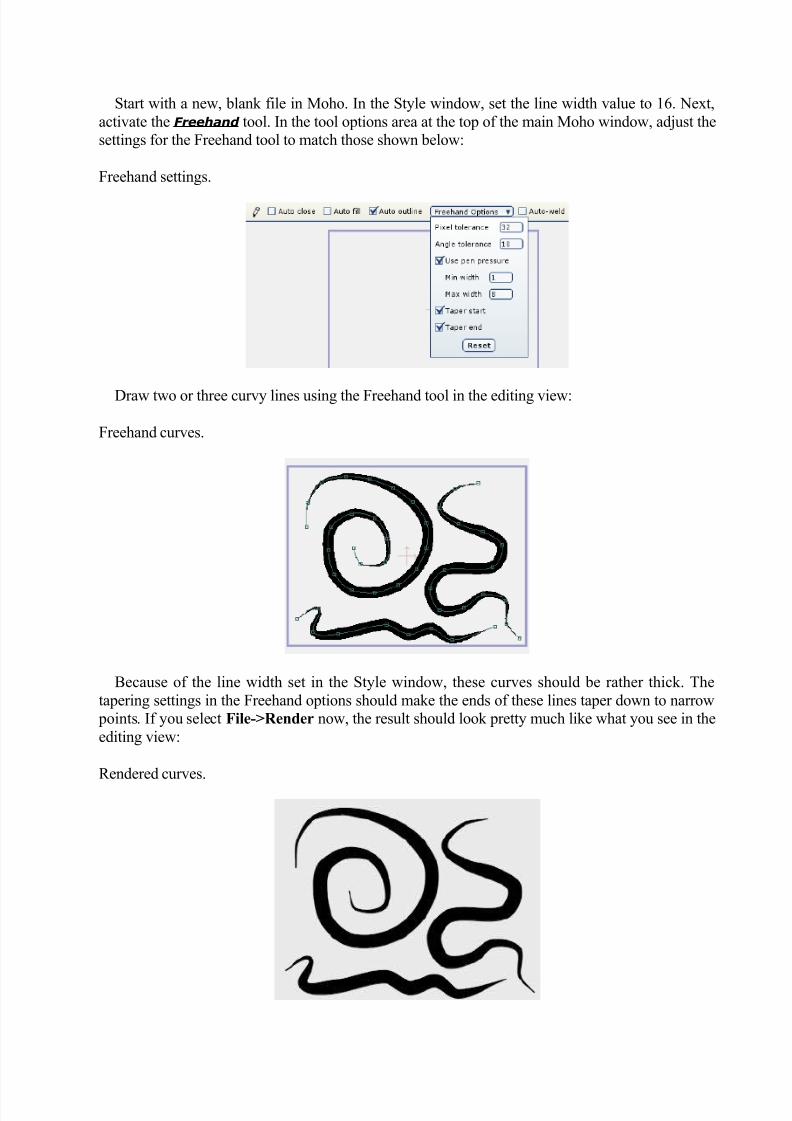
Start with a new, blank file in Moho. In the Style window, set the line width value to 16. Next,activate the Freehand tool. In the tool options area at the top of the main Moho window, adjust thesettings for the Freehand tool to match those shown below:
Freehand settings.
Draw two or three curvy lines using the Freehand tool in the editing view:
Freehand curves.
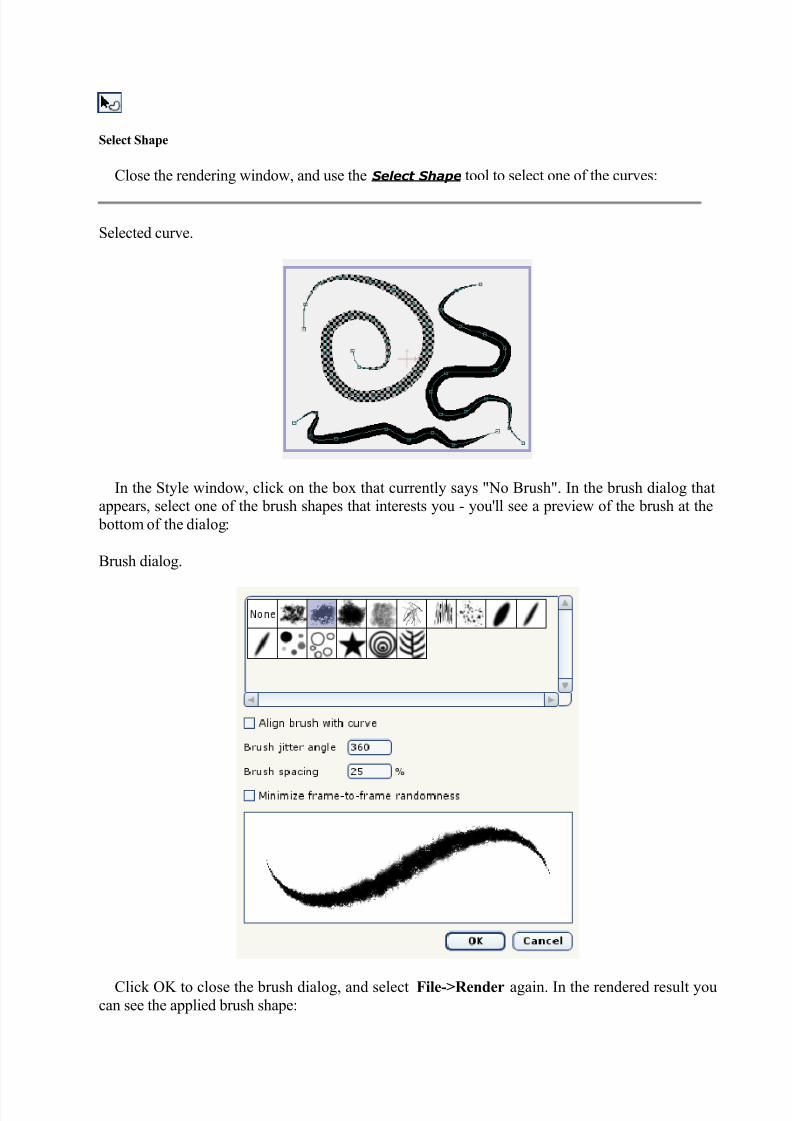
Because of the line width set in the Style window, these curves should be rather thick. Thetapering settings in the Freehand options should make the ends of these lines taper down to narrow
points. If you select File->Render now, the result should look pretty much like what you see in theediting view:
Rendered curves.
8/2/2019 01 - manual de Moho (introducción y básicos)
http://slidepdf.com/reader/full/01-manual-de-moho-introduccion-y-basicos 57/79
Select Shape
Close the rendering window, and use the Select Shape tool to select one of the curves:
Selected curve.
In the Style window, click on the box that currently says "No Brush". In the brush dialog thatappears, select one of the brush shapes that interests you - you'll see a preview of the brush at the
bottom of the dialog:
Brush dialog.
Click OK to close the brush dialog, and select File->Render again. In the rendered result youcan see the applied brush shape:
8/2/2019 01 - manual de Moho (introducción y básicos)
http://slidepdf.com/reader/full/01-manual-de-moho-introduccion-y-basicos 58/79
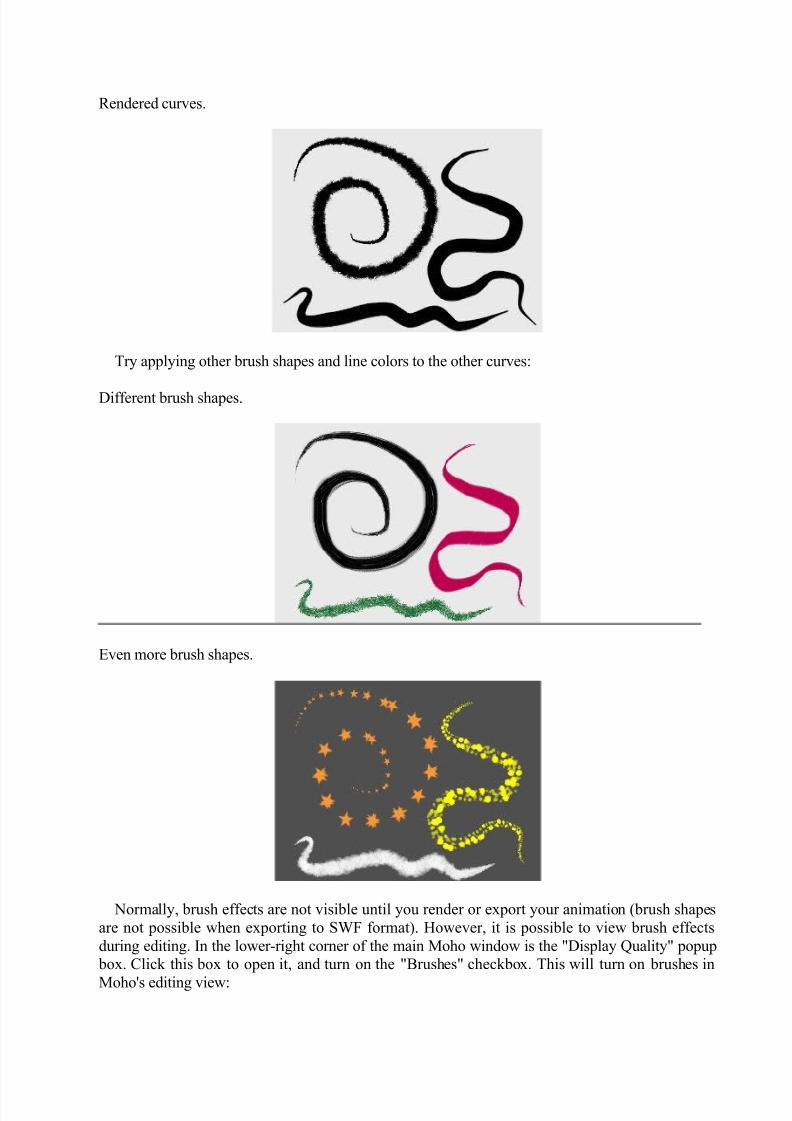
Rendered curves.
Try applying other brush shapes and line colors to the other curves:
Different brush shapes.
Even more brush shapes.
Normally, brush effects are not visible until you render or export your animation (brush shapesare not possible when exporting to SWF format). However, it is possible to view brush effectsduring editing. In the lower-right corner of the main Moho window is the "Display Quality" popup
box. Click this box to open it, and turn on the "Brushes" checkbox. This will turn on brushes in
Moho's editing view:
8/2/2019 01 - manual de Moho (introducción y básicos)
http://slidepdf.com/reader/full/01-manual-de-moho-introduccion-y-basicos 59/79
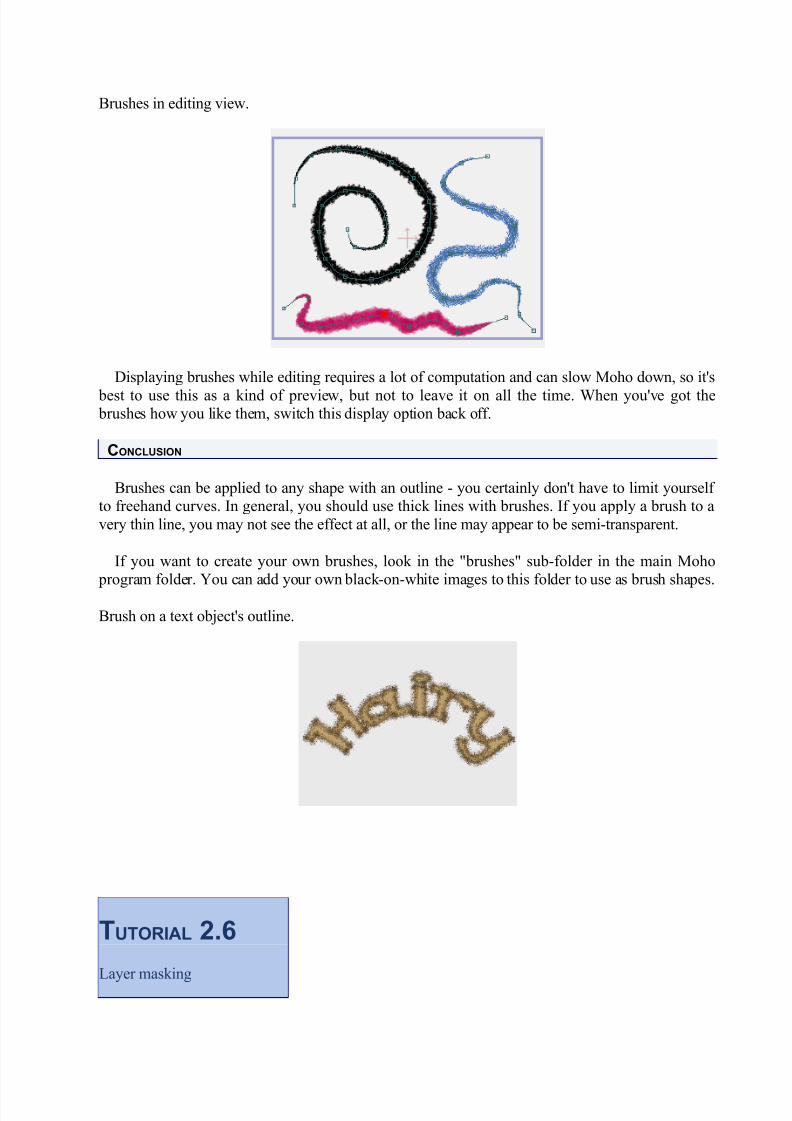
Brushes in editing view.
Displaying brushes while editing requires a lot of computation and can slow Moho down, so it's
best to use this as a kind of preview, but not to leave it on all the time. When you've got the brushes how you like them, switch this display option back off.
CONCLUSION
Brushes can be applied to any shape with an outline - you certainly don't have to limit yourself to freehand curves. In general, you should use thick lines with brushes. If you apply a brush to avery thin line, you may not see the effect at all, or the line may appear to be semi-transparent.
If you want to create your own brushes, look in the "brushes" sub-folder in the main Moho program folder. You can add your own black-on-white images to this folder to use as brush shapes.
Brush on a text object's outline.
TUTORIAL 2.6
Layer masking
8/2/2019 01 - manual de Moho (introducción y básicos)
http://slidepdf.com/reader/full/01-manual-de-moho-introduccion-y-basicos 60/79
INTRODUCTION
This tutorial is more of a show & tell than a hands-on creation of an animation. We willdemonstrate some examples of a powerful feature of Moho - layer masking. Layer masking can beused for all kinds of effects such as shadows, compositing, depth effects, transitions, and to
simplify certain modeling and animation tasks.
START WITH A SAMPLE FILE
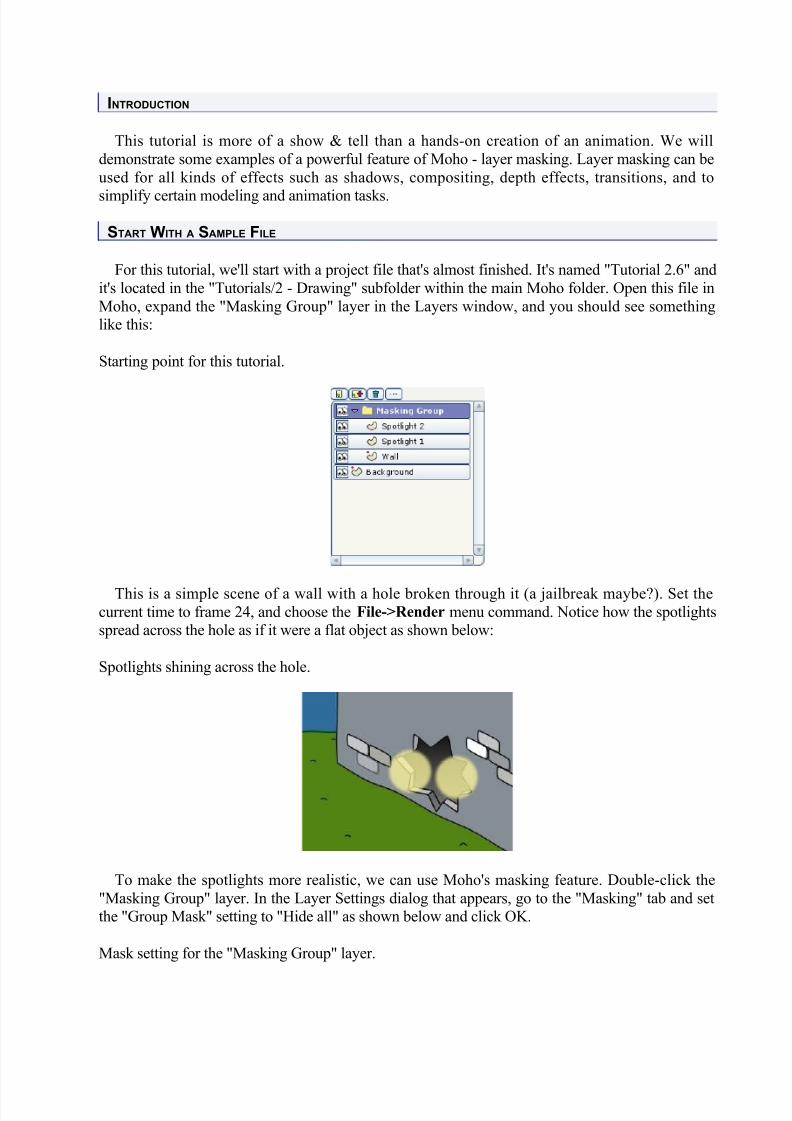
For this tutorial, we'll start with a project file that's almost finished. It's named "Tutorial 2.6" andit's located in the "Tutorials/2 - Drawing" subfolder within the main Moho folder. Open this file inMoho, expand the "Masking Group" layer in the Layers window, and you should see somethinglike this:
Starting point for this tutorial.
This is a simple scene of a wall with a hole broken through it (a jailbreak maybe?). Set thecurrent time to frame 24, and choose the File->Render menu command. Notice how the spotlightsspread across the hole as if it were a flat object as shown below:
Spotlights shining across the hole.
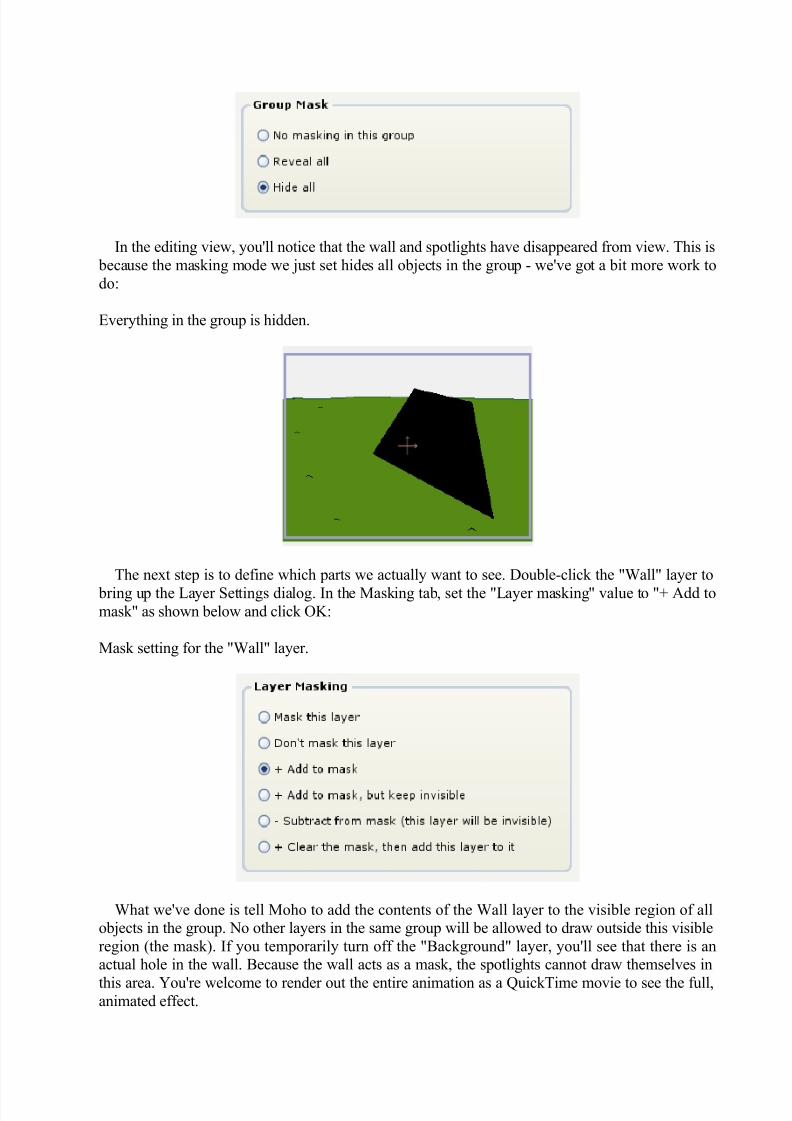
To make the spotlights more realistic, we can use Moho's masking feature. Double-click the"Masking Group" layer. In the Layer Settings dialog that appears, go to the "Masking" tab and setthe "Group Mask" setting to "Hide all" as shown below and click OK.
Mask setting for the "Masking Group" layer.
8/2/2019 01 - manual de Moho (introducción y básicos)
http://slidepdf.com/reader/full/01-manual-de-moho-introduccion-y-basicos 61/79
In the editing view, you'll notice that the wall and spotlights have disappeared from view. This is because the masking mode we just set hides all objects in the group - we've got a bit more work todo:
Everything in the group is hidden.
The next step is to define which parts we actually want to see. Double-click the "Wall" layer to
bring up the Layer Settings dialog. In the Masking tab, set the "Layer masking" value to "+ Add tomask" as shown below and click OK:
Mask setting for the "Wall" layer.
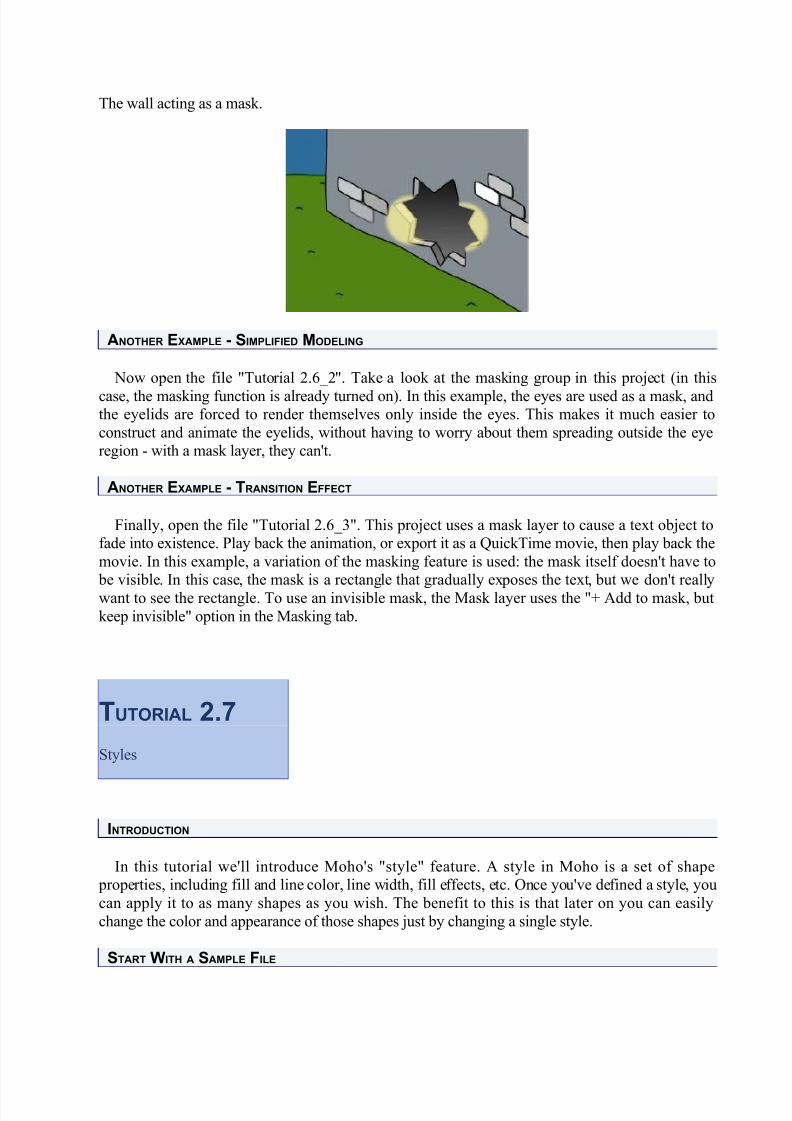
What we've done is tell Moho to add the contents of the Wall layer to the visible region of allobjects in the group. No other layers in the same group will be allowed to draw outside this visibleregion (the mask). If you temporarily turn off the "Background" layer, you'll see that there is anactual hole in the wall. Because the wall acts as a mask, the spotlights cannot draw themselves in
this area. You're welcome to render out the entire animation as a QuickTime movie to see the full,animated effect.
8/2/2019 01 - manual de Moho (introducción y básicos)
http://slidepdf.com/reader/full/01-manual-de-moho-introduccion-y-basicos 62/79
The wall acting as a mask.
ANOTHER EXAMPLE - SIMPLIFIED MODELING
Now open the file "Tutorial 2.6_2". Take a look at the masking group in this project (in this
case, the masking function is already turned on). In this example, the eyes are used as a mask, andthe eyelids are forced to render themselves only inside the eyes. This makes it much easier toconstruct and animate the eyelids, without having to worry about them spreading outside the eyeregion - with a mask layer, they can't.
ANOTHER EXAMPLE - TRANSITION EFFECT
Finally, open the file "Tutorial 2.6_3". This project uses a mask layer to cause a text object tofade into existence. Play back the animation, or export it as a QuickTime movie, then play back themovie. In this example, a variation of the masking feature is used: the mask itself doesn't have to
be visible. In this case, the mask is a rectangle that gradually exposes the text, but we don't reallywant to see the rectangle. To use an invisible mask, the Mask layer uses the "+ Add to mask, butkeep invisible" option in the Masking tab.
TUTORIAL 2.7
Styles
INTRODUCTION
In this tutorial we'll introduce Moho's "style" feature. A style in Moho is a set of shape properties, including fill and line color, line width, fill effects, etc. Once you've defined a style, youcan apply it to as many shapes as you wish. The benefit to this is that later on you can easilychange the color and appearance of those shapes just by changing a single style.
START WITH A SAMPLE FILE

8/2/2019 01 - manual de Moho (introducción y básicos)
http://slidepdf.com/reader/full/01-manual-de-moho-introduccion-y-basicos 63/79
To start off, we'll take a look at a Moho file that already contains some styles. It's named"Tutorial 2.7" and it's located in the "Tutorials/2 - Drawing" subfolder within the main Mohofolder. Open this file in Moho, and you should see something like this:
Starting point for this tutorial.
(Don't worry that the character is all split apart. This is part of the bone setup described in
another tutorial. If you want to try switching to frame 1, you'll see that the character snaps back together. Just be sure to go back to frame 0 before continuing.)
Let's see what a style is all about. In the Style window, select "Skin" from the Styles popupmenu. The Skin style will become selected in the Style window:
The skin style selected.
Click the "Fill color" color selector to change the Skin fill color. Pick any color you wish. Notice that the skin color updates instantly on all the body parts of the character, even though theyare separate shapes and in several separate layers. Styles can be used throughout an entire Moho
project, and are not limited to the shapes in a single layer.
Modified skin color.
8/2/2019 01 - manual de Moho (introducción y básicos)
http://slidepdf.com/reader/full/01-manual-de-moho-introduccion-y-basicos 64/79
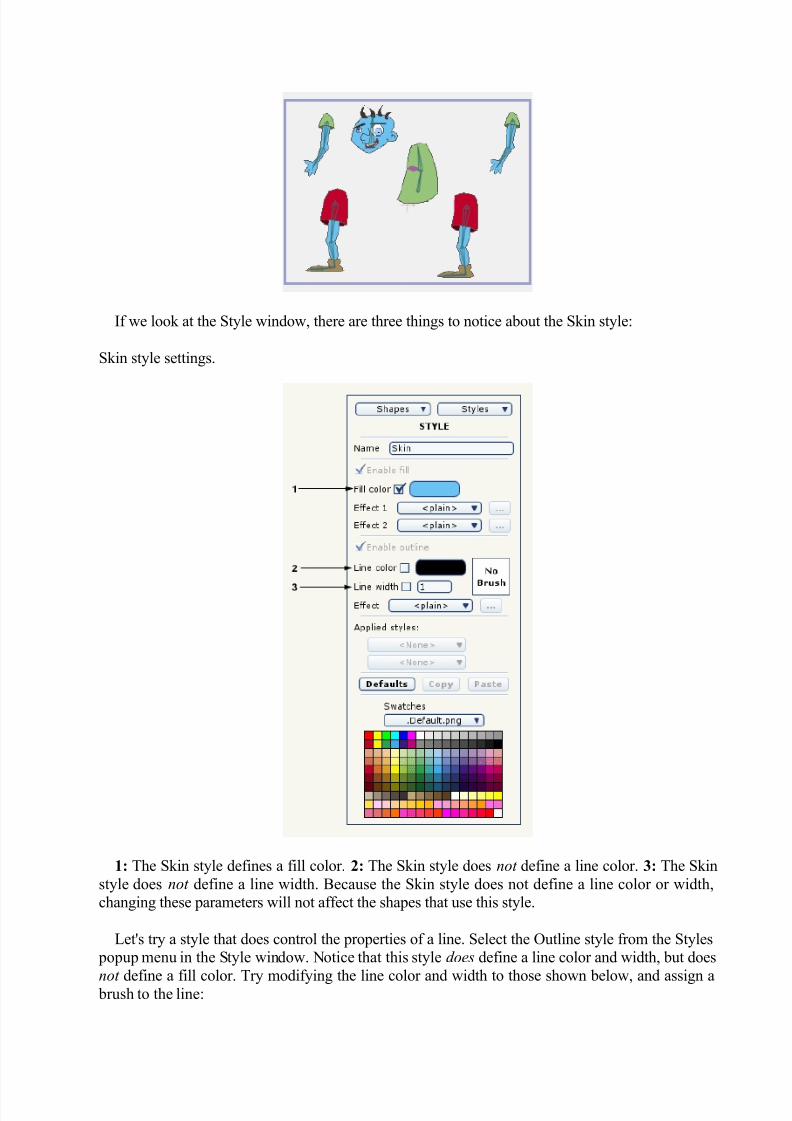
If we look at the Style window, there are three things to notice about the Skin style:
Skin style settings.
1: The Skin style defines a fill color. 2: The Skin style does not define a line color. 3: The Skinstyle does not define a line width. Because the Skin style does not define a line color or width,changing these parameters will not affect the shapes that use this style.
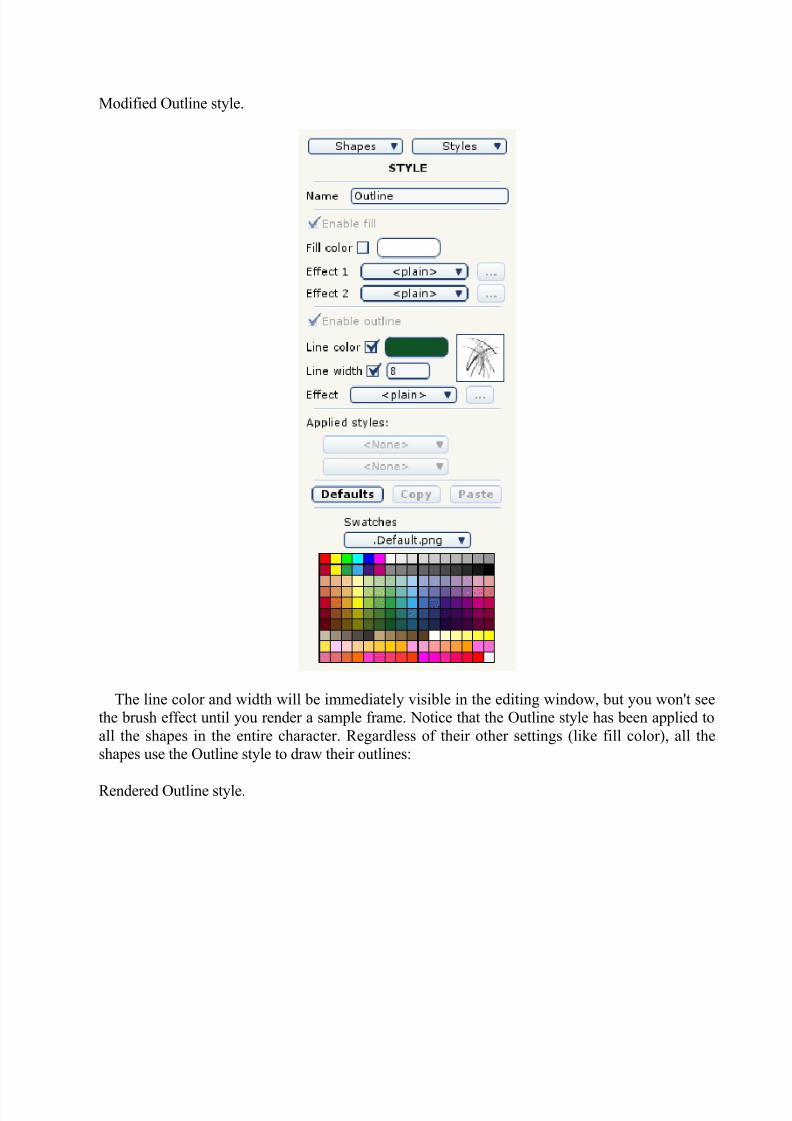
Let's try a style that does control the properties of a line. Select the Outline style from the Styles popup menu in the Style window. Notice that this style does define a line color and width, but does
not define a fill color. Try modifying the line color and width to those shown below, and assign a brush to the line:
8/2/2019 01 - manual de Moho (introducción y básicos)
http://slidepdf.com/reader/full/01-manual-de-moho-introduccion-y-basicos 65/79
Modified Outline style.
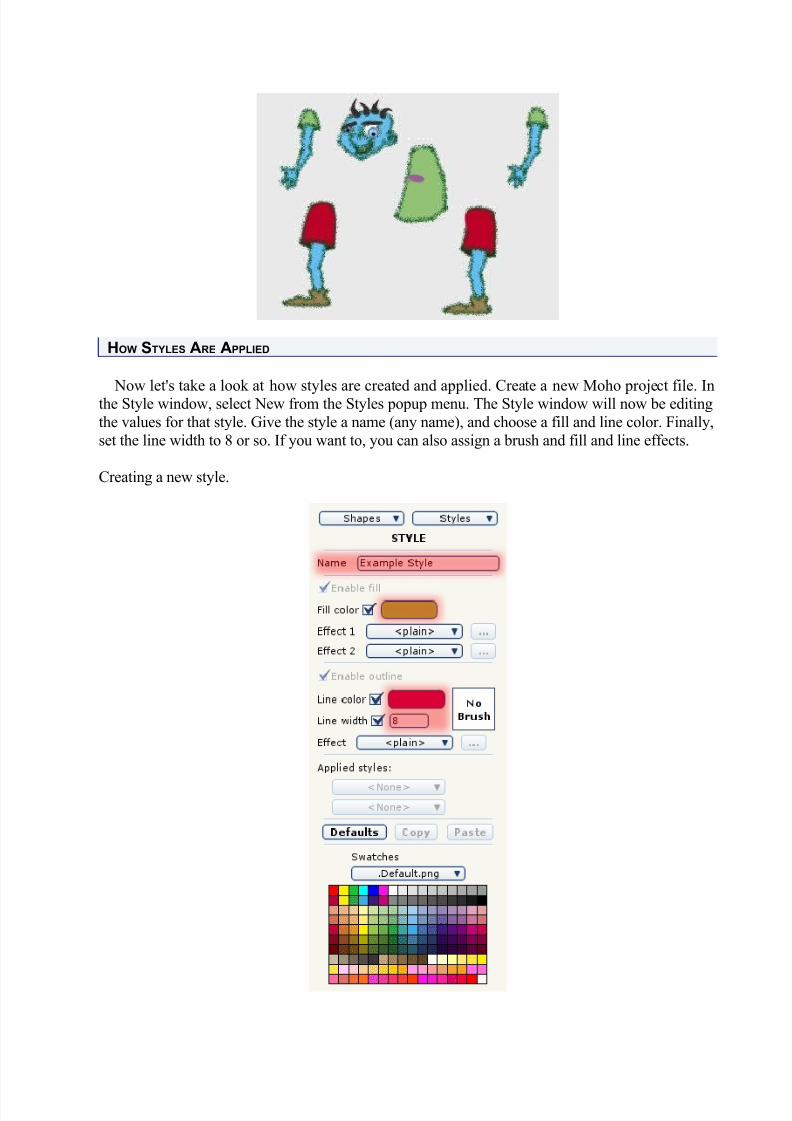
The line color and width will be immediately visible in the editing window, but you won't seethe brush effect until you render a sample frame. Notice that the Outline style has been applied toall the shapes in the entire character. Regardless of their other settings (like fill color), all theshapes use the Outline style to draw their outlines:
Rendered Outline style.
8/2/2019 01 - manual de Moho (introducción y básicos)
http://slidepdf.com/reader/full/01-manual-de-moho-introduccion-y-basicos 66/79
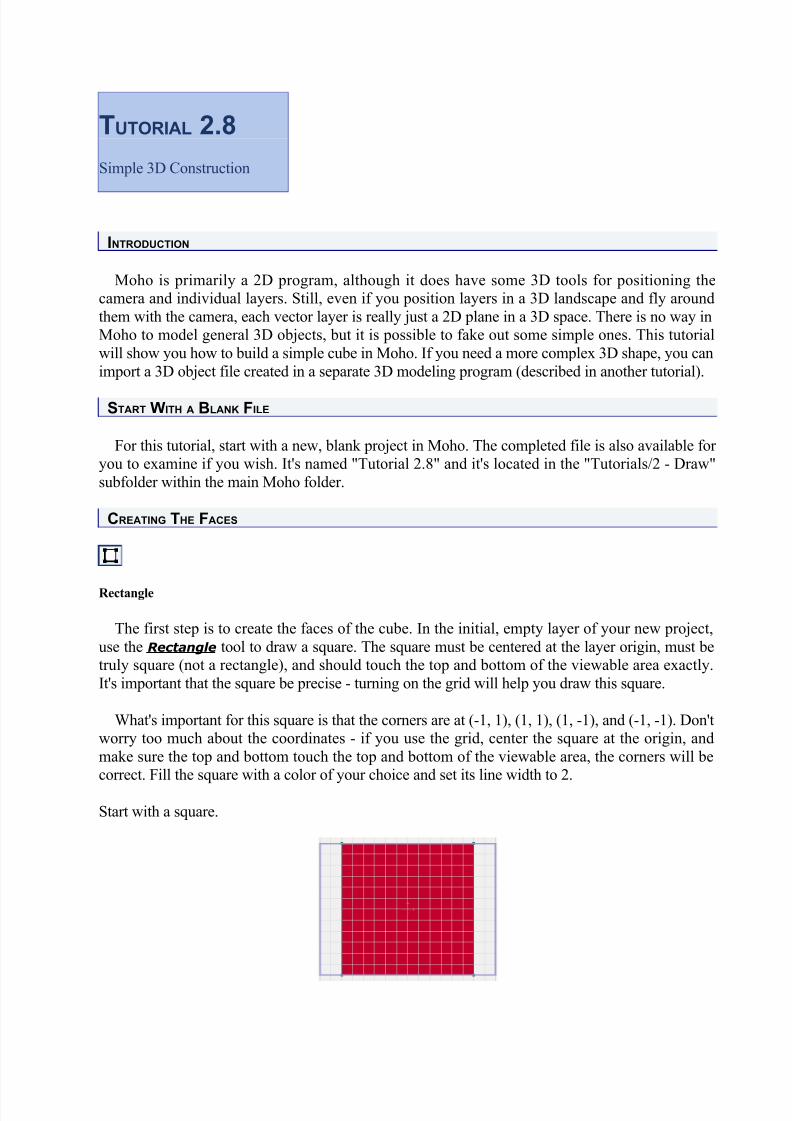
HOW STYLES ARE APPLIED
Now let's take a look at how styles are created and applied. Create a new Moho project file. Inthe Style window, select New from the Styles popup menu. The Style window will now be editingthe values for that style. Give the style a name (any name), and choose a fill and line color. Finally,set the line width to 8 or so. If you want to, you can also assign a brush and fill and line effects.
Creating a new style.

8/2/2019 01 - manual de Moho (introducción y básicos)
http://slidepdf.com/reader/full/01-manual-de-moho-introduccion-y-basicos 67/79
Next, create a simple shape in the main window - a circle, rectangle, or text object would befine. Make sure that the shape is filled. At this point, the shape should have the default fill and linecolor, which are usually white and black:
Create a simple shape.
Select Shape
Now use the Select Shape tool to click on your new shape to select it. The Style window willupdate itself to show you the properties of your shape. In the "Applied styles" section of the Stylewindow, select your style from the first popup menu. This tells Moho to apply that style to thecurrently selected shape - you should see the properties of your style applied immediately inMoho's editing view.
Applying a style to a shape.
That's it! As you've seen, it's quite easy to create and apply styles in Moho.
8/2/2019 01 - manual de Moho (introducción y básicos)
http://slidepdf.com/reader/full/01-manual-de-moho-introduccion-y-basicos 68/79
TUTORIAL 2.8
Simple 3D Construction
INTRODUCTION
Moho is primarily a 2D program, although it does have some 3D tools for positioning thecamera and individual layers. Still, even if you position layers in a 3D landscape and fly aroundthem with the camera, each vector layer is really just a 2D plane in a 3D space. There is no way inMoho to model general 3D objects, but it is possible to fake out some simple ones. This tutorialwill show you how to build a simple cube in Moho. If you need a more complex 3D shape, you canimport a 3D object file created in a separate 3D modeling program (described in another tutorial).
START WITH A BLANK FILE
For this tutorial, start with a new, blank project in Moho. The completed file is also available for you to examine if you wish. It's named "Tutorial 2.8" and it's located in the "Tutorials/2 - Draw"subfolder within the main Moho folder.
CREATING THE FACES
Rectangle
The first step is to create the faces of the cube. In the initial, empty layer of your new project,use the Rectangle tool to draw a square. The square must be centered at the layer origin, must betruly square (not a rectangle), and should touch the top and bottom of the viewable area exactly.It's important that the square be precise - turning on the grid will help you draw this square.
What's important for this square is that the corners are at (-1, 1), (1, 1), (1, -1), and (-1, -1). Don'tworry too much about the coordinates - if you use the grid, center the square at the origin, andmake sure the top and bottom touch the top and bottom of the viewable area, the corners will becorrect. Fill the square with a color of your choice and set its line width to 2.
Start with a square.
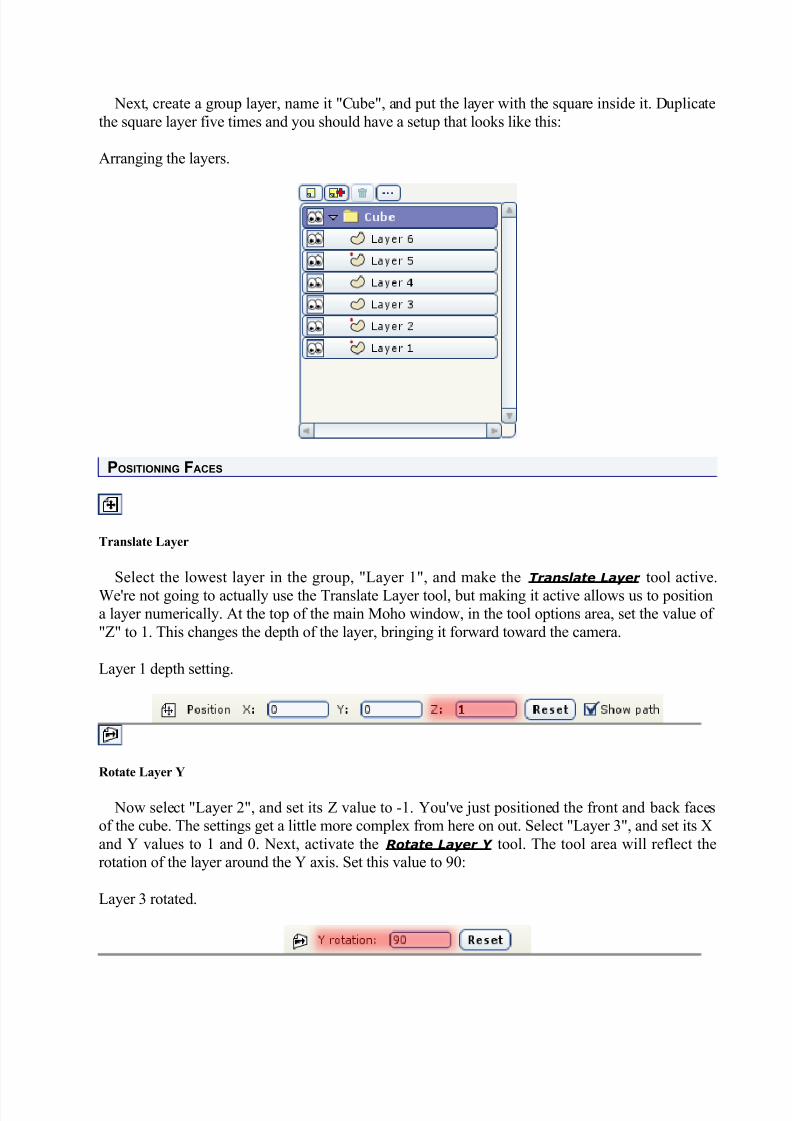
8/2/2019 01 - manual de Moho (introducción y básicos)
http://slidepdf.com/reader/full/01-manual-de-moho-introduccion-y-basicos 69/79
Next, create a group layer, name it "Cube", and put the layer with the square inside it. Duplicatethe square layer five times and you should have a setup that looks like this:
Arranging the layers.
POSITIONING FACES
Translate Layer
Select the lowest layer in the group, "Layer 1", and make the Translate Layer tool active.We're not going to actually use the Translate Layer tool, but making it active allows us to positiona layer numerically. At the top of the main Moho window, in the tool options area, set the value of "Z" to 1. This changes the depth of the layer, bringing it forward toward the camera.
Layer 1 depth setting.
Rotate Layer Y
Now select "Layer 2", and set its Z value to -1. You've just positioned the front and back facesof the cube. The settings get a little more complex from here on out. Select "Layer 3", and set its Xand Y values to 1 and 0. Next, activate the Rotate Layer Y tool. The tool area will reflect therotation of the layer around the Y axis. Set this value to 90:
Layer 3 rotated.
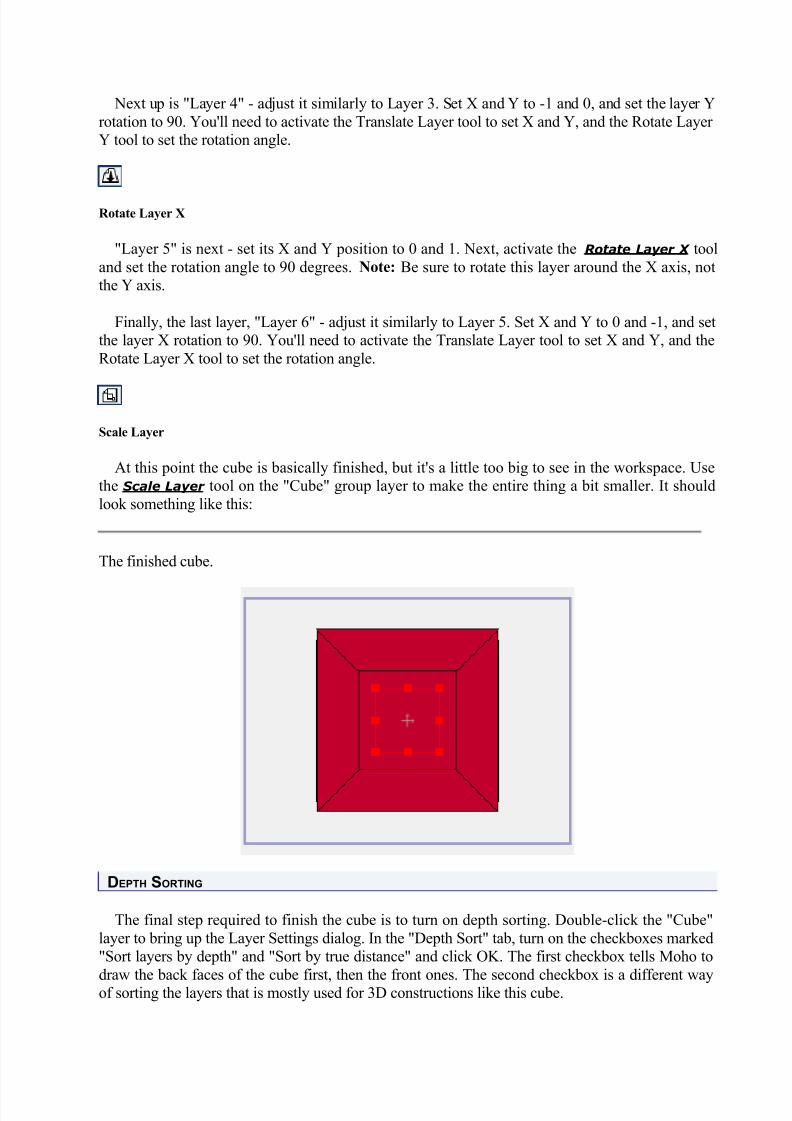
8/2/2019 01 - manual de Moho (introducción y básicos)
http://slidepdf.com/reader/full/01-manual-de-moho-introduccion-y-basicos 70/79
Next up is "Layer 4" - adjust it similarly to Layer 3. Set X and Y to -1 and 0, and set the layer Yrotation to 90. You'll need to activate the Translate Layer tool to set X and Y, and the Rotate Layer Y tool to set the rotation angle.
Rotate Layer X
"Layer 5" is next - set its X and Y position to 0 and 1. Next, activate the Rotate Layer X tooland set the rotation angle to 90 degrees. Note: Be sure to rotate this layer around the X axis, notthe Y axis.
Finally, the last layer, "Layer 6" - adjust it similarly to Layer 5. Set X and Y to 0 and -1, and setthe layer X rotation to 90. You'll need to activate the Translate Layer tool to set X and Y, and theRotate Layer X tool to set the rotation angle.
Scale Layer
At this point the cube is basically finished, but it's a little too big to see in the workspace. Usethe Scale Layer tool on the "Cube" group layer to make the entire thing a bit smaller. It shouldlook something like this:
The finished cube.
DEPTH SORTING
The final step required to finish the cube is to turn on depth sorting. Double-click the "Cube"layer to bring up the Layer Settings dialog. In the "Depth Sort" tab, turn on the checkboxes marked"Sort layers by depth" and "Sort by true distance" and click OK. The first checkbox tells Moho to
draw the back faces of the cube first, then the front ones. The second checkbox is a different wayof sorting the layers that is mostly used for 3D constructions like this cube.

8/2/2019 01 - manual de Moho (introducción y básicos)
http://slidepdf.com/reader/full/01-manual-de-moho-introduccion-y-basicos 71/79
Orbit Workspace
Try using the Orbit Workspace tool to view the cube from different angles. It should appear as
a true 3D object. You could now use the cube in a scene - using the Translate Layer and RotateLayer tools to position it at an interesting angle, or to move it around during the animation.
The finished cube, with depth sorting.
TUTORIAL 3.1Bone binding
INTRODUCTION
The purpose of bones in Moho is to provide high-level objects that are easy to manipulate in place of moving around lots of individual points. In order for bones to do their job, vector control
points and other objects must first be bound to the bones. There are three ways to bind objects to bones: automatic binding, manual binding, and layer binding. This tutorial will show you thedifference between the three.
START WITH A SAMPLE FILE
For this tutorial, we'll start with a project file that contains some artwork to get started with. It'snamed "Tutorial 3.1" and it's located in the "Tutorials/3 - Bones" subfolder within the main Mohofolder. Open this file in Moho, and you should see something like this:
Starting point for this tutorial.
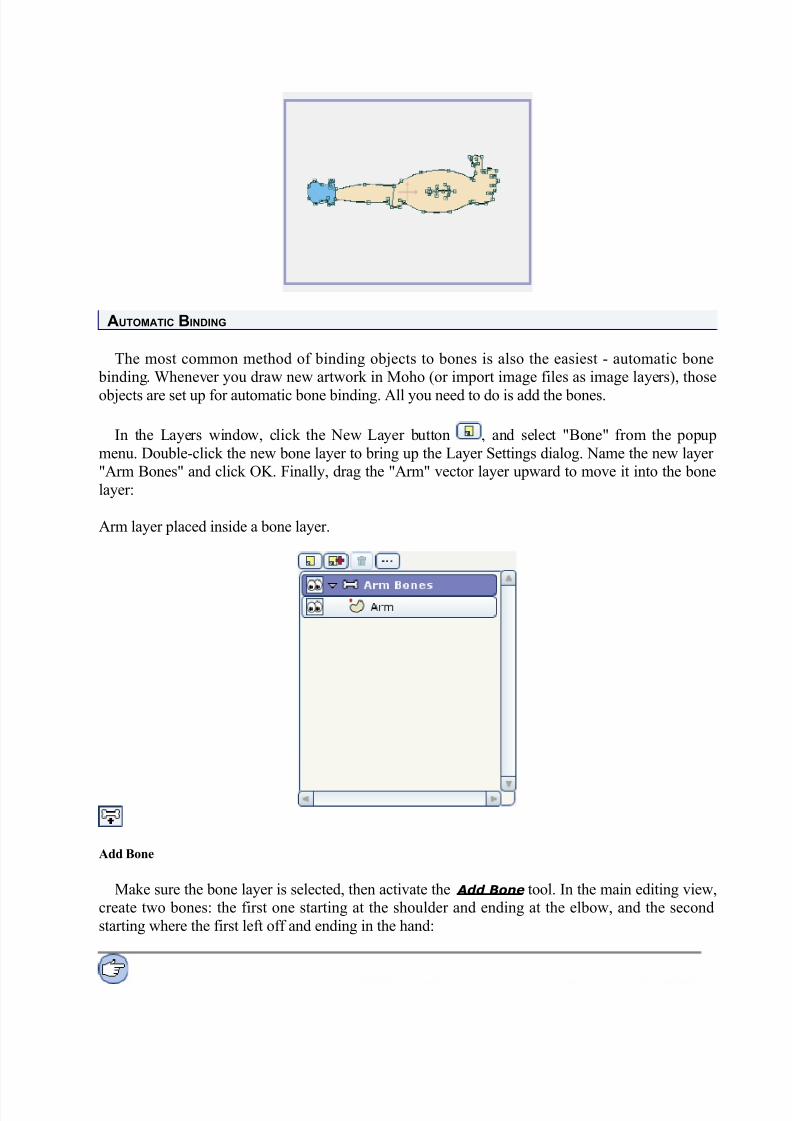
8/2/2019 01 - manual de Moho (introducción y básicos)
http://slidepdf.com/reader/full/01-manual-de-moho-introduccion-y-basicos 72/79
AUTOMATIC BINDING
The most common method of binding objects to bones is also the easiest - automatic bone binding. Whenever you draw new artwork in Moho (or import image files as image layers), those
objects are set up for automatic bone binding. All you need to do is add the bones.
In the Layers window, click the New Layer button , and select "Bone" from the popupmenu. Double-click the new bone layer to bring up the Layer Settings dialog. Name the new layer "Arm Bones" and click OK. Finally, drag the "Arm" vector layer upward to move it into the bonelayer:
Arm layer placed inside a bone layer.
Add Bone
Make sure the bone layer is selected, then activate the Add Bone tool. In the main editing view,create two bones: the first one starting at the shoulder and ending at the elbow, and the secondstarting where the first left off and ending in the hand:
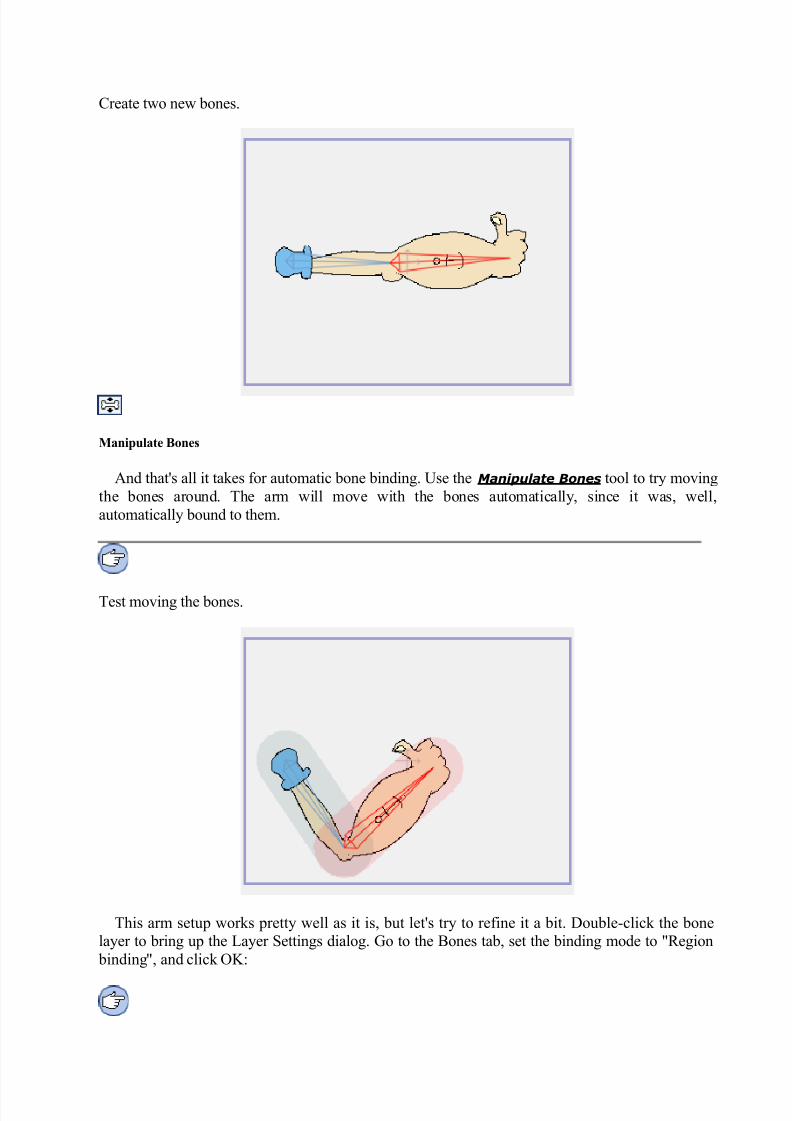
8/2/2019 01 - manual de Moho (introducción y básicos)
http://slidepdf.com/reader/full/01-manual-de-moho-introduccion-y-basicos 73/79
Create two new bones.
Manipulate Bones
And that's all it takes for automatic bone binding. Use the Manipulate Bones tool to try movingthe bones around. The arm will move with the bones automatically, since it was, well,automatically bound to them.
Test moving the bones.
This arm setup works pretty well as it is, but let's try to refine it a bit. Double-click the bonelayer to bring up the Layer Settings dialog. Go to the Bones tab, set the binding mode to "Region
binding", and click OK:
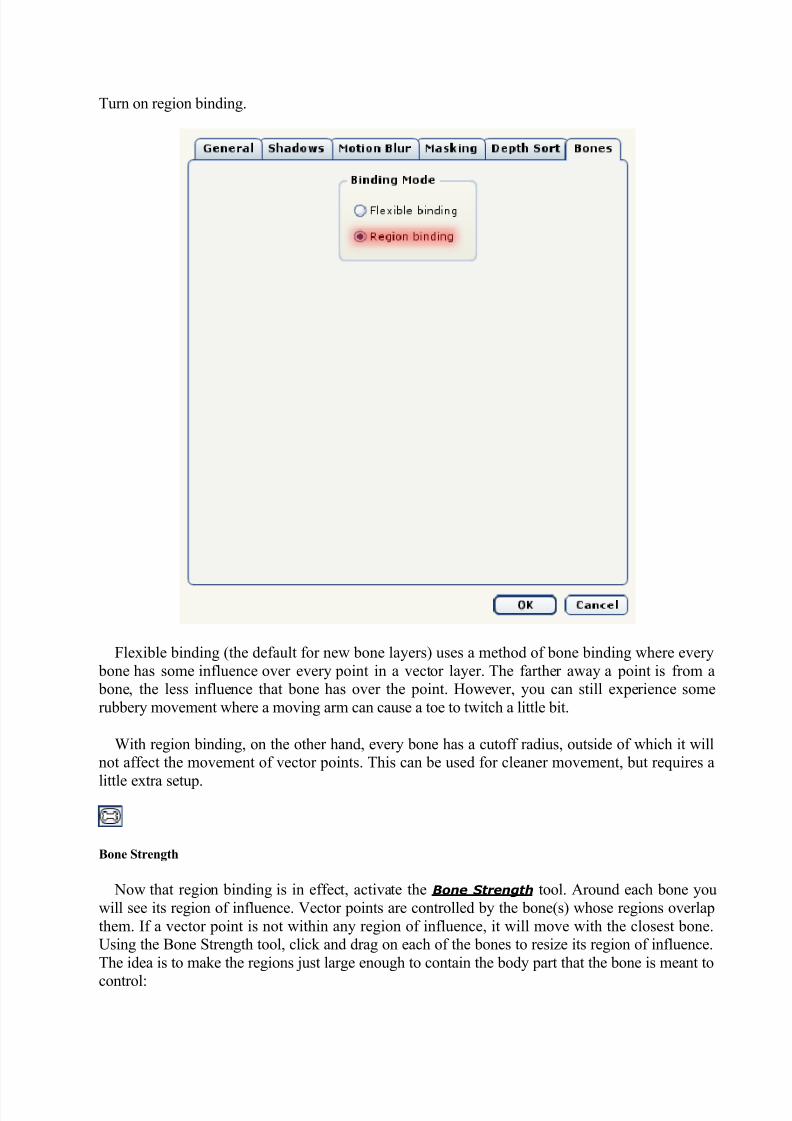
8/2/2019 01 - manual de Moho (introducción y básicos)
http://slidepdf.com/reader/full/01-manual-de-moho-introduccion-y-basicos 74/79
Turn on region binding.
Flexible binding (the default for new bone layers) uses a method of bone binding where every bone has some influence over every point in a vector layer. The farther away a point is from a bone, the less influence that bone has over the point. However, you can still experience somerubbery movement where a moving arm can cause a toe to twitch a little bit.
With region binding, on the other hand, every bone has a cutoff radius, outside of which it willnot affect the movement of vector points. This can be used for cleaner movement, but requires a
little extra setup.
Bone Strength
Now that region binding is in effect, activate the Bone Strength tool. Around each bone youwill see its region of influence. Vector points are controlled by the bone(s) whose regions overlapthem. If a vector point is not within any region of influence, it will move with the closest bone.Using the Bone Strength tool, click and drag on each of the bones to resize its region of influence.The idea is to make the regions just large enough to contain the body part that the bone is meant to
control:
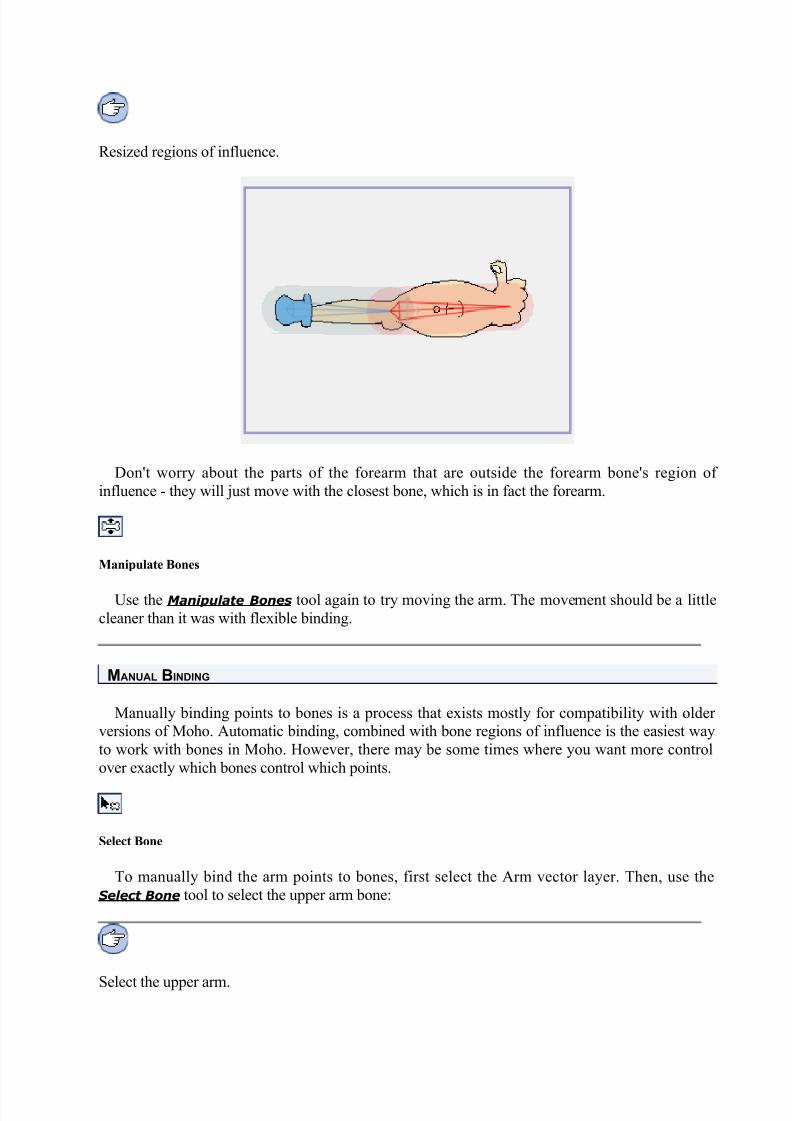
8/2/2019 01 - manual de Moho (introducción y básicos)
http://slidepdf.com/reader/full/01-manual-de-moho-introduccion-y-basicos 75/79
Resized regions of influence.
Don't worry about the parts of the forearm that are outside the forearm bone's region of influence - they will just move with the closest bone, which is in fact the forearm.
Manipulate Bones
Use the Manipulate Bones tool again to try moving the arm. The movement should be a littlecleaner than it was with flexible binding.
MANUAL BINDING
Manually binding points to bones is a process that exists mostly for compatibility with older versions of Moho. Automatic binding, combined with bone regions of influence is the easiest wayto work with bones in Moho. However, there may be some times where you want more controlover exactly which bones control which points.
Select Bone
To manually bind the arm points to bones, first select the Arm vector layer. Then, use theSelect Bone tool to select the upper arm bone:
Select the upper arm.
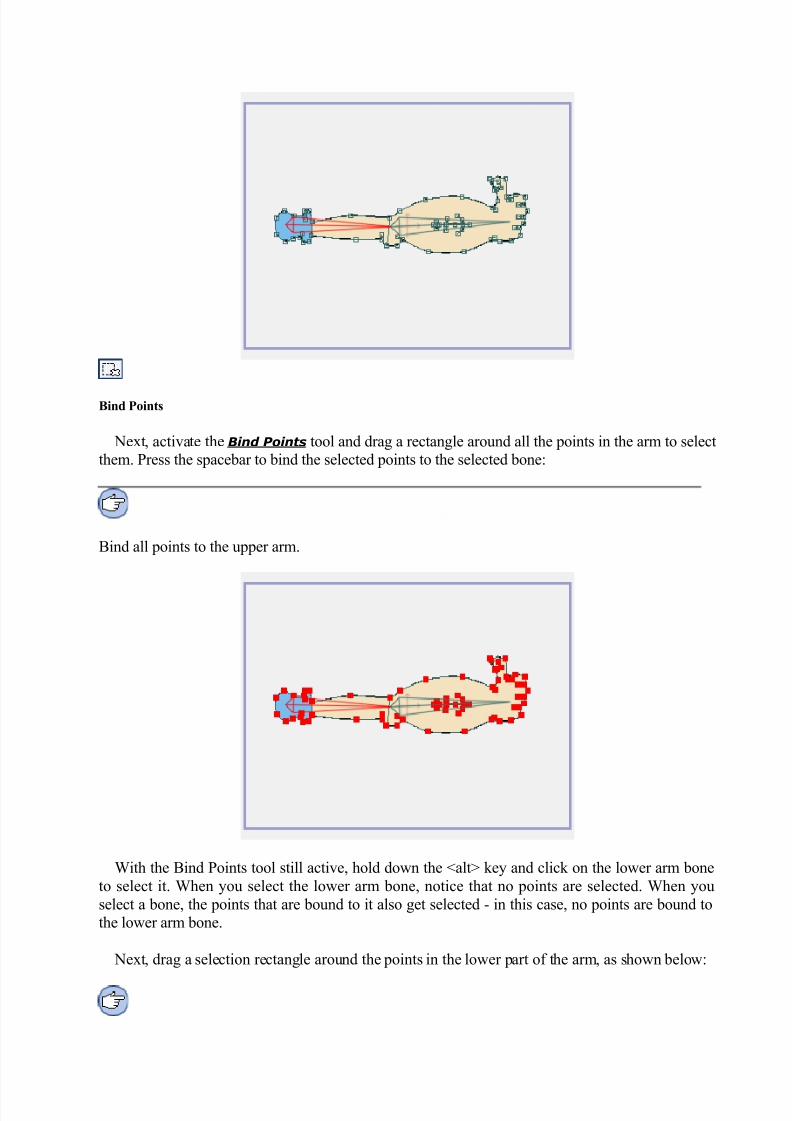
8/2/2019 01 - manual de Moho (introducción y básicos)
http://slidepdf.com/reader/full/01-manual-de-moho-introduccion-y-basicos 76/79
Bind Points
Next, activate the Bind Points tool and drag a rectangle around all the points in the arm to selectthem. Press the spacebar to bind the selected points to the selected bone:
Bind all points to the upper arm.
With the Bind Points tool still active, hold down the <alt> key and click on the lower arm boneto select it. When you select the lower arm bone, notice that no points are selected. When youselect a bone, the points that are bound to it also get selected - in this case, no points are bound tothe lower arm bone.
Next, drag a selection rectangle around the points in the lower part of the arm, as shown below:
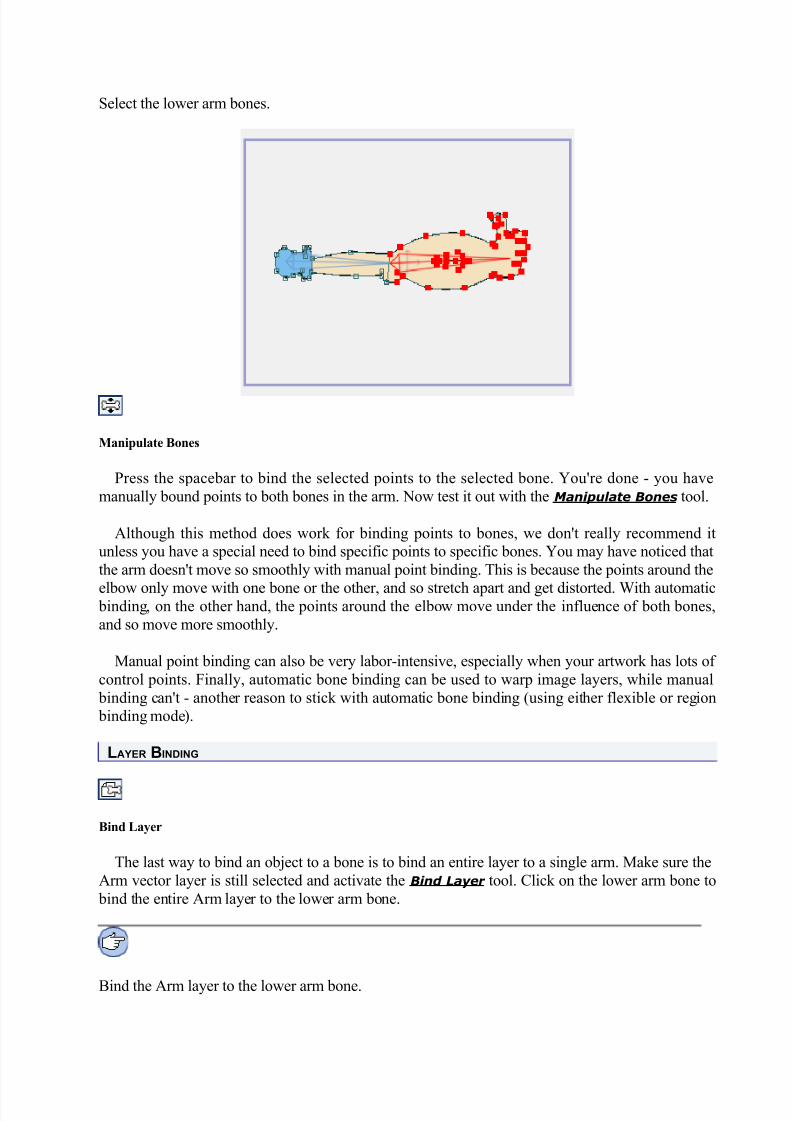
8/2/2019 01 - manual de Moho (introducción y básicos)
http://slidepdf.com/reader/full/01-manual-de-moho-introduccion-y-basicos 77/79
Select the lower arm bones.
Manipulate Bones
Press the spacebar to bind the selected points to the selected bone. You're done - you havemanually bound points to both bones in the arm. Now test it out with the Manipulate Bones tool.
Although this method does work for binding points to bones, we don't really recommend itunless you have a special need to bind specific points to specific bones. You may have noticed thatthe arm doesn't move so smoothly with manual point binding. This is because the points around the
elbow only move with one bone or the other, and so stretch apart and get distorted. With automatic binding, on the other hand, the points around the elbow move under the influence of both bones,and so move more smoothly.
Manual point binding can also be very labor-intensive, especially when your artwork has lots of control points. Finally, automatic bone binding can be used to warp image layers, while manual
binding can't - another reason to stick with automatic bone binding (using either flexible or region binding mode).
LAYER BINDING
Bind Layer
The last way to bind an object to a bone is to bind an entire layer to a single arm. Make sure theArm vector layer is still selected and activate the Bind Layer tool. Click on the lower arm bone to
bind the entire Arm layer to the lower arm bone.
Bind the Arm layer to the lower arm bone.
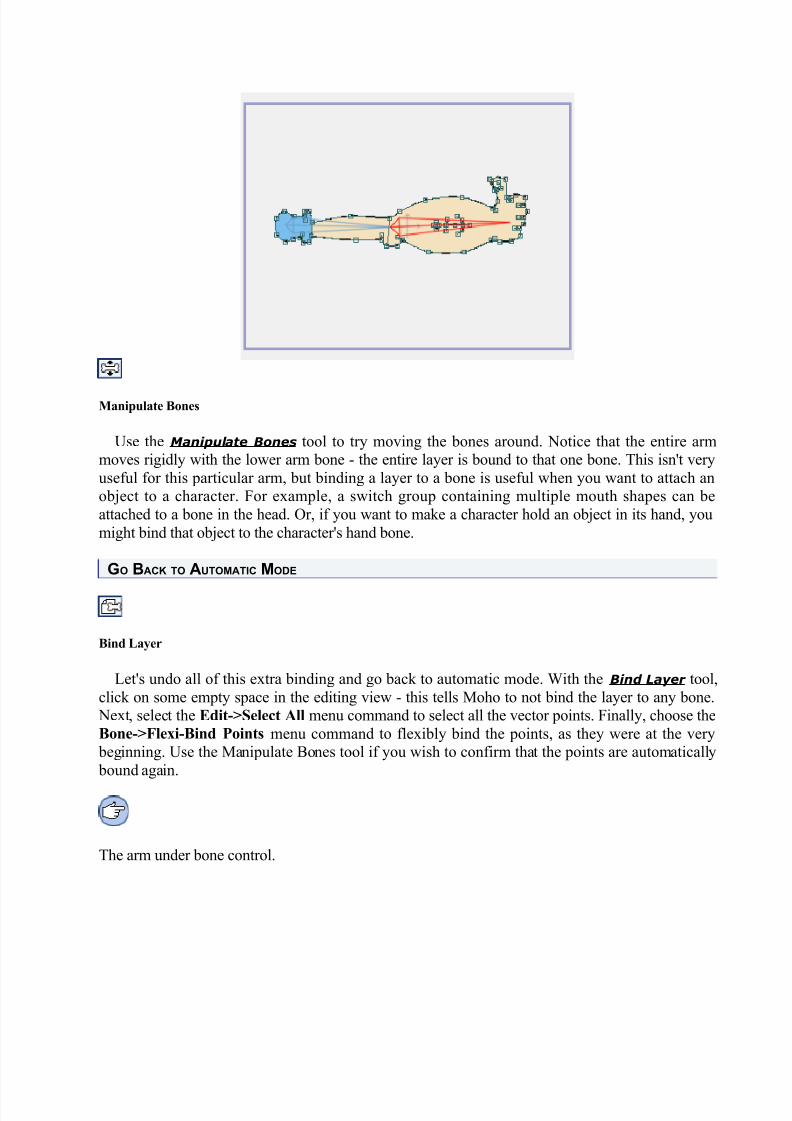
8/2/2019 01 - manual de Moho (introducción y básicos)
http://slidepdf.com/reader/full/01-manual-de-moho-introduccion-y-basicos 78/79
Manipulate Bones
Use the Manipulate Bones tool to try moving the bones around. Notice that the entire armmoves rigidly with the lower arm bone - the entire layer is bound to that one bone. This isn't veryuseful for this particular arm, but binding a layer to a bone is useful when you want to attach anobject to a character. For example, a switch group containing multiple mouth shapes can beattached to a bone in the head. Or, if you want to make a character hold an object in its hand, youmight bind that object to the character's hand bone.
GO BACK TO AUTOMATIC MODE
Bind Layer
Let's undo all of this extra binding and go back to automatic mode. With the Bind Layer tool,click on some empty space in the editing view - this tells Moho to not bind the layer to any bone.
Next, select the Edit->Select All menu command to select all the vector points. Finally, choose theBone->Flexi-Bind Points menu command to flexibly bind the points, as they were at the very
beginning. Use the Manipulate Bones tool if you wish to confirm that the points are automatically bound again.
The arm under bone control.

8/2/2019 01 - manual de Moho (introducción y básicos)
http://slidepdf.com/reader/full/01-manual-de-moho-introduccion-y-basicos 79/79