Embed Size (px)
Citation preview
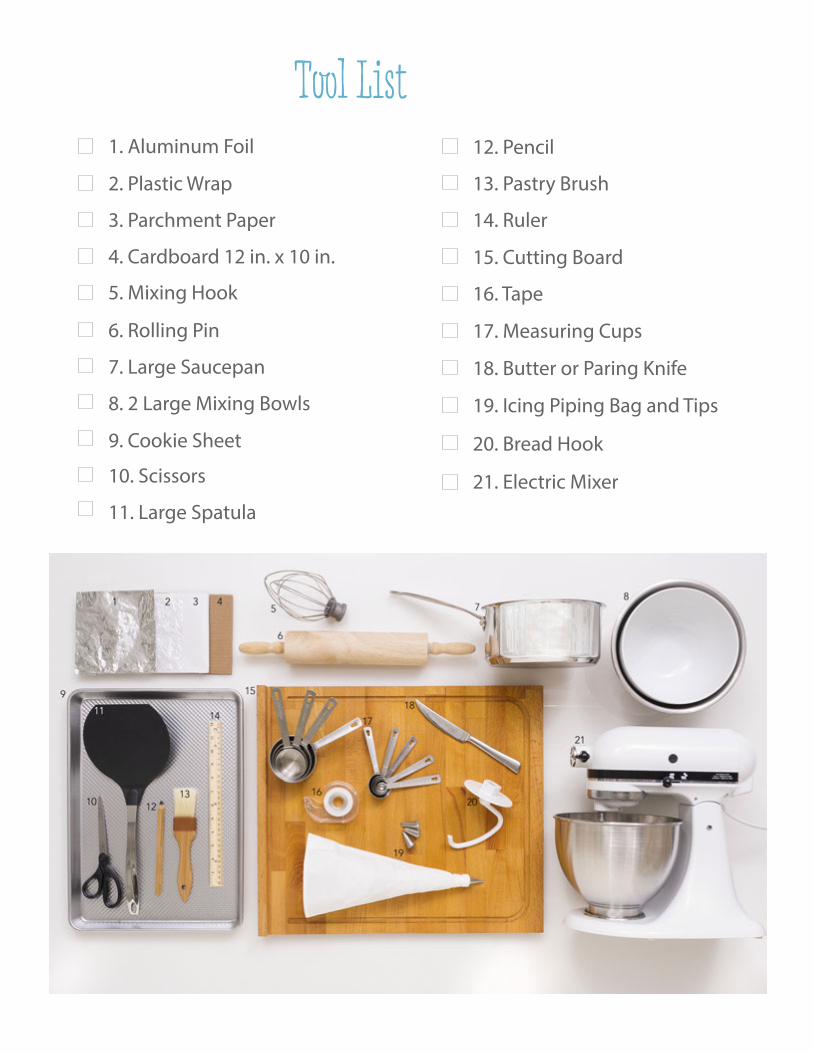
3. Parchment Paper
2. Plastic Wrap
1. Aluminum Foil
4. Cardboard 12 in. x 10 in.
6. Rolling Pin
7. Large Saucepan
8. 2 Large Mixing Bowls
9. Cookie Sheet
10. Scissors
11. Large Spatula
12. Pencil
13. Pastry Brush
14. Ruler
15. Cutting Board
16. Tape
17. Measuring Cups
18. Butter or Paring Knife
21. Electric Mixer
19. Icing Piping Bag and Tips
5. Mixing Hook
20. Bread Hook
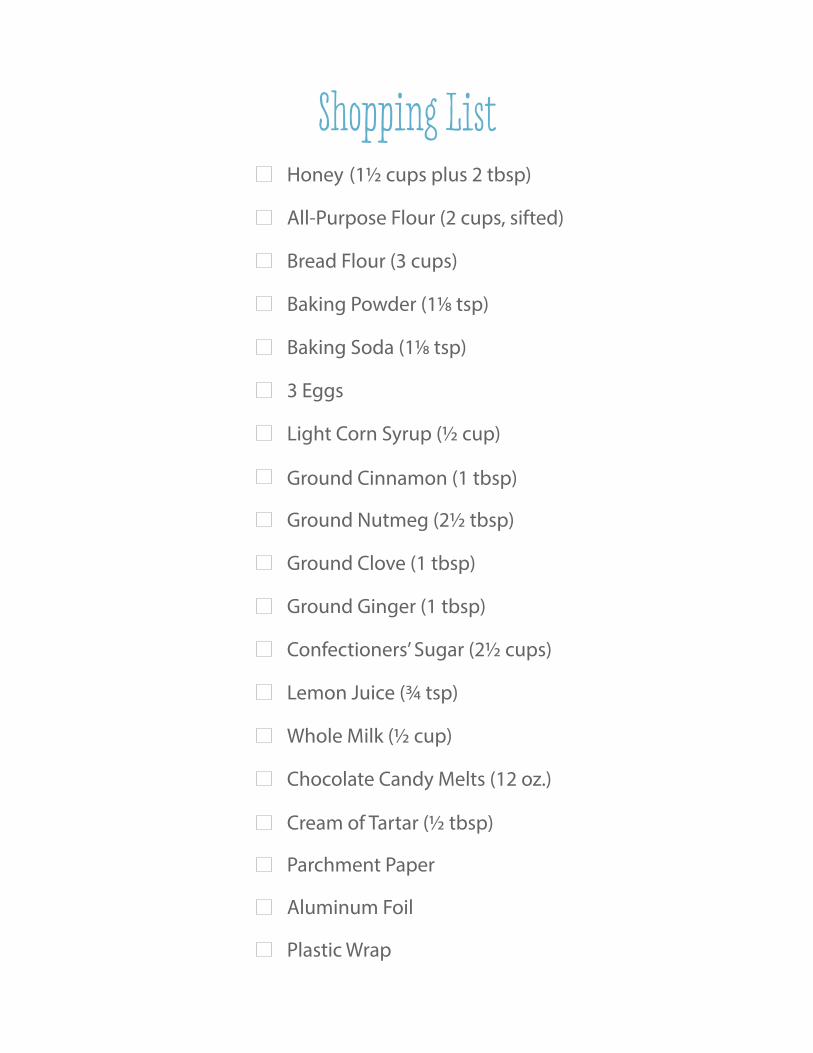
Cream of Tartar (½ tbsp)
All-Purpose Flour (2 cups, sifted)
Honey (1½ cups plus 2 tbsp)
Bread Flour (3 cups)
Baking Powder (11⁄8 tsp)
Baking Soda (11⁄8 tsp)
3 Eggs
Ground Cinnamon (1 tbsp)
Light Corn Syrup (½ cup)
Ground Nutmeg (2½ tbsp)
Ground Clove (1 tbsp)
Ground Ginger (1 tbsp)
Confectioners’ Sugar (2½ cups)
Lemon Juice (¾ tsp)
Whole Milk (½ cup)
Chocolate Candy Melts (12 oz.)
Parchment Paper
Aluminum Foil
Plastic Wrap
Shopping List
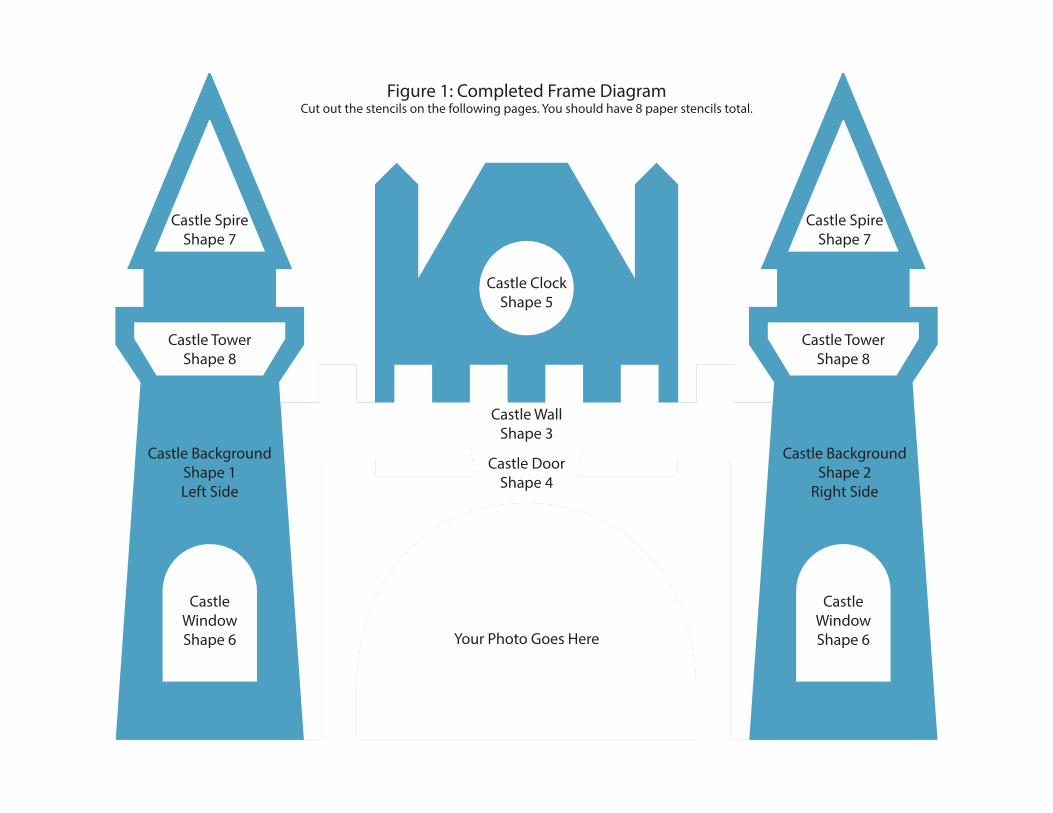
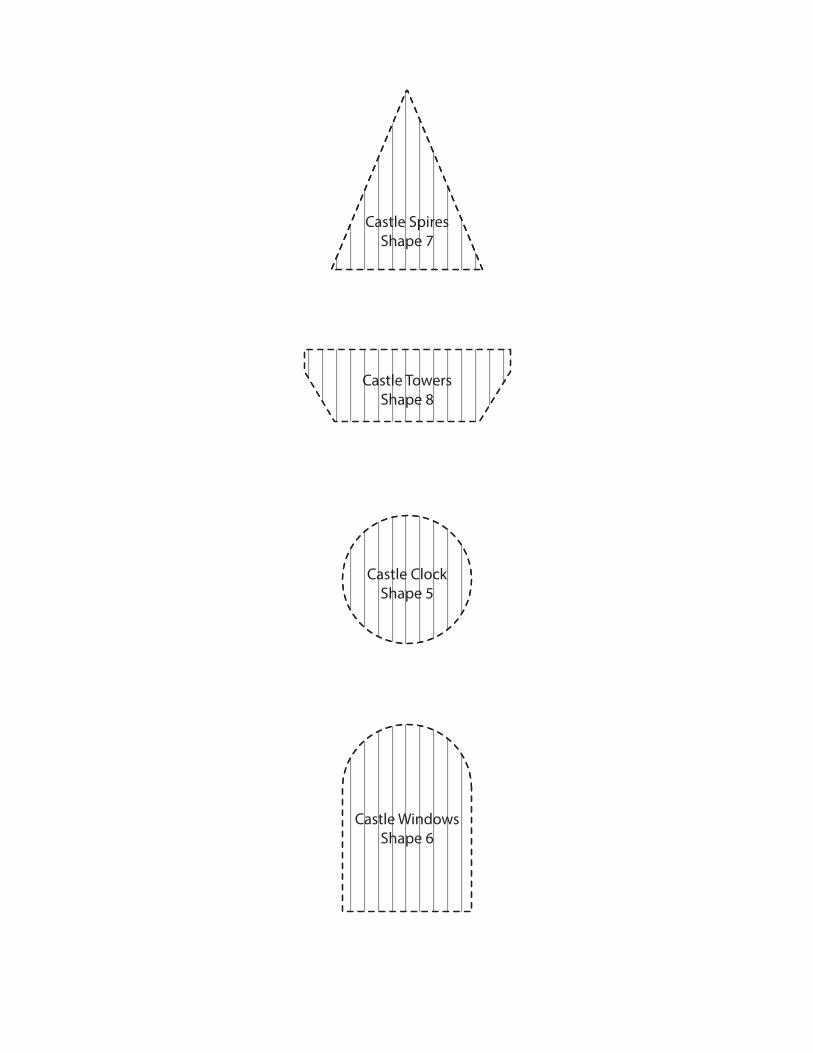
Castle SpireShape 7
Castle SpireShape 7
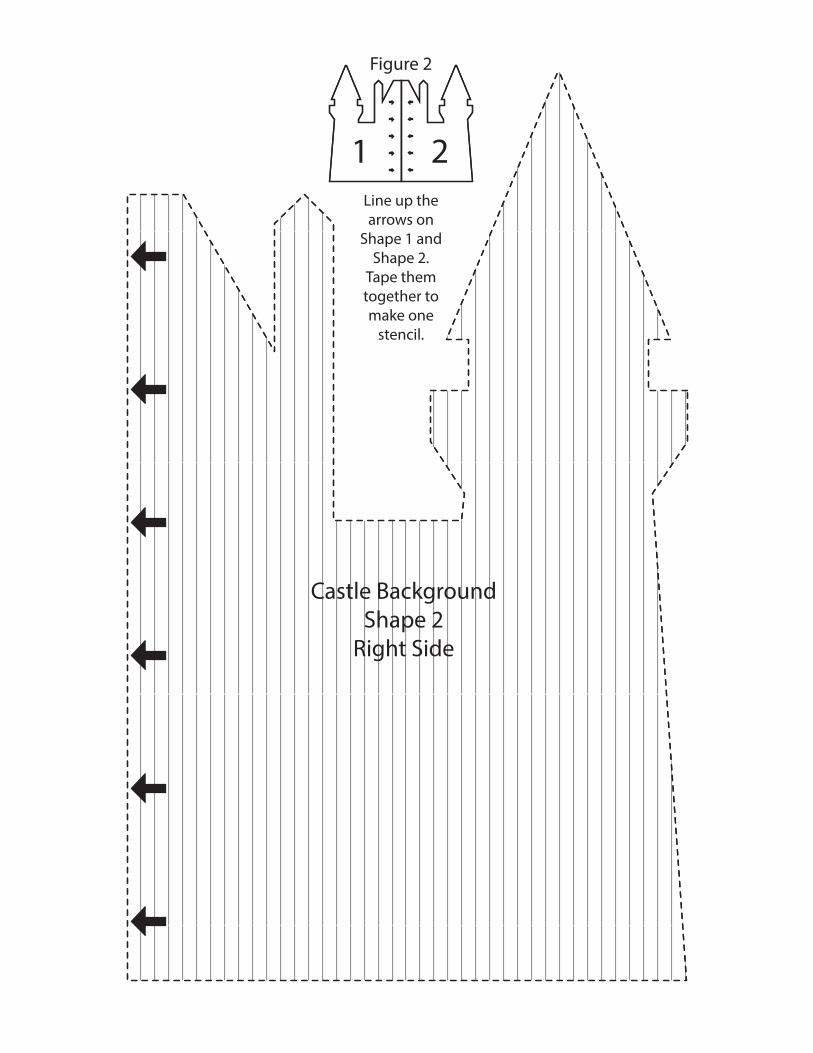
Castle BackgroundShape 2
Right Side
Castle TowerShape 8
Castle TowerShape 8
Castle BackgroundShape 1Left Side
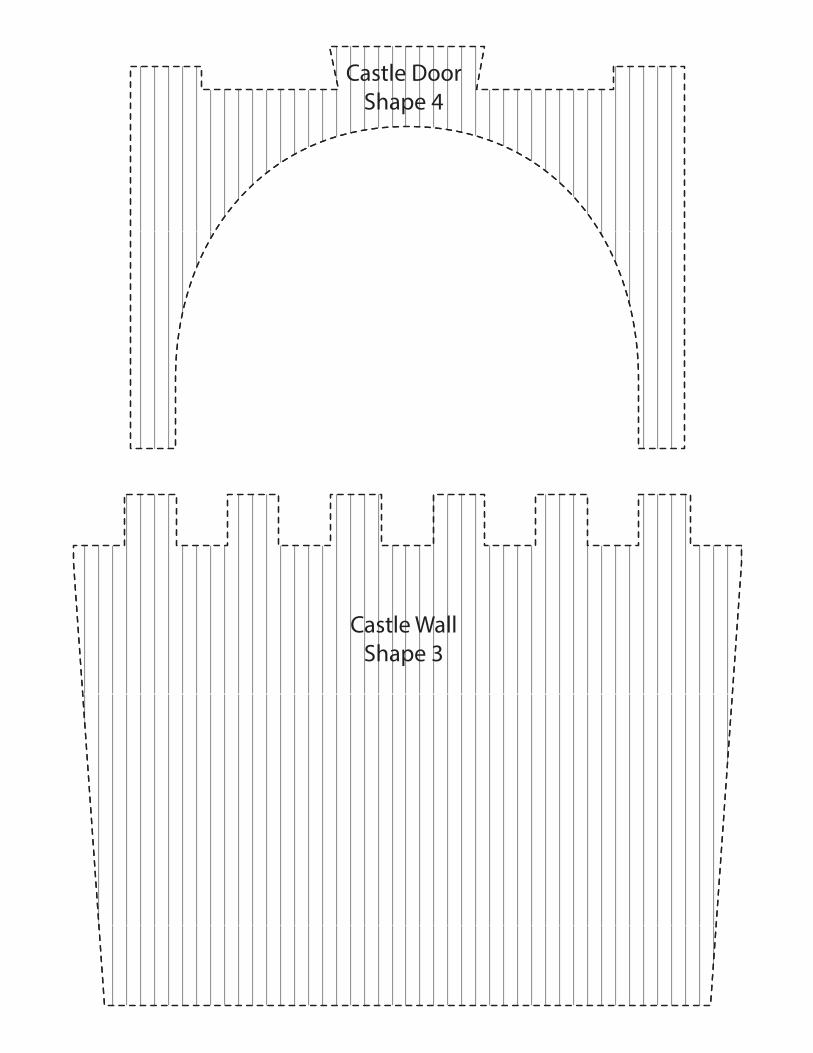
Castle DoorShape 4
Castle WallShape 3
Figure 1: Completed Frame DiagramCut out the stencils on the following pages. You should have 8 paper stencils total.
Castle ClockShape 5
CastleWindowShape 6
CastleWindowShape 6Your Photo Goes Here
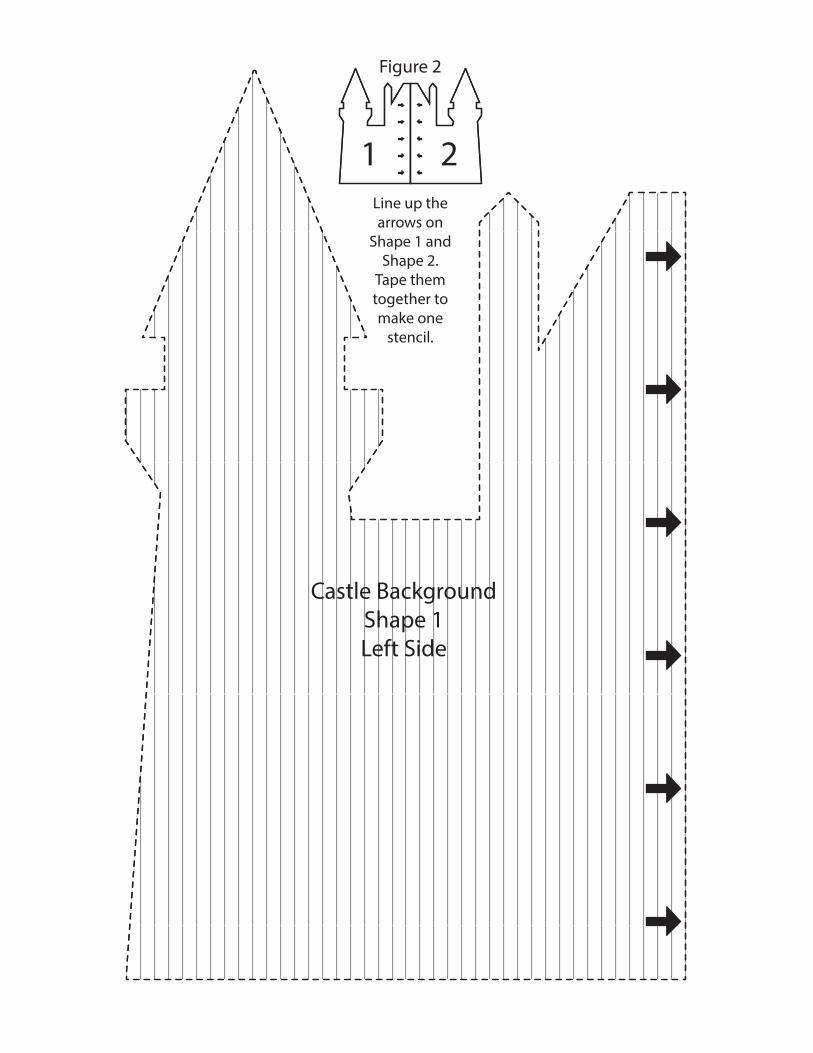
Castle BackgroundShape 1Left Side
Line up thearrows on
Shape 1 andShape 2.
Tape themtogether tomake one
stencil.
1 2
Figure 2
Castle BackgroundShape 2
Right Side
Line up thearrows on
Shape 1 andShape 2.
Tape themtogether tomake one
stencil.
1 2
Figure 2
Castle WallShape 3
Castle DoorShape 4
Castle ClockShape 5
Castle WindowsShape 6
Castle SpiresShape 7
Castle TowersShape 8
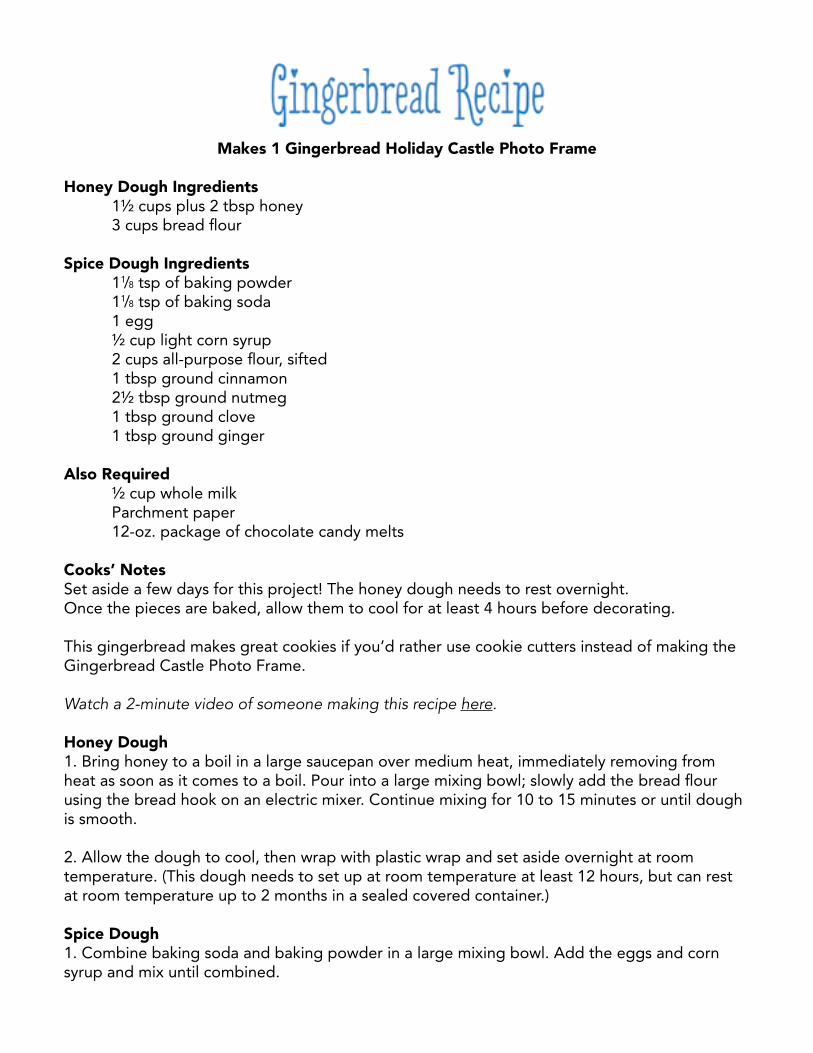
Makes 1 Gingerbread Holiday Castle Photo Frame
Honey Dough Ingredients 1½ cups plus 2 tbsp honey 3 cups bread flour
Spice Dough Ingredients 11/8 tsp of baking powder 11/8 tsp of baking soda 1 egg ½ cup light corn syrup 2 cups all-purpose flour, sifted 1 tbsp ground cinnamon 2½ tbsp ground nutmeg 1 tbsp ground clove 1 tbsp ground ginger
Also Required ½ cup whole milk Parchment paper 12-oz. package of chocolate candy melts
Cooks’ Notes Set aside a few days for this project! The honey dough needs to rest overnight. Once the pieces are baked, allow them to cool for at least 4 hours before decorating.
This gingerbread makes great cookies if you’d rather use cookie cutters instead of making the Gingerbread Castle Photo Frame.
Watch a 2-minute video of someone making this recipe here. Honey Dough1. Bring honey to a boil in a large saucepan over medium heat, immediately removing from heat as soon as it comes to a boil. Pour into a large mixing bowl; slowly add the bread flour using the bread hook on an electric mixer. Continue mixing for 10 to 15 minutes or until dough is smooth.
2. Allow the dough to cool, then wrap with plastic wrap and set aside overnight at room temperature. (This dough needs to set up at room temperature at least 12 hours, but can rest at room temperature up to 2 months in a sealed covered container.)
Spice Dough1. Combine baking soda and baking powder in a large mixing bowl. Add the eggs and corn syrup and mix until combined.
2. In a separate large bowl, sift the flour, cinnamon, nutmeg, clove and ginger. Gradually add the flour mixture to the wet mixture using the bread hook on an electric mixer just until flour is incorporated. The dough will become very stiff; do not overmix.
3. Cut the honey dough into three portions and add into the spice dough one portion at a time, blending well. Then knead the mixture by hand in a fold-and-press motion on a lightly floured work surface. (This is time-consuming, but it is important so that pieces cook evenly.)
Baking1. Preheat oven to 350°F.
2. Lightly flour work surface; work with one portion at a time. Using a rolling pin, roll the dough out in a square, not a circle, until about ¼ inch thick. While rolling, flour the work surface and rolling pin as needed so the dough doesn’t stick.
3. Cut out the stencils from frame_stencil.pdf. • Cut 1 Castle Background (Shape 1, left side)• Cut 1 Castle Background (Shape 2, right side) Tape Shape 1 and Shape 2 together.• Cut 1 Castle Wall (Shape 3)• Cut 1 Castle Door (Shape 4)• Cut 1 Castle Clock (Shape 5)• Cut 2 Castle Windows (Shape 6)• Cut 2 Castle Spires (Shape 7)• Cut 2 Castle Towers (Shape 8)
Use these stencils to cut the same shapes from the rolled-out gingerbread dough.
Helpful Tips:You should end up with 10 total gingerbread pieces (2 Castle Windows, Spiresand Towers).
Shape 1 and 2 combine to make one gingerbread piece. (You can also use the paperstencil of Shape 1 and 2 combined to cut out a cardboard backing.)
You can use a paring knife, utility blade or even a butter knife for cutting the gingerbread.Simply add flour to the knife and counter to prevent it from sticking.
A small ruler will help you steady your hand for straight lines. Several little cuts (scores) are better than one cut with a lot of pressure.
4. Transfer the shapes to a greased cookie sheet (also covered with parchment paper if possible) using a large floured spatula, placing them 1 inch apart. Similar-size shapes will cook at the same speed, so load your cookie sheets with similar-size pieces for best results. To make the gingerbread cook with a shiny finish, lightly brush the dough with milk before baking.
5. Bake until firm to the touch in the center and the edges begin to darken, 10 to 14 minutes. If the dough begins to bubble, pierce it with a toothpick to let the air out, then carefully smooth the surface. Allow to completely cool on the cookie sheet.
6. Be creative! Reroll scraps to make additional cookies or decorations like bricks, etc. Roll out an extra square if you want to create a square base to place your frame on. Cookie cutters work well to make extra decorations.
Tempering Chocolate (optional step)After baking the gingerbread and after it has cooled, brush the back of each gingerbread piece liberally with melted chocolate candy coating using a pastry brush. This adds rigidity to the gingerbread to assist it in standing up, and enhances the taste. The chocolate, along with the gingerbread and royal icing that you’ll make later, form a delicious taste combination. Allow the chocolate to completely cool and harden before beginning assembly.
1. Place chocolate chips in a microwavable icing piping bag. The more you use, the easier it will be to temper and maintain the temper.
2. Heat on a low heat. Don’t overheat the chocolate. Stop the microwave just after 2/3 of your chocolate is melted.
3. Take out of microwave and gently massage chocolate to allow the heated chocolate to melt the last few pieces. To continue using the melted chocolate, it’s important to keep it warm, but not hot. Stir or massage by hand in piping bag to maintain a uniform temperature.
This recipe has been converted from a larger quantity in the restaurant kitchens. The flavor profile may vary from the restaurant’s version. All recipes are the property of Walt Disney Parks and Resorts U.S., Inc., and may not be reproduced without express permission.
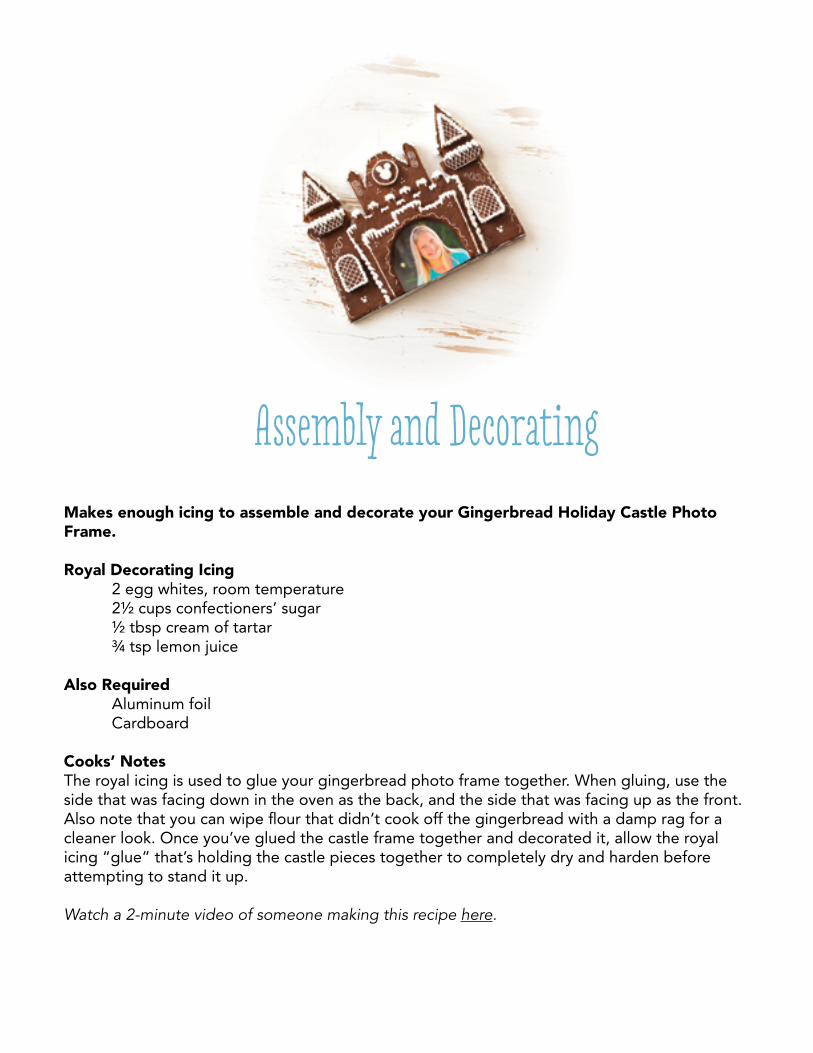
Makes enough icing to assemble and decorate your Gingerbread Holiday Castle Photo Frame.
Royal Decorating Icing 2 egg whites, room temperature 2½ cups confectioners’ sugar ½ tbsp cream of tartar ¾ tsp lemon juice
Also Required Aluminum foil Cardboard
Cooks’ Notes The royal icing is used to glue your gingerbread photo frame together. When gluing, use the side that was facing down in the oven as the back, and the side that was facing up as the front. Also note that you can wipe flour that didn’t cook off the gingerbread with a damp rag for a cleaner look. Once you’ve glued the castle frame together and decorated it, allow the royal icing “glue” that’s holding the castle pieces together to completely dry and harden before attempting to stand it up.
Watch a 2-minute video of someone making this recipe here.
Royal Icing Do not begin to make the icing until the gingerbread house pieces are completely cooled and you are ready to decorate. For the icing, be sure mixing bowl and utensils are free of oil—the smallest trace will keep icing from getting firm.
1. Beat egg whites until light and fluffy (5 to 7 minutes) in a large mixing bowl using an electric mixer on medium speed.
2. Gradually add the confectioners’ sugar and cream of tartar. Add the lemon juice and beat on high for at least 5 to 7 minutes or until mixture forms stiff, glossy peaks. Cover icing with plastic wrap, making sure the wrap touches the icing to keep it from drying out.
Gingerbread House Assembly Once your royal icing is ready, you can begin gluing your castle together. Refer to Figure 1 inthe frame_stencil.pdf you downloaded for a visual reference of shape placement.
1. If you’re going to stand your picture frame upright, we recommend using a cardboard backing (the chocolate alone won’t add enough stability to your frame to support its own weight). Cut and tape together a paper stencil of Shapes 1 and 2 from frame_stencil.pdf, and use that to cut a sturdy background from a 10-in. x 12-in. piece of cardboard. Glue the castle background piece to the backing cardboard using the royal icing. If you don’t plan on displaying your photo frame standing up, you can skip this step and start at step 2.
2. Glue Shape 3, the Castle Wall, into place on top of your castle background shape that has been attached to cardboard.
3. Glue Castle Clock, Shape 5, into place.
4. Glue Castle Spires, Shape 7, into place.
5. Glue Castle Towers, Shape 8, into place.
6. Glue Castle Windows, Shape 6, into place.
7. Print a favorite holiday photo and cut it to fit the archway of the Castle Door, Shape 4. Use Shape 4 as a template by laying it over your photo and tracing the inside curve on the part of your picture you want framed. Cut out the photo.
8. Glue Castle Door, Shape 4, down on top of Shape 3.
9. Glue your holiday photo in the Castle Door archway.
10. Use royal icing and candy to add your own touch of decorating magic.
11. Display your creation. (We stood ours up on a small plate easel.)
We’d love to see what you made! Post images of your creation to your favorite social media sites and tag your posts #mydisneysweets to share with us.

This recipe has been converted from a larger quantity in the restaurant kitchens. The flavor profile may vary from the restaurant’s version. All recipes are the property of Walt Disney Parks and Resorts U.S., Inc., and may not be reproduced without express permission.