Embed Size (px)
Citation preview

1) Eyepieces
2) Head
3) Magnification knob (6.7 – 45x)
4) Stand
5) Light condenser
6) Incident light & adjustment
7) Focusing knob
8) Light intensity dials
9) Disposable Petri dish
10) Specimen plate (illuminated)
11) On/off
12) Base
Microscope Competency © Kwantlen.ca/Horticulture
Dissecting microscope (Olympus)

1) Eyepieces
2) Eyepiece tubes & diopter adjust.
3) Stand
4) Head
5) Magnification knob (6.5 – 40x)
6) Light beam adjustment
7) Focusing knob
8) Light condenser
9) Specimen plate (use Petri dish)
10) Transformer, on/off, brightness
11) Base
Microscope Competency © Kwantlen.ca/Horticulture
Dissecting microscope (Leica)

Remove dust cover and leave in cabinet under “Student Drawer” (room 1660 only) Lift microscope with one hand on base and one hand on stand. Keep horizontal. Gently set microscope down on counter Ensure plastic rings are extended on the eyepieces (Leica only) Zero diopter adjustment: eyepieces should have white line markings lined-up (Leica)
or the one white line set to zero (Olympus) Plug microscope cord into back of transformer (Leica only) Plug cord into electrical outlet Turn on light by pushing button on transformer and rotate to turn up intensity (Leica) or
with on/off switch in right side of base and then rotating one or both light intensity knobs
Place specimen on specimen plate (or first on a Petri dish if cutting) Start with lowest magnification, aim light source Look through eyepieces, adjust for interpupillary distance, and focus on specimen Put away into same cabinet with same dust cover on; do not wrap cords around
Dissecting microscope set-up and care (Leica – room 1325; Olympus – room 1660)Microscope Competency © Kwantlen.ca/Horticulture

Dissecting Microscopes © Kwantlen.ca/Horticulture
1) Examine the specimen at a magnification that nearly fills the field of view.
2) Draw the specimen the same size within the circle provided on your assignment sheet (this circle represents the field of view you have looking through the microscope).
3) Place a metric ruler on the stage beside your specimen to measure the distance across any two points on the specimen while looking through the scope and record this distance in mm to the right of your drawing beside the word “scale:”
4) Measure the same two points on your drawing that you measured earlier while looking through the microscope and then draw a horizontal line of the same length above the number.
Remember: the line you draw beside the word “Scale:” is from your drawing and the number you put below this line is from your actual specimen!
Determination of scale using dissecting microscope

1) Eyepieces (magnifies 10x), 2) Interpupillary adjustment, 3) Head, 4) Revolving nosepiece, 5) Objectives (magnifies 4, 10, or 40x), 6) Slide holder, 7) Stage, 8) Iris diaphragm adjustment knob, 9) Light condenser, 10) Blue filter holder, 11) Condenser height adjustment knob, 12) Light source opening, 13) Field diaphragm adjustment, 14) Base, 15) Eyepiece diopter adjustment, 16) Stand, 17) Stage movement knobs, 18) Coarse focus knob, 19) Fine focus knob, 20) Light on/off switch & brightness 21) Plug-in
15
16
171819
2021
1234567891011121314
Compound microscope (Hund)
Microscope Competency © Kwantlen.ca/Horticulture
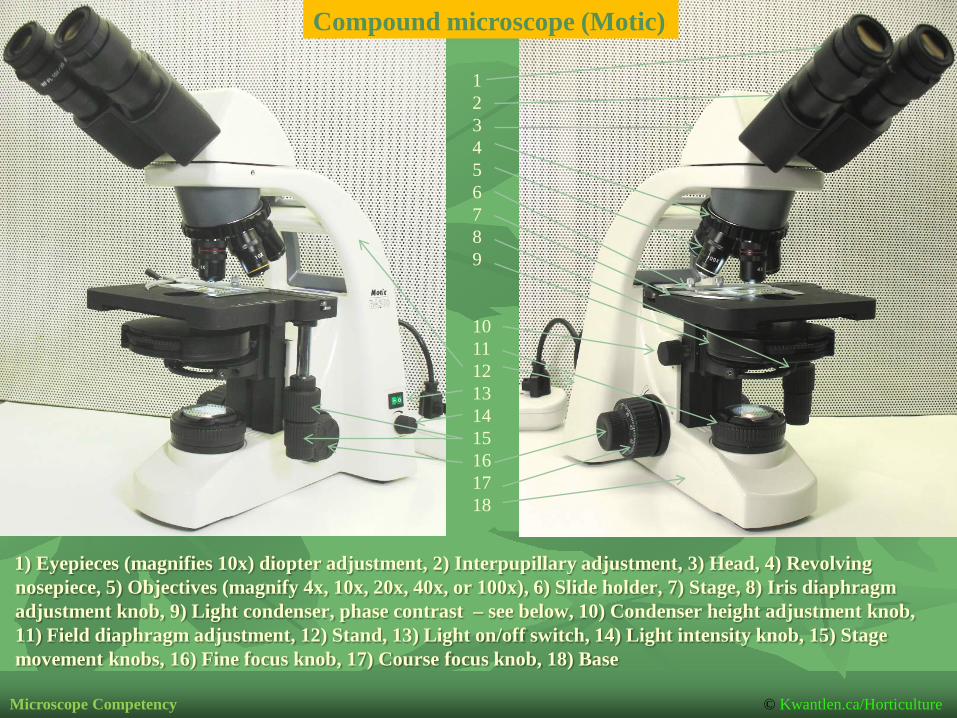
1) Eyepieces (magnifies 10x) diopter adjustment, 2) Interpupillary adjustment, 3) Head, 4) Revolving nosepiece, 5) Objectives (magnify 4x, 10x, 20x, 40x, or 100x), 6) Slide holder, 7) Stage, 8) Iris diaphragm adjustment knob, 9) Light condenser, phase contrast – see below, 10) Condenser height adjustment knob, 11) Field diaphragm adjustment, 12) Stand, 13) Light on/off switch, 14) Light intensity knob, 15) Stage movement knobs, 16) Fine focus knob, 17) Course focus knob, 18) Base
Compound microscope (Motic)
123456789
101112131415161718
Microscope Competency © Kwantlen.ca/Horticulture

The Motic microscope (room 1660) is very similar to the Hund microscope (room 1325) except that they are equipped with a phase contrast condenser. It is important the condenser turret be set at BF for Bright Field or the number setting corresponding to the objective in use to get phase contrast effects. When done please remove slide, return the turret to “BF”, and put the 4X objective back in place.
Microscope Competency © Kwantlen.ca/Horticulture

Leave dust cover in cabinet Lift microscope with one hand on base, other on stand Gently set microscope down on counter Plug in, turn on and adjust light intensity about half way Open field and iris diaphragm about half way Put the red coded 4x objective in place (gives 40x magnification) Put slide on stage using clip holder Condenser should be just below stage (arrow on knob pointing up for Motics) Move stage using knobs so light shines through specimen Eyepieces diopter set at 0 for Motic or 65 for Hund (line up number with white line) Set eyepiece distance between for your eyes Look though eyepiece and focus on specimen using course focus knob Turn revolving nose piece to yellow coded 10X objective to give 100x magn. Use fine focus, turn to 40X objective (400x magn.) and fine focus as necessary Turn off light, unplug cord but please do NOT wrap it around microscope Put microscope back in same cabinet with the same dust cover on
Microscope Competency © Kwantlen.ca/HorticultureCompound microscope set-up and care

Note: This calibration was accomplished using a stage micrometer ruler 1 mm long divided into 0.01 mm (= 10 µm) markings mounted on a slide. * 20X objectives found on Motic scopes only and not all Hund scopes have x1000
Step 1 (same as when using the dissection microscope): Measure two points on your drawing with the ruler from your student drawer. Make a horizontal line the same length beside the word “Scale:”. Step 2: Look at the actual specimen through the microscope and, using the ruler (ocular micrometer) in the right eyepiece, count the number of eyepiece divisions (epd) across same two points (this eyepiece ruler has no units - there are simply 100 eyepiece divisions on it). Multiply the epd by the corresponding number of micrometers given in the table below depending on which objective is in use to determine the width or length of the specimen in micrometers:
Objective Magnification 1 epd =Example: view & draw a happy plant cell: Step 1: Draw a line beside the word “Scale:” the same width as you drew the cell:
Scale: Step 2: Measure the actual cell width using eyepiece ruler. Multiply the number of eyepiece divisions by the number of micrometers that correspond to the objective in use e.g. using 10X objective: 4 epd x 10 µm = 40 µmIndicate scale beside drawing as:
Scale: 40 µm
4X x40 25 µm
10X x100 10 µm
20X* x200 5.0 µm
40X x400 2.5 µm
100X x1000 1.0 µm
Microscope Competency © Kwantlen.ca/Horticulture
Determination of scale using compound microscope

Microscope Competency © Kwantlen.ca/Horticulture
1
2
3
4
Identify the parts
5
6
7
8
9
10
11
12Type of microscope?

123456789
101112131415161718
Microscope Competency © Kwantlen.ca/Horticulture
Identify the parts
Type of microscope?
Microscope Competency © Kwantlen.ca/Horticulture
Microscope use and care pre-competency exam self test
Which two parts should be held when lifting the microscope and keeping it horizontal?Microscopes must be gently set down on the counter to prevent noise. (T/F) Is the light beam direction on Olympus dissecting microscope adjustable? (Y/N)Specimens are always cut on disposable Petri dishes and not directly on the stage. (T/F)Correct interpupillary adjustment ensures the specimen is seen with both eyes. (T/F)Diopter adjustment should be “zeroed” and only needs adjusted if one eye view is blurred. (T/F)There are 100 eyepiece divisions in the right eyepiece ruler in the compound scopes. (T/F)For a drawing, the line beside the word scale is from your actual specimen. (T/F)For a drawing, the number put beside the word scale is from your actual specimen. (T/F)When would you use phase contrast and how is the condenser adjusted for this?When moving to higher magnification you should only need to adjust the _________ focus.If field of view blackens using phase contrast you may need to check the ________ height.Field and iris diaphragms (in BF) should be opened just enough to provide adequate light. (T/F)The 100x objective must only be used with immersion oil and cleaned after with lens paper. (T/F) What should be done before the compound microscope is put away? (Y/N)Should the cord be wrapped around the microscope when you put it away? (Y/N)

Drawing made in lab assignment
Microscope Competency © Kwantlen.ca/Horticulture
Indicate the scale on this drawing
Scale:
Bug viewedthrough dissecting microscope.
Assume the abdomen is 1 cm wide.

Drawing made in lab assignment
Microscope Competency © Kwantlen.ca/Horticulture
Indicate the scale on this drawing
Scale:
Mite viewedthrough compound microscopeat 100x (10 x objective).Assume the abdomen is15 e.p.d. wide.
0________________100

Microscope Competency © Kwantlen.ca/Horticulture
Microscope slide preparation
Remove a small bit of fungus or infected plant tissue, or, using a single edge razor blade, make several thin sections of leaf or wood tissue (at the necrotic-green boundary) on a plastic Petri dish. View sections at 10x and place 3 or 4 of the thinner ones on a microscope slide in one drop of 0.5% Phloxine B or 1% Safranin O stain (rehydrate leaf in 0.3% KOH first if necessary). Lower cover slip one edge first and gently press down to remove air bubbles with wooden handle of teasing needle. Images can be taken of good sections with the camera-equipped microscope.

Microscope Competency © Kwantlen.ca/Horticulture