Embed Size (px)
Citation preview
12d Synergy Server
Installation Guide Version 3.0
April 2017
12d Solutions Pty Ltd
ACN 101 351 991
PO Box 351 Narrabeen NSW Australia 2101
(02) 9970 7117 (02) 9970 7118
[email protected] www.12d.com


12d Synergy Server Installation
April 2017
12d Synergy Server Installation Manual V3.0 April 2017
Disclaimer 12d Synergy is supplied without any express or implied warranties whatsoever.
No warranty of fitness for a particular purpose is offered.
No liabilities in respect of engineering details and quantities produced by 12d Synergy are accepted.
While every effort has been taken to ensure that the advice given in this manual and the program 12d Synergy is correct, no warranty is expressed or implied by 12d Solutions Pty Ltd.
Copyright This manual is copyrighted and all rights reserved.
This manual may not, in whole or part, be copied or reproduced without the prior consent in writing from 12d Solutions Pty Ltd.
Copies of 12d Synergy software must not be released to any party, or used for bureau applications without the written permission of 12d Solutions Pty Ltd.
Copyright © 1989 – 2017 by 12d Solutions Pty Ltd.
Sydney, New South Wales, Australia.
ACN 101 351 991
All rights reserved.

12d Synergy Server Installation
April 2017 i
Table of Contents
1.0 INSTALLING THE 12D SYNERGY SERVER1
1.1 Service account and password 1
1.2 Data directory 1
1.3 Required Components 1
1.4 Authorization Mode 1
1.5 Active Directory 1
1.6 Mail Server 1
2.0 PERFORMING THE INSTALLATION 1
2.1 Welcome to the 12d Synergy Server Installation 2
2.2 End User License Agreement 3
2.3 Pick Installation Location 4
2.4 Configure the 12d Synergy Server – Port and Login Details 5
2.5 Configure the 12d Synergy Server Database 6
2.6 Configure the 12d Synergy Server DB – Already Installed 7
2.7 Configure the 12d Synergy Server – Host and Mail Details 8
2.8 Configure the 12d Synergy File Storage Settings 9
2.9 Configure the 12d Synergy Authorization Settings10
2.10 Configure the 12d Synergy Server – Add an Admin User 11
2.11 Install Your Licence File 12
2.12 Performing Installation 13
3.0 VERIFYING THE INSTALLATION 13
4.0 UPGRADING THE 12D SYNERGY SERVER14
4.1 Welcome to the 12d Synergy Server Installation 14
4.2 Configure the 12d Synergy Server 15
4.3 Configure the 12d Synergy Server Database 16
4.4 Performing Installation 17
5.0 SILENT INSTALLATIONS 18
5.1 Generating an Answers File 18
5.2 Performing a Silent Installation 18
6.0 TEMPORARY PATHS 19
12d Synergy Server Installation
ii April 2017

12d Synergy Server Installation
April 2017 1
1.0 INSTALLING THE 12D SYNERGY SERVER If you have already installed the 12d Synergy server, you do not need to complete a full install. Please see the section entitled Upgrading the 12d Synergy Server.
1.1 Service account and password
A service account is the user under which the 12d Synergy server is run. It should have administrative rights on the computer. A service account must have the Log on as a Service right, but this can be applied after installation, and in some cases, can be applied automatically.
1.2 Data directory
You will be prompted for a location to store data during the installation.
This storage area could become quite large, depending on your usage and needs. It can be migrated at a later date if need be. Note that if you should not use a mapped network drive unless you can guarantee the drive letter will be available when the 12d Synergy Server service starts.
1.3 Required Components
You will need to know if you have a SQL Server database installed and the details to connect to it. If you do not have one installed, 12d Synergy can install one for you.
If you do have a SQL Server you wish to use, you will need to know:
1. The server address and instance name 2. The name of the database
1.4 Authorization Mode
Do you want Single Sign On, so 12d Synergy validates users against their Windows accounts, or would you like custom user names? If you want custom user names, you must also provide a Certificate for SSL. Using Windows Authentication, a certificate is provided by Microsoft.
1.5 Active Directory
You will need to know if you are using Active Directory and if you are using it for managing groups. If you are, you will need to know the Active Directory server name.
1.6 Mail Server
The 12d Synergy Server can send mail to alert users about specific actions. You will need to know:
The address of the SMTP Mail Server
Any optional authentication details for communicating with the server
2.0 PERFORMING THE INSTALLATION
The installation is started by running the 12dSynergy_Server_x86.exe.
The installer will provide you with helpful hints to make the process simple.

12d Synergy Server Installation
2 April 2017
2.1 Welcome to the 12d Synergy Server Installation
This is the welcome page. Click next to continue.

12d Synergy Server Installation
April 2017 3
2.2 End User License Agreement
To install 12d Synergy, you must accept the license agreement before clicking ‘Next’

12d Synergy Server Installation
4 April 2017
2.3 Pick Installation Location
Choose the installation location – it is recommended this is left as the default pre-defined setting.
Click next when you have selected the location to install to.

12d Synergy Server Installation
April 2017 5
2.4 Configure the 12d Synergy Server – Port and Login Details
Setting Description
Port The primary port for meta data communication. You can change this but it is recommended to leave it at port 1212. If you change it, you will need to configure the client settings to use the new port number.
File transfer port The port for file transfers. You can change this, but it is recommended to leave it at 1250. If you change it, you will need to configure the client settings to use the new port number.
Service account The login name of the account. If you are on a domain, enter it in the format: Domain\UserName
e.g. YourCompany\ServiceAccount
If you are not on a domain, enter it in the format: .\ServiceAccount
The service account must have administrative access.

12d Synergy Server Installation
6 April 2017
Service password
The password of the service account
Note: The installer will attempt to test these credentials. In some cases, it may be possible for an incorrect result to this test, depending on the complexity of your network. This test should be taken as a guideline only - a failed result can be ignored if you are sure your credentials are correct.
2.5 Configure the 12d Synergy Server Database
You can now choose if you are using a pre-existing SQL Server, or if you would like 12d Synergy to install a new copy of SQL Server Express 2014 for you.
Note: If you choose to install SQL Server 2014 express, you must accept Microsoft’s terms and conditions for the use of SQL Server 2014.

12d Synergy Server Installation
April 2017 7
2.6 Configure the 12d Synergy Server DB – Already Installed
If you choose to use an existing SQL Server, you will be prompted for the above information. If you chose to have one installed for you, you can skip this step.
Setting Description
Database instance
The address of the SQL Server – this might be a named instance so it’s important to check. SQL Server Manager might help you identify your server location. You should also the favour the use of a computer name over an IP Address if possible, as TCP/IP may not be enabled.
e.g: YourServer or YourServer\YourInstance
Database name The name of the database to store 12d Synergy data in
Database security
How to log in – using the Service Account or another username / password combination. Windows security is generally recommended, but requires that the Service Account you nominated earlier has access to the database.
If you use SQL Server security, you will be prompted for a user name and password.
You can use the Test Connection button to test your settings against your database server.

12d Synergy Server Installation
8 April 2017
2.7 Configure the 12d Synergy Server – Host and Mail Details
Setting Description
Host address The name of the server – this helps identify the server to the 12d Synergy client. This will be filled out automatically for you and should not need to be changed in most cases.
Mail server The address of an SMTP server that can send emails to your users.
Mail from The email address that 12d Synergy will send emails from.
Warning: Some email servers require that the email account actually exists before sending!
SMTP Authentication
Some mail servers require login details to send email. This is usually done to prevent spammers from using an email address to send mail. You may need to consult your IT staff for login information.
You can send a test email to test your mail settings – you should receive an email at the nominated ‘Send to’ address if the values are correct.
12d Synergy Server Installation
April 2017 9
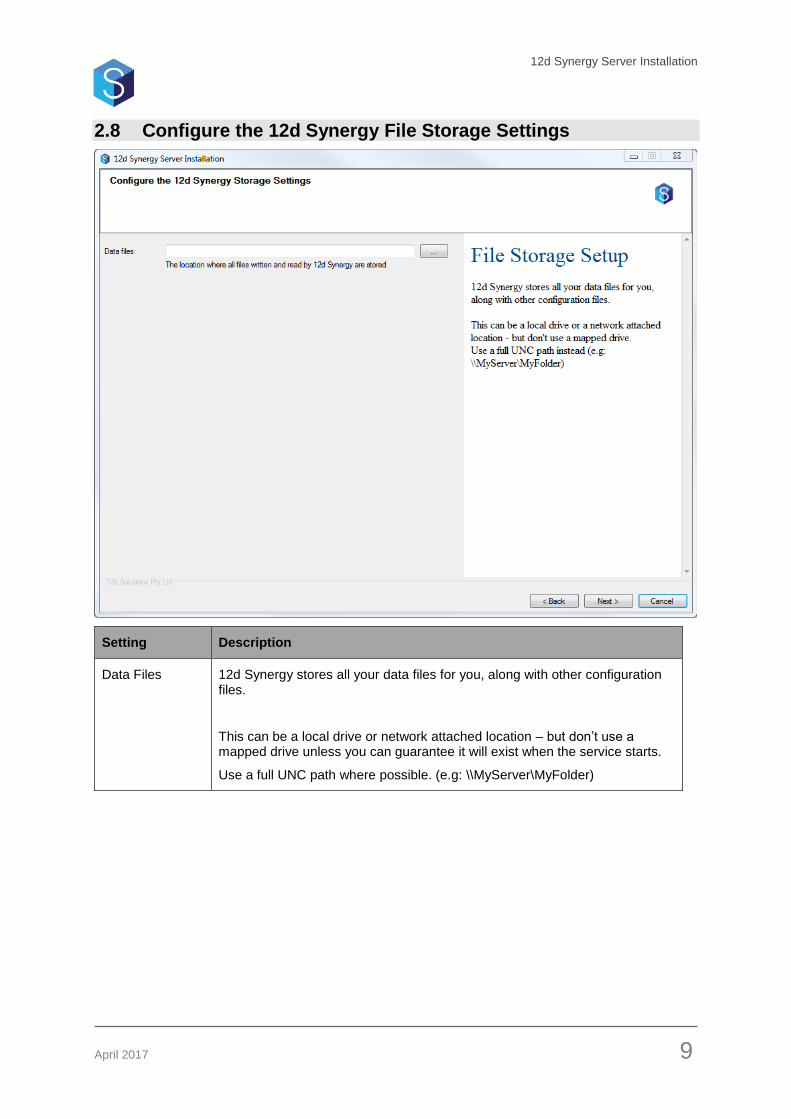
2.8 Configure the 12d Synergy File Storage Settings
Setting Description
Data Files 12d Synergy stores all your data files for you, along with other configuration files.
This can be a local drive or network attached location – but don’t use a mapped drive unless you can guarantee it will exist when the service starts.
Use a full UNC path where possible. (e.g: \\MyServer\MyFolder)

12d Synergy Server Installation
10 April 2017
2.9 Configure the 12d Synergy Authorization Settings
Setting Description
Authorization The mode to use for authorizing users.
You can use Windows Single Sign On or Custom Usernames.
Windows Single Sign is a mode where Microsoft Windows takes care of the logins for you. If your organization does not use Active Directory, you must ensure the users have an actual login on the server 12d Synergy runs on.
Custom Usernames allows you to specify your own user names and passwords, but requires a trusted X.509 certificate from a Certification Authority be installed on the server. This is an advanced operation.
Windows Single Sign On is the recommended method.
Use Active Directory and AD Server
Whether or not you would like Active Directory to manage your group membership for you. Active Directory will be used for authentication if you are on a Windows Domain, whether you choose to use your AD for group membership.
If you do not use AD for group membership, you will need to manage your groups manually.

12d Synergy Server Installation
April 2017 11
2.10 Configure the 12d Synergy Server – Add an Admin User
Setting Description
First name The first name of the administrative user to create
Last name The last name of the administrative user to create
Email The email address of the administrative user
Windows login The windows login (or custom login) of the administrative user. If you are using Windows Single Sign On, do not include the domain.

12d Synergy Server Installation
12 April 2017
2.11 Install Your Licence File
You will have been provided with a licence file by the 12d Synergy team. Please specify it here.

12d Synergy Server Installation
April 2017 13
2.12 Performing Installation
You are now ready to perform the installation. Click install to begin.
3.0 VERIFYING THE INSTALLATION To verify that the installation has worked,
1. Go to Start -> Control Panel -> Administrative Tools -> Services in Microsoft Windows. 2. Find the service named 12d Synergy Server 3. Ensure it is started

12d Synergy Server Installation
14 April 2017
If it has not started, try the following steps:
1. Double click the service 2. Choose the log on tab 3. Re-enter the password for the Service Account and click OK 4. If this was not a service account, it will now be given the Service Account attribute by
Windows 5. Right click and ‘Start’ the service
If the service has still not started, please consult the Windows Event Viewer for more details.
4.0 UPGRADING THE 12D SYNERGY SERVER To upgrade the 12d Synergy server, you do not need to run the full installer each time. The upgrader will remember your settings from last time and unless anything has changed, the upgrade should be quick and easy.
1. Uninstall the existing 12d Synergy server – this will not delete your data
2. Run 12dSynergy_Server_Upgrade_x86.exe
4.1 Welcome to the 12d Synergy Server Installation
This is the welcome screen. Click next.

12d Synergy Server Installation
April 2017 15
4.2 Configure the 12d Synergy Server
Setting Description
Port The primary port for meta data communication. You can change this but it is recommended to leave it at port 1212. If you change it, you will need to configure the client settings to use the new port number.
File transfer port The port for file transfers. You can change this, but it is recommended to leave it at 1250. If you change it, you will need to configure the client settings to use the new port number.
Service account The login name of the account. If you are on a domain, enter it in the format: Domain\UserName
e.g. YourCompany\ServiceAccount
If you are not on a domain, enter it in the format: .\ServiceAccount
The service account must have administrative access.

12d Synergy Server Installation
16 April 2017
Service password
The password of the service account
Note: The installer will attempt to test these credentials. In some cases, it may be possible for an incorrect result to this test, depending on the complexity of your network. This test should be taken as a guideline only - a failed result can be ignored if you are sure your credentials are correct.
4.3 Configure the 12d Synergy Server Database
If you choose to use an existing SQL Server, you will be prompted for the above information. If you chose to have one installed for you, you can skip this step.
Setting Description
Database instance
The address of the SQL Server – this might be a named instance so it’s important to check. SQL Server Manager might help you identify your server location. You should also the favour the use of a computer name over an IP Address if possible, as TCP/IP may not be enabled.
e.g: YourServer or YourServer\YourInstance
Database name The name of the database to store 12d Synergy data in

12d Synergy Server Installation
April 2017 17
Database security
How to log in – using the Service Account or another username / password combination. Windows security is generally recommended, but requires that the Service Account you nominated earlier has access to the database.
If you use SQL Server security, you will be prompted for a user name and password.
You can use the Test Connection button to test your settings against your database server.
4.4 Performing Installation
You are now ready to begin the upgrade. Click install to start the upgrade process.
12d Synergy Server Installation
18 April 2017
5.0 SILENT INSTALLATIONS The 12d Solutions Installer is capable of performing silent installations, which may assist in automatic rollouts of upgrades.
5.1 Generating an Answers File
To perform a silent installation, you will need to generate an answers file.
To do so, provide the following argument:
-o PathToAnswersFile
For example,
12dSynergy_Server_Upgrade_x86.exe –o c:\temp\answers.txt
When the installation is completed, an answers file will be generated for use time.
5.2 Performing a Silent Installation
To perform a silent installation, specify the following arguments on the command line:
-gm2 –m silent –a PathToAnswersFile
If you would like to also automatically uninstall the product first, use these arguments
-gm2 –m silent –u –a PathToAnswersFile
For example,
12dSynergy_Server_Upgrade_x86.exe –gm2 –m silent –u –a c:\temp\answers.txt

12d Synergy Server Installation
April 2017 19
6.0 TEMPORARY PATHS Please note that 12d Synergy will write any uploads and other assorted files to a temporary location before committing it to the data store. In this case, you must guarantee you have enough space in the temporary location to house any and potentially multiple concurrent uploads.
By default, 12d Synergy uses Windows default location - %TEMP%
The location of this can vary depending on the environment.
If you would like to move the temporary path to a disk with more space, you can do so by setting an environment variable (at the system level, or as a user variable for your service account)
This should be called:
12dSynergyTempPath
And should point to the location for temporary storage
EG: \\MyNetwork\TempStorage
If you are using a network drive, you should not use a mapped network drive and should always use a full UNC path.

12d Synergy Server Installation
20 April 2017


![-RVKXD $OOLVRQ 0LFKDHO %R]LNLV - Civil Engineering · Urban Engineering PDCE Urban Engineering Project Management Description of Project: 12d Synergy used as a development environment](https://img.pdfslide.net/doc/110x75/5f24ac16b1253823850415f4/rvkxd-oolvrq-0lfkdho-rlnlv-civil-engineering-urban-engineering-pdce-urban-engineering.jpg)