Embed Size (px)
Citation preview
8/14/2019 18 Paper Airplanes
http://slidepdf.com/reader/full/18-paper-airplanes 1/56
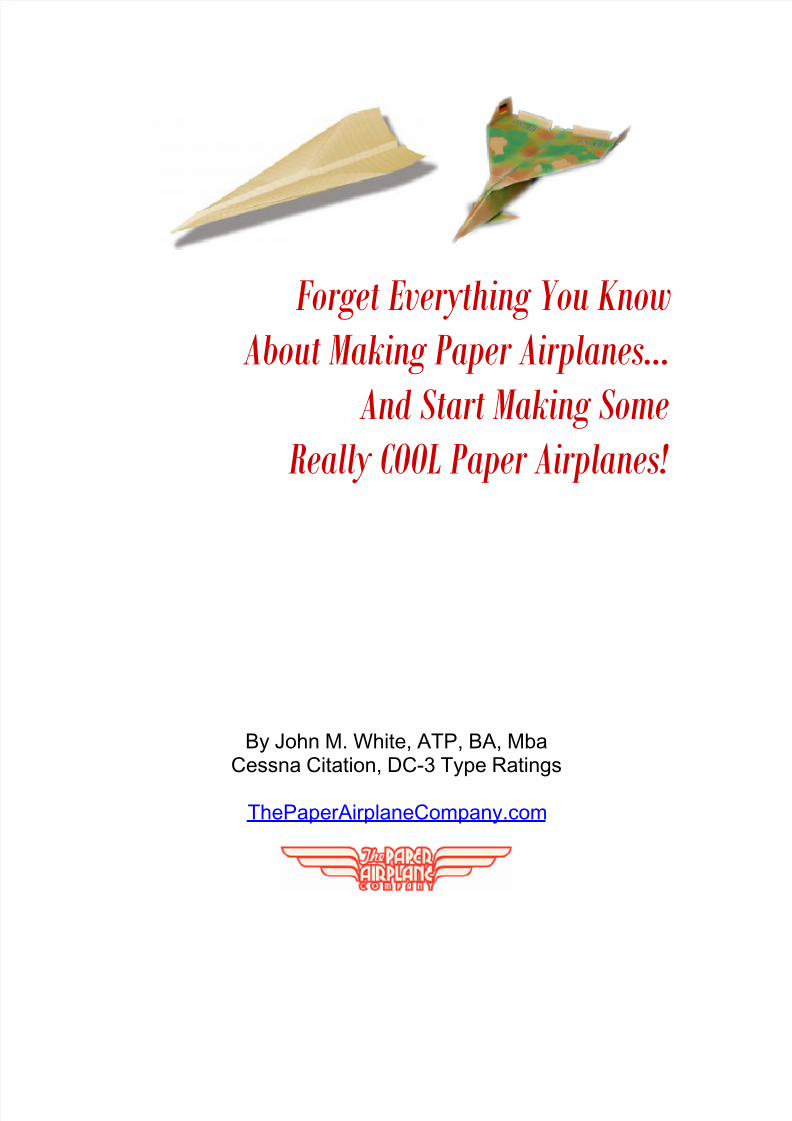
Forget Everything You Know
About Making Paper Airplanes…
And Start Making Some
Really COOL Paper Airplanes!
By John M. White, ATP, BA, MbaCessna Citation, DC-3 Type Ratings
ThePaperAirplaneCompany.com
8/14/2019 18 Paper Airplanes
http://slidepdf.com/reader/full/18-paper-airplanes 2/56
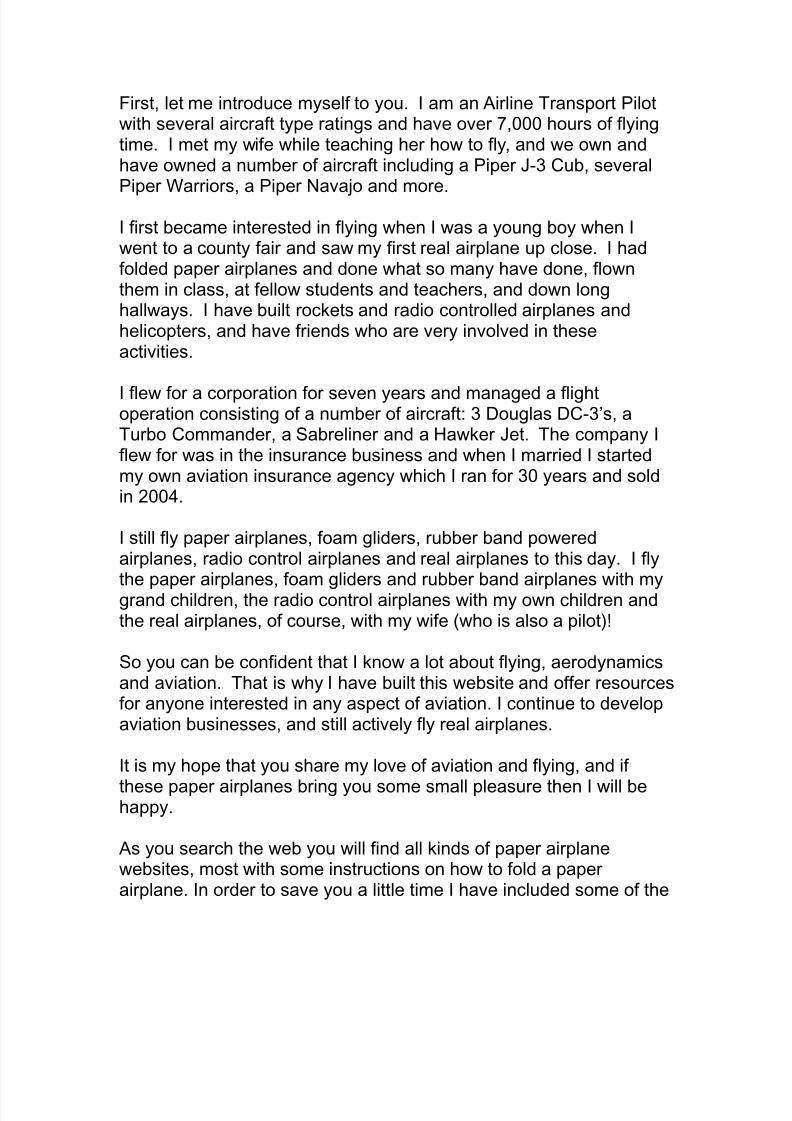
First, let me introduce myself to you. I am an Airline Transport Pilotwith several aircraft type ratings and have over 7,000 hours of flyingtime. I met my wife while teaching her how to fly, and we own andhave owned a number of aircraft including a Piper J-3 Cub, severalPiper Warriors, a Piper Navajo and more.
I first became interested in flying when I was a young boy when Iwent to a county fair and saw my first real airplane up close. I hadfolded paper airplanes and done what so many have done, flownthem in class, at fellow students and teachers, and down longhallways. I have built rockets and radio controlled airplanes andhelicopters, and have friends who are very involved in theseactivities.
I flew for a corporation for seven years and managed a flightoperation consisting of a number of aircraft: 3 Douglas DC-3’s, aTurbo Commander, a Sabreliner and a Hawker Jet. The company Iflew for was in the insurance business and when I married I startedmy own aviation insurance agency which I ran for 30 years and soldin 2004.
I still fly paper airplanes, foam gliders, rubber band poweredairplanes, radio control airplanes and real airplanes to this day. I flythe paper airplanes, foam gliders and rubber band airplanes with mygrand children, the radio control airplanes with my own children andthe real airplanes, of course, with my wife (who is also a pilot)!
So you can be confident that I know a lot about flying, aerodynamicsand aviation. That is why I have built this website and offer resourcesfor anyone interested in any aspect of aviation. I continue to developaviation businesses, and still actively fly real airplanes.
It is my hope that you share my love of aviation and flying, and if
these paper airplanes bring you some small pleasure then I will behappy.
As you search the web you will find all kinds of paper airplanewebsites, most with some instructions on how to fold a paperairplane. In order to save you a little time I have included some of the
8/14/2019 18 Paper Airplanes
http://slidepdf.com/reader/full/18-paper-airplanes 3/56
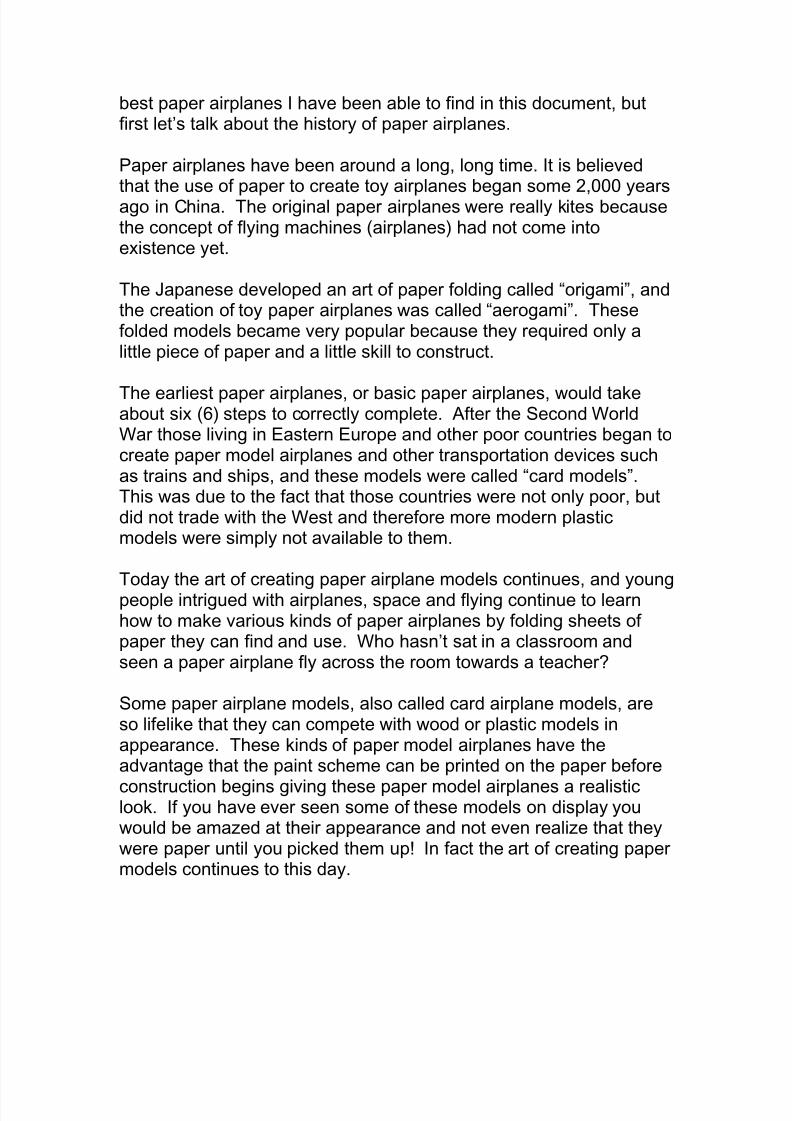
best paper airplanes I have been able to find in this document, butfirst let’s talk about the history of paper airplanes.
Paper airplanes have been around a long, long time. It is believedthat the use of paper to create toy airplanes began some 2,000 yearsago in China. The original paper airplanes were really kites becausethe concept of flying machines (airplanes) had not come intoexistence yet.
The Japanese developed an art of paper folding called “origami”, andthe creation of toy paper airplanes was called “aerogami”. Thesefolded models became very popular because they required only alittle piece of paper and a little skill to construct.
The earliest paper airplanes, or basic paper airplanes, would takeabout six (6) steps to correctly complete. After the Second WorldWar those living in Eastern Europe and other poor countries began tocreate paper model airplanes and other transportation devices suchas trains and ships, and these models were called “card models”.This was due to the fact that those countries were not only poor, butdid not trade with the West and therefore more modern plasticmodels were simply not available to them.
Today the art of creating paper airplane models continues, and youngpeople intrigued with airplanes, space and flying continue to learnhow to make various kinds of paper airplanes by folding sheets ofpaper they can find and use. Who hasn’t sat in a classroom andseen a paper airplane fly across the room towards a teacher?
Some paper airplane models, also called card airplane models, areso lifelike that they can compete with wood or plastic models inappearance. These kinds of paper model airplanes have theadvantage that the paint scheme can be printed on the paper before
construction begins giving these paper model airplanes a realisticlook. If you have ever seen some of these models on display youwould be amazed at their appearance and not even realize that theywere paper until you picked them up! In fact the art of creating papermodels continues to this day.
8/14/2019 18 Paper Airplanes
http://slidepdf.com/reader/full/18-paper-airplanes 4/56
In fact we offer some of the most unique and realistic paper airplaneson this website, one of which you can see below.
Before you go on to see a selection of paper airplanes you can fly Iwould like to make you an offer – a free copy of the Piper J-3 Cubairplane you see below. This model sells on our web site for $ 6.95but you can get it for FREE simply by going to the following link orclicking on the image and entering your first name and email address:
Download The Piper J-3 Cub Paper Airplane Model
I hate spam, and I will never sell or give any of your information toany third party. I will send you occasional emails when I find anotherpaper airplane model I think you might be interested in, or somespecial offers I think you might be interested in. If, at any time, youdo not wish to not receive any further information from me you cansimply click the link at the bottom of any email from me and you will
be removed from our my – it’s that simple!
8/14/2019 18 Paper Airplanes
http://slidepdf.com/reader/full/18-paper-airplanes 5/56
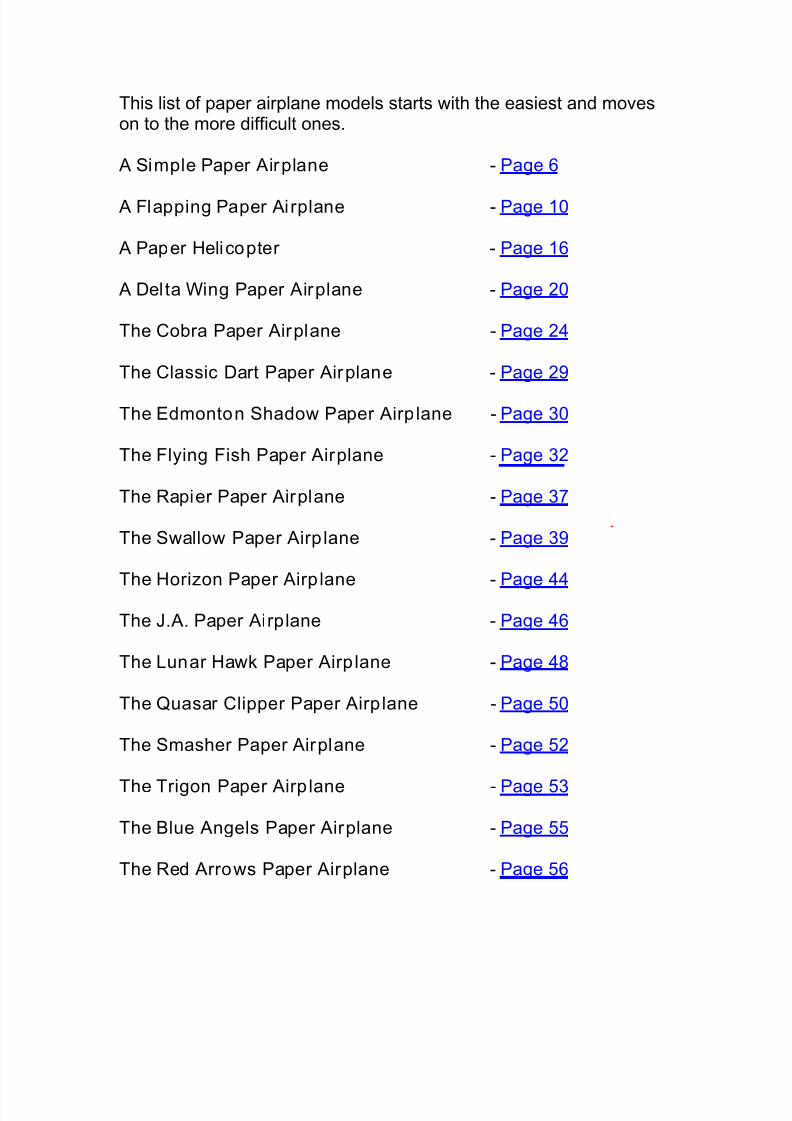
This list of paper airplane models starts with the easiest and moveson to the more difficult ones.
A Simple Paper Airplane - Page 6
A Flapping Paper Ai rplane - Page 10
A Paper Helicopter - Page 16
A Delta Wing Paper Airplane - Page 20
The Cobra Paper Airplane - Page 24
The Classic Dart Paper Airplane - Page 29
The Edmonton Shadow Paper Airp lane - Page 30
The Flying Fish Paper Airplane - Page 32
The Rapier Paper Airplane - Page 37
The Swallow Paper Airp lane - Page 39
The Horizon Paper Airp lane - Page 44
The J.A. Paper Airplane - Page 46
The Lunar Hawk Paper Airp lane - Page 48
The Quasar Clipper Paper Airp lane - Page 50
The Smasher Paper Airplane - Page 52
The Trigon Paper Airp lane - Page 53
The Blue Angels Paper Airplane - Page 55
The Red Arrows Paper Airplane - Page 56

8/14/2019 18 Paper Airplanes
http://slidepdf.com/reader/full/18-paper-airplanes 6/56
A Simple Paper Ai rplane:
1.
Fold a standard piece of printer paper (typically 8.5 by 11 inches) vertically in
half and crease.
2.
Open up the paper so that the crease is pointing up and fold two adjacent
corners to the middle crease.
3.
Fold the point made in the previous step down to the crease so that the flaps
are tucked under this fold. Now this should look somewhat like the back of an
envelope.
8/14/2019 18 Paper Airplanes
http://slidepdf.com/reader/full/18-paper-airplanes 7/56
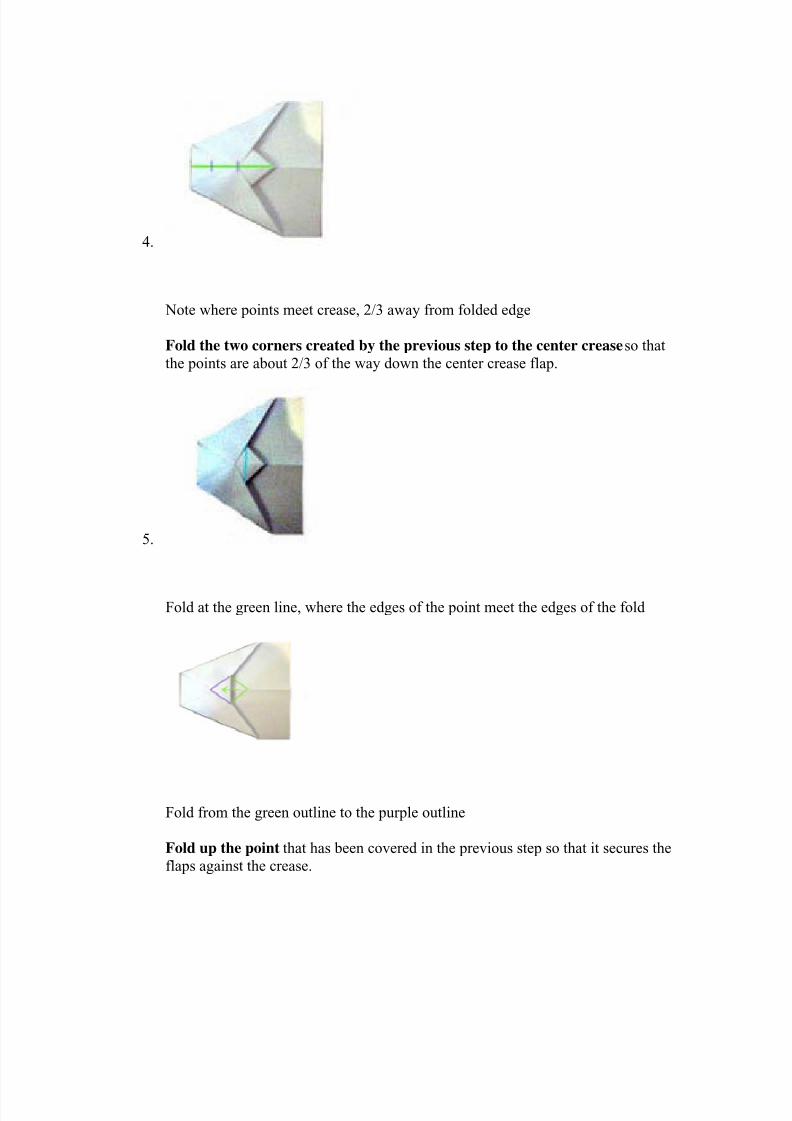
4.
Note where points meet crease, 2/3 away from folded edge
Fold the two corners created by the previous step to the center crease so that
the points are about 2/3 of the way down the center crease flap.
5.
Fold at the green line, where the edges of the point meet the edges of the fold
Fold from the green outline to the purple outline
Fold up the point that has been covered in the previous step so that it secures the
flaps against the crease.
8/14/2019 18 Paper Airplanes
http://slidepdf.com/reader/full/18-paper-airplanes 8/56
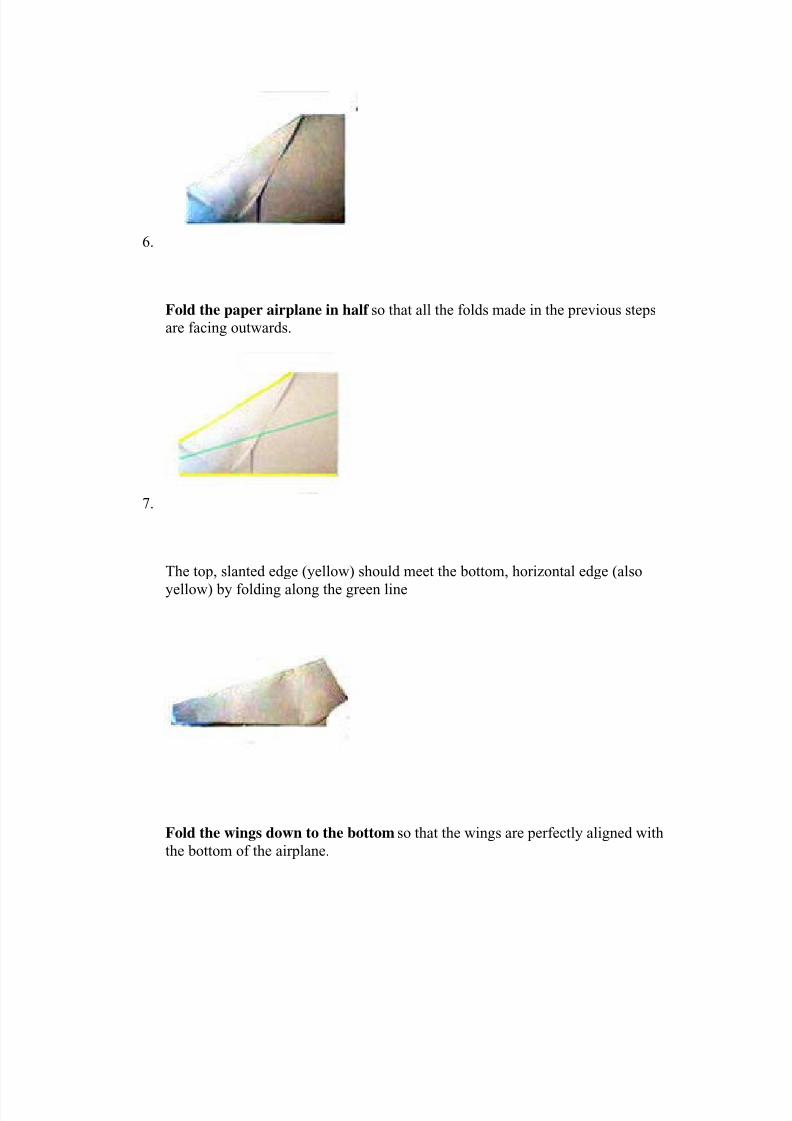
6.
Fold the paper airplane in half so that all the folds made in the previous steps
are facing outwards.
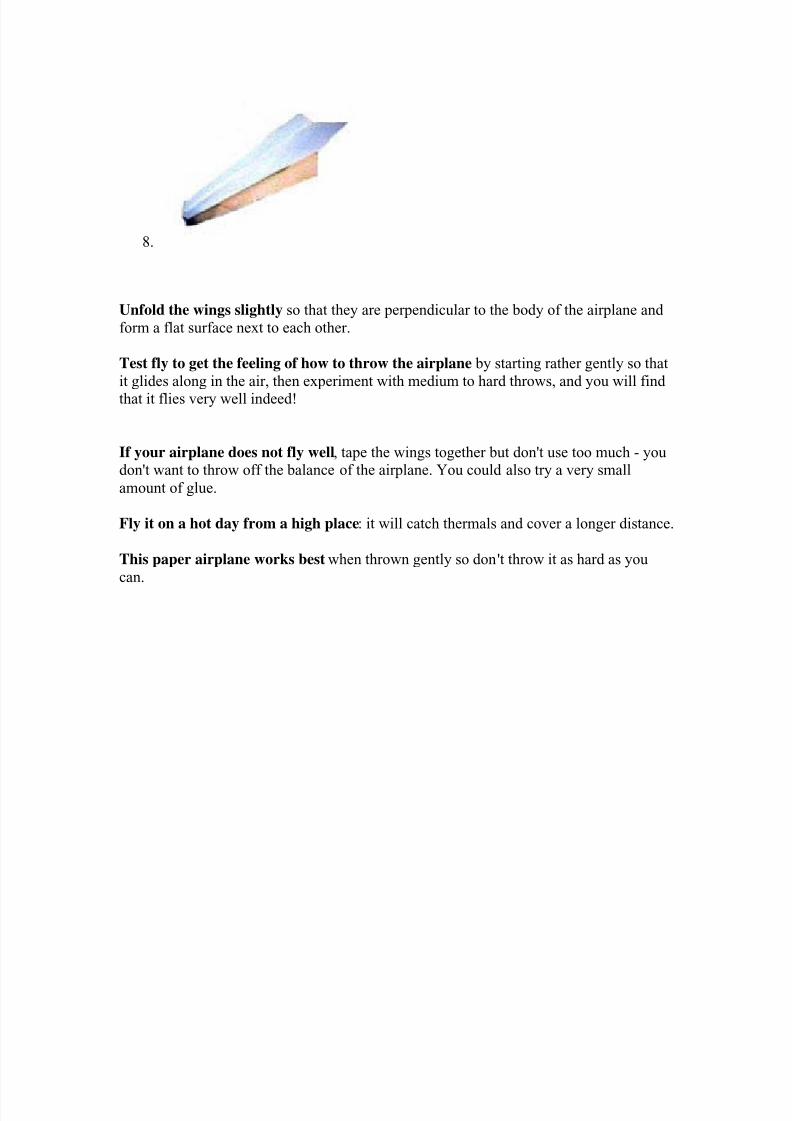
7.
The top, slanted edge (yellow) should meet the bottom, horizontal edge (also
yellow) by folding along the green line
Fold the wings down to the bottom so that the wings are perfectly aligned with
the bottom of the airplane.
8/14/2019 18 Paper Airplanes
http://slidepdf.com/reader/full/18-paper-airplanes 9/56
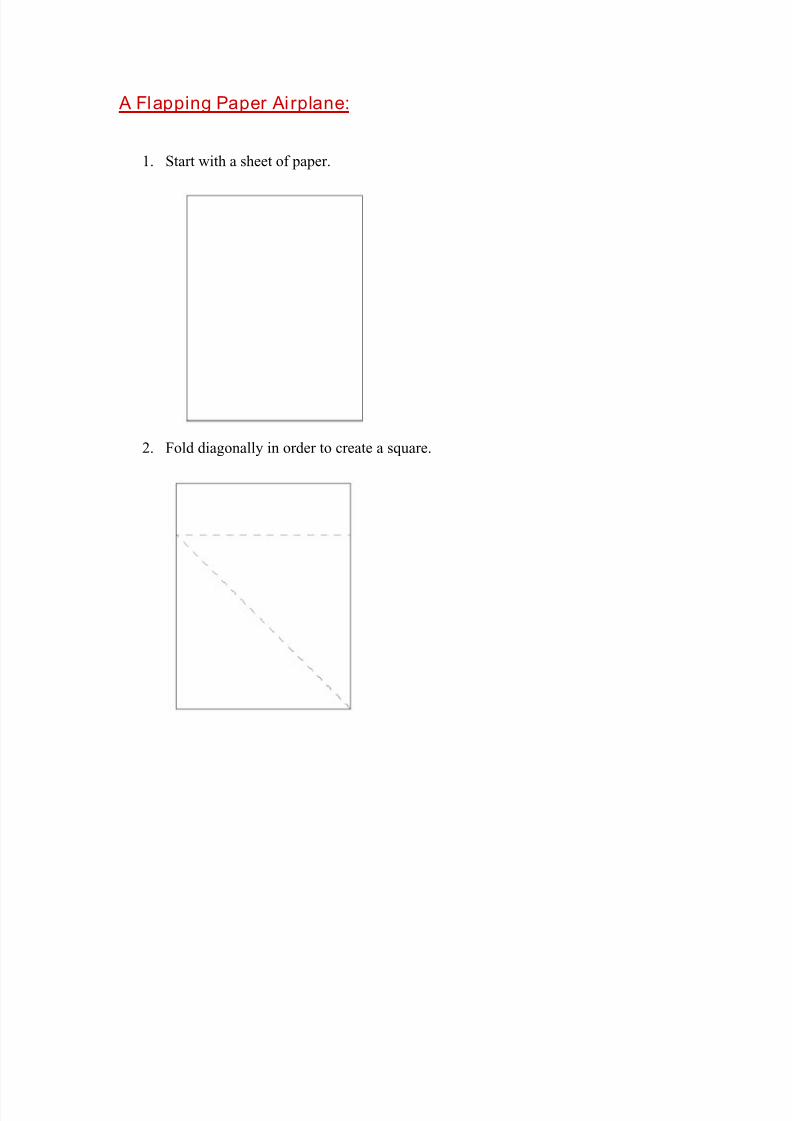
8.
Unfold the wings slightly so that they are perpendicular to the body of the airplane and
form a flat surface next to each other.
Test fly to get the feeling of how to throw the airplane by starting rather gently so that
it glides along in the air, then experiment with medium to hard throws, and you will findthat it flies very well indeed!
If your airplane does not fly well, tape the wings together but don't use too much - youdon't want to throw off the balance of the airplane. You could also try a very small
amount of glue.
Fly it on a hot day from a high place: it will catch thermals and cover a longer distance.
This paper airplane works best when thrown gently so don't throw it as hard as you
can.
8/14/2019 18 Paper Airplanes
http://slidepdf.com/reader/full/18-paper-airplanes 10/56
A Flapping Paper Ai rplane:
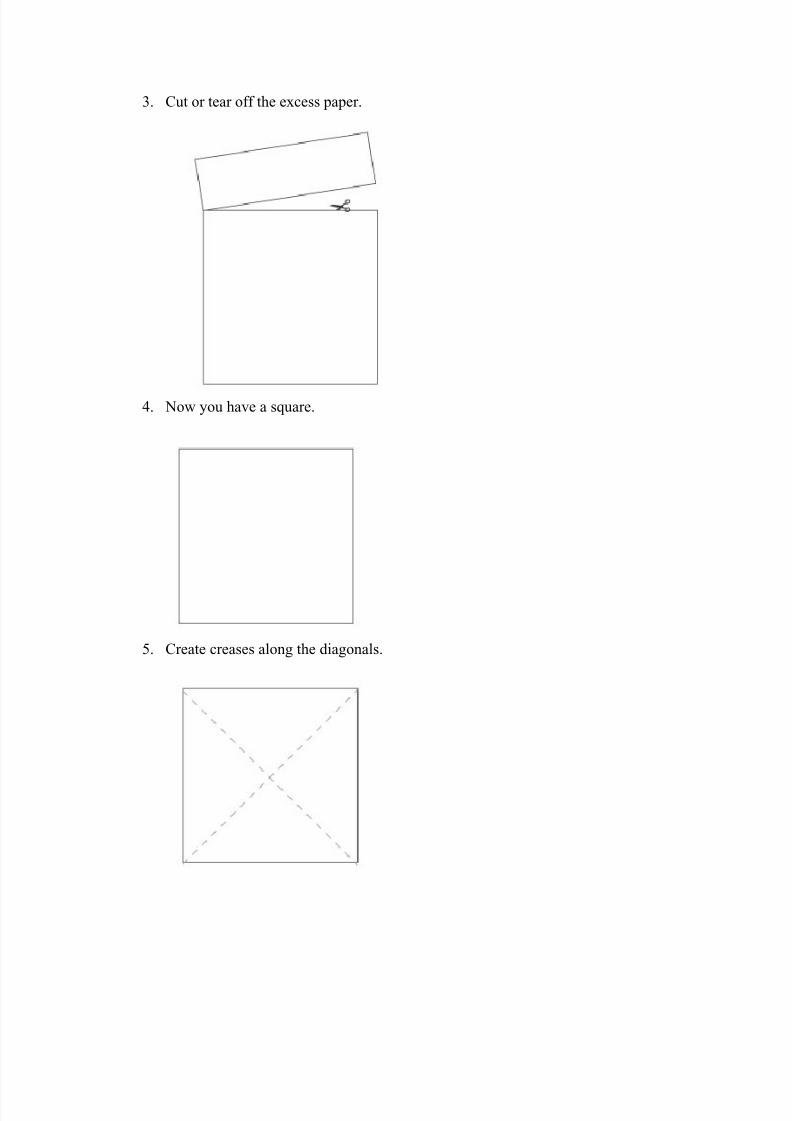
1. Start with a sheet of paper.
2. Fold diagonally in order to create a square.
8/14/2019 18 Paper Airplanes
http://slidepdf.com/reader/full/18-paper-airplanes 11/56
3. Cut or tear off the excess paper.
4. Now you have a square.
5. Create creases along the diagonals.
8/14/2019 18 Paper Airplanes
http://slidepdf.com/reader/full/18-paper-airplanes 12/56
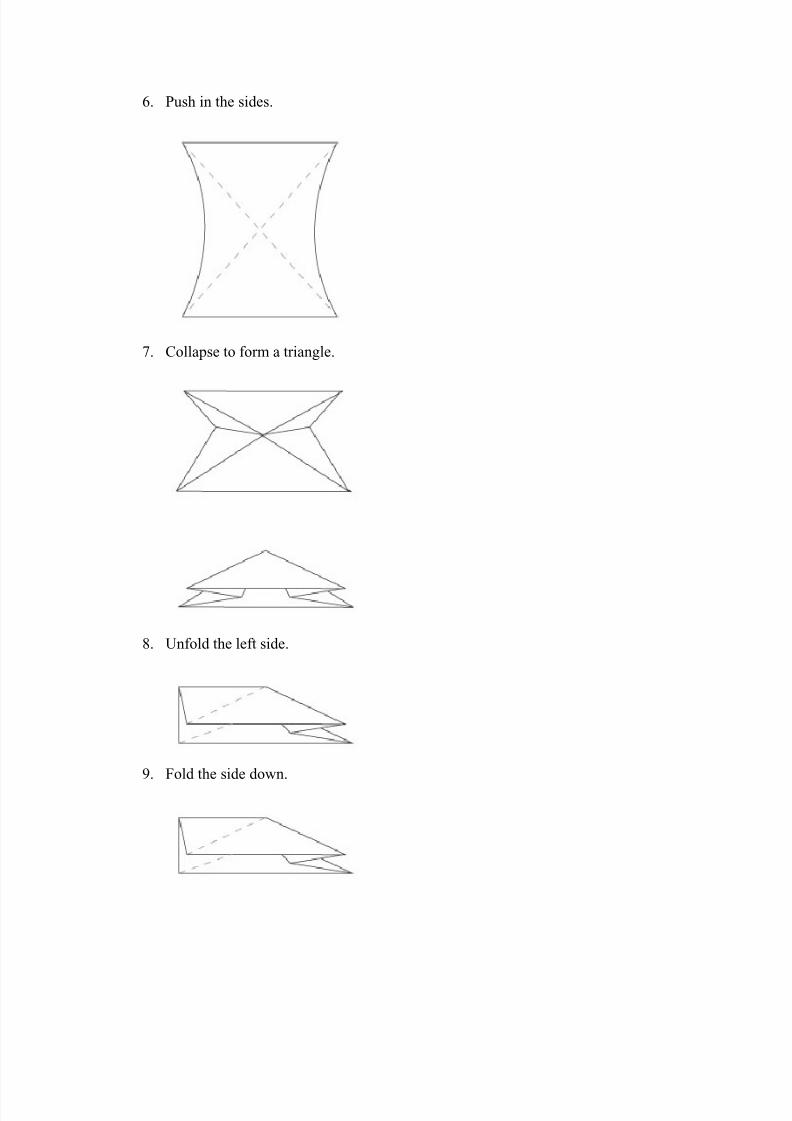
6. Push in the sides.
7. Collapse to form a triangle.
8. Unfold the left side.
9. Fold the side down.
8/14/2019 18 Paper Airplanes
http://slidepdf.com/reader/full/18-paper-airplanes 13/56
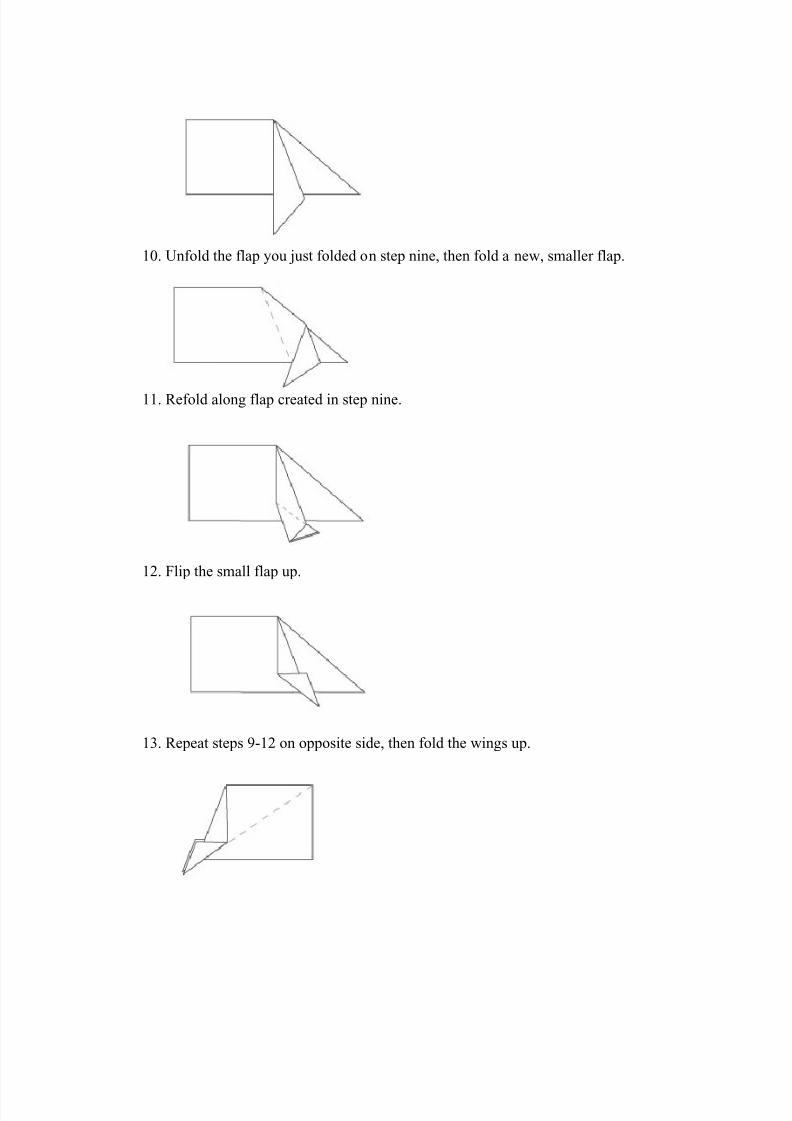
10. Unfold the flap you just folded on step nine, then fold a new, smaller flap.
11. Refold along flap created in step nine.
12. Flip the small flap up.
13. Repeat steps 9-12 on opposite side, then fold the wings up.
8/14/2019 18 Paper Airplanes
http://slidepdf.com/reader/full/18-paper-airplanes 14/56
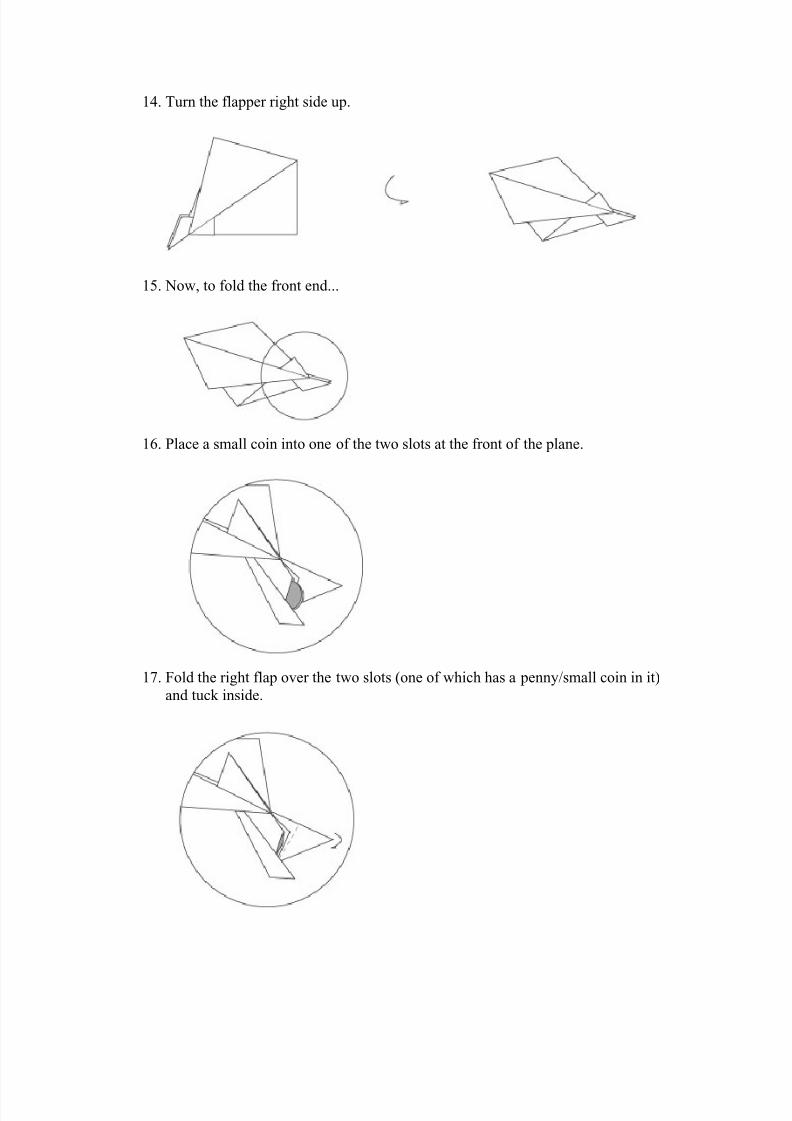
14. Turn the flapper right side up.
15. Now, to fold the front end...
16. Place a small coin into one of the two slots at the front of the plane.
17. Fold the right flap over the two slots (one of which has a penny/small coin in it)
and tuck inside.
8/14/2019 18 Paper Airplanes
http://slidepdf.com/reader/full/18-paper-airplanes 15/56
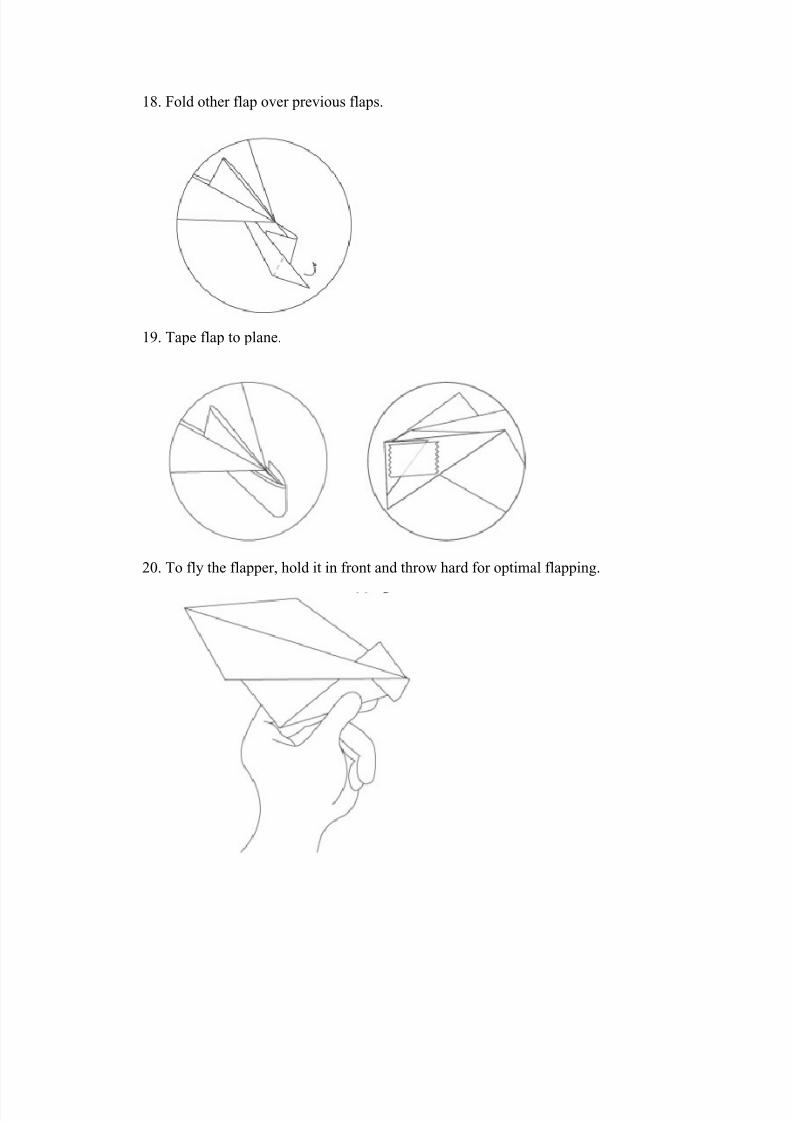
18. Fold other flap over previous flaps.
19. Tape flap to plane.
20. To fly the flapper, hold it in front and throw hard for optimal flapping.
8/14/2019 18 Paper Airplanes
http://slidepdf.com/reader/full/18-paper-airplanes 16/56
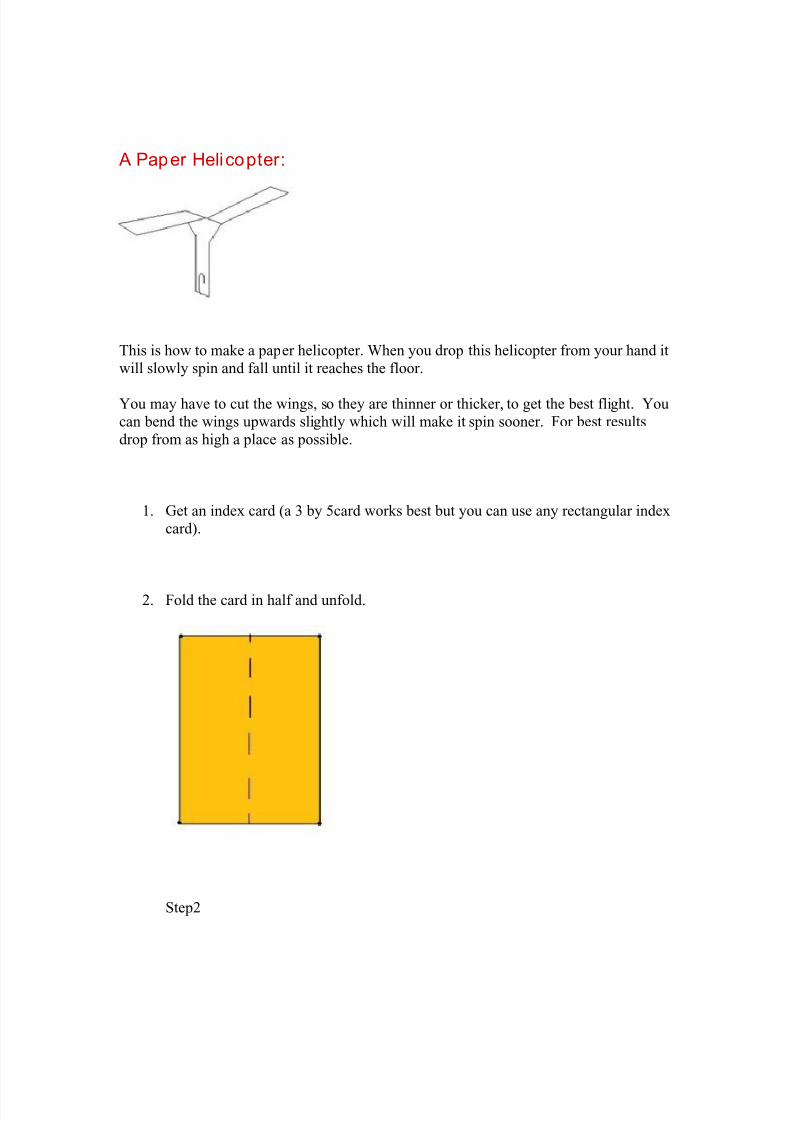
A Paper Helicopter:
This is how to make a paper helicopter. When you drop this helicopter from your hand it
will slowly spin and fall until it reaches the floor.
You may have to cut the wings, so they are thinner or thicker, to get the best flight. You
can bend the wings upwards slightly which will make it spin sooner. For best results
drop from as high a place as possible.
1. Get an index card (a 3 by 5card works best but you can use any rectangular index
card).
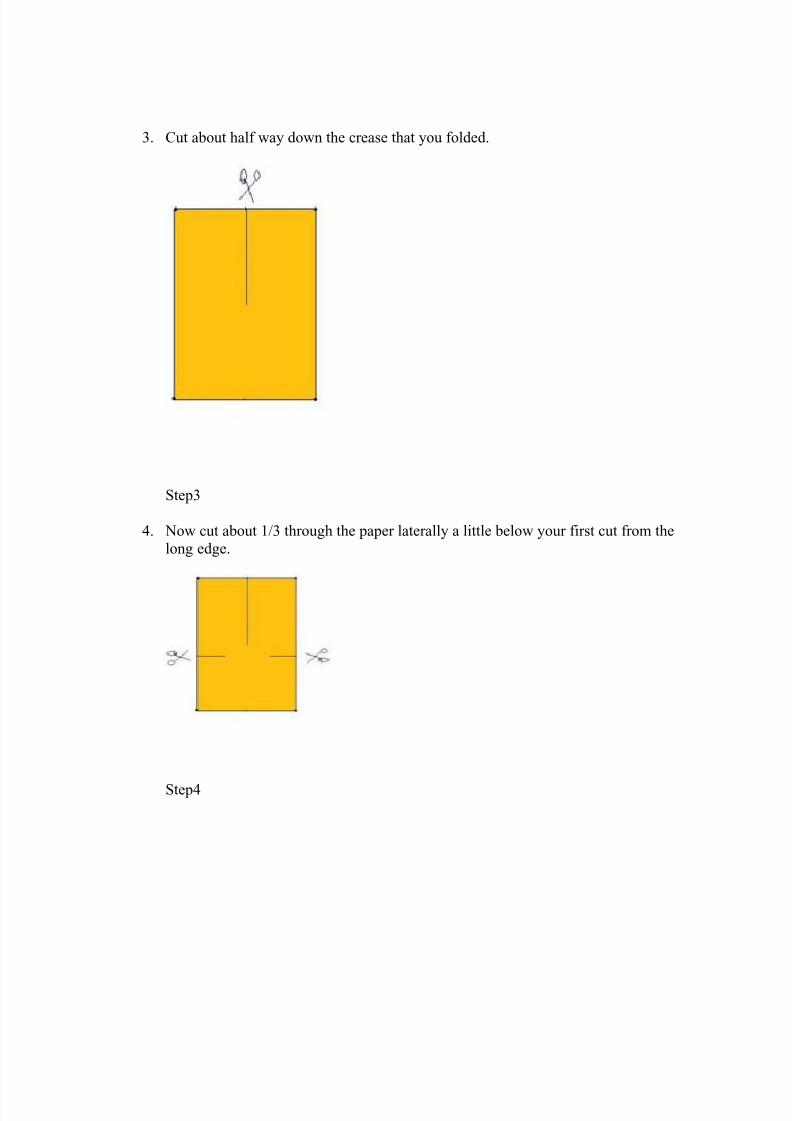
2. Fold the card in half and unfold.
Step2
8/14/2019 18 Paper Airplanes
http://slidepdf.com/reader/full/18-paper-airplanes 17/56
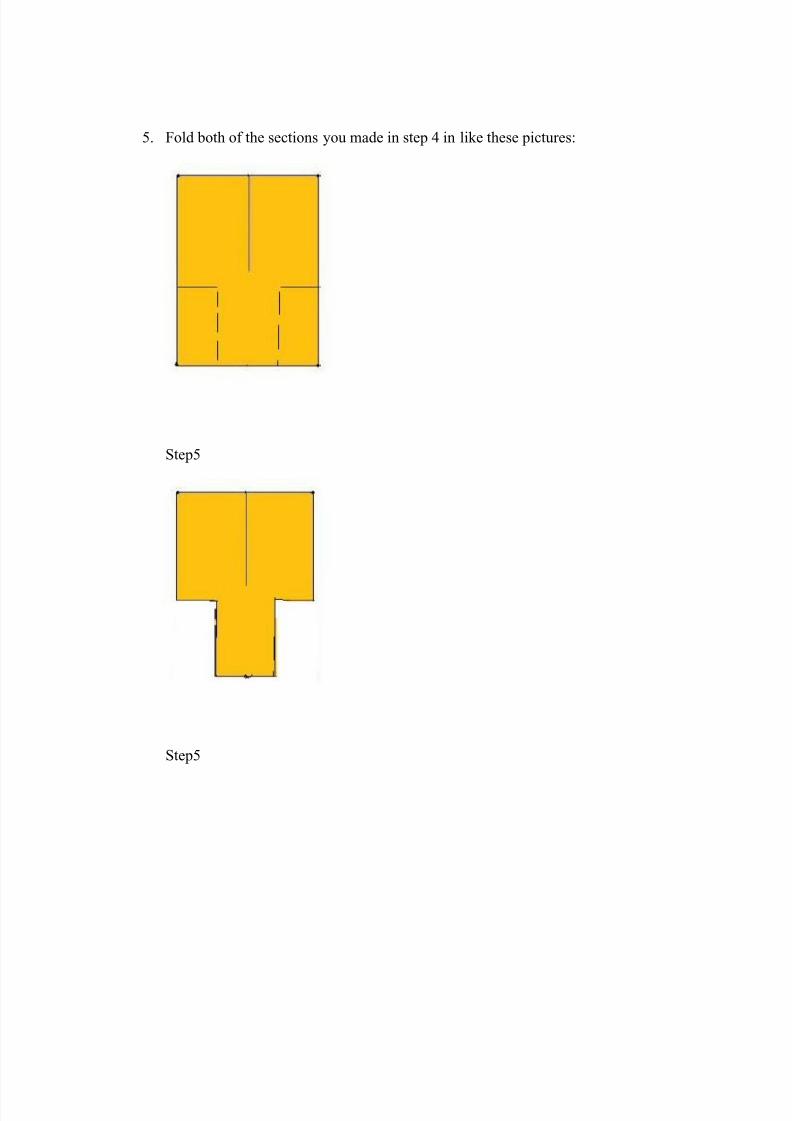
3. Cut about half way down the crease that you folded.
Step3
4. Now cut about 1/3 through the paper laterally a little below your first cut from the
long edge.
Step4
8/14/2019 18 Paper Airplanes
http://slidepdf.com/reader/full/18-paper-airplanes 18/56
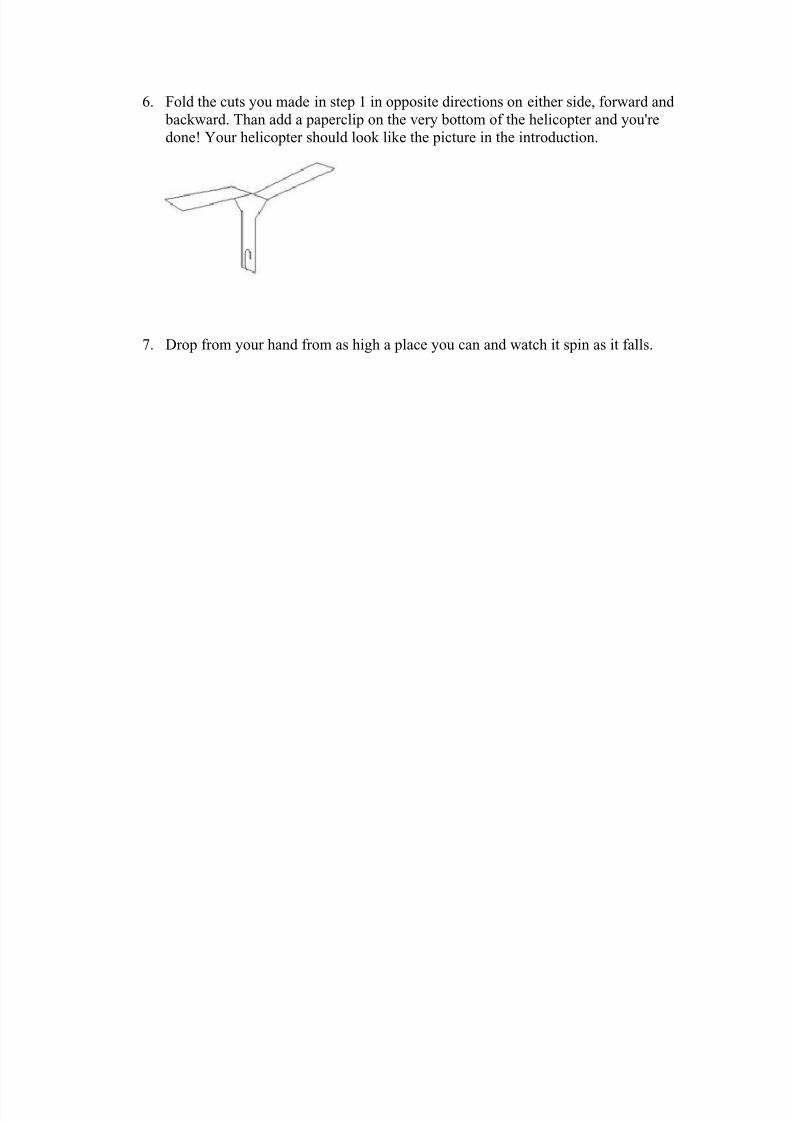
5. Fold both of the sections you made in step 4 in like these pictures:
Step5
Step5
8/14/2019 18 Paper Airplanes
http://slidepdf.com/reader/full/18-paper-airplanes 19/56
6. Fold the cuts you made in step 1 in opposite directions on either side, forward and
backward. Than add a paperclip on the very bottom of the helicopter and you're
done! Your helicopter should look like the picture in the introduction.
7. Drop from your hand from as high a place you can and watch it spin as it falls.
8/14/2019 18 Paper Airplanes
http://slidepdf.com/reader/full/18-paper-airplanes 20/56
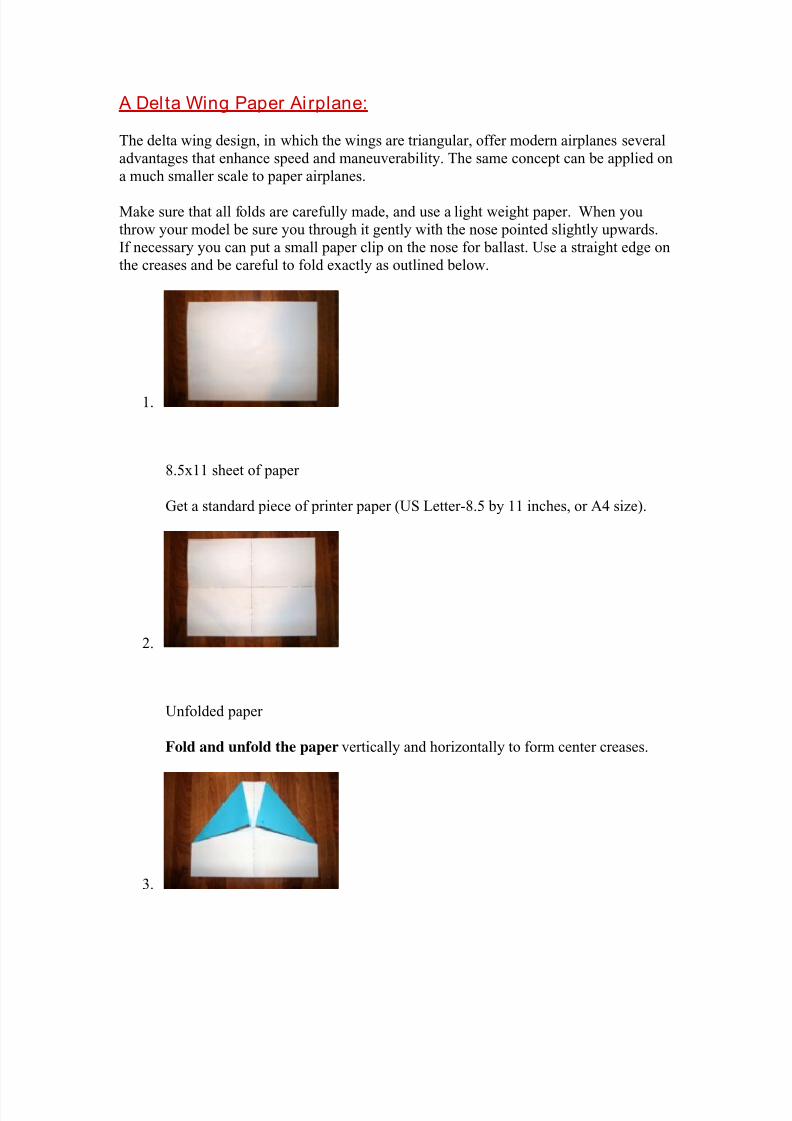
A Delta Wing Paper Ai rplane:
The delta wing design, in which the wings are triangular, offer modern airplanes several
advantages that enhance speed and maneuverability. The same concept can be applied on
a much smaller scale to paper airplanes.
Make sure that all folds are carefully made, and use a light weight paper. When you
throw your model be sure you through it gently with the nose pointed slightly upwards.
If necessary you can put a small paper clip on the nose for ballast. Use a straight edge on
the creases and be careful to fold exactly as outlined below.
1.
8.5x11 sheet of paper
Get a standard piece of printer paper (US Letter-8.5 by 11 inches, or A4 size).
2.
Unfolded paper
Fold and unfold the paper vertically and horizontally to form center creases.
3.
8/14/2019 18 Paper Airplanes
http://slidepdf.com/reader/full/18-paper-airplanes 21/56
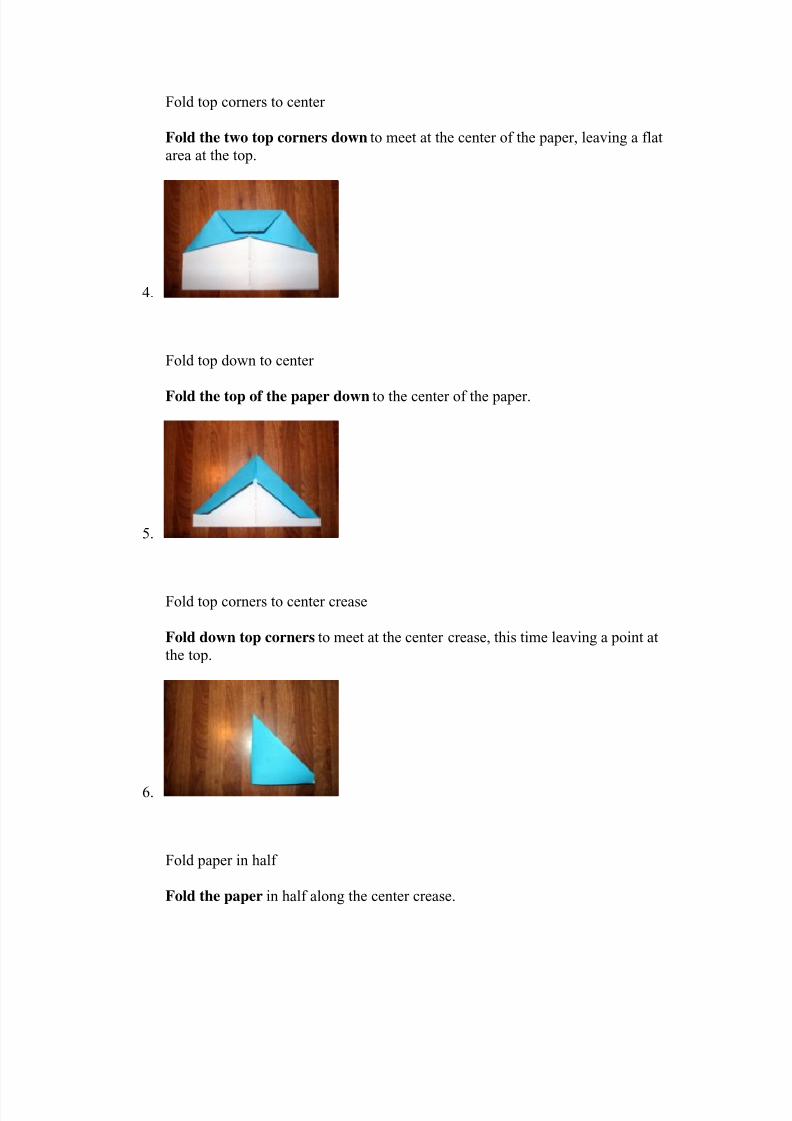
Fold top corners to center
Fold the two top corners down to meet at the center of the paper, leaving a flat
area at the top.
4.
Fold top down to center
Fold the top of the paper down to the center of the paper.
5.
Fold top corners to center crease
Fold down top corners to meet at the center crease, this time leaving a point at
the top.
6.
Fold paper in half
Fold the paper in half along the center crease.
8/14/2019 18 Paper Airplanes
http://slidepdf.com/reader/full/18-paper-airplanes 22/56
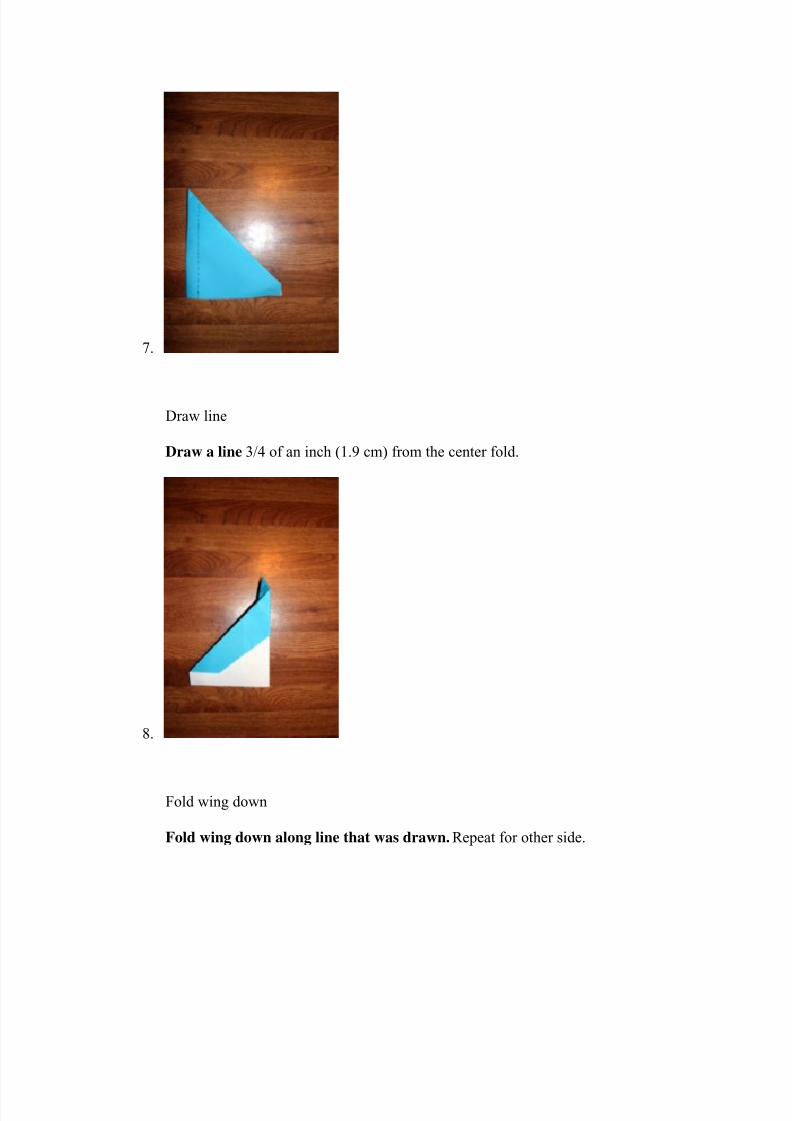
7.
Draw line
Draw a line 3/4 of an inch (1.9 cm) from the center fold.
8.
Fold wing down
Fold wing down along line that was drawn. Repeat for other side.
8/14/2019 18 Paper Airplanes
http://slidepdf.com/reader/full/18-paper-airplanes 23/56
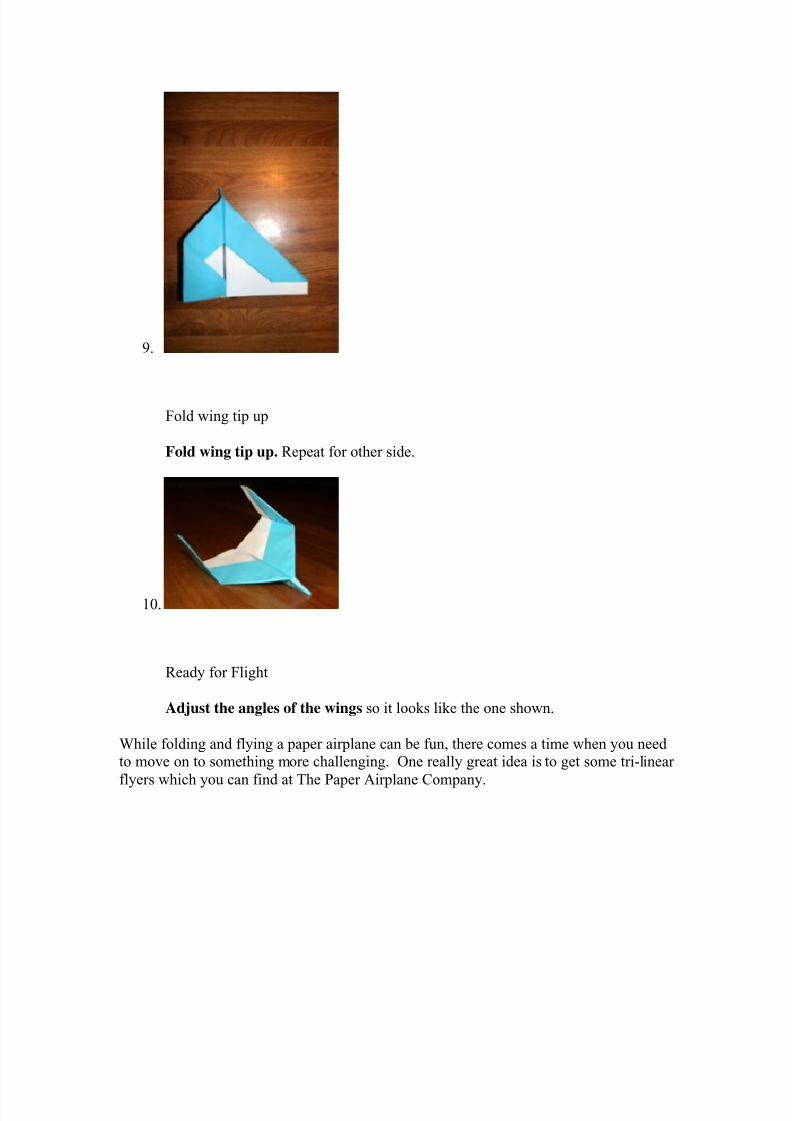
9.
Fold wing tip up
Fold wing tip up. Repeat for other side.
10.
Ready for Flight
Adjust the angles of the wings so it looks like the one shown.
While folding and flying a paper airplane can be fun, there comes a time when you needto move on to something more challenging. One really great idea is to get some tri-linear
flyers which you can find at The Paper Airplane Company.
8/14/2019 18 Paper Airplanes
http://slidepdf.com/reader/full/18-paper-airplanes 24/56
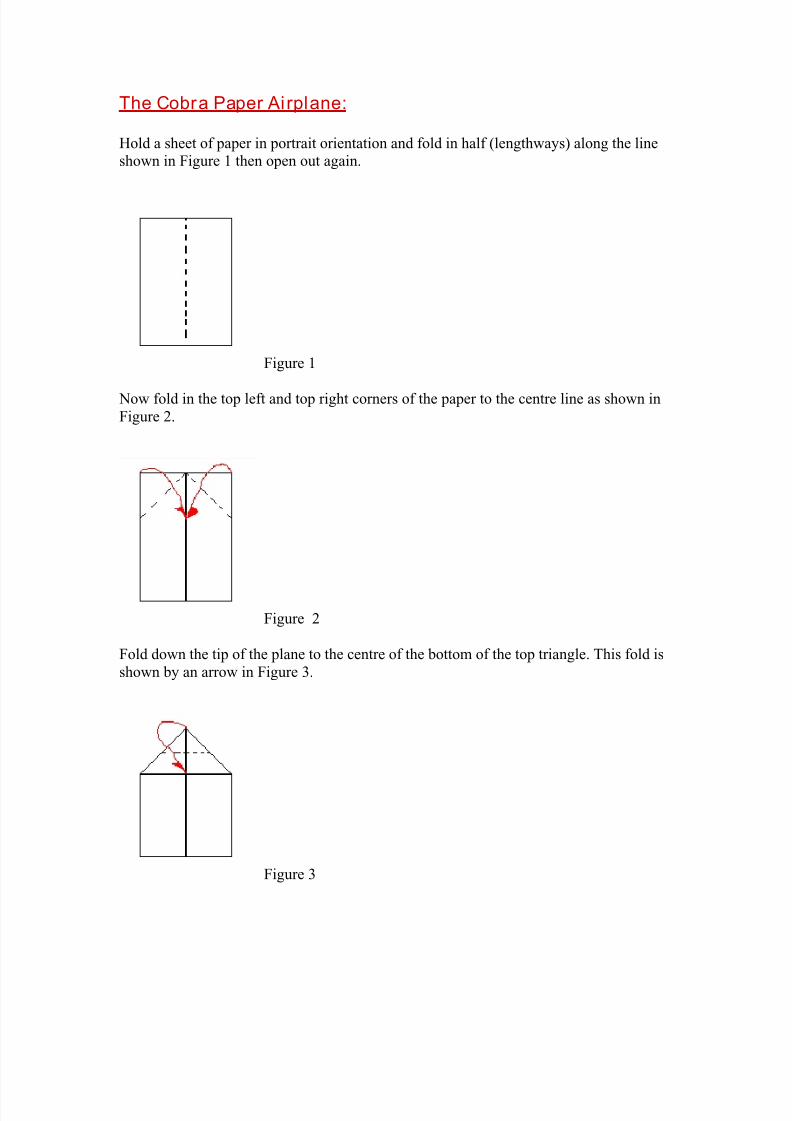
The Cobra Paper Ai rplane:
Hold a sheet of paper in portrait orientation and fold in half (lengthways) along the lineshown in Figure 1 then open out again.
Figure 1
Now fold in the top left and top right corners of the paper to the centre line as shown in
Figure 2.
Figure 2
Fold down the tip of the plane to the centre of the bottom of the top triangle. This fold is
shown by an arrow in Figure 3.
Figure 3

8/14/2019 18 Paper Airplanes
http://slidepdf.com/reader/full/18-paper-airplanes 25/56
Now comes the first tricky bit. Open up the paper to it's original form so that the dotted
lines shown in Figure 4 mark out the creased lines on the paper.
• Next, pull in the corners and top centre of the paper along the arrows shown in Figure4 so that the plane passes through the step shown in Figure 5 .
Figure 4
• The plane should fall relatively comfortably into the form shown in Figure 5 due to the
existing creases.
Figure 5
Fold down the trapezium shape at the top of Figure 6 along the bottom edge of the foldeddown paper. There are little dotted indicators at each end of the line in Figure 6 to
indicate which line to fold along.
Figure 6
8/14/2019 18 Paper Airplanes
http://slidepdf.com/reader/full/18-paper-airplanes 26/56
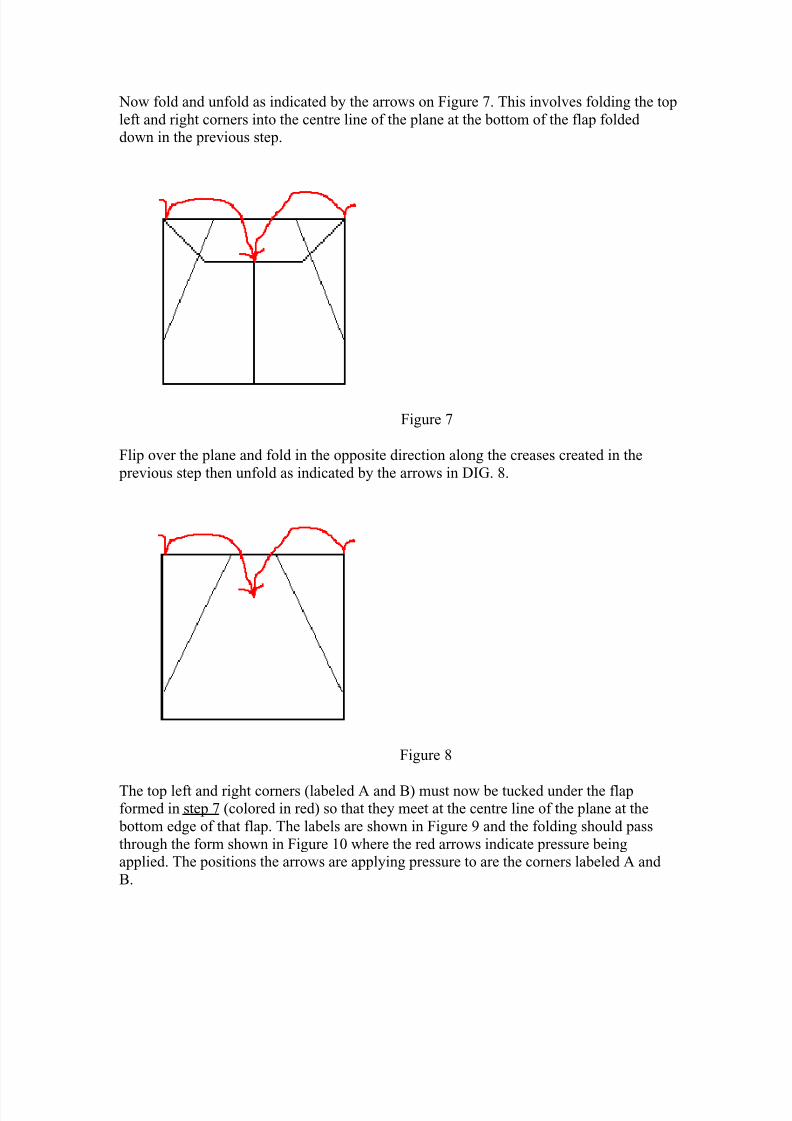
Now fold and unfold as indicated by the arrows on Figure 7. This involves folding the top
left and right corners into the centre line of the plane at the bottom of the flap foldeddown in the previous step.
Figure 7
Flip over the plane and fold in the opposite direction along the creases created in the
previous step then unfold as indicated by the arrows in DIG. 8.
Figure 8
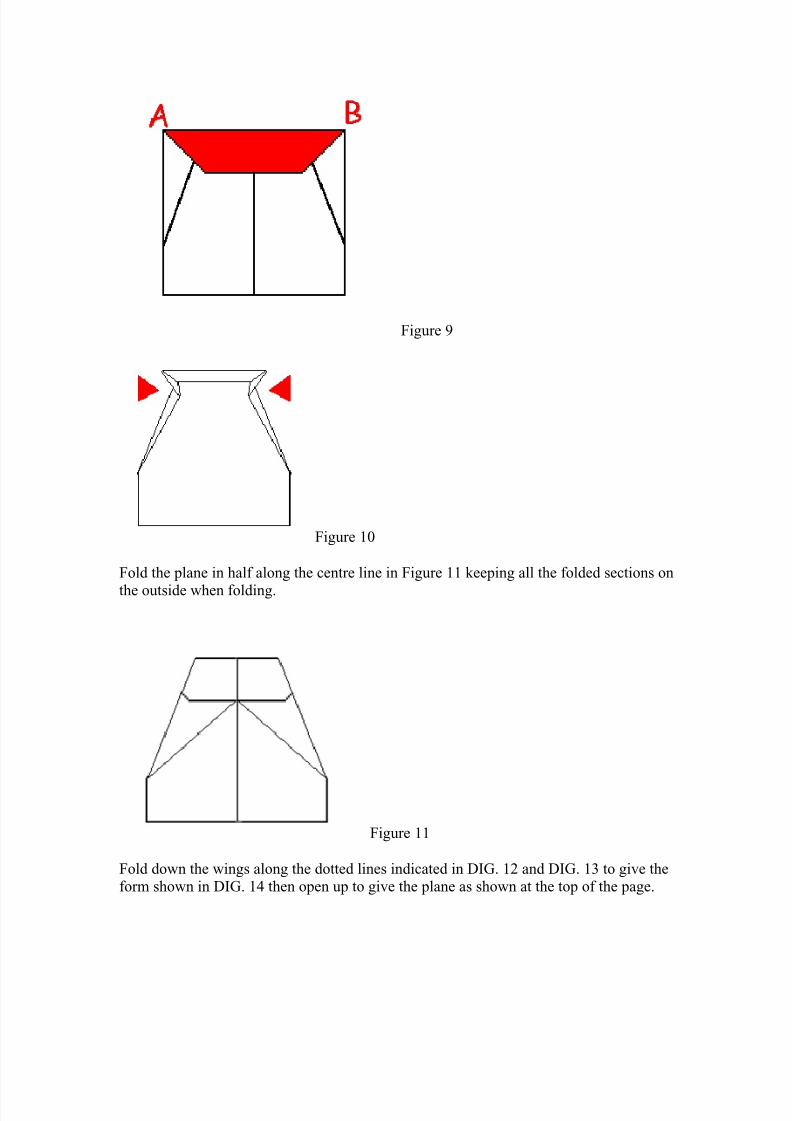
The top left and right corners (labeled A and B) must now be tucked under the flapformed in step 7 (colored in red) so that they meet at the centre line of the plane at the
bottom edge of that flap. The labels are shown in Figure 9 and the folding should pass
through the form shown in Figure 10 where the red arrows indicate pressure beingapplied. The positions the arrows are applying pressure to are the corners labeled A and
B.
8/14/2019 18 Paper Airplanes
http://slidepdf.com/reader/full/18-paper-airplanes 27/56
Figure 9
Figure 10
Fold the plane in half along the centre line in Figure 11 keeping all the folded sections on
the outside when folding.
Figure 11
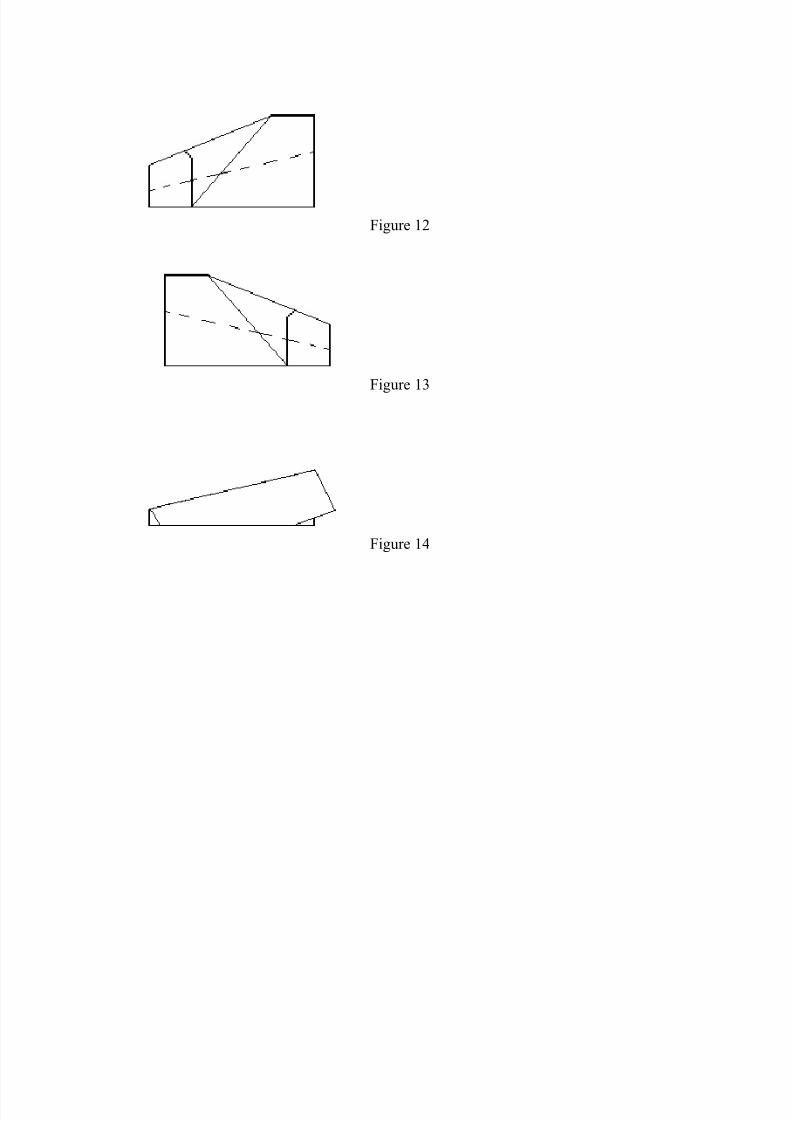
Fold down the wings along the dotted lines indicated in DIG. 12 and DIG. 13 to give theform shown in DIG. 14 then open up to give the plane as shown at the top of the page.
8/14/2019 18 Paper Airplanes
http://slidepdf.com/reader/full/18-paper-airplanes 28/56
Figure 12
Figure 13
Figure 14
8/14/2019 18 Paper Airplanes
http://slidepdf.com/reader/full/18-paper-airplanes 29/56
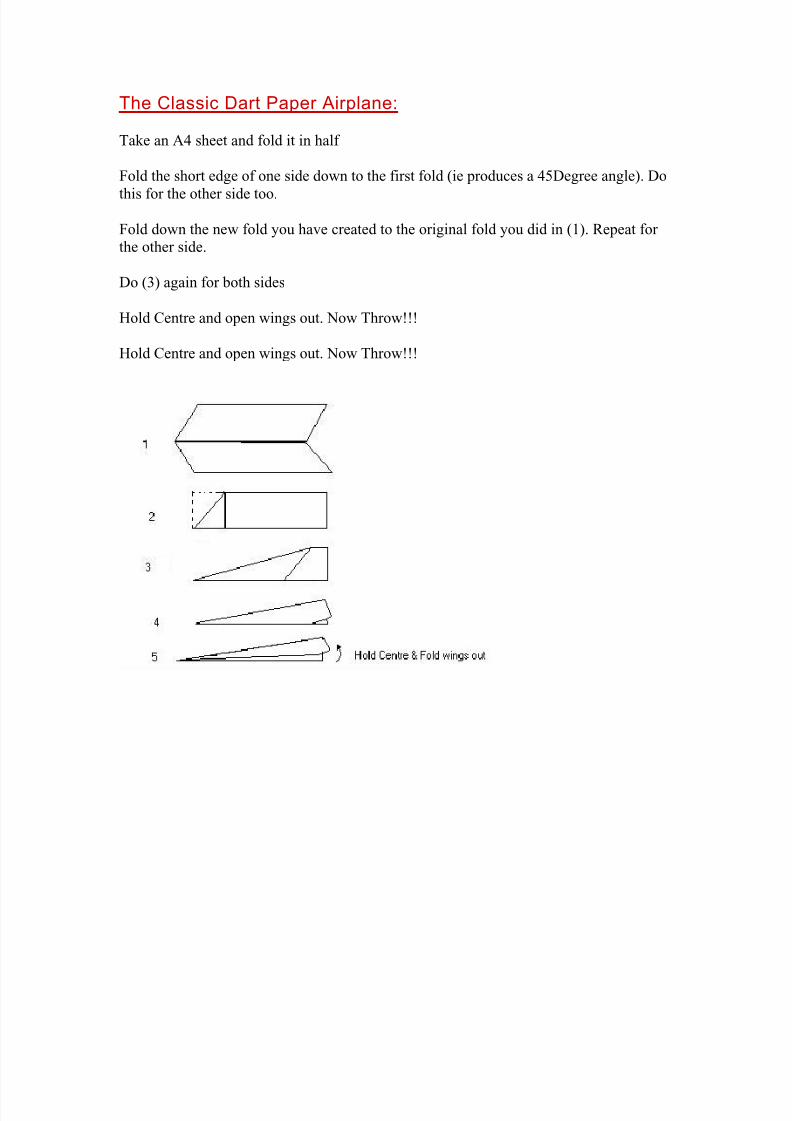
The Classic Dart Paper Airplane:
Take an A4 sheet and fold it in half
Fold the short edge of one side down to the first fold (ie produces a 45Degree angle). Do
this for the other side too.
Fold down the new fold you have created to the original fold you did in (1). Repeat forthe other side.
Do (3) again for both sides
Hold Centre and open wings out. Now Throw!!!
Hold Centre and open wings out. Now Throw!!!
8/14/2019 18 Paper Airplanes
http://slidepdf.com/reader/full/18-paper-airplanes 30/56
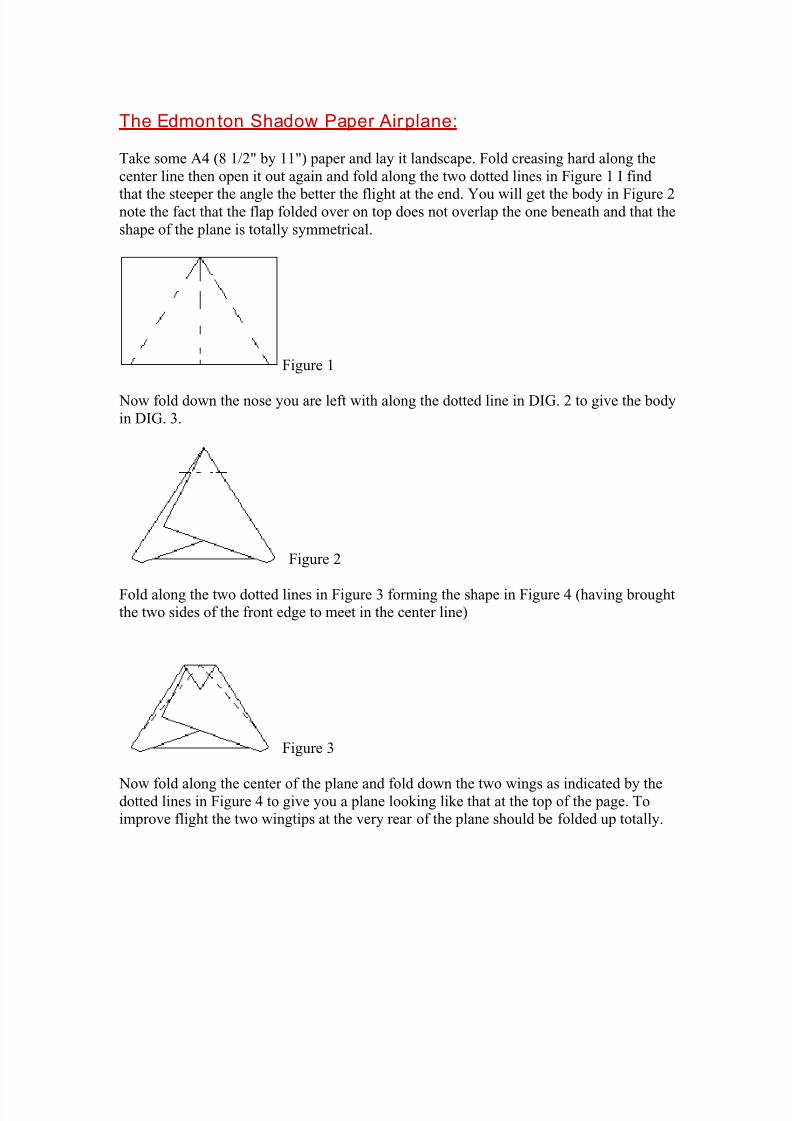
The Edmonton Shadow Paper Airplane:
Take some A4 (8 1/2" by 11") paper and lay it landscape. Fold creasing hard along the
center line then open it out again and fold along the two dotted lines in Figure 1 I find
that the steeper the angle the better the flight at the end. You will get the body in Figure 2note the fact that the flap folded over on top does not overlap the one beneath and that the
shape of the plane is totally symmetrical.
Figure 1
Now fold down the nose you are left with along the dotted line in DIG. 2 to give the body
in DIG. 3.
Figure 2
Fold along the two dotted lines in Figure 3 forming the shape in Figure 4 (having broughtthe two sides of the front edge to meet in the center line)
Figure 3
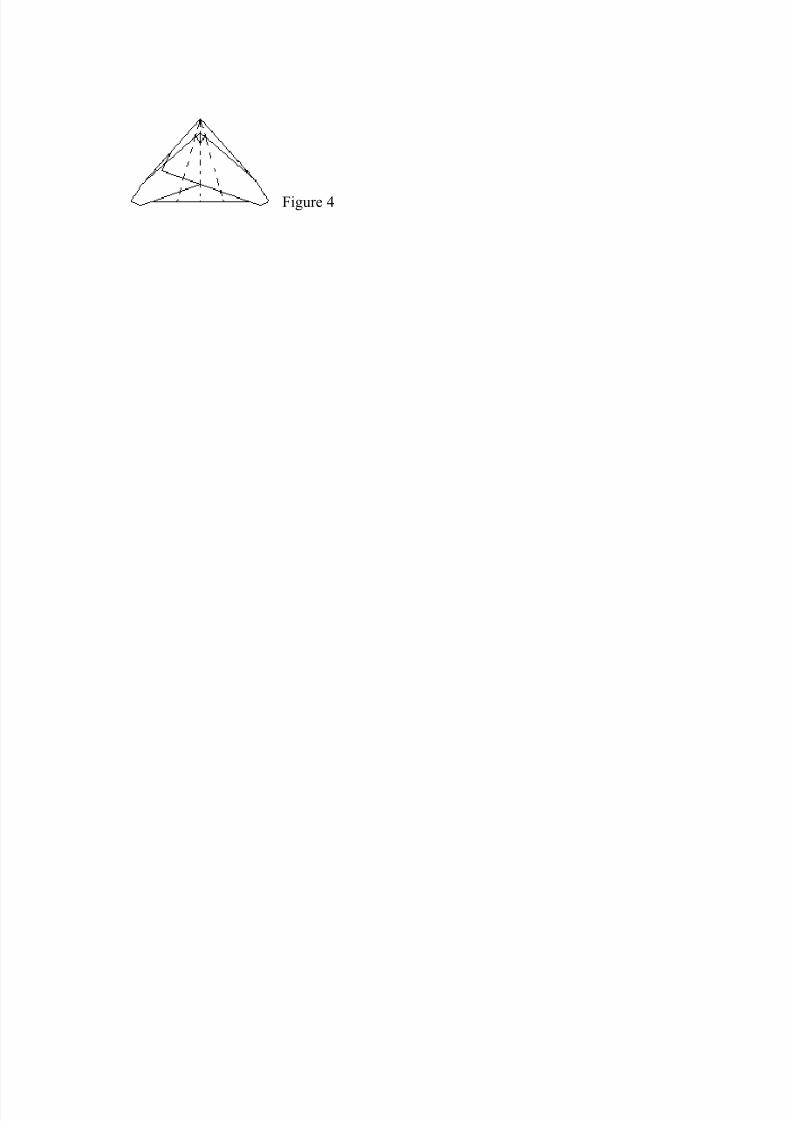
Now fold along the center of the plane and fold down the two wings as indicated by thedotted lines in Figure 4 to give you a plane looking like that at the top of the page. Toimprove flight the two wingtips at the very rear of the plane should be folded up totally.
8/14/2019 18 Paper Airplanes
http://slidepdf.com/reader/full/18-paper-airplanes 31/56
Figure 4
8/14/2019 18 Paper Airplanes
http://slidepdf.com/reader/full/18-paper-airplanes 32/56
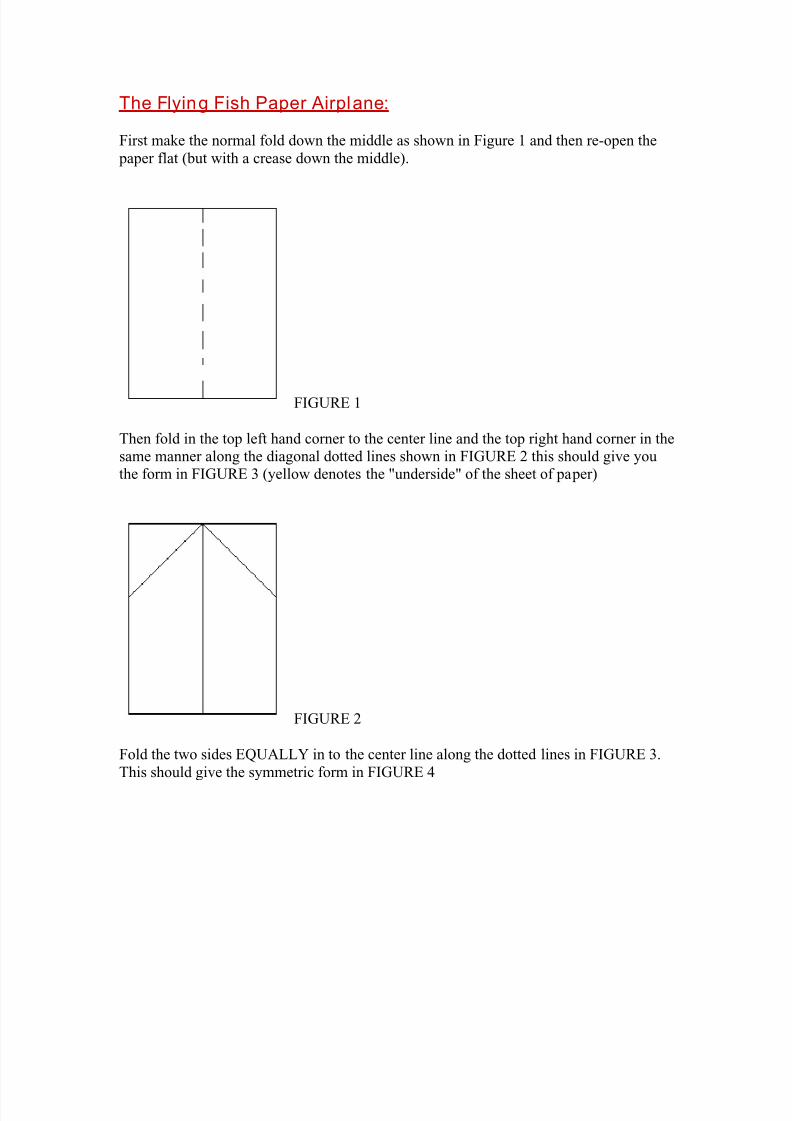
The Flying Fish Paper Airplane:
First make the normal fold down the middle as shown in Figure 1 and then re-open the
paper flat (but with a crease down the middle).
FIGURE 1
Then fold in the top left hand corner to the center line and the top right hand corner in thesame manner along the diagonal dotted lines shown in FIGURE 2 this should give youthe form in FIGURE 3 (yellow denotes the "underside" of the sheet of paper)
FIGURE 2
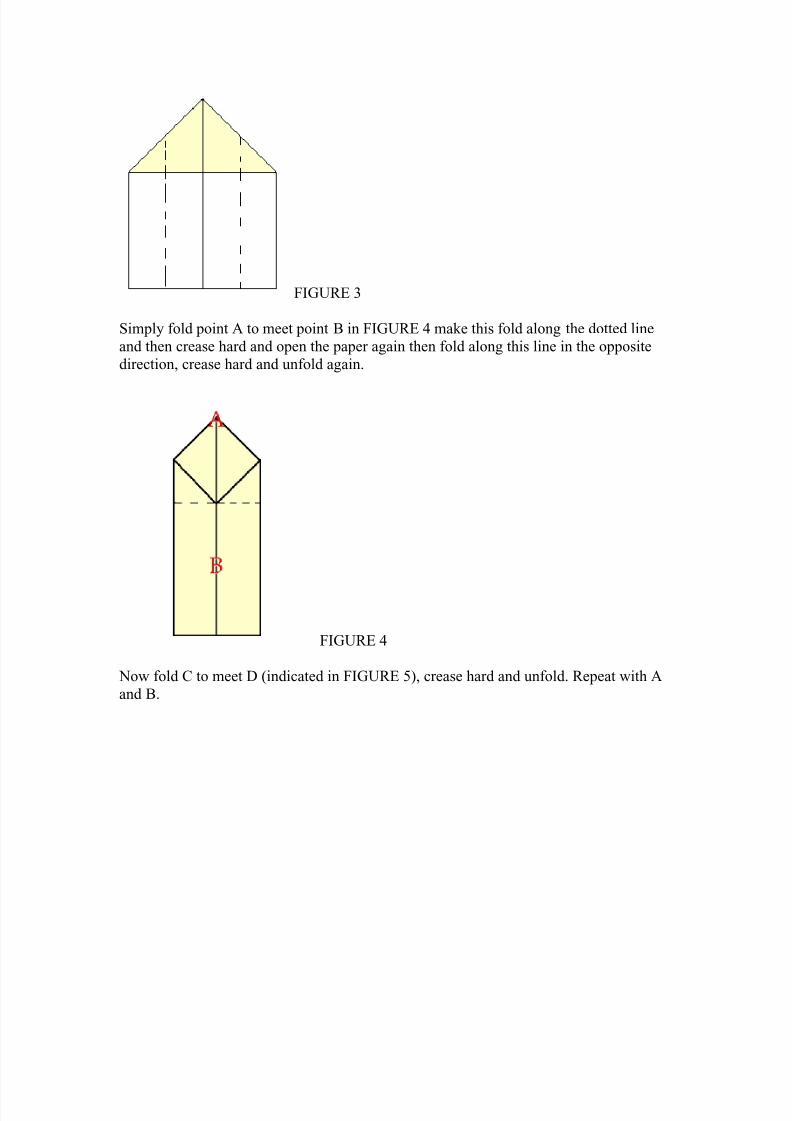
Fold the two sides EQUALLY in to the center line along the dotted lines in FIGURE 3.
This should give the symmetric form in FIGURE 4
8/14/2019 18 Paper Airplanes
http://slidepdf.com/reader/full/18-paper-airplanes 33/56
FIGURE 3
Simply fold point A to meet point B in FIGURE 4 make this fold along the dotted line
and then crease hard and open the paper again then fold along this line in the opposite
direction, crease hard and unfold again.
FIGURE 4
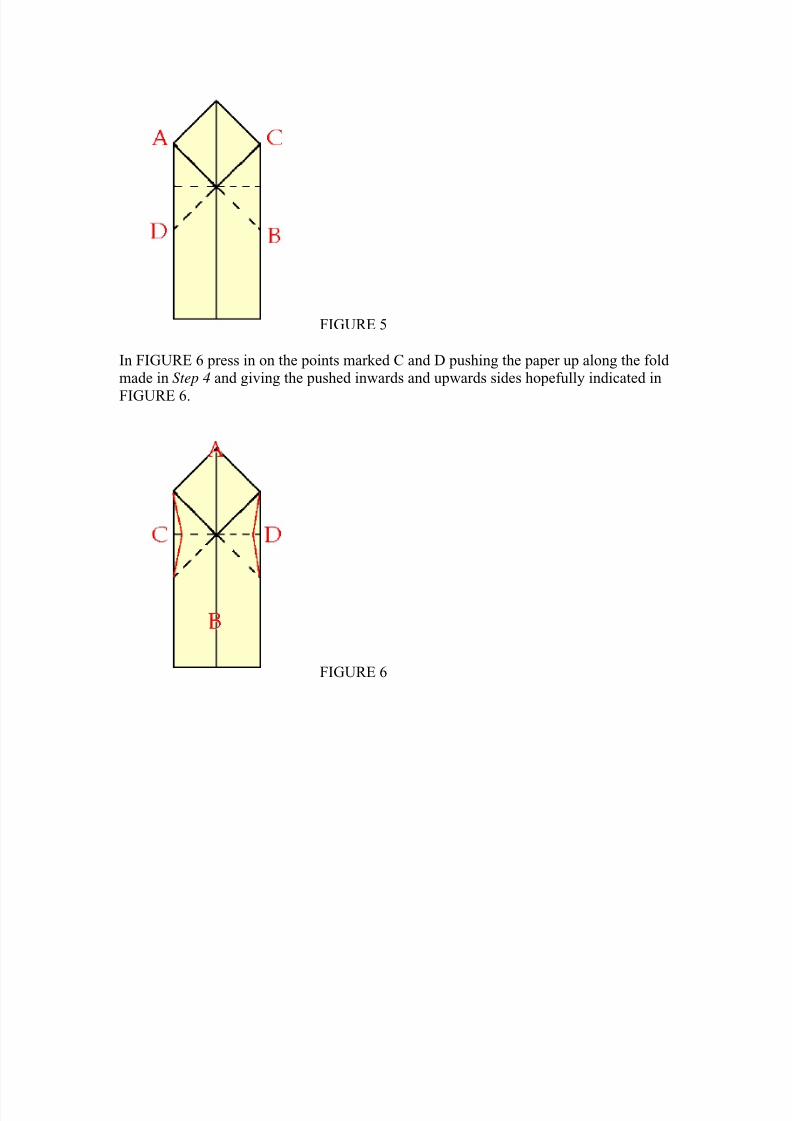
Now fold C to meet D (indicated in FIGURE 5), crease hard and unfold. Repeat with A
and B.
8/14/2019 18 Paper Airplanes
http://slidepdf.com/reader/full/18-paper-airplanes 34/56
FIGURE 5
In FIGURE 6 press in on the points marked C and D pushing the paper up along the foldmade in Step 4 and giving the pushed inwards and upwards sides hopefully indicated in
FIGURE 6.
FIGURE 6
8/14/2019 18 Paper Airplanes
http://slidepdf.com/reader/full/18-paper-airplanes 35/56
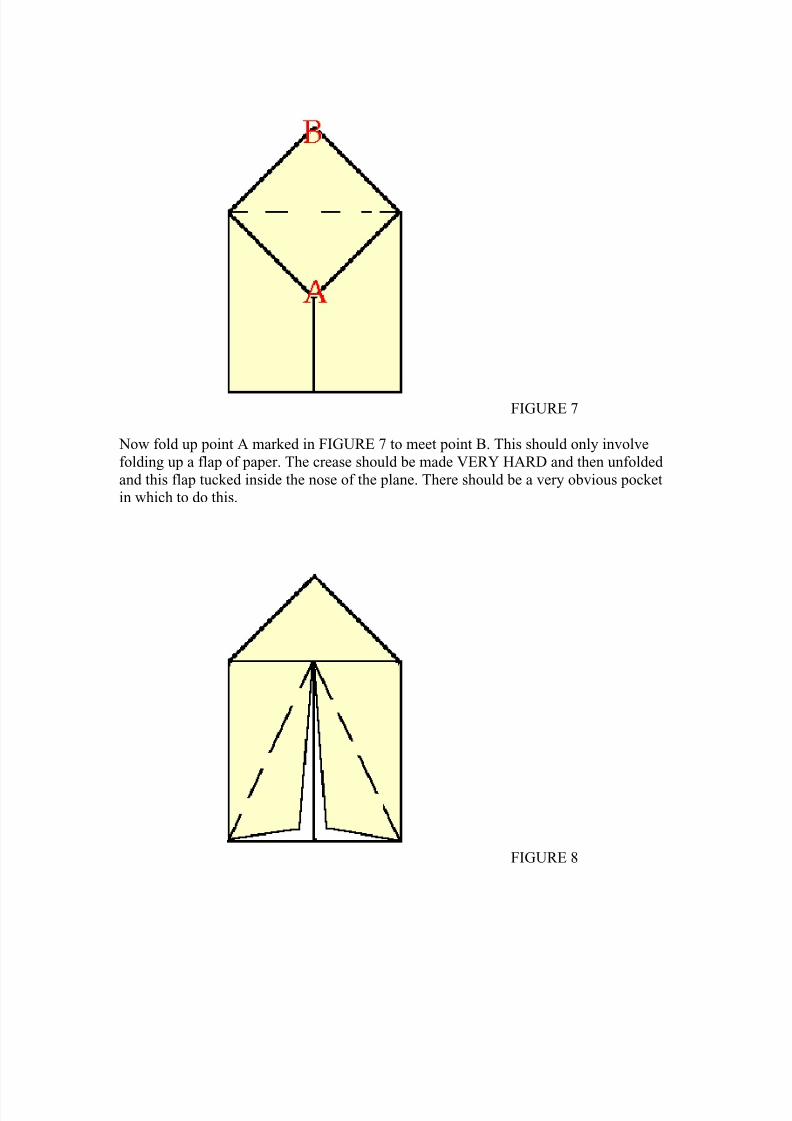
FIGURE 7
Now fold up point A marked in FIGURE 7 to meet point B. This should only involve
folding up a flap of paper. The crease should be made VERY HARD and then unfolded
and this flap tucked inside the nose of the plane. There should be a very obvious pocketin which to do this.
FIGURE 8
8/14/2019 18 Paper Airplanes
http://slidepdf.com/reader/full/18-paper-airplanes 36/56
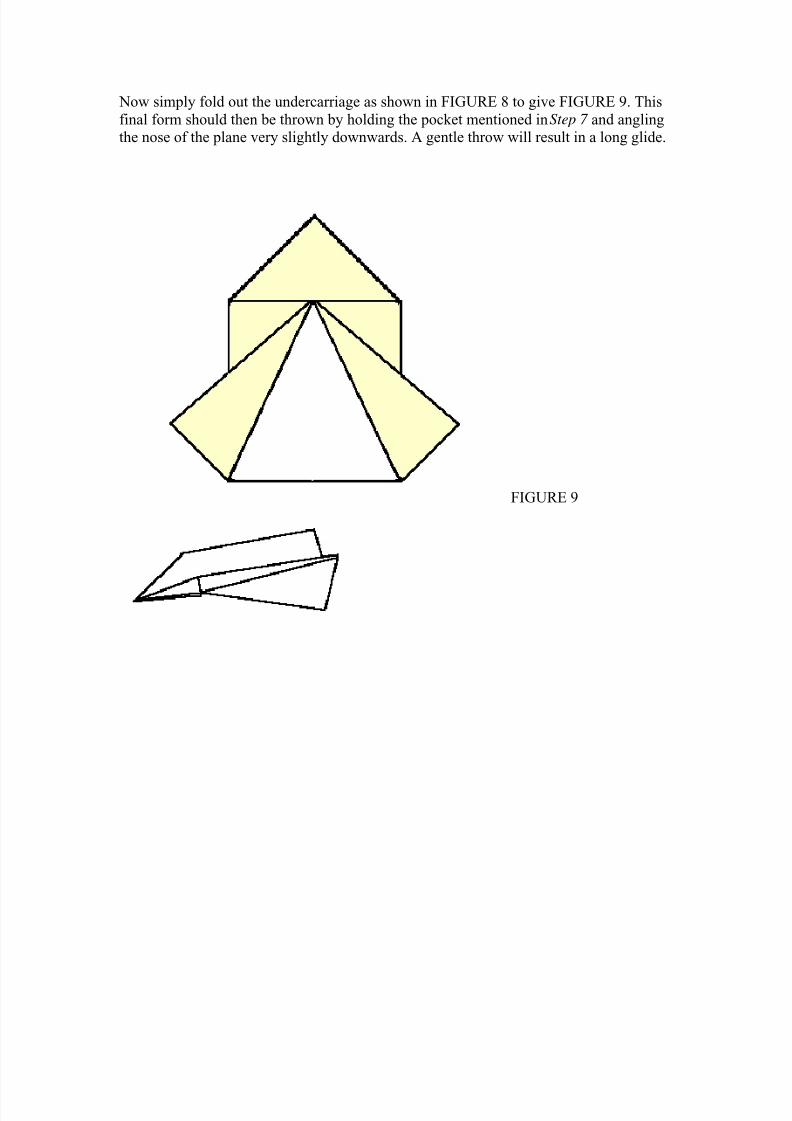
Now simply fold out the undercarriage as shown in FIGURE 8 to give FIGURE 9. This
final form should then be thrown by holding the pocket mentioned in Step 7 and anglingthe nose of the plane very slightly downwards. A gentle throw will result in a long glide.
FIGURE 9
8/14/2019 18 Paper Airplanes
http://slidepdf.com/reader/full/18-paper-airplanes 37/56
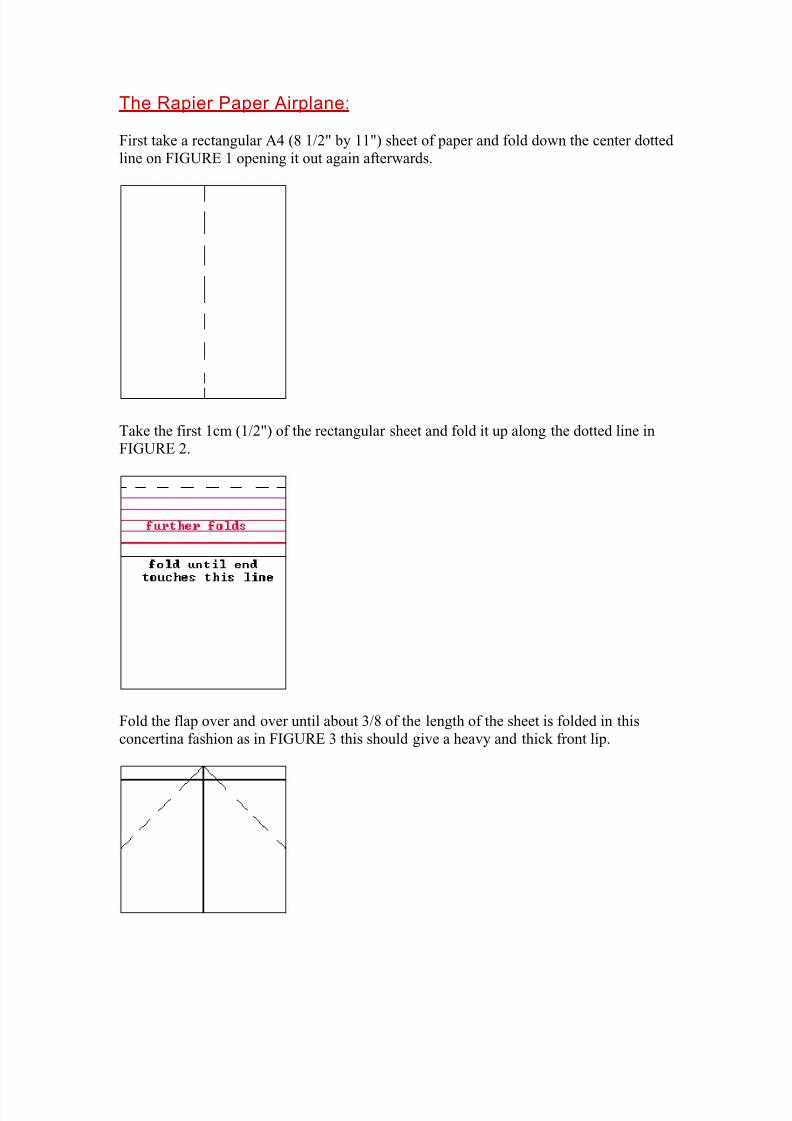
The Rapier Paper Airplane:
First take a rectangular A4 (8 1/2" by 11") sheet of paper and fold down the center dotted
line on FIGURE 1 opening it out again afterwards.
Take the first 1cm (1/2") of the rectangular sheet and fold it up along the dotted line in
FIGURE 2.
Fold the flap over and over until about 3/8 of the length of the sheet is folded in this
concertina fashion as in FIGURE 3 this should give a heavy and thick front lip.
8/14/2019 18 Paper Airplanes
http://slidepdf.com/reader/full/18-paper-airplanes 38/56
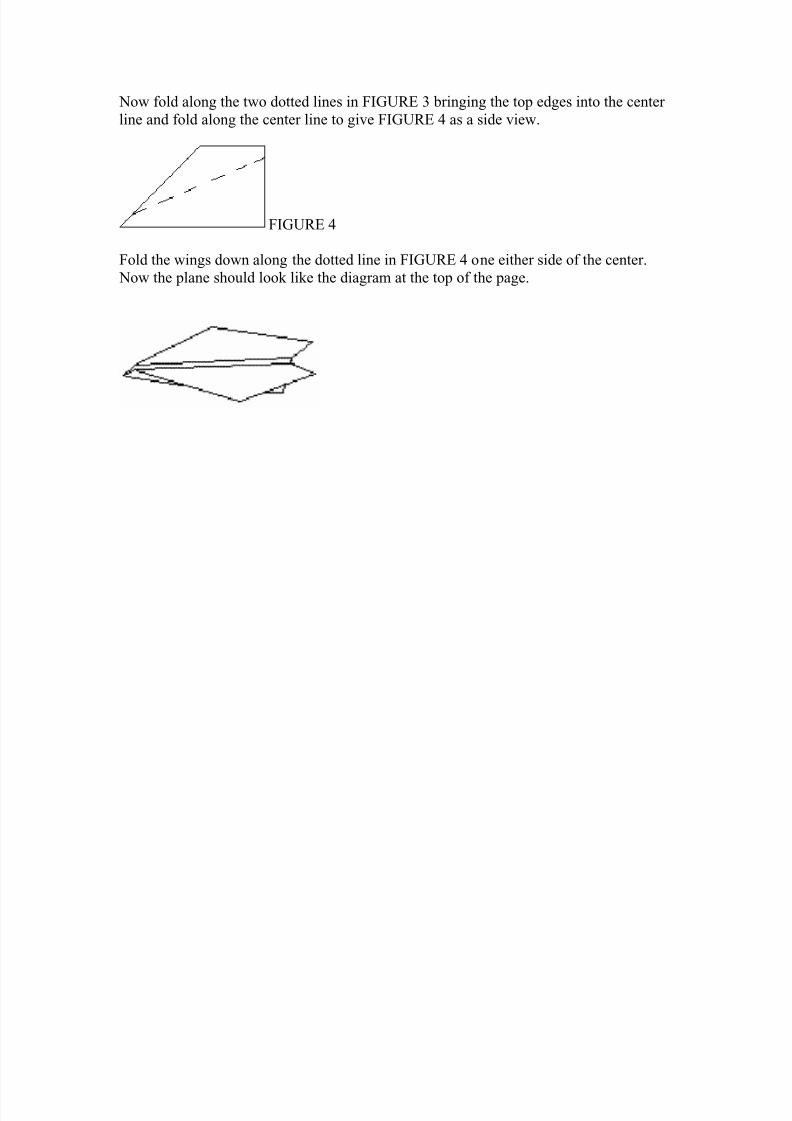
Now fold along the two dotted lines in FIGURE 3 bringing the top edges into the center
line and fold along the center line to give FIGURE 4 as a side view.
FIGURE 4
Fold the wings down along the dotted line in FIGURE 4 one either side of the center.
Now the plane should look like the diagram at the top of the page.
8/14/2019 18 Paper Airplanes
http://slidepdf.com/reader/full/18-paper-airplanes 39/56
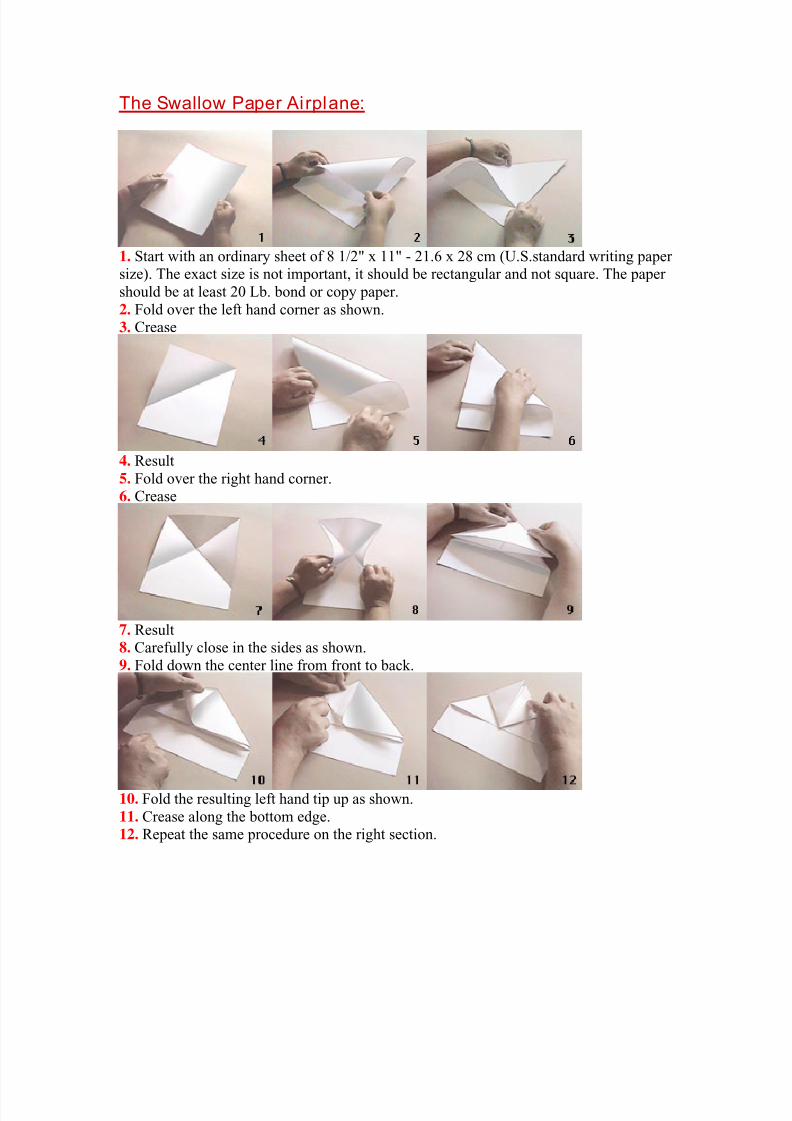
The Swallow Paper Airplane:
1. Start with an ordinary sheet of 8 1/2" x 11" - 21.6 x 28 cm (U.S.standard writing papersize). The exact size is not important, it should be rectangular and not square. The paper
should be at least 20 Lb. bond or copy paper.
2. Fold over the left hand corner as shown.
3. Crease
4. Result
5. Fold over the right hand corner.6. Crease
7. Result8. Carefully close in the sides as shown.
9. Fold down the center line from front to back.
10. Fold the resulting left hand tip up as shown.
11. Crease along the bottom edge.12. Repeat the same procedure on the right section.
8/14/2019 18 Paper Airplanes
http://slidepdf.com/reader/full/18-paper-airplanes 40/56
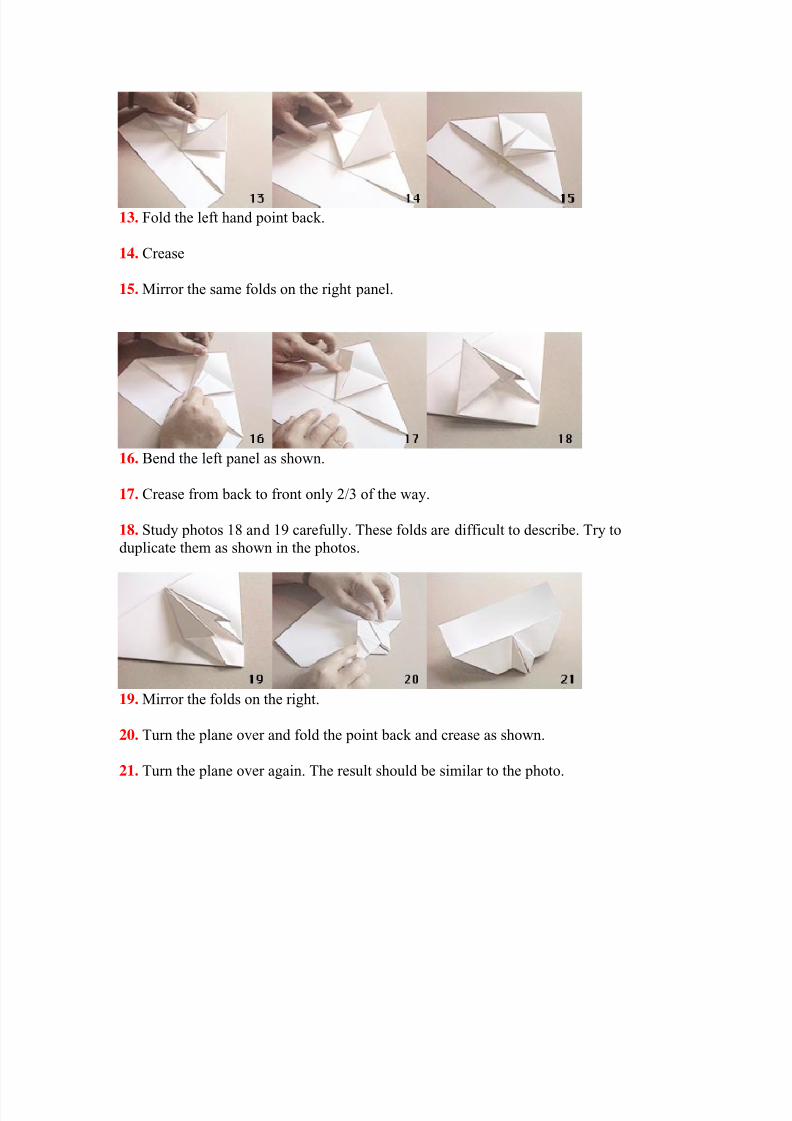
13. Fold the left hand point back.
14. Crease
15. Mirror the same folds on the right panel.
16. Bend the left panel as shown.
17. Crease from back to front only 2/3 of the way.
18. Study photos 18 and 19 carefully. These folds are difficult to describe. Try to
duplicate them as shown in the photos.
19. Mirror the folds on the right.
20. Turn the plane over and fold the point back and crease as shown.
21. Turn the plane over again. The result should be similar to the photo.
8/14/2019 18 Paper Airplanes
http://slidepdf.com/reader/full/18-paper-airplanes 41/56
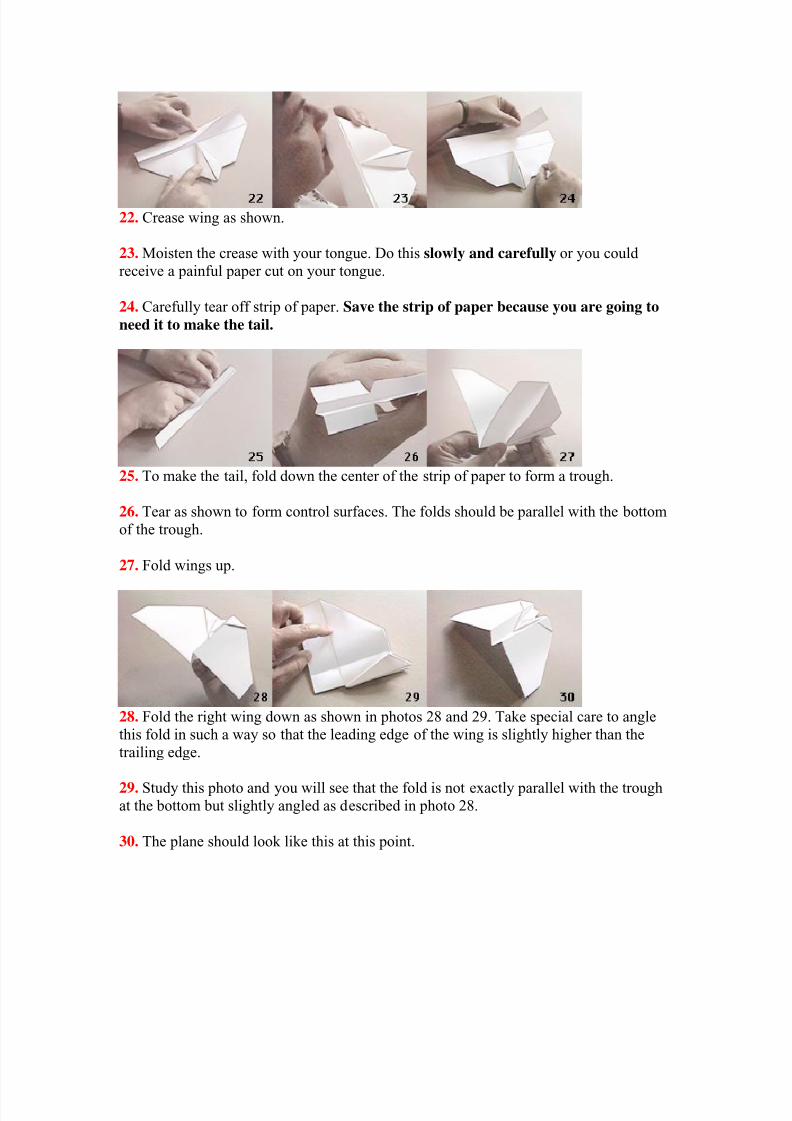
22. Crease wing as shown.
23. Moisten the crease with your tongue. Do this slowly and carefully or you could
receive a painful paper cut on your tongue.
24. Carefully tear off strip of paper. Save the strip of paper because you are going to
need it to make the tail.
25. To make the tail, fold down the center of the strip of paper to form a trough.
26. Tear as shown to form control surfaces. The folds should be parallel with the bottom
of the trough.
27. Fold wings up.
28. Fold the right wing down as shown in photos 28 and 29. Take special care to angle
this fold in such a way so that the leading edge of the wing is slightly higher than the
trailing edge.
29. Study this photo and you will see that the fold is not exactly parallel with the troughat the bottom but slightly angled as described in photo 28.
30. The plane should look like this at this point.

8/14/2019 18 Paper Airplanes
http://slidepdf.com/reader/full/18-paper-airplanes 42/56
31. Bend the wingtips up.
32. Insert tail into slot under wing.
33. Finished at last!
34. Aircraft shown with landing gears down. Note: the craft does not fly as well with the
gears down.
35. Ready to fly!
Preflight inspection - Before you fly the model plane for the first time you should examine it carefully looking
directly at the front and the rear. Just like a real airplane, the left and right side must bethe same, that is a mirror image of each other. If one wing is higher then the other or the
surfaces are not at the same angle, or the tail is crooked, then the plane is likely to fly
poorly. Make any adjustments to correct these problems now.
Flight techniques - This is the fun part, learning to fly. The airplane can be launched with force or softly.
Launching it on a windy day directly into the breeze causes it to climb into a half barrel
roll. For a second it will fly upside down and then flip over and fly a long distance withthe wind. On calm days you can launch it gently horizontally. It has a long glide path and
will generally go in a straight line or go into a gentle curve.
Fine tuning - If you find that the plane is banking to the left or right, you can correct this by
experimenting with bends on the control surfaces. To gain extra control, cut flaps on the
rear edge of the wings and bend the flaps up or down as needed. You can also try bending
the wing tips down instead of up.
8/14/2019 18 Paper Airplanes
http://slidepdf.com/reader/full/18-paper-airplanes 43/56
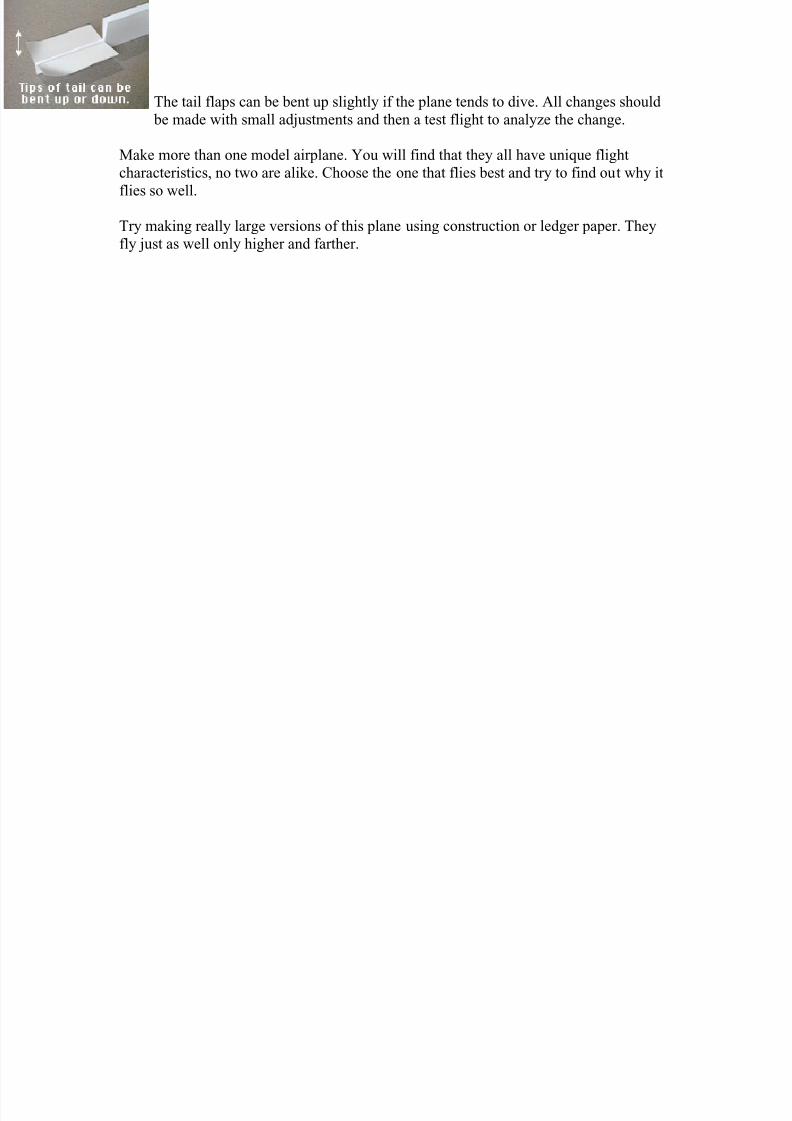
The tail flaps can be bent up slightly if the plane tends to dive. All changes should
be made with small adjustments and then a test flight to analyze the change.
Make more than one model airplane. You will find that they all have unique flight
characteristics, no two are alike. Choose the one that flies best and try to find out why it
flies so well.
Try making really large versions of this plane using construction or ledger paper. They
fly just as well only higher and farther.
8/14/2019 18 Paper Airplanes
http://slidepdf.com/reader/full/18-paper-airplanes 44/56
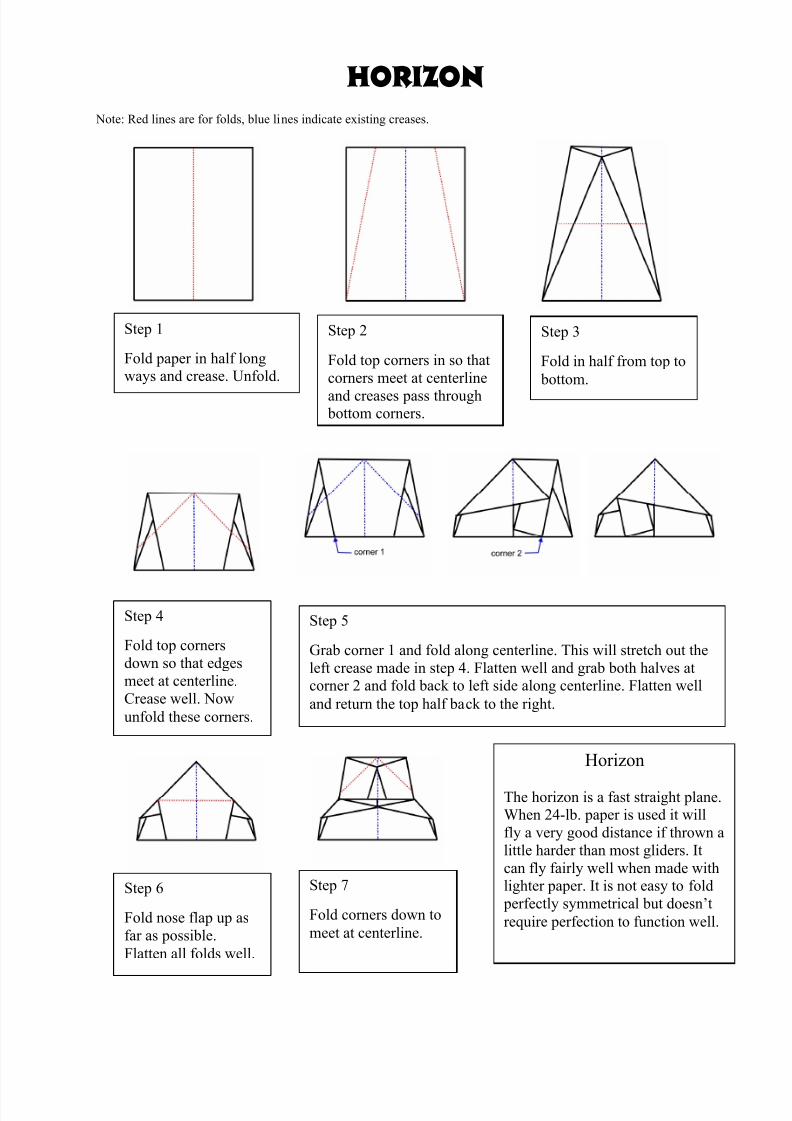
Horizon
Note: Red lines are for folds, blue lines indicate existing creases.
Step 1
Fold paper in half longways and crease. Unfold.
Step 4
Fold top corners
down so that edges
meet at centerline.
Crease well. Now
unfold these corners.
Horizon
The horizon is a fast straight plane.When 24-lb. paper is used it will
fly a very good distance if thrown a
little harder than most gliders. It
can fly fairly well when made withlighter paper. It is not easy to fold
perfectly symmetrical but doesn’t
require perfection to function well.
Step 2
Fold top corners in so that
corners meet at centerline
and creases pass through bottom corners.
Step 3
Fold in half from top to
bottom.
Step 5
Grab corner 1 and fold along centerline. This will stretch out the
left crease made in step 4. Flatten well and grab both halves atcorner 2 and fold back to left side along centerline. Flatten well
and return the top half back to the right.
Step 6
Fold nose flap up as
far as possible.
Flatten all folds well.
Step 7
Fold corners down to
meet at centerline.

8/14/2019 18 Paper Airplanes
http://slidepdf.com/reader/full/18-paper-airplanes 45/56
Step 8
Fold cornersshown and tuck in
behind inner flaps.
Flight InstructionsMake sure wings are level (orslightly up) and fins are straight up.
Throw level at a “medium” or a
“high” speed. Trim per generalinstructions if required but the
plane seems to do well “as folded”
on a variety of paper. It may do better if leading edges of wings are
taped together.
Step 11
Fold fins up 1 1/8”
from edges.
Step 9
Fold in half along
centerline withsmooth side on
inside.
Step 10
Fold wings over ¾”
from centerline. Foldtail on diagonal 2” up
from bottom edge
down to where the
wing crease meets the back edge. Crease.
Unfold and use index
finger to push intocenter of body.
8/14/2019 18 Paper Airplanes
http://slidepdf.com/reader/full/18-paper-airplanes 46/56
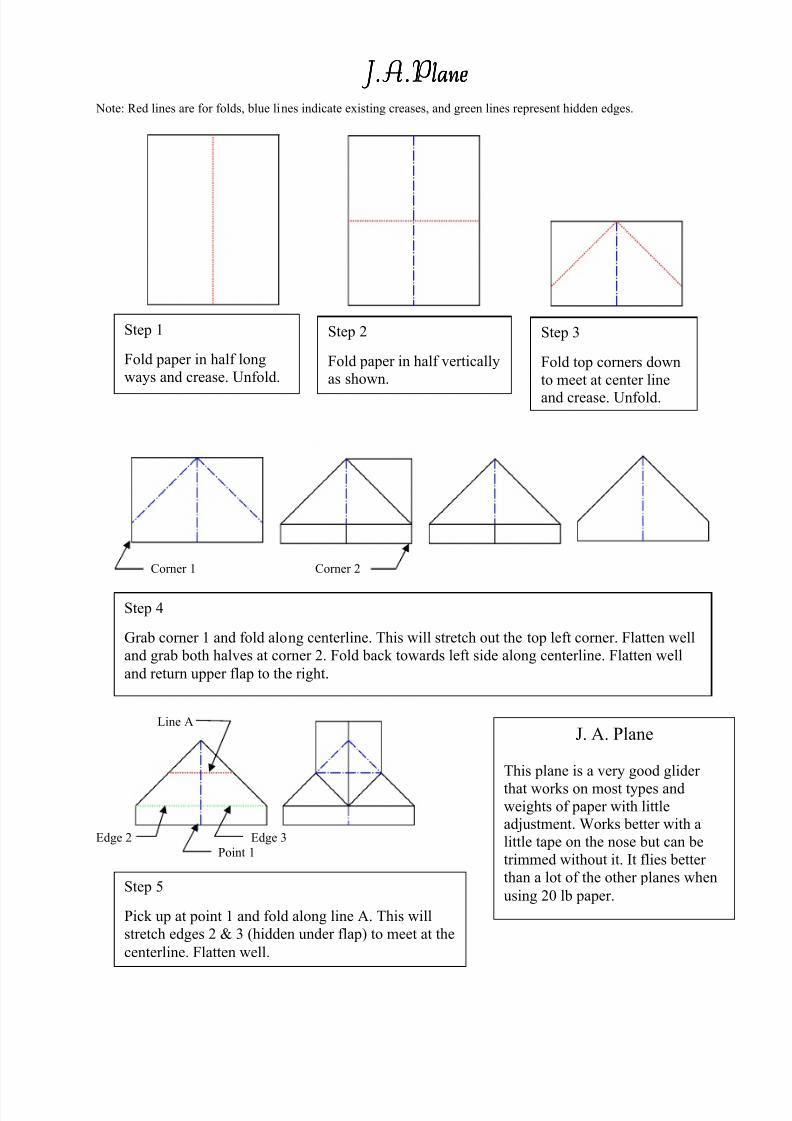
J.A.P J.A.P J.A.P J.A.Planelanelanelane Note: Red lines are for folds, blue lines indicate existing creases, and green lines represent hidden edges.
Corner 1 Corner 2
Edge 2 Edge 3
Point 1
Step 1
Fold paper in half long
ways and crease. Unfold.
Step 4
Grab corner 1 and fold along centerline. This will stretch out the top left corner. Flatten well
and grab both halves at corner 2. Fold back towards left side along centerline. Flatten well
and return upper flap to the right.
J. A. Plane
This plane is a very good glider
that works on most types andweights of paper with littleadjustment. Works better with a
little tape on the nose but can be
trimmed without it. It flies better
than a lot of the other planes when
using 20 lb paper.
Step 2
Fold paper in half verticallyas shown.
Step 3
Fold top corners down
to meet at center line
and crease. Unfold.
Step 5
Pick up at point 1 and fold along line A. This will
stretch edges 2 & 3 (hidden under flap) to meet at the
centerline. Flatten well.
Line A
8/14/2019 18 Paper Airplanes
http://slidepdf.com/reader/full/18-paper-airplanes 47/56
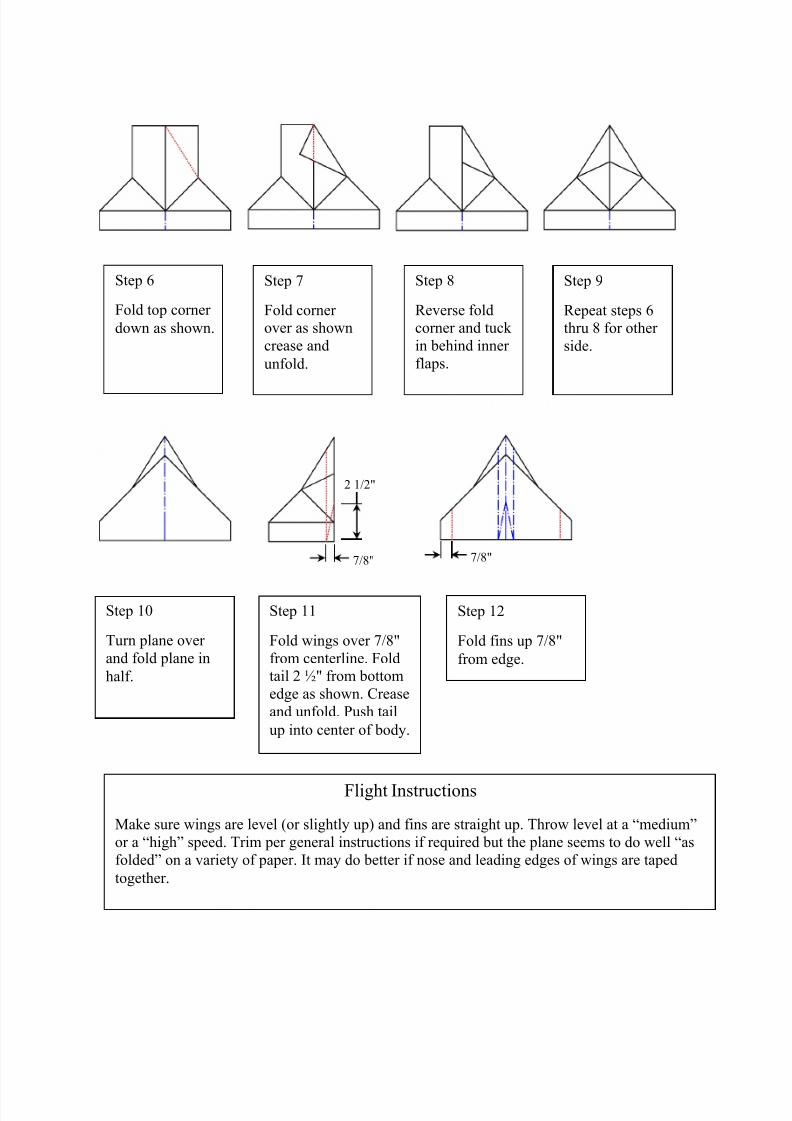
Step 6
Fold top corner
down as shown.
Flight Instructions
Make sure wings are level (or slightly up) and fins are straight up. Throw level at a “medium”
or a “high” speed. Trim per general instructions if required but the plane seems to do well “as
folded” on a variety of paper. It may do better if nose and leading edges of wings are taped
together.
Step 10
Turn plane over
and fold plane in
half.
Step 7
Fold cornerover as shown
crease and
unfold.
Step 8
Reverse foldcorner and tuck
in behind inner
flaps.
Step 9
Repeat steps 6thru 8 for other
side.
Step 11
Fold wings over 7/8"
from centerline. Foldtail 2 ½" from bottom
edge as shown. Crease
and unfold. Push tail
up into center of body.
Step 12
Fold fins up 7/8"
from edge.
7/8"
2 1/2"
7/8"
8/14/2019 18 Paper Airplanes
http://slidepdf.com/reader/full/18-paper-airplanes 48/56
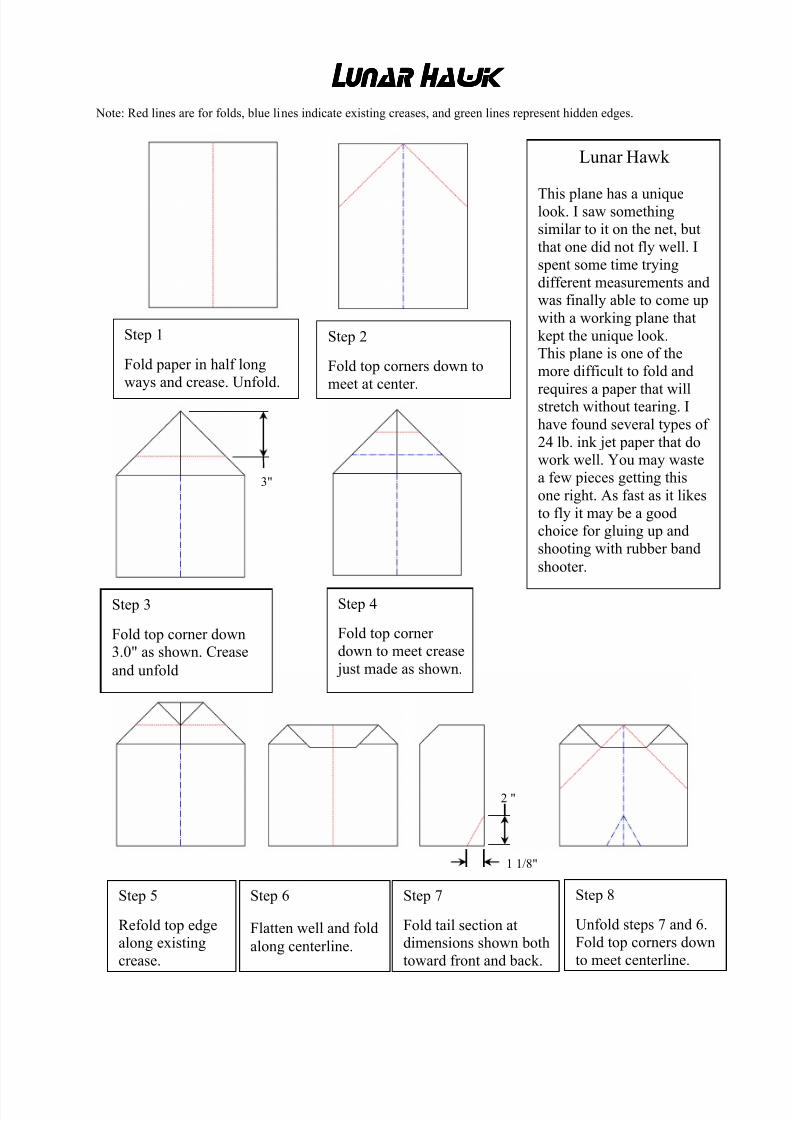
L LL Lunar unar unar unar H HH Hawk awk awk awk
Note: Red lines are for folds, blue lines indicate existing creases, and green lines represent hidden edges.
Step 1
Fold paper in half long
ways and crease. Unfold.
Step 3
Fold top corner down3.0" as shown. Crease
and unfold
Lunar Hawk
This plane has a uniquelook. I saw somethingsimilar to it on the net, but
that one did not fly well. I
spent some time trying
different measurements andwas finally able to come up
with a working plane that
kept the unique look.This plane is one of the
more difficult to fold and
requires a paper that willstretch without tearing. I
have found several types of
24 lb. ink jet paper that dowork well. You may waste
a few pieces getting this
one right. As fast as it likes
to fly it may be a goodchoice for gluing up and
shooting with rubber band
shooter.
Step 2
Fold top corners down to
meet at center.
Step 5
Refold top edgealong existing
crease.
Step 4
Fold top corner
down to meet crease
just made as shown.
Step 6
Flatten well and fold
along centerline.
Step 7
Fold tail section atdimensions shown both
toward front and back.
3"
1 1/8"
2 "
Step 8
Unfold steps 7 and 6.
Fold top corners down
to meet centerline.
8/14/2019 18 Paper Airplanes
http://slidepdf.com/reader/full/18-paper-airplanes 49/56
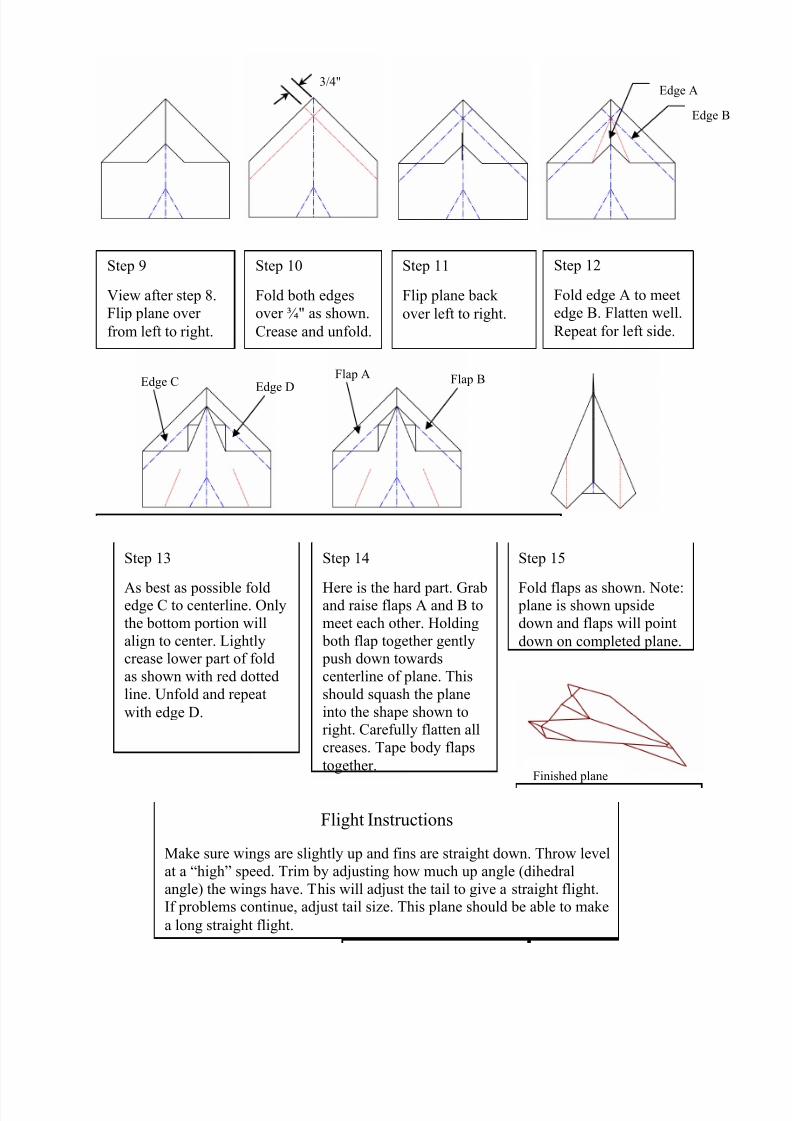
Step 9
View after step 8.
Flip plane over
from left to right.
Step 13
As best as possible foldedge C to centerline. Only
the bottom portion will
align to center. Lightlycrease lower part of fold
as shown with red dotted
line. Unfold and repeat
with edge D.
Step 14
Here is the hard part. Graband raise flaps A and B to
meet each other. Holding
both flap together gently push down towards
centerline of plane. This
should squash the plane
into the shape shown toright. Carefully flatten all
creases. Tape body flaps
together.
Edge B
Edge A
Flight Instructions
Make sure wings are slightly up and fins are straight down. Throw level
at a “high” speed. Trim by adjusting how much up angle (dihedral
angle) the wings have. This will adjust the tail to give a straight flight.If problems continue, adjust tail size. This plane should be able to make
a long straight flight.
Step 10
Fold both edges
over ¾" as shown.
Crease and unfold.
Step 11
Flip plane back
over left to right.
Step 12
Fold edge A to meet
edge B. Flatten well.
Repeat for left side.
Edge C
Edge D
3/4"
Step 15
Fold flaps as shown. Note: plane is shown upside
down and flaps will point
down on completed plane.
Flap A Flap B
Finished plane
8/14/2019 18 Paper Airplanes
http://slidepdf.com/reader/full/18-paper-airplanes 50/56
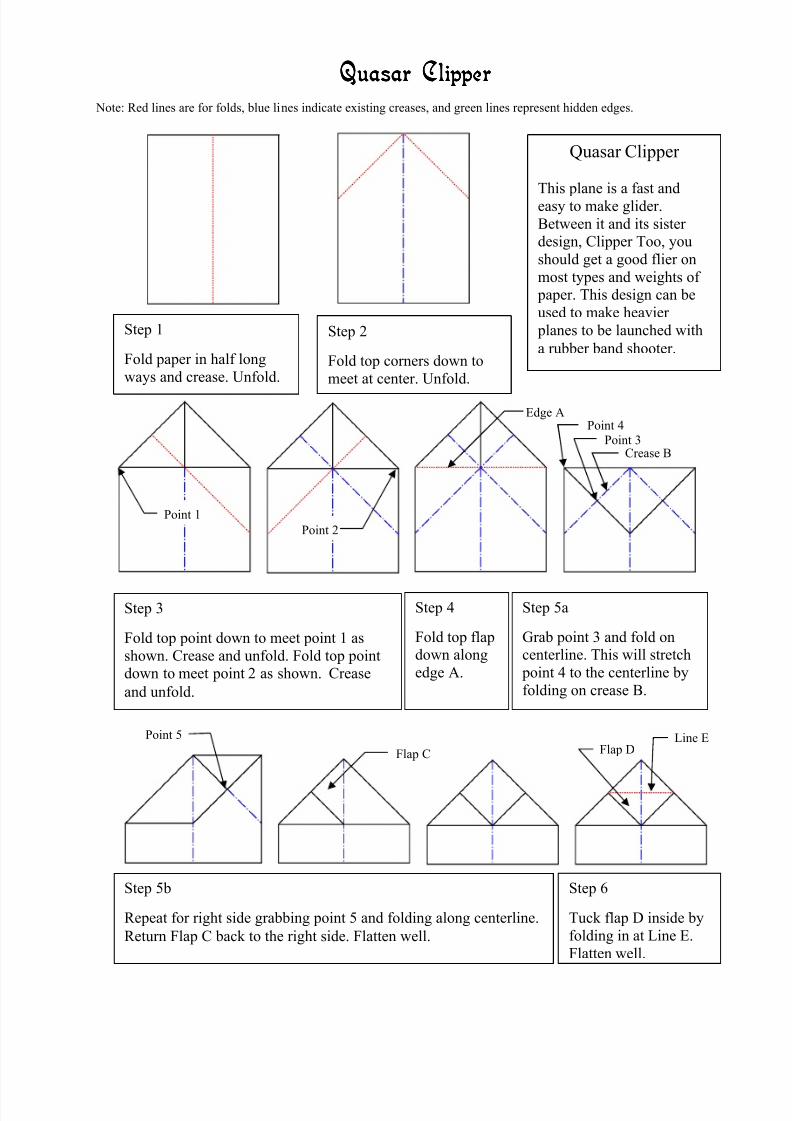
QQQQuasaruasaruasaruasar CCCClipperlipperlipperlipper Note: Red lines are for folds, blue lines indicate existing creases, and green lines represent hidden edges.
Step 1
Fold paper in half long
ways and crease. Unfold.
Step 3
Fold top point down to meet point 1 as
shown. Crease and unfold. Fold top pointdown to meet point 2 as shown. Crease
and unfold.
Quasar Clipper
This plane is a fast andeasy to make glider.
Between it and its sisterdesign, Clipper Too, you
should get a good flier on
most types and weights of paper. This design can be
used to make heavier
planes to be launched with
a rubber band shooter.Step 2
Fold top corners down to
meet at center. Unfold.
Step 5b
Repeat for right side grabbing point 5 and folding along centerline.
Return Flap C back to the right side. Flatten well.
Step 5a
Grab point 3 and fold oncenterline. This will stretch
point 4 to the centerline by
folding on crease B.
Step 4
Fold top flapdown along
edge A.
Point 3Crease B
Point 1
Point 2
Edge APoint 4
Step 6
Tuck flap D inside by
folding in at Line E.
Flatten well.
Flap D
Point 5
Flap C
Line E
8/14/2019 18 Paper Airplanes
http://slidepdf.com/reader/full/18-paper-airplanes 51/56
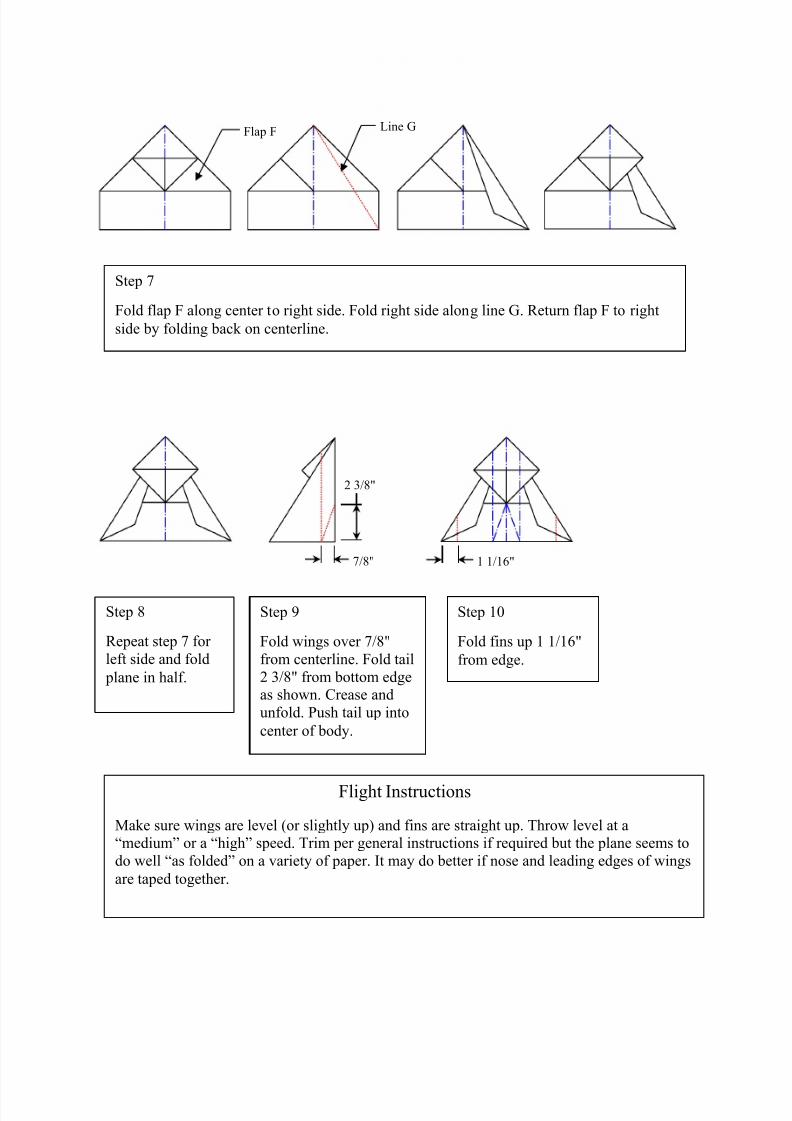
Step 7
Fold flap F along center to right side. Fold right side along line G. Return flap F to right
side by folding back on centerline.
Flight Instructions
Make sure wings are level (or slightly up) and fins are straight up. Throw level at a“medium” or a “high” speed. Trim per general instructions if required but the plane seems to
do well “as folded” on a variety of paper. It may do better if nose and leading edges of wings
are taped together.
Step 8
Repeat step 7 for
left side and fold
plane in half.
Step 9
Fold wings over 7/8"
from centerline. Fold tail
2 3/8" from bottom edgeas shown. Crease and
unfold. Push tail up into
center of body.
Step 10
Fold fins up 1 1/16"
from edge.
2 3/8"
7/8" 1 1/16"
Flap F Line G
8/14/2019 18 Paper Airplanes
http://slidepdf.com/reader/full/18-paper-airplanes 52/56
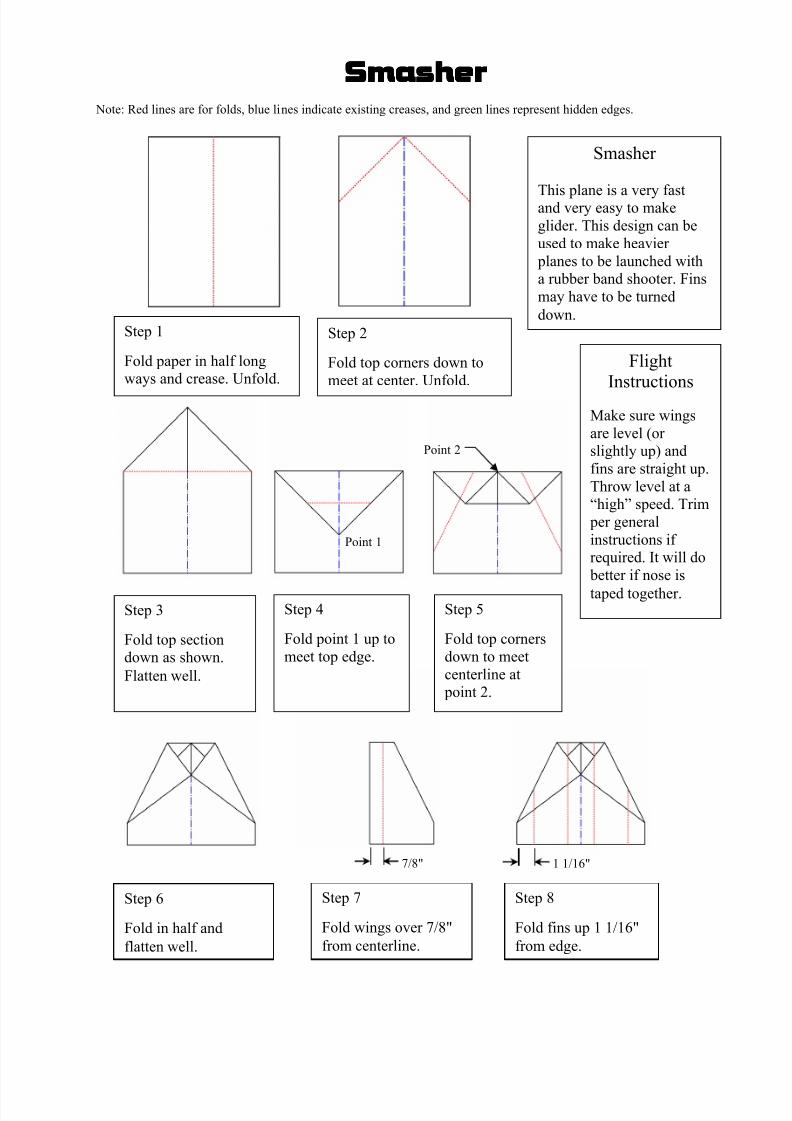
SmasherSmasherSmasherSmasher
Note: Red lines are for folds, blue lines indicate existing creases, and green lines represent hidden edges.
Step 1
Fold paper in half longways and crease. Unfold.
Step 3
Fold top sectiondown as shown.
Flatten well.
Smasher
This plane is a very fastand very easy to make
glider. This design can be
used to make heavier
planes to be launched witha rubber band shooter. Fins
may have to be turned
down.
Step 2
Fold top corners down to
meet at center. Unfold.
Step 6
Fold in half and
flatten well.
Step 5
Fold top corners
down to meet
centerline at point 2.
Step 4
Fold point 1 up to
meet top edge.
Point 1
Point 2
Step 7
Fold wings over 7/8"
from centerline.
Step 8
Fold fins up 1 1/16"
from edge.
7/8" 1 1/16"
FlightInstructions
Make sure wings
are level (orslightly up) and
fins are straight up.
Throw level at a“high” speed. Trim
per general
instructions ifrequired. It will do
better if nose is
taped together.

8/14/2019 18 Paper Airplanes
http://slidepdf.com/reader/full/18-paper-airplanes 53/56
Trigon
Note: Red lines are for folds, blue lines indicate existing creases.
Step 1
Fold paper in half long
ways and crease. Unfold.
Step 2
Fold upper right corner so that it touches left edge and the crease ends at the lower right
corner. Refold at center crease (a ruler or straight edge is a plus here). Unfold both folds.
Trigon
This plane like Smasher is a quick and easy plane to make. It is also
a good choice to make out of 28 lb (or heavier) paper for rubber band launching. Top nose flaps can be taped together but should not
be taped to main wing. Bottom nose flaps can be taped to wing at
leading edge. This plane flies as a fast glider on all weights of
paper.
Flight Instructions
Make sure wings are level (or slightly up) and fins are straight up. Throw level at a“medium” or "high" speed for glider. Trim per general instructions. Add tail only if
necessary for a particular type paper. Normally trailing edge adjustments work fine.
8/14/2019 18 Paper Airplanes
http://slidepdf.com/reader/full/18-paper-airplanes 54/56
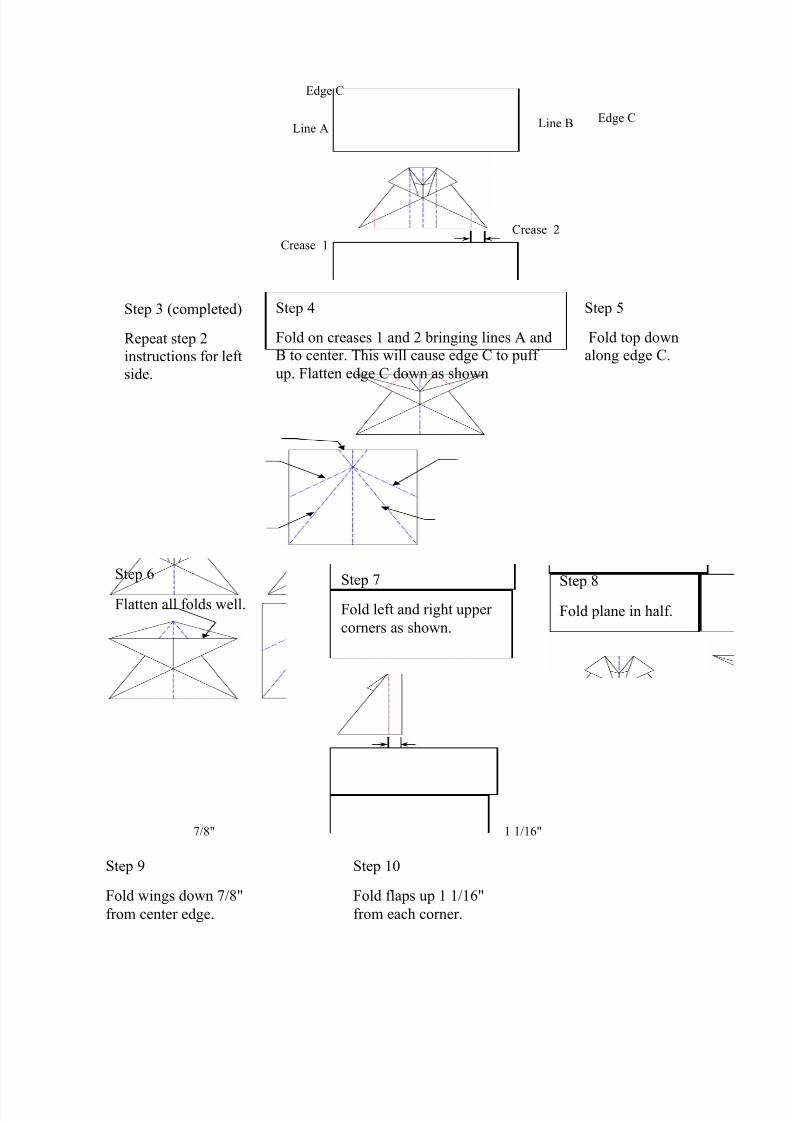
Step 3 (completed)
Repeat step 2
instructions for left
side.
Step 6
Flatten all folds well.
Step 8
Fold plane in half.
Step 9
Fold wings down 7/8"
from center edge.
Step 10
Fold flaps up 1 1/16"
from each corner.
Step 4
Fold on creases 1 and 2 bringing lines A and
B to center. This will cause edge C to puff
up. Flatten edge C down as shown
Step 5
Fold top down
along edge C.
Step 7
Fold left and right upper
corners as shown.
Line B
1 1/16"7/8"
Line A
Crease 2
Crease 1
Edge C
Edge C
8/14/2019 18 Paper Airplanes
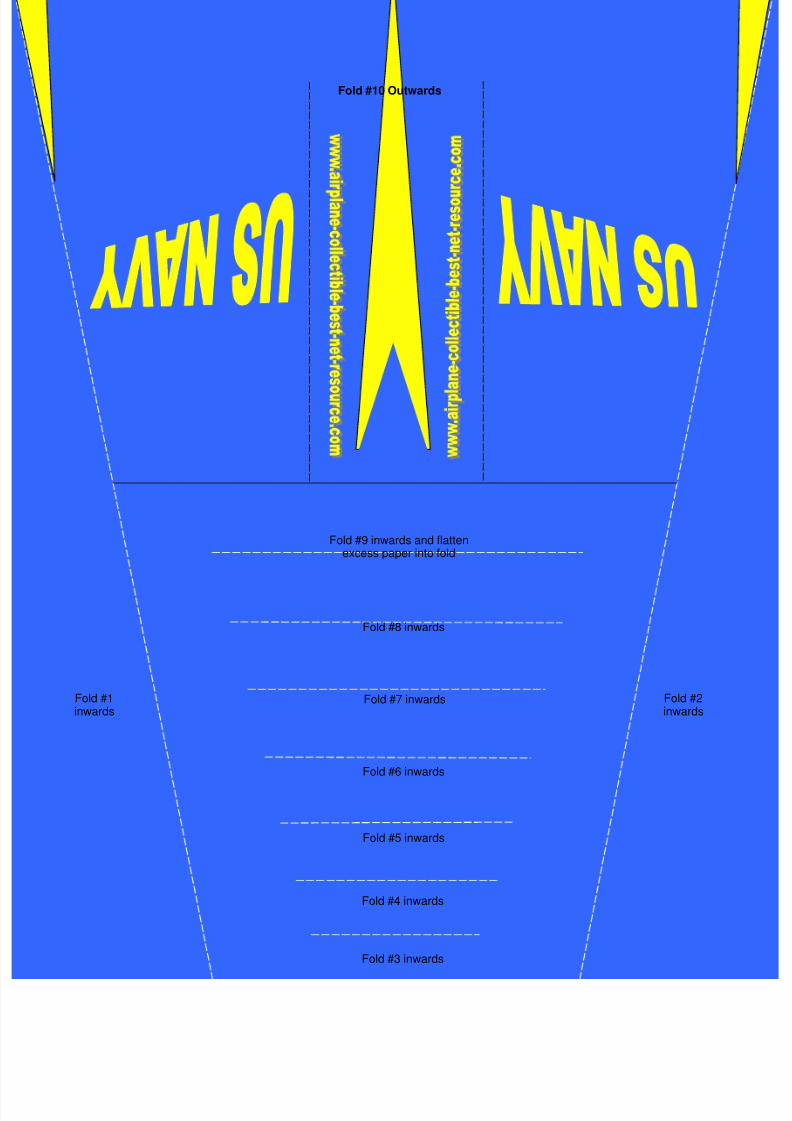
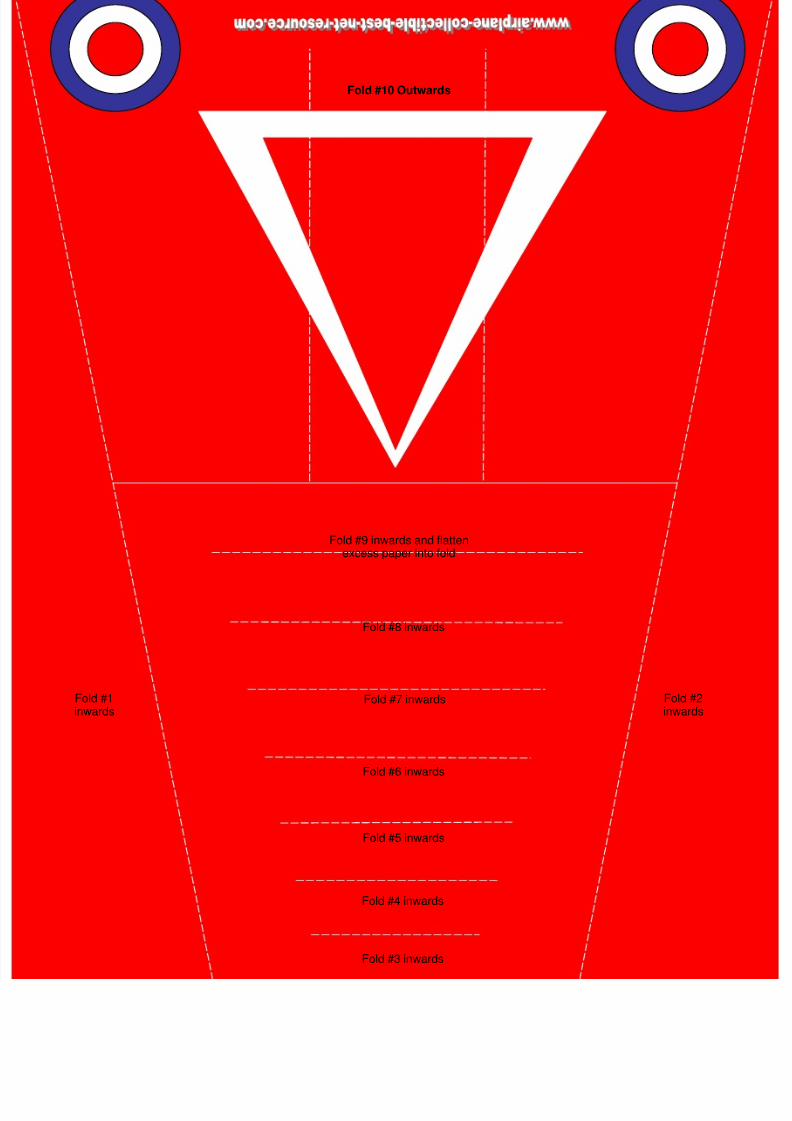
http://slidepdf.com/reader/full/18-paper-airplanes 55/56
Fold #9 inwards and flattenexcess paper into fold
Fold #8 inwards
Fold #7 inwards
Fold #6 inwards
Fold #5 inwards
Fold #4 inwards
Fold #3 inwards
Fold #1inwards
Fold #2inwards
Fold #10 Outwards
8/14/2019 18 Paper Airplanes
http://slidepdf.com/reader/full/18-paper-airplanes 56/56
Fold #9 inwards and flattenexcess paper into fold
Fold #8 inwards
Fold #7 inwards
Fold #6 inwards
Fold #5 inwards
Fold #1inwards
Fold #2inwards
Fold #10 Outwards


![[Thay Yang] Exotic Paper Airplanes](https://img.pdfslide.net/doc/110x75/5695d41b1a28ab9b02a04fe9/thay-yang-exotic-paper-airplanes.jpg)