Embed Size (px)
Citation preview
5/12/2018 1996-Nissan-Quest Manual Del Usuario - slidepdf.com
http://slidepdf.com/reader/full/1996-nissan-quest-manual-del-usuario 1/234
ForewordWelcome to the growing family of new NISSAN owners. This vehicle is delivered to you with confidence. It was produced using the ltechniques and strict quality control.
This manual was prepared to help you understand the operation and maintenance of your vehicle so that you may enjoy many mildriving pleasure. Please read through this manual before operating your vehicle.
A separate ‘‘Warranty Information Booklet’’ explains details about the warranties covering your vehicle.Your NISSAN dealer knows your vehicle best. When you require any service or have any questions, he will be glad to assist you withextensive resources available to him.
IMPORTANT SAFETY INFORMATION
REMINDERS FOR SAFETY!
Follow these five important driving rules to help ensure a safe andcomplete trip for you and your passengers:
● NEVER drive under the influence of alcohol or drugs.
●
ALWAYS observe posted speed limits and never drive toofast for conditions.
● ALWAYS use your seat belts and appropriate child restraintsystems.
● ALWAYS provide information about the proper use of ve-hicle safety features to all occupants of the vehicle.
● ALWAYS review this Owner’s Manual for important safetyinformation.
© 1995 NISSAN NORTH AMERICA, INC.TORRANCE, CALIFORNIA
All rights reserved. No part of this Owner’s Manual may be reproducedor stored in a retrieval system, or transmitted in any form, or by anymeans, electronic, mechanical, photocopying, recording or otherwise,without the prior written permission of Nissan North America, Inc.
NOTES ON THE INFORMATION CONTAINED INTHIS OWNER’S MANUAL
This owner’s manual contains descriptions and operinstructions for all systems, features and optional equipmthat might appear in any model of this vehicle built fordestination in North America, including the continental U
States, Canada and Hawaii. Therefore, you may very wellinformation in this manual that does not apply to your veh
MODIFICATION OF YOUR VEHICLE
This vehicle should not be modified. Modification could affectperformance, safety or durability, and may even violate govemental regulations. In addition, damage or performance prlems resulting from modifications may not be covered unNISSAN warranties.
All information, specifications and illustrations in this manuathose in effect at the time of printing. NISSAN reserves the rigchange specifications or design without notice and without obliga
The inside pages of this manual containa minimum of 50% recycled fibers,including 10% post-consumer fibers.
5/12/2018 1996-Nissan-Quest Manual Del Usuario - slidepdf.com
http://slidepdf.com/reader/full/1996-nissan-quest-manual-del-usuario 2/234
Welcome To The World Of NISSAN
Your new Nissan is the result of our dedication toproduce the finest in safe, reliable and economi-cal transportation. Your vehicle is the product of
a successful worldwide company that manufac-tures cars and trucks in over 20 countries anddistributes them in 150 nations.
Nissan vehicles are designed and manufacturedby Nissan Motor Co., Ltd. which was founded inTokyo, Japan in 1933, and Nissan affiliatesworldwide, collectively growing to become thefourth largest automaker in the world. In additionto cars and trucks, Nissan also makes textilemachinery, forklift trucks, marine engines, boatsand other products.
Nissan has made a substantial and growinginvestment in North America, starting with theopening of Nissan Motor Corporation U.S.A. in1960, continuing with the production of somecars and trucks at one of the world’s most
modern manufacturing facilities in Smyrna, Ten-nessee, vehicle styling at Nissan Design Interna-tional in San Diego, California, and engineering
at Nissan Research and Development in Farm-ington Hills, Michigan.
Nissan Motor Corporation U.S.A. and its dealersemploy about 50,000 Americans.
Nissan is also a substantial contributor to theCanadian economy. Nissan Canada Inc. and its200 dealers and suppliers employ approximately4,000 people. These include company employ-ees and the staffs of Nissan dealers all acrossCanada. In addition, many Canadians work forcompanies that supply Nissan and Nissan deal-
ers with materials and services ranging from theoperation of port facilities and transportation ser-vices, to the supply of lubricants, parts andaccessories.
Nissan pioneered the use of electronicscomputers in automobiles, and has led the itry in improving both performance and fueciency through new engine designs and thof synthetic materials to reduce vehicle wThe company has also developed ways to
quality into its vehicles at each stage oproduction process, both through extensivof automation and — most importantthrough an awareness that people are thetral element in quality control.
From the time the parts arrived from our sers until you took delivery of your new Nidozens of checks were made to ensure thathe best job was being done in producindelivering your vehicle. Nissan also takescare to ensure that when you take your Nissyour dealer for maintenance, the service tecian will perform his work according to the qstandards that have been established bfactory.
Safety has also been built into your Nissayou know, seat belts are an integral part safety systems that will help protect you andpassengers in the event of a sudden stopaccident. We urge you to use the belts everyou drive the vehicle.
The Nissan story of growth and achieve
reflects our major goal: to provide youcustomer, with a vehicle that is built with qand craftsmanship — a product that we cproud to build and you can be proud to ow
AFW0001
The inside pages of this manual containa minimum of 50% recycled fibers,including 10% post-consumer fibers.

5/12/2018 1996-Nissan-Quest Manual Del Usuario - slidepdf.com
http://slidepdf.com/reader/full/1996-nissan-quest-manual-del-usuario 3/234
NISSAN CUSTOMER CARE PROGRAMNISSAN CARES ...
Both NISSAN and your NISSAN dealer are dedicated to serving all your automotive needs. Your satisfaction withyour vehicle and your NISSAN dealer are our primary concerns. Your NISSAN dealer is always available to assistyou with all your automobile sales and service needs.
However, if there is something that your NISSANdealer cannot assist you with or you would like toprovide NISSAN directly with comments or questions,please contact our (NISSAN’s) Consumer Affairs De-partment using our toll-free number:
For U.S. mainland and Alaska customers1-800-NISSAN-1 (1-800-647-7261)
For Hawaii customers(808) 531-0231 (Oahu Number)
For Canada customers1-800-387-0122
The Consumer Affairs Department will ask for the following infor-mation:
— Your name, address, and telephone number — Vehicle identification number (on dashboard) — Date of purchase — Current odometer reading — Your NISSAN dealer’s name — Your comments or questions
OR
you may write to NISSAN with the information on theleft at:
For U.S. mainland and Alaska customersNissan Motor Corporation in U.S.A.Consumer Affairs DepartmentP.O. Box 191Gardena, California 90247
For Hawaii customersNissan Motor Corporation in Hawaii2880 Kilihau St.Honolulu, Hawaii 96819
For Canada customersNissan Canada Inc.P.O. Box 1709, Station ‘‘B’’Mississauga, Ontario L4Y 4H6
We appreciate your interest in NISSAN and thank you for buying a quality NISSAN vehicle.
5/12/2018 1996-Nissan-Quest Manual Del Usuario - slidepdf.com
http://slidepdf.com/reader/full/1996-nissan-quest-manual-del-usuario 4/234
Contents Instruments and controls
Pre-driving checks and adjustments
Heater, air conditioner and audio system
Starting and driving
In case of emergency
Appearance and interior care
Do-it-yourself operations
Maintenance schedule
Technical and consumer information
Index
5/12/2018 1996-Nissan-Quest Manual Del Usuario - slidepdf.com
http://slidepdf.com/reader/full/1996-nissan-quest-manual-del-usuario 5/234
5/12/2018 1996-Nissan-Quest Manual Del Usuario - slidepdf.com
http://slidepdf.com/reader/full/1996-nissan-quest-manual-del-usuario 6/234
1 Instruments and controls
Meters and gauges .............................................. 1-3
Warning/indicator lights and chimes .................... 1-6
Theft warning........................................................ 1-9
Windshield wiper lever and washer switch........ 1-10
Rear window wiper and washer switches.......... 1-11
Rear window defogger switch............................ 1-12
Headlight control switch ..................................... 1-12
Autolamp switch ................................................. 1-13
Spotlights............................................................ 1-15
Turn signal switch .............................................. 1-15Cornering light .................................................... 1-16
Instrument brightness control............................. 1-16
Hazard warning flasher switch........................... 1-16
Cigarette lighter (accessory) and ashtray .......... 1-17
Rear power point................................................ 1-18
Coin tray ............................................................. 1-18
Compact disc and audio cassette
storage compartment ......................................... 1-19
Power window .................................................... 1-19
Sunroof (If so equipped) .................................... 1-20
Manual rear windows ......................................... 1-21
Power rear windows........................................... 1-21
Clock................................................................... 1-22Interior lights....................................................... 1-23
5/12/2018 1996-Nissan-Quest Manual Del Usuario - slidepdf.com
http://slidepdf.com/reader/full/1996-nissan-quest-manual-del-usuario 7/234
AIC057
1-2

5/12/2018 1996-Nissan-Quest Manual Del Usuario - slidepdf.com
http://slidepdf.com/reader/full/1996-nissan-quest-manual-del-usuario 8/234
AIC057
METERS AND GAUGES
1-3
5/12/2018 1996-Nissan-Quest Manual Del Usuario - slidepdf.com
http://slidepdf.com/reader/full/1996-nissan-quest-manual-del-usuario 9/234
SPEEDOMETER
The speedometer indicates vehicle speed.
ODOMETER
The odometer records the total distance thevehicle has been driven.
TRIP ODOMETER
The trip odometer records the distance ofindividual trips. Before each trip, set the tripodometer to zero by pushing the RESET
button.
TACHOMETER
The tachometer indicates engine speed inrevolutions per minute (RPM).
CAUTION
When engine speed approaches thered zone, shift to a higher gear. Enginespeed in the red zone may cause seri-ous engine damage.
ENGINE COOLANT
TEMPERATURE GAUGEThis gauge indicates the coolant temperaturThe coolant temperature varies with the ouside air temperature and driving conditions.
CAUTION
If the gauge indicates over the normarange, stop the vehicle as soon assafely possible. If the engine is overheated, continued operation of the vehicle may seriously damage the engine
See ‘‘In case of emergency’’ section foimmediate action required.
AIC0003 AIC0110 AIC000
1-4
5/12/2018 1996-Nissan-Quest Manual Del Usuario - slidepdf.com
http://slidepdf.com/reader/full/1996-nissan-quest-manual-del-usuario 10/234
FUEL GAUGE
This gauge indicates the APPROXIMATEfuel level in the tank.
The gauge may move slightly during brak-ing, turning, acceleration, or when going upor down hills.
The gauge needle is designed to remain inapproximately the same position, evenwhen the ignition key is turned OFF.
Refill the fuel tank before the gaugeregisters at E (empty).
AIC0005
1-5
5/12/2018 1996-Nissan-Quest Manual Del Usuario - slidepdf.com
http://slidepdf.com/reader/full/1996-nissan-quest-manual-del-usuario 11/234
Checking bulbs
Apply the parking brake, fasten seat belts,and turn the ignition key to ON withoutstarting the engine. The following lightscome on and stay on until the engine isstarted:
The following lights come on briefly andthen go off:
ABS or
If any light fails to come on, it may
indicate a burned-out bulb or an opencircuit in the electrical system. Have thesystem repaired promptly.
Engine oil pressure warninglight
This light warns of low engine oil pressure. Ifthe light flickers or comes on during normaldriving, pull off the road in a safe area, stopthe engine immediately and call a NISSANdealer or other authorized repair shop. Run-
ning the engine with the oil pressurewarning light on could cause seriousdamage to the engine.
The oil pressure warning light is nodesigned to indicate a low oil level. Usthe dipstick to check the oil level. Se‘‘Engine oil’’ in the ‘‘Do-it-yourself opertions’’ section.
Charge warning light
If the light comes on while the engine running, it may indicate something wronwith the charging system. Turn the enginoff and check the generator belt. If the belt loose, broken, missing, or if the light re
mains on, see your NISSAN dealer immediately.
AIC058
WARNING/INDICATORLIGHTS AND CHIMES
1-6
5/12/2018 1996-Nissan-Quest Manual Del Usuario - slidepdf.com
http://slidepdf.com/reader/full/1996-nissan-quest-manual-del-usuario 12/234
CAUTION
Do not continue driving if the belt isloose, broken or missing.
Low fuel warning lightThis light comes on when the fuel level inthe fuel tank is getting low. Refuel as soonas it is convenient, preferably before the fuelgauge reaches E. There should be a smallreserve of fuel in the tank when the fuelgauge needle reaches E.
Door open warning light
This light comes on when any of the doors
are not closed securely while the ignitionkey is ON.
Seat belt warning light andchime
The light and chime remind you to fastenyour seat belts. If the driver’s seat belt isNOT securely fastened when the ignitionkey is turned to ON or START, the chimesounds four times and the light illuminates.
Refer to ‘‘Seat belts’’ in the ‘‘Pre-drivingchecks and adjustments’’ section for pre-cautions on seat belt usage.
Supplemental air bagwarning light
When the ignition key is in the ON or STARTposition, the supplemental air bag warning
light illuminates for about 7 seconds andthen turns off. This means the Air BagSupplemental Restraint System is opera-tional.
If any of the following conditions occur, thesupplemental air bag system needs servic-ing and your vehicle should be taken to yournearest authorized NISSAN dealer as soonas practical:
1. The supplemental air bag warning light
does not come on for 7 seconds and thengo off as described above.
2. The supplemental air bag warning lightflashes intermittently or remains on.
3. The supplemental air bag warning lightdoes not come on at all.
Unless checked and repaired, the Air BagSupplemental Restraint System may notfunction properly. For additional details, see‘‘Supplemental restraint system’’ in the ‘‘Pre-driving checks and adjustments’’ section.
Low washer fluid warninglight
This light comes on when the washer reservoir fluid is at a low level. Add washer fluias necessary. See the ‘‘Do-it-yourself operations’’ section.
Brake warning light
This light functions for both the parkinbrake and the foot brake systems.
The light comes on when the parking brakis applied, and also warns of a low brakfluid level. If the light comes on while thengine is running with the parking brake noapplied, stop the vehicle and perform thfollowing:
1. Check the brake fluid level. Add brakfluid as necessary. See ‘‘Brake fluid’’ the ‘‘Do-it-yourself operations’’ section.
2. If the brake fluid level is correct, checthe warning system.
1-7
5/12/2018 1996-Nissan-Quest Manual Del Usuario - slidepdf.com
http://slidepdf.com/reader/full/1996-nissan-quest-manual-del-usuario 13/234
WARNING
● If you judge it to be safe, drive care-fully to the nearest service stationfor repairs. Otherwise, have your ve-hicle towed because driving it could
be dangerous.
● Pressing the brake pedal with theengine stopped and/or low brakefluid level may increase your stop-ping distance and braking will re-quire greater pedal effort as well aspedal travel.
or ABS Anti-lock brake
warning lightIf the light comes on while the engine isrunning, it may indicate something wrongwith the anti-lock portion of the brake sys-tem. Have the system checked by yourNISSAN dealer.
If an abnormality occurs in the system, theanti-lock function ceases, but the brakescontinue to operate normally.
If the light comes on while you are driv-ing, contact your NISSAN dealer for re-pair.
Overdrive off indicator light
This light comes on during driving when theoverdrive switch is pressed to prevent over-drive operation.
The O/D OFF indicator light comes on fortwo seconds each time the ignition key isturned ON. This shows the light is function-ing properly.
If the O/D OFF indicator light blinks forapproximately 8 seconds after coming onfor 2 seconds, have your NISSAN dealercheck the transmission and repair it if nec-essary.
The automatic transmission is equippedwith an electronic Fail-Safe mode. This sys-tem allows the vehicle to be driven even inthe event of damage to the electrical cir-cuits. If this occurs, the gears automaticallyengage and lock into 3rd gear.
NOTE: See the ‘‘Fail-safe’’ section in the‘‘Starting and driving’’ section before visitingyour NISSAN dealer.
Turn signal/hazard indicatolights
The appropriate light flashes when the tursignal lever is activated.
Both lights flash when the hazard switch turned on.
High beam indicator light
This light comes on when the headlight higbeam is on and goes out when the lobeam is selected.
Cruise indicator light
The light comes on while the vehicle spee
is controlled by the cruise control system. the CRUISE indicator blinks, have the system checked by your NISSAN dealer.
Key reminder chime
The chime sounds if the driver side door opened while the key is left in the ignitioswitch. Remove the key and take it with yowhen leaving the vehicle.
Light reminder chime
A chime sounds when the driver side door opened if the headlight control switch
1-8
5/12/2018 1996-Nissan-Quest Manual Del Usuario - slidepdf.com
http://slidepdf.com/reader/full/1996-nissan-quest-manual-del-usuario 14/234
turned on (ignition switch is turned OFF).
Turn the headlight control switch to OFFwhen you leave the vehicle.
Brake pad wear warning
The disc brake pads have audible wearwarnings. When a brake pad requires re-placement, it makes a high pitched scrapingsound when the vehicle is in motion whetheror not the brake pedal is depressed. Havethe brakes checked as soon as possible ifthe warning sound is heard.
Malfunction indicator lamp(emission system)
If this light comes on or blinks while theengine is running, it may indicate a po-tential emission control problem. Al-though the vehicle is still driveable, seeyour NISSAN dealer for service as soonas possible. Continued operation with-out having the emission control systemchecked and repaired as necessarycould lead to poor driveability, reducedfuel economy, and possible damage tothe emission control system which may
affect your warranty coverage.
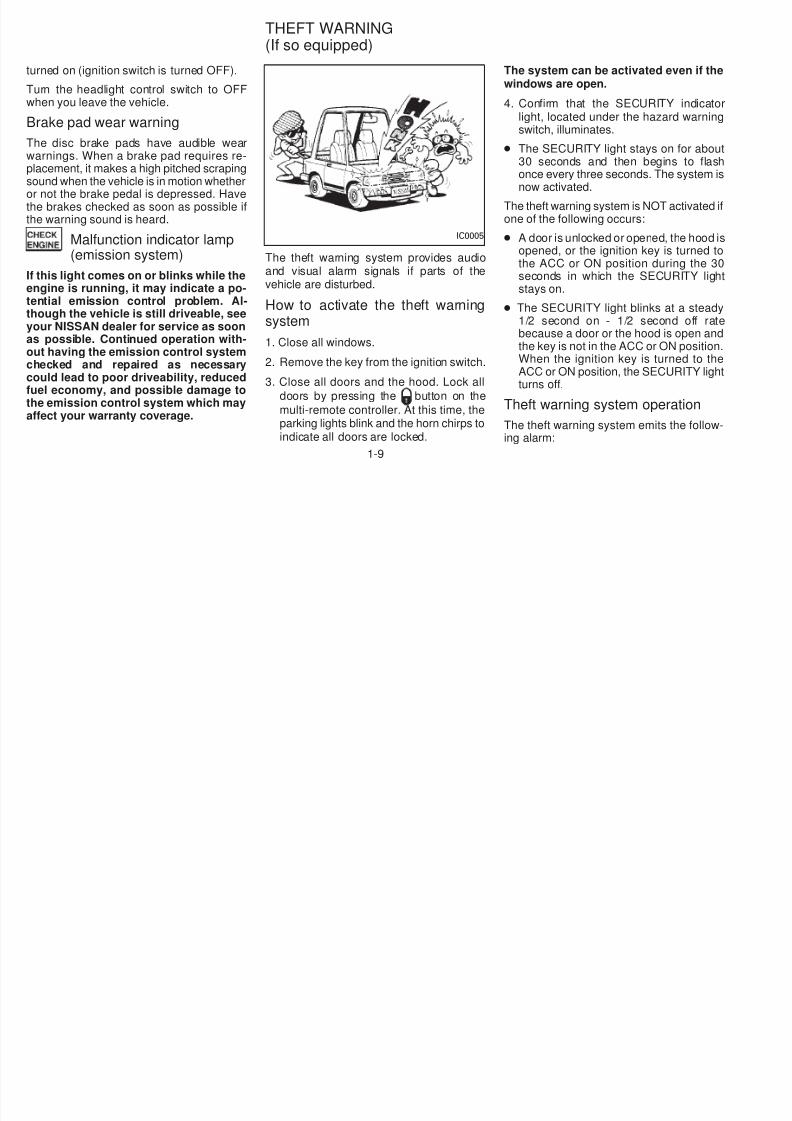
The theft warning system provides audioand visual alarm signals if parts of thevehicle are disturbed.
How to activate the theft warningsystem
1. Close all windows.
2. Remove the key from the ignition switch.
3. Close all doors and the hood. Lock all
doors by pressing the button on the
multi-remote controller. At this time, theparking lights blink and the horn chirps toindicate all doors are locked.
The system can be activated even if thwindows are open.
4. Confirm that the SECURITY indicatolight, located under the hazard warninswitch, illuminates.
● The SECURITY light stays on for abou30 seconds and then begins to flasonce every three seconds. The system now activated.
The theft warning system is NOT activatedone of the following occurs:
● A door is unlocked or opened, the hoodopened, or the ignition key is turned tthe ACC or ON position during the 3
seconds in which the SECURITY ligstays on.
● The SECURITY light blinks at a stead1/2 second on - 1/2 second off ratbecause a door or the hood is open anthe key is not in the ACC or ON positionWhen the ignition key is turned to thACC or ON position, the SECURITY ligturns off.
Theft warning system operation
The theft warning system emits the following alarm:
IC0005
THEFT WARNING(If so equipped)
1-9
5/12/2018 1996-Nissan-Quest Manual Del Usuario - slidepdf.com
http://slidepdf.com/reader/full/1996-nissan-quest-manual-del-usuario 15/234
● The headlights and tail lights flash andthe horn sounds intermittently. In addi-tion, the starter motor does not operate.
● The alarm automatically turns off after
two to three minutes. However, the alarm
reactivates if the vehicle is tampered withagain. The alarm can be shut off by
unlocking a door with the key or by
pressing the button on the multi-
remote controller.
The alarm is activated when:
● a door is unlocked or opened withoutusing the key or the multi-remote control-ler. This includes unlocking the doors
with the inside door lock switch.
● the hood is opened.
● the ignition is placed into the ACC, ON,or START position without the key in theignition.
How to stop the alarm
The alarm stops only by unlocking a doorwith the key or by pressing the button on
the multi-remote controller. The alarm doesnot stop if the ignition key is turned to theACC or ON position.
If the system does not operate as de-scribed above, have it checked by yourNISSAN dealer.
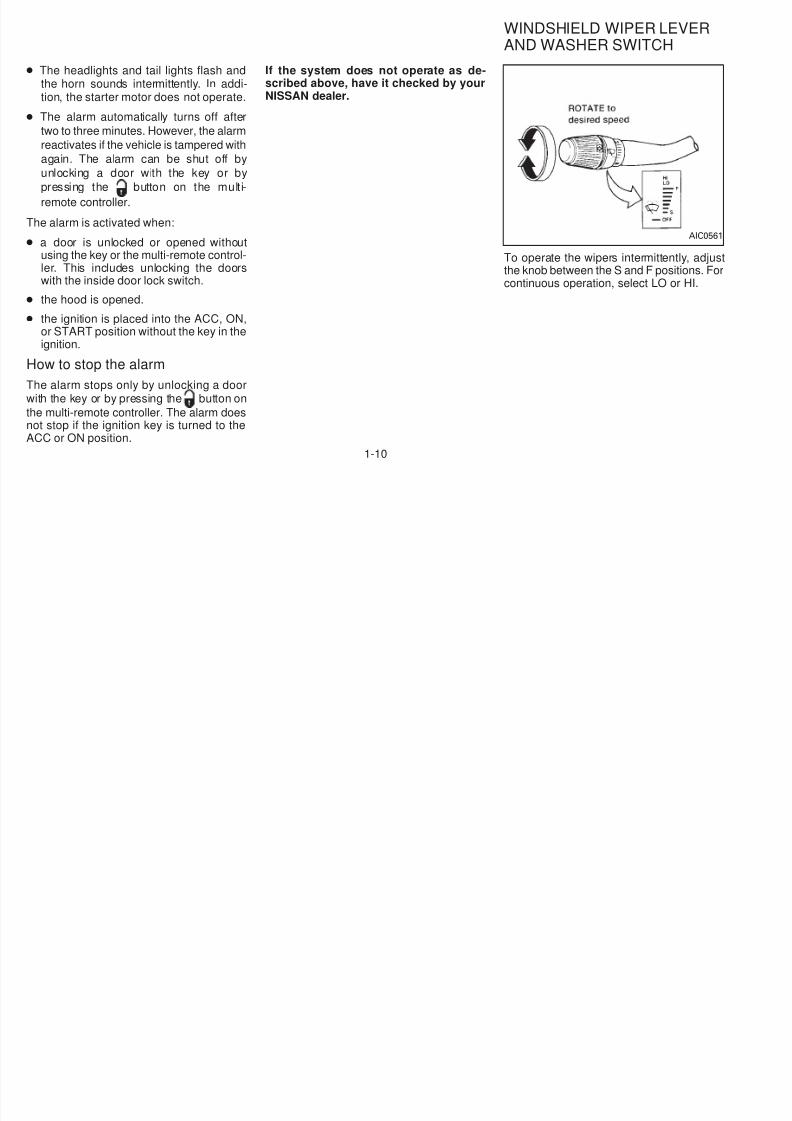
To operate the wipers intermittently, adjuthe knob between the S and F positions. Focontinuous operation, select LO or HI.
AIC056
WINDSHIELD WIPER LEVERAND WASHER SWITCH
1-10
5/12/2018 1996-Nissan-Quest Manual Del Usuario - slidepdf.com
http://slidepdf.com/reader/full/1996-nissan-quest-manual-del-usuario 16/234
To operate the washer, press on the end ofthe wiper knob. For more washer fluid, pushand hold the end of the wiper knob. Thewipers cycle a few times when the washer isactivated. The washer operates in any ofthe wiper positions.
CAUTION
● Do not operate the washer continu-ously for more than 30 seconds.
● Do not operate the washer if thereservoir tank is empty.
WARNING
In freezing temperatures the washersolution may freeze on the windshieldand obscure your vision. Warm thewindshield with the defroster before
you wash the windshield.
Push and hold the rear washer switch toperate the rear washer. The wiper cyclecontinuously until the switch is released.
Push the rear wiper switch to operate thwiper. The wiper cycles intermittently. Pusagain to cancel.
CAUTION
● Do not operate the washer continuously for more than 30 seconds.
● Do not operate the washer if the
reservoir tank is empty.
AIC0559 AIC057
REAR WINDOW WIPER ANDWASHER SWITCHES
1-11
5/12/2018 1996-Nissan-Quest Manual Del Usuario - slidepdf.com
http://slidepdf.com/reader/full/1996-nissan-quest-manual-del-usuario 17/234
To defog the rear window glass, start theengine and push the switch on. The indica-tor light comes on. Push the switch again toturn the defogger off.
The rear window defogger switch is alsoused to defrost, defog, or de-ice the poweroutside heated mirrors (if so equipped).
It automatically turns off in approximately 15minutes.
CAUTION
When cleaning the inner side of thewindow, be careful not to scratch ordamage the electrical conductors.
Lighting
Turn the dial to the position:
The front clearance, side marker, tail, cense plate and instrument lights come on
Turn the dial to the position:
Headlights come on and all of the previouslisted lights remain on.
To select the high beam, push the tursignal lever away from you. The levelatches in place. Pull it back to select the lo
beam.
AIC0573 AIC004
REAR WINDOW DEFOGGERSWITCH
HEADLIGHT CONTROLSWITCH
1-12
5/12/2018 1996-Nissan-Quest Manual Del Usuario - slidepdf.com
http://slidepdf.com/reader/full/1996-nissan-quest-manual-del-usuario 18/234
Daytime light system(for Canada)
Even if the headlight control dial is off, theheadlight high beams come on after startingthe engine. The headlights are a little dim-
mer than they are with the light switch in theposition.
If the parking brake is applied before theengine is started, the daytime lights do notilluminate. The daytime light system illumi-nates once the parking brake is released.Thereafter, the daytime lights do not turn offwhen using the parking brake at stop sig-nals, etc.
WARNINGWhen the daytime light system is ac-tive, tail lights on your vehicle will notbe on. It is necessary at dusk to turn onyour headlights. Failure to do so couldcause an accident injuring yourself andothers.
The autolamp system allows the headlightsto be set so they turn on and off automati-cally. The autolamp system can turn on theheadlights automatically when it is dark,turn off the headlights when it is light, andkeep the headlights on for up to threeminutes after you turn the key to OFF.
To set the autolamp system:
1. Make sure the headlight switch is in theOFF position. If the headlight switch is inthe ON position, the autolamp system is
canceled.
2. Turn the ignition key to ON.
3. Use the autolamp switch to activate thautolamp feature. It is to the left of thsteering wheel.
4. Turn the switch to the right. A sligdetent in the switch indicates it has bee
turned past the OFF position. After thswitch is turned past the detent, thautolamp automatically turns the lampon and off.
Shut-off delay
The length of time the autolamps stay oafter the ignition is turned to OFF dependon how far the switch is turned to the righIf the switch is turned all the way to the righthe headlights stay on about three minute
after the ignition is turned to OFF. If thswitch is turned only a little way to the righthe headlights may stay on for less than minute.
To turn the autolamp system OFF, turn thswitch all the way to the left until the deteis felt.
AIC0041
AUTOLAMP SWITCH
1-13
5/12/2018 1996-Nissan-Quest Manual Del Usuario - slidepdf.com
http://slidepdf.com/reader/full/1996-nissan-quest-manual-del-usuario 19/234
Be sure you do not put anything on topof the photo sensor located in the top
right side of the instrument panel. Thephoto sensor controls the autolamp; if itis covered, the photo sensor reacts as ifit is dark out and the headlights willilluminate.
AIC0101
1-14
S O G S S G S C
5/12/2018 1996-Nissan-Quest Manual Del Usuario - slidepdf.com
http://slidepdf.com/reader/full/1996-nissan-quest-manual-del-usuario 20/234
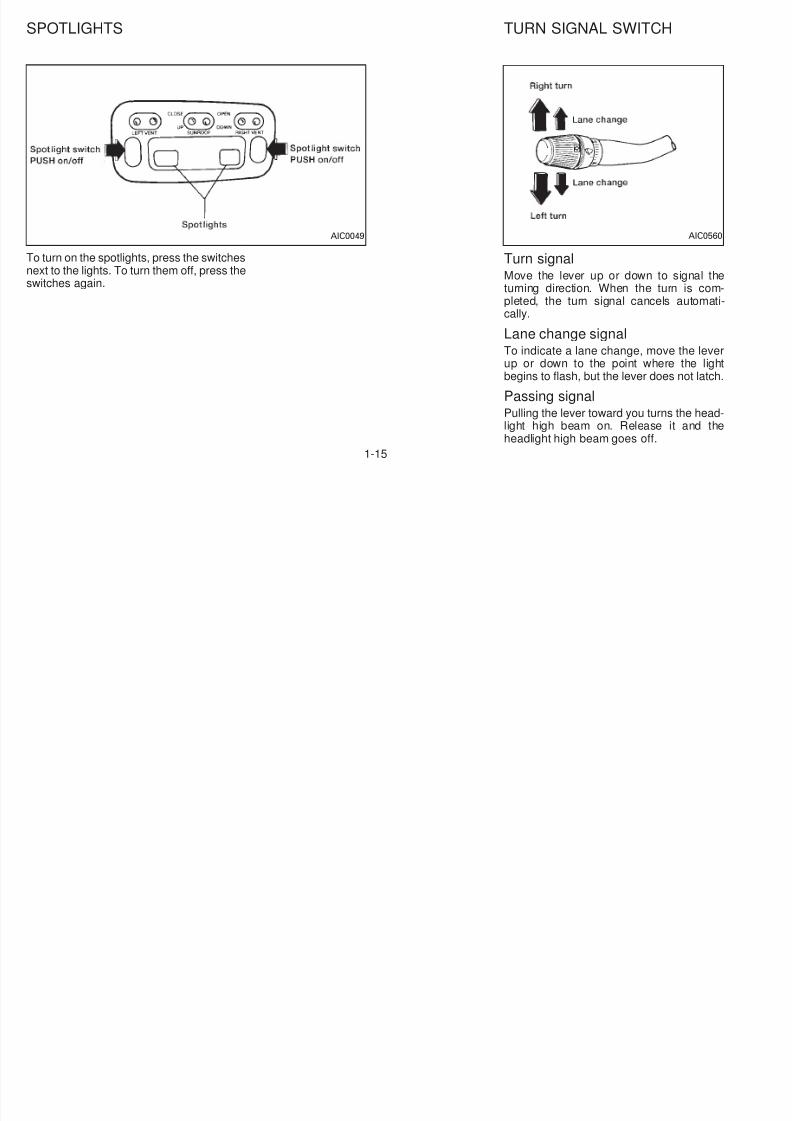
To turn on the spotlights, press the switchesnext to the lights. To turn them off, press the
switches again.
Turn signal
Move the lever up or down to signal thturning direction. When the turn is completed, the turn signal cancels automatcally.
Lane change signalTo indicate a lane change, move the leveup or down to the point where the ligbegins to flash, but the lever does not latc
Passing signal
Pulling the lever toward you turns the headlight high beam on. Release it and thheadlight high beam goes off.
AIC0049 AIC056
SPOTLIGHTS TURN SIGNAL SWITCH
1-15
CORNERING LIGHT INSTRUMENT BRIGHTNESS HAZARD WARNING FLASHER
5/12/2018 1996-Nissan-Quest Manual Del Usuario - slidepdf.com
http://slidepdf.com/reader/full/1996-nissan-quest-manual-del-usuario 21/234
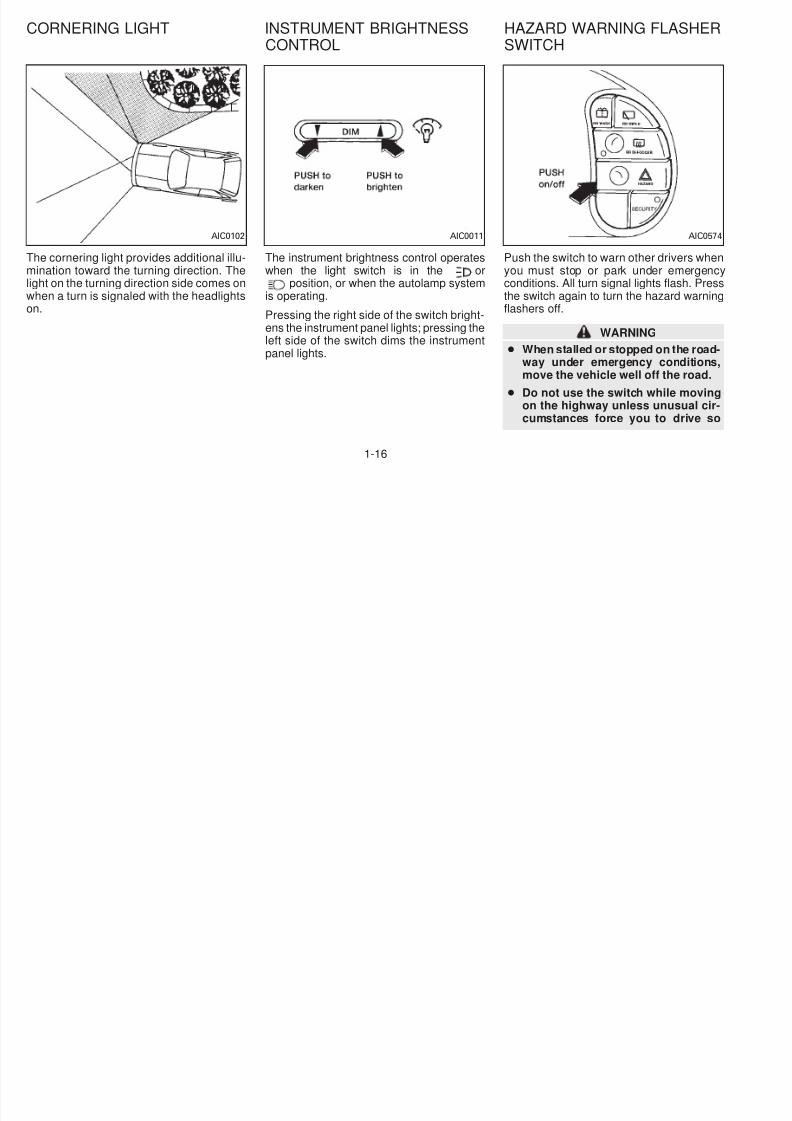
The cornering light provides additional illu-mination toward the turning direction. The
light on the turning direction side comes onwhen a turn is signaled with the headlightson.
The instrument brightness control operateswhen the light switch is in the or
position, or when the autolamp systemis operating.
Pressing the right side of the switch bright-ens the instrument panel lights; pressing theleft side of the switch dims the instrumentpanel lights.
Push the switch to warn other drivers wheyou must stop or park under emergenc
conditions. All turn signal lights flash. Presthe switch again to turn the hazard warninflashers off.
WARNING
● When stalled or stopped on the roadway under emergency conditionsmove the vehicle well off the road.
● Do not use the switch while movingon the highway unless unusual cir
cumstances force you to drive so
AIC0102 AIC0011 AIC057
CORNERING LIGHT INSTRUMENT BRIGHTNESSCONTROL
HAZARD WARNING FLASHERSWITCH
1-16
CIGARETTE LIGHTER
5/12/2018 1996-Nissan-Quest Manual Del Usuario - slidepdf.com
http://slidepdf.com/reader/full/1996-nissan-quest-manual-del-usuario 22/234
slowly that your vehicle might be-come a hazard to other traffic.
● Some state laws may prohibit theuse of the hazard warning flasherswitch while driving.
● Turn signals do not work when theswitch is operating.
The flashers can be actuated with the igni-tion switch either OFF or ON.
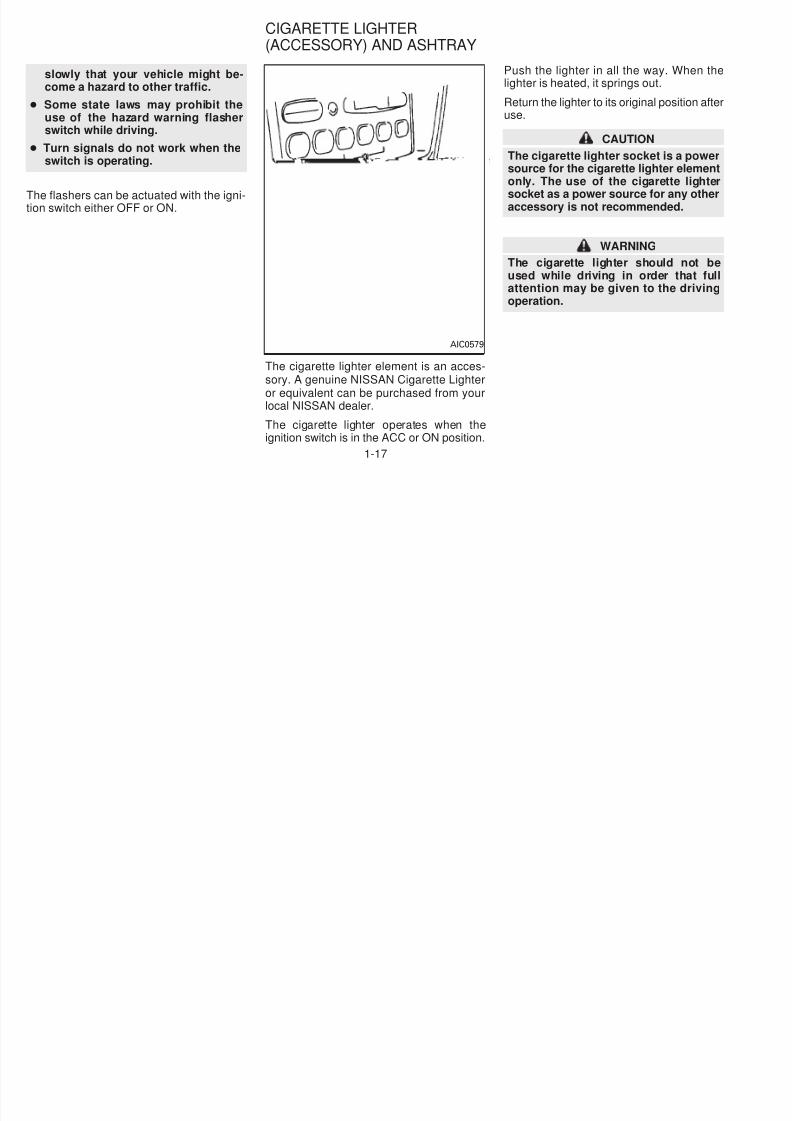
The cigarette lighter element is an acces-sory. A genuine NISSAN Cigarette Lighteror equivalent can be purchased from yourlocal NISSAN dealer.
The cigarette lighter operates when theignition switch is in the ACC or ON position.
Push the lighter in all the way. When thlighter is heated, it springs out.
Return the lighter to its original position afteuse.
CAUTIONThe cigarette lighter socket is a powesource for the cigarette lighter elemenonly. The use of the cigarette lightesocket as a power source for any otheaccessory is not recommended.
WARNING
The cigarette lighter should not be
used while driving in order that fulattention may be given to the drivingoperation.
AIC0579
CIGARETTE LIGHTER(ACCESSORY) AND ASHTRAY
1-17
REAR POWER POINT COIN TRAY
5/12/2018 1996-Nissan-Quest Manual Del Usuario - slidepdf.com
http://slidepdf.com/reader/full/1996-nissan-quest-manual-del-usuario 23/234
The rear power point is located on thedriver’s side trim panel of the second row
seats. Open the cover to gain access to thepower point.
Use the power point to plug in electricalequipment such as a cellular telephone, CBradio, etc. Follow the installation instruc-tions included with your electrical equip-ment.
When not in use, always close the powerpoint cover.
CAUTION
When using the power point:● Maximum load of any electrical
equipment should not exceed 10amps.
● Be sure to turn off any electricalequipment when not in use. Leavingelectrical equipment on for extendedperiods can drain your battery.
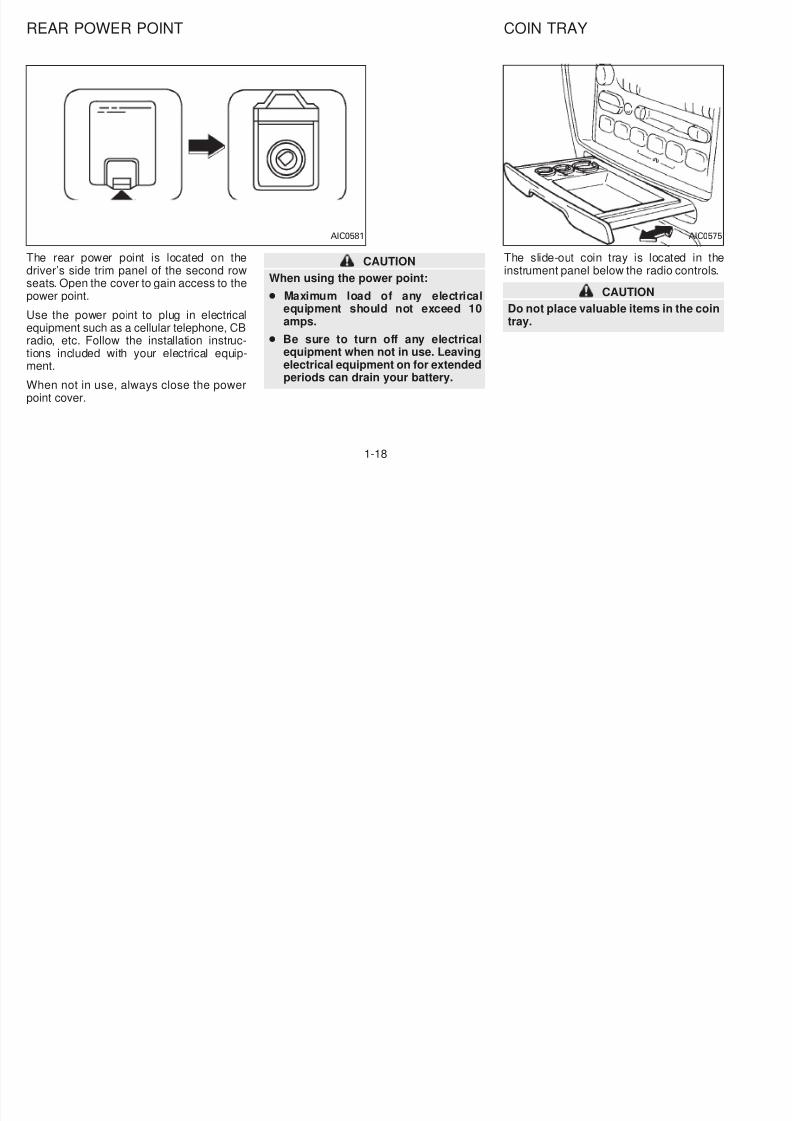
The slide-out coin tray is located in thinstrument panel below the radio controls
CAUTION
Do not place valuable items in the cointray.
AIC0581 AIC057
REAR POWER POINT COIN TRAY
1-18
SUNROOF (If so equipped)
5/12/2018 1996-Nissan-Quest Manual Del Usuario - slidepdf.com
http://slidepdf.com/reader/full/1996-nissan-quest-manual-del-usuario 24/234
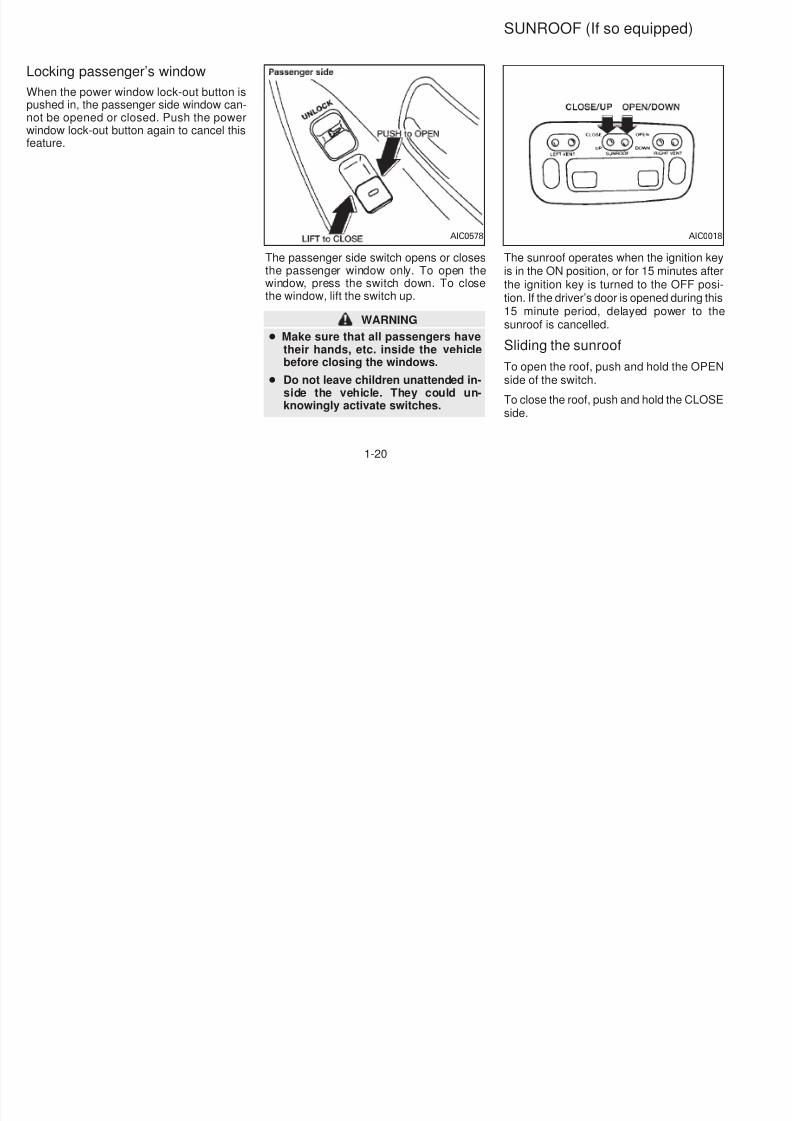
Locking passenger’s window
When the power window lock-out button ispushed in, the passenger side window can-not be opened or closed. Push the powerwindow lock-out button again to cancel this
feature.
The passenger side switch opens or closesthe passenger window only. To open the
window, press the switch down. To closethe window, lift the switch up.
WARNING
● Make sure that all passengers havetheir hands, etc. inside the vehiclebefore closing the windows.
● Do not leave children unattended in-side the vehicle. They could un-knowingly activate switches.
The sunroof operates when the ignition keis in the ON position, or for 15 minutes afte
the ignition key is turned to the OFF postion. If the driver’s door is opened during th15 minute period, delayed power to thsunroof is cancelled.
Sliding the sunroof
To open the roof, push and hold the OPEside of the switch.
To close the roof, push and hold the CLOS
side.
AIC0578 AIC001
SUNROOF (If so equipped)
1-20
MANUAL REAR WINDOWS POWER REAR WINDOWS
5/12/2018 1996-Nissan-Quest Manual Del Usuario - slidepdf.com
http://slidepdf.com/reader/full/1996-nissan-quest-manual-del-usuario 25/234
Tilting the sunroof
To tilt up, first close the sunroof, then pushthe UP side of the tilt switch. To close thesunroof, push the DOWN side of the tiltswitch.
Sun shade
Open and close the sun shade by sliding itforward or backward. The shade openswhen the sunroof opens, but it must beclosed manually.
WARNING
● Be extremely careful not to have anypart of your body in the sunroofopening while it is closing.
● Do not stand up or extend any por-tion of your body out of the openingwhile driving.
● Remove water drops, snow, ice orsand from the sunroof beforeopening.
● Do not place any heavy object on thesunroof or surrounding area.
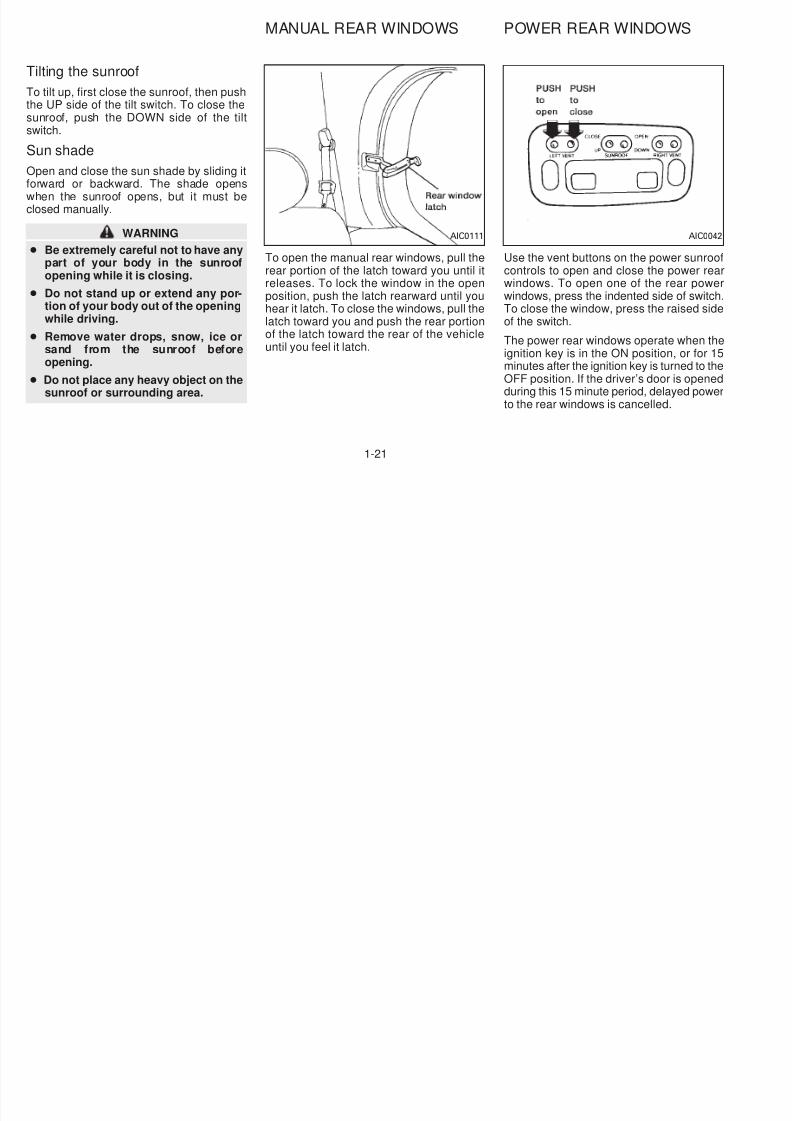
To open the manual rear windows, pull therear portion of the latch toward you until it
releases. To lock the window in the openposition, push the latch rearward until youhear it latch. To close the windows, pull thelatch toward you and push the rear portionof the latch toward the rear of the vehicleuntil you feel it latch.
Use the vent buttons on the power sunroocontrols to open and close the power rea
windows. To open one of the rear powewindows, press the indented side of switcTo close the window, press the raised sidof the switch.
The power rear windows operate when thignition key is in the ON position, or for 1minutes after the ignition key is turned to thOFF position. If the driver’s door is openeduring this 15 minute period, delayed poweto the rear windows is cancelled.
AIC0111 AIC004
MANUAL REAR WINDOWS POWER REAR WINDOWS
1-21
CLOCK
5/12/2018 1996-Nissan-Quest Manual Del Usuario - slidepdf.com
http://slidepdf.com/reader/full/1996-nissan-quest-manual-del-usuario 26/234
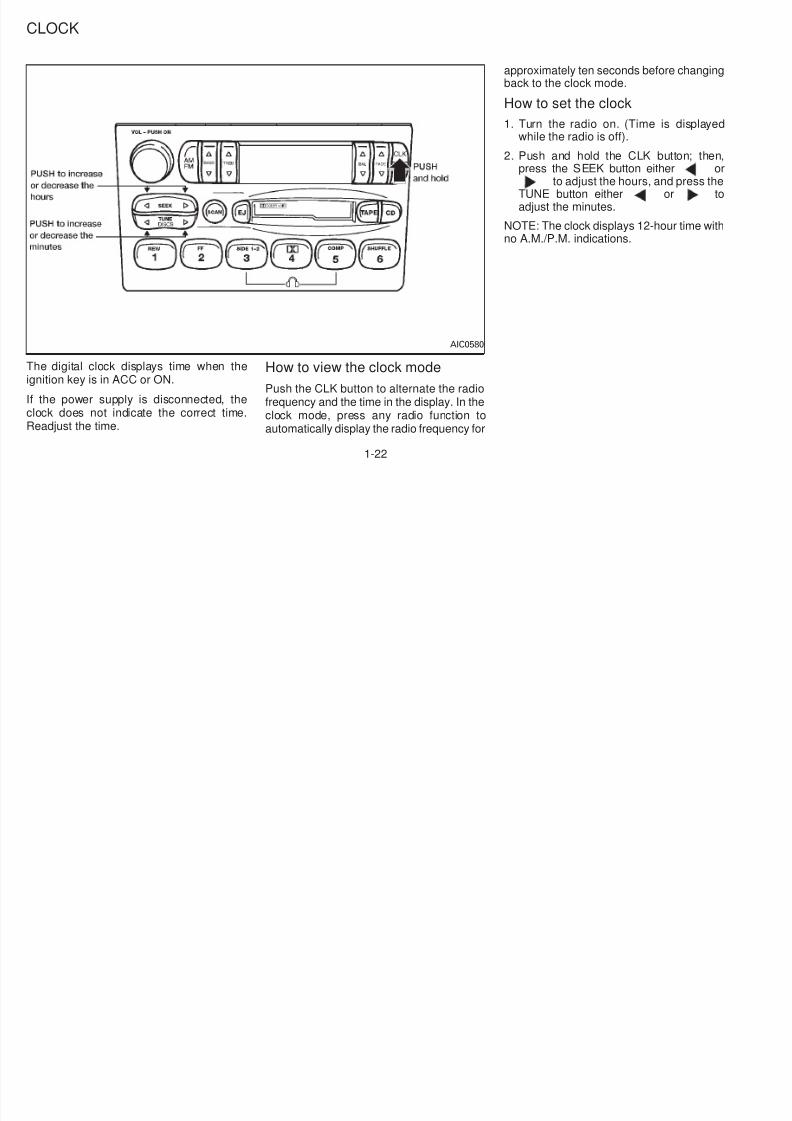
The digital clock displays time when theignition key is in ACC or ON.
If the power supply is disconnected, theclock does not indicate the correct time.Readjust the time.
How to view the clock mode
Push the CLK button to alternate the radiofrequency and the time in the display. In the
clock mode, press any radio function toautomatically display the radio frequency for
approximately ten seconds before changinback to the clock mode.
How to set the clock
1. Turn the radio on. (Time is displayewhile the radio is off).
2. Push and hold the CLK button; thepress the SEEK button either o
to adjust the hours, and press thTUNE button either or tadjust the minutes.
NOTE: The clock displays 12-hour time witno A.M./P.M. indications.
AIC0580
CLOCK
1-22
INTERIOR LIGHTS
5/12/2018 1996-Nissan-Quest Manual Del Usuario - slidepdf.com
http://slidepdf.com/reader/full/1996-nissan-quest-manual-del-usuario 27/234
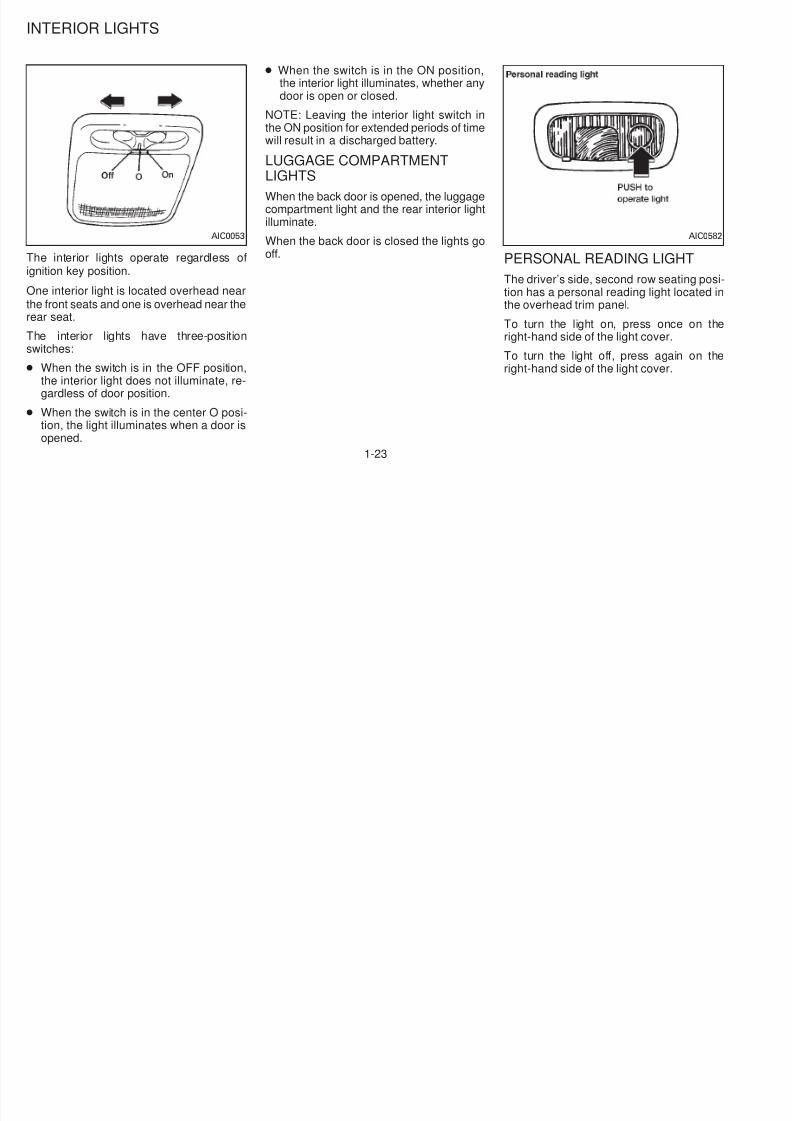
The interior lights operate regardless ofignition key position.
One interior light is located overhead nearthe front seats and one is overhead near therear seat.
The interior lights have three-positionswitches:
● When the switch is in the OFF position,the interior light does not illuminate, re-gardless of door position.
● When the switch is in the center O posi-tion, the light illuminates when a door isopened.
● When the switch is in the ON position,the interior light illuminates, whether anydoor is open or closed.
NOTE: Leaving the interior light switch inthe ON position for extended periods of time
will result in a discharged battery.LUGGAGE COMPARTMENTLIGHTS
When the back door is opened, the luggagecompartment light and the rear interior lightilluminate.
When the back door is closed the lights gooff. PERSONAL READING LIGHT
The driver’s side, second row seating postion has a personal reading light located the overhead trim panel.
To turn the light on, press once on thright-hand side of the light cover.
To turn the light off, press again on thright-hand side of the light cover.
AIC0053 AIC058
INTERIOR LIGHTS
1-23
5/12/2018 1996-Nissan-Quest Manual Del Usuario - slidepdf.com
http://slidepdf.com/reader/full/1996-nissan-quest-manual-del-usuario 28/234
2 P d i i h k d dj
5/12/2018 1996-Nissan-Quest Manual Del Usuario - slidepdf.com
http://slidepdf.com/reader/full/1996-nissan-quest-manual-del-usuario 29/234
2 Pre-driving checks and adjustments
Key ....................................................................... 2-2Door locks ............................................................ 2-2
Multi-remote control system (If so equipped) ...... 2-7
Battery replacement ............................................. 2-8
Hood release ...................................................... 2-10
Rear door lock.................................................... 2-11
Cargo net............................................................ 2-13
Luggage rack...................................................... 2-14
Fuel filler lid and cap.......................................... 2-15
Seats/floor mats ................................................. 2-15
Floor mat positioning.......................................... 2-17Seat positions..................................................... 2-21
Cup holder.......................................................... 2-31
Flexible seating .................................................. 2-33
Removing and installing the second row
bench seat.......................................................... 2-33
Removing second row bucket seats .................. 2-35Sliding three-passenger seat ............................. 2-39
Supplemental restraint system
(air bag system) ................................................. 2-42
Warning labels.................................................... 2-45
Supplemental air bag warning light.................... 2-45
Seat belts ........................................................... 2-47
Child restraints for infants and small children .. 2-58
Child restraint with top tether strap.................... 2-62
Tilting steering wheel ......................................... 2-74
Outside mirror control......................................... 2-75Outside mirrors ................................................... 2-76
Inside mirror ....................................................... 2-76
Vanity mirror ....................................................... 2-76
KEY DOOR LOCKS

5/12/2018 1996-Nissan-Quest Manual Del Usuario - slidepdf.com
http://slidepdf.com/reader/full/1996-nissan-quest-manual-del-usuario 30/234
Record the key number on the key numberplate and keep it in a safe place (such as
your wallet), NOT IN THE CAR. A keynumber plate is supplied with your key. Keepthe plate in a safe place. NISSAN does notrecord key numbers so it is very important tokeep track of your key number plate.
A key number is necessary only when youhave lost all vehicle keys and do not haveone to duplicate from. If you still have a key,this key can be duplicated by your NISSANdealer or locksmith shop.
Two keys are supplied with your vehicle —one has a plastic head and one is all metal.Both keys perform the same functions.
MANUAL DOOR LOCK
To lock the front doors or sliding door fromthe outside, turn the key toward the front ofthe vehicle. To unlock, turn it toward therear.
APD0142 APD000
2-2
5/12/2018 1996-Nissan-Quest Manual Del Usuario - slidepdf.com
http://slidepdf.com/reader/full/1996-nissan-quest-manual-del-usuario 31/234
Locking the doors without the key
To lock the doors from the outside without akey, move the inside lock knob so LOCKEDis visible, then close the door.
When locking the door this way, be certainnot to leave the key inside the vehicle.
Sliding door lock
To lock the sliding door from inside thvehicle, press the door lock rocker switch othe side marked L. To unlock, press throcker switch on the side marked U.
Only the sliding door locks and unlocks busing the door lock rocker switch.
APD0840 APD081
2-3
5/12/2018 1996-Nissan-Quest Manual Del Usuario - slidepdf.com
http://slidepdf.com/reader/full/1996-nissan-quest-manual-del-usuario 32/234
CAUTION
● Always have the doors locked whiledriving. Along with the use of seatbelts, this provides greater safety inthe event of an accident by helping
to prevent persons from beingthrown from the vehicle. This alsohelps keep children and others fromunintentionally opening the doors,and will help keep out intruders.
● Before opening any door, alwayslook for and avoid oncoming traffic.
● Always use the door handle to openor close the sliding door. Do notattempt to open or close the door by
merely placing your hand on thedoor edge or door slide roller, as thismay cause injury.
● When opening the sliding door on aslope, ensure that it is fully open andthat it does not close by itself.
CHILD SAFETY SLIDING DOORLOCK
Child safety locking helps prevent doorsfrom being opened accidentally, especiallywhen small children are in the vehicle.
When the lever is in the lock position, thesliding door can be opened only from theoutside.
APD0005
2-4
5/12/2018 1996-Nissan-Quest Manual Del Usuario - slidepdf.com
http://slidepdf.com/reader/full/1996-nissan-quest-manual-del-usuario 33/234
POWER DOOR LOCK
The power door lock system allows you tolock or unlock all doors simultaneously.
● Turning a door key to the front locks alldoors. This function can be operatedfrom the driver, passenger or slidingdoor.
● Pushing a front door lock knob in locks alldoors. When locking the doors this way,be certain not to leave the key inside thevehicle. All doors automatically unlock
with the key in the ignition.
Selective unlock (If so equipped)
●
Turning the door key one time to the reaof the vehicle unlocks the correspondindoor. From that position, returning thkey to Neutral (where the key can only bremoved and inserted) and turning it tthe rear again within 5 seconds unlockall doors. This function can be operatefrom the driver, passenger or slidindoor.
APD0841 APD082
2-5
5/12/2018 1996-Nissan-Quest Manual Del Usuario - slidepdf.com
http://slidepdf.com/reader/full/1996-nissan-quest-manual-del-usuario 34/234
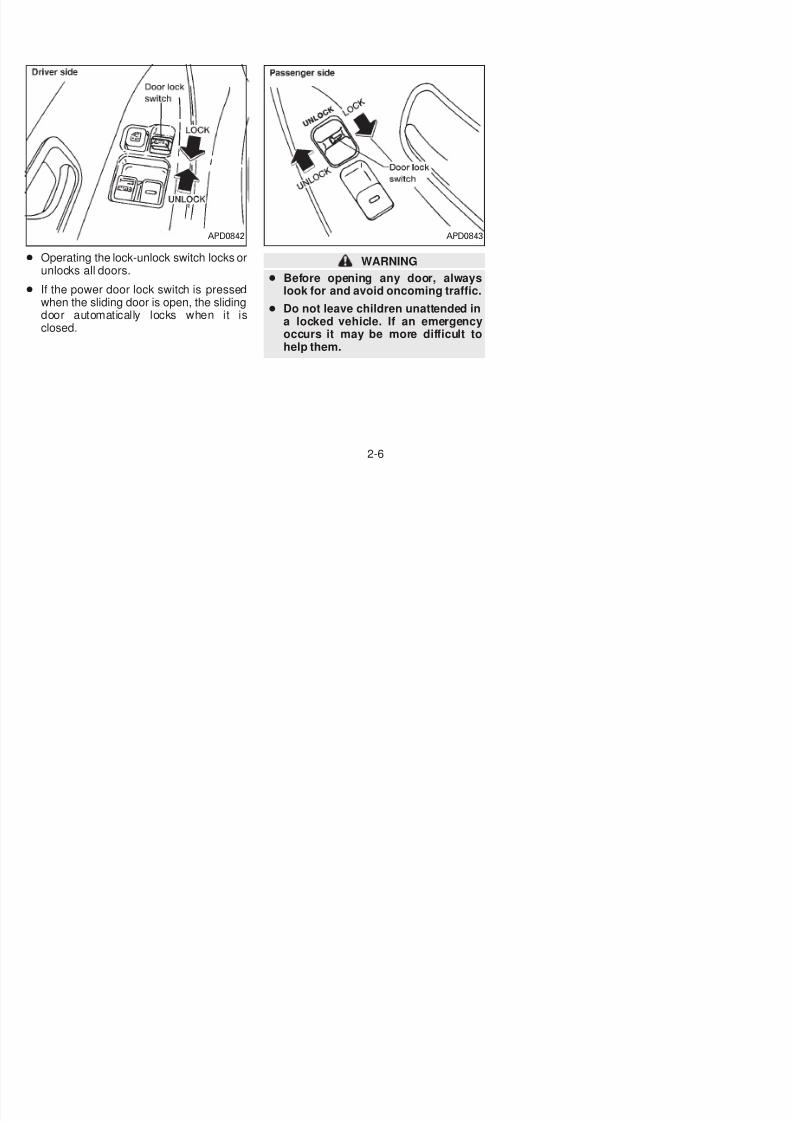
● Operating the lock-unlock switch locks orunlocks all doors.
● If the power door lock switch is pressedwhen the sliding door is open, the slidingdoor automatically locks when it isclosed.
WARNING
● Before opening any door, alwayslook for and avoid oncoming traffic.
● Do not leave children unattended ina locked vehicle. If an emergencyoccurs it may be more difficult tohelp them.
APD0842 APD0843
2-6
MULTI-REMOTE CONTROLSYSTEM (If i d)
5/12/2018 1996-Nissan-Quest Manual Del Usuario - slidepdf.com
http://slidepdf.com/reader/full/1996-nissan-quest-manual-del-usuario 35/234
It is possible to lock/unlock all doors, turnthe interior lights on or off, and activate thepanic alarm by using the remote controllerfrom outside the vehicle.
Be sure to remove the key from thevehicle before locking the doors andleaving it.
The remote controller can operate at adistance of approximately 49 ft (15 m) fromthe vehicle. (The effective distance dependson the conditions around the vehicle.)
As many as four remote controllers can beused with one vehicle. For more informationconcerning the purchase and use of addi-tional remote controllers, contact your NIS-
SAN dealer.
CAUTION
Listed below are conditions or occur-rences which will damage the remotecontroller:
● Do not allow the remote controller tobecome wet.
● Do not drop the remote controller.
● Do not strike the remote controller
sharply against another object.
● Do not place the remote controllerfor an extended period in an areawhere temperatures exceed 140°F(60°C).
Locking doors1. Close all of the doors.
2. Push the button on the multi-remotecontroller.
3. All of the doors lock.
4. The parking lights flash twice and thehorn chirps to verify all the doors arelocked.
Unlocking doors
1. Push the button on the multi-remote
controller. Only the driver side door un-locks.
2. The interior lights come on and stay onfor 30 seconds.
3. Push the button on the multi-remotecontroller again within five seconds. The
passenger doors and the rear door un-lock.
The interior lights can be turned off withouwaiting 30 seconds by either turning thignition to ON or locking the doors with thmulti-remote controller.
Using the panic alarm
If you are near your vehicle and feel threaened, you may activate the panic alarm tcall attention as follows:
1. Push the button on the remote controller for at least one full second.
2. The theft warning alarm (horn) soundand the headlights and tail lights flash fo30 seconds.
3. The panic alarm stops when:
● it has run for 30 seconds, or
● the or the button are pressed, o
● the buttonis releasedandre-pushe
SYSTEM (If so equipped)
2-7
BATTERY REPLACEMENT
5/12/2018 1996-Nissan-Quest Manual Del Usuario - slidepdf.com
http://slidepdf.com/reader/full/1996-nissan-quest-manual-del-usuario 36/234
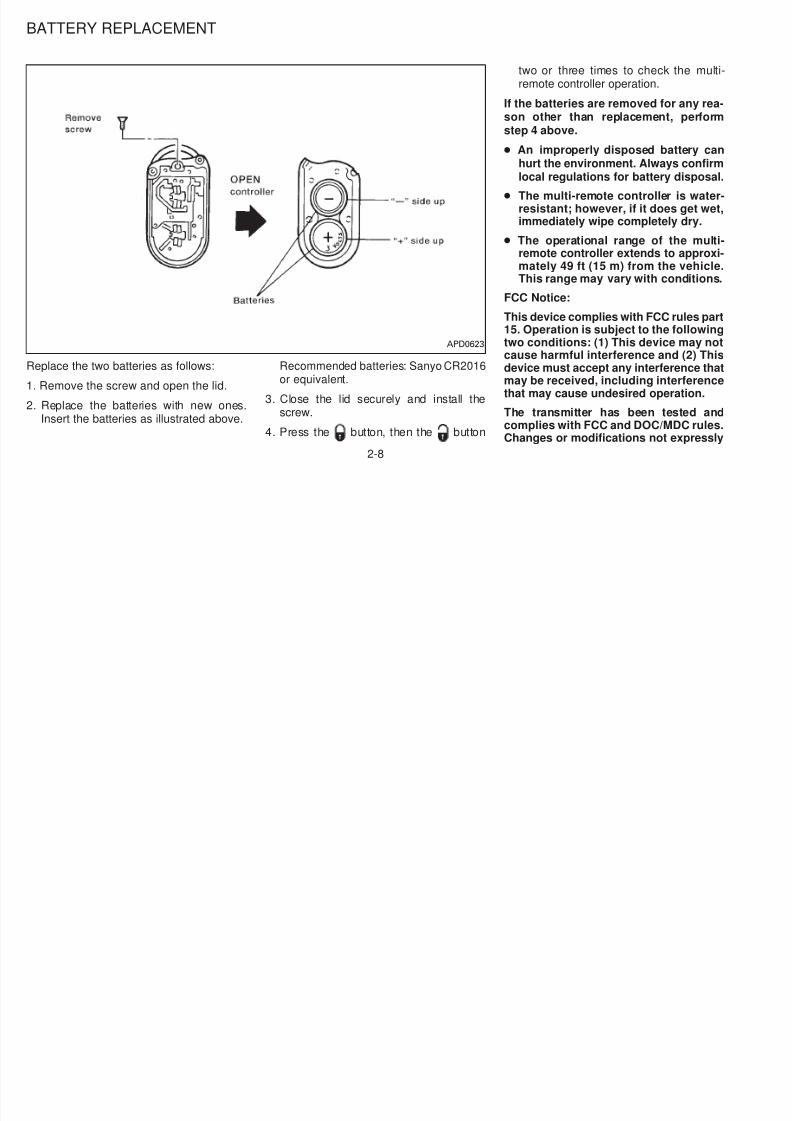
Replace the two batteries as follows:
1. Remove the screw and open the lid.
2. Replace the batteries with new ones.
Insert the batteries as illustrated above.
Recommended batteries: Sanyo CR2016or equivalent.
3. Close the lid securely and install thescrew.
4. Press the button, then the button
two or three times to check the multremote controller operation.
If the batteries are removed for any reason other than replacement, performstep 4 above.
● An improperly disposed battery cahurt the environment. Always confirmlocal regulations for battery disposa
● The multi-remote controller is wateresistant; however, if it does get weimmediately wipe completely dry.
● The operational range of the multremote controller extends to approxmately 49 ft (15 m) from the vehicleThis range may vary with conditions
FCC Notice:
This device complies with FCC rules pa15. Operation is subject to the followintwo conditions: (1) This device may nocause harmful interference and (2) Thdevice must accept any interference thamay be received, including interferencthat may cause undesired operation.
The transmitter has been tested an
complies with FCC and DOC/MDC rulesChanges or modifications not expressl
APD0623
2-8

5/12/2018 1996-Nissan-Quest Manual Del Usuario - slidepdf.com
http://slidepdf.com/reader/full/1996-nissan-quest-manual-del-usuario 37/234
approved by the party responsible forcompliance could void the user’s author-ity to operate the device.
Illuminated entry systemAll models
The interior lights, the cargo light, the step-well lights near the sliding door and on thefront doors, and the footwell lights near thedriver’s and front passenger’s feet illumi-nate when the front and sliding doors areopened. These lights gradually dim to offwithin 30 seconds or turn off immediatelywhen the key is turned to ON.
Battery saver
If the vehicle doors are not fully closed andthe interior lights remain illuminated, theyeventually turn off automatically to preventthe battery from becoming discharged.Lights that illuminate when the front doorsand/or the sliding door are open turn offafter approximately 30 minutes. Lights thatilluminate when the back door is open turnoff after approximately 60 minutes.
If the personal reading lamp is left on when
the key is removed from the ignition, it turnsoff automatically in 30 minutes.
2-9
HOOD RELEASE
5/12/2018 1996-Nissan-Quest Manual Del Usuario - slidepdf.com
http://slidepdf.com/reader/full/1996-nissan-quest-manual-del-usuario 38/234
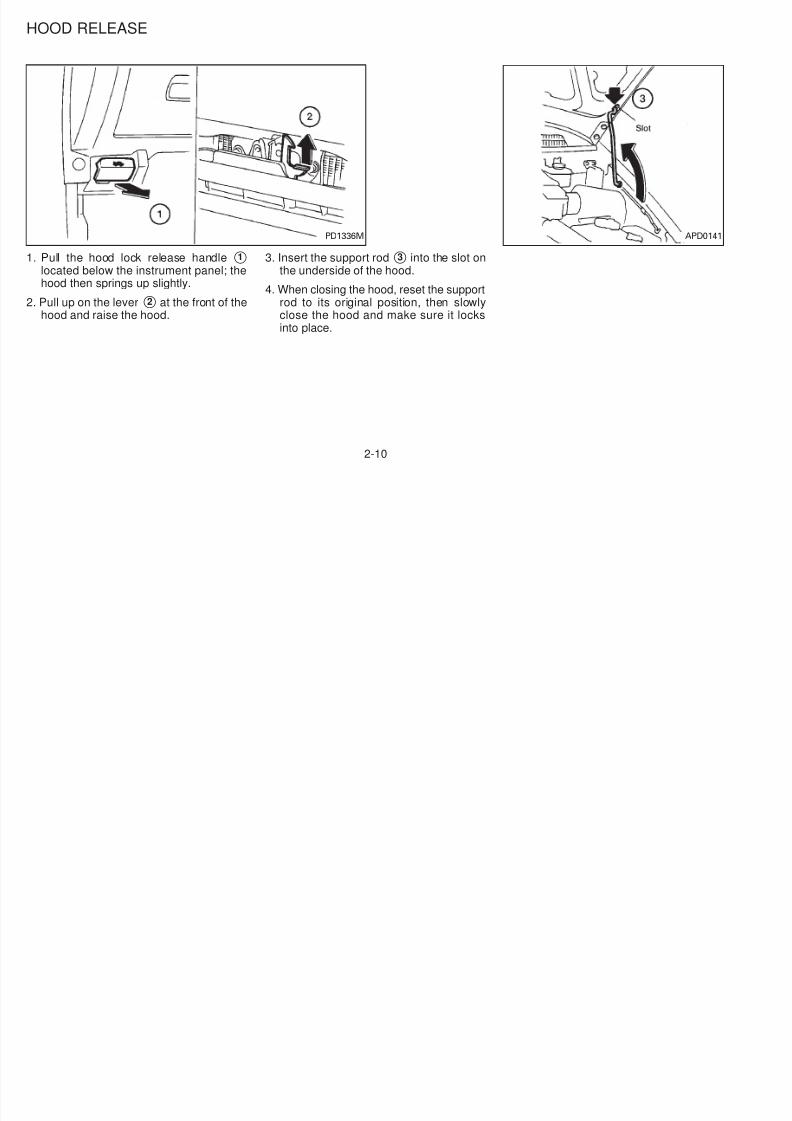
1. Pull the hood lock release handle 1located below the instrument panel; the
hood then springs up slightly.2. Pull up on the lever2 at the front of the
hood and raise the hood.
3. Insert the support rod3 into the slot onthe underside of the hood.
4. When closing the hood, reset the supportrod to its original position, then slowlyclose the hood and make sure it locksinto place.
PD1336M APD014
2-10
REAR DOOR LOCK
5/12/2018 1996-Nissan-Quest Manual Del Usuario - slidepdf.com
http://slidepdf.com/reader/full/1996-nissan-quest-manual-del-usuario 39/234
Key operation
To unlock the rear door, turn the key coun-terclockwise. To open the rear door, lift upon the opener handle near the license plate.To close, lower and push the rear doordown securely.
To lock the rear door without the key, set thelock lever to the lock position following the‘‘Push to Lock’’ instructions near the latch,then close the rear door securely.
WARNING
Do not drive with the rear door or glassopen. This could allow dangerous ex-haust gases to be drawn into the ve-hicle.
APD0824
2-11
5/12/2018 1996-Nissan-Quest Manual Del Usuario - slidepdf.com
http://slidepdf.com/reader/full/1996-nissan-quest-manual-del-usuario 40/234
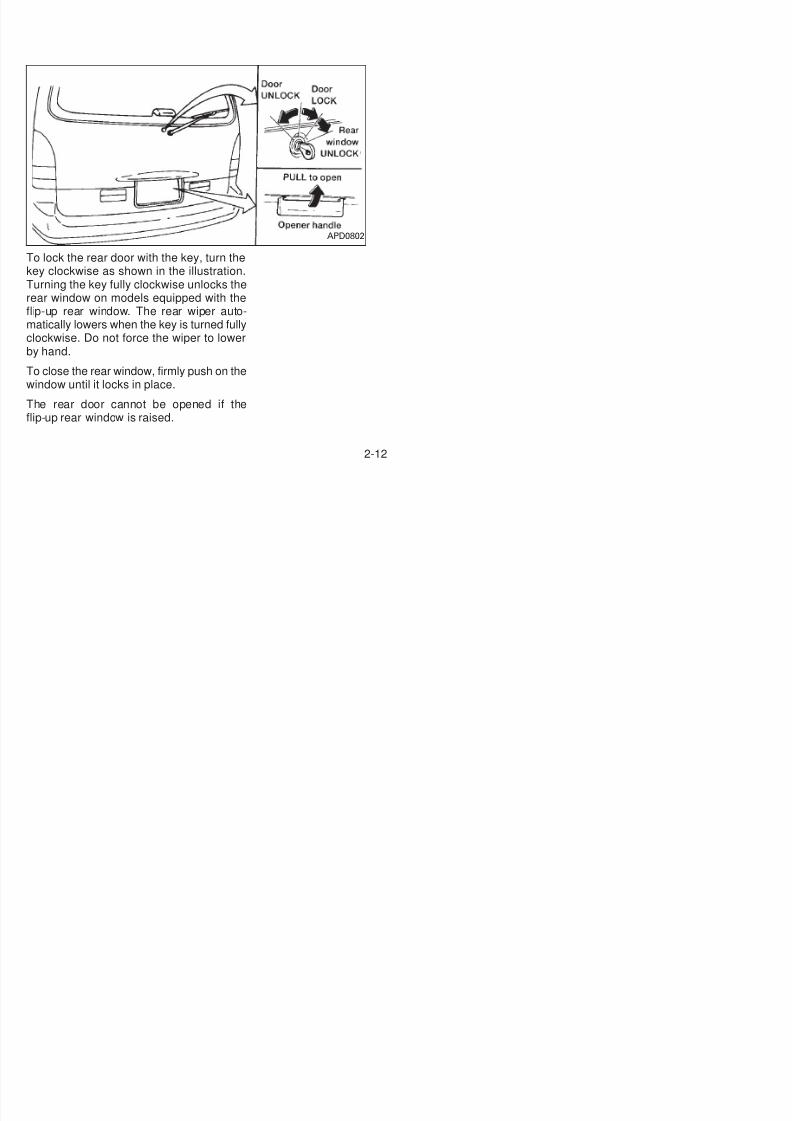
To lock the rear door with the key, turn thekey clockwise as shown in the illustration.
Turning the key fully clockwise unlocks therear window on models equipped with theflip-up rear window. The rear wiper auto-matically lowers when the key is turned fullyclockwise. Do not force the wiper to lowerby hand.
To close the rear window, firmly push on thewindow until it locks in place.
The rear door cannot be opened if theflip-up rear window is raised.
APD0802
2-12
CARGO NET
5/12/2018 1996-Nissan-Quest Manual Del Usuario - slidepdf.com
http://slidepdf.com/reader/full/1996-nissan-quest-manual-del-usuario 41/234
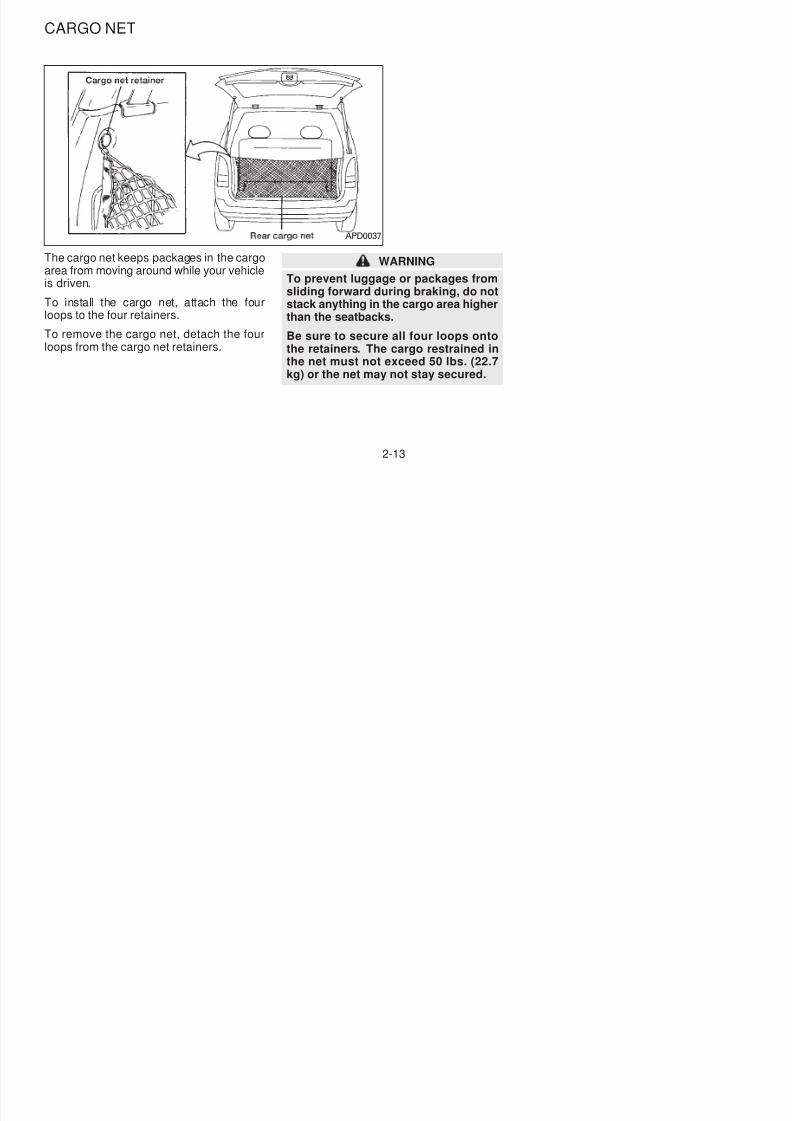
The cargo net keeps packages in the cargoarea from moving around while your vehicle
is driven.To install the cargo net, attach the fourloops to the four retainers.
To remove the cargo net, detach the fourloops from the cargo net retainers.
WARNING
To prevent luggage or packages from
sliding forward during braking, do notstack anything in the cargo area higherthan the seatbacks.
Be sure to secure all four loops ontothe retainers. The cargo restrained inthe net must not exceed 50 lbs. (22.7kg) or the net may not stay secured.
APD0037
2-13
LUGGAGE RACK
5/12/2018 1996-Nissan-Quest Manual Del Usuario - slidepdf.com
http://slidepdf.com/reader/full/1996-nissan-quest-manual-del-usuario 42/234
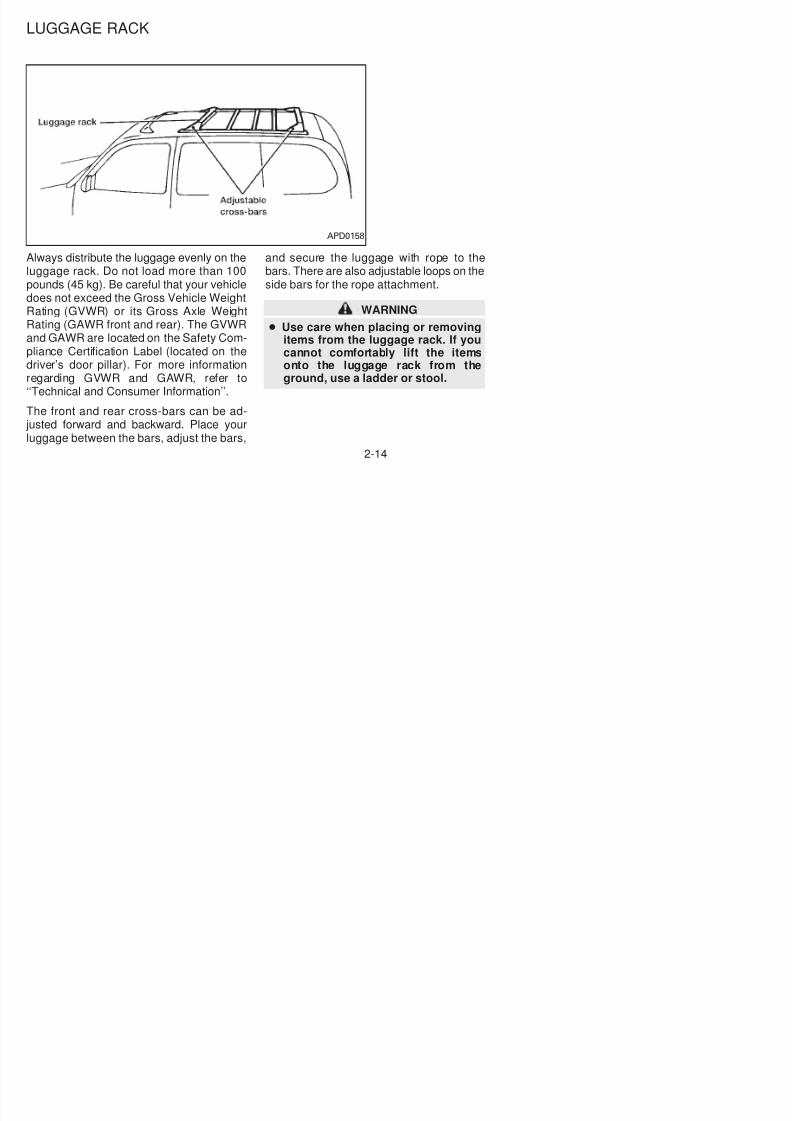
Always distribute the luggage evenly on theluggage rack. Do not load more than 100
pounds (45 kg). Be careful that your vehicledoes not exceed the Gross Vehicle WeightRating (GVWR) or its Gross Axle WeightRating (GAWR front and rear). The GVWRand GAWR are located on the Safety Com-pliance Certification Label (located on thedriver’s door pillar). For more informationregarding GVWR and GAWR, refer to‘‘Technical and Consumer Information’’.
The front and rear cross-bars can be ad-
justed forward and backward. Place yourluggage between the bars, adjust the bars,
and secure the luggage with rope to thebars. There are also adjustable loops on the
side bars for the rope attachment.
WARNING
● Use care when placing or removingitems from the luggage rack. If youcannot comfortably lift the itemsonto the luggage rack from theground, use a ladder or stool.
APD0158
2-14
FUEL FILLER LID AND CAP SEATS/FLOOR MATS

5/12/2018 1996-Nissan-Quest Manual Del Usuario - slidepdf.com
http://slidepdf.com/reader/full/1996-nissan-quest-manual-del-usuario 43/234
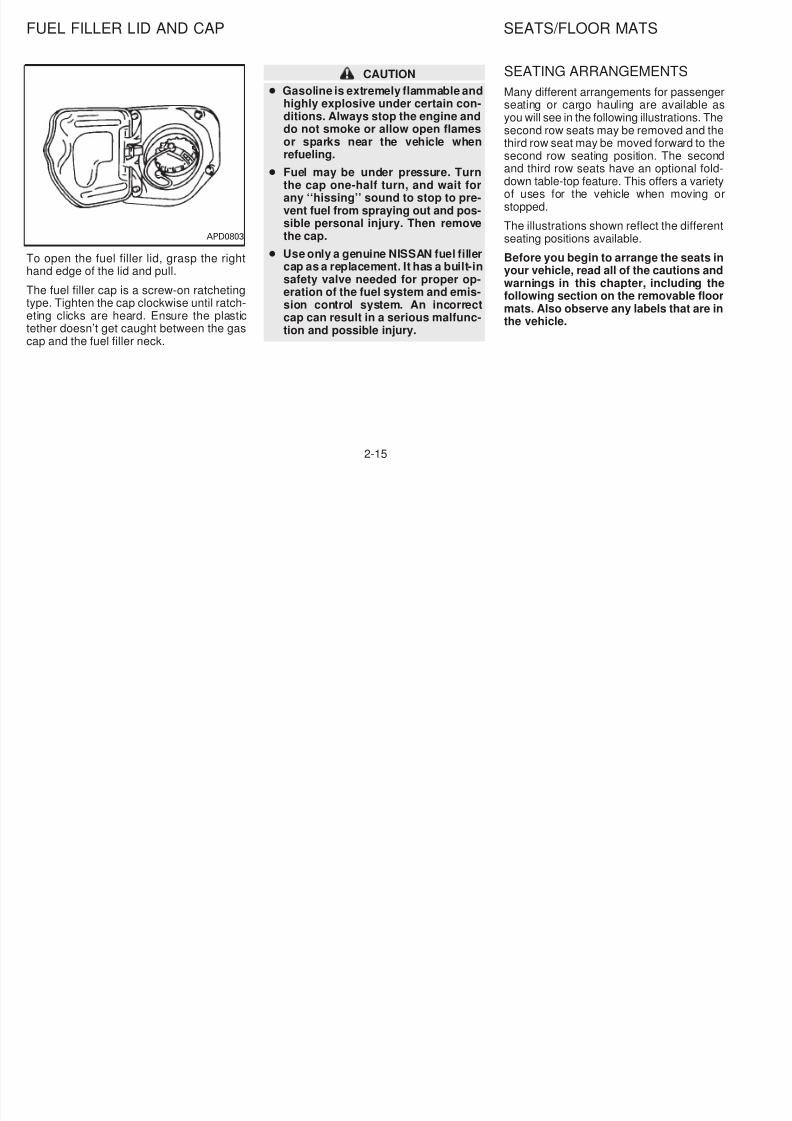
To open the fuel filler lid, grasp the righthand edge of the lid and pull.
The fuel filler cap is a screw-on ratchetingtype. Tighten the cap clockwise until ratch-eting clicks are heard. Ensure the plastictether doesn’t get caught between the gascap and the fuel filler neck.
CAUTION
● Gasoline is extremely flammable andhighly explosive under certain con-ditions. Always stop the engine anddo not smoke or allow open flamesor sparks near the vehicle when
refueling.
● Fuel may be under pressure. Turnthe cap one-half turn, and wait forany ‘‘hissing’’ sound to stop to pre-vent fuel from spraying out and pos-sible personal injury. Then removethe cap.
● Use only a genuine NISSAN fuel fillercap as a replacement. It has a built-insafety valve needed for proper op-
eration of the fuel system and emis-sion control system. An incorrectcap can result in a serious malfunc-tion and possible injury.
SEATING ARRANGEMENTS
Many different arrangements for passengeseating or cargo hauling are available ayou will see in the following illustrations. Thsecond row seats may be removed and ththird row seat may be moved forward to thsecond row seating position. The seconand third row seats have an optional folddown table-top feature. This offers a varieof uses for the vehicle when moving ostopped.
The illustrations shown reflect the differenseating positions available.
Before you begin to arrange the seats iyour vehicle, read all of the cautions an
warnings in this chapter, including thfollowing section on the removable floomats. Also observe any labels that are ithe vehicle.
APD0803
2-15
5/12/2018 1996-Nissan-Quest Manual Del Usuario - slidepdf.com
http://slidepdf.com/reader/full/1996-nissan-quest-manual-del-usuario 44/234
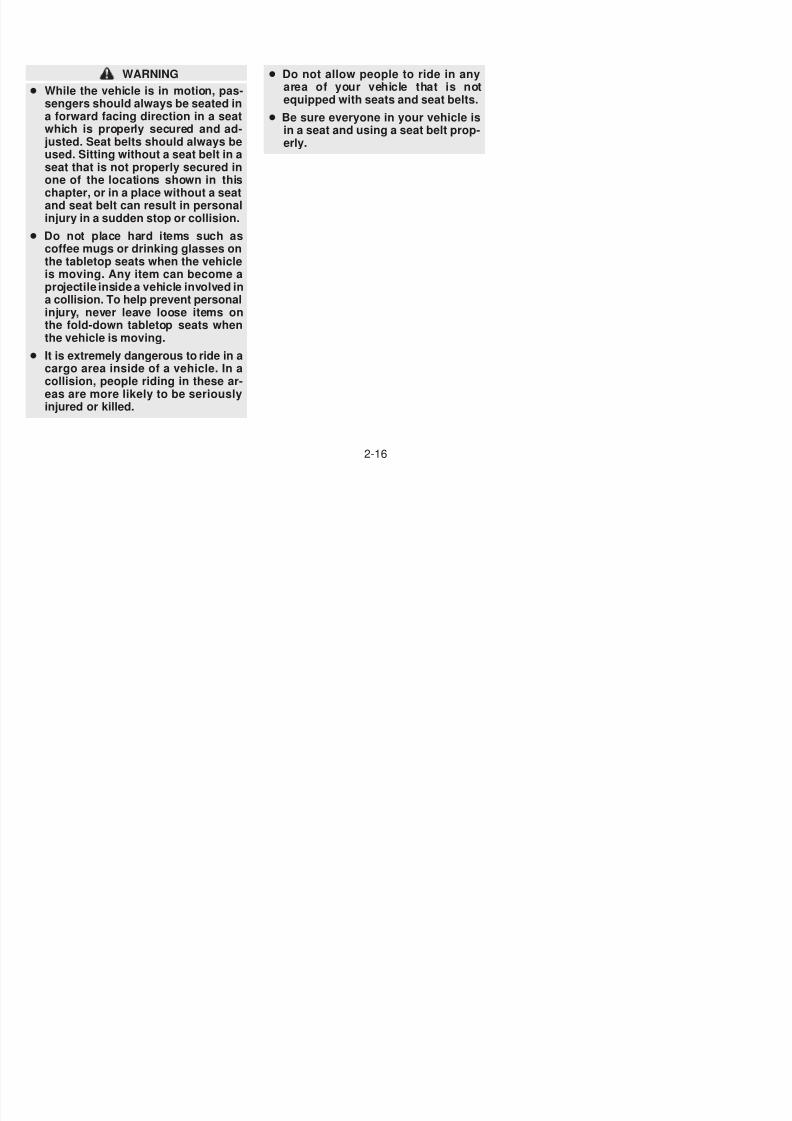
WARNING
● While the vehicle is in motion, pas-sengers should always be seated ina forward facing direction in a seatwhich is properly secured and ad-justed. Seat belts should always be
used. Sitting without a seat belt in aseat that is not properly secured inone of the locations shown in thischapter, or in a place without a seatand seat belt can result in personalinjury in a sudden stop or collision.
● Do not place hard items such ascoffee mugs or drinking glasses onthe tabletop seats when the vehicleis moving. Any item can become a
projectile inside a vehicle involved ina collision. To help prevent personalinjury, never leave loose items onthe fold-down tabletop seats whenthe vehicle is moving.
● It is extremely dangerous to ride in acargo area inside of a vehicle. In acollision, people riding in these ar-eas are more likely to be seriouslyinjured or killed.
● Do not allow people to ride in anyarea of your vehicle that is notequipped with seats and seat belts.
● Be sure everyone in your vehicle isin a seat and using a seat belt prop-erly.
2-16
FLOOR MAT POSITIONING
5/12/2018 1996-Nissan-Quest Manual Del Usuario - slidepdf.com
http://slidepdf.com/reader/full/1996-nissan-quest-manual-del-usuario 45/234
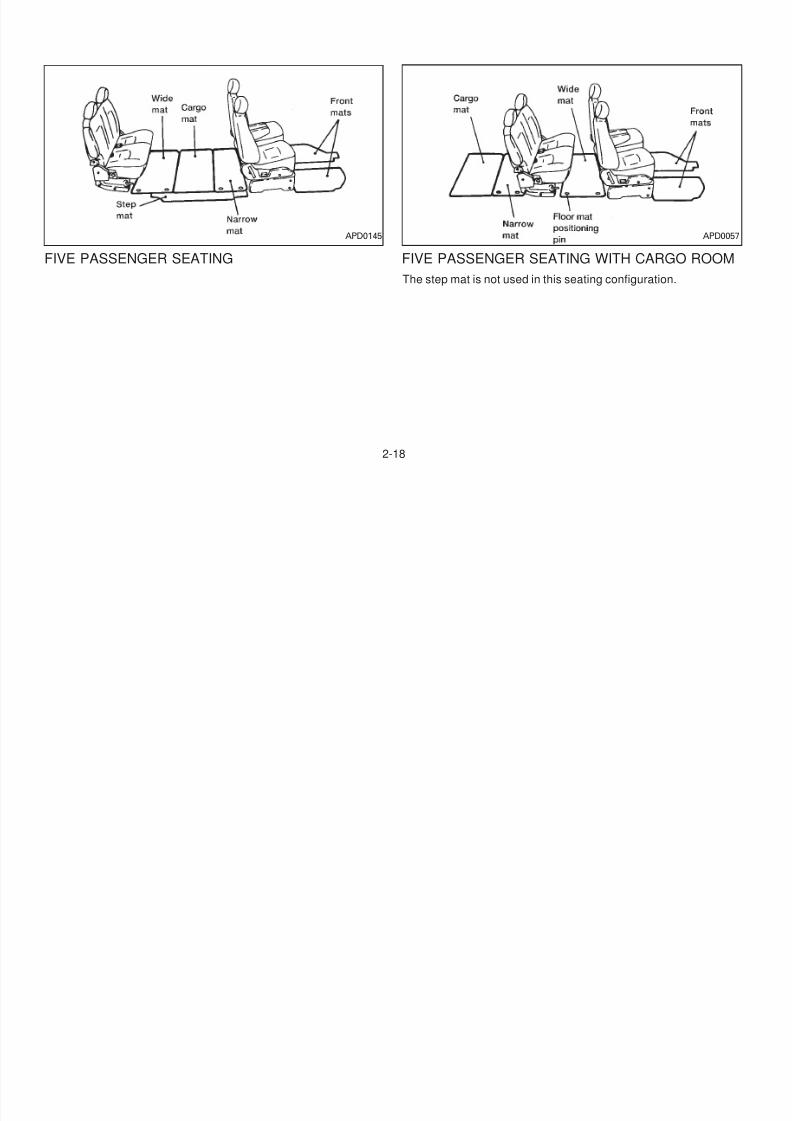
SEVEN PASSENGER SEATING
Removable floor mats
Whenever you remove the mats for any reason, the mats must bereinstalled before passengers ride in your vehicle. The floor matsare specifically designed to keep objects out of the seat tracks.
THREE-PASSENGER BENCH SEAT IN STORAGEPOSITION
WARNING
It is important to replace the floor mats whenever they areremoved for any reason. The floor mats are intended to helpprevent the possibility that high heeled shoes or similaobjects might become stuck in the seat tracks. Failure toreplace the floor mats might result in personal injury.
Be sure to keep the seat tracks clear of debris by cleaning themperiodically.
Review the following illustrations so you will know the proper way t
place the floor mats with the various seating arrangements availablin your vehicle.
APD0143 APD016
2-17
5/12/2018 1996-Nissan-Quest Manual Del Usuario - slidepdf.com
http://slidepdf.com/reader/full/1996-nissan-quest-manual-del-usuario 46/234
FIVE PASSENGER SEATING FIVE PASSENGER SEATING WITH CARGO ROO
The step mat is not used in this seating configuration.
APD0145 APD
2-18
5/12/2018 1996-Nissan-Quest Manual Del Usuario - slidepdf.com
http://slidepdf.com/reader/full/1996-nissan-quest-manual-del-usuario 47/234
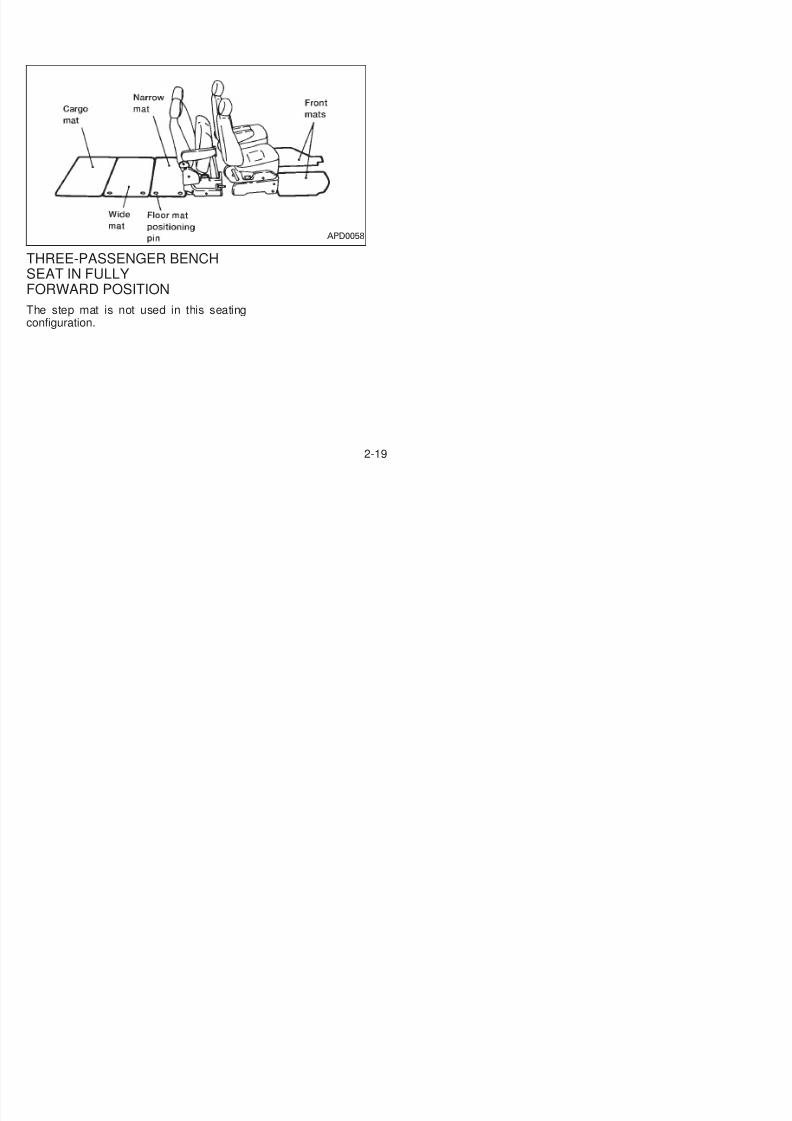
THREE-PASSENGER BENCHSEAT IN FULLY
FORWARD POSITIONThe step mat is not used in this seatingconfiguration.
APD0058
2-19
5/12/2018 1996-Nissan-Quest Manual Del Usuario - slidepdf.com
http://slidepdf.com/reader/full/1996-nissan-quest-manual-del-usuario 48/234
FLOOR MAT POSITIONING PINS
Positioning pins are attached to three of thefloor mats. The cargo mat and front mats donot have pins. However, the front floor mats
each have a grommet which is placed over
the floor mat positioning brackets located atthe base of the front seats.
Push the positioning pins into the seattracks to ensure correct installation, thenstraighten the mats as necessary.
The step mat has holes in addition to pins.When the mats are arranged properly, thepositioning pins of the two mats on eitherside of the step mat should fit through theholes in the step mat and into the seat track.
WARNING
● No occupant should ride in a vehicleseat unless it is in a normal ridingarrangement and the seat belts areproperly used.
● While driving, never allow anyone toride in the cargo area. It is not de-signed for passengers. They couldbe injured in sudden braking orcollision.
● To prevent luggage or packagesfrom sliding forward during braking,do not stack anything in the cargoarea higher than the seatbacks.
● Failure to follow proper seating instructions in this section could result in serious personal injury in anaccident or during a sudden stop.
APD0083
2-20
SEAT POSITIONS

5/12/2018 1996-Nissan-Quest Manual Del Usuario - slidepdf.com
http://slidepdf.com/reader/full/1996-nissan-quest-manual-del-usuario 49/234
WITH SECOND ROW BENCHSEAT
The most common seating arrangement forseven passengers is with the three-passenger bench seat in seating position#1. This provides more leg room for thepassengers sitting in the third row.
When more cargo area room is necessary,the three-passenger sliding bench seat canbe moved to seating position #2. This seat-ing arrangement provides less leg room forthird row passengers, but more cargo arearoom.
The fold-down tabletop seats in the seconand third rows provide a surface for eatinor playing games on long trips.
APD0096 APD0097 APD004
2-21
5/12/2018 1996-Nissan-Quest Manual Del Usuario - slidepdf.com
http://slidepdf.com/reader/full/1996-nissan-quest-manual-del-usuario 50/234
If a considerable amount of cargo arearoom is needed, the seat cushion of thethree-passenger sliding bench seat can beflipped up and the seat can be moved up tostorage position #2, just behind the secondrow seat.
When maximum cargo area is needed andthere are no rear seat passengers, thesecond row seat can be removed and thethree-passenger sliding bench seat can bemoved up to storage position #1, just behindthe front seats.
The second row bench seat can be foldedown to serve as a tabletop for passengesitting in the three-passenger bench seat.
APD0043 APD0049 APD004
2-22

5/12/2018 1996-Nissan-Quest Manual Del Usuario - slidepdf.com
http://slidepdf.com/reader/full/1996-nissan-quest-manual-del-usuario 51/234
The second and third row bench seats canbe folded down to tabletops.
To increase cargo area space, the secondrow bench seat can be removed and thethree-passenger sliding seat can be movedup to the second row position.
The third seat can be folded down into tabletop.
APD0045 APD0046 APD004
2-23
5/12/2018 1996-Nissan-Quest Manual Del Usuario - slidepdf.com
http://slidepdf.com/reader/full/1996-nissan-quest-manual-del-usuario 52/234
With the third seat folded down and thesecond seat removed, cargo can be placedin between the front seats and the third rowseat. People should not be allowed toride in areas meant for cargo. Passen-gers should always be properly re-strained in seat belts.
The second row seat can be folded downand the third row seat can be moved justbehind it in a storage position.
WITH SECOND ROW BUCKETSEATS
The normal seating arrangement for sevepassengers is with the three-passengebench seat in seating position #1. Thprovides more leg room for the passengesitting in the third row.
APD0048 APD0050 APD012
2-24
5/12/2018 1996-Nissan-Quest Manual Del Usuario - slidepdf.com
http://slidepdf.com/reader/full/1996-nissan-quest-manual-del-usuario 53/234
When one passenger in the three-passenger bench seat would like more legroom, one of the second row bucket seatscan be removed.
When more cargo area room is necessary,the three-passenger sliding bench seat canbe moved to seating position #2. This seat-ing arrangement provides less leg room forthird row passengers, but more cargo arearoom.
If passengers in the three-passenger bencseat would like more leg room, both seconrow bucket seats can be removed. Thfloor area should never be used by passengers. Passengers should always bproperly restrained by seat belts.
APD0052 APD0127 APD005
2-25
5/12/2018 1996-Nissan-Quest Manual Del Usuario - slidepdf.com
http://slidepdf.com/reader/full/1996-nissan-quest-manual-del-usuario 54/234
MANUAL FRONT SEATADJUSTMENT
WARNING● Do not adjust the driver’s seat while
driving. The seat may move sud-denly and could cause loss of con-trol of the vehicle.
● After adjustment, gently rock in theseat to make sure it is securelylocked.
1 Forward and backward
Rotate the lever up while you slide the seatforward or backward to the desired position.Release the lever to lock the seat in posi-tion.
2 Reclining
Pull the lever up and lean back until thedesired angle is obtained. To bring theseatback forward again, pull the lever andmove your body forward. The seatback
moves forward. Release the lever to lockthe seatback in position.
WARNING
The seatback should not be reclinedany more than needed for comforwhen the vehicle is moving. Seat beltsare most effective when the passengesits well back and straight up in th
seat. If the seat is reclined, the risk osliding under the lap belt and beinginjured is increased.
APD0119
2-26
5/12/2018 1996-Nissan-Quest Manual Del Usuario - slidepdf.com
http://slidepdf.com/reader/full/1996-nissan-quest-manual-del-usuario 55/234
POWER SUPPORT FRONT SEAT
WARNING
● Do not adjust the driver’s seat whiledriving.
● The seatback should not be reclinedany more than needed for comfortwhen the vehicle is moving. Seatbelts are most effective when thepassenger sits well back andstraight up in the seat. If the seat isreclined, the risk of sliding under thelap belt and being injured is
increased.
● Do not leave children unattended in-side the vehicle. They may inadvert-ently activate switches.
Operating tips
● The motor has an auto-reset overloadprotection circuit. If the motor stops dur-ing operation, wait 30 seconds, then re-activate the switch.
● Do not operate the power support seatfor a long period of time when the engine
is off. This discharges the battery.
The passenger seat only has the poweslide switch and the power recliner switch
Forward and backward adjustmenTo move the seat forward, push the raiseside of the power slide switch. To move thseat backward, push the indented side othe switch. Release the switch to stop thmovement of the seat.
APD0804 APD055
2-27
R li i
5/12/2018 1996-Nissan-Quest Manual Del Usuario - slidepdf.com
http://slidepdf.com/reader/full/1996-nissan-quest-manual-del-usuario 56/234
Reclining
To recline the seat, push the indented sideof the power recliner switch. To return to amore upright position, push the raised sideof the switch. Release the switch to stop themovement of the seatback.
Seat height adjustment
To raise the height of the seat, push the
raised side of the power seat height switchand release it when the desired position hasbeen reached. To lower the height of theseat, push the indented side of the switchand release it when the desired position hasbeen reached.
Lumbar support
To inflate the lumbar support, push th
raised side of the power lumbar switch anrelease it when the desired position habeen reached. To deflate the lumbar support, push the indented side of the switch
The power lumbar pump motor continues toperate after the lumbar support is fulinflated. Release the switch when the lumbar stops inflating.
APD0805 APD080
2-28
5/12/2018 1996-Nissan-Quest Manual Del Usuario - slidepdf.com
http://slidepdf.com/reader/full/1996-nissan-quest-manual-del-usuario 57/234
HEAD RESTRAINTS
Adjust the top of the head restraints level
with the top of your ears.To raise the head restraint, pull it up. Tolower, push in the release button and pushthe head restraint down. To remove thehead restraint, push in the button and pullthe head restraint up.
WARNING
● Head restraints should be adjustedproperly as they may provide signifi-cant protection against whiplash in-jury. Always replace and adjust themproperly if they have been removed
for any reason.● If the head restraints are removed for
any reason, they should be securelystored to prevent them from causingdamage to passengers or the vehiclein case of sudden braking or colli-sion.
Some seat arrangements may require re-moval of the head restraints when the seat
is in a storage position and not to be used bypassengers.
ARMRESTS
To use the armrests on any seat, pull the
down to the resting position.
PD1176M APD002
2-29
WARNING

5/12/2018 1996-Nissan-Quest Manual Del Usuario - slidepdf.com
http://slidepdf.com/reader/full/1996-nissan-quest-manual-del-usuario 58/234
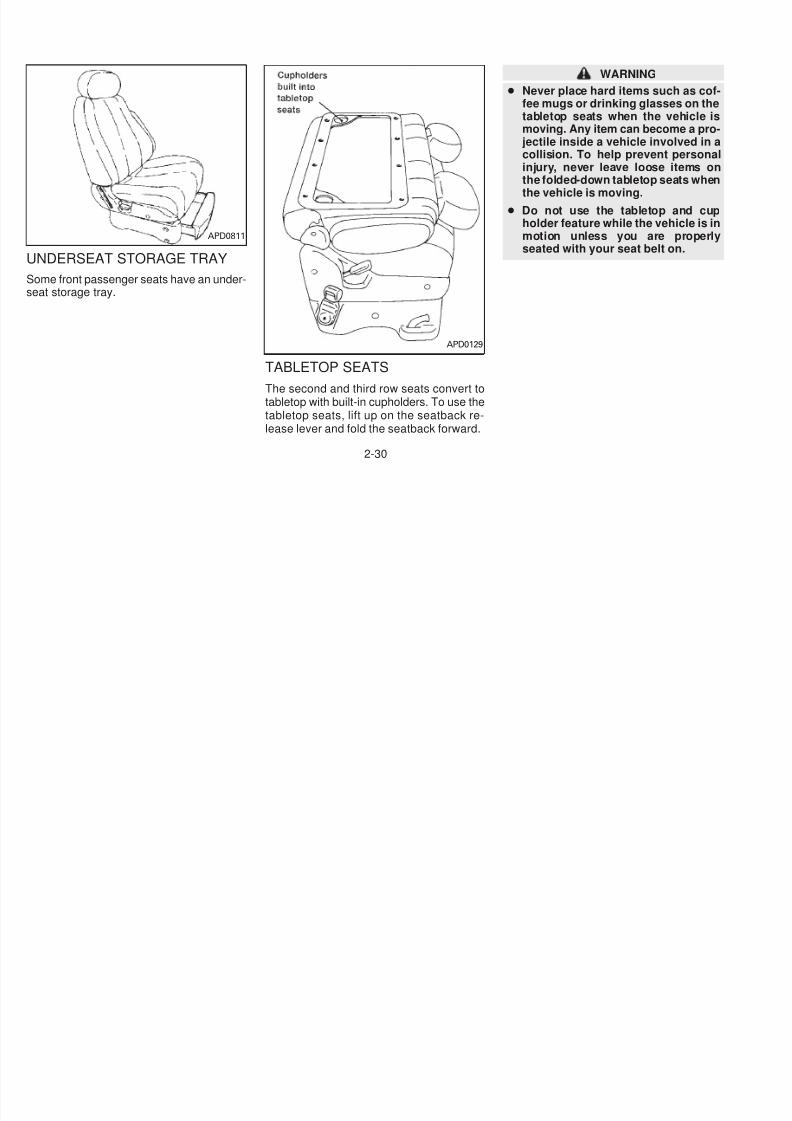
UNDERSEAT STORAGE TRAY
Some front passenger seats have an under-
seat storage tray.
TABLETOP SEATS
The second and third row seats convert totabletop with built-in cupholders. To use thetabletop seats, lift up on the seatback re-
lease lever and fold the seatback forward.
WARNING
● Never place hard items such as coffee mugs or drinking glasses on thetabletop seats when the vehicle ismoving. Any item can become a projectile inside a vehicle involved in a
collision. To help prevent personainjury, never leave loose items onthe folded-down tabletop seats whenthe vehicle is moving.
● Do not use the tabletop and cupholder feature while the vehicle is inmotion unless you are properlyseated with your seat belt on.
APD0811
APD0129
2-30
order that full attention may be given
CUP HOLDER
5/12/2018 1996-Nissan-Quest Manual Del Usuario - slidepdf.com
http://slidepdf.com/reader/full/1996-nissan-quest-manual-del-usuario 59/234
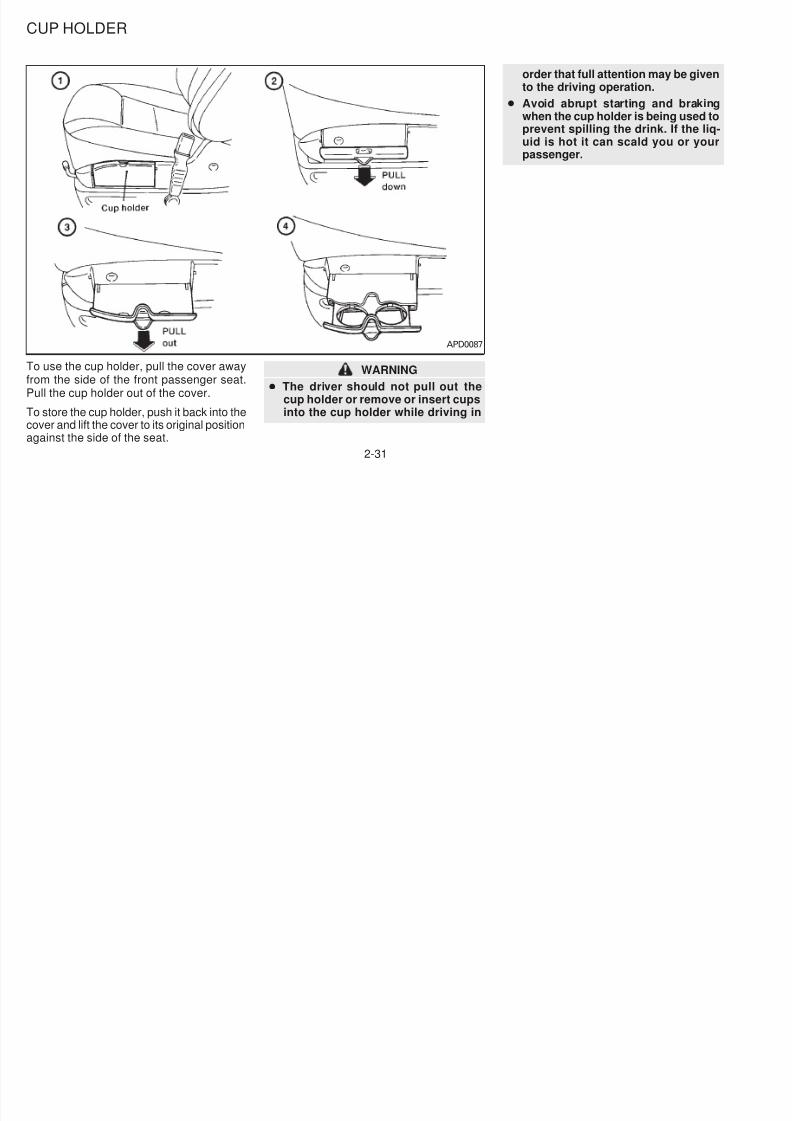
To use the cup holder, pull the cover awayfrom the side of the front passenger seat.Pull the cup holder out of the cover.
To store the cup holder, push it back into thecover and lift the cover to its original positionagainst the side of the seat.
WARNING
● The driver should not pull out thecup holder or remove or insert cupsinto the cup holder while driving in
order that full attention may be givento the driving operation.
● Avoid abrupt starting and brakingwhen the cup holder is being used toprevent spilling the drink. If the liquid is hot it can scald you or you
passenger.
APD0087
2-31
5/12/2018 1996-Nissan-Quest Manual Del Usuario - slidepdf.com
http://slidepdf.com/reader/full/1996-nissan-quest-manual-del-usuario 60/234
Second row cup holder(If so equipped)
Vehicles equipped with Captain’s chairs inthe second row have a cup holder attachedto the side of the left seat.
Simply pull the cup holder out from the seatto use.
APD0821
2-32
FLEXIBLE SEATING
5/12/2018 1996-Nissan-Quest Manual Del Usuario - slidepdf.com
http://slidepdf.com/reader/full/1996-nissan-quest-manual-del-usuario 61/234
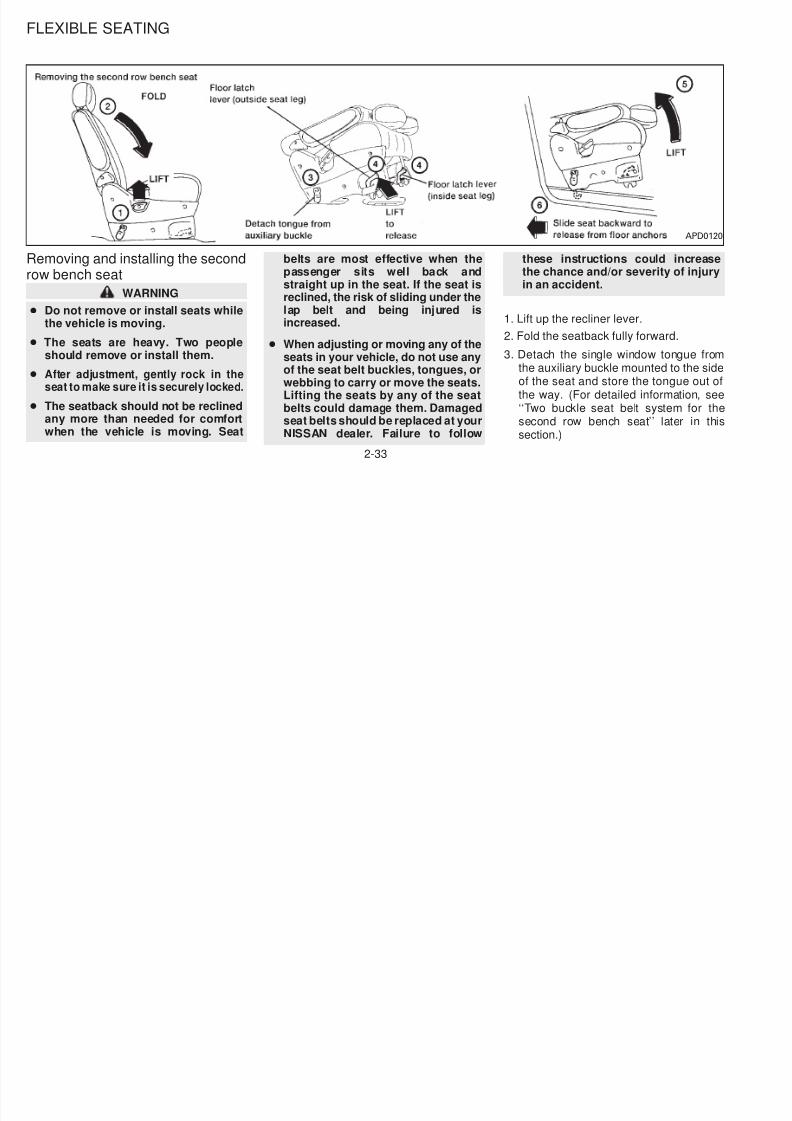
Removing and installing the secondrow bench seat
WARNING● Do not remove or install seats while
the vehicle is moving.
● The seats are heavy. Two peopleshould remove or install them.
● After adjustment, gently rock in theseat to make sure it is securely locked.
● The seatback should not be reclinedany more than needed for comfort
when the vehicle is moving. Seat
belts are most effective when thepassenger sits well back andstraight up in the seat. If the seat is
reclined, the risk of sliding under thelap belt and being injured isincreased.
● When adjusting or moving any of theseats in your vehicle, do not use anyof the seat belt buckles, tongues, orwebbing to carry or move the seats.Lifting the seats by any of the seatbelts could damage them. Damagedseat belts should be replaced at your
NISSAN dealer. Failure to follow
these instructions could increasethe chance and/or severity of injuryin an accident.
1. Lift up the recliner lever.
2. Fold the seatback fully forward.
3. Detach the single window tongue frothe auxiliary buckle mounted to the sidof the seat and store the tongue out othe way. (For detailed information, se‘‘Two buckle seat belt system for thsecond row bench seat’’ later in th
section.)
APD012
2-33
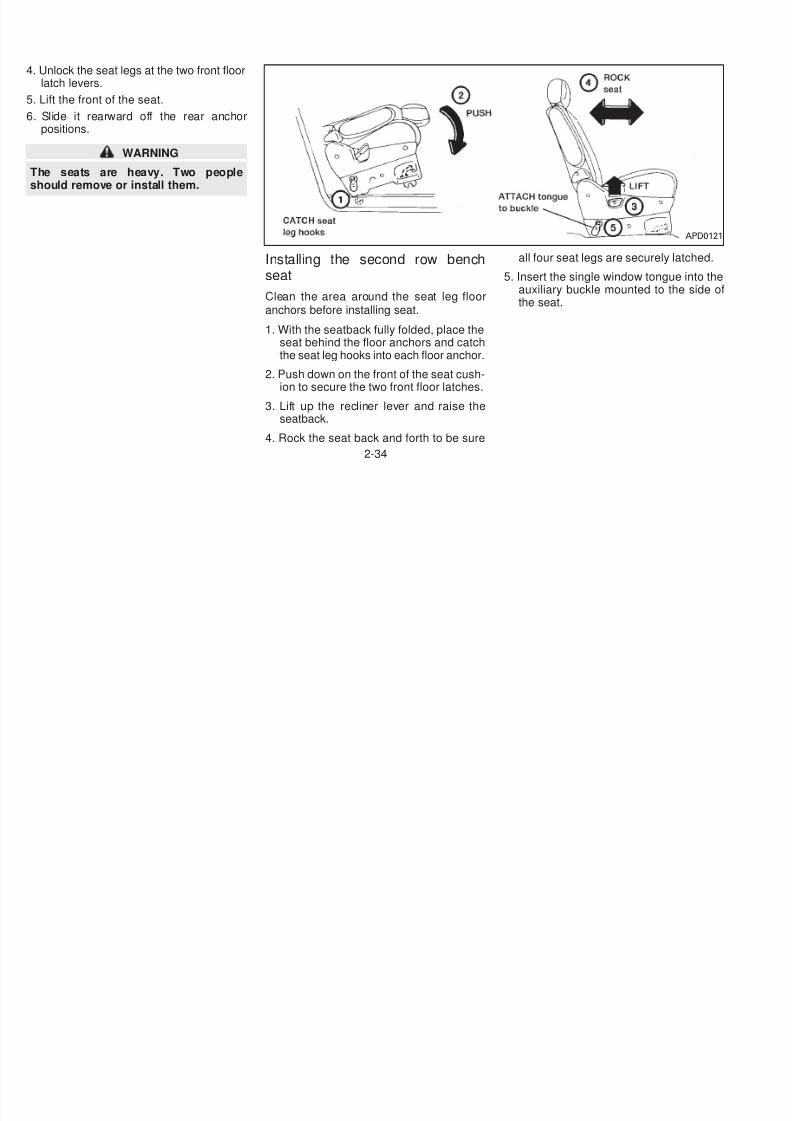
4. Unlock the seat legs at the two front floor
5/12/2018 1996-Nissan-Quest Manual Del Usuario - slidepdf.com
http://slidepdf.com/reader/full/1996-nissan-quest-manual-del-usuario 62/234
glatch levers.
5. Lift the front of the seat.
6. Slide it rearward off the rear anchorpositions.
WARNINGThe seats are heavy. Two peopleshould remove or install them.
Installing the second row benchseat
Clean the area around the seat leg flooranchors before installing seat.
1. With the seatback fully folded, place theseat behind the floor anchors and catchthe seat leg hooks into each floor anchor.
2. Push down on the front of the seat cush-ion to secure the two front floor latches.
3. Lift up the recliner lever and raise theseatback.
4. Rock the seat back and forth to be sure
all four seat legs are securely latched.
5. Insert the single window tongue into th
auxiliary buckle mounted to the side othe seat.
APD012
2-34
● The seatback should not be reclined
5/12/2018 1996-Nissan-Quest Manual Del Usuario - slidepdf.com
http://slidepdf.com/reader/full/1996-nissan-quest-manual-del-usuario 63/234
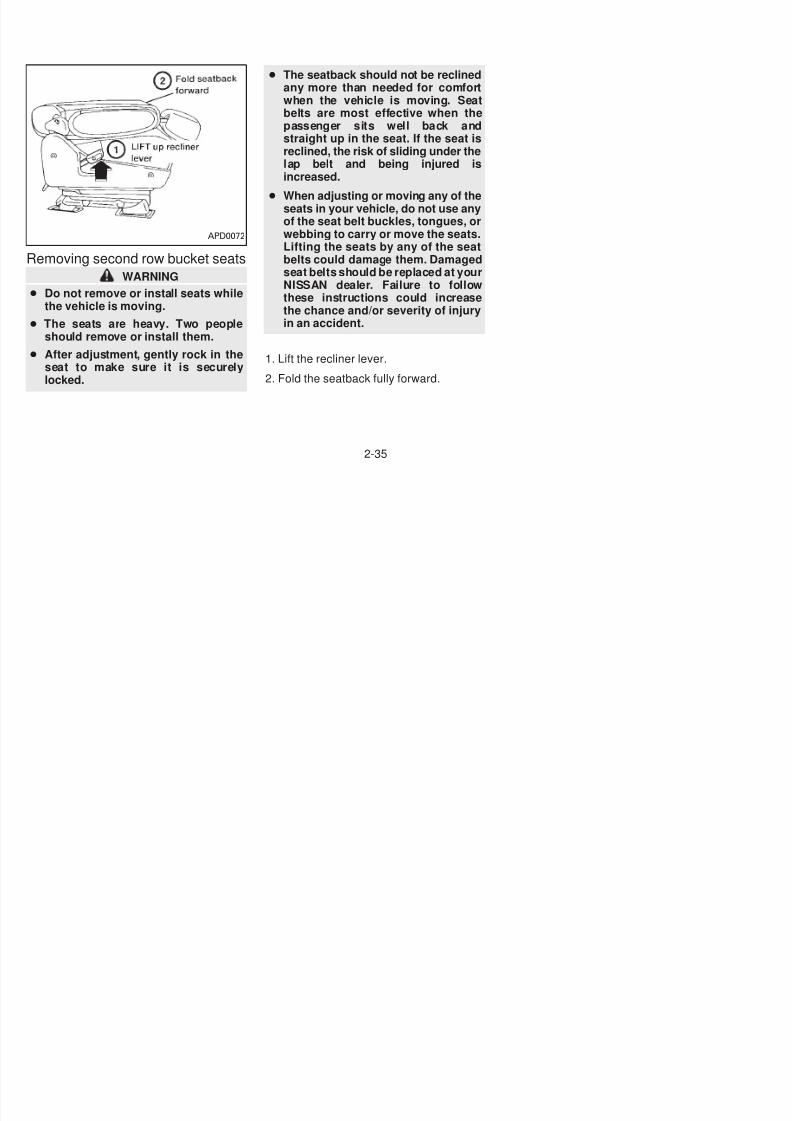
Removing second row bucket seats
WARNING
● Do not remove or install seats whilethe vehicle is moving.
● The seats are heavy. Two peopleshould remove or install them.
● After adjustment, gently rock in theseat to make sure it is securelylocked.
● The seatback should not be reclinedany more than needed for comfortwhen the vehicle is moving. Seatbelts are most effective when thepassenger sits well back andstraight up in the seat. If the seat isreclined, the risk of sliding under thelap belt and being injured isincreased.
● When adjusting or moving any of theseats in your vehicle, do not use anyof the seat belt buckles, tongues, orwebbing to carry or move the seats.Lifting the seats by any of the seatbelts could damage them. Damagedseat belts should be replaced at yourNISSAN dealer. Failure to follow
these instructions could increasethe chance and/or severity of injuryin an accident.
1. Lift the recliner lever.
2. Fold the seatback fully forward.
APD0072
2-35
5/12/2018 1996-Nissan-Quest Manual Del Usuario - slidepdf.com
http://slidepdf.com/reader/full/1996-nissan-quest-manual-del-usuario 64/234
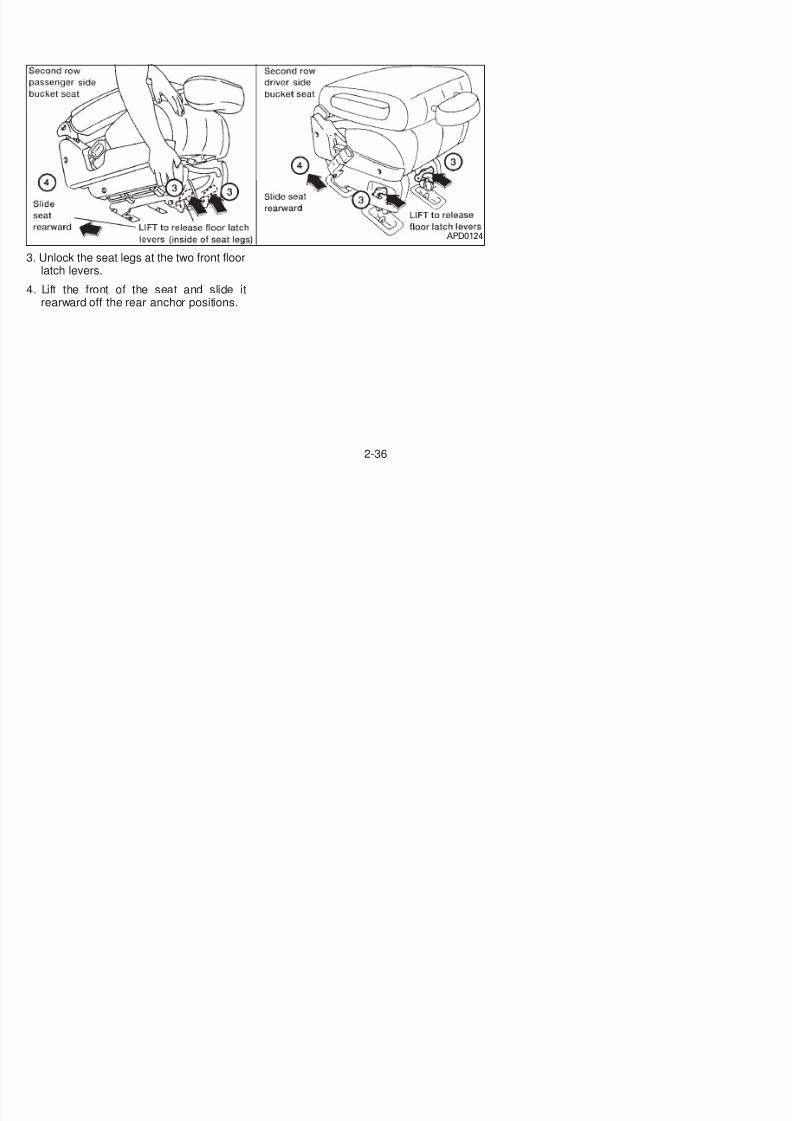
3. Unlock the seat legs at the two front floorlatch levers.
4. Lift the front of the seat and slide itrearward off the rear anchor positions.
APD0124
2-36
5/12/2018 1996-Nissan-Quest Manual Del Usuario - slidepdf.com
http://slidepdf.com/reader/full/1996-nissan-quest-manual-del-usuario 65/234
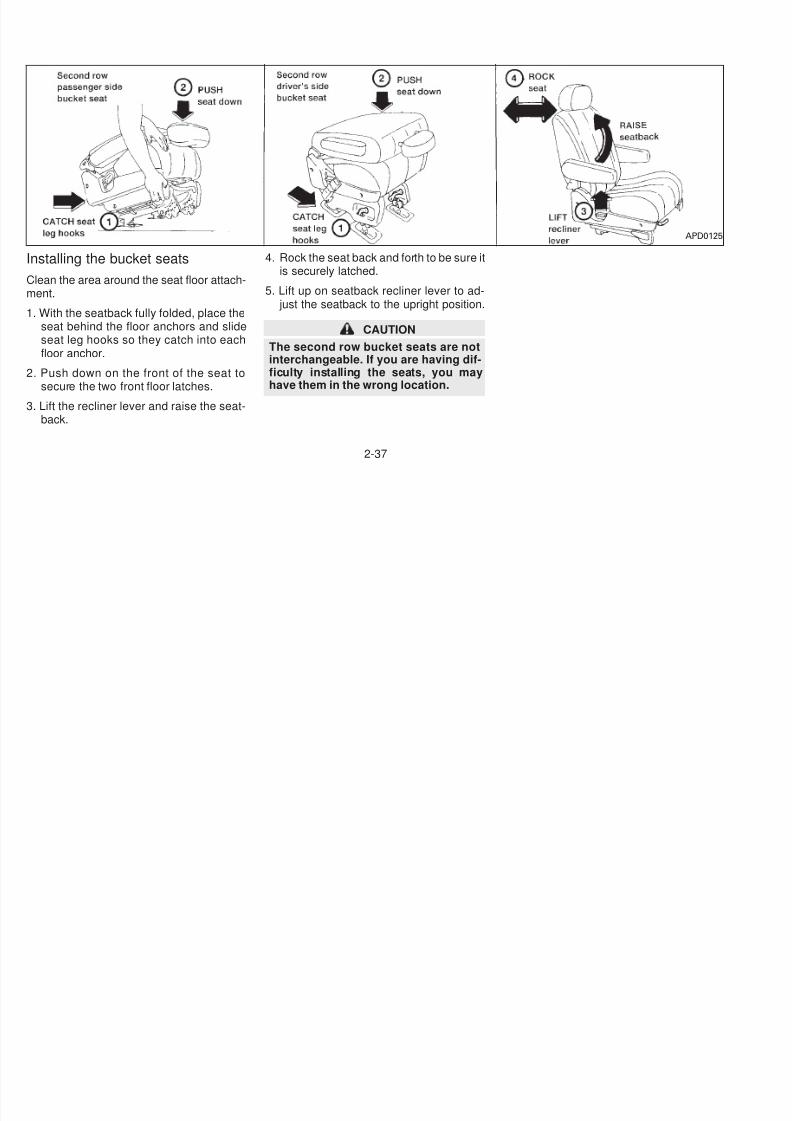
Installing the bucket seats
Clean the area around the seat floor attach-
ment.1. With the seatback fully folded, place the
seat behind the floor anchors and slideseat leg hooks so they catch into eachfloor anchor.
2. Push down on the front of the seat tosecure the two front floor latches.
3. Lift the recliner lever and raise the seat-back.
4. Rock the seat back and forth to be sure itis securely latched.
5. Lift up on seatback recliner lever to ad- just the seatback to the upright position.
CAUTION
The second row bucket seats are notinterchangeable. If you are having dif-ficulty installing the seats, you mayhave them in the wrong location.
APD012
2-37
5/12/2018 1996-Nissan-Quest Manual Del Usuario - slidepdf.com
http://slidepdf.com/reader/full/1996-nissan-quest-manual-del-usuario 66/234
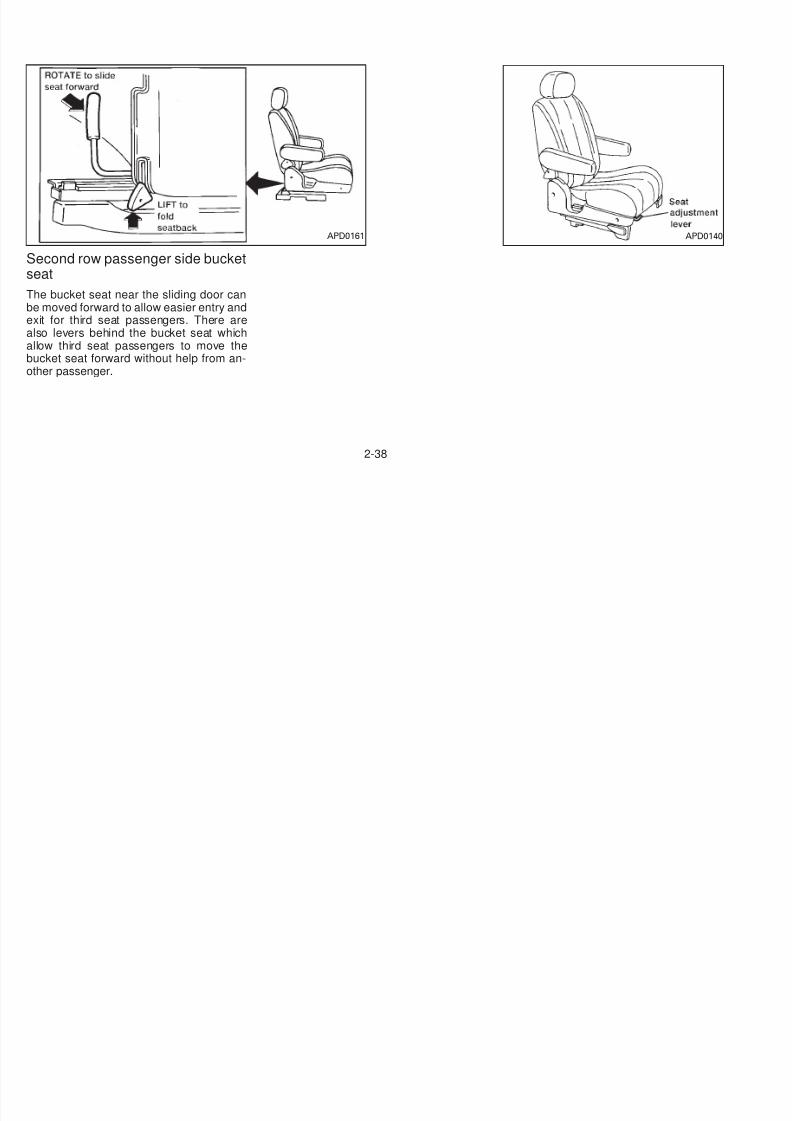
Second row passenger side bucketseat
The bucket seat near the sliding door canbe moved forward to allow easier entry andexit for third seat passengers. There arealso levers behind the bucket seat whichallow third seat passengers to move thebucket seat forward without help from an-other passenger.
APD014APD0161
2-38
SLIDING THREE-PASSENGERSEAT
● After adjustment, gently rock in the
5/12/2018 1996-Nissan-Quest Manual Del Usuario - slidepdf.com
http://slidepdf.com/reader/full/1996-nissan-quest-manual-del-usuario 67/234
SEAT
Reclining
To recline the three-passenger seat, lift upon the lever and lean back until you reach
the desired angle. To bring the seatbackforward, pull the lever up and lean yourbody forward.
Some three-passenger seats do not havethe recline feature.
WARNING
● Do not recline the seatback while thevehicle is moving.
● The seatback should not be reclined
any more than needed for comfortwhen the vehicle is moving. Seatbelts are most effective when thepassenger sits well back andstraight up in the seat. If the seat isreclined, the risk of sliding under thelap belt and being injured isincreased.
seat to be sure both sides are securely locked.
APD0026
2-39
5/12/2018 1996-Nissan-Quest Manual Del Usuario - slidepdf.com
http://slidepdf.com/reader/full/1996-nissan-quest-manual-del-usuario 68/234
Sliding the three-passenger seat
Before sliding the seat, fasten the centerbelt tongue to the center buckle and removethe appropriate floor mats.
1. Lift the seat cushion release lever.
2. Lift the seat cushion up into the lockeposition.
3. Lift the slide release lever and grasp thbar under the seat in the center.
4. Slide the seat until locked at a passengeseating position or a storage positioAfter the seat starts moving, release thslide lever. The seat latches at the nexlatching position. Continue to lift anrelease the slide lever until the desireposition is obtained.
To lower the cushion, the seat must b
APD0147
APD016
2-40
locked at a passenger seating position. Liftthe seat cushion release lever and lower the
tended movement of the seat andt ti l i j i
5/12/2018 1996-Nissan-Quest Manual Del Usuario - slidepdf.com
http://slidepdf.com/reader/full/1996-nissan-quest-manual-del-usuario 69/234
the seat cushion release lever and lower thecushion until locked.
The seat cushion cannot be lowered in astorage position. This prevents a pas-senger from using a seat or seat belt thatis out of a seating position.
The seating system allows great flexibility.Proper usage is important to your safety.
WARNING
● Do not slide the seat while the ve-hicle is moving.
● After adjustment, gently rock in theseat to be sure it is securely locked.
● After sliding the seat, check that bothsides of the seat are locked securelyby attempting to move each side ofthe seat forward and backward. Thismust be done before thevehicle is put
into motion in order to prevent unin-
potential passenger injuries.
● Do not attempt to use the seatsplaced into a storage position fopassengers because in this positionthe seat belts will not protect the
occupants. Be sure to use the propeseat belts for each seat locationImproper seat belt usage will increase the risk of severe injury in anaccident.
● When the vehicle is being used tocarry cargo, be sure contents are secure so that during a sudden stop ocollision, they do not becomprojectiles.
● Be careful not to damage the sea
belt. Never allow anyone to ride in thecargo area or on a seat that is in astorage position. It is not designedfor passengers. They could be injured in sudden braking or a collision
● To prevent luggage or packagesfrom sliding forward during brakingdo not stack anything in the cargoarea higher than the seatbacks.
APD0126
2-41
● Be sure to replace and repositionfloor mats as discussed in ‘‘Floor
Use a cloth wrapped around a screwdriver(or similar object) to clean the seat tracks.
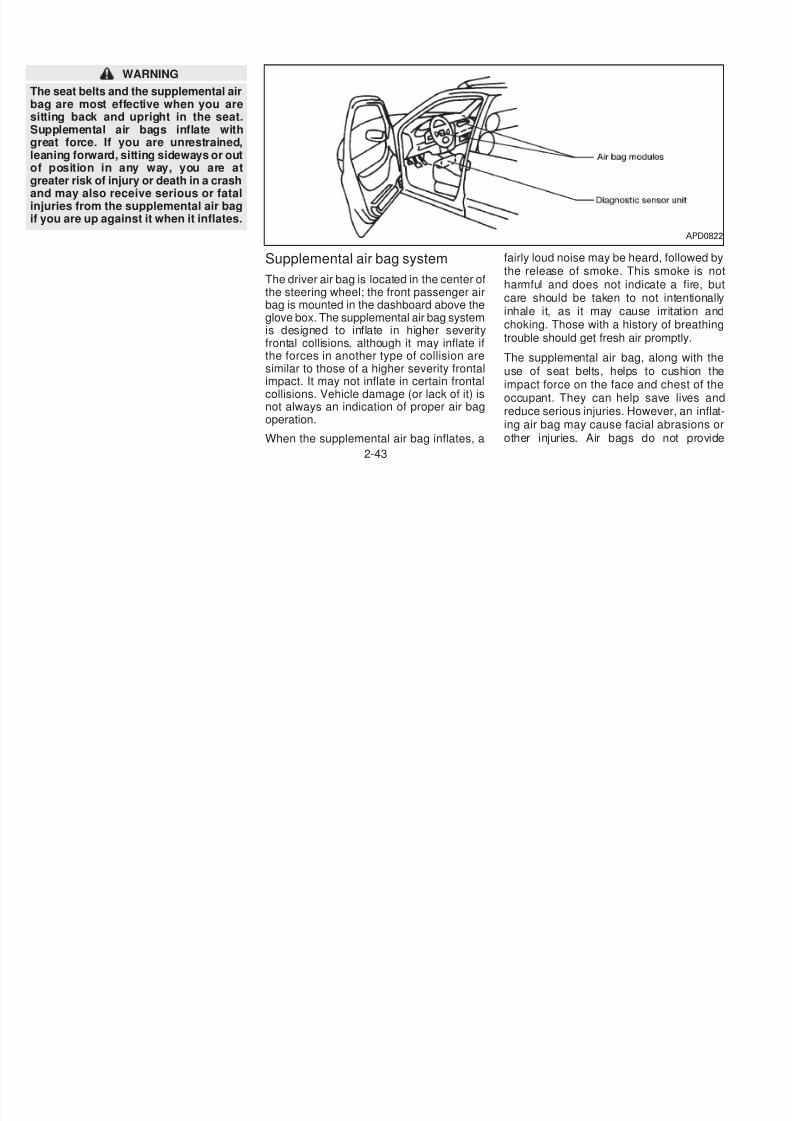
This Supplemental Restraint System description contains important informatio
SUPPLEMENTAL RESTRAINTSYSTEM (AIR BAG SYSTEM)
5/12/2018 1996-Nissan-Quest Manual Del Usuario - slidepdf.com
http://slidepdf.com/reader/full/1996-nissan-quest-manual-del-usuario 70/234
floor mats as discussed in Floormat positioning’’ in this section.
WARNING
The three-passenger sliding benchseat is not intended to be removed fromthe vehicle by consumers. However, ifit must be removed, have a qualifiedperson remove it. That person shouldrefer to the instructions in the ServiceManual. When seat is reinstalled, theattaching bolts must be tightened tothe appropriate torque specifications.Failure to follow these instructionscould increase the chance and/or se-
verity of injury in an accident.
Cleaning the seat tracks
The seat tracks for the three-passengersliding bench seat should be cleaned peri-odically with a high-powered vacuumcleaner. If the seat tracks become dirty itmay reduce the ability to slide the seat. Awet cleansing agent may be used if neces-sary, but the seat tracks must be thoroughly
dried.
(or similar object) to clean the seat tracks.Do not use your fingers to clean debris fromthe tracks.
Do not apply any type of lubricant to theseat tracks.
WARNING
● Never insert fingers into the seattrack rails. The rails may be sharpand could cause injury.
scription contains important informatioconcerning the special driver and passenger supplemental air bag. The Supplemetal Restraint System Air Bag can help reduce impact force to the driver and to thfront passenger in certain frontal collision
The air bags are designed to supplementhe crash protection provided by the sebelts and are not a substitute for the seabelts. The seat belts should always be corectly worn and the driver and front passenger seated a suitable distance from thsteering wheel and instrument panel. (Se‘‘Seat belts’’ for instructions and precautionon seat belt usage.)
The supplemental air bags operate on
when the ignition switch is in the ON oSTART position.
WARNING
The supplemental air bag ordinarily wilnot inflate in the event of a side impactrear impact, roll over, or lower severityfrontal collision; so always wear youseat belts to help reduce the risk oseverity of injury in various kinds oaccidents.
2-42
WARNING
Th b l d h l l i
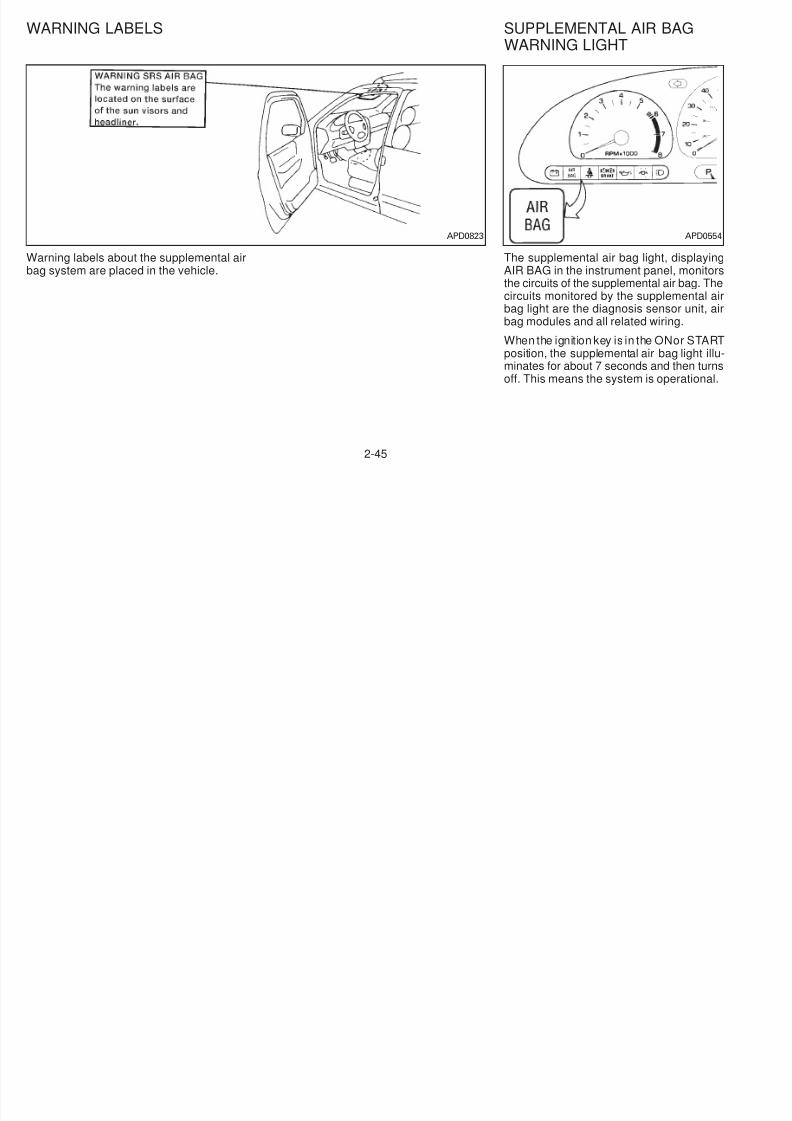
5/12/2018 1996-Nissan-Quest Manual Del Usuario - slidepdf.com
http://slidepdf.com/reader/full/1996-nissan-quest-manual-del-usuario 71/234
The seat belts and the supplemental airbag are most effective when you aresitting back and upright in the seat.Supplemental air bags inflate withgreat force. If you are unrestrained,
leaning forward, sitting sideways or outof position in any way, you are atgreater risk of injury or death in a crashand may also receive serious or fatalinjuries from the supplemental air bagif you are up against it when it inflates.
Supplemental air bag system
The driver air bag is located in the center of
the steering wheel; the front passenger airbag is mounted in the dashboard above theglove box. The supplemental air bag systemis designed to inflate in higher severityfrontal collisions, although it may inflate ifthe forces in another type of collision aresimilar to those of a higher severity frontalimpact. It may not inflate in certain frontalcollisions. Vehicle damage (or lack of it) isnot always an indication of proper air bagoperation.
When the supplemental air bag inflates, a
fairly loud noise may be heard, followed bthe release of smoke. This smoke is nharmful and does not indicate a fire, b
care should be taken to not intentionalinhale it, as it may cause irritation anchoking. Those with a history of breathintrouble should get fresh air promptly.
The supplemental air bag, along with thuse of seat belts, helps to cushion thimpact force on the face and chest of thoccupant. They can help save lives anreduce serious injuries. However, an inflaing air bag may cause facial abrasions o
other injuries. Air bags do not provid
APD082
2-43
restraint to the lower body.
The seat belts should be correctly worn and
● No unauthorized changes should bemade to any components or wiring
● Work around and on the supplemental air bag system should be done by
5/12/2018 1996-Nissan-Quest Manual Del Usuario - slidepdf.com
http://slidepdf.com/reader/full/1996-nissan-quest-manual-del-usuario 72/234
The seat belts should be correctly worn andthe driver and passenger seated upright asfar as practical away from the steeringwheel or dashboard. Since the supplemen-tal air bag inflates quickly in order to helpprotect the occupant, the force of thesupplemental air bag inflating can increasethe risk of injury if the occupant is too closeto or is against the supplemental air bagmodule during inflation.
The supplemental air bag deflates quicklyafter a collision.
The supplemental air bags operate onlywhen the ignition switch is in the ON orSTART position.
WARNING
● Right after inflation, several supple-mental air bag system componentswill be hot. Do not touch them; youmay severely burn yourself.
made to any components or wiringof the supplemental air bag system.This is to prevent accidental inflationof the supplemental air bag or dam-age to the supplemental air bagsystem.
● Tampering with the supplemental airbag system may result in seriouspersonal injury. Tampering includeschanges to the steering wheel andthe instrument panel assembly byplacing material over the steeringwheel pad and above the instrumentpanel, or by installing additional trimmaterial around the supplemental airbag system.
● Do not place any objects on thesteering wheel pad or to the instru-ment panel. Also, do not place anyobjects between any occupant andthe steering wheel or instrumentpanel. Such objects may becomedangerous projectiles and cause in-jury if the supplemental air baginflates.
tal air bag system should be done byan authorized NISSAN dealer. Installation of electrical equipment shouldalso be done by an authorized NISSAN dealer. The yellow SRS wiringshould not be modified or discon
nected. Unauthorized electrical tesequipment and probing devicesshould not be used on the supplemental air bag system.
2-44
WARNING LABELS SUPPLEMENTAL AIR BAGWARNING LIGHT

5/12/2018 1996-Nissan-Quest Manual Del Usuario - slidepdf.com
http://slidepdf.com/reader/full/1996-nissan-quest-manual-del-usuario 73/234
Warning labels about the supplemental airbag system are placed in the vehicle.
The supplemental air bag light, displayinAIR BAG in the instrument panel, monitothe circuits of the supplemental air bag. Th
circuits monitored by the supplemental abag light are the diagnosis sensor unit, abag modules and all related wiring.
When the ignition key is in the ONor STARposition, the supplemental air bag light illminates for about 7 seconds and then turnoff. This means the system is operational
APD0823 APD055
2-45
If any of the following conditions occur, thesupplemental air bag needs servicing and
tion label located on the driver side frontpillar.
● When selling your vehicle, wequest that you inform the buyer a
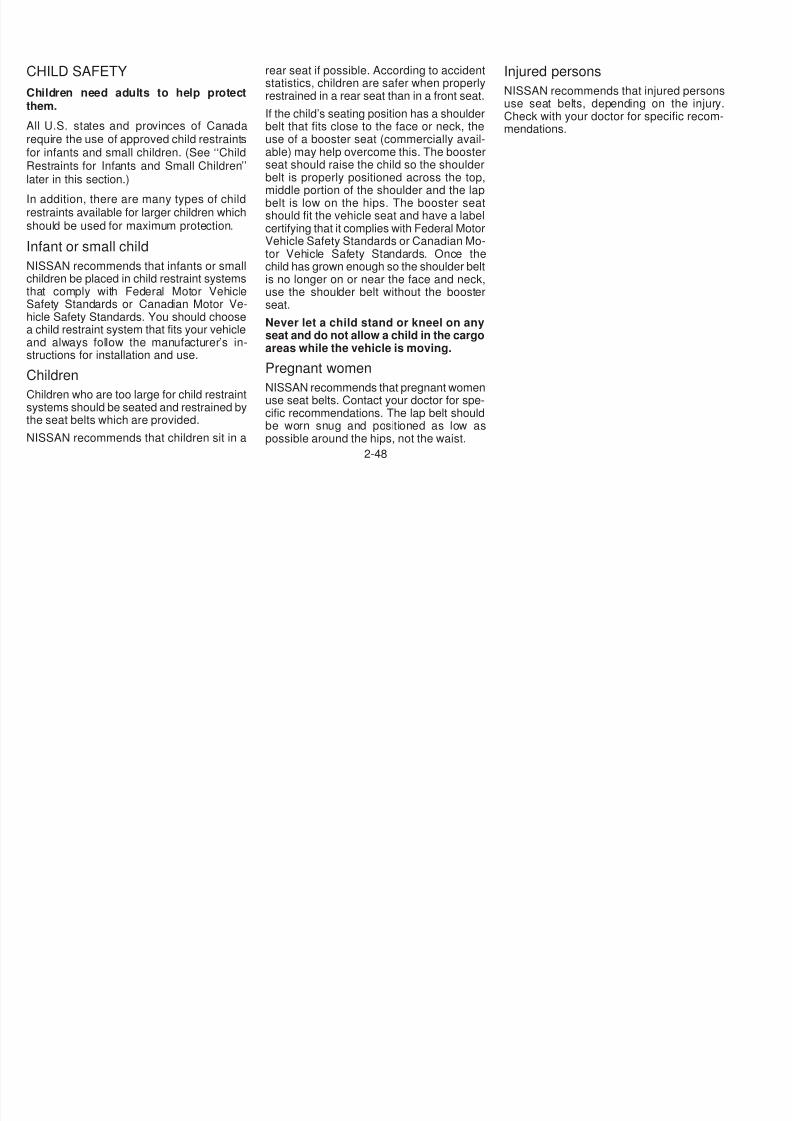
5/12/2018 1996-Nissan-Quest Manual Del Usuario - slidepdf.com
http://slidepdf.com/reader/full/1996-nissan-quest-manual-del-usuario 74/234
should be taken to your nearest authorizedNISSAN dealer:
1. The supplemental air bag light does notcome on for 7 seconds and then go off as
described above.2. The supplemental air bag light flashes
intermittently or remains on.
3. The supplemental air bag light does notcome on at all.
Under these conditions, the SupplementalRestraint System Air Bag does not operateproperly. It must be checked and repaired.
Repair and replacement procedure
The supplemental air bag system is de-signed to inflate on a one-time-only basis.As a reminder, unless it is damaged, thesupplemental air bag light remains illumi-nated after inflation has occurred. Repairand replacement of the supplemental airbag system should be done only by autho-rized NISSAN dealers. To ensure long-term functioning, the system must beinspected 10 years after the date of
manufacture as noted on the certifica-
When maintenance work is required on thevehicle, the supplemental air bag systemand related parts should be pointed out tothe person conducting the maintenance.The ignition key should always be in theLOCK position when working under thehood or inside the vehicle.
WARNING
● Once the supplemental air bag in-flates, the supplemental air bagmodule will not function again andmust be replaced. The supplementalair bag module cannot be repaired.
● After an air bag inflates, the front
instrument panel assembly shouldbe replaced if damaged, by your NIS-SAN dealer.
● The supplemental air bag systemshould be inspected by an autho-rized NISSAN dealer if there is anydamage to the front end portion ofthe vehicle or replaced if the supple-mental air bag has inflated.
q y ythe supplemental air bag system guide the buyer to the appropsections in this Owner’s Manual.
● If you need to dispose of a supmental air bag or scrap the vehcontact an authorized NISSAN deCorrect supplemental air bag posal procedures are set forth inappropriate NISSAN Service ManIncorrect disposal procedures cocause personal injury.
2-46
PRECAUTIONS ON SEAT BELTUSAGE
● Do not wear the belts inside out ortwisted. Be sure the seat belt tongue
● If the seat belt warning light glowscontinuously while the ignition is
SEAT BELTS
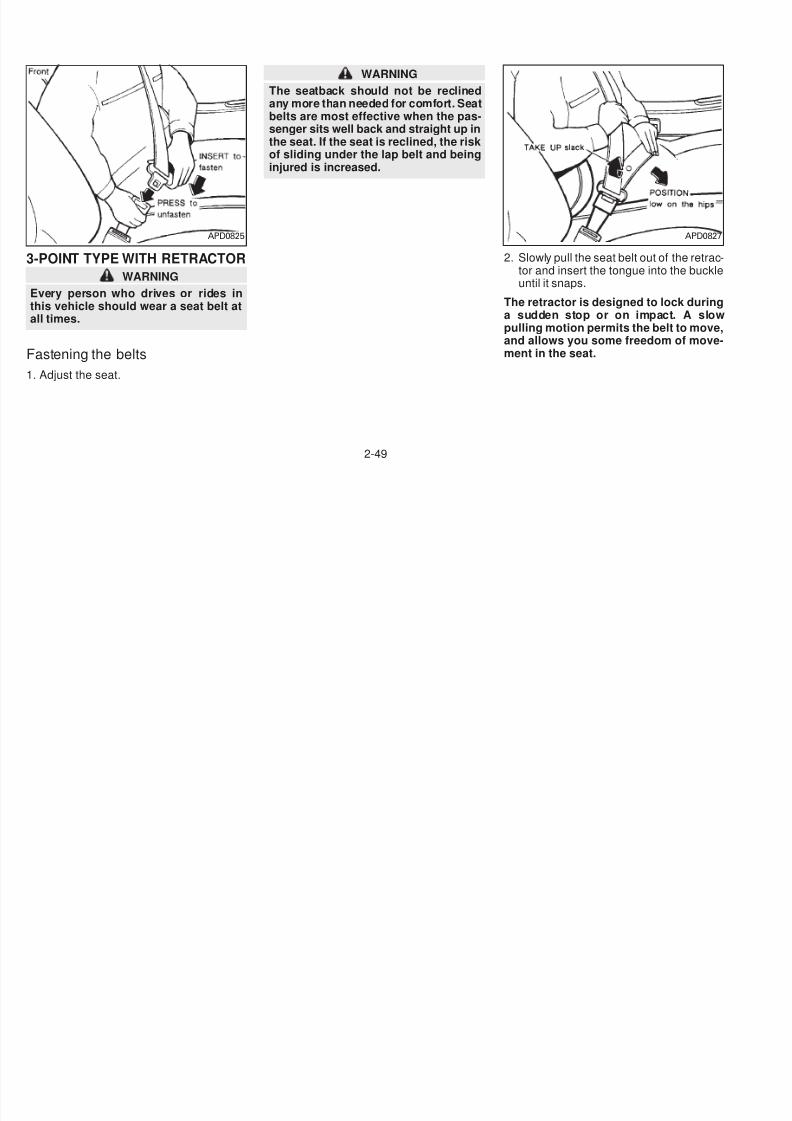
5/12/2018 1996-Nissan-Quest Manual Del Usuario - slidepdf.com
http://slidepdf.com/reader/full/1996-nissan-quest-manual-del-usuario 75/234
Your chances of being injured or killed in anaccident and/or the severity of injury may begreatly reduced if you are wearing your seatbelt and it is properly adjusted. NISSAN
strongly encourages you and all of yourpassengers to buckle up every time youdrive, even if your seating position includesan air bag.
Some states, provinces or territories re-quire that seat belts be worn at all timeswhen a vehicle is being driven.
WARNING
● Every person who drives or rides in
this vehicle should wear a seat beltat all times. Children should be inappropriate child restraints.
● The belts should be adjusted to asnug fit. Failure to do so will reducethe effectiveness of the entire re-straint system and increases thechances or severity of injury in anaccident.
gis securely fastened to the properbuckle.
● Do not allow more than one personto use the same seat belt.
● All seat belt assemblies, includingretractors and attaching hardware,should be inspected at your NISSANdealer after any collision. NISSANrecommends that all seat belt as-semblies in use during a collision bereplaced unless the collision wasminor and the belts show no damageand continue to operate properly.Seat belt assemblies not in use dur-ing a collision should also be in-
spected and replaced if either dam-age or improper operation is noted.
● Never carry more people in the ve-hicle than there are seat belts.
y gturned ON with all doors closed andall seat belts fastened, it may indicate a malfunction in the systemHave the system checked by youNISSAN dealer.
● Be sure to observe the followingcautions when using seat belts. Failure to do so could increase thechance and/or severity of injury in anaccident.
● Always route the shoulder belt oveyour outer shoulder and across youchest. Never run the belt under youarm. Serious injury can occur if theseat belt is not worn properly.
● Position the lap belt as low as possible AROUND THE HIPS, NOT THEWAIST.
● Serious injury or death can occur iseat belts are not worn properly.
2-47
CHILD SAFETY
Children need adults to help protect
rear seat if possible. According to accidentstatistics, children are safer when properly
t i d i t th i f t t
Injured persons
NISSAN recommends that injured person
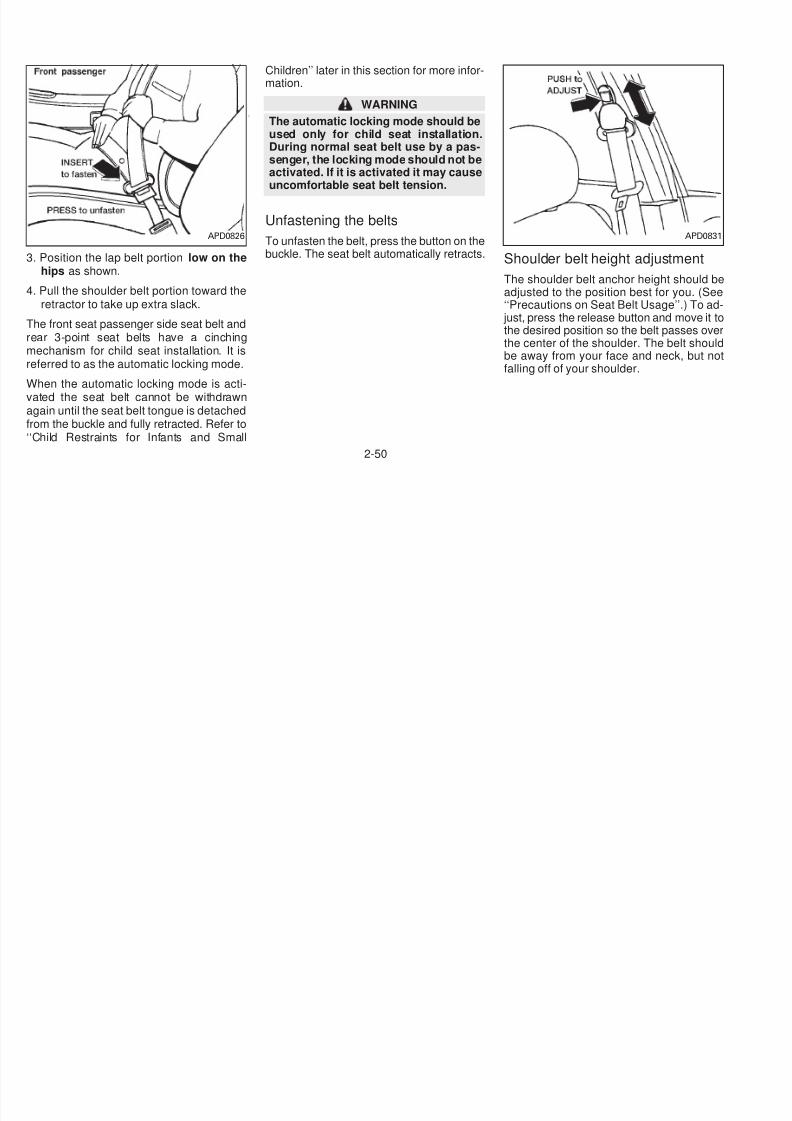
5/12/2018 1996-Nissan-Quest Manual Del Usuario - slidepdf.com
http://slidepdf.com/reader/full/1996-nissan-quest-manual-del-usuario 76/234
Children need adults to help protectthem.
All U.S. states and provinces of Canadarequire the use of approved child restraintsfor infants and small children. (See ‘‘Child
Restraints for Infants and Small Children’’later in this section.)
In addition, there are many types of childrestraints available for larger children whichshould be used for maximum protection.
Infant or small child
NISSAN recommends that infants or smallchildren be placed in child restraint systemsthat comply with Federal Motor VehicleSafety Standards or Canadian Motor Ve-hicle Safety Standards. You should choosea child restraint system that fits your vehicleand always follow the manufacturer’s in-structions for installation and use.
Children
Children who are too large for child restraintsystems should be seated and restrained bythe seat belts which are provided.
NISSAN recommends that children sit in a
restrained in a rear seat than in a front seat.
If the child’s seating position has a shoulderbelt that fits close to the face or neck, theuse of a booster seat (commercially avail-able) may help overcome this. The booster
seat should raise the child so the shoulderbelt is properly positioned across the top,middle portion of the shoulder and the lapbelt is low on the hips. The booster seatshould fit the vehicle seat and have a labelcertifying that it complies with Federal MotorVehicle Safety Standards or Canadian Mo-tor Vehicle Safety Standards. Once thechild has grown enough so the shoulder beltis no longer on or near the face and neck,use the shoulder belt without the boosterseat.
Never let a child stand or kneel on anyseat and do not allow a child in the cargoareas while the vehicle is moving.
Pregnant women
NISSAN recommends that pregnant womenuse seat belts. Contact your doctor for spe-cific recommendations. The lap belt shouldbe worn snug and positioned as low as
possible around the hips, not the waist.
NISSAN recommends that injured personuse seat belts, depending on the injurCheck with your doctor for specific recommendations.
2-48
WARNING
The seatback should not be reclined
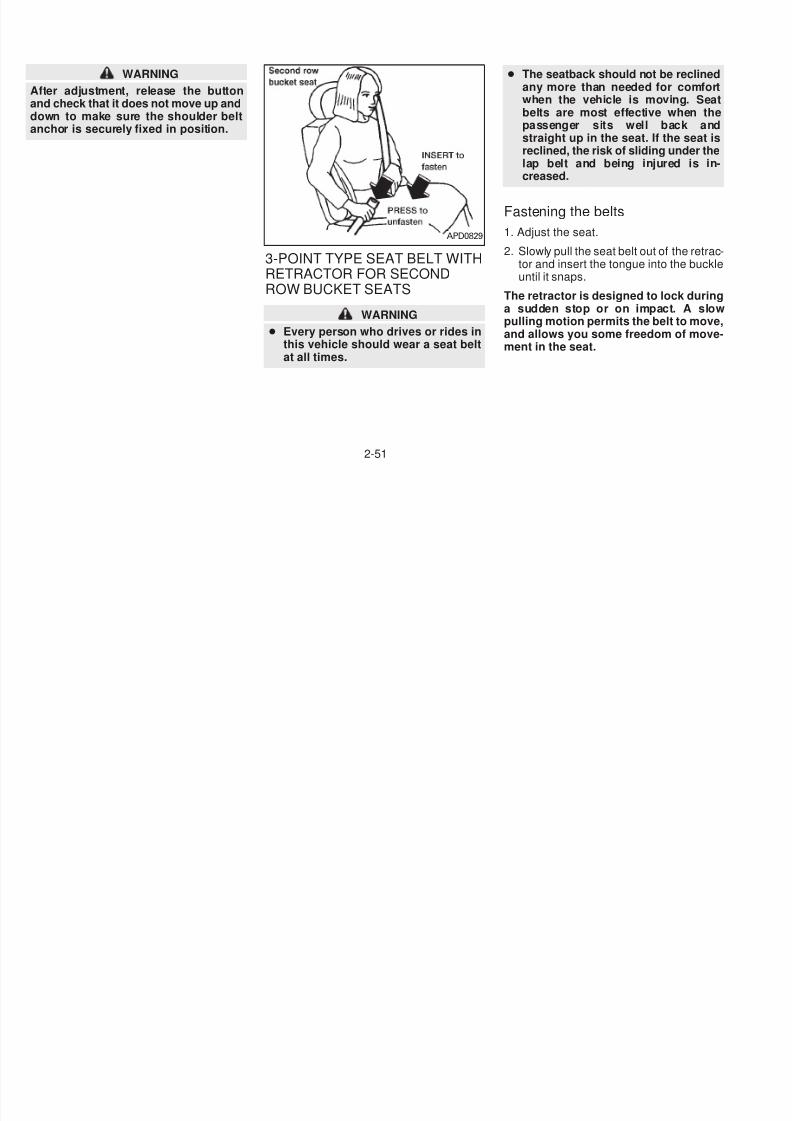
5/12/2018 1996-Nissan-Quest Manual Del Usuario - slidepdf.com
http://slidepdf.com/reader/full/1996-nissan-quest-manual-del-usuario 77/234
3-POINT TYPE WITH RETRACTOR
WARNING
Every person who drives or rides inthis vehicle should wear a seat belt atall times.
Fastening the belts
1. Adjust the seat.
any more than needed for comfort. Seatbelts are most effective when the pas-senger sits well back and straight up inthe seat. If the seat is reclined, the riskof sliding under the lap belt and beinginjured is increased.
2. Slowly pull the seat belt out of the retrator and insert the tongue into the buckuntil it snaps.
The retractor is designed to lock durina sudden stop or on impact. A slopulling motion permits the belt to moveand allows you some freedom of movement in the seat.
APD0825 APD082
2-49
Children’’ later in this section for more infor-mation.
5/12/2018 1996-Nissan-Quest Manual Del Usuario - slidepdf.com
http://slidepdf.com/reader/full/1996-nissan-quest-manual-del-usuario 78/234
3. Position the lap belt portion low on thehips as shown.
4. Pull the shoulder belt portion toward the
retractor to take up extra slack.
The front seat passenger side seat belt andrear 3-point seat belts have a cinchingmechanism for child seat installation. It isreferred to as the automatic locking mode.
When the automatic locking mode is acti-vated the seat belt cannot be withdrawnagain until the seat belt tongue is detachedfrom the buckle and fully retracted. Refer to
‘‘Child Restraints for Infants and Small
WARNING
The automatic locking mode should beused only for child seat installation.During normal seat belt use by a pas-
senger, the locking mode should not beactivated. If it is activated it may causeuncomfortable seat belt tension.
Unfastening the belts
To unfasten the belt, press the button on thebuckle. The seat belt automatically retracts. Shoulder belt height adjustment
The shoulder belt anchor height should badjusted to the position best for you. (Se‘‘Precautions on Seat Belt Usage’’.) To ad
just, press the release button and move it tthe desired position so the belt passes ovethe center of the shoulder. The belt shoube away from your face and neck, but nofalling off of your shoulder.
APD0826 APD083
2-50
WARNING
After adjustment, release the button
● The seatback should not be reclinedany more than needed for comfor
hen the ehicle is mo ing Sea
5/12/2018 1996-Nissan-Quest Manual Del Usuario - slidepdf.com
http://slidepdf.com/reader/full/1996-nissan-quest-manual-del-usuario 79/234
and check that it does not move up anddown to make sure the shoulder beltanchor is securely fixed in position.
3-POINT TYPE SEAT BELT WITHRETRACTOR FOR SECONDROW BUCKET SEATS
WARNING
● Every person who drives or rides inthis vehicle should wear a seat beltat all times.
when the vehicle is moving. Seabelts are most effective when thpassenger sits well back andstraight up in the seat. If the seat isreclined, the risk of sliding under the
lap belt and being injured is increased.
Fastening the belts
1. Adjust the seat.
2. Slowly pull the seat belt out of the retrator and insert the tongue into the buckuntil it snaps.
The retractor is designed to lock durina sudden stop or on impact. A slopulling motion permits the belt to moveand allows you some freedom of movement in the seat.
APD0829
2-51
WARNING
It is very important that you follow the
5/12/2018 1996-Nissan-Quest Manual Del Usuario - slidepdf.com
http://slidepdf.com/reader/full/1996-nissan-quest-manual-del-usuario 80/234
3. Position the lap belt portion low on thehips as shown.
4. Pull the shoulder belt portion toward the
retractor to take up extra slack.
Two buckle seat belt system for thesecond row bench seat
There is a two buckle seat belt system forthe seating position of the second rowbench seat next to the sliding door.
instructions in this section before any-one rides in this seating position of thetwo-passenger bench seat.
Failure to do so may result in improper
positioning of seat belt which couldlead to increased likelihood or severityof injury in a sudden stop or collision.
The two-passenger bench seat in the second row has a seat belt system made up otwo buckles and two tongues. There are twbody attaching points (one upper and onlower) that attach each end of the seat be
webbing.
APD0830
APD055
2-52
properly and fastened to the bucklemounted in the location in the middle of theseat.
5/12/2018 1996-Nissan-Quest Manual Del Usuario - slidepdf.com
http://slidepdf.com/reader/full/1996-nissan-quest-manual-del-usuario 81/234
One of the seat belt tongues has two ‘‘win-dows’’ (or holes) and the other has only one‘‘window’’. The seat belt tongue with onewindow attaches to the buckle mounted tothe side of the seat. The seat belt tongue
with two windows should be positioned
When the two buckle seat belt system is notin use, the webbing can be secured with theseat belt clip. The seat belt clip should notbe used with a child seat or during seat belt
usage. The seat belt clip opening shouldface the front of the vehicle.
A twisted belt may prevent the retractofrom working properly. If the two buckle seabelt system is twisted, disengage the sing
window tongue from the buckle on the sidof the seat, remove the twist and reinstathe tongue into the buckle until you hear snap and feel the latch engage.
Both tongues must be attached to theappropriate buckles whenever someonis riding in that seating position. If thtongue is released to allow a third rowpassenger to enter or exit, the tongumust be reattached.
When the two-passenger bench seat is re
APD0123
APD009
2-53
moved from the vehicle, you must detachthe single window tongue from the auxiliarybuckle.
Checking seat belt operation(3-point type with retractor)
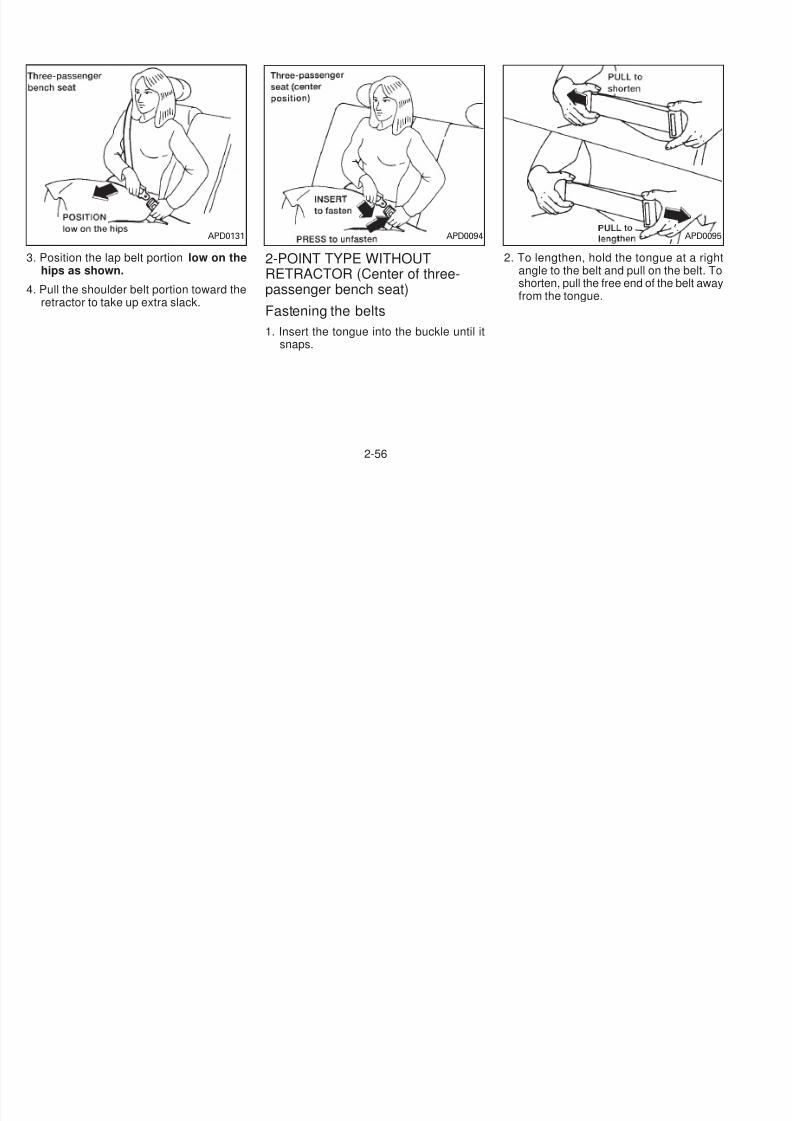
5/12/2018 1996-Nissan-Quest Manual Del Usuario - slidepdf.com
http://slidepdf.com/reader/full/1996-nissan-quest-manual-del-usuario 82/234
If the three-passenger bench seat ismoved up to the second row position,the outside passenger (near the slidingdoor) only needs to use the double win-
dow tongue and the standard buckle.Because the third row seat is so muchwider and is closer to the sliding door,the single window tongue and the auxil-iary buckle are not necessary.
WARNING
Third row passengers must be verycareful when exiting, because of the
auxiliary seat belt. It is important tostep over the seat belt guide and beltwebbing to avoid tripping.
Unfastening the belts
To unfasten the belt, press the button on thebuckle. The seat belt automatically retracts.
The second and third row seat belt retractors are designed to lock belt movement:
1) when the belt is pulled quickly from thretractor, and
2) when the vehicle slows down rapidly.
To increase your confidence in the beltcheck their operation. Grasp the shouldebelt and pull quickly forward. The retractoshould lock and restrict further belt movement.
If the retractor does not lock during thcheck or if you have any questions aboubelt operation, see your NISSAN dealer.
APD0089
2-54
WARNING
The seatback should not be reclinedany more than needed for comfort
a sudden stop or on impact. A slopulling motion permits the belt to moveand allows you some freedom of move
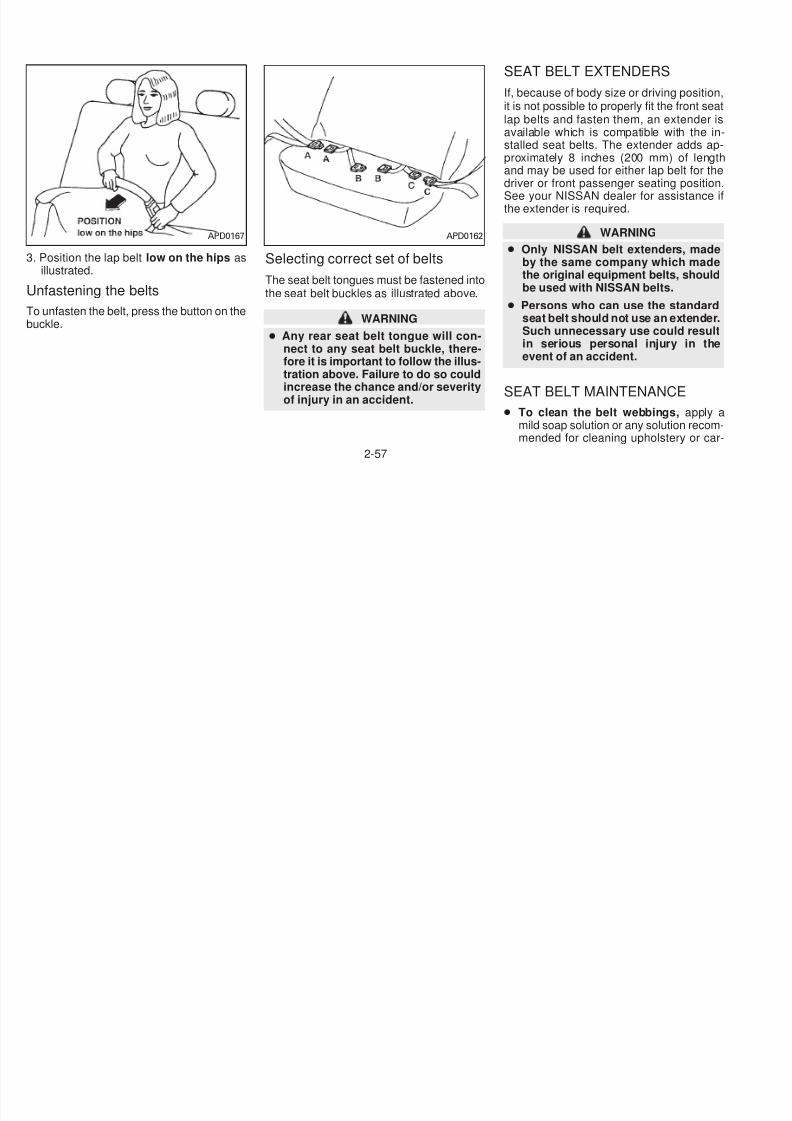
5/12/2018 1996-Nissan-Quest Manual Del Usuario - slidepdf.com
http://slidepdf.com/reader/full/1996-nissan-quest-manual-del-usuario 83/234
THREE-PASSENGER BENCHSEAT
Fastening the seat belts1. Adjust the seat.
any more than needed for comfortwhen the vehicle is moving. Seat beltsare most effective when the passengersits well back and straight up in theseat. If the seat is reclined, the risk of
sliding under the lap belt and beinginjured is increased.
Third row passengers should be aware thattheir shoulder belt is located slightly behindthe third row seating position. Never try touse the seat belts for the second row pas-sengers which are in front of the three-passenger bench seat.
WARNING● Use of the second row 3-point seat
belts by third row passengers couldincrease injury in a sudden stop oran accident.
2. Slowly pull the seat belt out of the retrac-tor and insert the tongue into the buckleuntil it snaps.
The retractor is designed to lock during
ment in the seat.
APD0091
2-55
5/12/2018 1996-Nissan-Quest Manual Del Usuario - slidepdf.com
http://slidepdf.com/reader/full/1996-nissan-quest-manual-del-usuario 84/234
3. Position the lap belt portion low on thehips as shown.
4. Pull the shoulder belt portion toward the
retractor to take up extra slack.
2-POINT TYPE WITHOUTRETRACTOR (Center of three-passenger bench seat)
Fastening the belts
1. Insert the tongue into the buckle until itsnaps.
2. To lengthen, hold the tongue at a righangle to the belt and pull on the belt. Tshorten, pull the free end of the belt awafrom the tongue.
APD0131 APD0094 APD009
2-56
SEAT BELT EXTENDERS
If, because of body size or driving positionit is not possible to properly fit the front sea
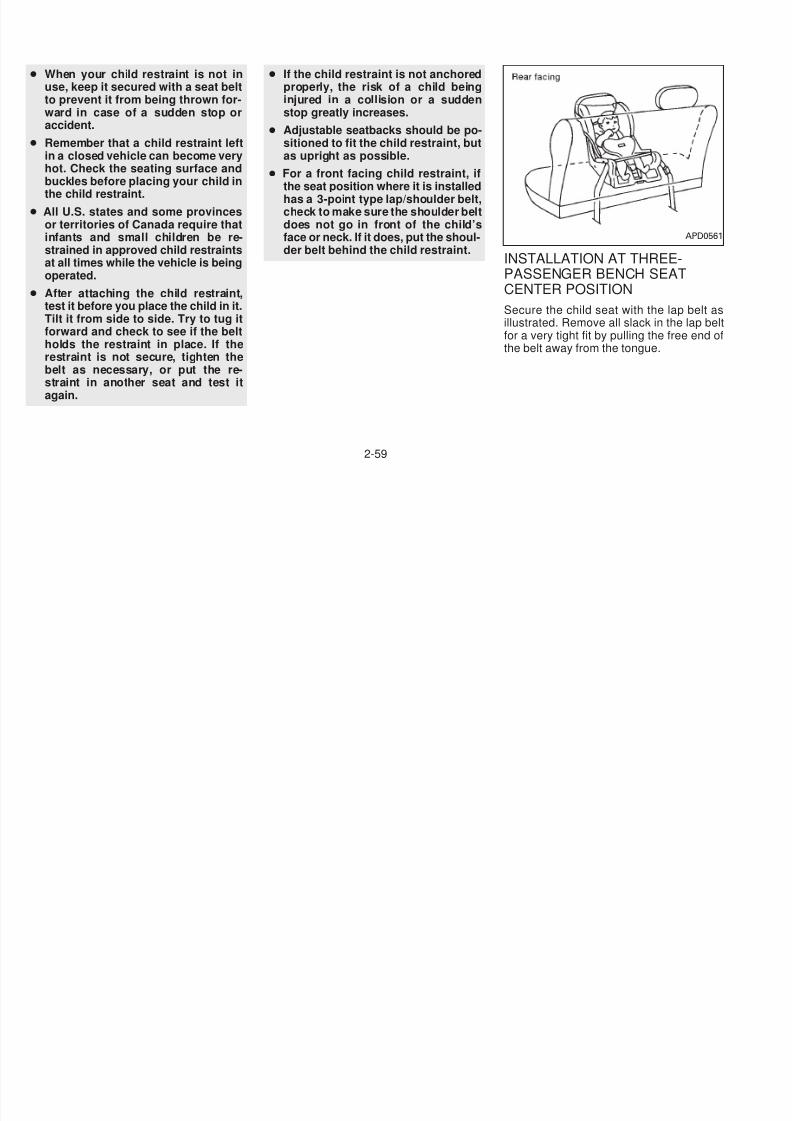
5/12/2018 1996-Nissan-Quest Manual Del Usuario - slidepdf.com
http://slidepdf.com/reader/full/1996-nissan-quest-manual-del-usuario 85/234
3. Position the lap belt low on the hips asillustrated.
Unfastening the belts
To unfasten the belt, press the button on thebuckle.
Selecting correct set of belts
The seat belt tongues must be fastened intothe seat belt buckles as illustrated above.
WARNING
● Any rear seat belt tongue will con-nect to any seat belt buckle, there-fore it is important to follow the illus-tration above. Failure to do so couldincrease the chance and/or severityof injury in an accident.
it is not possible to properly fit the front sealap belts and fasten them, an extender available which is compatible with the istalled seat belts. The extender adds approximately 8 inches (200 mm) of lengand may be used for either lap belt for thdriver or front passenger seating positioSee your NISSAN dealer for assistance the extender is required.
WARNING
● Only NISSAN belt extenders, madeby the same company which madethe original equipment belts, shouldbe used with NISSAN belts.
● Persons who can use the standardseat belt should not use an extenderSuch unnecessary use could resulin serious personal injury in theevent of an accident.
SEAT BELT MAINTENANCE
● To clean the belt webbings, apply mild soap solution or any solution recom
mended for cleaning upholstery or ca
APD0167 APD0162
2-57
pets. Then brush the webbing, wipe itwith a cloth and allow it to dry in theshade. Do not allow the belts to retract
il h l l d
● In general, child restraint systemsare designed to be installed with alap belt or the lap portion of a three-
3) If the child restraint is compatible wiyour vehicle, place your child in the chirestraint and check the various adjus
t t b th hild t i t

5/12/2018 1996-Nissan-Quest Manual Del Usuario - slidepdf.com
http://slidepdf.com/reader/full/1996-nissan-quest-manual-del-usuario 86/234
until they are completely dry.
● Periodically check to see that the beltand the metal components such asbuckles, tongues, retractors, flexible
wires and anchors work properly. If looseparts, deterioration, cuts or other dam-age on the webbing is found, the entirebelt assembly should be replaced.
CHILD RESTRAINTS FORINFANTS AND SMALLCHILDREN
Infants and small children should always beplaced in an appropriate child restraint sys-tem while riding in the vehicle.
WARNING
● Children and infants should never becarried on your lap. It is not possiblefor even the strongest adult to resistthe forces of a severe accident. Thechild could be crushed between theadult and parts of the vehicle. Also,do not put the same seat belt around
both your child and yourself.
p p ppoint type seat belt.
● Nissan recommends that the childrestraint be installed in a rear seat.According to accident statistics,children are safer when properly re-strained in a rear seat than in a frontseat.
● An improperly installed child re-straint could lead to serious injury inan accident.
Child restraints specially designed for in-fants and small children are offered by
several manufacturers. When selecting anychild restraint, keep the following points inmind:
1) Choose only a restraint with a label cer-tifying that it complies with Federal MotorVehicle Safety Standard 213 or Cana-dian Motor Vehicle Safety Standard 213.
2) Check the child restraint in your vehicleto be sure it is compatible with the vehi-
cle’s seat belt system.
ments to be sure the child restraint compatible with your child. Always folloall recommended procedures.
WARNING
● Never install a rear-facing child restraint in the front seat. A rear-facingchild restraint must only be used inthe rear seat. See ‘‘Installation onfront passenger seat’’ for details.
● Follow all of the child restrainmanufacturer’s instructions for installation and use. When purchasinga child restraint, be sure to selecone which will fit your child andvehicle. It may not be possible toproperly install some types of childrestraints in your vehicle.
● Improper use of a child restraint canresult in increased injuries for boththe infant or child and other occupants in the vehicle.
2-58
● When your child restraint is not inuse, keep it secured with a seat beltto prevent it from being thrown for-
● If the child restraint is not anchoredproperly, the risk of a child beinginjured in a collision or a sudden

5/12/2018 1996-Nissan-Quest Manual Del Usuario - slidepdf.com
http://slidepdf.com/reader/full/1996-nissan-quest-manual-del-usuario 87/234
ward in case of a sudden stop oraccident.
● Remember that a child restraint leftin a closed vehicle can become very
hot. Check the seating surface andbuckles before placing your child inthe child restraint.
● All U.S. states and some provincesor territories of Canada require thatinfants and small children be re-strained in approved child restraintsat all times while the vehicle is beingoperated.
● After attaching the child restraint,
test it before you place the child in it.Tilt it from side to side. Try to tug itforward and check to see if the beltholds the restraint in place. If therestraint is not secure, tighten thebelt as necessary, or put the re-straint in another seat and test itagain.
stop greatly increases.
● Adjustable seatbacks should be po-sitioned to fit the child restraint, butas upright as possible.
● For a front facing child restraint, ifthe seat position where it is installedhas a 3-point type lap/shoulder belt,check to make sure the shoulder beltdoes not go in front of the child’sface or neck. If it does, put the shoul-der belt behind the child restraint.
INSTALLATION AT THREE-PASSENGER BENCH SEATCENTER POSITION
Secure the child seat with the lap belt aillustrated. Remove all slack in the lap befor a very tight fit by pulling the free end othe belt away from the tongue.
APD056
2-59
INSTALLATION AT SECONDAND THIRD ROW OUTBOARDPOSITIONS
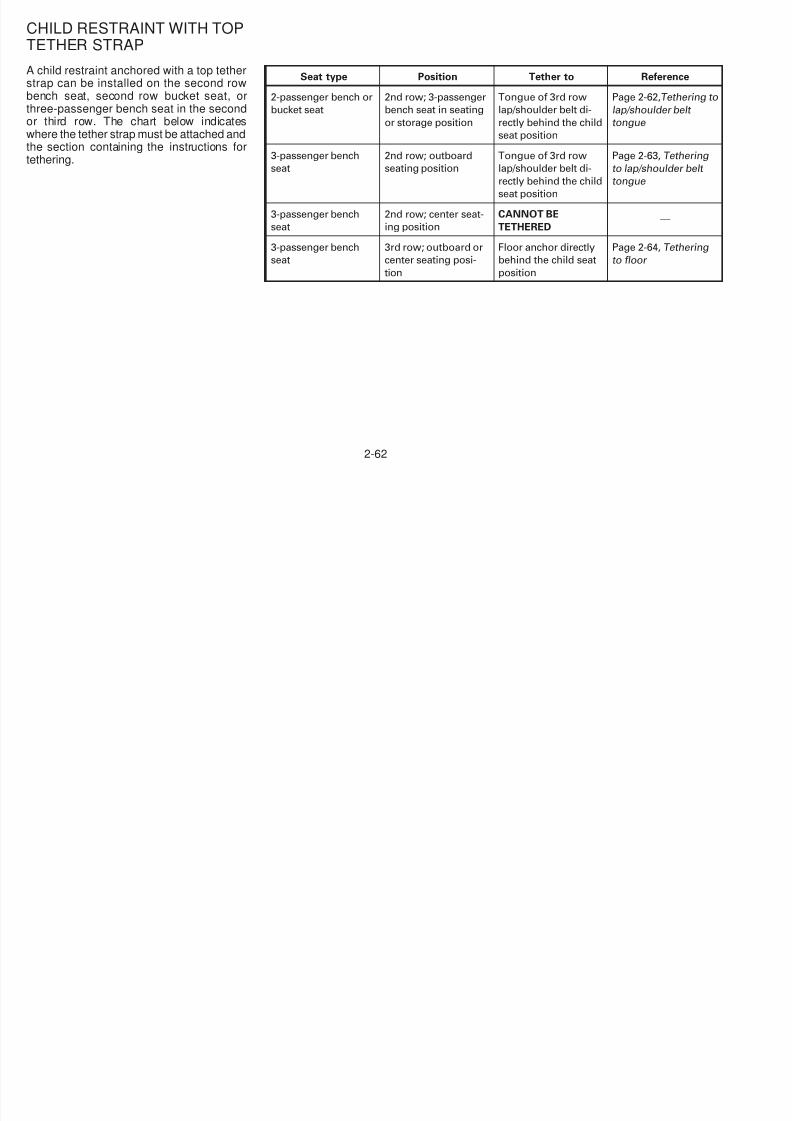
5/12/2018 1996-Nissan-Quest Manual Del Usuario - slidepdf.com
http://slidepdf.com/reader/full/1996-nissan-quest-manual-del-usuario 88/234
The following instructions apply to secondrow bucket seats, the second row benchseat and the outboard positions of the three-
passenger bench seat.WARNING
● When installing a child restraint inthe two-passenger bench seat, if it isplaced in the seating position next tothe sliding door, be sure both theauxiliary buckle and main buckle areproperly fastened. Failure to do socould increase the chance and/orseverity of injury in an accident.
WARNING
● The 3-point belt in your vehicle isequipped with a locking mode re
tractor which must be used wheninstalling a child restraint.
● Failure to use the retractor’s lockingmode will result in the child restrainnot being properly secured. The seacould tip over or otherwise be unsecured and cause injury to the child ina sudden stop or collision.
PD133APD0169
2-60
When you install a child restraint in a rearoutboard seat, follow these steps:
1. Position the child restraint on the seat. It
After the child restraint is removed and thseat belt is allowed to wind back into thretractor (for the passenger side of thtwo-passenger bench seat the auxillia
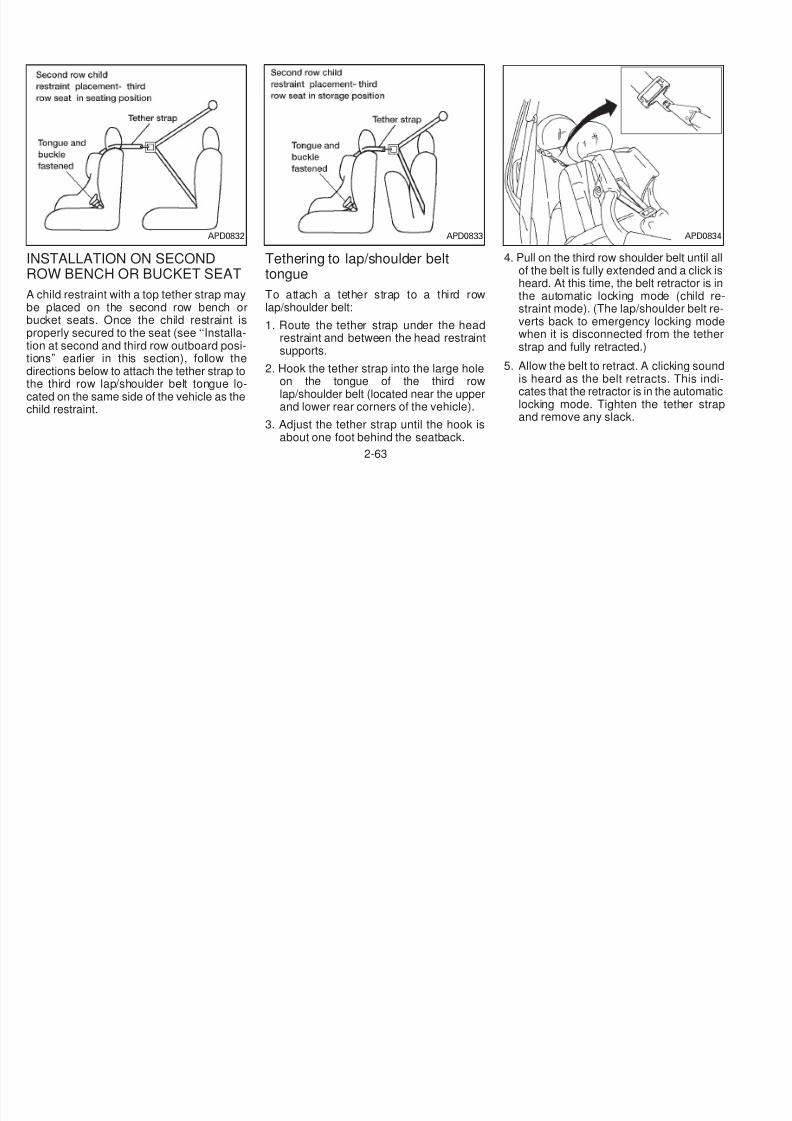
5/12/2018 1996-Nissan-Quest Manual Del Usuario - slidepdf.com
http://slidepdf.com/reader/full/1996-nissan-quest-manual-del-usuario 89/234
can be placed in a forward facing or rearfacing direction, depending on the size ofthe child. Always follow the restraintmanufacturer’s instructions.
2. Route the seat belt tongue through thechild restraint and insert it into the buckleuntil you hear and feel the latch engage.
Be sure to follow the child restraint manu-facturer’s instructions for belt routing.
3. Pull on the shoulder belt until all of thebelt is fully extended and a click is heard.At this time, the belt retractor is in theautomatic locking mode (child restraint
mode). (It reverts back to ‘‘emergencylocking’’ when the belt is fully retracted.)
4. Allow the belt to retract. A clicking soundis heard as the belt retracts. This indi-cates that the retractor is in the automaticlocking mode. Pull up on the shoulderbelt to remove any slack in the belt.
5. Before placing the child in the child re-straint, use force to tilt the child restraintfrom side to side, and tug it forward tomake sure it is securely held in place.
6. Check that the retractor is in the auto-matic locking mode by trying to pull morebelt out of the retractor. If you cannot pullany more belt webbing out of the retrac-tor, the belt is in the automatic lockingmode.
7. Check to make sure the child restraint isproperly secured prior to each use. If thebelt is not locked, repeat steps 3 through
6.
two passenger bench seat the auxilliabuckle must also be released), the automatic locking mode (child restraint mode) canceled; the seat belt may be used anormal and will only lock during a suddestop or impact.
PD1332
2-61
A child restraint anchored with a top tetherstrap can be installed on the second rowbench seat, second row bucket seat, orthree-passenger bench seat in the second
Seat type Position Tether to Reference
2-passenger bench or
bucket seat
2nd row; 3-passenger
bench seat in seating
Tongue of 3rd row
lap/shoulder belt di-
Page 2-62,Tethering to
lap/shoulder belt
CHILD RESTRAINT WITH TOPTETHER STRAP
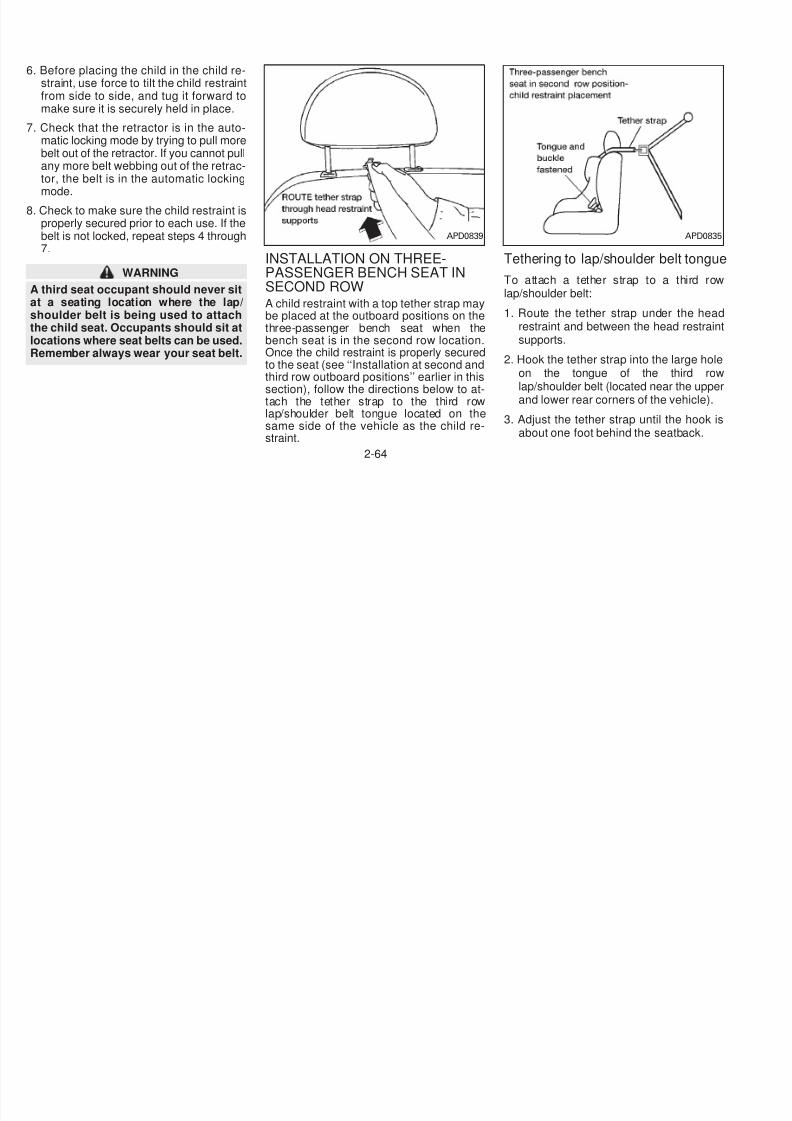
5/12/2018 1996-Nissan-Quest Manual Del Usuario - slidepdf.com
http://slidepdf.com/reader/full/1996-nissan-quest-manual-del-usuario 90/234
three passenger bench seat in the secondor third row. The chart below indicateswhere the tether strap must be attached andthe section containing the instructions fortethering.
bucket seat bench seat in seating
or storage position
lap/shoulder belt di
rectly behind the child
seat position
lap/shoulder belt
tongue
3-passenger bench
seat
2nd row; outboard
seating position
Tongue of 3rd row
lap/shoulder belt di-rectly behind the child
seat position
Page 2-63, Tethering
to lap/shoulder belt tongue
3-passenger bench
seat
2nd row; center seat-
ing position
CANNOT BE
TETHERED—
3-passenger bench
seat
3rd row; outboard or
center seating posi-
tion
Floor anchor directly
behind the child seat
position
Page 2-64, Tethering
to floor
2-62
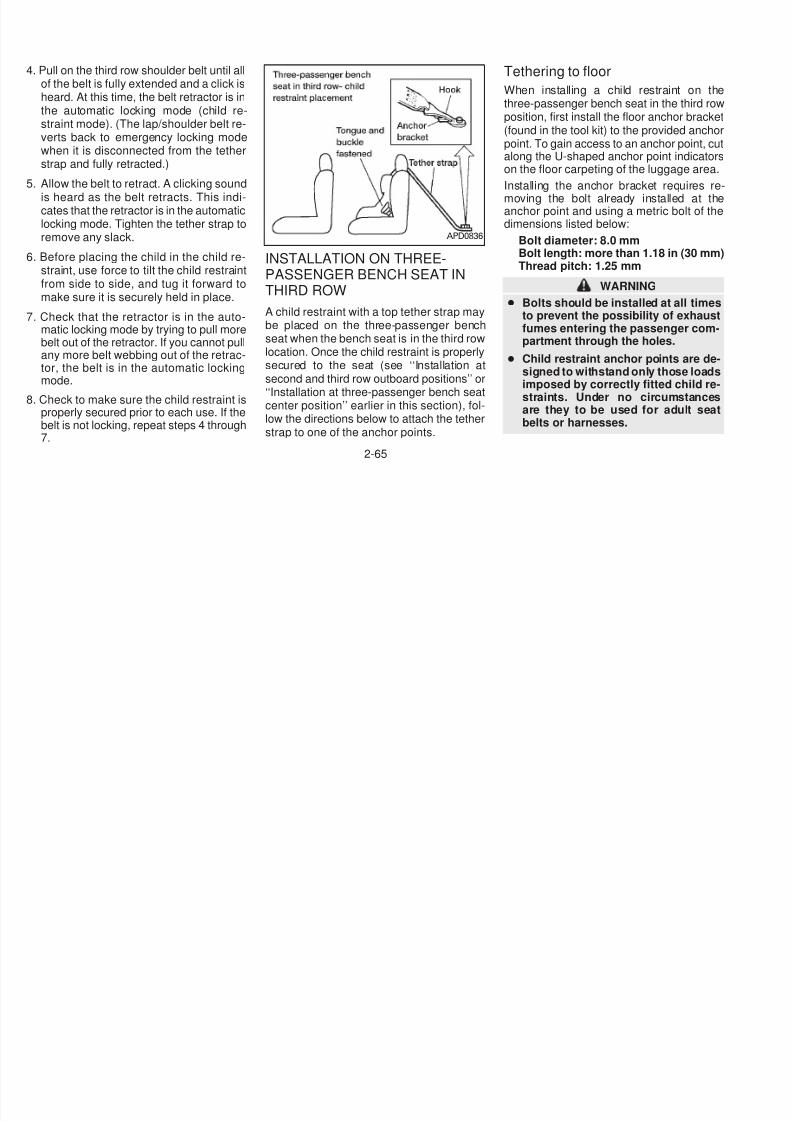
5/12/2018 1996-Nissan-Quest Manual Del Usuario - slidepdf.com
http://slidepdf.com/reader/full/1996-nissan-quest-manual-del-usuario 91/234
INSTALLATION ON SECONDROW BENCH OR BUCKET SEAT
A child restraint with a top tether strap may
be placed on the second row bench orbucket seats. Once the child restraint isproperly secured to the seat (see ‘‘Installa-tion at second and third row outboard posi-tions’’ earlier in this section), follow thedirections below to attach the tether strap tothe third row lap/shoulder belt tongue lo-cated on the same side of the vehicle as thechild restraint.
Tethering to lap/shoulder belttongue
To attach a tether strap to a third row
lap/shoulder belt:
1. Route the tether strap under the headrestraint and between the head restraintsupports.
2. Hook the tether strap into the large holeon the tongue of the third rowlap/shoulder belt (located near the upperand lower rear corners of the vehicle).
3. Adjust the tether strap until the hook is
about one foot behind the seatback.
4. Pull on the third row shoulder belt until aof the belt is fully extended and a click heard. At this time, the belt retractor is the automatic locking mode (child re
straint mode). (The lap/shoulder belt reverts back to emergency locking modwhen it is disconnected from the tethestrap and fully retracted.)
5. Allow the belt to retract. A clicking sounis heard as the belt retracts. This indcates that the retractor is in the automatlocking mode. Tighten the tether straand remove any slack.
APD0832 APD0833 APD083
2-63
6. Before placing the child in the child re-straint, use force to tilt the child restraintfrom side to side, and tug it forward tomake sure it is securely held in place.
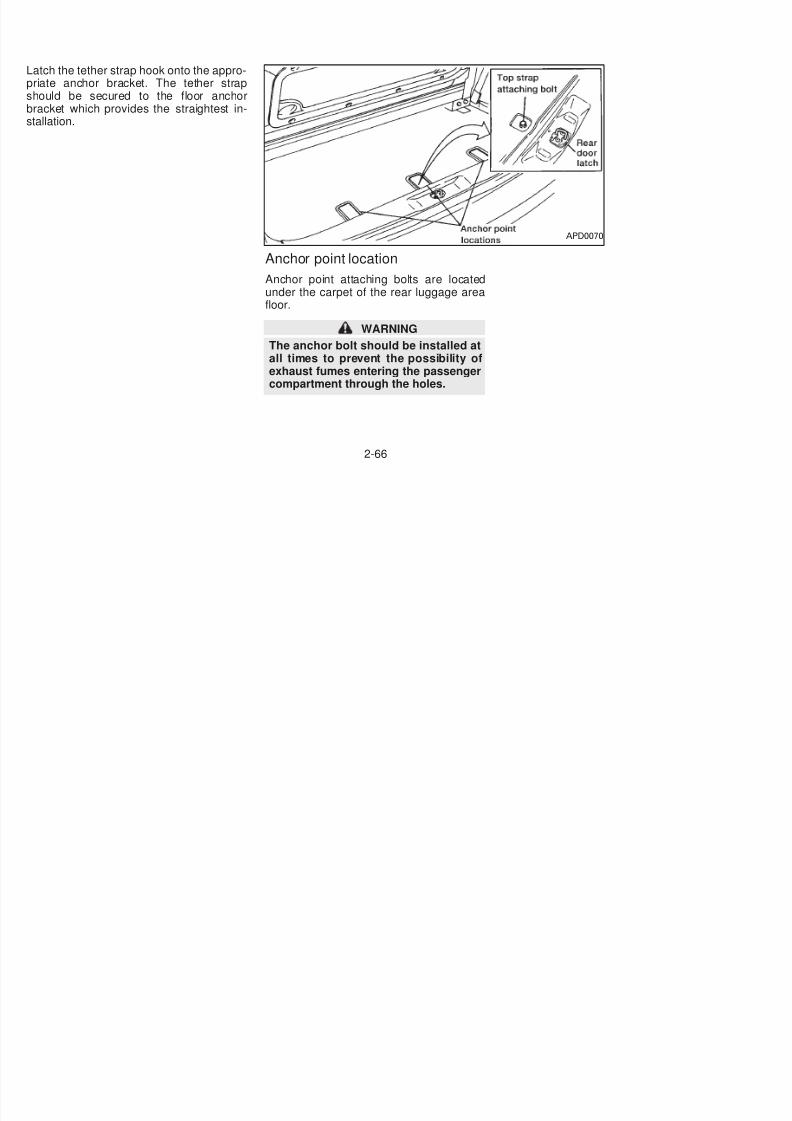
5/12/2018 1996-Nissan-Quest Manual Del Usuario - slidepdf.com
http://slidepdf.com/reader/full/1996-nissan-quest-manual-del-usuario 92/234
y p
7. Check that the retractor is in the auto-matic locking mode by trying to pull morebelt out of the retractor. If you cannot pull
any more belt webbing out of the retrac-tor, the belt is in the automatic lockingmode.
8. Check to make sure the child restraint isproperly secured prior to each use. If thebelt is not locked, repeat steps 4 through7.
WARNING
A third seat occupant should never sit
at a seating location where the lap/shoulder belt is being used to attachthe child seat. Occupants should sit atlocations where seat belts can be used.Remember always wear your seat belt.
INSTALLATION ON THREE-PASSENGER BENCH SEAT INSECOND ROW
A child restraint with a top tether strap maybe placed at the outboard positions on thethree-passenger bench seat when thebench seat is in the second row location.Once the child restraint is properly securedto the seat (see ‘‘Installation at second andthird row outboard positions’’ earlier in thissection), follow the directions below to at-tach the tether strap to the third rowlap/shoulder belt tongue located on thesame side of the vehicle as the child re-
straint.
Tethering to lap/shoulder belt tongu
To attach a tether strap to a third rolap/shoulder belt:
1. Route the tether strap under the hearestraint and between the head restraisupports.
2. Hook the tether strap into the large holon the tongue of the third rolap/shoulder belt (located near the uppeand lower rear corners of the vehicle).
3. Adjust the tether strap until the hook about one foot behind the seatback.
APD0839 APD083
2-64
4. Pull on the third row shoulder belt until allof the belt is fully extended and a click isheard. At this time, the belt retractor is inthe automatic locking mode (child re-
Tethering to floor
When installing a child restraint on ththree-passenger bench seat in the third roposition first install the floor anchor bracke

5/12/2018 1996-Nissan-Quest Manual Del Usuario - slidepdf.com
http://slidepdf.com/reader/full/1996-nissan-quest-manual-del-usuario 93/234
g (straint mode). (The lap/shoulder belt re-verts back to emergency locking modewhen it is disconnected from the tether
strap and fully retracted.)5. Allow the belt to retract. A clicking sound
is heard as the belt retracts. This indi-cates that the retractor is in the automaticlocking mode. Tighten the tether strap toremove any slack.
6. Before placing the child in the child re-straint, use force to tilt the child restraintfrom side to side, and tug it forward tomake sure it is securely held in place.
7. Check that the retractor is in the auto-matic locking mode by trying to pull morebelt out of the retractor. If you cannot pullany more belt webbing out of the retrac-tor, the belt is in the automatic lockingmode.
8. Check to make sure the child restraint isproperly secured prior to each use. If thebelt is not locking, repeat steps 4 through
7.
INSTALLATION ON THREE-PASSENGER BENCH SEAT INTHIRD ROW
A child restraint with a top tether strap maybe placed on the three-passenger benchseat when the bench seat is in the third rowlocation. Once the child restraint is properlysecured to the seat (see ‘‘Installation atsecond and third row outboard positions’’ or‘‘Installation at three-passenger bench seatcenter position’’ earlier in this section), fol-low the directions below to attach the tetherstrap to one of the anchor points.
position, first install the floor anchor bracke(found in the tool kit) to the provided anchopoint. To gain access to an anchor point, cualong the U-shaped anchor point indicator
on the floor carpeting of the luggage areaInstalling the anchor bracket requires removing the bolt already installed at thanchor point and using a metric bolt of thdimensions listed below:
Bolt diameter: 8.0 mmBolt length: more than 1.18 in (30 mmThread pitch: 1.25 mm
WARNING
● Bolts should be installed at all timesto prevent the possibility of exhausfumes entering the passenger compartment through the holes.
● Child restraint anchor points are designed to withstand only those loadsimposed by correctly fitted child restraints. Under no circumstancesare they to be used for adult seabelts or harnesses.
APD0836
2-65
Latch the tether strap hook onto the appro-priate anchor bracket. The tether strapshould be secured to the floor anchorbracket which provides the straightest in-
5/12/2018 1996-Nissan-Quest Manual Del Usuario - slidepdf.com
http://slidepdf.com/reader/full/1996-nissan-quest-manual-del-usuario 94/234
stallation.
Anchor point location
Anchor point attaching bolts are locatedunder the carpet of the rear luggage area
floor.
WARNING
The anchor bolt should be installed atall times to prevent the possibility ofexhaust fumes entering the passengercompartment through the holes.
APD0070
2-66
A child restraint with a top strap should notbe used in the front passenger seat.
WARNING
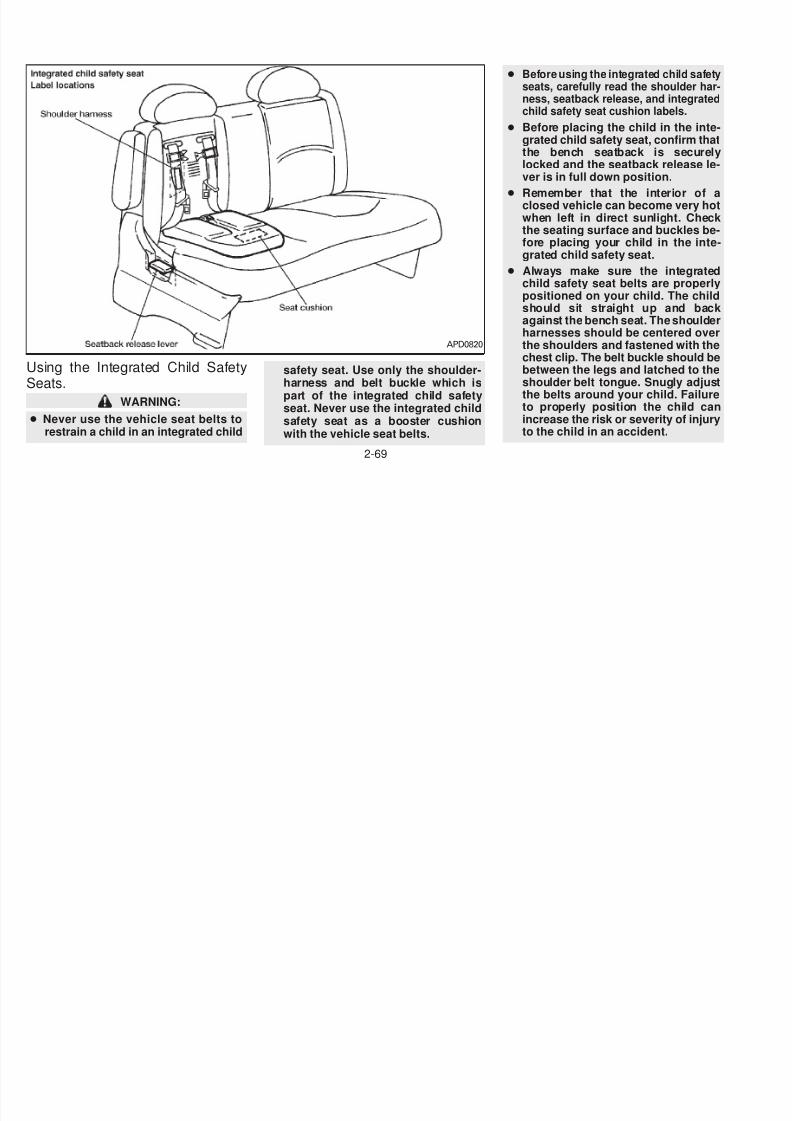
5/12/2018 1996-Nissan-Quest Manual Del Usuario - slidepdf.com
http://slidepdf.com/reader/full/1996-nissan-quest-manual-del-usuario 95/234
Installation on front passenger seat
WARNING
● Never install a rear-facing child re-
straint in the front passenger seat.Air bags inflate with great force. Arear-facing child restraint could bestruck by the air bag in a crash andcould seriously injure or kill yourchild.
● If you install a forward-facing childrestraint in the front passenger seat,place the passenger seat as far backas possible.
● The 3-point belt in your vehicle isequipped with a locking mode re-tractor which must be used when
installing a child restraint.● Failure to use the retractor’s locking
mode will result in the child restraintnot being properly secured. The seatcould tip over or otherwise be unse-cured and cause injury to the child ina sudden stop or collision.
When you install a child restraint in the frontseat, follow these steps:
1. Position the child restraint on the frontpassenger seat. It should be placed in aforward-facing direction only. Move theseat as far back from the instrument panelas possible. Always follow the child re-straint manufacturer’s instructions. Childrestraints for infants must be used inthe rear-facing direction and thereforemust not be used in the front seat.
2. Route the seat belt tongue through thechild restraint and insert it into the buckle
until you hear and feel the latch engage.
Be sure to follow the child restraint manfacturer’s instructions for belt routing.
3. Pull on the shoulder belt until all of th
belt is fully extended and a click is heardAt this time, the belt retractor is in thautomatic locking mode (child restraimode). It reverts back to emergenclocking mode when the belt is fully retracted.
4. Allow the belt to retract. A clicking sounis heard as the belt retracts. This indcates that the retractor is in the automatlocking mode. Pull down on the belt t
remove any slack in the belt.
APD0503 PD133
2-67
5. Before placing the child in the child re-straint, use force to tilt the child restraintfrom side to side, and tug it forward tomake sure it is securely held in place.
INTEGRATED CHILD SAFETYSEATS (If so equipped)
WARNING
In addition, these integrated child safeseats must only be used by children whmeet the following requirements:
● AGE:
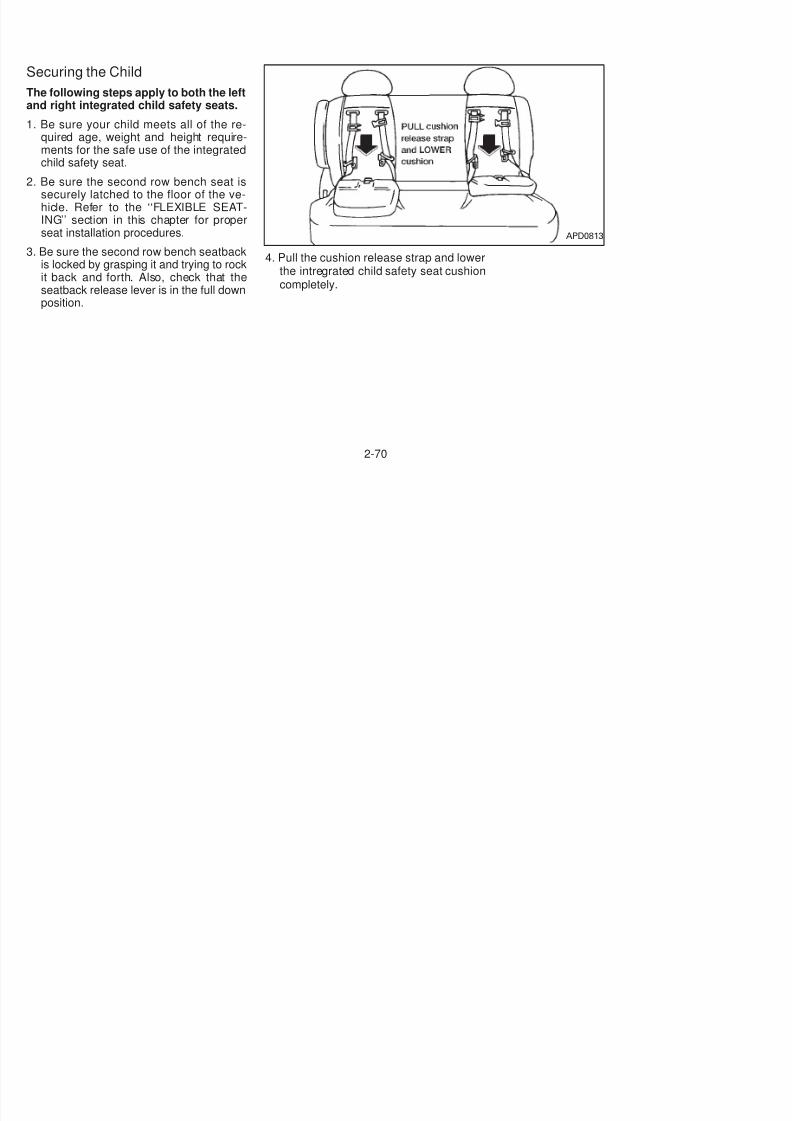
5/12/2018 1996-Nissan-Quest Manual Del Usuario - slidepdf.com
http://slidepdf.com/reader/full/1996-nissan-quest-manual-del-usuario 96/234
6. Check that the retractor is in the auto-matic locking mode by trying to pull morebelt out of the retractor. If you cannot pull
any more belt webbing out of the retrac-tor, the belt is in the automatic lockingmode.
7. Check to make sure the child restraint isproperly secured prior to each use. If thelap belt is not locked, repeat steps 3through 6.
After the child restraint is removed and theseat belt is allowed to wind back into theretractor, the automatic locking mode (child
restraint mode) is canceled; the seat beltmay be used as normal and will only lockduring a sudden stop or impact.
● Failure to follow the instructions forthe use of these integrated childsafety seats can result in your child
striking vehicle’s interior during asudden stop or crash, causing theinjury or death of your child.
● Improper use of a child restraint canincrease the risk or severity of injuryfor both the child and other occu-pants of the vehicle.
● All U.S. states and provinces ofCanada require that infants andsmall children be restrained in ap-
proved child restraints at all timeswhile the vehicle is being operated.
The optional second row bench seat con-tains two integrated child safety seats.These seats are designed for use only bychildren who weigh between 22 and 60pounds (10-27 kg) and whose height is 45inches (1145 mm) or less and who arecapable of sitting upright alone.
At least one year old
● SEATED HEIGHT:Top of child’s shoulders must be belo
the shoulder harness openings of thintegrated child seat.
Children smaller than these requiremenshould be restrained in an appropriaseparate child restraint. Children larger thathese requirements should also be restrained in an appropriate separate chirestraint or in the appropriate vehicle seabelt system. Refer to ‘‘Child Restraints foInfants and Small Children’’ and ‘‘Preca
tions On Seat Belt Usage’’ in this chapter foimportant child safety information.
2-68
● Before using the integrated child safetyseats, carefully read the shoulder harness, seatback release, and integratedchild safety seat cushion labels.
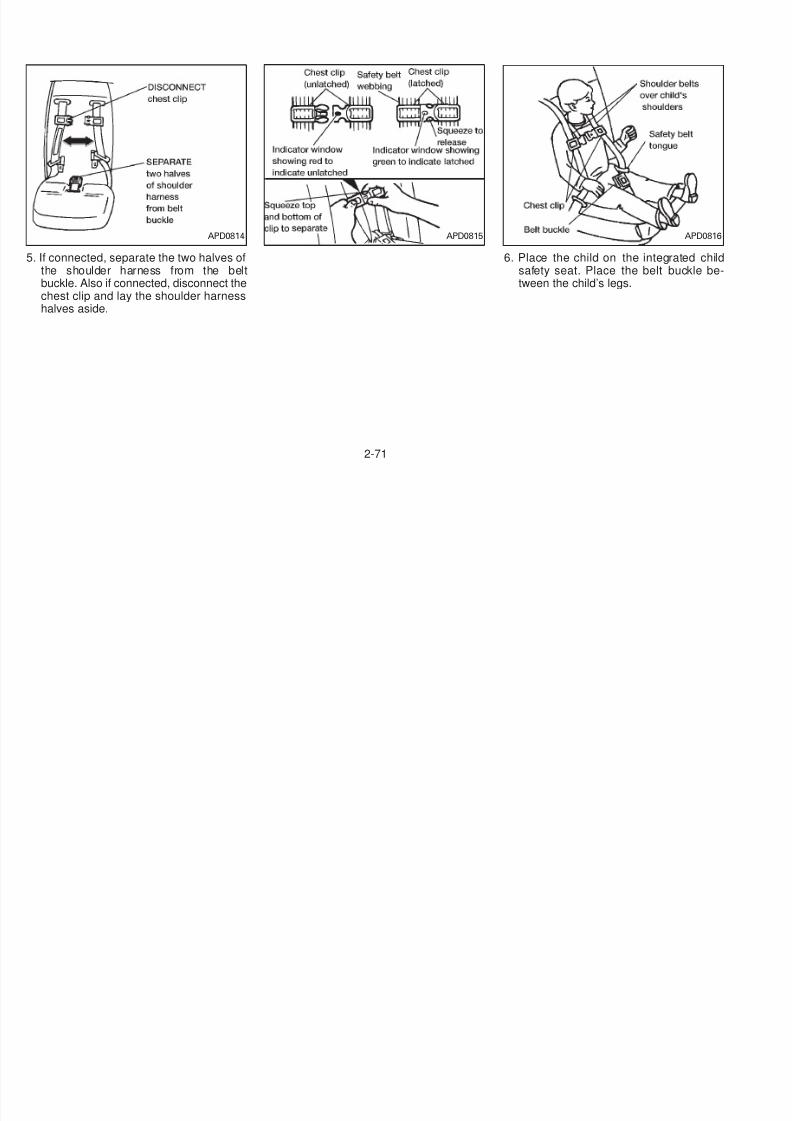
5/12/2018 1996-Nissan-Quest Manual Del Usuario - slidepdf.com
http://slidepdf.com/reader/full/1996-nissan-quest-manual-del-usuario 97/234
Using the Integrated Child SafetySeats.
WARNING:
● Never use the vehicle seat belts torestrain a child in an integrated child
safety seat. Use only the shoulder-harness and belt buckle which ispart of the integrated child safetyseat. Never use the integrated childsafety seat as a booster cushionwith the vehicle seat belts.
● Before placing the child in the integrated child safety seat, confirm thathe bench seatback is securely
locked and the seatback release lever is in full down position.
● Remember that the interior of aclosed vehicle can become very howhen left in direct sunlight. Checkthe seating surface and buckles before placing your child in the integrated child safety seat.
● Always make sure the integratedchild safety seat belts are properlypositioned on your child. The child
should sit straight up and bacagainst the bench seat. The shouldeharnesses should be centered ovethe shoulders and fastened with thechest clip. The belt buckle should bebetween the legs and latched to theshoulder belt tongue. Snugly adjusthe belts around your child. Failureto properly position the child canincrease the risk or severity of injuryto the child in an accident.
APD0820
2-69
Securing the Child
The following steps apply to both the leftand right integrated child safety seats.
1 B hild t ll f th
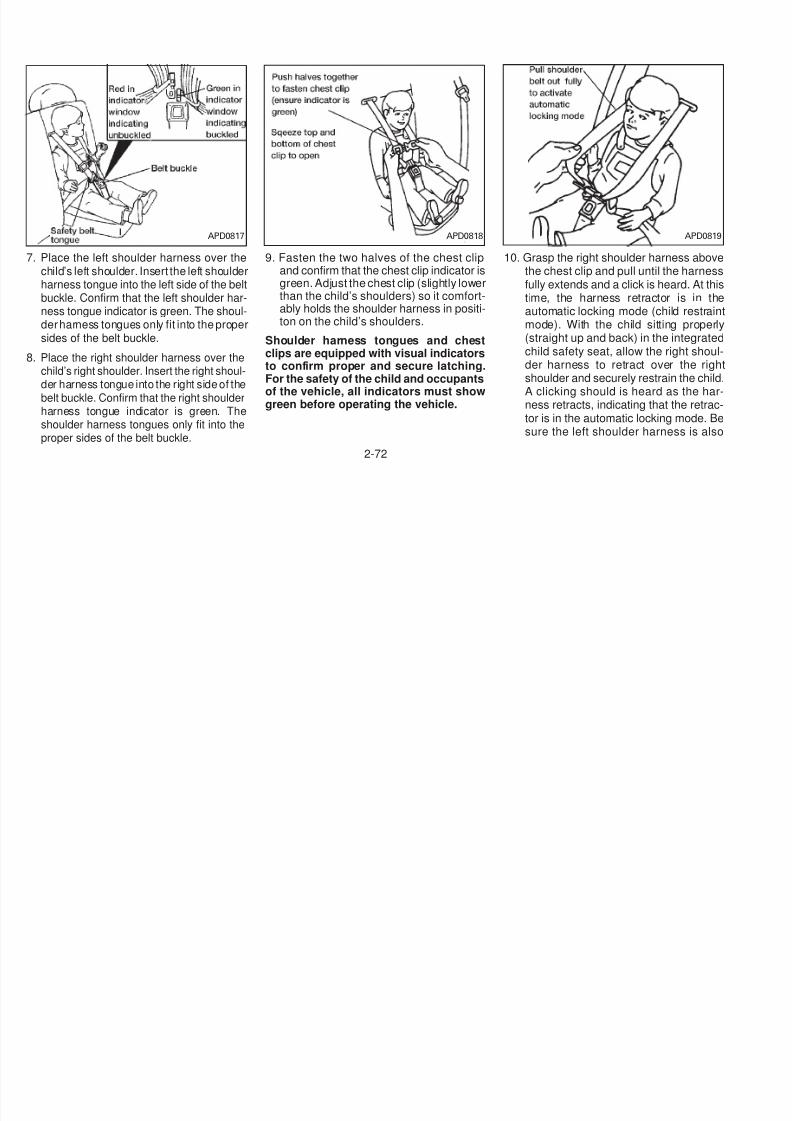
5/12/2018 1996-Nissan-Quest Manual Del Usuario - slidepdf.com
http://slidepdf.com/reader/full/1996-nissan-quest-manual-del-usuario 98/234
1. Be sure your child meets all of the re-quired age, weight and height require-ments for the safe use of the integratedchild safety seat.
2. Be sure the second row bench seat issecurely latched to the floor of the ve-hicle. Refer to the ‘‘FLEXIBLE SEAT-ING’’ section in this chapter for properseat installation procedures.
3. Be sure the second row bench seatbackis locked by grasping it and trying to rockit back and forth. Also, check that theseatback release lever is in the full down
position.
4. Pull the cushion release strap and lowerthe intregrated child safety seat cushioncompletely.
APD0813
2-70
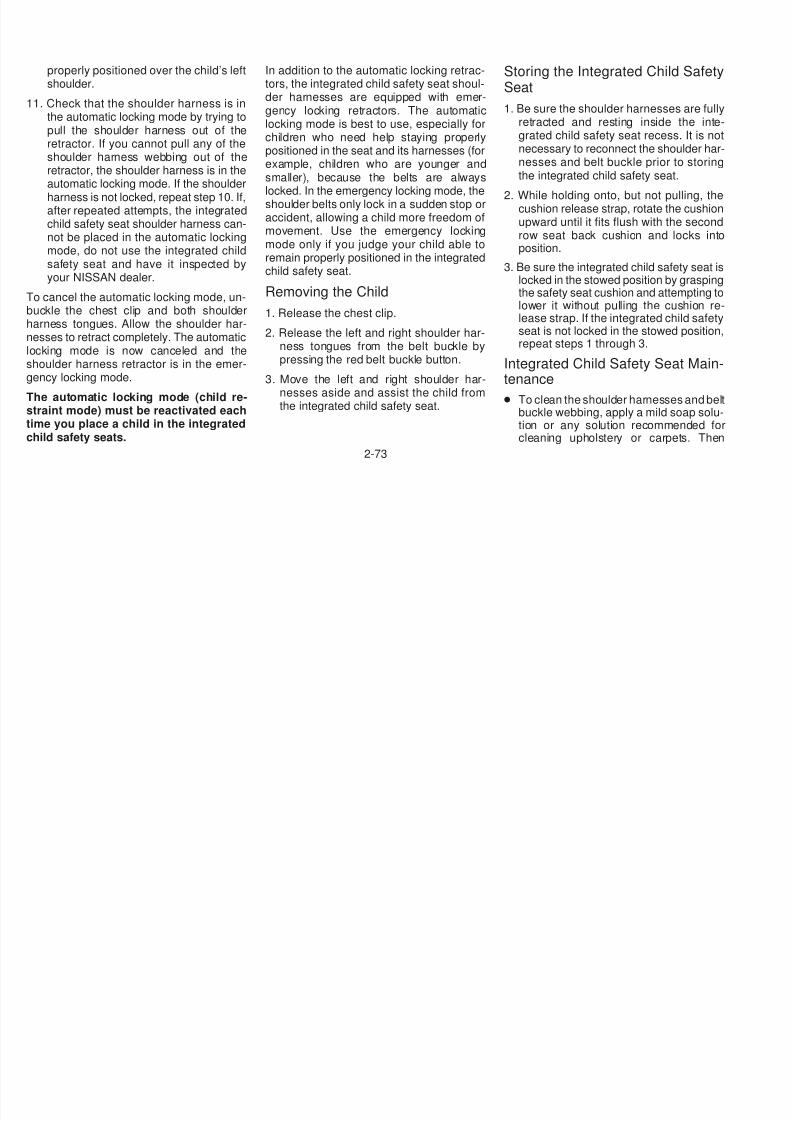
5/12/2018 1996-Nissan-Quest Manual Del Usuario - slidepdf.com
http://slidepdf.com/reader/full/1996-nissan-quest-manual-del-usuario 99/234
5. If connected, separate the two halves ofthe shoulder harness from the beltbuckle. Also if connected, disconnect thechest clip and lay the shoulder harness
halves aside.
6. Place the child on the integrated chisafety seat. Place the belt buckle between the child’s legs.
APD0814 APD0815 APD081
2-71
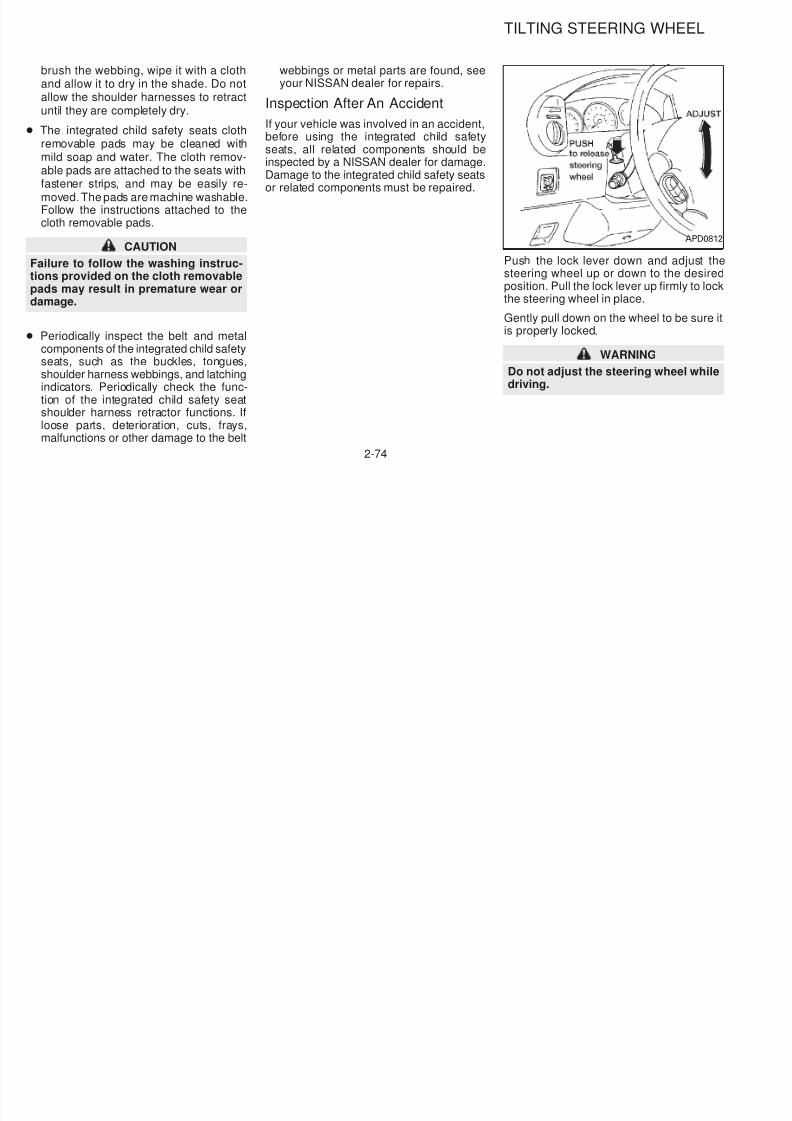
5/12/2018 1996-Nissan-Quest Manual Del Usuario - slidepdf.com
http://slidepdf.com/reader/full/1996-nissan-quest-manual-del-usuario 100/234
7. Place the left shoulder harness over thechild’s left shoulder. Insert the left shoulderharness tongue into the left side of the beltbuckle. Confirm that the left shoulder har-
ness tongue indicator is green. The shoul-der harness tongues only fit into the propersides of the belt buckle.
8. Place the right shoulder harness over thechild’s right shoulder. Insert the right shoul-der harness tongue into the right side of thebelt buckle. Confirm that the right shoulderharness tongue indicator is green. Theshoulder harness tongues only fit into theproper sides of the belt buckle.
9. Fasten the two halves of the chest clipand confirm that the chest clip indicator isgreen. Adjust the chest clip (slightly lowerthan the child’s shoulders) so it comfort-
ably holds the shoulder harness in positi-ton on the child’s shoulders.
Shoulder harness tongues and chestclips are equipped with visual indicatorsto confirm proper and secure latching.For the safety of the child and occupantsof the vehicle, all indicators must showgreen before operating the vehicle.
10. Grasp the right shoulder harness abovthe chest clip and pull until the harnesfully extends and a click is heard. At thtime, the harness retractor is in th
automatic locking mode (child restraimode). With the child sitting proper(straight up and back) in the integratechild safety seat, allow the right shouder harness to retract over the rigshoulder and securely restrain the childA clicking should is heard as the haness retracts, indicating that the retractor is in the automatic locking mode. Bsure the left shoulder harness is als
APD0817 APD0818 APD081
2-72
properly positioned over the child’s leftshoulder.
11. Check that the shoulder harness is inthe automatic locking mode by trying to
In addition to the automatic locking retrac-tors, the integrated child safety seat shoul-der harnesses are equipped with emer-gency locking retractors. The automaticlocking mode is best to use especially for
Storing the Integrated Child SafetSeat
1. Be sure the shoulder harnesses are fulretracted and resting inside the inte
5/12/2018 1996-Nissan-Quest Manual Del Usuario - slidepdf.com
http://slidepdf.com/reader/full/1996-nissan-quest-manual-del-usuario 101/234
pull the shoulder harness out of theretractor. If you cannot pull any of theshoulder harness webbing out of the
retractor, the shoulder harness is in theautomatic locking mode. If the shoulderharness is not locked, repeat step 10. If,after repeated attempts, the integratedchild safety seat shoulder harness can-not be placed in the automatic lockingmode, do not use the integrated childsafety seat and have it inspected byyour NISSAN dealer.
To cancel the automatic locking mode, un-
buckle the chest clip and both shoulderharness tongues. Allow the shoulder har-nesses to retract completely. The automaticlocking mode is now canceled and theshoulder harness retractor is in the emer-gency locking mode.
The automatic locking mode (child re-straint mode) must be reactivated eachtime you place a child in the integratedchild safety seats.
locking mode is best to use, especially forchildren who need help staying properlypositioned in the seat and its harnesses (forexample, children who are younger andsmaller), because the belts are alwayslocked. In the emergency locking mode, theshoulder belts only lock in a sudden stop oraccident, allowing a child more freedom ofmovement. Use the emergency lockingmode only if you judge your child able toremain properly positioned in the integratedchild safety seat.
Removing the Child
1. Release the chest clip.
2. Release the left and right shoulder har-ness tongues from the belt buckle bypressing the red belt buckle button.
3. Move the left and right shoulder har-nesses aside and assist the child fromthe integrated child safety seat.
retracted and resting inside the integrated child safety seat recess. It is nonecessary to reconnect the shoulder hanesses and belt buckle prior to storin
the integrated child safety seat.
2. While holding onto, but not pulling, thcushion release strap, rotate the cushioupward until it fits flush with the seconrow seat back cushion and locks inposition.
3. Be sure the integrated child safety seat locked in the stowed position by graspinthe safety seat cushion and attempting t
lower it without pulling the cushion release strap. If the integrated child safetseat is not locked in the stowed positiorepeat steps 1 through 3.
Integrated Child Safety Seat Maintenance
● To clean the shoulder harnesses and bebuckle webbing, apply a mild soap solution or any solution recommended focleaning upholstery or carpets. The
2-73
brush the webbing, wipe it with a clothand allow it to dry in the shade. Do notallow the shoulder harnesses to retractuntil they are completely dry.
Th i d hild f l h
webbings or metal parts are found, seeyour NISSAN dealer for repairs.
Inspection After An Accident
If your vehicle was involved in an accident
TILTING STEERING WHEEL
5/12/2018 1996-Nissan-Quest Manual Del Usuario - slidepdf.com
http://slidepdf.com/reader/full/1996-nissan-quest-manual-del-usuario 102/234
● The integrated child safety seats clothremovable pads may be cleaned withmild soap and water. The cloth remov-
able pads are attached to the seats withfastener strips, and may be easily re-moved. The pads are machine washable.Follow the instructions attached to thecloth removable pads.
CAUTION
Failure to follow the washing instruc-tions provided on the cloth removablepads may result in premature wear ordamage.
● Periodically inspect the belt and metalcomponents of the integrated child safetyseats, such as the buckles, tongues,shoulder harness webbings, and latchingindicators. Periodically check the func-tion of the integrated child safety seatshoulder harness retractor functions. Ifloose parts, deterioration, cuts, frays,malfunctions or other damage to the belt
If your vehicle was involved in an accident,before using the integrated child safetyseats, all related components should beinspected by a NISSAN dealer for damage.
Damage to the integrated child safety seatsor related components must be repaired.
Push the lock lever down and adjust thsteering wheel up or down to the desireposition. Pull the lock lever up firmly to locthe steering wheel in place.
Gently pull down on the wheel to be sure is properly locked.
WARNING
Do not adjust the steering wheel whiledriving.
APD081
2-74
defogger switch to activate the heating func-tion. Press the switch again to deactivate, orit automatically turns off in approximately 15minutes.
OUTSIDE MIRROR CONTROL
5/12/2018 1996-Nissan-Quest Manual Del Usuario - slidepdf.com
http://slidepdf.com/reader/full/1996-nissan-quest-manual-del-usuario 103/234
Electric control type
The outside mirrors operate only when theignition switch is in the ACC or ON position.
Move the switch to select the right or leftside mirror, then adjust using the controllever.
Objects viewed in the outside mirror onthe passenger side are closer than theyappear.
The electric control type outside mirrors canbe heated to defrost, defog, or de-ice forimproved visibility. Press the rear window
Manual control type
The outside mirror can be moved in andirection for a better rear view.
Objects viewed in the outside mirror othe passenger side are closer than theappear.
APD0808 PD1183M
2-75
OUTSIDE MIRRORS INSIDE MIRROR VANITY MIRROR
5/12/2018 1996-Nissan-Quest Manual Del Usuario - slidepdf.com
http://slidepdf.com/reader/full/1996-nissan-quest-manual-del-usuario 104/234
Push the outside mirrors backward to foldthem.
The night position reduces glare from theheadlights of vehicles behind you at night.
CAUTION
Use the night position only when nec-essary, because it reduces rear viewclarity.
Your vehicle may be equipped with a driveor passenger side vanity mirror. If the vanimirror on your vehicle has a cover, accesthe mirror by pulling the sun visor down an
lifting the cover up. Some vanity mirroilluminate when the mirror cover is opened
M008 PD1006M AIC056
2-76
3 Heater, air conditioner and audio system
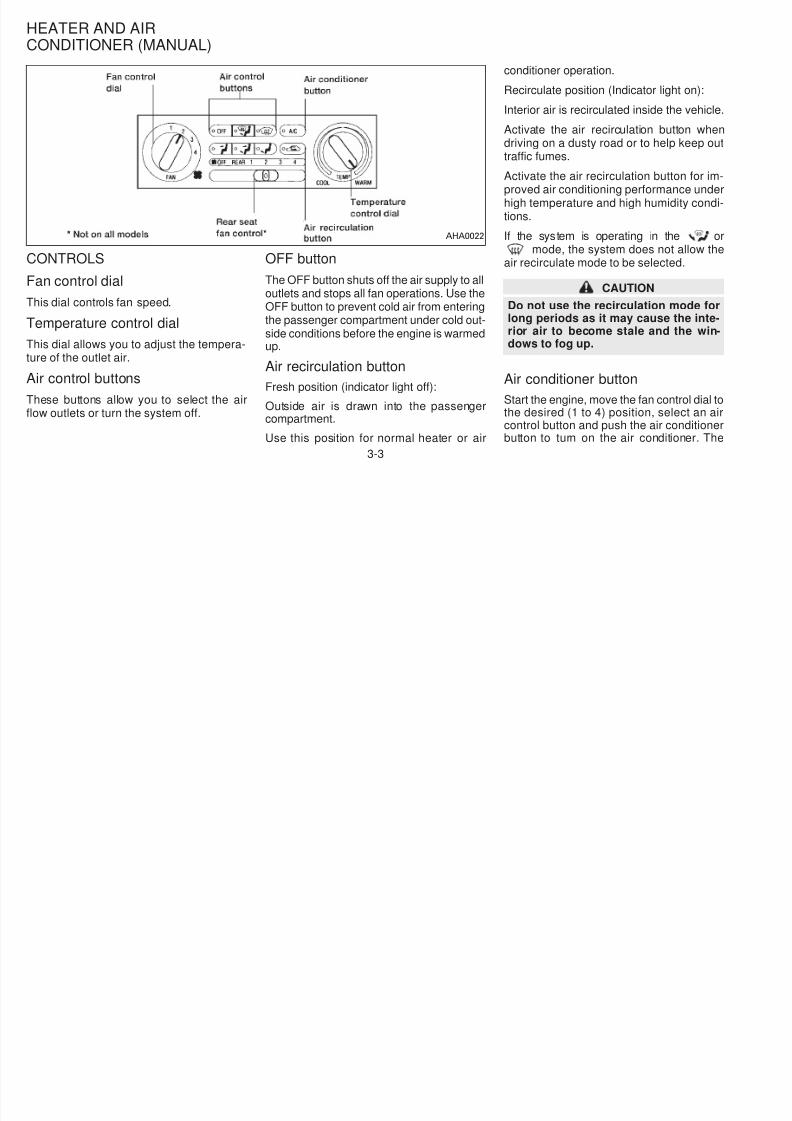
5/12/2018 1996-Nissan-Quest Manual Del Usuario - slidepdf.com
http://slidepdf.com/reader/full/1996-nissan-quest-manual-del-usuario 105/234
Ventilators............................................................. 3-2
Heater and air conditioner (manual) .................... 3-3
Heater and air conditioner (automatic)(If so equipped) .................................................. 3-11
Rear seat heater and air conditioner ................. 3-14
Radio .................................................................. 3-15
Antenna .............................................................. 3-21
CB radio or car phone........................................ 3-26
VENTILATORS
5/12/2018 1996-Nissan-Quest Manual Del Usuario - slidepdf.com
http://slidepdf.com/reader/full/1996-nissan-quest-manual-del-usuario 106/234
Center ventilators
Open, close and adjust the air flow directionof ventilators.
: This symbol indicates that the ventsare closed when the vent switch isrotated downward.
: This symbol indicates that the ventsare open when the vent switch isrotated upward.
Side ventilators
Open, close and adjust the air flow directionof ventilators.
: This symbol indicates that the ventsare closed when the vent switch ismoved to the left.
: This symbol indicates that the ventsare open when the vent switch ismoved to the right.
AHA0590 AHA0591
3-2
conditioner operation.
Recirculate position (Indicator light on):
Interior air is recirculated inside the vehicle
Activate the air recirculation button whe
HEATER AND AIRCONDITIONER (MANUAL)
5/12/2018 1996-Nissan-Quest Manual Del Usuario - slidepdf.com
http://slidepdf.com/reader/full/1996-nissan-quest-manual-del-usuario 107/234
CONTROLS
Fan control dial
This dial controls fan speed.
Temperature control dial
This dial allows you to adjust the tempera-ture of the outlet air.
Air control buttons
These buttons allow you to select the airflow outlets or turn the system off.
OFF button
The OFF button shuts off the air supply to alloutlets and stops all fan operations. Use the
OFF button to prevent cold air from enteringthe passenger compartment under cold out-side conditions before the engine is warmedup.
Air recirculation button
Fresh position (indicator light off):
Outside air is drawn into the passengercompartment.
Use this position for normal heater or air
Activate the air recirculation button whedriving on a dusty road or to help keep outraffic fumes.
Activate the air recirculation button for improved air conditioning performance undehigh temperature and high humidity condtions.
If the system is operating in the omode, the system does not allow th
air recirculate mode to be selected.
CAUTION
Do not use the recirculation mode folong periods as it may cause the interior air to become stale and the windows to fog up.
Air conditioner button
Start the engine, move the fan control dial tthe desired (1 to 4) position, select an acontrol button and push the air conditionebutton to turn on the air conditioner. Th
AHA0022
3-3
indicator light comes on when the air condi-tioner is on. To stop the air conditioner,push the button again; the indicator lightgoes off.
The air conditioner cooling function op-
Ventilation
This mode directs air to the side and centervents.
1. Push the button in.
unless illuminated in the previously selected mode. However, the air condtioner operates to dehumidify if the ouside temperature is more than 40°(4°C), whether or not the A/C button hab d M l l ti d ill
5/12/2018 1996-Nissan-Quest Manual Del Usuario - slidepdf.com
http://slidepdf.com/reader/full/1996-nissan-quest-manual-del-usuario 108/234
g perates only when the engine is running.
WARNINGPositioning of the heating or air condi-tioning controls should not be donewhile driving, in order that full attentionmay be given to the driving operation.
HEATER OPERATION
Heating
This mode is used to direct most of the hotair to the floor outlets.
The air recirculation button light should notbe on for normal heating.
1. Push the button in.
2. Turn the fan control dial to select speed.
3. Move the temperature control dial to thedesired position.
2. Turn the fan control dial to select speed.
3. Move the temperature control dial to thedesired position.
NOTE: The recirculate position can beused.
Defrosting or defogging
This mode is used to defrost/defog thewindows.
1. Push the button in.
2. Turn the fan control dial to select speed.
3. Move the temperature control dial to thedesired position.
When the button is pushed, the airconditioner automatically turns on to de-fog the windshield. The recirculated airmode automatically turns off to reducewindow fogging.
When is selected, the air condi-tioner indicator light does not illuminate
been pressed. Manual selection and illumination of the A/C button does noverride the automatic dehumidifyin
which occurs when is selected.
Operating Tips
Clear snow and ice from the wipeblades and air inlet in front of the windshield. This improves defrostingdefogging operation.
Bi-level heating/cooling
The bi-level mode directs air to the side an
center vents and to the floor outlets.
Bi-level is also a cooling mode when higsun load conditions are present with cotemperatures.
With the A/C system in operation, this modcan be used to cool the passenger’s odriver’s feet under high temperature condtions.
With the A/C system in operation under hig
3-4
temperature conditions, improved coolingcan be obtained by pushing the recirculationbutton to the on position.
Push the air recirculation button to the offposition when heating is required.
Operating tips
● Clear snow and ice from the wiperblades and air inlet in front of thewindshield. This improves heater op-eration.
A/C button is pressed again to turn it ofThe indicator light on the A/C button remains illuminated unless the button pressed to turn it off, or the OFF air contrbutton is pressed.
5/12/2018 1996-Nissan-Quest Manual Del Usuario - slidepdf.com
http://slidepdf.com/reader/full/1996-nissan-quest-manual-del-usuario 109/234
p g q
1. Push the button in.
2. Turn the fan control dial to the desiredposition.
3. Move the temperature control dial to thedesired position.
Heating and demisting
This mode heats the interior and demiststhe windshield.
1. Push the button in.
2. Turn the fan control dial to the desiredposition.
3. Move the temperature control dial to thedesired position.
When the button is pushed, the airrecirculate mode automatically turns off.Outside air is drawn into the passengercompartment to improve the defoggingperformance.
● To defog the side windows more effec-tively when in bi-level or ventilation
mode, close the center vent and directthe side vents toward the side windows.
● A slight delay may be experienced whenchanging air control buttons. This is not aproblem, it is only the system motors andsolenoids switching from one outlet toanother.
AIR CONDITIONER OPERATION
Start the engine, move the fan control dial to
the desired (1 to 4) position, and select anair control button before pushing in the airconditioner button to activate the air condi-tioner. When the air conditioner is on, cool-ing and dehumidifying functions are addedto the system operation.
The air conditioner cooling function op-erates only when the engine is running.
NOTE: When switching air flow outlets, theA/C system remains activated unless the
Cooling
This mode is used to cool and dehumidify
1. Push the button in.
2. Turn the fan control dial to select speed
3. Push the air conditioner button. The indcator light comes on.
4. Move the temperature control dial to thdesired position.
● For quick cooling when the outside temperature is high, move the air recircula
tion button to the on position. Be sure treturn the air recirculation button to thoff position for normal cooling.
● Opening the windows helps to vent heabuildup when parked in the sun.
Dehumidified heating
This mode is used to heat and dehumidify
1. Push the air recirculation button to the oposition.
3-5
2. Push the button in.
3. Turn the fan control dial to select speed.
4. Push on the air conditioner button. Theindicator light comes on.
5 M h l di l h
● After parking in the sun, drive for two orthree minutes with the windows open tovent hot air from the passenger compart-ment. Then, close the windows. Thisallows the air conditioner to cool theinterior more quickly
air conditioning system. See ‘‘Air conditioning system refrigerant and lubricant recommendations’’ in the ‘‘Technical and cosumer information’’ section of this manua
Your NISSAN dealer is able to service youi ll ‘‘f i dl ’’ i di i i

5/12/2018 1996-Nissan-Quest Manual Del Usuario - slidepdf.com
http://slidepdf.com/reader/full/1996-nissan-quest-manual-del-usuario 110/234
5. Move the temperature control dial to thedesired position.
Dehumidified defoggingThis mode is used to defog the windowsand dehumidify.
1. Push the button in.
2. Turn the fan control dial to the desiredspeed.
3. Move the temperature control dial to thedesired position.
When the button is pushed, the airconditioner automatically turns on to de-fog the windshield, (however, the lightdoes not illuminate unless illuminated inthe previously selected mode) and therecirculated air mode automatically turnsoff.
Operating tips
● Keep windows and sun roof closed whilethe air conditioner is in operation.
interior more quickly.
● The air conditioning system should be
operated for about ten minutes atleast once a month. This helps pre-vent damage to the system due to lackof lubrication.
● If the coolant temperature gauge ex-ceeds the H (hot) position, turn the airconditioner off. See ‘‘If your vehicle over-heats’’ in the ‘‘In case of emergency’’section for additional information.
Servicing air conditioning
The air conditioning system in your NISSANvehicle is charged with a new refrigerantdesigned with the environment in mind.
This new refrigerant does not harm theearth’s ozone layer.
Special charging equipment and lubricantare required when servicing your NISSANair conditioner. Using improper refrigerantsor lubricants causes severe damage to your
environmentally ‘‘friendly’’ air conditioninsystem.
3-6
AIR FLOW CHARTS
The following charts show the button anddial positions for MAXIMUM AND QUICKheating, cooling or defrosting. The air recir-culation switch should always be in the
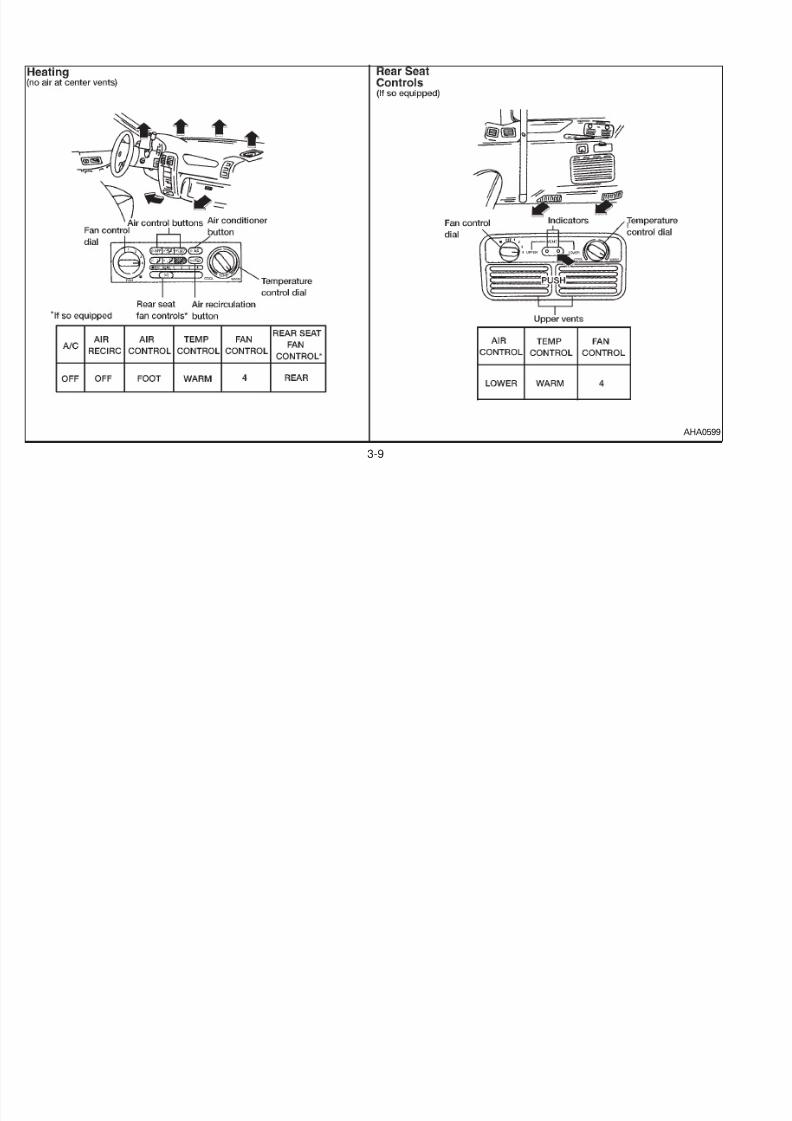
5/12/2018 1996-Nissan-Quest Manual Del Usuario - slidepdf.com
http://slidepdf.com/reader/full/1996-nissan-quest-manual-del-usuario 111/234
off position for heating and defrosting.
3-7
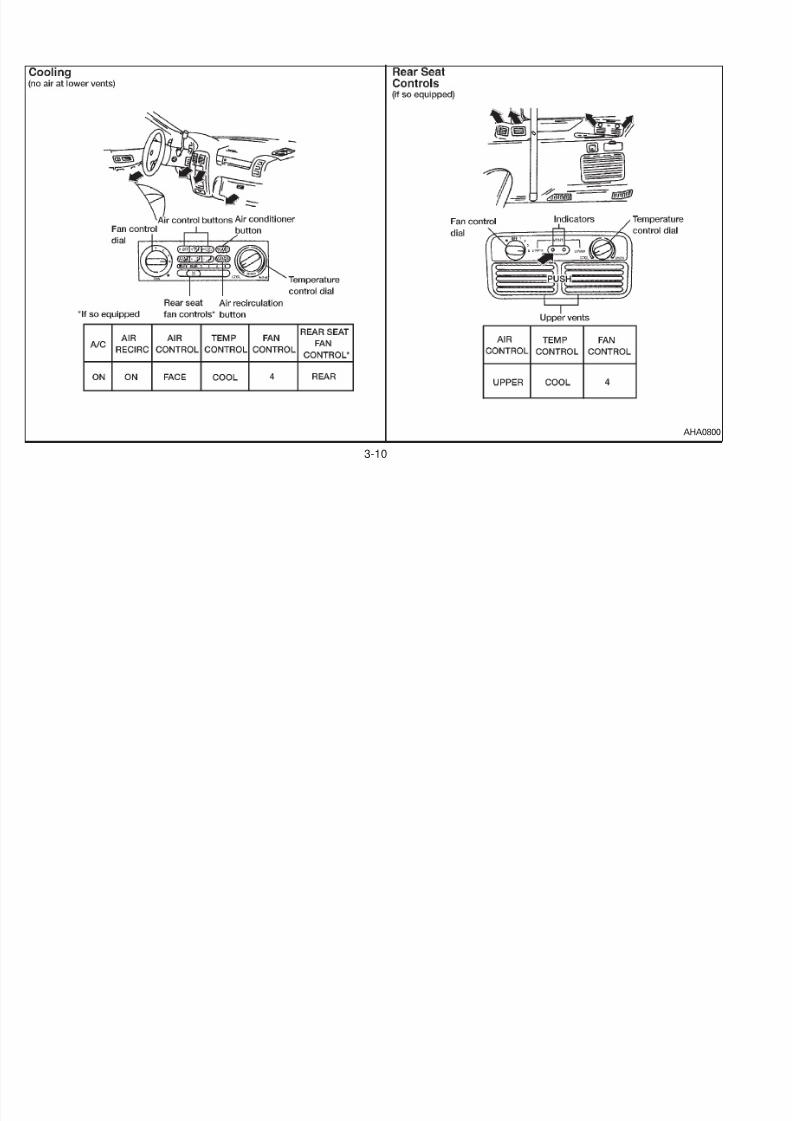
5/12/2018 1996-Nissan-Quest Manual Del Usuario - slidepdf.com
http://slidepdf.com/reader/full/1996-nissan-quest-manual-del-usuario 112/234
AHA059
3-8
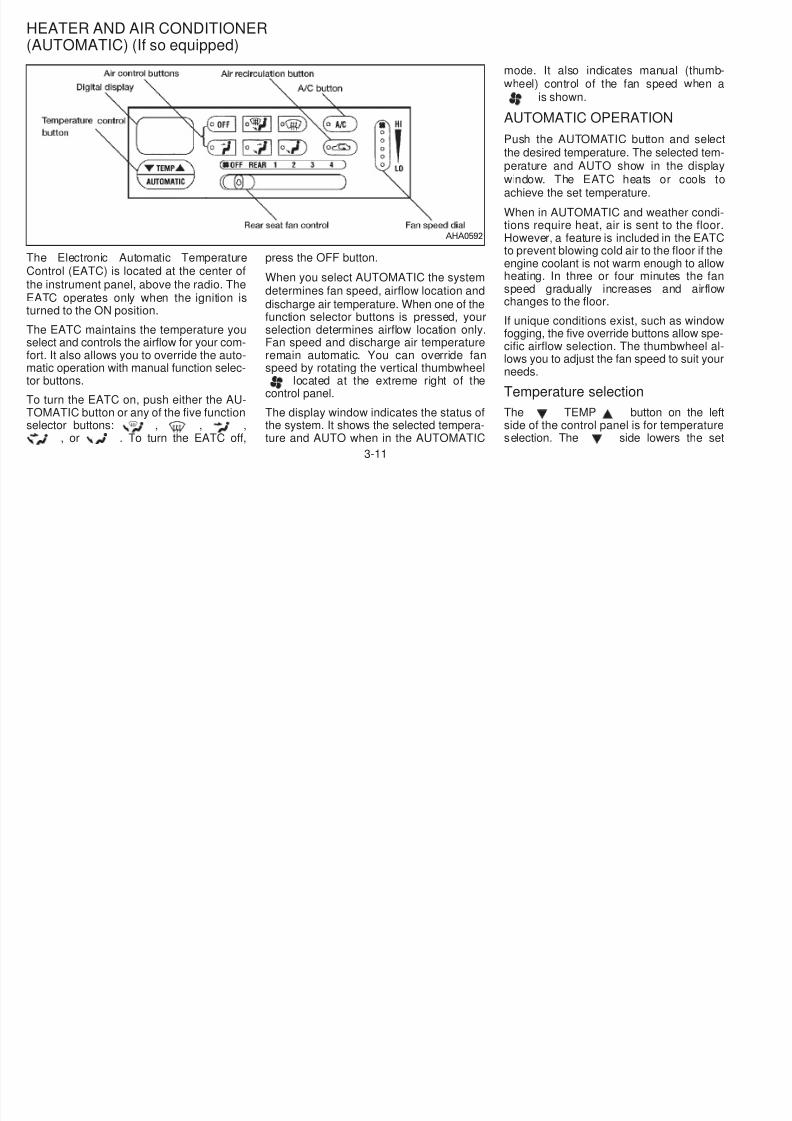
5/12/2018 1996-Nissan-Quest Manual Del Usuario - slidepdf.com
http://slidepdf.com/reader/full/1996-nissan-quest-manual-del-usuario 113/234
AHA059
3-9
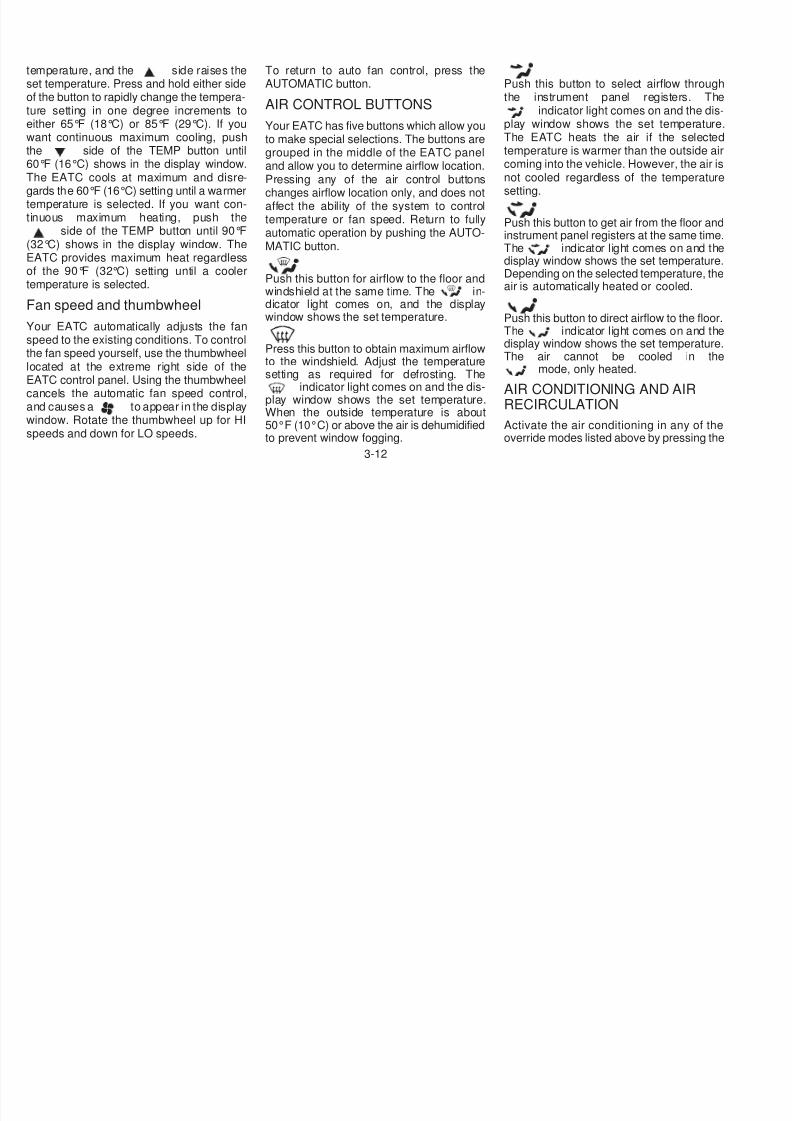
5/12/2018 1996-Nissan-Quest Manual Del Usuario - slidepdf.com
http://slidepdf.com/reader/full/1996-nissan-quest-manual-del-usuario 114/234
AHA080
3-10
mode. It also indicates manual (thumwheel) control of the fan speed when
is shown.
AUTOMATIC OPERATION
Push the AUTOMATIC button and sele
HEATER AND AIR CONDITIONER(AUTOMATIC) (If so equipped)
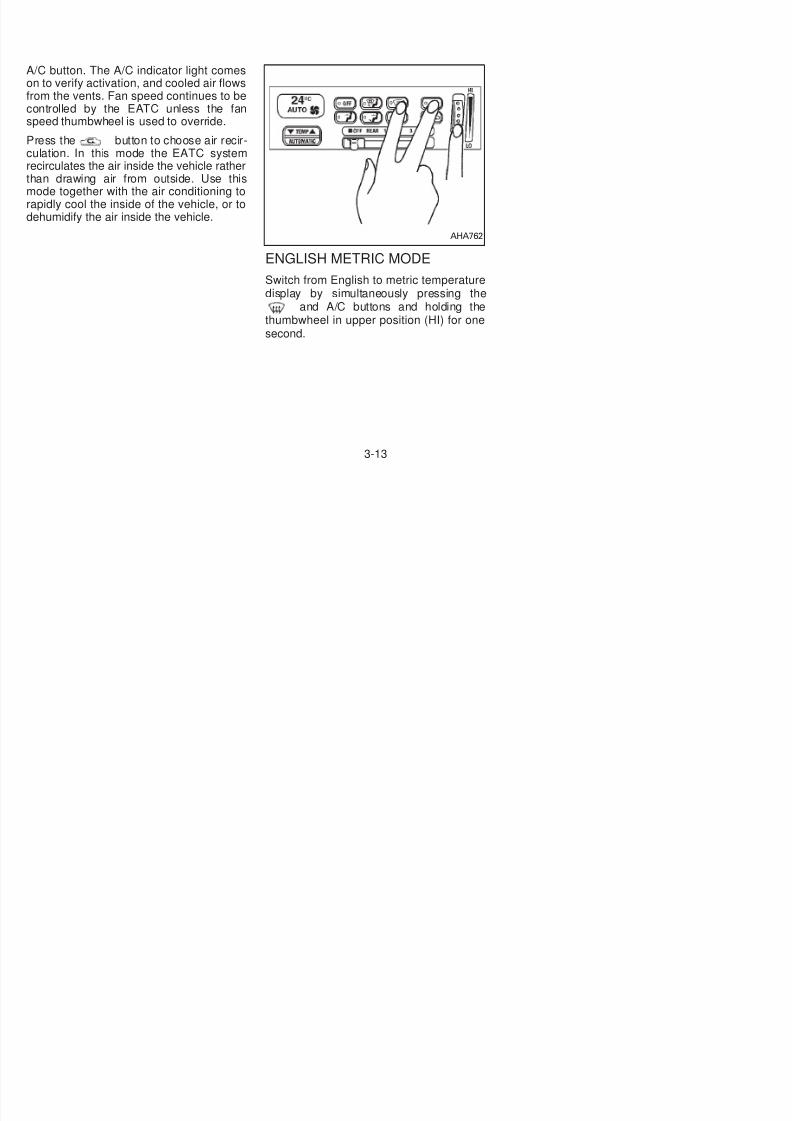
5/12/2018 1996-Nissan-Quest Manual Del Usuario - slidepdf.com
http://slidepdf.com/reader/full/1996-nissan-quest-manual-del-usuario 115/234
The Electronic Automatic TemperatureControl (EATC) is located at the center ofthe instrument panel, above the radio. TheEATC operates only when the ignition is
turned to the ON position.The EATC maintains the temperature youselect and controls the airflow for your com-fort. It also allows you to override the auto-matic operation with manual function selec-tor buttons.
To turn the EATC on, push either the AU-TOMATIC button or any of the five functionselector buttons: , , ,
, or . To turn the EATC off,
press the OFF button.
When you select AUTOMATIC the systemdetermines fan speed, airflow location anddischarge air temperature. When one of the
function selector buttons is pressed, yourselection determines airflow location only.Fan speed and discharge air temperatureremain automatic. You can override fanspeed by rotating the vertical thumbwheel
located at the extreme right of thecontrol panel.
The display window indicates the status ofthe system. It shows the selected tempera-ture and AUTO when in the AUTOMATIC
us t e U O C butto a d se ethe desired temperature. The selected temperature and AUTO show in the displa
window. The EATC heats or cools tachieve the set temperature.
When in AUTOMATIC and weather condtions require heat, air is sent to the flooHowever, a feature is included in the EATto prevent blowing cold air to the floor if thengine coolant is not warm enough to alloheating. In three or four minutes the faspeed gradually increases and airflochanges to the floor.
If unique conditions exist, such as windofogging, the five override buttons allow specific airflow selection. The thumbwheel alows you to adjust the fan speed to suit youneeds.
Temperature selection
The TEMP button on the leside of the control panel is for temperaturselection. The side lowers the se
AHA0592
3-11
temperature, and the side raises theset temperature. Press and hold either sideof the button to rapidly change the tempera-ture setting in one degree increments toeither 65°F (18°C) or 85°F (29°C). If youwant continuous maximum cooling, push
To return to auto fan control, press theAUTOMATIC button.
AIR CONTROL BUTTONS
Your EATC has five buttons which allow youto make special selections. The buttons are
Push this button to select airflow througthe instrument panel registers. Th
indicator light comes on and the display window shows the set temperaturThe EATC heats the air if the selecte
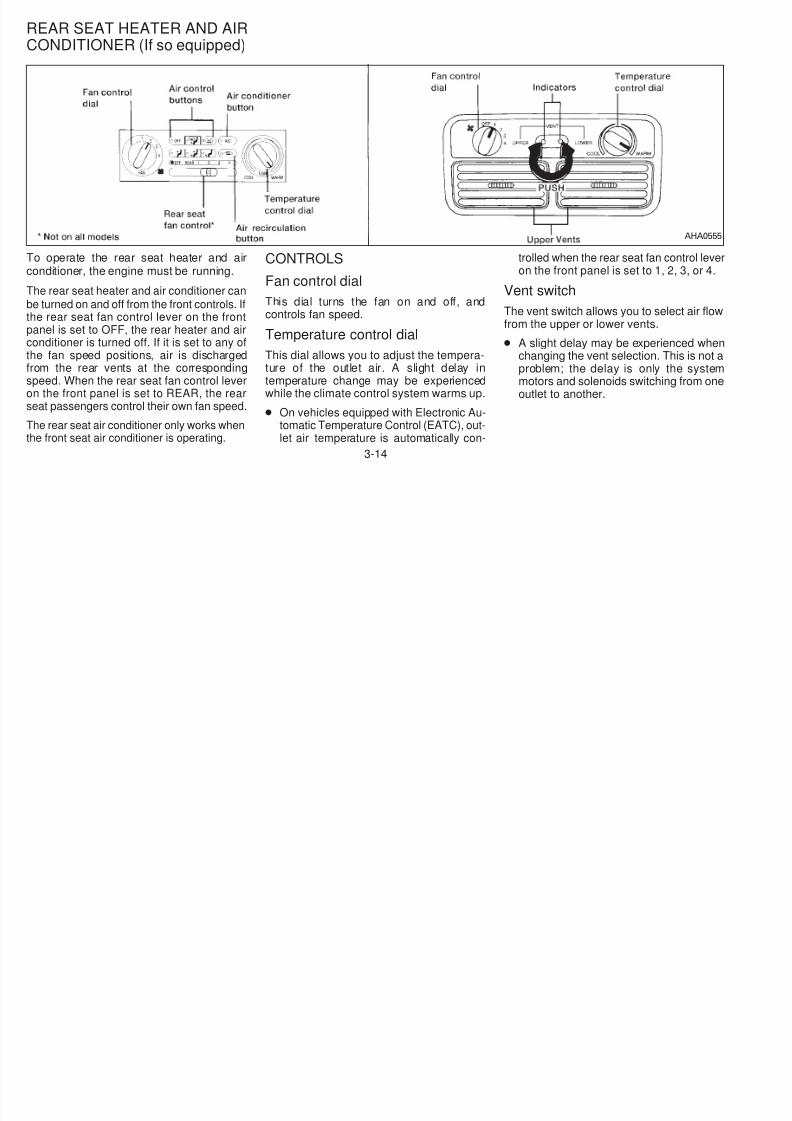
5/12/2018 1996-Nissan-Quest Manual Del Usuario - slidepdf.com
http://slidepdf.com/reader/full/1996-nissan-quest-manual-del-usuario 116/234
the side of the TEMP button until60°F (16°C) shows in the display window.
The EATC cools at maximum and disre-gards the 60°F (16°C) setting until a warmertemperature is selected. If you want con-tinuous maximum heating, push the
side of the TEMP button until 90°F(32°C) shows in the display window. TheEATC provides maximum heat regardlessof the 90°F (32°C) setting until a coolertemperature is selected.
Fan speed and thumbwheel
Your EATC automatically adjusts the fanspeed to the existing conditions. To controlthe fan speed yourself, use the thumbwheellocated at the extreme right side of theEATC control panel. Using the thumbwheelcancels the automatic fan speed control,and causes a to appear in the displaywindow. Rotate the thumbwheel up for HIspeeds and down for LO speeds.
pgrouped in the middle of the EATC paneland allow you to determine airflow location.
Pressing any of the air control buttonschanges airflow location only, and does notaffect the ability of the system to controltemperature or fan speed. Return to fullyautomatic operation by pushing the AUTO-MATIC button.
Push this button for airflow to the floor andwindshield at the same time. The in-dicator light comes on, and the display
window shows the set temperature.
Press this button to obtain maximum airflowto the windshield. Adjust the temperaturesetting as required for defrosting. The
indicator light comes on and the dis-play window shows the set temperature.When the outside temperature is about50°F (10°C) or above the air is dehumidifiedto prevent window fogging.
temperature is warmer than the outside acoming into the vehicle. However, the air
not cooled regardless of the temperatursetting.
Push this button to get air from the floor aninstrument panel registers at the same timeThe indicator light comes on and thdisplay window shows the set temperatureDepending on the selected temperature, thair is automatically heated or cooled.
Push this button to direct airflow to the flooThe indicator light comes on and thdisplay window shows the set temperatureThe air cannot be cooled in th
mode, only heated.
AIR CONDITIONING AND AIRRECIRCULATION
Activate the air conditioning in any of thoverride modes listed above by pressing th
3-12
A/C button. The A/C indicator light comeson to verify activation, and cooled air flowsfrom the vents. Fan speed continues to becontrolled by the EATC unless the fanspeed thumbwheel is used to override.
Press the button to choose air recir-
5/12/2018 1996-Nissan-Quest Manual Del Usuario - slidepdf.com
http://slidepdf.com/reader/full/1996-nissan-quest-manual-del-usuario 117/234
culation. In this mode the EATC systemrecirculates the air inside the vehicle rather
than drawing air from outside. Use thismode together with the air conditioning torapidly cool the inside of the vehicle, or todehumidify the air inside the vehicle.
ENGLISH METRIC MODE
Switch from English to metric temperaturedisplay by simultaneously pressing the
and A/C buttons and holding thethumbwheel in upper position (HI) for onesecond.
AHA762
3-13
REAR SEAT HEATER AND AIRCONDITIONER (If so equipped)
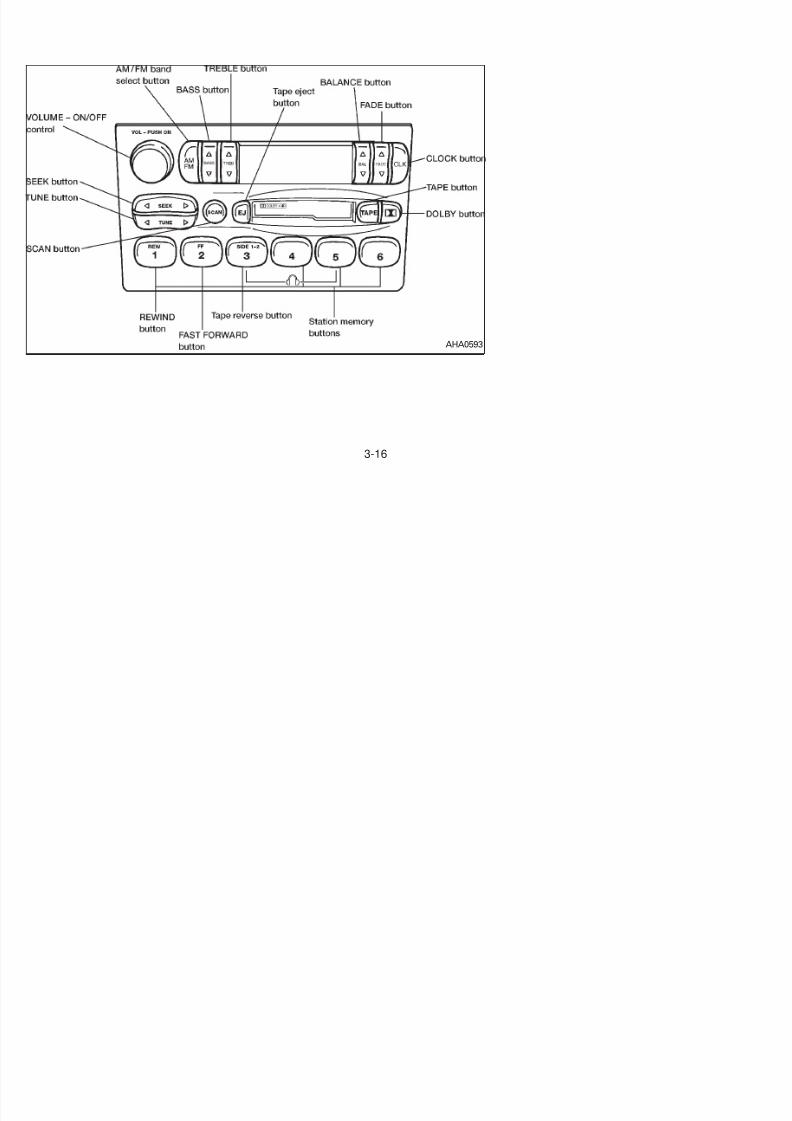
5/12/2018 1996-Nissan-Quest Manual Del Usuario - slidepdf.com
http://slidepdf.com/reader/full/1996-nissan-quest-manual-del-usuario 118/234
To operate the rear seat heater and airconditioner, the engine must be running.
The rear seat heater and air conditioner canbe turned on and off from the front controls. If
the rear seat fan control lever on the frontpanel is set to OFF, the rear heater and airconditioner is turned off. If it is set to any ofthe fan speed positions, air is dischargedfrom the rear vents at the correspondingspeed. When the rear seat fan control leveron the front panel is set to REAR, the rearseat passengers control their own fan speed.
The rear seat air conditioner only works whenthe front seat air conditioner is operating.
CONTROLS
Fan control dial
This dial turns the fan on and off, and
controls fan speed.
Temperature control dial
This dial allows you to adjust the tempera-ture of the outlet air. A slight delay intemperature change may be experiencedwhile the climate control system warms up.
● On vehicles equipped with Electronic Au-tomatic Temperature Control (EATC), out-let air temperature is automatically con-
trolled when the rear seat fan control leveon the front panel is set to 1, 2, 3, or 4.
Vent switch
The vent switch allows you to select air flowfrom the upper or lower vents.
● A slight delay may be experienced whechanging the vent selection. This is not problem; the delay is only the systemotors and solenoids switching from onoutlet to another.
AHA055
3-14
To turn the radio on, turn the ignition key toACC or ON. If you listen to the radio with theengine not running, turn the key to the ACCposition.
Radio reception is affected by station signalstrength, distance from radio transmitter,
AM-FM RADIO WITH CASSETTEPLAYER
Radio operation
Push the VOL-PUSH ON knob to turn theradio on. Push the VOL-PUSH ON knob
RADIO
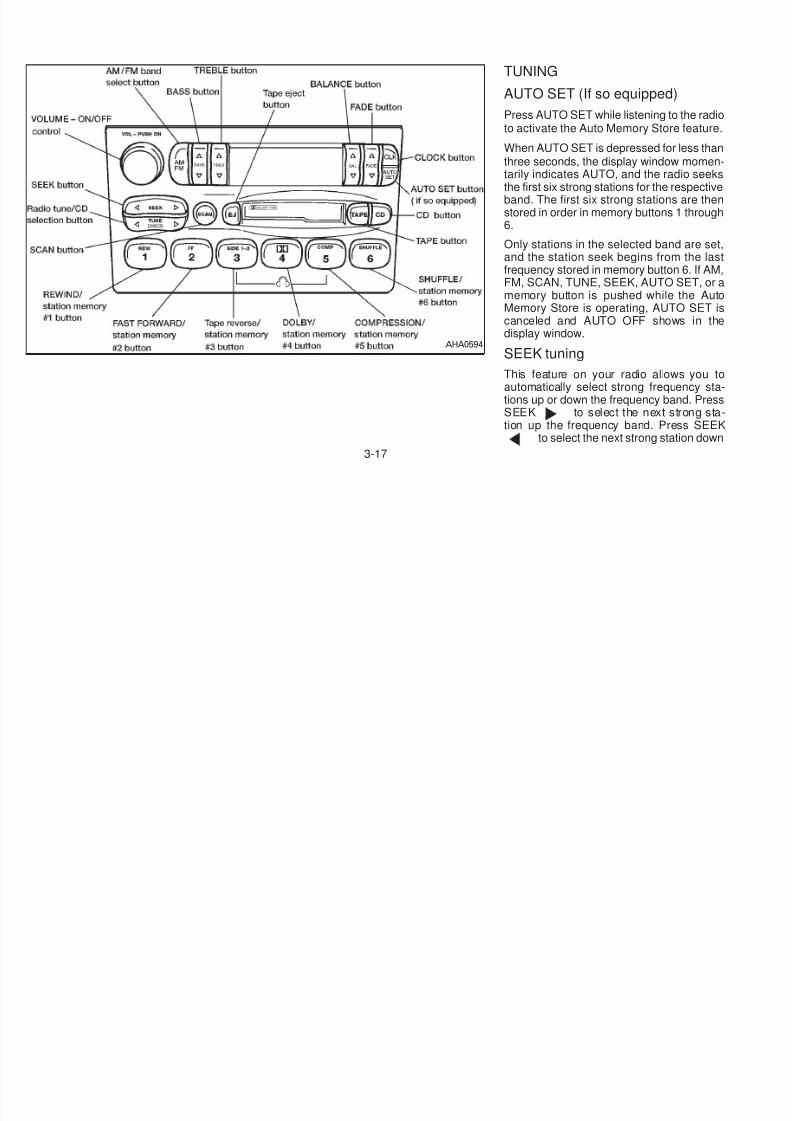
5/12/2018 1996-Nissan-Quest Manual Del Usuario - slidepdf.com
http://slidepdf.com/reader/full/1996-nissan-quest-manual-del-usuario 119/234
buildings, bridges, mountains and other ex-ternal influences. Intermittent changes in
reception quality normally are caused bythese external influences.
Clock
For information on setting the clock, refer tothe section ‘‘Instruments and controls’’.
once more to turn the radio off.
Turn the knob to adjust the volume.Inserting a cassette tape into the cassetteplayer while the radio is on turns the radiooff and turns the cassette player on.
3-15
5/12/2018 1996-Nissan-Quest Manual Del Usuario - slidepdf.com
http://slidepdf.com/reader/full/1996-nissan-quest-manual-del-usuario 120/234
AHA0593
3-16
TUNING
AUTO SET (If so equipped)
Press AUTO SET while listening to the radto activate the Auto Memory Store feature
When AUTO SET is depressed for less tha
5/12/2018 1996-Nissan-Quest Manual Del Usuario - slidepdf.com
http://slidepdf.com/reader/full/1996-nissan-quest-manual-del-usuario 121/234
When AUTO SET is depressed for less thathree seconds, the display window momen
tarily indicates AUTO, and the radio seekthe first six strong stations for the respectivband. The first six strong stations are thestored in order in memory buttons 1 throug6.
Only stations in the selected band are seand the station seek begins from the lasfrequency stored in memory button 6. If AMFM, SCAN, TUNE, SEEK, AUTO SET, ormemory button is pushed while the AuMemory Store is operating, AUTO SET canceled and AUTO OFF shows in thdisplay window.
SEEK tuning
This feature on your radio allows you tautomatically select strong frequency stations up or down the frequency band. PresSEEK to select the next strong station up the frequency band. Press SEE
to select the next strong station dow
AHA0594
3-17
the frequency band. To change frequenciesquickly, press and hold either side of theSEEK button.
SCAN tuning
Push SCAN to enter the scan tuning mode.The radio searches up the frequency band
NOTE: If the vehicle’s battery is discon-nected, the memory buttons need to bereset.
To set the memory buttons:
1. Select the desired band (AM, FM1, orFM2) by pressing the AM/FM button.
Push the BASS button either o; BASS and the setting indicator ba
appear in the display window. Pressing thBASS button either or increases or decreases the level of bass, aindicated by the number of bar segmenshowing in the display window
5/12/2018 1996-Nissan-Quest Manual Del Usuario - slidepdf.com
http://slidepdf.com/reader/full/1996-nissan-quest-manual-del-usuario 122/234
The radio searches up the frequency band,stopping and playing each strong frequency
station for five seconds. This continues untilthe SCAN button is pushed a second timeor a different tuning function is selected.The AM or FM1 or FM2 symbol in thedisplay window flashes while each station isbeing played.
AM/FM
Press the AM/FM button to select the de-sired band: AM, FM1, or FM2. The stereo
indicator shows in the display window dur-ing FM stereo reception. When the stereobroadcast signal is weak, the radio auto-matically changes from stereo to monauralreception.
Station memory operations
Your radio comes equipped with sixmemory buttons, which are used to presetup to six AM stations and 12 FM stations.
) y p g
2. Tune to the desired frequency.
3. Press one of the memory buttons andhold the button in. The sound mutes outfor about two seconds, then returns. Thatstation is now held in memory on thatbutton.
Repeat the three steps above for eachmemory button you want to set.
The memory buttons also control the rearaudio controls. Push memory buttons 3 and
5 simultaneously to turn the rear audiocontrols on. Push them again to turn therear audio controls off. A headphone sym-bol appears in the display window when therear controls are activated.
ADJUSTING TONE QUALITY
BASS
Bass control allows you to adjust the lower,bass frequencies to your preference.
showing in the display window.
Following bass adjustment, the display window shows the current setting for threseconds, then returns to the display prior tadjustment.
TREB
Treble control allows you to adjust thhigher, treble frequencies to your prefeence.
Push the TREB button either o
; TREB and the setting indicator baappear in the display window. Pressing thTREB button either or increases or decreases the level of treble, aindicated by the number of bar segmenshowing in the display window.
Following treble adjustment, the displawindow shows the current setting for threseconds, then returns to the display prior tadjustment.
3-18
BAL
Balance control allows you to adjust thesound distribution between the right and leftspeakers.
Push the BAL button either or; BAL and the setting indicator bar
appear in the display window. Press theFADE button to shift the sound to thefront speakers. The single indicator barmoves to the right of the display window.Press the FADE button to shift thesound to the rear speakers. The singleindicator bar moves to the left of the display
symbol (either 1 or 2) illuminate in thdisplay window.
A cassette tape can be loaded with thignition ON whether or not the radio poweis on. Inserting a cassette tape with thradio power off causes the audio system t
Af h i j d h
5/12/2018 1996-Nissan-Quest Manual Del Usuario - slidepdf.com
http://slidepdf.com/reader/full/1996-nissan-quest-manual-del-usuario 123/234
; BAL and the setting indicator barappear in the display window. Press the
BAL button to shift the sound to theright speakers. The single indicator barmoves to the right of the display window.Press the BAL button to shift thesound to the left speakers. The single indi-cator bar moves to the left of the displaywindow. When the indicator bar is in thecenter position the sound is equally distrib-uted between the right and left speakers.
Following balance adjustment, the display
window shows the current setting for threeseconds, then returns to the display prior toadjustment.
FADE
Fader control allows you to adjust sounddistribution between the front and rearspeakers.
Push the FADE button either or; FADE and the setting indicator bar
indicator bar moves to the left of the displaywindow. When the indicator bar is in the
center position the sound is equally distrib-uted between the front and rear speakers.
Following fader adjustment, the display win-dow shows the current setting for threeseconds, then returns to the display prior toadjustment.
CASSETTE TAPE OPERATIONS
Turn the ignition key to ACC or ON, theninsert the cassette tape into the tape door
by lightly pushing it. Because of the powerloading feature, the cassette tape is auto-matically pulled into the player and beginsto play.
Do not force the cassette tape into the tapedoor. Forcing a tape in or pushing too hardcould damage the player.
When a cassette is inserted into the audiosystem, the word TAPE and a cassette side
turn on. After the cassette is ejected, thaudio system turns off. Also, the poweantenna (if so equipped) stays in the dowposition during cassette tape operation.
The cassette tape automatically changedirections to play the other side when thfirst side is completed.
● To maintain good quality sound, NISSAN recommends using cassetttapes of 60 minutes or shorter ilength.
● Cassette tapes should be removefrom the player when not in use. Storcassettes in their protective caseand away from direct sunlight, heamoisture, and magnetic sources.
● Direct sunlight can cause the cassettto become deformed. The use of deformed cassettes may cause the cassette to jam in the player.
3-19
● Do not use cassettes with peeling orloose labels, as the label could jam inthe player.
● If a cassette has loose tape, insert apencil through one of the cassettehubs and rewind the tape firmly
d th h b L t
REW and FF
Push the REW (rewind) or FF (fast forward)button for the desired direction. When usingREW, push the FF button momentarily tostop the tape and resume playing. Similarly,when using FF, push the REW button mo-
Stopping and ejecting the cassetttape
Push the EJ button. The cassette tapautomatically ejects from the player and thradio turns off. A tape may be ejected witthe ignition switch in the ON or OFF posi
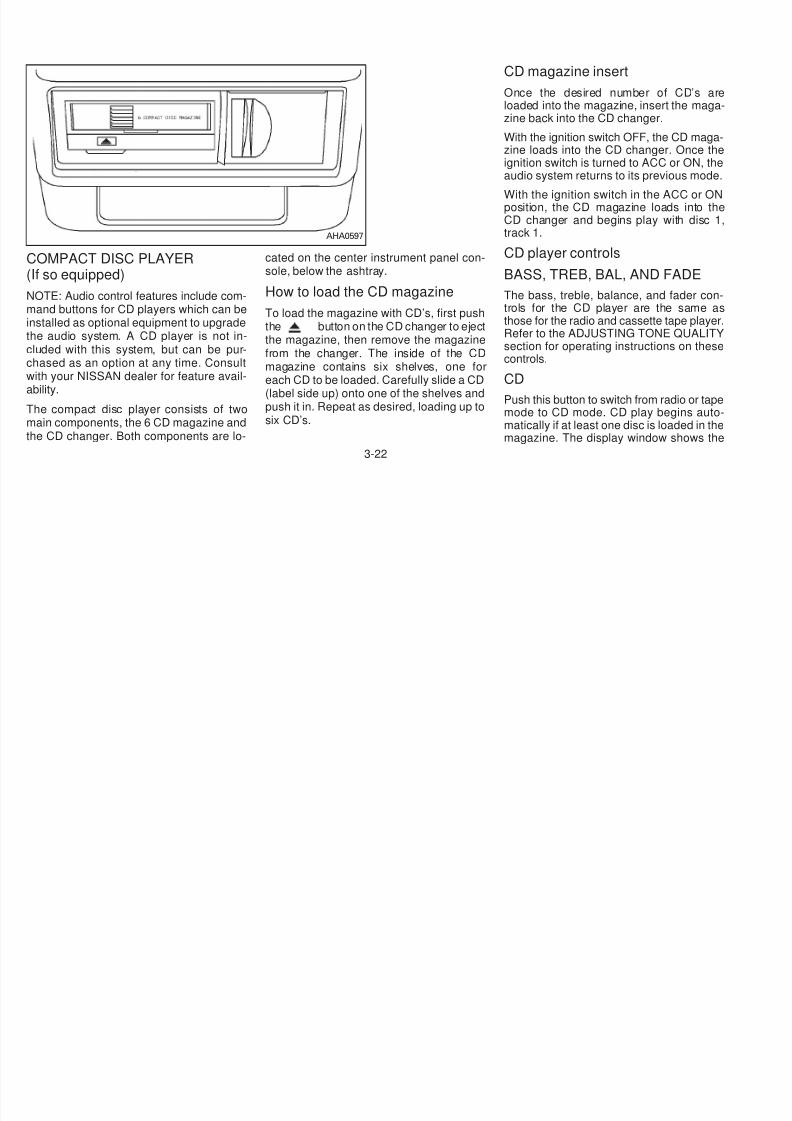
5/12/2018 1996-Nissan-Quest Manual Del Usuario - slidepdf.com
http://slidepdf.com/reader/full/1996-nissan-quest-manual-del-usuario 124/234
around the hubs. Loose tape maycause tape jamming and waveringsound quality.
● Over a period of time, the playbackhead, capstan, and pinch roller maycause a tape coating residue as thetape passes over the head. This resi-due accumulation can cause weak orwavering sound, and should be re-moved periodically with a head clean-ing tape.
If the residue is not removed periodi-cally, the player may need to be dis-assembled for cleaning.
Using a Nissan Cassette Deck CleaningSystem or equivalent to clean the tapeplayer head after 10-12 hours of play helpsto maintain the best playback sound andproper tape operation.
mentarily to stop the tape and resume play-ing.
Automatic Music Search (AMS)
Pushing the SEEK button while playing acassette tape activates the Automatic MusicSearch (AMS) mode. Press SEEK torewind the tape to the previous selection, orpress SEEK to forward the tape tothe next selection.
This system searches for the blank intervals
between selections. If there is a blank inter-val within one program or there is no intervalbetween programs, the system may notstop in the desired or expected location.
Changing the direction of tape play
Press the SIDE 1-2 button to reverse thetape to the opposite track. The display win-dow indicates the track being played with a1 or 2.
tion.
Dolby NR (noise reduction)Push the button for Dolby NR encoded tapes to reduce high frequency tapnoise. When activated, a appears the display window.
Dolby NR is manufactured under licensfrom Dolby Laboratories Licensing Corporation. ‘‘Dolby NR’’ and the double-D symbare trademarks of Dolby Laboratories Lcensing Corporation.
3-20
Manual antenna
The manual antenna on your vehicle re-mains in the up position at all times. Theantenna cannot be shortened, but can beremoved. When you need to remove theantenna, turn its base counterclockwise.
Dirt and other foreign matter on thepower antenna rod may interrupt itsoperation. Clean the rod periodicallywith a damp cloth. This type of cleaningis especially important during the win-ter seasons in areas where road saltand other chemicals may be spread on
ANTENNA
5/12/2018 1996-Nissan-Quest Manual Del Usuario - slidepdf.com
http://slidepdf.com/reader/full/1996-nissan-quest-manual-del-usuario 125/234
Power antenna (If so equipped)
The power antenna automatically extendswhen the radio is turned on, and retractswhen turned off or when a tape or CD isplayed. If the radio is left on, the antennaretracts and extends with the ignition keyOFF-ON operation.
CAUTION
Before turning the radio on, make surethat there is no one near the antenna
outlet and there is enough space for itto extend.
To prevent damage, be sure that thepower antenna is fully retracted beforethe vehicle enters an automated carwash.
y pthe road surfaces and splashed onto
the antenna rod.
3-21
CD magazine insert
Once the desired number of CD’s aloaded into the magazine, insert the magazine back into the CD changer.
With the ignition switch OFF, the CD magazine loads into the CD changer. Once th
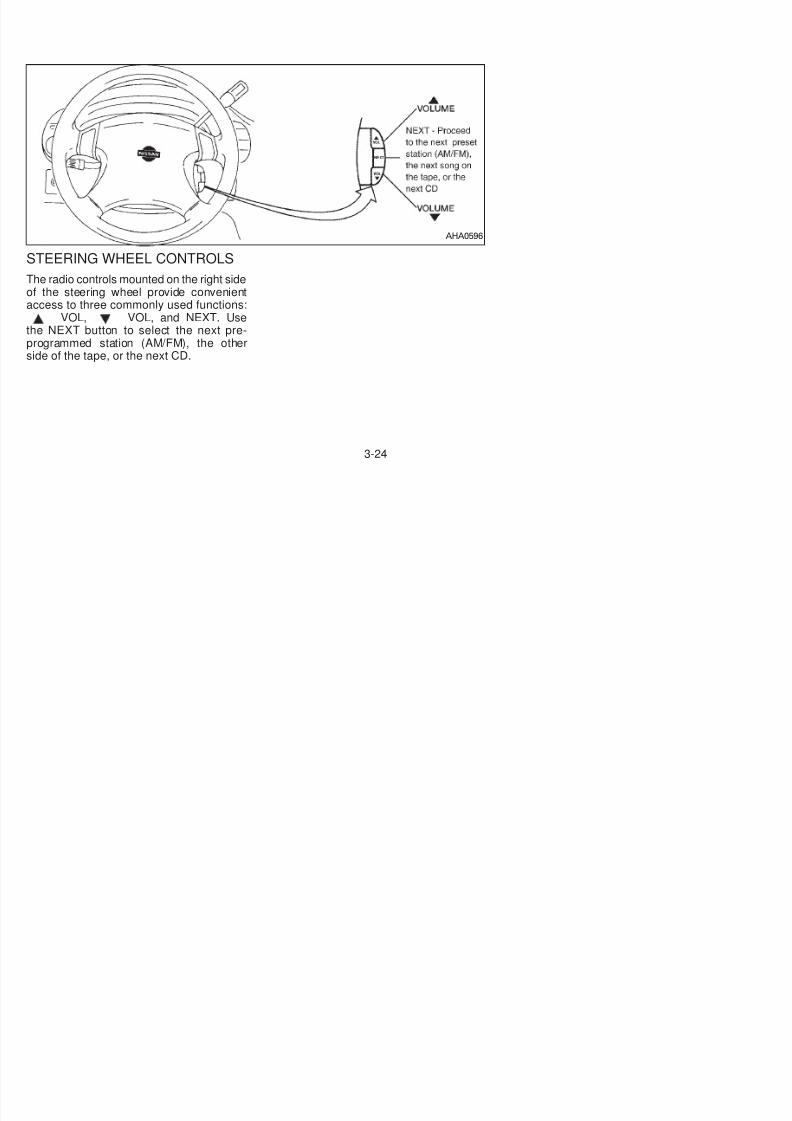
5/12/2018 1996-Nissan-Quest Manual Del Usuario - slidepdf.com
http://slidepdf.com/reader/full/1996-nissan-quest-manual-del-usuario 126/234
COMPACT DISC PLAYER(If so equipped)
NOTE: Audio control features include com-mand buttons for CD players which can beinstalled as optional equipment to upgradethe audio system. A CD player is not in-cluded with this system, but can be pur-chased as an option at any time. Consultwith your NISSAN dealer for feature avail-ability.
The compact disc player consists of twomain components, the 6 CD magazine andthe CD changer. Both components are lo-
cated on the center instrument panel con-sole, below the ashtray.
How to load the CD magazine
To load the magazine with CD’s, first pushthe button on the CD changer to ejectthe magazine, then remove the magazinefrom the changer. The inside of the CDmagazine contains six shelves, one foreach CD to be loaded. Carefully slide a CD(label side up) onto one of the shelves andpush it in. Repeat as desired, loading up tosix CD’s.
ignition switch is turned to ACC or ON, th
audio system returns to its previous modeWith the ignition switch in the ACC or Oposition, the CD magazine loads into thCD changer and begins play with disc track 1.
CD player controls
BASS, TREB, BAL, AND FADE
The bass, treble, balance, and fader controls for the CD player are the same a
those for the radio and cassette tape playeRefer to the ADJUSTING TONE QUALITsection for operating instructions on thescontrols.
CD
Push this button to switch from radio or tapmode to CD mode. CD play begins automatically if at least one disc is loaded in thmagazine. The display window shows th
AHA0597
3-22
CD number for three seconds, then thetrack number for three seconds, then dis-plays both together for the remainder of thetrack.
Push this button when a CD is alreadyplaying to stop the CD.
C
with the first track on the same disc. Thedisplay window flashes the track numberbeing auditioned during the SCAN function.
REW
Press this button to reverse the CD mecha-nism and move back to a previous point on
entire fast forward period.
COMP
Press this button to activate the compression function. This function reduces thdynamic range of the CD program materiawhich provides the listener with a mo
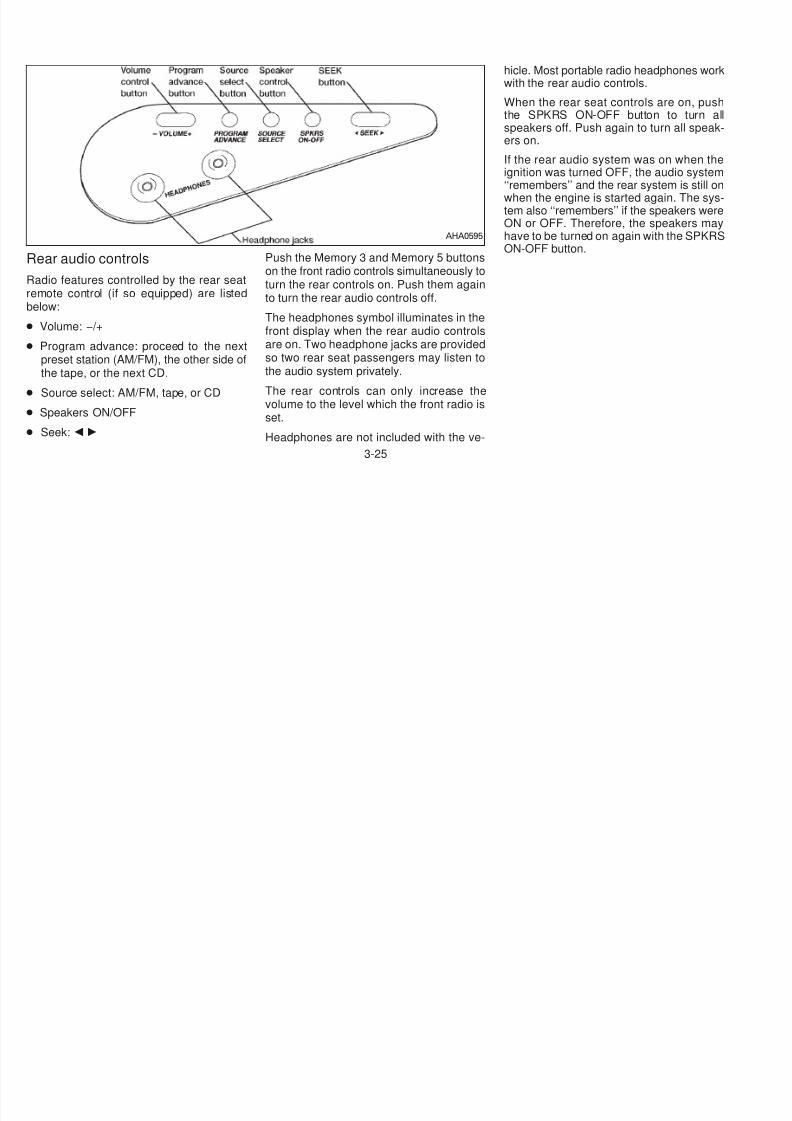
5/12/2018 1996-Nissan-Quest Manual Del Usuario - slidepdf.com
http://slidepdf.com/reader/full/1996-nissan-quest-manual-del-usuario 127/234
If the CD button is pushed while in the radio
or tape mode, and there are no CD’s loadedin the magazine, the display window flashesa NO DISC message for 4 seconds.
SEEK
Push SEEK to select the previoustrack number, or push SEEK to se-lect the next track number. After the lasttrack on a disc, pushing SEEK se-lects the first track of the same disc.
TUNE DISCSPush TUNE DISCS to select the pre-vious CD in the magazine. Push TUNEDISCS to select the next CD in themagazine.
SCAN
Push this button to audition the first 10seconds of each track on a disc. At the endof the disc, the SCAN function continues
p pthe disc. If held for less than three seconds,
this button causes the CD to reverse atthree times the normal play speed. If heldfor more than three seconds, the CD re-verses at 10 times the normal play speed.
The mechanism reverses to the beginningof track 1 and begins play if the button isheld continuously. The volume decreasesand the display window shows the elapsedtime during the entire fast reverse period.
FF
Press this button to advance the CD mecha-nism and move ahead on the disc. If held forless than three seconds, this button causesthe CD to advance at three times the normalplay speed. If held for more than threeseconds, the CD advances at 10 times thenormal play speed.
The volume decreases and the display win-dow shows the elapsed time during the
pconsistent level of volume. The display win
dow shows a C when the compressiofunction is activated.
SHUFFLE
Press this button to randomly select the plaorder of the tracks on a CD. When all trackof one CD have been played, the systechanges to the next CD in the magazinand proceeds to play the tracks in a randomly selected order. The shuffle featur
remains in effect until turned off by pressinthe SHUFFLE button again.
When the shuffle function is activated, thdisplay window shows the letters SHF for twseconds, then shows the disc number antrack selected for the remainder of that seletion. When a new track is selected, the letteSHF again appear for two seconds, followeby the new disc and track number, and so oas long as the shuffle function is active.
3-23

5/12/2018 1996-Nissan-Quest Manual Del Usuario - slidepdf.com
http://slidepdf.com/reader/full/1996-nissan-quest-manual-del-usuario 128/234
STEERING WHEEL CONTROLS
The radio controls mounted on the right sideof the steering wheel provide convenientaccess to three commonly used functions:
VOL, VOL, and NEXT. Usethe NEXT button to select the next pre-programmed station (AM/FM), the otherside of the tape, or the next CD.
AHA0596
3-24
hicle. Most portable radio headphones wowith the rear audio controls.
When the rear seat controls are on, pusthe SPKRS ON-OFF button to turn aspeakers off. Push again to turn all speaers on.
If the rear audio system was on when th
5/12/2018 1996-Nissan-Quest Manual Del Usuario - slidepdf.com
http://slidepdf.com/reader/full/1996-nissan-quest-manual-del-usuario 129/234
Rear audio controls
Radio features controlled by the rear seatremote control (if so equipped) are listedbelow:
● Volume: −/+
● Program advance: proceed to the nextpreset station (AM/FM), the other side ofthe tape, or the next CD.
● Source select: AM/FM, tape, or CD
● Speakers ON/OFF
● Seek:
Push the Memory 3 and Memory 5 buttonson the front radio controls simultaneously toturn the rear controls on. Push them againto turn the rear audio controls off.
The headphones symbol illuminates in thefront display when the rear audio controlsare on. Two headphone jacks are providedso two rear seat passengers may listen tothe audio system privately.
The rear controls can only increase thevolume to the level which the front radio isset.
Headphones are not included with the ve-
If the rear audio system was on when thignition was turned OFF, the audio syste‘‘remembers’’ and the rear system is still owhen the engine is started again. The system also ‘‘remembers’’ if the speakers werON or OFF. Therefore, the speakers mahave to be turned on again with the SPKRON-OFF button.
AHA0595
3-25
When installing a CB ham radio, a carphone or other transmitters in your NISSAN,be sure to observe the following cautions,otherwise the new equipment may ad-versely affect the MFI system and otherelectronic parts.
CAUTION
CB RADIO OR CAR PHONE
5/12/2018 1996-Nissan-Quest Manual Del Usuario - slidepdf.com
http://slidepdf.com/reader/full/1996-nissan-quest-manual-del-usuario 130/234
C U O
● Keep the antenna as far away aspossible from the Engine ControlModule.
● Also keep the antenna wire morethan 8 inches (20 cm) away from theMultiport Electronic Fuel Injection(MFI) harness. Do not route the an-tenna wire next to any harness.
● Adjust the antenna standing-waveratio as recommended by the
manufacturer.● Connect the ground wire from the
CB radio chassis to the body.
● For details, consult a NISSAN dealer.
3-26
4 Starting and driving
Precautions when starting and driving................. 4-2
Avoiding collision and rollover.............................. 4-3
Cruise control ....................................................... 4-9
Break-in schedule............................................... 4-11
5/12/2018 1996-Nissan-Quest Manual Del Usuario - slidepdf.com
http://slidepdf.com/reader/full/1996-nissan-quest-manual-del-usuario 131/234
Avoiding collision and rollover.............................. 4 3
Drinking alcohol/drugs and driving....................... 4-3
Ignition switch....................................................... 4-4
Before starting the engine .................................... 4-4
Driving with an automatic transmission ............... 4-5
Starting the engine ............................................... 4-8
Parking brake operation ....................................... 4-8
Break in schedule............................................... 4 11
Increasing fuel economy .................................... 4-11
Parking/parking on hills ...................................... 4-12
Precautions when driving ................................... 4-13
Anti-lock brake system ....................................... 4-13
Cold weather driving cautions............................ 4-15
WARNING
Do not leave children, unreliableadults, or pets alone in your vehicle.They could accidently injure them-selves or others through inadvertentoperation of the vehicle. Also, on hot,sunny days, temperatures in a closed
hi l ld i kl b hi h
● Do not park the vehicle with the en-gine running for any extended lengthof time.
● Keep the rear door and flip-up rearwindow closed while driving, other-wise exhaust gases could be drawninto the passenger compartment. If
b. You suspect that exhaust fumesare entering into the passengecompartment.
c. You notice a change in the soundof the exhaust system.
d. You have had an accident involving damage to the exhaust system
PRECAUTIONS WHEN
STARTING AND DRIVING
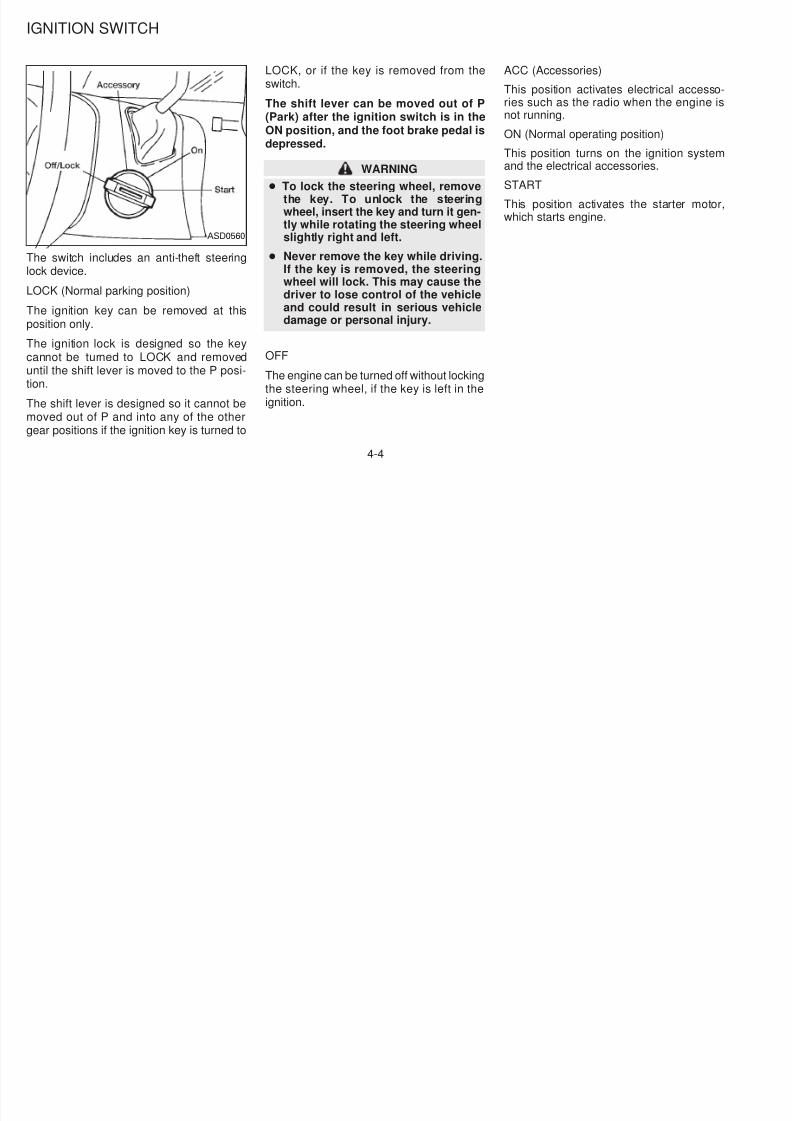
5/12/2018 1996-Nissan-Quest Manual Del Usuario - slidepdf.com
http://slidepdf.com/reader/full/1996-nissan-quest-manual-del-usuario 132/234
vehicle could quickly become high
enough to cause severe or possiblyfatal injuries to people or animals.
EXHAUST GAS (CarbonMonoxide)
WARNING
Do not breathe exhaust gases; theycontain colorless and odorless carbon
monoxide. Carbon monoxide is dan-gerous. It can cause unconsciousnessor death.
● If you suspect that exhaust fumesare entering the vehicle, drive withall windows fully open, and have thevehicle inspected immediately.
● Do not run the engine in closedspaces such as a garage for anylonger than is absolutely necessary.
you must drive in this manner for
some reason, take the followingsteps.
1. Open all the windows.
2. Set the air recirculate switch to‘‘OFF’’ and the fan control dial at 4(high) to circulate the air.
● If electrical wiring or other cableconnections must pass to a trailerthrough a seal on the body, follow
the manufacturer’s recommendationto prevent carbon monoxide entryinto the vehicle.
● The exhaust system and bodyshould be inspected by a qualifiedmechanic whenever:
a. The vehicle is raised for service.
g da age to t e e aust systeunderbody, or rear of the vehicle.
THREE WAY CATALYST
The three way catalyst is an emission control device installed in the exhaust systemExhaust gases in the three way catalyst arburned at high temperatures to help reducpollutants.
WARNING
● The exhaust gas and the exhaussystem are very hot. While the engine is running, keep people or flammable materials away from the exhaust pipe.
● Do not stop or park the vehicle oveflammable materials such as drygrass, waste paper or rags, as theymay burn easily.
4-2
To help prevent damage
● Do not use leaded gasoline.Deposits from leaded gasoline will se-riously reduce the three way cata-lyst’s ability to help reduce exhaustpollutants.
● Keep your engine tuned up. Malfunc-
Failure to operate this vehicle in a safe andprudent manner may result in loss of controlor an accident. Be alert and drive defen-sively at all times. Obey all traffic regula-tions. Avoid excessive speed, high speedcornering, or sudden steering maneuvers,because these driving practices couldcause you to lose control of your vehicle. As
WARNING
Alcohol in the blood stream reducescoordination, delays reaction time andimpairs judgement. Driving after drinking alcohol increases the likelihood obeing involved in an accident injuringyourself and others. Additionally, if youare injured in an accident alcohol can
AVOIDING COLLISION AND
ROLLOVER
DRINKING ALCOHOL/DRUGS
AND DRIVING
5/12/2018 1996-Nissan-Quest Manual Del Usuario - slidepdf.com
http://slidepdf.com/reader/full/1996-nissan-quest-manual-del-usuario 133/234
eep you e g e tu ed up a u ctions in the ignition, fuel injection, orelectrical systems can cause overrichfuel flow into the catalyst, causing it tooverheat. Do not keep driving if theengine misfires, or if noticeable lossof performance or other unusual op-erating conditions are detected. Havethe vehicle inspected promptly by anauthorized NISSAN dealer.
● Avoid driving with an extremely lowfuel level. Running out of fuel could
cause the engine to misfire, damagingthe three way catalyst.
● Do not race the engine while warmingit up.
● Do not push or tow your vehicle tostart the engine.
y ywith any vehicle, a loss of control could
result in a collision with other vehicles orobjects, or cause the vehicle to rollover,particularly if the loss of control causesthe vehicle to slide sideways. Be attentiveat all times, and avoid driving when tired.Never drive when under the influence ofalcohol or drugs (including prescription orover-the-counter drugs which may causedrowsiness). Always wear your seat belt asoutlined in the ‘‘Seat Belts’’ section of thismanual, and also instruct your passengersto do so.
are injured in an accident alcohol can
increase the severity of the injury.
Nissan is committed to safe driving. However, you must choose not to drive undethe influence of alcohol. Every year thousands of people are injured or killed alcohol related accidents. Although the loclaws vary on what is considered to blegally intoxicated, the fact is that alcohaffects all people differently and mo
people underestimate the effects of alcohoRemember, drinking and driving don’t mix
And that’s true for drugs, too (over thcounter, prescription, and illegal drugsDon’t drive if your ability to operate yovehicle is impaired by alcohol, drugs, osome other physical condition.
4-3
LOCK, or if the key is removed from theswitch.
The shift lever can be moved out of P(Park) after the ignition switch is in theON position, and the foot brake pedal isdepressed.
WARNING
ACC (Accessories)
This position activates electrical accessories such as the radio when the engine not running.
ON (Normal operating position)
This position turns on the ignition systeand the electrical accessories
IGNITION SWITCH
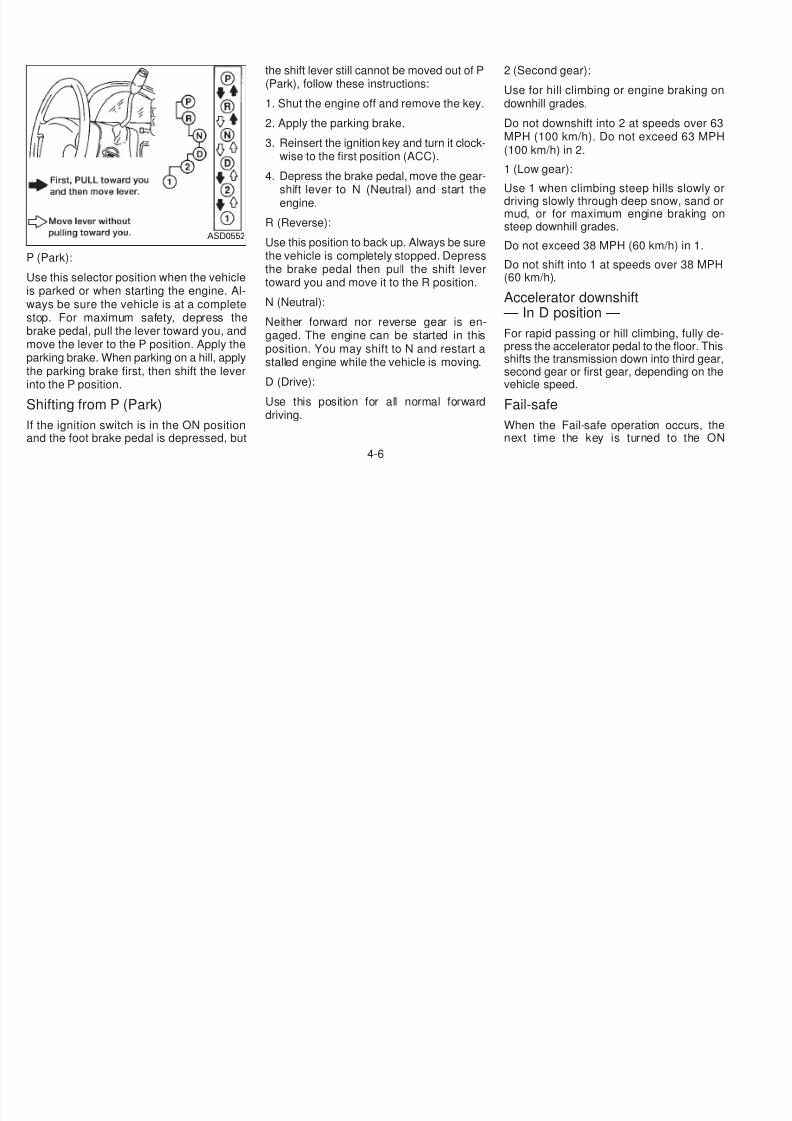
5/12/2018 1996-Nissan-Quest Manual Del Usuario - slidepdf.com
http://slidepdf.com/reader/full/1996-nissan-quest-manual-del-usuario 134/234
The switch includes an anti-theft steeringlock device.
LOCK (Normal parking position)
The ignition key can be removed at this
position only.
The ignition lock is designed so the keycannot be turned to LOCK and removeduntil the shift lever is moved to the P posi-tion.
The shift lever is designed so it cannot bemoved out of P and into any of the othergear positions if the ignition key is turned to
WARNING
● To lock the steering wheel, removethe key. To unlock the steeringwheel, insert the key and turn it gen-tly while rotating the steering wheelslightly right and left.
● Never remove the key while driving.If the key is removed, the steeringwheel will lock. This may cause thedriver to lose control of the vehicleand could result in serious vehicle
damage or personal injury.
OFF
The engine can be turned off without lockingthe steering wheel, if the key is left in theignition.
and the electrical accessories.
START
This position activates the starter motowhich starts engine.
ASD0560
4-4
● Make sure the area around the vehicle isclear.
● Maintenance items listed here should bechecked periodically, for example, eachtime you check engine oil.
● Check that all windows and lights areclean.
The automatic transmission in your vehicleis electronically controlled by a microcom-puter to produce maximum power andsmooth operation.
Shown on the following pages are the rec-ommended operating procedures for thistransmission. Follow these procedures formaximum vehicle performance and driving
1. Keep the foot brake pedal depressed anshift into a driving gear.
2. Release the parking brake and fobrake, then gradually start the vehicle motion.
● Cold engine idle speed is high, so uscaution when shifting into a forwar
BEFORE STARTING THE
ENGINE
DRIVING WITH AN
AUTOMATIC TRANSMISSION
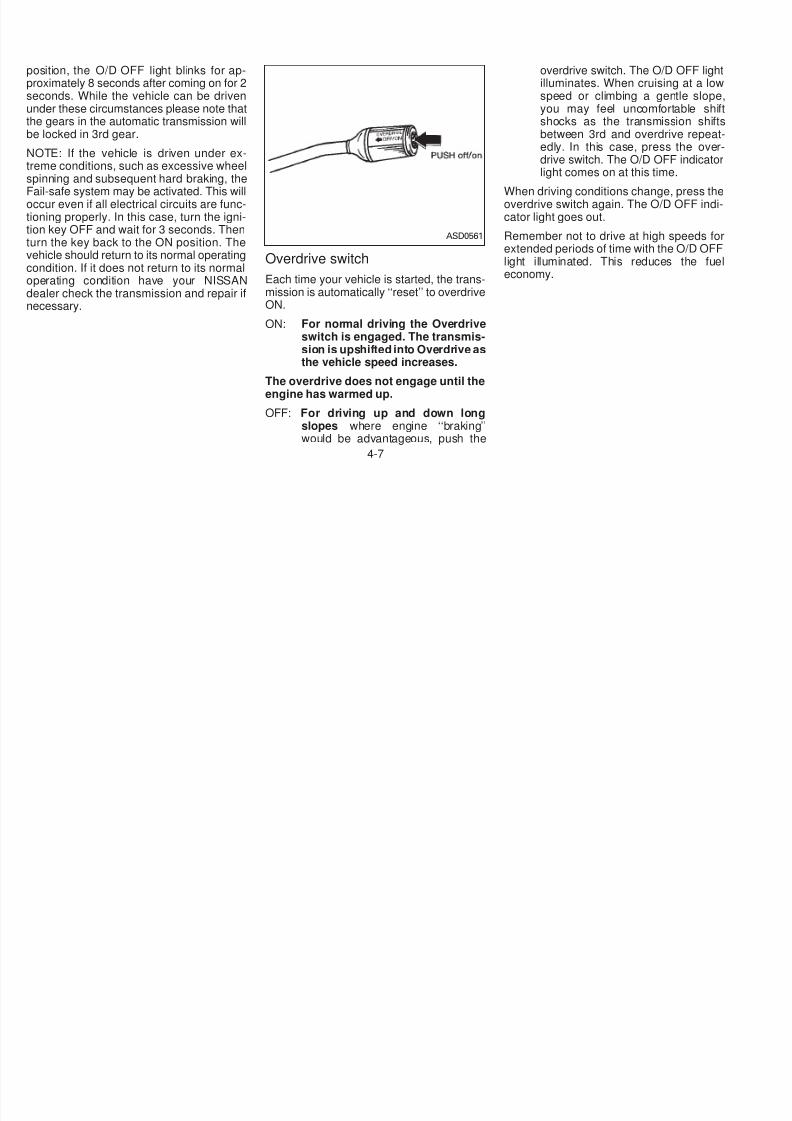
5/12/2018 1996-Nissan-Quest Manual Del Usuario - slidepdf.com
http://slidepdf.com/reader/full/1996-nissan-quest-manual-del-usuario 135/234
●
Visually inspect tires for their appearanceand condition. Also check tires for properinflation.
● Lock all doors.
● Position seat and adjust head restraints.
● Adjust inside and outside mirrors.
● Fasten seat belts and ask all passengersto do likewise.
● Check the operation of warning lightswhen key is turned to the ON position.
maximum vehicle performance and driving
enjoyment.
Starting the vehicle
● After starting the engine, fully depress thefoot brake pedal before shifting the selec-tor lever to the R, N, D, 2 or 1 position. Besure the vehicle is fully stopped beforeattempting to shift the selector lever.
This automatic transmission is designedso the foot brake pedal MUST be de-
pressed before shifting from P to any driveposition while the ignition switch is ON.
The shift lever cannot be moved out of Pand into any of the other gear positions ifthe ignition key is turned to ACC, LOCK,or if the key is removed from the switch.
When the battery charge is low, the shiftlever can be moved if the ignition switchis in the ACC position.
gor reverse gear before the engine hawarmed up.
● Avoid revving up the engine while thvehicle is stopped. This could causunexpected vehicle movement.
Driving precautions
To help prevent transmission damage:
● Do not depress the accelerator pedawhile shifting from P or N to: R, D, 2 o
1. Always depress the brake pedauntil shifting is completed.
● Never shift to P or R while the vehiclis moving.
● When stopping the vehicle on an uphill grade, do not hold the vehicle bdepressing the accelerator pedal. Thfoot brakes should be used for thpurpose.
4-5
the shift lever still cannot be moved out of P(Park), follow these instructions:
1. Shut the engine off and remove the key.
2. Apply the parking brake.
3. Reinsert the ignition key and turn it clock-wise to the first position (ACC).
2 (Second gear):
Use for hill climbing or engine braking odownhill grades.
Do not downshift into 2 at speeds over 6MPH (100 km/h). Do not exceed 63 MP(100 km/h) in 2.
1 (Low gear):
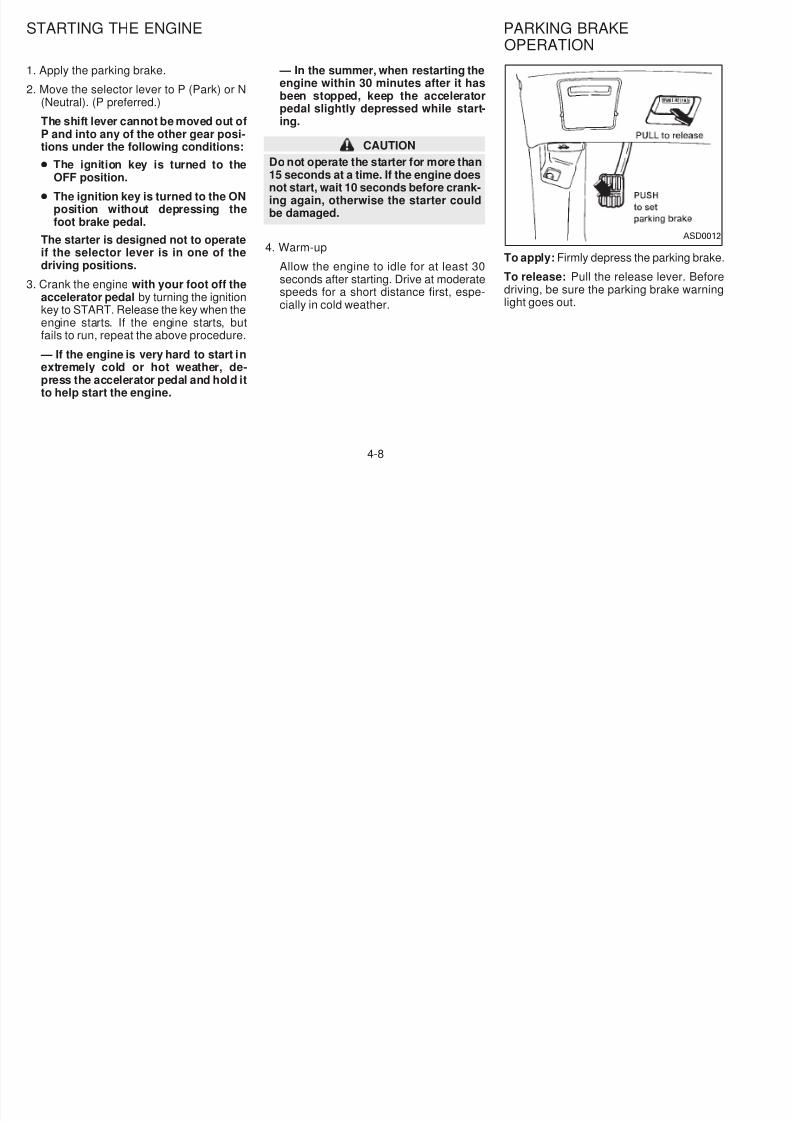
5/12/2018 1996-Nissan-Quest Manual Del Usuario - slidepdf.com
http://slidepdf.com/reader/full/1996-nissan-quest-manual-del-usuario 136/234
P (Park):
Use this selector position when the vehicleis parked or when starting the engine. Al-ways be sure the vehicle is at a complete
stop. For maximum safety, depress thebrake pedal, pull the lever toward you, andmove the lever to the P position. Apply theparking brake. When parking on a hill, applythe parking brake first, then shift the leverinto the P position.
Shifting from P (Park)
If the ignition switch is in the ON positionand the foot brake pedal is depressed, but
4. Depress the brake pedal, move the gear-shift lever to N (Neutral) and start theengine.
R (Reverse):
Use this position to back up. Always be surethe vehicle is completely stopped. Depressthe brake pedal then pull the shift levertoward you and move it to the R position.
N (Neutral):
Neither forward nor reverse gear is en-gaged. The engine can be started in thisposition. You may shift to N and restart astalled engine while the vehicle is moving.
D (Drive):
Use this position for all normal forwarddriving.
1 (Low gear):
Use 1 when climbing steep hills slowly odriving slowly through deep snow, sand omud, or for maximum engine braking osteep downhill grades.
Do not exceed 38 MPH (60 km/h) in 1.
Do not shift into 1 at speeds over 38 MP(60 km/h).
Accelerator downshift — In D position —
For rapid passing or hill climbing, fully depress the accelerator pedal to the floor. Thshifts the transmission down into third geasecond gear or first gear, depending on thvehicle speed.
Fail-safe
When the Fail-safe operation occurs, thnext time the key is turned to the O
ASD0552
4-6
position, the O/D OFF light blinks for ap-proximately 8 seconds after coming on for 2seconds. While the vehicle can be drivenunder these circumstances please note thatthe gears in the automatic transmission willbe locked in 3rd gear.
NOTE: If the vehicle is driven under ex-treme conditions, such as excessive wheel
overdrive switch. The O/D OFF lighilluminates. When cruising at a lospeed or climbing a gentle slopyou may feel uncomfortable shshocks as the transmission shifbetween 3rd and overdrive repeaedly. In this case, press the ovedrive switch. The O/D OFF indicatolight comes on at this time
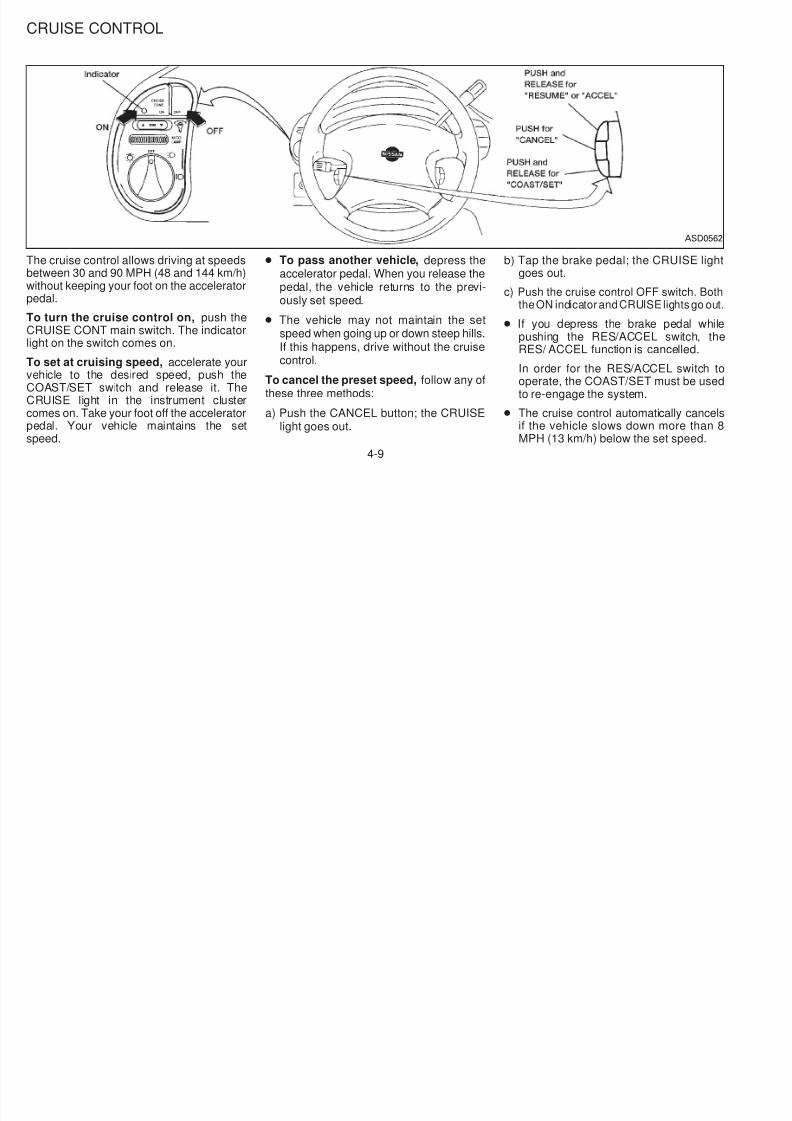
5/12/2018 1996-Nissan-Quest Manual Del Usuario - slidepdf.com
http://slidepdf.com/reader/full/1996-nissan-quest-manual-del-usuario 137/234
,
spinning and subsequent hard braking, theFail-safe system may be activated. This willoccur even if all electrical circuits are func-tioning properly. In this case, turn the igni-tion key OFF and wait for 3 seconds. Thenturn the key back to the ON position. Thevehicle should return to its normal operatingcondition. If it does not return to its normaloperating condition have your NISSANdealer check the transmission and repair ifnecessary.
Overdrive switch
Each time your vehicle is started, the trans-mission is automatically ‘‘reset’’ to overdriveON.
ON: For normal driving the Overdriveswitch is engaged. The transmis-sion is upshifted into Overdrive asthe vehicle speed increases.
The overdrive does not engage until theengine has warmed up.
OFF: For driving up and down longslopes where engine ‘‘braking’’would be advantageous, push the
light comes on at this time.
When driving conditions change, press thoverdrive switch again. The O/D OFF indcator light goes out.
Remember not to drive at high speeds foextended periods of time with the O/D OFlight illuminated. This reduces the fueconomy.
ASD0561
4-7
1. Apply the parking brake.
2. Move the selector lever to P (Park) or N(Neutral). (P preferred.)
The shift lever cannot be moved out ofP and into any of the other gear posi-tions under the following conditions:
● The ignition key is turned to the
— In the summer, when restarting theengine within 30 minutes after it hasbeen stopped, keep the acceleratorpedal slightly depressed while start-ing.
CAUTION
Do not operate the starter for more than15 d t ti If th i d
STARTING THE ENGINE PARKING BRAKE
OPERATION

5/12/2018 1996-Nissan-Quest Manual Del Usuario - slidepdf.com
http://slidepdf.com/reader/full/1996-nissan-quest-manual-del-usuario 138/234
OFF position.
● The ignition key is turned to the ONposition without depressing thefoot brake pedal.
The starter is designed not to operateif the selector lever is in one of thedriving positions.
3. Crank the engine with your foot off theaccelerator pedal by turning the ignitionkey to START. Release the key when the
engine starts. If the engine starts, butfails to run, repeat the above procedure.
— If the engine is very hard to start inextremely cold or hot weather, de-press the accelerator pedal and hold itto help start the engine.
15 seconds at a time. If the engine does
not start, wait 10 seconds before crank-ing again, otherwise the starter couldbe damaged.
4. Warm-up
Allow the engine to idle for at least 30seconds after starting. Drive at moderatespeeds for a short distance first, espe-cially in cold weather.
To apply: Firmly depress the parking brake
To release: Pull the release lever. Befordriving, be sure the parking brake warninlight goes out.
ASD001
4-8
CRUISE CONTROL
5/12/2018 1996-Nissan-Quest Manual Del Usuario - slidepdf.com
http://slidepdf.com/reader/full/1996-nissan-quest-manual-del-usuario 139/234
The cruise control allows driving at speedsbetween 30 and 90 MPH (48 and 144 km/h)without keeping your foot on the acceleratorpedal.
To turn the cruise control on, push theCRUISE CONT main switch. The indicatorlight on the switch comes on.
To set at cruising speed, accelerate yourvehicle to the desired speed, push theCOAST/SET switch and release it. TheCRUISE light in the instrument clustercomes on. Take your foot off the acceleratorpedal. Your vehicle maintains the setspeed.
● To pass another vehicle, depress theaccelerator pedal. When you release thepedal, the vehicle returns to the previ-ously set speed.
● The vehicle may not maintain the setspeed when going up or down steep hills.If this happens, drive without the cruisecontrol.
To cancel the preset speed, follow any ofthese three methods:
a) Push the CANCEL button; the CRUISElight goes out.
b) Tap the brake pedal; the CRUISE lighgoes out.
c) Push the cruise control OFF switch. Botthe ON indicator and CRUISE lights go ou
● If you depress the brake pedal whipushing the RES/ACCEL switch, thRES/ ACCEL function is cancelled.
In order for the RES/ACCEL switch toperate, the COAST/SET must be useto re-engage the system.
● The cruise control automatically canceif the vehicle slows down more than MPH (13 km/h) below the set speed.
ASD056
4-9
● Move the selector lever to N (Neutral).The CRUISE light goes out.
To reset at a faster cruising speed, useone of the following three methods:
a) Depress the accelerator pedal. When thevehicle attains the desired speed, pushand release the COAST/SET switch.
this, the set speed decreases by about 1MPH (1.6 km/h).
To resume the preset speed, push andrelease the RES/ACCEL switch. The ve-hicle resumes the last set cruising speedwhen the vehicle speed is over 30 MPH (48km/h).
● when it is not possible to keep the vehicat a set speed.
● in heavy traffic or in traffic that varies speed.
● on winding or hilly roads.
● on slippery roads (rain, snow, ice, etc.)
● in very windy areas
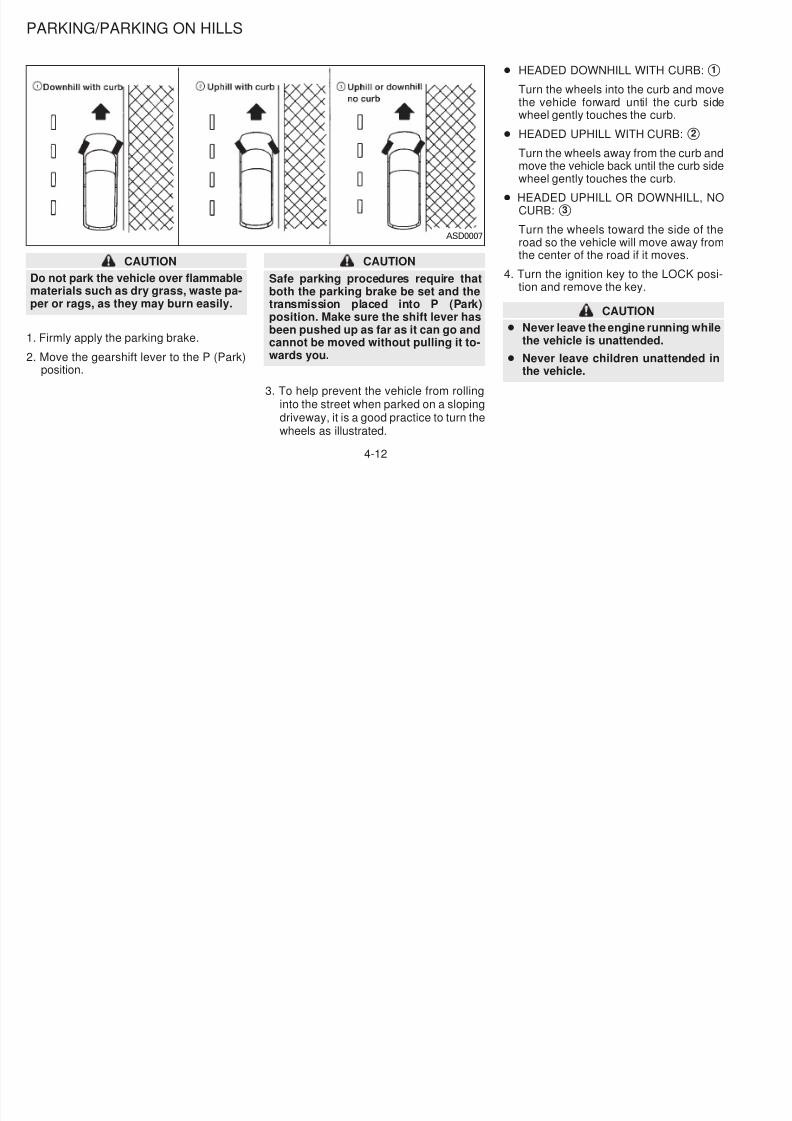
5/12/2018 1996-Nissan-Quest Manual Del Usuario - slidepdf.com
http://slidepdf.com/reader/full/1996-nissan-quest-manual-del-usuario 140/234
b) Push and hold the RES/ACCEL switch.When the vehicle attains the speed youdesire, release the switch.
c) Push, then quickly release theRES/ACCEL switch. Each time you dothis, the set speed increases by about 1MPH (1.6 km/h).
To reset at a slower cruising speed, useone of the following three methods:
a) Lightly tap the brake pedal. When thevehicle attains the desired speed, pushthe COAST/SET switch and release it.
b) Push and hold the COAST/SET switch.Release the switch when the vehicleslows down to the desired speed.
c) Push, then quickly release theCOAST/SET switch. Each time you do
Precautions● If the cruise control system malfunctions,
it cancels automatically. The CRUISEindicator in the instrument cluster thenblinks to warn the driver.
● When the cruise indicator blinks, turn thecruise control switch (main switch) OFFand have the system checked by yourNISSAN dealer.
● The cruise indicator may blink when thecruise control main switch is turned ONwhile pushing either the RES/ACCEL,COAST/SET, or the CANCEL switch (lo-cated on the steering wheel). To properlyset the cruise control system perform thesteps above in the order indicated.
Avoid using the cruise control whendriving under the following conditions:
● in very windy areas.
4-10
During the first 1,000 miles (1,600 km),follow these recommendations for the futurereliability and fuel economy of your newvehicle. Failure to follow these recommen-dations may result in vehicle damage orshortened engine life.
● Do not drive over 55 MPH (90 km/h) anddo not run the engine over 4,000 rpm.A id d i i f l i d t t t
● Keep your engine tuned up.
● Follow the recommended periodic maintenance schedule.
● Keep the tires inflated at the correpressure. Low pressure increases tiwear and waste fuel.
● Keep the front wheels in correct aligt I li t
BREAK-IN SCHEDULE INCREASING FUEL
ECONOMY
5/12/2018 1996-Nissan-Quest Manual Del Usuario - slidepdf.com
http://slidepdf.com/reader/full/1996-nissan-quest-manual-del-usuario 141/234
Avoid driving for long periods at constantspeed, either fast or slow.
● Do not accelerate at full throttle in anygear.
● Avoid quick starts.
● Avoid hard braking as much as possible.
● Do not tow a trailer for the first 500 miles(800 km).
● Accelerate slowly and smoothly. Main-tain cruising speeds with a constant ac-celerator position.
● Drive at moderate speeds on the high-
way. Driving at high speed lowers fueleconomy.
● Avoid unnecessary stopping and brak-ing. Maintain a safe distance behindother vehicles.
● Use a proper gear range which suits roadconditions. On level roads, shift into highgear as soon as possible.
● Avoid unnecessary engine idling.
ment. Improper alignment causes nonly tire wear but also lower fueconomy.
● Air conditioner operation lowers fueconomy. Use the air conditioner onwhen necessary.
● When cruising at highway speeds, it more economical to use the air condtioner and leave the windows closed treduce drag.
SD1001M
4-11
● HEADED DOWNHILL WITH CURB:1
Turn the wheels into the curb and movthe vehicle forward until the curb sidwheel gently touches the curb.
● HEADED UPHILL WITH CURB: 2
Turn the wheels away from the curb anmove the vehicle back until the curb sidwheel gently touches the curb
PARKING/PARKING ON HILLS

5/12/2018 1996-Nissan-Quest Manual Del Usuario - slidepdf.com
http://slidepdf.com/reader/full/1996-nissan-quest-manual-del-usuario 142/234
CAUTION
Do not park the vehicle over flammablematerials such as dry grass, waste pa-per or rags, as they may burn easily.
1. Firmly apply the parking brake.
2. Move the gearshift lever to the P (Park)position.
CAUTION
Safe parking procedures require thatboth the parking brake be set and thetransmission placed into P (Park)
position. Make sure the shift lever hasbeen pushed up as far as it can go andcannot be moved without pulling it to-wards you.
3. To help prevent the vehicle from rollinginto the street when parked on a slopingdriveway, it is a good practice to turn thewheels as illustrated.
wheel gently touches the curb.
● HEADED UPHILL OR DOWNHILL, NCURB:3
Turn the wheels toward the side of throad so the vehicle will move away frothe center of the road if it moves.
4. Turn the ignition key to the LOCK postion and remove the key.
CAUTION
● Never leave the engine running whilethe vehicle is unattended.
● Never leave children unattended inthe vehicle.
ASD0007
4-12
● Driving with vacuum assisted brake:
The brake booster aids braking by usingengine vacuum. If the engine stops, youcan stop the vehicle by depressing thebrake pedal. However, greater foot pres-sure on the brake pedal is required tostop the vehicle and the stopping dis-tance is longer.
pedal to heat up the brakes. Do this untilthe brakes return to normal. Avoid drivingthe vehicle at high speeds until thebrakes function correctly.
● Avoid resting your foot on the brakepedal while driving. This overheats thebrakes, wears out the brake linings andpads faster and reduces gas mileage.
The anti-lock brake system controls thbrakes at each wheel so the wheels do nlock when braking abruptly or when brakinon slippery surfaces. The system detects throtation speed at each wheel and varies thbrake fluid pressure to prevent each whefrom locking and sliding. By preventing whelockup, the system helps the driver maintasteering control and helps to minimize swerv
PRECAUTIONS WHEN
DRIVING
ANTI-LOCK BRAKE SYSTEM
(If so equipped)
5/12/2018 1996-Nissan-Quest Manual Del Usuario - slidepdf.com
http://slidepdf.com/reader/full/1996-nissan-quest-manual-del-usuario 143/234
● Driving with the power assisted steer-ing:
The power assisted steering is designedto use a hydraulic pump, driven by theengine, to assist steering.
If the engine stops or the drive beltbreaks, you still have control of the ve-hicle. However, much greater steeringeffort is needed, especially in sharp turns
or at low speeds.● Wet brakes:
When the vehicle is washed or driventhrough water, the brakes may get wet.As a result, your braking distance islonger and the vehicle may pull to oneside during braking.
To dry brakes, drive the vehicle at a safespeed while lightly pressing the brake
● To help save the brakes and to preventthe brakes from overheating, reducespeed and downshift to a lower gearbefore going down a slope or long grade.Overheated brakes may reduce brakingperformance and could result in loss ofvehicle control.
● While driving on a slippery surface, becareful when braking, accelerating ordownshifting. Abrupt braking actions or
sudden acceleration could cause thewheels to skid.
steering control and helps to minimize swerving and spinning on slippery surfaces.
Using the system
Depress the brake pedal and hold it down
It is not necessary to pump the brakpedal.
Doing so may result in increased stoppindistances.
Normal operation
The anti-lock brake system does not opeate at speeds below 3 to 6 MPH (5 to 1km/h) to completely stop the vehicle. (Thspeeds vary according to road conditionsWhen the anti-lock system senses one omore wheels are close to locking up, thactuator (under the hood) rapidly applieand releases hydraulic pressure (like pumping the brakes very quickly). While the ac
4-13
tuator is working, you may feel a pulsation inthe brake pedal and hear a noise or vibra-tion from the actuator under the hood. Thisis normal and indicates the anti-lock systemis working properly. However, the pulsationmay indicate road conditions are hazardousand extra care is required while driving.
Self-test feature
WARNING
The anti-lock brake system is a sophis-ticated device, but it cannot preventaccidents resulting from careless ordangerous driving techniques. It canhelp maintain vehicle control duringbraking on slippery surfaces, but re-member that the stopping distance onslippery surfaces will be longer than on
● When installing a spare tire, makesure it is the proper size and type asspecified on the tire placard. For tireplacard location information, refer to‘‘Tire placard’’ in the Owner’Manual index.
● Refer to ‘‘Wheels and tires’’ in th‘‘Do-it-yourself operations’’ section
5/12/2018 1996-Nissan-Quest Manual Del Usuario - slidepdf.com
http://slidepdf.com/reader/full/1996-nissan-quest-manual-del-usuario 144/234
The anti-lock brake system consists of elec-tronic sensors, electric pumps, and hydrau-lic solenoids controlled by a computer. Thecomputer has a built-in diagnostic featurethat tests the system each time you start theengine and move the vehicle at a low speedin forward or reverse. When the ‘‘self-test’’occurs, you may hear a ‘‘clunk’’ noiseand/or feel a ‘‘pulsation’’ in the brake pedal.This is normal and is not an indication of anymalfunction. If the computer senses anymalfunction, it switches the anti-lock brakesystem OFF and turns on the ANTI-LOCKbrake warning light in the dashboard. Thebrake system then operates normally, butwithout anti-lock assistance.
If the light comes on during the self check,or while driving, take your vehicle to yourNISSAN dealer for repair at your earliestconvenience.
slippery surfaces will be longer than onnormal surfaces, even with the anti-lock system. Stopping distances mayalso be longer on rough, gravel orsnow covered roads, or if you are usingtire chains. Always maintain a safe dis-tance from the vehicle in front of you.Ultimately, the responsibility for safetyof self and others rests in the hands ofthe driver.
Tire type and condition of tires may
also affect braking effectiveness.
● When replacing tires, install thespecified size of tires on all 4 wheels.
of this manual.
4-14
Freeing a frozen door lock
To prevent a door lock from freezing, applyde-icer or glycerin to it through the key hole.If the lock becomes frozen, heat the keybefore inserting it into the key hole.
Anti-freeze
In the winter when it is anticipated that the
before operating the vehicle. See ‘‘Chang-ing engine coolant’’ in the ‘‘Do-it-yourselfoperations’’ section.
Tire equipment
1. The SUMMER tires are of a tread designto provide superior performance on drypavement. However, the performance ofthese tires is substantially reduced in
according to the chain manufacturersuggestions. In addition, drive at a reduced speed, otherwise, your vehicmay be damaged and/or vehicle handlinand performance may be adversely afected.
Tire chains
Use of tire chains may be prohibited accord
COLD WEATHER DRIVING
CAUTIONS
5/12/2018 1996-Nissan-Quest Manual Del Usuario - slidepdf.com
http://slidepdf.com/reader/full/1996-nissan-quest-manual-del-usuario 145/234
p
temperature will drop below 32°F (0°C),check anti-freeze (ethylene glycol base) toassure proper winter protection. For details,see ‘‘Engine cooling system’’ in the ‘‘Do-it-yourself operations’’ section.
Battery
If the battery is not fully charged duringextremely cold weather conditions, the bat-tery fluid may freeze and damage the bat-
tery. To maintain maximum efficiency, thebattery should be checked regularly. Fordetails, see ‘‘Battery’’ in the ‘‘Do-it-yourselfoperations’’ section.
Draining of coolant water
If the vehicle is to be left outside withoutanti-freeze, drain the cooling system byopening the drain valves located under theradiator and on the engine block. Refill
y
snowy and icy conditions. If you operateyour vehicle on snowy or icy roads, NIS-SAN recommends using MUD & SNOWor ALL SEASON tires on all four wheels.Please consult your NISSAN dealer forthe tire type, size, speed rating and avail-ability information.
2. For additional traction on icy roads, stud-ded tires may be used. However, someprovinces and states prohibit their use.
Check local, state and provincial lawsbefore installing studded tires.
Skid and traction capabilities of studdedsnow tires, on wet or dry surfaces, maybe poorer than that of non-studded snowtires.
3. Snow chains may be used if desired.Make sure they are of proper size for thetires on your vehicle and are installed
Use of tire chains may be prohibited according to location. Check the local laws beforinstalling tire chains. When installing tichains, make sure they are of proper sizfor the tires on your vehicle and are installeaccording to the chain manufacturer’s suggestions. Use only SAE Class ‘‘S’’ chainsOther types may damage your vehicle. Uschain tensioners when recommended bthe tire chain manufacturer to ensure a tighfit. Loose end links of the tire chain must b
secured or removed to prevent the possibity of whipping action damage to the fendeor undercarriage. If possible, avoid fulloading your vehicle when using tire chainIn addition, drive at a reduced speed. Do nexceed maximum speed suggested bchain manufacturer. Otherwise, your vehicle may be damaged and/or vehicle handling and performance may be adverseaffected.
4-15
Never install tire chains on T-type and smallsize spare tires. Do not use the chains ondry roads.
Special winter equipment
It is recommended that the following itemsbe carried in the vehicle during winter:
1. A scraper and stiff-bristled brush to re-
too fast, the drive wheels spin and loseeven more traction.
● Allow more stopping distance underthese conditions. Braking should bestarted sooner than on dry pavement.
● Allow greater following distances on slip-pery roads.
● Watch for slippery spots (glare ice).
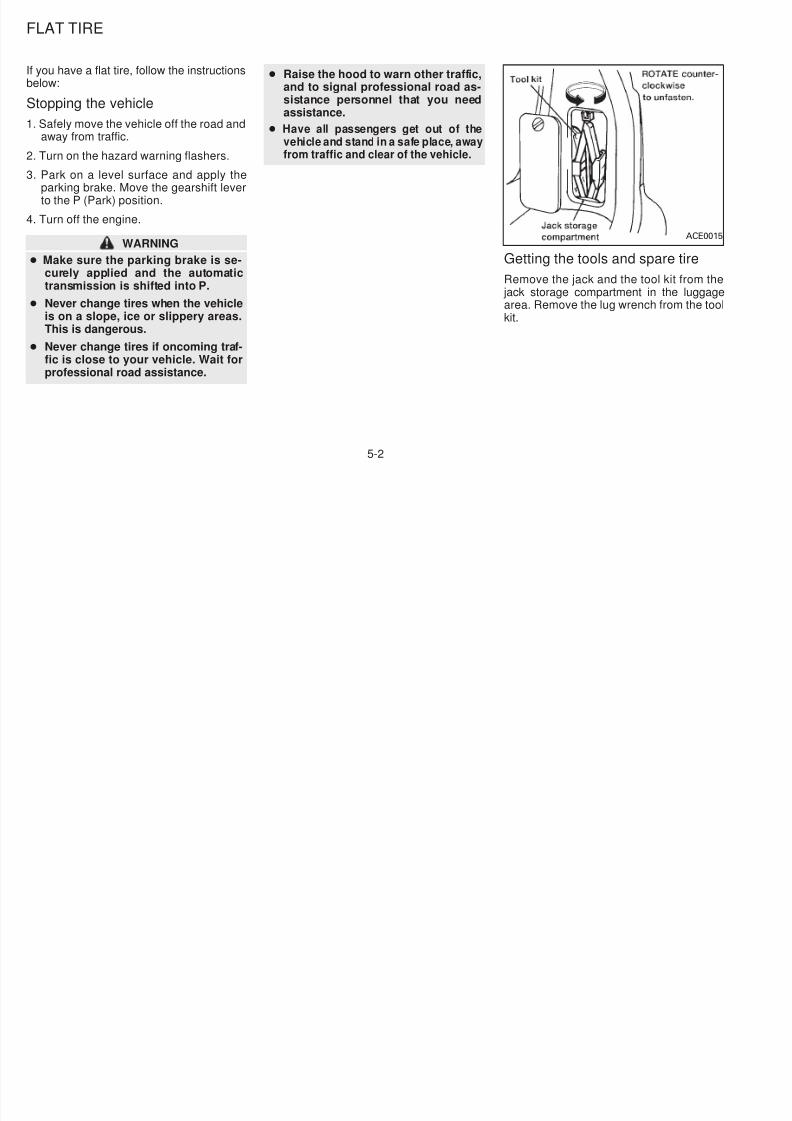
5/12/2018 1996-Nissan-Quest Manual Del Usuario - slidepdf.com
http://slidepdf.com/reader/full/1996-nissan-quest-manual-del-usuario 146/234
move ice and snow from the windowsand wiper blades.
2. A sturdy, flat board to be placed underthe jack to give it firm support.
3. A shovel to dig the vehicle out of snow-drifts.
4. Extra window washer fluid to refill thereservoir tank.
Driving on snow or ice● Wet ice (32°F, 0°C and freezing rain),
very cold snow or ice can be slick andvery hard to drive on. The vehicle willhave a lot less traction or ‘‘grip’’ underthese conditions. Try to avoid driving onwet ice until the road is salted or sanded.
● Whatever the condition, drive with cau-tion and accelerate gently. If accelerated
Watch for slippery spots (glare ice).These may appear on an otherwise clearroad in shaded areas. If a patch of ice isseen ahead, brake before reaching it. Trynot to brake while actually on the ice, andavoid any sudden steering maneuvers.
Engine block heater
WARNING
Do not use your heater (if so equipped)with an ungrounded electrical systemor two-pronged (cheater) adapters. Youcan be injured by an electrical shock ifyou use an ungrounded connection.
4-16
5 In case of emergency
Flat tire ................................................................. 5-2
Jump starting........................................................ 5-7
If your vehicle overheats ...................................... 5-9
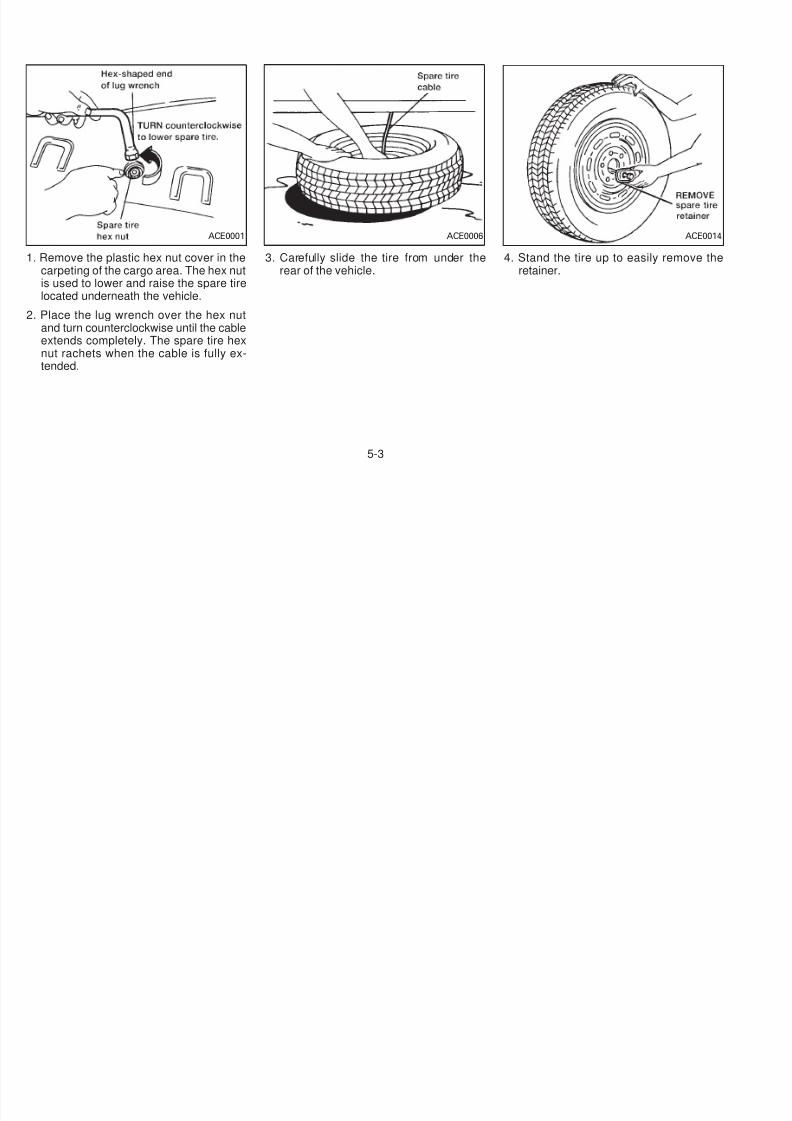
5/12/2018 1996-Nissan-Quest Manual Del Usuario - slidepdf.com
http://slidepdf.com/reader/full/1996-nissan-quest-manual-del-usuario 147/234
After an accident ................................................ 5-10Tow truck towing ................................................ 5-11
If you have a flat tire, follow the instructionsbelow:
Stopping the vehicle
1. Safely move the vehicle off the road andaway from traffic.
2. Turn on the hazard warning flashers.
3. Park on a level surface and apply the
● Raise the hood to warn other traffic,and to signal professional road as-sistance personnel that you needassistance.
● Have all passengers get out of thevehicle and stand in a safe place, awayfrom traffic and clear of the vehicle.
FLAT TIRE
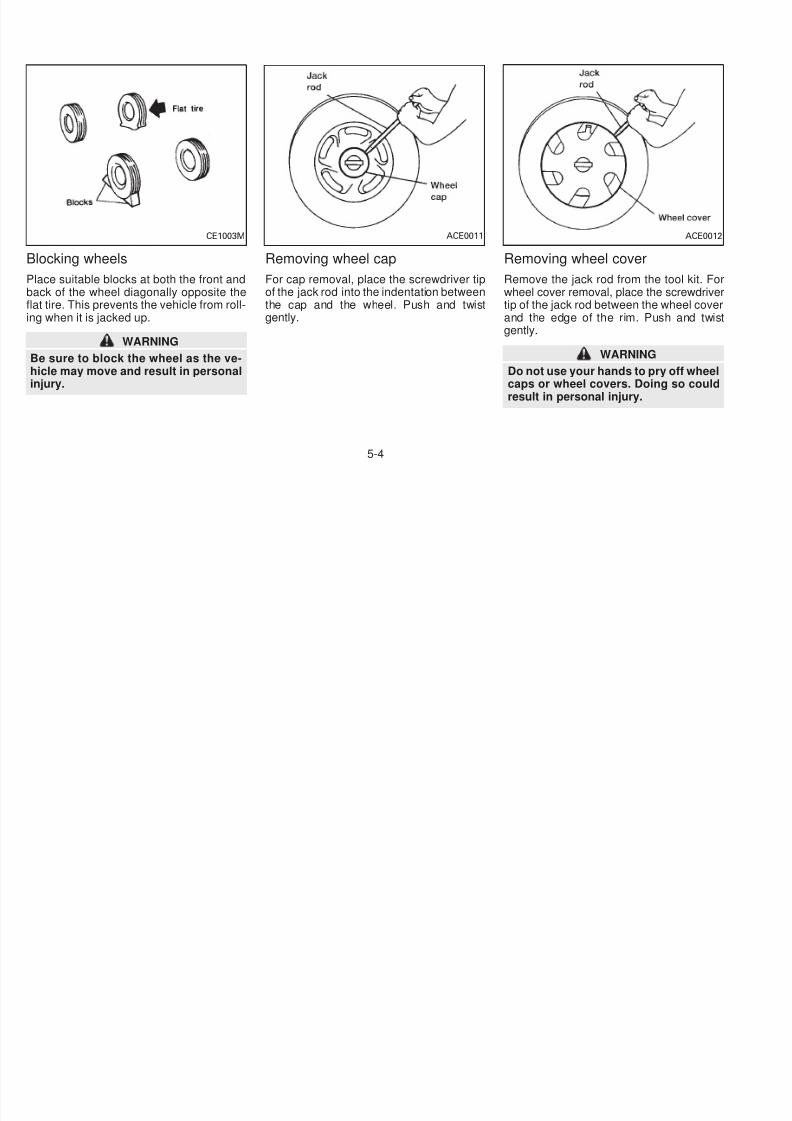
5/12/2018 1996-Nissan-Quest Manual Del Usuario - slidepdf.com
http://slidepdf.com/reader/full/1996-nissan-quest-manual-del-usuario 148/234
parking brake. Move the gearshift leverto the P (Park) position.
4. Turn off the engine.
WARNING
● Make sure the parking brake is se-curely applied and the automatictransmission is shifted into P.
● Never change tires when the vehicleis on a slope, ice or slippery areas.This is dangerous.
● Never change tires if oncoming traf-fic is close to your vehicle. Wait forprofessional road assistance.
Getting the tools and spare tire
Remove the jack and the tool kit from th jack storage compartment in the luggagarea. Remove the lug wrench from the tokit.
ACE001
5-2
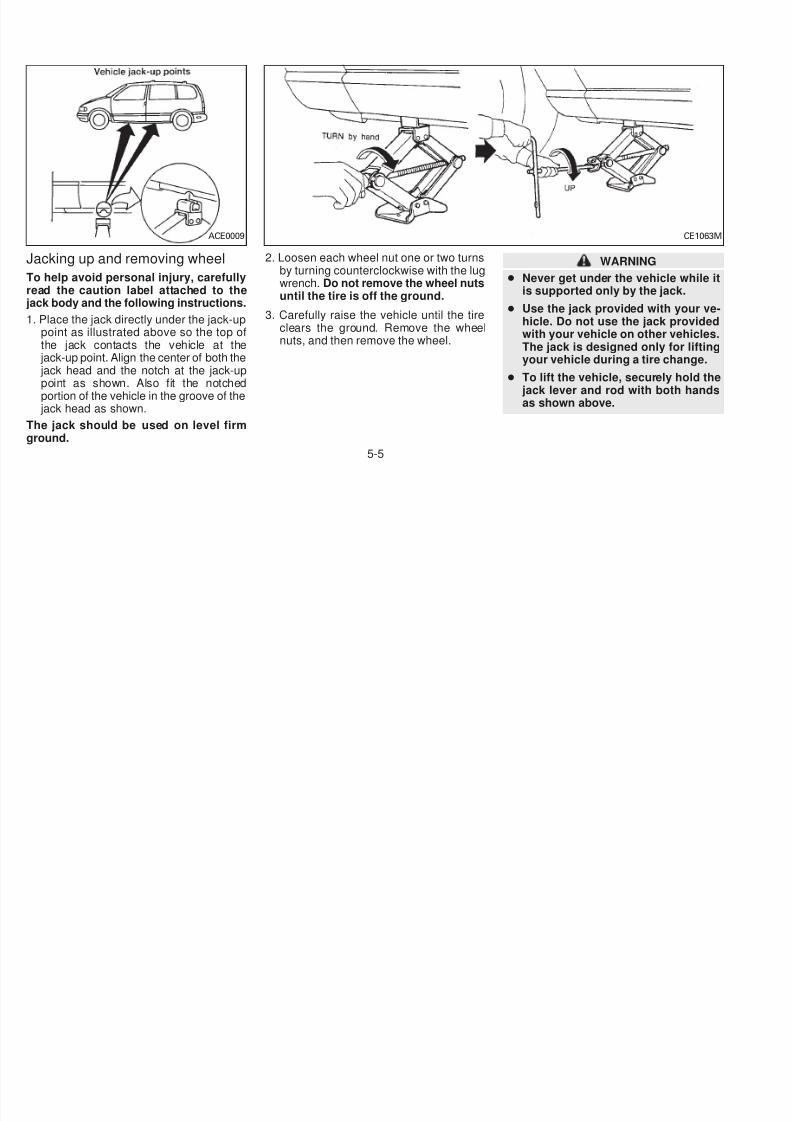
5/12/2018 1996-Nissan-Quest Manual Del Usuario - slidepdf.com
http://slidepdf.com/reader/full/1996-nissan-quest-manual-del-usuario 149/234
1. Remove the plastic hex nut cover in thecarpeting of the cargo area. The hex nutis used to lower and raise the spare tirelocated underneath the vehicle.
2. Place the lug wrench over the hex nut
and turn counterclockwise until the cableextends completely. The spare tire hexnut rachets when the cable is fully ex-tended.
3. Carefully slide the tire from under therear of the vehicle.
4. Stand the tire up to easily remove thretainer.
ACE0001 ACE0006 ACE001
5-3
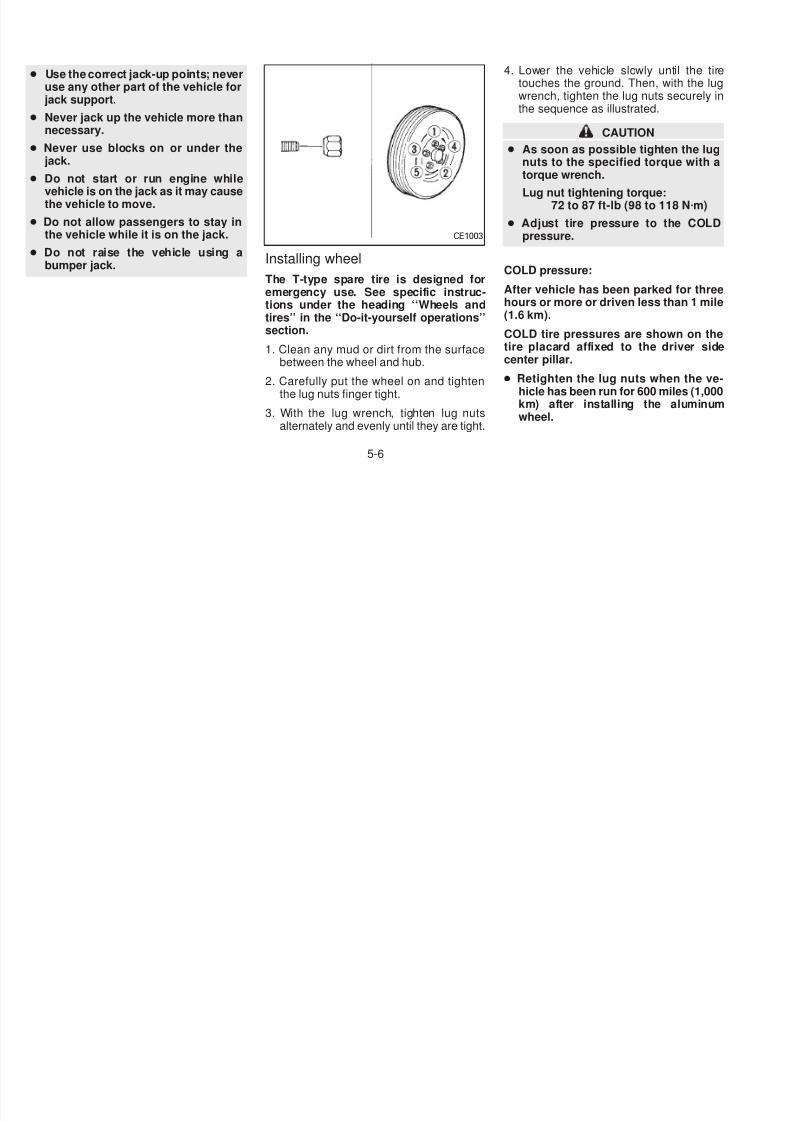
5/12/2018 1996-Nissan-Quest Manual Del Usuario - slidepdf.com
http://slidepdf.com/reader/full/1996-nissan-quest-manual-del-usuario 150/234
Blocking wheels
Place suitable blocks at both the front andback of the wheel diagonally opposite theflat tire. This prevents the vehicle from roll-ing when it is jacked up.
WARNING
Be sure to block the wheel as the ve-hicle may move and result in personalinjury.
Removing wheel cap
For cap removal, place the screwdriver tipof the jack rod into the indentation betweenthe cap and the wheel. Push and twistgently.
Removing wheel cover
Remove the jack rod from the tool kit. Fowheel cover removal, place the screwdrivetip of the jack rod between the wheel coveand the edge of the rim. Push and twigently.
WARNING
Do not use your hands to pry off wheecaps or wheel covers. Doing so couldresult in personal injury.
CE1003M ACE0011 ACE001
5-4
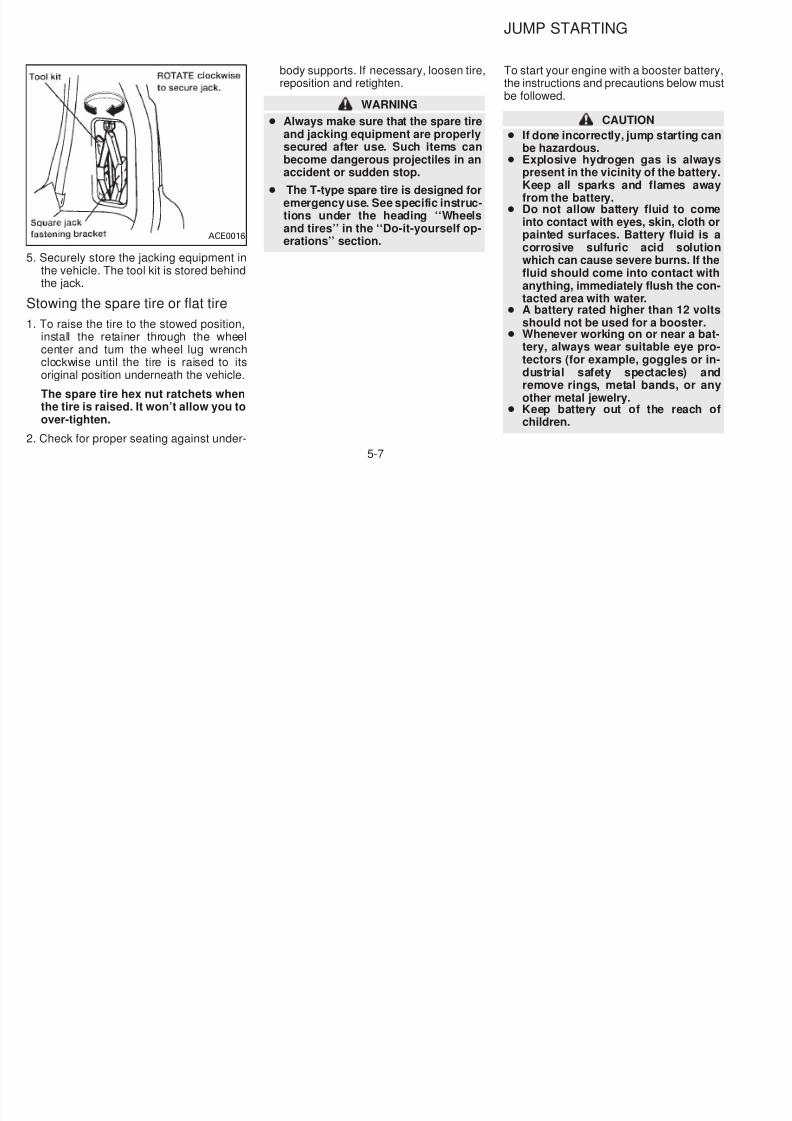
5/12/2018 1996-Nissan-Quest Manual Del Usuario - slidepdf.com
http://slidepdf.com/reader/full/1996-nissan-quest-manual-del-usuario 151/234
Jacking up and removing wheel
To help avoid personal injury, carefullyread the caution label attached to thejack body and the following instructions.
1. Place the jack directly under the jack-uppoint as illustrated above so the top ofthe jack contacts the vehicle at the
jack-up point. Align the center of both the jack head and the notch at the jack-uppoint as shown. Also fit the notchedportion of the vehicle in the groove of the
jack head as shown.
The jack should be used on level firmground.
2. Loosen each wheel nut one or two turnsby turning counterclockwise with the lugwrench. Do not remove the wheel nutsuntil the tire is off the ground.
3. Carefully raise the vehicle until the tire
clears the ground. Remove the wheelnuts, and then remove the wheel.
WARNING
● Never get under the vehicle while iis supported only by the jack.
● Use the jack provided with your ve
hicle. Do not use the jack providedwith your vehicle on other vehiclesThe jack is designed only for liftingyour vehicle during a tire change.
● To lift the vehicle, securely hold thejack lever and rod with both handsas shown above.
ACE0009 CE1063M
5-5
● Use the correct jack-up points; neveruse any other part of the vehicle forjack support.
● Never jack up the vehicle more thannecessary.
● Never use blocks on or under thejack.
● Do not start or run engine while
hi l i h j k i
4. Lower the vehicle slowly until the titouches the ground. Then, with the luwrench, tighten the lug nuts securely the sequence as illustrated.
CAUTION
● As soon as possible tighten the lugnuts to the specified torque with atorque wrench.
L i h i
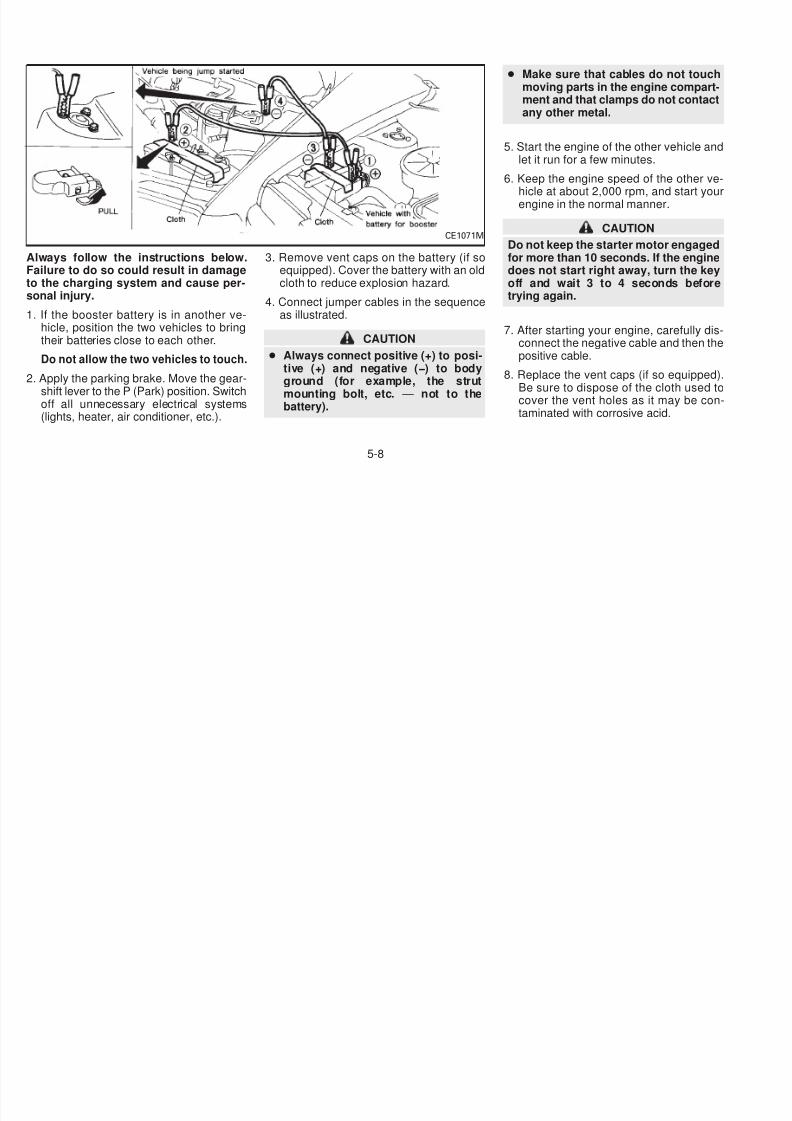
5/12/2018 1996-Nissan-Quest Manual Del Usuario - slidepdf.com
http://slidepdf.com/reader/full/1996-nissan-quest-manual-del-usuario 152/234
vehicle is on the jack as it may causethe vehicle to move.
● Do not allow passengers to stay inthe vehicle while it is on the jack.
● Do not raise the vehicle using abumper jack.
Installing wheel
The T-type spare tire is designed foremergency use. See specific instruc-tions under the heading ‘‘Wheels andtires’’ in the ‘‘Do-it-yourself operations’’section.
1. Clean any mud or dirt from the surfacebetween the wheel and hub.
2. Carefully put the wheel on and tightenthe lug nuts finger tight.
3. With the lug wrench, tighten lug nutsalternately and evenly until they are tight.
Lug nut tightening torque:72 to 87 ft-lb (98 to 118 Nm)
● Adjust tire pressure to the COLDpressure.
COLD pressure:
After vehicle has been parked for threhours or more or driven less than 1 mil(1.6 km).
COLD tire pressures are shown on thtire placard affixed to the driver sidcenter pillar.
● Retighten the lug nuts when the vehicle has been run for 600 miles (1,00km) after installing the aluminumwheel.
CE1003
5-6
body supports. If necessary, loosen tire,reposition and retighten.
WARNING
● Always make sure that the spare tireand jacking equipment are properlysecured after use. Such items canbecome dangerous projectiles in anaccident or sudden stop.
● Th T t ti i d i d f
To start your engine with a booster batterythe instructions and precautions below mube followed.
CAUTION
● If done incorrectly, jump starting canbe hazardous.
● Explosive hydrogen gas is alwayspresent in the vicinity of the battery
K ll k d fl
JUMP STARTING
5/12/2018 1996-Nissan-Quest Manual Del Usuario - slidepdf.com
http://slidepdf.com/reader/full/1996-nissan-quest-manual-del-usuario 153/234
5. Securely store the jacking equipment inthe vehicle. The tool kit is stored behindthe jack.
Stowing the spare tire or flat tire
1. To raise the tire to the stowed position,install the retainer through the wheelcenter and turn the wheel lug wrenchclockwise until the tire is raised to itsoriginal position underneath the vehicle.
The spare tire hex nut ratchets whenthe tire is raised. It won’t allow you toover-tighten.
2. Check for proper seating against under-
● The T-type spare tire is designed foremergency use. See specific instruc-tions under the heading ‘‘Wheelsand tires’’ in the ‘‘Do-it-yourself op-erations’’ section.
Keep all sparks and flames awayfrom the battery.● Do not allow battery fluid to come
into contact with eyes, skin, cloth opainted surfaces. Battery fluid is acorrosive sulfuric acid solutionwhich can cause severe burns. If thefluid should come into contact withanything, immediately flush the contacted area with water.
● A battery rated higher than 12 volts
should not be used for a booster.● Whenever working on or near a battery, always wear suitable eye protectors (for example, goggles or industrial safety spectacles) andremove rings, metal bands, or anyother metal jewelry.
● Keep battery out of the reach ochildren.
ACE0016
5-7
● Make sure that cables do not touchmoving parts in the engine compartment and that clamps do not contacany other metal.
5. Start the engine of the other vehicle anlet it run for a few minutes.
6. Keep the engine speed of the other ve
hicle at about 2 000 rpm and start you
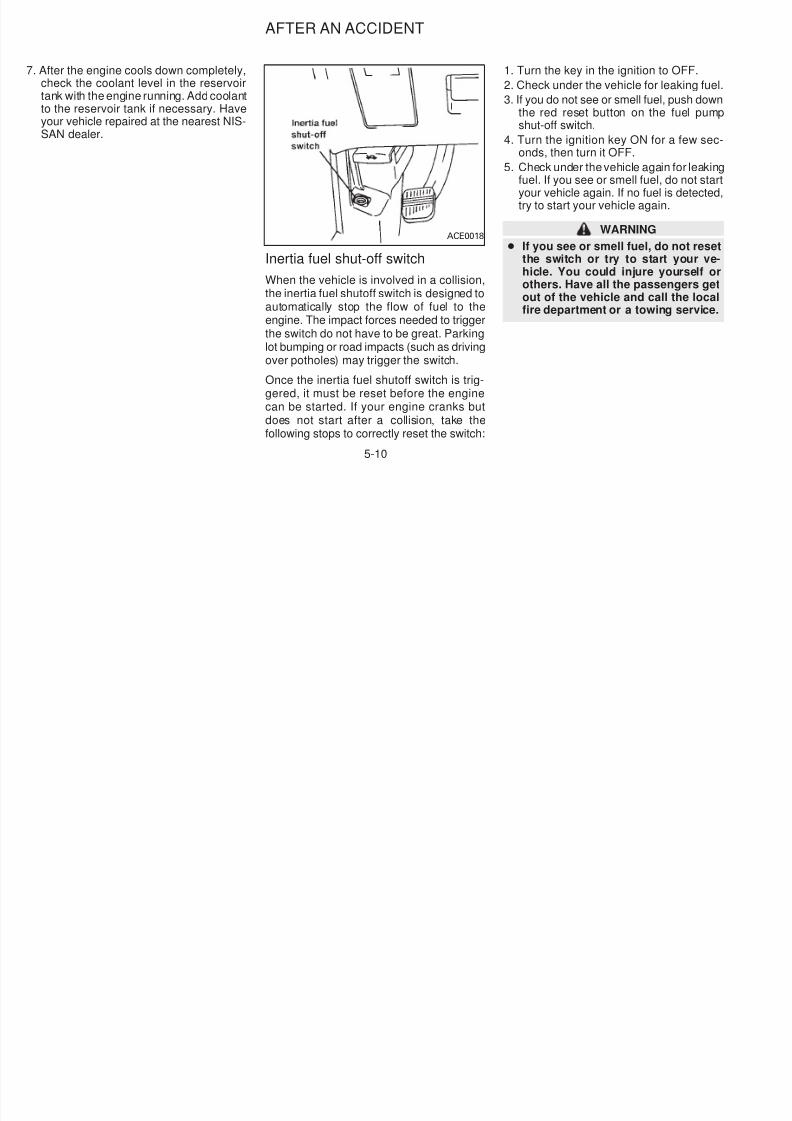
5/12/2018 1996-Nissan-Quest Manual Del Usuario - slidepdf.com
http://slidepdf.com/reader/full/1996-nissan-quest-manual-del-usuario 154/234
Always follow the instructions below.Failure to do so could result in damageto the charging system and cause per-sonal injury.
1. If the booster battery is in another ve-
hicle, position the two vehicles to bringtheir batteries close to each other.
Do not allow the two vehicles to touch.
2. Apply the parking brake. Move the gear-shift lever to the P (Park) position. Switchoff all unnecessary electrical systems(lights, heater, air conditioner, etc.).
3. Remove vent caps on the battery (if soequipped). Cover the battery with an oldcloth to reduce explosion hazard.
4. Connect jumper cables in the sequenceas illustrated.
CAUTION
● Always connect positive (+) to posi-tive (+) and negative (−) to bodyground (for example, the strutmounting bolt, etc. — not to thebattery).
hicle at about 2,000 rpm, and start youengine in the normal manner.
CAUTION
Do not keep the starter motor engagedfor more than 10 seconds. If the enginedoes not start right away, turn the keyoff and wait 3 to 4 seconds beforetrying again.
7. After starting your engine, carefully disconnect the negative cable and then thpositive cable.
8. Replace the vent caps (if so equippedBe sure to dispose of the cloth used tcover the vent holes as it may be contaminated with corrosive acid.
CE1071M
5-8
CAUTION
Automatic transmission models cannotbe push started. This may cause trans-mission damage.
If your vehicle is overheating (indicated byan extremely high temperature gauge read-ing), or if you feel a lack of engine power,detect abnormal noise, etc., take the follow-ing steps:
WARNING
To avoid the danger of being scalded,never remove the radiator cap while the
engine is still hot When the radiator
4. Open the hood.
WARNING
If steam or water is coming from theengine, stand clear to prevent gettingburned.
5. If engine overheating is caused by climbing a long hill on a hot day, run the engin
at a fast idle (approximately 1 500 rpm
IF YOUR VEHICLE
OVERHEATS
5/12/2018 1996-Nissan-Quest Manual Del Usuario - slidepdf.com
http://slidepdf.com/reader/full/1996-nissan-quest-manual-del-usuario 155/234
engine is still hot. When the radiatorcap is removed, pressurized hot waterwill spurt out, possibly causing seriousinjury.
1. Move the vehicle safely off the road,apply the parking brake and move thegearshift lever to the P (Park) position.
Do not stop the engine.
2. Turn off the air conditioner switch. Openall the windows, move the temperaturecontrol dial to warm and fan control knobto 4.
3. Get out of the vehicle. Look and listen forsteam or coolant escaping from the ra-diator before opening the hood. Wait untilno steam or coolant can be seen beforeproceeding.
at a fast idle (approximately 1,500 rpmuntil the temperature gauge indicatioreturns to normal.
6. Visually check drive belts for damage olooseness. Also check to make sure thcooling fan is running. The radiator hoseand radiator should not leak water.
WARNING
Be careful not to allow your hands, hai
or clothing to come into contact withor to get caught in, the running fanbelts, or motor fan.
The fan motor may start at any timewhen the coolant temperature is high
If coolant is leaking, the water pumpbelt is missing or loose, or the coolingfan does not run, stop the engine.
5-9
7. After the engine cools down completely,check the coolant level in the reservoirtank with the engine running. Add coolantto the reservoir tank if necessary. Haveyour vehicle repaired at the nearest NIS-SAN dealer.
1. Turn the key in the ignition to OFF.
2. Check under the vehicle for leaking fue
3. If you do not see or smell fuel, push dowthe red reset button on the fuel pumshut-off switch.
4. Turn the ignition key ON for a few seconds, then turn it OFF.
5. Check under the vehicle again for leakinfuel. If you see or smell fuel, do not sta
your vehicle again If no fuel is detected
AFTER AN ACCIDENT
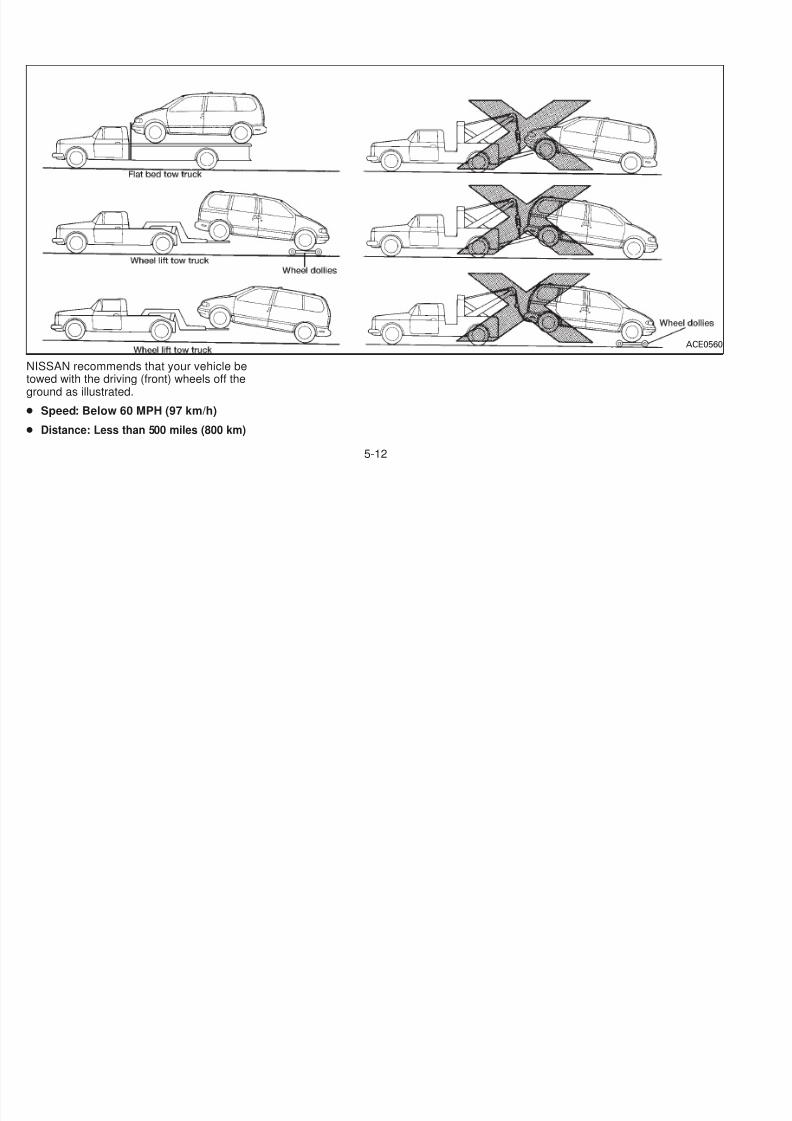
5/12/2018 1996-Nissan-Quest Manual Del Usuario - slidepdf.com
http://slidepdf.com/reader/full/1996-nissan-quest-manual-del-usuario 156/234
Inertia fuel shut-off switch
When the vehicle is involved in a collision,the inertia fuel shutoff switch is designed toautomatically stop the flow of fuel to theengine. The impact forces needed to triggerthe switch do not have to be great. Parkinglot bumping or road impacts (such as drivingover potholes) may trigger the switch.
Once the inertia fuel shutoff switch is trig-gered, it must be reset before the enginecan be started. If your engine cranks butdoes not start after a collision, take thefollowing stops to correctly reset the switch:
your vehicle again. If no fuel is detectedtry to start your vehicle again.
WARNING
● If you see or smell fuel, do not resethe switch or try to start your vehicle. You could injure yourself oothers. Have all the passengers geout of the vehicle and call the locafire department or a towing service
ACE0018
5-10
When towing your vehicle, all state (provin-cial in Canada) and local regulations fortowing must be followed. Incorrect towingequipment could damage your vehicle.Towing instructions are available from yourNISSAN dealer. Local service operators aregenerally familiar with the applicable lawsand procedures for towing. To assureproper towing and to prevent accidental
damage to your vehicle NISSAN recom-mends that you have a service operator tow
● When towing with the front wheelson dollies:Turn the ignition key to the OFFposition and secure the steeringwheel in a straight-ahead positionwith a rope or similar device. Neverplace the ignition key in the LOCKposition. This will result in damageto the steering lock mechanism.
Move the gearshift lever to the N
TOW TRUCK TOWING
5/12/2018 1996-Nissan-Quest Manual Del Usuario - slidepdf.com
http://slidepdf.com/reader/full/1996-nissan-quest-manual-del-usuario 157/234
damage to your vehicle, NISSAN recom-mends that you have a service operator towyour vehicle. It is advisable to have theservice operator carefully read the followingprecautions.
CAUTION
● When towing, make sure that thetransmission, axles, steering systemand powertrain are in working con-dition. If any unit is damaged, dollies
must be used.● Never use a tow bar that attaches to
the bumper when you tow your ve-hicle. It may damage the bumper andcause damage to the transmission.
Move the gearshift lever to the N(Neutral) position.
● When towing with the rear wheels onthe ground, release the parkingbrake.
● Attach safety chains for all towing.
5-11
5/12/2018 1996-Nissan-Quest Manual Del Usuario - slidepdf.com
http://slidepdf.com/reader/full/1996-nissan-quest-manual-del-usuario 158/234
NISSAN recommends that your vehicle betowed with the driving (front) wheels off theground as illustrated.
● Speed: Below 60 MPH (97 km/h)
● Distance: Less than 500 miles (800 km)
ACE056
5-12
Towing the vehicle with rear wheelsraised (with front wheels on theground)
CAUTION
Never tow the vehicle with the rearwheels raised (with the front wheels onthe ground) as this may cause seriousand expensive damage to the transmis-sion If it is necessary to tow the vehicle
● Do not tow with a sling type truck,either from the front or the rear. Itmay cause body damage.
● Never utilize the rear tie down brack-ets or slots to tow another vehicle asthis may cause body damage.
VEHICLE RECOVERY (Freeing astuck vehicle)
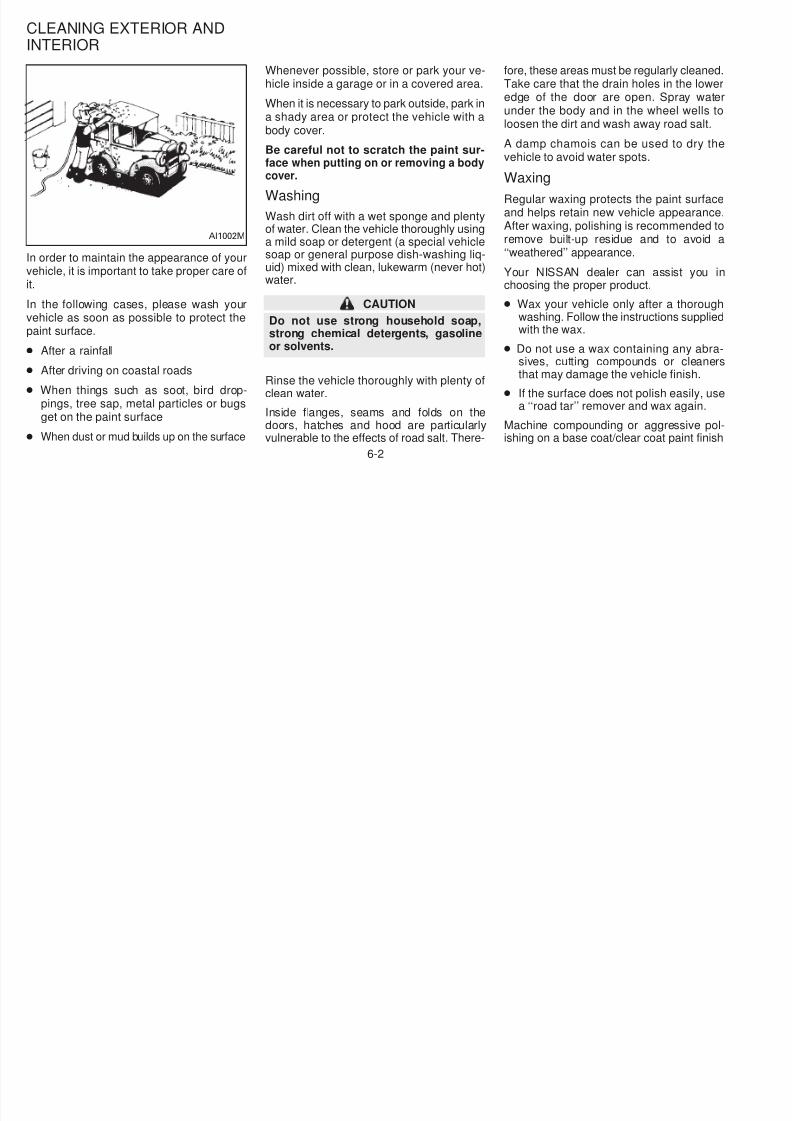
5/12/2018 1996-Nissan-Quest Manual Del Usuario - slidepdf.com
http://slidepdf.com/reader/full/1996-nissan-quest-manual-del-usuario 159/234
sion. If it is necessary to tow the vehiclewith the rear wheels raised, always usetowing dollies under the front wheels.
If you have to tow the vehicle withfour wheels on ground
Observe the following restricted towingspeeds and distances.
●
Speed: Below 30 MPH (50 km/h)● Distance: Less than 40 miles (65 km)
CAUTION
Never tow the vehicle from the rear (i.e.,backward) with four wheels on theground as this may cause serious andexpensive damage to the transmission.
stuck vehicle)
● Tow chains or cables must only be at-tached to the main structual members ofthe vehicle.
● Pulling devices should be routed so theydo not touch any part of the suspension,steering, brake or cooling systems.
● Always pull the cable straight out from
the front or rear of the vehicle. Never pullon the vehicle at a sideways angle.
● Pulling devices such as ropes or canvasstraps are not recommended for use invehicle towing or recovery.
5-13
5/12/2018 1996-Nissan-Quest Manual Del Usuario - slidepdf.com
http://slidepdf.com/reader/full/1996-nissan-quest-manual-del-usuario 160/234
6 Appearance and interior care
Cleaning exterior and interior............................... 6-2
Corrosion protection ............................................. 6-4
5/12/2018 1996-Nissan-Quest Manual Del Usuario - slidepdf.com
http://slidepdf.com/reader/full/1996-nissan-quest-manual-del-usuario 161/234
Whenever possible, store or park your ve-hicle inside a garage or in a covered area.
When it is necessary to park outside, park ina shady area or protect the vehicle with abody cover.
Be careful not to scratch the paint sur-face when putting on or removing a bodycover.
Washing
fore, these areas must be regularly cleanedTake care that the drain holes in the loweedge of the door are open. Spray wateunder the body and in the wheel wells tloosen the dirt and wash away road salt.
A damp chamois can be used to dry thvehicle to avoid water spots.
Waxing
Regular waxing protects the paint surfac
CLEANING EXTERIOR ANDINTERIOR
5/12/2018 1996-Nissan-Quest Manual Del Usuario - slidepdf.com
http://slidepdf.com/reader/full/1996-nissan-quest-manual-del-usuario 162/234
In order to maintain the appearance of yourvehicle, it is important to take proper care ofit.
In the following cases, please wash yourvehicle as soon as possible to protect the
paint surface.
● After a rainfall
● After driving on coastal roads
● When things such as soot, bird drop-pings, tree sap, metal particles or bugsget on the paint surface
● When dust or mud builds up on the surface
Washing
Wash dirt off with a wet sponge and plentyof water. Clean the vehicle thoroughly usinga mild soap or detergent (a special vehiclesoap or general purpose dish-washing liq-uid) mixed with clean, lukewarm (never hot)water.
CAUTION
Do not use strong household soap,strong chemical detergents, gasolineor solvents.
Rinse the vehicle thoroughly with plenty ofclean water.
Inside flanges, seams and folds on thedoors, hatches and hood are particularlyvulnerable to the effects of road salt. There-
Regular waxing protects the paint surfacand helps retain new vehicle appearanceAfter waxing, polishing is recommended tremove built-up residue and to avoid ‘‘weathered’’ appearance.
Your NISSAN dealer can assist you choosing the proper product.
● Wax your vehicle only after a thorougwashing. Follow the instructions supplie
with the wax.
● Do not use a wax containing any abrasives, cutting compounds or cleanethat may damage the vehicle finish.
● If the surface does not polish easily, usa ‘‘road tar’’ remover and wax again.
Machine compounding or aggressive poishing on a base coat/clear coat paint finis
AI1002M
6-2
may dull the finish or leave swirl marks.
Removing spots
Remove tar and oil spots, industrial dust,insects, and tree sap as quickly as possiblefrom the surface of the paint to avoid lastingdamage or staining. Special cleaning prod-ucts are available at your NISSAN dealer orany automotive accessory store.
Underbody
CAUTION
When cleaning the inside of the win-dow, do not use sharp-edged tools,abrasive cleaners or chlorine-baseddisinfectant cleaners. They could dam-age electrical conductors or rear win-dow defogger elements.
Cleaning alloy wheels
cleaner or soft brush. Wipe the vinyl anleather surfaces with a clean, soft clotdampened in mild soap solution, then wipclean with a dry, soft cloth. Before using anfabric protector, read the manufacturerrecommendations. Some fabric protectocontain chemicals that may stain or bleacthe seat material.
CAUTION● Never use benzine thinner or any
5/12/2018 1996-Nissan-Quest Manual Del Usuario - slidepdf.com
http://slidepdf.com/reader/full/1996-nissan-quest-manual-del-usuario 163/234
yIn areas where road salt is used in winter,the underbody must be cleaned regularly.This prevents dirt and salt from building upand causing underbody and suspensioncorrosion. Before the winter period andagain in the spring, the underseal must bechecked and, if necessary, re-treated.
Cleaning glass
Use glass cleaner to remove smoke anddust film from the glass surfaces. It is nor-mal for glass to become coated with a filmafter the vehicle is parked in the hot sun.Glass cleaner and a soft cloth easily removethis film.
g yWash regularly, especially during wintermonths in areas where road salt is used.Salt could discolor the wheel if not removed.
Chrome parts
Clean all chrome parts regularly with anon-abrasive chrome polish to maintain thefinish.
Plastic partsPlastic parts can be cleaned with a mildsoap solution. If the dirt cannot be easilyremoved, use a plastic cleaner. Do not usesolvents.
Cleaning interior
Occasionally remove loose dust from theinterior trim and seats using a vacuum
● Never use benzine, thinner, or anysimilar material.
● Leather seats should be regularlycoated with a leather wax like saddlesoap. Never use car wax.
● Never use fabric protectors unlessrecommended by the manufacturer
Front floor mat positioning aidThis model includes a front floor mbracket to act as a floor mat positioning aidNISSAN floor mats, specially designed foyour vehicle, incorporate grommets. To install, simply position the mat using the floomat bracket hook through the floor mgrommet hole while centering the mat in thfloor pan contour.
6-3
Periodically check to make certain the matis properly positioned.
Floor mats
The use of genuine NISSAN floor mats canextend the life of your vehicle carpet andmake it easier to clean the interior. Nomatter what mats are used, be sure they arefitted for your vehicle and are properly posi-
tioned in the footwell to prevent interferencewith pedal operation. Mats should be main-
Most common factors contributingto vehicle corrosion:
1. The accumulation of moisture-retainingdirt and debris in body panel sections,cavities, and other areas.
2. Damage to paint and other protectivecoatings caused by gravel and stonechips or minor traffic accidents.
Environmental factors influence the
● where road salt is used
Temperature
A temperature increase accelerates the ratof corrosion to those parts which are nwell ventilated.
Air pollution
Industrial pollution, the presence of salt the air in coastal areas, or heavy road sause accelerates the corrosion proces
CORROSION PROTECTION
5/12/2018 1996-Nissan-Quest Manual Del Usuario - slidepdf.com
http://slidepdf.com/reader/full/1996-nissan-quest-manual-del-usuario 164/234
p ptained with regular cleaning and replaced ifthey become excessively worn.
Seat belts
The seat belts can be cleaned by wipingthem with a sponge dampened in a mildsoap solution. Allow the belts to dry com-pletely before using them. Do not allow wetbelts to roll up in the retractor. NEVER use
bleach, dye, or chemical solvents sincethese may severely weaken the seat beltwebbing.
Environmental factors influence therate of corrosion:
Moisture
Accumulation of sand, dirt and water on thevehicle body underside can accelerate cor-rosion. Wet floor coverings do not dry com-pletely inside the vehicle, and should beremoved for drying to avoid floor panel
corrosion.Relative humidity
Corrosion will be accelerated:
● in areas of high relative humidity
● especially in those areas where the tem-peratures stay above freezing
● where atmospheric pollution exists
Road salt also accelerates the disintegration of paint surfaces.
To protect your vehicle from corrosion:
● Wash and wax your vehicle often to keethe vehicle clean.
● Always check for minor damage to thpaint and repair it as soon as possible.
● Keep drain holes at the bottom of thdoors open to avoid water accumulation
● Check the underbody for accumulation osand, dirt or salt. If present, wash witwater as soon as possible.
● NEVER remove dirt, sand or othedebris from the passenger compar
6-4
ment by washing it out with a hose.Remove dirt with a vacuum cleaner orbroom.
● Never allow water or other liquids tocome in contact with electronic com-ponents inside the vehicle.
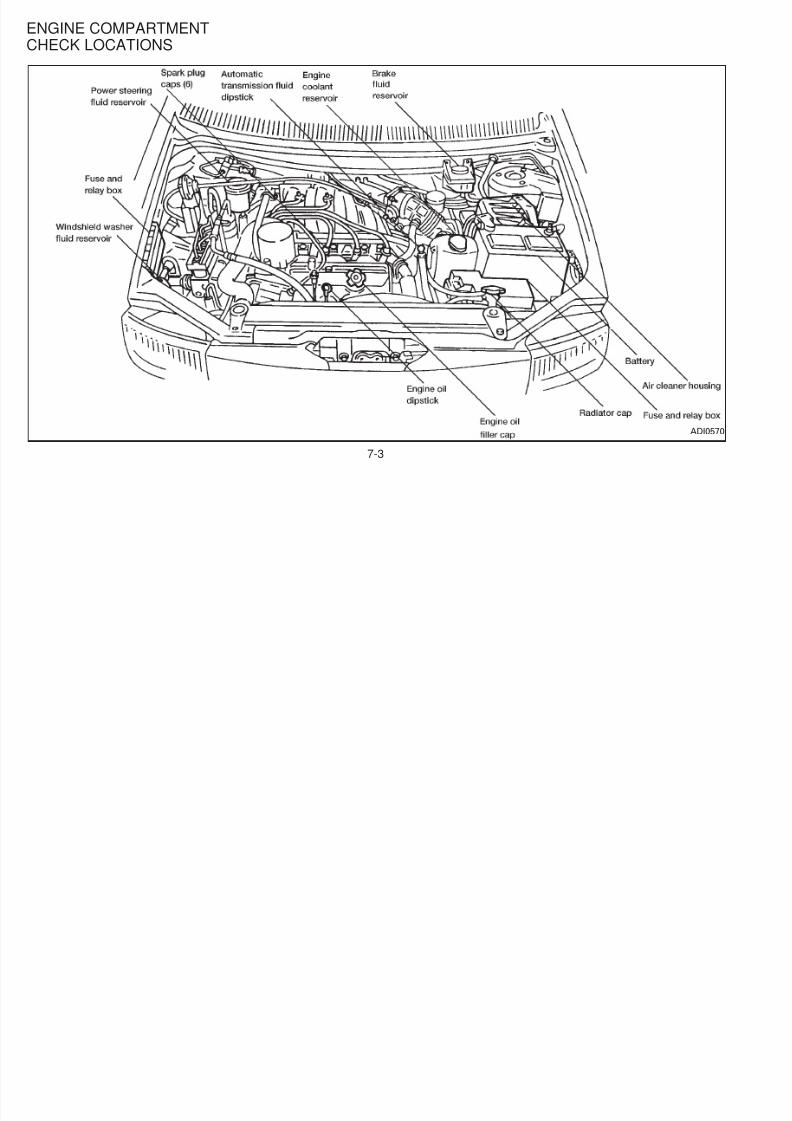
5/12/2018 1996-Nissan-Quest Manual Del Usuario - slidepdf.com
http://slidepdf.com/reader/full/1996-nissan-quest-manual-del-usuario 165/234
6-5
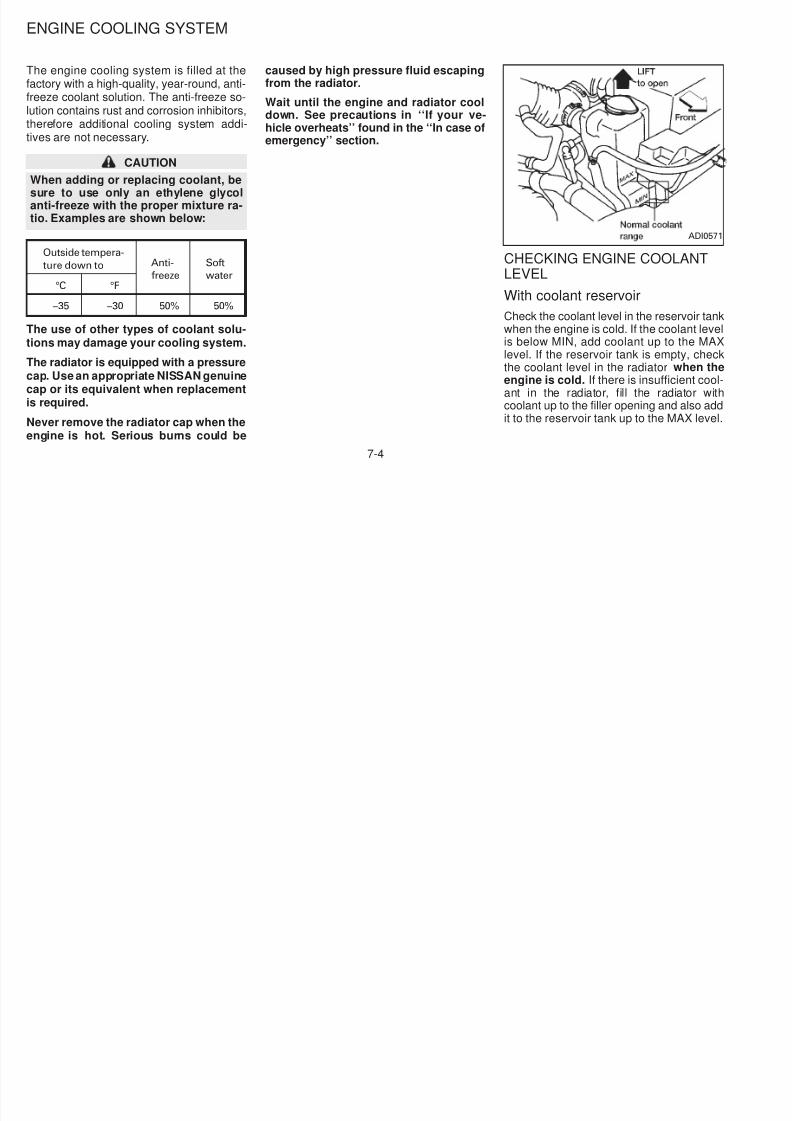
5/12/2018 1996-Nissan-Quest Manual Del Usuario - slidepdf.com
http://slidepdf.com/reader/full/1996-nissan-quest-manual-del-usuario 166/234
7 Do-it-yourself operations
Maintenance precautions ..................................... 7-2
Engine compartment check locations .................. 7-3
Engine cooling system ......................................... 7-4
Engine oil ............................................................ 7-5Automatic transmission fluid ................................ 7-8
Spark plug replacement ..................................... 7-12
Air cleaner housing filter .................................... 7-13
Wiper blades ...................................................... 7-14
Parking brake check........................................... 7-16Brake pedal ........................................................ 7-16
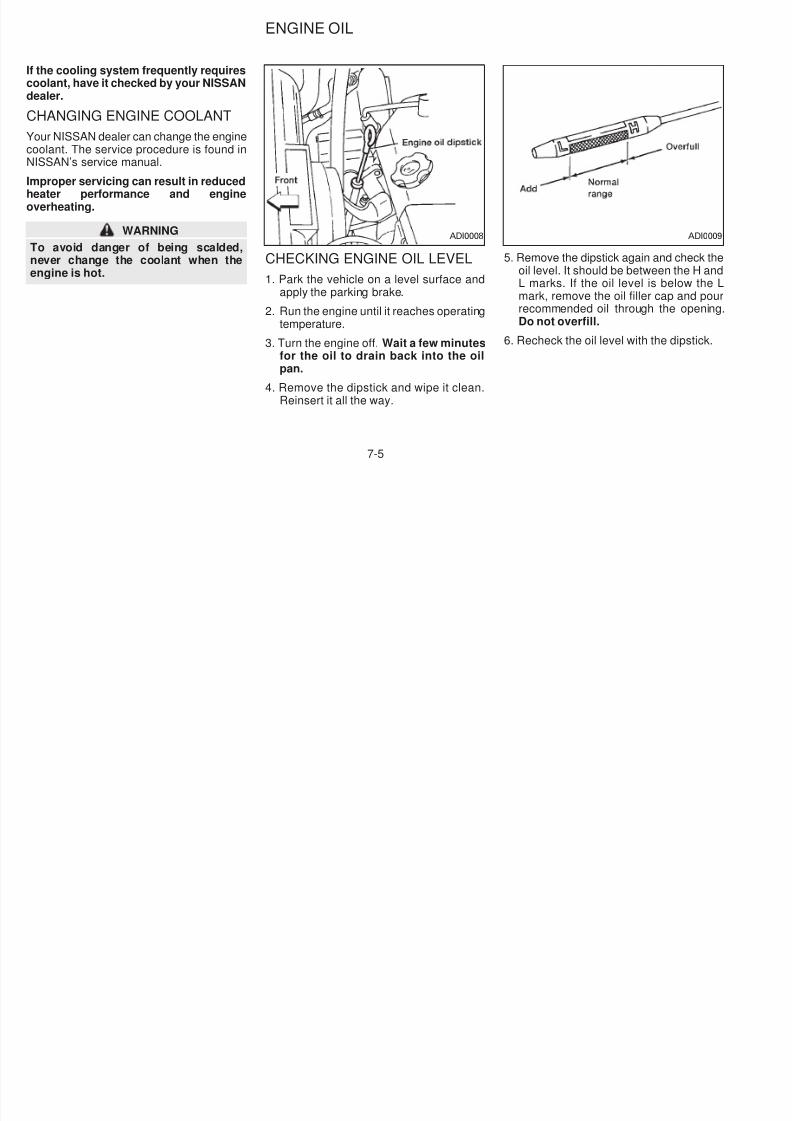
5/12/2018 1996-Nissan-Quest Manual Del Usuario - slidepdf.com
http://slidepdf.com/reader/full/1996-nissan-quest-manual-del-usuario 167/234
Power steering fluid.............................................. 7-9
Brake fluid .......................................................... 7-10
Window washer fluid .......................................... 7-10
Battery ................................................................ 7-11
Drive belts .......................................................... 7-12
Brake booster ..................................................... 7-17
Fuses.................................................................. 7-17
Fusible links........................................................ 7-18
Light bulbs .......................................................... 7-19
Wheels and tires ................................................ 7-24
When performing any inspection or mainte-nance work on your vehicle, always takecare to prevent serious accidental injury toyourself or damage to the vehicle. Thefollowing are general precautions whichshould be closely observed.
● Park the vehicle on a level surface,apply the parking brake securely andblock the wheels to prevent the ve-
hicle from moving. Move the gearshiftlever to neutral (N)
● It is advisable to remove ties and anyjewelry, such as rings, watches, etc.before working on your vehicle.
● If you must run the engine in an en-closed space such as a garage, besure there is proper ventilation forexhaust gases.
● Never get under the vehicle while it is
supported only by a jack. If it is nec-essary to work under the vehicle, sup-
● Improperly disposed motor oil and/oother vehicle fluids can hurt the envronment. Always conform to locregulations for disposal of vehicfluid.
This ‘‘Do-it-yourself operations’’ sectiogives instructions regarding only thositems which are relatively easy for an owneto perform.
You should be aware that incomplete oimproper servicing may result in operatin
MAINTENANCEPRECAUTIONS
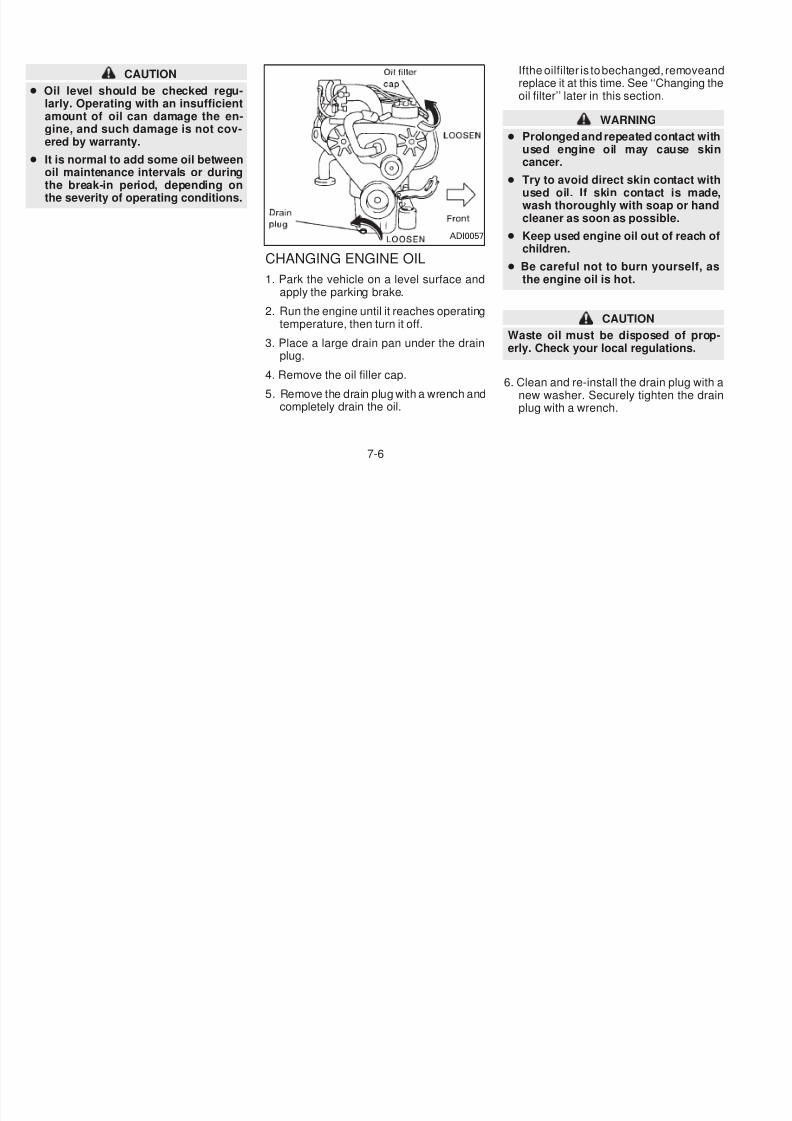
5/12/2018 1996-Nissan-Quest Manual Del Usuario - slidepdf.com
http://slidepdf.com/reader/full/1996-nissan-quest-manual-del-usuario 168/234
lever to neutral (N).
● Be sure the ignition key is OFF whenperforming any replacement or repair.
● Do not work under the hood while theengine is hot. Turn off the engine andwait until it cools down.
● Be sure to turn the ignition key to theOFF or LOCK position. When the igni-tion key is in the ON or ACC position,the cooling fan may start to operatesuddenly even when the engine is notrunning.
● If you must work with the engine run-ning, keep your hands, clothing, hairand tools away from moving fans,belts and any other moving parts.
port it with safety stands.
● Keep smoking materials, flame andsparks away from fuel and the battery.
● Never connect or disconnect eitherthe battery or any transistorized com-ponent connector while the ignition ison.
● On gasoline engine models with themultiport fuel injection (MFI) system,the fuel filter or fuel lines should beserviced by a NISSAN dealer becausethe fuel lines are under high pressureeven when the engine is off.
● Failure to follow these or other com-mon sense guidelines may lead toserious injury or vehicle damage.
improper servicing may result in operatindifficulties or excessive emissions, ancould affect your warranty coverage. If idoubt about any servicing, have it donby your NISSAN dealer.
7-2
ENGINE COMPARTMENTCHECK LOCATIONS
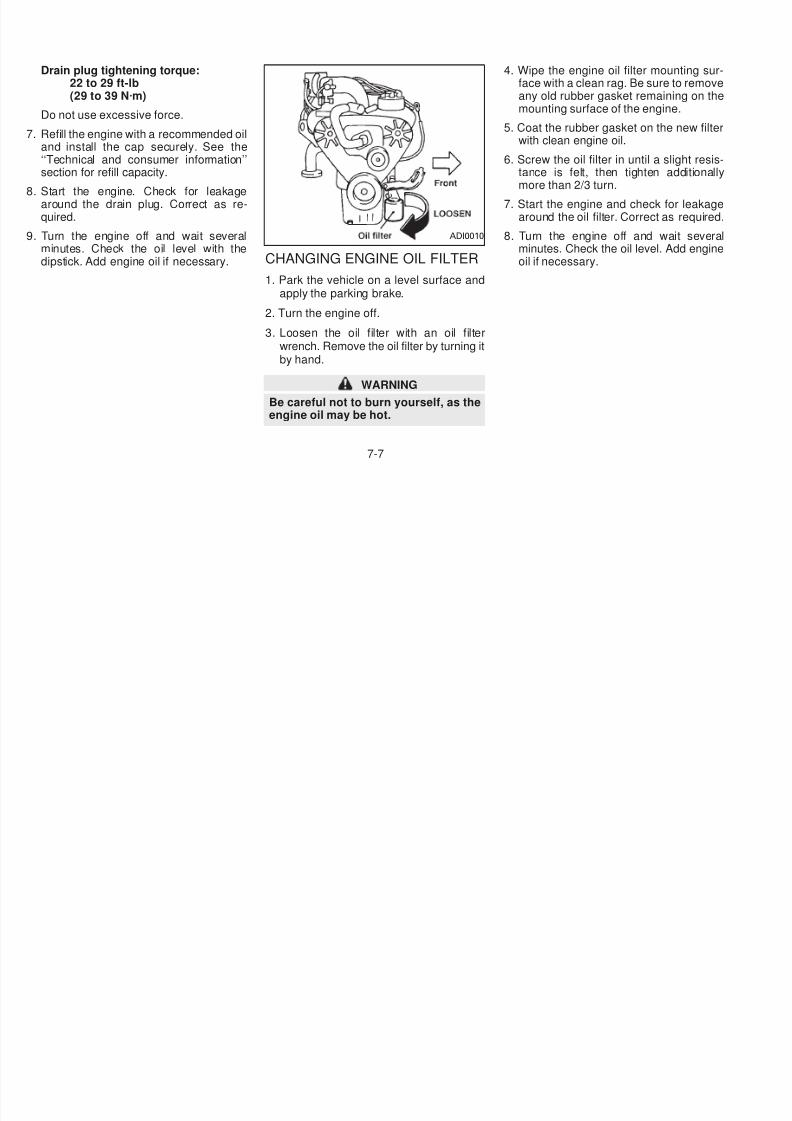
5/12/2018 1996-Nissan-Quest Manual Del Usuario - slidepdf.com
http://slidepdf.com/reader/full/1996-nissan-quest-manual-del-usuario 169/234
ADI057
7-3
The engine cooling system is filled at thefactory with a high-quality, year-round, anti-freeze coolant solution. The anti-freeze so-lution contains rust and corrosion inhibitors,therefore additional cooling system addi-tives are not necessary.
CAUTION
When adding or replacing coolant, be
sure to use only an ethylene glycolanti-freeze with the proper mixture ra-
caused by high pressure fluid escapingfrom the radiator.
Wait until the engine and radiator cooldown. See precautions in ‘‘If your ve-hicle overheats’’ found in the ‘‘In case ofemergency’’ section.
ENGINE COOLING SYSTEM
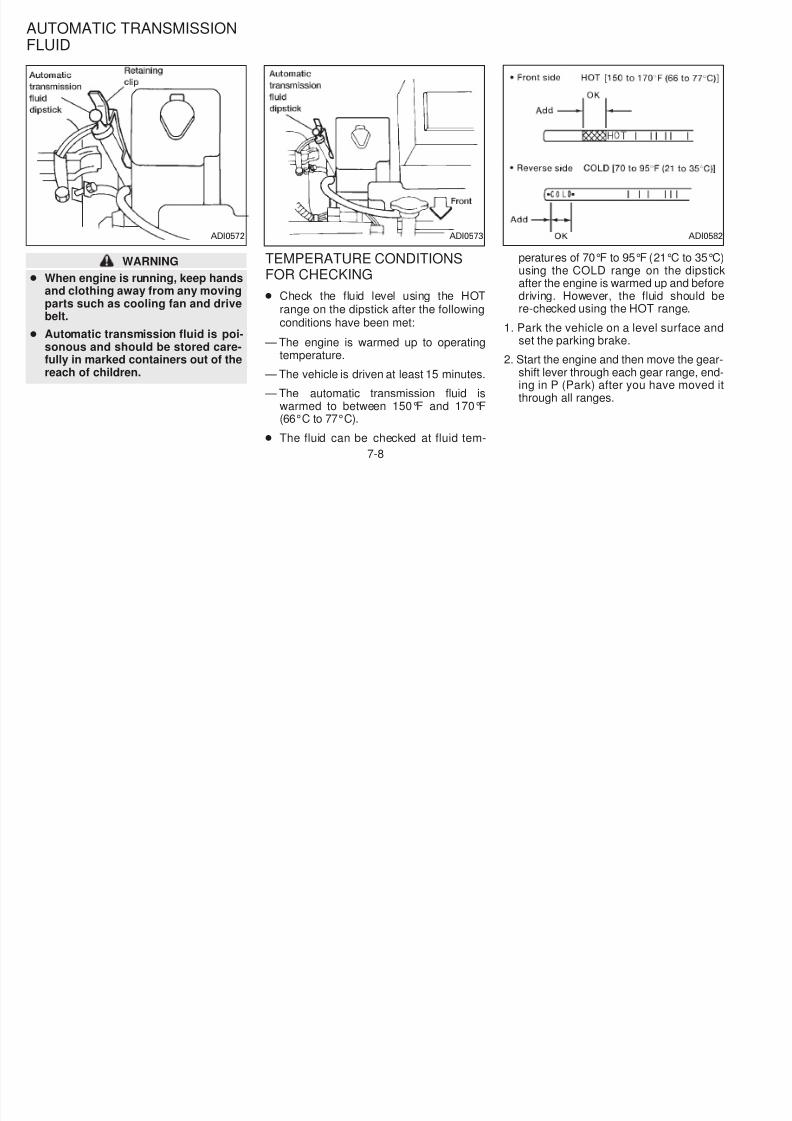
5/12/2018 1996-Nissan-Quest Manual Del Usuario - slidepdf.com
http://slidepdf.com/reader/full/1996-nissan-quest-manual-del-usuario 170/234
tio. Examples are shown below:
Outside tempera-
ture down to Anti-
freeze
Soft
water°C °F
−35 −30 50% 50%
The use of other types of coolant solu-tions may damage your cooling system.
The radiator is equipped with a pressurecap. Use an appropriate NISSAN genuinecap or its equivalent when replacementis required.
Never remove the radiator cap when theengine is hot. Serious burns could be
CHECKING ENGINE COOLANTLEVEL
With coolant reservoir
Check the coolant level in the reservoir tan
when the engine is cold. If the coolant leveis below MIN, add coolant up to the MAlevel. If the reservoir tank is empty, checthe coolant level in the radiator when thengine is cold. If there is insufficient cooant in the radiator, fill the radiator witcoolant up to the filler opening and also adit to the reservoir tank up to the MAX leve
ADI057
7-4
If the cooling system frequently requirescoolant, have it checked by your NISSANdealer.
CHANGING ENGINE COOLANT
Your NISSAN dealer can change the enginecoolant. The service procedure is found inNISSAN’s service manual.
Improper servicing can result in reduced
heater performance and engineoverheating.
ENGINE OIL
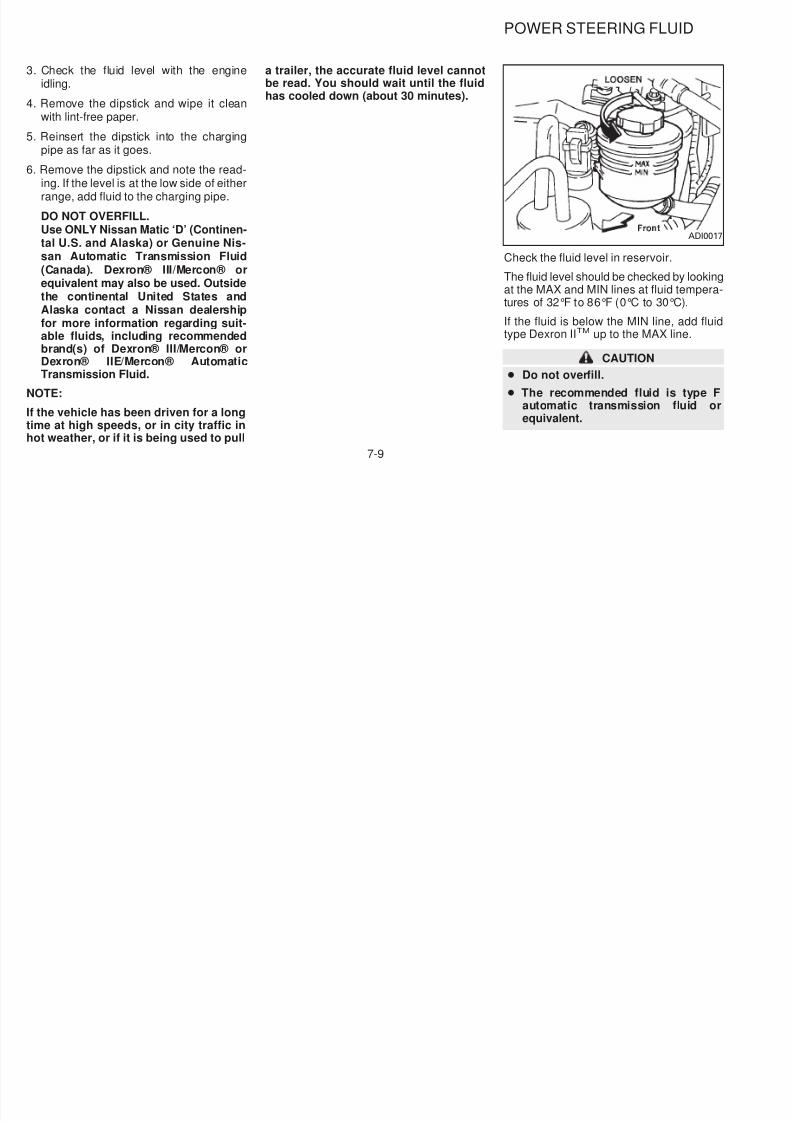
5/12/2018 1996-Nissan-Quest Manual Del Usuario - slidepdf.com
http://slidepdf.com/reader/full/1996-nissan-quest-manual-del-usuario 171/234
WARNING
To avoid danger of being scalded,never change the coolant when theengine is hot.
CHECKING ENGINE OIL LEVEL
1. Park the vehicle on a level surface andapply the parking brake.
2. Run the engine until it reaches operatingtemperature.
3. Turn the engine off. Wait a few minutesfor the oil to drain back into the oilpan.
4. Remove the dipstick and wipe it clean.Reinsert it all the way.
5. Remove the dipstick again and check thoil level. It should be between the H anL marks. If the oil level is below the mark, remove the oil filler cap and pourecommended oil through the openinDo not overfill.
6. Recheck the oil level with the dipstick.
ADI0008 ADI000
7-5
CAUTION
● Oil level should be checked regu-larly. Operating with an insufficientamount of oil can damage the en-gine, and such damage is not cov-ered by warranty.
● It is normal to add some oil betweenoil maintenance intervals or duringthe break-in period, depending on
the severity of operating conditions.
Ifthe oilfilter is to bechanged, removeanreplace it at this time. See ‘‘Changing thoil filter’’ later in this section.
WARNING
● Prolonged and repeated contact withused engine oil may cause skincancer.
● Try to avoid direct skin contact with
used oil. If skin contact is madewash thoroughly with soap or handl ibl
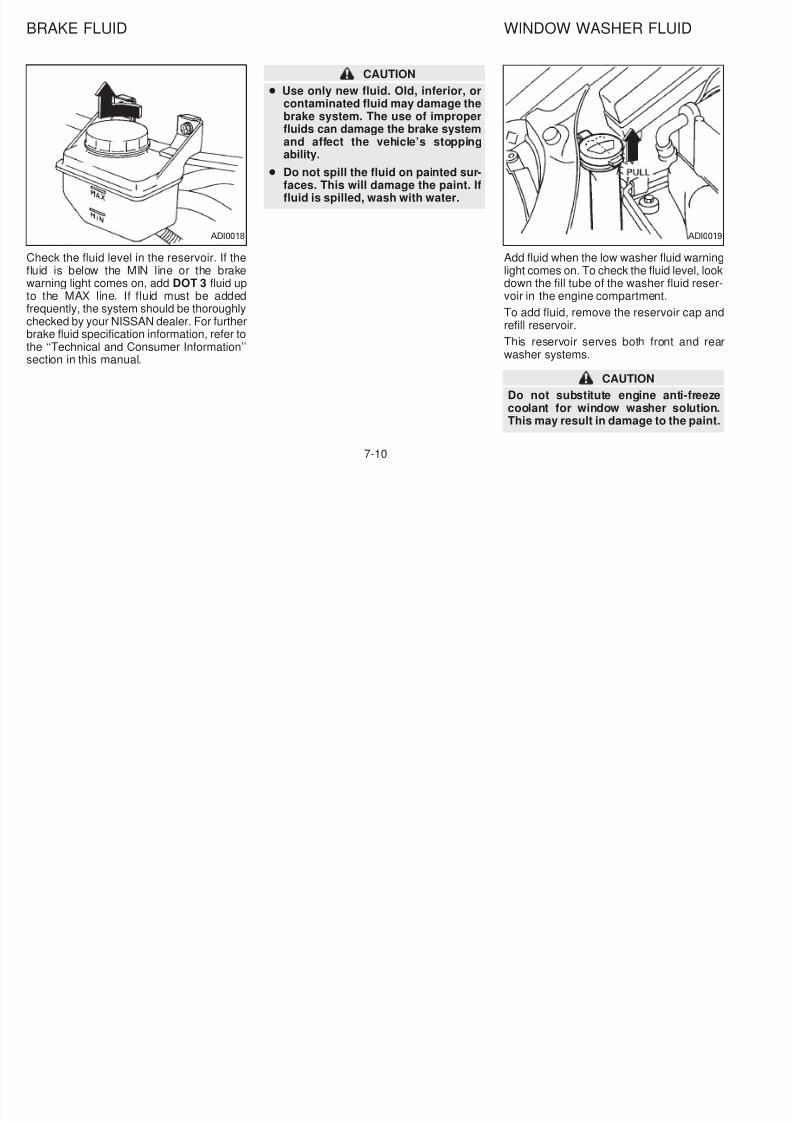
5/12/2018 1996-Nissan-Quest Manual Del Usuario - slidepdf.com
http://slidepdf.com/reader/full/1996-nissan-quest-manual-del-usuario 172/234
CHANGING ENGINE OIL
1. Park the vehicle on a level surface andapply the parking brake.
2. Run the engine until it reaches operatingtemperature, then turn it off.
3. Place a large drain pan under the drainplug.
4. Remove the oil filler cap.
5. Remove the drain plug with a wrench andcompletely drain the oil.
cleaner as soon as possible.
● Keep used engine oil out of reach ochildren.
● Be careful not to burn yourself, asthe engine oil is hot.
CAUTION
Waste oil must be disposed of properly. Check your local regulations.
6. Clean and re-install the drain plug with new washer. Securely tighten the draplug with a wrench.
ADI0057
7-6
Drain plug tightening torque:22 to 29 ft-lb(29 to 39 Nm)
Do not use excessive force.
7. Refill the engine with a recommended oiland install the cap securely. See the‘‘Technical and consumer information’’section for refill capacity.
8. Start the engine. Check for leakagearound the drain plug. Correct as re-quired
4. Wipe the engine oil filter mounting suface with a clean rag. Be sure to removany old rubber gasket remaining on thmounting surface of the engine.
5. Coat the rubber gasket on the new filtewith clean engine oil.
6. Screw the oil filter in until a slight resistance is felt, then tighten additionalmore than 2/3 turn.
7. Start the engine and check for leakagaround the oil filter Correct as required
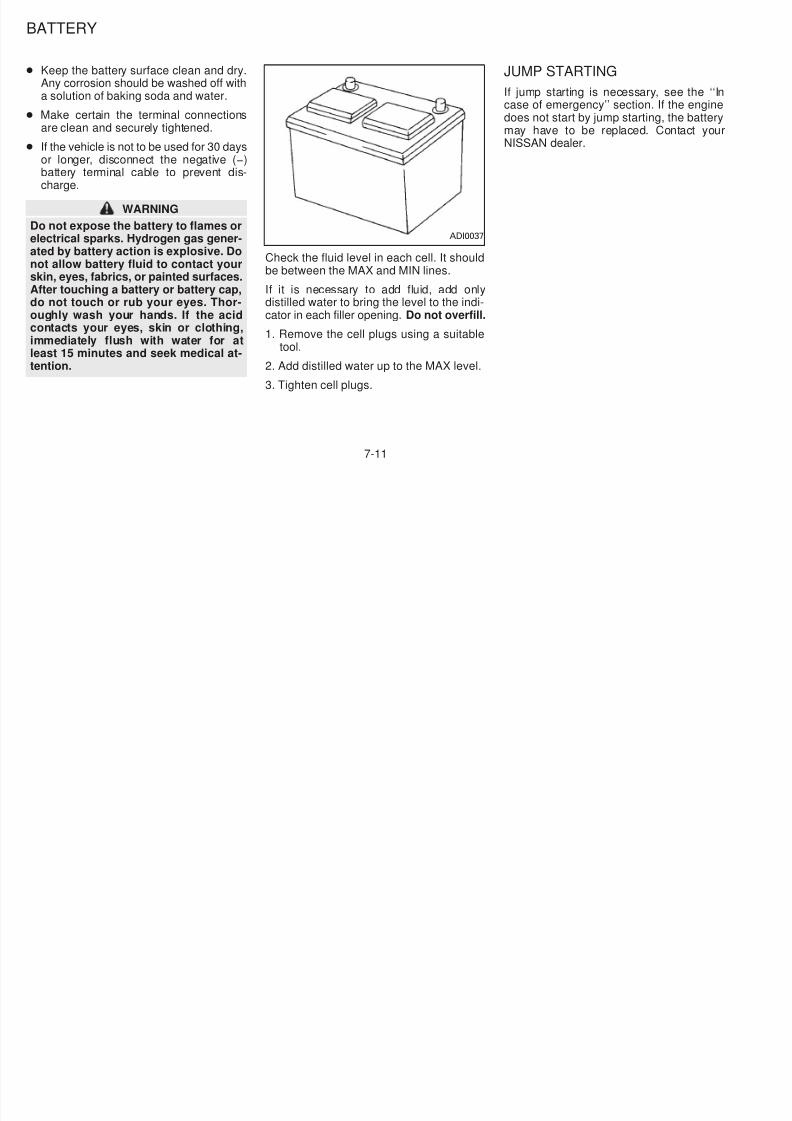
5/12/2018 1996-Nissan-Quest Manual Del Usuario - slidepdf.com
http://slidepdf.com/reader/full/1996-nissan-quest-manual-del-usuario 173/234
quired.
9. Turn the engine off and wait severalminutes. Check the oil level with thedipstick. Add engine oil if necessary. CHANGING ENGINE OIL FILTER
1. Park the vehicle on a level surface andapply the parking brake.
2. Turn the engine off.
3. Loosen the oil filter with an oil filterwrench. Remove the oil filter by turning itby hand.
WARNING
Be careful not to burn yourself, as theengine oil may be hot.
around the oil filter. Correct as required
8. Turn the engine off and wait severminutes. Check the oil level. Add enginoil if necessary.
ADI0010
7-7
AUTOMATIC TRANSMISSIONFLUID
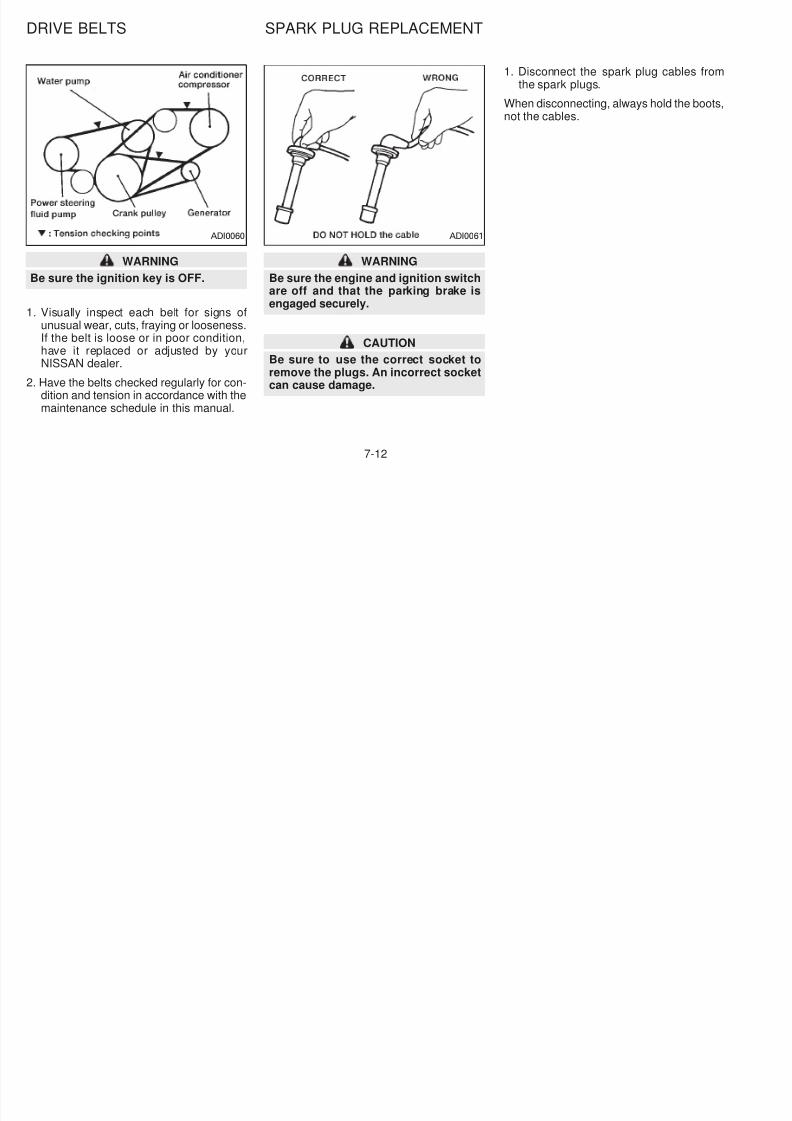
5/12/2018 1996-Nissan-Quest Manual Del Usuario - slidepdf.com
http://slidepdf.com/reader/full/1996-nissan-quest-manual-del-usuario 174/234
WARNING
● When engine is running, keep handsand clothing away from any movingparts such as cooling fan and drivebelt.
● Automatic transmission fluid is poi-sonous and should be stored care-fully in marked containers out of thereach of children.
TEMPERATURE CONDITIONSFOR CHECKING
● Check the fluid level using the HOTrange on the dipstick after the followingconditions have been met:
— The engine is warmed up to operatingtemperature.
— The vehicle is driven at least 15 minutes.
— The automatic transmission fluid iswarmed to between 150°F and 170°F(66°C to 77°C).
● The fluid can be checked at fluid tem-
peratures of 70°F to 95°F (21°C to 35°Cusing the COLD range on the dipsticafter the engine is warmed up and befordriving. However, the fluid should bre-checked using the HOT range.
1. Park the vehicle on a level surface anset the parking brake.
2. Start the engine and then move the geashift lever through each gear range, ending in P (Park) after you have moved through all ranges.
ADI058ADI0572 ADI0573
7-8
3. Check the fluid level with the engineidling.
4. Remove the dipstick and wipe it cleanwith lint-free paper.
5. Reinsert the dipstick into the chargingpipe as far as it goes.
6. Remove the dipstick and note the read-ing. If the level is at the low side of either
range, add fluid to the charging pipe.
DO NOT OVERFILL.
a trailer, the accurate fluid level cannotbe read. You should wait until the fluidhas cooled down (about 30 minutes).
POWER STEERING FLUID
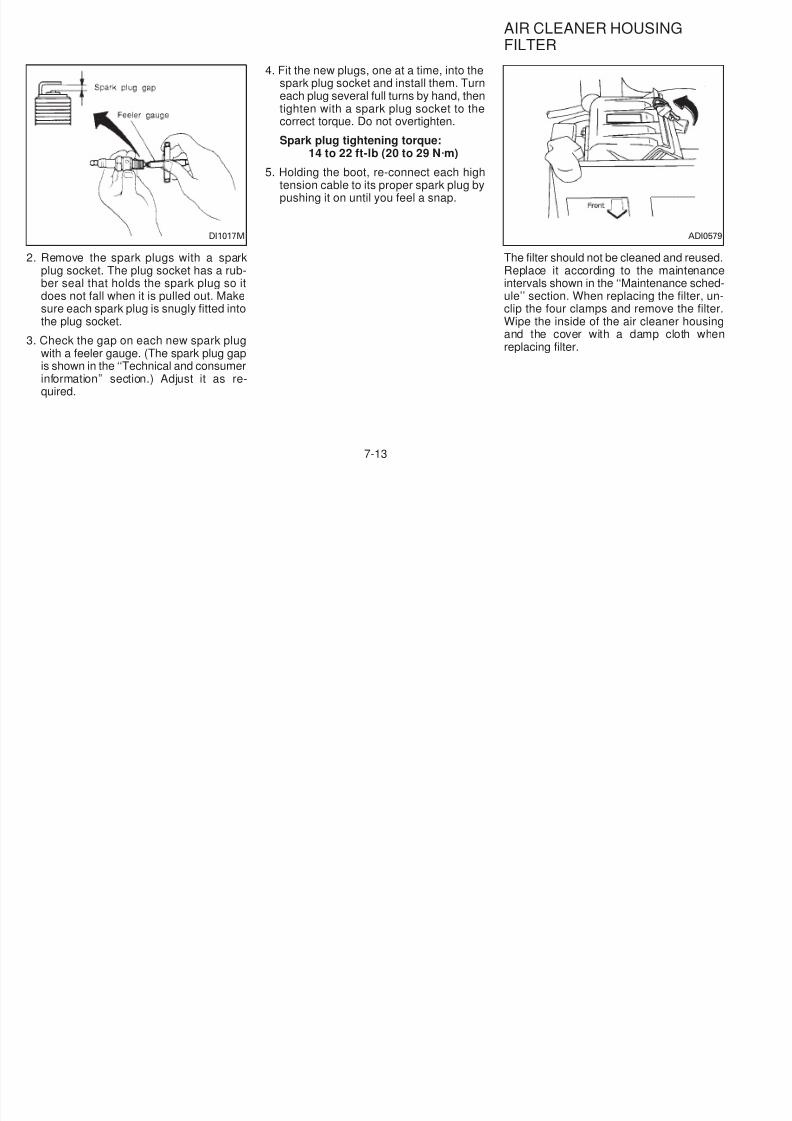
5/12/2018 1996-Nissan-Quest Manual Del Usuario - slidepdf.com
http://slidepdf.com/reader/full/1996-nissan-quest-manual-del-usuario 175/234
DO NOT OVERFILL.Use ONLY Nissan Matic ‘D’ (Continen-tal U.S. and Alaska) or Genuine Nis-san Automatic Transmission Fluid(Canada). Dexron® III/Mercon® orequivalent may also be used. Outsidethe continental United States andAlaska contact a Nissan dealershipfor more information regarding suit-
able fluids, including recommendedbrand(s) of Dexron® III/Mercon® orDexron® IIE/Mercon® AutomaticTransmission Fluid.
NOTE:
If the vehicle has been driven for a longtime at high speeds, or in city traffic inhot weather, or if it is being used to pull
Check the fluid level in reservoir.
The fluid level should be checked by lookinat the MAX and MIN lines at fluid temperatures of 32°F to 86°F (0°C to 30°C).
If the fluid is below the MIN line, add flu
type Dexron IITM
up to the MAX line.
CAUTION
● Do not overfill.
● The recommended fluid is type Fautomatic transmission fluid oequivalent.
ADI001
7-9
CAUTION
● Use only new fluid. Old, inferior, orcontaminated fluid may damage thebrake system. The use of improperfluids can damage the brake systemand affect the vehicle’s stoppingability.
● Do not spill the fluid on painted sur-faces. This will damage the paint. If
fluid is spilled, wash with water.
BRAKE FLUID WINDOW WASHER FLUID

5/12/2018 1996-Nissan-Quest Manual Del Usuario - slidepdf.com
http://slidepdf.com/reader/full/1996-nissan-quest-manual-del-usuario 176/234
Check the fluid level in the reservoir. If thefluid is below the MIN line or the brakewarning light comes on, add DOT 3 fluid upto the MAX line. If fluid must be addedfrequently, the system should be thoroughlychecked by your NISSAN dealer. For further
brake fluid specification information, refer tothe ‘‘Technical and Consumer Information’’section in this manual.
Add fluid when the low washer fluid warninlight comes on. To check the fluid level, loodown the fill tube of the washer fluid resevoir in the engine compartment.
To add fluid, remove the reservoir cap anrefill reservoir.
This reservoir serves both front and rewasher systems.
CAUTION
Do not substitute engine anti-freezecoolant for window washer solutionThis may result in damage to the paint
ADI0018 ADI001
7-10
● Keep the battery surface clean and dry.Any corrosion should be washed off witha solution of baking soda and water.
● Make certain the terminal connectionsare clean and securely tightened.
● If the vehicle is not to be used for 30 daysor longer, disconnect the negative (−)battery terminal cable to prevent dis-charge.
WARNING
D h b fl
JUMP STARTING
If jump starting is necessary, see the ‘‘case of emergency’’ section. If the engindoes not start by jump starting, the battermay have to be replaced. Contact youNISSAN dealer.
BATTERY
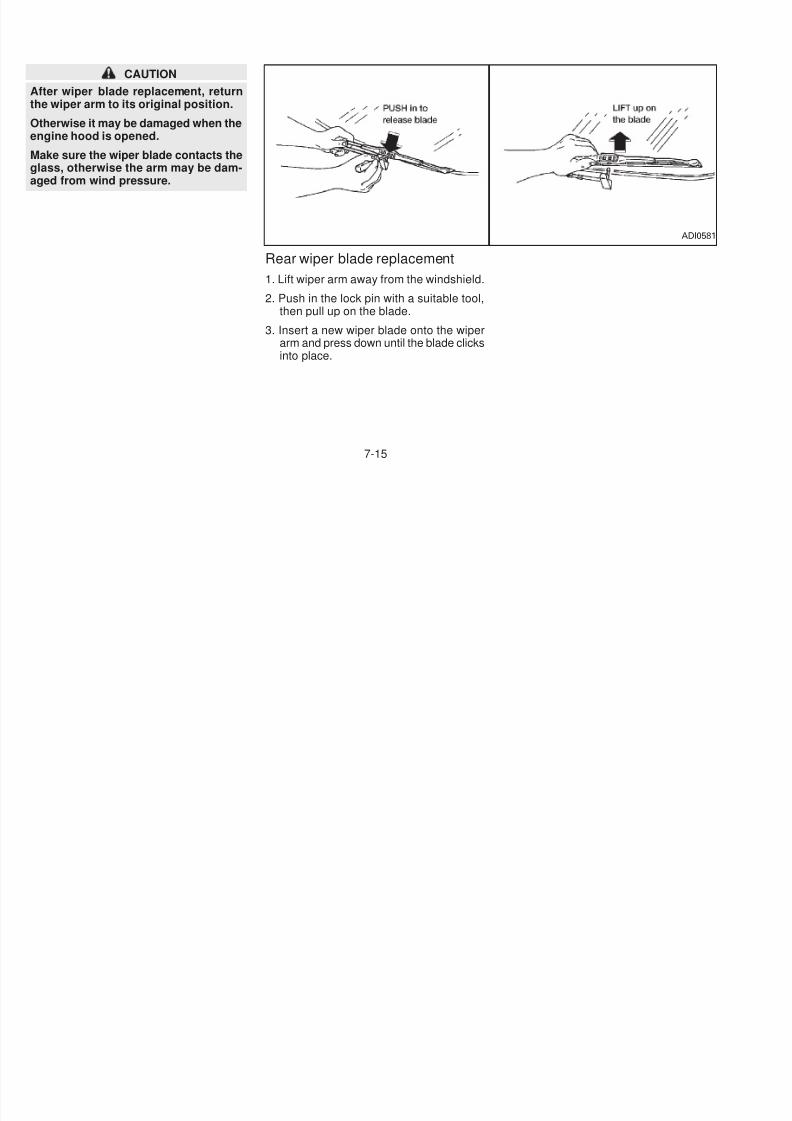
5/12/2018 1996-Nissan-Quest Manual Del Usuario - slidepdf.com
http://slidepdf.com/reader/full/1996-nissan-quest-manual-del-usuario 177/234
Do not expose the battery to flames orelectrical sparks. Hydrogen gas gener-ated by battery action is explosive. Donot allow battery fluid to contact yourskin, eyes, fabrics, or painted surfaces.After touching a battery or battery cap,do not touch or rub your eyes. Thor-oughly wash your hands. If the acidcontacts your eyes, skin or clothing,immediately flush with water for atleast 15 minutes and seek medical at-tention.
Check the fluid level in each cell. It shouldbe between the MAX and MIN lines.
If it is necessary to add fluid, add onlydistilled water to bring the level to the indi-cator in each filler opening. Do not overfill.
1. Remove the cell plugs using a suitabletool.
2. Add distilled water up to the MAX level.
3. Tighten cell plugs.
ADI0037
7-11
1. Disconnect the spark plug cables frothe spark plugs.
When disconnecting, always hold the bootnot the cables.
DRIVE BELTS SPARK PLUG REPLACEMENT
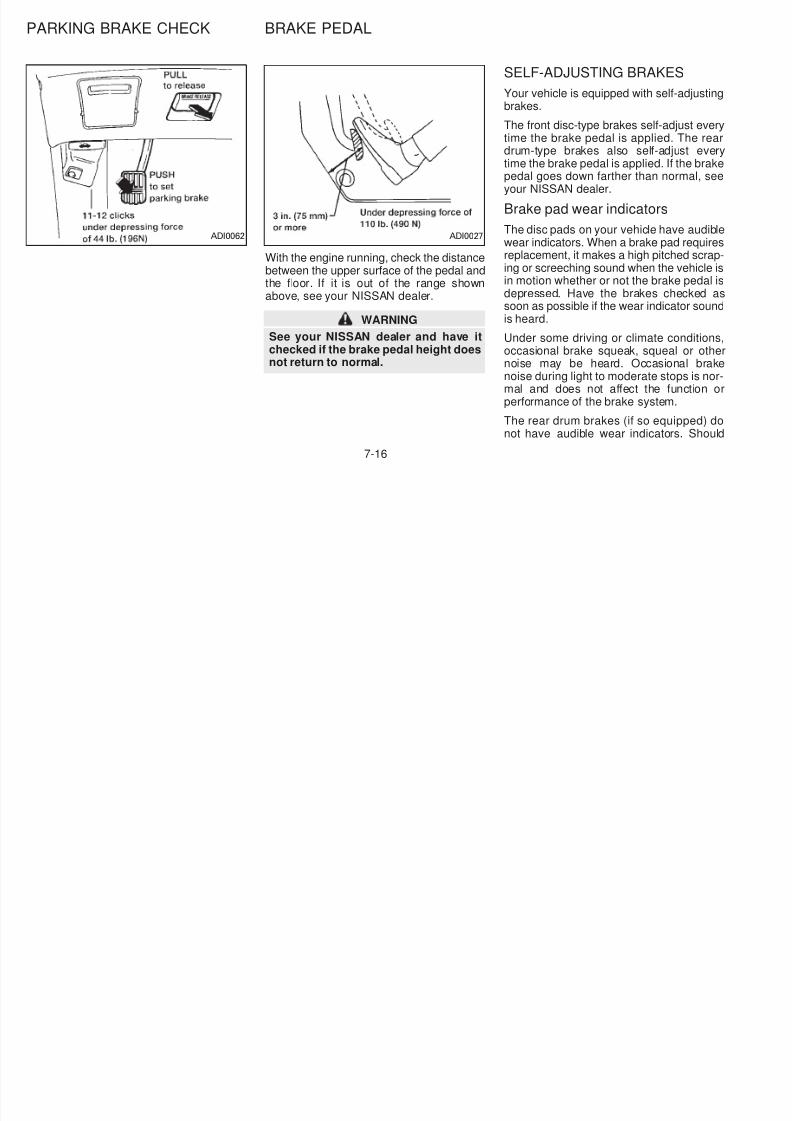
5/12/2018 1996-Nissan-Quest Manual Del Usuario - slidepdf.com
http://slidepdf.com/reader/full/1996-nissan-quest-manual-del-usuario 178/234
WARNING
Be sure the ignition key is OFF.
1. Visually inspect each belt for signs ofunusual wear, cuts, fraying or looseness.
If the belt is loose or in poor condition,have it replaced or adjusted by yourNISSAN dealer.
2. Have the belts checked regularly for con-dition and tension in accordance with themaintenance schedule in this manual.
WARNING
Be sure the engine and ignition switchare off and that the parking brake isengaged securely.
CAUTION
Be sure to use the correct socket toremove the plugs. An incorrect socketcan cause damage.
ADI0060 ADI0061
7-12
4. Fit the new plugs, one at a time, into thespark plug socket and install them. Turneach plug several full turns by hand, thentighten with a spark plug socket to thecorrect torque. Do not overtighten.
Spark plug tightening torque:14 to 22 ft-lb (20 to 29 Nm)
5. Holding the boot, re-connect each hightension cable to its proper spark plug by
pushing it on until you feel a snap.
AIR CLEANER HOUSINGFILTER
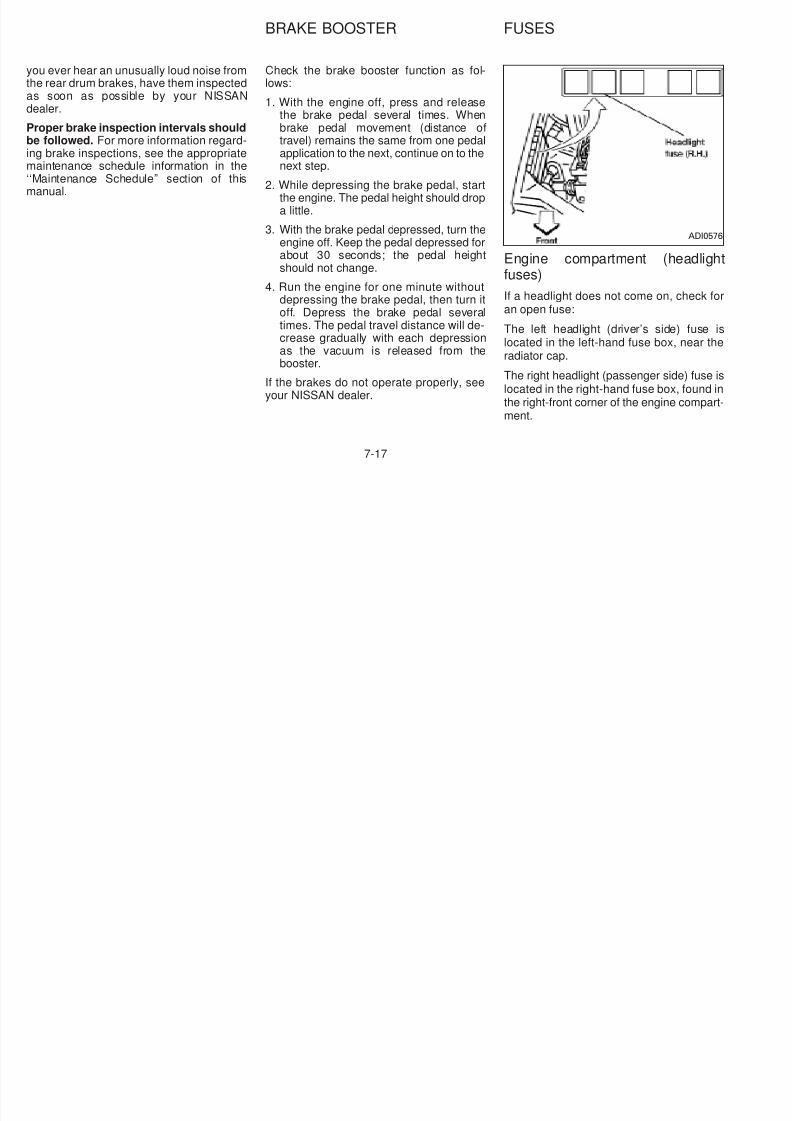
5/12/2018 1996-Nissan-Quest Manual Del Usuario - slidepdf.com
http://slidepdf.com/reader/full/1996-nissan-quest-manual-del-usuario 179/234
2. Remove the spark plugs with a sparkplug socket. The plug socket has a rub-ber seal that holds the spark plug so itdoes not fall when it is pulled out. Makesure each spark plug is snugly fitted intothe plug socket.
3. Check the gap on each new spark plugwith a feeler gauge. (The spark plug gapis shown in the ‘‘Technical and consumerinformation’’ section.) Adjust it as re-quired.
The filter should not be cleaned and reusedReplace it according to the maintenancintervals shown in the ‘‘Maintenance schedule’’ section. When replacing the filter, unclip the four clamps and remove the filteWipe the inside of the air cleaner housin
and the cover with a damp cloth whereplacing filter.
DI1017M ADI057
7-13
WARNING
Operating the engine with the air cleaneroff can cause you or others to be burned.The air cleaner not only cleans the air, itstops flame if the engine backfires. If itisn’t there, and the engine backfires, youcould be burned. Don’t drive with it off,and be careful working on the enginewith the air cleaner off.
WIPER BLADES
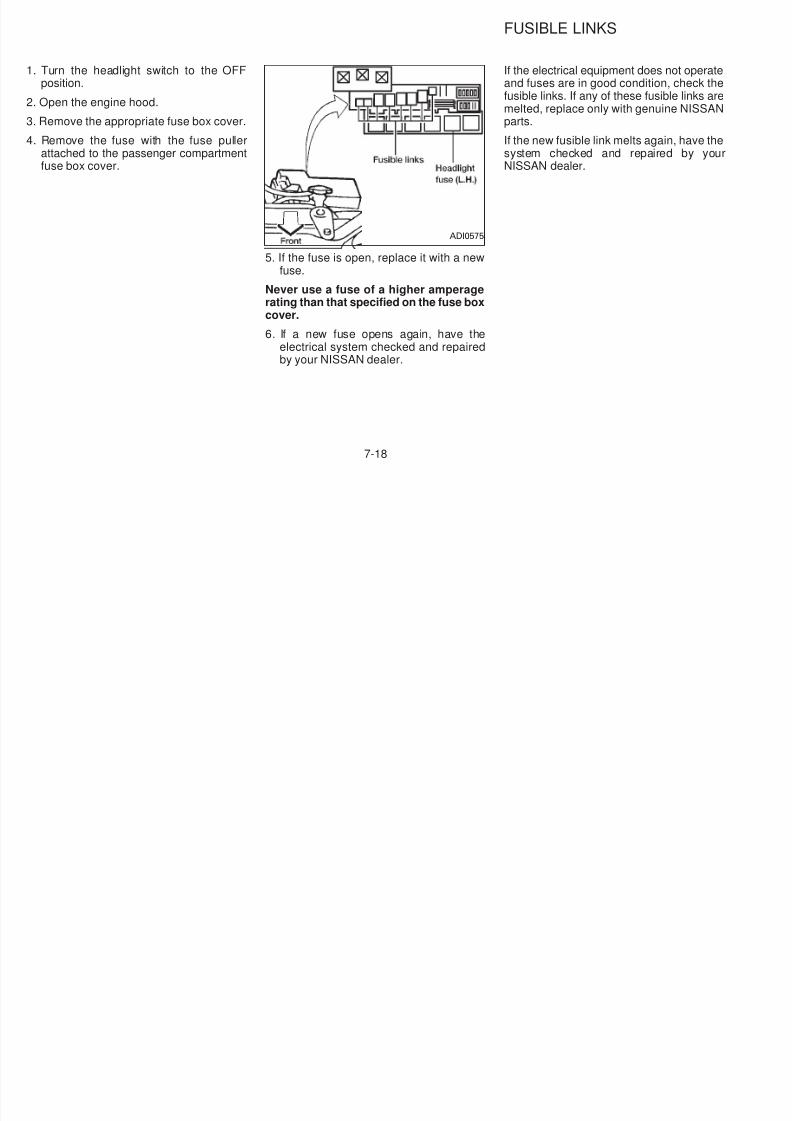
5/12/2018 1996-Nissan-Quest Manual Del Usuario - slidepdf.com
http://slidepdf.com/reader/full/1996-nissan-quest-manual-del-usuario 180/234
1) CLEANINGIf your windshield is not clear after usingthe windshield washer or if the wiperblade chatters when running, wax orother material may be on the blade orwindshield.
Clean the outside of the windshield with awasher solution or a mild detergent. Yourwindshield is clean if beads do not formwhen rinsing with clear water.
Clean the blade by wiping it with a clothsoaked in a washer solution or a milddetergent. Then, rinse the blade withclear water. If your windshield is still not
clear after cleaning the blades and usinthe wipers, replace the blades.
2) REPLACEMENT
1. Lift the wiper arm away from the windshield.
2. Push the lock pin, then remove the wipeblade.
3. Insert the new wiper blade to the wipearm until it clicks into place.
DI1018M
7-14
CAUTION
After wiper blade replacement, returnthe wiper arm to its original position.
Otherwise it may be damaged when theengine hood is opened.
Make sure the wiper blade contacts theglass, otherwise the arm may be dam-aged from wind pressure.
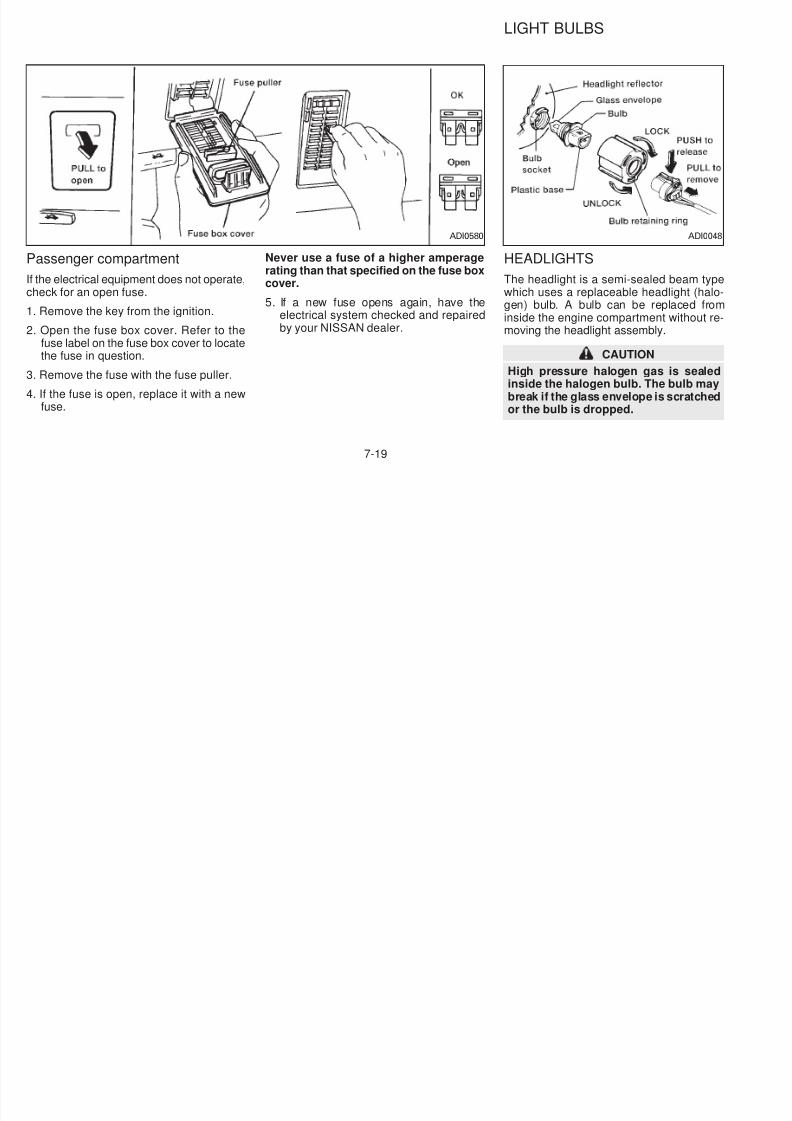
5/12/2018 1996-Nissan-Quest Manual Del Usuario - slidepdf.com
http://slidepdf.com/reader/full/1996-nissan-quest-manual-del-usuario 181/234
Rear wiper blade replacement
1. Lift wiper arm away from the windshield.
2. Push in the lock pin with a suitable tool,then pull up on the blade.
3. Insert a new wiper blade onto the wiperarm and press down until the blade clicksinto place.
ADI0581
7-15
SELF-ADJUSTING BRAKES
Your vehicle is equipped with self-adjustinbrakes.
The front disc-type brakes self-adjust evetime the brake pedal is applied. The readrum-type brakes also self-adjust evetime the brake pedal is applied. If the brakpedal goes down farther than normal, seyour NISSAN dealer.
Brake pad wear indicators
The disc pads on your vehicle have audib
PARKING BRAKE CHECK BRAKE PEDAL

5/12/2018 1996-Nissan-Quest Manual Del Usuario - slidepdf.com
http://slidepdf.com/reader/full/1996-nissan-quest-manual-del-usuario 182/234
With the engine running, check the distancebetween the upper surface of the pedal andthe floor. If it is out of the range shownabove, see your NISSAN dealer.
WARNING
See your NISSAN dealer and have itchecked if the brake pedal height doesnot return to normal.
The disc pads on your vehicle have audibwear indicators. When a brake pad requirereplacement, it makes a high pitched scraping or screeching sound when the vehicle in motion whether or not the brake pedal depressed. Have the brakes checked asoon as possible if the wear indicator sounis heard.
Under some driving or climate conditionoccasional brake squeak, squeal or othnoise may be heard. Occasional braknoise during light to moderate stops is nomal and does not affect the function operformance of the brake system.
The rear drum brakes (if so equipped) dnot have audible wear indicators. Shou
ADI0062 ADI0027
7-16
you ever hear an unusually loud noise fromthe rear drum brakes, have them inspectedas soon as possible by your NISSANdealer.
Proper brake inspection intervals shouldbe followed. For more information regard-ing brake inspections, see the appropriatemaintenance schedule information in the‘‘Maintenance Schedule’’ section of thismanual.
Check the brake booster function as fol-lows:
1. With the engine off, press and releasethe brake pedal several times. Whenbrake pedal movement (distance oftravel) remains the same from one pedalapplication to the next, continue on to thenext step.
2. While depressing the brake pedal, start
the engine. The pedal height should dropa little.
3 With the brake pedal depressed turn the
BRAKE BOOSTER FUSES
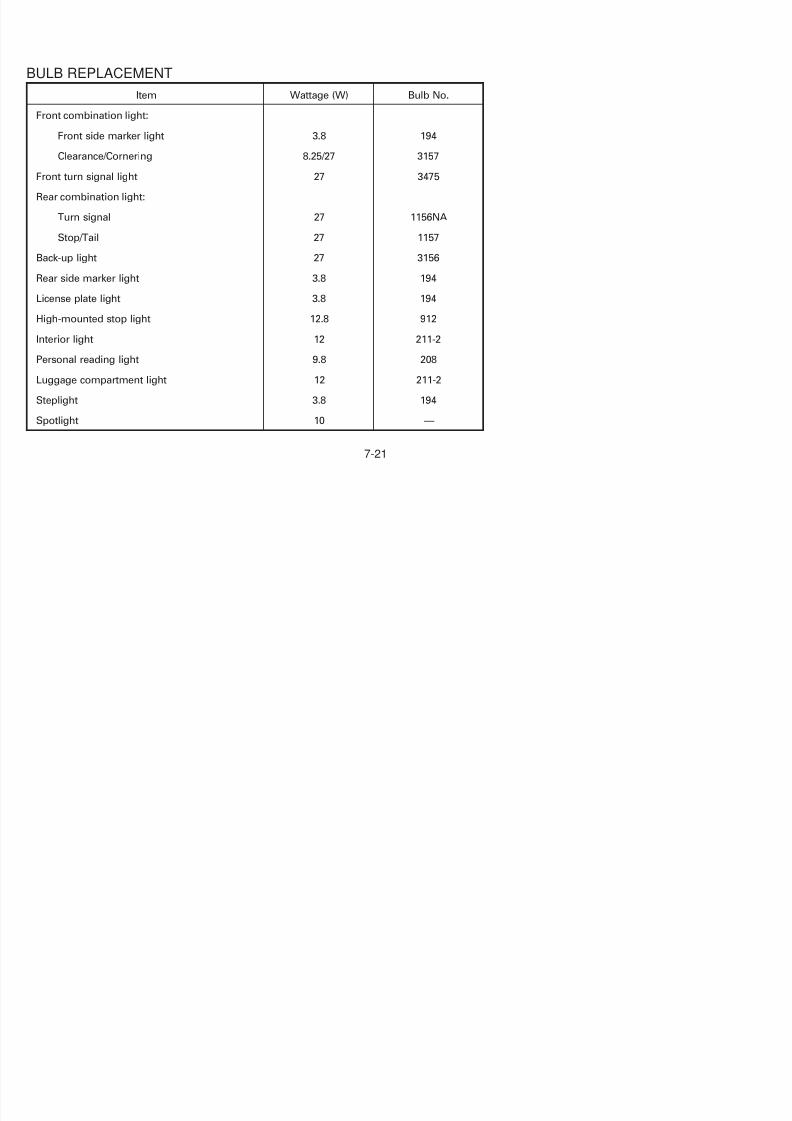
5/12/2018 1996-Nissan-Quest Manual Del Usuario - slidepdf.com
http://slidepdf.com/reader/full/1996-nissan-quest-manual-del-usuario 183/234
3. With the brake pedal depressed, turn theengine off. Keep the pedal depressed forabout 30 seconds; the pedal heightshould not change.
4. Run the engine for one minute withoutdepressing the brake pedal, then turn itoff. Depress the brake pedal severaltimes. The pedal travel distance will de-
crease gradually with each depressionas the vacuum is released from thebooster.
If the brakes do not operate properly, seeyour NISSAN dealer.
Engine compartment (headlighfuses)
If a headlight does not come on, check foan open fuse:
The left headlight (driver’s side) fuse located in the left-hand fuse box, near thradiator cap.
The right headlight (passenger side) fuse located in the right-hand fuse box, found the right-front corner of the engine comparment.
ADI057
7-17
1. Turn the headlight switch to the OFFposition.
2. Open the engine hood.
3. Remove the appropriate fuse box cover.
4. Remove the fuse with the fuse pullerattached to the passenger compartmentfuse box cover.
If the electrical equipment does not operatand fuses are in good condition, check thfusible links. If any of these fusible links armelted, replace only with genuine NISSAparts.
If the new fusible link melts again, have thsystem checked and repaired by youNISSAN dealer.
FUSIBLE LINKS
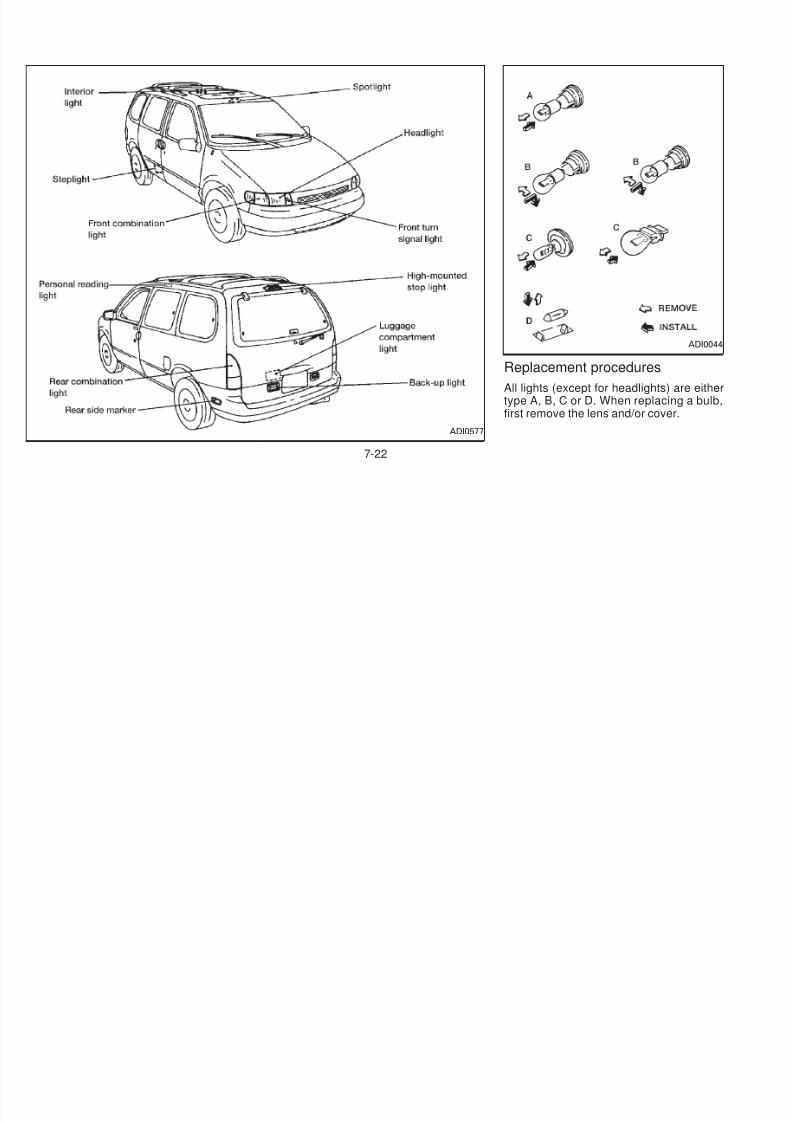
5/12/2018 1996-Nissan-Quest Manual Del Usuario - slidepdf.com
http://slidepdf.com/reader/full/1996-nissan-quest-manual-del-usuario 184/234
5. If the fuse is open, replace it with a newfuse.
Never use a fuse of a higher amperagerating than that specified on the fuse boxcover.
6. If a new fuse opens again, have theelectrical system checked and repairedby your NISSAN dealer.
ADI0575
7-18
LIGHT BULBS
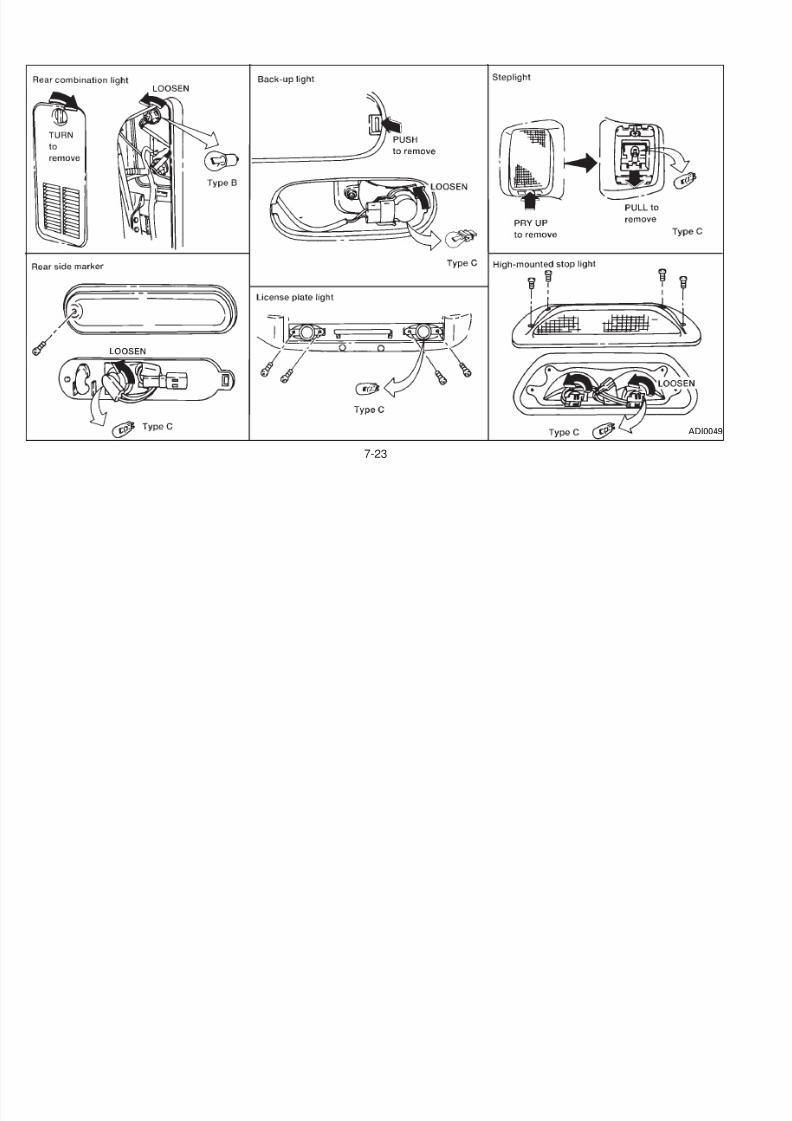
5/12/2018 1996-Nissan-Quest Manual Del Usuario - slidepdf.com
http://slidepdf.com/reader/full/1996-nissan-quest-manual-del-usuario 185/234
Passenger compartment
If the electrical equipment does not operate,check for an open fuse.
1. Remove the key from the ignition.
2. Open the fuse box cover. Refer to thefuse label on the fuse box cover to locatethe fuse in question.
3. Remove the fuse with the fuse puller.
4. If the fuse is open, replace it with a newfuse.
Never use a fuse of a higher amperagerating than that specified on the fuse boxcover.
5. If a new fuse opens again, have theelectrical system checked and repairedby your NISSAN dealer.
HEADLIGHTS
The headlight is a semi-sealed beam typwhich uses a replaceable headlight (halogen) bulb. A bulb can be replaced froinside the engine compartment without removing the headlight assembly.
CAUTION
High pressure halogen gas is sealedinside the halogen bulb. The bulb maybreak if the glass envelope is scratchedor the bulb is dropped.
ADI0580 ADI004
7-19
Hold the plastic base when handlingthe bulb. Never touch the glass enve-lope.
Removing the headlight bulb
1. Disconnect the negative battery cable.
2. Disconnect the electrical connector fromthe rear end of the bulb.
3. Turn the bulb retaining ring counterclock-wise until it is free from the headlightreflector then remove it
CAUTION
DO NOT TOUCH THE BULB.
● Use the same number and wattageas originally installed:
Wattage 55/65
Bulb no. 9007
● Aiming is not necessary after replac-ing the bulb. When aiming adjust-ment is necessary, contact your NIS-SAN dealer.
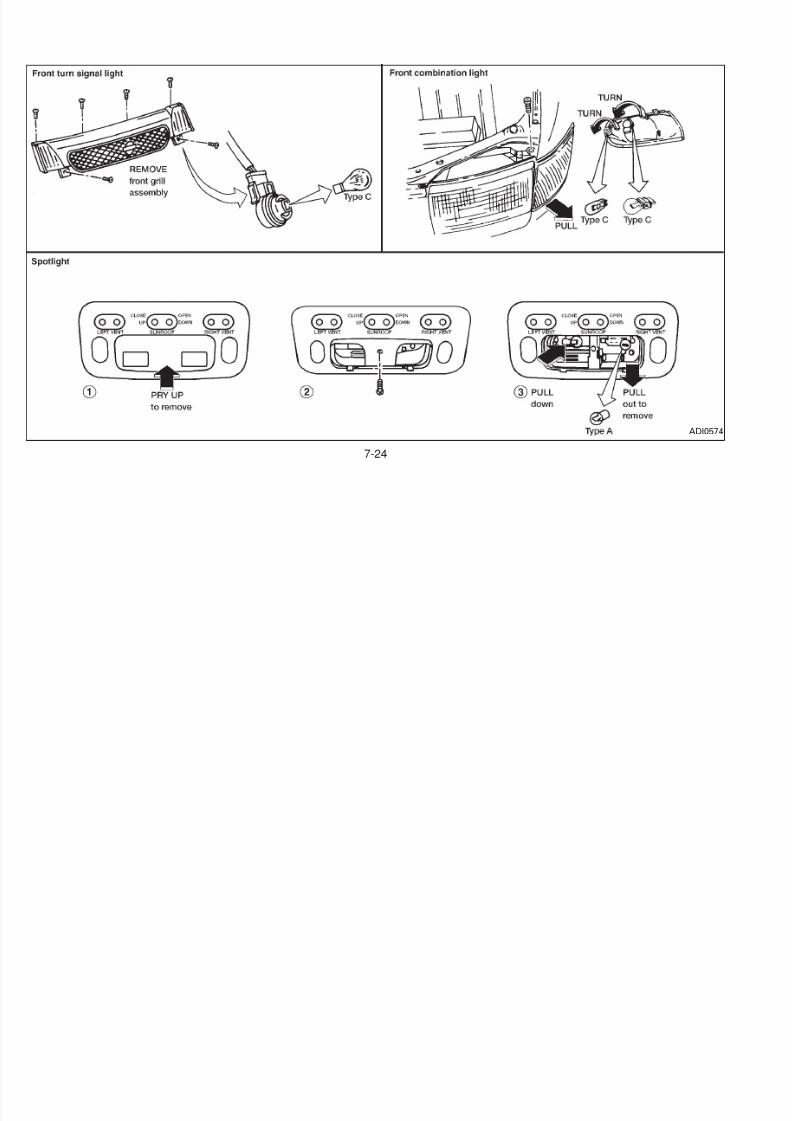
5/12/2018 1996-Nissan-Quest Manual Del Usuario - slidepdf.com
http://slidepdf.com/reader/full/1996-nissan-quest-manual-del-usuario 186/234
reflector, then remove it.
4. Remove the headlight bulb by pullingstraight rearward. Do not shake or rotatethe bulb when removing it.
Replacing the headlight bulb
1. Insert the bulb into the headlight reflectorwith the flat side of the plastic base facingupward.
2. Install the bulb retaining ring and turn itclockwise until it stops.
3. Push the electrical connector into thebulb plastic base until it snaps and stops.
● Do not leave the bulb out of theheadlight reflector for a long periodof time as dust, moisture, and smokemay enter the headlight body andaffect the performance of the head-light.
7-20
BULB REPLACEMENT
Item Wattage (W) Bulb No.
Front combination light:
Front side marker light 3.8 194
Clearance/Cornering 8.25/27 3157
Front turn signal light 27 3475
Rear combination light:Turn signal 27 1156NA
S /T il 27 1157
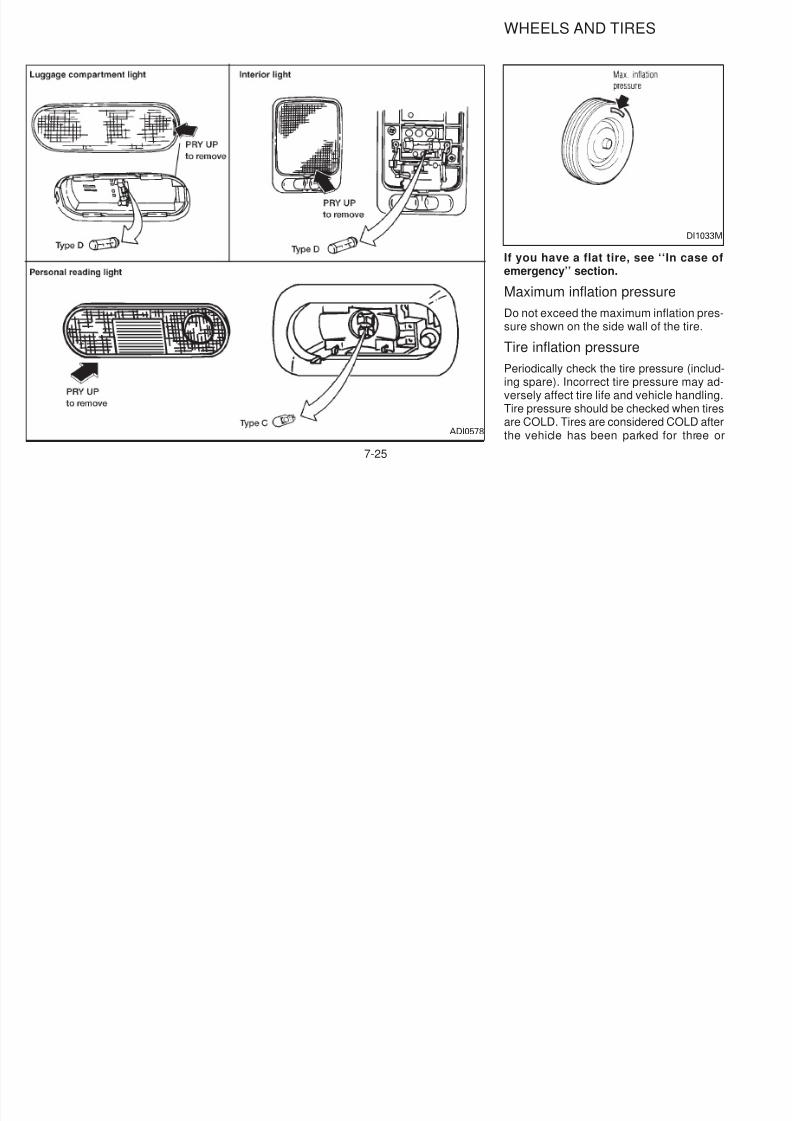
5/12/2018 1996-Nissan-Quest Manual Del Usuario - slidepdf.com
http://slidepdf.com/reader/full/1996-nissan-quest-manual-del-usuario 187/234
Stop/Tail 27 1157
Back-up light 27 3156
Rear side marker light 3.8 194
License plate light 3.8 194
High-mounted stop light 12.8 912
Interior light 12 211-2
Personal reading light 9.8 208
Luggage compartment light 12 211-2
Steplight 3.8 194
Spotlight 10 —
7-21

5/12/2018 1996-Nissan-Quest Manual Del Usuario - slidepdf.com
http://slidepdf.com/reader/full/1996-nissan-quest-manual-del-usuario 188/234
Replacement procedures
All lights (except for headlights) are eithetype A, B, C or D. When replacing a bulbfirst remove the lens and/or cover.
ADI0577
ADI004
7-22
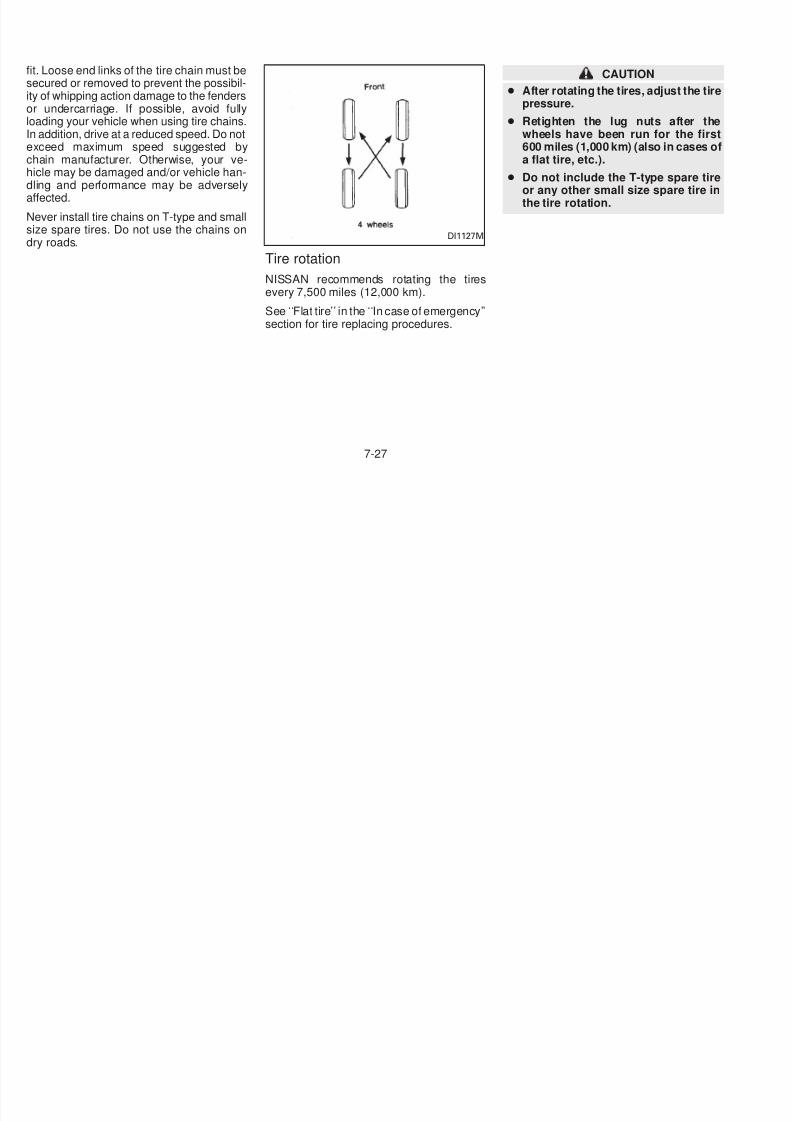
5/12/2018 1996-Nissan-Quest Manual Del Usuario - slidepdf.com
http://slidepdf.com/reader/full/1996-nissan-quest-manual-del-usuario 189/234
ADI004
7-23

5/12/2018 1996-Nissan-Quest Manual Del Usuario - slidepdf.com
http://slidepdf.com/reader/full/1996-nissan-quest-manual-del-usuario 190/234
ADI057
7-24
DI1033M
WHEELS AND TIRES

5/12/2018 1996-Nissan-Quest Manual Del Usuario - slidepdf.com
http://slidepdf.com/reader/full/1996-nissan-quest-manual-del-usuario 191/234
If you have a flat tire, see ‘‘In case oemergency’’ section.
Maximum inflation pressure
Do not exceed the maximum inflation pressure shown on the side wall of the tire.
Tire inflation pressure
Periodically check the tire pressure (including spare). Incorrect tire pressure may adversely affect tire life and vehicle handlingTire pressure should be checked when tireare COLD. Tires are considered COLD aftethe vehicle has been parked for three oADI0578
7-25
more hours, or driven less than 1 mile (1.6km). COLD tire pressures are shown on thetire placard affixed to the glove box door.
CAUTION
The vehicle weight capacity is indicatedon the tire placard. Do not load yourvehicle beyond this capacity. Overload-ing your vehicle may result in reduced tirelife, unsafe operating conditions due to
premature tire failure, or unfavorable han-dling characteristics and could also leadto a serious accident. Loading beyond thespecified capacity may also result in fail-
Types of tires
CAUTION
When changing or replacing tires, be sureall four tires are of the same type (i.e.,Summer, All Season or Snow) and con-struction. Your NISSAN dealer may beable to help you with information abouttire type, size, speed rating and availabil-ity. Replacement tires may have a lowerspeed rating than the factory equippedtires, and may not match the potentialmaximum vehicle speed. Never exceedthe maximum speed rating of the tire.
to the original equipment tires. If you do noit can adversely affect the safety and handling of your vehicle.
Generally, snow tires have lower speeratings than factory equipped tires and manot match the potential maximum vehicspeed. Never exceed the maximum speerating of the tire.
For additional traction on icy roads, studde
tires may be used. However, some stateand provinces prohibit their use. Check local, state and provincial laws before instai t dd d ti Skid d t ti bi
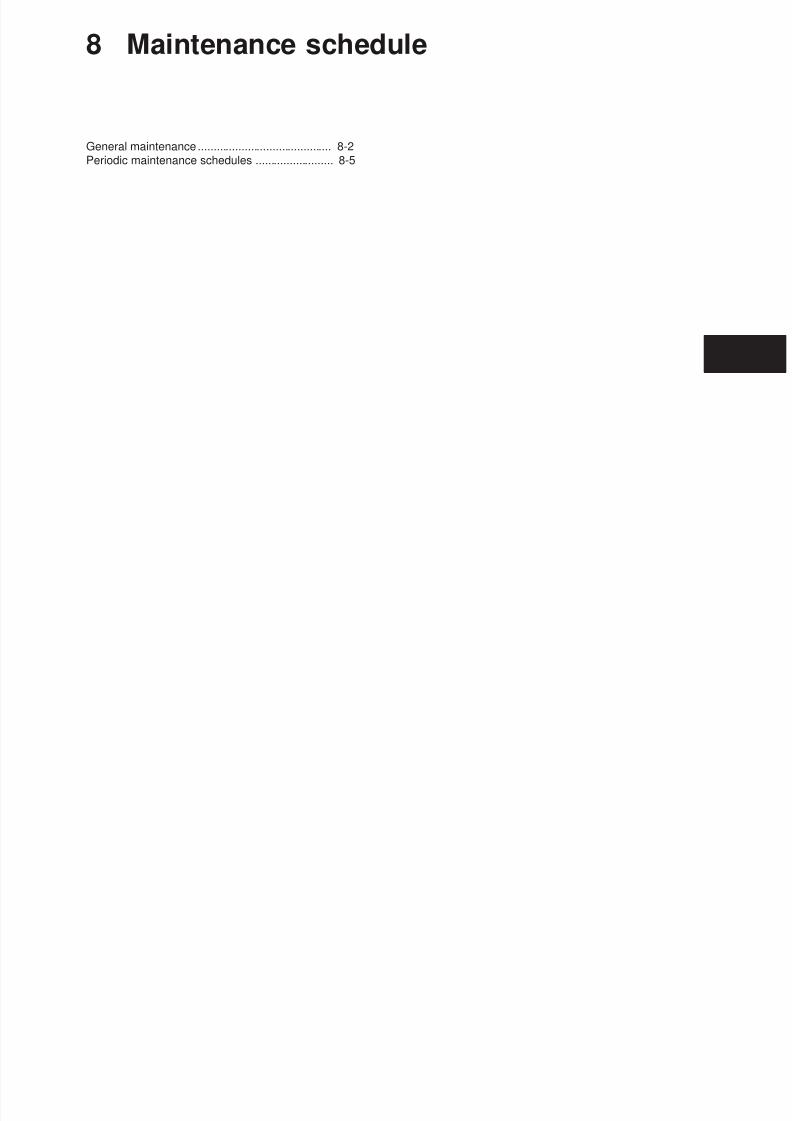
5/12/2018 1996-Nissan-Quest Manual Del Usuario - slidepdf.com
http://slidepdf.com/reader/full/1996-nissan-quest-manual-del-usuario 192/234
specified capacity may also result in fail-ure of other vehicle components.
Before taking a long trip, or wheneveryou have loaded your vehicle heavily,use a tire pressure gauge to ensure thatthe tire pressure is at the specified level.
CAUTION
Do not drive your vehicle over 85 MPH(140 km/h) unless it is equipped withhigh speed capability tires. Drivingfaster than 85 MPH (140 km/h) mayresult in tire failure, loss of control andpossible injury.
p g
All season tires
NISSAN specifies All Season tires to pro-vide good performance all year, includingsnowy and icy road conditions. All SeasonTires are identified by ‘‘ALL SEASON’’and/or ‘‘M&S’’ on the tire sidewall. Snowtires have better snow traction than AllSeason tires and may be more appropriatein some areas.
Snow tires
If snow tires are needed, it is necessary toselect tires equivalent in size and load rating
ing studded tires. Skid and traction capabities of studded snow tires on wet or dsurfaces may be poorer than that of nonstudded snow tires.
Tire chains
Use of tire chains may be prohibited accord
ing to location. Check the local laws beforinstalling tire chains. When installing tichains, make sure they are of proper sizfor the tires on your vehicle and are installeaccording to the chain manufacturer’s suggestions. Use only SAE Class ‘‘S’’ chainsOther types may damage your vehicle. Uschain tensioners when recommended bthe tire chain manufacturer to ensure a tigh
7-26
fit. Loose end links of the tire chain must besecured or removed to prevent the possibil-ity of whipping action damage to the fendersor undercarriage. If possible, avoid fullyloading your vehicle when using tire chains.In addition, drive at a reduced speed. Do notexceed maximum speed suggested bychain manufacturer. Otherwise, your ve-hicle may be damaged and/or vehicle han-dling and performance may be adversely
affected.Never install tire chains on T-type and smallsize spare tires. Do not use the chains ondry roads
CAUTION
● After rotating the tires, adjust the tirepressure.
● Retighten the lug nuts after thewheels have been run for the firs600 miles (1,000 km) (also in cases oa flat tire, etc.).
● Do not include the T-type spare tireor any other small size spare tire in
the tire rotation.
DI1127M
5/12/2018 1996-Nissan-Quest Manual Del Usuario - slidepdf.com
http://slidepdf.com/reader/full/1996-nissan-quest-manual-del-usuario 193/234
dry roads.
Tire rotation
NISSAN recommends rotating the tiresevery 7,500 miles (12,000 km).
See ‘‘Flat tire’’ in the ‘‘In case of emergency’’section for tire replacing procedures.
7-27
● Improper service for a T-type sparetire may result in serious personalinjury. If it is necessary to repair theT-type spare tire, contact your NIS-SAN dealer.
Changing tires and wheels
When replacing a tire, use the same size,speed rating and load carrying capacity asoriginally equipped. Recommended typesand sizes are shown in ‘‘Wheels and tires’’in the ‘‘Technical and consumer informa-tion’’ section. The use of tires other than
istics and/or interference with the brakdiscs/drums. Such interference can lead tdecreased braking efficiency and/or earbrake pad/shoe wear.
WARNING
Do not install a deformed wheel or tireeven if it has been repaired. Suchwheels or tires could have structuradamage and could fail without warning
Wheel balance
Unbalanced wheels may affect vehicle hanDI1035M
5/12/2018 1996-Nissan-Quest Manual Del Usuario - slidepdf.com
http://slidepdf.com/reader/full/1996-nissan-quest-manual-del-usuario 194/234
Tire wear and damage
WARNING
● Tires should be periodically in-spected for wear, cracking, bulging,or objects caught in the tread. Ifexcessive wear, cracks, bulging, or
deep cuts are found, the tire shouldbe replaced.
● The original tires have a built-intread wear indicator. When the wearindicator is visible, the tire should bereplaced.
those recommended or the mixed use oftires of different brands, construction (bias,bias-belted or radial), or tread patterns canadversely affect the ride, braking, handling,ground clearance, body-to-tire clearance,snow chain clearance, speedometer cali-bration, headlight aim and bumper height.
Some of these effects may lead to acci-dents and could result in serious per-sonal injury.
If the wheels are changed for any reason,always replace with wheels which have thesame offset dimension. Wheels of a differ-ent offset could cause early tire wear, pos-sibly degraded vehicle handling character-
Unbalanced wheels may affect vehicle handling and tire life. Even with regular uswheels can get out of balance. Thereforethey should be balanced as required.
Wheel balance service should be performewith the wheels off the vehicle. Spin balancing the front wheels on the vehicle cou
lead to transmission damage.
Care of wheels
● Wash the wheels when washing the vehicle to maintain their appearance.
● Clean the inner side of the wheels whethe wheel is changed or the underside othe vehicle is washed.
7-28
● Do not use abrasive cleaners whenwashing the wheels.
● Inspect wheel rims regularly for dents orcorrosion. Such damage may cause lossof pressure or poor seal at the tire bead.
● NISSAN recommends waxing the roadwheels to protect against road salt in areaswhere it is used during winter.
Spare tire (T-type spare tire)Observe the following precautions if theT-type spare tire must be used, otherwiseyour vehicle could be damaged or involved
● Do not drive your vehicle at speedsfaster than 50 MPH (80 km/h).
● Do not use tire chains on a T-typespare tire. Tire chains will not fitproperly on the T-type spare tire andmay cause damage to the vehicle.
● When driving on roads covered withsnow or ice, the T-type spare tireshould be used on the rear wheel and
the original tire used on the frontwheels (drive wheels). Use tire chainsonly on the front two original tires.
● Tire tread of the T-type spare tire will
● Do not use more than one T-typespare tire at the same time.
● Do not tow a trailer while the T-typespare tire is installed.

5/12/2018 1996-Nissan-Quest Manual Del Usuario - slidepdf.com
http://slidepdf.com/reader/full/1996-nissan-quest-manual-del-usuario 195/234
your vehicle could be damaged or involvedin an accident.
CAUTION
● The T-type spare tire should be usedonly for emergency. It should be re-placed by the standard tire at the
first opportunity.● Drive carefully while the T-type spare
tire is installed. Avoid sharp turnsand abrupt braking while driving.
● Periodically check tire inflation pres-sure, and always keep it at 60 psi(420 kP, 4.2 bar).
● Tire tread of the T type spare tire willwear at a faster rate than the originaltire. Replace the T-type spare tire assoon as the tread wear indicatorsappear.
● Because the T-type spare tire issmaller than the original tire, ground
clearance is reduced. To avoid dam-age to the vehicle do not drive overobstacles. Also do not drive the ve-hicle through an automatic car washsince it may get caught.
● Do not use the T-type spare tire onother vehicles.
7-29
5/12/2018 1996-Nissan-Quest Manual Del Usuario - slidepdf.com
http://slidepdf.com/reader/full/1996-nissan-quest-manual-del-usuario 196/234
8 Maintenance schedule
General maintenance ........................................... 8-2
Periodic maintenance schedules ......................... 8-5
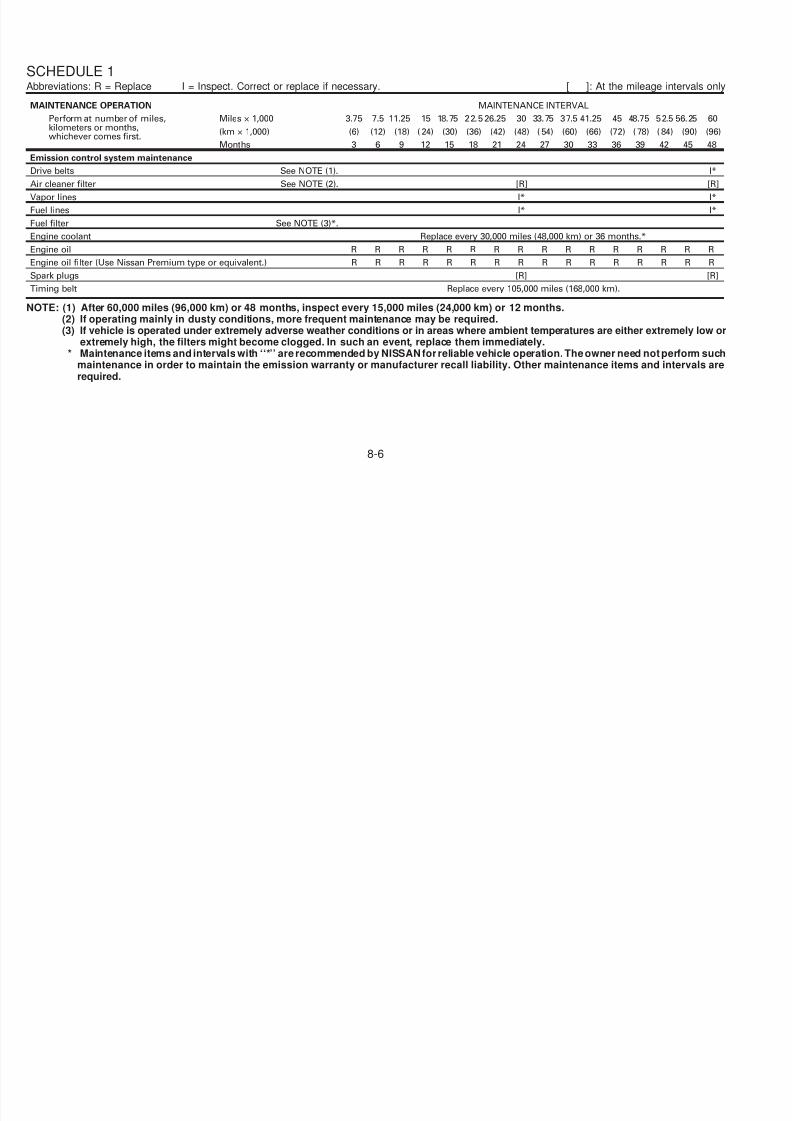
5/12/2018 1996-Nissan-Quest Manual Del Usuario - slidepdf.com
http://slidepdf.com/reader/full/1996-nissan-quest-manual-del-usuario 197/234
Your new NISSAN has been designed tohave minimum maintenance requirementswith longer service intervals to save youboth time and money. However, some day-to-day and regular maintenance is essentialto maintain your NISSAN’s good mechani-cal condition, as well as its emission andengine performance.
It is the owner’s responsibility to make surethe specified maintenance, as well as gen-eral maintenance, is performed.
As the vehicle owner, you are the only onewho can ensure that your vehicle receives
Periodic maintenance
The maintenance items listed in this sectionmust be serviced at regular intervals.
However, under severe driving conditions,additional or more frequent maintenance isrequired.
Where to go for service
If maintenance service is required or your
vehicle appears to malfunction, have thesystems checked and tuned by an autho-rized NISSAN dealer.
NISSAN technicians are well-trained spe-
During the normal day-to-day operation othe vehicle, general maintenance should bperformed regularly as prescribed in thsection. If you detect any unusual soundvibrations or smells, be sure to check for thcause or have your NISSAN dealer do promptly. In addition, you should notify youNISSAN dealer if you think repairs are required.
When performing any checks or maintnance work, closely observe the precations in the ‘‘Do-it-yourself operations’’ section.
GENERAL MAINTENANCE

5/12/2018 1996-Nissan-Quest Manual Del Usuario - slidepdf.com
http://slidepdf.com/reader/full/1996-nissan-quest-manual-del-usuario 198/234
ythe proper maintenance care. You are avital link in the maintenance chain.
General maintenance
General maintenance includes those itemswhich should be checked during normal
day-to-day operation of the vehicle. Theyare essential if your vehicle is to continue tooperate properly. It is your responsibility toperform these procedures regularly as pre-scribed.
These checks or inspections can be doneby yourself, a qualified technician or, if youprefer, your NISSAN dealer.
NISSAN technicians are well-trained spe-cialists and are kept up to date with thelatest service information through technicalbulletins, service tips, and in-dealershiptraining programs. They are completelyqualified to work on NISSAN’s vehicles be-fore they work on your vehicle, rather than
after they have worked on it.You can be confident that your NISSANdealer’s service department performs thebest job to meet the maintenance require-ments on your vehicle — in a reliable andeconomic way.
Additional information on the followinitems with ‘‘*’’ can be found in the ‘‘Do-iyourself operations’’ section.
OUTSIDE THE VEHICLE
The maintenance items listed here shou
be performed from time to time, unlesotherwise specified.
Tires* — Check the pressure with a gaugperiodically when at a service station, including the spare, and adjust to the specfied pressure if necessary. Check carefulfor damage, cuts or excessive wear.
Wheel nuts* — When checking the tire
8-2
make sure no nuts are missing, and checkfor any loose nuts. Tighten if necessary.
Tire rotation* — Tires should be rotatedevery 7,500 miles (12,000 km).
Wheel alignment and balance — If thevehicle should pull to either side while driv-ing on a straight and level road, or if youdetect uneven or abnormal tire wear, theremay be a need for wheel alignment.
If the steering wheel or seat vibrates atnormal highway speeds, wheel balancingmay be needed.
Windshield wiper blades* — Check for
INSIDE THE VEHICLE
The maintenance items listed here shouldbe checked on a regular basis, such aswhen performing periodic maintenance,cleaning the vehicle, etc.
Lights* — Make sure the headlights, stoplights, tail lights, turn signal lights, and otherlights are all operating properly and installedsecurely. Also check headlight aim.
Warning lights and buzzers/chimes —Make sure all warning lights andbuzzers/chimes are operating properly.
Wi d hi ld i d h * Ch k
Check that the head restraints move up andown smoothly and the locks hold securein all latched positions. Check that the sealeg latches lock securely in every anchoposition for the folding down rear seat andetachable rear seat (if so equipped).
Seat belts — Check that all parts of the sebelt system (e.g. buckles, anchors, adjusers and retractors) operate properly ansmoothly, and are installed securely. Chec
the belt webbing for cuts, fraying, wear odamage.
Accelerator pedal — Check the pedal foth ti d k th d
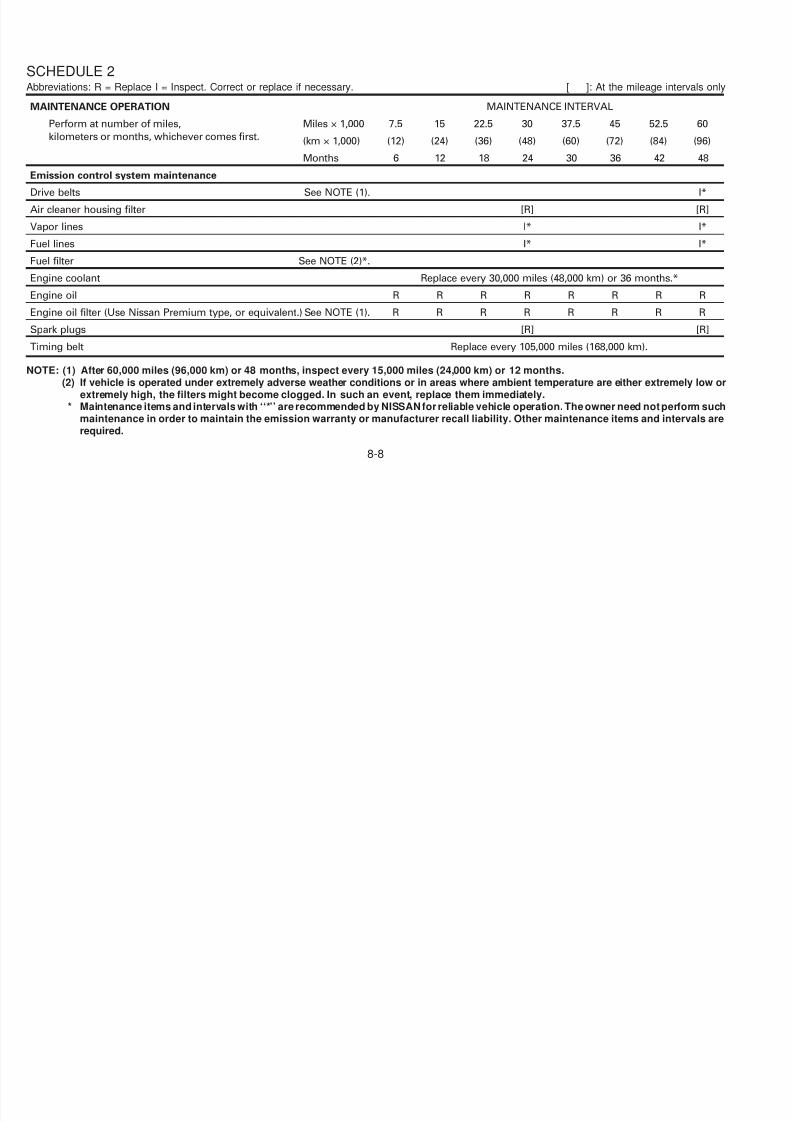
5/12/2018 1996-Nissan-Quest Manual Del Usuario - slidepdf.com
http://slidepdf.com/reader/full/1996-nissan-quest-manual-del-usuario 199/234
Windshield wiper blades — Check forcracks or wear if they do not wipe properly.
Doors and engine hood — Check that alldoors and the engine hood operate prop-erly. Also ensure that all latches lock se-curely. Lubricate hinges, latches, rollers andlinks if necessary. Make sure the secondary
latch keeps the hood from opening whenthe primary latch is released.
When driving in areas using road salt orother corrosive materials, check lubricationfrequently.
Windshield wiper and washer* — Checkthat the wipers and washer operate properlyand that the wipers do not streak.
Windshield defroster — Check that the aircomes out of the defroster outlets properlyand in sufficient quantity when operating theheater or air conditioner.
Steering wheel — Check for changes inthe steering conditions, such as excessivefreeplay, hard steering or strange noises.
Seats — Check seat position controls suchas seat adjusters, seatback recliner, etc. toensure they operate smoothly and alllatches lock securely in every position.
smooth operation and make sure the pedadoes not catch or require uneven effoKeep the floor mats away from the pedal.
Brakes — Check that the brakes do not puthe vehicle to one side when applied.
Brake pedal* — Check the pedal f
smooth operation and make sure it has thproper distance under it when depressefully. Check the brake booster function. Bcertain to keep floor mats away from thpedal.
Parking brake* — Check that the pedal adjusted to specification and confirm thyour vehicle is held securely on a fair
8-3
steep hill with only the parking brake ap-plied.
Automatic transmission ‘‘Park’’ mecha-nism — On a fairly steep hill check that yourvehicle is held securely with the selectorlever in the P (Park) position without apply-ing any brakes.
UNDER THE HOOD ANDVEHICLE
The maintenance items listed here shouldbe checked periodically, for example, eachtime you check the engine oil or refuel.
cell. It should be between the MAX and MINlines.
Engine drive belts* — Make sure no beltsare frayed, worn, cracked or oily.
Engine oil level* — Check the level afterparking the vehicle on a level surface andturning off the engine.
Power steering fluid level* and lines —Check the level when the fluid is cold and
the engine is turned off. Check the lines forproper attachment, leaks, cracks, etc.
Automatic transmission fluid level* —
stances, otherwise rust forms on the floopan, frame, fuel lines and around the exhaust system. At the end of winter, thunderbody should be thoroughly flushewith plain water, being careful to cleathose areas where mud and dirt may accumulate. See the ‘‘Appearance and interiocare’’ section for additional information.
Fluid leaks — Check under the vehicle fofuel, oil, water or other fluid leaks after th
vehicle has been parked for a while. Watedripping from the air conditioner after use normal. If you should notice any leaks or gasoline fumes are evident, check for th
d h i d i di l
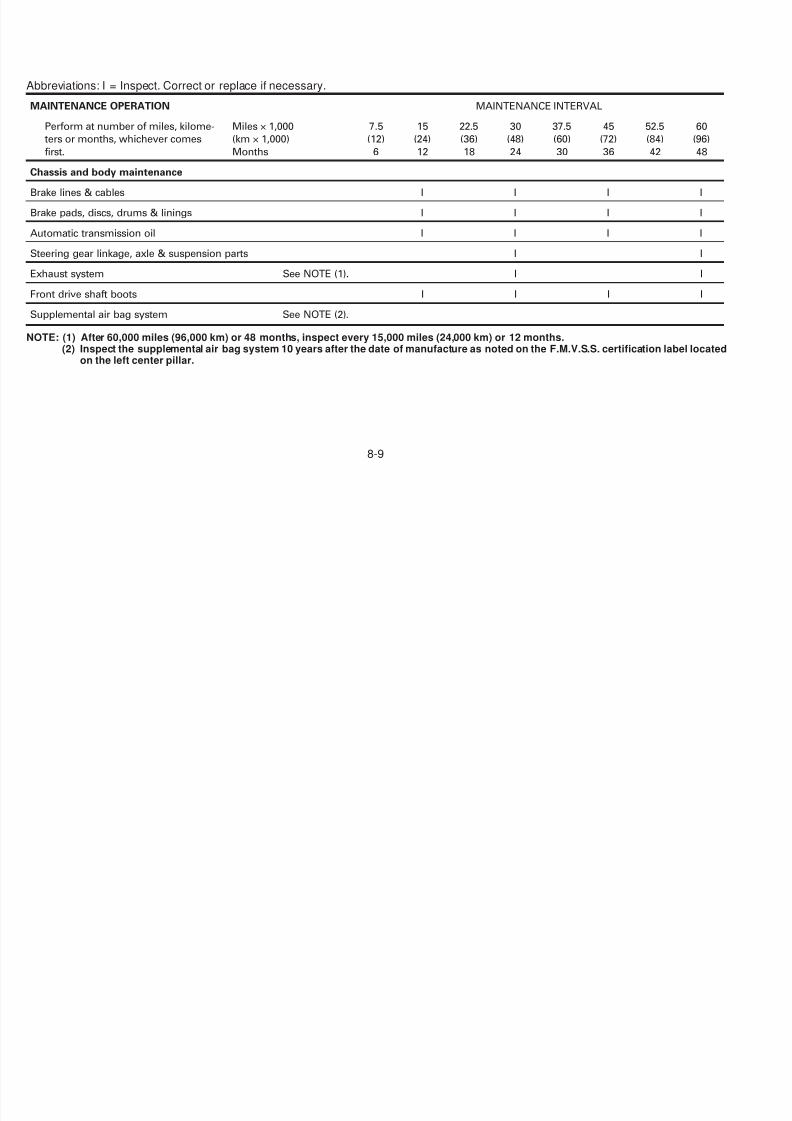
5/12/2018 1996-Nissan-Quest Manual Del Usuario - slidepdf.com
http://slidepdf.com/reader/full/1996-nissan-quest-manual-del-usuario 200/234
Windshield washer fluid* — Check thatthere is adequate fluid in the tank.
Engine coolant level* — Check the cool-ant level when the engine is cold.
Radiator and hoses — Check the front ofthe radiator and clean off any dirt, insects,leaves, etc., that may have accumulated.Make sure the hoses have no cracks, de-formation, rot, or loose connections.
Brake fluid level* — Make sure the brakefluid level is between the MAX and MINlines on the reservoir.
Battery* — Check the fluid level in each
Check the level after putting the selectorlever in P (Park) with the engine idling.
Exhaust system — Make sure there are nocracks, holes, loose joints or supports. If thesound of the exhaust seems unusual orthere is a smell of exhaust fumes, immedi-
ately have the exhaust system inspected bya qualified individual. (See the carbon mon-oxide warning in the ‘‘Starting and driving’’section.)
Underbody — The underbody is frequentlyexposed to corrosive substances such asthose used on icy roads or to control dust. Itis very important to remove these sub-
cause and have it corrected immediately.
8-4
To ensure smooth, trouble-free, safe andeconomical driving, NISSAN provides twodifferent maintenance schedules that maybe used, depending upon the conditions inwhich you usually drive. These schedulescontain both distance and time intervals, upto 60,000 miles (96,000 km)/48 months. Formost people, the odometer reading indi-cates when service is needed. However, ifyou drive very little, your vehicle should be
serviced at the regular time intervals shownin the schedule. After 60,000 miles (96,000km) or 48 months, continue periodicmaintenance at the same mileage/time
● Extensive idling and/or low speeddriving for long distances, such aspolice, taxi or door-to-door deliveryuse.
● Driving in dusty conditions.
● Driving on rough, muddy, or saltspread roads.
● Towing a trailer, using a camper or acar-top carrier.
SCHEDULE 2
Follow Periodic Maintenance Schedule 2 ifnone of the driving conditions shown in
PERIODIC MAINTENANCESCHEDULES
5/12/2018 1996-Nissan-Quest Manual Del Usuario - slidepdf.com
http://slidepdf.com/reader/full/1996-nissan-quest-manual-del-usuario 201/234
intervals.
SCHEDULE 1
Follow Periodic Maintenance Schedule 1 ifyour driving habits frequently include one ormore of the following driving conditions:
● Repeated short trips of less than 5miles (8 km).
● Repeated short trips of less than 10miles (16 km) with outside tempera-tures remaining below freezing.
● Operating in hot weather in stop-and-go ‘‘rush hour’’ traffic.
none of the driving conditions shown inSchedule 1 apply to your driving habits.
8-5
SCHEDULE 1Abbreviations: R = Replace I = Inspect. Correct or replace if necessary. [ ]: At the mileage intervals on
MAINTENANCE OPERATION MAINTENANCE INTERVAL
Perform at number of miles,kilometers or months,whichever comes first.
Miles × 1,000 3.75 7.5 11.25 15 18.75 2 2.5 26.25 30 33.75 3 7.5 41.25 45 48.75 5 2.5 56.25 60
(km × 1,000) (6) (12) (18) ( 24) (30) (36) (42) (48) ( 54) (60) (66) (72) ( 78) ( 84) (90) (96
Months 3 6 9 12 15 18 21 24 27 30 33 36 39 42 45 48
Emission control system maintenance
Drive belts See NOTE (1). I*
Air cleaner filter See NOTE (2). [R] [R
Vapor lines I* I*
Fuel lines I* I*
Fuel filter See NOTE (3)*.
Engine coolant Replace every 30,000 miles (48,000 km) or 36 months.*
Engine oil R R R R R R R R R R R R R R R R
5/12/2018 1996-Nissan-Quest Manual Del Usuario - slidepdf.com
http://slidepdf.com/reader/full/1996-nissan-quest-manual-del-usuario 202/234
g
Engine oil filter (Use Nissan Premium type or equivalent.) R R R R R R R R R R R R R R R R
Spark plugs [R] [R
Timing belt Replace every 105,000 miles (168,000 km).
NOTE: (1) After 60,000 miles (96,000 km) or 48 months, inspect every 15,000 miles (24,000 km) or 12 months.(2) If operating mainly in dusty conditions, more frequent maintenance may be required.(3) If vehicle is operated under extremely adverse weather conditions or in areas where ambient temperatures are either extremely low o
extremely high, the filters might become clogged. In such an event, replace them immediately.* Maintenance items and intervals with ‘‘*’’ are recommended by NISSAN for reliable vehicle operation. The owner need not perform suc
maintenance in order to maintain the emission warranty or manufacturer recall liability. Other maintenance items and intervals arrequired.
8-6
Abbreviations: I = Inspect. Correct or replace if necessary.
MAINTENANCE OPERATION MAINTENANCE INTERVAL
Perform at number of miles,
kilometers or months, whichever
comes first.
Miles × 1,000 7.5 15 22.5 30 37.5 45 52.5 60
(km × 1,000) (12) (24) (36) (48) (60) (72) (84) (96)
Months 6 12 18 24 30 36 42 48
Chassis and body maintenance
Brake lines & cables I I I I
Brake pads, discs, drums & linings I I I I I I I I
Automatic transmission fluid See NOTE (1). I I I I
5/12/2018 1996-Nissan-Quest Manual Del Usuario - slidepdf.com
http://slidepdf.com/reader/full/1996-nissan-quest-manual-del-usuario 203/234
Steering gear & linkage, axle & suspension parts I I I I I I I I
Steering linkage ball joints & front suspension ball joints I I I I I I I I
Exhaust system I I I I I I I I
Front drive shaft boots I I I I I I I I
Supplemental air bag system See NOTE (2).
NOTE: (1) If towing a trailer, using a camper or a car-top carrier, or driving on rough or muddy roads, change (not just inspect) fluid at eve30,000 miles (48,000 km) or 24 months.
(2) Inspect the supplemental air bag system 10 years after the date of manufacture as noted on the F.M.V.S.S. certification label locateon the left center pillar.
8-7
SCHEDULE 2Abbreviations: R = Replace I = Inspect. Correct or replace if necessary. [ ]: At the mileage intervals on
MAINTENANCE OPERATION MAINTENANCE INTERVAL
Perform at number of miles,
kilometers or months, whichever comes first.
Miles × 1,000 7.5 15 22.5 30 37.5 45 52.5 60
(km × 1,000) (12) (24) (36) (48) (60) (72) (84) (96)
Months 6 12 18 24 30 36 42 48
Emission control system maintenance
Drive belts See NOTE (1). I*
Air cleaner housing filter [R] [R]
Vapor lines I* I*
Fuel lines I* I*

5/12/2018 1996-Nissan-Quest Manual Del Usuario - slidepdf.com
http://slidepdf.com/reader/full/1996-nissan-quest-manual-del-usuario 204/234
Fuel filter See NOTE (2)*.
Engine coolant Replace every 30,000 miles (48,000 km) or 36 months.*
Engine oil R R R R R R R R
Engine oil filter (Use Nissan Premium type, or equivalent.) See NOTE (1). R R R R R R R R
Spark plugs [R] [R]
Timing belt Replace every 105,000 miles (168,000 km).
NOTE: (1) After 60,000 miles (96,000 km) or 48 months, inspect every 15,000 miles (24,000 km) or 12 months.(2) If vehicle is operated under extremely adverse weather conditions or in areas where ambient temperature are either extremely low o
extremely high, the filters might become clogged. In such an event, replace them immediately.* Maintenance items and intervals with ‘‘*’’ are recommended by NISSAN for reliable vehicle operation. The owner need not perform suc
maintenance in order to maintain the emission warranty or manufacturer recall liability. Other maintenance items and intervals arrequired.
8-8
Abbreviations: I = Inspect. Correct or replace if necessary.
MAINTENANCE OPERATION MAINTENANCE INTERVAL
Perform at number of miles, kilome-
ters or months, whichever comes
first.
Miles × 1,000
(km × 1,000)
Months
7.5
(12)
6
15
(24)
12
22.5
(36)
18
30
(48)
24
37.5
(60)
30
45
(72)
36
52.5
(84)
42
60
(96)
48
Chassis and body maintenance
Brake lines & cables I I I I
Brake pads, discs, drums & linings I I I I
Automatic transmission oil I I I I
Steering gear linkage, axle & suspension parts I I
5/12/2018 1996-Nissan-Quest Manual Del Usuario - slidepdf.com
http://slidepdf.com/reader/full/1996-nissan-quest-manual-del-usuario 205/234
g g g , p p
Exhaust system See NOTE (1). I I
Front drive shaft boots I I I I
Supplemental air bag system See NOTE (2).
NOTE: (1) After 60,000 miles (96,000 km) or 48 months, inspect every 15,000 miles (24,000 km) or 12 months.(2) Inspect the supplemental air bag system 10 years after the date of manufacture as noted on the F.M.V.S.S. certification label locate
on the left center pillar.
8-9
EXPLANATION OFMAINTENANCE ITEMS
Additional information on the followingitems with ‘‘*’’ is found in the ‘‘Do-it-yourself operations’’ section.
Emission control system mainte-nance
Drive belts* — Check drive belts for wear,
fraying or cracking and also for proper ten-sion. Replace the drive belts if found dam-aged.
Air cleaner filter — Under normal drivingconditions the air cleaner filter should be
Fuel filter — If the vehicle is operatedunder extremely adverse weather condi-tions or in areas where ambient tempera-tures are either extremely low or extremelyhigh, the filter might become clogged. Insuch an event, replace the filter immedi-ately.
Engine coolant* — Changing engine cool-ant can be performed by your NISSANdealer or procedures can be found in the
Service Manual. Improper air relief afterchanging coolant can result in reducedheater performance and overheating.
Engine oil & oil filter* — Under normal
vacuum hoses, connections & check valveand parking brake cables for proper attachment, leaks, cracks, chafing, abrasion, deterioration, etc.
Brake pads, discs, drums & linings —Check these and the other neighborinbrake components for wear, deterioratioand leaks. Under severe driving conditionthey may have to be inspected more frequently.
Automatic transmission fluid* — Checthe fluid level and visually inspect for signof leakage.
Under severe driving conditions, the flu
5/12/2018 1996-Nissan-Quest Manual Del Usuario - slidepdf.com
http://slidepdf.com/reader/full/1996-nissan-quest-manual-del-usuario 206/234
conditions, the air cleaner filter should bereplaced in accordance with the mainte-nance schedule. However, driving the ve-hicle in dusty areas may cause more rapidclogging of the element. Consequently, theelement may have to be replaced morefrequently.
Vapor lines — Check vapor lines and con-nections for failure or looseness. If leaks arefound, replace them.
Fuel lines — Check the fuel hoses, pipingand connections for leaks, looseness ordeterioration. Replace any parts if they aredamaged.
Engine oil & oil filter Under normaldriving conditions, the engine oil and oil filtershould be replaced in accordance with themaintenance schedule. However, under se-vere driving conditions, they may have to bereplaced more frequently.
Spark plugs* — Replace with new plugshaving the correct heat range.
Timing belt — Replace the timing belt fordriving the camshaft.
Chassis and body maintenance
Brake lines & cables — Check the brakelines and hoses (including brake booster
Under severe driving conditions, the flushould be replaced at the specified interva
Steering gear & linkage, axle & suspension parts, and drive shaft boots —Check for damage, looseness and leakagof oil or grease. Under severe driving conditions, more frequent inspection should bperformed.
Steering linkage ball joints & front suspension ball joints — Check the ball joinfor damage, looseness and grease leakage
8-10
Exhaust system — Visually check the ex-haust pipes, muffler, and hangers for properattachment, leaks, cracks, chafing, abra-sion, deterioration, etc. Under severe driv-ing conditions, inspection should be per-formed more frequently.
Air bag system — Check the air bagsystem components for proper attachment,damage, deformities, cracks, rust, etc. Workaround and on the air bag system should be
done by an authorized NISSAN dealer.
5/12/2018 1996-Nissan-Quest Manual Del Usuario - slidepdf.com
http://slidepdf.com/reader/full/1996-nissan-quest-manual-del-usuario 207/234
8-11
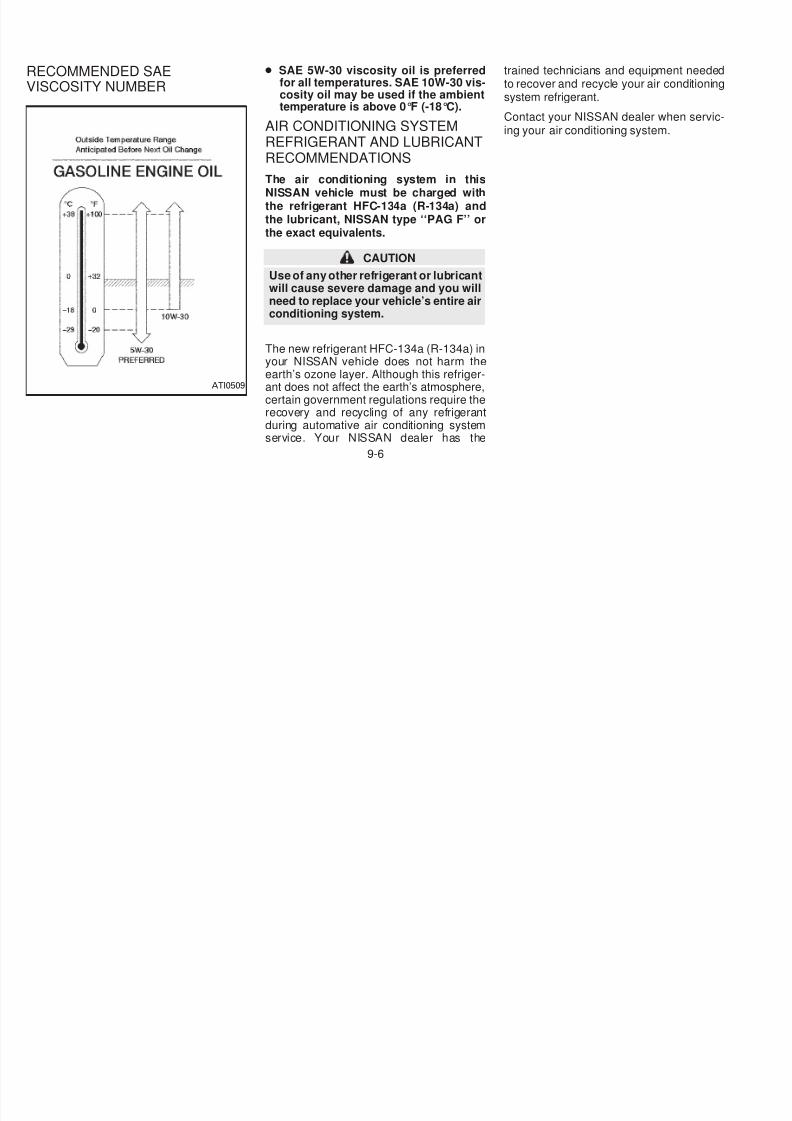
5/12/2018 1996-Nissan-Quest Manual Del Usuario - slidepdf.com
http://slidepdf.com/reader/full/1996-nissan-quest-manual-del-usuario 208/234
9 Technical and consumer information
Capacities and recommended
fuel/lubricants ....................................................... 9-2
Engine .................................................................. 9-7
Wheel/tire size...................................................... 9-8
Dimensions and weights ...................................... 9-8
Registering your vehicle
in another country ................................................ 9-9
Vehicle identification............................................. 9-9
Installing the license plate.................................. 9-11
Vehicle loading information................................ 9-12
Trailer towing...................................................... 9-13
Uniform tire quality grading................................ 9-18
Emission control system warranty ..................... 9-19
Reporting safety defects (USA) ......................... 9-19
NISSAN service/owner’s manual order form ..... 9-20
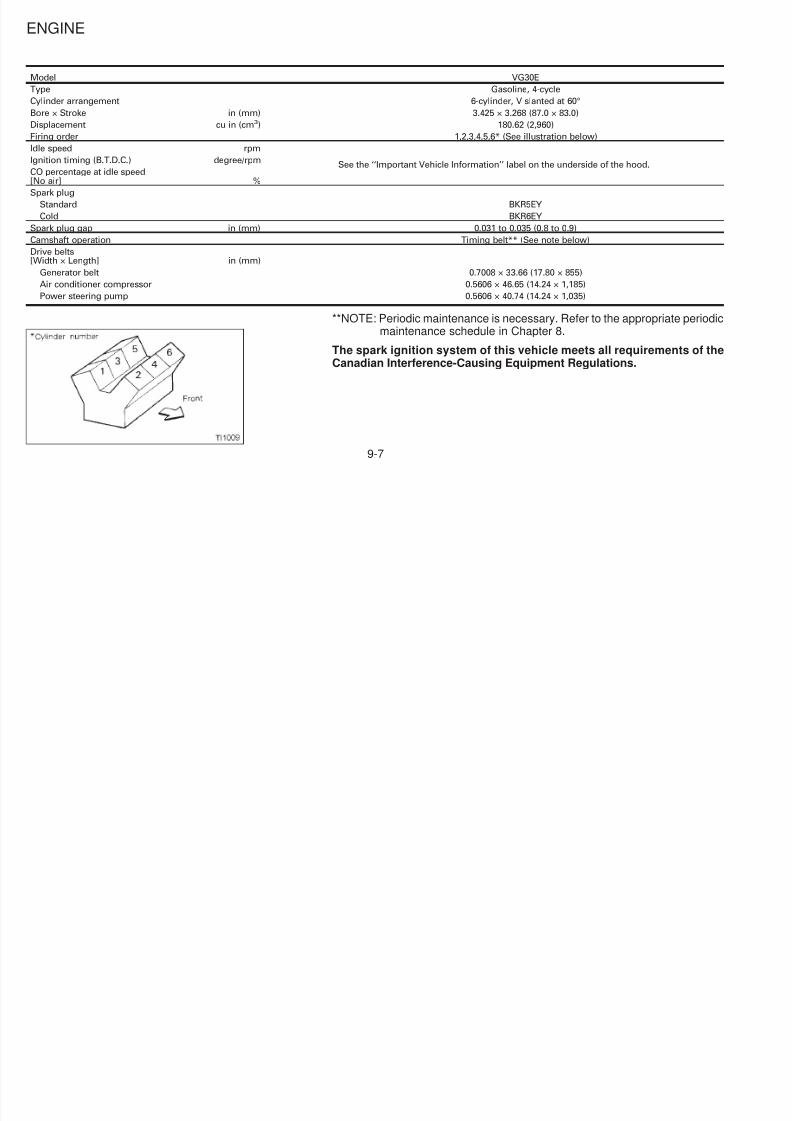
5/12/2018 1996-Nissan-Quest Manual Del Usuario - slidepdf.com
http://slidepdf.com/reader/full/1996-nissan-quest-manual-del-usuario 209/234
The following are approximate capacities. The actual refill capacities may be a littledifferent. When refilling, follow the procedure instructed in the ‘‘Do-it-yourselfoperations’’ section to determine the proper refill capacity.
Capacity (Approximate)Recommended SpecificationsUS
measureImp
measureLiter
Fuel 20 gal 16-5/8 gal 75.7Unleaded gasoline with an octane rat-ing of at least 87 AKI (RON 91)(1)
Engine oil (Refill)
With oil filter 4-1/4 qt 3-1/2 qt 4.0 API SG or SH and Energy Conserving II (2)API Certification Mark (2)Without oil filter 3-7/8 qt 3-1/8 qt 3.6
Cooling system
With reservoir tankWith rear heater 12-3/4 qt 10-5/8 qt 12.1 Anti-freeze coolant
(Ethylene glycol base)Without rear heater 11-3/8 qt 9-3/8 qt 10.7
Reservoir 3/4 qt 5/8 qt 0.7
Nissan matic ‘D’ (Continental U.S. and
FUEL RECOMMENDATIONAll models are designed to operate ounleaded gasoline with an octane ratinof at least 87 AKI (Anti-Knock Indexnumber (Research octane number 91).
CAUTION
Using a fuel other than that specifiedcould adversely affect the emissioncontrol devices and systems, and
could also affect warranty coverage.Under no circumstances should aleaded gasoline be used, since this wildamage the three way catalyst.
CAPACITIES AND RECOMMENDEDFUEL/LUBRICANTS
5/12/2018 1996-Nissan-Quest Manual Del Usuario - slidepdf.com
http://slidepdf.com/reader/full/1996-nissan-quest-manual-del-usuario 210/234
Automatic transaxle fluid Alaska) or Genuine Nissan AutomaticTransmission Fluid (Canada).(3)
Power steering fluid Refill to the proper oil levelaccordingto theinstructions in the‘‘Do-it-yourself operations’’section.
Type F automatic transmission fluid orequivalent
Brake fluidGenuine NISSAN Brake Fluid(4) orequivalentDOT 3 (US FMVSS No. 116)
Multi-purpose grease — — — NLGI No. 2 (Lithium complex)
Air conditioning system refrigerant — — — HFC-134a (R-134a)(5)
(1): For further details, see ‘‘Fuel recommendation’’.(2): For further details, see ‘‘Recommended SAE engine oil viscosity’’.(3): Dexron III/Mercon or equivalent may also be used. Outside the Continental United States and
Alaska contact a Nissan dealership for more information regarding suitable fluids, including recom-mended brand(s) of Dexron III/Mercon or Dexron IIE/Mercon Automatic Transmission Fluid.
(4): Available in mainland U.S.A. through your NISSAN dealer.(5): For further details, see ‘‘Air conditioner specification label’’.
Reformulated gasoline
Some fuel suppliers are now producing reformulated gasolines. These gasolines arspecially designed to reduce vehicle emis
sions. NISSAN supports efforts towardcleaner air and suggests that you use refomulated gasoline when available.
9-2
Gasoline containing oxygenatesSome fuel suppliers sell gasoline containingoxygenates such as ethanol, MTBE andmethanol with or without advertising theirpresence. Nissan does not recommend theuse of fuels of which the oxygenate contentand the fuel compatibility for your NISSANcannot be readily determined. If in doubt,ask your service station manager.
If you use oxygenate-blend gasoline, pleasetake the following precautions as the usageof such fuels may cause vehicle perfor-mance problems and/or fuel system dam-age.
sion inhibitors. If not properly formu-lated with appropriate cosolvents andcorrosion inhibitors, such methanolblends may cause fuel system dam-age and/or vehicle performance prob-lems. At this time, sufficient data isnot available to ensure that all metha-nol blends are suitable for use in NIS-SAN vehicles.
If any undesirable driveability problems
such as engine stalling and difficult hot-starting are experienced after usingoxygenate-blend fuels, immediately changeto a non-oxygenate fuel or a fuel with a lowblend of MTBE
can be harmful to the fuel system anengine.
Octane rating tips
In most parts of North America, you shouuse unleaded gasoline with an octane ratinof at least 87 AKI (Anti-Knock Index) number. However, you may use unleaded gasoline with an octane rating as low as 85 AK(Anti-Knock Index) in high altitude area(over 4,000 ft [1,219 m]) such as: ColoradoMontana, New Mexico, Utah, Wyomingnortheastern Nevada, southern Idahwestern South Dakota, western Nebraskaand that part of Texas which is directsouth of New Mexico
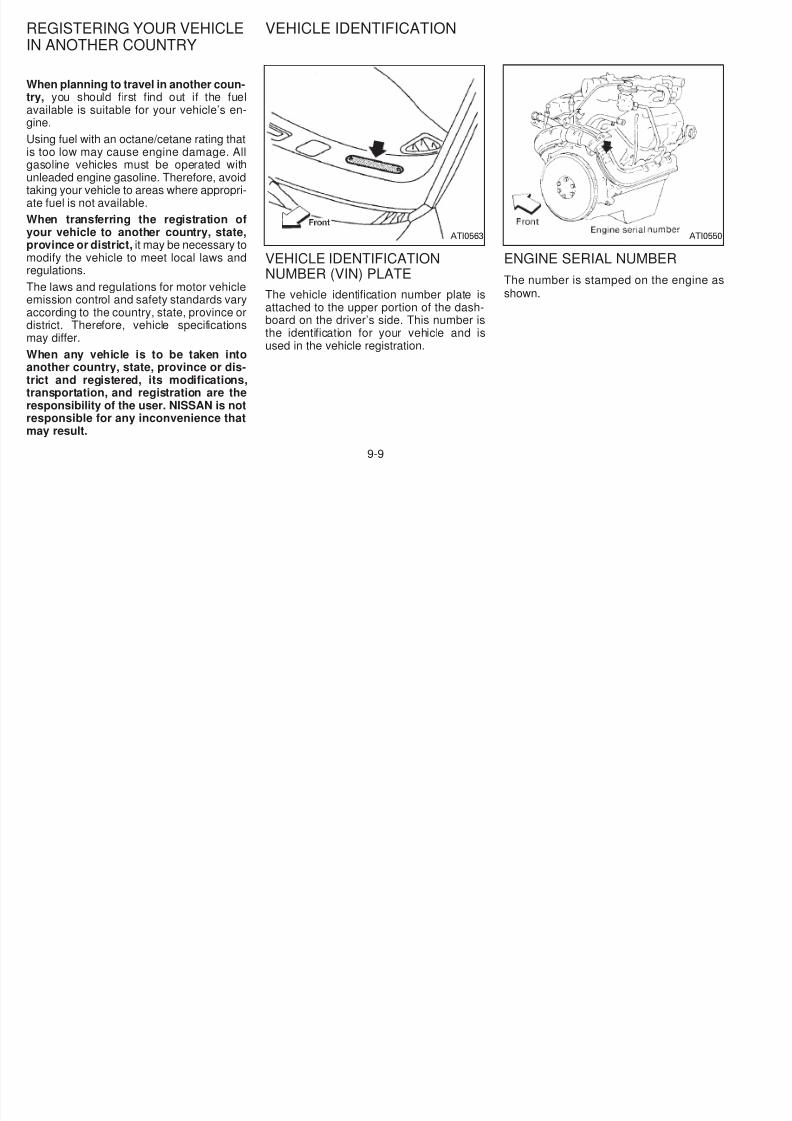
5/12/2018 1996-Nissan-Quest Manual Del Usuario - slidepdf.com
http://slidepdf.com/reader/full/1996-nissan-quest-manual-del-usuario 211/234
● The fuel should be unleaded and havean octane rating no lower than thatrecommended for unleaded gasoline.
● If an oxygenate-blend, excepting amethanol blend, is used, it should
contain no more than 10% oxygenate.(MTBE may, however, be added up to15%.)
● If a methanol blend is used, it shouldcontain no more than 5% methanol(methyl alcohol, wood alcohol). Itshould also contain a suitable amountof appropriate cosolvents and corro-
blend of MTBE.
Take care not to spill gasoline duringrefueling. Gasoline containing oxygen-ates can cause paint damage.
After market fuel additives
NISSAN does not recommend the use ofany fuel additives (i.e.: fuel injector cleaner,octane booster, intake valve deposit remov-ers, etc.) which are sold commercially.Many of these additives intended for gum,varnish or deposit removal may containactive solvents or similar ingredients that
south of New Mexico.
Using unleaded gasoline with an octanrating lower than stated above can causpersistent, heavy ‘‘spark knock.’’ (‘‘Sparknock’’ is a metallic rapping noise.) severe, this can lead to engine damage.
you detect a persistent heavy sparknock even when using gasoline of thstated octane rating, or if you hear steadspark knock while holding a steadspeed on level roads, have your dealecorrect the condition. Failure to correcthe condition is misuse of the vehicle, fowhich NISSAN is not responsible.
9-3
Incorrect ignition timing results in knocking,after-run, and/or overheating. This in turnmay cause excessive fuel consumption ordamage to the engine. If any of the abovesymptoms are encountered, have your ve-hicle checked at a NISSAN dealer or othercompetent service facility.
However, now and then you may noticelight spark knock for a short time whileaccelerating or driving up hills. This is
no cause for concern, because you getthe greatest fuel benefit when there islight spark knock for a short time underheavy engine load.
ENGINE OIL AND OIL FILTER Only those engine oils with the America
ATI0507
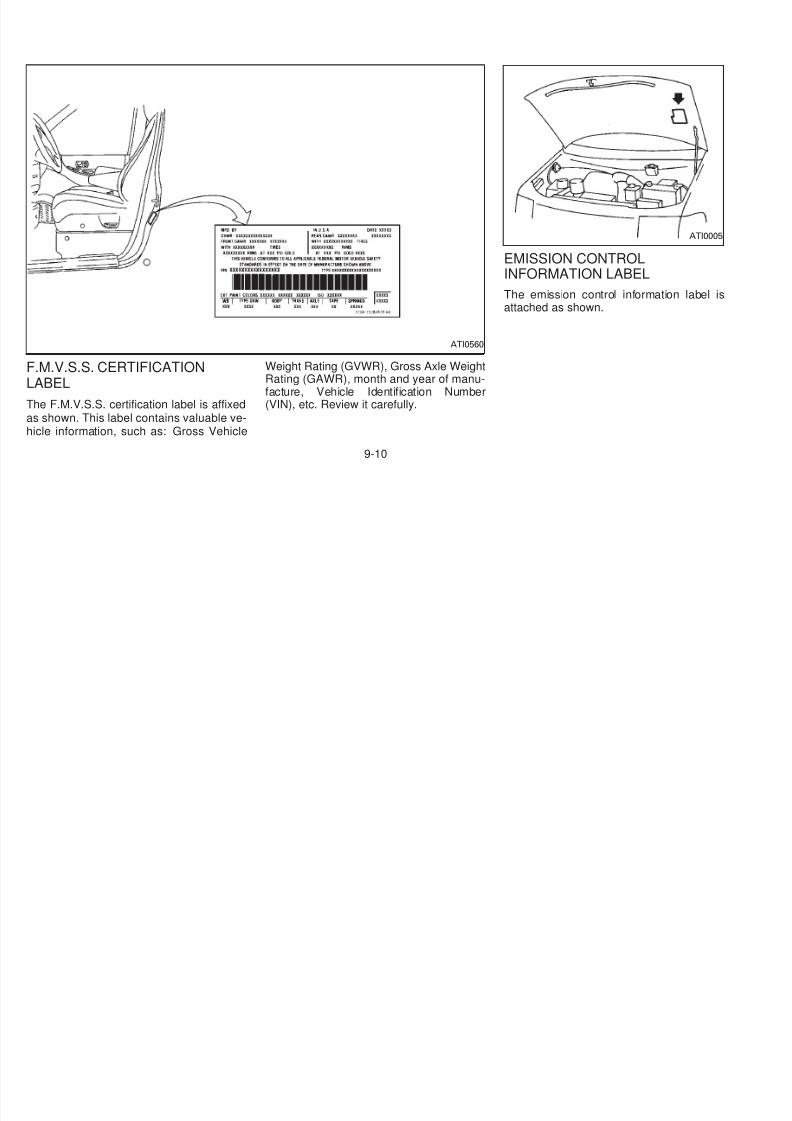
5/12/2018 1996-Nissan-Quest Manual Del Usuario - slidepdf.com
http://slidepdf.com/reader/full/1996-nissan-quest-manual-del-usuario 212/234
RECOMMENDATION
Selecting the correct oil
It is essential to chose the correct qualityand viscosity oil to ensure satisfactory en-gine life and performance. Nissan recom-mends the use of a low friction oil (energyconserving oil) in order to improve fueleconomy and conserve energy. Oils whichdo not have the specified quality labelshould not be used as they could causeengine damage.
Petroleum Institute (API) CERTIFICATIOMARK on the front of the container shoulbe used. This type of oil supersedes thexisting API SG or SH and Energy Conserving II categories.
If you cannot find engine oil with the CERTIFICATION MARK, an API SG or SH anEnergy Conserving II oil with API ServicSymbol may be used. An oil with a singdesignation SG or SH, or in combinatiowith other categories (for example, SG/Cor SG/CD) may also be used if one with th
9-4
API CERTIFICATION MARK cannot befound.
Mineral based or synthetic type oils may beused in your NISSAN vehicle. These oilsmust however, meet the API quality andSAE viscosity ratings specified for your ve-hicle. Do not mix mineral based and syn-thetic type oils in the engine at the sametime.
Oil additivesNISSAN does not recommend the use of oiladditives. The use of an oil additive is notnecessary when the proper oil type is usedand maintenance intervals are followed.
than that recommended could cause seri-ous engine damage.
Selecting the correct oil filter
Your new vehicle is equipped with a high-quality genuine NISSAN oil filter. Whenreplacing, use the genuine oil filter or itsequivalent for the reason described in‘‘Change intervals’’.
Change intervals
The oil and oil filter change intervals for yourengine are based on the use of the specifiedquality oils and filters. Oil and filter otherthan the specified quality, or oil and filterchange intervals longer than recommended
— repeated short distance driving at cooutside temperatures,
— driving in dusty conditions,
— extensive idling,
— towing a trailer.

5/12/2018 1996-Nissan-Quest Manual Del Usuario - slidepdf.com
http://slidepdf.com/reader/full/1996-nissan-quest-manual-del-usuario 213/234
a d a te a ce te a s a e o o ed
Oil which may contain foreign matter or hasbeen previously used should not be used.
Oil viscosity
The engine oil viscosity or thickness
changes with temperature. Because of this,it is important to select the engine oil viscos-ity based on the temperatures at which thevehicle will be operated before the next oilchange. The chart ‘‘Recommended SAEviscosity number’’ shows the recommendedoil viscosities for the expected ambient tem-peratures. Choosing an oil viscosity other
change intervals longer than recommendedcould reduce engine life. Damage to en-gines caused by improper maintenance oruse of incorrect oil and filter quality and/orviscosity is not covered by the new NISSANvehicle warranties.
Your engine was filled with a high qualityengine oil when it was built. You do not haveto change the oil before the first recom-mended change interval. Oil and filterchange intervals depend upon how you useyour vehicle. Operation under the followingconditions may require more frequent oiland filter changes:
9-5
RECOMMENDED SAEVISCOSITY NUMBER
● SAE 5W-30 viscosity oil is preferredfor all temperatures. SAE 10W-30 vis-cosity oil may be used if the ambienttemperature is above 0°F (-18°C).
AIR CONDITIONING SYSTEMREFRIGERANT AND LUBRICANTRECOMMENDATIONS
The air conditioning system in thisNISSAN vehicle must be charged with
the refrigerant HFC-134a (R-134a) andthe lubricant, NISSAN type ‘‘PAG F’’ orthe exact equivalents.
CAUTION
trained technicians and equipment needeto recover and recycle your air conditioninsystem refrigerant.
Contact your NISSAN dealer when servicing your air conditioning system.
5/12/2018 1996-Nissan-Quest Manual Del Usuario - slidepdf.com
http://slidepdf.com/reader/full/1996-nissan-quest-manual-del-usuario 214/234
Use of any other refrigerant or lubricantwill cause severe damage and you willneed to replace your vehicle’s entire airconditioning system.
The new refrigerant HFC-134a (R-134a) inyour NISSAN vehicle does not harm theearth’s ozone layer. Although this refriger-ant does not affect the earth’s atmosphere,certain government regulations require therecovery and recycling of any refrigerantduring automative air conditioning systemservice. Your NISSAN dealer has the
ATI0509
9-6
Model VG30E
Type Gasoline, 4-cycle
Cylinder arrangement 6-cylinder, V slanted at 60°
Bore × Stroke in (mm) 3.425 × 3.268 (87.0 × 83.0)
Displacement cu in (cm3) 180.62 (2,960)
Firing order 1,2,3,4,5,6* (See illustration below)
Idle speed rpm
See the ‘‘Important Vehicle Information’’ label on the underside of the hood.Ignition timing (B.T.D.C.) degree/rpm
CO percentage at idle speed[No air] %
Spark plug
Standard BKR5EY
Cold BKR6EY
Spark plug gap in (mm) 0.031 to 0.035 (0.8 to 0.9)
Camshaft operation Timing belt** (See note below)
Drive belts[Width × Length] in (mm)
G b l 0 7008 33 66 (17 80 855)
ENGINE
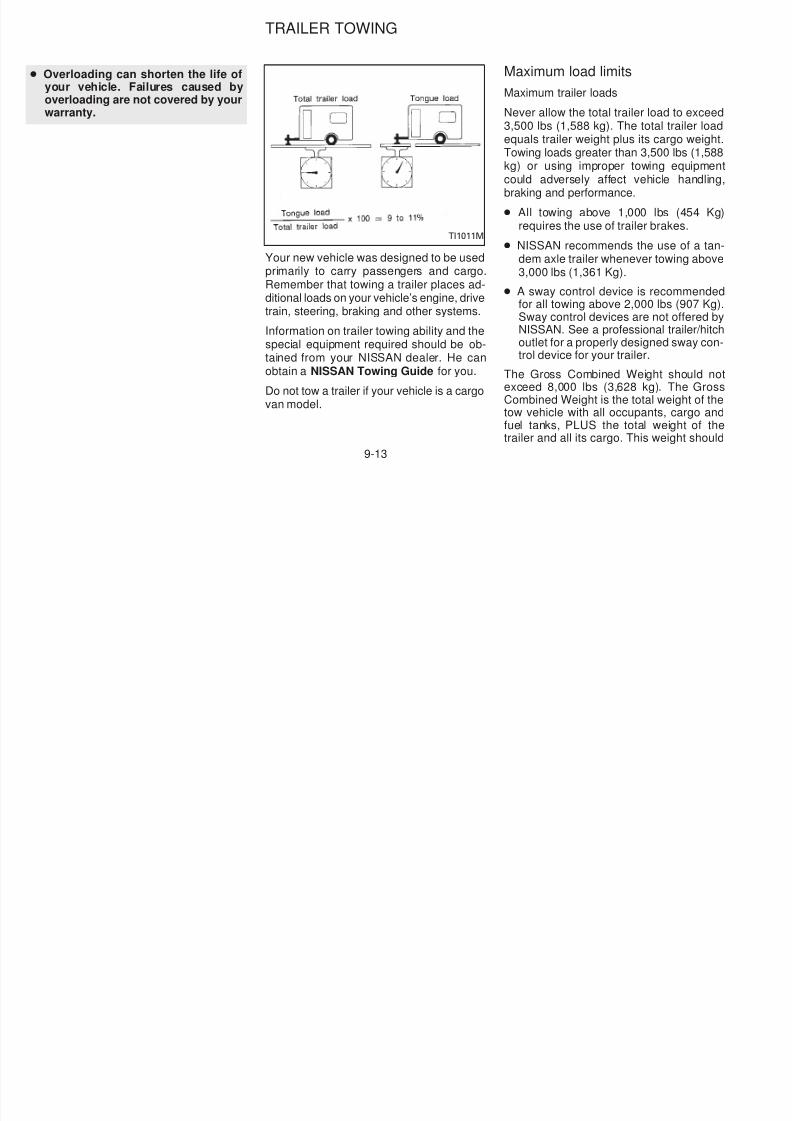
5/12/2018 1996-Nissan-Quest Manual Del Usuario - slidepdf.com
http://slidepdf.com/reader/full/1996-nissan-quest-manual-del-usuario 215/234
Generator belt 0.7008 × 33.66 (17.80 × 855)
Air conditioner compressor 0.5606 × 46.65 (14.24 × 1,185)
Power steering pump 0.5606 × 40.74 (14.24 × 1,035)
**NOTE: Periodic maintenance is necessary. Refer to the appropriate periodmaintenance schedule in Chapter 8.
The spark ignition system of this vehicle meets all requirements of thCanadian Interference-Causing Equipment Regulations.
9-7
Road wheel Steel 5-1/2 - JJ × 15
Aluminum 6-1/2 - JJ × 15
Offset in (mm) 1.77 (45)
Tire size Conventional P205/75R15 97 S
Cast aluminum* P205/75R15 97 S
P215/70R15 97 T
Spare T125/90D16
P205/75R15 97 S*
P215/70R15 97 T*
*: Option
Overall length in (mm) 189.9 (4,824)
Overall width in (mm) 73.7 (1,871)
Overall height in (mm) 67.6 (1,716)
Front tread in (mm) 63.4 (1,610)
Rear tread in (mm) 63.4 (1,610)
Wheelbase in (mm) 112.2 (2,850)
Gross vehicle weight
rating lb (kg)
See the ‘‘F.M.V.S.S. certification label’’
on the left center pillar.Gross axle weight rating
Front lb (kg)
R lb (k )
WHEEL/TIRE SIZE DIMENSIONS AND WEIGHTS
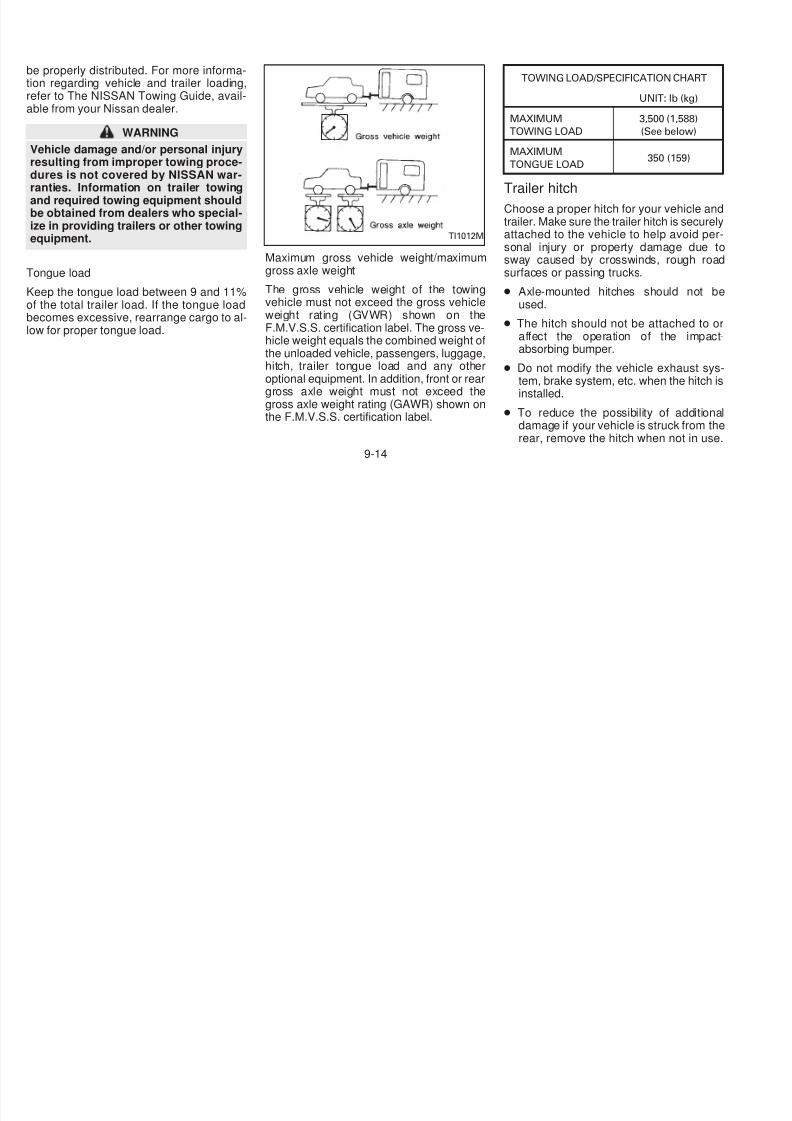
5/12/2018 1996-Nissan-Quest Manual Del Usuario - slidepdf.com
http://slidepdf.com/reader/full/1996-nissan-quest-manual-del-usuario 216/234
Rear lb (kg)
9-8
When planning to travel in another coun-try, you should first find out if the fuelavailable is suitable for your vehicle’s en-gine.
Using fuel with an octane/cetane rating thatis too low may cause engine damage. Allgasoline vehicles must be operated withunleaded engine gasoline. Therefore, avoidtaking your vehicle to areas where appropri-ate fuel is not available.
When transferring the registration ofyour vehicle to another country, state,province or district, it may be necessary tomodify the vehicle to meet local laws andregulations
VEHICLE IDENTIFICATIONNUMBER (VIN) PLATE
ENGINE SERIAL NUMBER
ATI0563 ATI055
REGISTERING YOUR VEHICLEIN ANOTHER COUNTRY
VEHICLE IDENTIFICATION
5/12/2018 1996-Nissan-Quest Manual Del Usuario - slidepdf.com
http://slidepdf.com/reader/full/1996-nissan-quest-manual-del-usuario 217/234
regulations.
The laws and regulations for motor vehicleemission control and safety standards varyaccording to the country, state, province ordistrict. Therefore, vehicle specificationsmay differ.
When any vehicle is to be taken intoanother country, state, province or dis-trict and registered, its modifications,transportation, and registration are theresponsibility of the user. NISSAN is notresponsible for any inconvenience thatmay result.
NUMBER (VIN) PLATE
The vehicle identification number plate isattached to the upper portion of the dash-board on the driver’s side. This number isthe identification for your vehicle and is
used in the vehicle registration.
The number is stamped on the engine ashown.
9-9
EMISSION CONTROLINFORMATION LABEL
ATI000
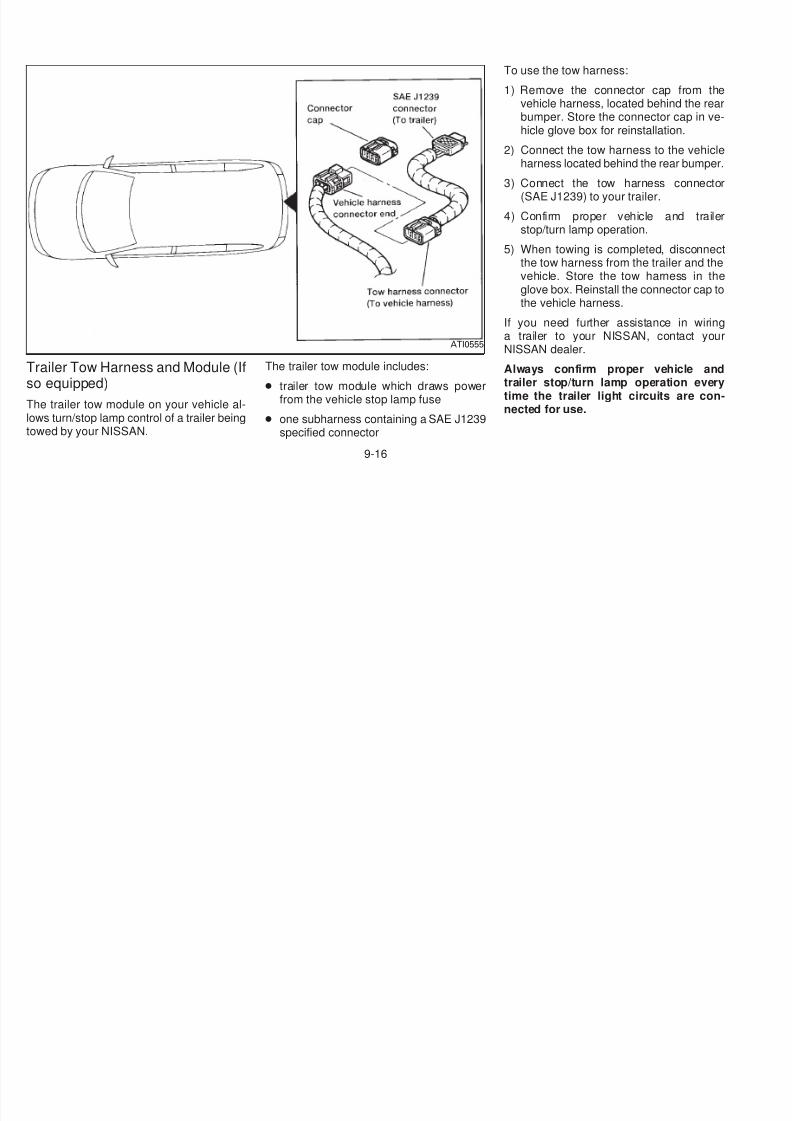
5/12/2018 1996-Nissan-Quest Manual Del Usuario - slidepdf.com
http://slidepdf.com/reader/full/1996-nissan-quest-manual-del-usuario 218/234
F.M.V.S.S. CERTIFICATIONLABEL
The F.M.V.S.S. certification label is affixedas shown. This label contains valuable ve-hicle information, such as: Gross Vehicle
Weight Rating (GVWR), Gross Axle WeightRating (GAWR), month and year of manu-facture, Vehicle Identification Number(VIN), etc. Review it carefully.
INFORMATION LABEL
The emission control information label attached as shown.
ATI0560
9-10
TIRE PLACARD
AIR CONDITIONER SPECIFICA-TION LABEL
ATI0561
INSTALLING THE LICENSEPLATE
5/12/2018 1996-Nissan-Quest Manual Del Usuario - slidepdf.com
http://slidepdf.com/reader/full/1996-nissan-quest-manual-del-usuario 219/234
The cold tire pressure is shown on the tireplacard affixed to the inside of the glovebox. The air conditioner specification label is
attached as shown.
Have your front license plate installed byour NISSAN dealer.
ATI0562
ATI056
9-11
VEHICLE LOADING INFORMATIONWARNING
● It is extremely dangerous to ride in acargo area inside of a vehicle. In acollision, people riding in these ar-eas are more likely to be seriouslyinjured or killed.
● Do not allow people to ride in anyarea of your vehicle that is not
equipped with seats and seat belts.● Be sure everyone in your vehicle is in
a seat and using a seat belt properly.
Terms
●
GVWR (Gross Vehicle Weight Rating) -maximum total weight (load) limit speci-fied for the vehicle.
● GAWR (Gross Axle Weight Rating) -maximum weight (load) limit specified forthe front or rear axle.
● Gross combined weight - GVW plus thetotal weight of the trailer and all its cargo.
Determining Vehicle Load Capacity
The load capacity of this vehicle is deter-mined by weight, not by available cargospace. For example, a luggage rack, bikecarrier, cartop carrier or similar equipmentdoes not increase load carrying capacity of
3) After loading (cargo & passengers), reweigh your vehicle to determine if eithGVWR or GAWR for your vehicle exceeded. If GVWR is exceeded, remove cargo as necessary. If either thfront or rear GAWR is exceeded, shthe load or remove cargo as necessary
Loading Tips
● The GVW must not exceed GVWR oGAWR specified on the FMVSS Certif
cation Label.
● Do not load the front and rear axle to thGAWR. Doing so will exceed the GVWR
CAUTION
5/12/2018 1996-Nissan-Quest Manual Del Usuario - slidepdf.com
http://slidepdf.com/reader/full/1996-nissan-quest-manual-del-usuario 220/234
Terms
It is important to familiarize yourself with thefollowing terms before loading your vehicle:
● Curb Weight (actual weight of your ve-hicle) - vehicle weight including: standardand optional equipment, fluids, emer-gency tools, and spare tire assembly.This weight does not include passen-gers and cargo.
● GVW (Gross Vehicle Weight) - curbweight plus the combined weight of pas-sengers and cargo.
does ot c ease oad ca y g capac ty oyour vehicle.
To determine vehicle load capacity:
Vehicle weight can be determined by usinga commercial-grade scale, found at places
such as a truck stop, gravel quarry, grainelevator, or a scrap metal recycling facility.
1) Determine the curb weight of your vehicle.
2) Compare the curb weight amount to theGVWR specified for your vehicle to de-termine how much more weight yourvehicle can carry.
● Properly secure all cargo to help prevent it from sliding or shifting. In asudden stop or collision, unsecuredcargo could cause personal injury.
● Do not load your vehicle any heaviethan the GVWR or the maximumfront and rear GAWRs. If you doparts on your vehicle can break, or ican change the way your vehiclehandles. This could result in loss ocontrol and cause personal injury.
9-12
● Overloading can shorten the life ofyour vehicle. Failures caused byoverloading are not covered by yourwarranty.
Your new vehicle was designed to be usedprimarily to carry passengers and cargo.
Maximum load limitsMaximum trailer loads
Never allow the total trailer load to excee3,500 lbs (1,588 kg). The total trailer loaequals trailer weight plus its cargo weighTowing loads greater than 3,500 lbs (1,58kg) or using improper towing equipmecould adversely affect vehicle handlinbraking and performance.
● All towing above 1,000 lbs (454 Kgrequires the use of trailer brakes.
● NISSAN recommends the use of a tandem axle trailer whenever towing abov3,000 lbs (1,361 Kg).
TI1011M
TRAILER TOWING
5/12/2018 1996-Nissan-Quest Manual Del Usuario - slidepdf.com
http://slidepdf.com/reader/full/1996-nissan-quest-manual-del-usuario 221/234
Remember that towing a trailer places ad-ditional loads on your vehicle’s engine, drivetrain, steering, braking and other systems.
Information on trailer towing ability and the
special equipment required should be ob-tained from your NISSAN dealer. He canobtain a NISSAN Towing Guide for you.
Do not tow a trailer if your vehicle is a cargovan model.
, ( , g)
● A sway control device is recommendefor all towing above 2,000 lbs (907 KgSway control devices are not offered bNISSAN. See a professional trailer/hitcoutlet for a properly designed sway control device for your trailer.
The Gross Combined Weight should nexceed 8,000 lbs (3,628 kg). The GrosCombined Weight is the total weight of thtow vehicle with all occupants, cargo anfuel tanks, PLUS the total weight of thtrailer and all its cargo. This weight shou
9-13
be properly distributed. For more informa-tion regarding vehicle and trailer loading,refer to The NISSAN Towing Guide, avail-able from your Nissan dealer.
WARNING
Vehicle damage and/or personal injuryresulting from improper towing proce-dures is not covered by NISSAN war-ranties. Information on trailer towingand required towing equipment should
be obtained from dealers who special-ize in providing trailers or other towingequipment.
Tongue load
Maximum gross vehicle weight/maximumgross axle weight
TOWING LOAD/SPECIFICATION CHART
UNIT: lb (kg)
MAXIMUM
TOWING LOAD
3,500 (1,588)
(See below)
MAXIMUM
TONGUE LOAD350 (159)
Trailer hitch
Choose a proper hitch for your vehicle antrailer. Make sure the trailer hitch is secureattached to the vehicle to help avoid pesonal injury or property damage due tsway caused by crosswinds, rough roasurfaces or passing trucks.
TI1012M
5/12/2018 1996-Nissan-Quest Manual Del Usuario - slidepdf.com
http://slidepdf.com/reader/full/1996-nissan-quest-manual-del-usuario 222/234
g
Keep the tongue load between 9 and 11%of the total trailer load. If the tongue loadbecomes excessive, rearrange cargo to al-low for proper tongue load.
The gross vehicle weight of the towingvehicle must not exceed the gross vehicleweight rating (GVWR) shown on theF.M.V.S.S. certification label. The gross ve-hicle weight equals the combined weight of
the unloaded vehicle, passengers, luggage,hitch, trailer tongue load and any otheroptional equipment. In addition, front or reargross axle weight must not exceed thegross axle weight rating (GAWR) shown onthe F.M.V.S.S. certification label.
p g
● Axle-mounted hitches should not bused.
● The hitch should not be attached to oaffect the operation of the impac
absorbing bumper.● Do not modify the vehicle exhaust sys
tem, brake system, etc. when the hitch installed.
● To reduce the possibility of additiondamage if your vehicle is struck from threar, remove the hitch when not in use
9-14
After the hitch is removed, seal the boltholes to prevent exhaust fumes, water ordust from entering the passenger com-partment.
● Regularly check that all hitch mountingbolts are securely mounted.
Tire pressures
● When towing a trailer, inflate the vehicletires to the recommended cold tire pres-
sure indicated on the tire placard (locatedon the inside of the glove box lid).
● Trailer tire condition, size, load rating andproper inflation pressure should be inaccordance with the trailer and tiremanufacturer’s specifications
vehicle for towing, connect the stop and taillight pickup into the vehicle electrical circuit.
Class I Trailer Tow electrical wiring providestwo circuits (right and left hand) to operatetrailer stop/turn tail lamps. Each individualstop/turn circuit will operate only one com-bination stop/turn light bulb (#1157, 3157,2357, or 3357) on the trailer. Never addmore than one trailer light bulb to onecircuit.
5/12/2018 1996-Nissan-Quest Manual Del Usuario - slidepdf.com
http://slidepdf.com/reader/full/1996-nissan-quest-manual-del-usuario 223/234
manufacturer s specifications.
Safety chain
Always use a suitable chain between yourvehicle and the trailer. The chain should be
crossed and should be attached to the hitch,not to the vehicle bumper or axle. Be sure toleave enough slack in the chain to permitturning corners.
Trailer lights
Trailer lights should comply with Federaland/or local regulations. When wiring the
9-15
To use the tow harness:
1) Remove the connector cap from thvehicle harness, located behind the reabumper. Store the connector cap in vehicle glove box for reinstallation.
2) Connect the tow harness to the vehicharness located behind the rear bumpe
3) Connect the tow harness connect(SAE J1239) to your trailer.
4) Confirm proper vehicle and trailstop/turn lamp operation.
5) When towing is completed, disconnethe tow harness from the trailer and thvehicle. Store the tow harness in th
5/12/2018 1996-Nissan-Quest Manual Del Usuario - slidepdf.com
http://slidepdf.com/reader/full/1996-nissan-quest-manual-del-usuario 224/234
Trailer Tow Harness and Module (Ifso equipped)
The trailer tow module on your vehicle al-lows turn/stop lamp control of a trailer beingtowed by your NISSAN.
The trailer tow module includes:
● trailer tow module which draws powerfrom the vehicle stop lamp fuse
● one subharness containing a SAE J1239specified connector
glove box. Reinstall the connector cap tthe vehicle harness.
If you need further assistance in wirina trailer to your NISSAN, contact you
NISSAN dealer.Always confirm proper vehicle antrailer stop/turn lamp operation evertime the trailer light circuits are connected for use.
ATI0555
9-16
Trailer brakesIf your trailer is equipped with a brakingsystem, make sure it conforms to Federaland/or local regulations and it is properlyinstalled.
CAUTION
Never connect a trailer brake systemdirectly to the vehicle brake system.
Pre-towing tips
● Be certain your vehicle maintains a levelposition when a loaded and/or unloadedtrailer is hitched. Do not drive the vehicleif i h b l
Trailer towing tipsIn order to gain skill and an understandingof the vehicle’s behavior, you should prac-tice turning, stopping and backing up in anarea which is free from traffic. Steering,stability, and braking performance aresomewhat different than under normal driv-ing conditions.
● Always secure items in the trailer toprevent load shift while driving.
● Avoid abrupt starts, acceleration or stops.
● Avoid sharp turns or lane changes.
● Always drive your vehicle at a moderatespeed.
gear and use the engine braking effecWhen ascending a long grade, downshthe transmission to a lower gear anreduce speed to reduce chances of engine overloading and/or overheating.
● If the engine coolant rises to an etremely high temperature when the aconditioning system is on, turn the aconditioner off. Coolant heat can be additionally vented by opening the wi
dows, switching the fan control dial thigh and setting the temperature contrdial to the WARM position.
● Trailer towing requires more fuel thanormal circumstances.

5/12/2018 1996-Nissan-Quest Manual Del Usuario - slidepdf.com
http://slidepdf.com/reader/full/1996-nissan-quest-manual-del-usuario 225/234
if it has an abnormal nose-up or nose-down condition; check for impropertongue load, overload, worn suspensionor other possible causes of either condi-tion.
● Always secure items in the trailer toprevent load shifts while driving.
● Be certain your rear view mirrors conformto all federal, state or local regulations. Ifnot, install any mirrors required for towingbefore driving the vehicle.
● Always block the wheels on both vehicleand trailer when parking. Parking on aslope is not recommended; however, ifyou must do so, first block the wheelsand apply the parking brake, and then
move the transmission gearshift leverinto the P (Park) position. If you move theshift lever to the P (Park) position beforeblocking the wheels and applying theparking brake, transmission damagecould occur.
● When going down a hill, shift into a lower
● Avoid towing a trailer for the first 50miles (800 km) of the vehicle’s life.
● Have your vehicle serviced more oftethan at intervals specified in the recom
mended Maintenance Schedule.● When making a turn, your trailer whee
will be closer to the inside of the turn thayour vehicle wheels. To compensate fothis, make a larger than normal turninradius during the turn.
● Crosswinds and rough roads adverse
9-17
affect vehicle/trailer handling, possiblycausing vehicle sway. When beingpassed by larger vehicles, be preparedfor possible changes in crosswinds thatcould affect vehicle handling. If swayingdoes occur, firmly grip the steeringwheel, steer straight ahead, and immedi-ately (but gradually) reduce vehiclespeed. This combination helps to stabi-lize the vehicle. Never increase speed.
● Be careful when passing other vehicles.
Passing while towing a trailer requiresconsiderably more distance than normalpassing. Remember the length of thetrailer must also pass the other vehiclebefore you can safely change lanes.
T i t i i b ki ffi i
Department of Transportation (DOT) Qual-ity Grades: All passenger car tires mustconform to Federal Safety Requirements inaddition to these grades.
Treadwear
Treadwear grade is a comparative ratingbased on tire wear rate when tested undercontrolled conditions on specified govern-ment test courses. For example, a tiregraded 150 would wear one and a half
(1-1/2) times as well on the governmentcourse as a tire graded 100. However,relative tire performance depends on actualdriving conditions, and may vary signifi-cantly from the norm, due to variations indriving habits, service practices and differ-
WARNINGThe traction grade assigned to youvehicle tires is based on straight linebraking traction tests and does noinclude cornering (turning) traction.
Temperature A, B and C
Temperature grades are A (the highest), Band C. They represent a tire’s resistance t
heat build-up, and its ability to dissipaheat when tested under controlled condtions on a specified indoor laboratory teswheel. Sustained high temperature cacause tire material to degenerate, reducintire life. Excessive temperatures can lead t
dd ti f il G d C d t
UNIFORM TIRE QUALITYGRADING
5/12/2018 1996-Nissan-Quest Manual Del Usuario - slidepdf.com
http://slidepdf.com/reader/full/1996-nissan-quest-manual-del-usuario 226/234
● To maintain engine braking efficiencyand electrical charging performance, donot use overdrive.
● Avoid holding the brake pedal down toolong or too frequently. This could causethe brakes to overheat, resulting in re-duced braking efficiency.
When towing a trailer, change fluid in thetransmission more frequently.
See the Maintenance schedule.
ences in road characteristics and climate.
Traction A, B and C
Traction grades are A (the highest), B andC. They represent a tire’s ability to stop onwet pavement as measured under con-trolled conditions, on specified governmenttest surfaces of asphalt and concrete. A tiremarked with a C may have poor tractionperformance.
sudden tire failure. Grade C corresponds ta performance level which all passenger catires must meet under the Federal MotoVehicle Safety Standard No. 109. Grades and B represent higher levels of perfo
mance on laboratory test wheels than thminimum required by law.
9-18
WARNINGThe temperature grade for this tire isestablished for a tire that is properlyinflated and not overloaded. Excessivespeed, under inflation, or excessiveloading, either separately or in combi-nation, can cause heat build-up andpossible tire failure problems.
Your NISSAN is covered by the followingemission warranties:
For USA
1) Emission Defects Warranty
2) Emissions Performance Warranty
For Canada
Emission Control System Warranty
Details of these warranties may be found
with other vehicle warranties in your war-ranty information booklet that comes withyour NISSAN. If you did not receive awarranty booklet, or it has become lost, youmay obtain a replacement by writing to:
● Nissan Motor Corporation in USA
If you believe that your vehicle has defect which could cause a crash ocould cause injury or death, you shoulimmediately inform the National Highway Traffic Safety Administratio(NHTSA) in addition to notifying NISSAN.
If NHTSA receives similar complaints, may open an investigation, and if finds that a safety defect exists in group of vehicles, it may order a reca
and remedy campaign. HoweveNHTSA cannot become involved in individual problems between you, youdealer, or NISSAN.
To contact NHTSA, you may either cath A t S f t H tli t ll f t 1
EMISSION CONTROLSYSTEM WARRANTY
REPORTING SAFETYDEFECTS (USA)
5/12/2018 1996-Nissan-Quest Manual Del Usuario - slidepdf.com
http://slidepdf.com/reader/full/1996-nissan-quest-manual-del-usuario 227/234
● Nissan Motor Corporation, in USAConsumer Affairs DepartmentP.O. Box 191Gardena, CA 90247
● Nissan Canada Inc.
P.O. Box 1709Station ‘‘B’’Mississauga, Ontario,L4Y 4H6
the Auto Safety Hotline toll-free at 1800-424-9393 (or 366-0123 in thWashington, D.C. area) or write toNHTSA, U.S. Department of Transpotation, Washington, D.C. 20590. Yo
can also obtain other information aboumotor vehicle safety from the Hotline.
You may notify NISSAN by contacting ouConsumer Affairs Department, toll-free, a1-800-NISSAN-1In Hawaii call (808) 531-0231.
9-19
A Genuine Nissan Service Manual is the besource of service and repair information fyour vehicle. Filled with wiring diagrams, illustrations and step-by-step diagnostic and ad justment procedures, this manual is the samone used by the factory trained technicianworking at your Nissan dealership. Also avaable are Genuine NISSAN Owner’s Manuals
For current pricing and availability of a Genuine NISSAN Service Manual or Genuine NISSAN Owner’s Manual, contact:
In the USA:See your NISSAN dealer or contact:
Dyment Distribution Services20770 Westwood Dr.Strongsville OH 44136
In a hurry? Call 1 800 247 5321 and charg
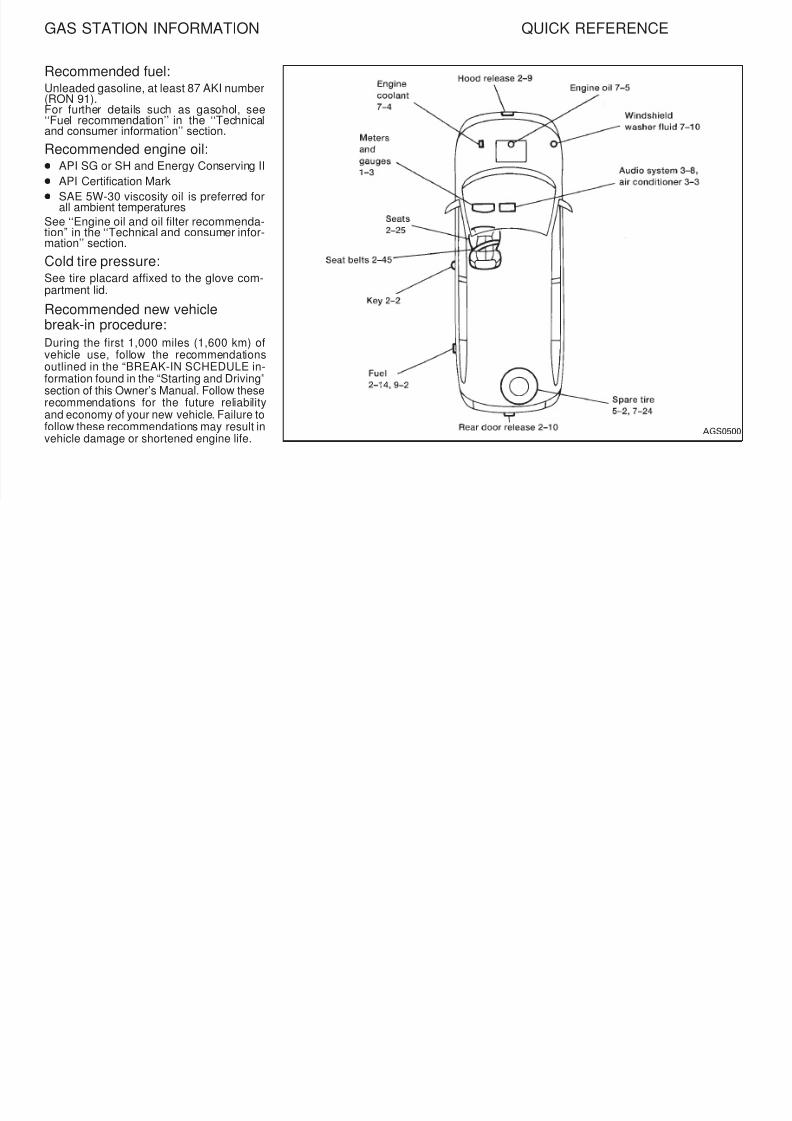
5/12/2018 1996-Nissan-Quest Manual Del Usuario - slidepdf.com
http://slidepdf.com/reader/full/1996-nissan-quest-manual-del-usuario 228/234
In a hurry? Call 1-800-247-5321 and chargyour purchase to Visa/Master Card.
In Canada:
To purchase a copy of a Genuine NISSAService Manual or Owner’s Manual pleas
contact your nearest NISSAN Dealer. For thphone number and location of a NISSADealer in your area call the Nissan SatisfactioCenter at 1-800-387-0122 and a bilingual NISSAN representative will assist you.
Also available are Genuine NISSAN Servicand Owner’s Manuals for older Nissan model
9-20
10 Index
A
After an accident........................................ 5-10
Air bag (See supplemental restraint system)
Air bag warning light.................................. 2-45
Air cleaner housing filter............................ 7-13
Air conditioner
Air conditioner operation ................. ....... 3-5
Air conditioner service ............................ 3-6
Air conditioner specification label......... 9-11Air conditioning system refrigerant andlubricant recommendations ................ .... 9-6
Air flow charts......................................... 3-7
Heater and air conditioner (automatic)(If so equipped) .................................... 3-11
Heater and air conditioner (manual) 3-3
Compact disc (CD) player.................... 3-22
Autolamp switch.................. ................. ...... 1-13
Automatic
Automatic transmission fluid................... 7-8
Driving with an automatic transmission.. 4-5
B
Battery................... ................. ................. ... 7-11
Before starting the engine ........................... 4-5
BrakeAnti-lock brake system ......................... 4-13
Brake booster ....................................... 7-17
Brake fluid ..................................... 7-10, 9-2
Brake pedal ................ ................. ......... 7-16
Brake wear indicators ................... 1-9, 7-16
Cassette player (See audio system)
CB radio or car phone ............................... 3-26
Child restraints for infants andsmall children............................................. 2-58
Child restraint with top tether strap ........... 2-62
Child safety sliding door lock....................... 2-4
Cigarette lighter and ashtray..................... 1-17
Cleaning exterior and interior ...................... 6-2
Clock .......................................................... 1-22
Coin tray ................ ................. ................. .. 1-18
Cold weather driving cautions ................... 4-15Compact disc (CD) player ......................... 3-22
Controls
Audio controls (rear)............................. 3-25
Heater and air conditioner controls ........ 3-3
Rear seat heater and air conditionercontrols 3-14

5/12/2018 1996-Nissan-Quest Manual Del Usuario - slidepdf.com
http://slidepdf.com/reader/full/1996-nissan-quest-manual-del-usuario 229/234
Heater and air conditioner (manual)....... 3-3
Rear seat heater and air conditioner ... 3-14
Air conditioning system refrigerant and lubricantrecommendations ................. ................. ...... 9-6
Anchor point location................................. 2-66
AntennaManual .................................................. 3-21
Power................. ................. ................. . 3-21
Anti-lock brake system ................. ............. 4-13
Armrests..................... ................. ............... 2-29
Ashtray (See cigarette lighter and ashtray)
Audio system
AM-FM radio with cassette player........ 3-15
,
Parking brake check............................. 7-16
Parking brake operation ......................... 4-8
Self-adjusting brakes ............................ 7-16
Break-in schedule...................................... 4-11
Bulb check/instrument panel ................. ...... 1-6
Bulb replacement....................................... 7-21
C
Capacities and recommended fuel/ lubricants..................... ................. ................ 9-2
Cargo net................................................... 2-13
controls ................................................. 3 14
Coolant
Capacities and recommended fuel/ lubricants ............... ................. ................ 9-2
Changing engine coolant........................ 7-5
Checking engine coolant level ............... 7-4Engine coolant temperature gauge........ 1-4
Cornering light ............... ................. ........... 1-16
Corrosion protection ................. ................. .. 6-4
Cruise control................. ................. ............. 4-9
Cup holder ................................................. 2-31
D
Daytime running light system (Canada
only)........................................................... 1-13Defogger switch
Rear window defogger switch .............. 1-12
Dimensions and weights................. ............. 9-8
Door locks.................................................... 2-2
Drive belts.................................................. 7-12
Driving
Cold weather driving cautions.............. 4-15
Driving with an automatic transmission.. 4-5
Precautions when driving ..................... 4-13
Precautions when starting and driving ... 4-2
E
Economy - fuel........................................... 4-11
Emission control information label............. 9-10
Emission control system warranty 9-19
Engine oil................................................ 7-5
Engine oil and oil filter recommendation ... 9-4
Engine oil viscosity................................. 9-5
Engine serial number ............................. 9-9Starting the engine ................................. 4-8
Exhaust gas (Carbon monoxide)................. 4-2
F
Five passenger seating ................ ............. 2-18
Five passenger seating with cargo room .. 2-18
Flashers (See hazard warning flasher switch)
Flat tire......................................................... 5-2
Flexible seating.......................................... 2-33Floor mat positioning................................. 2-17
Floor mat positioning pins ......................... 2-20
Fluid (checking)
Automatic transmission fluid......... .......... 7-8
Brake fluid............................................. 7-10
Capacities and recommended fuel/
Fuel recommendation............................. 9-2
Fuses......................................................... 7-17
Fusible links............................................... 7-18
G
Gas station information............................ 10-10
Gauge
Engine coolant temperature gauge........ 1-4
Fuel gauge.............................................. 1-5
Odometer................................................ 1-4
Speedometer .......................................... 1-4
Tachometer................. ................. ........... 1-4
Trip odometer ......................................... 1-4Gear selection (See shifting)
General maintenance ................. ................. 8-2
H

5/12/2018 1996-Nissan-Quest Manual Del Usuario - slidepdf.com
http://slidepdf.com/reader/full/1996-nissan-quest-manual-del-usuario 230/234
Emission control system warranty.. ........... 9 19
Engine.......................................................... 9-7
Before starting the engine...................... 4-5
Capacities and recommended fuel/ lubricants ................ ................. ............... 9-2
Changing engine coolant........................ 7-5Changing engine oil................................ 7-6
Changing engine oil filter........................ 7-7
Checking engine coolant level ............... 7-4
Checking engine oil level ....................... 7-5
Engine compartment check locations .... 7-3
Engine coolant temperature gauge........ 1-4
Engine cooling system ................. .......... 7-4
Capacities and recommended fuel/ lubricants ................ ................. ............... 9-2
Engine coolant........................................ 7-4
Engine oil................................................ 7-5
Power steering fluid................................ 7-9
Window washer fluid ............................ 7-10F.M.V.S.S. certification label ................ ..... 9-10
Fuel
Capacities and recommended fuel/ lubricants ................ ................. ............... 9-2
Fuel economy....................................... 4-11
Fuel filler lid and cap ............................ 2-15
Fuel gauge.............................................. 1-5
Hazard warning flasher switch ................ .. 1-16
Head restraints ................ ................. ......... 2-29
Headlight control switch................ ............. 1-12
Headlights.................................................. 7-19
Heater
Heater and air conditioner controls ..... 3-11
Rear seat heater and air conditioner ... 3-14
Hood release ................ ................. ............ 2-10
I
If your vehicle overheats ............................. 5-9
10-2
Ignition switch .............................................. 4-4
Increasing fuel economy................. ........... 4-11
Indicator lights and chimes (See warning/
indicator lights and chimes)Inertia fuel shut-off switch.......................... 5-10
Inside mirror............................................... 2-76
Installing the license plate ......................... 9-11
Instrument brightness control .................... 1-16
Interior lights.............................................. 1-23
J
Jump starting...................................... 5-7, 7-11
K
Key............................................................... 2-2
Keyless entry (See multi-remote control system)
L
Light
Air bag warning light............................. 2-45
Bulb check/instrument panel .................. 1-6
Bulb replacement................ ................. . 7-20Cornering light ...................................... 1-16
Headlight control switch ............... ........ 1-12
Headlights............................................. 7-19
Interior lights......................................... 1-23
Light bulbs ............................................ 7-19
Luggage compartment lights................ 1-23
Spotlights.............................................. 1-15
Warning/indicator lights and chimes ...... 1-6
Lock
Child safety sliding door lock ................. 2-4
Door locks............................................... 2-2Fuel filler lid and cap............................ 2-15
Power door lock...................................... 2-5
Rear door lock ...................................... 2-11
Luggage compartment lights ..................... 1-23
Luggage rack............................................. 2-14
Manual rear windows................................. 1-21
Mirror
Inside mirror.......................................... 2-76
Outside mirror control........................... 2-75Outside mirrors ..................................... 2-76
Vanity mirror ......................................... 2-76
Multi-remote control system ............... ......... 2-7
O
Odometer..................................................... 1-4
Oil
Capacities and recommended fuel/ lubricants ................. ................. .............. 9-2
Changing engine oil................................ 7-6Changing engine oil filter........................ 7-7
Checking engine oil level ....................... 7-5
Engine oil................................................ 7-5
Engine oil and oil filter recommendation ... 9-4
Outside mirror control ................................ 2-75

5/12/2018 1996-Nissan-Quest Manual Del Usuario - slidepdf.com
http://slidepdf.com/reader/full/1996-nissan-quest-manual-del-usuario 231/234
L
Labels
Air conditioner specification label......... 9-11
Emission control information label........ 9-10
Engine serial number ................ ............. 9-9F.M.V.S.S. certification label ................ 9-10
Vehicle identification number plate ........ 9-9
Warning labels (for SRS) ..................... 2-45
License plate
Installing the license plate .................... 9-11
M
Maintenance
General maintenance ............................. 8-2Inside the vehicle.................................... 8-3
Maintenance precautions ................ ....... 7-2
Outside the vehicle................................. 8-2
Periodic maintenance schedules............ 8-5
Seat belt maintenance.......................... 2-57
Under the hood and vehicle................... 8-4
Manual front seat adjustment .................... 2-26
Outside mirrors .......................................... 2-76
Overdrive switch .......................................... 4-7
Overheat
If your vehicle overheats ........................ 5-9
Owner’s manual order form....................... 9-20
P
Parking
Parking brake check............................. 7-16
Parking brake operation ......................... 4-8
Parking/parking on hills ........................ 4-12
10-3
Periodic maintenance schedules............ ..... 8-5
Personal reading light................................ 1-23
Power
Power antenna ..................................... 3-21Power door lock...................................... 2-5
Power rear windows ............................. 1-21
Power steering fluid ........................ 7-9, 9-2
Power support front seat ...................... 2-27
Power window ...................................... 1-19
Precautions
Maintenance precautions ................ ....... 7-2
Precautions on seat belt usage............ 2-47
Precautions when driving ..................... 4-13
Precautions when starting and driving ... 4-2
Q
Quick reference (See gas station information)
Remote keyless entry (See multi-remote controlsystem)
Reporting safety defects (USA)................. 9-19
S
Safety
Child safety sliding door lock ................. 2-4
Reporting safety defects (USA)............ 9-19
Seats
Five passenger seating ........................ 2-18
Five passenger seating with cargoroom............. ................. ................. ....... 2-18
Flexible seating............. ................. ....... 2-33Integrated child safety seats ................ 2-68
Manual front seat adjustment............... 2-26
Power support front seat ...................... 2-27
Seat positions....................................... 2-21
Second row bench seat........................ 2-21
Second row bucket seats..................... 2-24
3-point type with retractor..................... 2-49
Seat positions ............................................ 2-21
Seating arrangements ................ ............... 2-15
Seats/floor mats......................................... 2-15Self-adjusting brakes ................................. 7-16
Service manual order form ........................ 9-20
Seven passenger seating.......................... 2-17
Shifting......................................................... 4-6
Sliding three-passenger seat..... ................ 2-39
Spark plug replacement................... .......... 7-12
Speedometer ................ ................. .............. 1-4
Spotlights................................................... 1-15
SRS warning label ..................................... 2-45
Starting
Before starting the engine...................... 4-5
Jump starting................................. 5-7, 7-11
Precautions when starting and driving... 4-2
Starting the engine ................................. 4-8
Steering
Power steering fluid................................ 7-9

5/12/2018 1996-Nissan-Quest Manual Del Usuario - slidepdf.com
http://slidepdf.com/reader/full/1996-nissan-quest-manual-del-usuario 232/234
R
Radio................. ................. ................. ....... 3-15
AM-FM radio with cassette player........ 3-15
CB radio or car phone.......................... 3-26Rear door lock........................................... 2-11
Rear power point ....................................... 1-18
Rear seat heater and air conditioner......... 3-14
Rear window defogger switch ................... 1-12
Rear window wiper and washer switches . 1-11
Refrigerant recommendation ....................... 9-6
Registering your vehicle in another country . 9-9
Second row bucket seats..................... 2 24
Seven passenger seating ................... 2-17
Sliding three-passenger seat .............. 2-39
Three-passenger bench seat in fullyforward position ................................... 2-19
Three passenger bench seat in storageposition ................................................ 2-17
Seat belt
Precautions on seat belt usage............ 2-47
Seat belt extenders .............................. 2-57
Seat belt maintenance.......................... 2-57
Seat belts.............................................. 2-47
2-point type without retractor................ 2-56
g
Tilting steering wheel............................ 2-74
Storage
Coin tray ............................................... 1-18
Compact disc storage........................... 1-19
Underseat storage tray......................... 2-30Sunroof ................. ................. ................. ... 1-20
Sun shade.................. ................. ............... 1-21
Supplemental restraint system(air bag) ..................................................... 2-42
Switch
Autolamp switch ................. ................. . 1-13
Hazard warning flasher switch ............. 1-16
10-4
Headlight control switch ....................... 1-12
Ignition switch ......................................... 4-4
Overdrive switch ..................................... 4-7
Rear window defogger switch .............. 1-12Rear window wiper and washerswitches................................................ 1-11
Turn signal switch ............................... 1-15
Windshield wiper lever and washerswitch.................................................... 1-10
T
Tabletop seats........................................... 2-30
Tachometer......... ................. ................. ....... 1-4Three-passenger bench seat................ ..... 2-55
Three-passenger bench seat in fullyforward position ................ ................. ........ 2-19
Three-passenger bench seat in storageposition................ ................. ................. ..... 2-17
Three way catalyst.................. ................. .... 4-2
Tool kit.................................................... 5-2
Towing
Tow truck towing .................................. 5-11
Towing load/specification chart ............ 9-14Trailer tow harness and module................ 9-16
Trailer towing............................................. 9-13
Transmission
Automatic transmission fluid....... ............ 7-8
Driving with an automatic transmission.. 4-5
Travel (see registering your vehicle in anothercountry)
Trip odometer .............................................. 1-4
Turn signal switch ................................... 1-15
U
Underseat storage tray.............................. 2-30
Uniform tire quality grading ....................... 9-18
V
W
Warning
Air bag warning light............................. 2-45Hazard warning flasher switch ............. 1-16
Warning/indicator lights and chimes ...... 1-6
Warning labels (for SRS)........................... 2-45
Weights (See dimensions and weights)
Wheel/tire size ............................................. 9-8
Wheels and tires........................................ 7-25
Window washer fluid............. ................. .... 7-10
Windows
Locking passenger’s window............ .... 1-20
Manual rear windows ........................... 1-21
Power rear windows............................. 1-21Windshield wiper lever and washer switch. 1-10
Wiper
Rear window wiper and washerswitches................................................ 1-11
Windshield wiper lever and washerit h 1 10

5/12/2018 1996-Nissan-Quest Manual Del Usuario - slidepdf.com
http://slidepdf.com/reader/full/1996-nissan-quest-manual-del-usuario 233/234
Tilting steering wheel................................. 2-74
Timing belt ................................................... 9-7
Tire
Flat tire.................................................... 5-2
Tire chains ............................................ 7-26Tire placard................ ................. .......... 9-11
Tire pressure ............... ................. ........ 7-25
Tire rotation ................. ................. ........ 7-27
Types of tires........................................ 7-26
Uniform tire quality grading .................. 9-18
Wheel/tire size........................................ 9-8
Wheels and tires................................... 7-25
Vanity mirror (if so equipped).................... 2-76
Vehicle dimensions and weights ................. 9-8
Vehicle identification.................................... 9-9
Vehicle identification number plate.............. 9-9Vehicle loading information ............... ........ 9-12
Vehicle recovery........................................ 5-13
Ventilators.................................................... 3-2
switch.................................................... 1-10
Wiper blades......................................... 7-14
10-5
Recommended fuel:Unleaded gasoline, at least 87 AKI number(RON 91).For further details such as gasohol, see‘‘Fuel recommendation’’ in the ‘‘Technicaland consumer information’’ section.
Recommended engine oil:● API SG or SH and Energy Conserving II
● API Certification Mark
● SAE 5W-30 viscosity oil is preferred forall ambient temperatures
See ‘‘Engine oil and oil filter recommenda-tion’’ in the ‘‘Technical and consumer infor-mation’’ section.
Cold tire pressure:See tire placard affixed to the glove com-partment lid.
GAS STATION INFORMATION QUICK REFERENCE

5/12/2018 1996-Nissan-Quest Manual Del Usuario - slidepdf.com
http://slidepdf.com/reader/full/1996-nissan-quest-manual-del-usuario 234/234
pa t e t d
Recommended new vehiclebreak-in procedure:
During the first 1,000 miles (1,600 km) of
vehicle use, follow the recommendationsoutlined in the “BREAK-IN SCHEDULE in-formation found in the “Starting and Driving”section of this Owner’s Manual. Follow theserecommendations for the future reliabilityand economy of your new vehicle. Failure tofollow these recommendations may result invehicle damage or shortened engine life.
AG