Embed Size (px)
Citation preview
1
1999-2018 FORD F250, F350, SUPER DUTY BODY MOUNT KIT KF04050BK KF04050KV
BLACK POLYURETHANE KEVLAR INFUSED GRAY POLYURETHANE
www.Daystarweb.com Tech Support Contact Info [email protected] Phone: 623-907-0081 Fax: 623-907-0088 841 South 71st Avenue, Phoenix, AZ 85043
Introduction exclusive Go Everywhere© Limited Lifetime Warranty (see terms at Daystarweb.com). To ensure your safety and proper installation of this product, take a moment to read all instructions and product safety information before trying to install your Daystar® product. If you have any technical questions after reading these instructions, we are here to help. Contact us at 800-595-7659.
Product Safety Information Throughout these instructions, important safety information is generally preceded by one of three signal words indicating the relative risk of injury. The signal words are as follows:
! WARNING A hazardous situation which, if not avoided, could result in death or serious injury. Youcan be seriously injured or killed if you don’t follow instructions.
! CAUTION A hazardous situation which, if not avoided, could result in minor or moderate injury.You can be moderately injured and also may suffer property damage if you don’t follow instructions.
NOTICE Careful attention is required to this instruction or operation, but this does not generally relate to personal injury. Damage to your product or other property may result if you don’t follow instructions.
Daystar® is your number one source for Made in the USA quality vehicle accessories, backed by our
©2018 Daystar products international Inc. P10568-05 WC
2
NOTICE The new polyurethane body mounts in your kit will be a different size than the original mounts that you are replacing. Even though they appear to be a different size, they are the correct size for your truck and will position the cab at the original factory height. Also, the kit contains mounts for all cab styles and not all pieces will be used on your truck.
Installation Instructions 1. Read the instructions completely before beginning installation. A floor jack and basic
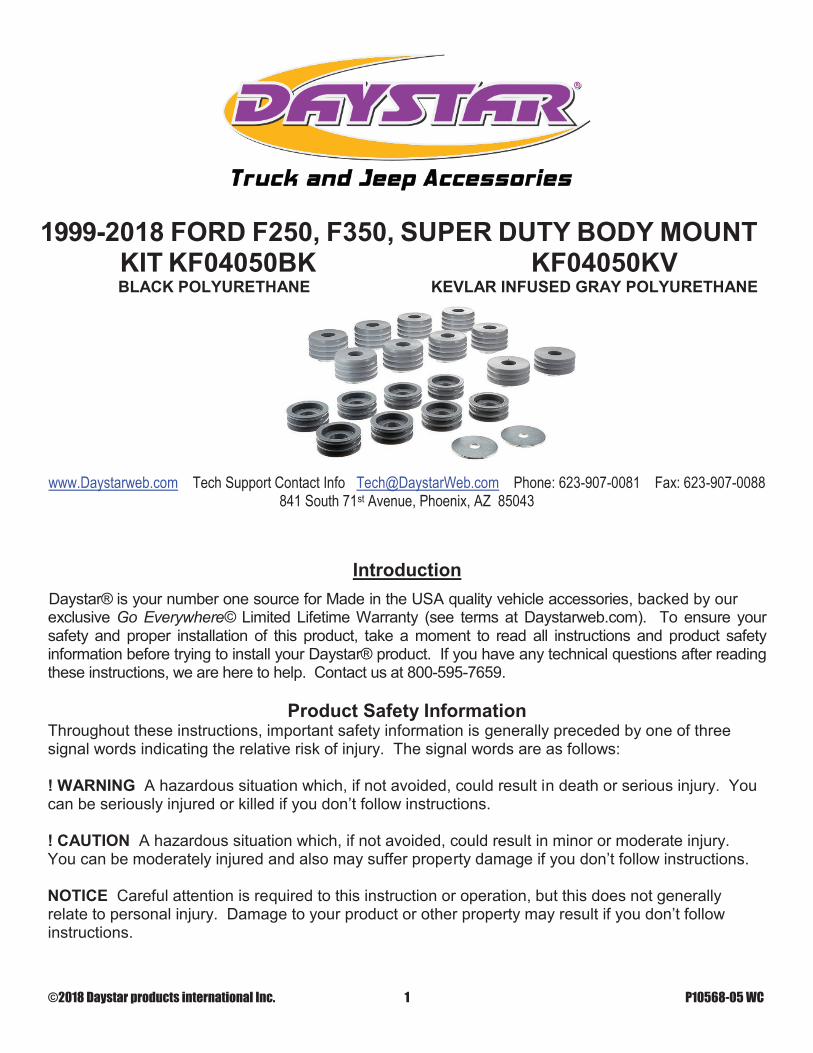
hand tools are needed.2. Disconnect the battery and remove the airbag fuse.3. Remove the trim securing the carpet down at the doors so you can access the body
mount bolts. On Super Cab and Super Crew Cab models you must remove the rearseat. Remove cab plugs to gain access to the cab mount bolts. See figure 1.
NOTICE On early model trucks the bolts go down from the top. On later model trucks (’08 and up), the bolts will come up from the bottom instead of down from the top. 4. All POSITONS - Remove the bolts from the passenger side body mounts and loosen
the driver’s side body mount bolts, but do not remove them. See figures 2 and 3.5. POSITION 1 - On the front radiator support bolts, you will need to remove the upper nut
on the inside of the radiator support and then you can loosen the lower bolt. A 24”extension with a universal swivel and an 18mm socket works well for this on most trucks.You might need to have someone hold the mounts with large adjustable pliers while youloosen the bolts. On some models, the front bumper must be removed to access thebolts.
6. Using a floor jack, carefully place the jack on the passenger side floorboard supportmounts and lift high enough to remove the body mounts. Make sure the cab is securelysupported with jack stands before working under the truck, or removing any mounts.
7. ALL POSITIONS - Remove and replace the passenger side body mounts one at atime. Take care not to mix up the pieces. The upper and lower mounts are clippedtogether on the frame and you may have to use a pair of large screwdrivers to pry themounts off. Separate the lower pieces from the uppers carefully. You will be reusing theoriginal steel parts. See figure 4.
©2018 Daystar products international Inc. P10568-05 WC
3
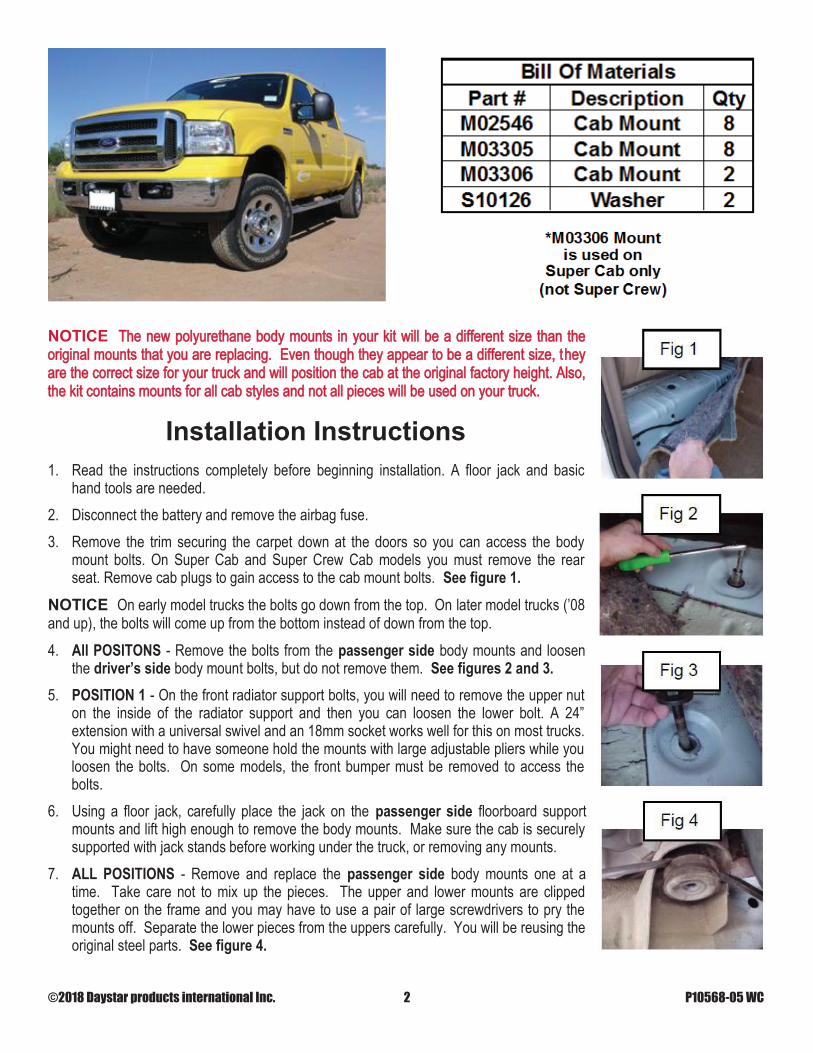
8. ALL POSITIONS – You will be removing the rubber from the upper mounts and replacingit with new body mounts. (You might have to use WD-40® or something similar to getthe rubber to release from the steel sleeve. You can also use a pair of adjustable pliers,one on the metal and one on the rubber, to pull them apart.) Use a wire brush to cleanup the metal shells before installing the new mounts. See figures 5 through 9.
9. ALL POSITIONS – When installing the new assemblies onto the frame, make sure theyare seated into the frame and centered in the hole.
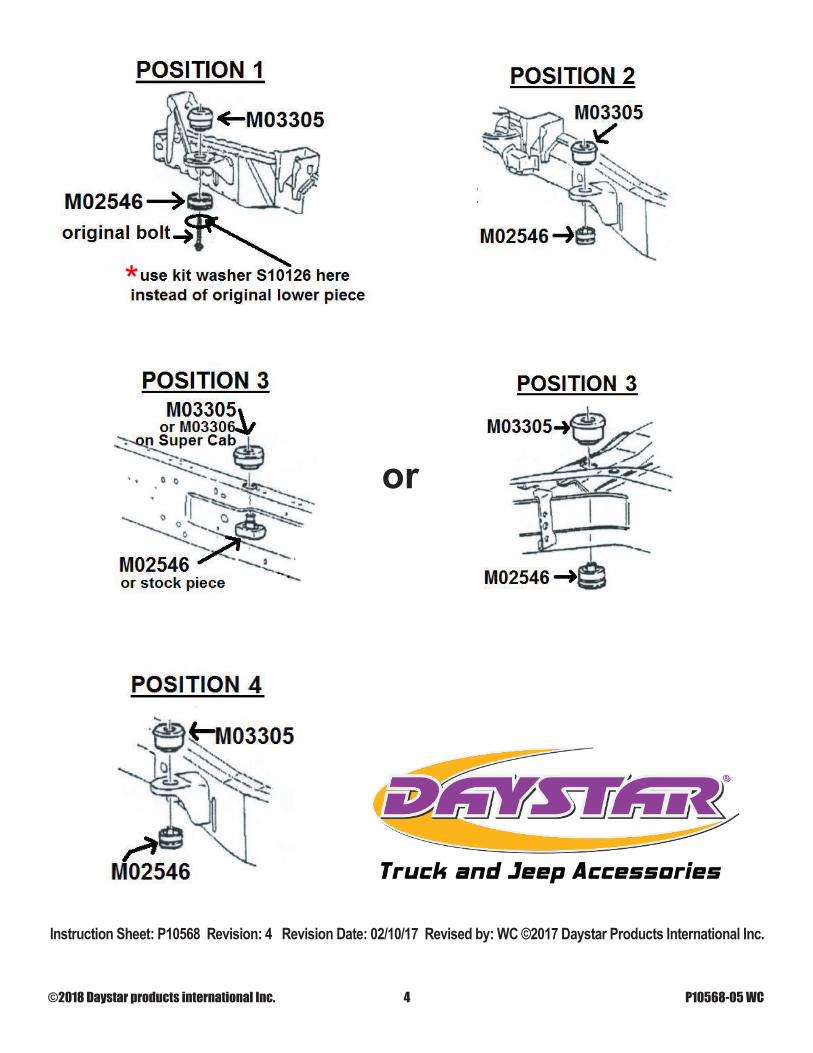
10. POSITION 1 – Install kit spacer M03305 on the top, and kit spacer M02546 along withkit washer S10126 on the bottom. Run the bolt in from the bottom and start it but don’ttighten it yet. Start the upper nut on the radiator support but don’t tighten it yet.
NOTICE At position 1 you do not reuse all of the original body mount metal shells. Use the original shell top half only with the kit washer on the bottom. Do not reuse the original bottom.
11. POSITIONS 2, 3, & 4 – Working on one position at a time, remove the remaining rubberfrom the mount shells and clean with a wire brush. Install kit M3305 mount on the tophalf shell and kit M02546 mount on the bottom half shell. Start the bolts but do nottighten.
NOTICE On some of t he Super Duty trucks there is a smaller body mount in position 3. If this is the case on your truck, use kit spacer M03306 instead of kit spacer M03305. If the new lower kit mount M02546 will not fit in the frame, reuse the original part.
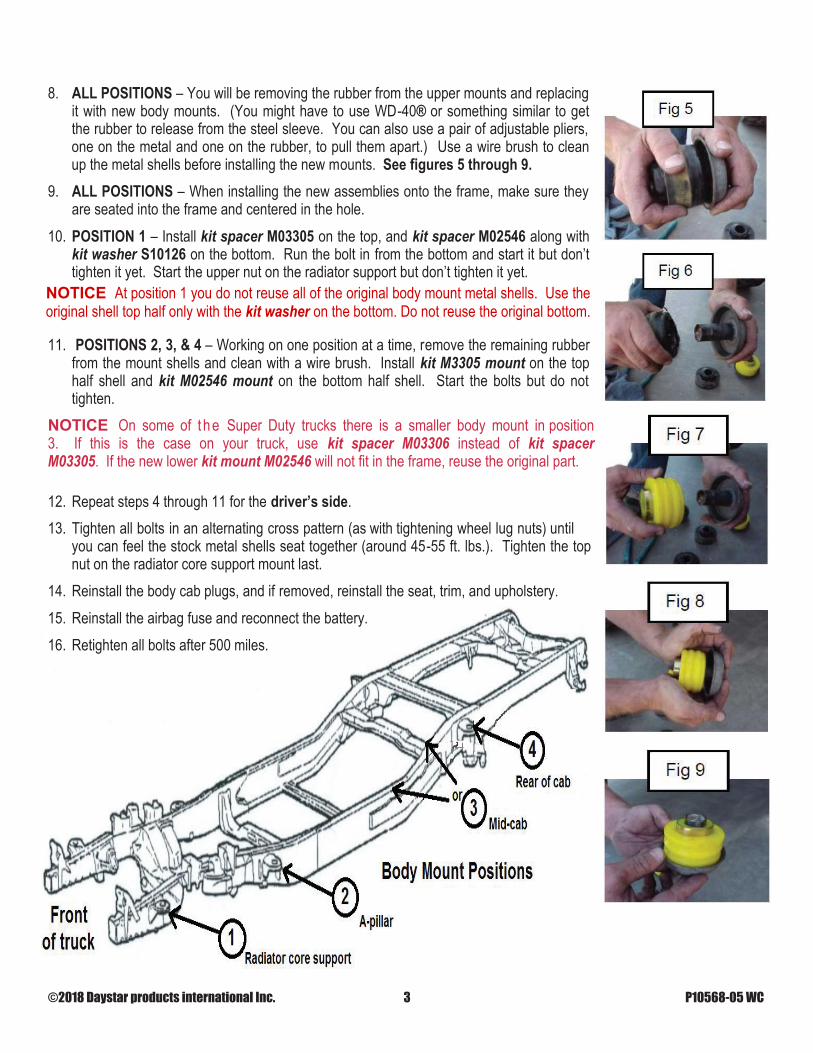
12. Repeat steps 4 through 11 for the driver’s side.13. Tighten all bolts in an alternating cross pattern (as with tightening wheel lug nuts) until
you can feel the stock metal shells seat together (around 45-55 ft. lbs.). Tighten the topnut on the radiator core support mount last.
14. Reinstall the body cab plugs, and if removed, reinstall the seat, trim, and upholstery.15. Reinstall the airbag fuse and reconnect the battery.16. Retighten all bolts after 500 miles.
©2018 Daystar products international Inc. P10568-05 WC
4
or
Instruction Sheet: P10568 Revision: 4 Revision Date: 02/10/17 Revised by: WC ©2017 Daystar Products International Inc.
©2018 Daystar products international Inc. P10568-05 WC
*