Embed Size (px)
Citation preview

2017 Mussel Monitoring Handbook
Thank you for participating in the 2017 Mussel Monitoring Program! This handbook can be used as a tool for both Mussel Observers and Mussel Searchers. Please pay special attention to the differing protocols for Mussel Observers and Mussel Searchers. If you have any additional questions please contact our Water Quality Specialist, Zac Driscoll, at [email protected].
Project Partners:

Contents Anatomy of Mussels...................................................................................................................................... 3
Protocols for Mussel Observers .................................................................................................................... 6
Method #1: Random Shoreline Searches ................................................................................................. 6
Method #2: Random Shallow Water Searches ......................................................................................... 7
Protocol for Mussel Searchers ...................................................................................................................... 9
Method #1: 2 Man-Hours Timed Search .................................................................................................. 9
Appendix 1 – How to Properly Take Photos of Mussels ............................................................................. 12
Appendix 2 – How to Properly Label Photos of Mussels ............................................................................ 14
Appendix 3 - How to Fill Out Data Sheets ................................................................................................... 15

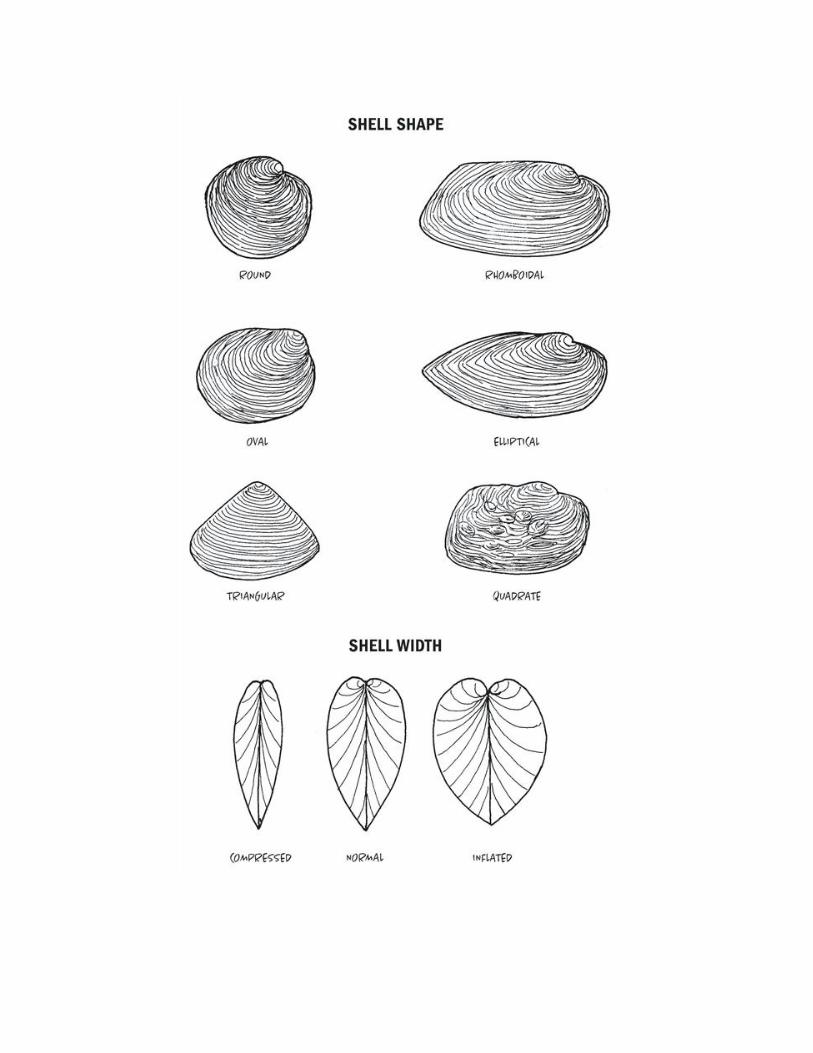
Anatomy of Mussels Freshwater mussels look similar to other bivalve animals like freshwater clams. The following images can help you determine if what you find are freshwater mussels and their species.
Exterior and Interior Shell View, showing the major parts of a mussel.


Protocols for Mussel Observers Mussel Observers is the more casual mussel monitoring group. Those interested can participate as part of a team or as an individual. Observers simply visit any waterway within the Milwaukee River Basin looking for mussel presence and fill out a data sheet. If mussels are found, Observers photograph them then send the pictures and data sheets to Zac at [email protected]
There are two methods that Mussel Observers can use to look for mussels: Random Shoreline Searches and Random Shallow Water Searches. See below for detailed descriptions of each method.
Method #1: Random Shoreline Searches
Equipment Required: (If you need to borrow any of these items, except a Camera or Phone, please contact Zac at [email protected])
Dish gloves
Data Sheet and writing utensils
Camera or Phone
Freshwater Mussels of the Upper Mississippi River Guide Book
Time Requirement: No time limit
Survey Method:
1. Choose your favorite river or creek within the Milwaukee River Basin to perform a Random Shoreline Search. If you need help choosing a location, contact Zac at [email protected]
2. Begin walking along the shoreline.
3. Collect any mussel shells that you find.
4. If you see any live mussels in the water and can SAFELY grab them, feel free to do so.
5. Use a camera or your phone to take photos of any live mussels or mussels shells. Follow the photograph guidelines (See Appendix 1).
6. Fill out a data sheet for each site you visit (See Appendix 2).
7. Place any live mussels that you find back into the water on their sides.
8. Email the pictures along with your data sheets to Zac at [email protected] within one week of completeing a Random Shoreline Search. Additionally, if you find

any very unusual shells, you can send them to Milwaukee Riverkeeper for further analysis. Please contact Zac for directions on how to do so.
Method #2: Random Shallow Water Searches
Equipment Required: (If you need to borrow any of these items, except a Camera or Phone, please contact Zac at [email protected])
Dish gloves
Bathyscopes
Data Sheet and writing utensils
Garden Trowel or Cultivator
Camera or Phone
Freshwater Mussels of the Upper Mississippi River Guide Book
Time Requirement: No time limit.
Survey Method:
1. Choose your favorite river or creek within the Milwaukee River Basin to perform a Random Shallow Water Search. If you need help choosing a location, contact Zac at [email protected]
2. Assess the safety of your waterway. Is the waterway safe to enter? If so, proceed. Any
time you feel uncomfortable, exit the waterway. Safety first!
3. Begin looking for mussels.
Where and How Do I Look for Mussels?
Where to Look for Mussels: Mussels can be tricky to find, but many are commonly found in the following locations:
a. In the bottom sediments of shallow water areas
b. On exposed sand and gravel bars
c. In the bottom sediments above or below riffles
d. Near islands or streambanks
e. In moderate run habitats with stable mixed substrates.
f. During periods of low water, in pools of rivers that are too deep to wade in otherwise

How to Look for Mussels:
Search Method 1: Hand Sweeps
This method is recommended for water banks or very shallow areas. With your hands, feel between and underneath rocks. Fan away the substrate to expose mussels potentially buried in the substrate of the waterway. Additionally, you can use a garden tool, such as a trowel or cultivator, to gently move substrate away from the stream bed to expose mussels.
Search Method 2: Using a Bathyscope
This method is recommended for deeper water that can’t be reached with hand sweeps. Look down into your bathyscope, searching for mussels that are on the surface of the substrate. Start at one bank of your waterway and move slowly, straight across to the other bank. You can use your feet to gently fan away the substrate to find any mussels that might be buried there. When you reach the opposite bank, turn around and repeat the process, slowly moving downstream.
If you’re searching with a partner, you can divide the waterway in half. Each person starts on an opposite bank and walks towards each other. At the middle of the stream, each searcher turns around and moves back towards their starting bank.
4. Collect any mussels that you find. On shore, use a camera or your phone to take photos following the photograph guidelines (See Appendix 1).
5. Fill out a data sheet (See Appendix 2).
6. Place any live mussels back into the water on their sides.
9. Email the pictures along with your data sheets to Zac at [email protected] within one week of completeing a Random Shallow Water Search. Additionally, if you find any very unusual shells, you can send them to Milwaukee Riverkeeper for further analysis. Please contact Zac for directions on how to do so.

Protocol for Mussel Searchers Mussel Searchers primary job is to determine which types of mussels live at a specific site within the Milwaukee River Basin. Mussel Searchers complete Timed Searches at as part of a team of 2-4 people.
Method #1: 2 Man-Hours Timed Search
Equipment Required:
Dish gloves
2 Bathyscopes
Hip Waders
Garden Trowel or Cultivator
Data Sheet and writing utensils
Camera or Phone
Freshwater Mussels of the Upper Mississippi River Guide Book
Time Requirement: 1.5 hours
Survey Method:
1. Refer to the Milwaukee Riverkeeper Mussel Monitoring Site map that can be found at http://milwaukeeriverkeeper.org/become-mussel-monitor/ to select sites where you would like to search for mussels.
2. Upon arrival at your site, assess the safety. Is the waterway safe to enter? If so, proceed. Any time you feel uncomfortable, exit the waterway. Safety first!
3. Plan your 2 Man-Hours Timed Search. ‘2 man-hours’ is equal to the total cumulative time Searchers are looking for mussels. See the chart below to calculate how much time each Searcher needs to be looking in the water for mussels.
# of Searchers Amount of time each Searcher looks for mussels
1 120 minutes
2 60 minutes
3 40 minutes
4 30 minutes

Since 120 consecutive minutes can be a long time to be looking into a bathyscope, time spent searching can be divided into 15 minute ‘dives’. See the chart below to calculate how many dives each Searcher can take during each survey.
# of Searchers # of 15 minute dives each Searcher can take during each survey
1 8 dives
2 4 dives
3 **Two 20 minute dives**
4 2 dives
4. Set a timer or have someone watching the clock for each dive. Searchers may take breaks between each dive before starting again.
5. Begin searching for mussels.
Where and How Do I Look for Mussels?
Where to Look for Mussels: Mussels can be tricky to find, but many are commonly found in the following locations:
a. In the bottom sediments of shallow water areas
b. On exposed sand and gravel bars
c. In the bottom sediments above or below riffles
d. Near islands or streambanks
e. In moderate run habitats with stable mixed substrates. f. During periods of low water, in pools of rivers that are too deep to wade in
otherwise
How to Look for Mussels:
Search Method 1: Hand Sweeps
This method is recommended for water banks or very shallow areas. With your hands, feel between and underneath rocks. Fan away the substrate to expose mussels potentially buried in the substrate of the waterway. Additionally, you can use a garden tool, such as a trowel or cultivator, to gently move substrate away from the stream bed to expose mussels.

Search Method 2: Using a Bathyscope
This method is recommended for deeper water that can’t be reached with hand sweeps. Look down into your bathyscope, looking for mussels that are at the surface of the substrate. Start at one bank of your waterway and move slowly, straight across to the other bank. You can use your feet to gently fan away the substrate to find any mussels that might be buried there. When you reach the opposite bank, turn around and repeat the process, slowly moving downstream.
If you’re searching with a partner, you can divide the waterway in half. Each person starts on an opposite bank and walks towards each other. At the middle of the stream, each searcher turns around and moves back towards their starting bank.
6. Once the full 2 Man-Hour Timed Search is complete, begin identifying the mussels you found. The simplest way to begin identifying your mussels, is to sort them by similar shape. Create sections of like-shaped mussels in neat piles.
7. Take a photo of each pile of like-shaped mussels to get a visual count of each group.
8. Then, photograph the best looking mussel from each pile to represent the group using the photograph guide (See Appendix 1).
9. Fill out a data sheet (See Appendix 2).
10. Once the all mussels are photographed, return any live mussels to the water. Place them on their sides on the streambed.
11. Email the pictures along with your data sheets to Zac at [email protected] within one week of completeing a Random Shallow Water Search. Additionally, if you find any very unusual shells, you can send them to Milwaukee Riverkeeper for further analysis. Please contact Zac for directions on how to do so.

Appendix 1 – How to Properly Take Photos of Mussels Groups of Mussels
If multiple mussels of similar shape are found, group them together by placing them in neat piles. Photograph each pile to get a total count of like-shaped mussels:
Individual Mussels
Take close-up photos of mussels to A.) represent a group of like-shaped mussels and B.) show any individual mussels found. When photographing a representative mussel, pick the cleanest, most complete mussel or shell from each group. Take 3 photos of the mussel or mussel shell in these specific views:
1. Lateral exterior view
Photograph the outside of the mussel or shell by placing it in your palm to add size perspective.

1a. Lateral interior view
Us e this view only if you’re photographing single shells or dead mussels. Never pry open a live mussel! Photograph the inside of the mussel shell by placing it in your palm to add size perspective.
2. Dorsal view
Turn the mussel or shell on its side so the hinge side is facing the camera lens.
3. Anterior View
Turn the mussel or shell on its side so the hinge side is facing upwards in the camera frame.

Appendix 2 – How to Properly Label Photos of Mussels Before emailing your mussel photos to Zac, make sure they are clearly labeled to assist with identification. Groups of Mussels (Date found using MMDDYYYY format)_(Waterbody where the mussels were found)_(Group #
from your data sheet)
Example: 07082017_CedarCreek_Group1
Representative Mussels from Groups
(Date found using MMDDYYYY format)_(Waterbody where the mussel was found)_
(RepGroup # from your data sheet)
Example: 07082017_CedarCreek_RepGroup1
Individual Mussels
(Date found using MMDDYYYY format)_(Waterbody where the mussel was found)_ (Mussel#
from your data sheet)
Example: 07082017_CedarCreek_Mussel1

Appendix 3 - How to Fill Out Data Sheets
Using a
bathyscope
is
considered
a Visual
Search.
Mussel
Searchers’
Total
Volunteer
Time
should
equal 2
man-hours
or 120
total
.minutes. If multiple
like-shaped
mussels are
found, they
can be
labeled by
‘Group #’. If
individual
mussels are
found they
can be
labeled as
‘Mussel #’.
Make sure
that the
correspondi
-ng
photograph-
s of each
mussel or
group of
mussels are
labeled the
same as the
data sheet.
Don’t fill out
this section
.
Using a
bathyscope
is
considered
a Visual
Search.
Group 1
Mussel
Searchers’
Total
Volunteer
Time should
equal 2
man-hours
or 120 total
minutes.
1 0
3 0
0
All brown w/ white interior. Oval in
shape. No teeth. Monitor ID:
Pyganodon grandis.
07082017_CedarCreek_RepGroup1
This
section can
be used for
notes
about each
Group or
Mussel.
Don’t
forget to
include
your photo
label! If
you like,
you can
include a
mussel
identificati-
on, just use
the
scientific
name.
Group 2 0 0
0
0
5 1 0 Roundish in shape. White interior.
Teeth present. . Pronounced ridges on
shell. Monitor ID: Amblema plicata.
07082017_CedarCreek_RepGroup2
Mussel 1 1 0 0 0 0 Exterior is yellowish-brown with
perpendicular lines. Small and
oval-ish. Monitor ID:
Venustaconcha ellipsiformis.
07082017_CedarCreek_Mussel1

Fill out the
Field
Observatio
-ns section
to the best
of your
ability.
Items like
Water
Depth and
Water
Temperatu
-re can be
estimated.
This section is optional, but you may use this space to
write a description, include photographs, or draw a
picture of the site.