Embed Size (px)
Citation preview
3D Character Creation Blender Taster Session
Developed by Dominic Lovegrove-Saville
Objective of session
An introduction into the possibilities of what can be achieved with Blender software whilst having some fun. You will learn how to navigate in a 3D world and make your very own simple 3D character that you can render as an image from any angle.
Background (subject area background)
All 3D models start with simple 3D shapes that exaggerate features, which can then be developed. Learning how to use simple shapes to create characters is a good foundation for design and 3D modelling. A lot of the most successful characters or logos are made of simple shapes.
You will need:
Blender 2.8 (latest version)
Your imagination!
www.takeyourplace.ac.uk
2 | 3D Character Creation | Blender Taster Session www.takeyourplace.ac.uk
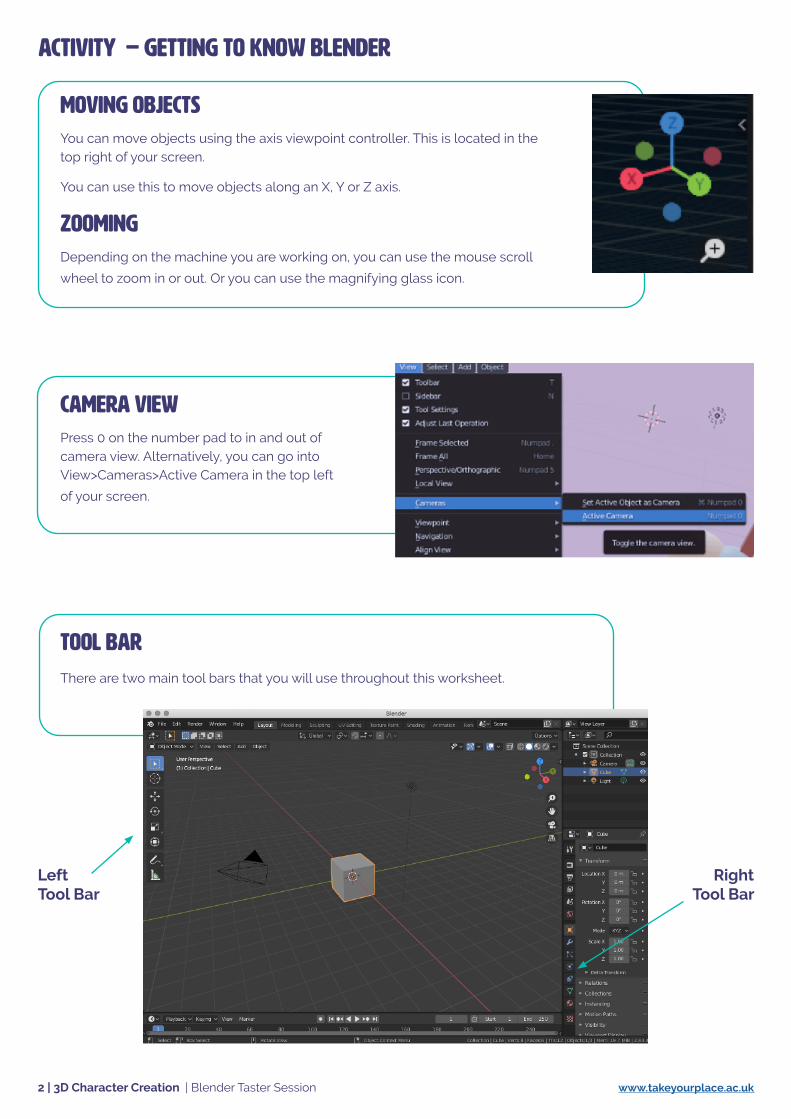
Moving Objects You can move objects using the axis viewpoint controller. This is located in the top right of your screen.
You can use this to move objects along an X, Y or Z axis.
Zooming Depending on the machine you are working on, you can use the mouse scroll
wheel to zoom in or out. Or you can use the magnifying glass icon.
Activity – Getting to know Blender
Camera View Press 0 on the number pad to in and out of camera view. Alternatively, you can go into View>Cameras>Active Camera in the top left
of your screen.
tool bar
There are two main tool bars that you will use throughout this worksheet.
Left Tool Bar
Right Tool Bar
3 | 3D Character Creation | Blender Taster Session www.takeyourplace.ac.uk
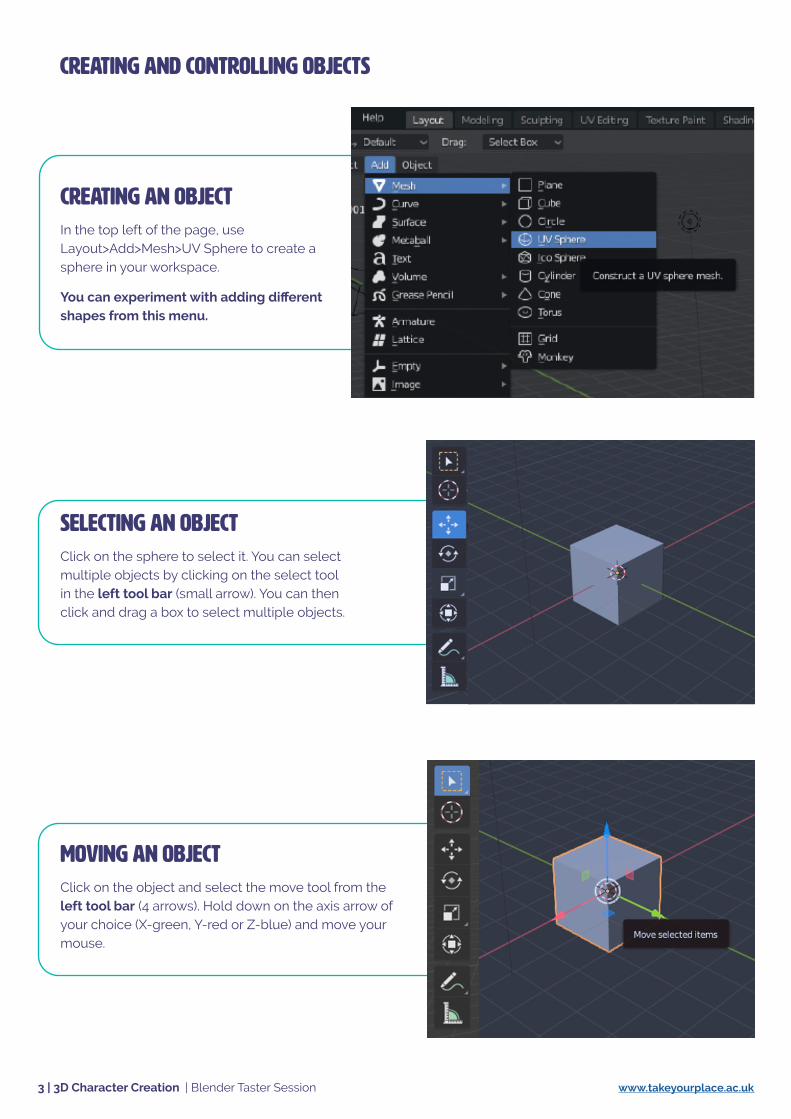
Creating an object In the top left of the page, use Layout>Add>Mesh>UV Sphere to create a sphere in your workspace.
You can experiment with adding different shapes from this menu.
Moving an object Click on the object and select the move tool from the left tool bar (4 arrows). Hold down on the axis arrow of your choice (X-green, Y-red or Z-blue) and move your mouse.
Creating and controlling objects
Selecting an object Click on the sphere to select it. You can select multiple objects by clicking on the select tool in the left tool bar (small arrow). You can then click and drag a box to select multiple objects.
4 | 3D Character Creation | Blender Taster Session www.takeyourplace.ac.uk
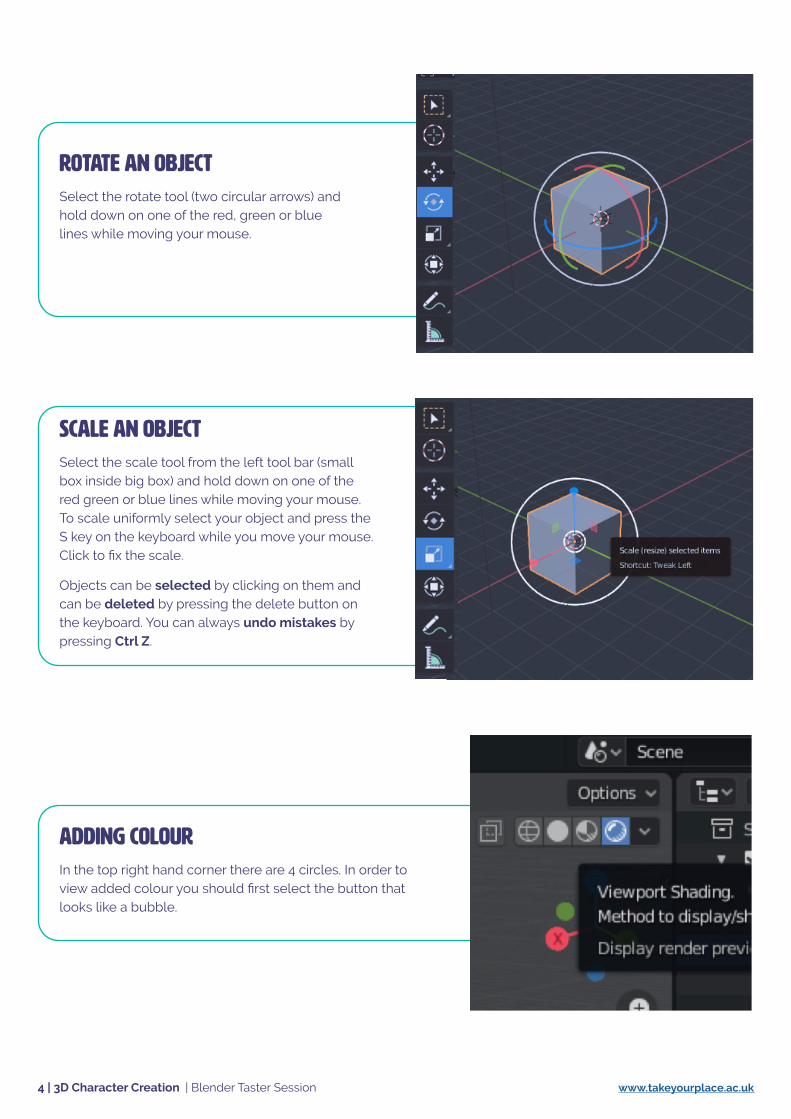
Rotate an object Select the rotate tool (two circular arrows) and hold down on one of the red, green or blue lines while moving your mouse.
Adding Colour In the top right hand corner there are 4 circles. In order to view added colour you should first select the button that looks like a bubble.
Scale an object Select the scale tool from the left tool bar (small box inside big box) and hold down on one of the red green or blue lines while moving your mouse. To scale uniformly select your object and press the S key on the keyboard while you move your mouse. Click to fix the scale.
Objects can be selected by clicking on them and can be deleted by pressing the delete button on the keyboard. You can always undo mistakes by pressing Ctrl Z.
5 | 3D Character Creation | Blender Taster Session www.takeyourplace.ac.uk
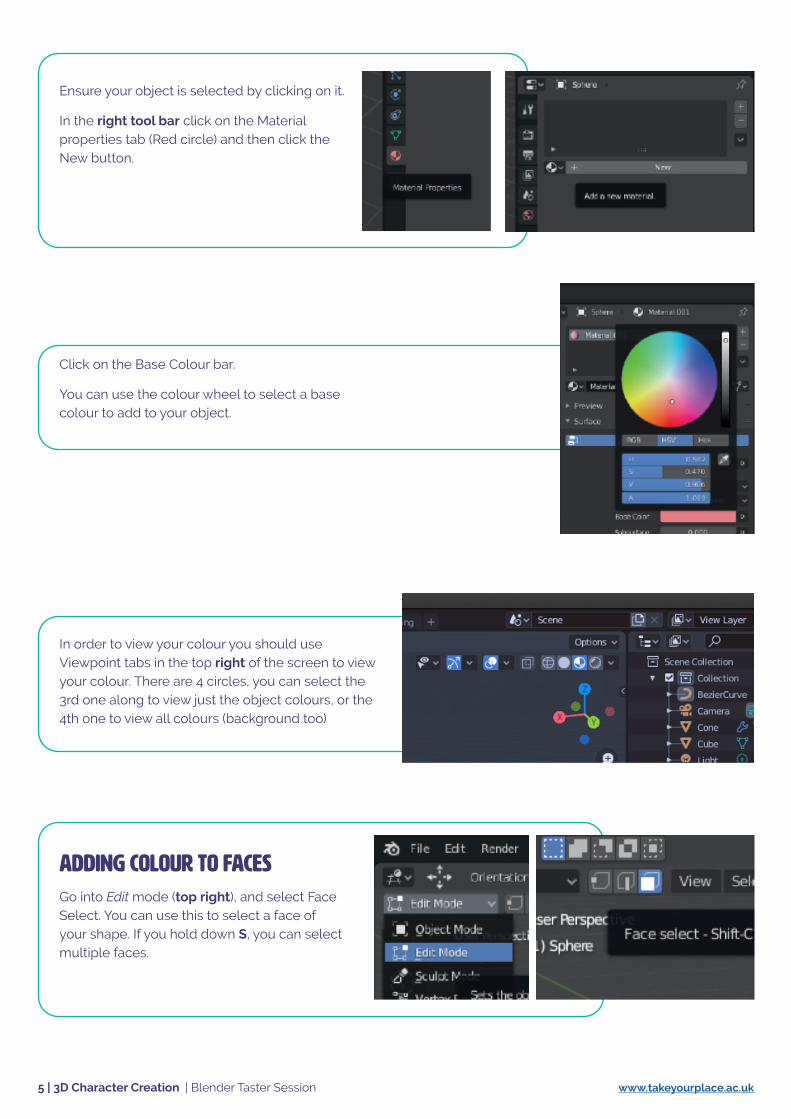
Ensure your object is selected by clicking on it.
In the right tool bar click on the Material properties tab (Red circle) and then click the New button.
In order to view your colour you should use Viewpoint tabs in the top right of the screen to view your colour. There are 4 circles, you can select the 3rd one along to view just the object colours, or the 4th one to view all colours (background too)
Click on the Base Colour bar.
You can use the colour wheel to select a base colour to add to your object.
Adding colour to faces Go into Edit mode (top right), and select Face Select. You can use this to select a face of your shape. If you hold down S, you can select multiple faces.

6 | 3D Character Creation | Blender Taster Session www.takeyourplace.ac.uk
Once you have selected the desired faces, you can add colour by clicking on the Material Properties button and then adding a new material (plus button)
Add a new colour and then click assign.
Remember: Make sure you come out of Edit mode by going back into Object mode.
Colouring BackgroundIn the right tool bar click on the Red World tab to change the colour. Select the colour you would like the background. You can view this by selecting the Viewpoint Shading button that looks like a bubble.
7 | 3D Character Creation | Blender Taster Session www.takeyourplace.ac.uk
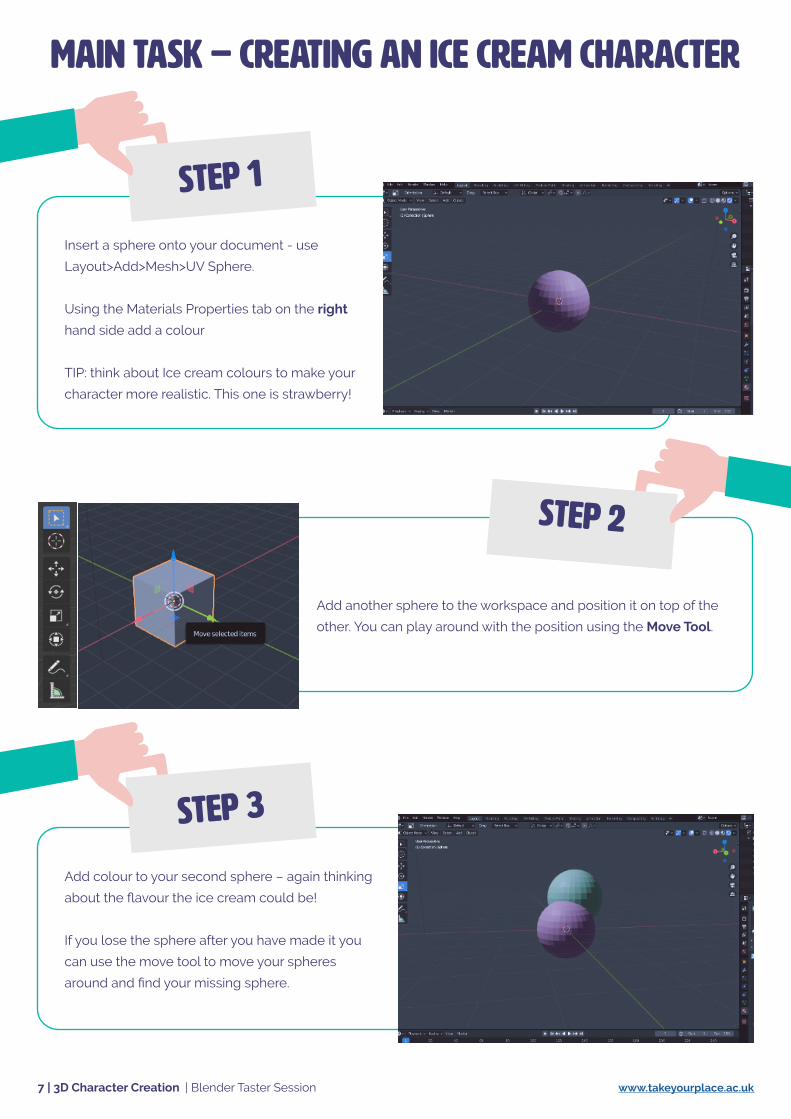
Insert a sphere onto your document - use
Layout>Add>Mesh>UV Sphere.
Using the Materials Properties tab on the right
hand side add a colour
TIP: think about Ice cream colours to make your
character more realistic. This one is strawberry!
STEP 1
MAIN TASK – Creating an Ice Cream Character
Add another sphere to the workspace and position it on top of the
other. You can play around with the position using the Move Tool.
STEP 2
Add colour to your second sphere – again thinking
about the flavour the ice cream could be!
If you lose the sphere after you have made it you
can use the move tool to move your spheres
around and find your missing sphere.
STEP 3
8 | 3D Character Creation | Blender Taster Session www.takeyourplace.ac.uk
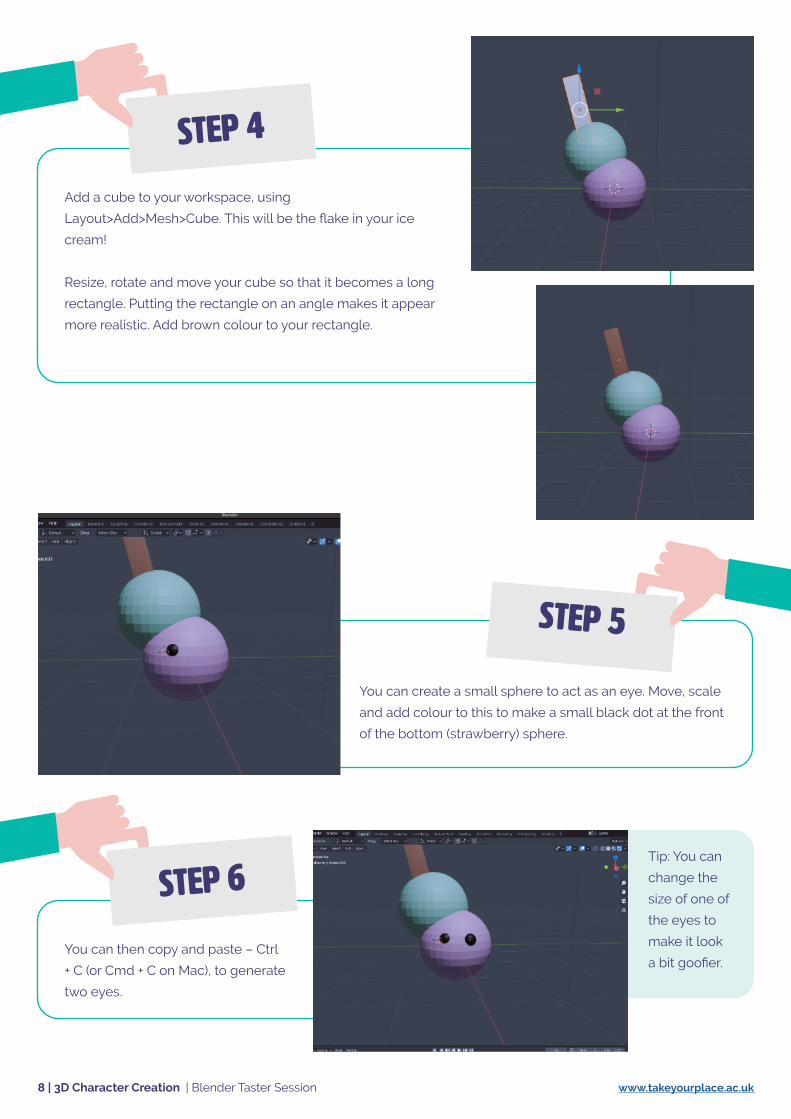
Add a cube to your workspace, using
Layout>Add>Mesh>Cube. This will be the flake in your ice
cream!
Resize, rotate and move your cube so that it becomes a long
rectangle. Putting the rectangle on an angle makes it appear
more realistic. Add brown colour to your rectangle.
STEP 4
You can create a small sphere to act as an eye. Move, scale
and add colour to this to make a small black dot at the front
of the bottom (strawberry) sphere.
STEP 5
You can then copy and paste – Ctrl
+ C (or Cmd + C on Mac), to generate
two eyes.
STEP 6Tip: You can
change the
size of one of
the eyes to
make it look
a bit goofier.
9 | 3D Character Creation | Blender Taster Session www.takeyourplace.ac.uk
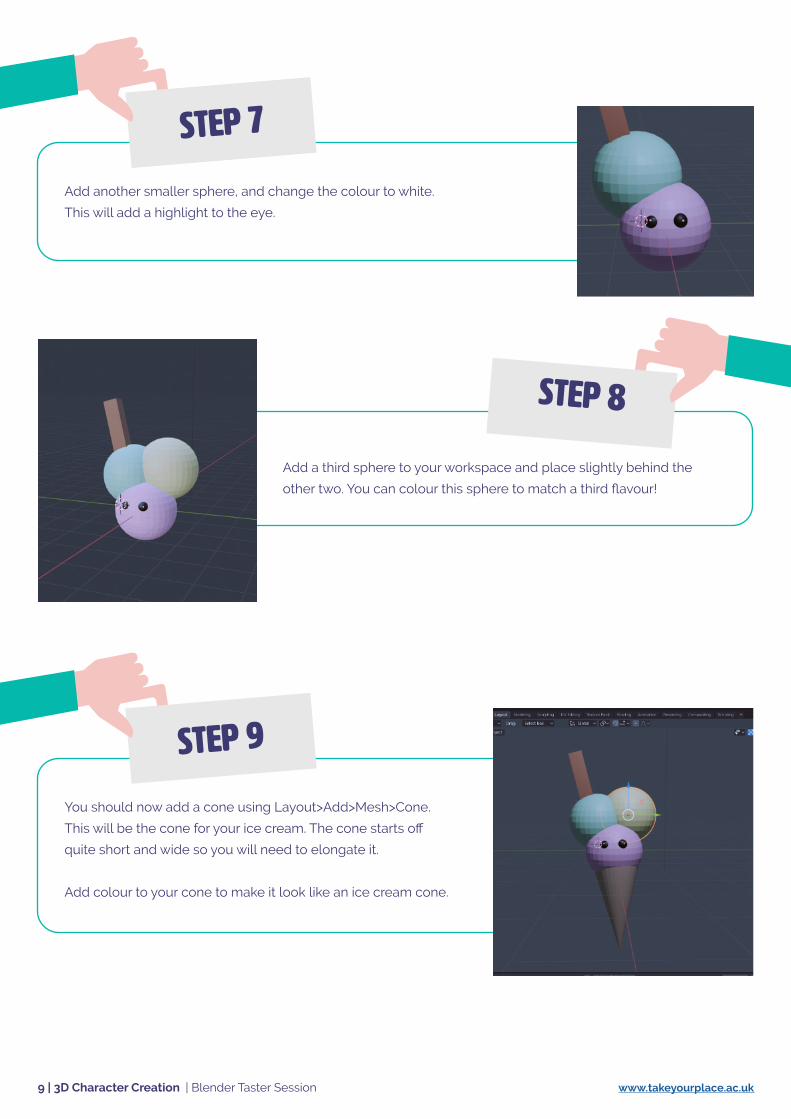
Add another smaller sphere, and change the colour to white.
This will add a highlight to the eye.
STEP 7
Add a third sphere to your workspace and place slightly behind the
other two. You can colour this sphere to match a third flavour!
STEP 8
You should now add a cone using Layout>Add>Mesh>Cone.
This will be the cone for your ice cream. The cone starts off
quite short and wide so you will need to elongate it.
Add colour to your cone to make it look like an ice cream cone.
STEP 9
10 | 3D Character Creation | Blender Taster Session www.takeyourplace.ac.uk
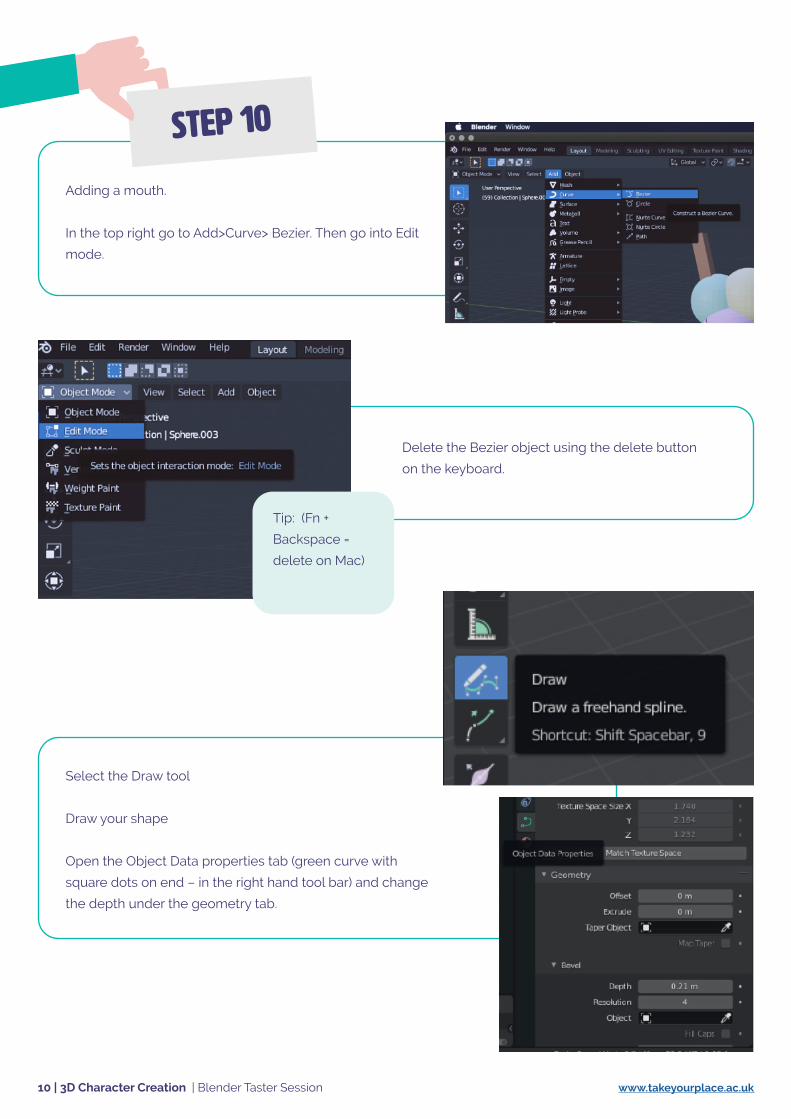
Adding a mouth.
In the top right go to Add>Curve> Bezier. Then go into Edit
mode.
STEP 10
Delete the Bezier object using the delete button
on the keyboard.
Tip: (Fn +
Backspace =
delete on Mac)
Select the Draw tool
Draw your shape
Open the Object Data properties tab (green curve with
square dots on end – in the right hand tool bar) and change
the depth under the geometry tab.

11 | 3D Character Creation | Blender Taster Session www.takeyourplace.ac.uk
You should then go back into Object mode and add colour to
your shape!
You can now scale the mouth to the correct size for your
character, and move it into the correct position, by using the
scale and move tools.
You can now change the
colour of your background
using the Red World tab on the
right hand side.
STEP 11
12 | 3D Character Creation | Blender Taster Session www.takeyourplace.ac.uk
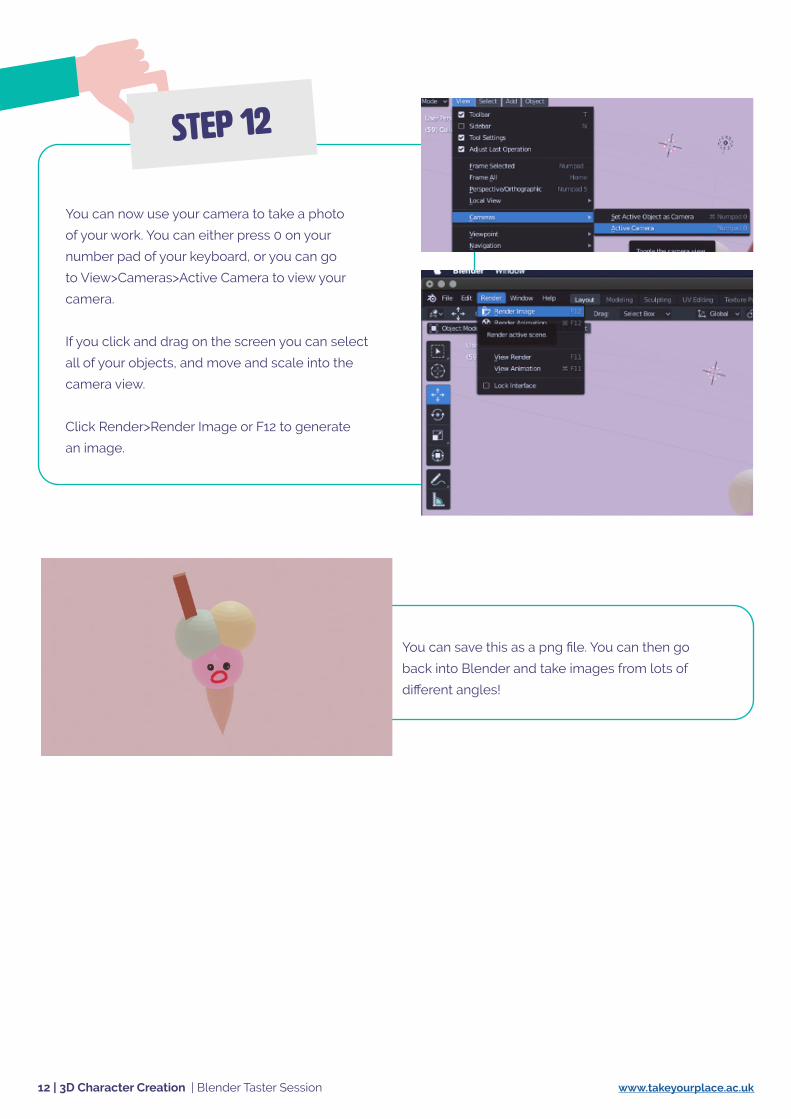
You can now use your camera to take a photo
of your work. You can either press 0 on your
number pad of your keyboard, or you can go
to View>Cameras>Active Camera to view your
camera.
If you click and drag on the screen you can select
all of your objects, and move and scale into the
camera view.
Click Render>Render Image or F12 to generate
an image.
STEP 12
You can save this as a png file. You can then go
back into Blender and take images from lots of
different angles!
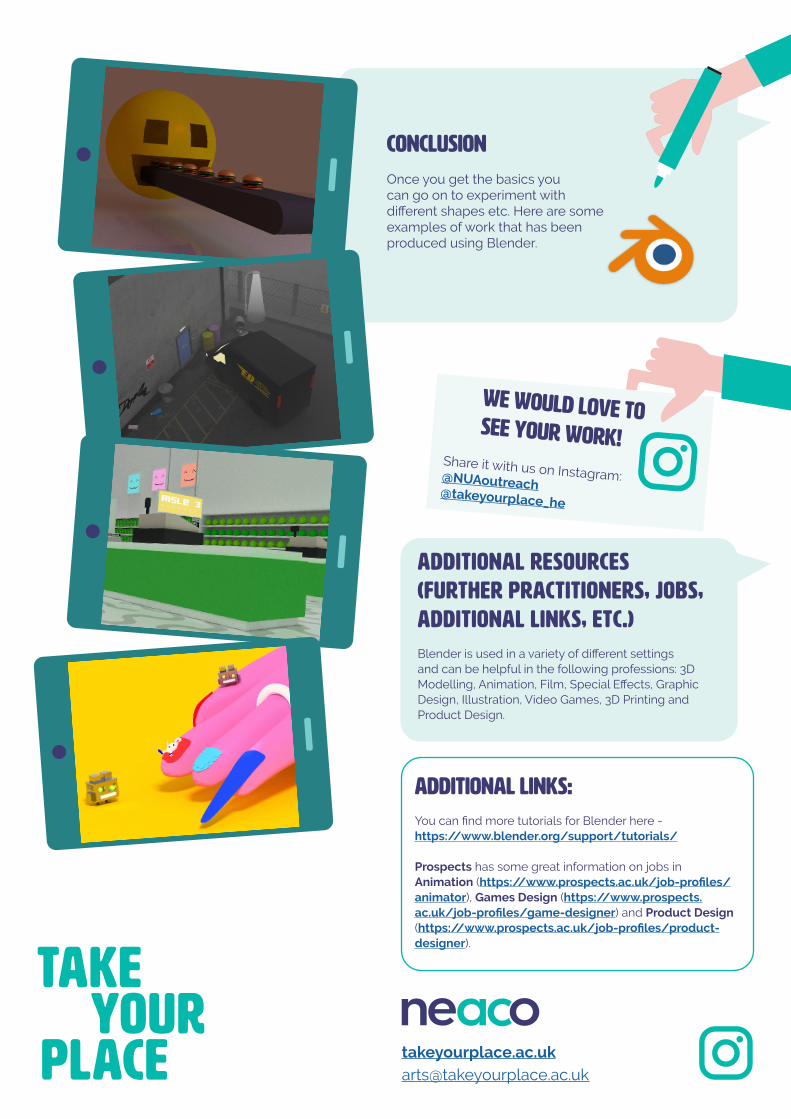
Conclusion Once you get the basics you can go on to experiment with different shapes etc. Here are some examples of work that has been produced using Blender.
Additional Links: You can find more tutorials for Blender here - https://www.blender.org/support/tutorials/
Prospects has some great information on jobs in Animation (https://www.prospects.ac.uk/job-profiles/animator), Games Design (https://www.prospects.ac.uk/job-profiles/game-designer) and Product Design (https://www.prospects.ac.uk/job-profiles/product-designer).
TOP TIPWe would love to see your work!
Share it with us on Instagram: @NUAoutreach@takeyourplace_he
Additional resources (further practitioners, jobs, additional links, etc.) Blender is used in a variety of different settings and can be helpful in the following professions: 3D Modelling, Animation, Film, Special Effects, Graphic Design, Illustration, Video Games, 3D Printing and Product Design.