Embed Size (px)
Citation preview
402 Boyer Circle • Williston, VT 05495 1-888-468-1417 • www.abtco.com
ABTCO and all other company names and product names are trademarks or registered trademarks of KP Building Products. ©2006 KP Building Products. All rights reserved.
MN-EIG06
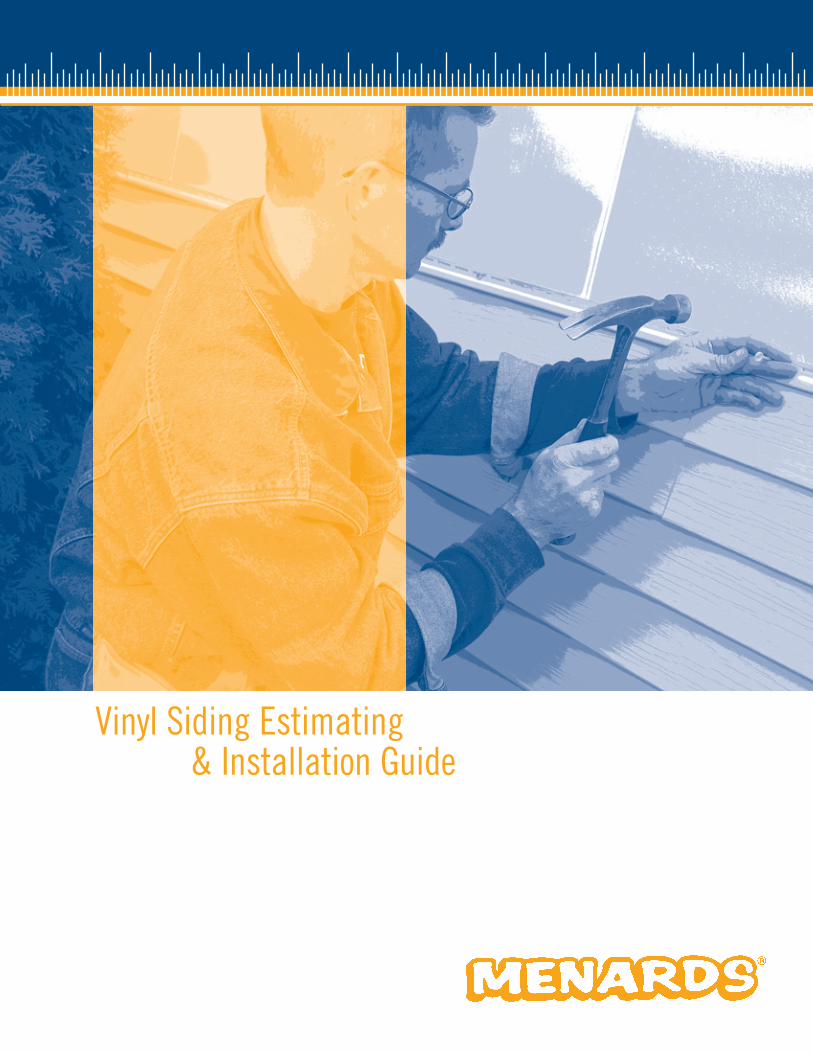
Vinyl Siding Estimating & Installation Guide
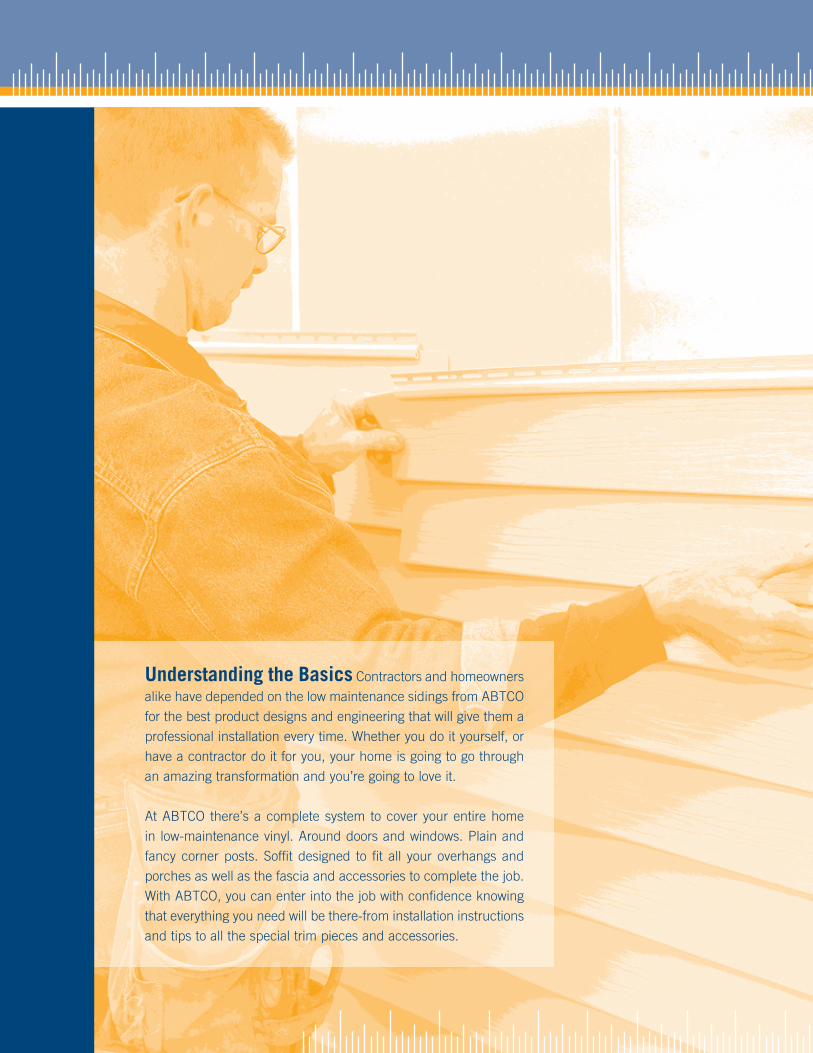
Understanding the Basics Contractors and homeowners
alike have depended on the low maintenance sidings from ABTCO
for the best product designs and engineering that will give them a
professional installation every time. Whether you do it yourself, or
have a contractor do it for you, your home is going to go through
an amazing transformation and you’re going to love it.
At ABTCO there’s a complete system to cover your entire home
in low-maintenance vinyl. Around doors and windows. Plain and
fancy corner posts. Soffit designed to fit all your overhangs and
porches as well as the fascia and accessories to complete the job.
With ABTCO, you can enter into the job with confidence knowing
that everything you need will be there-from installation instructions
and tips to all the special trim pieces and accessories.

Understanding the basics . . . . . . . . . . . . . . . . . . . . . . . . . . . . . . . . . . . . .2
Estimating the job . . . . . . . . . . . . . . . . . . . . . . . . . . . . . . . . . . . . . . . . . 4-9
Installing Vinyl Siding . . . . . . . . . . . . . . . . . . . . . . . . . . . . . . . . . . . . 10-12
Installing TimberCrest® i/s Insulated Vinyl Siding . . . . . . . . . . . . . . . . 13-14
Installing Vinyl Soffit and Fascia . . . . . . . . . . . . . . . . . . . . . . . . . . . . 15-16
Installing Vertical Vinyl Siding . . . . . . . . . . . . . . . . . . . . . . . . . . . . . . . .17
Installing Around Windows, Doors and Gables . . . . . . . . . . . . . . . . . . 18-19
Limited Lifetime Warranty . . . . . . . . . . . . . . . . . . . . . . . . . . . . . . . . . 20-23
The installation manual was designed to walk you through the job, so follow the steps as they
are laid out. It is best to read ahead as you work, so you will have a better understanding of the
directions and the order in which to proceed. This is the best path to that completed job that
will have the neighbors and friends asking you how you did it. Good luck.
Table of Contents
3
4
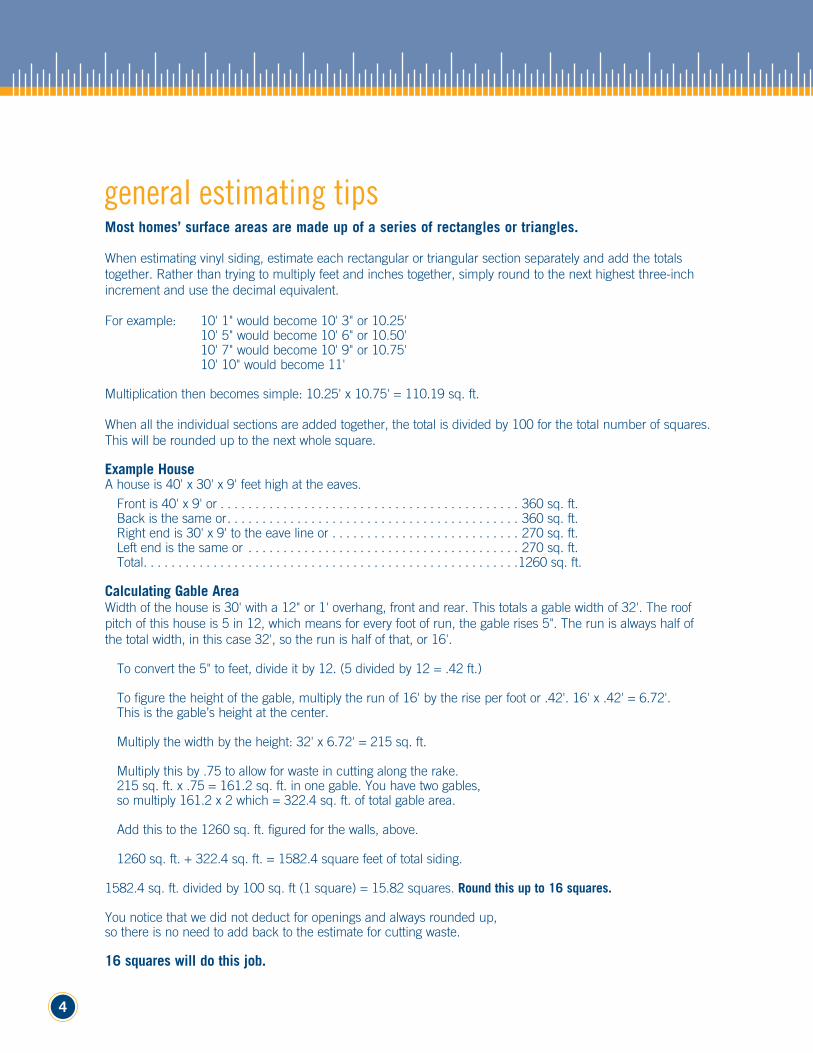
Most homes’ surface areas are made up of a series of rectangles or triangles .
When estimating vinyl siding, estimate each rectangular or triangular section separately and add the totals together. Rather than trying to multiply feet and inches together, simply round to the next highest three-inch increment and use the decimal equivalent.
For example: 10' 1" would become 10' 3" or 10.25' 10' 5" would become 10' 6" or 10.50' 10' 7" would become 10' 9" or 10.75' 10' 10" would become 11'
Multiplication then becomes simple: 10.25' x 10.75' = 110.19 sq. ft.
When all the individual sections are added together, the total is divided by 100 for the total number of squares. This will be rounded up to the next whole square.
Example HouseA house is 40' x 30' x 9' feet high at the eaves.
Front is 40' x 9' or . . . . . . . . . . . . . . . . . . . . . . . . . . . . . . . . . . . . . . . . . . . 360 sq. ft. Back is the same or. . . . . . . . . . . . . . . . . . . . . . . . . . . . . . . . . . . . . . . . . . 360 sq. ft. Right end is 30' x 9' to the eave line or . . . . . . . . . . . . . . . . . . . . . . . . . . . 270 sq. ft. Left end is the same or . . . . . . . . . . . . . . . . . . . . . . . . . . . . . . . . . . . . . . . 270 sq. ft. Total. . . . . . . . . . . . . . . . . . . . . . . . . . . . . . . . . . . . . . . . . . . . . . . . . . . . . .1260 sq. ft.
Calculating Gable AreaWidth of the house is 30' with a 12" or 1' overhang, front and rear. This totals a gable width of 32'. The roof pitch of this house is 5 in 12, which means for every foot of run, the gable rises 5". The run is always half of the total width, in this case 32', so the run is half of that, or 16'.
To convert the 5" to feet, divide it by 12. (5 divided by 12 = .42 ft.) To figure the height of the gable, multiply the run of 16' by the rise per foot or .42'. 16' x .42' = 6.72'. This is the gable’s height at the center.
Multiply the width by the height: 32' x 6.72' = 215 sq. ft.
Multiply this by .75 to allow for waste in cutting along the rake. 215 sq. ft. x .75 = 161.2 sq. ft. in one gable. You have two gables, so multiply 161.2 x 2 which = 322.4 sq. ft. of total gable area.
Add this to the 1260 sq. ft. figured for the walls, above.
1260 sq. ft. + 322.4 sq. ft. = 1582.4 square feet of total siding.
1582.4 sq. ft. divided by 100 sq. ft (1 square) = 15.82 squares. Round this up to 16 squares .
You notice that we did not deduct for openings and always rounded up, so there is no need to add back to the estimate for cutting waste.
16 squares will do this job .
general estimating tips

5
estimating for soffitSoffit material will be used on the front and rear eaves, the gable overhangs, the dormer overhangs and any porch ceilings.
Calculating the EavesFor the front and rear eaves, add the total length of each section and multiply by the width. The width is a straight-line distance from the wall to the tails of the rafters. This would also be done on the ends of the home on a hip roof.
Our sample home in GENERAL ESTIMATING TIPS was 40' long with a 12" overhang on each of its two gables. Total length of the home then, would be 42'. If the overhang is 12" on both the front and the rear eave, then the square footage of soffit needed is 42' x 1' = 42 sq. ft.
The back is a duplicate of the front so the total is 42 sq . ft . + 42 sq . ft . = 84 sq . ft .
These low eaves will require vented soffit for attic ventilation, so we will order 1 square of vented soffit for this job.
Use the same process of rounding up to the next highest 3" increment as described in GENERAL ESTIMATING TIPS. Do the same for any dormer eaves.
Calculating the Gable OverhangsFor the gable or dormer overhangs (rakes), you must determine the length of each section. These will be angled and the length will be dependent upon the pitch of the roof. The easiest way is to scale them off of the building plan. If you don’t have access to the plan, here is the process.
Let’s use the same home we used in GENERAL ESTIMATING TIPS. The width of this home was 30' with a 12" overhang, front and rear, making the gable width 32'. The run is half this width or 16'. The height as we calculated earlier was 6.72'. To figure the diagonal, which is the measurement we want, we do the following:
Multiply 16' x 16' and record the answer. (16' x 16' = 256')Multiply 6.72' x 6.72' and record the answer. (6.72' x 6.72' = 45.16')Add the two answers. (256' + 45.16' = 301.16')Put this number into your calculator and hit the square root button. The answer is 17 .35' .
This is the length of one side of the gable or soffit overhang. As there are always two pitched sides to a gable or dormer, multiply the result by 2.
17.35' x 2 = 34.7 linear feet. Round it up to 35 linear feet. Multiply this by the width of the overhang. Let’s assume 12" or 1 ft. 35 linear feet x 1 foot = 35 square feet. Enter this into your worksheet.
The other gable is the same, so enter 35 square feet for it into the worksheet.
Total soffit material required for both gables is 35 + 35 = 70 sq . ft . This does not have to be vented, so solid soffit is ordered for this section . We will order 1 square of solid (non-vented) soffit for this portion . Continue this same process for all gables and pitched dormers .
6
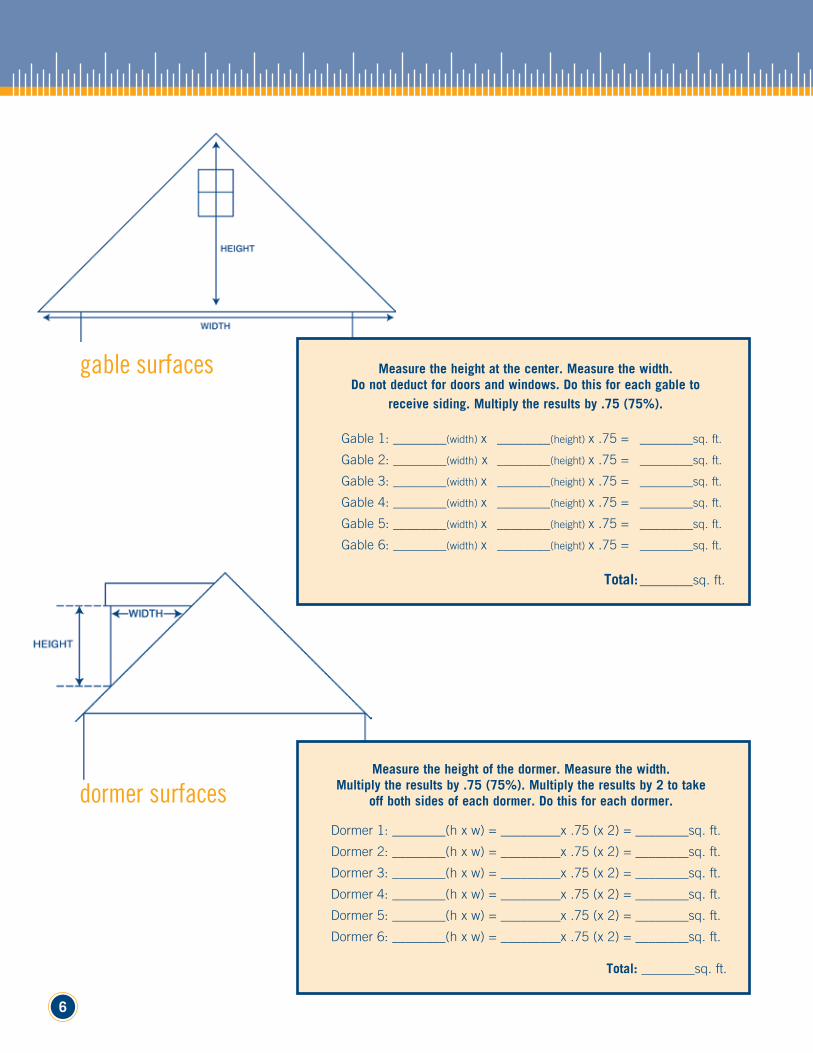
Measure the height at the center . Measure the width . Do not deduct for doors and windows . Do this for each gable to
receive siding . Multiply the results by .75 (75%) .
Gable 1: ________(width) x ________(height) x .75 = ________sq. ft.
Gable 2: ________(width) x ________(height) x .75 = ________sq. ft.
Gable 3: ________(width) x ________(height) x .75 = ________sq. ft.
Gable 4: ________(width) x ________(height) x .75 = ________sq. ft.
Gable 5: ________(width) x ________(height) x .75 = ________sq. ft.
Gable 6: ________(width) x ________(height) x .75 = ________sq. ft.
Total: ________sq. ft.
Measure the height of the dormer . Measure the width . Multiply the results by .75 (75%) . Multiply the results by 2 to take
off both sides of each dormer . Do this for each dormer .
Dormer 1: ________(h x w) = _________x .75 (x 2) = ________sq. ft.
Dormer 2: ________(h x w) = _________x .75 (x 2) = ________sq. ft.
Dormer 3: ________(h x w) = _________x .75 (x 2) = ________sq. ft.
Dormer 4: ________(h x w) = _________x .75 (x 2) = ________sq. ft.
Dormer 5: ________(h x w) = _________x .75 (x 2) = ________sq. ft.
Dormer 6: ________(h x w) = _________x .75 (x 2) = ________sq. ft.
Total: ________sq. ft.
gable surfaces
dormer surfaces
7
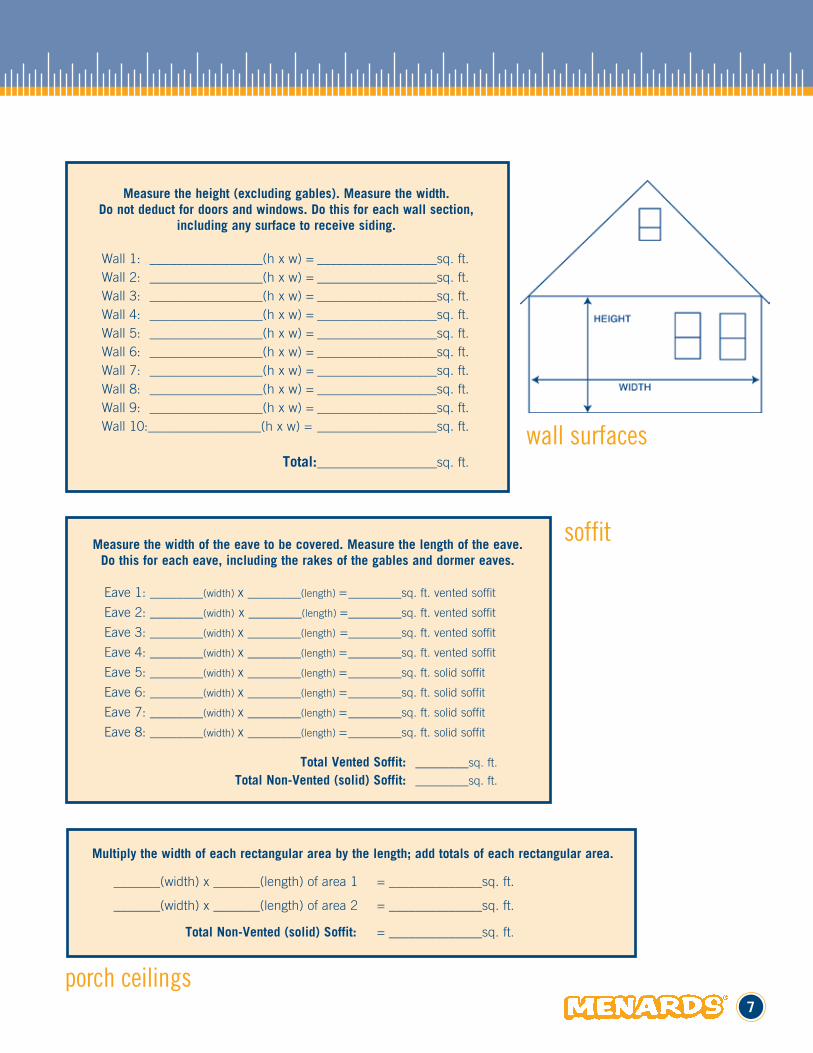
Measure the height (excluding gables) . Measure the width . Do not deduct for doors and windows . Do this for each wall section,
including any surface to receive siding .
Wall 1: _________________(h x w) = __________________sq. ft. Wall 2: _________________(h x w) = __________________sq. ft. Wall 3: _________________(h x w) = __________________sq. ft. Wall 4: _________________(h x w) = __________________sq. ft. Wall 5: _________________(h x w) = __________________sq. ft. Wall 6: _________________(h x w) = __________________sq. ft. Wall 7: _________________(h x w) = __________________sq. ft. Wall 8: _________________(h x w) = __________________sq. ft. Wall 9: _________________(h x w) = __________________sq. ft. Wall 10:_________________(h x w) = __________________sq. ft.
Total: __________________sq. ft.
wall surfaces
soffitMeasure the width of the eave to be covered . Measure the length of the eave .
Do this for each eave, including the rakes of the gables and dormer eaves .
Eave 1: ________(width) x ________(length) = ________sq. ft. vented soffit
Eave 2: ________(width) x ________(length) = ________sq. ft. vented soffit
Eave 3: ________(width) x ________(length) = ________sq. ft. vented soffit
Eave 4: ________(width) x ________(length) = ________sq. ft. vented soffit
Eave 5: ________(width) x ________(length) = ________sq. ft. solid soffit
Eave 6: ________(width) x ________(length) = ________sq. ft. solid soffit
Eave 7: ________(width) x ________(length) = ________sq. ft. solid soffit
Eave 8: ________(width) x ________(length) = ________sq. ft. solid soffit
Total Vented Soffit: ________sq. ft.
Total Non-Vented (solid) Soffit: ________sq. ft.
Multiply the width of each rectangular area by the length; add totals of each rectangular area .
_______(width) x _______(length) of area 1 = ______________sq. ft.
_______(width) x _______(length) of area 2 = ______________sq. ft.
Total Non-Vented (solid) Soffit: = ______________sq. ft.
porch ceilings
8
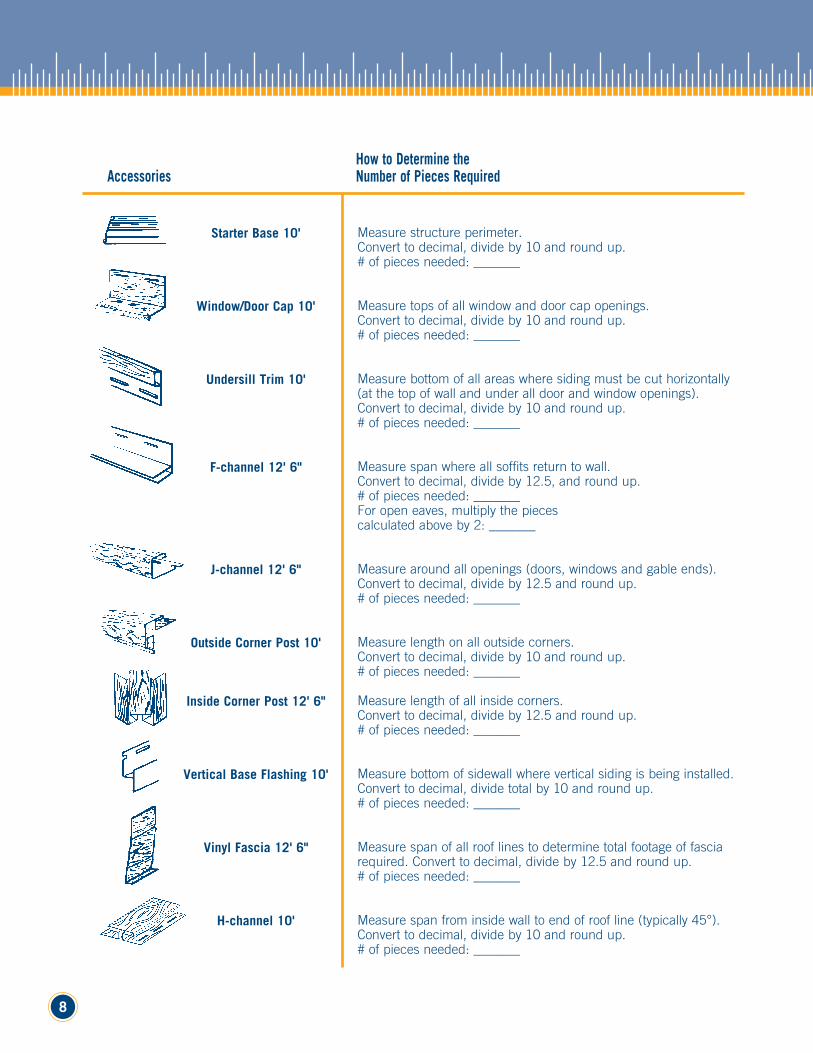
AccessoriesHow to Determine the Number of Pieces Required
Measure structure perimeter. Convert to decimal, divide by 10 and round up. # of pieces needed: _______
Measure tops of all window and door cap openings. Convert to decimal, divide by 10 and round up. # of pieces needed: _______
Measure bottom of all areas where siding must be cut horizontally (at the top of wall and under all door and window openings). Convert to decimal, divide by 10 and round up. # of pieces needed: _______
Measure span where all soffits return to wall. Convert to decimal, divide by 12.5, and round up. # of pieces needed: _______ For open eaves, multiply the pieces calculated above by 2: _______
Measure around all openings (doors, windows and gable ends). Convert to decimal, divide by 12.5 and round up. # of pieces needed: _______
Measure length on all outside corners. Convert to decimal, divide by 10 and round up. # of pieces needed: _______
Measure length of all inside corners. Convert to decimal, divide by 12.5 and round up. # of pieces needed: _______
Measure bottom of sidewall where vertical siding is being installed. Convert to decimal, divide total by 10 and round up.# of pieces needed: _______
Measure span of all roof lines to determine total footage of fascia required. Convert to decimal, divide by 12.5 and round up. # of pieces needed: _______
Measure span from inside wall to end of roof line (typically 45°). Convert to decimal, divide by 10 and round up. # of pieces needed: _______
Starter Base 10'
Window/Door Cap 10'
Undersill Trim 10'
F-channel 12' 6"
J-channel 12' 6"
Outside Corner Post 10' Inside Corner Post 12' 6"
Vertical Base Flashing 10'
Vinyl Fascia 12' 6"
H-channel 10'
9
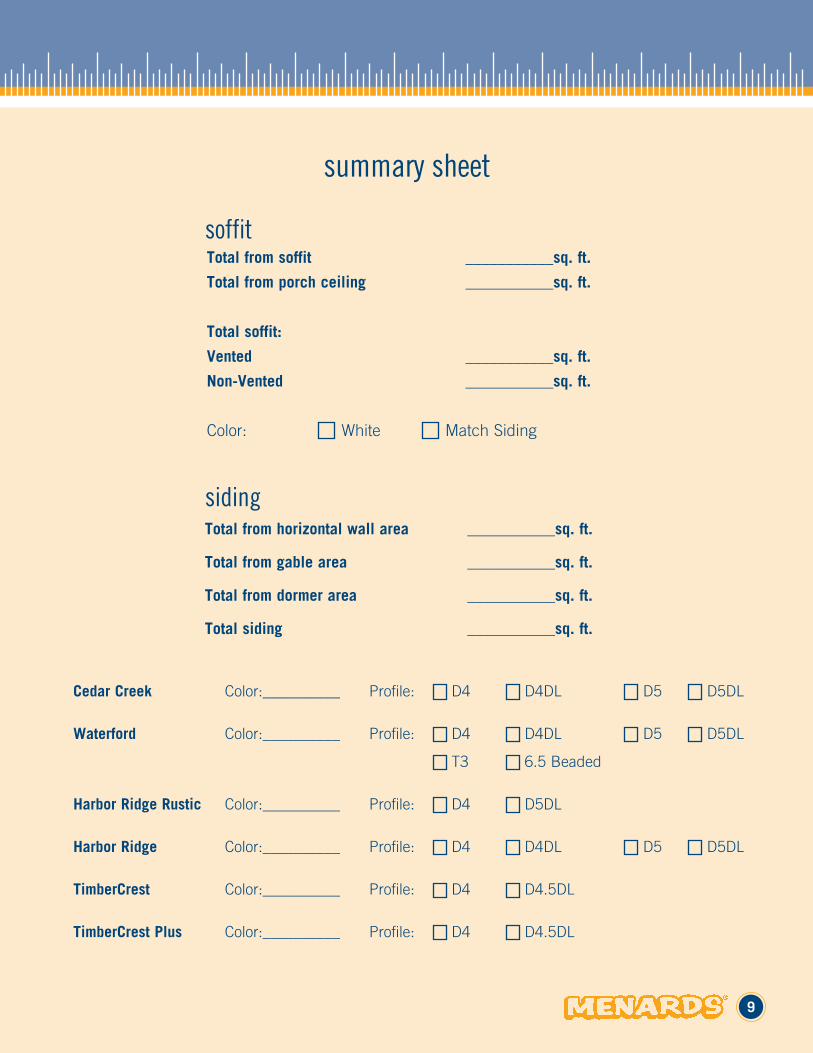
Total from soffit ___________sq . ft .
Total from porch ceiling ___________sq . ft .
Total soffit:
Vented ___________sq . ft .
Non-Vented ___________sq . ft .
Color: White Match Siding
Total from horizontal wall area ___________sq . ft .
Total from gable area ___________sq . ft .
Total from dormer area ___________sq . ft .
Total siding ___________sq . ft .
summary sheet
soffit
siding
Cedar Creek Color:__________ Profile: D4 D4DL D5 D5DL
Waterford Color:__________ Profile: D4 D4DL D5 D5DL
T3 6.5 Beaded
Harbor Ridge Rustic Color:__________ Profile: D4 D5DL
Harbor Ridge Color:__________ Profile: D4 D4DL D5 D5DL
TimberCrest Color:__________ Profile: D4 D4.5DL
TimberCrest Plus Color:__________ Profile: D4 D4.5DL
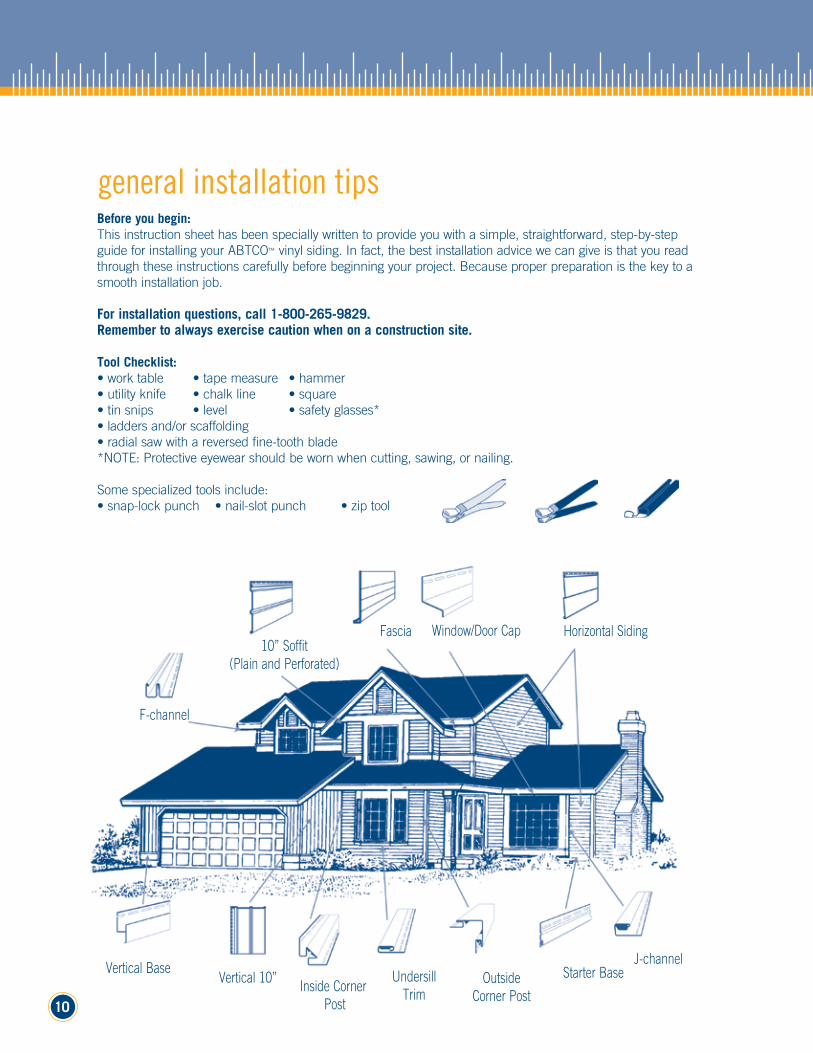
10
Undersill Trim
Vertical Base Vertical 10” Inside Corner
Post
OutsideCorner Post
Starter BaseJ-channel
F-channel
10” Soffit (Plain and Perforated)
Fascia Window/Door Cap Horizontal Siding
general installation tipsBefore you begin:This instruction sheet has been specially written to provide you with a simple, straightforward, step-by-step guide for installing your ABTCO™ vinyl siding. In fact, the best installation advice we can give is that you read through these instructions carefully before beginning your project. Because proper preparation is the key to a smooth installation job.
For installation questions, call 1-800-265-9829 . Remember to always exercise caution when on a construction site .
Tool Checklist:• work table • tape measure • hammer• utility knife • chalk line • square• tin snips • level • safety glasses*• ladders and/or scaffolding• radial saw with a reversed fine-tooth blade*NOTE: Protective eyewear should be worn when cutting, sawing, or nailing.
Some specialized tools include:• snap-lock punch • nail-slot punch • zip tool
11
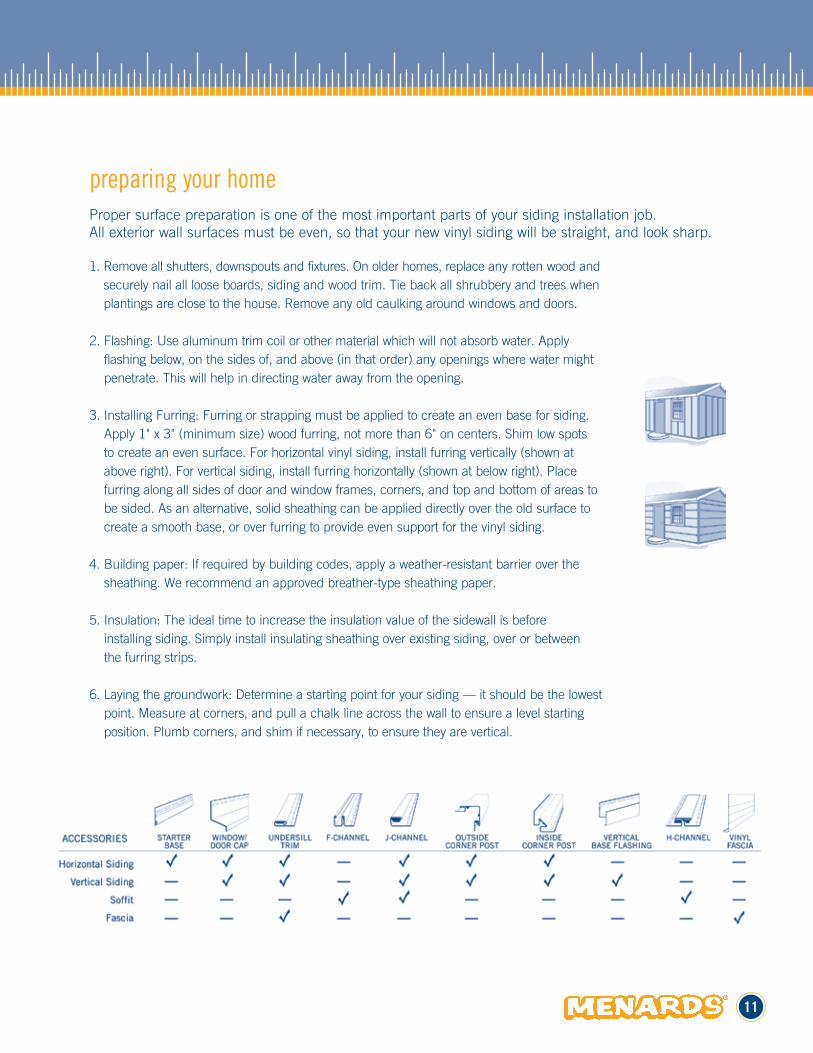
preparing your home Proper surface preparation is one of the most important parts of your siding installation job. All exterior wall surfaces must be even, so that your new vinyl siding will be straight, and look sharp.
1. Remove all shutters, downspouts and fixtures. On older homes, replace any rotten wood and securely nail all loose boards, siding and wood trim. Tie back all shrubbery and trees when plantings are close to the house. Remove any old caulking around windows and doors.
2. Flashing: Use aluminum trim coil or other material which will not absorb water. Apply flashing below, on the sides of, and above (in that order) any openings where water might penetrate. This will help in directing water away from the opening.
3. Installing Furring: Furring or strapping must be applied to create an even base for siding. Apply 1" x 3" (minimum size) wood furring, not more than 6" on centers. Shim low spots to create an even surface. For horizontal vinyl siding, install furring vertically (shown at above right). For vertical siding, install furring horizontally (shown at below right). Place furring along all sides of door and window frames, corners, and top and bottom of areas to be sided. As an alternative, solid sheathing can be applied directly over the old surface to create a smooth base, or over furring to provide even support for the vinyl siding.
4. Building paper: If required by building codes, apply a weather-resistant barrier over the sheathing. We recommend an approved breather-type sheathing paper.
5. Insulation: The ideal time to increase the insulation value of the sidewall is before installing siding. Simply install insulating sheathing over existing siding, over or between the furring strips.
6. Laying the groundwork: Determine a starting point for your siding — it should be the lowest point. Measure at corners, and pull a chalk line across the wall to ensure a level starting position. Plumb corners, and shim if necessary, to ensure they are vertical.
12
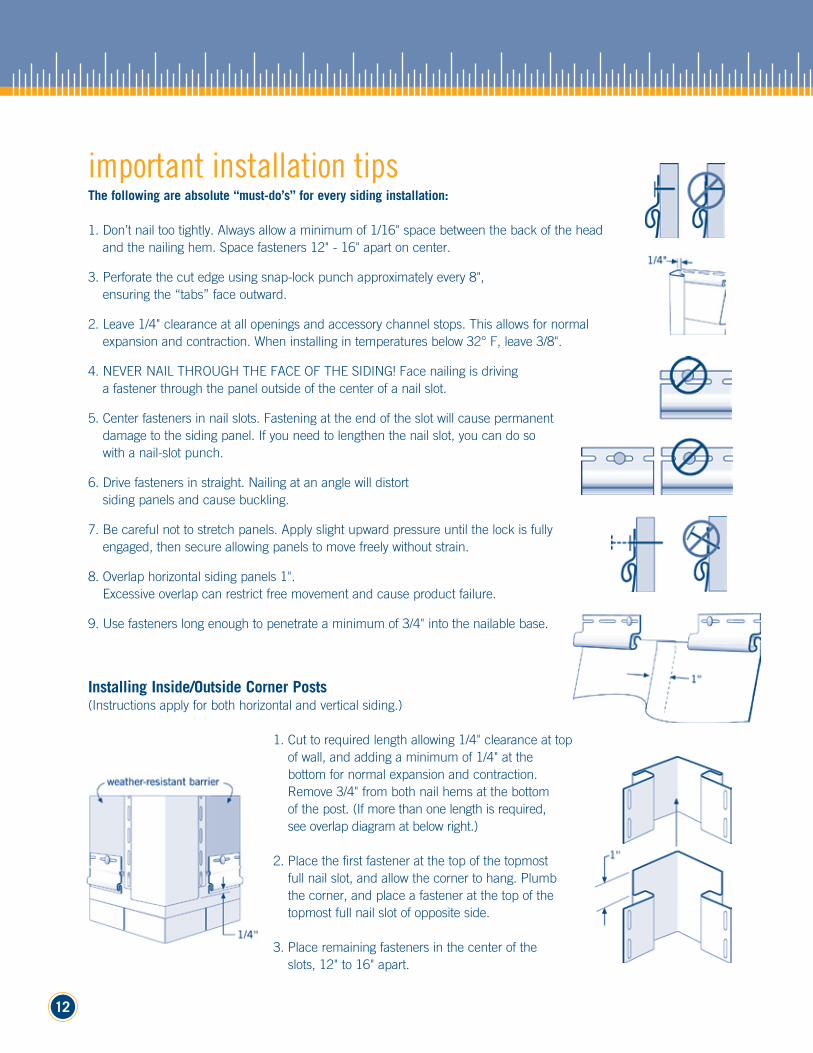
important installation tips The following are absolute “must-do’s” for every siding installation:
1. Don’t nail too tightly. Always allow a minimum of 1/16" space between the back of the head and the nailing hem. Space fasteners 12" - 16" apart on center.
3. Perforate the cut edge using snap-lock punch approximately every 8", ensuring the “tabs” face outward.
2. Leave 1/4" clearance at all openings and accessory channel stops. This allows for normal expansion and contraction. When installing in temperatures below 32° F, leave 3/8".
4. NEVER NAIL THROUGH THE FACE OF THE SIDING! Face nailing is driving a fastener through the panel outside of the center of a nail slot.
5. Center fasteners in nail slots. Fastening at the end of the slot will cause permanent damage to the siding panel. If you need to lengthen the nail slot, you can do so with a nail-slot punch.
6. Drive fasteners in straight. Nailing at an angle will distort siding panels and cause buckling.
7. Be careful not to stretch panels. Apply slight upward pressure until the lock is fully engaged, then secure allowing panels to move freely without strain.
8. Overlap horizontal siding panels 1". Excessive overlap can restrict free movement and cause product failure.
9. Use fasteners long enough to penetrate a minimum of 3/4" into the nailable base.
Installing Inside/Outside Corner Posts (Instructions apply for both horizontal and vertical siding.)
1. Cut to required length allowing 1/4" clearance at top of wall, and adding a minimum of 1/4" at the bottom for normal expansion and contraction. Remove 3/4" from both nail hems at the bottom of the post. (If more than one length is required, see overlap diagram at below right.)
2. Place the first fastener at the top of the topmost full nail slot, and allow the corner to hang. Plumb the corner, and place a fastener at the top of the topmost full nail slot of opposite side.
3. Place remaining fasteners in the center of the slots, 12" to 16" apart.
installing TimberCrest® i/s insulated siding
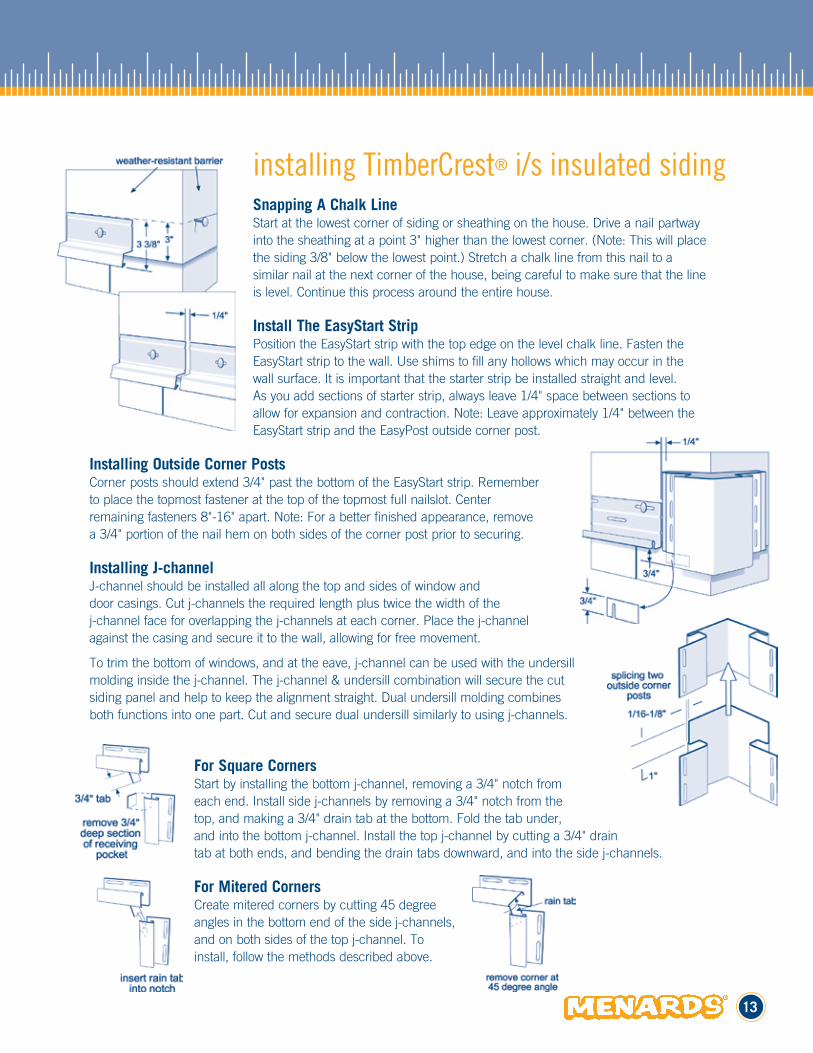
Snapping A Chalk LineStart at the lowest corner of siding or sheathing on the house. Drive a nail partway into the sheathing at a point 3" higher than the lowest corner. (Note: This will place the siding 3/8" below the lowest point.) Stretch a chalk line from this nail to a similar nail at the next corner of the house, being careful to make sure that the line is level. Continue this process around the entire house. Install The EasyStart StripPosition the EasyStart strip with the top edge on the level chalk line. Fasten the EasyStart strip to the wall. Use shims to fill any hollows which may occur in the wall surface. It is important that the starter strip be installed straight and level. As you add sections of starter strip, always leave 1/4" space between sections to allow for expansion and contraction. Note: Leave approximately 1/4" between the EasyStart strip and the EasyPost outside corner post.
Installing Outside Corner Posts Corner posts should extend 3/4" past the bottom of the EasyStart strip. Remember to place the topmost fastener at the top of the topmost full nailslot. Center remaining fasteners 8"-16" apart. Note: For a better finished appearance, remove a 3/4" portion of the nail hem on both sides of the corner post prior to securing. Installing J-channelJ-channel should be installed all along the top and sides of window and door casings. Cut j-channels the required length plus twice the width of the j-channel face for overlapping the j-channels at each corner. Place the j-channel against the casing and secure it to the wall, allowing for free movement.
To trim the bottom of windows, and at the eave, j-channel can be used with the undersill molding inside the j-channel. The j-channel & undersill combination will secure the cut siding panel and help to keep the alignment straight. Dual undersill molding combines both functions into one part. Cut and secure dual undersill similarly to using j-channels.
For Square CornersStart by installing the bottom j-channel, removing a 3/4" notch from each end. Install side j-channels by removing a 3/4" notch from the top, and making a 3/4" drain tab at the bottom. Fold the tab under, and into the bottom j-channel. Install the top j-channel by cutting a 3/4" drain tab at both ends, and bending the drain tabs downward, and into the side j-channels.
For Mitered CornersCreate mitered corners by cutting 45 degree angles in the bottom end of the side j-channels, and on both sides of the top j-channel. To install, follow the methods described above.
13
14
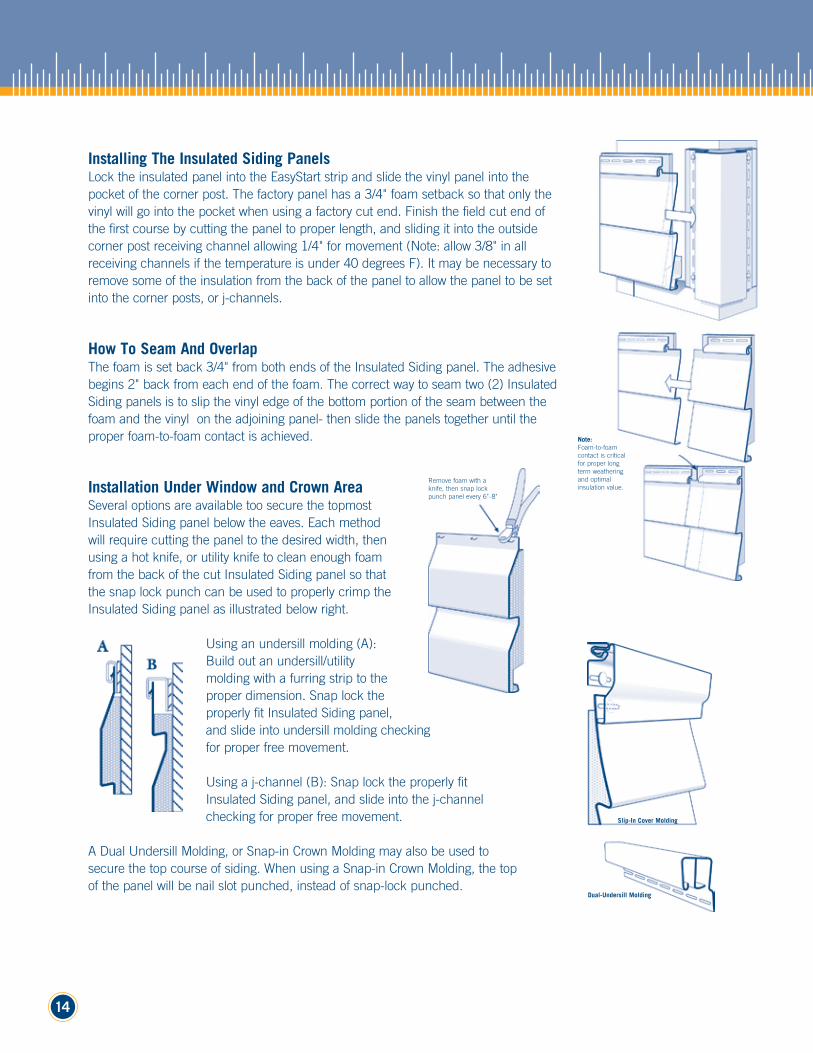
Installing The Insulated Siding PanelsLock the insulated panel into the EasyStart strip and slide the vinyl panel into the pocket of the corner post. The factory panel has a 3/4" foam setback so that only the vinyl will go into the pocket when using a factory cut end. Finish the field cut end of the first course by cutting the panel to proper length, and sliding it into the outside corner post receiving channel allowing 1/4" for movement (Note: allow 3/8" in all receiving channels if the temperature is under 40 degrees F). It may be necessary to remove some of the insulation from the back of the panel to allow the panel to be set into the corner posts, or j-channels.
How To Seam And OverlapThe foam is set back 3/4" from both ends of the Insulated Siding panel. The adhesive begins 2" back from each end of the foam. The correct way to seam two (2) Insulated Siding panels is to slip the vinyl edge of the bottom portion of the seam between the foam and the vinyl on the adjoining panel- then slide the panels together until the proper foam-to-foam contact is achieved.
Installation Under Window and Crown AreaSeveral options are available too secure the topmost Insulated Siding panel below the eaves. Each method will require cutting the panel to the desired width, then using a hot knife, or utility knife to clean enough foam from the back of the cut Insulated Siding panel so that the snap lock punch can be used to properly crimp the Insulated Siding panel as illustrated below right.
Using an undersill molding (A): Build out an undersill/utility molding with a furring strip to the proper dimension. Snap lock the properly fit Insulated Siding panel, and slide into undersill molding checking for proper free movement.
Using a j-channel (B): Snap lock the properly fit Insulated Siding panel, and slide into the j-channel checking for proper free movement.
A Dual Undersill Molding, or Snap-in Crown Molding may also be used to secure the top course of siding. When using a Snap-in Crown Molding, the top of the panel will be nail slot punched, instead of snap-lock punched.
Note:Foam-to-foam contact is critical for proper long term weathering and optimal insulation value.
Dual-Undersill Molding
Slip-In Cover Molding
Remove foam with a knife, then snap lock punch panel every 6"-8"
15
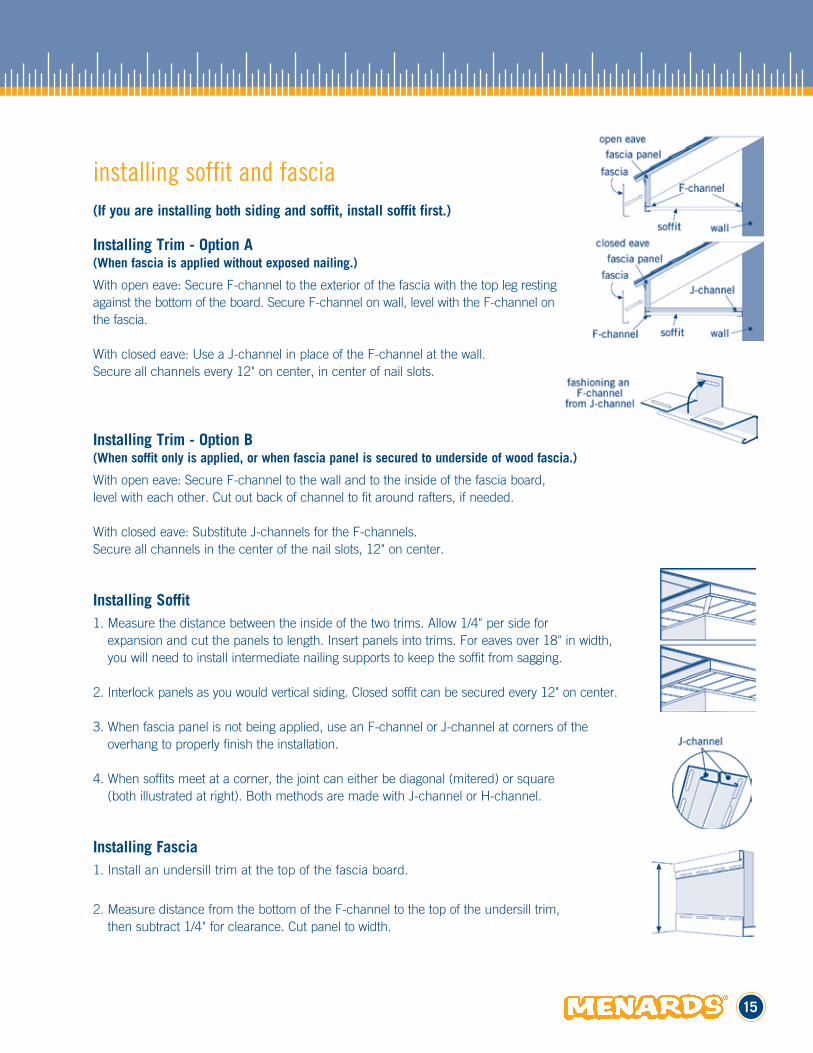
installing soffit and fascia (If you are installing both siding and soffit, install soffit first .)
Installing Trim - Option A(When fascia is applied without exposed nailing .)
With open eave: Secure F-channel to the exterior of the fascia with the top leg resting against the bottom of the board. Secure F-channel on wall, level with the F-channel on the fascia.
With closed eave: Use a J-channel in place of the F-channel at the wall. Secure all channels every 12" on center, in center of nail slots.
Installing Trim - Option B (When soffit only is applied, or when fascia panel is secured to underside of wood fascia .)
With open eave: Secure F-channel to the wall and to the inside of the fascia board, level with each other. Cut out back of channel to fit around rafters, if needed.
With closed eave: Substitute J-channels for the F-channels. Secure all channels in the center of the nail slots, 12" on center.
Installing Soffit1. Measure the distance between the inside of the two trims. Allow 1/4" per side for
expansion and cut the panels to length. Insert panels into trims. For eaves over 18" in width, you will need to install intermediate nailing supports to keep the soffit from sagging.
2. Interlock panels as you would vertical siding. Closed soffit can be secured every 12" on center.
3. When fascia panel is not being applied, use an F-channel or J-channel at corners of the overhang to properly finish the installation.
4. When soffits meet at a corner, the joint can either be diagonal (mitered) or square (both illustrated at right). Both methods are made with J-channel or H-channel.
Installing Fascia1. Install an undersill trim at the top of the fascia board.
2. Measure distance from the bottom of the F-channel to the top of the undersill trim, then subtract 1/4" for clearance. Cut panel to width.
16
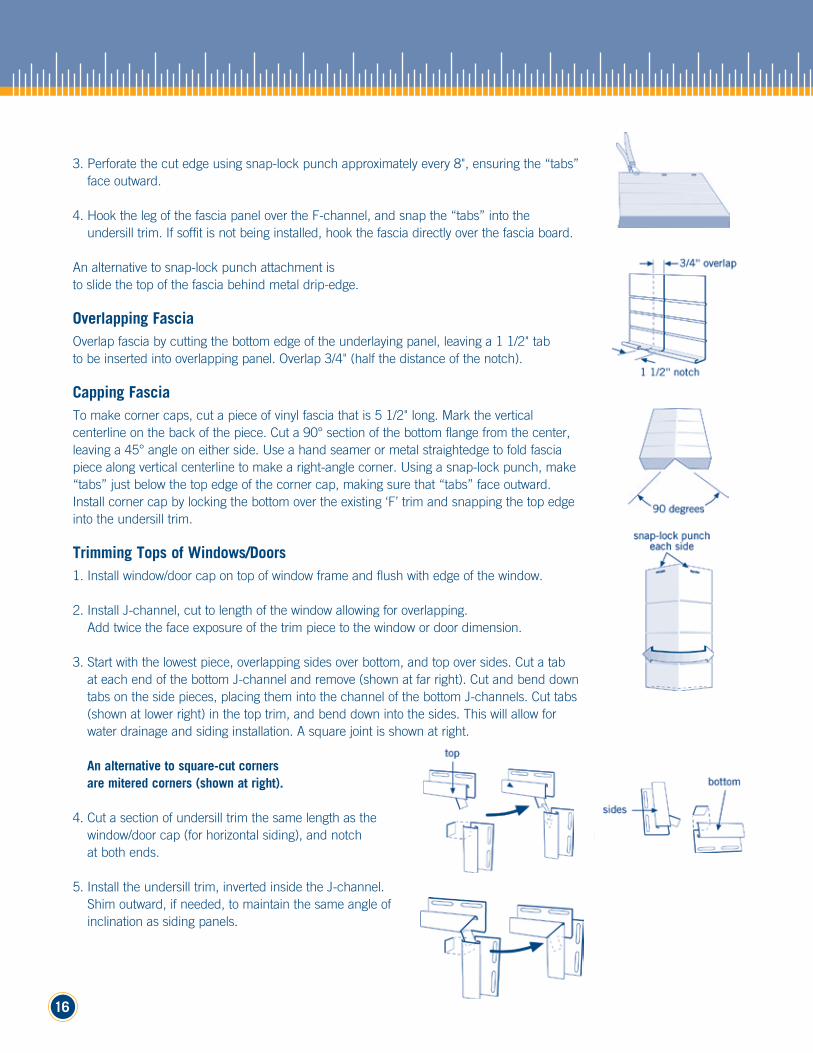
3. Perforate the cut edge using snap-lock punch approximately every 8", ensuring the “tabs” face outward.
4. Hook the leg of the fascia panel over the F-channel, and snap the “tabs” into the undersill trim. If soffit is not being installed, hook the fascia directly over the fascia board.
An alternative to snap-lock punch attachment is to slide the top of the fascia behind metal drip-edge.
Overlapping FasciaOverlap fascia by cutting the bottom edge of the underlaying panel, leaving a 1 1/2" tab to be inserted into overlapping panel. Overlap 3/4" (half the distance of the notch).
Capping FasciaTo make corner caps, cut a piece of vinyl fascia that is 5 1/2" long. Mark the vertical centerline on the back of the piece. Cut a 90° section of the bottom flange from the center, leaving a 45° angle on either side. Use a hand seamer or metal straightedge to fold fascia piece along vertical centerline to make a right-angle corner. Using a snap-lock punch, make “tabs” just below the top edge of the corner cap, making sure that “tabs” face outward. Install corner cap by locking the bottom over the existing ‘F’ trim and snapping the top edge into the undersill trim.
Trimming Tops of Windows/Doors1. Install window/door cap on top of window frame and flush with edge of the window.
2. Install J-channel, cut to length of the window allowing for overlapping. Add twice the face exposure of the trim piece to the window or door dimension.
3. Start with the lowest piece, overlapping sides over bottom, and top over sides. Cut a tab at each end of the bottom J-channel and remove (shown at far right). Cut and bend down tabs on the side pieces, placing them into the channel of the bottom J-channels. Cut tabs (shown at lower right) in the top trim, and bend down into the sides. This will allow for water drainage and siding installation. A square joint is shown at right.
An alternative to square-cut corners are mitered corners (shown at right) .
4. Cut a section of undersill trim the same length as the window/door cap (for horizontal siding), and notch it at both ends.
5. Install the undersill trim, inverted inside the J-channel. Shim outward, if needed, to maintain the same angle of inclination as siding panels.
installing vertical siding1. Using a level and chalk line, pull a line around the bottom of the wall where you want the siding to start, allowing
for type of starting channel being used (either vertical base flashing or J-channel).
2. If using a 10" panel (i.e. Double 5), measure width of the wall and divide by 10". Calculate the width of the starting and finishing panels, which should be the same size. This will provide a centered appearance.
3. Install starting channel with the bottom of the channel flush with the chalk line, inserted into the receiving pockets of the posts.
4. At top of wall, install a J-channel, inverted, to act as a cap over the panel.
5. If first panel is cut on flat portion, fill post cavity to full height with a furring strip 3/8" x 2" wide. Install an undersill trim vertically over the furring strip, within the cavity of the post. Nailing undersill trim holds the board in place.
6. Cut panels to length, allowing for expansion at top and bottom. Perforate cut edge of the panel every 12" using a snap-lock punch, ensuring the “tabs” face outward.
7. Insert the panel into the upper J-channel and lower vertical base flashing, then snap “tabs” into undersill trim.
8. Raise panel to 1/4" from the top of the upper J-channel, and secure by first placing a fastener at the top of the topmost full nail slot. Continue by centering the remaining fasteners in the nail slots, a maximum of 16" on center. Secure subsequent panels similarly, by first hanging the panel, then securing by centering the fasteners.
9. Fit the last panel into the corner post on the opposite side of the wall, in the same fashion as the first panel was installed.
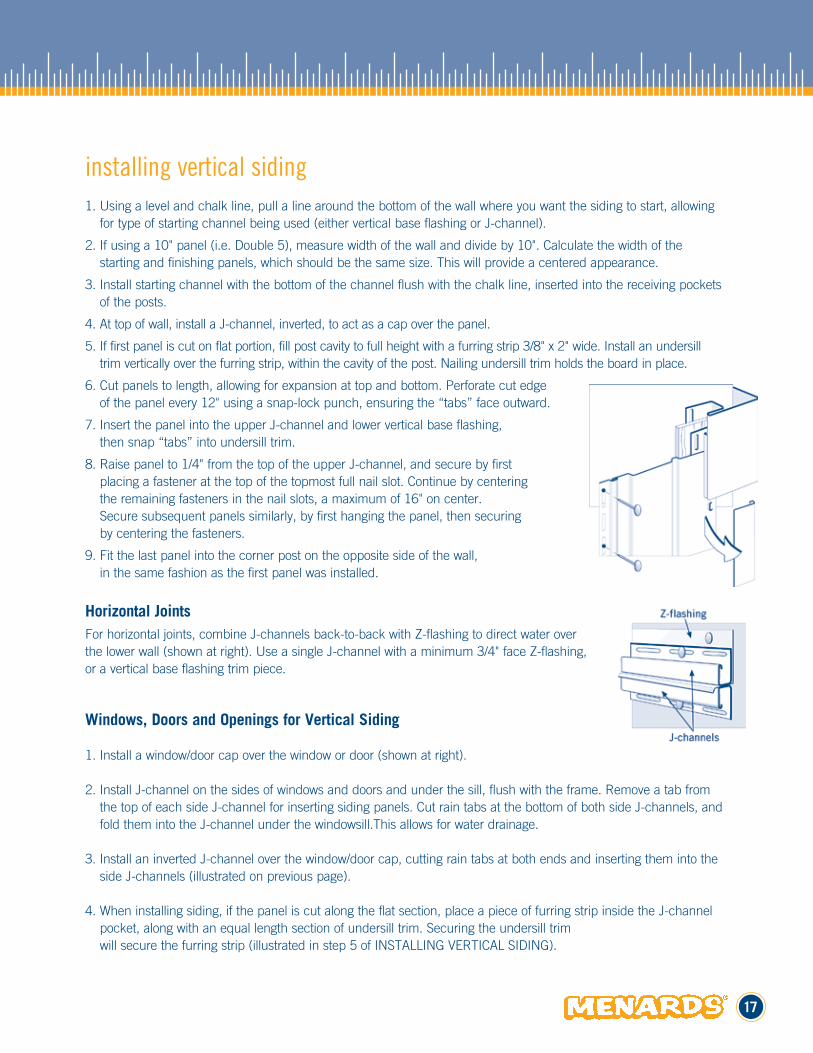
Horizontal Joints For horizontal joints, combine J-channels back-to-back with Z-flashing to direct water over the lower wall (shown at right). Use a single J-channel with a minimum 3/4" face Z-flashing, or a vertical base flashing trim piece.
Windows, Doors and Openings for Vertical Siding 1. Install a window/door cap over the window or door (shown at right).
2. Install J-channel on the sides of windows and doors and under the sill, flush with the frame. Remove a tab from the top of each side J-channel for inserting siding panels. Cut rain tabs at the bottom of both side J-channels, and fold them into the J-channel under the windowsill.This allows for water drainage.
3. Install an inverted J-channel over the window/door cap, cutting rain tabs at both ends and inserting them into the side J-channels (illustrated on previous page).
4. When installing siding, if the panel is cut along the flat section, place a piece of furring strip inside the J-channel pocket, along with an equal length section of undersill trim. Securing the undersill trim will secure the furring strip (illustrated in step 5 of INSTALLING VERTICAL SIDING).
17
18
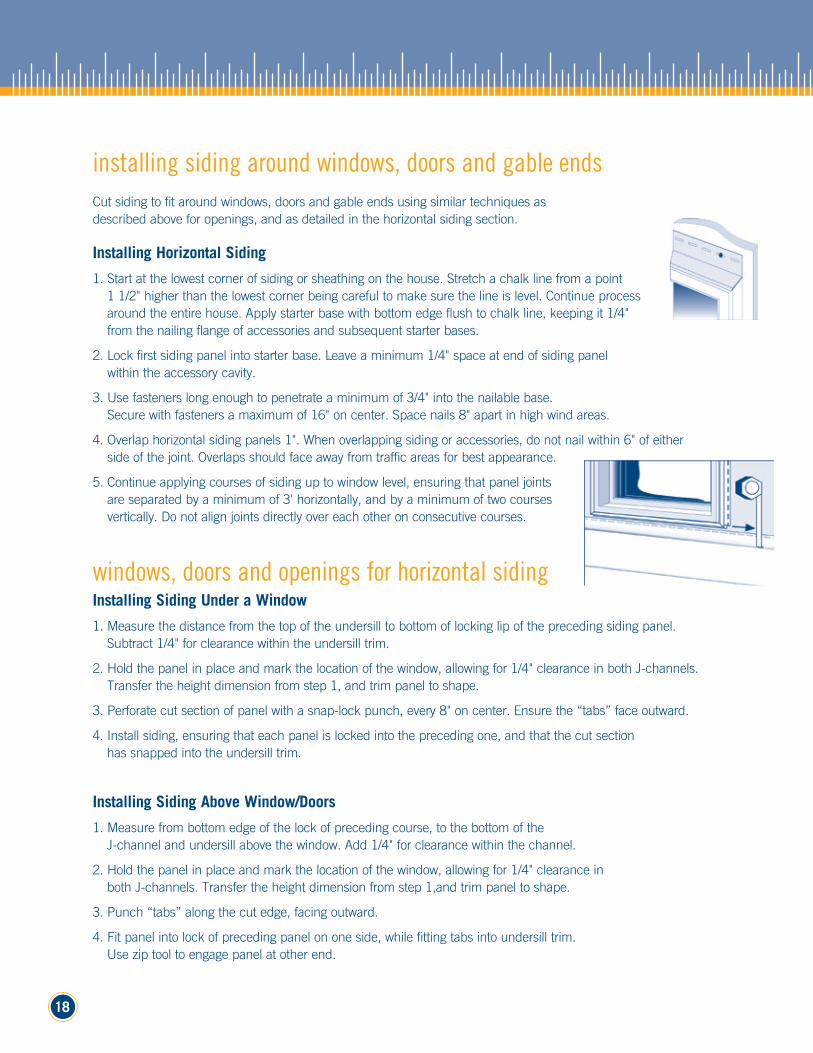
installing siding around windows, doors and gable endsCut siding to fit around windows, doors and gable ends using similar techniques as described above for openings, and as detailed in the horizontal siding section.
Installing Horizontal Siding
1. Start at the lowest corner of siding or sheathing on the house. Stretch a chalk line from a point 1 1/2" higher than the lowest corner being careful to make sure the line is level. Continue process around the entire house. Apply starter base with bottom edge flush to chalk line, keeping it 1/4" from the nailing flange of accessories and subsequent starter bases.
2. Lock first siding panel into starter base. Leave a minimum 1/4" space at end of siding panel within the accessory cavity.
3. Use fasteners long enough to penetrate a minimum of 3/4" into the nailable base. Secure with fasteners a maximum of 16" on center. Space nails 8" apart in high wind areas.
4. Overlap horizontal siding panels 1". When overlapping siding or accessories, do not nail within 6" of either side of the joint. Overlaps should face away from traffic areas for best appearance.
5. Continue applying courses of siding up to window level, ensuring that panel joints are separated by a minimum of 3' horizontally, and by a minimum of two courses vertically. Do not align joints directly over each other on consecutive courses.
windows, doors and openings for horizontal sidingInstalling Siding Under a Window
1. Measure the distance from the top of the undersill to bottom of locking lip of the preceding siding panel. Subtract 1/4" for clearance within the undersill trim.
2. Hold the panel in place and mark the location of the window, allowing for 1/4" clearance in both J-channels. Transfer the height dimension from step 1, and trim panel to shape.
3. Perforate cut section of panel with a snap-lock punch, every 8" on center. Ensure the “tabs” face outward.
4. Install siding, ensuring that each panel is locked into the preceding one, and that the cut section has snapped into the undersill trim.
Installing Siding Above Window/Doors
1. Measure from bottom edge of the lock of preceding course, to the bottom of the J-channel and undersill above the window. Add 1/4" for clearance within the channel.
2. Hold the panel in place and mark the location of the window, allowing for 1/4" clearance in both J-channels. Transfer the height dimension from step 1,and trim panel to shape.
3. Punch “tabs” along the cut edge, facing outward.
4. Fit panel into lock of preceding panel on one side, while fitting tabs into undersill trim. Use zip tool to engage panel at other end.
19
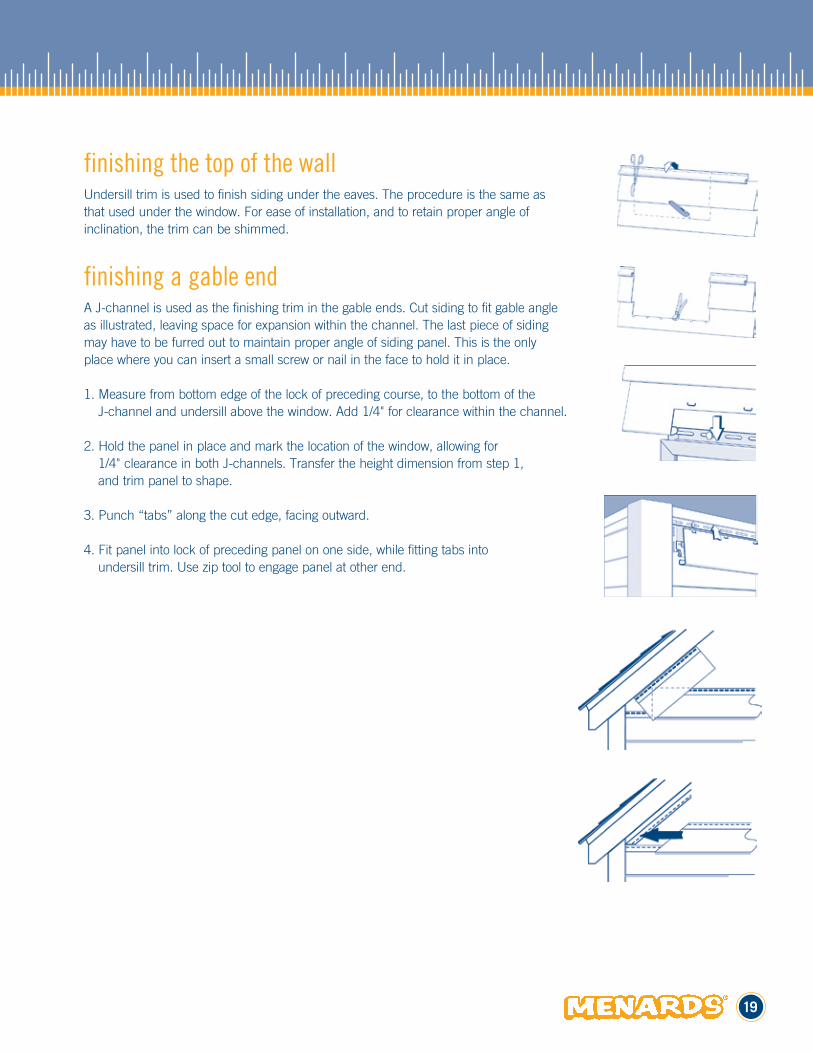
finishing the top of the wall Undersill trim is used to finish siding under the eaves. The procedure is the same as that used under the window. For ease of installation, and to retain proper angle of inclination, the trim can be shimmed.
finishing a gable endA J-channel is used as the finishing trim in the gable ends. Cut siding to fit gable angle as illustrated, leaving space for expansion within the channel. The last piece of siding may have to be furred out to maintain proper angle of siding panel. This is the only place where you can insert a small screw or nail in the face to hold it in place.
1. Measure from bottom edge of the lock of preceding course, to the bottom of the J-channel and undersill above the window. Add 1/4" for clearance within the channel.
2. Hold the panel in place and mark the location of the window, allowing for 1/4" clearance in both J-channels. Transfer the height dimension from step 1, and trim panel to shape.
3. Punch “tabs” along the cut edge, facing outward.
4. Fit panel into lock of preceding panel on one side, while fitting tabs into undersill trim. Use zip tool to engage panel at other end.
20
1. WARRANTY COVERAGEA. COVERAGE. This warranty applies to the original retail purchaser (“Purchaser”) of ABTCO vinyl siding, soffit and accessories (“Product(s)”) and to any owner (“Owner”) of a building on which the Product(s) is originally installed.
B. WARRANTY. We warrant that our Product(s), when applied in residential applications in the United States and Canada (including prefabricated residences located or to be located on a permanent building site) will remain free from manufacturing defects that cause peeling, flaking, rusting, blistering or rotting (“Nonconformities”). IF THE PRODUCT DOES NOT COMPLY WITH THIS LIMITED WARRANTY, OUR LIABILITY IS LIMITED TO THE REPAIR OR REPLACEMENT PROVISIONS SET FORTH IN SECTION 5.
C. HAIL DAMAGE. In the event of damage by hail, the Owner should report the damage to his or her homeowner’s insurance company to pursue coverage under a homeowner’s insurance policy. To the extent Product(s) damaged by hail is not covered by the homeowner’s insurance policy, we warrant to the original retail Purchaser only that we will provide replacement material only for the damaged Product(s). The Owner shall be responsible for the payment of all installation, labor, freight costs and for the purchase of any additional siding intended to replace undamaged Product(s).
D. WARRANTY TERM. If the original Purchaser of the Product(s) is an individual, the warranty term will be that original Purchaser’s lifetime. If the original Purchaser of the Product(s) is not an individual, the warranty term will be deemed to be 50 years. The warranty period for any Product(s) repaired or replaced under this Warranty shall be equal to the remaining warranty period applicable to any Product(s) originally installed on the residence.
2. WARRANTY TRANSFERThis warranty, except for the hail damage warranty in Section 1C, may be transferred to the subsequent owner of the residence where the Product(s) has been installed if we are notified of change in ownership within ninety (90) days of the change. Failure to notify us of change in ownership shall relieve us of all further obligations hereunder. Upon change in ownership of the residence where the products were originally installed and our receipt of timely notice of change of ownership, the warranty period shall be fixed at fifty (50) years from the date of original installation.
3. EXCLUSIONS FROM WARRANTY COVERAGETHIS EXPRESS WARRANTY PROVIDES A REMEDY ONLY FOR THE NONCONFORMITIES REPORTED AND CONFIRMED IN ACCORDANCE WITH SECTION 7. DISCOLORATION CAUSED BY AIR POLLUTION OR EXPOSURE TO HARMFUL CHEMICALS IS NOT COVERED BY THIS WARRANTY. DISCOLORATION CAUSED BY EXPOSURE TO THE ELEMENTS OR NORMAL WEATHERING, IN EXCESS OF A DELTA E OF 7 COLOR UNITS AS MEASURED BY AN INDUSTRY STANDARD COLOR MEASUREMENT DEVICE, IS NOT COVERED BY THIS WARRANTY. IN ADDITION, THIS WARRANTY DOES NOT PROVIDE A REMEDY FOR DAMAGE TO THE PRODUCT(S) CAUSED BY: A. (1) MISUSE OR IMPROPER HANDLING, INSTALLATION OR MAINTENANCE; (2) ALTERATIONS TO THE STRUCTURE AFTER THE ORIGINAL INSTALLATION OF THE PRODUCT(S); (3) ACTS OF GOD, SUCH AS LIGHTNING, WIND STORM, HURRICANE, TORNADO, EARTHQUAKE, FLOOD OR OTHER SIMILAR SEVERE
WEATHER OR NATURAL PHENOMENA;(4) DESIGN, APPLICATION OR CONSTRUCTION OF THE STRUCTURE ON WHICH THE PRODUCT(S) ARE INSTALLED; OR (5) TRANSPORT, STORAGE OR HANDLING OF THE PRODUCT(S) PRIOR TO INSTALLATION.
B. PRODUCT(S) NOT INSTALLED IN COMPLIANCE WITH ALL APPLICABLE BUILDING CODES AND/OR NOT INSTALLED AND MAINTAINED ACCORDING TO THE THEN CURRENT VINYL SIDING INSTITUTE INSTALLATION GUIDE.
C. INSTALLATION WORKMANSHIP.
D. ANY PRODUCT(S) WHICH IS PAINTED.
E. MISINSTALLATION OF ANOTHER PRODUCT ON THE SAME WALL.
F. USE OF ACCESSORIES WHICH DO NOT PROPERLY RECEIVE AND/OR SECURE THE PRODUCT(S) TO THE WALL.
G. IMPACT OF FOREIGN OBJECTS.
H. DAMAGE RESULTING FROM FAILURE TO COMPLY WITH OUR INSPECTION AND MAINTENANCE REQUIREMENTS AND INSTALLATION INSTRUCTIONS.
I. FAILURE OF OR DAMAGE TO THE WALL ON WHICH THE PRODUCT(S) WERE INSTALLED CAUSED BY MOVEMENT, DISTORTION, CRACKING OR SETTLING OF THE WALL OR THE BUILDING FOUNDATION.
4. EXCLUSION OF IMPLIED WARRANTIES; NO OTHER EXPRESS WARRANTIES THIS WARRANTY IS THE ONLY WARRANTY APPLICABLE TO THIS PRODUCT(S) AND EXCLUDES ALL OTHER EXPRESS OR IMPLIED WARRANTIES, INCLUDING ANY IMPLIED WARRANTY OF MERCHANTABILITY OR FITNESS FOR A PARTICULAR PURPOSE, OR ANY WARRANTIES OTHERWISE ARISING FROM THE COURSE OF DEALING OR USAGE OF TRADE OR ADVERTISING, EXCEPT WHERE SUCH WARRANTIES ARISE UNDER APPLICABLE CONSUMER PRODUCT WARRANTY LAWS AND CANNOT LAWFULLY BE DISCLAIMED, IN WHICH EVENT SUCH WARRANTIES ARE LIMITED TO SUCH SHORTER PERIOD AS PERMITTED OR REQUIRED UNDER APPLICABLE LAW. Some states do not allow limitations on how long an implied warranty lasts, so the above limitations may not apply to you. NO OTHER EXPRESS WARRANTY HAS BEEN MADE OR WILL BE MADE ON OUR BEHALF WITH RESPECT TO THIS PRODUCT(S).
5. REMEDIESTHIS SECTION PROVIDES FOR THE SOLE REMEDY AVAILABLE TO THE PURCHASER OR OWNER FOR ANY NONCONFORMITY IN THE PRODUCT(S). In the event of any Nonconformity covered by this or any implied warranty not disclaimed in Section 4, we will, at our sole option and at our expense, either repair or replace defective or damaged Product(s), including all labor and materials necessary to perform the work. WE MAY DISCONTINUE, MODIFY OR CHANGE THE COLOR OF ANY PRODUCT(S) WITHOUT NOTICE AND SHALL BEAR NO LIABILITY FOR ANY SUCH COLOR CHANGE. IF WE AGREE TO REPLACE PRODUCT(S) UNDER THIS WARRANTY AND AN EXACT REPLACEMENT PRODUCT IS NOT AVAILABLE, WE MAY SUBSTITUTE ANOTHER PRODUCT
ABTCOTM PREMIUM VINYL SIDING LIFETIME LIMITED WARRANTY
21
IT DEEMS TO BE EQUIVALENT IN VALUE AND QUALITY. Any dispute concerning this warranty shall be submitted to binding arbitration to a mutually agreed arbitrator; or, if the parties fail to agree, to the American Arbitration Association to be resolved using its Commercial Arbitration Rules. The jurisdiction of the arbitrator over the dispute shall be exclusive and the decision of the arbitrator shall be binding on the parties and nonappealable.
6. EXCLUSION OF OTHER REMEDIESIN NO EVENT SHALL WE BE LIABLE TO ANY PERSON FOR AN AMOUNT GREATER THAN THE VALUE OF THE REPAIR OR REPLACEMENT OF THE PRODUCT. IN NO EVENT WILL WE BE LIABLE FOR ANY INCIDENTAL, SPECIAL, INDIRECT, MULTIPLE, PUNITIVE OR CONSEQUENTIAL DAMAGES RESULTING FROM ANY DEFECT IN THE PRODUCT(S) SUPPLIED, INCLUDING, BUT NOT LIMITED TO DAMAGE TO PROPERTY OR LOST PROFITS REGARDLESS OF WHETHER SUCH CLAIMS ARE BASED ON THEORIES OF CONTRACT, WARRANTY, TORT (INCLUDING NEGLIGENCE AND GROSS NEGLIGENCE), STRICT LIABILITY, STATUTORY LIABILITY OR OTHERWISE. Some states do not allow the exclusion or limitation of incidental or consequential damages, so the above limitation or exclusion may not apply to you.
WARRANTY INFORMATION CAN BE FOUND ONLINE AT WWW.ABTCO.COM
7. RESPONSIBILITY OF PURCHASER/OWNERCOMPLIANCE WITH EACH OF THE ITEMS SET OUT BELOW IN SECTIONS A AND B INCLUSIVE IS A CONDITION TO OUR OBLIGATIONS UNDER THIS WARRANTY AND THE FAILURE TO COMPLY WITH ANY ONE OR MORE OF THE ITEMS SHALL VOID ANY RIGHTS OWNER OR PURCHASER MAY HAVE UNDER THIS WARRANTY.
A. WARRANTY REGISTRATION/CLAIMS(i) A warranty registration card must be properly completed and mailed to us within 30 days after the Product(s) installation date. A card is attached for your convenience.(ii) All claims under this Warranty must be sent in writing within 45 days after the discovery of the defect, and before beginning any permanent repair, to us at KP Building Products, 402 Boyer Circle, Williston, VT 05495.
B. OTHER(i) The Owner must notify us of any change in ownership of the home on which the Product(s) are installed within 90 days of the transfer of title.(ii) IT IS THE OWNER’S RESPONSIBILITY TO ESTABLISH THE DATE OF INSTALLATION. The Owner should do this by retaining any records which would tend to prove when the Product(s) was installed, including but not limited to: purchase invoices and receipts, contractor’s billings, service contracts and building permits.(iii) Upon reasonable notice, the Owner must allow our agents to enter the property and building on which the Product(s) is installed to inspect such Product(s). THE VINYL SIDING INSTITUTE’S IMPORTANT FIRE SAFETY INFORMATION STATEMENT IS AS FOLLOWS:Exterior vinyl building materials require little maintenance for many years. Nevertheless, common sense dictates that builders and
suppliers of vinyl products store, handle and install vinyl materials in a manner that avoids damage to the product and/or structure. Owners and Installers should take a few simple steps to protect vinyl building materials from fire. TO HOME AND BUILDING OWNERS:Rigid vinyl siding is made from organic materials and will melt or burn when exposed to a significant source of flame or heat. Building owners, occupants and outside maintenance personnel should always take normal precautions to keep sources of fire, such as barbeques, and combustible materials, such as dry leaves, mulch and trash, away from vinyl siding.
TO THE BUILDING TRADES, SPECIFIERS, PROFESSIONALS AND DO-IT-YOURSELF INSTALLERS:When rigid vinyl siding is exposed to significant heat or flame, the vinyl will soften, sag, melt or burn, and may thereby expose material underneath. Care must be exercised prior to installation when selecting underlayment materials because many underlayment materials are made from organic materials. All building materials should be installed in accordance with local, state, and Federal building codes and fire regulations.
CARE AND MAINTENANCEWhile ABTCO vinyl siding remains virtually maintenance-free, it will become dirty as any other product which is exposed to atmospheric conditions. Normally, your ABTCO vinyl siding can be cleaned satisfactorily through the use of an ordinary garden hose. If stubborn stains cannot be removed with water, the following procedure should be used:1. Equip the garden hose with a soft-bristled, long handle car brush.2. Where soil is of a stubborn nature, the following cleaning solution works well:- 1/3 cup household detergent- 2/3 cup trisodium phosphate- 1 gallon water
In certain geographic areas where mildew may be a problem, substitute one quart of 5% sodium hypochloride (household bleach) for one quart water in the above formula. Where the house is extremely dirty, it is recommended that you start washing from the bottom and go to the top, rinsing frequently. Cleaning solutions should be permitted to stand on the surface of the siding for several minutes before rinsing.
All questions concerning the meaning or applicability of this limited warranty are to be decided under the law of the State of Oregon without reference to its choice-of-law rules.
This Warranty gives you specific legal rights, and you may also have other rights which vary from state to state.
For further information, contact:
KP Building Products Quality Assurance Manager402 Boyer CircleWilliston, VT 05494
ABTCO and all other company names and product names are trademarks or registered trademarks of KP Building Products. ©2006 KP Building Products Corp. All rights reserved.
22
TIMBERCREST® I/S VINYL SIDING LIFETIME LIMITED WARRANTY
1. Warranty CoverageA. Coverage. This warranty applies to the original retail purchaser (“Purchaser”) of TimberCrest i/s vinyl siding, and accessories (the “Product (s)”) and to any owner of a building on which the Product(s) is originally installed (“Owner”).
B. Warranty. KP Building Products (“Manufacturer”) warrants that (a) the Product vinyl siding components will remain free from peeling, flaking, rusting, blistering or rotting (“Nonconformities”); (b) that the adhesive bond between the vinyl siding and the foam backer will be free of defects in materials and workmanship; and (c) that the foam backer will remain free from manufacturing defects that cause the foam to break apart or degrade. IF THE PRODUCT DOES NOT COMPLY WITH THIS LIMITED WARRANTY, THE MANUFACTURER’S LIABILITY IS LIMITED TO THE REPAIR OR REPLACEMENT PROVISIONS SET FORTH IN SECTION 5 BELOW.
C. Hail Damage: In the event of damage by hail the Owner should report the damage to his or her homeowners insurance company to pursue coverage under a homeowners insurance policy. To the extent Product(s) damaged by hail is not covered by the homeowner’s insurance policy, the Manufacturer warrants to the Owner that it will provide replacement material only for the damaged Product(s). The Owner shall be responsible for the payment of all installation, labor, freight costs, and for the purchase of any additional siding intended to replace undamaged Product(s).
D. Claims Periods. If the original purchaser of the Product(s) is an individual, claims relating to the Product(s) vinyl siding components may be made at any time during that original purchaser’s lifetime. If the original purchaser of the Product(s) is not an individual, the claims period shall be deemed to be 50 years from the installation date. The claims period relating to the vinyl/foam adhesive bond shall be five years from the installation date. The claims period for any claims relating to the foam backing shall be twenty years from the installation date. The warranty period for any Product(s) repaired or replaced under this Warranty shall be equal to the remaining warranty period applicable to any Product(s) originally installed on the residence.
2. Warranty TransferThis warranty, except for the hail damage warranty in Section 1C may be transferred to the subsequent owner of the residence where the Product(s) has been installed if the Manufacturer is notified of change in ownership within ninety (90) days of the change. Failure to notify the Manufacturer of change in ownership shall relieve the Manufacturer of all further obligation hereunder. Upon change in ownership of the residence where the products were originally installed and the Manufacturer’s receipt of timely notice of change of ownership, the claims period on Product(s) vinyl components shall be fixed at fifty (50) years from the date of original installation. The claim periods for foam and foam vinyl adhesion will not be affected by the transfer.
3. Exclusions from Warranty CoverageTHIS EXPRESS WARRANTY PROVIDES A REMEDY ONLY FOR THE NONCONFORMITIES REPORTED AND CONFIRMED IN ACCORDANCE WITH SECTION 6 BELOW. DISCOLORATION CAUSED BY AIR POLLUTION OR EXPOSURE TO HARMFUL CHEMICALS IS NOT COVERED BY THIS WARRANTY.DISCOLORATION CAUSED BY EXPOSURE TO THE ELEMENTS OR NORMAL WEATHERING, LESS THAN OF A DELTA E OF 7 COLOR
UNITS AS MEASURED BY AN INDUSTRY STANDARD COLOR MEASUREMENT DEVICE, IS NOT COVERED BY THIS WARRANTY. IN ADDITION, THIS WARRANTY DOES NOT PROVIDE A REMEDY FOR DAMAGE TO THE PRODUCT(S) CAUSED BY :
a. (1) MISUSE OR IMPROPER HANDLING, INSTALLATION OR MAINTENANCE; (2) ALTERATIONS TO THE STRUCTURE AFTER THE ORIGINAL INSTALLATION OF THE PRODUCT(S); (3) ACTS OF GOD, SUCH AS LIGHTNING, WIND STORM, HURRICANE, TORNADO, HAIL, EARTHQUAKE, FLOOD OR OTHER SIMILAR SEVERE WEATHER OR SIMILAR NATURAL PHENOMENA; (4) DESIGN, APPLICATION OR CONSTRUCTION OF THE STRUCTURE IN WHICH THE PRODUCT(S) ARE INSTALLED; OR (5) TRANSPORT, STORAGE OR HANDLING OF THE PRODUCT(S) PRIOR TO INSTALLATION.
b. PRODUCT(S) NOT INSTALLED IN COMPLIANCE WITH ALL APPLICABLE BUILDING CODES AND/OR NOT INSTALLED AND MAINTAINED ACCORDING TO THE THEN CURRENT VINYL SIDING INSTITUTE INSTALLATION GUIDE.
c. INSTALLATION WORKMANSHIP.
d. ANY PRODUCT(S) WHICH IS PAINTED.
e. MISINSTALLATION OF ANOTHER PRODUCT ON THE SAME WALL.
f. USE OF ACCESSORIES WHICH DO NOT PROPERLY RECEIVE AND /OR SECURE THE PRODUCT(S) TO THE WALL.
g. IMPACT OF FOREIGN OBJECTS.
h. DAMAGE RESULTING FROM FAILURE TO COMPLY WITH THE MANUFACTURER’S INSPECTION AND MAINTENANCE REQUIREMENTS AND INSTALLATION INSTRUCTIONS.
i. FAILURE OF OR DAMAGE TO THE WALL ON WHICH THE PRODUCT(S) WERE INSTALLED CAUSED BY MOVEMENT, DISTORTION, CRACKING OR SETTLING OF THE WALL OR THE BUILDING FOUNDATION.
4. Exclusion of Implied Warranties; No Other Express WarrantiesTHIS WARRANTY IS THE ONLY WARRANTY APPLICABLE TO THIS PRODUCT(S) AND EXCLUDES ALL OTHER EXPRESS OR IMPLIED WARRANTIES, INCLUDING ANY IMPLIED WARRANTY OF MERCHANTABILITY OR FITNESS FOR A PARTICULAR PURPOSE, OR ANY WARRANTIES OTHERWISE ARISING FROM THE COURSE OF DEALING OR USAGE OF TRADE OR ADVERTISING, EXCEPT WHERE SUCH WARRANTIES ARISE UNDER APPLICABLE CONSUMER PRODUCT WARRANTY LAWS AND CANNOT LAWFULLY BE DISCLAIMED, IN WHICH EVENT SUCH WARRANTIES ARE LIMITED TO SUCH SHORTER PERIOD AS PERMITTED OR REQUIRED UNDER APPLICABLE LAW. Some states and provinces do not allow limitations on how long an implied warranty lasts, so the above limitations may not apply to you. NO OTHER EXPRESS WARRANTY HAS BEEN MADE OR WILL BE MADE ON BEHALF OF MANUFACTURER WITH RESPECT TO THIS PRODUCT(S).
5. RemediesTHIS SECTION PROVIDES FOR THE SOLE REMEDY AVAILABLE TO THE PURCHASER OR OWNER FROM MANUFACTURER FOR

23
ANY NONCONFORMITY IN THE PRODUCT(S). In the event of any Nonconformity covered by this or any implied warranty not disclaimed in Section 4, Manufacturer will, at its sole option and at its expense, either repair or replace defective or damaged Product(s) including all labor and materials necessary to perform the work. MANUFACTURER MAY DISCONTINUE, MODIFY OR CHANGE THE COLOR OF ANY PRODUCT(S) WITHOUT NOTICE AND SHALL BEAR NO LIABILITY FOR ANY SUCH COLOR CHANGE. IF MANUFACTURER AGREES TO REPLACE PRODUCT(S) UNDER THIS WARRANTY AND AN EXACT REPLACEMENT PRODUCT IS NOT AVAILABLE, MANUFACTURER MAY SUBSTITUTE ANOTHER PRODUCT IT DEEMS TO BE EQUIVALENT IN VALUE AND QUALITY.
Any dispute concerning this warranty shall be submitted to binding arbitration to a mutually agreed arbitrator; or, if the parties fail to agree, to the American Arbitration Association to be resolved using its Commercial Arbitration Rules. The jurisdiction of the arbitrator over the dispute shall be exclusive and the decision of the arbitrator shall be binding on the parties and non-appealable. 6. Exclusion of Other RemediesIN NO EVENT SHALL MANUFACTURER BE LIABLE TO ANY PERSON FOR AN AMOUNT GREATER THAN THE VALUE OF THE REPAIR OR REPLACEMENT OF THE PRODUCT. IN NO EVENT WILL THE MANUFACTURER BE LIABLE FOR ANY INCIDENTAL, SPECIAL, INDIRECT, MULTIPLE, PUNITIVE OR CONSEQUENTIAL DAMAGES RESULTING FROM ANY DEFECT IN THE PRODUCT(S) SUPPLIED, INCLUDING, BUT NOT LIMITED TO DAMAGE TO PROPERTY OR LOST PROFITS REGARDLESS OF WHETHER SUCH CLAIMS ARE BASED ON THEORIES OF CONTRACT, WARRANTY, TORT (INCLUDING NEGLIGENCE AND GROSS NEGLIGENCE), STRICT LIABILITY, STATUTORY LIABILITY OR OTHERWISE.
Some states and provinces do not allow the exclusion or limitation of incidental or consequential damages, so the above limitation or exclusion may not apply to you.
7. Responsibility of Purchaser/ Owner. COMPLIANCE WITH EACH OF THE ITEMS SET OUT BELOW IN SECTIONS A and B INCLUSIVE IS A CONDITION TO MANUFACTURER’S OBLIGATIONS UNDER THIS WARRANTY AND THE FAILURE TO COMPLY WITH ANY ONE OR MORE OF THE ITEMS SHALL VOID ANY RIGHTS OWNER AND PURCHASER MAY HAVE AGAINST MANUFACTURER.
A. Warranty Registration/Claims(i) A warranty registration card must be properly completed and mailed to Manufacturer within 30 days after the Product(s) installation date . A card is attached for convenience. (ii) All claims under this Warranty must be sent in writing within 45 days after the discovery of the defect, and before beginning any permanent repair, to Manufacturer at 402 Boyer Circle, Williston VT 05495, Attention: TimberCrest Quality Assurance Manager.
B. Other(i) Owner must notify Manufacturer of any change in ownership of the home on which the Product)s) are installed within 90 days of the transfer of title. (ii) IT IS THE OWNER’S RESPONSIBILITY TO ESTABLISH THE DATE OF INSTALLATION. The Owner should do this by retaining
any records which would tend to prove when the Product(s) was installed, including but not limited to: purchase invoices and receipts, contractor’s billings, service contracts, and building permits.
(iii) Upon reasonable notice, the Owner must allow MANUFACTURER’s agents to enter the property and building on which the Product(s) is installed to inspect such Product(s).
This Warranty gives you specific legal rights, and you may also have other rights which vary from state to state.
For further information, contact:KP Building Products TimberCrest Quality Assurance Manager402 Boyer Circle, Williston VT 05495 800-845-6541
TimberCrest i/s a trademark of KP Building Products.©2006 KP Building Products. All rights reserved.


![Combined Meeting of The Blueprint Executive Committee and ......Vermont Blueprint for Health [Phone] 802-879-5988 312 Hurricane Lane, Suite 201 [Fax] 802-879-5651 Williston VT 05495-2807](https://img.pdfslide.net/doc/110x75/600e0d56ef0e787d9e3c311b/combined-meeting-of-the-blueprint-executive-committee-and-vermont-blueprint.jpg)