Embed Size (px)
Citation preview
90
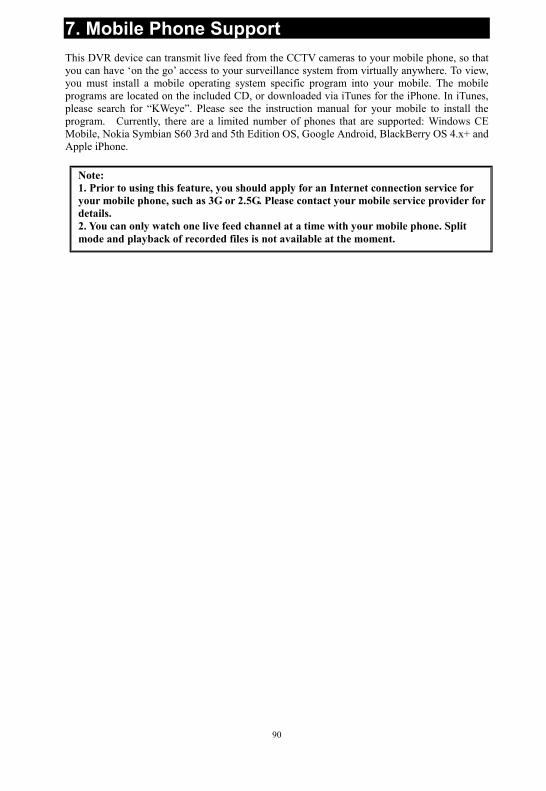
7. Mobile Phone Support This DVR device can transmit live feed from the CCTV cameras to your mobile phone, so that you can have ‘on the go’ access to your surveillance system from virtually anywhere. To view, you must install a mobile operating system specific program into your mobile. The mobile programs are located on the included CD, or downloaded via iTunes for the iPhone. In iTunes, please search for “KWeye”. Please see the instruction manual for your mobile to install the program. Currently, there are a limited number of phones that are supported: Windows CE Mobile, Nokia Symbian S60 3rd and 5th Edition OS, Google Android, BlackBerry OS 4.x+ and Apple iPhone.
Note: 1. Prior to using this feature, you should apply for an Internet connection service for your mobile phone, such as 3G or 2.5G. Please contact your mobile service provider for details. 2. You can only watch one live feed channel at a time with your mobile phone. Split mode and playback of recorded files is not available at the moment.

91
7.1 Windows Mobile From the installation CD, install file “KWeyesetup.cab” onto your Windows Mobile phone. See your phone user manual for more details on application install. Find and execute program KWeye and click the Setting button to setup the IP address for your DVR. In the ensuing screen, input the user name (Admin), password, and IP address for your DVR (Server). Input the value for the Port: default 7050 and choose the channel for streaming data from the dropdown menu.
Click OK to save the settings.
The main window of the Mobile Phone application offers the choice of channels, Connect and Settings buttons. To connect to the system and start watching the live feed from your CCTV cameras, click on the Connect button. To choose the camera, use the Channel dropdown menu. To modify settings, press the Setting button. On-screen data will provide information about current time (in the YYYY-MM-DD HH:MM:SS format), Channel number, bit rate (Kbps), frame rate (fps), resolution, and status of the camera. The menu bar contains the following controls.
Directional buttons for controlling the direction of the PTZ camera view

92
Zoom in / out
Iris
Focus
Snapshot
7.2 Symbian S60 3rd Phone From the installation CD, install file “xxx.sisx” onto your Symbian S60 3rd Edition mobile phone (for the list of mobile phones tested for compatibility, please see Section 7.3). For instructions on installing software onto your mobile phone, please refer to the phone’s user manual. Please see a sample installation process shown below (The N95 will be taken as an example to introduce installation): (1) Copy “KWeye_JH_3rd_1222.sisx” to your mobile from the installation CD; (2) Open file management on your mobile and find “KWeye_JH_3rd_1222.sisx” you have
copied;
(3) Select “Options” and a dialog will displayed which indicates “Install Kweye?” You
should choose “Yes” to continue the following steps; after you choose “Yes”, a dialog will appear as picture below, select “continue”

93
(4) After selecting “Continue” on last picture above, the software will start install. After
installation, there will be a icon named “KWeye” in application interface.
(5) Select “KWeye” to execute KWeye and the program window will appear on the screen.
Select icon and press button “ENTER” to enter setting interface.

94
In the Setting screen, enter the following data: IP: DVR IP address Port: Mobile port (7050 by defaulted) User Name: Login User Name〖Admin〗 Password: Password [888888 by default] Channel: Choose a channel you want to monitor Alias: Set a name for device (6) After configuration, select “Back” to return to live interface, select a channel and select to connect DVR.
Selection of channels. If your system supports 8-channels, to switch between channel buttons 1-4 and
5-8 please use functional button (see below)
PTZ camera direction controls
PTZ camera Zoom, Focus and Iris controls / : Connect or
disconnect DVR.
: Full Mode. Displays the camera feed in the full-screen mode. All menus and buttons will be hidden.
Snap. Allows you to take a snapshot of the camera view.
Setting. Brings up the connectivity setup screen.
Next Group. Toggling between two available 4-channel views: 1-4 and 5-8
* Available only for programs supporting 8-camera views
Exit KWeye.
In order to start working with the CCTV feed on your Symbian mobile phone, you will have to configure the program by entering the preferred network access point, IP address of the DVR, mobile phone port, username, and password.
Click the icon to enter the setup window.
7.3 List of Symbian Supported Mobile Phones Please review the list of Symbian mobile phones tested for compatibility with the remote access to DVR.

95
LG-KT610 S60 3rd_FP1 LG KS10 S60 3rd_FP1 LG-KT615 S60 3rd_FP1 Nokia 3250 S60 3rd_INIT Nokia 5320 XpressMusic S60 3rd_FP2 Nokia 5500 Sport S60 3rd_INIT Nokia 5630 XpressMusic S60 3rd_FP2 Nokia 5700 S60 3rd_FP1 Nokia 5730 XpressMusic S60 3rd_FP2 Nokia 6110 Navigator S60 3rd_FP1 Nokia 6120 S60 3rd_FP1 Nokia 6121 S60 3rd_FP1 Nokia 6210 Navigator S60 3rd_FP2 Nokia 6220 S60 3rd_FP2 Nokia 6290 S60 3rd_FP1 Nokia 6710 Navigator S60 3rd_FP2 Nokia 6720 Classic S60 3rd_FP2 Nokia E51 S60 3rd_FP1 Nokia E55 S60 3rd_FP2 Nokia E60 S60 3rd_INIT Nokia E61 S60 3rd_INIT Nokia E61i S60 3rd_INIT Nokia E62 S60 3rd_INIT Nokia E63 S60 3rd_FP1 Nokia E65 S60 3rd_INIT Nokia E66 S60 3rd_FP1 Nokia E70 S60 3rd_INIT Nokia E71 S60 3rd_FP1 Nokia E75 S60 3rd_FP2 Nokia E90 S60 3rd_FP1 Nokia N71 S60 3rd_INIT Nokia N73 S60 3rd_INIT Nokia N75 S60 3rd_INIT Nokia N76 S60 3rd_FP1 Nokia N77 S60 3rd_INIT Nokia N78 S60 3rd_FP2 Nokia N79 S60 3rd_FP2 Nokia N80 S60 3rd_INIT Nokia N81 S60 3rd_FP1 Nokia N81 8GB S60 3rd_FP1 Nokia N82 S60 3rd_FP1 Nokia N85 S60 3rd_FP2 Nokia N86 8MP S60 3rd_FP2 Nokia N91 S60 3rd_INIT Nokia N92 S60 3rd_INIT Nokia N93 S60 3rd_INIT Nokia N93i S60 3rd_INIT Nokia N95 S60 3rd_FP1 Nokia N95 8GB S60 3rd_FP1
96
Nokia N96 S60 3rd_FP2 Samsung I7110 S60 3rd_FP2 Samsung INNOV8 S60 3rd_FP2 Samsung SGH-G810 S60 3rd_FP1 Samsung SGH-i400 S60 3rd_FP1 Samsung SGH-i450 S60 3rd_FP1 Samsung SGH-i520 S60 3rd_FP1 Samsung SGH-i550 S60 3rd_FP1 Samsung SGH-i560 S60 3rd_FP1 Samsung SGH-L870 S60 3rd_FP2
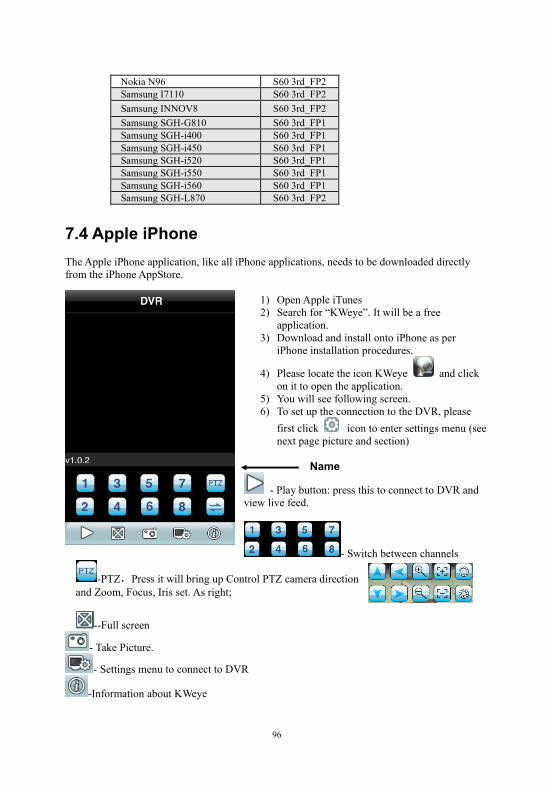
7.4 Apple iPhone
The Apple iPhone application, like all iPhone applications, needs to be downloaded directly from the iPhone AppStore.
1) Open Apple iTunes 2) Search for “KWeye”. It will be a free
application. 3) Download and install onto iPhone as per
iPhone installation procedures. 4) Please locate the icon KWeye and click
on it to open the application. 5) You will see following screen. 6) To set up the connection to the DVR, please
first click icon to enter settings menu (see next page picture and section)
Name
- Play button: press this to connect to DVR and view live feed.
- Switch between channels
-PTZ,Press it will bring up Control PTZ camera direction and Zoom, Focus, Iris set. As right;
--Full screen
- Take Picture.
- Settings menu to connect to DVR
-Information about KWeye

97
- This will switch over to the next Quad set of channels Name: Set name for DVR
Address: DVR IP address
Port: Mobile Port [7050 by default]
User ID: Login User Name〖Admin〗
Password: Password [888888 by default]
Save and press [Back] to main windows
7.5 Blackberry Mobile 1) Program installation 1. Copy the setup software “KWeye.cod” and “KWeye.alx” to your PC. 2. In order to be able to install applications and themes via BlackBerry Desktop Manager,
firstly the PC should install Blackberry Desktop Manager. BlackBerry Desktop Manager will be known as “DM.”; otherwise the phone cannot establish the connection with the PC.
3. Connect your BlackBerry mobile phone to your computer via the USB cable that came with it, or any USB cable that fits. Start the DM.
4. Before the installation, open the BlackBerry Desktop Manager. Shown as the red sign on the following pictures, Fig1 means the phone isn’t connected to the PC, Fig2 means the phone has been connected to the PC.

98
Fig 1
Fig 2
5. Click on “Application Loader” to enter into its interface. In this screen you have two
options to select from. Select “Add/Remove Applications” (shown as follows).

99
6. You should now see something like what you see below. From this screen, click “Browse”
(shown as follows).
7. Once you click “Browse” you will see a file search screen like the one below. Go to and locate where you saved the application files. Make sure you saved both the “.alx” file and “.cod” file in the same folder. After finding the “KWeye.alx” file for the application, highlight it and click “open”.
100
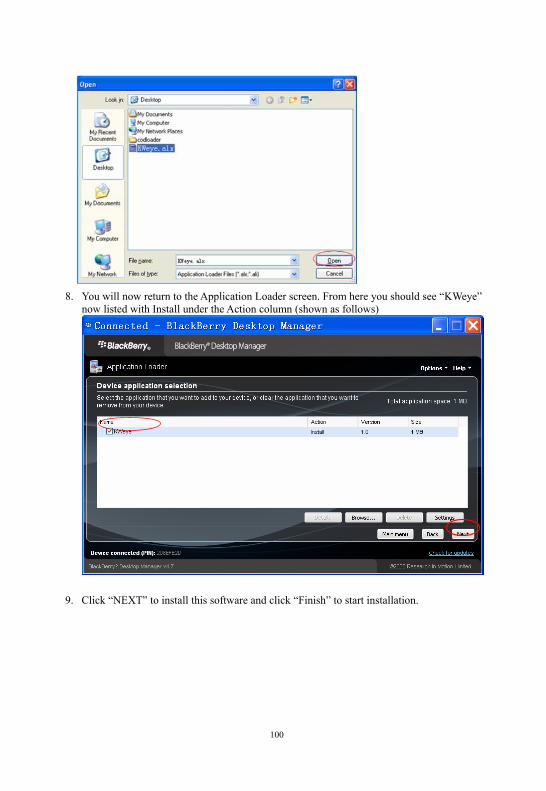
8. You will now return to the Application Loader screen. From here you should see “KWeye”
now listed with Install under the Action column (shown as follows)
9. Click “NEXT” to install this software and click “Finish” to start installation.

101
10. You can remove the program “KWEye” as the following method. To enter into Application
Loader screen, on “Device application selection” you can select the application that you want to clear from your device. When the option “Action” is “Remove”, it means the program will be clear from your device.
11. Click “Next” and the screen will show as follows. Click “Finish” to confirm and the
application “KWeye” can be removed from your device.

102
2) System explanations KWeye phone port has the following capabilities and functions: live video surveillance, channel switch, full screen display, PTZ control, including zoon/focus/iris, image capture, save as favorite and exit function. ① System main interface After the installation, press “KWeye” icon in the application, see the below picture.
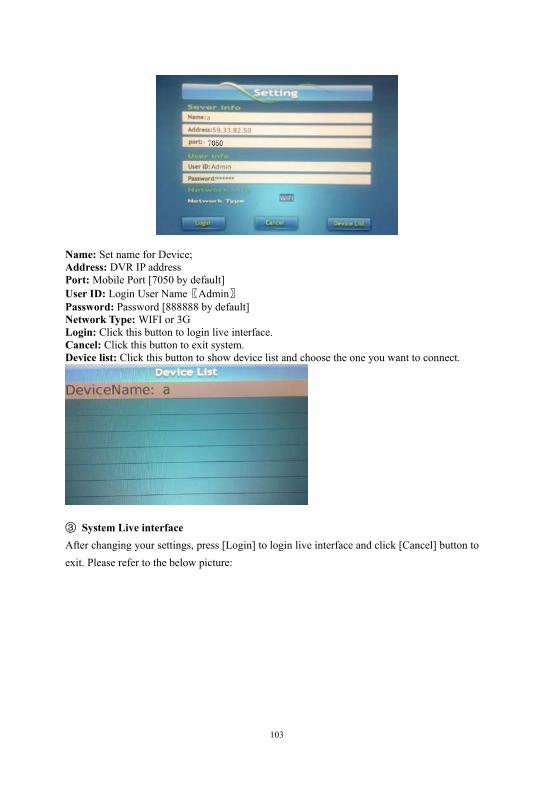
② System configure interface Open the main interface, see the configure interface as bellow. Modify your parameters as necessary.
103
Name: Set name for Device; Address: DVR IP address Port: Mobile Port [7050 by default] User ID: Login User Name〖Admin〗 Password: Password [888888 by default] Network Type: WIFI or 3G Login: Click this button to login live interface. Cancel: Click this button to exit system. Device list: Click this button to show device list and choose the one you want to connect.
③ System Live interface After changing your settings, press [Login] to login live interface and click [Cancel] button to exit. Please refer to the below picture:

104
④ Connect to DVR To connect to the server, move the icon to “Connect” and it will be highlighted. Press the enter button on your mobile to connect to the server.
In the interface the user can switch the channel, PTZ control, image capture and full screen display, please see the below picture: See below for more details:
Connect: Connect or disconnect to your DVR;
Full Screen: Display images in full screen mode;
Capture: Capture image;
Setting: Click this button to turn back configure interface;
About: Click to display information about KWeye
Channel Switch: Switch between channels
Control PTZ camera direction
-Zoom out zoom in;
-Set focus

105
- Set iris ⑤System Help interface
After the setting, move the cursor on the icon and press [Help] button to enter into the help interface. ⑥System Exit interface To exit, go back to the setting interface and press [Cancel] button. You will be prompted “Do you want to exit?” Press “yes” to exit the program, or press “no” to return to the setting interface, please see the below picture:
3) Familiar questions and their answers 1:Why can’t it connect to the server? A: Check that the server, port, user name, password settings are correct. B: Make sure the mobile phone is connected to the Internet. 2:Why can’t I control the PTZ after entering into the main interface? A: Check if the channel is a PTZ camera and properly set up. B: The PTZ might take a few moments to load; please be patient.
7.6 Android (Google Phone) 1) Install the program 1.1 Copy the software “KWeye” to your Android phone or copy to SD card. 1.2 Open your “ES File Explore” in android phone and find the [KWeye_ceshi] File in your android phone memory or SD card. Click [KWeye.apk] to install software.

106
Click “Install” and it will be installed.
2). Start KWeye software KWeye provide video surveillance, channel switch, full screen magnify, PTZ control, focus, capture image, save as favorite and exit function. 2.1 System main interface After the installation, press “KWEye” icon in the application

107
Open the main interface, see the below picture:
2.2 System setting interface
Click the icon to enter into setting interface. For the first time using or need to modify the parameters, press [setting] button to ccess to the parameters setting.
108
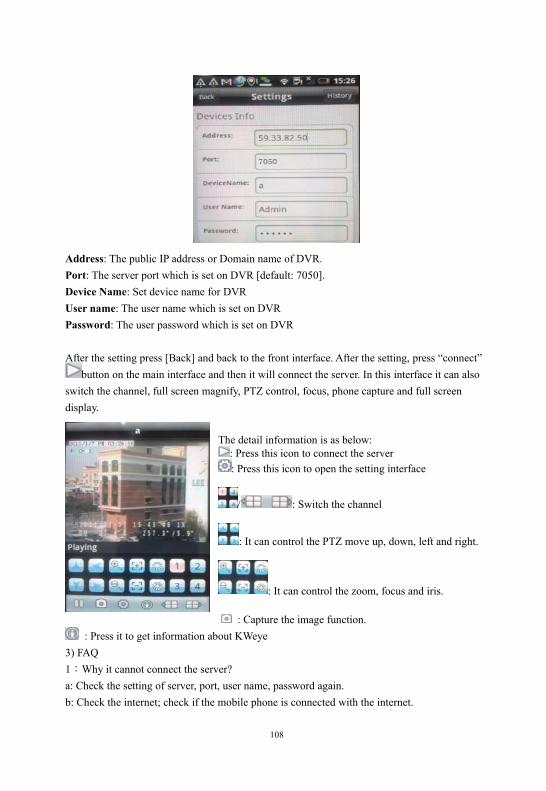
Address: The public IP address or Domain name of DVR. Port: The server port which is set on DVR [default: 7050]. Device Name: Set device name for DVR User name: The user name which is set on DVR Password: The user password which is set on DVR After the setting press [Back] and back to the front interface. After the setting, press “connect”
button on the main interface and then it will connect the server. In this interface it can also switch the channel, full screen magnify, PTZ control, focus, phone capture and full screen display.
The detail information is as below: : Press this icon to connect the server : Press this icon to open the setting interface
/ : Switch the channel
: It can control the PTZ move up, down, left and right.
: It can control the zoom, focus and iris.
: Capture the image function. : Press it to get information about KWeye
3) FAQ 1:Why it cannot connect the server? a: Check the setting of server, port, user name, password again. b: Check the internet; check if the mobile phone is connected with the internet.

109
2:After enter into the main interface, why the user cannot control the PTZ? a: Check if the channel has the PTZ camera setting. b: if network bandwidth is insufficient then video refresh slowly for PTZ control. Please wait a moment for video refresh.