Embed Size (px)
Citation preview
A User Manual
on
8085 Simulatorhttps://8085simulator.codeplex.com/
Product Version 2.0STABLE RELEASE
ByJUBIN MITRA
This documentation is under construction.
February 29, 2016
Version and Bug fixes
Release Date
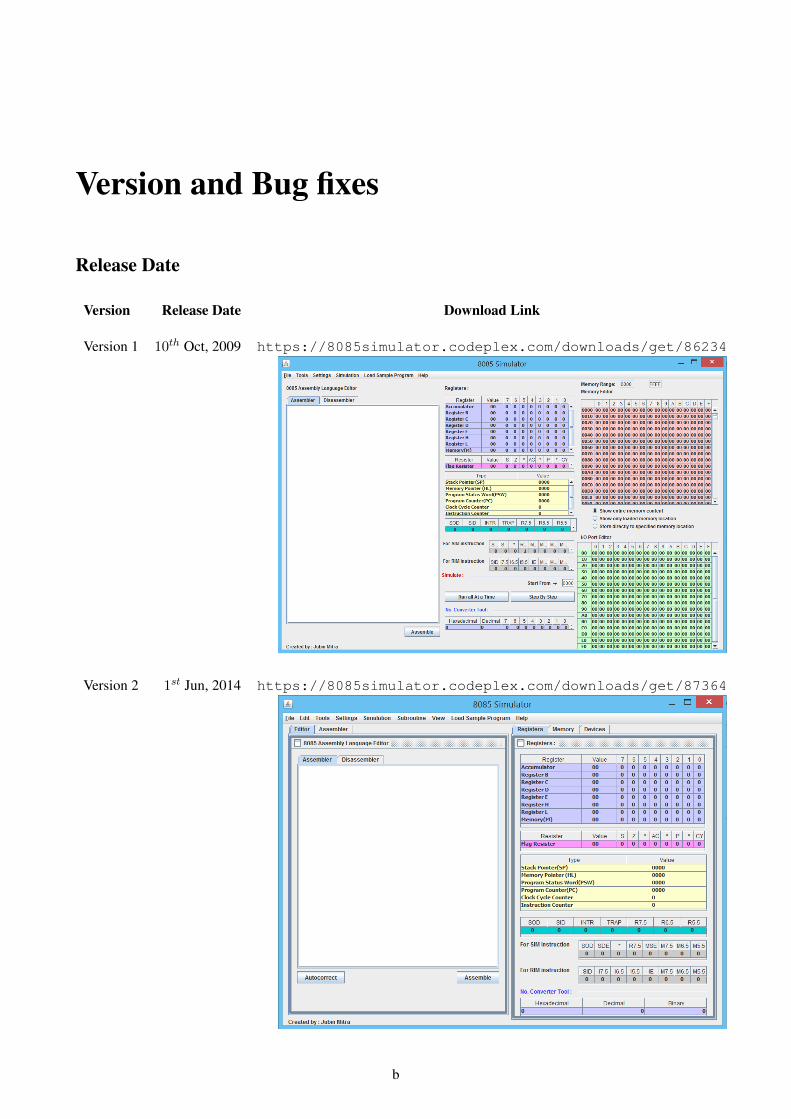
Version Release Date Download Link
Version 1 10th Oct, 2009 https://8085simulator.codeplex.com/downloads/get/86234
Version 2 1st Jun, 2014 https://8085simulator.codeplex.com/downloads/get/87364
b

c
Bug fixes
From the 2nd Version of this software bug history log is maintained.
Preface
This software was first published in October 10, 2009 and since then it has been in this field. It is gratifying tosee such acceptance and popularity of the software in many institutes and universities. This tool is an integratedsoftware environment for teaching microprocessor concepts. The second version of the software has undergonemany changes and bug fixing.
About the Author
Author has completed his B.Tech. in Electronics and Communication Engineering from Heritage Institute ofTechnology, Kolkata and M.E. from Bengal Engineering and Science University (BESU), Howrah, India. Heis currently pursuing Ph.D. at Variable Energy Cyclotron Centre (VECC) at Kolkata under the aegis of HomiBhabha National Institute (HBNI).
Acknowledgment
My sincere thanks and love for my parents Dipendra Kali Mitra and Bharati Mitra for their continuous inspira-tion, encouragement, love, patience and support during this software development.
This software was designed during my B.Tech days when I was studying 8085 Microprocessor subjectitself. Since then it has evolved and attained much maturity. I would do injustice if I do not mention the nameof my friend circle, who always maintained a positive vibe and joyous environment for creative work culture.Cheers to my college friends Anirban Goswami, Debanjan Chatterjee and Abhyuday Jatty.
I salute the spontaneous guidance and inspiration of my college faculty members Amitava Hatial, SaibalDutta, and Surajit Bagchi.
Contact Details
In the end I would love to request my esteemed users to kindly send their valuable suggestions for the improve-ment of the software and to notify me any errors that you may come across while using the software. You cancomment in the blogspot http://8085simulatorj.blogspot.in or in the software download pageyou can give your valuable feedback, http://8085simulator.codeplex.com. If you need to contactme directly just drop a mail in my mailbox, [email protected]. If it is applicable for all users then Iwould suggest you to post it in the blogspot, so that it is accessible to other users as well.
Jubin MitraEMAIL: [email protected]
i

Contents
1 Product Description 51.1 Motivation . . . . . . . . . . . . . . . . . . . . . . . . . . . . . . . . . . . . . . . . . . . . . 51.2 Installation and Upgrade Note . . . . . . . . . . . . . . . . . . . . . . . . . . . . . . . . . . 51.3 Limitations . . . . . . . . . . . . . . . . . . . . . . . . . . . . . . . . . . . . . . . . . . . . 51.4 Known Issues . . . . . . . . . . . . . . . . . . . . . . . . . . . . . . . . . . . . . . . . . . . 61.5 Software Design Architecture . . . . . . . . . . . . . . . . . . . . . . . . . . . . . . . . . . . 6
1.5.1 Preprocessor . . . . . . . . . . . . . . . . . . . . . . . . . . . . . . . . . . . . . . . 61.5.2 Assembler . . . . . . . . . . . . . . . . . . . . . . . . . . . . . . . . . . . . . . . . 61.5.3 Simulator Engine . . . . . . . . . . . . . . . . . . . . . . . . . . . . . . . . . . . . . 71.5.4 Step-wise Traversal Controller . . . . . . . . . . . . . . . . . . . . . . . . . . . . . . 7
1.6 Source Code . . . . . . . . . . . . . . . . . . . . . . . . . . . . . . . . . . . . . . . . . . . . 7
2 Features 8
3 Comparitive Analysis 11
4 Assembler Directives 124.1 Directives . . . . . . . . . . . . . . . . . . . . . . . . . . . . . . . . . . . . . . . . . . . . . 124.2 Number Format Support . . . . . . . . . . . . . . . . . . . . . . . . . . . . . . . . . . . . . 13
5 Disassembler 145.1 Disassembler Demonstration . . . . . . . . . . . . . . . . . . . . . . . . . . . . . . . . . . . 145.2 Intel HEX . . . . . . . . . . . . . . . . . . . . . . . . . . . . . . . . . . . . . . . . . . . . . 165.3 Writing Hexcode in Disassembler . . . . . . . . . . . . . . . . . . . . . . . . . . . . . . . . 17
5.3.1 Limitation of disassembler . . . . . . . . . . . . . . . . . . . . . . . . . . . . . . . . 17
6 Timing Diagram generator 186.1 Static Timing Diagram Generation . . . . . . . . . . . . . . . . . . . . . . . . . . . . . . . . 196.2 Dynamic Timing Diagram Generation By Manual Step by Step Simulation . . . . . . . . . . . 206.3 Dynamic Timing Diagram Generation By Automatic Step by Step Simulation . . . . . . . . . 21
7 Trainer Kit Emulator 227.1 Keyboard . . . . . . . . . . . . . . . . . . . . . . . . . . . . . . . . . . . . . . . . . . . . . 227.2 Using the Trainer Kit Emulator . . . . . . . . . . . . . . . . . . . . . . . . . . . . . . . . . . 23
7.2.1 How to enter a program . . . . . . . . . . . . . . . . . . . . . . . . . . . . . . . . . 237.2.2 To Execute the Program . . . . . . . . . . . . . . . . . . . . . . . . . . . . . . . . . 237.2.3 How to examine memory and register contents . . . . . . . . . . . . . . . . . . . . . 23
7.3 Shortcut Keys for Trainer Kit Button . . . . . . . . . . . . . . . . . . . . . . . . . . . . . . . 26
8 Debugging Mode 27
ii
License and Disclaimer
GNU General Public License version 2 (GPLv2)
Copyright (C) 1989, 1991 Free Software Foundation, Inc. 59 Temple Place, Suite 330, Boston, MA 02111-1307USA
Everyone is permitted to copy and distribute verbatim copies of this license document, but changing it isnot allowed.
Preamble
The licenses for most software are designed to take away your freedom to share and change it. By contrast,the GNU General Public License is intended to guarantee your freedom to share and change free software–tomake sure the software is free for all its users. This General Public License applies to most of the Free SoftwareFoundation’s software and to any other program whose authors commit to using it. (Some other Free SoftwareFoundation software is covered by the GNU Library General Public License instead.) You can apply it to yourprograms, too.
When we speak of free software, we are referring to freedom, not price. Our General Public Licensesare designed to make sure that you have the freedom to distribute copies of free software (and charge for thisservice if you wish), that you receive source code or can get it if you want it, that you can change the softwareor use pieces of it in new free programs; and that you know you can do these things.
To protect your rights, we need to make restrictions that forbid anyone to deny you these rights or to askyou to surrender the rights. These restrictions translate to certain responsibilities for you if you distribute copiesof the software, or if you modify it.
For example, if you distribute copies of such a program, whether gratis or for a fee, you must give therecipients all the rights that you have. You must make sure that they, too, receive or can get the source code.And you must show them these terms so they know their rights.
We protect your rights with two steps: (1) copyright the software, and (2) offer you this license which givesyou legal permission to copy, distribute and/or modify the software.
Also, for each author’s protection and ours, we want to make certain that everyone understands that thereis no warranty for this free software. If the software is modified by someone else and passed on, we want itsrecipients to know that what they have is not the original, so that any problems introduced by others will notreflect on the original authors’ reputations.
Finally, any free program is threatened constantly by software patents. We wish to avoid the danger that re-distributors of a free program will individually obtain patent licenses, in effect making the program proprietary.To prevent this, we have made it clear that any patent must be licensed for everyone’s free use or not licensedat all.
The precise terms and conditions for copying, distribution and modification follow.
TERMS AND CONDITIONS FOR COPYING, DISTRIBUTION AND MODI-FICATION
0. This License applies to any program or other work which contains a notice placed by the copyright holdersaying it may be distributed under the terms of this General Public License. The "Program", below, refers to
1
CONTENTS 2
any such program or work, and a "work based on the Program" means either the Program or any derivative workunder copyright law: that is to say, a work containing the Program or a portion of it, either verbatim or withmodifications and/or translated into another language. (Hereinafter, translation is included without limitationin the term "modification".) Each licensee is addressed as "you".
Activities other than copying, distribution and modification are not covered by this License; they are outsideits scope. The act of running the Program is not restricted, and the output from the Program is covered only if itscontents constitute a work based on the Program (independent of having been made by running the Program).Whether that is true depends on what the Program does.
1. You may copy and distribute verbatim copies of the Program’s source code as you receive it, in anymedium, provided that you conspicuously and appropriately publish on each copy an appropriate copyrightnotice and disclaimer of warranty; keep intact all the notices that refer to this License and to the absence of anywarranty; and give any other recipients of the Program a copy of this License along with the Program.
You may charge a fee for the physical act of transferring a copy, and you may at your option offer warrantyprotection in exchange for a fee.
2. You may modify your copy or copies of the Program or any portion of it, thus forming a work based onthe Program, and copy and distribute such modifications or work under the terms of Section 1 above, providedthat you also meet all of these conditions:
a) You must cause the modified files to carry prominent notices stating that you changed the files and thedate of any change. b) You must cause any work that you distribute or publish, that in whole or in part containsor is derived from the Program or any part thereof, to be licensed as a whole at no charge to all third partiesunder the terms of this License.
c) If the modified program normally reads commands interactively when run, you must cause it, whenstarted running for such interactive use in the most ordinary way, to print or display an announcement includ-ing an appropriate copyright notice and a notice that there is no warranty (or else, saying that you provide awarranty) and that users may redistribute the program under these conditions, and telling the user how to viewa copy of this License. (Exception: if the Program itself is interactive but does not normally print such anannouncement, your work based on the Program is not required to print an announcement.)
These requirements apply to the modified work as a whole. If identifiable sections of that work are notderived from the Program, and can be reasonably considered independent and separate works in themselves,then this License, and its terms, do not apply to those sections when you distribute them as separate works. Butwhen you distribute the same sections as part of a whole which is a work based on the Program, the distributionof the whole must be on the terms of this License, whose permissions for other licensees extend to the entirewhole, and thus to each and every part regardless of who wrote it.
Thus, it is not the intent of this section to claim rights or contest your rights to work written entirely by you;rather, the intent is to exercise the right to control the distribution of derivative or collective works based on theProgram.
In addition, mere aggregation of another work not based on the Program with the Program (or with a workbased on the Program) on a volume of a storage or distribution medium does not bring the other work under thescope of this License.
3. You may copy and distribute the Program (or a work based on it, under Section 2) in object code orexecutable form under the terms of Sections 1 and 2 above provided that you also do one of the following:
a) Accompany it with the complete corresponding machine-readable source code, which must be distributedunder the terms of Sections 1 and 2 above on a medium customarily used for software interchange; or,
b) Accompany it with a written offer, valid for at least three years, to give any third party, for a chargeno more than your cost of physically performing source distribution, a complete machine-readable copy of thecorresponding source code, to be distributed under the terms of Sections 1 and 2 above on a medium customarilyused for software interchange; or,
c) Accompany it with the information you received as to the offer to distribute corresponding source code.(This alternative is allowed only for noncommercial distribution and only if you received the program in objectcode or executable form with such an offer, in accord with Subsection b above.)
The source code for a work means the preferred form of the work for making modifications to it. For anexecutable work, complete source code means all the source code for all modules it contains, plus any associatedinterface definition files, plus the scripts used to control compilation and installation of the executable. However,
CONTENTS 3
as a special exception, the source code distributed need not include anything that is normally distributed (ineither source or binary form) with the major components (compiler, kernel, and so on) of the operating systemon which the executable runs, unless that component itself accompanies the executable.
If distribution of executable or object code is made by offering access to copy from a designated place,then offering equivalent access to copy the source code from the same place counts as distribution of the sourcecode, even though third parties are not compelled to copy the source along with the object code.
4. You may not copy, modify, sublicense, or distribute the Program except as expressly provided underthis License. Any attempt otherwise to copy, modify, sublicense or distribute the Program is void, and willautomatically terminate your rights under this License. However, parties who have received copies, or rights,from you under this License will not have their licenses terminated so long as such parties remain in fullcompliance.
5. You are not required to accept this License, since you have not signed it. However, nothing else grantsyou permission to modify or distribute the Program or its derivative works. These actions are prohibited bylaw if you do not accept this License. Therefore, by modifying or distributing the Program (or any work basedon the Program), you indicate your acceptance of this License to do so, and all its terms and conditions forcopying, distributing or modifying the Program or works based on it.
6. Each time you redistribute the Program (or any work based on the Program), the recipient automaticallyreceives a license from the original licensor to copy, distribute or modify the Program subject to these termsand conditions. You may not impose any further restrictions on the recipients’ exercise of the rights grantedherein. You are not responsible for enforcing compliance by third parties to this License.
7. If, as a consequence of a court judgment or allegation of patent infringement or for any other reason (notlimited to patent issues), conditions are imposed on you (whether by court order, agreement or otherwise) thatcontradict the conditions of this License, they do not excuse you from the conditions of this License. If youcannot distribute so as to satisfy simultaneously your obligations under this License and any other pertinentobligations, then as a consequence you may not distribute the Program at all. For example, if a patent licensewould not permit royalty-free redistribution of the Program by all those who receive copies directly or indirectlythrough you, then the only way you could satisfy both it and this License would be to refrain entirely fromdistribution of the Program.
If any portion of this section is held invalid or unenforceable under any particular circumstance, the balanceof the section is intended to apply and the section as a whole is intended to apply in other circumstances.
It is not the purpose of this section to induce you to infringe any patents or other property right claimsor to contest validity of any such claims; this section has the sole purpose of protecting the integrity of thefree software distribution system, which is implemented by public license practices. Many people have madegenerous contributions to the wide range of software distributed through that system in reliance on consistentapplication of that system; it is up to the author/donor to decide if he or she is willing to distribute softwarethrough any other system and a licensee cannot impose that choice.
This section is intended to make thoroughly clear what is believed to be a consequence of the rest of thisLicense.
8. If the distribution and/or use of the Program is restricted in certain countries either by patents or bycopyrighted interfaces, the original copyright holder who places the Program under this License may add anexplicit geographical distribution limitation excluding those countries, so that distribution is permitted only inor among countries not thus excluded. In such case, this License incorporates the limitation as if written in thebody of this License.
9. The Free Software Foundation may publish revised and/or new versions of the General Public Licensefrom time to time. Such new versions will be similar in spirit to the present version, but may differ in detail toaddress new problems or concerns.
Each version is given a distinguishing version number. If the Program specifies a version number of thisLicense which applies to it and "any later version", you have the option of following the terms and conditionseither of that version or of any later version published by the Free Software Foundation. If the Program doesnot specify a version number of this License, you may choose any version ever published by the Free SoftwareFoundation.
10. If you wish to incorporate parts of the Program into other free programs whose distribution conditionsare different, write to the author to ask for permission. For software which is copyrighted by the Free Software
CONTENTS 4
Foundation, write to the Free Software Foundation; we sometimes make exceptions for this. Our decision willbe guided by the two goals of preserving the free status of all derivatives of our free software and of promotingthe sharing and reuse of software generally.
NO WARRANTY
11. BECAUSE THE PROGRAM IS LICENSED FREE OF CHARGE, THERE IS NO WARRANTY FORTHE PROGRAM, TO THE EXTENT PERMITTED BY APPLICABLE LAW. EXCEPT WHEN OTHER-WISE STATED IN WRITING THE COPYRIGHT HOLDERS AND/OR OTHER PARTIES PROVIDE THEPROGRAM "AS IS" WITHOUT WARRANTY OF ANY KIND, EITHER EXPRESSED OR IMPLIED, IN-CLUDING, BUT NOT LIMITED TO, THE IMPLIED WARRANTIES OF MERCHANTABILITY AND FIT-NESS FOR A PARTICULAR PURPOSE. THE ENTIRE RISK AS TO THE QUALITY AND PERFOR-MANCE OF THE PROGRAM IS WITH YOU. SHOULD THE PROGRAM PROVE DEFECTIVE, YOUASSUME THE COST OF ALL NECESSARY SERVICING, REPAIR OR CORRECTION.
12. IN NO EVENT UNLESS REQUIRED BY APPLICABLE LAW OR AGREED TO IN WRITINGWILL ANY COPYRIGHT HOLDER, OR ANY OTHER PARTY WHO MAY MODIFY AND/OR REDIS-TRIBUTE THE PROGRAM AS PERMITTED ABOVE, BE LIABLE TO YOU FOR DAMAGES, INCLUD-ING ANY GENERAL, SPECIAL, INCIDENTAL OR CONSEQUENTIAL DAMAGES ARISING OUT OFTHE USE OR INABILITY TO USE THE PROGRAM (INCLUDING BUT NOT LIMITED TO LOSS OFDATA OR DATA BEING RENDERED INACCURATE OR LOSSES SUSTAINED BY YOU OR THIRDPARTIES OR A FAILURE OF THE PROGRAM TO OPERATE WITH ANY OTHER PROGRAMS), EVENIF SUCH HOLDER OR OTHER PARTY HAS BEEN ADVISED OF THE POSSIBILITY OF SUCH DAM-AGES.
Disclaimer
This is a voluntary work of an individual to develop a common platform for 8085 programming. Please beadvised that nothing found here has necessarily been peer reviewed by people with the expertise required toprovide you with complete, accurate or reliable information. So, user’s discretion is advisable.
That is not to say that you will not always find inaccurate results in 8085 Simulator; but sometimes due tobug you may get some. However, the author cannot guarantee the validity or the liability of the results foundusing this software.
Chapter 1
Product Description
1.1 Motivation
Understanding of Intel 8085 microprocessor is fundamental to getting insight into the Von-Neumann Archi-tecture. It was first introduced in 1976, since then many generations of computer architecture have come up,some still persists while others are lost in history. This microprocessor still survives because it is still popular inuniversity and training institutes to get students acquainted with basic computer architecture. For this purpose8085 trainer kit are available on the market. However, with more popular technologies to learn, technical syl-labus has very low time bandwidth available for this topic. All that is necessary for the students is to understandthe functional working model of this basic architecture and then proceed on to next advance level of the subject.
With this academic learning purpose in mind this simulator software is designed. It helps in get startedeasily with example codes, and to learn the architecture playfully. It also provides a trainer kit as an appealingfunctional alternative to real hardware. The users can write assembly code easily and get results quickly withouteven having the actual hardware.
1.2 Installation and Upgrade Note
The program code is written Java Syntax and available in java virtual machine executable format (.jar). To runin :Windows :1) Make sure you have Java installed on your system. Check this by typing java -version into the commandterminal. If you don’t have the latest version of Java, update it before proceeding.2) Install Java (ver >6) http://www.java.com/en/download/manual.jsp3) Just double click the “.jar ” file, it should execute.4) Otherwise you can execute in CMD ( Command Prompt ) by typing “ java -jar <filename>.jar ”
Linux :1) Open terminal and type “ java -jar <filename>.jar ”
UPDATES :Automatic or push updates are not supported in this software. Users are requested to keep track of the newrelease available at the web-link : https://8085simulator.codeplex.com/.
1.3 Limitations
This or any 8085 simulator software is no way a replacement for real hardware. It only does functional simu-lation of the codes. It is not an emulator and hence do not expect that the timing information will be accuratelymodeled. However, the exact performance of the code can only be monitored in real 8085 microprocessorhardware.
5
CHAPTER 1. PRODUCT DESCRIPTION 6
1.4 Known Issues
• Issue 1 : DAA instruction wrongly toggles the carry flag if already there is a carry instead of setting ithigh, like take for example (88H + 88H). Users need to be cautious while using this instruction. It willbe fixed in future realize v2.1.
• Issue 2: In Assembler Window, during pre-processing stage of the code it flags error if‘ ; ’ (SEMICOLON) comment marking character is followed after “ // ” (DOUBLE FORWARD SLASH).Example→ "<Label>: <Assembler Code> // <Comments> ; <More Comments>"
1.5 Software Design Architecture
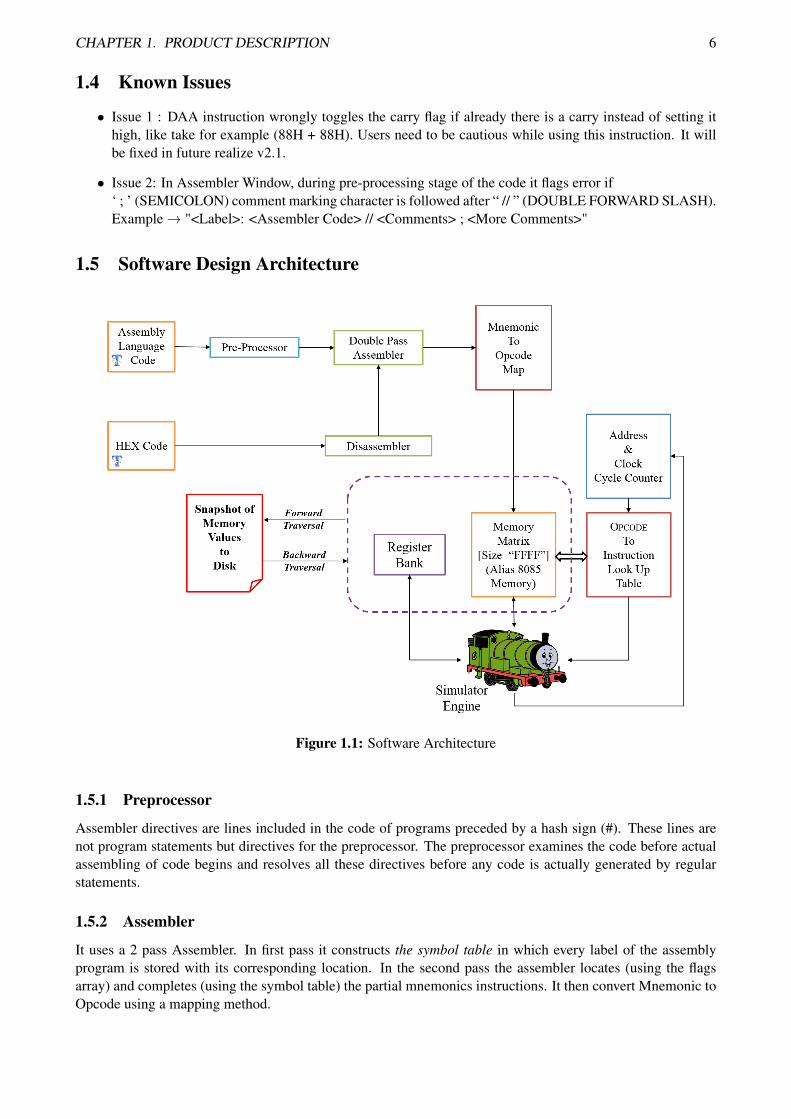
Figure 1.1: Software Architecture
1.5.1 Preprocessor
Assembler directives are lines included in the code of programs preceded by a hash sign (#). These lines arenot program statements but directives for the preprocessor. The preprocessor examines the code before actualassembling of code begins and resolves all these directives before any code is actually generated by regularstatements.
1.5.2 Assembler
It uses a 2 pass Assembler. In first pass it constructs the symbol table in which every label of the assemblyprogram is stored with its corresponding location. In the second pass the assembler locates (using the flagsarray) and completes (using the symbol table) the partial mnemonics instructions. It then convert Mnemonic toOpcode using a mapping method.
CHAPTER 1. PRODUCT DESCRIPTION 7
1.5.3 Simulator Engine
It resets all the register. Then starts from "Origin address". It scans the opcode value and sends it to "Opcode toinstruction set look table". It then instructs the simulator engine the registers that will be affected, the number ofdata opcode that follows after the instruction opcode to increment the address and also to increment the numberof clock cycles accordingly.
1.5.4 Step-wise Traversal Controller
It consists of memory snapshot maker and memory register - data value monitor. During forward traversalmemory snapshot maker dumps the entire memory current values to a temp file. With each forward step onetemp file is created in the working directory pool of the software. During backward traversal the memorysnapshot maker read backs the temp files and reloads with the past value. Once the process is stopped itclears out all the snapshots that are dumped. In this manner this software can able to traverse also in backwarddirection, inspite of using forward traversal instruction code.
1.6 Source Code
The entire design is built in Netbeans IDE with JDK bundle. It can easily be opened by the software. Thecoding was done in bit unprofessional way, as it was developed during very early stage of my academics.Students are free to use the code for their understanding and distribution as defined under the GNU licenseagreement.
It is being actively maintained in GIT repository find it at link :https://8085simulator.codeplex.com/SourceControl/latest
Chapter 2
Features
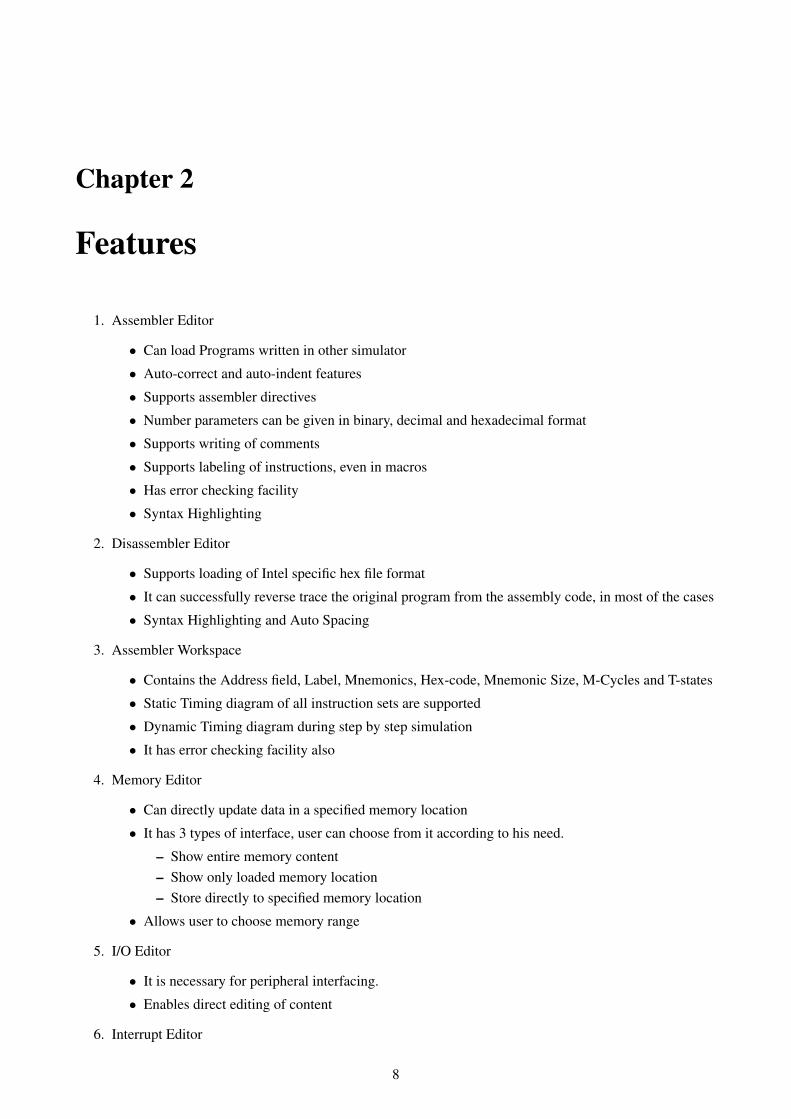
1. Assembler Editor
• Can load Programs written in other simulator
• Auto-correct and auto-indent features
• Supports assembler directives
• Number parameters can be given in binary, decimal and hexadecimal format
• Supports writing of comments
• Supports labeling of instructions, even in macros
• Has error checking facility
• Syntax Highlighting
2. Disassembler Editor
• Supports loading of Intel specific hex file format
• It can successfully reverse trace the original program from the assembly code, in most of the cases
• Syntax Highlighting and Auto Spacing
3. Assembler Workspace
• Contains the Address field, Label, Mnemonics, Hex-code, Mnemonic Size, M-Cycles and T-states
• Static Timing diagram of all instruction sets are supported
• Dynamic Timing diagram during step by step simulation
• It has error checking facility also
4. Memory Editor
• Can directly update data in a specified memory location
• It has 3 types of interface, user can choose from it according to his need.
– Show entire memory content– Show only loaded memory location– Store directly to specified memory location
• Allows user to choose memory range
5. I/O Editor
• It is necessary for peripheral interfacing.
• Enables direct editing of content
6. Interrupt Editor
8

CHAPTER 2. FEATURES 9
• All possible interrupts are supported. Interrupts are triggered by pressing the appropriate column(INTR, TRAP, RST 7.5, RST 6.5, RST 5.5) on the interrupt table. The simulation can be reset anytime by pressing the clear memory in the settings tab.
7. Debugger
• Support of breakpoints
• Step by step execution/debugging of program.
• It supports both forward and backward traversal of programs.
• Allows continuation of program from the breakpoint.
8. Simulator
• There are 3 level of speed for simulation:
– Step-by-step −→ Automatic line by line execution with each line highlighting. The time tohalt at each line is be decided by the user.
– Normal −→ Full execution with reflecting intermittent states periodically.– Ultimate −→ Full execution with reflecting final state directly.
• There are 2 modes of simulator engine:
– Run all at a Time −→ It takes the current settings from the simulation speed level and startsexecution accordingly.
– Step by Step −→ It is manual mode of control of FORWARD and BACKWARD traversal ofinstruction set. It also displays the in-line comment if available for currently executed instruc-tion.
• Allows setting of starting address for the simulator
• Users can choose the mnemonic where program execution should terminate
9. Helper
• Help on the mnemonics is integrated
• CODE WIZARD is a tool added to enable users with very little knowledge of assembly code couldalso 8085 assembly programs.
• Already loaded with plenty SAMPLE programs
• Dynamic loading of user code if placed in user_code folder
• It also includes a user manual
10. Printing
• Assembler Content
• Workspace Content
11. Register Bank −→ Each register content is accompanied with its equivalent binary value
• Accumulator, Reg B, Reg C, Reg D, Reg E, Reg H, Reg L, Memory (M)
• Flag Register
• Stack Pointer (SP)
• Memory Pointer (HL)
• Program Status Word (PSW)
• Program Counter (PC)
• Clock Cycle Counter
• Instruction Counter
CHAPTER 2. FEATURES 10
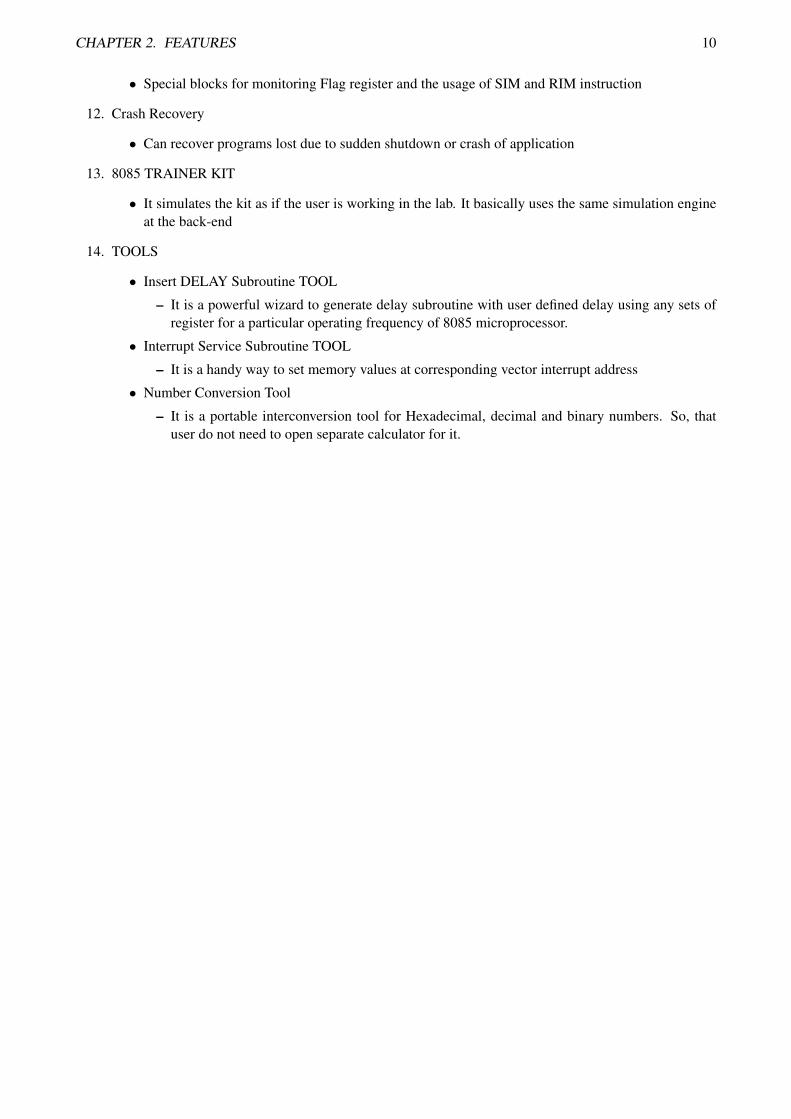
• Special blocks for monitoring Flag register and the usage of SIM and RIM instruction
12. Crash Recovery
• Can recover programs lost due to sudden shutdown or crash of application
13. 8085 TRAINER KIT
• It simulates the kit as if the user is working in the lab. It basically uses the same simulation engineat the back-end
14. TOOLS
• Insert DELAY Subroutine TOOL
– It is a powerful wizard to generate delay subroutine with user defined delay using any sets ofregister for a particular operating frequency of 8085 microprocessor.
• Interrupt Service Subroutine TOOL
– It is a handy way to set memory values at corresponding vector interrupt address
• Number Conversion Tool
– It is a portable interconversion tool for Hexadecimal, decimal and binary numbers. So, thatuser do not need to open separate calculator for it.
Chapter 3
Comparitive Analysis
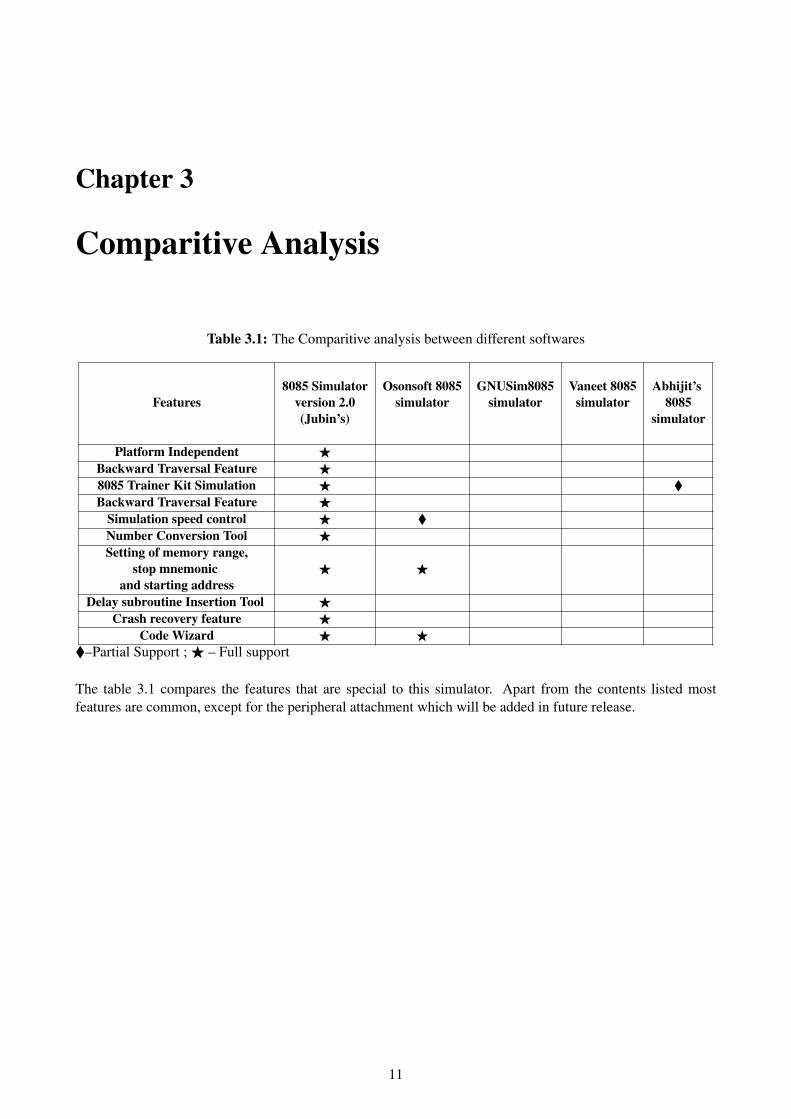
Table 3.1: The Comparitive analysis between different softwares
8085 Simulator Osonsoft 8085 GNUSim8085 Vaneet 8085 Abhijit’sFeatures version 2.0 simulator simulator simulator 8085
(Jubin’s) simulator
Platform Independent FBackward Traversal Feature F8085 Trainer Kit Simulation F �Backward Traversal Feature F
Simulation speed control F �Number Conversion Tool FSetting of memory range,
stop mnemonic F Fand starting address
Delay subroutine Insertion Tool FCrash recovery feature F
Code Wizard F F�–Partial Support ;F – Full support
The table 3.1 compares the features that are special to this simulator. Apart from the contents listed mostfeatures are common, except for the peripheral attachment which will be added in future release.
11
Chapter 4
Assembler Directives
The assembler directives[1] are the instructions to the assembler concerning the program being assembled; theyalso are called pseudo instructions or pseudo opcodes.
In the Assembler Editor, the Assembler Directives must be preceded by ‘.’ or ‘#’. The editor would thenunderstand and would automatically change font foreground color to red color. Since execution of assemblerdirectives do not assign any machine code but it directs the assembler engine and the memory loader to loada specific user code at user defined position. So it loads code directly in the MEMORY EDITOR, it’soutput code is not visible in ASSEMBLER WORKSPACE. Section 4.1 lists the assembler directives thatare currently supported by the assembler.
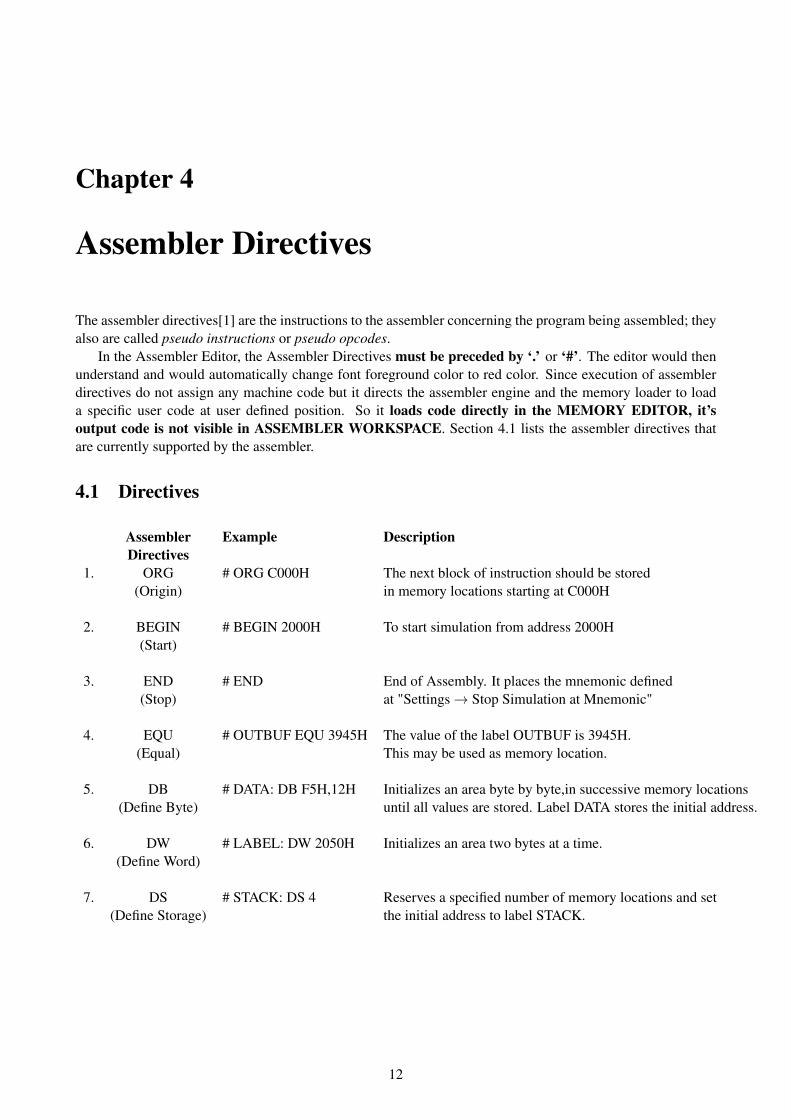
4.1 Directives
Assembler Example DescriptionDirectives
1. ORG # ORG C000H The next block of instruction should be stored(Origin) in memory locations starting at C000H
2. BEGIN # BEGIN 2000H To start simulation from address 2000H(Start)
3. END # END End of Assembly. It places the mnemonic defined(Stop) at "Settings→ Stop Simulation at Mnemonic"
4. EQU # OUTBUF EQU 3945H The value of the label OUTBUF is 3945H.(Equal) This may be used as memory location.
5. DB # DATA: DB F5H,12H Initializes an area byte by byte,in successive memory locations(Define Byte) until all values are stored. Label DATA stores the initial address.
6. DW # LABEL: DW 2050H Initializes an area two bytes at a time.(Define Word)
7. DS # STACK: DS 4 Reserves a specified number of memory locations and set(Define Storage) the initial address to label STACK.
12
CHAPTER 4. ASSEMBLER DIRECTIVES 13
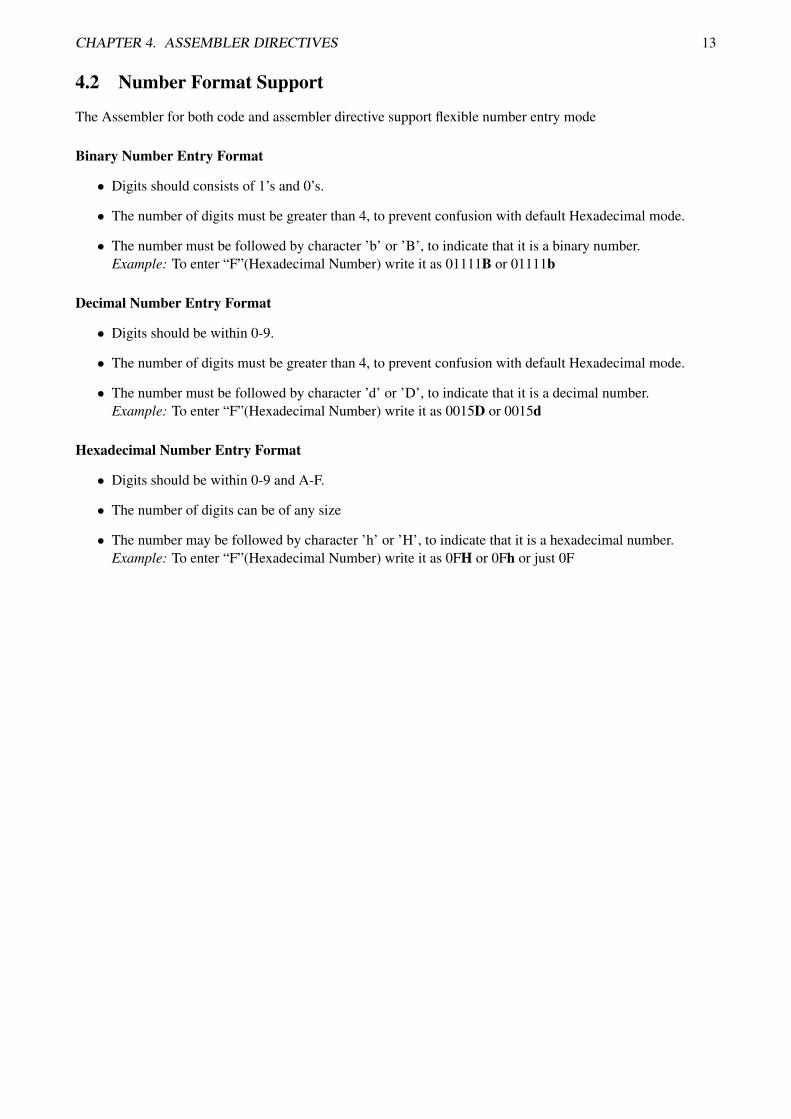
4.2 Number Format Support
The Assembler for both code and assembler directive support flexible number entry mode
Binary Number Entry Format
• Digits should consists of 1’s and 0’s.
• The number of digits must be greater than 4, to prevent confusion with default Hexadecimal mode.
• The number must be followed by character ’b’ or ’B’, to indicate that it is a binary number.Example: To enter “F”(Hexadecimal Number) write it as 01111B or 01111b
Decimal Number Entry Format
• Digits should be within 0-9.
• The number of digits must be greater than 4, to prevent confusion with default Hexadecimal mode.
• The number must be followed by character ’d’ or ’D’, to indicate that it is a decimal number.Example: To enter “F”(Hexadecimal Number) write it as 0015D or 0015d
Hexadecimal Number Entry Format
• Digits should be within 0-9 and A-F.
• The number of digits can be of any size
• The number may be followed by character ’h’ or ’H’, to indicate that it is a hexadecimal number.Example: To enter “F”(Hexadecimal Number) write it as 0FH or 0Fh or just 0F
Chapter 5
Disassembler
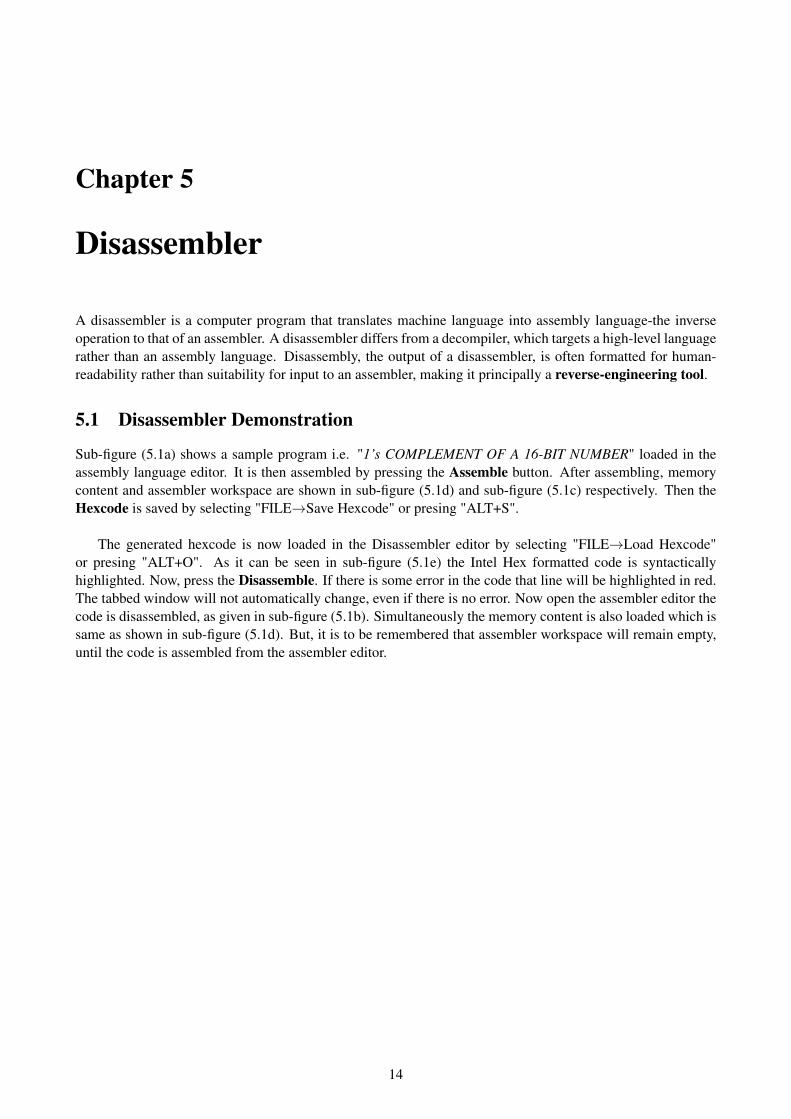
A disassembler is a computer program that translates machine language into assembly language-the inverseoperation to that of an assembler. A disassembler differs from a decompiler, which targets a high-level languagerather than an assembly language. Disassembly, the output of a disassembler, is often formatted for human-readability rather than suitability for input to an assembler, making it principally a reverse-engineering tool.
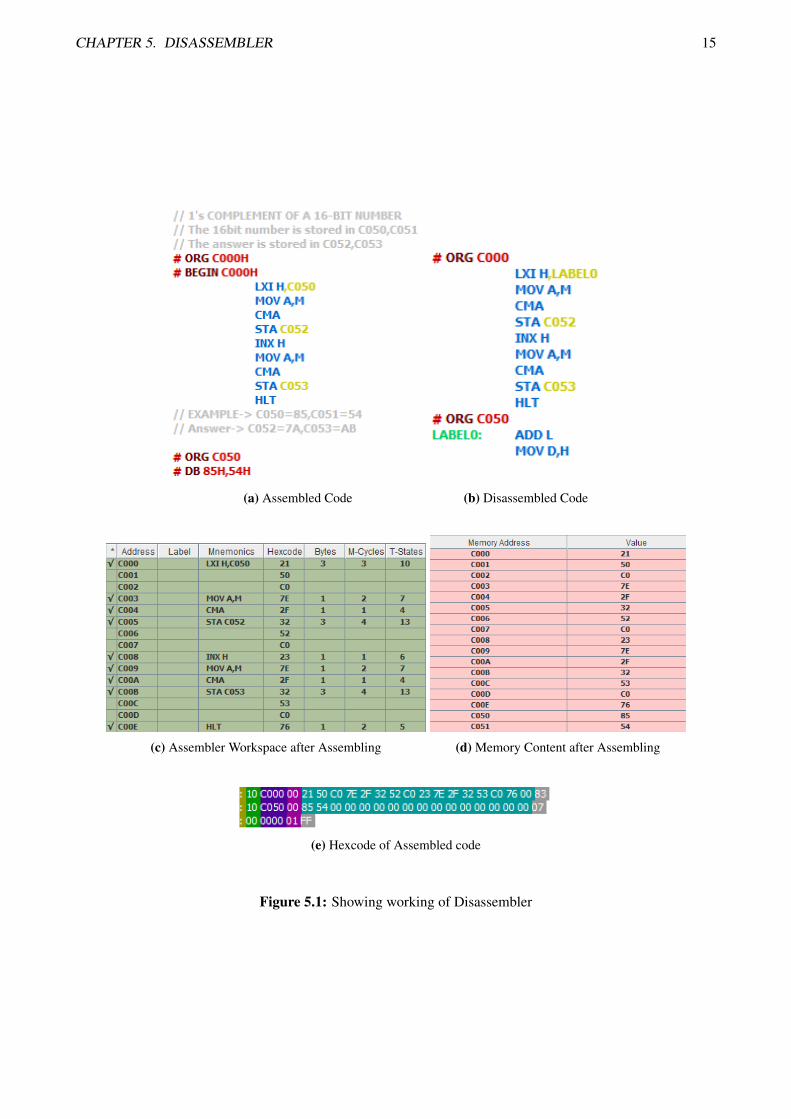
5.1 Disassembler Demonstration
Sub-figure (5.1a) shows a sample program i.e. "1’s COMPLEMENT OF A 16-BIT NUMBER" loaded in theassembly language editor. It is then assembled by pressing the Assemble button. After assembling, memorycontent and assembler workspace are shown in sub-figure (5.1d) and sub-figure (5.1c) respectively. Then theHexcode is saved by selecting "FILE→Save Hexcode" or presing "ALT+S".
The generated hexcode is now loaded in the Disassembler editor by selecting "FILE→Load Hexcode"or presing "ALT+O". As it can be seen in sub-figure (5.1e) the Intel Hex formatted code is syntacticallyhighlighted. Now, press the Disassemble. If there is some error in the code that line will be highlighted in red.The tabbed window will not automatically change, even if there is no error. Now open the assembler editor thecode is disassembled, as given in sub-figure (5.1b). Simultaneously the memory content is also loaded which issame as shown in sub-figure (5.1d). But, it is to be remembered that assembler workspace will remain empty,until the code is assembled from the assembler editor.
14
CHAPTER 5. DISASSEMBLER 15
(a) Assembled Code (b) Disassembled Code
(c) Assembler Workspace after Assembling (d) Memory Content after Assembling
(e) Hexcode of Assembled code
Figure 5.1: Showing working of Disassembler
CHAPTER 5. DISASSEMBLER 16
5.2 Intel HEX
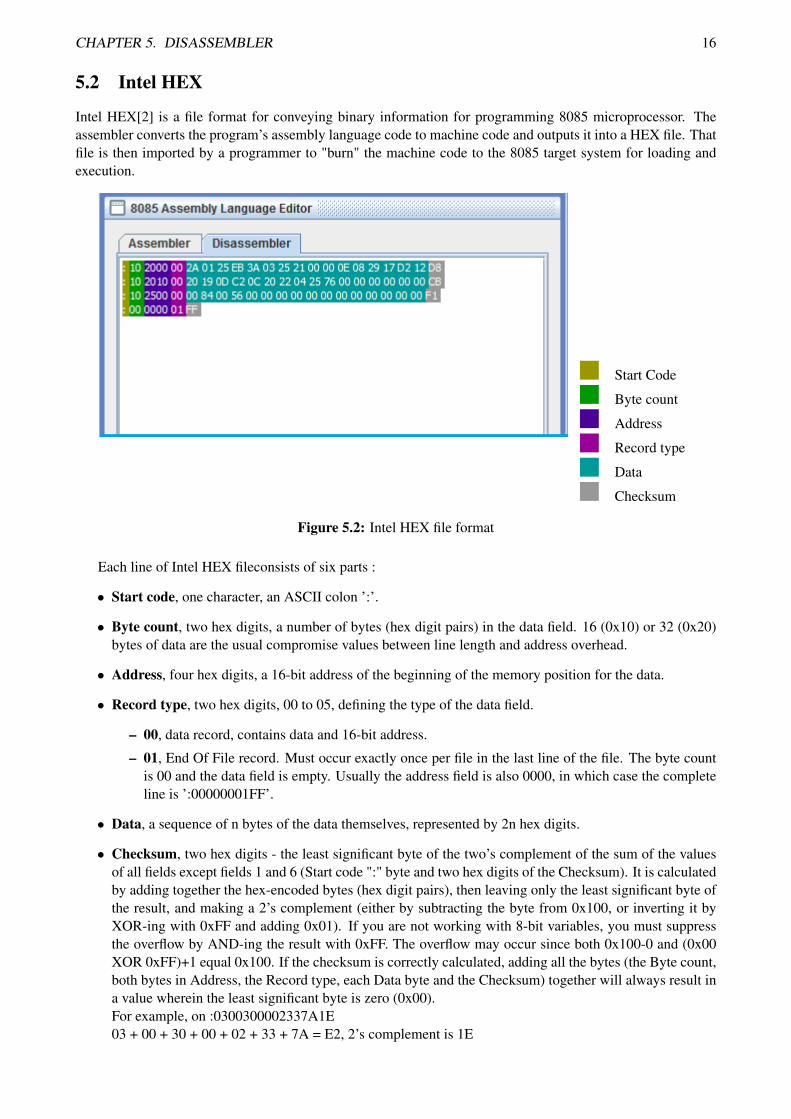
Intel HEX[2] is a file format for conveying binary information for programming 8085 microprocessor. Theassembler converts the program’s assembly language code to machine code and outputs it into a HEX file. Thatfile is then imported by a programmer to "burn" the machine code to the 8085 target system for loading andexecution.
Start Code
Byte count
Address
Record type
Data
Checksum
Figure 5.2: Intel HEX file format
Each line of Intel HEX fileconsists of six parts :
• Start code, one character, an ASCII colon ’:’.
• Byte count, two hex digits, a number of bytes (hex digit pairs) in the data field. 16 (0x10) or 32 (0x20)bytes of data are the usual compromise values between line length and address overhead.
• Address, four hex digits, a 16-bit address of the beginning of the memory position for the data.
• Record type, two hex digits, 00 to 05, defining the type of the data field.
– 00, data record, contains data and 16-bit address.
– 01, End Of File record. Must occur exactly once per file in the last line of the file. The byte countis 00 and the data field is empty. Usually the address field is also 0000, in which case the completeline is ’:00000001FF’.
• Data, a sequence of n bytes of the data themselves, represented by 2n hex digits.
• Checksum, two hex digits - the least significant byte of the two’s complement of the sum of the valuesof all fields except fields 1 and 6 (Start code ":" byte and two hex digits of the Checksum). It is calculatedby adding together the hex-encoded bytes (hex digit pairs), then leaving only the least significant byte ofthe result, and making a 2’s complement (either by subtracting the byte from 0x100, or inverting it byXOR-ing with 0xFF and adding 0x01). If you are not working with 8-bit variables, you must suppressthe overflow by AND-ing the result with 0xFF. The overflow may occur since both 0x100-0 and (0x00XOR 0xFF)+1 equal 0x100. If the checksum is correctly calculated, adding all the bytes (the Byte count,both bytes in Address, the Record type, each Data byte and the Checksum) together will always result ina value wherein the least significant byte is zero (0x00).For example, on :0300300002337A1E03 + 00 + 30 + 00 + 02 + 33 + 7A = E2, 2’s complement is 1E
CHAPTER 5. DISASSEMBLER 17
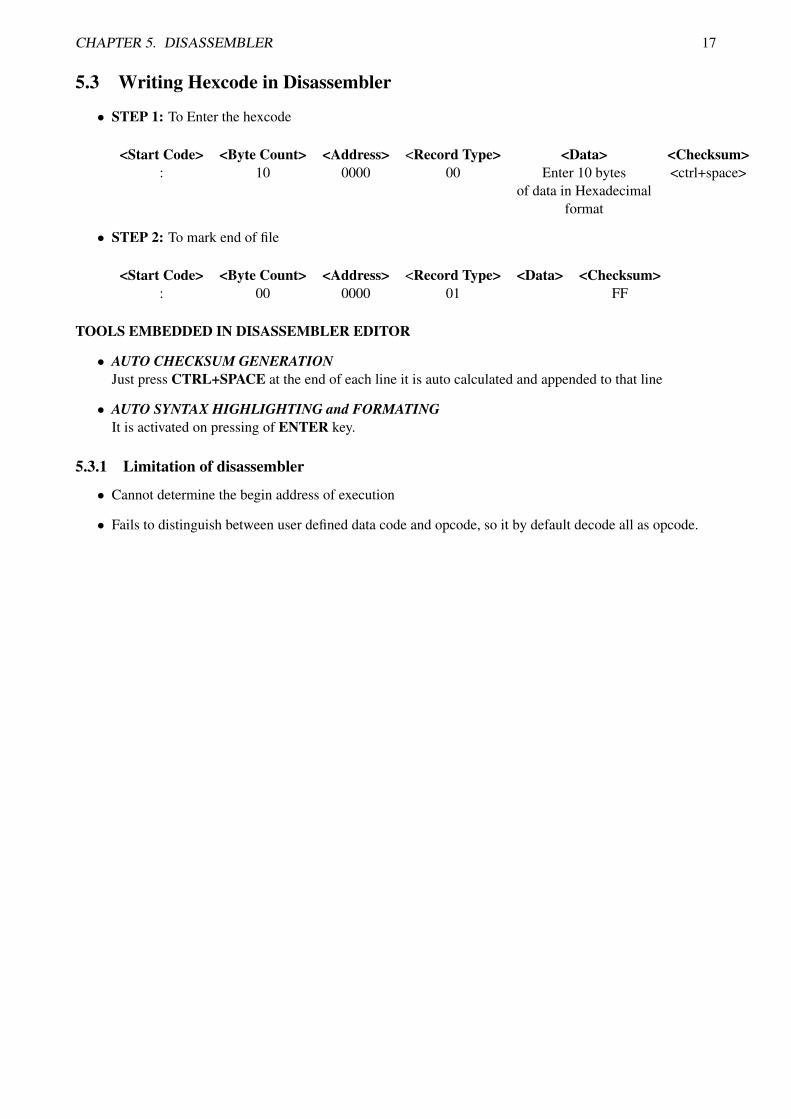
5.3 Writing Hexcode in Disassembler
• STEP 1: To Enter the hexcode
<Start Code> <Byte Count> <Address> <Record Type> <Data> <Checksum>: 10 0000 00 Enter 10 bytes <ctrl+space>
of data in Hexadecimalformat
• STEP 2: To mark end of file
<Start Code> <Byte Count> <Address> <Record Type> <Data> <Checksum>: 00 0000 01 FF
TOOLS EMBEDDED IN DISASSEMBLER EDITOR
• AUTO CHECKSUM GENERATIONJust press CTRL+SPACE at the end of each line it is auto calculated and appended to that line
• AUTO SYNTAX HIGHLIGHTING and FORMATINGIt is activated on pressing of ENTER key.
5.3.1 Limitation of disassembler
• Cannot determine the begin address of execution
• Fails to distinguish between user defined data code and opcode, so it by default decode all as opcode.
Chapter 6
Timing Diagram generator
The 8085 Microprocessor is designed to execute 74 different types of instruction. Each instruction has twoparts: OPCODE (operation code) and OPERAND. Each functions are divided into machine cycles and eachcycles is further divided into T-states.
Basically, the microprocessor external communication functions can be divided into 3 categories of Ma-chine Cycle:
1. Memory Read and Write
2. I/O Read and Write
3. Request Acknowledge
Of which Request Acknowledge machine cycle is not yet supported in this version of the software, butinternally it is simulated.There are three methods of Timing Diagram Generation :
1. Static Timing Diagram Generation
2. Dynamic Timing Diagram Generation
(a) By Manual Step by Step Simulation
(b) By Automatic Step by Step Simulation
18
CHAPTER 6. TIMING DIAGRAM GENERATOR 19
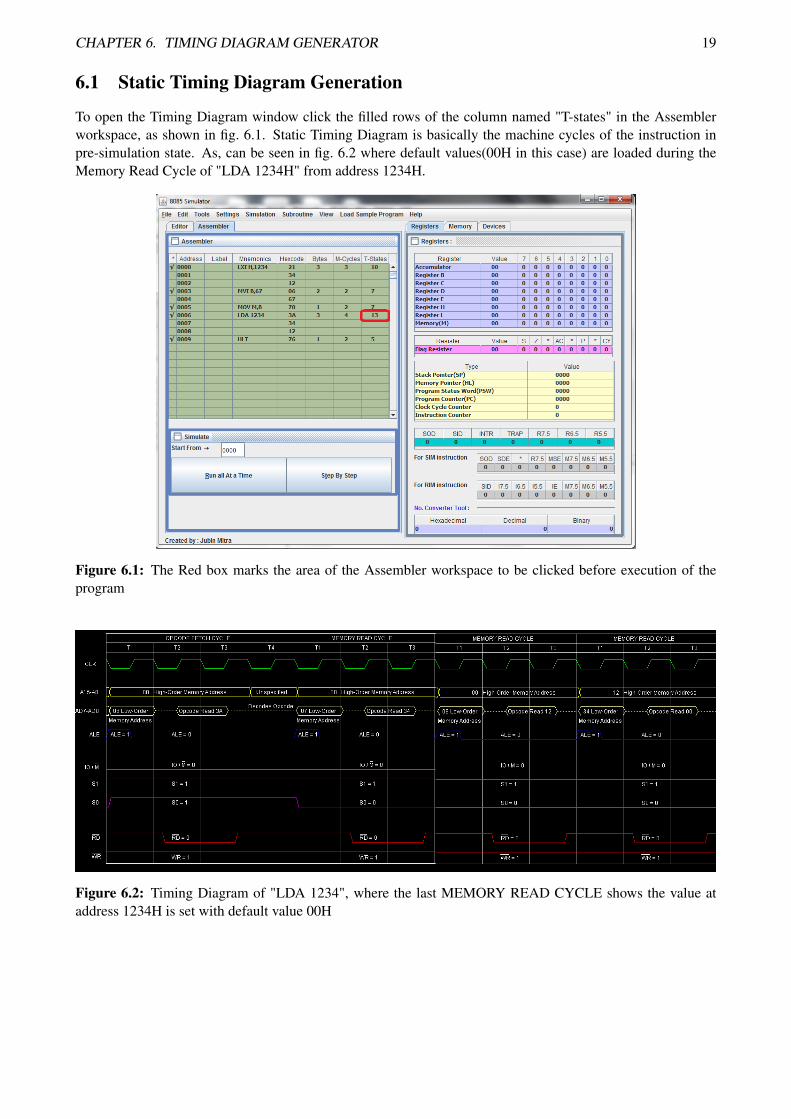
6.1 Static Timing Diagram Generation
To open the Timing Diagram window click the filled rows of the column named "T-states" in the Assemblerworkspace, as shown in fig. 6.1. Static Timing Diagram is basically the machine cycles of the instruction inpre-simulation state. As, can be seen in fig. 6.2 where default values(00H in this case) are loaded during theMemory Read Cycle of "LDA 1234H" from address 1234H.
Figure 6.1: The Red box marks the area of the Assembler workspace to be clicked before execution of theprogram
Figure 6.2: Timing Diagram of "LDA 1234", where the last MEMORY READ CYCLE shows the value ataddress 1234H is set with default value 00H
CHAPTER 6. TIMING DIAGRAM GENERATOR 20
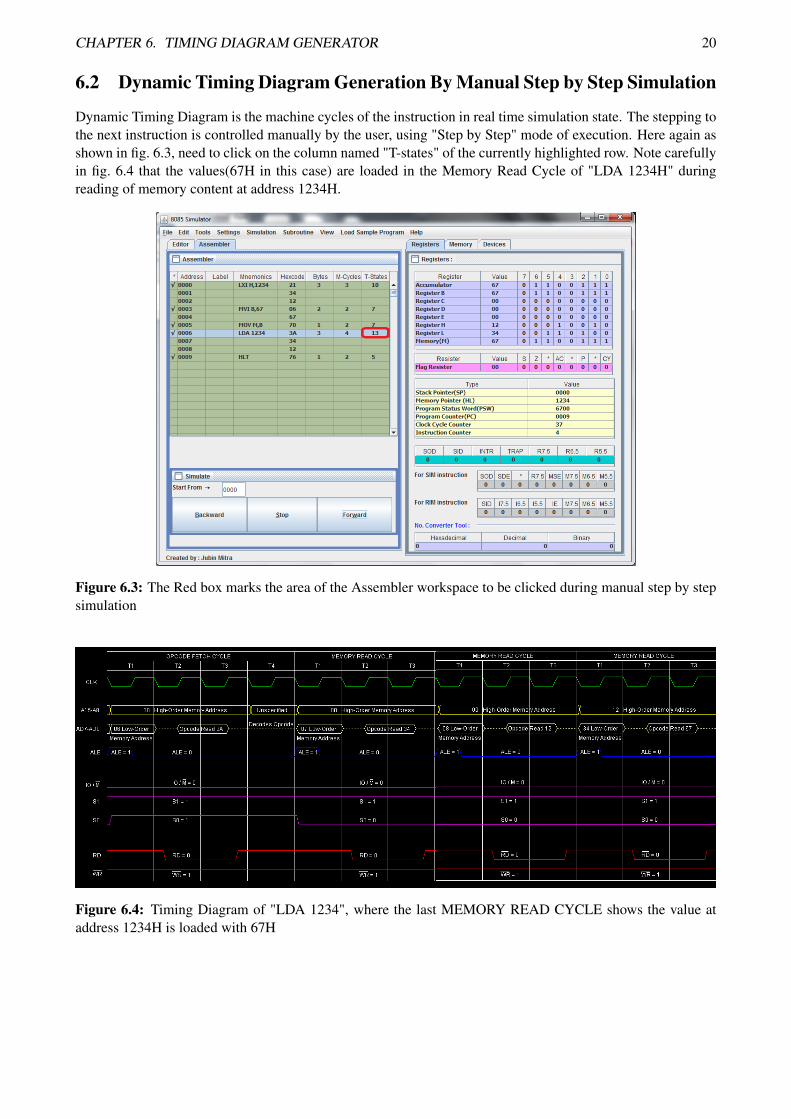
6.2 Dynamic Timing Diagram Generation By Manual Step by Step Simulation
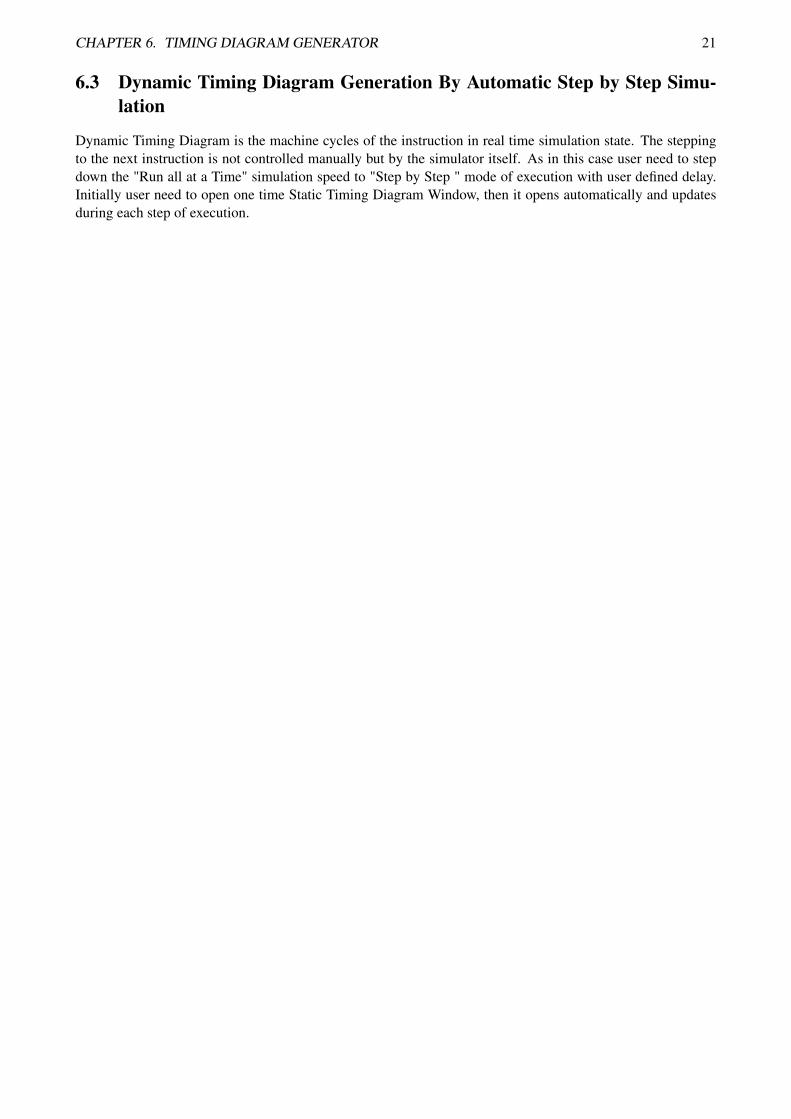
Dynamic Timing Diagram is the machine cycles of the instruction in real time simulation state. The stepping tothe next instruction is controlled manually by the user, using "Step by Step" mode of execution. Here again asshown in fig. 6.3, need to click on the column named "T-states" of the currently highlighted row. Note carefullyin fig. 6.4 that the values(67H in this case) are loaded in the Memory Read Cycle of "LDA 1234H" duringreading of memory content at address 1234H.
Figure 6.3: The Red box marks the area of the Assembler workspace to be clicked during manual step by stepsimulation
Figure 6.4: Timing Diagram of "LDA 1234", where the last MEMORY READ CYCLE shows the value ataddress 1234H is loaded with 67H
CHAPTER 6. TIMING DIAGRAM GENERATOR 21
6.3 Dynamic Timing Diagram Generation By Automatic Step by Step Simu-lation
Dynamic Timing Diagram is the machine cycles of the instruction in real time simulation state. The steppingto the next instruction is not controlled manually but by the simulator itself. As in this case user need to stepdown the "Run all at a Time" simulation speed to "Step by Step " mode of execution with user defined delay.Initially user need to open one time Static Timing Diagram Window, then it opens automatically and updatesduring each step of execution.
Chapter 7
Trainer Kit Emulator
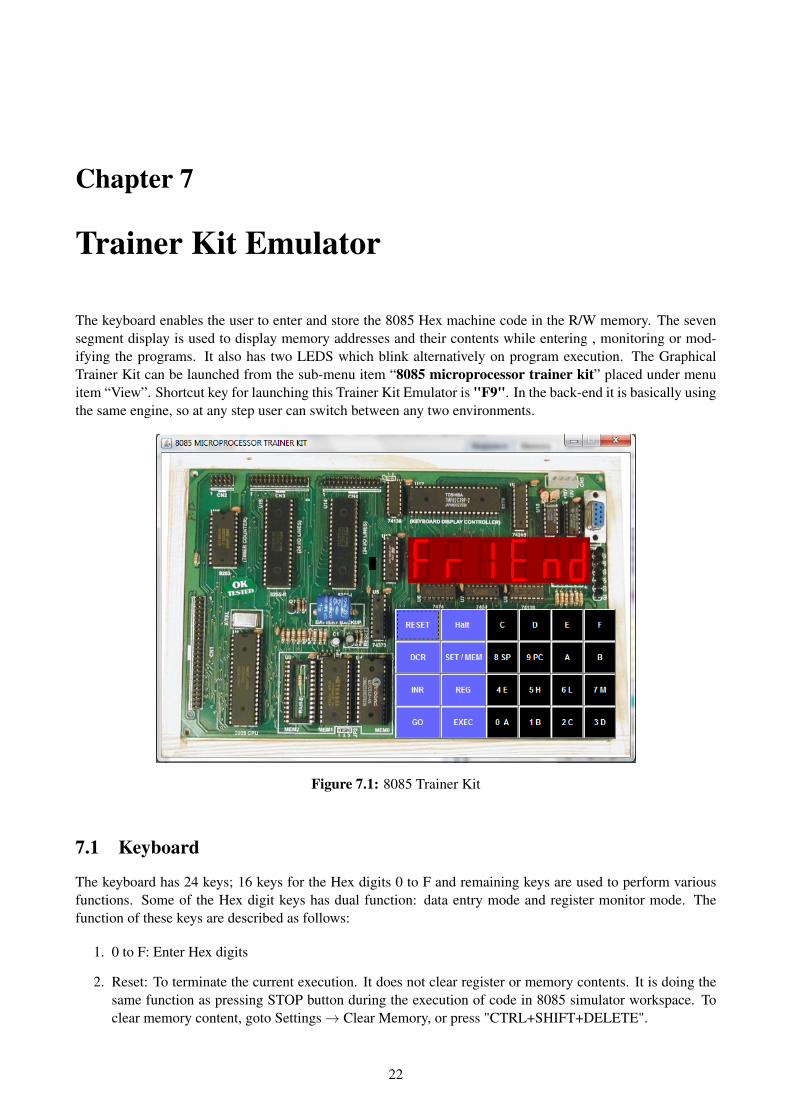
The keyboard enables the user to enter and store the 8085 Hex machine code in the R/W memory. The sevensegment display is used to display memory addresses and their contents while entering , monitoring or mod-ifying the programs. It also has two LEDS which blink alternatively on program execution. The GraphicalTrainer Kit can be launched from the sub-menu item “8085 microprocessor trainer kit” placed under menuitem “View”. Shortcut key for launching this Trainer Kit Emulator is "F9". In the back-end it is basically usingthe same engine, so at any step user can switch between any two environments.
Figure 7.1: 8085 Trainer Kit
7.1 Keyboard
The keyboard has 24 keys; 16 keys for the Hex digits 0 to F and remaining keys are used to perform variousfunctions. Some of the Hex digit keys has dual function: data entry mode and register monitor mode. Thefunction of these keys are described as follows:
1. 0 to F: Enter Hex digits
2. Reset: To terminate the current execution. It does not clear register or memory contents. It is doing thesame function as pressing STOP button during the execution of code in 8085 simulator workspace. Toclear memory content, goto Settings→ Clear Memory, or press "CTRL+SHIFT+DELETE".
22
CHAPTER 7. TRAINER KIT EMULATOR 23
3. Halt: It pauses the program at any stage of execution. It is equivalent to pressing PAUSE during theexecution of code in 8085 simulator workspace. From where it is possible to do both forward andbackward traversal.
4. DCR: Decrements the memory address and displays the new address and its data.
5. INR: Increments the memory address and displays the new address and its data.
6. SET/MEM: To enter contents in particular memory address.
7. REG: To monitor the current register content.
8. GO: To set the starting address of execution.
9. EXEC: To begin execution of the program from the begin address that is set. It takes the simulation speedthat is default by the user in the editor. But, the default speed is set to ultimate.
7.2 Using the Trainer Kit Emulator
7.2.1 How to enter a program
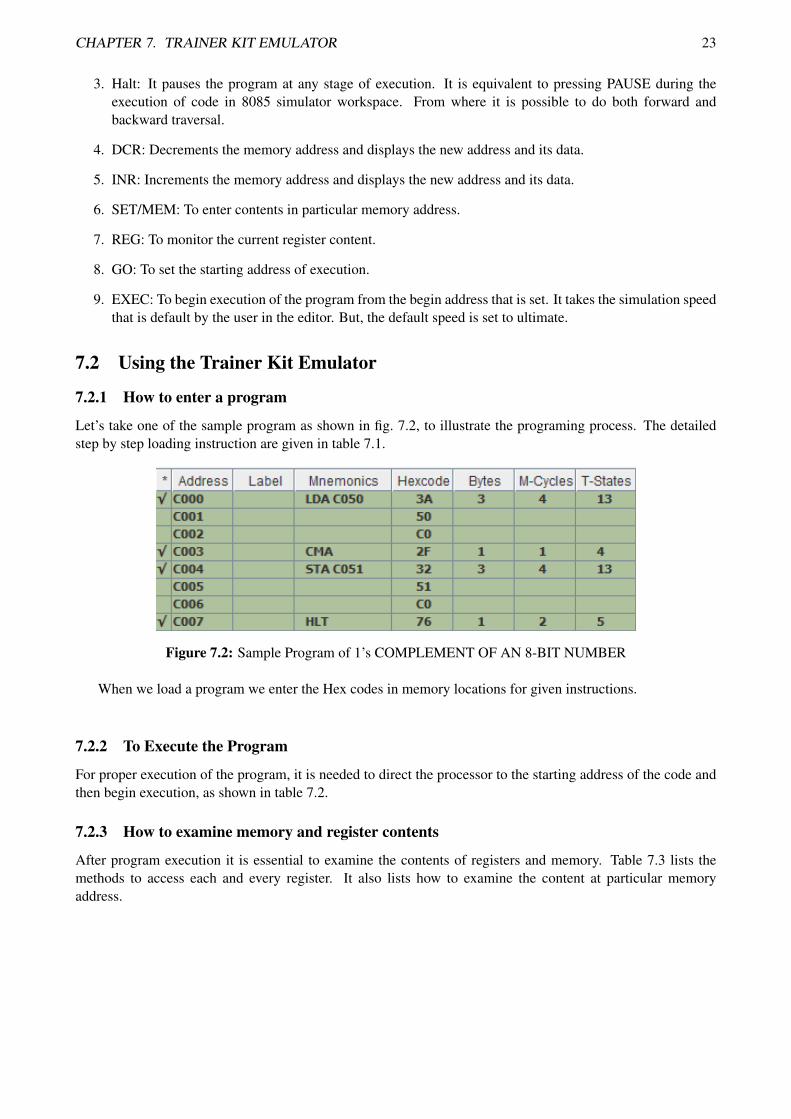
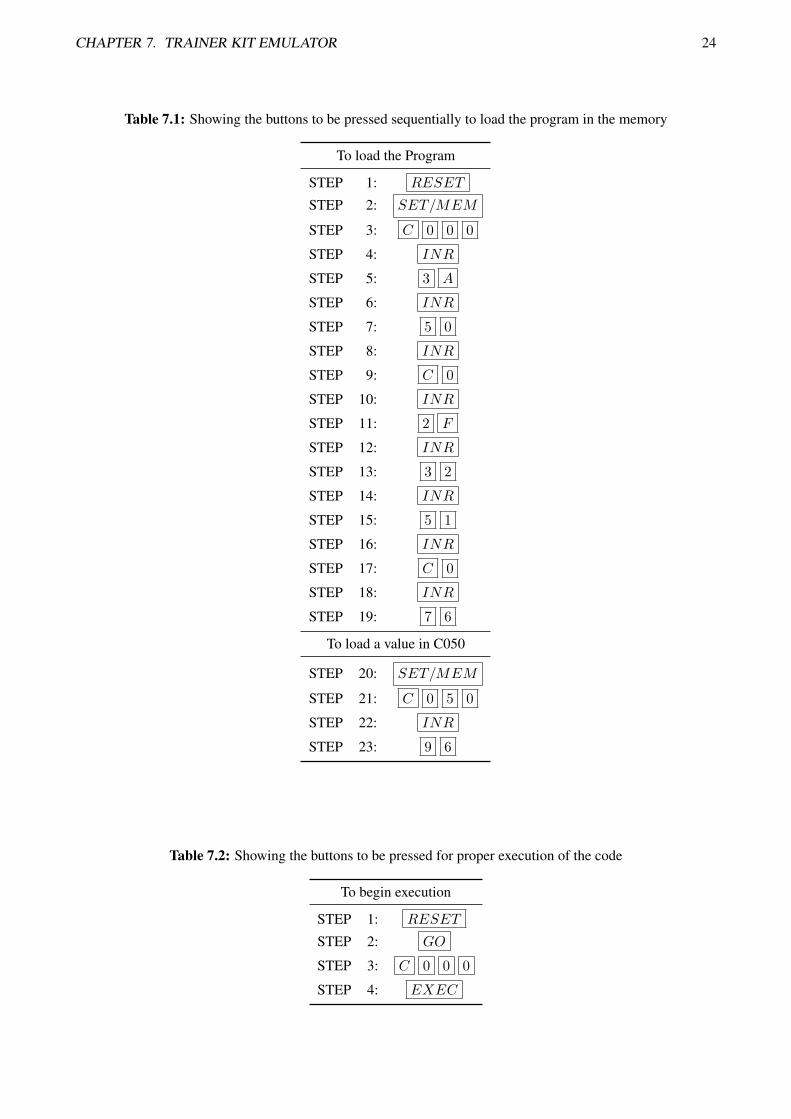
Let’s take one of the sample program as shown in fig. 7.2, to illustrate the programing process. The detailedstep by step loading instruction are given in table 7.1.
Figure 7.2: Sample Program of 1’s COMPLEMENT OF AN 8-BIT NUMBER
When we load a program we enter the Hex codes in memory locations for given instructions.
7.2.2 To Execute the Program
For proper execution of the program, it is needed to direct the processor to the starting address of the code andthen begin execution, as shown in table 7.2.
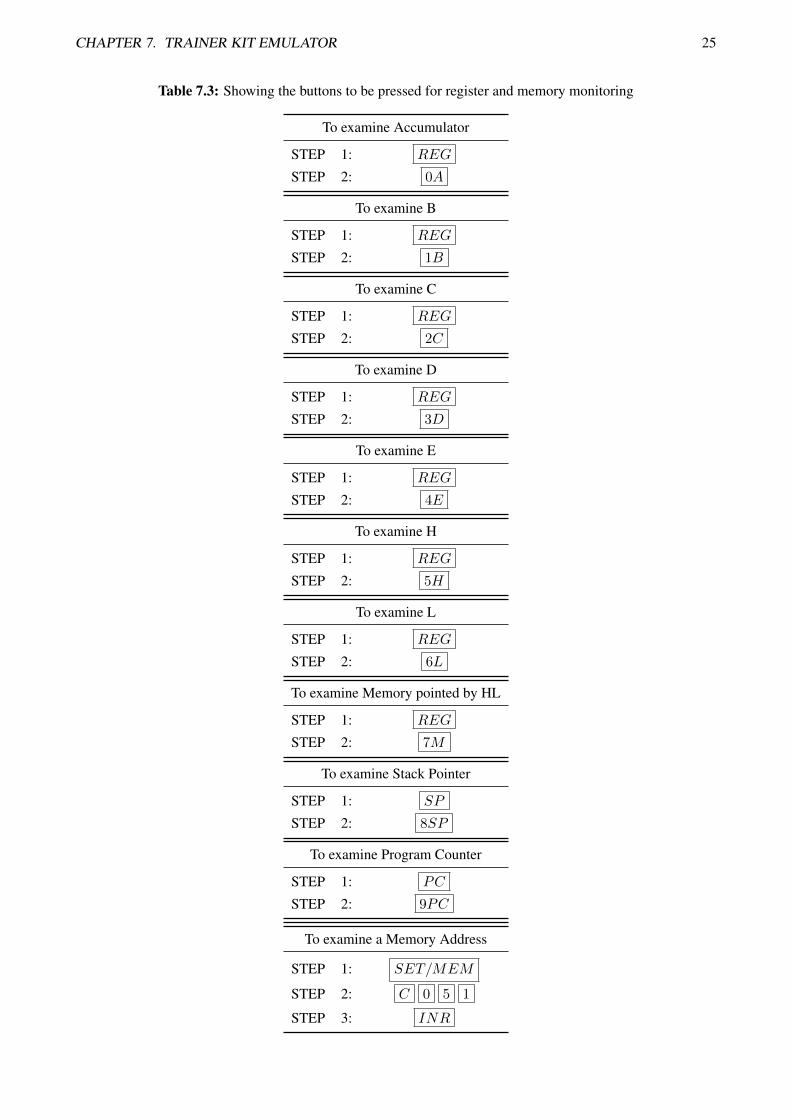
7.2.3 How to examine memory and register contents
After program execution it is essential to examine the contents of registers and memory. Table 7.3 lists themethods to access each and every register. It also lists how to examine the content at particular memoryaddress.
CHAPTER 7. TRAINER KIT EMULATOR 24
Table 7.1: Showing the buttons to be pressed sequentially to load the program in the memory
To load the Program
STEP 1: RESET
STEP 2: SET/MEM
STEP 3: C 0 0 0
STEP 4: INR
STEP 5: 3 A
STEP 6: INR
STEP 7: 5 0
STEP 8: INR
STEP 9: C 0
STEP 10: INR
STEP 11: 2 F
STEP 12: INR
STEP 13: 3 2
STEP 14: INR
STEP 15: 5 1
STEP 16: INR
STEP 17: C 0
STEP 18: INR
STEP 19: 7 6
To load a value in C050
STEP 20: SET/MEM
STEP 21: C 0 5 0
STEP 22: INR
STEP 23: 9 6
Table 7.2: Showing the buttons to be pressed for proper execution of the code
To begin execution
STEP 1: RESET
STEP 2: GO
STEP 3: C 0 0 0
STEP 4: EXEC
CHAPTER 7. TRAINER KIT EMULATOR 25
Table 7.3: Showing the buttons to be pressed for register and memory monitoring
To examine Accumulator
STEP 1: REG
STEP 2: 0A
To examine B
STEP 1: REG
STEP 2: 1B
To examine C
STEP 1: REG
STEP 2: 2C
To examine D
STEP 1: REG
STEP 2: 3D
To examine E
STEP 1: REG
STEP 2: 4E
To examine H
STEP 1: REG
STEP 2: 5H
To examine L
STEP 1: REG
STEP 2: 6L
To examine Memory pointed by HL
STEP 1: REG
STEP 2: 7M
To examine Stack Pointer
STEP 1: SP
STEP 2: 8SP
To examine Program Counter
STEP 1: PC
STEP 2: 9PC
To examine a Memory Address
STEP 1: SET/MEM
STEP 2: C 0 5 1
STEP 3: INR
CHAPTER 7. TRAINER KIT EMULATOR 26
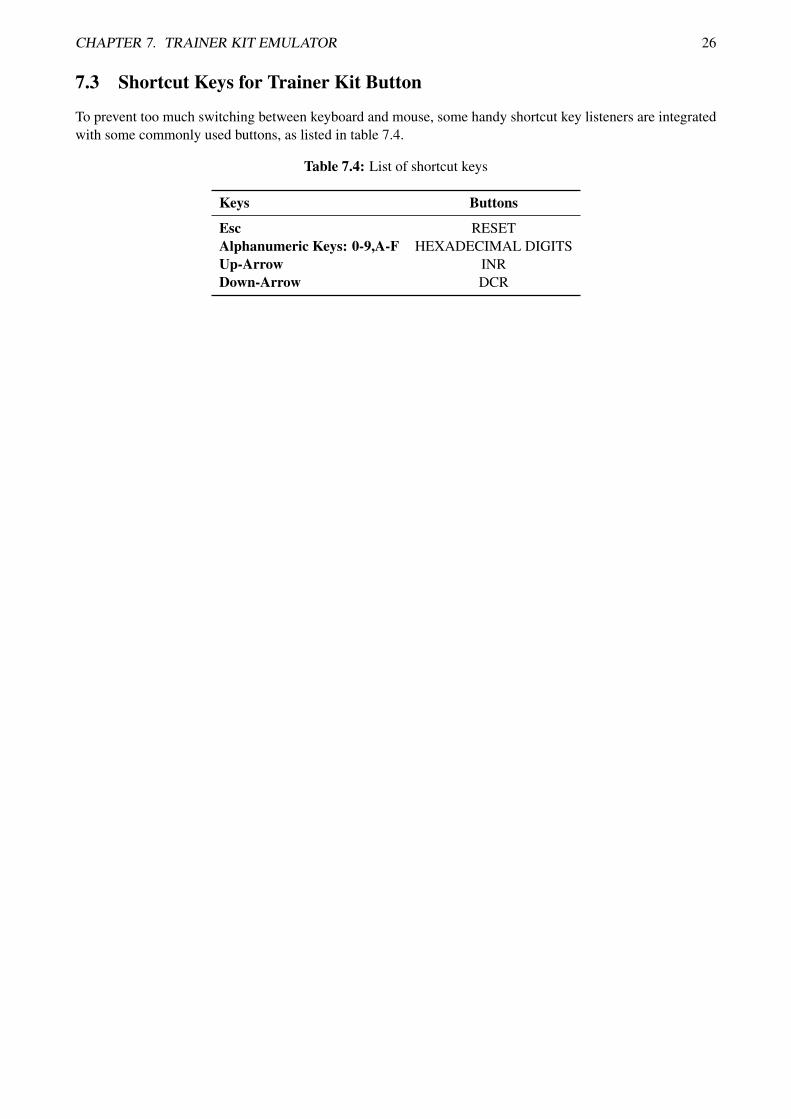
7.3 Shortcut Keys for Trainer Kit Button
To prevent too much switching between keyboard and mouse, some handy shortcut key listeners are integratedwith some commonly used buttons, as listed in table 7.4.
Table 7.4: List of shortcut keys
Keys Buttons
Esc RESETAlphanumeric Keys: 0-9,A-F HEXADECIMAL DIGITSUp-Arrow INRDown-Arrow DCR
Chapter 8
Debugging Mode
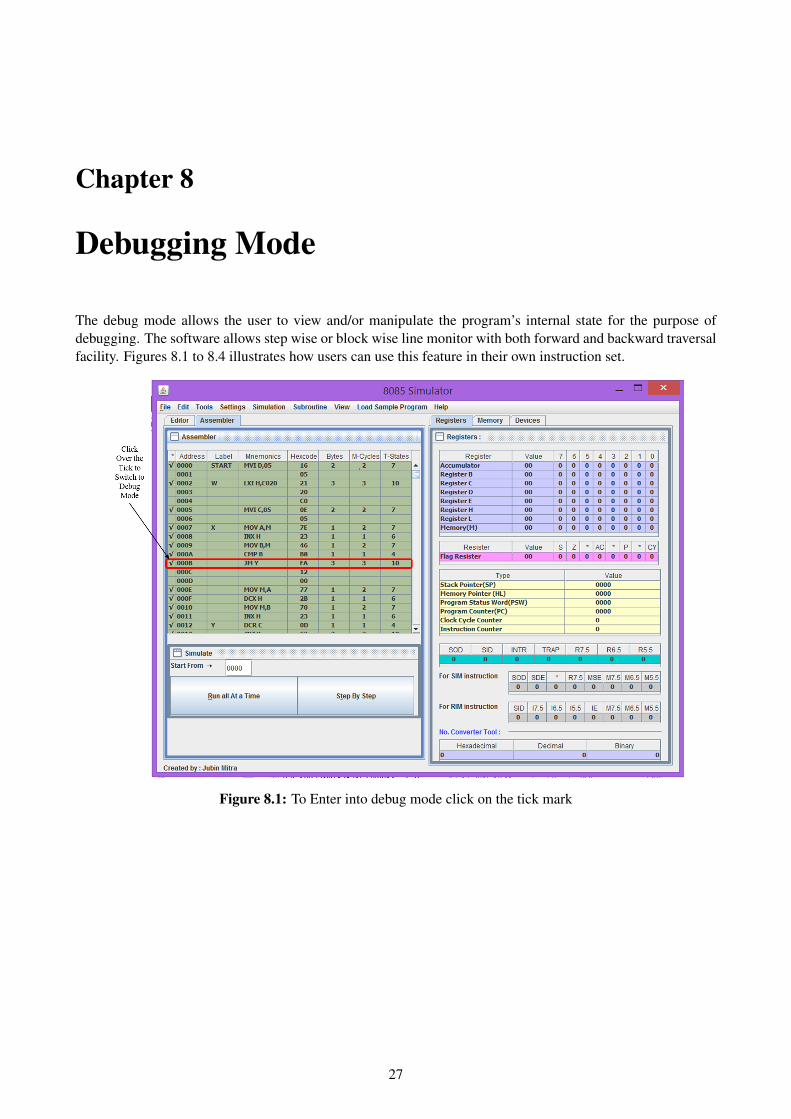
The debug mode allows the user to view and/or manipulate the program’s internal state for the purpose ofdebugging. The software allows step wise or block wise line monitor with both forward and backward traversalfacility. Figures 8.1 to 8.4 illustrates how users can use this feature in their own instruction set.
Figure 8.1: To Enter into debug mode click on the tick mark
27
CHAPTER 8. DEBUGGING MODE 28
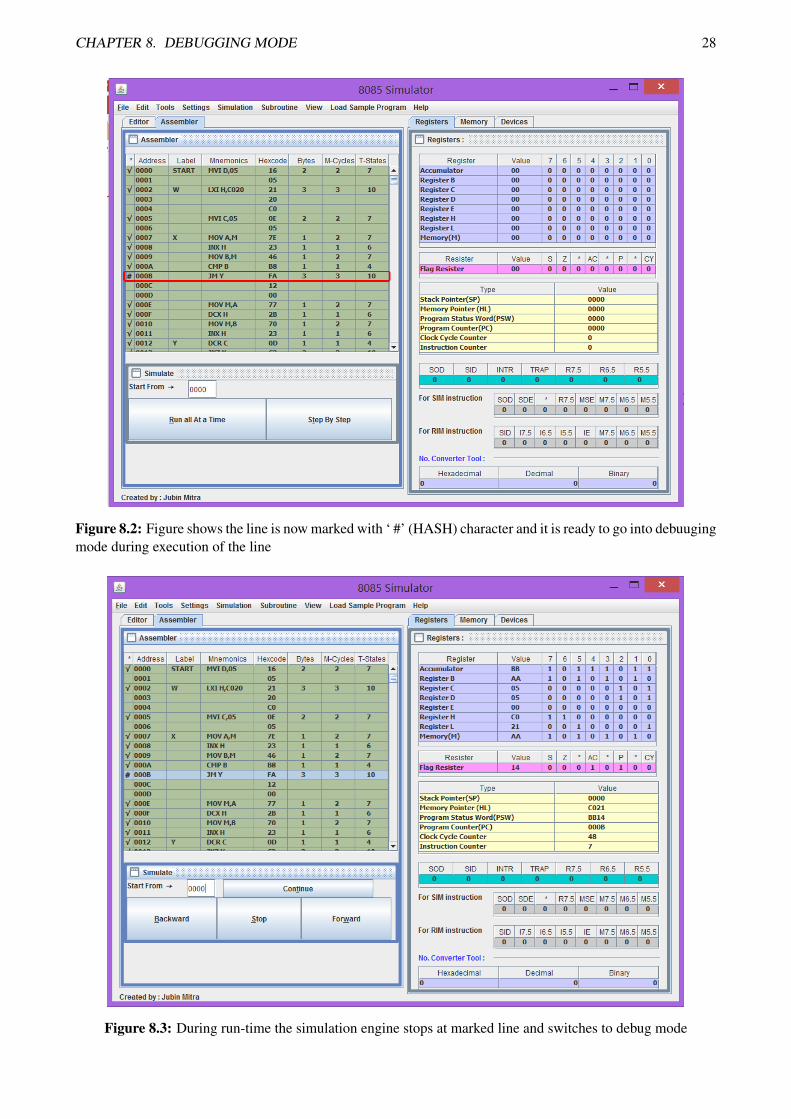
Figure 8.2: Figure shows the line is now marked with ‘ #’ (HASH) character and it is ready to go into debuugingmode during execution of the line
Figure 8.3: During run-time the simulation engine stops at marked line and switches to debug mode
CHAPTER 8. DEBUGGING MODE 29
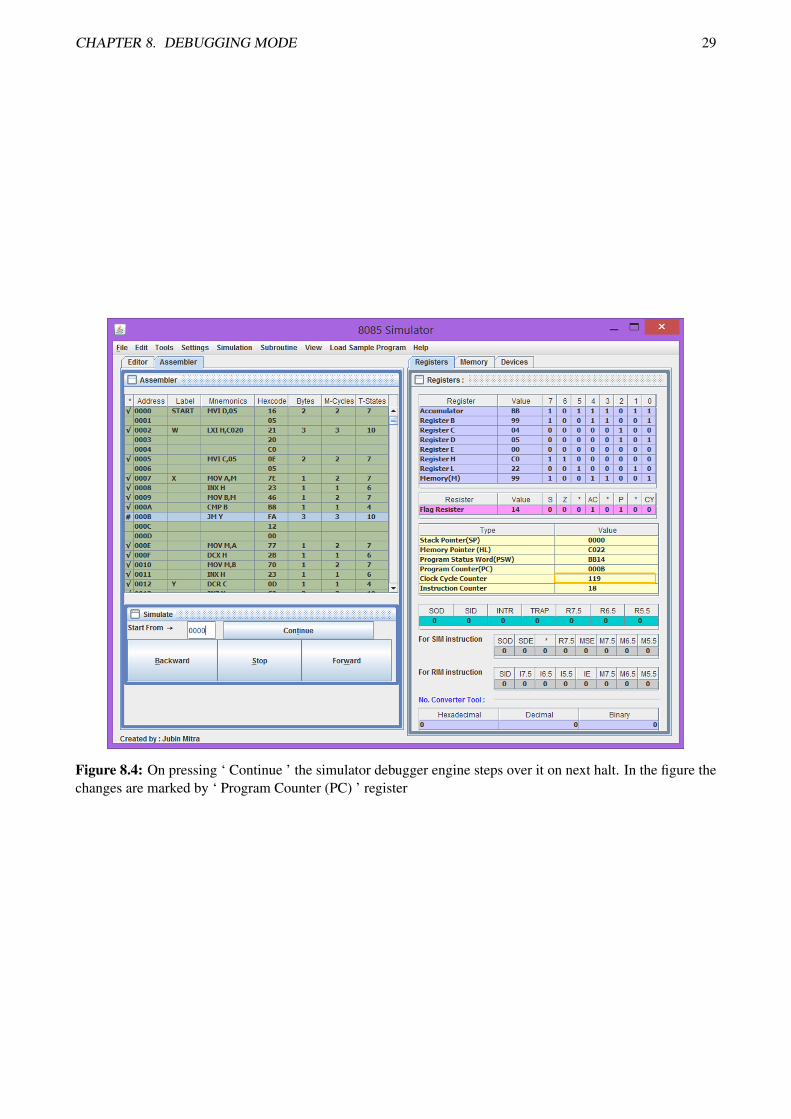
Figure 8.4: On pressing ‘ Continue ’ the simulator debugger engine steps over it on next halt. In the figure thechanges are marked by ‘ Program Counter (PC) ’ register
Bibliography
[1] Intel Corporation, “Intel 8080-8085 assembly language programming guide,” 1978 (cit. on p. 12).
[2] Intel, “Hexadecimal object file format specification, Revision a,” journaltitle, [Online]. Available: http://microsym.com/editor/assets/intelhex.pdf (cit. on p. 16).
30
![List research published Number of Specialization General ...€¦ · Dr. Adel A. Attiya Mathematics Math Pure-Mathematicsin the Unit Disk, FILOMAT. In Press [1] Adel A. Attiya, Some](https://img.pdfslide.net/doc/110x75/5f80d471c4d8dc58951bbbbc/list-research-published-number-of-specialization-general-dr-adel-a-attiya.jpg)