Embed Size (px)
Citation preview
8530CougarTM
Industrial Terminal User’s Guide
(for VS Software)
B15339700A(10/99).00
© Mettler-Toledo, Inc. 1998, 1999No part of this manual may be reproduced or transmitted in any form or by any means, electronic or mechanical, including photocopying and recording, for any purpose without the express written per-mission of Mettler-Toledo, Inc.U.S. Government Restricted Rights: This documentation is furnished with Restricted Rights.
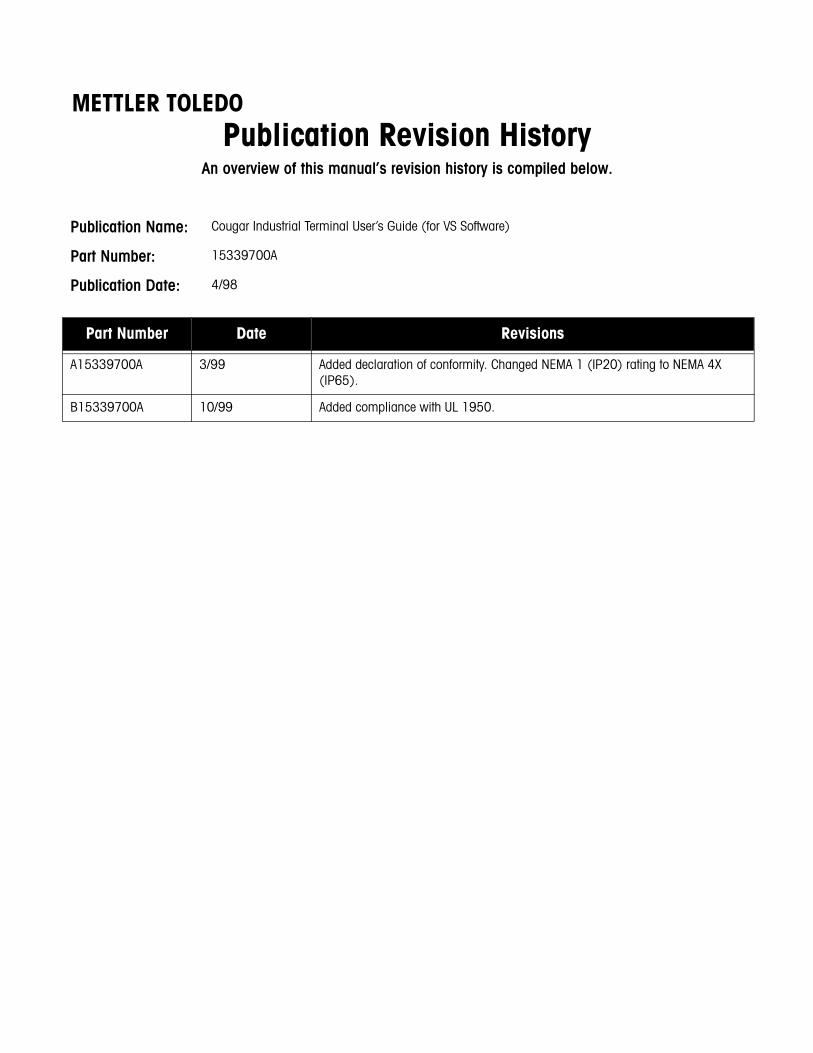
METTLER TOLEDOPublication Revision History
An overview of this manual’s revision history is compiled below.
Publication Name: Cougar Industrial Terminal User’s Guide (for VS Software)
Part Number: 15339700A
Publication Date: 4/98
Part Number Date Revisions
A15339700A 3/99 Added declaration of conformity. Changed NEMA 1 (IP20) rating to NEMA 4X (IP65).
B15339700A 10/99 Added compliance with UL 1950.
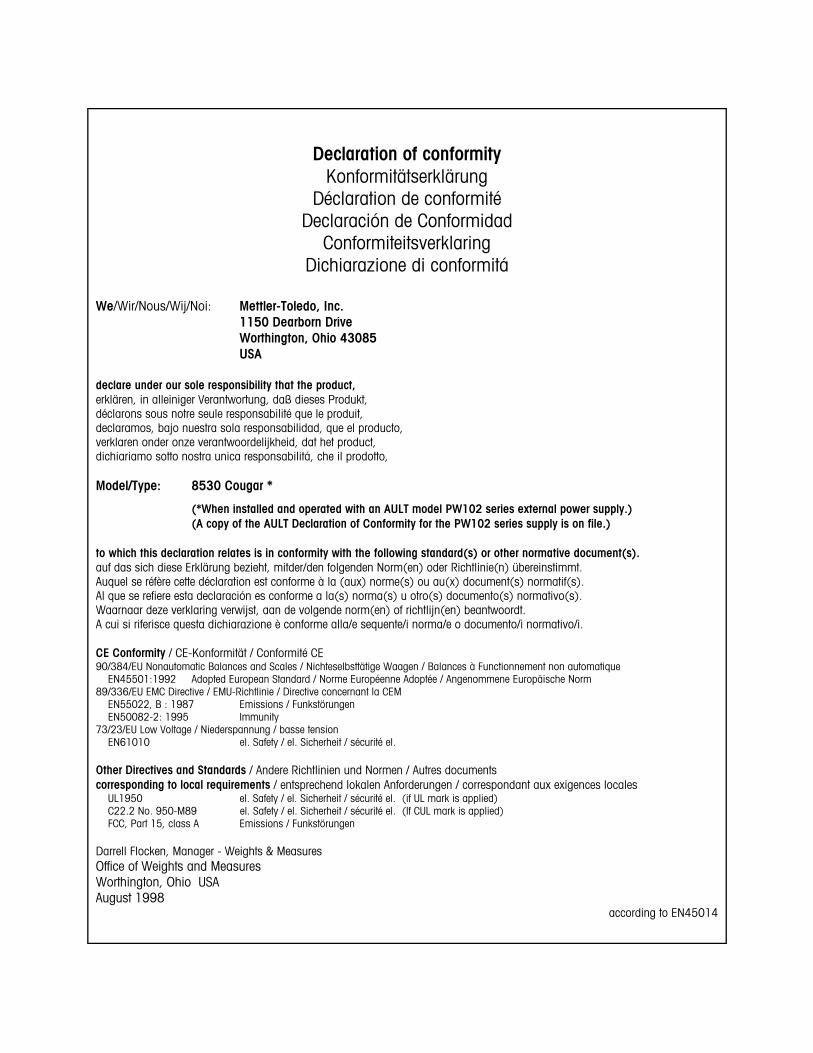
Declaration of conformityKonformitätserklärung
Déclaration de conformitéDeclaración de Conformidad
ConformiteitsverklaringDichiarazione di conformitá
We/Wir/Nous/Wij/Noi: Mettler-Toledo, Inc.1150 Dearborn DriveWorthington, Ohio 43085USA
declare under our sole responsibility that the product,erklären, in alleiniger Verantwortung, daß dieses Produkt,déclarons sous notre seule responsabilité que le produit,declaramos, bajo nuestra sola responsabilidad, que el producto,verklaren onder onze verantwoordelijkheid, dat het product,dichiariamo sotto nostra unica responsabilitá, che il prodotto,
Model/Type: 8530 Cougar *
(*When installed and operated with an AULT model PW102 series external power supply.)(A copy of the AULT Declaration of Conformity for the PW102 series supply is on file.)
to which this declaration relates is in conformity with the following standard(s) or other normative document(s).auf das sich diese Erklärung bezieht, mitder/den folgenden Norm(en) oder Richtlinie(n) übereinstimmt.Auquel se réfère cette déclaration est conforme à la (aux) norme(s) ou au(x) document(s) normatif(s).Al que se refiere esta declaración es conforme a la(s) norma(s) u otro(s) documento(s) normativo(s).Waarnaar deze verklaring verwijst, aan de volgende norm(en) of richtlijn(en) beantwoordt.A cui si riferisce questa dichiarazione è conforme alla/e sequente/i norma/e o documento/i normativo/i.
CE Conformity / CE-Konformität / Conformité CE90/384/EU Nonautomatic Balances and Scales / Nichteselbsttätige Waagen / Balances à Functionnement non automatique EN45501:1992 Adopted European Standard / Norme Européenne Adoptée / Angenommene Europäische Norm89/336/EU EMC Directive / EMU-Richtlinie / Directive concernant la CEM EN55022, B : 1987 Emissions / Funkstörungen EN50082-2: 1995 Immunity73/23/EU Low Voltage / Niederspannung / basse tension EN61010 el. Safety / el. Sicherheit / sécurité el.
Other Directives and Standards / Andere Richtlinien und Normen / Autres documentscorresponding to local requirements / entsprechend lokalen Anforderungen / correspondant aux exigences locales UL1950 el. Safety / el. Sicherheit / sécurité el. (if UL mark is applied) C22.2 No. 950-M89 el. Safety / el. Sicherheit / sécurité el. (If CUL mark is applied) FCC, Part 15, class A Emissions / Funkstörungen
Darrell Flocken, Manager - Weights & MeasuresOffice of Weights and MeasuresWorthington, Ohio USAAugust 1998
according to EN45014
INTRODUCTION
This publication is provided solely as a guide to operating the Cougar Industrial Scale Terminal. Information aboutinstalling, maintaining, and servicing the terminal is available in the Cougar Service Manual (PN B15537100A).
FCC NoticeThis device complies with Part 15 of the FCC Rules and the Radio Interference Requirements of the Canadian Departmentof Communications. Operation is subject to the following conditions: (1) this device may not cause harmful interference,and (2) this device must accept any interference received, including interference that may cause undesired operation.
This equipment has been tested and found to comply with the limits for a Class A digital device, pursuant to Part 15 ofFCC Rules. These limits are designed to provide reasonable protection against harmful interference when the equipmentis operated in a commercial environment. This equipment generates, uses, and can radiate radio frequency energy and,if not installed and used in accordance with the instruction manual, may cause harmful interference to radio commu-nications. Operation of this equipment in a residential area is likely to cause harmful interference, in which case userswill be required to correct the interference at their own expense.
METTLER TOLEDO RESERVES THE RIGHT TO MAKE REFINEMENTS OR CHANGES WITHOUT NOTICE.
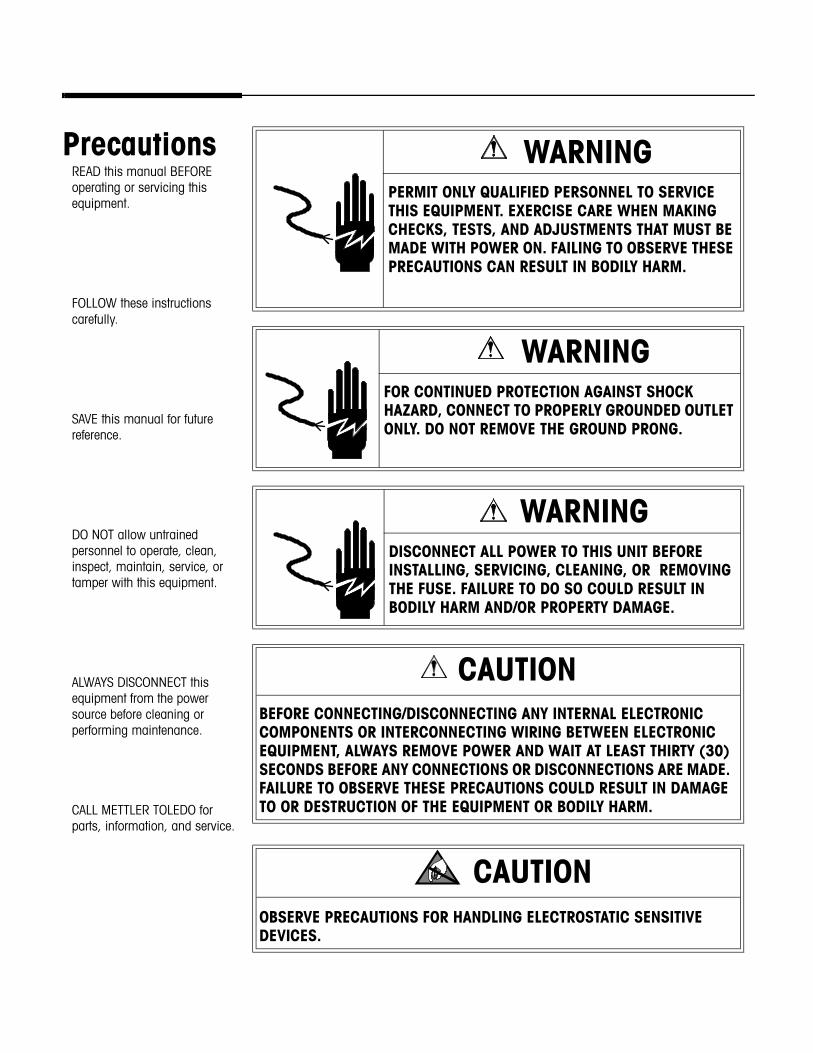
Precautions WARNINGPERMIT ONLY QUALIFIED PERSONNEL TO SERVICE THIS EQUIPMENT. EXERCISE CARE WHEN MAKING CHECKS, TESTS, AND ADJUSTMENTS THAT MUST BE MADE WITH POWER ON. FAILING TO OBSERVE THESE PRECAUTIONS CAN RESULT IN BODILY HARM.
WARNINGFOR CONTINUED PROTECTION AGAINST SHOCK HAZARD, CONNECT TO PROPERLY GROUNDED OUTLET ONLY. DO NOT REMOVE THE GROUND PRONG.
WARNINGDISCONNECT ALL POWER TO THIS UNIT BEFORE INSTALLING, SERVICING, CLEANING, OR REMOVING THE FUSE. FAILURE TO DO SO COULD RESULT IN BODILY HARM AND/OR PROPERTY DAMAGE.
CAUTIONBEFORE CONNECTING/DISCONNECTING ANY INTERNAL ELECTRONIC COMPONENTS OR INTERCONNECTING WIRING BETWEEN ELECTRONIC EQUIPMENT, ALWAYS REMOVE POWER AND WAIT AT LEAST THIRTY (30) SECONDS BEFORE ANY CONNECTIONS OR DISCONNECTIONS ARE MADE. FAILURE TO OBSERVE THESE PRECAUTIONS COULD RESULT IN DAMAGE TO OR DESTRUCTION OF THE EQUIPMENT OR BODILY HARM.
CAUTIONOBSERVE PRECAUTIONS FOR HANDLING ELECTROSTATIC SENSITIVE DEVICES.
READ this manual BEFORE operating or servicing this equipment.
FOLLOW these instructions carefully.
SAVE this manual for future reference.
DO NOT allow untrained personnel to operate, clean, inspect, maintain, service, or tamper with this equipment.
ALWAYS DISCONNECT this equipment from the power source before cleaning or performing maintenance.
CALL METTLER TOLEDO for parts, information, and service.
Contents
1 Introduction .......................................................................................................... 1-1Model Identification ................................................................................................................. 1-1Specifications .......................................................................................................................... 1-2
Physical Dimensions ......................................................................................................................... 1-2Power Requirements.......................................................................................................................... 1-4Controller PCB .................................................................................................................................. 1-4Display and Keyboard ....................................................................................................................... 1-4Temperature and Humidity ................................................................................................................. 1-5Environmental Protection ................................................................................................................... 1-5Hazardous Areas............................................................................................................................... 1-5
Standards Compliance ............................................................................................................. 1-5UL and cUL Listing ............................................................................................................................ 1-5CE Conformity .................................................................................................................................. 1-6Weights and Measures Approval (U.S.)................................................................................................ 1-6Conducted and Radiated Emissions (RFI) ............................................................................................ 1-6Radio Frequency Interference Susceptibility........................................................................................... 1-6
2 Operating Instructions............................................................................................ 2-1Cougar Display ........................................................................................................................ 2-2Cougar Keypad........................................................................................................................ 2-3Powerup Sequence .................................................................................................................. 2-5FUNCTION Key Operations........................................................................................................ 2-6MEMORY Key Operations .......................................................................................................... 2-8
Commodity Registers......................................................................................................................... 2-8Permanent Registers........................................................................................................................ 2-10
Operating Modes ................................................................................................................... 2-12Inbound/Outbound Weighing............................................................................................................ 2-12Permanent Stored Tare Weight Registers............................................................................................. 2-15Quick Print ..................................................................................................................................... 2-16
Memory Reports .................................................................................................................... 2-18
3 Appendices........................................................................................................... 3-1Appendix 1: Basic Weighing Concepts....................................................................................... 3-1
Zero ................................................................................................................................................ 3-1Tare................................................................................................................................................. 3-1Sections ........................................................................................................................................... 3-2Setpoints.......................................................................................................................................... 3-2Inbound/Outbound Weighing.............................................................................................................. 3-2Net Sign Correction ........................................................................................................................... 3-3One-Pass Weighing........................................................................................................................... 3-3
Appendix 2: Autorange Operation.............................................................................................. 3-4
4 Glossary ............................................................................................................... 4-1
Chapter 1: IntroductionModel Identification
(10/99) 1-1
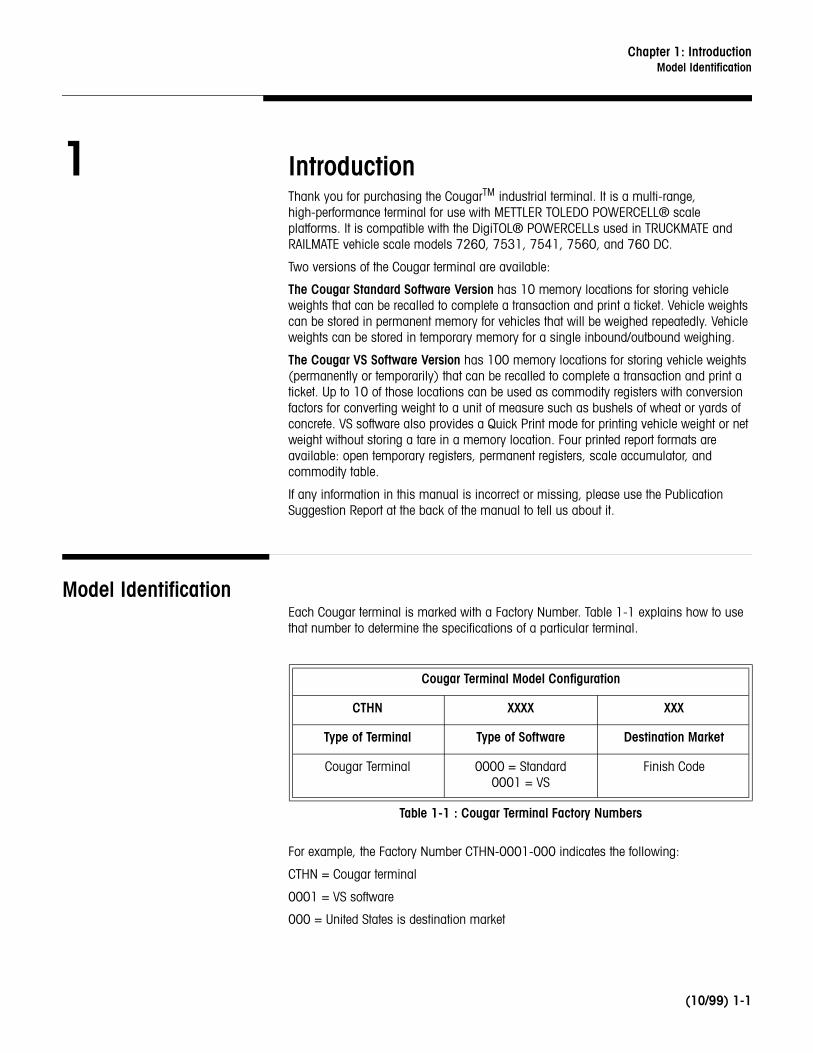
1 IntroductionThank you for purchasing the CougarTM industrial terminal. It is a multi-range, high-performance terminal for use with METTLER TOLEDO POWERCELL® scale platforms. It is compatible with the DigiTOL® POWERCELLs used in TRUCKMATE and RAILMATE vehicle scale models 7260, 7531, 7541, 7560, and 760 DC.
Two versions of the Cougar terminal are available:
The Cougar Standard Software Version has 10 memory locations for storing vehicle weights that can be recalled to complete a transaction and print a ticket. Vehicle weights can be stored in permanent memory for vehicles that will be weighed repeatedly. Vehicle weights can be stored in temporary memory for a single inbound/outbound weighing.
The Cougar VS Software Version has 100 memory locations for storing vehicle weights (permanently or temporarily) that can be recalled to complete a transaction and print a ticket. Up to 10 of those locations can be used as commodity registers with conversion factors for converting weight to a unit of measure such as bushels of wheat or yards of concrete. VS software also provides a Quick Print mode for printing vehicle weight or net weight without storing a tare in a memory location. Four printed report formats are available: open temporary registers, permanent registers, scale accumulator, and commodity table.
If any information in this manual is incorrect or missing, please use the Publication Suggestion Report at the back of the manual to tell us about it.
Model IdentificationEach Cougar terminal is marked with a Factory Number. Table 1-1 explains how to use that number to determine the specifications of a particular terminal.
Table 1-1 : Cougar Terminal Factory Numbers
For example, the Factory Number CTHN-0001-000 indicates the following:
CTHN = Cougar terminal
0001 = VS software
000 = United States is destination market
Cougar Terminal Model Configuration
CTHN XXXX XXX
Type of Terminal Type of Software Destination Market
Cougar Terminal 0000 = Standard0001 = VS
Finish Code
Mettler Toledo Cougar VS User’s Guide
1-2 (10/99)
SpecificationsThe Cougar conforms to the following specifications.
Physical DimensionsThe Cougar terminal (excluding the mounting bracket) measures
• 10.00 inches (25.4 cm) wide x 7.00 inches (17.78 cm) high• 3.22 inches (8.18 cm) deepSee Figure 1-1 for mounting dimensions.
Chapter 1: IntroductionSpecifications
(10/99) 1-3
Figure 1-1 : Cougar Terminal Dimensions (Dimensions shown are in inches)
Mettler Toledo Cougar VS User’s Guide
1-4 (10/99)
Power Requirements
The Cougar terminal uses an externally mounted, universal line-switching power supply. It accepts an IEC modular line cord for worldwide operation. The terminal operates at 90 to 265 VAC with a line frequency of 47 to 63 Hz. Power consumption is 12 watts maximum.
The integrity of the power ground is important both for safety and for dependable operation of the Cougar and its associated scale bases. A poor ground can result in an unsafe condition if an electrical short develops in the equipment. A good ground connection is needed to minimize extraneous electrical noise pulses. It is important that equipment does not share power lines with noise-generating equipment such as heavy load switching, motor starter circuits, RF thermal heaters, and inductive loads.
To confirm ground integrity, a commercial branch circuit analyzer like an ICE Model SureTest ST-1D (or equivalent) is recommended. This instrument uses a high-amperage pulse to check ground resistance. It measures the voltage from the neutral wire to the ground connection and will provide an assessment of the line loading. Instructions with the instrument give guidelines about limits that ensure good connections. Visually inspect the installation and question the user to get information about equipment sharing the power line.
If adverse power conditions exist, a dedicated power line or circuit might be required.
Controller PCBThe Cougar terminal’s controller printed circuit board (PCB) has a POWERCELL interface that can support up to 24 load cells. Supply voltage for the load cells is 24 VDC.
The printer serial port can be either RS-232 or 20 mA current loop active transmit.
The computer serial port can be either RS-232 or RS-422. Both serial ports are available simultaneously for transmitting; however, only one can receive data.
Connections to the controller PCB are made using removable terminal strips. The wire size for these terminal strips ranges from 23 to 16 AWG.
The controller PCB stores setup parameters in a battery-backed RAM. Scale calibration and other metrological data are stored in a removable EEPROM.
Display and KeyboardThe Cougar terminal has a vacuum fluorescent display that shows weighing data, setup information, and error messages. The display includes seven alphanumeric characters, each measuring 0.55 inch (12.7 mm) high. Cursors below these characters light up to indicate which of the legends printed on the keyboard overlay are currently active.
WARNINGFOR CONTINUED PROTECTION AGAINST SHOCK HAZARD, CONNECT TO PROPERLY GROUNDED OUTLET ONLY. DO NOT REMOVE THE GROUND PRONG.
Chapter 1: IntroductionStandards Compliance
(10/99) 1-5
The terminal’s 20-key keyboard is used to enter data and commands. The keyboard consists of a flat membrane switch covered with a domed polyester overlay. The lens is made of polyester and hardcoated to resist damage.
Temperature and Humidity
The Cougar can be operated at temperatures ranging from 14° to 113° F (-10° to 45° C) at 10 to 95% relative humidity, noncondensing.
It can be stored at temperatures ranging from -40° to 158° F (-40° to 70° C) at 10 to 95% relative humidity, noncondensing.
Environmental ProtectionThe Cougar is designed to meet NEMA 4X (IP65) requirements.
Hazardous AreasThe Cougar is not intrinsically safe and must not be operated in areas classified as Hazardous by the National Electrical Code (NEC) because of the combustible or explosive atmospheres in those areas. Contact your authorized METTLER TOLEDO representative for information about hazardous applications.
Standards Compliance
The following compliance standards apply to the Cougar industrial terminal.
UL and cUL ListingThe Cougar terminal complies with UL 1950.
WARNINGThe Cougar terminal IS NOT intrinsically safe. DO NOT use in areas classified as Hazardous by the National Electrical Code (NEC) because of combustible or explosive atmospheres.
Mettler Toledo Cougar VS User’s Guide
1-6 (10/99)
CE ConformityThe Cougar terminal conforms to the following European Union regulations:
• EN61010 Safety• 73/23/EU Low Voltage
Weights and Measures Approval (U.S.)
The Cougar terminal meets or exceeds requirements for Class III or IIIL devices. Certificate of Conformance number 88-259 was issued under the National Type Evaluation Program of the National Conference on Weights and Measures for approval.
Conducted and Radiated Emissions (RFI)
The Cougar terminal meets or exceeds FCC docket 80-284 for conducted and radiated emissions requirements as a Class A digital device.
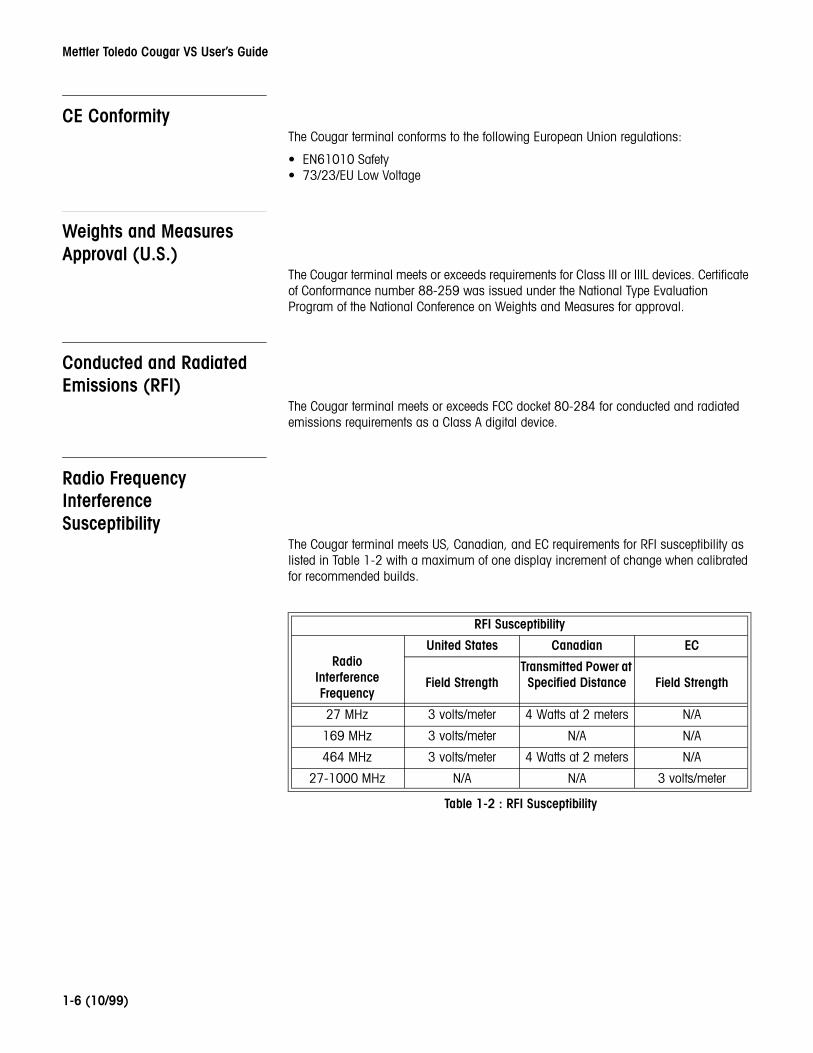
Radio Frequency Interference Susceptibility
The Cougar terminal meets US, Canadian, and EC requirements for RFI susceptibility as listed in Table 1-2 with a maximum of one display increment of change when calibrated for recommended builds.
Table 1-2 : RFI Susceptibility
RFI Susceptibility
RadioInterferenceFrequency
United States Canadian EC
Field StrengthTransmitted Power at Specified Distance Field Strength
27 MHz 3 volts/meter 4 Watts at 2 meters N/A
169 MHz 3 volts/meter N/A N/A
464 MHz 3 volts/meter 4 Watts at 2 meters N/A
27-1000 MHz N/A N/A 3 volts/meter
Chapter 2: Operating Instructions
(10/99) 2-1
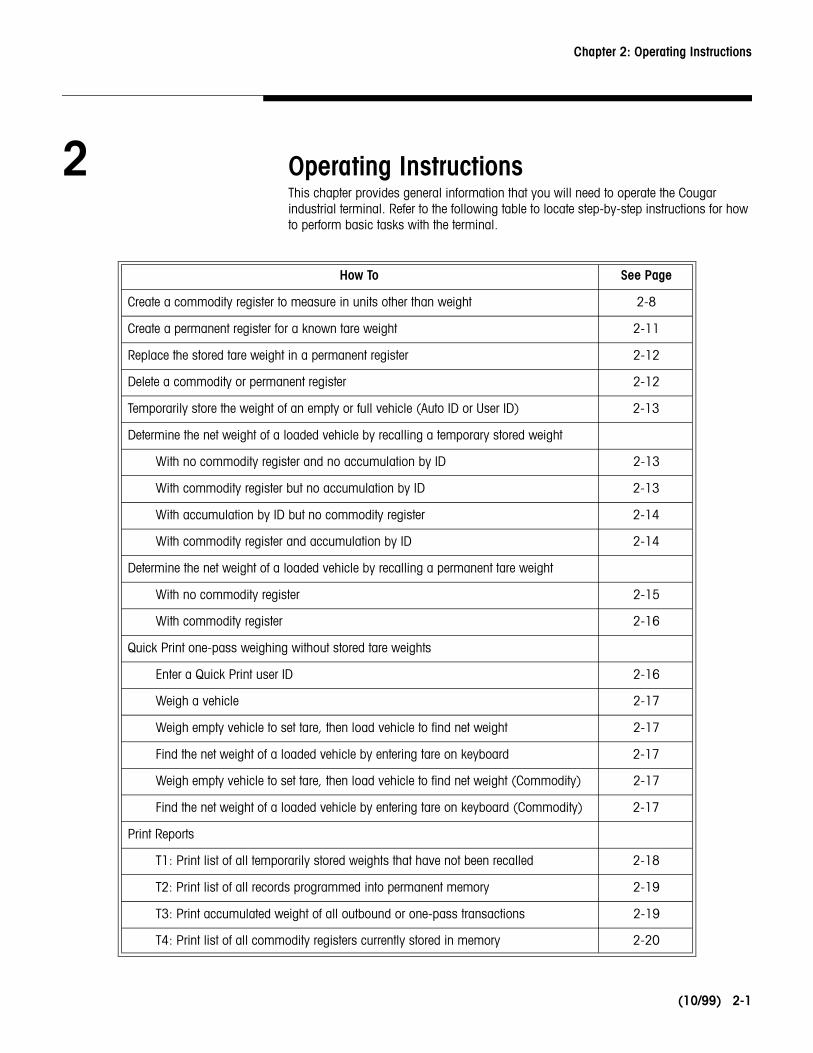
2 Operating InstructionsThis chapter provides general information that you will need to operate the Cougar industrial terminal. Refer to the following table to locate step-by-step instructions for how to perform basic tasks with the terminal.
How To See Page
Create a commodity register to measure in units other than weight 2-8
Create a permanent register for a known tare weight 2-11
Replace the stored tare weight in a permanent register 2-12
Delete a commodity or permanent register 2-12
Temporarily store the weight of an empty or full vehicle (Auto ID or User ID) 2-13
Determine the net weight of a loaded vehicle by recalling a temporary stored weight
With no commodity register and no accumulation by ID 2-13
With commodity register but no accumulation by ID 2-13
With accumulation by ID but no commodity register 2-14
With commodity register and accumulation by ID 2-14
Determine the net weight of a loaded vehicle by recalling a permanent tare weight
With no commodity register 2-15
With commodity register 2-16
Quick Print one-pass weighing without stored tare weights
Enter a Quick Print user ID 2-16
Weigh a vehicle 2-17
Weigh empty vehicle to set tare, then load vehicle to find net weight 2-17
Find the net weight of a loaded vehicle by entering tare on keyboard 2-17
Weigh empty vehicle to set tare, then load vehicle to find net weight (Commodity) 2-17
Find the net weight of a loaded vehicle by entering tare on keyboard (Commodity) 2-17
Print Reports
T1: Print list of all temporarily stored weights that have not been recalled 2-18
T2: Print list of all records programmed into permanent memory 2-19
T3: Print accumulated weight of all outbound or one-pass transactions 2-19
T4: Print list of all commodity registers currently stored in memory 2-20

Mettler Toledo Cougar VS User’s Guide
2-2 (10/99)
The front panel of the Cougar terminal is shown in Figure 2-1.
Figure 2-1 : Cougar Terminal Front Panel
Cougar DisplayThe Cougar terminal has a seven-segment display where scale data and operational messages are presented. The display is pictured in Figure 2-2.
Figure 2-2 : Cougar Terminal Display
The display uses both letters and numbers. It shows the weight on the scale unless the terminal is in setup mode. Error messages are displayed when errors occur. The display includes cursors that point to the legends printed on the keyboard overlay directly below
F O lb kg G NET PT
Chapter 2: Operating InstructionsCougar Keypad
(10/99) 2-3
the display area. Cursors are used to indicate which of those legends are currently active. Cougar terminals feature the following legends:
• Function (F)The Function cursor lights up when the FUNCTION key has been pressed.
• Zero (→→→→0←←←←)The Zero cursor lights up to indicate that the weight on the scale is within ± 0.25 increments of gross zero and that the Cougar terminal is in the gross weight mode. If the net zero cursor is enabled during setup, the zero cursor indicates when the weight on the weighbridge is within ± 0.25 increments of gross or net zero.
• Pounds (lb)The lb cursor lights up to indicate that pound weight units are being used and that the weight on the scale is stable.
• Kilograms (kg)The kg cursor lights up to indicate that kilogram weight units are being used and that the weight on the scale is stable.
• Gross (G)The Gross cursor lights up to indicate that a gross weight value is being displayed.
• Net (NET)The Net cursor lights up to indicate that a tare has been entered and that a net weight value is being displayed.
• Preset Tare (PT)The Preset Tare cursor lights up to indicate that a preset tare weight value is being displayed. It also lights up when displaying the stored tare value of a permanent register.
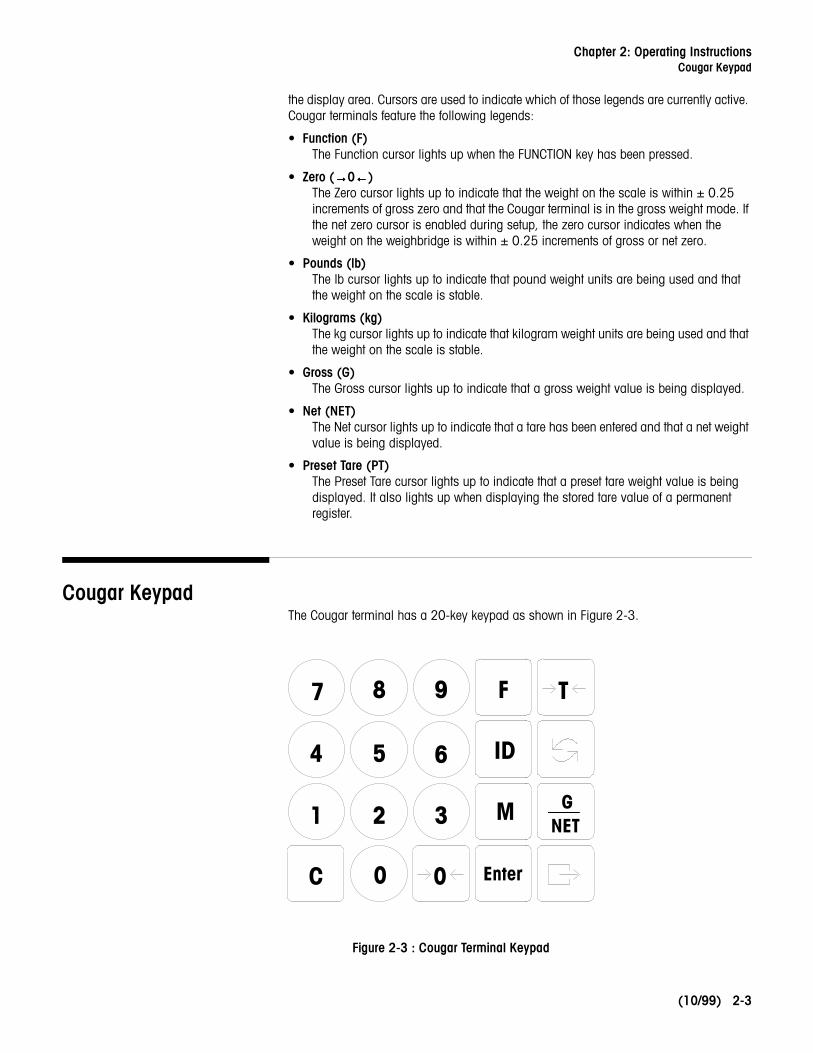
Cougar KeypadThe Cougar terminal has a 20-key keypad as shown in Figure 2-3.
Figure 2-3 : Cougar Terminal Keypad
C Enter
ID
0
T
M
F987
654
0
31 2 GNET
Mettler Toledo Cougar VS User’s Guide
2-4 (10/99)
The keypad consists of numeric keys 0 to 9, decimal point, space, and eight function keys. The keys perform the following functions:
• Numeric Keys (0-9)Numeric keys are used to enter numeric data for tare, consecutive numbering, time, date, setpoints, etc.
• Function (F)The FUNCTION key is used in conjunction with numeric keys to access functions for consecutive numbering, time, date, memory registers, and setpoints 1 to 4.
• Tare (→→→→T←←←←)The TARE key is used to perform an autotare (the weight on the scale must be stable and not at gross zero). The TARE key is also used to terminate a keyboard (numeric) tare entry. The least significant digit of a keyboard tare entry must correspond to the displayed increment size in order for a tare value to be accepted. If tare interlock is enabled during setup, a keyboard tare can be entered only at gross zero.
• Identification Number (ID)The ID key is used for entering and recalling the scale’s identification number. It is also used to begin an inbound or outbound transaction.
• lb/kg Switching ( )The lb/kg switching key toggles between pound and kilogram weight units if lb/kg switching is enabled during setup. The increment size and decimal point are adjusted to the nearest equivalent when switching between units. For example, a 1-lb increment size changes to 0.5 kg, a 2-lb increment size changes to 1 kg, etc.
• Memory (M)The MEMORY key is used to edit permanent scale memories in the terminal.
• Gross/Net (G/NET)The GROSS/NET key is used to toggle between gross and net weight display. This key has no effect if the terminal is in the gross weight mode.
• Clear (C)The CLEAR key is used to clear data entries from the display so that new data can be entered. It is also used to clear a tare weight when in the net weight mode.
• Zero (→→→→0←←←←)The ZERO key is used to zero the scale when it is within the zero capture range selected during setup. In setup, the ZERO key is used to back up to the previous step.
• EnterThe ENTER key is used to terminate data entries and to move through the setup mode without making changes. It is also used to terminate an inbound or outbound transaction.
• Print ( )The PRINT key is used to request a demand mode output or Quick Print ticket output. If the weight on the scale is unstable when PRINT is pressed, the print request is saved and data will be output when the weight becomes stable. The PRINT key is also used to print setup parameters when the terminal is in setup mode.
Throughout this manual we make a distinction between key names and commands. Key names such as ENTER are presented in capital letters, and commands such as “select” are presented in lower case. For example:
“Press SELECT...” means to press the SELECT key on the key pad.
“Select an option...” means to use the SELECT key to display an item, then press ENTER.
Chapter 2: Operating InstructionsPowerup Sequence
(10/99) 2-5
Powerup SequenceThe Cougar terminal executes a series of self tests when it is turned on. These tests confirm that the terminal is operating properly. The powerup sequence is as follows:
1. The software part number is displayed briefly.
2. The revision level number of the software is displayed briefly.
3. All segments of the seven display digits are lit briefly.
4. All cursors are lit briefly.
5. All decimal points are lit briefly.
6. The terminal may display [ E E E ] or [ -E E E ] while attempting to capture zero. Once zero has been captured, the terminal will display weight. If autozero capture and tare interlock are disabled, the terminal will display the current weight without attempting to capture zero. After powerup, zero must always be captured before the terminal will print demand mode data or before lb/kg switching.
Mettler Toledo Cougar VS User’s Guide
2-6 (10/99)
FUNCTION Key Operations
Function mode allows you access to several commonly used non-weighing parameters without having to open the enclosure and insert the calibration jumper. When you enter function mode, the terminal automatically returns to weighing mode if no key is pressed within five seconds. Cougar terminals support the following FUNCTION key operations:
Manual Shift AdjustThe FUNCTION-0 key is used only when manual shift adjust is enabled. Manual shift adjust should be performed only by a qualified service technician.
1. Press FUNCTION, then press 0. Refer to the Cougar Service Manual for instructions on how to perform a manual shift adjust.
Setpoints 1 to 4These Function keys let you display and change setpoint data. You can use these keys only if the setpoints were enabled during setup.
1. Press FUNCTION, then press the number of the setpoint to be displayed (1 to 4).
2. The current setpoint value will be displayed for five seconds. Enter a new setpoint value while the current value is displayed. Press ENTER to accept the new setpoint value (or the current value if you made no changes) and return to the weight display mode.
The least significant digit of the setpoint value that is entered must match the displayed increment size selected in setup; otherwise the terminal will ignore the setpoint entry.
Consecutive NumberingThe FUNCTION-5 key lets you display and change the consecutive numbering counter.
1. Press FUNCTION, then press 5.
2. The current consecutive numbering value will be displayed for five seconds. Enter a new consecutive numbering value (up to six digits) while the current value is displayed. Press ENTER to accept the new consecutive numbering value (or the current value if you made no changes) and return to the weight display mode.
TimeThe FUNCTION-6 key lets you display and change the time.
1. Press FUNCTION, then press 6.
2. The current time will be displayed for five seconds. Enter a new time while the current time is displayed (time is entered in the format selected during setup). Press ENTER to accept the new time (or the current time if you made no changes) and return to the weight display mode.
DateThe FUNCTION-7 key lets you display and change the date.
1. Press FUNCTION, then press 7.
2. The current date will be displayed for five seconds. Enter a new date while the current date is displayed (date is entered in the format selected during setup). Press ENTER
Chapter 2: Operating InstructionsFUNCTION Key Operations
(10/99) 2-7
to accept the new date (or the current date if you made no changes) and return to the weight display mode.
Display Available MemoryThe FUNCTION-8 key lets you display the number of memory registers that are available. The terminal is capable of storing 100 transactions.
1. Press FUNCTION, then press 8.
2. The terminal will display the number of unused memory registers for five seconds.
Password Access to SetupThe FUNCTION-9 key allows access to several data output setup steps without having to open the terminal’s enclosure and use the W1 (CAL) jumper. FUNCTION-9 allows access to the following setup steps:
Alphanumeric Field 1 (for printing) [46]
Alphanumeric Field 2 (for printing) [47]
Alphanumeric Field 3 (for printing) [48]
Alphanumeric Field 4 (for printing) [49]
Clear ID after Print [71]
Time/Date Format [73]
Line Feeds after Quick Print [75]
Line Feeds after Inbound Ticket [77]
Line Feeds after Outbound Ticket [79]
The terminal can be programmed so that the FUNCTION-9 key also provides access to the following setup steps:
Stored Tare Memory [37]
Conversion Factor [38]
Conversion Factor Description [39]
Quick Print Format [74]
Inbound Ticket Format [76]
Outbound Ticket Format [78]
1. Press FUNCTION, then press 9.
2. At the [9 ----] prompt, use the numeric key to enter the four-digit password.
3. At the [--] prompt, enter the two-digit number of the desired setup step. The FUNCTION-9 key does not allow access to a group of setup steps. You must enter the number of a specific setup step at the [--] prompt.
Tare RecallThis Function key is used to display the current tare value.
• Press FUNCTION, then press TARE. The current tare value will be displayed but cannot be changed.
Mettler Toledo Cougar VS User’s Guide
2-8 (10/99)
MEMORY Key Operations
Cougar VS terminals have 100 memory addresses that can be used as permanent registers for permanent stored tare weights, for accumulating weight data by ID, or for commodity registers. To create or modify permanent registers, permanent storage of tare weights and the MEMORY key must be enabled during setup.
A permanent stored weight can be modified manually by entering the tare weight from the keyboard or by saving the current weight on the scale into the permanent stored tare.
Each permanent register that is created reduces by one the number of temporary registers that is available for storing inbound vehicle weights. A permanent register can be used to store an inbound weight if enabled during setup, if the permanent register has a stored weight of zero, and if the inbound weight is stored using the ID of the permanent register.
Commodity and permanent registers can be created by using either the memory address (00 to 99) or the user ID (100 to 999,999). If a register is created using the user ID, the terminal will assign the register to the next available memory address. The operator can access permanent registers in the weigh mode either by the memory address or the user ID associated with that permanent register.
Commodity RegistersA Cougar VS terminal can have up to ten commodity registers. Each commodity register provides a conversion factor for converting weight to user-defined units of measurement. The commodity registers also provide a converted weight accumulator, a nine-character description field, and a number of loads consecutive numbering counter.
The commodity registers can be used with Quick Print if in the net weight mode, with temporary storage inbound/outbound weighing, or with permanent stored tare one-pass weighing.
Creating/Editing Commodity Registers1. Press the MEMORY key to create or edit a commodity register.
2. At the [ LOC ] prompt, enter the user ID (100 to 999,999) or memory address (00 to 99) that you wish to configure as a commodity register, then press ENTER.
3. At the [ id6 ] prompt, press ENTER to begin entering the user ID.
4. If you created a commodity by memory address and wish to be able to access the commodity by means of a user ID, enter the user ID (100 to 999,999) then press ENTER. The terminal will not accept a user ID that is being used by another commodity or permanent register. If you do not want user ID access to this commodity, press CLEAR or ENTER when the display shows all zeroes.
If you are editing an existing commodity, the current user ID is now displayed. Press ENTER to accept the displayed ID or enter a new ID (100 to 999,999). The terminal will not accept a user ID that is being used with another commodity or permanent register. If you do not want user ID access to this commodity, press CLEAR.
5. At the [Cd ] prompt, press the 1 key to create a commodity register. This prompt is not displayed if you are editing an existing commodity register or if the ten commodities permitted have already been created.

Chapter 2: Operating InstructionsMEMORY Key Operations
(10/99) 2-9
6. The [Cd FAC ] prompt is displayed to indicate that the following field is for the commodity conversion factor. The conversion factor is used for converting weight to units that are not supported by the terminal, for example: bushels of wheat or corn, yards of concrete, etc. The converted value is the weight reading multiplied by the conversion factor.
7. At the [1000000] prompt, press ENTER to accept the commodity conversion factor that is displayed or press CLEAR to begin entering a new conversion factor. If you accept the existing conversion factor, the display will advance to Step 10.
8. At the [------.-] prompt, select the number of digits to the right of the decimal point in the conversion factor value. Press the 0 key to move the decimal point one position to the left. When the desired decimal point is displayed, press ENTER.
9. At the [ . ] prompt, use the numeric keys to enter the conversion factor value. Press ENTER to accept the displayed value.
10. At the [ 2] prompt, enter the number of digits that you want to be printed to the right of the decimal point for the converted value. Valid selections are from zero to six.
11. The [ ACC ] prompt indicates that the following field is the accumulated weight data. Press ENTER to advance to the next prompt.
12. The [ 0] prompt shows the current starting value for the accumulator. Press ENTER to accept the accumulated weight that is displayed or enter a new starting value.
13. At the [ ACC - ] prompt, press the 0 key or the ENTER key to accumulate positive weight. Press the 1 key to accumulate negative weight.
14. The [ LOAd] prompt indicates that the following field is the number of loads counter. Press ENTER to advance to the next prompt.
15. At the [ 0] prompt, press ENTER to accept the displayed starting value for the number of loads counter or enter a new starting value.
16. The [Cd dESC] prompt indicates that the following fields contain the conversion factor description.
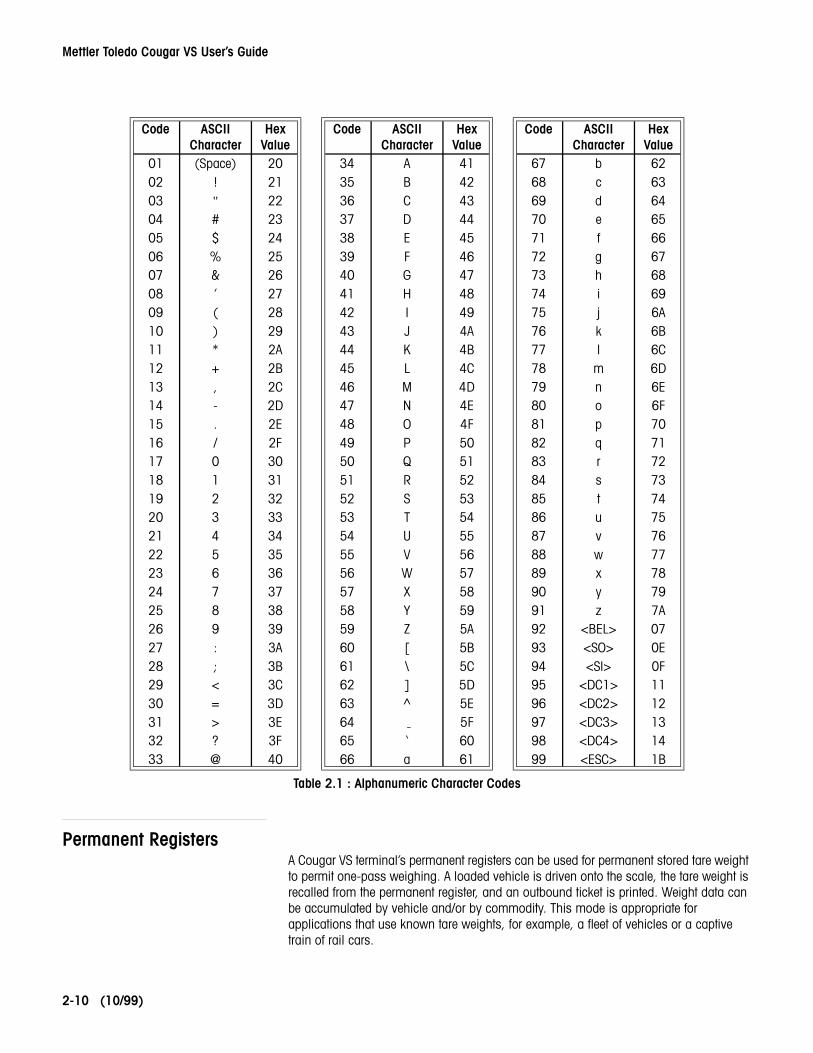
17. The first three characters of the conversion factor description are now displayed; if there is no existing description, the display will show [000000]. Press ENTER to accept the displayed values, or press CLEAR to erase the values and enter new character data. The conversion factor can contain up to nine ASCII characters selected from Table 2-1.
Repeat this procedure for the second and third sets of characters. Enter 00 for each position in a character set after a description has been completed. For example, the characters that should be entered for the description “CORN” are [364851] [470000] [000000]. When the third set of characters has been entered, the terminal returns to its normal weighing mode.
Mettler Toledo Cougar VS User’s Guide
2-10 (10/99)
Table 2.1 : Alphanumeric Character Codes
Permanent RegistersA Cougar VS terminal’s permanent registers can be used for permanent stored tare weight to permit one-pass weighing. A loaded vehicle is driven onto the scale, the tare weight is recalled from the permanent register, and an outbound ticket is printed. Weight data can be accumulated by vehicle and/or by commodity. This mode is appropriate for applications that use known tare weights, for example, a fleet of vehicles or a captive train of rail cars.
Code ASCIICharacter
Hex Value
Code ASCIICharacter
Hex Value
Code ASCIICharacter
Hex Value
01 (Space) 20 34 A 41 67 b 6202 ! 21 35 B 42 68 c 6303 " 22 36 C 43 69 d 6404 # 23 37 D 44 70 e 6505 $ 24 38 E 45 71 f 6606 % 25 39 F 46 72 g 6707 & 26 40 G 47 73 h 6808 ’ 27 41 H 48 74 i 6909 ( 28 42 I 49 75 j 6A10 ) 29 43 J 4A 76 k 6B11 * 2A 44 K 4B 77 l 6C12 + 2B 45 L 4C 78 m 6D13 , 2C 46 M 4D 79 n 6E14 - 2D 47 N 4E 80 o 6F15 . 2E 48 O 4F 81 p 7016 / 2F 49 P 50 82 q 7117 0 30 50 Q 51 83 r 7218 1 31 51 R 52 84 s 7319 2 32 52 S 53 85 t 7420 3 33 53 T 54 86 u 7521 4 34 54 U 55 87 v 7622 5 35 55 V 56 88 w 7723 6 36 56 W 57 89 x 7824 7 37 57 X 58 90 y 7925 8 38 58 Y 59 91 z 7A26 9 39 59 Z 5A 92 <BEL> 0727 : 3A 60 [ 5B 93 <SO> 0E28 ; 3B 61 \ 5C 94 <SI> 0F29 < 3C 62 ] 5D 95 <DC1> 1130 = 3D 63 ^ 5E 96 <DC2> 1231 > 3E 64 5F 97 <DC3> 1332 ? 3F 65 ‘ 60 98 <DC4> 1433 @ 40 66 a 61 99 <ESC> 1B
Chapter 2: Operating InstructionsMEMORY Key Operations
(10/99) 2-11
An existing permanent stored tare weight can be modified manually by entering the tare weight from the keyboard or by saving the current weight on the scale into the permanent stored tare.
Permanent registers that are created with a stored tare weight of zero can be used for accumulation by ID. This mode permits the operator to combine inbound/outbound weighing by using temporary memory with accumulation of weight data into a permanent register.
Creating/Editing Permanent Registers1. Press the MEMORY key to create or edit a permanent register.
2. At the [ LOC ] prompt, enter the user ID (100 to 999,999) or memory address (00 to 99) that you wish to configure as a permanent register, then press ENTER.
3. At the [ id6 ] prompt, press ENTER to begin entering the user ID.
4. If you created a permanent register by memory address and wish to be able to access the register by means of a user ID, enter the user ID (100 to 999,999) then press ENTER. The terminal will not accept a user ID that is being used by another commodity or permanent register. If you do not want user ID access to this permanent register, press CLEAR or ENTER when the display shows all zeroes.
If you are editing an existing register, the current user ID is now displayed. Press ENTER to accept the displayed ID or enter a new ID (100 to 999,999). The terminal will not accept a user ID that is being used with another commodity or permanent register. If you do not want user ID access to this register, press CLEAR.
5. At the [Cd ] prompt, press the 0 key to create a permanent register. This prompt is not displayed if you are editing an existing permanent register that has a stored tare weight or if the ten commodities permitted have already been created.
6. If you are creating a new permanent register, enter the empty (tare) weight of the vehicle at the [ 0] prompt, then press ENTER. If a tare weight of zero is entered, this register can be used to permit accumulation by ID with inbound/outbound weighing.
If you are editing an existing permanent register, the current tare weight is displayed. Press ENTER to accept the displayed weight or enter a new tare weight.
7. The [ ACC ] prompt indicates that the following field is the accumulated weight data. Press ENTER to advance to the next prompt.
8. If you are creating a new permanent register, you can enter a starting value for the accumulator at the [ 0] prompt. Press ENTER to accept the displayed value or use the numeric keys to enter a new value.
If you are editing an existing permanent register, the current accumulated weight is displayed. Press ENTER to accept the displayed value or enter a new value.
9. At the [ ACC - ] prompt, press the 0 key or the ENTER key to accumulate positive weight. Press the 1 key to accumulate negative weight.
10. The [ LOAd] prompt indicates that the following field is the number of loads counter. Press ENTER to advance to the next prompt.
11. If you are creating a new permanent register, you can enter a starting value for the number of loads counter at the [ 0] prompt. Press ENTER to accept the displayed value and return to normal weighing mode.
If you are editing an existing permanent register, the current number of loads is displayed. Enter a new value if desired. Press ENTER to accept the displayed value and return to normal weighing mode.
Mettler Toledo Cougar VS User’s Guide
2-12 (10/99)
Replacing the Stored Tare Weight in a Permanent Register1. Press the MEMORY key to replace the stored tare weight value in a permanent
register.
2. At the [ LOC ] prompt, enter the user ID (100 to 999,999) of the permanent register that you wish to update.
3. Press TARE to store the current weight on the scale into the permanent register tare field of memory address [ id XX]. Note that the weight on the scale must be stable to store tare.
Deleting an Existing Commodity or Permanent Register1. Press the MEMORY key to delete an existing commodity or permanent register.
2. At the [ LOC ] prompt, enter the user ID (100 to 999,999) or memory address (00 to 99) that you wish to delete, then press ENTER.
3. At the [ id6 ] prompt, press CLEAR.
4. At the [ del ] prompt, press the 1 key to delete the register or press the 0 key to retain the register. The terminal then returns to normal weighing mode.
Operating ModesCougar VS terminals provide three modes of weighing operation: inbound/outbound weighing with temporary registers to store the inbound weight, permanent stored tare weights for one-pass weighing, and Quick Print mode.
Inbound/Outbound Weighing
The inbound/outbound weighing mode is most commonly used with random, over-the-road haulers that are delivering or picking up product. The vehicle is weighed twice, once inbound and once outbound. The inbound weight is stored in a temporary register. When the outbound vehicle is weighed, the stored inbound weight is recalled from memory and used to calculate the net weight of the contents of the vehicle.
Net sign correction permits a temporary memory register to be used for both shipping and receiving. If net sign correction is enabled during setup, the stored inbound weight can be either the full or the empty weight of the vehicle. When the inbound weight is recalled from memory, the Cougar terminal will automatically select the larger of the two weights (the current weight on the scale or the inbound weight recalled from memory) as the gross weight. The smaller weight becomes the tare weight and the difference between the two is a positive net weight.
An inbound weight can be stored in a temporary register using either auto ID or user ID. In the auto ID mode, the terminal selects the next available temporary register and the operator must use the two-digit memory address of that register to recall the inbound weight. In the user ID mode, the operator enters a user ID (100 to 999,999) to select the temporary register in which the vehicle weight is stored. Either the user ID or the memory address assigned by the terminal can be used to recall the stored inbound weight.
The type of printer connected to the terminal will normally determine if both inbound and outbound ticket formats are printed or if only the outbound ticket format is printed. If the
Chapter 2: Operating InstructionsOperating Modes
(10/99) 2-13
Model 8806 ticket printer is used, then typically both the inbound and outbound ticket formats are printed. If the Model 8845 ticket printer is used, then typically only an outbound ticket format is printed.
Weight data can be converted to a user-defined unit if a scale conversion factor was programmed during setup. Weight data can also be accumulated by ID into any permanent register that was created with a stored tare weight of zero. Both the memory address and user ID of the permanent register can be printed on the outbound ticket.
If commodity registers are used, the operator is given an opportunity to select a commodity register to accumulate weight data into. The commodity description, memory address, user ID, and converted weight data can be printed on the outbound ticket.
Inbound: Store Inbound Weight with Auto ID Assignment1. Drive the inbound vehicle onto the scale, then press the ID key.
2. At the [ id ] prompt, press ENTER.
3. The inbound weight is stored in the memory address XX (00 to 99) displayed in the [ id2 XX] prompt.
4. The [ -P- ] prompt is displayed while the inbound ticket is printed using the format entered during setup. The gross weight field is printed with a (1) after it to indicate that it is the value stored in memory, if selected to print.
Inbound: Store Inbound Weight with User ID1. Drive the inbound vehicle onto the scale, then press the ID key.
2. At the [ id ] prompt, enter the vehicle number (100 to 999,999) as a user ID, then press ENTER.
3. The inbound weight is stored in the memory address XX (00 to 99) displayed in the [ id2 XX] prompt.
4. The [ -P- ] prompt is displayed while the inbound ticket is printed using the format entered during setup. The gross weight field is printed with a (1) after it to indicate that it is the value stored in memory, if selected to print.
Outbound: Recall Inbound Weight (No Commodity, No Accumulation by ID)This procedure assumes that no commodity registers have been created.
1. Drive the outbound vehicle onto the scale, then press the ID key.
2. At the [ id ] prompt, enter the memory address (00 to 99) or the user ID (100 to 999,999) under which the inbound weight was stored, then press ENTER.
3. The [ -P- ] prompt is displayed while the outbound ticket is printed using the format selected in setup. The weight field recalled from memory is printed with a (1) after it.
If accumulation is enabled, the scale accumulator and number of loads counter (T-3 report) is updated.
Outbound: Recall Inbound Weight (Use Commodity, No Accumulation by ID)This procedure assumes that a commodity register has been created.
1. Drive the outbound vehicle onto the scale, then press the ID key.
2. At the [ id ] prompt, enter the memory address (00 to 99) or the user ID (100 to 999,999) under which the inbound weight was stored, then press ENTER.
Mettler Toledo Cougar VS User’s Guide
2-14 (10/99)
3. If you wish to use a commodity register for this transaction, enter the memory address (00 to 99) or user ID (100 to 999,999) at the [Cd ] prompt. The memory address or user ID must point to commodity register, or the entry will be ignored. Press ENTER to accept the entry.
If you do not wish to use a commodity register for this transaction, press ENTER at the [Cd ] prompt.
4. The [ -P- ] prompt is displayed while the outbound ticket is printed using the format entered during setup. The weight field recalled from memory is printed with a (1) after it. Commodity description and converted weight values can be printed on the outbound ticket.
If accumulation is enabled, the scale accumulator and number of loads counter (T-3 report) is updated. If accumulation is enabled, converted weight data is accumulated and the number of loads counter is incremented in the commodity register selected at Step 3.
Outbound: Recall Inbound Weight (No Commodity, Accumulation by ID)This procedure assumes that accumulation was enabled during setup, a permanent register with a stored tare of zero has been created, and no commodity registers have been created.
1. Drive the outbound vehicle onto the scale, then press the ID key.
2. At the [ id ] prompt, enter the memory address (00 to 99) or the user ID (100 to 999,999) under which the inbound weight was stored, then press ENTER.
3. Press TARE to recall the stored inbound weight from memory and display the net weight.
4. When the net weight is displayed, press the ID key.
5. At the [ id ] prompt, enter the memory address (00 to 99) or the user ID (100 to 999,999) of the permanent register into which weight data is to be accumulated. The permanent register must have a stored tare value of zero, or an [E42] error code will be displayed. Press ENTER to accept the entry.
6. The [ -P- ] prompt is displayed while the outbound ticket is printed using the format entered during setup. The weight field recalled from memory is printed with a (1) after it.
If accumulation is enabled, the scale accumulator and number of loads counter (T-3 report) is updated. If accumulation is enabled, weight data is accumulated and the number of loads counter is incremented in the permanent register selected.
Outbound: Recall Inbound Weight (Use Commodity, Accumulate by ID)This procedure assumes that accumulation was enabled during setup [29 1], a permanent register with a stored tare of zero has been created, and a commodity register has been created.
1. Drive the outbound vehicle onto the scale, then press the ID key.
2. At the [ id ] prompt, enter the memory address (00 to 99) or the user ID (100 to 999,999) under which the inbound weight was stored, then press ENTER.
3. Press TARE to recall the stored inbound weight from memory and display the net weight.
4. When the net weight is displayed, press the ID key.
Chapter 2: Operating InstructionsOperating Modes
(10/99) 2-15
5. At the [ id ] prompt, enter the memory address (00 to 99) or the user ID (100 to 999,999) of the permanent register in which weight data is to be accumulated. The permanent register must have a stored tare value of zero, or an [E42] error code will be displayed. Press ENTER to accept the entry.
6. If you wish to use a commodity register for this transaction, enter the memory address (00 to 99) or user ID (100 to 999,999) at the [Cd ] prompt. The memory address or user ID must point to commodity register, or the entry will be ignored. Press ENTER to accept the entry.
If you do not wish to use a commodity register for this transaction, press ENTER at the [Cd ] prompt.
7. The [ -P- ] prompt is displayed while the outbound ticket is printed using the format entered during setup. The weight field recalled from memory is printed with a (1) after it. Commodity description and converted weight values can also be printed on the outbound ticket.
If accumulation is enabled, the scale accumulator and number of loads counter (T-3 report) is updated. If accumulation is enabled, weight data is accumulated and the number of loads counter is incremented in the permanent register selected.
Permanent Stored Tare Weight Registers
Permanent stored tare weight registers are normally used for a fleet of vehicles with known empty (tare) weights for which a fixed tare value can be used. The loaded vehicle is driven onto the scale, the tare weight is recalled from memory by ID, and an outbound ticket is printed.
Weight data can be converted to a user-defined unit if a scale conversion factor was programmed during setup. Weight data accumulation and the number of loads counter for the permanent memory register is updated when the stored tare weight is recalled from memory.
If commodity registers are used, the operator is given an opportunity to select a commodity register in which the weight data will be accumulated. The commodity description, memory address, user ID, and converted weight data can be printed on the outbound ticket.
Permanent Stored Tare Weights (No Commodity)This procedure assumes that no commodity registers have been created.
1. Drive the outbound vehicle onto the scale, then press the ID key.
2. At the [ id ] prompt, enter the memory address (00 to 99) or the user ID (100 to 999,999) of the permanent register in which the vehicle tare weight was stored, then press ENTER.
3. The [ -P- ] prompt is displayed while the outbound ticket is printed, using the format entered during setup. The weight field recalled from memory is printed with a (1) after it.
If accumulation is enabled, weight data is accumulated and the number of loads counter is incremented in the permanent register from which the tare weight was recalled. If accumulation is enabled, the number of loads counter is incremented and weight data is added to the scale accumulator.
Mettler Toledo Cougar VS User’s Guide
2-16 (10/99)
Permanent Stored Tare Weights (Use Commodity)This procedure assumes that a commodity register has been created.
1. Drive the outbound vehicle onto the scale, then press the ID key.
2. At the [ id ] prompt, enter the memory address (00 to 99) or the user ID (100 to 999,999) of the permanent register in which the vehicle tare weight was stored, then press ENTER.
3. If you wish to use a commodity register for this transaction, enter the memory address (00 to 99) or user ID (100 to 999,999) at the [Cd ] prompt. The memory address or user ID must point to commodity register, or the entry will be ignored. Press ENTER to accept the entry.
If you do not wish to use a commodity register for this transaction, press ENTER at the [Cd ] prompt.
4. The [ -P- ] prompt is displayed while the outbound ticket is printed using the format entered during setup. The weight field recalled from memory is printed with a (1) after it. Commodity description and converted weight values can be printed on the outbound ticket.
If accumulation is enabled, weight data is accumulated and the number of loads counter is incremented in the permanent register from which the tare weight was recalled. If accumulation is enabled, converted weight data is accumulated and the number of loads counter is incremented in the commodity register selected.
Quick PrintQuick Print does not use stored inbound weight or permanent stored tare weight registers. It provides a way to print a ticket without affecting the scale accumulation or number of loads consecutive numbering counter.
Quick Print can be performed with one-pass weighing where the known tare weight of the vehicle is entered using the keyboard. Quick Print weighing can also be used with pushbutton tare for filling applications. Net sign correction can also be used with Quick Print for both shipping and receiving operations.
The Quick Print mode adds a 12-digit ID field that can be printed on any of the three ticket formats: inbound, outbound, and Quick Print. The Quick Print ID is retained until cleared and can be used without having to reenter the ID each time. The Quick Print ID can also be configured to clear automatically after a Quick Print ticket format has been printed.
Quick Print can be combined with outbound ticket printing for permanent register accumulation by ID.
If a commodity register exists and the terminal is displaying net weight, the operator is given a chance to select a commodity register before printing the Quick Print ticket.
Enter a Quick Print User ID1. Press ENTER to enter a Quick Print user ID.
2. At the [ E] prompt, press the ID key.
3. Digits 1 through 6 [ 123456] of the current Quick Print ID are displayed for a few seconds, then digits 7 through 12 [ 789012] of the current Quick Print ID are displayed for a few seconds. Press ENTER to accept the current entry or enter a new Quick Print ID value while the current entry is displayed. If more than six digits of ID are entered, the display will scroll to the left as digits 7 through 12 are entered. If
Chapter 2: Operating InstructionsOperating Modes
(10/99) 2-17
more than five seconds pass without a keyboard entry, the terminal will abort the ID entry and return to normal weighing mode.
Quick Print (No Tare)1. Drive the vehicle onto the scale, then press the PRINT key.
2. The [ -P- ] prompt is displayed while the Quick Print ticket is printed using the format entered during setup.
Quick Print (Pushbutton Tare, No Commodity)This procedure assumes that no commodity registers have been created.
1. Drive the empty vehicle onto the scale, then press the TARE key.
2. With the terminal displaying net zero, load the vehicle.
3. Once the vehicle has been loaded, press the PRINT key.
4. The [ -P- ] prompt is displayed while the Quick Print ticket is printed using the format entered during setup.
Quick Print (Keyboard Entered Tare, No Commodity)This procedure assumes that no commodity registers have been created.
1. Drive the loaded vehicle onto the scale, then use the numeric keys to enter the known tare weight of the vehicle.
2. Press the TARE key. The net weight of the contents of the vehicle is displayed.
3. Press the PRINT key.
4. The [ -P- ] prompt is displayed while the Quick Print ticket is printed using the format entered during setup.
Quick Print (Pushbutton Tare, Use Commodity)This procedure assumes that a commodity register has been created.
1. Drive the empty vehicle onto the scale, then press the TARE key.
2. With the terminal displaying net zero, load the vehicle.
3. Once the vehicle has been loaded, press the PRINT key.
4. If you wish to use a commodity register for this transaction, enter the memory address (00 to 99) or user ID (100 to 999,999) at the [Cd ] prompt. The memory address or user ID must point to commodity register, or the entry will be ignored. Press ENTER to accept the entry.
If you do not wish to use a commodity register for this transaction, press ENTER at the [Cd ] prompt.
5. The [ -P- ] prompt is displayed while the Quick Print ticket is printed using the format entered during setup. Commodity description and converted weight values can be printed on the ticket.
If accumulation is enabled, converted weight data is accumulated and the number of loads counter is incremented in the commodity register selected.
Quick Print (Keyboard Entered Tare, Use Commodity)This procedure assumes that a commodity register has been created.
1. Drive the loaded vehicle onto the scale, then use the numeric keys to enter the known tare weight of the vehicle.
Mettler Toledo Cougar VS User’s Guide
2-18 (10/99)
2. Press the TARE key. The net weight of the contents of the vehicle is displayed.
3. Press the PRINT key.
4. If you wish to use a commodity register for this transaction, enter the memory address (00 to 99) or user ID (100 to 999,999) at the [Cd ] prompt. The memory address or user ID must point to commodity register, or the entry will be ignored. Press ENTER to accept the entry.
If you do not wish to use a commodity register for this transaction, press ENTER at the [Cd ] prompt.
5. The [ -P- ] prompt is displayed while the Quick Print ticket is printed using the format entered during setup. Commodity description and converted weight values can be printed on the ticket.
If accumulation is enabled, converted weight data is accumulated and the number of loads counter is incremented in the commodity register selected.
Memory ReportsCougar VS terminals provide four printed reports to help manage data that is stored in memory: open temporary register transaction report, permanent register report, scale accumulator report, and commodity table report.
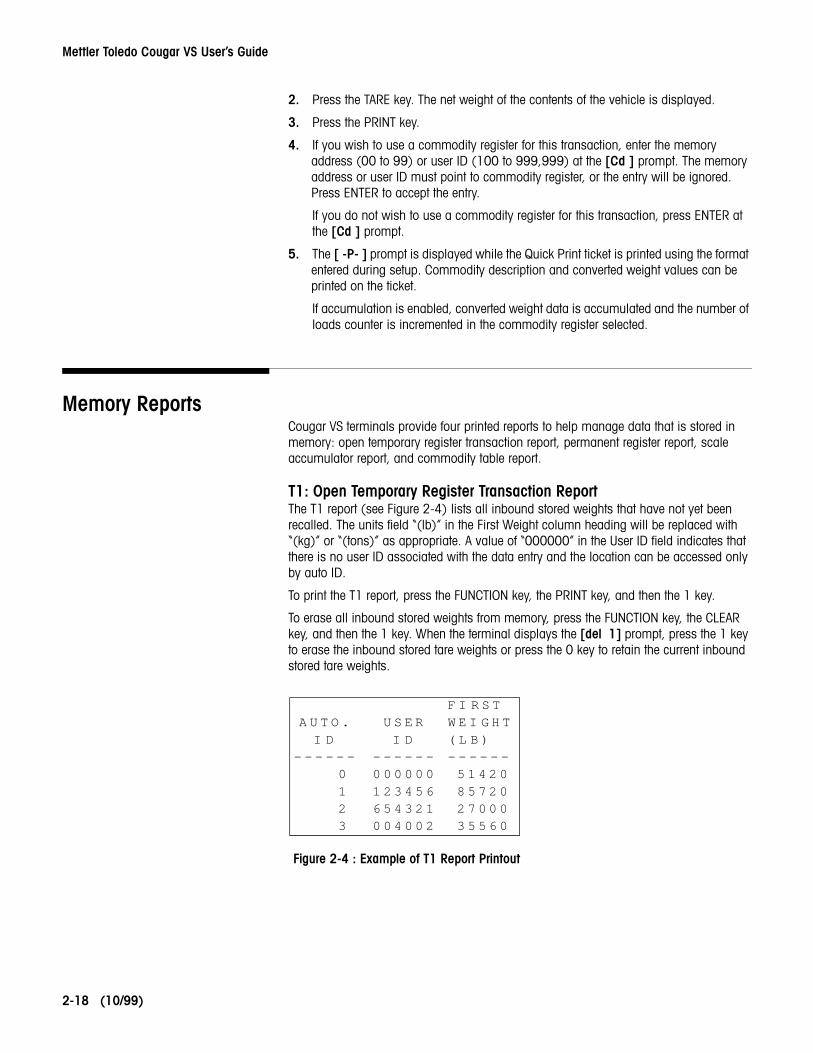
T1: Open Temporary Register Transaction ReportThe T1 report (see Figure 2-4) lists all inbound stored weights that have not yet been recalled. The units field “(lb)” in the First Weight column heading will be replaced with “(kg)” or “(tons)” as appropriate. A value of “000000” in the User ID field indicates that there is no user ID associated with the data entry and the location can be accessed only by auto ID.
To print the T1 report, press the FUNCTION key, the PRINT key, and then the 1 key.
To erase all inbound stored weights from memory, press the FUNCTION key, the CLEAR key, and then the 1 key. When the terminal displays the [del 1] prompt, press the 1 key to erase the inbound stored tare weights or press the 0 key to retain the current inbound stored tare weights.
Figure 2-4 : Example of T1 Report Printout
A U T O .I D
- - - - - -
U S E RI D
- - - - - -
F I R S TW E I G H T( L B )- - - - - -
0 0 0 0 0 0 0 5 1 4 2 01 1 2 3 4 5 6 8 5 7 2 02 6 5 4 3 2 1 2 7 0 0 03 0 0 4 0 0 2 3 5 5 6 0
Chapter 2: Operating InstructionsMemory Reports
(10/99) 2-19
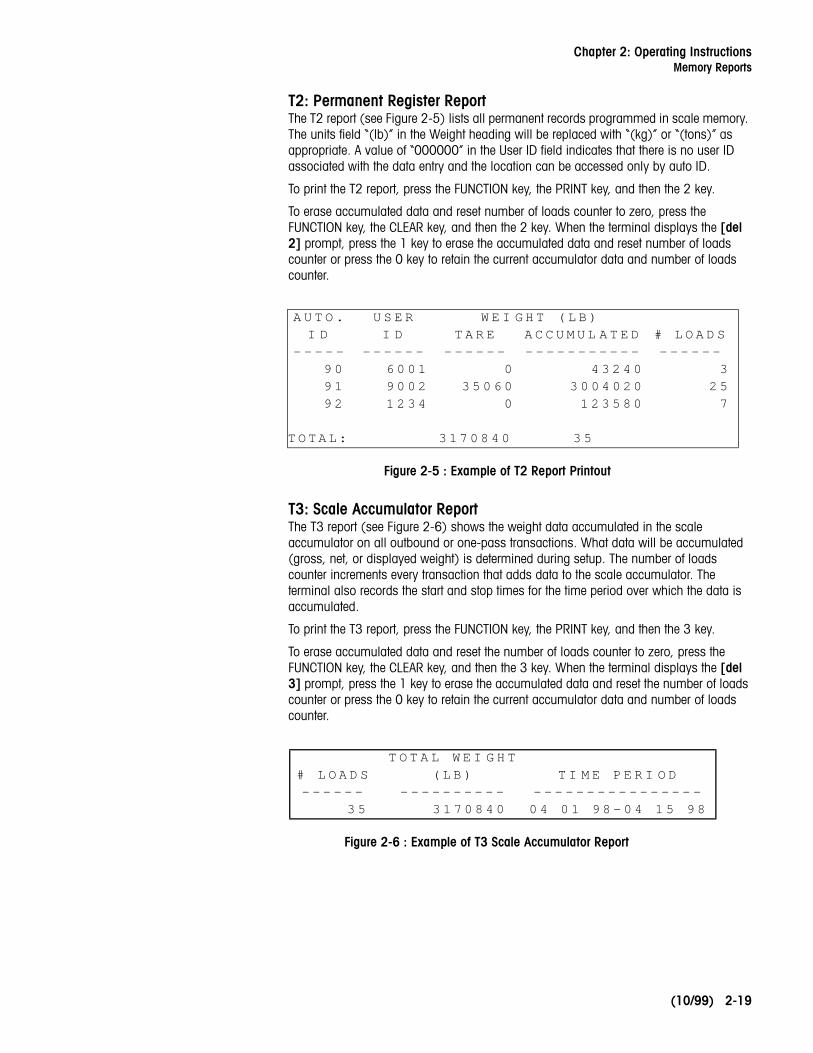
T2: Permanent Register ReportThe T2 report (see Figure 2-5) lists all permanent records programmed in scale memory. The units field “(lb)” in the Weight heading will be replaced with “(kg)” or “(tons)” as appropriate. A value of “000000” in the User ID field indicates that there is no user ID associated with the data entry and the location can be accessed only by auto ID.
To print the T2 report, press the FUNCTION key, the PRINT key, and then the 2 key.
To erase accumulated data and reset number of loads counter to zero, press the FUNCTION key, the CLEAR key, and then the 2 key. When the terminal displays the [del 2] prompt, press the 1 key to erase the accumulated data and reset number of loads counter or press the 0 key to retain the current accumulator data and number of loads counter.
Figure 2-5 : Example of T2 Report Printout
T3: Scale Accumulator ReportThe T3 report (see Figure 2-6) shows the weight data accumulated in the scale accumulator on all outbound or one-pass transactions. What data will be accumulated (gross, net, or displayed weight) is determined during setup. The number of loads counter increments every transaction that adds data to the scale accumulator. The terminal also records the start and stop times for the time period over which the data is accumulated.
To print the T3 report, press the FUNCTION key, the PRINT key, and then the 3 key.
To erase accumulated data and reset the number of loads counter to zero, press the FUNCTION key, the CLEAR key, and then the 3 key. When the terminal displays the [del 3] prompt, press the 1 key to erase the accumulated data and reset the number of loads counter or press the 0 key to retain the current accumulator data and number of loads counter.
Figure 2-6 : Example of T3 Scale Accumulator Report
A U T O .I D
- - - - -
U S E RI D
- - - - - -
W E I G H T ( L B )# L O A D S- - - - - -
T A R E- - - - - -
A C C U M U L A T E D- - - - - - - - - - -
9 0 6 0 0 1 0 4 3 2 4 0 39 1 9 0 0 2 3 5 0 6 0 3 0 0 4 0 2 0 2 59 2 1 2 3 4 0 1 2 3 5 8 0 7
TOTAL: 3 1 7 0 8 4 0 3 5
# L O A D S- - - - - -
T O T A L W E I G H T( L B )
- - - - - - - - - -T I M E P E R I O D
- - - - - - - - - - - - - - - -3 5 3 1 7 0 8 4 0 0 4 0 1 9 8 - 0 4 1 5 9 8
Mettler Toledo Cougar VS User’s Guide
2-20 (10/99)
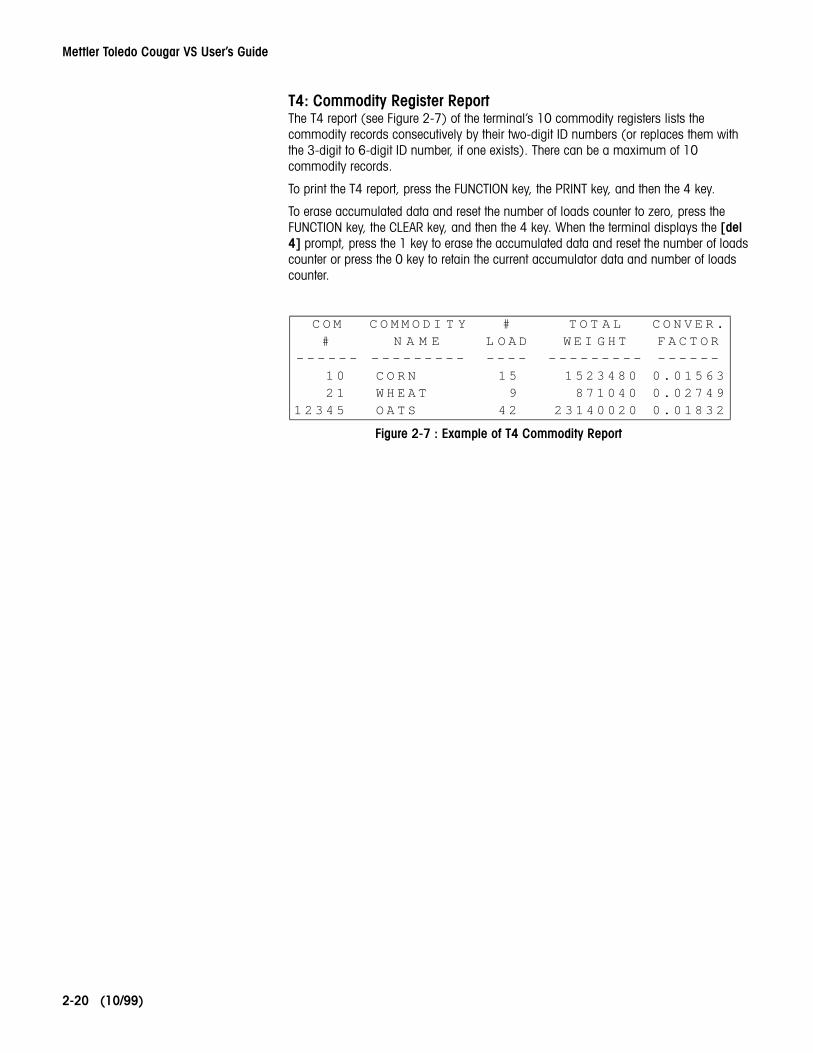
T4: Commodity Register ReportThe T4 report (see Figure 2-7) of the terminal’s 10 commodity registers lists the commodity records consecutively by their two-digit ID numbers (or replaces them with the 3-digit to 6-digit ID number, if one exists). There can be a maximum of 10 commodity records.
To print the T4 report, press the FUNCTION key, the PRINT key, and then the 4 key.
To erase accumulated data and reset the number of loads counter to zero, press the FUNCTION key, the CLEAR key, and then the 4 key. When the terminal displays the [del 4] prompt, press the 1 key to erase the accumulated data and reset the number of loads counter or press the 0 key to retain the current accumulator data and number of loads counter.
Figure 2-7 : Example of T4 Commodity Report
C O M#
- - - - - -
C O M M O D I T YN A M E
- - - - - - - - -
#L O A D- - - -
T O T A LW E I G H T
- - - - - - - - -
C O N V E R .F A C T O R- - - - - -
1 0 C O R N 1 5 1 5 2 3 4 8 0 0 . 0 1 5 6 32 1 W H E A T 9 8 7 1 0 4 0 0 . 0 2 7 4 9
1 2 3 4 5 O A T S 4 2 2 3 1 4 0 0 2 0 0 . 0 1 8 3 2
Chapter 3: AppendicesAppendix 1: Basic Weighing Concepts
(10/99) 3-1
3 Appendices
Appendix 1: Basic Weighing Concepts
This Appendix explains some of the specialized terminology and concepts that are used in the weighing industry.
ZeroZero is the empty weight of the scale platform or weighbridge. The gross zero reference is recorded during calibration.
Pushbutton Zero is a way for the operator to capture a new gross zero reference point. The weight on the scale must be stable and be within the pushbutton zero capture range, typically ±20% of full scale capacity. The zero of the scale can change because material builds up on the scale or because the temperature changes.
Auto Zero Maintenance (AZM) is a way for the terminal to gradually rezero itself in order to compensate for small changes in zero. Class IIIL legal-for-trade vehicle scales use an AZM range of ±3 displayed increments above/below gross zero. AZM is active any time the weight on the scale is stable and is within the AZM range.
TareTare is the empty weight of a vehicle. Tare is normally used to determine the net weight of the contents of a vehicle. It can be used in the following ways:
AutotareAn autotare is taken by pressing the TARE key when an empty vehicle is on the scale. The terminal then displays a zero weight with the net cursor lit. The vehicle is loaded and driven back onto the scale. The terminal then displays the net weight of the contents. If the TARE key is pressed while the terminal is in the net mode, the current weight on the scale becomes the new tare value. Tare interlocks inhibit replacement autotare.
Keyboard TareKeyboard entered tare is used when the empty weight of the vehicle is a known value. The known tare weight is entered using the numeric keys, and the TARE key is pressed. The terminal will then display the net weight of the contents of the vehicle.
Chain TareChain tare is a rarely used mode of keyboard entered tare. If a tare is entered using the numeric keypad while the terminal is in the net weight mode, the tare value entered is added to the existing tare weight value. Tare interlocks inhibit this mode.
Mettler Toledo Cougar VS User’s Guide
3-2 (10/99)
Tare InterlocksTare interlocks are a set of restrictions on how tare can be used. They are required by some local weights and measures regulations. If tare interlocks are enabled, the terminal must be at gross zero to clear a tare weight or to enter a keyboard tare. Tare interlocks also prevent the terminal from replacing an existing tare with a new tare.
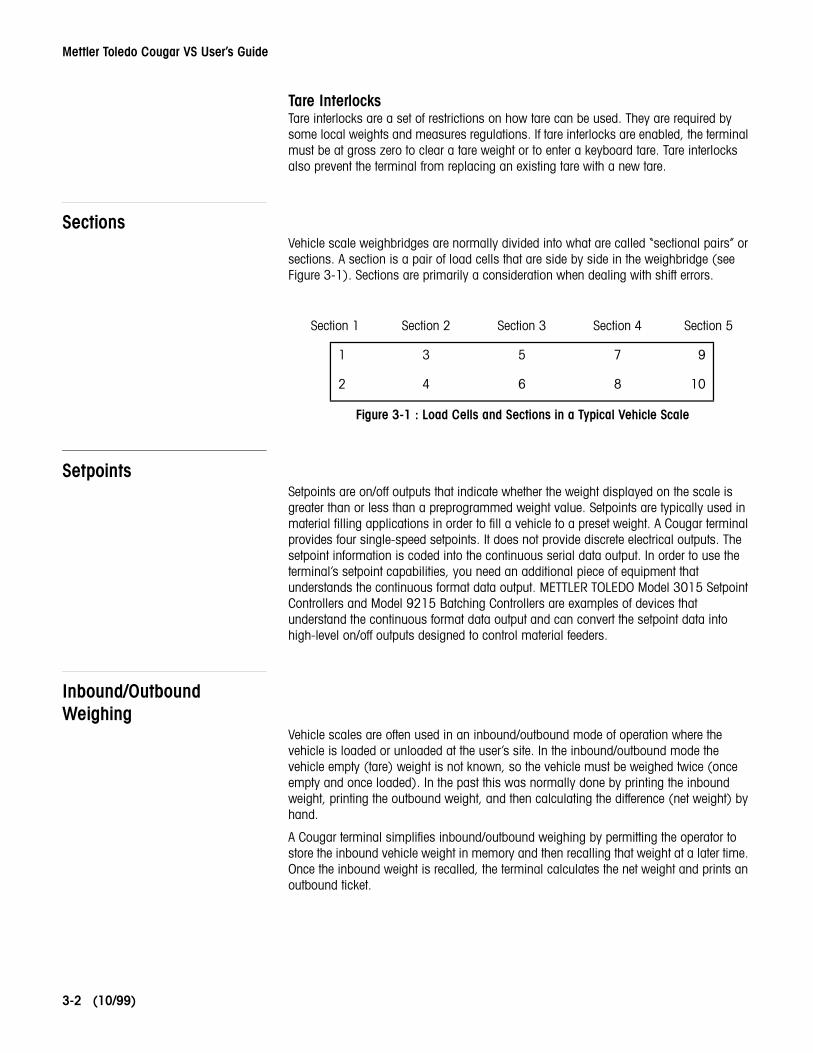
SectionsVehicle scale weighbridges are normally divided into what are called “sectional pairs” or sections. A section is a pair of load cells that are side by side in the weighbridge (see Figure 3-1). Sections are primarily a consideration when dealing with shift errors.
Figure 3-1 : Load Cells and Sections in a Typical Vehicle Scale
SetpointsSetpoints are on/off outputs that indicate whether the weight displayed on the scale is greater than or less than a preprogrammed weight value. Setpoints are typically used in material filling applications in order to fill a vehicle to a preset weight. A Cougar terminal provides four single-speed setpoints. It does not provide discrete electrical outputs. The setpoint information is coded into the continuous serial data output. In order to use the terminal’s setpoint capabilities, you need an additional piece of equipment that understands the continuous format data output. METTLER TOLEDO Model 3015 Setpoint Controllers and Model 9215 Batching Controllers are examples of devices that understand the continuous format data output and can convert the setpoint data into high-level on/off outputs designed to control material feeders.
Inbound/Outbound Weighing
Vehicle scales are often used in an inbound/outbound mode of operation where the vehicle is loaded or unloaded at the user’s site. In the inbound/outbound mode the vehicle empty (tare) weight is not known, so the vehicle must be weighed twice (once empty and once loaded). In the past this was normally done by printing the inbound weight, printing the outbound weight, and then calculating the difference (net weight) by hand.
A Cougar terminal simplifies inbound/outbound weighing by permitting the operator to store the inbound vehicle weight in memory and then recalling that weight at a later time. Once the inbound weight is recalled, the terminal calculates the net weight and prints an outbound ticket.
Section 1 Section 2 Section 3 Section 4 Section 5
1 3 5 7 9
2 4 6 8 10
Chapter 3: AppendicesAppendix 1: Basic Weighing Concepts
(10/99) 3-3
Net Sign CorrectionNet sign correction is a feature that permits the Cougar terminal to be used for both shipping (inbound empty) and receiving (inbound loaded) operations. If net sign correction is enabled, The terminal will swap the gross and tare weight fields on the printed ticket, if necessary, so that the larger weight is the gross weight, the smaller weight is the tare weight, and the difference is always a positive net weight.
One-Pass WeighingOne-pass weighing is a mode where the user has a fleet of vehicles with known empty (tare) weight. The tare weight is recalled by ID with the loaded vehicle on the scale.
Mettler Toledo Cougar VS User’s Guide
3-4 (10/99)
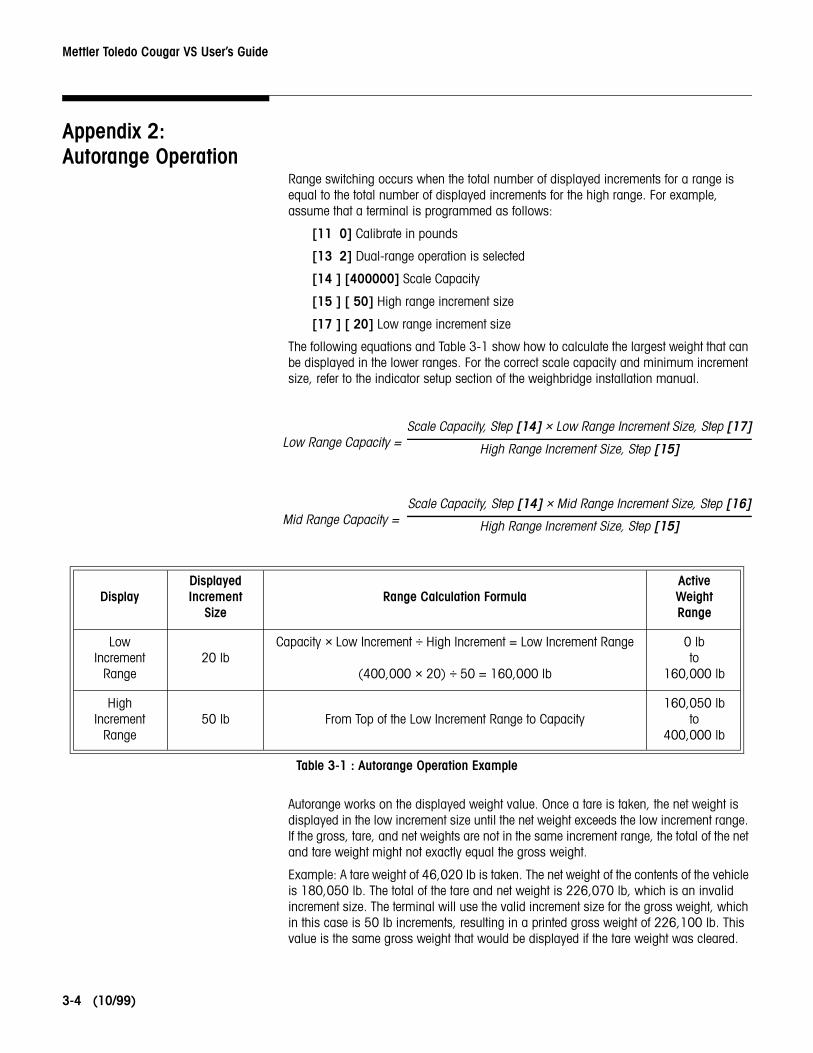
Appendix 2: Autorange Operation
Range switching occurs when the total number of displayed increments for a range is equal to the total number of displayed increments for the high range. For example, assume that a terminal is programmed as follows:
[11 0] Calibrate in pounds
[13 2] Dual-range operation is selected
[14 ] [400000] Scale Capacity
[15 ] [ 50] High range increment size
[17 ] [ 20] Low range increment size
The following equations and Table 3-1 show how to calculate the largest weight that can be displayed in the lower ranges. For the correct scale capacity and minimum increment size, refer to the indicator setup section of the weighbridge installation manual.
Table 3-1 : Autorange Operation Example
Autorange works on the displayed weight value. Once a tare is taken, the net weight is displayed in the low increment size until the net weight exceeds the low increment range. If the gross, tare, and net weights are not in the same increment range, the total of the net and tare weight might not exactly equal the gross weight.
Example: A tare weight of 46,020 lb is taken. The net weight of the contents of the vehicle is 180,050 lb. The total of the tare and net weight is 226,070 lb, which is an invalid increment size. The terminal will use the valid increment size for the gross weight, which in this case is 50 lb increments, resulting in a printed gross weight of 226,100 lb. This value is the same gross weight that would be displayed if the tare weight was cleared.
Low Range Capacity =Scale Capacity, Step [14] × Low Range Increment Size, Step [17]
High Range Increment Size, Step [15]
Mid Range Capacity =Scale Capacity, Step [14] × Mid Range Increment Size, Step [16]
High Range Increment Size, Step [15]
DisplayDisplayedIncrement
SizeRange Calculation Formula
ActiveWeightRange
LowIncrement
Range20 lb
Capacity × Low Increment ÷ High Increment = Low Increment Range
(400,000 × 20) ÷ 50 = 160,000 lb
0 lbto
160,000 lb
HighIncrement
Range50 lb From Top of the Low Increment Range to Capacity
160,050 lbto
400,000 lb
Chapter 4: Glossary
(10/99) 4-1
4 GlossaryAccuracy—The capability of a measuring device to provide measured values without systematic measurement deviations.
Address—A unique sequence of letters or numbers for the location of data or the identity of an intelligent device.
ASCII (American Standard Code for Information Interchange)—A system used to represent alphanumeric data; a 7-bit-plus-parity character set established by ANSI and used for data communications and data processing; ASCII allows compatibility among data services.
Auto Range—An automatic device for switching ranges in multiple-range scales and multiple-division scales.
Automatic Zero Setting (autozero)—An automatic zero-setting device which makes it possible to correct zero-point drifts or soiling of load carriers without manual intervention.
Baud/Baud Rate—Unit of the transmission rate in serial data transmission expressed in bits per second.
Bit (Binary Digit)—The smallest unit of information in a binary system; a 1 or 0 condition.
Byte—A data word with a length of 8 bits, which allows the encoding of 256 different characters. All common microprocessors possess a byte structure or a multiple of it in their data words.
Calibration—In the field of metrology, calibration means determination of the relationship between the displayed quantity and the true value of the measured variable under specified measurement conditions, for example, by means of a calibration curve.
Capacity—The maximum load that can be weighed on a particular scale.
Character—Letter, number, punctuation, or any other symbol contained in a message.
Checksum—The total of a group of data items or a segment of data that is used for error-checking purposes. Both numeric and alphabetic fields can be used in calculating a checksum, since the binary content of the data can be added. Just as a check digit tests the accuracy of a single number, a checksum serves to test an entire set of data which has been transmitted or stored. Checksum can detect single-bit errors and some multiple-bit errors.
Current Loop Interface (20 mA)—A digital peripheral interface for serial data transmission in which the logic states 0 and 1 are represented by the current 0 mA and 20 mA.
EPROM (Erasable Programmable Read-Only Memory)—Read-only, nonvolatile, semiconductor memory that can be erased via ultraviolet light and reprogrammed. See ROM.
Even Parity—Each data character must have an even number of “on” bits.
I/O—Input/Output.
Jumper—A wire which connects a number of pins on one end of a cable only, such as looping back Request to Send from Clear to Send. A connector on a printed circuit board of an electronic circuit used to set or initiate certain functions.
Mettler Toledo Cougar VS User’s Guide
4-2 (10/99)
Keyboard (keypad)—A device consisting of an array of keys used to initiate functions and/or enter alphanumeric data and special characters.
Linearity—A measure of how well a scale follows the linear relationship between the loaded weight and the display value. The characteristic curve of a balance is envisaged as a straight line between zero and the maximum load. The nonlinearity defines the width of the band within which a plus or minus deviation of the measured value from the ideal characteristic line can occur.
Metrology—The science of measurement, measurement systems, and units.
MultiRange—A balance whose weighing range is divided into partial weighing ranges with different scale division values. Switching of the division values occurs automatically with increasing and decreasing load at the same display values.
Net Weight—The weight of a weighing sample after deduction of the weight of its packaging or of the transport device (tare weight) with which it had previously been weighed.
Odd Parity—Each data character must have an odd number of “on” bits.
Parity Bit—A bit that is set at 0 or 1 in a character to ensure that the total number of 1 bits in the data field is even or odd.
PCB—Printed Circuit Board.
Port—A point of access into a computer, a network, or other electronic device; the physical or electrical interface through which one gains access; the interface between a process and a communications or transmission facility.
Preset Tare Value (PT)—A numerical value, representing a weight, that is introduced in the scale terminal. This can be done by keying in the data, recalling it from data storage, or inserting it via an interface.
RAM (Random Access Memory)—A storage device into which data can be entered (written) and read. Compare with ROM.
RFI—Radio Frequency Interference.
ROM (Read-Only Memory)—A data storage device, the contents of which cannot normally be altered; storage in which writing over is prevented; permanent storage. Compare with RAM.
RS-232 Interface—A digital serial interface that complies with the EIA RS-232 standard for modem connections for data transmission over telephone lines. The standard is suitable for the description of computer interfaces (for example, descriptions of connector design, pin assignment, and signals). The use of modem control lines is not defined for the connection of computers and often leads to difficulties in data transmission.
RS-422—Electrical characteristics of balanced-voltage digital interface circuits.
Serial Transmission—The most common transmission mode, in which information bits are sent sequentially on a single data channel.
Stability—The measure of a scale’s ability to give the same weight or count reading at different points in time. Phenomena affecting stability include creep, vibration, temperature, and humidity.
Start Bit—In asynchronous transmission, the first bit or element in each character, normally a space, which prepares the receiving equipment for the reception and registration of the character.
Stop Bit—In asynchronous transmission, the last bit, which is used to indicate the end of a character and serves to return the line to its idle state.
Chapter 4: Glossary
(10/99) 4-3
String—Any combination of alphanumeric characters (letters, numbers, and special characters), for example, language sets for output on the screen. With variable types, a distinction is made between numeric variables, which can contain only numbers, and string variables.
Tare, Tare Weight—The mass of the package or transport container of the weighing sample. See Gross Weight, Net Weight.
Tare Memory—A feature that makes it possible to store and then recall the tare weight.
Terminal—The point in a network at which data can either enter or leave; a device, usually equipped with a keyboard and display, capable of sending and receiving data over a communications link.
Test Weight—A weight piece that comes with the balance. This weight has the appropriate accuracy and is used for regular checks on the functioning and accuracy of the balance.
X-ON/X-OFF (Transmitter On/Transmitter Off)—Control characters used for flow control, instructing a terminal to start transmission (X-ON) and end transmission (X-OFF).

METTLER TOLEDO
Mettler-Toledo, Inc. Printed in U.S.A. 14981600A
Publication Suggestion ReportIf you have suggestions concerning this publication, please complete this form and fax it to (614) 841-7295
Publication Name: Cougar Industrial Terminal User’s Guide (for VS Software)
Publication Part Number: B15339700A Publication Date: 10/99
Your Name: Location:Phone Number:
PROBLEM(S) TYPE: DESCRIBE PROBLEM(S): INTERNAL USE ONLY Technical Accuracy Text Illustration
Completeness Procedure/step Illustration Definition Info. in manualWhat information is Example Guideline Featuremissing? Explanation Other (please explain below)
Info. not in manual
ClarityWhat is not clear?
SequenceWhat is not in the rightorder?
Other CommentsUse another sheet foradditional comments.
Fax this completed form to METTLER TOLEDO at (614) 841-7295
METTLER TOLEDO1900 Polaris ParkwayColumbus, Ohio 43240
P/N: B15339700A
(10/99).00
METTLER TOLEDO®, DigiTOL®, and POWERCELL® are Registered Trademarks of Mettler-Toledo, Inc.© 1998, 1999 Mettler-Toledo, Inc.Printed in U.S.A.
B15339700A


![TSI통합8532.ppt [호환 모드]eninstrument.co.kr/product/data/8532.pdf에스 케이테크엑스 1 8530 LG 1 8530 르노삼성자동차 2 8530 세종파마텍 1 8530 미세먼지측정기](https://img.pdfslide.net/doc/110x75/5f776772aeac7e65eb70302e/tsi8532ppt-eeoe-oe-1-8530-lg-1-8530-eee.jpg)