Embed Size (px)
DESCRIPTION
here hare the fundaments to now how to play a force more powerful
Citation preview
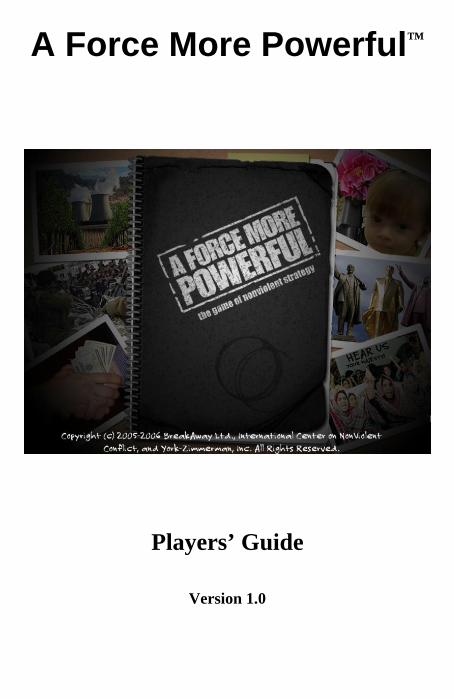
A Force More Powerful™
Players’ Guide
Version 1.0
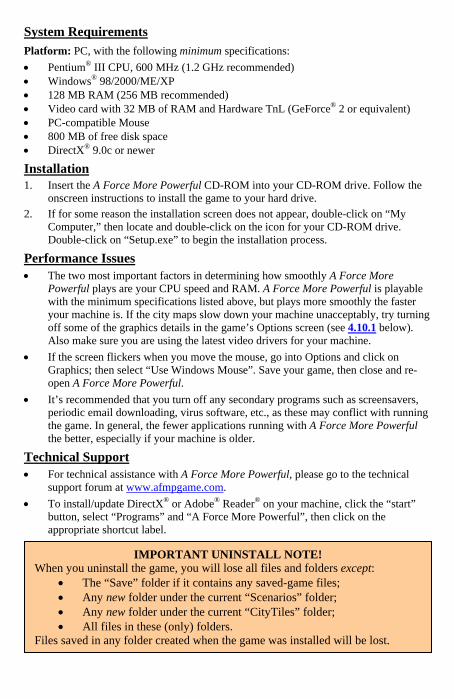
System Requirements Platform: PC, with the following minimum specifications: • Pentium® III CPU, 600 MHz (1.2 GHz recommended) • Windows® 98/2000/ME/XP • 128 MB RAM (256 MB recommended) • Video card with 32 MB of RAM and Hardware TnL (GeForce® 2 or equivalent) • PC-compatible Mouse • 800 MB of free disk space • DirectX® 9.0c or newer
Installation 1. Insert the A Force More Powerful CD-ROM into your CD-ROM drive. Follow the
onscreen instructions to install the game to your hard drive. 2. If for some reason the installation screen does not appear, double-click on “My
Computer,” then locate and double-click on the icon for your CD-ROM drive. Double-click on “Setup.exe” to begin the installation process.
Performance Issues • The two most important factors in determining how smoothly A Force More
Powerful plays are your CPU speed and RAM. A Force More Powerful is playable with the minimum specifications listed above, but plays more smoothly the faster your machine is. If the city maps slow down your machine unacceptably, try turning off some of the graphics details in the game’s Options screen (see 4.10.1 below). Also make sure you are using the latest video drivers for your machine.
• If the screen flickers when you move the mouse, go into Options and click on Graphics; then select “Use Windows Mouse”. Save your game, then close and re-open A Force More Powerful.
• It’s recommended that you turn off any secondary programs such as screensavers, periodic email downloading, virus software, etc., as these may conflict with running the game. In general, the fewer applications running with A Force More Powerful the better, especially if your machine is older.
Technical Support • For technical assistance with A Force More Powerful, please go to the technical
support forum at www.afmpgame.com. • To install/update DirectX® or Adobe® Reader® on your machine, click the “start”
button, select “Programs” and “A Force More Powerful”, then click on the appropriate shortcut label.
IMPORTANT UNINSTALL NOTE! When you uninstall the game, you will lose all files and folders except:
• The “Save” folder if it contains any saved-game files; • Any new folder under the current “Scenarios” folder; • Any new folder under the current “CityTiles” folder; • All files in these (only) folders.
Files saved in any folder created when the game was installed will be lost.
To learn more about A Force More Powerful™, go to www.afmpgame.com
PRODUCERS’ NOTE We didn’t set out to create a game. Some years ago, after we produced a series of documentary films on nonviolent conflict, activists all over the world began using them as training tools. This was surprising; the films were intended to demonstrate factually that nonviolent strategies frequently succeed. And we knew our stories would be inspiring. But we hadn’t designed the films to be used for training. When we saw the demand for an educational tool, we immediately considered whether an interactive game might be the answer. We knew that strategy games were popular, and experts who use games for serious purposes such as ours encouraged us to go forward. Three years later, you hold the results in your hand. It carries the same title as the original documentary films and the book which accompanied them: “A Force More Powerful.” The game contains no secrets, no sure-fire recipes for winning. But through active immersion in simulated conflicts—in fictionalized but realistic settings—the game allows you to learn the principles and techniques of nonviolent strategy. We are grateful to the designers, programmers, artists, and others whose great efforts and considerable talent have gone into this first version of the game. We do not consider it a finished product. Rather, we see it as the first step towards creating a worldwide community of users whom we invite to become our partners—suggesting and contributing refinements, revisions, and improvements for new versions and versions in other languages. We dedicate this first version of the game to the courageous people who have taken up nonviolent strategies to fight for their rights and freedom, whose experiences and achievements inspired and informed this project.
Peter Ackerman Steve York

Page 2 A Force More Powerful™ Players’ Guide
Table of Contents 1. INTRODUCTION .............................................................................4 2. GETTING STARTED.......................................................................6
2.1 Fundamental Concepts .......................................................................6 2.2 Screen Flowchart................................................................................9 2.3 Example of Play—“Corruption is Stealing” Scenario......................10
3. INTERFACE OVERVIEW............................................................27 3.1 Main Menu Screen ...........................................................................27 3.2 Scenario Selection Screen ................................................................28 3.3 Strategic Estimate Screen.................................................................28 3.4 The Game Screen .............................................................................29
3.4.1 The Status Bar ..........................................................................29 3.4.2 The View Screen ......................................................................30 3.4.3 The Jump Map (National Map) ................................................31 3.4.4 Tactics Control Panel................................................................31 3.4.5 Navigation Area........................................................................32 3.4.6 Tactic Coordinator Display.......................................................33 3.4.7 Tactics Selection Display .........................................................36 3.4.8 Target Selection Display...........................................................37 3.4.9 Information Screen ...................................................................38 3.4.10 Organization Screen................................................................40 3.4.11 National Map ..........................................................................42 3.4.12 Tactics Queue .........................................................................45 3.4.13 Information Panes...................................................................46
3.5 Evaluation Screen.............................................................................55 4. PLAYING THE GAME..................................................................56
4.1 Managing Game Information ...........................................................56 4.1.1 Choosing a Scenario .................................................................56 4.1.2 Managing Game Play ...............................................................59
4.2 Using the Strategic Estimate ............................................................70 4.3 Building and Strengthening the Movement......................................70
4.3.1 The Player’s Role as the Movement Planner ............................70 4.3.2 Characters .................................................................................70
A Force More Powerful™ Players’ Guide Page 3
4.3.3 Groups ......................................................................................76 4.3.4 Alliances ...................................................................................79
4.4 Weakening the Regime ....................................................................82 4.4.1 Pillars of Support ......................................................................82
4.5 Avoiding Violence and the Consequences of Violence ...................83 4.5.1 Violent and Nonviolent Tactics ................................................84 4.5.2 The Occurrence of Violence .....................................................85 4.5.3 The Resolution of Violence ......................................................85 4.5.4 Results of Regime Violence .....................................................85 4.5.5 Violence as a Result of Movement Actions..............................86 4.5.6 The Ripple Effects of Violence ................................................86
4.6 Confronting and Disrupting the Regime ..........................................87 4.7 Managing Messages .........................................................................87 4.8 Understanding the Local and National Economy.............................90 4.9 Winning the Game (Victory Conditions) .........................................91 4.10 Game Options and Shortcut Keys ..................................................92
4.10.1 Game Options .........................................................................92 4.10.2 Keyboard Shortcuts ................................................................94
4.11 Vignette Tactics .............................................................................94 4.12 Tips on Play....................................................................................96
5. STRATEGIC ESTIMATE..............................................................99 5.1 Strategic Estimate Screens and Tabs—An Overview ......................99 5.2 Building a Strategic Estimate .........................................................101
5.2.1 Review the Situation...............................................................101 5.2.2 Assess the Mission..................................................................105 5.2.3 Choose Victory Conditions.....................................................113 5.2.4 Create Phases & Objectives....................................................114
6. Appendix..............................................................................................119 6.1 Tactics & Competencies.................................................................119 6.2 Tactics & Training (& Potential for Violence)...............................122
Page 4 A Force More Powerful™ Players’ Guide
1. INTRODUCTION “Never doubt that a small Group of committed citizens can change the world. Indeed, it's the only thing that has.”
— Margaret Mead
A Force More Powerful is a game; it is also a tool for you to learn the value of, and enhance your capacity for, strategic thinking in nonviolent conflict. Hence it emphasizes assessing the overall political, social, economic, and military situation in detail, selecting and prioritizing objectives, planning the appropriate strategy and tactics to achieve those objectives, and reacting appropriately to the actions of one’s adversary. The better your planning is, the more successful your strategy will be.
You assume the role of senior strategist within a nonviolent resistance or opposition movement. You will take charge of the organization’s material and human resources, and decide how best to allocate them to conduct a variety of Tactics (actions) to support the larger strategy that you employ. Regardless of whatever individual, organization or group of organizations you represent, your side is always termed the Movement in the game.
As the Movement strategist, you play against the Regime, which is the game’s term for your opponent. “Regime” is the word that best encompasses the variety of adversaries represented in the game’s 10 scenarios, and describes a system or mode of rule—not just the ruler. Regardless of whether an individual, government or other entity is your opponent in a scenario (e.g., a dictator, an oligarchy, a military junta, a foreign occupying power, or a city council), the functional term in the game is Regime. The Regime is created by the scenario designer, and is controlled by the game’s artificial intelligence.
The purpose of the Movement is to pursue the goals you have chosen, which may or may not lead to a change of leadership in the Regime. Just as often your goals may be achieved by inducing the Regime to change its policies or behavior (e.g., securing fair elections or winning the right to form a free labor union).
Many game-play decisions involve choosing which Characters (see 4.3.2) and Groups (see 4.3.3) to involve in your strategy and tactics, and evaluating the benefits of such actions relative to the resources they will cost. Characters represent specific named individuals who may lead Groups. Groups are the central political unit in the game; they represent the diverse interests and agendas present in any complicated struggle. One special Group—the General Public—is present in every scenario. Influencing the General Public, and getting its support, is an important objective for both the Movement and the Regime.
You must also consider the actions of the Regime, which will have its own array of actions to consider and its own resources to budget. Therefore, you are often
required to choose between offensive and defensive Tactics. A successful offense will reduce the material and human resources available to the Regime, and may shift the Support Levels (see 4.3.2) of Characters, Groups, neighborhoods, regions, or the General Public. Successful defensive Tactics will conserve or build resources for the long term, but allow the Regime to conserve its resources as well.
Both the Movement and the Regime influence the game by planning and executing Tactics, which are the “things you can do” in the game. Tactics for the Movement are drawn largely, but not exclusively, from Gene Sharp’s book Methods of Nonviolent Action. Regime Tactics are inspired by the conduct of real-world government repression. Tactics usually, but not always, involve a specific target Group or Character.
A Force More Powerful™ Players’ Guide Page 5
IMPORTANT!
Although A Force More Powerful aims to impart the values and techniques of strategic thinking for individuals participating in (or leading) nonviolent movements against oppressive opponents, it does not guarantee real-world results. Life is very complicated and circumstances in the real world are difficult (even in the best of times) to anticipate and can change rapidly. Thus, no training tool can simulate these circumstances fully. Please keep this in mind when playing A Force More Powerful, and know that the results you receive during play may not be the same results you receive if (and when) you apply these methods to a real movement.
CITATIONS
The following two publications are referenced in this manual: • Helvey, Robert L,, 2004, On Strategic Nonviolent Conflict: Thinking
About the Fundamentals, (Boston, Massachusetts: The Albert Einstein Institution)
For information on how to obtain copies of these books, go to www.afmpgame.com.
• Sharp, Gene, 1973, The Politics of Nonviolent Action, Vol. 2, The Methods of Nonviolent Action, (Boston, Massachusetts: Porter Sargent Publishers)
© 2005-2006 BreakAway Ltd., International Center on Nonviolent
Conflict, and York Zimmerman Inc. All Rights Reserved.
Page 6 A Force More Powerful™ Players’ Guide
2. GETTING STARTED If this is your first time playing A Force More Powerful, we recommend that you read through this chapter, and follow the steps in Section 2.3 to launch and play the game.
2.1 Fundamental Concepts At its heart, A Force More Powerful is a political game; it is about putting pressure on interest groups and people so that they will do what you want them to do and help you further your goals instead of the Regime’s. To do this, though, you must master both risk and timing: the risks involved in taking public action against a repressive Regime can be considerable, and the timing required by such a campaign can be unforgiving. Though the information below is discussed in more detail throughout the Players’ Guide, the key elements in the game are:
• Alliances: Your Movement and the Regime you are trying to reform or change are both Alliances.
• Groups: A Group is a political constituency or presence with influence or other political significance in a given scenario. Alliances get their power from Groups and from the Characters who belong to those Groups.
• Characters: A Character is a named personality who can perform Tactics to further the goals of the Alliance he or she belongs to.
Groups and Characters have the following qualities which play important roles in the game:
• Support Levels. Each Group and Character has an Overall Support Level for the Regime and for the Movement. The Overall Support Level is the highest of the three individual Support Levels: Legitimacy, Ideology, and Financial Gain. Different Tactics affect different Support Levels. Some Tactics, such as Recruit Character and Meet With, are for influencing Characters. Others, such as Fraternize and Organize Social Event, are for influencing Groups.
• Fear, which reflects unwillingness to take risks, lack of hope, and pessimism about the future and the possibility of change. Fear affects many political variables in the game, but especially willingness to face physical risks for a cause.
• Enthusiasm, a measure of the willingness to engage in activism and to agitate for change. Enthusiasm affects many variables as well, but especially the willingness to show up and publicly oppose the Regime.
A Force More Powerful™ Players’ Guide Page 7
• Public Influence, which measures how likely the General Public and local populations are to pay attention to the political moves of a Character or Group.
• Policy Preferences, which represent ideology. Two Characters who have nearly identical Policy Preferences are ideologically similar. Characters who strongly disagree about Policies may nonetheless take the same side, though. Alliances have Manifestoes (see 4.3.4) which are like Policy Preferences but are set by the Alliance’s leadership (or by you, in the Movement’s case).
When playing a scenario, you represent the behind-the-scenes strategic planner for your Alliance. You are not its leader, nor are you directly represented in the game. Instead, think of yourself as engaged in a game of chess with your opponent the Regime, with your Movement’s Groups and Characters as your chess pieces. To make your moves, consider the following:
• The Goal of a scenario is the most important thing to consider. In the
Strategic Estimate (see below), you will choose Objectives and Victory Conditions which are like stepping stones towards the Goal. Political benefits will flow from successfully carrying out a plan that you formulated beforehand.
• Tactics are how you, as a strategic planner, implement the strategy you have developed. They range widely in cost, risk, and effect. Before attempting a Tactic, you should read its description in the Tactics Notebook (see 3.4.7), and its expanded description in the Resistopedia. Tactics for the Movement are drawn largely, but not exclusively, from Gene Sharp’s book Methods of Nonviolent Action. Regime tactics are inspired by the conduct of real-world government repression. Tactics usually, but not always, involve a specific target Group or Character.
• The Strategic Estimate is both a planning tool and an information repository. It contains all the information about Alliances, Groups, and Characters that can be seen in the game, as well as Notes that will relate important details about them. You can use this to study your opponent and take note of its weaknesses and internal divisions, and figure out how best to exploit them.
You will get more help by the detailed coverage in the manual as well as the Hints & Tips sprinkled throughout, but this is a basic outline of some things you might want to pay special attention to:
• Neighborhood Support. Like Characters and Groups, geographic areas like neighborhoods and regions can support one side or the other. (They don’t have the individual Support Levels, though.) Their support will greatly
Page 8 A Force More Powerful™ Players’ Guide
affect the chances of success with Tactics that depend on crowds of sympathizers showing up, such as Mass Protests and Concerts.
• Alliance Membership. In general, a Character or Group belongs to the Alliance for which it has the highest overall support, plus meets the minimum support requirement of High. (Neighborhoods and Regions never belong to an Alliance.) A Character can belong to a different Alliance than his/her Group. A Character who is a leader of a Group can guide that Group’s Support Levels—if a Group changes Alliance membership, it can “snap back” because its leader doesn’t want it to change. If the leader is weak, though, with low Will and poor political skills, the Group can simply get a new leader.
• Fear and Enthusiasm. The most important effect of these two values is that a Character or Group whose Fear exceeds its Enthusiasm will not change Alliances. Enthusiasm also particularly affects Tactics and their success.
• Ideology and Policies. Ideology support is determined by the level of agreement in Policy Preferences between a Group or Character and an Alliance’s Manifesto (except for the Regime—there, it is the Status Quo that matters).
• Public Profile. The lower a Character’s Public Profile, the less the Regime can do directly to interfere with him… but beware of “free arrest” attempts by the Regime, which it gets whenever a Character attempts a Tactic that brings him into the open (such as Distribute Literature or Publish Website).
• Regime Collapse. In each scenario, the Regime has a “collapse threshold” that it must maintain in order to stay in power. Everything it does is aimed at keeping enough Groups in its Alliance to stay above this threshold. Different Groups contribute different amounts to the Regime’s “base”; you can usually figure out which ones are the most important by looking at the Strategic Estimate. But if you cause the Regime to collapse, be careful! Unless you have taken steps to ensure the military, police, and other influential elements do not oppose your program, the ensuing chaos could yield an outcome worse than the original Regime.
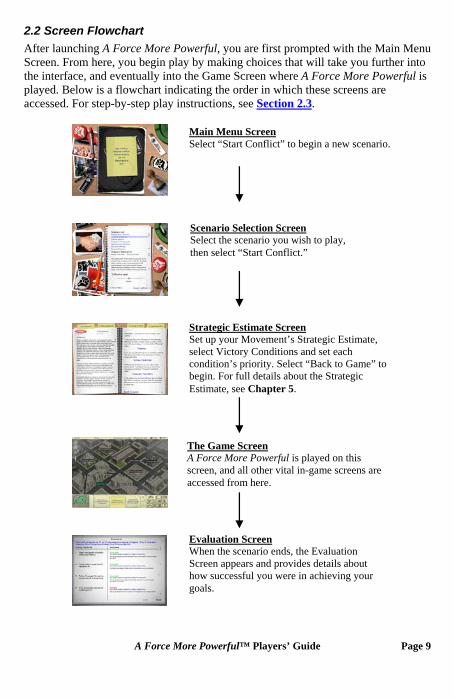
2.2 Screen Flowchart After launching A Force More Powerful, you are first prompted with the Main Menu Screen. From here, you begin play by making choices that will take you further into the interface, and eventually into the Game Screen where A Force More Powerful is played. Below is a flowchart indicating the order in which these screens are accessed. For step-by-step play instructions, see Section 2.3.
Main Menu Screen Select “Start Conflict” to begin a new scenario.
A Force More Powerful™ Players’ Guide Page 9
Scenario Selection Screen Select the scenario you wish to play, then select “Start Conflict.”
Strategic Estimate Screen Set up your Movement’s Strategic Estimate, select Victory Conditions and set each condition’s priority. Select “Back to Game” to begin. For full details about the Strategic Estimate, see Chapter 5.
The Game Screen A Force More Powerful is played on this screen, and all other vital in-game screens are accessed from here.
Evaluation Screen When the scenario ends, the Evaluation Screen appears and provides details about how successful you were in achieving your goals.
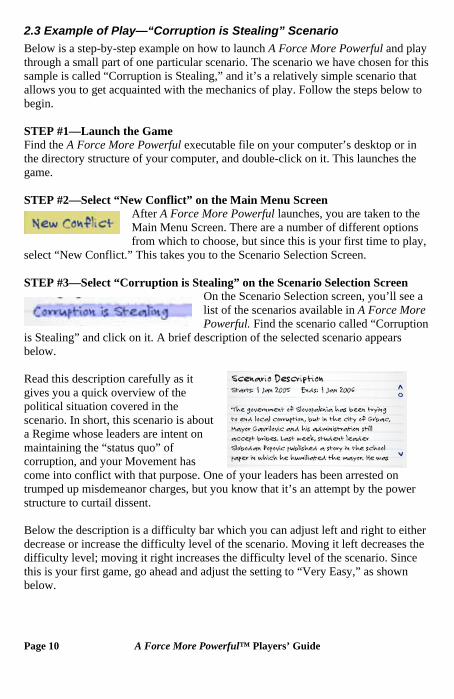
2.3 Example of Play—“Corruption is Stealing” Scenario Below is a step-by-step example on how to launch A Force More Powerful and play through a small part of one particular scenario. The scenario we have chosen for this sample is called “Corruption is Stealing,” and it’s a relatively simple scenario that allows you to get acquainted with the mechanics of play. Follow the steps below to begin. STEP #1—Launch the Game Find the A Force More Powerful executable file on your computer’s desktop or in the directory structure of your computer, and double-click on it. This launches the game. STEP #2—Select “New Conflict” on the Main Menu Screen
After A Force More Powerful launches, you are taken to the Main Menu Screen. There are a number of different options from which to choose, but since this is your first time to play,
select “New Conflict.” This takes you to the Scenario Selection Screen. STEP #3—Select “Corruption is Stealing” on the Scenario Selection Screen
On the Scenario Selection screen, you’ll see a list of the scenarios available in A Force More Powerful. Find the scenario called “Corruption
is Stealing” and click on it. A brief description of the selected scenario appears below.
Page 10 A Force More Powerful™ Players’ Guide
ne of your leaders has been arrested on
Read this description carefully as it gives you a quick overview of the political situation covered in the scenario. In short, this scenario is about a Regime whose leaders are intent on maintaining the “status quo” of corruption, and your Movement has come into conflict with that purpose. Otrumped up misdemeanor charges, but you know that it’s an attempt by the power structure to curtail dissent. Below the description is a difficulty bar which you can adjust left and right to either decrease or increase the difficulty level of the scenario. Moving it left decreases the difficulty level; moving it right increases the difficulty level of the scenario. Since this is your first game, go ahead and adjust the setting to “Very Easy,” as shown below.
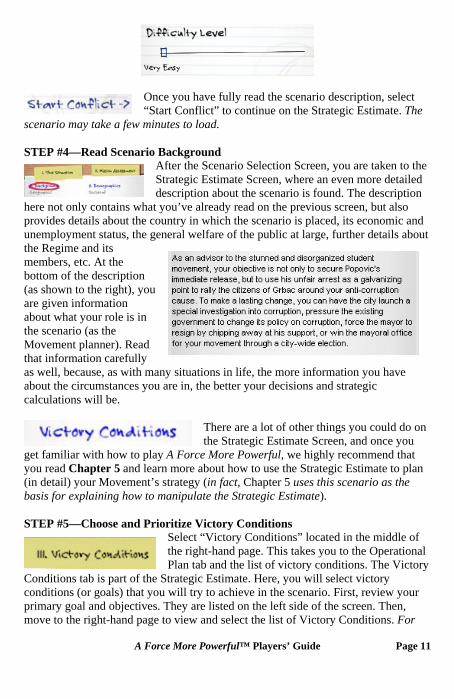
Once you have fully read the scenario description, select “Start Conflict” to continue on the Strategic Estimate. The
scenario may take a few minutes to load. STEP #4—Read Scenario Background
After the Scenario Selection Screen, you are taken to the Strategic Estimate Screen, where an even more detailed description about the scenario is found. The description
here not only contains what you’ve already read on the previous screen, but also provides details about the country in which the scenario is placed, its economic and unemployment status, the general welfare of the public at large, further details about the Regime and its members, etc. At the bottom of the description (as shown to the right), yare given information about what your role is in the scenario (as the Movement planner). Read that information carefully as well, because, as with many situations in life, the more information you have about the circumstances you are in, the better your decisions and strategic calculations will be.
ou
There are a lot of other things you could do on the Strategic Estimate Screen, and once you
get familiar with how to play A Force More Powerful, we highly recommend that you read Chapter 5 and learn more about how to use the Strategic Estimate to plan (in detail) your Movement’s strategy (in fact, Chapter 5 uses this scenario as the basis for explaining how to manipulate the Strategic Estimate). STEP #5—Choose and Prioritize Victory Conditions
Select “Victory Conditions” located in the middle of the right-hand page. This takes you to the Operational Plan tab and the list of victory conditions. The Victory
Conditions tab is part of the Strategic Estimate. Here, you will select victory conditions (or goals) that you will try to achieve in the scenario. First, review your primary goal and objectives. They are listed on the left side of the screen. Then, move to the right-hand page to view and select the list of Victory Conditions. For
A Force More Powerful™ Players’ Guide Page 11
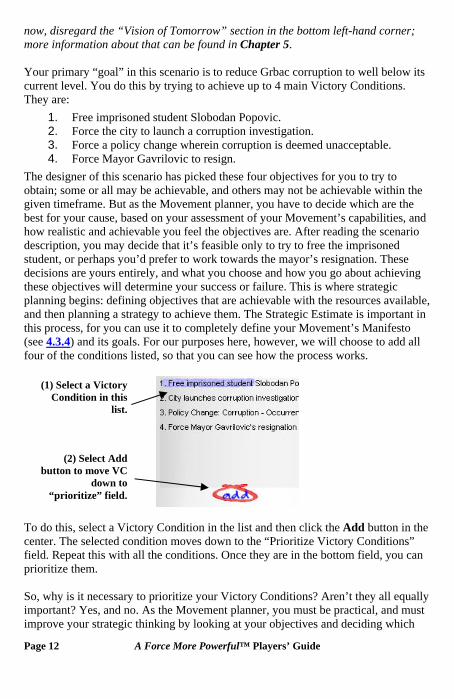
now, disregard the “Vision of Tomorrow” section in the bottom left-hand corner; more information about that can be found in Chapter 5. Your primary “goal” in this scenario is to reduce Grbac corruption to well below its current level. You do this by trying to achieve up to 4 main Victory Conditions. They are:
1. Free imprisoned student Slobodan Popovic. 2. Force the city to launch a corruption investigation. 3. Force a policy change wherein corruption is deemed unacceptable. 4. Force Mayor Gavrilovic to resign.
The designer of this scenario has picked these four objectives for you to try to obtain; some or all may be achievable, and others may not be achievable within the given timeframe. But as the Movement planner, you have to decide which are the best for your cause, based on your assessment of your Movement’s capabilities, and how realistic and achievable you feel the objectives are. After reading the scenario description, you may decide that it’s feasible only to try to free the imprisoned student, or perhaps you’d prefer to work towards the mayor’s resignation. These decisions are yours entirely, and what you choose and how you go about achieving these objectives will determine your success or failure. This is where strategic planning begins: defining objectives that are achievable with the resources available, and then planning a strategy to achieve them. The Strategic Estimate is important in this process, for you can use it to completely define your Movement’s Manifesto (see 4.3.4) and its goals. For our purposes here, however, we will choose to add all four of the conditions listed, so that you can see how the process works.
(1) Select a Victory Condition in this
list.
(2) Select Add button to move VC
down to “prioritize” field.
To do this, select a Victory Condition in the list and then click the Add button in the center. The selected condition moves down to the “Prioritize Victory Conditions” field. Repeat this with all the conditions. Once they are in the bottom field, you can prioritize them. So, why is it necessary to prioritize your Victory Conditions? Aren’t they all equally important? Yes, and no. As the Movement planner, you must be practical, and must improve your strategic thinking by looking at your objectives and deciding which
Page 12 A Force More Powerful™ Players’ Guide
are the most important and achievable at a given time. Many real-world Movements fail because their leadership tries to accomplish too much too soon. Again, be practical and take time to consider your most important goals, and then plan to achieve them based on your analysis of the information about the scenario.
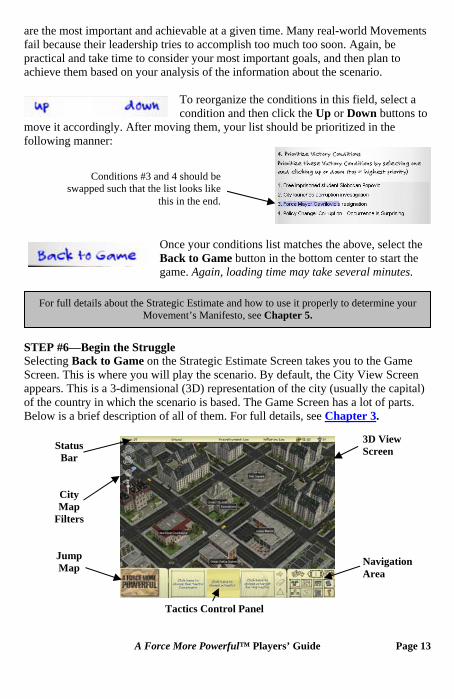
To reorganize the conditions in this field, select a condition and then click the Up or Down buttons to
move it accordingly. After moving them, your list should be prioritized in the following manner:
Conditions #3 and 4 should be swapped such that the list looks like
this in the end.
Once your conditions list matches the above, select the Back to Game button in the bottom center to start the game. Again, loading time may take several minutes.
For full details about the Strategic Estimate and how to use it properly to determine your Movement’s Manifesto, see Chapter 5.
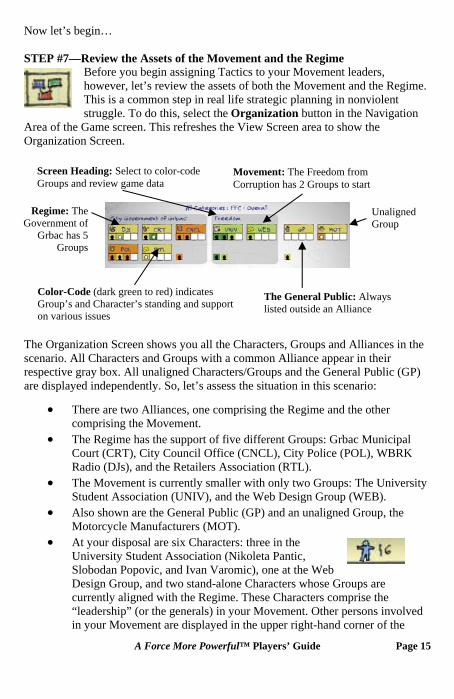
STEP #6—Begin the Struggle Selecting Back to Game on the Strategic Estimate Screen takes you to the Game Screen. This is where you will play the scenario. By default, the City View Screen appears. This is a 3-dimensional (3D) representation of the city (usually the capital) of the country in which the scenario is based. The Game Screen has a lot of parts. Below is a brief description of all of them. For full details, see Chapter 3
A Force More Powerful™ Players’ Guide Page 13
.
Status
Bar
City Map
Filters
Jump Map
Tactics Control Panel
3D View Screen Navigation Area
Status Bar: The Status Bar shows pertinent information about the scenario: The current date, the name of the city, the unemployment and inflation rates of the country, and the amount of money and people available in your Movement. City Map Filters: These filters allow you to highlight the City View with various color-coded data. They also allow you to display the names of important buildings, and allow you to zoom in and out. 3D View Screen: This is the center of the screen and by default, the City View appears. You may change the screen which appears here by using the Navigation buttons in the bottom right-hand corner (see below). Jump-Map (National Map): This map shows the country in which the scenario takes place. You may click here to jump back and forth between the City map and the National map. This scenario does not have a National map, and thus the A Force More Powerful game logo appears here instead. Tactics Control Panel: This is where you will select Tactics. More on this can be found in Section 3.4.4. Navigation Area: The Navigation Area is where you can access various data screens that can be displayed in the View Screen area. We will describe some of these screens as we proceed below. Before we continue, let’s review some definitions, as these represent the core elements that comprise A Force More Powerful.
The Struggle: Every scenario in A Force More Powerful is constructed such that you have two opposing Alliances: The Movement versus the Regime. Each Alliance is composed of like-minded Characters and Groups.
The Character: A Character is a person who belongs to a particular Group, and may also belong to a particular Alliance. Some Characters are independent and thus do not belong to an Alliance.
The Group: A Group is a collection of Characters that are brought together by common interests, aspirations, emotional bonds, or economic or political necessity. A police force, such as the City Police of Grbac in
this scenario, is considered a Group. The Alliance: An Alliance is a collection of Groups with a like-minded purpose. The “Freedom from Corruption” Movement in this scenario is considered an Alliance. The Regime: The Regime is an Alliance of Characters and Groups supporting the ruling body, and is (in essence) your opponent. In this scenario, the Regime is called The Government of Grbac. The Movement: In this scenario, your Movement is called Freedom From Corruption. The Movement is an Alliance of Characters and Groups that support your goals objectives. You are the behind-the-scenes planner of the Movement. Members of the Movement are at your disposal to perform Tactics.
A Tactic: A Tactic is an action taken by a Character to support the larger strategic goals and objectives of his/her Group and Alliance.
For example, Mass Protest is a Tactic in the game.
Page 14 A Force More Powerful™ Players’ Guide
Now let’s begin… STEP #7—Review the Assets of the Movement and the Regime
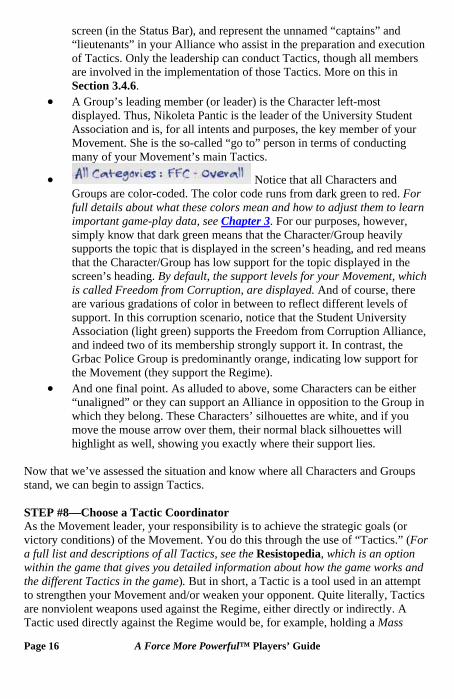
Before you begin assigning Tactics to your Movement leaders, however, let’s review the assets of both the Movement and the Regime. This is a common step in real life strategic planning in nonviolent struggle. To do this, select the Organization button in the Navigation
Area of the Game screen. This refreshes the View Screen area to show the Organization Screen.
Screen Heading: Select to color-code Groups and review game data
Regime: The Government of
Grbac has 5 Groups
The General Public: Always listed outside an Alliance
Movement: The Freedom from Corruption has 2 Groups to start
Color-Code (dark green to red) indicates Group’s and Character’s standing and support on various issues
Unaligned Group
The Organization Screen shows you all the Characters, Groups and Alliances in the scenario. All Characters and Groups with a common Alliance appear in their respective gray box. All unaligned Characters/Groups and the General Public (GP) are displayed independently. So, let’s assess the situation in this scenario:
• There are two Alliances, one comprising the Regime and the other comprising the Movement.
• The Regime has the support of five different Groups: Grbac Municipal Court (CRT), City Council Office (CNCL), City Police (POL), WBRK Radio (DJs), and the Retailers Association (RTL).
• The Movement is currently smaller with only two Groups: The University Student Association (UNIV), and the Web Design Group (WEB).
• Also shown are the General Public (GP) and an unaligned Group, the Motorcycle Manufacturers (MOT).
• At your disposal are six Characters: three in the University Student Association (Nikoleta Pantic, Slobodan Popovic, and Ivan Varomic), one at the Web Design Group, and two stand-alone Characters whose Groups are currently aligned with the Regime. These Characters comprise the “leadership” (or the generals) in your Movement. Other persons involved in your Movement are displayed in the upper right-hand corner of the
A Force More Powerful™ Players’ Guide Page 15
screen (in the Status Bar), and represent the unnamed “captains” and “lieutenants” in your Alliance who assist in the preparation and execution of Tactics. Only the leadership can conduct Tactics, though all members are involved in the implementation of those Tactics. More on this in Section 3.4.6.
• A Group’s leading member (or leader) is the Character left-most displayed. Thus, Nikoleta Pantic is the leader of the University Student Association and is, for all intents and purposes, the key member of your Movement. She is the so-called “go to” person in terms of conducting many of your Movement’s main Tactics.
• Notice that all Characters and Groups are color-coded. The color code runs from dark green to red. For full details about what these colors mean and how to adjust them to learn important game-play data, see Chapter 3. For our purposes, however, simply know that dark green means that the Character/Group heavily supports the topic that is displayed in the screen’s heading, and red means that the Character/Group has low support for the topic displayed in the screen’s heading. By default, the support levels for your Movement, which is called Freedom from Corruption, are displayed. And of course, there are various gradations of color in between to reflect different levels of support. In this corruption scenario, notice that the Student University Association (light green) supports the Freedom from Corruption Alliance, and indeed two of its membership strongly support it. In contrast, the Grbac Police Group is predominantly orange, indicating low support for the Movement (they support the Regime).
• And one final point. As alluded to above, some Characters can be either “unaligned” or they can support an Alliance in opposition to the Group in which they belong. These Characters’ silhouettes are white, and if you move the mouse arrow over them, their normal black silhouettes will highlight as well, showing you exactly where their support lies.
Now that we’ve assessed the situation and know where all Characters and Groups stand, we can begin to assign Tactics. STEP #8—Choose a Tactic Coordinator As the Movement leader, your responsibility is to achieve the strategic goals (or victory conditions) of the Movement. You do this through the use of “Tactics.” (For a full list and descriptions of all Tactics, see the Resistopedia, which is an option within the game that gives you detailed information about how the game works and the different Tactics in the game). But in short, a Tactic is a tool used in an attempt to strengthen your Movement and/or weaken your opponent. Quite literally, Tactics are nonviolent weapons used against the Regime, either directly or indirectly. A Tactic used directly against the Regime would be, for example, holding a Mass
Page 16 A Force More Powerful™ Players’ Guide
Protest or Harassing a Regime official. A Tactic used indirectly against the Regime would be raising money for your Movement, which opposes the Regime, or training your Movement’s members in Nonviolent Intervention (which are high-risk Tactics in nonviolent action that disrupt the opponent directly. Training in this allows members of your Movement to carry out disciplined nonviolent action with less likelihood of it devolving into chaos or violence). Regardless, the purpose of any Tactic that you initiate is to strengthen the Movement and to weaken the Regime.
In the bottom center of the screen rests the Tactics Control Panel. This is where you will assign a Tactic Coordinator, a Tactic and a Target for the Tactic. Although you can select these options in any order you wish, the best policy is to first select a Coordinator. The Characters available to make these assignments are your
Movement leaders.
A Force More Powerful™ Players’ Guide Page 17
our ” of sted
To pick a coordinator, select the “Click here to Choose the Tactic Coordinator” button. This opens a notebook listing yMovement leaders. The current “headyour Movement, Nikoleta Pantic, is lisecond under Municipal Court member John Duval. Go ahead and select her by clicking on her portrait. The selection circle should appear over her portrait. Her attributes are then listed on the right-hand side. Let’s take a minute to review her characteristics. All Characters have a set of attributes that define who they are and what their “qualities” are. For Nikoleta, her “Public Profile” is marked in orange, meaning that she isn’t very well known. But she’s capable of having influence over the public (light green), and her “Enthusiasm” for the Movement itself is very high (dark green). The color-codes here are the same as they are across the entire A Force More Powerful interface; for full details, see Chapter 3. Nikoleta also has a number of “Competencies” that make her an excellent leader: Writing, Charisma, Vision, Empathy, Creativity and Street Smarts. These Competencies play a very important role in how successful a Character is when conducting Tactics (see 4.3.2 and the Appendix for more information about competencies). Nikoleta is also skilled in Nonviolent Intervention and Support & Logistics Training, so she’s a good candidate for Training Tactics. Clicking the “More Information” button will open up
an even greater list of attributes and data on Ms. Pantic, but we won’t worry about that now. More information on that can be found in both Chapters 3 and 4.
Let’s give Nikoleta her first assignment. To do this, double-click on her portrait or select the OK button in the bottom right-hand corner. Doing so closes the leadership display and places Nikoleta’s portrait in the
coordinator spot on the Tactics Control Panel. STEP #9—Choose a Tactic
Now that you have a coordinator, you must choose a Tactic. There are a lot of different Tactics to choose from. Which Tactic to pick and when to apply it is the big challenge in A Force More Powerful, and the more you play and understand how things work, the more
proficient you will become. For now, let’s start slow and have Nikoleta raise some money through the Tactic of Fundraising. Your Movement has some money to start (as shown in the upper right-hand display on the Status Bar), but you can always use more. Nikoleta has the Competency of “Charisma” and so she’s a good candidate to raise money.
To do this, select the “Click here to Choose a Tactic” button on the Tactics Control Panel. This opens a list of Tactics. There are five different categories of Tactics: Attack, Deny, Build Strength, Defend, and Communicate. Beneath each of these categories is a series of individual Tactics that you can assign to your Movement leaders.
The Tactic we require is located under the Build Strength category.
• Select the “+” sign next to this category to open a list of Tactics. • Then select the Fundraise Tactic
(it should be the first Tactic listed). It highlights and the right side of the page refreshes to reveal details about the Tactic.
A Tactic’s description page is divided into three sections: Description, Resource Expenditure, and Duration. Description: This gives a description of the Tactic you’ve selected. Since you’ve selected the Tactic of Fundraise, a description of it appears here. Resource Expenditure: This section indicates the cost in both money and in personnel needed to conduct this Tactic. Fundraising does not require any significant amount of money (thankfully), but it does require at least two other Movement people to participate. Looking at your current money and people
Page 18 A Force More Powerful™ Players’ Guide
numbers in the upper right-hand corner of the Status Bar, you have more than enough personnel to conduct this Tactic. Duration: This section is interactive, in that you can adjust the values that appear in the bottom three listings. The “duration” of a Tactic is important to consider carefully, and a full explanation of this can be found in Chapters 3 and 4. In short, using the up and down carets, you can indicate the number of days (or turns) that a Character should “wait” before beginning the Tactic; the number of days to “prepare” for the Tactic; and how many days the Tactic will “last” before it completes.
A Force More Powerful™ Players’ Guide Page 19
The default settings for the Fundraiser is 3 days for “prep” and 14 days for “duration,” which means that Ms. Pantic would be tied up for 17 day preparing and conducting the event. But we want her to be available for further operations sooner, so lets’ reset these numbers. For our Fundraiser, we will set the preparation time to 5 days, and decrease the number of days the Tactic will last to 3 days, which means that Nikoleta Pantic will be tied up for only 8 days planning and implementing the fundraiser (completion date of 9 January 05). Note: While Nikoleta works on the fundraiser, she can be given other Tactics, but she will not be able to begin them until she finishes her duties on the fundraiser; see Chapter 4 on assigning multiple Tactics.
When you have finished reviewing the information about Fundraising, select the OK button in the bottom right-hand corner and the Tactic he Tactics Control Panel. appears on t
STEP #10—Choose a Target
The next step is to pick a Target for the Tactic. Not all Tactics require Targets, but Fundraising does. To choose a Target, select the “Click here to choose a target for this tactic” button on the
Tactics Control Panel (as shown above). This opens a list of Targets. There are three Groups from which to raise
money: The University Student Association, the Web Design Group, and the “unaligned” Motorcycle
Manufacturers. Since Ms. Pantic is a member of the student Group, let’s choose it as the Target of our
Fundraiser. As with selecting a Tactic, select the Target in the list on the left-hand side of the page. Details of the Target appear on the right-hand page. The details for our Target, the University Student Association, are formatted much like Nikoleta Pantic’s information. The name of the Target (a “Group” in this example) is listed at the top, followed by what kind of Group it is, its leader (luckily for us, it’s Nikoleta herself), where it is located (if available), and a series of other details indicating its support for the Regime, the Movement, etc. As always, the color-code is the same here as in other displays (dark green to red). Finally, you may select the More Information button to access further details about this Group (see Chapters 3 and 4).
Select the OK button in the bottom right-hand corner and the Target appears on the Tactics Control Panel.
After completing steps 8, 9 and 10 above, the Tactics Control Panel should look like this:
STEP #11—Review Your Decision with Movement Leaders
Once all three areas of the Tactics Control Panel are filled, the small sidebar next to the Target area highlights with a green arrow (submit Tactic), a red chalkboard eraser (clear Tactic), and either a green dot, a yellow triangle, or ared stop sign (survey Tactic). This area gives you the opportunity to submit your Tactic for implementation (green arrow), delete the Tactic that you’ve
selected (eraser), and/or survey the viability of the Tactic with your Movement leaders (colored survey symbol). Let’s take a survey first. To get the opinions of your leaders, select the green Survey button. This opens the Survey dialog and shows what your leaders think of the Tactic you’ve selected.
Page 20 A Force More Powerful™ Players’ Guide
Fundraising is a very popular Tactic in your Movement, so it’s full speed ahead with this one. If the Survey button had been a yellow triangle, then some of your leaders would not have been sure about the feasibility of your decision. If it had been a red stop-
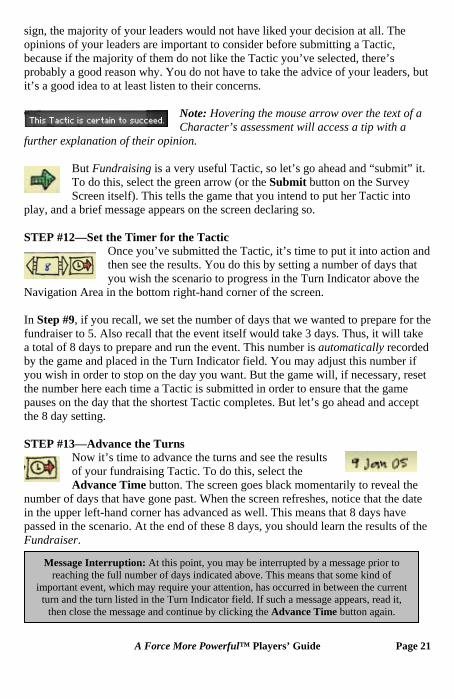
sign, the majority of your leaders would not have liked your decision at all. The opinions of your leaders are important to consider before submitting a Tactic, because if the majority of them do not like the Tactic you’ve selected, there’s probably a good reason why. You do not have to take the advice of your leaders, but it’s a good idea to at least listen to their concerns.
Note: Hovering the mouse arrow over the text of a Character’s assessment will access a tip with a
further explanation of their opinion.
But Fundraising is a very useful Tactic, so let’s go ahead and “submit” it. To do this, select the green arrow (or the Submit button on the Survey Screen itself). This tells the game that you intend to put her Tactic into
play, and a brief message appears on the screen declaring so. STEP #12—Set the Timer for the Tactic
Once you’ve submitted the Tactic, it’s time to put it into action and then see the results. You do this by setting a number of days that you wish the scenario to progress in the Turn Indicator above the
Navigation Area in the bottom right-hand corner of the screen. In Step #9, if you recall, we set the number of days that we wanted to prepare for the fundraiser to 5. Also recall that the event itself would take 3 days. Thus, it will take a total of 8 days to prepare and run the event. This number is automatically recorded by the game and placed in the Turn Indicator field. You may adjust this number if you wish in order to stop on the day you want. But the game will, if necessary, reset the number here each time a Tactic is submitted in order to ensure that the game pauses on the day that the shortest Tactic completes. But let’s go ahead and accept the 8 day setting. STEP #13—Advance the Turns
Now it’s time to advance the turns and see the results of your fundraising Tactic. To do this, select the Advance Time button. The screen goes black momentarily to reveal the
number of days that have gone past. When the screen refreshes, notice that the date in the upper left-hand corner has advanced as well. This means that 8 days have passed in the scenario. At the end of these 8 days, you should learn the results of the Fundraiser.
Message Interruption: At this point, you may be interrupted by a message prior to reaching the full number of days indicated above. This means that some kind of
important event, which may require your attention, has occurred in between the current turn and the turn listed in the Turn Indicator field. If such a message appears, read it,
then close the message and continue by clicking the Advance Time button again.
A Force More Powerful™ Players’ Guide Page 21
STEP #14—Review Results (Messages)
Page 22 A Force More Powerful™ Players’ Guide
primary fail. There (listed balloons
ws d
alongside a newspaper).
t
tent said message appears to the right.
s
ediately goe
an
through your Fundraiser and through your Groups. You’re off to a good art.
iple Tactics before progressing the turns in the scenario. We will do this below.
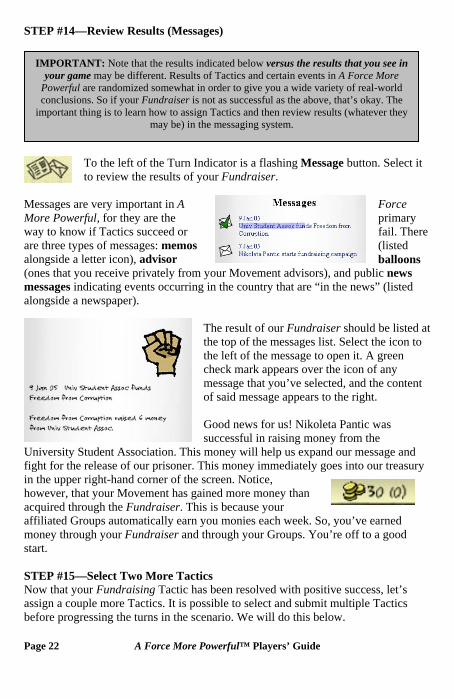
To the left of the Turn Indicator is a flashing Message button. Select it to review the results of your Fundraiser.
Messages are very important in A More Powerful, for they are the way to know if Tactics succeed or are three types of messages: memos alongside a letter icon), advisor (ones that you receive privately from your Movement advisors), and public nemessages indicating events occurring in the country that are “in the news” (liste
Force
The result of our Fundraiser should be listed athe top of the messages list. Select the icon tothe left of the message to open it. A greencheck mark appears over the icon of any message that you’ve selected, and the conof Good news for us! Nikoleta Pantic wasuccessful in raising money from the
University Student Association. This money will help us expand our message and fight for the release of our prisoner. This money immin the upper right-hand corner of the screen. Notice, however, that your Movement has gained more money thacquired through the Fundraiser. This is because your affiliated Groups automatically earn you monies each week. So, you’ve earned money
s into our treasury
IMPORTANT: Note that the results indicated below versus the results that you see in your game may be different. Results of Tactics and certain events in A Force More
Powerful are randomized somewhat in order to give you a wide variety of real-world conclusions. So if your Fundraiser is not as successful as the above, that’s okay. The
important thing is to learn how to assign Tactics and then review results (whatever they may be) in the messaging system.
st STEP #15—Select Two More Tactics Now that your Fundraising Tactic has been resolved with positive success, let’s assign a couple more Tactics. It is possible to select and submit mult
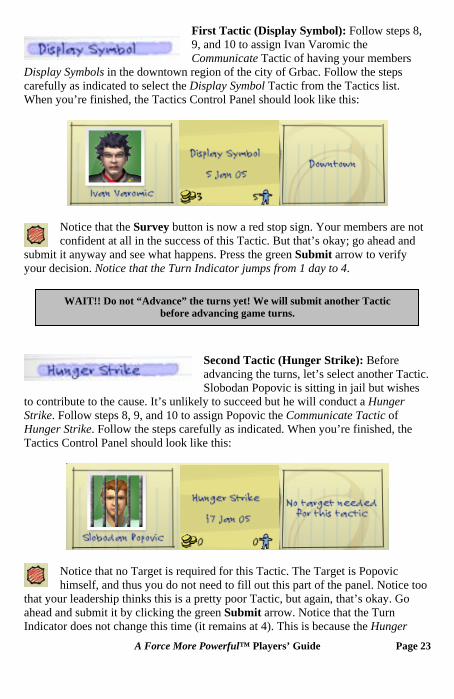
First Tactic (Display Symbol): Follow steps 8, 9, and 10 to assign Ivan Varomic the Communicate Tactic of having your members
Display Symbols in the downtown region of the city of Grbac. Follow the steps carefully as indicated to select the Display Symbol Tactic from the Tactics list. When you’re finished, the Tactics Control Panel should look like this:
Notice that the Survey button is now a red stop sign. Your members are not confident at all in the success of this Tactic. But that’s okay; go ahead and
it anyway and see what happens. Press the green Submit arrow to verify your decision. Notice that the Turn Indicator jumps from 1 day to 4. submit
WAIT!! Do not “Advance” the turns yet! We will submit another Tactic before advancing game turns.
Second Tactic (Hunger Strike): Before advancing the turns, let’s select another Tactic. Slobodan Popovic is sitting in jail but wishes
to contribute to the cause. It’s unlikely to succeed but he will conduct a Hunger Strike. Follow steps 8, 9, and 10 to assign Popovic the Communicate Tactic of Hunger Strike. Follow the steps carefully as indicated. When you’re finished, the Tactics Control Panel should look like this:
Notice that no Target is required for this Tactic. The Target is Popovic himself, and thus you do not need to fill out this part of the panel. Notice too
that your leadership thinks this is a pretty poor Tactic, but again, that’s okay. Go ahead and submit it by clicking the green Submit arrow. Notice that the Turn Indicator does not change this time (it remains at 4). This is because the Hunger A Force More Powerful™ Players’ Guide Page 23
Strike Tactic is scheduled to take longer than the Display Symbol Tactic, and thus there’s no need for the game to change the time. Once the Display Symbol Tactic is completed, the time will be reset to indicate the number of days remaining before the Hunger Strike Tactic is complete.
NOTE: The ability to assign and submit multiple Tactics before advancing turns is important to keep in mind, for you can go through all of your members and give them
assignments immediately. This saves time and uses your resources to best effect.
Government Rally: At this point, the game may be halted by a government rally. If this happens, the screen goes blank momentarily, tells you what’s about to occur, and then jumps back to the 3D View to show the rally taking place. This kind of 3D-visual Tactic is called a “vignette” Tactic. For more details, see Section 4.11. STEP #16—Review All Tactics on the Tactics Queue
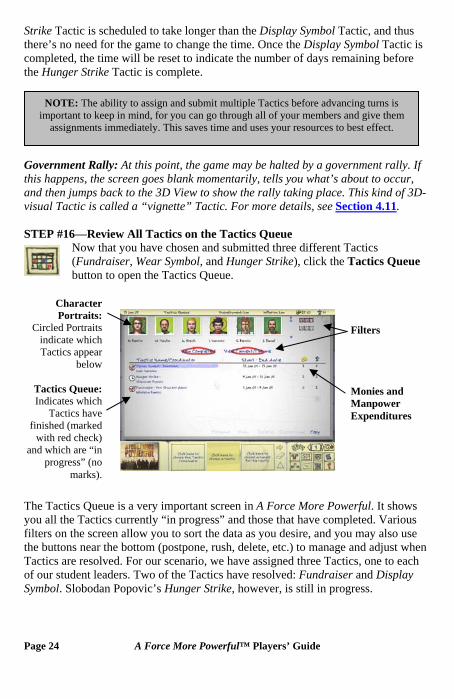
Now that you have chosen and submitted three different Tactics (Fundraiser, Wear Symbol, and Hunger Strike), click the Tactics Queue button to open the Tactics Queue.
Character Portraits:
Circled Portraits indicate which Tactics appear
below
Tactics Queue: Indicates which
Tactics have finished (marked
with red check) and which are “in
progress” (no marks).
Filters Monies and Manpower Expenditures
The Tactics Queue is a very important screen in A Force More Powerful. It shows you all the Tactics currently “in progress” and those that have completed. Various filters on the screen allow you to sort the data as you desire, and you may also use the buttons near the bottom (postpone, rush, delete, etc.) to manage and adjust when Tactics are resolved. For our scenario, we have assigned three Tactics, one to each of our student leaders. Two of the Tactics have resolved: Fundraiser and Display Symbol. Slobodan Popovic’s Hunger Strike, however, is still in progress.
Page 24 A Force More Powerful™ Players’ Guide
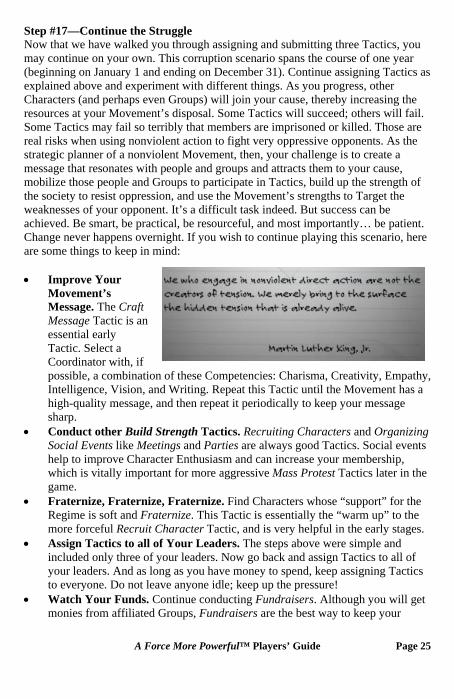
Step #17—Continue the Struggle Now that we have walked you through assigning and submitting three Tactics, you may continue on your own. This corruption scenario spans the course of one year (beginning on January 1 and ending on December 31). Continue assigning Tactics as explained above and experiment with different things. As you progress, other Characters (and perhaps even Groups) will join your cause, thereby increasing the resources at your Movement’s disposal. Some Tactics will succeed; others will fail. Some Tactics may fail so terribly that members are imprisoned or killed. Those are real risks when using nonviolent action to fight very oppressive opponents. As the strategic planner of a nonviolent Movement, then, your challenge is to create a message that resonates with people and groups and attracts them to your cause, mobilize those people and Groups to participate in Tactics, build up the strength of the society to resist oppression, and use the Movement’s strengths to Target the weaknesses of your opponent. It’s a difficult task indeed. But success can be achieved. Be smart, be practical, be resourceful, and most importantly… be patient. Change never happens overnight. If you wish to continue playing this scenario, here are some things to keep in mind: • Improve Your
Movement’s Message. The Craft Message Tactic is an essential early Tactic. Select a Coordinator with, if possible, a combination of these Competencies: Charisma, Creativity, Empathy, Intelligence, Vision, and Writing. Repeat this Tactic until the Movement has a high-quality message, and then repeat it periodically to keep your message sharp.
• Conduct other Build Strength Tactics. Recruiting Characters and Organizing Social Events like Meetings and Parties are always good Tactics. Social events help to improve Character Enthusiasm and can increase your membership, which is vitally important for more aggressive Mass Protest Tactics later in the game.
• Fraternize, Fraternize, Fraternize. Find Characters whose “support” for the Regime is soft and Fraternize. This Tactic is essentially the “warm up” to the more forceful Recruit Character Tactic, and is very helpful in the early stages.
• Assign Tactics to all of Your Leaders. The steps above were simple and included only three of your leaders. Now go back and assign Tactics to all of your leaders. And as long as you have money to spend, keep assigning Tactics to everyone. Do not leave anyone idle; keep up the pressure!
• Watch Your Funds. Continue conducting Fundraisers. Although you will get monies from affiliated Groups, Fundraisers are the best way to keep your
A Force More Powerful™ Players’ Guide Page 25
Page 26 A Force More Powerful™ Players’ Guide
Movement financially secure. As time goes on, you’ll want to try more aggressive, more costly Tactics. You’ll need money to conduct these Tactics.
• Continue with Hunger Strikes. Your first Hunger Strike may fail. If so, try it again, and again, and again, until it succeeds. It’s an important Tactic in this scenario.
• Watch Your Messages. You will get scores of messages during play. Watch and read them carefully. Pay particular attention to any messages that indicate that a certain Character is interested in your Movement. And then, make immediate Fraternize or Recruit Character attempts to sway him/her to your cause. These may fail and they may take a long time, but they are worth it. More Characters mean more support.
• Read More Tips-On-Play. Read Section 4.12 for a more detailed and comprehensive set of tips on how to play A Force More Powerful.
3. INTERFACE OVERVIEW This chapter describes all of the interface features available in A Force More Powerful. After reviewing this chapter you should have a good understanding on how all the various buttons, tabs, text fields, etc. function. For full details about how these features work in context to game play, please refer to Chapter 4.
3.1 Main Menu Screen
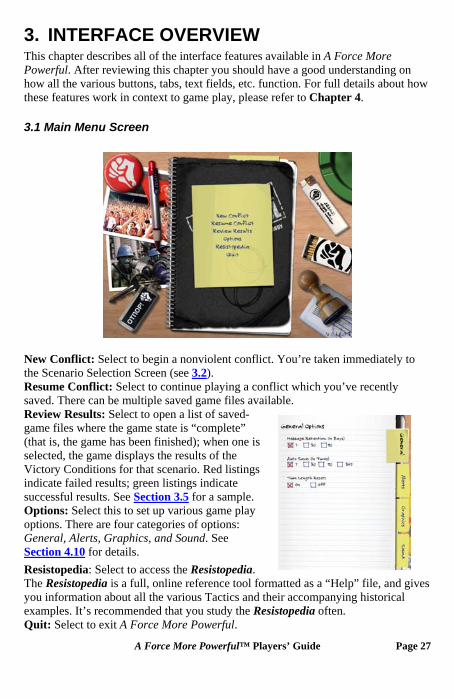
New Conflict: Select to begin a nonviolent conflict. You’re taken immediately to the Scenario Selection Screen (see 3.2). Resume Conflict: Select to continue playing a conflict which you’ve recently saved. There can be multiple saved game files available. Review Results: Select to open a list of saved-game files where the game state is “complete” (that is, the game has been finished); when one is selected, the game displays the results of the Victory Conditions for that scenario. Red listings indicate failed results; green listings indicate successful results. See Section 3.5 for a sample.
A Force More Powerful™ Players’ Guide Page 27
Options: Select this to set up various game play options. There are four categories of options: General, Alerts, Graphics, and Sound. See Section 4.10 for details. Resistopedia: Select to access the Resistopedia. The Resistopedia is a full, online reference tool formatted as a “Help” file, and gives you information about all the various Tactics and their accompanying historical examples. It’s recommended that you study the Resistopedia often. Quit: Select to exit A Force More Powerful.
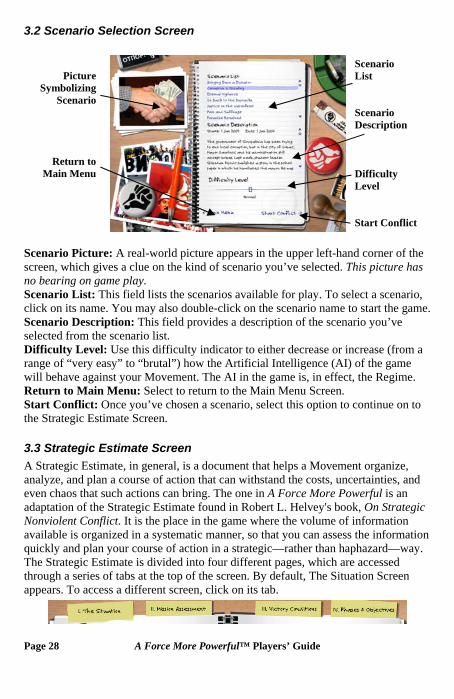
3.2 Scenario Selection Screen
Picture Symbolizing
Scenario
Return to Main Menu
Scenario List Scenario Description Difficulty Level Start Conflict
Scenario Picture: A real-world picture appears in the upper left-hand corner of the screen, which gives a clue on the kind of scenario you’ve selected. This picture has no bearing on game play. Scenario List: This field lists the scenarios available for play. To select a scenario, click on its name. You may also double-click on the scenario name to start the game. Scenario Description: This field provides a description of the scenario you’ve selected from the scenario list. Difficulty Level: Use this difficulty indicator to either decrease or increase (from a range of “very easy” to “brutal”) how the Artificial Intelligence (AI) of the game will behave against your Movement. The AI in the game is, in effect, the Regime. Return to Main Menu: Select to return to the Main Menu Screen. Start Conflict: Once you’ve chosen a scenario, select this option to continue on to the Strategic Estimate Screen.
3.3 Strategic Estimate Screen A Strategic Estimate, in general, is a document that helps a Movement organize, analyze, and plan a course of action that can withstand the costs, uncertainties, and even chaos that such actions can bring. The one in A Force More Powerful is an adaptation of the Strategic Estimate found in Robert L. Helvey's book, On Strategic Nonviolent Conflict. It is the place in the game where the volume of information available is organized in a systematic manner, so that you can assess the information quickly and plan your course of action in a strategic—rather than haphazard—way. The Strategic Estimate is divided into four different pages, which are accessed through a series of tabs at the top of the screen. By default, The Situation Screen appears. To access a different screen, click on its tab.
Page 28 A Force More Powerful™ Players’ Guide
The Situation: The Situation Screen displays the information and data you need to know before starting the scenario. Mission Assessment: The Mission Assessment Screen provides tools that you can use to begin planning your Movement's actions. Victory Conditions: The Victory Conditions Screen comprises four areas which enable you to review goals and your Vision of Tomorrow, select Victory Conditions, and prioritize Victory Conditions. This page must be accessed and Victory Conditions must be selected and prioritized before you can begin any scenario. Phases and Objectives: The Phases and Objectives Screen allows you set your phases and determine your objectives for those phases. An entire chapter has been devoted to the Strategic Estimate. For more details about this screen and all of its capabilities, see Chapter 5.
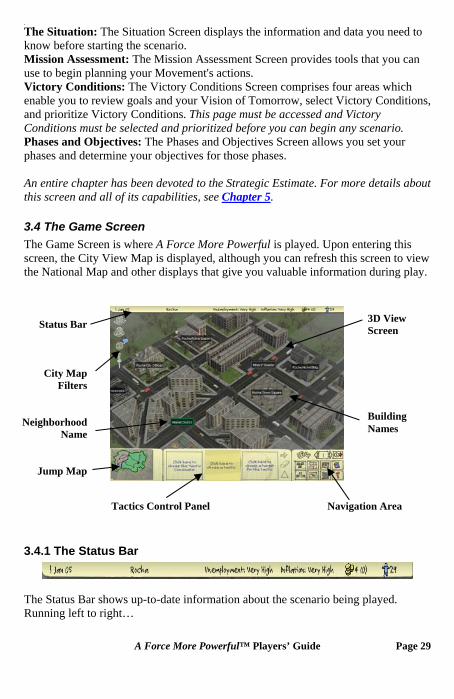
3.4 The Game Screen The Game Screen is where A Force More Powerful is played. Upon entering this screen, the City View Map is displayed, although you can refresh this screen to view the National Map and other displays that give you valuable information during play.
A Force More Powerful™ Players’ Guide Page 29
3.4.1 The Status Bar
The Status Bar shows up-to-date information about the scenario being played. Running left to right…
Status Bar
City Map Filters
Neighborhood Name
Jump Map
Tactics Control Panel Navigation Area
3D View Screen Building Names
Date—Shows the current day, month, and year in the scenario. This information changes as play progresses. Name—Shows the name of the map or the informational data currently displayed in the center of the screen. By default, the City Map View Screen is displayed, but this can be changed by using various display tools in the Navigation Area (see below). Unemployment—Shows the unemployment level of the map area currently displayed in the center of the screen. There are five levels: Very Low, Low, Medium, High, and Very High. Unemployment rates can change during play. Inflation—Shows the current inflation level of the entire country. There are five levels: Very Low, Low, Medium, High, and Very High. Inflation rates can change during play. Money and People—Shows the total amount of money and personnel your Movement currently has available. This rate fluctuates up and down as you play. For money, the left number is the amount of money your Movement currently has; the number in parenthesis is the amount you’ve currently allotted to conducting Tactics. If the amount is red, then you need more money before you can conduct further Tactics. For personnel, the number represents a symbolic representation of the total people resources of your Movement.
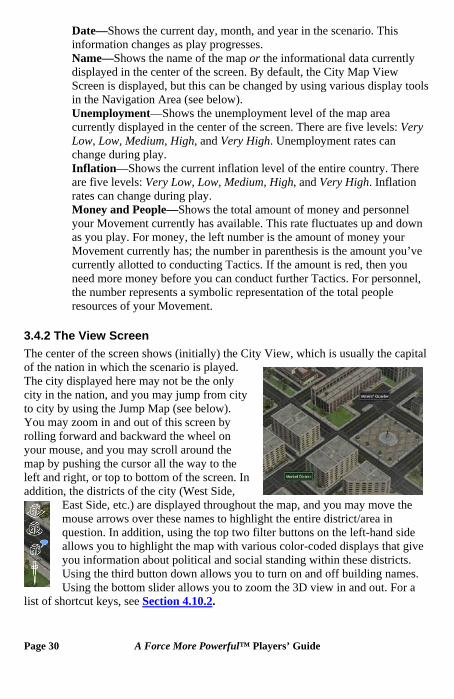
3.4.2 The View Screen The center of the screen shows (initially) the City View, which is usually the capital of the nation in which the scenario is played. The city displayed here may not be the only city in the nation, and you may jump from city to city by using the Jump Map (see below). You may zoom in and out of this screen by rolling forward and backward the wheel on your mouse, and you may scroll around the map by pushing the cursor all the way to the left and right, or top to bottom of the screen. In addition, the districts of the city (West Side,
East Side, etc.) are displayed throughout the map, and you may move the mouse arrows over these names to highlight the entire district/area in question. In addition, using the top two filter buttons on the left-hand side allows you to highlight the map with various color-coded displays that give you information about political and social standing within these districts. Using the third button down allows you to turn on and off building names. Using the bottom slider allows you to zoom the 3D view in and out. For a
list of shortcut keys, see Section 4.10.2.
Page 30 A Force More Powerful™ Players’ Guide
3.4.3 The Jump Map (National Map)
A Force More Powerful™ Players’ 31
large squares), but they also s
The Jump Map allows you to change the display in the middle of the screen to the National Map. Clicking anywhere inside the Jump Map will automatically change the view screen from whatever is displayed there to the National View. Not only do the Map Controls show all the main cities of the nation (the how outer-lying resource areas, such as oil wells, radio
stations, coal mines, etc. that can be selected and targeted with Tactics (see 3.4.8).
The buttons appearing in the upper left-hand corner of the National Map
on
you to
3.4.4 Tactics Control Panel ick Tactics, Tactic Coordinators, and Targets
To jump from the National View back to the City View, click on the icon of the desired city and the view screen will change again to display that city.
allow you to color-code the various regions of the map to glean valuable information about the status of the country on various issues. The top buttallows you to cycle through various Support Levels; the bottom button allowscycle through demographic information. Repeatedly clicking a button
changes the information displayed.
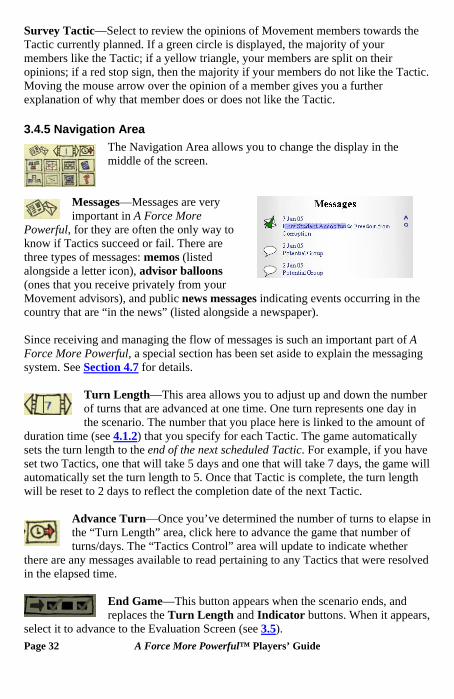
This area of the screen allows you to pfor Tactics.
Guide Page
Tactic Coordinator Tactics Selection Target Selection
actic Coordinator—This area is where the coordinator of a Tactic is selected and T
displayed. See Section 3.4.6 for more details. Tactics Selection—This area is where a Tactic is selected and displayed. See Section 3.4.7 for more details. Target Selection—This area is where the target of a Tactic is selected and displayed. See Section 3.4.8 for more details. Submit Tactic—This arrow highlights in green when you have picked a Tactic
this
the Tactic you’ve just selected. This allows you to start over from scratch.
Coordinator, a Tactic, and a Target. As soon as these three areas are filled, click arrow to confirm that this is the Tactic you wish to put into action. Clear Tactic—Use the eraser to remove (or delete)
Page 32 A Force More Powerful™ Players’ Guide
vement members towards the ed, the majority of your
if a yellow triangle, your members are split on their ur members do not like the Tactic.
ber gives you a further he Tactic.
ages are very t
Powerful, for the to know if Tactics succeed or fail. There are three types of me ages: memos (listed
e(ones that our
ge side a newspaper).
an important part of A been set aside to explain the messaging
Survey Tactic—Select to review the opinions of MoTactic currently planned. If a green circle is displaymembers like the Tactic; opinions; if a red stop sign, then the majority if yoMoving the mouse arrow over the opinion of a memexplanation of why that member does or does not like t
3.4.5 Navigation Area The Navigation Area allows you to change the display in the middle of the screen.
Messages—Messant in A Force More y are often the only way
impor
ssalongsid a letter icon), advisor balloons
you receive privately from yMovement advisors), and public news messacountry that are “in the news” (listed along Since receiving and managing the flow of messages is suchForce More Powerful, a special section hassystem. See Section 4.7
s indicating events occurring in the
for details.
Turn Length—This area allows you to adjust up and down the number of turns that are advanced at one time. One turn represents one day in the scenario. The number that you place here is linked to the amount of
duration time (see 4.1.2) that you specify for each Tactic. The game automatically ts the turn length to the end of the next scheduled Tactic. For example, if you have
ctiautomaticallwill be reset
ere resolved the elapsed time.
rs, select it to advance to the Evaluation Screen (see 3.5
seset two Ta cs, one that will take 5 days and one that will take 7 days, the game will
y set the turn length to 5. Once that Tactic is complete, the turn length to 2 days to reflect the completion date of the next Tactic.
Advance Turn—Once you’ve determined the number of turns to elapse in the “Turn Length” area, click here to advance the game that number of turns/days. The “Tactics Control” area will update to indicate whether
there are any messages available to read pertaining to any Tactics that win
End Game—This button appears when the scenario ends, and replaces the Turn Length and Indicator buttons. When it appea
).
A Force More Powerful™ Players’ Guide Page 33
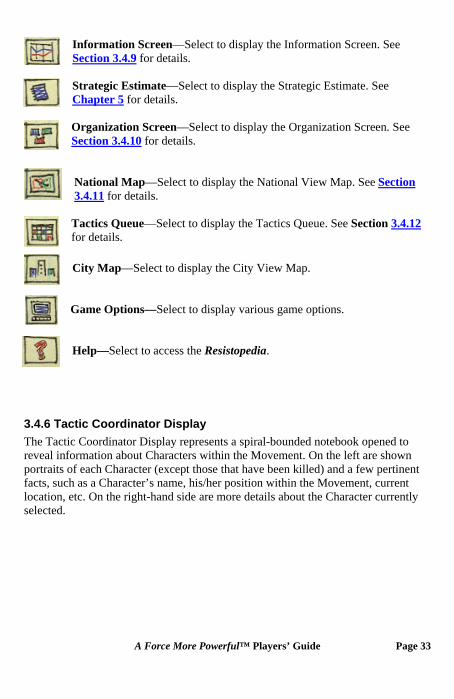
n Screen—Select to display the Information Screen. See Section .4.9
Informatio
3 for details.
eg Strat ic Estimate—Select to display the Strategic Estimate. See Chapter 5 for details. Organization Screen—Select to display the Organization Screen. See Section 3.4.10 for details. National Map—Select to display the National View Map. See Section 3.4.11 for details.
isplay the Tactics Queue. See Section 3.4.12
Tactics Queue—Select to d r details.
actic CThe Tacti unded notebook opened to reveal information about Characters within the Movement. On the left are shown
ts of each Character (except those that have been killed) and a few pertinent cts, such as a Character’s name, his/her position within the Movement, current
location, etc. On the right-hand side are more details about the Character currently
fo City Map—Select to display the City View Map. Game Options—Select to display various game options. Help—Select to access the Resistopedia.
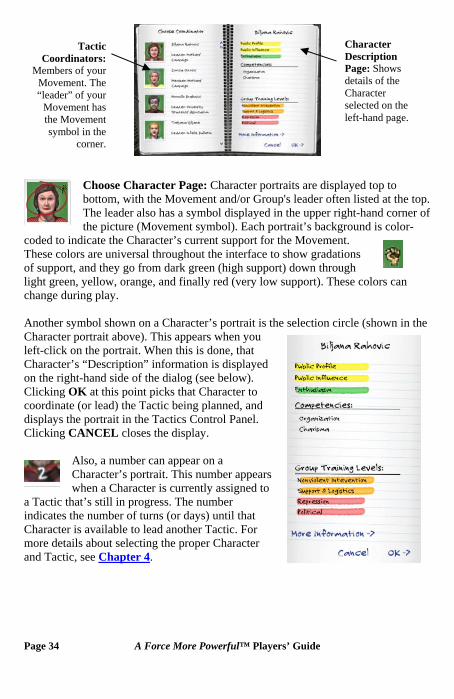
oordinator Display Coordinator Display represents a spiral-bo
3.4.6 Tc
portraifa
selected.
Page 34 A Force More Powerful™ Players’ Guide
Tactic Coordinators:
Members of your Movement. The “leader” of your
Movement has the Movement symbol in the
corner.
Character Description Page: Shows details of the Character selected on the left-hand page.
Choose Character Page: Character portraits are displayed top to bottom, with the Movement and/or Group's leader often listed at the top. The leader also has a symbol displayed in the upper right-hand corner of the picture (Movement symbol). Each portrait’s background is color-
coded to indicate the Character’s current support for the Movement. These colors are universal throughout the interface to show gradations of support, and they go from dark green (high support) down through light green, yellow, orange, and finally red (very low support). These colors can change during play. Another symbol shown on a Character’s portrait is the selection circle (shown in the Character portrait above). This appears when you left-click on the portrait. When this is done, that Character’s “Description” information is displayed on the right-hand side of the dialog (see below). Clicking OK at this point picks that Character to coordinate (or lead) the Tactic being planned, and displays the portrait in the Tactics Control Panel. Clicking CANCEL closes the display.
Also, a number can appear on a Character’s portrait. This number appears when a Character is currently assigned to
a Tactic that’s still in progress. The number indicates the number of turns (or days) until that Character is available to lead another Tactic. For more details about selecting the proper Character and Tactic, see Chapter 4.
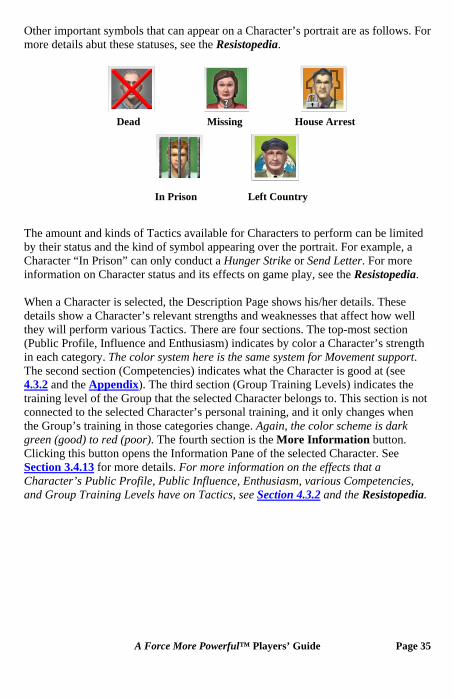
Other important symbols that can appear on a Character’s portrait are as follows. For more details abut these statuses, see the Resistopedia.
Dead Missing House Arrest
In Prison Left Country The amount and kinds of Tactics available for Characters to perform can be limited by their status and the kind of symbol appearing over the portrait. For example, a Character “In Prison” can only conduct a Hunger Strike or Send Letter. For more information on Character status and its effects on game play, see the Resistopedia. When a Character is selected, the Description Page shows his/her details. These details show a Character’s relevant strengths and weaknesses that affect how well they will perform various Tactics. There are four sections. The top-most section (Public Profile, Influence and Enthusiasm) indicates by color a Character’s strength in each category. The color system here is the same system for Movement support. The second section (Competencies) indicates what the Character is good at (see 4.3.2 and the Appendix). The third section (Group Training Levels) indicates the training level of the Group that the selected Character belongs to. This section is not connected to the selected Character’s personal training, and it only changes when the Group’s training in those categories change. Again, the color scheme is dark green (good) to red (poor). The fourth section is the More Information button. Clicking this button opens the Information Pane of the selected Character. See Section 3.4.13 for more details. For more information on the effects that a Character’s Public Profile, Public Influence, Enthusiasm, various Competencies, and Group Training Levels have on Tactics, see Section 4.3.2 and the Resistopedia.
A Force More Powerful™ Players’ Guide Page 35
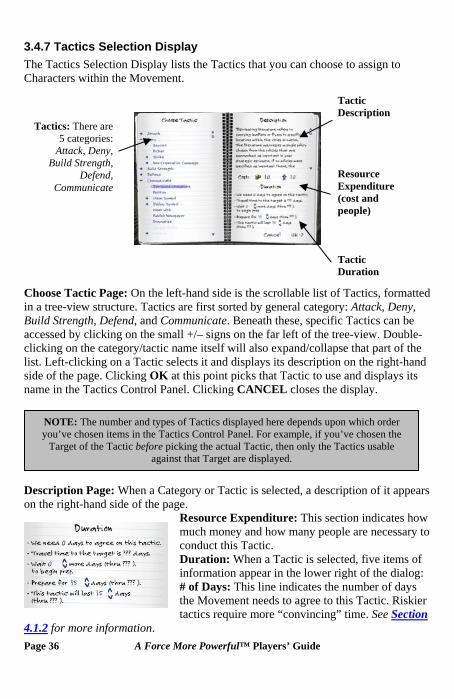
3.4.7 Tactics Selection Display The Tactics Selection Display lists the Tactics that you can choose to assign to Characters within the Movement.
Page 36 A Force More Powerful™ Players’ Guide
Tactics: There are 5 categories:
Attack, Deny, Build Strength,
Defend, Communicate
Tactic Description Resource Expenditure (cost and people) Tactic Duration
Choose Tactic Page: On the left-hand side is the scrollable list of Tactics, formatted in a tree-view structure. Tactics are first sorted by general category: Attack, Deny, Build Strength, Defend, and Communicate. Beneath these, specific Tactics can be accessed by clicking on the small +/– signs on the far left of the tree-view. Double-clicking on the category/tactic name itself will also expand/collapse that part of the list. Left-clicking on a Tactic selects it and displays its description on the right-hand side of the page. Clicking OK at this point picks that Tactic to use and displays its name in the Tactics Control Panel. Clicking CANCEL closes the display.
NOTE: The number and types of Tactics displayed here depends upon which order you’ve chosen items in the Tactics Control Panel. For example, if you’ve chosen the
Target of the Tactic before picking the actual Tactic, then only the Tactics usable against that Target are displayed.
Description Page: When a Category or Tactic is selected, a description of it appears on the right-hand side of the page.
Resource Expenditure: This section indicates how much money and how many people are necessary to conduct this Tactic. Duration: When a Tactic is selected, five items of information appear in the lower right of the dialog: # of Days: This line indicates the number of days the Movement needs to agree to this Tactic. Riskier tactics require more “convincing” time. See Section
4.1.2 for more information.
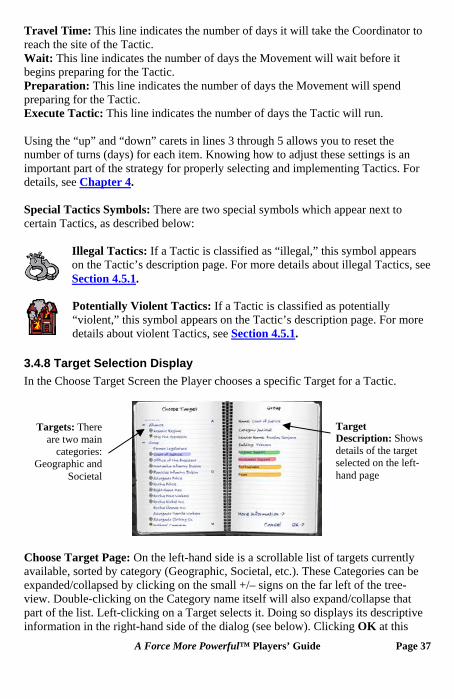
Travel Time: This line indicates the number of days it will take the Coordinator to reach the site of the Tactic. Wait: This line indicates the number of days the Movement will wait before it begins preparing for the Tactic. Preparation: This line indicates the number of days the Movement will spend preparing for the Tactic. Execute Tactic: This line indicates the number of days the Tactic will run. Using the “up” and “down” carets in lines 3 through 5 allows you to reset the number of turns (days) for each item. Knowing how to adjust these settings is an important part of the strategy for properly selecting and implementing Tactics. For details, see Chapter 4. Special Tactics Symbols: There are two special symbols which appear next to certain Tactics, as described below:
Illegal Tactics: If a Tactic is classified as “illegal,” this symbol appears on the Tactic’s description page. For more details about illegal Tactics, see Section 4.5.1.
Potentially Violent Tactics: If a Tactic is classified as potentially “violent,” this symbol appears on the Tactic’s description page. For more details about violent Tactics, see Section 4.5.1.
3.4.8 Target Selection Display In the Choose Target Screen the Player chooses a specific Target for a Tactic.
Targets: There are two main
categories: Geographic and
Societal
Target Description: Shows details of the target selected on the left-hand page
Choose Target Page: On the left-hand side is a scrollable list of targets currently available, sorted by category (Geographic, Societal, etc.). These Categories can be expanded/collapsed by clicking on the small +/– signs on the far left of the tree-view. Double-clicking on the Category name itself will also expand/collapse that part of the list. Left-clicking on a Target selects it. Doing so displays its descriptive information in the right-hand side of the dialog (see below). Clicking OK at this A Force More Powerful™ Players’ Guide Page 37
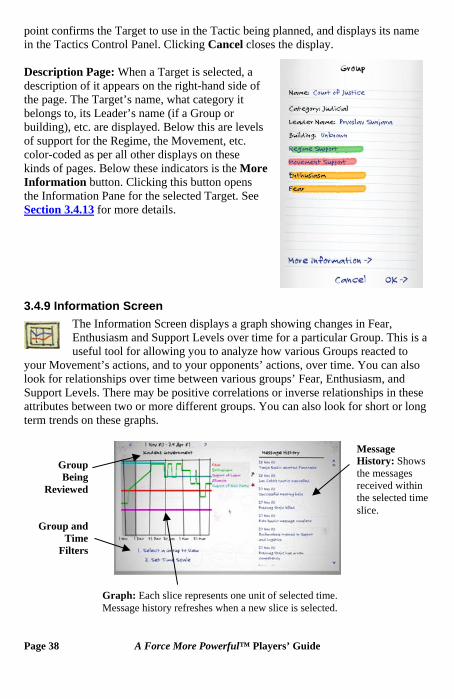
point confirms the Target to use in the Tactic being planned, and displays its name in the Tactics Control Panel. Clicking Cancel closes the display.
Page 38 A Force More Powerful™ Players’ Guide
re
ee
Description Page: When a Target is selected, a description of it appears on the right-hand side of the page. The Target’s name, what category it belongs to, its Leader’s name (if a Group or building), etc. are displayed. Below this are levels of support for the Regime, the Movement, etc. color-coded as per all other displays on these kinds of pages. Below these indicators is the MoInformation button. Clicking this button opens the Information Pane for the selected Target. SSection 3.4.13 for more details. 3.4.9 Information Screen
The Information Screen displays a graph showing changes in Fear, Enthusiasm and Support Levels over time for a particular Group. This is a useful tool for allowing you to analyze how various Groups reacted to
your Movement’s actions, and to your opponents’ actions, over time. You can also look for relationships over time between various groups’ Fear, Enthusiasm, and Support Levels. There may be positive correlations or inverse relationships in these attributes between two or more different groups. You can also look for short or long term trends on these graphs.
Group Being
Reviewed
Group and Time
Filters
Message History: Shows the messages received within the selected time slice.
Graph: Each slice represents one unit of selected time. Message history refreshes when a new slice is selected.

The Graph: The left-hand side of the screen contains the graph. The colored lines indicate the Fear, Enthusiasm, and Support Levels of the Group being reviewed. The Fear line is red, the Enthusiasm line is green, and the Support Levels for the Alliances are purple and light blue. Also shown to the right of each Alliance is its symbol.
The graph is vertically divided into slices, with each slice representing a fraction of the total time measured on the graph. The number of slices depends on the number of days being measured, as follows:
• If 1 month (30 days) is being measured, each set of 7 days gets its own slice.
• If 6 months (180 days) are being measured, each set of 30 days gets its own slice.
• If 1 year (365 days) is being measured, each set of 90 days gets its own slice.
A Force More Powerful™ Players’ Guide Page 39
• If 5 years (1825 days) are being measured, each set of 365 days gets its own slice.
Selecting a different slice refreshes the message history (see below). Pull-Down Menus: Below the graph are two pull-down menus that allow you to select different Groups and time-scales to view.. Choose Select a Group to View to sort Groups by category (Bureaucracy, Business, Labor, etc.). Once a category is selected, you may choose a Group on the right-hand side. Choose Set Time Scale to set a different time-scale.
Graph Measurements: By default, all measurement lines on the graph appear. If you move the mouse cursor over a single measurement category to the right of the graph, only its line appears. So if you highlight Fear, only the red line appears.
Message History: Along the right-hand side of the screen is a list of messages that were generated within the time-scale selected on the graph. Select one to read the full message. These messages do not go away as per the normal rules for message deletion (see 4.7). All messages generated in the selected time-scale (slice) appear here.
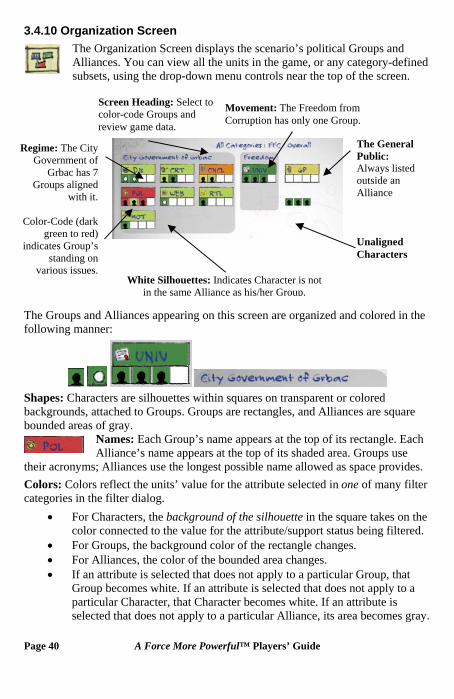
3.4.10 Organization Screen The Organization Screen displays the scenario’s political Groups and Alliances. You can view all the units in the game, or any category-defined subsets, using the drop-down menu controls near the top of the screen.
Screen Heading: Select to color-code Groups and review game data.
White Silhouettes: Indicates Character is not in the same Alliance as his/her Group.
Regime: The City Government of
Grbac has 7 Groups aligned
with it.
Color-Code (dark green to red)
indicates Group’s standing on
various issues.
The General Public: Always listed outside an Alliance Unaligned Characters
Movement: The Freedom from Corruption has only one Group.
The Groups and Alliances appearing on this screen are organized and colored in the following manner:
Shapes: Characters are silhouettes within squares on transparent or colored backgrounds, attached to Groups. Groups are rectangles, and Alliances are square bounded areas of gray.
Names: Each Group’s name appears at the top of its rectangle. Each Alliance’s name appears at the top of its shaded area. Groups use
their acronyms; Alliances use the longest possible name allowed as space provides. Colors: Colors reflect the units’ value for the attribute selected in one of many filter categories in the filter dialog.
• For Characters, the background of the silhouette in the square takes on the color connected to the value for the attribute/support status being filtered.
• For Groups, the background color of the rectangle changes. • For Alliances, the color of the bounded area changes. • If an attribute is selected that does not apply to a particular Group, that
Group becomes white. If an attribute is selected that does not apply to a particular Character, that Character becomes white. If an attribute is selected that does not apply to a particular Alliance, its area becomes gray.
Page 40 A Force More Powerful™ Players’ Guide
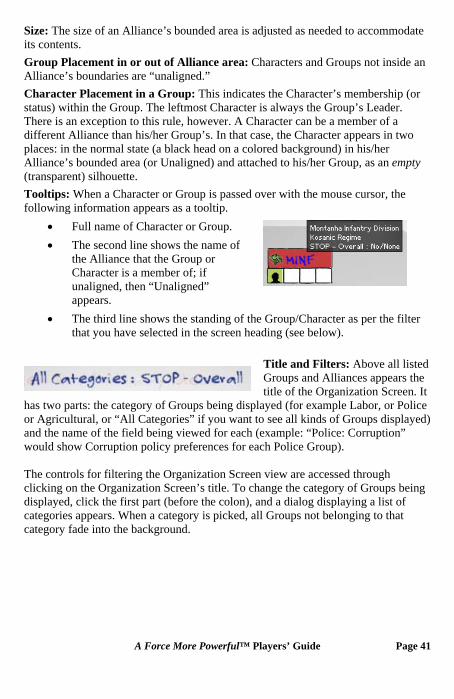
Size: The size of an Alliance’s bounded area is adjusted as needed to accommodate its contents. Group Placement in or out of Alliance area: Characters and Groups not inside an Alliance’s boundaries are “unaligned.” Character Placement in a Group: This indicates the Character’s membership (or status) within the Group. The leftmost Character is always the Group’s Leader. There is an exception to this rule, however. A Character can be a member of a different Alliance than his/her Group’s. In that case, the Character appears in two places: in the normal state (a black head on a colored background) in his/her Alliance’s bounded area (or Unaligned) and attached to his/her Group, as an empty (transparent) silhouette. Tooltips: When a Character or Group is passed over with the mouse cursor, the following information appears as a tooltip.
• Full name of Character or Group. • The second line shows the name of
the Alliance that the Group or Character is a member of; if unaligned, then “Unaligned” appears.
• The third line shows the standing of the Group/Character as per the filter that you have selected in the screen heading (see below).
Title and Filters: Above all listed Groups and Alliances appears the title of the Organization Screen. It
has two parts: the category of Groups being displayed (for example Labor, or Police or Agricultural, or “All Categories” if you want to see all kinds of Groups displayed) and the name of the field being viewed for each (example: “Police: Corruption” would show Corruption policy preferences for each Police Group). The controls for filtering the Organization Screen view are accessed through clicking on the Organization Screen’s title. To change the category of Groups being displayed, click the first part (before the colon), and a dialog displaying a list of categories appears. When a category is picked, all Groups not belonging to that category fade into the background.
A Force More Powerful™ Players’ Guide Page 41
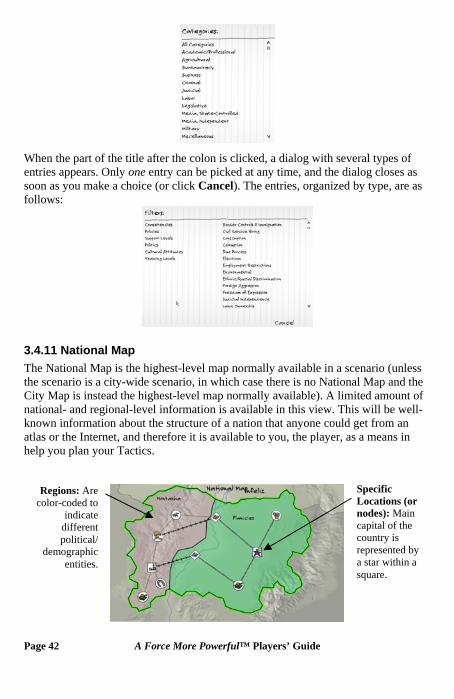
When the part of the title after the colon is clicked, a dialog with several types of entries appears. Only one entry can be picked at any time, and the dialog closes as soon as you make a choice (or click Cancel). The entries, organized by type, are as follows:
3.4.11 National Map The National Map is the highest-level map normally available in a scenario (unless the scenario is a city-wide scenario, in which case there is no National Map and the City Map is instead the highest-level map normally available). A limited amount of national- and regional-level information is available in this view. This will be well-known information about the structure of a nation that anyone could get from an atlas or the Internet, and therefore it is available to you, the player, as a means in help you plan your Tactics.
SpecificLo
Regions: Are color-coded to
indicate different political/
demographic entities.
cations (or nodes): Main capital of the country is represented by a star within a square.
Page 42 A Force More Powerful™ Players’ Guide
The basic function of the National Map is to depict and simulate activity outside urban areas. The map is not scrollable. All game functionality on the National Map resides in the icon network overlaying the background. Cities and Interactive Map Features (listed below) are square or circular icons; the transportation network of the country is represented by connections between the icons. City names show up near the city icons. A second part of the functionality is in the division of the country into different colored Regions, which exist as separate political/demographic entities. National-Map Features/Key: Features shown on the National Map are listed below. The shape of each National/Regional Map icon helps distinguish between cities and other types of map features.
The buttons appearing in the upper left-hand corner of the National Map allow you to color-code the various regions of the map to glean valuable information about the status of the country on various issues. The top button allows you to cycle through various support levels; the bottom button allows
you to cycle through demographic information. Clicking multiple times on a button changes the information displayed.
City icons are square.
Road Junctions, Road/Rail Junctions, Airports, Mountain Passes, and Bridges are diamond-shaped.
All other clickable features are circles. The entire set of National Map icons is as follows:
A Force More Powerful™ Players’ Guide Page 43
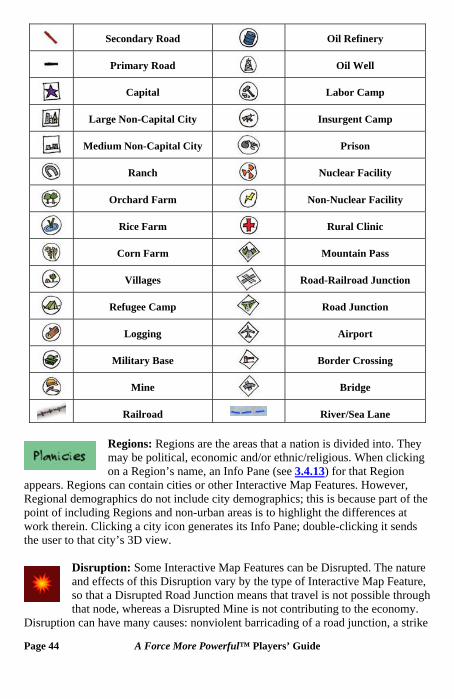
Secondary Road
Oil Refinery
Primary Road
Oil Well
Capital
Labor Camp
Large Non-Capital City
Insurgent Camp
Medium Non-Capital City
Prison
Ranch
Nuclear Facility
Orchard Farm
Non-Nuclear Facility
Rice Farm
Rural Clinic
Corn Farm
Mountain Pass
Villages
Road-Railroad Junction
Refugee Camp
Road Junction
Logging
Airport
Military Base
Border Crossing
Mine
Bridge
Railroad River/Sea Lane
Regions: Regions are the areas that a nation is divided into. They may be political, economic and/or ethnic/religious. When clicking on a Region’s name, an Info Pane (see 3.4.13) for that Region
appears. Regions can contain cities or other Interactive Map Features. However, Regional demographics do not include city demographics; this is because part of the point of including Regions and non-urban areas is to highlight the differences at work therein. Clicking a city icon generates its Info Pane; double-clicking it sends the user to that city’s 3D view.
Disruption: Some Interactive Map Features can be Disrupted. The nature and effects of this Disruption vary by the type of Interactive Map Feature, so that a Disrupted Road Junction means that travel is not possible tthat node, whereas a Disrupted Mine is not contributing to the economy
Disruption can have many causes: nonviolent barricading of a road junction, a
hrough .
strike
Page 44 A Force More Powerful™ Players’ Guide
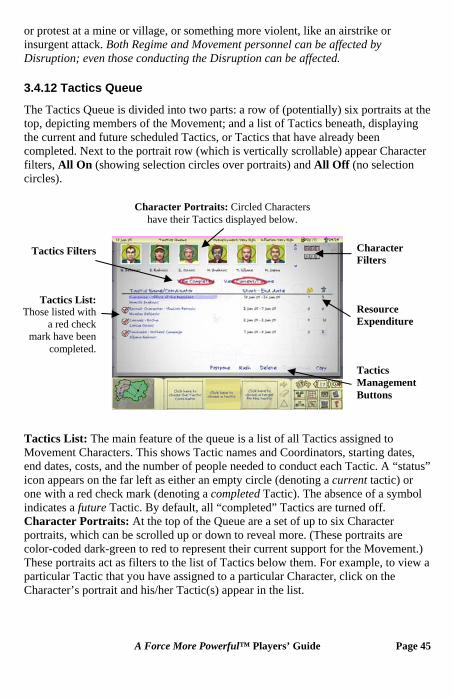
or protest at a mine or village, or something more violent, like an airstrike or insurgent attack. Both Regime and Movement personnel can be affected by Disruption; even those conducting the Disruption can be affected.
3.4.12 Tactics Queue
The Tactics Queue is divided into two parts: a row of (potentially) six portraits at the top, depicting members of the Movement; and a list of Tactics beneath, displaying the current and future scheduled Tactics, or Tactics that have already been completed. Next to the portrait row (which is vertically scrollable) appear Character filters, All On (showing selection circles over portraits) and All Off (no selection circles).
Character Portraits: Circled Characters have their Tactics displayed below.
Tactics Filters
Tactics List: Those listed with
a red check mark have been
completed.
Character Filters Resource Expenditure Tactics Management Buttons
Tactics List: The main feature of the queue is a list of all Tactics assigned to Movement Characters. This shows Tactic names and Coordinators, starting dates, end dates, costs, and the number of people needed to conduct each Tactic. A “status” icon appears on the far left as either an empty circle (denoting a current tactic) or one with a red check mark (denoting a completed Tactic). The absence of a symbol indicates a future Tactic. By default, all “completed” Tactics are turned off. Character Portraits: At the top of the Queue are a set of up to six Character portraits, which can be scrolled up or down to reveal more. (These portraits are color-coded dark-green to red to represent their current support for the Movement.) These portraits act as filters to the list of Tactics below them. For example, to view a particular Tactic that you have assigned to a particular Character, click on the Character’s portrait and his/her Tactic(s) appear in the list.
A Force More Powerful™ Players’ Guide Page 45
Character Filters: Clicking the filter buttons at the far right of the Characters selects all or de-selects them accordingly. The Tactics list will refresh to show the proper set of Tactics. Resource Expenditure: These displays indicate the amount of money and people needed to conduct the Tactic. When it’s time to conduct the Tactic, the game looks to see if it has the money necessary; if not, the Tactic is delayed until such a time as monies are available. View Completed/Current/Future: These buttons can be activated (clicked on) at the same time. When Completed is active, all completed tactics (subject to the Character filter) are displayed. When Current/Future is active, all current and future Tactics (subject to the Character filter) are displayed. Tactics Management Buttons • Postpone: Any future Tactic can be postponed, if the Tactic has not yet
occurred (or is in the process of completing). To postpone a Tactic, select the Tactic and then select the Postpone button. This shifts the selected Tactic down one slot in the list.
• Rush: Rushing a Tactic is the opposite of postponement. To do so, select the Tactic and then select the Rush button. This shifts the selected Tactic up one slot in the list.
• Delete Tactic: Any future Tactic can be deleted. Do this by clicking the tactic to be deleted, then the Delete button.
• Discontinue: If a Tactic is currently in the middle of execution, you can discontinue it. To do so, select the Tactic and then select the Discontinue button. Tactics can be automatically discontinued if certain conditions are met; for example, if the Target of a Recruit Character Tactic changes Alliances, the Tactic will automatically discontinue.
• Copy Tactic: You can also click a Tactic and then the Copy button. This copies the Tactic and its parameters entirely into the Control Panel, altering only the start date. The Tactic must still be submitted normally. A Character cannot be “copied” a Tactic that he or she is currently conducting (i.e., a Character cannot conduct two Hunger Strikes at the same time).
NOTE: There are certain times in which the Tactics Management buttons are not all available at the same time. If an option is not available, then the button will be grayed
out (deactivated).
3.4.13 Information Panes Information Panes are widely used and available in the A Force More Powerful interface. They can be
Page 46 A Force More Powerful™ Players’ Guide
accessed through nearly every major screen in-game. Information Panes list all the information relevant to whatever has been selected. For example, if a building has been selected (for possible targeting of a Tactic), then an Information Pane for that building appears, listing its name, affiliated Groups, any Characters physically present there, and its Economic Significance, plus perhaps one more building-specific piece of information (such as a foreign power’s attitude towards the nation, if the selected building is an embassy). Information Panes are accessed through a variety of different buttons, links, and menu options. Below are some of the places through which an Information Pane can be accessed.
(1) When a CHARACTER is selected via the portrait area of the Control Panel or the Organization Screen, or via the “More Information” button in the Character Display…
• Name: The Character’s name is listed on top.
A Force More Powerful™ Players’ Guide Page 47
• Leader of: Indicates what Group the Character leads. When this is clicked, the Information Pane switches to display details about this Group (see entry #2). It’s possible that two or more “leader of” displays appear; the Character may be the leader of more than one Group/Alliance.
• Member of: Indicates what Alliance the Character belongs to. When this is clicked, the Information Pane switches to display details about this Alliance (see #3 below).
• Location: Indicates the current physical location of the Character, whether it be a neighborhood, a building, an indication that the Character is “Traveling to” a specific location, or is “Exiled” and living in a different country.
• Regime Support: Indicates the support the Character has for the Regime. When this is clicked, a pop-up appears showing Financial Gain, Ideology, and Legitimacy support and their levels.
• Movement Support: Indicates the support the Character has for the Movement. When this is clicked a pop-up appears showing Financial Gain, Ideology, and Legitimacy support and their levels.
• Other Alliance Support: Indicates the Character’s support for other Alliances. If no such support exists, this display is faded to the background.
• Enthusiasm: Indicates the willingness of the Character to carry out Tactics for his/her Alliance. A high value here is important to the success or failure of a Character’s actions.
• Fear: Indicates the Character’s fear of oppression and/or retaliation from the Regime. A high fear factor reduces the chance that the Character will change Alliances.
• Competencies: This is a list of skills that the Character possesses. For details, see the Appendix.
• Notes Button: Select Notes to type in a brief note/comment about the Character you are reviewing.
• Close and Target Buttons: Select Close to remove the pane from view. Select the Target symbol to indicate that this Character is the Target for a Tactic.
• Forward and Back Carets: Use these to scroll through previously opened panes.
• Policy Preferences: If selected, this opens up the Character’s Policy Preferences display. This dialog is formatted by tabs, which can be selected to reveal the Character’s standing on various policy issues. To access a preference category, click on its tab.
Page 48 A Force More Powerful™ Players’ Guide
Key Policy Preferences—The first page
displayed indicates the policies that the Character cares about the most. The color-coded system here works similarly to all other colored status displays: Dark green means the Character cares a great deal about the policy; red indicates the Character doesn’t care at all, or has great disdain for the policy.
Military—This lists the Character’s attitude towards military policy. Law Enforcement—This lists the Character’s attitude towards law enforcement
policy. Labor—This lists the Character’s attitude towards labor policy. General Welfare—This lists the Character’s attitude towards the general
welfare of the nation.
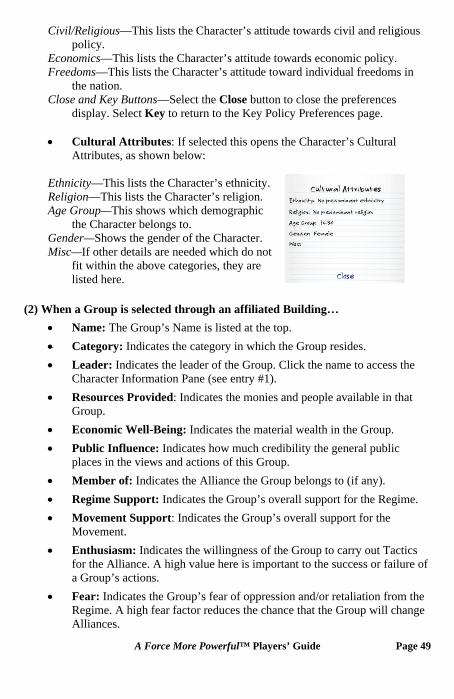
Civil/Religious—This lists the Character’s attitude towards civil and religious policy.
Economics—This lists the Character’s attitude towards economic policy. Freedoms—This lists the Character’s attitude toward individual freedoms in
the nation. Close and Key Buttons—Select the Close button to close the preferences
display. Select Key to return to the Key Policy Preferences page. • Cultural Attributes: If selected this opens the Character’s Cultural
Attributes, as shown below: Ethnicity—This lists the Character’s ethnicity. Religion—This lists the Character’s religion. Age Group—This shows which demographic
the Character belongs to. Gender—Shows the gender of the Character. Misc—If other details are needed which do not
fit within the above categories, they are listed here.
(2) When a Group is selected through an affiliated Building… • Name: The Group’s Name is listed at the top. • Category: Indicates the category in which the Group resides. • Leader: Indicates the leader of the Group. Click the name to access the
Character Information Pane (see entry #1). • Resources Provided: Indicates the monies and people available in that
Group. • Economic Well-Being: Indicates the material wealth in the Group. • Public Influence: Indicates how much credibility the general public
places in the views and actions of this Group. • Member of: Indicates the Alliance the Group belongs to (if any). • Regime Support: Indicates the Group’s overall support for the Regime. • Movement Support: Indicates the Group’s overall support for the
Movement. • Enthusiasm: Indicates the willingness of the Group to carry out Tactics
for the Alliance. A high value here is important to the success or failure of a Group’s actions.
• Fear: Indicates the Group’s fear of oppression and/or retaliation from the Regime. A high fear factor reduces the chance that the Group will change Alliances.
A Force More Powerful™ Players’ Guide Page 49
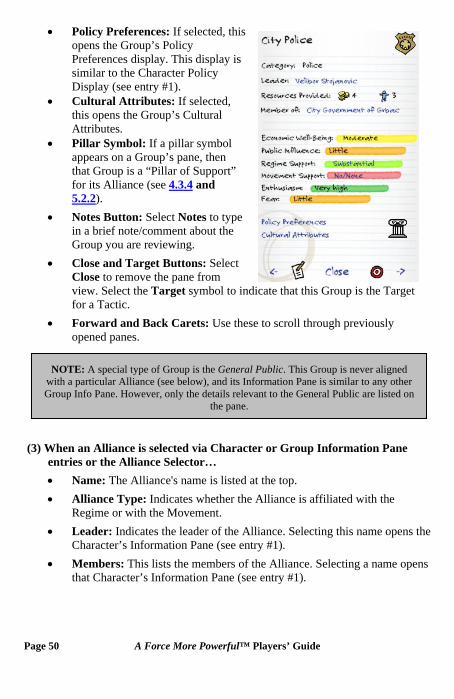
Page 50 A Force More Powerful™ Players’ Guide
his • Policy Preferences: If selected, topens the Group’s Policy Preferences display. This display is similar to the Character Policy Display (see entry #1).
• Cultural Attributes: If selected, this opens the Group’s Cultural Attributes.
• Pillar Symbol: If a pillar symbol appears on a Group’s pane, then that Group is a “Pillar of Support” for its Alliance (see 4.3.4 and 5.2.2).
• Notes Button: Select Notes to type in a brief note/comment about the Group you are reviewing.
• Close and Target Buttons: Select Close to remove the pane from view. Select the Target symbol to indicate that this Group is the Target for a Tactic.
• Forward and Back Carets: Use these to scroll through previously opened panes.
NOTE: A special type of Group is the General Public. This Group is never aligned with a particular Alliance (see below), and its Information Pane is similar to any other Group Info Pane. However, only the details relevant to the General Public are listed on
the pane.
(3) When an Alliance is selected via Character or Group Information Pane entries or the Alliance Selector… • Name: The Alliance's name is listed at the top. • Alliance Type: Indicates whether the Alliance is affiliated with the
Regime or with the Movement. • Leader: Indicates the leader of the Alliance. Selecting this name opens the
Character’s Information Pane (see entry #1). • Members: This lists the members of the Alliance. Selecting a name opens
that Character’s Information Pane (see entry #1).
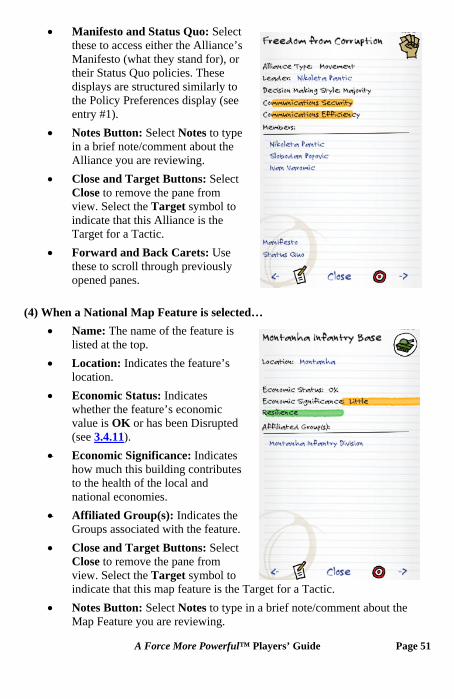
• Manifesto and Status Quo: Select these to access either the Alliance’s Manifesto (what they stand for), or their Status Quo policies. These displays are structured similarly to the Policy Preferences display (see entry #1).
• Notes Button: Select Notes to type in a brief note/comment about the Alliance you are reviewing.
• Close and Target Buttons: Select Close to remove the pane from view. Select the Target symbol to indicate that this Alliance is the Target for a Tactic.
• Forward and Back Carets: Use these to scroll through previously opened panes.
(4) When a National Map Feature is selected…
• Name: The name of the feature is listed at the top.
A Force More Powerful™ Players’ Guide Page 51
• Location: Indicates the feature’s location.
• Economic Status: Indicates whether the feature’s economic value is OK or has been Disrupted (see 3.4.11).
• Economic Significance: Indicates how much this building contributes to the health of the local and national economies.
• Affiliated Group(s): Indicates the Groups associated with the feature.
• Close and Target Buttons: Select Close to remove the pane from view. Select the Target symbol to indicate that this map feature is the Target for a Tactic.
• Notes Button: Select Notes to type in a brief note/comment about the Map Feature you are reviewing.
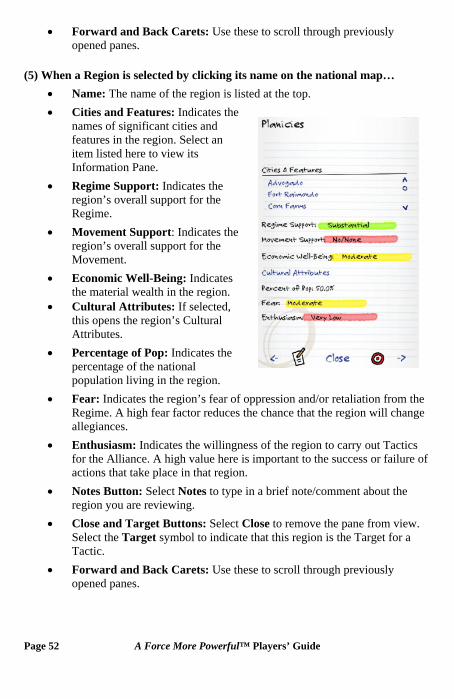
• Forward and Back Carets: Use these to scroll through previously opened panes.
(5) When a Region is selected by clicking its name on the national map… • Name: The name of the region is listed at the top. • Cities and Features: Indicates the
names of significant cities and features in the region. Select an item listed here to view its Information Pane.
• Regime Support: Indicates the region’s overall support for the Regime.
• Movement Support: Indicates the region’s overall support for the Movement.
• Economic Well-Being: Indicates the material wealth in the region.
• Cultural Attributes: If selected, this opens the region’s Cultural Attributes.
• Percentage of Pop: Indicates the percentage of the national population living in the region.
• Fear: Indicates the region’s fear of oppression and/or retaliation from the Regime. A high fear factor reduces the chance that the region will change allegiances.
• Enthusiasm: Indicates the willingness of the region to carry out Tactics for the Alliance. A high value here is important to the success or failure of actions that take place in that region.
• Notes Button: Select Notes to type in a brief note/comment about the region you are reviewing.
• Close and Target Buttons: Select Close to remove the pane from view. Select the Target symbol to indicate that this region is the Target for a Tactic.
• Forward and Back Carets: Use these to scroll through previously opened panes.
Page 52 A Force More Powerful™ Players’ Guide
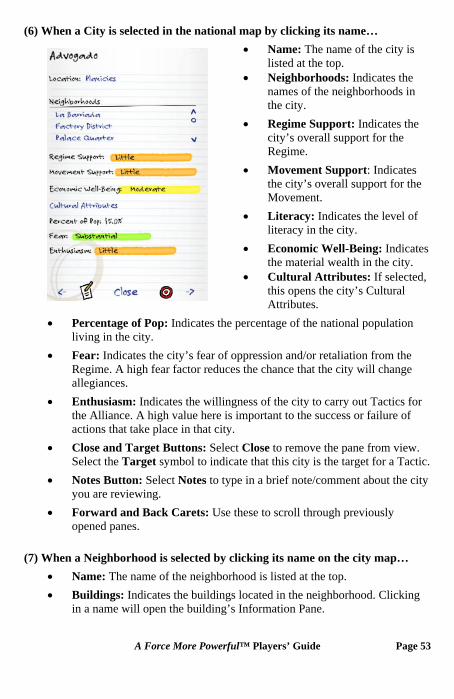
(6) When a City is selected in the national map by clicking its name… • Name: The name of the city is
listed at the top. • Neighborhoods: Indicates the
names of the neighborhoods in the city.
• Regime Support: Indicates the city’s overall support for the Regime.
• Movement Support: Indicates the city’s overall support for the Movement.
• Literacy: Indicates the level of literacy in the city.
• Economic Well-Being: Indicates the material wealth in the city.
• Cultural Attributes: If selected, this opens the city’s Cultural Attributes.
• Percentage of Pop: Indicates the percentage of the national population living in the city.
• Fear: Indicates the city’s fear of oppression and/or retaliation from the Regime. A high fear factor reduces the chance that the city will change allegiances.
• Enthusiasm: Indicates the willingness of the city to carry out Tactics for the Alliance. A high value here is important to the success or failure of actions that take place in that city.
• Close and Target Buttons: Select Close to remove the pane from view. Select the Target symbol to indicate that this city is the target for a Tactic.
• Notes Button: Select Notes to type in a brief note/comment about the city you are reviewing.
• Forward and Back Carets: Use these to scroll through previously opened panes.
(7) When a Neighborhood is selected by clicking its name on the city map…
• Name: The name of the neighborhood is listed at the top. • Buildings: Indicates the buildings located in the neighborhood. Clicking
in a name will open the building’s Information Pane.
A Force More Powerful™ Players’ Guide Page 53
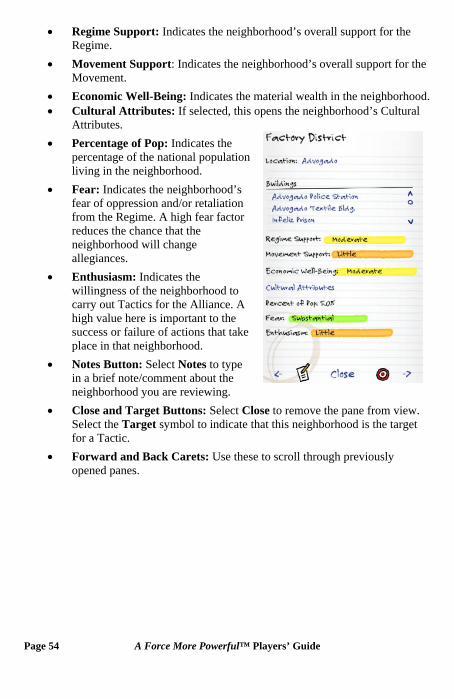
• Regime Support: Indicates the neighborhood’s overall support for the Regime.
• Movement Support: Indicates the neighborhood’s overall support for the Movement.
• Economic Well-Being: Indicates the material wealth in the neighborhood. • Cultural Attributes: If selected, this opens the neighborhood’s Cultural
Attributes. • Percentage of Pop: Indicates the
percentage of the national population living in the neighborhood.
• Fear: Indicates the neighborhood’s fear of oppression and/or retaliation from the Regime. A high fear factor reduces the chance that the neighborhood will change allegiances.
• Enthusiasm: Indicates the willingness of the neighborhood to carry out Tactics for the Alliance. A high value here is important to the success or failure of actions that take place in that neighborhood.
• Notes Button: Select Notes to type in a brief note/comment about the neighborhood you are reviewing.
• Close and Target Buttons: Select Close to remove the pane from view. Select the Target symbol to indicate that this neighborhood is the target for a Tactic.
• Forward and Back Carets: Use these to scroll through previously opened panes.
Page 54 A Force More Powerful™ Players’ Guide
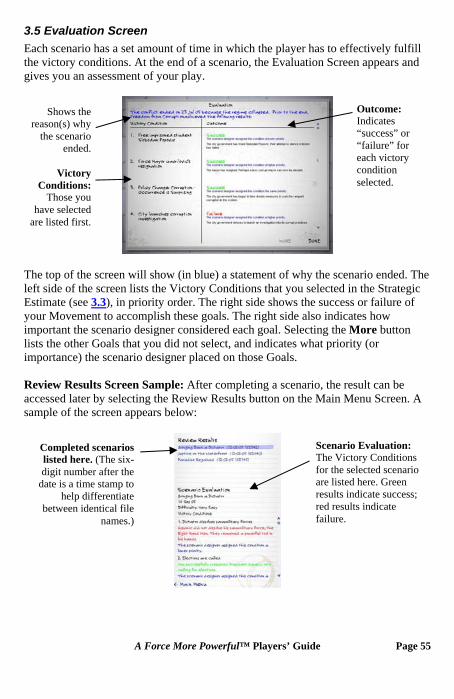
3.5 Evaluation Screen Each scenario has a set amount of time in which the player has to effectively fulfill the victory conditions. At the end of a scenario, the Evaluation Screen appears and gives you an assessment of your play.
Shows the reason(s) why
the scenario ended.
Victory
Conditions: Those you
have selected are listed first.
Outcome: Indicates “success” or “failure” for each victory condition selected.
The top of the screen will show (in blue) a statement of why the scenario ended. The left side of the screen lists the Victory Conditions that you selected in the Strategic Estimate (see 3.3), in priority order. The right side shows the success or failure of your Movement to accomplish these goals. The right side also indicates how important the scenario designer considered each goal. Selecting the More button lists the other Goals that you did not select, and indicates what priority (or importance) the scenario designer placed on those Goals. Review Results Screen Sample: After completing a scenario, the result can be accessed later by selecting the Review Results button on the Main Menu Screen. A sample of the screen appears below:
Completed scenarios listed here. (The six-digit number after the
date is a time stamp to help differentiate
between identical file names.)
Scenario Evaluation: The Victory Conditions for the selected scenario are listed here. Green results indicate success; red results indicate failure.
A Force More Powerful™ Players’ Guide Page 55
4. PLAYING THE GAME Chapters 2 and 3 walked you through the procedures on how to actually play A Force More Powerful, and also provided a graphical layout of how the screens look and function. This chapter explains in more detail key areas in which to focus your attention while playing. It’s highly recommended that you read through this chapter carefully, especially if this is your first time playing. We also recommend that experienced players review this chapter from time to time as well to help refresh their memory.
4.1 Managing Game Information You will be more successful in A Force More Powerful if you are able to manage information effectively. During play, you select Tactics Coordinators and the Tactics they will conduct. The results of those Tactics are presented to you through various displays, and it’s vital for effective play to understand these displays and be able to glean the proper information from them. As in real life, some information is more relevant than other information in choosing your course(s) of action, and it is important to discern what the most crucial pieces of information are when making your decisions. Also, as in real life, the more you know, the better you will be able to plan the most realistic and appropriate course for your Movement. Let’s begin by walking through the process of selecting a scenario and choosing Victory Conditions.
4.1.1 Choosing a Scenario The first thing to consider when beginning A Force More Powerful is which scenario to select. There are quite a few to choose from, with goals ranging anywhere from bringing down a dictator to forcing the ruling government to cease its corruptive behavior. If this is your first time playing A Force More Powerful, we suggest that you select the scenario featured in Chapter 2 (Corruption is Stealing), as this one has Victory Conditions which are easier to achieve than those in many of the other scenarios. But if you’ve played a few times and want to delve further, we recommend that you select a scenario that best fits your particular situation. As mentioned in the Introduction, A Force More Powerful does not guarantee real-world results, but it does provide a wide variety of options that mimic real-world situations. And through the play of these scenarios, you can (hopefully) gain a better understanding of how to best promote your nonviolent Movement’s agenda through effective strategic planning.
Page 56 A Force More Powerful™ Players’ Guide
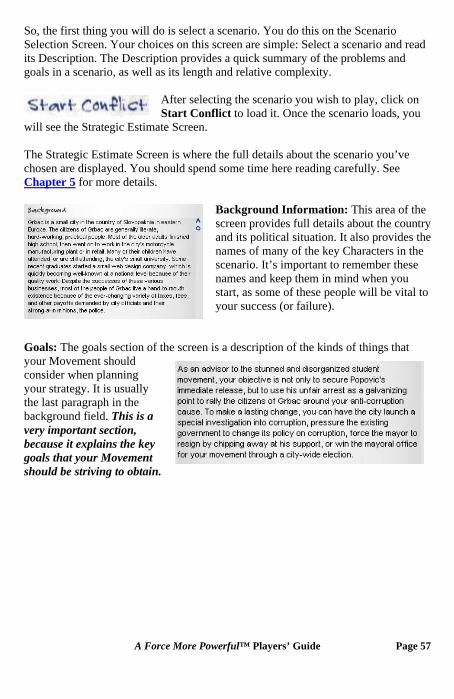
So, the first thing you will do is select a scenario. You do this on the Scenario Selection Screen. Your choices on this screen are simple: Select a scenario and read its Description. The Description provides a quick summary of the problems and goals in a scenario, as well as its length and relative complexity.
After selecting the scenario you wish to play, click on Start Conflict to load it. Once the scenario loads, you
will see the Strategic Estimate Screen. The Strategic Estimate Screen is where the full details about the scenario you’ve chosen are displayed. You should spend some time here reading carefully. See Chapter 5 for more details.
Background Information: This area of the screen provides full details about the cand its political situation. It also provides names of many of the key Characters in scenario. It’s important to remember these names and keep them in mind when you start, as some of these people will be vityour success (or failure).
ountry the
the
al to
oals: The goals section of the screen is a description of the kinds of things that
a
ey
.
Gyour Movement should consider when planning your strategy. It is usuallythe last paragraph in the background field. This isvery important section, because it explains the kgoals that your Movement should be striving to obtain
A Force More Powerful™ Players’ Guide Page 57
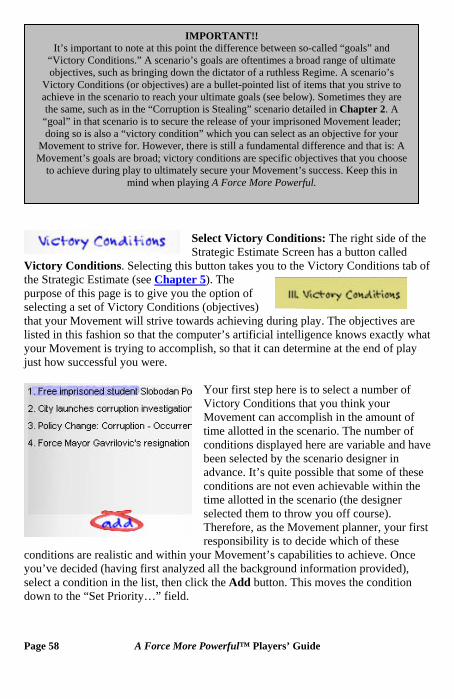
IMPORTANT!! It’s important to note at this point the difference between so-called “goals” and
“Victory Conditions.” A scenario’s goals are oftentimes a broad range of ultimate objectives, such as bringing down the dictator of a ruthless Regime. A scenario’s
Victory Conditions (or objectives) are a bullet-pointed list of items that you strive to achieve in the scenario to reach your ultimate goals (see below). Sometimes they are the same, such as in the “Corruption is Stealing” scenario detailed in Chapter 2. A “goal” in that scenario is to secure the release of your imprisoned Movement leader; doing so is also a “victory condition” which you can select as an objective for your
Movement to strive for. However, there is still a fundamental difference and that is: A Movement’s goals are broad; victory conditions are specific objectives that you choose
to achieve during play to ultimately secure your Movement’s success. Keep this in mind when playing A Force More Powerful.
Select Victory Conditions: The right side of the Strategic Estimate Screen has a button called
Victory Conditions. Selecting this button takes you to the Victory Conditions tab of the Strategic Estimate (see Chapter 5). The purpose of this page is to give you the option of selecting a set of Victory Conditions (objectives) that your Movement will strive towards achieving during play. The objectives are listed in this fashion so that the computer’s artificial intelligence knows exactly what your Movement is trying to accomplish, so that it can determine at the end of play just how successful you were.
ave
Your first step here is to select a number of Victory Conditions that you think your Movement can accomplish in the amount of time allotted in the scenario. The number of conditions displayed here are variable and hbeen selected by the scenario designer in advance. It’s quite possible that some of these conditions are not even achievable within the time allotted in the scenario (the designer selected them to throw you off course). Therefore, as the Movement planner, your first responsibility is to decide which of these
conditions are realistic and within your Movement’s capabilities to achieve. Once you’ve decided (having first analyzed all the background information provided), select a condition in the list, then click the Add button. This moves the condition down to the “Set Priority…” field.
Page 58 A Force More Powerful™ Players’ Guide
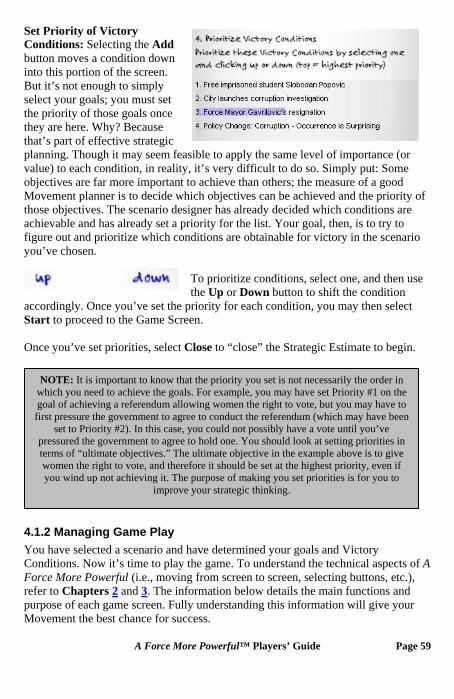
Set Priority of Victory Conditions: Selecting the Add button moves a condition down into this portion of the screen. But it’s not enough to simply select your goals; you must set the priority of those goals once they are here. Why? Because that’s part of effective strategic planning. Though it may seem feasible to apply the same level of importance (or value) to each condition, in reality, it’s very difficult to do so. Simply put: Some objectives are far more important to achieve than others; the measure of a good Movement planner is to decide which objectives can be achieved and the priority of those objectives. The scenario designer has already decided which conditions are achievable and has already set a priority for the list. Your goal, then, is to try to figure out and prioritize which conditions are obtainable for victory in the scenario you’ve chosen.
To prioritize conditions, select one, and then use the Up or Down button to shift the condition
accordingly. Once you’ve set the priority for each condition, you may then select Start to proceed to the Game Screen. Once you’ve set priorities, select Close to “close” the Strategic Estimate to begin.
NOTE: It is important to know that the priority you set is not necessarily the order in which you need to achieve the goals. For example, you may have set Priority #1 on the goal of achieving a referendum allowing women the right to vote, but you may have to first pressure the government to agree to conduct the referendum (which may have been
set to Priority #2). In this case, you could not possibly have a vote until you’ve pressured the government to agree to hold one. You should look at setting priorities in terms of “ultimate objectives.” The ultimate objective in the example above is to give women the right to vote, and therefore it should be set at the highest priority, even if you wind up not achieving it. The purpose of making you set priorities is for you to
improve your strategic thinking.
4.1.2 Managing Game Play You have selected a scenario and have determined your goals and Victory Conditions. Now it’s time to play the game. To understand the technical aspects of A Force More Powerful (i.e., moving from screen to screen, selecting buttons, etc.), refer to Chapters 2 and 3. The information below details the main functions and purpose of each game screen. Fully understanding this information will give your Movement the best chance for success.
A Force More Powerful™ Players’ Guide Page 59
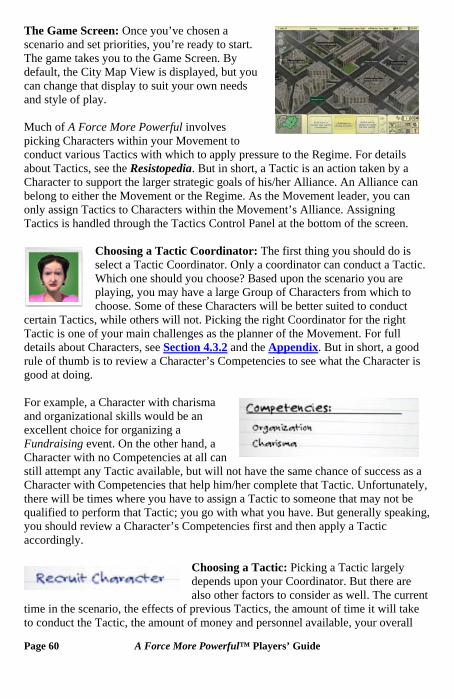
The Game Screen: Once you’ve chosen a scenario and set priorities, you’re ready to start. The game takes you to the Game Screen. By default, the City Map View is displayed, but you can change that display to suit your own needs and style of play.
Page 60 A Force More Powerful™ Players’ Guide
Much of A Force More Powerful involves picking Characters within your Movement to conduct various Tactics with which to apply pressure to the Regime. For details about Tactics, see the Resistopedia. But in short, a Tactic is an action taken by a Character to support the larger strategic goals of his/her Alliance. An Alliance can belong to either the Movement or the Regime. As the Movement leader, you can only assign Tactics to Characters within the Movement’s Alliance. Assigning Tactics is handled through the Tactics Control Panel at the bottom of the screen.
Choosing a Tactic Coordinator: The first thing you should do is select a Tactic Coordinator. Only a coordinator can conduct a Tactic. Which one should you choose? Based upon the scenario you are playing, you may have a large Group of Characters from which to choose. Some of these Characters will be better suited to conduct
certain Tactics, while others will not. Picking the right Coordinator for the right Tactic is one of your main challenges as the planner of the Movement. For full details about Characters, see Section 4.3.2 and the Appendix. But in short, a good rule of thumb is to review a Character’s Competencies to see what the Character is good at doing. For example, a Character with charisma and organizational skills would be an excellent choice for organizing a Fundraising event. On the other hand, a Character with no Competencies at all cstill attempt any Tactic available, but will not have the same chance of success as a Character with Competencies that help him/her complete that Tactic. Unfothere will be times where you have to assign a Tactic to someone that may not be qualified to perform that Tactic; you go with what you have. But generally speaking, you should review a Character’s Competencies first and then apply a Tactic accordingly.
an
rtunately,
Choosing a Tactic: Picking a Tactic largely depends upon your Coordinator. But there are also other factors to consider as well. The current
time in the scenario, the effects of previous Tactics, the amount of time it will take to conduct the Tactic, the amount of money and personnel available, your overall
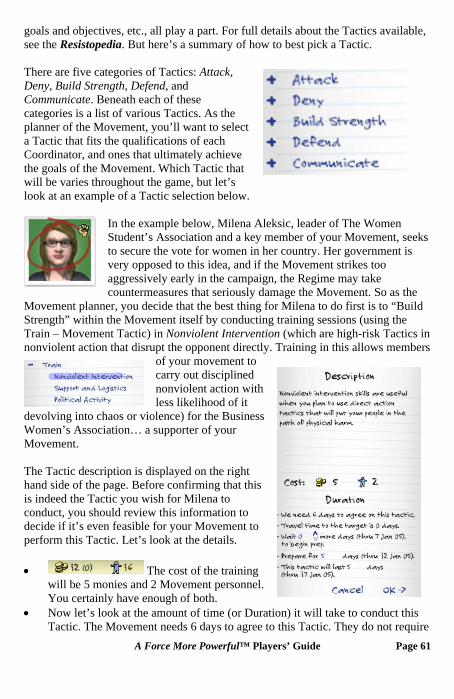
goals and objectives, etc., all play a part. For full details about the Tactics available, see the Resistopedia. But here’s a summary of how to best pick a Tactic.
A Force More Powerful™ Players’ Guide Page 61
There are five categories of Tactics: Attack, Deny, Build Strength, Defend, and Communicate. Beneath each of these categories is a list of various Tactics. As the planner of the Movement, you’ll want to select a Tactic that fits the qualifications of each Coordinator, and ones that ultimately achieve the goals of the Movement. Which Tactic that will be varies throughout the game, but let’s look at an example of a Tactic selection below.
In the example below, Milena Aleksic, leader of The Women Student’s Association and a key member of your Movement, seeks to secure the vote for women in her country. Her government is very opposed to this idea, and if the Movement strikes too aggressively early in the campaign, the Regime may take countermeasures that seriously damage the Movement. So as the
Movement planner, you decide that the best thing for Milena to do first is to “Build Strength” within the Movement itself by conducting training sessions (using the Train – Movement Tactic) in Nonviolent Intervention (which are high-risk Tactics in nonviolent action that disrupt the opponent directly. Training in this allows members
of your movement to carry out disciplined nonviolent action with less likelihood of it
devolving into chaos or violence) for the Business Women’s Association… a supporter of your Movement. The Tactic description is displayed on the right hand side of the page. Before confirming that this is indeed the Tactic you wish for Milena to conduct, you should review this information to decide if it’s even feasible for your Movement to perform this Tactic. Let’s look at the details. • The cost of the training
will be 5 monies and 2 Movement personnel. You certainly have enough of both.
• Now let’s look at the amount of time (or Duration) it will take to conduct this Tactic. The Movement needs 6 days to agree to this Tactic. They do not require
time to travel to the training (everyone is located in the capital). If necessary, you could wait a certain number of additional days before beginning the training by using the carets to adjust the time up.
• Finally, you will have to spend 5 additional days to prepare for the training, and the training itself will last 5 days.
• All of these days are added up to tell you the exact amount of time it will take for this Tactic to begin and end. Do you have that much time? You decide that you do, and click OK to approve the Tactic.
Have you selected the right Tactic? Sometimes it’s hard to judge. However, A Force More Powerful gives you tools with which to see if your decision is feasible or (at the least) popular within the Movement. Selecting the Tactics Survey button can help you decide if your decision was the right one (see below).
A NOTE ON TIMING: Before we proceed to choosing a Target for a Tactic, it’s important to spend a little more time on the “duration” of a Tactic. The numbers under the Duration section can be adjusted if you choose to do so, or you may simply ignore this section and proceed. However, it’s important to know that simply accepting the
defaults given to you by the AI can dramatically affect the success or failure of a Tactic. Any listing that gives you Up and Down carets allows you to adjust the number
of days that that listing will take. For example, you could adjust the “Prepare for…” area to increase (or decrease) the number of days it will take to prepare for the Tactic.
Now, why would you do this? You would do this to ensure that you’ve given your Coordinator enough time to effectively plan for this Tactic. Perhaps you’ve picked an Attack Tactic such as Mass Protest. You need a lot of time to plan this kind of event
effectively, and so you add an additional 10 days to the prep time. Doing so may be the difference between success and failure. A longer duration time generally makes the
Tactic more effective, but also garners more expense.
Another very important thing to consider is how long your coordinator should wait before beginning the preparation of a Tactic. You may wish to adjust this number in order to ensure that certain Tactics “complete” on the same day. This isn’t such an issue early in a campaign, because your goal at that point is to build your Movement’s strength and conduct lower-risk actions. However, near the end of a successful campaign, when the Regime is feeling pressure from the Movement and you think one dramatic push could break their back, you may wish to have a number of Tactics complete on the same day in order to apply real, powerful, and long-lasting results. For example, you’ve decided to have both a Mass Protest and a Building Occupation (see the Resistopedia) occur on the same day, but the Mass Protest will take 15 days to prepare, while the Building Occupation may only take one. When setting up these Tactics, you would adjust the “Wait” and “Prepare” days listings to ensure that both Tactics occur on the same day. To help you see when a Tactic begins and ends, use the Tactics Queue (see 3.4.12).
Page 62 A Force More Powerful™ Players’ Guide
A NOTE ON PERSUASION TIME: Most Tactics involve Persuasion Time—the time
needed to achieve the required level of consensus amongst the members of the Alliance regarding the action to be taken. The more hierarchical the Alliance's Decision-Making
Style (see 4.3.4), the smaller the Persuasion Time will be (all else being equal); i.e., each Tactic will have a base value for Persuasion Time, and will be modified by the tasked Character's Alliance's decision-making style as well as the Alliance leader's political
skills. Persuasion time can be "paid off" during a waiting period before a Tactic (e.g., if a Tactic is scheduled for a week in advance, and the Persuasion Time is less than a week, there will be no additional delay for the Tactic; hence it is to your advantage to schedule
Tactics in advance, so the Persuasion Time hurdle can be taken care of in advance).
Finally, the number of days you choose will be reflected on the Character’s portrait as a large number directly below his/her face. This indicates the number of days that that Character will be “tied up” in
planning and orchestrating the Tactic. It’s important to keep this number in mind when assigning new Tactics to a coordinator already conducting a Tactic, since that Character won’t be able to begin a new Tactic until the current one is finished. Choosing a Target: Now that you’ve chosen a Coordinator and a Tactic, it’s time to choose a Target. Whom (or what) should you choose? That depends upon your first two cplus the goals you wish to ultimately achieve. The best method for choosing a Target is to understand the nature of the Tactic that you’ve chosen. For example, if you’ve choa Mass Protest Tactic, you may target the protest toward an entity or in a part of thcountry where you think it will do the most good, which in the pictured example is a monastery. When choosing a Target, keep these things in mind:
hoices,
sen e
• For an Attack Tactic (like Mass Protest), pick a Target, such as a
Character (or organization/alliance/building), fully aligned with the Regime. This target may not be swayed under any other condition and will likely only respond to direct pressure.
• For a Deny Tactic (like Boycott), pick a Target whose economic or political power rests in their ability to perform duties or services for the public. If you “deny” their access to the public, you will be denying them their ability to maintain their strength.
• For a Build Strength Tactic (like Fraternize), you generally want to pick a Character who is either sympathetic to your Movement or is a person inside the Regime whom you’d like to sway to your side of the fence, such as a Chief of Police. This kind of Tactic is also directed to Alliances or organizations within the Movement itself, such as Training Tactics wherein you try to bolster the skills of persons within your Movement.
A Force More Powerful™ Players’ Guide Page 63
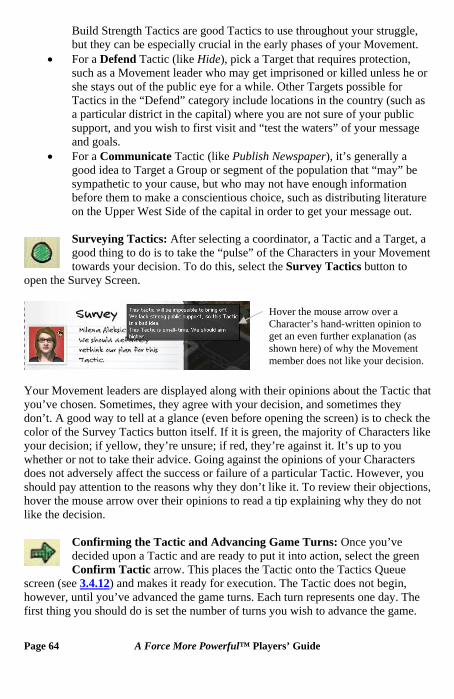
Build Strength Tactics are good Tactics to use throughout your struggle, but they can be especially crucial in the early phases of your Movement.
• For a Defend Tactic (like Hide), pick a Target that requires protection, such as a Movement leader who may get imprisoned or killed unless he or she stays out of the public eye for a while. Other Targets possible for Tactics in the “Defend” category include locations in the country (such as a particular district in the capital) where you are not sure of your public support, and you wish to first visit and “test the waters” of your message and goals.
• For a Communicate Tactic (like Publish Newspaper), it’s generally a good idea to Target a Group or segment of the population that “may” be sympathetic to your cause, but who may not have enough information before them to make a conscientious choice, such as distributing literature on the Upper West Side of the capital in order to get your message out.
Page 64 A Force More Powerful™ Players’ Guide
ovement Surveying Tactics: After selecting a coordinator, a Tactic and a Target, a good thing to do is to take the “pulse” of the Characters in your Mtowards your decision. To do this, select the Survey Tactics button to
open the Survey Screen.
Hover the mouse arrow over a Character’s hand-written opinion to get an even further explanation (as shown here) of why the Movement member does not like your decision.
Your Movement leaders are displayed along with their opinions about the Tactic that you’ve chosen. Sometimes, they agree with your decision, and sometimes they don’t. A good way to tell at a glance (even before opening the screen) is to check the color of the Survey Tactics button itself. If it is green, the majority of Characters like your decision; if yellow, they’re unsure; if red, they’re against it. It’s up to you whether or not to take their advice. Going against the opinions of your Characters does not adversely affect the success or failure of a particular Tactic. However, you should pay attention to the reasons why they don’t like it. To review their objections, hover the mouse arrow over their opinions to read a tip explaining why they do not like the decision.
Confirming the Tactic and Advancing Game Turns: Once you’ve decided upon a Tactic and are ready to put it into action, select the green Confirm Tactic arrow. This places the Tactic onto the Tactics Queue
screen (see 3.4.12) and makes it ready for execution. The Tactic does not begin, however, until you’ve advanced the game turns. Each turn represents one day. The first thing you should do is set the number of turns you wish to advance the game.
By default, the game automatically sets the number of turns for you, taking into consideration the Tactic that you’ve just submitted. For example, if you’ve submitted a Tactic that will take 7 days to complete, the Turn Indicator will refresh to show a number of turns equal to the submitted Tactic. It will only
do this if the Tactic just submitted is shorter than a Tactic currently “in progress”; meaning, if a 4 day Tactic is pending completion, submitting a 7 turn Tactic will not change the Turn Indicator (because the shorter Tactic will complete sooner). See Section 4.10.1 to adjust this function. However, you may overrule the game’s default settings by clicking the forward and backward arrows alongside the Turn Indicator. Each click progresses the turns up or down accordingly (one turn in A Force More Powerful equals one day in the scenario). Once you’ve settled on the exact number of turns/days you wish to advance the game, select the Advance Turns button. The game moves forward the specified number of turns. When it reappears, you may (or may not) have results of ongoing Tactics shown in the Message display (see 4.7). How many turns should you advance the game? It’s totally up to you. You may wish to advance the game only one day each time, or you may wish to increase the turns to 10, which means that the game will jump ahead 10 days. Whatever you wish is fine.
A word of warning: Pay close attention to when the scenario ends, because if you’ve selected a Tactic that takes 10 days to complete and the scenario lasts for only 5 more
days, the Tactic will not resolve before time runs out.
Reviewing Important Game Play Data: During A Force More Powerful, there are a number of screens that provide important game play data which you should use to best effect. These are the in-game screens accessed from the Game Screen. The information below explains why you, as the Movement planner, should access and use these screens to achieve your Movement’s goals.
The Organization Screen: The Organization Screen allows you to view all of the political Groups in play, and compare those Groups to one another.
A Force More Powerful™ Players’ Guide Page 65
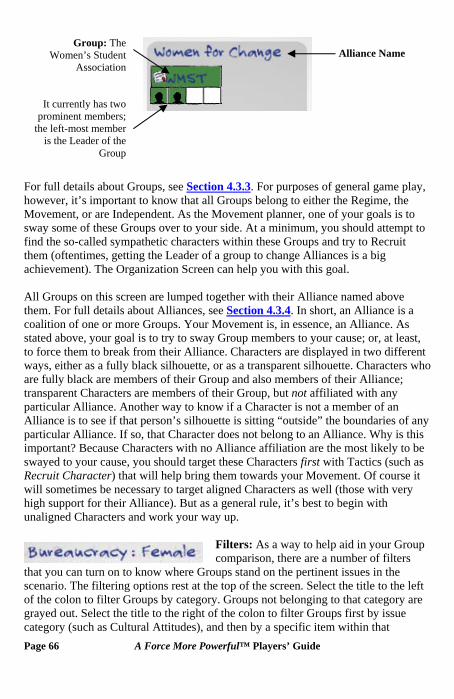
Page 66 A Force More Powerful™ Players’ Guide
Group: The Women’s Student
Association
It currently has two prominent members;
the left-most member is the Leader of the
Group
Alliance Name
For full details about Groups, see Section 4.3.3. For purposes of general game play, however, it’s important to know that all Groups belong to either the Regime, the Movement, or are Independent. As the Movement planner, one of your goals is to sway some of these Groups over to your side. At a minimum, you should attempt to find the so-called sympathetic characters within these Groups and try to Recruit them (oftentimes, getting the Leader of a group to change Alliances is a big achievement). The Organization Screen can help you with this goal. All Groups on this screen are lumped together with their Alliance named above them. For full details about Alliances, see Section 4.3.4. In short, an Alliance is a coalition of one or more Groups. Your Movement is, in essence, an Alliance. As stated above, your goal is to try to sway Group members to your cause; or, at least, to force them to break from their Alliance. Characters are displayed in two different ways, either as a fully black silhouette, or as a transparent silhouette. Characters who are fully black are members of their Group and also members of their Alliance; transparent Characters are members of their Group, but not affiliated with any particular Alliance. Another way to know if a Character is not a member of an Alliance is to see if that person’s silhouette is sitting “outside” the boundaries of any particular Alliance. If so, that Character does not belong to an Alliance. Why is this important? Because Characters with no Alliance affiliation are the most likely to be swayed to your cause, you should target these Characters first with Tactics (such as Recruit Character) that will help bring them towards your Movement. Of course it will sometimes be necessary to target aligned Characters as well (those with very high support for their Alliance). But as a general rule, it’s best to begin with unaligned Characters and work your way up.
Filters: As a way to help aid in your Group comparison, there are a number of filters
that you can turn on to know where Groups stand on the pertinent issues in the scenario. The filtering options rest at the top of the screen. Select the title to the left of the colon to filter Groups by category. Groups not belonging to that category are grayed out. Select the title to the right of the colon to filter Groups first by issue category (such as Cultural Attitudes), and then by a specific item within that
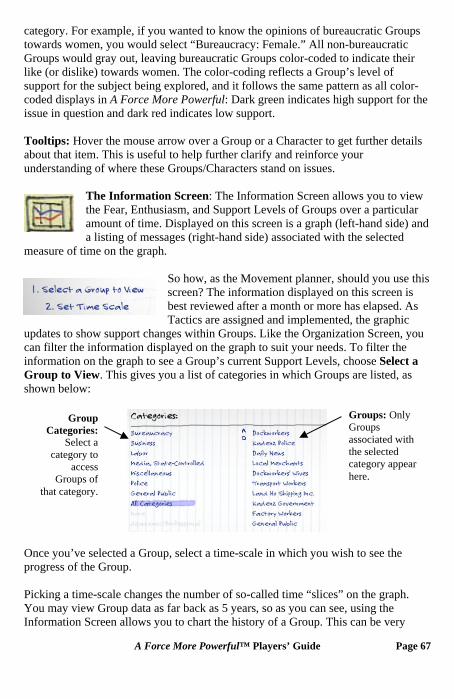
category. For example, if you wanted to know the opinions of bureaucratic Groups towards women, you would select “Bureaucracy: Female.” All non-bureaucratic Groups would gray out, leaving bureaucratic Groups color-coded to indicate their like (or dislike) towards women. The color-coding reflects a Group’s level of support for the subject being explored, and it follows the same pattern as all color-coded displays in A Force More Powerful: Dark green indicates high support for the issue in question and dark red indicates low support. Tooltips: Hover the mouse arrow over a Group or a Character to get further details about that item. This is useful to help further clarify and reinforce your understanding of where these Groups/Characters stand on issues.
The Information Screen: The Information Screen allows you to view the Fear, Enthusiasm, and Support Levels of Groups over a particular amount of time. Displayed on this screen is a graph (left-hand side) and a listing of messages (right-hand side) associated with the selected
measure of time on the graph.
So how, as the Movement planner, should you use this screen? The information displayed on this screen is best reviewed after a month or more has elapsed. As Tactics are assigned and implemented, the graphic
updates to show support changes within Groups. Like the Organization Screen, you can filter the information displayed on the graph to suit your needs. To filter the information on the graph to see a Group’s current Support Levels, choose Select a Group to View. This gives you a list of categories in which Groups are listed, as shown below:
Group Categories:
Select a category to
access Groups of
that category.
Groups: Only Groups associated with the selected category appear here.
Once you’ve selected a Group, select a time-scale in which you wish to see the progress of the Group. Picking a time-scale changes the number of so-called time “slices” on the graph. You may view Group data as far back as 5 years, so as you can see, using the Information Screen allows you to chart the history of a Group. This can be very
A Force More Powerful™ Players’ Guide Page 67
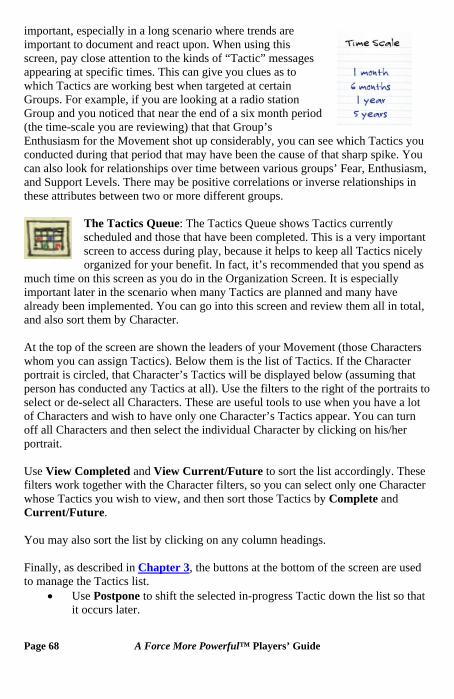
Page 68 A Force More Powerful™ Players’ Guide
important, especially in a long scenario where trends are important to document and react upon. When using this screen, pay close attention to the kinds of “Tactic” messages appearing at specific times. This can give you clues as to which Tactics are working best when targeted at certain Groups. For example, if you are looking at a radio station Group and you noticed that near the end of a six month period (the time-scale you are reviewing) that that Group’s Enthusiasm for the Movement shot up considerably, you can see which Tactics you conducted during that period that may have been the cause of that sharp spike. You can also look for relationships over time between various groups’ Fear, Enthusiasm, and Support Levels. There may be positive correlations or inverse relationships in these attributes between two or more different groups.
The Tactics Queue: The Tactics Queue shows Tactics currently scheduled and those that have been completed. This is a very important screen to access during play, because it helps to keep all Tactics nicely organized for your benefit. In fact, it’s recommended that you spend as
much time on this screen as you do in the Organization Screen. It is especially important later in the scenario when many Tactics are planned and many have already been implemented. You can go into this screen and review them all in total, and also sort them by Character. At the top of the screen are shown the leaders of your Movement (those Characters whom you can assign Tactics). Below them is the list of Tactics. If the Character portrait is circled, that Character’s Tactics will be displayed below (assuming that person has conducted any Tactics at all). Use the filters to the right of the portraits to select or de-select all Characters. These are useful tools to use when you have a lot of Characters and wish to have only one Character’s Tactics appear. You can turn off all Characters and then select the individual Character by clicking on his/her portrait. Use View Completed and View Current/Future to sort the list accordingly. These filters work together with the Character filters, so you can select only one Character whose Tactics you wish to view, and then sort those Tactics by Complete and Current/Future. You may also sort the list by clicking on any column headings. Finally, as described in Chapter 3, the buttons at the bottom of the screen are used to manage the Tactics list.
• Use Postpone to shift the selected in-progress Tactic down the list so that it occurs later.
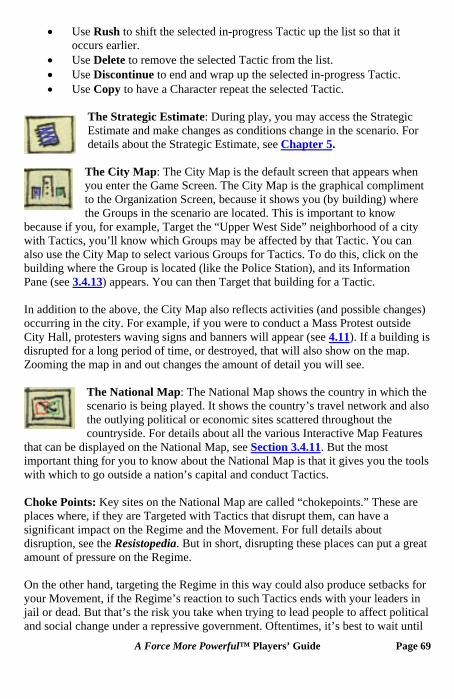
• Use Rush to shift the selected in-progress Tactic up the list so that it occurs earlier.
• Use Delete to remove the selected Tactic from the list. • Use Discontinue to end and wrap up the selected in-progress Tactic. • Use Copy to have a Character repeat the selected Tactic.
The Strategic Estimate: During play, you may access the Strategic Estimate and make changes as conditions change in the scenario. For details about the Strategic Estimate, see Chapter 5. The City Map: The City Map is the default screen that appears when you enter the Game Screen. The City Map is the graphical compliment to the Organization Screen, because it shows you (by building) where the Groups in the scenario are located. This is important to know
because if you, for example, Target the “Upper West Side” neighborhood of a city with Tactics, you’ll know which Groups may be affected by that Tactic. You can also use the City Map to select various Groups for Tactics. To do this, click on the building where the Group is located (like the Police Station), and its Information Pane (see 3.4.13) appears. You can then Target that building for a Tactic. In addition to the above, the City Map also reflects activities (and possible changes) occurring in the city. For example, if you were to conduct a Mass Protest outside City Hall, protesters waving signs and banners will appear (see 4.11). If a building is disrupted for a long period of time, or destroyed, that will also show on the map. Zooming the map in and out changes the amount of detail you will see.
The National Map: The National Map shows the country in which the scenario is being played. It shows the country’s travel network and also the outlying political or economic sites scattered throughout the countryside. For details about all the various Interactive Map Features
that can be displayed on the National Map, see Section 3.4.11. But the most important thing for you to know about the National Map is that it gives you the tools with which to go outside a nation’s capital and conduct Tactics.
Choke Points: Key sites on the National Map are called “chokepoints.” These are places where, if they are Targeted with Tactics that disrupt them, can have a significant impact on the Regime and the Movement. For full details about disruption, see the Resistopedia. But in short, disrupting these places can put a great amount of pressure on the Regime. On the other hand, targeting the Regime in this way could also produce setbacks for your Movement, if the Regime’s reaction to such Tactics ends with your leaders in jail or dead. But that’s the risk you take when trying to lead people to affect political and social change under a repressive government. Oftentimes, it’s best to wait until
A Force More Powerful™ Players’ Guide Page 69
Page 70 A Force More Powerful™ Players’ Guide
a later phase of the campaign before conducting such aggressive Tactics. At that point, you may have greater support from the public and from influential government officials, which can be important if such a Tactic is to work.
Receiving Messages: See Section 4.7 for details about A Force More Powerful’s messaging system.
4.2 Using the Strategic Estimate During play, you may access the Strategic Estimate to periodically review data about the scenario being played. Some information can be modified once play begins, some cannot (the Movement Manifesto,
Objectives and Victory Conditions). For full details about the Strategic Estimate, see Chapter 5.
4.3 Building and Strengthening the Movement An important part of play is to build and strengthen your Movement. To do that, you must first understand the fundamentals that comprise a Movement: your role as the Movement Leader, your Characters, the Groups within your Movement, and the Alliances that Groups form.
4.3.1 The Player’s Role as the Movement Planner While playing A Force More Powerful, you represent the Character who is the strategic thinker in charge of planning your Movement’s campaign for nonviolent change. Note that this person is not always the public “leader” of the resistance Movement, who in some cases is a charismatic figurehead but not the actual decision maker. You are not directly represented in the game, but your role is significant, because you assign Tactics and plan the Movement’s strategy. You cannot be targeted directly by the Regime, but your Characters and Groups can, so it’s dependent upon you to make the choices that will not only keep your Movement going forward with its strategic goals, but will also bring the least amount of danger to your Movement’s supporters.
4.3.2 Characters Characters are very important to the Movement. They comprise the backbone of your Movement, and are absolutely essential in carrying out the strategic goals of the Movement. Without Characters, the Movement cannot survive.
A Character has several attributes and qualities which are displayed when you select a Character’s name (or the More Information button on Character displays) inside the game. All Characters are rated in the following ways:
• The Character’s name. • A Character is either “male” or “female” (which should be obvious from
the portrait).
A Force More Powerful™ Players’ Guide Page 71
ch
topedia. • cation.
blic
• as a listing of
e
by
• A Character has a “title” if one is applicable, such as “Governor of Ulmar.” Characters can be leaders of more than one Group/Alliance.
• A Character is placed within aspecific Group category, suas “Judicial” or “Labor.” For details, see the ResisA Character’s lo
• A Character has both a puprofile and public influence rating, which is indicated by color-code. A Character hSupport Levels for the different Alliances in thscenario (including the Regime), again indicatedcolor-code. They can be clicked on to reveal separate Support Levels.
• A Character’s support for “Other Alliances” is indicated (assuming the scenario has more than two Alliances in play).
• The Character’s current Fear level. For details, see below and the Resistopedia.
• The Character’s current Enthusiasm. For details, see below and the Resistopedia.
• A Character has a set of “Policy Preferences” which indicate a set of the Character’s ideology on the issues present in the game (see 3.4.13). These policies can change during game play, so pay close attention to them.
• A Character has a set of “Cultural Attributes” which indicate his/her cultural traits.
• A Character is defined by a set of “competencies” that reflect particular aptitudes and proficiency at different kinds of Tactics. For details, see below and the Resistopedia.
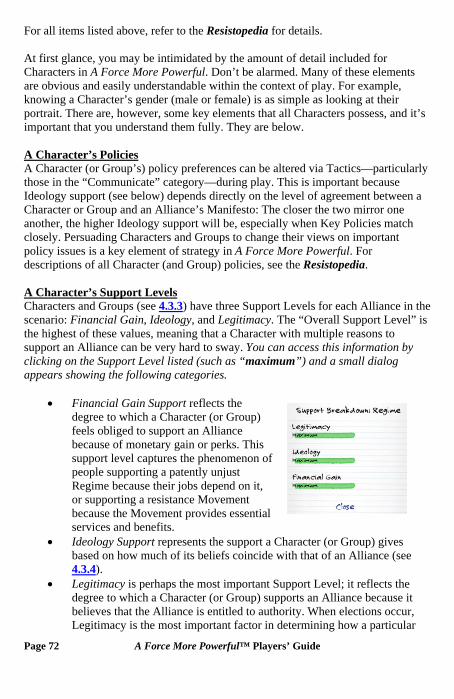
For all items listed above, refer to the Resistopedia for details. At first glance, you may be intimidated by the amount of detail included for Characters in A Force More Powerful. Don’t be alarmed. Many of these elements are obvious and easily understandable within the context of play. For example, knowing a Character’s gender (male or female) is as simple as looking at their portrait. There are, however, some key elements that all Characters possess, and it’s important that you understand them fully. They are below. A Character’s Policies A Character (or Group’s) policy preferences can be altered via Tactics—particularly those in the “Communicate” category—during play. This is important because Ideology support (see below) depends directly on the level of agreement between a Character or Group and an Alliance’s Manifesto: The closer the two mirror one another, the higher Ideology support will be, especially when Key Policies match closely. Persuading Characters and Groups to change their views on important policy issues is a key element of strategy in A Force More Powerful. For descriptions of all Character (and Group) policies, see the Resistopedia. A Character’s Support Levels Characters and Groups (see 4.3.3) have three Support Levels for each Alliance in the scenario: Financial Gain, Ideology, and Legitimacy. The “Overall Support Level” is the highest of these values, meaning that a Character with multiple reasons to support an Alliance can be very hard to sway. You can access this information by clicking on the Support Level listed (such as “maximum”) and a small dialog appears showing the following categories.
• Financial Gain Support reflects the degree to which a Character (or Group) feels obliged to support an Alliance because of monetary gain or perks. This support level captures the phenomenon of people supporting a patently unjust Regime because their jobs depend on it, or supporting a resistance Movement because the Movement provides essential services and benefits.
• Ideology Support represents the support a Character (or Group) gives based on how much of its beliefs coincide with that of an Alliance (see 4.3.4).
• Legitimacy is perhaps the most important Support Level; it reflects the degree to which a Character (or Group) supports an Alliance because it believes that the Alliance is entitled to authority. When elections occur, Legitimacy is the most important factor in determining how a particular
Page 72 A Force More Powerful™ Players’ Guide
A Force More Powerful™ Players’ Guide Page 73
Group will vote. Legitimacy is generally the second hardest Support Level to dramatically change (Ideology is harder).
A Character’s Enthusiasm Enthusiasm is a measure of the Character’s willingness to carry out Tactics or otherwise engage in activism on behalf of his/her Alliance (see 4.3.4). Characters with low Enthusiasm may refuse Tactics or do them poorly. Enthusiasm is independent from Support Levels (see above) because a Character may be a strong supporter of an Alliance, yet be unwilling to do anything involving personal inconvenience or risk. However, if a Character has low Enthusiasm which persists at that low level for an extended time, then Support Levels may be affected. Several game factors can influence Enthusiasm:
• Specific Tactics: Both success and failure of Tactics can positively or negatively affect Enthusiasm levels of the tasked Character, the Target of the Tactic, and affiliated Characters, Groups, Alliances, neighborhoods, and regions.
• Decision-Making Style: Alliances using a more hierarchical Decision-Making Style will cause Characters to lose Enthusiasm (since those Characters will feel that their views and concerns are not being addressed by the decision-making process).
• Personality Differences: An Alliance full of strong-willed, ambitious Characters can lead to low Enthusiasm for some of them, to reflect bruised egos and leadership struggles.
• Repression: Strong repression or intimidating Tactics carried out successfully by the Regime (see 4.4) or another violent non-Player Alliance may cause Characters to lose Enthusiasm; they still support their cause, but are unwilling to take risks on for it.
A Character’s Fear Level All Characters, Groups, neighborhoods, and regions, no matter what their Alliance affiliations are, can experience Fear. In game terms, this value represents many things: fear of repression, fear of physical harm, fear of change, fear of chaos, and fear of losing power. Fear can paralyze people into inaction, and this can only be overcome when Enthusiasm is greater than Fear. As such, Characters can actively pursue Tactics that increase Fear for their opponent, or decrease Fear for their Alliance, as they see fit. Factors that can change Fear levels include:
• Repression: Strong repression or intimidating Tactics carried out by the Regime or other violent non-player Alliances may cause members or supporters of the repressed Alliance to gain Fear; they still support their chosen cause, but are unwilling to take risks for it. This Fear can also ripple out to unrelated Characters, Groups, neighborhoods, and regions.

Page 74 A Force More Powerful™ Players’ Guide
• Specific Tactics: Both success and failure of Tactics can positively or negatively affect Fear levels of the tasked Character, the target of the Tactic, and affiliated Characters, Groups, neighborhoods, and regions.
A Character’s Competencies Competencies reflect a Character’s particular set of proficiencies that may assist him in carrying out different kinds of Tactics. For example, a Character with the Competency of “Writing” would likely be a good choice for the Craft Message Tactic. Also, a Character with multiple Competencies that affect one particular Tactic is much more likely to succeed at that Tactic. For example, if a Character has Charisma, Creativity, and Empathy, he or she would be three times more likely to succeed at the Craft Message Tactic. Competencies represent not just training or acquired learning, but also exceptional personal qualities and aptitudes. In the Appendix is a chart listing Character Competencies and their associated Tactics. Acquiring Competencies Through Training: Characters can acquire new Competencies through Training Tactics. This is especially good for those Characters in your Movement that do not have any Competencies at all. Whenever you conduct a Training Tactic, the following can occur:
• If the training session was anything other than Repression, all Characters who are members of the target Group have a 10% chance of getting one of the following Competencies (randomly determined): Writing, Organization, Public Speaking, Training, Fundraising, and Vision.
• If the training session was Repression, the possible Competencies gained are: Interrogation, Weapons, and Crisis Management.
A Character’s Public Profile A Character's Public Profile is basically a measure of how well-known he or she is to the public. The Public Profile ratings from most to least visible are Famous, Prominent, Visible, Low, and Anonymous. The value is set for each Character in the beginning of the scenario, but will increase when the Character performs certain Tactics (e.g., giving speeches and other “visible” activities). It will also degrade over periods of inactivity or low-visibility. Public Profile affects a variety of game-play elements. Characters with sufficiently low Public Profile ratings cannot be targeted by the Regime; therefore, it makes sense for you to manage risks to the Movement's Characters with this in mind. For example, a Character with a low Profile might be useful in carrying out Tactics that have a high probability of arrest, because the Regime is less likely to “see” them. Alternately, a Character with a high Public Profile that has been attracting negative
Regime attention might do well to Hide for a few days (which lowers his/her Public Profile). Characters with high Public Profile are generally more likely to succeed with Tactics that require public recognition, such as making speeches, or leading mass protests. Conversely, these Characters will lose Enthusiasm if tasked with mundane, low visibility Tactics such as Distributing Literature. Public Profile also comes into play when replacing Group leaders. If the current leader of a Group is removed, and there is another Character with equal or greater Public Profile in the Group, that Character becomes the leader. A Character’s Public Influence Public Influence measures how much credibility the General Public places in the views and actions of the Character (or Group). Public Influence can represent that their individual opinions are well-respected, or that their memberships or affiliations are widespread throughout the public. Characters with high Public Influence are more likely to “pull” the General Public along with them when they alter their Support Levels or Policy Preferences. Recruiting Characters: Recruiting Characters to participate in your Movement is an important strategy in A Force More Powerful, and is essential to strengthen and improve the Movement. To that end, here are some things you should keep in mind:
• Do not try to recruit hardcore Regime supporters, those individuals whose Regime Support Levels are very high. It’s unlikely that they will ever change Alliances, and making the attempt may cause more trouble than it’s worth. Putting your Characters in front of such high level Regime personnel brings a lot of attention to your cause; attention that you may not desire at the moment.
• A good Character to recruit is one that is not affiliated with any particular Alliance (i.e., those Characters whose silhouette on the Organization Screen (see 3.4.10) is transparent). These Characters tend to be soft or (at least) uncommitted to the Regime, and may very well share many of your philosophies.
• Another factor to consider when recruiting is if the Character in question has the same Policy Agreements as you do. This information can be found on the Organization Screen or on the Character’s own Information Pane (see 3.4.13).
• Pay close attention to your Character’s Competencies (see above). If a Character has Empathy or Vision or even Charisma, he or she is the best person to choose to make recruitment attempts.
A Force More Powerful™ Players’ Guide Page 75
• Finally, it’s important to not try to recruit a Character too often. Roughly once a week is about the right number of attempts. Any more than that and you run the risk of annoying the Character and turning him/her completely away from your cause.
4.3.3 Groups
Page 76 A Force More Powerful™ Players’ Guide
spirations, or livelihood rely on o
A Group is the basic political element in the game. A Group represents an organization, institution or constituency that can potentially play an important role in the scenario. Groups comprise one or more Characters, whose interests, ar are manifest through the activities (or responsibilities) of the
Group. For example, all of the employees of a television station can comprise a Group. Groups are gathered either under an Alliance (see 4.3.4) or are Independent. This is easily seen by accessing the Organization Screen (see 3.4.10). Groups connected with the Regime have thrown their support behind the Regime’s goals; Groups connected with your Movement have thrown their support behind your Goals. But Group affiliations are not static in A Force More Powerful, and Groups can shift their support back and forth between the Movement and Regime many times during play. Power is expressed in both the game and in real life though Groups. By providing their cooperation, or withdrawing it, Groups (especially key Groups that are Pillars of Support) have a major influence over how powerful and effective the Regime and the Movement will be in carrying out their actions. The trick for you, as the Movement planner, is to sway as many Groups as you can over to supporting your goals, or at the least expressing some sympathy with your cause. For the most part, Groups are affected by the same things that affect Characters (see 4.3.2), and they also share many of the same attributes (such as Fear and Enthusiasm levels). A Group’s attributes and Support Levels, however, are independent of its membership; meaning, a Group’s Fear level may be very different from an individual member’s Fear Level (i.e., a Group’s Fear level is not a composite of its Characters’ levels). But it’s still important to note that what affects Characters can also affect Groups. Also, Characters who change their Support Levels, Fear, and Enthusiasm can have ripple effects on the Groups they’re members of. Keep all this in mind when playing the game. The Leader: All Groups have a leader, who is the Character displayed in the left-most box. The leader of a Group is often a good Character to Recruit because he or she carries great weight within the Group. If the Group leader changes his/her Alliances or expresses interest in your cause, there is a good chance that the Group will also change its position as well.
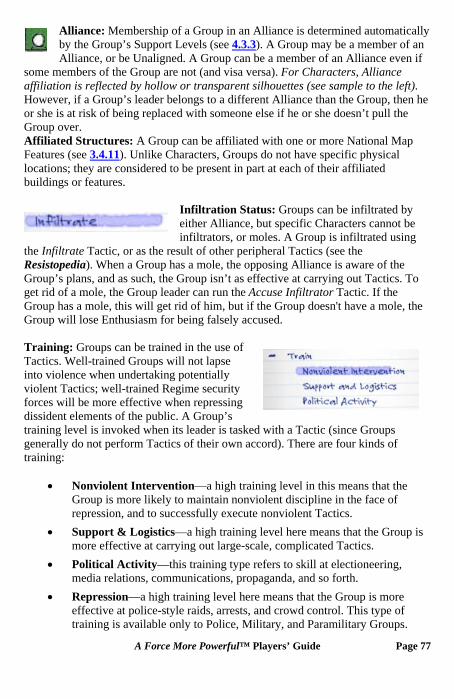
Alliance: Membership of a Group in an Alliance is determined automatically by the Group’s Support Levels (see 4.3.3). A Group may be a member of an Alliance, or be Unaligned. A Group can be a member of an Alliance even if
some members of the Group are not (and visa versa). For Characters, Alliance affiliation is reflected by hollow or transparent silhouettes (see sample to the left). However, if a Group’s leader belongs to a different Alliance than the Group, then he or she is at risk of being replaced with someone else if he or she doesn’t pull the Group over. Affiliated Structures: A Group can be affiliated with one or more National Map Features (see 3.4.11). Unlike Characters, Groups do not have specific physical locations; they are considered to be present in part at each of their affiliated buildings or features.
Infiltration Status: Groups can be infiltrated by either Alliance, but specific Characters cannot be infiltrators, or moles. A Group is infiltrated using
the Infiltrate Tactic, or as the result of other peripheral Tactics (see the Resistopedia). When a Group has a mole, the opposing Alliance is aware of the Group’s plans, and as such, the Group isn’t as effective at carrying out Tactics. To get rid of a mole, the Group leader can run the Accuse Infiltrator Tactic. If the Group has a mole, this will get rid of him, but if the Group doesn't have a mole, the Group will lose Enthusiasm for being falsely accused. Training: Groups can be trained in the use of Tactics. Well-trained Groups will not lapse into violence when undertaking potentially violent Tactics; well-trained Regime security forces will be more effective when repressing dissident elements of the public. A Group’s training level is invoked when its leader is tasked with a Tactic (since Groups generally do not perform Tactics of their own accord). There are four kinds of training:
• Nonviolent Intervention—a high training level in this means that the Group is more likely to maintain nonviolent discipline in the face of repression, and to successfully execute nonviolent Tactics.
• Support & Logistics—a high training level here means that the Group is more effective at carrying out large-scale, complicated Tactics.
• Political Activity—this training type refers to skill at electioneering, media relations, communications, propaganda, and so forth.
• Repression—a high training level here means that the Group is more effective at police-style raids, arrests, and crowd control. This type of training is available only to Police, Military, and Paramilitary Groups.
A Force More Powerful™ Players’ Guide Page 77
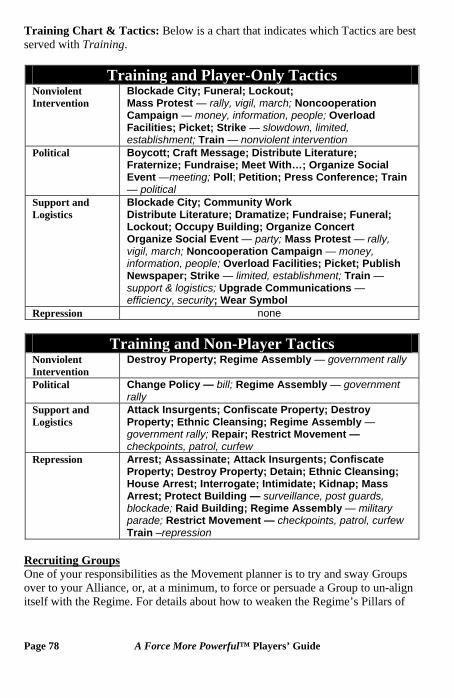
Page 78 A Force More Powerful™ Players’ Guide
Training Chart & Tactics: Below is a chart that indicates which Tactics are best served with Training.
Training and Player-Only Tactics Nonviolent Intervention
Blockade City; Funeral; Lockout; Mass Protest — rally, vigil, march; Noncooperation Campaign — money, information, people; Overload Facilities; Picket; Strike — slowdown, limited, establishment; Train — nonviolent intervention
Political Boycott; Craft Message; Distribute Literature; Fraternize; Fundraise; Meet With…; Organize Social Event —meeting; Poll; Petition; Press Conference; Train — political
Support and Logistics
Blockade City; Community Work Distribute Literature; Dramatize; Fundraise; Funeral; Lockout; Occupy Building; Organize Concert Organize Social Event — party; Mass Protest — rally, vigil, march; Noncooperation Campaign — money, information, people; Overload Facilities; Picket; Publish Newspaper; Strike — limited, establishment; Train — support & logistics; Upgrade Communications — efficiency, security; Wear Symbol
Repression none
Training and Non-Player Tactics Nonviolent Intervention
Destroy Property; Regime Assembly — government rally
Political Change Policy — bill; Regime Assembly — government rally
Support and Logistics
Attack Insurgents; Confiscate Property; Destroy Property; Ethnic Cleansing; Regime Assembly —government rally; Repair; Restrict Movement —checkpoints, patrol, curfew
Repression Arrest; Assassinate; Attack Insurgents; Confiscate Property; Destroy Property; Detain; Ethnic Cleansing; House Arrest; Interrogate; Intimidate; Kidnap; Mass Arrest; Protect Building — surveillance, post guards, blockade; Raid Building; Regime Assembly — military parade; Restrict Movement — checkpoints, patrol, curfew Train –repression
Recruiting Groups One of your responsibilities as the Movement planner is to try and sway Groups over to your Alliance, or, at a minimum, to force or persuade a Group to un-align itself with the Regime. For details about how to weaken the Regime’s Pillars of
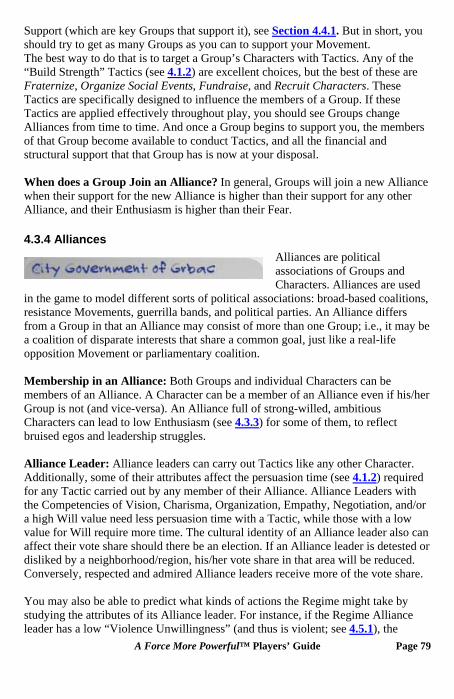
Support (which are key Groups that support it), see Section 4.4.1. But in short, you should try to get as many Groups as you can to support your Movement. The best way to do that is to target a Group’s Characters with Tactics. Any of the “Build Strength” Tactics (see 4.1.2) are excellent choices, but the best of these are Fraternize, Organize Social Events, Fundraise, and Recruit Characters. These Tactics are specifically designed to influence the members of a Group. If these Tactics are applied effectively throughout play, you should see Groups change Alliances from time to time. And once a Group begins to support you, the members of that Group become available to conduct Tactics, and all the financial and structural support that that Group has is now at your disposal. When does a Group Join an Alliance? In general, Groups will join a new Alliance when their support for the new Alliance is higher than their support for any other Alliance, and their Enthusiasm is higher than their Fear.
4.3.4 Alliances Alliances are political associations of Groups and Characters. Alliances are used
in the game to model different sorts of political associations: broad-based coalitions, resistance Movements, guerrilla bands, and political parties. An Alliance differs from a Group in that an Alliance may consist of more than one Group; i.e., it may be a coalition of disparate interests that share a common goal, just like a real-life opposition Movement or parliamentary coalition. Membership in an Alliance: Both Groups and individual Characters can be members of an Alliance. A Character can be a member of an Alliance even if his/her Group is not (and vice-versa). An Alliance full of strong-willed, ambitious Characters can lead to low Enthusiasm (see 4.3.3) for some of them, to reflect bruised egos and leadership struggles. Alliance Leader: Alliance leaders can carry out Tactics like any other Character. Additionally, some of their attributes affect the persuasion time (see 4.1.2) required for any Tactic carried out by any member of their Alliance. Alliance Leaders with the Competencies of Vision, Charisma, Organization, Empathy, Negotiation, and/or a high Will value need less persuasion time with a Tactic, while those with a low value for Will require more time. The cultural identity of an Alliance leader also can affect their vote share should there be an election. If an Alliance leader is detested or disliked by a neighborhood/region, his/her vote share in that area will be reduced. Conversely, respected and admired Alliance leaders receive more of the vote share. You may also be able to predict what kinds of actions the Regime might take by studying the attributes of its Alliance leader. For instance, if the Regime Alliance leader has a low “Violence Unwillingness” (and thus is violent; see 4.5.1), the A Force More Powerful™ Players’ Guide Page 79
Page 80 A Force More Powerful™ Players’ Guide
Regime is more likely to choose violent tactics when responding to the Movement’s actions. It’s important to note again that an Alliance leader is not necessarily the public “leader” of your resistance Movement, who in some cases is a charismatic figurehead but not the actual decision-maker. In fact, many of the scenarios in A Force More Powerful challenge you to strategically pick the most effective figurehead to lead the Movement, based on the specifics of the political situation represented by that scenario. The Movement is an Alliance: Though it should be obvious, it’s important to stress that your resistance Movement is an Alliance, whose goal is to carry out Tactics intended to achieve the Victory Conditions you have selected within the scenario. The Regime: The Regime is the Alliance of your adversary, and it is played by the computer’s artificial intelligence. The Regime starts each scenario as the government. A Force More Powerful allows for a wide range of possible Regimes, from almost-benign to pervasively evil, from unified under a dictator’s iron fist to “ready to crack.” The Regime is created by the scenario designer. Regimes may collapse due to overwhelming political pressure caused by noncooperation of a city’s or country’s people. The threat of collapse is ever-present, although it may be very difficult to achieve in some scenarios. Regimes depend on their pillars of support (key groups that support them) to retain power. If enough groups withdraw their support from a Regime, it will collapse. For more details about how to place pressure on the Regime, see Section 4.4. Alliance Decision-Making Styles: An Alliance’s decision-making style represents the process by which the Alliance makes decisions. There are five settings that range from rigid and hierarchical to consensus-based. An Alliance with a more rigid decision-making style gets things done faster, but rapidly depletes the Enthusiasm of its members. Coming to a consensus takes longer, but the members are more enthusiastic because they are involved in the process. The decision-making styles are listed below.
• Autocratic: One person within the Alliance makes all decisions with minimal outside influence. Real-world examples include Tsarist Russia and North Korea.
• Oligarchic: The Alliance leader and a close cabal of influential advisors make decisions that are carried out by the rest of the Alliance. Real-world examples include the former Soviet Union, Communist China, and Iran.
• Majority Rule: The Alliance leader must persuade a majority of the Group leaders within the Alliance to go along with plans and Tactics. Note that this is not literally enforced within the game; rather, it is abstractly enforced through the reduced Enthusiasm cost (and greater time cost,
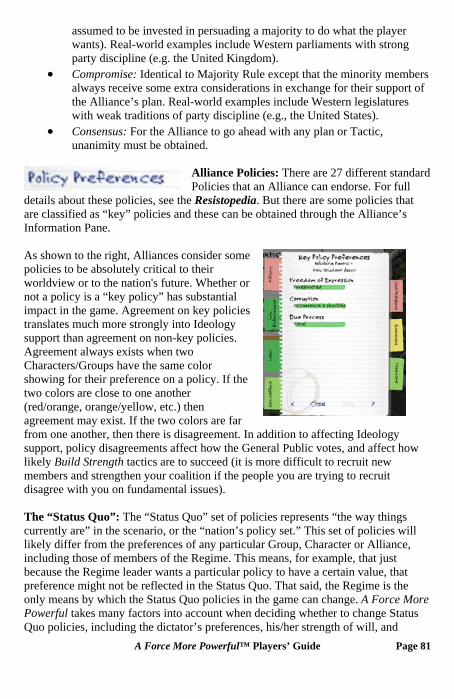
assumed to be invested in persuading a majority to do what the player wants). Real-world examples include Western parliaments with strong party discipline (e.g. the United Kingdom).
• Compromise: Identical to Majority Rule except that the minority members always receive some extra considerations in exchange for their support of the Alliance’s plan. Real-world examples include Western legislatures with weak traditions of party discipline (e.g., the United States).
A Force More Powerful™ Players’ Guide Page 81
tandard
• Consensus: For the Alliance to go ahead with any plan or Tactic, unanimity must be obtained.
Alliance Policies: There are 27 different sPolicies that an Alliance can endorse. For full
details about these policies, see the Resistopedia. But there are some policies thatare classified as “key” policies and these can be obtained through the Alliance’s Information Pane. As shown to the right, Alliances consider some policies to be absolutely critical to their worldview or to the nation's future. Whether or not a policy is a “key policy” has substantial impact in the game. Agreement on key policies translates much more strongly into Ideology support than agreement on non-key policies. Agreement always exists when two Characters/Groups have the same color showing for their preference on a policy. If the two colors are close to one another (red/orange, orange/yellow, etc.) then agreement may exist. If the two colors are far from one another, then there is disagreement. In addition to affecting Ideology support, policy disagreements affect how the General Public votes, and affect how likely Build Strength tactics are to succeed (it is more difficult to recruit new members and strengthen your coalition if the people you are trying to recruit disagree with you on fundamental issues). The “Status Quo”: The “Status Quo” set of policies represents “the way things currently are” in the scenario, or the “nation’s policy set.” This set of policies will likely differ from the preferences of any particular Group, Character or Alliance, including those of members of the Regime. This means, for example, that just because the Regime leader wants a particular policy to have a certain value, that preference might not be reflected in the Status Quo. That said, the Regime is the only means by which the Status Quo policies in the game can change. A Force More Powerful takes many factors into account when deciding whether to change Status Quo policies, including the dictator’s preferences, his/her strength of will, and

his/her leadership type (e.g., Ideologues are less likely to change the Status Quo away from their preferences, even if doing so would help them politically). The interaction between Policy Preferences of Groups, Characters, and Alliances, and the actual Status Quo is very important. For example, a Regime may decide to set Status Quo policies in ways its current supporters don’t like, in order to solidify its support outside its inner circle. Additionally, sometimes a Tactic will refer to a particular Status Quo policy setting as part of its resolution. For instance, the status quo policy on “Freedom of Expression” will affect the difficulty of distributing literature, and the Status Quo policy on “Use of Torture” will affect the likelihood of a Character surviving arrest and interrogation. The Alliance’s Manifesto: The policy preferences of an Alliance are its Manifesto. Each Alliance’s Manifesto is set by the scenario designer. You may change any part of the Manifesto at the very beginning of the game before time has passed. Afterwards, you may not change the Manifesto.
4.4 Weakening the Regime The Regime is the adversary in A Force More Powerful. It is an Alliance, and starts each scenario as the government. The nature of the Regime in each scenario will be a major determinant of scenario difficulty. The easiest scenarios will have lenient, careless or politically vulnerable Regimes. The hardest ones will have well-trained, well-
funded, ruthless and politically strong Regimes. It’s recommended that you start with easy scenarios and work your way up.
4.4.1 Pillars of Support Both your Movement and the Regime have Pillars of Support… those Groups provide you with crucial legitimacy, services, and/or human or materials resources. Of course, as you strengthen and protect your Pillars of Support, you should try to weaken the Regime’s. Weakening a
Regime’s Pillars of Support can be very difficult, as the Regime tries very hard to keep its core supporters on its side because these Groups are vital to its survival. So, how should you go after these seemingly unmovable supporters? The first step is to recognize which Group (or Groups) in the Regime represent the Pillars of Support. This is best found through the Strategic Estimate (see Chapter 5), which can be accessed in-game through the Strategic Estimate button in the bottom right-hand corner of the screen. Once you’ve identified the Pillars of Support for the Regime, the next step is to figure out what kind of support they provide to the Regime. In the game, there are three kinds of support:
Page 82 A Force More Powerful™ Players’ Guide
A Force More Powerful™ Players’ Guide Page 83
Legitimacy Support—Pillars of Support that believe that the Regime is the “legitimate” government of the country can be swayed through Tactics that attempt to reveal the “illegitimacy” of the government. For example, if one of a Regime’s Pillars of Support is a military Group, then you would want to find commanders within that Group whose support for the Regime is soft. Conduct Tactics that Target them, such as Recruit Character, to try and sway them to your cause. Even if they do not change Alliances, then perhaps they can be softened enough such that, when and if the Regime orders them to conduct violent Tactics against your Movement, they are less likely to act. If you can sway the General Public against the Regime through Tactics such as Distributing Literature or if the Regime orders a violent crackdown on a Mass Protest and the public does not like it, then members of the Pillars of Support may begin to realize that their first duty is to the people, and not the illegitimate government, of their country. Financial Support—Pillars of Support that support the Regime because of financial gain (often because they sell the Regime goods or services) can often be swayed through Tactics such as Strikes, Building Occupation, Boycotts, etc. Any Tactics which weaken a Regime’s hold on the financial resources of the country are useful against these kinds of Pillars of Support. Ideological Support—This kind of support is the most difficult to change because it involves changing people’s deeply held preferences. If the members of a Pillar of Support strongly believe in the Regime’s ideology, and share the same goals and outlook on life, then they are much harder to sway. The best way to target these kinds of Pillars of Support is to make sure that your Movement’s Manifesto can appeal to at least some of the belief system as the members of these Pillars. For more details about Manifestos, see Section 4.3.4.
4.5 Avoiding Violence and the Consequences of Violence In a nonviolent struggle, one goal of any Movement is to avoid violence. Violence engages Regimes where they are strongest; regimes are well-prepared for, and know how to handle, violent opposition. Often, Regimes will even try to instigate violence among opposition Groups so that they will have an excuse to arrest, kill or otherwise repress opposition members. Also, violence among the opposition tends to solidify the support of a Regime’s troops and political supporters, whereas nonviolent action creates an asymmetric conflict that tends to create division in the regime’s troops and political supporters. Historically, it has been difficult for some nonviolent movements to avoid violence altogether: people involved get impatient, lose their cool, react to violence or other provocative behavior perpetrated by the Regime, etc. Therein lays the challenge for any movement planner: Do you have the patience and forbearance to see your struggle through without resorting to violence? In the game, you must take special care to prevent your Characters and Groups from slipping into violence, so that your
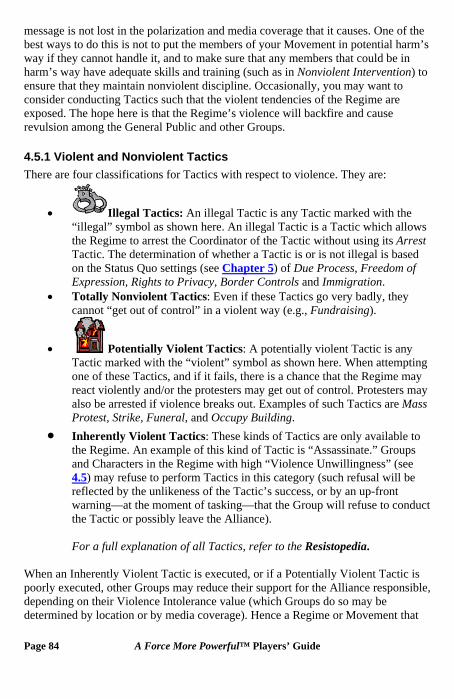
message is not lost in the polarization and media coverage that it causes. One of the best ways to do this is not to put the members of your Movement in potential harm’s way if they cannot handle it, and to make sure that any members that could be in harm’s way have adequate skills and training (such as in Nonviolent Intervention) to ensure that they maintain nonviolent discipline. Occasionally, you may want to consider conducting Tactics such that the violent tendencies of the Regime are exposed. The hope here is that the Regime’s violence will backfire and cause revulsion among the General Public and other Groups.
4.5.1 Violent and Nonviolent Tactics There are four classifications for Tactics with respect to violence. They are:
• Illegal Tactics: An illegal Tactic is any Tactic marked with the “illegal” symbol as shown here. An illegal Tactic is a Tactic which allows the Regime to arrest the Coordinator of the Tactic without using its Arrest Tactic. The determination of whether a Tactic is or is not illegal is based on the Status Quo settings (see Chapter 5) of Due Process, Freedom of Expression, Rights to Privacy, Border Controls and Immigration.
• Totally Nonviolent Tactics: Even if these Tactics go very badly, they cannot “get out of control” in a violent way (e.g., Fundraising).
• Potentially Violent Tactics: A potentially violent Tactic is any Tactic marked with the “violent” symbol as shown here. When attempting one of these Tactics, and if it fails, there is a chance that the Regime may react violently and/or the protesters may get out of control. Protesters may also be arrested if violence breaks out. Examples of such Tactics are Mass Protest, Strike, Funeral, and Occupy Building.
• Inherently Violent Tactics: These kinds of Tactics are only available to the Regime. An example of this kind of Tactic is “Assassinate.” Groups and Characters in the Regime with high “Violence Unwillingness” (see 4.5) may refuse to perform Tactics in this category (such refusal will be reflected by the unlikeness of the Tactic’s success, or by an up-front warning—at the moment of tasking—that the Group will refuse to conduct the Tactic or possibly leave the Alliance). For a full explanation of all Tactics, refer to the Resistopedia.
When an Inherently Violent Tactic is executed, or if a Potentially Violent Tactic is poorly executed, other Groups may reduce their support for the Alliance responsible, depending on their Violence Intolerance value (which Groups do so may be determined by location or by media coverage). Hence a Regime or Movement that
Page 84 A Force More Powerful™ Players’ Guide
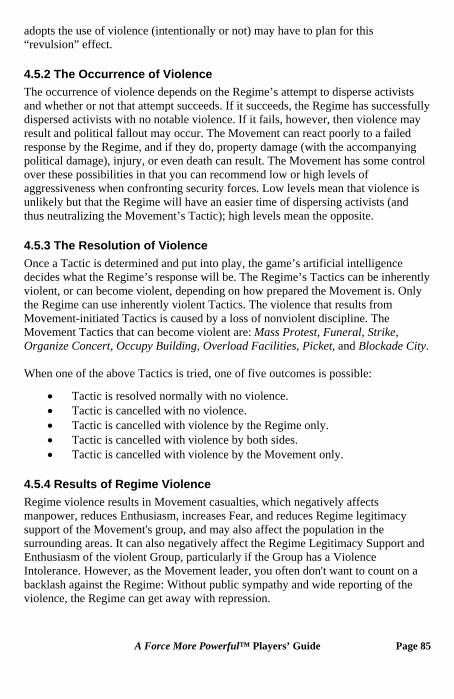
A Force More Powerful™ Players’ Guide Page 85
adopts the use of violence (intentionally or not) may have to plan for this “revulsion” effect.
4.5.2 The Occurrence of Violence The occurrence of violence depends on the Regime’s attempt to disperse activists and whether or not that attempt succeeds. If it succeeds, the Regime has successfully dispersed activists with no notable violence. If it fails, however, then violence may result and political fallout may occur. The Movement can react poorly to a failed response by the Regime, and if they do, property damage (with the accompanying political damage), injury, or even death can result. The Movement has some control over these possibilities in that you can recommend low or high levels of aggressiveness when confronting security forces. Low levels mean that violence is unlikely but that the Regime will have an easier time of dispersing activists (and thus neutralizing the Movement’s Tactic); high levels mean the opposite.
4.5.3 The Resolution of Violence Once a Tactic is determined and put into play, the game’s artificial intelligence decides what the Regime’s response will be. The Regime’s Tactics can be inherently violent, or can become violent, depending on how prepared the Movement is. Only the Regime can use inherently violent Tactics. The violence that results from Movement-initiated Tactics is caused by a loss of nonviolent discipline. The Movement Tactics that can become violent are: Mass Protest, Funeral, Strike, Organize Concert, Occupy Building, Overload Facilities, Picket, and Blockade City. When one of the above Tactics is tried, one of five outcomes is possible:
• Tactic is resolved normally with no violence. • Tactic is cancelled with no violence. • Tactic is cancelled with violence by the Regime only. • Tactic is cancelled with violence by both sides. • Tactic is cancelled with violence by the Movement only.
4.5.4 Results of Regime Violence Regime violence results in Movement casualties, which negatively affects manpower, reduces Enthusiasm, increases Fear, and reduces Regime legitimacy support of the Movement's group, and may also affect the population in the surrounding areas. It can also negatively affect the Regime Legitimacy Support and Enthusiasm of the violent Group, particularly if the Group has a Violence Intolerance. However, as the Movement leader, you often don't want to count on a backlash against the Regime: Without public sympathy and wide reporting of the violence, the Regime can get away with repression.
Page 86 A Force More Powerful™ Players’ Guide
4.5.5 Violence as a Result of Movement Actions Movement violence is the result of the tasked Group losing nonviolent discipline. This is less likely to happen if…
a) no casualties are suffered, or b) if the Tactic Coordinator, Group, Alliance, and General Public have a high violence unwillingness, or c) if the Tactic Coordinator has Crisis Management or Organization skills, or d) if the Tactic requires few people, and if the cultural attitudes in the neighborhood are favorable.
Movement violence can directly cause property damage, but not Movement casualties (although Movement casualties may result if the Regime initiates counter-violence in response to the Movement). If a building is destroyed as a result of Movement violence, it affects the Economic Well-Being of the associated Groups, which can also affect their Support levels, Enthusiasm, and Fear. As a practical matter, mixing nonviolent resistance with violence is a poor idea. It gives Regimes an excuse to violently crack down and arrest members of the opposition. It tends to alienate members or the General Public and third parties (including international actors) from the opposition. It also tends to increase the reliability of a Regime's troops. For example, in Russia 1905, in the face of massive strikes and nonviolent action, Russian troops were on the verge of defecting from the Tsar's army. However, once strikers and other opposition members became violent, soldiers felt threatened and immediately began following orders again. They then reliably obeyed the Tsars commands to violently put down the opposition Movement. The Movement was then defeated.
4.5.6 The Ripple Effects of Violence In the game, violence generates its own ripple effects that affect not just the General Public but also Groups… particularly Groups tied to buildings local to the violence. The ripple effects of violence are also connected to the amount of media coverage the violence receives. So, when a Tactic gets violent, there are two ripple effects generated: one for the Tactic itself and one for the violence associated with it. These effects may offset or reinforce one another.
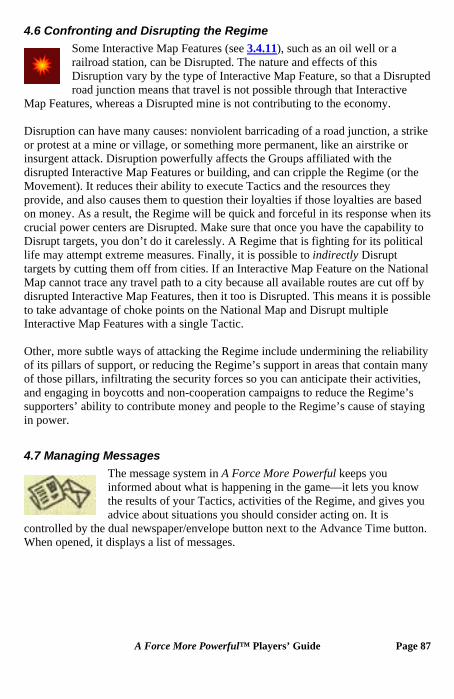
4.6 Confronting and Disrupting the Regime Some Interactive Map Features (see 3.4.11), such as an oil well or a railroad station, can be Disrupted. The nature and effects of this Disruption vary by the type of Interactive Map Feature, so that a Droad junction means that travel is not possible through that Interactive
Map Features, whereas a Disrupted mine is not contributing to the economy.
isrupted
isruption can have many causes: nonviolent barricading of a road junction, a strike
r the
ased
ional
ther, more subtle ways of attacking the Regime include undermining the reliability
aging Messages system in A Force More Powerful keeps you
now
e tton.
Dor protest at a mine or village, or something more permanent, like an airstrike or insurgent attack. Disruption powerfully affects the Groups affiliated with the disrupted Interactive Map Features or building, and can cripple the Regime (oMovement). It reduces their ability to execute Tactics and the resources they provide, and also causes them to question their loyalties if those loyalties are bon money. As a result, the Regime will be quick and forceful in its response when itscrucial power centers are Disrupted. Make sure that once you have the capability to Disrupt targets, you don’t do it carelessly. A Regime that is fighting for its political life may attempt extreme measures. Finally, it is possible to indirectly Disrupt targets by cutting them off from cities. If an Interactive Map Feature on the NatMap cannot trace any travel path to a city because all available routes are cut off by disrupted Interactive Map Features, then it too is Disrupted. This means it is possibleto take advantage of choke points on the National Map and Disrupt multiple Interactive Map Features with a single Tactic. Oof its pillars of support, or reducing the Regime’s support in areas that contain many of those pillars, infiltrating the security forces so you can anticipate their activities, and engaging in boycotts and non-cooperation campaigns to reduce the Regime’s supporters’ ability to contribute money and people to the Regime’s cause of stayingin power.
4.7 ManThe messageinformed about what is happening in the game—it lets you kthe results of your Tactics, activities of the Regime, and gives youadvice about situations you should consider acting on. It is dual newspaper/envelope button next to the Advance Time bu
When opened, it displays a list of messages.
controlled by th
A Force More Powerful™ Players’ Guide Page 87
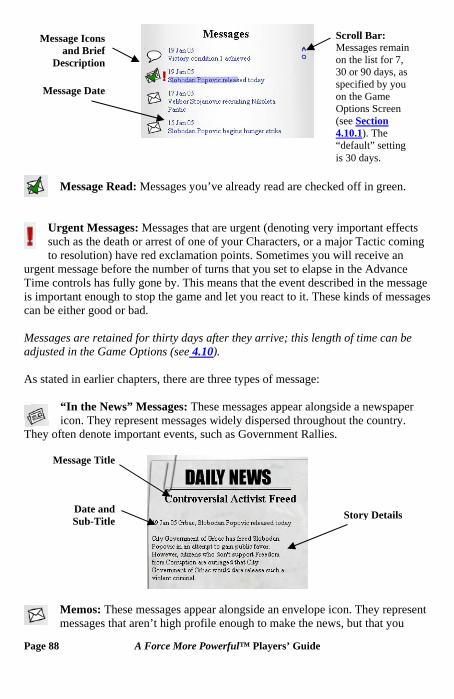
Message Icons and Brief
Description
Message Date
Scroll Bar: Messages remain on the list for 7, 30 or 90 days, as specified by you on the Game Options Screen (see Section 4.10.1
Page 88 A Force More Powerful™ Players’ Guide
). The “default” setting is 30 days.
Message Read: Messages you’ve already read are checked off in green.
Urgent Messages: Messages that are urgent (denoting very important effects such as the death or arrest of one of your Characters, or a major Tactic coming to resolution) have red exclamation points. Sometimes you will receive an
urgent message before the number of turns that you set to elapse in the Advance Time controls has fully gone by. This means that the event described in the message is important enough to stop the game and let you react to it. These kinds of messages can be either good or bad. Messages are retained for thirty days after they arrive; this length of time can be adjusted in the Game Options (see 4.10). As stated in earlier chapters, there are three types of message:
“In the News” Messages: These messages appear alongside a newspaper icon. They represent messages widely dispersed throughout the country. ten denote important events, such as Government Rallies. They of
Message Title
Date and Sub-Title
Story Details
Memos: These messages appear alongside an envelope icon. They represent messages that aren’t high profile enough to make the news, but that you
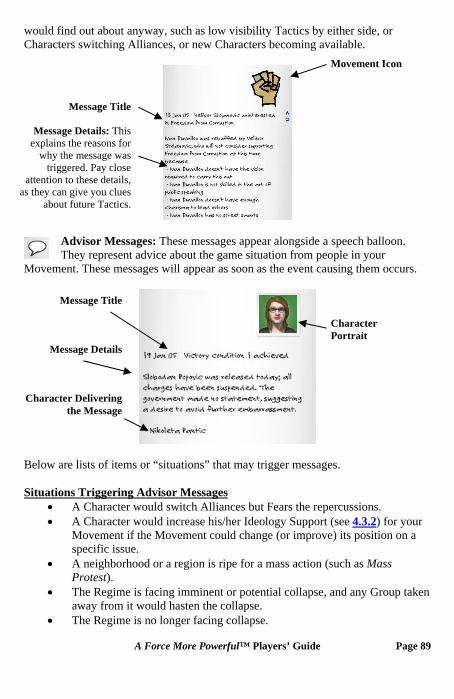
would find out about anyway, such as low visibility Tactics by either side, or Characters switching Alliances, or new Characters becoming available.
Advisor Messages: These messages appear alongside a speech balloon. They represent advice about the game situation from people in your
Movement. These messages will appear as soon as the event causing them occurs.
Message Title
Message Details: This explains the reasons for
why the message was triggered. Pay close
attention to these details, as they can give you clues
about future Tactics.
Movement Icon
Message Title
Message Details
Character Delivering the Message
Character Portrait
Below are lists of items or “situations” that may trigger messages. Situations Triggering Advisor Messages
• A Character would switch Alliances but Fears the repercussions. • A Character would increase his/her Ideology Support (see 4.3.2) for your
Movement if the Movement could change (or improve) its position on a specific issue.
• A neighborhood or a region is ripe for a mass action (such as Mass Protest).
• The Regime is facing imminent or potential collapse, and any Group taken away from it would hasten the collapse.
• The Regime is no longer facing collapse.
A Force More Powerful™ Players’ Guide Page 89
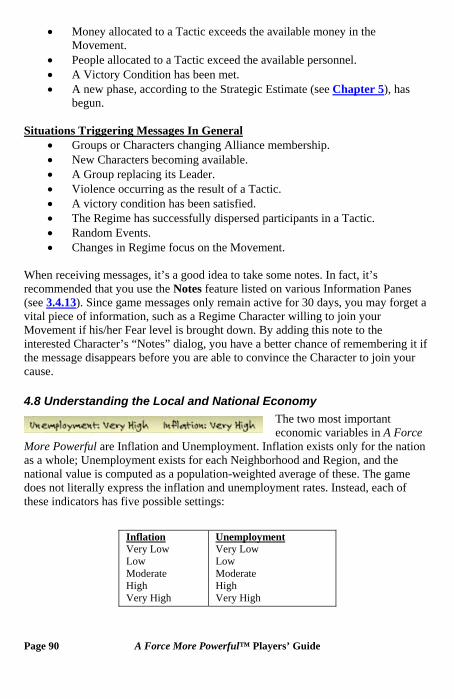
• Money allocated to a Tactic exceeds the available money in the Movement.
• People allocated to a Tactic exceed the available personnel. • A Victory Condition has been met. • A new phase, according to the Strategic Estimate (see Chapter 5), has
begun.
Situations Triggering Messages In General • Groups or Characters changing Alliance membership. • New Characters becoming available. • A Group replacing its Leader. • Violence occurring as the result of a Tactic. • A victory condition has been satisfied. • The Regime has successfully dispersed participants in a Tactic. • Random Events. • Changes in Regime focus on the Movement.
When receiving messages, it’s a good idea to take some notes. In fact, it’s recommended that you use the Notes feature listed on various Information Panes (see 3.4.13). Since game messages only remain active for 30 days, you may forget a vital piece of information, such as a Regime Character willing to join your Movement if his/her Fear level is brought down. By adding this note to the interested Character’s “Notes” dialog, you have a better chance of remembering it if the message disappears before you are able to convince the Character to join your cause.
4.8 Understanding the Local and National Economy The two most important economic variables in A Force
More Powerful are Inflation and Unemployment. Inflation exists only for the nation as a whole; Unemployment exists for each Neighborhood and Region, and the national value is computed as a population-weighted average of these. The game does not literally express the inflation and unemployment rates. Instead, each of these indicators has five possible settings:
Inflation Very Low Low Moderate High Very High
Unemployment Very Low Low Moderate High Very High
Page 90 A Force More Powerful™ Players’ Guide
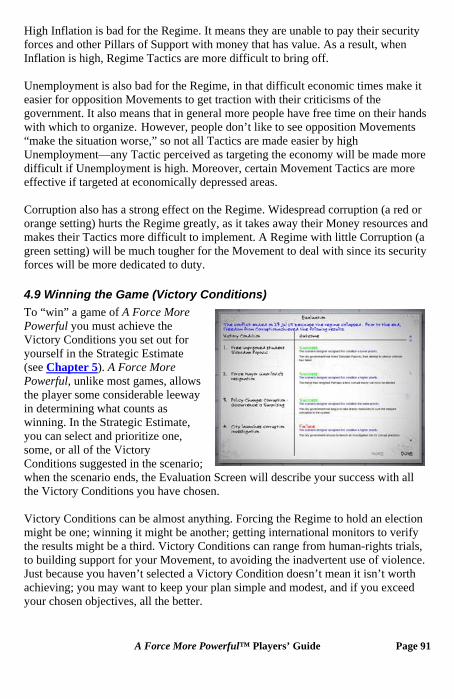
High Inflation is bad for the Regime. It means they are unable to pay their security forces and other Pillars of Support with money that has value. As a result, when Inflation is high, Regime Tactics are more difficult to bring off. Unemployment is also bad for the Regime, in that difficult economic times make it easier for opposition Movements to get traction with their criticisms of the government. It also means that in general more people have free time on their hands with which to organize. However, people don’t like to see opposition Movements “make the situation worse,” so not all Tactics are made easier by high Unemployment—any Tactic perceived as targeting the economy will be made more difficult if Unemployment is high. Moreover, certain Movement Tactics are more effective if targeted at economically depressed areas. Corruption also has a strong effect on the Regime. Widespread corruption (a red or orange setting) hurts the Regime greatly, as it takes away their Money resources and makes their Tactics more difficult to implement. A Regime with little Corruption (a green setting) will be much tougher for the Movement to deal with since its security forces will be more dedicated to duty.
4.9 Winning the Game (Victory Conditions) To “win” a game of A Force More Powerful you must achieve the Victory Conditions you set out for yourself in the Strategic Estimate (see Chapter 5). A Force More Powerful, unlike most games, allows the player some considerable leeway in determining what counts as winning. In the Strategic Estimate, you can select and prioritize one, some, or all of the Victory Conditions suggested in the swhen the scenario ends, the Evaluation Screen will describe your success with all the Victory Conditions you have chosen.
cenario;
Victory Conditions can be almost anything. Forcing the Regime to hold an election might be one; winning it might be another; getting international monitors to verify the results might be a third. Victory Conditions can range from human-rights trials, to building support for your Movement, to avoiding the inadvertent use of violence. Just because you haven’t selected a Victory Condition doesn’t mean it isn’t worth achieving; you may want to keep your plan simple and modest, and if you exceed your chosen objectives, all the better.
A Force More Powerful™ Players’ Guide Page 91
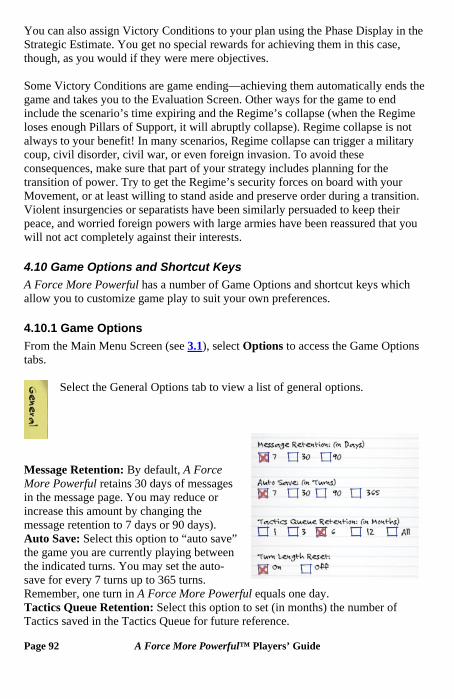
You can also assign Victory Conditions to your plan using the Phase Display in the Strategic Estimate. You get no special rewards for achieving them in this case, though, as you would if they were mere objectives. Some Victory Conditions are game ending—achieving them automatically ends the game and takes you to the Evaluation Screen. Other ways for the game to end include the scenario’s time expiring and the Regime’s collapse (when the Regime loses enough Pillars of Support, it will abruptly collapse). Regime collapse is not always to your benefit! In many scenarios, Regime collapse can trigger a military coup, civil disorder, civil war, or even foreign invasion. To avoid these consequences, make sure that part of your strategy includes planning for the transition of power. Try to get the Regime’s security forces on board with your Movement, or at least willing to stand aside and preserve order during a transition. Violent insurgencies or separatists have been similarly persuaded to keep their peace, and worried foreign powers with large armies have been reassured that you will not act completely against their interests.
4.10 Game Options and Shortcut Keys A Force More Powerful has a number of Game Options and shortcut keys which allow you to customize game play to suit your own preferences.
4.10.1 Game Options From the Main Menu Screen (see 3.1), select Options to access the Game Options tabs.
Select the General Options tab to view a list of general options.
Page 92 A Force More Powerful™ Players’ Guide
Message Retention: By default, A Force More Powerful retains 30 days of messages in the message page. You may reduce or increase this amount by changing the message retention to 7 days or 90 days). Auto Save: Select this option to “auto save” the game you are currently playing between the indicated turns. You may set the auto-save for every 7 turns up to 365 turns. Remember, one turn in A Force More Powerful equals one day. Tactics Queue Retention: Select this option to set (in months) the number of Tactics saved in the Tactics Queue for future reference.
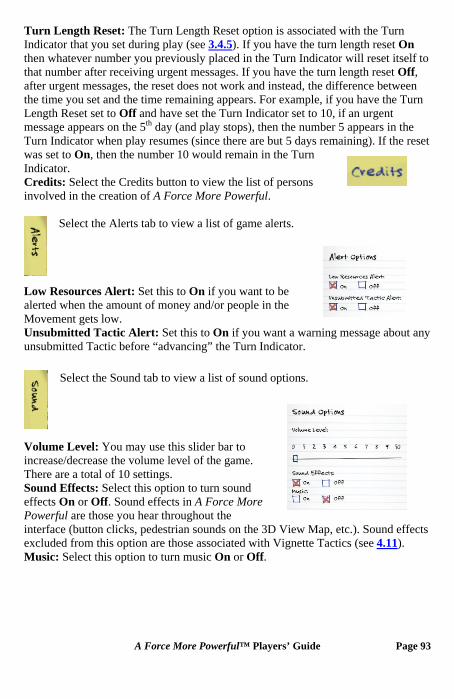
Turn Length Reset: The Turn Length Reset option is associated with the Turn Indicator that you set during play (see 3.4.5). If you have the turn length reset On then whatever number you previously placed in the Turn Indicator will reset itself to that number after receiving urgent messages. If you have the turn length reset Off, after urgent messages, the reset does not work and instead, the difference between the time you set and the time remaining appears. For example, if you have the Turn Length Reset set to Off and have set the Turn Indicator set to 10, if an urgent message appears on the 5th day (and play stops), then the number 5 appears in the Turn Indicator when play resumes (since there are but 5 days remaining). If the reset was set to On, then the number 10 would remain in the Turn Indicator. Credits: Select the Credits button to view the list of persons involved in the creation of A Force More Powerful.
Low R
Select the Alerts tab to view a list of game alerts.
esources Alert: Set this to On if you want to be alerted when the amount of money and/or people in the Movement gets low. Unsubmitted Tactic Alert: Set this to On if you want a warning message about any unsubmitted Tactic before “advancing” the Turn Indicator.
Select the Sound tab to view a list of sound options.
A Force More Powerful™ Players’ Guide Page 93
Volume Level: You may use this slider bar to increase/decrease the volume level of the game. There are a total of 10 settings. Sound Effects: Select this option to turn sound effects On or Off. Sound effects in A Force More Powerful are those you hear throughout the interface (button clicks, pedestrian sounds on the 3D View Map, etc.). Sound effects excluded from this option are those associated with Vignette Tactics (see 4.11). Music: Select this option to turn music On or Off.
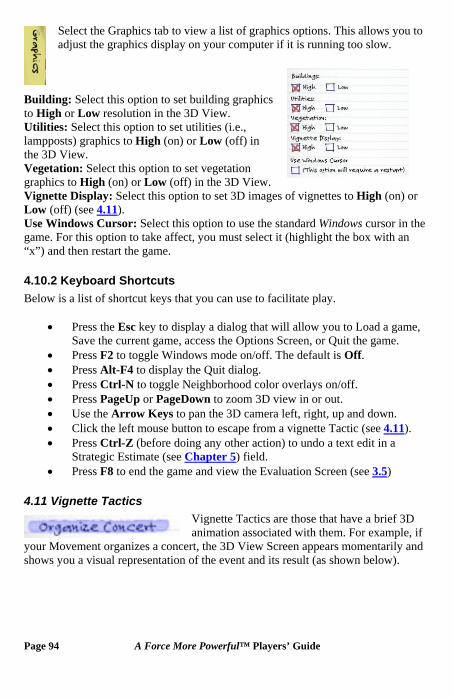
Select the Graphics tab to view a list of graphics options. This allows you to adjust the graphics display on your computer if it is running too slow.
Building: Select this option to set building graphics to High or Low resolution in the 3D View. Utilities: Select this option to set utilities (i.e., lampposts) graphics to High (on) or Low (off) in the 3D View. Vegetation: Select this option to set vegetation graphics to High (on) or Low (off) in the 3D View. Vignette Display: Select this option to set 3D images of vignettes to High (on) or Low (off) (see 4.11). Use Windows Cursor: Select this option to use the standard Windows cursor in the game. For this option to take affect, you must select it (highlight the box with an “x”) and then restart the game.
4.10.2 Keyboard Shortcuts Below is a list of shortcut keys that you can use to facilitate play.
• Press the Esc key to display a dialog that will allow you to Load a game, Save the current game, access the Options Screen, or Quit the game.
• Press F2 to toggle Windows mode on/off. The default is Off. • Press Alt-F4 to display the Quit dialog. • Press Ctrl-N to toggle Neighborhood color overlays on/off. • Press PageUp or PageDown to zoom 3D view in or out. • Use the Arrow Keys to pan the 3D camera left, right, up and down. • Click the left mouse button to escape from a vignette Tactic (see 4.11). • Press Ctrl-Z (before doing any other action) to undo a text edit in a
Strategic Estimate (see Chapter 5) field. • Press F8 to end the game and view the Evaluation Screen (see 3.5)
4.11 Vignette Tactics Vignette Tactics are those that have a brief 3D animation associated with them. For example, if
your Movement organizes a concert, the 3D View Screen appears momentarily and shows you a visual representation of the event and its result (as shown below).
Page 94 A Force More Powerful™ Players’ Guide
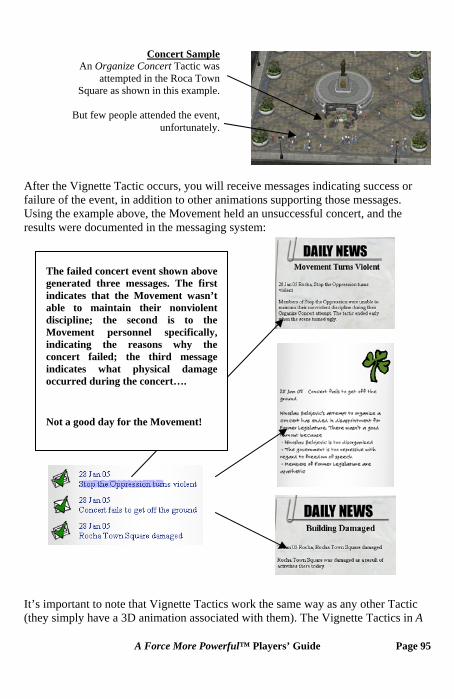
Concert Sample An Organize Concert Tactic was
attempted in the Roca Town Square as shown in this example.
But few people attended the event,
unfortunately.
After the Vignette Tactic occurs, you will receive messages indicating success or failure of the event, in addition to other animations supporting those messages. Using the example above, the Movement held an unsuccessful concert, and the results were documented in the messaging system:
A Force More Powerful™ Players’ Guide Page 95
The failed concert event shown above generated three messages. The first indicates that the Movement wasn’t able to maintain their nonviolent discipline; the second is to the Movement personnel specifically, indicating the reasons why the concert failed; the third message indicates what physical damage occurred during the concert….
Not a good day for the Movement!
It’s important to note that Vignette Tactics work the same way as any other Tactic (they simply have a 3D animation associated with them). The Vignette Tactics in A
Page 96 A Force More Powerful™ Players’ Guide
Force More Powerful are: Funeral, Mass Execution, Mass Protest (March, Rally and Vigil), Organize Concert, Raid Building, and Regime Assembly (Rally and Military Parade). It’s also important to note that the 3D animation associated with a Vignette Tactic is seen only if the Tactic is conducted “in” a city and, for the Tactics listed below, only at certain location types:
Tactic with Restricted Vignette Location Options
Mass Protest—Rally Courthouse, University, Embassy
Mass Protest—Vigil Prison
Mass Execution Stadium, Town Square
Organize Concert Town Square
4.12 Tips on Play Here are some additional tips that will help improve your play. Fear and Enthusiasm • Fear and Enthusiasm are among the most important elements in the game.
Groups and Characters whose Fear is higher than their Enthusiasm won’t change sides, regardless of who they support.
• Fear and Enthusiasm also play a role in national elections. Elections are based on two factors: turnout and vote share. Turnout is how many people show up to vote; vote share is who they vote for. High Fear and low Enthusiasm will reduce turnout. Vote share is affected by Policy agreements or disagreements with the Regime and the other Alliances, and by the existence of independent political Groups. So, if you want to prevent independent political Groups from siphoning off your votes, it may make sense to persuade them to join you before the election.
• To lower Fear, it can be effective to defy the Regime and show that they cannot impose their will. The Display Symbol, Wear Symbol, and Dramatize Tactics are good for this. Mass actions, such as Organize Concert and Mass Protest, will also lower the Fear of the General Public.
• To raise Enthusiasm, Tactics such as Organize Social Event, Charity, Community Work, Train, and Publish Website will serve to encourage people to act on their beliefs.
General Public • A Character’s Public Profile has a large effect on how easy it is for the Regime
to arrest him. Characters with a high Public Profile are often better at certain Tactics (such as Press Conferences, Meetings, etc.), that are seen by or involve the general population, but are also more visible and therefore more likely to be targeted by the Regime.
A Force More Powerful™ Players’ Guide Page 97
• Sometimes the General Public will mimic a political shift, such as a change in Support Levels, Enthusiasm, or Fear, undergone by a Character or Group. The chance of this happening is directly linked with the Character or Group’s Public Influence. Therefore, the more influential Characters and Groups you persuade to support you, or to agree with you about Policies, the greater the chance the General Public will do so as well. This matters a lot in elections.
Joining Alliances • It’s easier for a Character or Group to join the Regime than any other Alliance
(including the Movement). If Regime support is yellow, and the Character or Group has no higher support for someone else, then that’s enough for that Character or Group to join the Regime. For anyone else, the support must be light or dark green.
Regime • Remember that the Regime’s goal is not to “beat” you; it’s to stay in power.
This means that unless your goal is to get rid of the Regime entirely, the Regime may actually help you achieve your goals if you put enough pressure on it. The Regime will not always engage in repression. Depending on the characteristics of the Regime leader and the amount of pressure you are putting on the Regime and its Pillars of Support, the Regime may opt to grant concessions or otherwise try to give you some of what you want.
• The Regime can’t assign Tactics to Characters unless they strongly support the Regime or belong to the Police, Military, or Bureaucracy categories. So, to prevent the Regime from doing too many Tactics, it may be possible simply to erode a Character’s support, even if you don’t get him/her to leave the Regime outright.
Support Levels • Remember that a Character or Group’s Overall Support is the highest of the
three different Support Levels (Legitimacy, Ideology, and Financial Gain). This means that a Group with high Support Levels for the Regime in all three types will be very hard to sway, since reducing just one will have no effect on Overall Support.
Support Changes • Changes in Support, Fear, and Enthusiasm are gradual; even a very successful
Tactic won’t completely change them overnight. Tactics • It’s best to try small, strength-building Tactics early in a scenario, before you
try anything more public or ambitious. The Regime will notice you and start to do something about you, and you don’t want this to happen before you are ready.
Page 98 A Force More Powerful™ Players’ Guide
• Many Tactics, particularly public Tactics that require the participation of local people who are not part of the Groups in your Alliance (such as Mass Protest, Strike, Occupy Building, Funeral, etc.), will require the support of the neighborhood or region in which the target is located. Attempting these Tactics without high support in those areas will not turn out well, regardless of how strong or influential the Groups in your Movement are.
• Many Tactics are helped if the Tactic Coordinator has certain Competencies. See the Appendix for a list of Competencies and which Tactics they support. Also refer to the Resistopedia for additional information.
• The Craft Message Tactic is very important, particularly in the early phase of the game. You will want to attempt it early in the scenario, for some time (at least a couple of weeks). Your message quality will decline over time, too (whenever this happens you will get a message). So you will need to have one of your Characters do the Craft Message Tactic again from time to time.
• Having a good message will do you little good unless you use it! Most Tactics are helped by a good message, but those in the Communicate, Build Strength, and Deny categories are especially effective when your message resonates with the public.
• When you adopt Tactics designed to change a target’s mind about a Policy, you should always have a Policy Focus for the current Phase in your operational plan. If you have no Policy Focus, then your coordinator will decide which Policy to emphasize in the Tactic, which may not be the same one you want to work on!
• Preparation time is crucial to the success of most Tactics. More preparation time will never hurt you, but if all your Tactics take a long time, you may run out of time in the scenario before achieving your goals, or fall behind the schedule you laid out in your operational plan.
• The Groups who are aligned with your Movement will generate a steady trickle of money each week, but the Fundraise Tactic can be used to increase your money reserves even more. If successful, it will generate daily income based on the Economic Well-Being of the Target—but it will not work if repeatedly targeted at the same Group.
A Force More Powerful™ Players’ Guide Page 99
5. STRATEGIC ESTIMATE Good planning is the cornerstone of a successful Movement; without a plan, the resistance effort may squander its human and material resources, mismanage its time, make poor choices that result in setbacks of public support, and without a plan the Movement may even fall apart in moments of crisis. The Strategic Estimate is the most important planning tool provided to an organizer of a nonviolent movement. A Strategic Estimate, in general, is a document that helps you to organize, analyze and plan a course of action that can withstand the costs, uncertainties, and even chaos that a nonviolent struggle can bring. The one in A Force More Powerful is an adaptation of the Strategic Estimate found in Robert L. Helvey's book, On Strategic Nonviolent Conflict It is the place in the game where the volume of information available is organized in a systematic manner, so that you can assess the information available, and plan your course of action in a strategic—rather than haphazard—way. To fully utilize the benefits of planning via the Strategic Estimate, you may want to:
1. Evaluate the scenario situation; 2. Create a plan; 3. Test the plan by playing the scenario; 4. Evaluate your success (or lack thereof); 5. Evaluate where/why your plan failed to identify or consider dangers and
opportunities; 6. Create a new and better plan; 7. Test this plan by playing the scenario again.
This process should enable you to hone your strategic planning skills.
5.1 Strategic Estimate Screens and Tabs—An Overview The Strategic Estimate is the first screen you see after choosing a scenario (see 3.2). It contains four sections:
I. The Situation II. Mission Assessment
III. Victory Conditions IV. Phases & Objectives
Each of these sections is described in more detail in the following pages. By default, The Situation Screen appears first, and it’s recommended that you start with the options offered on this screen to devise your plan. Below is a brief description of the screen layout.
Page 100 A Force More Powerful™ Players’ Guide
The Tabs/Pages: Each tab/page provides options that you can set to develop your own
Strategic Estimate.
Background Information: Gives
details about the scenario selected.
Situation Options: Select Planning, Victory Conditions, or Movement Manifesto to access these options. Select Go to Game to begin
Sub-Sections: Select these blue buttons to access sub-pages.
Backward/Forward Buttons: Use these to page through the Strategic Estimate.
play.
You have four options on this page:
1. Read the Background. This is an indispensable source of information about the scenario, and you should always review it before starting play.
2. Start Planning. Clicking on the Planning link takes you to the Mission Assessment section, where you can start building your strategic plan. This can be a lengthy process, and is not required in order to play the scenario—but completing it will provide valuable insights into how best to play it. See Section 5.2 for building a Strategic Estimate.
3. Choose Victory Conditions. You choose your own Victory Conditions in A Force More Powerful; in fact it is a required step prior to starting the scenario. If you choose the Planning option above, you don’t need to click on the Victory Conditions link here; you’ll be taken to that section as part of the Planning process. However, if you wish to proceed straight into the scenario, click this link to go to that section and choose your Victory Conditions first. See Section 5.2.3 for more details.
4. View/Revise your Movement Manifesto. The Movement’s various policy beliefs form its Manifesto, which is what Groups and Characters look at when deciding whether or not to join with you. If you choose the Planning option above, you don’t need to click on the Movement Manifesto link here; you’ll be taken to it as part of the Planning process. However, if you wish to proceed straight into the scenario, you might want to click this link to look at it and possibly make some adjustments. See Section 5.2.2 for more details.
Advanced players, and those interested in real-world applications and training, will want to complete the entire Strategic Estimate before beginning the scenario. Note
that the Strategic Estimate can (and indeed should) be updated during play to keep it current with the actual situation in the scenario. Only the Movement Manifesto, Objectives and Victory Conditions cannot be changed once gameplay starts. Navigation through the Strategic Estimate: You can navigate within the Strategic Estimate in several ways:
• You can click on one of the four yellow tabs (labeled I.-IV.) to go to that section;
• You can click on one of the blue links (variously labeled A-F) to go to that sub-page;
• You can click on the (Forward) arrow to advance sequentially to the next page;
• You can click on the (Back) arrow to return to the preceding sequential (not the previously viewed) page.
5.2 Building a Strategic Estimate In this section we will walk you through the development of an entire Strategic Estimate. We’ll use the Corruption is Stealing scenario to build this estimate. Launch this scenario (see 2.3), and like this section in Chapter 2, follow the steps below in order.
As part of reviewing the scenario information, you can always click on Go to Game to view maps, the Organization Screen or whatever else you wish, and then return to the
Strategic Estimate.
5.2.1 Review the Situation The Situation Screen displays the information and data you need to know before making your plan. The following “pages” (accessed by the links at the top left of each “page”)
are included: A. Background
This contains the background text
description of the overall situation in the scenario. It is the first step to understanding what you need to plan for in any scenario, and what constraints you face. In this scenario, as shown to the right, the Background tells us that corruption is a massive problem in the city of Grbac.
A Force More Powerful™ Players’ Guide Page 101
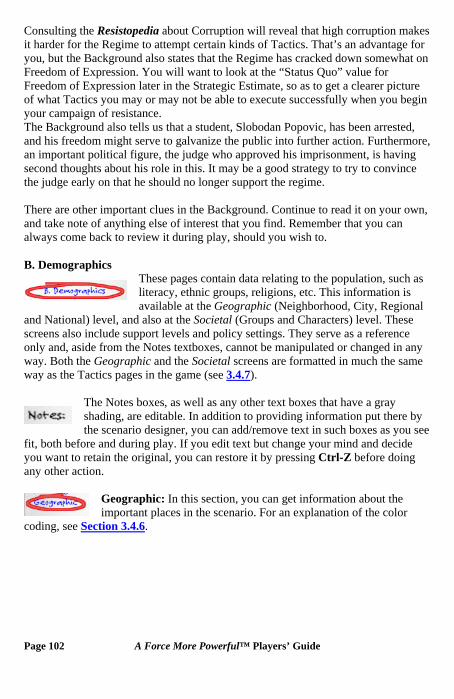
Consulting the Resistopedia about Corruption will reveal that high corruption makes it harder for the Regime to attempt certain kinds of Tactics. That’s an advantage for you, but the Background also states that the Regime has cracked down somewhat on Freedom of Expression. You will want to look at the “Status Quo” value for Freedom of Expression later in the Strategic Estimate, so as to get a clearer picture of what Tactics you may or may not be able to execute successfully when you begin your campaign of resistance. The Background also tells us that a student, Slobodan Popovic, has been arrested, and his freedom might serve to galvanize the public into further action. Furthermore, an important political figure, the judge who approved his imprisonment, is having second thoughts about his role in this. It may be a good strategy to try to convince the judge early on that he should no longer support the regime. There are other important clues in the Background. Continue to read it on your own, and take note of anything else of interest that you find. Remember that you can always come back to review it during play, should you wish to. B. Demographics
These pages contain data relating to the population, such as literacy, ethnic groups, religions, etc. This information is available at the Geographic (Neighborhood, City, Regional
and National) level, and also at the Societal (Groups and Characters) level. These screens also include support levels and policy settings. They serve as a reference only and, aside from the Notes textboxes, cannot be manipulated or changed in any way. Both the Geographic and the Societal screens are formatted in much the same way as the Tactics pages in the game (see 3.4.7).
The Notes boxes, as well as any other text boxes that have a gray shading, are editable. In addition to providing information put there by the scenario designer, you can add/remove text in such boxes as you see
fit, both before and during play. If you edit text but change your mind and decide you want to retain the original, you can restore it by pressing Ctrl-Z before doing any other action.
Geographic: In this section, you can get information about the important places in the scenario. For an explanation of the color
coding, see Section 3.4.6.
Page 102 A Force More Powerful™ Players’ Guide
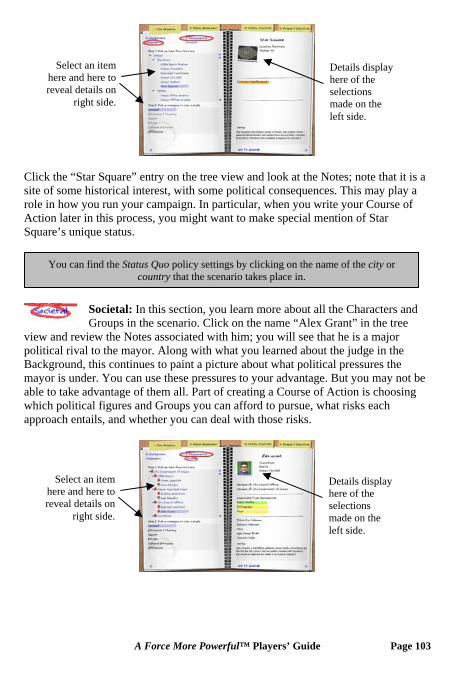
Select an item here and here to reveal details on
right side.
Details display here of the selections made on the left side.
Click the “Star Square” entry on the tree view and look at the Notes; note that it is a site of some historical interest, with some political consequences. This may play a role in how you run your campaign. In particular, when you write your Course of Action later in this process, you might want to make special mention of Star Square’s unique status.
A Force More Powerful™ Players’ Guide Page 103
You can find the Status Quo policy settings by clicking on the name of the city or country that the scenario takes place in.
Societal: In this section, you learn more about all the Characters and Groups in the scenario. Click on the name “Alex Grant” in the tree
view and review the Notes associated with him; you will see that he is a major political rival to the mayor. Along with what you learned about the judge in the Background, this continues to paint a picture about what political pressures the mayor is under. You can use these pressures to your advantage. But you may not be able to take advantage of them all. Part of creating a Course of Action is choosing which political figures and Groups you can afford to pursue, what risks each approach entails, and whether you can deal with those risks.
Select an item here and here to reveal details on
right side.
Details display here of the selections made on the left side.
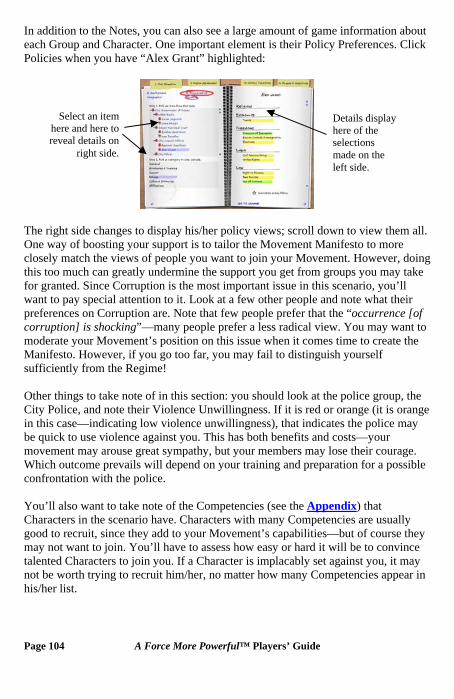
In addition to the Notes, you can also see a large amount of game information about each Group and Character. One important element is their Policy Preferences. Click Policies when you have “Alex Grant” highlighted:
Select an item here and here to reveal details on
right side.
Details display here of the selections made on the left side.
The right side changes to display his/her policy views; scroll down to view them all. One way of boosting your support is to tailor the Movement Manifesto to more closely match the views of people you want to join your Movement. However, doing this too much can greatly undermine the support you get from groups you may take for granted. Since Corruption is the most important issue in this scenario, you’ll want to pay special attention to it. Look at a few other people and note what their preferences on Corruption are. Note that few people prefer that the “occurrence [of corruption] is shocking”—many people prefer a less radical view. You may want to moderate your Movement’s position on this issue when it comes time to create the Manifesto. However, if you go too far, you may fail to distinguish yourself sufficiently from the Regime! Other things to take note of in this section: you should look at the police group, the City Police, and note their Violence Unwillingness. If it is red or orange (it is orange in this case—indicating low violence unwillingness), that indicates the police may be quick to use violence against you. This has both benefits and costs—your movement may arouse great sympathy, but your members may lose their courage. Which outcome prevails will depend on your training and preparation for a possible confrontation with the police. You’ll also want to take note of the Competencies (see the Appendix) that Characters in the scenario have. Characters with many Competencies are usually good to recruit, since they add to your Movement’s capabilities—but of course they may not want to join. You’ll have to assess how easy or hard it will be to convince talented Characters to join you. If a Character is implacably set against you, it may not be worth trying to recruit him/her, no matter how many Competencies appear in his/her list.
Page 104 A Force More Powerful™ Players’ Guide
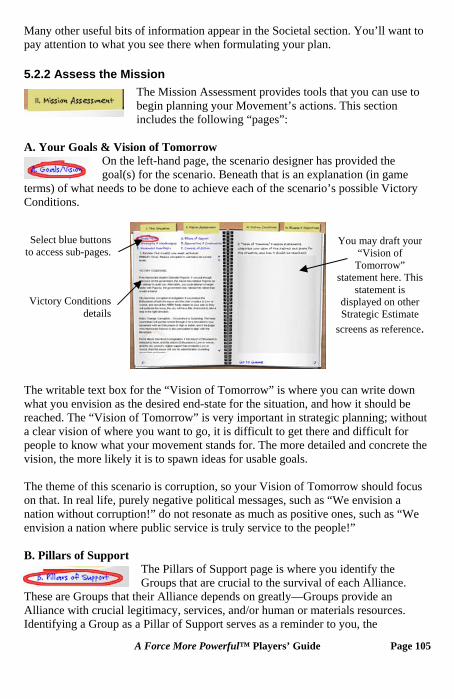
Many other useful bits of information appear in the Societal section. You’ll want to pay attention to what you see there when formulating your plan.
5.2.2 Assess the Mission The Mission Assessment provides tools that you can use to begin planning your Movement’s actions. This section includes the following “pages”:
A. Your Goals & Vision of Tomorrow
On the left-hand page, the scenario designer has provided the goal(s) for the scenario. Beneath that is an explanation (in game
terms) of what needs to be done to achieve each of the scenario’s possible Victory Conditions.
Select blue buttons to access sub-pages.
Victory Conditions details
You may draft your “Vision of
Tomorrow” statement here. This
statement is displayed on other Strategic Estimate
screens as reference.
The writable text box for the “Vision of Tomorrow” is where you can write down what you envision as the desired end-state for the situation, and how it should be reached. The “Vision of Tomorrow” is very important in strategic planning; without a clear vision of where you want to go, it is difficult to get there and difficult for people to know what your movement stands for. The more detailed and concrete the vision, the more likely it is to spawn ideas for usable goals. The theme of this scenario is corruption, so your Vision of Tomorrow should focus on that. In real life, purely negative political messages, such as “We envision a nation without corruption!” do not resonate as much as positive ones, such as “We envision a nation where public service is truly service to the people!” B. Pillars of Support
The Pillars of Support page is where you identify the Groups that are crucial to the survival of each Alliance.
These are Groups that their Alliance depends on greatly—Groups provide an Alliance with crucial legitimacy, services, and/or human or materials resources. Identifying a Group as a Pillar of Support serves as a reminder to you, the
A Force More Powerful™ Players’ Guide Page 105

Movement planner, to watch the activities of this Group. The reminder will be both in the Strategic Estimate and on the Info Pane for that Group (see 3.4.13). For Groups that have been identified as the Regime’s Pillars of Support, you will want to pull them away from the Regime, such that the Regime eventually topples. For Groups that are Movement Pillars of Support, you will want to keep them happy.
Select blue buttons to access sub-pages.
Alliance dropdown menu.
Groups and their Support Levels.
Support Levels are color-coded dark green to red. Select to return to the game.
To select a Pillar of Support, pick the pertinent Alliance in the dropdown menu, then simply click on the name of a Group. (Note that when you place the mouse cursor over the name, the Group’s “category” appears.)
Remember to set the pertinent Alliance in the dropdown menu before you begin assigning support levels!
Here, the Regime’s pillars of support are twofold. It is usually appropriate to designate at least one Group from the Security category as a Pillar of Support, since without these Groups many of the regime’s tactics are ineffective or unavailable. However, the WBRK Radio group has a Substantial Public Influence rating, meaning that its ability to influence the general public is greater than most other Groups’. It might therefore be considered a Pillar of Support as well. Similarly, the Grbac Municipal Court may also be designated as a Pillar of Support, as it is both wealthy (High Economic Well-Being) and somewhat influential (Moderate Public Influence). C. Strengths and Weaknesses
Here you list and examine each Alliance’s strengths and weaknesses. These are your perceptions at this stage, b
on the information provided by the scenario and the policy values of the variousGroups. There is also a place to list what you don’t know—but would like to find out—about each Alliance; this provides you with a list of important “unknyou should try to find out about. Lastly, there is a text box for noting who gives eac
ased
owns” h
Page 106 A Force More Powerful™ Players’ Guide
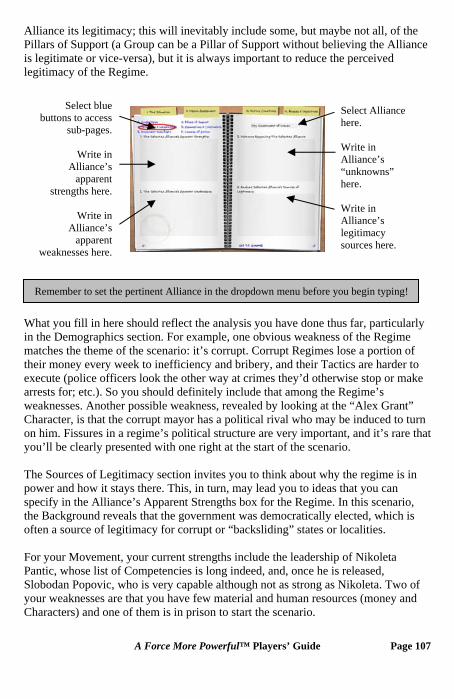
A Force More Powerful™ Players’ Guide Page 107
lliance Alliance its legitimacy; this will inevitably include some, but maybe not all, of the Pillars of Support (a Group can be a Pillar of Support without believing the Ais legitimate or vice-versa), but it is always important to reduce the perceived legitimacy of the Regime.
Select blue buttons to access
sub-pages.
Write in Alliance’s
apparent strengths here.
Write in
Alliance’s apparent
weaknesses here.
Select Alliance here. Write in Alliance’s “unknowns” here. Write in Alliance’s legitimacy sources here.
Remember to set the pertinent Alliance in the dropdown menu before you begin typing!
What you fill in here should reflect the analysis you have done thus far, particularly in the Demographics section. For example, one obvious weakness of the Regime matches the theme of the scenario: it’s corrupt. Corrupt Regimes lose a portion of their money every week to inefficiency and bribery, and their Tactics are harder to execute (police officers look the other way at crimes they’d otherwise stop or make arrests for; etc.). So you should definitely include that among the Regime’s weaknesses. Another possible weakness, revealed by looking at the “Alex Grant” Character, is that the corrupt mayor has a political rival who may be induced to turn on him. Fissures in a regime’s political structure are very important, and it’s rare that you’ll be clearly presented with one right at the start of the scenario. The Sources of Legitimacy section invites you to think about why the regime is in power and how it stays there. This, in turn, may lead you to ideas that you can specify in the Alliance’s Apparent Strengths box for the Regime. In this scenario, the Background reveals that the government was democratically elected, which is often a source of legitimacy for corrupt or “backsliding” states or localities. For your Movement, your current strengths include the leadership of Nikoleta Pantic, whose list of Competencies is long indeed, and, once he is released, Slobodan Popovic, who is very capable although not as strong as Nikoleta. Two of your weaknesses are that you have few material and human resources (money and Characters) and one of them is in prison to start the scenario.
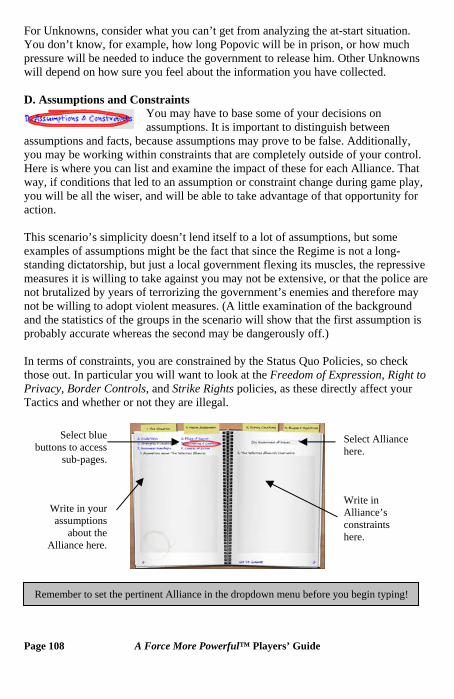
For Unknowns, consider what you can’t get from analyzing the at-start situation. You don’t know, for example, how long Popovic will be in prison, or how much pressure will be needed to induce the government to release him. Other Unknowns will depend on how sure you feel about the information you have collected. D. Assumptions and Constraints
You may have to base some of your decisions on assumptions. It is important to distinguish between
assumptions and facts, because assumptions may prove to be false. Additionally, you may be working within constraints that are completely outside of your control. Here is where you can list and examine the impact of these for each Alliance. That way, if conditions that led to an assumption or constraint change during game play, you will be all the wiser, and will be able to take advantage of that opportunity for action. This scenario’s simplicity doesn’t lend itself to a lot of assumptions, but some examples of assumptions might be the fact that since the Regime is not a long-standing dictatorship, but just a local government flexing its muscles, the repressive measures it is willing to take against you may not be extensive, or that the police are not brutalized by years of terrorizing the government’s enemies and therefore may not be willing to adopt violent measures. (A little examination of the background and the statistics of the groups in the scenario will show that the first assumption is probably accurate whereas the second may be dangerously off.) In terms of constraints, you are constrained by the Status Quo Policies, so check those out. In particular you will want to look at the Freedom of Expression, Right to Privacy, Border Controls, and Strike Rights policies, as these directly affect your Tactics and whether or not they are illegal.
Select Alliance here. Write in Alliance’s constraints here.
Select blue buttons to access
sub-pages.
Write in your assumptions
about the Alliance here.
Remember to set the pertinent Alliance in the dropdown menu before you begin typing!
Page 108 A Force More Powerful™ Players’ Guide
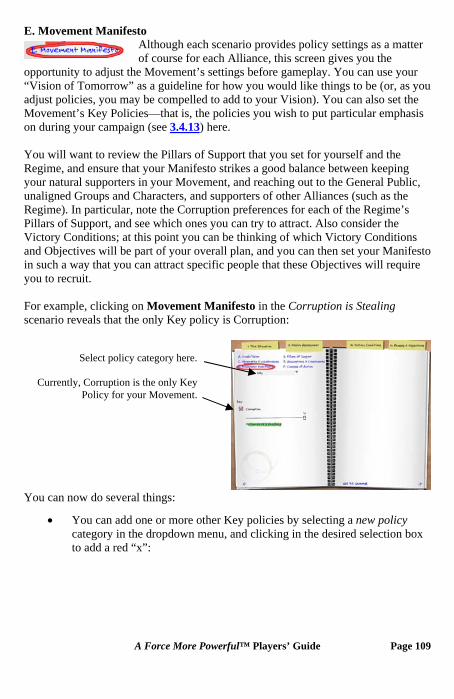
E. Movement Manifesto Although each scenario provides policy settings as a matter of course for each Alliance, this screen gives you the
opportunity to adjust the Movement’s settings before gameplay. You can use your “Vision of Tomorrow” as a guideline for how you would like things to be (or, as you adjust policies, you may be compelled to add to your Vision). You can also set the Movement’s Key Policies—that is, the policies you wish to put particular emphasis on during your campaign (see 3.4.13) here. You will want to review the Pillars of Support that you set for yourself and the Regime, and ensure that your Manifesto strikes a good balance between keeping your natural supporters in your Movement, and reaching out to the General Public, unaligned Groups and Characters, and supporters of other Alliances (such as the Regime). In particular, note the Corruption preferences for each of the Regime’s Pillars of Support, and see which ones you can try to attract. Also consider the Victory Conditions; at this point you can be thinking of which Victory Conditions and Objectives will be part of your overall plan, and you can then set your Manifesto in such a way that you can attract specific people that these Objectives will require you to recruit. For example, clicking on Movement Manifesto in the Corruption is Stealing scenario reveals that the only Key policy is Corruption:
Select policy category here.
Currently, Corruption is the only Key Policy for your Movement.
You can now do several things:
• You can add one or more other Key policies by selecting a new policy category in the dropdown menu, and clicking in the desired selection box to add a red “x”:
A Force More Powerful™ Players’ Guide Page 109
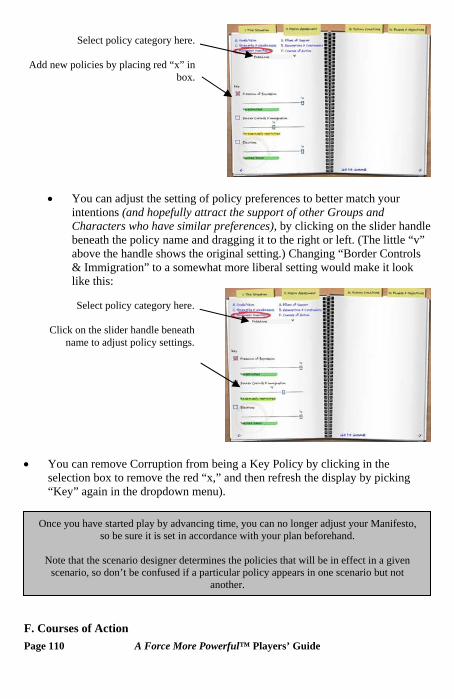
Select policy category here.
Add new policies by placing red “x” in box.
• You can adjust the setting of policy preferences to better match your
intentions (and hopefully attract the support of other Groups and Characters who have similar preferences), by clicking on the slider handle beneath the policy name and dragging it to the right or left. (The little “v” above the handle shows the original setting.) Changing “Border Controls & Immigration” to a somewhat more liberal setting would make it look like this:
Select policy category here.
Click on the slider handle beneath name to adjust policy settings.
• You can remove Corruption from being a Key Policy by clicking in the
selection box to remove the red “x,” and then refresh the display by picking “Key” again in the dropdown menu).
Page 110 A Force More Powerful™ Players’ Guide
Once you have started play by advancing time, you can no longer adjust your Manifesto, so be sure it is set in accordance with your plan beforehand.
Note that the scenario designer determines the policies that will be in effect in a given
scenario, so don’t be confused if a particular policy appears in one scenario but not another.
F. Courses of Action
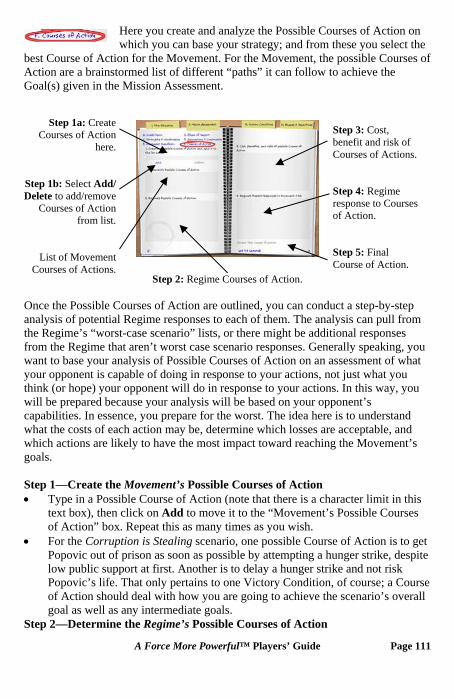
Here you create and analyze the Possible Courses of Action on which you can base your strategy; and from these you select the
best Course of Action for the Movement. For the Movement, the possible Courses of Action are a brainstormed list of different “paths” it can follow to achieve the Goal(s) given in the Mission Assessment.
Step 1a: Create Courses of Action
here.
Step 1b: Select Add/ Delete to add/remove
Courses of Action from list.
List of Movement Courses of Actions.
Step 2: Regime Courses of Action.
Step 3: Cost, benefit and risk of Courses of Actions. Step 4: Regime response to Courses of Action. Step 5: Final Course of Action.
Once the Possible Courses of Action are outlined, you can conduct a step-by-step analysis of potential Regime responses to each of them. The analysis can pull from the Regime’s “worst-case scenario” lists, or there might be additional responses from the Regime that aren’t worst case scenario responses. Generally speaking, you want to base your analysis of Possible Courses of Action on an assessment of what your opponent is capable of doing in response to your actions, not just what you think (or hope) your opponent will do in response to your actions. In this way, you will be prepared because your analysis will be based on your opponent’s capabilities. In essence, you prepare for the worst. The idea here is to understand what the costs of each action may be, determine which losses are acceptable, and which actions are likely to have the most impact toward reaching the Movement’s goals. Step 1—Create the Movement’s Possible Courses of Action • Type in a Possible Course of Action (note that there is a character limit in this
text box), then click on Add to move it to the “Movement’s Possible Courses of Action” box. Repeat this as many times as you wish.
• For the Corruption is Stealing scenario, one possible Course of Action is to get Popovic out of prison as soon as possible by attempting a hunger strike, despite low public support at first. Another is to delay a hunger strike and not risk Popovic’s life. That only pertains to one Victory Condition, of course; a Course of Action should deal with how you are going to achieve the scenario’s overall goal as well as any intermediate goals.
Step 2—Determine the Regime’s Possible Courses of Action
A Force More Powerful™ Players’ Guide Page 111
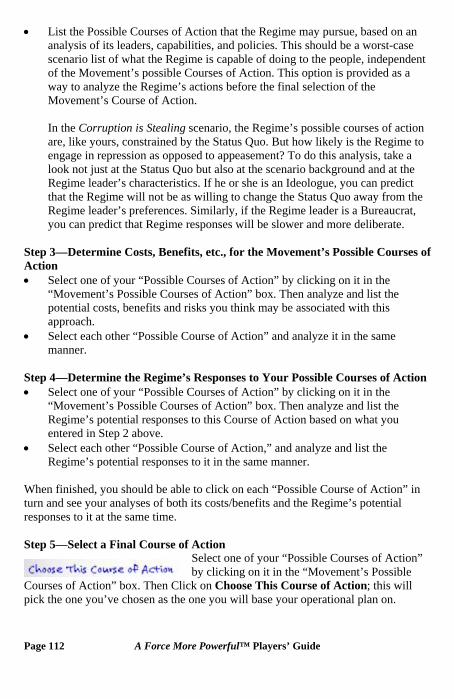
• List the Possible Courses of Action that the Regime may pursue, based on an analysis of its leaders, capabilities, and policies. This should be a worst-case scenario list of what the Regime is capable of doing to the people, independent of the Movement’s possible Courses of Action. This option is provided as a way to analyze the Regime’s actions before the final selection of the Movement’s Course of Action.
In the Corruption is Stealing scenario, the Regime’s possible courses of action are, like yours, constrained by the Status Quo. But how likely is the Regime to engage in repression as opposed to appeasement? To do this analysis, take a look not just at the Status Quo but also at the scenario background and at the Regime leader’s characteristics. If he or she is an Ideologue, you can predict that the Regime will not be as willing to change the Status Quo away from the Regime leader’s preferences. Similarly, if the Regime leader is a Bureaucrat, you can predict that Regime responses will be slower and more deliberate.
Step 3—Determine Costs, Benefits, etc., for the Movement’s Possible Courses of Action • Select one of your “Possible Courses of Action” by clicking on it in the
“Movement’s Possible Courses of Action” box. Then analyze and list the potential costs, benefits and risks you think may be associated with this approach.
• Select each other “Possible Course of Action” and analyze it in the same manner.
Step 4—Determine the Regime’s Responses to Your Possible Courses of Action • Select one of your “Possible Courses of Action” by clicking on it in the
“Movement’s Possible Courses of Action” box. Then analyze and list the Regime’s potential responses to this Course of Action based on what you entered in Step 2 above.
• Select each other “Possible Course of Action,” and analyze and list the Regime’s potential responses to it in the same manner.
When finished, you should be able to click on each “Possible Course of Action” in turn and see your analyses of both its costs/benefits and the Regime’s potential responses to it at the same time. Step 5—Select a Final Course of Action
Page 112 A Force More Powerful™ Players’ Guide
Courses of Action” box. Then Clic
Select one of your “Possible Courses of Action” by clicking on it in the “Movement’s Possible k on Choose This Course of Action; this will
pick the one you’ve chosen as the one you will base your operational plan on.
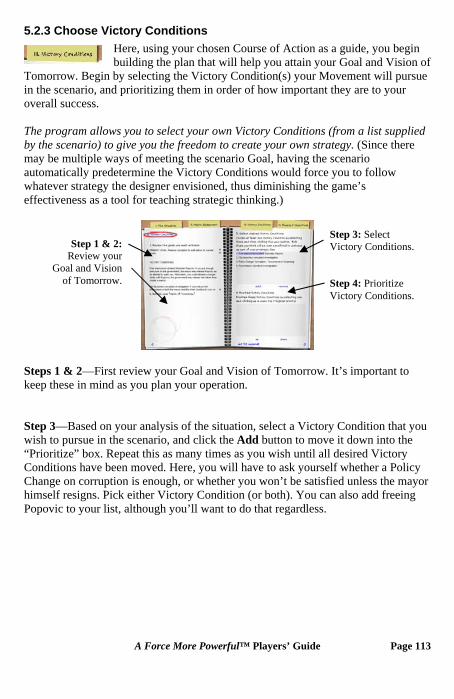
5.2.3 Choose Victory Conditions
A Force More Powerful™ Players’ Guide Page 113
f sue
Here, using your chosen Course of Action as a guide, you begin building the plan that will help you attain your Goal and Vision o
Tomorrow. Begin by selecting the Victory Condition(s) your Movement will purin the scenario, and prioritizing them in order of how important they are to your overall success. The program allows you to select your own Victory Conditions (from a list supplied by the scenario) to give you the freedom to create your own strategy. (Since there may be multiple ways of meeting the scenario Goal, having the scenario automatically predetermine the Victory Conditions would force you to follow whatever strategy the designer envisioned, thus diminishing the game’s effectiveness as a tool for teaching strategic thinking.)
Step 1 & 2:
Review your Goal and Vision
of Tomorrow.
Step 3: Select Victory Conditions. Step 4: Prioritize Victory Conditions.
Steps 1 & 2—First review your Goal and Vision of Tomorrow. It’s important to keep these in mind as you plan your operation. Step 3—Based on your analysis of the situation, select a Victory Condition that you wish to pursue in the scenario, and click the Add button to move it down into the “Prioritize” box. Repeat this as many times as you wish until all desired Victory Conditions have been moved. Here, you will have to ask yourself whether a Policy Change on corruption is enough, or whether you won’t be satisfied unless the mayor himself resigns. Pick either Victory Condition (or both). You can also add freeing Popovic to your list, although you’ll want to do that regardless.
Victory Conditions are the same as Objectives in game terms, except that some Victory Conditions cause the game to end when achieved. Usually these will be obvious, as they are closely related to the Goals of the scenario, but it will be spelled out in the Goals text.
Some Victory Conditions may be unreasonable for the given situation. Nothing prevents the designer from including a ‘red herring’ or two (i.e., Victory Conditions unobtainable
within the time allotted) to test your analytical abilities.
Step 4—Prioritize the Victory Conditions that you’ve chosen, by selecting one in the “Prioritize” box and clicking the Up or Down button to change the number at the beginning of its line. “1” is the top priority, “2” is the next highest, etc. Repeat this as many times as you wish until you’re satisfied with the prioritization.
5.2.4 Create Phases & Objectives
The next part of building your plan comprises determining which Objective(s) you will seek to achieve, and creating the Phases of
your operation and assigning Objectives and Victory Conditions to them. A good plan should include objectives and an expectation of when they will be attained. On these “pages” you’re given the opportunity to: • Divide your plan into Phases; • Give each Phase a “Policy Focus” and a text description of what you hope to
achieve in it; • Choose the Objectives that you think will aid your progress, and; • Assign those Objectives (including Victory Conditions) to the Phases.
This process allows you to document your strategy in a step-by-step manner, and determine what you hope to achieve by certain dates.
Some Objectives may be unreasonable for the given situation. Nothing prevents the designer from including a “red herring” or two to test your analytical abilities!
When you meet an Objective within the designated Phase, the members of your
Movement gain confidence, which may manifest as a boost in Enthusiasm for your Movement’s Groups and Characters, or amongst unaligned people. Regime figures may
also lose support or Enthusiasm.
Prioritize your Victory Conditions according to their importance in achieving your Vision of Tomorrow, not by the order in which you should attain them.
Once you have started play by advancing time, you can no longer adjust your Victory
Conditions in any way, so be sure they are in accordance with your desires beforehand.
Page 114 A Force More Powerful™ Players’ Guide
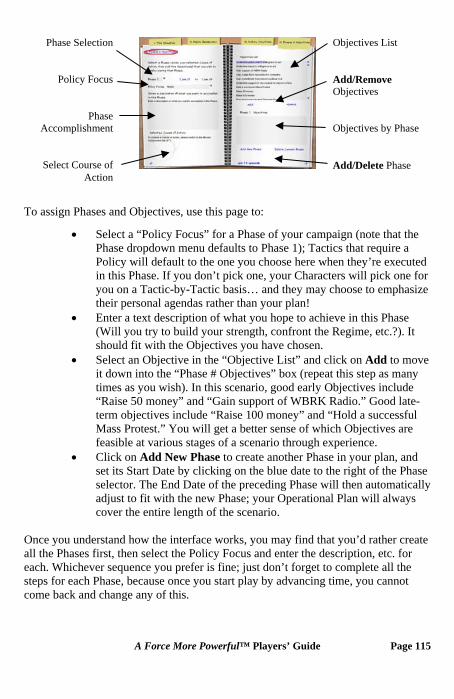
Phase Selection
Policy Focus
Phase Accomplishment
Select Course of Action
Objectives List Add/Remove Objectives Objectives by Phase Add/Delete Phase
To assign Phases and Objectives, use this page to:
• Select a “Policy Focus” for a Phase of your campaign (note that the Phase dropdown menu defaults to Phase 1); Tactics that require a Policy will default to the one you choose here when they’re executed in this Phase. If you don’t pick one, your Characters will pick one for you on a Tactic-by-Tactic basis… and they may choose to emphasize their personal agendas rather than your plan!
• Enter a text description of what you hope to achieve in this Phase (Will you try to build your strength, confront the Regime, etc.?). It should fit with the Objectives you have chosen.
• Select an Objective in the “Objective List” and click on Add to move it down into the “Phase # Objectives” box (repeat this step as many times as you wish). In this scenario, good early Objectives include “Raise 50 money” and “Gain support of WBRK Radio.” Good late-term objectives include “Raise 100 money” and “Hold a successful Mass Protest.” You will get a better sense of which Objectives are feasible at various stages of a scenario through experience.
• Click on Add New Phase to create another Phase in your plan, and set its Start Date by clicking on the blue date to the right of the Phase selector. The End Date of the preceding Phase will then automatically adjust to fit with the new Phase; your Operational Plan will always cover the entire length of the scenario.
Once you understand how the interface works, you may find that you’d rather create all the Phases first, then select the Policy Focus and enter the description, etc. for each. Whichever sequence you prefer is fine; just don’t forget to complete all the steps for each Phase, because once you start play by advancing time, you cannot come back and change any of this.
A Force More Powerful™ Players’ Guide Page 115
Note that some Objectives are also Victory Conditions. You can think of Victory Conditions as “primary” objectives. When you’ve finished to your satisfaction, your plan should be complete, and you should be ready to begin play. Click on Go to Game and start conducting the Tactics that will help you achieve your Objectives. You can always refer back to what you have done, although your Manifesto and operational plan are frozen once any game time has passed.
Once you have started play by advancing time, you can no longer change your Phases and Objectives, so be sure they’re set to your satisfaction beforehand.
Page 116 A Force More Powerful™ Players’ Guide
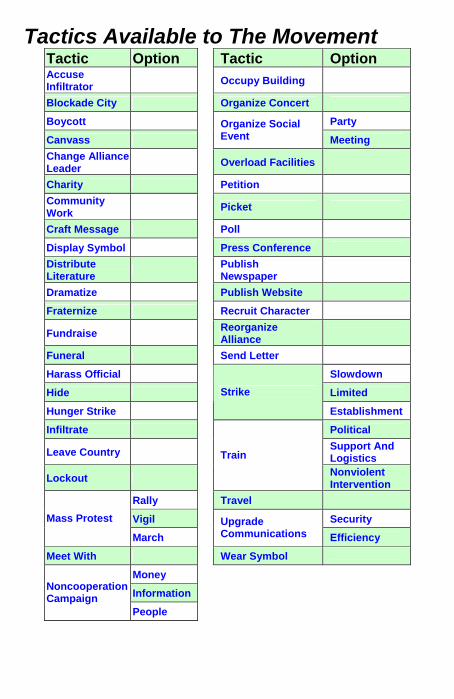
Tactics Available to The Movement Tactic Option Tactic Option Accuse Infiltrator Occupy Building
Blockade City Organize Concert
Boycott Party
Canvass Organize Social Event Meeting
Change Alliance Leader Overload Facilities
Charity Petition Community Work Picket
Craft Message Poll
Display Symbol Press Conference Distribute Literature Publish
Newspaper
Dramatize Publish Website
Fraternize Recruit Character
Fundraise Reorganize Alliance
Funeral Send Letter
Harass Official Slowdown
Hide Limited
Hunger Strike Strike
Establishment
Infiltrate Political
Leave Country Support And Logistics
Lockout Train
Nonviolent Intervention
Rally Travel
Vigil Security Mass Protest
March Upgrade Communications Efficiency
Meet With Wear Symbol
Money
Information Noncooperation Campaign
People
• Press Ctrl-Z (before doing any other action) to undo a text edit in a Strategic Estimate (see Chapter 5) text box.
• Press Alt-F4 to display the Quit dialog.
• Press F2 to toggle windowed mode on/off. The default is Off.
• Press the Esc key to display a dialog that will allow you to Load a game, Save the current game, access the Options Screen, or Quit the game.
• Press Ctrl-N to toggle Neighborhood color overlays on/off.
• Press F8 to end the game and view the Evaluation Screen (see 3.5)
• Click the left mouse button to escape from a vignette Tactic (see 4.11).
• Use the Arrow Keys to pan the 3D camera left, right, up and down.
• Press PageUp or PageDown to zoom the 3D view in or out.
To learn more about A Force More Powerful, go to
www.afmpgame.com
Keyboard Shortcuts
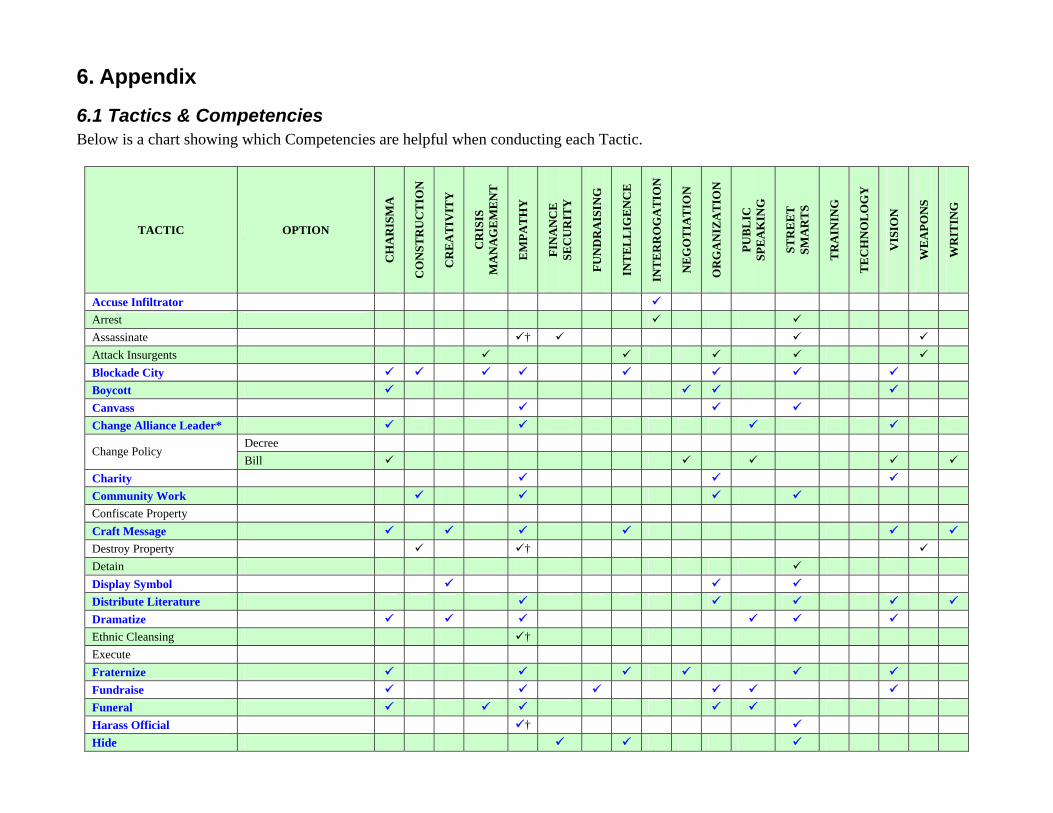
6. Appendix
6.1 Tactics & Competencies Below is a chart showing which Competencies are helpful when conducting each Tactic.
TACTIC OPTION
CH
AR
ISM
A
CO
NST
RU
CT
ION
CR
EA
TIV
ITY
CR
ISIS
M
AN
AG
EM
EN
T
EM
PAT
HY
FIN
AN
CE
SE
CU
RIT
Y
FUN
DR
AIS
ING
INT
EL
LIG
EN
CE
INT
ER
RO
GA
TIO
N
NE
GO
TIA
TIO
N
OR
GA
NIZ
AT
ION
PUB
LIC
SP
EA
KIN
G
STR
EE
T
SMA
RT
S
TR
AIN
ING
TE
CH
NO
LO
GY
VIS
ION
WE
APO
NS
WR
ITIN
G
Accuse Infiltrator
Arrest
Assassinate †
Attack Insurgents
Blockade City
Boycott
Canvass
Change Alliance Leader*
Decree Change Policy
Bill
Charity
Community Work
Confiscate Property
Craft Message
Destroy Property †
Detain
Display Symbol
Distribute Literature
Dramatize
Ethnic Cleansing †
Execute
Fraternize
Fundraise
Funeral
Harass Official †
Hide
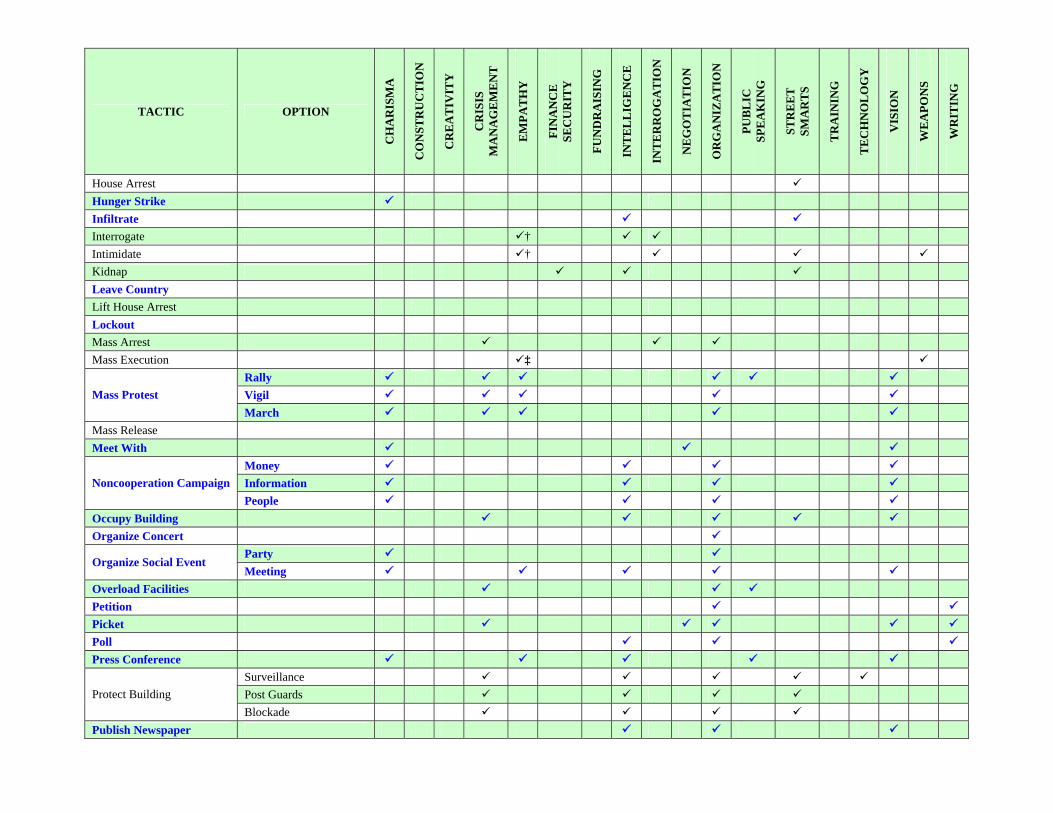
TACTIC OPTION
CH
AR
ISM
A
CO
NST
RU
CT
ION
CR
EA
TIV
ITY
CR
ISIS
M
AN
AG
EM
EN
T
EM
PAT
HY
FIN
AN
CE
SE
CU
RIT
Y
FUN
DR
AIS
ING
INT
EL
LIG
EN
CE
INT
ER
RO
GA
TIO
N
NE
GO
TIA
TIO
N
OR
GA
NIZ
AT
ION
PUB
LIC
SP
EA
KIN
G
STR
EE
T
SMA
RT
S
TR
AIN
ING
TE
CH
NO
LO
GY
VIS
ION
WE
APO
NS
WR
ITIN
G
House Arrest
Hunger Strike
Infiltrate
Interrogate †
Intimidate †
Kidnap
Leave Country
Lift House Arrest
Lockout
Mass Arrest
Mass Execution ‡
Rally
Vigil Mass Protest March
Mass Release
Meet With
Money
Information Noncooperation Campaign People
Occupy Building
Organize Concert
Party Organize Social Event
Meeting
Overload Facilities
Petition
Picket
Poll
Press Conference
Surveillance
Post Guards Protect Building Blockade
Publish Newspaper
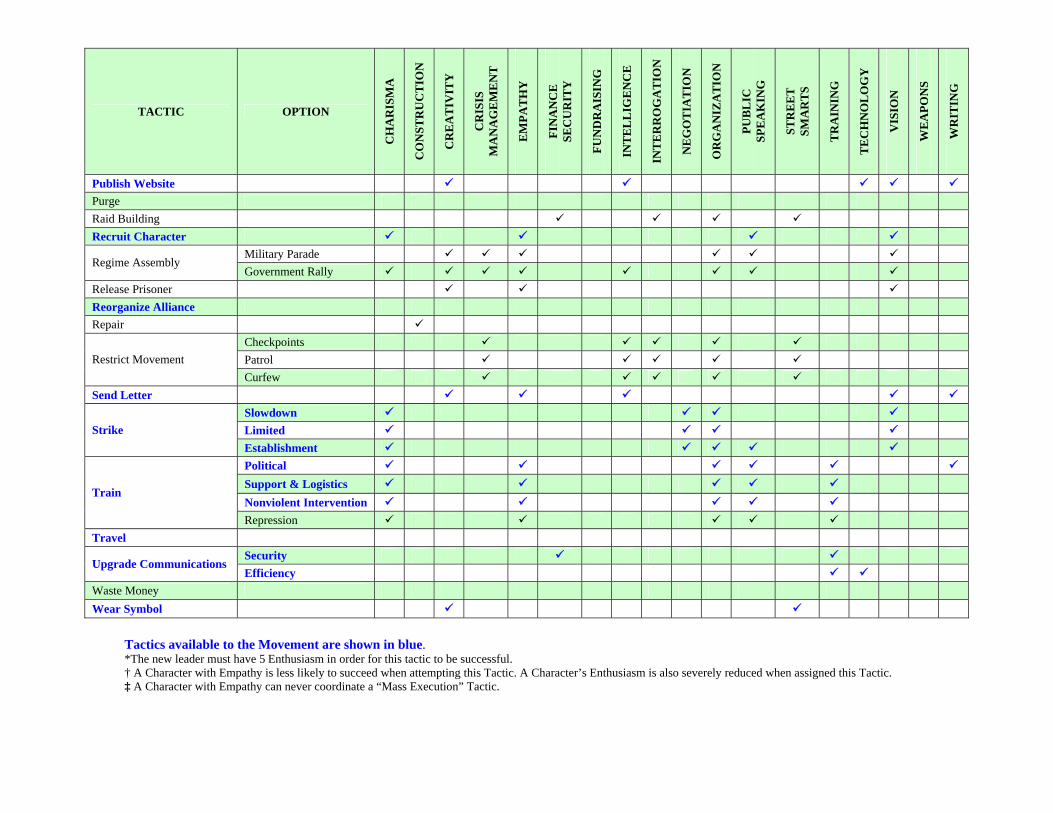
TACTIC OPTION
CH
AR
ISM
A
CO
NST
RU
CT
ION
CR
EA
TIV
ITY
CR
ISIS
M
AN
AG
EM
EN
T
EM
PAT
HY
FIN
AN
CE
SE
CU
RIT
Y
FUN
DR
AIS
ING
INT
EL
LIG
EN
CE
INT
ER
RO
GA
TIO
N
NE
GO
TIA
TIO
N
OR
GA
NIZ
AT
ION
PUB
LIC
SP
EA
KIN
G
STR
EE
T
SMA
RT
S
TR
AIN
ING
TE
CH
NO
LO
GY
VIS
ION
WE
APO
NS
WR
ITIN
G
Publish Website
Purge
Raid Building
Recruit Character
Military Parade Regime Assembly
Government Rally
Release Prisoner
Reorganize Alliance
Repair
Checkpoints
Patrol Restrict Movement Curfew
Send Letter
Slowdown
Limited Strike Establishment
Political
Support & Logistics
Nonviolent Intervention Train
Repression
Travel
Security Upgrade Communications
Efficiency
Waste Money
Wear Symbol
Tactics available to the Movement are shown in blue. *The new leader must have 5 Enthusiasm in order for this tactic to be successful. † A Character with Empathy is less likely to succeed when attempting this Tactic. A Character’s Enthusiasm is also severely reduced when assigned this Tactic. ‡ A Character with Empathy can never coordinate a “Mass Execution” Tactic.
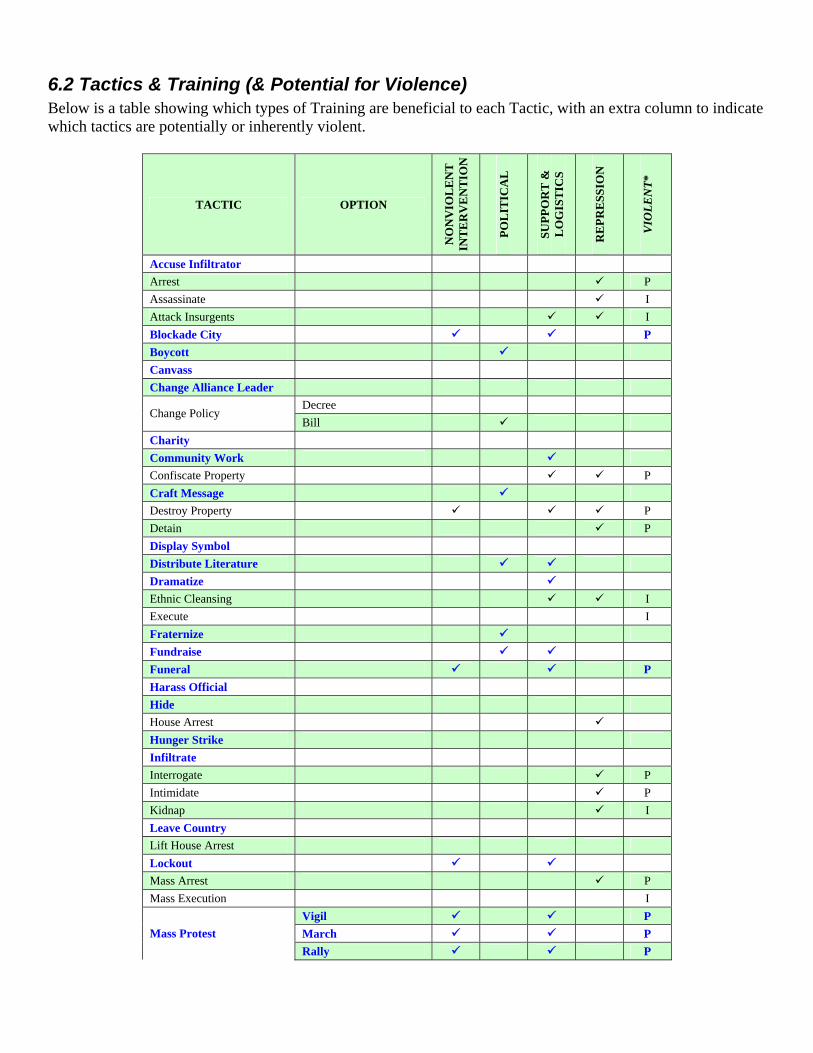
6.2 Tactics & Training (& Potential for Violence) Below is a table showing which types of Training are beneficial to each Tactic, with an extra column to indicate which tactics are potentially or inherently violent.
TACTIC OPTION
NO
NV
IOL
EN
T
INT
ER
VE
NT
ION
POL
ITIC
AL
SUPP
OR
T &
L
OG
IST
ICS
RE
PRE
SSIO
N
VIO
LEN
T*
Accuse Infiltrator Arrest P Assassinate I Attack Insurgents I Blockade City P Boycott Canvass Change Alliance Leader
Decree Change Policy
Bill Charity Community Work Confiscate Property P Craft Message Destroy Property P Detain P Display Symbol Distribute Literature Dramatize Ethnic Cleansing I Execute I Fraternize Fundraise Funeral P Harass Official Hide House Arrest Hunger Strike Infiltrate Interrogate P Intimidate P Kidnap I Leave Country Lift House Arrest Lockout Mass Arrest P Mass Execution I
Vigil P March P Mass Protest Rally P
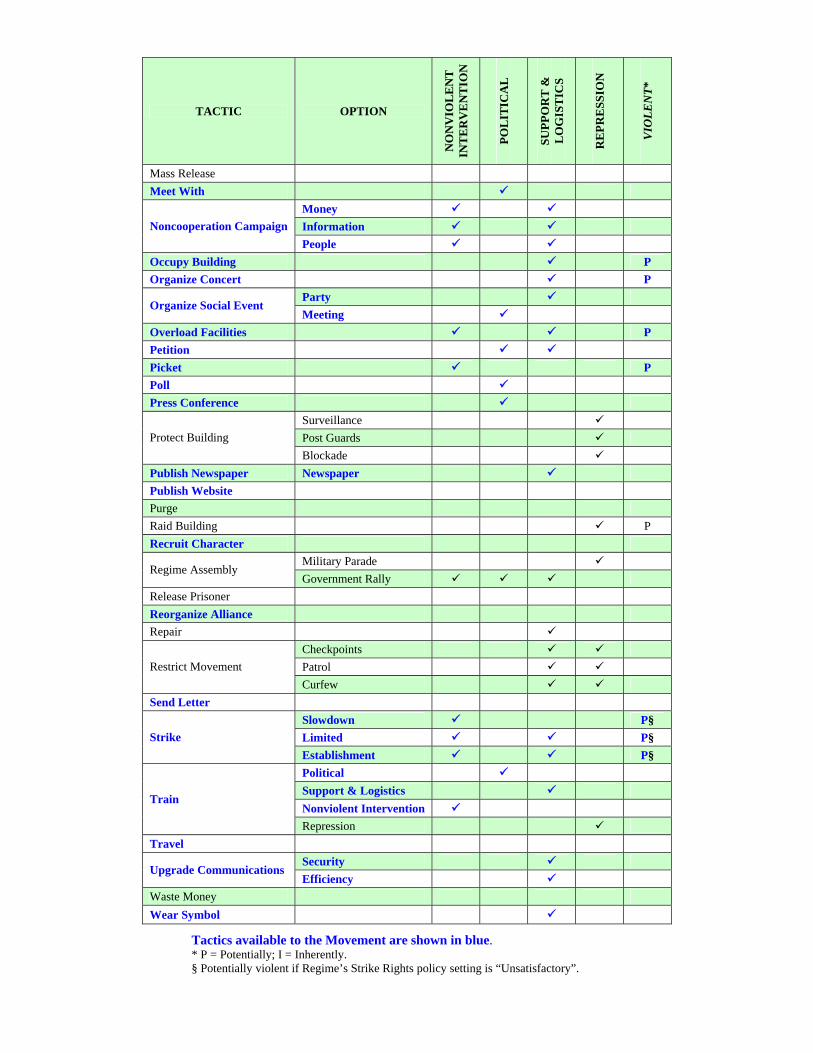
TACTIC OPTION
NO
NV
IOL
EN
T
INT
ER
VE
NT
ION
POL
ITIC
AL
SUPP
OR
T &
L
OG
IST
ICS
RE
PRE
SSIO
N
VIO
LEN
T*
Mass Release Meet With
Money Information Noncooperation Campaign People
Occupy Building P Organize Concert P
Party Organize Social Event
Meeting Overload Facilities P Petition Picket P Poll Press Conference
Surveillance Post Guards Protect Building Blockade
Publish Newspaper Newspaper Publish Website Purge Raid Building P Recruit Character
Military Parade Regime Assembly
Government Rally Release Prisoner Reorganize Alliance Repair
Checkpoints Patrol Restrict Movement Curfew
Send Letter Slowdown P§ Limited P§ Strike Establishment P§ Political Support & Logistics Nonviolent Intervention
Train
Repression Travel
Security Upgrade Communications
Efficiency Waste Money Wear Symbol
Tactics available to the Movement are shown in blue. * P = Potentially; I = Inherently. § Potentially violent if Regime’s Strike Rights policy setting is “Unsatisfactory”.

![THE GALE FORCE 9 TANKS GAME CRACKING THE POINTS … the points system code 01.pdfTANKS Game – Point System Code [Version 2, November 2016] THE GALE FORCE 9 TANKS GAME – CRACKING](https://img.pdfslide.net/doc/110x75/5f2339108255547b303deb4f/the-gale-force-9-tanks-game-cracking-the-points-the-points-system-code-01pdf-tanks.jpg)