Embed Size (px)
Citation preview
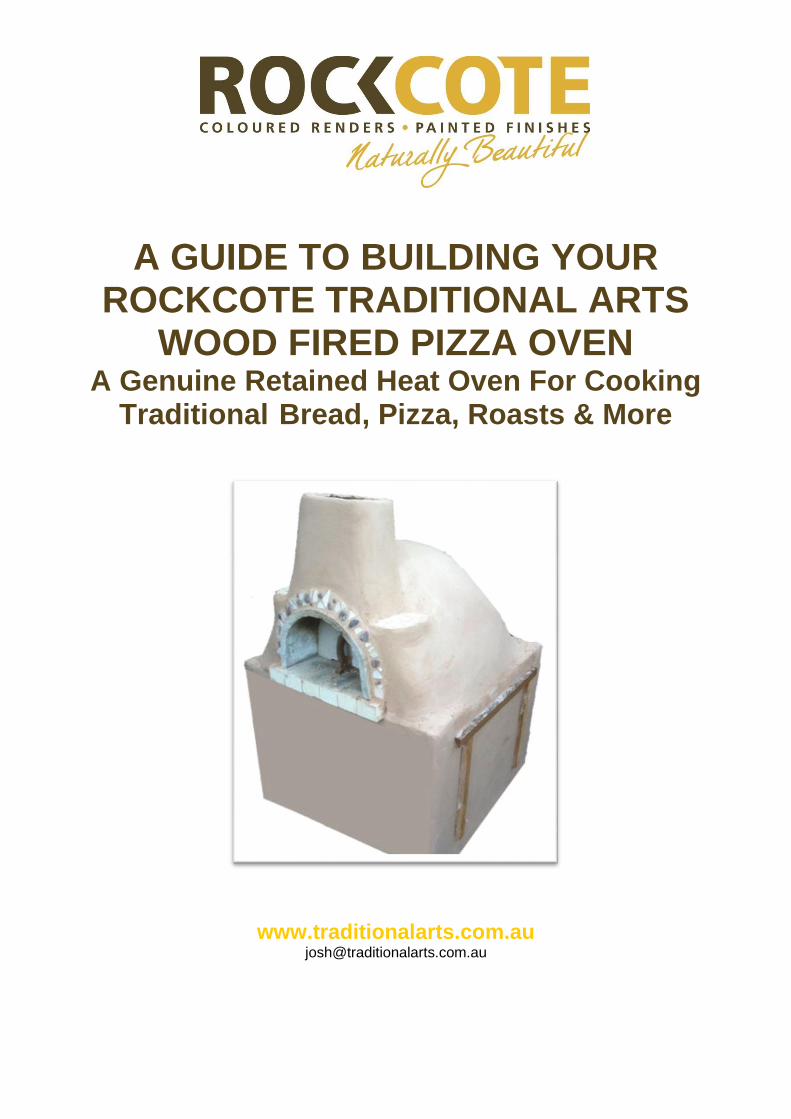
A GUIDE TO BUILDING YOUR ROCKCOTE TRADITIONAL ARTS
WOOD FIRED PIZZA OVEN A Genuine Retained Heat Oven For Cooking
Traditional Bread, Pizza, Roasts & More
www.traditionalarts.com.au [email protected]
Page 2 of 23
ROCKCOTE & Wood Fired
Natural Clay Ovens
Rockcote has become involved in Wood Fired Natural
Clay Ovens because of Our Vision and Our Purpose.
Our Vision: To be celebrated for championing the
societal, commercial and environmental benefits of a
culture of innovation that brings ancient wisdom,
biomimicry and modern science together.
Our Purpose: To unlock the potential of traditional
skills and materials to make healthy modern buildings
renowned for natural beauty.
Our ovens allow us to do this, starting in a small way
by helping us with the future of natural building
materials and application methods in which we are
currently in danger of losing in the modern world.
Building with Cob
Earth is the most common, and perhaps the most
versatile building material on the planet. Mixed with
sand and straw a clay subsoil will become very hard
and durable; indeed it was the first natural “concrete.”
In the Americas this material is called “adobe,” from an
Arabic word, al-toba, meaning “the brick.” Invading
Moors brought the word to Spain from North Africa
where the ancient tradition of mud building continues
today. In Britain, the continuing tradition of earthen
building is called cob, from an old English word
meaning “lump.” The Brits skipped the step of forming
bricks, and made their walls by packing wet blobs of
mud on top of each other, letting them dry, and carving
them smooth. Five hundred year old cob houses are
common in Devon, England, where they are
recognized on historic registers, and command high
prices when sold.
Building a cob oven is like building a cob house, on a
smaller scale. The dome shape is basic in nature,
common to beehives, birds’ nests, caves, cliff
dwellings, igloos, huts and the Houston Astrodome –
strong, self-supporting, easy to build and heat.
History of Wood Fired Ovens
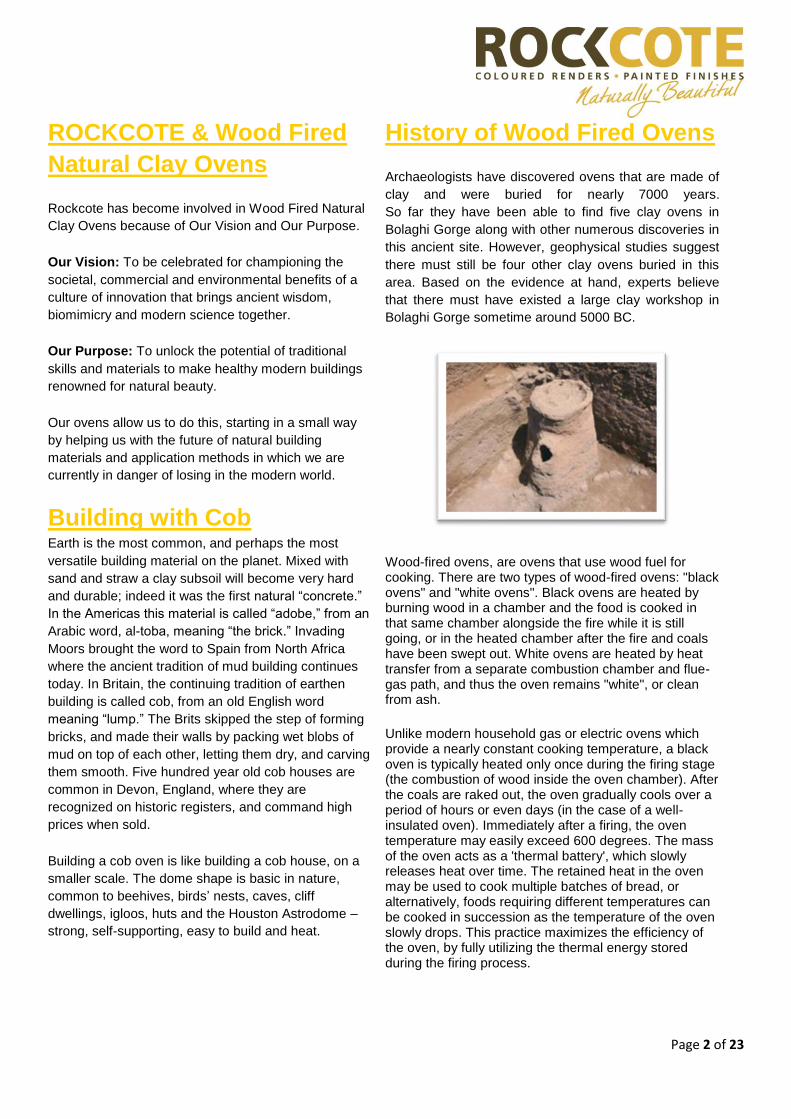
Archaeologists have discovered ovens that are made of
clay and were buried for nearly 7000 years.
So far they have been able to find five clay ovens in
Bolaghi Gorge along with other numerous discoveries in
this ancient site. However, geophysical studies suggest
there must still be four other clay ovens buried in this
area. Based on the evidence at hand, experts believe
that there must have existed a large clay workshop in
Bolaghi Gorge sometime around 5000 BC.
Wood-fired ovens, are ovens that use wood fuel for cooking. There are two types of wood-fired ovens: "black ovens" and "white ovens". Black ovens are heated by burning wood in a chamber and the food is cooked in that same chamber alongside the fire while it is still going, or in the heated chamber after the fire and coals have been swept out. White ovens are heated by heat transfer from a separate combustion chamber and flue-gas path, and thus the oven remains "white", or clean from ash.
Unlike modern household gas or electric ovens which provide a nearly constant cooking temperature, a black oven is typically heated only once during the firing stage (the combustion of wood inside the oven chamber). After the coals are raked out, the oven gradually cools over a period of hours or even days (in the case of a well-insulated oven). Immediately after a firing, the oven temperature may easily exceed 600 degrees. The mass of the oven acts as a 'thermal battery', which slowly releases heat over time. The retained heat in the oven may be used to cook multiple batches of bread, or alternatively, foods requiring different temperatures can be cooked in succession as the temperature of the oven slowly drops. This practice maximizes the efficiency of the oven, by fully utilizing the thermal energy stored during the firing process.

Page 3 of 23
RESEEK & DEVELOP: Five Axioms
Embrace Ancient Knowledge and Traditional Skills.
Learning from our ancestors is not a new idea. Over 2,000 years ago Marcus Vitruvius Pollio, a man often considered
the world’s first architect, wrote “I cannot too strongly insist upon the need of a return to the method of old times.”
Vitruvius, who would later be immortalized by Leonardo da Vinci, was commenting on how to choose the site for a
new city, but this point had a much wider application. Over 100 billion people have lived on earth. Most learned to
build their own shelters in communities that lived more intimately with Mother Nature than we do. They mastered the
art of working with the materials she provided. Always innovators, they grew to be visionaries and artisans. Many
great architectural accomplishments came before industrialization or the emergence of modern engineering and
materials. Their skills and creativity were exceptional and enduring. So why would we not look to them still for
inspiration and guidance today? After all, as Tolkien once put it “do not despise the lore that has come down from
distant years; for oft it may chance that old wives keep in memory word of things that once were needful for the wise
to know.”
To Live In Harmony with Mother Nature, Mimic Her.
Biomimicry may be a modern term, but its central themes aren’t. Vitruvius argued that by imitating nature in our choice
of materials, construction methods and sense of proportion, buildings are better able solid (firmitas), useful (utilitas),
and beautiful (venustas). Far more recently biomimicry pioneer Janine Benyus wrote: “After 3.8 billion years of
evolution, nature has learned: What works. What is appropriate. What lasts.” Nature has no waste. Natural systems
have ingenious ways of solving highly complex problems. We must study nature. Understand it. Learn from it. And
reapply what we learn. This sentiment has been at the heart of our approach to designing our sustainable
manufacturing and operational facilities. And it has an equal impact on how we innovate, from our processes and
products to our culture and business models too.
Be Judicious with Modern Science and Technology.
Around 600 years ago German writer Thomas Murner coined the term ‘das kindt mit dem bad vβ schitten’ (‘to throw
the baby out with the bath water’). Sadly, as we migrate from old to new technologies, this occurs all too often. Modern
science unleashes many wonderful benefits. But how much of the $1.2 trillion dollars spent globally on R&D rests on
materials that bring with them problems as well as solutions? Our ‘minimum intervention’ model uses just enough
advanced technology to develop products that meet the needs of skilled craftsmen and the demands of our punishing
Australian climate.
Revive the use of Natural Materials.
There are many naturally occurring minerals that we use extensively today, like quartz and marble chips. But many
other natural materials – lime, mud, clay and fibrous ingredients like straw and horse hair – have the potential to
create stunning and enduring buildings that are healthier and have a lower impact on our environment. We are
dedicated to reviving them, and the skills craftsmen need to use them. An obvious choice for cob and straw bale
homes, and the revived use of natural substrates like bamboo, they are equally relevant as architectural coatings that
complement contemporary home design and construction too.
Keep Our Eyes on the Prize: Naturally Beautiful Buildings.
In real estate, location may be important, but a good site alone isn’t capable of creating buildings that achieve their
potential to enliven our senses and enrich our souls. Inspired by the great fresco and plaster artists of the
Renaissance, our brand of beauty is natural rather than synthetic in nature. We strive for an aesthetic that combines
rich, deep colours with mood altering textures in coatings that ooze classic qualities, bring naturally occurring minerals
to the fore and enhance, rather than fight with the environments in which buildings are located, be that rural, suburban
or a cityscape. Well-crafted Rockcote buildings, we have found, are so stunning to their creators, owners and visitors
find it hard to resist the urge to touch them, as well as be touched by them.
Page 4 of 23
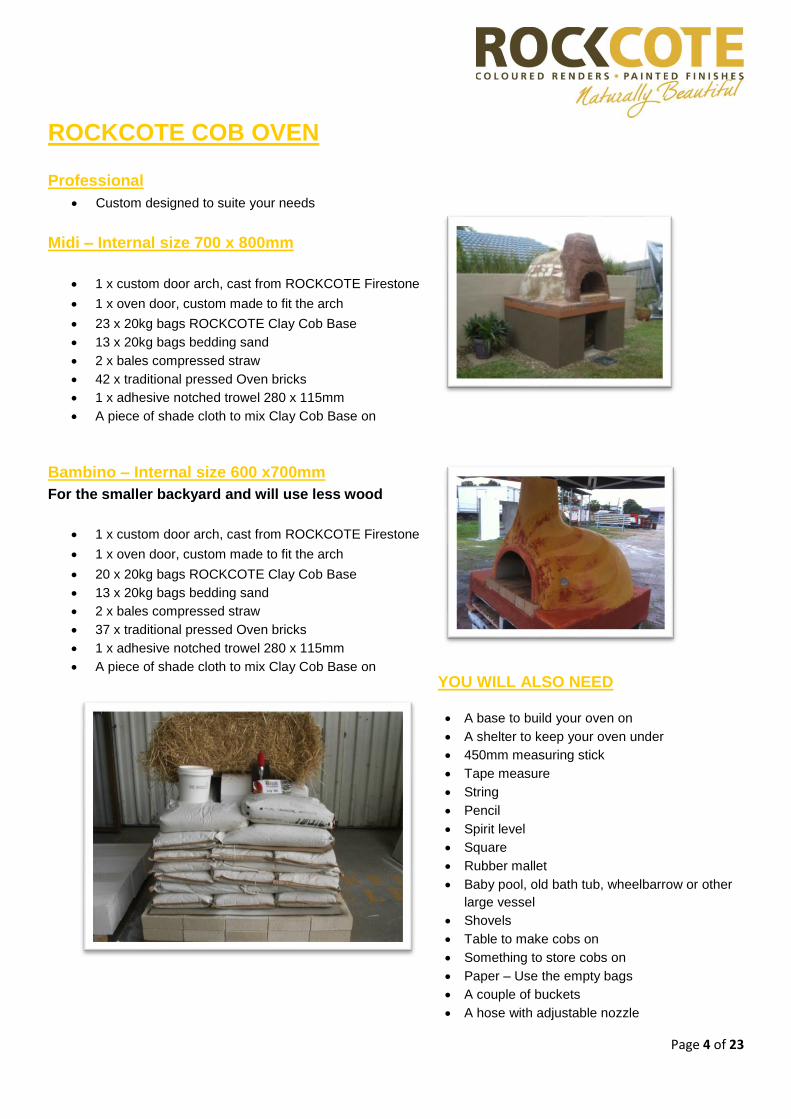
ROCKCOTE COB OVEN
Professional
Custom designed to suite your needs
Midi – Internal size 700 x 800mm
1 x custom door arch, cast from ROCKCOTE Firestone
1 x oven door, custom made to fit the arch
23 x 20kg bags ROCKCOTE Clay Cob Base
13 x 20kg bags bedding sand
2 x bales compressed straw
42 x traditional pressed Oven bricks
1 x adhesive notched trowel 280 x 115mm
A piece of shade cloth to mix Clay Cob Base on
Bambino – Internal size 600 x700mm
For the smaller backyard and will use less wood
1 x custom door arch, cast from ROCKCOTE Firestone
1 x oven door, custom made to fit the arch
20 x 20kg bags ROCKCOTE Clay Cob Base
13 x 20kg bags bedding sand
2 x bales compressed straw
37 x traditional pressed Oven bricks
1 x adhesive notched trowel 280 x 115mm
A piece of shade cloth to mix Clay Cob Base on
YOU WILL ALSO NEED A base to build your oven on
A shelter to keep your oven under
450mm measuring stick
Tape measure
String
Pencil
Spirit level
Square
Rubber mallet
Baby pool, old bath tub, wheelbarrow or other
large vessel
Shovels
Table to make cobs on
Something to store cobs on
Paper – Use the empty bags
A couple of buckets
A hose with adjustable nozzle
Page 5 of 23
SELECTING A SITE The oven must be built and kept under a sheltered
area and protected from direct weather.
Check with your local council regulations in regards to
where you can build your oven. Check with engineers
before building on a patio or verandah as the oven
weighs a substantial amount.
Make sure the site is well away from any combustible
materials and consult your local by-laws as to fire
restrictions.
You might also want to think about keeping the chef dry
by providing a cooking bench under the shelter to work
from.
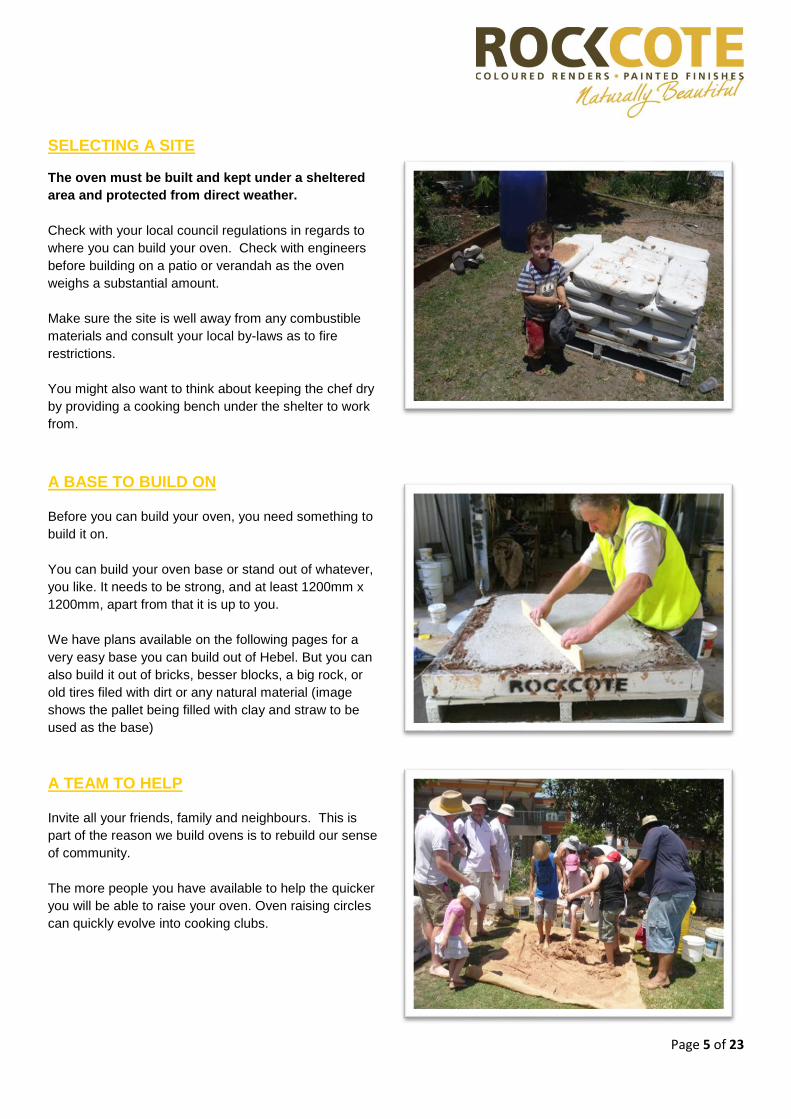
A BASE TO BUILD ON
Before you can build your oven, you need something to
build it on.
You can build your oven base or stand out of whatever,
you like. It needs to be strong, and at least 1200mm x
1200mm, apart from that it is up to you.
We have plans available on the following pages for a
very easy base you can build out of Hebel. But you can
also build it out of bricks, besser blocks, a big rock, or
old tires filed with dirt or any natural material (image
shows the pallet being filled with clay and straw to be
used as the base)
A TEAM TO HELP
Invite all your friends, family and neighbours. This is
part of the reason we build ovens is to rebuild our sense
of community.
The more people you have available to help the quicker
you will be able to raise your oven. Oven raising circles
can quickly evolve into cooking clubs.
Page 6 of 23
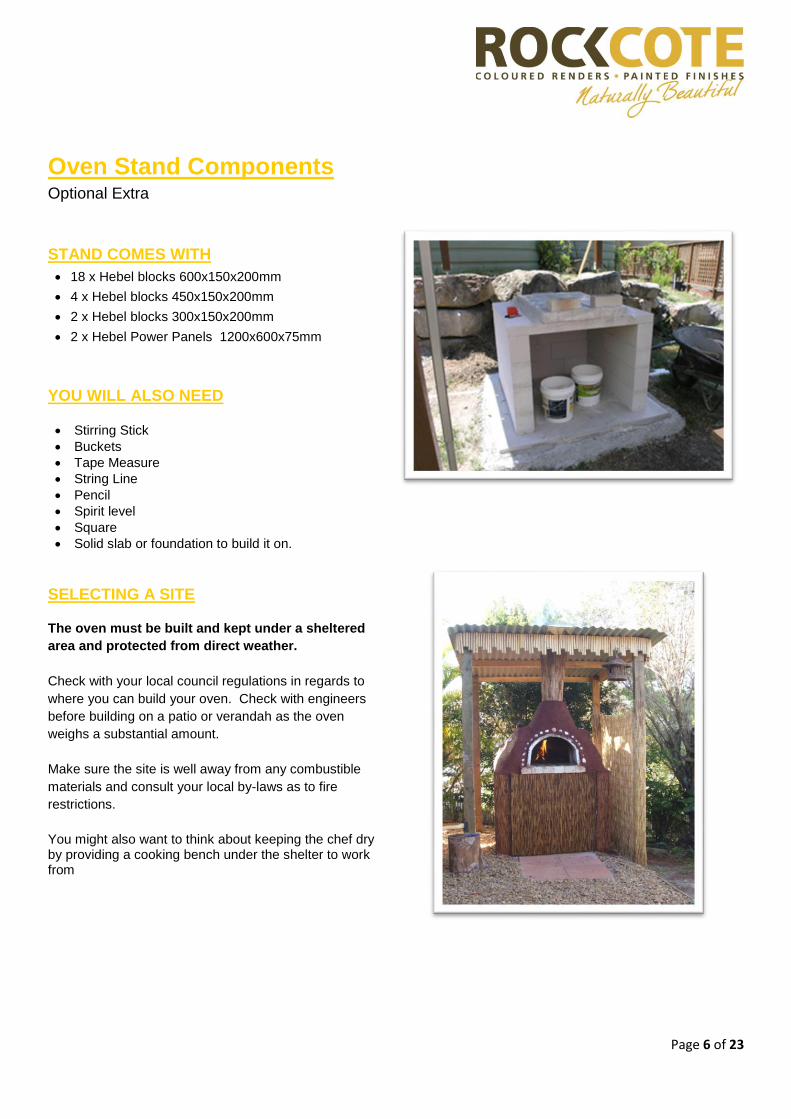
Oven Stand Components Optional Extra
STAND COMES WITH
18 x Hebel blocks 600x150x200mm
4 x Hebel blocks 450x150x200mm
2 x Hebel blocks 300x150x200mm
2 x Hebel Power Panels 1200x600x75mm
YOU WILL ALSO NEED Stirring Stick
Buckets
Tape Measure
String Line
Pencil
Spirit level
Square
Solid slab or foundation to build it on.
SELECTING A SITE The oven must be built and kept under a sheltered
area and protected from direct weather.
Check with your local council regulations in regards to
where you can build your oven. Check with engineers
before building on a patio or verandah as the oven
weighs a substantial amount.
Make sure the site is well away from any combustible
materials and consult your local by-laws as to fire
restrictions.
You might also want to think about keeping the chef dry by providing a cooking bench under the shelter to work from
Page 7 of 23
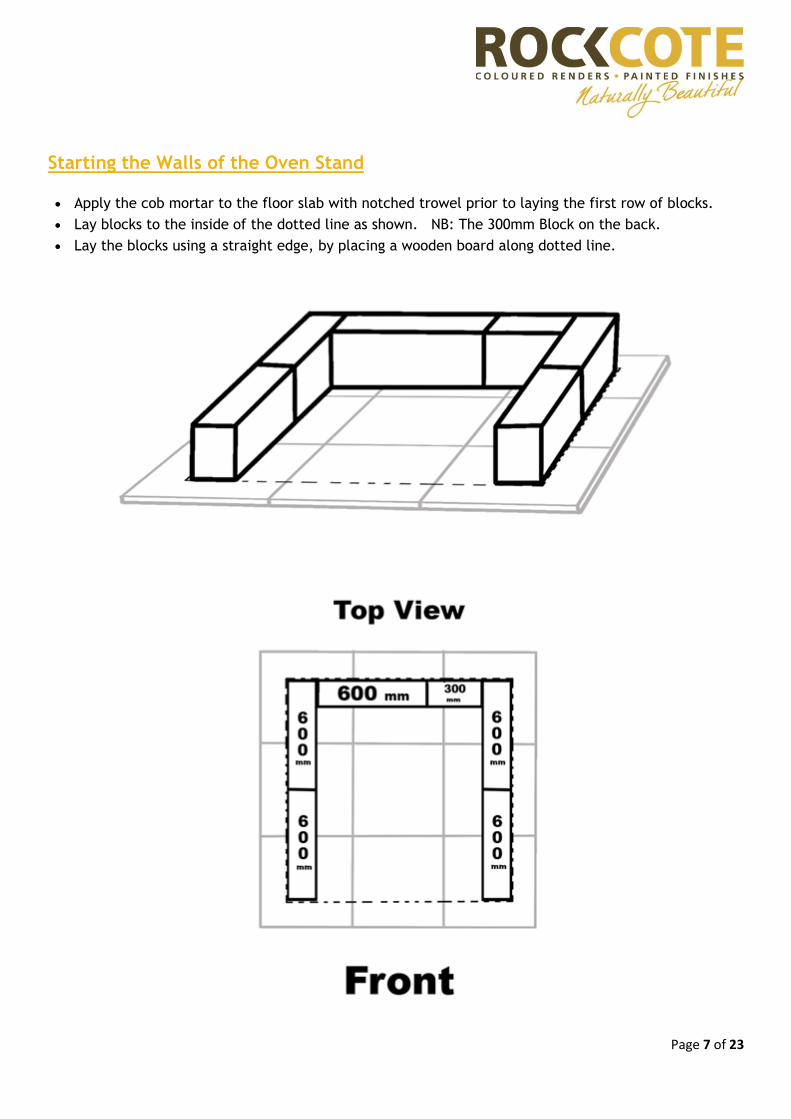
Starting the Walls of the Oven Stand
Apply the cob mortar to the floor slab with notched trowel prior to laying the first row of blocks.
Lay blocks to the inside of the dotted line as shown. NB: The 300mm Block on the back.
Lay the blocks using a straight edge, by placing a wooden board along dotted line.
Page 8 of 23
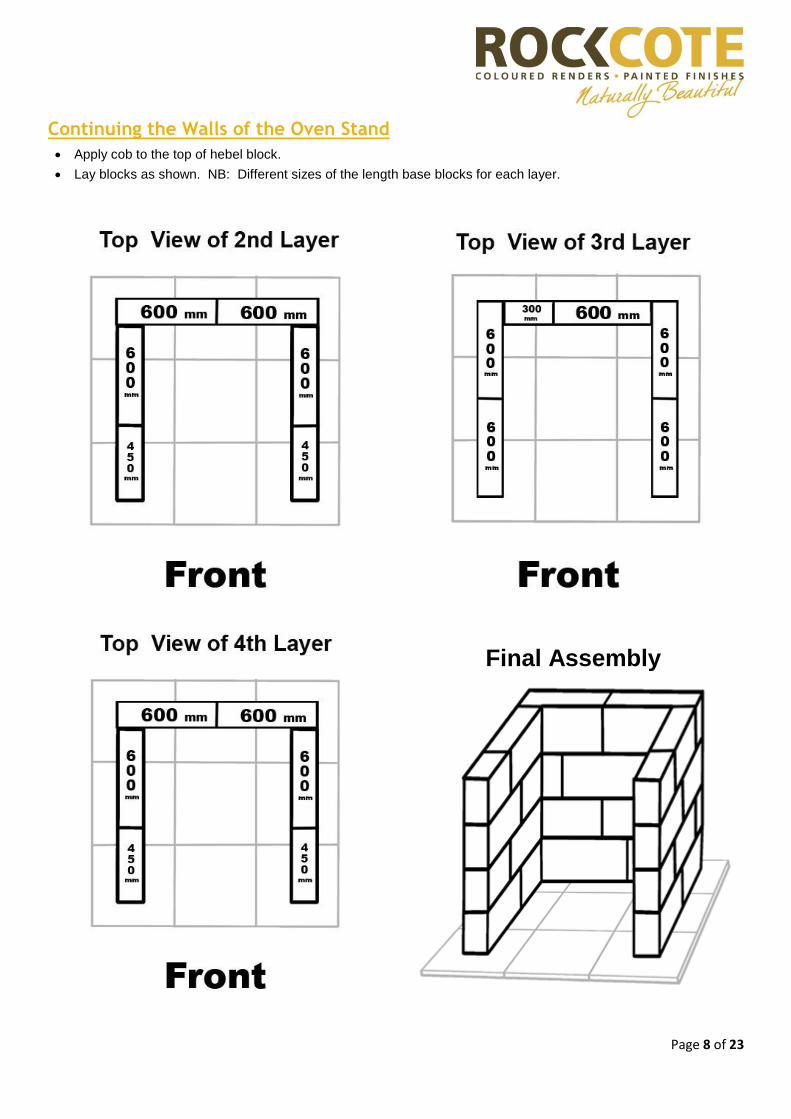
Continuing the Walls of the Oven Stand
Apply cob to the top of hebel block.
Lay blocks as shown. NB: Different sizes of the length base blocks for each layer.
Final Assembly
Page 9 of 23
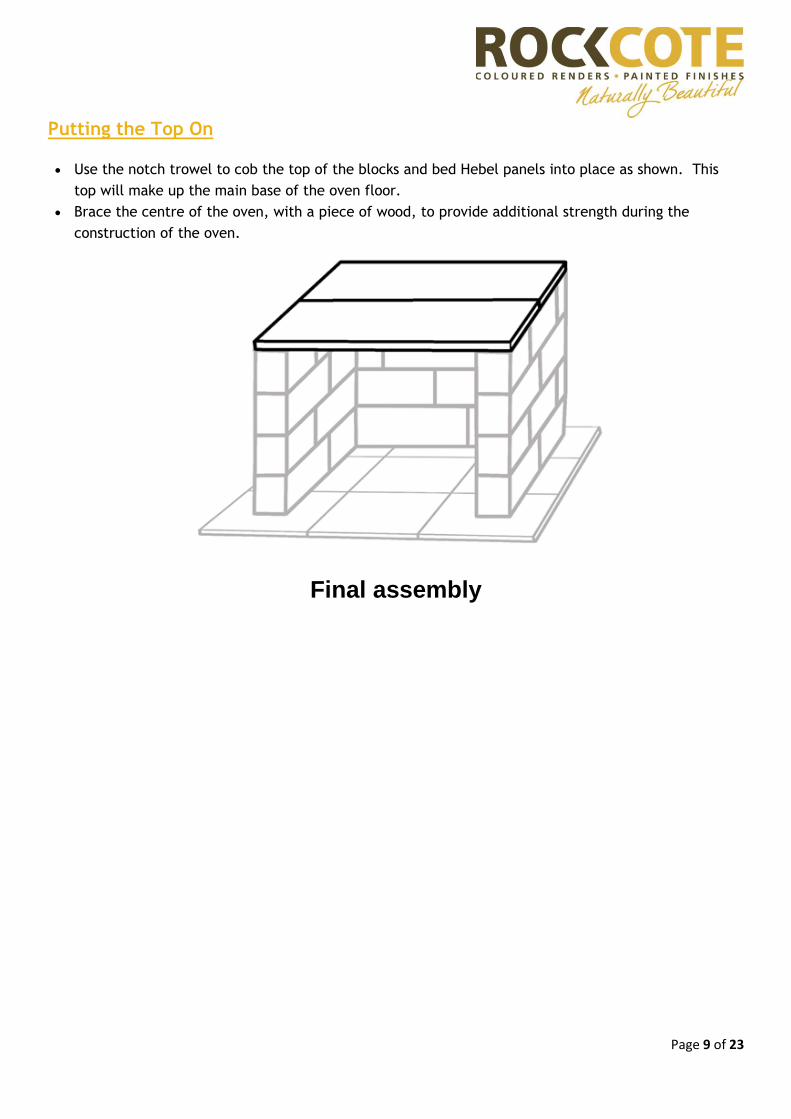
Putting the Top On
Use the notch trowel to cob the top of the blocks and bed Hebel panels into place as shown. This
top will make up the main base of the oven floor.
Brace the centre of the oven, with a piece of wood, to provide additional strength during the
construction of the oven.
Final assembly
Page 10 of 23
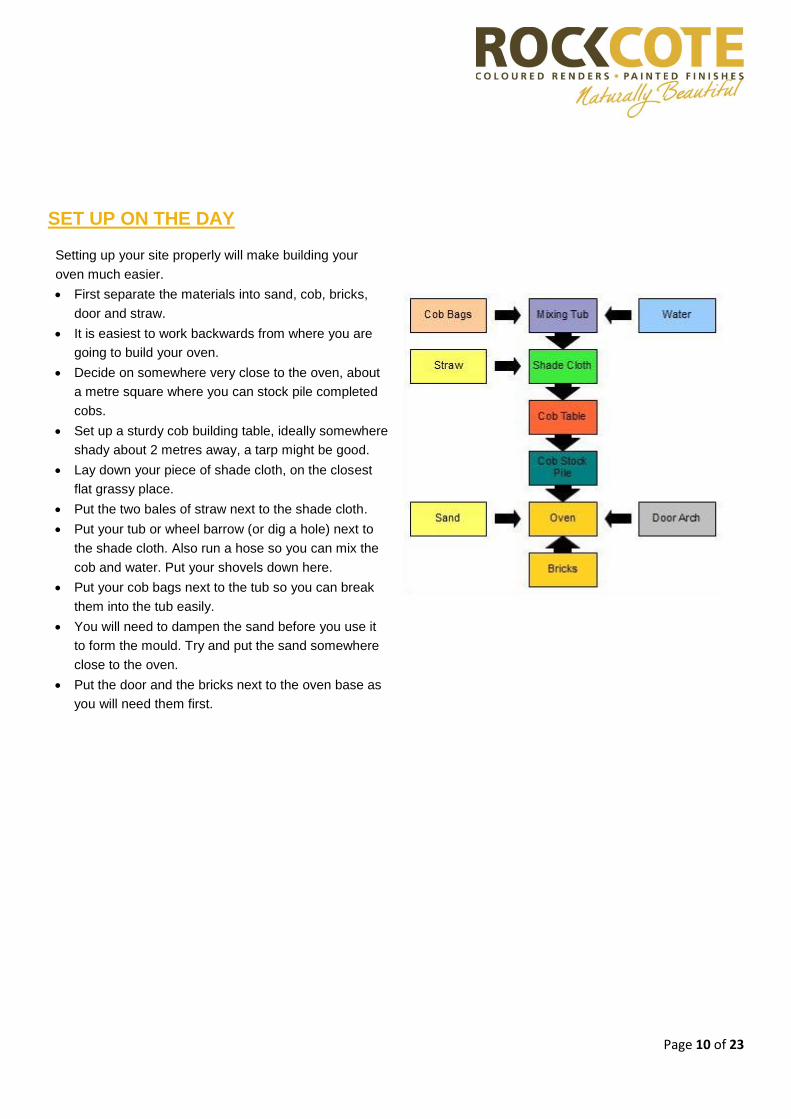
SET UP ON THE DAY
Setting up your site properly will make building your
oven much easier.
First separate the materials into sand, cob, bricks,
door and straw.
It is easiest to work backwards from where you are
going to build your oven.
Decide on somewhere very close to the oven, about
a metre square where you can stock pile completed
cobs.
Set up a sturdy cob building table, ideally somewhere
shady about 2 metres away, a tarp might be good.
Lay down your piece of shade cloth, on the closest
flat grassy place.
Put the two bales of straw next to the shade cloth.
Put your tub or wheel barrow (or dig a hole) next to
the shade cloth. Also run a hose so you can mix the
cob and water. Put your shovels down here.
Put your cob bags next to the tub so you can break
them into the tub easily.
You will need to dampen the sand before you use it
to form the mould. Try and put the sand somewhere
close to the oven.
Put the door and the bricks next to the oven base as
you will need them first.
Page 11 of 23
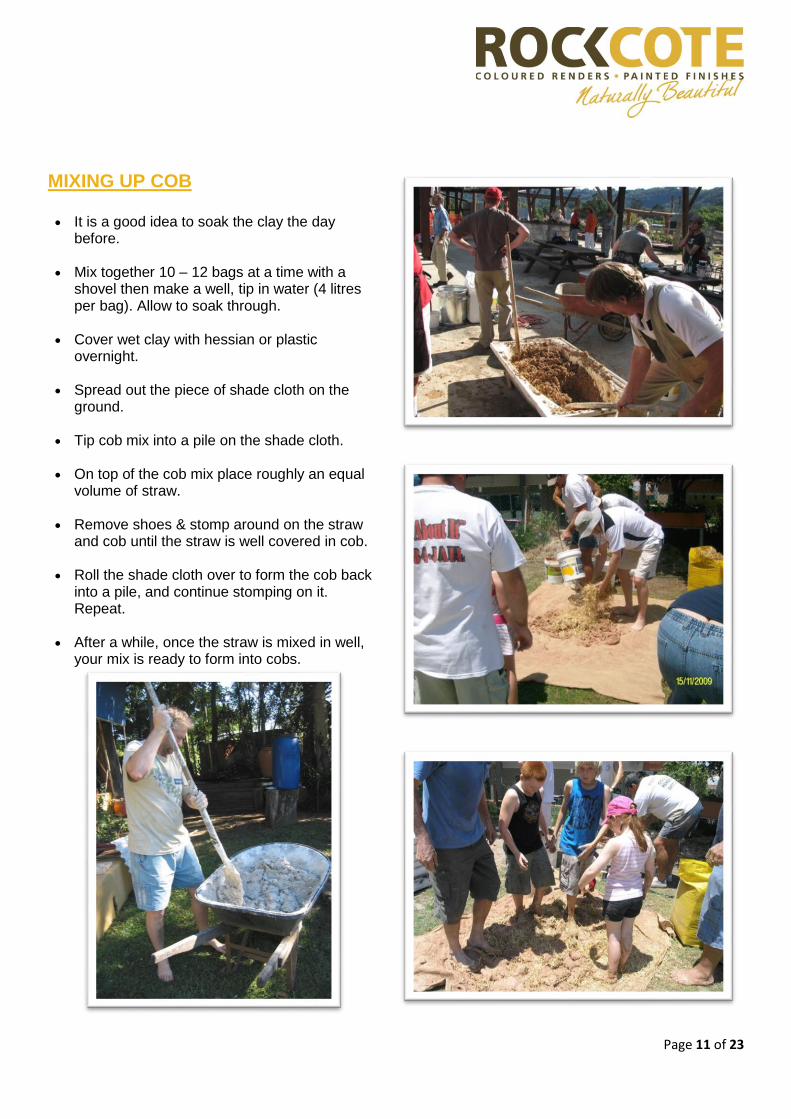
MIXING UP COB It is a good idea to soak the clay the day
before.
Mix together 10 – 12 bags at a time with a shovel then make a well, tip in water (4 litres per bag). Allow to soak through.
Cover wet clay with hessian or plastic
overnight. Spread out the piece of shade cloth on the
ground. Tip cob mix into a pile on the shade cloth.
On top of the cob mix place roughly an equal
volume of straw. Remove shoes & stomp around on the straw
and cob until the straw is well covered in cob. Roll the shade cloth over to form the cob back
into a pile, and continue stomping on it. Repeat.
After a while, once the straw is mixed in well,
your mix is ready to form into cobs.
Page 12 of 23
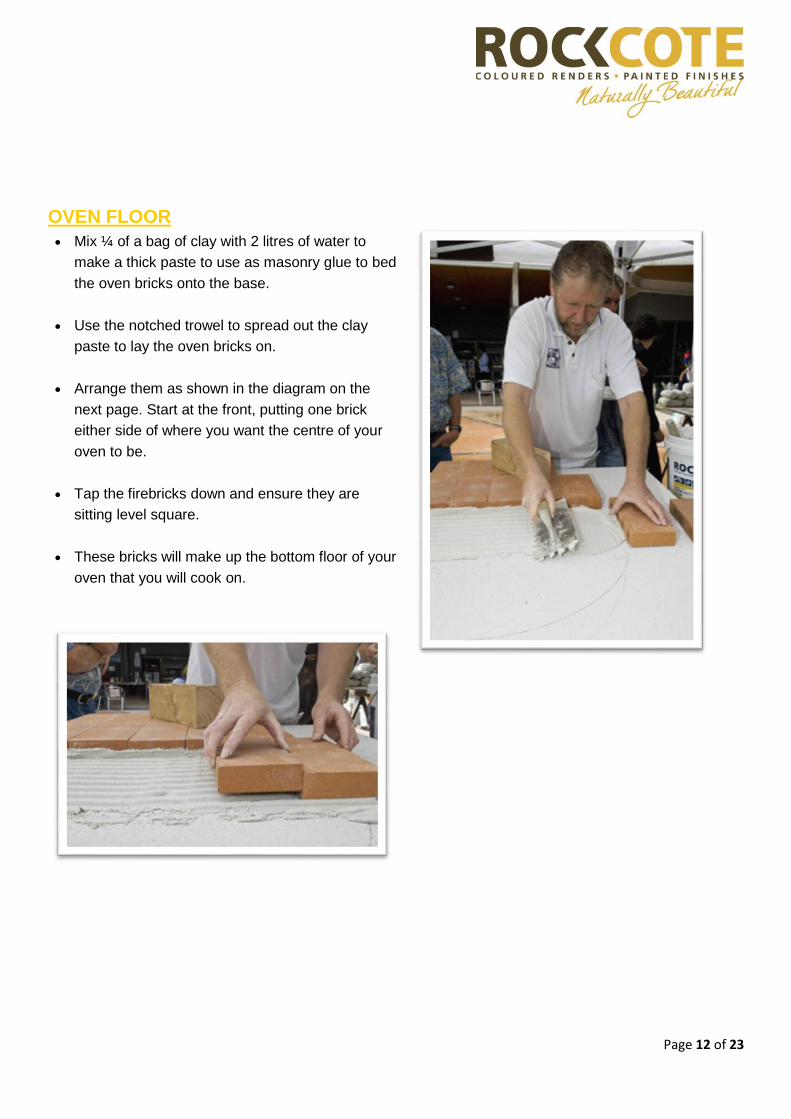
OVEN FLOOR
Mix ¼ of a bag of clay with 2 litres of water to
make a thick paste to use as masonry glue to bed
the oven bricks onto the base.
Use the notched trowel to spread out the clay
paste to lay the oven bricks on.
Arrange them as shown in the diagram on the
next page. Start at the front, putting one brick
either side of where you want the centre of your
oven to be.
Tap the firebricks down and ensure they are
sitting level square.
These bricks will make up the bottom floor of your
oven that you will cook on.
Page 13 of 23
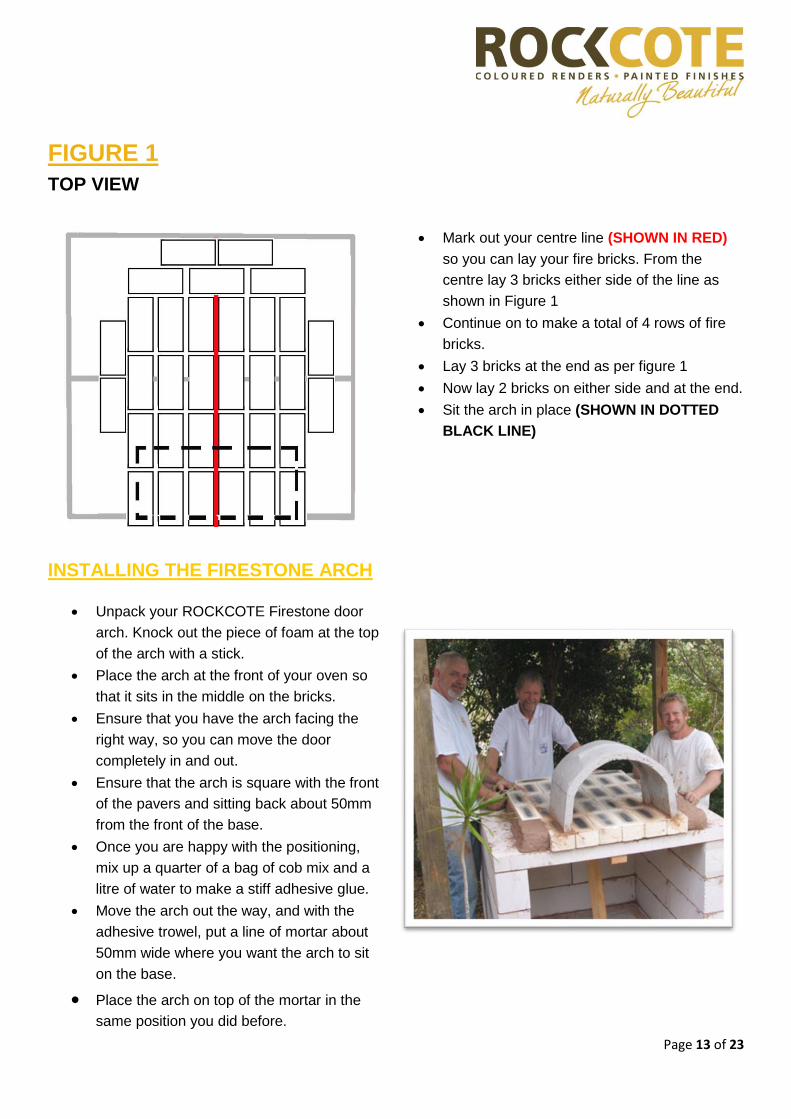
FIGURE 1
TOP VIEW
INSTALLING THE FIRESTONE ARCH
Unpack your ROCKCOTE Firestone door
arch. Knock out the piece of foam at the top
of the arch with a stick.
Place the arch at the front of your oven so
that it sits in the middle on the bricks.
Ensure that you have the arch facing the
right way, so you can move the door
completely in and out.
Ensure that the arch is square with the front
of the pavers and sitting back about 50mm
from the front of the base.
Once you are happy with the positioning,
mix up a quarter of a bag of cob mix and a
litre of water to make a stiff adhesive glue.
Move the arch out the way, and with the
adhesive trowel, put a line of mortar about
50mm wide where you want the arch to sit
on the base.
Place the arch on top of the mortar in the
same position you did before.
Mark out your centre line (SHOWN IN RED)
so you can lay your fire bricks. From the
centre lay 3 bricks either side of the line as
shown in Figure 1
Continue on to make a total of 4 rows of fire
bricks.
Lay 3 bricks at the end as per figure 1
Now lay 2 bricks on either side and at the end.
Sit the arch in place (SHOWN IN DOTTED
BLACK LINE)
Page 14 of 23
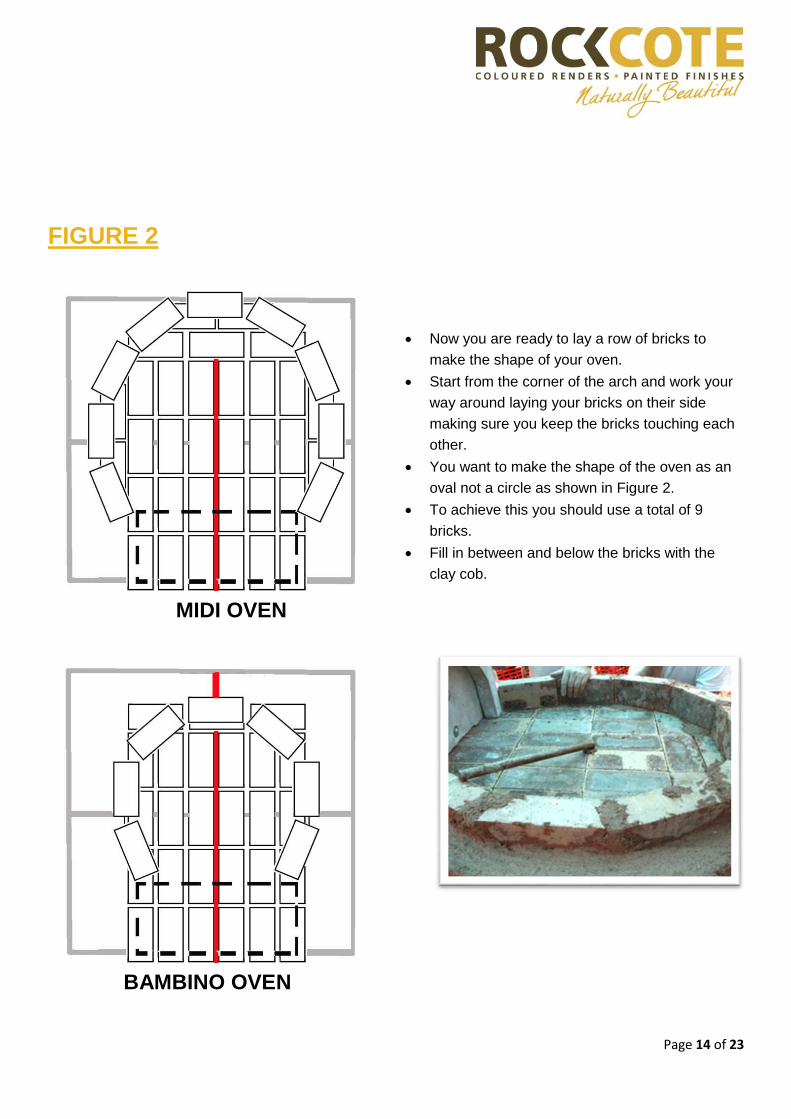
FIGURE 2
MIDI OVEN
BAMBINO OVEN
Now you are ready to lay a row of bricks to
make the shape of your oven.
Start from the corner of the arch and work your
way around laying your bricks on their side
making sure you keep the bricks touching each
other.
You want to make the shape of the oven as an
oval not a circle as shown in Figure 2.
To achieve this you should use a total of 9
bricks.
Fill in between and below the bricks with the
clay cob.
Page 15 of 23
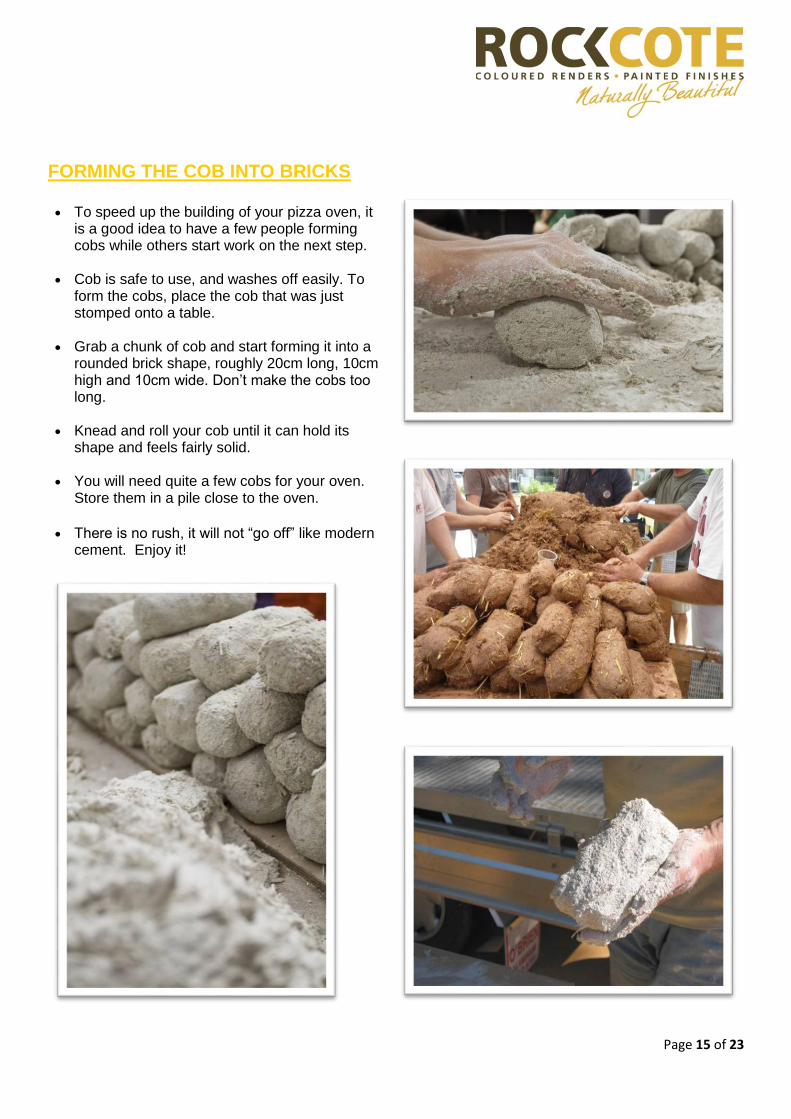
FORMING THE COB INTO BRICKS To speed up the building of your pizza oven, it
is a good idea to have a few people forming cobs while others start work on the next step.
Cob is safe to use, and washes off easily. To
form the cobs, place the cob that was just stomped onto a table.
Grab a chunk of cob and start forming it into a
rounded brick shape, roughly 20cm long, 10cm high and 10cm wide. Don’t make the cobs too long.
Knead and roll your cob until it can hold its
shape and feels fairly solid. You will need quite a few cobs for your oven.
Store them in a pile close to the oven. There is no rush, it will not “go off” like modern
cement. Enjoy it!
Page 16 of 23
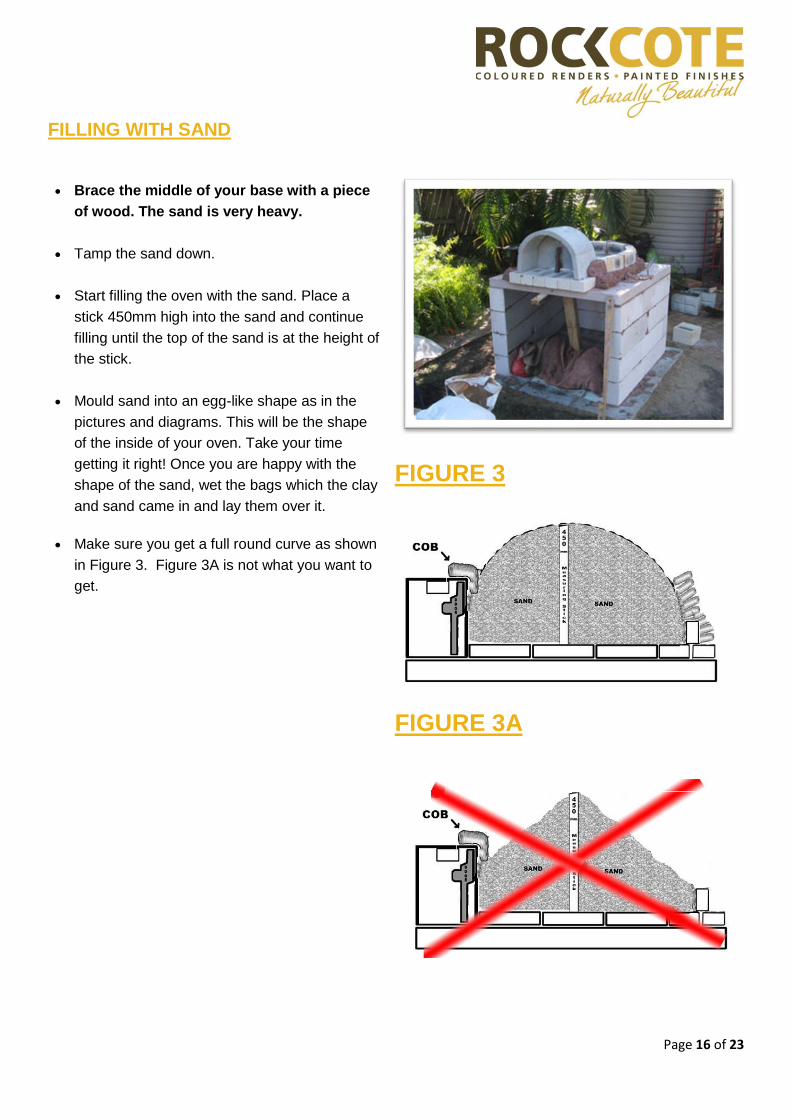
FILLING WITH SAND
Brace the middle of your base with a piece
of wood. The sand is very heavy.
Tamp the sand down.
Start filling the oven with the sand. Place a
stick 450mm high into the sand and continue
filling until the top of the sand is at the height of
the stick.
Mould sand into an egg-like shape as in the
pictures and diagrams. This will be the shape
of the inside of your oven. Take your time
getting it right! Once you are happy with the
shape of the sand, wet the bags which the clay
and sand came in and lay them over it.
Make sure you get a full round curve as shown
in Figure 3. Figure 3A is not what you want to
get.
FIGURE 3
FIGURE 3A
Page 17 of 23
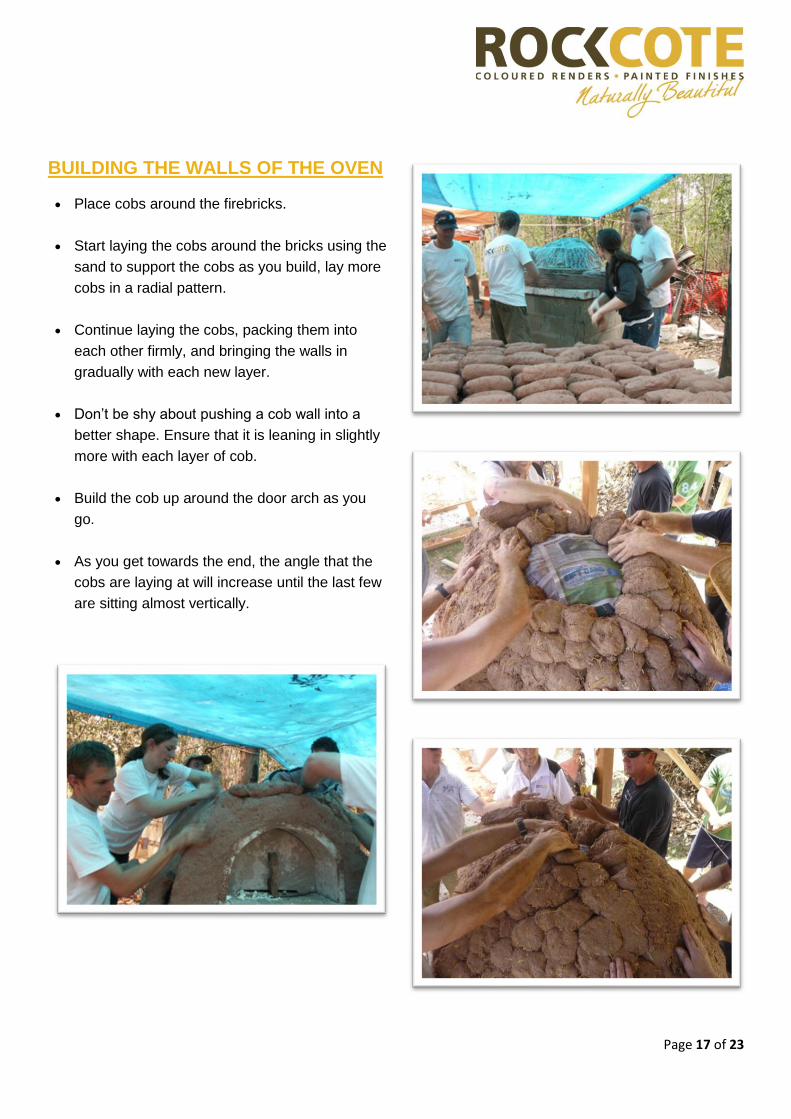
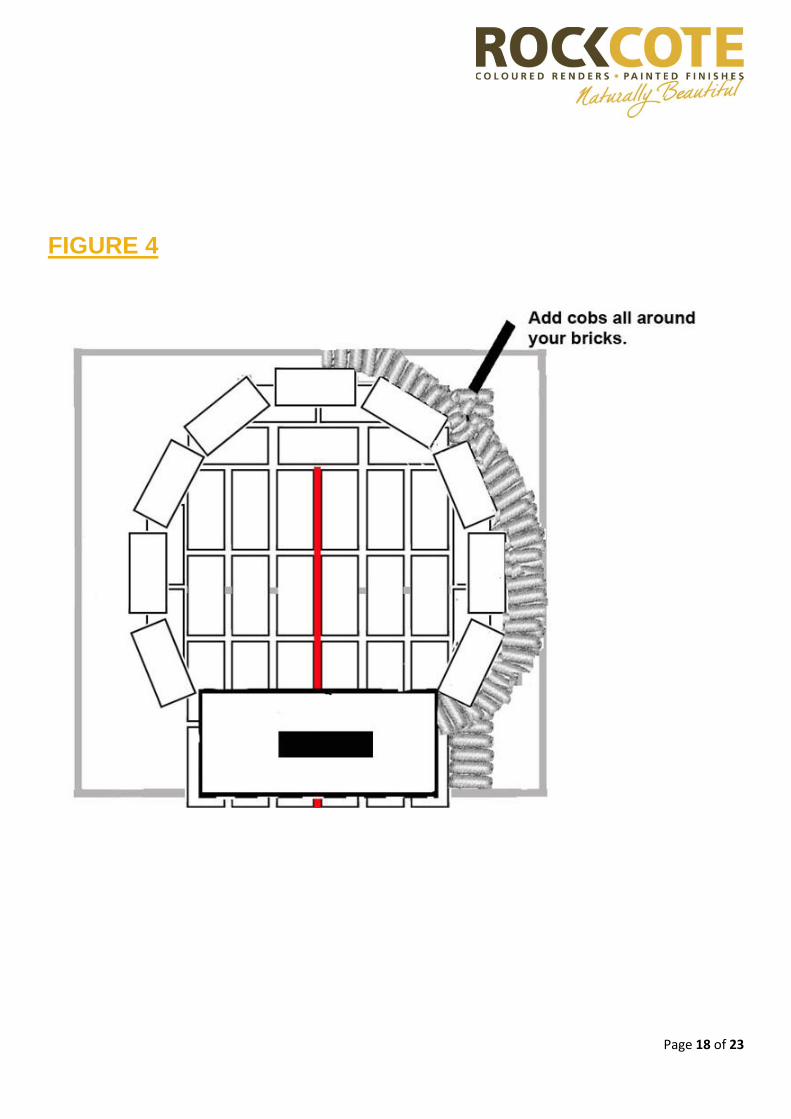
BUILDING THE WALLS OF THE OVEN Place cobs around the firebricks.
Start laying the cobs around the bricks using the
sand to support the cobs as you build, lay more
cobs in a radial pattern.
Continue laying the cobs, packing them into
each other firmly, and bringing the walls in
gradually with each new layer.
Don’t be shy about pushing a cob wall into a
better shape. Ensure that it is leaning in slightly
more with each layer of cob.
Build the cob up around the door arch as you
go.
As you get towards the end, the angle that the
cobs are laying at will increase until the last few
are sitting almost vertically.
Page 18 of 23
FIGURE 4
Page 19 of 23
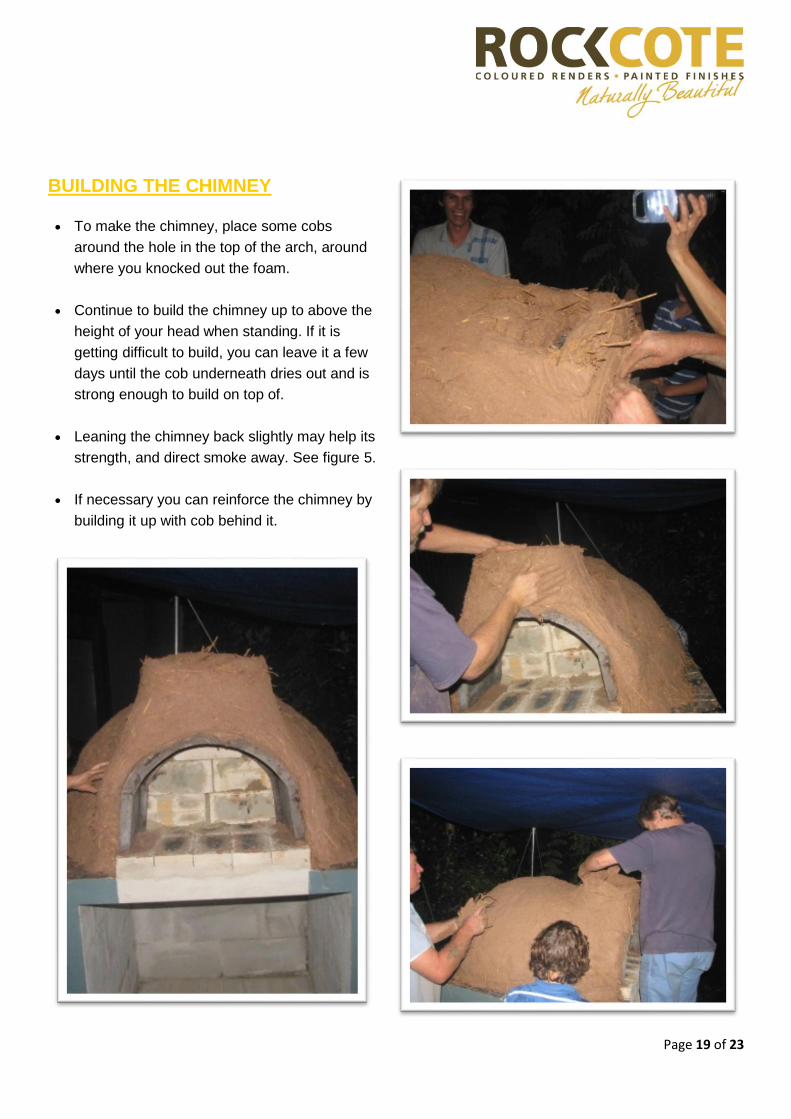
BUILDING THE CHIMNEY To make the chimney, place some cobs
around the hole in the top of the arch, around
where you knocked out the foam.
Continue to build the chimney up to above the
height of your head when standing. If it is
getting difficult to build, you can leave it a few
days until the cob underneath dries out and is
strong enough to build on top of.
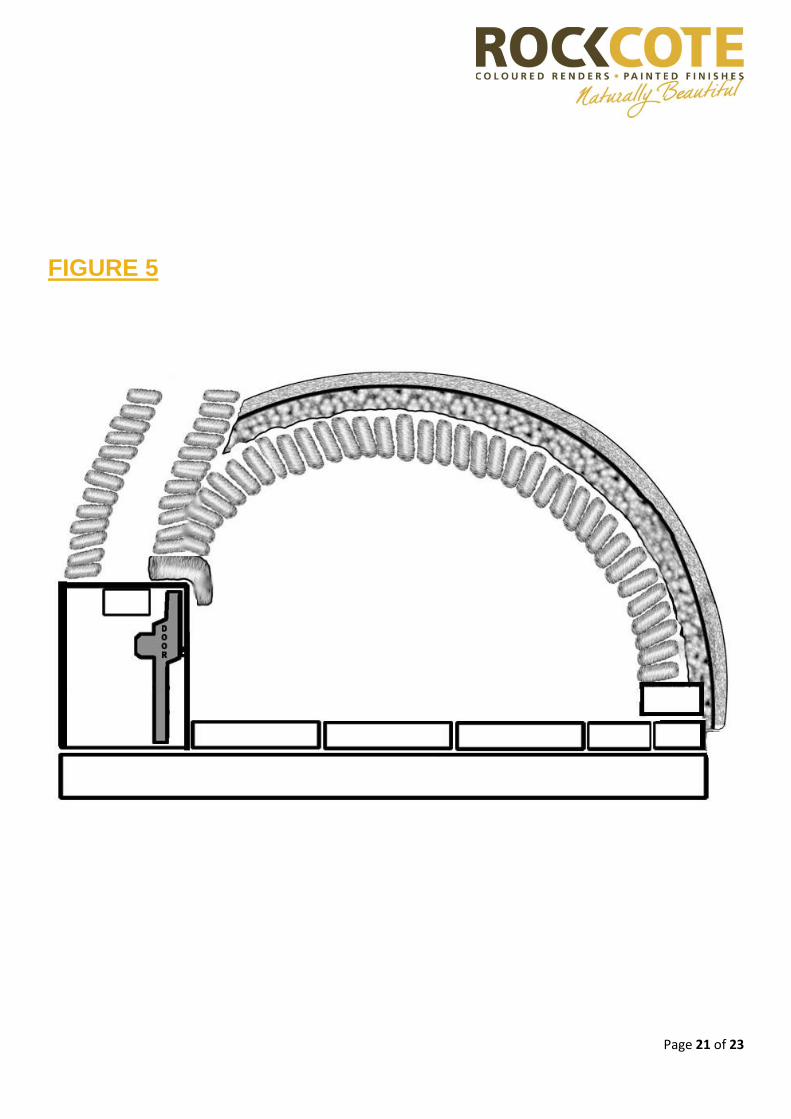
Leaning the chimney back slightly may help its
strength, and direct smoke away. See figure 5.
If necessary you can reinforce the chimney by
building it up with cob behind it.
Page 20 of 23
THE INSULATION COAT
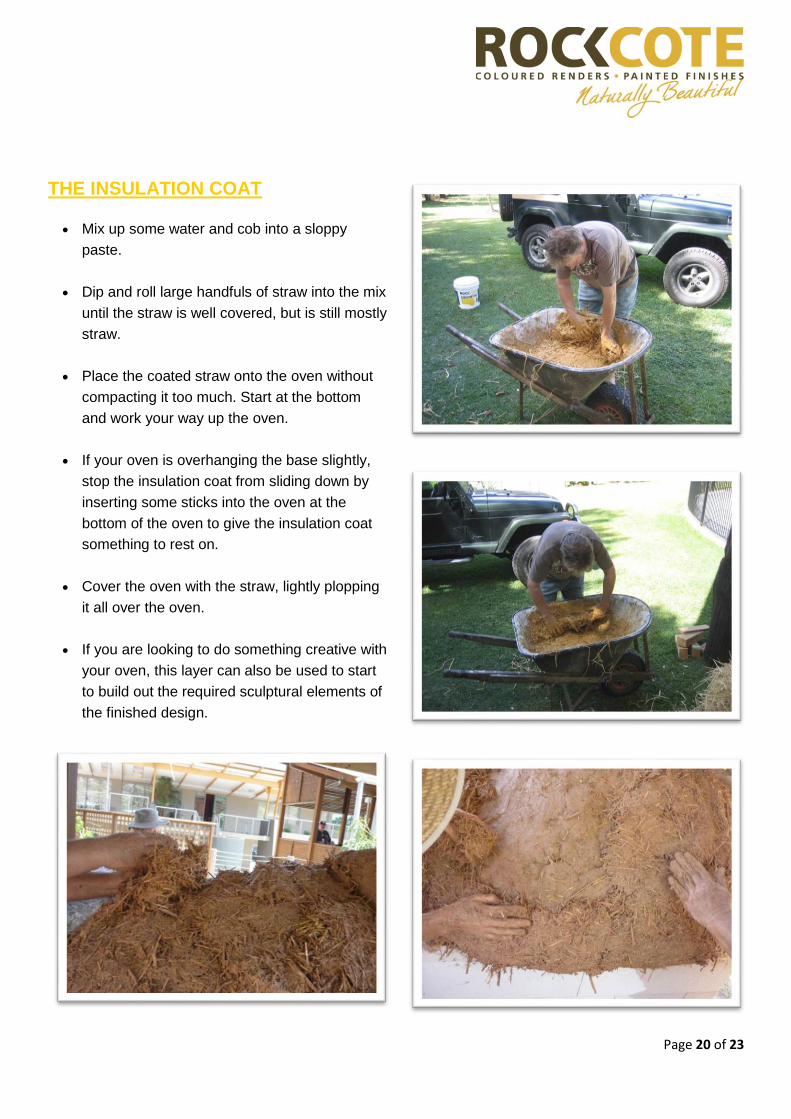
Mix up some water and cob into a sloppy
paste.
Dip and roll large handfuls of straw into the mix
until the straw is well covered, but is still mostly
straw.
Place the coated straw onto the oven without
compacting it too much. Start at the bottom
and work your way up the oven.
If your oven is overhanging the base slightly,
stop the insulation coat from sliding down by
inserting some sticks into the oven at the
bottom of the oven to give the insulation coat
something to rest on.
Cover the oven with the straw, lightly plopping
it all over the oven.
If you are looking to do something creative with
your oven, this layer can also be used to start
to build out the required sculptural elements of
the finished design.
Page 21 of 23
FIGURE 5
Page 22 of 23
OPTIONAL FINAL COAT &
DECORATION
The final coat is optional. Used when you want
to decorate your oven.
Thoroughly mix together a bag of cob with water
to form a fairly stiff paste. (If another colour is
desired use ROCKCOTE Clay Décor or similar)
Spread the mix over the oven using your hands,
making it just thick enough to cover well.
Decorate your oven with old tiles, stones, or
anything else you think you would like.
You may also like to use the clay to render your
base at this stage.
We now can supply you with Rockcote
Bodycote, Décor and lime plaster to give your
oven that personal touch
See next page for some ideas
TAKING THE SAND OUT AND FIRING
After about 5 days the oven should have dried
out enough to remove the sand through the door
arch.
Once the sand is out you can start lighting a
small fire in the oven each day for about a week
to help it to dry out.
Very Important. When lighting fire do not put the
door in place until the oven has totally dried out.
Otherwise, the increased pressure may cause
the oven to collapse.
Once your oven has dried out it should be
strong enough to start cooking in!
COOKING IN YOUR OVEN
Check with your local fire authority to ensure
that you are not breaking any fire bans by
lighting your oven.
NEVER burn treated wood in your oven. Off
cuts from building sites will be treated, and
SHOULD NOT BE USED to fuel your oven.
Place some lightly scrunched newspaper into
the back of your oven. Place kindling over the
newspaper and light the bottom of the
newspaper.
As the kindling takes light commence putting
slightly larger pieces of wood onto the fire.
Give the oven about sixty minutes to heat up.
You can cook either with the door on or off. Use
the door to regulate the temperature of the
oven, by adjusting the amount of air that feeds
the fire.
TELL US ABOUT YOUR OVEN
RECIPES AND
COOKING EXPERIENCES
We want to know how you went, what worked,
what was confusing, what you are cooking up in
it. What advice would you offer to other
communities building ovens.
Send you photos, stories or comments to
[email protected] or join our forums
at www.traditionalarts.com.au
Thanks for helping us revive the traditional arts!
Page 23 of 23
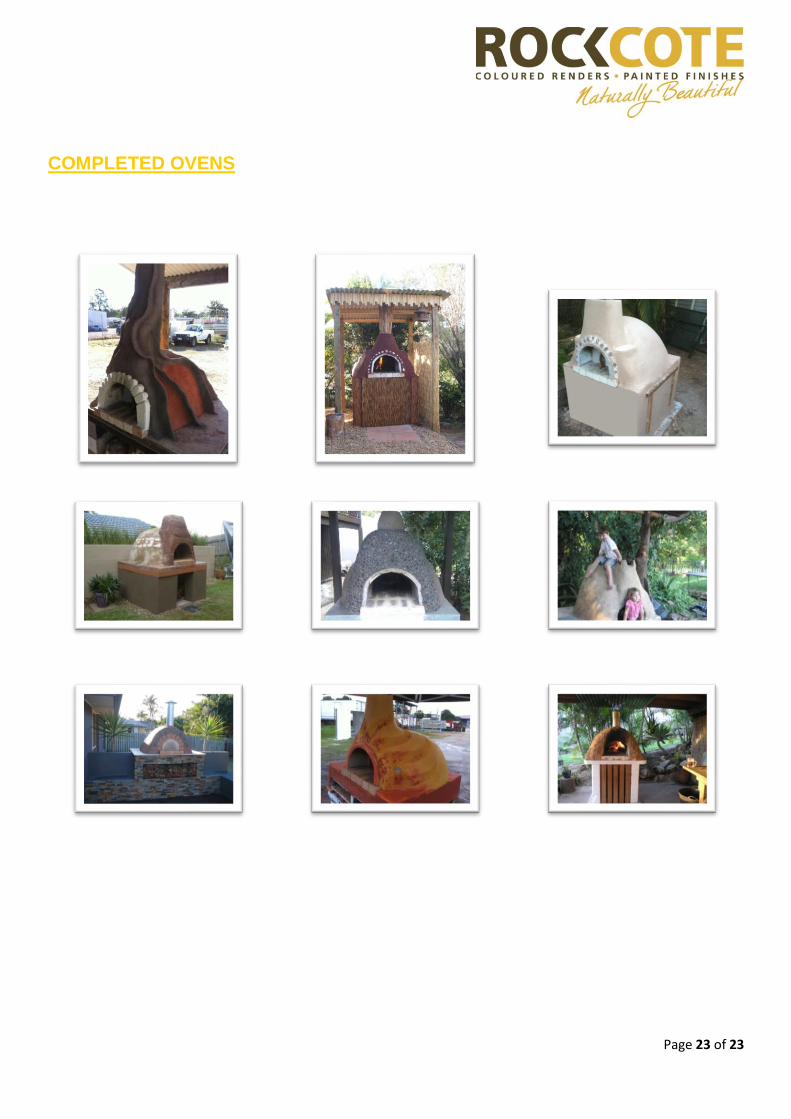
COMPLETED OVENS