Embed Size (px)
Citation preview
A+ Guide to Managing & Maintaining Your PC, 8th Edition
Chapter 14Troubleshooting Windows Startup
Problems
© Cengage Learning 2014A+ Guide to Managing & Maintaining Your PC, 8th Edition
Objectives
• Learn about the boot process from the time you press the power button until the Windows desktop loads
• Learn about Windows tools that can help when solving Windows startup problems
• Learn how to troubleshoot Windows startup problems
2
© Cengage Learning 2014
Understanding The Boot Process
• Choosing between a hard boot and a soft boot– Hard boot (cold boot): turning on the power with the
on/off switch• Takes more time than a soft boot• Initializes the processor and clears memory
– Soft boot (warm boot): using the OS to reboot• To save time use the soft boot to restart• If a soft boot doesn’t work, use a hard boot
A+ Guide to Managing & Maintaining Your PC, 8th Edition
3
© Cengage Learning 2014
Startup BIOS Controls The Beginning Of The Boot
• Startup BIOS: responsible for getting a system up and running
• A successful boot depends on the hardware, the BIOS, and the OS performing without errors
• Startup BIOS is responsible for:– Reads motherboard settings and runs the POST– Setup BIOS might be run (if key is pressed to
request)– Startup BIOS searches for a bootable device
A+ Guide to Managing & Maintaining Your PC, 8th Edition
4
© Cengage Learning 2014A+ Guide to Managing & Maintaining Your PC, 8th Edition
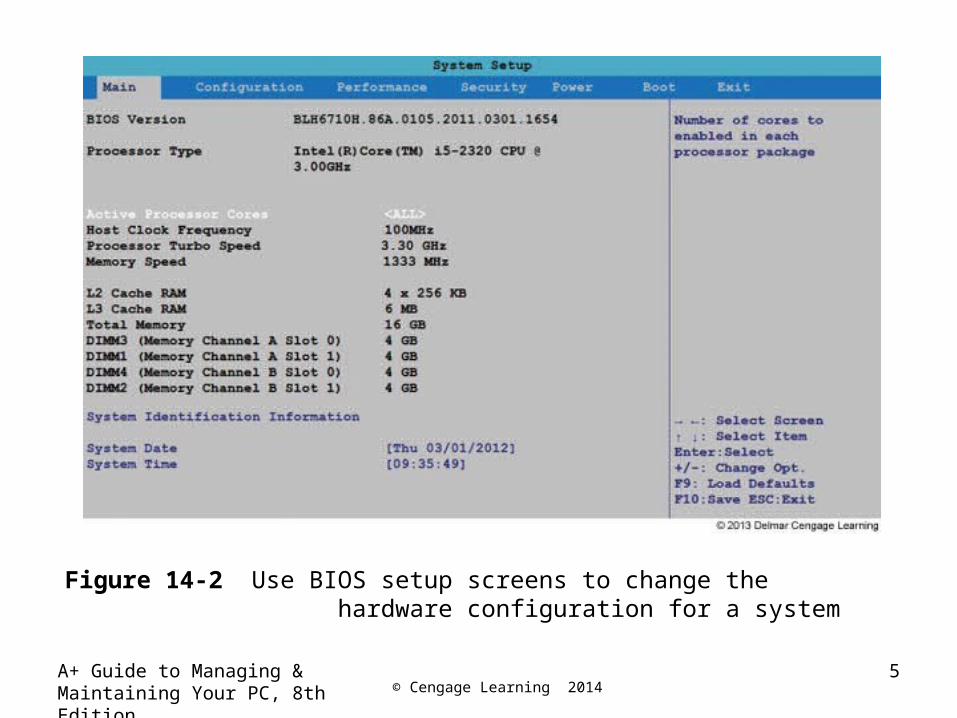
5
Figure 14-2 Use BIOS setup screens to change the hardware configuration for a system
© Cengage Learning 2014
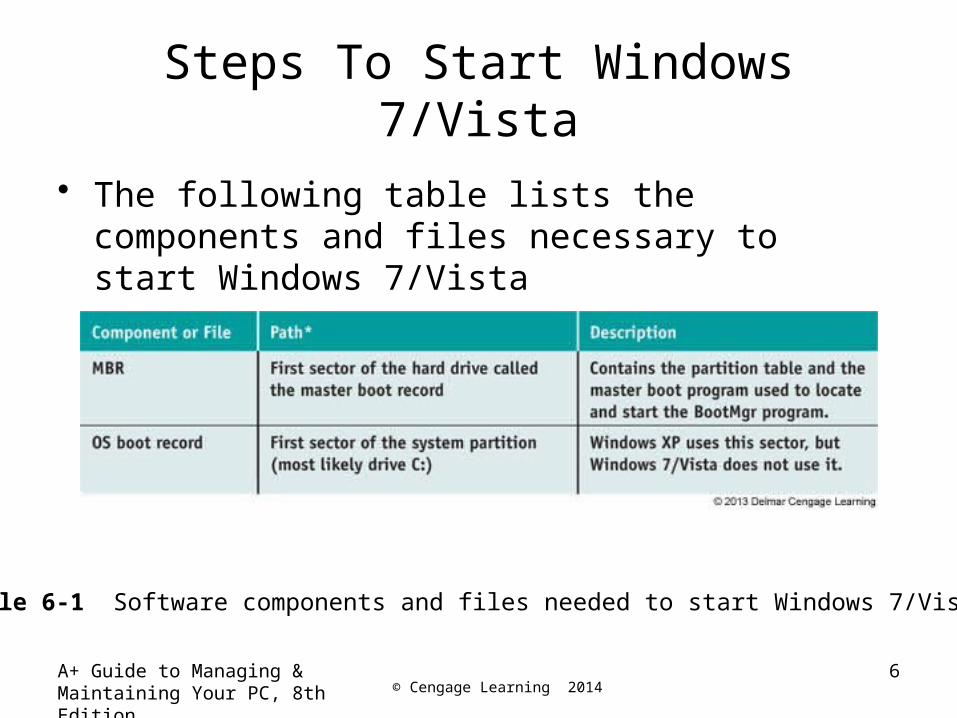
Steps To Start Windows 7/Vista
• The following table lists the components and files necessary to start Windows 7/Vista
A+ Guide to Managing & Maintaining Your PC, 8th Edition
6
Table 6-1 Software components and files needed to start Windows 7/Vista
© Cengage Learning 2014A+ Guide to Managing & Maintaining Your PC, 8th Edition
7
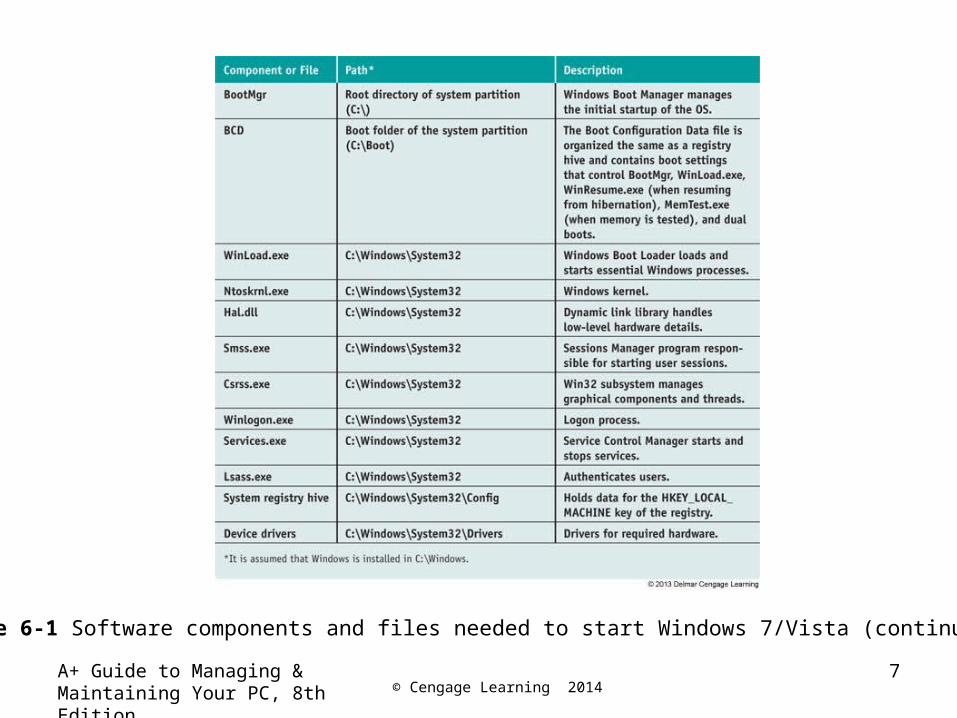
Table 6-1 Software components and files needed to start Windows 7/Vista (continued)
© Cengage Learning 2014A+ Guide to Managing & Maintaining Your PC, 8th Edition
8
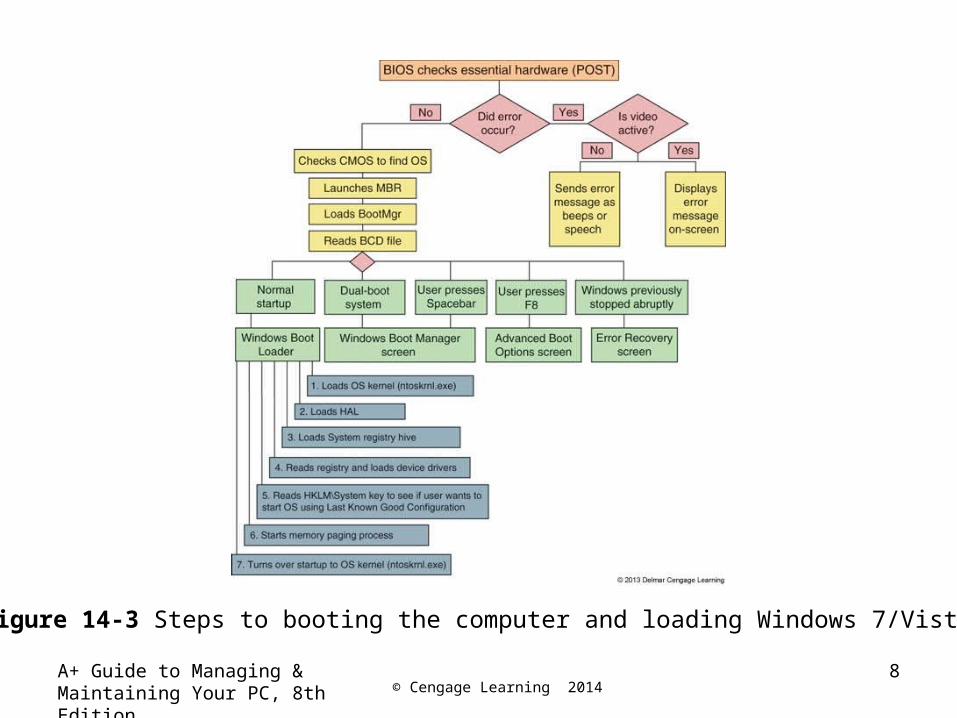
Figure 14-3 Steps to booting the computer and loading Windows 7/Vista
© Cengage Learning 2014A+ Guide to Managing & Maintaining Your PC, 8th Edition
9
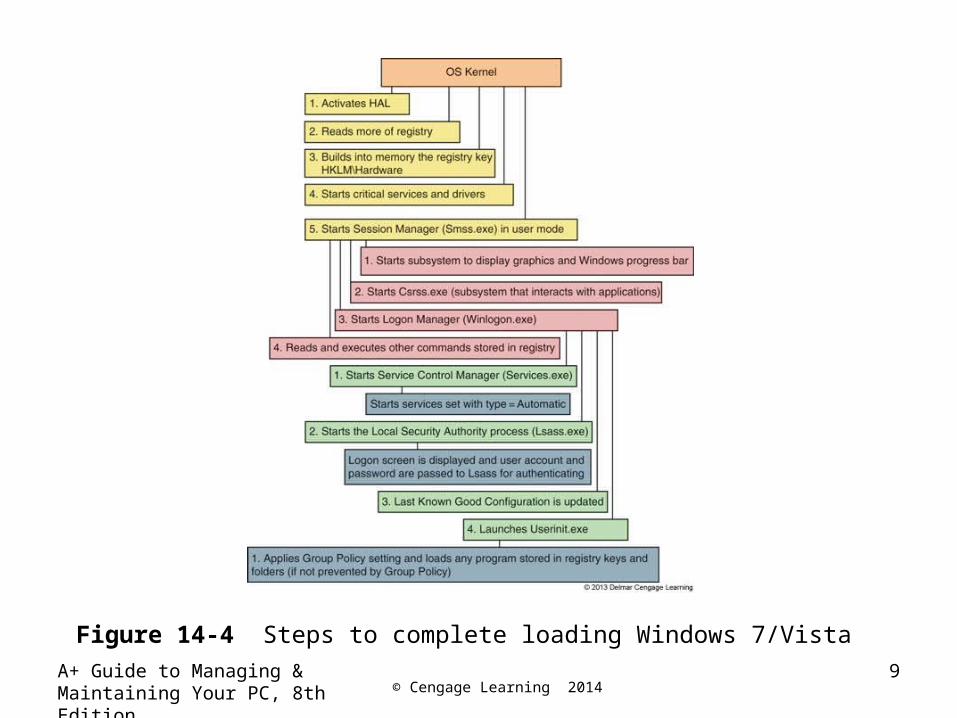
Figure 14-4 Steps to complete loading Windows 7/Vista
© Cengage Learning 2014
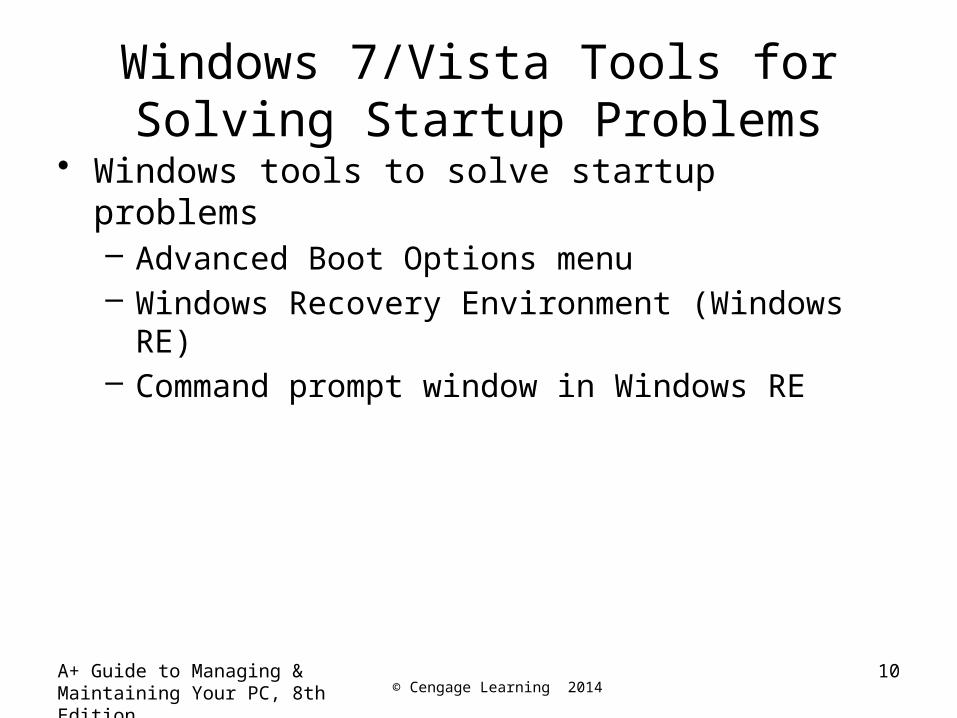
Windows 7/Vista Tools for Solving Startup Problems
• Windows tools to solve startup problems– Advanced Boot Options menu– Windows Recovery Environment (Windows RE)– Command prompt window in Windows RE
A+ Guide to Managing & Maintaining Your PC, 8th Edition
10
© Cengage Learning 2014
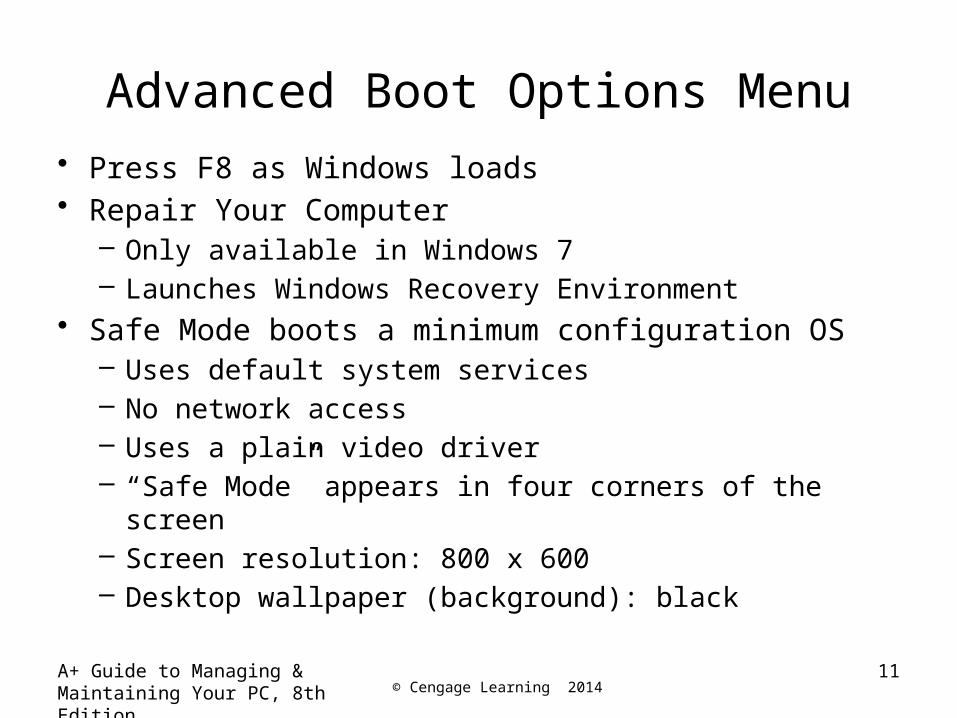
Advanced Boot Options Menu
• Press F8 as Windows loads• Repair Your Computer
– Only available in Windows 7– Launches Windows Recovery Environment
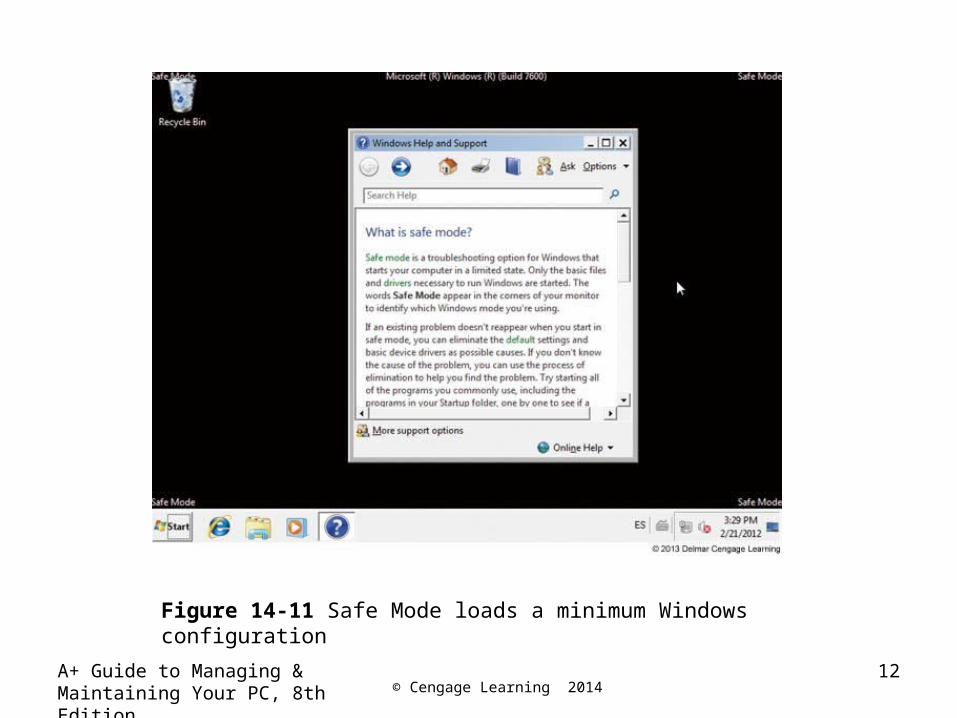
• Safe Mode boots a minimum configuration OS– Uses default system services– No network access– Uses a plain video driver– “Safe Mode” appears in four corners of the screen– Screen resolution: 800 x 600– Desktop wallpaper (background): black
A+ Guide to Managing & Maintaining Your PC, 8th Edition
11
© Cengage Learning 2014A+ Guide to Managing & Maintaining Your PC, 8th Edition
Figure 14-11 Safe Mode loads a minimum Windows configuration
12

© Cengage Learning 2014A+ Guide to Managing & Maintaining Your PC, 8th Edition
Advanced Boot Options Menu• Recovering the system using Safe Mode
– Use System restore– Scan system for virus and run Memory Diagnostics and
Chkdsk– Use Device Manager to uninstall, disable a device with
problems, or roll back a driver– Use System Configuration (Msconfig) to disable
unneeded services or startup processes– Use Programs and Features window to uninstall
software– Use Event Viewer to find information about previously
failed startups
13

© Cengage Learning 2014
Advanced Boot Options Menu
• Tips about loading Safe Mode– Form Advanced Boot Options menu
• First, try Safe Mode with Networking• Next, try Safe Mode• Then, try Safe Mode with Command prompt
– Safe Mode won’t load if core Windows components are corrupted
– When loading Windows in Safe Mode• All files used for the load are recorded in Ntbtlog.txt file• File might identify service, device driver, or application
loaded at startup causing a problem
A+ Guide to Managing & Maintaining Your PC, 8th Edition
14
© Cengage Learning 2014
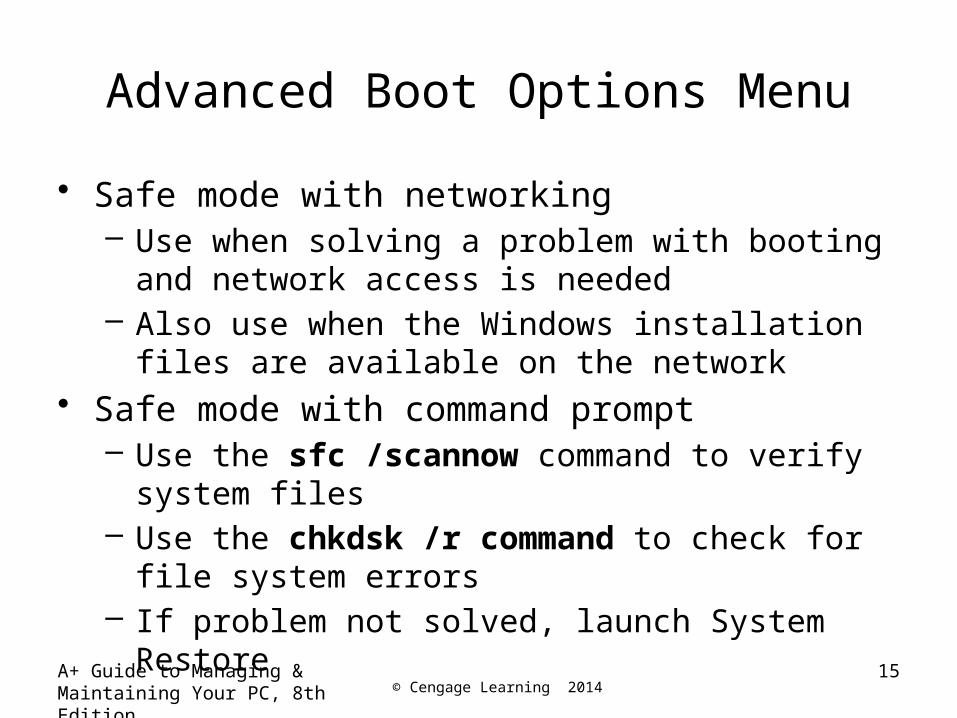
Advanced Boot Options Menu
• Safe mode with networking– Use when solving a problem with booting and network
access is needed– Also use when the Windows installation files are
available on the network• Safe mode with command prompt
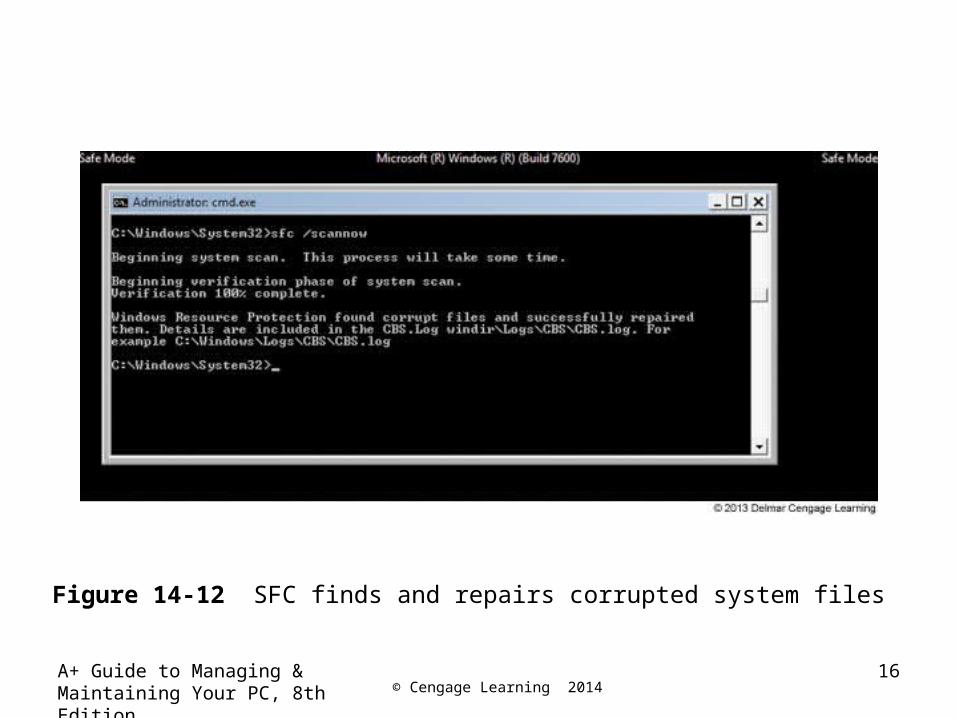
– Use the sfc /scannow command to verify system files
– Use the chkdsk /r command to check for file system errors
– If problem not solved, launch System Restore
A+ Guide to Managing & Maintaining Your PC, 8th Edition
15
© Cengage Learning 2014A+ Guide to Managing & Maintaining Your PC, 8th Edition
16
Figure 14-12 SFC finds and repairs corrupted system files

© Cengage Learning 2014A+ Guide to Managing & Maintaining Your PC, 8th Edition
17
Figure 14-13 Use System Restore after booting to Safe Mode with Command Prompt
© Cengage Learning 2014
Advanced Boot Options Menu
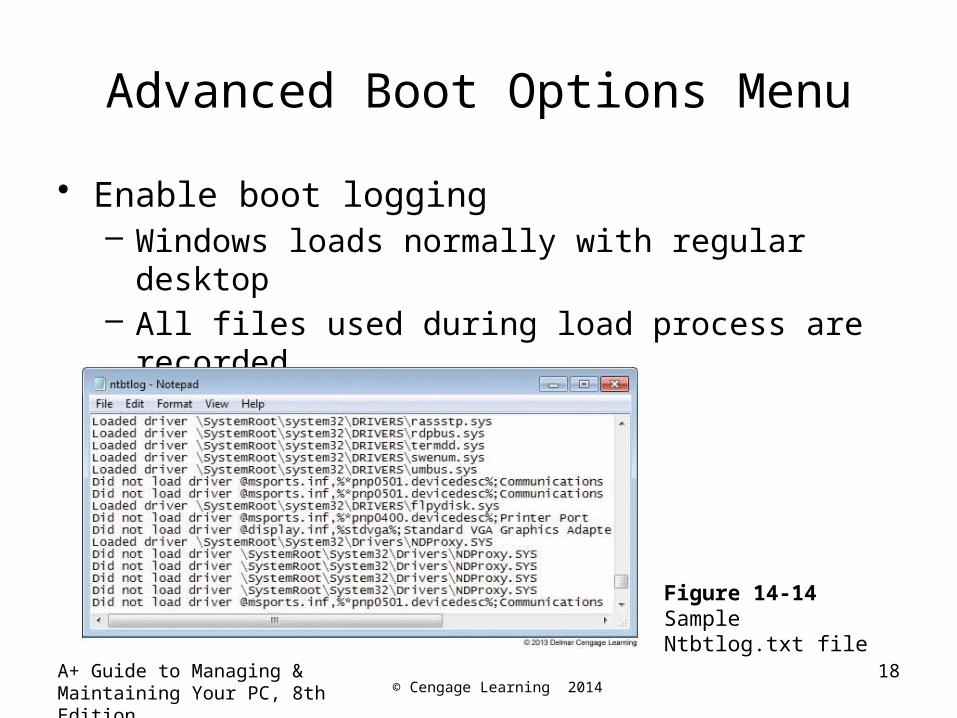
• Enable boot logging– Windows loads normally with regular desktop– All files used during load process are recorded
• C:\Windows\Ntbtlog.txt
A+ Guide to Managing & Maintaining Your PC, 8th Edition
Figure 14-14 Sample Ntbtlog.txt file
18
© Cengage Learning 2014
Advanced Boot Options Menu
• Enable low-resolution video (640x480)– Used when video setting does not allow screen to
display clearly to fix a bad setting– Windows XP, option is called “Enable VGA Mode”
• Last known good configuration– Saved in registry after each successful logon– Can undo a bad installation and solve the problem– Try the Last Known Good early in troubleshooting,
before it’s overwritten• When logging onto the system in Safe Mode, the Last
Known Good not saved
A+ Guide to Managing & Maintaining Your PC, 8th Edition
19
© Cengage Learning 2014
Advanced Boot Options Menu
• Directory services restore mode (Windows Domain controllers only)– Used as one step in the process of recovering from a
corrupted Active Directory• Debugging mode
– Can move system boot logs from failing computer to another computer for evaluation
• Disable automatic restart on system failure– Stop rebooting upon encountering a system failure
A+ Guide to Managing & Maintaining Your PC, 8th Edition
20
© Cengage Learning 2014
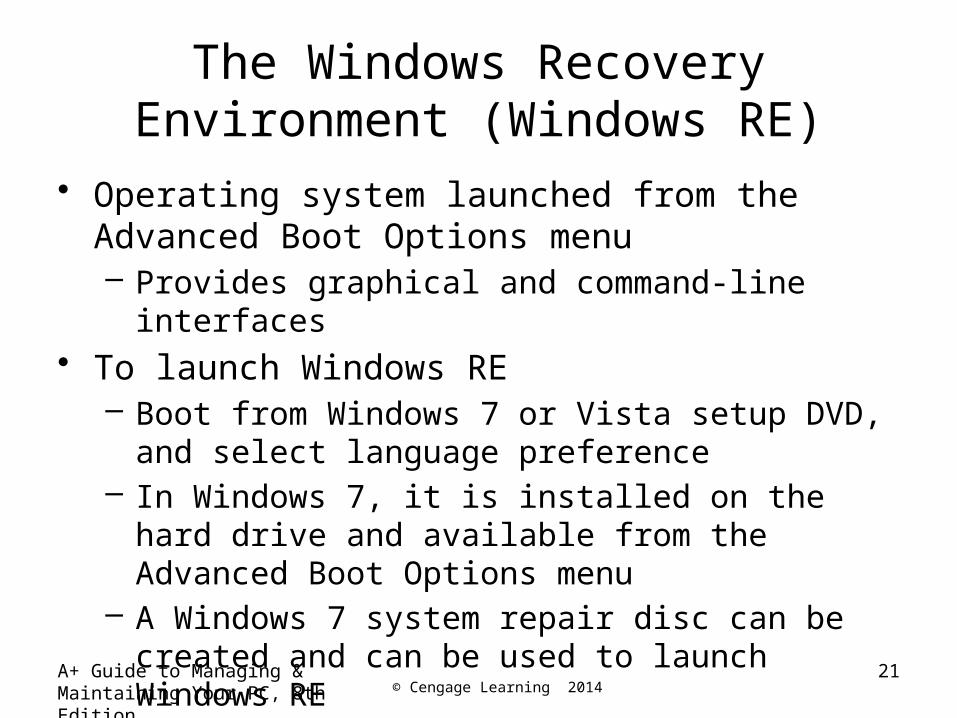
The Windows Recovery Environment (Windows RE)
• Operating system launched from the Advanced Boot Options menu– Provides graphical and command-line interfaces
• To launch Windows RE– Boot from Windows 7 or Vista setup DVD, and select
language preference– In Windows 7, it is installed on the hard drive and
available from the Advanced Boot Options menu– A Windows 7 system repair disc can be created and
can be used to launch Windows RE
A+ Guide to Managing & Maintaining Your PC, 8th Edition
21
© Cengage Learning 2014A+ Guide to Managing & Maintaining Your PC, 8th Edition
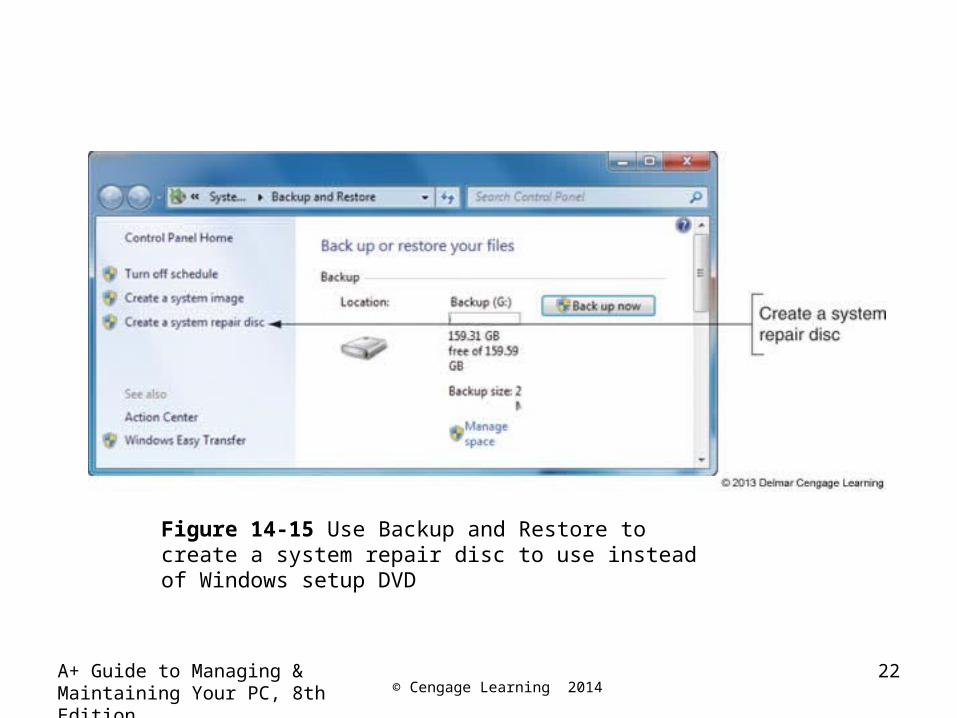
Figure 14-15 Use Backup and Restore to create a system repair disc to use instead of Windows setup DVD
22
© Cengage Learning 2014
The Windows Recovery Environment (Windows RE)
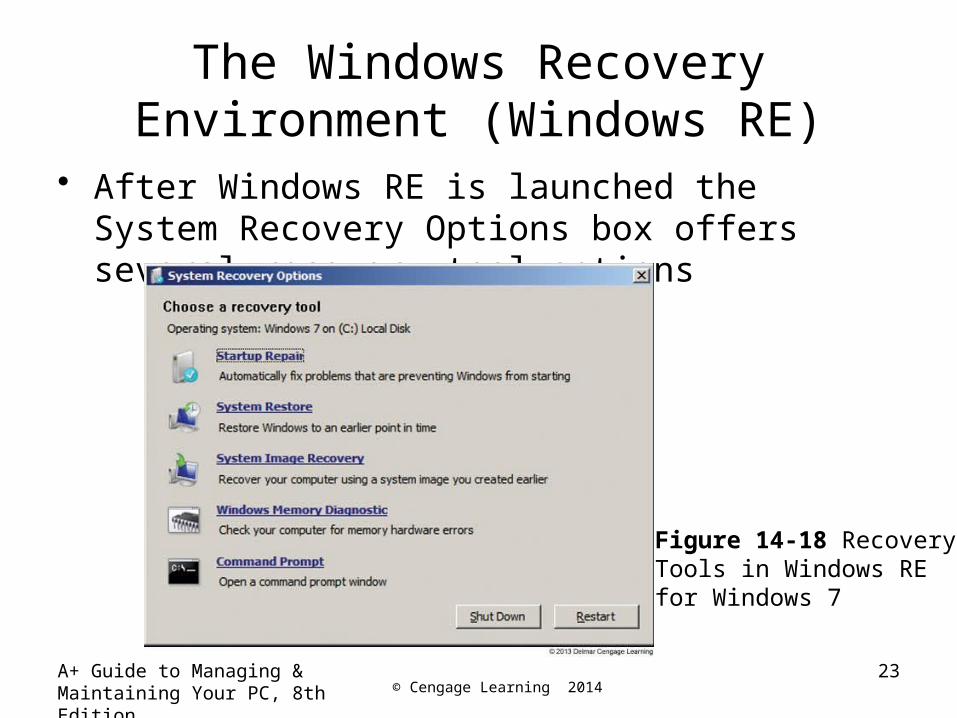
• After Windows RE is launched the System Recovery Options box offers several recovery tool options
A+ Guide to Managing & Maintaining Your PC, 8th Edition
23
Figure 14-18 RecoveryTools in Windows REfor Windows 7

© Cengage Learning 2014
The Windows Recovery Environment (Windows RE)
• Use the least intrusive tools first• Use these Windows RE tools in the order listed:
– 1. Startup Repair – least intrusive• Does not change data or installed applications
A+ Guide to Managing & Maintaining Your PC, 8th Edition
24
Figure 14-20 StartupRepair suggests youuse System Restore
© Cengage Learning 2014
The Windows Recovery Environment (Windows RE)
• Use these Windows RE tools in the order listed:– 2. Windows Memory Diagnostic
• Use if memory is suspected to be a problem– 3. System Restore
• Can sometimes fix a problem with a corrupted device driver, corrupted Windows settings, or corrupted programs
– 4. Command Prompt• Use this option to run chkdsk or restore a corrupted
registry from the Command Prompt window– 5. System Image Recovery – last resort
• Will erase everything and restore previous image
A+ Guide to Managing & Maintaining Your PC, 8th Edition
25
© Cengage Learning 2014
The Windows Recovery Environment (Windows RE)
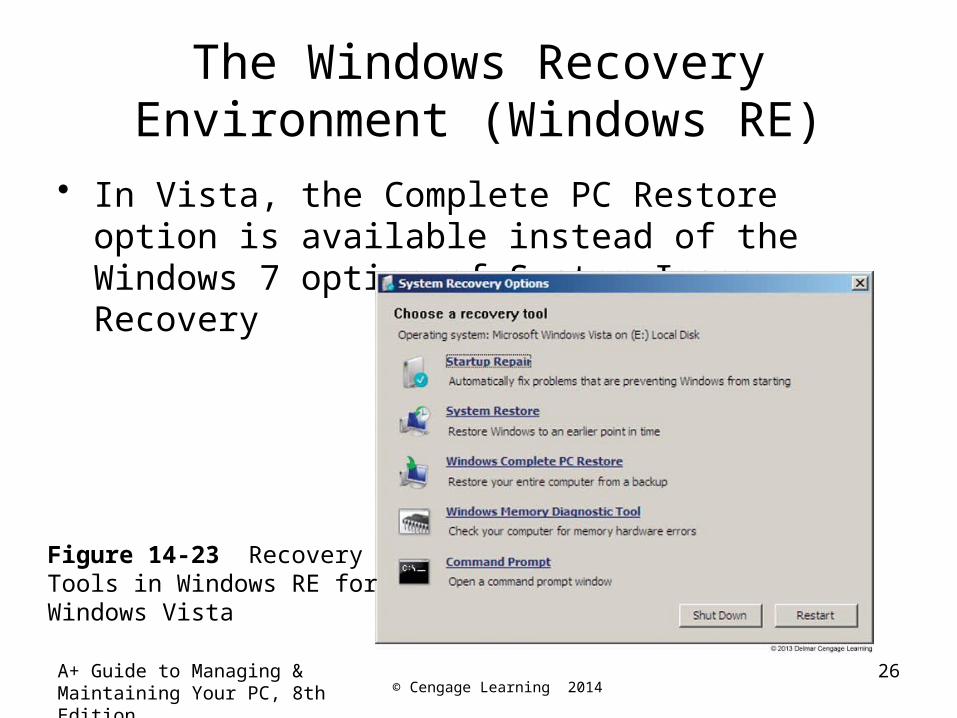
• In Vista, the Complete PC Restore option is available instead of the Windows 7 option of System Image Recovery
A+ Guide to Managing & Maintaining Your PC, 8th Edition
26
Figure 14-23 RecoveryTools in Windows RE forWindows Vista
© Cengage Learning 2014
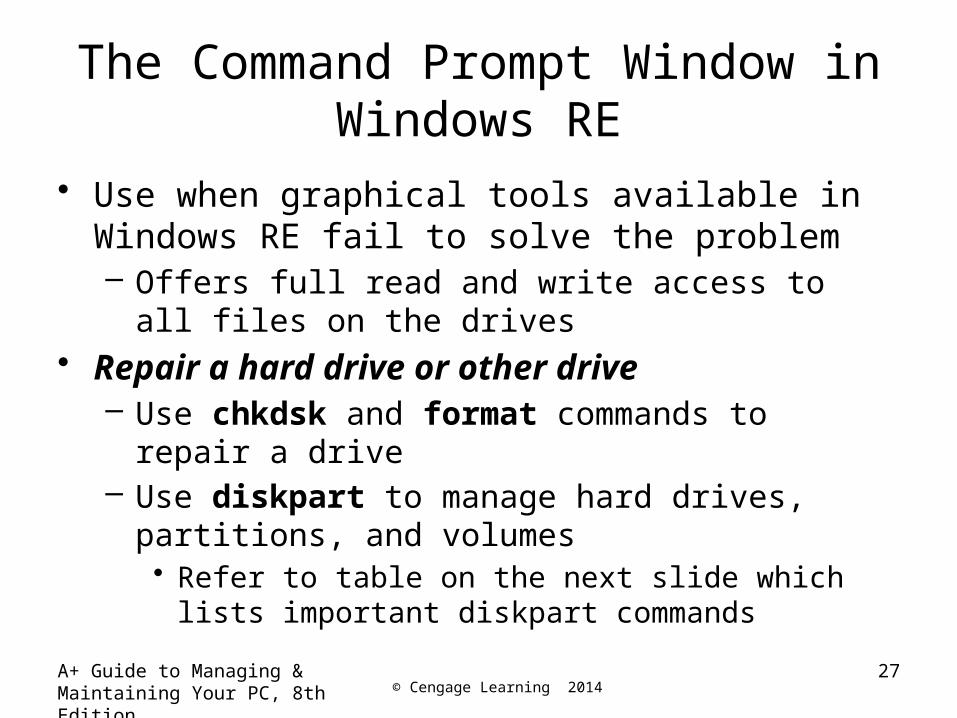
The Command Prompt Window in Windows RE
• Use when graphical tools available in Windows RE fail to solve the problem– Offers full read and write access to all files on the
drives• Repair a hard drive or other drive
– Use chkdsk and format commands to repair a drive– Use diskpart to manage hard drives, partitions, and
volumes• Refer to table on the next slide which lists important
diskpart commands
A+ Guide to Managing & Maintaining Your PC, 8th Edition
27
© Cengage Learning 2014A+ Guide to Managing & Maintaining Your PC, 8th Edition
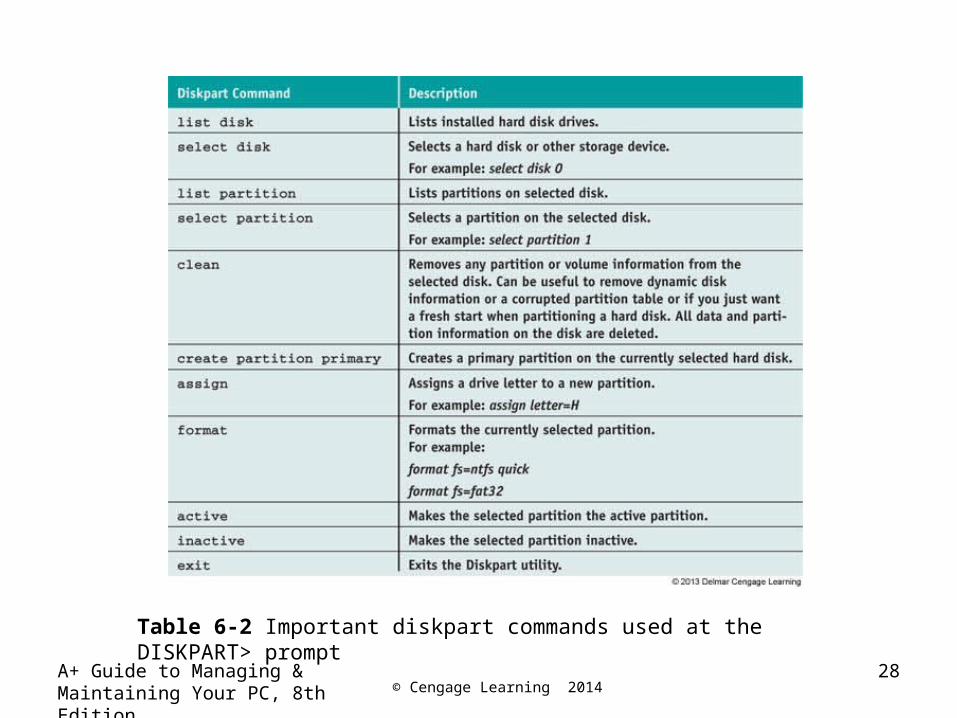
Table 6-2 Important diskpart commands used at the DISKPART> prompt
28
© Cengage Learning 2014A+ Guide to Managing & Maintaining Your PC, 8th Edition
29
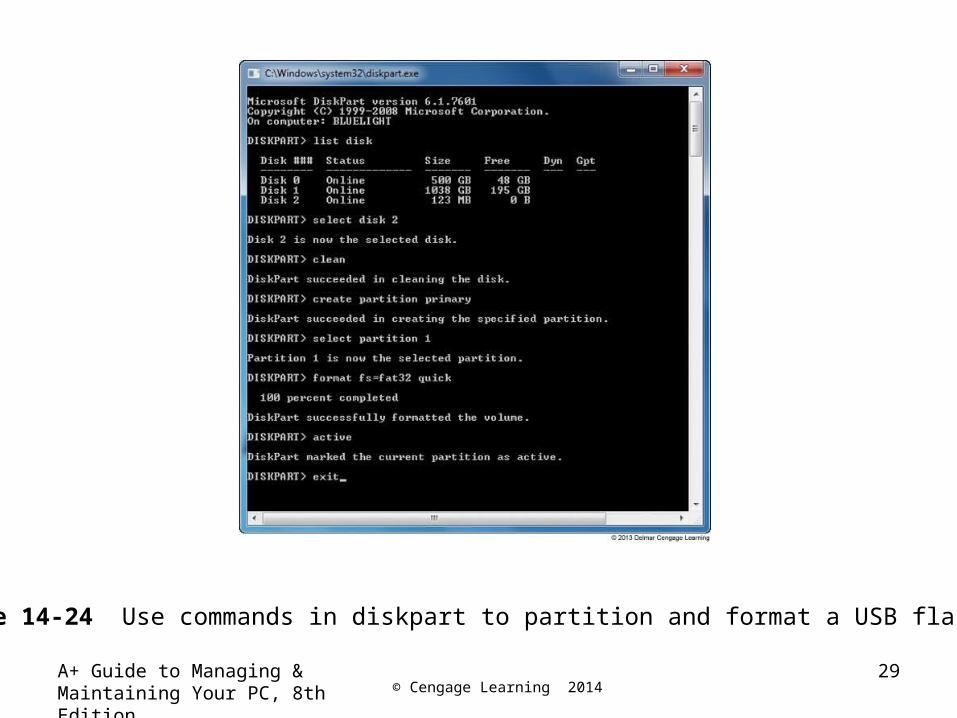
Figure 14-24 Use commands in diskpart to partition and format a USB flash drive
© Cengage Learning 2014
The Command Prompt Window in Windows RE
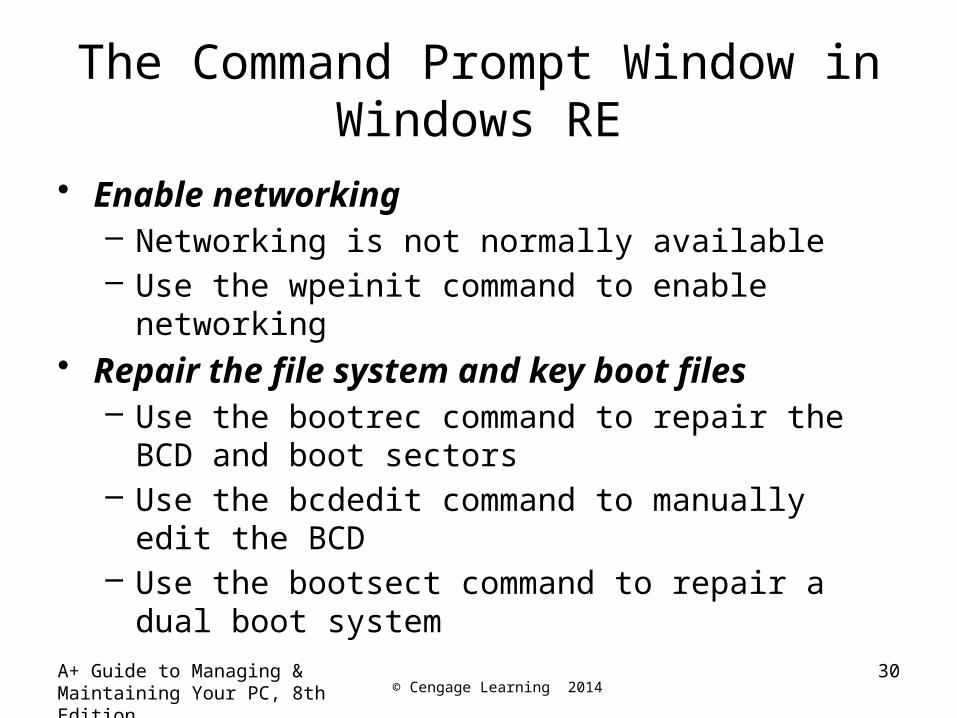
• Enable networking– Networking is not normally available– Use the wpeinit command to enable networking
• Repair the file system and key boot files– Use the bootrec command to repair the BCD and boot
sectors– Use the bcdedit command to manually edit the BCD– Use the bootsect command to repair a dual boot
system
A+ Guide to Managing & Maintaining Your PC, 8th Edition
30
© Cengage Learning 2014A+ Guide to Managing & Maintaining Your PC, 8th Edition
31
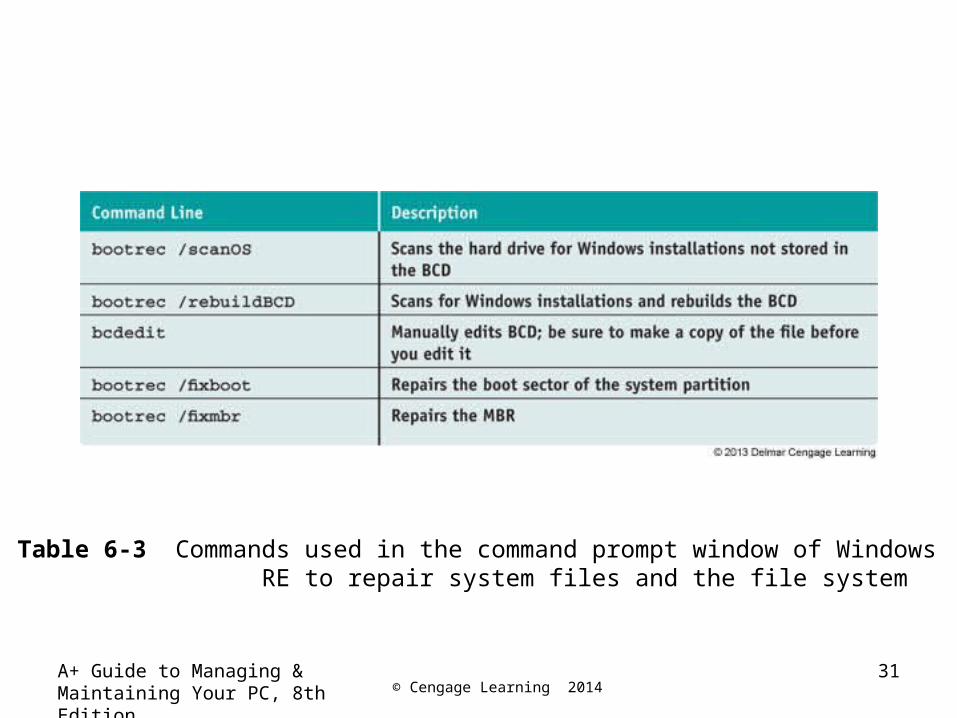
Table 6-3 Commands used in the command prompt window of Windows RE to repair system files and the file system
© Cengage Learning 2014
The Command Prompt Window in Windows RE
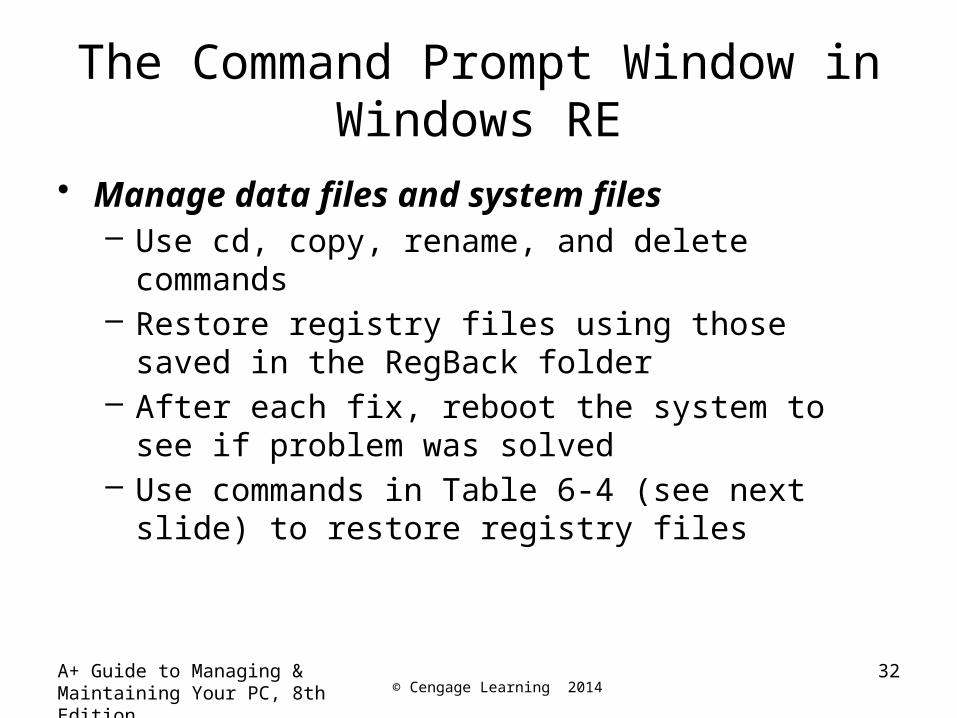
• Manage data files and system files– Use cd, copy, rename, and delete commands– Restore registry files using those saved in the
RegBack folder– After each fix, reboot the system to see if problem
was solved– Use commands in Table 6-4 (see next slide) to restore
registry files
A+ Guide to Managing & Maintaining Your PC, 8th Edition
32
© Cengage Learning 2014A+ Guide to Managing & Maintaining Your PC, 8th Edition
33
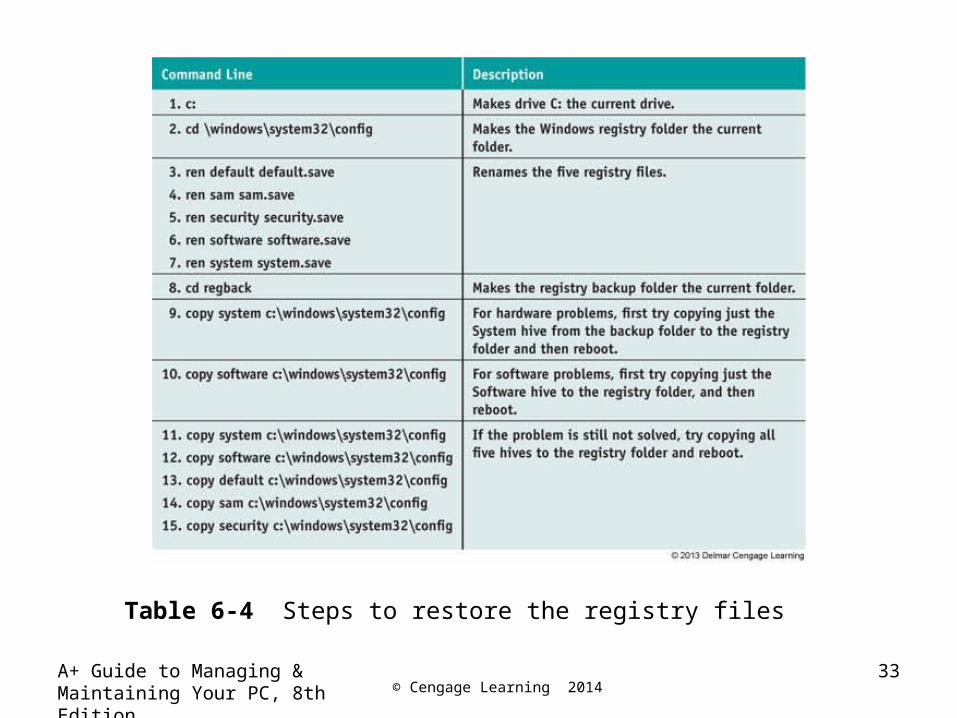
Table 6-4 Steps to restore the registry files
© Cengage Learning 2014A+ Guide to Managing & Maintaining Your PC, 8th Edition
Troubleshooting Windows 7/Vista Startup
• To determine where in the boot process the failure occurred, focus on three startup stages of the boot– Stage 1: Before the progress bar– Stage 2: After the progress bar and before logon– Stage 3: After logon
34
© Cengage Learning 2014
Problems At Stage 1: Before The Flag Or Progress Bar Appears
• Problems might be caused by hardware or startup files
• Is the screen blank? If nothing is on the screen:– Monitor LED light lit
• Reboot, check monitor power, and that it is on– Monitor LED light is not lit
• Verify system power, monitor is plugged in and on– If hard drive is not spinning suspect no power is
getting to system• Verify system not in standby mode or hibernation
– Trade monitor for a good oneA+ Guide to Managing & Maintaining Your PC, 8th Edition
35
© Cengage Learning 2014
Problems At Stage 1: Before The Flag Or Progress Bar Appears
• Does the computer appear to have power?– Can’t hear spinning drive or see lights on case front
• Suspect electrical system• Check power connections and switches• May have bad power supply• Loose connections inside case
A+ Guide to Managing & Maintaining Your PC, 8th Edition
36

© Cengage Learning 2014
Problems At Stage 1: Before The Flag Or Progress Bar Appears
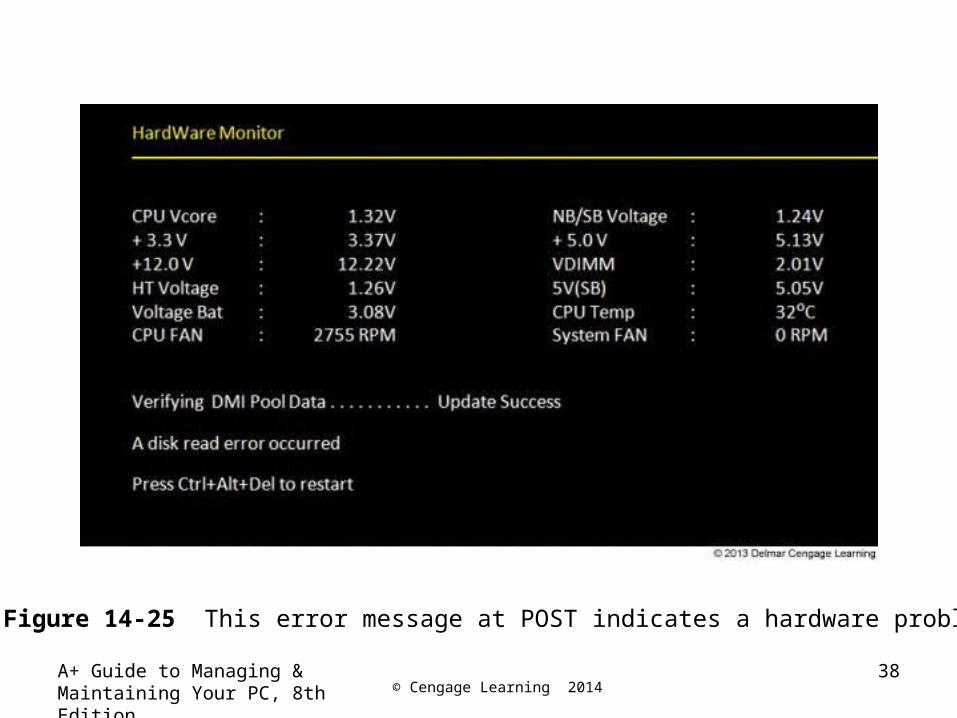
• Does an error message appear before Windows starts?– BIOS displays error message on-screen if problem is
detected• Uses beeps or speech if video not working
– On-screen messages for nonessential hardware• Try to bypass error by pressing a key and moving
forward in the boot– On-screen messages for essential hardware
• Focus attention on the error message, beep code, and voice message describing problem
A+ Guide to Managing & Maintaining Your PC, 8th Edition
37
© Cengage Learning 2014A+ Guide to Managing & Maintaining Your PC, 8th Edition
38
Figure 14-25 This error message at POST indicates a hardware problem

© Cengage Learning 2014
Problems At Stage 1: Before The Flag Or Progress Bar Appears
• Can startup BIOS access the hard drive?– Possible messages
• Hard drive not found• Fixed disk error• Disk boot failure, insert system disk and press enter• No boot device available
– Check for physical problem• Drive, data cable, power, motherboard
– Verify BIOS detected drive correctly• Turn on autodetection and reboot
– Power down system, unplug it, and physically inspect
A+ Guide to Managing & Maintaining Your PC, 8th Edition
39
© Cengage Learning 2014
Problems At Stage 1: Before The Flag Or Progress Bar Appears
• Can startup BIOS access the hard drive? (cont’d.)– BIOS found hard drive, but could not read drive
• A disk read error occurred• Drive not recognized• Invalid boot disk• Inaccessible boot device• Invalid drive specification• Invalid partition table• Operating system not found• Could not find bootmgr or bootmgr missing
– Boot from Windows setup DVD (see next slide)A+ Guide to Managing & Maintaining Your PC, 8th Edition
40
© Cengage Learning 2014
Problems At Stage 1: Before The Flag Or Progress Bar Appears
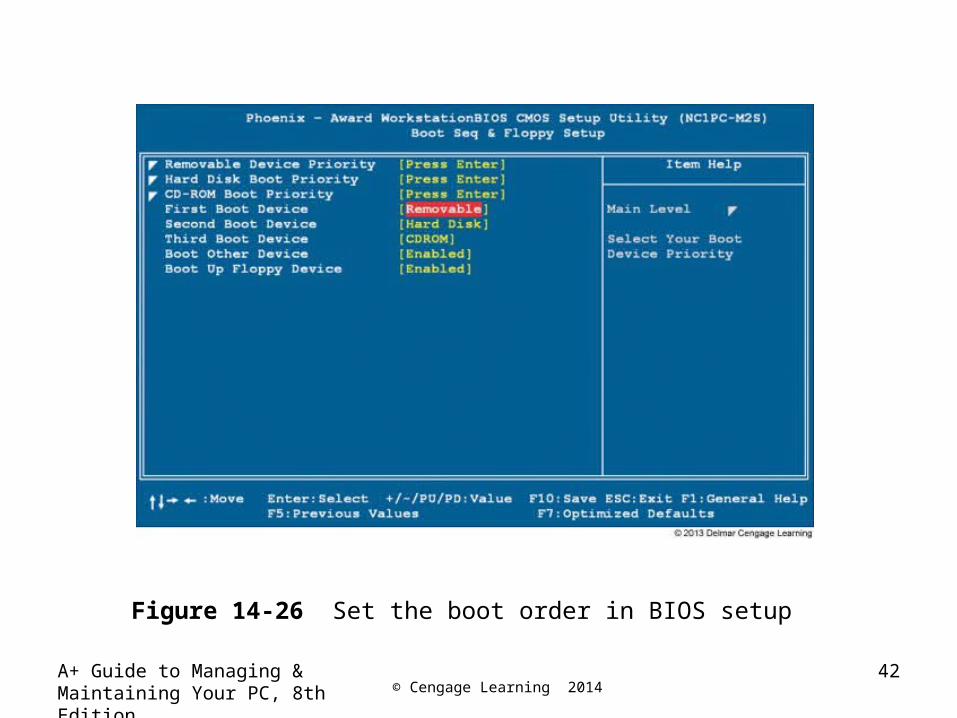
• Use BIOS setup to set the boot sequence– Access BIOS setup utility– Find screen to change boot sequence– Make sure DVD drive is listed before hard drive
• Force system to boot from Windows Vista setup DVD– Save settings and exit BIOS setup
A+ Guide to Managing & Maintaining Your PC, 8th Edition
41
© Cengage Learning 2014A+ Guide to Managing & Maintaining Your PC, 8th Edition
42
Figure 14-26 Set the boot order in BIOS setup
© Cengage Learning 2014
Problems At Stage 1: Before The Flag Or Progress Bar Appears
• Can you boot from the Windows setup DVD?– If not then study error messages, and solve
immediate hardware problem• Hard drive and optical drive might have failed• Try a bootable USB flash drive• Successful boot from flash drive indicates problem with
both the hard drive and DVD drive– If able to boot from Windows DVD
• Windows logon screen appears• Problem isolated to the hard drive
A+ Guide to Managing & Maintaining Your PC, 8th Edition
43
© Cengage Learning 2014
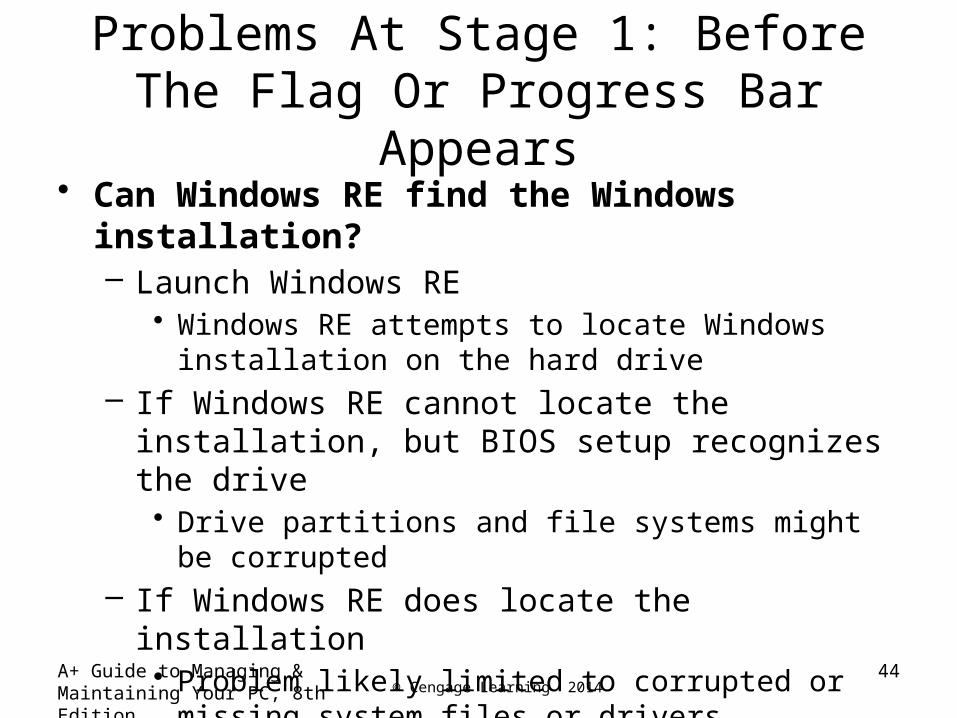
Problems At Stage 1: Before The Flag Or Progress Bar Appears
• Can Windows RE find the Windows installation?– Launch Windows RE
• Windows RE attempts to locate Windows installation on the hard drive
– If Windows RE cannot locate the installation, but BIOS setup recognizes the drive• Drive partitions and file systems might be corrupted
– If Windows RE does locate the installation• Problem likely limited to corrupted or missing system
files or drivers– Attempt fixes: restart system after each step
A+ Guide to Managing & Maintaining Your PC, 8th Edition
44
© Cengage Learning 2014
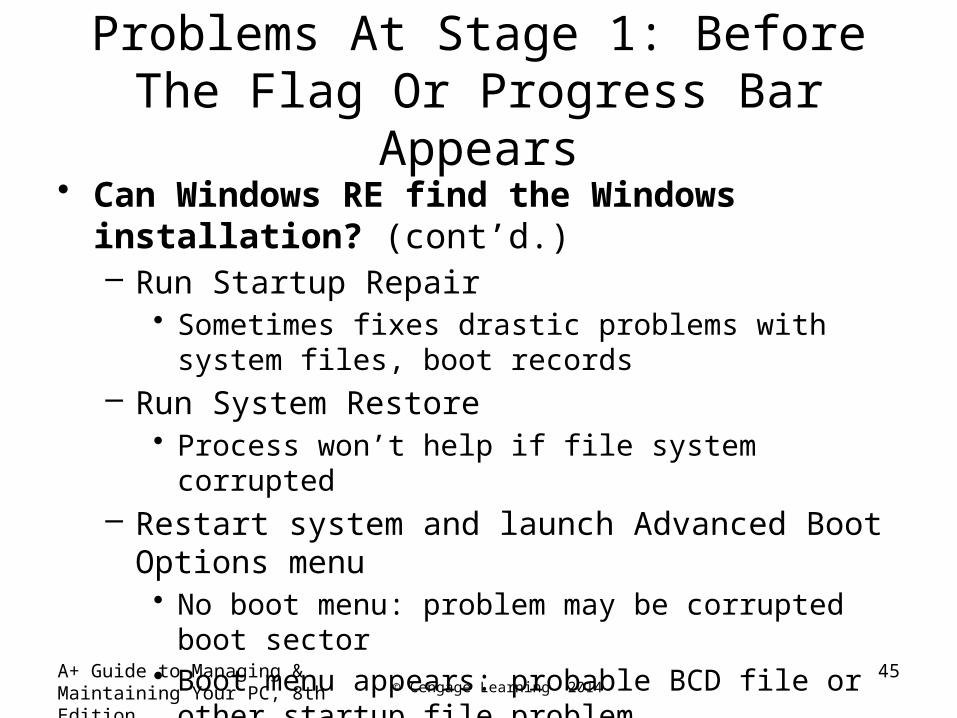
Problems At Stage 1: Before The Flag Or Progress Bar Appears
• Can Windows RE find the Windows installation? (cont’d.)– Run Startup Repair
• Sometimes fixes drastic problems with system files, boot records
– Run System Restore• Process won’t help if file system corrupted
– Restart system and launch Advanced Boot Options menu• No boot menu: problem may be corrupted boot sector• Boot menu appears: probable BCD file or other startup
file problemA+ Guide to Managing & Maintaining Your PC, 8th Edition
45
© Cengage Learning 2014
Problems At Stage 1: Before The Flag Or Progress Bar Appears
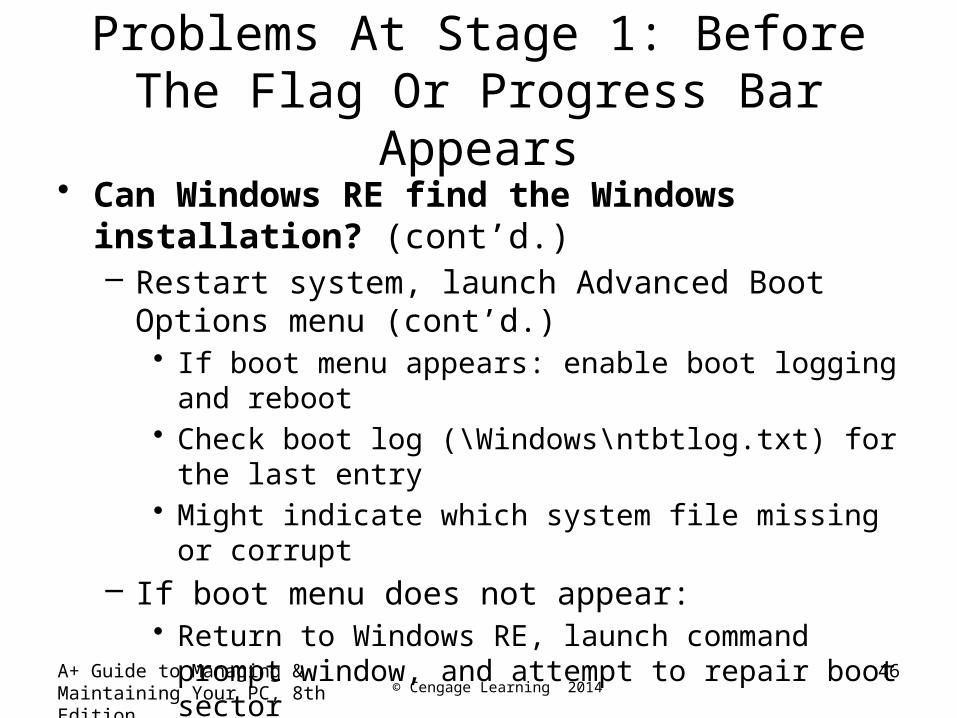
• Can Windows RE find the Windows installation? (cont’d.)– Restart system, launch Advanced Boot Options menu
(cont’d.)• If boot menu appears: enable boot logging and reboot• Check boot log (\Windows\ntbtlog.txt) for the last entry• Might indicate which system file missing or corrupt
– If boot menu does not appear:• Return to Windows RE, launch command prompt
window, and attempt to repair boot sector
A+ Guide to Managing & Maintaining Your PC, 8th Edition
46
© Cengage Learning 2014
Problems At Stage 1: Before The Flag Or Progress Bar Appears
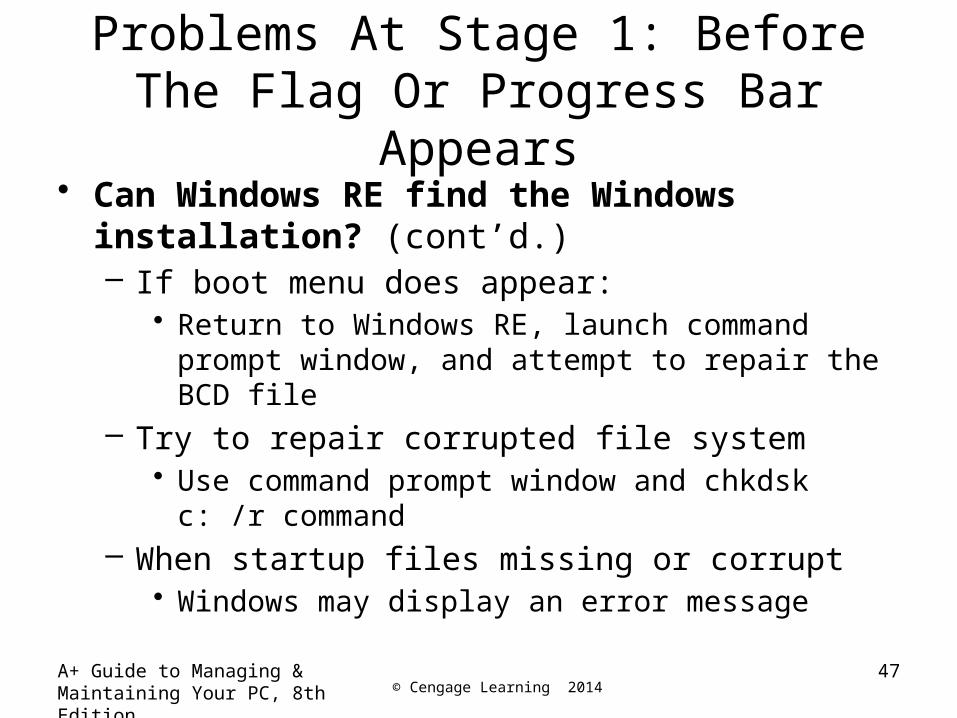
• Can Windows RE find the Windows installation? (cont’d.)– If boot menu does appear:
• Return to Windows RE, launch command prompt window, and attempt to repair the BCD file
– Try to repair corrupted file system• Use command prompt window and chkdsk c: /r
command– When startup files missing or corrupt
• Windows may display an error message
A+ Guide to Managing & Maintaining Your PC, 8th Edition
47
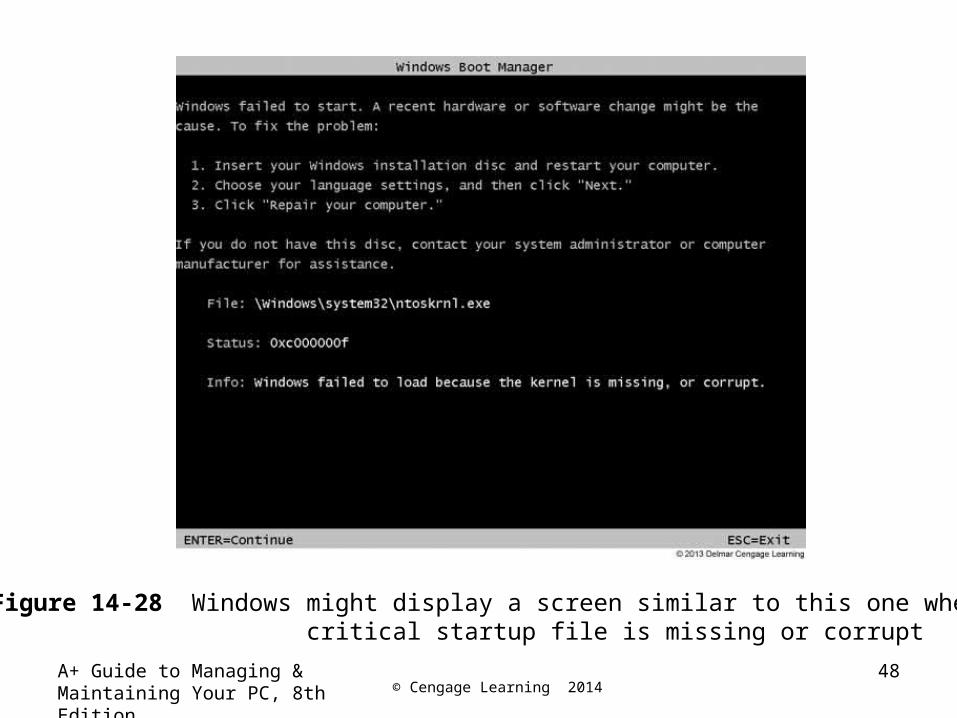
© Cengage Learning 2014A+ Guide to Managing & Maintaining Your PC, 8th Edition
48
Figure 14-28 Windows might display a screen similar to this one when a critical startup file is missing or corrupt
© Cengage Learning 2014
Problems At Stage 1: Before The Flag Or Progress Bar Appears
• Can Windows RE find the Windows installation? (cont’d.)– Use command prompt window to access drive C
• Get to C prompt: use DIR command to list folders and files
• Good list: check log file for clues• Not a good list: most likely Vista installation destroyed
beyond repair• Make every effort to copy data to another media
A+ Guide to Managing & Maintaining Your PC, 8th Edition
49
© Cengage Learning 2014
Problems At Stage 1: Before The Flag Or Progress Bar Appears
• Options to recover from a corrupted Windows installation– Option 1: Complete PC backup available
• Restore system to last backup– Option 2: Complete PC backup not available and data
backups available on hard drive• Install Windows, format hard drive during installation,
install all applications again, restore data– Option 3: Complete PC backup and data backup not
available• Try to copy data to removable device and reinstall
WindowsA+ Guide to Managing & Maintaining Your PC, 8th Edition
50
© Cengage Learning 2014
Problems At Stage 1: Before The Flag Or Progress Bar Appears
• Steps to reinstall Windows • Follow these steps when OS refuses to boot and
important data on the drive:– Boot from Windows setup DVD
• Follow directions on-screen to install the OS– If you suspect hard drive might be failing, reformat the
hard drive and reinstall Windows– If you suspect a healthy hard drive
• Run Chkdsk to fix errors• Install all applications and device drivers• Create all user accounts and customize Vista settings• Delete the \Windows.Old folder
A+ Guide to Managing & Maintaining Your PC, 8th Edition
51
© Cengage Learning 2014
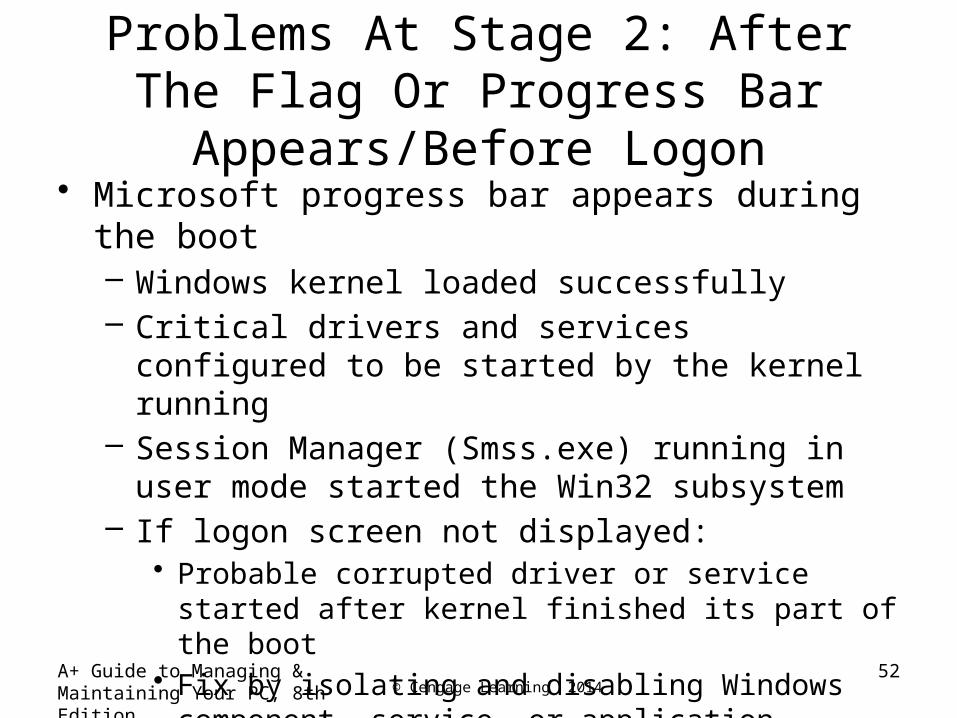
Problems At Stage 2: After The Flag Or Progress Bar Appears/Before Logon
• Microsoft progress bar appears during the boot– Windows kernel loaded successfully– Critical drivers and services configured to be started
by the kernel running– Session Manager (Smss.exe) running in user mode
started the Win32 subsystem– If logon screen not displayed:
• Probable corrupted driver or service started after kernel finished its part of the boot
• Fix by isolating and disabling Windows component, service, or application causing trouble
A+ Guide to Managing & Maintaining Your PC, 8th Edition
52
© Cengage Learning 2014
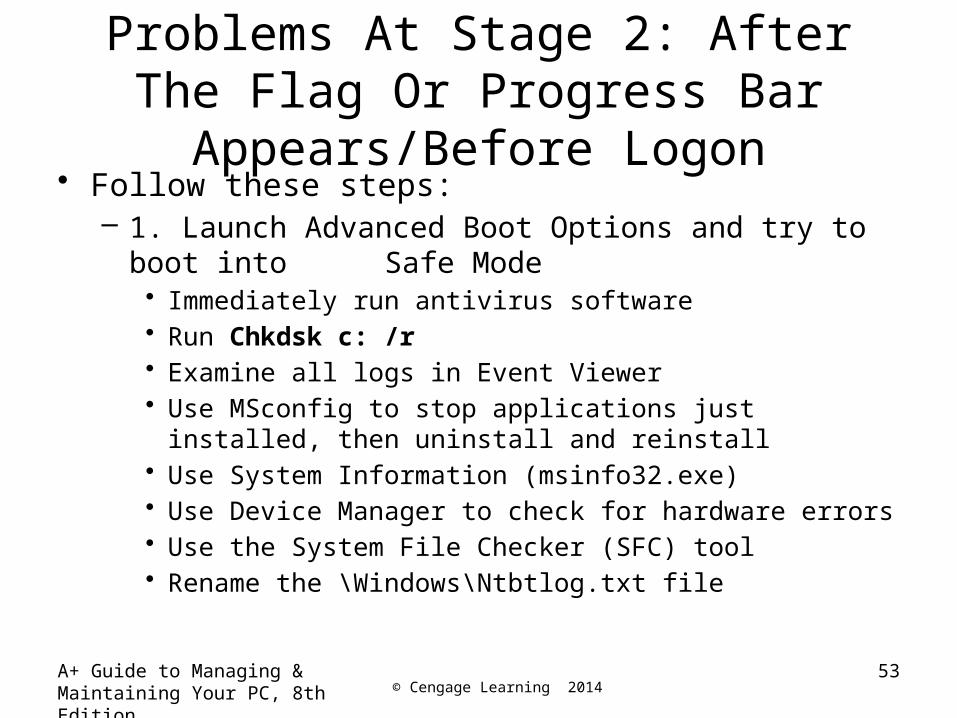
Problems At Stage 2: After The Flag Or Progress Bar Appears/Before Logon
• Follow these steps:– 1. Launch Advanced Boot Options and try to boot into
Safe Mode• Immediately run antivirus software• Run Chkdsk c: /r• Examine all logs in Event Viewer• Use MSconfig to stop applications just installed, then
uninstall and reinstall• Use System Information (msinfo32.exe)• Use Device Manager to check for hardware errors• Use the System File Checker (SFC) tool• Rename the \Windows\Ntbtlog.txt file
A+ Guide to Managing & Maintaining Your PC, 8th Edition
53

© Cengage Learning 2014
Problems At Stage 2: After The Flag Or Progress Bar Appears/Before Logon
• Follow these steps: (cont’d)– 2. If cannot boot into Safe Mode, select Last Known
Good Configuration on the Advanced Boot Options menu
– 3. Launch Windows RE and run Startup Repair from the System Recovery Options menu
– 4. In Windows RE, run System Restore• Select the latest restore point• If that doesn’t fix the problem, try an earlier one
– 5. Boot to Advanced Boot Options menu and select Enable Boot Logging
A+ Guide to Managing & Maintaining Your PC, 8th Edition
54
© Cengage Learning 2014
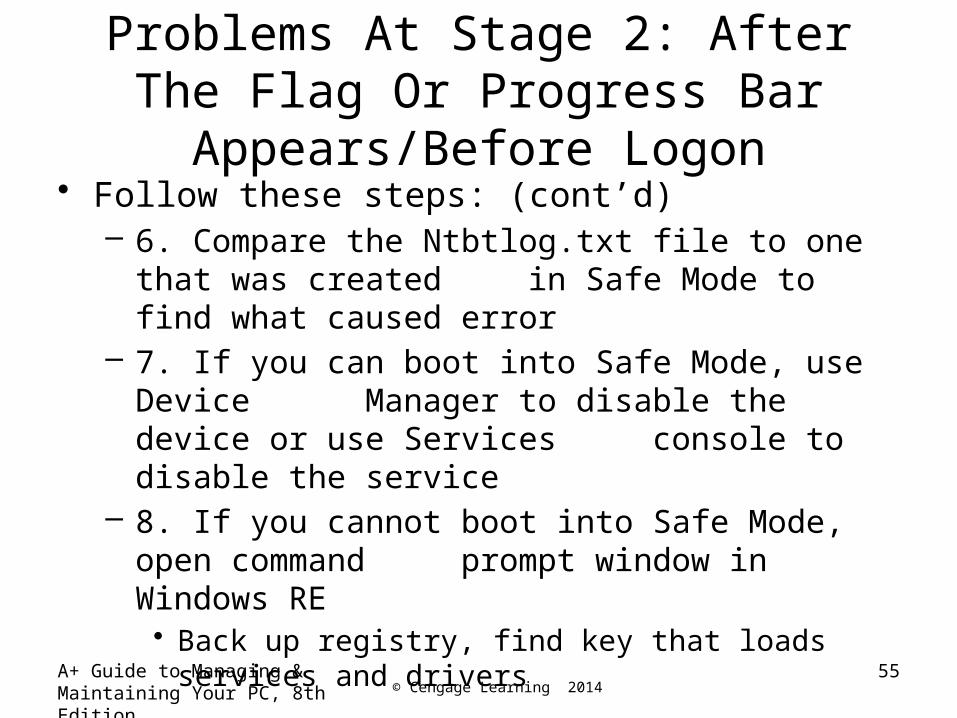
Problems At Stage 2: After The Flag Or Progress Bar Appears/Before Logon
• Follow these steps: (cont’d)– 6. Compare the Ntbtlog.txt file to one that was created
in Safe Mode to find what caused error– 7. If you can boot into Safe Mode, use Device
Manager to disable the device or use Services console to disable the service
– 8. If you cannot boot into Safe Mode, open command prompt window in Windows RE
• Back up registry, find key that loads services and drivers
A+ Guide to Managing & Maintaining Your PC, 8th Edition
55
© Cengage Learning 2014
Problems At Stage 2: After The Flag Or Progress Bar Appears/Before Logon
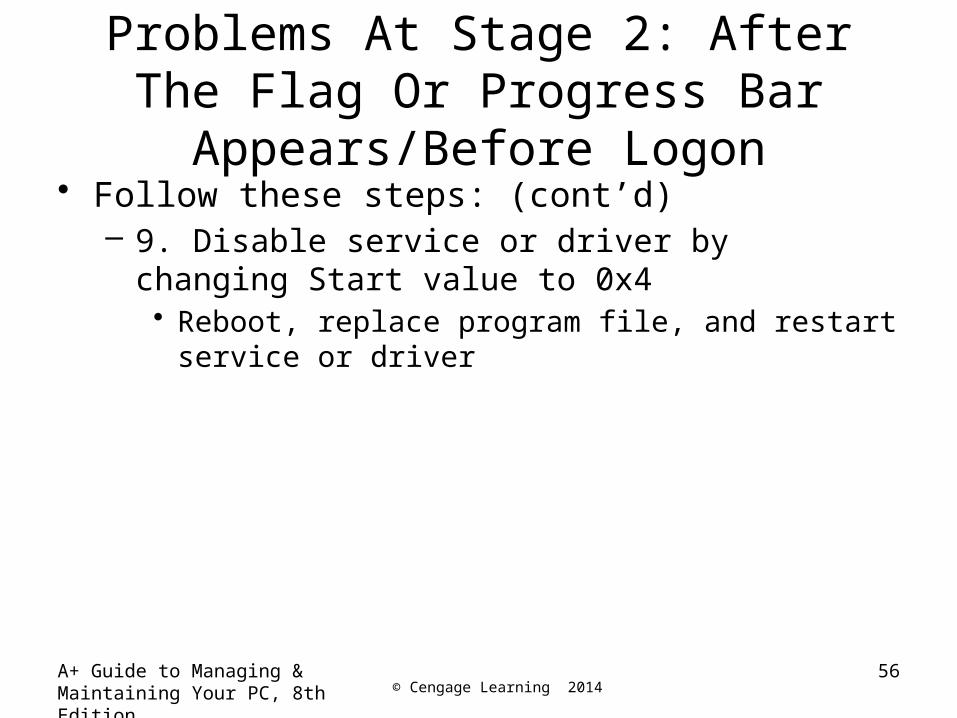
• Follow these steps: (cont’d)– 9. Disable service or driver by changing Start value to
0x4• Reboot, replace program file, and restart service or
driver
A+ Guide to Managing & Maintaining Your PC, 8th Edition
56

© Cengage Learning 2014
Problems At Stage 3: After Windows Logon
• Problems caused by applications or services configured to launch at startup– Shortcuts in startup folders, Scheduled Tasks, or
software installation processes affecting registry entries
– Error message at startup• Disable program using MSconfig
A+ Guide to Managing & Maintaining Your PC, 8th Edition
57
© Cengage Learning 2014A+ Guide to Managing & Maintaining Your PC, 8th Edition
58
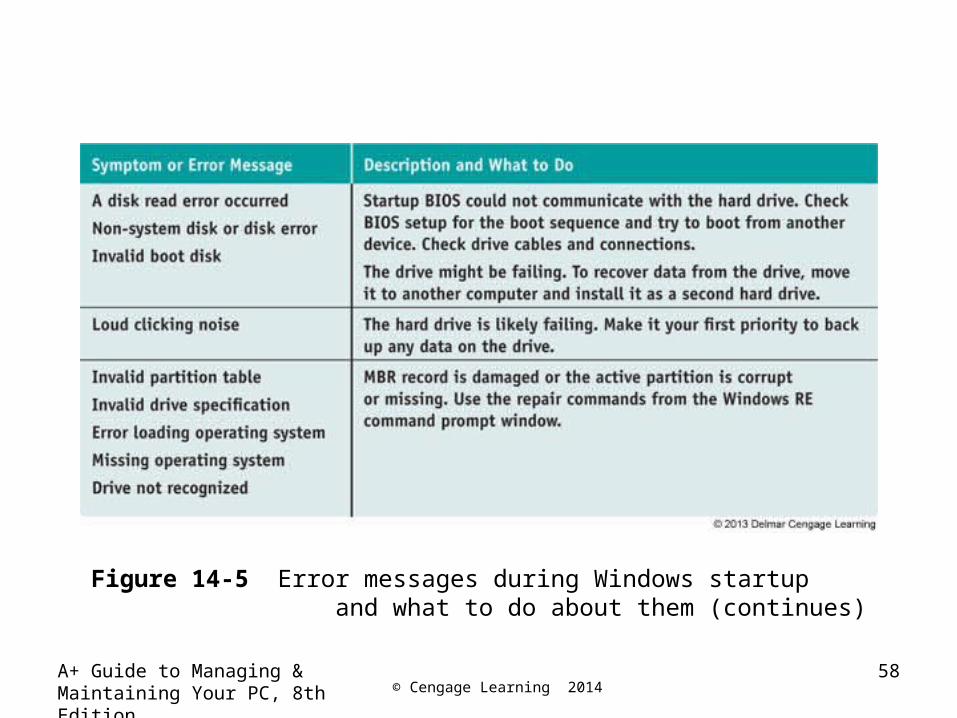
Figure 14-5 Error messages during Windows startup and what to do about them (continues)
© Cengage Learning 2014A+ Guide to Managing & Maintaining Your PC, 8th Edition
59
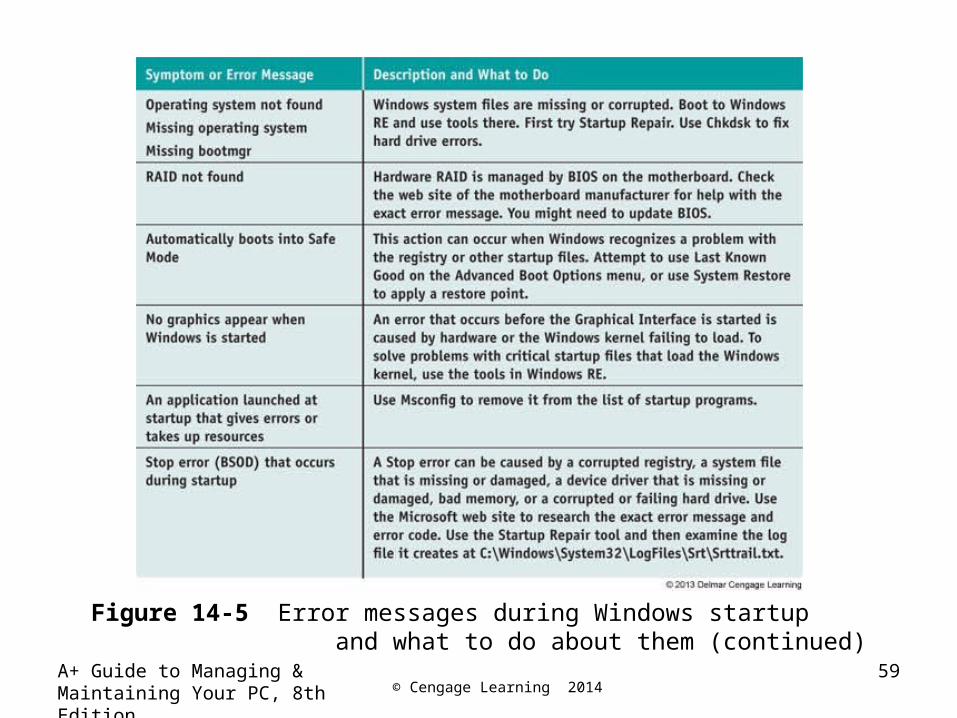
Figure 14-5 Error messages during Windows startup and what to do about them (continued)
© Cengage Learning 2014
How to Recover Lost Data
• Use Windows tools, third party software, or commercial data recovery services
• Recovering a deleted or corrupted data file– Look in the Recycle Bin– Restore it from backup using the Backup and Restore
window or use Previous Versions tab on file’s Properties box
– Use the Recover command– Use application manufacturer’s web site– Use third party software
A+ Guide to Managing & Maintaining Your PC, 8th Edition
60
© Cengage Learning 2014
How to Recover Lost Data
• Recover data from a computer that will not boot– Remove hard drive and install as a second
nonbooting hard drive in another system– Use IDE to USB or a SATA to USB converter kit
• Temporarily connect hard drive to a USB port on a working computer
• Browse drive and copy data using Windows Explorer
• Use a data recovery service– Search for “data recovery” on the Internet– Read up on reviews, understand warranty and
guarantees, and get a recommendation
A+ Guide to Managing & Maintaining Your PC, 8th Edition
61
© Cengage Learning 2014
Summary
• When a system is turned on, startup BIOS takes control to examine hardware components and find an OS to load
• Windows 7/Vista startup is managed by Windows Boot Manager(BootMgr) and Windows Boot Loader (WinLoad.exe)
• Advanced Boot Options menu offers many options that are useful when troubleshooting startup problems
A+ Guide to Managing & Maintaining Your PC, 8th Edition
62
© Cengage Learning 2014
Summary
• Windows Recovery Environment (Windows RE) includes tools such as System Repair, Memory Diagnostics, System Restore, a command prompt window, and System Image Recovery
• Windows tools and techniques used to troubleshoot a failed boot include Last Known Good Configuration, Startup Repair, System Restore, Safe Mode, Command Prompt, in-place upgrade of Windows, reimaging the hard drive, and reinstalling Windows
A+ Guide to Managing & Maintaining Your PC, 8th Edition
63
© Cengage Learning 2014
Summary
• In a failed Windows boot, it is important to determine at what point in the boot the failure occurred
• If a hard drive will not boot, data recovery might be possible by installing the drive in another system as a second, nonbooting hard drive
A+ Guide to Managing & Maintaining Your PC, 8th Edition
64


![Troubleshooting and Maintaining Cisco IP Networks (TSHOOT) · Troubleshooting and Maintaining Cisco IP Networks (TSHOOT) Version: Demo [ Total Questions: 10 ] Topic break down Topic](https://img.pdfslide.net/doc/110x75/6071e7bd049c343b9b5cd31b/troubleshooting-and-maintaining-cisco-ip-networks-tshoot-troubleshooting-and-maintaining.jpg)