Embed Size (px)
Citation preview

GUIDE 3: ORFORD TO FELIXSTOWE
A
Orford to Felixstowe is one of four guides to Second World War archaeology in Suffolk, published in the same format. Together they will help readers to discover, appreciate and enjoy the physical remains of the conflict that still lie in the countryside. This guide describes the anti-invasion defences that once stood on this part of the Suffolk coastline.
Robert Liddiard and David Sims are based in the School of History at the University of East Anglia, Norwich.
A G
UID
E TO
SEC
ON
D W
OR
LD
WA
R A
RC
HA
EO
LO
GY
IN SU
FFOL
K
Robert Liddiard and D
avid Sims
A GUIDE TO SECOND WORLD WAR
ARCHAEOLOGY IN SUFFOLKGuide 3: Orford to Felixstowe
Robert Liddiard and David Sims
A G
UID
E TO
SEC
ON
D W
OR
LD
WA
R A
RC
HA
EO
LO
GY
IN SU
FFOL
K
Robert Liddiard and D
avid Sims
GUIDE 3: ORFORD TO FELIXSTOWE
i
A GUIDE TO SECOND WORLD WAR
ARCHAEOLOGY IN SUFFOLKGuide 3: Orford to Felixstowe
Robert Liddiard and David Sims

ii
A GUIDE TO SECOND WORLD WAR ARCHAEOLOGY IN SUFFOLK
First published 2014
Copyright © Robert Liddiard and David Sims
No part of this publication may be translated, reproduced or transmitted in any form or by any means (electronical or mechanical, including photocopying, recording or by
any information storage and retrieval system) except brief extracts by a reviewer for the purpose of review, without
permission of the copyright owner.
Printed in England by Barnwell Print Ltd., Dunkirk Industrial Estate,Aylsham, Norfolk, NR11 6SU, UK.
By using Carbon Balanced Paper through the World Land Trust on this publication we have offset 1115kg of Carbon & preserved 93sqm of critically threatened tropical forests.CBP00094262905141002

GUIDE 3: ORFORD TO FELIXSTOWE
iii
We would like to thank all those who have helped in the production of this guide, especially the staff at the Imperial War Museum, the Suffolk Record Office at Ipswich, Suffolk County Council Archaeology Service, Felixstowe Museum, the RSPB and The National Archives, Kew. Valuable assistance was also provided by Margaret Shiress, John Smith, Lt. Col. Alan Walpole R.A. Retd. and Dave Wood. This guide has been produced as part of the ‘World War II Heritage’ project funded by the European Union: www.worldwar2heritage.com
Orford to Felixstowe is one of four guides to Second World War archaeology in Suffolk. Three guides examine the anti-invasion coastal defences, built principally in 1940–41, while the fourth examines the stop lines constructed during the same period. Although the Second World War is a conflict rapidly fading from human memory, its physical legacy is more permanent, and in places it is still possible to gain an impression of how militarisation affected the countryside. We hope that this guide will help readers to explore, understand and enjoy the physical remains of that conflict that still lie in the countryside, as well as giving some idea of the historical background.
iv
A GUIDE TO SECOND WORLD WAR ARCHAEOLOGY IN SUFFOLK
Introduction
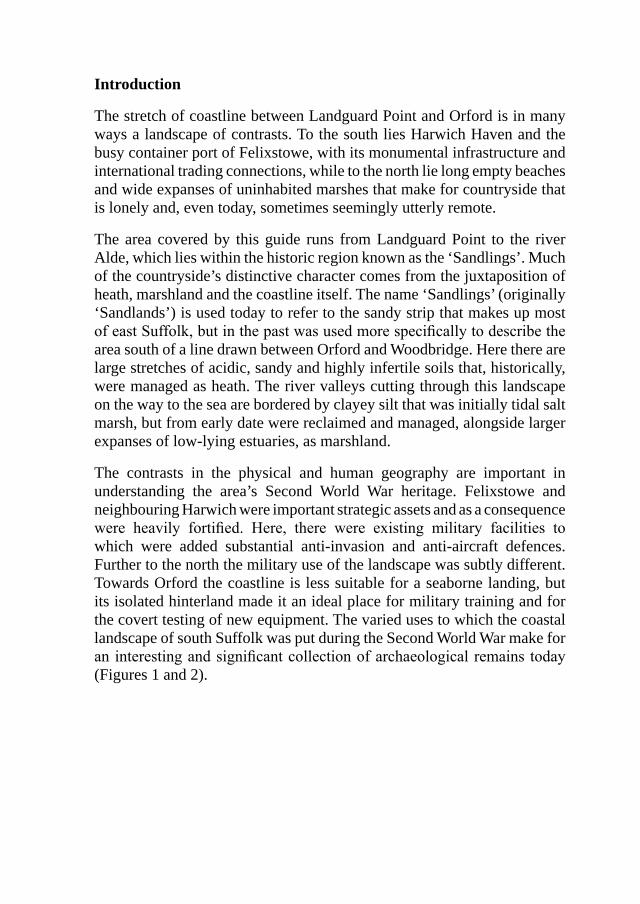
The stretch of coastline between Landguard Point and Orford is in many ways a landscape of contrasts. To the south lies Harwich Haven and the busy container port of Felixstowe, with its monumental infrastructure and international trading connections, while to the north lie long empty beaches and wide expanses of uninhabited marshes that make for countryside that is lonely and, even today, sometimes seemingly utterly remote.
The area covered by this guide runs from Landguard Point to the river Alde, which lies within the historic region known as the ‘Sandlings’. Much of the countryside’s distinctive character comes from the juxtaposition of heath, marshland and the coastline itself. The name ‘Sandlings’ (originally ‘Sandlands’) is used today to refer to the sandy strip that makes up most of east Suffolk, but in the past was used more specifically to describe the area south of a line drawn between Orford and Woodbridge. Here there are large stretches of acidic, sandy and highly infertile soils that, historically, were managed as heath. The river valleys cutting through this landscape on the way to the sea are bordered by clayey silt that was initially tidal salt marsh, but from early date were reclaimed and managed, alongside larger expanses of low-lying estuaries, as marshland.
The contrasts in the physical and human geography are important in understanding the area’s Second World War heritage. Felixstowe and neighbouring Harwich were important strategic assets and as a consequence were heavily fortified. Here, there were existing military facilities to which were added substantial anti-invasion and anti-aircraft defences. Further to the north the military use of the landscape was subtly different. Towards Orford the coastline is less suitable for a seaborne landing, but its isolated hinterland made it an ideal place for military training and for the covert testing of new equipment. The varied uses to which the coastal landscape of south Suffolk was put during the Second World War make for an interesting and significant collection of archaeological remains today (Figures 1 and 2).
GUIDE 3: ORFORD TO FELIXSTOWE
v
Figure 1. Felixstowe port. For centuries Landguard Fort was chiefly responsible for the defence of the Orwell estuary and during the twentieth century the haven remained an important military installation.
Figure 2. View south from Orford, with the cranes of Felixstowe docks in the distance. Much of the intervening countryside is marsh and heath and, on the ground, the area often seems isolated.
vi
A GUIDE TO SECOND WORLD WAR ARCHAEOLOGY IN SUFFOLK
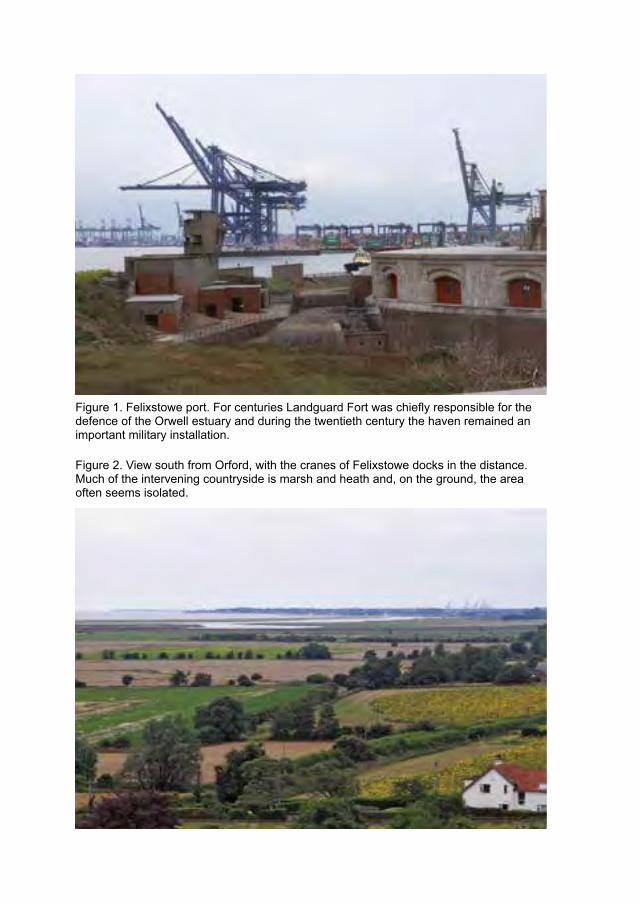
Figure 3. First World War beach defences in Felixstowe. (Ipswich Record Office)
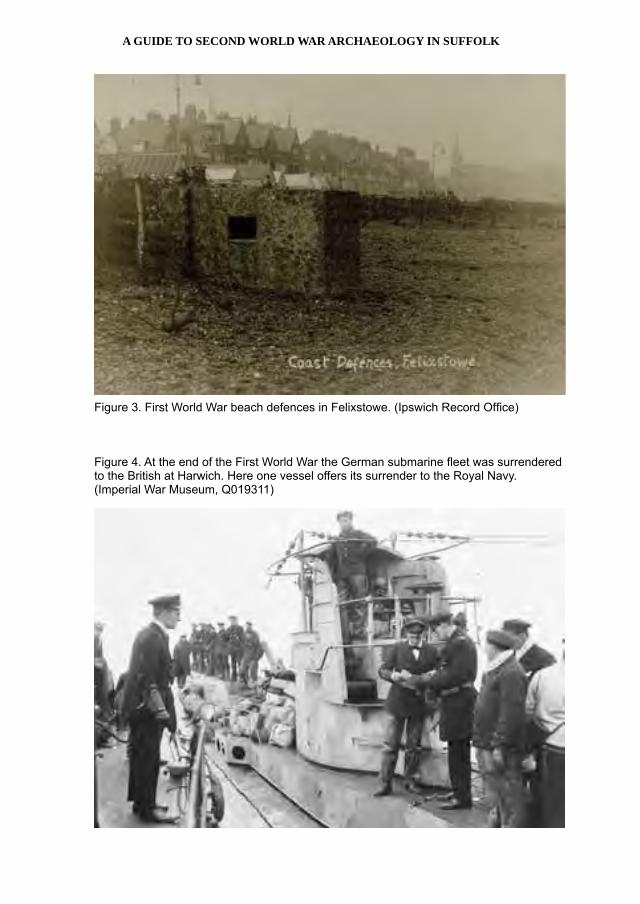
Figure 4. At the end of the First World War the German submarine fleet was surrendered to the British at Harwich. Here one vessel offers its surrender to the Royal Navy. (Imperial War Museum, Q019311)
GUIDE 3: ORFORD TO FELIXSTOWE
1
The Wartime Geography
South Suffolk has for centuries been of strategic importance, as the Orwell estuary (also known as Harwich Haven) provides the only deep water anchorage along the 200 miles of coastline between the Thames and the Humber. The sheltered waters provided protection for merchant shipping and, historically, a base for English maritime operations elsewhere. The factors that made the Orwell estuary a flourishing maritime centre also made it a target for hostile invasion fleets, however; if Harwich and Felixstowe could be captured, a landing force could be put ashore and be within reach of London in days.
The defence of the estuary historically rested on fortifications at Landguard Point, Harwich and Shotley Point. Of these, Landguard was always the most important, as it is here that the deep water channel runs into the harbour, so bringing any vessel within easy range of any shore-based cannon. Landguard was first fortified during the sixteenth century and over the eighteenth and nineteenth centuries developed into a fort of national importance. On the Harwich side, the chief defence from the late nineteenth century was Beacon Hill Battery, which covered the southern approaches. The defence of the Haven during the twentieth century was conducted from these two points, while the nineteenth-century defences at Shotley Point became a naval training establishment, HMS Ganges, in 1905.
The Haven’s defence was not restricted to the fixed defences of Felixstowe and Harwich. Immediately to the north lies Hollesley Bay, which provided a safe anchorage for hostile fleets to gather before attacking the port; it was from here that in 1667 the Dutch launched an unsuccessful attack on Landguard Fort. The short stretch of coastline up to the mouth of the Alde was therefore also marked out for defence in the past, the most obvious evidence for which today is the line of Napoleonic Martello towers that runs from Felixstowe up to Shingle Street.
In response to the rise of Germany to the status of Britain’s main strategic rival in the late nineteenth and at the start of the twentieth century, the port’s fixed fortifications were dramatically upgraded, with new batteries at Landguard and Harwich. Felixstowe became the site for a seaplane station in 1913 and during the First World War Harwich and Felixstowe, together with parts of the neighbouring coastline, were provided with beach defences including trench systems, barbed wire and concrete pillboxes (Figures 3 and 4).

2
A GUIDE TO SECOND WORLD WAR ARCHAEOLOGY IN SUFFOLK
The Threat from the Sky
The area covered by this guide also contains two sites that are nationally important in the defence of Britain’s airspace: Orford Ness and Bawdsey Manor. During the interwar period the problem of providing adequate defence against air attack became ever more pressing and government looked to science and technology for a solution. An air station that had chiefly served as an experimental aerodrome had been established on Orford Ness during the First World War, and this was reopened in 1924, when the Ness was used as a bombing range and for the testing of ordnance and equipment.
During the 1930s the use of technology to detect approaching hostile aircraft, especially the method involving the use of reflected radio waves from aircraft as a means of establishing their location, was seen as one of the most promising avenues for air-defence. At the time, the method was known as Radio Direction Finding, but it soon became known as radar. In 1935, after early experiments proved the feasibility of this method, Orford Ness was chosen as the site for further research. The Ness was an ideal location: it was remote, facilities already existed and the secret work could be carried on under the guise of meteorological research.
The testing of radar technology progressed well and in 1936 the whole establishment moved the short distance south to Bawdsey Manor. In September 1937 RAF Bawdsey became the first operational radar station and subsequently a chain of stations spread rapidly across Britain. Bawdsey’s location and very visible infrastructure marked the station out as a target for the Luftwaffe and it was attacked numerous times by German aircraft. On the outbreak of war, the research teams moved to Scotland and then Dorset, but Bawdsey not only remained a working station but continued to lead the way when it came to developing radar technology (Figure 5).
A Vulnerable Coastline
In 1940 assessments of the vulnerability of the coastline to German invasion repeated concerns that went back centuries (Figure 6). Now, however, there were the additional threats of tanks and aeroplanes. The most dangerous areas were deemed to stretch from Landguard Point to the mouth of the Deben, where deep water anchorages existed at all states
GUIDE 3: ORFORD TO FELIXSTOWE
3
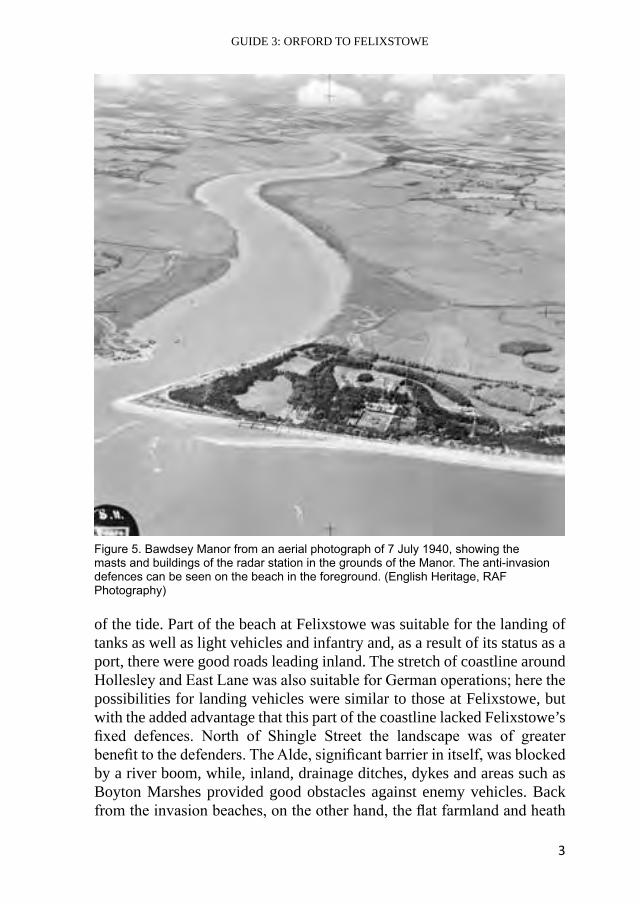
of the tide. Part of the beach at Felixstowe was suitable for the landing of tanks as well as light vehicles and infantry and, as a result of its status as a port, there were good roads leading inland. The stretch of coastline around Hollesley and East Lane was also suitable for German operations; here the possibilities for landing vehicles were similar to those at Felixstowe, but with the added advantage that this part of the coastline lacked Felixstowe’s fixed defences. North of Shingle Street the landscape was of greater benefit to the defenders. The Alde, significant barrier in itself, was blocked by a river boom, while, inland, drainage ditches, dykes and areas such as Boyton Marshes provided good obstacles against enemy vehicles. Back from the invasion beaches, on the other hand, the flat farmland and heath
Figure 5. Bawdsey Manor from an aerial photograph of 7 July 1940, showing the masts and buildings of the radar station in the grounds of the Manor. The anti-invasion defences can be seen on the beach in the foreground. (English Heritage, RAF Photography)
4
A GUIDE TO SECOND WORLD WAR ARCHAEOLOGY IN SUFFOLK
that made up the area inland was not only good tank country, but also ideal for the landing of paratroops and gliders.
These wider geographic and tactical concerns are crucial to understanding the Second World War remains that we can see in the landscape today. The highest densities of fixed defences and gun batteries lie in the south, around Felixstowe and Bawdsey, while to the north of Shingle Street there are fewer defensive structures, but more remains connected with training (Figure 7 and Figure 8).
The Phoney War, 1939–May 1940
On the outbreak of war a limited mobilisation took place in order to guard key points and installations, such as Felixstowe’s seaplane station and docks and RAF Bawdsey. More serious thought was given to the prospect of a German invasion from November 1939 and additional troops were moved into south Suffolk, principally to form the basis for the defence of the Orwell Estuary. It was thought that some kind of German amphibious
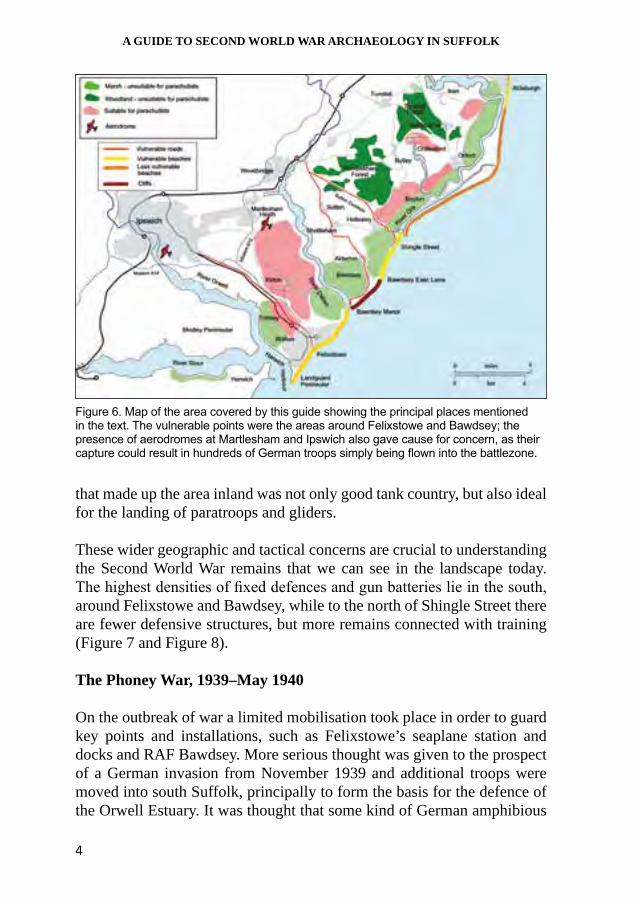
Figure 6. Map of the area covered by this guide showing the principal places mentioned in the text. The vulnerable points were the areas around Felixstowe and Bawdsey; the presence of aerodromes at Martlesham and Ipswich also gave cause for concern, as their capture could result in hundreds of German troops simply being flown into the battlezone.
GUIDE 3: ORFORD TO FELIXSTOWE
5
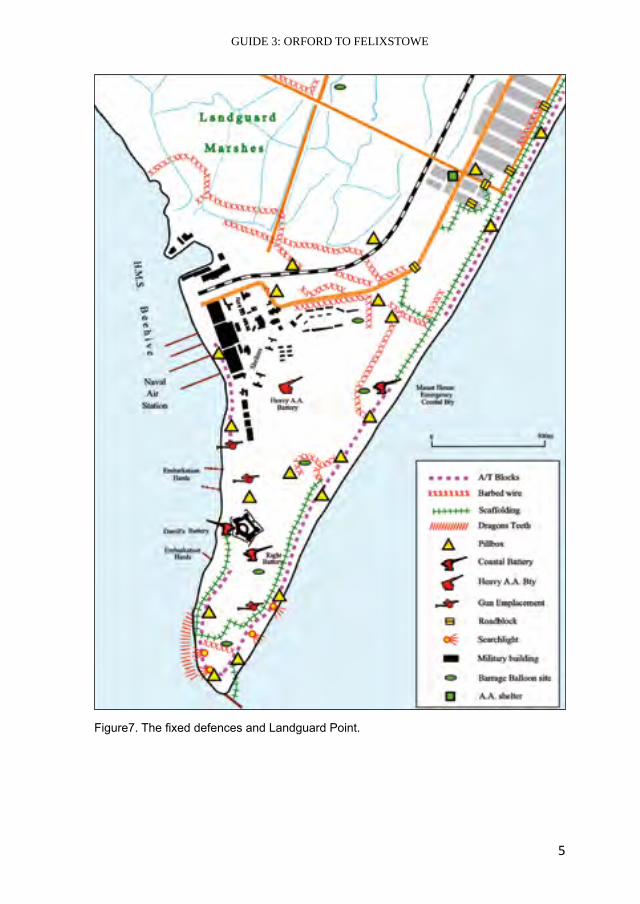
Figure7. The fixed defences and Landguard Point.

6
A GUIDE TO SECOND WORLD WAR ARCHAEOLOGY IN SUFFOLK
Figure 8. The defences of RAF Bawdsey. By the middle of the war the radar station was heavily defended and fully integrated into the wider anti-invasion landscape.
landing was a possibility, albeit a remote one. Of slightly greater concern was the possibility that the Germans might use parachute troops to seize the port facilities and RAF Bawdsey from inland. Such an eventuality could be the precursor to the landing of a much larger force and so likely exits leading inland from the coastline were identified with a view to their being blocked by defending troops. The overall conclusion was that it was important to hold Bawdsey and Harwich, and that any reserve troops should be ready to reinforce these places if required. But few new defences were built during this period and the resources available on the ground to resist any attack were minimal. The absence of any large-scale defences reflected a broader current of opinion that a German attack was a distant prospect, one senior officer believing that a sea-borne attack would be attempted only ‘as a desperate remedy or by a lunatic’. But in April 1940 such sentiments were quickly forgotten as Germany opened the war in the west, which led rapidly to the Fall of France and the Low Countries and initiated an invasion crisis in Britain.
GUIDE 3: ORFORD TO FELIXSTOWE
7
The Landscape of Coastal Defence, 1940–41
Following the defeat of the British Expeditionary Force in France the situation facing the Commander in Chief of British Home Forces, General Edmund Ironside, was far from ideal. With an exhausted army that had abandoned its modern equipment, Ironside had little choice but to enact a strategy based on linear defence. The German invader would be held up by a fortified coastal ‘crust’. Landing grounds back from the coast were to be blocked; the exits from beaches were to be protected by pillboxes and mines; vulnerable beaches were to receive concrete pillboxes and barbed wire. These defences were not intended to throw the invader back into the sea, but rather to hold up the German advance for as long as possible. Once inland, German columns would find themselves consistently delayed by fortified nodal points and stop lines (described in Guide 4) until what was left of Britain’s mobile reserves would meet the invaders and defeat them decisively in a pitched battle.
But in July 1940 General Ironside was replaced as Commander in Chief Home Forces by Alan Brooke, who advocated a more active policy of ‘all round defence’, rather than a thin coastal crust. Beach defences were thus to comprise a series of ‘forward defended localities’ that could expect to hold out in the event of invasion until relieving forces, which now existed in greater numbers, could move up to deal with the invader. Particularly in 1941, across large part of southern and eastern England, beach defences were reorganised and strengthened with anti-landing ditches, scaffolding and anti-tank ditches. In places, the positions of the previous year were abandoned and new ones created.
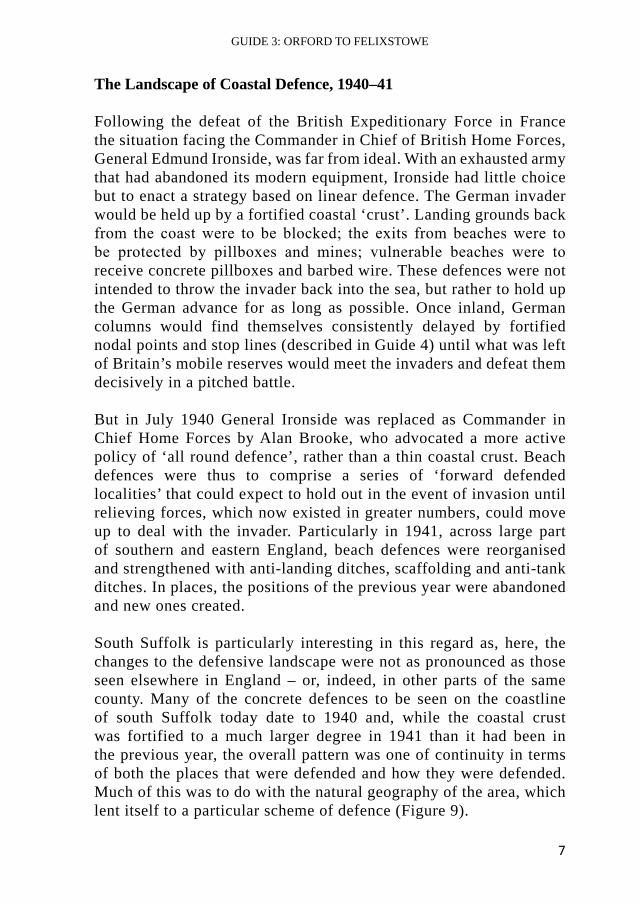
South Suffolk is particularly interesting in this regard as, here, the changes to the defensive landscape were not as pronounced as those seen elsewhere in England – or, indeed, in other parts of the same county. Many of the concrete defences to be seen on the coastline of south Suffolk today date to 1940 and, while the coastal crust was fortified to a much larger degree in 1941 than it had been in the previous year, the overall pattern was one of continuity in terms of both the places that were defended and how they were defended. Much of this was to do with the natural geography of the area, which lent itself to a particular scheme of defence (Figure 9).
8
A GUIDE TO SECOND WORLD WAR ARCHAEOLOGY IN SUFFOLK
Figure 9. The defences at Felixstowe c.1944, showing the scale of fortification and how the formerly picturesque beaches were transformed by obstacles. (John Smith)
The Coastal Crust
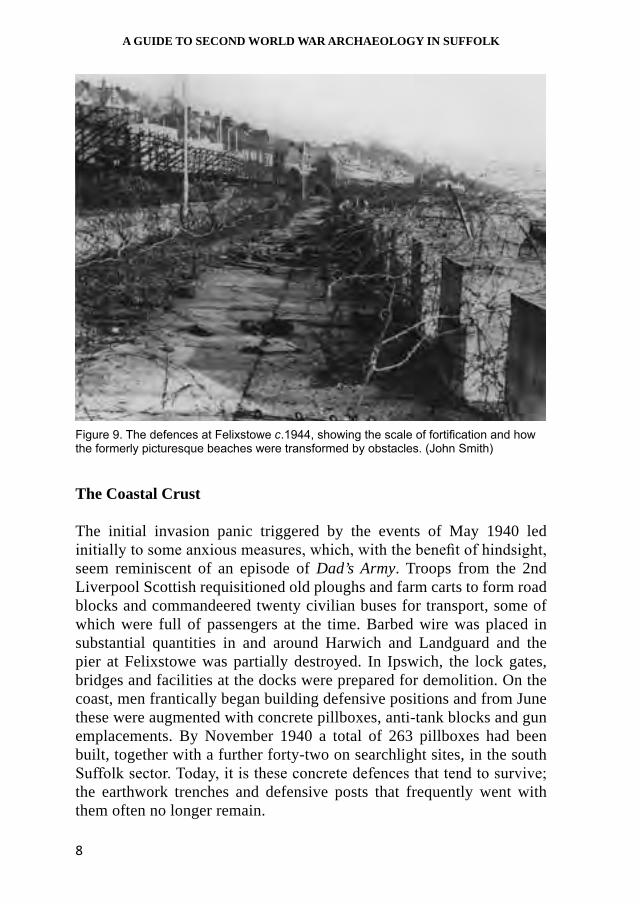
The initial invasion panic triggered by the events of May 1940 led initially to some anxious measures, which, with the benefit of hindsight, seem reminiscent of an episode of Dad’s Army. Troops from the 2nd Liverpool Scottish requisitioned old ploughs and farm carts to form road blocks and commandeered twenty civilian buses for transport, some of which were full of passengers at the time. Barbed wire was placed in substantial quantities in and around Harwich and Landguard and the pier at Felixstowe was partially destroyed. In Ipswich, the lock gates, bridges and facilities at the docks were prepared for demolition. On the coast, men frantically began building defensive positions and from June these were augmented with concrete pillboxes, anti-tank blocks and gun emplacements. By November 1940 a total of 263 pillboxes had been built, together with a further forty-two on searchlight sites, in the south Suffolk sector. Today, it is these concrete defences that tend to survive; the earthwork trenches and defensive posts that frequently went with them often no longer remain.
GUIDE 3: ORFORD TO FELIXSTOWE
9
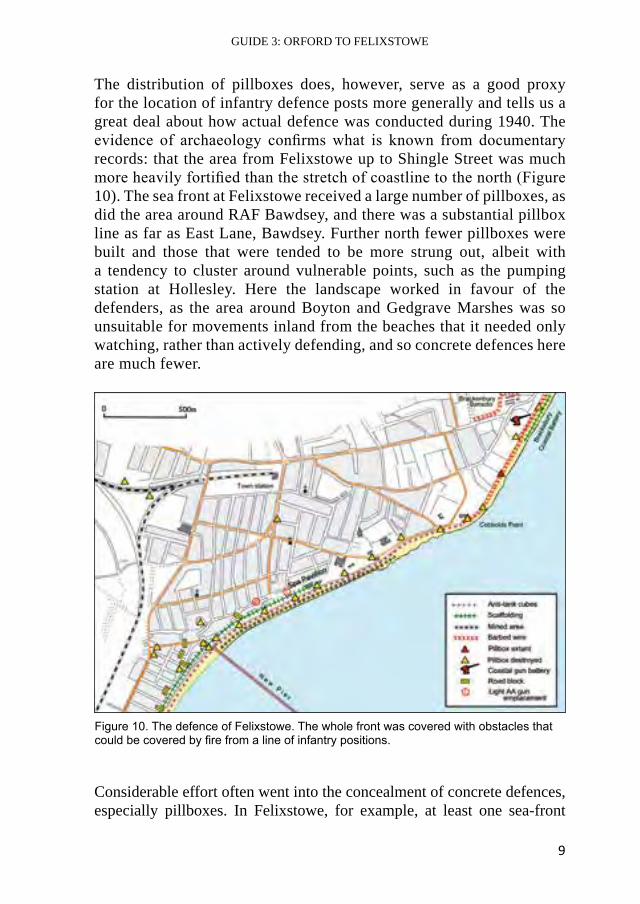
The distribution of pillboxes does, however, serve as a good proxy for the location of infantry defence posts more generally and tells us a great deal about how actual defence was conducted during 1940. The evidence of archaeology confirms what is known from documentary records: that the area from Felixstowe up to Shingle Street was much more heavily fortified than the stretch of coastline to the north (Figure 10). The sea front at Felixstowe received a large number of pillboxes, as did the area around RAF Bawdsey, and there was a substantial pillbox line as far as East Lane, Bawdsey. Further north fewer pillboxes were built and those that were tended to be more strung out, albeit with a tendency to cluster around vulnerable points, such as the pumping station at Hollesley. Here the landscape worked in favour of the defenders, as the area around Boyton and Gedgrave Marshes was so unsuitable for movements inland from the beaches that it needed only watching, rather than actively defending, and so concrete defences here are much fewer.
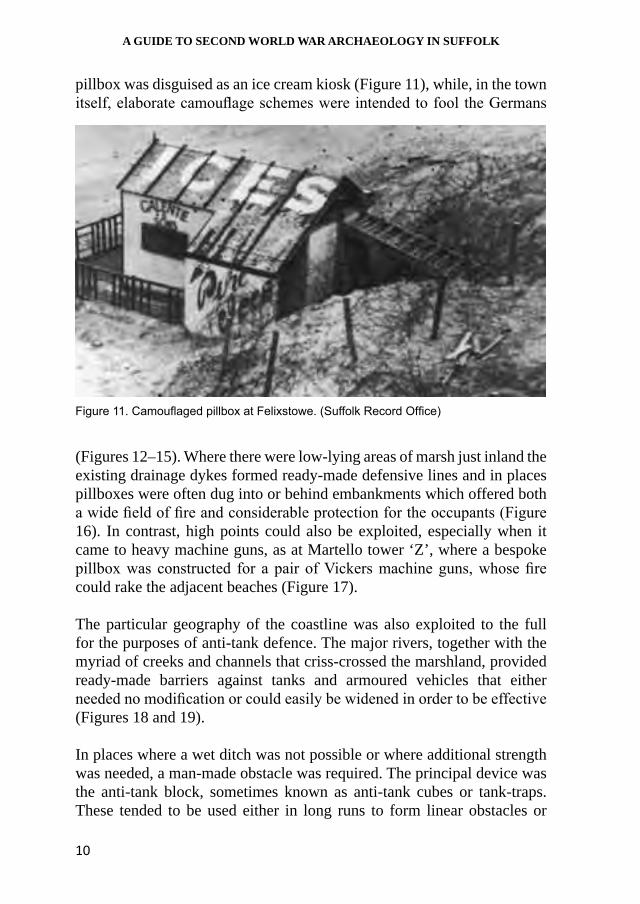
Considerable effort often went into the concealment of concrete defences, especially pillboxes. In Felixstowe, for example, at least one sea-front
Figure 10. The defence of Felixstowe. The whole front was covered with obstacles that could be covered by fire from a line of infantry positions.
10
A GUIDE TO SECOND WORLD WAR ARCHAEOLOGY IN SUFFOLK
pillbox was disguised as an ice cream kiosk (Figure 11), while, in the town itself, elaborate camouflage schemes were intended to fool the Germans
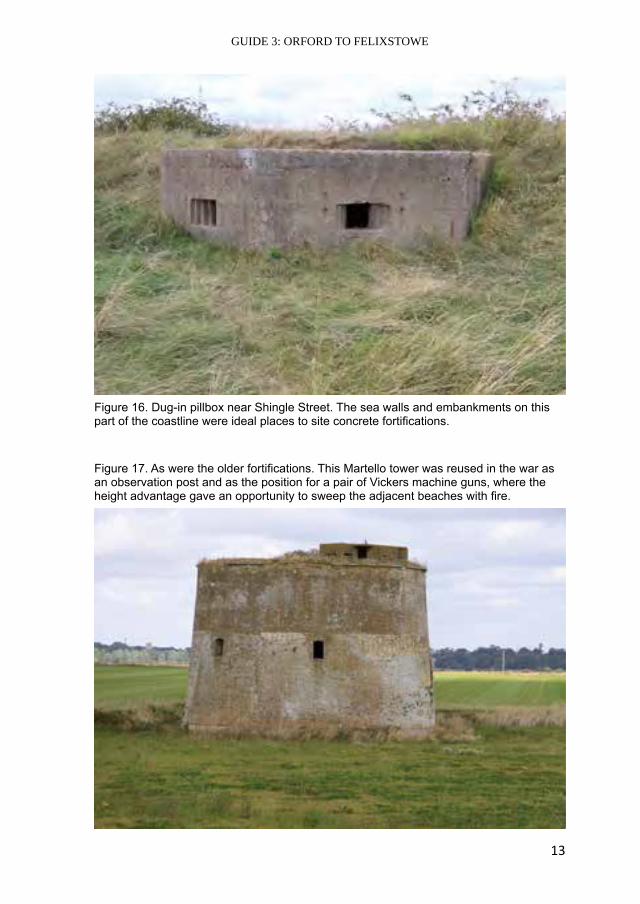
(Figures 12–15). Where there were low-lying areas of marsh just inland the existing drainage dykes formed ready-made defensive lines and in places pillboxes were often dug into or behind embankments which offered both a wide field of fire and considerable protection for the occupants (Figure 16). In contrast, high points could also be exploited, especially when it came to heavy machine guns, as at Martello tower ‘Z’, where a bespoke pillbox was constructed for a pair of Vickers machine guns, whose fire could rake the adjacent beaches (Figure 17).
The particular geography of the coastline was also exploited to the full for the purposes of anti-tank defence. The major rivers, together with the myriad of creeks and channels that criss-crossed the marshland, provided ready-made barriers against tanks and armoured vehicles that either needed no modification or could easily be widened in order to be effective (Figures 18 and 19).
In places where a wet ditch was not possible or where additional strength was needed, a man-made obstacle was required. The principal device was the anti-tank block, sometimes known as anti-tank cubes or tank-traps. These tended to be used either in long runs to form linear obstacles or
Figure 11. Camouflaged pillbox at Felixstowe. (Suffolk Record Office)
GUIDE 3: ORFORD TO FELIXSTOWE
11
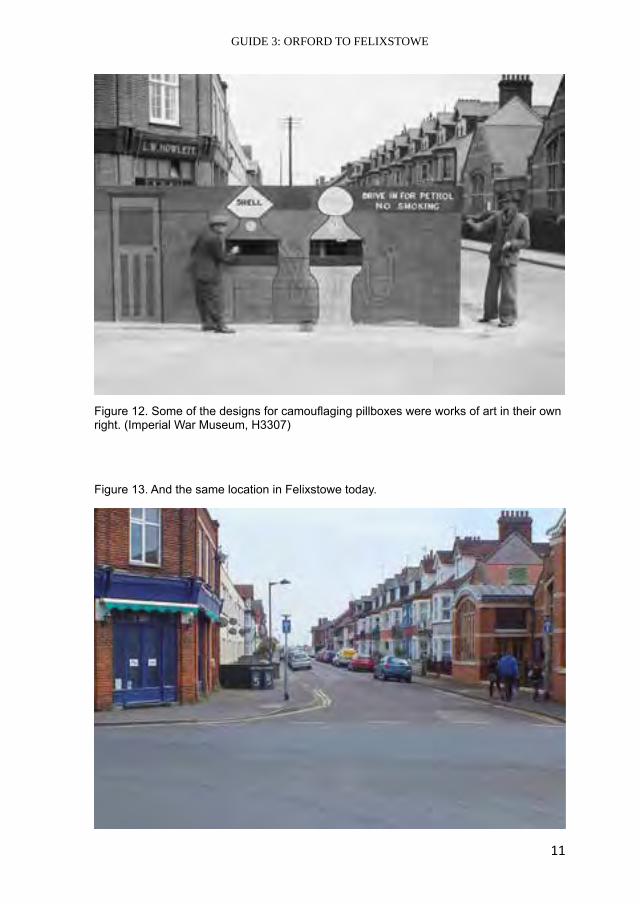
Figure 12. Some of the designs for camouflaging pillboxes were works of art in their own right. (Imperial War Museum, H3307)
Figure 13. And the same location in Felixstowe today.
12
A GUIDE TO SECOND WORLD WAR ARCHAEOLOGY IN SUFFOLK
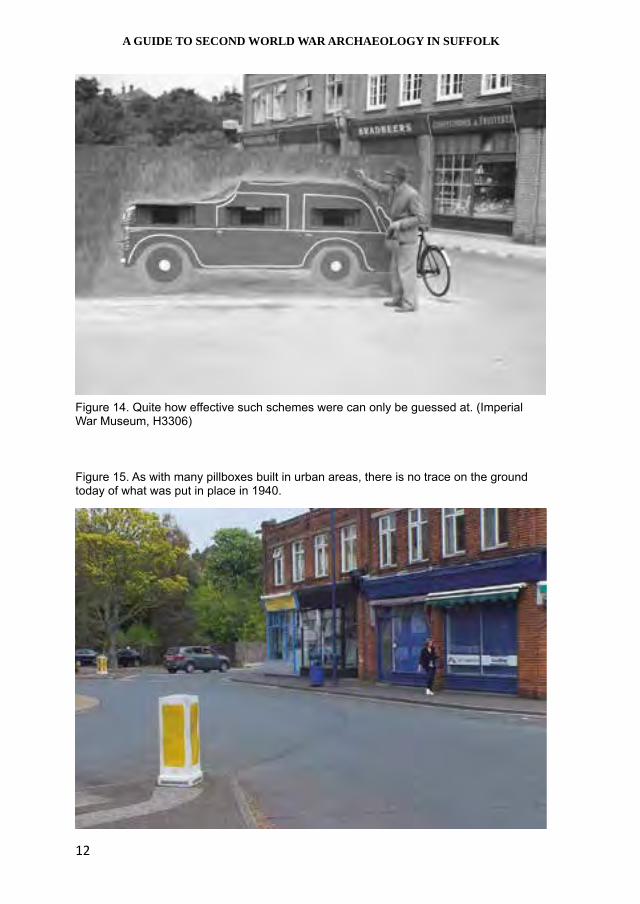
Figure 15. As with many pillboxes built in urban areas, there is no trace on the ground today of what was put in place in 1940.
Figure 14. Quite how effective such schemes were can only be guessed at. (Imperial War Museum, H3306)
GUIDE 3: ORFORD TO FELIXSTOWE
13
Figure 16. Dug-in pillbox near Shingle Street. The sea walls and embankments on this part of the coastline were ideal places to site concrete fortifications.
Figure 17. As were the older fortifications. This Martello tower was reused in the war as an observation post and as the position for a pair of Vickers machine guns, where the height advantage gave an opportunity to sweep the adjacent beaches with fire.
14
A GUIDE TO SECOND WORLD WAR ARCHAEOLOGY IN SUFFOLK
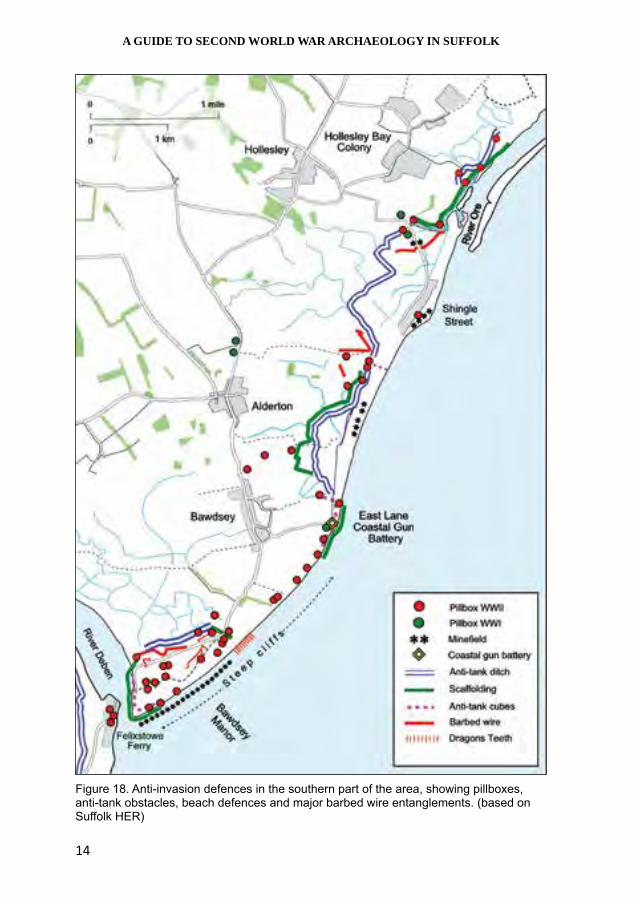
Figure 18. Anti-invasion defences in the southern part of the area, showing pillboxes, anti-tank obstacles, beach defences and major barbed wire entanglements. (based on Suffolk HER)
GUIDE 3: ORFORD TO FELIXSTOWE
15
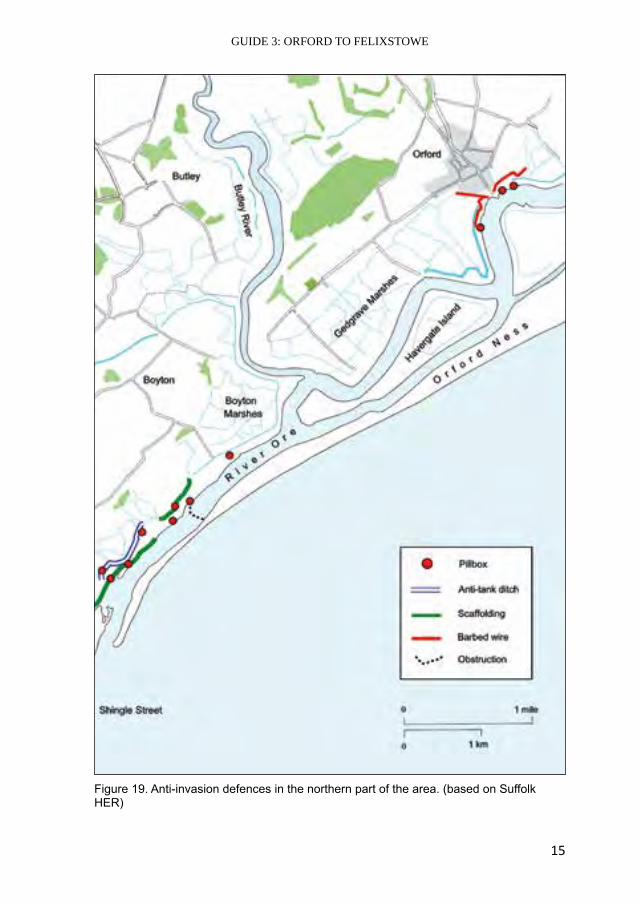
Figure 19. Anti-invasion defences in the northern part of the area. (based on Suffolk HER)
16
A GUIDE TO SECOND WORLD WAR ARCHAEOLOGY IN SUFFOLK
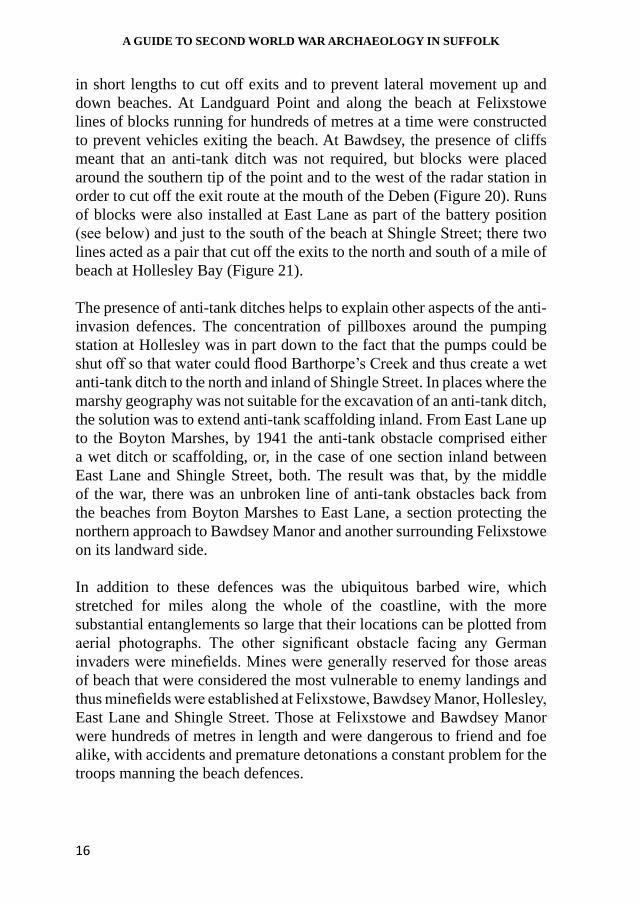
in short lengths to cut off exits and to prevent lateral movement up and down beaches. At Landguard Point and along the beach at Felixstowe lines of blocks running for hundreds of metres at a time were constructed to prevent vehicles exiting the beach. At Bawdsey, the presence of cliffs meant that an anti-tank ditch was not required, but blocks were placed around the southern tip of the point and to the west of the radar station in order to cut off the exit route at the mouth of the Deben (Figure 20). Runs of blocks were also installed at East Lane as part of the battery position (see below) and just to the south of the beach at Shingle Street; there two lines acted as a pair that cut off the exits to the north and south of a mile of beach at Hollesley Bay (Figure 21).
The presence of anti-tank ditches helps to explain other aspects of the anti-invasion defences. The concentration of pillboxes around the pumping station at Hollesley was in part down to the fact that the pumps could be shut off so that water could flood Barthorpe’s Creek and thus create a wet anti-tank ditch to the north and inland of Shingle Street. In places where the marshy geography was not suitable for the excavation of an anti-tank ditch, the solution was to extend anti-tank scaffolding inland. From East Lane up to the Boyton Marshes, by 1941 the anti-tank obstacle comprised either a wet ditch or scaffolding, or, in the case of one section inland between East Lane and Shingle Street, both. The result was that, by the middle of the war, there was an unbroken line of anti-tank obstacles back from the beaches from Boyton Marshes to East Lane, a section protecting the northern approach to Bawdsey Manor and another surrounding Felixstowe on its landward side.
In addition to these defences was the ubiquitous barbed wire, which stretched for miles along the whole of the coastline, with the more substantial entanglements so large that their locations can be plotted from aerial photographs. The other significant obstacle facing any German invaders were minefields. Mines were generally reserved for those areas of beach that were considered the most vulnerable to enemy landings and thus minefields were established at Felixstowe, Bawdsey Manor, Hollesley, East Lane and Shingle Street. Those at Felixstowe and Bawdsey Manor were hundreds of metres in length and were dangerous to friend and foe alike, with accidents and premature detonations a constant problem for the troops manning the beach defences.
GUIDE 3: ORFORD TO FELIXSTOWE
17
Figure 20. Line of anti-tank blocks at the mouth of the Deben at Bawdsey Point. As well as being part of the anti-invasion defences, these blocks helped to protect the southern part of Bawdsey Radar Station. (Stefan Dewickere)
Figure 21. Row of anti-tank blocks near Shingle Street. While this lonely spot on the coast seems an odd place for such defences, this line of cubes blocked an exit off the beach and was integrated with other anti-tank obstacles that have since been removed.
18
A GUIDE TO SECOND WORLD WAR ARCHAEOLOGY IN SUFFOLK
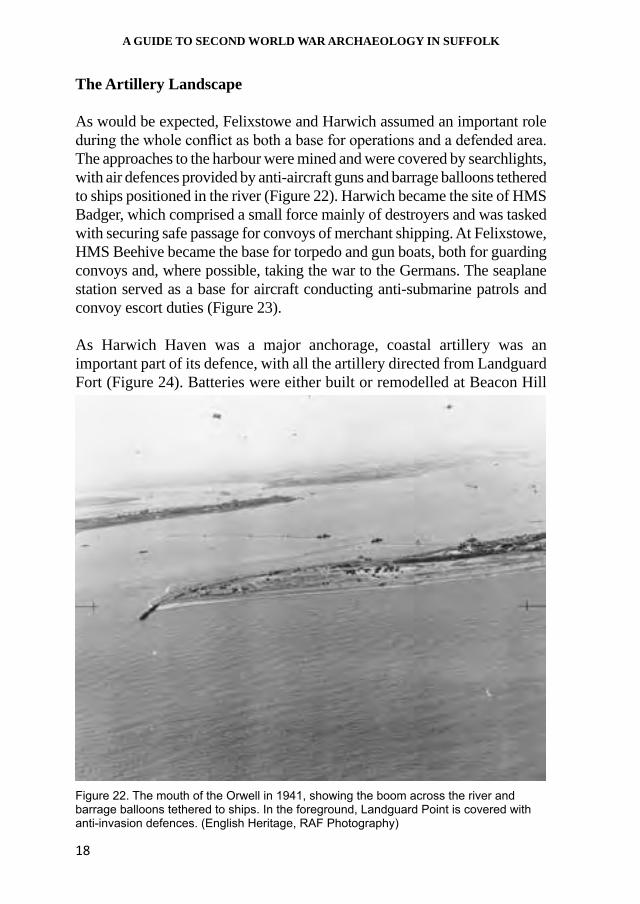
The Artillery Landscape
As would be expected, Felixstowe and Harwich assumed an important role during the whole conflict as both a base for operations and a defended area. The approaches to the harbour were mined and were covered by searchlights, with air defences provided by anti-aircraft guns and barrage balloons tethered to ships positioned in the river (Figure 22). Harwich became the site of HMS Badger, which comprised a small force mainly of destroyers and was tasked with securing safe passage for convoys of merchant shipping. At Felixstowe, HMS Beehive became the base for torpedo and gun boats, both for guarding convoys and, where possible, taking the war to the Germans. The seaplane station served as a base for aircraft conducting anti-submarine patrols and convoy escort duties (Figure 23).
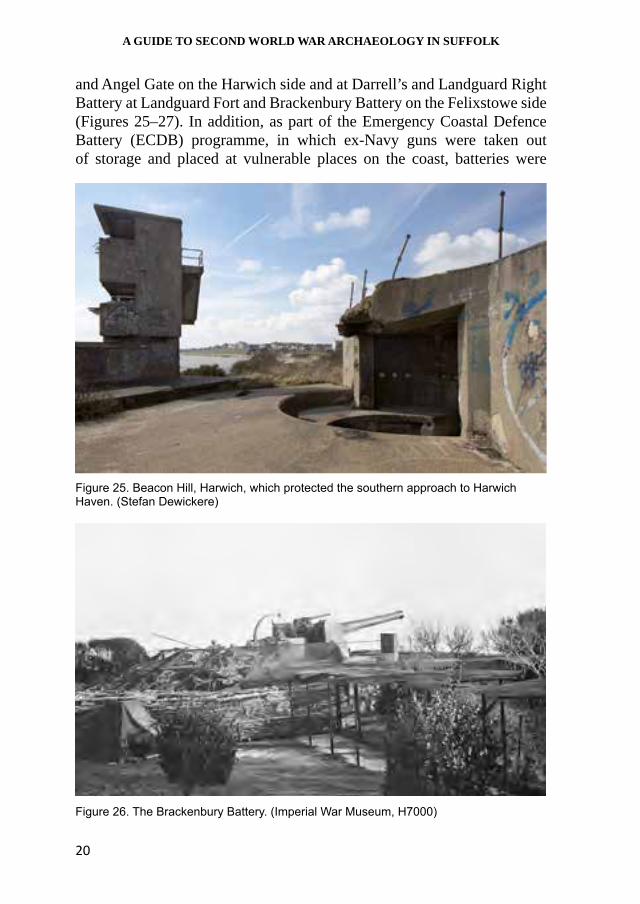
As Harwich Haven was a major anchorage, coastal artillery was an important part of its defence, with all the artillery directed from Landguard Fort (Figure 24). Batteries were either built or remodelled at Beacon Hill
Figure 22. The mouth of the Orwell in 1941, showing the boom across the river and barrage balloons tethered to ships. In the foreground, Landguard Point is covered with anti-invasion defences. (English Heritage, RAF Photography)
GUIDE 3: ORFORD TO FELIXSTOWE
19
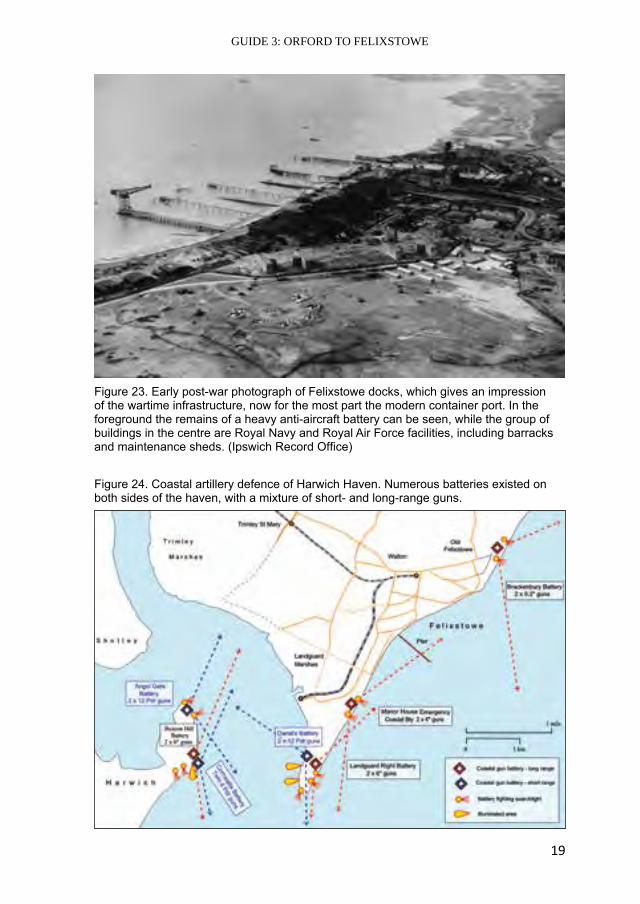
Figure 23. Early post-war photograph of Felixstowe docks, which gives an impression of the wartime infrastructure, now for the most part the modern container port. In the foreground the remains of a heavy anti-aircraft battery can be seen, while the group of buildings in the centre are Royal Navy and Royal Air Force facilities, including barracks and maintenance sheds. (Ipswich Record Office)
Figure 24. Coastal artillery defence of Harwich Haven. Numerous batteries existed on both sides of the haven, with a mixture of short- and long-range guns.
20
A GUIDE TO SECOND WORLD WAR ARCHAEOLOGY IN SUFFOLK
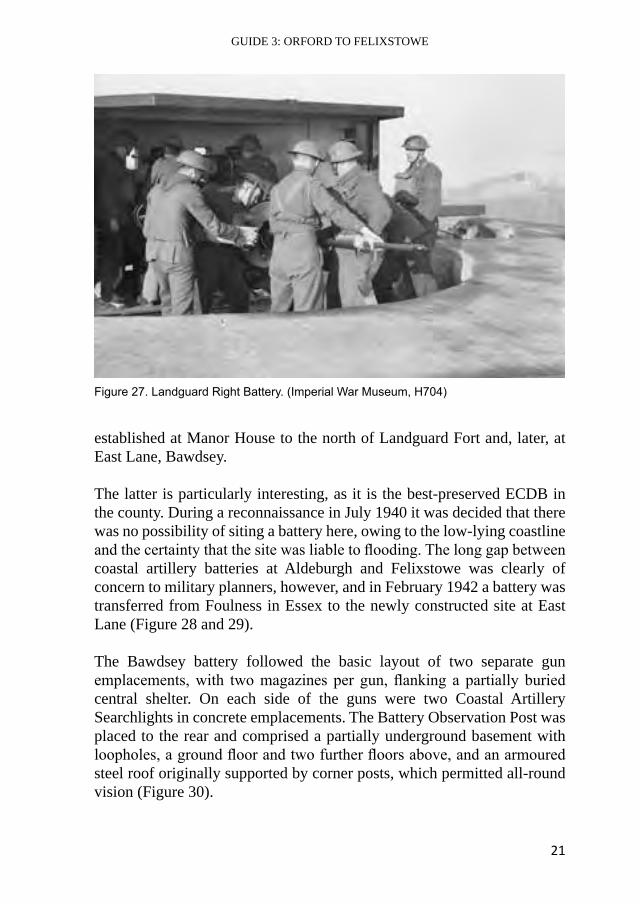
and Angel Gate on the Harwich side and at Darrell’s and Landguard Right Battery at Landguard Fort and Brackenbury Battery on the Felixstowe side (Figures 25–27). In addition, as part of the Emergency Coastal Defence Battery (ECDB) programme, in which ex-Navy guns were taken out of storage and placed at vulnerable places on the coast, batteries were
Figure 25. Beacon Hill, Harwich, which protected the southern approach to Harwich Haven. (Stefan Dewickere)
Figure 26. The Brackenbury Battery. (Imperial War Museum, H7000)
GUIDE 3: ORFORD TO FELIXSTOWE
21
Figure 27. Landguard Right Battery. (Imperial War Museum, H704)
established at Manor House to the north of Landguard Fort and, later, at East Lane, Bawdsey.
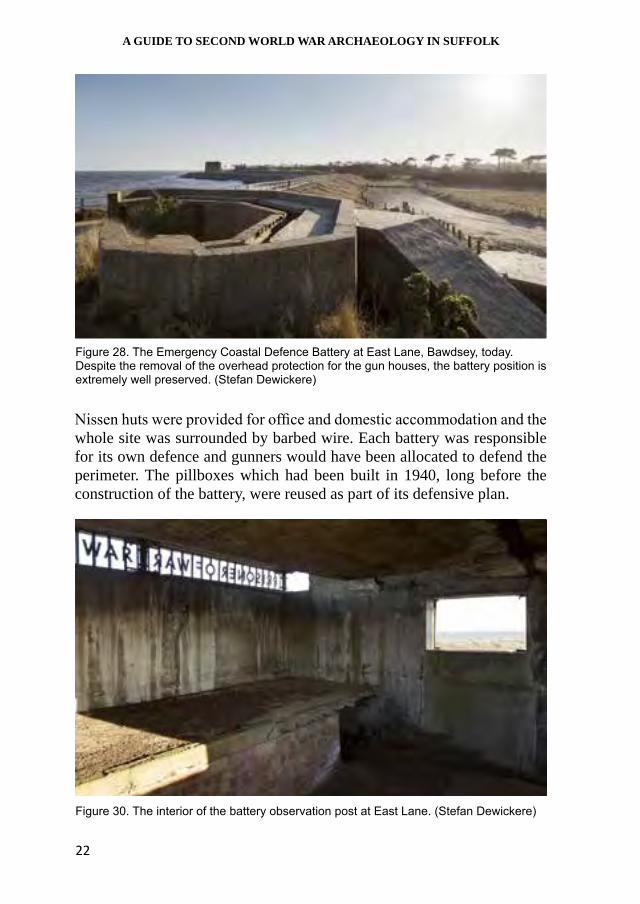
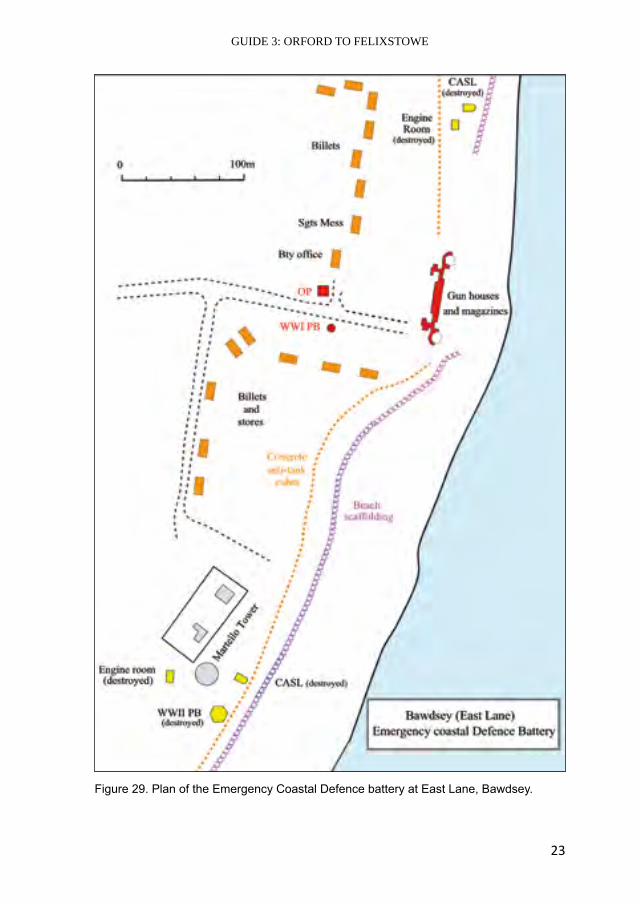
The latter is particularly interesting, as it is the best-preserved ECDB in the county. During a reconnaissance in July 1940 it was decided that there was no possibility of siting a battery here, owing to the low-lying coastline and the certainty that the site was liable to flooding. The long gap between coastal artillery batteries at Aldeburgh and Felixstowe was clearly of concern to military planners, however, and in February 1942 a battery was transferred from Foulness in Essex to the newly constructed site at East Lane (Figure 28 and 29).
The Bawdsey battery followed the basic layout of two separate gun emplacements, with two magazines per gun, flanking a partially buried central shelter. On each side of the guns were two Coastal Artillery Searchlights in concrete emplacements. The Battery Observation Post was placed to the rear and comprised a partially underground basement with loopholes, a ground floor and two further floors above, and an armoured steel roof originally supported by corner posts, which permitted all-round vision (Figure 30).
22
A GUIDE TO SECOND WORLD WAR ARCHAEOLOGY IN SUFFOLK
Figure 28. The Emergency Coastal Defence Battery at East Lane, Bawdsey, today. Despite the removal of the overhead protection for the gun houses, the battery position is extremely well preserved. (Stefan Dewickere)
Nissen huts were provided for office and domestic accommodation and the whole site was surrounded by barbed wire. Each battery was responsible for its own defence and gunners would have been allocated to defend the perimeter. The pillboxes which had been built in 1940, long before the construction of the battery, were reused as part of its defensive plan.
Figure 30. The interior of the battery observation post at East Lane. (Stefan Dewickere)
GUIDE 3: ORFORD TO FELIXSTOWE
23
Figure 29. Plan of the Emergency Coastal Defence battery at East Lane, Bawdsey.
24
A GUIDE TO SECOND WORLD WAR ARCHAEOLOGY IN SUFFOLK
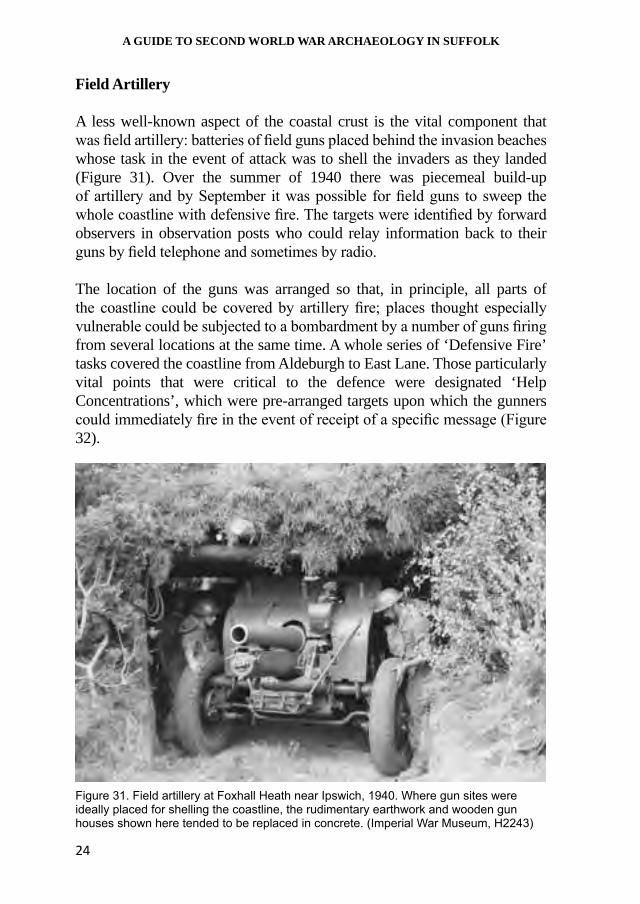
Field Artillery
A less well-known aspect of the coastal crust is the vital component that was field artillery: batteries of field guns placed behind the invasion beaches whose task in the event of attack was to shell the invaders as they landed (Figure 31). Over the summer of 1940 there was piecemeal build-up of artillery and by September it was possible for field guns to sweep the whole coastline with defensive fire. The targets were identified by forward observers in observation posts who could relay information back to their guns by field telephone and sometimes by radio.
The location of the guns was arranged so that, in principle, all parts of the coastline could be covered by artillery fire; places thought especially vulnerable could be subjected to a bombardment by a number of guns firing from several locations at the same time. A whole series of ‘Defensive Fire’ tasks covered the coastline from Aldeburgh to East Lane. Those particularly vital points that were critical to the defence were designated ‘Help Concentrations’, which were pre-arranged targets upon which the gunners could immediately fire in the event of receipt of a specific message (Figure 32).
Figure 31. Field artillery at Foxhall Heath near Ipswich, 1940. Where gun sites were ideally placed for shelling the coastline, the rudimentary earthwork and wooden gun houses shown here tended to be replaced in concrete. (Imperial War Museum, H2243)

GUIDE 3: ORFORD TO FELIXSTOWE
25
Figure 32. Arrangements for field artillery in the area between Bawdsey and Orford, 1941.
The system relied heavily on the ability of the forward observers to spot for their guns further behind the lines and, as a result, the location of the observation posts (OPs) and the protection of their occupants were crucial to effectiveness. OPs required wide fields of vision and, given the muted topography of south Suffolk, any tall building marked itself out as a possible
26
A GUIDE TO SECOND WORLD WAR ARCHAEOLOGY IN SUFFOLK
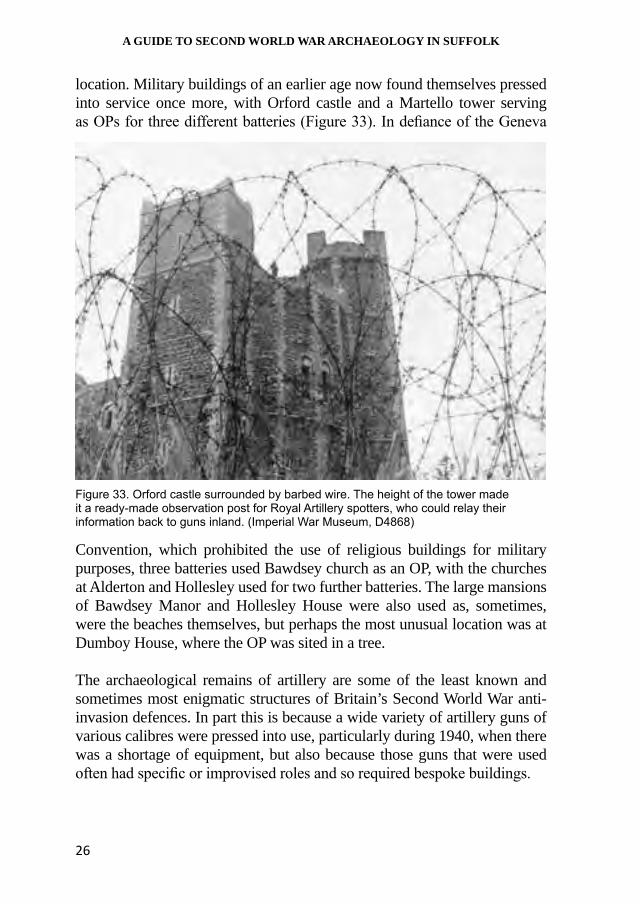
location. Military buildings of an earlier age now found themselves pressed into service once more, with Orford castle and a Martello tower serving as OPs for three different batteries (Figure 33). In defiance of the Geneva
Convention, which prohibited the use of religious buildings for military purposes, three batteries used Bawdsey church as an OP, with the churches at Alderton and Hollesley used for two further batteries. The large mansions of Bawdsey Manor and Hollesley House were also used as, sometimes, were the beaches themselves, but perhaps the most unusual location was at Dumboy House, where the OP was sited in a tree.
The archaeological remains of artillery are some of the least known and sometimes most enigmatic structures of Britain’s Second World War anti-invasion defences. In part this is because a wide variety of artillery guns of various calibres were pressed into use, particularly during 1940, when there was a shortage of equipment, but also because those guns that were used often had specific or improvised roles and so required bespoke buildings.
Figure 33. Orford castle surrounded by barbed wire. The height of the tower made it a ready-made observation post for Royal Artillery spotters, who could relay their information back to guns inland. (Imperial War Museum, D4868)
GUIDE 3: ORFORD TO FELIXSTOWE
27
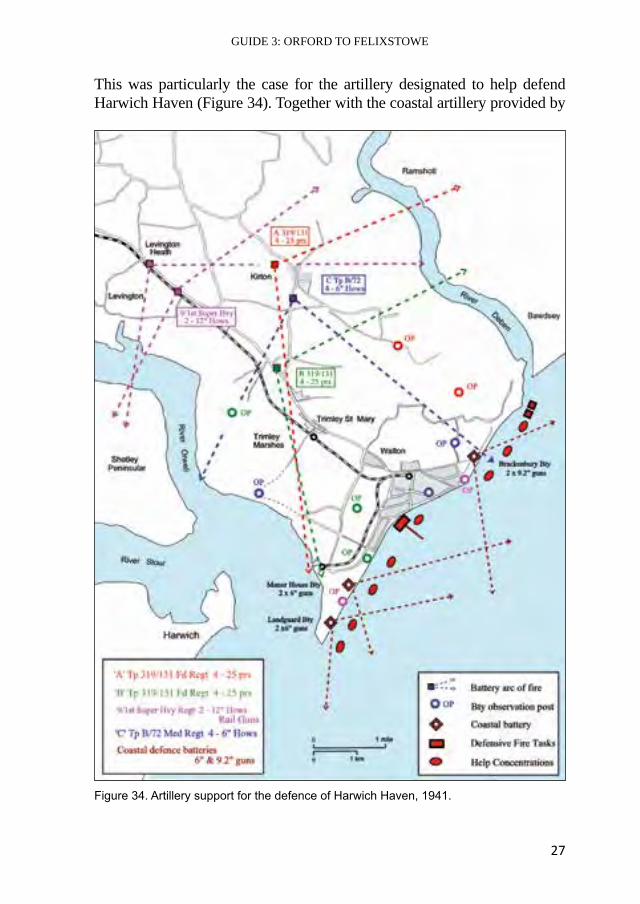
This was particularly the case for the artillery designated to help defend Harwich Haven (Figure 34). Together with the coastal artillery provided by
Figure 34. Artillery support for the defence of Harwich Haven, 1941.

28
A GUIDE TO SECOND WORLD WAR ARCHAEOLOGY IN SUFFOLK
the batteries at Landguard and Harwich, additional firepower was provided by two enormous 12-inch rail guns with a range of almost ten miles that were placed inland, at Trimley and Nacton. The gun at Trimley was housed in a purpose-built gunhouse that comprised a shed placed astride the railway line on its own parallel set of rails. When the gun was prepared for action the shed would be moved back, so allowing the gun a clear field of fire (Figures 35 and 36). Photographs of test firing show that the railway carriages upon which the guns were mounted were literally bolted down to lessen the recoil (Figure 37).
An even more unusual case was that of the Royal Artillery detachment manning two ex-Royal Navy 6-inch guns in a battery position just outside of the village of Hollesley. Here there are two very unusual gunhouses that are
Figure 35. Rail gun at Trimley, near Felixstowe. (Imperial War Museum, H15751)
GUIDE 3: ORFORD TO FELIXSTOWE
29
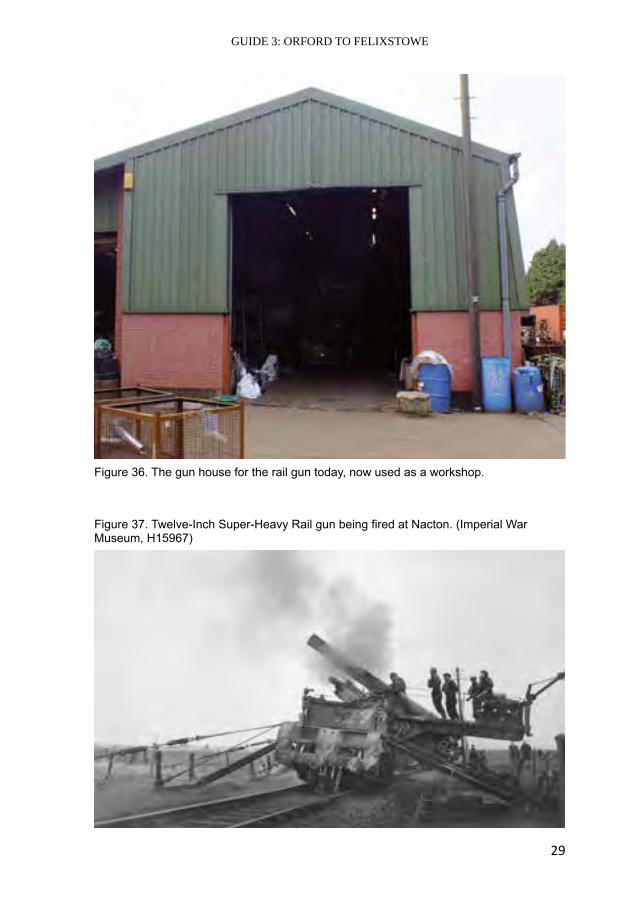
Figure 36. The gun house for the rail gun today, now used as a workshop.
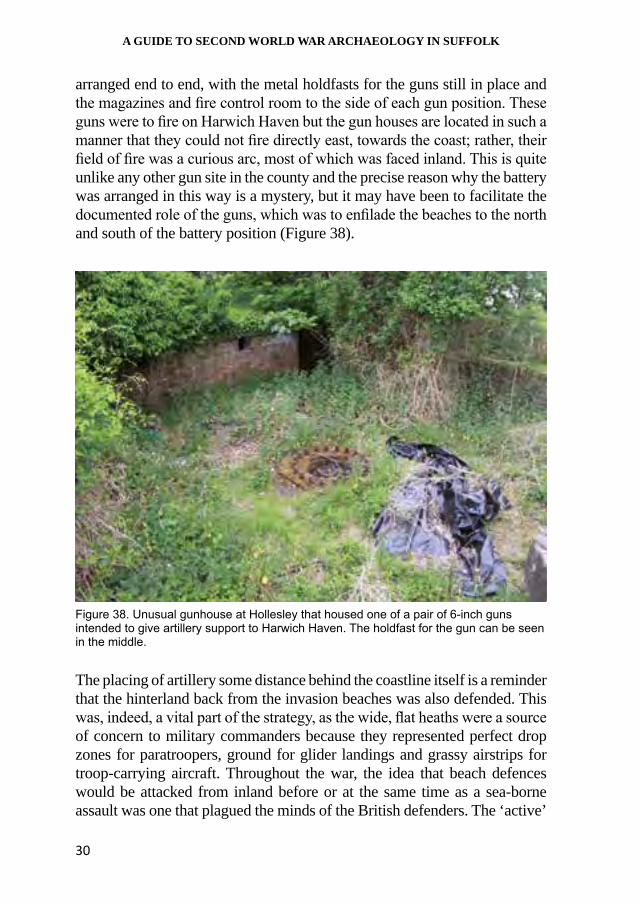
Figure 37. Twelve-Inch Super-Heavy Rail gun being fired at Nacton. (Imperial War Museum, H15967)
30
A GUIDE TO SECOND WORLD WAR ARCHAEOLOGY IN SUFFOLK
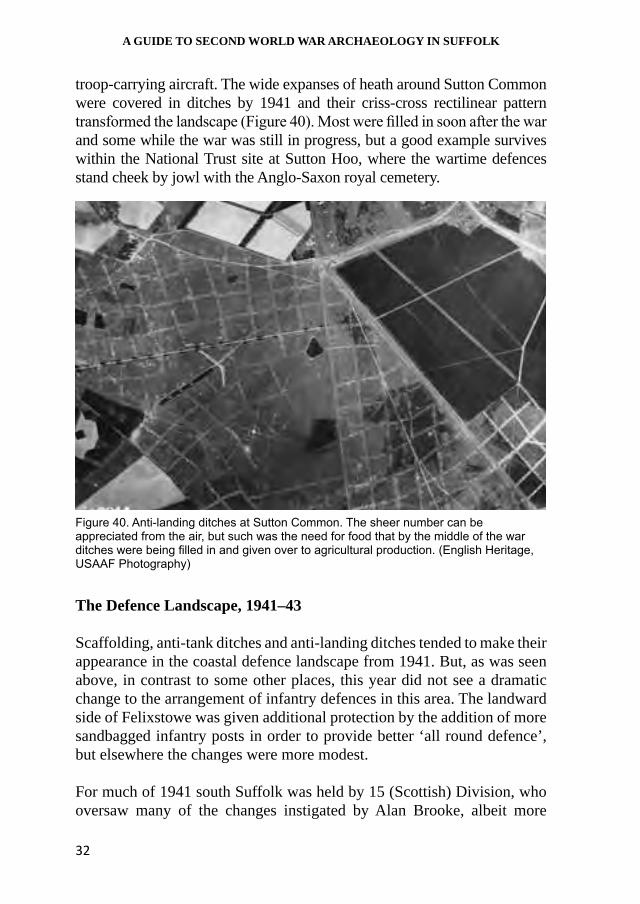
arranged end to end, with the metal holdfasts for the guns still in place and the magazines and fire control room to the side of each gun position. These guns were to fire on Harwich Haven but the gun houses are located in such a manner that they could not fire directly east, towards the coast; rather, their field of fire was a curious arc, most of which was faced inland. This is quite unlike any other gun site in the county and the precise reason why the battery was arranged in this way is a mystery, but it may have been to facilitate the documented role of the guns, which was to enfilade the beaches to the north and south of the battery position (Figure 38).
The placing of artillery some distance behind the coastline itself is a reminder that the hinterland back from the invasion beaches was also defended. This was, indeed, a vital part of the strategy, as the wide, flat heaths were a source of concern to military commanders because they represented perfect drop zones for paratroopers, ground for glider landings and grassy airstrips for troop-carrying aircraft. Throughout the war, the idea that beach defences would be attacked from inland before or at the same time as a sea-borne assault was one that plagued the minds of the British defenders. The ‘active’
Figure 38. Unusual gunhouse at Hollesley that housed one of a pair of 6-inch guns intended to give artillery support to Harwich Haven. The holdfast for the gun can be seen in the middle.

GUIDE 3: ORFORD TO FELIXSTOWE
31
defence of these areas fell to designated reserves or mobile platoons placed behind the lines and also to the artillery who, as we have seen, for their own reasons were placed in the middle of the potential landing grounds. More passive defence was provided by anti-landing ditches and other obstacles.
The area for five miles around Felixstowe was designated an anti-landing zone, with even some arable fields being provisioned with tubular scaffold poles erected at intervals and connected together by barbed wire some 12–15 feet above the ground. To deny its use to enemy aircraft the former aerodrome at Orford Ness was covered with concrete pimples to prevent any kind of landing (Figure 39). But most common were long ditches which today are normally known as anti-glider ditches, although in fact gliders had such a short landing run that their use could never have been prevented. Rather, the ditches could discourage the use of flat open areas as grassy airstrips by
Figure 39. A German Heinkel bomber at Orford Ness, which would have been brought to the Ness for assessment of its vulnerability to hostile fire. The anti-landing obstacles that covered the runway of the pre-war airfield can be seen in the distance. (Imperial War Museum, H23665)
32
A GUIDE TO SECOND WORLD WAR ARCHAEOLOGY IN SUFFOLK
troop-carrying aircraft. The wide expanses of heath around Sutton Common were covered in ditches by 1941 and their criss-cross rectilinear pattern transformed the landscape (Figure 40). Most were filled in soon after the war and some while the war was still in progress, but a good example survives within the National Trust site at Sutton Hoo, where the wartime defences stand cheek by jowl with the Anglo-Saxon royal cemetery.
Figure 40. Anti-landing ditches at Sutton Common. The sheer number can be appreciated from the air, but such was the need for food that by the middle of the war ditches were being filled in and given over to agricultural production. (English Heritage, USAAF Photography)
The Defence Landscape, 1941–43
Scaffolding, anti-tank ditches and anti-landing ditches tended to make their appearance in the coastal defence landscape from 1941. But, as was seen above, in contrast to some other places, this year did not see a dramatic change to the arrangement of infantry defences in this area. The landward side of Felixstowe was given additional protection by the addition of more sandbagged infantry posts in order to provide better ‘all round defence’, but elsewhere the changes were more modest.
For much of 1941 south Suffolk was held by 15 (Scottish) Division, who oversaw many of the changes instigated by Alan Brooke, albeit more

GUIDE 3: ORFORD TO FELIXSTOWE
33
modestly than elsewhere. The most noticeable change was the abandonment of isolated pillboxes and defence posts that had been hurriedly built in 1940 but that were, on reflection, of little practical purpose (Figure 41).
In an operational instruction of 16 April the Divisional Command stated that pillboxes that could not be manned after ‘stand to’ (the period in the morning and evening when attack was felt to be most likely and when men stood at their posts) were dangerous as they might be used by any invading Germans, and so should have their loopholes blocked up. To judge from the pillboxes on the ground, this task was completed on those in places where large numbers had been built in 1940, such as around Hollesley pumping station, or where pillboxes were physically isolated, as was often the case north of Shingle Street.
But, in the main, throughout 1941 the Division assigned to this part of the Suffolk coast placed most of its strength in the south, with a long thin line to the north (Figures 42 and 43). This is not to say that the defences were not upgraded. As we have seen, scaffolding and anti-tank ditches
Figure 41. Pair of pillboxes on Simpson’s Saltings, disused in 1941 as part of a rationalisation of Britain’s anti-invasion landscape. Unlike many other places on the south and east coast, this part of the Suffolk coast did not see a wholesale reorganisation of defences.
34
A GUIDE TO SECOND WORLD WAR ARCHAEOLOGY IN SUFFOLK
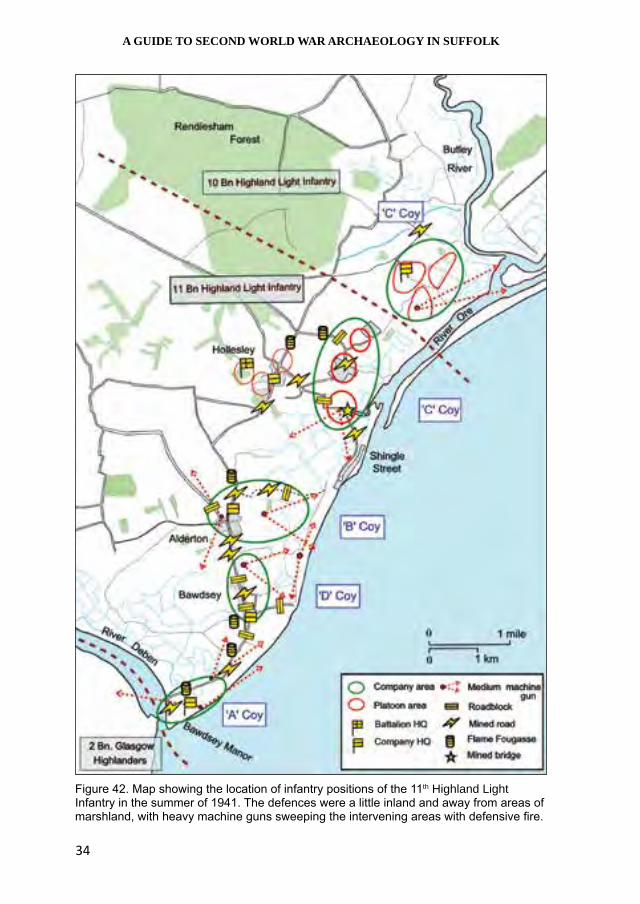
Figure 42. Map showing the location of infantry positions of the 11th Highland Light Infantry in the summer of 1941. The defences were a little inland and away from areas of marshland, with heavy machine guns sweeping the intervening areas with defensive fire.

GUIDE 3: ORFORD TO FELIXSTOWE
35
Figure 43. Map showing the dispositions of the 10th Highland Light Infantry around Orford. As this area was less suitable for a seaborne landing, the troops on the ground were more thinly scattered.
36
A GUIDE TO SECOND WORLD WAR ARCHAEOLOGY IN SUFFOLK
were added, as were weapons such as the Canadian Pipe Bomb and the Flame Fougasse, which were intended to crater roads and destroy vehicles respectively. Felixstowe aside, this was a quiet sector of the coast and guarding it brought boredom, as one incident reported in a war diary brings home:
About noon on Tuesday 8th Apr[il], a convoy of about 60 ships sailing north was attacked … by bombers – “50 plus”. Wonderful day with bright blue sky and sparkling sea. Bosche flew so high they only hit the sea. A.[nti[ A[ircraft] from the ships and shore only hit the air. Due to an unfortunate “time lag” in the receipt of the warning, fighters from Martlesham A’drome arrived about ten minutes too late. They didn’t hit anything either. They did, however, have a good game of hide and seek about 30,000 ft up and laid on some pretty vapour trails for the benefit of the interested spectators. Pleasant interlude from digging and wiring.
The Landscape of Training
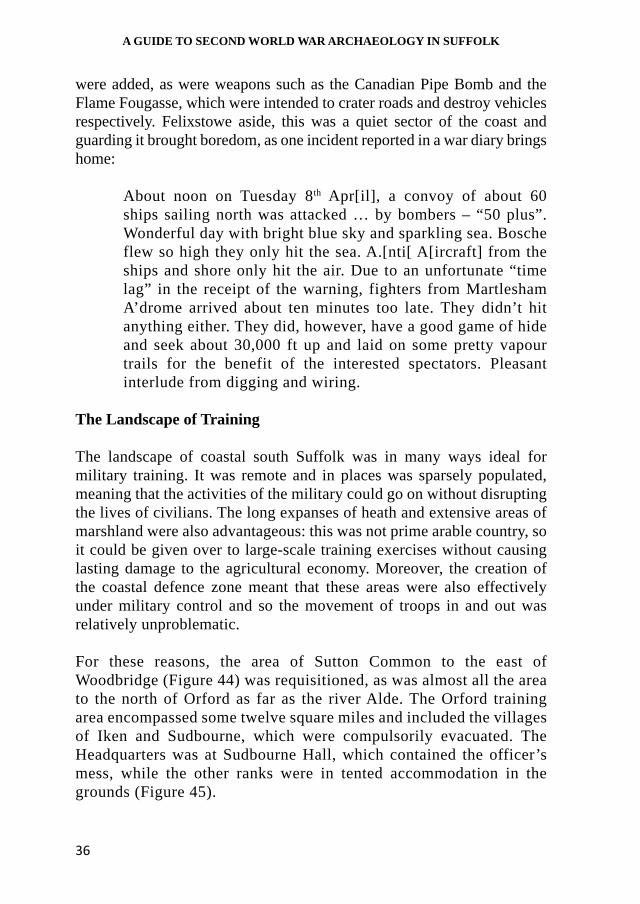
The landscape of coastal south Suffolk was in many ways ideal for military training. It was remote and in places was sparsely populated, meaning that the activities of the military could go on without disrupting the lives of civilians. The long expanses of heath and extensive areas of marshland were also advantageous: this was not prime arable country, so it could be given over to large-scale training exercises without causing lasting damage to the agricultural economy. Moreover, the creation of the coastal defence zone meant that these areas were also effectively under military control and so the movement of troops in and out was relatively unproblematic.
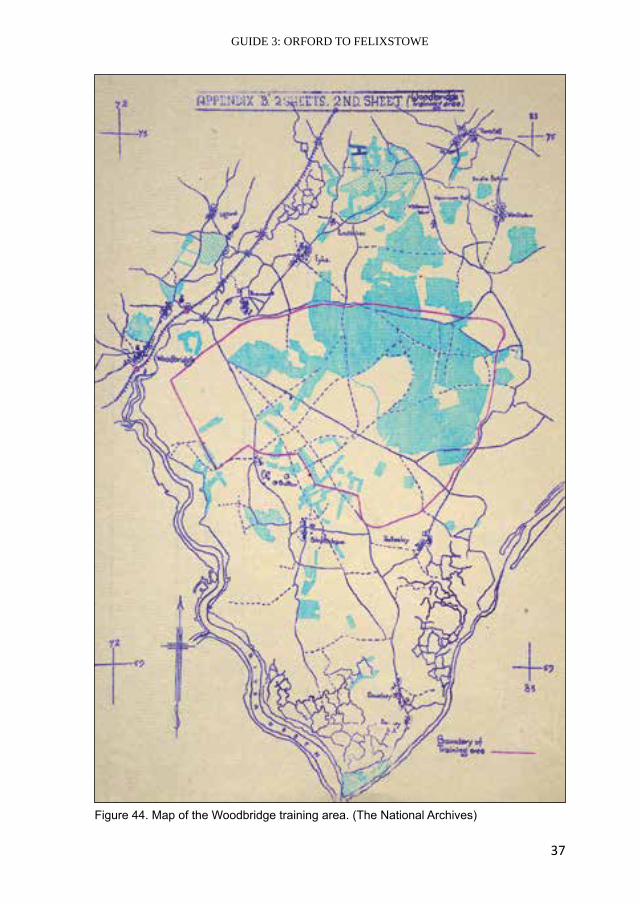
For these reasons, the area of Sutton Common to the east of Woodbridge (Figure 44) was requisitioned, as was almost all the area to the north of Orford as far as the river Alde. The Orford training area encompassed some twelve square miles and included the villages of Iken and Sudbourne, which were compulsorily evacuated. The Headquarters was at Sudbourne Hall, which contained the officer’s mess, while the other ranks were in tented accommodation in the grounds (Figure 45).
GUIDE 3: ORFORD TO FELIXSTOWE
37
Figure 44. Map of the Woodbridge training area. (The National Archives)
38
A GUIDE TO SECOND WORLD WAR ARCHAEOLOGY IN SUFFOLK
Figure 45. The Orford Battle Training Area.
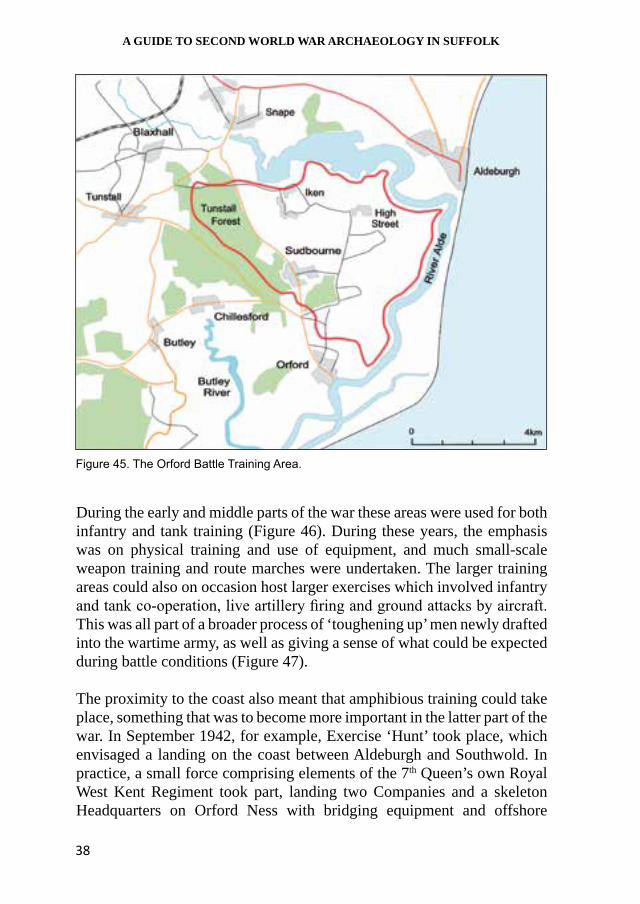
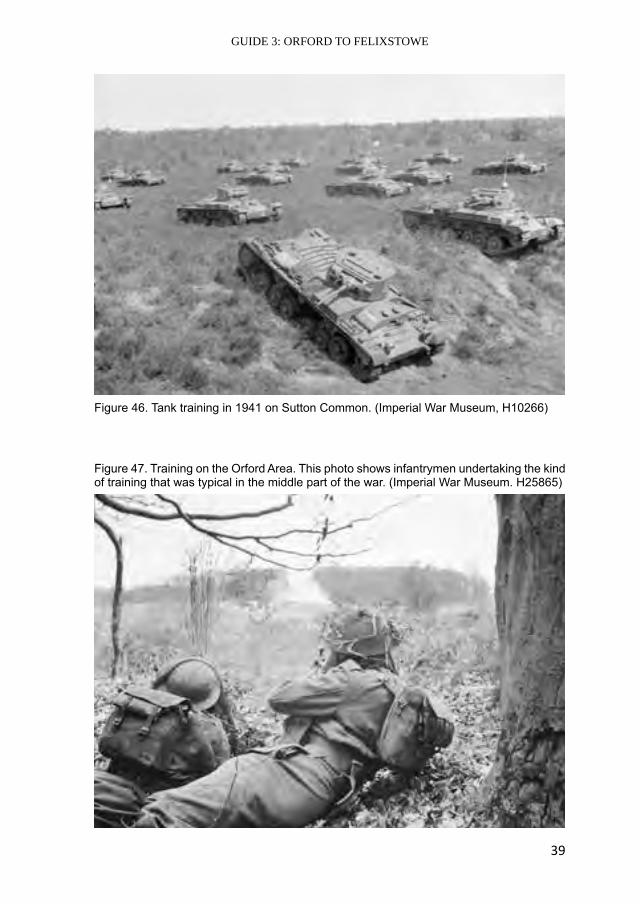
During the early and middle parts of the war these areas were used for both infantry and tank training (Figure 46). During these years, the emphasis was on physical training and use of equipment, and much small-scale weapon training and route marches were undertaken. The larger training areas could also on occasion host larger exercises which involved infantry and tank co-operation, live artillery firing and ground attacks by aircraft. This was all part of a broader process of ‘toughening up’ men newly drafted into the wartime army, as well as giving a sense of what could be expected during battle conditions (Figure 47).
The proximity to the coast also meant that amphibious training could take place, something that was to become more important in the latter part of the war. In September 1942, for example, Exercise ‘Hunt’ took place, which envisaged a landing on the coast between Aldeburgh and Southwold. In practice, a small force comprising elements of the 7th Queen’s own Royal West Kent Regiment took part, landing two Companies and a skeleton Headquarters on Orford Ness with bridging equipment and offshore
GUIDE 3: ORFORD TO FELIXSTOWE
39
Figure 46. Tank training in 1941 on Sutton Common. (Imperial War Museum, H10266)
Figure 47. Training on the Orford Area. This photo shows infantrymen undertaking the kind of training that was typical in the middle part of the war. (Imperial War Museum. H25865)
40
A GUIDE TO SECOND WORLD WAR ARCHAEOLOGY IN SUFFOLK
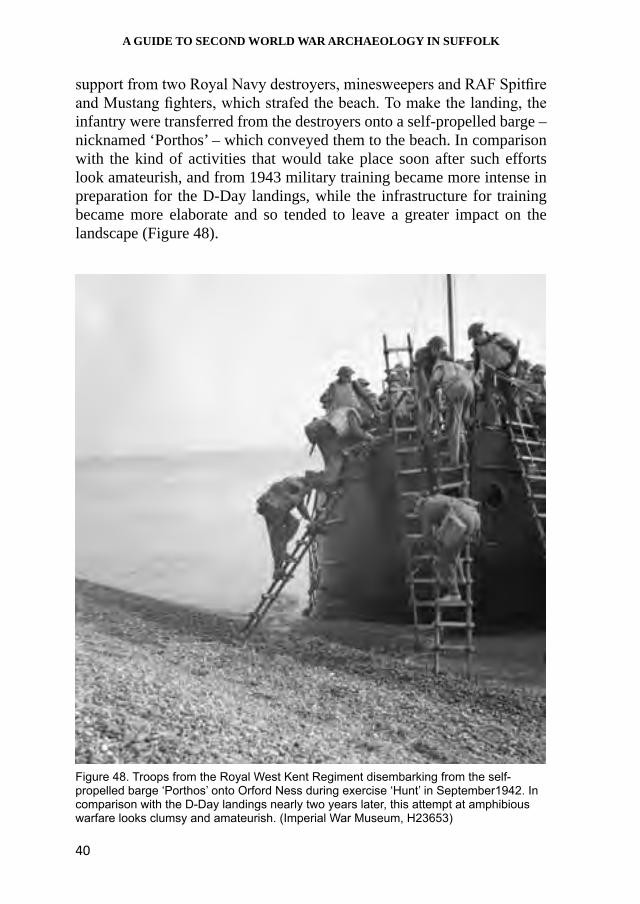
support from two Royal Navy destroyers, minesweepers and RAF Spitfire and Mustang fighters, which strafed the beach. To make the landing, the infantry were transferred from the destroyers onto a self-propelled barge – nicknamed ‘Porthos’ – which conveyed them to the beach. In comparison with the kind of activities that would take place soon after such efforts look amateurish, and from 1943 military training became more intense in preparation for the D-Day landings, while the infrastructure for training became more elaborate and so tended to leave a greater impact on the landscape (Figure 48).
Figure 48. Troops from the Royal West Kent Regiment disembarking from the self-propelled barge ‘Porthos’ onto Orford Ness during exercise ‘Hunt’ in September1942. In comparison with the D-Day landings nearly two years later, this attempt at amphibious warfare looks clumsy and amateurish. (Imperial War Museum, H23653)
GUIDE 3: ORFORD TO FELIXSTOWE
41
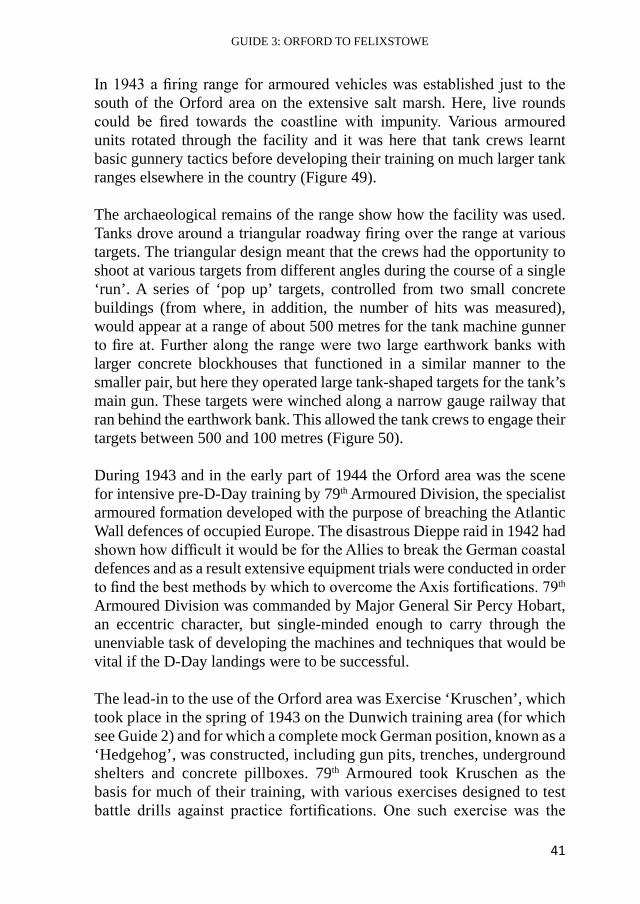
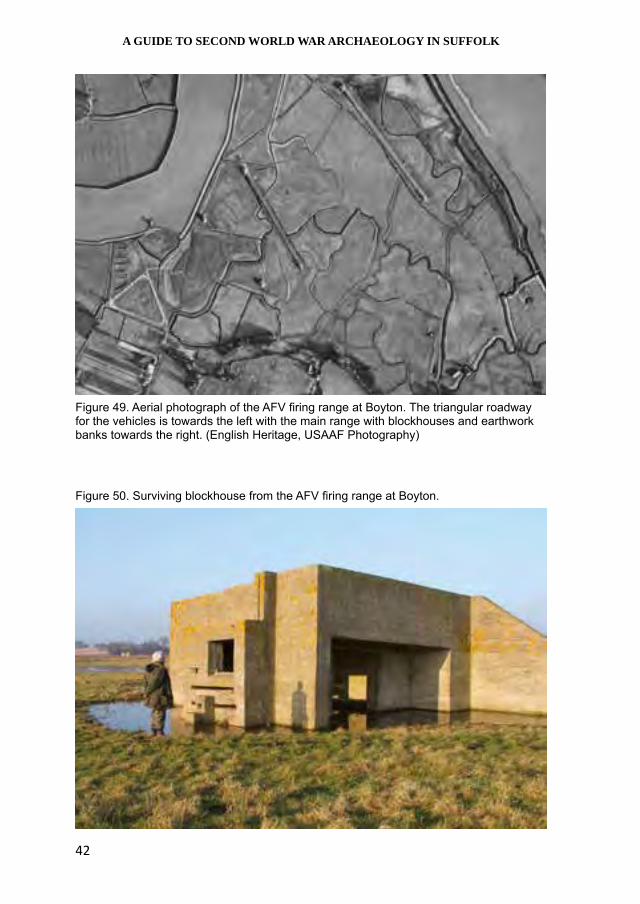
In 1943 a firing range for armoured vehicles was established just to the south of the Orford area on the extensive salt marsh. Here, live rounds could be fired towards the coastline with impunity. Various armoured units rotated through the facility and it was here that tank crews learnt basic gunnery tactics before developing their training on much larger tank ranges elsewhere in the country (Figure 49).
The archaeological remains of the range show how the facility was used. Tanks drove around a triangular roadway firing over the range at various targets. The triangular design meant that the crews had the opportunity to shoot at various targets from different angles during the course of a single ‘run’. A series of ‘pop up’ targets, controlled from two small concrete buildings (from where, in addition, the number of hits was measured), would appear at a range of about 500 metres for the tank machine gunner to fire at. Further along the range were two large earthwork banks with larger concrete blockhouses that functioned in a similar manner to the smaller pair, but here they operated large tank-shaped targets for the tank’s main gun. These targets were winched along a narrow gauge railway that ran behind the earthwork bank. This allowed the tank crews to engage their targets between 500 and 100 metres (Figure 50).
During 1943 and in the early part of 1944 the Orford area was the scene for intensive pre-D-Day training by 79th Armoured Division, the specialist armoured formation developed with the purpose of breaching the Atlantic Wall defences of occupied Europe. The disastrous Dieppe raid in 1942 had shown how difficult it would be for the Allies to break the German coastal defences and as a result extensive equipment trials were conducted in order to find the best methods by which to overcome the Axis fortifications. 79th Armoured Division was commanded by Major General Sir Percy Hobart, an eccentric character, but single-minded enough to carry through the unenviable task of developing the machines and techniques that would be vital if the D-Day landings were to be successful.
The lead-in to the use of the Orford area was Exercise ‘Kruschen’, which took place in the spring of 1943 on the Dunwich training area (for which see Guide 2) and for which a complete mock German position, known as a ‘Hedgehog’, was constructed, including gun pits, trenches, underground shelters and concrete pillboxes. 79th Armoured took Kruschen as the basis for much of their training, with various exercises designed to test battle drills against practice fortifications. One such exercise was the
42
A GUIDE TO SECOND WORLD WAR ARCHAEOLOGY IN SUFFOLK
Figure 49. Aerial photograph of the AFV firing range at Boyton. The triangular roadway for the vehicles is towards the left with the main range with blockhouses and earthwork banks towards the right. (English Heritage, USAAF Photography)
Figure 50. Surviving blockhouse from the AFV firing range at Boyton.
GUIDE 3: ORFORD TO FELIXSTOWE
43
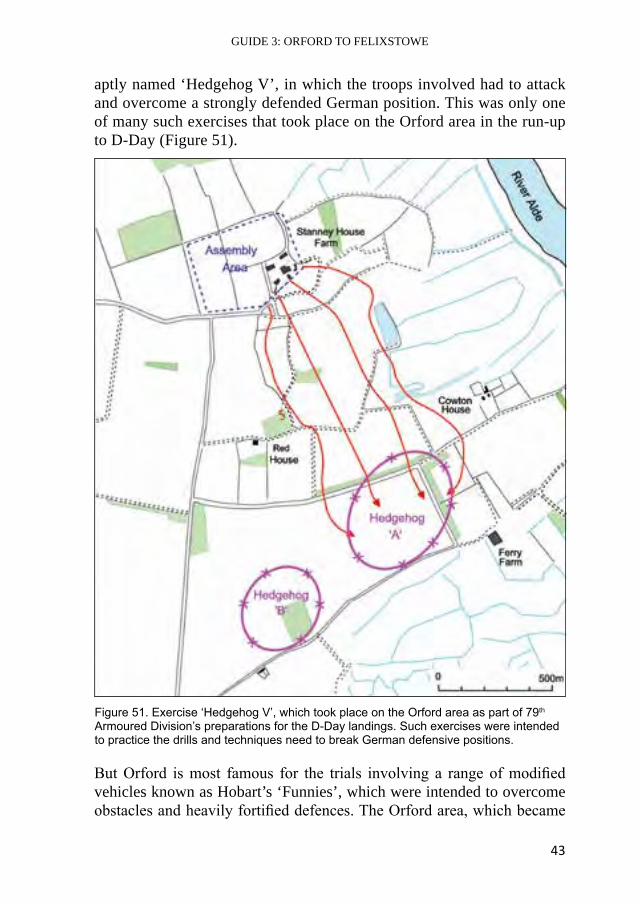
aptly named ‘Hedgehog V’, in which the troops involved had to attack and overcome a strongly defended German position. This was only one of many such exercises that took place on the Orford area in the run-up to D-Day (Figure 51).
But Orford is most famous for the trials involving a range of modified vehicles known as Hobart’s ‘Funnies’, which were intended to overcome obstacles and heavily fortified defences. The Orford area, which became
Figure 51. Exercise ‘Hedgehog V’, which took place on the Orford area as part of 79th Armoured Division’s preparations for the D-Day landings. Such exercises were intended to practice the drills and techniques need to break German defensive positions.
44
A GUIDE TO SECOND WORLD WAR ARCHAEOLOGY IN SUFFOLK
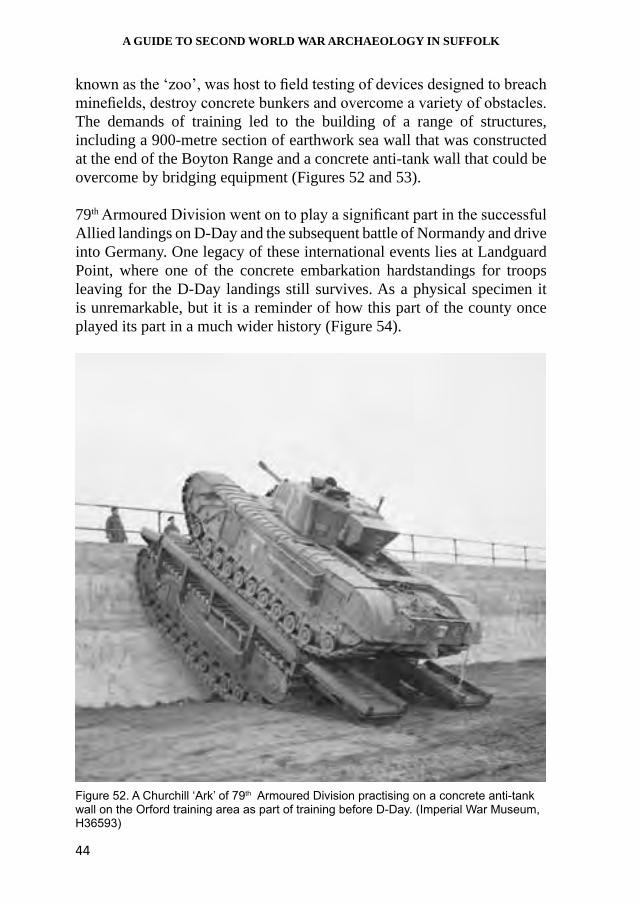
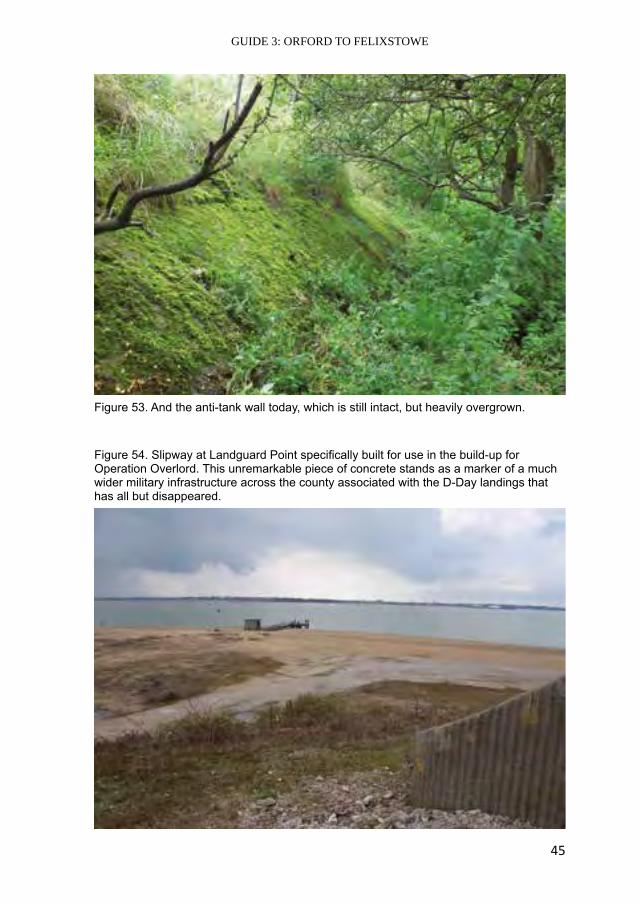
known as the ‘zoo’, was host to field testing of devices designed to breach minefields, destroy concrete bunkers and overcome a variety of obstacles. The demands of training led to the building of a range of structures, including a 900-metre section of earthwork sea wall that was constructed at the end of the Boyton Range and a concrete anti-tank wall that could be overcome by bridging equipment (Figures 52 and 53).
79th Armoured Division went on to play a significant part in the successful Allied landings on D-Day and the subsequent battle of Normandy and drive into Germany. One legacy of these international events lies at Landguard Point, where one of the concrete embarkation hardstandings for troops leaving for the D-Day landings still survives. As a physical specimen it is unremarkable, but it is a reminder of how this part of the county once played its part in a much wider history (Figure 54).
Figure 52. A Churchill ‘Ark’ of 79th Armoured Division practising on a concrete anti-tank wall on the Orford training area as part of training before D-Day. (Imperial War Museum, H36593)
GUIDE 3: ORFORD TO FELIXSTOWE
45
Figure 53. And the anti-tank wall today, which is still intact, but heavily overgrown.
Figure 54. Slipway at Landguard Point specifically built for use in the build-up for Operation Overlord. This unremarkable piece of concrete stands as a marker of a much wider military infrastructure across the county associated with the D-Day landings that has all but disappeared.
46
A GUIDE TO SECOND WORLD WAR ARCHAEOLOGY IN SUFFOLK
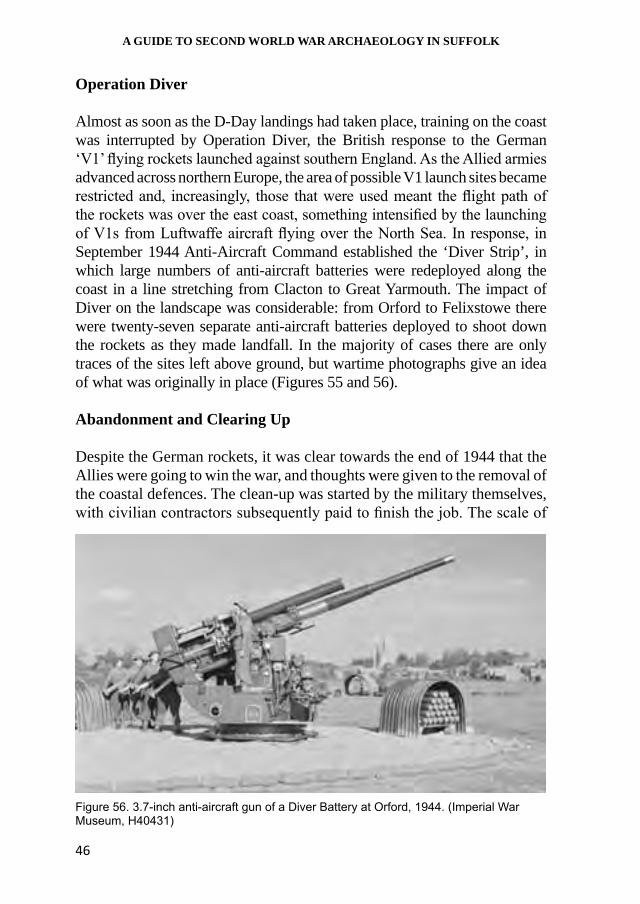
Operation Diver
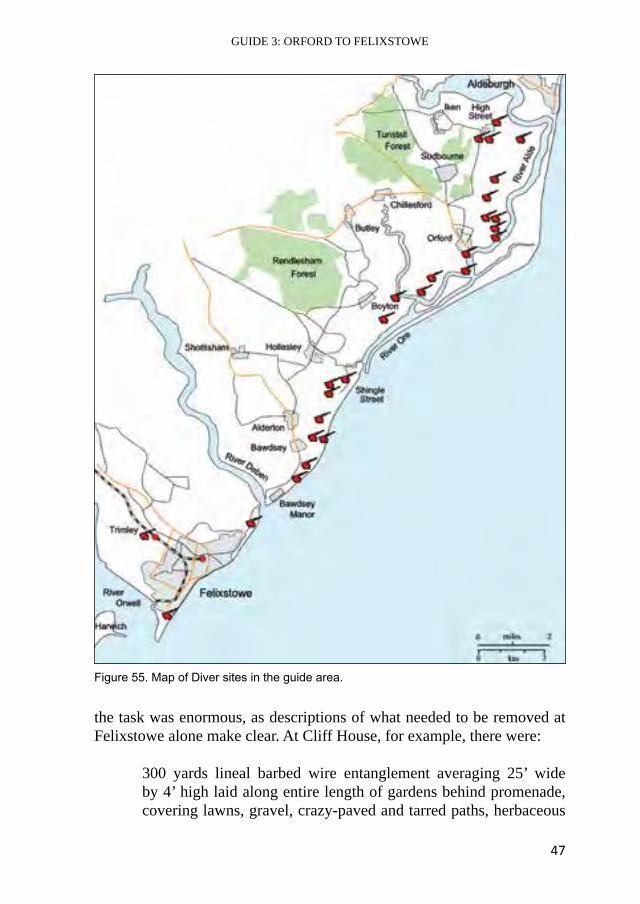
Almost as soon as the D-Day landings had taken place, training on the coast was interrupted by Operation Diver, the British response to the German ‘V1’ flying rockets launched against southern England. As the Allied armies advanced across northern Europe, the area of possible V1 launch sites became restricted and, increasingly, those that were used meant the flight path of the rockets was over the east coast, something intensified by the launching of V1s from Luftwaffe aircraft flying over the North Sea. In response, in September 1944 Anti-Aircraft Command established the ‘Diver Strip’, in which large numbers of anti-aircraft batteries were redeployed along the coast in a line stretching from Clacton to Great Yarmouth. The impact of Diver on the landscape was considerable: from Orford to Felixstowe there were twenty-seven separate anti-aircraft batteries deployed to shoot down the rockets as they made landfall. In the majority of cases there are only traces of the sites left above ground, but wartime photographs give an idea of what was originally in place (Figures 55 and 56).
Abandonment and Clearing Up
Despite the German rockets, it was clear towards the end of 1944 that the Allies were going to win the war, and thoughts were given to the removal of the coastal defences. The clean-up was started by the military themselves, with civilian contractors subsequently paid to finish the job. The scale of
Figure 56. 3.7-inch anti-aircraft gun of a Diver Battery at Orford, 1944. (Imperial War Museum, H40431)
GUIDE 3: ORFORD TO FELIXSTOWE
47
Figure 55. Map of Diver sites in the guide area.
the task was enormous, as descriptions of what needed to be removed at Felixstowe alone make clear. At Cliff House, for example, there were:
300 yards lineal barbed wire entanglement averaging 25’ wide by 4’ high laid along entire length of gardens behind promenade, covering lawns, gravel, crazy-paved and tarred paths, herbaceous
48
A GUIDE TO SECOND WORLD WAR ARCHAEOLOGY IN SUFFOLK
borders and flower beds, part rose-garden, and shrubberies. Stakes driven into lawns and paths … 23 yards linear slit trench dug 5’ deep x 2’ 9” wide from lily-pond to blockhouse on promenade; sides revetted with corrugated iron sheets …
While in the grounds of South Beach Mansion were
180 yards lineal Tubular Steel Scaffolding Barrier 15’ wide x 10’ high erected along whole length of grounds behind promenade over euonymus hedge shrubs and herbaceous border and edge of tarred gravel roadway and interlaced barbed wire. Outer feet driven into holes in tarred roadway (approximately 200 holes) …
The cost of the removal of works along the sea front at Felixstowe was estimated at just under £7000. Elsewhere, the barbed wire, minefields and scaffolding were removed, the anti-landing ditches filled in and the landscape was in many ways transformed again by the intensification of post-war agriculture and, in places, coastal erosion. The concrete defences are the ones that tended to survive, either in remote parts of the countryside, where they are preserved by an alternative use, or, as at Landguard Fort, where they became part of heritage sites. Today, the remnants of the Second World War defences are a valued part of Suffolk’s history and careful management will ensure that many will remain in existence long into the future (Figure 57).
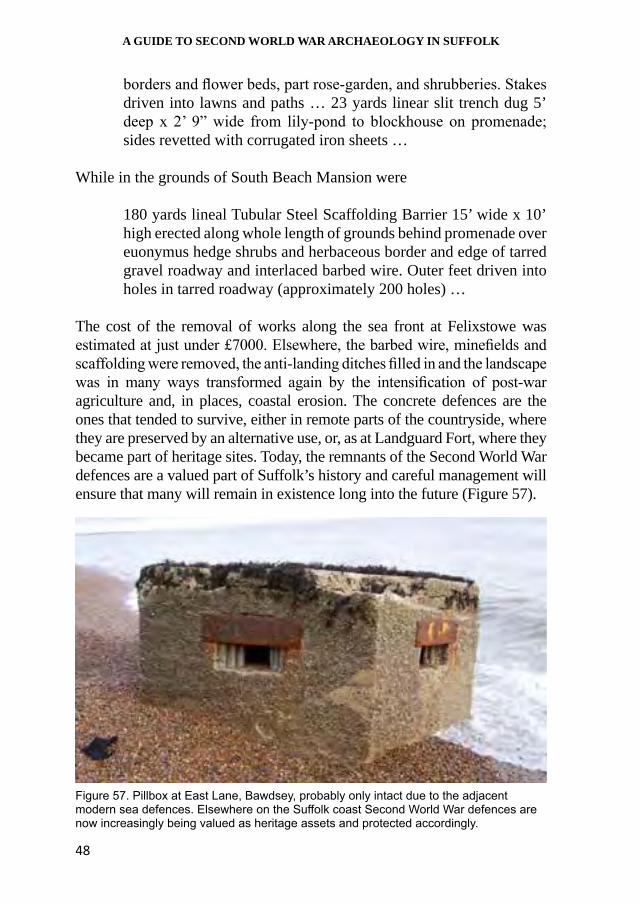
Figure 57. Pillbox at East Lane, Bawdsey, probably only intact due to the adjacent modern sea defences. Elsewhere on the Suffolk coast Second World War defences are now increasingly being valued as heritage assets and protected accordingly.
GUIDE 3: ORFORD TO FELIXSTOWE
49
The Post-war Landscape: The Cold War, Folklore and Shingle Street
As has been seen, south Suffolk has a long military history and this did not come to an end in 1945. Some longstanding themes found new expression in the Cold War. RAF Bawdsey’s role in air defence continued, first as a radar station and then as a Bloodhound missile site. At Orford Ness, the long history of use as a testing ground continued with the Atomic Weapons Research Establishment, where components for nuclear weapons were developed. In addition, ‘Cobra Mist’, an over-the-horizon radar listening station, was built on the Ness in the late 1960s in an attempt to give early warning of hostile action by the Soviet Union. The climate of secrecy and the clandestine military operations that had characterised the region’s history in the earlier part of the twentieth century was to remain up to the end of the Cold War.
The background of secret research and weapons testing is of crucial importance to post-war perceptions, in particular the association of this part of the Suffolk coast with one of the most persistent myths concerning the Second World War: that it was the scene for an unsuccessful German invasion attempt that was subsequently covered up by British authorities who feared the effect that any kind of invasion would have on civilian morale. Although there are numerous variants on the story, most involve hundreds of bodies being washed up on the beach, many of them burned as a result of British petroleum weapons that had been used to set the sea on fire.
The idea that there had been a failed German attack on Britain was current in 1940 and persisted long after the end of the war; and the notion that Shingle Street was the site of the attempted landing gained renewed vigour in the 1990s, when the alleged incident attracted national press coverage that led to the release of previously classified documents from the National Archives at Kew. On balance, however, all the evidence points to no failed German landings, no burning sea and an absence of hundreds of burnt German soldiers. Rather, the truth lies in a series of otherwise unconnected incidents and deliberate propaganda on the part of the British government. Explaining why the myth came to take hold in the way that it did and why it has been so persistent does, however, reveal a great deal about the history of this stretch of coastline more generally. The myth has been comprehensively de-bunked by Hayward in his book The Bodies on the Beach and it is difficult to add much to his comprehensive account.
50
A GUIDE TO SECOND WORLD WAR ARCHAEOLOGY IN SUFFOLK
Flame Weapons for Coastal Defence
Experiments with using petroleum weapons to defend coastlines and as a means of attacking enemy waterways and ports had originally been suggested during the First World War, but experiments had been unfavourable because of the practical problems of how to deliver the flammable material to the target and the large quantity of fuel needed to create a major conflagration.
The start of the Second World War brought with it a renewed interest in petroleum warfare, in terms of both revisiting the ideas of the earlier conflict and developing further notions, such as using flammable fuel on the sea to restrict the activities of seaplanes. However, on the negative side was the lack of practical benefits, coupled with the fact that such techniques were considered close to chemical warfare and so restricted by the Geneva Convention.
The German conquest of France and the Low Countries led to a speedy re-evaluation of the merits of petroleum warfare nevertheless, especially as an anti-invasion device that could be used to protect Britain’s vulnerable coastline and ports. In addition, it was thought possible that inland drainage dykes could be fired and roads flooded with petrol that could then be ignited.
In the summer of 1940 a conference on flame warfare took place, trials were conducted and the Petroleum Warfare Department was established to research the development of flame weapons. By the middle of the summer experiments on the south coast – conducted in full view of the Germans across the Channel – had successfully set the sea on fire, thus demonstrating that there might be a place for such a weapon in Britain’s anti-invasion strategy.
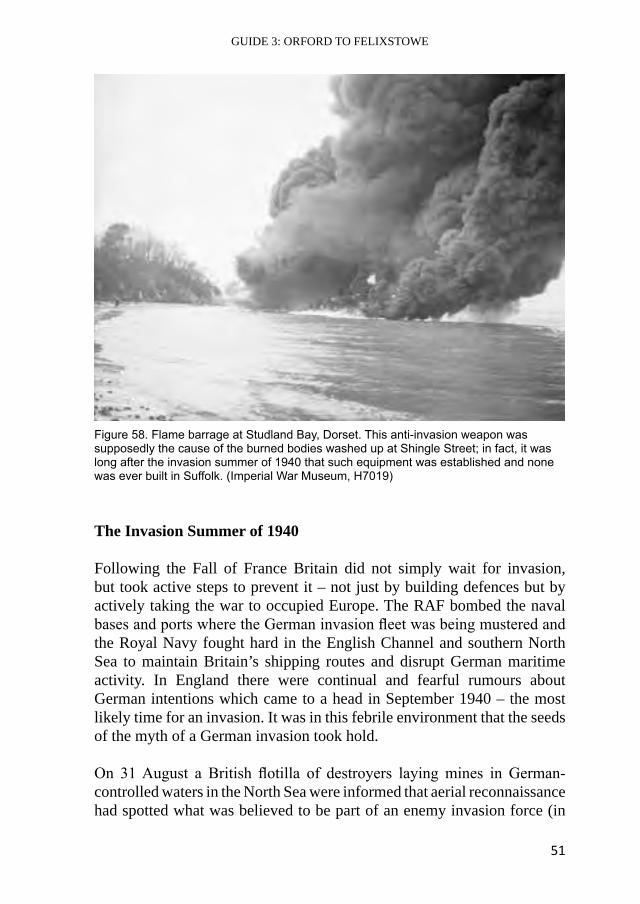
By 1941 the idea of a floating petrol barrage had been developed to such an extent that it could be deployed and, eventually, just under ten miles of barrage (out of an originally planned 50 miles) were established along the south coast. Importantly, however, in September 1940 no flame barrage had been constructed anywhere in the country and throughout the war none was ever laid in Suffolk or at Shingle Street (Figure 58).
GUIDE 3: ORFORD TO FELIXSTOWE
51
Figure 58. Flame barrage at Studland Bay, Dorset. This anti-invasion weapon was supposedly the cause of the burned bodies washed up at Shingle Street; in fact, it was long after the invasion summer of 1940 that such equipment was established and none was ever built in Suffolk. (Imperial War Museum, H7019)
The Invasion Summer of 1940
Following the Fall of France Britain did not simply wait for invasion, but took active steps to prevent it – not just by building defences but by actively taking the war to occupied Europe. The RAF bombed the naval bases and ports where the German invasion fleet was being mustered and the Royal Navy fought hard in the English Channel and southern North Sea to maintain Britain’s shipping routes and disrupt German maritime activity. In England there were continual and fearful rumours about German intentions which came to a head in September 1940 – the most likely time for an invasion. It was in this febrile environment that the seeds of the myth of a German invasion took hold.
On 31 August a British flotilla of destroyers laying mines in German-controlled waters in the North Sea were informed that aerial reconnaissance had spotted what was believed to be part of an enemy invasion force (in
52
A GUIDE TO SECOND WORLD WAR ARCHAEOLOGY IN SUFFOLK
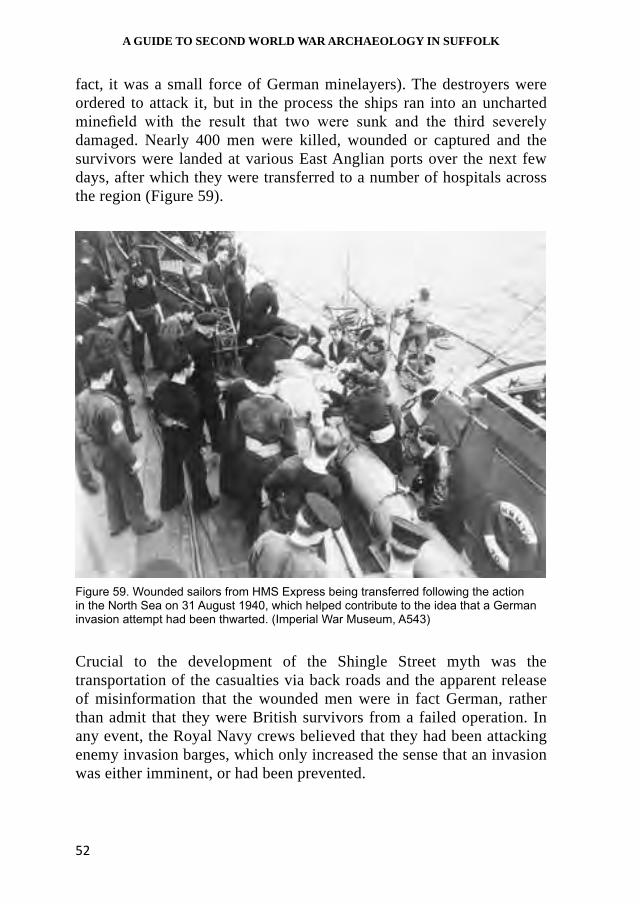
fact, it was a small force of German minelayers). The destroyers were ordered to attack it, but in the process the ships ran into an uncharted minefield with the result that two were sunk and the third severely damaged. Nearly 400 men were killed, wounded or captured and the survivors were landed at various East Anglian ports over the next few days, after which they were transferred to a number of hospitals across the region (Figure 59).
Crucial to the development of the Shingle Street myth was the transportation of the casualties via back roads and the apparent release of misinformation that the wounded men were in fact German, rather than admit that they were British survivors from a failed operation. In any event, the Royal Navy crews believed that they had been attacking enemy invasion barges, which only increased the sense that an invasion was either imminent, or had been prevented.
Figure 59. Wounded sailors from HMS Express being transferred following the action in the North Sea on 31 August 1940, which helped contribute to the idea that a German invasion attempt had been thwarted. (Imperial War Museum, A543)
GUIDE 3: ORFORD TO FELIXSTOWE
53
In addition, a week later, on 7 September, the British military signalled the code word ‘Cromwell’ to units stationed on the coast, which was the signal for an anticipated invasion in the subsequent twelve hours. This action had been prompted by the favourable tidal conditions, the Luftwaffe’s commencement of heavy bombing against London and the capture of German spies in Kent. In some places it was believed that an invasion had actually started, and countermeasures were put into place.
It is easy to see how, in the general atmosphere, the Cromwell alarm and the recently evacuated Royal Navy casualties became blurred in East Anglia. Across the country rumours of a failed German invasion circulated and then were reported in the press. Such stories were picked up with alacrity by foreign newspapers, especially those in the United States that could corroborate their stories with journalists’ reports from occupied Europe that told of mass German casualties and burnt bodies being washed up near the channel ports. The idea that there had been a failed German invasion attempt spread around the world and in turn fed British rumours.
There is also the strong possibility that British intelligence deliberately fed the story and, while they tried unsuccessfully to curb its worst excesses in the home newspapers, there was utility in using the network of British agents abroad to spread the idea. The notion of burned bodies fed the suspicion that the British had developed a working flame barrage and that anti-invasion defences were well advanced. In a climate of suspicion and with a lack of hard information, even the suggestion that an invasion had been successfully repelled had the utility of demonstrating that British resolve was firm and that there was no intention of surrender. So successful, indeed, was the idea that there had been a failed invasion that the Germans themselves were forced to deny that any military operation had taken place.
On the coast itself, the evidence from military units also suggests that no attack took place. There were no movements of troops, no deployment of reserves and no hint at all that any kind of confrontation had occurred. But interestingly, military records do acknowledge the rumours that were circulating about large numbers of dead bodies being washed up on the coast, although, tellingly, these were always in a neighbouring sector. Together with Shingle Street, other parts of the south coast have similar tales, albeit often with less notoriety than in Suffolk.
54
A GUIDE TO SECOND WORLD WAR ARCHAEOLOGY IN SUFFOLK
The only German bodies to be washed up were those of airmen and sailors who had died at sea and sometimes of soldiers who had either died while training for Operation Sealion or were manning vessels such as flak trawlers. It is again telling that the military did not try to cover up or hide these incidents; rather, they record that correct protocols were followed. The body of the German airman washed up near Walberswick was taken to the police station and searched before being collected and passed on for further examination and then burial. So, in short, there is no evidence that any bodies were washed up on Shingle Street during 1940 and at that stage of the war there was no working flame barrage weaponry deployed anywhere along the coast, so it would not have been possible for any bodies to have been consumed in a raging fire.
The wartime history of Shingle Street itself is of some interest and only adds depth to the myth of the burned bodies. In June 1940 the village was evacuated, in part because the construction of minefields and other conventional anti-invasion defences had rendered the already isolated community irretrievably cut off. The remote location was in part responsible for the grant of permission to the Chemical Defence Research Establishment to use the area for the testing of a chemical weapon bomb, which took place in March the following year and resulted in the destruction of the village pub. The beach was also extensively quarried for material for the construction of wartime airfields and used by 79th Armoured Division for DD-tank training. The latter probably accounts for a variant on the ‘bodies on the beach’ story in which the bodies were Allied soldiers killed during a friendly fire accident while training for D-Day, which in turn represents a conflation of the historically attested Slapton Sands disaster in Devon in 1944, when hundreds of American troops taking part in an amphibious exercise were attacked and killed by German E-boats.
What is perhaps of most interest is how the wartime history of Shingle Street, coupled with the broader character of this part of Suffolk, has shaped the myth. The remote, mysterious marshlands and landscape where long runs of beaches merge with the vast East Anglian sky have for centuries been a fertile breeding ground for folklore and legend. This stretch of coast was one of the haunts of ‘Black Shuck’, the East Anglian black devil dog. In the twentieth century the area also provided inspiration for M. R. James’ famous ghost stories. Even during the war,
GUIDE 3: ORFORD TO FELIXSTOWE
55
the remote nature of the area formed the basis for strange events, such as rumours that patrols had gone out never to be seen again, with only their equipment left behind on the beach.
Given the military secrecy that accompanied the development of radar at Bawdsey manor, the training of Hobart’s ‘Funnies’ at Orford and the Cold War testing of bomb components and listening station at Orford Ness it is easy to see how tall stories became attached to this part of the coastline. It is perhaps inevitable that in a place where there were no people to witness the day-to-day events that occurred, Shingle Street should form the focus for what is best described as modern-day folklore.
The best place to end is with the recollection of a veteran from the Liverpool Scottish who was stationed at Shingle Street when the invasion was supposed to have occurred and is recounted in Hayward’s excellent debunking of the myth:
Although there were constant warnings about imminent invasion the only German we saw was a dead airman who we fished out of the sea and carried back to camp on a hurdle.
WALKING THE COASTAL CRUST: PILLBOX TRAILS
The Suffolk coast is well known to walkers and the pillbox trails here are intended to give a little more interest to a good walk. Some monuments are on private land, but all can be viewed from public footpaths. Please help preserve these important monuments.
• Do not climb into pillboxes or other concrete structures.
• In places close to the sea be aware of the dangers from cliffs and tides.
• Keep dogs on leads.
• Take your litter home.
• Obey the strict rules of access to managed sites.
56
A GUIDE TO SECOND WORLD WAR ARCHAEOLOGY IN SUFFOLK
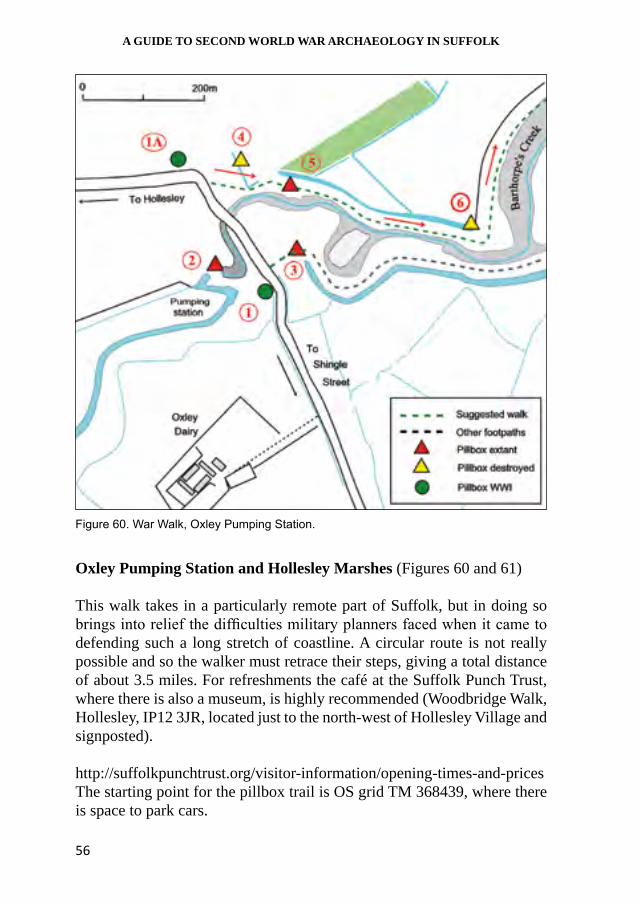
Figure 60. War Walk, Oxley Pumping Station.
Oxley Pumping Station and Hollesley Marshes (Figures 60 and 61)
This walk takes in a particularly remote part of Suffolk, but in doing so brings into relief the difficulties military planners faced when it came to defending such a long stretch of coastline. A circular route is not really possible and so the walker must retrace their steps, giving a total distance of about 3.5 miles. For refreshments the café at the Suffolk Punch Trust, where there is also a museum, is highly recommended (Woodbridge Walk, Hollesley, IP12 3JR, located just to the north-west of Hollesley Village and signposted).
http://suffolkpunchtrust.org/visitor-information/opening-times-and-pricesThe starting point for the pillbox trail is OS grid TM 368439, where there is space to park cars.
GUIDE 3: ORFORD TO FELIXSTOWE
57
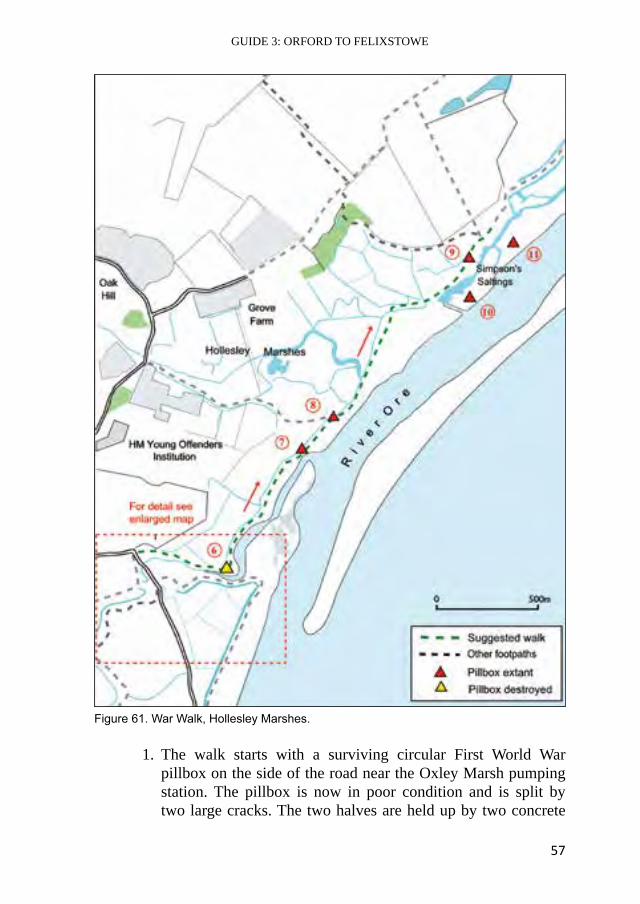
Figure 61. War Walk, Hollesley Marshes.
1. The walk starts with a surviving circular First World War pillbox on the side of the road near the Oxley Marsh pumping station. The pillbox is now in poor condition and is split by two large cracks. The two halves are held up by two concrete
58
A GUIDE TO SECOND WORLD WAR ARCHAEOLOGY IN SUFFOLK
buttresses that were added during the Second World War when the pillbox was brought back into use. This reuse saw a new embrasure added in the walls to allow the occupants to cover the road leading inland from the beach, and another embrasure was partially blocked up, probably to receive a ‘Turnball Mount’ to support a Bren gun. Although now much faded, on the interior there is graffiti reading ‘house for tramps 1918’. The present condition of the pillbox makes it dangerous to enter, so look at it from the outside. A second First World War pillbox (1A), but without any sign of later alteration, lies on private land close to the road and just to the west of the pumping station. These two pillboxes were built to defend the road leading inland from Shingle Street and represent important survivals from the earlier defended landscape.
2. Follow the track to the west over the bridge that crosses Barthorpe Creek and past the Oxley Marshes pumping station. Here there is a Type 22 pillbox built into the dyke adjacent to the sluice. The embrasures and doorways are bricked up, but originally this pillbox had a field of fire to the south and helped to defend the bridge.
3. Retrace your steps back over the bridge, cross the road and join the public footpath that runs along the top of the drainage dyke. Not far down this path is another pillbox, but this time a small brick structure built into the dyke. The embrasures and entrance are blocked up and the design is similar to those used by the Admiralty, which makes this an unusual pillbox for this part of Suffolk.
4. Retrace your steps again, go back to the road and head north, before turning east along the northern side of Barthorp’s Creek. Here a suspiciously large quantity of brick and concrete that forms the path is suggestive of a destroyed pillbox, of which nothing more is known.
5. Further along the path a pillbox survives on the dyke bank. The front is completely overgrown, but the entrance is accessible. This is a ‘Suffolk Square’ design modified by the addition of a significant blast wall, probably a response to the pillbox’s location, which potentially exposed the entrance to small arms fire.

GUIDE 3: ORFORD TO FELIXSTOWE
59
The pillboxes encountered so far on the walk were part of a strongly defended area based on the crossing of Barthorp’s Creek. Other defences included barbed wire, scaffolding, anti-tank cubes and ditches and earthworks. As a collection of archaeological remains they are also significant because it is very unusual to have four completely different types of pillbox situated so close to one another. Just on this short stretch there are two survivors from the First World War and one each of Type 22, Admiralty design and Suffolk Square from the Second World War.
6. Continue along the path. Where it dog-legs to the left (north) is the site of another pillbox, the presence of which is known from aerial photographs. Although it has since been removed, chunks of concrete are sometimes exposed on the dyke bank. Continue north along the path. From this point, the River Ore would have been an efficient barrier against German infantry and vehicles.
7. The next pillbox is buried in the river bank and overgrown at the rear, so be careful not to miss it. This example is a similar shape to the Suffolk Square, but its design was probably slightly modified in order to take advantage of the defence provided by the river bank. When originally camouflaged it probably would have been almost impossible to see.
8. There is no missing the next pillbox, which is a Type 22 with a flying buttress supporting the anti-blast wall. A buttress was required as the ground here is marshy and unstable. Prior to its present use as a Young Offender’s Institution, Hollesley Colony, as it was known, was a colonial college tasked with training the unemployed for work – in this case chiefly in agriculture – in the British Empire. The graffiti inside contains the names of some of those working at the college and, from more recent times, prisoners who found themselves here while on working parties.
9. There is now a longer stretch that takes the walker up to Simpson’s Saltings. Here there is a Type 22 pillbox built into the sea wall. It has had its embrasures blocked up, but the entrance is still clear. Inside, one of the blocked embrasures is dated ‘June 1941’. From this point on the walk it is possible to see two pillboxes that lie over the creek on the Saltings. The Saltings are a Site of Special Scientific Interest and cannot be entered by the general
60
A GUIDE TO SECOND WORLD WAR ARCHAEOLOGY IN SUFFOLK
public, but the pillboxes may be viewed from the path on the sea wall, which is part of the Suffolk Coast and Heaths Path.
10. This is a Type 22 pillbox with blocked-up embrasures. There are the remains of turf on the roof and the exterior walls have been rendered and given a pebbledash finish, also as an aid to camouflage.
11. The second pillbox is also a Type 22 and is a duplicate of its neighbour.
These three pillboxes (9–11) make up an interesting defensive position. Those on the Simpson’s Saltings defend the River Ore, while the pillbox on the sea wall is situated between and behind these two forward positions and so would have been in a good position to give supporting fire. All the Second World War pillboxes on the walk were built in 1940, but as part of the broader changes in coastal defence that took place the following year some were subject to alteration. In an operating instruction of 16 April 1941 it was stated by the Divisional Command that Surplus pillboxes for which no personnel are available to man after ‘Stand To’ constitute a danger should they be occupied by the enemy. The loopholes of all surplus pillboxes will be filled with concrete under arrangements of C[ommander].R[oyal].E[ngineers].
The dating evidence from the pillboxes themselves would suggest that a number of boxes on this particularly remote stretch of the Suffolk Coastline had their embrasures blocked up in response to this order, albeit not immediately. The seasoned hiker may follow the coast path north to Boyton Marshes, which is now an RSPB site from which the public are excluded, but the blockhouses of the AFV range can clearly be seen from the path.
Shingle Street to East Lane, Bawdsey (Figure 62)This pillbox trail connects the heavily defended area at Oxley Marsh pumping station, which covers the road inland from Shingle Street, with the Emergency Coastal Defence Battery at East Lane. The walk lends itself to using two cars, leaving one at East Lane in the car park by the gun battery and the second either close to the pumping station or in the Shingle Street visitor’s car park.
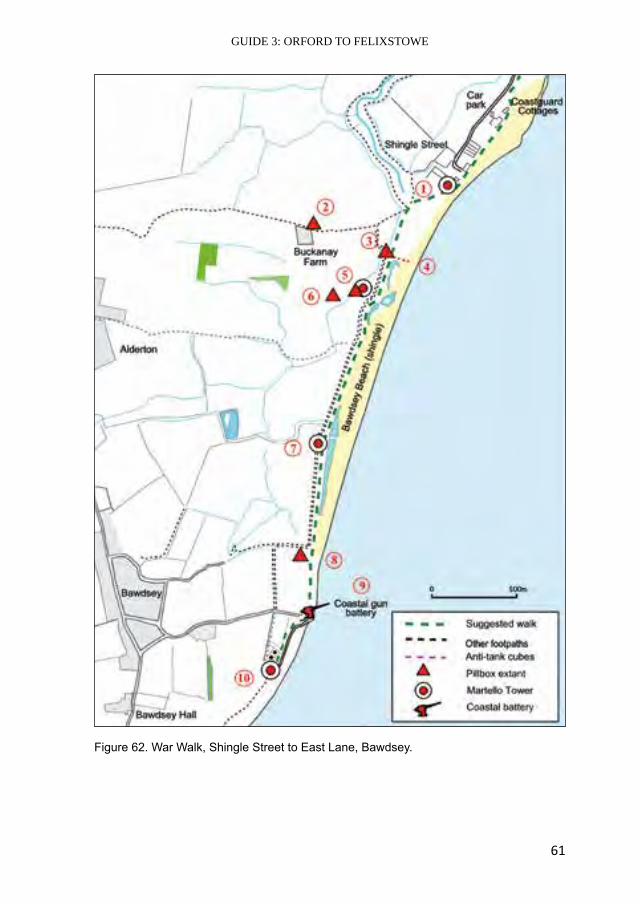
GUIDE 3: ORFORD TO FELIXSTOWE
61
Figure 62. War Walk, Shingle Street to East Lane, Bawdsey.

62
A GUIDE TO SECOND WORLD WAR ARCHAEOLOGY IN SUFFOLK
Shingle Street developed as a settlement from the early nineteenth century and is contemporary with the construction of the Martello towers. Local fishermen who often acted as pilots for entry into the River Ore put up shacks on the beach and later built more permanent cottages. Once the Napoleonic invasion scare had passed coastguards used the Martello towers until, in the late nineteenth century, they moved into purpose-built Coastguard Cottages.
In 1940 the construction of anti-invasion defences effectively cut off this already remote settlement from the surrounding area and so the village was evacuated. For the rest of the war the village and beach were part of the military landscape; they were manned against invasion and used as a military testing ground. When the houses were handed back to their civilian owners at the end of the war many were so badly damaged that they had to be rebuilt.
This can be a wild, windswept and inhospitable part of the Suffolk coastline. Where the River Ore meets the North Sea there are strong currents and whirlpools, with waves breaking heavily on the exposed and hidden shingle banks, waiting to catch the unwary mariner. To the south of Shingle Street the path follows the sea wall, with large shingle banks and the sea to the east and extensive grazing marshes cut by dykes to the west.This unique landscape has played its part in the rich folklore of the area, particularly when it comes to the ‘myth of Shingle Street’ described in this guide. This pillbox trail offers the reader the chance to walk a battlefield that never was (Figure 63).
1. The Walk begins at the Martello tower, which is now a private house. Martello towers were built during the Napoleonic Wars to defend the coastline against possible invasion from France.
2. When walking south along the public footpath the dedicated pillbox spotter can take a detour to the west and follow the public footpath towards Buckanay Farm, where there is a Type 22 Pillbox built to defend the track leading inland, which eventually joins the Alderton Road. This pillbox is on private land, but can easily be seen from the footpath.
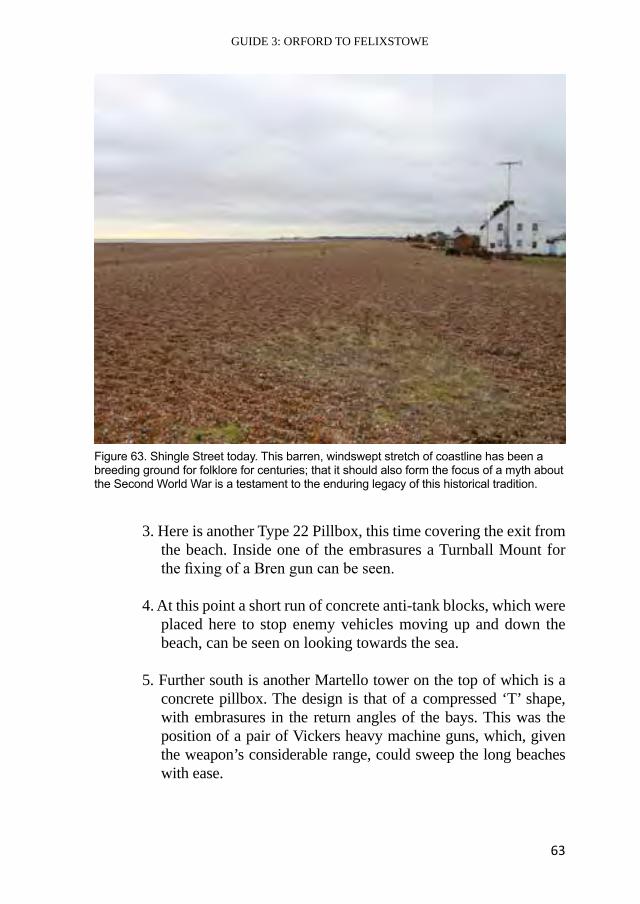
GUIDE 3: ORFORD TO FELIXSTOWE
63
3. Here is another Type 22 Pillbox, this time covering the exit from the beach. Inside one of the embrasures a Turnball Mount for the fixing of a Bren gun can be seen.
4. At this point a short run of concrete anti-tank blocks, which were placed here to stop enemy vehicles moving up and down the beach, can be seen on looking towards the sea.
5. Further south is another Martello tower on the top of which is a concrete pillbox. The design is that of a compressed ‘T’ shape, with embrasures in the return angles of the bays. This was the position of a pair of Vickers heavy machine guns, which, given the weapon’s considerable range, could sweep the long beaches with ease.
Figure 63. Shingle Street today. This barren, windswept stretch of coastline has been a breeding ground for folklore for centuries; that it should also form the focus of a myth about the Second World War is a testament to the enduring legacy of this historical tradition.
64
A GUIDE TO SECOND WORLD WAR ARCHAEOLOGY IN SUFFOLK
6. When the vegetation cover is low a Type 22 pillbox is just visible in the hedge line. This is on private land and is not accessible. It was possibly placed here to cover the paths leading inland to the north and south, which are now public footpaths.
7. The path runs close to another Martello tower, which is now a private house.
8. Here there is a survivor of the 1940 beach defences. A Type 22 pillbox half full of pebbles can be seen at low water and probably survives at all only thanks to the new sea defences made of granite rocks that lie adjacent and offer some protection. The pillbox retains its armoured door and armoured plates above the embrasures. The walls were originally cement rendered, presumably to receive beach pebbles for camouflage.
9. Follow the path south and arrive at the remains of East Lane, Bawdsey Emergency Coastal Defence Battery, which is described in some detail in this guide. The gun houses and lockers are well preserved, with the only significant absence being the gun house roofs, which were removed after the war. The battery observation post that stands a little inland from the car park is one of the best preserved of its kind and the First World War pillbox that stands close by is an important reminder that this coastline was also fortified earlier in the twentieth century.
10. Continue south to Martello tower ‘W’, which is now a private house. A suitable end to the walk is provided by looking north from this point, where it is possible to see a Napoleonic Martello tower, a First World War pillbox and a Second World War gun battery all in a line. There could be no better illustration of the perceived vulnerability of this stretch of Suffolk’s coastline over the centuries (Figure 64).
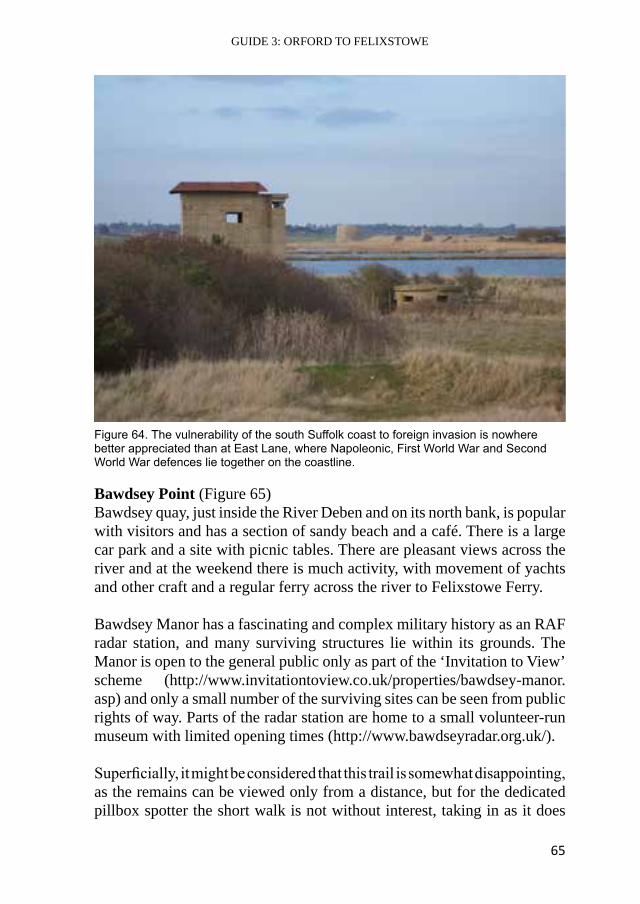
GUIDE 3: ORFORD TO FELIXSTOWE
65
Bawdsey Point (Figure 65)Bawdsey quay, just inside the River Deben and on its north bank, is popular with visitors and has a section of sandy beach and a café. There is a large car park and a site with picnic tables. There are pleasant views across the river and at the weekend there is much activity, with movement of yachts and other craft and a regular ferry across the river to Felixstowe Ferry.
Bawdsey Manor has a fascinating and complex military history as an RAF radar station, and many surviving structures lie within its grounds. The Manor is open to the general public only as part of the ‘Invitation to View’ scheme (http://www.invitationtoview.co.uk/properties/bawdsey-manor.asp) and only a small number of the surviving sites can be seen from public rights of way. Parts of the radar station are home to a small volunteer-run museum with limited opening times (http://www.bawdseyradar.org.uk/).
Superficially, it might be considered that this trail is somewhat disappointing, as the remains can be viewed only from a distance, but for the dedicated pillbox spotter the short walk is not without interest, taking in as it does
Figure 64. The vulnerability of the south Suffolk coast to foreign invasion is nowhere better appreciated than at East Lane, where Napoleonic, First World War and Second World War defences lie together on the coastline.
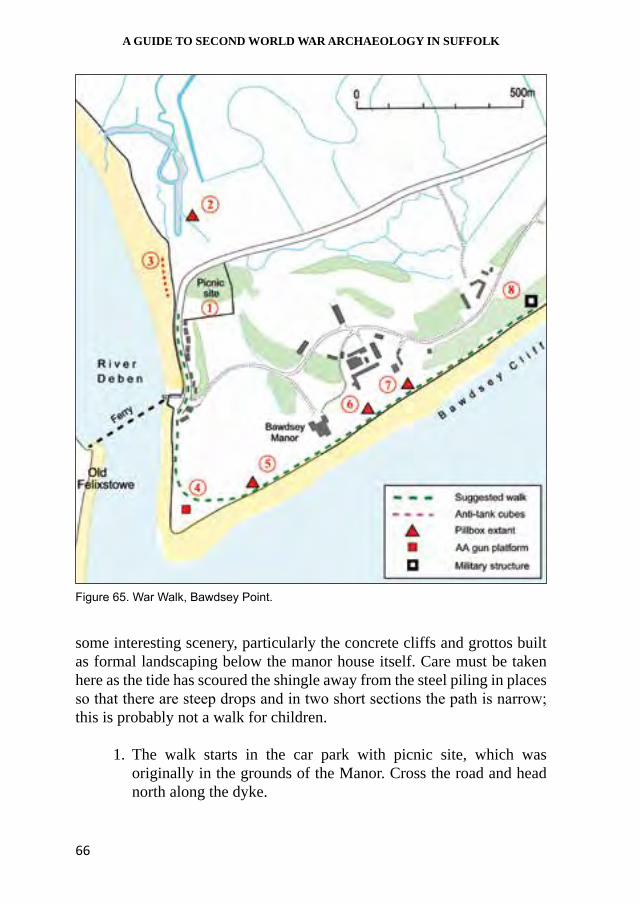
66
A GUIDE TO SECOND WORLD WAR ARCHAEOLOGY IN SUFFOLK
some interesting scenery, particularly the concrete cliffs and grottos built as formal landscaping below the manor house itself. Care must be taken here as the tide has scoured the shingle away from the steel piling in places so that there are steep drops and in two short sections the path is narrow; this is probably not a walk for children.
1. The walk starts in the car park with picnic site, which was originally in the grounds of the Manor. Cross the road and head north along the dyke.
Figure 65. War Walk, Bawdsey Point.
GUIDE 3: ORFORD TO FELIXSTOWE
67
2. On the marshes to the north, built into the dyke bank, is a Type 22 pillbox with an L-shaped exterior blast wall protecting the entrance. This pillbox marks the northern perimeter of the radar station’s defences and could cover not only the northern approaches but also the beach scaffolding that followed the line of the river.
3. Walk back and follow the path by the river. Lying along the foreshore is a row of twenty-nine anti-tank blocks. Some of these have tumbled on their sides and others are badly cracked. These are all that is left of a much longer line of cubes that once ran down to Bawdsey Point and then north as far as Bawdsey Manor itself.
4. The walk continues south along the beach and past various buildings, including the first-floor café with balcony and then the ferry stage. Follow the track leading towards the Point. Just before the start of the shingle may be found an overgrown rectangular gun platform, which is the base for a light anti-aircraft gun. Originally a Bofor Gun was placed here as part of the radar station’s anti-aircraft defence.
5. Walk round to the shoreline of the former estate. Here a Type 22 Pillbox can be seen at close quarters, although access is not possible. It has an L-shaped blast wall and there are bolts for the embrasure shutters. Continue along the path, bringing into view part of Bawdsey Manor itself. This part of the walk gives a good view of the nineteenth-century landscaping of the Manor, with its artificial concrete cliff and grottos. These grottos were adapted to incorporate pillbox structures and had commanding positions across the beach. Almost all of the beach in front of the radar station was a minefield.
6. Here there is a pillbox on the cliff side. It comprises a large chamber formed from a deep grotto faced with a reinforced concrete wall pierced with two embrasures. Today the embrasures can just be seen, almost covered by vegetation.
7. Nearby is another pillbox with an L-shaped blast wall and a brick anti-aircraft chamber above, built into a cliff grotto. It

68
A GUIDE TO SECOND WORLD WAR ARCHAEOLOGY IN SUFFOLK
forms a combined observation post, light anti-aircraft position and machine gun emplacement. The upper part of the structure is clearly visible from the path.
8. Carry on along the path to a brick wall which is probably the blast wall protecting the entrance to a brick-built surface infantry shelter or store.
GUIDE 3: ORFORD TO FELIXSTOWE
69
Other places to visit
There are a number of heritage sites in south Suffolk connected with the Second World War. Many are small museums run by volunteers and so have restricted opening times, so check their websites before you travel.
Landguard Fort
Landguard Fort is a site of major importance and repays a visit. The fort is in the guardianship of English Heritage and is run by the Landguard Fort Trust, who have overseen the development of the site as a heritage asset for the region.
http://www.english-heritage.org.uk/daysout/properties/landguard-fort/
http://www.landguard.com/
A short distance from the fort is Felixstowe Museum, which houses a military collection. http://felixstowemuseum.org/
Debach museum
This small museum is housed in the control tower of the former American airfield and also includes an exhibition on wartime life.
http://493bgdebach.co.uk/museum.php
Parham Museum
Another airfield museum, but which also houses an exhibition on the Auxiliary units, an underground resistance movement intended to operate as a guerrilla force in the event of a German invasion.
http://www.parhamairfieldmuseum.co.uk/
70
A GUIDE TO SECOND WORLD WAR ARCHAEOLOGY IN SUFFOLK
Orford Ness
Orford Ness is owned by the National Trust and there are guided tours of the twentieth-century military remains, which date from the First World War to the Cold War.
http://www.nationaltrust.org.uk/orford-ness/
Sutton Hoo
Sutton Hoo is internationally famous as the burial ground of East Anglia’s Anglo-Saxon kings, where archaeological excavations that transformed our understanding of the ‘Dark Ages’ were carried out in the 1930s. The National Trust site also preserves some of the anti-landing ditches dug to defend the heath in 1941.
http://www.nationaltrust.org.uk/sutton-hoo/
GUIDE 3: ORFORD TO FELIXSTOWE
71
Further Reading
C. Dobinson, Anti-Invasion Defences of WWII Twentieth-Century Fortifications in England vol.2 (CBA, York, 1996). An unpublished report by the Council for British Archaeology which is sometimes available from local libraries.
C. Dobinson, Building Radar. Forging Britain’s Early-Warning Chain, 1935-1945 (Methuen, London, 2010).
W. Foot, Beaches, Fields, Streets, and Hills: The Anti-Invasion Landscapes of England, 1940 (CBA Research Report 144, York, 2006).
G. Kinsey, Orfordness, Secret Site (Terence Dalton, Lavenham, 1981).
G. Kinsey, Bawdsey, Birth of the Beam (Terence Dalton, Lavenham, 1983).
J. Hayward, The Bodies on the Beach. Sealion, Shingle Street and the Burning Sea Myth of 1940 (Barnwells, Aylsham, 2001).
P. Kent, Fortifications of East Anglia (Terence Dalton, Lavenham, 1988).
B. Lowry (ed.), 20th Century Defences in Britain: An Introductory Guide (CBA, York, 1995).
C. Hegarty and S. Newsome, Suffolk’s Defended Shore: Coastal Fortifications from the Air (English Heritage, Swindon, 2007).
S. Newsome, ‘The Coastal Landscapes of Suffolk during the Second World War’, Landscapes 4 (2003), 42–58.
M. Osborne, Defending Britain: Twentieth-Century Military Structures in the Landscape (Tempus, Stroud, 2004).
M. Osborne, Twentieth-Century Defences in Britain: Suffolk (Concrete Publications, Market Deeping, 2008).
P. Patterson, Landguard Fort (English Heritage, Swindon, 2006).
Useful websites
http://www.archaeologyuk.org/cba/projects/dob/

72
A GUIDE TO SECOND WORLD WAR ARCHAEOLOGY IN SUFFOLK

GUIDE 3: ORFORD TO FELIXSTOWE
73

74
A GUIDE TO SECOND WORLD WAR ARCHAEOLOGY IN SUFFOLK
Orford to Felixstowe is one of four guides to Second World War archaeology in Suffolk, published in the same format. Together they will help readers to discover, appreciate and enjoy the physical remains of the conflict that still lie in the countryside. This guide describes the anti-invasion defences that once stood on this part of the Suffolk coastline.
Robert Liddiard and David Sims are based in the School of History at the University of East Anglia, Norwich.
A G
UID
E TO
SEC
ON
D W
OR
LD
WA
R A
RC
HA
EO
LO
GY
IN SU
FFOL
K
Robert Liddiard and D
avid Sims
A GUIDE TO SECOND WORLD WAR
ARCHAEOLOGY IN SUFFOLKGuide 3: Orford to Felixstowe
Robert Liddiard and David Sims
A G
UID
E TO
SEC
ON
D W
OR
LD
WA
R A
RC
HA
EO
LO
GY
IN SU
FFOL
K
Robert Liddiard and D
avid Sims


![Marry Poppins Conflict Calendar - Brightstone Productions · 2020-01-31 · Marry Poppins Conflict Calendar Read ALL notes below before filling out conflict calendar. [ ] Check](https://img.pdfslide.net/doc/110x75/5ee39e3cad6a402d666d5cb2/marry-poppins-coniict-calendar-brightstone-productions-2020-01-31-marry-poppins.jpg)