Embed Size (px)
Citation preview

How to Disassemble, Assemble, and Maintain a Version III Gearbox Page 1
HOW TO DISASSEMBLE,
ASSEMBLE, AND MAINTAIN
A VERSION III AIRSOFT GEARBOX

How to Disassemble, Assemble, and Maintain a Version III Gearbox Page 2
Table of Contents
I. Introduction____________________________________3 1. Requirements ……………………………………………………………3
2. Equipment………………………………………………………………..4
II. Disassembling the Gearbox _______________________5 1. Removing the Motor Cage………………………………………….……5
2. Opening the Gearbox…………………………………………………….6
3. Removing the Cylinder Unit…….……………………………………….6
4. Removing the Gear Assembly……….…………………………………..7
5. Removing the Trigger Unit………………………………………………8
III. Maintaining the Gearbox __________________________9 1. Greasing The Gears………………………………………………………9
2. Lubricating the Cylinder Unit….……………….………………………10
3. Cleaning the Electric Contacts……………….…………………………10
IV. Assembling the Gearbox__________________________11
V. Troubleshooting ________________________________14 1. Disassembly…………………………………………………………….14
2. Assembly……………………………………………………………….14
3. Retailers for Parts, Grease, and More…………….………………….…14

How to Disassemble, Assemble, and Maintain a Version III Gearbox Page 3
Models using
a version III
gearbox:
AUGA1
AUGA2
G36C
G36K
G36
SLR-105
AK-47
SIG 552
MP5K
MP5
MP40
HOW TO DISASSEMBLE,
ASSEMBLE, AND MAINTENANCE
A VERSION III AIRSOFT GEARBOX
_______________________________________________________________
Disassembly and reassembly of your version III airsoft gearbox may be
necessary for a variety of reasons. Most likely, you are experiencing a
mechanical failure or need to reapply grease and lubricant to maintain full
functionality. Frequency of maintenance depends entirely on use of your
gearbox and can vary from once every few months to every few years. If you
notice performance in your rifle drop, it is a good time to maintain your
gearbox. A gearbox is a mechanical engine, and like all other engines, it
requires maintenance and occasional repairs to continue functioning.
Additionally, if you are experiencing a mechanical failure and you isolate the
problem, almost all parts within your gearbox are available for individual
purchase.
This guide does not cover how to remove the gearbox from your rifle. See
“Trouble Shooting,” page 14, for more information.
Requirements
While disassembling and maintaining are relatively simple procedures, reassembling a gearbox
require persistence and patiencs above all else. Familiarity with tools will aid your progress, but
anyone can perform the steps in this guide with dedication. Before beginning, allow for:
Adequate time for the process: Assembling a gearbox takes around 1 to 2 hours for a
first time attempt. However, once you successfully complete the process you will find it
far less time consuming.
Room to spread out: Give yourself plenty of room to lay out the internal parts of the
gearbox. During a repair, plan on the parts remaining out for a week in case a new part
needs to be ordered.
The will to succeed: Take the process as a learning experience and approach it with a
positive attitude, but brace for potential frustration. Remember, the gearbox is designed
to come apart. Your effort will be rewarded as you become better with each repetition!
How to Disassemble, Assemble, and Maintain a Version III Gearbox Page 4
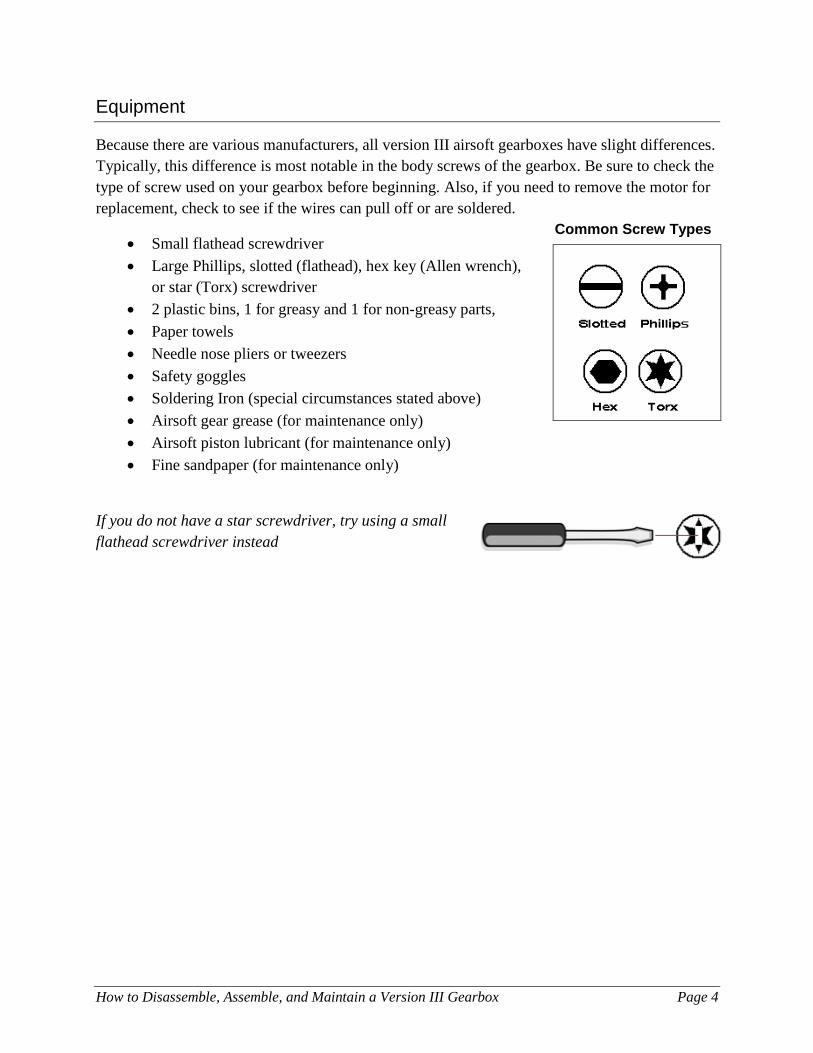
Equipment
Because there are various manufacturers, all version III airsoft gearboxes have slight differences.
Typically, this difference is most notable in the body screws of the gearbox. Be sure to check the
type of screw used on your gearbox before beginning. Also, if you need to remove the motor for
replacement, check to see if the wires can pull off or are soldered.
Small flathead screwdriver
Large Phillips, slotted (flathead), hex key (Allen wrench),
or star (Torx) screwdriver
2 plastic bins, 1 for greasy and 1 for non-greasy parts,
Paper towels
Needle nose pliers or tweezers
Safety goggles
Soldering Iron (special circumstances stated above)
Airsoft gear grease (for maintenance only)
Airsoft piston lubricant (for maintenance only)
Fine sandpaper (for maintenance only)
If you do not have a star screwdriver, try using a small
flathead screwdriver instead
Common Screw Types

How to Disassemble, Assemble, and Maintain a Version III Gearbox Page 5
A
motor
cage
B
b
c
e d
a
Unplug battery
Disassembling the Gearbox
WARNING: Main spring has very high tension. Follow
directions closely and where safety goggles until instructed
otherwise.
WARNING: Always disconnect the battery from the
gearbox before handling. Failure to remove the battery
could lead to injury while handling gears and internals.
Removing the Motor Cage
Typically, one does not need to disassemble the motor cage. While it still must be removed, the
motor cage can be kept as a unit unless the motor needs to be replaced.
If your motor does not need to be replaced, perform step 1
and then proceed to the next section, “Opening the Gearbox.”
Motor Assembly
a. Motor Cage
b. Motor Spring
c. Motor Plate
d. Round Head Screws
e. Lock Washers
1. Remove the two long screws connecting
the motor cage to the gearbox frame (A).
Skip to next section “Opening the Gearbox” if your
motor functions
2. Remove the two shorter screws located at the
bottom of the motor cage (B). Note that each
screw has a small lock washer.
3. Open the motor cage by pressing firmly on the
front half of the shell. Separate the cage in two
by rotating the back half away from the motor.
4. To completely extract motor, first check to see if
the attached wires can be pulled off. If not, use a
soldering iron to heat up the joints and remove the wires.
Safety
Glasses
Required

How to Disassemble, Assemble, and Maintain a Version III Gearbox Page 6
Safe to
remove
glasses
Opening the Gearbox
The main difficulty of opening the gearbox is fighting the powerful spring within the gearbox. If
the spring does not decompress gently, parts may fly everywhere. If this does happen, don’t
panic, just locate the parts and follow through the rest of the instructions as best you can.
If your motor needs to be replaced, opening the gearbox is unnecessary. Skip to step 19 of
“Assembling the Gearbox” on page 13 once you obtain a replacement motor.
1. Use a flathead screwdriver to push the top side off (A)
2. Pull out the gear protector located directly
behind the trigger (B).
3. Take out all screws. Place the screws in a
non-greasy plastic container ( ).
4. Gently peel apart the gearbox using a
flathead screwdriver starting at the front.
Work your way to the back. Use a small
flathead to press down on the spring guide at position (C).
5. Lift off the top cover completely. Immediately after opening, release the tension from the
main spring by lift the spring guide located at the tip of the screwdriver (D).
Removing the Cylinder Unit
If you are troubleshooting your gearbox, remove and inspect this
unit and those that follow individually. Check for broken parts by
referencing the images.
Cylinder Unit Parts
a. Spring Guide
b. Main Spring
c. Piston
d. Cylinder
e. Cylinder Head
f. Air Nozzle
g. Tappet Plate
h. Tappet Spring
a b
c d e
f
g h
C
B
A
D

How to Disassemble, Assemble, and Maintain a Version III Gearbox Page 7
1. Using needle nose piers or
tweezers, remove the tappet spring
from the gearbox frame (A)
2. Remove the bushing and shim
(small washer) from the sector
gear (B)
3. Grab and extract the entire unit.
4. Place the spring and spring guide
in the non-greasy parts bin.
5. Place the air nozzle, tappet plate, and tappet spring in the non-greasy parts bin.
Remove the piston and cylinder head from the cylinder for inspection only. Replace the
piston and cylinder head into the cylinder before placing the entire unit in the non-greasy
parts bin.
Removing the Gear Assembly
The gear assembly will be greasy, but only wipe off the grease if you have replacement airsoft
gear grease. If not, move the gears into the greasy parts bin and minimize contact with the gears.
Gear Assembly Parts
a. Sector Gear
b. Bevel Gear
c. Spur Gear
d. Bushing (x6)
e. Shim (x6)
f. Anti-reversal latch
g. Anti-reversal latch spring
1. Take off the bushing and shim from the top of
the bevel and spur gears. Place in a bin
dedicated to greasy parts.
2. Remove the gears. If you have replacement
gear grease, wipe the gears as you remove
them. Otherwise, minimize contact and transfer
them to the greasy parts bin.
3. Be sure to collect the three shims and bushings
from the bottoms of the gears. Transfer all to the greasy parts container.
a
b
c
d
e
g
f
Gear Assembly
Cylinder unit
A
B

How to Disassemble, Assemble, and Maintain a Version III Gearbox Page 8
Removing Trigger Unit
Even if you are not troubleshooting your electrical component, you should remove the trigger
unit to avoid losing parts.
Trigger Unit Parts
a. Trigger
b. Trigger Contact
c. Trigger Spring
d. Trigger Lever
e. Trigger Contact Spring
f. Wire Assembly
1. Use needle nose pliers to remove the
Trigger Contact Spring (A) and transfer
it to the non-greasy parts bin.
2. Check for a tiny screw at the top of the
trigger unit. Remove it if present (B).
Place it in non-greasy bin.
3. Place the trigger, trigger lever, and
trigger spring in non-greasy bin.
4. The wires leading into the wire
assembly will slip out or require a
soldering iron to completely remove. Unless your gun needs a replacement main trigger
unit, leave it attached.
5. Inspect the copper contacts on the trigger contact and the wire assembly. If they are
blackened or dull, preform the “Clean the Electrical Contacts” section under the next
section, “Maintenance” (page 10).
Congratulations! You have completely disassembled your gearbox.
A B
a
b
c d
e
f

How to Disassemble, Assemble, and Maintain a Version III Gearbox Page 9
Maintenance
Greasing the Gears
While clean, shiny gears look nice, grease is an essential part of any
mechanized system to maintain optimal performance. Excessive grease is also
undesirable, and many gearboxes from the factory suffer from over greasing.
This section will cover how and where to apply airsoft gear grease.
If you do not have airsoft gear grease, skip to next section.
1. Clean all gears, bushings, shims, and the insides of both gearbox frames with paper
towels to remove old grease.
2. Open the gear grease and place it within reach. Also, be sure to
have paper towels handy for you to use after you apply the grease.
3. Pinch the bevel gear (A) by the top and bottom of the axle in your
left hand.
4. Use your right fingers to evenly spread a thin layer of grease onto
the contact points of the gear. This includes the large bottom face of
the bevel gear, the first, outermost face of the bevel gear, and all
teeth. Also dab the bottom axel in grease.
Do not worry about the top axel of any of the gears at this point. The gears
must be handled and the grease will rub off. Instead, the tops of the axels
will be greased as a final finishing touch when assembling the gearbox.
5. Place the bevel gear in the greasy parts container. Try to minimize
contact with the gear from this point forward. Now secure the sector
gear (B).
6. Apply an even coating of grease to the sector gear’s bottom and both
rows of teeth. Place a small amount on the bottom axel as well.
7. Put the sector gear in the greasy object bin and now remove the spur
gear (C).
8. Once more, apply some grease to the contact points. On the spur
gear, this includes the entire gear.
9. Wipe and then wash your hands to finish the job!
Note: The sector and
spur gears are upside
down in these images
A
B
C

How to Disassemble, Assemble, and Maintain a Version III Gearbox Page 10
Lubricating the Cylinder Unit
Maximum performance from your airsoft gun demands a good seal in the
piston. Special airsoft piston lubrication allows for a tight seal that can still
slide rapidly within the cylinder.
If you do not have airsoft piston lubrication, proceed to the next section.
1. Use paper towels to wipe of the current lubricant from the piston, cylinder, and cylinder
head. 2. Open the piston lubricant and place within reach. Also, keep paper towels nearby during
the process. 3. Apply a medium coat of piston lubricant to the O-ring on the cylinder head (A). 4. Fit the cylinder head back into the cylinder. The bottom cutout section
of the cylinder head should be flush with the edge of the cylinder and
O-ring should be just far enough into the cylinder to be obscured. 5. Apply a medium coat of piston lubricant to the piston and insert into
the cylinder O-ring first (B). 6. Slide the piston up and down a few times to distribute lubricant. If the
sliding seems stiff, remove the piston and apply a
second thin layer of lubricant. 7. Pull the piston partially out and work some piston
lubricant into the grove on both sides of the piston (C). 8. Push the piston back into the cylinder. 9. Wipe and then wash your hands to finish the job!
Cleaning the Electric Contacts
Maintaining good electric contacts is an essential to the
function of your gearbox. This simple procedure is an
important precautionary measure for the function of your
weapon.
1. Gently rub the sides of the copper wedge on the
trigger contact with sandpaper (A).
2. Sand the insides of the prongs on the wire
assembly (B).
Congratulations! You have finished maintaining your gearbox.
A
B
A
B C
How to Disassemble, Assemble, and Maintain a Version III Gearbox Page 11
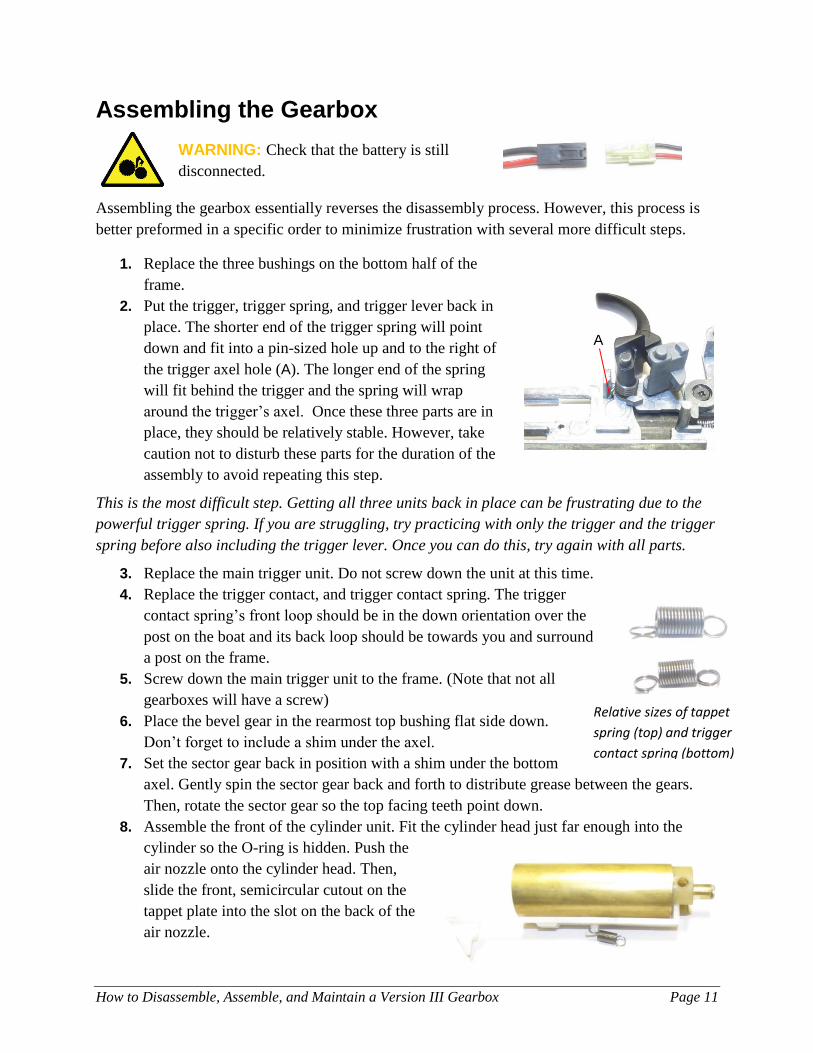
Relative sizes of tappet
spring (top) and trigger
contact spring (bottom)
Assembling the Gearbox
WARNING: Check that the battery is still
disconnected.
Assembling the gearbox essentially reverses the disassembly process. However, this process is
better preformed in a specific order to minimize frustration with several more difficult steps.
1. Replace the three bushings on the bottom half of the
frame.
2. Put the trigger, trigger spring, and trigger lever back in
place. The shorter end of the trigger spring will point
down and fit into a pin-sized hole up and to the right of
the trigger axel hole (A). The longer end of the spring
will fit behind the trigger and the spring will wrap
around the trigger’s axel. Once these three parts are in
place, they should be relatively stable. However, take
caution not to disturb these parts for the duration of the
assembly to avoid repeating this step.
This is the most difficult step. Getting all three units back in place can be frustrating due to the
powerful trigger spring. If you are struggling, try practicing with only the trigger and the trigger
spring before also including the trigger lever. Once you can do this, try again with all parts.
3. Replace the main trigger unit. Do not screw down the unit at this time.
4. Replace the trigger contact, and trigger contact spring. The trigger
contact spring’s front loop should be in the down orientation over the
post on the boat and its back loop should be towards you and surround
a post on the frame.
5. Screw down the main trigger unit to the frame. (Note that not all
gearboxes will have a screw)
6. Place the bevel gear in the rearmost top bushing flat side down.
Don’t forget to include a shim under the axel.
7. Set the sector gear back in position with a shim under the bottom
axel. Gently spin the sector gear back and forth to distribute grease between the gears.
Then, rotate the sector gear so the top facing teeth point down.
8. Assemble the front of the cylinder unit. Fit the cylinder head just far enough into the
cylinder so the O-ring is hidden. Push the
air nozzle onto the cylinder head. Then,
slide the front, semicircular cutout on the
tappet plate into the slot on the back of the
air nozzle.
A

How to Disassemble, Assemble, and Maintain a Version III Gearbox Page 12
Safety
Glasses
Required
9. Set the entire unit in place. Start with the
tappet spring lying over the appropriate post
on the frame (A). Then, move the entire unit
back to stretch the spring and seat the unit in
place. The downward facing circular hole in
the cylinder head will fit onto a small post on
the frame and you will feel the cylinder lock
firmly in place.
10. Slide the piston, main spring, and spring guide back into the cylinder without removing
the cylinder. DO NOT compress the main spring.
11. Place the anti-reversal latch, anti-reversal spring, and spur gear back. To make things
easier, place a shim on the bottom (skinny side) of
the spur gear. The grease should hold it in place. Put
the spring on the latch by placing the spring’s loop
on the shorter, bottom axel. The spring should fit
nicely around the latch. Next, put the unit in bottom
left whole. The spring will butt up against the wall
of the frame (A). Pull the spring latch back and hold
it with tweezers or needle nose pliers (B). Fit the
spur gear in place and release the anti-reversal latch.
This is the probably the second most difficult step. While easier to put in than other parts, the
anti-reversal latch is not as stable and can be easily disturbed. Be as careful as possible not to
touch the part once it is in and repeat this step if it pops out of its socket.
12. If available, use your finger to gently dab each gear’s top axel with gear grease.
13. Place one shim and then one bushing on each axel with the rim side down.
14. Checklist: Before compressing the main spring, it is wise to perform a last minute check
on several problem areas. Check:
The trigger is in socket
The piston moves on track
The anti-reversal latch is
in socket
All springs are present
15. Put on safety glasses. Now, read
through the next two steps before
continuing. These steps will be an effort of fitting all components
together and it helps to know what to expect before reaching a step.
16. Firmly grip the cylinder with your right hand and compress the spring and slide the tab on
the spring guide into the slot on the frame using your left.
A B
A

How to Disassemble, Assemble, and Maintain a Version III Gearbox Page 13
Safe to
remove
glasses
17. Replace the top frame. While evenly pressing down on the top frame, push the back of
the spring guide to set the back in place. Then, use a flat head screwdriver to manipulate
the bushings into place by reaching through the holes in the top frame. Lastly, pull the
trigger slightly as you if you were shooting to get the notch on the trigger into the slot on
the top frame.
18. Replace all screws.
If your motor cage is still assembled, skip to step 24.
19. Place the motor spring on the neck of the motor.
20. Place the small metal motor plate on the bottom, semicircular section of the front motor
cage piece. This is the section with the screw hole in the bottom.
21. Put the front motor cage piece under around the motor so the spring is under the semi-
circular cutout for the motor’s shaft without dropping the motor plate.
22. Surround the motor with the other, rear section of the motor cage. In one step, press down
on the front motor cage, up on the motor, and push the rear section into position. Release
the assembly and the motor spring will lock the cage together.
23. Screw the two round-head, medium size screws into the bottom of the gear box with a
lock washer on each.
24. Use the two longest screws to fasten the motor cage back to the gearbox.
25. Lastly, slide the top slide back onto the top rib of the gearbox.
Your assembly is now complete. Well done!
Disassembling and reassembling a gearbox is
no small feat, especially for a first time
attempt. Every repetition will strengthen your
ability to complete the task more quickly in
the future. Thank you for your persistence
with this endeavor, and enjoy your newly
repaired or refreshed airsoft rifle.
Motor cage
Specific to
AK-47 Model
How to Disassemble, Assemble, and Maintain a Version III Gearbox Page 14
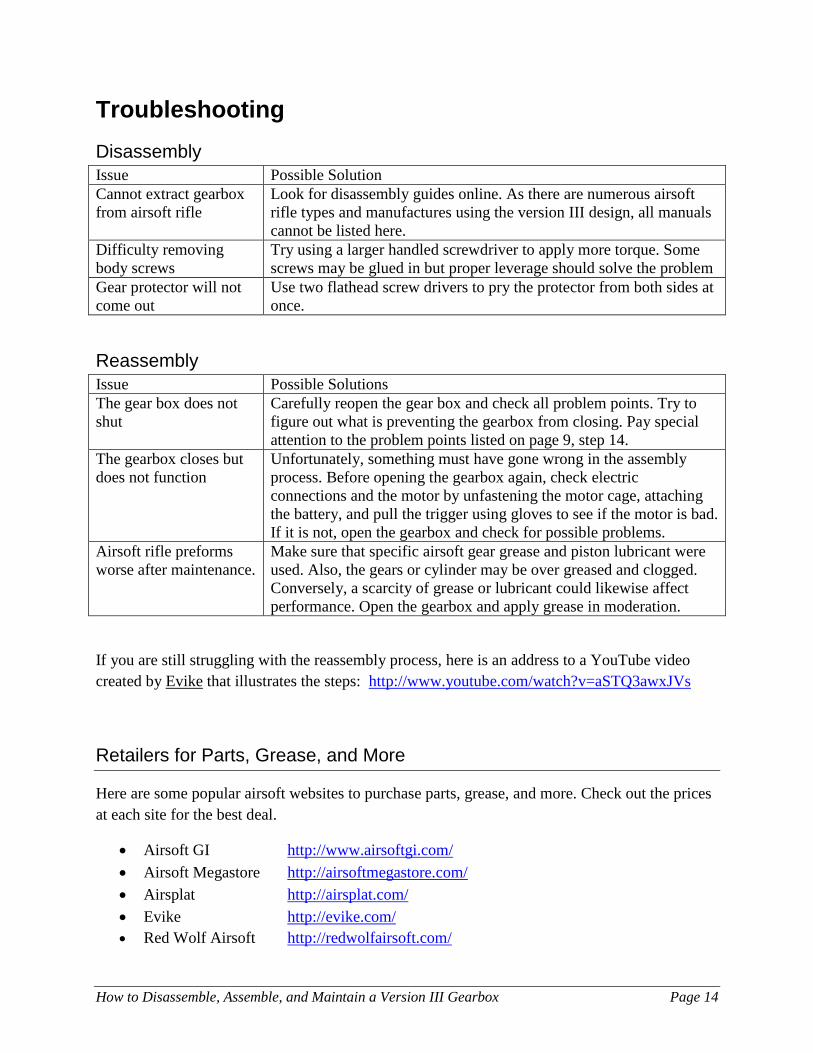
Troubleshooting
Disassembly
Issue Possible Solution
Cannot extract gearbox
from airsoft rifle
Look for disassembly guides online. As there are numerous airsoft
rifle types and manufactures using the version III design, all manuals
cannot be listed here.
Difficulty removing
body screws
Try using a larger handled screwdriver to apply more torque. Some
screws may be glued in but proper leverage should solve the problem
Gear protector will not
come out
Use two flathead screw drivers to pry the protector from both sides at
once.
Reassembly
Issue Possible Solutions
The gear box does not
shut
Carefully reopen the gear box and check all problem points. Try to
figure out what is preventing the gearbox from closing. Pay special
attention to the problem points listed on page 9, step 14.
The gearbox closes but
does not function
Unfortunately, something must have gone wrong in the assembly
process. Before opening the gearbox again, check electric
connections and the motor by unfastening the motor cage, attaching
the battery, and pull the trigger using gloves to see if the motor is bad.
If it is not, open the gearbox and check for possible problems.
Airsoft rifle preforms
worse after maintenance.
Make sure that specific airsoft gear grease and piston lubricant were
used. Also, the gears or cylinder may be over greased and clogged.
Conversely, a scarcity of grease or lubricant could likewise affect
performance. Open the gearbox and apply grease in moderation.
If you are still struggling with the reassembly process, here is an address to a YouTube video
created by Evike that illustrates the steps: http://www.youtube.com/watch?v=aSTQ3awxJVs
Retailers for Parts, Grease, and More
Here are some popular airsoft websites to purchase parts, grease, and more. Check out the prices
at each site for the best deal.
Airsoft GI http://www.airsoftgi.com/
Airsoft Megastore http://airsoftmegastore.com/
Airsplat http://airsplat.com/
Evike http://evike.com/
Red Wolf Airsoft http://redwolfairsoft.com/

How to Disassemble, Assemble, and Maintain a Version III Gearbox Page 15
Works Cited
Airsoft GI. “Internal Upgrade.” 2013. 13 Feb. 2013. <http://www.airsoftgi.com/index.php?cPath=31>
YouTube. “EVIKE.COM – Gearbox Guide for Version 3 Gearbox.” 14 Jul. 2009. 12 Feb. 2013.
<http://www.youtube.com/watch?v=aSTQ3awxJVs>