Embed Size (px)
Citation preview

P a g e 1 | 33
125 N. Kickapoo | Lincoln, Illinois 62656 | integrity-data.com | 888.786.6162
**Updated Documentation** visit our website to check for updated user guides.
ACA Cloud Compliance Solution Year End Quick Reference Guide Last Update 1/16/2018
P a g e 2 | 33
Copyright
Manual copyright 2017 Integrity Data. All rights reserved.
Limitation of Liability
The content of this manual is furnished for informational use only, is subject to change without notice
and should not be construed as a commitment by Integrity Data. Integrity Data assumes no responsibility
or liability for any errors or inaccuracies that may appear in this manual.
Neither Integrity Data nor anyone else who has been involved in the creation, production or delivery of
this documentation shall be liable for any indirect, incidental, special, exemplary or consequential
damage, including but not limited to any loss of anticipated profit or benefits, resulting from the use of
this documentation or sample code.
Publication Date January 2018
P a g e 3 | 33
Table of Contents Table of Contents ...................................................................................................................................... 3
What’s in this manual ............................................................................................................................... 4
Future releases.......................................................................................................................................... 4
Symbols and conventions ......................................................................................................................... 4
Verify Information Before Year-End ......................................................................................................... 5
Create a Pre-requisite Record ................................................................................................................... 5
ACA Information Assignments .................................................................................................................. 6
Verify ACA Plan Information ..................................................................................................................... 7
Review Company Information .................................................................................................................. 7
Verify Standard Measurement Information ............................................................................................. 8
Verify Initial Measurement Period Information ..................................................................................... 10
Year End Close Process ........................................................................................................................... 10
Review 1095-Cs ....................................................................................................................................... 14
Print 1095-Cs ........................................................................................................................................... 16
1095-C Distribution Center ..................................................................................................................... 18
Validating Forms ................................................................................................................................. 19
Previewing Forms ................................................................................................................................ 19
Account Totals..................................................................................................................................... 19
Sending Forms via USPS ...................................................................................................................... 20
USPS Tracking Progress Bar ................................................................................................................ 22
Account Totals..................................................................................................................................... 22
Emailing Forms to Employees ............................................................................................................. 23
Printing 1095-Cs from 1095-C Distribution ......................................................................................... 26
IRS Filing .................................................................................................................................................. 28
IRS Filing Activity ..................................................................................................................................... 30
Create and Download Retention Package .............................................................................................. 32
P a g e 4 | 33
What’s in this manual This manual is designed to provide you with a framework for understanding and working with the ACA Compliance Solution software with regards to the year-end close process.
Included are instructions on software utilities that have been developed as part of this package to help users maximize the functionality of their ERP system.
Future releases The ACA Compliance Solution will continue to have product updates and feature releases as we receive feedback from customers and guidance from the IRS. As updates are released, you may see menu navigation changes and new functionality published. We typically publish changes on a Sunday evening. You will be notified of changes via email if you are on our ACA distribution list.
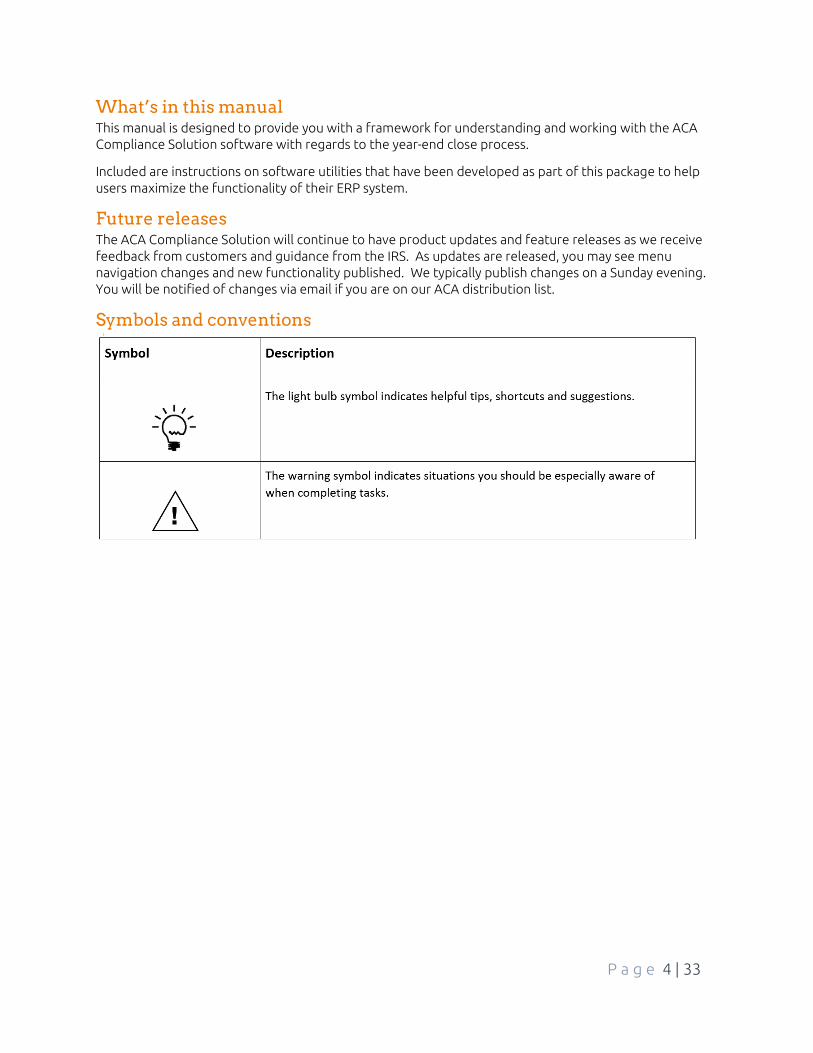
Symbols and conventions

P a g e 5 | 33
Verify Information Before Year-End Before beginning the year end process, it is important that all updated addresses for employees and dependents (if self-insured) are uploaded into the ACA Compliance Solution through either the import templates or the GP Cloud Connector. Monthly transactions for the filing year are also required in order for the 1094-C and 1095-C forms to be coded correctly. Once this data is in the Compliance Solution, you can continue with the next steps
Create a Pre-requisite Record Utilities & Maintenance > ACA Maintenance > 1094-C Prerequisites
This is the record that is used for the IRS to contact your company if more information is needed. A 1094-C prerequisite record is needed for each company that is filing for the year. Once you have completed the required information, click save and continue to the next prerequisite record, if needed.
• Choose the company ID from the drop down list at the top of the page • Increment the year to the current filing year • Complete all of the contact information needed in the provided fields. Keep in mind that phone
numbers may have dashes, but parenthesis are not allowed. • Is this the authoritative transmittal for this ALE member?
o If you are one company, the answer to this will be “yes”. o If you share an EIN with one or more companies, only one company using that EIN can be
marked as authoritative – usually the largest company o If you have several companies as part of a control group, each company will be
authoritative on its own unless they share an EIN. • Is ALE Member a member of an aggregated ALE group?
P a g e 6 | 33
o If you are a member of an ALE group, answer yes to this and choose the control group from the drop down list provided
• You are eligible for a qualifying offer method, would you like to claim it? o This refers to transition relief provided to many companies in 2015 and few in 2016. If
you have a non-calendar year plan, check “yes” in this box • For all months of the calendar year did you offer affordable coverage providing minimum value
to at least 98% of employees? o If this is true, check “yes” in this box.
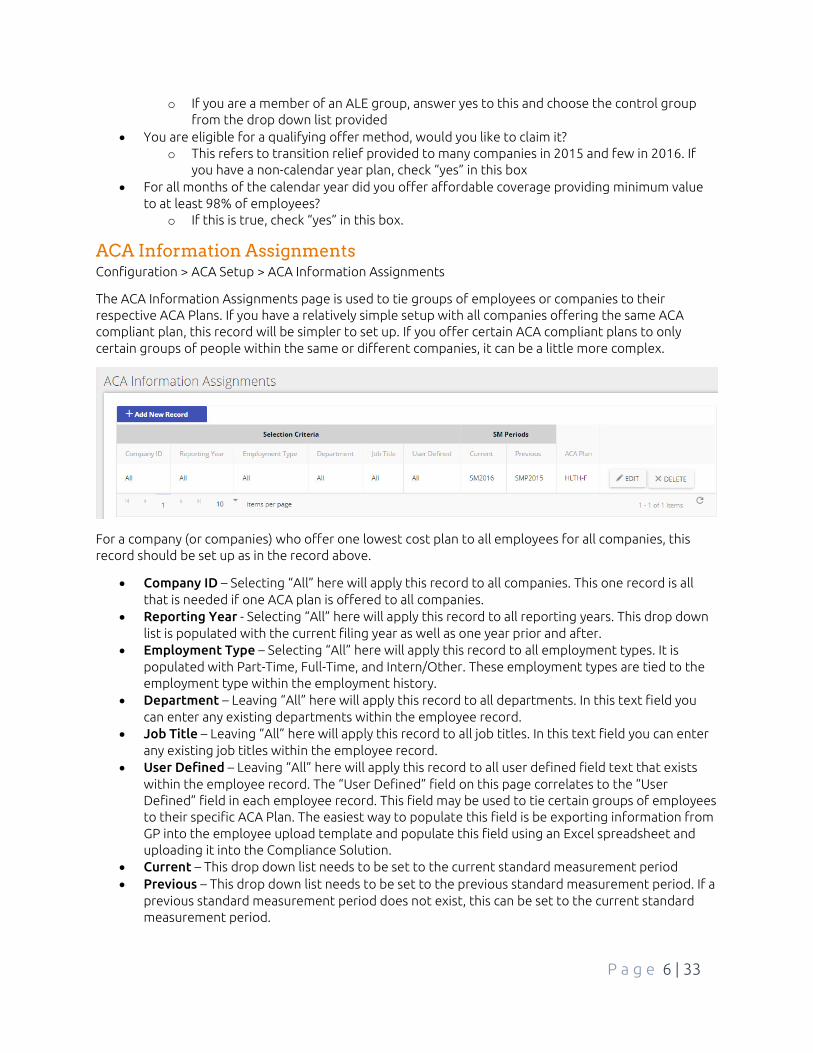
ACA Information Assignments Configuration > ACA Setup > ACA Information Assignments
The ACA Information Assignments page is used to tie groups of employees or companies to their respective ACA Plans. If you have a relatively simple setup with all companies offering the same ACA compliant plan, this record will be simpler to set up. If you offer certain ACA compliant plans to only certain groups of people within the same or different companies, it can be a little more complex.
For a company (or companies) who offer one lowest cost plan to all employees for all companies, this record should be set up as in the record above.
• Company ID – Selecting “All” here will apply this record to all companies. This one record is all that is needed if one ACA plan is offered to all companies.
• Reporting Year - Selecting “All” here will apply this record to all reporting years. This drop down list is populated with the current filing year as well as one year prior and after.
• Employment Type – Selecting “All” here will apply this record to all employment types. It is populated with Part-Time, Full-Time, and Intern/Other. These employment types are tied to the employment type within the employment history.
• Department – Leaving “All” here will apply this record to all departments. In this text field you can enter any existing departments within the employee record.
• Job Title – Leaving “All” here will apply this record to all job titles. In this text field you can enter any existing job titles within the employee record.
• User Defined – Leaving “All” here will apply this record to all user defined field text that exists within the employee record. The “User Defined” field on this page correlates to the “User Defined” field in each employee record. This field may be used to tie certain groups of employees to their specific ACA Plan. The easiest way to populate this field is be exporting information from GP into the employee upload template and populate this field using an Excel spreadsheet and uploading it into the Compliance Solution.
• Current – This drop down list needs to be set to the current standard measurement period • Previous – This drop down list needs to be set to the previous standard measurement period. If a
previous standard measurement period does not exist, this can be set to the current standard measurement period.
P a g e 7 | 33
• ACA Plan – This is the ACA Plan you would like to tie to this record. If you have an “All” record, one plan will suffice. If you have a more complicated setup, the ACA Plan chosen here will only tie to the changes made in the previous columns.
The first six columns (Company ID, Reporting Year, Employment Type, Department, Job Title and User Defined) cannot be edited after it has been saved the first time. In order to make changes to
these columns you will need to delete the record and create a new one.
Verify ACA Plan Information Configuration > ACA Setup > ACA Plan
If your plan has stayed the same as previous filing years, this record can simply be created for the current filing year.
If you have a calendar year plan, the start date should be January 1 of the current filing year with an end date of December 31 of the current filing year.
If you have a non-calendar year plan, the start date should coincide with the end date of the previous plan. For example : your non-calendar year plan begins on 4/1/2015 and ends on 3/31/2016. In order for all of 2016 to be encompassed, another record needs to be added to the ACA Plan page with a start date of 4/1/2016 and ends on 3/31/2017.
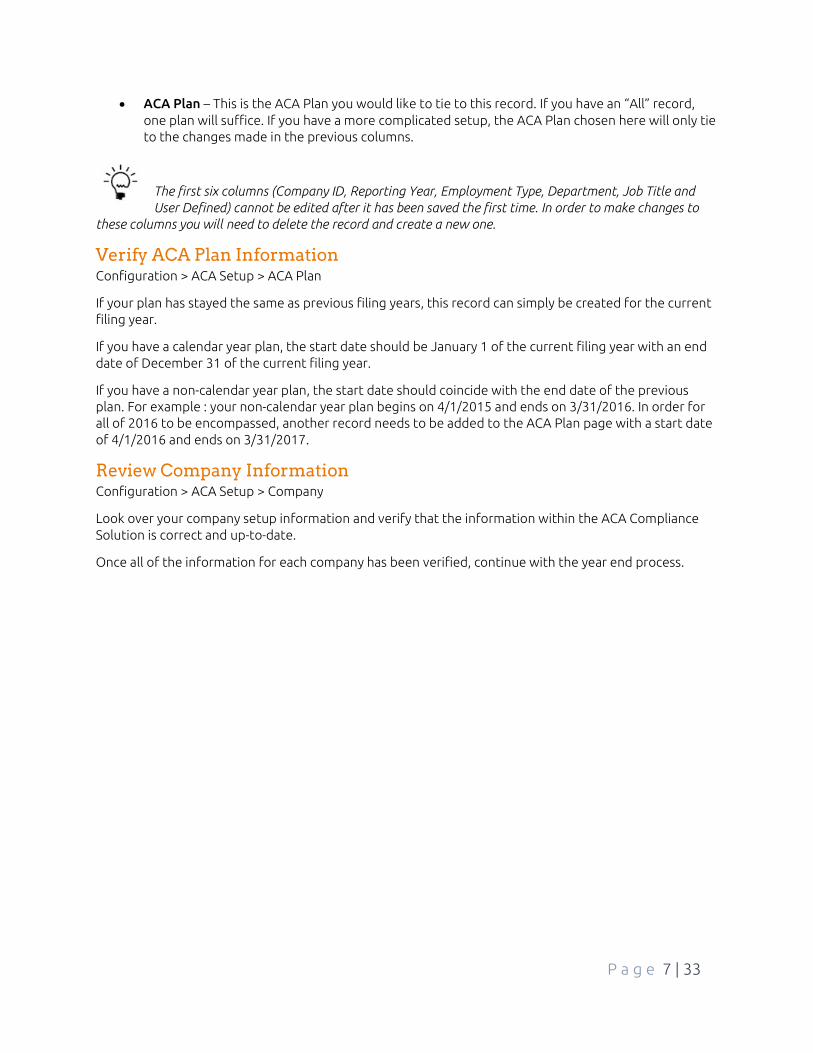
Review Company Information Configuration > ACA Setup > Company
Look over your company setup information and verify that the information within the ACA Compliance Solution is correct and up-to-date.
Once all of the information for each company has been verified, continue with the year end process.
P a g e 8 | 33
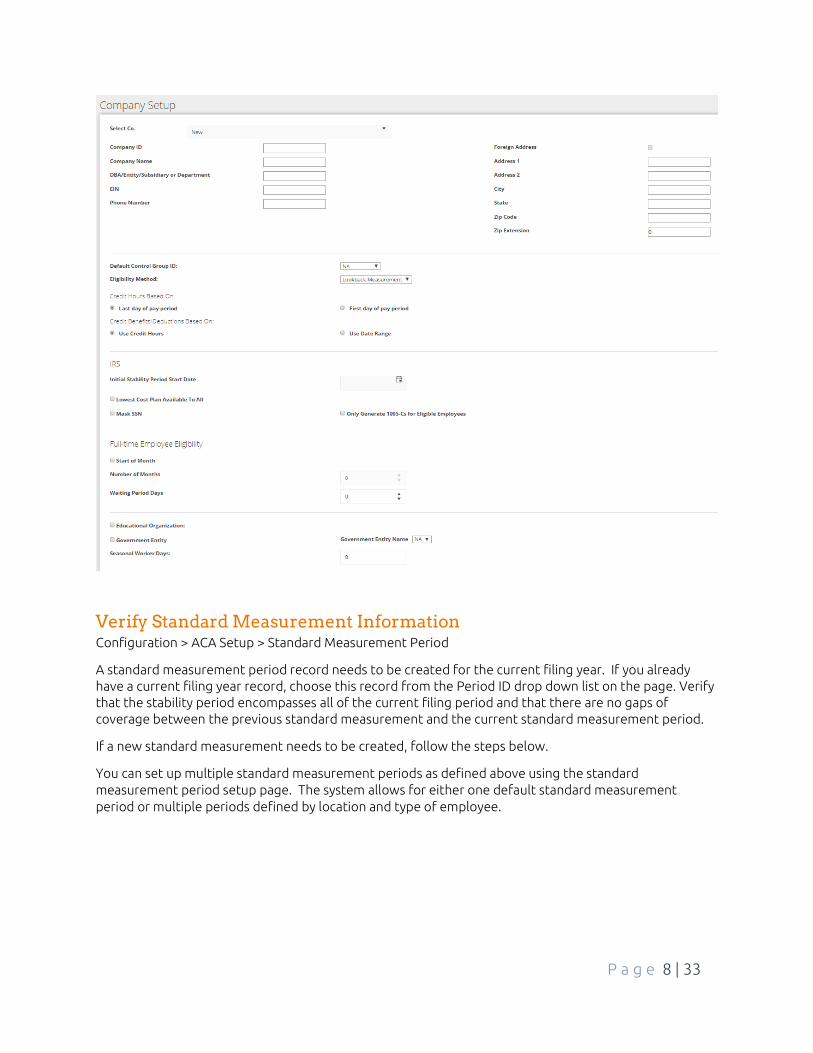
Verify Standard Measurement Information Configuration > ACA Setup > Standard Measurement Period
A standard measurement period record needs to be created for the current filing year. If you already have a current filing year record, choose this record from the Period ID drop down list on the page. Verify that the stability period encompasses all of the current filing period and that there are no gaps of coverage between the previous standard measurement and the current standard measurement period.
If a new standard measurement needs to be created, follow the steps below.
You can set up multiple standard measurement periods as defined above using the standard measurement period setup page. The system allows for either one default standard measurement period or multiple periods defined by location and type of employee.

P a g e 9 | 33
Period
You can select an existing period ID or create a new one by typing a name into the “New Period” field. This is a unique name for this standard measurement period. You can have multiple standard measurement periods.
Employment Type
Using this drop down list, you can choose to apply this standard measurement to hourly or salaried employees or “All” types of employees. Most companies leave this record as “All” because the most accurate way of separating different employees is by using their employment record and the ACA Information Assignments page (more on this page later)
State
The ACA allows you to have different standard measurement periods by location, which is defined as States. This drop down list contains the State abbreviations applicable for your employees. (Derived from transactions and employee maintenance records) You can choose to select individually or include ALL. Most companies leave this as “All”
Close Period
This feature reserved for a future release
Start of Measurement Period
You can start your measurement period as of the hire date or the first day of the next month. In most cases, you will select Using First Day of Next Month. This is because you are not credited with having offered coverage to an individual unless the coverage period included every day of the month. Most insurance coverage starts on the first day of the month.
Standard Measurement Period
Input the start date for your measurement period. Input the number of months in your period. The end date will automatically calculate.
Administrative Period
P a g e 10 | 33
If you have an administrative period, input the start date of the administrative period and the number of months. ACA Compliance Solution will not allow you to enter more than 3 months.
Stability Period
Employees determined to be full-time during a measurement period must be offered coverage during a corresponding “stability period” of generally the same length even if their hours drop below full-time, provided they remain employed. The stability period can be no shorter than 6 months. The stability period can be no longer than the preceding measurement period.
Input the start date of the stability period and the number of months. ACA Compliance Solution will check for compliance.
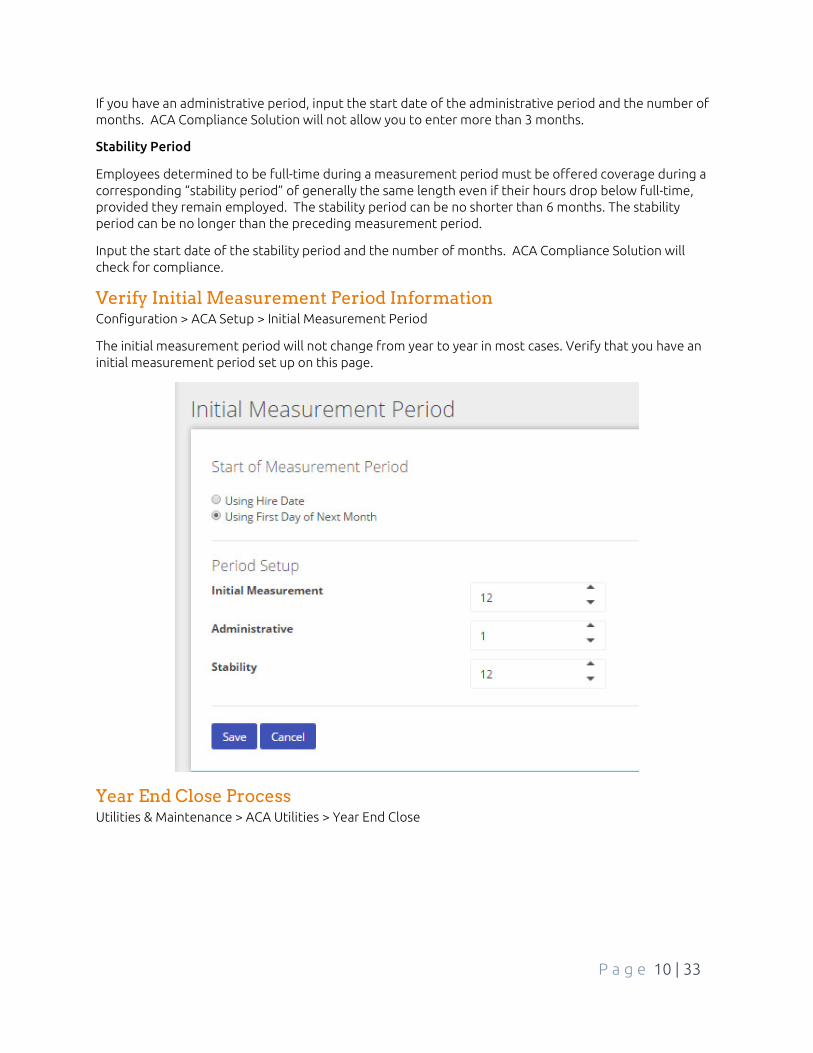
Verify Initial Measurement Period Information Configuration > ACA Setup > Initial Measurement Period
The initial measurement period will not change from year to year in most cases. Verify that you have an initial measurement period set up on this page.
Year End Close Process Utilities & Maintenance > ACA Utilities > Year End Close
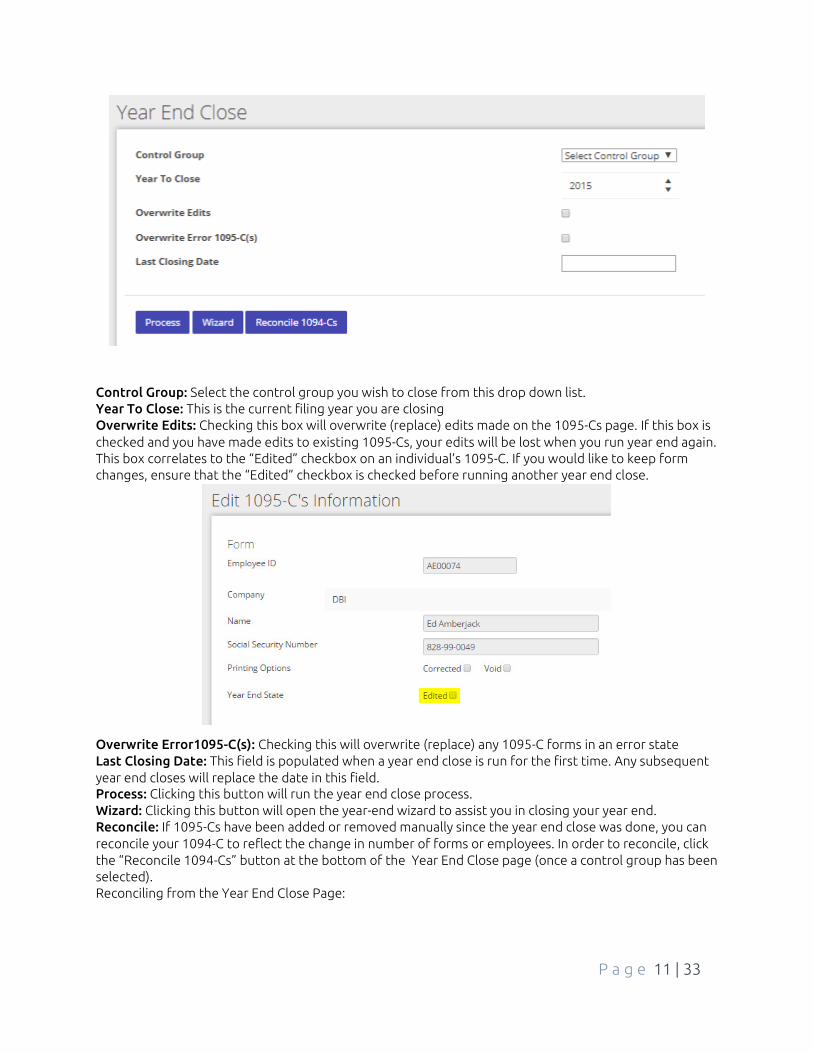
P a g e 11 | 33
Control Group: Select the control group you wish to close from this drop down list. Year To Close: This is the current filing year you are closing Overwrite Edits: Checking this box will overwrite (replace) edits made on the 1095-Cs page. If this box is checked and you have made edits to existing 1095-Cs, your edits will be lost when you run year end again. This box correlates to the “Edited” checkbox on an individual’s 1095-C. If you would like to keep form changes, ensure that the “Edited” checkbox is checked before running another year end close.
Overwrite Error1095-C(s): Checking this will overwrite (replace) any 1095-C forms in an error state Last Closing Date: This field is populated when a year end close is run for the first time. Any subsequent year end closes will replace the date in this field. Process: Clicking this button will run the year end close process. Wizard: Clicking this button will open the year-end wizard to assist you in closing your year end. Reconcile: If 1095-Cs have been added or removed manually since the year end close was done, you can reconcile your 1094-C to reflect the change in number of forms or employees. In order to reconcile, click the “Reconcile 1094-Cs” button at the bottom of the Year End Close page (once a control group has been selected). Reconciling from the Year End Close Page:
P a g e 12 | 33
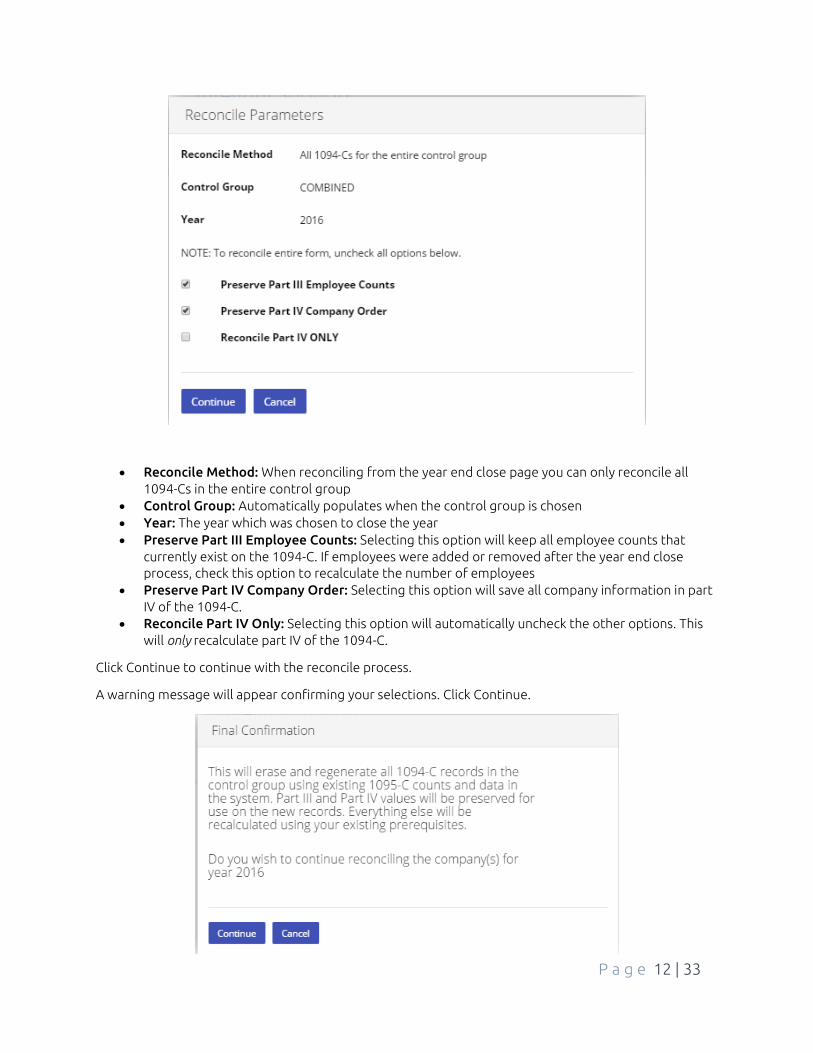
• Reconcile Method: When reconciling from the year end close page you can only reconcile all 1094-Cs in the entire control group
• Control Group: Automatically populates when the control group is chosen • Year: The year which was chosen to close the year • Preserve Part III Employee Counts: Selecting this option will keep all employee counts that
currently exist on the 1094-C. If employees were added or removed after the year end close process, check this option to recalculate the number of employees
• Preserve Part IV Company Order: Selecting this option will save all company information in part IV of the 1094-C.
• Reconcile Part IV Only: Selecting this option will automatically uncheck the other options. This will only recalculate part IV of the 1094-C.
Click Continue to continue with the reconcile process.
A warning message will appear confirming your selections. Click Continue.
P a g e 13 | 33
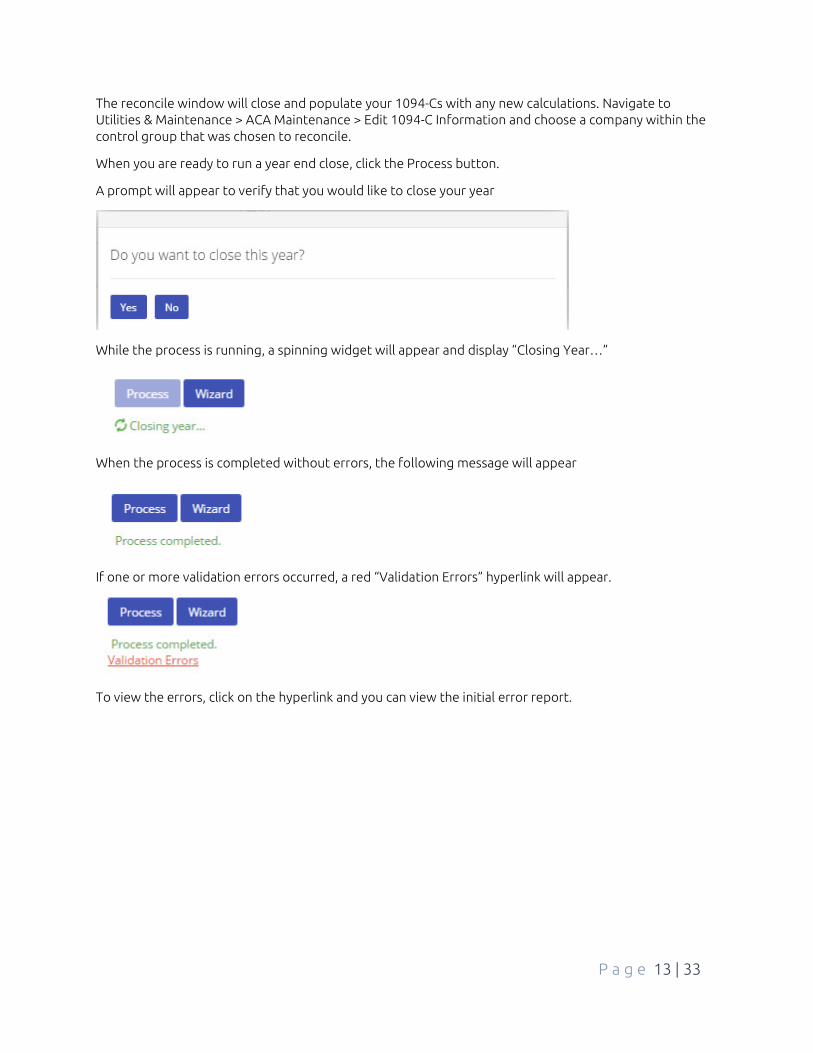
The reconcile window will close and populate your 1094-Cs with any new calculations. Navigate to Utilities & Maintenance > ACA Maintenance > Edit 1094-C Information and choose a company within the control group that was chosen to reconcile.
When you are ready to run a year end close, click the Process button.
A prompt will appear to verify that you would like to close your year
While the process is running, a spinning widget will appear and display “Closing Year…”
When the process is completed without errors, the following message will appear
If one or more validation errors occurred, a red “Validation Errors” hyperlink will appear.
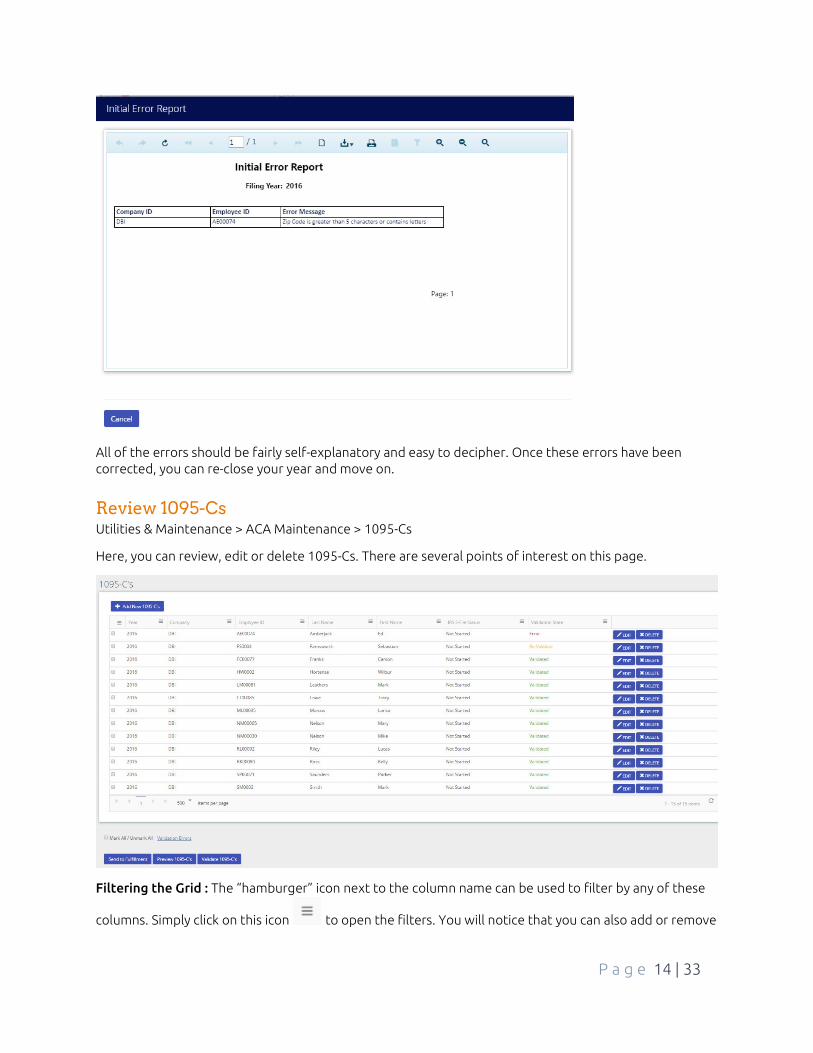
To view the errors, click on the hyperlink and you can view the initial error report.
P a g e 14 | 33
All of the errors should be fairly self-explanatory and easy to decipher. Once these errors have been corrected, you can re-close your year and move on.
Review 1095-Cs Utilities & Maintenance > ACA Maintenance > 1095-Cs
Here, you can review, edit or delete 1095-Cs. There are several points of interest on this page.
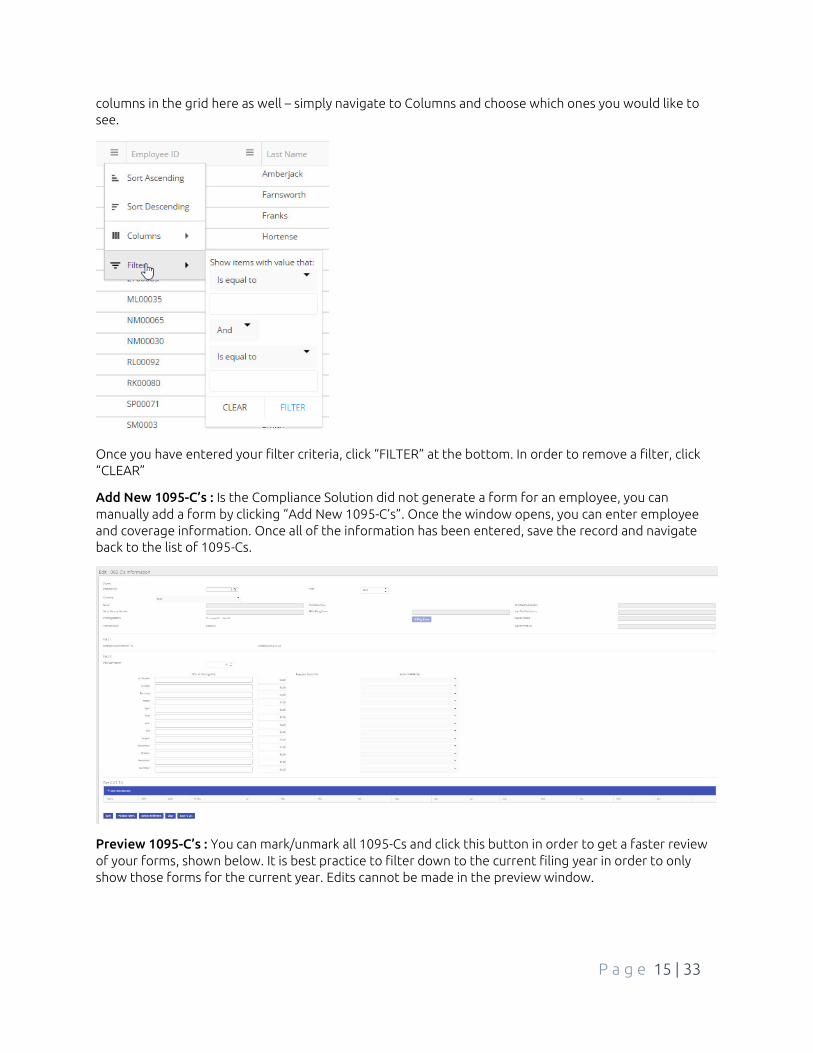
Filtering the Grid : The “hamburger” icon next to the column name can be used to filter by any of these
columns. Simply click on this icon to open the filters. You will notice that you can also add or remove
P a g e 15 | 33
columns in the grid here as well – simply navigate to Columns and choose which ones you would like to see.
Once you have entered your filter criteria, click “FILTER” at the bottom. In order to remove a filter, click “CLEAR”
Add New 1095-C’s : Is the Compliance Solution did not generate a form for an employee, you can manually add a form by clicking “Add New 1095-C’s”. Once the window opens, you can enter employee and coverage information. Once all of the information has been entered, save the record and navigate back to the list of 1095-Cs.
Preview 1095-C’s : You can mark/unmark all 1095-Cs and click this button in order to get a faster review of your forms, shown below. It is best practice to filter down to the current filing year in order to only show those forms for the current year. Edits cannot be made in the preview window.

P a g e 16 | 33
Validate 1095-C’s : The validation state (shown on the first picture on the right of the page) is an easy way to see if individual forms have correct information. While a green, “validated” status is not required to continue with your filing, it is a good way of making sure all of the employee information is correct. You can validate two ways. 1) Mark the form(s) and click the “Validate 1095-C’s” button 2) Inside of the individual 1095-C you can validate each one individually.
Edit : In order to manually edit one particular form, click the Edit button on the row. Once the page opens, you can edit parts II, III and IV of the form to reflect any changes you need. When you are done editing, save the record and navigate back to the list of 1095-Cs.
Delete : If the system generated a form that is not required, you can use the Delete button to remove the form from the system. Deleting a form cannot be undone.
Print 1095-Cs Alerts & Reports > ACA Reports > IRS Forms
There are two different types of 1095-C forms available to print from the Compliance Solution. When you Create an IRS Form, the file will appear at the bottom of the page in a “Pending” status. Once the file is

P a g e 17 | 33
available to view it will appear in a blue hyperlink that can be clicked to open the PDF file. This file contains all created 1095-C forms and can then be opened and saved to your computer or printed.
1095-C : This form is the IRS regulated 1095-C that will be used in the case of paper filing.
1095-C Envelope : This form is not an IRS regulated form and is printed in portrait format. This form is exclusively for mailing the 1095-Cs to employees. Note: When mailing sensitive information, masking the social security number is always best practice.
The 1095-C Envelope form is designed to fit in the following envelopes:
P a g e 18 | 33
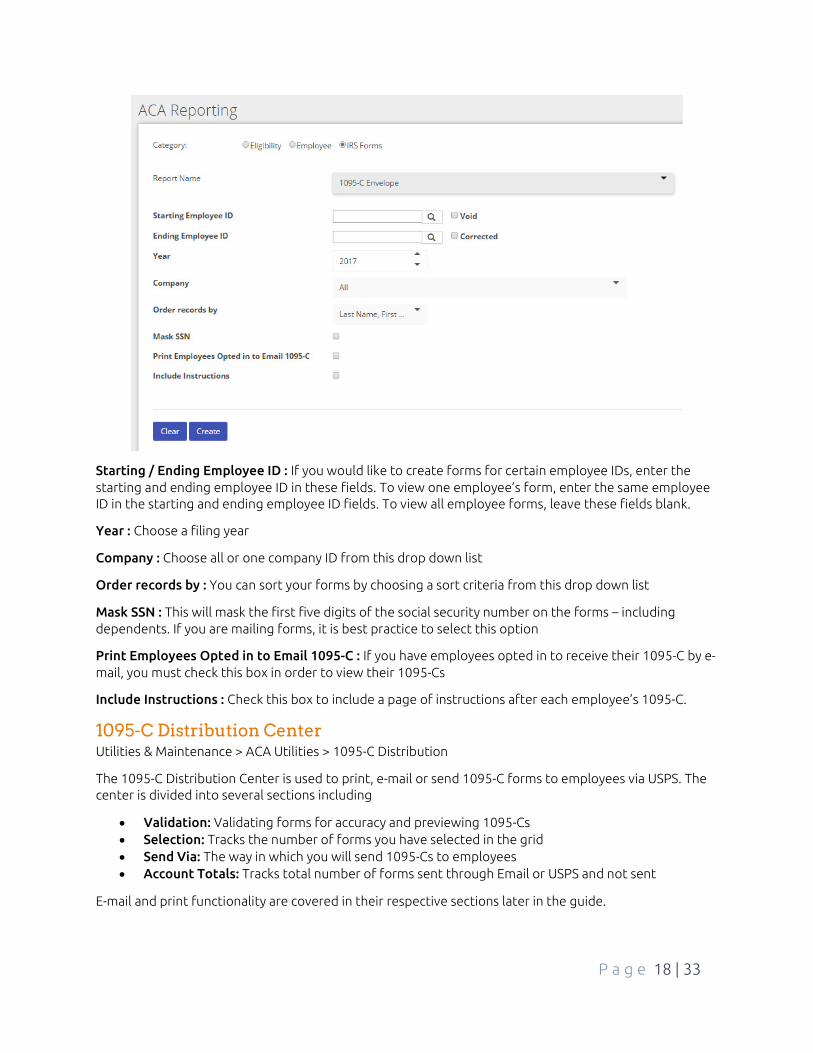
Starting / Ending Employee ID : If you would like to create forms for certain employee IDs, enter the starting and ending employee ID in these fields. To view one employee’s form, enter the same employee ID in the starting and ending employee ID fields. To view all employee forms, leave these fields blank.
Year : Choose a filing year
Company : Choose all or one company ID from this drop down list
Order records by : You can sort your forms by choosing a sort criteria from this drop down list
Mask SSN : This will mask the first five digits of the social security number on the forms – including dependents. If you are mailing forms, it is best practice to select this option
Print Employees Opted in to Email 1095-C : If you have employees opted in to receive their 1095-C by e-mail, you must check this box in order to view their 1095-Cs
Include Instructions : Check this box to include a page of instructions after each employee’s 1095-C.
1095-C Distribution Center Utilities & Maintenance > ACA Utilities > 1095-C Distribution
The 1095-C Distribution Center is used to print, e-mail or send 1095-C forms to employees via USPS. The center is divided into several sections including
• Validation: Validating forms for accuracy and previewing 1095-Cs • Selection: Tracks the number of forms you have selected in the grid • Send Via: The way in which you will send 1095-Cs to employees • Account Totals: Tracks total number of forms sent through Email or USPS and not sent
E-mail and print functionality are covered in their respective sections later in the guide.
P a g e 19 | 33
Warning! The 1095-C Distribution center is not multi –user capable. Only one user should be performing actions on this page at a time. Failure to restrict to one user may result in extra forms being sent and charges incurred. Take care to follow this advisory.
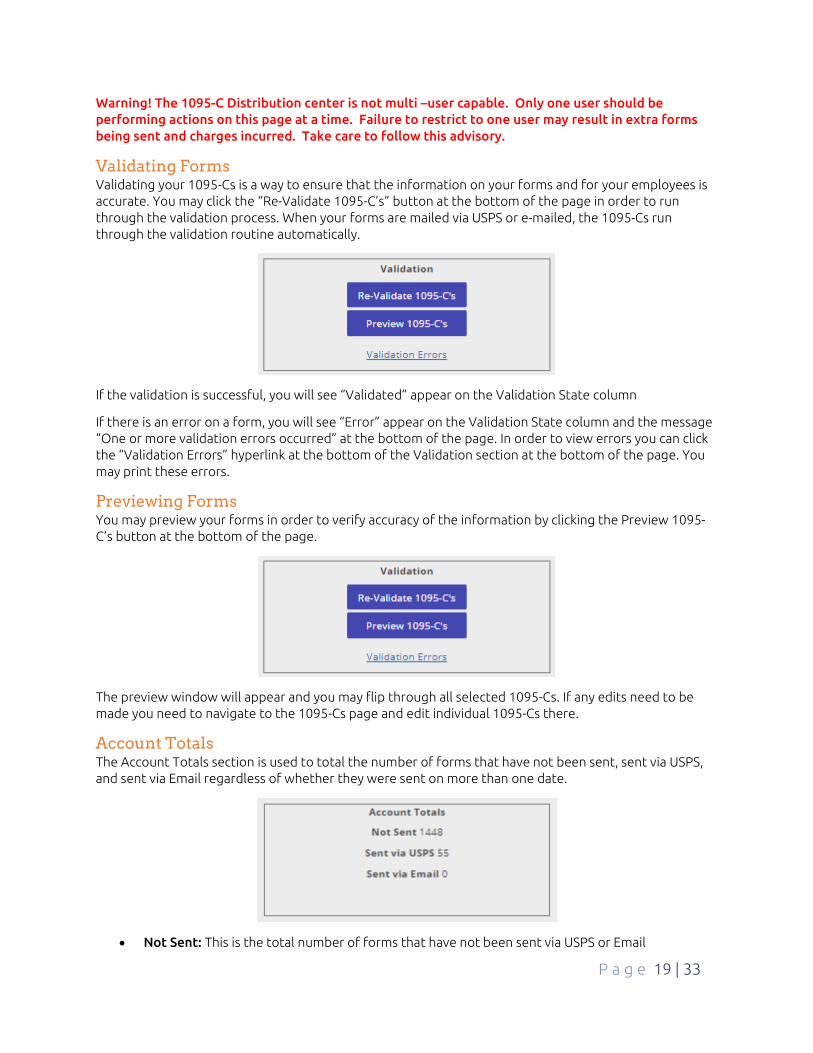
Validating Forms Validating your 1095-Cs is a way to ensure that the information on your forms and for your employees is accurate. You may click the “Re-Validate 1095-C’s” button at the bottom of the page in order to run through the validation process. When your forms are mailed via USPS or e-mailed, the 1095-Cs run through the validation routine automatically.
If the validation is successful, you will see “Validated” appear on the Validation State column
If there is an error on a form, you will see “Error” appear on the Validation State column and the message “One or more validation errors occurred” at the bottom of the page. In order to view errors you can click the “Validation Errors” hyperlink at the bottom of the Validation section at the bottom of the page. You may print these errors.
Previewing Forms You may preview your forms in order to verify accuracy of the information by clicking the Preview 1095-C’s button at the bottom of the page.
The preview window will appear and you may flip through all selected 1095-Cs. If any edits need to be made you need to navigate to the 1095-Cs page and edit individual 1095-Cs there.
Account Totals The Account Totals section is used to total the number of forms that have not been sent, sent via USPS, and sent via Email regardless of whether they were sent on more than one date.
• Not Sent: This is the total number of forms that have not been sent via USPS or Email
P a g e 20 | 33
• Sent via USPS: This is the total number of forms that have been sent via USPS Note: This number is only populated once the number of forms make it past the Creation section
• Sent via Email: This is the total number of forms that have been sent via Email
Sending Forms via USPS Mailing forms to employees via USPS is done in separate batches throughout the filing season.
Step 1
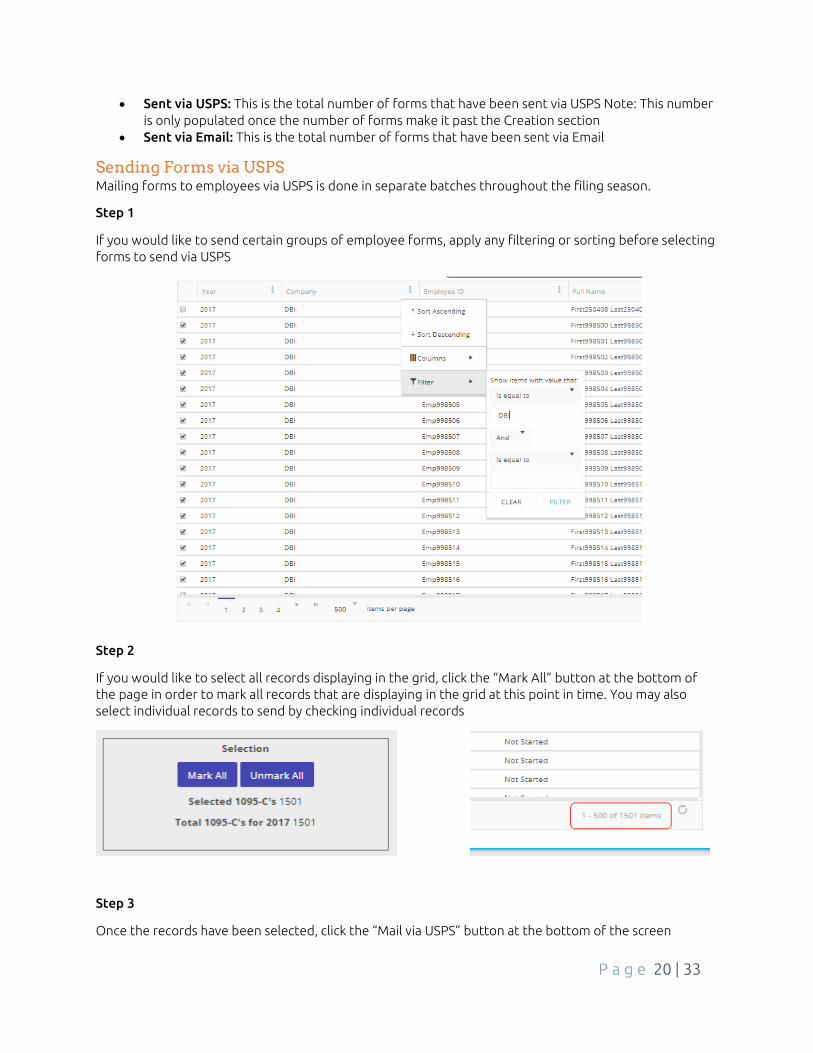
If you would like to send certain groups of employee forms, apply any filtering or sorting before selecting forms to send via USPS
Step 2
If you would like to select all records displaying in the grid, click the “Mark All” button at the bottom of the page in order to mark all records that are displaying in the grid at this point in time. You may also select individual records to send by checking individual records
Step 3
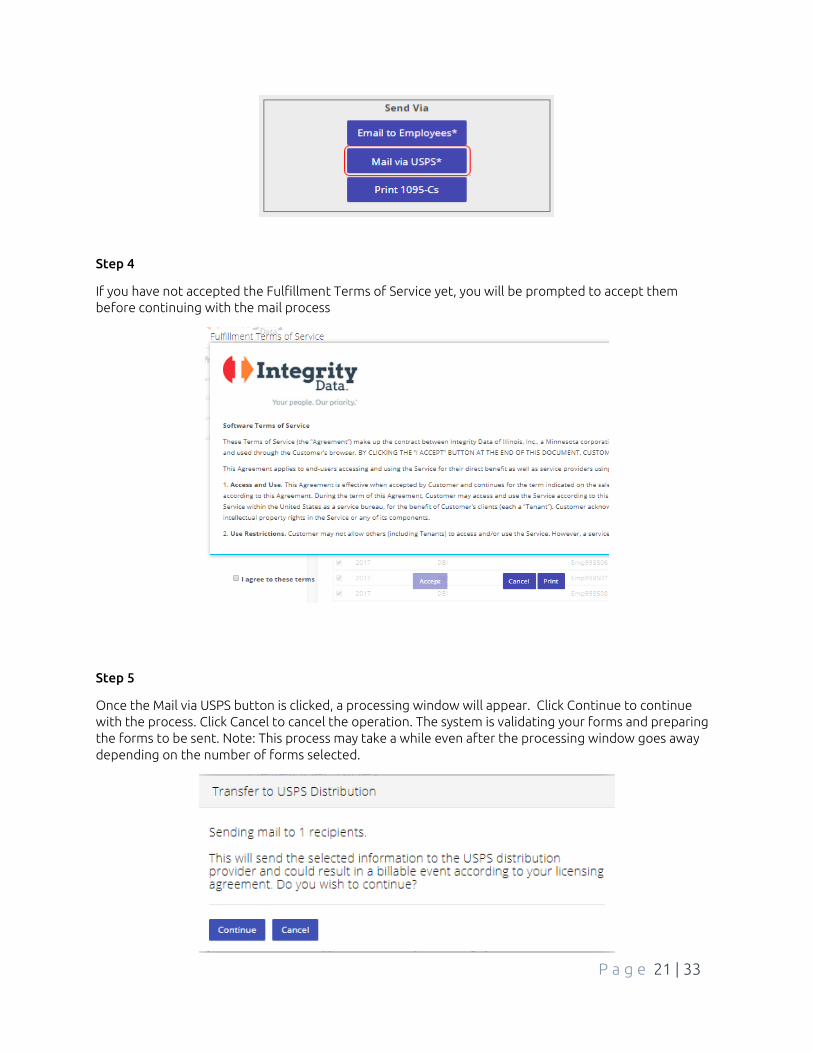
Once the records have been selected, click the “Mail via USPS” button at the bottom of the screen
P a g e 21 | 33
Step 4
If you have not accepted the Fulfillment Terms of Service yet, you will be prompted to accept them before continuing with the mail process
Step 5
Once the Mail via USPS button is clicked, a processing window will appear. Click Continue to continue with the process. Click Cancel to cancel the operation. The system is validating your forms and preparing the forms to be sent. Note: This process may take a while even after the processing window goes away depending on the number of forms selected.
P a g e 22 | 33
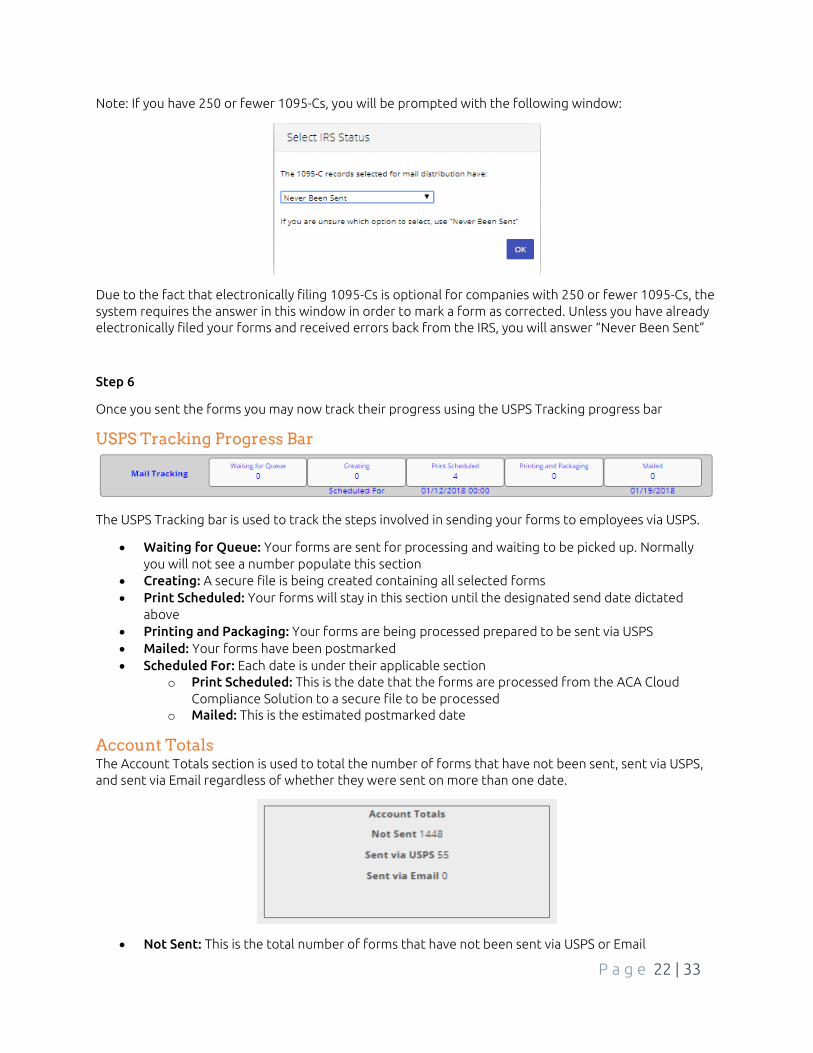
Note: If you have 250 or fewer 1095-Cs, you will be prompted with the following window:
Due to the fact that electronically filing 1095-Cs is optional for companies with 250 or fewer 1095-Cs, the system requires the answer in this window in order to mark a form as corrected. Unless you have already electronically filed your forms and received errors back from the IRS, you will answer “Never Been Sent”
Step 6
Once you sent the forms you may now track their progress using the USPS Tracking progress bar
USPS Tracking Progress Bar
The USPS Tracking bar is used to track the steps involved in sending your forms to employees via USPS.
• Waiting for Queue: Your forms are sent for processing and waiting to be picked up. Normally you will not see a number populate this section
• Creating: A secure file is being created containing all selected forms • Print Scheduled: Your forms will stay in this section until the designated send date dictated
above • Printing and Packaging: Your forms are being processed prepared to be sent via USPS • Mailed: Your forms have been postmarked • Scheduled For: Each date is under their applicable section
o Print Scheduled: This is the date that the forms are processed from the ACA Cloud Compliance Solution to a secure file to be processed
o Mailed: This is the estimated postmarked date
Account Totals The Account Totals section is used to total the number of forms that have not been sent, sent via USPS, and sent via Email regardless of whether they were sent on more than one date.
• Not Sent: This is the total number of forms that have not been sent via USPS or Email
P a g e 23 | 33
• Sent via USPS: This is the total number of forms that have been sent via USPS Note: This number is only populated once the number of forms make it past the Creation section
• Sent via Email: This is the total number of forms that have been sent via Email
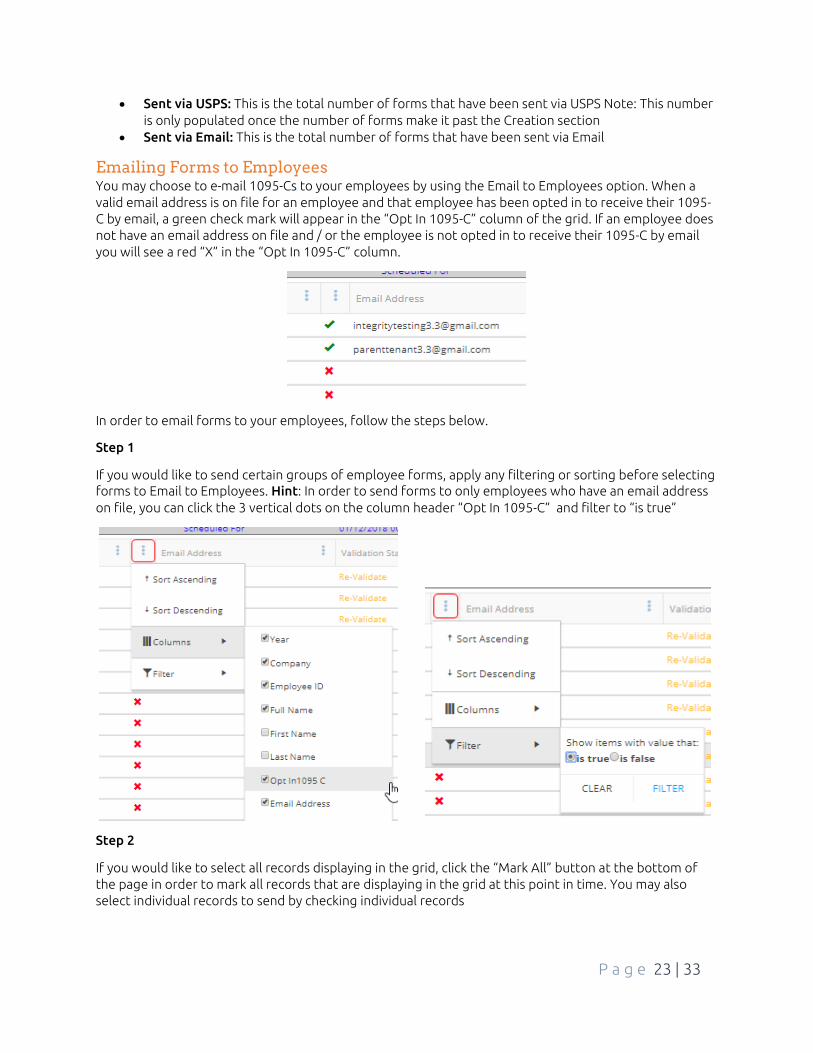
Emailing Forms to Employees You may choose to e-mail 1095-Cs to your employees by using the Email to Employees option. When a valid email address is on file for an employee and that employee has been opted in to receive their 1095-C by email, a green check mark will appear in the “Opt In 1095-C” column of the grid. If an employee does not have an email address on file and / or the employee is not opted in to receive their 1095-C by email you will see a red “X” in the “Opt In 1095-C” column.
In order to email forms to your employees, follow the steps below.
Step 1
If you would like to send certain groups of employee forms, apply any filtering or sorting before selecting forms to Email to Employees. Hint: In order to send forms to only employees who have an email address on file, you can click the 3 vertical dots on the column header “Opt In 1095-C” and filter to “is true”
Step 2
If you would like to select all records displaying in the grid, click the “Mark All” button at the bottom of the page in order to mark all records that are displaying in the grid at this point in time. You may also select individual records to send by checking individual records

P a g e 24 | 33
Step 3
Once the records have been selected, click the “Email to Employees” button at the bottom of the screen
Step 4
When the email window appears, enter information as indicated
Subject: This is the subject line that will appear in the employee’s inbox
Body: This will be the body of your message
BCC: Contains the email address of the recipient of the Blind Carbon Copy. This will not be visible to the employee and is typically a special email address set up to receive the correspondence as proof that the email was actually sent.

P a g e 25 | 33
Reply-To Address: This email address will be visible to the employee. If the employee elects to respond to the email the address specified in this field will be the recipient of the reply. Typically, this is a dedicated email account for the payroll department or for support.
Password: Using a password to protect the employee’s 1095-Cs is highly suggested in order to prevent unauthorized persons from accessing their secure information. This drop down list contains 3 options for password protection and are thusly explained:
None – The attachments will not be password protected
Last 4 of Employee SSN – The attachments will require the recipient to enter the last 4 digits of the recipients SSN to be accessed
First 5 of Employee SSN – The attachments will require the recipient to enter the first 5 digits of the recipients SSN to be accessed
NOTE: The password protection applies to the 1095-C attachment only. General attachments are not subject to password protection
Include 1095-C Instructions: Checking this box will cause the system to include an extra attachment to the email correspondence, namely the instruction file for 1095-C.
Download 1095-C Instructions: This is a hyperlink to instruction file that will allow the user to preview the contents before deciding whether or not to attach it.

P a g e 26 | 33
Step 5
When you have completed the email setup, click the Send Email button. A prompt will appear to confirm that you would like to send the selected forms via email. Select Yes to continue or No to stop the process.
Step 6
The system will run through the validation routine to ensure accuracy of your information before sending the emails to your employees. If the validations detect an error, the email process will stop and the forms in error will display “Error” in the validation state column. You may click on the word “Error” in order to view the error.
Validation errors will display at the bottom of the page and you may view these errors in the Validation Errors hyperlink at the bottom of the page.
Once the errors have been corrected, you may navigate back to the 1095-C Distribution Center and re-email your forms to employees.
Printing 1095-Cs from 1095-C Distribution You may choose to manually print and mail your 1095-Cs without using the fulfillment service provided by Integrity Data. In order to print your forms, click the Print 1095-Cs button on the 1095-C Distribution page. The forms will print on the 1095-C Envelope form in order to show employee address information in the W-2 envelope window. More on this form and the envelopers in the ACA Reports section of the guide. Forms are not validated automatically when you choose to manually print the forms. In order to ensure accuracy it is advised that you validate forms before distributing them to employees.
P a g e 27 | 33
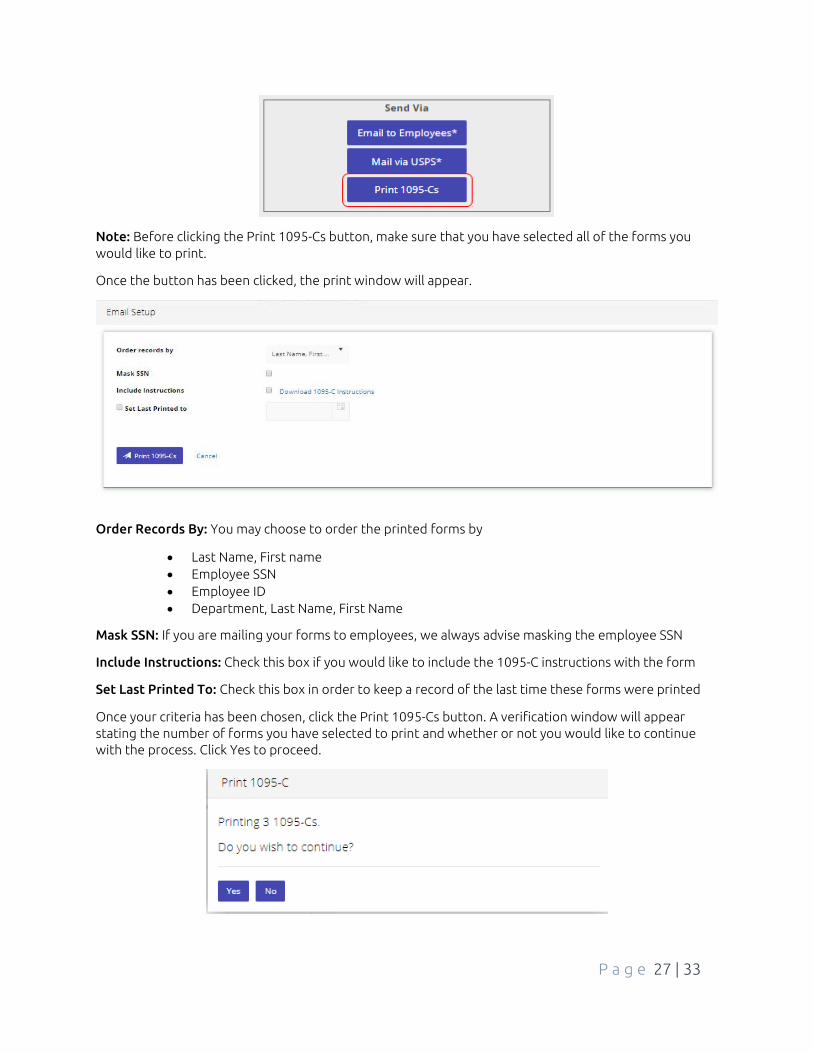
Note: Before clicking the Print 1095-Cs button, make sure that you have selected all of the forms you would like to print.
Once the button has been clicked, the print window will appear.
Order Records By: You may choose to order the printed forms by
• Last Name, First name • Employee SSN • Employee ID • Department, Last Name, First Name
Mask SSN: If you are mailing your forms to employees, we always advise masking the employee SSN
Include Instructions: Check this box if you would like to include the 1095-C instructions with the form
Set Last Printed To: Check this box in order to keep a record of the last time these forms were printed
Once your criteria has been chosen, click the Print 1095-Cs button. A verification window will appear stating the number of forms you have selected to print and whether or not you would like to continue with the process. Click Yes to proceed.
P a g e 28 | 33
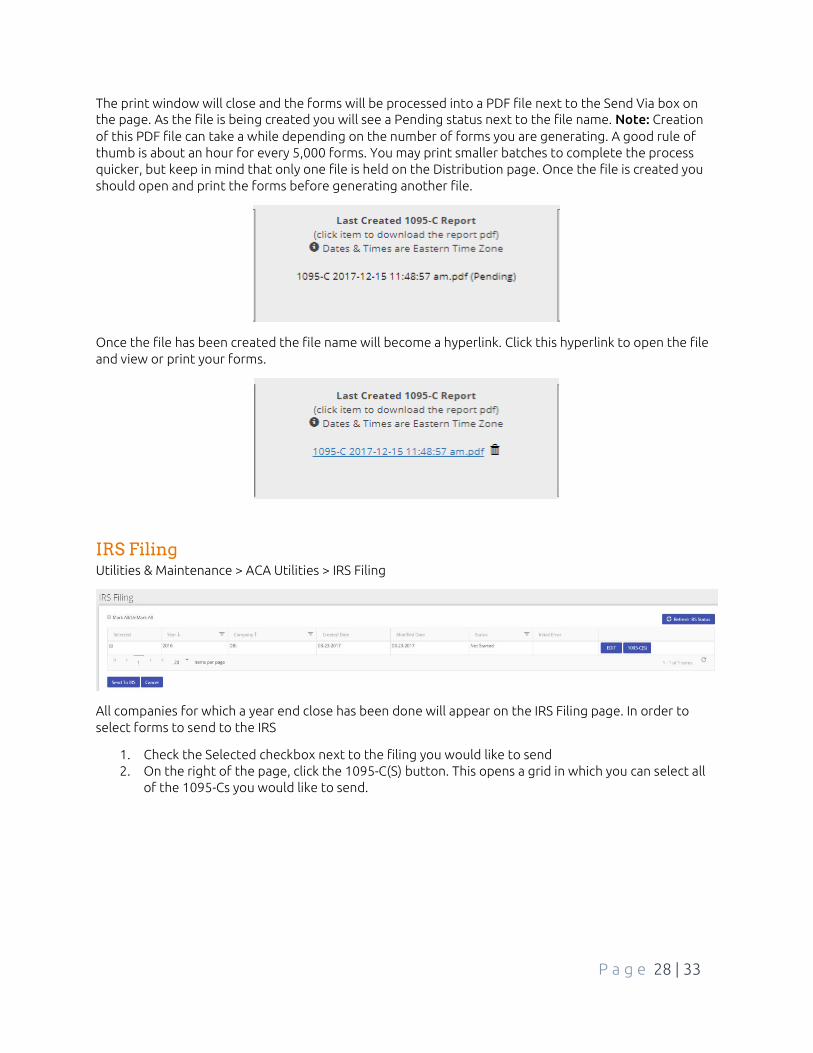
The print window will close and the forms will be processed into a PDF file next to the Send Via box on the page. As the file is being created you will see a Pending status next to the file name. Note: Creation of this PDF file can take a while depending on the number of forms you are generating. A good rule of thumb is about an hour for every 5,000 forms. You may print smaller batches to complete the process quicker, but keep in mind that only one file is held on the Distribution page. Once the file is created you should open and print the forms before generating another file.
Once the file has been created the file name will become a hyperlink. Click this hyperlink to open the file and view or print your forms.
IRS Filing Utilities & Maintenance > ACA Utilities > IRS Filing
All companies for which a year end close has been done will appear on the IRS Filing page. In order to select forms to send to the IRS
1. Check the Selected checkbox next to the filing you would like to send 2. On the right of the page, click the 1095-C(S) button. This opens a grid in which you can select all
of the 1095-Cs you would like to send.

P a g e 29 | 33
3. Go through each page in this grid and ensure that all forms are selected. Note: if you have
manually added 1095-Cs, they will not be checked by default. You will need to go through and manually check them. If you check or uncheck a form on a page, save each page you make a change to before moving on to the next page.
4. Close the grid 5. Repeat these steps for each company. Once all companies are selected, click the Send To IRS
button
Once the Send To IRS button has been clicked, the IRS Filing page will refresh and you will see a couple of different messages appear
• Waiting on Validation : This is the Compliance Solution doing some last minute checks to make sure that your submission does not have any obvious errors. If an error is found, “Initial Error” will display in the Initial Error column and you can click on the link to view it. Once all errors have been corrected, you can resubmit your forms to the IRS following the same steps above.
• Sending : The Compliance Solution is transmitting your forms to the IRS
• Pending: Your forms are in line to be processed by the IRS.
P a g e 30 | 33
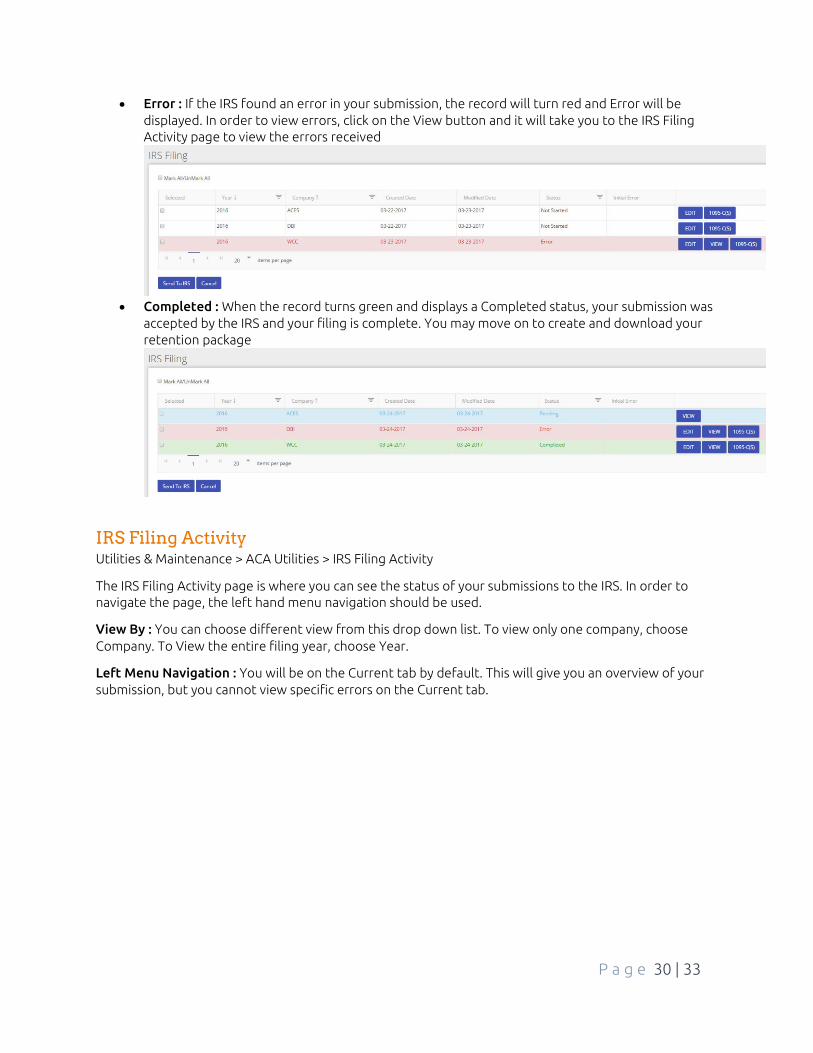
• Error : If the IRS found an error in your submission, the record will turn red and Error will be displayed. In order to view errors, click on the View button and it will take you to the IRS Filing Activity page to view the errors received
• Completed : When the record turns green and displays a Completed status, your submission was
accepted by the IRS and your filing is complete. You may move on to create and download your retention package
IRS Filing Activity Utilities & Maintenance > ACA Utilities > IRS Filing Activity
The IRS Filing Activity page is where you can see the status of your submissions to the IRS. In order to navigate the page, the left hand menu navigation should be used.
View By : You can choose different view from this drop down list. To view only one company, choose Company. To View the entire filing year, choose Year.
Left Menu Navigation : You will be on the Current tab by default. This will give you an overview of your submission, but you cannot view specific errors on the Current tab.
P a g e 31 | 33
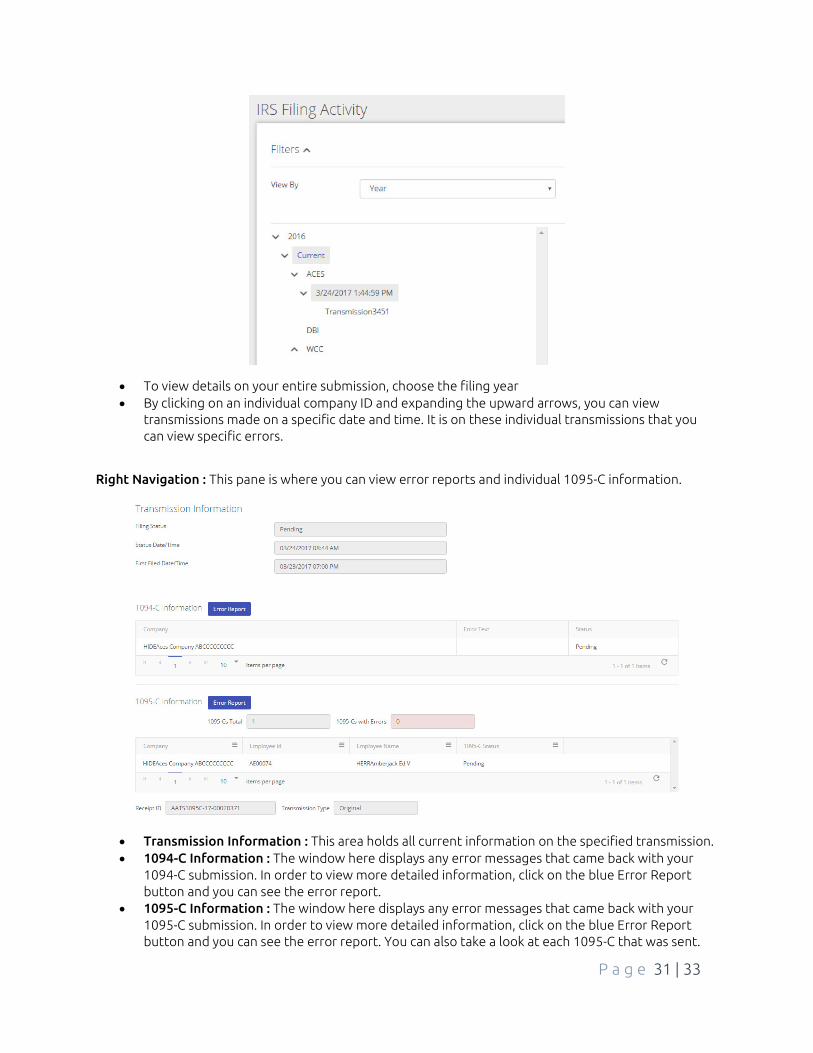
• To view details on your entire submission, choose the filing year • By clicking on an individual company ID and expanding the upward arrows, you can view
transmissions made on a specific date and time. It is on these individual transmissions that you can view specific errors.
Right Navigation : This pane is where you can view error reports and individual 1095-C information.
• Transmission Information : This area holds all current information on the specified transmission. • 1094-C Information : The window here displays any error messages that came back with your
1094-C submission. In order to view more detailed information, click on the blue Error Report button and you can see the error report.
• 1095-C Information : The window here displays any error messages that came back with your 1095-C submission. In order to view more detailed information, click on the blue Error Report button and you can see the error report. You can also take a look at each 1095-C that was sent.
P a g e 32 | 33
Create and Download Retention Package Utilities & Maintenance > ACA Utilities > IRS Filing Activity
Only create your retention package when you have a Completed status for all of your companies for the current filing year. The retention package holds all submitted 1094-C forms, all 1095-C forms and all of your transmissions to the IRS with all of the responses from the IRS.
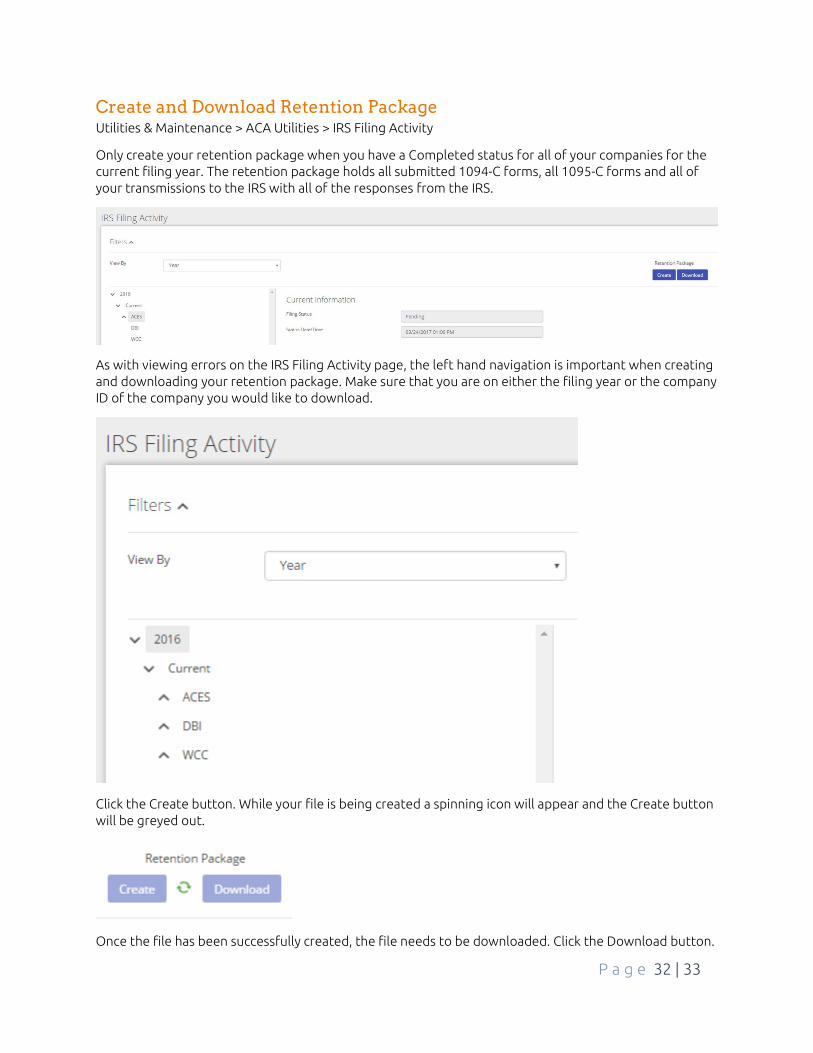
As with viewing errors on the IRS Filing Activity page, the left hand navigation is important when creating and downloading your retention package. Make sure that you are on either the filing year or the company ID of the company you would like to download.
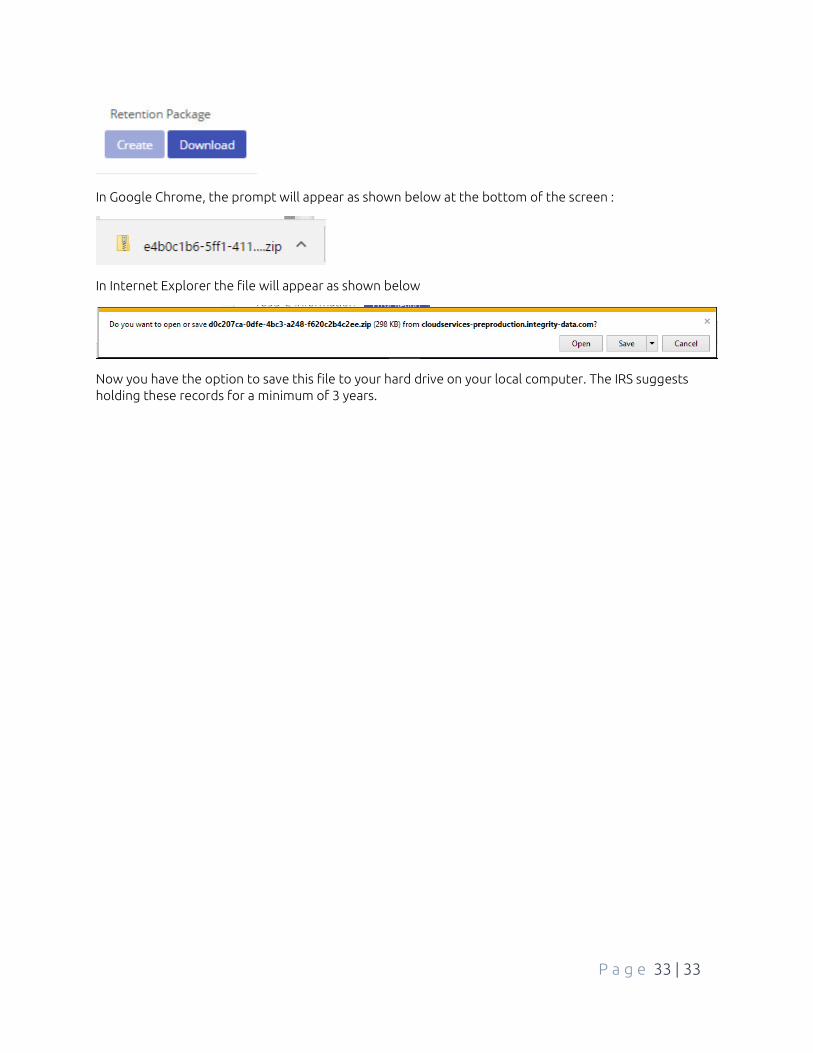
Click the Create button. While your file is being created a spinning icon will appear and the Create button will be greyed out.
Once the file has been successfully created, the file needs to be downloaded. Click the Download button.
P a g e 33 | 33
In Google Chrome, the prompt will appear as shown below at the bottom of the screen :
In Internet Explorer the file will appear as shown below
Now you have the option to save this file to your hard drive on your local computer. The IRS suggests holding these records for a minimum of 3 years.