Embed Size (px)
Citation preview
Printed in the USA by ACBL.
6575 Windchase Blvd.Horn Lake MS 38637-1523
acbl.org/IMG
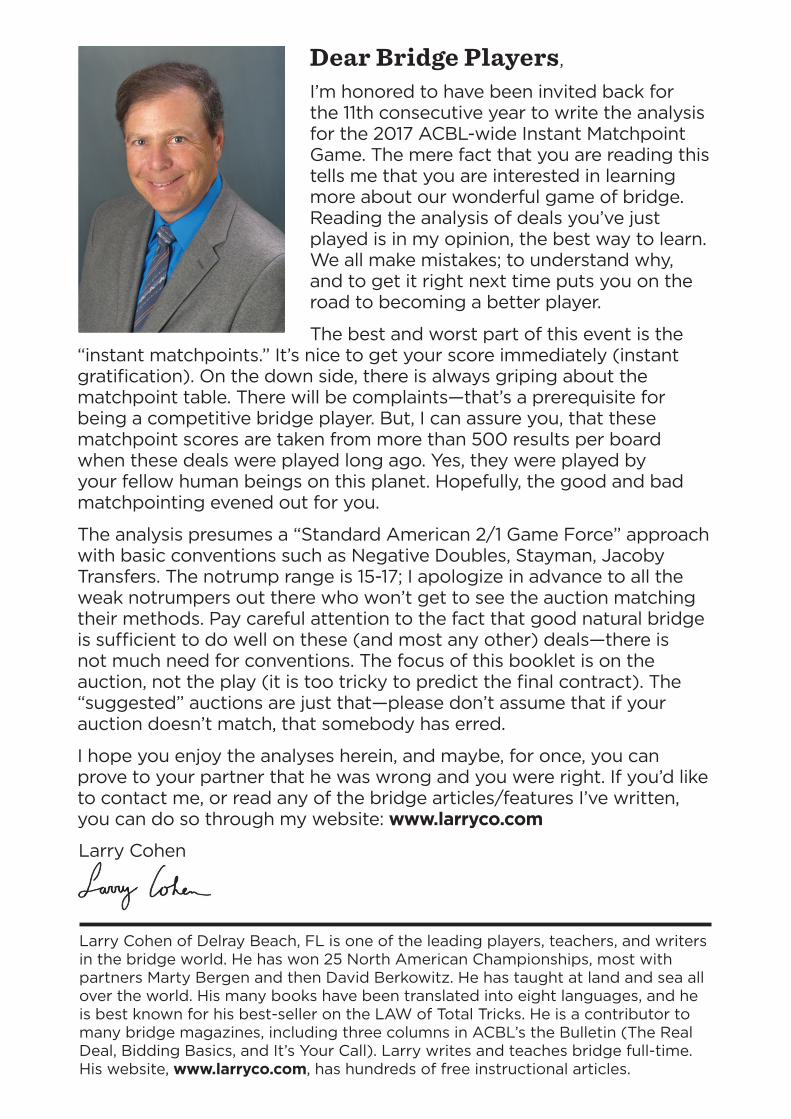
Dear Bridge Players,
I’m honored to have been invited back for the 11th consecutive year to write the analysis for the 2017 ACBL-wide Instant Matchpoint Game. The mere fact that you are reading this tells me that you are interested in learning more about our wonderful game of bridge. Reading the analysis of deals you’ve just played is in my opinion, the best way to learn. We all make mistakes; to understand why, and to get it right next time puts you on the road to becoming a better player.
The best and worst part of this event is the “instant matchpoints.” It’s nice to get your score immediately (instant gratification). On the down side, there is always griping about the matchpoint table. There will be complaints—that’s a prerequisite for being a competitive bridge player. But, I can assure you, that these matchpoint scores are taken from more than 500 results per board when these deals were played long ago. Yes, they were played by your fellow human beings on this planet. Hopefully, the good and bad matchpointing evened out for you.
The analysis presumes a “Standard American 2/1 Game Force” approach with basic conventions such as Negative Doubles, Stayman, Jacoby Transfers. The notrump range is 15-17; I apologize in advance to all the weak notrumpers out there who won’t get to see the auction matching their methods. Pay careful attention to the fact that good natural bridge is sufficient to do well on these (and most any other) deals—there is not much need for conventions. The focus of this booklet is on the auction, not the play (it is too tricky to predict the final contract). The “suggested” auctions are just that—please don’t assume that if your auction doesn’t match, that somebody has erred.
I hope you enjoy the analyses herein, and maybe, for once, you can prove to your partner that he was wrong and you were right. If you’d like to contact me, or read any of the bridge articles/features I’ve written, you can do so through my website: www.larryco.com
Larry Cohen of Delray Beach, FL is one of the leading players, teachers, and writers in the bridge world. He has won 25 North American Championships, most with partners Marty Bergen and then David Berkowitz. He has taught at land and sea all over the world. His many books have been translated into eight languages, and he is best known for his best-seller on the LAW of Total Tricks. He is a contributor to many bridge magazines, including three columns in ACBL’s the Bulletin (The Real Deal, Bidding Basics, and It’s Your Call). Larry writes and teaches bridge full-time. His website, www.larryco.com, has hundreds of free instructional articles.
Larry Cohen
MATCHPOINTTABLE
N-S Match- Score points
1Board
1
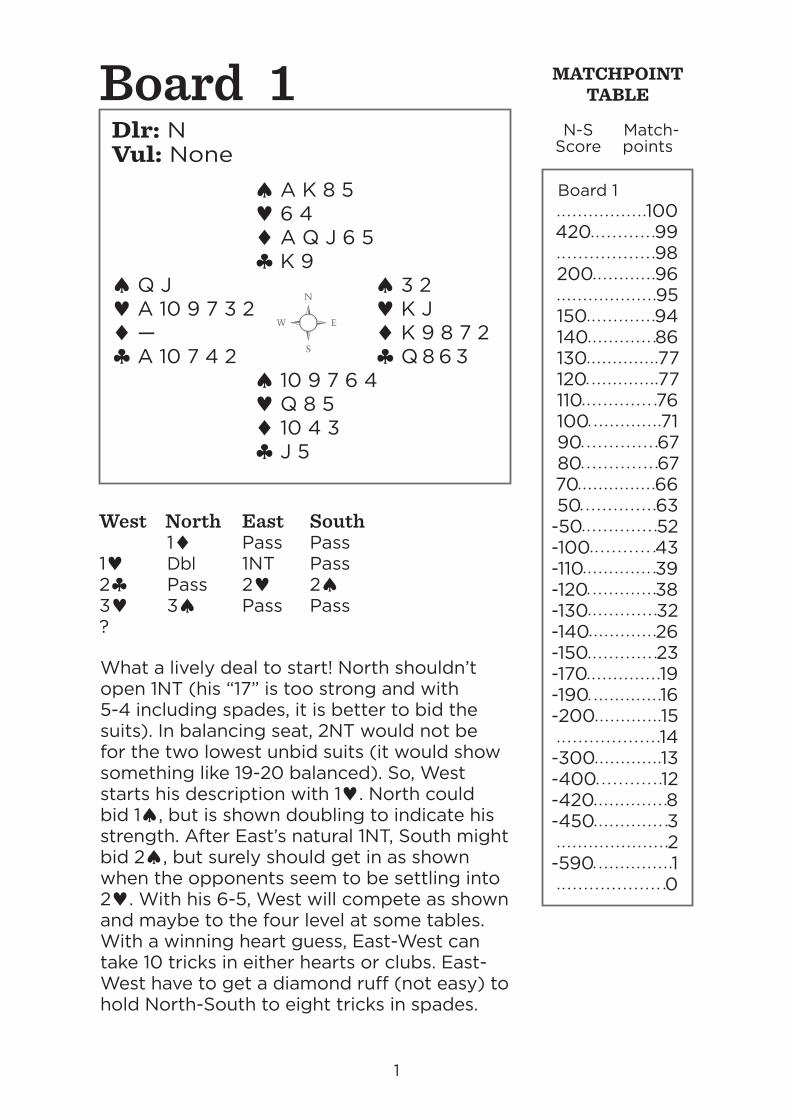
Dlr: N Vul: None ♠ A K 8 5 ♥ 6 4 ♦ A Q J 6 5 ♣ K 9♠ Q J ♠ 3 2♥ A 10 9 7 3 2 ♥ K J♦ — ♦ K 9 8 7 2♣ A 10 7 4 2 ♣ Q 8 6 3 ♠ 10 9 7 6 4 ♥ Q 8 5 ♦ 10 4 3 ♣ J 5
Board 1 100420 99 98200 96 95150 94140 86130 77120 77110 76100 7190 6780 6770 6650 63
-50 52-100 43-110 39-120 38-130 32-140 26-150 23-170 19-190 16-200 15 14
-300 13-400 12-420 8-450 3 2
-590 1 0
West North East South 1♦ Pass Pass1♥ Dbl 1NT Pass2♣ Pass 2♥ 2♠3♥ 3♠ Pass Pass?
What a lively deal to start! North shouldn’t open 1NT (his “17” is too strong and with 5-4 including spades, it is better to bid the suits). In balancing seat, 2NT would not be for the two lowest unbid suits (it would show something like 19-20 balanced). So, West starts his description with 1♥. North could bid 1♠, but is shown doubling to indicate his strength. After East’s natural 1NT, South might bid 2♠, but surely should get in as shown when the opponents seem to be settling into 2♥. With his 6-5, West will compete as shown and maybe to the four level at some tables. With a winning heart guess, East-West can take 10 tricks in either hearts or clubs. East-West have to get a diamond ruff (not easy) to hold North-South to eight tricks in spades.
MATCHPOINTTABLE
N-S Match- Score points
2Board
2
West North East South 2♦ 3♣Pass 3♥ Pass 3NTAll Pass
Yes, East has only 4 HCP, but they are all in his suit. Furthermore, he is dealer at favorable vulnerability. Do you mean to tell me if we added a side jack, all would be okay because he is in the 5-11 range marked on his convention card? After South’s overcall, North bids hearts and with diamonds stopped, South tries the winning bid of 3NT (though 3♠ is a possibility). Declarer can take 10 tricks by losing only the three high red cards. In fact, 11 tricks are possible on a heart lead. If East doesn’t preempt, South opens 1♣ and West overcalls 1♥. North might try 3NT himself or pass to try to collect a penalty. South would likely reopen with 2♣ (having no interest in defending), and North could ignore the lack of a diamond stopper and try 3NT the second time.
Board 2
1001370 99 99800 98 97720 96 95690 88660 74650 69630 59620 47600 40500 33300 31 29180 28170 28150 26140 24130 22120 20110 19100 17 15-100 10 7-200 5-300 2-400 1 0
Dlr: E Vul: N-S ♠ A K J ♥ K Q 10 3 2 ♦ 10 3 2 ♣ 7 5♠ Q 10 9 3 ♠ 8 7♥ A J 8 6 4 ♥ 9 7 5♦ A ♦ K J 9 8 7 4♣ 9 6 3 ♣ 10 8 ♠ 6 5 4 2 ♥ — ♦ Q 6 5 ♣ A K Q J 4 2
MATCHPOINTTABLE
N-S Match- Score points
3Board
3
West North East South 1♠Dbl 3♠ All Pass
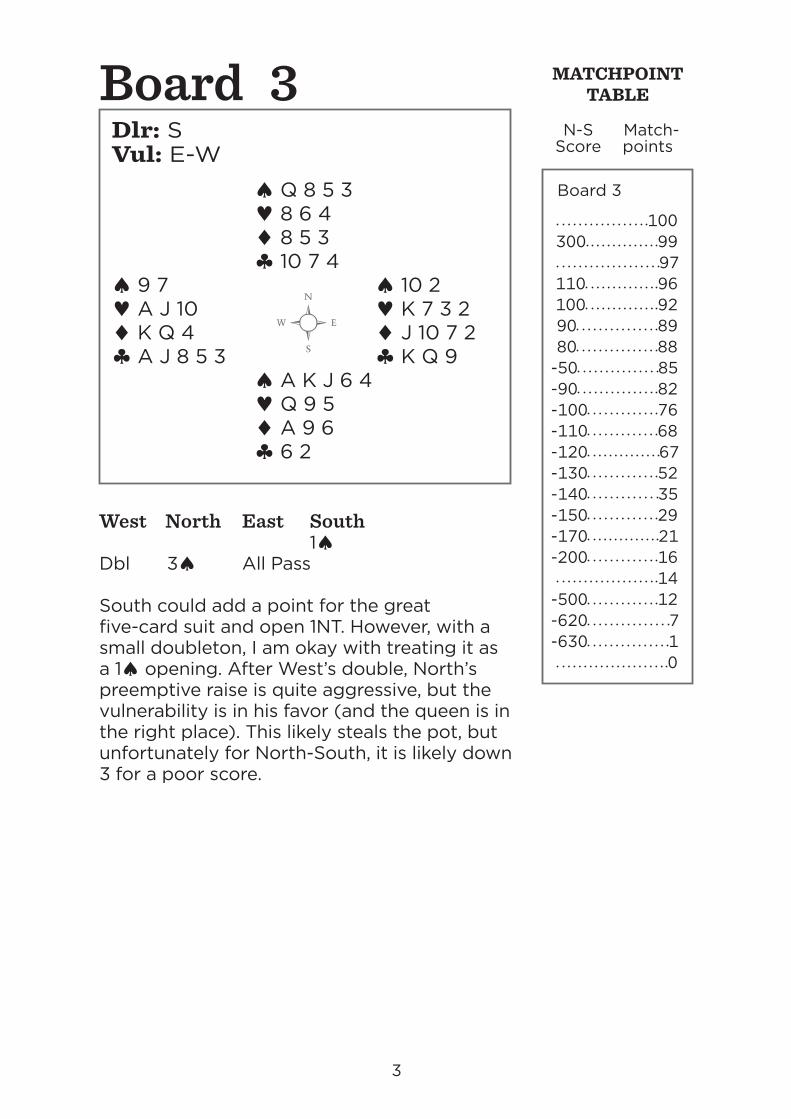
South could add a point for the great five-card suit and open 1NT. However, with a small doubleton, I am okay with treating it as a 1♠ opening. After West’s double, North’s preemptive raise is quite aggressive, but the vulnerability is in his favor (and the queen is in the right place). This likely steals the pot, but unfortunately for North-South, it is likely down 3 for a poor score.
Board 3
100300 99 97110 96100 9290 8980 88
-50 85-90 82-100 76-110 68-120 67-130 52-140 35-150 29-170 21-200 16 14
-500 12-620 7-630 1 0
Dlr: S Vul: E-W ♠ Q 8 5 3 ♥ 8 6 4 ♦ 8 5 3 ♣ 10 7 4♠ 9 7 ♠ 10 2♥ A J 10 ♥ K 7 3 2♦ K Q 4 ♦ J 10 7 2♣ A J 8 5 3 ♣ K Q 9 ♠ A K J 6 4 ♥ Q 9 5 ♦ A 9 6 ♣ 6 2
MATCHPOINTTABLE
N-S Match- Score points
4Board
4
Dlr: W Vul: Both ♠ J 10 8 7 2 ♥ J 8 ♦ 9 6 ♣ J 10 4 2♠ K Q 5 ♠ 6 3♥ K 4 3 ♥ 10 9 2♦ Q 8 7 2 ♦ J 10 5 4♣ K Q 7 ♣ A 6 5 3 ♠ A 9 4 ♥ A Q 7 6 5 ♦ A K 3 ♣ 9 8
West North East South1NT Pass Pass ?
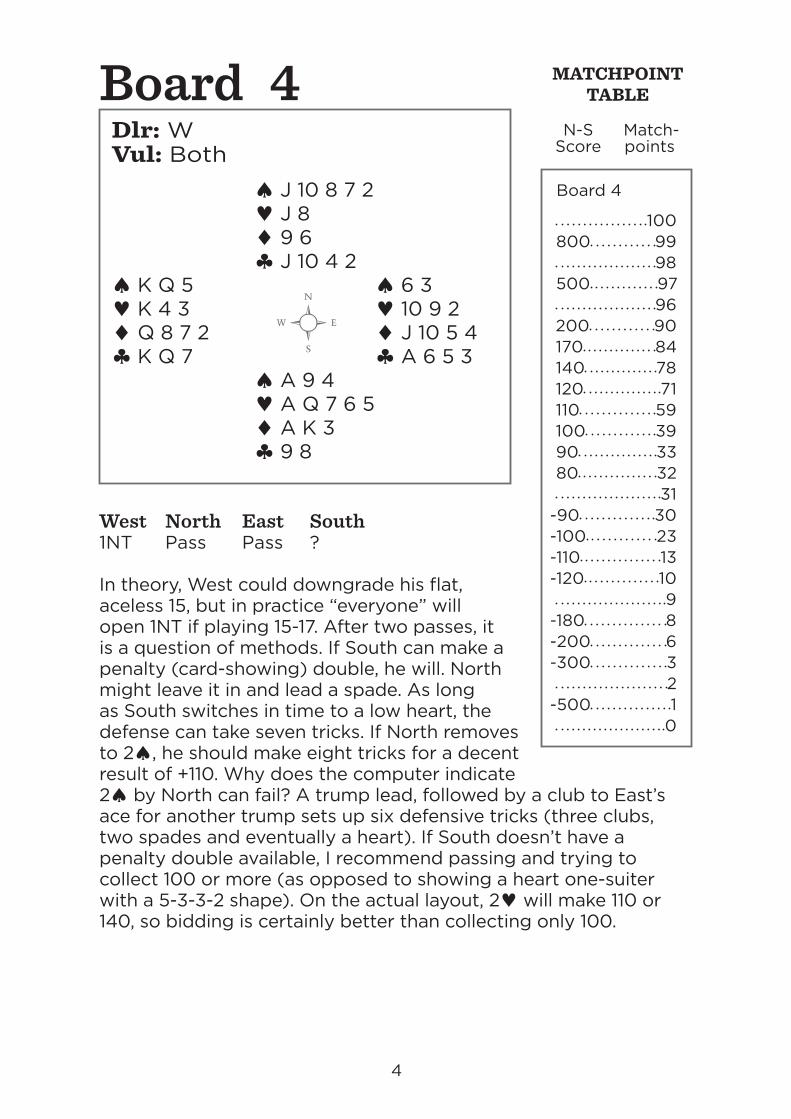
In theory, West could downgrade his flat, aceless 15, but in practice “everyone” will open 1NT if playing 15-17. After two passes, it is a question of methods. If South can make a penalty (card-showing) double, he will. North might leave it in and lead a spade. As long as South switches in time to a low heart, the defense can take seven tricks. If North removes to 2♠, he should make eight tricks for a decent result of +110. Why does the computer indicate 2♠ by North can fail? A trump lead, followed by a club to East’s ace for another trump sets up six defensive tricks (three clubs, two spades and eventually a heart). If South doesn’t have a penalty double available, I recommend passing and trying to collect 100 or more (as opposed to showing a heart one-suiter with a 5-3-3-2 shape). On the actual layout, 2♥ will make 110 or 140, so bidding is certainly better than collecting only 100.
Board 4
100800 99 98500 97 96200 90170 84140 78120 71110 59100 3990 3380 32 31
-90 30-100 23-110 13-120 10 9
-180 8-200 6-300 3 2
-500 1 0
MATCHPOINTTABLE
N-S Match- Score points
5Board
5
Dlr: N Vul: N-S ♠ Q 10 ♥ 9 7 5 3 ♦ K 9 8 3 ♣ 10 4 3♠ A K 6 4 ♠ J 9 8 3 2♥ A 10 ♥ K J 6♦ A Q 6 ♦ 10 7 4♣ K J 9 8 ♣ 7 2 ♠ 7 5 ♥ Q 8 4 2 ♦ J 5 2 ♣ A Q 6 5
West North East South Pass Pass Pass2NT Pass 3♥ Pass4♠ All Pass
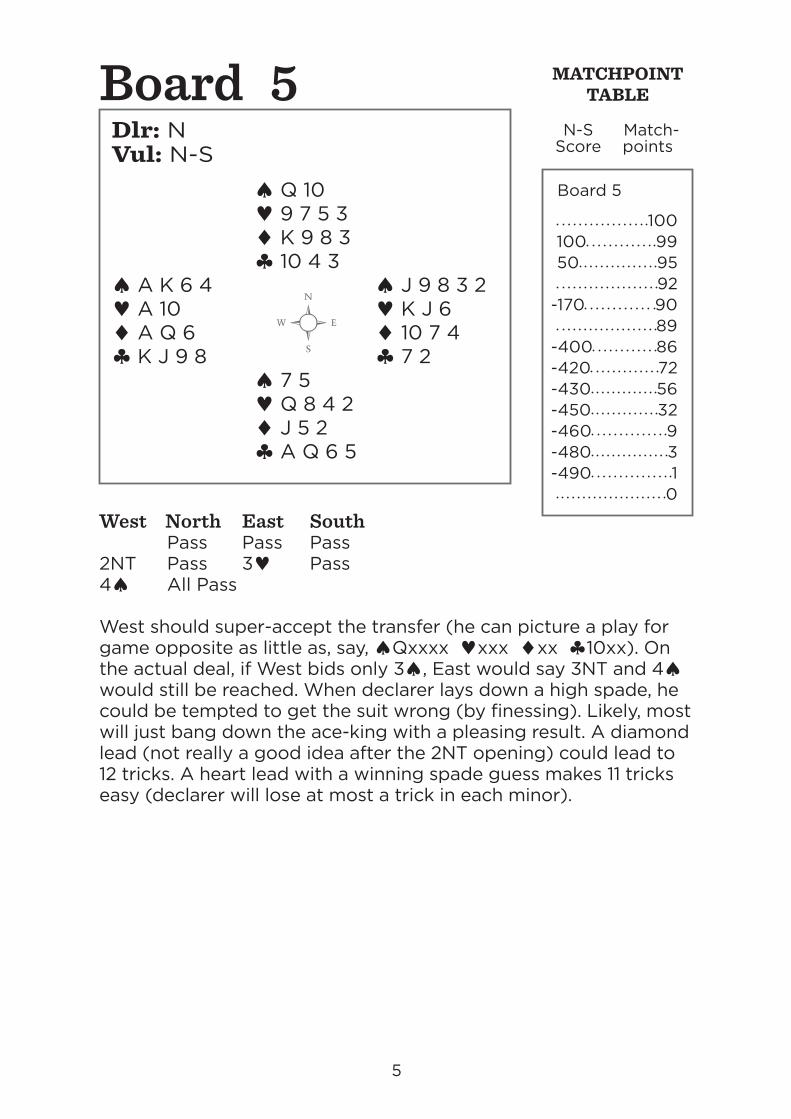
West should super-accept the transfer (he can picture a play for game opposite as little as, say, ♠Qxxxx ♥xxx ♦xx ♣10xx). On the actual deal, if West bids only 3♠, East would say 3NT and 4♠ would still be reached. When declarer lays down a high spade, he could be tempted to get the suit wrong (by finessing). Likely, most will just bang down the ace-king with a pleasing result. A diamond lead (not really a good idea after the 2NT opening) could lead to 12 tricks. A heart lead with a winning spade guess makes 11 tricks easy (declarer will lose at most a trick in each minor).
Board 5
100100 9950 95 92
-170 90 89
-400 86-420 72-430 56-450 32-460 9-480 3-490 1 0

MATCHPOINTTABLE
N-S Match- Score points
6Board
6
Dlr: E Vul: E-W ♠ A Q 9 7 ♥ K Q 4 ♦ A Q 10 ♣ Q 9 4♠ 8 2 ♠ K 6 4♥ 9 7 5 3 ♥ A J 6♦ J 8 6 3 2 ♦ K 5♣ 8 3 ♣ K J 10 6 2 ♠ J 10 5 3 ♥ 10 8 2 ♦ 9 7 4 ♣ A 7 5
Board 6
100580 98500 97430 96 95300 93200 90180 86170 85150 84140 80120 75110 67100 5990 5680 54 53
-50 42-80 30-90 29-100 18-110 8-150 5-180 2-200 1 0
West North East South 1NT PassPass ?
Just as on Board 4, it is a question of methods. If North doesn’t have a penalty double available, he should pass. South leads a spade and declarer should win the ♠K and start clubs. North-South have to help declarer’s cause, so the carnage won’t be too bad. If North can make a penalty double, South should sit, but West should run. It isn’t clear what will happen when East-West land in a red-suit (will North double and what will the result be?).

MATCHPOINTTABLE
N-S Match- Score points
7Board
7
Dlr: S Vul: Both ♠ J 9 4 2 ♥ A K Q 9 8 6 ♦ 7 ♣ A Q♠ 6 5 3 ♠ A K Q 8♥ 7 ♥ 5♦ A 5 4 3 2 ♦ Q J 10 9 8♣ K 8 6 2 ♣ J 10 9 ♠ 10 7 ♥ J 10 4 3 2 ♦ K 6 ♣ 7 5 4 3
Board 7
100790 98650 97620 75500 53 51200 47170 39 35100 30
-100 19 13
-140 10 9
-200 6 3
-600 2-620 1 0
West North East South PassPass 1♥ Dbl 3♥Pass 4♥ All Pass
South could raise immediately to 4♥, but the road shown also leads to 4♥ by North. Especially if South jumps to 4♥ the first time, West might be tempted into 4NT (minors), leading to a good result for East-West. Where the auction goes as shown, East has a dream hand to lead from! Sequences galore!! After a high spade (or two), East will likely shift to the ♦Q. Declarer will eventually have no choice but to rely on the club finesse and his luck is in. Only at the tables where East-West find the 5♦ sacrifice will there be anything but a slew of 620’s to North-South.
MATCHPOINTTABLE
N-S Match- Score points
8Board
8
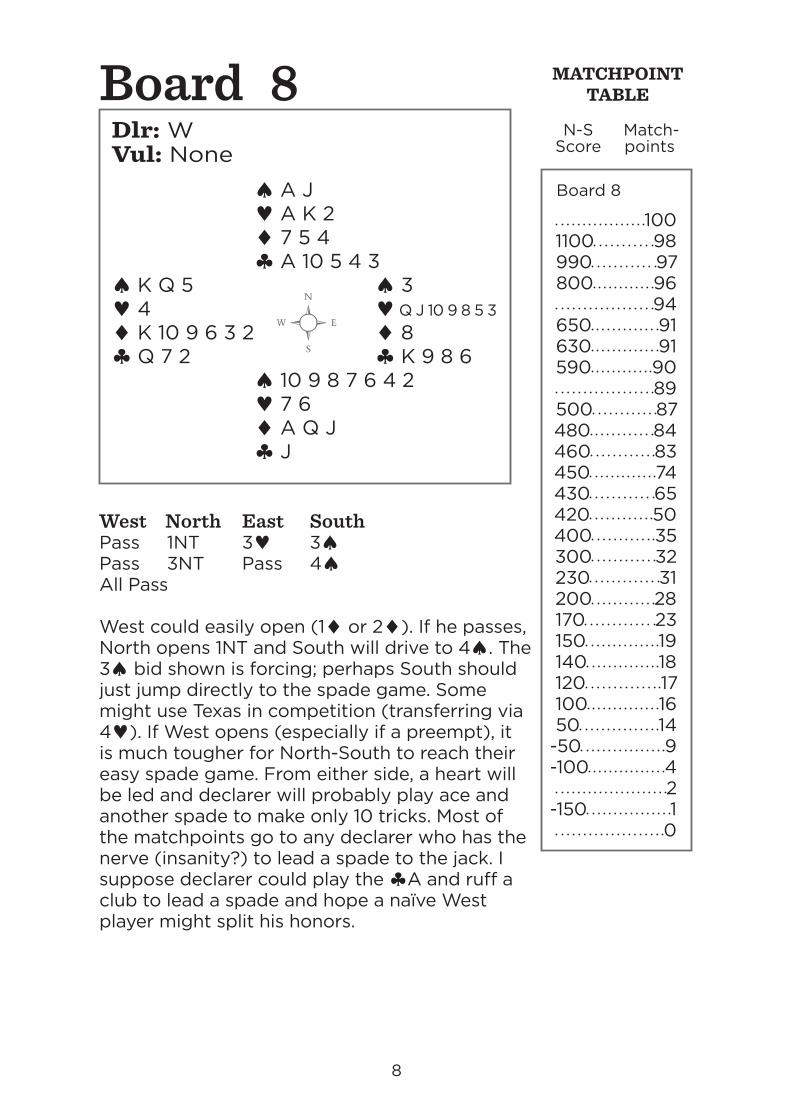
Dlr: W Vul: None ♠ A J ♥ A K 2 ♦ 7 5 4 ♣ A 10 5 4 3♠ K Q 5 ♠ 3♥ 4 ♥ Q J 10 9 8 5 3♦ K 10 9 6 3 2 ♦ 8♣ Q 7 2 ♣ K 9 8 6 ♠ 10 9 8 7 6 4 2 ♥ 7 6 ♦ A Q J ♣ J
West North East South Pass 1NT 3♥ 3♠Pass 3NT Pass 4♠All Pass
West could easily open (1♦ or 2♦). If he passes, North opens 1NT and South will drive to 4♠. The 3♠ bid shown is forcing; perhaps South should just jump directly to the spade game. Some might use Texas in competition (transferring via 4♥). If West opens (especially if a preempt), it is much tougher for North-South to reach their easy spade game. From either side, a heart will be led and declarer will probably play ace and another spade to make only 10 tricks. Most of the matchpoints go to any declarer who has the nerve (insanity?) to lead a spade to the jack. I suppose declarer could play the ♣A and ruff a club to lead a spade and hope a naïve West player might split his honors.
Board 8
1001100 98990 97800 96 94650 91630 91590 90 89500 87480 84460 83450 74430 65420 50400 35300 32230 31200 28170 23150 19140 18120 17100 1650 14
-50 9-100 4 2
-150 1 0
MATCHPOINTTABLE
N-S Match- Score points
9Board
9
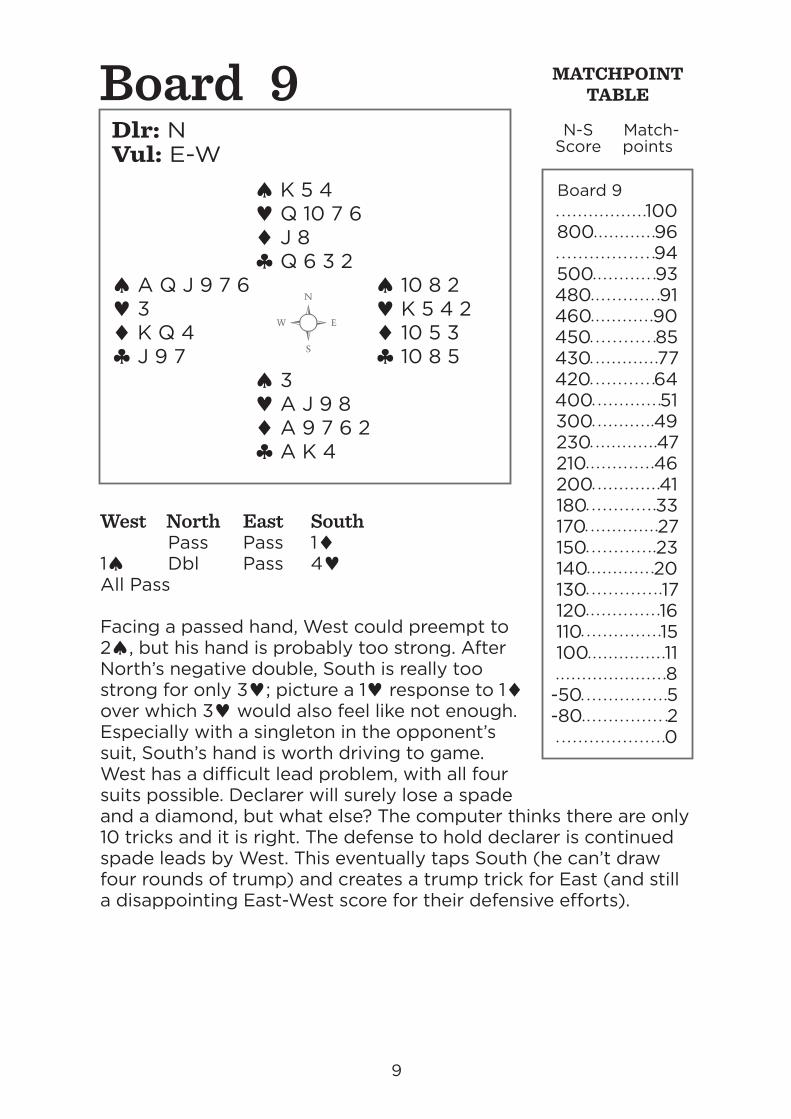
Dlr: N Vul: E-W ♠ K 5 4 ♥ Q 10 7 6 ♦ J 8 ♣ Q 6 3 2♠ A Q J 9 7 6 ♠ 10 8 2♥ 3 ♥ K 5 4 2♦ K Q 4 ♦ 10 5 3♣ J 9 7 ♣ 10 8 5 ♠ 3 ♥ A J 9 8 ♦ A 9 7 6 2 ♣ A K 4
West North East South Pass Pass 1♦1♠ Dbl Pass 4♥All Pass
Facing a passed hand, West could preempt to 2♠, but his hand is probably too strong. After North’s negative double, South is really too strong for only 3♥; picture a 1♥ response to 1♦ over which 3♥ would also feel like not enough. Especially with a singleton in the opponent’s suit, South’s hand is worth driving to game. West has a difficult lead problem, with all four suits possible. Declarer will surely lose a spade and a diamond, but what else? The computer thinks there are only 10 tricks and it is right. The defense to hold declarer is continued spade leads by West. This eventually taps South (he can’t draw four rounds of trump) and creates a trump trick for East (and still a disappointing East-West score for their defensive efforts).
Board 9 100800 96 94500 93480 91460 90450 85430 77420 64400 51300 49230 47210 46200 41180 33170 27150 23140 20130 17120 16110 15100 11 8
-50 5-80 2 0
MATCHPOINTTABLE
N-S Match- Score points
10Board
10
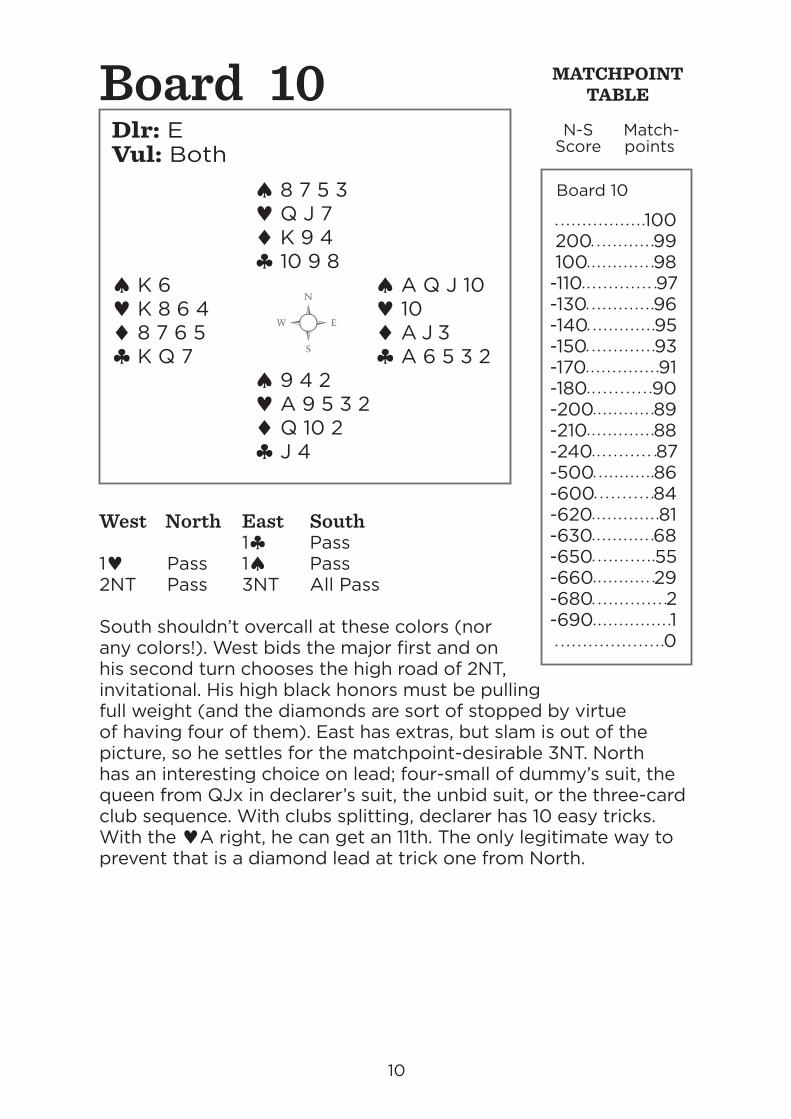
Dlr: E Vul: Both ♠ 8 7 5 3 ♥ Q J 7 ♦ K 9 4 ♣ 10 9 8♠ K 6 ♠ A Q J 10♥ K 8 6 4 ♥ 10♦ 8 7 6 5 ♦ A J 3♣ K Q 7 ♣ A 6 5 3 2 ♠ 9 4 2 ♥ A 9 5 3 2 ♦ Q 10 2 ♣ J 4
West North East South 1♣ Pass1♥ Pass 1♠ Pass2NT Pass 3NT All Pass
South shouldn’t overcall at these colors (nor any colors!). West bids the major first and on his second turn chooses the high road of 2NT, invitational. His high black honors must be pulling full weight (and the diamonds are sort of stopped by virtue of having four of them). East has extras, but slam is out of the picture, so he settles for the matchpoint-desirable 3NT. North has an interesting choice on lead; four-small of dummy’s suit, the queen from QJx in declarer’s suit, the unbid suit, or the three-card club sequence. With clubs splitting, declarer has 10 easy tricks. With the ♥A right, he can get an 11th. The only legitimate way to prevent that is a diamond lead at trick one from North.
Board 10
100200 99100 98
-110 97-130 96-140 95-150 93-170 91-180 90-200 89-210 88-240 87-500 86-600 84-620 81-630 68-650 55-660 29-680 2-690 1 0
MATCHPOINTTABLE
N-S Match- Score points
11Board
11
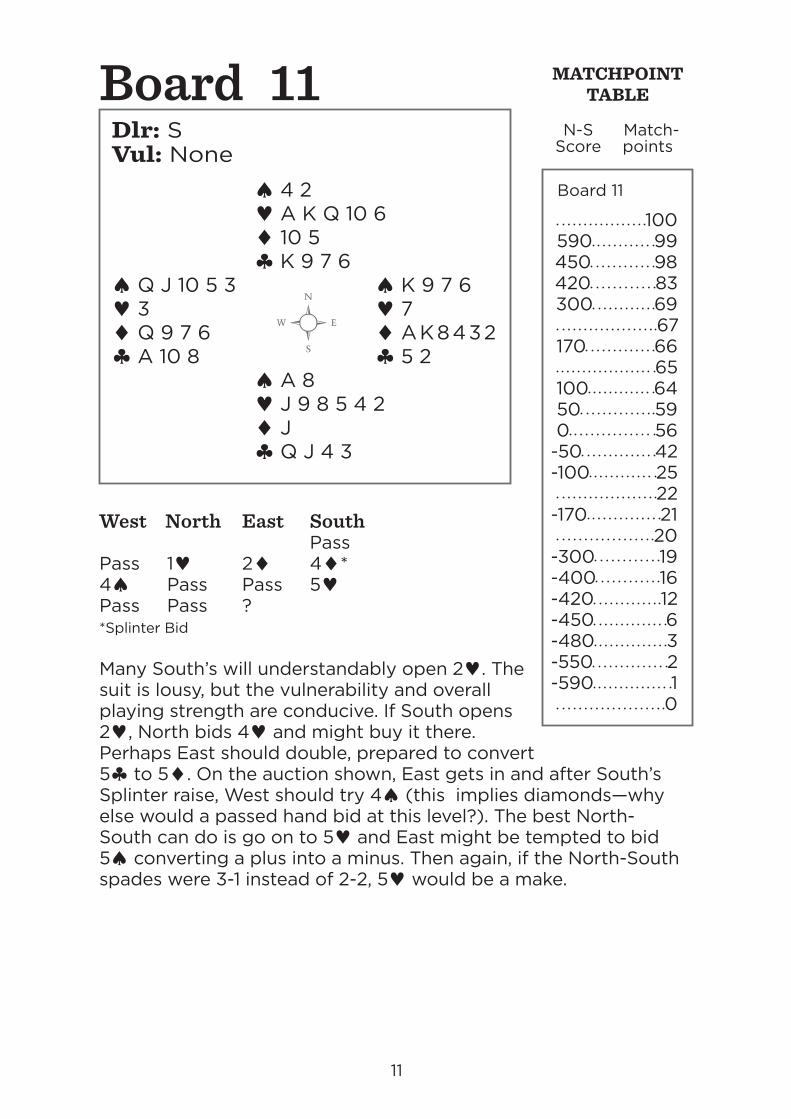
Dlr: S Vul: None ♠ 4 2 ♥ A K Q 10 6 ♦ 10 5 ♣ K 9 7 6♠ Q J 10 5 3 ♠ K 9 7 6♥ 3 ♥ 7♦ Q 9 7 6 ♦ A K 8 4 3 2♣ A 10 8 ♣ 5 2 ♠ A 8 ♥ J 9 8 5 4 2 ♦ J ♣ Q J 4 3
West North East South PassPass 1♥ 2♦ 4♦*4♠ Pass Pass 5♥Pass Pass ? *Splinter Bid
Many South’s will understandably open 2♥. The suit is lousy, but the vulnerability and overall playing strength are conducive. If South opens 2♥, North bids 4♥ and might buy it there. Perhaps East should double, prepared to convert 5♣ to 5♦. On the auction shown, East gets in and after South’s Splinter raise, West should try 4♠ (this implies diamonds—why else would a passed hand bid at this level?). The best North-South can do is go on to 5♥ and East might be tempted to bid 5♠ converting a plus into a minus. Then again, if the North-South spades were 3-1 instead of 2-2, 5♥ would be a make.
Board 11
100590 99450 98420 83300 69 67170 66 65100 6450 590 56
-50 42-100 25 22
-170 21 20
-300 19-400 16-420 12-450 6-480 3-550 2-590 1 0
MATCHPOINTTABLE
N-S Match- Score points
12Board
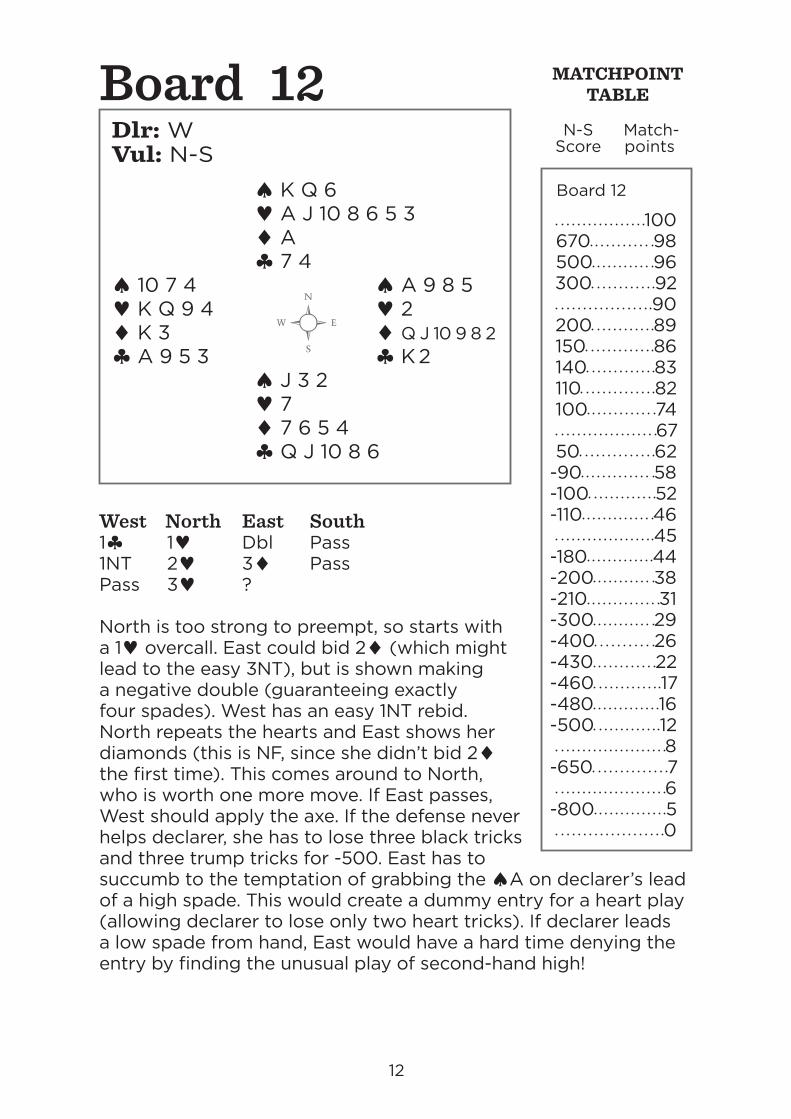
12
West North East South1♣ 1♥ Dbl Pass1NT 2♥ 3♦ PassPass 3♥ ?
North is too strong to preempt, so starts with a 1♥ overcall. East could bid 2♦ (which might lead to the easy 3NT), but is shown making a negative double (guaranteeing exactly four spades). West has an easy 1NT rebid. North repeats the hearts and East shows her diamonds (this is NF, since she didn’t bid 2♦ the first time). This comes around to North, who is worth one more move. If East passes, West should apply the axe. If the defense never helps declarer, she has to lose three black tricks and three trump tricks for -500. East has to succumb to the temptation of grabbing the ♠A on declarer’s lead of a high spade. This would create a dummy entry for a heart play (allowing declarer to lose only two heart tricks). If declarer leads a low spade from hand, East would have a hard time denying the entry by finding the unusual play of second-hand high!
Dlr: W Vul: N-S ♠ K Q 6 ♥ A J 10 8 6 5 3 ♦ A ♣ 7 4♠ 10 7 4 ♠ A 9 8 5♥ K Q 9 4 ♥ 2♦ K 3 ♦ Q J 10 9 8 2♣ A 9 5 3 ♣ K 2 ♠ J 3 2 ♥ 7 ♦ 7 6 5 4 ♣ Q J 10 8 6
Board 12
100670 98500 96300 92 90200 89150 86140 83110 82100 74 6750 62
-90 58-100 52-110 46 45
-180 44-200 38-210 31-300 29-400 26-430 22-460 17-480 16-500 12 8
-650 7 6
-800 5 0
MATCHPOINTTABLE
N-S Match- Score points
13Board
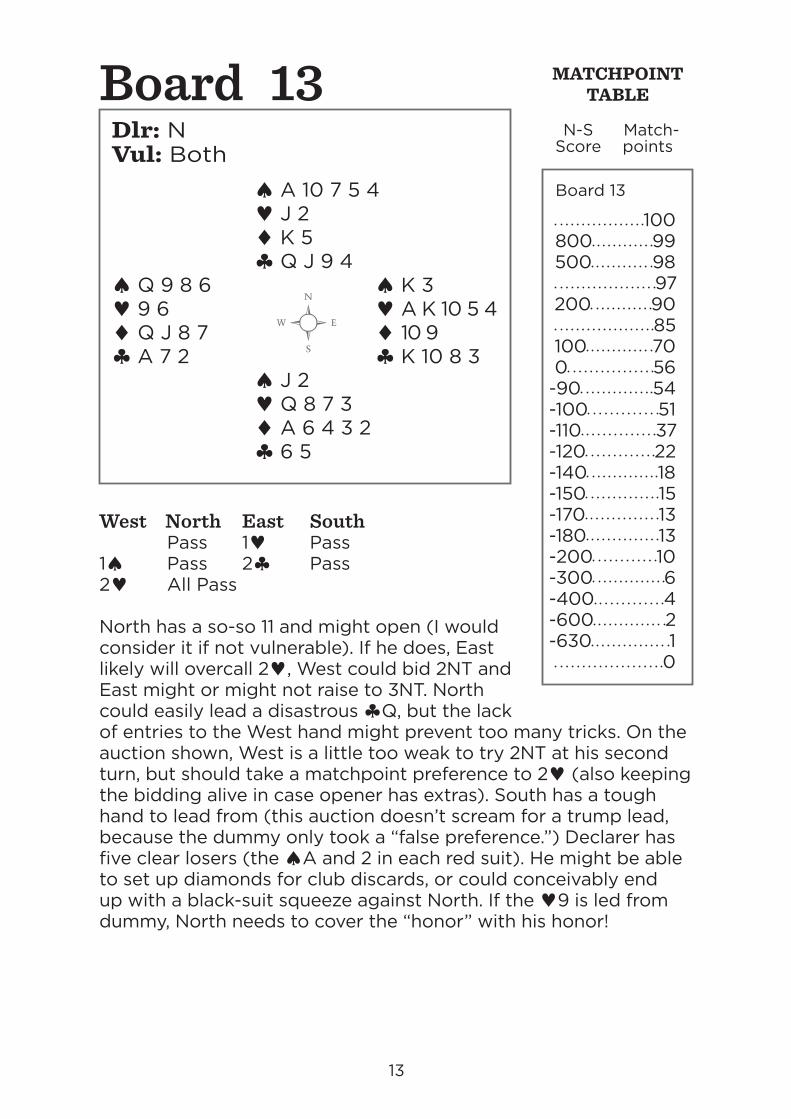
13
Dlr: N Vul: Both ♠ A 10 7 5 4 ♥ J 2 ♦ K 5 ♣ Q J 9 4♠ Q 9 8 6 ♠ K 3♥ 9 6 ♥ A K 10 5 4♦ Q J 8 7 ♦ 10 9♣ A 7 2 ♣ K 10 8 3 ♠ J 2 ♥ Q 8 7 3 ♦ A 6 4 3 2 ♣ 6 5
West North East South Pass 1♥ Pass1♠ Pass 2♣ Pass2♥ All Pass
North has a so-so 11 and might open (I would consider it if not vulnerable). If he does, East likely will overcall 2♥, West could bid 2NT and East might or might not raise to 3NT. North could easily lead a disastrous ♣Q, but the lack of entries to the West hand might prevent too many tricks. On the auction shown, West is a little too weak to try 2NT at his second turn, but should take a matchpoint preference to 2♥ (also keeping the bidding alive in case opener has extras). South has a tough hand to lead from (this auction doesn’t scream for a trump lead, because the dummy only took a “false preference.”) Declarer has five clear losers (the ♠A and 2 in each red suit). He might be able to set up diamonds for club discards, or could conceivably end up with a black-suit squeeze against North. If the ♥9 is led from dummy, North needs to cover the “honor” with his honor!
Board 13
100800 99500 98 97200 90 85100 700 56
-90 54-100 51-110 37-120 22-140 18-150 15-170 13-180 13-200 10-300 6-400 4-600 2-630 1 0
MATCHPOINTTABLE
N-S Match- Score points
14Board
14
Dlr: E Vul: None ♠ J 5 ♥ J 9 6 ♦ K Q 8 6 4 ♣ Q 10 9♠ Q 10 6 3 ♠ A K 7 4♥ K 7 4 2 ♥ Q 10 3♦ A 5 ♦ J 2♣ A J 7 ♣ 8 5 3 2 ♠ 9 8 2 ♥ A 8 5 ♦ 10 9 7 3 ♣ K 6 4
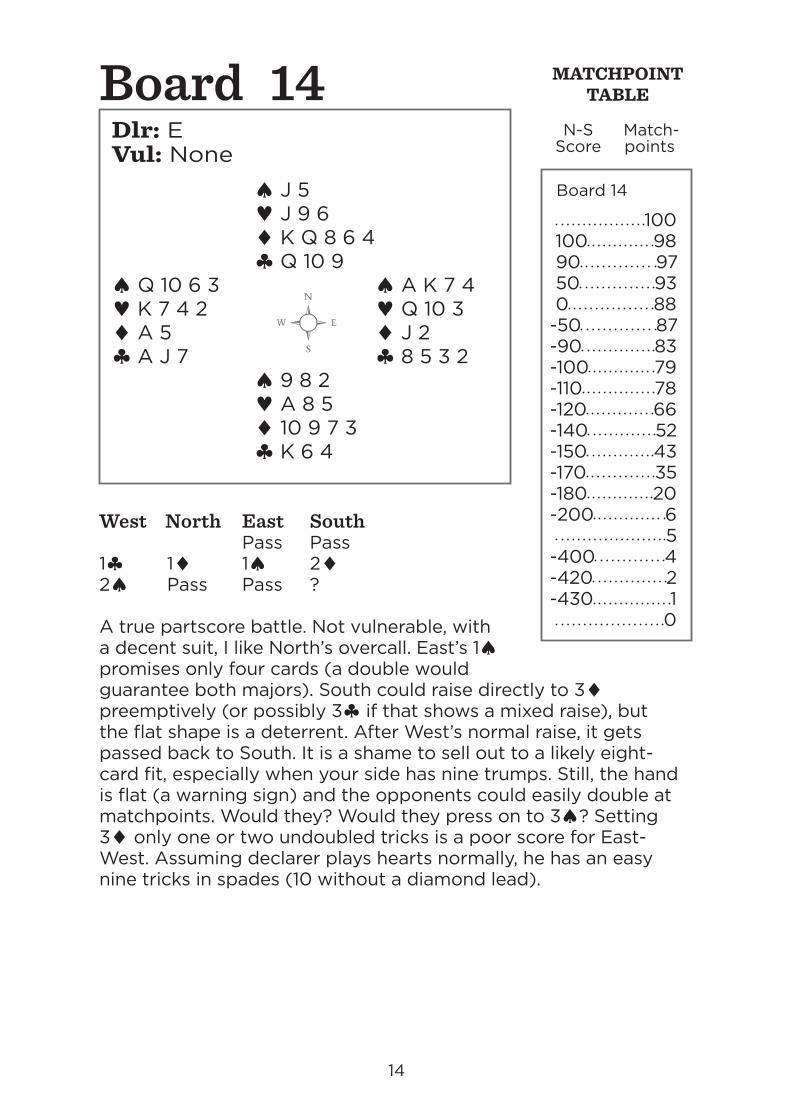
West North East South Pass Pass1♣ 1♦ 1♠ 2♦2♠ Pass Pass ?
A true partscore battle. Not vulnerable, with a decent suit, I like North’s overcall. East’s 1♠ promises only four cards (a double would guarantee both majors). South could raise directly to 3♦ preemptively (or possibly 3♣ if that shows a mixed raise), but the flat shape is a deterrent. After West’s normal raise, it gets passed back to South. It is a shame to sell out to a likely eight-card fit, especially when your side has nine trumps. Still, the hand is flat (a warning sign) and the opponents could easily double at matchpoints. Would they? Would they press on to 3♠? Setting 3♦ only one or two undoubled tricks is a poor score for East-West. Assuming declarer plays hearts normally, he has an easy nine tricks in spades (10 without a diamond lead).
Board 14
100100 9890 9750 930 88
-50 87-90 83-100 79-110 78-120 66-140 52-150 43-170 35-180 20-200 6 5
-400 4-420 2-430 1 0
MATCHPOINTTABLE
N-S Match- Score points
15Board
15
Dlr: S Vul: N-S ♠ K 8 6 ♥ K J 7 5 4 2 ♦ Q 6 ♣ 8 4♠ A Q J 9 4 ♠ 10♥ Q 9 ♥ 10 8 3♦ J 10 8 7 ♦ 5 3♣ Q J ♣ A K 9 7 6 5 2 ♠ 7 5 3 2 ♥ A 6 ♦ A K 9 4 2 ♣ 10 3
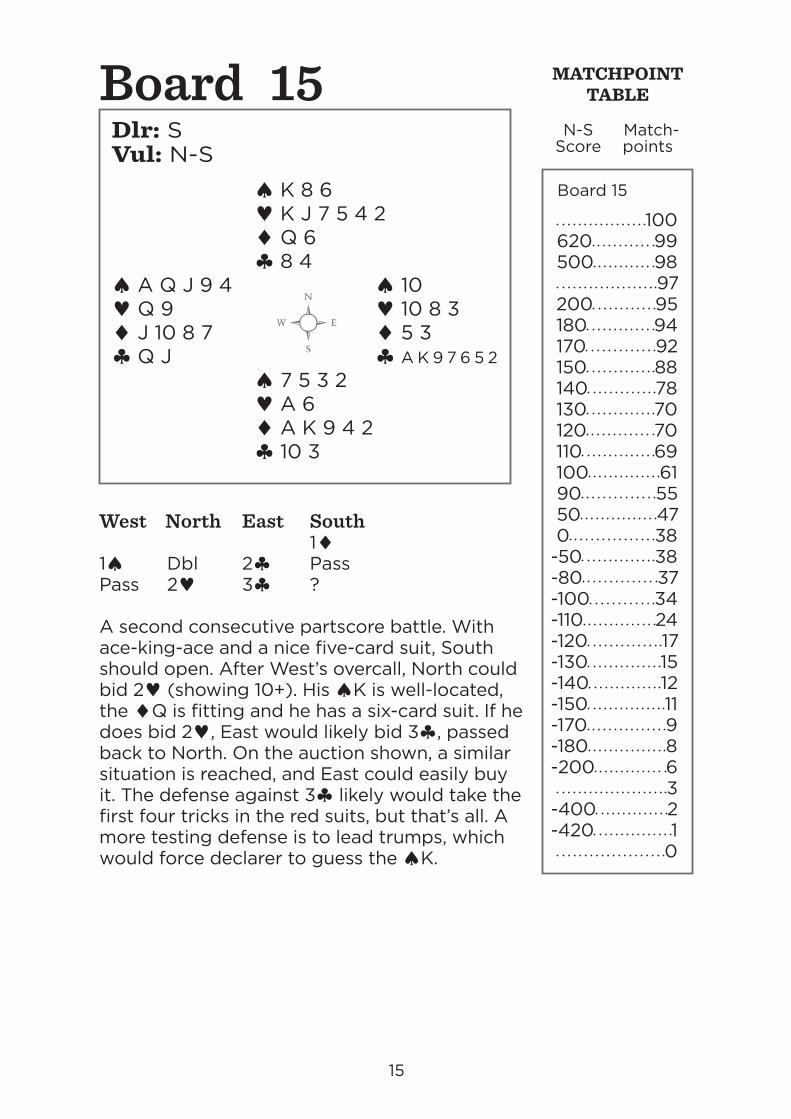
West North East South 1♦1♠ Dbl 2♣ PassPass 2♥ 3♣ ?
A second consecutive partscore battle. With ace-king-ace and a nice five-card suit, South should open. After West’s overcall, North could bid 2♥ (showing 10+). His ♠K is well-located, the ♦Q is fitting and he has a six-card suit. If he does bid 2♥, East would likely bid 3♣, passed back to North. On the auction shown, a similar situation is reached, and East could easily buy it. The defense against 3♣ likely would take the first four tricks in the red suits, but that’s all. A more testing defense is to lead trumps, which would force declarer to guess the ♠K.
Board 15
100620 99500 98 97200 95180 94170 92150 88140 78130 70120 70110 69100 6190 5550 470 38
-50 38-80 37-100 34-110 24-120 17-130 15-140 12-150 11-170 9-180 8-200 6 3
-400 2-420 1 0
MATCHPOINTTABLE
N-S Match- Score points
16Board
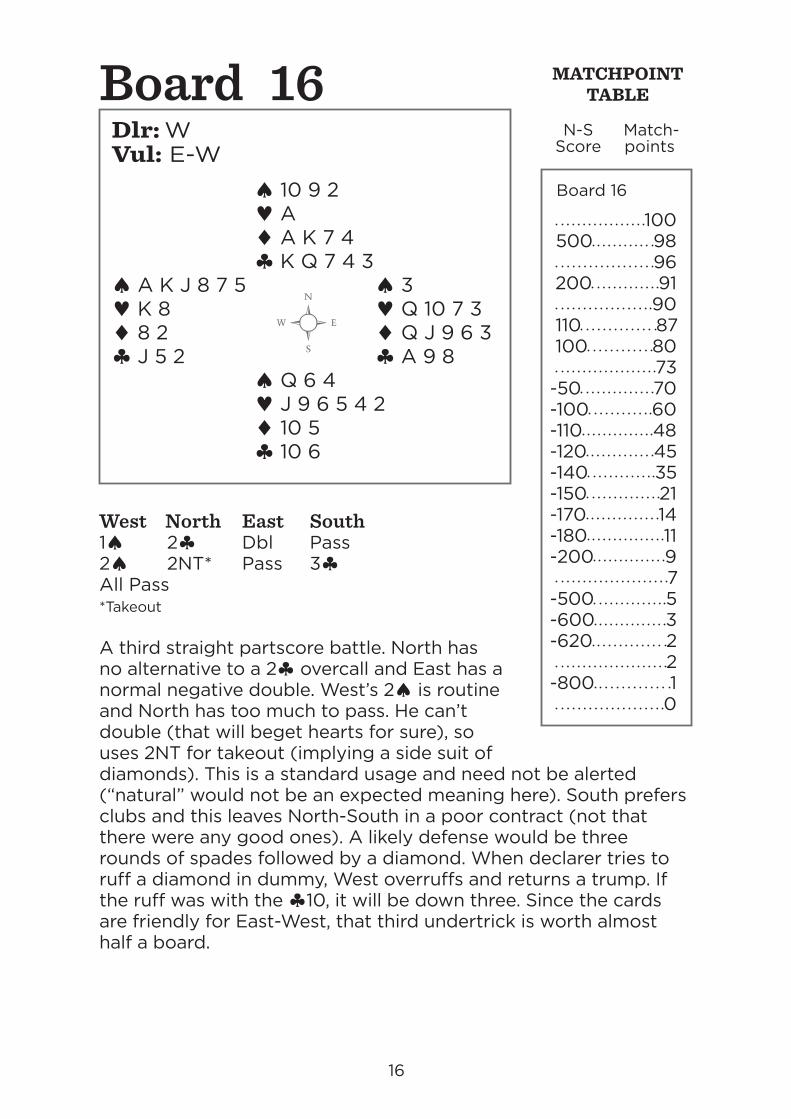
16
Dlr: W Vul: E-W ♠ 10 9 2 ♥ A ♦ A K 7 4 ♣ K Q 7 4 3♠ A K J 8 7 5 ♠ 3♥ K 8 ♥ Q 10 7 3♦ 8 2 ♦ Q J 9 6 3♣ J 5 2 ♣ A 9 8 ♠ Q 6 4 ♥ J 9 6 5 4 2 ♦ 10 5 ♣ 10 6
West North East South1♠ 2♣ Dbl Pass2♠ 2NT* Pass 3♣All Pass *Takeout
A third straight partscore battle. North has no alternative to a 2♣ overcall and East has a normal negative double. West’s 2♠ is routine and North has too much to pass. He can’t double (that will beget hearts for sure), so uses 2NT for takeout (implying a side suit of diamonds). This is a standard usage and need not be alerted (“natural” would not be an expected meaning here). South prefers clubs and this leaves North-South in a poor contract (not that there were any good ones). A likely defense would be three rounds of spades followed by a diamond. When declarer tries to ruff a diamond in dummy, West overruffs and returns a trump. If the ruff was with the ♣10, it will be down three. Since the cards are friendly for East-West, that third undertrick is worth almost half a board.
Board 16
100500 98 96200 91 90110 87100 80 73
-50 70-100 60-110 48-120 45-140 35-150 21-170 14-180 11-200 9 7
-500 5-600 3-620 2 2
-800 1 0
MATCHPOINTTABLE
N-S Match- Score points
17Board
17
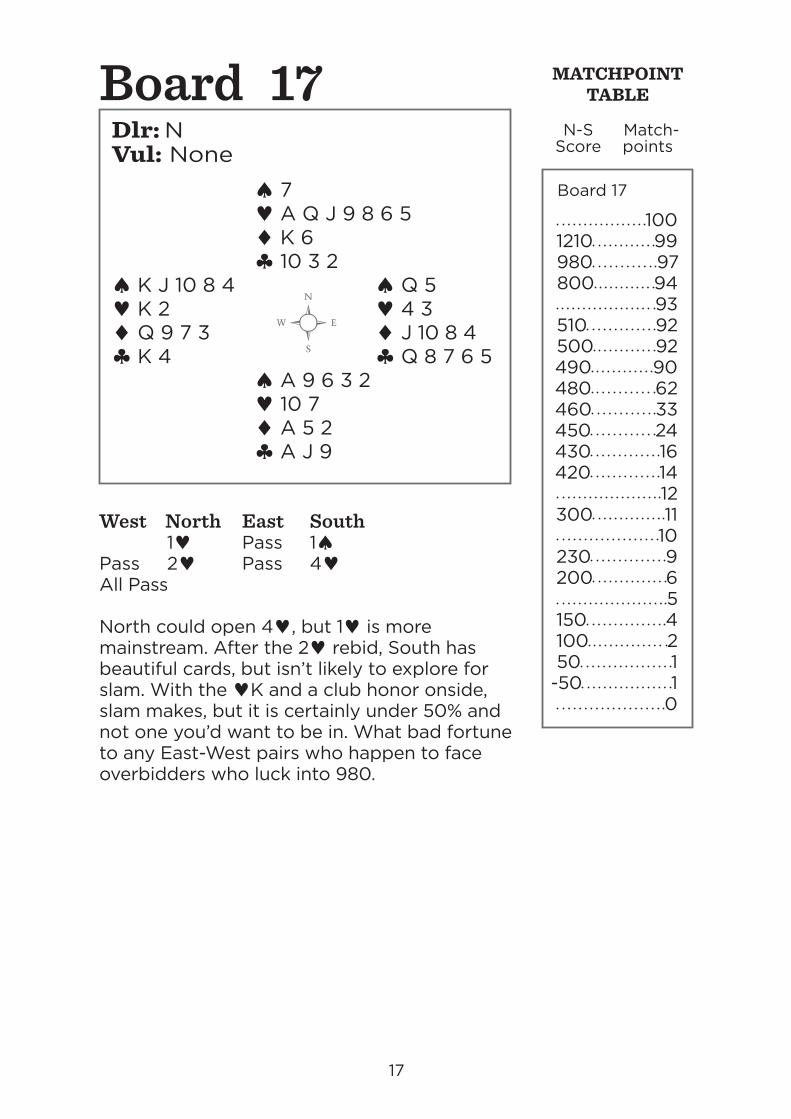
Dlr: N Vul: None ♠ 7 ♥ A Q J 9 8 6 5 ♦ K 6 ♣ 10 3 2♠ K J 10 8 4 ♠ Q 5♥ K 2 ♥ 4 3♦ Q 9 7 3 ♦ J 10 8 4♣ K 4 ♣ Q 8 7 6 5 ♠ A 9 6 3 2 ♥ 10 7 ♦ A 5 2 ♣ A J 9
West North East South 1♥ Pass 1♠Pass 2♥ Pass 4♥All Pass
North could open 4♥, but 1♥ is more mainstream. After the 2♥ rebid, South has beautiful cards, but isn’t likely to explore for slam. With the ♥K and a club honor onside, slam makes, but it is certainly under 50% and not one you’d want to be in. What bad fortune to any East-West pairs who happen to face overbidders who luck into 980.
Board 17
1001210 99980 97800 94 93510 92500 92490 90480 62460 33450 24430 16420 14 12300 11 10230 9200 6 5150 4100 250 1
-50 1 0

MATCHPOINTTABLE
N-S Match- Score points
18Board
18
Dlr: E Vul: N-S ♠ J 10 5 4 ♥ 6 5 ♦ Q J 8 7 ♣ K Q 6♠ 9 7 2 ♠ K Q 6♥ 10 7 ♥ A K Q J 8♦ 10 5 4 3 ♦ K 6♣ 9 5 4 3 ♣ A 10 2 ♠ A 8 3 ♥ 9 4 3 2 ♦ A 9 2 ♣ J 8 7
West North East South 2♣ Pass2♦ Pass 2NT All Pass
East’s auction (regardless of the system of responses used to 2♣) is fairly normal. He shows 22-24 balanced (a better approach than bidding the hearts). West is broke, but amongst his pile of junk is an entry (the ♥10). How should declarer use it? Probably to lead up to the ♦K. If that were to win, he could then drive out the ♠A to make 8 tricks. As we can see, the ♦A is wrong (as is the ♠A) so careful defense should hold declarer to at most seven tricks. With an unlikely club lead, or if East does play to the ♦K and an in-time club shift, he might be down two! What a disappointment for East!
Board 18
100500 99 98150 97 95100 8990 8350 66
-80 50-90 50-110 44-120 27-140 13-150 7-170 2-180 1 0
MATCHPOINTTABLE
N-S Match- Score points
19Board
19
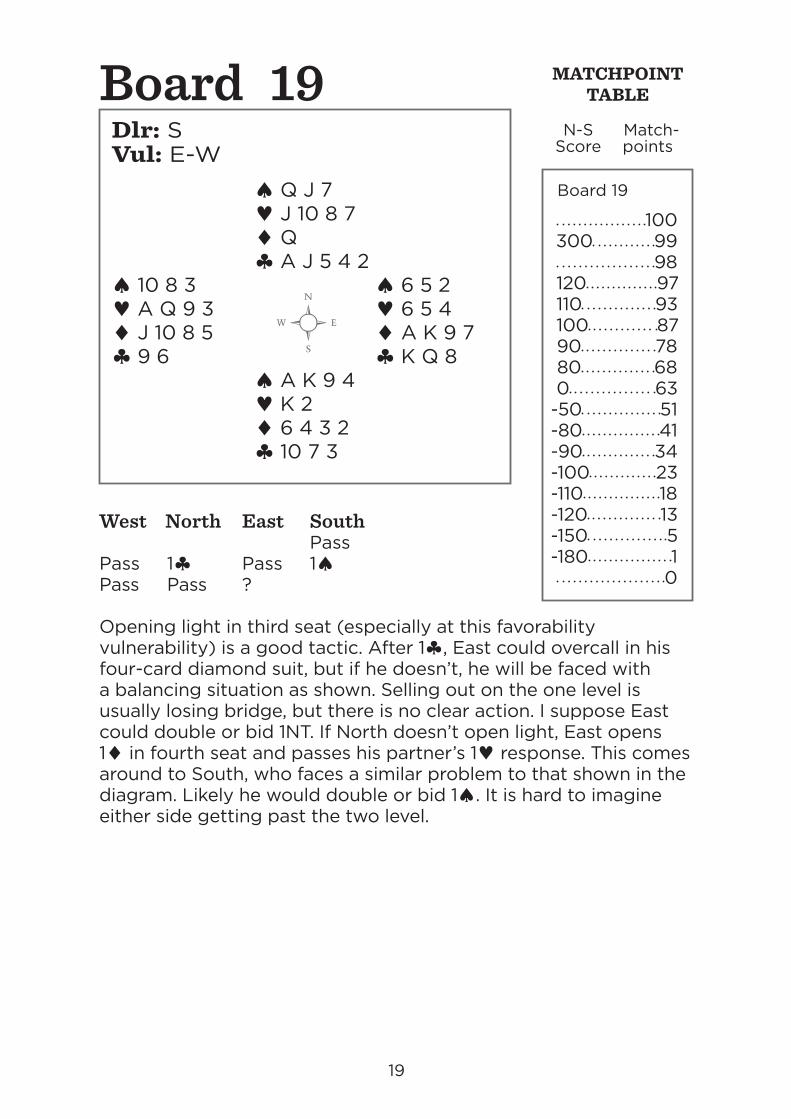
Dlr: S Vul: E-W ♠ Q J 7 ♥ J 10 8 7 ♦ Q ♣ A J 5 4 2♠ 10 8 3 ♠ 6 5 2♥ A Q 9 3 ♥ 6 5 4♦ J 10 8 5 ♦ A K 9 7♣ 9 6 ♣ K Q 8 ♠ A K 9 4 ♥ K 2 ♦ 6 4 3 2 ♣ 10 7 3
West North East South PassPass 1♣ Pass 1♠Pass Pass ?
Opening light in third seat (especially at this favorability vulnerability) is a good tactic. After 1♣, East could overcall in his four-card diamond suit, but if he doesn’t, he will be faced with a balancing situation as shown. Selling out on the one level is usually losing bridge, but there is no clear action. I suppose East could double or bid 1NT. If North doesn’t open light, East opens 1♦ in fourth seat and passes his partner’s 1♥ response. This comes around to South, who faces a similar problem to that shown in the diagram. Likely he would double or bid 1♠. It is hard to imagine either side getting past the two level.
Board 19
100300 99 98120 97110 93100 8790 7880 680 63
-50 51-80 41-90 34-100 23-110 18-120 13-150 5-180 1 0
MATCHPOINTTABLE
N-S Match- Score points
20Board
20
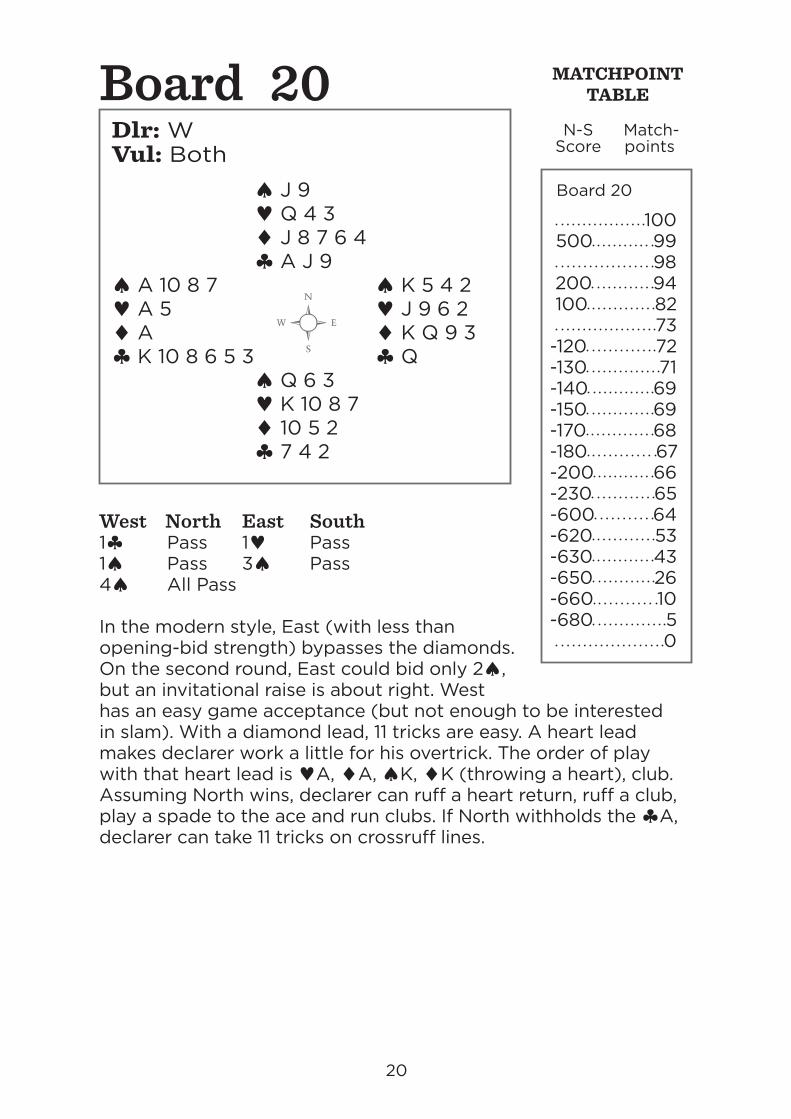
Dlr: W Vul: Both ♠ J 9 ♥ Q 4 3 ♦ J 8 7 6 4 ♣ A J 9♠ A 10 8 7 ♠ K 5 4 2♥ A 5 ♥ J 9 6 2♦ A ♦ K Q 9 3♣ K 10 8 6 5 3 ♣ Q ♠ Q 6 3 ♥ K 10 8 7 ♦ 10 5 2 ♣ 7 4 2
West North East South1♣ Pass 1♥ Pass1♠ Pass 3♠ Pass4♠ All Pass
In the modern style, East (with less than opening-bid strength) bypasses the diamonds. On the second round, East could bid only 2♠, but an invitational raise is about right. West has an easy game acceptance (but not enough to be interested in slam). With a diamond lead, 11 tricks are easy. A heart lead makes declarer work a little for his overtrick. The order of play with that heart lead is ♥A, ♦A, ♠K, ♦K (throwing a heart), club. Assuming North wins, declarer can ruff a heart return, ruff a club, play a spade to the ace and run clubs. If North withholds the ♣A, declarer can take 11 tricks on crossruff lines.
Board 20
100500 99 98200 94100 82 73
-120 72-130 71-140 69-150 69-170 68-180 67-200 66-230 65-600 64-620 53-630 43-650 26-660 10-680 5 0
MATCHPOINTTABLE
N-S Match- Score points
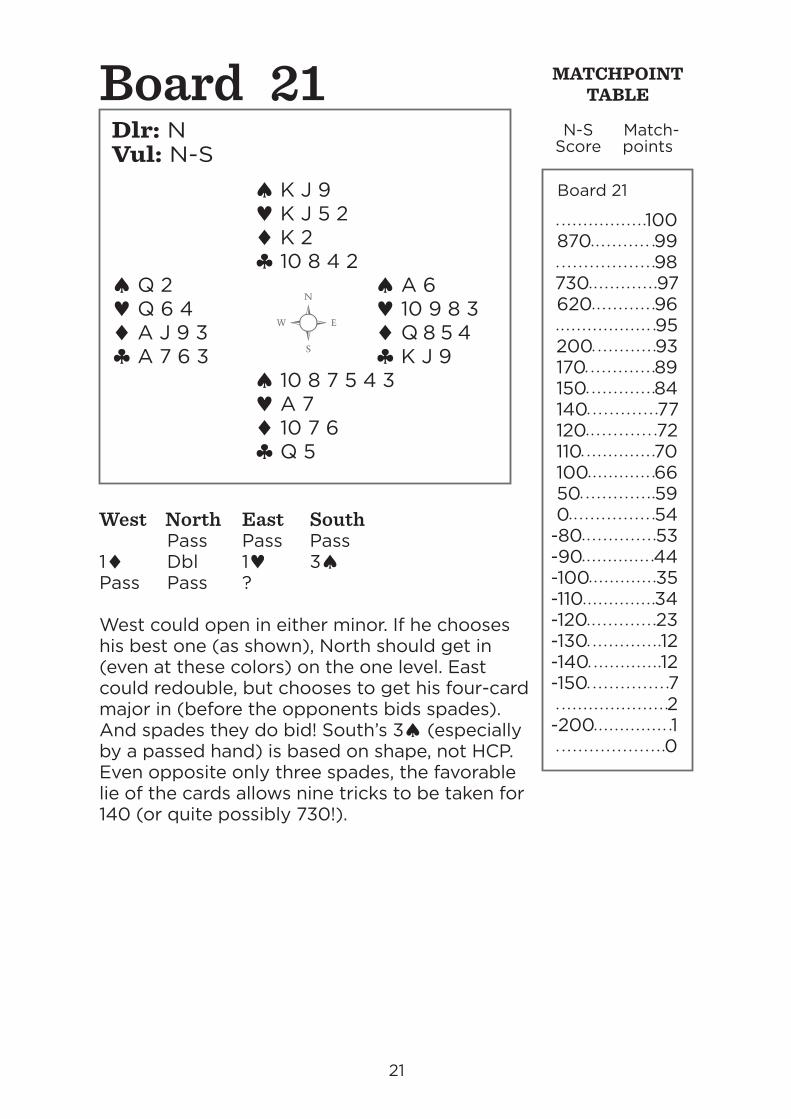
21Board
21
Dlr: N Vul: N-S ♠ K J 9 ♥ K J 5 2 ♦ K 2 ♣ 10 8 4 2♠ Q 2 ♠ A 6♥ Q 6 4 ♥ 10 9 8 3♦ A J 9 3 ♦ Q 8 5 4♣ A 7 6 3 ♣ K J 9 ♠ 10 8 7 5 4 3 ♥ A 7 ♦ 10 7 6 ♣ Q 5
West North East South Pass Pass Pass1♦ Dbl 1♥ 3♠Pass Pass ?
West could open in either minor. If he chooses his best one (as shown), North should get in (even at these colors) on the one level. East could redouble, but chooses to get his four-card major in (before the opponents bids spades). And spades they do bid! South’s 3♠ (especially by a passed hand) is based on shape, not HCP. Even opposite only three spades, the favorable lie of the cards allows nine tricks to be taken for 140 (or quite possibly 730!).
Board 21
100870 99 98730 97620 96 95200 93170 89150 84140 77120 72110 70100 6650 590 54
-80 53-90 44-100 35-110 34-120 23-130 12-140 12-150 7 2
-200 1 0
MATCHPOINTTABLE
N-S Match- Score points
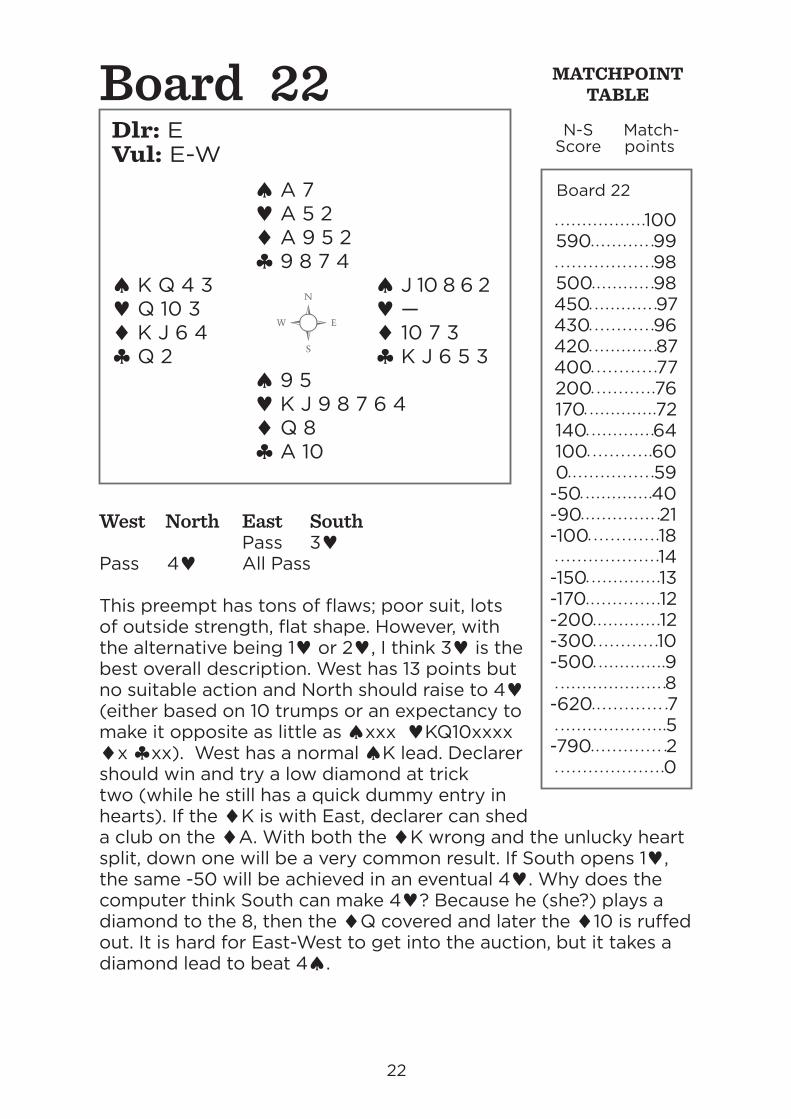
22Board
22
Dlr: E Vul: E-W ♠ A 7 ♥ A 5 2 ♦ A 9 5 2 ♣ 9 8 7 4♠ K Q 4 3 ♠ J 10 8 6 2♥ Q 10 3 ♥ —♦ K J 6 4 ♦ 10 7 3♣ Q 2 ♣ K J 6 5 3 ♠ 9 5 ♥ K J 9 8 7 6 4 ♦ Q 8 ♣ A 10
West North East South Pass 3♥Pass 4♥ All Pass
This preempt has tons of flaws; poor suit, lots of outside strength, flat shape. However, with the alternative being 1♥ or 2♥, I think 3♥ is the best overall description. West has 13 points but no suitable action and North should raise to 4♥ (either based on 10 trumps or an expectancy to make it opposite as little as ♠xxx ♥KQ10xxxx ♦x ♣xx). West has a normal ♠K lead. Declarer should win and try a low diamond at trick two (while he still has a quick dummy entry in hearts). If the ♦K is with East, declarer can shed a club on the ♦A. With both the ♦K wrong and the unlucky heart split, down one will be a very common result. If South opens 1♥, the same -50 will be achieved in an eventual 4♥. Why does the computer think South can make 4♥? Because he (she?) plays a diamond to the 8, then the ♦Q covered and later the ♦10 is ruffed out. It is hard for East-West to get into the auction, but it takes a diamond lead to beat 4♠.
Board 22
100590 99 98500 98450 97430 96420 87400 77200 76170 72140 64100 600 59
-50 40-90 21-100 18 14
-150 13-170 12-200 12-300 10-500 9 8
-620 7 5
-790 2 0
MATCHPOINTTABLE
N-S Match- Score points
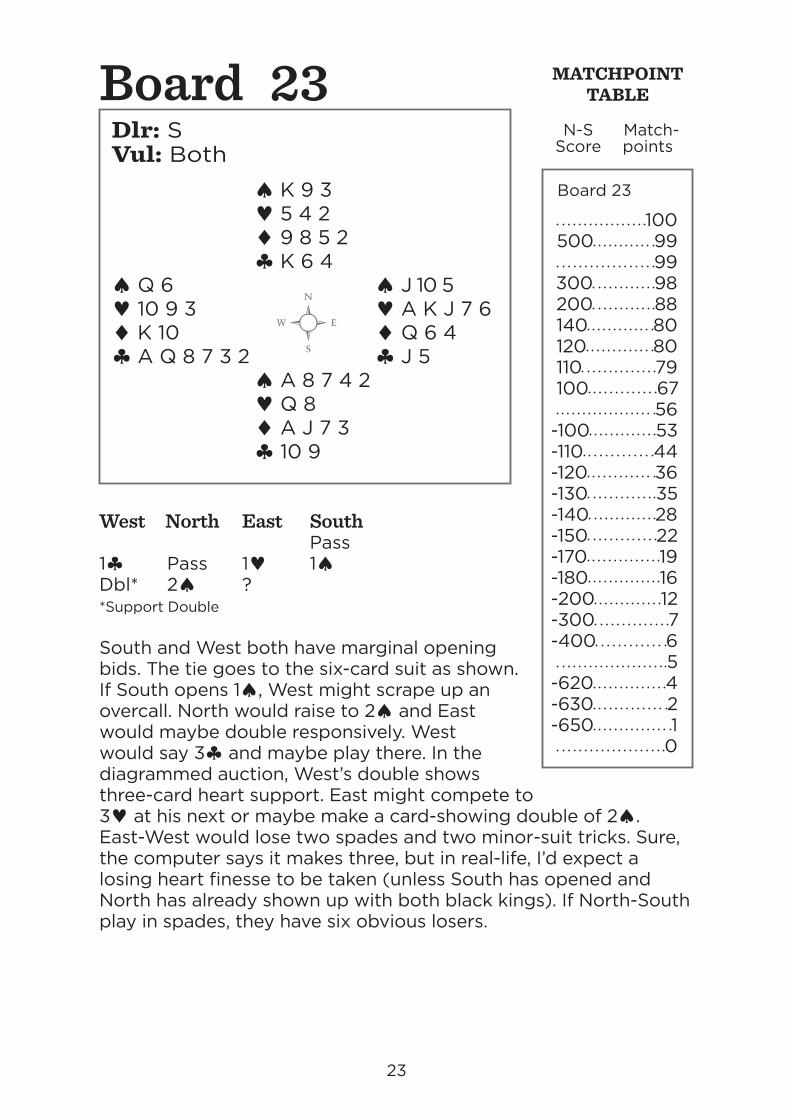
23Board
23
Dlr: S Vul: Both ♠ K 9 3 ♥ 5 4 2 ♦ 9 8 5 2 ♣ K 6 4♠ Q 6 ♠ J 10 5♥ 10 9 3 ♥ A K J 7 6♦ K 10 ♦ Q 6 4♣ A Q 8 7 3 2 ♣ J 5 ♠ A 8 7 4 2 ♥ Q 8 ♦ A J 7 3 ♣ 10 9
West North East South Pass1♣ Pass 1♥ 1♠Dbl* 2♠ ?*Support Double
South and West both have marginal opening bids. The tie goes to the six-card suit as shown. If South opens 1♠, West might scrape up an overcall. North would raise to 2♠ and East would maybe double responsively. West would say 3♣ and maybe play there. In the diagrammed auction, West’s double shows three-card heart support. East might compete to 3♥ at his next or maybe make a card-showing double of 2♠. East-West would lose two spades and two minor-suit tricks. Sure, the computer says it makes three, but in real-life, I’d expect a losing heart finesse to be taken (unless South has opened and North has already shown up with both black kings). If North-South play in spades, they have six obvious losers.
Board 23
100500 99 99300 98200 88140 80120 80110 79100 67 56
-100 53-110 44-120 36-130 35-140 28-150 22-170 19-180 16-200 12-300 7-400 6 5
-620 4-630 2-650 1 0
MATCHPOINTTABLE
N-S Match- Score points
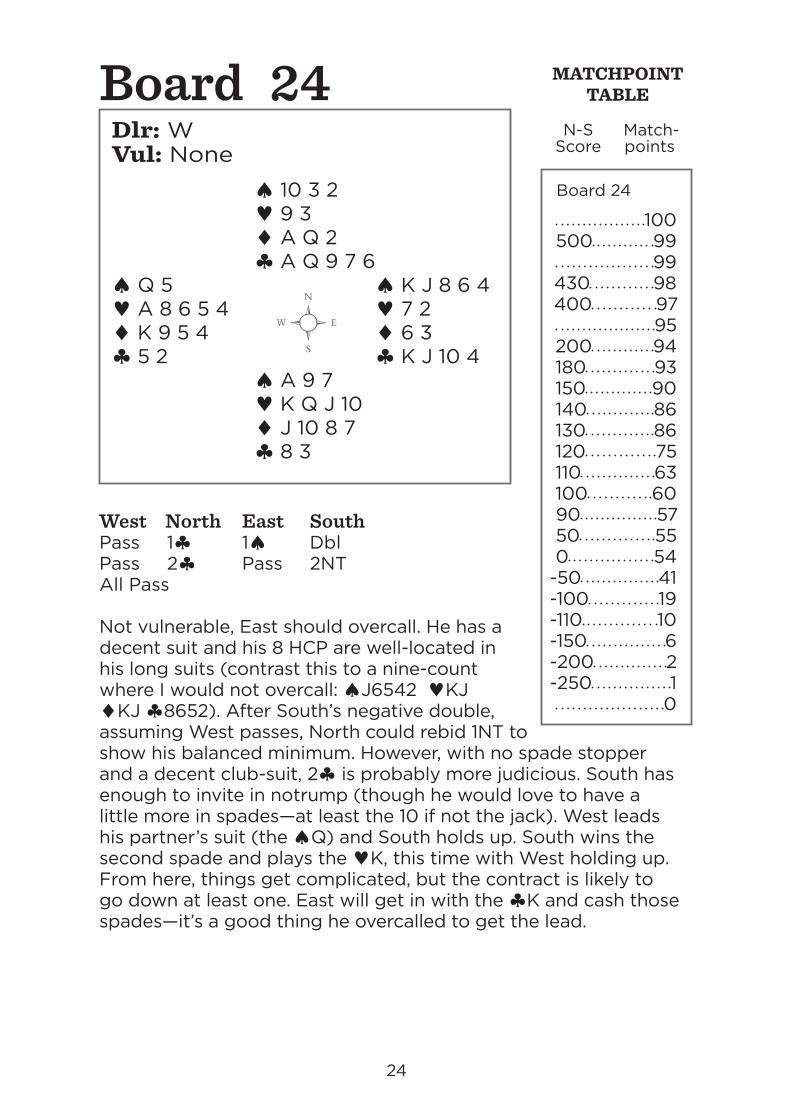
24Board
24
Dlr: W Vul: None ♠ 10 3 2 ♥ 9 3 ♦ A Q 2 ♣ A Q 9 7 6♠ Q 5 ♠ K J 8 6 4♥ A 8 6 5 4 ♥ 7 2♦ K 9 5 4 ♦ 6 3♣ 5 2 ♣ K J 10 4 ♠ A 9 7 ♥ K Q J 10 ♦ J 10 8 7 ♣ 8 3
West North East SouthPass 1♣ 1♠ DblPass 2♣ Pass 2NTAll Pass
Not vulnerable, East should overcall. He has a decent suit and his 8 HCP are well-located in his long suits (contrast this to a nine-count where I would not overcall: ♠J6542 ♥KJ ♦KJ ♣8652). After South’s negative double, assuming West passes, North could rebid 1NT to show his balanced minimum. However, with no spade stopper and a decent club-suit, 2♣ is probably more judicious. South has enough to invite in notrump (though he would love to have a little more in spades—at least the 10 if not the jack). West leads his partner’s suit (the ♠Q) and South holds up. South wins the second spade and plays the ♥K, this time with West holding up. From here, things get complicated, but the contract is likely to go down at least one. East will get in with the ♣K and cash those spades—it’s a good thing he overcalled to get the lead.
Board 24
100500 99 99430 98400 97 95200 94180 93150 90140 86130 86120 75110 63100 6090 5750 550 54
-50 41-100 19-110 10-150 6-200 2-250 1 0
MATCHPOINTTABLE
N-S Match- Score points
25Board
25
Dlr: N Vul: E-W ♠ Q J 5 3 ♥ K J 5 ♦ A 8 ♣ A K 5 4♠ 9 8 2 ♠ A K 10 6♥ Q 10 ♥ 9 6 4 2♦ K 6 3 ♦ 10 9 4♣ Q 9 7 6 3 ♣ J 2 ♠ 7 4 ♥ A 8 7 3 ♦ Q J 7 5 2 ♣ 10 8
West North East South 1♣ Pass 1♥Pass 2NT Pass 3NTAll Pass
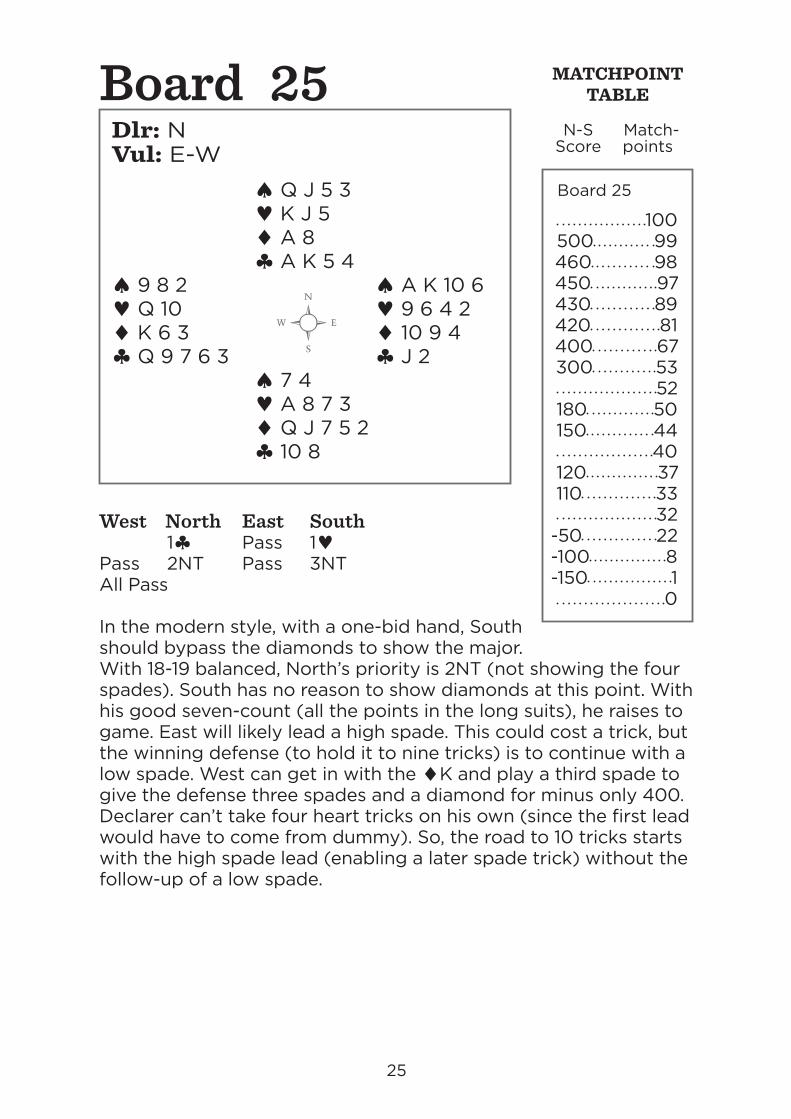
In the modern style, with a one-bid hand, South should bypass the diamonds to show the major. With 18-19 balanced, North’s priority is 2NT (not showing the four spades). South has no reason to show diamonds at this point. With his good seven-count (all the points in the long suits), he raises to game. East will likely lead a high spade. This could cost a trick, but the winning defense (to hold it to nine tricks) is to continue with a low spade. West can get in with the ♦K and play a third spade to give the defense three spades and a diamond for minus only 400. Declarer can’t take four heart tricks on his own (since the first lead would have to come from dummy). So, the road to 10 tricks starts with the high spade lead (enabling a later spade trick) without the follow-up of a low spade.
Board 25
100500 99460 98450 97430 89420 81400 67300 53 52180 50150 44 40120 37110 33 32
-50 22-100 8-150 1 0
MATCHPOINTTABLE
N-S Match- Score points
26Board
26
Dlr: E Vul: Both ♠ K 6 4 ♥ A 4 ♦ Q 10 8 4 3 ♣ A K 8♠ A 9 8 7 2 ♠ Q 3♥ 8 2 ♥ K 10 9 7 3♦ A K 2 ♦ 7 6 5♣ 10 7 5 ♣ 9 4 2 ♠ J 10 5 ♥ Q J 6 5 ♦ J 9 ♣ Q J 6 3
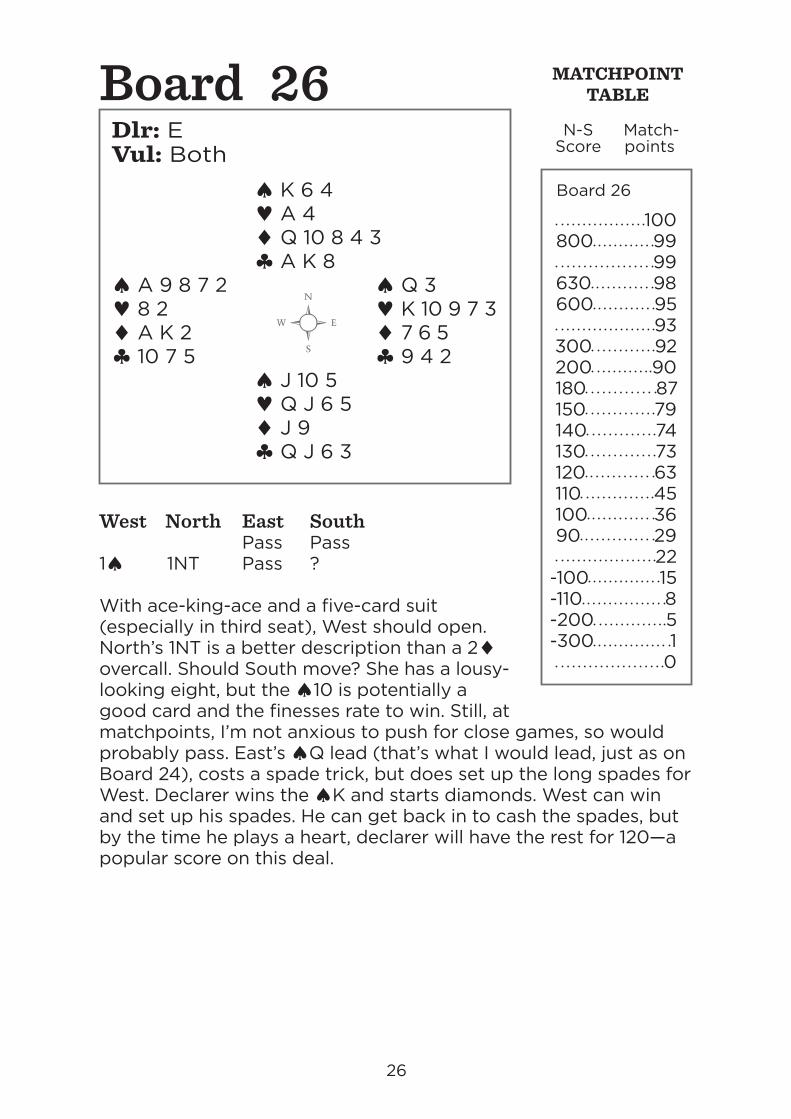
West North East South Pass Pass1♠ 1NT Pass ?
With ace-king-ace and a five-card suit (especially in third seat), West should open. North’s 1NT is a better description than a 2♦ overcall. Should South move? She has a lousy-looking eight, but the ♠10 is potentially a good card and the finesses rate to win. Still, at matchpoints, I’m not anxious to push for close games, so would probably pass. East’s ♠Q lead (that’s what I would lead, just as on Board 24), costs a spade trick, but does set up the long spades for West. Declarer wins the ♠K and starts diamonds. West can win and set up his spades. He can get back in to cash the spades, but by the time he plays a heart, declarer will have the rest for 120—a popular score on this deal.
Board 26
100800 99 99630 98600 95 93300 92200 90180 87150 79140 74130 73120 63110 45100 3690 29 22
-100 15-110 8-200 5-300 1 0
MATCHPOINTTABLE
N-S Match- Score points
27Board
27
Dlr: S Vul: None ♠ A 9 6 ♥ 9 8 2 ♦ J 8 7 3 ♣ 9 8 6♠ Q 8 ♠ 3 2♥ Q 6 5 4 ♥ A J 10 7♦ Q 10 6 4 2 ♦ A K 9♣ A 10 ♣ K Q J 2 ♠ K J 10 7 5 4 ♥ K 3 ♦ 5 ♣ 7 5 4 3
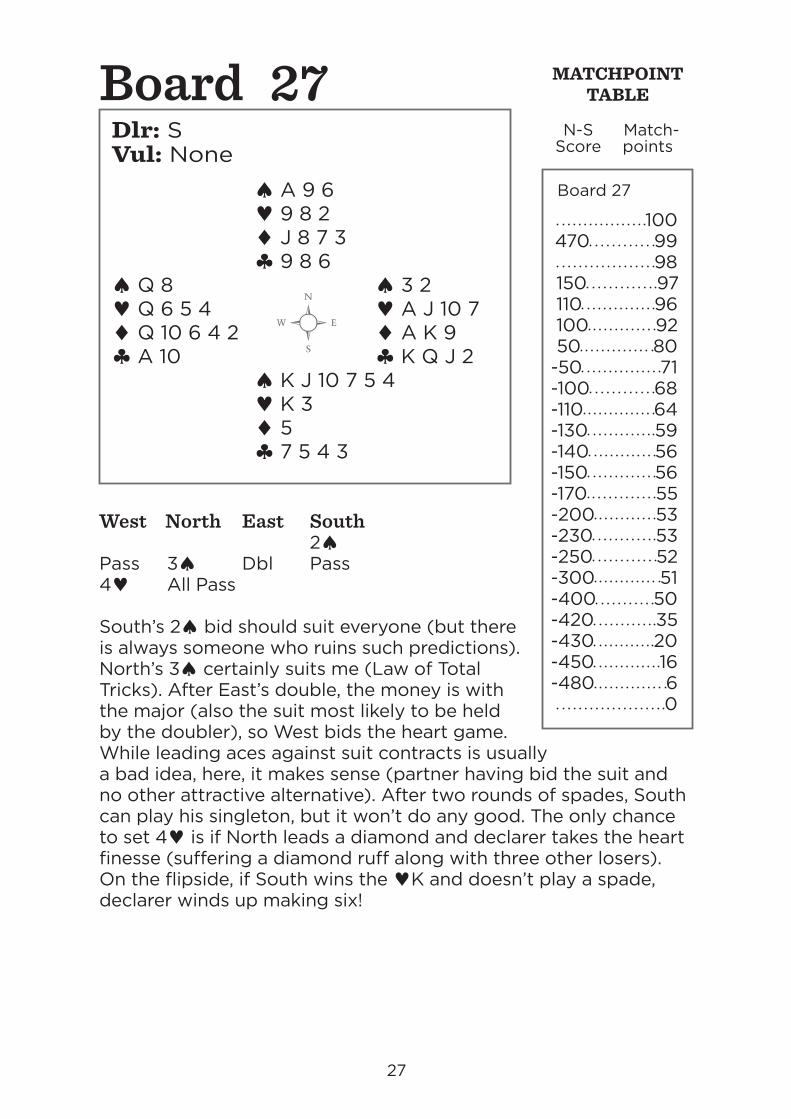
West North East South 2♠Pass 3♠ Dbl Pass4♥ All Pass
South’s 2♠ bid should suit everyone (but there is always someone who ruins such predictions). North’s 3♠ certainly suits me (Law of Total Tricks). After East’s double, the money is with the major (also the suit most likely to be held by the doubler), so West bids the heart game. While leading aces against suit contracts is usually a bad idea, here, it makes sense (partner having bid the suit and no other attractive alternative). After two rounds of spades, South can play his singleton, but it won’t do any good. The only chance to set 4♥ is if North leads a diamond and declarer takes the heart finesse (suffering a diamond ruff along with three other losers). On the flipside, if South wins the ♥K and doesn’t play a spade, declarer winds up making six!
Board 27
100470 99 98150 97110 96100 9250 80
-50 71-100 68-110 64-130 59-140 56-150 56-170 55-200 53-230 53-250 52-300 51-400 50-420 35-430 20-450 16-480 6 0
MATCHPOINTTABLE
N-S Match- Score points
28Board
28
Dlr: W Vul: N-S ♠ Q J 4 ♥ K 8 5 ♦ J 8 5 4 3 ♣ J 2♠ K ♠ A 9 6 3 2♥ A 7 6 4 3 ♥ Q 10 9♦ A 9 ♦ 10 7 6♣ 9 8 7 6 3 ♣ 10 5 ♠ 10 8 7 5 ♥ J 2 ♦ K Q 2 ♣ A K Q 4
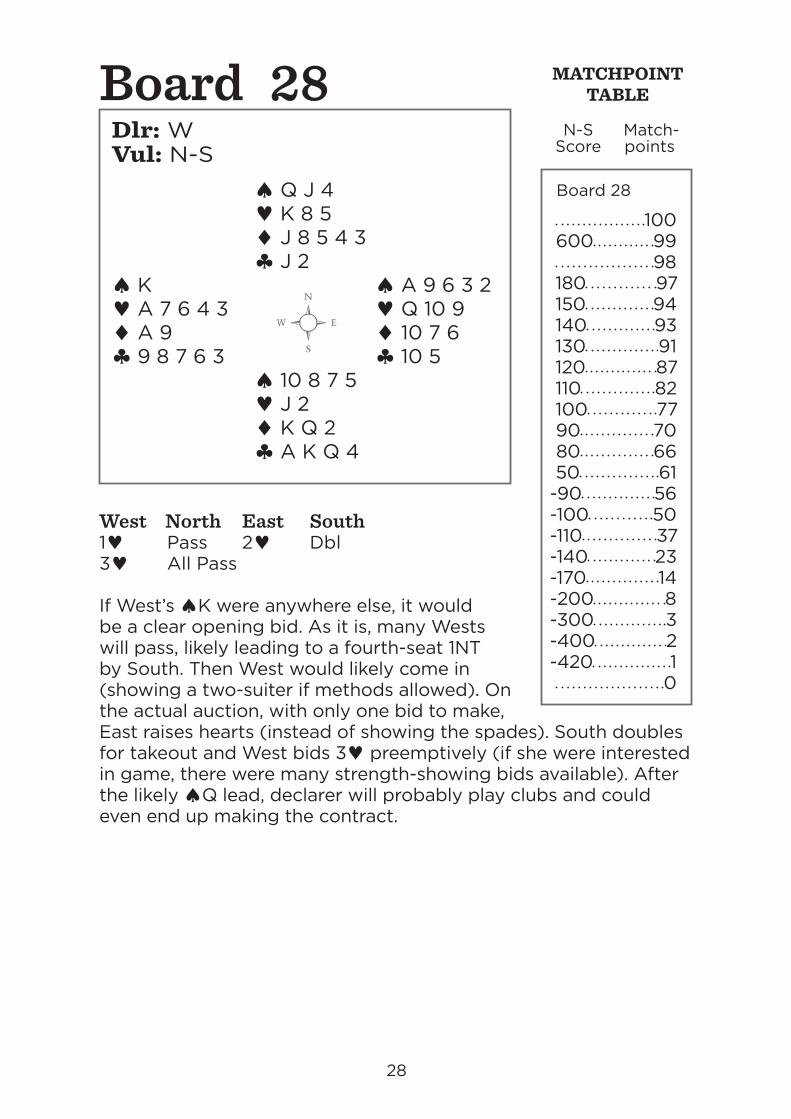
West North East South1♥ Pass 2♥ Dbl3♥ All Pass
If West’s ♠K were anywhere else, it would be a clear opening bid. As it is, many Wests will pass, likely leading to a fourth-seat 1NT by South. Then West would likely come in (showing a two-suiter if methods allowed). On the actual auction, with only one bid to make, East raises hearts (instead of showing the spades). South doubles for takeout and West bids 3♥ preemptively (if she were interested in game, there were many strength-showing bids available). After the likely ♠Q lead, declarer will probably play clubs and could even end up making the contract.
Board 28
100600 99 98180 97150 94140 93130 91120 87110 82100 7790 7080 6650 61
-90 56-100 50-110 37-140 23-170 14-200 8-300 3-400 2-420 1 0
MATCHPOINTTABLE
N-S Match- Score points
29Board
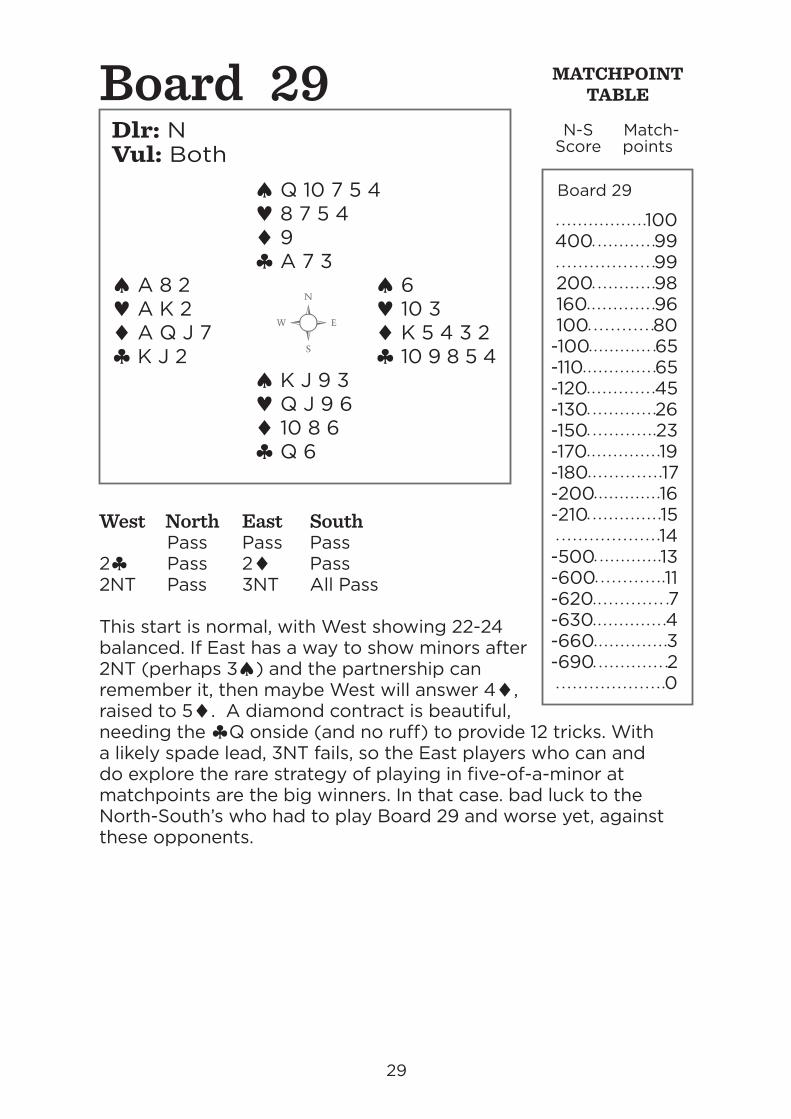
29
Dlr: N Vul: Both ♠ Q 10 7 5 4 ♥ 8 7 5 4 ♦ 9 ♣ A 7 3♠ A 8 2 ♠ 6♥ A K 2 ♥ 10 3♦ A Q J 7 ♦ K 5 4 3 2♣ K J 2 ♣ 10 9 8 5 4 ♠ K J 9 3 ♥ Q J 9 6 ♦ 10 8 6 ♣ Q 6
West North East South Pass Pass Pass2♣ Pass 2♦ Pass2NT Pass 3NT All Pass
This start is normal, with West showing 22-24 balanced. If East has a way to show minors after 2NT (perhaps 3♠) and the partnership can remember it, then maybe West will answer 4♦, raised to 5♦. A diamond contract is beautiful, needing the ♣Q onside (and no ruff) to provide 12 tricks. With a likely spade lead, 3NT fails, so the East players who can and do explore the rare strategy of playing in five-of-a-minor at matchpoints are the big winners. In that case. bad luck to the North-South’s who had to play Board 29 and worse yet, against these opponents.
Board 29
100400 99 99200 98160 96100 80
-100 65-110 65-120 45-130 26-150 23-170 19-180 17-200 16-210 15 14
-500 13-600 11-620 7-630 4-660 3-690 2 0
MATCHPOINTTABLE
N-S Match- Score points
30Board
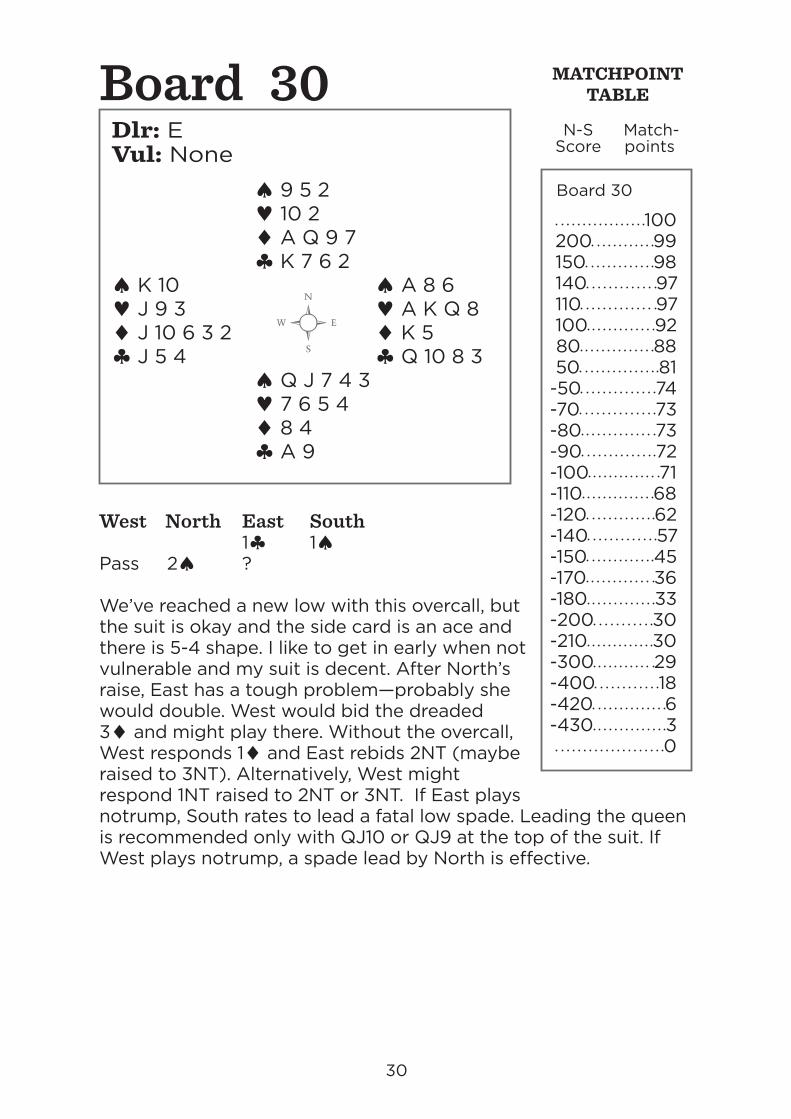
30
Dlr: E Vul: None ♠ 9 5 2 ♥ 10 2 ♦ A Q 9 7 ♣ K 7 6 2♠ K 10 ♠ A 8 6♥ J 9 3 ♥ A K Q 8♦ J 10 6 3 2 ♦ K 5♣ J 5 4 ♣ Q 10 8 3 ♠ Q J 7 4 3 ♥ 7 6 5 4 ♦ 8 4 ♣ A 9
West North East South 1♣ 1♠Pass 2♠ ? We’ve reached a new low with this overcall, but the suit is okay and the side card is an ace and there is 5-4 shape. I like to get in early when not vulnerable and my suit is decent. After North’s raise, East has a tough problem—probably she would double. West would bid the dreaded 3♦ and might play there. Without the overcall, West responds 1♦ and East rebids 2NT (maybe raised to 3NT). Alternatively, West might respond 1NT raised to 2NT or 3NT. If East plays notrump, South rates to lead a fatal low spade. Leading the queen is recommended only with QJ10 or QJ9 at the top of the suit. If West plays notrump, a spade lead by North is effective.
Board 30
100200 99150 98140 97110 97100 9280 8850 81
-50 74-70 73-80 73-90 72-100 71-110 68-120 62-140 57-150 45-170 36-180 33-200 30-210 30-300 29-400 18-420 6-430 3 0
MATCHPOINTTABLE
N-S Match- Score points
31Board
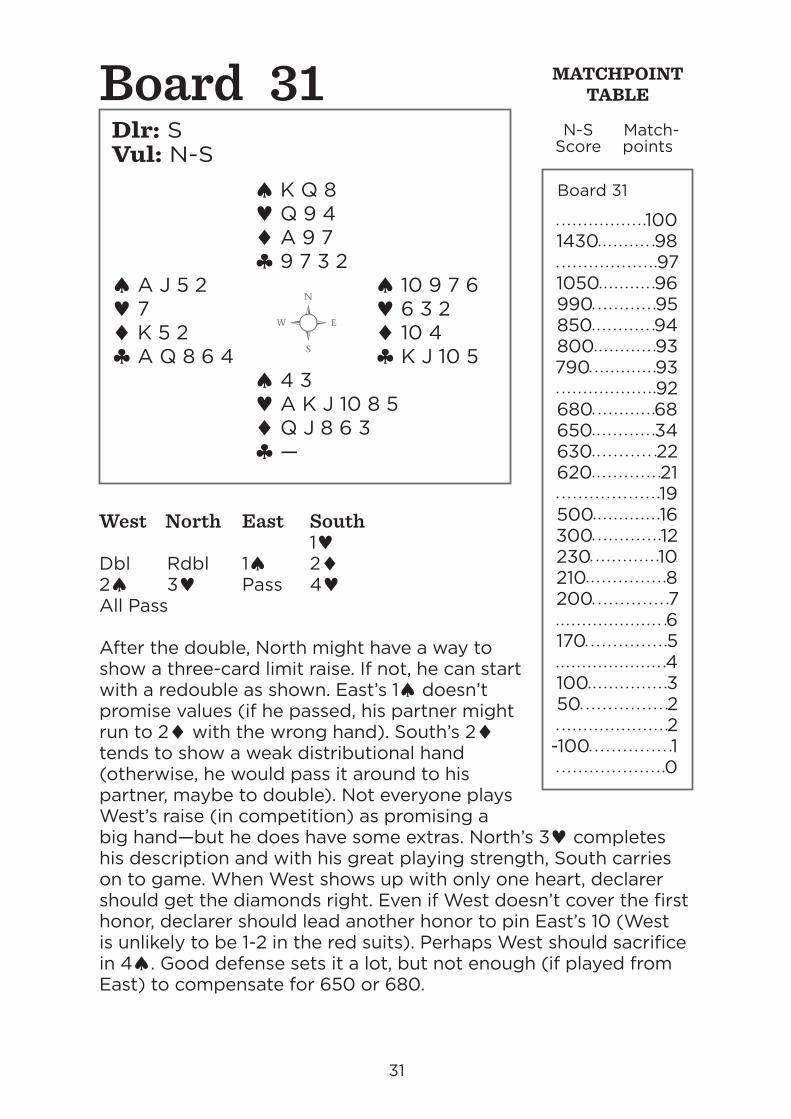
31
Dlr: S Vul: N-S ♠ K Q 8 ♥ Q 9 4 ♦ A 9 7 ♣ 9 7 3 2♠ A J 5 2 ♠ 10 9 7 6♥ 7 ♥ 6 3 2♦ K 5 2 ♦ 10 4♣ A Q 8 6 4 ♣ K J 10 5 ♠ 4 3 ♥ A K J 10 8 5 ♦ Q J 8 6 3 ♣ —
West North East South 1♥Dbl Rdbl 1♠ 2♦2♠ 3♥ Pass 4♥All Pass
After the double, North might have a way to show a three-card limit raise. If not, he can start with a redouble as shown. East’s 1♠ doesn’t promise values (if he passed, his partner might run to 2♦ with the wrong hand). South’s 2♦ tends to show a weak distributional hand (otherwise, he would pass it around to his partner, maybe to double). Not everyone plays West’s raise (in competition) as promising a big hand—but he does have some extras. North’s 3♥ completes his description and with his great playing strength, South carries on to game. When West shows up with only one heart, declarer should get the diamonds right. Even if West doesn’t cover the first honor, declarer should lead another honor to pin East’s 10 (West is unlikely to be 1-2 in the red suits). Perhaps West should sacrifice in 4♠. Good defense sets it a lot, but not enough (if played from East) to compensate for 650 or 680.
Board 31
1001430 98 971050 96990 95850 94800 93790 93 92680 68650 34630 22620 21 19500 16300 12230 10210 8200 7 6170 5 4100 350 2 2
-100 1 0
MATCHPOINTTABLE
N-S Match- Score points
32Board
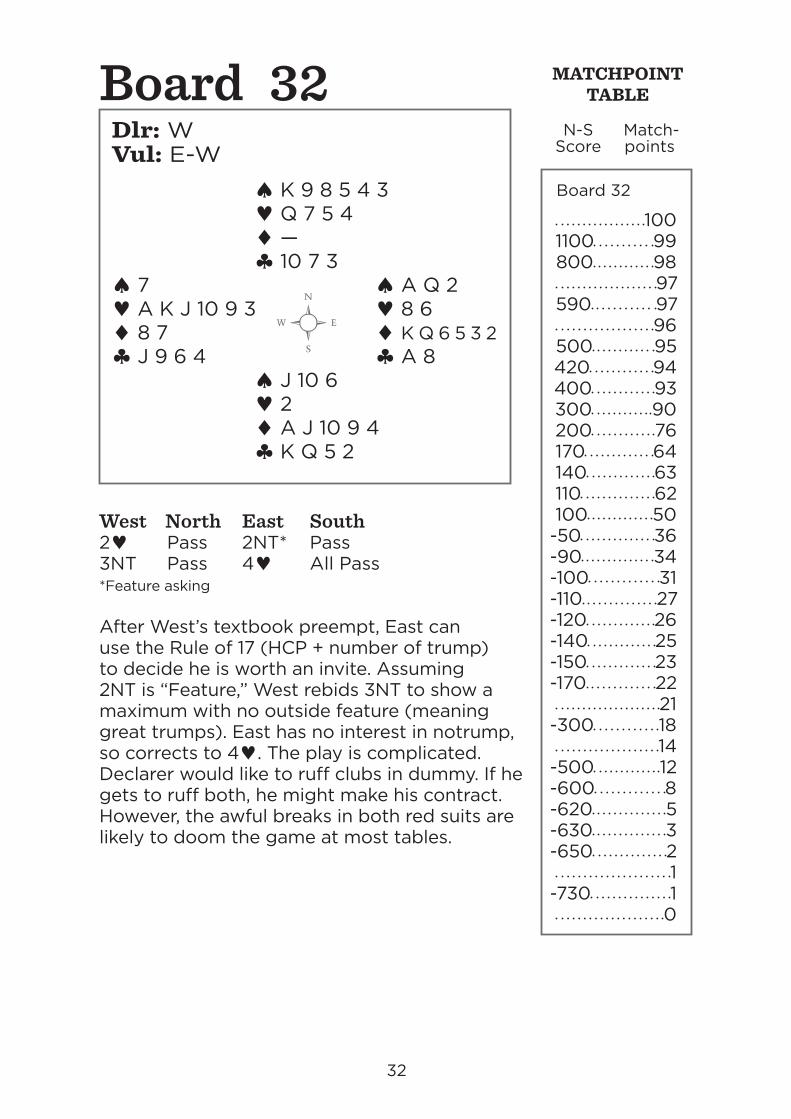
32
Dlr: W Vul: E-W ♠ K 9 8 5 4 3 ♥ Q 7 5 4 ♦ — ♣ 10 7 3♠ 7 ♠ A Q 2♥ A K J 10 9 3 ♥ 8 6♦ 8 7 ♦ K Q 6 5 3 2♣ J 9 6 4 ♣ A 8 ♠ J 10 6 ♥ 2 ♦ A J 10 9 4 ♣ K Q 5 2
West North East South2♥ Pass 2NT* Pass3NT Pass 4♥ All Pass*Feature asking
After West’s textbook preempt, East can use the Rule of 17 (HCP + number of trump) to decide he is worth an invite. Assuming 2NT is “Feature,” West rebids 3NT to show a maximum with no outside feature (meaning great trumps). East has no interest in notrump, so corrects to 4♥. The play is complicated. Declarer would like to ruff clubs in dummy. If he gets to ruff both, he might make his contract. However, the awful breaks in both red suits are likely to doom the game at most tables.
Board 32
1001100 99800 98 97590 97 96500 95420 94400 93300 90200 76170 64140 63110 62100 50
-50 36-90 34-100 31-110 27-120 26-140 25-150 23-170 22 21
-300 18 14
-500 12-600 8-620 5-630 3-650 2 1
-730 1 0
MATCHPOINTTABLE
N-S Match- Score points
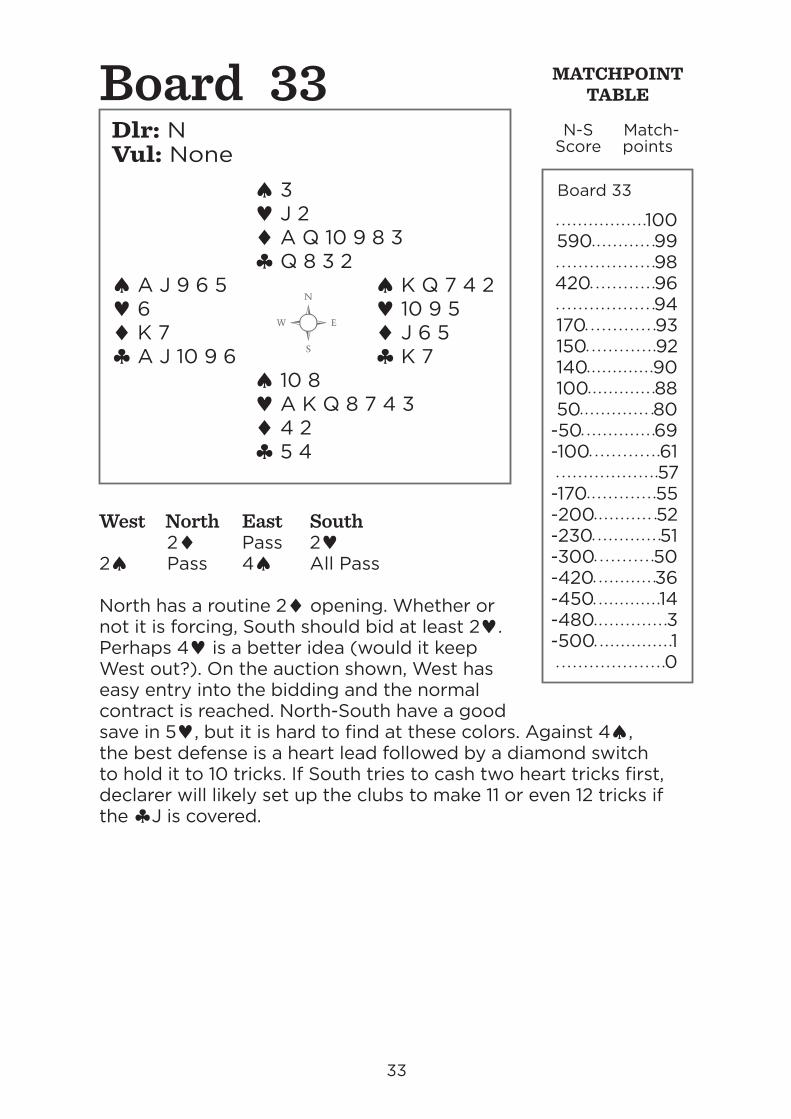
33Board
33
Dlr: N Vul: None ♠ 3 ♥ J 2 ♦ A Q 10 9 8 3 ♣ Q 8 3 2♠ A J 9 6 5 ♠ K Q 7 4 2♥ 6 ♥ 10 9 5♦ K 7 ♦ J 6 5♣ A J 10 9 6 ♣ K 7 ♠ 10 8 ♥ A K Q 8 7 4 3 ♦ 4 2 ♣ 5 4
West North East South 2♦ Pass 2♥2♠ Pass 4♠ All Pass
North has a routine 2♦ opening. Whether or not it is forcing, South should bid at least 2♥. Perhaps 4♥ is a better idea (would it keep West out?). On the auction shown, West has easy entry into the bidding and the normal contract is reached. North-South have a good save in 5♥, but it is hard to find at these colors. Against 4♠, the best defense is a heart lead followed by a diamond switch to hold it to 10 tricks. If South tries to cash two heart tricks first, declarer will likely set up the clubs to make 11 or even 12 tricks if the ♣J is covered.
Board 33
100590 99 98420 96 94170 93150 92140 90100 8850 80
-50 69-100 61 57
-170 55-200 52-230 51-300 50-420 36-450 14-480 3-500 1 0
MATCHPOINTTABLE
N-S Match- Score points
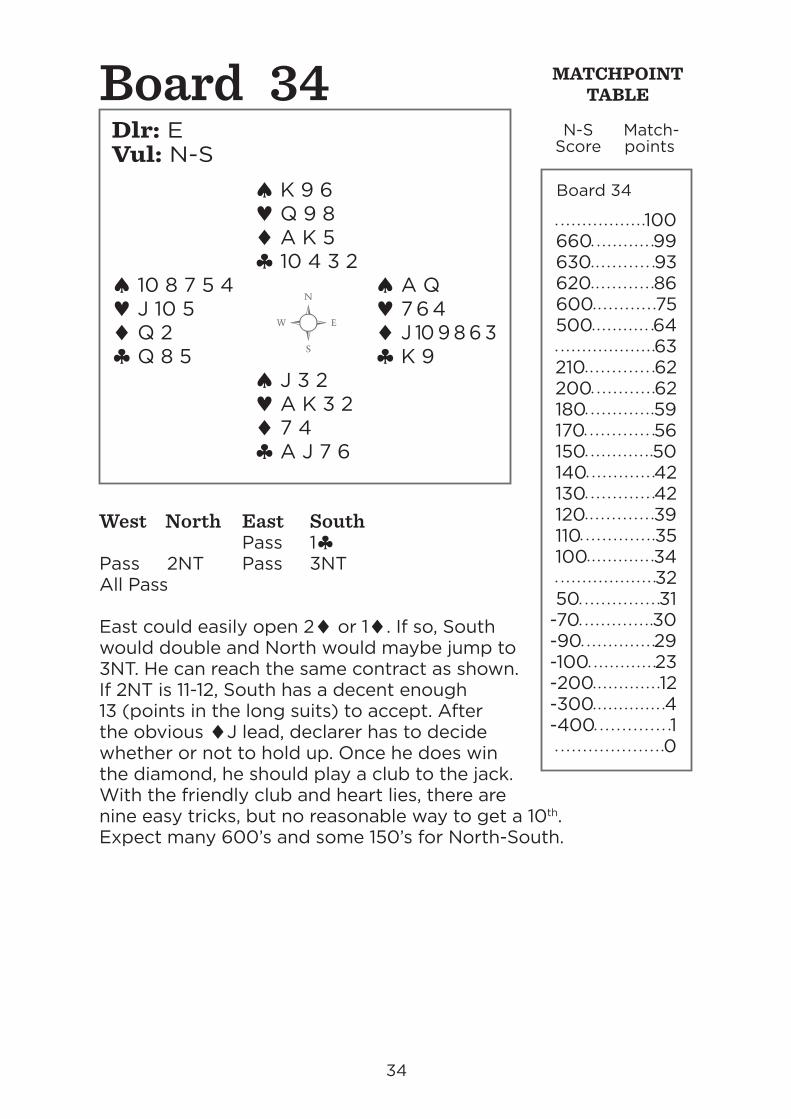
34Board
34
Dlr: E Vul: N-S ♠ K 9 6 ♥ Q 9 8 ♦ A K 5 ♣ 10 4 3 2♠ 10 8 7 5 4 ♠ A Q♥ J 10 5 ♥ 7 6 4♦ Q 2 ♦ J 10 9 8 6 3♣ Q 8 5 ♣ K 9 ♠ J 3 2 ♥ A K 3 2 ♦ 7 4 ♣ A J 7 6
West North East South Pass 1♣Pass 2NT Pass 3NTAll Pass
East could easily open 2♦ or 1♦. If so, South would double and North would maybe jump to 3NT. He can reach the same contract as shown. If 2NT is 11-12, South has a decent enough 13 (points in the long suits) to accept. After the obvious ♦J lead, declarer has to decide whether or not to hold up. Once he does win the diamond, he should play a club to the jack. With the friendly club and heart lies, there are nine easy tricks, but no reasonable way to get a 10th. Expect many 600’s and some 150’s for North-South.
Board 34
100660 99630 93620 86600 75500 64 63210 62200 62180 59170 56150 50140 42130 42120 39110 35100 34 3250 31
-70 30-90 29-100 23-200 12-300 4-400 1 0
MATCHPOINTTABLE
N-S Match- Score points
35Board
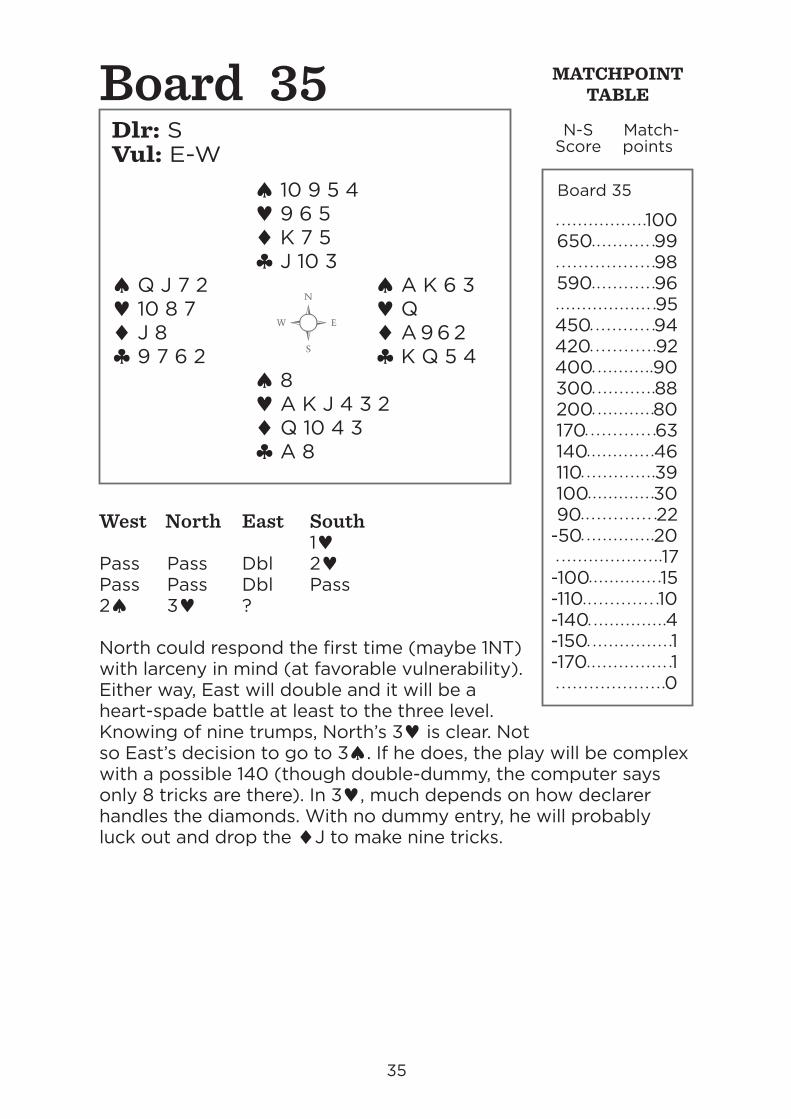
35
Dlr: S Vul: E-W ♠ 10 9 5 4 ♥ 9 6 5 ♦ K 7 5 ♣ J 10 3♠ Q J 7 2 ♠ A K 6 3♥ 10 8 7 ♥ Q♦ J 8 ♦ A 9 6 2♣ 9 7 6 2 ♣ K Q 5 4 ♠ 8 ♥ A K J 4 3 2 ♦ Q 10 4 3 ♣ A 8
West North East South 1♥Pass Pass Dbl 2♥Pass Pass Dbl Pass2♠ 3♥ ?
North could respond the first time (maybe 1NT) with larceny in mind (at favorable vulnerability). Either way, East will double and it will be a heart-spade battle at least to the three level. Knowing of nine trumps, North’s 3♥ is clear. Not so East’s decision to go to 3♠. If he does, the play will be complex with a possible 140 (though double-dummy, the computer says only 8 tricks are there). In 3♥, much depends on how declarer handles the diamonds. With no dummy entry, he will probably luck out and drop the ♦J to make nine tricks.
Board 35
100650 99 98590 96 95450 94420 92400 90300 88200 80170 63140 46110 39100 3090 22
-50 20 17
-100 15-110 10-140 4-150 1-170 1 0

MATCHPOINTTABLE
N-S Match- Score points
36Board
36
Dlr: W Vul: Both ♠ J ♥ K ♦ A K Q 8 7 6 3 2 ♣ K 7 6♠ A 10 5 2 ♠ K Q 9 8 4♥ A Q 7 2 ♥ J 9 8 6 4♦ J 5 ♦ 4♣ A J 9 ♣ Q 3 ♠ 7 6 3 ♥ 10 5 3 ♦ 10 9 ♣ 10 8 5 4 2
West North East South1NT ?
North could pass and dream of leading against notrump. However, a leap in diamonds is more practical. Will East know how to show majors after a jump overcall of 3♦? Would 4♦ be a transfer or majors? What about after a jump overcall of 4♦? Depending on North’s actions, it will be a challenge for East-West to find one of their excellent major suit fits. If they do, 10 tricks are easy; 11 if they guess the hearts (not that there is a good reason to do so). If North chooses to sacrifice in 5♦, good defense would limit him to his eight tricks for a disastrous -800.
Board 36
100750 99 98500 97 96200 95 94130 94110 94100 8690 780 77
-100 76-140 75-170 74-200 70-300 65-500 58-620 49-630 45-650 31-680 17 16
-790 15-800 9 2
-990 1-1050 1 0
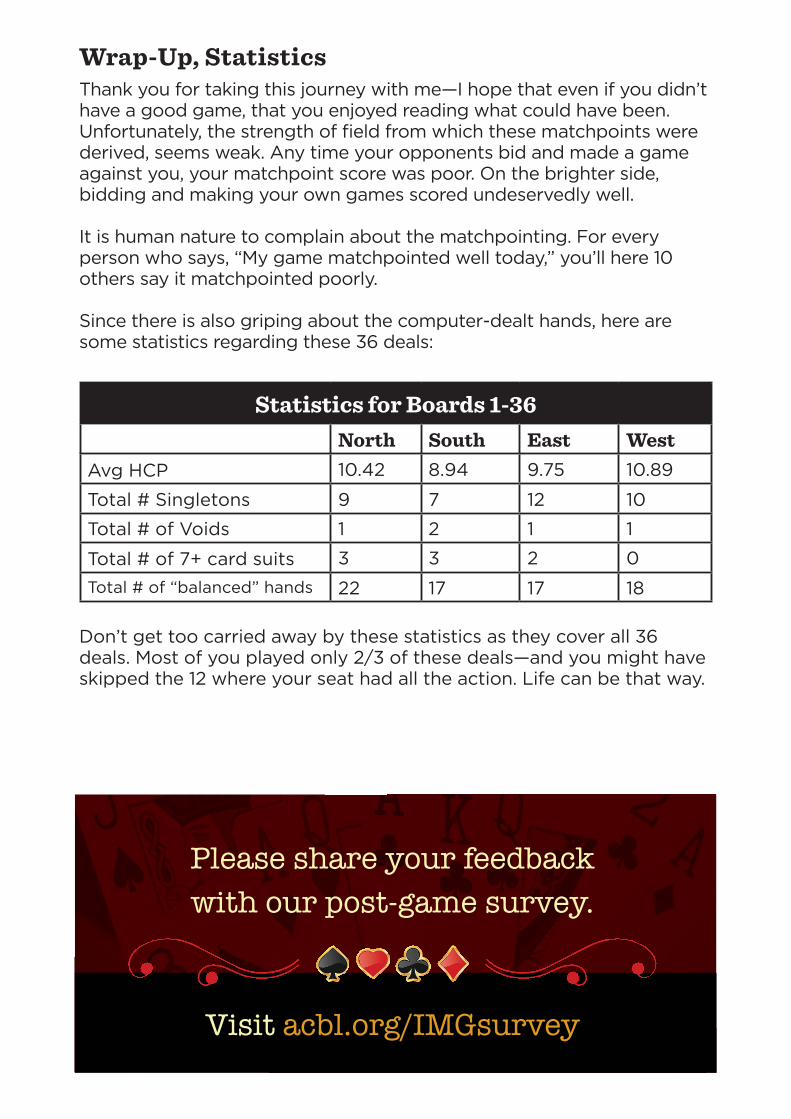
Wrap-Up, StatisticsThank you for taking this journey with me—I hope that even if you didn’t have a good game, that you enjoyed reading what could have been. Unfortunately, the strength of field from which these matchpoints were derived, seems weak. Any time your opponents bid and made a game against you, your matchpoint score was poor. On the brighter side, bidding and making your own games scored undeservedly well.
It is human nature to complain about the matchpointing. For every person who says, “My game matchpointed well today,” you’ll here 10 others say it matchpointed poorly.
Since there is also griping about the computer-dealt hands, here are some statistics regarding these 36 deals:
Statistics for Boards 1-36North South East West
Avg HCP 10.42 8.94 9.75 10.89
Total # Singletons 9 7 12 10Total # of Voids 1 2 1 1
Total # of 7+ card suits 3 3 2 0Total # of “balanced” hands 22 17 17 18
Don’t get too carried away by these statistics as they cover all 36 deals. Most of you played only 2/3 of these deals—and you might have skipped the 12 where your seat had all the action. Life can be that way.
Please share your feedback with our post-game survey.
Visit acbl.org/IMGsurvey
Printed in the USA by ACBL.
6575 Windchase Blvd.Horn Lake MS 38637-1523
acbl.org/IMG