Embed Size (px)
Citation preview

1 Copyright ©️ 2020, Paradigm Applications
QUICK START USER GUIDEACCOUNT USERS AND ADMINISTRATORS
TABLE OF CONTENTS
AO REQUEST A NEW ACCOUNT 1
AO ADD USERS 2
AO EDIT/DEACTIVATE USERS 3
AU REGISTER INITIAL FINANCING STATEMENT 4
AU REGISTER FINANCING STATEMENT OF PRIOR SECURITY INTEREST 6
AU SEARCH FOR FINANCING STATEMENTS/CERTIFIED SEARCH REPORT 6
AU ACCOUNT TRANSACTIONS HISTORY 7AO = Administrators Only | AU = All Users
REQUEST A NEW ACCOUNT 1. Select Help > Select Support from the main menu
2. Enter your contact information
3. Select Client Account from the Support Issue Type drop down
4. Enter in the Support Question text box: Request to create Client Account (include the institution name and contact information)
5. Select Submit
Next Steps: The Registrar’s office contacts you to complete the process > You will need to provide additional information to complete the setup > Log in to the Registry and Add Users once the account setup is confirmed
AU REGISTER A MODIFICATION OR TERMINATION STATEMENT 8
AO DATA IMPORT 9
AO VIEW/EXPORT INVOICES 9
AO MAKE A PAYMENT USING A CREDIT/DEBIT CARD 10
AO RECORD A BANK TRANSFER 10
AO APPROVE A WORKFLOW STATEMENT 10
For help with questions related to search only access to the registry refer to the How To Guides available on the Registry.

2 Copyright ©️ 2020, Paradigm Applications
ADD USERS 1. Log in > Select Home > Account Management > Select Update or View Client Account Information > Select Add User
2. Leave the default setting of Active selected. Only deselect Active if you need to hold the user’s information for activation at a later date
3. Enter the user’s contact information
4. Enter the following information to create the user’s login credentials:
• Login ID
• Password, re-enter to confirm
5. Check the box(es) to grant the user’s permissions: The following are the recommended* permissions for most users:
• Client Administrator: Select all permissions if there is only one Account User (Workflow Statement Approval is optional)
• Client General User: Select the following permissions search and file statements (Select Workflow Statement Entry if administrator approval is required on statements)
* See the How to Set up an Account for additional information regarding permissions
6. Select Save > Select Close
Note: Fields with *(asterisk) are REQUIRED

3 Copyright ©️ 2020, Paradigm Applications
EDIT / DEACTIVATE USERS 1. Log in > Select Home > Account Management > Select Update or View Client Account Information > Select Users
2. Use the Search function or scroll to find the user
3. To edit a user: Select the user under the Login ID header. To disable a user: Select Deactivate
4. Edit the user’s information as required:
• User’s contact information
• Login ID
• Permissions (see Add Users for detailed descriptions)
5. Select Save > Select Close
Note: Fields with *(asterisk) are REQUIRED
4 Copyright ©️ 2020, Paradigm Applications
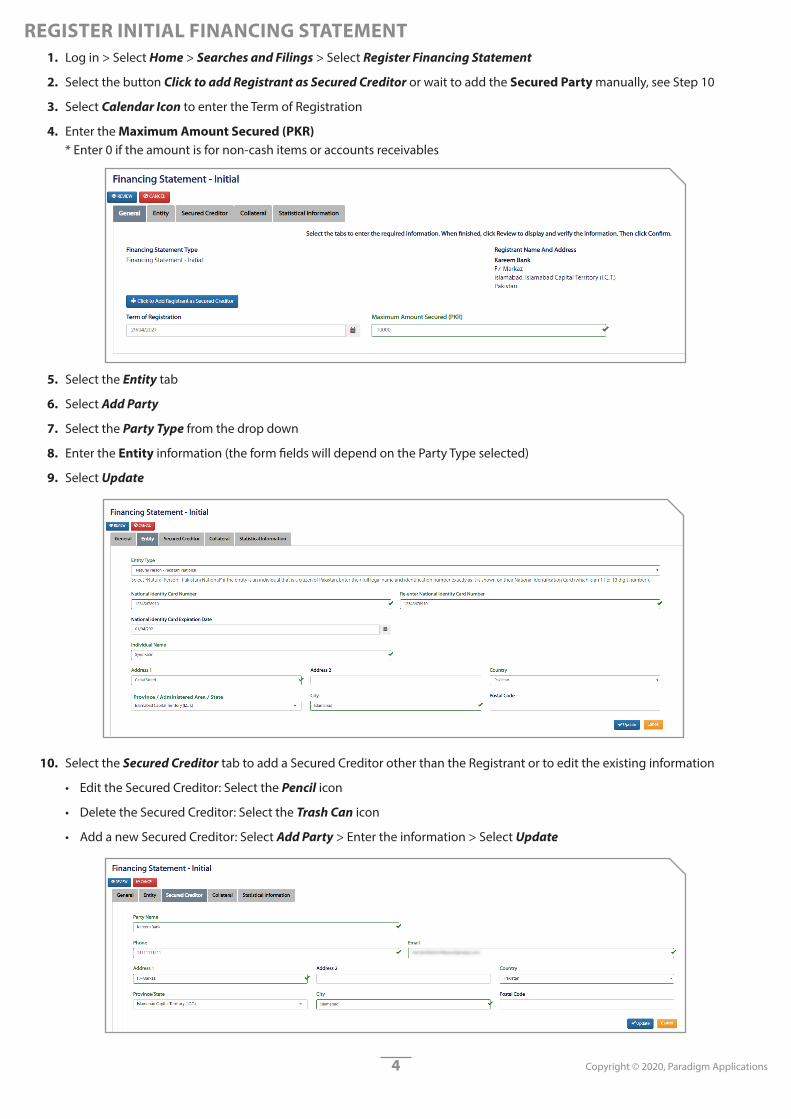
REGISTER INITIAL FINANCING STATEMENT 1. Log in > Select Home > Searches and Filings > Select Register Financing Statement
2. Select the button Click to add Registrant as Secured Creditor or wait to add the Secured Party manually, see Step 10
3. Select Calendar Icon to enter the Term of Registration
4. Enter the Maximum Amount Secured (PKR) * Enter 0 if the amount is for non-cash items or accounts receivables
5. Select the Entity tab
6. Select Add Party
7. Select the Party Type from the drop down
8. Enter the Entity information (the form fields will depend on the Party Type selected)
9. Select Update
10. Select the Secured Creditor tab to add a Secured Creditor other than the Registrant or to edit the existing information
• Edit the Secured Creditor: Select the Pencil icon
• Delete the Secured Creditor: Select the Trash Can icon
• Add a new Secured Creditor: Select Add Party > Enter the information > Select Update

5 Copyright ©️ 2020, Paradigm Applications
11. Select the Collateral tab
12. Enter a description of the Security Provider’s collateral in the Collateral Description
13. If a vehicle is used as collateral: Select Add Number > Enter the Vehicle Registration Number > Re-enter VRN to confirm
14. Select the Statistical Information tab
15. Enter the statistical information regarding the Financing Statement
• The information is confidential and only used for statistical purposes
16. Select Review and select one of the following options
• Select Confirm to register the notice
• Select Edit to make changes
• Select Submit for Approval (if required). You will be notified when the Financing Statement is approved and registered or if further action is required.
17. Select Close

6 Copyright ©️ 2020, Paradigm Applications
REGISTER FINANCING STATEMENT OF PRIOR SECURITY INTEREST 1. Log in > Select Home > Searches and Filings > Select Register Financing Statement of Prior Security Interest
2. See Register Financing Statement for details on entering information
SEARCH FOR FINANCING STATEMENTS / CERTIFIED SEARCH REPORT 1. Log in > Select Home > Searches and Filings > Select Search for Financing Statements or Request a Certified Search Report
2. Check the box for Certified Search Result if required (a fee is charged for certified searches)
3. Select a tab to use one of the following search criteria:
• Entity > Select Entity Type from the drop down > Enter the information based on the Entity Type
• Vehicle Registration Number (VRN) > Enter the number
• Financing Statement Registration Number > Enter the number of the original Financing Statement*
• Corporate Registry Search > Enter the Company Unique Identification Number
• Certified Search Verification > Enter the Certified Search Report number
4. Select Search
5. Optional: Select Print
* See Account Transactions History for information on finding Financing Statement Numbers and Certified Search Numbers
Note: See the How To Guide for Search Financing Statements for more information on Certified Search Reports

7 Copyright ©️ 2020, Paradigm Applications
ACCOUNT TRANSACTIONS HISTORYUse Account Transactions History to find Financing Statement Numbers, Access Numbers, transaction details and to start a Modify or Terminate a Statement
1. Log in > Select Home > Searches and Filings > Select Account Transactions History
2. Select one or more search criteria:
• Select a transaction date range in the From and Through
• Select a date range for Term of Registration From to Term of Registration Through
• Select the type of transaction from the Transaction Type drop down
3. Select Search
4. Options:
• Enter key terms in the Search box to filter data
• Select Excel All to export
• Select Print
• Select the Reference Number from the list to view the Access Number and other notice details
• Select the Hand icon under Action to create a Modify or Terminate a Statement. For additional steps, see Modify or Terminate a Statement

8 Copyright ©️ 2020, Paradigm Applications
REGISTER A MODIFICATION OR TERMINATION STATEMENTThe Financing Statement Number and Access Number are required. See Account Transactions History
1. Log in > Select Home > Searches and Filings > Select Register a Modification or Termination Statement
2. Select the Change Statement Type from the drop down
3. Enter the Financing Statement Registration Number and the Access Number
4. Select Next
5. Check the box under Authorizing to indicate the Secured Creditor approves the change
For Modifications (edit the following information as required):
• Select the Calendar icon to update the Term of Registration
• Enter the Maximum Amount Secured (PKR)
• Select the menu tabs to edit the information as required. For details on each tab see Register Financing Statement
For Terminations:
• Select at least one creditor to authorize the termination.
• Once the termination statement is registered, it is removed from the registry and no longer appears in the search results
6. Select Review
• Select Confirm to register the amended notice
• Select Edit to make changes
7. Select Close
9 Copyright ©️ 2020, Paradigm Applications
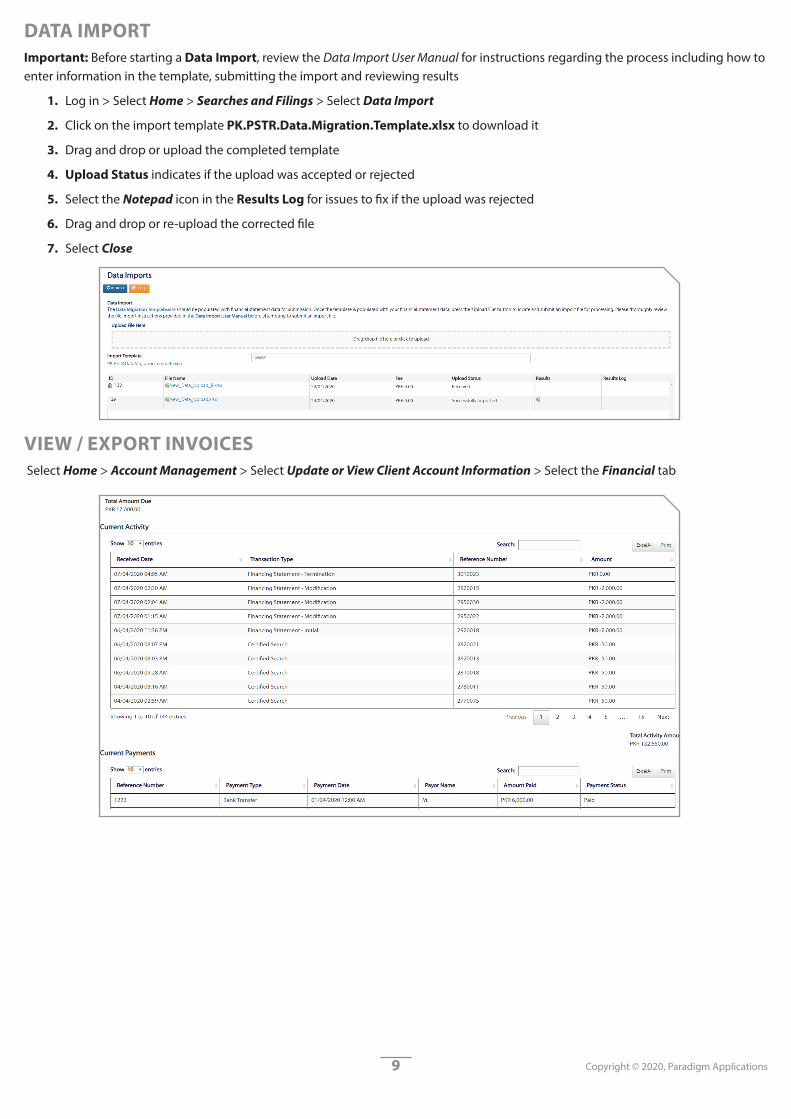
DATA IMPORTImportant: Before starting a Data Import, review the Data Import User Manual for instructions regarding the process including how to enter information in the template, submitting the import and reviewing results
1. Log in > Select Home > Searches and Filings > Select Data Import
2. Click on the import template PK.PSTR.Data.Migration.Template.xlsx to download it
3. Drag and drop or upload the completed template
4. Upload Status indicates if the upload was accepted or rejected
5. Select the Notepad icon in the Results Log for issues to fix if the upload was rejected
6. Drag and drop or re-upload the corrected file
7. Select Close
VIEW / EXPORT INVOICES Select Home > Account Management > Select Update or View Client Account Information > Select the Financial tab

10 Copyright ©️ 2020, Paradigm Applications
MAKE A PAYMENT USING A CREDIT/DEBIT CARD 1. Log in > Select Home > Account Management > Select Make a Credit/Debit Card Payment
2. Select the outstanding invoice from the list
3. Select Make Payment
4. Enter the payment information on the secure site and submit the payment
PK_QSG_Acct_Admin_Eng ver. 1.0 5.22.20
RECORD A BANK TRANSFER 1. A monthly invoice is sent to the client accounts via email for review and payment
2. Process a bank transfer to the SECP bank account via RTGS. Include the Registry Client Account Number and amount
3. Log in to the Registry and select Record a Bank Transfer from the Home page
4. Select the invoice from the list
5. Enter the following information:
• Name of the person performing the transfer
• Payment Reference Number
• Transaction Date
6. Select Submit
Results: Once the transfer is recorded in the Registry, the payment will be marked as paid
APPROVE A WORKFLOW STATEMENT Financing Statements are only approved by users with the Workflow Statement Approver permission enabled under User Detail. See the How to Manage Accounts for more information.
1. Login > Select Home > Select the Work Queue icon > Select the Hand icon under the Action header.
2. Review the Financing Statement and select one of the following actions:
• File in Registry: Registers the Financing Statement
• Send Back: Returns to the originator for editing and resubmission
• Cancel Filing: Cancels the Financing Statement
• Cancel: Cancels the action and returns to the Home page