Embed Size (px)
Citation preview
Activity DataBase 2012Tutorial1. General Notes on Data...............................................................................3
Crown copyright............................................................................................3Reference Data Projects................................................................................3Navigation through the data..........................................................................3
Navigating through Reports........................................................................4The Data Set content..................................................................................4
2. Introduction.............................................................................................5Log in.............................................................................................................5Registering the ADB Reference and existing Projects....................................7
3. Creating a project.......................................................................................8Creating a new project..................................................................................8Copying a department.................................................................................11Amending room quantities..........................................................................13Using the Search Engine to insert rooms into the department....................14Additional search tools................................................................................16
Column Filters..........................................................................................16Outlook Style search.................................................................................19Quick Filter, Quick Search, Sticky Filter, Sticky Search.............................20
Deleting a room from the department.........................................................21Creating a new Department........................................................................23Inserting multiple rooms into a Department................................................24Inserting a room with a known code into a department..............................30Setting a room number................................................................................31
4. Generating room data sheets...................................................................34Viewing a room graphic...............................................................................38Amending rooms within the project.............................................................40
Changing equipment quantities................................................................40Deleting equipment from a room.............................................................41
Adding new equipment to a room using drag and drop...............................41Creating a new component..........................................................................45Attaching documents...................................................................................49Instanced Data............................................................................................55Viewing rooms.............................................................................................59Pop-up descriptions.....................................................................................60Exploding assemblies..................................................................................60Inserting new assemblies............................................................................61Inserting new components...........................................................................61
5. Reporting in Activity DataBase.................................................................63About list reports.........................................................................................64About schedule reports................................................................................66About data sheets........................................................................................66Report Filter Wizard.....................................................................................68Crystal Reports Template Editor..................................................................69
1
Copying and Editing a Report......................................................................73About ‘where used’ reports.........................................................................77Further Report Options................................................................................78Automated Audit Reports............................................................................80Exporting reports.........................................................................................81
6. New Engineering Data Format..................................................................827. Using Activity DataBase with AutoCAD.....................................................84
2

1. General Notes on DataCrown copyright
Both ADB data and software are Crown Copyright. Where a licensed user makes a material change to the data this no longer pertains and the Department of Health endorsement ceases to apply. Use of any element of the ADB data or software without a current licence contravenes the copyright.
Reference Data ProjectsADB reference data is included in the Projects directory on the CD. If you are running a standalone version of ADB you should copy these files to the folder C:\ADB\Projects created by the installation program or other folder if you prefer.
New reference data projects will be released from time and email notification will be sent to all ADB users when a data release is to be made available.
The project data referred to in the tutorial are only examples. You should substitute alternatives from the refernce projects you have available.
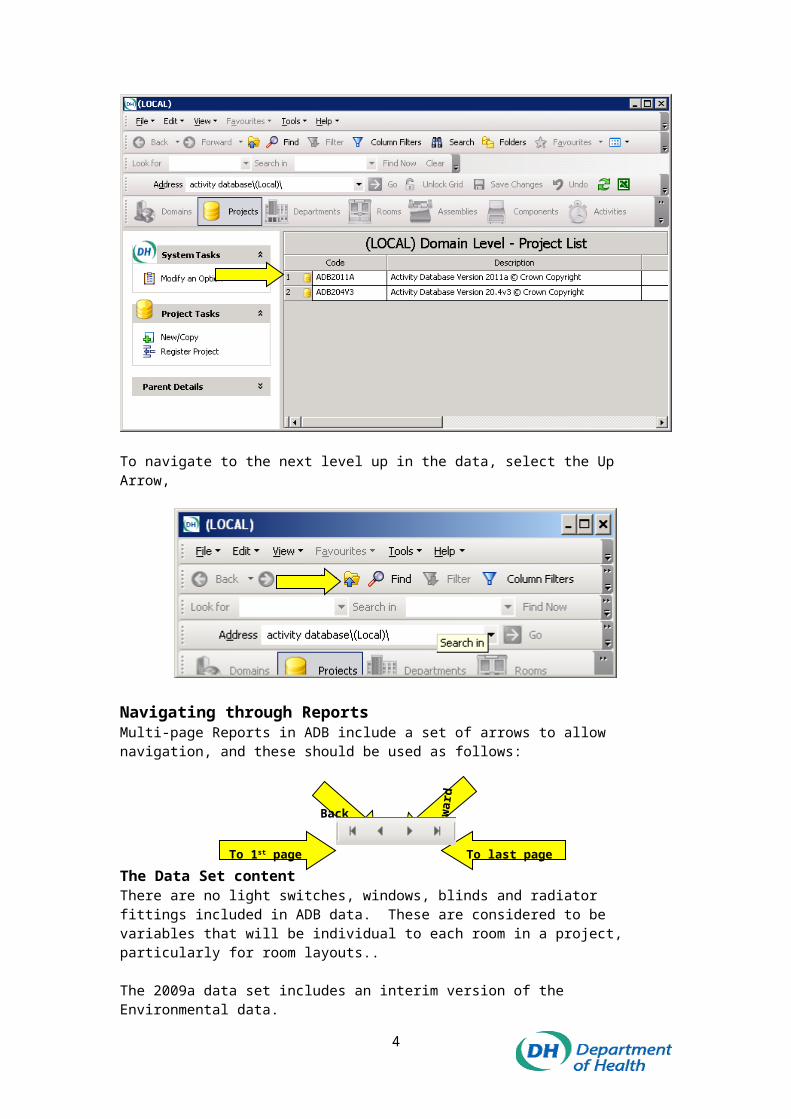
Navigation through the dataThe record selector button will select a complete row in the grid. Clicking in the grid itself will highlight a single cell, which does not select the whole record. To drill down a level in the data, double click on the record selector button.
To navigate to the next level up in the data, select the Up Arrow,
3
To 1st page To last page
Back
Forw
ard
Navigating through ReportsMulti-page Reports in ADB include a set of arrows to allow navigation, and these should be used as follows:
The Data Set contentThere are no light switches, windows, blinds and radiator fittings included in ADB data. These are considered to be variables that will be individual to each room in a project, particularly for room layouts..
The 2009a data set includes an interim version of the Environmental data.
4

2. IntroductionThis tutorial is designed to demonstrate the basic operation of Activity DataBase, and has two parts:
creating a project amending rooms within the project.
Log inRun the ADB Explorer option under the ADB 2011 from the Programs selection of the Start menu. A prompt will appear to enter a user name and password. Enter the user name as manager and the password as adb (the password is case-sensitive) and click the OK button to start Activity DataBase.
Once the program has started, a list of servers is displayed as shown below.
Note the format of the display depends on the Icon Style setting which is set to default to display as a grid. If you wish to change to other settings, select Tools from the top toolbar, then select Folder Options, and then select other settings from the options provided as illustrated below.
5

To see the list of projects for the server, double click anywhere in the grid row.
6

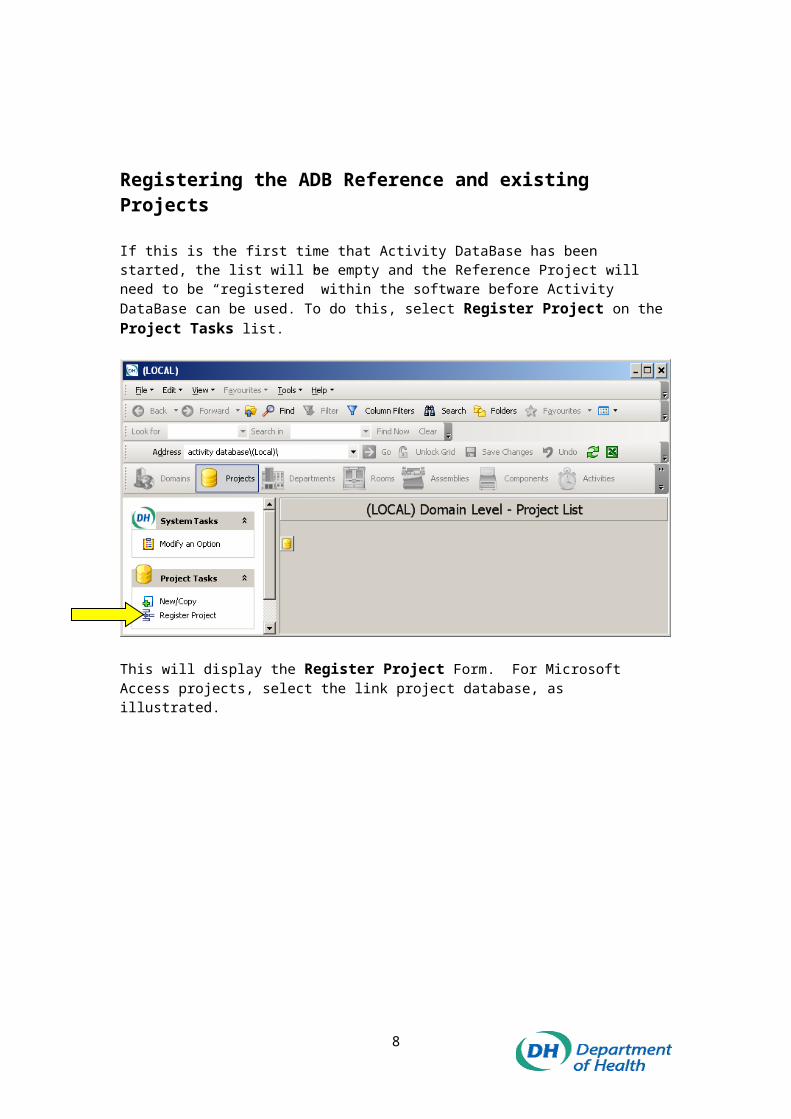
Registering the ADB Reference and existing Projects
If this is the first time that Activity DataBase has been started, the list will be empty and the Reference Project will need to be “registered” within the software before Activity DataBase can be used. To do this, select Register Project on the Project Tasks list.
This will display the Register Project Form. For Microsoft Access projects, select the link project database, as illustrated.
A window of all available projects will be displayed (if you have copied your reference projects to a different location browse to that location instead. Select with a single mouse click the project database file e.g.
7
ADB204V2.mdb file and click on Open, which will display a screen showing the path to the database.
Click on Register. A message indicating that the project has been successfully registered will be displayed.
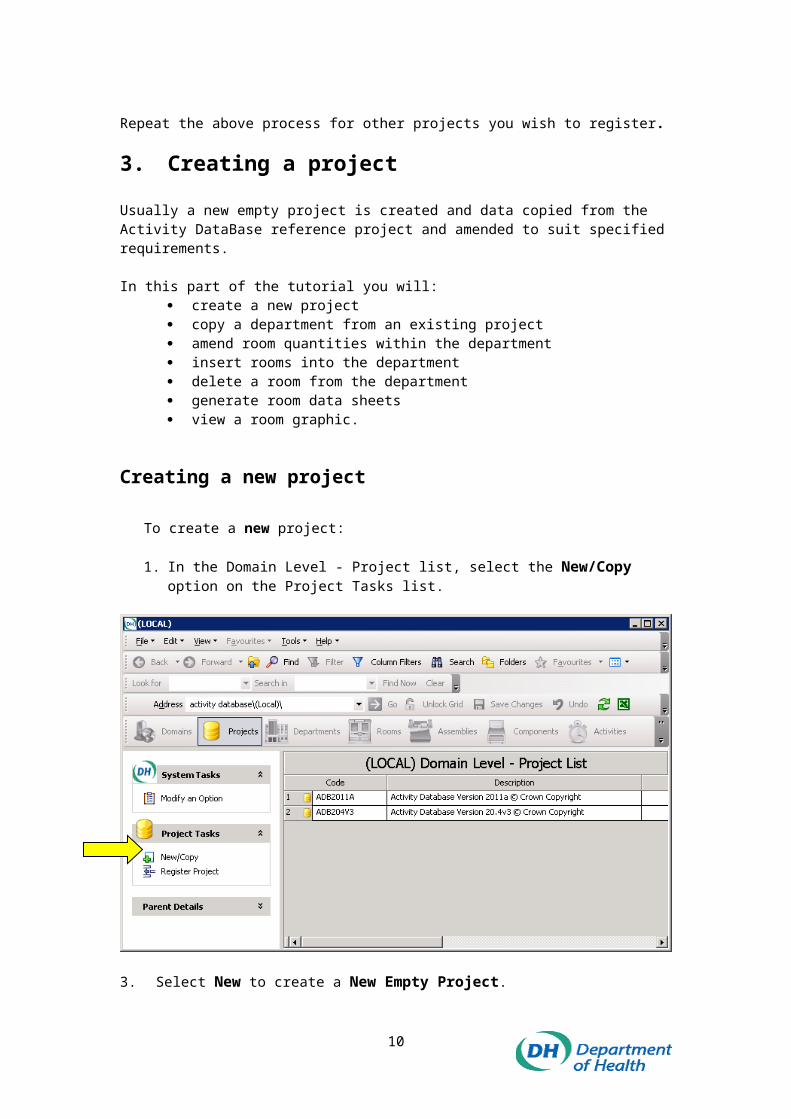
Repeat the above process for other projects you wish to register.
3. Creating a projectUsually a new empty project is created and data copied from the Activity DataBase reference project and amended to suit specified requirements.
In this part of the tutorial you will: create a new project copy a department from an existing project amend room quantities within the department insert rooms into the department delete a room from the department generate room data sheets view a room graphic.
Creating a new project
To create a new project:
1. In the Domain Level - Project list, select the New/Copy option on the Project Tasks list.
8

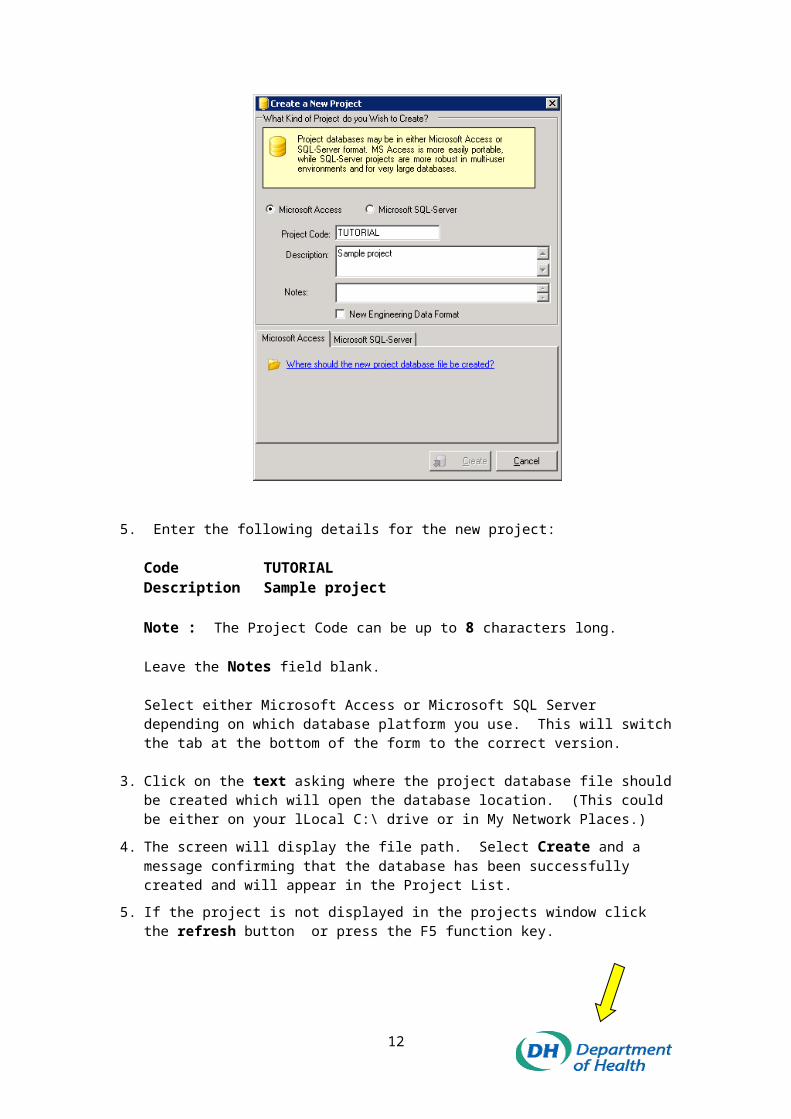
3. Select New to create a New Empty Project.4. Click the Next button. The second window of the wizard will be
displayed.
9
5. Enter the following details for the new project:
Code TUTORIALDescription Sample project
Note : The Project Code can be up to 8 characters long.
Leave the Notes field blank.
10

Select either Microsoft Access or Microsoft SQL Server depending on which database platform you use. This will switch the tab at the bottom of the form to the correct version.
3. Click on the text asking where the project database file should be created which will open the database location. (This could be either on your lLocal C:\ drive or in My Network Places.)
4. The screen will display the file path. Select Create and a message confirming that the database has been successfully created and will appear in the Project List.
5. If the project is not displayed in the projects window click the refresh button or press the F5 function key.
Copying a department
In this operation you will copy two departments (In-Patient and Day Surgery) from the Activity DataBase 2011a Reference project supplied with Activity DataBase into your new TUTORIAL project. As you copy the departments, you will change the code and description of one.
1. To open the TUTORIAL project, double click the grid row from the Project list which will open the empty project.
11
2. Select Insert (Search) from the Department Tasks.3. The Multiple Insert – Departments list screen will be displayed. This will
be blank until a Project is selected. Select a reference project containing departments. Default is the current project
4. Using the scroll bar in the left hand (Source) list find and highlight the 04-01 entry line, clicking the Record Selector.
4. Click the Move button
5. The department will be copied into the Right hand (Target) list area.
12

6. In the Target List area, change the entry in the Rename to field to INP01, and change the Description to IN-PATIENTS
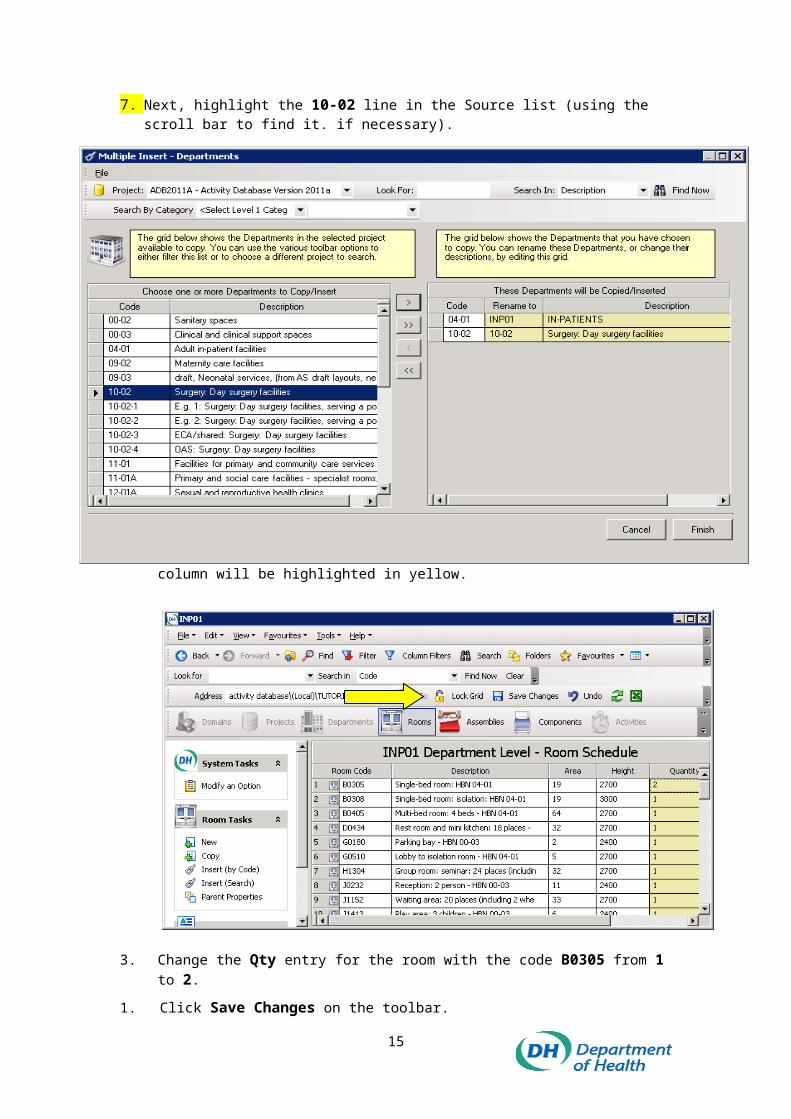
7. Next, highlight the 10-02 line in the Source list (using the scroll bar to find it. if necessary).
8. Click the button. The Day Surgery department will be copied into the Target List area.
9. Click the Finish button. The two departments (one with its amended code and description) will be copied into the TUTORIAL project.
Amending room quantitiesIn this operation you will change the quantity of the B0305 room type within one of the departments you copied into the project:
1. In the Department list for the TUTORIAL project, double-click on the Record Selector to highlight the INP01 department. This will open the department and display the list of rooms within it.
2. Ensure that the Lock Grid button on the toolbar (marked with a padlock) on the toolbar is off (not selected). The Quantity column will be highlighted in yellow.
13

3. Change the Qty entry for the room with the code B0305 from 1 to 2.1. Click Save Changes on the toolbar. 2. Click the Lock Grid button to remove the yellow from the Quantity
column.
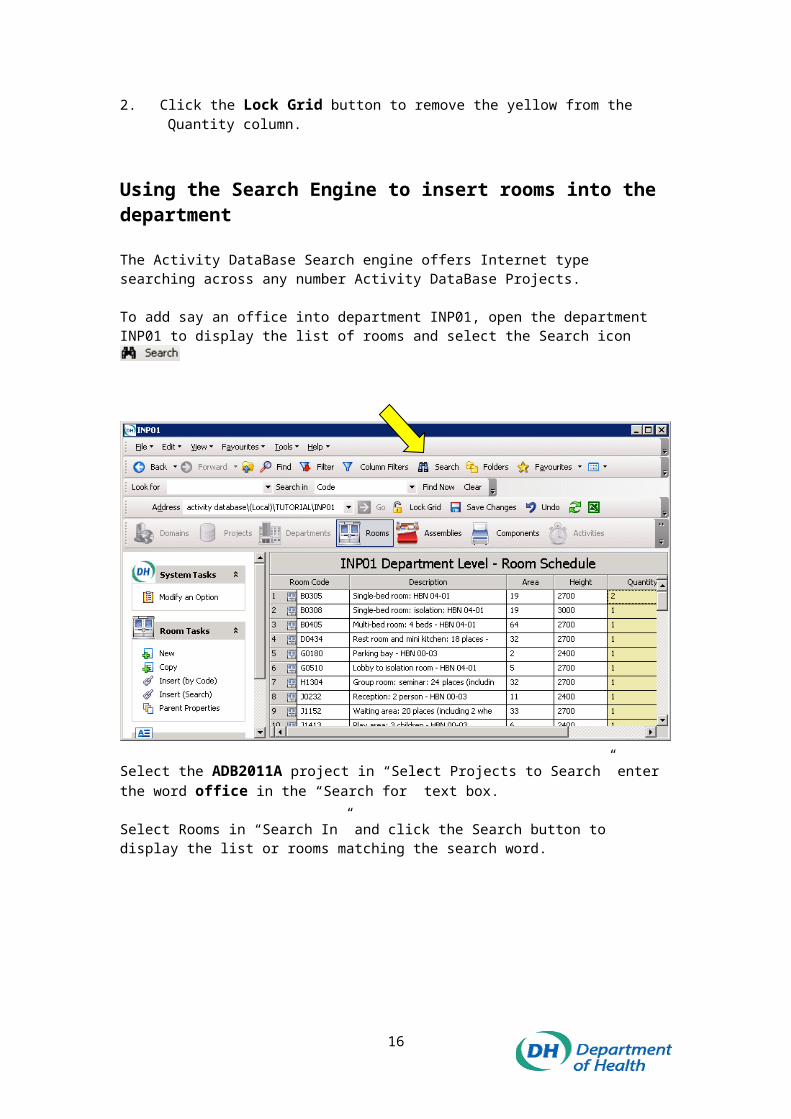
Using the Search Engine to insert rooms into the department
The Activity DataBase Search engine offers Internet type searching across any number Activity DataBase Projects.
To add say an office into department INP01, open the department INP01 to display the list of rooms and select the Search icon
14
Select the ADB2011A project in “Select Projects to Search” enter the word office in the “Search for” text box.
Select Rooms in “Search In” and click the Search button to display the list or rooms matching the search word.
15
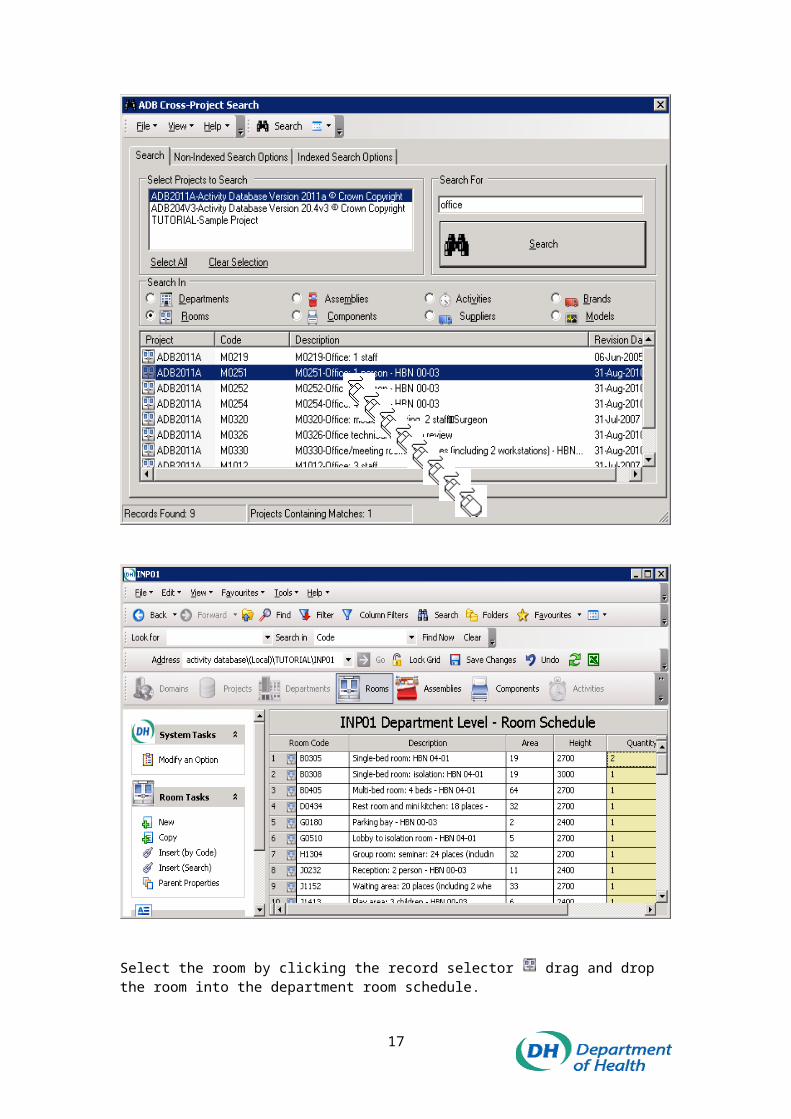
Select the room by clicking the record selector drag and drop the room into the department room schedule.
Additional search tools
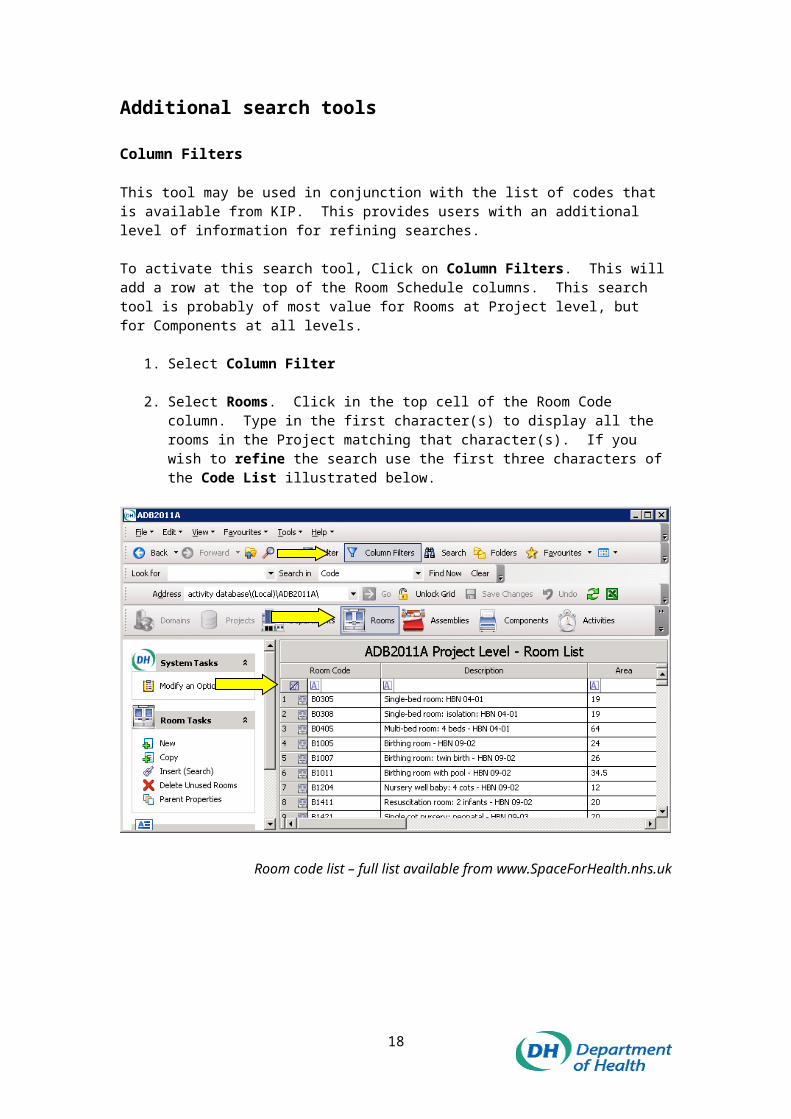
Column Filters
This tool may be used in conjunction with the list of codes that is available from KIP. This provides users with an additional level of information for refining searches.
To activate this search tool, Click on Column Filters. This will add a row at the top of the Room Schedule columns. This search tool is probably of most value for Rooms at Project level, but for Components at all levels.
1. Select Column Filter
2. Select Rooms. Click in the top cell of the Room Code column. Type in the first character(s) to display all the rooms in the Project matching that character(s). If you wish to refine the search use the first three characters of the Code List illustrated below.
16
Room code list – full list available from www.SpaceForHealth.nhs.uk
17
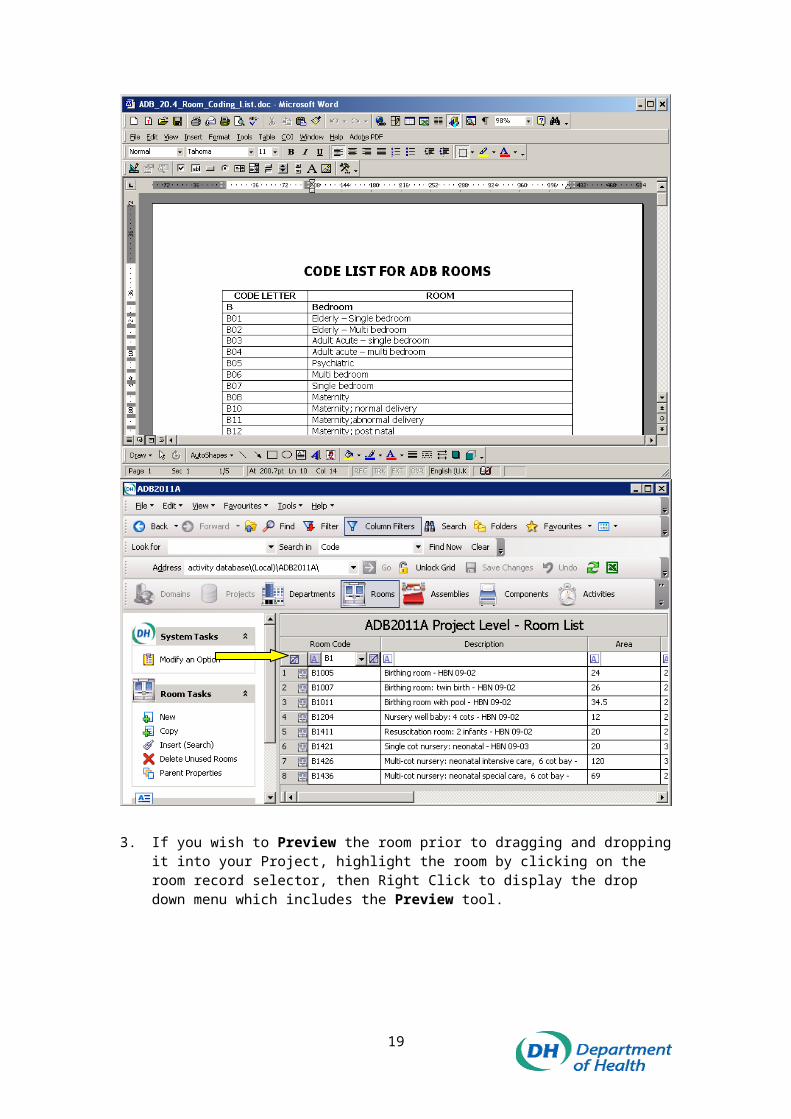
3. If you wish to Preview the room prior to dragging and dropping it into your Project, highlight the room by clicking on the room record selector, then Right Click to display the drop down menu which includes the Preview tool.
18
Similarly the Search will work in the Description, Area, and all columns. It also provides an effective way of searching for rooms with blank fields by using the drop down arrow at the right side of the column, and selecting Blanks.
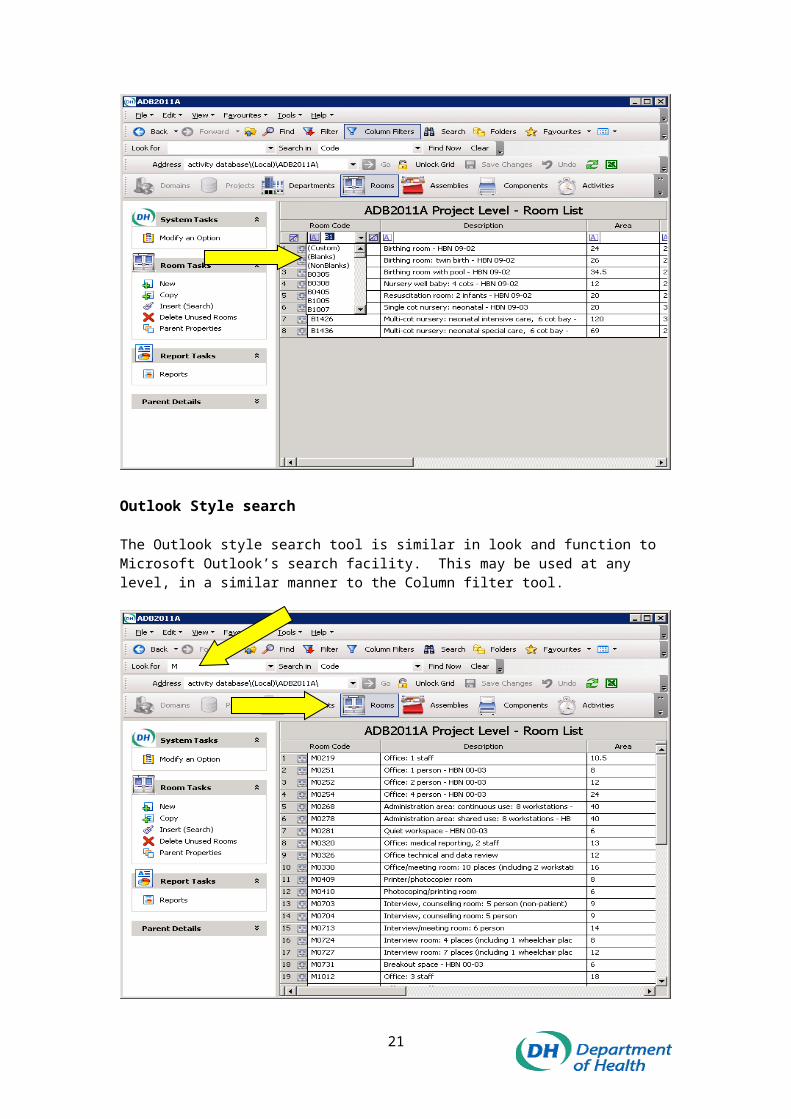
Outlook Style search
The Outlook style search tool is similar in look and function to Microsoft Outlook’s search facility. This may be used at any level, in a similar manner to the Column filter tool.
19

1. Enter the search letter or text and using the drop down box to select the option to Search In for a Code or Description.
2. Using the toolbar to select the category of data you wish to search for, click on Departments, Rooms, Assemblies or Components etc.
3. Once the search results have been displayed the data can be dragged and dropped into the required project in the usual way.
4. To close the search, click on Clear
Quick Filter, Quick Search, Sticky Filter, Sticky Search
Highlight a Department, and Select Properties under the Departmental Tasks. A right click on any property page field label will display the Quick and Sticky filter menu.
1. Quick search allows a string to be specified.
2. Sticky filters and searches apply filters and searches to lists which are already filtered.
20
Click on Class and select Quick Filter and this will filter all records in the grid with the specified class.
Deleting a room from the department
In this procedure you will delete a room (G0180, a public telephone) from department INP01.
1. In the room list for department INP01, scroll down to find room G0180.
21

2. Ensure that the Lock Grid button on the toolbar is off (not selected).3. In the room list, highlight the G0180 entry line with a single click on the
Record Selector . 4. Click the Remove button in the room tasks list. You will be asked to
confirm the decision.5. Click the Yes button. The room will be deleted and the Quantity
column will turn yellow.6. If you click Lock Grid you will be prompted to Save Changes.
7. Alternatively Click Save Changes on the toolbar.
Note : Until Save Changes has been confirmed you can undo Quantity changes and Deleted by selecting Undo.
22

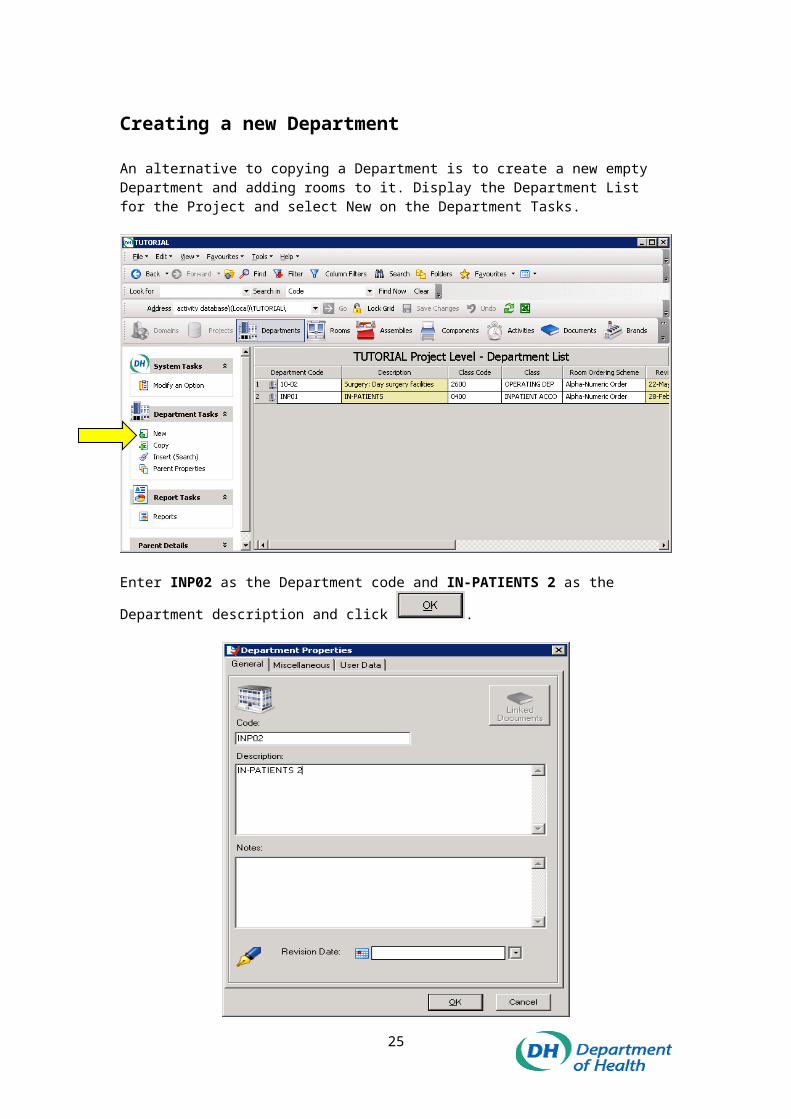
Creating a new Department
An alternative to copying a Department is to create a new empty Department and adding rooms to it. Display the Department List for the Project and select New on the Department Tasks.
Enter INP02 as the Department code and IN-PATIENTS 2 as the Department
description and click .
23
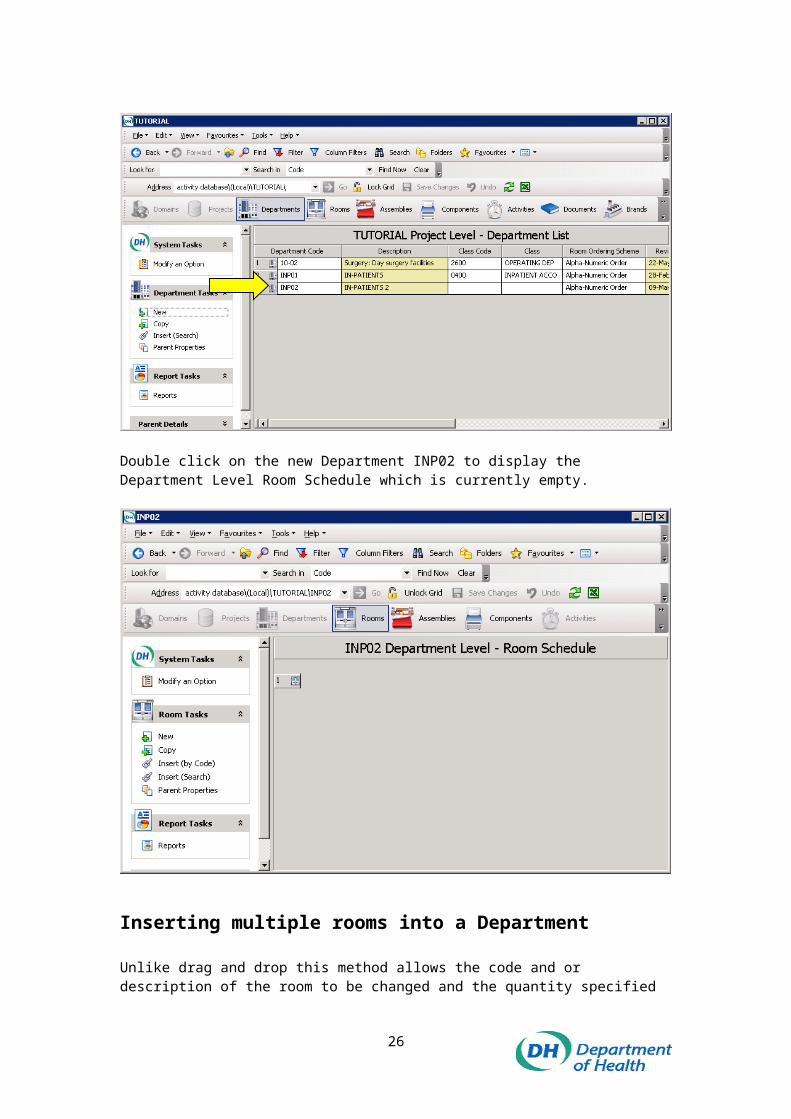
Double click on the new Department INP02 to display the Department Level Room Schedule which is currently empty.
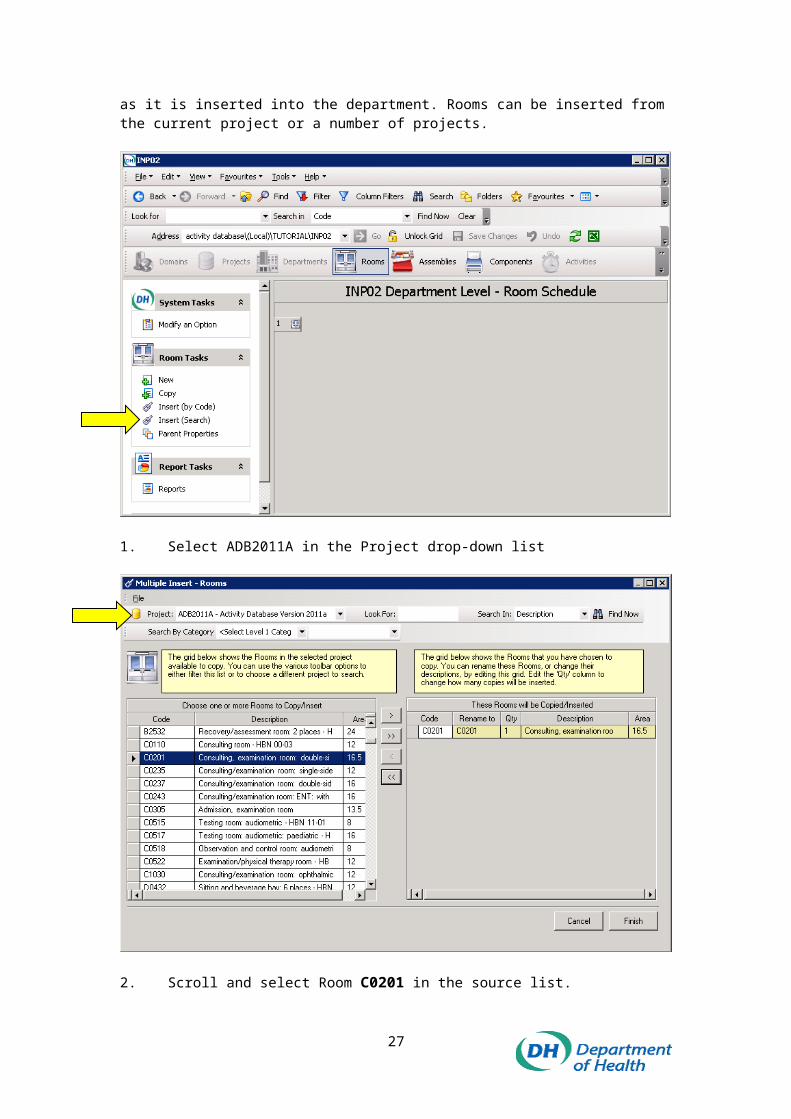
Inserting multiple rooms into a Department
Unlike drag and drop this method allows the code and or description of the room to be changed and the quantity specified as it is inserted into the department. Rooms can be inserted from the current project or a number of projects.
24
1. Select ADB2011A in the Project drop-down list
2. Scroll and select Room C0201 in the source list.
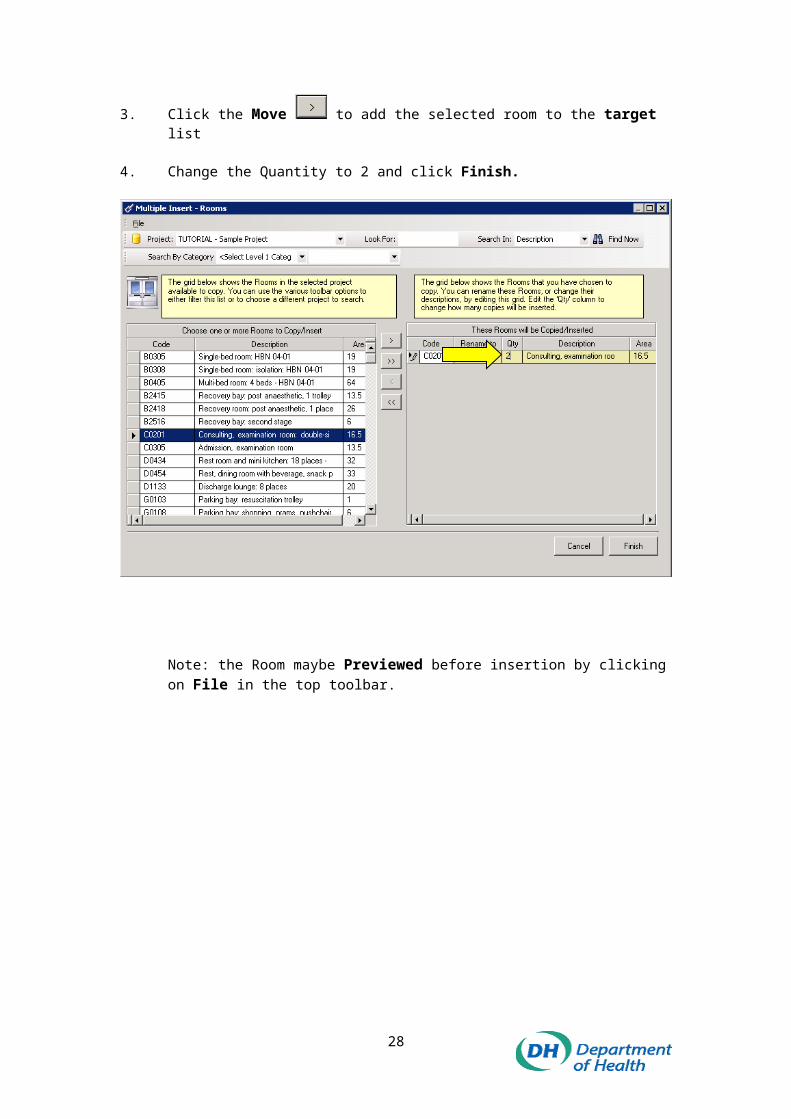
3. Click the Move to add the selected room to the target list
4. Change the Quantity to 2 and click Finish.
25
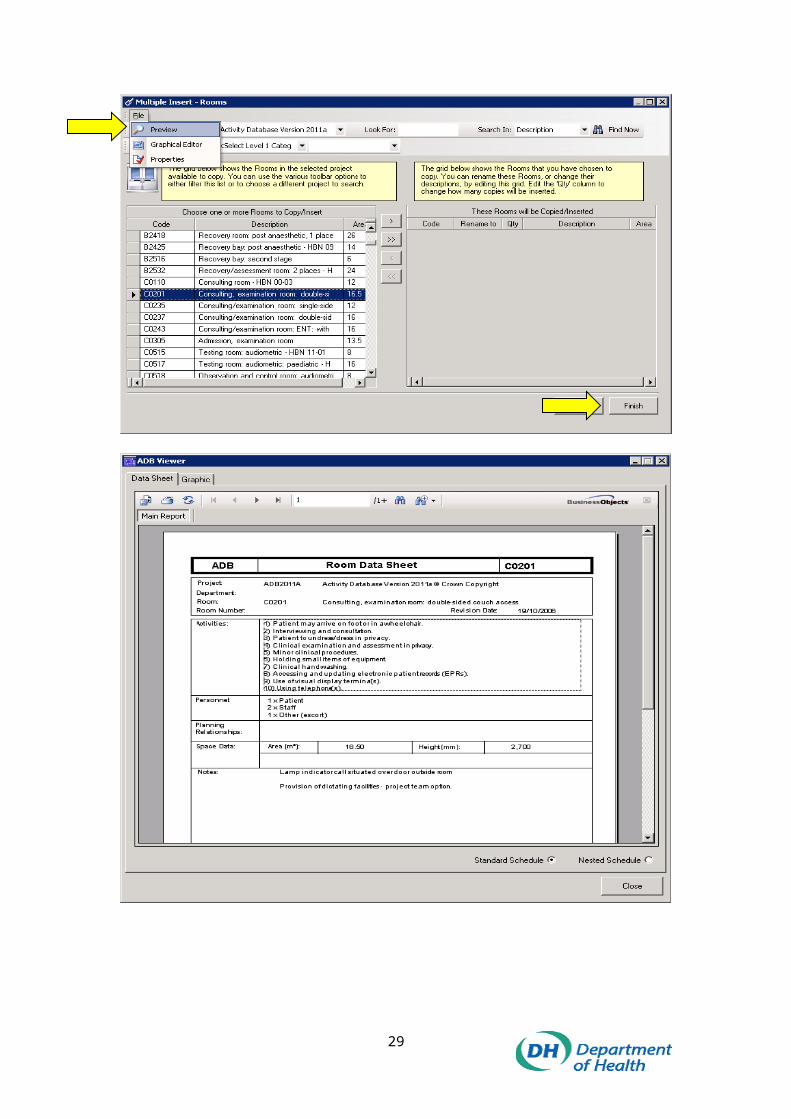
Note: the Room maybe Previewed before insertion by clicking on File in the top toolbar.
26
27
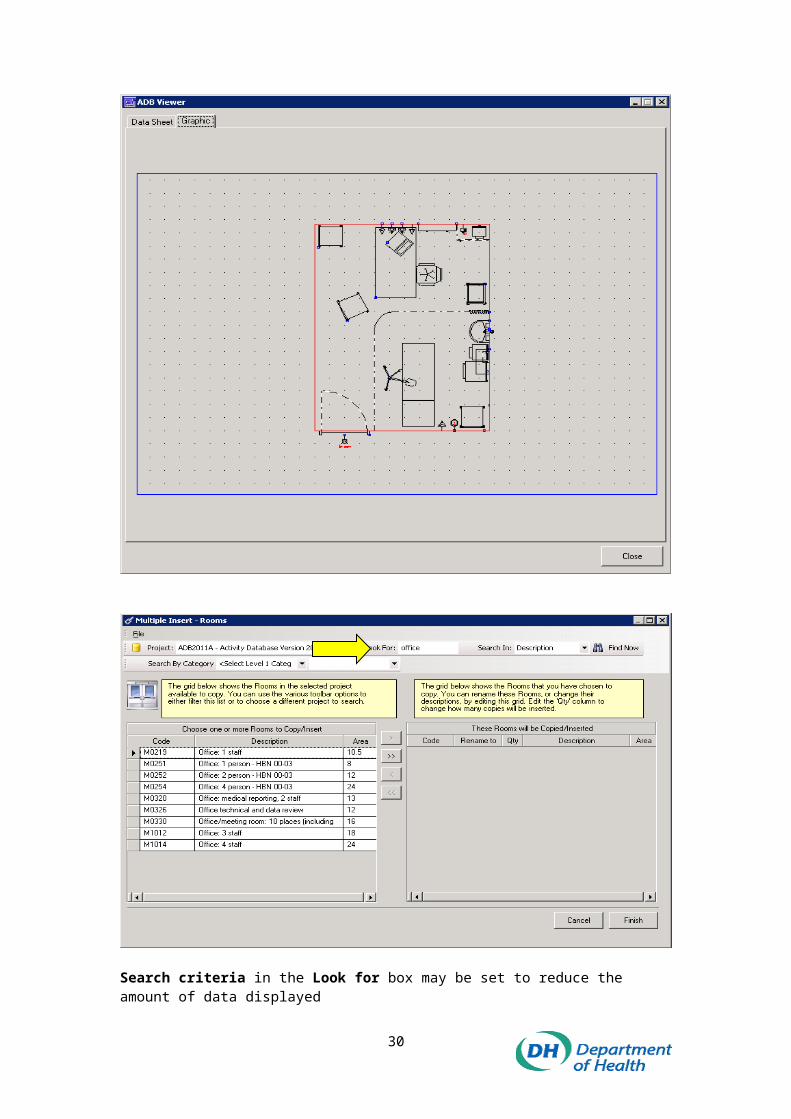
Search criteria in the Look for box may be set to reduce the amount of data displayed
28
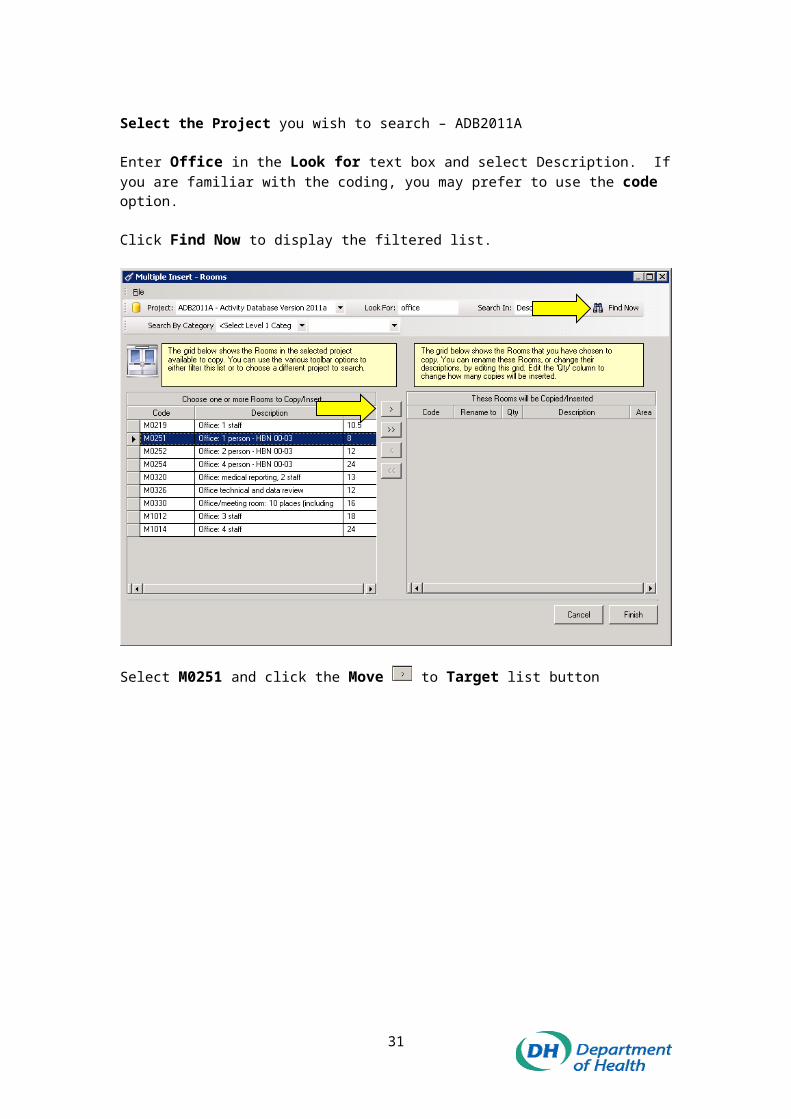
Select the Project you wish to search – ADB2011A
Enter Office in the Look for text box and select Description. If you are familiar with the coding, you may prefer to use the code option.
Click Find Now to display the filtered list.
Select M0251 and click the Move to Target list button
29
Modify the code to M0251A in the Rename to column.
Click the Finish button to copy the rooms into the department
Use a similar procedure to add two Rooms with code B0308 to the Department.
Note: Activity DataBase never overwrites. If a room already exists in the target project with the same code as the one you are copying the definition of the room will be taken as that in the target list.
Inserting a room with a known code into a department
In this procedure you will copy a room (V1635 Shower room: assisted) into the INP02 department from within the TUTORIAL PROJECT: (Note the room must exist in the current project)
1. Ensure that the Rooms button on the toolbar is selected, showing the rooms in the INP01 department.
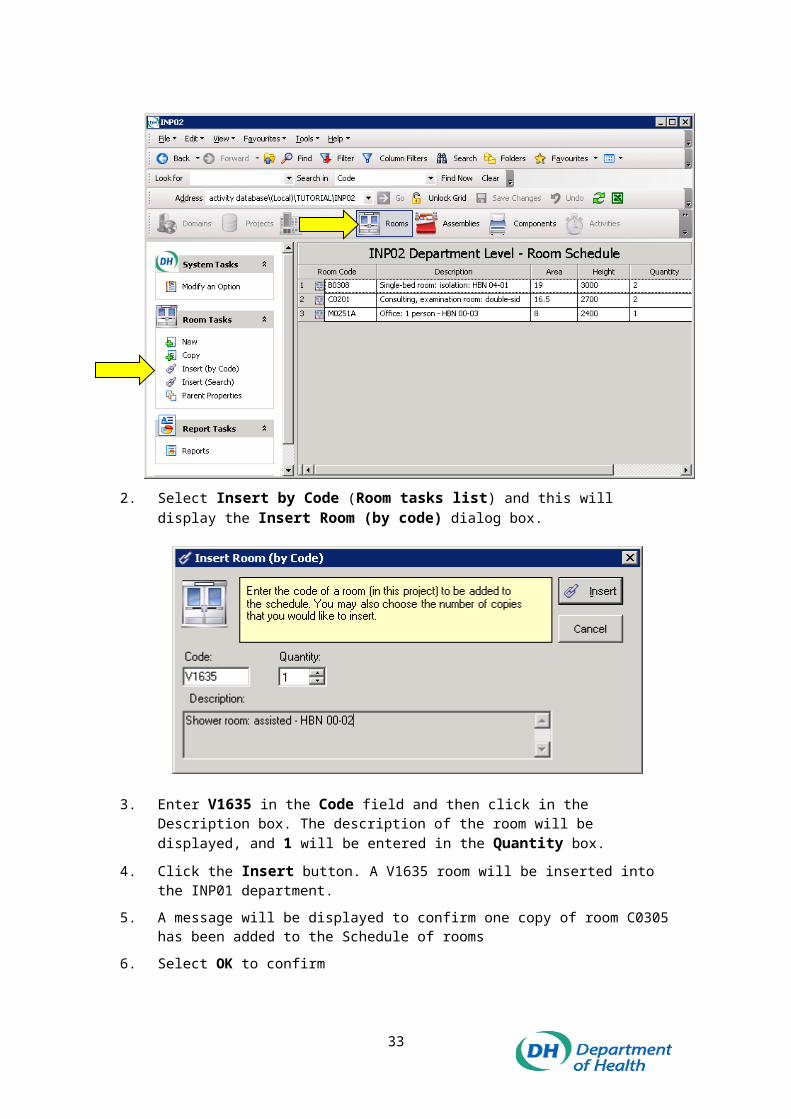
2. Select Insert by Code (Room tasks list) and this will display the Insert Room (by code) dialog box.
30
3. Enter V1635 in the Code field and then click in the Description box. The description of the room will be displayed, and 1 will be entered in the Quantity box.
4. Click the Insert button. A V1635 room will be inserted into the INP01 department.
5. A message will be displayed to confirm one copy of room C0305 has been added to the Schedule of rooms
6. Select OK to confirm
Setting a room number
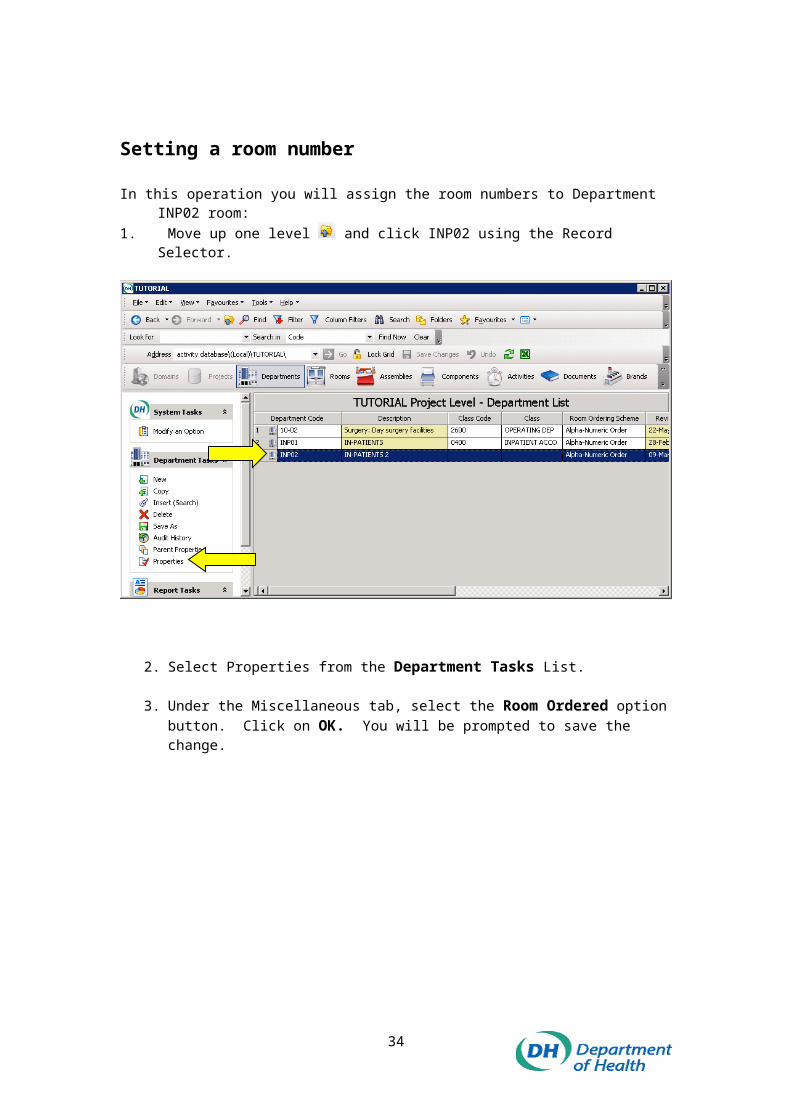
In this operation you will assign the room numbers to Department INP02 room:
1. Move up one level and click INP02 using the Record Selector.
31

2. Select Properties from the Department Tasks List.
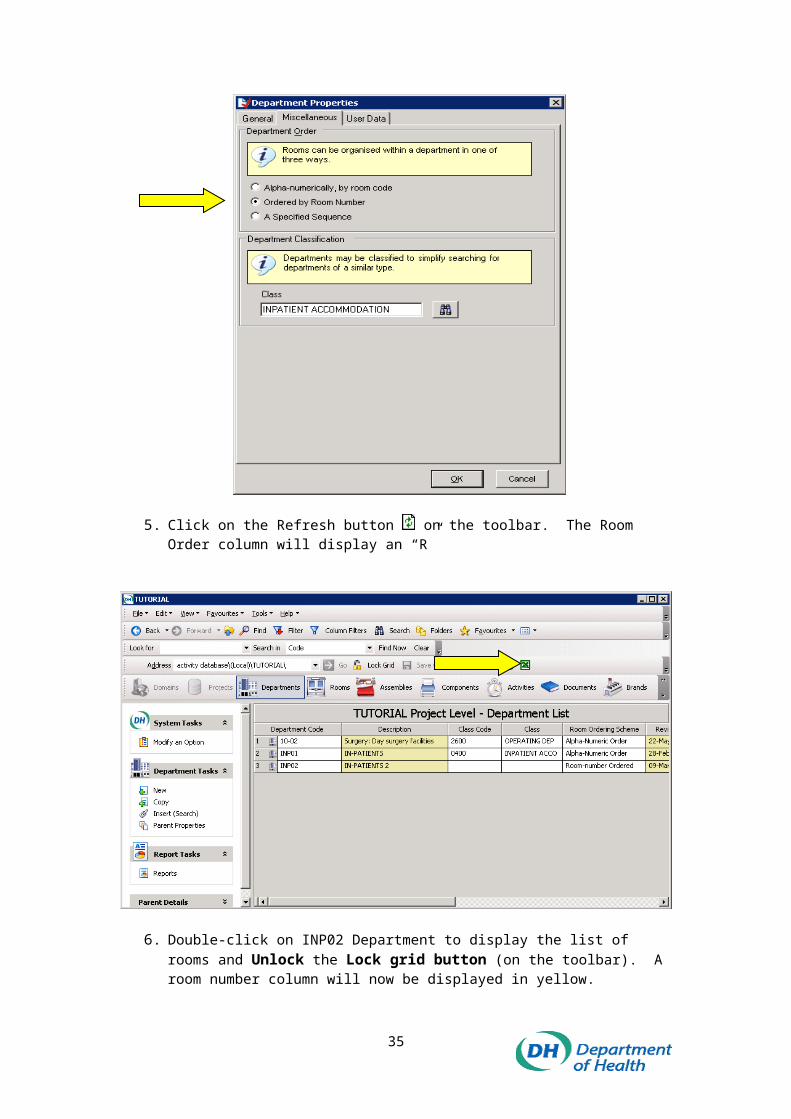
3. Under the Miscellaneous tab, select the Room Ordered option button. Click on OK. You will be prompted to save the change.
5. Click on the Refresh button on the toolbar. The Room Order column will display an “R”
32
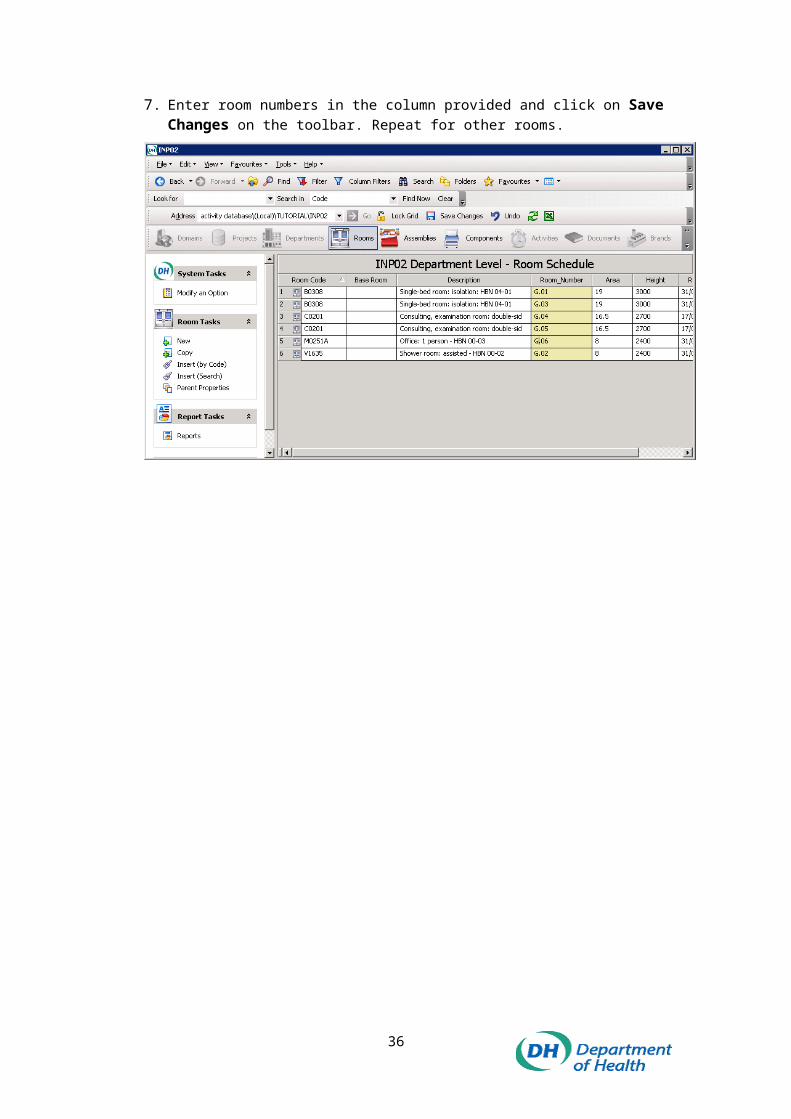
6. Double-click on INP02 Department to display the list of rooms and Unlock the Lock grid button (on the toolbar). A room number column will now be displayed in yellow.
7. Enter room numbers in the column provided and click on Save Changes on the toolbar. Repeat for other rooms.
33
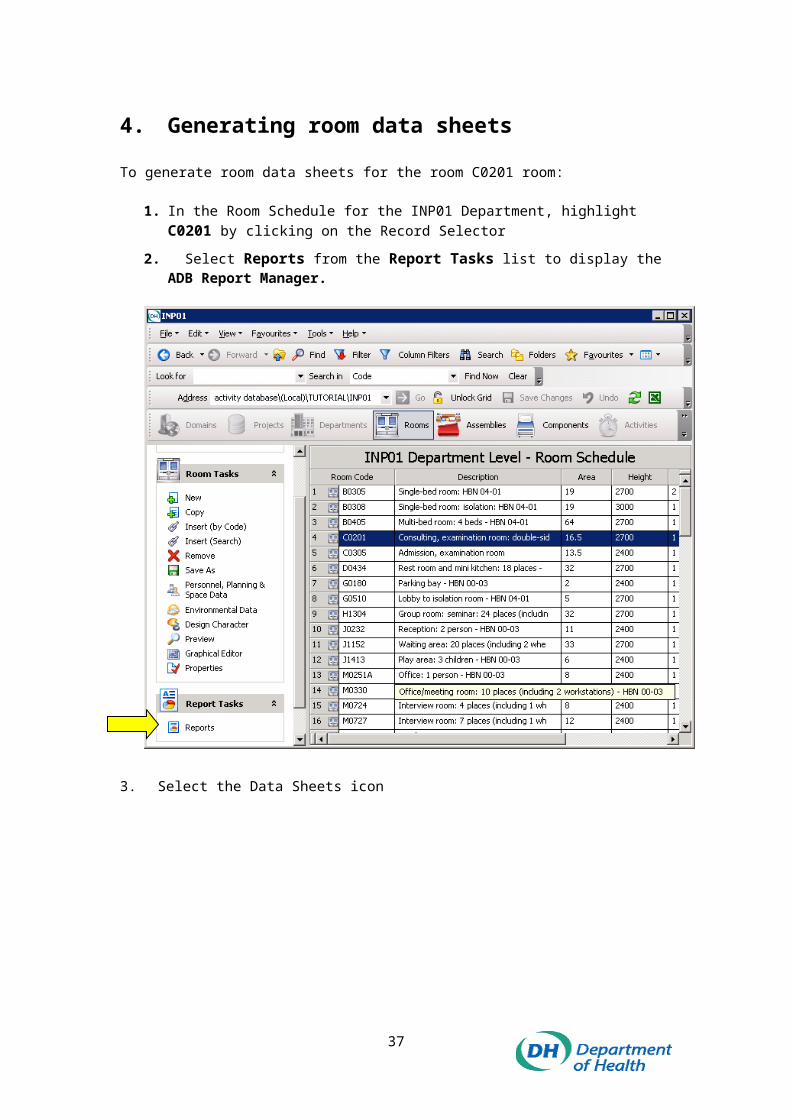
4. Generating room data sheetsTo generate room data sheets for the room C0201 room:
1. In the Room Schedule for the INP01 Department, highlight C0201 by clicking on the Record Selector
2. Select Reports from the Report Tasks list to display the ADB Report Manager.
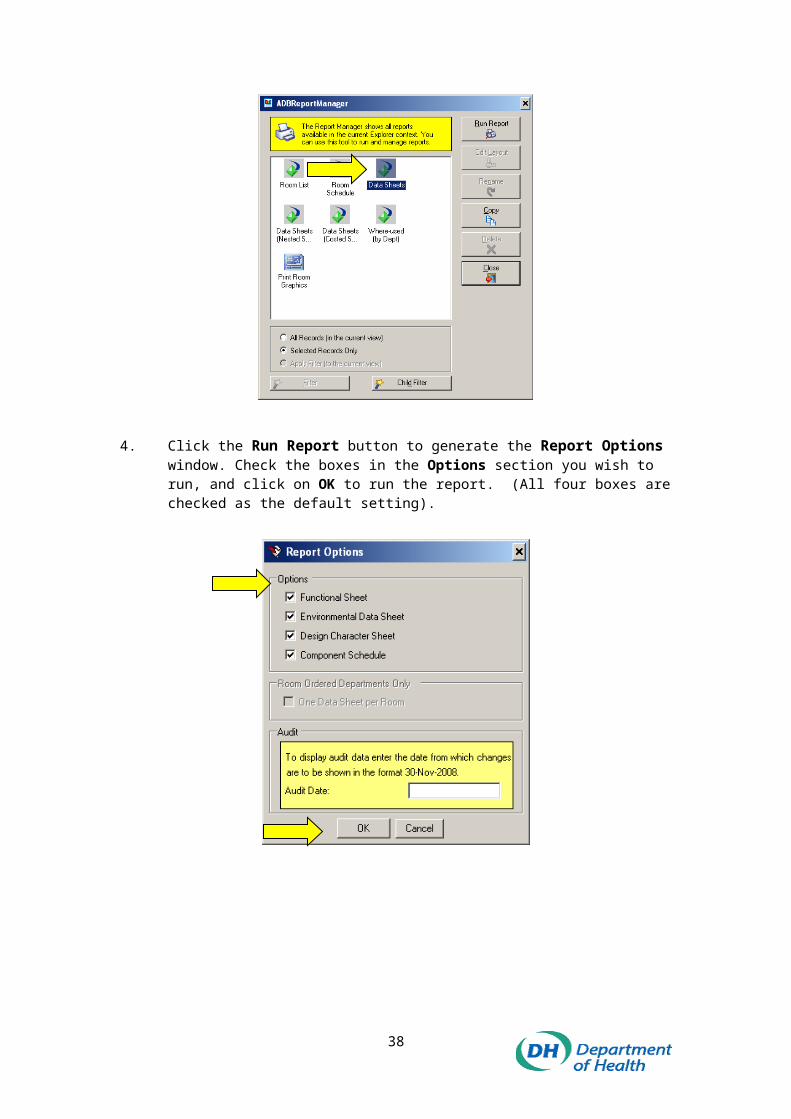
3. Select the Data Sheets icon
34
4. Click the Run Report button to generate the Report Options window. Check the boxes in the Options section you wish to run, and click on OK to run the report. (All four boxes are checked as the default setting).
35
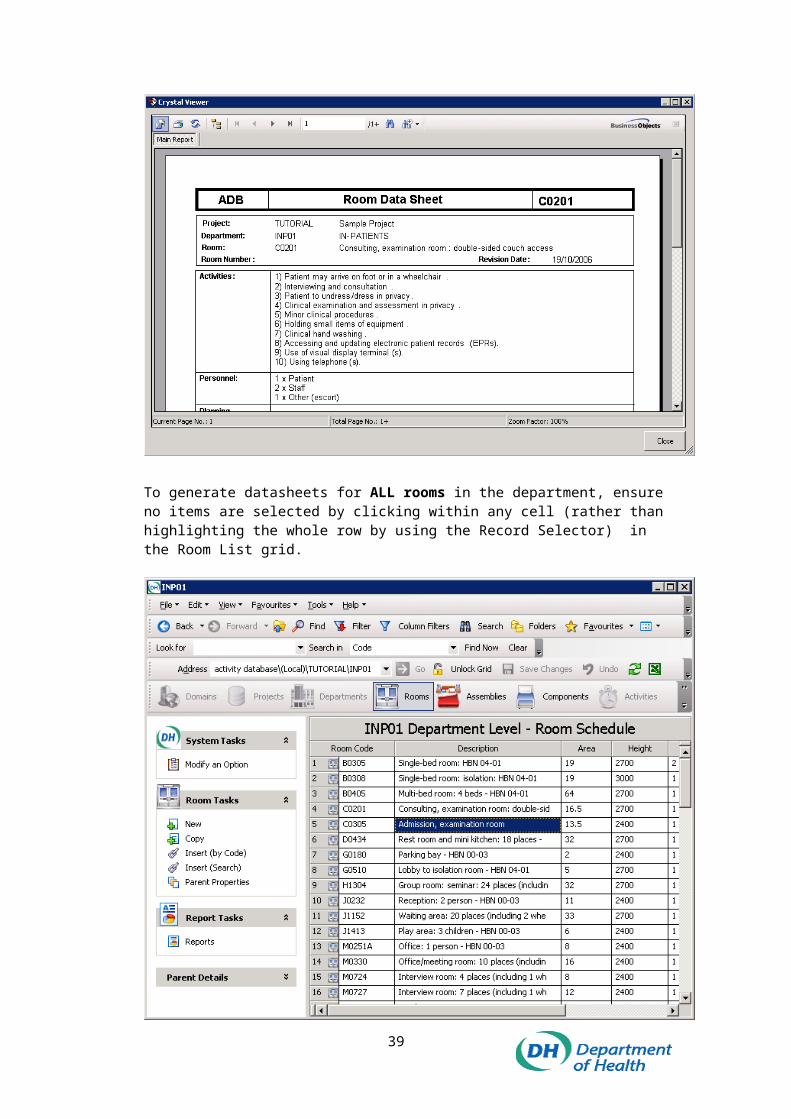
To generate datasheets for ALL rooms in the department, ensure no items are selected by clicking within any cell (rather than highlighting the whole row by using the Record Selector) in the Room List grid.
36
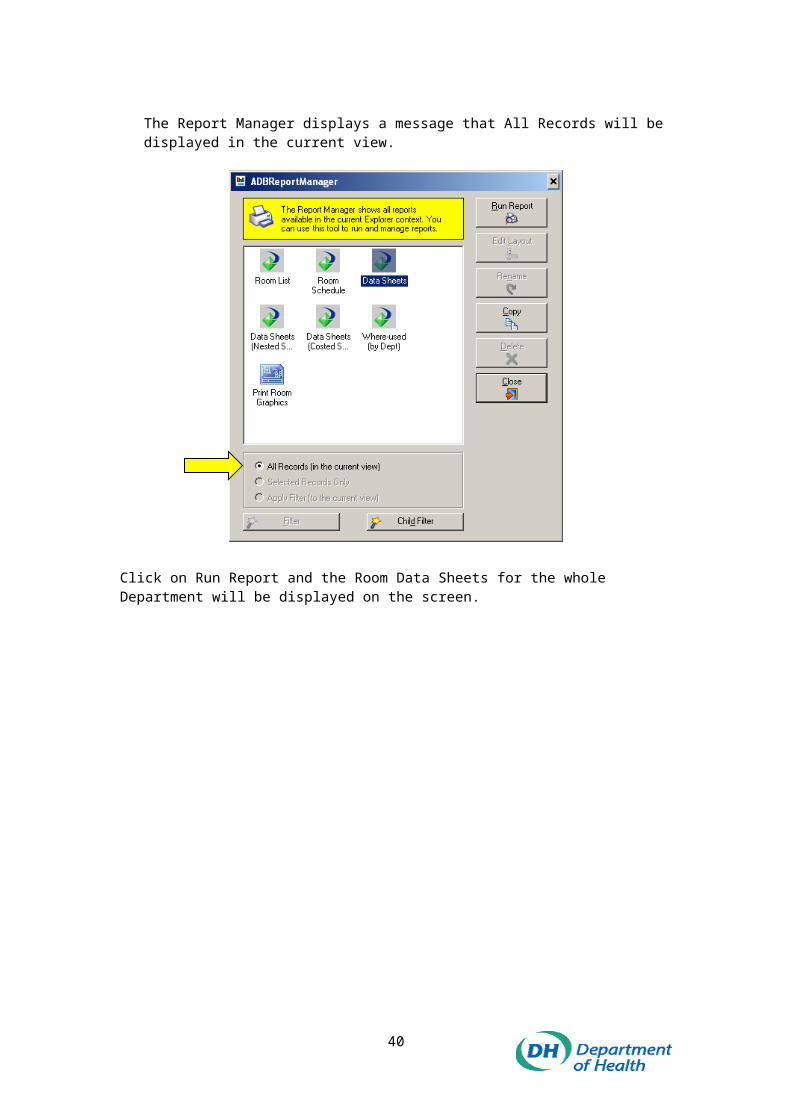
The Report Manager displays a message that All Records will be displayed in the current view.
Click on Run Report and the Room Data Sheets for the whole Department will be displayed on the screen.
37
Viewing a room graphic
In this procedure you will open the C0201 room in graphics mode, showing its assemblies and components:
1. Click the Graphical Editor button in the Room Tasks list
2. Close the Graphical Editor window by clicking on the .
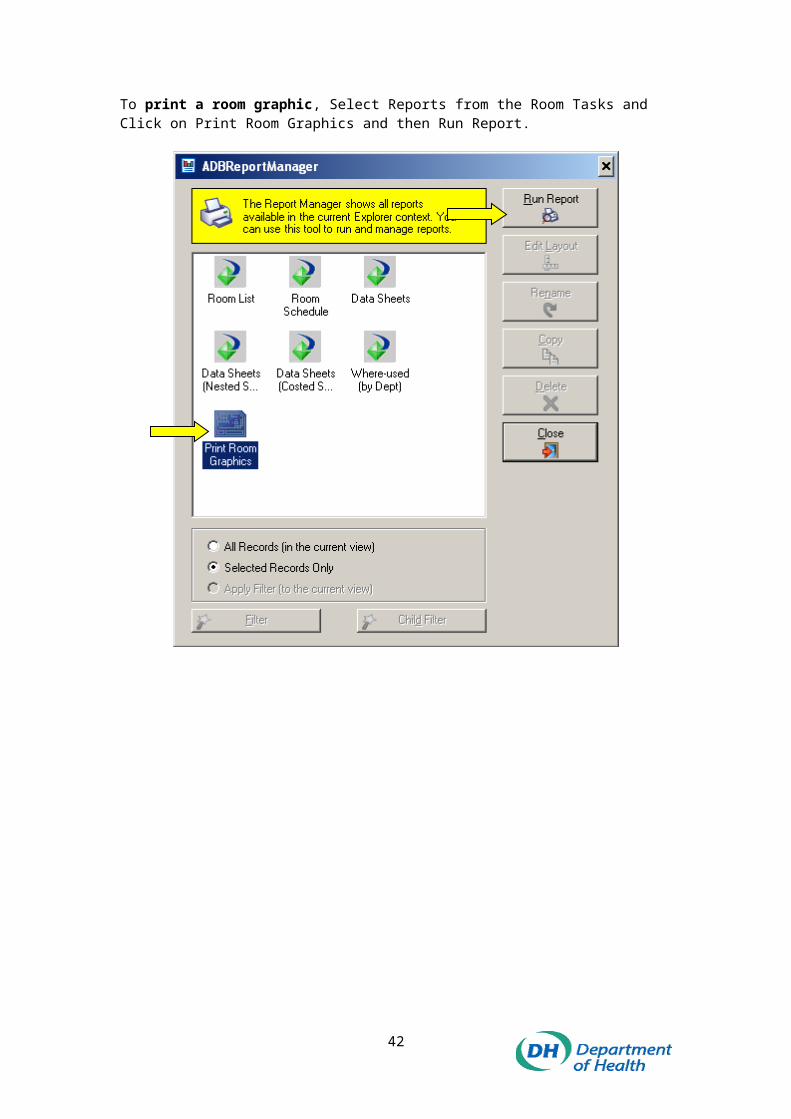
To print a room graphic, Select Reports from the Room Tasks and Click on Print Room Graphics and then Run Report.
38
39
Amending rooms within the project
In this part of the tutorial you will: change the quantities of equipment in a room delete equipment from a room add new equipment to a room add room numbers to a department.
Changing equipment quantities
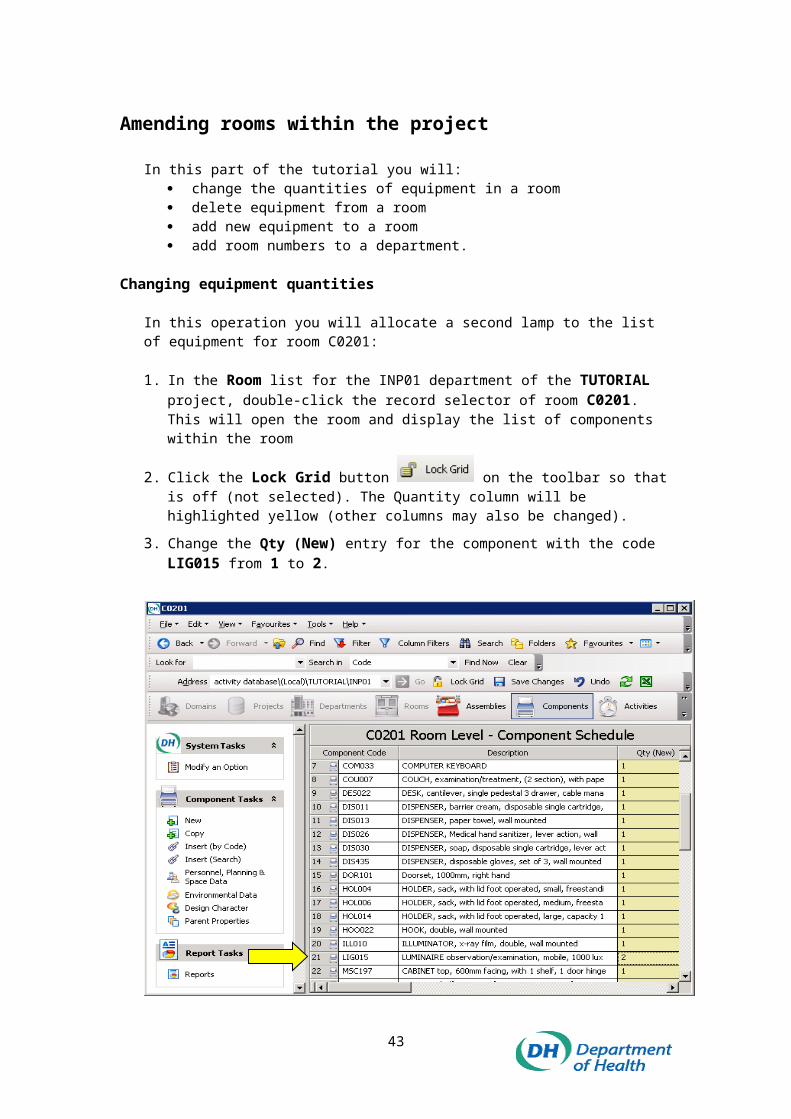
In this operation you will allocate a second lamp to the list of equipment for room C0201:
1. In the Room list for the INP01 department of the TUTORIAL project, double-click the record selector of room C0201. This will open the room and display the list of components within the room
2. Click the Lock Grid button on the toolbar so that is off (not selected). The Quantity column will be highlighted yellow (other columns may also be changed).
3. Change the Qty (New) entry for the component with the code LIG015 from 1 to 2.
4. Click Save Changes on the toolbar.
Deleting equipment from a room
40

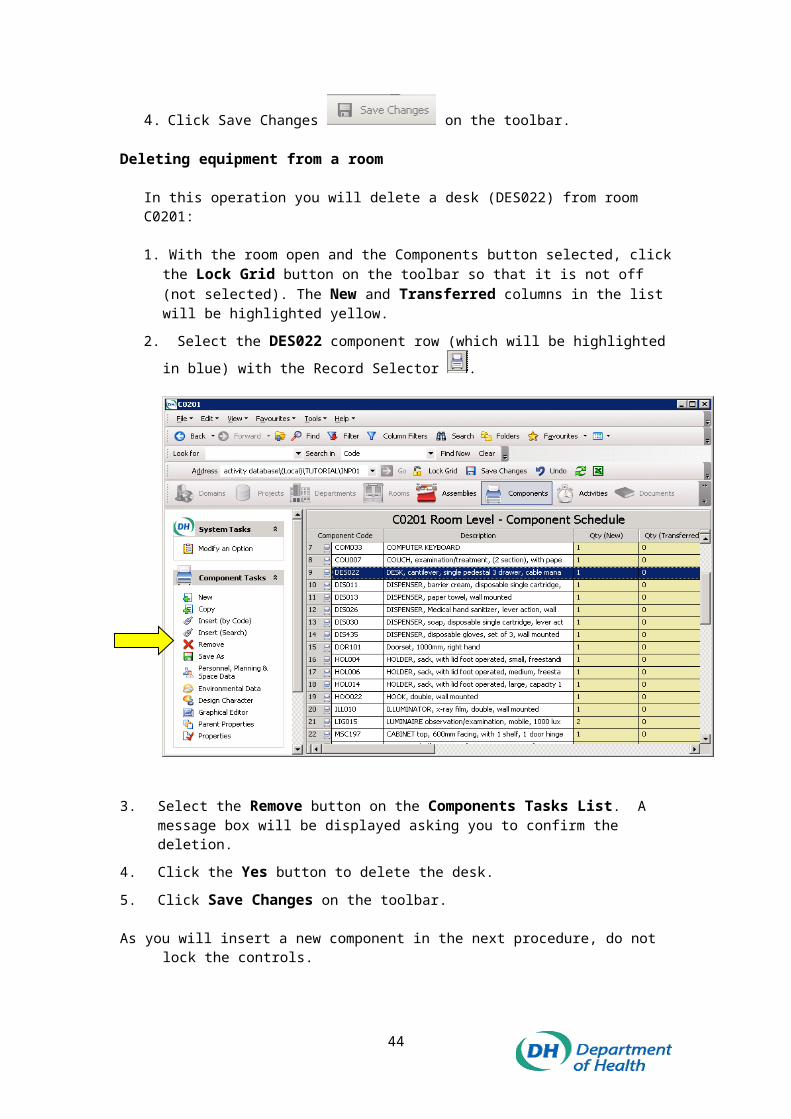
In this operation you will delete a desk (DES022) from room C0201:
1. With the room open and the Components button selected, click the Lock Grid button on the toolbar so that it is not off (not selected). The New and Transferred columns in the list will be highlighted yellow.
2. Select the DES022 component row (which will be highlighted in blue) with the Record Selector .
3. Select the Remove button on the Components Tasks List. A message box will be displayed asking you to confirm the deletion.
4. Click the Yes button to delete the desk. 5. Click Save Changes on the toolbar.
As you will insert a new component in the next procedure, do not lock the controls.
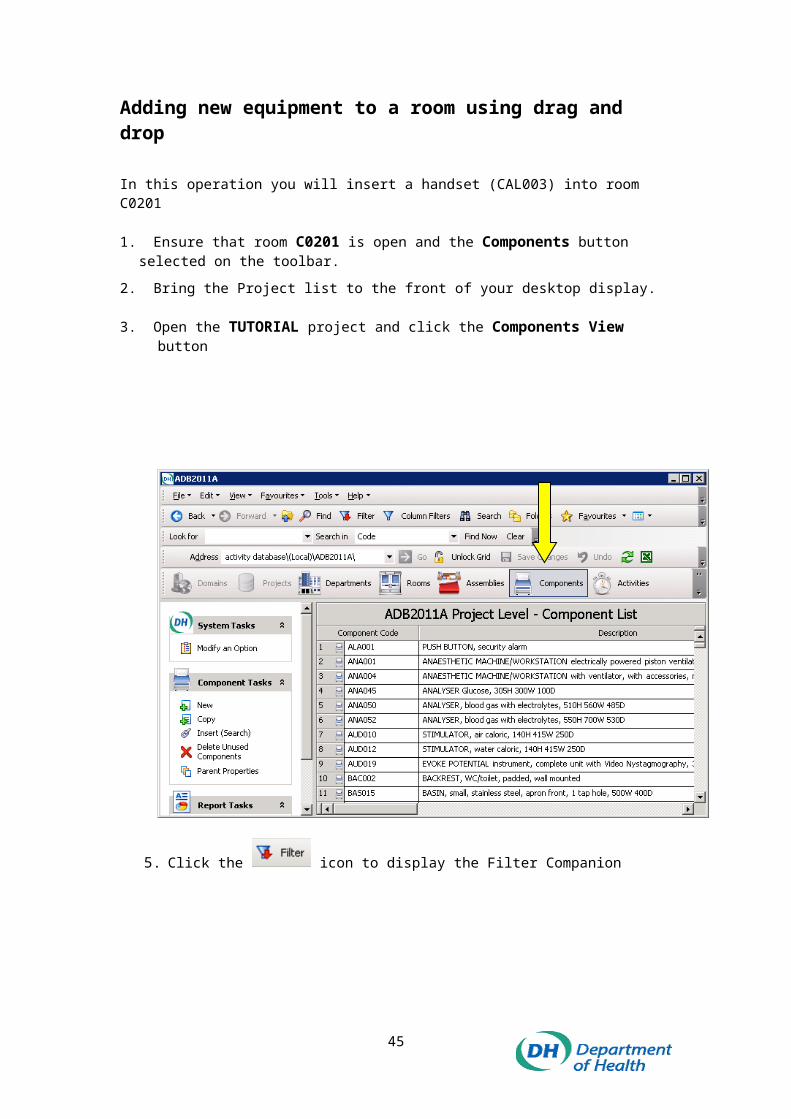
Adding new equipment to a room using drag and drop
In this operation you will insert a handset (CAL003) into room C0201
1. Ensure that room C0201 is open and the Components button selected on the toolbar.
2. Bring the Project list to the front of your desktop display.
3. Open the TUTORIAL project and click the Components View button
41
5. Click the icon to display the Filter Companion
42
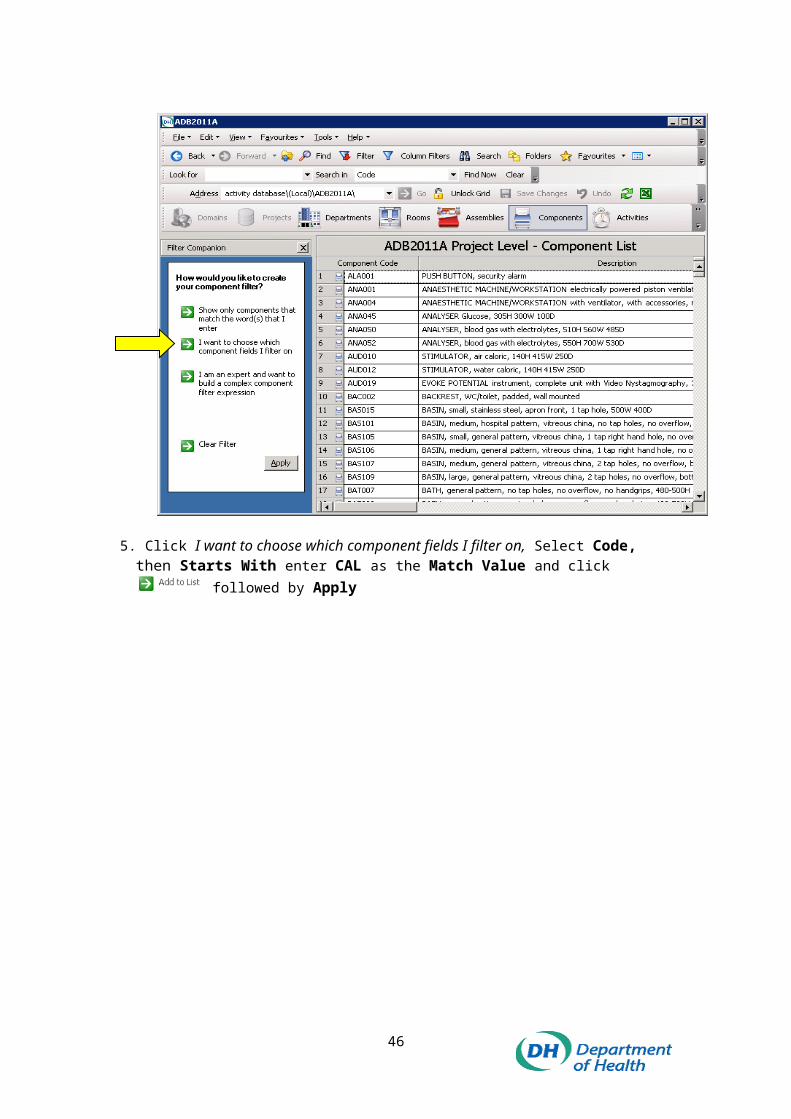
5. Click I want to choose which component fields I filter on, Select Code, then Starts With enter CAL as the Match Value and click followed by Apply
43
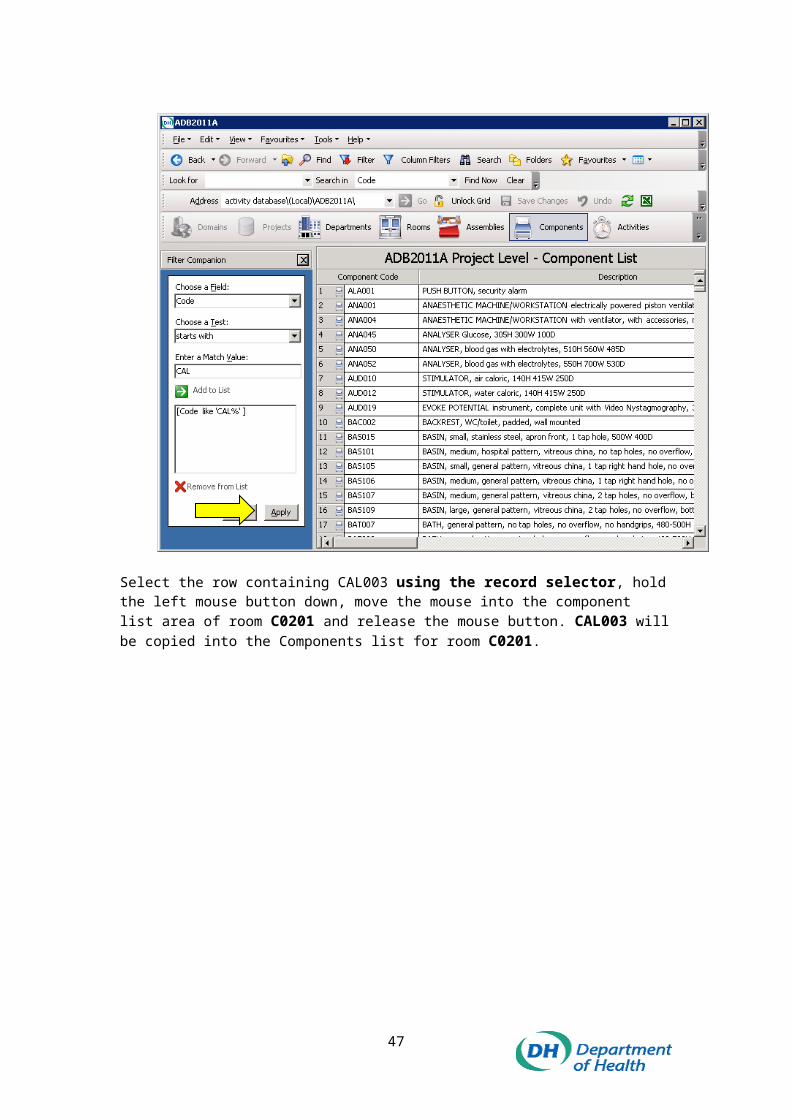
Select the row containing CAL003 using the record selector, hold the left mouse button down, move the mouse into the component list area of room C0201 and release the mouse button. CAL003 will be copied into the Components list for room C0201.
44
Note: The same drag and drop procedure may be used for any entity e.g. activities into rooms. It may also be used in association with the data displayed using the Column Filter, and the Outlook Style search tools.
Creating a new component
In this procedure you will create a stool (code STL901) that will be placed in room C0201 for use when interviewing patients. You will also assign Properties to the Stool including Class, Group, dimensions, costing and any other details you may wish to include.
1. Click New in the Components Tasks List. This will display the first window of the Component wizard.
2. In the Code field, enter STL901 then press the TAB key to move the cursor to the Description field.
3. Type STOOL, four legs, then press the TAB key to move the cursor to the Notes field.
4. Type Used during patient interview.
Important having created the new component it must be assigned a class and group in order that it will appear on reports.
45
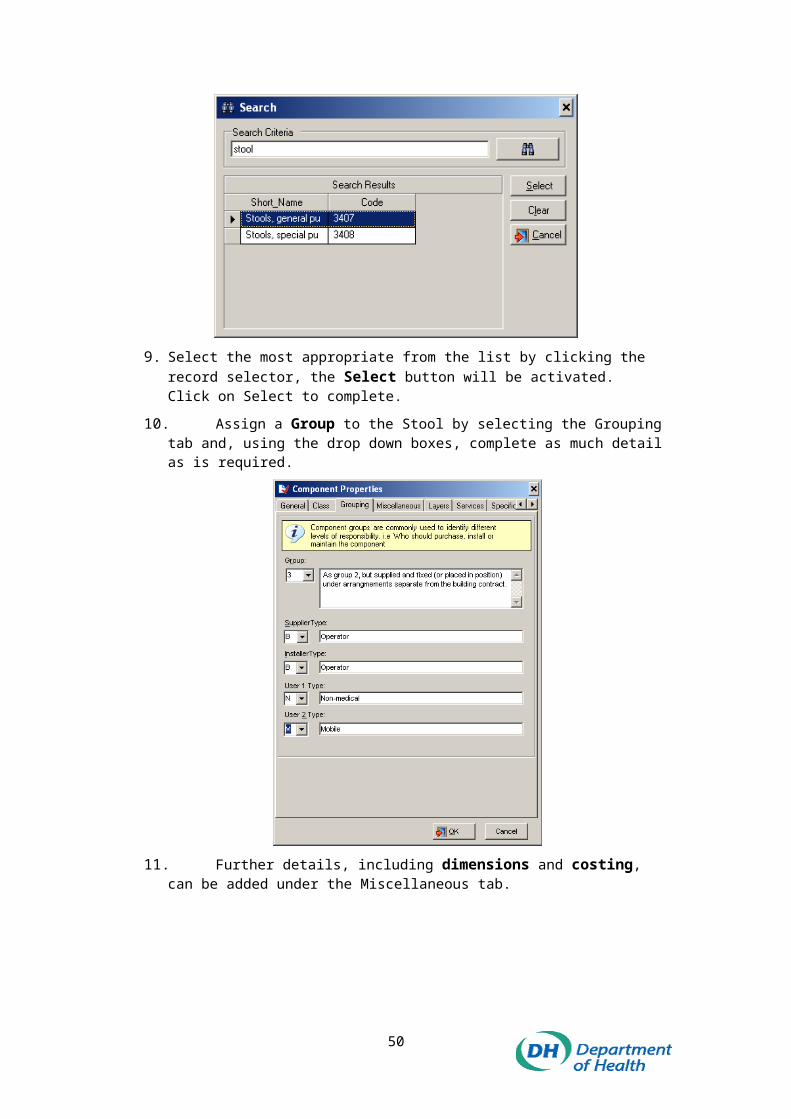
8. Select the Class tab to assign a class to the component. Click button to start the Search for the relevant Class names, then on the next screen type Stool into the Search Criteria box and click on the
button. The list will provide the options from which to choose.
9. Select the most appropriate from the list by clicking the record selector, the Select button will be activated. Click on Select to complete.
10.Assign a Group to the Stool by selecting the Grouping tab and, using the drop down boxes, complete as much detail as is required.
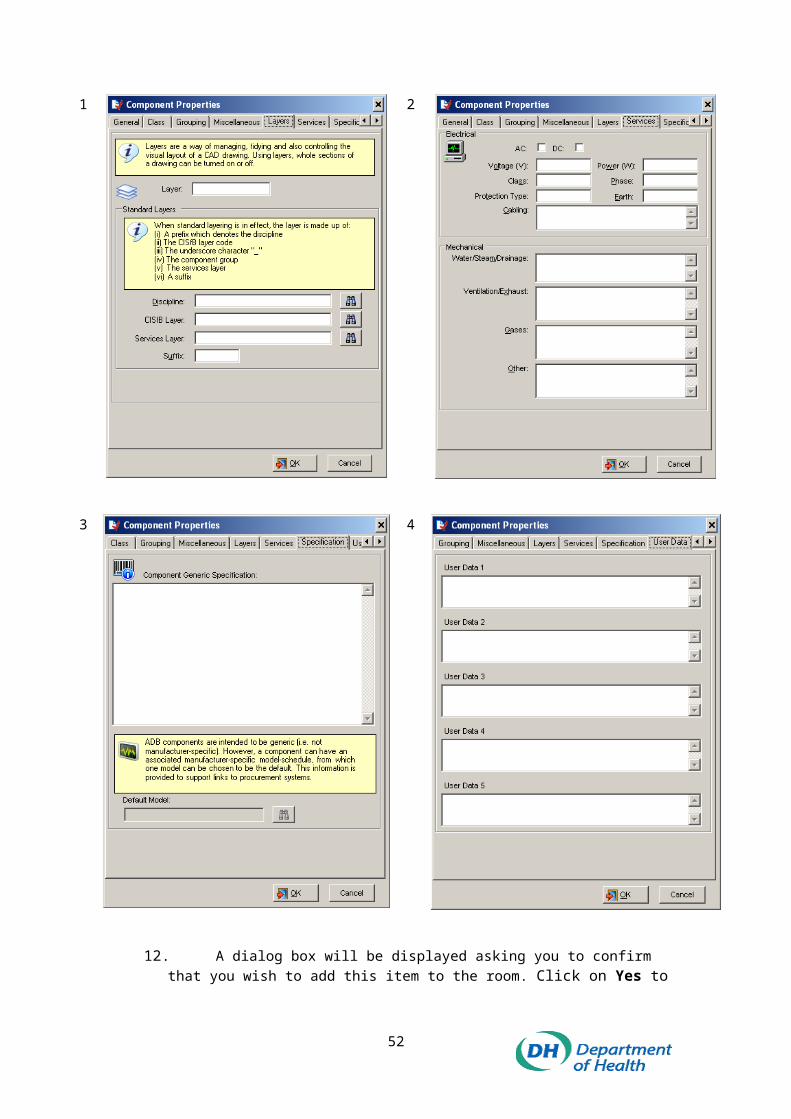
11.Further details, including dimensions and costing, can be added under the Miscellaneous tab.
46
Note : By entering the dimensions of the component a “box” will appear in the graphics reflecting these dimensions. Further Component Properties screens are available to include details as follows:
47

1 2
3 4
12.A dialog box will be displayed asking you to confirm that you wish to add this item to the room. Click on Yes to confirm, and the component will be added to the component list.
48

Attaching documents
All ADB entities can now have attached documents. These can be paths to physical files e.g. Word documents, PDFs etc. or Web addresses. Documents can be added as any other ADB entity and then attached to another entity via the property page or created directly from the property page.
Once a new component has been created you may wish to link a document such as a specification, or a web link to an illustration in a catalogue. To do this:
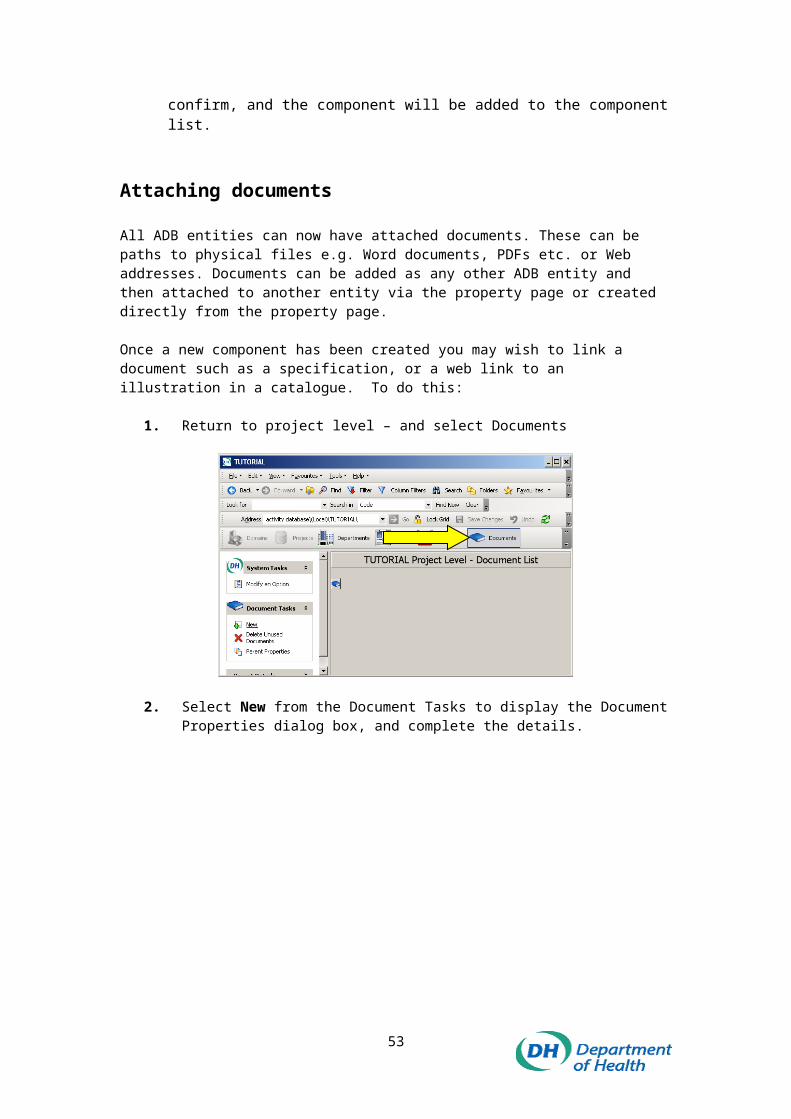
1. Return to project level – and select Documents
2. Select New from the Document Tasks to display the Document Properties dialog box, and complete the details.
49
50

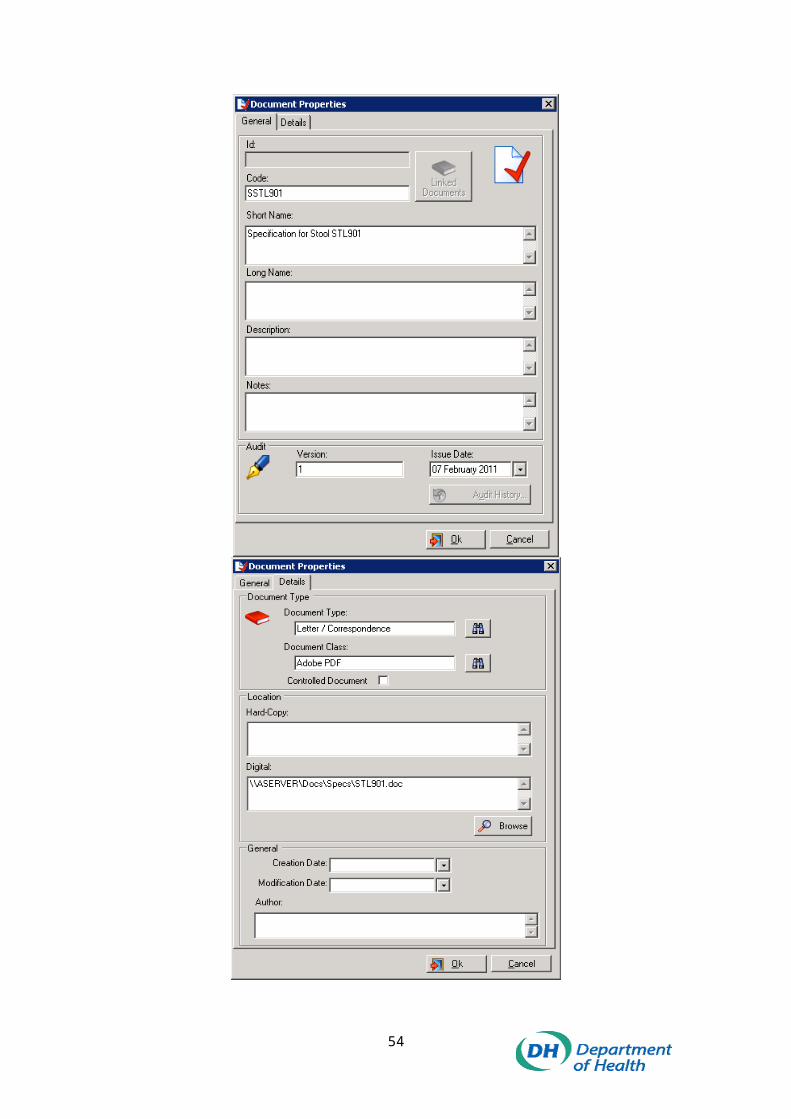
3. Select the Details tab to complete the document details and location using the to search for the available options and Browse to point to the location of a digital document.
4. Click on OK and a message will be displayed for you to confirm that you wish to save the Document.
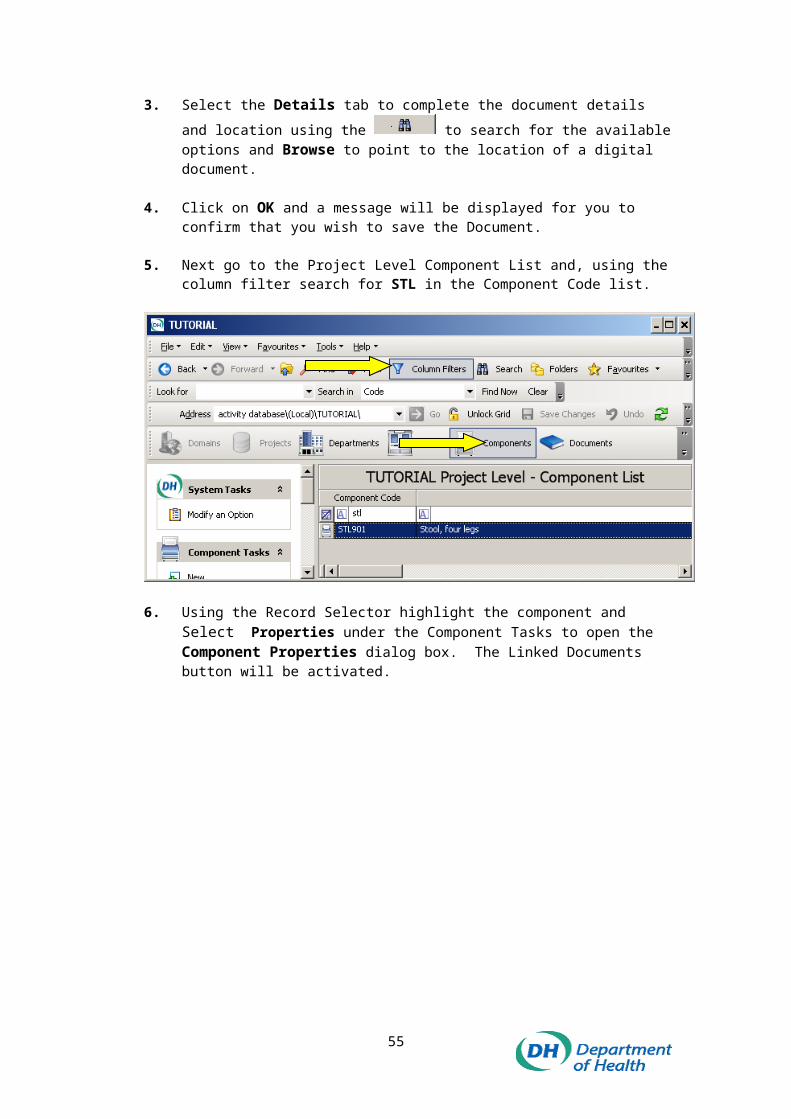
5. Next go to the Project Level Component List and, using the column filter search for STL in the Component Code list.
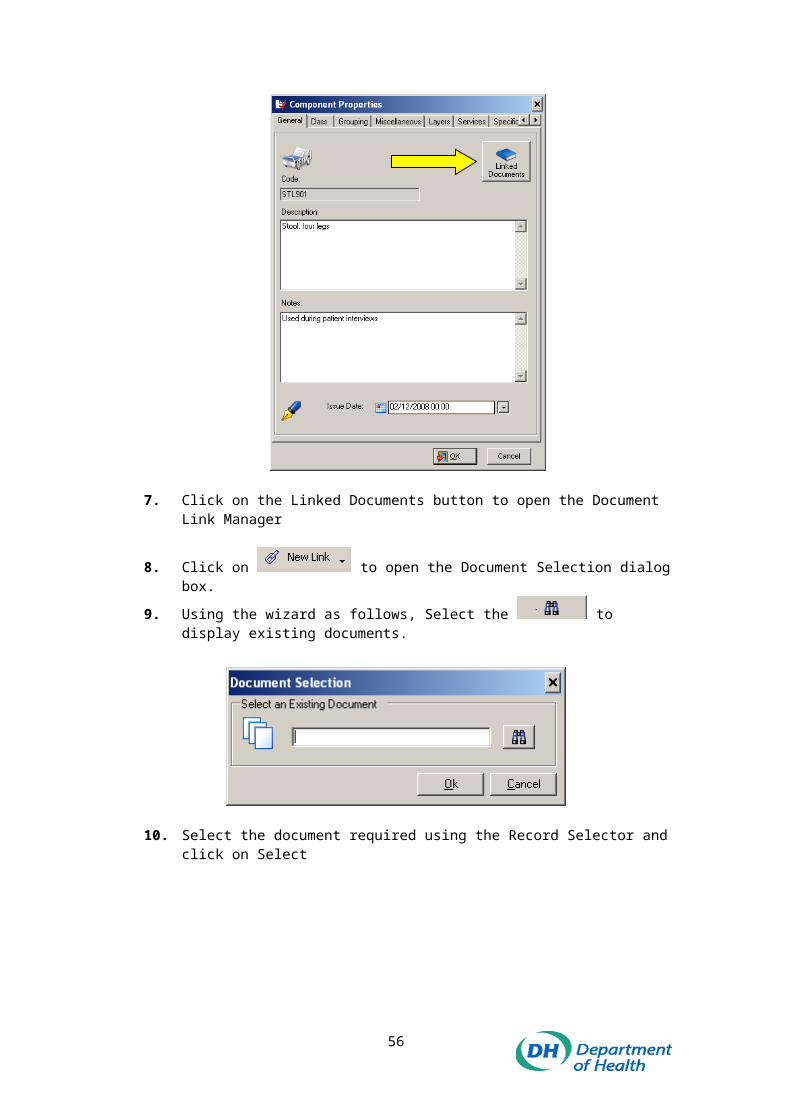
6. Using the Record Selector highlight the component and Select Properties under the Component Tasks to open the Component Properties dialog box. The Linked Documents button will be activated.
51
7. Click on the Linked Documents button to open the Document Link Manager
8. Click on to open the Document Selection dialog box.9. Using the wizard as follows, Select the to display existing
documents.
10. Select the document required using the Record Selector and click on Select
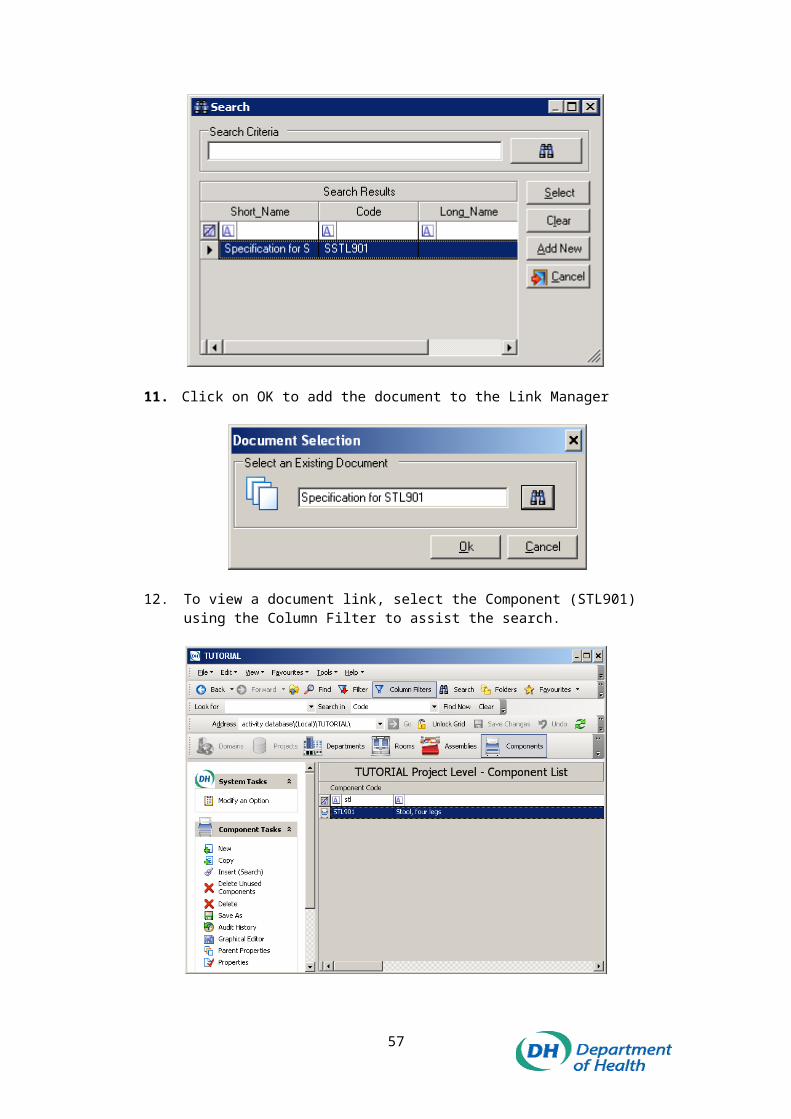
11. Click on OK to add the document to the Link Manager
12. To view a document link, select the Component (STL901) using the Column Filter to assist the search.
52
12. Click on Properties under the Component Tasks to open the Component Properties page.
13. Click on the Linked Document button to open the screen showing the Document Link Manager.
14. Click on the Record Selector (even if the document appears highlighted) to access the Open Document option.
53
54
Instanced Data
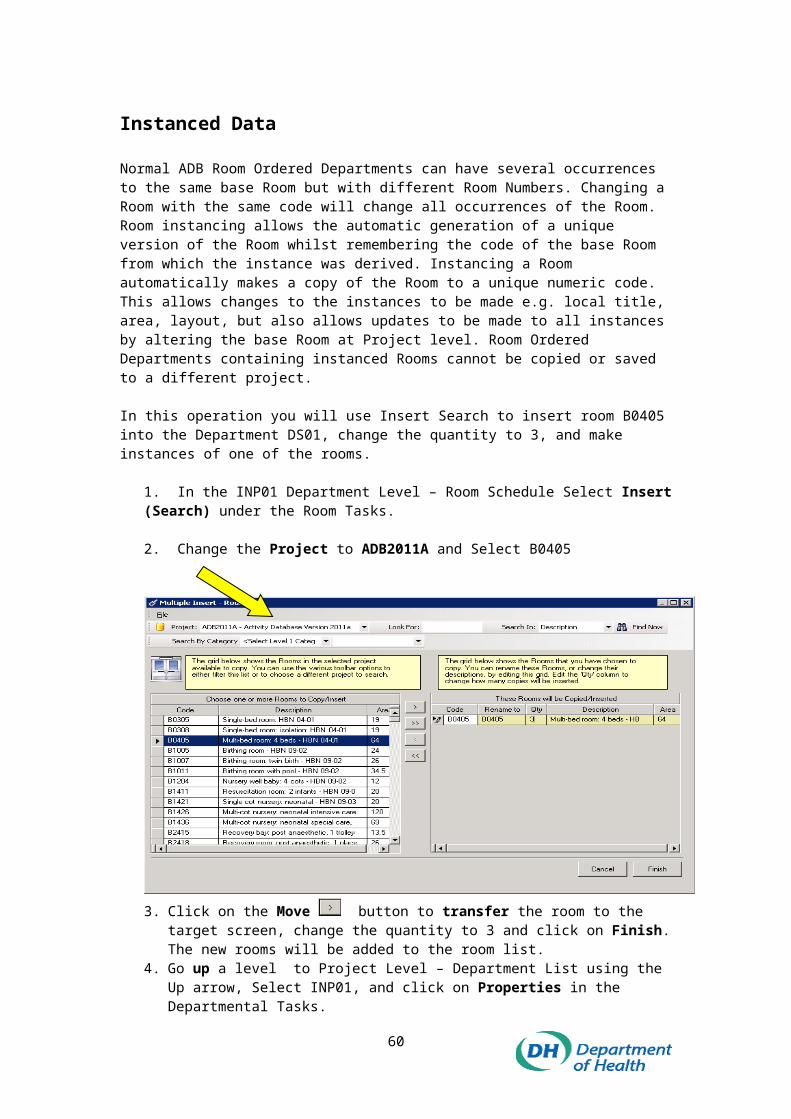
Normal ADB Room Ordered Departments can have several occurrences to the same base Room but with different Room Numbers. Changing a Room with the same code will change all occurrences of the Room. Room instancing allows the automatic generation of a unique version of the Room whilst remembering the code of the base Room from which the instance was derived. Instancing a Room automatically makes a copy of the Room to a unique numeric code. This allows changes to the instances to be made e.g. local title, area, layout, but also allows updates to be made to all instances by altering the base Room at Project level. Room Ordered Departments containing instanced Rooms cannot be copied or saved to a different project.
In this operation you will use Insert Search to insert room B0405 into the Department DS01, change the quantity to 3, and make instances of one of the rooms.
1. In the INP01 Department Level – Room Schedule Select Insert (Search) under the Room Tasks.
2. Change the Project to ADB2011A and Select B0405
3. Click on the Move button to transfer the room to the target
screen, change the quantity to 3 and click on Finish. The new rooms will be added to the room list.
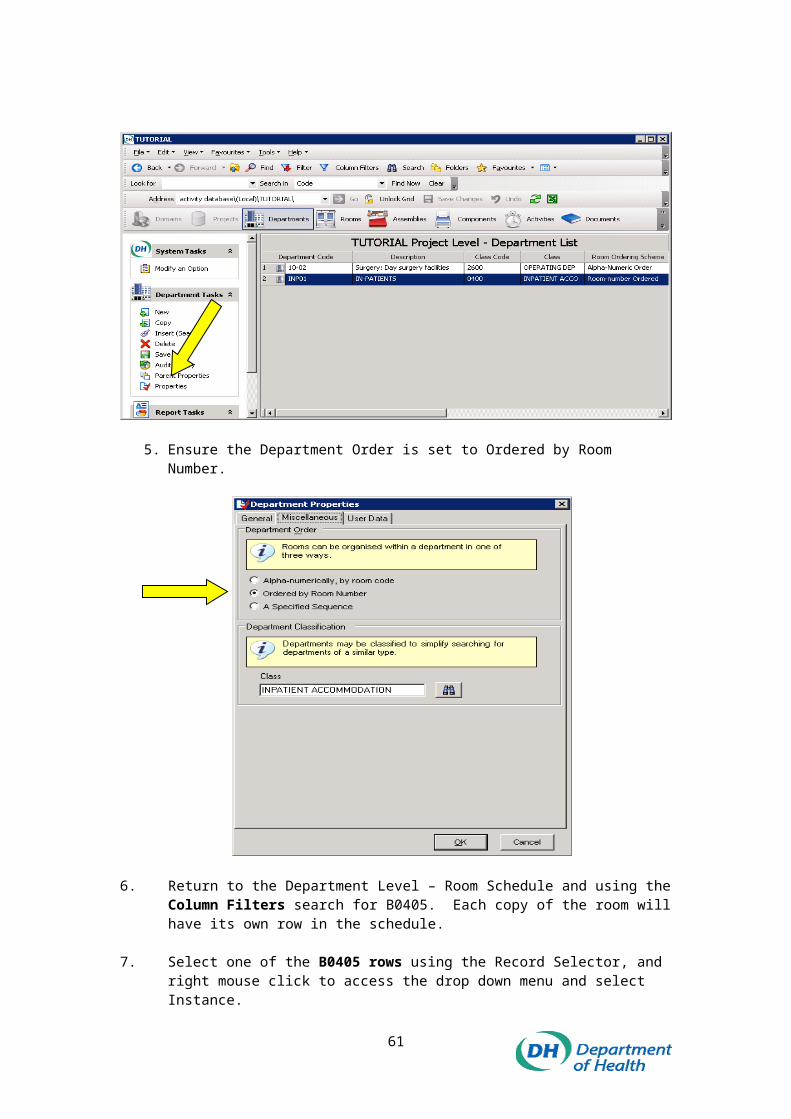
4. Go up a level to Project Level – Department List using the Up arrow, Select INP01, and click on Properties in the Departmental Tasks.
55
5. Ensure the Department Order is set to Ordered by Room Number.
6. Return to the Department Level – Room Schedule and using the
Column Filters search for B0405. Each copy of the room will have its own row in the schedule.
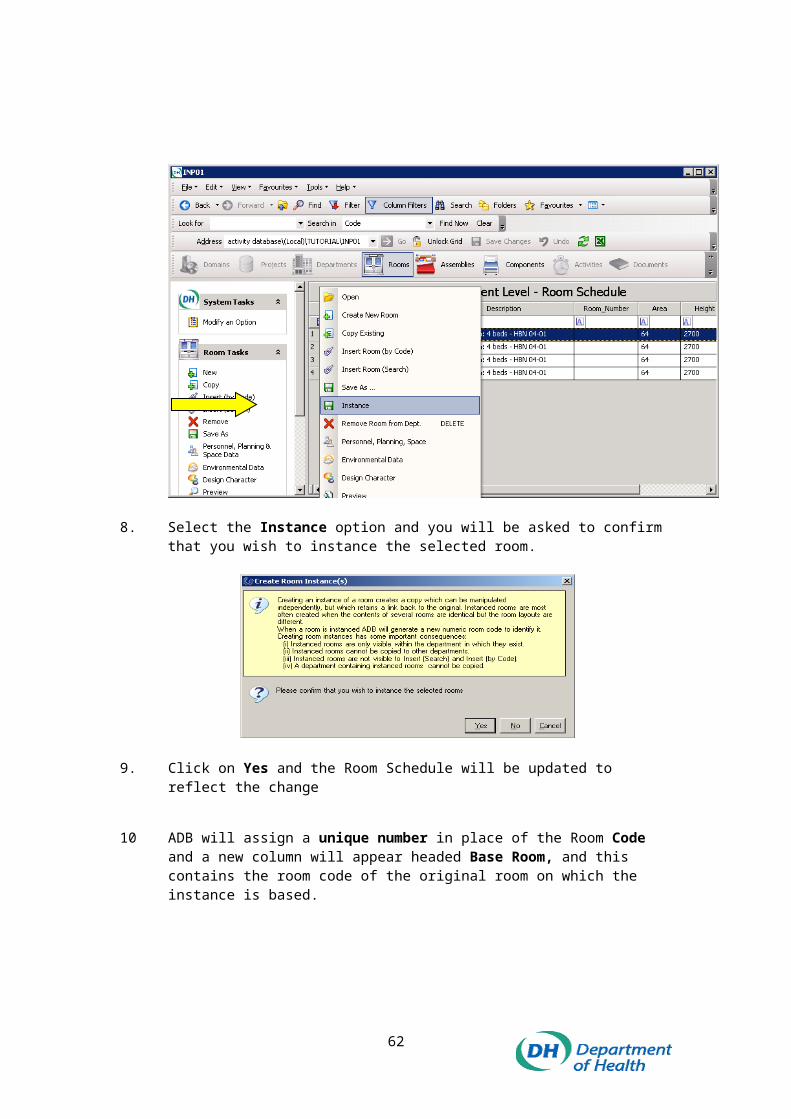
7. Select one of the B0405 rows using the Record Selector, and right mouse click to access the drop down menu and select Instance.
56
8. Select the Instance option and you will be asked to confirm that you wish to instance the selected room.
9. Click on Yes and the Room Schedule will be updated to reflect the change
10 ADB will assign a unique number in place of the Room Code and a new column will appear headed Base Room, and this contains the room code of the original room on which the instance is based.
57

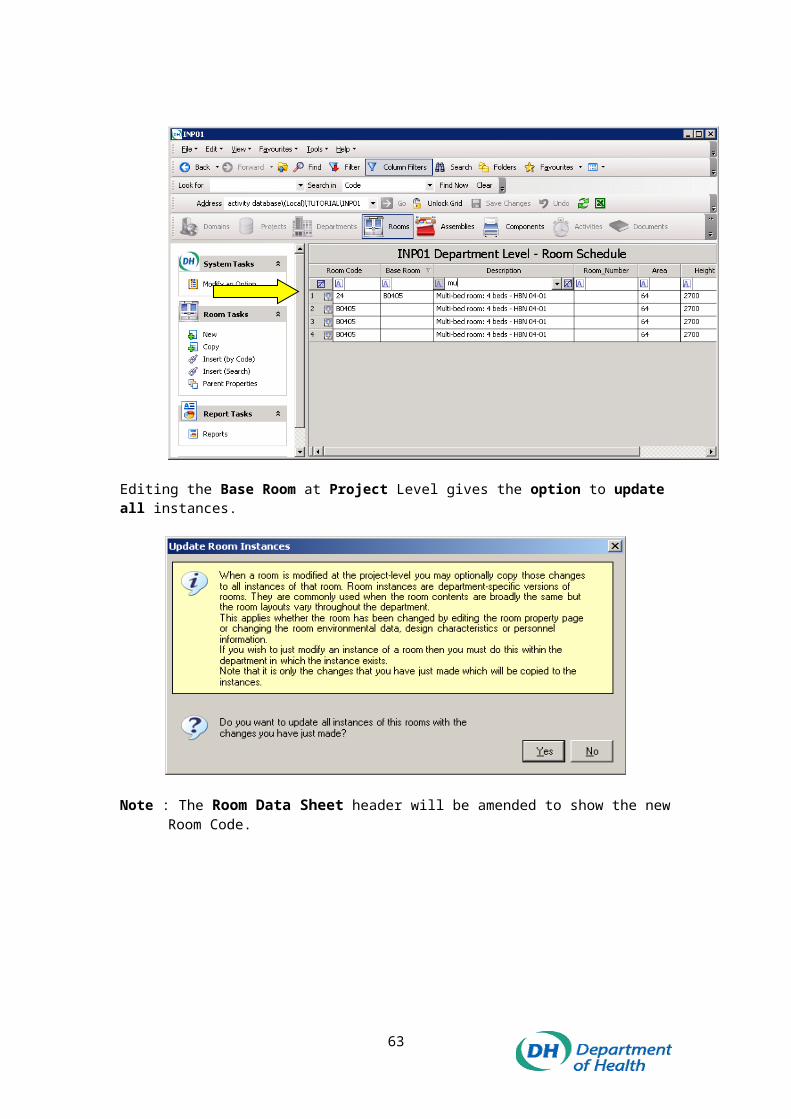
Editing the Base Room at Project Level gives the option to update all instances.
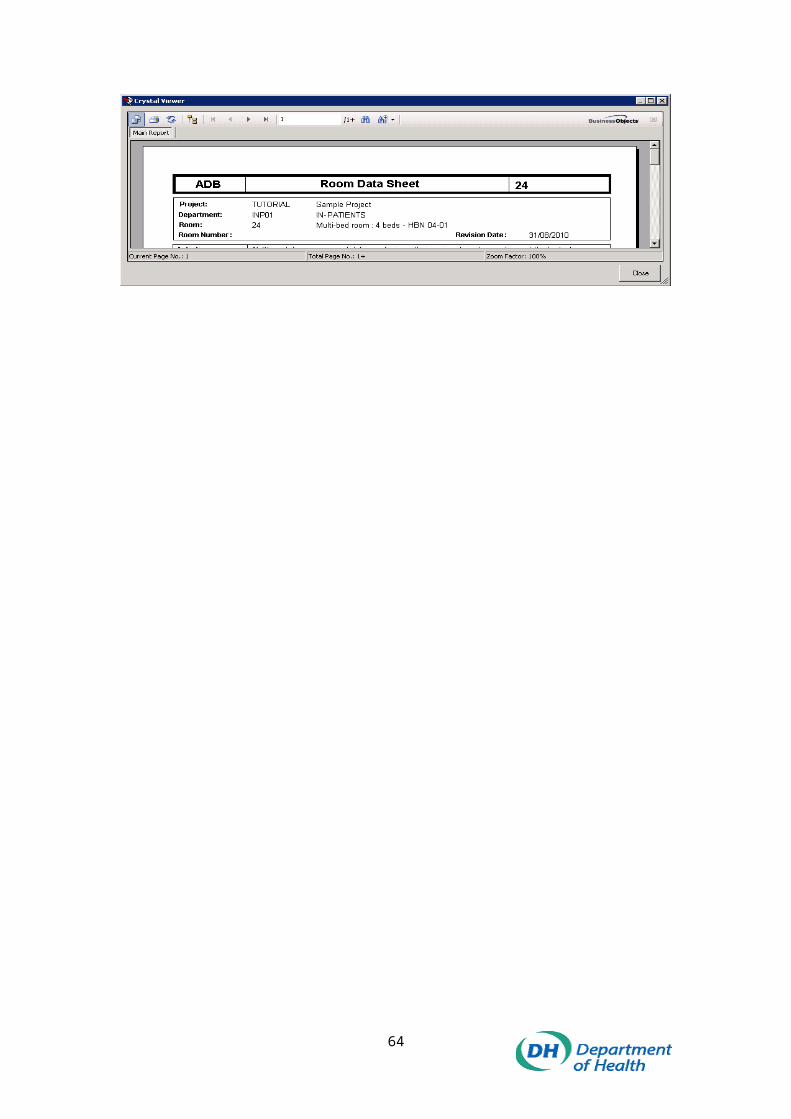
Note : The Room Data Sheet header will be amended to show the new Room Code.
58

5. Using the Activity DataBase Graphical Editor
Activity DataBase is supplied with its own Graphical Editor through which the actual appearance of rooms, assemblies and components can be viewed. The Graphical Editor allows assemblies and components to be built into rooms to give a plan and elevation representation of their appearance. Room layouts can be planned and the feasibility of designs checked.
Within the Graphical Editor, items may be inserted, positioned and rotated to achieve an optimum layout, working at any scale. A grid to ensure accurate placement of items can also be defined.
At any stage, a plan view, front elevation or right-side elevation can be seen.
Viewing rooms
A room can be opened in graphics mode, showing the assemblies, components and activities that are allocated to the room:
1 Find the room using one of the standard methods. The row should be highlighted in blue. If it is not, click the record selector for the room again.
2 Click Graphical Editor in the task bar to display the plan view.
59
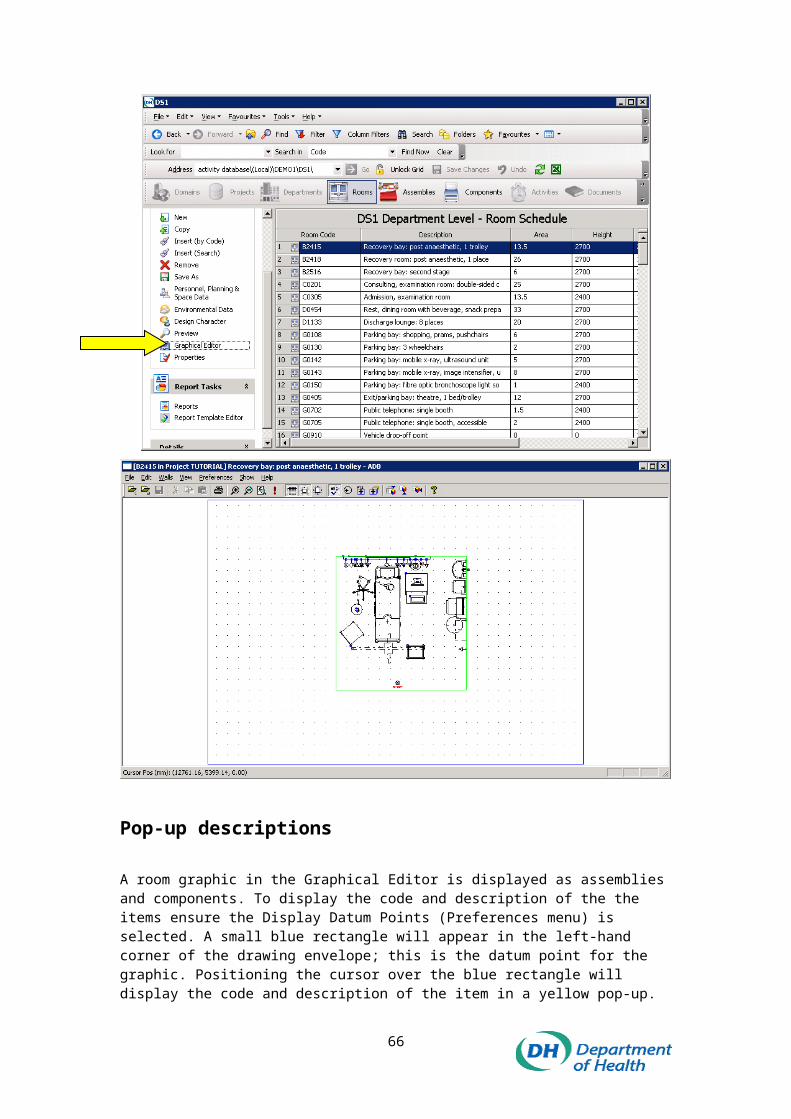
Pop-up descriptions
A room graphic in the Graphical Editor is displayed as assemblies and components. To display the code and description of the the items ensure the Display Datum Points (Preferences menu) is selected. A small blue rectangle will appear in the left-hand corner of the drawing envelope; this is the datum point for the graphic. Positioning the cursor over the blue rectangle will display the code and description of the item in a yellow pop-up.
Exploding assemblies
60
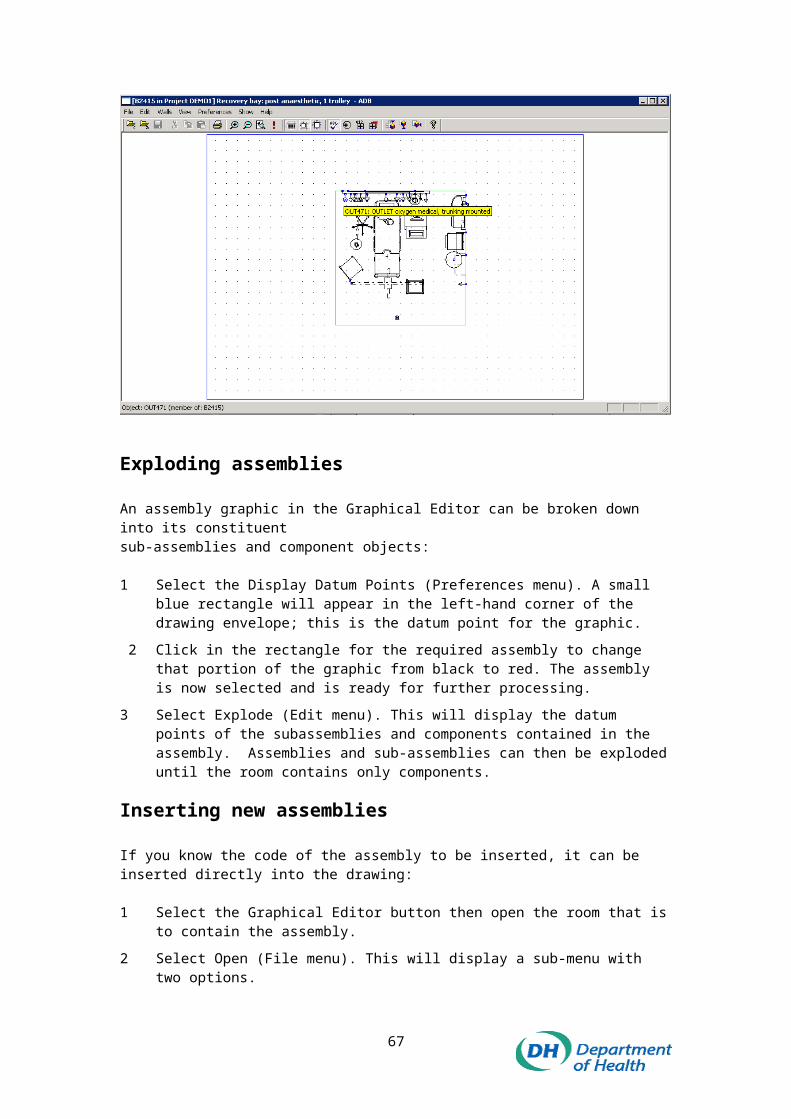
An assembly graphic in the Graphical Editor can be broken down into its constituentsub-assemblies and component objects:
1 Select the Display Datum Points (Preferences menu). A small blue rectangle will appear in the left-hand corner of the drawing envelope; this is the datum point for the graphic.
2 Click in the rectangle for the required assembly to change that portion of the graphic from black to red. The assembly is now selected and is ready for further processing.
3 Select Explode (Edit menu). This will display the datum points of the subassemblies and components contained in the assembly. Assemblies and sub-assemblies can then be exploded until the room contains only components.
Inserting new assemblies
If you know the code of the assembly to be inserted, it can be inserted directly into the drawing:
1 Select the Graphical Editor button then open the room that is to contain the assembly.
2 Select Open (File menu). This will display a sub-menu with two options.3 Select Assembly. This will display the Assembly Selection dialog box.4 Enter the code for the assembly in the Assembly code field.5 Click the OK button. The pointer will change to a cross, which represents
the datum point of the assembly, and the assembly items will be shown on the drawing.
6 Move the pointer to place the assembly in the required position.7 Click the mouse button. The assembly will be placed on the drawing.
Note that if Snap to Grid has been selected, the item will move in steps as the datum point can be placed only on grid markings.
Inserting new components
If you know the code of the component to be inserted, you can insert it directly into the drawing:
1. Select the Graphical Editor button2. Open the room that is to contain the component3. Select Open (File menu). This will display a sub-menu with two options4. Select Component. This will display the Component Selection dialog
box5. Enter the code for the component in the Component Code field6. Click the OK button. The pointer will change to a cross which
represents the datum point of the component, and the component will be shown on the drawing
7. Move the pointer to place the component in the required position
61
8. Click the mouse button. The component will be placed on the drawing. Note that if Snap to Grid has been selected, the item will move in steps as the datum point can be placed only on grid markings.
62
5. Reporting in Activity DataBaseActivity DataBase for Windows produces a range of reports that can be viewed on-screen and/or printed out. An all-XML based reporting system using Crystal Reports XI Release 2 is used. This allows users to copy and modify their own reports.The reports fall into four main categories:
list reports schedule reports data sheets where used’ reports.
This section gives a brief overview of Reports in Activity DataBase, together with some examples.
63
About list reports
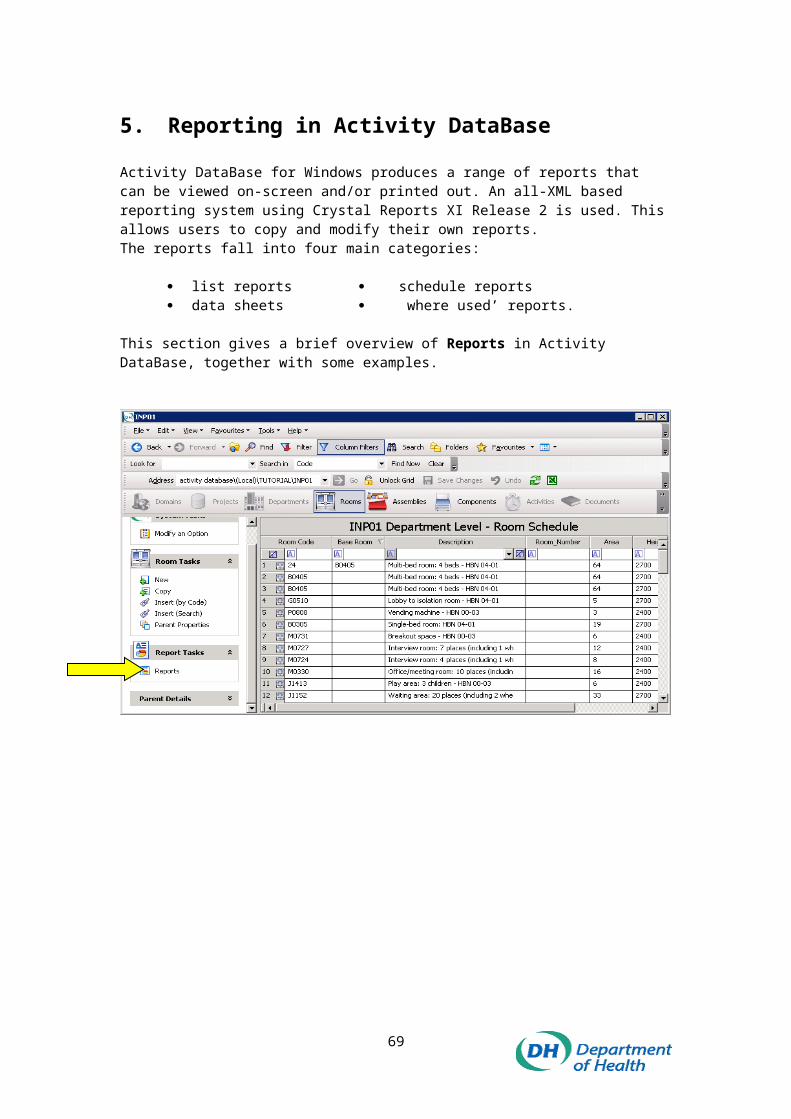
List reports show a simple list of items of the selected type (departments, rooms, assemblies, components or activities). For each item, a list will show the code and description, together with other data that is specific to the item type (for example, floor area for rooms).
To generate a list report:
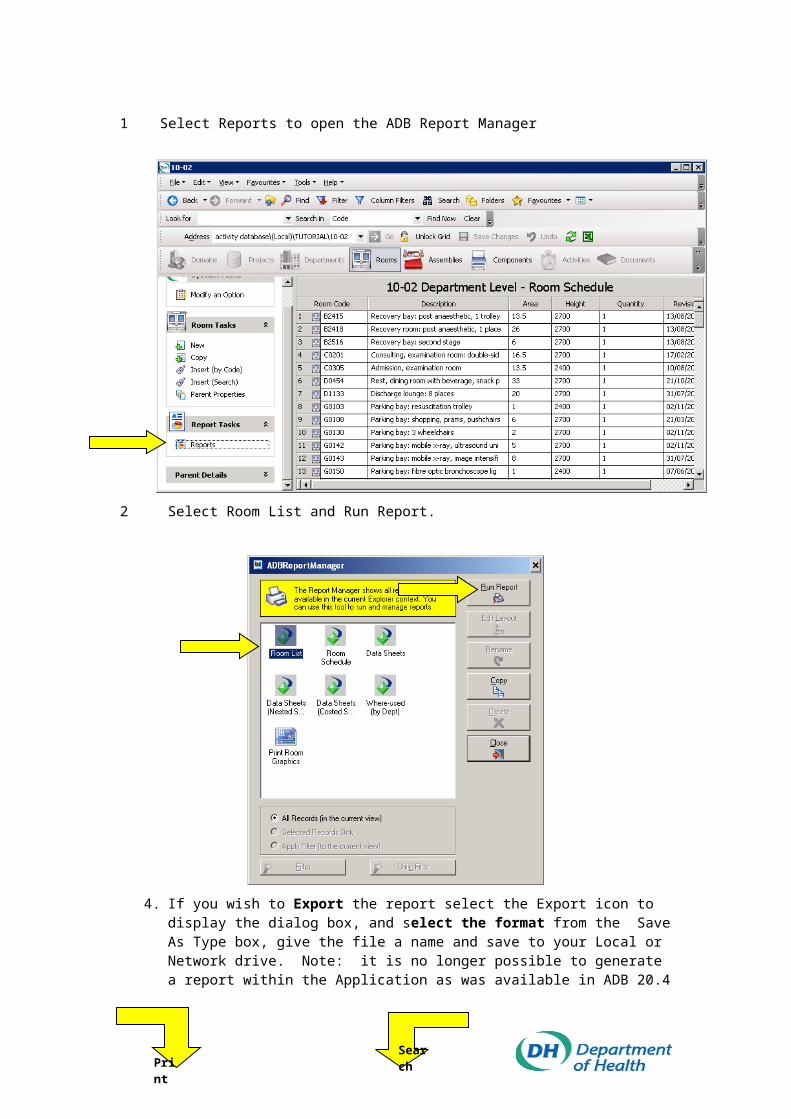
1 Select Reports to open the ADB Report Manager
64
2 Select Room List and Run Report.
4. If you wish to Export the report select the Export icon to display the dialog box, and select the format from the Save As Type box, give the file a name and save to your Local or Network drive. Note: it is no longer possible to generate a report within the Application as was available in ADB 20.4
65
Search
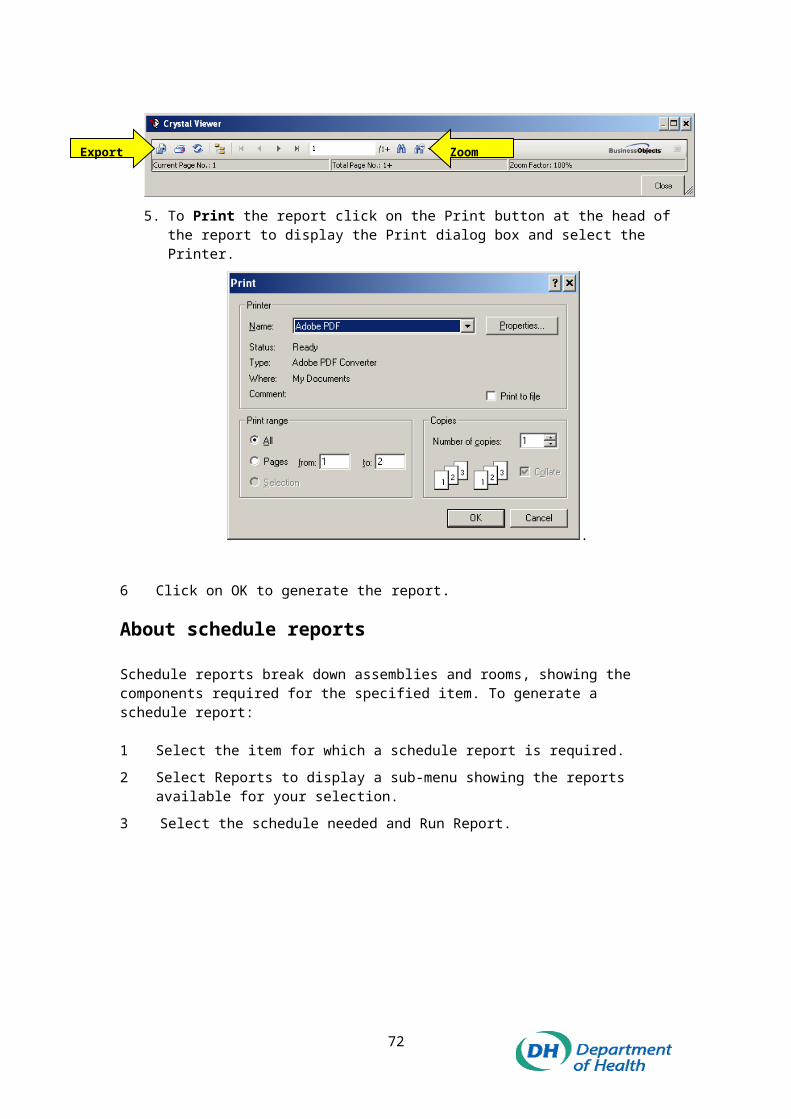
5. To Print the report click on the Print button at the head of the report to display the Print dialog box and select the Printer.
.
6 Click on OK to generate the report.
About schedule reports
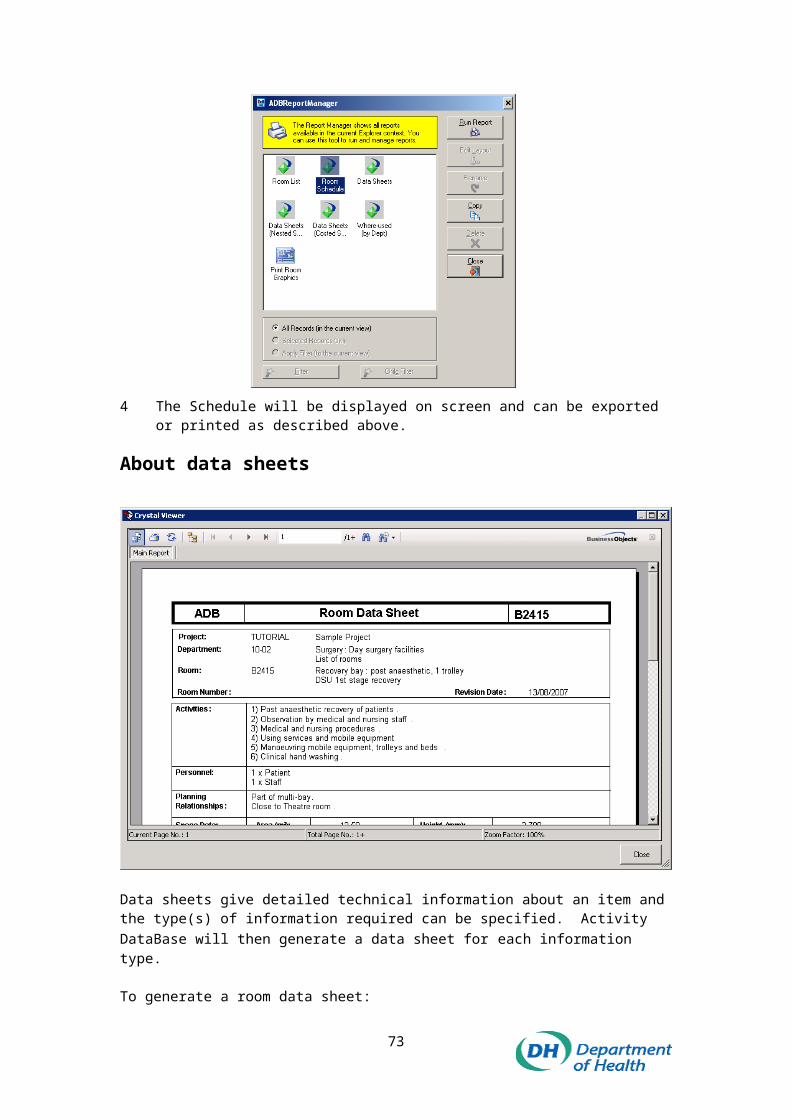
Schedule reports break down assemblies and rooms, showing the components required for the specified item. To generate a schedule report:
1 Select the item for which a schedule report is required.2 Select Reports to display a sub-menu showing the reports available for
your selection.3 Select the schedule needed and Run Report.
66
Export Zoom
4 The Schedule will be displayed on screen and can be exported or printed as described above.
About data sheets
Data sheets give detailed technical information about an item and the type(s) of information required can be specified. Activity DataBase will then generate a data sheet for each information type.
To generate a room data sheet:
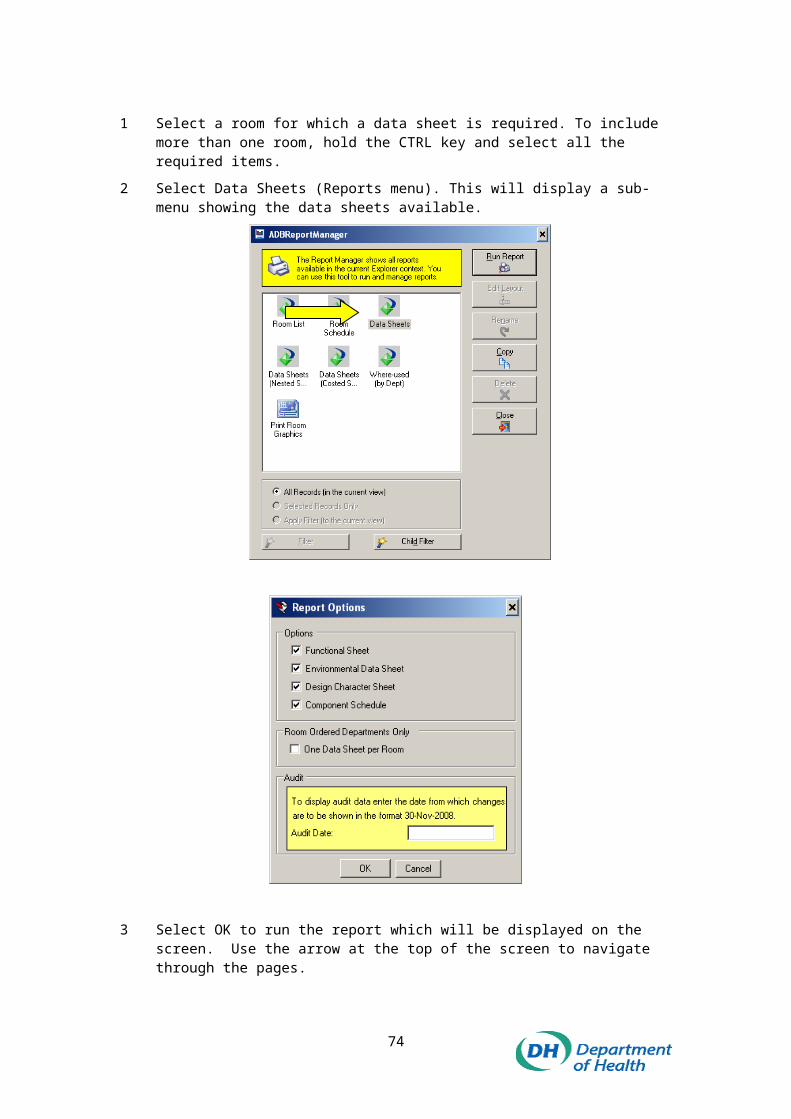
1 Select a room for which a data sheet is required. To include more than one room, hold the CTRL key and select all the required items.
67

2 Select Data Sheets (Reports menu). This will display a sub-menu showing the data sheets available.
3 Select OK to run the report which will be displayed on the screen. Use the arrow at the top of the screen to navigate through the pages.
Report Filter Wizard To filter the data sheet content, click the Filter button in the Filters area to display the first screen of the filter wizard for the selected item type. Make the required selections to filter the items then click the OK button.
68
Filters can be saved for later use
ADB specific filters by category and/or component group
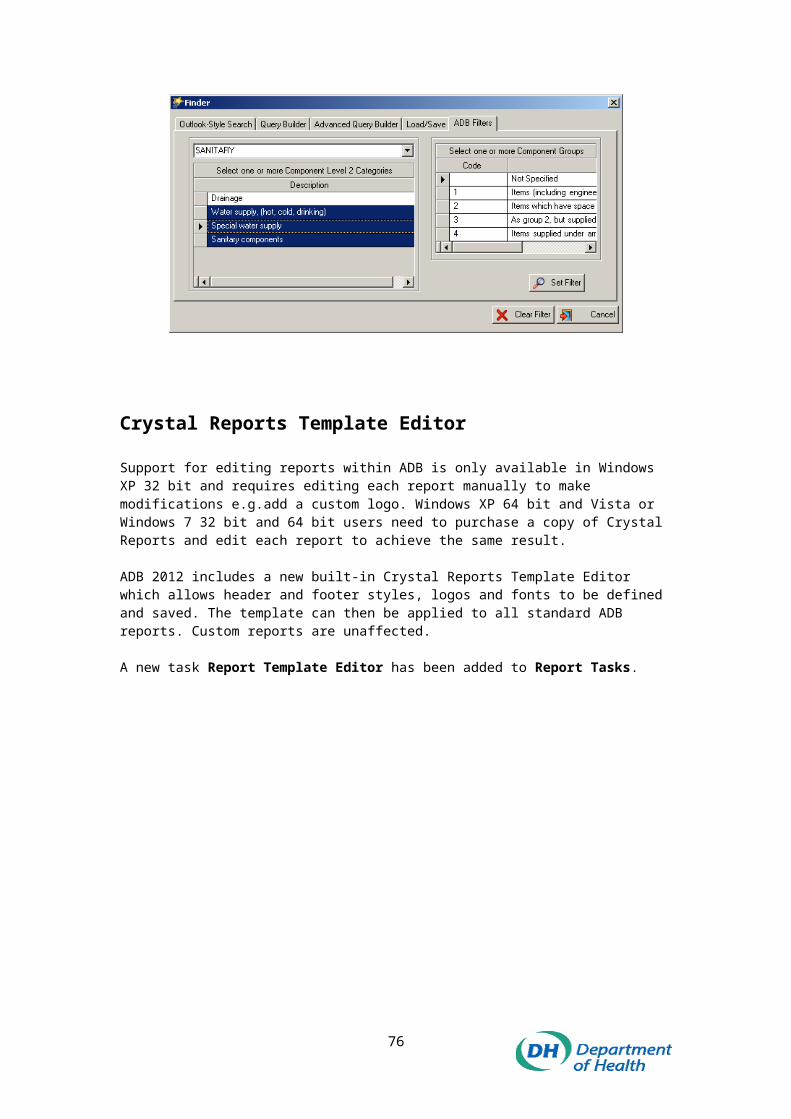
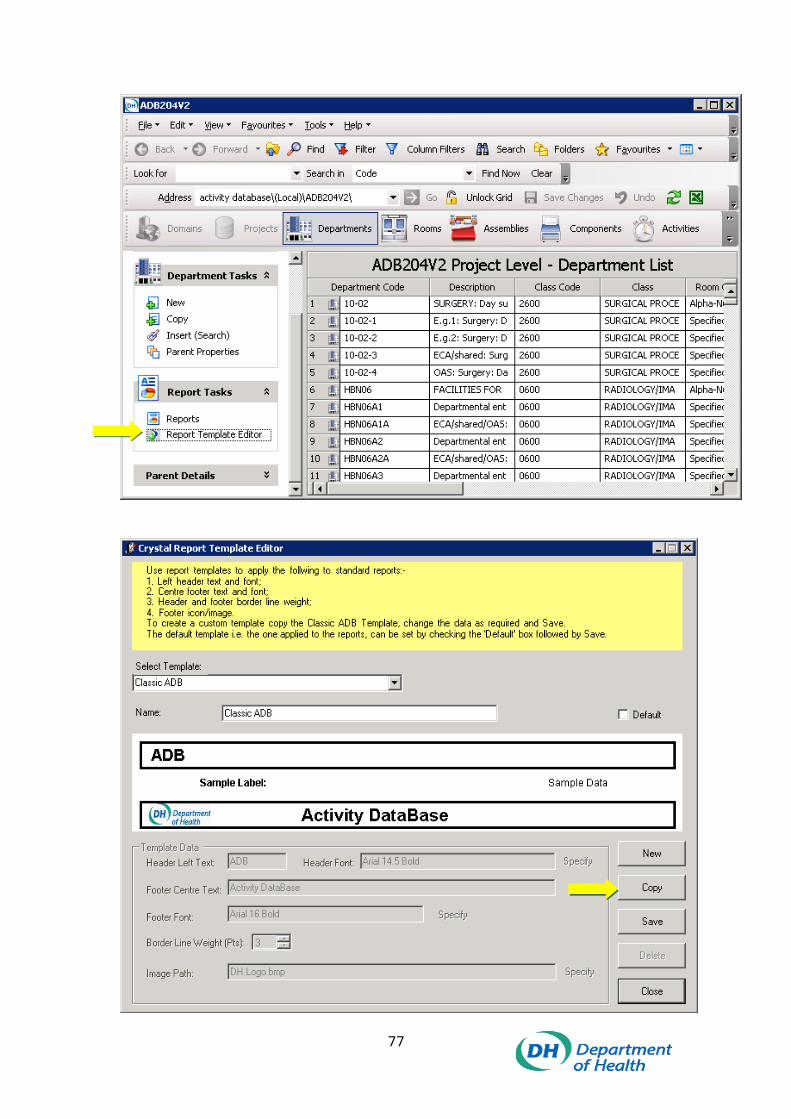
Crystal Reports Template Editor
69

Support for editing reports within ADB is only available in Windows XP 32 bit and requires editing each report manually to make modifications e.g.add a custom logo. Windows XP 64 bit and Vista or Windows 7 32 bit and 64 bit users need to purchase a copy of Crystal Reports and edit each report to achieve the same result.
ADB 2012 includes a new built-in Crystal Reports Template Editor which allows header and footer styles, logos and fonts to be defined and saved. The template can then be applied to all standard ADB reports. Custom reports are unaffected.
A new task Report Template Editor has been added to Report Tasks.
70
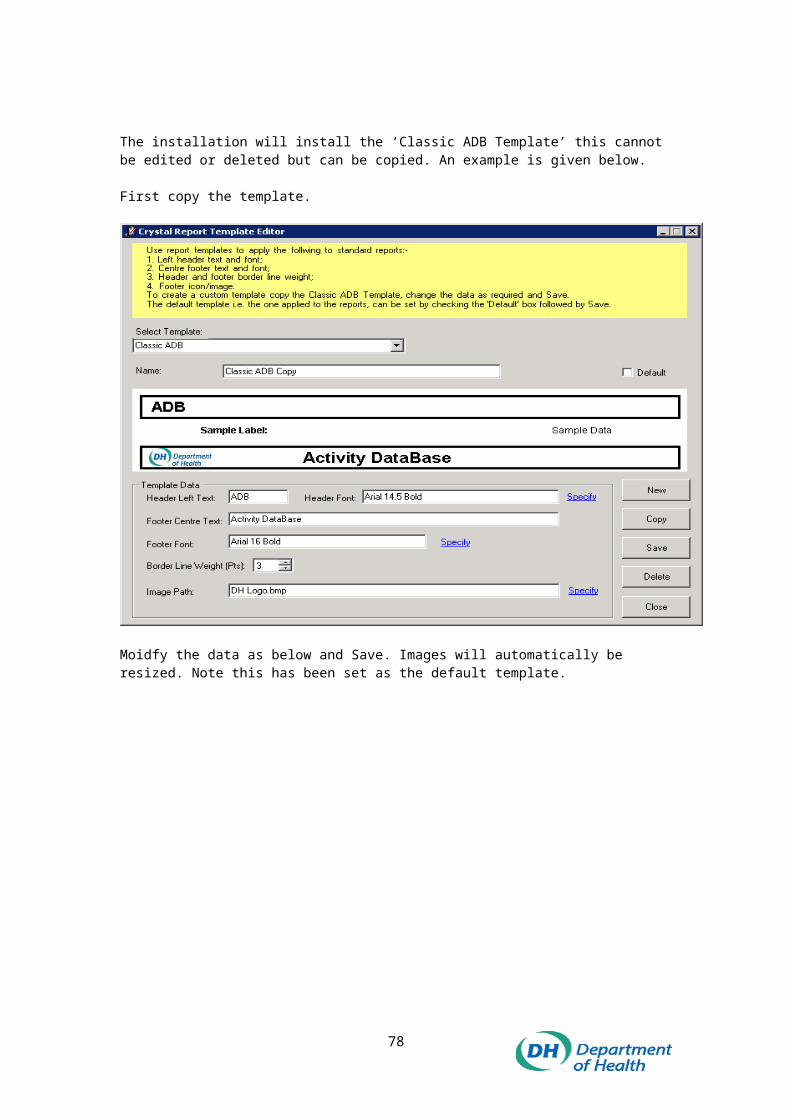
The installation will install the ‘Classic ADB Template’ this cannot be edited or deleted but can be copied. An example is given below.
First copy the template.
71
Moidfy the data as below and Save. Images will automatically be resized. Note this has been set as the default template.
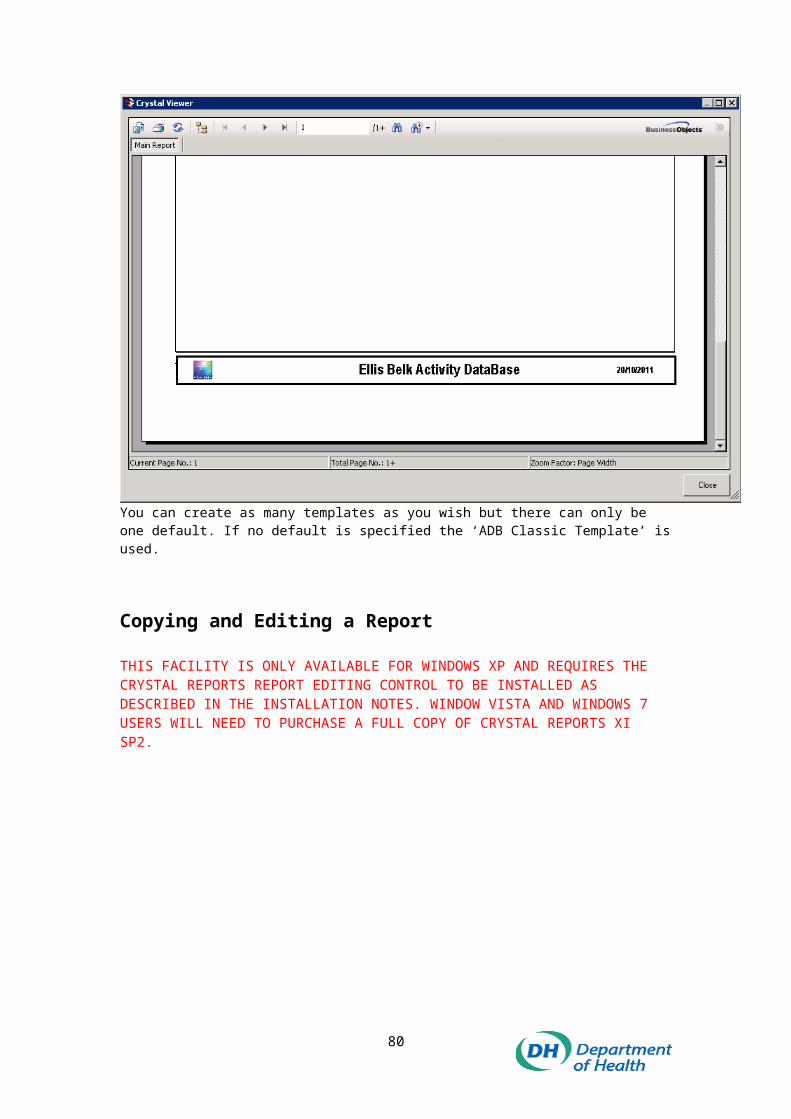
A sample report with the template applied is shown below:-
72
You can create as many templates as you wish but there can only be one default. If no default is specified the ‘ADB Classic Template’ is used.
73
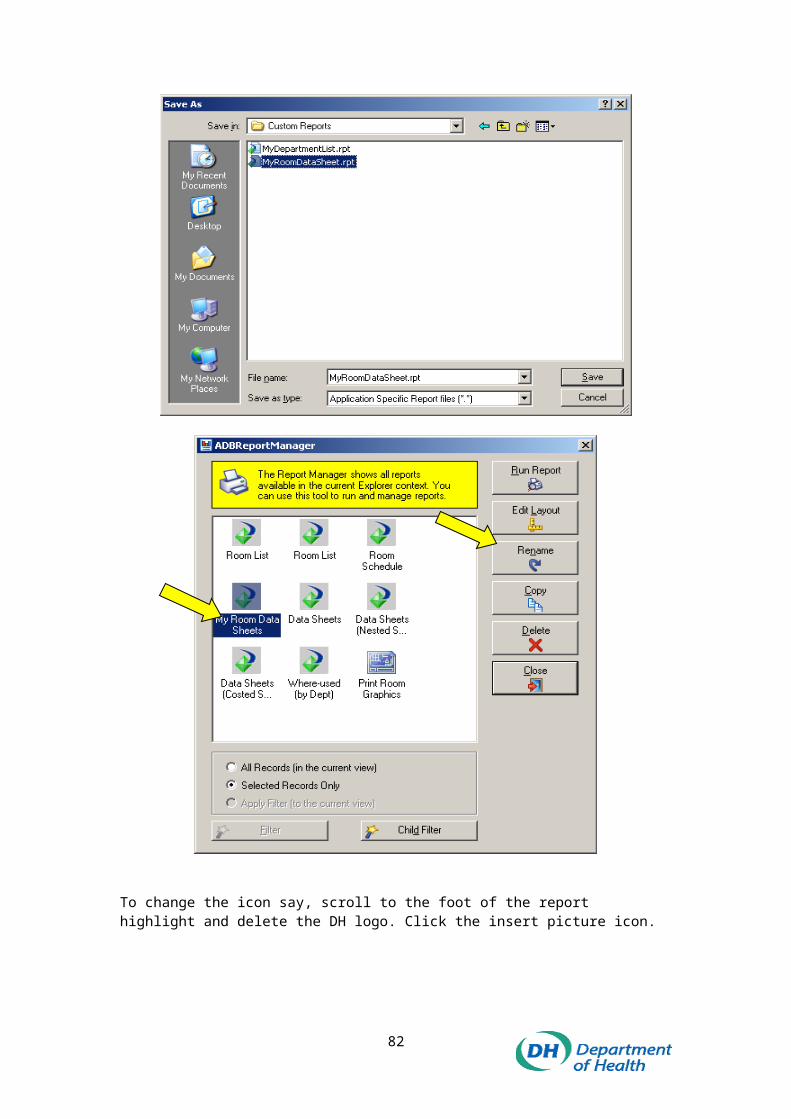
Copying and Editing a Report
THIS FACILITY IS ONLY AVAILABLE FOR WINDOWS XP AND REQUIRES THE CRYSTAL REPORTS REPORT EDITING CONTROL TO BE INSTALLED AS DESCRIBED IN THE INSTALLATION NOTES. WINDOW VISTA AND WINDOWS 7 USERS WILL NEED TO PURCHASE A FULL COPY OF CRYSTAL REPORTS XI SP2.
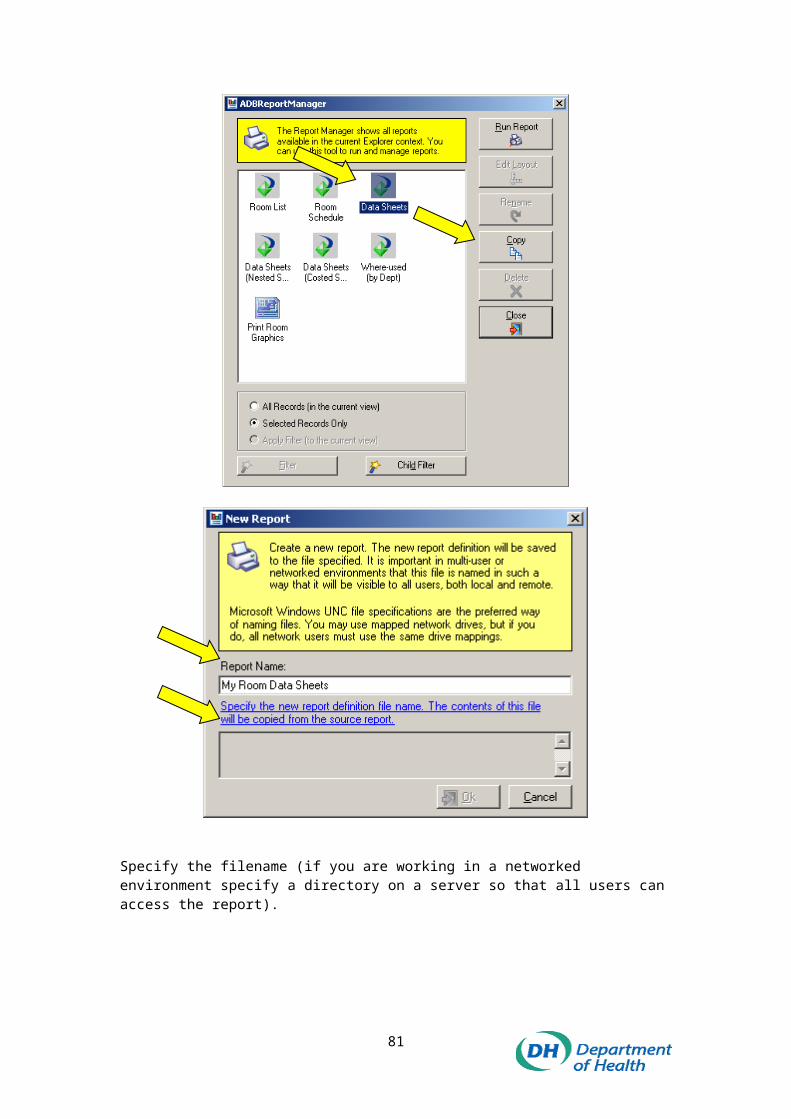
Specify the filename (if you are working in a networked environment specify a directory on a server so that all users can access the report).
74

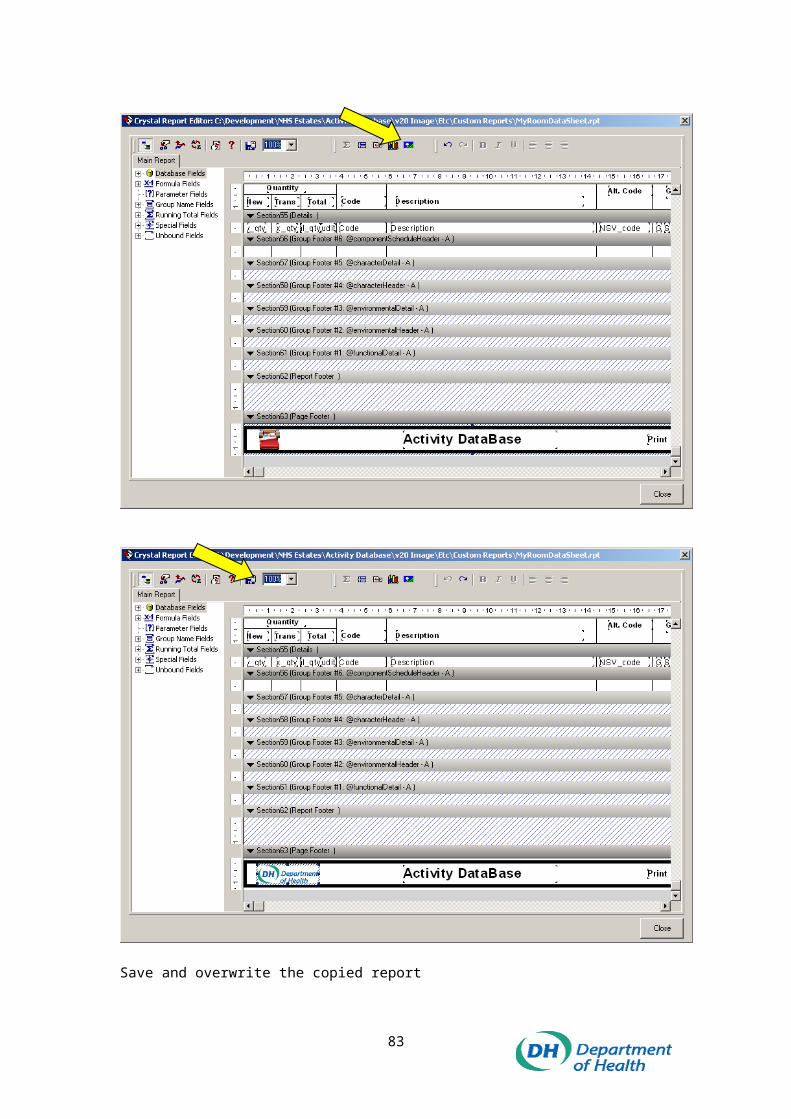
To change the icon say, scroll to the foot of the report highlight and delete the DH logo. Click the insert picture icon.
75
Save and overwrite the copied report
76
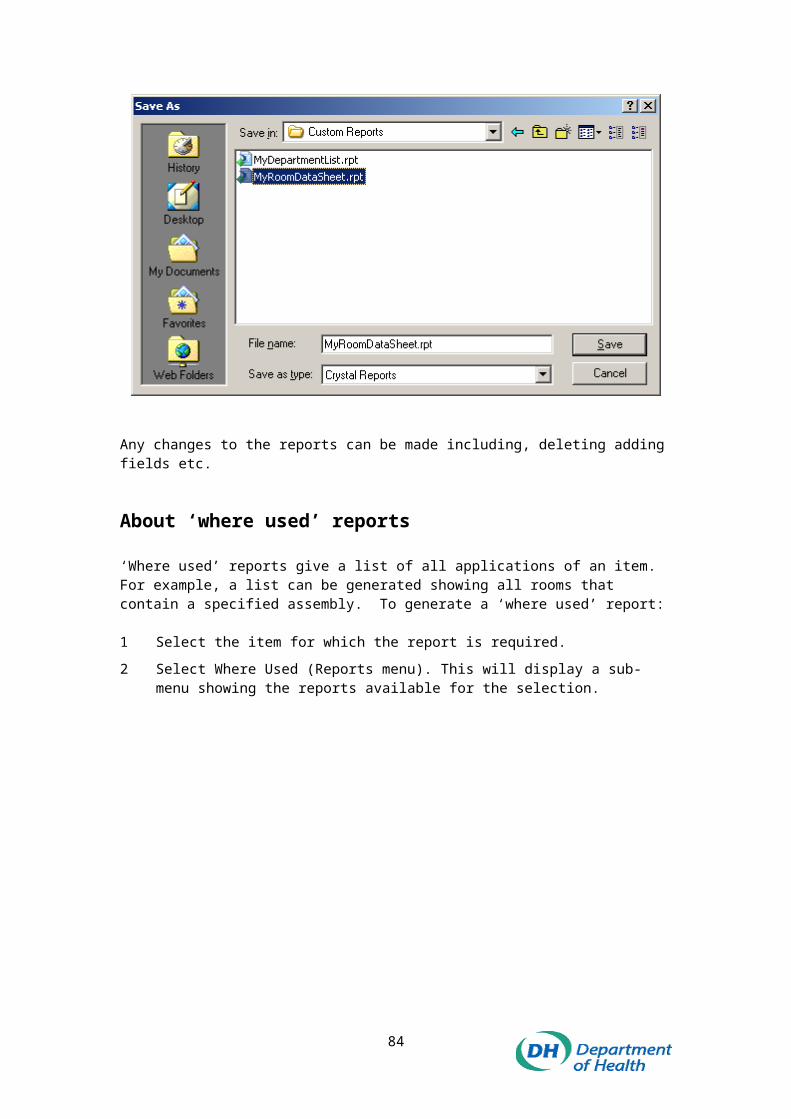
Any changes to the reports can be made including, deleting adding fields etc.
About ‘where used’ reports
‘Where used’ reports give a list of all applications of an item. For example, a list can be generated showing all rooms that contain a specified assembly. To generate a ‘where used’ report:
1 Select the item for which the report is required.2 Select Where Used (Reports menu). This will display a sub-menu showing
the reports available for the selection.
77
3 Select the report to be produced. This will display the Report dialog box, in which the options for your report can be set. Select Run Report
4 The report will display on the screen
Further Report Options
Component schedule arranged to display the contents of the Assemblies – the nested schedule.
78

For Room Ordered Departments the option to output one data sheet per room and display the Room Number instead of the code at the top of the report. To do this, Select the Room, click on Reports and Select Data Sheets and Run Report.
79
Automated Audit Reports
If automated audit is turned on (see chapter 3 Audit Configuration in the Activity DataBase Getting Started Guide) additions, deletions and quantity changes are automatically recorded in the database for both textual and graphical edits, including changes made in AutoCAD. Departmental Room Schedules and Component schedule display these changes as highlighted text when the audit date is specified on the ADB Reports form.
Changes made to the schedule since the Audit date was set are highlighted as shown below.
80
Exporting reports
A displayed report can be exported by clicking the Export button. This displays a dialog box in which the file format can be specified and destination folder selected from the appropriate lists.
81
Enter the File name and Save as type option and click on Save.
6. New Engineering Data FormatADB2011 introduced a new format for Engineering Data an example of which is shown below.
When this data is copied to an existing project this will automatically be converted into the original format by making use of the notes fields.
82
If this data is copied to an existing project this will automatically be converted into the original format by making use of the notes fields.
You can specify that the New Engineering Data Format is to be used when creating a new Project. It is suggested that you delay this until all ADB reference data is in the new format.
83
7. Using Activity DataBase with AutoCAD
Please see the separate Activity DataBase 2012 AutoCAD Tutorial.
84