Embed Size (px)
Citation preview

Adlib PDF OEM Installation Guide
PRODUCT VERSION: 5.0
REVISION DATE: Sept 2013

Copyright
© 2013 Adlib
This manual, and the Adlib products to which it refers, is furnished under license and maybe used or copied only in accordance with the terms of such license. The content of thismanual is provided for informational use only, is subject to change without notice andshould not be construed as a commitment by Adlib Publishing Systems Inc. AdlibPublishing Systems Inc. assumes no responsibility or liability for any errors or inaccuraciesthat may appear in this manual.
Except as permitted by such license, no part of this publication may be reproduced, storedin a retrieval system, or transmitted, in any form or by any means, electronic, mechanical,recording, or otherwise without the prior written permission of Adlib Publishing Systems Inc.
Adlib, Adlib Software, Adlib PDF, Adlib Workflows for SharePoint, Adlib Director, the AdlibSoftware logo, and Adlib logo are either registered trademarks or trademarks of AdlibPublishing Systems Inc. All other trademarks are property of their respective owners.
Portions of this product contain code from OmniPage Capture SDK (registered trademarkof Nuance Communications Inc.), Outside In (registered trademark of Oracle), Glyph &Cog, LLC (Copyright 2003-2013), Pegasus Imaging Corporation (Tampa, FL), PDFNetSDK from PDFTron™ Systems (Copyright 2001-2013), FreeImage and are distributed byAdlib under license.
Adlib Publishing Systems Inc.
215 - 3228 South Service Rd.
Burlington, Ontario
Canada L7N 3H8
Phone: 1-905-631-2875
www.adlibsoftware.com
Printed in Canada.
All rights reserved.

Adlib PDF OEM Installation Guide © 2013 Adlib 1
Table of Contents
1 Installation Guide Overview....................................................................................... 3Typographical Conventions....................................................................................................................3Notes......................................................................................................................................................3Terminology ...........................................................................................................................................4
2 System Requirements ................................................................................................ 5Complete Adlib PDF Installation Requirements .....................................................................................5 System Requirements by Component ................................................................................................12Database..............................................................................................................................................12 Services ..............................................................................................................................................13System Manager ..................................................................................................................................17Transformation Engine.........................................................................................................................18
3 Installation Instructions ........................................................................................... 20Overview ..............................................................................................................................................20Installation Instructions.........................................................................................................................22
4 Silent Installation ...................................................................................................... 37Overview ..............................................................................................................................................37AdlibInstall.cfg ......................................................................................................................................38AdlibUninstall.cfg..................................................................................................................................40Glossary ...............................................................................................................................................41
5 License Manager Instructions ................................................................................. 45Explanation of License Types ..............................................................................................................45Evaluation License ...............................................................................................................................46Activate License - Online .....................................................................................................................49Activate License - Offline .....................................................................................................................54Rehost License - Online.......................................................................................................................63Rehost License - Offline.......................................................................................................................68Return License - Online .......................................................................................................................75Return License - Offline .......................................................................................................................80
6 Key Concepts ............................................................................................................ 87Components.........................................................................................................................................88
7 Uninstallation and Modification............................................................................... 89Complete Uninstallation .......................................................................................................................89Modification ..........................................................................................................................................90
A Content Transformation Viewers and Supported File Types .............................. 96Adlib Viewer Support............................................................................................................................99Generic Viewer Support .....................................................................................................................100Supported File Types .........................................................................................................................101
Adlib PDF OEM Installation Guide © 2013 Adlib 2
B Database Growth Management ............................................................................ 110Database Growth Management Modes .............................................................................................110
C Software Product Activation FAQ ........................................................................ 111
D Adlib CAD Viewer Licensing FAQ ........................................................................ 114
E Contact Adlib ......................................................................................................... 115
F Index ....................................................................................................................... 116

Adlib PDF OEM Installation Guide © 2013 Adlib 3
Installation Guide Overview
Adlib PDF is the next generation of Adlib transformation technology. Its design offers a high degree of flexibility for developing systems that provide scalability and high availability. An intuitive, interactive interface enables users to setup, configure, and troubleshoot systems which are easily configured to fulfill each user’s unique requirements.
The Installation Guide provides a comprehensive list of the steps required to perform a complete Adlib PDF installation, uninstallation, and licensing of the product. Users can also choose to install and modify Adlib Components individually, according to business requirements.
This guide also contains a detailed list of all system prerequisites that must be available before installation.
Typographical ConventionsThe following typographical conventions are used throughout this guide.
NotesNotes, cautions and tips are offered throughout the guide and are quickly identified with the following icons:
Provides informational notes relevant to the content.
Provides important cautionary notes relevant to the content.
Item Convention Examples
Adlib elements Teal, Title case
The Folder Connector integrates with file folders
Menu options & titles
Push buttons
Settings
Bold Select Transformation Rules from the Settings menu.
Click Save.
Drag Active from the Settings toolbox.
Page elements and titles
Window titles
Italics Navigate to the Edit tab on the Rule Set Editor page.
Drag Active from the Settings toolbox to the work area.
Define attribute settings in the Edit Attribute window.
Script Mono code ${Adlib.FolderConnector.InputFileExtension}
URLs Lowercase http://www.adlibsoftware.com/
User-defined element Enclosed in angle brackets
C:\Adlib\<install folder>

Adlib PDF OEM Installation Guide © 2013 Adlib 4
Provides helpful tips and shortcuts.
TerminologyDetailed descriptions of terminology applicable to the Adlib product can be found in the Adlib PDF Glossary.

Adlib PDF OEM Installation Guide © 2013 Adlib 5
System Requirements
The following prerequisites must be available prior to a complete installation of Adlib PDF. If performing a custom installation, please refer to the System Requirements by Component section, as each Component can be installed individually and may have differing needs.
During the installation of Adlib PDF, the user can choose to install IIS-based or Self-hosted Services Components. Software requirements are listed for all installations, regardless of the Services mode chosen. If IIS-based Services are installed, additional prerequisites are required.
Please refer to Software Requirements - Additional Requirements for IIS-Based Services for more information.
Complete Adlib PDF Installation Requirements
Hardware Requirements
Component Requirement
Processor Speed Minimum: 1.6 GHz
Recommended: 2.8 GHz or higher
Processing Cores Minimum: Single core
Recommended: Two cores
Memory (RAM) Minimum: 1 GB
Recommended: 2 GB or higher
Additional RAM should be added if processing large files or if running intensive applications in parallel with a Transformation Engine, or if a Network Load Balancing IIS Cluster with multiple System Manager Components is not being used.
Network Minimum: 100 MB
Recommended: 1 GB
Hard Disk Space Minimum: 3.5 GB
Recommended: See Storage Requirements Section
All Hardware Components Recommended: Increased performance can be gained by launching multiple Folder Connector and Job Management Service threads through multiple CPUs.

Adlib PDF OEM Installation Guide © 2013 Adlib 6
Storage Requirements
Component Requirement
Database Disk Space Requirements (Data and Index)
200 KB per successful job when logging in Info mode.
Unsuccessful jobs may retain additional information; the space requirements for this information is variable and may be up to 3-4x larger, depending on log level settings.
The following formula may be used to determine the minimum disk space required relative to the time elapsed between database clean-up procedures:
200 KB * Average Number of Active Jobs in the Adlib System = Estimated Database Growth Per Day
Adlib PDF contains a Database Growth Management feature that purges certain database tables according to parameters such as database size or age of the records, depending on the type of database being utilized. For more information see the Database Growth Management Appendix.
Runtime File Share Disk Space Requirements
The shared file system used for processing documents should have enough disk space to store all active documents and their renditions (plus a buffer for queued documents) for all Adlib Servers installed.
This formula is recommended:Average Document File Size * 2.5 * Average Number of Jobs in the Adlib System = Estimated Minimum Disk Space for the file share
For example, if the average document file size is 10 MB, and the average queue length is 100 jobs:
10 MB * 2.5 * 100 documents in system = 2.5 GB minimum disk space
After a job has been processed by Adlib PDF, the documents can be automatically deleted from the shared file system.
Runtime Adlib Server Disk Space Requirements
Each Adlib Server requires enough disk space to handle the largest document and its rendition

Adlib PDF OEM Installation Guide © 2013 Adlib 7
Software Requirements The following software prerequisites are required for all installations, regardless of the Services mode chosen (IIS-based or Self-hosted). For IIS-based Services installations, please refer to Software Requirements - Additional Requirements for IIS-Based Services.
For Windows Server 2008 R2 / 2012
Component Requirement
CAD File Type Conversions For CAD files generated by Autodesk Inventor:
Autodesk Inventor View 2011/2012 must be installed prior to the Transformation Engine to support the rendering of these files when the ConvertToPdf.Cad setting has been configured under the Transformation Rules.
The Adlib CAD module is incompatible with the Informative Graphics Brava application. CAD conversions will fail in Adlib if Brava is being run on the same machine.
Licensed Fonts Proper licenses must be obtained in order for the Transformation Engine to embed licensed fonts within PDF output.
Microsoft .NET Framework .NET Framework 3.5
.NET Framework 4
.NET Framework 4.5 (Windows Server 2012 only)
Microsoft Internet Explorer Microsoft Internet Explorer 7.0 / 8.0 / 9.0 (32-bit)
Internet Explorer 9.0 (32-bit) is supported for Windows Server 2008 R2 only.Internet Explorer 7.0 is included by default on Windows Server 2008 R2.
Microsoft Silverlight Microsoft Silverlight 4.0 (or greater)
Microsoft Office 2007/2010 and/or Microsoft Office Compatibility Pack
System Manager requires MS Office and/or Office Compatibility Pack installed when utilizing processing rules that reference document properties for Office 2007/2010 file formats.
Please see the Content Transformation Viewers and Supported File Types Appendix for information regarding the Microsoft Office applications that are supported with Adlib PDF.

Adlib PDF OEM Installation Guide © 2013 Adlib 8
Native Application Rendering For Native Application rendering support, the proper licenses must be obtained.
These applications must be registered in compliance with the licensing guidelines specified for each product.
Your organization is responsible to ensure that these Native Applications use complies with the rights and licenses obtained.
Any Configuration/Initialization dialogs need to be acknowledged within each application before the Transformation Engine can utilize them. For example, many applications have dialogs where users must provide personal information (Title, Name, Company, etc.) before using the application.
Please see the Content Transformation Viewers and Supported File Types Appendix for information regarding the native applications that are supported with Adlib PDF.
Operating System Windows Server 2008 R2 SP1Windows Server 2012
Support is currently available for only the English versions of Windows Server for use with Adlib PDF. Alternative language versions of these applications are not officially supported at this time.
User Account Control Settings Turn off UAC for the user under which Adlib executables and services will be run.
Windows Print Spooler Services Windows Print Spooler Services must be running in order for the Transformation Engine to render content.
Component Requirement

Adlib PDF OEM Installation Guide © 2013 Adlib 9
For Windows Server 2012 (specific)
XPS File Type Conversion The XPS Viewer feature must be installed in order to use the ConvertToXps.”*” Transformation Rule Settings to convert content to the XPS file type.
Windows Server 2008:
The Microsoft XML Paper Specifications Essentials Pack must be installed.
If using MS Office 2007, the Save As XPS add-in must be installed, in addition to the XPS Viewer Feature.
Windows Server 2012:
The XPS Viewer is bundled as a feature on 2012. To install this feature, open Server Manager, click Add Roles or Features and follow the wizard to install the XPS Viewer Feature.
Component Requirement
Internet Explorer Security Settings IE Enhanced Security Configuration must be disabled in order to view the Adlib Management Console once installation is complete.
This prerequisite is required for Self-hosted Services installations only.
Remote Desktop Settings If Adlib PDF is to be accessed by a user other than the local Administrator, the Windows Server 2012 default Remote Desktop setting must be changed to “Allow connections from computers running any version of Remote Desktop”.
For more information on this procedure or the Adlib PDF workaround, please see Granting Access for Users without Local Administrator Rights (Windows Server 2012 Only)
Component Requirement

Adlib PDF OEM Installation Guide © 2013 Adlib 10
Database
Software Requirements - Additional Requirements for IIS-Based Services
For Windows Server 2008 R2 (specific)
Component Requirement
Database Microsoft SQL Server 2005
Microsoft SQL Server 2008
Microsoft SQL Server 2008 R2
If using WIndows Server 2012, Service Pack 3 (SP3) must be installed with SQL Server 2008 R2.
Microsoft SQL Server 2012
Microsoft SQL Express 2008 can be installed with Adlib PDF if desired.
Microsoft SQL Server 2005 Named Pipes must be enabled.
Tablespace/schema and User Account A database tablespace/schema with a corresponding user account must be created prior to an Adlib PDF Enterprise installation.
When creating the database, the following options must be used explicitly:
CREATE DATABASE [ADLIB_CTP|OTHER_NAME] COLLATE SQL_Latin1_General_CP1_CI_AIwhere:
Latin1_General = Default ordering for sorts
CP1 = code page 1252 for non-Unicode data
(Note: All Adlib string data types are Unicode)CI = case insensitive
AI = accent insensitive
Component Requirement
Microsoft .NET 3.5.1 Framework Features Required:
HTTP Activation
HTTP Activation is located within the .NET Framework 3.5.1 WCF Activation Group.

Adlib PDF OEM Installation Guide © 2013 Adlib 11
For Windows Server 2012 (specific)
Web Server IIS Management Tools
IIS 6 Management Compatibility
IIS 7.5 must be enabled
IIS 7.5 is included (but not enabled) by default on Windows Server 2008 R2.
Common HTTP Features
WebDAV 7.5 Publishing (IIS Web Publishing Extension Module)
Web Server
Application Development
ASP.NET
Security
Windows Authentication
Component Requirement
Microsoft .NET 3.5 Framework Features Required:
HTTP Activation
.NET 3.5 Framework is included (but not enabled) by default on Windows Server 2012.
Microsoft .NET 4.5 Framework Features Required:
ASP.NET 4.5
WCF Services
HTTP Activation
Web Server IIS Management Tools
IIS 6 Management Compatibility
IIS Management Scripts and Tools
Common HTTP Features
WebDAV Publishing
Web Server
Application Development
ASP.NET 3.5
ASP.NET 4.5
Security
Windows Authentication
Application Server
COM + Network Access
Component Requirement

Adlib PDF OEM Installation Guide © 2013 Adlib 12
System Requirements by ComponentWhen performing a custom installation, ensure that the following prerequisites are available according to the Adlib PDF Component being installed on the system.
Database
Hardware Requirements
Storage Requirements
Component Requirement
Processor Speed
Memory (RAM)
The hardware required to accommodate the desired operating size of the database.
Component Requirement
Database Disk Space Requirements (Data and Index)
200 KB per successful job when logging in Info mode.
Unsuccessful jobs may retain additional information; the space requirements for this information is variable and may be up to 3-4x larger, depending on log level settings.
The following formula may be used to determine the minimum disk space required relative to the time elapsed between database clean-up procedures:
200 KB * Average Number of Active Jobs in the Adlib System = Estimated Database Growth Per Day
Adlib PDF contains a Database Growth Management feature that purges certain database tables according to parameters such as database size or age of the records, depending on the type of database being utilized. For more information see the Database Growth Management Appendix.

Adlib PDF OEM Installation Guide © 2013 Adlib 13
Software Requirements
Services
Hardware Requirements
Component Requirement
Database Microsoft SQL Server 2005
Microsoft SQL Server 2008
Microsoft SQL Server 2008 R2
If using WIndows 2012, Service Pack 3 (SP3) must be installed with SQL Server 2008 R2.
Microsoft SQL Server 2012
Microsoft SQL Server 2005 Named Pipes must be enabled.
Microsoft .NET Framework .NET Framework 3.5
Tablespace/schema and User Account A database tablespace/schema with a corresponding user account must be created prior to an Adlib PDF Enterprise installation.
When creating the database, the following options must be used explicitly:
CREATE DATABASE [ADLIB_CTP|OTHER_NAME] COLLATE SQL_Latin1_General_CP1_CI_AIwhere:
Latin1_General = Default ordering for sorts
CP1 = code page 1252 for non-Unicode data
(Note: All Adlib string data types are Unicode)
CI = case insensitive
AI = accent insensitive
Component Requirement
Processor Speed
Memory (RAM)
Hard Disk Space
Minimum: The hardware required to run the Operating System on the machine.
Recommended: Increased performance can be gained by launching multiple Job Management Service threads through multiple CPUs.

Adlib PDF OEM Installation Guide © 2013 Adlib 14
Software RequirementsThe software requirements for the Services Components vary dependant on whether IIS-based or self-hosted Services are to be installed on the system.
IIS-Based Services Requirements
For Windows Server 2008 R2 (specific)
For Windows Server 2012 (specific)
Component Requirement
Microsoft .NET 3.5.1 Framework Features Required:
HTTP Activation
HTTP Activation is located within the .NET Framework 3.5.1 WCF Activation Group.
Web Server IIS Management Tools
IIS 6 Management Compatibility
IIS 7.5 must be enabled
IIS 7.5 is included (but not enabled) by default on Windows Server 2008 R2.
Common HTTP Features
WebDAV 7.5 Publishing (IIS Web Publishing Extension Module)
Web Server
Application Development
ASP.NET
Security
Windows Authentication
Component Requirement
Microsoft .NET 3.5 Framework Features Required:
HTTP Activation
.NET 3.5 Framework is included (but not enabled) by default on Windows Server 2012.
Microsoft .NET 4.5 Framework Features Required:
ASP.NET 4.5
WCF Services
HTTP Activation

Adlib PDF OEM Installation Guide © 2013 Adlib 15
Web Browser User Interface
Self-Hosted Services Requirements
For Windows Server 2008 R2 / 2012
Web Server IIS Management Tools
IIS 6 Management Compatibility
IIS Management Scripts and Tools
Common HTTP Features
WebDAV Publishing
Web Server
Application Development
ASP.NET 3.5
ASP.NET 4.5
Security
Windows Authentication
Internet Explorer Security Settings IE Enhanced Security Configuration must be disabled in order to view the Adlib Management Console once installation is complete.
Remote Desktop Settings If Adlib PDF is to be accessed by a user other than the local Administrator, the Windows 2012 default Remote Desktop setting must be changed to “Allow connections from computers running any version of Remote Desktop”.
For more information on this procedure or the Adlib PDF workaround, please see Granting Access for Users without Local Administrator Rights (Windows Server 2012 Only)
Component Requirement
Microsoft Internet Explorer Microsoft Internet Explorer 7.0 / 8.0 / 9.0 (32-bit mode)
Internet Explorer 9.0 (32-bit) is supported for Windows Server 2008 R2 only.Internet Explorer 7.0 is included by default on Windows Server 2008 R2.
Microsoft Silverlight Microsoft Silverlight 4.0 (or greater)
Component Requirement
Microsoft .NET Framework .NET Framework 3.5
.NET Framework 4
Component Requirement

Adlib PDF OEM Installation Guide © 2013 Adlib 16
For Windows Server 2012 (specific) Self-Hosted Services only
Web Browser User Interface
User Account Control Settings Turn off UAC for the user under which Adlib executables and services will be run.
Component Requirement
Internet Explorer Security Settings IE Enhanced Security Configuration must be disabled in order to view the Adlib Management Console once installation is complete.
Remote Desktop Settings If Adlib PDF is to be accessed by a user other than the local Administrator, the Windows 2012 default Remote Desktop setting must be changed to “Allow connections from computers running any version of Remote Desktop”.
For more information on this procedure or the Adlib PDF workaround, please see Granting Access for Users without Local Administrator Rights (Windows Server 2012 Only)
Component Requirement
Microsoft Internet Explorer Microsoft Internet Explorer 7.0 / 8.0 / 9.0 (32-bit mode)
Internet Explorer 9.0 (32-bit) is supported for Windows Server 2008 R2 only.Internet Explorer 7.0 is included by default on Windows Server 2008 R2.
Microsoft Silverlight Microsoft Silverlight 4.0 (or greater)
Component Requirement

Adlib PDF OEM Installation Guide © 2013 Adlib 17
System Manager
Hardware Requirements
Software Requirements
Component Requirement
Processor Speed See General Requirements Section.
Memory (RAM) See General Requirements Section.
Network See General Requirements Section.
Hard Disk Space Minimum: 1 GB
Component Requirement
Microsoft Office 2007/2010 and/or MIcrosoft Office Compatibility Pack
System Manager requires MS Office and/or Office Compatibility Pack installed when utilizing processing rules that reference document properties for Office 2007/2010 file formats.
Please see the Content Transformation Viewers and Supported File Types Appendix for information regarding the Microsoft Office applications that are supported with Adlib PDF.
Microsoft .NET Framework .NET Framework 3.5
User Account Control Settings Turn off UAC for the user under which Adlib executables and services will be run.

Adlib PDF OEM Installation Guide © 2013 Adlib 18
Transformation Engine
Hardware Requirements
Storage Requirements
Component Requirement
Processor Speed see General Requirements Section
Memory (RAM) see General Requirements Section
Additional RAM should be added if processing large files or if running resource intensive applications in parallel with the Transformation Engine
Hard Disk Space see General Requirements Section
Component Requirement
Disk Space Requirements Minimum: 1 GB
Runtime File Share Disk Space Requirements
The shared file system used for processing documents should have enough disk space to store all active documents and their renditions (plus a buffer for queued documents) for all Adlib Servers installed.
This formula is recommended:Average Document File Size * 2.5 * Average Number of Jobs in the Adlib System = Estimated Minimum Disk Space for the file share
For example, if the average document file size is 10 MB, and the average queue length is 100 jobs:
10 MB * 2.5 * 100 documents in system = 2.5 GB minimum disk space
After a job has been processed by Adlib, the documents can be automatically deleted from the shared file system.
Runtime Adlib Server Disk Space Requirements
Each Adlib Server requires enough disk space to handle the largest document and its rendition

Adlib PDF OEM Installation Guide © 2013 Adlib 19
Software Requirements
Component Requirement
Microsoft Internet Explorer Microsoft Internet Explorer 7.0 / 8.0 / 9.0 (32-bit)
Internet Explorer 9.0 (32-bit) is supported for Windows Server 2008 R2 only.Internet Explorer 7.0 is included by default on Windows Server 2008 R2.
Native Application Rendering For Native Application rendering support, the proper licenses must be obtained.
These applications must be registered in compliance with the licensing guidelines specified for each product.
Your organization is responsible to ensure that these Native Applications use complies with the rights and licenses obtained.
Any Configuration/Initialization dialogs need to be acknowledged within each application before the Transformation Engine can utilize them. For example, many applications have dialogs where users must provide personal information (Title, Name, Company, etc.) before using the application.
Please see the Content Transformation Viewers and Supported File Types Appendix for information regarding the native applications that are supported with Adlib PDF.
Licensed Fonts Proper licenses must be obtained in order for the Transformation Engine to embed licensed fonts within PDF output.
CAD File Type Conversions For CAD files generated by Autodesk Inventor:
Autodesk Inventor View 2011/2012 must be installed on the system prior to the installation of the Transformation Engine Component if these file types will be rendered.
The Adlib CAD module is incompatible with the Informative Graphics Brava application. CAD conversions will fail in Adlib if Brava is being run on the same machine.
Microsoft .NET Framework .NET Framework 3.5
.NET Framework 4
User Account Control Settings Turn off UAC for the user under which Adlib executables and services will be run.
Windows Print Spooler Services Windows Print Spooler Services must be running in order for the Transformation Engine to render content.

Adlib PDF OEM Installation Guide © 2013 Adlib 20
Installation Instructions
OverviewAdlib PDF, including all the associated components, can be installed on a single server by performing a Complete Installation. Using a Custom installation, the user can install selected components on multiple servers. For more information on configuring a multi-server deployment of Adlib PDF, Contact Adlib.
Prepare for Initial InstallationTo install Adlib PDF you must be logged into the system with an account that has Local Administrator rights.
After installation is complete, a configuration change is required If users without local Administrator rights are to be granted access to the system. Please see Granting Access for Users without Local Administrator Rights (Windows Server 2012 Only) for more information on this procedure. Note: this applies to Windows Server 2012 users only.
Ensure that the necessary system requirements are available, including a database tablespace/schema with a corresponding user account. (See System Requirements for more details on installation prerequisites and the database creation options that are required).
SQL Server Setup
1. Create a new SQL Server database named ADLIB_PDF (or a preferred naming convention). This database must NOT be case sensitive.
2. Create an SQL user and ensure this user has database access to the newly created database.
3. Document the name of the SQL server including Instance name, SQL user credentials and database name for use during the Adlib software install.
Domain Controllers
1. SQL Server Express cannot be installed by Adlib PDF on a domain controller because of a database service account conflict.
2. In order for a SQL Server Express database is to be used, it must be installed manually before the installation of Adlib PDF and an alternate account must be used as the SQL Server service account. This account cannot be a local service or network service account.
Using Windows Authentication for SQL Server
1. If desired, Windows authentication for SQL Server can be used by selecting a checkbox on the SQL Server Database Settings window during the Adlib PDF installation procedure. Before beginning, the user that will be performing the installation must be added to the list of users in the database and given sysadmin privileges:
a) Instance -> Security -> Logins -> Right-click New Login or Edit Existing.

Adlib PDF OEM Installation Guide © 2013 Adlib 21
b) Server Roles -> Click Sysadmin
2. Repeat the steps above to give sysadmin privileges to NT_AUTHORITY\SYSTEM and NT_AUTHORITY\NETWORK SERVICE.
3. If Adlib PDF will be installed across multiple servers, the remote machines must also be added to the list of users with sysadmin privileges. An example of the query is as follows:
CREATE LOGIN [ADLIBSYS\[MACHINE_NAME_REPLACE] $] FROM WINDOWS
GO
EXEC sp_addsrvrolemember ‘ADLIBSYS\[MACHINE_NAME_REPLACE] $’, ‘sysadmin’;
GO
Adlib Active Directory Service Account User
1. Create an account in the Active Directory that will be dedicated as the ADLIB service account used during the Adlib PDF install.
2. Ensure this account has access to any remote shares if the Folder Connector Component will be installed.
3. Ensure that this account is a local administrator for any virtual image servers dedicating to Adlib.
Install the Necessary Prerequisites
1. Ensure that Windows UAC is turned off for the install.
2. If IIS-based Services will be installed, ensure that IIS is installed and that WebDAV IIS compatibility is enabled. If self-hosted Services will be installed, this requirement is not necessary.
3. Ensure that RDP is enabled on the server. For Windows Server 2012 users, if Adlib PDF is to be accessed by a user other than the local Administrator, the Windows default Remote Desktop setting must be changed to “Allow connections from computers running any version of Remote Desktop” For more information on this procedure, or the Adlib PDF workaround for this issue, please see Granting Access for Users without Local Administrator Rights (Windows Server 2012 Only).
4. Ensure that .NET 3.5 is installed via Server Manager and that HTTP Activation is turned on (HTTP Activation is only required if IIS-based Services will be installed).
5. Download and install .NET 4.0, if necessary. Windows Server 2012 also require .NET 4.5.
6. Review the System Requirements chapter for any additional prerequisites required for the Components that will be installed.

Adlib PDF OEM Installation Guide © 2013 Adlib 22
Installation Instructions
To Install Adlib PDF:1. Close all applications.
2. Run the Adlib PDF 32- or 64-bit installation file.
3. In the Adlib-Installation Wizard window, click Next.
Figure 1 - Adlib-Installation Wizard
Adlib PDF OEM Installation Guide © 2013 Adlib 23
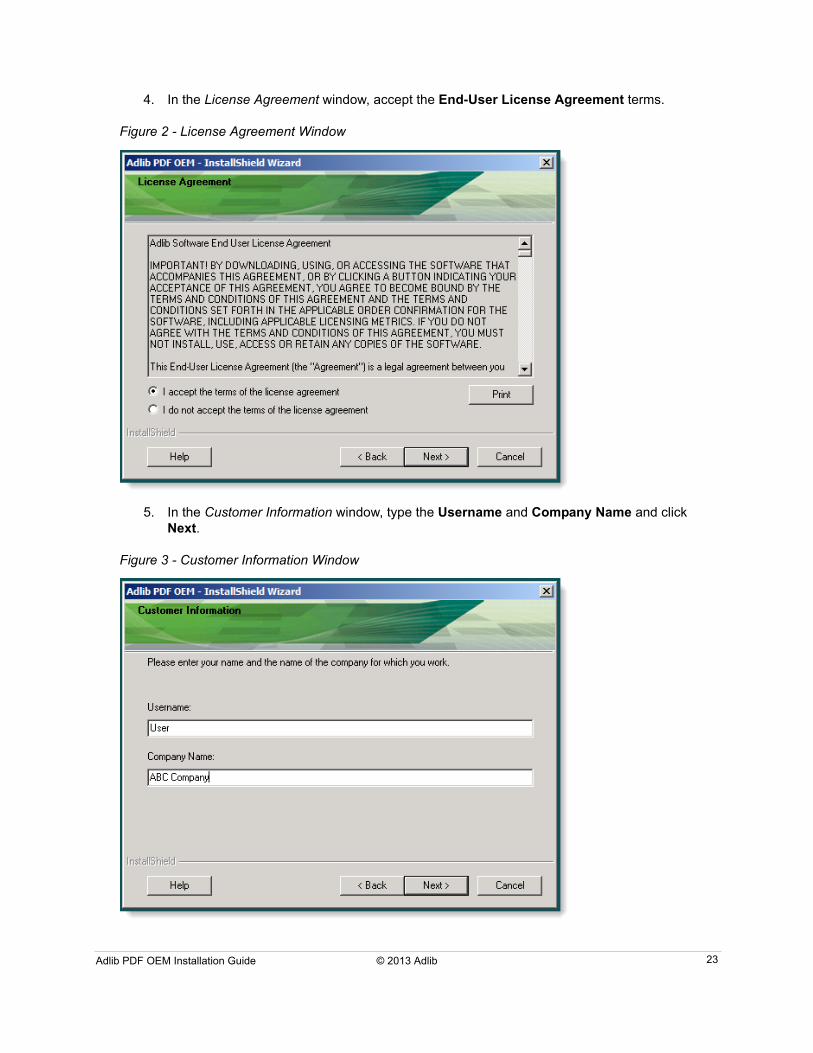
4. In the License Agreement window, accept the End-User License Agreement terms.
Figure 2 - License Agreement Window
5. In the Customer Information window, type the Username and Company Name and click Next.
Figure 3 - Customer Information Window

Adlib PDF OEM Installation Guide © 2013 Adlib 24
6. In the Setup Type window, select Complete to begin a complete installation of all components of the Adlib system.
Or,
7. Select Custom to begin an installation of the components of your choice.
8. If desired, click Browse… and select an alternate Installation Folder for the installation.
9. Click Next.
Figure 4 - Setup Type Window
The specified installation folder will be checked to ensure that the user NETWORK SERVICE has the required permissions to allow IIS to access the web.config in the install folder. If the proper permissions have not been set, a pop-up dialog will provide the following options:
Yes: The install will attempt to change the permissions. If it fails to set permissions, the installation will fail. If successful, the install will continue.
No: The install will not attempt to change permissions if not set. The user will be prompted to select a different installation path.
Ignore: The installer will check for permissions, and note in install log if required permissions are not set. The installation will continue.
If any system prerequisites are not available, a pop-up window will be displayed listing the missing requirements.
10. If a Custom installation was specified, select the components you wish to install in the Select Features window. The disk space required/available for the selected components will be displayed.The following options are available:

Adlib PDF OEM Installation Guide © 2013 Adlib 25
Database Scripts: The scripts and support files required to create the Adlib System Database.
Services: The Job Management Service.
System Manager: The component that manages jobs and monitors all Adlib System components. System Manager also prepares each job by executing the appropriate rule sets and issues alerts to the system administrator.
Transformation Engine: The component that performs file transformations.
For further instructions on a Custom installation, please refer to the steps below that are applicable to the components you wish to install. During a Complete installation several system defaults are created that must be replicated manually after a Custom installation before Adlib PDF will be operational. For a description of these procedures, see Manual System Configurations.
Figure 5 - Select Features Window
The Adlib Database Scripts Component, which registers a schema to the database platform, must be installed only once even if other components are installed on multiple servers.

Adlib PDF OEM Installation Guide © 2013 Adlib 26
11. In the Management Console Login Settings window, type the Password to be associated with the sysadmin Username. These credentials will be used to register Components rather than to login to the Adlib Management Console.
12. Enter the Email Address at which you wish to receive system notifications and click Next. Note: Email notification is not available with Adlib PDF OEM.
The Username for these administrator-level credentials is predefined as “sysadmin”.
Figure 6 - Management Console Login Settings

Adlib PDF OEM Installation Guide © 2013 Adlib 27
13. Select either Connect to an existing SQL Server or Install a new instance of SQL Express in the Database Type Selection window.
Figure 7 - Database Type Selection Window

Adlib PDF OEM Installation Guide © 2013 Adlib 28
14. If Connect to an existing SQL Server was selected, enter or modify the default values for the following fields in the SQL Server Database Settings window and click Next:
Database Name: Any alias for the name of the database to be used by Adlib PDF.
Server Name: The machine name where the database is located. This must be an externally visible/resolvable name.
Username/Password: The credentials of a database user with read/write privileges. These credentials will be used to register components and to make calls to the database.
Use Windows Authentication: Check the box to set the authentication for SQL Server to Windows Authentication. The user performing the installation, as well as the NT_AUTHORITY\SYSTEM and NT_AUTHORITY\NETWORK SERVICE must have sysadmin privileges in the database. For more information, see Using Windows Authentication for SQL Server.
When performing an Adlib PDF for SQL Server installation, the database tablespace/schema with a corresponding user account must be available prior to the installation of the Adlib system.
The information provided in the Database Settings window will be used to verify a connection to the database before the remainder of the installation can proceed.
Figure 8 - SQL Server Database Settings Window

Adlib PDF OEM Installation Guide © 2013 Adlib 29
15. If desired, modify the default path in the Root Adlib Work Folder window. This is the location where the working folders will be created as necessary for the components being installed.
Figure 9 - Root Adlib Work Folder

Adlib PDF OEM Installation Guide © 2013 Adlib 30
16. In the Windows Credentials window, type the Account and Password under which the Adlib executables and services will run. These must be the credentials of a Windows user with local administrator privileges. The Account name must be in the local admin\username or domain\username format. For example:
Local admin\username format: .\Administrator
Domain\username format: mydomain\adlibuser
User Account Control security settings must be turned off for this Windows user before the installation of Adlib PDF.
Figure 10 - Windows Credentials Window

Adlib PDF OEM Installation Guide © 2013 Adlib 31
17. Two options are available in the Service Settings window, depending on the Services mode chosen by the user. If the web Services and Job Management Service are to be self-hosted, select the Self-Hosted Service Mode radio button and enter or modify the default values for the following fields:
Services/Job Management Service Port Numbers: The port numbers to be used by the web Services and Job Management Service to access Adlib PDF. Defaults are provided during installation, but these can be modified if necessary. The port numbers will be validated before the next step in the installation.
Create a local Job Folder: A shared path will be created for use by the System Manager.
Or,
Use Existing Job Folder: Select this option if you are configuring a clustered environment.
If IIS is not detected on the machine on which Adlib PDF is being installed, the choice to use the IIS Services Mode will not be enabled. Also, if Adlib PDF Services are installed on multiple servers, only one type of Services Mode can be utilized across the system.
Figure 11 - Self-Hosted Services Settings
OR, if the web Services and Job Management Services are to be hosted by IIS, select the IIS Services Mode radio button and complete the following fields:
IIS Port Number: The port number for the user console connection to the Adlib website.
IIS Authentication Settings Account/Password: The credentials of a user with the right to create Internet Information Services Settings, using the domain\username format.

Adlib PDF OEM Installation Guide © 2013 Adlib 32
Create a local Job Folder: An IIS virtual directory and a shared path will be created for use by the System Manager.
Or,
Use Existing Job Folder: Select this option if you are configuring a clustered environment.
If the Use Existing Job Folder option is selected, the File Repository UNC Path and File Repository Web Server Path must be specified in the Job Management Service System Settings, using the Adlib Management Console. For more information on modifying System Settings, see the Adlib PDF User Guide.
Figure 12 - IIS Service Settings Window
18. During a custom installation, if a Transformation Engine Component is being installed on an alternate server, additional information is required in order for that server to access the Services Components:
In the Management Console Login Settings window, enter the Password created for the SA Username and select the appropriate Services Mode.
Services/Job Management Service Root URLs: To enable the Services Components to connect to the main Adlib PDF installation, the full URLs must be specified with the main Adlib PDF server name and the web and Job Management Services port numbers in the following manner:
http://<server_name>:port number/Adlib/

Adlib PDF OEM Installation Guide © 2013 Adlib 33
The Job Management Service Root URL is required for a Self-Hosted Services installation only.
Figure 13 - Management Console Login Settings Window
19. In the Start Copying Files window, review the list of components that will be installed. If any changes are required, click Back to make changes.

Adlib PDF OEM Installation Guide © 2013 Adlib 34
20. Click Next to begin copying the program files. The software will install using the settings defined during the installation process.
Figure 14 - Start Copying Files Window

Adlib PDF OEM Installation Guide © 2013 Adlib 35
21. In the InstallShield Wizard Complete window, select the appropriate checkbox if you wish to view the Installation Log and or launch the License Manager and click Finish.
The Installation Log is stored in the following location:
C:\Users\<USERNAME>\AppData\Local\Temp\1
For more information on activating a license for Adlib PDF, see License Manager Instructions.
The License Manager link will appear only when a Complete installation has been performed, or when the Transformation Engine has been installed.
Figure 15 - InstallShield Wizard Complete Window
The Transformation Engine must be activated in either evaluation mode or with a license key before jobs can be processed.
Once Adlib PDF has been licensed, the Process Manager Service must be started (on each server in a multi-server installation) using Windows Services before the Transformation Engine will be operational.

Adlib PDF OEM Installation Guide © 2013 Adlib 36
Granting Access for Users without Local Administrator Rights (Windows Server 2012 Only)In order to grant access to Adlib PDF to users without local Administrator rights, the default Remote Desktop settings must be changed to allow this type of connection.
Modify System Properties within Windows Server 2012:1. Access the Control Panel and open System Properties.
2. Click the Remote tab.
3. Select Allow connections from computers running any version of Remote Desktop (less secure) and click Apply.
Figure 16 - Remote Desktop Settings

Adlib PDF OEM Installation Guide © 2013 Adlib 37
Silent Installation
OverviewAdlib PDF can be configured to install silently, without the need for user intervention.
An interactive installation receives the necessary input from the user in the form of responses to dialog boxes. A silent installation receives user input from an Adlib PDF Installation Configuration file (AdlibInstall.cfg).
The installation configuration file contains information that an end user would ordinarily enter as responses to within the Wizard when running an installation from the user interface. The format of AdlibInstall.cfg resembles that of an .ini file. The installation configuration file is a plain text file consisting of sections containing installation parameters for each Component. The user must specify YES or NO for the “Install” parameter within each section and enter any additional information for each Component to be installed.
For example: [Engine]
Install = Yes
ActivationID = <Customer License ID>
To install Adlib PDF silently, the user executes the installation with an "/s" command line parameter (i.e. Adlib.5.0x64.exe /s). The installation will search for the AdlibInstall.cfg in the same folder as the installation file. Optionally, the user can specify a different location for the installation configuration file by passing the path as a second parameter (i.e. Adlib.5.0x64.exe /s C:\User\SomePath\AdlibInstall.cfg). The installation configuration file must always be named "AdlibInstall.cfg". The silent installation will read the information from the installation configuration file and install the product according to the data provided. To modify the installation configuration file, simply open it in a text editor.
The user will not be notified when the installation process is completed, but the executable will be visible within the Windows Task Manager while it is running.
The silent installation will not force a reboot, however it is recommended that the user reboot after the installation has completed.
Installation LogThe Installation Log is stored in the following location:
C:\Users\<USERNAME>\AppData\Local\Temp\1
Process Manager ServicesThe Adlib Process Manager Service must be started in Windows (Administrative Tools/Services) before jobs can be submitted for processing.

Adlib PDF OEM Installation Guide © 2013 Adlib 38
DatabasesAdlib PDF can be installed for use with an existing SQL database. If an SQL database is to be used, the database tablespace/schema with a corresponding user account must be available prior to the installation of Adlib PDF. If a SQL database is not already installed, a SQL Express Instance and database can be created during the Adlib PDF installation. To install a SQL Express database, uncomment and complete the parameters that pertain to the SQL Express installation within the silent installation file:
InstallSQLServerExpress = Yes
SQLServerExpressSAPassword = <SQL Password for SA>
Multi-Server InstallationsWhen Adlib PDF Components are to be installed on multiple servers, the silent installation file must be modified for each installation, and a defined order of Component installation must be followed.
To Install Adlib PDF Components on Multiple Servers:1. Install the database scripts or SQL Server Express database. For all subsequent installations,
specify “Install = No” within the Database/Scripts sections.
2. Install the Services Component(s). If installing a Services Component on a machine that does not contain the database, ensure that the “RemoteDatabaseConnectionString” parameter is included in the silent installation file.
3. Install the System Manager and Engine and any additional Components as required. Any Component installations on servers where the Services Component has not been installed requires the “RemoteServicesURL(s)” location to be specified within the silent installation file. This location should be a fully qualified domain name when performing an install in a distributed system.
UninstallationSimilarly to installation, the silent uninstallation file (AdlibUninstall.cfg) contains information that the user would ordinarily enter as responses within the wizard when running an uninstall from the user interface. To begin the silent uninstall, the user executes the installation with an "/s" command line parameter, (i.e. Adlib.5.0x64.exe /s). The program will search for the .cfg in the same folder as the installation file. If present, the silent installation file (AdlibInstall.cfg) must be removed from the folder before performing the uninstall, or a silent installation will be executed. Optionally, the user can specify a different location for the uninstallation configuration file by passing the path as a second parameter:Adlib.5.0x64.exe /s C:\User\SomePath\AdlibUnInstall.cfg.
The silent uninstallation configuration file will perform a complete uninstall. Currently, modifications cannot be performed silently.
AdlibInstall.cfg[Common]
InstallFolder = C:\Program Files\Adlib
RootFolder = C:\Adlib
WindowsUsername = <Windows Login>
WindowsPassword = <Windows Password>

Adlib PDF OEM Installation Guide © 2013 Adlib 39
ManagementConsoleUsername = sysadmin
ManagementConsolePassword = <sysadmin password>
SysadminEmailAddress = <[email protected]>
ChangeNetworkServicePermission = Yes l No l Ignore
CustomerName = <MyName>
CompanyName = <MyCompany>
#DatabaseConnectionString = Data Source = <[Computer_Name] l [Computer_Name]\DB Instance Name>; Initial Catalog = <DatabaseName>; User Id = <DatabaseAccountUserID>; Password = <DatabaseAccountPassword>;
#RemoteDatabaseEngine = System.Data.SqlClient
#RemoteServicesURL = http://<HOSTNAME>:<Port>/Adlib
#RemoteJMSServicesURL = http://<HOSTNAME>:<Port>/Adlib
[Database]
Install = Yes l No
DatabaseEngine = SQLServer
DatabaseAccount = AccountName
DatabasePassword = <SQL Password>
# SQLServer-specific
ServerName = localhost\SQLEXPRESS
SQLServerAuthentication = SQLServer | Windows
DatabaseName = ADLIB_PDF
# Uncomment next two lines to install SQL Express
#InstallSQLServerExpress = Yes l No
#SQLServerExpressSAPassword = <SQL Password for SA>
[SystemManager]
Install = Yes l No
ServiceAccount = <Windows Login for SystemManager>
ServicePassword = <Windows Password>
[Engine]
Install = Yes l No
ActivationID = <Customer license ID>

Adlib PDF OEM Installation Guide © 2013 Adlib 40
[Services]
Install = Yes l No
Mode = SelfHosted | IIS
PortNumber = <Selfhosted_Default=51050 | IIS_Default=80>
JMSPortNumber = 51051
DirectorJobFolder = Create
IISAuthenticationAccount = <Windows Login for Services>
IISAuthenticationPassword = <Windows Password>
[GenericConnector]
InstallPath = C:\Program Files\Adlib\Generic Connector
InstallVersion = 1.0.0.0
AdlibUninstall.cfgManagementConsoleUsername = sysadmin
ManagementConsolePassword = <PASSWORD>
RehostEngineLicenses = Yes | No

Adlib PDF OEM Installation Guide © 2013 Adlib 41
Glossary
Silent Install Script Parameter Description
[Common]
InstallFolder Specify the install location.
Default = C:\Program Files\Adlib
RootFolder Specify the location to create the default processing folders. Default = C:\Adlib
WindowsUsername/Password Enter the username and password under which the Adlib executables and services will run. These must be the credentials of a Windows user with local administrator privileges. The username must be in the domain\username format or the .\username format for a local user.
User Account Control security settings must be turned off for this Windows user before the installation of Adlib PDF
ManagementConsoleUsername The username is pre-defined as “sysadmin”.
ManagementConsolePassword Enter the password you wish to use to login to the Adlib Management Console.
SysadminEmailAddress Enter the email address at which you wish to receive system notifications.
ServicesURL Specify the location of the Services installation in the following format:
http://localhost/Adlib
If a port number other than 80 will be used, the port number must also be specified:
http://localhost:<portnumber>/Adlib
ChangeNetworkServicePermission Specify whether or not the installer should check the installation folder to ensure that the user NETWORK SERVICE has the correct permissions so that IIS can access the web.config in the install folder.
Yes - The install will attempt to change the permissions. If it fails to set permissions, the installation will fail. If successful, the install will continue.
No - The install will not attempt to change permissions if not set. The installation will fail.
Ignore - The installer will check for permissions, and note in install log if required permissions are not set. The installation will continue.
CustomerName Specify the customer name.

Adlib PDF OEM Installation Guide © 2013 Adlib 42
CompanyName Specify the company name.
RemoteDatabaseConnectionString When deploying additional Adlib PDF Components in a subsequent installation on a machine that does not contain the database, specify the following parameters within the RemoteDatabaseConnectionString:
Data Source = Computer Name or Computer Name\Database Instance Name
Initial Catalog = Database Name
User ID = Database User Account Name
Password = Database User Password
RemoteDatabaseEngine Default = System.Data.SqlClient
RemoteServicesURL
RemoteJMSServicesURL
If IIS-based Services have been installed, only the RemoteServicesURL (default port = 80) is required.
If self-hosted Services have been installed, both the RemoteServicesURL (default port = 51050) and the RemoteJMSServicesURL (default port = 51051) are required.
The Remote Services and JMS Services URLs must be a fully qualified domain names when Adlib PDF Components are installed on additional servers.
[Database]
Install Specify Yes when installing all the Adlib PDF Components on a single server. If Components will be installed on multiple servers, the database scripts must be installed first. During subsequent installations, the database install parameter must be:
Install = No
DatabaseEngine Default = SQLServer
DatabaseAccount/Password Specify the credentials of a database user with read/write privileges. These credentials will be used to register components and to make calls to the database.
The Database Account/Password must also be entered during a SQL Express installation.
#SQLServer-specific
When performing an Adlib PDF for SQL Server installation, the database tablespace/schema with a corresponding user account must be available prior to the installation of the Adlib system
Silent Install Script Parameter Description

Adlib PDF OEM Installation Guide © 2013 Adlib 43
ServerName The machine name where the database is located. This must be an externally visible/resolvable name.
<Databasehost> or <Databasehost>\<DatabaseInstance>
Default = localhost\SQLEXPRESS
SQLServerAuthentication Select either SQLServer or Windows Authentication for the SQL Server database
DatabaseName Any alias for the name of the database to be used by Adlib PDF.
Default = ADLIB_PDF
#InstallSQLServerExpress Uncomment this parameter and specify Yes to install a SQL Server Express database along with Adlib PDF.
#SQLServerExpressSAPassword Uncomment this parameter and specify the SA password for the SQL Express database. These credentials will be used to register components and to make calls to the database.
[SystemManager]
Install Specify whether or not to install the System Manager Component.
ServiceAccount/Password The credentials of a local administrator account, which will be used to run the System Manager Service. If desired, this can be the same account specified for the WindowsUsername/Password parameter in the Common section.
[Engine]
Install Specify whether or not to install the Transformation Engine.
ActivationID The customer license ID.
[Services]
Install Specify whether or not to install Services. When installing Adlib PDF Components on additional servers, the Services Component must be installed after the Database, but before all subsequent Components. In those cases, the RemoteServicesURL(s) must be included in the .cfg file when installing Components on other servers.
Mode Use Mode to select either IIS or Self-hosted. The port number parameter must be specified. If IIS services are selected, the JMSPortNumber will be ignored.
Silent Install Script Parameter Description

Adlib PDF OEM Installation Guide © 2013 Adlib 44
PortNumber Indicate the port number for the user console connection to the Adlib website.
Default = 80 (IIS Services).
JMSPortNumber Indicate the port number for Job Management Services (Self-hosted Services only).
Default = 51051
DirectorJobFolder The default “Create” will create an IIS virtual directory and a shared path for use by the System Manager.
IISAuthenticationAccount/Password Specify the credentials of a user with the right to create Internet Information Services Settings, using the domain\username format.
[UserInterface]
Install The Management Console is not available with Adlib PDF OEM.
[GenericConnector]
InstallPath If applicable, specify the path to the location of the custom integration to Adlib PDF. The default is:
C:\Program Files\Adlib\Generic Connector
InstallVersion Indicate the version number of the custom connector used when registering the Component with Adlib PDF.
Silent Install Script Parameter Description

Adlib PDF OEM Installation Guide © 2013 Adlib 45
License Manager Instructions
The Adlib License Manager can be used to manage all of your Adlib PDF license needs. Licenses can be activated, returned and rehosted according to business requirements.
Explanation of License TypesThere are four types of license transactions that can be performed within the Adlib License Manager:
The Transformation Engine must be stopped using the Process Manager before performing any type of license transaction. For more details on stopping and restarting the service, see the Adlib PDF User Guide.
License Type Use
Evaluation License Enables Adlib PDF for a 30-day evaluation period. Evaluation may be enabled only once per computer. Output will be watermarked.
Activate License Activates an Adlib PDF license for exclusive use with all of the features that are included in the purchased license package.
Rehost License Temporarily returns a license to the Adlib license server so that it can be re-activated on a different machine.
Rehost can also be used to temporarily remove then return a license to the same machine when making any significant changes to a server (such as virtualizing a server or making any significant hardware changes.)
Return License Returns a license to the Adlib license server with no transfer.

Adlib PDF OEM Installation Guide © 2013 Adlib 46
Evaluation LicenseThe Activate Evaluation license transaction enables Adlib PDF in evaluation mode for a 30-day trial period. Output will be watermarked.
To Activate an Evaluation License:1. In the License Transaction Type window, select Activate Evaluation and click Next.
Figure 17 - License Transaction Type window
Adlib PDF OEM Installation Guide © 2013 Adlib 47
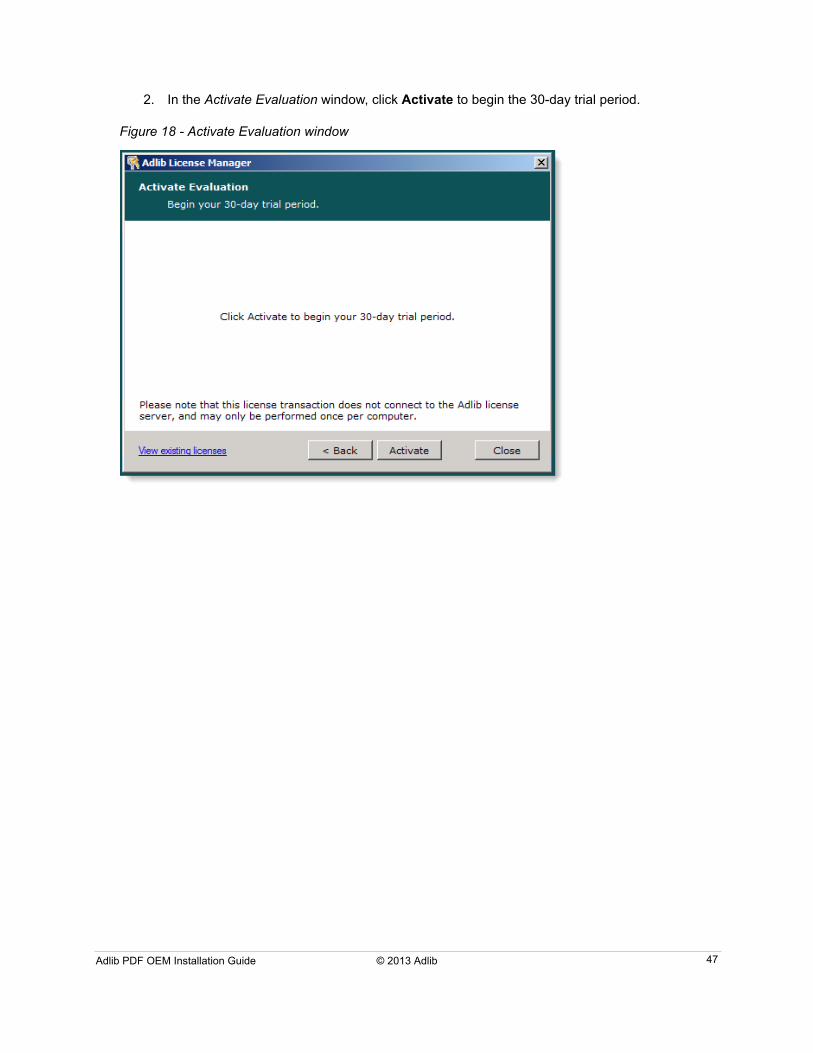
2. In the Activate Evaluation window, click Activate to begin the 30-day trial period.
Figure 18 - Activate Evaluation window

Adlib PDF OEM Installation Guide © 2013 Adlib 48
3. In the License Transaction Complete window, click Close to close the License Manager. The Transformation engine must now be restarted using the Process Manager service before jobs can be processed. For more information on stopping and starting the service, see the Adlib PDF User Guide.
Figure 19 - License Transaction Complete window

Adlib PDF OEM Installation Guide © 2013 Adlib 49
Activate License - OnlineThe Activate License transaction type registers Adlib PDF with all of the features that are included in the purchased license package. Any feature that is outside of the purchased license package will produce evaluation watermarks when selected.
To Activate a License Online:1. In the License Transaction Type window, select Activate License and click Next.
Figure 20 - License Transaction Type window
The Adlib License server is only contacted during user-initiated license transactions from the Adlib License Manager application, and not at any other time without explicit user notification and consent.

Adlib PDF OEM Installation Guide © 2013 Adlib 50
2. In the License Transaction Method window, select Online and click Next.
Figure 21 - License Transaction Method window
3. If desired, in the User Information window type the Name, Company, Phone and Email and click Next.
Figure 22 - User Information window

Adlib PDF OEM Installation Guide © 2013 Adlib 51
This information is only used when contacting Adlib for support.
4. In the Activation ID window, type the Activation ID provided by Adlib Fulfillment and click Next.
Figure 23 - Activation ID window

Adlib PDF OEM Installation Guide © 2013 Adlib 52
5. In the Online License Transaction window, click Activate to begin the activation.
The Transformation Engine must be stopped using the Process Manager before performing any type of license transaction. For more details on stopping and restarting the service, see the Adlib PDF User Guide.
Figure 24 - Online License Transaction window
The Adlib Transformation Engine requires one license per virtual machine.

Adlib PDF OEM Installation Guide © 2013 Adlib 53
6. When the license has been activated, click Finish to return to the main menu of the Adlib License Manager or Close to exit the application. The Transformation Engine must now be restarted using the Process Manager service before jobs can be processed. For more information on stopping and starting the service, see the Adlib PDF User Guide.
Figure 25 - License Transaction Complete window

Adlib PDF OEM Installation Guide © 2013 Adlib 54
Activate License - OfflineLicenses can be activated offline by generating an activation request file and transmitting it online to the Adlib license server on an alternate computer, or by email to Adlib customer service.
When Adlib PDF is licensed for the first time using the offline process, two response files must be requested and submitted; the first activation request file creates a license storage placeholder on the Transformation Engine server and the second provides the necessary information to complete the license transaction. Any subsequent activations require only one response file submission to the Adlib license server.
To Activate a License Offline:1. In the License Transaction Type window, select Activate License and click Next.
Figure 26 - License Transaction Type window
2. In the License Transaction Method window, select Offline and click Next.

Adlib PDF OEM Installation Guide © 2013 Adlib 55
Figure 27 - License Transaction Method window
3. In the Offline License Transaction Steps window, select Step 1: Generate an offline activation request file.
4. Type the Activation ID provided by Adlib Fulfillment and click Next.
Figure 28 - Offline License Transaction Steps window

Adlib PDF OEM Installation Guide © 2013 Adlib 56
5. In the Offline License Transaction Request File window, click Save to File and choose a location to save the file to your computer.
6. Click Next.
Figure 29 - Offline License Transaction Request File window
7. The file must then be processed using one of the following methods
Copy the Activation Request file to a system connected to the internet and access http://www.adlibsoftware.com/AdlibLicenseServices. An Activation Response file can be generated from this website for the next step in the Activation process.
Or,
Submit the Activation Request file via email to [email protected]. An Activation Response file sent by Adlib (within one business day) can then be used in the next step of the license transaction. The Adlib License Manager can be reopened to continue with the next step at anytime.
8. Once the response file has been received, copy it to the machine where the Adlib Transformation Engine is installed.

Adlib PDF OEM Installation Guide © 2013 Adlib 57
9. In the Offline License Transaction Steps window, select Step 2: Process the Offline Activation Response File and click Browse to locate the file. Click Next.
Figure 30 - Offline License Transaction Steps Window
10. If Adlib PDF is being licensed for the first time, the License Storage Initialization window appears. In order to complete the license transaction, a second request file must be requested and submitted. Click Next to return to Step 1.
If this is not the first activation of a license, proceed to step 17 in the Offline License Activation procedure.

Adlib PDF OEM Installation Guide © 2013 Adlib 58
Figure 31 - License Storage Initialization
11. Click Next in the Offline License Transaction Steps window. Do not modify the contents of the Activation ID field.
Figure 32 - Offline License Transaction Steps
12. In the Offline License Transaction Request File window, click Save to File and choose a location to save the file to your computer.

Adlib PDF OEM Installation Guide © 2013 Adlib 59
13. Click Next.
Figure 33 - Offline License Transaction Request File window
14. The file must then be processed using one of the following methods
Copy the Activation Request file to a system connected to the internet and access http://www.adlibsoftware.com/AdlibLicenseServices. An Activation Response file can be generated from this website for the next step in the Activation process.
Or,
Submit the Activation Request file via email to [email protected]. An Activation Response file sent by Adlib (within one business day) can then be used in the next step of the license transaction. The Adlib License Manager can be reopened to continue with the next step at anytime.
15. Once the response file has been received, copy it to the machine where the Adlib Transformation Engine is installed.

Adlib PDF OEM Installation Guide © 2013 Adlib 60
16. In the Offline License Transaction Steps window, select Step 2: Process the Offline Activation Response File and click Browse to locate the file. Click Next.
Figure 34 - Offline License Transaction Steps Window
17. If desired, in the User Information window, type the Name, Company, Phone and Email and click Next.
Figure 35 - User Information window

Adlib PDF OEM Installation Guide © 2013 Adlib 61
This information is only used when contacting Adlib for support.
18. In the Offline License Transaction window, click Activate to begin the activation.
The Transformation Engine must be stopped using the Process Manager before performing any type of license transaction. For more details on stopping and restarting the service, see the Adlib PDF User Guide.
Figure 36 - Offline License Transaction window
The Adlib Transformation Engine requires one license per virtual machine.

Adlib PDF OEM Installation Guide © 2013 Adlib 62
19. When the license has been activated, click Main Menu to return to the main menu of the Adlib License Manager or Close to exit the application. The Transformation Engine must now be restarted using the Process Manager service before jobs can be processed. For more information on stopping and starting the service, see the Adlib PDF User Guide.
Figure 37 - License Transaction Complete window
Adlib PDF OEM Installation Guide © 2013 Adlib 63
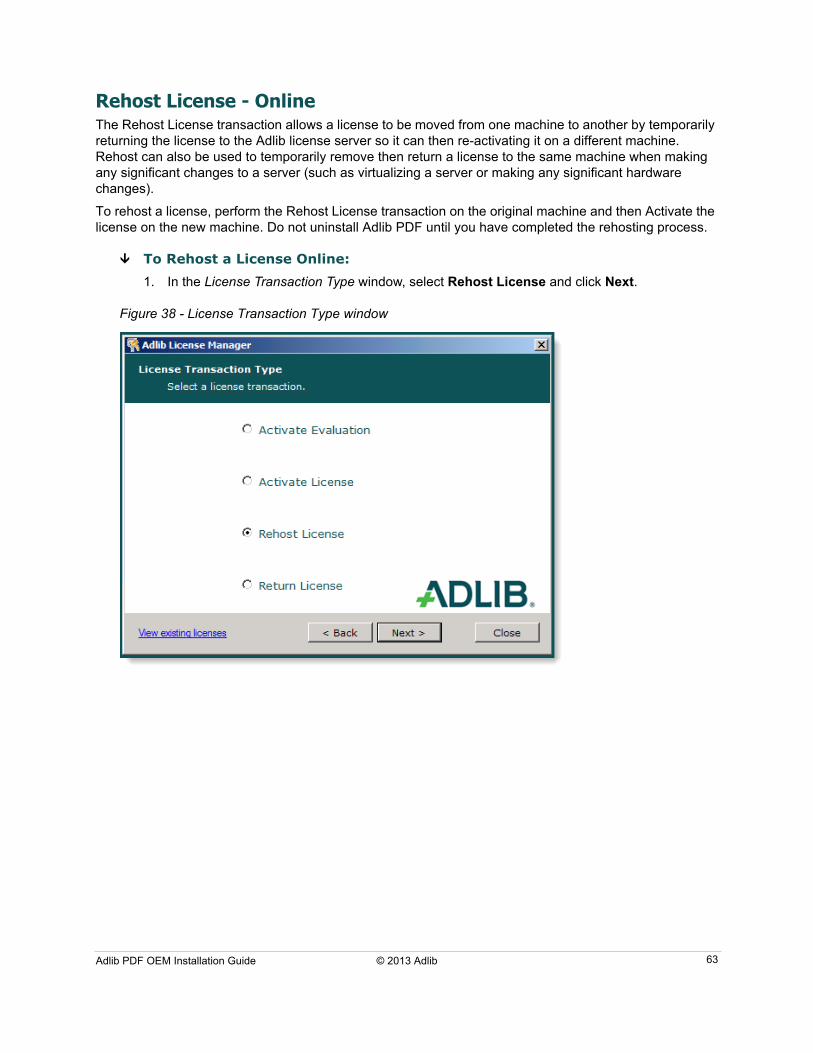
Rehost License - OnlineThe Rehost License transaction allows a license to be moved from one machine to another by temporarily returning the license to the Adlib license server so it can then re-activating it on a different machine. Rehost can also be used to temporarily remove then return a license to the same machine when making any significant changes to a server (such as virtualizing a server or making any significant hardware changes).
To rehost a license, perform the Rehost License transaction on the original machine and then Activate the license on the new machine. Do not uninstall Adlib PDF until you have completed the rehosting process.
To Rehost a License Online:1. In the License Transaction Type window, select Rehost License and click Next.
Figure 38 - License Transaction Type window

Adlib PDF OEM Installation Guide © 2013 Adlib 64
2. In the License Transaction Method window, select Online and click Next.
Figure 39 - License Transaction Method window
The Adlib License server is only contacted during user-initiated license transactions from the Adlib License Manager application, and not at any other time without explicit user notification and consent.

Adlib PDF OEM Installation Guide © 2013 Adlib 65
3. In the Activation ID window, type the original Activation ID provided by Adlib Fulfillment and click Next.
The Activation IDs for all licenses currently in use can be viewed by clicking the View Existing Licenses link in the lower left of the Adlib License Manager windows.
Figure 40 - Existing Licenses window
Figure 41 - Activation ID window

Adlib PDF OEM Installation Guide © 2013 Adlib 66
4. In the Online License Transaction window, click Rehost to return your license temporarily to the Adlib License server.
The Transformation Engine must be stopped using the Process Manager before performing any type of license transaction. For more details on stopping and restarting the service, see the Adlib PDF User Guide.
Figure 42 - Online License Transaction window

Adlib PDF OEM Installation Guide © 2013 Adlib 67
5. When the license has been rehosted, click Finish to return to the main menu of the Adlib License Manager or Close to exit the application.
Figure 43 - License Transaction Complete window
Once the rehost has been completed, the Adlib Transformation Engine will return to Evaluation mode with time remaining from the original Evaluation start date.
Adlib PDF can now be uninstalled from the original machine and installed on a new machine, or rather, modifications can be made to the original server before the license is re-activated on the same machine. For detailed uninstallation and instructions, see Uninstallation and Modification. The original license can then be activated on the new machine or on the modified, original machine (see To Activate a License Online:).

Adlib PDF OEM Installation Guide © 2013 Adlib 68
Rehost License - OfflineLicenses can be rehosted offline by generating an rehost request file and transmitting it online to the Adlib license server on an alternate computer or by email to Adlib customer service.
To Rehost a License Offline:1. In the License Transaction Type window, select Rehost License and click Next.
Figure 44 - License Transaction window

Adlib PDF OEM Installation Guide © 2013 Adlib 69
2. In the License Transaction Method window, select Offline and click Next.
Figure 45 - License Transaction Method window

Adlib PDF OEM Installation Guide © 2013 Adlib 70
3. In the Offline License Transaction Steps window, select Step 1: Generate an offline rehost request file.
4. Type the Activation ID provided by Adlib Fulfillment and click Next.
Figure 46 - Offline License Transaction Steps window

Adlib PDF OEM Installation Guide © 2013 Adlib 71
5. In the Offline License Transaction Request File window, click Save to File and choose a location to save the file to your computer.
6. Click Next.
Figure 47 - Offline License Transaction Request File window
7. The file must then be processed using one of the following methods:
Copy the Rehost Request file to a system connected to the internet and access http://www.adlibsoftware.com/AdlibLicenseServices. A Rehost Response file can be generated from this website for the next step in the Rehost process.
Or,
Submit the Rehost Request file via email to [email protected]. A Rehost Response file sent by Adlib (within one business day) can then be used in the next step to complete the license transaction. The Adlib License Manager can be reopened to continue with the next step at anytime.
8. Once the response file is received, copy it to the system where the Adlib Transformation Engine is installed.

Adlib PDF OEM Installation Guide © 2013 Adlib 72
9. In the Offline License Transaction Steps window, select Step 2: Process the offline rehost response file and click Browse to locate the file.
Figure 48 - Offline License Transaction Steps window

Adlib PDF OEM Installation Guide © 2013 Adlib 73
10. In the Offline License Transaction window, click Rehost to temporarily return the license to the Adlib License server.
The Transformation Engine must be stopped using the Process Manager before performing any type of license transaction. For more details on stopping and restarting the service, see the Adlib PDF User Guide.
Figure 49 - Offline License Transaction window

Adlib PDF OEM Installation Guide © 2013 Adlib 74
11. When the license has been rehosted, click Finish to return to the main menu of the Adlib License Manager or Close to exit the application.
Figure 50 - License Transaction Complete window
Once the rehost has completed, the Adlib Transformation Engine will return to Evaluation mode with the time remaining from the original Evaluation start date.
Adlib PDF can now be uninstalled from the original machine and installed on a new machine or rather, modifications can be made to the original server. For detailed uninstallation and instructions, see Uninstallation and Modification. The original license can then be activated on the new machine or on the modified, original machine (see To Activate a License Online:).

Adlib PDF OEM Installation Guide © 2013 Adlib 75
Return License - OnlineThe Return License transaction permanently returns a license to the Adlib license server.
To Return a License Online:1. In the License Transaction Type window, select Return License and click Next.
Figure 51 - License Transaction Type window

Adlib PDF OEM Installation Guide © 2013 Adlib 76
2. In the License Transaction Method window, select Online and click Next.
Figure 52 - License Transaction Method window

Adlib PDF OEM Installation Guide © 2013 Adlib 77
3. In the Activation ID window, type the Activation ID for the license to be returned and click Next.
The Activation IDs for all licenses currently in use can be viewed by clicking the View Existing Licenses link in the lower left of the Adlib License Manager windows.
Figure 53 - Existing Licenses window
Figure 54 - Activation ID window

Adlib PDF OEM Installation Guide © 2013 Adlib 78
4. In the Online License Transaction window, click Return to permanently return your license to the Adlib License server.
Figure 55 - Online License Transaction window
5. When the license has been returned, click Finish to return to the main menu of the Adlib License Manager or Close to exit the application.
Figure 56 - License Transaction Complete window

Adlib PDF OEM Installation Guide © 2013 Adlib 79
Once the return has been completed, Adlib Transformation Engine returns to Evaluation mode with time remaining from the original Evaluation start date.
If desired, Adlib PDF can now be uninstalled. For detailed uninstallation instructions, see Uninstallation and Modification.

Adlib PDF OEM Installation Guide © 2013 Adlib 80
Return License - OfflineLicenses can be returned offline by generating an return request file and transmitting it online to the Adlib license server on an alternate computer or by email to Adlib customer service.
To Return a License Offline:1. In the License Transaction Type window, select Return License and click Next.
Figure 57 - License Transaction Type window

Adlib PDF OEM Installation Guide © 2013 Adlib 81
2. In the License Transaction Method window, select Offline and click Next.
Figure 58 - License Transaction Method window

Adlib PDF OEM Installation Guide © 2013 Adlib 82
3. In the Offline License Transaction Steps window, select Step 1: Generate an offline return request file.
4. Type the Activation ID provided by Adlib Fulfillment and click Next.
Figure 59 - Offline License Transaction Steps window

Adlib PDF OEM Installation Guide © 2013 Adlib 83
5. In the Offline License Transaction Request File window, click Save to File and choose a location to save the file to your computer.
6. Click Next.
Figure 60 - Offline License Transaction Request File window
7. The file must then be processed using one of the following methods:
Copy the Return Request file to a system connected to the internet and access http://www.adlibsoftware.com/AdlibLicenseServices. A Return Response file can be generated from this website for the next step in the Return process.
Or,
Submit the Return Request file via email to [email protected]. A Return Response file sent by Adlib (within one business day) can then be used in the next step to complete the license transaction. The Adlib License Manager can be reopened to continue with the next step at anytime.
8. Once the response file is received, copy it to the system where the Adlib Transformation Engine is installed.

Adlib PDF OEM Installation Guide © 2013 Adlib 84
9. In the Offline License Transaction Steps window, select Step 2: Process the offline return response file and click Browse to locate the file.
Figure 61 - Offline License Transaction Steps window

Adlib PDF OEM Installation Guide © 2013 Adlib 85
10. In the Offline License Transaction window, click Return to permanently return the license to the Adlib License server.
Figure 62 - Offline License Transaction window

Adlib PDF OEM Installation Guide © 2013 Adlib 86
11. When the license has been returned, click Finish to return to the main menu of the Adlib License Manager or Close to exit the application.
Figure 63 - License Transaction Complete window
Once the return has completed, the Adlib Transformation Engine returns to Evaluation mode with remaining time from the original Evaluation start date.
If desired, Adlib PDF can now be uninstalled. For detailed uninstallation instructions, see Uninstallation and Modification.

Adlib PDF OEM Installation Guide © 2013 Adlib 87
Key Concepts
The process of document transformation begins when a Connector detects input in a Source repository that it is monitoring. When a new job becomes available, the Connector extracts the content from the Source and submits it to the Job Management Service. The Job Management Service submits the accepted job to the database.
The System Manager is constantly polling the database for jobs it can process. When a new job is detected, the System Manager creates a job ticket and submits the ticket to the database. The Transformation Engine picks up the job, performs the transformation according to the job ticket and writes the completed job back to the database. The Connector, which has been polling the database for completed jobs, uploads the transformed job into the Source output folder or repository.
In addition to the Components that perform content transformation, Adlib PDF contains a Process Manager whose role it is to stop, start and monitor the Transformation Engine, Connector(s) and System Manager. The System Manager also monitors the health of Adlib PDF Components and reports alerts to the system administrator.
Figure 64 - Key Concepts

Adlib PDF OEM Installation Guide © 2013 Adlib 88
ComponentsAdlib PDF comprises several Components to interface with users, manage jobs, perform transformations, monitor services, and report system and job status. Adlib PDF includes the following Component types:
Connectors
A Connector Component monitors a Source for content, submits the content as a job to Adlib PDF, and receives completed job output.
Different types of Connectors integrate with various Source types:
The Generic Connector integrates with the Web Service interface. Please see the Adlib PDF Integration Guide for more information on how to integrate using the Generic Connector.
Job Management Service
This is a service interface within Adlib PDF used to submit and receive Jobs. It is called by Connectors and custom integrations.
Logger
This Component logs data into the Adlib PDF database.
Process Manager
This Component controls individual processes on a single machine within the Adlib system. Its role is to start, stop, monitor, and restart the processes assigned to it.
There is one Process Manager Component installed on each machine on which any Adlib Components, such as Folder Connector, are installed.
Services
This is a layer of communication services used primarily by the Management Console.
System Manager
This Component manages jobs and monitors all Adlib PDF Components. It prepares jobs for the Transformation Engine by executing the appropriate Transformation Rule Sets. It also monitors the health of Components and issues alerts to the System Administrator.
Transformation Engine
This Component performs the transformation of content.

Adlib PDF OEM Installation Guide © 2013 Adlib 89
Uninstallation and Modification
Users can perform a complete uninstallation of the entire Adlib PDF system, including all of the installed Components, or if desired, users can modify an existing installation of Adlib PDF by uninstalling selected Components or by adding new Components to the current configuration. For more information on a multi-server deployment of Adlib PDF, Contact Adlib.
Complete Uninstallation
To Perform a Complete Uninstallation:1. On the Windows Start menu, select Control Panel, then Programs and Features. Select
Adlib and click Uninstall.
Before performing an uninstallation of Adlib PDF, ensure that Process Manager Services have been stopped.
2. In the Adlib-InstallShield Wizard window, type the “sysadmin” account Password that was used in the installation of Adlib PDF and ensure that the default Services URL is the URL that hosted the Adlib Services. Click Next.
Figure 65 - Adlib - InstallShield Wizard Window

Adlib PDF OEM Installation Guide © 2013 Adlib 90
3. To begin the uninstallation, click Yes in the confirmation pop-up.
Figure 66 - Uninstall Confirmation pop-up
4. In the Uninstall Complete window, click the checkbox if you wish to view the Installation Log, and click Finish to complete the uninstallation.
Figure 67 - Uninstall Complete Window
ModificationDuring modification, a user can choose to uninstall one or more existing Components or add a new Component to the system.
Before uninstalling a Component, ensure that Process Manager Services have been stopped, and that the Component is no longer assigned to an Environment in the Adlib Management Console. For more information, see the Adlib PDF User Guide.

Adlib PDF OEM Installation Guide © 2013 Adlib 91
To Uninstall one or more Components:1. On the Windows Start menu, select Control Panel, then Programs and Features. Select
Adlib and click Change.
2. In the Adlib Setup Maintenance window, click Modify.
Figure 68 - Adlib Setup Maintenance window

Adlib PDF OEM Installation Guide © 2013 Adlib 92
3. In the Select Features window, deselect the features to be removed from the system and click Next.
The checkboxes for the features that are currently installed will show as selected.
Figure 69 - Select Features window
4. Provide additional Component information as required.
Additional information may be required for the deregistration process, such as the user credentials specified during installation, according to the Component chosen to remove.

Adlib PDF OEM Installation Guide © 2013 Adlib 93
5. The Components selected to be removed will be listed in the Start Copying Files window. Click Next to proceed with the removal. The selected Components will be removed from Adlib PDF.
Figure 70 - Start Copying Files Window
To Install a New Component:1. On the Windows Start menu, select Control Panel, then Programs and Features. Select
Adlib and click Change.

Adlib PDF OEM Installation Guide © 2013 Adlib 94
2. In the Adlib Setup Maintenance window, click Modify.
Figure 71 - Adlib Setup Maintenance window
3. In the Select Features window, select the features to be added to the system and click Next.
Figure 72 - Select Features window
4. Provide additional Component information as required.

Adlib PDF OEM Installation Guide © 2013 Adlib 95
5. The Components selected to be installed will be listed in the Start Copying Files window. Click Next to proceed with the installation of the Component(s). The selected Component(s) will be added to Adlib PDF.
Figure 73 - Start Copying Files Window

Adlib PDF OEM Installation Guide © 2013 Adlib 96
Appendix A: Content Transformation Viewers and Supported File Types
Adlib PDF provides automated document conversion of over 300 file types to PDF, Text, and Image. During content rendering, the Transformation Engine uses a "viewer" in preparation for transformation to the specified format. In order to select the appropriate rendering viewer, the Transformation Engine must first identify the file type being converted by reading the header and/or the file extension. Once the file type has been identified, the document is rendered and output to the format specified in the Rule Setting.
Supported Native Applications and Associated Rule SettingsThis table contains a list of the native applications that are currently supported; additional applications (and versions) are always being added. The level of support is also indicated for each version/format of the application.
A native application must be installed on the same server as the Transformation Engine performing the processing of the job in order to be used as a viewer.
The levels of support for native applications include:
This table refers to only the English versions of each application. Alternative language versions of these applications are not officially supported by Adlib PDF.
Level of Support Definition Notes
Certified (C) Extensively tested. This is the recommended version, edition, language, service pack, etc.
Supported (S) Known to work, however not subject to the same degree of testing as Certified.
We provide support for these versions, editions, languages, etc., but do not test as thoroughly.
Partially Supported (P) Is expected to work. We will provide our best effort to support.
These are versions, editions, languages, etc., that are being phased out by their vendor and/or are limited in functionality.
Mfgr Application Version/Format Support
Adobe Framemaker 6.0 S
7.0 S
Corel CorelDRAW 8.0 S
12.0 S
Corel WordPerfect 8.0 to X51 S
Ghostscript Ghostscript 7.04 to 8.15 (32-bit only) S

Adlib PDF OEM Installation Guide © 2013 Adlib 97
Microsoft Excel 4 2003 P
20073 C
20105 C
20135 C
Microsoft InfoPath 20032 P
2007 C
20105 C
20135 C
Microsoft Internet Explorer 7.0 P
8.0 C
9.0 C
Microsoft Outlook 2003 P
20073 C
2010 C
20135 C
Microsoft PowerPoint 4 2003 P
20073 C
20105 C
20135 C
Microsoft Project 2003 P
2007 C
20105 C
20135 C
Microsoft Visio 2003 P
20073 C
20105 C
20135 C
Microsoft Word 4 2003 P
20073 C
Mfgr Application Version/Format Support
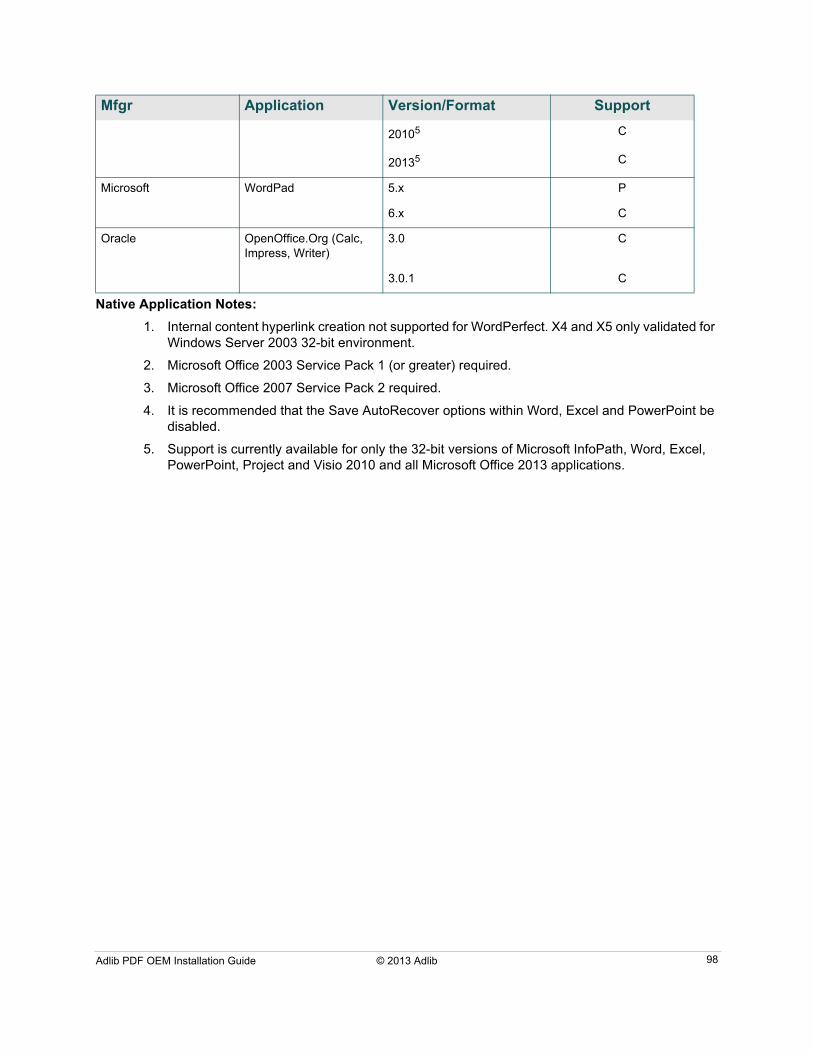
Adlib PDF OEM Installation Guide © 2013 Adlib 98
Native Application Notes:
1. Internal content hyperlink creation not supported for WordPerfect. X4 and X5 only validated for Windows Server 2003 32-bit environment.
2. Microsoft Office 2003 Service Pack 1 (or greater) required.
3. Microsoft Office 2007 Service Pack 2 required.
4. It is recommended that the Save AutoRecover options within Word, Excel and PowerPoint be disabled.
5. Support is currently available for only the 32-bit versions of Microsoft InfoPath, Word, Excel, PowerPoint, Project and Visio 2010 and all Microsoft Office 2013 applications.
20105 C
20135 C
Microsoft WordPad 5.x P
6.x C
Oracle OpenOffice.Org (Calc, Impress, Writer)
3.0 C
3.0.1 C
Mfgr Application Version/Format Support

Adlib PDF OEM Installation Guide © 2013 Adlib 99
Adlib Viewer SupportAdlib viewers are installed with the Transformation Engine and are used to render Text (non-unicode), Images, HPGL, MSG and PDF file types. This method ensures the highest rendering accuracy and efficiency for these document types.
Adlib Viewer Supported File Types and Associated Rule Settings
Adlib Viewer Notes:
1. Requires a CAD license.
2. For a list of all supported Image and OCR input file types see the Supported File Types table.
Input File Type Output File Type
PDF HTML
PDF JPEG
CAD1 PDF
Image2 PDF
OCR2 PDF
Text (non-unicode) PDF
XSL-FO PDF
PDF Png
PDF Text
PDF Tiff
PDF Cals
PDF Gif
PDF Xps

Adlib PDF OEM Installation Guide © 2013 Adlib 100
Generic Viewer SupportThe Generic viewer is installed with the Transformation Engine and supports the rendering of hundreds of file types. This method ensures rendering efficiency without requiring additional software to be installed on the computer performing the conversion.
For a list of all file types that are currently supported by the Generic viewer, see the Supported File Types table.
Supported File Types Table - Levels of SupportThe supported file types table indicates the level of support for the rendering of each version/format of the files, according to the viewer(s) used to process that file.
The levels of support for file formats include:
Level of Support Definition Notes
Certified (C) Extensively tested and fully supported.
Rendition quality of the output file is nearly is not perfectly identical to the input document under all circumstances.
Supported (S) Known to work; format not as thoroughly tested as Certified formats.
Possible minor issues in output quality compared to the original input document is possible in some rare circumstances.
Partially Supported (P) Expected to work but not fully tested.
Formats that may have known limitations and/or produce a noticeably lower level of output quality when compared to the original input document in some or all circumstances.
Variations in the input document, for example a seldom used compression format within an image file, may cause output quality problems or fail to render.

Adlib PDF OEM Installation Guide © 2013 Adlib 101
Supported File Types
File Type File Extensions Versions/Formats NAS Adlib Generic
Adobe Acrobat PDF All C
Adobe FrameMaker MIF 6.0 P
Adobe FrameMaker FM 6.0, 7.0 S
Adobe FrameMaker Graphics
FMV Vector/raster to 5.0 P
Adobe Illustrator AI 1.0 to 7.0, 9.0, CS3 C
Adobe Photoshop PSD 4.0, CS3 C
Ami Draw SDW Ami Draw P
ANSI Text TXT 7 & 8 bit C
AutoCAD Drawing Web Format
DWF 2012 and below C1
AutoCAD Interchange DXF 2012 and below C1
AutoCAD Native Drawing
DWG 2012 and below C1
AutoDesk Inventor DWG, IAM, IDW, IPT 11 and below C1
AutoDesk Inventor DWG, IAM, IDW, IPT 2011, 2012 C1, 15
AutoShade Rendering RND 2.0 P
Bentley MicroStation Drawing
DGN 8.9, 8.5, 8.1, and below C1
Binary Group 3 Fax All P
Bitmap BMP, ICO, DIB C
CADKEY PRT C1
CalComp PCI 906/907 Plot
906 C1
CALS Group IV CAL, CG4, MIL, ODA, C4
Type I, Type II C
CAMCAD CC P1
CIT Intergraph Group IV CIT All P1
Computer Graphics Metafile
CGM ANSI, CALS C
Computer Graphics Metafile
CGM 4 C1

Adlib PDF OEM Installation Guide © 2013 Adlib 102
Corel Clipart format CMX 5.0 to 6.0 P
Corel Draw CDR with TIFF header 2.0 to 9.0 S C
Corel Draw CDR 6.0 to 12.0 S C
Corel/Novell Quattro Pro 1.0 to 12 S C
Corel/Novell WordPerfect
WPD, WP5 1.0 to 12, X3 S P
DataEase 4.x P
dBASE 1.0 to 5.0 P
dBXL 1.3 P
DEC WPS Plus DX 1.0 to 4.0 P
DEC WPS Plus WPL 1.0 to 4.1 P
DG Auto-trol Vector DG P1
DisplayWrite 2 & 3 TXT All P
DisplayWrite 4 & 5 1.0 to 2.0 P
Enable 3.0, 4.0, 4.5 P
Encapsulated PostScript EPS TIFF header only S10
Executable EXE, DLL C6
Extensible Markup Language
XML, XSL All C4
First Choice 1.0 to 3.0 P
FoxBase 2.1 P
Framework 3.0 P
Freelance for OS/2 1.0 to 2.0 P
Freelance for Windows 1.0 to 9.6 P
GEM Paint IMG P
Graphics Environment Manager
GEM Bitmap & vector P
Graphics Interchange Format
GIF C
GZIP Compression Utility
GZ P
Harvard Graphics for DOS
2.x, 3.x P
File Type File Extensions Versions/Formats NAS Adlib Generic

Adlib PDF OEM Installation Guide © 2013 Adlib 103
Harvard Graphics for Windows
PRS All P
Hewlett Packard Graphics Language
HP, HPGL, HGL, HPG, PLT, 000, HPGL/2
C
Hewlett Packard Graphics Language
HPGL, HPGL/2 C1
Hewlett Packard ME10 CMI, MI 13 and below P1
Hypertext Markup Language
HTM, HTML 1.0 to 3.0 C C
Hypertext Markup Language
HTM, HTML, CSS All C3
IBM FFT All P
IBM Graphics Data Format
GDF 1.0 P
IBM Picture Interchange Format
PIF 1.0 P
IBM Revisable Form Text
All P
IBM Writing Assistant 1.01 P
Initial Graphics Exchange Specification
IGES 5.2 P1 P
Joint Photographic Experts Group
JPG, JPEG, JPE C
JPEG 2000 J2K, JP2 C
JustSystems Ichitaro 5.0, 6.0, 8.0, 9.0 P
JustWrite 1.0 to 3.0 P
Kodak Flash Pix FPX P
Kodak Photo CD PCD 1.0 P
Legacy LEG 1.0 to 1.1 P
Lotus 1-2-3 (DOS & Windows)
WK1, WK3, WK4, WKS
1.0 to 5.0 S
Lotus 1-2-3 (OS/2) 1.0 to 2.0 S
Lotus 1-2-3 Charts (DOS & Windows)
WK1, WK3, WK4, WKS
1.0 to 5.0 S
Lotus 1-2-3 for SmartSuite
WK1, WK3, WK4, WKS
97 to 9.6 S
File Type File Extensions Versions/Formats NAS Adlib Generic

Adlib PDF OEM Installation Guide © 2013 Adlib 104
Lotus AMI/AMI Professional
1.0 to 3.1 P
Lotus Manuscript 2.0 P
Lotus Notes NSF P7
Lotus PIC P
Lotus Snapshot All P
Lotus Symphony 1.0,1.1, 2.0 P
Lotus Word Pro LWP, MWP 96 to 9.8 S
LZA Self Extracting Compress
P
Macintosh PICT1 & PICT2
Bitmap only P
MacPaint PNTG P
MacWrite II 1.1 P
MASS11 M11 1.0 to 8.0 P
Micrografx Designer DRW 1.0 to 3.1 P
Micrografx Designer DSF 6.0 P
Micrografx Draw DRW 1.0 to 4.0 P
Microsoft Access 1.0 to 2.0 C
Microsoft Binder OBD 7.0 to 97 P
Microsoft Excel Charts XLC 2.x to 7.0 P
Microsoft Excel XML 2003 S
Microsoft Excel XLS, XLT 2.2 to 2003 C C
Microsoft Excel XLSX, XLTX 2007, 2010, 2013 C16 C
Microsoft Infopath XML 2003, 2007, 2010, 2013 C
Microsoft Multiplan 4.0 P
Microsoft Outlook MSG 2003, 2007, 2010, 2013 C C C
Microsoft Outlook Express Mail Message
EML C C C
Microsoft PowerPoint PPT, PPS 3.0 to 2003 C C
Microsoft PowerPoint PPTX 2007, 2010 C14, 16 C
File Type File Extensions Versions/Formats NAS Adlib Generic

Adlib PDF OEM Installation Guide © 2013 Adlib 105
Microsoft PowerPoint POT 3.0 to 2010 C
Microsoft Project 98 Text only C
Microsoft Project 2002 to 2010 C
Microsoft Publisher PUB 2013 S
Microsoft Rich Text Format
RTF All C8
Microsoft Snapshot Viewer
SNP 9.0 to 11 P
Microsoft Visio Drawing VSD All C C
Microsoft Visio Drawing VSDX 2013 C
Microsoft Visio Stencil VSS 2003 to 2010 C
Microsoft Visio Template VST 2003 to 2010 C
Microsoft Visio Web Drawing
VDW 2010 C
Microsoft Windows Write 1.0 to 3.0 P
Microsoft Word XML 2003 S
Microsoft Word DOC 1.0 to 2003 C C
Microsoft Word DOCX 2007, 2010, 2013 C16 C
Microsoft Word DOT 1.0 to 2010 C
Microsoft Works 1.0 to 2.0 P
Microsoft Works WPS 1.0 to 4.0 P
MIME HTML MHT C
MIME Text Mail C P
Mosaic Twin 2.5 P
MultiMate 1.0 to 4.0 P
Navy DIF All P
Nota Bene 3.0 P
Novell Perfect Works 2.0 P
Novell Perfect Works (Draw)
2.0 P
File Type File Extensions Versions/Formats NAS Adlib Generic
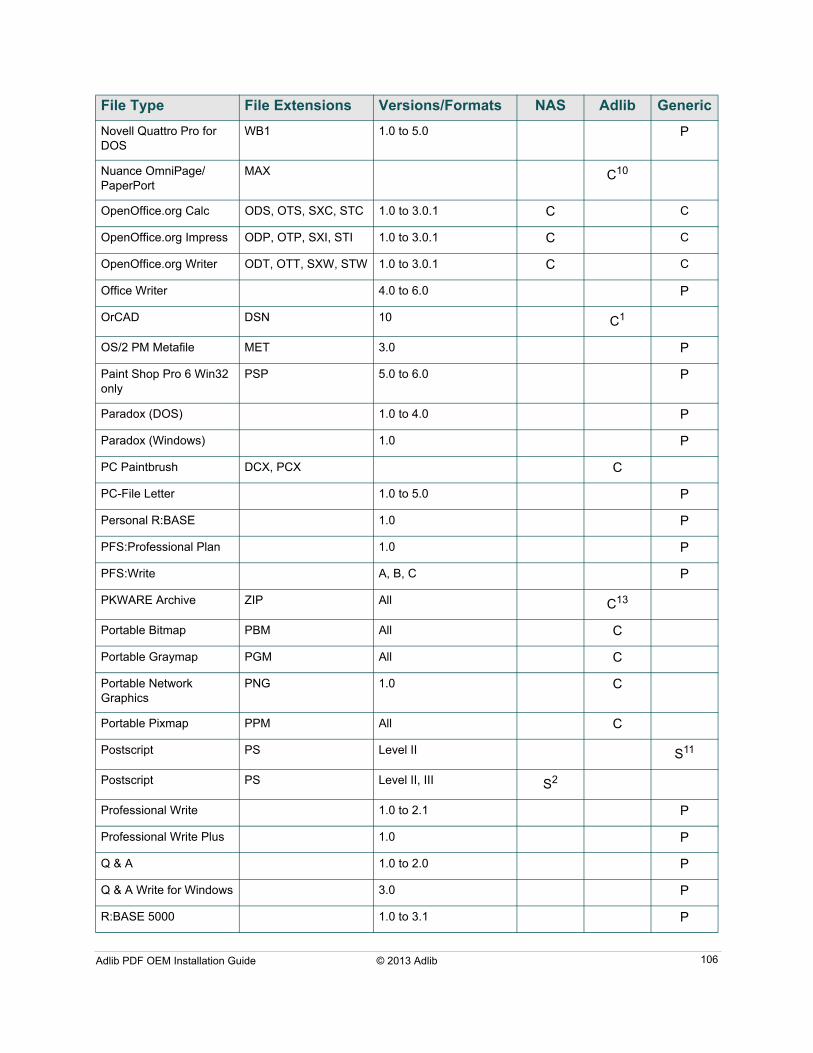
Adlib PDF OEM Installation Guide © 2013 Adlib 106
Novell Quattro Pro for DOS
WB1 1.0 to 5.0 P
Nuance OmniPage/PaperPort
MAX C10
OpenOffice.org Calc ODS, OTS, SXC, STC 1.0 to 3.0.1 C C
OpenOffice.org Impress ODP, OTP, SXI, STI 1.0 to 3.0.1 C C
OpenOffice.org Writer ODT, OTT, SXW, STW 1.0 to 3.0.1 C C
Office Writer 4.0 to 6.0 P
OrCAD DSN 10 C1
OS/2 PM Metafile MET 3.0 P
Paint Shop Pro 6 Win32 only
PSP 5.0 to 6.0 P
Paradox (DOS) 1.0 to 4.0 P
Paradox (Windows) 1.0 P
PC Paintbrush DCX, PCX C
PC-File Letter 1.0 to 5.0 P
Personal R:BASE 1.0 P
PFS:Professional Plan 1.0 P
PFS:Write A, B, C P
PKWARE Archive ZIP All C13
Portable Bitmap PBM All C
Portable Graymap PGM All C
Portable Network Graphics
PNG 1.0 C
Portable Pixmap PPM All C
Postscript PS Level II S11
Postscript PS Level II, III S2
Professional Write 1.0 to 2.1 P
Professional Write Plus 1.0 P
Q & A 1.0 to 2.0 P
Q & A Write for Windows 3.0 P
R:BASE 5000 1.0 to 3.1 P
File Type File Extensions Versions/Formats NAS Adlib Generic

Adlib PDF OEM Installation Guide © 2013 Adlib 107
R:BASE System V 1.0 P
Reflex 2.0 P
RLE Intergraph Runlength
RLE All P1
Samna Word 1.0 to IV+ P
SmartWare II DEF 1.02 P
SolidWorks 2D SLDDRW 2008 and below C1
Sprint 1.0 P
StarOffice Calc SDC C12 C
StarOffice Impress SDA C12 C
StarOffice Writer SDW C12 C
Sun Raster SRS All P
SuperCalc 5 4.0 P
Tagged Image File Format
TIF, TIFF All C
Text Mail MIME C C
Total Word 1.2 P
Truevision Targa TGA 2 C
Unicode Text TXT All C5 C P
Unigraphics SolidEdge 2D
DFT 8 to 20 C1
UNIX Compress GZ P
UNIX TAR P
UUEncode P
vCard VCF 2.1 P
Volkswriter 3 & 4 1.0 P
VP Planner 3D 1.0 P
Wang PC IWP 1.0 to 2.6 P
Wavesoft MOT P1
WBMP All P
File Type File Extensions Versions/Formats NAS Adlib Generic

Adlib PDF OEM Installation Guide © 2013 Adlib 108
Rendering Notes:
1. Requires CAD license.
2. Requires Ghostscript.
3. Supports Hypertext Markup Language (HTML) with Cascading Style Sheets (CSS).
4. Supports Extensible Markup Language (XML) with Extensible Style Sheet Language (XSL).
5. Requires WordPad.
6. The output will be a report of technical file information.
7. Only NSF files with one email are supported.
8. WordPad will be used to convert the document unless Microsoft Word is installed.
9. The Encapsulated PostScript (EPS) file specification allows a graphic file to be included for screen preview. The graphic file formats supported are: PICT (MAC), TIFF, Metafile and EPSI. The Adlib Transformation Engine only supports EPS files with TIFF graphic file format.
10. Requires Recognition license.
11. In some instances PostScript files have a loss in fidelity when rendering. Native Application (Ghostscript) processing produces higher quality PDF files and is recommended.
12. Requires OpenOffice.org equivalent (Calc, Impress or Write) installed.
13. Contents of the Zip file are merged into a single output. Contents appear in the order they were added to the Zip file.
Windows Enhanced Metafile
EMF All S
Windows Metafile WMF All S
Wireless Markup Language
WML 5.2 P
WordMARC 1.0 to Composer P
WordPerfect Graphics WPG, WPG2 1.0 to 2.0 C
WordStar 1.0 to 7.0 P
WordStar 2000 DOC 1.0 to 3.0 P
WordStar for Windows DOC 1.0 P
X-Windows Bitmap XBM x10 compatible P
X-Windows Dump XDM x10 compatible P
X-Windows Pixmap XPM x10 compatible P
XSL Formatting Objects Form
FO, XML C
XyWrite XYP 1.0 to III Plus P
File Type File Extensions Versions/Formats NAS Adlib Generic

Adlib PDF OEM Installation Guide © 2013 Adlib 109
14. It is recommended that High Quality printing be enabled within the PowerPoint 2007 native application. This setting provides the best quality when rendering PowerPoint files through the Adlib PDF Transformation Engine.
15. Autodesk Inventor View 2011/2012 must be installed prior to the Transformation Engine to support the rendering of these files.
16. If using Microsoft Office 2003 NAS to render, the Microsoft Office Compatibility Pack is required in addition to Microsoft Office 2003 Service Pack 3.
Additional file types are continually being added. If the file type you are looking for is not listed please email Adlib at [email protected].
General Notes:
a) This list only contains the most common file extensions used for each file type. Other file extensions may exist.
b) File extensions are not used to identify the file type except for CAD files and files that do not contain file information (e.g. HPGL).
c) Please let us know if you need additional file type support.

Adlib PDF OEM Installation Guide © 2013 Adlib 110
Appendix B: Database Growth Management
Database Growth Management settings are included with Adlib PDF to assist in controlling database growth as a result of the job information that is retained during the operation of the system.
When logging in Info mode, approximately 200KB of job information will be retained per successful job. Unsuccessful jobs and/or higher logging levels may retain additional information, requiring up to 3-4x as much space in the database.
Database Growth Management ModesDatabase Growth Management runs in two modes:
Mode 1: SQL Express only
Since SQL Express databases have a data size cap (10GB for Express 2008) a mandatory “by-size” cleanup will be performed by default when this type of database is detected. Every hour, Database Growth Management will check if the database has reached 80% of capacity. If it has, enough records will be purged to reduce the size to 50% of capacity.
Mode 2: SQL Server
By default, the Database Growth Management procedure will purge jobs and any associated child records older than 90 days at 2:00am local time.
Database Tables
The following tables are involved in the cleanup process:
SRT_JOB_ARCHIVE
SRT_JOB_DOCUMENT_ARCHIVE
SRT_JOB_GROUP
ELS_LOG_ENTRY
ELS_STATISTIC_ENTRY
Any records in the ELS tables associated with a purged job will be purged themselves (the JOB_CONTEXT field is checked for the association). Additionally, any unassociated records in these tables (null/empty JOB_CONTEXT field) older than the purged job will also be removed. Therefore the database will never retain any ELS records older than the most recently purged job.

Adlib PDF OEM Installation Guide © 2013 Adlib 111
Appendix C: Software Product Activation FAQ
What is Activation?Software activation is an interactive representation of Adlib's license agreement for our valued customers. Activation protects the intellectual property and innovation delivered within Adlib’s products.
Adlib is committed to preventing unauthorized use of its software using methods designed to have minimal impact on licensed users. When a customer installs an Adlib product that requires activation, the software will automatically attempt to activate via a connection to the Internet. The license information will be sent to Adlib and it will be verified without any action by the customer. For installations without an active internet connection there is a convenient 'offline' method for activating Adlib software products.
The activation process does not transmit any personally identifiable information, except to the extent that IP addresses may be considered personally identifiable in some locations, nor does it limit licensed users' ability to use the software the way they always have under the Adlib End-User License Agreement.
How Does Activation Work?A unique Activation ID is issued to the end-user, which corresponds to license rights stored on the Adlib License Server. The Adlib License Manager application (included with the software installation) is used in conjunction with the Activation ID to transfer those license rights to the end-user machine; this is referred to as "activating" the license, and is only required to be performed once. Adlib License Manager also supports other license lifecycle transactions, such as transferring ("rehosting") a license from one end-user machine to another, upgrading a license, and activating additional licenses.
Why is Activation Necessary?To ensure that the software is used in compliance with the product license, in terms of:
1. Concurrent Installations
2. Feature Set
3. Expiry Date
4. Support/Upgrade Policies
How can I Activate my Product License?In the Adlib License Manager (Start/Programs/Adlib), select Activate License. You can choose one of two activation methods:
1. Online (automatic via Internet)
This method requests an Activation ID and contacts the Adlib License Server directly via the Internet, activating the license automatically without further user interaction. Please note that your network must permit communication through port 80 for this activation method to succeed.

Adlib PDF OEM Installation Guide © 2013 Adlib 112
2. Offline (manual via proxy)
This method requests an Activation ID and generates an XML file that contains the activation request. The request file must be submitted to Adlib for processing, either through the Adlib self-serve web page (http://www.adlibsoftware.com/AdlibLicenseServices), or by email attachment to [email protected]. An XML file will be returned that contains the activation response, which must be input into the Adlib License Manager to complete the activation.
What about Evaluation Licenses?The standard 30-day evaluation license is embedded within the Adlib License Manager, and therefore does not require an Activation ID or communication with the Adlib License Server. However, you must still activate this license through the "Activate Evaluation" option when you are ready to begin your evaluation period.
Can I Extend my Evaluation Period?Yes. If you require additional time to evaluate the product, please contact your Adlib representative. Evaluation extensions require an Activation ID and must be activated against the Adlib License Server in the same manner as full product licenses.
Is an Internet Connection Required for Activation?No. If the machine requiring the activation does not have Internet access, you can use any other Internet enabled machine as a manual proxy. If this is still not feasible, you can send an offline activation request by regular mail on any portable file storage medium.
How Often will the Software Contact the Adlib License Server?The Adlib License Server is only contacted by the Adlib License Manager during user-initiated license transactions (activations, rehosts and returns). There is no "background" communication with the Adlib License Server. The only exception to this rule is for silent installations, where the installer can be configured to automatically perform an activation.
Does Activation Transmit any Personal Information from my Machine?No. A unique machine ID is generated and transmitted to the Adlib License Server when activating, for the purpose of ensuring the uniqueness of each activation. This machine ID acts as a cumulative hardware "signature" and does not include details about the specific make or model of individual hardware components.
Why do Offline Activations Sometimes Require More than Two Steps?If an end-user machine has never performed an activation, its license storage must be initialized by the Adlib License Server before any activations can occur. Initialization is a distinct step that cannot be combined with the activation itself. Because the Adlib License Server cannot know whether an end-user machine requires initialization until it receives an activation request, such a request may result in an initialization rather than activation. For online activations, this process is transparent to the end-user since Adlib License Manager will automatically submit a new activation request in the event of an initialization response. For offline activations, however, an initialization response will require the user to manually submit a new activation request.

Adlib PDF OEM Installation Guide © 2013 Adlib 113
Can I Activate using my old Customer Number/Serial Number?No. Please contact your Adlib representative to obtain an Activation ID.
Can I Transfer my License to a Different Machine after Activation?Yes. Select the "Rehost" option in Adlib License Manager to temporarily return your license to the Adlib License Server. The license is now available to be activated on a different machine.
Will I Lose my License if I Format my Hard Drive after Activation? No. Simply re-install the software and activate using your original Activation ID. Please note that if you are also making significant hardware changes to the machine, it is recommended that you rehost your license first to ensure that it can be re-activated on the new hardware configuration.
Will Activation Work in a Virtual Machine Environment?Yes. Please note that each virtual machine will require its own unique activation. If you plan on virtualizing an existing installation, please be sure to rehost any existing licenses first, so that they can be successfully activated when running the new virtual machine.
How will this Impact my Disaster Recovery Plan (DRP)?The following DRP activities will invalidate an activated license:
1. Restoring a system backup to a different machine.
2. Virtualizing a machine.
3. Moving the boot hard drive to a different machine.
Always be sure to rehost your license before moving to a new machine. If your original machine is unrecoverable and you are unable to perform the rehost, please contact your Adlib representative to obtain a new Activation ID.
Who do I Contact if I have Questions or Concerns?Your Adlib representative (+1.905.631.2875), or send an email to [email protected].

Adlib PDF OEM Installation Guide © 2013 Adlib 114
Appendix D: Adlib CAD Viewer Licensing FAQ
The Adlib CAD Viewer can be licensed for Adlib PDF and provides the facility to convert many different CAD file types. For a full list of supported CAD file types, please refer to the Adlib PDF User Guide. In order to Activate an Adlib CAD Viewer license, the following instructions must be followed to ensure it will be properly registered:
The user performing the CAD Viewer license registration must have Administrator rights.
1. Apply the Activation ID provided by Adlib which contains the Adlib CAD Viewer option. (This will remove the Adlib CAD Viewer evaluation watermark but will still enforce a 1,000 CAD page conversion limit.)
2. Send Adlib the computer name that the Transformation Engine and Adlib CAD Viewer will be installed on. (Right click on "My Computer", Select Properties, Computer Name. The first part of "Full computer name" is what Adlib requires.) If the Computer Name is larger than 25 characters, the Adlib CAD Viewer will need to be tied to a system based IP address instead of the Computer Name.
3. Stop the Process Manager and NET Enterprise .NET Job Processor Services (if running).
4. Apply the updated license key file, named “IGCKey.lic” provided by Adlib into two locations where the Transformation Engine is installed (backup the existing evaluation IGCKey file, descriptive renaming of the file is fine) default locations are as follows:
32-bit system:
C:\Program Files\Adlib\Engine\ECAD\JobProcessor
C:\Program Files\Adlib\Engine\ECAD\JobProcessor\ModelPressPublisher
64-bit system:
C:\Program Files (x86)\Adlib\Engine\ECAD\JobProcessor
C:\Program Files (x86)\Adlib\Engine\ECAD\JobProcessor\ModelPressPublisher
5. Restart the Services that were stopped in Step 3.
6. The Adlib CAD Viewer can be evaluated but has a conversion limitation of 1,000 CAD pages. This evaluation limitation is not related to the regular Adlib PDF 30-day trial expiration. Once 1,000 CAD pages have been rendered through the Adlib CAD Viewer component, the trial for this module will expire, even if 30 have not passed. The Adlib CAD 30-day evaluation period begins at the time of installation, regardless of when the evaluation license is activated.
7. To Rehost Adlib PDF activation (including an Adlib CAD Viewer license) to another system, please Contact Adlib.

Adlib PDF OEM Installation Guide © 2013 Adlib 115
Appendix E: Contact Adlib
Web Site www.adlibsoftware.com/
Sales [email protected]
Support [email protected]
Phone 1-905-631-2875 or
1-866-991-1704 (North America)
Fax 1-905-639-3540
Mail Adlib
215-3228 South Service Road
Burlington, Ontario
Canada L7N 3H8

Adlib PDF OEM Installation Guide © 2013 Adlib 116
Appendix F: Index
AActivate License
Offline . . . . . . . . . . . . . . . . . . . . . . . . . . . . . 54Online . . . . . . . . . . . . . . . . . . . . . . . . . . . . . 49
Activation Response File, offline . . . . . . . 57, 60Active Directory Service Account User . . . . . . 21Adlib License Manager . . . . . . . . . . . . . . . . . . 45Adlib license server . . . . . . . . . . . . . . . . . . . . 45
CComplete Uninstallation . . . . . . . . . . . . . . . . . 89Connector . . . . . . . . . . . . . . . . . . . . . . . . . . . . 88Contact Adlib . . . . . . . . . . . . . . . . . . . . . . . . 115Create a local Job Folder . . . . . . . . . . . . . 31, 32Custom Installation . . . . . . . . . . . . . . . . . . . . . 24Customer Information window . . . . . . . . . . . . 23Customer Number/Serial Number . . . . . . . . 113
DDatabase Growth Management . . . . . . . . . . 110
Modes . . . . . . . . . . . . . . . . . . . . . . . . . . . . 110Database Name . . . . . . . . . . . . . . . . . . . . . . . 28Database Scripts . . . . . . . . . . . . . . . . . . . . . . 25Database Settings
Database Name . . . . . . . . . . . . . . . . . . . . . 28Server Name . . . . . . . . . . . . . . . . . . . . . . . . 28Username/Password . . . . . . . . . . . . . . . . . 28
Database tablespace/schema . . . . . . . . . . . . 20Disaster Recovery Plan . . . . . . . . . . . . . . . . 113Disk space required/available . . . . . . . . . . . . . 24
EEvaluation License . . . . . . . . . . . . . . . . . . . . . 46
FFile Repository UNC Path . . . . . . . . . . . . . . . 32File Repository Web Server Path . . . . . . . . . . 32
IIIS Authentication Settings Account/Password 31Install a New Component . . . . . . . . . . . . . . . . 93Installation Instructions
Adlib PDF . . . . . . . . . . . . . . . . . . . . . . . . . . 22InstallShield Wizard Complete window . . . . . . 35
JJob Management Service . . . . . . . . . . . . . . . . 88
LLicense Agreement window . . . . . . . . . . . . . . 23License Manager . . . . . . . . . . . . . . . . . . . . . . 45License Types . . . . . . . . . . . . . . . . . . . . . . . . 45local administrator rights . . . . . . . . . . . . . 20, 30Logger . . . . . . . . . . . . . . . . . . . . . . . . . . . . . . 88
MManagement Console Login Settings window 26Modification of Installation . . . . . . . . . . . . . . . 90
NNamed Pipes . . . . . . . . . . . . . . . . . . . . . . 10, 13
OOffline
Activation Request File . . . . . . . . . . . . . . . . 55Activation Response File . . . . . . . . . . . 57, 60Rehost Request File . . . . . . . . . . . . . . . . . . 70Rehost Response File . . . . . . . . . . . . . . . . 72Return Request File . . . . . . . . . . . . . . . . . . 82Return Response File . . . . . . . . . . . . . . . . . 84
PPort Number . . . . . . . . . . . . . . . . . . . . . . . . . . 31Process Manager . . . . . . . . . . . . . . . . . . . 45, 88
System Requirements . . . . . . . . . . . . . . . . 17
RRehost License
Offline . . . . . . . . . . . . . . . . . . . . . . . . . . . . . 68Online . . . . . . . . . . . . . . . . . . . . . . . . . . . . . 63
Rehost Request File, offline . . . . . . . . . . . . . . 70Rehost Response File . . . . . . . . . . . . . . . . . . 71Return License
Offline . . . . . . . . . . . . . . . . . . . . . . . . . . . . . 80Online . . . . . . . . . . . . . . . . . . . . . . . . . . . . . 75
Return Request File, offline . . . . . . . . . . . . . . 82Return Response File, offline . . . . . . . . . . . . . 83Root Adlib Work Folder . . . . . . . . . . . . . . . . . 29

Adlib PDF OEM Installation Guide © 2013 Adlib 117
SServer Name . . . . . . . . . . . . . . . . . . . . . . . . . 28Services . . . . . . . . . . . . . . . . . . . . . . . . . . 25, 88Services Settings
Create a local Job Folder/Use Existing Job Folder . . . . . . . . . . . 31, 32
IIS Authentication Settings Account/Password . . . . . . . . . . . . . . . 31
Port Number . . . . . . . . . . . . . . . . . . . . . . . . 31Setup Type window . . . . . . . . . . . . . . . . . . . . 24Silent Installation . . . . . . . . . . . . . . . . . . . . . . 37SQL Server Setup . . . . . . . . . . . . . . . . . . . . . 20Start Copying Files window . . . . . . . . . . . . . . 33System Manager . . . . . . . . . . . . . . . . . . . 25, 88
System Requirements . . . . . . . . . . . . . . . . 17System Requirements
Process Manager . . . . . . . . . . . . . . . . . . . . 17System Manager . . . . . . . . . . . . . . . . . . . . . 17Transformation Engine . . . . . . . . . . . . . . . . 17
TTransformation Engine . . . . . . . . . . . . . . . 25, 88
Stopped for License Activation . . . . . . . . . . 45System Requirements . . . . . . . . . . . . . . . . 17
UUninstallation . . . . . . . . . . . . . . . . . . . . . . . . . 89Use Existing Job Folder . . . . . . . . . . . . . . 31, 32User Account Control security settings . . . . . . 30
VView Existing Licenses . . . . . . . . . . . . . . . . . . 65
Wwatermark . . . . . . . . . . . . . . . . . . . . . . . . . . . . 46Windows Authentication for SQL Server . . . . 20Windows Credentials
Account/Password . . . . . . . . . . . . . . . . . . . 30