Embed Size (px)
Citation preview
(back to the top) 1
Adobe Connect Writing Center Tutorial
Welcome to the Writing Center. Here, we use Adobe Connect for our distance appointments.
We understand that Adobe Connect may be a bit challenging the first time, so we have provided
this instructional guideline to help.
If you just need some troubleshooting help, you can jump to our “Frequently Asked Questions”
section.
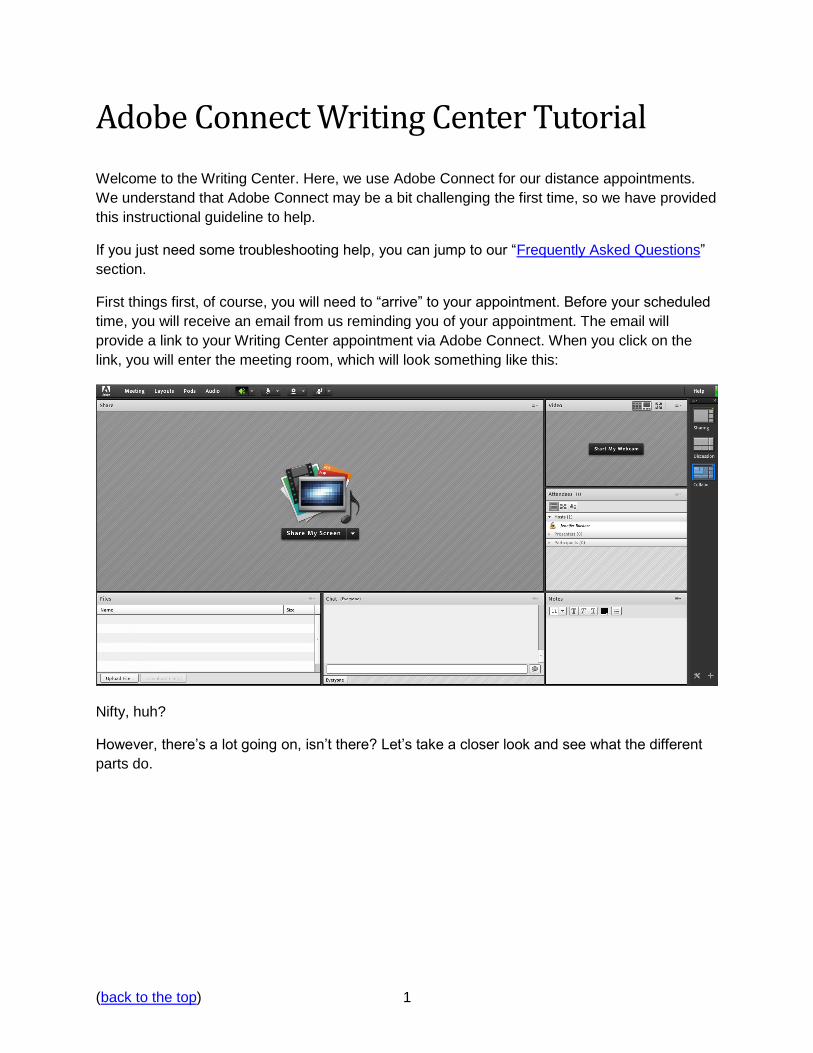
First things first, of course, you will need to “arrive” to your appointment. Before your scheduled
time, you will receive an email from us reminding you of your appointment. The email will
provide a link to your Writing Center appointment via Adobe Connect. When you click on the
link, you will enter the meeting room, which will look something like this:
Nifty, huh?
However, there’s a lot going on, isn’t there? Let’s take a closer look and see what the different
parts do.

(back to the top) 2
Adobe Connect: The Four Windows
This window will be the focal point of your appointment. Using the “Share My Screen” feature,
your consultant will be able to see your computer screen, which will give us the ability to see
your assignment at the same time you do.
This window is where you will see the people in your meeting, which means you and your
consultant.
(back to the top) 3
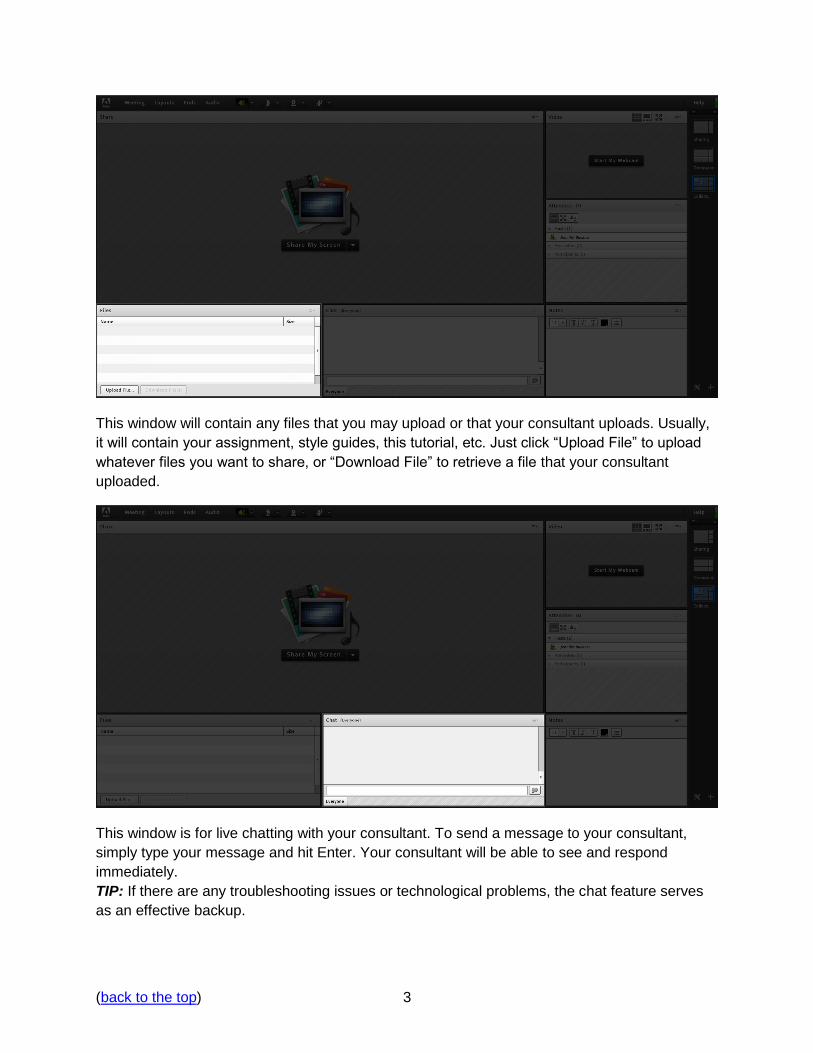
This window will contain any files that you may upload or that your consultant uploads. Usually,
it will contain your assignment, style guides, this tutorial, etc. Just click “Upload File” to upload
whatever files you want to share, or “Download File” to retrieve a file that your consultant
uploaded.
This window is for live chatting with your consultant. To send a message to your consultant,
simply type your message and hit Enter. Your consultant will be able to see and respond
immediately.
TIP: If there are any troubleshooting issues or technological problems, the chat feature serves
as an effective backup.

(back to the top) 4
Adobe Connect: The Banner
Now that you know what you’re looking at, it’s time to make it so you can communicate with
your consultant. Let’s look at what you will need to do in the banner above the first window:
The first thing you’ll want to do is run the Audio Setup Wizard, which will make sure that your
audio will work during your appointment. You can run this wizard by clicking on the “Meeting”
tab and then clicking “Audio Setup Wizard” on the drop-down menu.
This button makes sure your sound is on for Adobe Connect. Make sure this button is green.
After that, make sure the volume on your computer is not muted either. Both are important for
our appointment with you.
(back to the top) 5
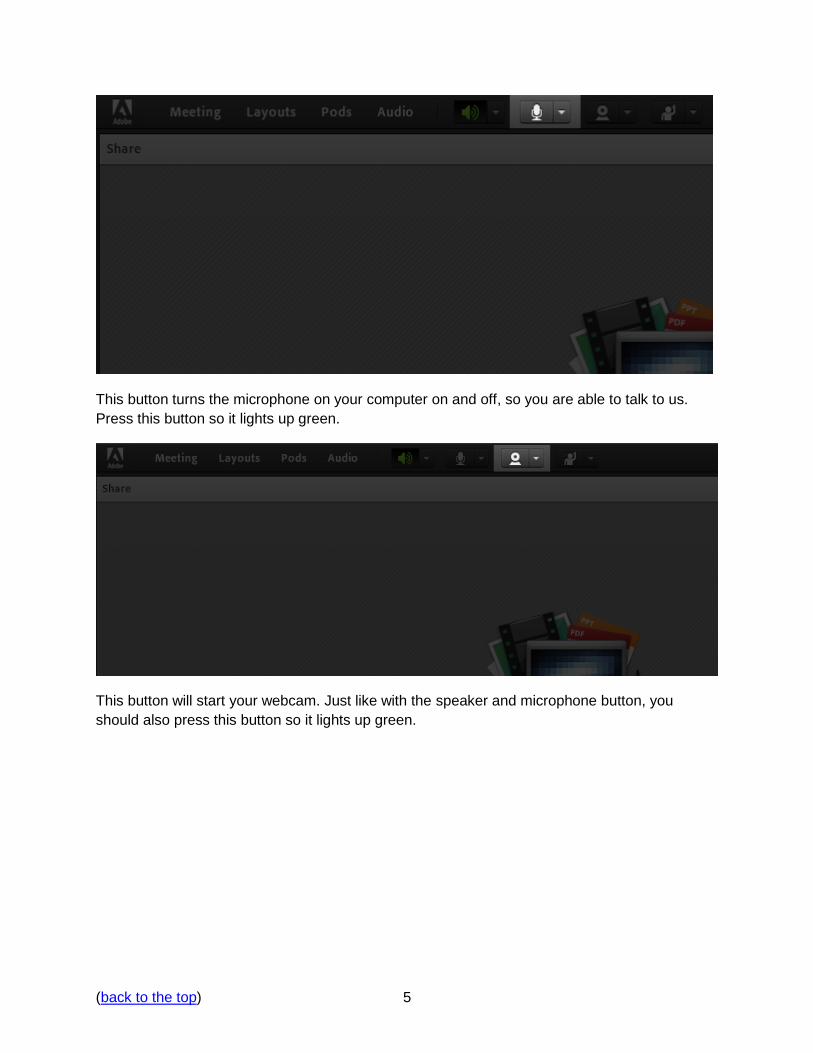
This button turns the microphone on your computer on and off, so you are able to talk to us.
Press this button so it lights up green.
This button will start your webcam. Just like with the speaker and microphone button, you
should also press this button so it lights up green.
(back to the top) 6
Frequently Asked Questions
How do I Share My Screen?
When you enter the Adobe Connect meeting room, and you have turned on your sound,
microphone, and webcam, we would like for you to share your screen with us. When you land
on the Adobe Connect meeting room, you will see the window with the “Share My Screen”
button and drop-down menu. Click the “Share My Screen” button (you don’t need to click on the
drop-down menu).
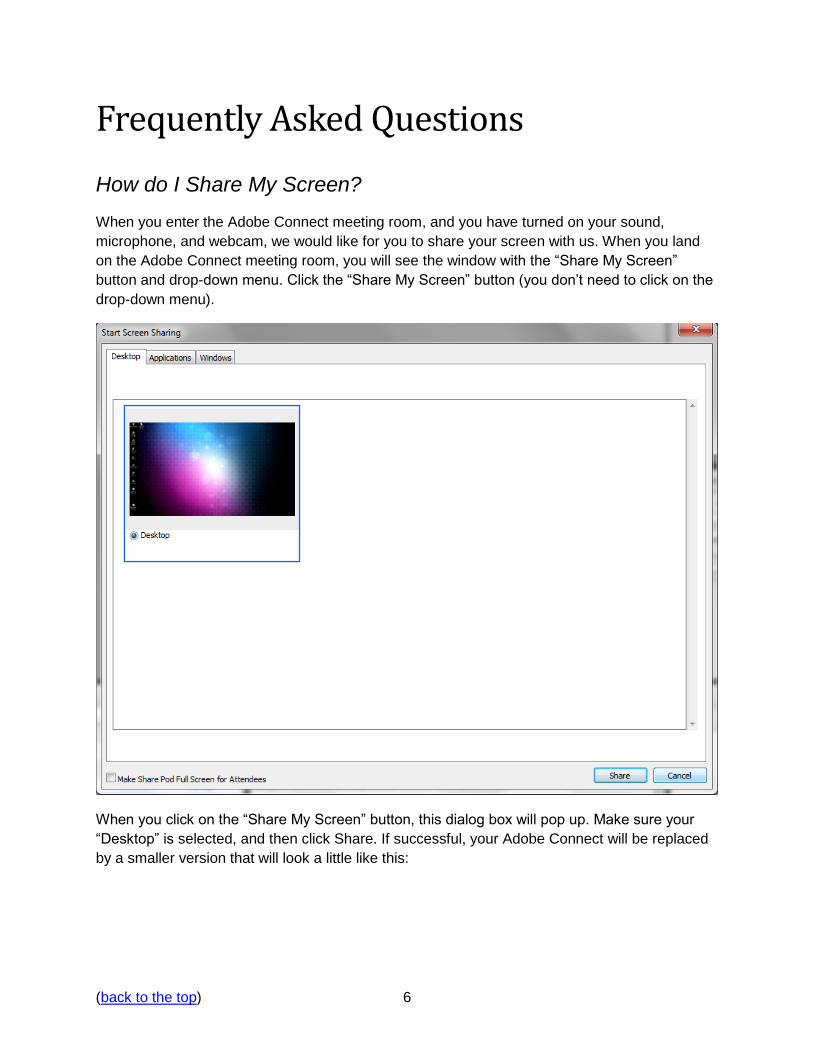
When you click on the “Share My Screen” button, this dialog box will pop up. Make sure your
“Desktop” is selected, and then click Share. If successful, your Adobe Connect will be replaced
by a smaller version that will look a little like this:
(back to the top) 7
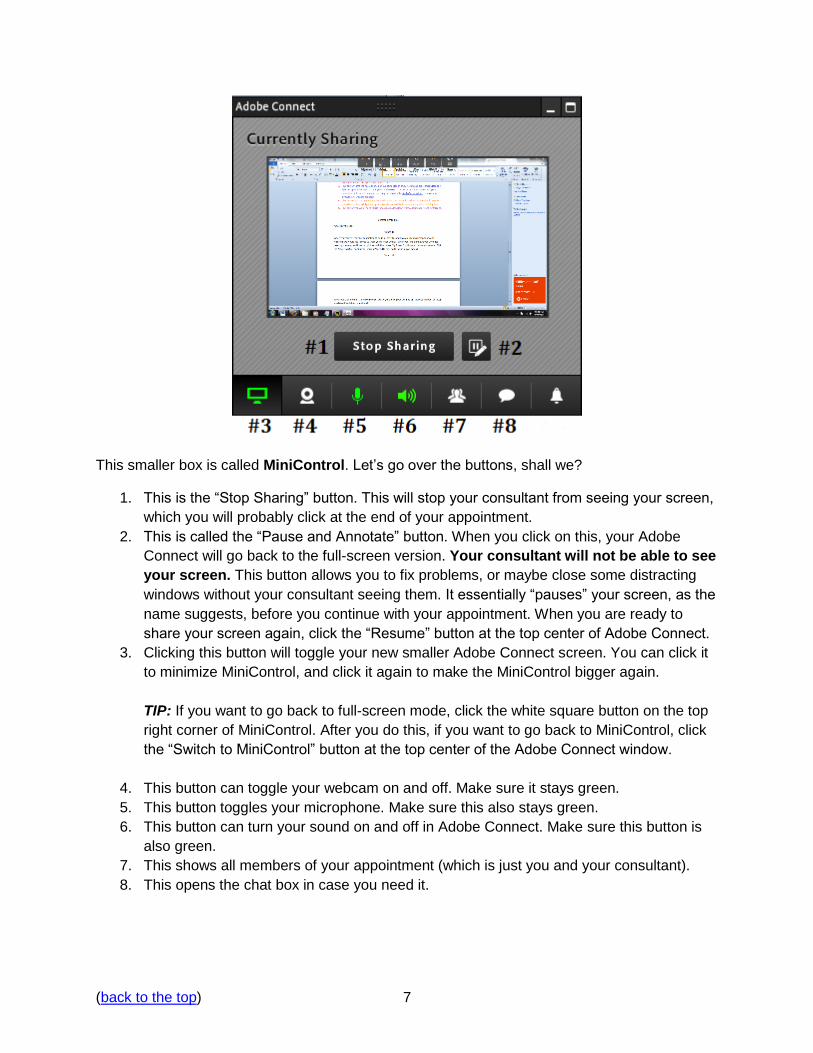
This smaller box is called MiniControl. Let’s go over the buttons, shall we?
1. This is the “Stop Sharing” button. This will stop your consultant from seeing your screen,
which you will probably click at the end of your appointment.
2. This is called the “Pause and Annotate” button. When you click on this, your Adobe
Connect will go back to the full-screen version. Your consultant will not be able to see
your screen. This button allows you to fix problems, or maybe close some distracting
windows without your consultant seeing them. It essentially “pauses” your screen, as the
name suggests, before you continue with your appointment. When you are ready to
share your screen again, click the “Resume” button at the top center of Adobe Connect.
3. Clicking this button will toggle your new smaller Adobe Connect screen. You can click it
to minimize MiniControl, and click it again to make the MiniControl bigger again.
TIP: If you want to go back to full-screen mode, click the white square button on the top
right corner of MiniControl. After you do this, if you want to go back to MiniControl, click
the “Switch to MiniControl” button at the top center of the Adobe Connect window.
4. This button can toggle your webcam on and off. Make sure it stays green.
5. This button toggles your microphone. Make sure this also stays green.
6. This button can turn your sound on and off in Adobe Connect. Make sure this button is
also green.
7. This shows all members of your appointment (which is just you and your consultant).
8. This opens the chat box in case you need it.
(back to the top) 8
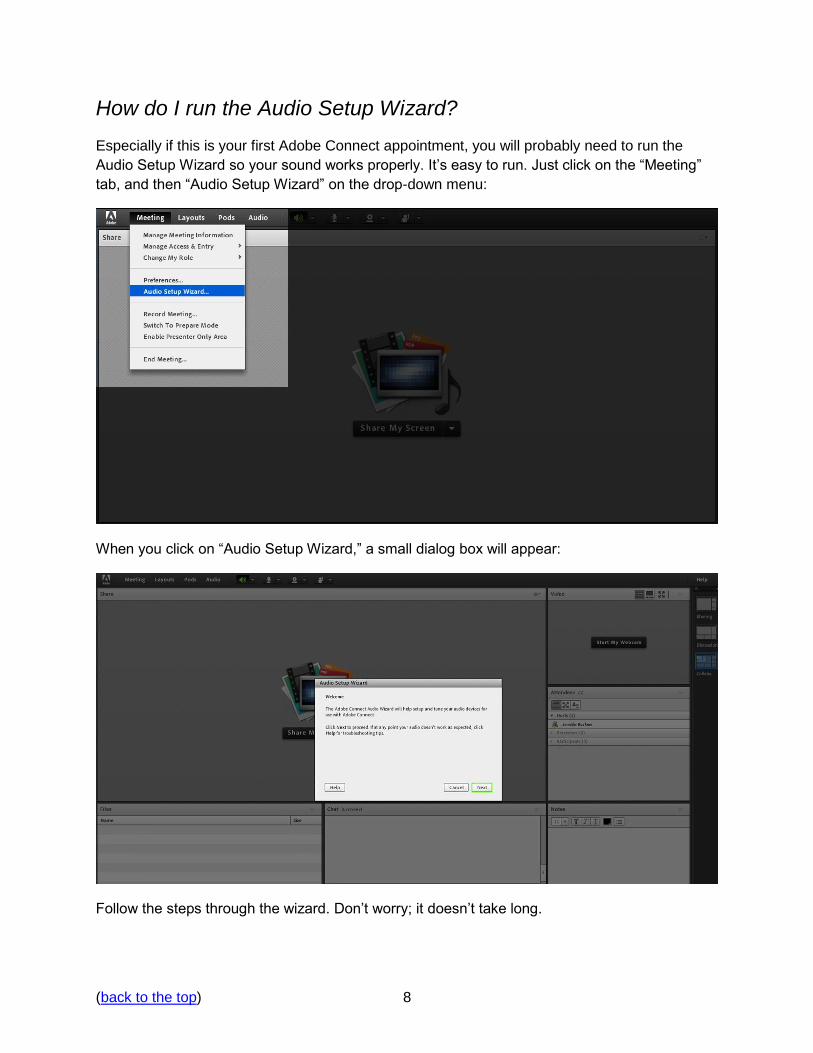
How do I run the Audio Setup Wizard?
Especially if this is your first Adobe Connect appointment, you will probably need to run the
Audio Setup Wizard so your sound works properly. It’s easy to run. Just click on the “Meeting”
tab, and then “Audio Setup Wizard” on the drop-down menu:
When you click on “Audio Setup Wizard,” a small dialog box will appear:
Follow the steps through the wizard. Don’t worry; it doesn’t take long.
(back to the top) 9
Why are some of the Adobe Connect features not working?
Check to make sure that you have downloaded and installed the free Adobe Connect Add-In.
This add-in, which you must download to your computer, enables you to use the “Share My
Screen” feature. When you attempt to share your screen, Adobe Connect will prompt you to
download the add-in.
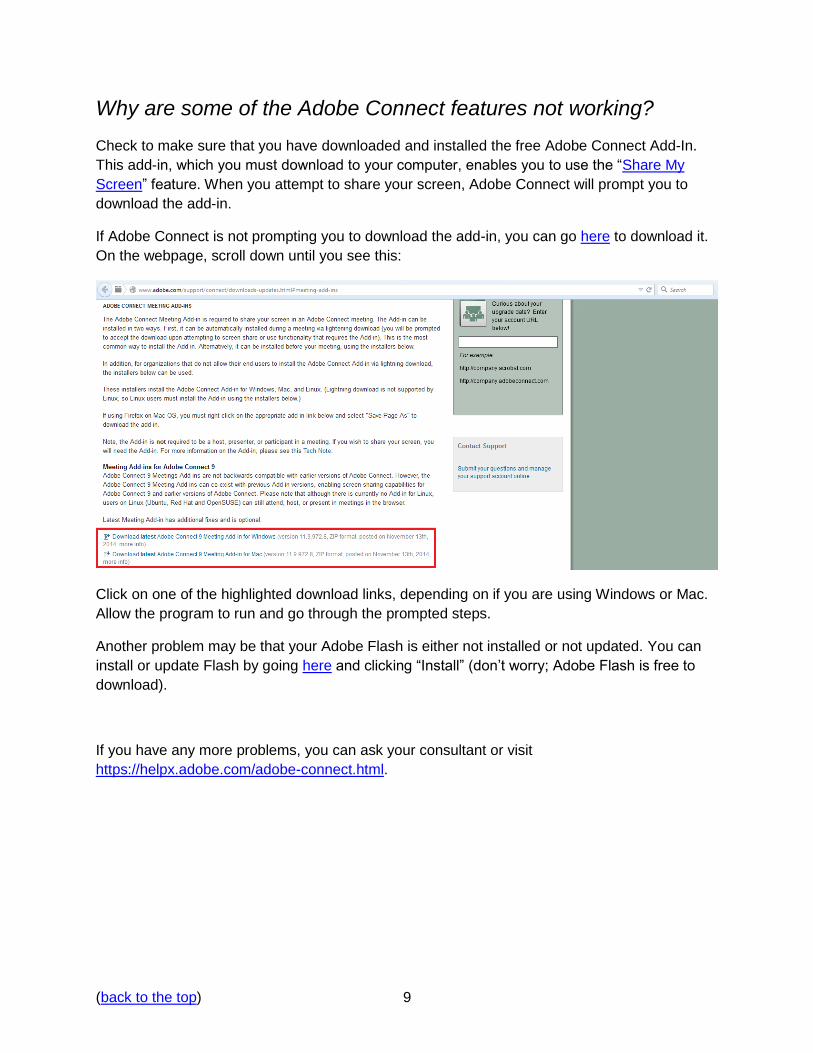
If Adobe Connect is not prompting you to download the add-in, you can go here to download it.
On the webpage, scroll down until you see this:
Click on one of the highlighted download links, depending on if you are using Windows or Mac.
Allow the program to run and go through the prompted steps.
Another problem may be that your Adobe Flash is either not installed or not updated. You can
install or update Flash by going here and clicking “Install” (don’t worry; Adobe Flash is free to
download).
If you have any more problems, you can ask your consultant or visit
https://helpx.adobe.com/adobe-connect.html.