Embed Size (px)
Citation preview


A.D.S. 1000
VETERINARYANESTHESIA DELIVERY SYSTEM
INSTRUCTION MANUAL
REV. E/4/07

TABLE OF CONTENTS
SECTION PAGE_______________________________________________________________________
INTRODUCTION 1PARTS LIST 2INSTALLATION INSTRUCTIONS 3-4GETTING FAMILIAR WITH THE A.D.S. 1000 4-6POUNDS TO KILOGRAM CONVERSION 7TURNING ON THE A.D.S. 1000 8-9THE LCD DISPLAY in SET MODE 9-10THE LCD DISPLAY in RUN MODE 11-12THE MINUTE VOLUME NUMBER 12THE INSPIRATORY TIME 13DISPLAYING TIDAL VOLUME 14UNDERSTANDING FLOW RATE 14UNDERSTANDING BREATHS PER MINUTE 15HOW TO SET P.I.P. 15UNDERSTANDING ASSIST 15USING THE FILL / HOLD FEATURE 16BUCKING THE A.D.S. 16USING BREATHE FEATURE 17USING THE MASK MODE 17-18UNDERSTANDING PEEP MODE 19-20UNDERSTANDING THE FLUSH MODE 21ENDOTRACHEAL TUBES and the A.D.S.1000 22USING THE A.D.S. 1000 in LAB MODE 22-23USE OF EXTERNAL EQUIPMENT WITH THE A.D.S. 1000 23TROUBLESHOOTING CHECK LIST 24-25TROUBLESHOOTING THE A.D.S. 1000 25-28COMMONLY ASKED QUESTIONS 29-31COMPANY INFORMATION 32RETURN FOR EVALUTATION 33
NOTE: The A.D.S.1000 is a sophisticated electronic device and althoughdesigned for ease of use, care must be taken in its operation. Please read this entire manual before using the A.D.S. 1000.
The A.D.S.1000 is FOR VETERINARY USE ONLY.
A.D.S. 1000 Engler Engineering Corporation i

INTRODUCTION
Thank you for choosing the A.D.S. 1000 from Engler Engineering Corporation. Webelieve that this machine will change the way anesthesia and ventilation therapy isadministered to veterinary patients. The A.D.S. 1000 has a Normal and Lab Mode ofoperation, both of these operating modes will be covered in this manual.
The A.D.S. 1000 is a microprocessor controlled anesthetic ventilator. Themicroprocessor serves as a command and control base for a combination of flowcontrolling valves, exhale valves, safety valves and electronic sensors located withinthe A.D.S. 1000. The microprocessor simultaneously senses the proximal airwaypressure, inspiratory time, breaths per minute, flow rate, and then calculates aminute volume per kg, based upon these parameters. The A.D.S. 1000 also sensesany negative proximal pressure and depending on the amplitude of this pressuredetermines whether or not to give an assisted breath to the patient. Themicroprocessor is the brain of the A.D.S. 1000, it sends and receives all informationwithin the unit. The unit electronically controls the following parameters;
- Flow Rate - Breaths per Minute- Peek Inspiratory Pressure - Inspiration Assist- Positive End Expiratory Pressure
The A.D.S. 1000 has default settings for these parameters already programmed intoit. All the operator need do is enter in the patients' weight and the A.D.S. 1000 willdo the rest. However, if at any time the operator feels that a certain patient requiresa different setting for a specific parameter then the preset value, he may changethis value at any time. This feature allows the operator greater options over the waythe anesthetic is delivered to the patient. With these functions, the A.D.S. 1000 maybe used to safely deliver anesthesia while avoiding the risk of anesthesia relatedrespiratory depression.
The A.D.S. 1000 may be used without a vaporizer as a critical care ventilator,and has a number of built-in features designed for veterinary respiratory therapy.
PLEASE READ VERY CAREFULLY
Engler Engineering Corporation makes every effort to verify that all parts for the unitalong with any optional accessories shipped from our location are included in yourorder. It is imperative that you inspect the package and if you find any piecesmissing or damaged, you must notify us immediately.
Engler Engineering Corporation will not be held liable for any damage including, butnot limited to leakage caused by improper installation of our products.
If you have any questions or comments, please contact:
Engler Engineering Corporation1099 East 47th Street, Hialeah, Florida 33013
800-445-8581 – 305-688-8581 – FAX 305-685-7671
A.D.S. 1000 Engler Engineering Corporation 1
PARTS LIST
Upon opening the carton the A.D.S. 1000 was shipped in, you will find:
{ } A.D.S.1000 Unit
{ } A.D.S. Instruction Manual, Which Should be Read Prior to Operating the Unit
{ } A.D.S. Video
{ } Breathing Circuit
{ } Oxygen Hose, Green
{ } To Vaporizer Hose
{ } From Vaporizer Hose
{ } Scavenger Tubing, Blue
{ } Power Adapter
{ } Mask Adapter, For Masking Procedures
{ } Test Lung
NOTE: 1
Your A.D.S. 1000 has an internal battery backup. The internal battery isdesigned to be used only in the event of a power outage or power surge. In order tokeep the battery at a proper charge always keep the power adapter plugged intothe A.D.S. 1000. On a full charge, the internal battery backup should give up totwelve hours of emergency operation.
NOTE: 2
To ensure proper operation, unit must be flushed after every procedure! Pleaserefer to page 20 “Understanding flush mode”.
IMPORTANT:
Service and repairs should only be carried out by authorized Engler EngineeringCorporation Service trained personnel. Service by unauthorized personnel will voidthe warranty.
2 Engler Engineering Corporation A.D.S. 1000

INSTALLATION INSTRUCTIONS1. Connecting the Oxygen Hose - On the back panel of the unit there is a port marked"OXYGEN IN", connect one end of the Green Oxygen Hose to this port and connect theother end of this hose to your 50 P.S.I. oxygen source. Since the oxygen fittings areuniversally standard, you may use your own oxygen hose if desired.
CAUTION: IT IS EXTREMELY IMPORTANT THAT THE OXYGEN BEREGULATED TO A PRESSURE OF 50 POUNDS PER SQUARE INCH (PSI),FOR THE MINUTE VOLUME PER KILOGRAM DISPLAY TO READ ACCURATELY.
2. Connecting the Vaporizer Hose - On the back panel of the unit thereis a port marked "TO VAPORIZER", connect one end of the White, To Vaporizer Hose tothis port and connect the other end to your vaporizer inlet port.
3. Connecting the Vaporizer Hose - On the back panel of the unit thereis a port marked "FROM VAPORIZER", connect one end of the Violet, FromVaporizer Hose to this port and connect the other end to your vaporizer outlet port.
NOTE: The A.D.S. 1000 must be used with a precision Halothane or Isofluorane vaporizer.
CAUTION: It is important when connecting the vaporizer to ensure that thevaporizer is mounted lower than the ADS1000.
4. Connecting the Scavenger Tubing - Connect one end of the Blue Scavenger tubingto the "SCAVENGER OUT” port on the back of the unit. Connect the other end to eithera "passive" or "active" scavenging system. This will help to eliminate all traces ofanesthetic gases used in the operating room that could pose a possible hazard topersonnel. The use of a f/air anesthesia gas filter unit or active anesthesia scavengersystem is highly recommended. Care must be taken to ensure that the scavenger portis not blocked by improper use of these devices as the animal's ease of expirationdepends on the resistance of the scavenger line.
5. Connecting the Power Adapter - Connect the small male plug of the poweradapter into the back of the A.D.S. 1000 at the 15 VDC @ 1.2 A outlet. Thenplug the adapter into an electrical outlet. The power adapter contains electronics for thecharging of the internal battery backup, while this adapter is made of sturdy material,improper treatment could result in failure of the adapter.
NOTE: On a full charge the A.D.S. 1000 has up to 12 hours of battery backup foruninterrupted operation during power failure. Complete battery recharging isaccomplished in approximately 8 hours.
6. Connecting the Breathing Circuit - Connect the two large ends of thebreathing circuit to the "BREATHING CIRCUIT" ports on the front panel of theA.D.S. 1000. You may use your own breathing circuit if you desire. The top port(inspiratory) of the ADS 1000 feeds oxygen/anesthesia into the animal’slungs. The bottom port (expiratory) is the exhaust. After the lungs have been inflated theinternal exhale valve allows the natural elasticity of the animal's lungs to exhaleoxygen/anesthesia through this port.
A.D.S. 1000 Engler Engineering Corporation 3

7. Connecting the gas sampling system - To connect the external gas samplingsystem perform the following steps:
1) Insert the Luer lock connector to the gas sampling input and rotate it clockwise onehalf turn.
2) Connect the two breathing circuits ends to the breathing circuit ports.3) Now insert the gas sampling elbow into the end of the breathing circuit as shown.4) Insert the Luer lock connector to the gas sampling elbow and rotate it clockwise
one half turn. 5) Connect breathing circuit to the gas sampling elbow.
4 Engler Engineering Corporation A.D.S. 1000
Note: Do not connect test lung until unit has been properly initiated.

GETTING FAMILIAR WITH THE A.D.S. 1000
In order to operate the A.D.S. 1000 properly, you need know its controls.Front View:
[1] POWER Switch - This switch turns the power to the A.D.S. 1000 ON and OFF.[2] MASK Switch - This switch is used for enabling and disabling the mask mode[3] SET / RUN Switch - When in the SET position this switch allows the
operator to enter in the patients' weight. When switched to RUN theA.D.S. 1000 starts to ventilate the patient.
[4] VOLUME Knob - This knob controls the loudness of the audible warningalarm. We suggest that you start with it turned fully Clockwise, i.e. full volumeand adjust it as necessary.
[5] FILL / HOLD Button - When this button is pressed, the A.D.S. 1000 will fill thelungs of the patient to the indicated peak inspiratory pressure and hold it untilthe button is released.
[6] BREATHE Button - When this button is pressed, the A.D.S. 1000 willinitiate a breath to the patient.
[7] WEIGHT UP / DOWN Buttons - When the A.D.S. 1000 is in the SETmode these buttons allow the operator to enter in the weight of the patient.
[8] FLOW RATE UP / DOWN Buttons - Depressing these buttons cause the flowrate to increase or decrease.
[9] BREATHS PER MINUTE UP / DOWN Buttons - These buttons controlthe minimal amount of times that the A.D.S. 1000 will breath per minute.
[10] P.l.P. UP / DOWN Buttons - These buttons control the Peek InspiratoryPressure in cm. of H2O, that the A.D.S. 1000 will deliver to the patient.
[11] ASSIST UP / DOWN Buttons - These buttons set the sensitivity ofinspiratory effort necessary for the A.D.S. 1000 to facilitate an assistedbreath. They also allow the assist feature to be turned off.
[12] LCD DISPLAY - Displays minute volume, inspiratory time, proximalairway pressure, flow rate, breaths per minute, peek inspiratory pressure, andassist pressure.
[13] BREATHING CIRCUIT PORTS - Connect the breathing circuit to theseports.
[14] BATTERY LOW INDICATOR - The red led on the front panel of the A.D.S.1000 is a warning indicator that the battery power is low, and that the unit
A.D.S. 1000 Engler Engineering Corporation 5

should be placed on charge immediately. When the unit is first powered upthe led will self test by flashing on and then should remain off. When thebattery is nearly discharged the led will remain on indicating that the unitshould be charged immediately.
[15] GAS SAMPLING INPUT - To connect the external sensor input, insert theLuer lock connector to the gas sampling input and rotate it clockwise onehalf turn. The Luer lock connector is located at the end of the 1/8” clear tube.
Rear View:
[16] SCAVENGER OUT - Connect one end of the blue "Scavenger" tubing to thisport and connect the other end to a scavenging filter canister or otherscavenging device, either active or passive.
[17] FROM VAPORIZER - Connect one end of the "From Vaporizer"tubing to this port and connect the other end to the outlet port of yourprecision vaporizer.
[18] TO VAPORIZER - Connect one end of the "To Vaporizer" tubing to this portand connect the other end to the inlet port or your precision vaporizer.
[19] OXYGEN IN - Connect one end of the green "Oxygen" tubing to this port andconnect the other end to an oxygen source that is set to a pressure of 50P.S.I. (pounds per square inch).
[20] POWER INLET - Connect your power cord to this port.[21] ALARM - This is the alarm speaker.[22] 50 P.S.I. / 5 P.S.I. - This is the manual control switch to go between the 50
P.S.I. normal operating mode and the 5 P.S.I. for lab mode.
6 Engler Engineering Corporation A.D.S. 1000

POUNDS TO KILOGRAM CONVERSIONIn order for the A.D.S. 1000 to operate properly you must enter in the correctpatient weight. The A.D.S. 1000 requires that the patients weight be entered inkilograms, therefore if the patients weight in pounds is known then the followingformula will help in determining the patients weight in kilograms.
Kg = P x 0.454
Where:Kg = patients' weight in kilogramsP = patients' weight in pounds
Example: You have a 40 pound patient and need to find out its' weight inkilograms.
Kg = 40 x 0.454
Kg = 18.2 Kilograms or just 18 Kilograms
A.D.S. 1000 Engler Engineering Corporation 7
77.16079.36581.57083.77485.97988.18390.38892.59394.79797.00299.206
101.411103.616105.820108.025110.229112.434114.638116.843119.048121.252123.457125.661127.866130.071132.275134.480136.684138.889141.093143.298145.503147.707149.912
35363738394041424344454647484950515253545556575859606162636465666768
2.2054.4096.6148.818
11.02313.22815.43217.63719.84122.04624.25026.45528.66030.86433.06935.27337.47839.68341.88744.09246.29648.50150.70552.91055.11557.31959.52461.72863.93366.12868.34270.54772.75174.956
123456789
10111213141516171819202122232425262728293031323334
Conversion from kilograms to pounds
Kilograms Pounds Kilograms Pounds

TURNING ON THE A.D.S. 1000
1. Turn on or connect the oxygen supply to the A.D.S. 1000. The oxygen supplymust be regulated to 50 P.S.I. Make sure that the vaporizer (if in circuit) is in the"OFF" position.
2. Place the "POWER" and "MASK" switches into the "O" position. Place the"SET / RUN" switch into the "SET" position. Check that the normal 50 P.S.I. / Lab 5 P.S.I. switch located at the rear of the case is set to normal 50 P.S.I.position.
3. Place your thumb over the open end of the gas-sampling elbow that is connectedto the end of the the breathing circuit.Note: By placing your thumb over the gas-sampling elbow you are creating a closedcircuit for the A.D.S. 1000’s built in self-test feature.
4. While still holding your thumb over the sampling elbow, place the Power switchinto the "I" or"On" position. The A.D.S. 1000 will now perform a self-test. This will beindicated by the LCD display as shown in Figure 1. Continue to hold your thumbover the end of the sampling elbow until this test is complete.
5. As shown in Figure 2, at the end of the self-test you will be prompted by one ofthe following messages in the LCD display.
8 Engler Engineering Corporation A.D.S. 1000
A.
H.
F.E.D.
C.B.
G.
Fig.1
Fig.2

TURNING ON THE A.D.S. 1000 (cont.)
6. If everything has checked out OK. the LCD Display should give readout "A.", if itdoes, then proceed to Step 10.
7. If you get readout "B. SWITCH TO SET", then place the SET/RUN switchinto the "SET" position. The display should now give readout "A." or "C.", if you getreadout "A." then proceed to Step 10.
8. If you get readout "C. SWITCH MASK OFF" then place the "MASK" switchinto the "O" or "OFF" position. The display should now give readout "A.", if it does,then proceed to Step 10.
9. If you get any one of the error messages "D." through "H." Then go to theTROUBLESHOOTING THE A.D.S. 1000, section of this manual.
10. The A.D.S.1000 has just completed the self-test and it has found nothingwrong
The A.D.S.1000 is ready for operation!
11. In the next section you will learn how to understand and set up theparameters of the A.D.S. 1000 in the "SET MODE". The "SET MODE" is theresting or static mode for the A.D.S. 1000. The "SET MODE" is the mode inwhich you will enter the patients' weight in kilograms and from that input theA.D.S. 1000 will select all of the rest of the parameters for you. Of course theA.D.S. 1000 will only select values based on an average, if at any time you wish tochange any parameter, you may do so.
THE LCD DISPLAY in SET MODE
1. Make sure that the switch is in the "SET MODE" position.
2. Take a look at the display above. From this display we can see thefollowing:
a. Patient weight is selected at 20 Kilograms.
b. The flow rate for this patient has been preselected to a value of 24 liters per minute.
c. The patient will be ventilated at a preselected minimum of 7.0 breaths per minute.
A.D.S. 1000 Engler Engineering Corporation 9

THE LCD DISPLAY in SET MODE (cont.)
d. The peak inspiratory pressure for this patient has been preselected to a value of 15 cm of H2O.
e. The ASSIST feature is on, at a preselected value of -3.0 cm of H2O.
Every time you turn on the A.D.S. 1000, these are the values that will bedisplayed on the LCD after a successful self test.
3. To enter in a different weight all you need to do is press either the WEIGHTUP or WEIGHT DOWN buttons on the front of the A.D.S. 1000 until the upperline of the LCD displays the desired weight.
NOTE: Weights under 10 Kilograms are set to the nearest 0.5 Kilograms, whileweights over 10 Kilograms are set to the nearest 1 Kilogram.
NOTE: It is important to set the unit for the correct weight for each patient sothat the MINUTE VOLUME PER KILOGRAM delivered will be calculatedcorrectly.
4. As you select different weights the A.D.S. 1000 automatically provides Defaultventilation parameters for those weights. If, at any time before or during aprocedure, you desire to change any parameters you may do so. The parametersthat you can override are the following:
a. LITERS PER MINUTE - To adjust the flow rate to the patient, simplypress the FLOW RATE UP or FLOW RATE DOWN buttons on the front ofthe A.D.S. 1000.
b. BREATHS PER MINUTE - To adjust the amount of breaths per minute delivered to the patient, simply press the BREATHS PERMINUTE UP or BREATHS PER MINUTE DOWN buttons on the front ofthe A.D.S.1000.
c. PEAK INSPIRATORY PRESSURE - To adjust the peak inspiratory pressure delivered to the patient, press either the P.l.P. UP orP.l.P. DOWN buttons on the front of the A.D.S. 1000.
d. ASSIST - To adjust the amount of inspiratory effort needed to initiatea breath by the patient, press either the ASSIST UP or ASSIST DOWNbuttons on the front of the A.D.S. 1000.
NOTE: To turn the ASSIST feature Off, press the and hold ASSISTDOWN button until the LCD displays "OFF" where the Assist value waslocated.
10 Engler Engineering Corporation A.D.S. 1000

THE LCD DISPLAY in RUN MODE
NOTE: We suggest that you practice with the provided test lung. Until you feelconfident that you fully understand the proper operation of the A.D.S. 1000.Throughout the manual whenever the word "patient(s)" is used, you will also see thewords (TEST LUNG), this means that you should first familiarize yourself with thisfunction by using the "TEST LUNG".
NOTE: When using the TEST LUNG you should always keep the vaporizer inthe OFF position.
1. Now that you have entered in the patients' weight (the TEST LUNG simulates a 20Kilogram patient), you are ready to begin delivering anesthesia or ventilating yourpatient (TEST LUNG).
2. If you haven't done so already, connect the end of the Breathing Circuit to your patient (TEST LUNG).
3. Place the SET/RUN switch into the "RUN" position. The patients' (TESTLUNG) chest should begin to fill up to the preset P.l.P.
4. After the patient (TEST LUNG) has reached the preset P.l.P. the exhale valve willopen and the patients' (TEST LUNG) chest will exhale. The LCD display should looksimilar to the display below.
NOTE: Numbers used in section 5 and 6 of pages 11 and 12 are examples only.
5. The upper line of the LCD readout is now displaying, from left to right, thefollowing information:
a: Minute Volume Per Kilogram, (100 in this case). This number will be updated upon each inspiration.
b. Peak Inspiratory Pressure Graph, (A square black cursor moving across a white background).
NOTE: The cursor starts at 0 cm of H2O and moves up to the selectedPeak Inspiratory Pressure (15 cm of H2O in this case).
A.D.S. 1000 Engler Engineering Corporation 11

THE LCD DISPLAY in RUN MODE (cont.)
NOTE: A square BLACK cursor moving across a WHITE background indicates thatthe breath was initiated by the A.D.S. 1000. Whereas a square WHITE cursor movingacross a BLACK background indicates that the breath was initiated by the patient.
c. Inspiratory Time, ( .73 seconds in this case)
6. The bottom line of the LCD readout is shows the following parameters:
a. Flow Rate, (24 Liters Per Minute in this case).
b. Breaths Per Minute, (7 Breaths per minute in this case).
c. Peak Inspiratory Pressure, (15 cm of H2O in this case).
d. Assist (Inspiratory Effort), ( -3.0 cm of H20 in this case).
7. The A.D.S. 1000 will now wait until either the patient initiates a breath, either bygiving an inspiratory effort of equal or greater to the ASSIST value (-3.0 in this case), or until it is time to give the next breath (computed by the A.D.S.1000's microprocessor) and repeat this cycle.
NOTE: If pressure in the system increases between breaths, a built in safety featurewill cause the A.D.S. 1000 to allow an "exhale", i.e. the exhale valve opens to allowpressure to escape. This would happen, for instance, if the surgeon leaned on thepatient's chest. It can also happen if the patient tries to exhale after he has alreadyexhaled a tidal volume. You will hear the exhale valve open and close rapidly. This isnormal.
8. To temporarily stop the A.D.S. during a procedure, place the SET/RUN switch intothe "SET" position. By doing so the current parameters will be held, the currentbreath will be completed and the machine will stop. To continue ventilation, switchback to the "RUN" position.
UNDERSTANDING THE MINUTE VOLUME NUMBER
1. Since a blood gas analysis is not always available, we provide a minute volumenumber as a guide, to know if you are properly ventilating the patient. A properlyventilated patient should require from 150 to 250 ml. / minute / Kg. The 150 ml. /minute / Kg number is appropriate for larger patients and the 250 ml. / minute/ Kgnumber for smaller patients. In general, it is better to overventilate rather thanunderventilate a patient.
NOTE: The Minute Volume per Kilogram number becomes useful after the patienthas stabilized. It will take a few breaths for this stabilization to take place, then youwill see fluctuations of the Minute Volume per Kilogram number between breaths.
12 Engler Engineering Corporation A.D.S. 1000

2. There are two ways to change the Minute Volume per Kilogram number:
a. Since Minute Volume number is directly proportional to Breaths PerMinute, the most direct way to change the Minute Volume number isto change the amount of Breaths Per Minute.
b. Changing the Peak Inspiratory Pressure (P.l.P.) will change the Tidal Volume and therefore change Minute Volume number as well.Obese patients with low thoracic compliance and patients withrestrictive lung conditions will often need a higher Peak InspiratoryPressure. The best method is to observe the chest and adjust the PeakInspiratory Pressure for a "reasonable" amount of filling.
THE PEAK INSPIRATORY PRESSURE GRAPH
1. The Peak Inspiratory Pressure of the patient is indicated by a cursor movingacross the middle of the LCD display.
2. The cursor starts at 0 cm of H2O and moves up to the selected PeakInspiratory Pressure.
3. A square BLACK cursor moving across a WHITE background indicates that thebreath was initiated by the A.D.S. 1000. Whereas a square WHITE cursor movingacross a BLACK background indicates that the breath was initiated by the patient.
THE INSPIRATORY TIME
1. The right four digits display the Inspiratory Time in seconds, e.g., 1.20. thisnumber is updated with EACH breath. The exact length of inspiration is not critical,but it should allow an INSPIRATORY: EXPIRATORY RATIO of at least 1:2. This meansat 10 breaths per minute, the inspiratory time should be no longer than twoseconds. Generally, intervals of 0.75 to 2 seconds are suggested, the shorter timeintervals being best for smaller patients.
2. The easiest way to adjust the Inspiratory Time is to adjust the Flow Rate, i.e. thehigher the flow rate the quicker the lungs will be brought up to the preset PeakInspiratory Pressure, thus a quicker Inspiratory Time. Generally set the FLOW RATEso that the patient's chest rises in a reasonable time.
IMPORTANT: Very short inspiratory times may indicate a very high FLOWRATE into a very small patient. Under these circumstances, the narrowness of thetube and the resistance of the trachea and other air passageways causes thepressure to build up without inflating the lungs. It is usually very obvious when thisoccurs because the pressure will rise extremely rapidly, but the chest will not fill. DONOT LET THIS CONDITION GO UNCORRECTED. Lower the flow rate to 2 or 4 LPMand let the chest fill slowly. Once the chest is filling normally, raise the flow rateback up to a reasonable inspiratory time.
A.D.S. 1000 Engler Engineering Corporation 13

3. If the Inspiratory Time exceeds 3 seconds, the ALARM will sound. This maybe due to a too low FLOW RATE, but is usually caused by a leak in the system.Most of the time the problem will be a leaking endotracheal tube cuff. This canalmost always be detected by carefully listening for a leak during inhalation .
DISPLAYING TIDAL VOLUME
1. Tidal Volume can be displayed instead of Minute Volume Per Kilogram. Thisoption can only be done upon start-up of the A.D.S. 1000. In order to have theA.D.S. 1000 display the Tidal Volume, depress the LPM UP button and hold it thenturn the A.D.S. 1000 ON. To exit this mode, you must turn the A.D.S.1000 OFF andrestart the unit.
UNDERSTANDING FLOW RATE
1. The Flow Rate displayed on the A.D.S. 1000 is an instantaneous value, i.e. if theA.D.S. 1000 was set to 24 L.P.M. then if the unit were to have a inspiratory time of 1minute then 24 liters of gas would have been used. In reality, the A.D.S. 1000 onlyallows gas to flow for whatever the Inspiratory Time is. In order to determine the"Actual Flow Rate" a simple calculation can be performed. This calculation is asfollows:
Fave. = ( Fins x Ton x B ) / 60
Where:Fave.= Actual Flow Rate
Fins.= Flow Rate on L.C.D. Display
Ton= Inspiratory Time
B= Actual Breaths Per Minute
14 Engler Engineering Corporation A.D.S. 1000

UNDERSTANDING BREATHS PER MINUTE
1. The Breaths Per Minute displayed is the exact Breaths Per Minute only when theASSIST is in the OFF setting. If the ASSIST in ON, the displayed value is theminimum Breaths Per Minute, i.e. the A.D.S. will initiate a breath only if the patientdoes not do so in the allotted time. The A.D.S. 1000 correctly updates and displaysthe Minute Volume per Kilogram after each breath, regardless of if the patient or themachine initiated the breath.
NOTE: If the ASSIST is in the OFF position and the Breaths Per Minute is set at 6.0,then the patient (TEST LUNG) will only have six inspiratory/expiratory cycles eachminute.
NOTE: If in the above case, the ASSIST was in the -2.0 setting and the Breaths PerMinute remained at 6.0, and the patient gave a single inspiratory effort of -2.0 cm ofH2O, then the patient will have seven inspiratory/expiratory cycles for that minute.
HOW TO SET P.l.P.
1. To adjust the Peak Inspiratory Pressure, simply depress either the P.l.P. UPor P.l.P. DOWN buttons on the front of the A.D.S. 1000.
NOTE: To see how the P.l.P. graph works, press the P.l.P. DOWN button until itdisplays 5.0, place the SET/RUN switch into the "RUN" position. The patients' (TESTLUNG) chest should begin to fill up to the preset P.l.P. Notice that the patients' chest(TEST LUNG) does not inflate as much as it did when the P.l.P. was set at 15.
UNDERSTANDING ASSIST
1. The default setting for ASSIST i.e. assisted respiration is set at -3.0 cm of H2O.This setting allows for a breath to be initiated by the patient. If you wish to allow thepatient to initiate its own breath, use the ASSIST buttons on the far right to set theamount of NEGATIVE PRESSURE, i.e. VACUUM the patient has to produce in orderto initiate a breath.
2. You would usually select the lowest possible absolute number that does notcause false breaths. When in ASSIST mode the A.D.S. 1000 will wait for the patientto initiate a breath. If the patient does not spontaneously INITIATE a breath, theA.D.S. 1000 will automatically begin the breathing cycle for the patient at the setparameters.
3. If you prefer not to allow the patient to initiate it's own breath, you may do so bypressing the ASSIST DOWN button until the display reads "OFF".
A.D.S. 1000 Engler Engineering Corporation 15

USING THE FILL / HOLD FEATURE
1. FILL / HOLD fills the chest to the selected pressure and then maintains thatpressure, i.e., it does not allow exhalation until the button is released. FILL andHOLD can be used to induce a patient as described below in the section BUCKINGTHE A.D.S. It can also help during closure of thoracotomy incisions. Simply pressthe FILL and HOLD and hold it until the lungs are filled. The lungs will fill to thepreset parameter and will remain inflated AT THAT PRESSURE until the button isreleased. There is some hysteresis, i.e. the pressure is allowed to fall 3 CM beforethe chest is refilled. Overzealous hyperinflation of previously collapsed areas of thelungs can cause pulmonary damage.
For this reason it is best to inflate the lungs at the lowest possible P.l.P. value,(around 10 cm of H2O) and for the shortest time necessary (a few seconds) whenthe chest is open.
BUCKING THE A.D.S.
1. If the patient is not in a deep enough plane of anesthesia he will attempt to buckthe A.D.S. 1000. You will see very short inspiration times and violent attempts toinhale and exhale. There are several practical solutions to this problem.
a. Patient may require additional medication, on Doctors orders. (For exampleintravenous drugs).
b. Set the vaporizer to 4 or 5 percent. Then press FILL & HOLD and keep thebutton depressed for a second or two. Release, then repeat. Do this until thepatient relaxes, then reset the vaporizer and allow the A.D.S. 1000 to takeover.
c. Set the ASSIST value to a more sensitive value (i.e. a smaller negativenumber, -2.0 is more sensitive than -4.0), turn the vaporizer to 3 or 4 percent.The patient will usually ventilate himself down. The Minute Volume numbermay go up for a few breaths.
2. Once the patient is stabilized, the settings can be adjusted (if necessary).
16 Engler Engineering Corporation A.D.S. 1000
USING THE BREATHE FEATURE
1. The BREATHE button can be pressed at any time between cycles to initiate abreath, overriding both timed and assisted respiration.
NOTE: To test the BREATHE function, turn ON the A.D.S. 1000, install theTEST LUNG onto the end of the Breathing Circuit, place theSET/RUN switch into the "RUN" position. In between a machine controlledbreath press the BREATHE button, the TEST LUNG should inflate and deflate.
USING THE MASK MODE
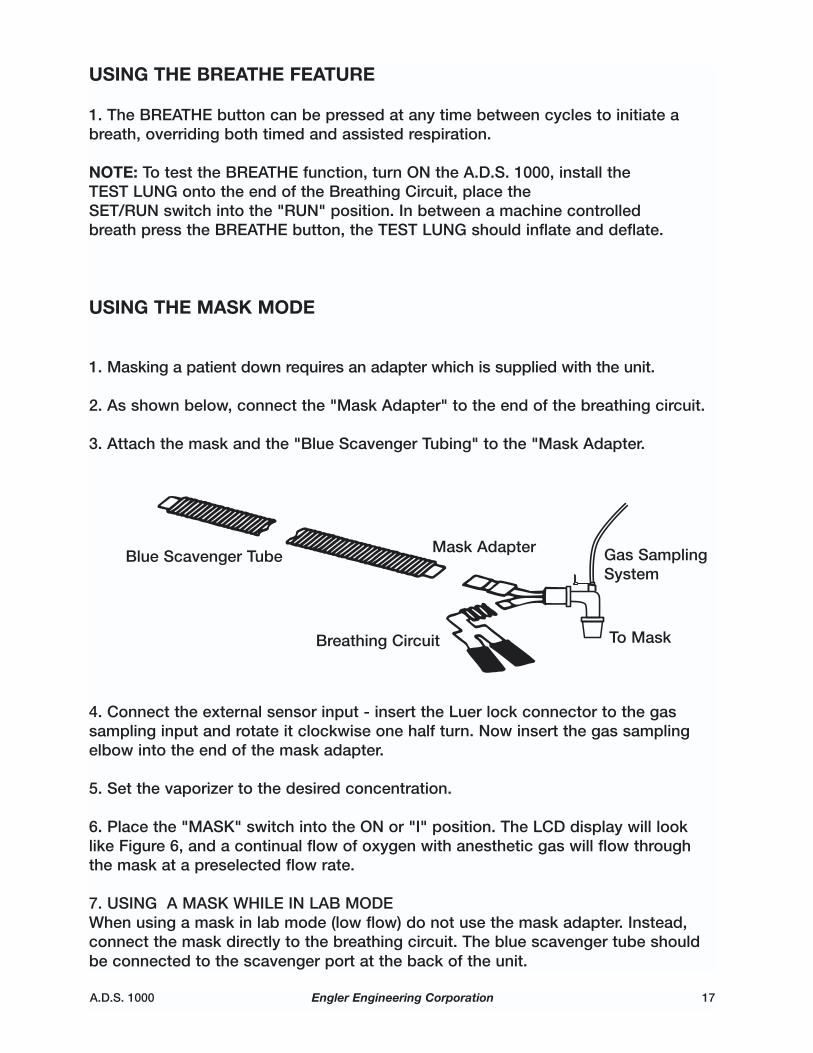
1. Masking a patient down requires an adapter which is supplied with the unit.
2. As shown below, connect the "Mask Adapter" to the end of the breathing circuit.
3. Attach the mask and the "Blue Scavenger Tubing" to the "Mask Adapter.
4. Connect the external sensor input - insert the Luer lock connector to the gassampling input and rotate it clockwise one half turn. Now insert the gas samplingelbow into the end of the mask adapter.
5. Set the vaporizer to the desired concentration.
6. Place the "MASK" switch into the ON or "I" position. The LCD display will looklike Figure 6, and a continual flow of oxygen with anesthetic gas will flow throughthe mask at a preselected flow rate.
7. USING A MASK WHILE IN LAB MODEWhen using a mask in lab mode (low flow) do not use the mask adapter. Instead,connect the mask directly to the breathing circuit. The blue scavenger tube shouldbe connected to the scavenger port at the back of the unit.
A.D.S. 1000 Engler Engineering Corporation 17
Blue Scavenger Tube
Breathing Circuit
Mask Adapter
To Mask
Gas Sampling System

USING THE MASK MODE (cont.)
NOTE: An adequate MASK flow is calculated as in the formula below:
FMASK = 3 x Mv
Where: FMASK = Mask Flow RateMv = Minute Volume per Kilogram
The A.D.S. 1000 automatically selects a Mask Flow Rate of at least 3 times MinuteVolume based on the patients' weight entered.
NOTE: The scavenger system must be able to hold at least one Tidal Volume for themask function to work properly.
NOTE: In the MASK mode there is a built in pressure safety that stops the flow tothe patient and causes an audible alarm if the pressure exceeds 35cm of H2O. Thispressure can build up if the MASK ADAPTER is not used, i.e. the mask is connecteddirectly to the Breathing Circuit.
8. To end a MASK procedure, simply place the “MASK” switch into the OFF or “O”position. The A.D.S. 1000 then reverts back to normal operation.
18 Engler Engineering Corporation A.D.S. 1000

UNDERSTANDING PEEP MODE
1. The A.D.S. 1000 has a built in PEEP (Positive End Expiratory Pressure)mode. To activate the PEEP mode perform the following:
a. Turn OFF the A.D.S. 1000.
b. Place and hold your thumb over the end of the breathing circuit.
c. Press the ASSIST UP button and hold it down while turning ON the A.D.S. 1000.
d. As shown below, the LCD display will now show a PEEP value instead of an ASSIST number
NOTE: An "*" is displayed as an indication that the A.D.S. 1000 is in the PEEPmode.
NOTE: The ASSIST mode will not function when the A.D.S. 1000 is in PEEP mode.
NOTE: PEEP pressures range from 0 to 9 cm of H2O. Adjust the PEEPpressure by using the ASSIST UP and ASSIST DOWN buttons.
e. To exit the PEEP mode you must first turn OFF and then restart the A.D.S. 1000.
A.D.S. 1000 Engler Engineering Corporation 19

UNDERSTANDING THE FLUSH MODE
1. It is recommended that the unit be flushed at the end of each surgery. In order toflush out any debris or condensation that may build up in the A.D.S. 1000's internallines, the A.D.S. 1000 comes with a FLUSH mode.
2. To enter the FLUSH mode perform the following:
a. Turn OFF the A.D.S. 1000, turn the vaporizer to the off position, andensure the 5 PSI / 50 PSI switch is set to 50 PSI.
b. Place and hold your thumb over the end of the breathing circuit.
c. Press the FILL & HOLD button and hold it down while turning ON theA.D.S. 1000.
d. The LCD will now look like the display below. The A.D.S. 1000 is nowin the FLUSH mode and a full 60 LPM flow of oxygen is passingthrough the A.D.S.1000.
e. To exit this mode, simply release the FILL & HOLD button and the unit will go through the self test.
NOTE: As a method of preventative maintenance the Flush mode should bedone after every procedure. This will insure that the internal linesand valves are kept clean and dry.
20 Engler Engineering Corporation A.D.S. 1000

ENDOTRACHEAL TUBES and the A.D.S. 1000
1. The proper function of any ventilator depends on a good seal between thetrachea and the tube cuff. Small leaks will cause the Minute Volume Per Kilogram tobe off, while larger leaks will not allow the peak inspiratory pressure to be reachedin a reasonable time if at all.
2. Small tubes should have the adapter on the OUTSIDE, rather than the inside ofthe tube. When they are on the inside, the adapter narrows the opening significantlyand can seriously interfere with respiration. This is, of course, true whether positivepressure ventilation is used or not. In fact, it is even more important for "regular"anesthesia systems. The adapter can be glued onto the outside of the tube.
3. The cuff should be tested to be sure there are no leaks. Fill and cap the cuff,then submerge in water to check for leaks.
4. A good seal must be made to the patient, but care should be used not to put toomuch pressure on the trachea since excessive pressure can cause damage to thetissue.
A.D.S. 1000 Engler Engineering Corporation 21
USING THE A.D.S. 1000 in LAB MODEIn order to facilitate the ventilation of very small patients the A.D.S. 1000 has a lowpressure LAB mode. This mode does not have any preset default parameters byweight, therefore it is advised that you have experience operating the A.D.S. 1000before using this mode. To enter this mode perform the following.
1. Turn ON the A.D.S. 1000 as usual and allow it to go through the self-testprocedure. The LCD should display the initial default 20 Kilograms readout.
NOTE: The start-up self-test may show an error if you attempt to start the A.D.S.1000 with the input pressure set at 5 P.S.I., therefore, always start the A.D.S. 1000 inthe NORMAL mode at 50 P.S.I. and set the 50 P.S.I. / 5 P.S.I. switch to the 5 P.S.I.setting. (to the right)
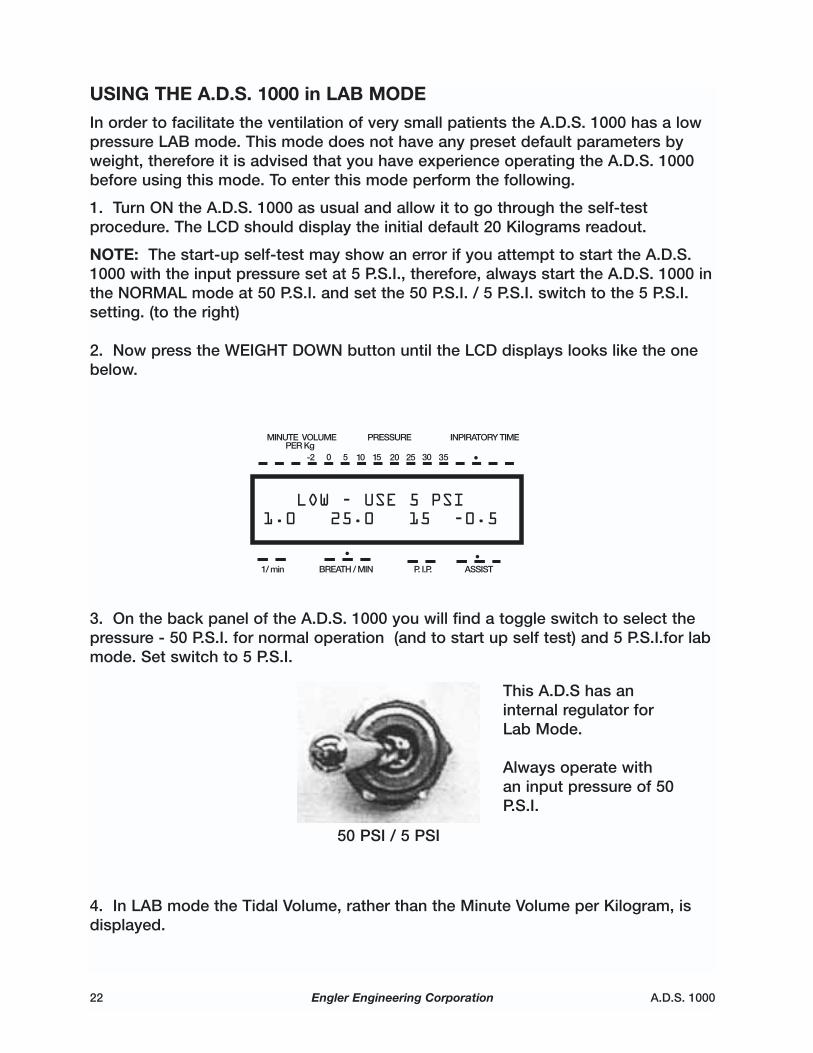
2. Now press the WEIGHT DOWN button until the LCD displays looks like the onebelow.
3. On the back panel of the A.D.S. 1000 you will find a toggle switch to select thepressure - 50 P.S.I. for normal operation (and to start up self test) and 5 P.S.I.for labmode. Set switch to 5 P.S.I.
4. In LAB mode the Tidal Volume, rather than the Minute Volume per Kilogram, isdisplayed.
22 Engler Engineering Corporation A.D.S. 1000
50 PSI / 5 PSI
This A.D.S has aninternal regulator forLab Mode.
Always operate withan input pressure of 50P.S.I.

USING THE A.D.S. 1000 in LAB MODE (cont.)
5. In LAB mode the Flow Rates are adjustable between 0.2 to 6.0 Liters per Minute.
6. The Breaths per Minute in LAB mode are adjustable between 1 and 95.
NOTE: The Breaths per Minute are in increments of 0.5 for 1 - 12 BPM1.0 for 13 - 50 BPM2.0 for 50 - 70 BPM5.0 for 70 - 95 BPM
7. The MASK function in LAB mode does not require the use of a Mask Adapter.
USE OF EXTERNAL EQUIPMENT WITH THE A.D.S. 1000
Connecting any external apparatus to the ADS 1000 may adversely affect theoperation of the unit.
Always test for correct operation on the test lung prior to using it on a patient.
CAUTION:
Electromagnetic interference from Electro-cauterization (Electro- surgical) units mayinterrupt the normal operation of the microprocessor within this medical device.Suggestion: While using Electro cauterization unplug the A.D.S. 1000’s power supplyadapter and run the A.D.S. 1000 on its internal battery. This may help stop theinterference disrupting the operation of the microprocessor. When using the A.D.S.1000 in this manner the A.D.S. 1000 must be monitored closely for any abnormalitiesin operation.
A.D.S. 1000 Engler Engineering Corporation 23

TROUBLESHOOTING CHECK LIST.
1. Check the unit’s calibration:
To enter the calibration mode perform the following:
a. Turn OFF the A.D.S. 1000, turn the vaporizer to the off position.b. Disconnect the breathing circuit and the gas sampling system (if available).c. Disconnect the scavenger port.d. Press the PIP buttons up and down at the same time and hold them down
while turning ON the A.D.S. 1000.e. A single number will be displayed in the LCD screen; this number must be
between 25 and 27 for the unit to function properly. If the calibration numberis not between 25 and 27, the unit is out of calibration. To have the unitcalibrated, fill the repair form in the back of this manual and send it with theunit to Engler Engineering Corporation for recalibration.
2. Make sure that the unit has been flushed at the end of each procedure:
To enter the FLUSH mode perform the following:
a. Turn OFF the A.D.S. 1000, turn the vaporizer to the off position, and ensurethe 5 PSI / 50 PSI switch is set to 50 PSI.
b. Place and hold your thumb over the end of the breathing circuit.c. Press the FILL & HOLD button and hold it down while turning ON the A.D.S.
1000.d. The LCD will display “SET TO 50 PSI”. The A.D.S. 1000 is now in the FLUSH
mode and a full 60 LPM flow of oxygen is passing through the A.D.S. 1000.
3. Make sure oxygen is on and the oxygen line pressure is 50 PSI.4. Check for cracks and leaks on the breathing circuit. If any damage is found
replace breathing circuit.5. Ensure that unit is connected to power and that the battery low LED is not
on. If battery low LED is on the unit must be charged.
If battery low LED continues to be on after the unit has been powered you may haveone of the following problems:
a. There is no power in the wall socket that you are connecting the unit to.b. The wall adapter is damaged.c. The battery has expired and needs to be replaced. To have the battery
replaced, complete the repair form in the back of this manual and send it withthe unit to Engler Engineering Corporation for repair.
d. The power socket in the back of the A.D.S. 1000 has been damaged andneed’s to be repaired. To have the unit repaired, complete the repair form inthe back of this manual and send it with the unit to Engler EngineeringCorporation for repair.
24 Engler Engineering Corporation A.D.S. 1000

6. Make sure that the gas sampling system is connected.
To connect the external sensor input, insert the Luer lock connector to the gassampling input and rotate it clockwise one half turn. Now insert the gas-samplingelbow into the end of the breathing circuit.
7. Observe the vaporizer hoses and make sure that they are properly connected.
TROUBLESHOOTING THE A.D.S. 1000
NOTE: The use of certain types of electrosurge cauterizing units can cause severeradio interference resulting in locking up of the microprocessor. It is suggested toexperiment with the supplied test lung to see which cauterizing units are compatiblewith the ADS 1000.
NOTE: The power supply that is supplied with the ADS 1000 can sometimes act asan antenna for receiving the interference from the electrosurge, sometimesunplugging the power supply (running in battery mode) aids in isolating the ADS1000 from the electrosurges interference.
If you encounter any unusual difficulties with the A.D.S. 1000 call Engler Engineeringat 1-800 445-8581. Engler Engineering Corporation warrants the A.D.S. 1000 to befree from material or manufacturing defects for two years. Do not attempt to repairthe A.D.S 1000 on your own. Doing so will invalidate your warranty.
1. If upon Self-Test you get the following display:
This indicates that the mechanical Safety pop-off valve inside the unit is dirty or ithas failed.
a. There is debris or condensation trapped inside the exhale valve, perform aFLUSH of the unit by following the instructions in the UNDERSTANDING THEFLUSH MODE section of this manual. Then Press WEIGHT DOWN button toretry.
b. Call Engler’s assistance hot line. 1-800 445-8581.
A.D.S. 1000 Engler Engineering Corporation 25

TROUBLESHOOTING THE A.D.S. 1000 (cont.)
2. If upon Self-Test you get the following display:
This may indicate a number of problems. In order to test all internal lines and valvesthe A.D.S.1000 attempts to pressurize itself and then checks for leaks. If it cannotpressurize itself then it will give the above readout. The causes for the error are asfollows:
a. No oxygen or very low oxygen pressure, check to insure that there is 50P.S.I. of oxygen in the Green oxygen tubing that runs to the back of the A.D.S.1000. Press WEIGHT DOWN button to retry.
b. The "To Vaporizer" and / or "From Vaporizer" connectors are loose, checkall vaporizer hoses and connectors, make sure they are secure and that theyhave no leaks. Press WEIGHT DOWN button to retry.
c. The vaporizer has a leak internally, to eliminate this problem connect the"To Vaporizer" hose directly to the "From Vaporizer" hose, and Press WEIGHTDOWN button to retry.
d. You are not placing you thumb over the gas-sampling elbow that isconnected to the the end of the breathing circuit during start-up. Place yourthumb over the end of the gas-sampling elbow and press WEIGHT DOWNbutton to retry.
e. Low battery recharge unit.
f. If the problem persists call Engler's assistance hot line. 1-800-445-8581
26 Engler Engineering Corporation A.D.S. 1000

TROUBLESHOOTING THE A.D.S. 1000 (cont.)
3. If upon Self-Test you get the following display:
This indicates that there is leak somewhere in the system.
a. There is debris or condensation trapped inside the exhale valve, perform a FLUSH of the unit by following the instructions in the UNDERSTANDING THE FLUSH MODE section of this manual. Then PressWEIGHT DOWN button to retry.
b. One of the tubes coming out of the back of the unit is loose, checkall connections and Press WEIGHT DOWN button to retry.
c. The Breathing Circuit has a leak in it, check the Breathing Circuit for leaks and check to see if it is securely connected to the Breathing CircuitPorts on the front of the unit. Press WEIGHT DOWN button to retry.
d. Vaporizer has a leak.
e. Pop off valve adjustment needed. This must be completed by EnglerEngineering as specialized tools and test equipment is required.
f. If the problem persists call Engler’s assistance hot line. 1-800-445-8581
4. If upon Self-Test you get the following display:
This display indicates that there is a minor leak or the Safety pop-off isreleasing at too low a pressure.
A.D.S. 1000 Engler Engineering Corporation 27

TROUBLESHOOTING THE A.D.S. 1000 (cont.)
a. There is a loose connection to the A.D.S. 1000 or to the vaporizer, check allof the connections and secure them if necessary. Press WEIGHT DOWNbutton to retry.
b. There is debris or condensation trapped inside the exhale valve, perform aFLUSH of the unit by following the instructions in the UNDERSTANDING THEFLUSH MODE section of this manual. Then Press WEIGHT DOWN button toretry.
c. If the problem persists call Engler's assistance hot line.1-800-445-8581
5. If upon Self-Test you get the following display:
This display indicates that there is an obstruction to the exhale valve or that theexhale valve did not open. This error can be caused by the following.
a. There is an obstruction in the scavenging system, check to insure that a free flow of exhaust gas can pass through the scavenging system. Then Press WEIGHT DOWN button to retry.
b. An active scavenging system is being used and the active scavenger valve is in the CLOSED or SHUT position. Open the active scavenger valve and then Press WEIGHT DOWN button to retry.
c. Battery is too low – recharge unit
d. If the problem persists call Engler's assistance hot line.1-800-445-8581
28 Engler Engineering Corporation A.D.S. 1000

COMMONLY ASKED QUESTIONS:
Q. The Flow Rate indicated on my LCD readout seems to be a very highnumber, in my rebreathing system I never used flow rates like 32 or 44 liters perminute, is this normal?
A. Absolutely, the LCD readout on the A.D.S. 1000 gives the Flow Rate if the unitwere left on for an inspiratory time of 60 seconds (1 minute). An example would beas follows; say the A.D.S. 1000 was set to 24 L.P.M. and we let the unit have aninspiratory time of 1 minute, then 24 liters of gas would have been used. In reality,the A.D.S. 1000 only allows gas to flow for whatever the Inspiratory Time is. In orderto determine the "Actual Flow Rate" a simple calculation can be performed. Thiscalculation is as follows:
Fave. = ( Fins x Ton x B ) / 60Where:
Fave.= Actual Flow Rate
Fins.= Flow Rate on L.C.D. Display
Ton= Inspiratory Time
B= Actual Breaths Per Minute
Q. How does the A.D.S. 1000 calculate the Minute Volume per Kilogram?
A. The formula for calculating minute volume is:
Mv=(Tv x B) / W
Where: Mv = Minute Volume per KilogramTv = Tidal VolumeB = Breaths Per MinuteW = Weight in Kilograms
The A.D.S. has a built in computer which determines this number and updates thedisplay after each inspiration has ended.
Q. What is proper value for the Minute Volume per Kilogram number?
A. A properly ventilated patient should require from 150 to 250 ml. / minute / Kg.The 150 ml. / minute / Kg number is appropriate for larger patients and the 250 ml. /minute/ Kg number for smaller patients.
A.D.S. 1000 Engler Engineering Corporation 29

COMMONLY ASKED QUESTIONS (cont.):
Q. How do I add additional anesthesia liquid to my vaporizer during aprocedure?
A. To fill the vaporizer during a procedure, place the SET/RUN switch into the"SET" position, wait for the A.D.S. 1000 to complete the last breath cycle. Fill thevaporizer as usual, then switch back to "RUN" and continue.
Q. How do I change my oxygen tank when it is low?
A. As with any anesthesia system, be sure to check your oxygen supply beforestarting any procedure. To replace the tank, shut off the valve on the top of theoxygen tank, then depressurize the GREEN, "Oxygen In" line running to the A.D.S.1000. The pressure may be released in the line by slightly loosening the GREEN,hose for a few seconds to bleed the line.
Q. I have just successfully completed several procedures, but when I turn the A.D.S.1000 back ON and it goes through the SELF-TEST, the LCD display gives me Error 4- LEAK/SAFETY LO, is this normal?
A. Yes, this Error is usually caused by a build up of condensation in the exhale valveof the A.D.S. 1000. To remove this condensation simply perform the followingprocedure:
a. Turn OFF the A.D.S. 1000
b. Place and hold your thumb over the end of the gas sampling elbow breathing circuit.
c. Press the FILL & HOLD button and hold it down while turning ON the A.D.S. 1000.
d. The unit is now in the FLUSH mode and a full 60 LPM flow of oxygen is passing through the A.D.S. 1000.
e. To exit this mode, simply release the FILL & HOLD button and the unit will go through the self test.
30 Engler Engineering Corporation A.D.S. 1000

COMMONLY ASKED QUESTIONS (cont.):
Q. Can I use the A.D.S. 1000 with my induction chamber?
A. Of course, if you put the A.D.S. 1000 into the MASK mode it will allow acontinuous flow of anesthetic gas to exit through the breathing circuit. All you haveto do is connect the mask adapter to the unit as described in the section USINGTHE MASK MODE, but instead of connecting the output to a mask, connect it toyour induction chamber.
Q. Can I use my vaporizer at the same settings that I am used to using on myrebreathing system?
A. Since the A.D.S. 1000 delivers a constant plane of anesthesia on eachbreath, you may find that you can actually turn your vaporizer settings to about one-half of what you had been using with your rebreathing system.
Q. Why doesn’t the A.D.S.1000 use a Lime Canister or Breathing Bag?
A. Since the A.D.S. 1000 is a positive pressure type of ventilator it only allows theoxygen and / or anesthetic to flow during the inspiration phase of the respiratorycycle i.e. only for the inspiratory time. Since the A.D.S. 1000 fills up the lungs foreach breath there is no need for a breathing bag. The A.D.S. 1000 does not recyclethe exhaled gas, it delivers the waste gas to the scavenger system.
Q. What happens if the electronic safety fails?
A. To prevent the over-inflation of the lungs, the A.D.S. 1000 incorporates both anelectronic and mechanical safety mechanism.
A.D.S. 1000 Engler Engineering Corporation 31

COMPANY INFORMATION
Engler Engineering Corp., has been in business since 1964, in Hialeah, Florida,building and maintaining dental units and parts for not only our ultrasonic scalers,polishers, and anesthesia machine, but for many others on the market today. As aleader in the field, we would appreciate a minute of your time to let us know how wecan better serve you.
You can mail all comments, suggestions and questions to us at the following address.
Engler Engineering Corp.1099 East 47 StreetHialeah, FL 33013
If you wish to fax to us, please use 305-685-7671.
For your convenience, the following names are listed for your correspondence:
President Eva EnglerVP Sales & Marketing Steven MenagedOperations Manager Joel KatzCustomer Service Raya EnglerCust. Service/Repair Harvey Meinstein
If you have any questions or concerns, please call us.ENGLER ENGINEERING CORP 800-445-8581.
32 Engler Engineering Corporation A.D.S. 1000
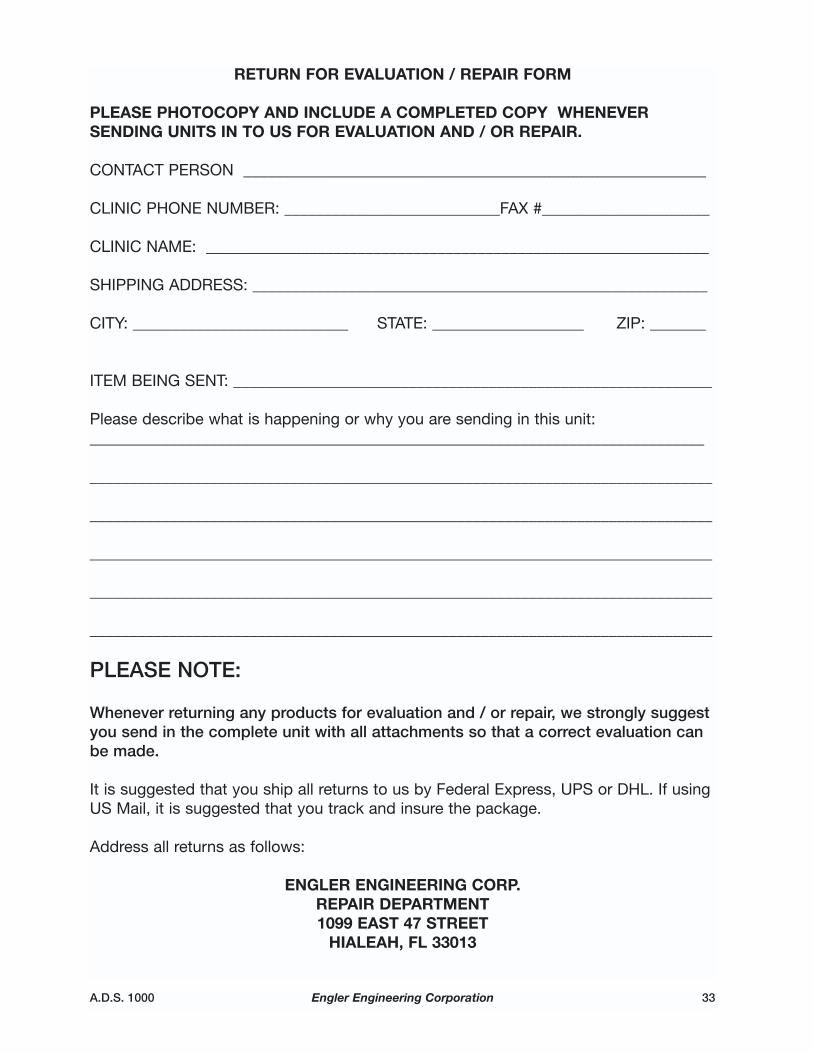
RETURN FOR EVALUATION / REPAIR FORM
PLEASE PHOTOCOPY AND INCLUDE A COMPLETED COPY WHENEVERSENDING UNITS IN TO US FOR EVALUATION AND / OR REPAIR.
CONTACT PERSON __________________________________________________________
CLINIC PHONE NUMBER: ___________________________FAX #_____________________
CLINIC NAME: _______________________________________________________________
SHIPPING ADDRESS: _________________________________________________________
CITY: ___________________________ STATE: ___________________ ZIP: _______
ITEM BEING SENT: ____________________________________________________________
Please describe what is happening or why you are sending in this unit:_____________________________________________________________________________
______________________________________________________________________________
______________________________________________________________________________
______________________________________________________________________________
______________________________________________________________________________
______________________________________________________________________________
PLEASE NOTE:
Whenever returning any products for evaluation and / or repair, we strongly suggestyou send in the complete unit with all attachments so that a correct evaluation canbe made.
It is suggested that you ship all returns to us by Federal Express, UPS or DHL. If usingUS Mail, it is suggested that you track and insure the package.
Address all returns as follows:
ENGLER ENGINEERING CORP.REPAIR DEPARTMENT1099 EAST 47 STREET
HIALEAH, FL 33013
A.D.S. 1000 Engler Engineering Corporation 33

Notes
34 Engler Engineering Corporation A.D.S. 1000

A.D.S. 1000 Engler Engineering Corporation 1