Embed Size (px)
Citation preview
Advanced Host Controller Interface (AHCI), RapidDrive, and Redundant Array of Independent Disks (RAID) on HP Compaq 6005 Pro Business PC Using AMD Array Management Software (RAIDXpert)
Introduction . . . . . . . . . . . . . . . . . . . . . . . . . . . . . . . . . . . . . . . . . . . . . . . . . . . . . . . . . . . . . . .2 Mirroring and Parity . . . . . . . . . . . . . . . . . . . . . . . . . . . . . . . . . . . . . . . . . . . . . .. . . . . . . . . . . .2 Disk Striping . . . . . . . . . . . . . . . . . . . . . . . . . . . . . . . . . . . . . . . . . . . . . . . . . . . . . . . . . . . . . . . . .2 Basics of AHCI and RAID Technology . . . . . . . . . . . . . . . . . . . . . . . . . . . . . . . . . . . . . . . . . .2 Definitions . . . . . . . . . . . . . . . . . . . . . . . . . . . . . . . . . . . . . . . . . . . . . . . . . . . . . . . . . .2 Introduction to RapidDrive Technology. . . . . . . . . . . . . . . . . . . . . . . . . . . . . . . . . . . . . . . .3 Basics of RapidDrive Technology. . . . . . . . . . . . . . . . . . . . . . . . . . . . . . . . . . . . . . . . . . . . . . .4 RapidDrive Performance. . . . . . . . . . . . . . . . . . . . . . . . . . . . . . . . . . . . . . . . . . . . . . . . . . . . .4 RapidDrive Price Performance analysis . . . . . . . . . . . . . . . . . . . . . . . . . . . . . . . . . . . . . . . .5 RapidDrive Reliability. . . . . . . . . . . . . . . . . . . . . . . . . . . . . . . . . . . . . . . . . . . . . . . . . . .. . . . . .6 RapidDrive is Eco Friendly. . . . . . . . . . . . . . . . . . . . . . . . . . . . . . . . . . . . . . . . . . . .. . . . . . . . .6 Single Drive AHCI Configuration . . . . . . . . . . . . . . . . . . . . . . . . . . . . . . . . . . . . . . . . . . . . . .7 Basic RAID Types . . . . . . . . . . . . . . . . . . . . . . . . . . . . . . . . . . . . . . . . . . . . . . . . . . . . . . . . . . .7 RAID 0 with two hard drives(Striped) . . . . . . . . . . . . . . . . . . . . . . . . . . . . . . . . . . . . . . .7 RAID 1 with two hard drives(Mirror) . . . . . . . . . . . . . . . . . . . . . . . . . . . . . . . . . . . . . . . .9 Recommended configurations . . . . . . . . . . . . . . . . . . . . . . . . . . . . . . . . . . . . . . . . . . . . .10 HP Backup and Recovery interactions . . . . . . . . . . . . . . . . . . . . . . . . . . . . . . . . . . . . . . .11 Other supported configurations . . . . . . . . . . . . . . . . . . . . . . . . . . . . . . . . . . . . . . . . . . . .11 Unsupported configurations . . . . . . . . . . . . . . . . . . . . . . . . . . . . . . . . . . . . . . . . . . . . .11 Non-RAID Drive Detection Scheme . . . . . . . . . . . . . . . . . . . . . . . . . . . . . . . . . . . . . . . .12 Configuring RAID on non-factory preinstalled configurations . . . . . . . . . . . . . . . . . . .13
Enabling RAID through F10 System BIOS . . . . . . . . . . . . . . . . . . . . . . . . . . . . . . . . . . . .13
Configuring RAID Option ROM . . . . . . . . . . . . . . . . . . . . . . . . . . . . . . . . . . . . . . . . . . .14
Configuring RAID Volume using the Option ROM . . . . . . . . . . . . . . . . . . . . . . . . . . . . . .14
Select boot order . . . . . . . . . . . . . . . . . . . . . . . . . . . . . . . . . . . . . . . . . . . . . . . . . . . . . . . .16
Notes for operating system installation . . . . . . . . . . . . . . . . . . . . . . . . . . . . . . . . . . . . . .16
AMD Array Management Software (RAIDXpert) . . . . . . . . . . . . . . . . . . . . . . . . . . . . . . .17
Java Runtime Environment . . . . . . . . . . . . . . . . . . . . . . . . . . . . . . . . . . . . . . . . . . . . . .17
Console Software Installation . . . . . . . . . . . . . . . . . . . . . . . . . . . . . . . . . . . . . . . . . . . .18
Recommended Initial Settings . . . . . . . . . . . . . . . . . . . . . . . . . . . . . . . . . . . . . . . . . . . .18

Degradation . . . . . . . . . . . . . . . . . . . . . . . . . . . . . . . . . . . . . . . . . . . . . . . . . . . .. . . . . . .20
For More Information . . . . . . . . . . . . . . . . . . . . . . . . . . . . . . . . . . . . . . . . . . . . . . . . . . . . .21
Introduction A RAID (Redundant Array of Independent Disks) is a data storage scheme that uses two or more drives accessed in combination to improve fault tolerance. Initially used with servers, desktop PCs are increasingly using RAID controllers and extra ATA or SCSI disks. Newer system boards often have
RAID controllers.
The HP Compaq 6005 Pro Business PC takes advantage of Serial Advanced Technology Attachment (SATA) and the integration of RAID into AMD’s 785G and SB710 chipsets. The HP Compaq 6005 Pro Business PC products incorporate RAID drive support through factory configurations. This white paper provides a basic overview of RAID technology, supported factory configurations of HP Compaq 6005 Pro Business PCs, and other supported RAID configurations.
Mirroring and Parity Fault tolerance is achieved by mirroring or parity. Mirroring is 100% duplication of the data on two drives (RAID 1). Parity is used to calculate the data in two drives and store the results on a third drive (RAID 5). After a failed drive is replaced, the RAID controller automatically rebuilds the lost data from the other two drives. RAID systems may have a spare drive (hot spare) ready and waiting to be the replacement for a drive that fails.
Disk Striping
RAID improves performance by disk striping, which interleaves bytes or groups of bytes across multiple drives, so more than one disk is reading and writing simultaneously. MBR = Master Book Record
Basics of AHCI and RAID Technology
Definitions Table 1. Basic AHCI and RAID Definitions
AHCI Advanced Host Controller Interface, a specification for hardware and software, is a register
interface for SATA, intended to add higher speed, NCQ and other features.
ATA Advanced Technology Attachment. BIOS Basic Input/Output System, also known as system ROM.
Chipset Term used to define a collection of integrated components required to make a PC function.
INF Information file (.inf) used by Microsoft operating systems that support the Plug & Play feature.
When installing a driver, this file provides the operating system needed information about driver filenames, driver components, and supported hardware.
JBOD Just a Bunch of Disk. Logical drives concatenation LD Logical Drive MDD Meta Data, i.e. previous RAID configuration
information
Migration Term used to describe the movement of data from one configuration or
usage model to another. NCQ Native Command Queuing.
Option ROM Third-party module that is loaded by the System BIOS which provides extended support for a
particular piece of hardware. The RAID Option ROM provides boot support for RAID volumes as
well as a user interface for managing and configuring the system’s RAID volumes.
PCI Peripheral Components Interface. PCIe PCI express. A serial version of PCI. PnP Plug and Play. RAID Redundant Array of Independent Disks. ROM Read Only Memory. SATA Serial ATA. Strip Set of data on a single hard drive in a RAID 0 volume.
Stripe Group of all strips going horizontally across all the hard drive members of a RAID 0 volume.
Table 2. RAID Drives
Mode Purpose Minimal HDD Required RAID 0 Striped for Performance 2 RAID 1 Mirrored for Protection 2 RAID 0 + 1 Mirrored and Striped 4*
HP Note * Not supported on HP Compaq 6005 Pro Business PCs
Important RAID Configuration information • RAID 1 and JBOD (RapidDrive) are the only RAID configuration that HP Compaq 6005 Pro
Business PC products offer as factory configurations.
• The preconfigured systems: • Are complete RAID systems. • Have both drives installed. • Have the necessary Option ROM configuration. • Are preloaded and preinstalled with all required software. • Include a preinstalled operating system that is in mirrored mode out of the box.
Introduction to RapidDrive Technology The current trend in the PC industry is to maximize performance while minimizing costs. Customers and industry leaders are demanding higher performance from lower cost PCs. The performance gains for processor and memory technology has seen much improvement over the recent years. However, in the realm of traditional HDD storage technology, performance gains have been minimal in relation to processors and memory. HDD access times can range anywhere from 8 to 15ms while memory access times are measured in nanoseconds. Since HDDs are the dominant storage medium in PCs and portables, this is an industry-wide problem. When a system boots, most of the time is consumed by seeking and reading the operating system (OS) files from the HDD. Boot times of up to 2 minutes or more are possible from system power-on to full OS functionality. System
performance degradation can also occur during runtime with large file I/O from applications such as MS Office and Adobe Photoshop. A significant amount of time can be saved if HDD access time is minimized.
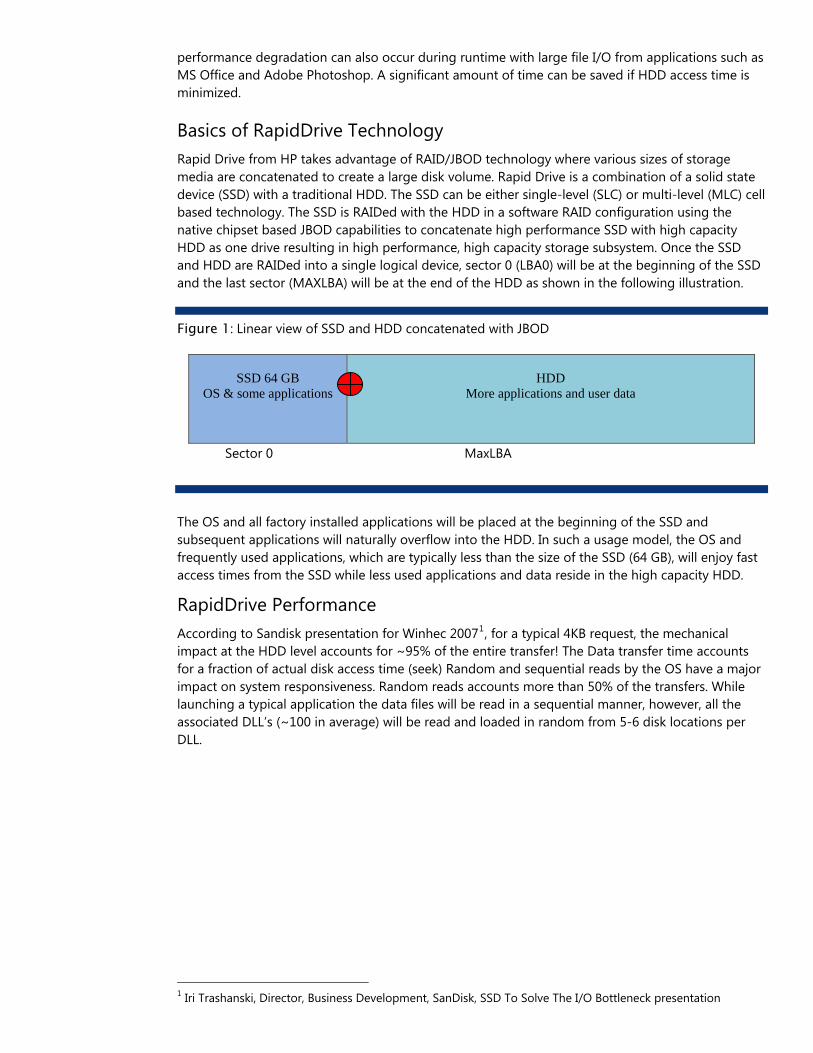
Basics of RapidDrive Technology Rapid Drive from HP takes advantage of RAID/JBOD technology where various sizes of storage media are concatenated to create a large disk volume. Rapid Drive is a combination of a solid state device (SSD) with a traditional HDD. The SSD can be either single-level (SLC) or multi-level (MLC) cell based technology. The SSD is RAIDed with the HDD in a software RAID configuration using the native chipset based JBOD capabilities to concatenate high performance SSD with high capacity HDD as one drive resulting in high performance, high capacity storage subsystem. Once the SSD and HDD are RAIDed into a single logical device, sector 0 (LBA0) will be at the beginning of the SSD and the last sector (MAXLBA) will be at the end of the HDD as shown in the following illustration.
Figure 1: Linear view of SSD and HDD concatenated with JBOD
SSD 64 GB
OS & some applications
HDD
More applications and user data
Sector 0 MaxLBA
The OS and all factory installed applications will be placed at the beginning of the SSD and subsequent applications will naturally overflow into the HDD. In such a usage model, the OS and frequently used applications, which are typically less than the size of the SSD (64 GB), will enjoy fast access times from the SSD while less used applications and data reside in the high capacity HDD.
RapidDrive Performance According to Sandisk presentation for Winhec 20071, for a typical 4KB request, the mechanical impact at the HDD level accounts for ~95% of the entire transfer! The Data transfer time accounts for a fraction of actual disk access time (seek) Random and sequential reads by the OS have a major impact on system responsiveness. Random reads accounts more than 50% of the transfers. While launching a typical application the data files will be read in a sequential manner, however, all the associated DLL’s (~100 in average) will be read and loaded in random from 5-6 disk locations per DLL.
1 Iri Trashanski, Director, Business Development, SanDisk, SSD To Solve The I/O Bottleneck presentation

Figure 2. Average Access Time Example
Formula: Average Access Time = Ave. Seek Time + Latency Time/2 Example: Average Access Time = 12 msec + 5 msec ~ 17 msec (5400rpm)
HP RapidDrive comparison against HDD and SDD. The RapidDrive configuration speeds up the random reads providing the faster seek times reducing the latency for reads, which translates into greater speed in accessing data and more responsiveness for overall system. The following figure show the PC-Mark 05 benchmark results comparing traditional HDD, SSD only and RapidDrive. The SSD only configuration scores the highest but RapidDrive comes very close (within 80%).
Figure 3: Pc Mark 05 Storage scores on HP Compaq 6005 Business PC pro
RapidDrive Price Performance analysis The combination of SSD and HDD with software RAID results in the optimal solution from a price versus performance perspective. User may choose to select smaller or larger mechanical HDD in combination with 64 GB SSD without negatively impacting the overall PCmark05 score. Assuming the price of $600-$800 for 500+ SSD ($3.2/GB), the rapid Drive provides the similar capacity and performance for the fraction of the price.
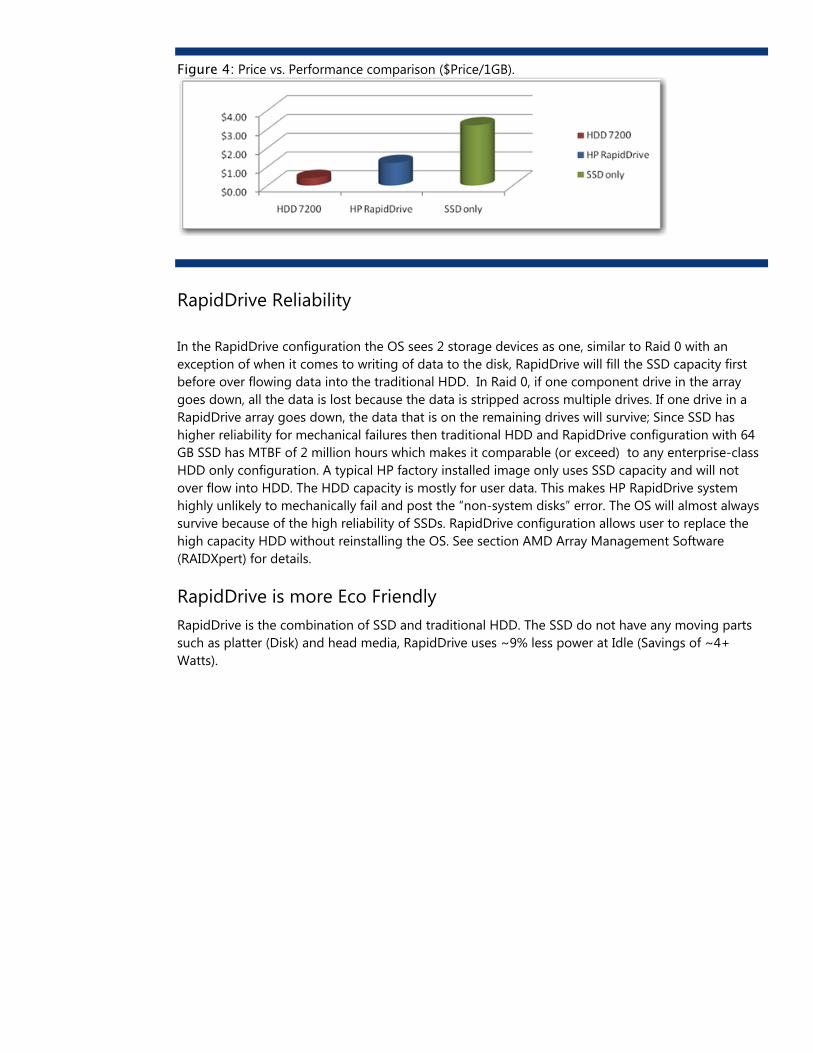
Figure 4: Price vs. Performance comparison ($Price/1GB).
RapidDrive Reliability In the RapidDrive configuration the OS sees 2 storage devices as one, similar to Raid 0 with an exception of when it comes to writing of data to the disk, RapidDrive will fill the SSD capacity first before over flowing data into the traditional HDD. In Raid 0, if one component drive in the array goes down, all the data is lost because the data is stripped across multiple drives. If one drive in a RapidDrive array goes down, the data that is on the remaining drives will survive; Since SSD has higher reliability for mechanical failures then traditional HDD and RapidDrive configuration with 64 GB SSD has MTBF of 2 million hours which makes it comparable (or exceed) to any enterprise-class HDD only configuration. A typical HP factory installed image only uses SSD capacity and will not over flow into HDD. The HDD capacity is mostly for user data. This makes HP RapidDrive system highly unlikely to mechanically fail and post the “non-system disks” error. The OS will almost always survive because of the high reliability of SSDs. RapidDrive configuration allows user to replace the high capacity HDD without reinstalling the OS. See section AMD Array Management Software (RAIDXpert) for details.
RapidDrive is more Eco Friendly RapidDrive is the combination of SSD and traditional HDD. The SSD do not have any moving parts such as platter (Disk) and head media, RapidDrive uses ~9% less power at Idle (Savings of ~4+ Watts).
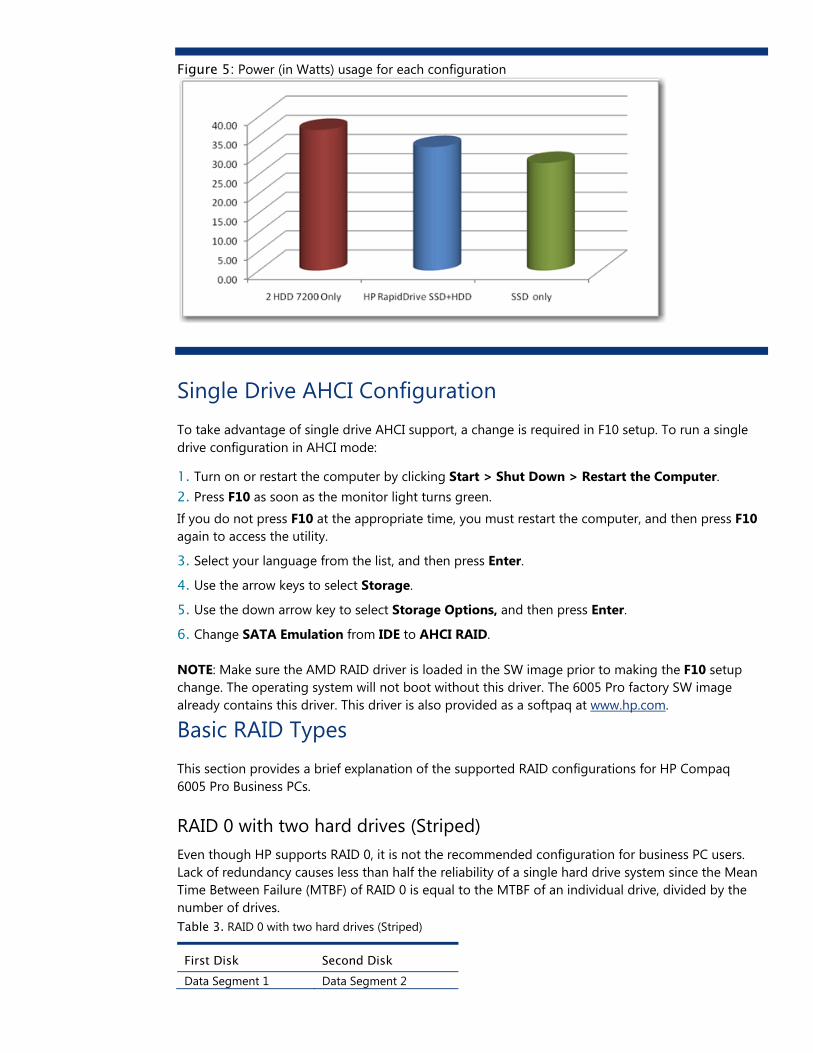
Figure 5: Power (in Watts) usage for each configuration
Single Drive AHCI Configuration To take advantage of single drive AHCI support, a change is required in F10 setup. To run a single drive configuration in AHCI mode:
1. Turn on or restart the computer by clicking Start > Shut Down > Restart the Computer. 2. Press F10 as soon as the monitor light turns green.
If you do not press F10 at the appropriate time, you must restart the computer, and then press F10 again to access the utility.
3. Select your language from the list, and then press Enter.
4. Use the arrow keys to select Storage.
5. Use the down arrow key to select Storage Options, and then press Enter.
6. Change SATA Emulation from IDE to AHCI RAID. NOTE: Make sure the AMD RAID driver is loaded in the SW image prior to making the F10 setup change. The operating system will not boot without this driver. The 6005 Pro factory SW image already contains this driver. This driver is also provided as a softpaq at www.hp.com.
Basic RAID Types This section provides a brief explanation of the supported RAID configurations for HP Compaq 6005 Pro Business PCs.
RAID 0 with two hard drives (Striped) Even though HP supports RAID 0, it is not the recommended configuration for business PC users. Lack of redundancy causes less than half the reliability of a single hard drive system since the Mean Time Between Failure (MTBF) of RAID 0 is equal to the MTBF of an individual drive, divided by the number of drives. Table 3. RAID 0 with two hard drives (Striped)
First Disk Second Disk Data Segment 1 Data Segment 2
Data Segment 3 Data Segment 4 Data Segment 5 Data Segment 6 Data Segment 7 Data Segment 8 Data Segment 9 Data Segment 10 Data Segment 11 Data Segment 12 Data Segment 13 Data Segment 14 Data Segment 15 Data Segment 16
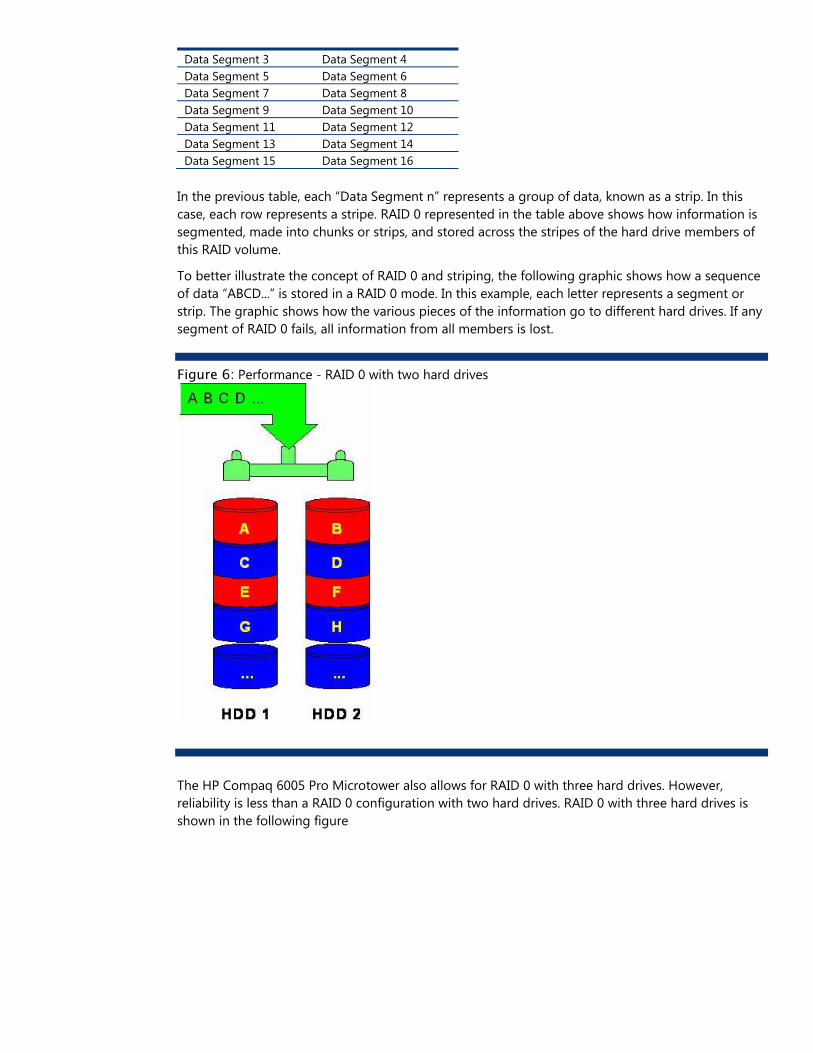
In the previous table, each “Data Segment n” represents a group of data, known as a strip. In this case, each row represents a stripe. RAID 0 represented in the table above shows how information is segmented, made into chunks or strips, and stored across the stripes of the hard drive members of this RAID volume.
To better illustrate the concept of RAID 0 and striping, the following graphic shows how a sequence of data “ABCD...” is stored in a RAID 0 mode. In this example, each letter represents a segment or strip. The graphic shows how the various pieces of the information go to different hard drives. If any segment of RAID 0 fails, all information from all members is lost.
Figure 6: Performance - RAID 0 with two hard drives
The HP Compaq 6005 Pro Microtower also allows for RAID 0 with three hard drives. However, reliability is less than a RAID 0 configuration with two hard drives. RAID 0 with three hard drives is shown in the following figure
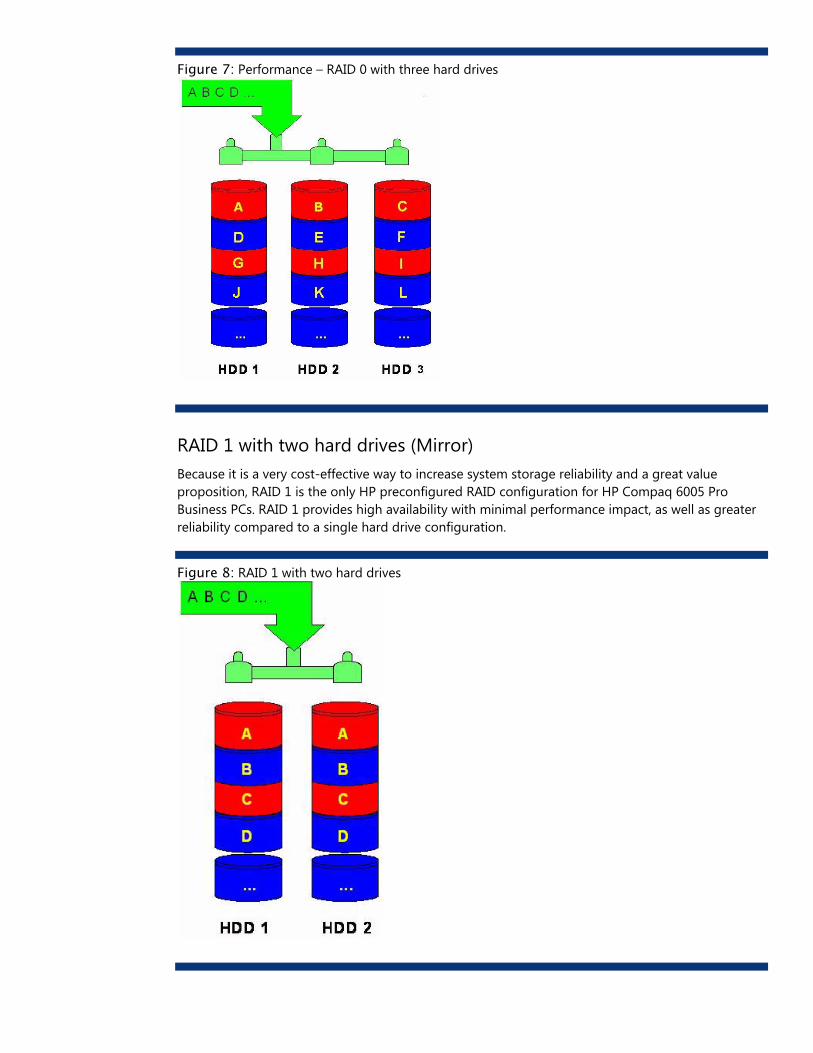
Figure 7: Performance – RAID 0 with three hard drives
RAID 1 with two hard drives (Mirror) Because it is a very cost-effective way to increase system storage reliability and a great value proposition, RAID 1 is the only HP preconfigured RAID configuration for HP Compaq 6005 Pro Business PCs. RAID 1 provides high availability with minimal performance impact, as well as greater reliability compared to a single hard drive configuration.
Figure 8: RAID 1 with two hard drives
RAID 1 has redundancy and hence is a true RAID. It more than doubles reliability because the MTBF of RAID 1 is equal to the MTBF of an individual drive multiplied by the number of drives (2). In other words, the probability of one hard drive failure on a given day is the square root of that same probability. Hypothetically, if the chance that a single hard drive fails is 1:2000, with RAID 1 the chance that both of your hard drives fail is 1:4,000,000.
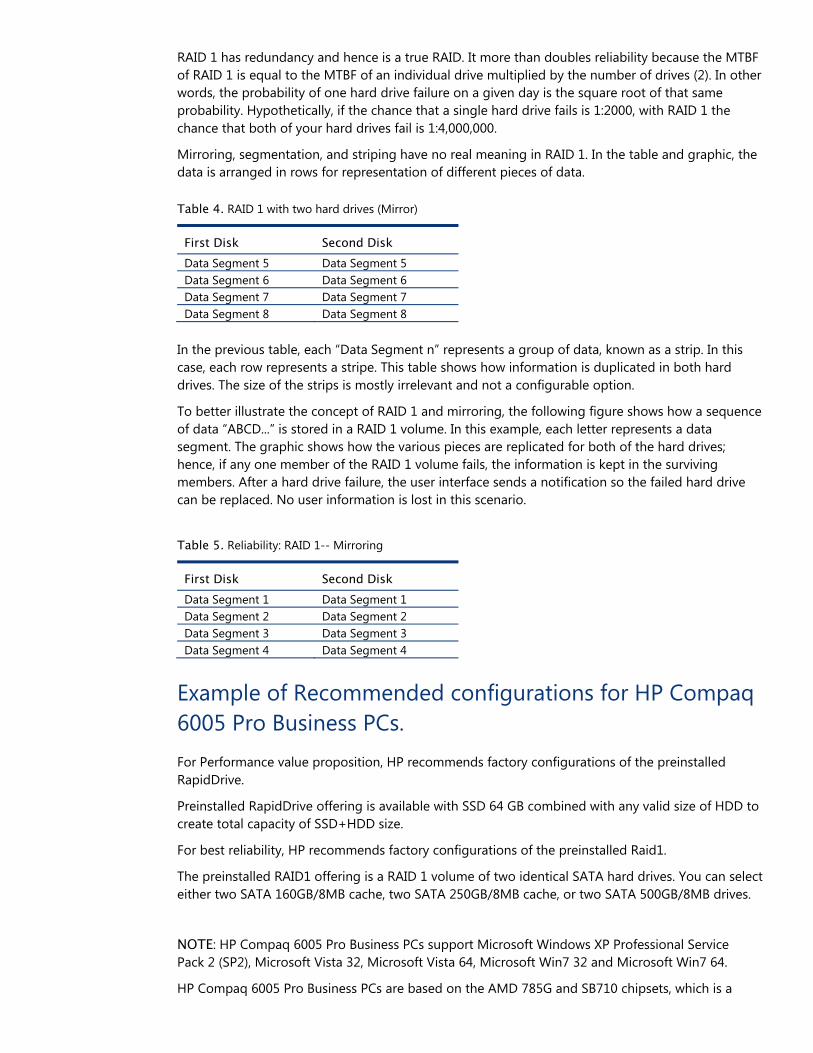
Mirroring, segmentation, and striping have no real meaning in RAID 1. In the table and graphic, the data is arranged in rows for representation of different pieces of data. Table 4. RAID 1 with two hard drives (Mirror)
First Disk Second Disk Data Segment 5 Data Segment 5 Data Segment 6 Data Segment 6 Data Segment 7 Data Segment 7 Data Segment 8 Data Segment 8
In the previous table, each “Data Segment n” represents a group of data, known as a strip. In this case, each row represents a stripe. This table shows how information is duplicated in both hard drives. The size of the strips is mostly irrelevant and not a configurable option.
To better illustrate the concept of RAID 1 and mirroring, the following figure shows how a sequence of data “ABCD...” is stored in a RAID 1 volume. In this example, each letter represents a data segment. The graphic shows how the various pieces are replicated for both of the hard drives; hence, if any one member of the RAID 1 volume fails, the information is kept in the surviving members. After a hard drive failure, the user interface sends a notification so the failed hard drive can be replaced. No user information is lost in this scenario.
Table 5. Reliability: RAID 1-- Mirroring
First Disk Second Disk Data Segment 1 Data Segment 1 Data Segment 2 Data Segment 2 Data Segment 3 Data Segment 3 Data Segment 4 Data Segment 4
Example of Recommended configurations for HP Compaq 6005 Pro Business PCs. For Performance value proposition, HP recommends factory configurations of the preinstalled RapidDrive.
Preinstalled RapidDrive offering is available with SSD 64 GB combined with any valid size of HDD to create total capacity of SSD+HDD size.
For best reliability, HP recommends factory configurations of the preinstalled Raid1.
The preinstalled RAID1 offering is a RAID 1 volume of two identical SATA hard drives. You can select either two SATA 160GB/8MB cache, two SATA 250GB/8MB cache, or two SATA 500GB/8MB drives.
NOTE: HP Compaq 6005 Pro Business PCs support Microsoft Windows XP Professional Service Pack 2 (SP2), Microsoft Vista 32, Microsoft Vista 64, Microsoft Win7 32 and Microsoft Win7 64.
HP Compaq 6005 Pro Business PCs are based on the AMD 785G and SB710 chipsets, which is a
combined hardware and software RAID solution. The SB710 mass storage controller operates in either IDE or AHCI RAID mode. Changing the mode of the controller changes the PCI device ID and class code, requiring different device drivers in most operating systems.
NOTE: HP recommends and only supports Microsoft’s IDE driver stack based on ATAPI.SYS and AMD drivers for HP Compaq Business PC products, including all supported RAID configurations.
WARNING: The PCI Device ID of the mass storage controller changes after changing the BIOS “SATA Emulation” Computer Setup option. Changing SATA Emulation from IDE mode to RAID mode is the equivalent of connecting the hard drives to a new add-on RAID storage controller. The installed operating system on the hard drive is unaware of this new mass storage controller. If the operating system does not have the RAID drivers installed, the operating system will fail to boot. For example, All Microsoft OSes will cause a blue screen and/or reboot when attempting to boot in RAID mode without the RAID drivers installed.
HP Backup and Recovery interactions After enabling and configuring RAID, restore the system using backup CDs. After completing the restore, reinstall HP Backup and Recovery. These steps are necessary for the F11 restore to function properly.
Additional technical information will be provided in the future for customers who want to add RAID software image deployment capabilities.
Before proceeding, follow the steps below to identify which version shipped with your system.
1. Click Start > Search.
2. Click All files and folders.
3. Type supp*.ini in the name field.
4. Enter the drive letter of the HP Recovery partition and \isos. Example: d:\isos.
5. Click Search. Search results may locate more than one .ini file. Double click to open the .ini files until you locate the file containing HP Backup and Recovery.
To order a Recovery Disc Set, go to the following Web site, select your region, and click the Technical support after you buy link under the Call HP heading to obtain the support center telephone number for your region. You will need the computer model and serial number of your system before calling.
http://welcome.hp.com/country/us/en/wwcontact_us.html
Other supported configurations The HP Compaq 6005 Pro Business PC products support two other RAID configurations:
• Two hard drive configuration. • Two equal size/type SATA hard drive RAID configurations in RAID 0 or RAID 1.
• Maximum of two SATA optical drives. • Three hard drive configuration (only on HP Compaq 6005 Pro Microtower).
• Three equal size/type SATA hard drive RAID configurations in RAID 0.
• Maximum of one SATA optical drive.
Unsupported configurations The HP Compaq 6005 Pro Business Desktop PC products only support the best user experience and highest possible reliability. As a result, HP does not support the following combinations of RAID hard drives:
• Different sizes. • Different speeds (5400 rpm, 7200 rpm, etc.). • Old and new technologies (SATA 1.5 GB and SATA 3.0 GB). • NCQ hard drives and non-NCQ drives. • Different cache size.
• RAID combinations of hard drives with any operating system other than Microsoft XP Pro (SP2) or Microsoft Vista using Microsoft’s IDE driver stack based on ATAPI.SYS and AMD drivers.
• RAID configurations of two or more 10,000 RPM hard drives.
Non-RAID Drive Detection Scheme
Operation RAID 1 or 0; Working RAID 1 Degraded; No RAID ConfiguredAdd blank HDD (hard disk drive)
Add HDD as RAID Ready Add HDD as Raid Ready* (RAID 1 auto-rebuild when hot plug blank HDD only) Add HDD as RAID Ready
Add HDD with MBR and MDD Add HDD with MBR and no MDD
Add HDD as whatever RAID mode defined in the MDD of the HDD Add HDD as JBOD Add HDD as whatever RAID mode defined in the MDD of the HDD Add HDD as JBOD
Add HDD with MDD and no MBR (once as a LD but has been deleted)
Add HDD as RAID Ready* Add HDD as RAID Ready* (RAID1 auto-rebuild when hotplug blank HDD only) Add HDD as RAID Ready*
Add HDD with MDD and no MBR
Add HDD as Spare Drive** Auto-rebuild (RAID1 auto-rebuild can directly work with Spare Drive) Add HDD as Spare Drive**
* You can “clean” a HDD by selecting Secure Erase in SB710 Option ROM to make sure no MBR or MDD data is left on the HDD before testing.
** Spare Drive can be configured from RAIDXpert. It will write a flag into MDD for driver and Option ROM to recognize it as Spare Drive.
HP Note MBR = Master Book Record MDD = Meta Data, i.e. previous RAID configuration information
JBOD = Just a bunch of drives
LD = Logical Drive
System Condition IMPORTANT: The rebuild process does not automatically occur when a drive is plugged in; this is by design to protect the accidental plug-in of a data drive (diagnostics or backup). The newly added drive needs to be defined as a spare drive via RAIDXpert. The BIOS will continue to flag the error condition until the rebuild process is completed. Note: If the tab to define the drive as a Spare is grayed out, use the Secure Erase feature to erase any metadata that may exist on the drive. After the drive is erased, the tab to define the drive as a Spare will be selectable. Also, if the new drive appears as a Logical Drive, delete this Logical Drive in order to define it as a spare.
Configuring RAID on non-factory preinstalled configurations The remaining sections of this white paper describe steps to set up supported RAID configurations where customers have not purchased factory preinstalled RAID configurations. WARNING: Before configuring RAID in the Option ROM interface, be sure to back up all data. Once a RAID configuration is saved, the drives will no longer be bootable until an operating system is re-installed.
HP Note You will need a diskette drive to use the downloaded HP softpaq required for Windows XP CD or Microsoft Vista DVD installation. The softpaq must be downloaded to a diskette.
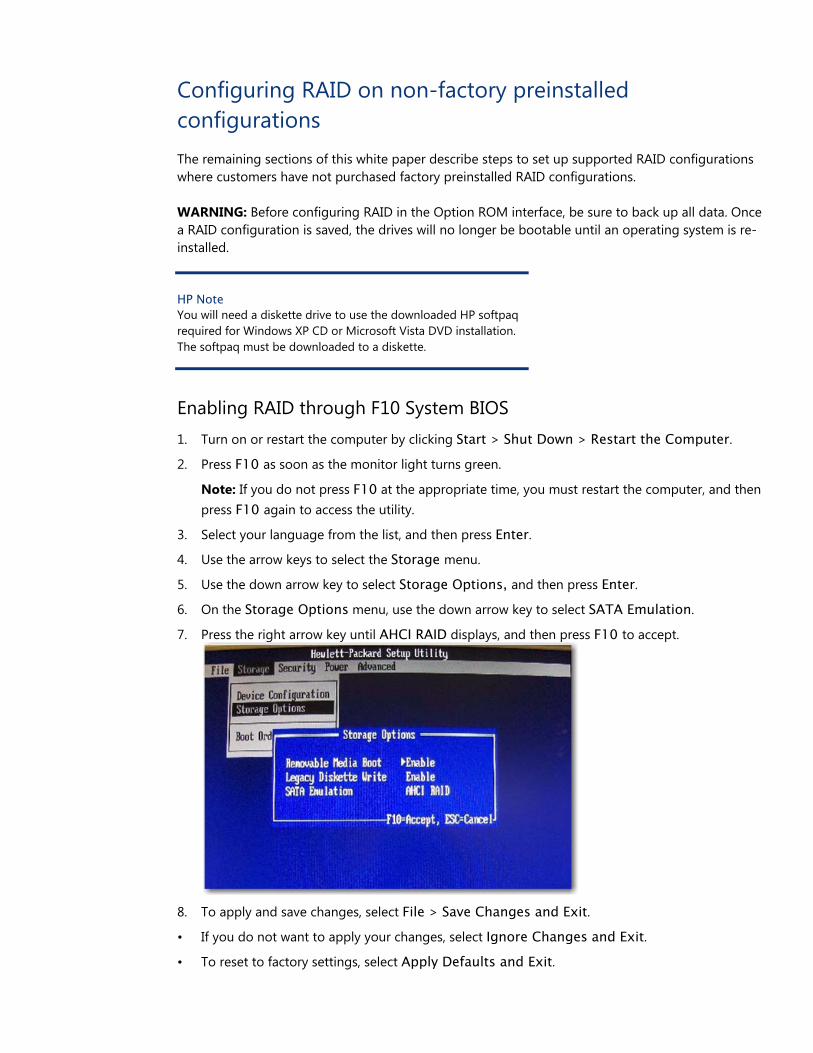
Enabling RAID through F10 System BIOS 1. Turn on or restart the computer by clicking Start > Shut Down > Restart the Computer.
2. Press F10 as soon as the monitor light turns green.
Note: If you do not press F10 at the appropriate time, you must restart the computer, and then press F10 again to access the utility.
3. Select your language from the list, and then press Enter.
4. Use the arrow keys to select the Storage menu.
5. Use the down arrow key to select Storage Options, and then press Enter.
6. On the Storage Options menu, use the down arrow key to select SATA Emulation.
7. Press the right arrow key until AHCI RAID displays, and then press F10 to accept.
8. To apply and save changes, select File > Save Changes and Exit.
• If you do not want to apply your changes, select Ignore Changes and Exit.
• To reset to factory settings, select Apply Defaults and Exit.
NOTE: Applying default settings never changes or resets the SATA Emulation mode (RAID vs. IDE). This setting must always be changed by selecting the appropriate mode from the F10 Setup Utility under Storage Options. CAUTION: Do NOT turn the computer power off while the ROM is saving the F10 Computer Setup changes because the CMOS could become corrupted. Only turn the computer off after exiting the F10 Setup screen.
Configuring RAID Option ROM Before proceeding you will need the following:
• Microsoft Windows XP CD-ROM or Microsoft Vista DVD and Product Key.
• RAID driver diskette. To create one, go to www.hp.com/support. Select your country and language, select Download drivers and software, enter the model number of the computer, and press Enter. You can only access Computer Setup at system startup. To access the Computer Setup Utilities menu and enable RAID:
1 Turn on or restart the computer by clicking Start > Shut Down > Restart the Computer.
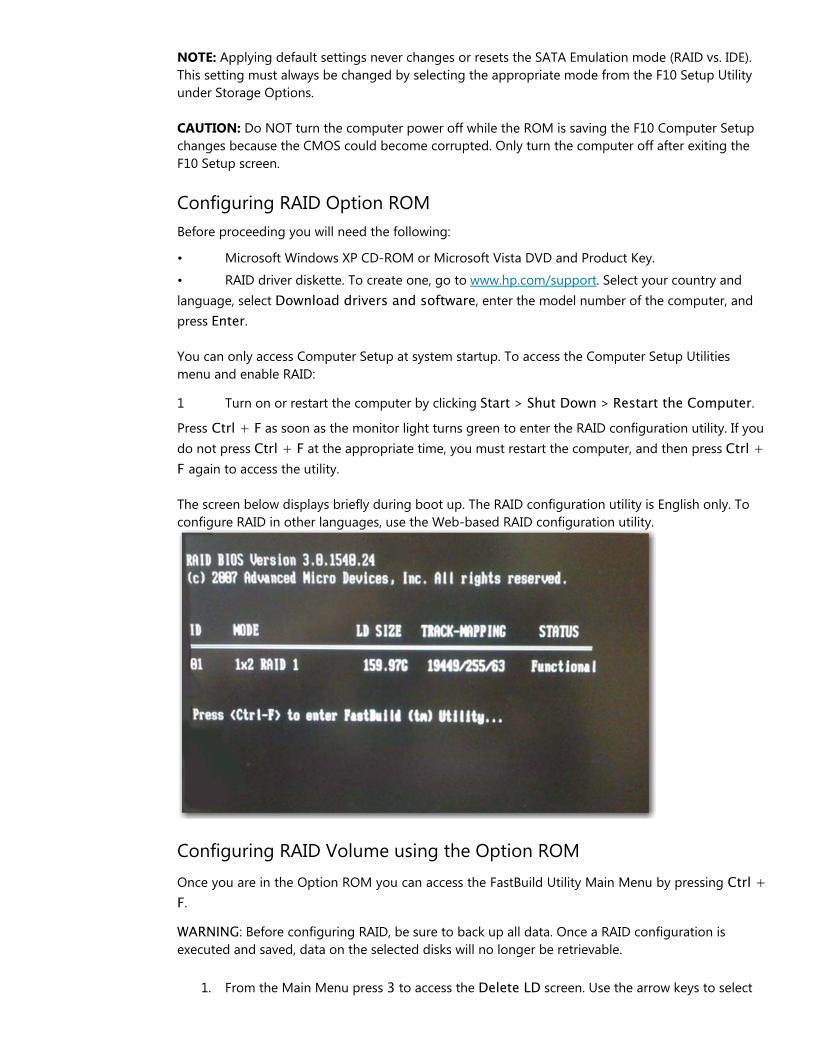
Press Ctrl + F as soon as the monitor light turns green to enter the RAID configuration utility. If you do not press Ctrl + F at the appropriate time, you must restart the computer, and then press Ctrl + F again to access the utility. The screen below displays briefly during boot up. The RAID configuration utility is English only. To configure RAID in other languages, use the Web-based RAID configuration utility.
Configuring RAID Volume using the Option ROM Once you are in the Option ROM you can access the FastBuild Utility Main Menu by pressing Ctrl + F.
WARNING: Before configuring RAID, be sure to back up all data. Once a RAID configuration is executed and saved, data on the selected disks will no longer be retrievable.
1. From the Main Menu press 3 to access the Delete LD screen. Use the arrow keys to select
the drives. Press Del or Alt + D to delete the drives. At the prompt, press Ctrl + Y to delete or any other key to abort. Repeat until all drives are deleted. Press Esc to return to the main menu.
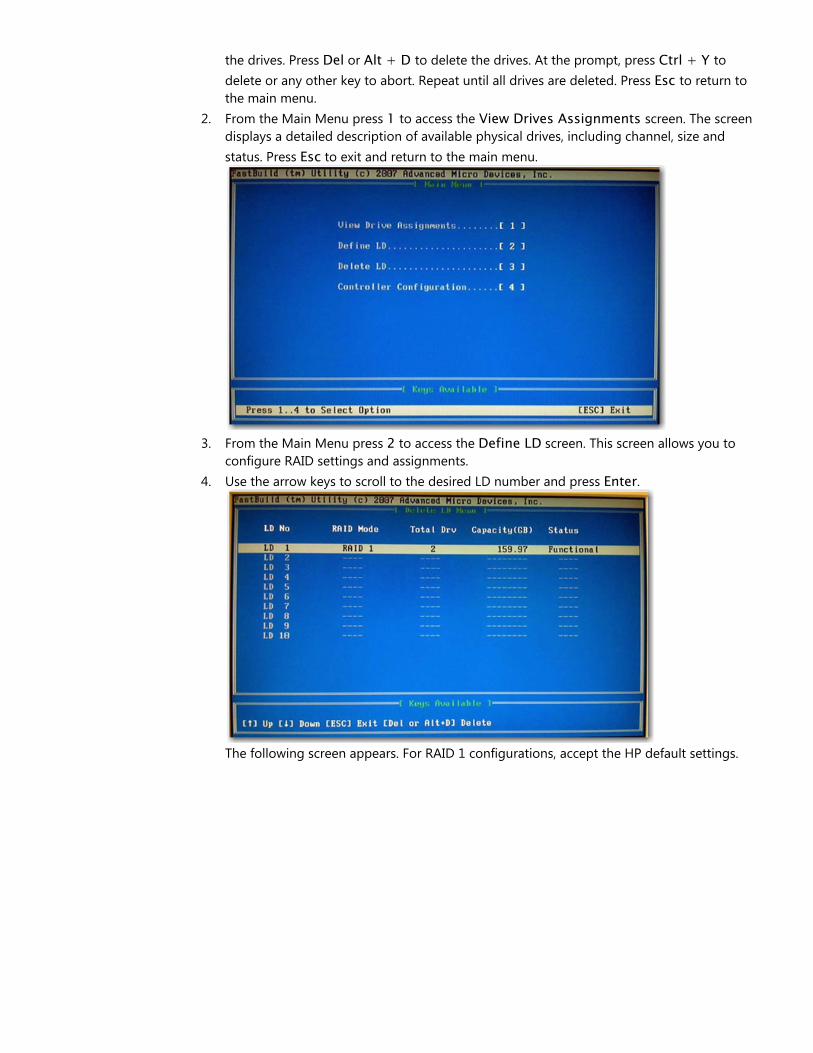
2. From the Main Menu press 1 to access the View Drives Assignments screen. The screen displays a detailed description of available physical drives, including channel, size and status. Press Esc to exit and return to the main menu.
3. From the Main Menu press 2 to access the Define LD screen. This screen allows you to
configure RAID settings and assignments. 4. Use the arrow keys to scroll to the desired LD number and press Enter.
The following screen appears. For RAID 1 configurations, accept the HP default settings.
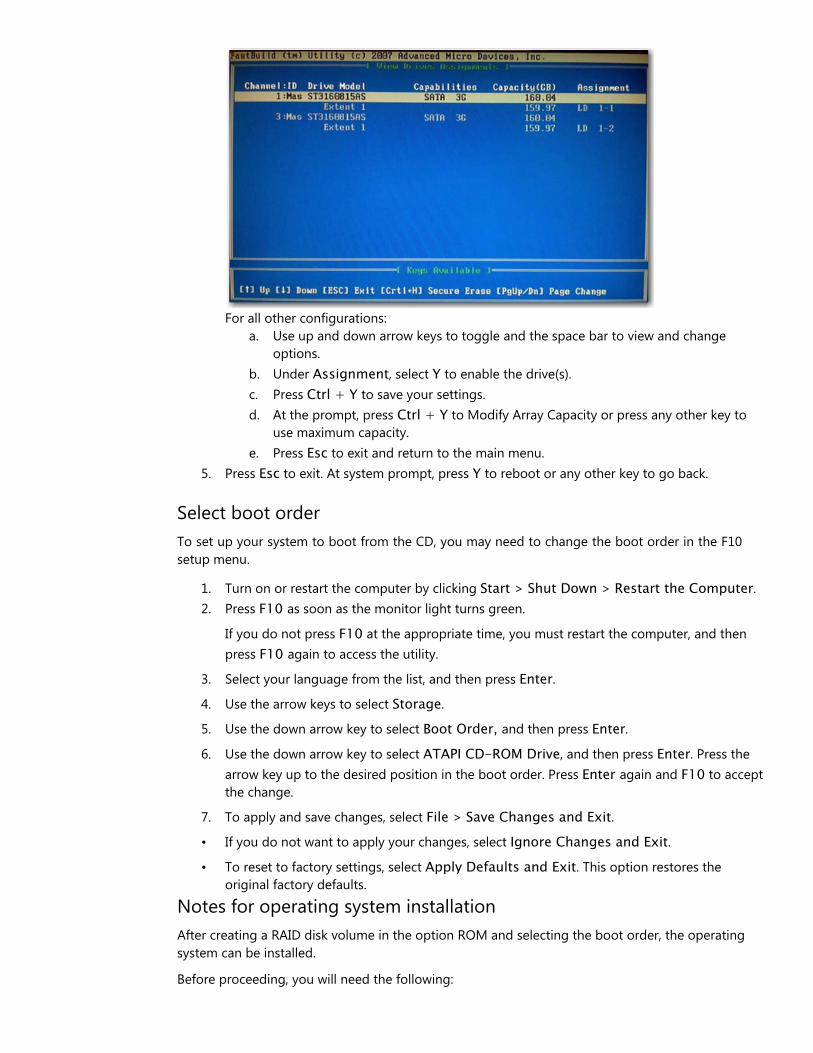
For all other configurations:
a. Use up and down arrow keys to toggle and the space bar to view and change options.
b. Under Assignment, select Y to enable the drive(s). c. Press Ctrl + Y to save your settings. d. At the prompt, press Ctrl + Y to Modify Array Capacity or press any other key to
use maximum capacity. e. Press Esc to exit and return to the main menu.
5. Press Esc to exit. At system prompt, press Y to reboot or any other key to go back.
Select boot order To set up your system to boot from the CD, you may need to change the boot order in the F10 setup menu.
1. Turn on or restart the computer by clicking Start > Shut Down > Restart the Computer. 2. Press F10 as soon as the monitor light turns green.
If you do not press F10 at the appropriate time, you must restart the computer, and then press F10 again to access the utility.
3. Select your language from the list, and then press Enter.
4. Use the arrow keys to select Storage.
5. Use the down arrow key to select Boot Order, and then press Enter.
6. Use the down arrow key to select ATAPI CD-ROM Drive, and then press Enter. Press the arrow key up to the desired position in the boot order. Press Enter again and F10 to accept the change.
7. To apply and save changes, select File > Save Changes and Exit.
• If you do not want to apply your changes, select Ignore Changes and Exit.
• To reset to factory settings, select Apply Defaults and Exit. This option restores the original factory defaults.
Notes for operating system installation After creating a RAID disk volume in the option ROM and selecting the boot order, the operating system can be installed.
Before proceeding, you will need the following:
• Microsoft Windows XP CD-ROM or Microsoft Vista DVD and Product Key.
• RAID driver diskette. To create, go to www.hp.com/support. Select your country and lan-guage, select Download drivers and software, enter the model number of the computer, and press Enter. The following steps apply to either Microsoft Windows XP or Microsoft Vista installations.
1 Insert the Windows XP CD-ROM or Microsoft Vista DVD and reboot the computer.
2 Press F9 at the prompt to begin installation.
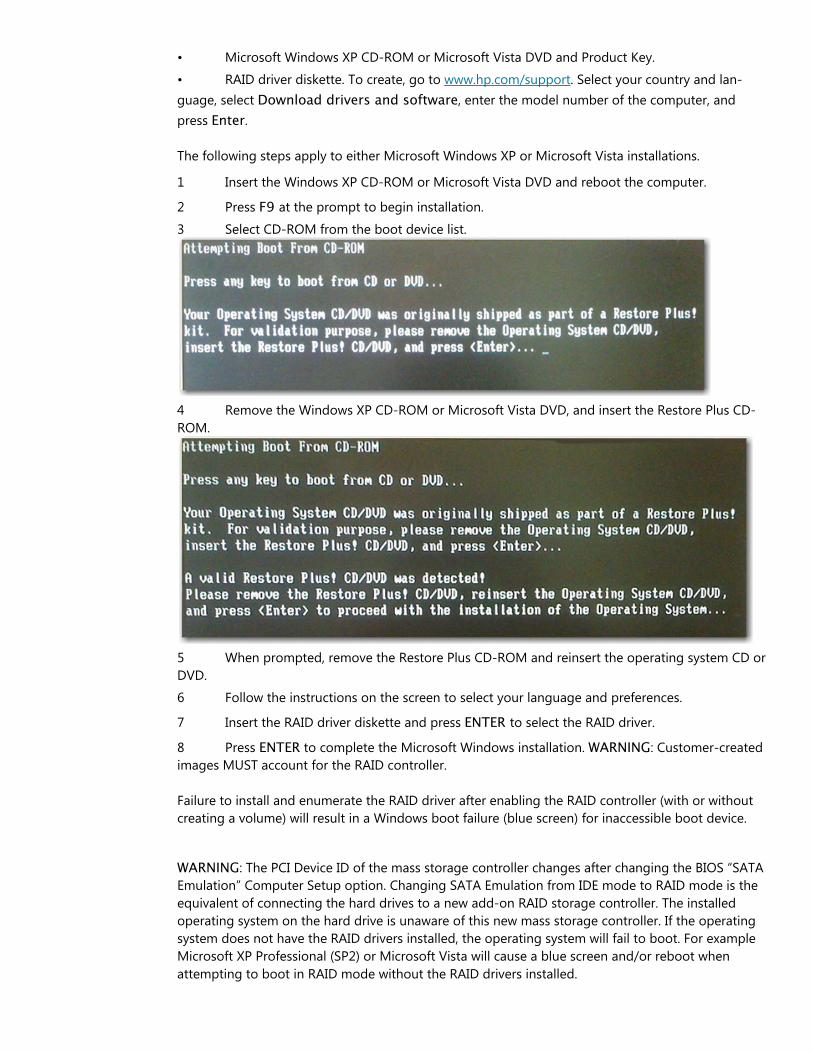
3 Select CD-ROM from the boot device list.
4 Remove the Windows XP CD-ROM or Microsoft Vista DVD, and insert the Restore Plus CD-ROM.
5 When prompted, remove the Restore Plus CD-ROM and reinsert the operating system CD or DVD.
6 Follow the instructions on the screen to select your language and preferences.
7 Insert the RAID driver diskette and press ENTER to select the RAID driver.
8 Press ENTER to complete the Microsoft Windows installation. WARNING: Customer-created images MUST account for the RAID controller. Failure to install and enumerate the RAID driver after enabling the RAID controller (with or without creating a volume) will result in a Windows boot failure (blue screen) for inaccessible boot device.
WARNING: The PCI Device ID of the mass storage controller changes after changing the BIOS “SATA Emulation” Computer Setup option. Changing SATA Emulation from IDE mode to RAID mode is the equivalent of connecting the hard drives to a new add-on RAID storage controller. The installed operating system on the hard drive is unaware of this new mass storage controller. If the operating system does not have the RAID drivers installed, the operating system will fail to boot. For example Microsoft XP Professional (SP2) or Microsoft Vista will cause a blue screen and/or reboot when attempting to boot in RAID mode without the RAID drivers installed.
Additional technical information will be provided in the future for customers who want to add RAID SW image deployment capabilities.
AMD Array Management Software (RAIDXpert) This section of the paper focuses on how to configure RAID using AMD Array Management Software (RAIDXpert).
Java Runtime Environment RAIDXpert will install JRE 1.4 on your system unless you already have JRE versions 1.3.0 or 1.4.
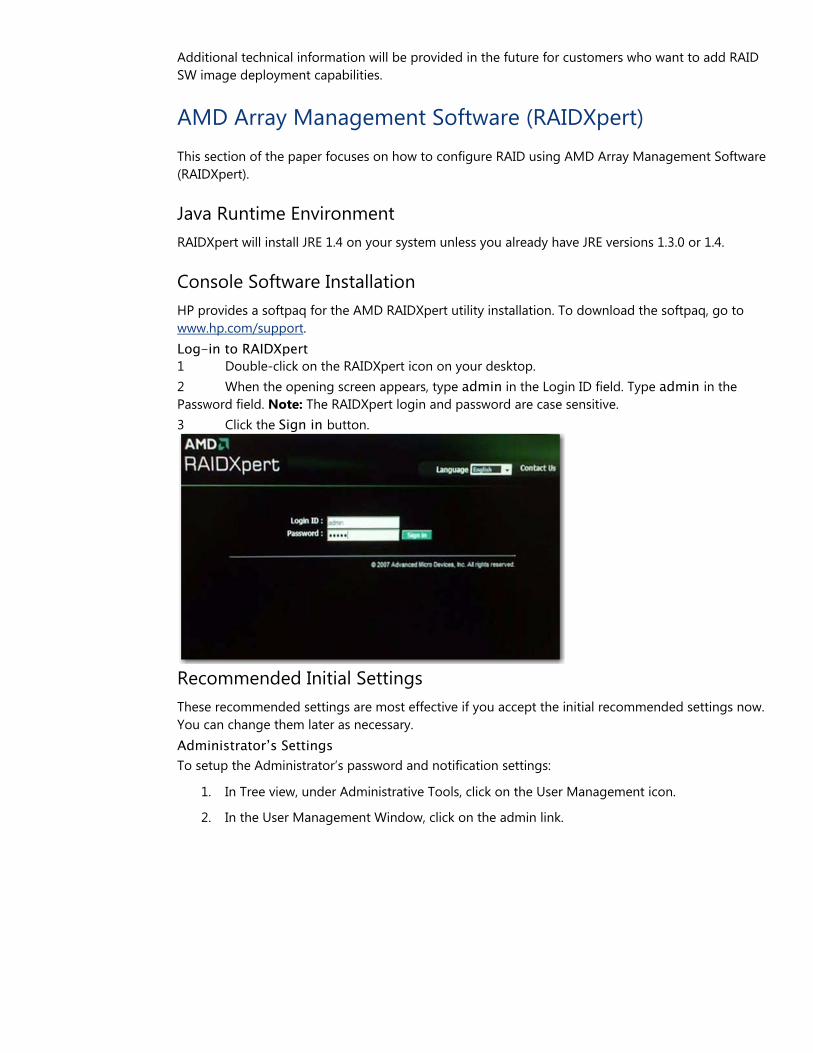
Console Software Installation HP provides a softpaq for the AMD RAIDXpert utility installation. To download the softpaq, go to www.hp.com/support. Log-in to RAIDXpert 1 Double-click on the RAIDXpert icon on your desktop. 2 When the opening screen appears, type admin in the Login ID field. Type admin in the Password field. Note: The RAIDXpert login and password are case sensitive. 3 Click the Sign in button.
Recommended Initial Settings These recommended settings are most effective if you accept the initial recommended settings now. You can change them later as necessary. Administrator’s Settings To setup the Administrator’s password and notification settings:
1. In Tree view, under Administrative Tools, click on the User Management icon.
2. In the User Management Window, click on the admin link.
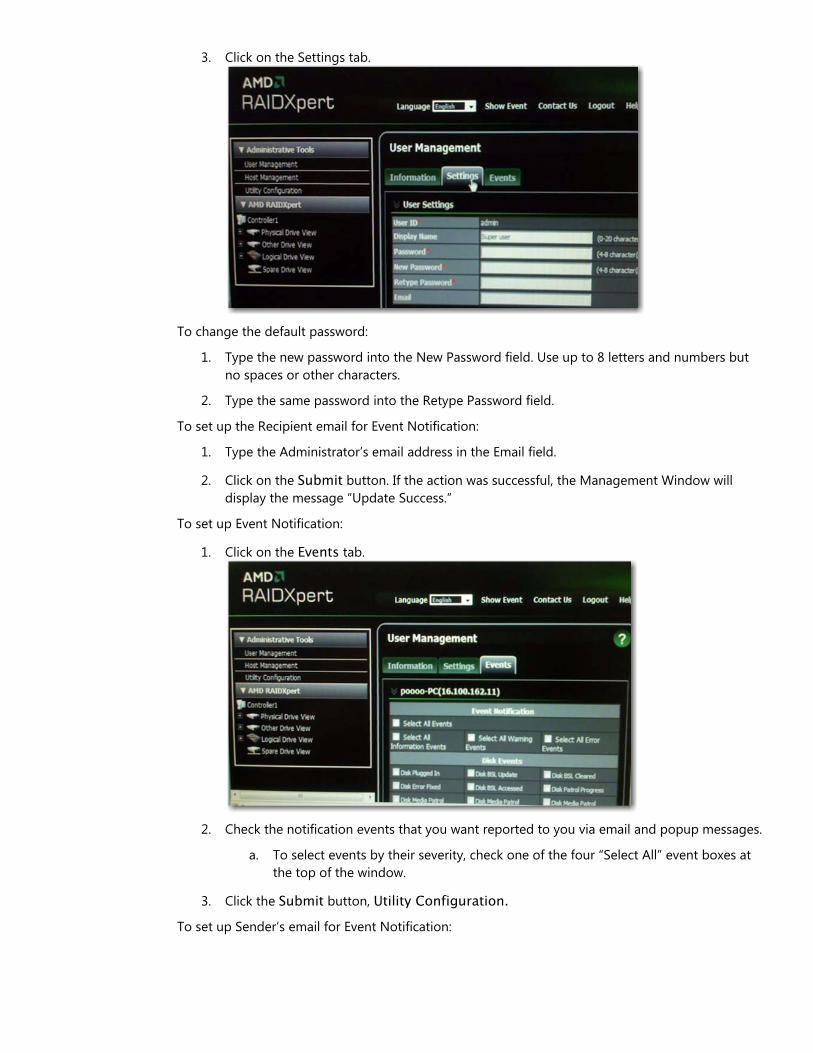
3. Click on the Settings tab.
To change the default password:
1. Type the new password into the New Password field. Use up to 8 letters and numbers but no spaces or other characters.
2. Type the same password into the Retype Password field.
To set up the Recipient email for Event Notification:
1. Type the Administrator’s email address in the Email field.
2. Click on the Submit button. If the action was successful, the Management Window will display the message “Update Success.”
To set up Event Notification:
1. Click on the Events tab.
2. Check the notification events that you want reported to you via email and popup messages.
a. To select events by their severity, check one of the four “Select All” event boxes at the top of the window.
3. Click the Submit button, Utility Configuration.
To set up Sender’s email for Event Notification:
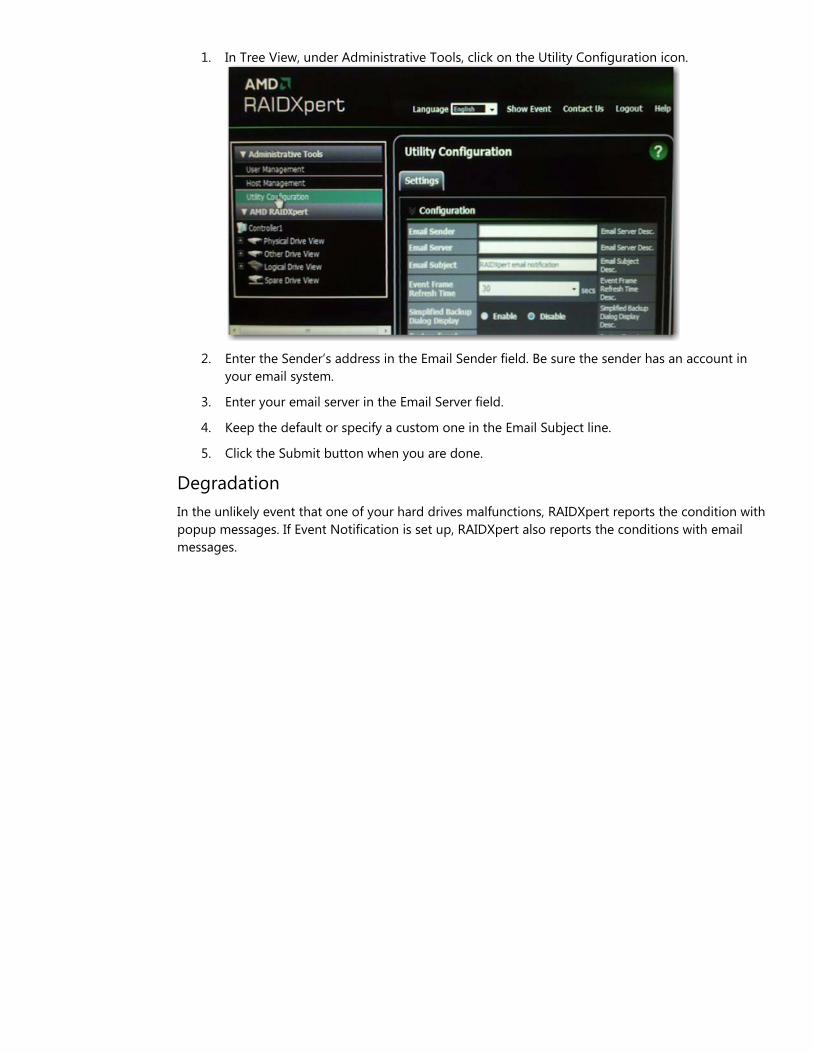
1. In Tree View, under Administrative Tools, click on the Utility Configuration icon.
2. Enter the Sender’s address in the Email Sender field. Be sure the sender has an account in your email system.
3. Enter your email server in the Email Server field.
4. Keep the default or specify a custom one in the Email Subject line.
5. Click the Submit button when you are done.
Degradation In the unlikely event that one of your hard drives malfunctions, RAIDXpert reports the condition with popup messages. If Event Notification is set up, RAIDXpert also reports the conditions with email messages.

For More Information A comprehensive RAIDXpert whitepaper is available at www.hp.com/support. Select your country and language, select See support and troubleshooting information, enter the model number of the computer, and press Enter. In the Resources category, click Manuals (guides, supplements, addendums, etc.). Under Quick jump to manuals by category, click White papers.
© 2009 Hewlett-Packard Development Company, L.P. The information contained herein is subject to change without notice. The only warranties for HP products and services are set forth in the express warranty statements accompanying such products and services. Nothing herein should be construed as constituting an additional warranty. HP shall not be liable for technical or editorial errors or omissions contained herein.
Microsoft, Windows, Windows NT, Windows XP, Windows Mobile, and Windows Vista are U.S. registered trademarks of Microsoft Corporation.
Linux is a U.S. registered trademark of Linus Torvalds.
UNIX is a registered trademark of The Open Group.
Intel, Intel Celeron, Itanium, Intel Itanium, Pentium, and Intel Xeon are trademarks of Intel Corporation in the United States and other countries.
AMD, AMD Athlon, AMD Opteron, AMD Virtualization, ATI HyperMemory, HyperTransport, PCnet, and combinations thereof, are trademarks of Advanced Micro Devices, Inc.
Oracle is a registered US trademark of Oracle Corporation, Redwood City, California.
Java is a US trademark of Sun Microsystems, Inc.
469440-003, 10/2009