Embed Size (px)
Citation preview

2015
Advanced styles in
OpenLayers 3
Mutlu Güney

Advanced styles in OpenLayers 3 Page 2
Table of contents Introduction ............................................................................................................................................. 3
Why OpenLayers 3 is developed? ........................................................................................................... 3
Current state of feature style .................................................................................................................. 3
Fill property ......................................................................................................................................... 4
Stroke property ................................................................................................................................... 4
Text property ....................................................................................................................................... 4
Image property .................................................................................................................................... 5
What can we do? ................................................................................................................................. 5
Style application .................................................................................................................................. 6
OpenLayers and its renderers ................................................................................................................. 8
What is a renderer? ............................................................................................................................. 8
The Canvas renderer ........................................................................................................................... 8
How the features are drawn into the Canvas?...................................................................................... 10
The Instructions ................................................................................................................................. 10
When are they applied? .................................................................................................................... 10
How it works? .................................................................................................................................... 10
Focus on one instruction: SET_FILL_STYLE ........................................................................................ 12
Style improvement ................................................................................................................................ 13
Filling a Canvas with an image........................................................................................................... 13
Filling a Canvas with repeatedly image pattern ................................................................................ 13
Test: Applying repeatedly image pattern as fill style to a feature .................................................... 13
Image opacity .................................................................................................................................... 14
Hook .................................................................................................................................................. 16
Further style improvements .............................................................................................................. 18
Feature moving.............................................................................................................................. 18
Map zooming ................................................................................................................................. 19
Conclusion ............................................................................................................................................. 20

Advanced styles in OpenLayers 3 Page 3
Introduction
OpenLayers is an open source JavaScript library for developing map applications on the web. It
provides a way to build rich web-based geographic applications such as Google Maps. This library
assumes a set of functionalities oriented to fluid web mapping client applications. It also allows
reading geospatial data from various data sources.
OpenLayers was released as open source software during 2006 and its community has quickly grown
with its evolution and it’s now one of the most powerful open source web-mapping applications.
First, this document deals what is currently possible for styling in OpenLayers 3 with, how the styling
operation works and its limitations. Finally a way to perform the style improvement will be explained.
Why OpenLayers 3 is developed?
The technology that was available 9 years ago is not the same as nowadays. OpenLayers 2.0 has been
under continuous development since it was released. It is still widely used and covers people needs
for their web mapping applications.
The code of OpenLayers 3 is not based on the one of OpenLayers 2. It was made from scratch, that
means the code was completely rewritten to take advantages from the latest technologies such as
WebGL which provides enhanced capabilities renderer, but also high level of displaying vector, for
example in three dimensions with Cesium.
The responsible team for this project keeps this up to date and takes the opportunity to optimize the
code thanks to tools such as Google Closure.
Current state of feature style
Currently, the geometrical shapes represented by the features can support different styles. A style is
a simple JavaScript object with 4 properties: fill, stroke, text and image (see Figure 1 below).
Figure 1 – Style objects

Advanced styles in OpenLayers 3 Page 4
Fill property The fill property is an object with only one attribute: color.
The color attribute can be a :
Hexadecimal color code, e.g. ‘#ffffff’ or ‘#fff’
RGB code (red, green, blue), e.g. ‘255,255,255’
RGBA code (red, green, blue, alpha), e.g. ‘255,255,255, 1’
Color string, e.g.‘white‘
Figure 2 - Fill style applied to a circle feature
Stroke property The stroke property is an object with 3 attributes: color, width and lineDash.
The color attribute can be one of the 4 color values explain above.
The width attribute is a number corresponding to the thickness of the stroke.
The lineDash attribute is an array of 2 elements. The first is the length of the dash and the
second is the interval length between 2 dashes.
Figure 3 - Stroke style applied to a circle feature
Text property The text property is an object with many attributes such as:
The text attribute, which is a simple string that will appear in the feature centre.
The fill attribute, which is a fill object representing the text color.
The stroke attribute, which is a stroke object representing the border thickness of the text.

Advanced styles in OpenLayers 3 Page 5
Figure 4 - Text and fill style applied to a circle feature
Image property The image property is an object with several attributes that are anchorXUnits, anchorYUnits, anchor,
opacity, src, rotation, scale and rotateWithView
The anchorXUnits attribute is a string corresponding to the metric system of the X axis
anchor.
The anchorYUnits attribute is a string corresponding to the metric system of the Y axis
anchor.
The anchor attribute is an array of 2 numbers corresponding to image position relative to
feature’s coordinates.
The opacity attribute is the image transparency.
The src attribute indicates the image URL.
The rotation attribute is the radian value applied to the image rotation.
The scale attribute is the multiplication factor which is applied to the image size.
The rotateWithView attribute is a Boolean indicating whether the image rotation is relative
to the view rotation or not.
Figure 5 - Image style applied to a point feature
What can we do? With the use of all of these properties, we can define a feature that looks like below (Figure 6: Global
style applied to a polygon feature)

Advanced styles in OpenLayers 3 Page 6
Figure 6 - Global style applied to a polygon feature
Style application
These style objects can be applied to an individual feature or to the entire feature’s layer.
OpenLayers 3 gives us the ability to change the style dynamically. For example, the style can be
based on:
- The resolution of the map, the zoom level (Figure 7 : Style based on map’s resolution)
- Properties of the data source such as the population density of a city, temperature, etc.
- The state of the feature: the features can have many states, for example when the user
moves his mouse over the feature. It could have the ‘mouse over’ state, or when the feature
is clicked, the ‘selected’ state. So we can define style according to feature state.
Figure 7 - Style based on map's resolution
We can also manually set the style after the feature has been rendered, with the “setStyle()”
function:

Advanced styles in OpenLayers 3 Page 7
Figure 8 - Style applied after the feature has been rendered
These many ways to define the style or to apply them seems good enough, but what if we would like
to apply advanced styles such as a hatch pattern or an image inside some features? The current state
of the library development does not allow us to define these particular styles.
Till now, the style can be applied from many ways. However they are quite basic if we only limit
ourselves to what is available.
Openlayers 3 has a repository of examples: http://openlayers.org/en/v3.2.0/examples/ . There are
some good samples of the current style usage.

Advanced styles in OpenLayers 3 Page 8
OpenLayers and its renderers
What is a renderer? A renderer is what is used to display data. So for OpenLayers, the renderer is the element that will
display the map, the different vector layers and their features.
OpenLayers 2 uses many renderers such as ‘Canvas’, ‘SVG’, ‘VML’, etc.
OpenLayers 3 still has the ‘Canvas’ renderer but not the ‘SVG’ and ‘VML’ renderer. Why? Here’s one
explanation1 posted by Tim Schaub, an OpenLayers 3 contributor:
« Using Canvas and WebGL instead of SVG makes it possible to render and interact with very large
numbers of vector features without the extra overhead of creating a DOM element for each feature.
Rendering with Canvas allows you to leverage other basic image manipulation techniques. »
Modern web browsers implement different ways for rendering elements on web pages and
OpenLayers 3 currently implements 3 renderers: ‘Canvas’, ‘WebGL’ (mentioned above) and ‘Dom’.
The Canvas renderer Up to now, only the Canvas renderer supports vector data so I based my research in this direction.
The fact that OpenLayers 3 implements the Canvas renderer is a good thing because since HTML 5,
the Canvas component supports the displaying of graphics drawn on the fly with JavaScript. With this
component, we can draw what one wants.
Furthermore, the Canvas is a rich component in which images can be drawn and even processed pixel
by pixel. It is now a web standard implemented by all modern web browsers, this excludes Internet
Explorer versions before 9.
For drawing graphics into the Canvas, we need to retrieve its context with the getContext(“2d”)
Canvas function which returns the Canvas’ context. This specification defines the 2D context for the
HTML Canvas element. The 2D context provides objects, methods and properties to draw and
manipulate graphics on a Canvas drawing surface.
OpenLayers 3 does not currently benefit from all the Canvas renderer capabilities.
Let’s see what the Canvas can present as workable style for the features:
The gradient: A way to interface some complex colors with different degree of color intensity
(see Figure 9 – Example of gradient color Heatmap)
An OpenLayers example shows a similar use of gradient:
http://openlayers.org/en/v3.2.0/examples/heatmap-earthquakes.html?q=heatmap
1 OpenLayers 3 Is Coming (Posted on 14/02/2014 by Tim Schaub) -
http://boundlessgeo.com/2014/02/openlayers-3-coming/

Advanced styles in OpenLayers 3 Page 9
Figure 9 - Example of gradient color Heatmap
Browsing the source code of OpenLayers 3, I found some code part which references the
createLinearGradient() function of the Canvas’context. So it uses some capabilities of the
Canvas.
The image: the Canvas element allows integrating an image into it.
The pattern: allows filling Canvas area’s part with a repeated element in the specified
direction.
And more others
There are many other Canvas processing which could be interesting for applying complex styles to
the features.
For example, we can imagine filling features with an icon pattern background and that’s what I will
attempt to implement for my research.

Advanced styles in OpenLayers 3 Page 10
How the features are drawn into the Canvas?
The Canvas executes instructions sent by OpenLayers with an array of instructions. This array is filled
by one or more instructions each time the Canvas has to draw something into the Canvas
component.
The Instructions Each directive that OpenLayers uses to draw something into the Canvas is transmitted as Canvas’
instructions
Figure 10 - Enumeration of all the Canvas'instructions
We can see that all these instructions correspond to instructions that OpenLayers 3 can send to the
Canvas for drawing into it.
When are they applied? These instructions are applied each time the frame of the Canvas has to be rendered.
Browsing the source code of OpenLayers 3 with a debugger, we can see in the call stack that one of
the origin function call is the “ol.renderer.Canvas.Map.renderFrame()“ function. It means that when
the Canvas has to render a frame, this function is executed as well as all the subsequent instructions
called by this function, including the instructions array which is sent to the Canvas.
How it works? First, each time graphics have to be drawn into the Canvas, various functions make sure to fill the
Canvas’ instructions array with all that is needed.
Then, the Canvas browses the instructions array, cell by cell and translates all instructions with its
own functions. For example, when the Canvas receives the SET_FILL_STYLE instruction, it executes
the following instruction: “context.fillStyle = instruction[1];” where in instruction[1] we find the fill
property content that is set into the fill object.
Advanced styles in OpenLayers 3 Page 11
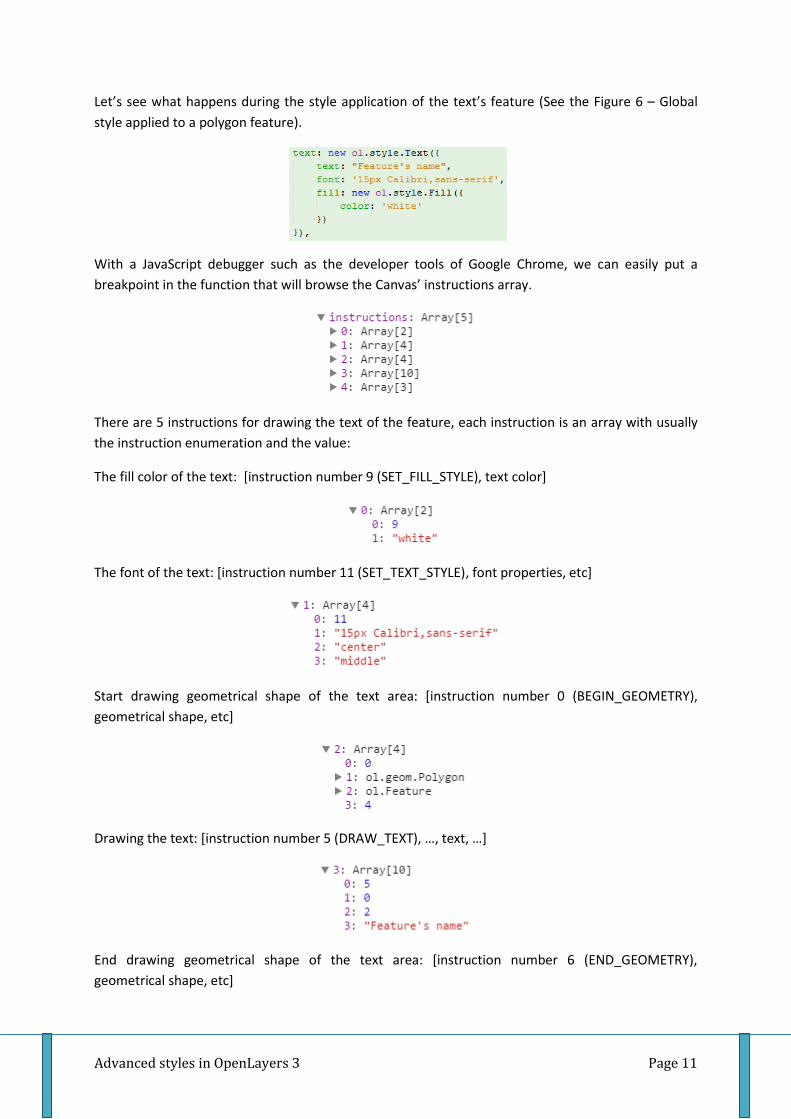
Let’s see what happens during the style application of the text’s feature (See the Figure 6 – Global
style applied to a polygon feature).
With a JavaScript debugger such as the developer tools of Google Chrome, we can easily put a
breakpoint in the function that will browse the Canvas’ instructions array.
There are 5 instructions for drawing the text of the feature, each instruction is an array with usually
the instruction enumeration and the value:
The fill color of the text: [instruction number 9 (SET_FILL_STYLE), text color]
The font of the text: [instruction number 11 (SET_TEXT_STYLE), font properties, etc]
Start drawing geometrical shape of the text area: [instruction number 0 (BEGIN_GEOMETRY),
geometrical shape, etc]
Drawing the text: [instruction number 5 (DRAW_TEXT), …, text, …]
End drawing geometrical shape of the text area: [instruction number 6 (END_GEOMETRY),
geometrical shape, etc]

Advanced styles in OpenLayers 3 Page 12
Focus on one instruction: SET_FILL_STYLE To apply a custom complex style to a feature such as an icon pattern background, the most
interesting Canvas instruction is the SET_FILL_STYLE instruction, because it’s with this instruction that
we could change the fill background of features.
Figure 11 - Style translation
Figure 12 - Feature style application
Figure 13 - Vector layer & tile layer

Advanced styles in OpenLayers 3 Page 13
Style improvement
If the fill style Canvas’ instruction makes a simple assignation of the content color property to the
Canvas’ context (see Figure 11 – Style translation), then we can imagine assigning an image instead of
a color.
Filling a Canvas with an image With the Canvas component, we can easily draw an image into it with the drawImage context
function.
Figure 14 - Draw image
Filling a Canvas with repeatedly image pattern Supposing the feature can be moved over the Canvas, if we want it to have the image background,
we have to draw the image all over the Canvas. Fortunately the createPattern context function gives
us the ability to draw a repeatedly image all over a Canvas area.
Figure 15 - Fill Image pattern 'repeat'
Test: Applying repeatedly image pattern as fill style to a feature Hardcoding the JavaScript OpenLayers debug file (a way to override the library functions without
hardcoding is explained below) for testing this style application, we just changed the value sent with
the SET_FILL_STYLE Canvas instruction by the pattern created with the createPattern context
function such as the following part code :

Advanced styles in OpenLayers 3 Page 14
Here is the result of this custom style:
Figure 16 - Custom style application
This looks promising, it means that we can define our custom feature styles which are much more
complex than those provided by OpenLayers 3.
Note: we don’t have to specify the “rect()” and “fill()” function such as the Figure 15 – Fill image
pattern ‘repeat’. Indeed, these functions correspond to other Canvas’ instructions that we don’t have
to worry now.
Remember that OpenLayers sends instructions to the Canvas each time a frame has to be rendered,
even if the map is moved with the mouse. So the feature will seem moving over its background,
whereas it is in fact redrawn by the Canvas when rendering the frame.
Image opacity It would be nice and useful to set the feature opacity with this more complex style. The actual state
of OpenLayers 3 fill style gives us the ability to define an alpha intensity of the color (See the Figure 2
– Fill style applied to a circle feature). In fact, the Canvas doesn’t apply the defined alpha to the color.
Two rgba color codes with the same red, green, blue attribute and not the same alpha attribute are
two distinct colors.

Advanced styles in OpenLayers 3 Page 15
Then how to set the image opacity for our custom style? The Canvas’ context has a property that we
could find interesting: the globalAlpha property. It is used as his name suggests, to apply the alpha
transparency to the context.
The problem with this globalAlpha property is that it sets the Canvas’ context opacity not only for
one feature style application but for all the use of the context. It means that if a context globalAlpha
is defined, the transparency intensity will be the same for all the features even for the features filled
by an rgba color code. However there’s a way to save the context state with all its properties for
restoring it before applying another style for another feature: context.save() and context.restore()
functions. These functions would be required to apply distinct opacity intensities with the same
context. To do this, we need to find in the library where to restore this context for the next style
application.
Although the saving and restoring context function could be a solution, we preferred another
approach: Image processing with the Canvas. We said earlier that the Canvas is a rich component
with rich features. One of the useful features provided by the Canvas is to retrieve each Canvas pixel
as a pixel data array that we can iterate over all pixels.
What this pixel data looks like?
Figure 17 - Pixel data array
What we need to do now is to iterate over all alpha data of each pixel in the array for setting it to the
wanted value.
The getImageData parameters are the same as the rect() function seen in the Figure 15 – Fill image
pattern ‘repeat’.
The putImageData() function will redraw the image into the Canvas.

Advanced styles in OpenLayers 3 Page 16
Hook How to define our custom style without altering the current OpenLayers library behaviour? This
question is often asked when we want to modify some existing code parts of thousands lines of code.
This performance is called a hook, it allows the user’s software to customize the software’s
operations by making them executing additional actions at predetermined times. Ideally this should
go hand in hand with regression tests to be sure not to alter other executions.
A way to create our hook is to override OpenLayers functions that will be sensitive to our new
custom style.
First of all, we need to change the fill object constructor and its functions:
Figure 18 - Changing fill object constructor
This will ensure that we can now insert an object into the image attribute of the fill object. Why an
object and not only an image object? As we improved the image processing at the previous chapter
to set the image opacity, we could set a more complex object for the image object. Such as an array
where the first element would be the image object and the second element would be a number
corresponding to the transparency intensity 0 to 1.
Figure 19 - Our new style object
Let’s see now what is the value sent with the SET_FILL_STYLE Canvas’ instruction with the following
style declaration.

Advanced styles in OpenLayers 3 Page 17
Figure 20 - Custom style translation
With the Google Chrome Developer Tools, we can exactly see what object is passed as the fillstyle
value :
Fortunately, it’s precisely what we want. It means that our change of the fill style object constructor
is correct. Now we have to redefine how OpenLayers apply the fill style in the function where the
Canvas’ instructions array is iterated: ol.render.Canvas.Replay.replay_().
We will redefine this function by overriding it as we did with the fill style object constructor.
Figure 21 - Changing fill style application

Advanced styles in OpenLayers 3 Page 18
This hook works well for applying our custom style. Note that if two features have two different
background images, it will work too. Why? See Figure 16 – Custom style application, it shows that the
style is applied only on the feature we want to custom. Then if we have two features, each style is
applied only on the selected feature independently of the other features and it does not conflict with
the other styles or background images.
Further style improvements
Feature moving
As we said earlier with our image background, when a feature is moved, it seems moving over its
background because it’s not composed of a unique color such as the default fill style of the current
fill style object.
Figure 22 - Style application when moving
What we can do to work around this is still to fill the Canvas with the wanted image but now only the
Canvas area that is covered by the feature position. Then at each feature movement this Canvas area
will be attached to the feature position and redrawn according to that. The Canvas area position can
be calculated by getExtend() function of a feature’s geometry. This function returns an array with
min, max of x and y position of the feature.
Figure 23 - Drawing background at feature's position

Advanced styles in OpenLayers 3 Page 19
This workaround will ensure that the feature will be attached to its background and will remove the
appearance of moving over it. Then the moving will be less disturbing for the user.
Map zooming
The same problem will occur when the user will zoom in or out with this custom style.
Figure 24 - Style application when zooming
Furthermore, remember that the context of the Canvas element provides some processing image
functions. E.g. the drawImage() function accepts image size parameters :
Then we can imagine processing the image before filling the Canvas by the repeatedly image. This
processing will resize the image based on the zoom level or the map resolution value.

Advanced styles in OpenLayers 3 Page 20
Conclusion Finally, we can easily say that the current state of OpenLayers 3 doesn’t benefit from all that we can
do with the Html Canvas component which is rich enough, as we have seen in this document. We
could set some styles which should be much more complicated than what we did. Another example
would be to integrate a video into the Canvas element if the user of the web map application moves
his mouse on particular features.
Open source libraries such as OpenLayers offer big advantages not only because they are free, but
also because they are largely accessible. Anybody can browse through the source code, try to
understand the different parts and finally modify it. Thanks to this transparency and thanks to the
OpenLayers community work, this library is rapidly evolving. Anyone can bring its contribution to the
project which can therefore experience new improvements days after days. This finally leads to a
powerful and efficient tool.