Embed Size (px)
Citation preview


The Skills Framework
The relevant skills icons are placed adjacent to the lesson outcomes
- 7

TB
Unit 1 (Year 3) Lesson 1
Phase 1: Introduction Phase 2: Teacher Input Introduce the unit (see unit outcomes and Skills Discuss and agree class ‘ground rules’ for working in groups e.g. background information) Framework: only one person talking at one time, everyone is given a chance
to contribute Lesson outcomes:
Introduce the Newspaper Game (OL Card TB1) paired challenges
• Work cooperatively to solve group /
Introduce the Paper Mountain Activity (OL card TB2) suggestions
• Listen to and evaluate all ideas and
• Contribute to the group discussion by speaking clearly and offer constructive suggestions
Key Words: co-operation, participate, role / job
Geirfa Allweddol: cydweithrediad, cyfranogi, rôl / swydd
Phase 3: Pupil Interaction Phase 4: Review Newspaper game: Pupils re-assemble a ripped up comic / newspaper, putting it back together using tape
Paper Mountain: Pupils build the tallest free standing structure using the resources provided (paper, glue, tape etc)
Re-visit the lesson outcomes; • What helped the group to succeed? • Did everyone in the group speak? • Did you divide jobs fairly amongst the group? • Did everyone in the group have a job?
Think of your own personal target for next lesson
Resources and equipment: Outdoor Learning cards TB1, TB2, Newspapers / comics, roll of clear sticky tape, glue, paper clips
- 8

Unit 1 (Year 3) Lesson 2
Phase 1: Introduction Phase 2: Teacher Input
TB
Recap last lesson.
Lesson outcomes: • Explore different methods of
communication (verbal / non-verbal) and decide which is most effective for you
• Demonstrate a willingness to trust others and accept support
Key Words: communication, trust, support, verbal, non-verbal, evaluate
Geirfa Allweddol: cyfathrebu, ymddiriedaeth, cefnogaeth, geiriol, di-eiriau, gwerthuso
Skills Discuss with pupils different forms of non-verbal communication Framework: E.G. demonstration, mime, gesture
Introduce the activities one by one
Warm up activity: amoeba tag. 2 pupils ‘on it’ and holding hands. When another pupil is tagged, the join hands to make a three. When a fourth person is tagged they can split into two. Mobilise ad stretch.
Phase 3: Pupil Interaction Phase 4: Review Pupils complete the following challenges:
• OL card TB3; All Aboard • Hoop Challenge • Bench Shuffle • Magic Carpet • OL card TB4; Cross the Swamp
Re-visit the lesson outcomes; • How did you plan each of the responses to the tasks?
How did this help? • What was the most important factor in helping you to
succeed? • Did you listen to everyone’s ideas and suggestions? • Which form of communication did you find most / least
useful? Why? • Which activity did you like most / least? Why?
Think of your own personal target for next lesson
Resources and equipment: Outdoor Learning cards TB3, TB4, TB11, AR cards AR1, AR2, Hoops, mats, piece of carpet/cotton sheet, benches, skipping ropes
- 9

Unit 1 (Year 3) Lesson 3
Phase 1: Introduction Phase 2: Teacher Input
TB
Recap last lesson. Skills Framework:
Lesson outcomes: • Give clear and concise instructions • Follow instructions and accept support
from a partner (verbal / physical) • Recognise when your partner needs
support
Key Words: Instructions, support, trust, circuit
Geirfa Allweddol: Cyfarwyddiadau, cefnogaeth, ymddiriedaeth, cylch cerdded
Discuss with pupils the key point to remember when giving instructions;
• Clear voice projected in the direction of your partner • Think about what you are going to say before you say it • Imagine what you would want to hear if you could not see
Set out and explain the blindfold circuit to pupils
Phase 3: Pupil Interaction Phase 4: Review Pupils work with partners to undertake a series of trust building exercises.
Pupils complete the blindfold circuit as set out in the time given
Pupils think of a different way to guide their partner through the obstacle e.g. clapping, sounds, holding hands, whistle
Re-visit the lesson outcomes; • What was good about the way your partner guided you? • Did you feel safe? • Did you peek? If so why? • What did you say to your partner when you were guiding
them?
Think of your own personal target for next lesson
Resources and equipment: Outdoor Learning card TB5, AR3, benches, cones, blindfolds, rope / tape, whistles
- 10

Unit 1 (Year 3) Lesson 4
Phase 1: Introduction Phase 2: Teacher Input
TB
Recap last lesson. Skills Framework:
Lesson outcomes: • Plan the task carefully with each
group member contributing their ideas
• Work as a team to solve the problem • Explain how you solved the task
Key Words: Plan, teamwork, experiment, choose
Geirfa Allweddol: Cynllunio, gwaith tîm, arbrofi, dewis
Pupils should have brought to school their favourite teddy to school to be rescued from an island in the swamp.
Draw 4 or 5 3 metre diameter circles (enough for groups of around 5)
Explain the task as outlined on TB13. The Lesson follows the same format as Toxic Waste but substitutes rescuing a Teddy from a swamp.
Warm up activity; use the circles to run/skip/hop/jump around, change direction, change circles. Mobilise and stretch.
Phase 3: Pupil Interaction Phase 4: Review Pupils plan, experiment and choose the best way to rescue teddy with the given resources (skipping ropes 3 metres long, hoops, elastic ring e.g. bungee cord, bicycle inner tube, large elastic band
In their groups, pupils discuss what they did to the rest of the class.
Re-visit the lesson outcomes; • What methods did you try? What worked? • What didn’t work and why? • How did you decide which to choose? • Did everyone agree? • If you were to do this task again, what would you do
differently?
Think of your own personal target for next lesson
Resources and equipment: Outdoor Learning card TB13 (Toxic Waste adapted) Teddy’s, tape / chalk, skipping ropes, elastic rings
- 11

Unit 1 (Year 3) Lesson 5
O
Phase 1: Introduction Phase 2: Teacher Input Recap last lesson.
Lesson outcomes: • Demonstrate understanding of the
concept of a basic map • Navigate your way around a simple
orienteering course • Understand the term ‘orientate’ or
‘setting’ a map
Key Words: map, orientate, set, symbol, birds-eye view
Geirfa Allweddol: map, cyfeiriadu, gosod, symbol, golygfa oddi uchod
Skills Framework:
Warm up activities; • Pupils spin around in space to experience ‘disorientation’.
Highlight how this feels i.e. not knowing where you are. The opposite of which is ‘orientation’
• Pupils run around in space and get into groups of a set number as directed by teacher (end in 2’s) Do this part just before pupils do physical activity
Introduce the concept of drawing a plan and what symbols we might use to represent objects
Phase 3: Pupil Interaction Phase 4: Review Build a model of a house, farm, garden etc from a ‘birds eye view’ using blocks (a demonstration of Google Earth can explain ‘birds-eye’ very well) Draw a plan of the model. Discuss the size of the plan Draw a map of your table and who sits where Repeat this after changing places with others (teacher specifies who is to swap with whom e.g. No 1 swap with No 5 so pupils have to use their maps to see who they should swap with) Remember to alter maps after each turn or their map will not be correct! Pupils complete a round map activity indoors (AR4)
Re-visit the lesson outcomes; • Define orientation (knowing where you are in relation to a
map) • What do you need to do to ‘orientate’ or ‘set’ your map? (turn
it to fit the ground) • How do you know when you have set your map correctly?
(objects around you are in the same place as on the map) • How do you show objects on a map? (symbols) • What is different about the maps we have used? ( sizes) • What is scale? (changing the size of objects or an area to fit a
plan or map)
Think of your own personal target for next lesson
Resources & Equipment: AR4, building blocks, round maps, pencil, paper, internet access, round map examples
- 12

Unit 1 (Year 3) Lesson 6
Phase 1: Introduction Phase 2: Teacher Input
O
Recap last lesson. Skills Framework:
Lesson outcomes: • Design and create a route for others to
follow • Follow a route using a simple map • Discuss safety considerations when
orienteering
Key Words: route, safety, map, symbol
Geirfa Allweddol: llwybr, diogelwch, map, symbol
Introduce the activity as outlined on O1. Set out the course area and give out the maps. Pupils will develop their ability to orientate a map and navigate a simple course.
Warm up activities; pupils run randomly in space, on the whistle they run to a specified area, marked with cones or hoops. The last one in completes a forfeit. Mobilise and stretch.
Phase 3: Pupil Interaction Phase 4: Review Pupils work in pairs to match the shapes on the map to those on the ground (see activity card O1 for details) Design a route for others to follow using the given map Swap with another pair / group to test your route. In groups pupils discuss the safety considerations applicable when completing the activity inside (no running, be aware of others, objects around the hall) Feedback to the class. Class discussion on how we might safely undertake this activity outdoors (stay in your group, have clearly defined boundaries e.g. tarmac area of playground, school gates)
Re-visit the lesson outcomes; • What was your task today? • What did you need to do to follow a route? • Was it as easy to follow other people’s routes? Why? • Are there ways that it could be made easier or harder? • Was there a clear start and finish? How can they be
shown on the map? • Think of another word for shapes that describes objects
on a map (symbols)
Think of your own personal target for next lesson
Resources and equipment: Outdoor Learning Card O1, AR13, cones, maps (previously drawn), pencils
- 13

Unit 1 (Year 3) Lesson 7
Phase 1: Introduction Phase 2: Teacher Input
O
Recap last lesson. Skills Framework:
Lesson outcomes: • Create symbols for use on an
orienteering map and agree class symbols
• Plot symbols onto a school map and agree on an accurate school map for class use
• Demonstrate ability to operate safely in small groups when working outside
Key Words: symbol, plot, accurate, scale, safety
Geirfa Allweddol: symbol, plotio, manwl gywir, graddfa, diogelwch
Discuss with pupils what they might find within their school grounds (trees, bike shed, buildings, fences etc) What symbols might they use to describe what they see? This may be a classroom lesson.
Introduce a simple map of the school grounds containing an outline of the major features e.g. school buildings
Phase 3: Pupil Interaction Phase 4: Review Pupils work in groups to design map symbols. Class feedback and discussion to agree a common set of symbols (possible classroom lesson) Pupils work in groups to plot the class symbols onto a maps Pupils check that another groups’ feature has been placed in the right location by visiting each point in turn Feedback, discuss and agree on a final school map for use next lesson during a ‘star’ orienteering activity
Re-visit the lesson outcomes; • As a class how did you decide which were the most
relevant symbols to use? • How did you know what size to draw each of the
symbols? • How did you check the accuracy of the map? (visually) • Name some of the safety considerations when working
outside (reference lesson 6)
Think of your own personal target for next lesson
Resources and equipment: Paper, pencils, school maps (previously drawn)
- 14

Unit 1 (Year 3) Lesson 8
Phase 1: Introduction Phase 2: Teacher Input
O
Phase 3: Pupil Interaction Phase 4: Review
Recap last lesson. Skills Framework:
Lesson outcomes: • Complete a simple ‘star’ orienteering
activity in pairs / groups • Record information accurately and neatly • Follow rules when completing a star
orienteering activity
Key Words: control point, star orienteering, accurate, rules
Geirfa Allweddol: rheolfan, cyfeiriadu seren, manwl gywir, rheolau
Pupils work in pairs / groups to collect as many control points as they can in the time given
Pupils should be as accurate as possible in writing their answers and check their answers with teacher each time
Link with art / DT to create marker stamps
Introduce the concept of ‘star’ orienteering i.e. pupils going out from a central point to visit one control point at a time. Pupils then return to confirm where they have been to the teacher having accurately recorded the details (letters / numbers) found at the control point. The control points could be orienteering markers, photographs or jig-saw pieces of the area to make a trail or treasure hunt. If correct pupils can then be sent to collect the next one Show pupils the recording sheet and explain what they should write where
Warm up activity: place a number of coloured hoops around the outside of the space. All pupils start in the centre of the space and on command run to a specified colour hoop and return to centre. Mobilise and stretch.
Re-visit the lesson outcomes; • How did you apply your knowledge of the safety rules to
your orienteering task? • Why is this activity called ‘star’ orienteering? • How did we show that we had been to each point?
Think of your own personal target for next lesson
Resources and equipment: Paper, pencils, school maps, hoops, AR14
- 15

Unit 1 (Year 3) Lesson 9
Phase 1: Introduction Phase 2: Teacher Input
J
Recap last lesson. Skills Framework:
Lesson outcomes: • Plan and undertake a journey from A to
B around the school grounds • Draw a simple map of the route • Assess the potential risks associated
with your journey and areas to avoid
Key Words: Journey, plan, directions, risks, dangers
Geirfa Allweddol: Taith, cynllun, cyfeiriadau, risgiau, peryglon
Teacher led class discussion on what a journey may be e.g. home to school, shops, holiday, a walk in the country, visiting friends / family.
During this lesson we will journey around school and will need to follow maps of the school (you will need to have completed the orienteering lessons before this)
Explain the task as outlined on J2.
Agree with pupils the ‘ground rules’ when working outside the classroom e.g. time limit, staying together, out of bounds areas
Phase 3: Pupil Interaction Phase 4: Review Pupils plan an interesting route around the school. It should take no longer than 10 minutes to complete. Pupils undertake the journey, amending their route as necessary
Pupils draw their route using a simple school map and give basic directions for others to follow (verbally, written or drawn) Pupils list the potential dangers en route and measures taken to minimise risk
Test your planning and journey by completing it again.
Re-visit the lesson outcomes; • How did you decide where to go? • Did you identify any potential hazards on your journey? • How did you avoid them? • What were they key features you identified in your
description of the journey? • Think of how you might apply what you learned today to
planning a longer journey outside of the school grounds
Think of your own personal target for next lesson
Resources and equipment: Outdoor Learning card J2, AR 8, basic map of the school and grounds, paper, pencils
- 16

Unit 1 (Year 3) Lesson 10
Phase 1: Introduction Phase 2: Teacher Input
J
Recap last lesson. Skills Framework:
Lesson outcomes: • Follow a journey planned by another group • Give thoughtful feedback that helps others
improve their planning
Key Words: Journey, feedback, on-site, off-site, plan (to plan, a plan)
Geirfa Allweddol: Taith, adborth, ar y safle, oddi ar y safle, cynllun (cynllunio, cynllun)
Organise the pupils and their respective plans into the same groups from last week.
Re-cap the ground rules for working outside of the classroom and swap group journeys
During classroom time lead a discussion on planning an off-site journey that will be undertaken next lesson. Introduce equipment that may be needed for a more extended journey e.g. rucksack, healthy packed lunch, first aid kit, spare jumper, waterproofs, sensible footwear, inhaler, epipen. Agree class rules and code of conduct for an off site journey.
Phase 3: Pupil Interaction Phase 4: Review Pupils undertake a journey planned by another group following their map and directions. Pupils discuss how easy it was to follow the journey and provide feedback to the group that provided the description and map.
Pupils contribute to a class discussion on how to plan an off-site journey. Pupils make a list of things they may need. Discuss why you may need each item.
Re-visit the lesson outcomes; • How helpful was the description provided by the
other group? • How could you have improved it? • Did the map make it easier or harder to follow the
route? How could it have been improved? • What do we mean by the terms on-site and off-site?
Think of your own personal target for next lesson
Resources and equipment: Outdoor Learning card J3, AR9, AR10, AR11, AR12, maps and route descriptions from last lesson
- 17

h safety
Unit 1 (Year 3) Lesson 11
J
Phase 1: Introduction Phase 2: Teacher Input Recap last lesson.
Lesson outcomes: • Undertake a planned journey off-site • Understand the potential hazards of the
journey • Recognise the safety and environmental
considerations (countryside code) that must be adhered to when undertaking a journey
Key Words: Journey, hazard, safety, environment
Geirfa Allweddol: Taith, perygl, diogelwch, amgylchedd
Skills Framework:
Discuss the safety considerations that should be adhered to when undertaking a journey.
Apply the agreed class rules and code of conduct that should be adhered to when journeying off-site.
Lead the class on a simple off site journey to a local feature or place e.g. park, statue, monument, neighbouring school.
Ensure the necessary planning forms (EV1 and risk assessment) have been completed and approved.
Phase 3: Pupil Interaction Phase 4: Review Pupils follow safety and conduct rules when undertaking their journey.
Pupils discuss the potential hazards of the journey (teacher led). Consider the risks you may face when journeying in more remote countryside/ terrain.
Teacher can expand this idea by providing examples of more adventurous journeys e.g. polar exploration, mountaineering to Everest. Pupils may then write a diary of their imaginary adventurous journey.
Re-visit the lesson outcomes; • Describe some of the hazards you encountered during
the journey. • Were there any unexpected hazards? • List some of environmental considerations associated
with a journey in the countryside
Think of your own personal target for next lesson
Resources and equipment: Outdoor Learning card J3, AR 11, clothing / equipment for the journey, teachers rucksack wit pack
Unit 1 (Year 3) Lesson 12
J
- 18

Phase 1: Introduction Phase 2: Teacher Input Recap last lesson:
Lesson outcomes: • In groups work together to build a shelter
from the equipment provided • Describe 3 things to consider when
planning where to build a shelter • Evaluate other groups shelters using
agreed criteria
Key Words: Shelter, weather, evaluate, criteria
Geirfa Allweddol: Lloches, tywydd, gwerthuso, meini prawf
Skills Framework:
Phase 3: Pupil Interaction Phase 4: Review
Teacher explains the scenario: You are on a journey in the Sherwood Forest; the Sheriff of Nottingham has stolen all your supplies. You need to make a shelter for the night to protect you from the weather and the bears using the equipment provided.
Outline the different environments you may find, and the possibilities for constructing a shelter in one of them e.g. woodland, meadow with livestock, open mountain side, riverbank, desert, arctic
Pupils plan carefully how and where to construct a shelter then construct their shelter in groups using the resources available
Pupils decide in groups what makes a good shelter and using agreed criteria, evaluate theirs and other groups’ shelters.
Feedback from each group as to the effectiveness of the shelters (2 stars and a wish)
Example criteria; the ability to withstand, wind, rain, flooding, polar bears!
Re-visit the lesson outcomes; • How effective was your shelter? • What else would you need if you were caught out
unexpectedly in the wilds? • Describe 3 things you considered when planning to build
your shelter • How could you improve your shelter?
Think of your own personal target for next lesson
Resources and equipment: Outdoor Learning card J1, materials to make a shelter e.g. tarpaulin, polythene sheet, cardboard, rope, poles, tent pegs, rocks
- 19
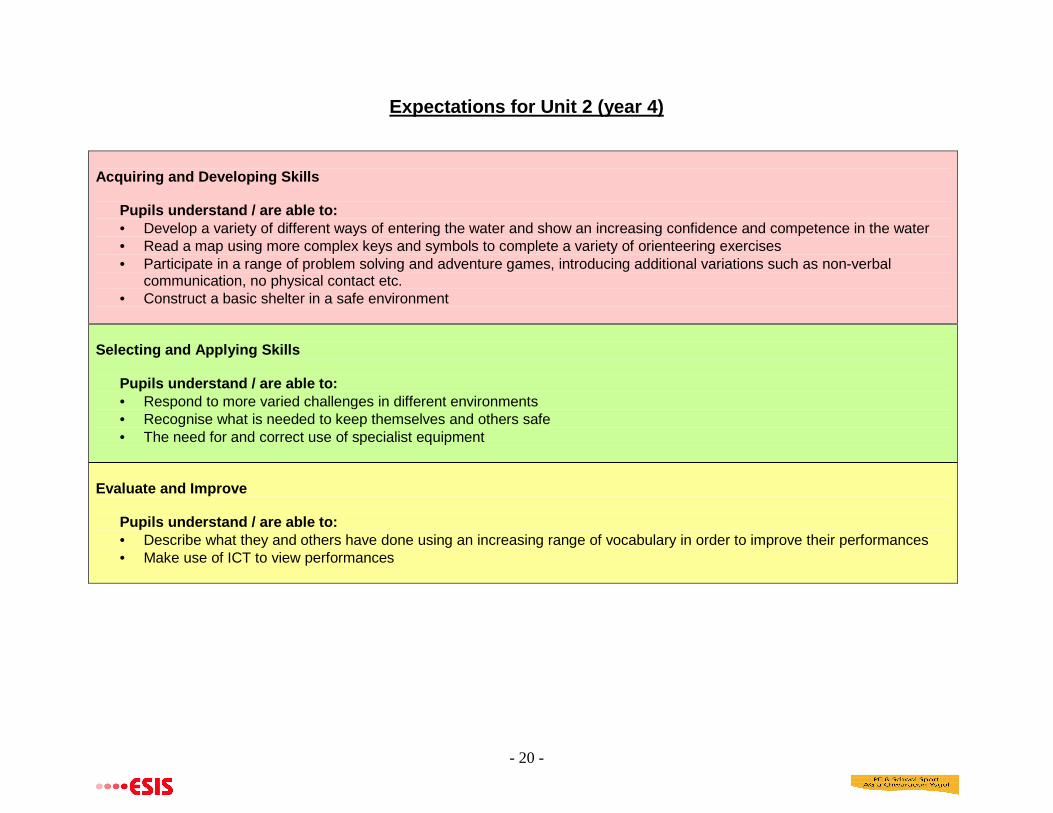
Expectations for Unit 2 (year 4)
Acquiring and Developing Skills
Pupils understand / are able to: • Develop a variety of different ways of entering the water and show an increasing confidence and competence in the water • Read a map using more complex keys and symbols to complete a variety of orienteering exercises • Participate in a range of problem solving and adventure games, introducing additional variations such as non-verbal
communication, no physical contact etc. • Construct a basic shelter in a safe environment
Selecting and Applying Skills
Pupils understand / are able to: • Respond to more varied challenges in different environments • Recognise what is needed to keep themselves and others safe • The need for and correct use of specialist equipment
Evaluate and Improve
Pupils understand / are able to: • Describe what they and others have done using an increasing range of vocabulary in order to improve their performances • Make use of ICT to view performances
- 20
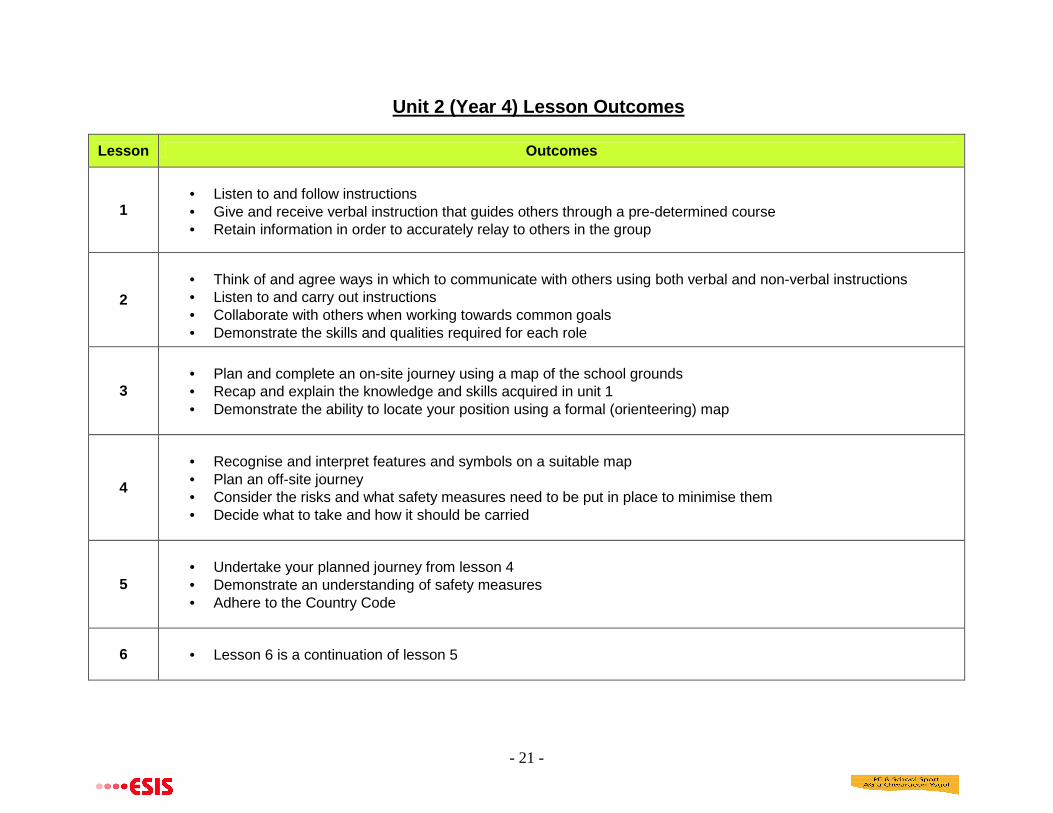
Unit 2 (Year 4) Lesson Outcomes
Lesson Outcomes
1 • Listen to and follow instructions • Give and receive verbal instruction that guides others through a pre-determined course • Retain information in order to accurately relay to others in the group
2 • Think of and agree ways in which to communicate with others using both verbal and non-verbal instructions • Listen to and carry out instructions • Collaborate with others when working towards common goals • Demonstrate the skills and qualities required for each role
3 • Plan and complete an on-site journey using a map of the school grounds • Recap and explain the knowledge and skills acquired in unit 1 • Demonstrate the ability to locate your position using a formal (orienteering) map
4
• Recognise and interpret features and symbols on a suitable map • Plan an off-site journey • Consider the risks and what safety measures need to be put in place to minimise them • Decide what to take and how it should be carried
5 • Undertake your planned journey from lesson 4 • Demonstrate an understanding of safety measures • Adhere to the Country Code
6 • Lesson 6 is a continuation of lesson 5
- 21

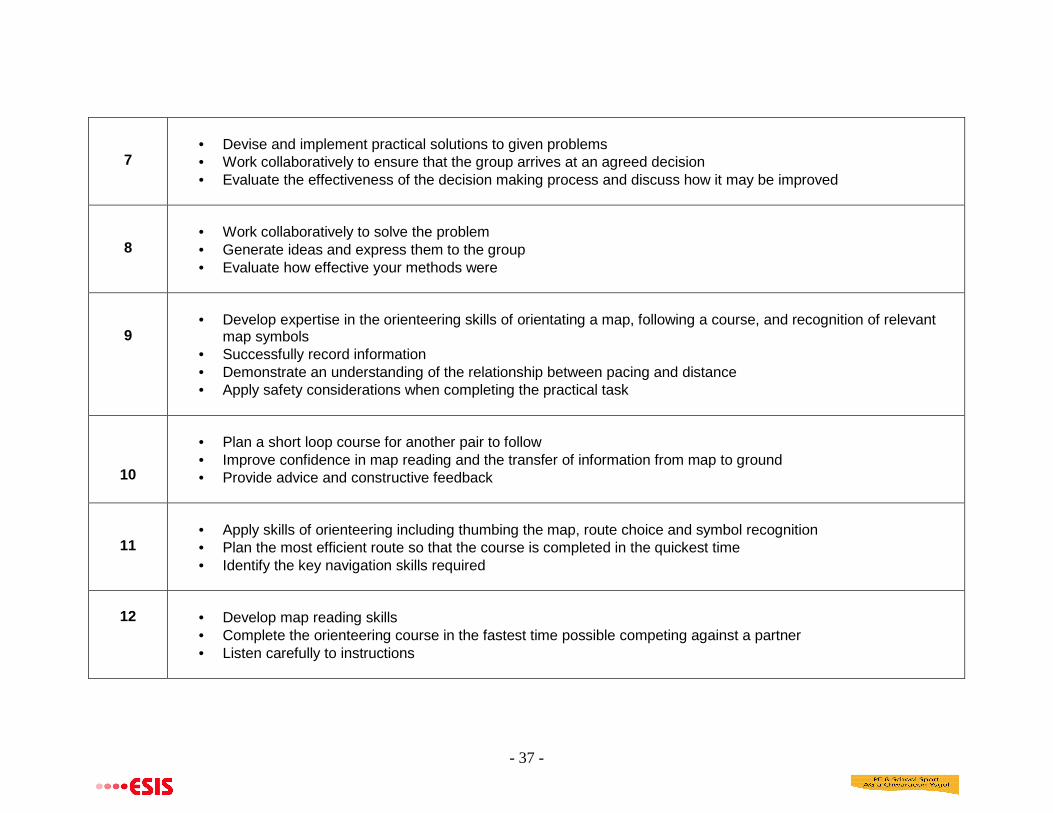
7
• Design and build varying sized shelters using set equipment • Work successfully as a group, having considered and evaluated each members’ contributions • Compare and evaluate the shelters in relation to their sturdiness, durability, weatherproofing and whether it is
fit for purpose
8
• Check component parts of the tent and agree on a method of construction • Construct a tent in groups, giving each person a specific role • Compare different size / design of tent and their suitability for use • List other equipment that would be needed to spend a night in a tent
9 • Develop understanding of maps and match map symbols with their corresponding explanation • Memorise and retain map information • Recall information previously learned regarding star orienteering
10 • Recognise features and symbols on the map • Understand how to orientate the map • Record information accurately
11 • Demonstrate understanding of a line orienteering course (short loop) • Compare line and star orienteering • List the pros and cons of each type of orienteering course
12 • Demonstrate orientating a map to find control points • Develop trust and support with your partner • Record accurate information
- 22
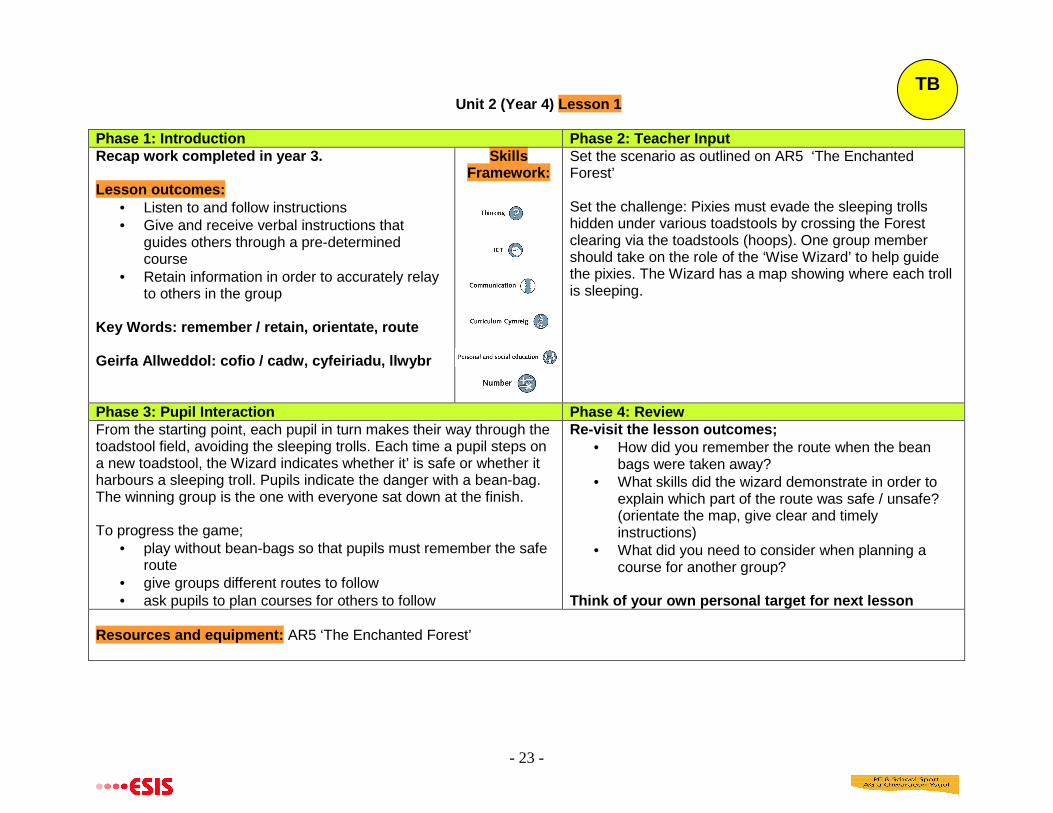
Unit 2 (Year 4) Lesson 1
Phase 1: Introduction Phase 2: Teacher Input
TB
Phase 3: Pupil Interaction Phase 4: Review
Recap work completed in year 3.
Lesson outcomes: • Listen to and follow instructions • Give and receive verbal instructions that
guides others through a pre-determined course
• Retain information in order to accurately relay to others in the group
Key Words: remember / retain, orientate, route
Geirfa Allweddol: cofio / cadw, cyfeiriadu, llwybr
Skills Framework:
From the starting point, each pupil in turn makes their way through the toadstool field, avoiding the sleeping trolls. Each time a pupil steps on a new toadstool, the Wizard indicates whether it’ is safe or whether it harbours a sleeping troll. Pupils indicate the danger with a bean-bag. The winning group is the one with everyone sat down at the finish.
To progress the game; • play without bean-bags so that pupils must remember the safe
route • give groups different routes to follow • ask pupils to plan courses for others to follow
Set the scenario as outlined on AR5 ‘The Enchanted Forest’
Set the challenge: Pixies must evade the sleeping trolls hidden under various toadstools by crossing the Forest clearing via the toadstools (hoops). One group member should take on the role of the ‘Wise Wizard’ to help guide the pixies. The Wizard has a map showing where each troll is sleeping.
Re-visit the lesson outcomes; • How did you remember the route when the bean
bags were taken away? • What skills did the wizard demonstrate in order to
explain which part of the route was safe / unsafe? (orientate the map, give clear and timely instructions)
• What did you need to consider when planning a course for another group?
Think of your own personal target for next lesson
Resources and equipment: AR5 ‘The Enchanted Forest’
- 23

TB Unit 2 (Year 4) Lesson 2
Phase 1: Introduction Phase 2: Teacher Input Recap last lesson. Skills Outline roles and responsibilities as explained in Outdoor
Framework: Learning card TB8 (Director, Robot, Caller). Lesson outcomes:
Explain the challenge. communicate with others using both verbal and non-verbal instructions
• Think of and agree ways in which to
• Listen to and carry out instructions • Collaborate with others when working towards
common goals • Demonstrate the skills and qualities required
for each role
Key Words: communicate, verbal, non-verbal, collaborate, listen
Geirfa Allweddol: cyfathrebu, geiriol, di-eiriau, cydweithio, gwrando
Phase 3: Pupil Interaction Phase 4: Review Pupils work in groups of 3, each undertaking one of the roles in turn.
The aim is to guide the blindfolded robot across a simple course to pick up a ball and place it in a container
Re-visit the lesson outcomes; • How did you agree upon a set of instructions? • How successful were your instructions? • Did you need to revise them once tested? • Which role did you find easiest / hardest? • Which skill/quality was the most critical to the
success of your role?
Think of your own personal target for next lesson
Resources and equipment: Outdoor Learning card TB8
- 24

Unit 2 (Year 4) Lesson 3
Phase 1: Introduction Phase 2: Teacher Input
J
Recap last lesson. Skills Framework:
Lesson outcomes:
• Plan and complete an on-site journey using a map of the school grounds
• Recap and explain the knowledge and skills acquired in unit 1
• Demonstrate the ability to locate your position using a formal (orienteering) map
Key Words: Journey, Locate, Danger, Map
Geirfa Allweddol: Taith, Lleoli, Perygl, Map
Recap the skills and knowledge acquired in unit 1: • The ability to write and follow simple directions • The ability to draw a simple map • Consider potential risks associated with your
journey and any areas to avoid
Set out 12 pre-positioned pictures of natural features e.g. waterfall, rope bridge, gorge
Phase 3: Pupil Interaction Phase 4: Review
Pupils plan and undertake a short on-site journey in groups ensuring that they visit 5 places of interest along the way. Record evidence of the journey by locating and identifying the pre-positioned pictures of natural features.
Pupils may write a journal of their journey, describing how they overcame some of the difficulties en route e.g. how did they cross the river?
Re-visit the lesson outcomes; • How did you decide where to go? • Was it easy to agree? How did you manage your
discussions? • Pick one of the locations and outline how you may
have overcome that obstacle E.G. How would they have crossed the river?
Think of your own personal target for next lesson
Resources and equipment: Paper, pencils, pictures of natural features, AR 6a-6l
- 25

Unit 2 (Year 4) Lesson 4
Phase 1: Introduction Phase 2: Teacher Input
J
Phase 3: Pupil Interaction Phase 4: Review
Recap last lesson.
Lesson outcomes: • Recognise and interpret features and symbols
on a map • Plan an off-site journey • Consider the risks and which safety measures
need to be put in place in order to minimise them
• Decide what to take and how it should be carried
Key Words: Journey, symbol, map, risk, safety
Geirfa Allweddol: Taith, symbol, map, risg, diogelwch
Skills Framework:
Pupils take turns to run the relay to collect a piece of the jigsaw each time. Once every piece is collected they assemble the map. Discuss. Complete the same activity with map symbols. They then match the symbol with the descriptors. Discuss the merits of differing styles of bags / rucksack. Then undertake a practical investigation with loaded bags in order to decide which would be the most suitable for use on a journey.
Classroom activity The class then plans the journey and completes a risk assessment in preparation for the next lesson.
Warm up activity: complete jogging paced relay activities which may include picking up set out cones, going through hoops, skipping etc. Mobilise and stretch.
Set out relay stations, enough for one per group (4 in a group)
Set out jigsaw pieces of 1 the off-site map 2 the map symbols
Possibilities to compete an offsite journey include: a school exchange, visit to local park, canal path, country park. Use Google Earth, Street Map, Ordnance Survey, local authority planning department to obtain a map of your school and its surrounding streets/places of interest
Re-visit the lesson outcomes;
• Identify symbols as displayed (teacher holds up card)
• What are the potential risks associated with the journey?
• What safety measures have you put in place? • What are you going to carry in your bag and why?
Think of your own personal target for next lesson
Resources and equipment: Outdoor Learning card J4, visual resources for bags, contents of a rucksack, symbols cards, map jigsaws
- 26

Unit 2 (Year 4) Lesson 5
Phase 1: Introduction Phase 2: Teacher Input
J
Recap last lesson.
Lesson outcomes: • Undertake your planned journey from lesson 4 • Demonstrate an understanding of the safety
measures • Adhere to the Country Code
Key Words: Journey, safety, Country Code
Geirfa Allweddol: Taith, diogelwch, Cod Cefn Gwlad
Skills Framework:
Phase 3: Pupil Interaction Phase 4: Review Pupils complete the journey. They should be able to follow the route using the map and recognise simple features.
Pupils should ensure that they adhere to the agreed safety measures and to the country code.
Decide if the weather conditions are suitable to undertake the journey. Have an alternative bad weather option.
Ensure the necessary planning has been undertaken and approval has been obtained (EV1, EV2, risk assessment)
Ensure pupils are well equipped for the journey and that toileting considerations have been addressed
Remind pupils of what is expected of them when out of school.
Re-visit the lesson outcomes; • How successful was the journey? • What were the highs and lows? • How could it have been improved? • Was there any equipment that you didn’t have that
would have been useful? • What factors did you decide when deciding what to
take for lunch? (e.g. healthy eating, nutritional value, packaging, etc)
Think of your own personal target for next lesson
Resources and equipment: Outdoor Learning card J4, required equipment for an off site journey, teachers rucksack with safety pack
- 27

J Unit 2 (Year 4) Lesson 6
Phase 1: Introduction Phase 2: Teacher Input Recap last lesson. Skills
Framework: Lesson outcomes:
Lesson 6 is a continuation of lesson 5 in consideration of the time required to complete an
off site journey.
Key Words:
Geirfa Allweddol:
Phase 3: Pupil Interaction Phase 4: Review Re-visit the lesson outcomes;
Think of your own personal target for next lesson
Resources and equipment:
- 28

Unit 2 (Year 4) Lesson 7
J
Phase 1: Introduction Phase 2: Teacher Input Recap last lesson.
Lesson outcomes: • Design and build varying sized shelters using
set equipment • Work successfully as a group, having
considered and evaluated each members’ contributions
• Compare and evaluate the shelters in relation to their sturdiness, durability, weatherproofing and whether it is fit for purpose
Key Words: Shelter, evaluate, compare, sturdiness, durability
Geirfa Allweddol: Lloches, gwerthuso, cymharu, cadernid, gwydnwch
Skills Framework:
Set out the equipment. Divide children into groups of around 5.
Give groups a different sized shelter to build e.g. for 1 person or 6 people.
Set a time limit to complete the task (e.g. 15 minutes).
Phase 3: Pupil Interaction Phase 4: Review Pupils plan how to build their shelter in their groups considering its purpose and the resources provided. Set a time limit for this e.g. 5 minutes They construct the shelter.
Pupils discuss the types of situation in which their shelter could be used. Pupils present a scenario back to the rest of the class.
Pupils directly compare the shelters (similarities and differences) and evaluate how effective they would be
Re-visit the lesson outcomes; • How effective were the different design of shelters? • How did you ensure that each group member
contributed to the task? • List the similarities and differences between the
shelter designs • How could you improve your shelter?
Think of your own personal target for next lesson
Resources and equipment: A selection of tarpaulin, sheets, ropes, poles, polythene sheet, cardboard, tent pegs, rocks
- 29

Unit 2 (Year 4) Lesson 8
Phase 1: Introduction Phase 2: Teacher Input
J
Recap last lesson. Skills Framework:
Lesson outcomes: • Check component parts of the tent and agree
on a method of construction • Construct a tent in groups, giving each person
a specific role • Compare different size / design of tent and
their suitability for use • List other equipment that would be needed to
spend a night in a tent
Key Words: Tent, construct, poles, tent pegs, material, role
Geirfa Allweddol: Pabell, adeiladu, polion, pegiau pabell, defnydd, rôl
Supply suitable tents of various sizes and designs. One tent per group x 4 groups minimum. (Tents are available from supermarkets, Halfords etc. at very cheap prices. More specialist tents may be loaned from local authority Duke of Edinburgh organisers or Outdoor Centres).
Discuss the safety issues e.g. tent poles in eyes. Set guidelines for safe construction:
• Don’t force poles through sleeves or put them under undue pressure
• Ensure everyone has a role to play in the group (e.g. reading instructions, collecting and assembling component parts)
Phase 3: Pupil Interaction Phase 4: Review Pupils check the components against the list and construct the tent.
Groups may sit in their tents to discuss the following: • The varying tents and their suitability for different locations and
use. • A list of other equipment needed if staying overnight in their
tent Groups pack their equipment away ensuring it is dry and clean.
Re-visit the lesson outcomes; • How easy was the tent to construct? What were the
difficulties? • What were the best and worst design features? • List and discuss the equipment required for an
overnight stay
Think of your own personal target for next lesson
Resources and equipment: Outdoor Learning Card J5, tents of varying size
- 30

Unit 2 (Year 4) Lesson 9
Phase 1: Introduction Phase 2: Teacher Input
O
Phase 3: Pupil Interaction Phase 4: Review
Recap last lesson. Skills Framework:
Lesson outcomes:
• Develop understanding of maps and match map symbols with their corresponding explanation (keys)
• Memorise and retain map information • Recall information previously learned
regarding star orienteering
Key Words: map, symbol, control point, star orienteering, key
Geirfa Allweddol: map, symbol, rheolfan, cyfeiriadu seren, allwedd
Each team member in turn picks up a name card and runs to the far end of the course to pick up the corresponding symbol. They then run back to the start with both cards. Each runner repeats the exercise until all the cards have been collected and symbols matched to names. Pupils complete the relay again collecting the jig-saw pieces of the school map.
Teams complete a star orienteering exercise by taking one section of the jig-saw each and visiting and identifying the control point shown on that section. The winning team is the one with the assembled map and all control points correctly identified.
Set out relay lanes ready for warm up and main activity. Set out jig-saw pieces of the map at selected points relevant to the symbols (or inside the school hall if preferred)
Warm up: In teams of 4 pupils complete relay races such as walking, jogging, running, skipping, crawling etc. Mobilise and stretch.
Set out the symbols and jig-saw pieces at the far end of the relay with the corresponding explanations at the near end.
Repeat the relay exercise to obtain jig-saw sections of a school map. Teams can race each other or be timed.
Explain the ‘star’ exercise
Re-visit the lesson outcomes; • What does each of the symbols mean? (hold
examples up) • Why are symbols used on maps? • How easy were the symbols to understand?
Think of your own personal target for next lesson
Resources and equipment: Outdoor Learning card O4, O14 – as an indoor alternative to the jig-saw activity, cones, map jigsaw
- 31

Unit 2 (Year 4) Lesson 10
Phase 1: Introduction Phase 2: Teacher Input
O
Recap last lesson.
Lesson outcomes: • Recognise features and symbols on the map • Understand how to orientate the map • Record information accurately
Key Words: symbols, key, features, orientate
Geirfa Allweddol: symbolau, allwedd, nodweddion, cyfeiriadu
Skills Framework:
Phase 3: Pupil Interaction Phase 4: Review Pupils complete the star exercise in pairs (OL card 8)
Set out the Star Orienteering course as outlined on Outdoor Learning Card O8.
Warm pupils up by sending them to various corners of the playground as in a star exercise. Mobilise and stretch.
Re-visit the lesson outcomes; • How did you keep you map orientated all of the
time? • How do you know you visited the correct controls? • Were any of the map symbols unclear or confusing?
In what way? • How could you improve next time?
Think of your own personal target for next lesson
Resources and equipment: Outdoor Learning Card O8, control point record card, pencils, maps
- 32

Unit 2 (Year 4) Lesson 11
Phase 1: Introduction Phase 2: Teacher Input
O
Recap last lesson. Skills Framework:
Lesson outcomes: • Demonstrate understanding of a line
orienteering course (short loop) • Compare line and star orienteering • List the pros and cons of each type of
orienteering course
Key Words: star, line, orienteering, record, accurate, compare
Geirfa Allweddol: seren, llinell, cyfeiriadu, cofnod, cywir, cymharu
Prepare 6-10 school maps with short line (loop) courses (around 3 control points per course + start and finish). Each map should be different. You can send two pairs on the same course starting in opposite directions and / or timed intervals
Warm pupils up by asking them to shadow their partner running along lines of a netball court, on the whistle they should change direction, change the way they are travelling or change the leader. Mobilise and stretch.
Give a map to each pair and explain the task.
Phase 3: Pupil Interaction Phase 4: Review Pairs take their map and collect the marked control points on their short loop course. Once completed they may return to the base and collect another map. The focus should be on accuracy rather than speed.
Re-visit the lesson outcomes; • Explain what the differences are between line and
star orienteering • What are the pros and cons of each type of
orienteering course? • Which do you think is the most skilful?
Think of your own personal target for next lesson
Resources and equipment: Outdoor Learning Card O5 (optional), whistle, school maps with pre-set short loop courses marked out, pencils, orienteering control point record card, AR14
- 33

O Unit 2 (Year 4) Lesson 12
Phase 1: Introduction Phase 2: Teacher Input Recap last lesson. Skills Set out the ‘Netball Numbers’ activity as outlined on OL
Framework: Card O6. Lesson outcomes:
Copies of the master maps can be found on the Outdoor control points
• Demonstrate orientating the map to find Learning CD.
• Develop trust and support with your partner • Record accurate information
Key Words: orientate, control point, accurate
Geirfa Allweddol: cyfeiriadu, rheolfan, manwl gywir
Phase 3: Pupil Interaction Phase 4: Review Pupils complete the Netball Numbers activity in pairs (OL card O6) Re-visit the lesson outcomes;
• Why was it important to keep the map orientated for this activity?
• How did you balance speed with accuracy? • How important was it to record the information
correctly?
Think of your own personal target for next lesson
Resources and equipment: Outdoor Learning Card O6, numbered cones, paper, pencils, netball numbers maps, netball court
- 34

Expectations for Unit 3 (Year 5)
Acquiring and Developing Skills
Pupils understand / are able to: • Show increased water competence when performing and developing basic survival skills • Plan and organise a simple orienteering trail using a variety of map reading and compass skills • Make more complex route choices • Develop skills in unfamiliar and varying terrain • Apply the skills and safety requirements for survival in an outdoor environment
Selecting and Applying Skills
Pupils understand / are able to: • Devise appropriate responses to challenges and tasks and adapt to changing circumstances • Accept responsibility for personal and group safety
Evaluate and Improve
Pupils understand / are able to: • Make informed judgements about their own and others performances and use this to improve the quality and variety of their
own work using an increasingly wider range of subject vocabulary • Record, view and evaluate their own performances independently
- 35

Unit 3 (Year 5) Lesson Outcomes
Lesson Outcomes
1 • Demonstrate how to warm up and cool down safely for bouldering activities • Demonstrate an understanding of the safety considerations essential when bouldering I.E. ‘spotting’ • Practice finding and using appropriate hand and foot holds • Develop trust with a partner in order to give and accept support
2 • Demonstrate effective footwork techniques • Use the correct terms to describe what they are doing • Evaluate the effectiveness of each of the techniques learned
3 • Traverse across the wall using routes of varying difficulty • Provide constructive support and feedback to others • Apply previously learned skills to complete the tasks
4 • Apply learned techniques to climb in the most efficient manner • Memorise moves learned from individual sections to successfully complete a longer continuous traverse • Improve own learning and performance through reflective thinking and actions • Persevere to overcome difficult challenges
5 • Undertake a planned journey • Demonstrate understanding of the safety measures that have been considered and an understanding of the
Country Code • Understand the benefits of using a route card to include distances, route description and compass bearings
6 • Undertake a planned journey • Demonstrate understanding of the safety measures that have been considered and an understanding of the
Country Code • Understand the benefits of using a route card to include distances, route description and compass bearings
- 36
7 • Devise and implement practical solutions to given problems • Work collaboratively to ensure that the group arrives at an agreed decision • Evaluate the effectiveness of the decision making process and discuss how it may be improved
8 • Work collaboratively to solve the problem • Generate ideas and express them to the group • Evaluate how effective your methods were
9 • Develop expertise in the orienteering skills of orientating a map, following a course, and recognition of relevant
map symbols • Successfully record information • Demonstrate an understanding of the relationship between pacing and distance • Apply safety considerations when completing the practical task
10
• Plan a short loop course for another pair to follow • Improve confidence in map reading and the transfer of information from map to ground • Provide advice and constructive feedback
11 • Apply skills of orienteering including thumbing the map, route choice and symbol recognition • Plan the most efficient route so that the course is completed in the quickest time • Identify the key navigation skills required
12 • Develop map reading skills • Complete the orienteering course in the fastest time possible competing against a partner • Listen carefully to instructions
- 37

Unit 3 (Year 5) Lesson 1
Phase 1: Introduction Phase 2: Teacher Input
B
Recap last lesson. Skills Framework:
Lesson outcomes: • Demonstrate how to warm up and cool down
safely for bouldering activities • Demonstrate an understanding of the safety
considerations essential when bouldering i.e. ‘spotting’
• Practice finding and using appropriate hand and foot holds
• Develop trust with a partner in order to give and accept support
Key Words: warm up, cool down, bouldering, hand hold, foot hold, spotting, trust, support
Geirfa Allweddol: cynhesu, oeri, dringo clogfeini, twll llaw, twll troed, sbotio, ymddiried, cefnogi
Introduce’ bouldering’ and explain what it entails.
Warm up activity; fun activity to increase heart rate such as jogging in small space and following commands such as right hand touch the floor, left hand touch the floor, jump up high etc Demonstrate how to mobilise the joints (see CD, bouldering card 1)
Demonstrate how to stretch the appropriate muscles (see CD, bouldering card 1)
Introduce ‘spotting’
Phase 3: Pupil Interaction Phase 4: Review Pupils develop trust with their partner by completing the trust exercises and practice the spotting technique.
Pupils take turns to complete the ‘climb on demand’ activities with their partner spotting in turn (see card for challenges OL Card B1)
Re-visit the lesson outcomes; • Why is it important to warm up and cool down after
bouldering activities? • Name some of the safety considerations when
bouldering • What is spotting? • How should you stand when spotting?
Think of your own personal target for next lesson
Resources and equipment: Outdoor Learning Card B1, CD bouldering card 1, AR 3a-3g
- 38

Unit 3 (Year 5) Lesson 2
Phase 1: Introduction Phase 2: Teacher Input
B
Recap last lesson. Skills Framework:
Lesson outcomes: • Demonstrate effective footwork techniques • Use the correct terms to describe what they
are doing • Evaluate the effectiveness of each of the
techniques learned
Key Words: centre of balance, frogging position, Egyptian position, foot swap, cross through
Geirfa Allweddol: craidd cydbwysedd, osgo dolennog, osgo Eifftaidd, cyfnewid traed, croesi drwyddo
Warm pupils up using the ‘climb on demand’ activity and mobilising and stretching exercises from last lesson.
Introduce pupils to the various techniques as described on OL card B2:
• ‘Edging’ foot position • Frogging / Egyptian positions • Centre of Balance • Foot swap sequence • Cross through sequence
Phase 3: Pupil Interaction Phase 4: Review Pupils practice the various techniques with their partner spotting for them.
Describe to your partner which technique you are performing.
Re-visit the lesson outcomes; • Why is good footwork important? • What is the best part of your foot to use when
standing on footholds? • Before moving your foot, what should you do with
your centre of gravity? • What was the hardest move for you?
Think of your own personal target for next lesson
Resources and equipment: Outdoor Learning card B2
- 39

Unit 3 (Year 5) Lesson 3
Phase 1: Introduction Phase 2: Teacher Input
B
Recap last lesson. Skills Framework:
Lesson outcomes: • Traverse across the wall using routes of
varying difficulty • Provide constructive support and feedback to
others • Apply previously learned skills to complete the
tasks
Key Words: Traverse, support, feedback, route, crux
Geirfa Allweddol: Croesi, cefnogi, adborth, llwybr, craidd
Mark out a series of footholds using chalk along the base of the wall and along some of the lower level holds. Vary the size and spacing to create easier or more difficult sections.
Warm pupils up using the ‘climb on demand’ activity and mobilising and stretching exercises from last lesson.
Outline the different routes (colour coded).
Phase 3: Pupil Interaction Phase 4: Review Pupils complete the challenges with their partner spotting for them. Partners should offer support and feedback to their climber in order to assist their traverse.
Re-visit the lesson outcomes; • What footwork technique did you use on the
traverse? • What was the hardest part of the traverse? • How did you solve this ‘crux’ move? • Did your partner use the same technique to
overcome the problem?
Think of your own personal target for next lesson
Resources and equipment: Outdoor Learning card B3, CD bouldering card 3, chalk
- 40

Unit 3 (Year 5) Lesson 4
Phase 1: Introduction Phase 2: Teacher Input
B
Recap last lesson. Skills Framework:
Lesson outcomes: • Apply learned techniques to climb in the most
efficient manner • Memorise moves learned from individual
sections to successfully complete a longer continuous traverse
• Improve own learning and performance through reflective thinking and actions
• Persevere to overcome difficult challenges
Key Words: memorise, reflect, persevere, efficient, continuous
Geirfa Allweddol: cofio, adlewyrchu, dal ati, effeithlon, parhaus
Warm pupils up using the ‘climb on demand’ activity and mobilising and stretching exercises from last lesson.
Set out the sections as shown on OL Card B4. Explain the task.
Groups to be given a set time period to practice on each of the sections
Phase 3: Pupil Interaction Phase 4: Review Pupils practice the various sections as described on OL card B4.
Pupils complete a continuous traverse.
Re-visit the lesson outcomes; • What was the crux of the traverse for you? • How did you overcome this section? • Was the crux the same for you and your partner? • When you tried to link the sections, what helped you
to remember the easiest way across? • Did you use the same holds when you did the
continuous traverse as you did when traversing the individual sections?
Think of your own personal target for next lesson
Resources and equipment: Outdoor Learning card B4, CD Bouldering card 4
- 41

Unit 3 (Year 5) Lesson 5
Phase 1: Introduction Phase 2: Teacher Input
J
Recap last lesson. Skills Framework:
Lesson outcomes: • Undertake a planned journey • Demonstrate understanding of the safety
measures that have been considered and adhere to the Country Code
• Understand the benefits of using a route card to include distances, route description and compass bearings (general bearing)
Key Words: general bearing, compass, country code, route description
Geirfa Allweddol: cyfeirbwynt cyffredinol, cwmpawd, cod cefn gwlad, taith, disgrifiad
Decide if the weather conditions are suitable to undertake the planned journey. Have an alternative bad weather option. Ensure the necessary planning has been undertaken and approval has been obtained (EV1, EV2, risk assessment)
Ensure pupils are well equipped for the journey including knowing what they should take for the day. Ensure toileting considerations have been addressed. Remind pupils of what is expected of them when out of school.
Before the journey is undertaken, prior work should be completed in class on the 8 cardinal points. These can then be used to help orientate the map and to gauge direction of travel using a general bearing.
Phase 3: Pupil Interaction Phase 4: Review
Pupils complete the journey. They should be able to follow the route using the map and compass and recognise simple features and their respective map symbols.
Pupils should ensure that they adhere to the agreed safety measures and to the country code.
Re-visit the lesson outcomes; • How successful was the journey? • What were the highs and lows? • How could it have been improved? • Was there any equipment that you didn’t have that
would have been useful? • How did you use your compass to help you follow
the correct route?
Think of your own personal target for next lesson
Resources and equipment: Outdoor Learning Card J4, maps, compasses, route cards, rucksack and equipment for the journey, teachers rucksack with safety pack
- 42

J
Phase 1: Introduction Recap last lesson. Skills
Framework: Lesson outcomes:
Key Words:
Geirfa Allweddol:
Unit 3 (Year 5) Lesson 6
Phase 2: Teacher Input
Lesson 6 is a continuation of lesson 5 in consideration of the time required to complete an
off site journey.
Phase 3: Pupil Interaction Phase 4: Review Re-visit the lesson outcomes;
Think of your own personal target for next lesson
Resources and equipment:
- 43


Unit 3 (Year 5) Lesson 8
Phase 1: Introduction Phase 2: Teacher Input
TB
Recap last lesson.
Lesson outcomes: • Work collaboratively to solve the problem • Generate ideas and express them to the group • Evaluate how effective your methods were
Key Words: collaborate, generate (ideas) evaluate
Geirfa Allweddol: cydweithio, cynhyrchu (syniadau) gwerthuso
Skills Framework:
Phase 3: Pupil Interaction Phase 4: Review Pupils complete activities as outlined on TB10, TB11.
Pupils discuss their methods
Warm pupils up by asking them to jog around in shapes circles, squares. Mobilise, stretch.
Complete TB11 activities
Explain the activity as outlined on TB10, ensuring that pupils complete a variety of challenges i.e. time limit, more / less people, no talking
Re-visit the lesson outcomes; • Why is it important to talk to each other during these
exercises? • Why is it important to listen? • How did you reach an agreement?
Think of your own personal target for next lesson
Resources and equipment: Outdoor Learning Card TB10, TB11, blindfolds, ropes
- 45

Unit 3 (Year 5) Lesson 9
Phase 1: Introduction Phase 2: Teacher Input
O
Recap last lesson. Skills Framework:
Lesson outcomes: • Develop expertise in the orienteering skills of
orientating a map, following a course and symbol recognition
• Successfully record information • Demonstrate an understanding of the
relationship between pacing and distance • Apply safety considerations when completing
the practical task
Key Words: orientate, record, cross country, pace, distance, control point
Geirfa Allweddol: cyfeiriadu, cofnodi, traws gwlad, cyflymder, pellter, rheolfan
Set out the orienteering Cross Country course as outlined on O10 (an extended ‘short loop’ course with up to 6 controls)
Warm pupils up by using the 4 cardinal points set out at various distances (e.g. 10 m, 15 m, 50 m, 25 m) Discuss with pupils the relationship between pacing and distance (double paces). Mobilise and stretch.
Explain the Cross Country challenge.
Phase 3: Pupil Interaction Phase 4: Review Pupils complete the course as described using the control description card to record their answers.
Re-visit the lesson outcomes; • What helped you to work out where to go? • Can you describe the routes you followed? • Could you have taken a better route? • Name some of the safety considerations you
followed
Think of your own personal target for next lesson
Resources and equipment: Outdoor Learning Card O10, OL CD ‘Orienteering Record Sheets’, maps, cones, AR14
- 46

Unit 3 (Year 5) Lesson 10
Phase 1: Introduction Phase 2: Teacher Input
O
Recap last lesson. Skills Framework:
Lesson outcomes: • Plan a short loop course for another pair to
follow • Improve confidence in map reading and the
transfer of information from map to ground • Provide advice and constructive feedback
Key Words: short loop, master map, transfer of information, feedback
Geirfa Allweddol: dolen fer, y prif fap, trosglwyddo gwybodaeth, adborth
Set out around 10 cones randomly. Warm pupils up by dividing them into pairs and asking them to run between 3 cones of their choice then to tag their partner who will complete the same. Ensure pupils run to different cones each turn. They should have around 3-5 turns each. It may be easier to split the class in half with different starting points for each. Mobilise and stretch.
Explain to pupils how to plot a short loop course. i.e. either use existing control points with a master map, or have pupils devise and position their own control points setting out cones to mark the area.
Phase 3: Pupil Interaction Phase 4: Review Pupils plan in pairs, a short loop course for another pair to follow (3 – 5 control points).
Pairs complete the course and provide feedback as to the accuracy of the map
Re-visit the lesson outcomes; • What did you do to make sure you put the control in
the right place? • How easy was it to find the other pairs’ controls? • Were the control markers located accurately? • Was the route a sensible one, if not how could it be
improved?
Think of your own personal target for next lesson
Resources and equipment: Cones, maps, pencils, control card, master map
- 47

Unit 3 (Year 5) Lesson 11
Phase 1: Introduction Phase 2: Teacher Input
O
Recap last lesson. Skills Framework:
Lesson outcomes: • Apply skills of orienteering including thumbing
the map, route choice and symbol recognition • Plan the most efficient route so that the course
is completed in the quickest time • Identify the key navigation skills required
Key Words: Thumbing, route, score event, symbol, efficient
Geirfa Allweddol: Bodio, taith, sgorio gweithgaredd, symbol, effeithlon
Warm pupils up by getting them to run in a circle and on command do the following; 1 = touch the floor 2 = jump high and stretch 3 = side step 4 = star jump 5 = sit down
Mobilise and stretch.
Explain a score event (scatter orienteering). Set the challenge of visiting as many control points as possible in any order within the specified time (15 mins). Explain to pupils that this is a competitive event and that details of control points should be kept secret!
Phase 3: Pupil Interaction Phase 4: Review Pupils should work in pairs (or individually) to plan their own route.
Pupils complete the challenge as outlined on O9
Re-visit the lesson outcomes; • What planning did you do before setting off for your
first control? • Would you change anything next time? • List the navigation skills you used
Think of your own personal target for next lesson
Resources and equipment: Outdoor Learning Card O9, maps, control card
- 48

Unit 3 (Year 5) Lesson 12
Phase 1: Introduction Phase 2: Teacher Input
O
Recap last lesson.
Lesson outcomes: • Develop map reading skills • Complete the orienteering course in the fastest
time possible whilst competing against a partner
• Listen carefully to instructions
Key Words: compete, listen, fast, partner
Geirfa Allweddol: cystadlu, gwrando, cyflym, partner
Skills Framework:
Phase 3: Pupil Interaction Phase 4: Review Pupils complete the challenge against their partners.
Pupils take part in a further 2 races with winner vs. winners, runners up vs. runners up.
Scoring System 3 points for the winner 1 point for runners up
Warm pupils up by understanding short relay races in pairs. Mobilise and stretch.
Set out 18 control points. Divide them into 3 courses with 3 different maps.
Explain the task as outlined on O12.
Re-visit the lesson outcomes; • Did you orientate and thumb your map at all times? • If you made a mistake, why do you think that was? • Which was more important – speed or accuracy? • How could you improve on both?
Think of your own personal target for next lesson
Resources and equipment: Outdoor Learning Card O12, maps with 3 different courses marked, control card, pencils
- 49

Expectations for Unit 4 (Year 6)
Acquiring and Developing Skills
Pupils understand / are able to: • Show increasing control when performing more advanced survival skills • Plan and navigate a variety of orienteering challenges using map reading and compass skills in unfamiliar settings • Plan and undertake a journey in the outdoors • Participate in the different types of orienteering courses in preparation for competition and participating in the sport of
orienteering
Selecting and Applying Skills
Pupils understand / are able to: • Plan and respond to more complex challenges in different environments and in unfamiliar circumstances • Work with others to identify potential hazards and devise strategies to ensure that safe working practices and followed
Evaluate and Improve
Pupils understand / are able to: • View and appraise their own and others performances with confidence using range of appropriate language
- 50

Unit 4 (Year 6) Lesson Outcomes
Lesson Outcomes
1 • Recap basic skills of spotting, foot holds, positions and sequences • Apply safety considerations • Demonstrate and name the various foothold techniques. • Apply each technique to the most appropriate situation
2 • Identify and practice the different types of handhold (jug, jam, edge, pinch, undercut, pocket, sloper) • Practice the more advanced climbing techniques e.g. shake out (resting on 1 arm) and slap / dyno sequence to
reach a distant hold • Apply each technique to the most appropriate situation
3 • Practice climbing techniques to find the most comfortable and energy efficient position on the rock face • Successfully complete a task whilst hanging one handed in a comfortable position on the wall • Develop stamina for climbing
4 • Further develop climbing skills by completing bouldering ‘problems’ • Develop communication skills by presenting and expressing ideas, offering constructive support and feedback, and
discussing solutions to problems
5 • Develop communication skills in terms of speaking and listening • Work as a group to overcome a challenge • Review how well the group performed the task and outline ways to work more effectively to complete future tasks
6 • Develop map reading and running skills in a competitive situation • Further develop navigational skills by planning ahead, identifying problems and making decisions • Learn to balance speed and accuracy
- 51

7 • Become familiar with the ‘Silva’ (protractor) compass • Set, read and follow a bearing • Practice and develop pacing skills
8 • Reinforce setting, reading and following a compass bearing • Undertake a cross country (short loop) course using bearings and pacing
9
• Be able to take a bearing from a map and use that bearing to find a control point • Combine map reading and compass skills • Measure the distance between control points and, using the map scale, estimate the number of paces required to
reach the each control
10
• Successfully undertake an orienteering competition using an unfamiliar map in a new location e.g. visit to another school site
• Demonstrate effective use of orientating a map, using a compass, setting, reading and following bearings, and scale to navigate around a score (scatter) orienteering course
11
• Undertake a planned journey and put up a tent or other shelter as a lunch stop • Pack and carry a suitable rucksack containing a healthy lunch and necessary equipment for the journey • Understand and implement the safety rules and adhere to the country code • Demonstrate the effective use of a simple route card
12
• Undertake a planned journey and put up a tent or other shelter as a lunch stop • Pack and carry a suitable rucksack containing a healthy lunch and necessary equipment for the journey • Understand and implement the safety rules and adhere to the country code • Demonstrate the effective use of a simple route card
- 52

Unit 4 (Year 6) Lesson 1
Phase 1: Introduction Phase 2: Teacher Input
B
Recap last lesson. Skills Framework:
Lesson outcomes: • Recap basic skills of spotting, foot holds,
positions and sequences • Apply safety considerations (as listed in OL
Card B1) • Demonstrate and name the various foothold
techniques. • Apply each technique to the most appropriate
situation
Key Words: rock over, heel hook, smear, bridge, Egyptian
Geirfa Allweddol: dros y graig, bachu'r sawdl, iro, pont, Eifftaidd
Warm pupils up using the ‘climb on demand’ activity. Mobilise and stretch as outlined on CD card 1.
Introduce the various foothold techniques to pupils
Mark out 5 coned off sections, one for each technique
Use the resource card 5 from the CD to provide a visual prompt for pupils.
Phase 3: Pupil Interaction Phase 4: Review Pupils practice the various foothold techniques as outlined on B5 in their pairs in the designated sections.
Pupils traverse along the wall applying the varying techniques as appropriate. Partners ‘spot’ and advise as to which technique may be best suited to each hold.
Re-visit the lesson outcomes; • What move felt the hardest to do? • How did you make it easier? • Which moves allowed you to rest your arms the
most? • Which move did you / your partner do best? • Which move do you / your partner need to work on
the most?
Think of your own personal target for next lesson
Resources and equipment: Outdoor Learning Card B5, CD Bouldering card 5
- 53

Unit 4 (Year 6) Lesson 2
B
Phase 1: Introduction Phase 2: Teacher Input Recap last lesson.
Lesson outcomes: • Identify and practice the different types of
handhold (jug, jam, edge, pinch, undercut, pocket, sloper)
• Practice the more advanced climbing techniques e.g. shake out (resting on 1 arm) and slap / dyno sequence to reach a distant hold
• Apply each technique to the most appropriate situation
Key Words: jug, jam, edge, pinch, undercut, pocket, sloper, shake out, slap / dyno Sequence
Geirfa Allweddol: jwg, jam, ymyl, pinsiad, tandoriad, poced, ar oledd, ysgwyd allan, trefn dyno / slap
Skills Framework:
Warm pupils up by asking them to work in pairs with an identified leader. The leader demonstrates different ways of travelling (e.g. jog, side step, jump etc) and varying movements (e.g. star jump, long stretched position, superman jump) their partner performs them as a mirror image. They swap roles. Mobilise and stretch as outlined on CD card 1.
Organise pupils in 3’s, lined up across the wall. Introduce each of the hand holds and give pupils opportunity to practice each one.
Introduce the more advanced climbing techniques and give opportunity for practice.
Phase 3: Pupil Interaction Phase 4: Review Pupils practice the various hand hold techniques in their 3’s in their designated area of the wall. Pupils practice the shake out and slap / dyno techniques.
Pupils then complete a scored challenge with points given for each type of handhold used. Bonus points awarded for the 2 advanced techniques. Roles = climber, spotter, scorer. The class is organised into 2 halves, starting at either end and working towards the middle of the wall.
Re-visit the lesson outcomes; • Which hand hold / moves did you find the hardest /
easiest? • Which hand holds are best for shaking out from? • Name some of the hand holds you practiced
Think of your own personal target for next lesson
Resources and equipment: Outdoor Learning Card B6, CD card 6
- 54

Unit 4 (Year 6) Lesson 3
Phase 1: Introduction Phase 2: Teacher Input
B
Recap last lesson. Skills Framework:
Lesson outcomes: • Practice climbing techniques to find the most
comfortable and energy efficient position on the rock face
• Successfully complete a task whilst hanging one handed in a comfortable position on the wall
• Develop stamina for climbing
Key Words: comfortable, energy efficient, stamina, shake out
Geirfa Allweddol: cyfforddus, defnyddio ynni'n effeithlon, stamina, ysgwyd allan
Warm pupils up by throwing a tennis ball between pairs one handed, two handed, under arm, over arm etc. Traverse across the wall using a zigzag or wave system (use tape or chalk to outline where hands can go) Mobilise and stretch as outlined on CD card 1
Set out paper on the wall (as on OL card B7)
Phase 3: Pupil Interaction Phase 4: Review Pupils complete the challenge traversing the wall until they reach a piece of paper, find a position where they can take one hand off, draw a picture and sign it. Carry on to the next paper and repeat.
Climbing races can be organised as a fun activity to end. A pupil starts at either end of the wall and race each other to the middle. If you fall off you go back to the start.
Re-visit the lesson outcomes; • Where was the easiest / hardest place to stop and
draw? • What techniques did you use to hang in there? • Why is it important to stop and find a relaxed
position when you are climbing?
Think of your own personal target for next lesson
Resources and equipment: Outdoor Learning card B7, paper, pencils, cones
- 55

Unit 4 (Year 6) Lesson 4
Phase 1: Introduction Phase 2: Teacher Input
B
Phase 3: Pupil Interaction Phase 4: Review
Recap last lesson.
Lesson outcomes: • Further develop climbing skills by completing
bouldering ‘problems’ • Develop communication skills by presenting
and expressing ideas, offering constructive support and feedback and discussing solutions to problems
Key Words: communication, feedback, support, discuss, sit start
Geirfa Allweddol: cyfathrebu, adborth, cefnogaeth, trafod, cychwyn o eistedd
Skills Framework:
Pupils work in pairs to complete as many challenges as possible.
Pupils can be given the opportunity to design their own bouldering problems.
Warm pupils up by jogging to different coloured cones on command. Mobilise and stretch as outlined on CD card 1.
Set out some graded bouldering problems by chalking around different holds. Some to be undertaken from standing and some from a sitting start. Hoops or ‘rescue teddy’ may be used to increase the challenge (see CD card 8)
Re-visit the lesson outcomes; • What was your favourite bouldering problem? • Why was it so good? • Which hand / foot hold techniques did you use to
solve the problem? • What skills do you still need to work on?
Think of your own personal target for next lesson
Resources and equipment: Outdoor Learning card B8, CD card 8
- 56

Unit 4 (Year 6) Lesson 5
Phase 1: Introduction Phase 2: Teacher Input
TB
Recap last lesson.
Lesson outcomes: • Develop communication skills in terms of
speaking and listening • Work as a group to overcome a challenge • Review how well the group performed the task
and outline ways to work more effectively to complete future tasks
Key Words: communication, speaking , listening, team work, trust, support, evaluate
Geirfa Allweddol: cyfathrebu, siarad, gwrando, gwaith tîm, ymddiried, cefnogi, gwerthuso
Skills Framework:
Phase 3: Pupil Interaction Phase 4: Review Pupils complete the challenges as outlined on the activity cards. Four groups of pupils work in 4 separate areas. Groups can either complete their task one by one (easier) or all four together (harder)
Pupils discuss and evaluate how well they performed the task
Give each pupil a piece of paper with an animal written on it. Without showing what animal they are, pupils move around the room finding other animals in the same group by making the respective animal noise. You should end up with 4 groups. Mobilise and stretch.
Explain the Sheep and Shepherd activity as outlined on TB12
Explain the Magic Carpet activity as explained on the additional resource card (if time allows)
Re-visit the lesson outcomes; • How effective did your communicate during the
Sheep and Shepherd activity? • If it was successful, why. If not why not? • How did you feel when you were blindfolded?
Think of your own personal target for next lesson
Resources and equipment: Outdoor Learning Card TB12, magic carpet activity card, blindfolds, rope or tape to mark out sheep pens, piece of carpet (1.2m x 1.5 m) or tent ground sheet (anything not slippery)
- 57

Unit 4 (Year 6) Lesson 6
Phase 1: Introduction Phase 2: Teacher Input
O
Recap last lesson. Skills Framework:
Lesson outcomes: • Develop map reading and running skills in a
competitive situation • Further develop navigational skills by planning
ahead, identifying problems and making decisions
• Learn to balance speed and accuracy
Key Words: competition, navigate, speed, accuracy, decision making
Geirfa Allweddol: cystadleuaeth, canfod ffordd, cyflymder, manwl gywirdeb, gwneud penderfyniad
Warm pupils up by working in pairs, one partner jogging behind the other, on command the lead partner tries to ‘lose’ their shadow by changing speed and direction. Mobilise and stretch.
Pair up pupils of equal ability. Explain the rules of the race as outlined on O12.
Phase 3: Pupil Interaction Phase 4: Review Pupils take part in the Sprint Race, with points being award as outlined on O12. Pupils practice their skills of orientating (setting) the map, thumbing the map and planning ahead to identify the route.
Re-visit the lesson outcomes; • Did you keep your map set all the time? • If you made a mistake why do you think that was? • What was the most useful skill you used?
Think of your own personal target for next lesson
Resources and equipment: Outdoor Learning Card O12, control cards, pencils, AR14
- 58

Unit 4 (Year 6) Lesson 7
Phase 1: Introduction Phase 2: Teacher Input
O
Recap last lesson.
Lesson outcomes: • Become familiar with the ‘protractor (Silva)
compass • Set, read and follow a bearing • Practice and develop pacing skills
Key Words: Silva, protractor, compass, bearing, pacing, set, magnetic north
Geirfa Allweddol: Silva, Protractor, cwmpawd, cyfeirbwynt, cyflymdra, gosod, gogledd magnetig
Skills Framework:
Phase 3: Pupil Interaction Phase 4: Review Complete activity 2 individually but working in pairs.
Pupils work in pairs to practice setting and reading their compass.
Pairs visit as many star bearing controls as possible. The emphasis is on making sure they visit the correct control point and accuracy in pacing the distance correctly. Using the scorecard (shown on O15) estimated distances can be compared when completed to the actual distance and undertaken as a competitive event i.e. whose pacing is the most accurate?
Set out an orienteering course e.g. 8 control points within a manageable area.
Complete activity 1 in O15
Explain the parts of the protractor (Silva) compass i.e. base plate, rotating compass housing, magnetic needle, direction of travel arrow (CD Orienteering resources ‘taking a compass bearing’) This may be done in a classroom lesson.
Explain how to set and read a compass bearing and how to follow that bearing to a control point.
Re-visit the lesson outcomes; • When using the compass how did you ensure that
you went to the correct control? • Was your estimated distance close to or very
different to the actual distance? • Were you more accurate walking or running?
Think of your own personal target for next lesson
Resources and equipment: Outdoor Learning Card 15, compasses, CD Orienteering resources ‘taking a compass bearing
- 59
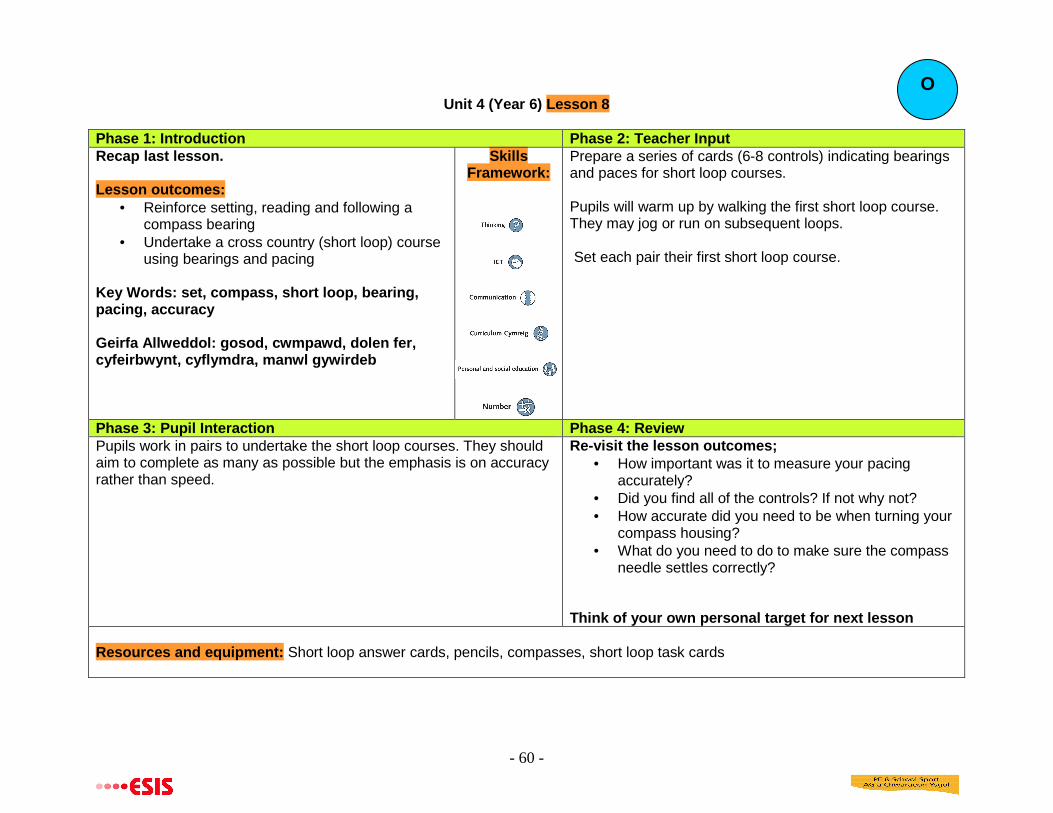
Unit 4 (Year 6) Lesson 8
Phase 1: Introduction Phase 2: Teacher Input
O
Recap last lesson.
Lesson outcomes: • Reinforce setting, reading and following a
compass bearing • Undertake a cross country (short loop) course
using bearings and pacing
Key Words: set, compass, short loop, bearing, pacing, accuracy
Geirfa Allweddol: gosod, cwmpawd, dolen fer, cyfeirbwynt, cyflymdra, manwl gywirdeb
Skills Framework:
Phase 3: Pupil Interaction Phase 4: Review Pupils work in pairs to undertake the short loop courses. They should aim to complete as many as possible but the emphasis is on accuracy rather than speed.
Prepare a series of cards (6-8 controls) indicating bearings and paces for short loop courses.
Pupils will warm up by walking the first short loop course. They may jog or run on subsequent loops.
Set each pair their first short loop course.
Re-visit the lesson outcomes; • How important was it to measure your pacing
accurately? • Did you find all of the controls? If not why not? • How accurate did you need to be when turning your
compass housing? • What do you need to do to make sure the compass
needle settles correctly?
Think of your own personal target for next lesson
Resources and equipment: Short loop answer cards, pencils, compasses, short loop task cards
- 60

Unit 4 (Year 6) Lesson 9
Phase 1: Introduction Phase 2: Teacher Input
O
Recap last lesson. Skills Framework:
Lesson outcomes: • Be able to take a bearing from a map and use
that bearing to find a control point • Combine map reading and compass skills • Measure the distance between control points
and, using the map scale, estimate the number of paces required to reach the each control
Key Words: bearing, compass, measure, distance, paces, scale
Geirfa Allweddol: cyfeiriant, cwmpawd, mesur, pellter, cyflymdraau, graddfa
Prepare a number of short courses around the school. 3-4 courses each with 3-4 controls (OL card O16)
Explain to pupils how to take a bearing from the map (CD Orienteering card ‘taking a bearing’). Reinforce the concept of ‘scale’ This may be done in classroom lessons.
Explain the line orienteering ‘short loop’ task. Lines may be drawn on the map between controls to make the task easier.
Set pupils on task in pairs.
Phase 3: Pupil Interaction Phase 4: Review Pupils must take a bearing using the map and compass and then follow it around each of the courses. Pupils measure and record the distance between controls and estimate the number of paces required.
Re-visit the lesson outcomes; • Ask the pupils to teach you how to take a bearing
from the map • Explain how to estimate distance using scale • How did you allocate roles and responsibilities in
your pairs?
Think of your own personal target for next lesson
Resources and equipment: Outdoor Learning card O16, CD Orienteering card ‘taking a bearing’, compasses, pencils, maps
- 61

Unit 4 (Year 6) Lesson 10
Phase 1: Introduction Phase 2: Teacher Input
O
Recap last lesson. Skills Framework:
Lesson outcomes: • Successfully undertake an orienteering
competition using an unfamiliar map in a new location(e.g. visit to another school site)
• Demonstrate effective use of orientating a map, using a compass, setting, reading and following bearings and scale to navigate around a score (scatter) orienteering course
Key Words: competition, unfamiliar, off-site
Geirfa Allweddol: cystadleuaeth, anghyfarwydd, oddi ar y safle
Arrange to visit another school site to practice orienteering in unfamiliar surroundings. A visit to another local school may not need transport. The host school may use their pupils to run the competition taking on leadership responsibilities. This could be a reciprocal arrangement. An EV2 form is not required.
Ensure pupils are warmed up (possibly run by the host school) before they embark on the competition.
Phase 3: Pupil Interaction Phase 4: Review Pupils should work in pairs to navigate their way around the score event. They should balance speed with accuracy in order to score the most possible points against peers.
Re-visit the lesson outcomes; • What were the difficulties associated with using an
unfamiliar map? • Did anything look the same as on your own school
map or grounds? • How did you balance accuracy with speed? • Did you plan your route before you set off? • If you were to do another similar event in an
unfamiliar location, how could you improve?
Think of your own personal target for next lesson
Resources and equipment: score cards, pencils, maps, compasses
- 62

Unit 4 (Year 6) Lesson 11
Phase 1: Introduction Phase 2: Teacher Input
J
Recap last lesson. Skills Framework:
Lesson outcomes: • Undertake a planned journey and put up a tent
or other shelter as a lunch stop • Pack and carry a suitable rucksack containing
a healthy lunch and necessary equipment for the journey
• Understand and implement the safety rules and adhere to the country code
• Demonstrate the effective use of a simple route card
Key Words: journey, shelter, route card, safety, country code
Geirfa Allweddol: taith, lloches, cerdyn taith, diogelwch, cod cefn gwlad
Ensure the necessary EV forms have been approved for the journey and check that the weather conditions are suitable.
Ensure pupils are well equipped for the journey and know which group they are part of in order that they take turns to carry the tent.
Discuss the implications and requirements for an overnight stay either camping, at a hostel or an outdoor centre. This could be considered as an option if resources and staffing allows.
Phase 3: Pupil Interaction Phase 4: Review Pupils undertake the journey, following the planned route using the route card. Pupils should regularly identify features on the map and be able to pin point their current position.
Whilst eating lunch pupils should compile a list of skills and equipment that is required to undertake an overnight stay e.g. lighting a stove, devising a kit list
Re-visit the lesson outcomes; • Did the group work as a team to carry and construct
the tent? • Did the route take in some interesting features?
What were they? • How did you identify where you were on the map
during the journey?
Think of your own personal target for next lesson
Resources and equipment: Outdoor Learning Cards J4, J5, J7, CD card Journeying ‘kit list for overnight journey’, tents, rucksacks, route cards, teachers rucksack with safety pack, pencils, AR 15 a & b
- 63

J
Phase 1: Introduction Recap last lesson. Skills
Framework: Lesson outcomes:
Key Words:
Geirfa Allweddol:
Unit 4 (Year 6) Lesson 12
Phase 2: Teacher Input
Lesson 12 is a continuation of lesson 11 in consideration of the time required to complete an
off site journey.
Phase 3: Pupil Interaction Phase 4: Review Re-visit the lesson outcomes;
Think of your own personal target for next lesson
Resources and equipment:
- 64


![Column Methods Help Code : 002 Add & Subtract Booster146347]002_-_Column_M… · Help Code : 002 Add & Subtract 2012A KS2 Q4 2012A KS2 Q12 2013A KS2 Q1 . 2011A KS2 Q12 2011A KS2 Q6](https://img.pdfslide.net/doc/110x75/5f0facf67e708231d445558c/column-methods-help-code-002-add-subtract-booster-146347002-columnm.jpg)