Embed Size (px)
Citation preview
OracleService CloudAgent Browser User InterfaceGuide
Release August 2016

Oracle Service Cloud Agent Browser User Interface Guide
Part Number: E77807–02
Copyright © 2016, Oracle and/or its affiliates. All rights reserved
Authors: The Service Cloud Information Development Team
This software and related documentation are provided under a license agreement containing restrictions on use and disclosure and are protected byintellectual property laws. Except as expressly permitted in your license agreement or allowed by law, you may not use, copy, reproduce, translate,broadcast, modify, license, transmit, distribute, exhibit, perform, publish, or display in any part, in any form, or by any means. Reverse engineering,disassembly, or decompilation of this software, unless required by law for interoperability, is prohibited.
The information contained herein is subject to change without notice and is not warranted to be error-free. If you find any errors, please report themto us in writing.
If this is software or related documentation that is delivered to the U.S. Government or anyone licensing it on behalf of the U.S. Government, thefollowing notice is applicable:
U.S. GOVERNMENT END USERS: Oracle programs, including any operating system, integrated software, any programs installed on the hardware,and/or documentation, delivered to U.S. Government end users are "commercial computer software" pursuant to the applicable Federal AcquisitionRegulation and agency-specific supplemental regulations. As such, use, duplication, disclosure, modification, and adaptation of the programs, includingany operating system, integrated software, any programs installed on the hardware, and/or documentation, shall be subject to license terms and licenserestrictions applicable to the programs. No other rights are granted to the U.S. Government.
This software or hardware is developed for general use in a variety of information management applications. It is not developed or intended for use inany inherently dangerous applications, including applications that may create a risk of personal injury. If you use this software or hardware in dangerousapplications, then you shall be responsible to take all appropriate fail-safe, backup, redundancy, and other measures to ensure its safe use. OracleCorporation and its affiliates disclaim any liability for any damages caused by use of this software or hardware in dangerous applications.
Oracle and Java are registered trademarks of Oracle and/or its affiliates. Other names may be trademarks of their respective owners.
Intel and Intel Xeon are trademarks or registered trademarks of Intel Corporation. All SPARC trademarks are used under license and are trademarks orregistered trademarks of SPARC International, Inc. AMD, Opteron, the AMD logo, and the AMD Opteron logo are trademarks or registered trademarksof Advanced Micro Devices. UNIX is a registered trademark of The Open Group.
This software or hardware and documentation may provide access to or information about content, products, and services from third parties. OracleCorporation and its affiliates are not responsible for and expressly disclaim all warranties of any kind with respect to third-party content, products, andservices unless otherwise set forth in an applicable agreement between you and Oracle. Oracle Corporation and its affiliates will not be responsiblefor any loss, costs, or damages incurred due to your access to or use of third-party content, products, or services, except as set forth in an applicableagreement between you and Oracle.
For information about Oracle's commitment to accessibility, visit the Oracle Accessibility Program website at http://www.oracle.com/pls/topic/lookup?ctx=acc&id=docacc.
Oracle customers that have purchased support have access to electronic support through My Oracle Support. For information, visit http://www.oracle.com/pls/topic/lookup?ctx=acc&id=info or visit http://www.oracle.com/pls/topic/lookup?ctx=acc&id=trs if you are hearing impaired.
Oracle Service CloudAgent Browser User Interface Guide
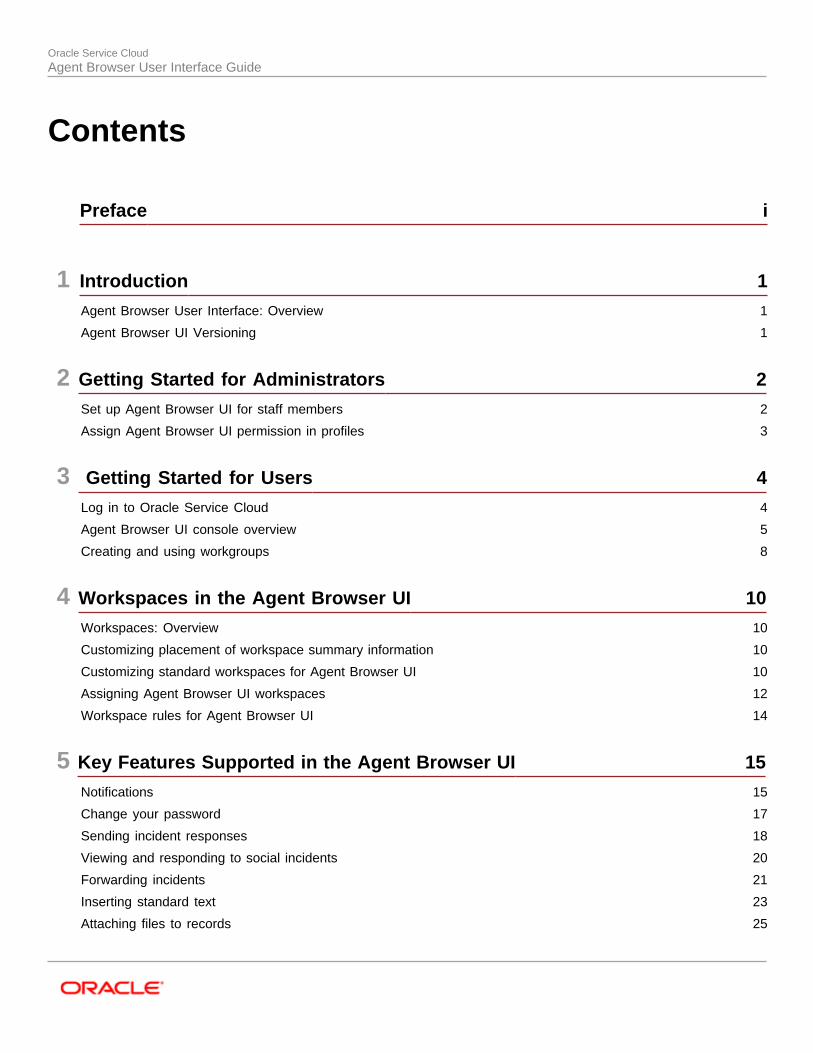
Contents
Preface i
1 Introduction 1
Agent Browser User Interface: Overview 1
Agent Browser UI Versioning 1
2 Getting Started for Administrators 2
Set up Agent Browser UI for staff members 2
Assign Agent Browser UI permission in profiles 3
3 Getting Started for Users 4
Log in to Oracle Service Cloud 4
Agent Browser UI console overview 5
Creating and using workgroups 8
4 Workspaces in the Agent Browser UI 10
Workspaces: Overview 10
Customizing placement of workspace summary information 10
Customizing standard workspaces for Agent Browser UI 10
Assigning Agent Browser UI workspaces 12
Workspace rules for Agent Browser UI 14
5 Key Features Supported in the Agent Browser UI 15
Notifications 15
Change your password 17
Sending incident responses 18
Viewing and responding to social incidents 20
Forwarding incidents 21
Inserting standard text 23
Attaching files to records 25
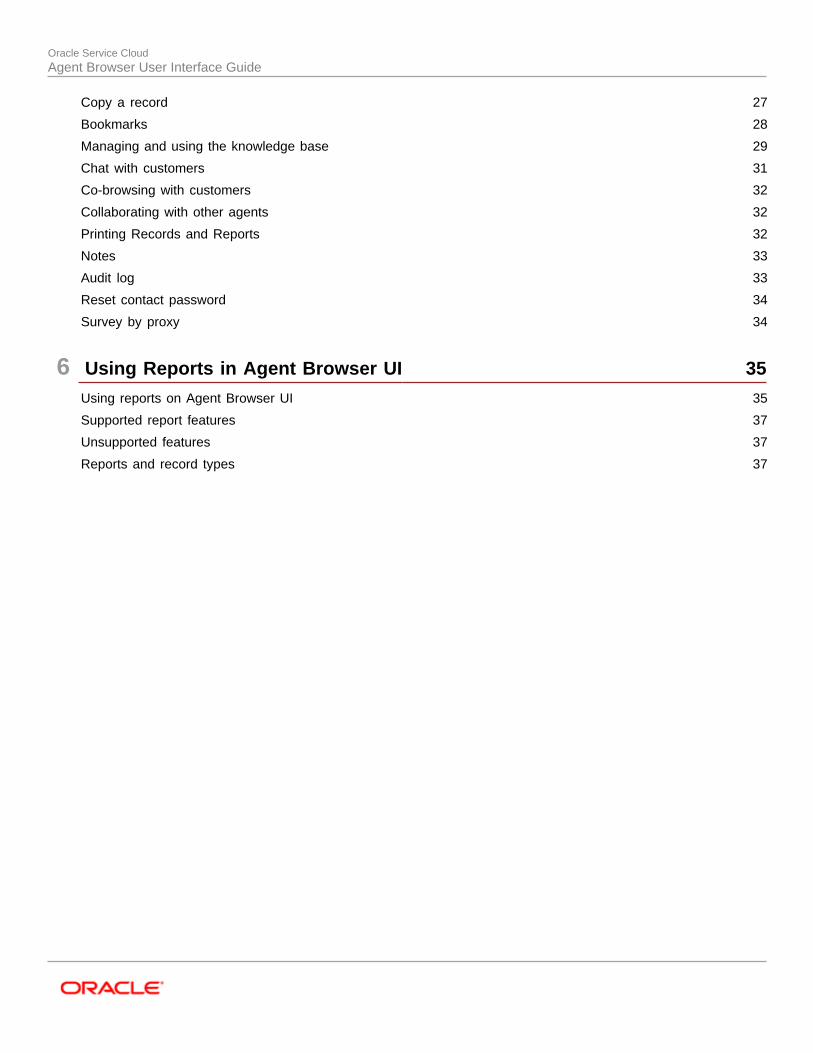
Oracle Service CloudAgent Browser User Interface Guide
Copy a record 27
Bookmarks 28
Managing and using the knowledge base 29
Chat with customers 31
Co-browsing with customers 32
Collaborating with other agents 32
Printing Records and Reports 32
Notes 33
Audit log 33
Reset contact password 34
Survey by proxy 34
6 Using Reports in Agent Browser UI 35
Using reports on Agent Browser UI 35
Supported report features 37
Unsupported features 37
Reports and record types 37

Oracle Service CloudAgent Browser User Interface Guide
Oracle Service CloudAgent Browser User Interface Guide
Preface
i
Preface
PrefaceThis preface introduces information sources that can help you use the application and this guide.
Oracle Applications GuidesTo find guides for Oracle Applications, go to the Oracle Help Center at http://docs.oracle.com/.
Documentation AccessibilityFor information about Oracle's commitment to accessibility, visit the Oracle Accessibility Program website at http://www.oracle.com/pls/topic/lookup?ctx=acc&id=docacc.
Comments and SuggestionsIf you find an error or want to suggest enhancements to our documentation, please take one of the following surveys:
• For web-based user guide, http://documentation.custhelp.com/ci/documents/detail/5/4/12.
• For tutorials, http://documentation.custhelp.com/ci/documents/detail/5/3/12.
Thank you for helping us improve our documentation.
Oracle Service CloudAgent Browser User Interface Guide
Chapter 1Introduction
1
1 IntroductionIntroduction
Agent Browser User Interface: OverviewThe Agent Browser User Interface (Agent Browser UI) is a web browser-based user interface to Oracle Service Cloud,giving you one more way — along with the Microsoft® .NET-based dynamic agent desktop Smart Client and mobile agentapp interfaces — to access Oracle Service Cloud.
Agent Browser UI allows you to:
• Access Oracle Service Cloud using devices that do not support Microsoft® .NET.
• Use environments where browser-based applications are required, for example when an organization’scompliance or governance rules mandate it.
• Access Oracle Service Cloud when installing and supporting the smart client agent desktop may not be viable,such as for light or infrequent users.
Related Topics
• Agent Browser UI Versioning
Agent Browser UI VersioningThe version of the Agent Browser UI site you use is independent of the Microsoft® .NET-based Smart Client version ofOracle Service Cloud you use.
When you request a new or upgraded Agent Browser UI site, the most recent release will be deployed. The specificset of features and functions available in your version of Agent Browser UI depends on the combination of the OracleService Cloud release and the Agent Browser UI release you have deployed. For information on specific Agent BrowserUI features and functions available, refer to Answer ID 8173.
Related Topics
• Agent Browser User Interface: Overview
Oracle Service CloudAgent Browser User Interface Guide
Chapter 2Getting Started for Administrators
2
2 Getting Started for AdministratorsGetting Started for Administrators
Set up Agent Browser UI for staff membersYou must complete certain administrative tasks before your staff members can begin using the Agent Browser UI.
PrerequisitesThe Agent Browser UI feature for your site must be enabled and configured. Contact your Oracle accountmanager.
Steps1. Assign permission for staff members to access Agent Browser UI on the Service Console of the Smart
Client. Refer to Assign Agent Browser UI permission in profiles.
2. Create workspaces customized for Agent Browser UI on the Service Console of the Smart Client. Referto Customizing standard workspaces for Agent Browser UI.
3. Assign custom workspaces to define the appearance of the desktop in Agent Browser UI on the ServiceConsole of the Smart Client. Refer to Assigning Agent Browser UI workspaces.
Note: To learn about workspaces for Agent Browser UI, refer to Workspaces: Overview.
Next StepAfter completing the setup steps, your staff members must use one of the following supportedbrowsers to access Agent Browser UI:
• Windows 7 (Professional and Ultimate) (32 bit and 64 bit) SP1 with IE 11.x, Chrome 49 or greater, Firefox 45 orgreater
• Windows 8.1 (Professional and Enterprise) (32 bit and 64 bit) with IE11.x, Chrome 49 or greater, Firefox 45 orgreater
• Windows 10 with IE11, Chrome 49 or greater, Firefox 45 or greater
• Mac OS X with Safari 9, Firefox 45 or greater
• Tablets running iOS 8.2, 9.x with Safari 9.x or greater, Chrome 49 or greater
• Tablets running Android 5.x with Firefox 45 or greater
Related Topics
• Assign Agent Browser UI permission in profiles
• Customizing standard workspaces for Agent Browser UI
• Assigning Agent Browser UI workspaces
• Workspaces: Overview
Oracle Service CloudAgent Browser User Interface Guide
Chapter 2Getting Started for Administrators
3
Assign Agent Browser UI permission in profilesAdministrators can specify which profiles have permission to use Agent Browser UI on the Service Console of the SmartClient.
PrerequisitesYou must be logged in to the .NET-based Smart Client.
Steps1. Click the Configuration button on the navigation pane.
2. Double-click Profiles under Staff Management.
The report opens on the content pane.
3. Double-click the profile you want to edit.
The Profile Editor opens.
4. Click the Permissions button on the ribbon.
The Permissions page opens.
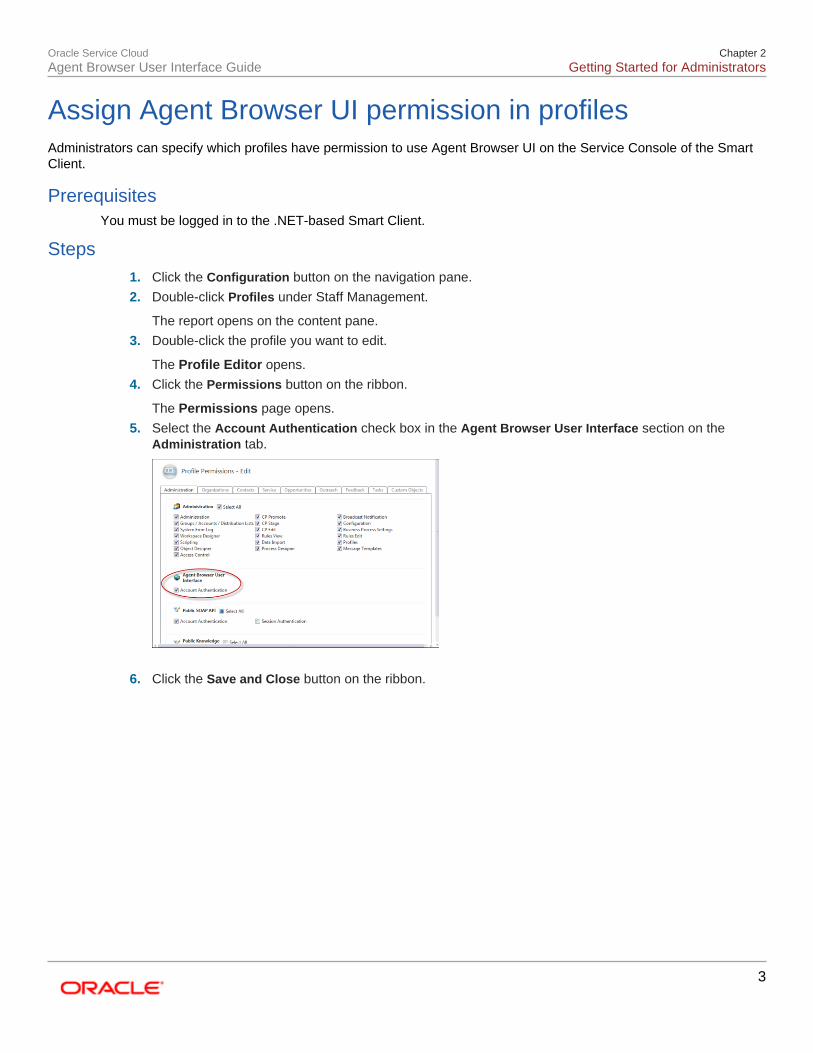
5. Select the Account Authentication check box in the Agent Browser User Interface section on theAdministration tab.
6. Click the Save and Close button on the ribbon.
Oracle Service CloudAgent Browser User Interface Guide
Chapter 3Getting Started for Users
4
3 Getting Started for UsersGetting Started for Users
Log in to Oracle Service CloudOnce you have a staff account and appropriate permissions, you will be able to log in to Oracle Service Cloud using theAgent Browser UI.
PrerequisitesYou need to have a user name and password. If you have logged in to the Oracle Service Cloud .NET-basedSmart Client, use those same credentials. Otherwise, contact your administrator for your credentials.
The Acount Authentication permission for Agent Browser User Interface must be selected in your profile by theadministrator.
Steps1. Open your web browser and navigate to http://your_site.custhelp.com/cgi-
bin/your_interface.cfg/php/ admin/launch.php.
2. Click Launch Browser Agent Desktop.
The Login window opens.
3. If you need help logging in, for example, if you’ve forgotten your password, click Login Help.
4. Type your user name in the Username field.
Note: Your user name and password are defined in your staff account and both are casesensitive.
5. If you have been assigned a password, type it in the Password field. (Passwords are optional in OracleService Cloud.)
6. Click Login.
ResultThe Agent Browser UI main console is displayed.
Related Topics
• Agent Browser UI console overview
Oracle Service CloudAgent Browser User Interface Guide
Chapter 3Getting Started for Users
5
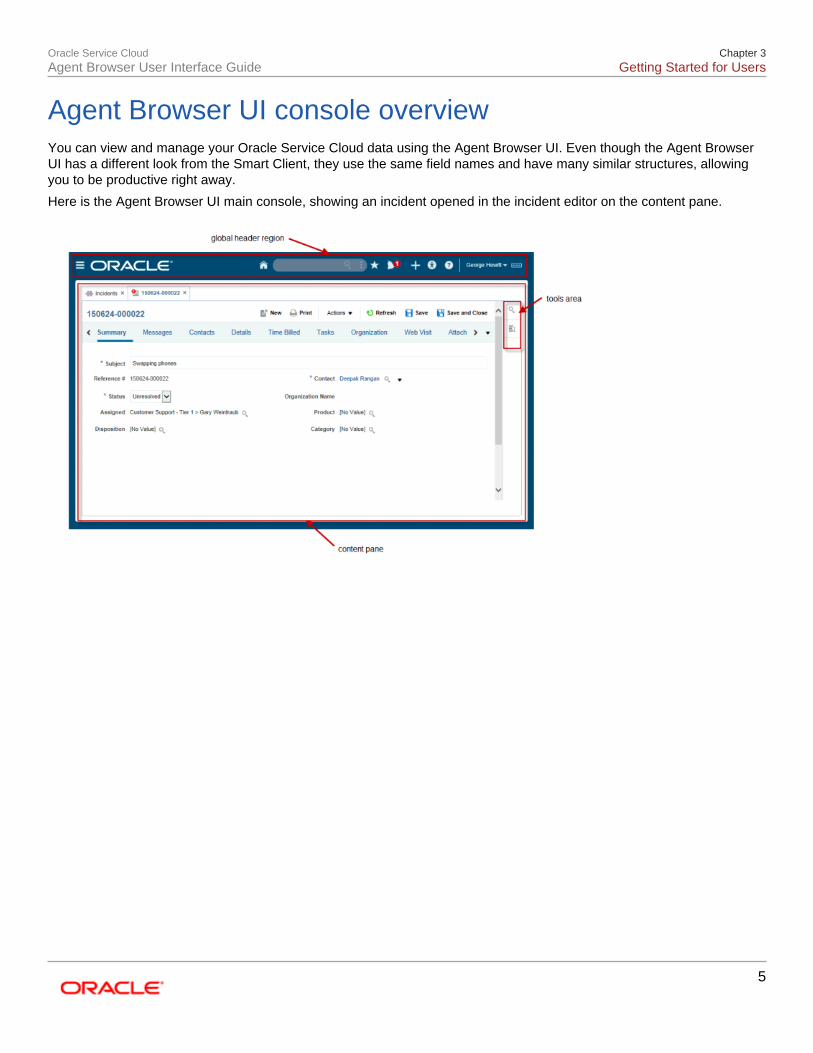
Agent Browser UI console overviewYou can view and manage your Oracle Service Cloud data using the Agent Browser UI. Even though the Agent BrowserUI has a different look from the Smart Client, they use the same field names and have many similar structures, allowingyou to be productive right away.
Here is the Agent Browser UI main console, showing an incident opened in the incident editor on the content pane.
Oracle Service CloudAgent Browser User Interface Guide
Chapter 3Getting Started for Users
6
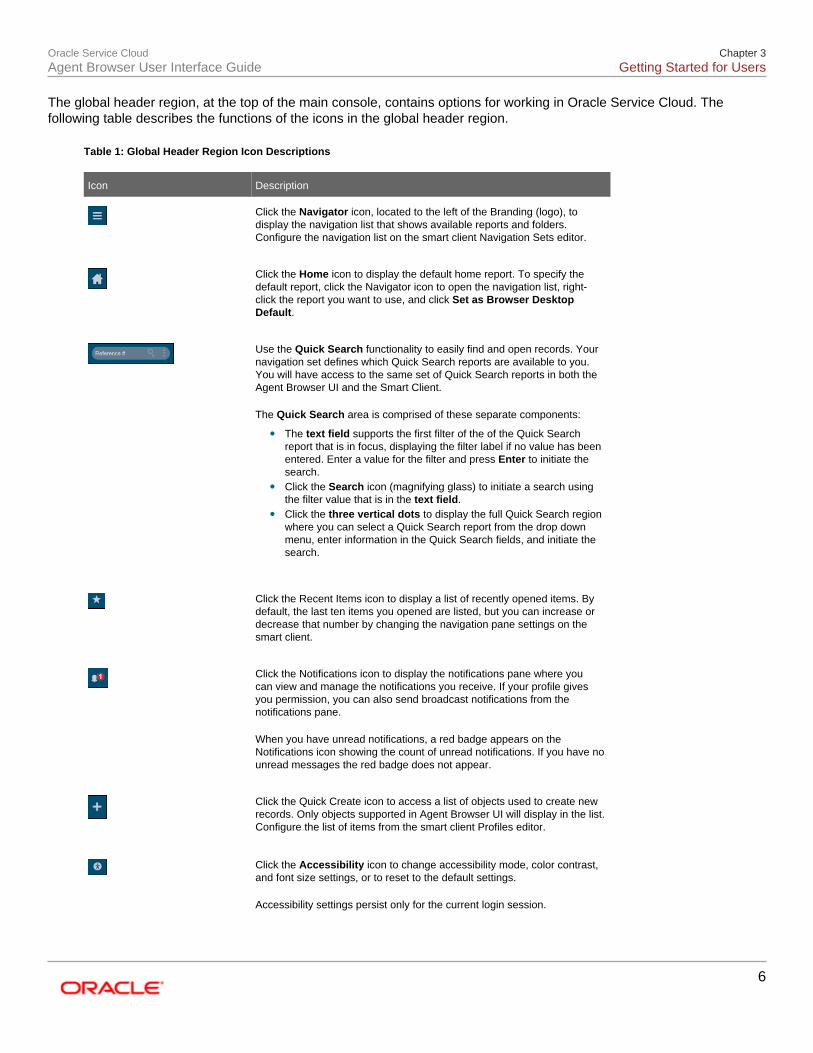
The global header region, at the top of the main console, contains options for working in Oracle Service Cloud. Thefollowing table describes the functions of the icons in the global header region.
Table 1: Global Header Region Icon Descriptions
Icon Description
Click the Navigator icon, located to the left of the Branding (logo), todisplay the navigation list that shows available reports and folders.Configure the navigation list on the smart client Navigation Sets editor.
Click the Home icon to display the default home report. To specify thedefault report, click the Navigator icon to open the navigation list, right-click the report you want to use, and click Set as Browser DesktopDefault.
Use the Quick Search functionality to easily find and open records. Yournavigation set defines which Quick Search reports are available to you.You will have access to the same set of Quick Search reports in both theAgent Browser UI and the Smart Client.
The Quick Search area is comprised of these separate components:
• The text field supports the first filter of the of the Quick Searchreport that is in focus, displaying the filter label if no value has beenentered. Enter a value for the filter and press Enter to initiate thesearch.
• Click the Search icon (magnifying glass) to initiate a search usingthe filter value that is in the text field.
• Click the three vertical dots to display the full Quick Search regionwhere you can select a Quick Search report from the drop downmenu, enter information in the Quick Search fields, and initiate thesearch.
Click the Recent Items icon to display a list of recently opened items. Bydefault, the last ten items you opened are listed, but you can increase ordecrease that number by changing the navigation pane settings on thesmart client.
Click the Notifications icon to display the notifications pane where youcan view and manage the notifications you receive. If your profile givesyou permission, you can also send broadcast notifications from thenotifications pane.
When you have unread notifications, a red badge appears on theNotifications icon showing the count of unread notifications. If you have nounread messages the red badge does not appear.
Click the Quick Create icon to access a list of objects used to create newrecords. Only objects supported in Agent Browser UI will display in the list.Configure the list of items from the smart client Profiles editor.
Click the Accessibility icon to change accessibility mode, color contrast,and font size settings, or to reset to the default settings.
Accessibility settings persist only for the current login session.
Oracle Service CloudAgent Browser User Interface Guide
Chapter 3Getting Started for Users
7
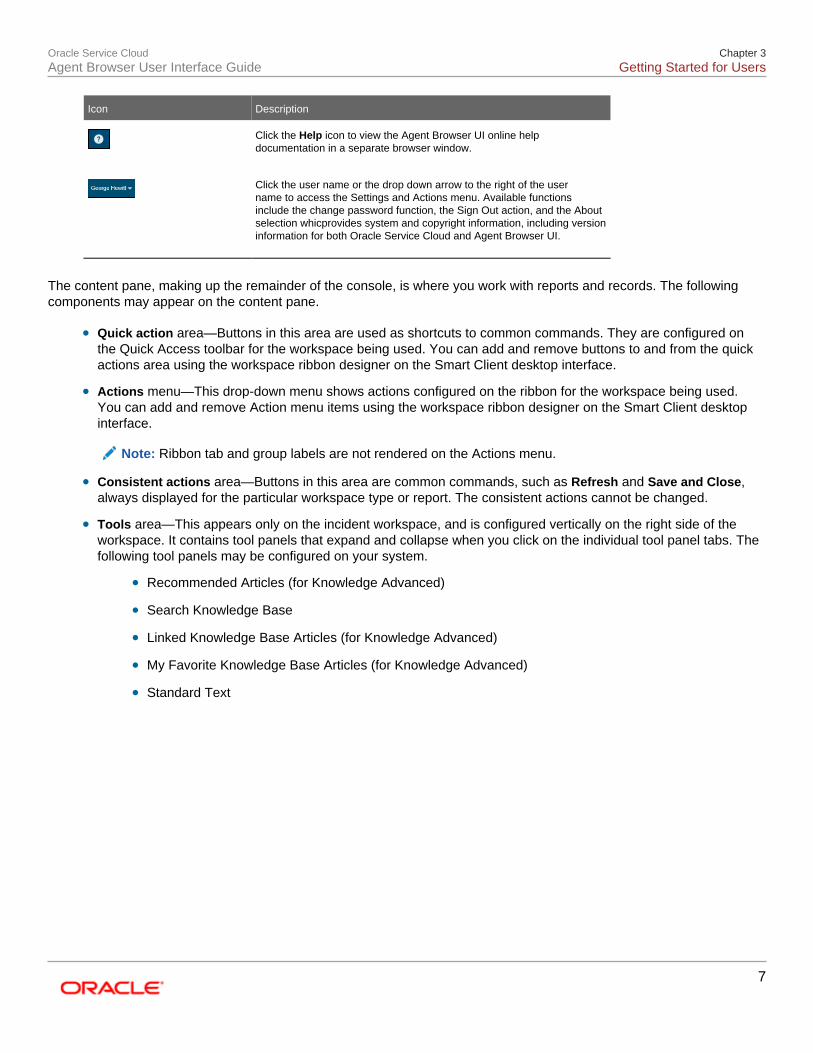
Icon Description
Click the Help icon to view the Agent Browser UI online helpdocumentation in a separate browser window.
Click the user name or the drop down arrow to the right of the username to access the Settings and Actions menu. Available functionsinclude the change password function, the Sign Out action, and the Aboutselection whicprovides system and copyright information, including versioninformation for both Oracle Service Cloud and Agent Browser UI.
The content pane, making up the remainder of the console, is where you work with reports and records. The followingcomponents may appear on the content pane.
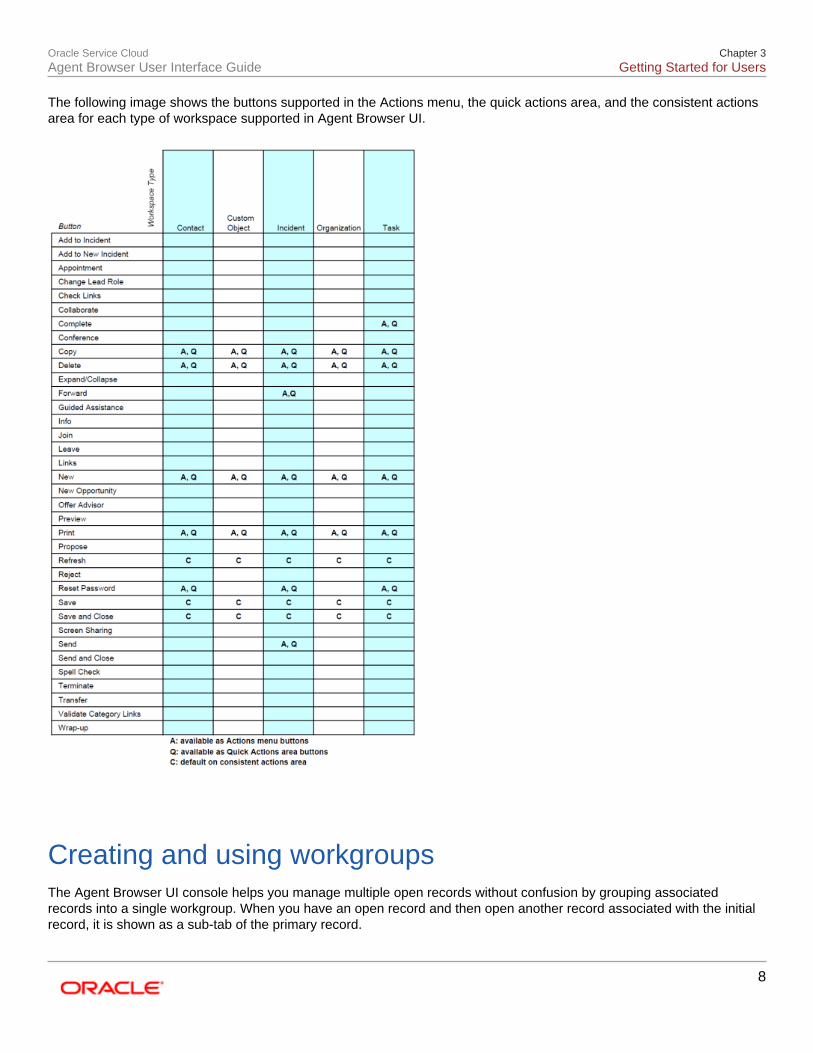
• Quick action area—Buttons in this area are used as shortcuts to common commands. They are configured onthe Quick Access toolbar for the workspace being used. You can add and remove buttons to and from the quickactions area using the workspace ribbon designer on the Smart Client desktop interface.
• Actions menu—This drop-down menu shows actions configured on the ribbon for the workspace being used.You can add and remove Action menu items using the workspace ribbon designer on the Smart Client desktopinterface.
Note: Ribbon tab and group labels are not rendered on the Actions menu.
• Consistent actions area—Buttons in this area are common commands, such as Refresh and Save and Close,always displayed for the particular workspace type or report. The consistent actions cannot be changed.
• Tools area—This appears only on the incident workspace, and is configured vertically on the right side of theworkspace. It contains tool panels that expand and collapse when you click on the individual tool panel tabs. Thefollowing tool panels may be configured on your system.
• Recommended Articles (for Knowledge Advanced)
• Search Knowledge Base
• Linked Knowledge Base Articles (for Knowledge Advanced)
• My Favorite Knowledge Base Articles (for Knowledge Advanced)
• Standard Text
Oracle Service CloudAgent Browser User Interface Guide
Chapter 3Getting Started for Users
8
The following image shows the buttons supported in the Actions menu, the quick actions area, and the consistent actionsarea for each type of workspace supported in Agent Browser UI.
Creating and using workgroupsThe Agent Browser UI console helps you manage multiple open records without confusion by grouping associatedrecords into a single workgroup. When you have an open record and then open another record associated with the initialrecord, it is shown as a sub-tab of the primary record.
Oracle Service CloudAgent Browser User Interface Guide
Chapter 3Getting Started for Users
9
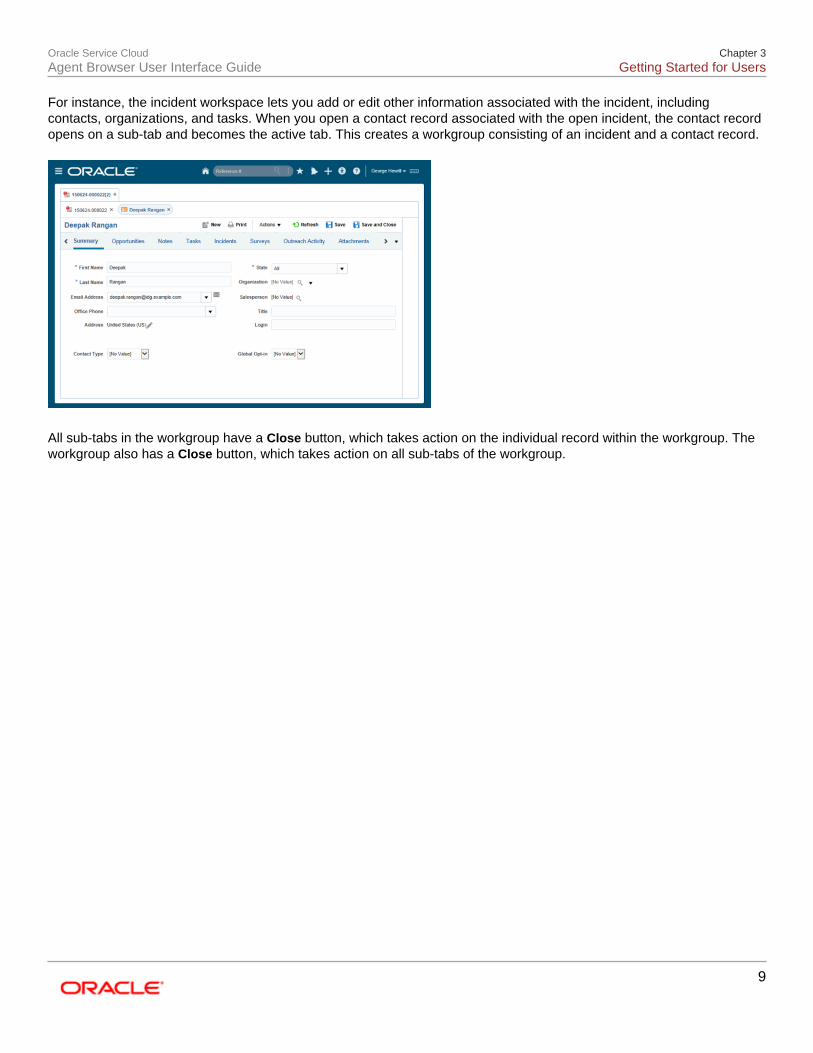
For instance, the incident workspace lets you add or edit other information associated with the incident, includingcontacts, organizations, and tasks. When you open a contact record associated with the open incident, the contact recordopens on a sub-tab and becomes the active tab. This creates a workgroup consisting of an incident and a contact record.
All sub-tabs in the workgroup have a Close button, which takes action on the individual record within the workgroup. Theworkgroup also has a Close button, which takes action on all sub-tabs of the workgroup.
Oracle Service CloudAgent Browser User Interface Guide
Chapter 4Workspaces in the Agent Browser UI
10
4 Workspaces in the Agent Browser UIWorkspaces in the Agent Browser UI
Workspaces: OverviewWorkspaces define the configuration of the content pane when working in Oracle Service Cloud.
When you open a record—such as an incident or contact—the workspace determines the layout of fields, controls, andtabs on the content pane as well as the arrangement of buttons on the toolbar.
Workspaces for incidents, contacts, organizations, tasks, and custom objects are supported in Agent Browser UI,although not all fields and actions may display. Workspaces for answers, opportunities, assets, chat, quotes, and quoteproducts, and all multi-edit workspaces are not supported in Agent Browser UI.
Customizing placement of workspace summaryinformationThe summary panel may appear as the first tab in the primary tabset of a workspace or it may placed in a persistent panelabove the primary tabset.
Use the .NET-based Smart Client to set the Summary Panel Alignment control Options property to specify the placementof the summary information of a record. Select the value First Tab to show the summary information in the first tab of theprimary tabset. Select the value Top to show the summary information in a persistent panel above the primary tabset.
Customizing standard workspaces for Agent Browser UIBy default, standard desktop workspaces are used in Agent Browser UI, but you can create custom workspacesspecifically for Agent Browser UI.
However, because unsupported fields and controls are simply disregarded in Agent Browser UI, some blank fields andcontrols may be displayed, which can lead to confusion. For example, if a tab contains an unsupported relationship item,the user will see a tab with no content. You can provide a better user experience by customizing the workspaces used inAgent Browser UI to include only supported fields and controls.
Below are specific procedures to create basic workspaces suitable for Agent Browser UI by altering the standardworkspaces on the Service Console of the smart client.
Note: You may choose to further customize the workspaces you use for Agent Browser UI to suit your businessneeds and specific Oracle Service Cloud functions you use.
Related Topics
• Customize the standard contact workspace for Agent Browser UI

Oracle Service CloudAgent Browser User Interface Guide
Chapter 4Workspaces in the Agent Browser UI
11
• Customize the standard incident workspace for Agent Browser UI
• Customize the standard organization workspace for Agent Browser UI
• Customize the standard task workspace for Agent Browser UI
Customize the standard incident workspace for Agent Browser UIUse the workspace editor in the Oracle Service Cloud Smart client to customize an incident workspace suitable for AgentBrowser UI.
Steps1. From the workspaces explorer, copy the standard incident workspace and rename it.
2. From the workspaces explorer, open the renamed incident workspace.
3. Remove the Time Billed tab, which contains the unsupported Time Billed relationship item.
4. Configure buttons in the quick actions area, by clicking Configure Quick Access Buttons in the ribbondesigner. Supported buttons are Copy, Delete, New, Reset Password, Send, and Print. (Refresh, Save,and Save and Close buttons always appear in the consistent area to the left of the Actions menu.)
5. Configure buttons on the Actions menu in the ribbon designer. Supported buttons are Copy, Delete,Forward, New, Reset Password, Send, and Print. (Refresh, Save, and Save and Close buttons alwaysappear in the consistent area to the left of the Actions menu.)
Note: Because the Send on Save control is not supported in Agent Browser UI, it is important toinclude the Send button on either the quick actions area or on the Actions menu.
6. Click the Save and Close button.
Customize the standard organization workspace for Agent BrowserUIUse the workspace editor in the Oracle Service Cloud Smart client to customize an organization workspace suitable forAgent Browser UI.
Steps1. From the workspaces explorer, copy the standard organization workspace and rename it.
2. From the workspaces explorer, open the renamed organization workspace.
3. Remove the Hierarchy tab, which contains the unsupported Organization Hierarchy relationship item.
4. Remove the SLA field, which is the unsupported SLA Container relationship item.
5. Configure buttons in the quick actions area, by clicking Configure Quick Access Buttons in the ribbondesigner. Supported buttons are Copy, Delete, New, and Print. (Refresh, Save, and Save and Closebuttons always appear in the consistent area to the left of the Actions menu.)
6. Configure buttons on the Actions menu in the ribbon designer. Supported buttons are Copy, Delete,New, and Print. (Refresh, Save, and Save and Close buttons always appear in the consistent area tothe left of the Actions menu.)
7. Click the Save and Close button.
Oracle Service CloudAgent Browser User Interface Guide
Chapter 4Workspaces in the Agent Browser UI
12
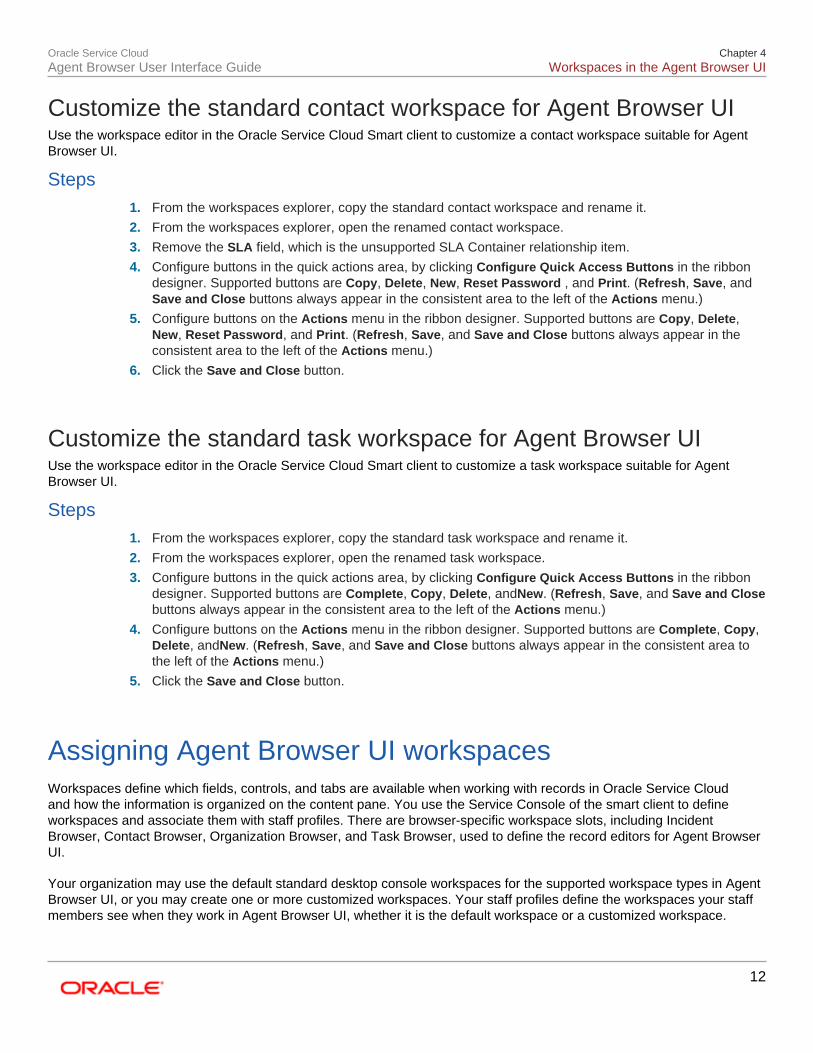
Customize the standard contact workspace for Agent Browser UIUse the workspace editor in the Oracle Service Cloud Smart client to customize a contact workspace suitable for AgentBrowser UI.
Steps1. From the workspaces explorer, copy the standard contact workspace and rename it.
2. From the workspaces explorer, open the renamed contact workspace.
3. Remove the SLA field, which is the unsupported SLA Container relationship item.
4. Configure buttons in the quick actions area, by clicking Configure Quick Access Buttons in the ribbondesigner. Supported buttons are Copy, Delete, New, Reset Password , and Print. (Refresh, Save, andSave and Close buttons always appear in the consistent area to the left of the Actions menu.)
5. Configure buttons on the Actions menu in the ribbon designer. Supported buttons are Copy, Delete,New, Reset Password, and Print. (Refresh, Save, and Save and Close buttons always appear in theconsistent area to the left of the Actions menu.)
6. Click the Save and Close button.
Customize the standard task workspace for Agent Browser UIUse the workspace editor in the Oracle Service Cloud Smart client to customize a task workspace suitable for AgentBrowser UI.
Steps1. From the workspaces explorer, copy the standard task workspace and rename it.
2. From the workspaces explorer, open the renamed task workspace.
3. Configure buttons in the quick actions area, by clicking Configure Quick Access Buttons in the ribbondesigner. Supported buttons are Complete, Copy, Delete, andNew. (Refresh, Save, and Save and Closebuttons always appear in the consistent area to the left of the Actions menu.)
4. Configure buttons on the Actions menu in the ribbon designer. Supported buttons are Complete, Copy,Delete, andNew. (Refresh, Save, and Save and Close buttons always appear in the consistent area tothe left of the Actions menu.)
5. Click the Save and Close button.
Assigning Agent Browser UI workspacesWorkspaces define which fields, controls, and tabs are available when working with records in Oracle Service Cloudand how the information is organized on the content pane. You use the Service Console of the smart client to defineworkspaces and associate them with staff profiles. There are browser-specific workspace slots, including IncidentBrowser, Contact Browser, Organization Browser, and Task Browser, used to define the record editors for Agent BrowserUI.
Your organization may use the default standard desktop console workspaces for the supported workspace types in AgentBrowser UI, or you may create one or more customized workspaces. Your staff profiles define the workspaces your staffmembers see when they work in Agent Browser UI, whether it is the default workspace or a customized workspace.
Oracle Service CloudAgent Browser User Interface Guide
Chapter 4Workspaces in the Agent Browser UI
13
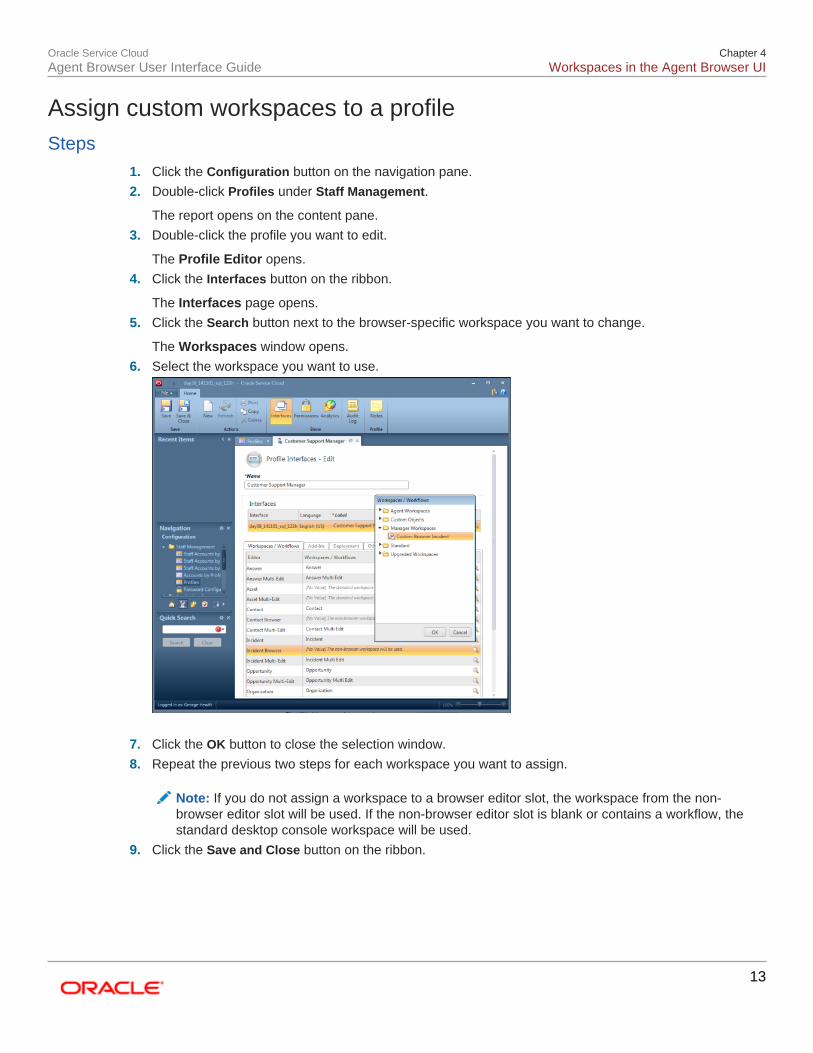
Assign custom workspaces to a profileSteps
1. Click the Configuration button on the navigation pane.
2. Double-click Profiles under Staff Management.
The report opens on the content pane.
3. Double-click the profile you want to edit.
The Profile Editor opens.
4. Click the Interfaces button on the ribbon.
The Interfaces page opens.
5. Click the Search button next to the browser-specific workspace you want to change.
The Workspaces window opens.
6. Select the workspace you want to use.
7. Click the OK button to close the selection window.
8. Repeat the previous two steps for each workspace you want to assign.
Note: If you do not assign a workspace to a browser editor slot, the workspace from the non-browser editor slot will be used. If the non-browser editor slot is blank or contains a workflow, thestandard desktop console workspace will be used.
9. Click the Save and Close button on the ribbon.
Oracle Service CloudAgent Browser User Interface Guide
Chapter 4Workspaces in the Agent Browser UI
14
Workspace rules for Agent Browser UIUse workspace rules to extend the functionality of your custom workspaces and help reduce the time staff membersspend performing routine tasks. Workspace rules are used to dynamically change the display, behavior, and values offields and controls on a workspace, and are triggered by staff member actions, events, and conditions.
Note: Workspace rules are supported for incident, contact, organization, and custom object workspaces in AgentBrowser UI. Not all available workspace rule triggers, conditions, and actions are supported by Agent Browser UI.
You will use the Service Console of the smart client to manage workspace rules.
Oracle Service CloudAgent Browser User Interface Guide
Chapter 5Key Features Supported in the Agent Browser UI
15
5 Key Features Supported in the AgentBrowser UIKey Features Supported in the Agent Browser UI
NotificationsA notification is a message that notifies appropriate staff members of certain events within Service Cloud.
Nofitifications are supported by Agent Browser UI for the following events.
• A broadcast notification is sent to you from another staff member.
• An incident or task is assigned to you.
• An incident or task that was assigned to you has been reassigned to another staff member.
• An incident or task has been escalated.
• An incident is updated, closed, or reopened.
• A system error has occurred.
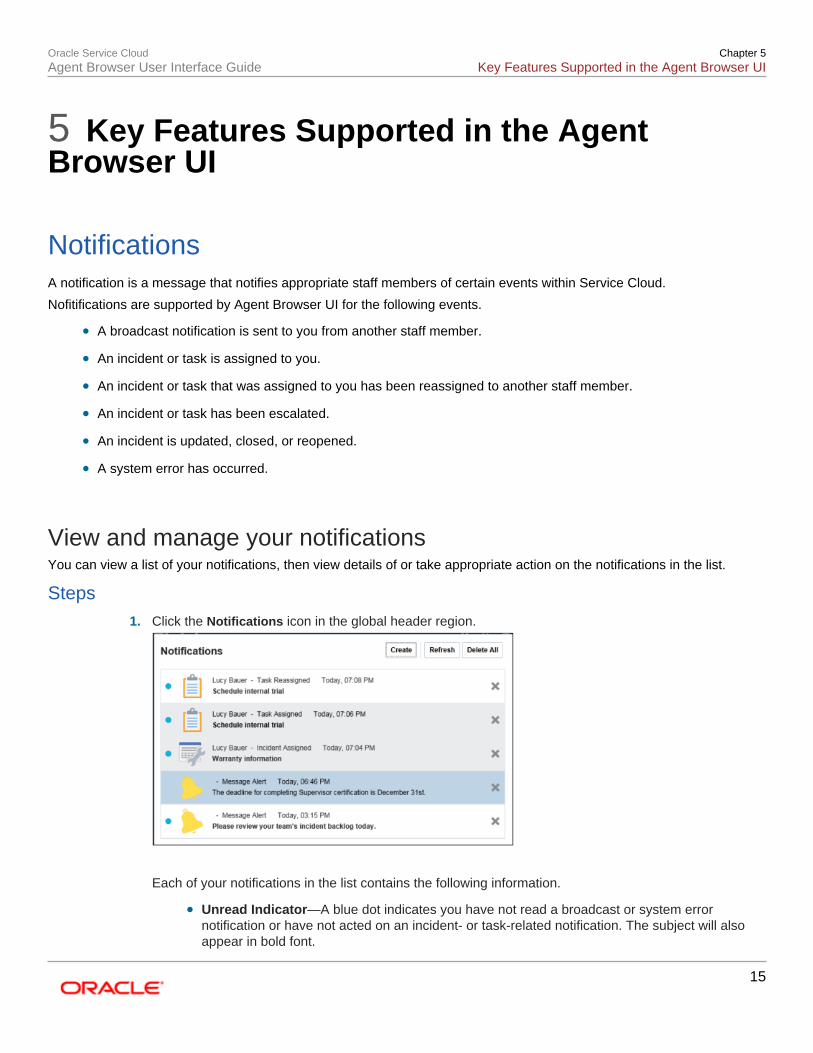
View and manage your notificationsYou can view a list of your notifications, then view details of or take appropriate action on the notifications in the list.
Steps1. Click the Notifications icon in the global header region.
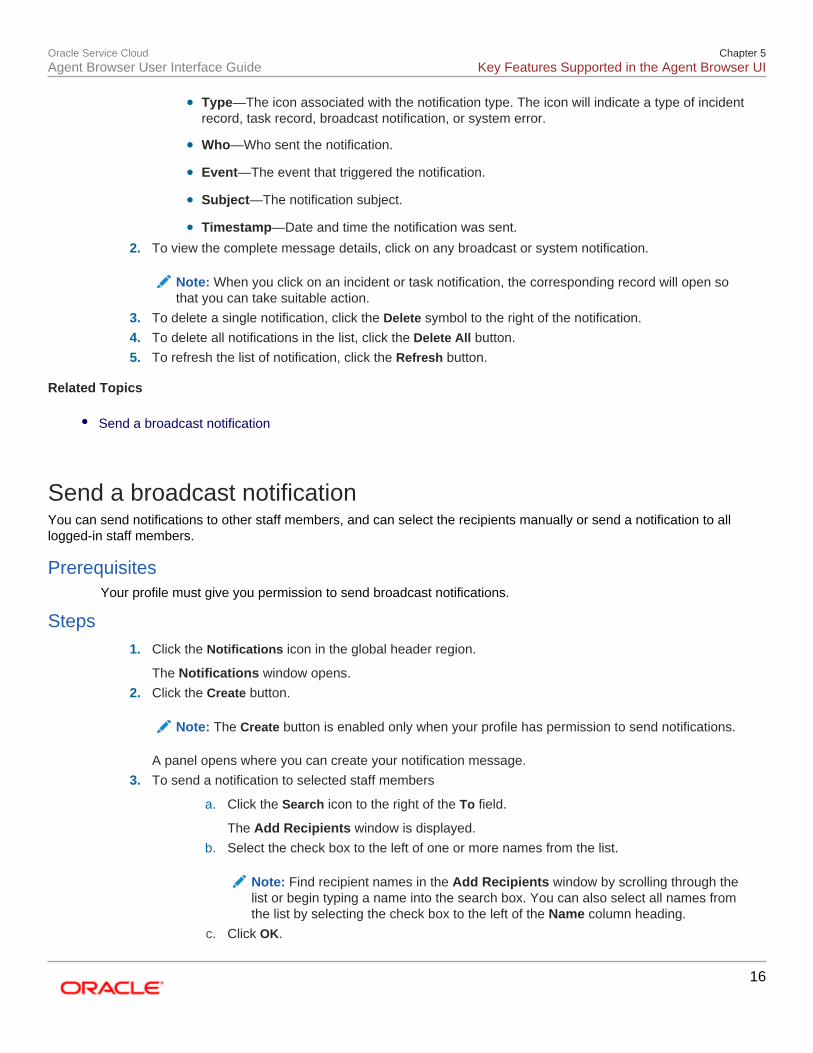
Each of your notifications in the list contains the following information.
• Unread Indicator—A blue dot indicates you have not read a broadcast or system errornotification or have not acted on an incident- or task-related notification. The subject will alsoappear in bold font.
Oracle Service CloudAgent Browser User Interface Guide
Chapter 5Key Features Supported in the Agent Browser UI
16
• Type—The icon associated with the notification type. The icon will indicate a type of incidentrecord, task record, broadcast notification, or system error.
• Who—Who sent the notification.
• Event—The event that triggered the notification.
• Subject—The notification subject.
• Timestamp—Date and time the notification was sent.
2. To view the complete message details, click on any broadcast or system notification.
Note: When you click on an incident or task notification, the corresponding record will open sothat you can take suitable action.
3. To delete a single notification, click the Delete symbol to the right of the notification.
4. To delete all notifications in the list, click the Delete All button.
5. To refresh the list of notification, click the Refresh button.
Related Topics
• Send a broadcast notification
Send a broadcast notificationYou can send notifications to other staff members, and can select the recipients manually or send a notification to alllogged-in staff members.
PrerequisitesYour profile must give you permission to send broadcast notifications.
Steps1. Click the Notifications icon in the global header region.
The Notifications window opens.
2. Click the Create button.
Note: The Create button is enabled only when your profile has permission to send notifications.
A panel opens where you can create your notification message.
3. To send a notification to selected staff members
a. Click the Search icon to the right of the To field.
The Add Recipients window is displayed.
b. Select the check box to the left of one or more names from the list.
Note: Find recipient names in the Add Recipients window by scrolling through thelist or begin typing a name into the search box. You can also select all names fromthe list by selecting the check box to the left of the Name column heading.
c. Click OK.
Oracle Service CloudAgent Browser User Interface Guide
Chapter 5Key Features Supported in the Agent Browser UI
17
The selected names appear in the Tofield.
4. To send the notification to all staff members who are logged in, select the Send to all logged in userscheck box.
Note: When the Send to all logged in users check box is selected, the To field is disabled. Anyrecipient names already in the To field will still appear, but you cannot make any changes untilyou clear the Send to all logged in users check box.
5. Type your message in the Message field.
6. Click the Send button.
Related Topics
• View and manage your notifications
Change your passwordYour organization may have security policies in place that require all staff to use a password to log in to Oracle ServiceCloud. You may be required to change your password at regular intervals or you may choose to change your password atany time.
Important: If your profile contains the SSO Login (SAML 2.0) permission for single sign-on, you cannot changeyour password in Oracle Service Cloud.
Steps1. Click your user name in the global header region.
The Settings and Actions menu opens.
2. Click Change Password.
3. Type your current password and press Tab.
Note: Don’t forget that your password is case sensitive.
4. Type the new password and press Tab.
If an entry does not meet your organization’s password requirements, such as password length orcharacter repetition, the system highlights the incorrect entry.
5. Retype your new password.
6. Click OK.
ResultThe server verifies your password history (both current and new passwords) and, if errors are found,displays the requirements that were not met.
Oracle Service CloudAgent Browser User Interface Guide
Chapter 5Key Features Supported in the Agent Browser UI
18
Sending incident responsesYou send your reply to the customer after you have completed a response to an incident.
In Agent Browser UI, the thread control on the incident workspace appears differently than in the Smart Client interface.In particular, you can use the Done button to move a new message from the editor to the message list in draft mode (forResponse) or not yet saved mode (for Customer Entry or Note). Until you take further action, the draft response andunsaved threads will be highlighted with color and will have edit and delete controls in the thread entry.
You can also include an existing knowledge article in an email response to an incident. Customers receive the link to thearticle, which is available to them on the customer portal.
Note: If you want staff members to be able to send incident responses, you will need to assign incident Add/Editand Send Response permissions in their profile Service permissions.te record types.
Related Topics
• Set up the send incident response function
• Send an incident response
Set up the send incident response functionSteps
1. On the Smart Client desktop interface, open the incident browser workspace.
2. Verify the Rich Text Incident Thread relationship item is added to the incident workspace.
3. Use the Response Options drop-down menu in the Design tab to select options for the Rich TextIncident Thread control.
4. Use the Read Only behavior property in the Design tab to select an option for the Rich Text IndcidentThread control.
• Read Only on New
• Read Only on Edit
• Read Only/Profile Based
5. Use the Default Thread drop-down menu in the Design tab to define the default thread type for new andedited incidents.
6. Click the Ribbon button in the Home tab to open the ribbon designer and configure the Send button onthe Actions menu or in the quick actions area on the incident workspace.
7. Click the Save and Close button.
Related Topics
• Send an incident response
Oracle Service CloudAgent Browser User Interface Guide
Chapter 5Key Features Supported in the Agent Browser UI
19
Send an incident responseSteps
1. On the Messages tab of an open incident, click the Compose Response drop-down and select theresponse channel.
2. To add Cc recipients, click in the Cc field and enter one or more email addresses. Type email addressesdirectly into the field or click the Search button to use the Select Names window.
Note: All recipients are able to see the email addresses in the Cc field.
3. To add Bcc recipients, click in the Bcc field and enter one or more email addresses. Type emailaddresses directly into the field, or click the Search button to use the Select Names window.
Note: No recipients are able to see the email addresses in the Bcc field.
4. Type your response in the message field.
5. To add an attachment to the response, click the Attachment button (paper clip). A window displays anyexisting incident attachments.
a. To attach any incident attachment, select the check box to the left of the filename. Incidentattachments attached to the response will display at the bottom of the message field.
b. To attach a new file to the response, click Add New File, then click Browse to navigate toand select the desired file. New files attached to the response will display at the bottom ofthe message field.
c. To attach additional files to the response, repeat the substep above.
Note: Attachments can be added only to email responses. The maximum file size for eachattachment is 20MB.
6. To include a knowledge article in an incident response refer to Managing and using the knowledgebase.
7. To save the response in draft mode, do one of the following:
• To move the response to the message list without saving the record, click the Done button onthe Messages tab.
• To move the response to the message list and save the record, click the Save button above theincident tabs.
8. To delete a response in draft mode, click the Delete button (X) to the right of the message.
9. To edit a response in draft mode, click the Edit button (pencil) to the right of the message.
10. To send the draft response message, select the message then click Send on the Actions menu drop-down list or quick actions area. The message is sent to the recipient, and any attachments are savedwith the incident and are listed on the Attachments tab.
11. Click the Save and Close button.
Related Topics
• Set up the send incident response function
Oracle Service CloudAgent Browser User Interface Guide
Chapter 5Key Features Supported in the Agent Browser UI
20
View incident response attachmentsYou can easily view attachments that have been sent with each incident response from an open incident record.
Steps1. Open an incident.
2. Click the attachment icon on a response thread header.
Note: The attachment icon does not appear on a response thread header when no attachmentswere included.
A list of attachments sent with that response is displayed.
3. Click on an attachment in the list to view the attachment.
The attachment opens in a separate window.
4. Close the window when you have finished viewing the file.
Viewing and responding to social incidentsUsing powerful features of Oracle RightNow Social Experience (Social Experience), you can view and respond to socialincidents when using Agent Browser UI.
Agents can monitor and participate in conversations on the social web from the Agent Browser UI.
• View and drill down into social cloud search results, using reports specifically for Agent Browser UI—SocialMonitor Search Results and Social Monitor New Results in Public Reports/Common/Social Monitor/Browser.
• Create incidents from social cloud results using theCreate Incident button.
Note: When a social incident is created using Agent Browser UI, if an existing contact exists and isassociated to the social media user tied to the cloud result, that contact will be used in the incident.Otherwise, a new contact is created.
• Respond to incidents that have been created from Facebook subscriptions and private messages and Twitterpublic posts and @mentions.
• Monitor and respond to customer responses on existing incidents.
Agents use social response mechanisms integrated in the Messages tab on the incident workspace to respond to socialincidents.
For more information on Social Experience, refer to the Social Experience section of your Oracle Service Cloud onlinehelp.
Oracle Service CloudAgent Browser User Interface Guide
Chapter 5Key Features Supported in the Agent Browser UI
21
Forwarding incidentsAn incident forwarding function is available when working with an incident record. For example, you may need additionalinformation from another staff member before responding to a customer.
To forward an incident, you complete fields in an email template. Information is automatically taken from the incidentrecord and included with the email message when it is sent.
Related Topics
• Forward an incident
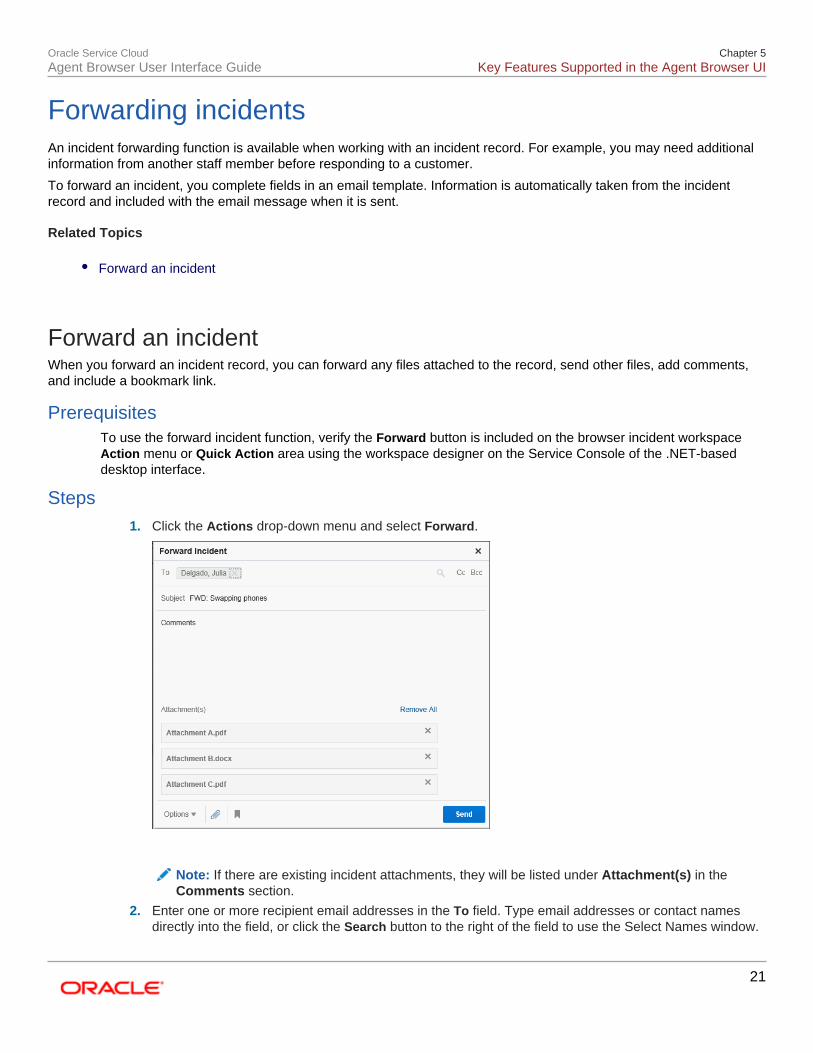
Forward an incidentWhen you forward an incident record, you can forward any files attached to the record, send other files, add comments,and include a bookmark link.
PrerequisitesTo use the forward incident function, verify the Forward button is included on the browser incident workspaceAction menu or Quick Action area using the workspace designer on the Service Console of the .NET-baseddesktop interface.
Steps1. Click the Actions drop-down menu and select Forward.
Note: If there are existing incident attachments, they will be listed under Attachment(s) in theComments section.
2. Enter one or more recipient email addresses in the To field. Type email addresses or contact namesdirectly into the field, or click the Search button to the right of the field to use the Select Names window.
Oracle Service CloudAgent Browser User Interface Guide
Chapter 5Key Features Supported in the Agent Browser UI
22
Tip: Use the contact match function when typing directly into the To field. Type part of thecontact name, then enter the recipient separator (;) or navigate to the next field. If there is amatching record, it will be populated into the To field. If there is more than one matching recordyou will be able to select from the matching records.
3. To add Cc recipients, click on Cc and enter one or more email addresses. Type email addresses directlyinto the field, or click the Search button to the right of the field to use the Select Names window.
Note: All recipients are able to see the email addresses in the Cc field.
4. To add Bcc recipients, click on Bcc and enter one or more email addresses. Type email addressesdirectly into the field, or click the Search button to the right of the field to use the Select Names window.
Note: No recipients are able to see the email addresses in the Bcc field.
5. Edit the Subject field, if needed.
6. Type the message you want to include with the record in the Comments field.
7. To include a bookmark to the incident in the Comments field, click the Bookmark button at the bottom ofthe window.
Tip: Including the bookmark to the incident in the Comments field allows the recipient to quicklynavigate to the incident.
8. To set Exclude Notes and Send Contact Information options, click the Options drop-down menu.
Note: The Exclude Notes option check box is cleared by default, so private notes in the incidentmessage thread are included in the forwarded incident information. To prevent private notes frombeing forwarded with the incident, select the Exclude Notes check box.
The Send Contacts option check box is cleared by default, so contacts associated withthe incident are not included in the forwarded incident information. To include the contactsassociated with the incident, select the Send Contacts check box.
9. To add or remove existing attachments or add a new file to the forwarded incident, click the fileattachment button to the right of the Options drop-down menu and do one or more of the following:
• To remove an existing incident attachment from the forwarded incident, clear the check box tothe left of the file name.
• To add an existing incident attachment to the forwarded incident, select the check box to the leftof the file name.
• To add a new file to the forwarded incident, click Add New File, then browse to and select thefile.
10. Click the Send button.
Related Topics
• Bookmarks
• Create a bookmark URL
Oracle Service CloudAgent Browser User Interface Guide
Chapter 5Key Features Supported in the Agent Browser UI
23
Inserting standard textUsing standard text in incident responses saves time, eliminates errors, and helps staff members respond to customerswith consistent information.
Once your administrator has added standard text using the .NET-based desktop interface, you can insert standard textusing the Standard Text tool panel or, if you know the hot key sequence for the text item, you can type it without openingthe Standard Text window.
Related Topics
• Insert standard text from the Standard Text tools panel
• Insert standard text using a hot key sequence
Insert standard text from the Standard Text tools panelUse standard text in your responses as an alternative to repeatedly typing often-used information.
PrerequisitesStandard text must be added by an administrator using the .NET-based desktop interface.
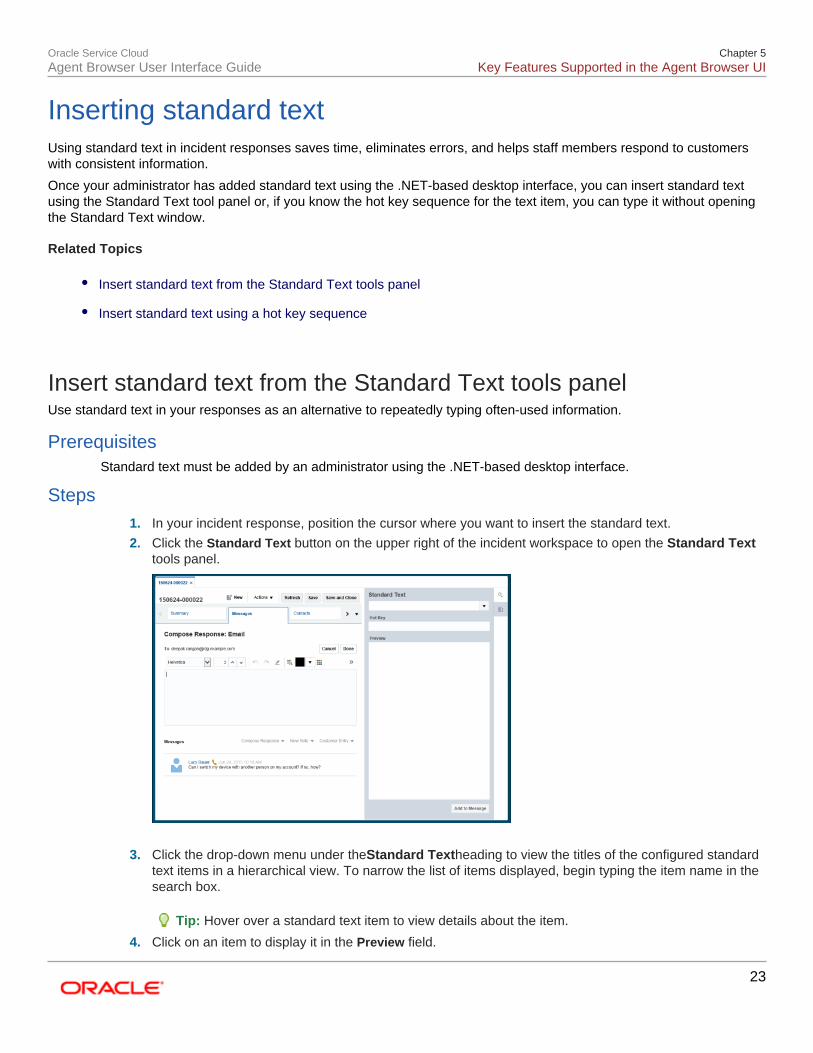
Steps1. In your incident response, position the cursor where you want to insert the standard text.
2. Click the Standard Text button on the upper right of the incident workspace to open the Standard Texttools panel.
3. Click the drop-down menu under theStandard Textheading to view the titles of the configured standardtext items in a hierarchical view. To narrow the list of items displayed, begin typing the item name in thesearch box.
Tip: Hover over a standard text item to view details about the item.
4. Click on an item to display it in the Preview field.
Oracle Service CloudAgent Browser User Interface Guide
Chapter 5Key Features Supported in the Agent Browser UI
24
5. Click Add to Message to insert the standard text into your response.
6. To add other standard text items to the response, repeat the steps above.
7. To modify the standard text, edit it as necessary in the response.
Note: If the standard text includes one or more variables, the variable is displayed in yourresponse rather than the value of the variable. The variable is replaced with the data only whenyou send your response. Then, when you reopen the incident, the data appears where thevariable had been inserted.
8. Click the Standard Text button to close the Standard Text tools panel.
Related Topics
• Inserting standard text
• Insert standard text using a hot key sequence
Insert standard text using a hot key sequenceUse the hot key sequence for a standard text item to insert often-used information into your incident response mostefficiently.
Steps1. In your incident response, position the cursor where you want to insert the standard text.
2. Press F8.
3. Type the hot key sequence in the Standard Text field.
Tip: To display the hot key sequence for a standard text item, open the Standard Text toolspanel and select the standard text item from the drop-down menu. The keystrokes are displayedin the Hot Keyy field.
4. Press F8 again to insert the standard text in your response.
5. To add other standard text items to the response, repeat the steps above.
6. To modify the standard text, edit it as necessary in the response.
Note: If the standard text includes one or more variables, the variable is displayed in yourresponse rather than the value of the variable. The variable is replaced with the data only whenyou send your response. Then, when you reopen the incident, the data appears where thevariable had been inserted.
Related Topics
• Inserting standard text
• Insert standard text from the Standard Text tools panel
Oracle Service CloudAgent Browser User Interface Guide
Chapter 5Key Features Supported in the Agent Browser UI
25
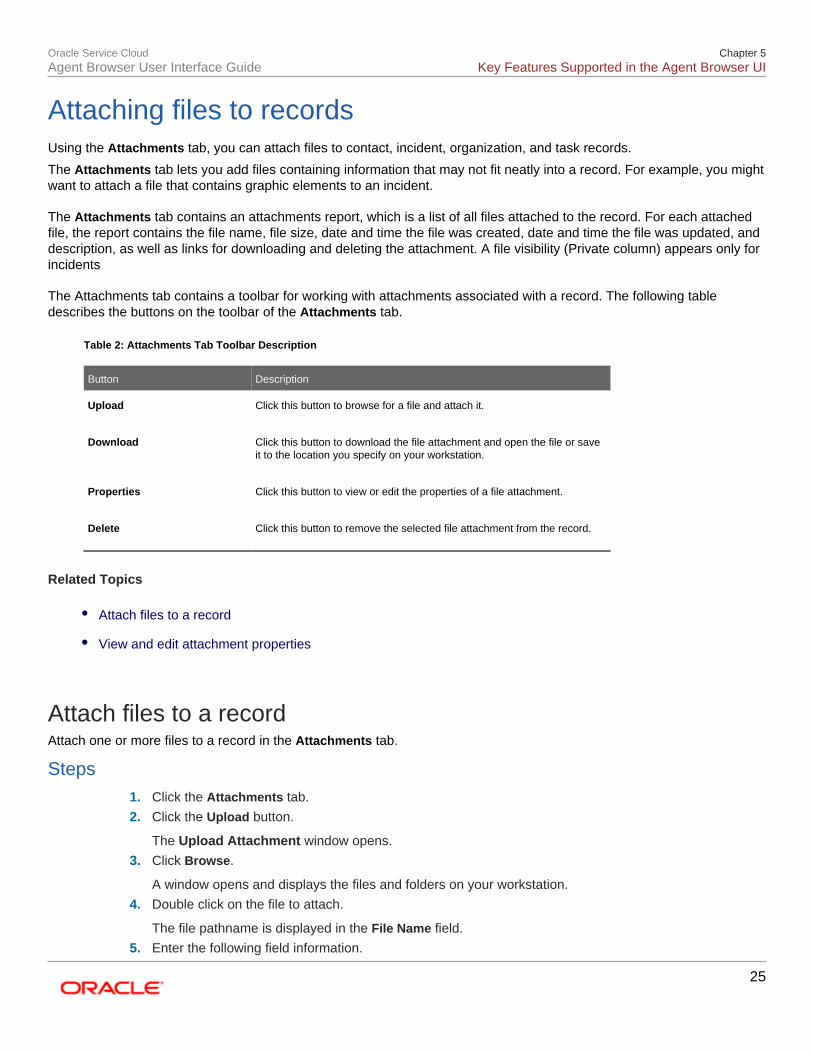
Attaching files to recordsUsing the Attachments tab, you can attach files to contact, incident, organization, and task records.
The Attachments tab lets you add files containing information that may not fit neatly into a record. For example, you mightwant to attach a file that contains graphic elements to an incident.
The Attachments tab contains an attachments report, which is a list of all files attached to the record. For each attachedfile, the report contains the file name, file size, date and time the file was created, date and time the file was updated, anddescription, as well as links for downloading and deleting the attachment. A file visibility (Private column) appears only forincidents
The Attachments tab contains a toolbar for working with attachments associated with a record. The following tabledescribes the buttons on the toolbar of the Attachments tab.
Table 2: Attachments Tab Toolbar Description
Button Description
Upload Click this button to browse for a file and attach it.
Download Click this button to download the file attachment and open the file or saveit to the location you specify on your workstation.
Properties Click this button to view or edit the properties of a file attachment.
Delete Click this button to remove the selected file attachment from the record.
Related Topics
• Attach files to a record
• View and edit attachment properties
Attach files to a recordAttach one or more files to a record in the Attachments tab.
Steps1. Click the Attachments tab.
2. Click the Upload button.
The Upload Attachment window opens.
3. Click Browse.
A window opens and displays the files and folders on your workstation.
4. Double click on the file to attach.
The file pathname is displayed in the File Name field.
5. Enter the following field information.
Oracle Service CloudAgent Browser User Interface Guide
Chapter 5Key Features Supported in the Agent Browser UI
26
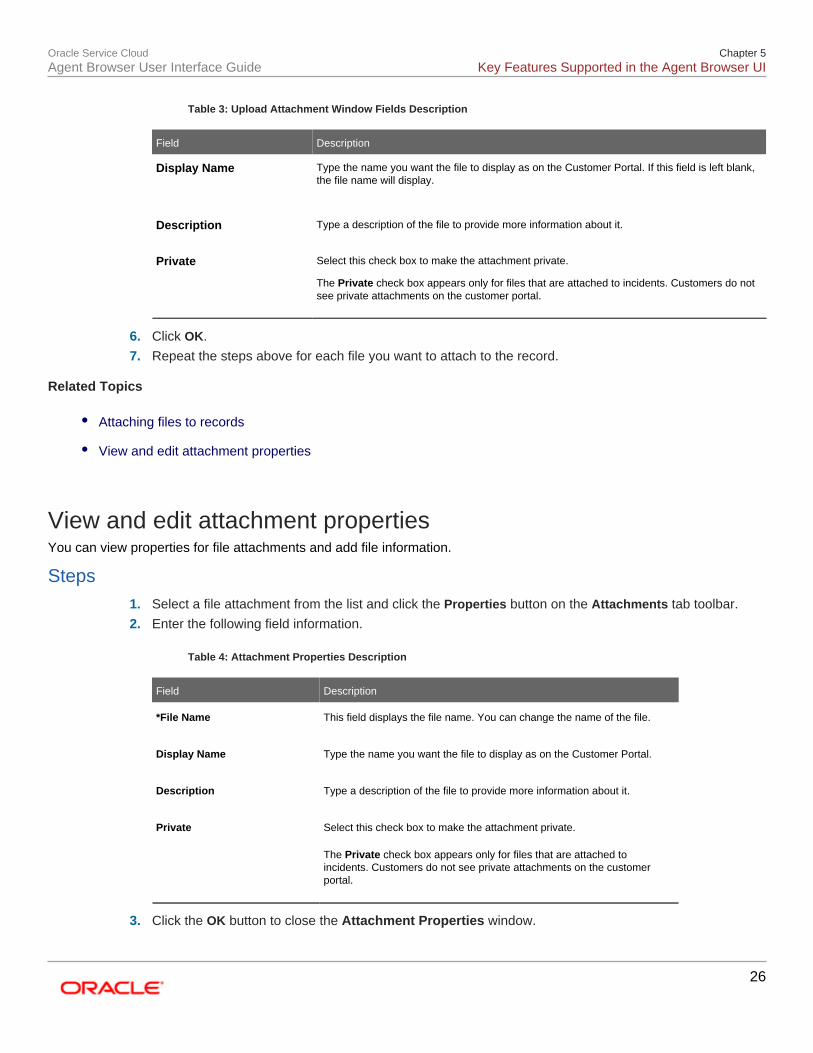
Table 3: Upload Attachment Window Fields Description
Field Description
Display Name Type the name you want the file to display as on the Customer Portal. If this field is left blank,the file name will display.
Description Type a description of the file to provide more information about it.
Private Select this check box to make the attachment private.
The Private check box appears only for files that are attached to incidents. Customers do notsee private attachments on the customer portal.
6. Click OK.
7. Repeat the steps above for each file you want to attach to the record.
Related Topics
• Attaching files to records
• View and edit attachment properties
View and edit attachment propertiesYou can view properties for file attachments and add file information.
Steps1. Select a file attachment from the list and click the Properties button on the Attachments tab toolbar.
2. Enter the following field information.
Table 4: Attachment Properties Description
Field Description
*File Name This field displays the file name. You can change the name of the file.
Display Name Type the name you want the file to display as on the Customer Portal.
Description Type a description of the file to provide more information about it.
Private Select this check box to make the attachment private.
The Private check box appears only for files that are attached toincidents. Customers do not see private attachments on the customerportal.
3. Click the OK button to close the Attachment Properties window.
Oracle Service CloudAgent Browser User Interface Guide
Chapter 5Key Features Supported in the Agent Browser UI
27
Related Topics
• Attaching files to records
• Attach files to a record
Copy a recordYou can copy a record from a report or an open record to use as a starting point for creating another record.
Prerequisites
Steps1. Do one of the following:
• With a report open on the content pane, click the record you want to copy and click the Copybutton on the toolbar.
• With the record open, click the Actions drop-down menu, then select Copy.
The Copy window opens.
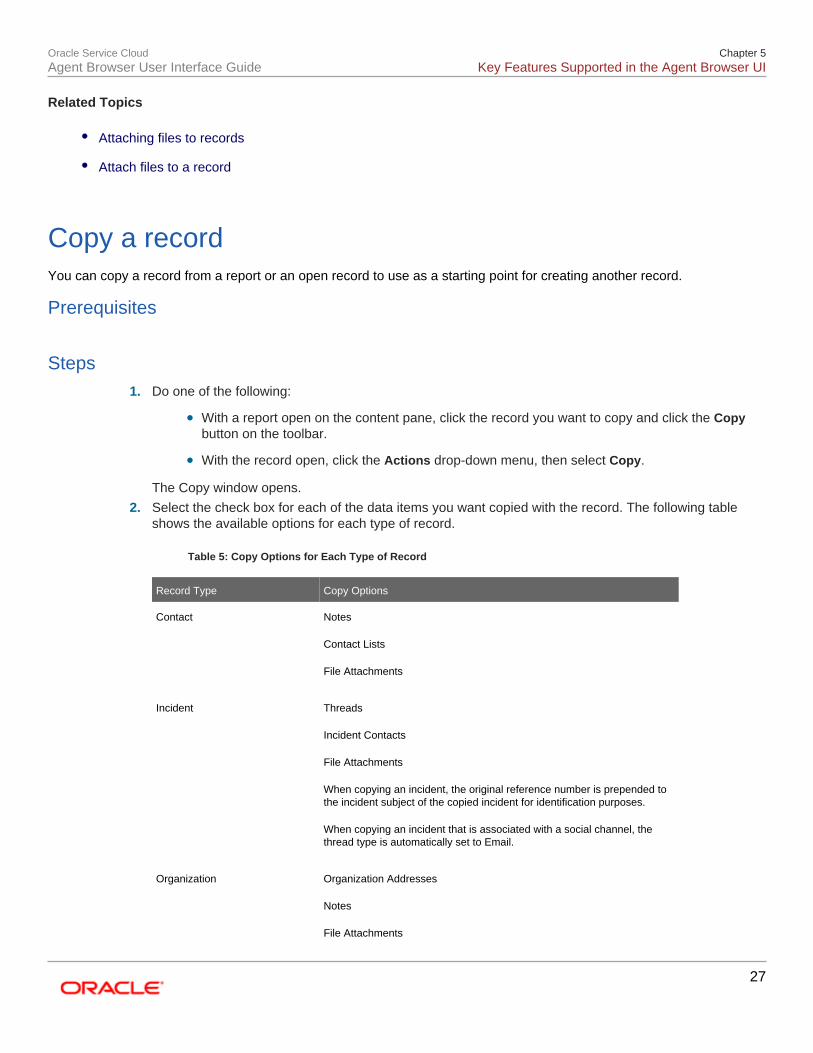
2. Select the check box for each of the data items you want copied with the record. The following tableshows the available options for each type of record.
Table 5: Copy Options for Each Type of Record
Record Type Copy Options
Contact Notes
Contact Lists
File Attachments
Incident Threads
Incident Contacts
File Attachments
When copying an incident, the original reference number is prepended tothe incident subject of the copied incident for identification purposes.
When copying an incident that is associated with a social channel, thethread type is automatically set to Email.
Organization Organization Addresses
Notes
File Attachments
Oracle Service CloudAgent Browser User Interface Guide
Chapter 5Key Features Supported in the Agent Browser UI
28
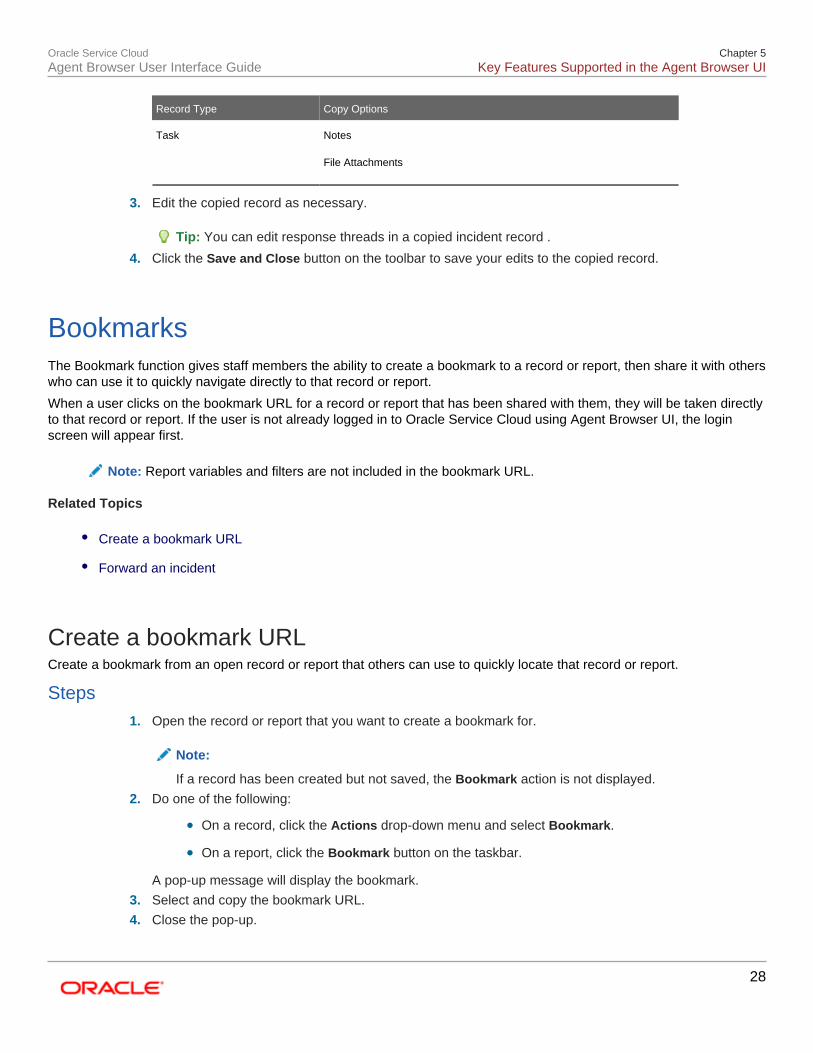
Record Type Copy Options
Task Notes
File Attachments
3. Edit the copied record as necessary.
Tip: You can edit response threads in a copied incident record .
4. Click the Save and Close button on the toolbar to save your edits to the copied record.
BookmarksThe Bookmark function gives staff members the ability to create a bookmark to a record or report, then share it with otherswho can use it to quickly navigate directly to that record or report.
When a user clicks on the bookmark URL for a record or report that has been shared with them, they will be taken directlyto that record or report. If the user is not already logged in to Oracle Service Cloud using Agent Browser UI, the loginscreen will appear first.
Note: Report variables and filters are not included in the bookmark URL.
Related Topics
• Create a bookmark URL
• Forward an incident
Create a bookmark URLCreate a bookmark from an open record or report that others can use to quickly locate that record or report.
Steps1. Open the record or report that you want to create a bookmark for.
Note:
If a record has been created but not saved, the Bookmark action is not displayed.
2. Do one of the following:
• On a record, click the Actions drop-down menu and select Bookmark.
• On a report, click the Bookmark button on the taskbar.
A pop-up message will display the bookmark.
3. Select and copy the bookmark URL.
4. Close the pop-up.
Oracle Service CloudAgent Browser User Interface Guide
Chapter 5Key Features Supported in the Agent Browser UI
29
5. Paste the copied bookmark URL into an email or other communication channel or use it whenforwarding an incident.
Related Topics
• Bookmarks
• Forward an incident
Managing and using the knowledge baseThe knowledge base in Oracle Service Cloud contains information that provides solutions to common customer supportquestions.
The standard knowledge base embedded in Oracle Service Cloud is knowledge foundation (often referred to as Answers).
Oracle Knowledge Advanced (Knowledge Advanced), which provides more powerful and intelligent contextual searchcapabilities can be integrated with Oracle Service Cloud..
Related Topics
• Using Knowledge Foundation
• Search the knowledge base
• Using Knowledge Advanced
Using Knowledge FoundationStaff members can search the knowledge base based on the context of the incident, perform an adhoc search, and filterknowledge search results.
The knowledge base search function, accessible using the Search Knowledge Base tool panel tab in the tools area on theincident workspace, allows staff members to view details of the set of answers within a single window and add an answerto the incident as a link or text.
Related Topics
• Managing and using the knowledge base
• Search the knowledge base
• Using Knowledge Advanced
Search the knowledge baseFind informtion in the knowledge base to support common customer support questions.
Steps1. Open the incident which needs an answer.
Oracle Service CloudAgent Browser User Interface Guide
Chapter 5Key Features Supported in the Agent Browser UI
30
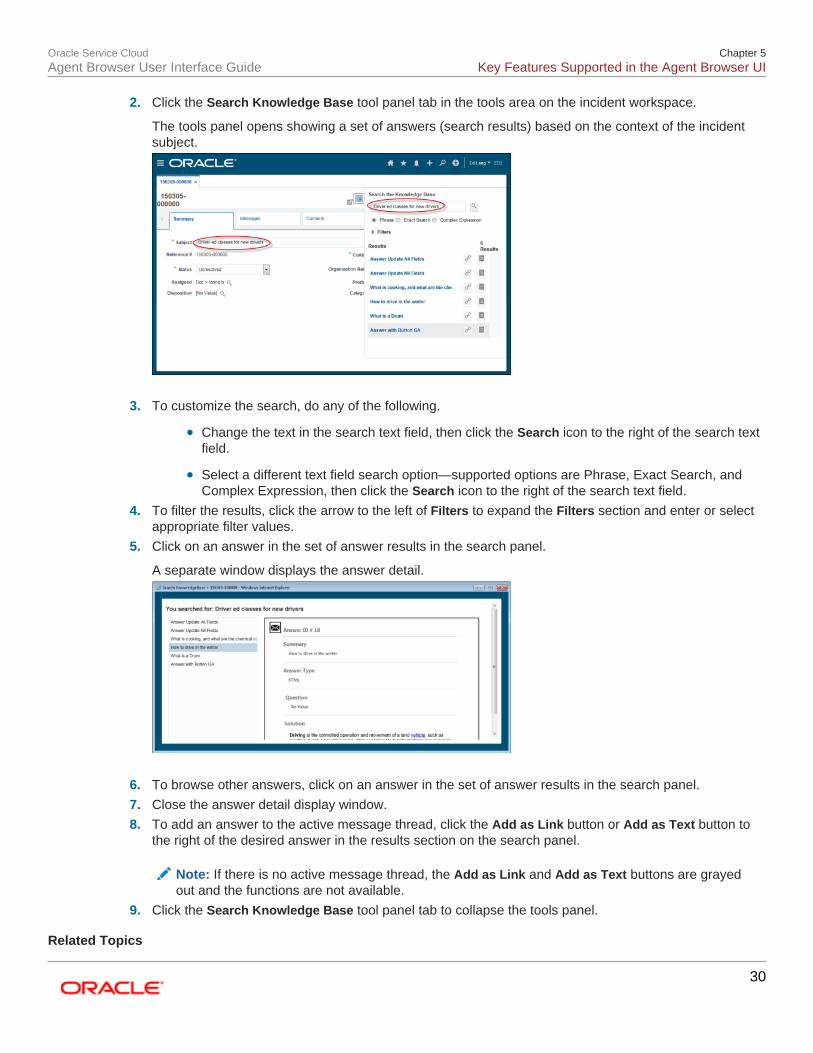
2. Click the Search Knowledge Base tool panel tab in the tools area on the incident workspace.
The tools panel opens showing a set of answers (search results) based on the context of the incidentsubject.
3. To customize the search, do any of the following.
• Change the text in the search text field, then click the Search icon to the right of the search textfield.
• Select a different text field search option—supported options are Phrase, Exact Search, andComplex Expression, then click the Search icon to the right of the search text field.
4. To filter the results, click the arrow to the left of Filters to expand the Filters section and enter or selectappropriate filter values.
5. Click on an answer in the set of answer results in the search panel.
A separate window displays the answer detail.
6. To browse other answers, click on an answer in the set of answer results in the search panel.
7. Close the answer detail display window.
8. To add an answer to the active message thread, click the Add as Link button or Add as Text button tothe right of the desired answer in the results section on the search panel.
Note: If there is no active message thread, the Add as Link and Add as Text buttons are grayedout and the functions are not available.
9. Click the Search Knowledge Base tool panel tab to collapse the tools panel.
Related Topics
Oracle Service CloudAgent Browser User Interface Guide
Chapter 5Key Features Supported in the Agent Browser UI
31
• Managing and using the knowledge base
• Using Knowledge Foundation
• Using Knowledge Advanced
Using Knowledge AdvancedKnowledge Advanced provides more powerful knowledge management capabilities when using Agent Browser UI.
When Knowledge Advanced is enabled and configured in Oracle Service Cloud, you will have access to many advancedknowledge management features using Agent Browser UI. Use the Recommended Articles, Search Knowledge Base,Linked Knowledge Base Articles, and My Favorite Knowledge Base tool panel tabs on the right side of the incidentworkspace to access these functions:
• View a list of recommended knowledge articles based on the context of the incident subject or products andcategories.
• Perform searches of the knowledge base.
• Add an article to an incident as a link or text, using hot keys or buttons on the My Favorites tab or SearchKnowledge Base tab.
• Save and remove articles from a list of favorites.
• View a list of all articles linked to an incident.
• Choose one or more languages for viewing search results.
• Create, modify, and curate knowledge articles.
Knowledge Advanced also allows you to track events such as answers viewed and answers added to incidents and viewevent tracking reports on the Smart Client.
For detailed information on configuring and using Knowledge Advanced refer to the Oracle Knowledge AdvancedConfiguration Guide and the Oracle Knowledge Advanced User Guide at Answer ID 8156.
Chat with customersIf your profile is configured to use the chat function, you can chat with customers from theAgent Browser UI.
To receive chat requests, you must first log in to chat and set your status as Available or anything equivalent. Thefollowing options are available.
• View a new chat request notification and accept or decline it.
• View notifications for new chat messages in an existing chat window.
• Conference another agent to a chat.
• Chat with multiple customers simultaneously and view information on chats that are not in focus.
• Terminate or wrap up a chat.

Oracle Service CloudAgent Browser User Interface Guide
Chapter 5Key Features Supported in the Agent Browser UI
32
• Transfer a chat to a different agent or queue.
Refer to the documentation on Chat in the Oracle Service Cloud online help.
Co-browsing with customersCo-browse allows an agent to view a customer’s screen, making it an important tool to assist with customer support andsales conversion.
While speaking to a customer by phone, staff members can initiate co-browse to take control of the customer’s webbrowser and guide the customer to complete a task.
Before staff members can begin initiating co-browse sessions with customers, you must configure the incident browserworkspace and provide profile permissions.
Note: Co-browse in the Agent Browser UI is supported only for the case when an agent is speaking with acustomer by phone.
Collaborating with other agentsAs in the Smart Client, agents using the Agent Browser UI can collaborate with others to help resolve customer issues.Refer to the Collaborating with other agents section of the Oracle Service Cloud online help.
Printing Records and ReportsYou can easily print details of records and reports using the Print button on toolbars and the Action menu.
You can print the details of contacts, organizations, tasks, and incidents from the Print button on the Action drop-downmenu or the Quick Access Toolbar. You can also print a report from the Print button on the report toolbar.
In an open incident, the Print button is available on the Contacts tab, the Action drop-down menu, and the Quick AccessToolbar. If you click the Print button on the Contacts tab, only the contact details are printed. However, if you click thePrint button on the Actions menu or on the Quick Access toolbar, complete details of the incident are printed.
Oracle Service CloudAgent Browser User Interface Guide
Chapter 5Key Features Supported in the Agent Browser UI
33
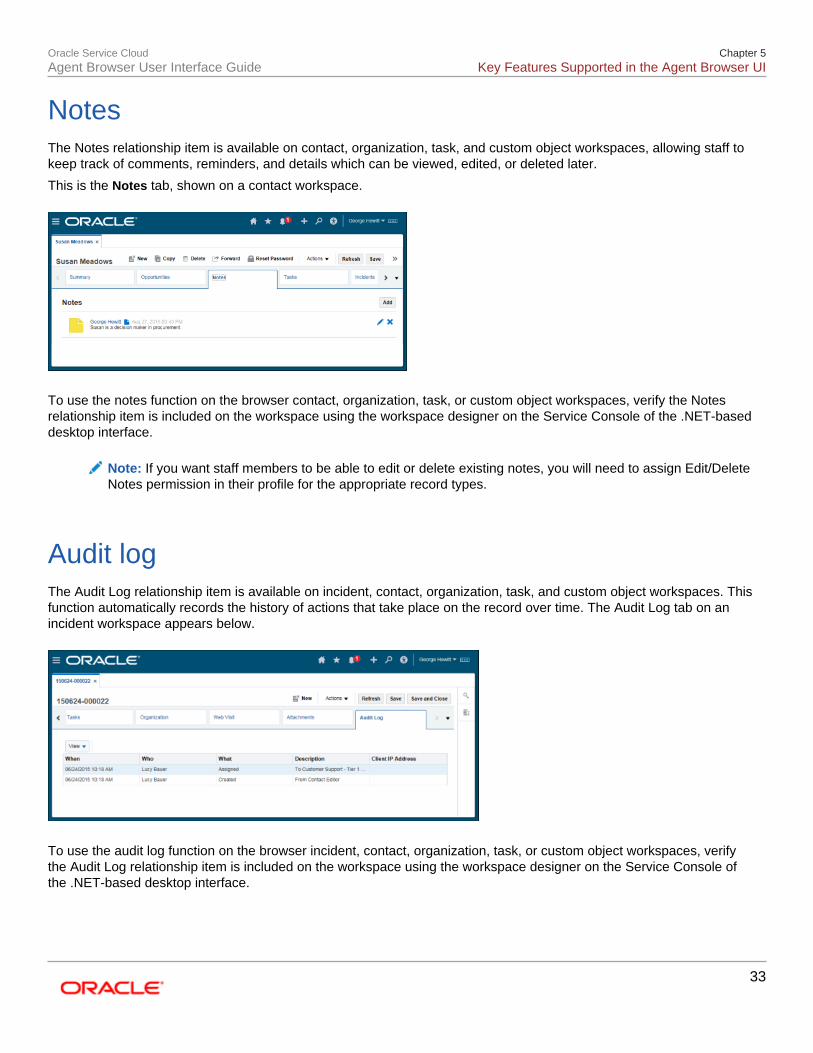
NotesThe Notes relationship item is available on contact, organization, task, and custom object workspaces, allowing staff tokeep track of comments, reminders, and details which can be viewed, edited, or deleted later.
This is the Notes tab, shown on a contact workspace.
To use the notes function on the browser contact, organization, task, or custom object workspaces, verify the Notesrelationship item is included on the workspace using the workspace designer on the Service Console of the .NET-baseddesktop interface.
Note: If you want staff members to be able to edit or delete existing notes, you will need to assign Edit/DeleteNotes permission in their profile for the appropriate record types.
Audit logThe Audit Log relationship item is available on incident, contact, organization, task, and custom object workspaces. Thisfunction automatically records the history of actions that take place on the record over time. The Audit Log tab on anincident workspace appears below.
To use the audit log function on the browser incident, contact, organization, task, or custom object workspaces, verifythe Audit Log relationship item is included on the workspace using the workspace designer on the Service Console ofthe .NET-based desktop interface.
Oracle Service CloudAgent Browser User Interface Guide
Chapter 5Key Features Supported in the Agent Browser UI
34
Reset contact passwordStaff members can initiate resetting a contact’s password while working on a contact record.
PrerequisitesVerify the Reset Contact Password button is included on the browser contact workspace ribbon or Quick AccessToolbar using the workspace designer on the Service Console of the .NET-based desktop interface.
Steps1. Open the contact record you want to reset the password for.
2. Click the Actions drop-down menu, then select Reset Password.
3. Click Yes to confirm you want to reset the contact’s password.
ResultOnce the password reset is initiated, the contact’s previous password becomes invalid and an emailis sent to the contact’s primary email address with steps for completing the password reset.
Survey by proxyThe Survey by Proxy workspace control is now supported in the Agent Browser UI. Adding the control to a contact,organization, or incident workspace allows your agents to complete surveys on behalf of a customer.
Oracle Service CloudAgent Browser User Interface Guide
Chapter 6Using Reports in Agent Browser UI
35
6 Using Reports in Agent Browser UIUsing Reports in Agent Browser UI
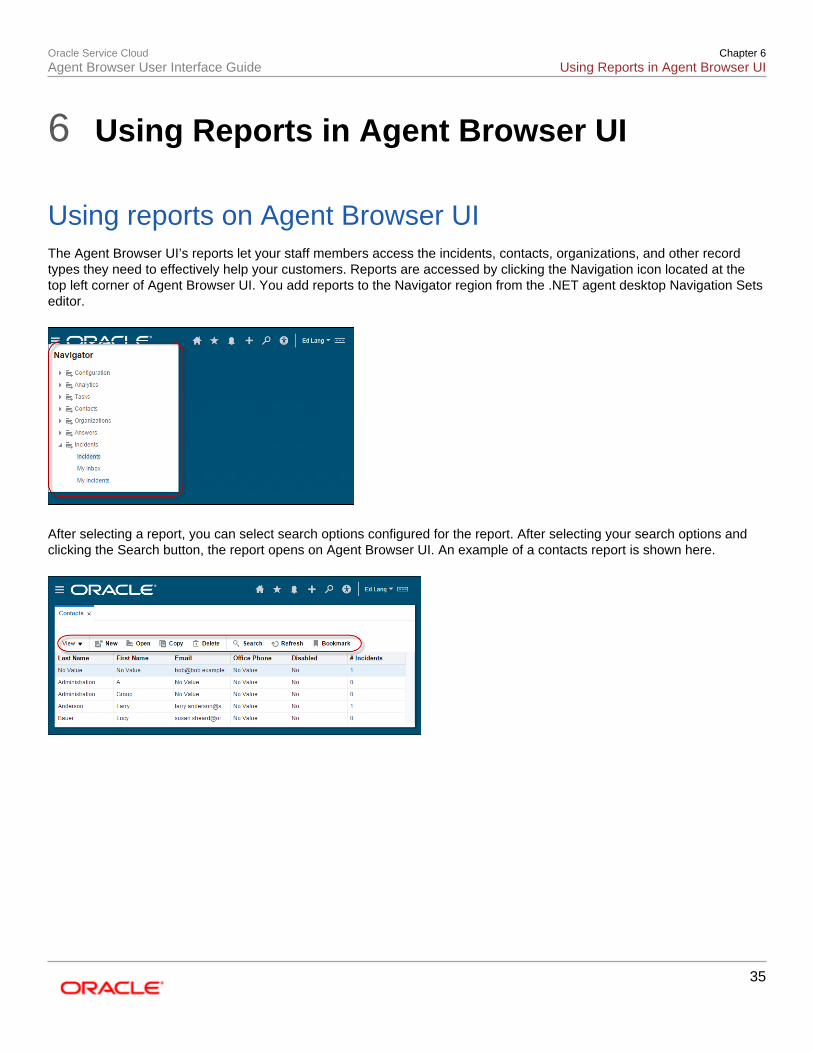
Using reports on Agent Browser UIThe Agent Browser UI’s reports let your staff members access the incidents, contacts, organizations, and other recordtypes they need to effectively help your customers. Reports are accessed by clicking the Navigation icon located at thetop left corner of Agent Browser UI. You add reports to the Navigator region from the .NET agent desktop Navigation Setseditor.
After selecting a report, you can select search options configured for the report. After selecting your search options andclicking the Search button, the report opens on Agent Browser UI. An example of a contacts report is shown here.
Oracle Service CloudAgent Browser User Interface Guide
Chapter 6Using Reports in Agent Browser UI
36
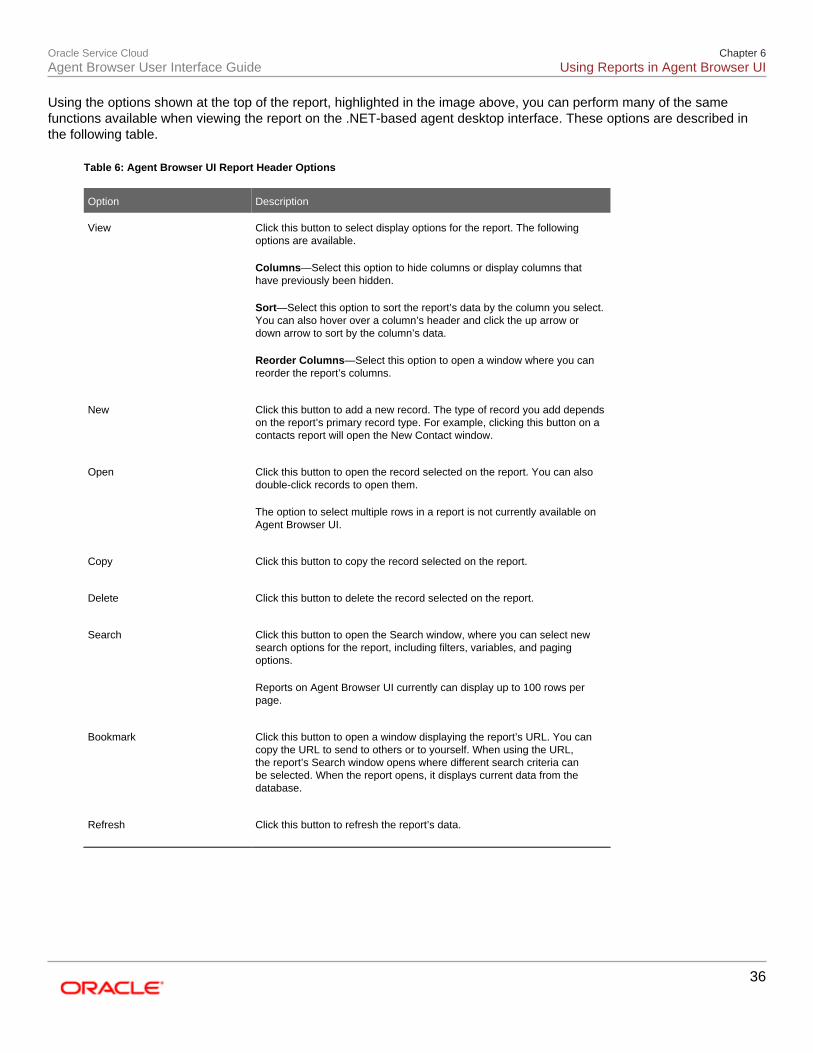
Using the options shown at the top of the report, highlighted in the image above, you can perform many of the samefunctions available when viewing the report on the .NET-based agent desktop interface. These options are described inthe following table.
Table 6: Agent Browser UI Report Header Options
Option Description
View Click this button to select display options for the report. The followingoptions are available.
Columns—Select this option to hide columns or display columns thathave previously been hidden.
Sort—Select this option to sort the report’s data by the column you select.You can also hover over a column’s header and click the up arrow ordown arrow to sort by the column’s data.
Reorder Columns—Select this option to open a window where you canreorder the report’s columns.
New Click this button to add a new record. The type of record you add dependson the report’s primary record type. For example, clicking this button on acontacts report will open the New Contact window.
Open Click this button to open the record selected on the report. You can alsodouble-click records to open them.
The option to select multiple rows in a report is not currently available onAgent Browser UI.
Copy Click this button to copy the record selected on the report.
Delete Click this button to delete the record selected on the report.
Search Click this button to open the Search window, where you can select newsearch options for the report, including filters, variables, and pagingoptions.
Reports on Agent Browser UI currently can display up to 100 rows perpage.
Bookmark Click this button to open a window displaying the report’s URL. You cancopy the URL to send to others or to yourself. When using the URL,the report’s Search window opens where different search criteria canbe selected. When the report opens, it displays current data from thedatabase.
Refresh Click this button to refresh the report’s data.
Oracle Service CloudAgent Browser User Interface Guide
Chapter 6Using Reports in Agent Browser UI
37
Supported report featuresWhile Agent Browser UI supports many of the standard reporting options available in the .NET-based agent desktopinterface, some options have not yet been added. Additional features will be added in future releases until the samereport options are available regardless of which interface you access reports from. To effectively access data from AgentBrowser UI, you should understand which features are currently supported.
Important: Since many of the reports available in the Analytics explorer use features that are not yet supported onAgent Browser UI, we recommend creating reports specifically for use on Agent Browser UI. If a report currentlyexists that you want to use on the interface, you can copy it and remove any unsupported report options from thecopy.
The following reporting features are currently supported on Agent Browser UI.
• Quick Search reports
• Report variables
• Dashboard features are supported except minimizing, maximizing, and hiding dashboard reports.
• All chart types are supported except 3D Funnel, 2D and 3D Pyramid (a Funnel chart sub-type), and 2D and 3DStacked Line/Bar Combo.
• Data exceptions are supported. However, they cannot currently interact with chart displays.
• Column format options that change how data in a column displays are supported. For example, if your report isconfigured to display data in a numeric column as percentages, this is shown on Agent Browser UI.
• Column calculations are supported. For example, a column formatted to include the Total calculation will displaythe total of the data in a numeric column on Agent Browser UI.
Unsupported featuresThere are several features that are commonly used in reports on the .NET-based agent desktop are not yet available inAgent Browser UI. These include rollups, cross-tabs, slicing, and in-line editing. These and other features will be added infuture releases, with the timeline determined in part by customer usage statistics.
Reports and record typesThe Agent Browser UI does not currently support all Oracle Service Cloud record types. Reports that attempt to outputunsupported record types may not function correctly, and you will not be able to open unsupported record types shown inthe reports. The following record types are currently supported.
• Contacts
• Custom Objects
• Incidents
• Organizations
Oracle Service CloudAgent Browser User Interface Guide
Chapter 6Using Reports in Agent Browser UI
38
• Tasks
Each report on Agent Browser UI supports only a single record type. For example, when using a report displayingincidents on the .NET-based agent desktop interface, you can open the incident record, along with the related contact andorganization records. In Agent Browser UI, you can open only the incident.
If you want to open records from a report that displays information from multiple record types, you should ensure that thereport’s record commands are configured to let you access the record type you want. To do so, open the report on thereport designer, click the Records button on the ribbon’s Home tab, and clear the check boxes next to the record typesexcept for the record type you want to be able to open from the report.