Embed Size (px)
Citation preview

Name:
See more at www.sonseekers.com.au Teacher Resource - Unit 3 Level One
TEACHERRESOURCE
LEVEL ONE
AGES 4-5
UNIT 3From Aaron‛s Rod to Eli
RUTH, NAOMI
AND BOAZA LOVE STORY
Balaam Donkeyandhis
god’s people entera newland
visionone10 Old Goombungee Road,
Toowoomba, Qld 4350 AustraliaPhone: 1300 885 048 - Fax: 1300 728 293
Email: [email protected] - Website: www.visionone.org.au
.com.au
.com.au
TRU3L1.indd 1 2/09/2009 11:04:35 AM

Introduction Teacher Resource - Level One Page 1
ContentsTeaching Sonseekers ..........1
A teacher’s guide ................2
Publisher’s note ..................3
Unit 3 (Lessons 33-48):
33. Aaron’s rod ....................... 434. Moses hits the rock ......... 1035. The bronze serpent ......... 1436. Balaam and his ass ........ 1837. Joshua and Rahab .......... 2238. Crossing the Jordan, Jericho ............................ 2639. The sin of Achan ............. 3040. The sun stands still ......... 3441. Gideon’s fleece ............... 3842. Gideon and his army ...... 4243. Samson ........................... 4644. Samson and Delilah ....... 4845. Ruth, Naomi and Boaz ... 5246. Hannah ........................... 5647. Samuel hears God speak 6048. Eli, Hophni and Phinehas 64Unit 3 Awards ....................... 68
Curriculum Outline .........72
Published byvisionone incABN 37 430 685 89010 Old Goombungee RdToowoomba Qld 4350AustraliaPhone: 1300 885 048Fax: 1300 728 293Email: [email protected]: www.visionone.org.au
©All rights reservedJuly 2009
Teaching Sonseekers …
Dear Teacher
Teaching young people about God’s Word is a great honour and privilege. We note God chose Abraham, a man of faith because he “would teach his children and his household after him, to know the Way of The Lord” (Gen 18:19)
One who undertakes such a task will understand they have accepted a responsibility to become a witness of God’s great love and faithfulness. As an example of Christian faith and integrity they have a wonderful opportunity to share their love for God’s Word. The tremendous blessing for those who commit themselves to this task is that the Holy Spirit will strengthen and equip you to shine as a light to your class.
Recent trends away from Sunday School structures towards child minding activities have, we believe, been unfortunate as they fail to recognise the impact and effect the message of God’s love through Christ has on young people.
Children are the Church’s future. As such they are precious and well worth any investment in quality resources and dedicated teachers.
The ‘Sonseekers’ curriculum offers children Sunday School material that gives them a sound background in Biblical events, people and places. Secondly it offers a pastoral approach for the children to know God is able to help them and change their lives.
Structurally, any program will operate effectively if those teaching are faithful, zealous and committed to a team approach that might include:
regular prayer and discussion in relation to curriculum issues, ●student needs and upcoming events and presentations;organisation and management of resources; ●training and development needs of teaching staff. ●
Teaching Sunday School is a rich and rewarding task. May God bless and guide you as you serve in this way.
Yours in Christ
The Sonseekers Team
Teacher Resource

Page 2 Teacher Resource - Level One Introduction
Timeline Creation4000BC Adam and Eve The Fall2500BC Noah The Flood Tower of Babel2000BC Abraham1900BC Isaac1800BC Esau and Jacob1750BC Joseph1360BC Moses1280BC Exodus from Egypt and Journeys Joshua1240BC Entry into and Conquest of Land1220BC Judges1100BC Gideon1070BC Samson1063BC Samuel1020BC Saul as King980BC David as King940BC Solomon as King900BC Kingdom Divided839BC Elijah Emerges; Mt Carmel Jehoshaphat814BC Elisha’s Ministry749BC Jonah662BC Hezekiah; Isaiah576BC Josiah540BC Daniel taken to Babylon527BC Exile into Babylon457BC Restoration from Babylon4BC Birth of Jesus26AD Baptism of Jesus Call of Disciples28AD Feeding of 5000 Parables29AD Miracles; Transfiguration30AD Raising of Lazarus Parables Palm Sunday Jesus’ Crucifixion and Resurrection Day of Pentecost Peter’s Ministry33AD Conversion of Paul45AD Paul’s Missionary Journeys60AD Paul as Prisoner to Rome
What are the Sonseekers materials?The Sonseekers Sunday School materials are a four year course of 128 Bible lessons. The lessons are written with the twin aims of teaching the students an accurate chronology of Biblical events and also drawing from each lesson pastoral points relevant to the age and stage of each child. They are written at four levels to cover from Prep to 12+ age groups. The 128 lessons are organised into 8 units, each of sixteen lessons. The table below indicates the suitable age group for each level:
Sonseekers Student School Level Age Level Level One 4 - 5 Kindergarten, Prep Level Two 6 - 7 Lower Primary Level Three 8 - 10 Middle Primary Level Four 11 – 12+ Upper Primary
The Sonseekers materials comprise two related elements:
Teacher Resource• – including lesson plans & activity masters which can be photocopied;Student Handbooks• – including homework activities.
There is also a Bible timeline showing chronology of major events, with the dates of the current unit’s lessons highlighted, included in each Teacher Resource.
What’s in my SonseekersLevel One Teacher Resource?Each Level One Teacher Resource contains sixteen lesson plans for the relevant age of your students. Each lesson plan comprises:
the key thought or focus for the lesson; ●a suggested way to introduce the lesson; ●a summary of the relevant bible story; ●a memory verse for the lesson, together with a suggested way ●of teaching that verse;an activity which can be used in the lesson; ●a number of extra ideas involving fun, practical activities. ●
Note: The photocopy masters for each activity are included with the lessons in this Teacher Resource book.
…/cont’d
A teacher’s guide to using the Sonseekers materials . . .

Introduction Teacher Resource - Level One Page 3
. . . teacher’s guide . . .How do I best use my Teacher Resource?The art of serving as an effective Sunday School teacher is linked to the degree of diligence in preparing for each lesson. The Sonseekers materials are only designed to assist the teacher in this process. They do not take away from the teacher his or her responsibility to prayerfully consider the needs of the children in the class and to seek God’s revelation and wisdom in presenting each Bible lesson. The following suggestions are then made with regard to using this resource.
Prior to the lesson
Prayerfully read the Bible passage for the lesson. The reference is provided in the header on the first ♦page of the lesson plan. All Scripture references are taken from the New King James Version (1983 edition).Read through the lesson plan and decide which activities will be most appropriate for the students in ♦your class. Generally, aim for a variety of activities over a unit.Think about how you will combine the various elements of your lesson. Refer to the suggested teaching ♦approach for ideas if necessary. Link the activity to the story so that the significance of the activity is clear to the students.Prepare all activities thoroughly prior to the lesson. Rehearse any planned activity at home to make ♦sure:
that you know how to do it yourself; ●that you have all the relevant materials in the quantities you will need; ●that you know the length of time that the children will need for the activity. ●
During the lesson
Review the memory verse from the previous lesson with the children. Also check on the completion of ♦the homework activity page.Revise the previous lesson before going on to a new story. You may like to use the timeline to help you ♦do this.
Publisher’s note:The publisher wishes to acknowledge the use of clip art from Coreldraw, Clickart, Bible View Clip Art by Pastoral Computer Services and Logos Bible Clips.
The publisher gives permission for artwork masters to be photocopied for the use of the students in the Sonseekers classes. However, no other part of this publication may be produced or transmitted in any form without permission in writing from the publisher.

Page 4 Teacher Resource - Level One Lesson 33
Aaron’s Rod Numbers 16 & 17
FocusBe content.
Memory Verse
“Be content.” (Luke 3:14).
Lesson IntroductionTell the story using a felt-board as a 1. visual aid, using five male figures for the main characters.Involve the children in the story by 2. enlisting their help for lots of counting activities, eg. counting the 12 leaders of the tribes and counting their 12 rods.At the appropriate part of the story, 3. actually lay out 12 dead sticks (as the leaders’ rods). Ask the children to close their eyes, or turn around and exchange one of the sticks for one of a similar size with leaves, buds or flowers. Ask the children to spot the difference.
Story SummaryKorah, Dathan and Abiram rebelled 1. against Moses and Aaron. They were not happy with it being so hard 2. to get to the promised land and believed they were equal to Moses and Aaron. Moses cried to the Lord. God was angry 3. and caused Korah, Dathan and Abiram and their families to be affected by the plague. Each of the 12 tribes was asked to bring 4. their rod to the tabernacle. Aaron’s rod was the only one that budded 5. - this was a sign that Moses and Aaron were to lead the people.
Teaching SuggestionExplain that “content” means happy and satisfied with what you have. Play “Simon Says” using facial expressions for angry, happy, sad and content. Have the children repeat the memory verse whenever you use it in the game.
Extra IdeasSand Play. 1. Use a sand tray or sandpit if one is available. Make small stick puppets using the figures from the Extra Ideas Activity Sheet. Back these with cardboard and a straw or paddlepop stick to represent Moses, Aaron, Korah, Dathan and Abiram. Make tents from sticks and tissues. Actually bury the puppets in the sand when the earth opens up.Collage/Carpentry. 2. Use thick firm cardboard or lengths of softwood as a base for Aaron’s rod (1 per child). Use masking tape, sticky tape, strong tacky craft glue, or hammer and small nails to attach any of the following: real leaves, cut out paper leaves, patty cake papers for flowers, pieces of paper or cardboard for flowers, real flowers, real nuts. (Ensure that no-one eats the nuts after handling and gluing.)Magic Painting (Crayon Resist). 3. Photocopy the Extra Ideas Activity Sheet – 1 per child. At home draw in leaves and fruit on only one rod per page using a candle or white crayon. Children paint lightly over the page using a watery, but deeply coloured paint to reveal which rod was Aaron’s.Games. 4. “Follow the Leader” and “Everybody Do This” giving each child a turn to be the leader or the one to copy.Morning Tea. 5. Iced biscuits. Children ice milk arrowroot biscuits then top with a musk or liquorice stick or choc mint stick to represent Aaron’s rod. Make it bud by adding mint leaves and almonds or lollies which look like flowers, leaves and nuts.
Preparation is the key to pre-school. It is essential to establish a consistent lesson routine for this age. Take time to develop when they come to class, when they sit down and how they answer questions. Attention triggers, such as a small ball and hands on heads are helpful to get the students to stop what they are doing and to listen.

Lesson 33 Teacher Resource - Level One Page 5
Activity - Budding Rod
MaterialsOne picture of leaves per child.• One satay stick (remove points), wooden ruler or chopstick per child.• Light cardboard or cardboard cylinders from alfoil, paper towel rolls etc. - approx 300 mm long. One per child.• Masking tape.• Small squares of cellophane (100 x 100 mm) in clear or coloured yellow, red or orange.• Twist-ties (optional).• Blanched almonds (or small balls of marzipan).• Crayons/colouring pencils.•
Steps
At HomeIf not using cardboard rolls, pre-cut cardboard into 300 x 130 mm rectangles. Roll the rectangles into cylinders. • Tape edges securely, overlapping edges by 10mm.Cut out the leaves.• It is a good idea to make a demonstration model at home, so the children can be shown what the finished activity • will look like and to make sure that your tape is strong enough.
In ClassChildren colour in the leaves.• Give each child a square of cellophane. Show them how to put one or two nuts in the centre of the paper and twist • the cellophane to wrap around the buds. Help the children use tape or a twist-tie to secure the cellophane around the almonds.Help the children tape the nuts over the drawn nuts and to tape them both to the top of the satay stick. Add other • leaves just below.Gently push sticks, with leaves and ‘buds’ down into the cylinder.• When the stick is pushed up from the bottom, Aaron’s rod ‘buds’.•

Page 6 Teacher Resource - Level One Lesson 33
Aaron’s rodActivity – Budding Rod

Lesson 33 Teacher Resource - Level One Page 7
Aaron’s rodExtra Ideas Activity Sheet – Magic Painting

Page 8 Teacher Resource - Level One Lesson 33
Aaron’s rodExtra Ideas Activity Sheet – Sand Play

Lesson 33 Teacher Resource - Level One Page 9
This page is intentionally blank

Page 10 Teacher Resource - Level One Lesson 34
Moses hits the rock Numbers 20:2-13
FocusAnger can cause us to disobey God.
Memory Verse
“Slow to anger.” (Proverbs 15:18).
Lesson IntroductionTo tell the story, first draw a simple 1. background (sky, cloud, ground, a few rocks and tufts of grass) on the blackboard or on a large sheet of cardboard.Use cut-out cardboard figures for the 2. main characters and attach them to the background using Blu-tack. Add the rock and blue lines for water at 3. the appropriate point in the story.Allowing the children to help place and 4. move the figures on the background and to colour in the rock and add more lines of blue water, will keep their interest.
Story SummaryThe Israelites complained, this time 1. because there wasn’t any water. Moses and Aaron asked the Lord about it. 2. Moses was told to go to a certain rock and 3. speak to it and out would flow water. Instead of speaking to the rock Moses hit 4. it twice with his rod. Because Moses got annoyed and 5. disobeyed God, Moses was not allowed to take the people into the promised land.
Teaching SuggestionStand up and pretend to be elephants with arms as trunks, saying the words as you walk around slowly. For a variation, have each child take a turn at being the leading elephant as you say the verse.
Extra IdeasSlow Motion. 1. This activity can be related to the memory verse. The children take turns to do simple physical activity, which the class copy, first at normal speed and then in slow motion. Try clapping, hopping, jumping, running, walking etc.Paper Bag Piñata. 2. Fill a paper bag with newspaper, tie with string and paint with wallpaper paste. When dry, remove newspaper and fill with children’s morning tea - eg. wrapped biscuits, dried fruit in a plastic bag, sweets, popcorn in a bag, etc. Place piñata on the ground as the rock, each child has a turn at closing their eyes or being blindfolded and hitting the ‘rock’ twice like Moses. After each child has had a turn and the bag is broken, enjoy the morning tea within.Morning Tea. 3.
Chocolate, patty cakes can be spread with blue icing or cut • ‘butterfly style’ with blue cream in the top. Rock cakes made at home. • Plain sweet biscuits that the children can decorate with • icing - chocolate icing over the biscuit and blue icing in an icing tube for the children to squeeze a line of water over the chocolate coated ‘rock’.
Continue reinforcing routines and manners from last week. Write out a list with simple pictures with such things as hands up and sit in a circle. Children enjoy practising routines in a game format. eg ‘Let’s see how quickly you can sit in a circle with one hand on your head and one hand on your nose.’

Lesson 34 Teacher Resource - Level One Page 11
Activity - Bubble Blowing
MaterialsPhotocopies of Figure 2 from the Activity Sheet - 1 per child.• Firm brown cardboard.• Sticky tape, masking tape or glue.• Straws.• Dishwashing liquid (approx ¼ - ½ cup per child).• Dark blue powder paint, edicol or food dye.• Large empty yoghurt or margarine containers - one per child.• Plain white paper.• Scissors.• Drop cloths, aprons/painting cover-ups and clean-up cloths.• Ping-pong balls or balloons.• Quick drying glue.•
Steps
At HomeCut 1 rock per child from firm cardboard using Figure 1 as a template.• Cut out Figure 2 - 1 per child.• Prepare the back of the ‘rock’ (Figure 1) to hold the tab of the ‘bubbles’ (Figure 2) so that the water will pop up in • the right place as per diagrams.If using powder paint, mix with a small amount of water. • Then add mixed powder paint, edicol or food dye to the washing up liquid until the colour is intense.
In ClassPrepare the area and the children for painting.• Give each child a straw. Practise blowing through the straws • by blowing ping-pong balls or balloons. Stress that the children must blow not suck.Put 1.5 – 2 cm in each container. Show the children how • to use the straw to blow bubbles in the paint mixture until bubbles slightly overflow container.Lay paper gently on top of the bubbles so as not to burst • them - this is a bubble print. Allow these to dry for a few minutes.Cut a circle (using Figure 2 as a template) for each child • from their bubble print. Glue to pre-cut Figure 2 cardboard using quick-drying glue.Help the children place their Figure 2 bubbles into the slots • on the back of Figure 1, so that the bubbles can be pushed up and down - as if water is coming from the rock.Alternative quicker version - make the bubble painting print • and when dry cut it to a ‘flowing shape’. Glue the print to a circle of dark cardboard that represents the rock.
Strip of paper 17cm longtaped 14cm apart
Strip of paper taped 8cm apart
Back ofFigure 2
Push tab up anddown

Page 12 Teacher Resource - Level One Lesson 34
Moses hits the rockActivity – Bubble Blowing
Figure 1
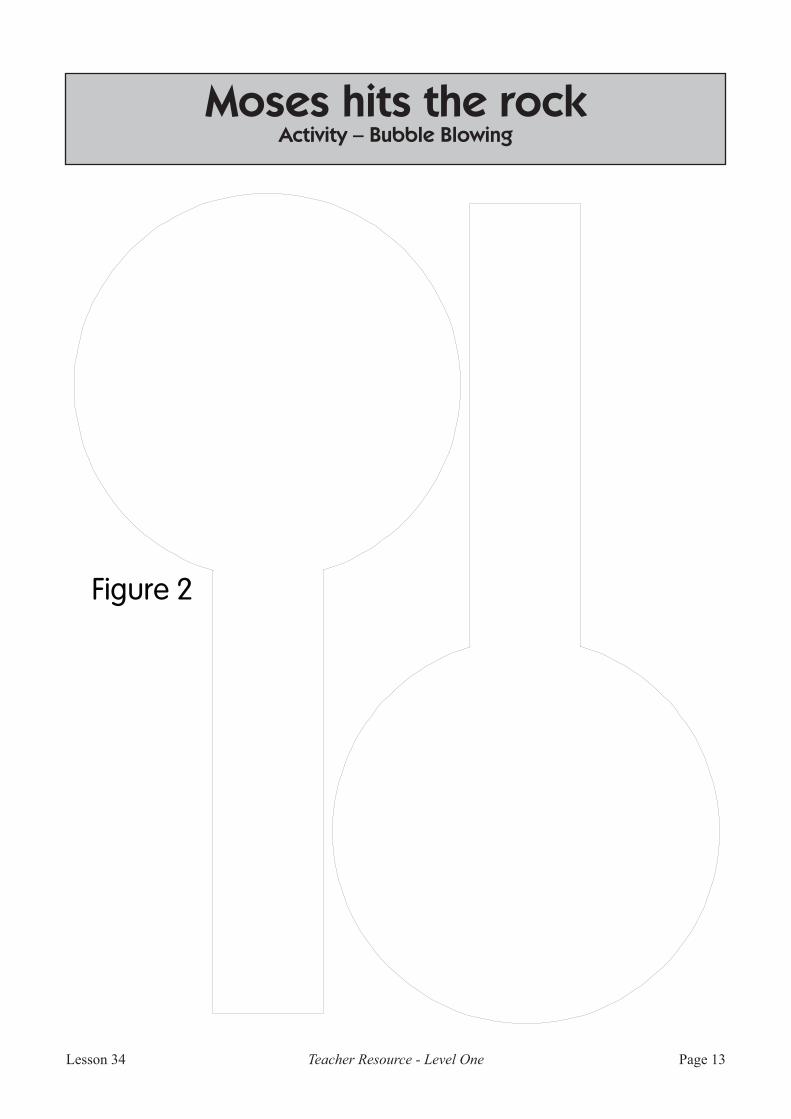
Lesson 34 Teacher Resource - Level One Page 13
Moses hits the rockActivity – Bubble Blowing
Figure 2

Page 14 Teacher Resource - Level One Lesson 35
The bronze serpent Numbers 21:4-9; John 3:14-15
FocusBe thankful.
Memory Verse
“God shall supply … your need.” (Philippians 4:19).
Lesson IntroductionUse a felt-board as a visual aid. Actual 1. examples of God’s healthful provision (bread, water, perhaps fruit) could be used, and to illustrate the Israelites discontent, show some junk food we crave, (eg chocolate, chips etc.)Pause in the story to introduce ‘snakes’ 2. perhaps showing a plastic snake. Ask the children: (a) What do they know about snakes? (b) What do snakes eat? (c) How do they move? The class could all wriggle around the room like snakes, and practise hissing. Children might act out being bitten by a poisonous snake.Return to the felt-board to finish the story.3. Use either the plastic snake fixed on a 4. pole or a large picture of a snake on a pole as a visual aid for the end of the story.
Story SummaryOn the journey to the promised land 1. the children of Israel became very discouraged and murmured against God and Moses and against God’s provision for them. God sent His judgement among them 2. with fiery serpents and many of the children of Israel died. Those remaining repented of their sins 3. and asked Moses to pray for them. God told Moses to make a bronze fiery 4. serpent and put it on a pole for their healing.
Teaching SuggestionHold hands in line, teacher as leader to start the game. Weave in and out of chairs or other furniture as you say the memory verse together, or using a rope for the children to hold, weave in and out of the furniture. The children may take turns at being the leader.
Extra IdeasSkipping Rope Snakes. 1. Teacher wriggles a rope on the floor for the children to jump over. If the children touch the rope, they then have to go and look at the serpent on the stick before being able to have more turns over the rope.Threading a Snake. 2. Have threaded bodkins ready. (You may like to have a forked tongue of strong cloth or vinyl at the knot at the end of the wool.) Thread such things as painted egg cartons separated out, coloured patty papers, bottle tops, etc. Make holes in these before use. Add extra wool so that it can be pulled along.Playdough Snakes. 3. Roll out pieces of red and yellow playdough to make snakes. (This can be quite a challenge for pre-schoolers). Use toothpicks, forks, plastic knives, etc. to make patterns on the snakes. (Provide paper plates to carry the snakes home.)Group Snake. 4. Make a large snake using old socks or stockings. Children help stuff these with newspaper and then tie them together. Skin patterns, eyes, etc can be added using thick felt pens. Tied to a broom, this could become the ‘serpent on a pole’.Morning Tea. 5. Try balancing jelly snakes on musk sticks or firm liquorice. (Snake beans balanced on celery sticks would be a healthy but less enticing alternative).
At this time of year, distribute questions to involve only one student at a time. eg ‘ Mark, what do you think?’

Lesson 35 Teacher Resource - Level One Page 15
Activity - Spaghetti Painting
MaterialsPlain uncooked spaghetti.• Food colouring or edicol dyes - yellow or red to make ‘fiery serpents’.• Sheets of firm cardboard, approx A4 size (dark colours are best).• Strainer or colander.• Large trays or plastic containers.• Drop cloths, painting aprons/cover-ups and clean-up cloths.• Optional – one photocopy per child of the Activity Sheet figure on cardboard, sticky tape.•
Steps
At HomeAllowing a separate saucepan for each colour, add colouring to water, bring to the boil and cook spaghetti till it is • ‘al dente’ (it will absorb the colouring). Cool.Drain off most of the water but retain enough to just cover the spaghetti. Place in sealable container to take to class. • (If your venue has a kitchen, step one could be done by a helper while the story is being told.)Optional - bend Tab A on Activity Sheet figure towards the back of each figure. Glue or tape the tab to the corner • of each piece of cardboard so that the Israelite stands up. An additional piece of tape from his mid-back to the cardboard will help hold him in place.
In ClassPrepare the area and the children for painting.• Give each child a piece of cardboard.• Drain the spaghetti, putting each colour of spaghetti in a separate tray where the children can reach it easily.• Encourage the children to arrange the spaghetti; piece by piece, ‘snake by • snake’ (not handfuls) onto the cardboard to make fiery serpents. The starch in the spaghetti makes it stick to the cardboard and no other glue is needed. The ‘snakes’ can also be wound around the Israelites.
Tab A
Fold

Page 16 Teacher Resource - Level One Lesson 35
The bronze serpentActivity – Spaghetti Painting

Lesson 35 Teacher Resource - Level One Page 17
This page is intentionally blank

Page 18 Teacher Resource - Level One Lesson 36
Balaam and his ass Numbers 22 - 24
FocusLet us listen carefully to God when He speaks to us (eg. through Bible stories, our parents, teachers etc.).
Memory Verse“Hear the word of the Lord.” (Isaiah 1:10).
Lesson IntroductionUse simple puppets. Balaam’s ass could 1. be made as a sock puppet with felt ears, glue-on eyes and a woolly mane. He can be made to ‘talk’ by using your thumb in the heel and fingers in the toe. Balaam and King Balak’s men could be finger puppets and the angel could be taken from the Christmas tree decorations.A sock stuffed with old rags and with a 2. dish mop partly poked through a small hole in the heel of the sock makes a different puppet. The dish mop mane is at the top of the donkey’s head and the sock ankle opening is tied around the handle of the dish mop. Add ears and eyes.Use a sand-tray landscape. Fill a large 3. baking tray or biscuit tin with damp sand and use rocks and small plant cuttings to simulate cliffs, trees and narrow paths. A plastic donkey from a farm set could be Balaam’s ass and the story characters could be the farmer and his family dressed in Bible costume, or stick puppets.
Story SummaryThe Israelites came into Moab and King 1. Balak was worried. He sent his men to bring Balaam, the wise 2. man, to put a curse on the Israelites. Balaam inquired of the Lord and finally 3. God allowed him to go if he waited for the men to call for him the next day. Balaam did not wait and left on his 4. donkey. On the way to Moab, his donkey behaved 5. in an unusual way when an angel of the Lord appeared. Balaam scolded the donkey and God caused it to speak.Balaam saw the angel and repented.6. He went to the king, but blessed the 7. people instead of cursing them.
Teaching SuggestionSay the memory verse a few times before starting the game. Children sit in a circle, all children cover their eyes, a child is chosen and, with the teacher, says the memory verse. The children open their eyes and point to (or name) the child who said the verse. Give each child a turn.
Extra IdeasPin Balaam on the Donkey. 1. A large simple poster of a donkey and a simple drawing or picture of Balaam with Blu-tack on the back.Magic Painting. 2. Before class, draw a narrow road with walls or rocks on its sides on A4 paper. Photocopy 1 per child using a white crayon or candle. Draw a simple angel standing on the path. In class, children paint over the page using deeply coloured, watery paint to reveal the angel.“Simon Says.” 3. Use the events of the story eg “wait for the men,” “saddle your donkey,” “bray like a donkey,” “walk like a donkey,” “be cross like Balaam,” “nurse a sore foot” etc.
Pre-schoolers respond well to routine. Keep the lesson moving by having short 5 – 10 minute segments.
5 mins – revise memory verse revision.
10 mins – outline lesson
5 mins – explain activity and demonstrate skills
15 mins – complete activity
5 mins – clean up
5 mins – revise lesson

Lesson 36 Teacher Resource - Level One Page 19
Activity - Donkey Ears Headband
MaterialsOne set of donkey ears from the Activity Sheet photocopied onto cardboard for each child.• One strip of the same cardboard for each child, 3 cm wide and long enough to fit around the child’s head.• Crayons/colouring pencils/felt pens.• Staples.• Brown or grey wool cut into 4.5 cm lengths, clag or quick-drying craft glue (optional).•
Steps
At HomeCut out the ears and strips of cardboard.•
In ClassChildren colour the ears.• Optional – the children glue pieces of wool around the outer edges and back of the ears. Avoid too much wool or • glue at the top of the ears - it will make them floppy.Teacher assists the children to staple the ears onto the headband, making sure the staple ends are on the outer edge • so as not to pull the child’s hair.Teacher staples headband to fit each child’s head.•

Page 20 Teacher Resource - Level One Lesson 36
Balaam and his assActivity – Donkey Ears Headband

Lesson 36 Teacher Resource - Level One Page 21
This page is intentionally blank

Page 22 Teacher Resource - Level One Lesson 37
Joshua and Rahab Joshua 1 & 2
FocusEach of us is important to God, but we have to choose to be a part of God’s family.
Memory Verse“Choose… whom you will serve.” (Joshua 24:15).
Lesson IntroductionAct out the story for the children using 1. dolls for Rahab, the spies, one or two men from Jericho and perhaps Joshua and Rahab’s family. Give the dolls simple outfits made from a rectangular piece of cloth, with a hole cut to go over the doll’s head (see Diagram 1).Use a large cardboard box as Rahab’s 2. house. Up-end the box. Before class, cut out a window on two sides (see Diagram 2) so that you can sit at one side of the box and reach through the window at the side to hold Rahab at the open window at the front of the box. Attach a piece of cardboard to the front edge of the roof (see Diagram 2) using sticky tape to make a hinge so that the cardboard forms a flap which can be raised or lowered. Glue or draw grass stalks on the cardboard to resemble stalks of grain. The flap can then be used to hide the Israelite spies while telling the story.Use red wool or cord to actually lower the 3. spies from Rahab’s window.The children could help hide the spies and 4. lower them with the red cord.
Story SummaryJoshua was the man chosen by God to 1. replace Moses.God told Joshua that they were to take 2. Jericho.The spies stayed at Rahab’s house.3. The king of Jericho found out and looked 4. for the spies, but Rahab hid them in the roof and Rahab sent the king’s men looking elsewhere.Rahab wanted to be saved when the spies 5. were to return and destroy Jericho, so they told her exactly what to do to protect herself and her family. Rahab helped the spies escape.6.
Teaching SuggestionUse Extra Idea No. 2. Say the memory verse when all the children rush inside the cubby. Do this as many times as you like.
Extra IdeasGo out doors 1. to act out the part of the escaping spies - use any playground equipment like a fireman’s pole or fort from which to climb down.Rahab’s House. 2. Make a cubby, from furniture and sheets for Rahab’s house. Act out how Rahab’s family were to be inside the house if they were to be saved. Children pretend to be the family busy with their chores. When Rahab (teacher) puts out a red cord or piece of material on the pretend window, the children must rush into the house and close the door. How quickly can they get in? Can they all fit? Relate this to the Focus. As an extension to this activity, some children may like to be the spies.Kim’s Game. 3. Use up to 10 of the items used in the story telling or activities, eg. Rahab doll, spy costume, rope, red cord, whatever was used to hide the spies, etc. While the children close their eyes, remove one item. Children then try to guess which is missing and relate it to the story.
Organisation of resources is essential in this year level. Determine what each student is capable of doing and plan ahead. This will ensure that each child achieves a certain level of success.

Lesson 37 Teacher Resource - Level One Page 23
Activity - Making Rahab’s House and Escaping Spies (ie. a smaller version of the house used to tell the story during the lesson.)
MaterialsA small box for each child (a shoe box or small grocery box is ideal).• Figure 1.• Red wool, safety scissors.• Colouring pencils/felt pens/crayons.• Extra pieces of cardboard to cover the roof of each box.• Sticky tape.• Blu-tack.• Long stalks of grass, thin stick, etc (optional).•
Steps
At HomePre-cut window in the front and side of the boxes (as in Diagram 2) large enough for the child’s hand to fit through. • Make a small 1 cm extended cut straight down from the bottom corners of the window on the front of each box.Photocopy Figure 1 onto white cardboard (or glue standard photocopies to cardboard) and cut out.•
In ClassThe children colour in the spies and Rahab.• Help the children sticky tape red wool to each spy (or tie the wool onto the • spy). Show the children how to slip the red wool into the slit at the window edges and pull the spies up and down. (The slits will help keep the spies from falling or moving out of place if the children lose hold of the string.)The children can then draw long straight strokes all over the extra pieces of • cardboard to represent stalks of grain (or they could sticky tape real grass stalks or small sticks to the cardboard).Help the children sticky tape the edge of the cardboard as a hinged flap, to • either the front or back edge of the box. The spies can then be taken from their windows and ‘hidden’ under the stalks of grain.Rahab can be attached with a small piece of Blu-tack either inside looking • out of her window, or moved anywhere else in the box.Children can now retell the story using their own boxes and puppets.•
Figure 1

Page 24 Teacher Resource - Level One Lesson 37
Joshua and RahabActivity – Making Rahab’s House and Escaping Spies
Figure 1Figure 1
Figu
re 1

Lesson 37 Teacher Resource - Level One Page 25
This page is intentionally blank

Page 26 Teacher Resource - Level One Lesson 38
Teaching SuggestionAs you march around Jericho repeat the memory verse. Put it to music if you like.
Extra IdeasJericho’s Walls. 1. Use cardboard boxes to build the walls of Jericho. The walls can be marched around before being knocked down, or the children can take turns knocking down the walls. Remember, no shouting at first, only the trumpet noise. Pretend to lie down and sleep each night till the 7th day.Songs. 2. Sing familiar choruses that have a marching beat as you march around ‘Jericho’.Playdough Crossing. 3. On a paper plate base children draw in a strip of river across the middle. Colour in the middle of that strip yellow (sand). Press blue playdough onto the upstream and downstream sections of the river. The surrounding area of the plate could be coloured in or use green or yellow playdough. For the Ark use a small matchbox painted or covered with gold paper. Place the Ark in the middle of the river. Use real pebbles (or yellow or brown playdough balls) for the memorial beside the river. Pictures of people from previous lessons could be reduced on a photocopier, glued to cardboard and cut out, and then poked into the playdough to tell the story.God has a Plan. 4. For this you will need approx. 6 pictures photocopied from a children’s picture Bible, or very simple stick figure drawings. The pictures need to show the order in which the Jordan crossing took place, eg. 1. The Jordan in flood. 2. God speaks to Joshua. 3. The Ark carried to the edge of the river. 4. The waters stop. 5. The Israelites cross while the Ark is in the middle of the river bed. 6. The stones are gathered and a memorial made. 7. The priest and the Ark leave the river. 8. The Jordan flows again. Hide the pictures in a bag and bring them out 1 at a time (in any order). As a group, the children help identify them and line them up across the floor in the correct sequence.
Crossing theJordan, Jericho Joshua 3 - 6; I Kings 16:34
FocusThe battle is not ours but God’s when we choose His way.
Memory Verse“Yours … Lord, is … the victory.” (I Chronicles 29:11).
Lesson IntroductionUse visual aids such as:1.
a large box with dowelling poles for • the Ark of the Testimony;a blue tarp or a piece of material, • or two lengths of wool to depict the Jordan;actual stones or small boxes for the • memorial;a length of rope or wool for the wall of • Jericho.
Tell the story and have the children act 2. out the parts of it such as the Jordan crossing with the Ark, building the memorial of stones and marching around Jericho.After completing the activity use the 3. trumpets in the re-enactment of the march and enjoy making the final shout and trumpet blowing in the story.
Story SummaryAfter 40 years, the time came for Joshua 1. to lead God’s people across the Jordan River. God gave very specific instructions as to 2. how they were to accomplish this, with the Ark of the Testimony going first. After the crossing, the Israelites set up a 3. memorial of stones from the Jordan. An angel appeared to Joshua and 4. explained how to capture Jericho. Joshua and the people did what the 5. Lord asked and they seized Jericho, not forgetting Rahab and her caring deed.
For pre-school, it is recommended whenever possible that a helper work with the teacher to assist students. This is particularly helpful when doing a major craft activity.

Lesson 38 Teacher Resource - Level One Page 27
Activity - Making Trumpets
Materials1 copy per child of trumpet pattern, enlarged on the photocopier by 200%.• Streamers or strips of coloured paper or crepe paper (allow 5-10 per child).• Stickers of stars or anything appropriate (optional).• Felt pens.• Stapler.•
Steps
At HomePre-cut trumpets.• Cut streamers/paper to lengths of approx. 40 cm.•
In ClassChildren use felt pens to decorate their trumpet.• Help them to staple streamer lengths to trumpets.• Roll up the trumpet and overlap edges by 1cm and staple together.•

Page 28 Teacher Resource - Level One Lesson 38
Crossing the Jordan, JerichoActivity – Making Trumpets
Trumpet Template

Lesson 38 Teacher Resource - Level One Page 29
This page is intentionally blank
Page 30 Teacher Resource - Level One Lesson 39
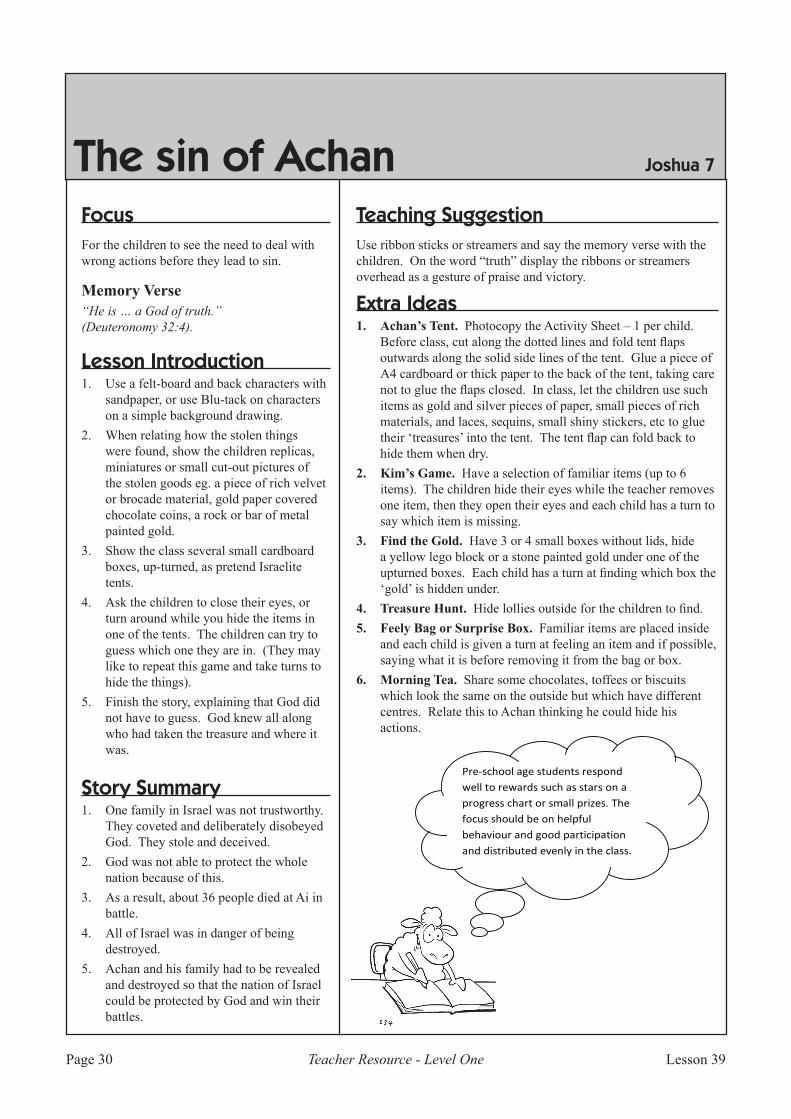
Teaching SuggestionUse ribbon sticks or streamers and say the memory verse with the children. On the word “truth” display the ribbons or streamers overhead as a gesture of praise and victory.
Extra IdeasAchan’s Tent. 1. Photocopy the Activity Sheet – 1 per child. Before class, cut along the dotted lines and fold tent flaps outwards along the solid side lines of the tent. Glue a piece of A4 cardboard or thick paper to the back of the tent, taking care not to glue the flaps closed. In class, let the children use such items as gold and silver pieces of paper, small pieces of rich materials, and laces, sequins, small shiny stickers, etc to glue their ‘treasures’ into the tent. The tent flap can fold back to hide them when dry.Kim’s Game. 2. Have a selection of familiar items (up to 6 items). The children hide their eyes while the teacher removes one item, then they open their eyes and each child has a turn to say which item is missing.Find the Gold. 3. Have 3 or 4 small boxes without lids, hide a yellow lego block or a stone painted gold under one of the upturned boxes. Each child has a turn at finding which box the ‘gold’ is hidden under.Treasure Hunt. 4. Hide lollies outside for the children to find.Feely Bag or Surprise Box.5. Familiar items are placed inside and each child is given a turn at feeling an item and if possible, saying what it is before removing it from the bag or box.Morning Tea. 6. Share some chocolates, toffees or biscuits which look the same on the outside but which have different centres. Relate this to Achan thinking he could hide his actions.
The sin of Achan Joshua 7
FocusFor the children to see the need to deal with wrong actions before they lead to sin.
Memory Verse“He is … a God of truth.” (Deuteronomy 32:4).
Lesson IntroductionUse a felt-board and back characters with 1. sandpaper, or use Blu-tack on characters on a simple background drawing.When relating how the stolen things 2. were found, show the children replicas, miniatures or small cut-out pictures of the stolen goods eg. a piece of rich velvet or brocade material, gold paper covered chocolate coins, a rock or bar of metal painted gold.Show the class several small cardboard 3. boxes, up-turned, as pretend Israelite tents.Ask the children to close their eyes, or 4. turn around while you hide the items in one of the tents. The children can try to guess which one they are in. (They may like to repeat this game and take turns to hide the things). Finish the story, explaining that God did 5. not have to guess. God knew all along who had taken the treasure and where it was.
Story SummaryOne family in Israel was not trustworthy. 1. They coveted and deliberately disobeyed God. They stole and deceived. God was not able to protect the whole 2. nation because of this. As a result, about 36 people died at Ai in 3. battle. All of Israel was in danger of being 4. destroyed. Achan and his family had to be revealed 5. and destroyed so that the nation of Israel could be protected by God and win their battles.
Pre-school age students respond well to rewards such as stars on a progress chart or small prizes. The focus should be on helpful behaviour and good participation and distributed evenly in the class.

Lesson 39 Teacher Resource - Level One Page 31
Activity - Achan’s Stolen Treasure
Materials1 Activity Sheet per child, and spares for if they want to do more than one each.• White crayons or candle.• Thin water based paint.• Paint brushes.• Protective clothing.• Drop sheet.•
Steps
At Home
After photocopying the Activity Sheet, draw or trace Achan’s stolen treasure in white crayon or candle on each tent•
In ClassThe children are given a picture and asked if they can see Achan’s treasure, and do they think God can see it?• They then paint over the entire picture to reveal Achan’s treasure.• Relate this to them not being able to hide things from God.•
Achan’s Tent

Page 32 Teacher Resource - Level One Lesson 39
The sin of AchanActivity – Achan’s Stolen Treasure

Lesson 39 Teacher Resource - Level One Page 33
The sin of AchanActivity – Achan’s Stolen Treasure

Page 34 Teacher Resource - Level One Lesson 40
The sun stands still Joshua 10:1-15
FocusGod is so mighty that He has the power to stop even the sun and moon moving.
Memory Verse“God is … mighty.” (Job 9:4).
Lesson IntroductionAs an introduction, talk with the children 1. about day and night. Use small pre-cut pictures of day/night activities and attributes (eg. sun, moon, stars, bed, pyjamas, children at play, breakfast cereal etc), and enlist the children’s help to attach each picture with Blu-tack to either a black sheet of cardboard (for night) or a yellow one (day). Then use the pictures and cardboard 2. sheets to play the, “Which is in the wrong place?” game. Ask the children to close their eyes and then shift one of the pictures to the wrong sheet of cardboard (eg. the sun onto the black cardboard). Tell the children to open their eyes and find which picture is misplaced. Discuss how the sun moves through the sky.Introduce the lesson as a story of how 3. God made the sun stay in the sky all day and all night.Visual aids for the story could be a felt 4. board, or Blu-tack board.
Story SummaryJoshua and his army were called by 1. the Amorites to fight a battle with five kings and their armies who had banded together. God told Joshua not to be afraid because 2. He was going to fight the battle. Joshua and his army came upon them 3. suddenly and killed many and chased many more. God sent hailstones from heaven, which 4. killed more of the enemy than the army had killed.Joshua asked God to make the sun and 5. moon stand still so that he could finish the battle without stopping for night.
Teaching SuggestionMarch around in a circle singing the memory verse to a tune you know.
Extra IdeasHail Storm Game. 1. All you will need are some chairs, some empty milk containers, or substitute, with faces of the enemy pasted on them, plus lots of white paper scrunched into balls (hailstones). Arrange the chairs in a circle and stand the enemy containers in the middle. The children toss the hailstones at the enemy as God did to destroy them. Point out that God was a very good shot!Songs:2. “From the Rising of the Sun”“God’s Got an Army”“I’m Too Young”“Come as Captain”Or a similar song known to you.Finger Play. 3. 5 little soldiers.Ice Cubes. 4. Have some ice cubes, the very small round ones if you can. Use them in the story as many children do not know what hail is like. The ice cubes can be used in the morning tea drink.
Make the last lesson a celebration of the students’ first term in Sonseekers. Allow time for a small party at the end of the activity.

Lesson 40 Teacher Resource - Level One Page 35
Activity - Sun and Hailstones
Materials1 Activity Sheet per child.• Bright yellow paper.• Scissors.• Colouring pencils (not felt pens or crayons).• Rice in small container/s depending on the number of tables to be used.• Strong glue (Aquadhere thinned with some clag would be best).• Glue brushes.•
Steps
At HomeCut out circles from bright yellow paper, the same size as the centre of the sun in the Activity Sheet. Mix the glue • ready for use and try the activity yourself to see if the glue is strong enough to hold the rice.
In ClassAsk the children to glue the yellow paper over the sun.• Then the children can colour the enemy and the thundercloud.• They can now brush glue over the sheet and sprinkle some rice over it to look like hailstones.•
Howdid Godfight theenemy army?

Page 36 Teacher Resource - Level One Lesson 40
The sun stands stillActivity – Sun and Hailstones
How did God fight the enemy army?

Lesson 40 Teacher Resource - Level One Page 37
This page is intentionally blank

Page 38 Teacher Resource - Level One Lesson 41
Gideon’s fleece Judges 6:36-40
FocusFor the children to know that if God asks us to do a special job for Him, He will help us to be brave and give us confidence.
Memory Verse“You are my help.” (Psalm 40:17).
Lesson IntroductionIf possible, tell the story outside on the grass. If this is not possible, have a large plastic sheet that can be placed beneath the sheepskin. Use real sheepskins (if using only one sheepskin you will need an absorbent cloth to dry it). Have the children sit in a large circle around the plastic. The teacher could act the part of Gideon, and include the children in the story by encouraging them to pretend to sleep while it is ‘night’. While the children’s eyes are closed, lightly spray ‘dew’ on either the sheepskin or on the grass/plastic as appropriate. Use a spray bottle filled with water. ‘Wake up’ the children and let them feel the moisture.
Story SummaryGod sent an angel to Gideon to tell him 1. he was going to save the people from the enemy.
Gideon didn’t believe he could do this so 2. he tested God by putting a fleece out on the ground overnight.
He asked God to wet the fleece with dew 3. but the ground was to be dry.
This happened but Gideon wanted more 4. proof so he put the wool out again.
This time the fleece was to be dry and the 5. ground wet.
Once again, God performed the miracle.6.
Teaching SuggestionDivide the children into two teams. Have them sit in a line – the two teams facing each other. The first child in Team 1 rolls a ball to the first child in Team 2. As they roll the ball they repeat the memory verse. That child then goes to the end of the line. The first child in Team 2 now rolls the ball back to the second child in Team 1, repeating the verse and then goes to the end of the line. Repeat until all the children have had a turn.
Extra IdeasSheep Painting. 1. Use the Extra Ideas Activity Sheet to cut a sheep stencil from cardboard, and fill a squirt bottle with water. Place the stencil on concrete (or other surface which will absorb the water slightly) and have the children squirt the water around the stencil. Remove the stencil and the sheep shape will be seen. Allow the children to do a few of these.Animal Sounds. 2. Use a tape of animal sounds for the children to guess the animals. Make a different animal sound with the children. Have the children make animal movements: gallop like a horse; walk like a sheep; slither like a snake; hop like a kangaroo, etc.
Be well prepared for all craft activities. Take time to explain to the children all that the activity involves and your expectations of their behaviour. Be clear in your own mind the steps to be followed to make the activity successful.

Lesson 41 Teacher Resource - Level One Page 39
Activity - Dry/Wet Fleece
Materials2 sheets of stiff cardboard per child (at least A4 size).• 2 pieces of quilt wadding per child (at least 25 mm smaller on all sides than the cardboard sheets).• Silver glitter.• Glue – an all purpose glue, eg. clag and a strong glue, eg. craft glue.• Colouring pencils.• Drop sheet (for easy clean up of glitter).•
StepsGive each child one piece of cardboard and have them colour a border around it to represent grass.• Lightly cover the grass with glue and sprinkle silver glitter on the grass.• Give each child one piece of wadding to glue in the middle of their glittery grass.• Give each child a second piece of cardboard and have them colour the grass around the edge. • Give each child a second piece of wadding and glue the wadding to the middle of the grass. • Lightly cover the wadding with glue and sprinkle with glitter.•

Page 40 Teacher Resource - Level One Lesson 41
Gideon’s fleeceExtra Ideas Activity Sheet

Lesson 41 Teacher Resource - Level One Page 41
This page is intentionally blank

Page 42 Teacher Resource - Level One Lesson 42
Gideon and his army Judges 6:11-35; 7:1 – 8:28
FocusFor the children to know that God is with us at all times.
Memory Verse“God will save.” (Psalm 69:35).
Lesson IntroductionTalk with the children about being strong 1. – perhaps have some practice push-ups, or try picking up each other. Then suggest trying something 2. impossible, eg. pick up the building, or pick up the teacher. Introduce Gideon as someone who 3. thought the job God had picked him for was too difficult. The story could be told using a felt-board 4. for a visual aid.
Story SummaryThe Lord spoke to Gideon and told him 1. that he was a valiant warrior, and that he should deliver the Israelites from their enemy.Gideon found it hard to believe that God 2. would choose him, for his family was “least in the land.”He believed God’s plan to build an army 3. from weak people who did not have any weapons.Through faith and obedience, Gideon was 4. led by God to select 300 men to defeat the countless enemy.Gideon’s army blew their trumpets, broke 5. their jars, and showed their torches. This surprised the enemy, who fled in fear.
Teaching SuggestionBall game. As you say the memory verse, roll a ball to each child in turn, on the word ‘save’. Have them roll it back to you and say the verse with each of them.
Extra IdeasGideon Says. 1. A game like Simon says: drink at the river; creep like the soldiers; blow your trumpets; wave your torch.Movement. 2. March like Gideon’s army.Songs. 3. “God’s Got an Army” “I’m too Young” “Come as Captain of the Host”, or other similar songs known to you.
Encourage appropriate behaviour by reinforcing the positives. eg ‘I really appreciate the way you are sitting quietly and waiting for your turn, Matt.’
Lesson 42 Teacher Resource - Level One Page 43
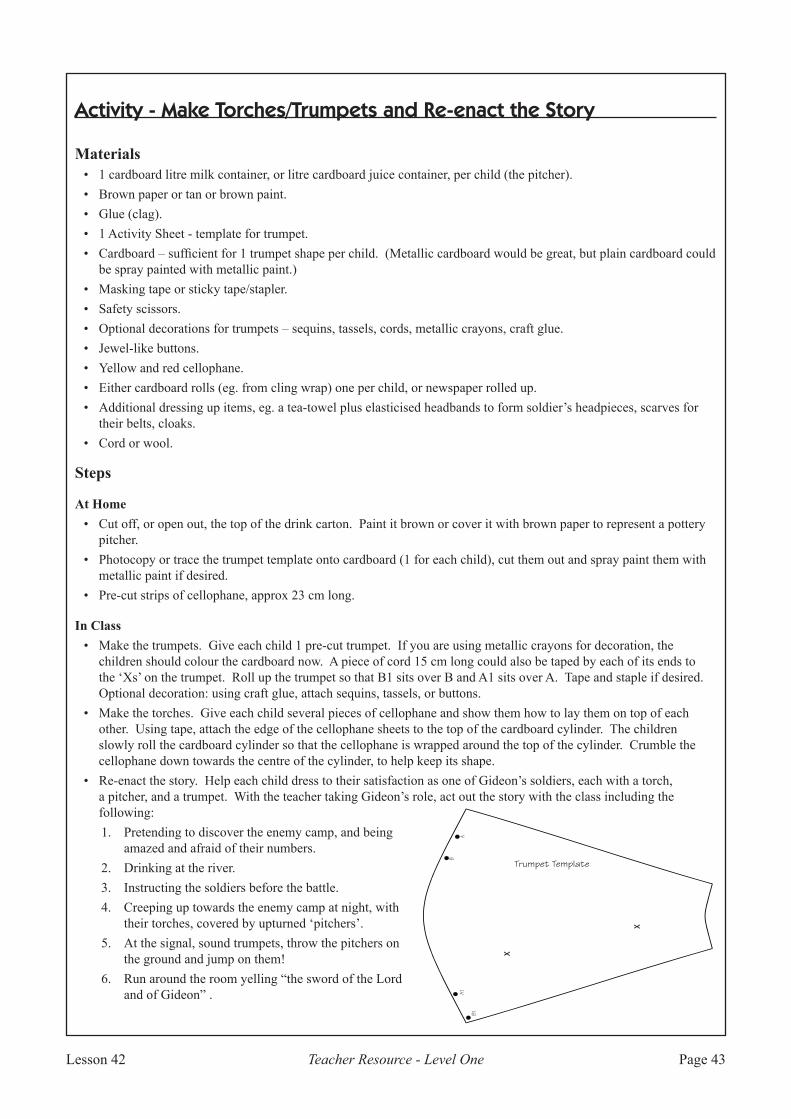
Activity - Make Torches/Trumpets and Re-enact the Story
Materials1 cardboard litre milk container, or litre cardboard juice container, per child (the pitcher).• Brown paper or tan or brown paint.• Glue (clag).• 1 Activity Sheet - template for trumpet.• Cardboard – sufficient for 1 trumpet shape per child. (Metallic cardboard would be great, but plain cardboard could • be spray painted with metallic paint.)Masking tape or sticky tape/stapler.• Safety scissors.• Optional decorations for trumpets – sequins, tassels, cords, metallic crayons, craft glue.• Jewel-like buttons.• Yellow and red cellophane.• Either cardboard rolls (eg. from cling wrap) one per child, or newspaper rolled up.• Additional dressing up items, eg. a tea-towel plus elasticised headbands to form soldier’s headpieces, scarves for • their belts, cloaks.Cord or wool.•
Steps
At HomeCut off, or open out, the top of the drink carton. Paint it brown or cover it with brown paper to represent a pottery • pitcher.Photocopy or trace the trumpet template onto cardboard (1 for each child), cut them out and spray paint them with • metallic paint if desired.Pre-cut strips of cellophane, approx 23 cm long.•
In ClassMake the trumpets. Give each child 1 pre-cut trumpet. If you are using metallic crayons for decoration, the • children should colour the cardboard now. A piece of cord 15 cm long could also be taped by each of its ends to the ‘Xs’ on the trumpet. Roll up the trumpet so that B1 sits over B and A1 sits over A. Tape and staple if desired. Optional decoration: using craft glue, attach sequins, tassels, or buttons.Make the torches. Give each child several pieces of cellophane and show them how to lay them on top of each • other. Using tape, attach the edge of the cellophane sheets to the top of the cardboard cylinder. The children slowly roll the cardboard cylinder so that the cellophane is wrapped around the top of the cylinder. Crumble the cellophane down towards the centre of the cylinder, to help keep its shape.Re-enact the story. Help each child dress to their satisfaction as one of Gideon’s soldiers, each with a torch, • a pitcher, and a trumpet. With the teacher taking Gideon’s role, act out the story with the class including the following:
Pretending to discover the enemy camp, and being 1. amazed and afraid of their numbers.Drinking at the river.2. Instructing the soldiers before the battle.3. Creeping up towards the enemy camp at night, with 4. their torches, covered by upturned ‘pitchers’.At the signal, sound trumpets, throw the pitchers on 5. the ground and jump on them!Run around the room yelling “the sword of the Lord 6. and of Gideon” .
B1
B
AA1
Trumpet Template

Page 44 Teacher Resource - Level One Lesson 42
Gideon and his armyActivity – Make Torches/Trumpets and Re-enact the Story
B1
B
AA1
Lesson 42 Teacher Resource - Level One Page 45
This page is intentionally blank

Page 46 Teacher Resource - Level One Lesson 43
Samson Judges 13 & 15
FocusFor the children to know that God gave Samson great strength for the special purpose of delivering His people.
Memory Verse“The Lord is my strength.” (Psalm 118:14).
Lesson IntroductionMake use of a picture book or picture 1. Bible with this story.Concentrate on the following aspects of 2. the story:
the promise to the parents of a baby, • Samson;the fact that he didn’t have his hair cut;• Samson’s strength came from God;• the dramatic parts of the story:•
catching the foxes;• the lion and the bees;• the jawbone of the donkey;• Samson not being held down by • brand new ropes and bow strings.
Story SummaryThe Israelites had been ruled by the 1. Philistines for 40 years.The Angel of the Lord came to Manoah’s 2. wife and told her she would have a son who was to be a Nazarite and he was never to cut his hair.Samson had great strength whenever the 3. Spirit of God came upon him.He would rise up against the Philistines 4. and slay them.He killed a lion with his bare hands.5. He caught 300 foxes and put a fire 6. between their tails and burnt all the Philistines’ crops. He took the jawbone of a donkey and 7. slew 1000 men.He was able to free himself when tied 8. tightly with new ropes.
Teaching SuggestionDo some body building exercises with the children, eg. 5 push-ups, 5 star jumps, touching toes 5 times, etc. After each exercise repeat the memory verse together with the class.
Extra IdeasPlaydough. 1. Playdough used in free creative play. Talk to the children as they use the playdough about what they are making. Emphasise that God makes us all different, but He has a special plan in mind when He makes each of us. Sometimes we can’t see what is special about ourselves, but God knows. Older pre-schoolers might like to try making a ‘Samson’ and add playdough hair by squeezing it through a garlic press.AlargefloorpuzzleofSamson.2. Enlarge a picture of Samson, using a photocopier (eg. A3 size). Glue the picture to cardboard and cut it into approx. 10 pieces as a simple jigsaw. The jigsaw can be assembled in class on the floor as a group activity. Emphasise that God had a special plan for Samson (and for us) and He knows best how the pieces fit together.Morning Tea. 3. Ice arrowroot biscuits to resemble Samson. Add features with lollies or small pieces of dried fruit. Hair can be made by using a piping bag and icing, shredded coconut, cooked spaghetti or thin liquorice.Playaversionof“SimonSays”.4. Children take turns to be the leader and instruct the others. Simon says “Be like Samson and do five push-ups” (instructions should be either related to showing strength or to something Samson does in the story.)Collage. 5. Use a paper plate for Samson’s face. Draw on his features with felt pen. Add long strips of crepe paper using glue, tape or staples, to make Samson’s hair.
It is always helpful to use visual resources when telling the story. This helps the children to focus, concentrate and remember the lesson.

Lesson 43 Teacher Resource - Level One Page 47
Activity - Hairy Samson
NoteCreate one of these at least a week ahead of the scheduled class so that the children will be able to see the finished • product with its hair growing.
Materials1 stocking per child.• 1 cup of potting-mix per child.• A polymark/scribbler’s pen or pens, or similar fabric paint.• Approx. 1 tablespoon of grass seeds per child – especially one that will grow in shade as well as sun.• 1 polystyrene cup per child.•
StepsAllow the children to help as much as possible. Take the stocking and add the grass seeds.• Carefully add the potting mix. Compact, and tie off the stocking tightly against the potting mix.• Turn upright and carefully pinch the stocking away from the back of the head to allow the grass seeds to slip down • to eventually create hair at the back of the head.Using the polymark pen, help the children add the facial features – eyes, nose, and mouth.• Place in a polystyrene cup.• Tell the children that when they get home they need to carefully dunk the head in some water and then sit Samson’s • head on a glass jar, making sure the stocking length of his neck is in the jar full of water.

Page 48 Teacher Resource - Level One Lesson 44
Samson and Delilah Judges 16
FocusEven though Samson made mistakes, when he cried out to the Lord, the Lord heard him.
Memory Verse“Abide in Me.” (John 15:4).
Lesson IntroductionUse whatever of these props you can 1. to act out the story: a paper or material wig made from strips of brown paper or material stapled onto a strip of cardboard (cover staple ends with masking tape so hair is not pulled), staple ends of cardboard together to fit around your head; a blanket and pillow for Samson’s head; wool for bowstrings; rope; loom made from sticks and strings; scissors, large boxes and soft covering to create columns of the temple; blindfold.When acting out the story, emphasise 2. the part of the story where Samson tries to keep his secret about his hair, but eventually fails, giving in to Delilah. Have blindfolded Samson sit in the temple while relating that part of the story and have him pull the columns to make the temple collapse.
Story SummarySamson’s strength was in not cutting his 1. hair.The Philistines used his relationship with 2. Delilah to overcome him.Samson lied to Delilah three times about 3. the source of his strength.The fourth time he spoke the truth.4. The Philistines shaved Samson’s head and 5. captured him.While in captivity Samson’s hair began to 6. grow again.The Philistines wanted him to perform for 7. them.Samson was placed between two pillars in 8. the temple.He called out to the Lord and was able to 9. regain his strength and destroy the temple.Samson was killed along with all the 10. Philistines when the temple crashed around them.
Teaching SuggestionExplain that the word ‘abide’ means live. Play a version of the game “Duck, Duck, Goose”. Have the children sit in a circle. Choose a child. As the child walks around the outside of the circle he taps each child on the shoulder and says the memory verse. (Encourage the other children to say it as well). When the child gets to the word ‘me’ he taps the child and runs around the outside of the circle and is chased by the last child tapped. He sits down in the chaser’s place, then the game begins again with the chaser as the child who now does the tapping. (Make sure each child has a turn.)
Extra IdeasSleeping Samson. 1. Choose a ‘Samson’ and have him lie on the carpet/blanket as if asleep. The rest of the children pretend to creep up on ‘Samson’ and try to cut his hair before he wakes up.Blind Samson. 2. Blindfold a child then ask them to find the floor, a chair, another child, the door, etc. Repeat the activity with the other children.Cutting Samson’s Hair. 3. Use masking tape to attach seven long strands of crepe paper to the top of empty milk cartons. The children can paste on eyes, nose and mouth, cut out of coloured paper, to the front of the carton. Allow the children to then cut the crepe paper to give Samson a hair cut.
Encourage the children to know that the Lord loves to speak with them. It doesn’t matter where they are, they can always pray to Him and He will hear them..

Lesson 44 Teacher Resource - Level One Page 49
Activity - Finger Puppets and Block Play
Materials1 set of puppets from the Activity Sheet mounted or photocopied onto cardboard per child and one set for the • teacher.Glue.• Scissors.• Colouring pencils.• Blocks or empty milk cartons or similar boxes – have plenty as each child will require quite a few.•
Steps
At HomeCut out the holes for the children’s fingers. Cut the holes larger in the teacher’s puppets.• Colour the teacher’s puppets only•
In ClassThe children colour in their puppets.• Show the children how to put them on their fingers and make the legs walk.• Now have the children build a temple with the blocks or boxes.• Using their finger puppet of Samson, let them knock down their ‘temple’. Allow them to do this a few times•

Page 50 Teacher Resource - Level One Lesson 44
Samson and DelilahActivity – Finger Puppets and Block Play

Lesson 44 Teacher Resource - Level One Page 51
This page is intentionally blank

Page 52 Teacher Resource - Level One Lesson 45
Ruth, Naomiand Boaz Ruth
FocusBecause Ruth was willing and obedient, God provided all that she and Naomi needed.
Memory Verse“The Lord is my helper.” (Hebrews 13:6).
Lesson IntroductionAs a visual aid a felt board could be used 1. to tell the story.Alternatively, dolls could be used as 2. simple puppets for Ruth, Naomi, Boaz and perhaps Boaz’s kinsman.When telling the story actual objects such 3. as an ear of wheat, grains of wheat, a shoe/sandal etc will help make the story more real for the children.
Story SummaryNaomi’s husband and sons died in Moab.1. Naomi and her two daughters-in-law, 2. Orpah and Ruth, began the trip to Bethlehem, but Orpah returned to Moab, while Ruth continued on with Naomi.At Bethlehem, part of the culture for 3. widows was to collect the wheat which was left in the field after the reaping.Ruth was noticed by Boaz as she was 4. doing this one day.Boaz acknowledged Ruth’s sincerity and 5. was willing to accept responsibility to look after her as she was now his relative.Boaz fell in love with Ruth and married 6. her.King David and Jesus are descendants of 7. Boaz and Ruth.
Teaching SuggestionHave a bundle of drinking straws (‘wheat’ or ‘barley’) and toss these on the floor. As the children collect the ‘wheat’ or ‘barley’ say the words of the memory verse.
Extra IdeasFollow the Leader. 1. The essence of the game is that Ruth followed Naomi and went wherever she did. Give each child a turn at being the leader and encourage them to walk around and over various things just as Ruth and Naomi would have done on their way to Bethlehem.Kym’s Game. 2. Suggested items include a sandal, an ear of barley, or grass, a picture of Ruth and Boaz, a cloak/coat/wrap, cake of soap, wedding ring, baby doll, pillow. Name each item as you display them on a tablecloth. Tell the children to cover their eyes and name which is missing. Repeat the game a few times. WhichOneisDifferent.3. Have a selection of items listed in Kym’s Game plus some items in the story or totally contrary. Place three items from the story and one not, in front of the children. The children then choose which one is different or out of place in the story.Free Play. 4. Dress-up clothes (coat, cloak, shawl, sandals, baskets for collecting the barley). Then act out the story.Blanket Game.5. Ask the children to sit in a circle making sure there is plenty of room. The children cover their eyes and the teacher covers one child with a blanket (or sheet if it is hot). Start with a very confident child. The children then try to guess who is under the blanket/sheet. Give each child a turn to be covered.Shoe Race. 6. Three pairs of shoes (one per child, any size). Place one of each pair in a space in the centre of the room and give one shoe to each child. The aim of the game is for the children to find their shoe’s mate.Song. 7. Sing to the tune of “Here we go around the mulberry bush,” “This is the way we glean the wheat.” Make up your own verses.Morning Tea. 8. Make pikelets or other grain based mixture.
If enjoying morning tea together, take the time to encourage the serving of one another in setting up, serving of food and in the cleaning up.

Lesson 45 Teacher Resource - Level One Page 53
Activity - Collage
MaterialsGrass stalks with a good head of seeds (you will need a lot of these, the nearby park may be handy for collecting).• Photocopies of Ruth and Boaz (1 set per child).• Cardboard cut to A4 size (1 per child).• Strong glue.• Safety scissors.• Colouring pencils/crayons.•
Steps
At HomeCollect lots of grass with seed heads.• Cut out Ruth and Boaz figures.• Cut cardboard to A4 size.•
In ClassThe children colour Ruth and Boaz.• Then the children can glue grass stalks onto the cardboard.• Add Ruth and Boaz last of all to complete the picture.•

Page 54 Teacher Resource - Level One Lesson 45
Ruth, Naomi and BoazActivity - Collage

Lesson 45 Teacher Resource - Level One Page 55
This page is intentionally blank

Page 56 Teacher Resource - Level One Lesson 46
Hannah I Samuel 1 & 2
FocusGod is our comfort and strength when we place our worries in His hands.
Memory Verse“He cares for you.” (I Peter 5:7).
Lesson IntroductionUsing a toy telephone or walkie talkie, 1. pretend to have a conversation. Talk about using a telephone to talk to someone we can’t see and introduce prayer as being similar to talking on the phone – with God on the other end.Alternatively, invite a mother and young 2. baby to class and introduce the lesson watching and talking about babies. The story itself could be told using either 3. a felt board, picture book or simple finger puppets or dolls as visual aids.
Story SummaryHannah and her husband loved and 1. worshipped the Lord.Hannah’s inability to have children was 2. a great grief to her and was considered by some as a sign of God’s disfavour and they would tease her.Hannah sought the Lord on the matter and 3. did not lose heart or become bitter as the years passed.God heard her prayers and gave her a son, 4. Samuel.Hannah committed him to God and she 5. rejoiced in the Lord.
Teaching SuggestionExplain the verse to the children. As you say the memory verse, roll a ball to each in turn. Roll the ball on the word ‘cast’. Have them roll it back to you and say the verse with each child.
Extra IdeasHappy/Sad Faces. 1. Have the children colour in the Happy/Sad Faces from the Extra Ideas Activity Sheet.Songs. 2. Sing thankful songs, eg. “Thank you, thank you, Lord, for saving me,” “With my hands lifted up,” or similar song known to you.Photos. 3. Bring some of your baby photos or have the children bring some of theirs.
Pre-schoolers enjoy simple games. This is a helpful tool in revising previous lessons. eg ‘Who am I? My husband and two sons died in Moab.’

Lesson 46 Teacher Resource - Level One Page 57
Activity - Printing
MaterialsA large sheet of paper or plain white cardboard per child.• Kitchen sponges, preferably ½” thickness, cut into heart shapes (approx. 1 – 2”). A peg attached to the back of the • heart can act as a handle. You will need approx. 1 heart to each child.Kitchen sponges, as above, cut into lip shapes.• Several printing pads. These can be made from old polystyrene meat trays, with several layers of dampened paper • towel on the tray.Paint. (Needs to be thick, eg. poster paint, or wallpaper paste coloured with good quality dye.)• Paint shirts.• Drop sheet.• Bucket with water to wash hands.• Towel.•
StepsSpoon a little paint onto each printing pad, and spread it into the pad. Give each child a piece of paper and put on • paint shirts.Do ‘lip’ prints first. Make lip prints using a sponge shape. • Heart and sponge lip shapes can then be used to print onto the paper, using the pegs as handles when inking the • paint tray and printing.Lastly, children use one of their own hands for hand prints. After pressing their hand on the print pad, they hold • their hand with fingers together and thumb spread, make one careful print. A second hand print, next to the little finger side of the first print, with the fingers still together and thumb apart will look like a pair of praying hands.

Page 58 Teacher Resource - Level One Lesson 46
HannahExtra Ideas Activity Sheet

Lesson 46 Teacher Resource - Level One Page 59
This page is intentionally blank

Page 60 Teacher Resource - Level One Lesson 47
Samuel hearsGod speak I Samuel 3
FocusSamuel was willing to hear God’s voice, so we must be willing and open too.
Memory Verse“Hear My voice.” (John 10:27).
Lesson IntroductionTalk to the children very quietly or by 1. using signs. Ask them to sit quietly and listen to all the sounds they can hear for 30 seconds (set a timer). Have them share what sounds could be heard, particularly those not usually noticed, eg. a ticking clock.Call the roll, explaining to the children 2. that they must listen for their name to be called and answer “yes”.Show some simple pictures of animals, 3. machines, household appliances, asking “what sound does this make?” Introduce the story as being about a boy who heard a very different sound to any he had heard before.Use plenty of visual aids as well as 4. pictures, actual objects such as a pillow and blanket, and dolls or puppets for Eli and Samuel – visual aids that you can move and touch. A demonstration model of the activity could also be used to tell the story.
Story SummarySamuel ministered to the Lord before Eli. 1. The word of the Lord was rare in those days.As Samuel was going to sleep one night, 2. the Lord called him by name and he ran to Eli and said, “Here I am,” but Eli hadn’t called him.This happened three times until Eli 3. realised it was God calling him and told him to answer, “Speak, Lord, for your servant hears.”So God told Samuel of the judgement that 4. was to be brought upon Eli and His house because of the wicked behaviour of his sons – these things came to pass.Samuel grew in the Lord and became 5. known throughout all Israel as one of the great prophets of the Lord.
Teaching SuggestionMusical Bobs. The children walk around the room to music or singing a chorus, when the music stops or chorus finishes, the children quickly sit down and with direction from the teacher repeat the memory verse.
Extra IdeasListening Game. 1. A child sits in the centre of the circle, blindfolded or with eyes closed. The teacher points to a child in the circle who then calls to the person in the centre by name three times. The child in the centre tries to identify who called their name.Another Listening Game. 2. You will need pairs of simple instruments, eg. rhythm sticks, bells, party trumpets, shakers, whistles, biscuit tin drum. Children close their eyes and each child is given an instrument. The aim is for the children to sound their instrument and listen carefully to try to find their instrument partner.Pipi Shells. 3. If you have access to pipi shells, these make great ears. Use them pressed into playdough to create ears – add eyes, mouth, etc. The pipi shells may also be used in a sand tray or sand pit, if available.
Children may enjoy acting out the story together. This is a good opportunity to revise appropriate listening skills and turn-taking.

Lesson 47 Teacher Resource - Level One Page 61
Activity - Eli and Samuel in the Temple
Materials1 Activity Sheet per child photocopied or mounted onto cardboard.• Cardboard.• Scissors.• Glue.• Colouring pencils.• Sticky tape.• Straws.• Stanley knife (for teacher).•
Steps
BeforeClassPre-cut Samuel.• Using the Stanley knife, cut along the dotted line on the scene and reinforce the ends of the slit with tape.• Then paste another piece of cardboard 7 cm x 13 cm on the back of the scene covering the slit. Only put paste at • the top of the piece so as to allow the figure to be moved back and forth along the slit.
In ClassThe children colour the scene and Samuel.• Tape Samuel onto a straw.• Insert the figure of Samuel through the slit in the scene and place him next to his bed. Move Samuel back and forth • to Eli.

Page 62 Teacher Resource - Level One Lesson 47
Samuel hears God speakActivity – Eli and Samuel in the Temple

Lesson 47 Teacher Resource - Level One Page 63
This page is intentionally blank

Page 64 Teacher Resource - Level One Lesson 48
Eli, Hophniand Phinehas I Samuel 4 - 6
FocusHophni and Phinehas did what they wanted to do and never listened to and obeyed God.
Memory Verse“Do what is right.” (Deuteronomy 12:25).
Lesson IntroductionChildren love the absurd. This suggestion 1. may help them to realise that we can’t do just as we please, but all things must be in order – pretend to do something very silly, eg. “I think I might wear my shoes on my hands,” or “wear my sun-glasses back to front,” and “because I am hungry I might eat the chair.” This should get their attention!Make up a small model of the ark using 2. a tissue box (spray painted gold, if you like), some satay sticks for the poles, and 2 cherubim (diagram is included). This can be used in telling the story.
Story SummaryEli’s two sons, Hophni and Phinehas were 1. priests in God’s tabernacle, but they were disobedient.Through Samuel, God warned Eli of their 2. sin and said they would both die on the same day.Israel was defeated in battle because of 3. the sin of the two sons. Israel brought the ark to the place of battle to help win the fight, but Israel was still defeated with many dying along with Hophni and Phinehas.The ark was captured by the enemy.4. Eli fell to his death when he heard the 5. news of his sons’ death and of the ark being taken by the enemy.The Philistines kept the ark for seven 6. months but returned it when many of them became sick or were killed because the ark belonged to God and was holy but the Philistines were unholy.
Teaching SuggestionThe children sit in a circle. The teacher goes round and taps the first child and says “Do,” tap the second and say “what,” tap the third and say “is,” point to the fourth child and everyone says “right.” Continue going round the circle until the verse has been said a number of times. It does not then matter if the number of children is not a multiple of four.
Extra IdeasFollow Instructions/Obedience Activities. 1. An obstacle course/treasure hunt with footsteps to follow. “Simon Says”. Cars and traffic lights.Memory Game. 2. Using items from the story, eg. ark model, something to represent warfare (toy sword, shield), bandages (to help heal the Philistines), dolls or puppets as Eli, Hophni and Phinehas. Display the items in front of the children, then have them close their eyes. Place some of the items behind you and have the children name the missing items.
Take time to do a stock take of your resources, so that you are prepared for the new term.

Lesson 48 Teacher Resource - Level One Page 65
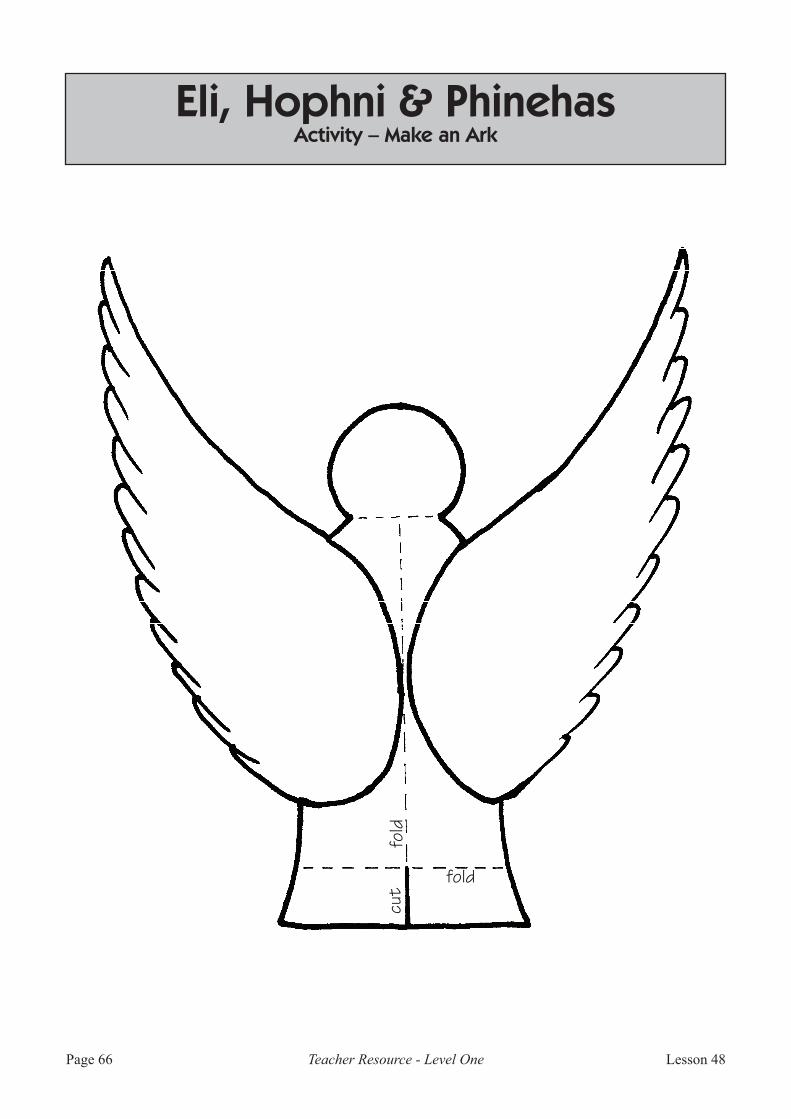
Activity - Make an Ark
Materials1 large box (stove or small fridge box – found at the local appliance shop).• Paint – gold or yellow spray paint (to paint the box at home), or ordinary paint and brushes for the children to paint • the box in class – painting shirts and drop sheet will also be needed.2 cardboard cherubim (from Activity Sheet template).• 2 dowel rods or broom handles.• Long strips of paper to create the fancy edge for around the top of the ark.• Scissors.• Colouring pencils.• Tape or glue for fancy edge.•
Steps
At HomeFold short lengths of the strips of paper and draw some scalloped edge for the children to cut along and eventually • open out.Make holes in the front and back of the ark – at the upper corners, large enough for the dowel rods.•
In ClassThe children paint the ark if you have not done it at home.• Ask the children to cut out scallops. These can be decorated if time allows. Attach these around the top of the edge • of the ark.The children can colour the faces of the cherubim.• Attach the cherubim in place on top of the ark.• Insert the dowel rods. The ark is now ready to be transported – the children can take turns in being the Levite • priests who were the only ones allowed by God to carry the ark. A chorus can be sung as they march around carrying the ark.
fold
fold
cut
Page 66 Teacher Resource - Level One Lesson 48
Eli, Hophni & PhinehasActivity – Make an Ark
fold
fold
cut

Lesson 48 Teacher Resource - Level One Page 67
This page is intentionally blank

This page is intentionally blank

This page is intentionally blank

This page is intentionally blank


Curriculum Teacher Resource - Level One Page 72
Sonseekers CurriculumUnit One Unit Two Unit Three Unit Four
Creation 11. Creation 22. Adam and Eve3. The fall4. Cain and Abel5. Noah builds an ark6. The flood, Noah and his 7. sonsThe tower of Babel8. Abram called, Abram 9. and LotThe covenant with 10. AbrahamIshmael and Isaac11. Sodom and Gomorrah12. The sacrifice of Isaac13. Rebekah, Isaac’s bride14. Jacob and Esau15. Jacob’s ladder, Leah and 16. Rachel
Jacob becomes Israel17. Joseph, the favourite son18. Joseph goes to Egypt19. Joseph interprets the 20. dreamsJoseph’s brothers21. Israel in Egypt22. Israelite slaves, Moses 23. bornMoses flees and returns 24. to Egypt“Let My people go” 25. The first passover, Israel 26. deliveredCrossing the Red Sea27. Manna, water from the 28. rockSinai and the ten 29. commandmentsMoses and the tabernacle30. The golden calf31. Twelve spies, 40 years of 32. wandering
Aaron’s rod33. Moses hits the rock34. The bronze serpent35. Balaam and his ass36. Joshua and Rahab37. Crossing the Jordan, 38. JerichoThe sin of Achan39. The sun stands still40. Gideon’s fleece41. Gideon and his army42. Samson43. Samson and Delilah44. Ruth, Naomi and Boaz45. Hannah46. Samuel hears God speak47. Eli, Hophni and Phinehas48.
Saul chosen49. Saul and the Amalekites50. David chosen51. David and Goliath52. David and Jonathan53. David and Saul54. David crowned55. David and the ark56. Absalom57. Solomon becomes king58. Solomon’s temple59. Israel divided, Rehoboam 60. and JeroboamElijah and the widow61. Elijah on Mount Carmel62. Good King Jehoshaphat63. Elisha and the double 64. portion
Unit Five Unit Six Unit Seven Unit EightThe widow’s oil, a boy 65. raisedNaaman66. Famine in Samaria67. Jonah68. The captivity of Israel 69. (the northern kingdom)Hezekiah and 70. SennacheribIsaiah71. Josiah72. Jeremiah73. The captivity of Judah 74. (the southern kingdom)Daniel interprets the 75. king’s dreamThe fiery furnace76. The writing on the wall77. Daniel in the lions’ den78. Esther79. Restoration80.
Zacharias, Elizabeth, 81. Mary and JohnThe birth of Jesus82. Jesus in the temple83. John the Baptist 84. Jesus baptised and 85. temptedThe call of the disciples86. Water turned to wine87. The temple cleansed, 88. NicodemusThe woman at the well89. Healing of the paralysed 90. manThe house built on the 91. rockJesus stills the storm92. The feeding of the 500093. The centurion’s servant94. Forgiveness in Simon’s 95. houseThe sower and the seed96.
Jairus’ daughter, a 97. woman touches JesusJesus walks on the water98. Miracles of healing99. The transfiguration100. A boy is healed101. The unmerciful servant102. A man born blind103. The good Samaritan104. Prayer105. The raising of Lazarus106. The lost sheep, coin and 107. sonAttitudes of a servant108. The marriage of the 109. king’s sonThe ten lepers110. The ten virgins111. The talents112.
Palm Sunday113. The last supper and 114. GethsemaneThe crucifixion115. The resurrection116. Peter restored117. The risen Christ and His 118. ascensionThe day of Pentecost119. Peter and John120. Peter and the Gentiles121. Stephen122. Philip123. Paul’s conversion124. Paul’s first missionary 125. journeyPaul’s second and third 126. missionary journeysPaul’s capture and 127. imprisonmentPaul’s final journey128.