Embed Size (px)
Citation preview
Agilent 6200 Series TOF and 6500
Series Q-TOF LC/MS System
Quick Start GuideWhat’s New 4Where to find information 5Getting Started 8
Step 1. Start the Data Acquisition software 9Step 2. Prepare the LC modules 16Step 3. Prepare the TOF and Q-TOF instrument 20Step 4. Set up and run a method 37Step 5. Review results and find compounds with Qualitative Analysis 45
Step 6. Set up and run quantitation 45Step 7. Review data in IM-MS Browser 46
Use this guide for your first steps with the Agilent 6200 Series Time-of-Flight and 6500 Series Quadrupole Time-of-Flight LC/MS system, and as a road map for your user information.
What is the Agilent 6200 Series TOF LC/MS system?
The Agilent TOF is an orthogonal acceleration time-of-flight mass spectrometer (oa-TOF). The ions reaching the time-of-flight chamber are impelled in a direction perpendicular to their original path, meaning that the acceleration pulse applied to send the ions down the flight tube is orthogonal to the direction that ions are entering the mass analyzer. This geometry minimizes the effect of the entrance velocity on the flight time, leading to higher resolution.

1
What is the Agilent 6500 Series Q-TOF LC/MS system?
You can set up a TOF LC/MS with Agilent 1200, 1260, 1260 Infinity II, 1290 Infinity, or 1290 Infinity II LC modules and with one of several ion interfaces:
• ESI
• Dual ESI
• AJS ESI (Agilent Jet Stream ESI)
• Dual AJS ESI (Dual Agilent Jet Stream ESI)
• HPLC-Chip
• APCI
• APPI
• Multimode
• Nanospray (nanoESI)
• Dual nanospray (Dual nanoESI)
• MALDI
• GC-APCI
The 6230 Accurate-Mass TOF is the only TOF instrument that supports the Agilent Jet Stream ESI and the Dual Agilent Jet Stream ESI. The AJS ESI and Dual AJS ESI sources use a super-heated sheath gas to collimate the nebulizer spray which dramatically increases the number of ions that enter the mass spectrometer.
Each Agilent system has advantages for drug discovery, metabolomics, and environmental analysis — high throughput sample screening with highly sensitive detection and accurate mass assignment.
What is the Agilent 6500 Series Q-TOF LC/MS system?
The Agilent Q-TOF LC/MS is a liquid chromatograph-quadrupole time-of-flight mass spectrometer that performs MS/MS using a quadrupole, a hexapole collision cell and a time-of-flight analyzer to produce spectra. The quadrupole selects precursor ions that are fragmented in the collision cell into product ions, which are then impelled to the detector, at an angle perpendicular to the original path.
You can set up an Agilent Q-TOF LC/MS with Agilent 1200, 1260, 1260 Infinity II, 1290 Infinity, or 1290 Infinity II LC modules, and with one of several ion interfaces: ESI, Dual ESI, AJS ESI, Dual AJS ESI, HPLC-Chip, APCI, APPI, Multimode, nanospray, dual nanospray, MALDI and GC-APCI.
2 Agilent 6200 Series TOF and 6500 Series Q-TOF LC/MS Quick Start Guide
1
What is the Agilent MassHunter Workstation Software?
The 6530, 6540 UHD Accurate-Mass Q-TOF, the 6545 Q-TOF, the 6550 iFunnel Q-TOF, and the 6560 Ion Mobility Q-TOF are the only Q-TOF instruments that can be set up with the Agilent Jet Stream ESI source (AJS ESI) and the Dual AJS ESI. These sources use a super-heated sheath gas to collimate the nebulizer spray which dramatically increases the number of ions that enter the mass spectrometer.
What is the Agilent MassHunter Workstation Software?
The Agilent TOF and Q-TOF LC/MS comes with Agilent MassHunter Workstation Software that includes these programs:
• Data Acquisition – From one application you can tune the massspectrometer, control and monitor instrument parameters, set up methodscontaining acquisition parameters and worklists containing multiplesamples and monitor real-time run plots.
• Qualitative Analysis – From Qualitative Analysis Navigator and QualitativeAnalysis Workflows, you can set up methods to extract and integratechromatograms, extract peak spectra and compare data from differenttypes of data files. More importantly, you can find compounds and generateformulas for those compounds in the Qualitative Analysis Workflowsprogram. For more information on the Qualitative Analysis software, pleaserefer to the Qualitative Analysis Familiarization Guide for LC/MS, theQualitative Analysis Familiarization Guide for GC/MS, or the online Helpfor the Qualitative Analysis program.
• IM-MS Browser - From one application you can interactively browse andvisualize data from a single LC-IM-MS data file, simultaneously examiningthe separation of complex mixtures in retention time, drift time, and m/zdimensions. You can visualize various 2D and 3D subsets of that data,export data in a variety of formats, and calculate collision cross sections.
• Quantitative Analysis - From one application you can set up a batch of datafiles and quantify, evaluate and requantify the results should you want todo this. For more information on the Quantitative Analysis program, pleaserefer to either the Quantitative Analysis Familiarization Guide or theonline Help for the Quantitative Analysis program.
Agilent 6200 Series TOF and 6500 Series Q-TOF LC/MS Quick Start Guide 3

1
What’s New
What’s New
in B.08.00
• You can set a threshold for profile scan spectra. You can set two differentthreshold values: one for MS scan profile and one for MS/MS scan profiledata.
• SWARM Autotune is available for the 6530 and 6550 Q-TOF instruments.
• The 1260 Infinity II systems are supported.
• Microsoft Windows 10 and Microsoft Windows 7 are supported.
• Customizable, automatic data file name generation is available for aWorklist.
For a list of updates made to previous versions, refer to the online Help.
4 Agilent 6200 Series TOF and 6500 Series Q-TOF LC/MS Quick Start Guide
Where to find information 1
Online Help
Where to find information
Online Help
Press F1 To get more information about a window or dialog box, place the cursor on the window or dialog box of interest and press F1. In the Agilent MassHunter IM-MS Browser program, you instead click Help > Contents.
Help menu From the Help menu, access “How-to” help and reference help.
Installation and User Guides
You can access these guides from the online Help if they are installed. Some of these guides are also included with your system in printed format. They are also available at www.chem.agilent.com.
Installation Guide This guide is used by the Agilent customer engineer to install the hardware and software, configure the instrument, and verify performance. A separate installation guide is available for the TOF, Q-TOF, and IM-QTOF.
Upgrade Guide This guide is used to upgrade your MassHunter Workstation software from a previous version.
MassHunter Offline Installation Guide This guide provides instructions to install Data Analysis software on a computer other than the one used to acquire data. It also supplements the Upgrade Guide and Installation Guide.
Maintenance Guide (animated) Use this animated guide to help maintain and troubleshoot your LC/MS instrument.
Concepts Guide - The Big Picture Learn the background information to help you understand operation of the hardware and acquisition software.
TOF/Q-TOF Familiarization Guide Do the exercises to learn to use the TOF/Q-TOF LC/MS hardware and acquisition software.
Agilent 6200 Series TOF and 6500 Series Q-TOF LC/MS Quick Start Guide 5

1 Where to find information
Installation and User Guides
MassHunter IM-MS Browser Quick Start Guide Use this guide to learn to use the MassHunter IM-MS Browser software. You can find a PDF version of this manual on the LCMS TOF/Q-TOF Resource DVD in the Manuals folder.
MassHunter Study Manager Quick Start Guide Use this guide to learn to use the MassHunter Study Manager software. You can find a PDF version of this manual on the LCMS TOF/Q-TOF Resource DVD in the Manuals folder.
MassHunter Data Acquisition User Management and Audit Trail Quick Start Guide
Use this guide to learn about the MassHunter Data Acquisition User Management and Audit Trail software. You can find a PDF version of this manual on the LCMS TOF/Q-TOF Resource DVD in the Manuals folder.
MassHunter Quantitative Analysis Compliance Software Quick Start Guide Use this guide to learn about the MassHunter Quantitative Analysis Compliance software. (The documentation for MassHunter Quantitative Analysis can be installed from the MassHunter Quantitative Analysis disk.)
Quantitative Analysis Familiarization Guide Do the exercises to learn to use the Quantitative Analysis program. (The documentation for MassHunter Quantitative Analysis can be installed from the MassHunter Quantitative Analysis disk.)
Qualitative Analysis Familiarization Guide for LC/MS Do the exercises to learn to use the Qualitative Analysis program. (This guide is on the MassHunter Analysis Resource DVD B.08.00.)
MassHunter Qualitative Analysis eFamiliarization Guide for TOF/Q-TOF Do the exercises to learn to use the Qualitative Analysis program. (This interactive guide is on the MassHunter Analysis Resource DVD B.08.00.)
MassHunter BioConfirm Software Quick Start Guide Learn how to use the BioConfirm software (The Agilent MassHunter BioConfirm software can be purchased separately.)
MassHunter BioConfirm Familiarization Guide Do the exercises to learn how to use the BioConfirm software. (The Agilent MassHunter BioConfirm software can be purchased separately.)
6 Agilent 6200 Series TOF and 6500 Series Q-TOF LC/MS Quick Start Guide
Where to find information 1
Training
MassHunter Mass Profiler Quick Start Guide Learn how to use the Mass Profiler software (The Agilent MassHunter Mass Profiler software can be purchased separately.) (This guide is on the Mass Profiler Resource disk.)
MassHunter Mass Profiler Familiarization Guide Do the exercises to learn how to use the Mass Profiler software. (The Agilent MassHunter Mass Profiler software can be purchased separately.) (This guide is on the Mass Profiler Resource disk.)
Training
Familiarization Guide Use all three Familiarization Guides (Data Acquisition, Qualitative Analysis, and Quantitative Analysis) to get to know the software.
eFamiliarization Guide Use all eFamiliarization Guides (Data Acquisition, Qualitative Analysis, and Quantitative Analysis) to get an interactive introduction to the software.
Quick Start Guide Use the Quick Start Guides for Study Manager, Acquisition User Management and Audit Trail, and Quantitative Analysis Compliance to get to know these programs.
Report Designer User Information DVD Watch the movies and use the Familiarization Guide to learn how to customize a report for the MassHunter Qualitative Analysis and MassHunter Quantitative Analysis programs.
Training Courses Visit www.chem.agilent.com to view a listing of training courses for the Series 6200 TOF and the Series 6500 Q-TOF LC/MS.
Agilent 6200 Series TOF and 6500 Series Q-TOF LC/MS Quick Start Guide 7
1 Getting Started
Getting Started
Install the TOF or Q-TOF LC/MS hardware and software
Use the Installation Guide for your instrument to install the hardware and software and verify performance.
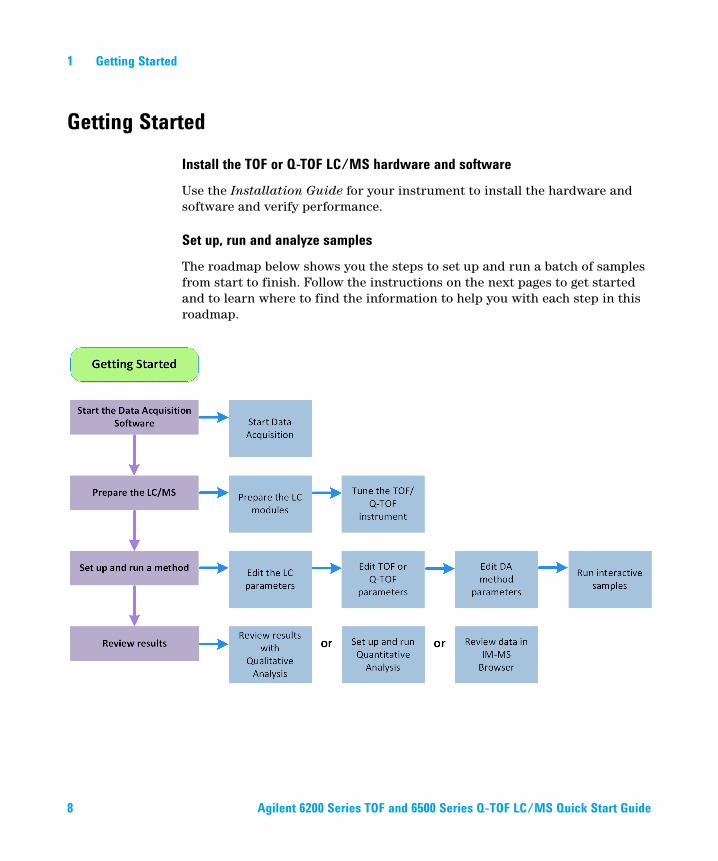
Set up, run and analyze samples
The roadmap below shows you the steps to set up and run a batch of samples from start to finish. Follow the instructions on the next pages to get started and to learn where to find the information to help you with each step in this roadmap.
8 Agilent 6200 Series TOF and 6500 Series Q-TOF LC/MS Quick Start Guide
Getting Started 1
Step 1. Start the Data Acquisition software
Step 1. Start the Data Acquisition software
The instructions below assume that:
• The hardware and software are installed.
• The instrument is configured.
Use instructions in the Installation Guide to configure the instrument for the first time and any time you change the LC configuration.
• The LC modules and the LC/MS instrument are turned on, but the LC pump is not running.
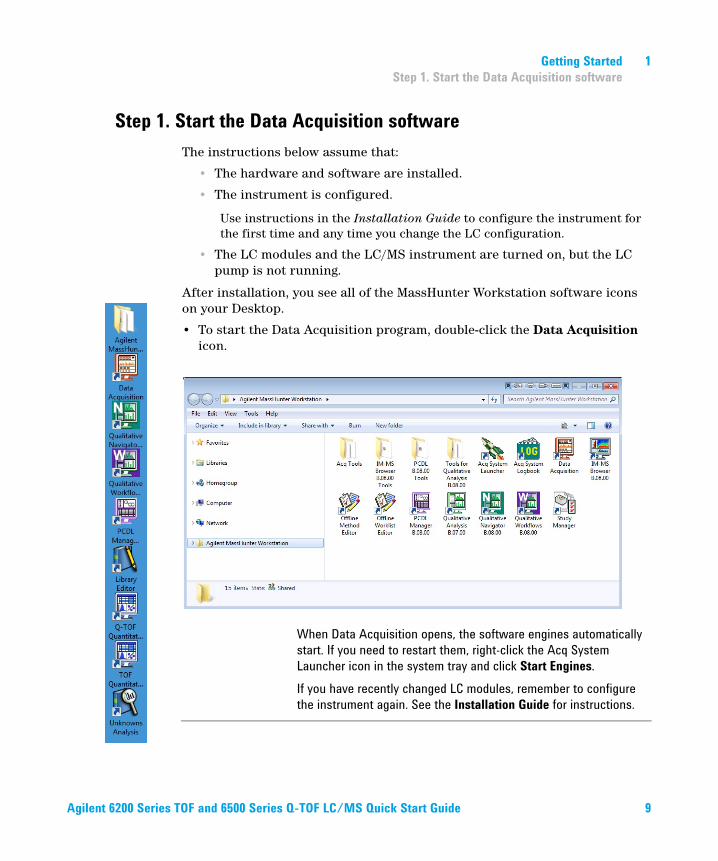
After installation, you see all of the MassHunter Workstation software icons on your Desktop.
• To start the Data Acquisition program, double-click the Data Acquisition icon.
When Data Acquisition opens, the software engines automatically start. If you need to restart them, right-click the Acq System Launcher icon in the system tray and click Start Engines.If you have recently changed LC modules, remember to configure the instrument again. See the Installation Guide for instructions.
Agilent 6200 Series TOF and 6500 Series Q-TOF LC/MS Quick Start Guide 9
1 Getting Started
Step 1. Start the Data Acquisition software
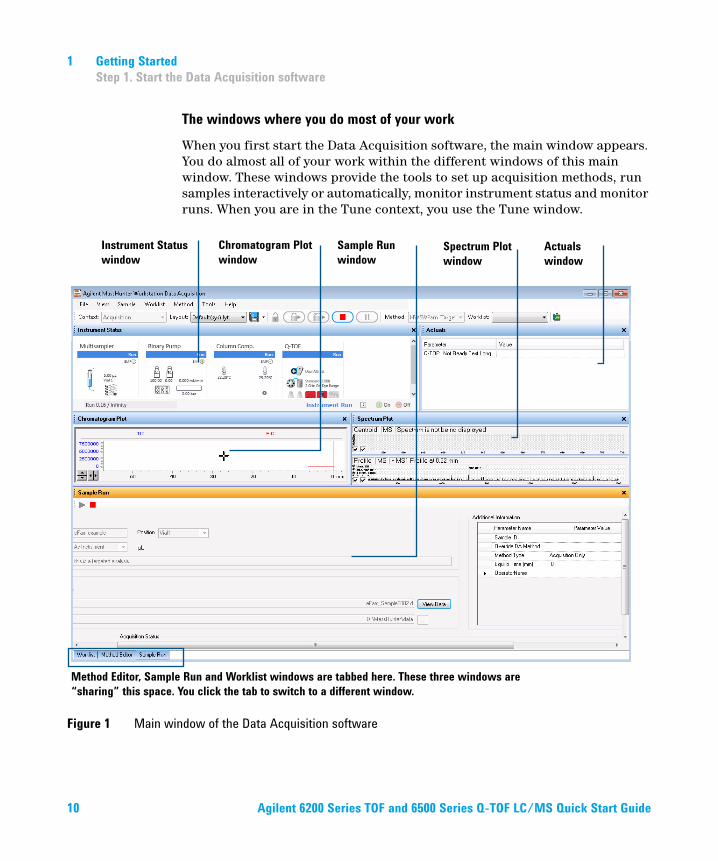
The windows where you do most of your work
When you first start the Data Acquisition software, the main window appears. You do almost all of your work within the different windows of this main window. These windows provide the tools to set up acquisition methods, run samples interactively or automatically, monitor instrument status and monitor runs. When you are in the Tune context, you use the Tune window.
Figure 1 Main window of the Data Acquisition software
Instrument Status
window
Chromatogram Plot
window
Sample Run
window
Spectrum Plot
window
Method Editor, Sample Run and Worklist windows are tabbed here. These three windows are
“sharing” this space. You click the tab to switch to a different window.
Actuals
window
10 Agilent 6200 Series TOF and 6500 Series Q-TOF LC/MS Quick Start Guide

Getting Started 1
Step 1. Start the Data Acquisition software
Show/hide the windows You can show one window at a time on the screen or all seven windows. You can never hide all of the windows. To show or hide a window, you click the commands in the View menu. You can also hide a window by clicking the X icon in the upper right corner of the window.
When you click a window, the title of the active window changes to a different color. Press F1 to obtain help on the active window. You can also drag a window border to resize the window. If you double-click the title of the window, the window “floats” outside of the main window. You can double-click the title bar again to “dock” the window. You can also float and dock the window by right-clicking the title of the window and clicking Floating.
Instrument Status window With this window you view the status of each device configured with the instrument. The possible values for Status are shown below. You also set non-method control and configuration parameters for the LC devices and the MS instrument. A shortcut menu is available for each device.
This window displays each device's current status both as text and by its color-coding:
You can click the ?
button in any device
pane to get help on
that device. This icon
is visible when you
hover over that
device.
Agilent 6200 Series TOF and 6500 Series Q-TOF LC/MS Quick Start Guide 11
1 Getting Started
Step 1. Start the Data Acquisition software
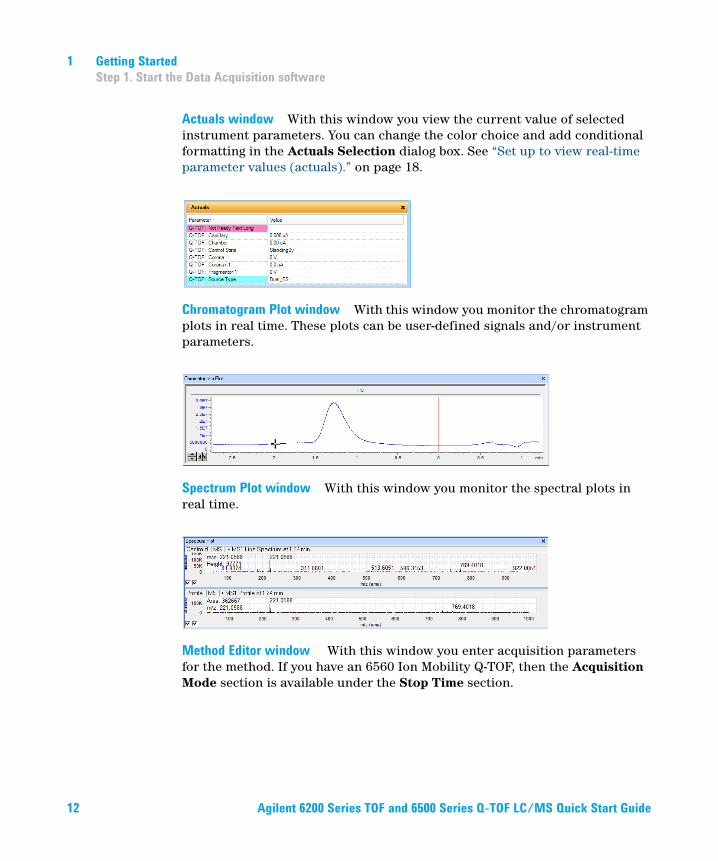
Actuals window With this window you view the current value of selected instrument parameters. You can change the color choice and add conditional formatting in the Actuals Selection dialog box. See “Set up to view real-time parameter values (actuals).” on page 18.
Chromatogram Plot window With this window you monitor the chromatogram plots in real time. These plots can be user-defined signals and/or instrument parameters.
Spectrum Plot window With this window you monitor the spectral plots in real time.
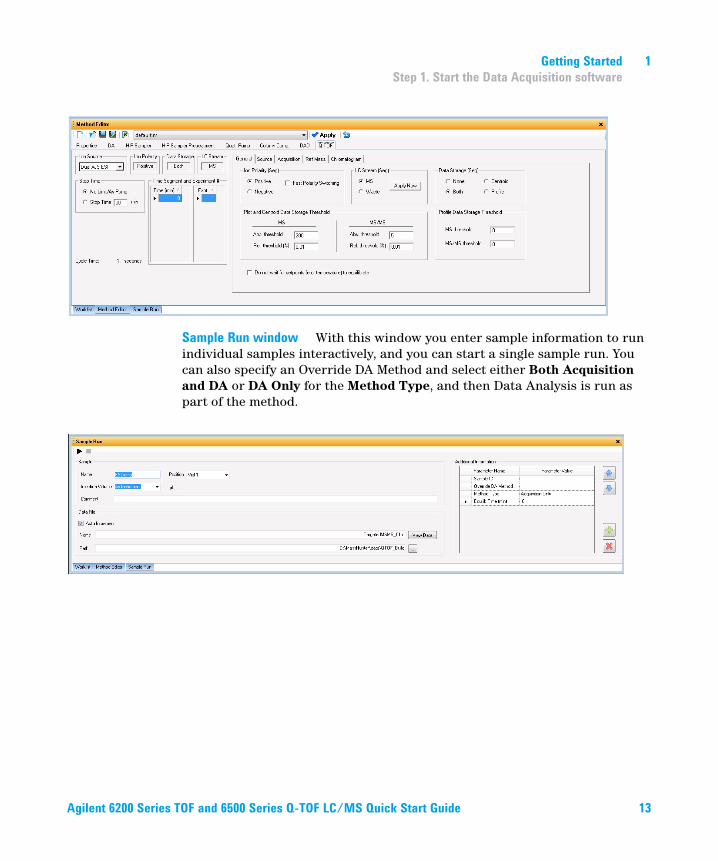
Method Editor window With this window you enter acquisition parameters for the method. If you have an 6560 Ion Mobility Q-TOF, then the Acquisition Mode section is available under the Stop Time section.
12 Agilent 6200 Series TOF and 6500 Series Q-TOF LC/MS Quick Start Guide
Getting Started 1
Step 1. Start the Data Acquisition software
Sample Run window With this window you enter sample information to run individual samples interactively, and you can start a single sample run. You can also specify an Override DA Method and select either Both Acquisition and DA or DA Only for the Method Type, and then Data Analysis is run as part of the method.
Agilent 6200 Series TOF and 6500 Series Q-TOF LC/MS Quick Start Guide 13
1 Getting Started
Step 1. Start the Data Acquisition software
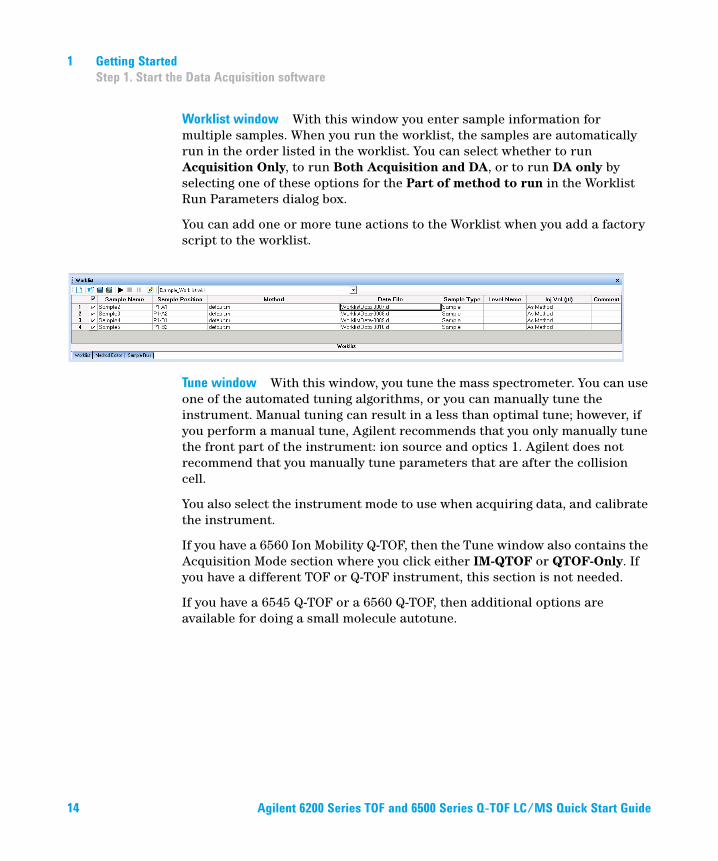
Worklist window With this window you enter sample information for multiple samples. When you run the worklist, the samples are automatically run in the order listed in the worklist. You can select whether to run Acquisition Only, to run Both Acquisition and DA, or to run DA only by selecting one of these options for the Part of method to run in the Worklist Run Parameters dialog box.
You can add one or more tune actions to the Worklist when you add a factory script to the worklist.
Tune window With this window, you tune the mass spectrometer. You can use one of the automated tuning algorithms, or you can manually tune the instrument. Manual tuning can result in a less than optimal tune; however, if you perform a manual tune, Agilent recommends that you only manually tune the front part of the instrument: ion source and optics 1. Agilent does not recommend that you manually tune parameters that are after the collision cell.
You also select the instrument mode to use when acquiring data, and calibrate the instrument.
If you have a 6560 Ion Mobility Q-TOF, then the Tune window also contains the Acquisition Mode section where you click either IM-QTOF or QTOF-Only. If you have a different TOF or Q-TOF instrument, this section is not needed.
If you have a 6545 Q-TOF or a 6560 Q-TOF, then additional options are available for doing a small molecule autotune.
14 Agilent 6200 Series TOF and 6500 Series Q-TOF LC/MS Quick Start Guide
Getting Started 1
Step 1. Start the Data Acquisition software
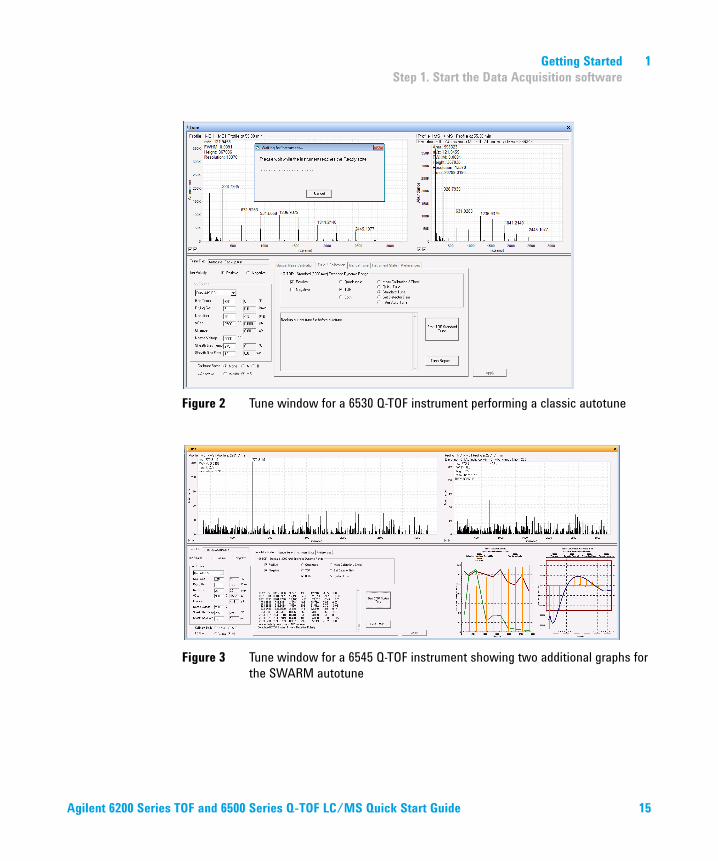
Figure 2 Tune window for a 6530 Q-TOF instrument performing a classic autotune
Figure 3 Tune window for a 6545 Q-TOF instrument showing two additional graphs for the SWARM autotune
Agilent 6200 Series TOF and 6500 Series Q-TOF LC/MS Quick Start Guide 15
1 Getting Started
Step 2. Prepare the LC modules
Step 2. Prepare the LC modules
Read and follow the instructions in the online Help for each of the tasks in the checklist described on the following pages.
1 Switch LC Stream to Waste.
While you condition or equilibrate the column, you can tune the TOF or Q-TOF MS. During this time you do not want pump effluent going into the TOF or Q-TOF MS, so you switch the direction of the LC stream away from the MS ion source and to waste.
If you have the LC connected to a VWD or DAD, you can still monitor the fluctuations of the VWD or DAD real-time chromatogram before a run.
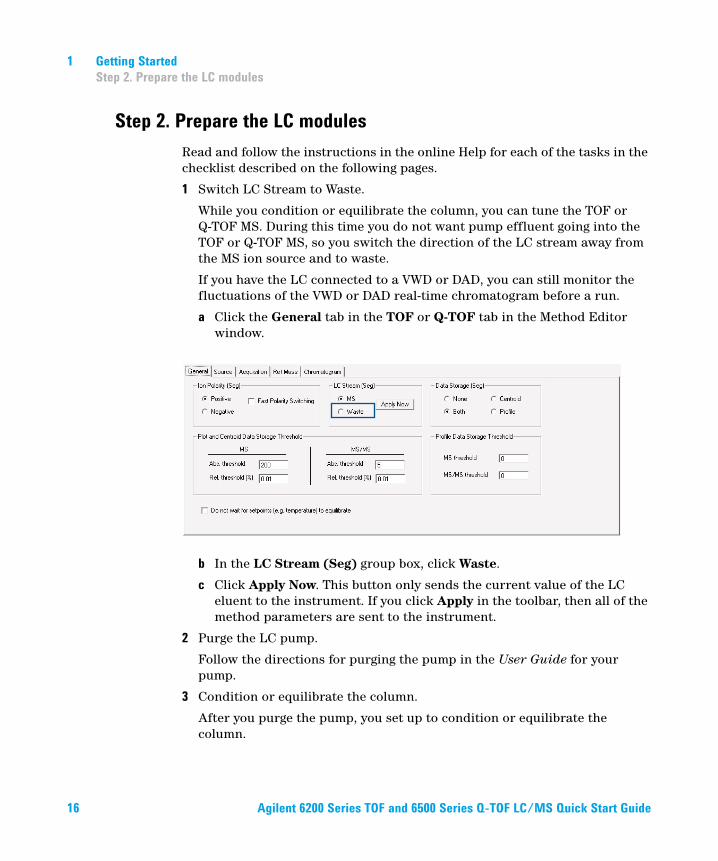
a Click the General tab in the TOF or Q-TOF tab in the Method Editor window.
b In the LC Stream (Seg) group box, click Waste.
c Click Apply Now. This button only sends the current value of the LC eluent to the instrument. If you click Apply in the toolbar, then all of the method parameters are sent to the instrument.
2 Purge the LC pump.
Follow the directions for purging the pump in the User Guide for your pump.
3 Condition or equilibrate the column.
After you purge the pump, you set up to condition or equilibrate the column.
16 Agilent 6200 Series TOF and 6500 Series Q-TOF LC/MS Quick Start Guide
Getting Started 1
Step 2. Prepare the LC modules
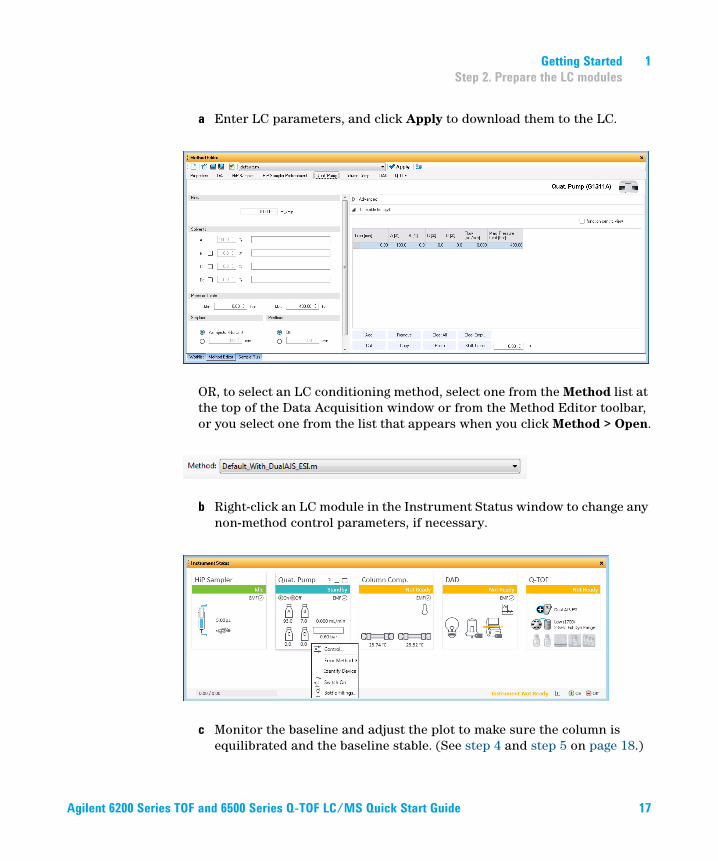
a Enter LC parameters, and click Apply to download them to the LC.
OR, to select an LC conditioning method, select one from the Method list at the top of the Data Acquisition window or from the Method Editor toolbar, or you select one from the list that appears when you click Method > Open.
b Right-click an LC module in the Instrument Status window to change any non-method control parameters, if necessary.
c Monitor the baseline and adjust the plot to make sure the column is equilibrated and the baseline stable. (See step 4 and step 5 on page 18.)
Agilent 6200 Series TOF and 6500 Series Q-TOF LC/MS Quick Start Guide 17
1 Getting Started
Step 2. Prepare the LC modules
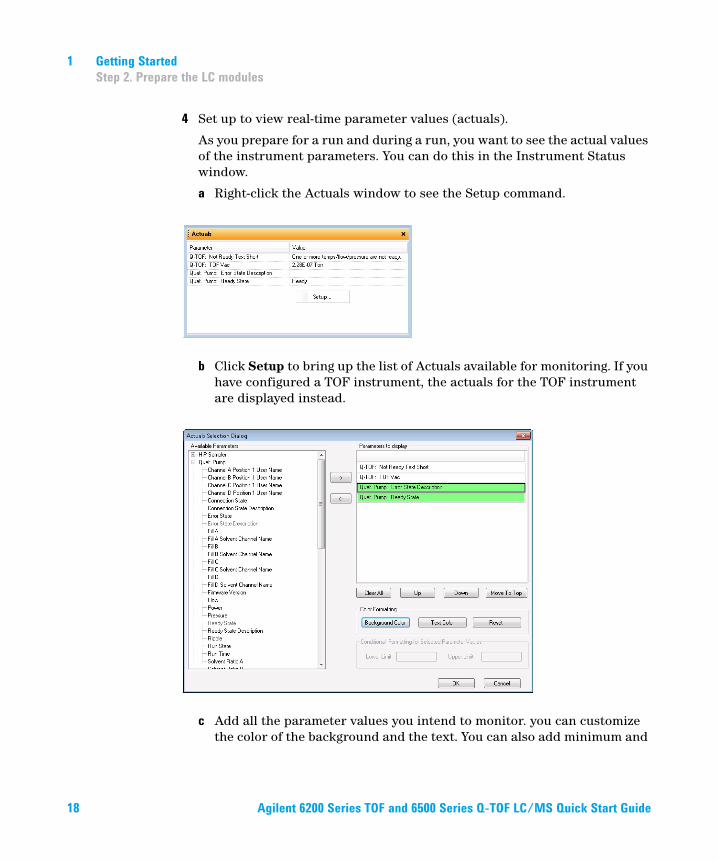
4 Set up to view real-time parameter values (actuals).
As you prepare for a run and during a run, you want to see the actual values of the instrument parameters. You can do this in the Instrument Status window.
a Right-click the Actuals window to see the Setup command.
b Click Setup to bring up the list of Actuals available for monitoring. If you have configured a TOF instrument, the actuals for the TOF instrument are displayed instead.
c Add all the parameter values you intend to monitor. you can customize the color of the background and the text. You can also add minimum and
18 Agilent 6200 Series TOF and 6500 Series Q-TOF LC/MS Quick Start Guide
Getting Started 1
Step 2. Prepare the LC modules
maximum values to use; if the value is not within the given range, then the background of the value is set to red in the Actuals window.
d Click OK.
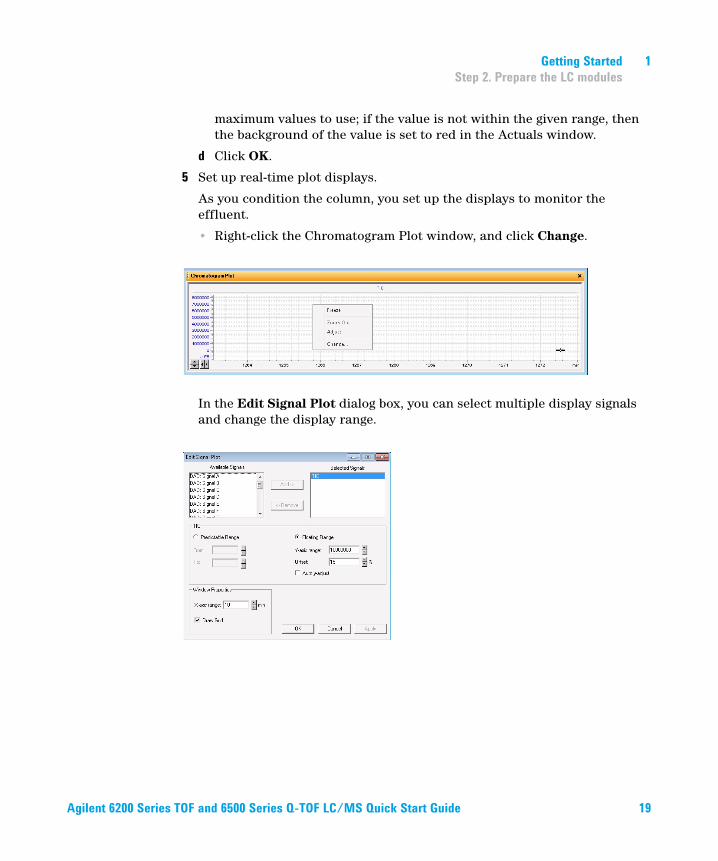
5 Set up real-time plot displays.
As you condition the column, you set up the displays to monitor the effluent.
• Right-click the Chromatogram Plot window, and click Change.
In the Edit Signal Plot dialog box, you can select multiple display signals and change the display range.
Agilent 6200 Series TOF and 6500 Series Q-TOF LC/MS Quick Start Guide 19
1 Getting Started
Step 3. Prepare the TOF and Q-TOF instrument
Step 3. Prepare the TOF and Q-TOF instrument
You need to tune the instrument the first time you use it or after maintenance, service or pump-down and restart. You do not need to tune often with standard use. Agilent does recommend that you calibrate the mass-axis regularly.
The user interface in the Tune window changes based on the options that you select in the Instrument State tab and the Preferences tab and based on the type of TOF or Q-TOF instrument that you have. In the Preferences Tab, you can mark whether or not to show the Manual TOF Mass Calibration tab and the Diagnostics tab. For a 6530 and 6550 Q-TOF, you can also mark whether or not to use the Classic Autotune interface.
In the Instrument State tab, you can select the Mass Range and the mode. The options in the Tune & Calibration tab change depending on the Mass Range and the mode.
If you have a 6530, 6545, 6550, or 6560 Q-TOF, then the SWARM autotune is available. The user interface shows the options available for the SWARM autotune. If you have a 6545/6560 Q-TOF and you select Low (1700 m/z) for the Mass Range, then you also have small molecule autotune options.
If you are installing the instrument, please refer to the Installation Guide for instructions on how to tune the instrument for the first time. The instructions below describe the entire tuning process for an instrument that has previously been tuned, starting with the Calibration / Check algorithm.
SWARM
Autotune
When you tune a 6530, 6545, 6550, or 6560 Q-TOF instrument, a different tune algorithm called SWARM is (or can be) used. One of the key features to SWARM is the ability to find a global optimum value for some of the parameters because more than one parameter is tuned at the same time.
The new auto tune uses both Particle Swarm Optimization (PSO) and a simplex algorithm within the physical constraints of the mass spectrometer.
• For a well-known parameter, the auto tune uses the simplex algorithm to maximize speed.
• For unknown behavior, PSO is used.
• PSO and simplex are interchanged between coarse and fine adjustment.
• All the parameters are bound within the knowledge of ion physics, to limit the search space.
20 Agilent 6200 Series TOF and 6500 Series Q-TOF LC/MS Quick Start Guide
Getting Started 1
Step 3. Prepare the TOF and Q-TOF instrument
The theory of mass spectrometry is built into the algorithm so that no ion storage or ion blocking occurs during optimization. For more information, see the Concepts Guide.
You can only run System Tune, and Set Detector Gain with a source that is supported for all Autotunes and if the Instrument Mode is Extended Dynamic Range. These buttons are grayed out or missing if a different Instrument Mode is selected, or if a different source is installed.
If you are given the option, select High Resolution for the Slicer Mode to get the best results from tuning. You must select High Resolution for the Slicer Mode before you do a System Tune.
Also, you can only run Set Detector Gain or System Tune (for the TOF or Quadrupole), with the mass range set to 3200 m/z.
Classic Autotune Before you run a Set Detector Gain, Standard Tune or Initial Tune, the Instrument Mode must be set to Extended Dynamic Range, and the Mass Range must be set to Standard (3200 m/z). After you run one of these autotunes, if you want to acquire data with a different Mass Range or Instrument Mode, change these values to the appropriate values for your analysis. If you change the values in the Instrument State tab after you finish the autotune, you must recalibrate the TOF or Q-TOF. If you change the mass range, you must recalibrate the TOF or Q-TOF.
You can only run Initial Tune, Standard Tune, or Set Detector Gain with a source that is supported for all Autotunes and if the Instrument Mode is Extended Dynamic Range. These buttons are grayed out if a different Instrument Mode is selected, or if a different source is installed.
If you are given the option, select High Resolution for the Slicer Mode to get the best results from tuning. You must select High Resolution for the Slicer Mode before you do an Initial Auto Tune.
Also, you can only run Set Detector Gain or an Initial Auto Tune (for the TOF or Quadrupole), with the Mass Range set to Standard (3200 m/z). If the software is version B.05.01 SP1 or later, after you run an Initial Tune on the Quadrupole with the mass range set to 3200 m/z, then for small molecule applications you also perform an additional Quad Tune in the 1700 m/z range which leads to a performance increase for molecules < 300 m/z.
Agilent 6200 Series TOF and 6500 Series Q-TOF LC/MS Quick Start Guide 21
1 Getting Started
Step 3. Prepare the TOF and Q-TOF instrument
Supported Sources
For Agilent 6200 Series TOF and 6500 Series Q-TOF
You can do a Mass Calibration / Check, and Quick Tune, if available, with all instrument states and the following sources:
• ESI
• AJS ESI (Agilent Jet Stream ESI)
• Dual ESI
• Dual AJS ESI (Dual Agilent Jet Stream ESI)
• Multimode
• APPI
• APCI
You cannot do any of the automated tunes if the source is a nanoESI, a Dual nanoESI, an HPLC-Chip, a MALDI, or a GC-QTOF source.
Fast Polarity
Switching
For the 6545, if Fast Polarity Switching is Enabled, you can only run the Mass Calibration / Check autotune or the FPS System Tune. For TOF and other Q-TOF instruments, you can only run Mass Calibration / Check or FPS Initial Auto Tune.
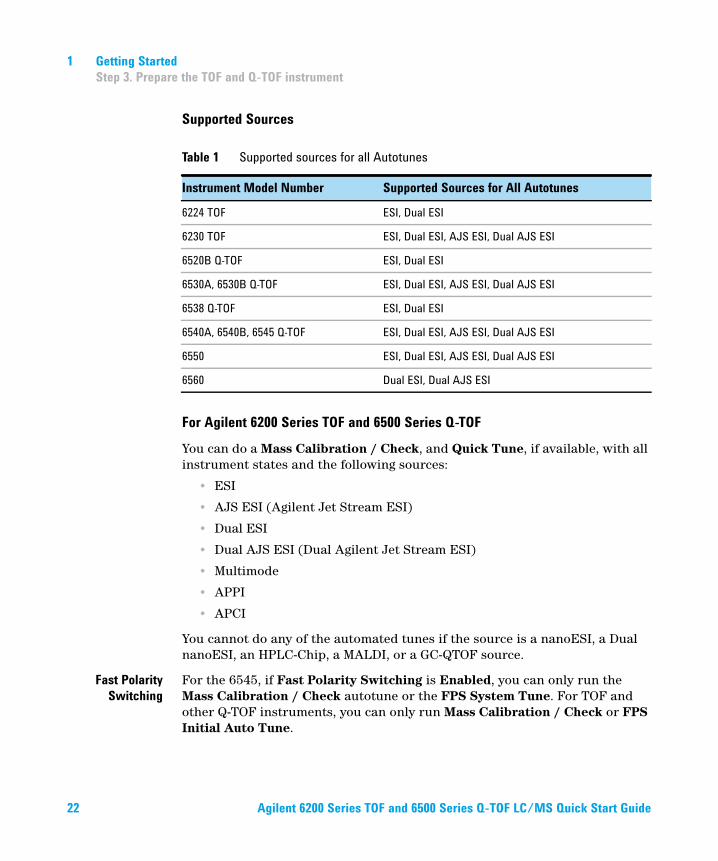
Table 1 Supported sources for all Autotunes
Instrument Model Number Supported Sources for All Autotunes
6224 TOF ESI, Dual ESI
6230 TOF ESI, Dual ESI, AJS ESI, Dual AJS ESI
6520B Q-TOF ESI, Dual ESI
6530A, 6530B Q-TOF ESI, Dual ESI, AJS ESI, Dual AJS ESI
6538 Q-TOF ESI, Dual ESI
6540A, 6540B, 6545 Q-TOF ESI, Dual ESI, AJS ESI, Dual AJS ESI
6550 ESI, Dual ESI, AJS ESI, Dual AJS ESI
6560 Dual ESI, Dual AJS ESI
22 Agilent 6200 Series TOF and 6500 Series Q-TOF LC/MS Quick Start Guide
Getting Started 1
Step 3. Prepare the TOF and Q-TOF instrument
Diluting the ESI-L Tune Mix
If your instrument is a 6560A, 6550A, 6545A, 6540A or 6530A with either an Agilent Jet Stream ESI source or a Dual AJS ESI source, autotune can fail unless you dilute the tuning mix.
For other models, you may need to dilute the tuning mix under certain conditions. When tuning in negative ion polarity, dilute the tuning mix to calibrate properly. When tuning in positive ion polarity, dilute the tuning mix if you are not getting proper calibration. The instructions for diluting the tuning mix are included in the Installation Guide and in the online Help.
Q-TOF
If your instrument is a 6538A, then you use the undiluted tune mix.
If your instrument is a 6545A, 6550A or 6560A, you can avoid separate dilutions by clearing the Always perform only Quick Calibration check box on the Preferences tab. For the Agilent 6550A or 6560A with the Dual Agilent Jet Stream ESI, you tune with a 1:10 diluted tune mix in both polarities. No additional dilution for negative mode is necessary if you clear this check box.
The 6530 with Dual Agilent Jet Stream ESI uses the 1:10 diluted tune mix in Positive Mode and a 1:40 diluted tune mix in Negative Mode. See the online Help or the Installation Guide for more information.
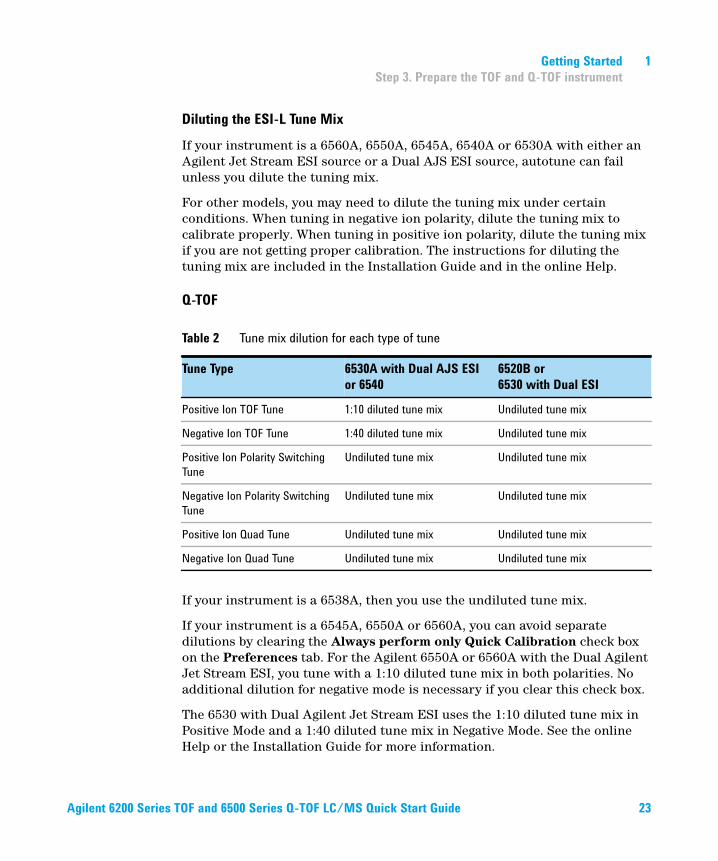
Table 2 Tune mix dilution for each type of tune
Tune Type 6530A with Dual AJS ESI
or 6540
6520B or
6530 with Dual ESI
Positive Ion TOF Tune 1:10 diluted tune mix Undiluted tune mix
Negative Ion TOF Tune 1:40 diluted tune mix Undiluted tune mix
Positive Ion Polarity Switching Tune
Undiluted tune mix Undiluted tune mix
Negative Ion Polarity Switching Tune
Undiluted tune mix Undiluted tune mix
Positive Ion Quad Tune Undiluted tune mix Undiluted tune mix
Negative Ion Quad Tune Undiluted tune mix Undiluted tune mix
Agilent 6200 Series TOF and 6500 Series Q-TOF LC/MS Quick Start Guide 23
1 Getting Started
Step 3. Prepare the TOF and Q-TOF instrument
TOF
If your instrument is a 6230 TOF, the tuning mix must be diluted with the AJS ESI or Dual AJS ESI source for both positive and negative ion. You use the 1:10 dilution for positive ion tuning and 1:40 for negative ion tuning. You do not dilute the tune mix for the Dual ESI source on the 6224 TOF; problems occur if you do dilute the tune mix and tune for positive ion.
Tune the TOF and Q-TOF MS except for the 6545 and 6560 Q-TOF
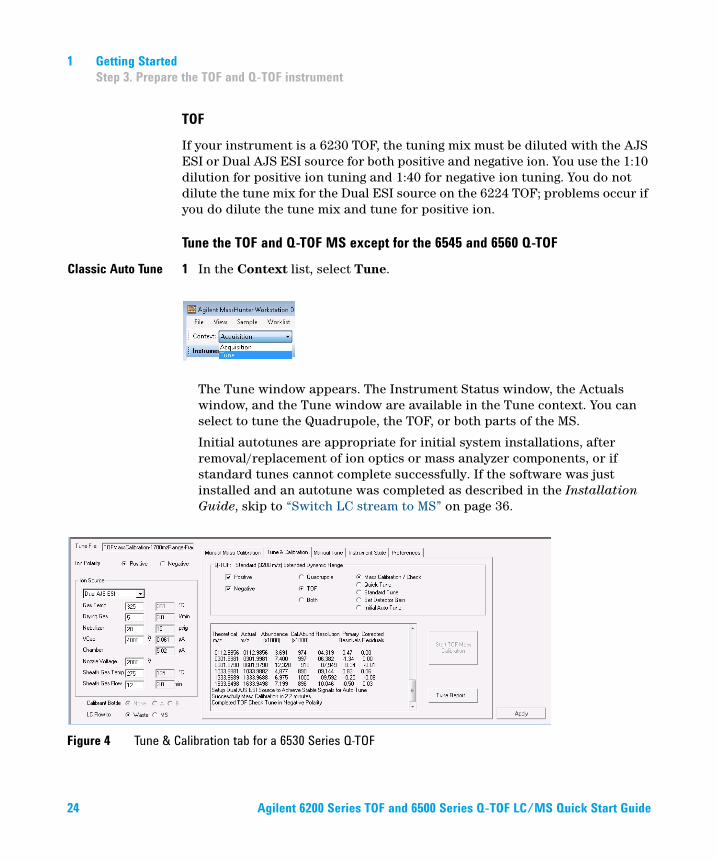
Classic Auto Tune 1 In the Context list, select Tune.
The Tune window appears. The Instrument Status window, the Actuals window, and the Tune window are available in the Tune context. You can select to tune the Quadrupole, the TOF, or both parts of the MS.
Initial autotunes are appropriate for initial system installations, after removal/replacement of ion optics or mass analyzer components, or if standard tunes cannot complete successfully. If the software was just installed and an autotune was completed as described in the Installation Guide, skip to “Switch LC stream to MS” on page 36.
Figure 4 Tune & Calibration tab for a 6530 Series Q-TOF
24 Agilent 6200 Series TOF and 6500 Series Q-TOF LC/MS Quick Start Guide
Getting Started 1
Step 3. Prepare the TOF and Q-TOF instrument
The Quadrupole, TOF, and Both options are only available if you have configured a Q-TOF instrument.
2 (optional) If the instrument is a 6560A Ion Mobility Q-TOF, click the Acquisition Mode. You can click either IM-QTOF or QTOF-Only.
3 (optional) Click the Preferences tab.
4 (optional) Mark whether or not you want the system to automatically adjust the abundance of the calibrant ions. This feature is for the 6530A/B models only.
This is an advanced feature, and you probably do not need to change this setting.
If you mark the Adjust abundances for optimal calibration check box, the system automatically adjusts the fragmentor voltage to reduce the abundance for calibration masses if the calibration masses are detected to be out of the 50 to 650K range. If the fragmentor voltage cannot be adjusted low enough to cause the abundance level to fall below 650K, the system tells you to dilute the calibrant and then to try the calibration or autotune again.
5 (optional) If the instrument is a 6550A iFunnel Q-TOF, clear the Always perform only Quick Calibration check box. No additional dilution for negative mode is necessary if you clear this check box.
6 (optional) Mark the Pause Between Auto Tune (Swapping Calibrant) check box if you use a different calibration solution for positive and negative autotunes.
7 If you have a 6550 Q-TOF instrument and you want to run small molecule applications, you must set the Quad AMU value before running any of the autotune procedures. If you are running small molecule applications, you also select Low (1700 m/z) for the Mass Range on the Instrument State tab.
a Click the Manual Tune tab.
b Click the Quad tab in the Manual Tune tab.
c If you are going to tune in Positive polarity, do the following: Click the Positive polarity button. Type 100 in the Quad AMU box. Click the Apply button. You must click Apply before switching to the Negative polarity to save the new value.
d If you are going to tune in Negative polarity, do the following: Click the Negative polarity button. Type 90 in the Quad AMU box. Click the Apply button.
8 Click the Instrument State tab.
Agilent 6200 Series TOF and 6500 Series Q-TOF LC/MS Quick Start Guide 25
1 Getting Started
Step 3. Prepare the TOF and Q-TOF instrument
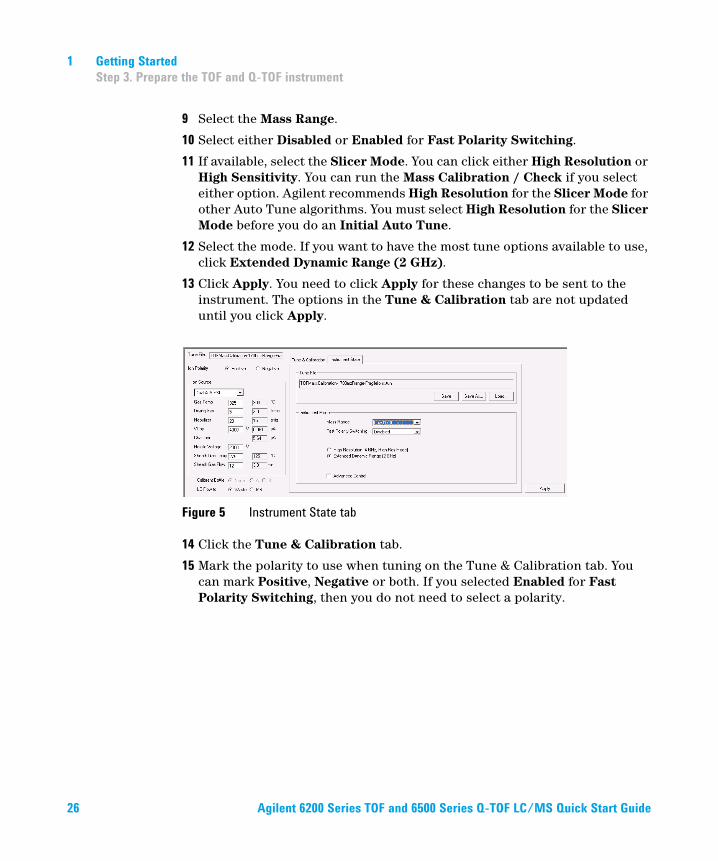
9 Select the Mass Range.
10 Select either Disabled or Enabled for Fast Polarity Switching.
11 If available, select the Slicer Mode. You can click either High Resolution or High Sensitivity. You can run the Mass Calibration / Check if you select either option. Agilent recommends High Resolution for the Slicer Mode for other Auto Tune algorithms. You must select High Resolution for the Slicer Mode before you do an Initial Auto Tune.
12 Select the mode. If you want to have the most tune options available to use, click Extended Dynamic Range (2 GHz).
13 Click Apply. You need to click Apply for these changes to be sent to the instrument. The options in the Tune & Calibration tab are not updated until you click Apply.
Figure 5 Instrument State tab
14 Click the Tune & Calibration tab.
15 Mark the polarity to use when tuning on the Tune & Calibration tab. You can mark Positive, Negative or both. If you selected Enabled for Fast Polarity Switching, then you do not need to select a polarity.
26 Agilent 6200 Series TOF and 6500 Series Q-TOF LC/MS Quick Start Guide
Getting Started 1
Step 3. Prepare the TOF and Q-TOF instrument
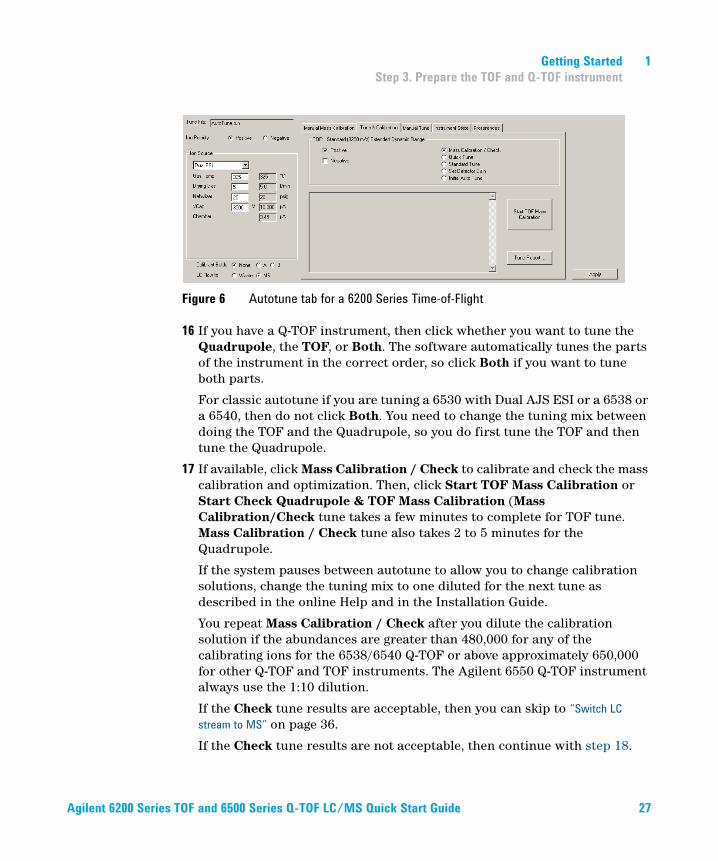
Figure 6 Autotune tab for a 6200 Series Time-of-Flight
16 If you have a Q-TOF instrument, then click whether you want to tune the Quadrupole, the TOF, or Both. The software automatically tunes the parts of the instrument in the correct order, so click Both if you want to tune both parts.
For classic autotune if you are tuning a 6530 with Dual AJS ESI or a 6538 or a 6540, then do not click Both. You need to change the tuning mix between doing the TOF and the Quadrupole, so you do first tune the TOF and then tune the Quadrupole.
17 If available, click Mass Calibration / Check to calibrate and check the mass calibration and optimization. Then, click Start TOF Mass Calibration or Start Check Quadrupole & TOF Mass Calibration (Mass Calibration/Check tune takes a few minutes to complete for TOF tune. Mass Calibration / Check tune also takes 2 to 5 minutes for the Quadrupole.
If the system pauses between autotune to allow you to change calibration solutions, change the tuning mix to one diluted for the next tune as described in the online Help and in the Installation Guide.
You repeat Mass Calibration / Check after you dilute the calibration solution if the abundances are greater than 480,000 for any of the calibrating ions for the 6538/6540 Q-TOF or above approximately 650,000 for other Q-TOF and TOF instruments. The Agilent 6550 Q-TOF instrument always use the 1:10 dilution.
If the Check tune results are acceptable, then you can skip to “Switch LC stream to MS” on page 36.
If the Check tune results are not acceptable, then continue with step 18.
Agilent 6200 Series TOF and 6500 Series Q-TOF LC/MS Quick Start Guide 27
1 Getting Started
Step 3. Prepare the TOF and Q-TOF instrument
18 If you selected Enabled for Fast Polarity Switching on the Instrument State tab, click FPS Initial Auto Tune. This option and Mass Calibration /Check are the only options available if Fast Polarity Switching is Enabled.
If the results from FPS Initial Auto Tune are acceptable, then you can skip to “Switch LC stream to MS” on page 36. If your tune results are still not acceptable, please contact Agilent Field Support.
19 If available, click Quick Tune to use a limited set of parameters to tune the MS automatically. Then, click Start TOF Quick Tune (Quick Tune takes 7 to 10 minutes to complete). You cannot run a Quick Tune if you clicked either Quadrupole or Both as the part of the instrument to tune.
If the system pauses between autotune to allow you to change calibration solutions, change the tuning mix to one diluted for the next tune as described in the online Help and in the Installation Guide.
You repeat Quick Tune after you dilute the calibration solution if the abundances are greater than 480,000 for any of the calibrating ions for the 6538/6540 Q-TOF or above approximately 650,000 for other Q-TOF and TOF instruments. For the Agilent 6550, the calibration solution is always diluted, so you do not repeat the Quick Tune.
If Quick Tune results are acceptable, then you can skip to “Switch LC stream to MS” on page 36.
If Quick Tune results are not acceptable, then continue with step 20.
20 Run a Standard Tune to use even more parameters. This tune takes 10 to 15 minutes for the TOF part of the instrument, and 10 to 15 minutes for the quadrupole part of the instrument.
The source that is used must be supported for all Autotunes when running a Standard Tune. The Dual ESI source is supported for all Autotunes for all instruments. Refer to “Supported sources for all Autotunes” on page 22 for a complete list of sources that are supported for all Autotunes.
28 Agilent 6200 Series TOF and 6500 Series Q-TOF LC/MS Quick Start Guide
Getting Started 1
Step 3. Prepare the TOF and Q-TOF instrument
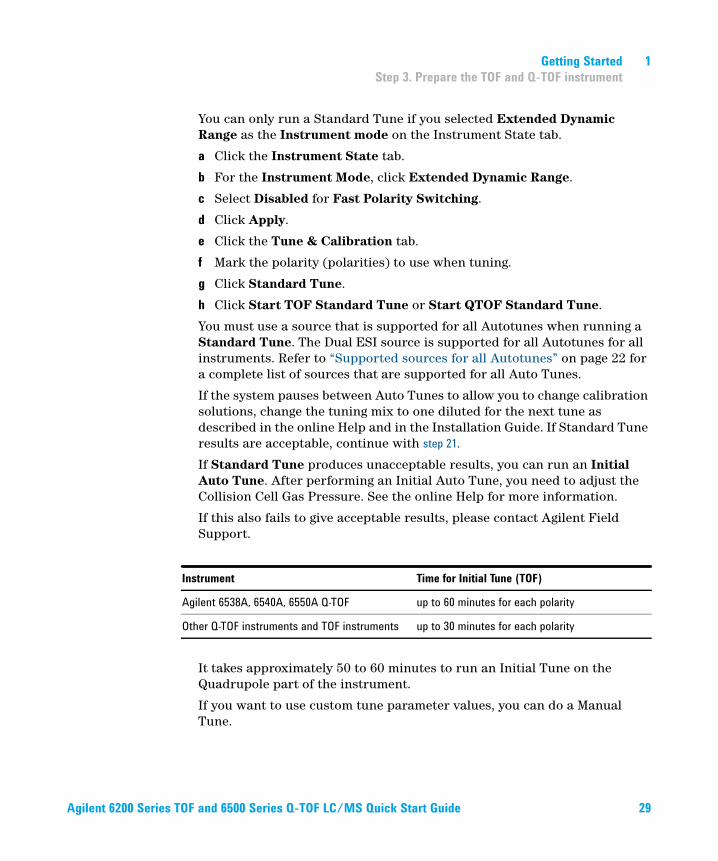
You can only run a Standard Tune if you selected Extended Dynamic Range as the Instrument mode on the Instrument State tab.
a Click the Instrument State tab.
b For the Instrument Mode, click Extended Dynamic Range.
c Select Disabled for Fast Polarity Switching.
d Click Apply.
e Click the Tune & Calibration tab.
f Mark the polarity (polarities) to use when tuning.
g Click Standard Tune.
h Click Start TOF Standard Tune or Start QTOF Standard Tune.
You must use a source that is supported for all Autotunes when running a Standard Tune. The Dual ESI source is supported for all Autotunes for all instruments. Refer to “Supported sources for all Autotunes” on page 22 for a complete list of sources that are supported for all Auto Tunes.
If the system pauses between Auto Tunes to allow you to change calibration solutions, change the tuning mix to one diluted for the next tune as described in the online Help and in the Installation Guide. If Standard Tune results are acceptable, continue with step 21.If Standard Tune produces unacceptable results, you can run an Initial Auto Tune. After performing an Initial Auto Tune, you need to adjust the Collision Cell Gas Pressure. See the online Help for more information.
If this also fails to give acceptable results, please contact Agilent Field Support.
It takes approximately 50 to 60 minutes to run an Initial Tune on the Quadrupole part of the instrument.
If you want to use custom tune parameter values, you can do a Manual Tune.
Instrument Time for Initial Tune (TOF)
Agilent 6538A, 6540A, 6550A Q-TOF up to 60 minutes for each polarity
Other Q-TOF instruments and TOF instruments up to 30 minutes for each polarity
Agilent 6200 Series TOF and 6500 Series Q-TOF LC/MS Quick Start Guide 29
1 Getting Started
Step 3. Prepare the TOF and Q-TOF instrument
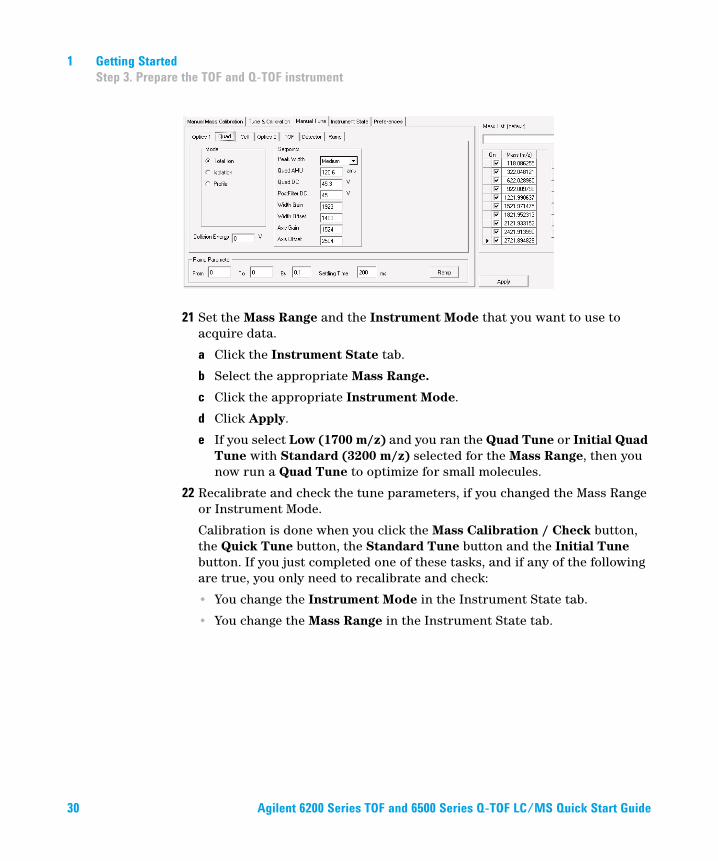
21 Set the Mass Range and the Instrument Mode that you want to use to acquire data.
a Click the Instrument State tab.
b Select the appropriate Mass Range.
c Click the appropriate Instrument Mode.
d Click Apply.
e If you select Low (1700 m/z) and you ran the Quad Tune or Initial Quad Tune with Standard (3200 m/z) selected for the Mass Range, then you now run a Quad Tune to optimize for small molecules.
22 Recalibrate and check the tune parameters, if you changed the Mass Range or Instrument Mode.
Calibration is done when you click the Mass Calibration / Check button, the Quick Tune button, the Standard Tune button and the Initial Tune button. If you just completed one of these tasks, and if any of the following are true, you only need to recalibrate and check:
• You change the Instrument Mode in the Instrument State tab.
• You change the Mass Range in the Instrument State tab.
30 Agilent 6200 Series TOF and 6500 Series Q-TOF LC/MS Quick Start Guide
Getting Started 1
Step 3. Prepare the TOF and Q-TOF instrument
• The peak abundances are above approximately 480,000 for the 6538/6540 Q-TOF or above approximately 650,000 for other Q-TOF (except for the 6550) and TOF instruments. You always use the 1:10 dilution for the Agilent 6550. You have to dilute the tune calibrant before you recalibrate. You recalibrate to get optimal mass accuracy.
a Click the Tune & Calibration tab.
b Mark the desired polarity or polarities in this tab.
c Click the Mass Calibration / Check option.
Tune reports are automatically generated at the end of a tune.
See the Concepts Guide for more information on the TOF and Q-TOF MS instruments.
Tune the Agilent 6530, 6545, 6550, or 6560 Q-TOF Mass Spectrometer
SWARM Auto
Tune
The Agilent 6530, 6545, 6550, and 6560 Q-TOF Mass Spectrometers use the SWARM autotune. The options available in the Tune & Calibration tab are different for these instruments.
The System Tune is the SWARM Initial Auto Tune which starts with all default values and includes the detector tune. You can perform a System Tune when you select Standard (3200 m/z) as the Mass Range. System tunes are appropriate for initial system installations, after a vent cycle, after removal/replacement of ion optics or mass analyzer components, or if Mass Calibration / Check or Transmission Tune cannot complete successfully.
If you select Low (1700 m/z) as the Mass Range, then you cannot perform a System Tune. You can perform a Transmission Tune which does not include the detector tune and is more comparable with the Standard Tune in Classic Auto tune. The Transmission Tune should be done as frequently as needed (for example, when a different sample class is analyzed.) Start the Transmission Tune either from the last Q-TOF system tune, or the last detector tune, as detector and resolution parameters are not included in these tunes.
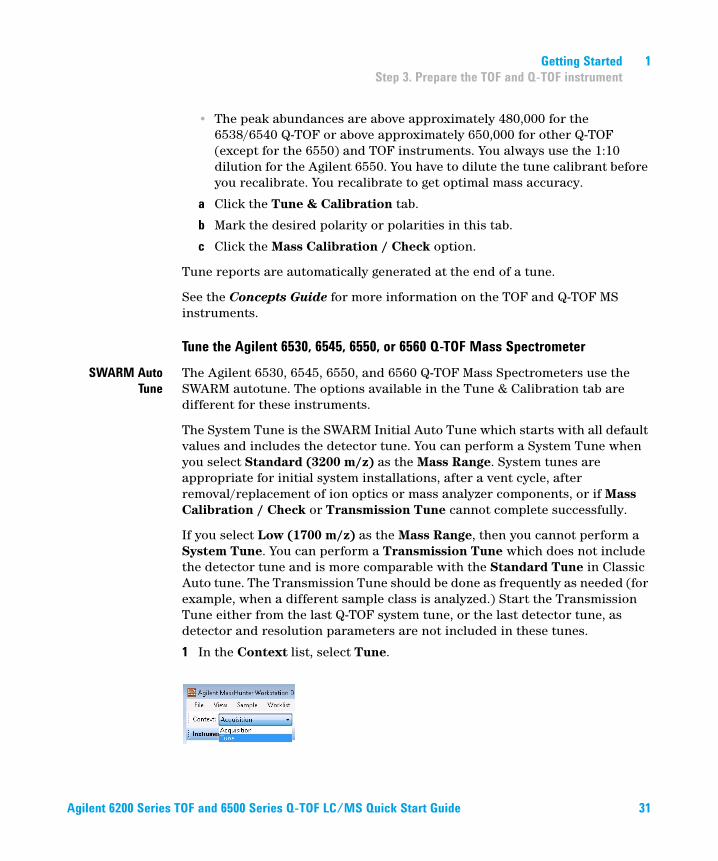
1 In the Context list, select Tune.
Agilent 6200 Series TOF and 6500 Series Q-TOF LC/MS Quick Start Guide 31
1 Getting Started
Step 3. Prepare the TOF and Q-TOF instrument
The Tune window appears. The Instrument Status window, the Actuals window, and the Tune window are available in the Tune context. Note that you can select to tune the Quadrupole, the TOF, or both parts of the mass spectrometer.
If the software was just installed, and an auto tune was completed as described in the Installation Guide, skip to “Switch LC stream to MS” on page 36.
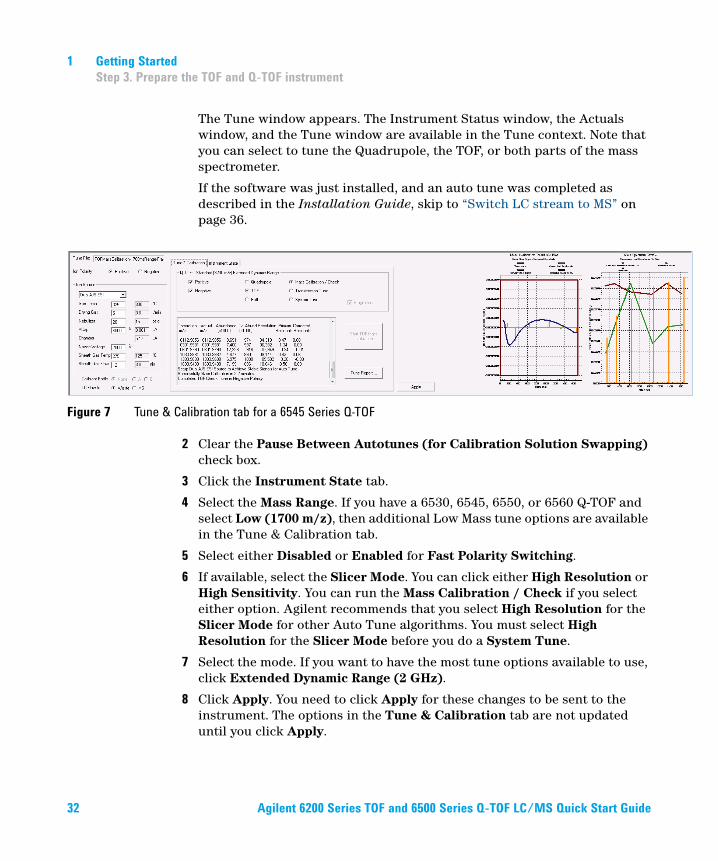
Figure 7 Tune & Calibration tab for a 6545 Series Q-TOF
2 Clear the Pause Between Autotunes (for Calibration Solution Swapping) check box.
3 Click the Instrument State tab.
4 Select the Mass Range. If you have a 6530, 6545, 6550, or 6560 Q-TOF and select Low (1700 m/z), then additional Low Mass tune options are available in the Tune & Calibration tab.
5 Select either Disabled or Enabled for Fast Polarity Switching.
6 If available, select the Slicer Mode. You can click either High Resolution or High Sensitivity. You can run the Mass Calibration / Check if you select either option. Agilent recommends that you select High Resolution for the Slicer Mode for other Auto Tune algorithms. You must select High Resolution for the Slicer Mode before you do a System Tune.
7 Select the mode. If you want to have the most tune options available to use, click Extended Dynamic Range (2 GHz).
8 Click Apply. You need to click Apply for these changes to be sent to the instrument. The options in the Tune & Calibration tab are not updated until you click Apply.
32 Agilent 6200 Series TOF and 6500 Series Q-TOF LC/MS Quick Start Guide
Getting Started 1
Step 3. Prepare the TOF and Q-TOF instrument
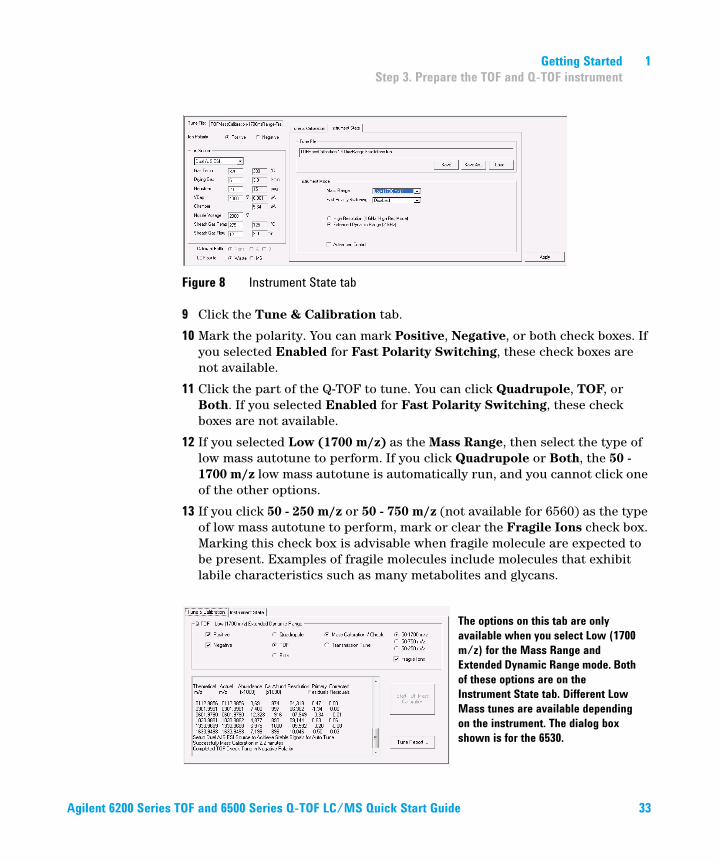
Figure 8 Instrument State tab
9 Click the Tune & Calibration tab.
10 Mark the polarity. You can mark Positive, Negative, or both check boxes. If you selected Enabled for Fast Polarity Switching, these check boxes are not available.
11 Click the part of the Q-TOF to tune. You can click Quadrupole, TOF, or Both. If you selected Enabled for Fast Polarity Switching, these check boxes are not available.
12 If you selected Low (1700 m/z) as the Mass Range, then select the type of low mass autotune to perform. If you click Quadrupole or Both, the 50 - 1700 m/z low mass autotune is automatically run, and you cannot click one of the other options.
13 If you click 50 - 250 m/z or 50 - 750 m/z (not available for 6560) as the type of low mass autotune to perform, mark or clear the Fragile Ions check box. Marking this check box is advisable when fragile molecule are expected to be present. Examples of fragile molecules include molecules that exhibit labile characteristics such as many metabolites and glycans.
The options on this tab are only
available when you select Low (1700
m/z) for the Mass Range and
Extended Dynamic Range mode. Both
of these options are on the
Instrument State tab. Different Low
Mass tunes are available depending
on the instrument. The dialog box
shown is for the 6530.
Agilent 6200 Series TOF and 6500 Series Q-TOF LC/MS Quick Start Guide 33
1 Getting Started
Step 3. Prepare the TOF and Q-TOF instrument
14 Click Start TOF Mass Calibration or Start Check Quadrupole & TOF Mass Calibration.
The duration for each Check tune is approximately 30 seconds.
If the Check tune results are acceptable, then you can skip to “Switch LC stream to MS” on page 36.
If the Check tune results are not acceptable, then continue with step 15.
15 If available, click Transmission Tune. Click Start TOF Transmission Tune or Start QTOF Transmission Tune.
The duration of each Transmission Tune is approximately six to ten minutes. Due to this fast process, Agilent recommends to perform transmission tunes on a regular basis.
The small molecule tunes are designed for increased sensitivity and can result in small resolution losses for masses outside the specified window. If the obtained resolution is insufficient for the application, perform a tune in a higher m/z range. Ions at higher m/z values than the specified mass window are reduced compared to transmission tunes with larger window sizes.
If the Fragile Ions check box is marked, the Fragmentor Voltage is reduced to minimize fragmentation. This can lead to lower signal of calibrant ions compared to the non-fragile tune option, but increased transmission of fragile ions should be observed in the application.
If the Transmission tune results are acceptable, then you can skip to “Switch LC stream to MS” on page 36.
If the Transmission tune results are not acceptable, then continue with step 16.
16 Click System Tune. If this option is not available, do the following:
a Click the Instrument State tab.
b Select Standard (3200 m/z) for the Mass Range.
c Click Apply.
d Click the Tune & Calibration tab.
e Click System Tune.
17 Click Start TOF System Tune or Start Q-TOF System Tune.
If the System Tune results are not acceptable, then contact your local field service engineer.
34 Agilent 6200 Series TOF and 6500 Series Q-TOF LC/MS Quick Start Guide
Getting Started 1
Step 3. Prepare the TOF and Q-TOF instrument
Calibrate the mass-axis
During calibration, a sample that contains known masses is infused into the source, and the actual flight times for ions of known masses are measured. These times and exact masses are used to calculate updated calibration coefficients. This process ensures accurate mass assignments for unknowns. Agilent recommends that you do this regularly.
Mass Calibration is done when you click the Mass Calibration / Check button, the Quick Tune button, the Standard Tune button, or the Initial Auto Tune button. If you use the SWARM autotune, Mass Calibration is done when you click Mass Calibration / Check button, Transmission Tune button, or System Tune button. You only need to recalibrate and check the tune if:
• You change the Instrument Mode in the Instrument State tab.
• You change the Mass Range in the Instrument State tab.
• You change the Slicer Mode.
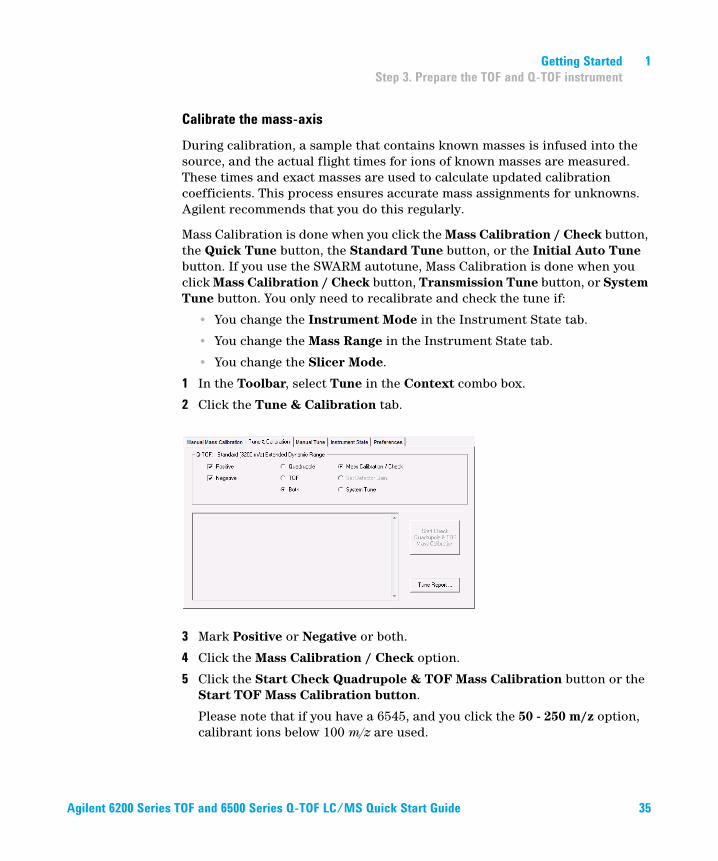
1 In the Toolbar, select Tune in the Context combo box.
2 Click the Tune & Calibration tab.
3 Mark Positive or Negative or both.
4 Click the Mass Calibration / Check option.
5 Click the Start Check Quadrupole & TOF Mass Calibration button or the Start TOF Mass Calibration button.
Please note that if you have a 6545, and you click the 50 - 250 m/z option, calibrant ions below 100 m/z are used.
Agilent 6200 Series TOF and 6500 Series Q-TOF LC/MS Quick Start Guide 35
1 Getting Started
Step 3. Prepare the TOF and Q-TOF instrument
Switch LC stream to MS
After you condition the column and tune the TOF or Q-TOF MS, you switch the LC stream from Waste to MS.
a In the Context list, click Acquisition. You need to answer several questions when switching from the Tune context to the Acquisition context.
b Make sure that the General tab in the TOF or Q-TOF tab is selected in the Method Editor window.
c In the LC Stream (Seg) group box, click MS.
d Click Apply Now in the General tab.
Monitor MS baseline and spectral displays
• If you did not monitor the LC baseline with a VWD or DAD, make sure that the TOF or Q-TOF baseline is stable and no spectra of interfering intensity appear.
• If you did monitor the LC baseline with a VWD or DAD, change back to the default TOF or Q-TOF displays.
a Right-click the chromatogram plot, and click Change.
b Select the MS signal, and click OK.
View the system logbook for events and errors
As you prepare the instrument, you may run into an error that you want to troubleshoot. You do this through the System Logbook Viewer.
• Click the Log icon in the toolbar of the Data Acquisition window, and view the logged events.
• Or right-click the icon in the system taskbar. First, click Enable Notification. Then, right-click the LOG icon and click Configure. The system can notify you of new errors and warning by showing messages from the taskbar.
36 Agilent 6200 Series TOF and 6500 Series Q-TOF LC/MS Quick Start Guide
Getting Started 1
Step 4. Set up and run a method
Step 4. Set up and run a method
A MassHunter method for TOF and Q-TOF can contain acquisition parameters, qualitative analysis parameters, quantitative analysis parameters, or all three.
In the Data Acquisition method, you can specify whether or not to run a Qualitative Analysis method and whether or not to run a Quantitative Analysis automation. You specify whether to copy or link the Qualitative Analysis method and the Quantitative Analysis method to the Data Acquisition method.
When you run multiple samples in a worklist with this .m method, you can specify whether to run both data acquisition and data analysis or to only run either data acquisition or data analysis. If you run a single sample in the Data Acquisition program, then both acquisition and data analysis are done.
If you select to run both data acquisition and data analysis in a worklist, then the data analysis method automatically follows acquisition if you mark either the Qual Automation check box or the Quant Automation check box or the BioConfirm Automation check box in the DA tab in the Method Editor window. You can also run a method to produce only raw data (acquisition only) or reprocess the data with a method containing only qualitative analysis parameters, BioConfirm parameters, or quantitative analysis parameters (data analysis only).
In this step you learn how to set up the method with acquisition parameters only, with qualitative analysis parameters only and with a combination of acquisition parameters and qualitative analysis parameters.
Read and follow the instructions in the online Help for each of the tasks described on the following pages.
Set up a method with acquisition parameters
Do Exercise 1 and Exercise 2 of the TOF/Q-TOF Familiarization Guide to learn how to set up and run a method with only acquisition parameters.
Do Exercise 3 of the TOF/Q-TOF Familiarization Guide to learn how to set up and run a method in IM-QTOF mode.
Do Exercise 4 of the TOF/Q-TOF Familiarization Guide to learn how to optimize IM-MS methods for labile compounds, small molecules and intact proteins.
Agilent 6200 Series TOF and 6500 Series Q-TOF LC/MS Quick Start Guide 37
1 Getting Started
Step 4. Set up and run a method
Do Exercise 5 of the TOF/Q-TOF Familiarization Guide to learn how to set up a method for collision cross section (CCS) calculations.
Before you edit or run a method, set the options in the Instrument State tab in the Tune window.
• Type the values and settings for each of the tabs below.
• (optional) If you want to download the settings to the instrument, click Apply in the toolbar.
• To save the method after entering parameters, click either Method > Save or Method > Save As.
• Type the name for the method in the Method box, and click OK.
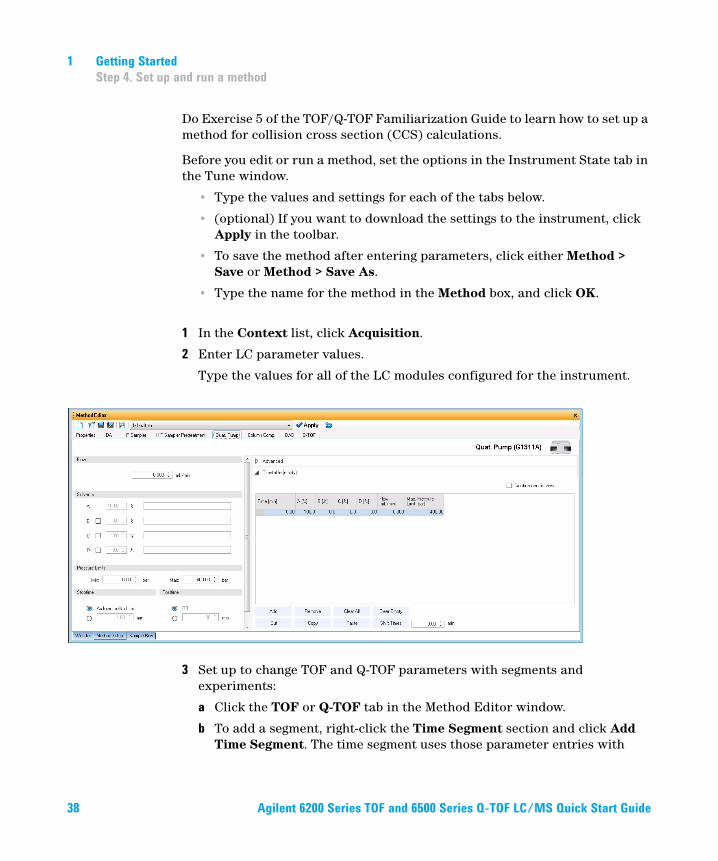
1 In the Context list, click Acquisition.
2 Enter LC parameter values.
Type the values for all of the LC modules configured for the instrument.
3 Set up to change TOF and Q-TOF parameters with segments and experiments:
a Click the TOF or Q-TOF tab in the Method Editor window.
b To add a segment, right-click the Time Segment section and click Add Time Segment. The time segment uses those parameter entries with
38 Agilent 6200 Series TOF and 6500 Series Q-TOF LC/MS Quick Start Guide
Getting Started 1
Step 4. Set up and run a method
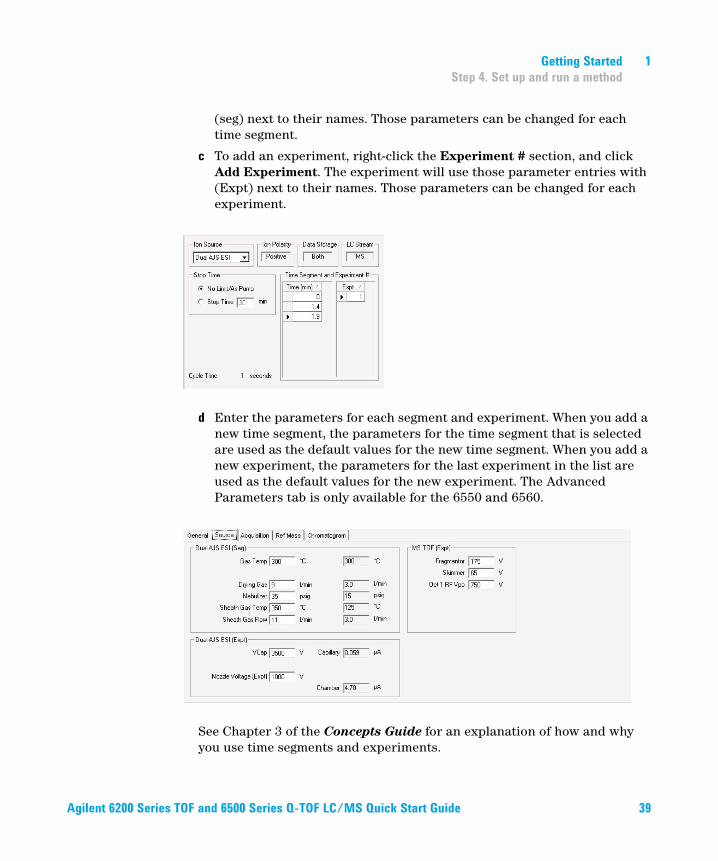
(seg) next to their names. Those parameters can be changed for each time segment.
c To add an experiment, right-click the Experiment # section, and click Add Experiment. The experiment will use those parameter entries with (Expt) next to their names. Those parameters can be changed for each experiment.
d Enter the parameters for each segment and experiment. When you add a new time segment, the parameters for the time segment that is selected are used as the default values for the new time segment. When you add a new experiment, the parameters for the last experiment in the list are used as the default values for the new experiment. The Advanced Parameters tab is only available for the 6550 and 6560.
See Chapter 3 of the Concepts Guide for an explanation of how and why you use time segments and experiments.
Agilent 6200 Series TOF and 6500 Series Q-TOF LC/MS Quick Start Guide 39
1 Getting Started
Step 4. Set up and run a method
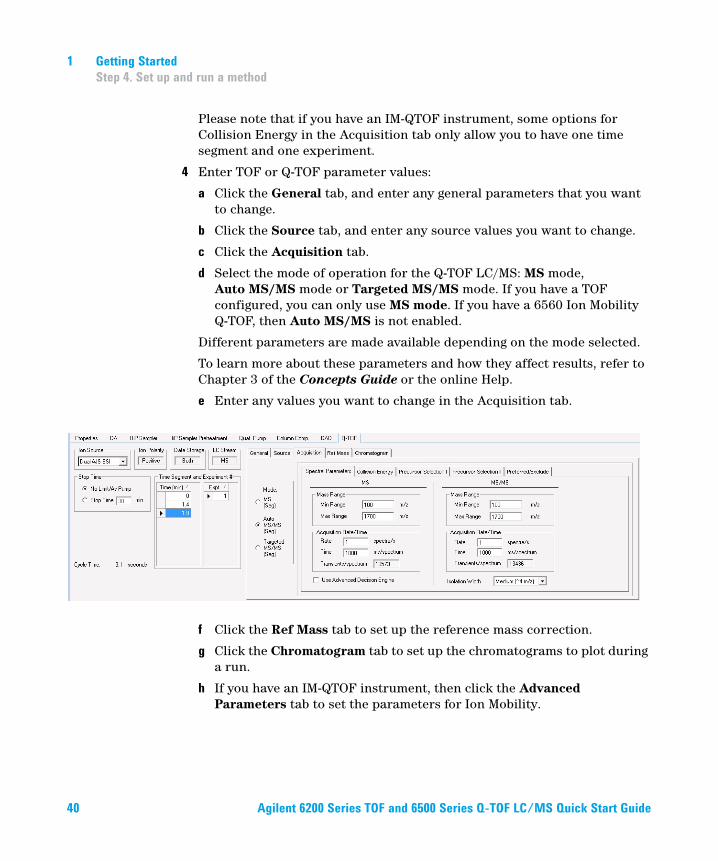
Please note that if you have an IM-QTOF instrument, some options for Collision Energy in the Acquisition tab only allow you to have one time segment and one experiment.
4 Enter TOF or Q-TOF parameter values:
a Click the General tab, and enter any general parameters that you want to change.
b Click the Source tab, and enter any source values you want to change.
c Click the Acquisition tab.
d Select the mode of operation for the Q-TOF LC/MS: MS mode, Auto MS/MS mode or Targeted MS/MS mode. If you have a TOF configured, you can only use MS mode. If you have a 6560 Ion Mobility Q-TOF, then Auto MS/MS is not enabled.
Different parameters are made available depending on the mode selected.
To learn more about these parameters and how they affect results, refer to Chapter 3 of the Concepts Guide or the online Help.
e Enter any values you want to change in the Acquisition tab.
f Click the Ref Mass tab to set up the reference mass correction.
g Click the Chromatogram tab to set up the chromatograms to plot during a run.
h If you have an IM-QTOF instrument, then click the Advanced Parameters tab to set the parameters for Ion Mobility.
40 Agilent 6200 Series TOF and 6500 Series Q-TOF LC/MS Quick Start Guide
Getting Started 1
Step 4. Set up and run a method
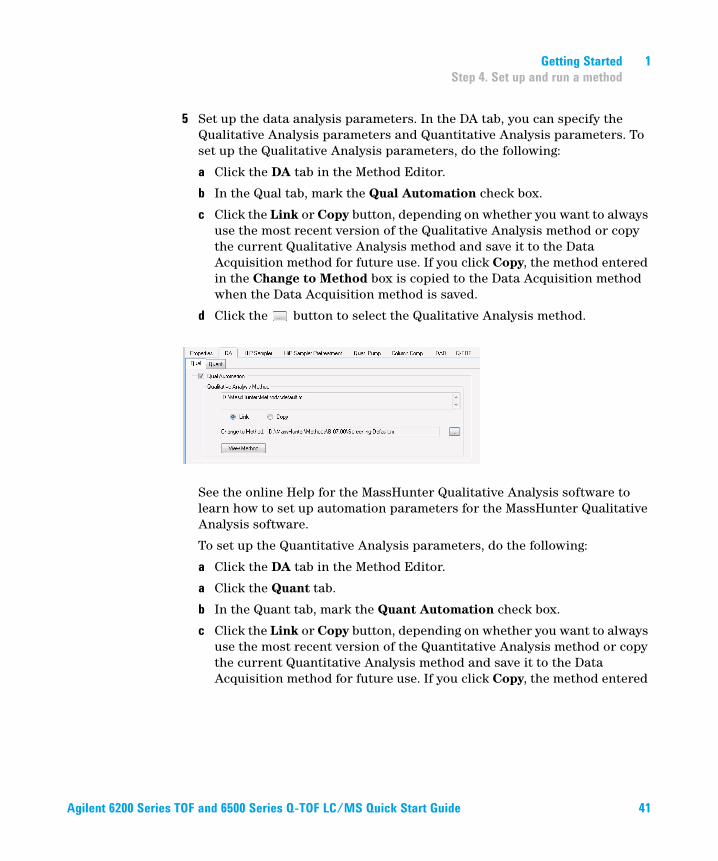
5 Set up the data analysis parameters. In the DA tab, you can specify the Qualitative Analysis parameters and Quantitative Analysis parameters. To set up the Qualitative Analysis parameters, do the following:
a Click the DA tab in the Method Editor.
b In the Qual tab, mark the Qual Automation check box.
c Click the Link or Copy button, depending on whether you want to always use the most recent version of the Qualitative Analysis method or copy the current Qualitative Analysis method and save it to the Data Acquisition method for future use. If you click Copy, the method entered in the Change to Method box is copied to the Data Acquisition method when the Data Acquisition method is saved.
d Click the button to select the Qualitative Analysis method.
See the online Help for the MassHunter Qualitative Analysis software to learn how to set up automation parameters for the MassHunter Qualitative Analysis software.
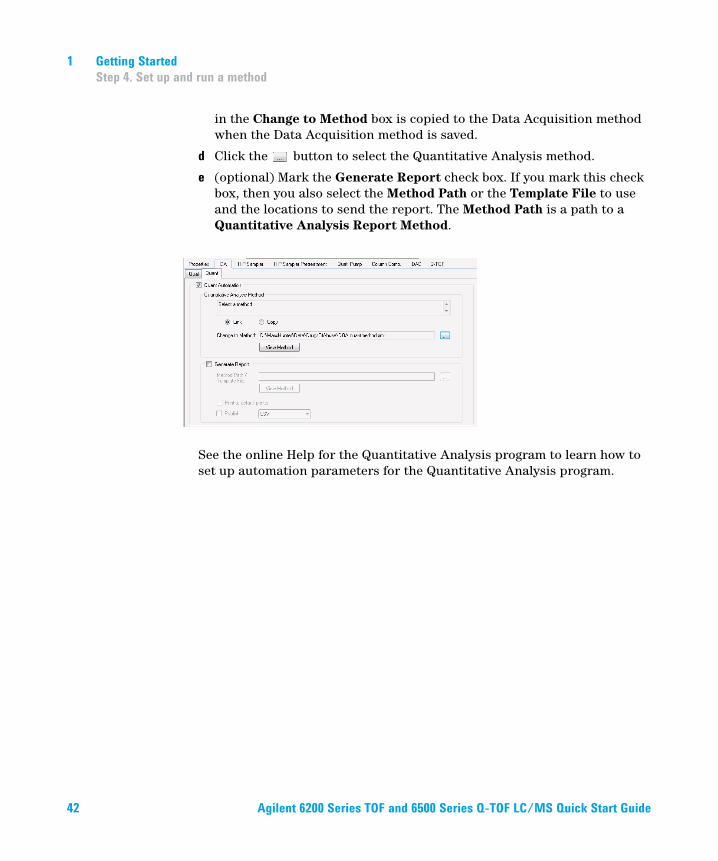
To set up the Quantitative Analysis parameters, do the following:
a Click the DA tab in the Method Editor.
a Click the Quant tab.
b In the Quant tab, mark the Quant Automation check box.
c Click the Link or Copy button, depending on whether you want to always use the most recent version of the Quantitative Analysis method or copy the current Quantitative Analysis method and save it to the Data Acquisition method for future use. If you click Copy, the method entered
Agilent 6200 Series TOF and 6500 Series Q-TOF LC/MS Quick Start Guide 41
1 Getting Started
Step 4. Set up and run a method
in the Change to Method box is copied to the Data Acquisition method when the Data Acquisition method is saved.
d Click the button to select the Quantitative Analysis method.
e (optional) Mark the Generate Report check box. If you mark this check box, then you also select the Method Path or the Template File to use and the locations to send the report. The Method Path is a path to a Quantitative Analysis Report Method.
See the online Help for the Quantitative Analysis program to learn how to set up automation parameters for the Quantitative Analysis program.
42 Agilent 6200 Series TOF and 6500 Series Q-TOF LC/MS Quick Start Guide
Getting Started 1
Step 4. Set up and run a method
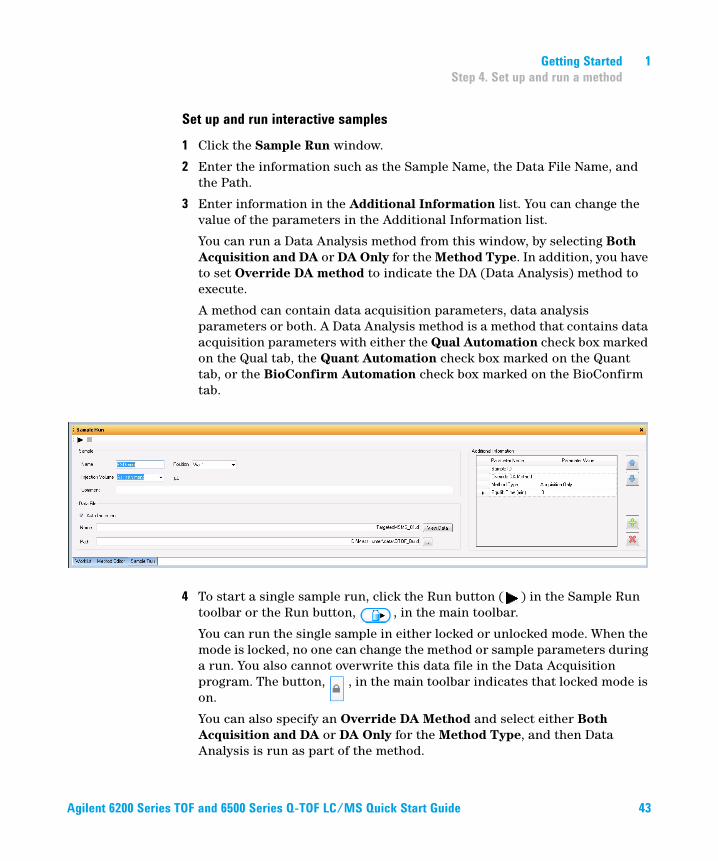
Set up and run interactive samples
1 Click the Sample Run window.
2 Enter the information such as the Sample Name, the Data File Name, and the Path.
3 Enter information in the Additional Information list. You can change the value of the parameters in the Additional Information list.
You can run a Data Analysis method from this window, by selecting Both Acquisition and DA or DA Only for the Method Type. In addition, you have to set Override DA method to indicate the DA (Data Analysis) method to execute.
A method can contain data acquisition parameters, data analysis parameters or both. A Data Analysis method is a method that contains data acquisition parameters with either the Qual Automation check box marked on the Qual tab, the Quant Automation check box marked on the Quant tab, or the BioConfirm Automation check box marked on the BioConfirm tab.
4 To start a single sample run, click the Run button ( ) in the Sample Run toolbar or the Run button, , in the main toolbar.
You can run the single sample in either locked or unlocked mode. When the mode is locked, no one can change the method or sample parameters during a run. You also cannot overwrite this data file in the Data Acquisition program. The button, , in the main toolbar indicates that locked mode is on.
You can also specify an Override DA Method and select either Both Acquisition and DA or DA Only for the Method Type, and then Data Analysis is run as part of the method.
Agilent 6200 Series TOF and 6500 Series Q-TOF LC/MS Quick Start Guide 43

1 Getting Started
Step 4. Set up and run a method
Set up and run worklists
1 Right-click the upper left corner of the worklist to display the following menu.
2 Click Add Multiple Samples. The Add Multiple Samples dialog box opens.
3 Enter all relevant information, and click the Sample Position tab to specify the sample vial locations (make sure the specific sample tray type has been configured by right-clicking the autosampler device image).
4 Specify the locations, and click OK.
5 To set up the worklist run, right-click the upper left corner, and click Worklist Run Parameters. The Worklist Run Parameters dialog box appears.
6 Type the paths for the method, the Override DA method, and the data files, and click OK.
7 To start the run, click the Run Worklist icon, , in the main toolbar or click the Start Worklist Run button ( ) in the Worklist toolbar.
You can run the worklist in either locked or unlocked mode. When the mode is locked, no one can change the method or the worklist while the worklist is running. The button, in the main toolbar indicates that locked mode is on.
44 Agilent 6200 Series TOF and 6500 Series Q-TOF LC/MS Quick Start Guide
Getting Started 1
Step 5. Review results and find compounds with Qualitative Analysis
Step 5. Review results and find compounds with Qualitative
Analysis
Use the Qualitative Analysis software to do these steps and more:
• Review results for acquisition method development
• Find compounds
• Identify compounds
• Do molecular feature extraction
• Export results
• Print reports
Refer to the online Help and do the exercises in the Qualitative Analysis Familiarization Guide to help you learn how to use the Qualitative Analysis program to do these tasks.
Step 6. Set up and run quantitation
If you want to quantitate your data, use the Quantitative Analysis program.
Refer to the online Help and to the Quantitative Analysis Familiarization Guide to learn how to do more steps to analyze your data.
To use an acquisition method that has a different DA method than the method entered in the worklist, show the column called Override DA Method in the worklist by using the Show/Hide/Order Columns dialog box.In this column, type the name of another method containing the DA parameters you want to use for the sample. The DA part of this method is used instead of the DA part of the current method.You can also type the name of this method in the Add Multiple Samples dialog box.
Agilent 6200 Series TOF and 6500 Series Q-TOF LC/MS Quick Start Guide 45
1 Getting Started
Step 7. Review data in IM-MS Browser
Step 7. Review data in IM-MS Browser
If you have an IM-QTOF data file, use the MassHunter IM-MS Browser program to analyze the data. You can examine abundance maps of the data. You can also do collision cross section calculations. In addition, you can use the Ion Mobility Feature Extractor (IMFE) to find compounds.
Refer to the online Help for IM-MS Browser for more information.
If needed, install the IM-MS Browser program. From the MassHunter Data Acquisition installation disc, open the IM-MS Browser folder and run setup.exe.
46 Agilent 6200 Series TOF and 6500 Series Q-TOF LC/MS Quick Start Guide
Getting Started 1
Step 7. Review data in IM-MS Browser
Agilent 6200 Series TOF and 6500 Series Q-TOF LC/MS Quick Start Guide 47
Agilent Technologies
Agilent Technologies, Inc. 2017
Revision A, January 2017
*G3335-90222*G3335-90222
www.agilent.com
In this book
This book contains brief instructions to help you get started with your Agilent 6200 Series TOF or 6500 Series Q-TOF LC/MS system. This book takes a quick look at using the Agilent MassHunter Workstation software to:
• Prepare the instrument fora run
• Set up acquisition methods
• Set up and runningworklists