Embed Size (px)
Citation preview
Agilent Technologies
Agilent Lab Advisor
User Manual
Notices© Agilent Technologies, Inc. 2016No part of this manual may be reproduced in any form or by any means (including electronic storage and retrieval or transla-tion into a foreign language) without prior agreement and written consent from Agi-lent Technologies, Inc. as governed by United States and international copyright laws.
Manual Part NumberM8550-90007
Edition11/2016Printed in GermanyAgilent TechnologiesHewlett-Packard-Strasse 8 76337 Waldbronn
WarrantyThe material contained in this docu-ment is provided “as is,” and is sub-ject to being changed, without notice, in future editions. Further, to the max-imum extent permitted by applicable law, Agilent disclaims all warranties, either express or implied, with regard to this manual and any information contained herein, including but not limited to the implied warranties of merchantability and fitness for a par-ticular purpose. Agilent shall not be liable for errors or for incidental or consequential damages in connection with the furnishing, use, or perfor-mance of this document or of any information contained herein. Should Agilent and the user have a separate written agreement with warranty terms covering the material in this document that conflict with these terms, the warranty terms in the sep-arate agreement shall control.
Technology Licenses The hardware and/or software described in this document are furnished under a license and may be used or copied only in accordance with the terms of such license.
Restricted Rights LegendIf software is for use in the performance of a U.S. Government prime contract or sub-contract, Software is delivered and licensed as “Commercial computer software” as defined in DFAR 252.227-7014 (June 1995), or as a “commercial item” as defined in FAR 2.101(a) or as “Restricted computer software” as defined in FAR 52.227-19 (June 1987) or any equivalent agency regu-lation or contract clause. Use, duplication or disclosure of Software is subject to Agi-lent Technologies’ standard commercial license terms, and non-DOD Departments and Agencies of the U.S. Government will
receive no greater than Restricted Rights as defined in FAR 52.227-19(c)(1-2) (June 1987). U.S. Government users will receive no greater than Limited Rights as defined in FAR 52.227-14 (June 1987) or DFAR 252.227-7015 (b)(2) (November 1995), as applicable in any technical data.
Safety Notices
CAUTION
A CAUTION notice denotes a hazard. It calls attention to an operating procedure, practice, or the like that, if not correctly per-formed or adhered to, could result in damage to the product or loss of important data. Do not proceed beyond a CAUTION notice until the indicated condi-tions are fully understood and met.
WARNING
A WARNING notice denotes a hazard. It calls attention to an operating procedure, practice, or the like that, if not correctly performed or adhered to, could result in personal injury or death. Do not proceed beyond a WARNING notice until the indi-cated conditions are fully understood and met.
Lab Advisor User Manual
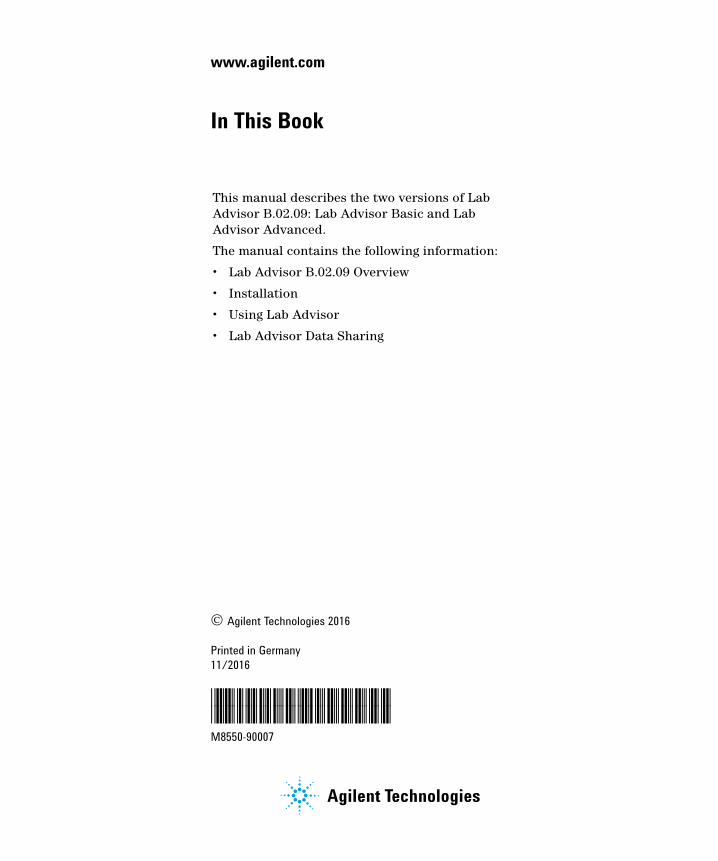
In This Book
In This Book
This manual describes the two versions of Lab Advisor B.02.09: Lab Advisor Basic and Lab Advisor Advanced.
1 Lab Advisor B.02.09 OverviewThis chapter describes the two versions of Lab Advisor B.02.09: Lab Advisor Basic and Lab Advisor Advanced.
2 InstallationThis chapter contains instructions for installing Lab Advisor B.02.09.
3 Using Lab AdvisorThis chapter describes the Lab Advisor user interface and provides details about the available features.
4 Lab Advisor Data SharingThis chapter describes the setup and use of the Lab Advisor Data Sharing App.
Lab Advisor User Manual 3
Contents
Contents
1 Lab Advisor B.02.09 Overview 5Lab Advisor Basic 6Lab Advisor Advanced 7
2 Installation 9Prerequisites 10Deployment Modes 12Hard drive installation 13Running Lab Advisor from the CD-ROM 19Installing Add-ons 20
3 Using Lab Advisor 23Navigation 25System Overview 29Configuration 39Apps 45Firmware Update 48Logs and Results 50Service and Diagnostics 53System Report 55Instrument Control (LC and CE) 58EMFs (LC and CE) 63
4 Lab Advisor Data Sharing 65Typical Uses of Data Sharing 67Data Sharing Setup 69Data Import from the Data Share Folder 71Data Sharing Review Client 72
4 Lab Advisor User Manual
Lab Advisor User Manual
1Lab Advisor B.02.09 OverviewLab Advisor Basic 6Lab Advisor Advanced 7
This chapter describes the two versions of Lab Advisor B.02.09: Lab Advisor Basic and Lab Advisor Advanced.With its advanced diagnostic and maintenance capabilities, Agilent Lab Advisor helps you to keep your Agilent analytical instruments in top condition and thereby achieve high quality chromatographic results. Agilent Lab Advisor is an application-independent tool: it can support Agilent analytical instrumentation regardless of whether you are using Agilent or non-Agilent software to control the instruments. With add-ons, additional functionality can be added, for example, diagnostics for Agilent mass spectrometers. The Agilent Lab Advisor is available in two flavors: Lab Advisor Basic and Lab Advisor Advanced.
5Agilent Technologies
1 Lab Advisor B.02.09 OverviewLab Advisor Basic
Lab Advisor Basic
Lab Advisor Basic provides state-of-the-art tests, tools and calibrations to support you in the daily operation, maintenance and basic troubleshooting tasks. The Basic version comes with a full set of diagnostic capabilities and full access to the Early Maintenance Feedback counters, allowing you to perform troubleshooting and calibrations efficiently and with little effort.
The optional Maintenance Wizard Add-on adds fully guided, animation-enhanced maintenance procedures for all current analytical scale Agilent LC instruments.
6 Lab Advisor User Manual
Lab Advisor B.02.09 Overview 1Lab Advisor Advanced
Lab Advisor Advanced
Lab Advisor Advanced has been designed to support users who need the highest quality data and the utmost reliability from the Agilent LC and CE instrumentation. This is provided by additional functionality that includes tools and features that allow you to carry out sophisticated diagnostic, usage-based maintenance, and generate traceable results, including features such as user log-on with password, traceable result files, advanced EMF functionality and data sharing facilities. Of course, the optional Maintenance Wizard Add-on is also fully compatible with Lab Advisor Advanced.
Lab Advisor User Manual 7

1 Lab Advisor B.02.09 OverviewLab Advisor Advanced
8 Lab Advisor User Manual
Lab Advisor User Manual
2InstallationPrerequisites 10Deployment Modes 12Hard drive installation 13Running Lab Advisor from the CD-ROM 19Installing Add-ons 20
This chapter contains instructions for installing Lab Advisor B.02.09.
9Agilent Technologies
2 InstallationPrerequisites
Prerequisites
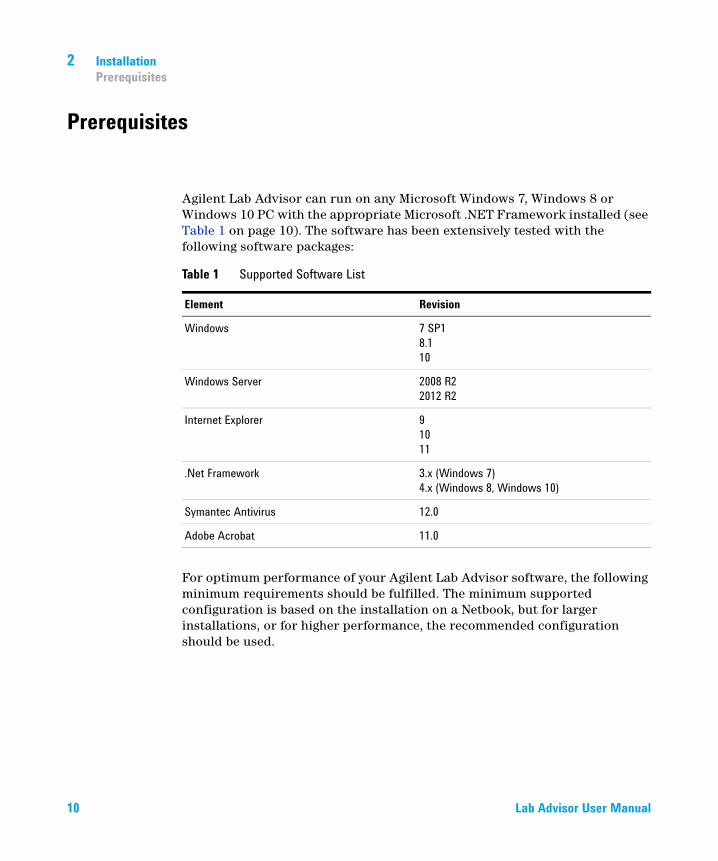
Agilent Lab Advisor can run on any Microsoft Windows 7, Windows 8 or Windows 10 PC with the appropriate Microsoft .NET Framework installed (see Table 1 on page 10). The software has been extensively tested with the following software packages:
For optimum performance of your Agilent Lab Advisor software, the following minimum requirements should be fulfilled. The minimum supported configuration is based on the installation on a Netbook, but for larger installations, or for higher performance, the recommended configuration should be used.
Table 1 Supported Software List
Element Revision
Windows 7 SP18.110
Windows Server 2008 R22012 R2
Internet Explorer 91011
.Net Framework 3.x (Windows 7)4.x (Windows 8, Windows 10)
Symantec Antivirus 12.0
Adobe Acrobat 11.0
10 Lab Advisor User Manual
Installation 2Prerequisites
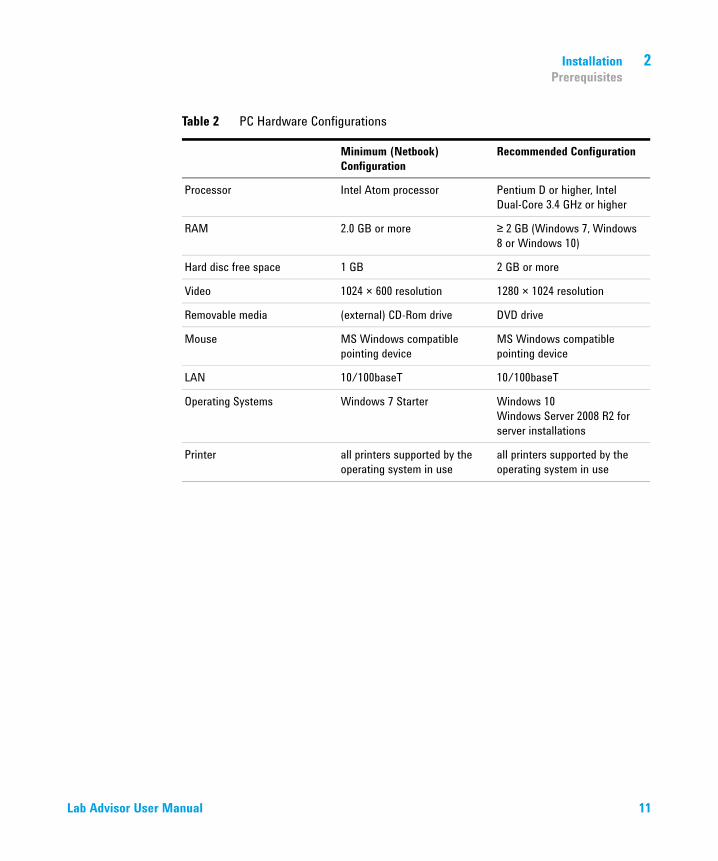
Table 2 PC Hardware Configurations
Minimum (Netbook) Configuration
Recommended Configuration
Processor Intel Atom processor Pentium D or higher, Intel Dual-Core 3.4 GHz or higher
RAM 2.0 GB or more ≥ 2 GB (Windows 7, Windows 8 or Windows 10)
Hard disc free space 1 GB 2 GB or more
Video 1024 × 600 resolution 1280 × 1024 resolution
Removable media (external) CD-Rom drive DVD drive
Mouse MS Windows compatible pointing device
MS Windows compatible pointing device
LAN 10/100baseT 10/100baseT
Operating Systems Windows 7 Starter Windows 10Windows Server 2008 R2 for server installations
Printer all printers supported by the operating system in use
all printers supported by the operating system in use
Lab Advisor User Manual 11
2 InstallationDeployment Modes
Deployment Modes
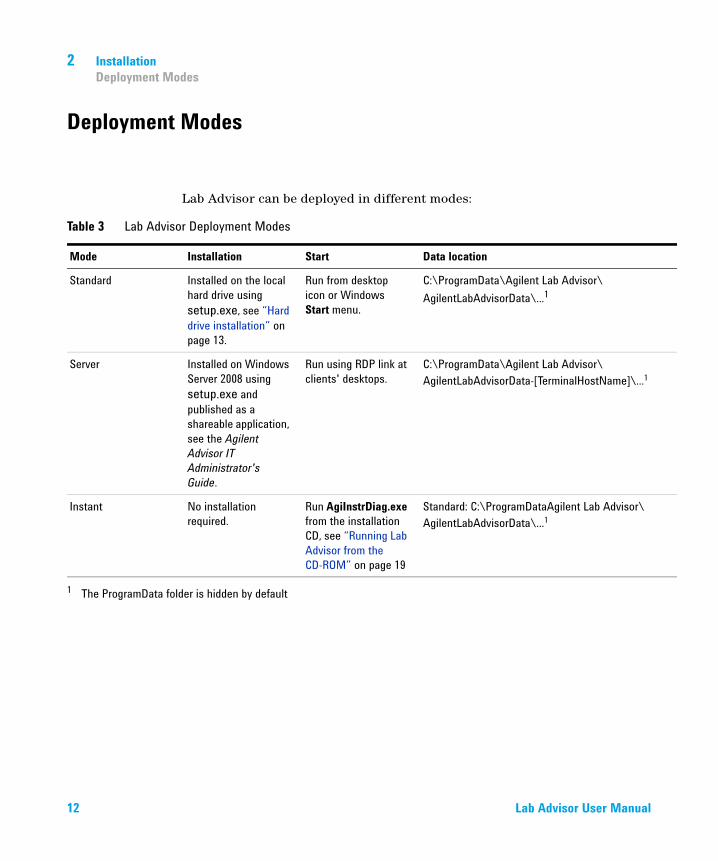
Lab Advisor can be deployed in different modes:
Table 3 Lab Advisor Deployment Modes
Mode Installation Start Data location
Standard Installed on the local hard drive using setup.exe, see “Hard drive installation” on page 13.
Run from desktop icon or Windows Start menu.
C:\ProgramData\Agilent Lab Advisor\AgilentLabAdvisorData\...1
Server Installed on Windows Server 2008 using setup.exe and published as a shareable application, see the Agilent Advisor IT Administrator's Guide.
Run using RDP link at clients' desktops.
C:\ProgramData\Agilent Lab Advisor\AgilentLabAdvisorData-[TerminalHostName]\...1
Instant No installation required.
Run AgiInstrDiag.exe from the installation CD, see “Running Lab Advisor from the CD-ROM” on page 19
Standard: C:\ProgramDataAgilent Lab Advisor\AgilentLabAdvisorData\...1
1 The ProgramData folder is hidden by default
12 Lab Advisor User Manual
Installation 2Hard drive installation
Hard drive installation
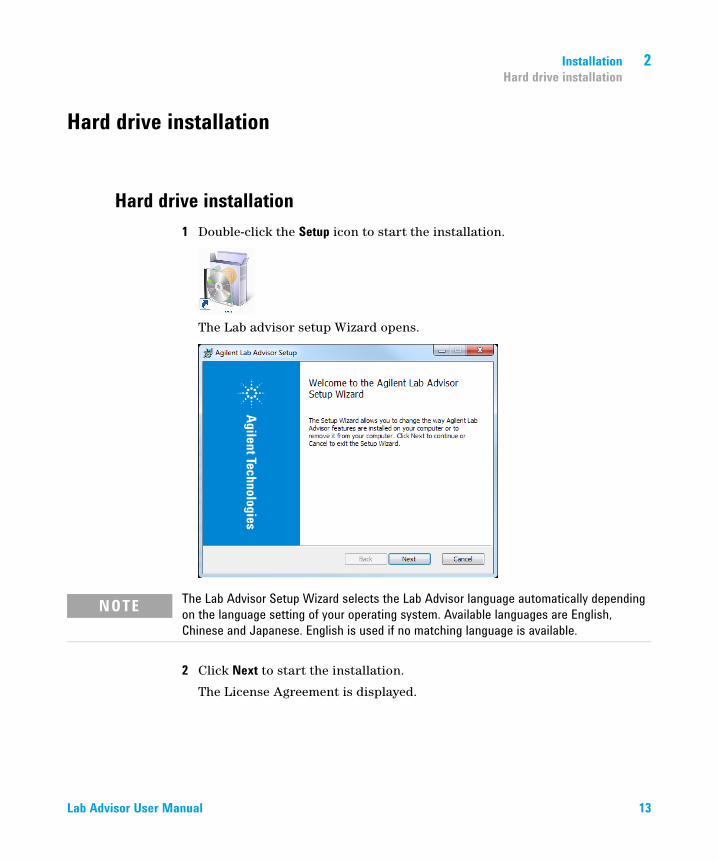
Hard drive installation1 Double-click the Setup icon to start the installation.
The Lab advisor setup Wizard opens.
2 Click Next to start the installation.
The License Agreement is displayed.
NOTE The Lab Advisor Setup Wizard selects the Lab Advisor language automatically depending on the language setting of your operating system. Available languages are English, Chinese and Japanese. English is used if no matching language is available.
Lab Advisor User Manual 13

2 InstallationHard drive installation
3 Select to accept the terms of the license and click Next.
The destination folder screen opens.
4 If you want to change the default installation location, click Change to select a new location; otherwise, click Next.
The last page of the installation wizard is displayed.
14 Lab Advisor User Manual
Installation 2Hard drive installation
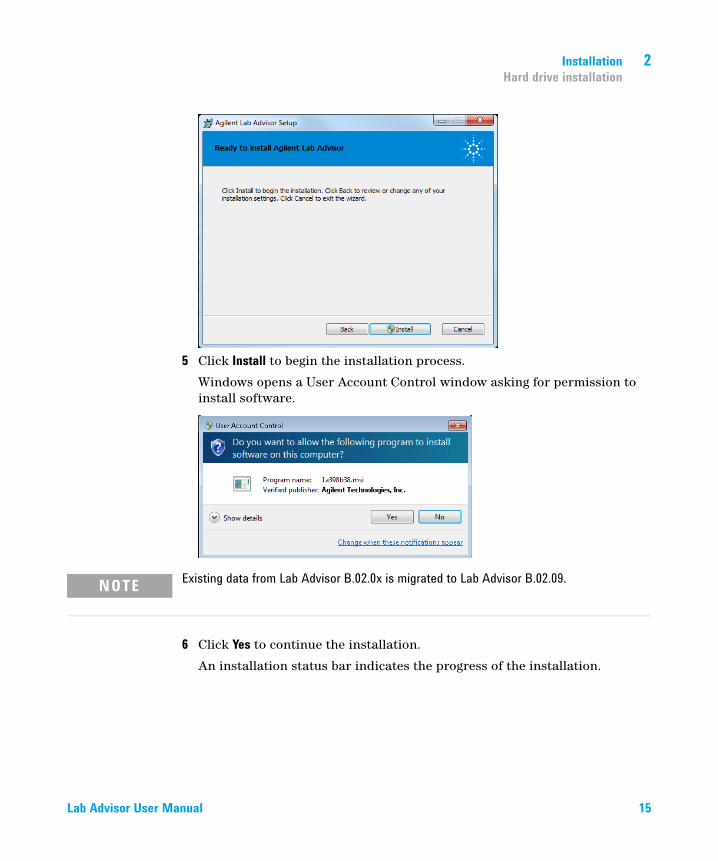
5 Click Install to begin the installation process.
Windows opens a User Account Control window asking for permission to install software.
6 Click Yes to continue the installation.
An installation status bar indicates the progress of the installation.
NOTE Existing data from Lab Advisor B.02.0x is migrated to Lab Advisor B.02.09.
Lab Advisor User Manual 15
2 InstallationHard drive installation
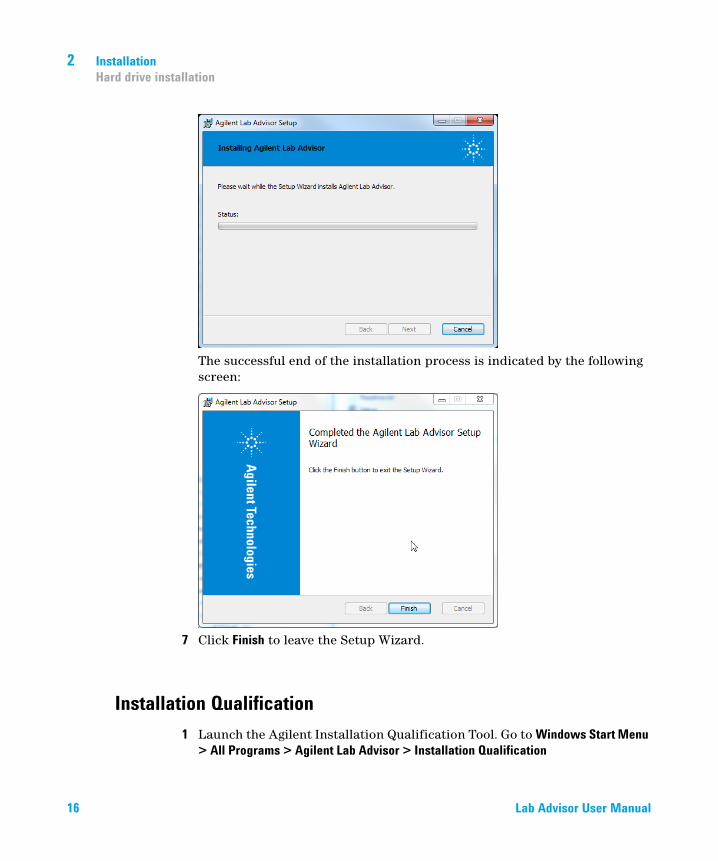
The successful end of the installation process is indicated by the following screen:
7 Click Finish to leave the Setup Wizard.
Installation Qualification1 Launch the Agilent Installation Qualification Tool. Go to Windows Start Menu
> All Programs > Agilent Lab Advisor > Installation Qualification
16 Lab Advisor User Manual
Installation 2Hard drive installation
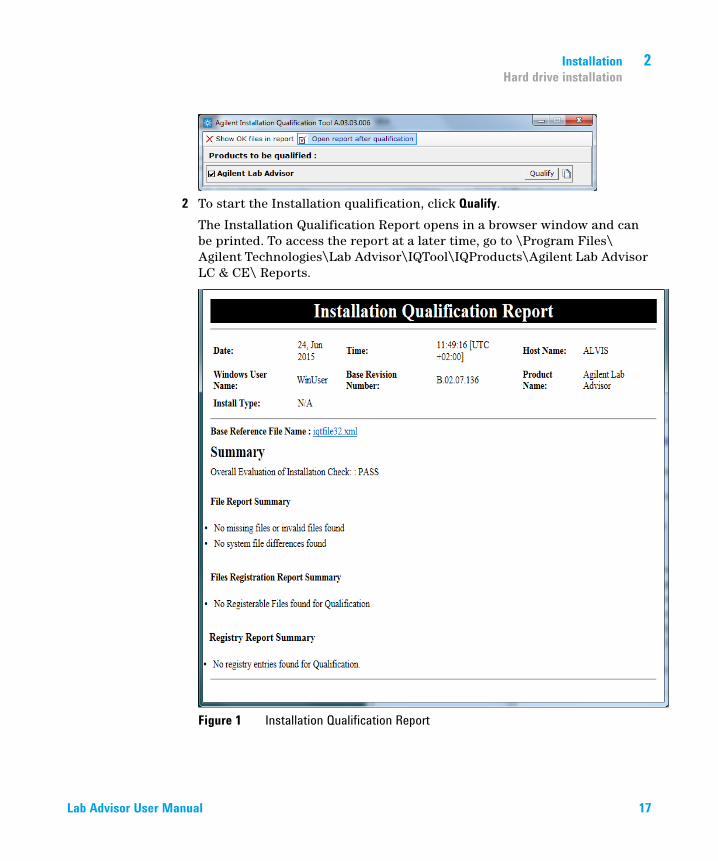
2 To start the Installation qualification, click Qualify.
The Installation Qualification Report opens in a browser window and can be printed. To access the report at a later time, go to \Program Files\ Agilent Technologies\Lab Advisor\IQTool\IQProducts\Agilent Lab Advisor LC & CE\ Reports.
Figure 1 Installation Qualification Report
Lab Advisor User Manual 17
2 InstallationHard drive installation
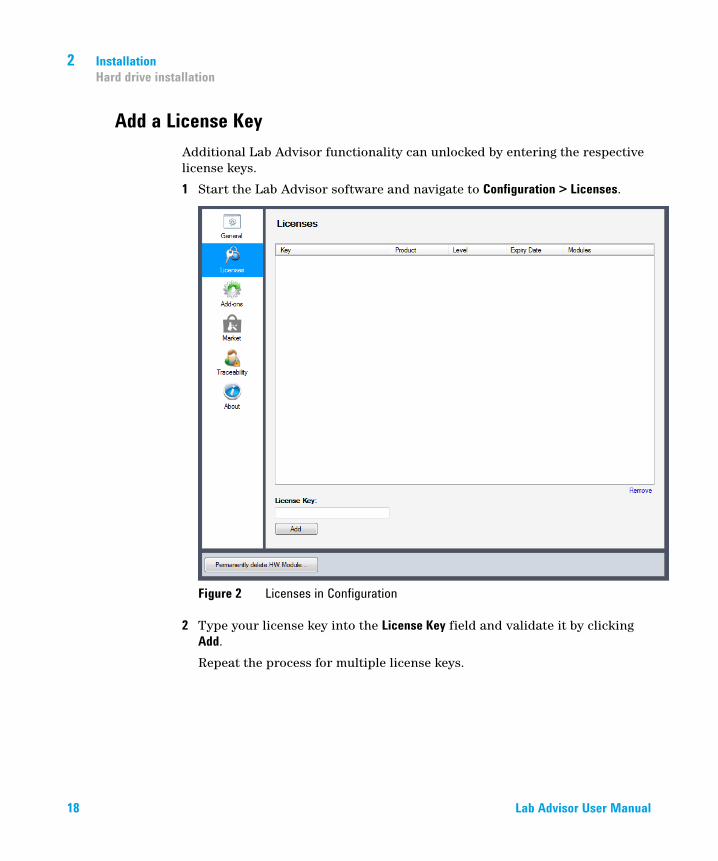
Add a License KeyAdditional Lab Advisor functionality can unlocked by entering the respective license keys.
1 Start the Lab Advisor software and navigate to Configuration > Licenses.
Figure 2 Licenses in Configuration
2 Type your license key into the License Key field and validate it by clicking Add.
Repeat the process for multiple license keys.
18 Lab Advisor User Manual
Installation 2Running Lab Advisor from the CD-ROM
Running Lab Advisor from the CD-ROM
When you run Lab Advisor from the CD-ROM, no program files are copied to the local hard drive. However, any data that you generate will be saved in a folder C:\ProgramData\Agilent Lab Advisor\ AgilentLabAdvisorData\ on the local hard drive.
1 Insert the Lab Advisor installation CD-ROM into the drive.
2 Double-click the Instant Diagnostic item in the root directory of the CD-ROM.
Lab Advisor User Manual 19
2 InstallationInstalling Add-ons
Installing Add-ons
Add-ons are installed from the Configuration screen, using a Lab Advisor Extension file with the with the extension .LAX.
1 In the Global Tasks section of the Navigation Panel, click Configuration.
The Configuration screen is displayed.
NOTE You need Administrator rights in order to install Add-ons.
20 Lab Advisor User Manual
Installation 2Installing Add-ons
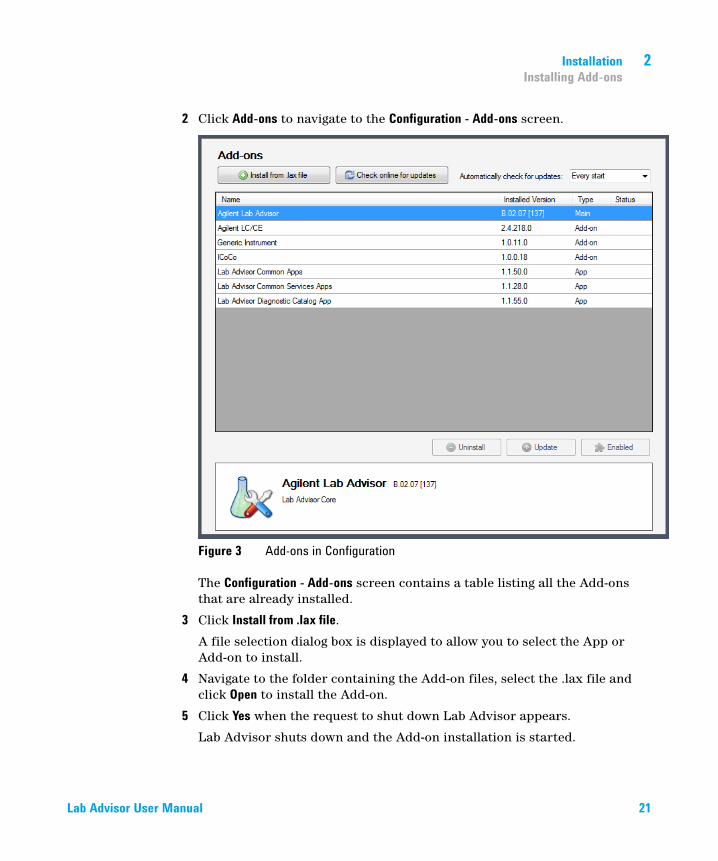
2 Click Add-ons to navigate to the Configuration - Add-ons screen.
Figure 3 Add-ons in Configuration
The Configuration - Add-ons screen contains a table listing all the Add-ons that are already installed.
3 Click Install from .lax file.
A file selection dialog box is displayed to allow you to select the App or Add-on to install.
4 Navigate to the folder containing the Add-on files, select the .lax file and click Open to install the Add-on.
5 Click Yes when the request to shut down Lab Advisor appears.
Lab Advisor shuts down and the Add-on installation is started.
Lab Advisor User Manual 21
2 InstallationInstalling Add-ons
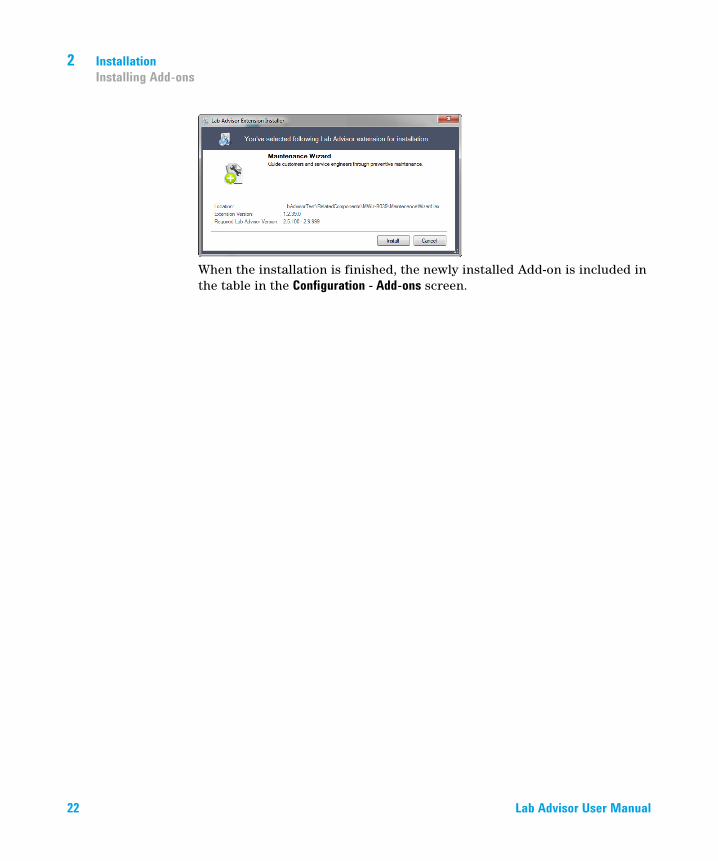
When the installation is finished, the newly installed Add-on is included in the table in the Configuration - Add-ons screen.
22 Lab Advisor User Manual
Lab Advisor User Manual
3Using Lab AdvisorNavigation 25System Overview 29
System hierarchy 29Adding a new system 30Changing system properties 34Removing a system 35Adding a new system group 36Deleting a system group 36Moving systems between groups 36Copying Device Details to the Clipboard 37Fast Connect 37
Configuration 39Configuring the General Parameters 39Licenses 40Add-ons 42Market 43Traceability 43
Apps 45Diagnostic Catalog 45Data Sharing 46TCP Relay Service 46
Firmware Update 48Logs and Results 50Service and Diagnostics 53System Report 55Instrument Control (LC and CE) 58EMFs (LC and CE) 63
23Agilent Technologies
3 Using Lab AdvisorInstalling Add-ons
This chapter describes the Lab Advisor user interface and provides details about the available features.
24 Lab Advisor User Manual
Using Lab Advisor 3Navigation
Navigation
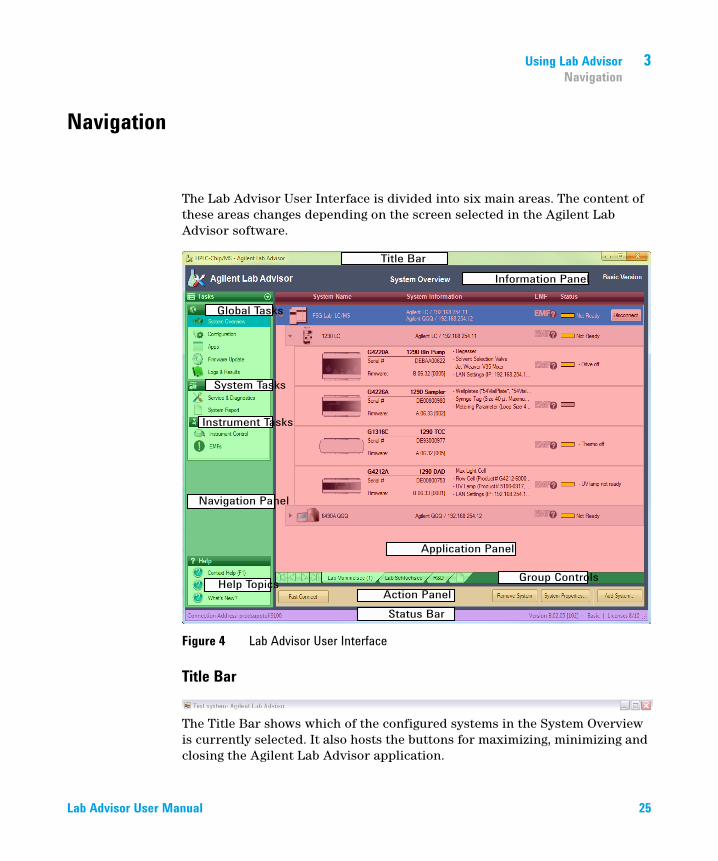
The Lab Advisor User Interface is divided into six main areas. The content of these areas changes depending on the screen selected in the Agilent Lab Advisor software.
Figure 4 Lab Advisor User Interface
Title Bar
The Title Bar shows which of the configured systems in the System Overview is currently selected. It also hosts the buttons for maximizing, minimizing and closing the Agilent Lab Advisor application.
Lab Advisor User Manual 25
3 Using Lab AdvisorNavigation
Navigation Panel
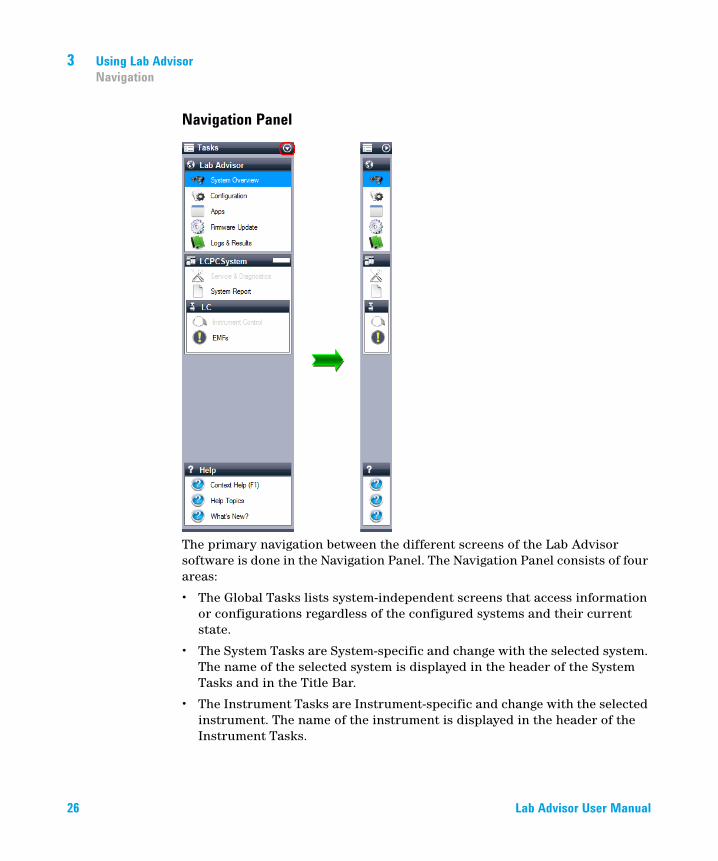
The primary navigation between the different screens of the Lab Advisor software is done in the Navigation Panel. The Navigation Panel consists of four areas:
• The Global Tasks lists system-independent screens that access information or configurations regardless of the configured systems and their current state.
• The System Tasks are System-specific and change with the selected system. The name of the selected system is displayed in the header of the System Tasks and in the Title Bar.
• The Instrument Tasks are Instrument-specific and change with the selected instrument. The name of the instrument is displayed in the header of the Instrument Tasks.
26 Lab Advisor User Manual
Using Lab Advisor 3Navigation
• At the bottom of the Navigation Panel, the Help topics provide information about the software and about the individual screens. Context-sensitive help topics can also be accessed at any time by clicking F1.
The Navigation Panel can be minimized by clicking the minimize icon in the top Task bar.
Information Panel
The Information Panel contains information about the currently selected screen and the Agilent Lab Advisor software version. If the Traceability feature is in use, the Information Panel also includes information about the current logged-in user.
Application PanelThis is the primary area where the different screens selected in the Navigation Panel of the Agilent Lab Advisor software are displayed. Refer to the individual applications for more detailed information.
Group Controls
If system grouping has been activated in software configuration, these controls allow you to switch between system groups, and to add a new system group or delete an existing group.
Action Panel
Additional buttons or actions that are applicable to the selected screen may be displayed in the Action Panel. Such controls are applicable to the entire selected screen; buttons or actions that are applicable to individual items within the screen are displayed in the screen itself.
Status Bar
Lab Advisor User Manual 27
3 Using Lab AdvisorNavigation
The left side of the Status Bar contains information about the connection used; details about the Agilent Lab Advisor revision, license level and license usage are shown on the right side.
28 Lab Advisor User Manual
Using Lab Advisor 3System Overview
System Overview
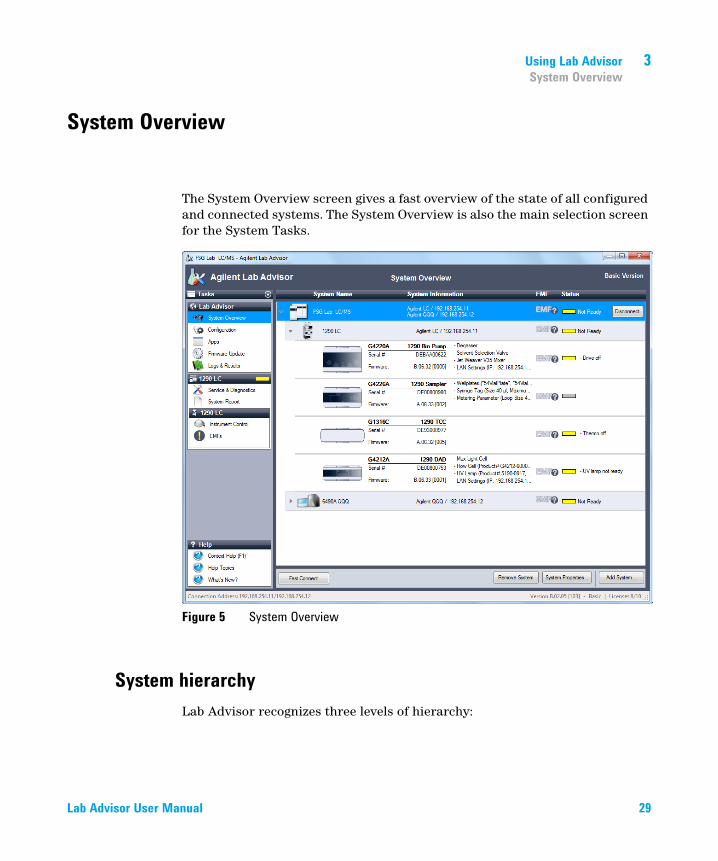
The System Overview screen gives a fast overview of the state of all configured and connected systems. The System Overview is also the main selection screen for the System Tasks.
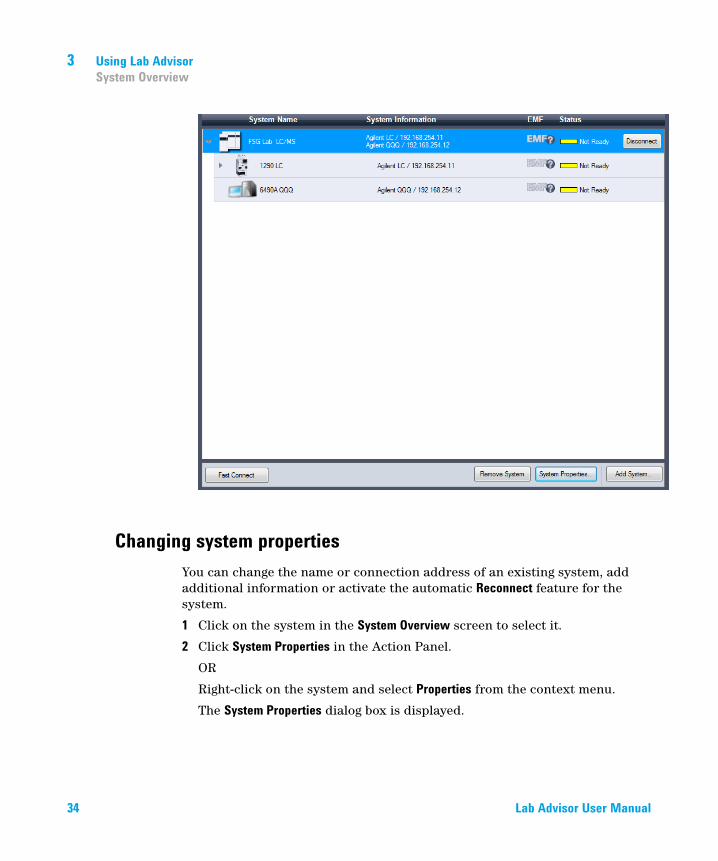
Figure 5 System Overview
System hierarchyLab Advisor recognizes three levels of hierarchy:
Lab Advisor User Manual 29
3 Using Lab AdvisorSystem Overview
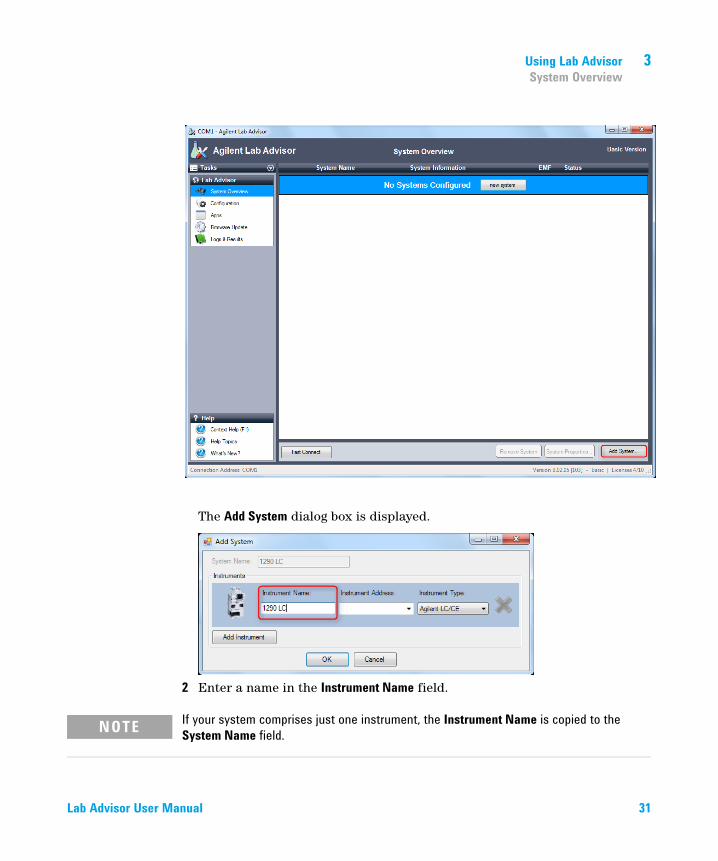
Adding a new system1 In the Action Panel of the System Overview, click Add System.
System The System is the highest level. A system consists of one or more Instruments, each with its own communication address, for example, an LC system with ELSD detector or an LC/MS system. The System icon is always the same.
Instrument An Instrument is characterized by having an individual connection address to Lab Advisor. Instruments may comprise multiple Devices (for example, a modular LC system), but the Devices all communicate with Lab Advisor through a single connection address. Each Instrument has its own icon.
Device The Devices (sometimes referred to elsewhere as Modules) are the constituent parts of an Instrument, for example the pump, sampler, and detector in a modular LC system. Each Device type has its own icon.
30 Lab Advisor User Manual
Using Lab Advisor 3System Overview
The Add System dialog box is displayed.
2 Enter a name in the Instrument Name field.
NOTE If your system comprises just one instrument, the Instrument Name is copied to the System Name field.
Lab Advisor User Manual 31
3 Using Lab AdvisorSystem Overview
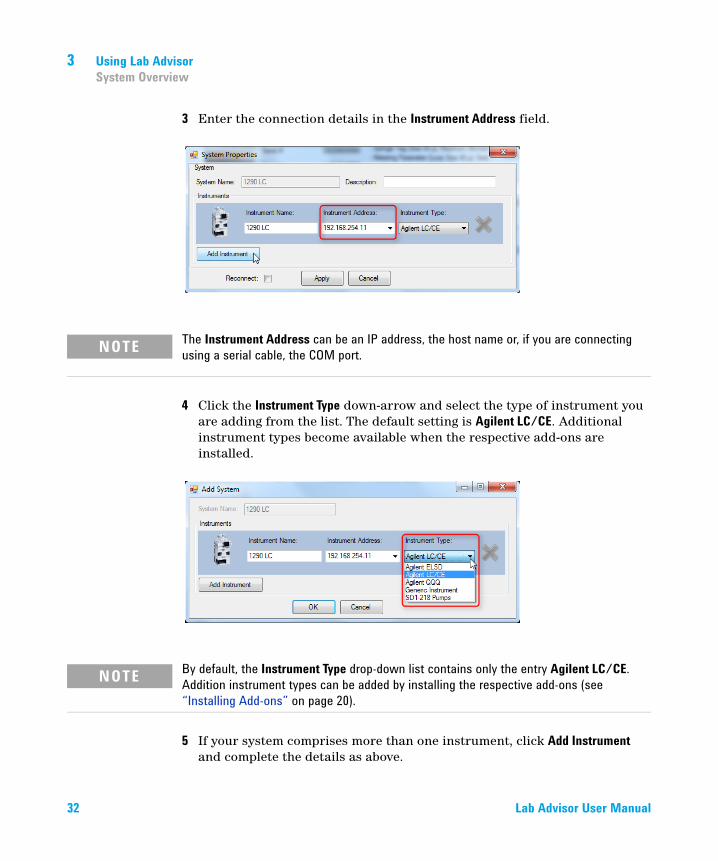
3 Enter the connection details in the Instrument Address field.
4 Click the Instrument Type down-arrow and select the type of instrument you are adding from the list. The default setting is Agilent LC/CE. Additional instrument types become available when the respective add-ons are installed.
5 If your system comprises more than one instrument, click Add Instrument and complete the details as above.
NOTE The Instrument Address can be an IP address, the host name or, if you are connecting using a serial cable, the COM port.
NOTE By default, the Instrument Type drop-down list contains only the entry Agilent LC/CE. Addition instrument types can be added by installing the respective add-ons (see “Installing Add-ons” on page 20).
32 Lab Advisor User Manual
Using Lab Advisor 3System Overview
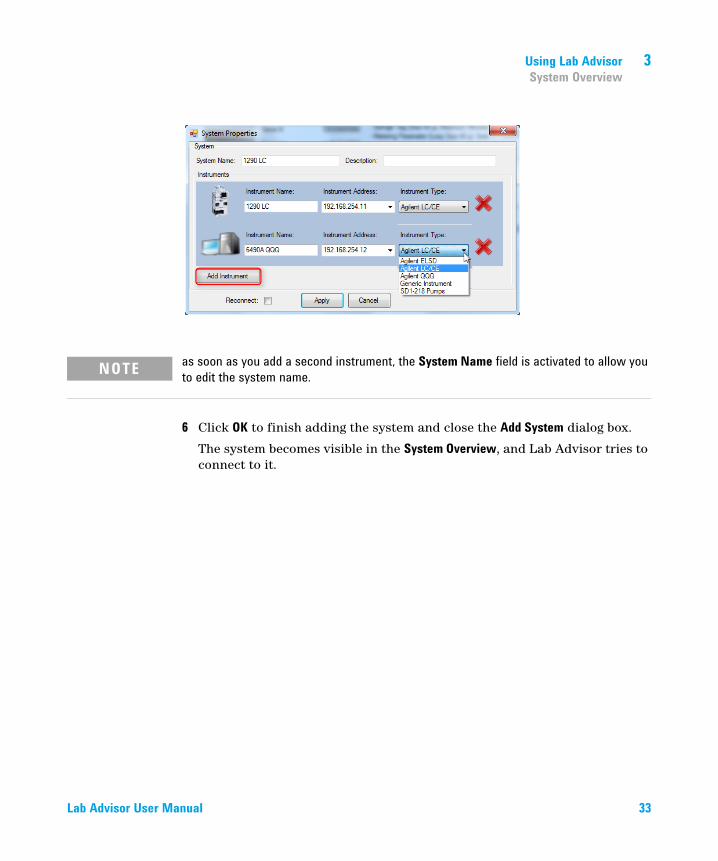
6 Click OK to finish adding the system and close the Add System dialog box.
The system becomes visible in the System Overview, and Lab Advisor tries to connect to it.
NOTE as soon as you add a second instrument, the System Name field is activated to allow you to edit the system name.
Lab Advisor User Manual 33
3 Using Lab AdvisorSystem Overview
Changing system propertiesYou can change the name or connection address of an existing system, add additional information or activate the automatic Reconnect feature for the system.
1 Click on the system in the System Overview screen to select it.
2 Click System Properties in the Action Panel.
OR
Right-click on the system and select Properties from the context menu.
The System Properties dialog box is displayed.
34 Lab Advisor User Manual
Using Lab Advisor 3System Overview
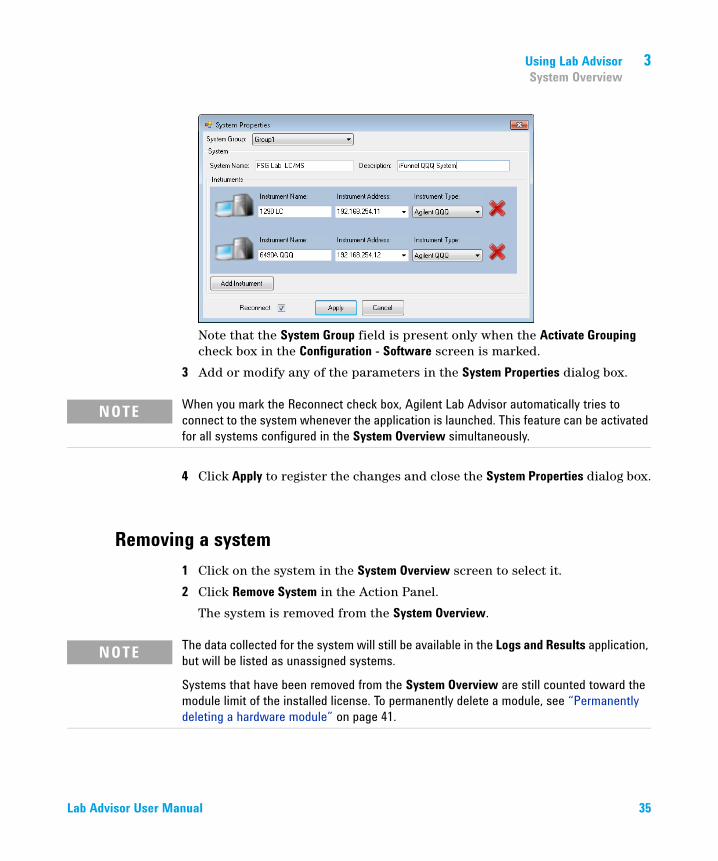
Note that the System Group field is present only when the Activate Grouping check box in the Configuration - Software screen is marked.
3 Add or modify any of the parameters in the System Properties dialog box.
4 Click Apply to register the changes and close the System Properties dialog box.
Removing a system1 Click on the system in the System Overview screen to select it.
2 Click Remove System in the Action Panel.
The system is removed from the System Overview.
NOTE When you mark the Reconnect check box, Agilent Lab Advisor automatically tries to connect to the system whenever the application is launched. This feature can be activated for all systems configured in the System Overview simultaneously.
NOTE The data collected for the system will still be available in the Logs and Results application, but will be listed as unassigned systems.
Systems that have been removed from the System Overview are still counted toward the module limit of the installed license. To permanently delete a module, see “Permanently deleting a hardware module” on page 41.
Lab Advisor User Manual 35
3 Using Lab AdvisorSystem Overview
Adding a new system group
1 Click at the right of the group controls.
A new system group tab is added with a default name.
2 Right-click on the new tab, select Rename from the context menu and overwrite the default name with a new name.
OR
Double-click on the new tab and overwrite the default name with a new name.
3 Click Add System to display the Add System dialog box, which allows you add a system into the new system group.
Deleting a system group
1 Right-click on the tab of the system group that you want to delete.
2 Select Delete from the context menu.
If the system group is empty, it is deleted; if the group contains systems, a message is displayed.
Moving systems between groups1 In the System Overview, select the system that you want to move and click
System Properties.
OR
NOTE The system group controls are available only when the Activate Grouping check box in the Configuration - Software screen is marked.
NOTE You cannot delete a system group that contains systems. Before deleting a group, move the systems into another group (see “Moving systems between groups” on page 36).
36 Lab Advisor User Manual
Using Lab Advisor 3System Overview
In the System Overview, right-click the system that you want to move and select Properties from the context menu.
The System Properties dialog box is displayed.
2 Click the System Group down-arrow and select the target group that you want to move the system to.
3 Click Apply.
The system is moved from the existing group to the new group and the System Properties dialog box is closed.
Copying Device Details to the ClipboardSometimes, it can be helpful to have the details presented in the System Information section of a device available for copying and pasting into other applications.
1 Click on the system in the System Overview screen to select it.
2 If the system modules are not listed, click to display them.
3 Right-click on the module whose details you want to copy and select Copy details to Clipboard from the context menu.
The device information is copied to the clipboard, and can be pasted into another application such as Notepad, Wordpad or a Microsoft Office application.
Fast ConnectIf you are using mobile laptop computers for servicing systems, a fast connection can be established using a serial cable (RS232) or a USB cable.
All modules with a USB mini-B port can be connected using a USB cable (part number 5188-8050).
For computers without an RS232 port, an RS232-to-USB adapter cable is available (part number 8121-1013).
1 Connect the serial cable between the system and the PC (using the RS232-to-USB adapter, p/n 8121-1013, if necessary). The serial cable should
Lab Advisor User Manual 37
3 Using Lab AdvisorSystem Overview
be connected to the module that is providing the most data, usually the detector.
2 Click Fast Connect on the Action Panel.
Lab Advisor searches all available COM and USB ports for installed systems and adds them automatically to the System Overview screen.
NOTE This feature is especially helpful for connecting systems with no LAN access, because it provides easy access to data such as LAN card configuration, MAC address and IP address without having to reconfigure the Laptop internal IP address or set up a BootP server.
38 Lab Advisor User Manual
Using Lab Advisor 3Configuration
Configuration
Application-wide settings, information and tools are accessible from the Configuration screen.
Configuring the General ParametersThe General configuration specifies the Path to the data generated by the Lab Advisor software. This is a non-configurable path, and is dependent on the operating system used and the type of installation (USB stick or hard drive).
BackupBackup of Lab Advisor data is provided by export and import functions, where the exported .ZIP file is stored in a safe location. This feature can also be used to distribute configured systems and their corresponding data, by exporting data from one Lab Advisor installation and importing it into other installations.
TracingIf unexpected behavior is observed from the Lab Advisor software, a trace file can be generated to help the Agilent Technologies technicians locate the problem.
You can also switch on the continuous collection of all instrument communication data. This form of logging does not persist beyond the current Lab Advisor session.
LanguageThe Lab Advisor software supports English, Chinese and Japanese languages. The language is usually selected during installation of the software. However, there is a possibility to change the language later by selecting the appropriate language in the Software configuration screen. After the language has been changed, the software needs to be restarted for the new settings to take effect.
Lab Advisor User Manual 39
3 Using Lab AdvisorConfiguration
System GroupsLab Advisor supports the grouping of systems, for example, by laboratory. Up to 25 systems can be assembled into a group; each system can contain up to 50 devices. An unlimited number of groups can be defined.
The grouping of systems is switched on by marking the Activate Grouping check box. When the check box is marked, the group controls (see “Group Controls” on page 27) are appended to the application panel in the System Overview and the Review Client.
LicensesThe licensing scheme of Lab Advisor B.02.xx has changed compared to previous versions. The unique combinations of Type and Serial number for each configured device are counted and tracked in the license module of the software. For each configured device, a license is deducted from the total number of eligible devices; the license status can be tracked in the Status Bar.
Lab Advisor licenses acquired for previous versions of Lab Advisor and Lab Monitor and Diagnostic software are still eligible for Lab Advisor B.02.xx and are transformed according to Table 4 on page 40.
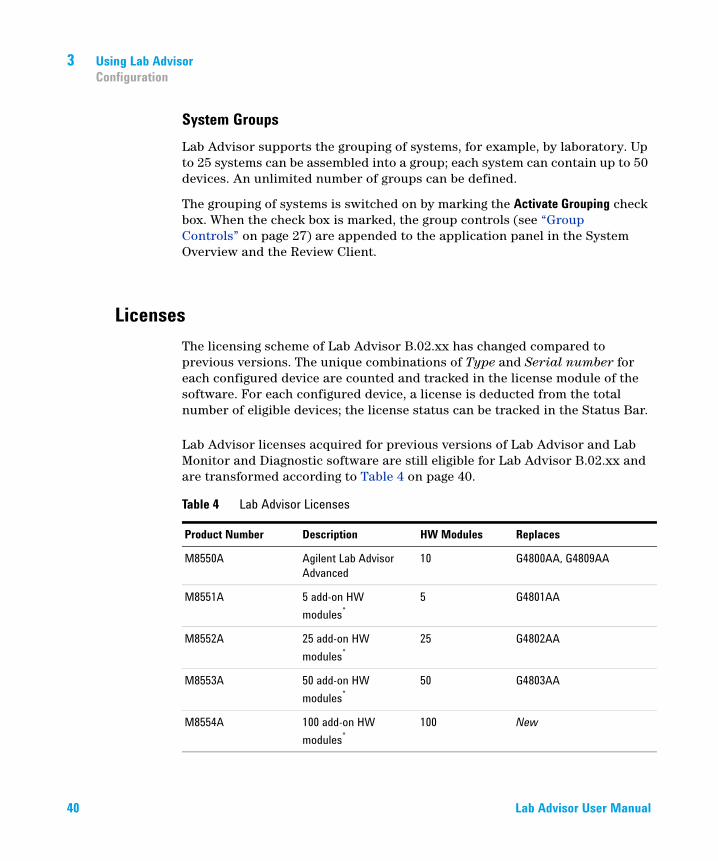
Table 4 Lab Advisor Licenses
Product Number Description HW Modules Replaces
M8550A Agilent Lab Advisor Advanced
10 G4800AA, G4809AA
M8551A 5 add-on HW modules*
5 G4801AA
M8552A 25 add-on HW modules*
25 G4802AA
M8553A 50 add-on HW modules*
50 G4803AA
M8554A 100 add-on HW modules*
100 New
40 Lab Advisor User Manual
Using Lab Advisor 3Configuration
* Requires M8550A installed
Any combination of the listed Product Numbers is possible, and it is also possible to install a Product Number multiple times. Each unique license number adds to the number of modules supported.
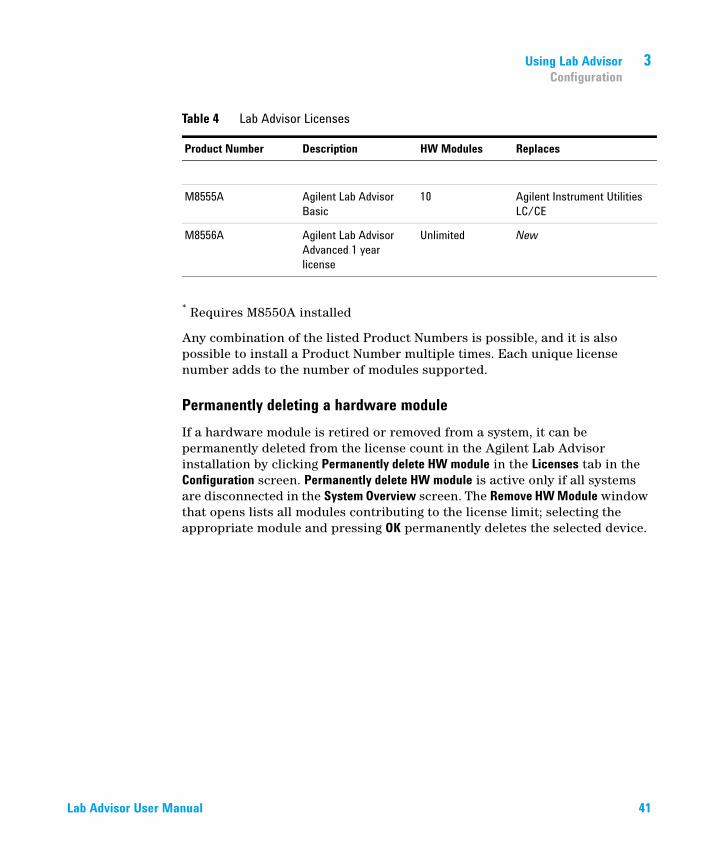
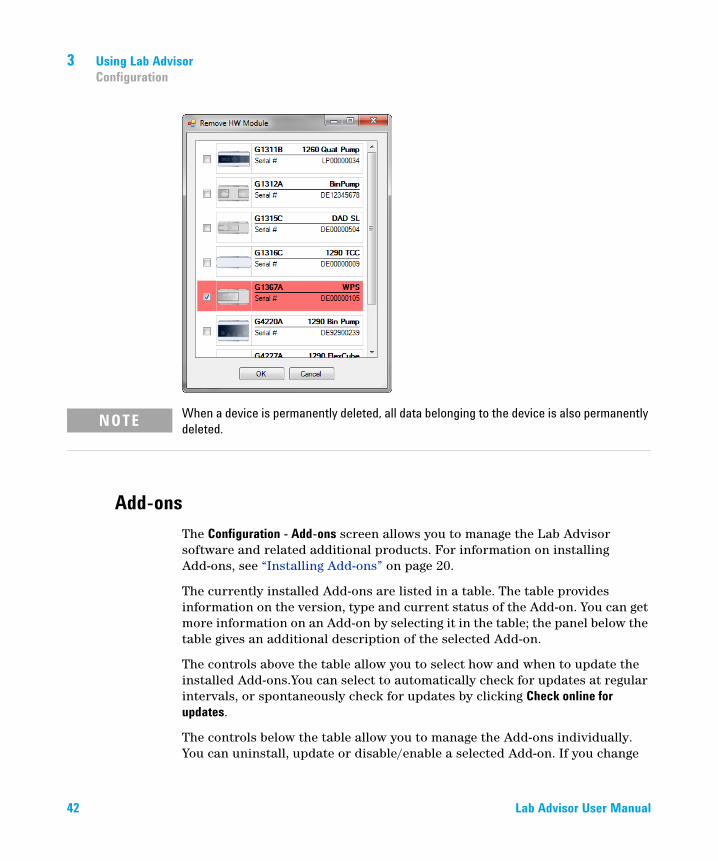
Permanently deleting a hardware moduleIf a hardware module is retired or removed from a system, it can be permanently deleted from the license count in the Agilent Lab Advisor installation by clicking Permanently delete HW module in the Licenses tab in the Configuration screen. Permanently delete HW module is active only if all systems are disconnected in the System Overview screen. The Remove HW Module window that opens lists all modules contributing to the license limit; selecting the appropriate module and pressing OK permanently deletes the selected device.
M8555A Agilent Lab Advisor Basic
10 Agilent Instrument Utilities LC/CE
M8556A Agilent Lab Advisor Advanced 1 year license
Unlimited New
Table 4 Lab Advisor Licenses
Product Number Description HW Modules Replaces
Lab Advisor User Manual 41
3 Using Lab AdvisorConfiguration
Add-onsThe Configuration - Add-ons screen allows you to manage the Lab Advisor software and related additional products. For information on installing Add-ons, see “Installing Add-ons” on page 20.
The currently installed Add-ons are listed in a table. The table provides information on the version, type and current status of the Add-on. You can get more information on an Add-on by selecting it in the table; the panel below the table gives an additional description of the selected Add-on.
The controls above the table allow you to select how and when to update the installed Add-ons.You can select to automatically check for updates at regular intervals, or spontaneously check for updates by clicking Check online for updates.
The controls below the table allow you to manage the Add-ons individually. You can uninstall, update or disable/enable a selected Add-on. If you change
NOTE When a device is permanently deleted, all data belonging to the device is also permanently deleted.
42 Lab Advisor User Manual
Using Lab Advisor 3Configuration
the enabled/disabled status of an Add-on, you must restart Lab Advisor to activate the change. The Add-on's status is shown in the table. Some Add-ons are essential to the operation of Lab Advisor; in these cases, Uninstall and Disable are disabled. Update is enabled only when an up date is available for the selected Add-on.
MarketThe Market is a mechanism that provides access to the Agilent Technologies web site to allow you to download additional products related to Lab Advisor.
The products available for download are separated into channels, which you can select from the drop-down list at the top right of the Market screen. For example, the Software channel gives you access to additional Apps and Add-ons that can extend the usability of your Lab Advisor installation; the Documents channel allows you to download the current revisions of Lab Advisor documentation.
TraceabilityThe Traceability feature of the software logs the use of Lab Advisor and keeps track of which user did what procedure and when. This information is written into the Logs & Results and is included in the printed results. If the Data Sharing feature is used, the traceability data is also uploaded.
Traceability LevelLab Advisor offers three levels of traceability. Change of traceability level requires administrator rights. For the initial setting, the user Admin is set up using the password Admin. After the first login, this password should be changed to prevent unauthorized access.
The default level is No Traceability, which allows any user to access all parts of the Lab Advisor software, depending on Licenses. At this level, no user names are added to Logs & Results or printouts.
Medium Traceability requires that the user be selected from a drop-down list. No password is required, and users can register and enable themselves. The selected user name is added to the printouts and Logs & Results.
Lab Advisor User Manual 43
3 Using Lab AdvisorConfiguration
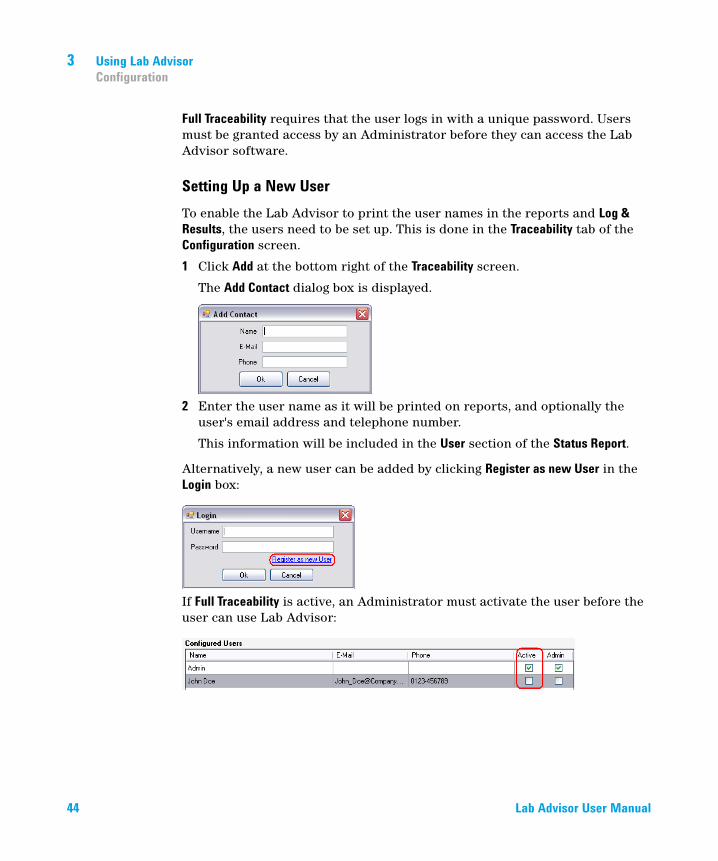
Full Traceability requires that the user logs in with a unique password. Users must be granted access by an Administrator before they can access the Lab Advisor software.
Setting Up a New UserTo enable the Lab Advisor to print the user names in the reports and Log & Results, the users need to be set up. This is done in the Traceability tab of the Configuration screen.
1 Click Add at the bottom right of the Traceability screen.
The Add Contact dialog box is displayed.
2 Enter the user name as it will be printed on reports, and optionally the user's email address and telephone number.
This information will be included in the User section of the Status Report.
Alternatively, a new user can be added by clicking Register as new User in the Login box:
If Full Traceability is active, an Administrator must activate the user before the user can use Lab Advisor:
44 Lab Advisor User Manual
Using Lab Advisor 3Apps
Apps
Apps are small applications designed to help you perform specific non-system-related tasks.
Diagnostic Catalog
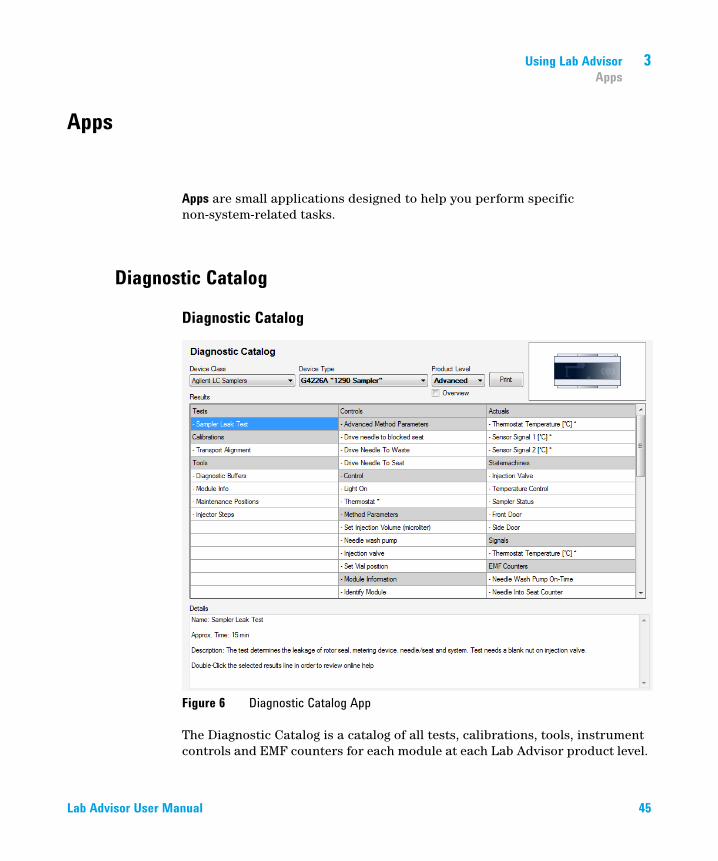
Diagnostic Catalog
Figure 6 Diagnostic Catalog App
The Diagnostic Catalog is a catalog of all tests, calibrations, tools, instrument controls and EMF counters for each module at each Lab Advisor product level.
Lab Advisor User Manual 45
3 Using Lab AdvisorApps
The list is filtered by Device Class (that is, instrument or module type), Device Type and Product Level. The diagnostic catalog for the selected module at the selected product level is displayed in the Results table three columns:
• Tests, Calibrations and Tools available in Lab Advisor at the selected product level
• Controls provided in the Instrument Control screen of Lab Advisor at the selected product level
• EMF Counters shown the EMFs screen of Lab Advisor at the selected product level
For the tests, calibrations and tools, a short description is provided in the Details panel below the Results table. You can retrieve more information on the test, calibration or tool by double-clicking its name, which displays the online help.
You can print the diagnostic catalog for the current selection by clicking Print.
Data SharingThe Data Sharing feature of the Advanced version of Lab Advisor allows multiple Lab Advisor installations to upload and synchronize the collected instrument information and data to an upload folder.
For full details of the Data Sharing App, see “Lab Advisor Data Sharing” on page 65.
TCP Relay ServiceThe TCP Relay Service replaces the Lab Advisor Relay service in Lab Advisor B.02.09 and later. The TCP Relay Service has a new, simplified Dashboard, and is compatible with both Lab Advisor and Agilent Remote Advisor. For full details of the TCP Relay Service, see the Agilent TCP Relay Service Administrator's Guide.
If necessary, you can continue to use the Lab Advisor Relay Service, which is fully compatible with Lab Advisor B.02.09. If you need to add more installations, you can install the Lab Advisor Relay Service from the installation media of a previous revision of Lab Advisor.
46 Lab Advisor User Manual

Using Lab Advisor 3Apps
You can also continue to use the Lab Advisor Dashboard user interface in conjunction with the TCP Relay Service. The Lab Advisor Dashboard user interface is an integral part of Lab Advisor B.02.09, and can be configured as described in the Agilent Lab Advisor IT Administrator's Guide.
It is also possible to set up the new TCP Relay Service with a mix of Dashboards from the Lab Advisor Relay Service and the TCP Relay Service. In this case, however, you must ensure that the password security feature of the TCP Relay Service is not switched on. See the Agilent TCP Relay Service Administrator's Guide for full details.
Lab Advisor User Manual 47

3 Using Lab AdvisorFirmware Update
Firmware Update
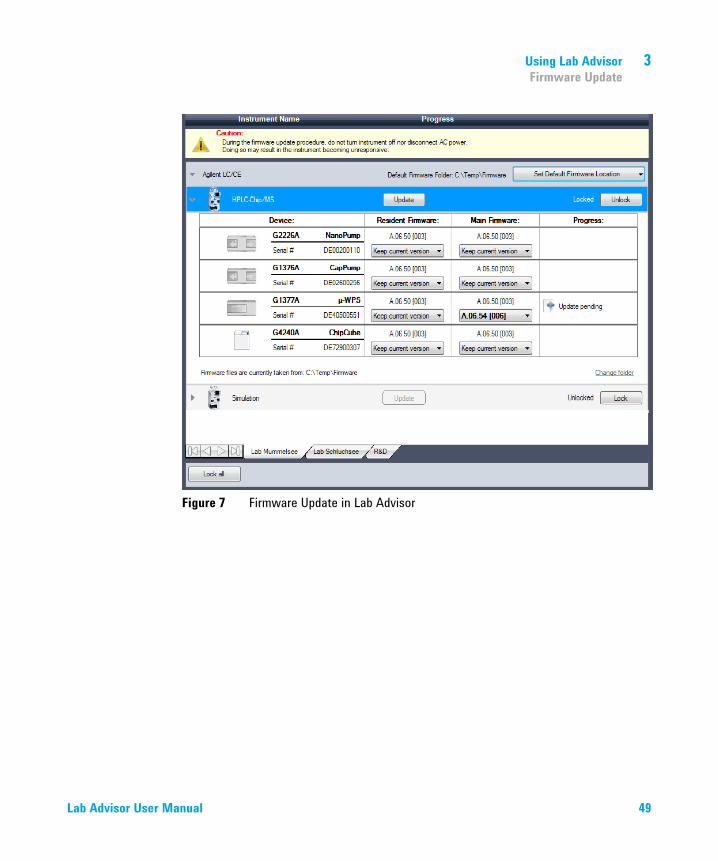
Lab Advisor can be used to update the device-internal software (called firmware — FW).
The Firmware Update screen lists all systems configured in the System Overview screen. The devices of these systems can be updated individually, or the entire system can be updated at one time. It is also possible to update multiple systems at one time. To start the FW update procedure, select the Firmware Update tab in the global screens section of the Navigation Panel.
Lab Advisor does not provide any firmware files. Firmware sets can be downloaded from http://www.chem.agilent.com/_layouts/agilent/downloadFirmware.aspx?whid=69761. Unzip the downloaded firmware archive C.\Temp\Firmware\ or another location of your choice. Use Set Default Firmware Folder to point Lab Advisor to this location.
48 Lab Advisor User Manual
Using Lab Advisor 3Firmware Update
Figure 7 Firmware Update in Lab Advisor
Lab Advisor User Manual 49
3 Using Lab AdvisorLogs and Results
Logs and Results
The Logs & Results screen presents data collected from the configured devices, and helps to review the status of the systems or devices.
The Logs & Results data includes:
• Test results
• Error information
• FW revision and updates
• EMF changes
• Maintenance log entries
Each line in the log shows the module identifier (type and serial number), type of information, description and a time stamp. If the Traceability feature is in use, user-generated data is logged with user name in the Message field.
50 Lab Advisor User Manual
Using Lab Advisor 3Logs and Results
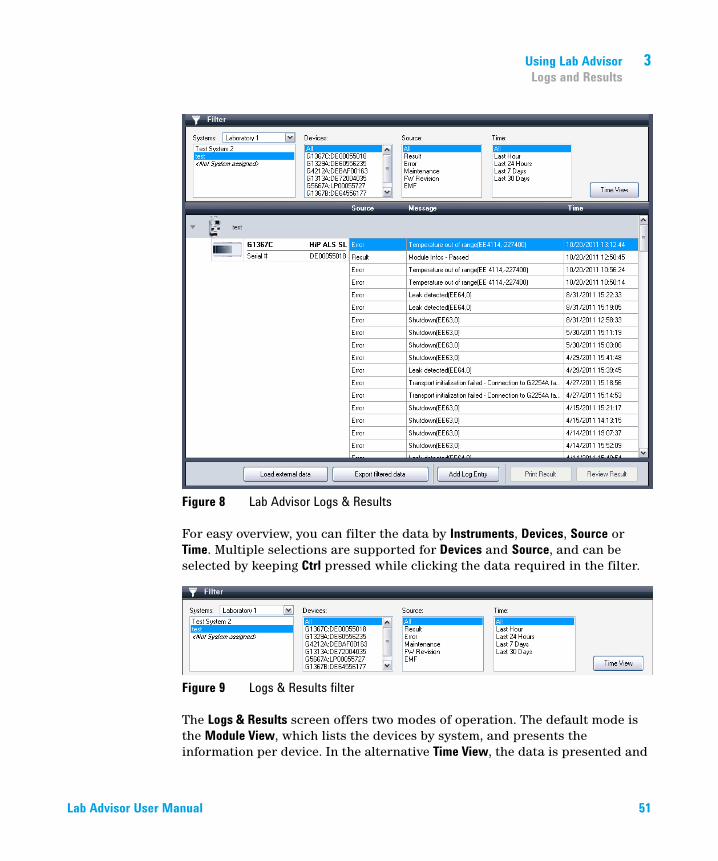
Figure 8 Lab Advisor Logs & Results
For easy overview, you can filter the data by Instruments, Devices, Source or Time. Multiple selections are supported for Devices and Source, and can be selected by keeping Ctrl pressed while clicking the data required in the filter.
Figure 9 Logs & Results filter
The Logs & Results screen offers two modes of operation. The default mode is the Module View, which lists the devices by system, and presents the information per device. In the alternative Time View, the data is presented and
Lab Advisor User Manual 51
3 Using Lab AdvisorLogs and Results
sorted by time stamp. This allows for a system-wide overview of the sequence of the data.
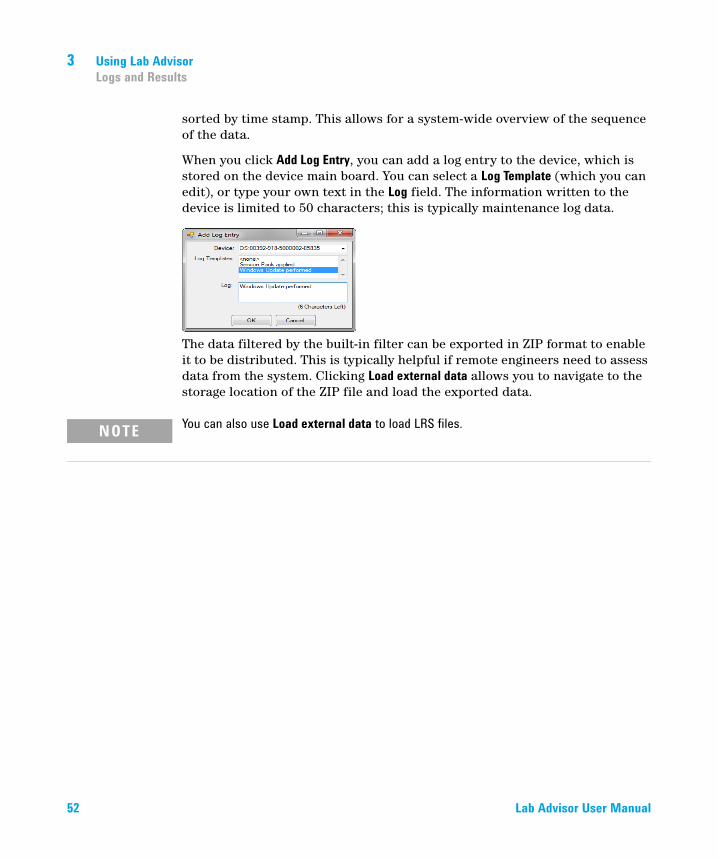
When you click Add Log Entry, you can add a log entry to the device, which is stored on the device main board. You can select a Log Template (which you can edit), or type your own text in the Log field. The information written to the device is limited to 50 characters; this is typically maintenance log data.
The data filtered by the built-in filter can be exported in ZIP format to enable it to be distributed. This is typically helpful if remote engineers need to assess data from the system. Clicking Load external data allows you to navigate to the storage location of the ZIP file and load the exported data.
NOTE You can also use Load external data to load LRS files.
52 Lab Advisor User Manual
Using Lab Advisor 3Service and Diagnostics
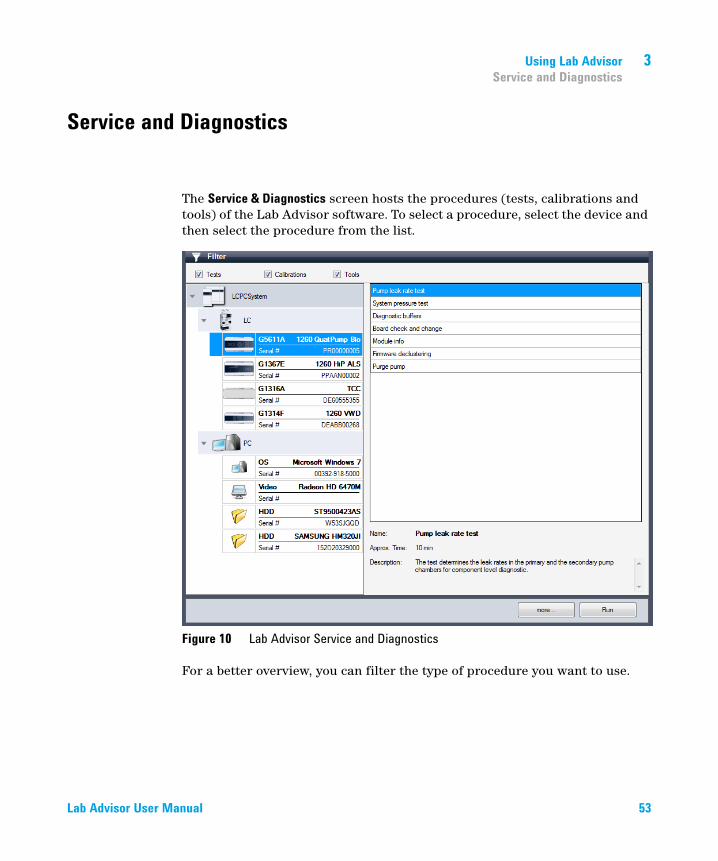
Service and Diagnostics
The Service & Diagnostics screen hosts the procedures (tests, calibrations and tools) of the Lab Advisor software. To select a procedure, select the device and then select the procedure from the list.
Figure 10 Lab Advisor Service and Diagnostics
For a better overview, you can filter the type of procedure you want to use.
Lab Advisor User Manual 53
3 Using Lab AdvisorService and Diagnostics
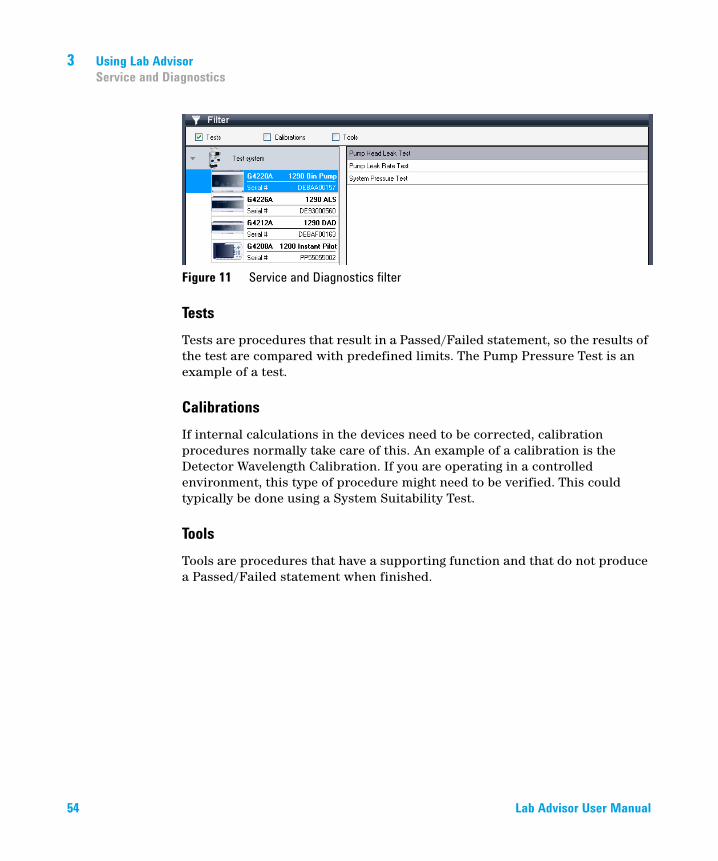
Figure 11 Service and Diagnostics filter
TestsTests are procedures that result in a Passed/Failed statement, so the results of the test are compared with predefined limits. The Pump Pressure Test is an example of a test.
CalibrationsIf internal calculations in the devices need to be corrected, calibration procedures normally take care of this. An example of a calibration is the Detector Wavelength Calibration. If you are operating in a controlled environment, this type of procedure might need to be verified. This could typically be done using a System Suitability Test.
ToolsTools are procedures that have a supporting function and that do not produce a Passed/Failed statement when finished.
54 Lab Advisor User Manual
Using Lab Advisor 3System Report
System Report
The Lab Advisor System Report screen provides a system-wide overview of the devices in the system.
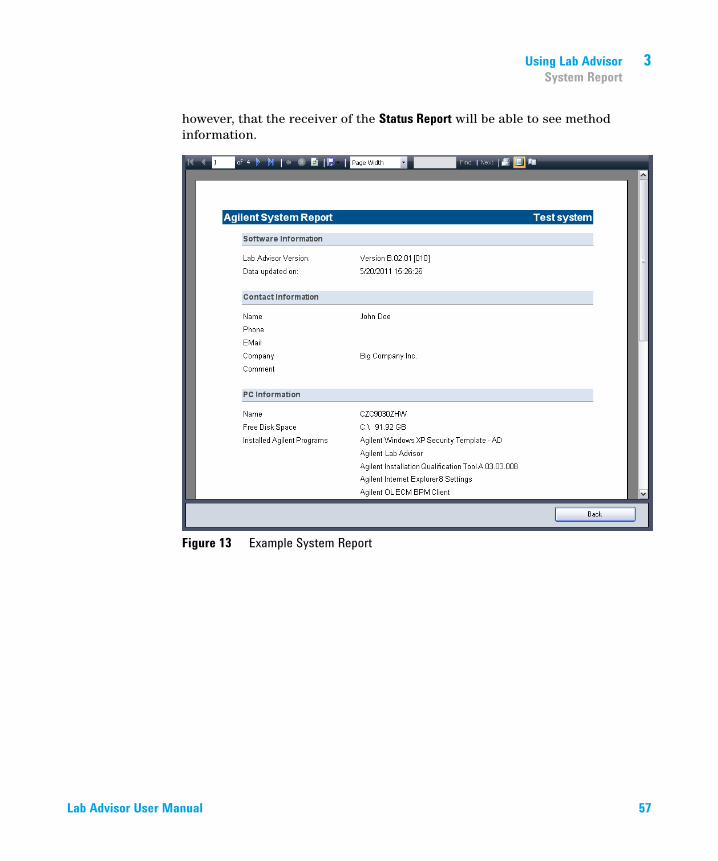
The information in the System Report includes:
• Lab Advisor software information
• Contact information
• PC information (optional)
• System configuration
• Logbook
• EMF counters
• Test Results
• Instrument actuals (optional)
The information included in the System Report can be used to document the system or to share diagnostic information with a remote engineer when troubleshooting the system.
The System Report screen displays the information in at least two tabs: a General tab that includes Contact Information, Company, Logs and results and PC information, and a tab for each instrument in the system. The instrument tabs allow you to select the instrument-specific information to include.
Lab Advisor User Manual 55
3 Using Lab AdvisorSystem Report
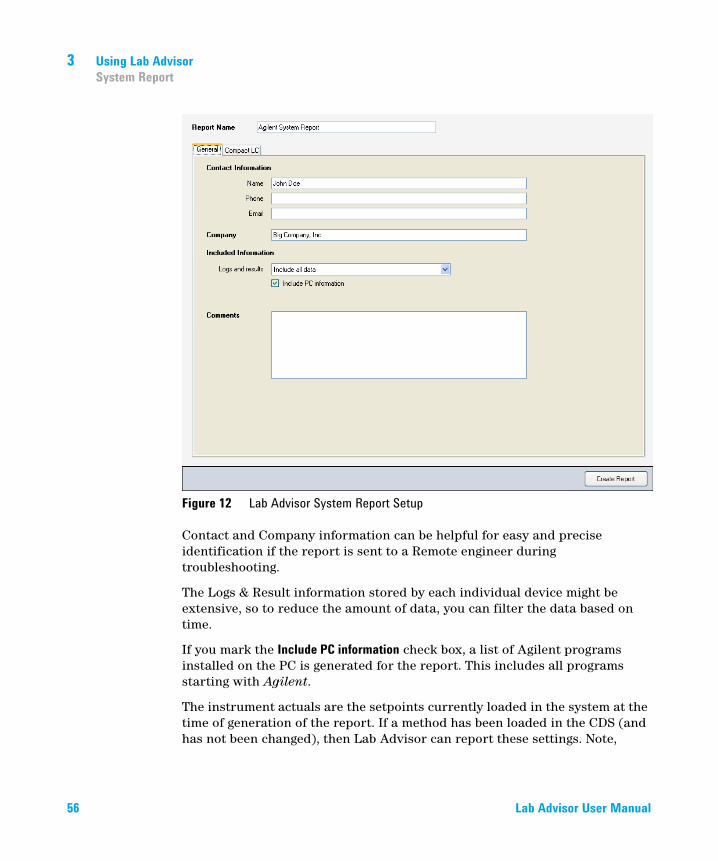
Figure 12 Lab Advisor System Report Setup
Contact and Company information can be helpful for easy and precise identification if the report is sent to a Remote engineer during troubleshooting.
The Logs & Result information stored by each individual device might be extensive, so to reduce the amount of data, you can filter the data based on time.
If you mark the Include PC information check box, a list of Agilent programs installed on the PC is generated for the report. This includes all programs starting with Agilent.
The instrument actuals are the setpoints currently loaded in the system at the time of generation of the report. If a method has been loaded in the CDS (and has not been changed), then Lab Advisor can report these settings. Note,
56 Lab Advisor User Manual
Using Lab Advisor 3System Report
however, that the receiver of the Status Report will be able to see method information.
Figure 13 Example System Report
Lab Advisor User Manual 57
3 Using Lab AdvisorInstrument Control (LC and CE)
Instrument Control (LC and CE)
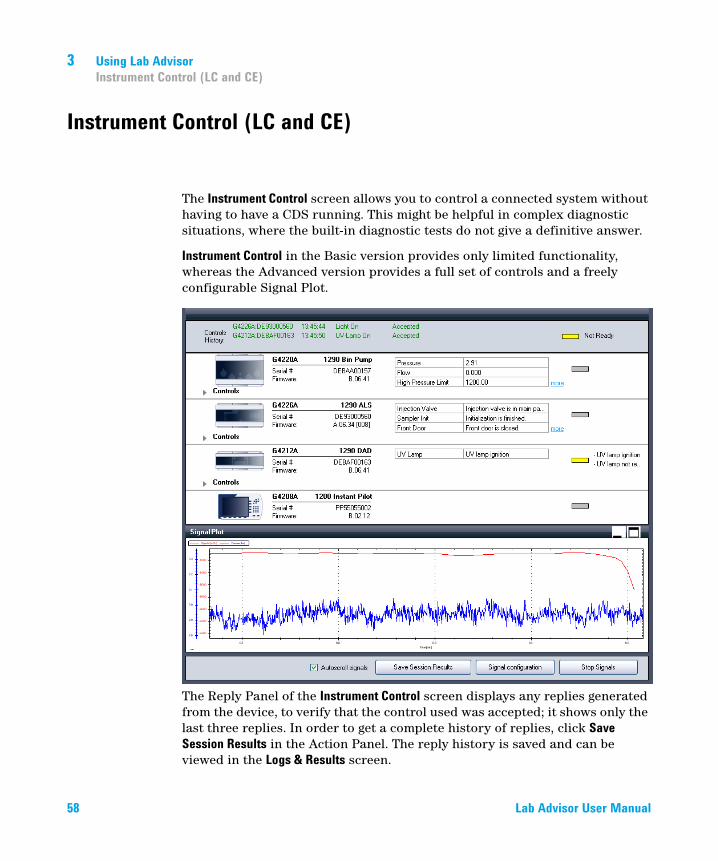
The Instrument Control screen allows you to control a connected system without having to have a CDS running. This might be helpful in complex diagnostic situations, where the built-in diagnostic tests do not give a definitive answer.
Instrument Control in the Basic version provides only limited functionality, whereas the Advanced version provides a full set of controls and a freely configurable Signal Plot.
The Reply Panel of the Instrument Control screen displays any replies generated from the device, to verify that the control used was accepted; it shows only the last three replies. In order to get a complete history of replies, click Save Session Results in the Action Panel. The reply history is saved and can be viewed in the Logs & Results screen.
58 Lab Advisor User Manual
Using Lab Advisor 3Instrument Control (LC and CE)
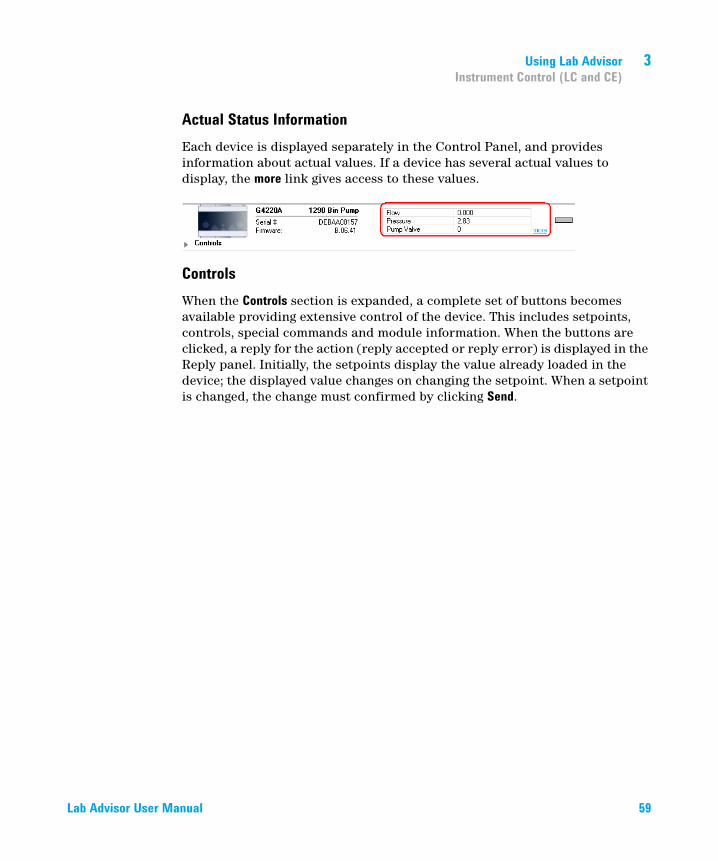
Actual Status InformationEach device is displayed separately in the Control Panel, and provides information about actual values. If a device has several actual values to display, the more link gives access to these values.
ControlsWhen the Controls section is expanded, a complete set of buttons becomes available providing extensive control of the device. This includes setpoints, controls, special commands and module information. When the buttons are clicked, a reply for the action (reply accepted or reply error) is displayed in the Reply panel. Initially, the setpoints display the value already loaded in the device; the displayed value changes on changing the setpoint. When a setpoint is changed, the change must confirmed by clicking Send.
Lab Advisor User Manual 59
3 Using Lab AdvisorInstrument Control (LC and CE)
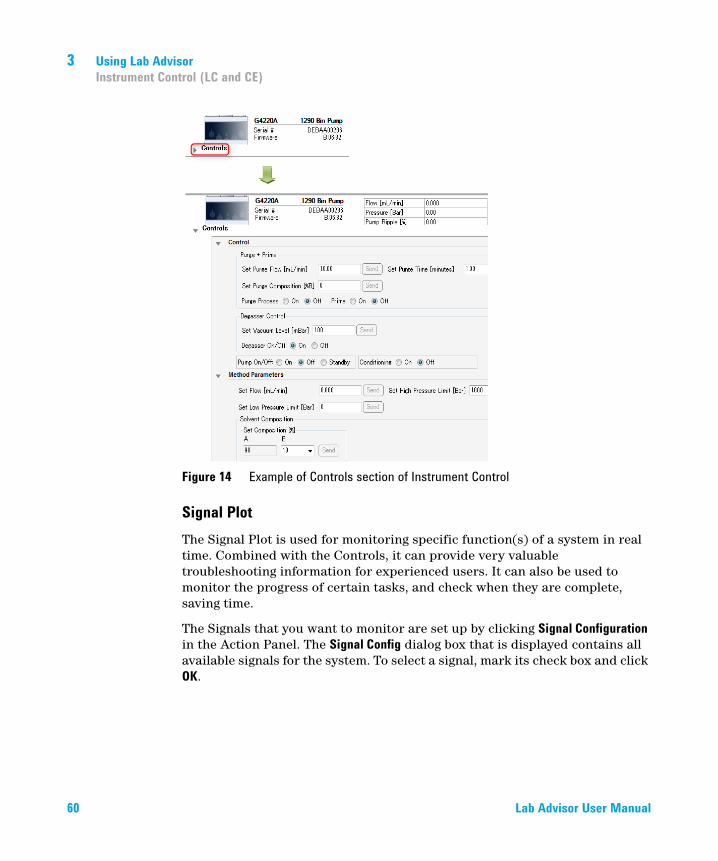
Figure 14 Example of Controls section of Instrument Control
Signal PlotThe Signal Plot is used for monitoring specific function(s) of a system in real time. Combined with the Controls, it can provide very valuable troubleshooting information for experienced users. It can also be used to monitor the progress of certain tasks, and check when they are complete, saving time.
The Signals that you want to monitor are set up by clicking Signal Configuration in the Action Panel. The Signal Config dialog box that is displayed contains all available signals for the system. To select a signal, mark its check box and click OK.
60 Lab Advisor User Manual
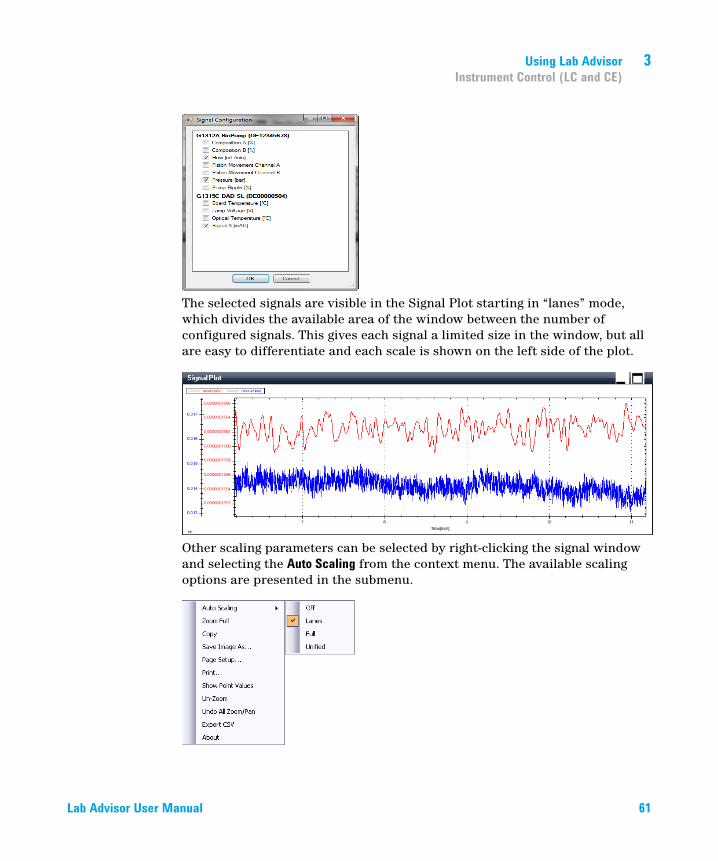
Using Lab Advisor 3Instrument Control (LC and CE)
The selected signals are visible in the Signal Plot starting in “lanes” mode, which divides the available area of the window between the number of configured signals. This gives each signal a limited size in the window, but all are easy to differentiate and each scale is shown on the left side of the plot.
Other scaling parameters can be selected by right-clicking the signal window and selecting the Auto Scaling from the context menu. The available scaling options are presented in the submenu.
Lab Advisor User Manual 61
3 Using Lab AdvisorInstrument Control (LC and CE)
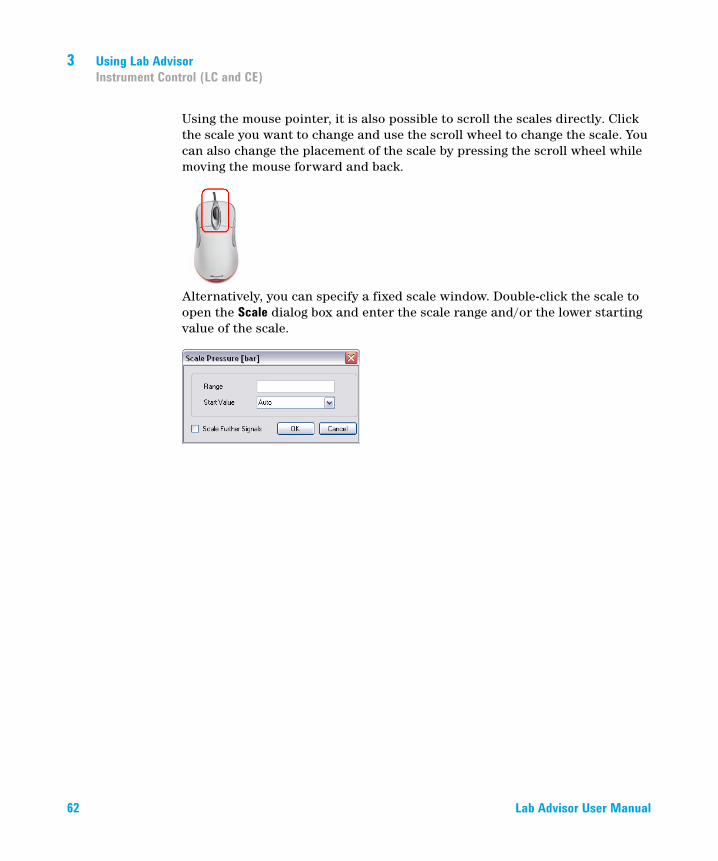
Using the mouse pointer, it is also possible to scroll the scales directly. Click the scale you want to change and use the scroll wheel to change the scale. You can also change the placement of the scale by pressing the scroll wheel while moving the mouse forward and back.
Alternatively, you can specify a fixed scale window. Double-click the scale to open the Scale dialog box and enter the scale range and/or the lower starting value of the scale.
62 Lab Advisor User Manual
Using Lab Advisor 3EMFs (LC and CE)
EMFs (LC and CE)
Agilent Technologies LC Instrumentation has supported the Early Maintenance Feedback (EMF) feature since the introduction of the 1100 system in 1995, and continues to support this feature. EMF helps to keep the usage of devices in focus, and facilitates usage-based maintenance, which minimizes maintenance costs.
The EMF counters can be read and reset with both the Basic and the Advanced versions of the software, but the Advanced version allows limits to be activated and set in addition. Lab Advisor provides Agilent-recommended EMF limits. These limits have been determined by measurements under standard laboratory conditions, and do not take into account any application-, user- or site-specific conditions; to maximize the lifetimes of system components, they might need to be adjusted based on experience.
Lab Advisor User Manual 63
3 Using Lab AdvisorEMFs (LC and CE)
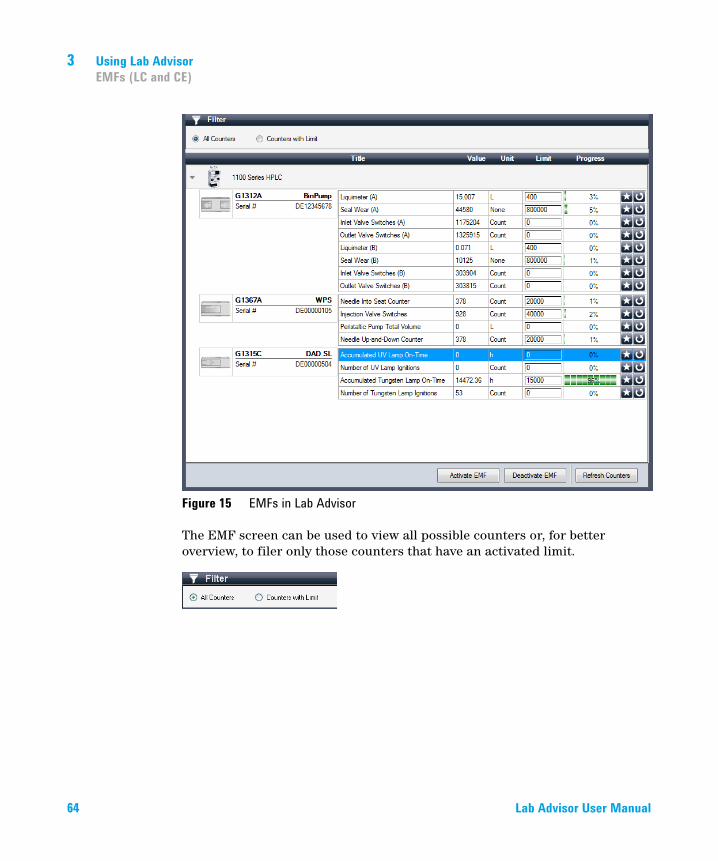
Figure 15 EMFs in Lab Advisor
The EMF screen can be used to view all possible counters or, for better overview, to filer only those counters that have an activated limit.
64 Lab Advisor User Manual
Lab Advisor User Manual
4Lab Advisor Data SharingTypical Uses of Data Sharing 67Data Sharing Setup 69Data Import from the Data Share Folder 71Data Sharing Review Client 72
This chapter describes the setup and use of the Lab Advisor Data Sharing App.The Agilent Lab Advisor Advanced software features Data Sharing, a function that allows Lab Advisor to upload and synchronize collected instrument information and data to an upload folder anywhere on a Windows network share.
65Agilent Technologies
4 Lab Advisor Data SharingEMFs (LC and CE)
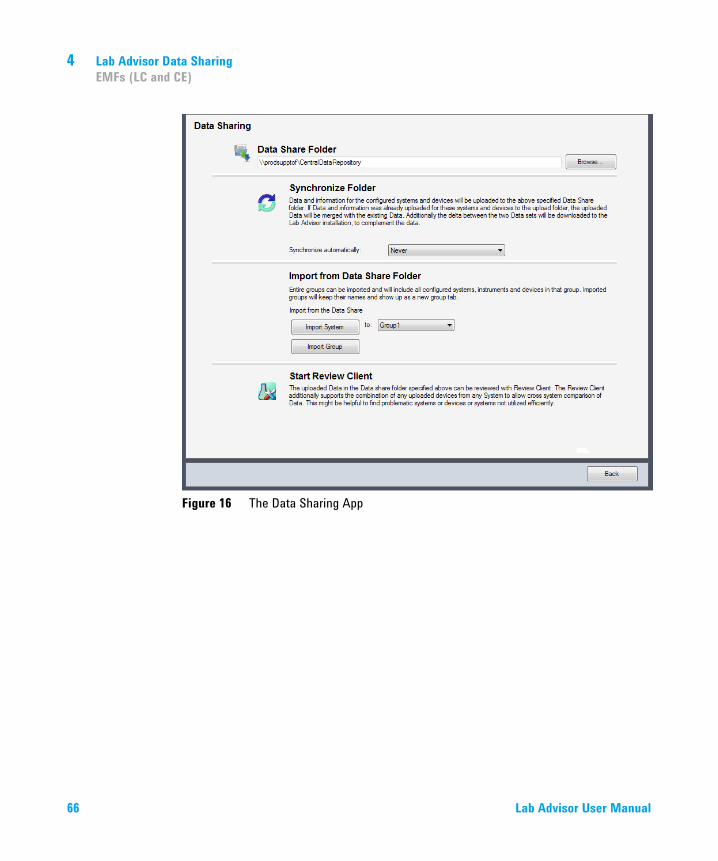
Figure 16 The Data Sharing App
66 Lab Advisor User Manual
Lab Advisor Data Sharing 4Typical Uses of Data Sharing
Typical Uses of Data Sharing
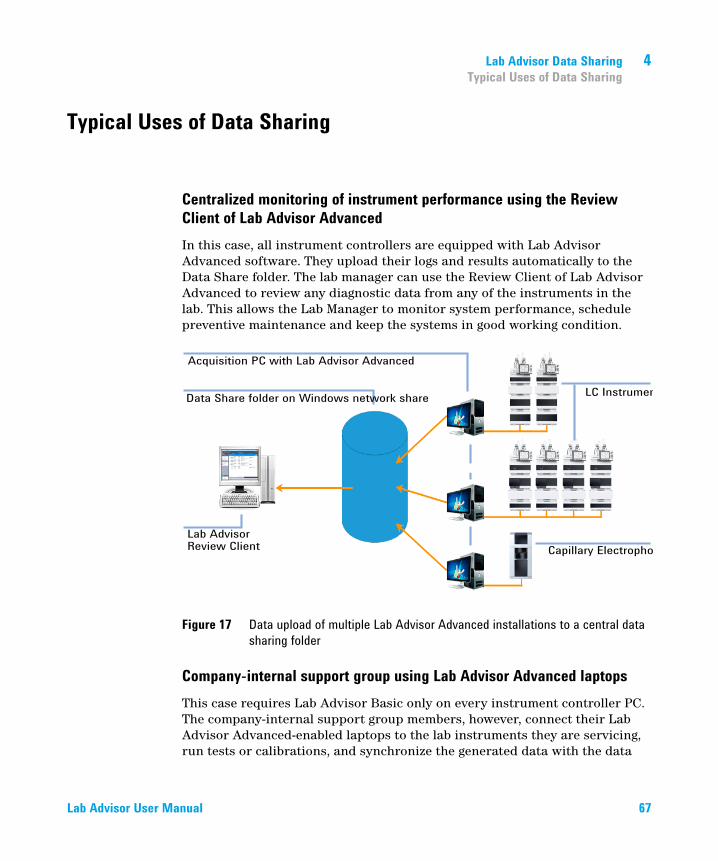
Centralized monitoring of instrument performance using the Review Client of Lab Advisor AdvancedIn this case, all instrument controllers are equipped with Lab Advisor Advanced software. They upload their logs and results automatically to the Data Share folder. The lab manager can use the Review Client of Lab Advisor Advanced to review any diagnostic data from any of the instruments in the lab. This allows the Lab Manager to monitor system performance, schedule preventive maintenance and keep the systems in good working condition.
Figure 17 Data upload of multiple Lab Advisor Advanced installations to a central data sharing folder
Company-internal support group using Lab Advisor Advanced laptopsThis case requires Lab Advisor Basic only on every instrument controller PC. The company-internal support group members, however, connect their Lab Advisor Advanced-enabled laptops to the lab instruments they are servicing, run tests or calibrations, and synchronize the generated data with the data
Lab Advisor User Manual 67
4 Lab Advisor Data SharingTypical Uses of Data Sharing
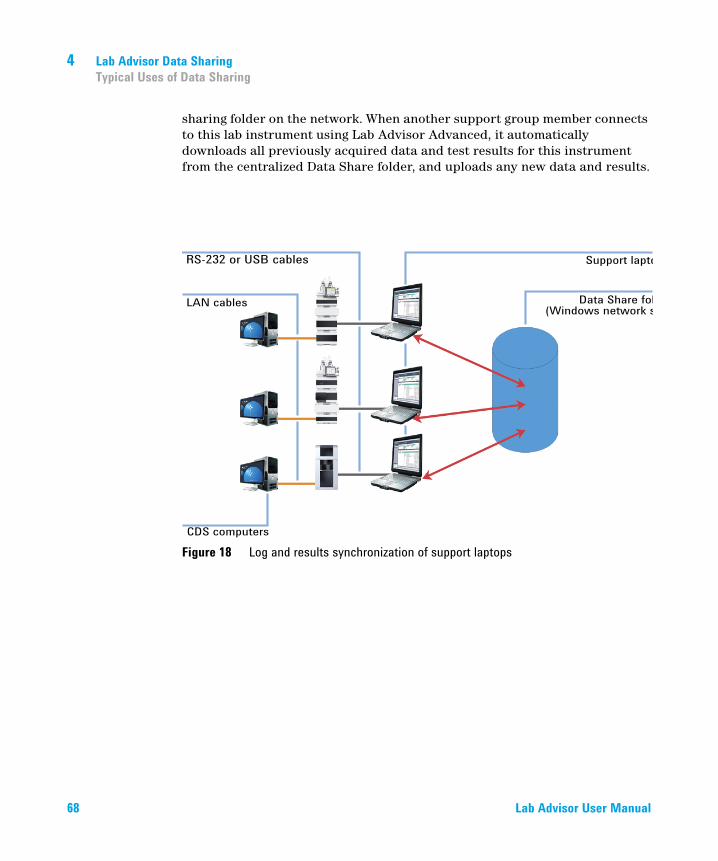
sharing folder on the network. When another support group member connects to this lab instrument using Lab Advisor Advanced, it automatically downloads all previously acquired data and test results for this instrument from the centralized Data Share folder, and uploads any new data and results.
Figure 18 Log and results synchronization of support laptops
68 Lab Advisor User Manual
Lab Advisor Data Sharing 4Data Sharing Setup
Data Sharing Setup
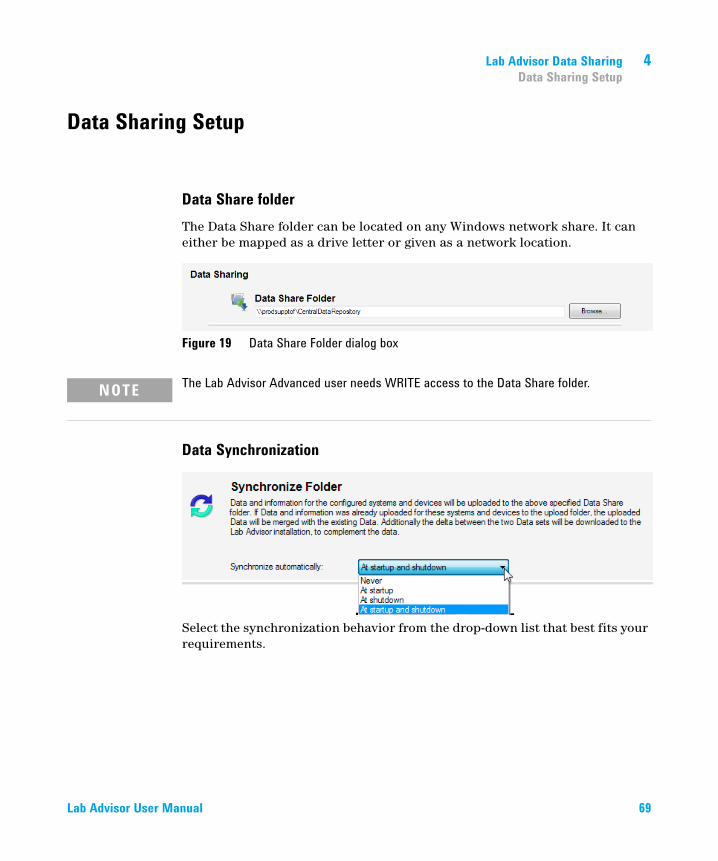
Data Share folderThe Data Share folder can be located on any Windows network share. It can either be mapped as a drive letter or given as a network location.
Figure 19 Data Share Folder dialog box
Data Synchronization
Select the synchronization behavior from the drop-down list that best fits your requirements.
NOTE The Lab Advisor Advanced user needs WRITE access to the Data Share folder.
Lab Advisor User Manual 69
4 Lab Advisor Data SharingData Sharing Setup
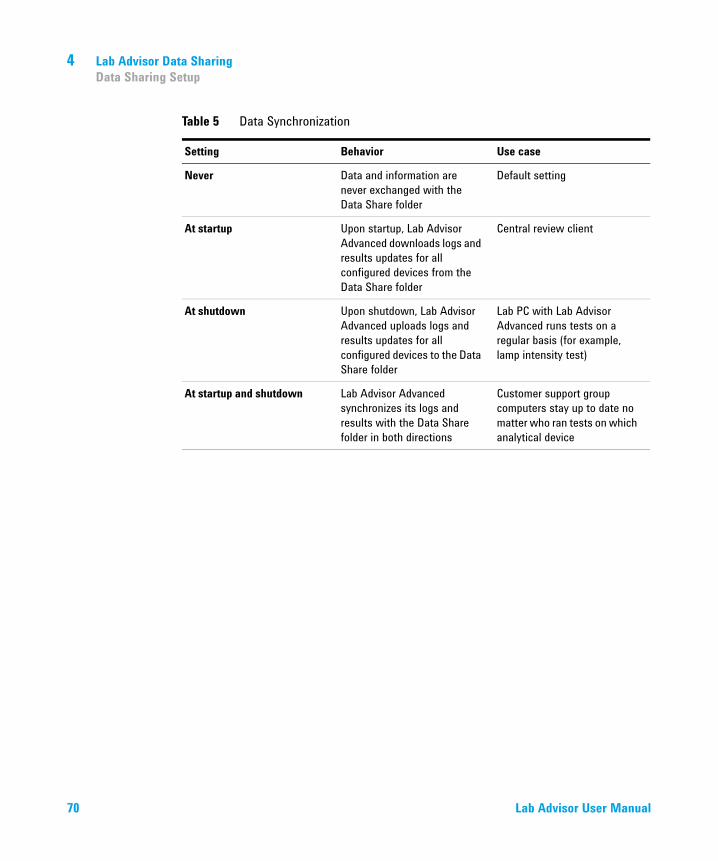
Table 5 Data Synchronization
Setting Behavior Use case
Never Data and information are never exchanged with the Data Share folder
Default setting
At startup Upon startup, Lab Advisor Advanced downloads logs and results updates for all configured devices from the Data Share folder
Central review client
At shutdown Upon shutdown, Lab Advisor Advanced uploads logs and results updates for all configured devices to the Data Share folder
Lab PC with Lab Advisor Advanced runs tests on a regular basis (for example, lamp intensity test)
At startup and shutdown Lab Advisor Advanced synchronizes its logs and results with the Data Share folder in both directions
Customer support group computers stay up to date no matter who ran tests on which analytical device
70 Lab Advisor User Manual

Lab Advisor Data Sharing 4Data Import from the Data Share Folder
Data Import from the Data Share Folder
Figure 20 Data import dialog box
Logs & Results from devices that are not configured in this instance of Lab Advisor can be imported from the Data Share folder. It is possible to either import systems (for example, an LC) or groups of systems.
If the grouping function has been activated, systems can be imported into existing groups (“Adding a new system group” on page 36).
NOTE When importing from the Data Share folder, Lab Advisor needs to have sufficient licenses for all configured and imported devices.
Lab Advisor User Manual 71
4 Lab Advisor Data SharingData Sharing Review Client
Data Sharing Review Client
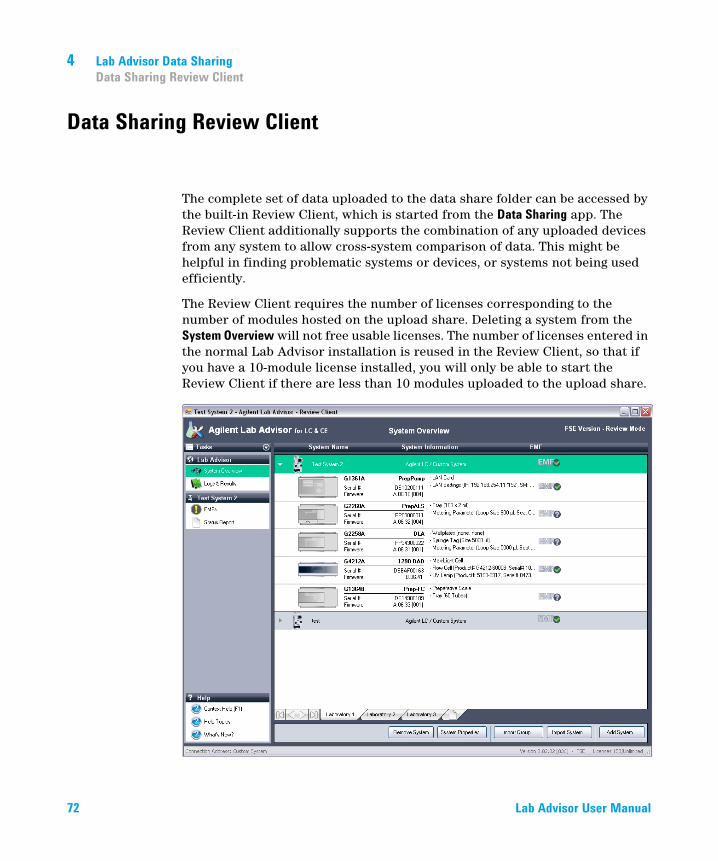
The complete set of data uploaded to the data share folder can be accessed by the built-in Review Client, which is started from the Data Sharing app. The Review Client additionally supports the combination of any uploaded devices from any system to allow cross-system comparison of data. This might be helpful in finding problematic systems or devices, or systems not being used efficiently.
The Review Client requires the number of licenses corresponding to the number of modules hosted on the upload share. Deleting a system from the System Overview will not free usable licenses. The number of licenses entered in the normal Lab Advisor installation is reused in the Review Client, so that if you have a 10-module license installed, you will only be able to start the Review Client if there are less than 10 modules uploaded to the upload share.
72 Lab Advisor User Manual
Lab Advisor Data Sharing 4Data Sharing Review Client
There are several ways to use the Review Client:
• All portable Lab Advisor installations upload their data to the same folder. Each portable Lab Advisor is then up to date, and a Review Client has the opportunity to observe the entire data pool.
• Each portable Lab Advisor has its own folder, which is used for back-up. By changing the share folder in the Review Client, it is possible to look into each separate user’s data.
• Lab Advisor installations on local PCs connected to a single Instrument can use the synchronize function to upload data to a system-specific folder. This can be used as a backup solution, and by changing the share folder the Review Client can be used to look at each system separately.
In each case, the installation starting the Review Client needs enough licenses for all uploaded modules.
If system grouping has been activated in software configuration, you can set up groups of systems; the group controls allow you to switch between the groups. The groups you set up in the Review Client are independent of those set up in the System Overview.
Lab Advisor User Manual 73
Index
Index
Aaction panel 27activate user 44add contact 44add log entry 52add system 30add-ons 42advanced version 7application panel 27applications 45apps 45automatic reconnect 34
Bbackup 39basic version 6
Ccalibrations 54catalog 45COM port 32, 38commands 59configuration 39connect via serial cable 38connection details 32contact information 55controls 59copy device details 37
Ddelete hardware module 41device details 37device 30
diagnostic catalog 45diagnostics 53disable 42documents market 43
Eearly maintenance feedback 63EMF changes 50EMF counters 55EMF 63error information 50export data 52
Ffast connect 37filter 51, 53, 64firmware revision 50firmware update 48full traceability 44full tracing 39
Ggeneral configuration 39global tasks 26group controls 27groups 40, 73
Hhard drive installation 13hardware requirements 10help 27host name 32
Iimport/export data 39information panel 27installation qualification 16installation 13instrument address 32instrument control 58instrument information 55instrument name 31instrument type 32instrument 30IP address 32, 38
LLAN configuration 38language 39license agreement 13license key 18licenses 40load external data 52location 14log entries 50log entry 52logbook 55logs 50LRS files 52
MMAC address 38maintenance log entries 50maintenance wizard 6market 43medium traceability 43
74 Lab Advisor User Manual
Index
minimize 27module information 59module view 51module 30
Nnavigation panel 26navigation 25new system 30new user 44no traceability 43
Oonline help 27
Ppath 39PC information 55
Rreconnect 34remove hardware module 41remove system 35reply panel 58report 55requirements 10results 50review client 72RS232 37
Sscaling 61serial cable 37service 53setpoints 59signal configuration 60signal plot 60
signal scaling 61signals 60software market 43software requirements 10software revision 27status bar 28status information 59status 42system configuration 55system groups 40system name 31system overview 29system properties 34, 34system report 55system tasks 26, 26system 30
Ttasks 26, 29test results 50, 55tests 54time view 51title bar 25tools 54trace file 39traceability 43tracing 39type 32
Uuninstall 42update 42USB 37user interface 25
Vversion 5, 27, 58
Lab Advisor User Manual 75
www.agilent.com
In This Book
This manual describes the two versions of Lab Advisor B.02.09: Lab Advisor Basic and Lab Advisor Advanced.
The manual contains the following information:
• Lab Advisor B.02.09 Overview
• Installation
• Using Lab Advisor
• Lab Advisor Data Sharing
© Agilent Technologies 2016
Printed in Germany 11/2016
*M8550-90007**M8550-90007*M8550-90007
Agilent Technologies