Embed Size (px)
Citation preview
ScopeCaptureHowTo.doc 3/2/2009 1
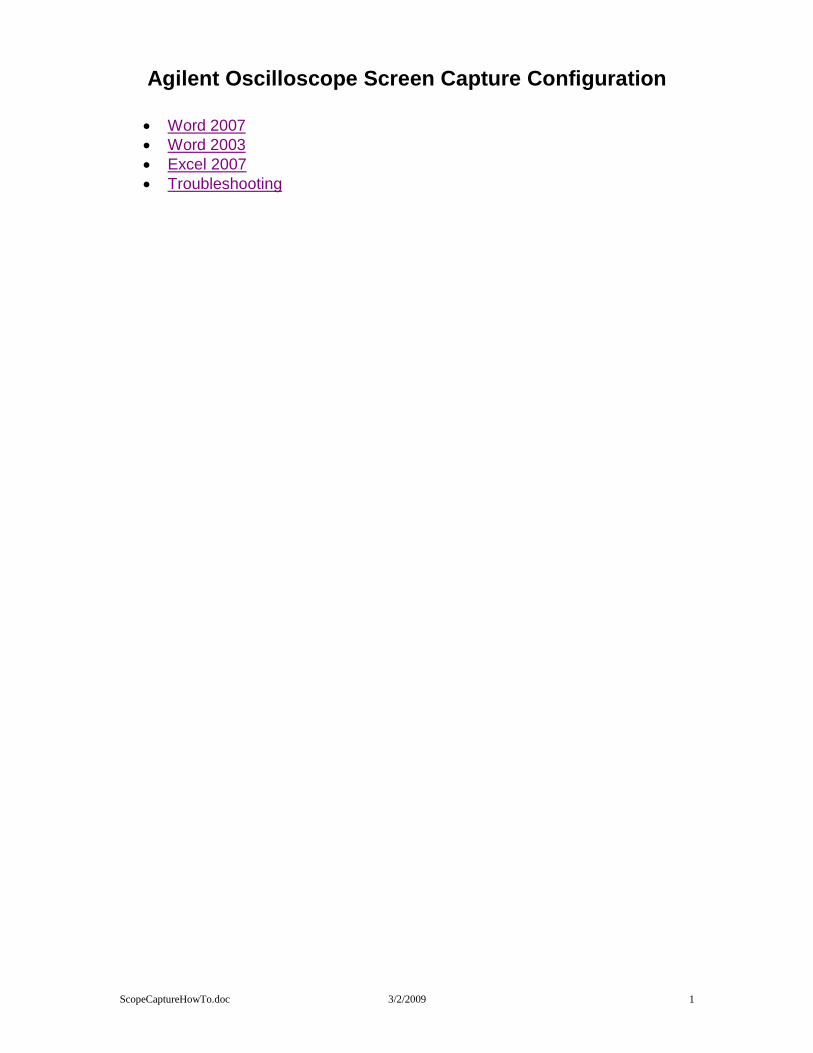
Agilent Oscilloscope Screen Capture Configuration
Word 2007
Word 2003
Excel 2007
Troubleshooting
ScopeCaptureHowTo.doc 3/2/2009 2
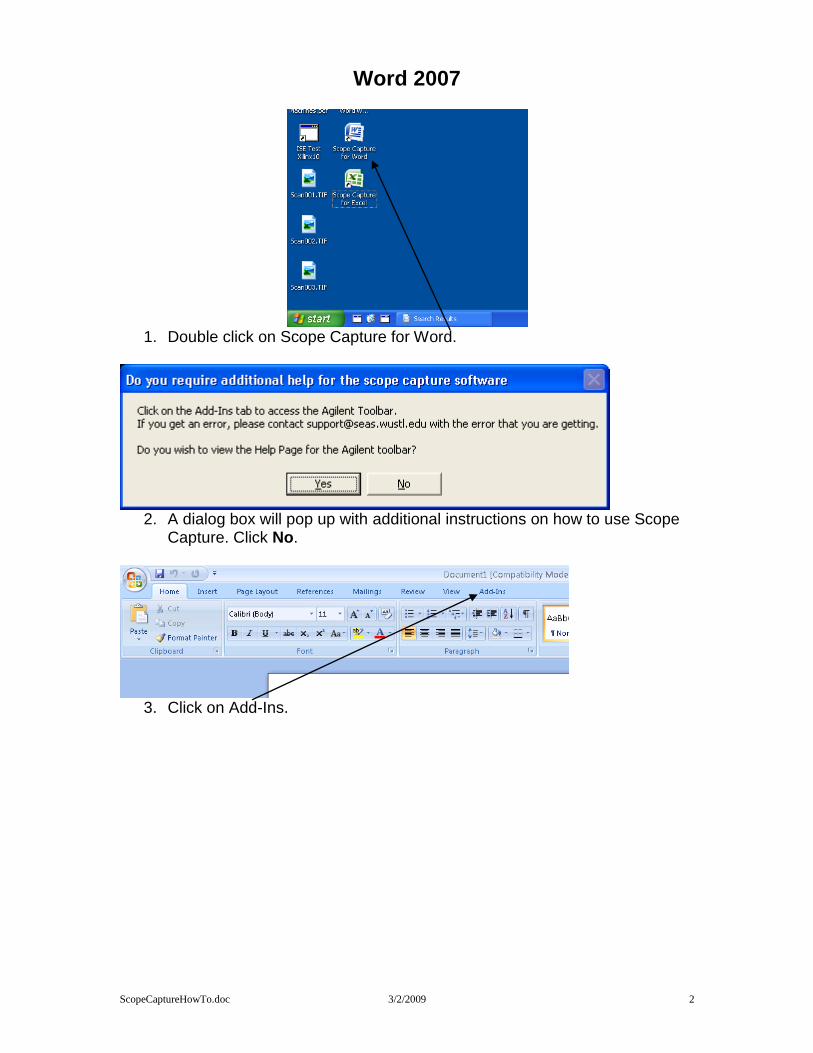
Word 2007
1. Double click on Scope Capture for Word.
2. A dialog box will pop up with additional instructions on how to use Scope
Capture. Click No.
3. Click on Add-Ins.
ScopeCaptureHowTo.doc 3/2/2009 3
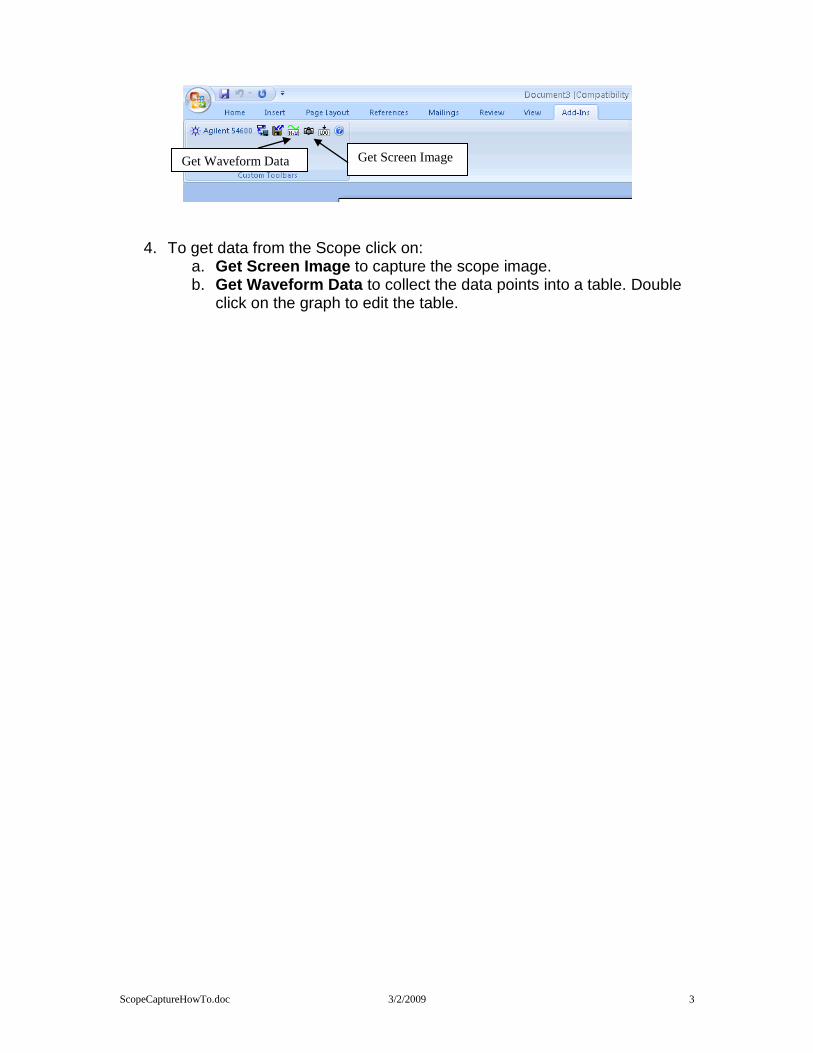
4. To get data from the Scope click on:
a. Get Screen Image to capture the scope image. b. Get Waveform Data to collect the data points into a table. Double
click on the graph to edit the table.
Get Waveform Data Get Screen Image
ScopeCaptureHowTo.doc 3/2/2009 4
Excel 2007
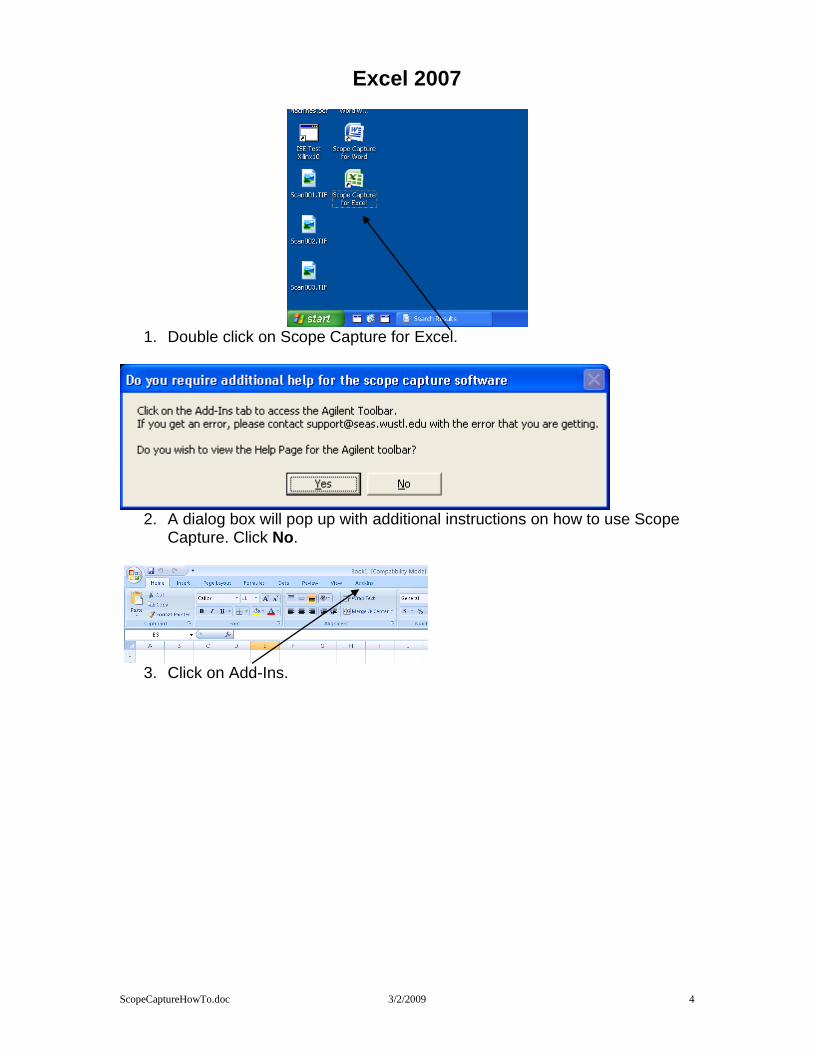
1. Double click on Scope Capture for Excel.
2. A dialog box will pop up with additional instructions on how to use Scope
Capture. Click No.
3. Click on Add-Ins.
ScopeCaptureHowTo.doc 3/2/2009 5
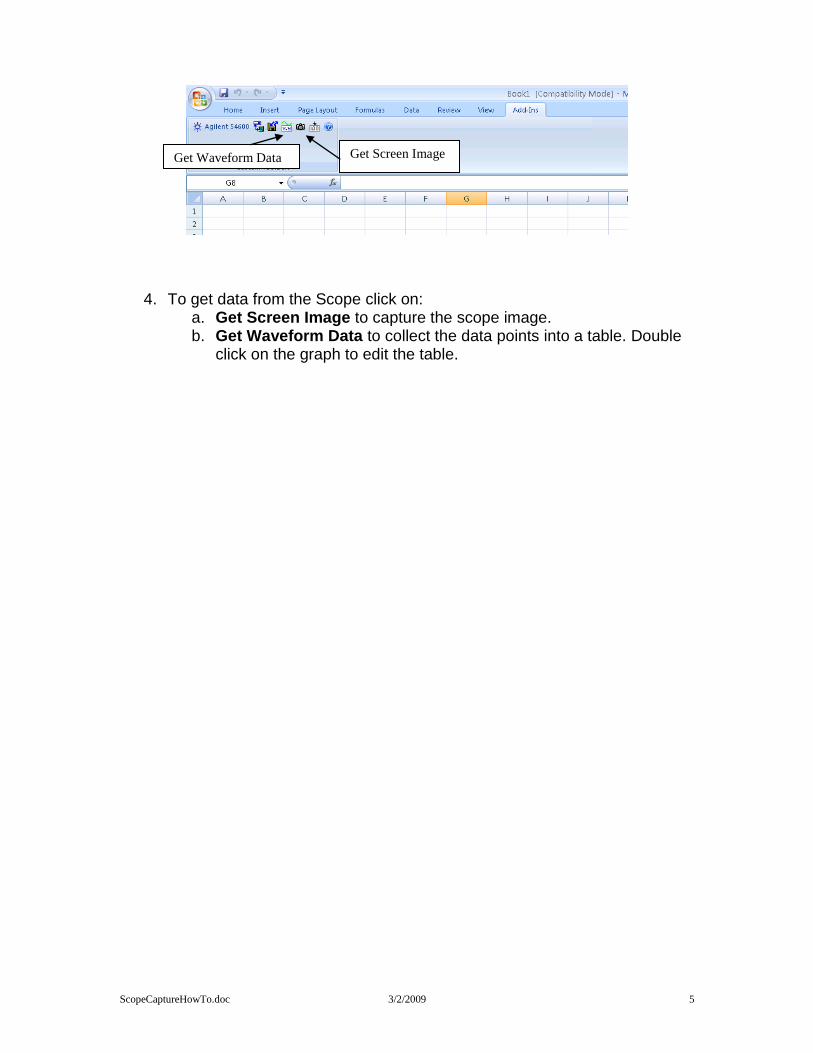
4. To get data from the Scope click on: a. Get Screen Image to capture the scope image. b. Get Waveform Data to collect the data points into a table. Double
click on the graph to edit the table.
Get Waveform Data Get Screen Image

ScopeCaptureHowTo.doc 3/2/2009 6
Word 2003
1. Double-Click on the Desktop icons for “Scope Capture with Word” or run
Microsoft Office Word 2003 or Word 2007.
2. If you are running Word 2003, click OK to enable scope capture.
3. To get data from the Scope click on: a. Get Screen Image to capture the scope image. b. Get Waveform Data to collect the data points into a table.
Get Waveform Data Get Screen Image
ScopeCaptureHowTo.doc 3/2/2009 7
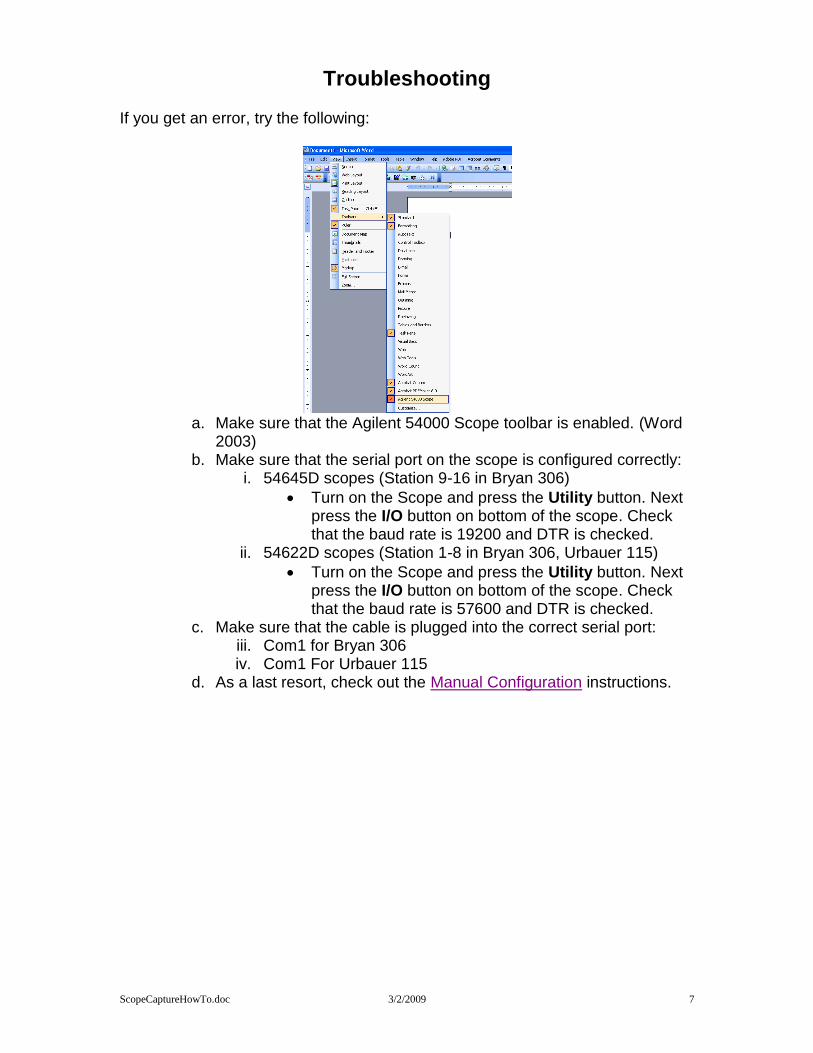
Troubleshooting If you get an error, try the following:
a. Make sure that the Agilent 54000 Scope toolbar is enabled. (Word
2003) b. Make sure that the serial port on the scope is configured correctly:
i. 54645D scopes (Station 9-16 in Bryan 306)
Turn on the Scope and press the Utility button. Next press the I/O button on bottom of the scope. Check that the baud rate is 19200 and DTR is checked.
ii. 54622D scopes (Station 1-8 in Bryan 306, Urbauer 115)
Turn on the Scope and press the Utility button. Next press the I/O button on bottom of the scope. Check that the baud rate is 57600 and DTR is checked.
c. Make sure that the cable is plugged into the correct serial port: iii. Com1 for Bryan 306 iv. Com1 For Urbauer 115
d. As a last resort, check out the Manual Configuration instructions.
ScopeCaptureHowTo.doc 3/2/2009 8
Manual Configuration
1. Turn on the Scope and press the Utility button. Next Select I/O button on bottom of the scope. Check that the baud rate is
a. Bryan 306: 19200 / DTR for Agilent 54645D scopes b. Bryan 316/Urbauer 115: 57600 / DTR for Agilent 54622D scopes
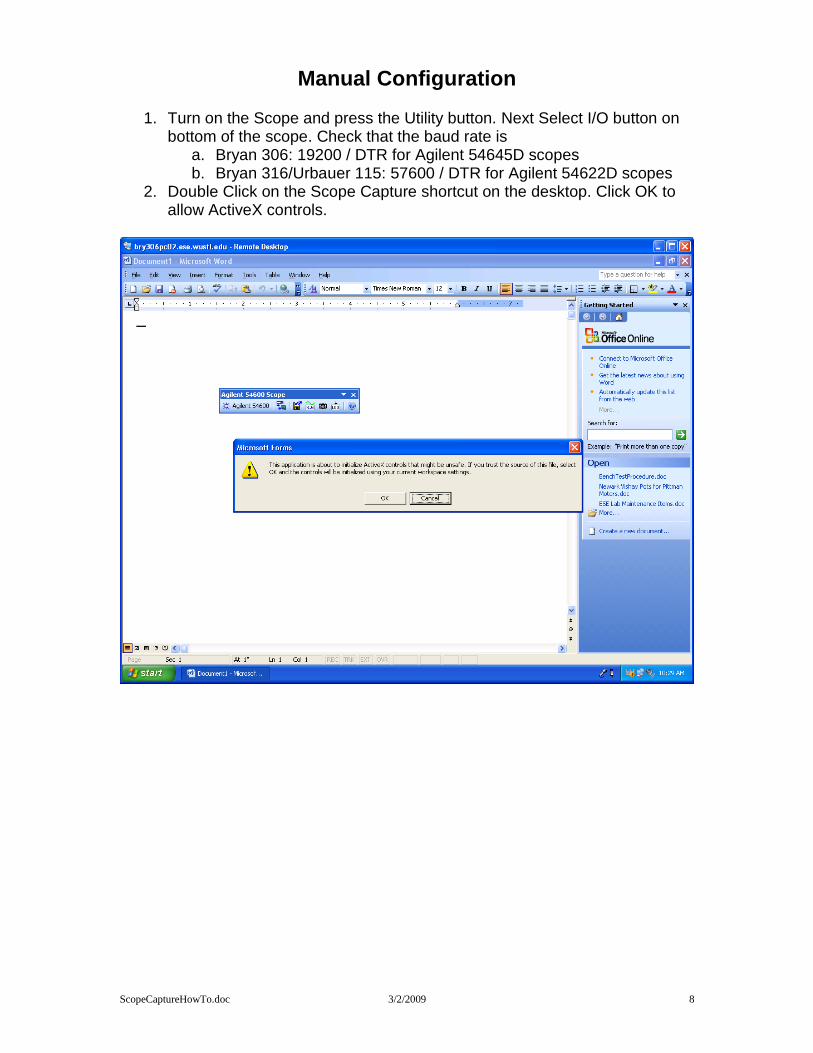
2. Double Click on the Scope Capture shortcut on the desktop. Click OK to allow ActiveX controls.
ScopeCaptureHowTo.doc 3/2/2009 9
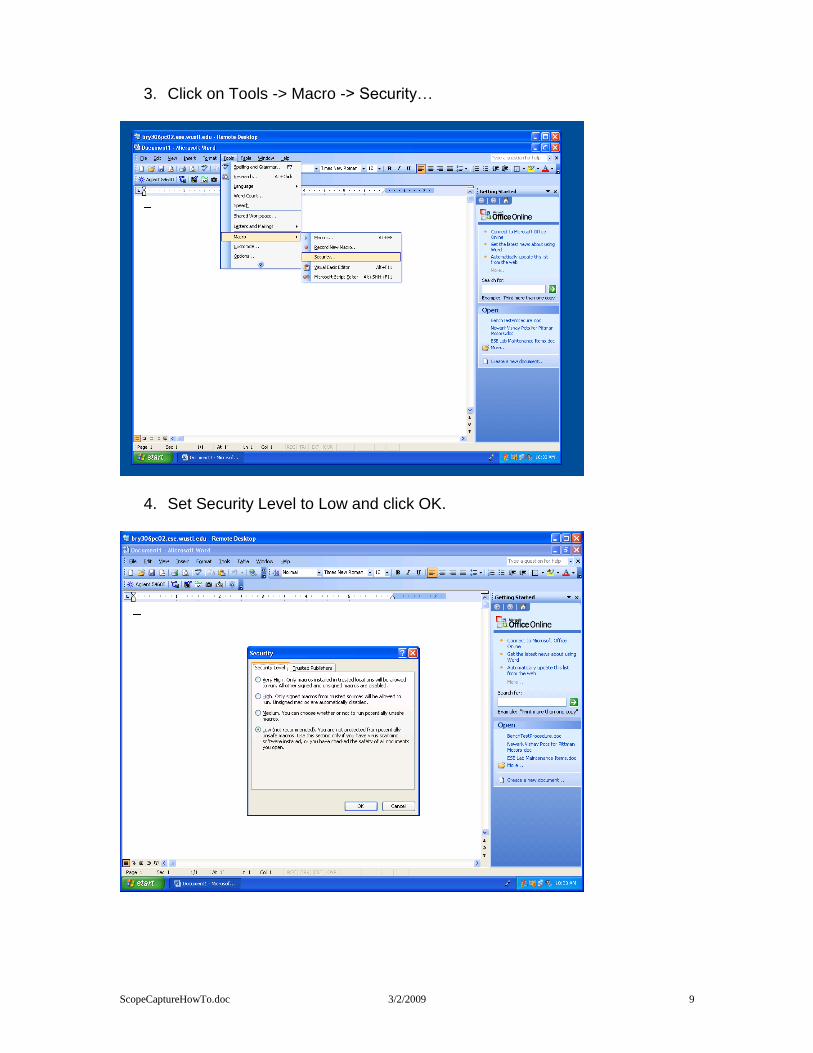
3. Click on Tools -> Macro -> Security…
4. Set Security Level to Low and click OK.
ScopeCaptureHowTo.doc 3/2/2009 10
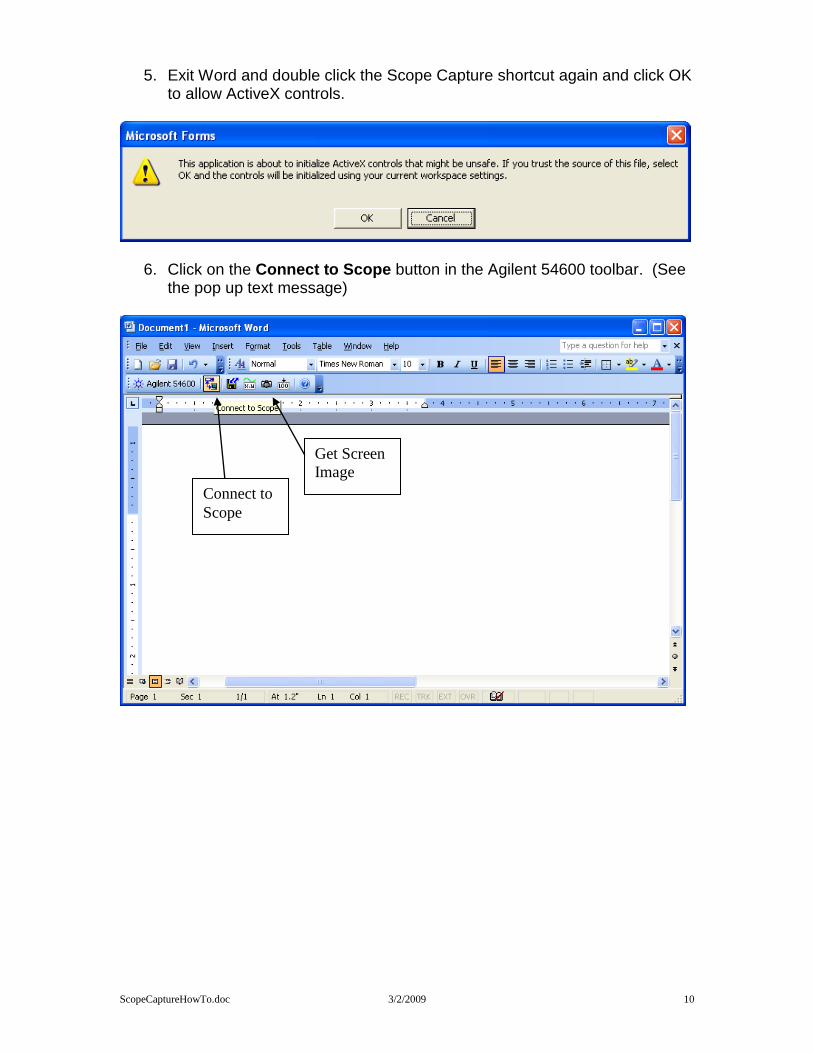
5. Exit Word and double click the Scope Capture shortcut again and click OK to allow ActiveX controls.
6. Click on the Connect to Scope button in the Agilent 54600 toolbar. (See the pop up text message)
Connect to
Scope
Get Screen
Image
ScopeCaptureHowTo.doc 3/2/2009 11
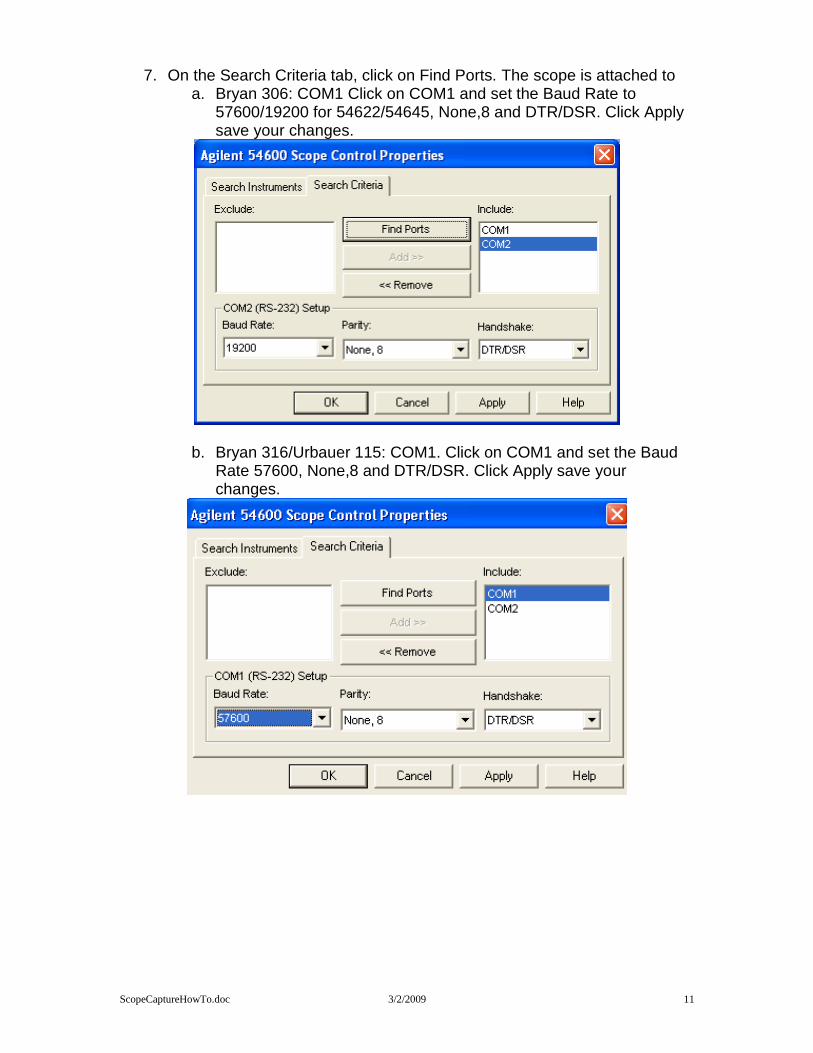
7. On the Search Criteria tab, click on Find Ports. The scope is attached to a. Bryan 306: COM1 Click on COM1 and set the Baud Rate to
57600/19200 for 54622/54645, None,8 and DTR/DSR. Click Apply save your changes.
b. Bryan 316/Urbauer 115: COM1. Click on COM1 and set the Baud Rate 57600, None,8 and DTR/DSR. Click Apply save your changes.
ScopeCaptureHowTo.doc 3/2/2009 12
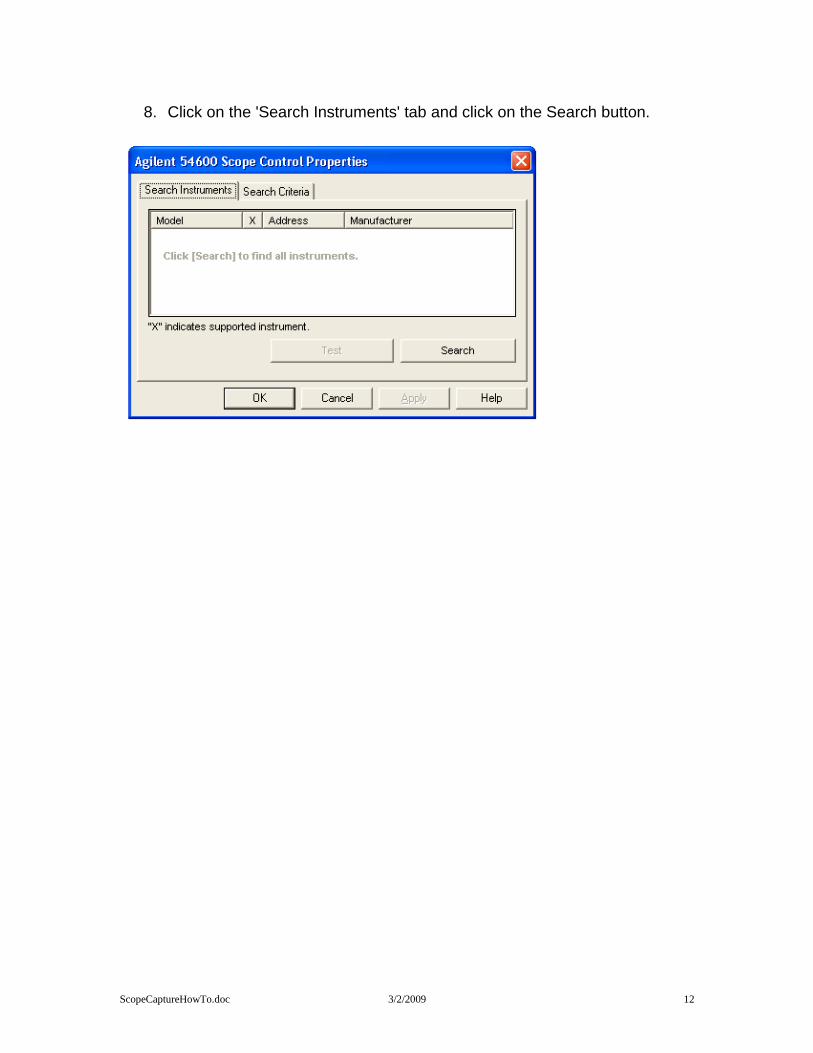
8. Click on the 'Search Instruments' tab and click on the Search button.
ScopeCaptureHowTo.doc 3/2/2009 13
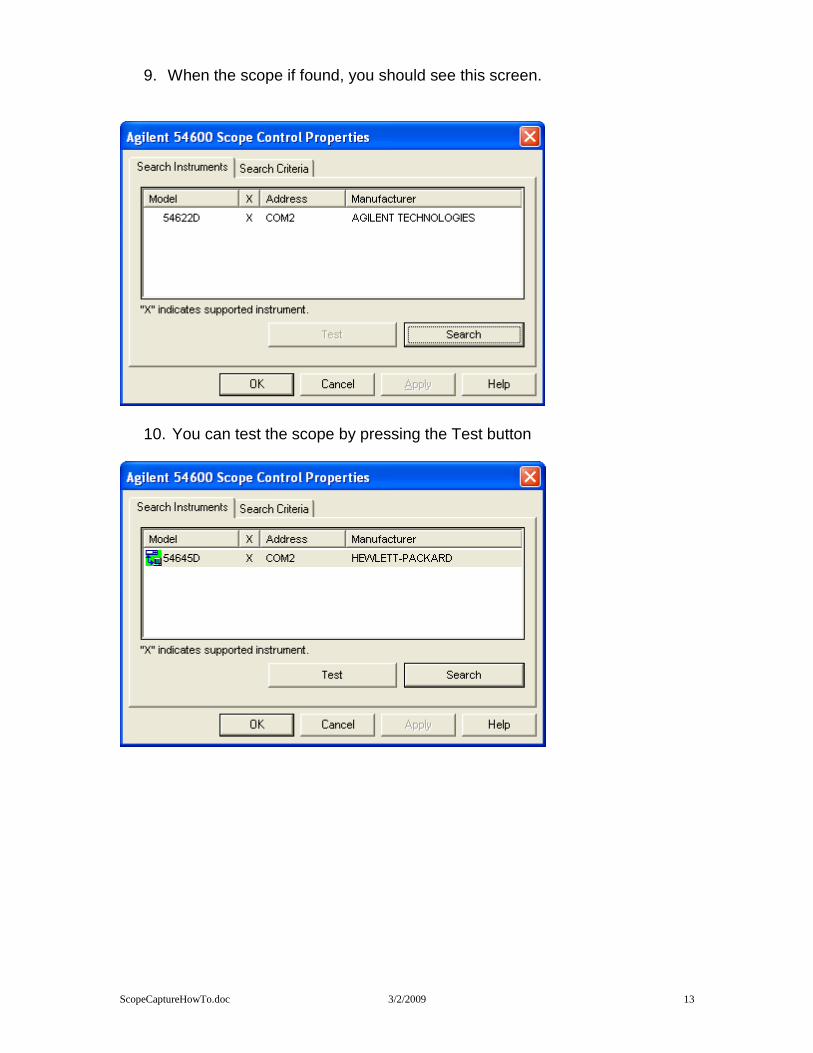
9. When the scope if found, you should see this screen.
10. You can test the scope by pressing the Test button
ScopeCaptureHowTo.doc 3/2/2009 14
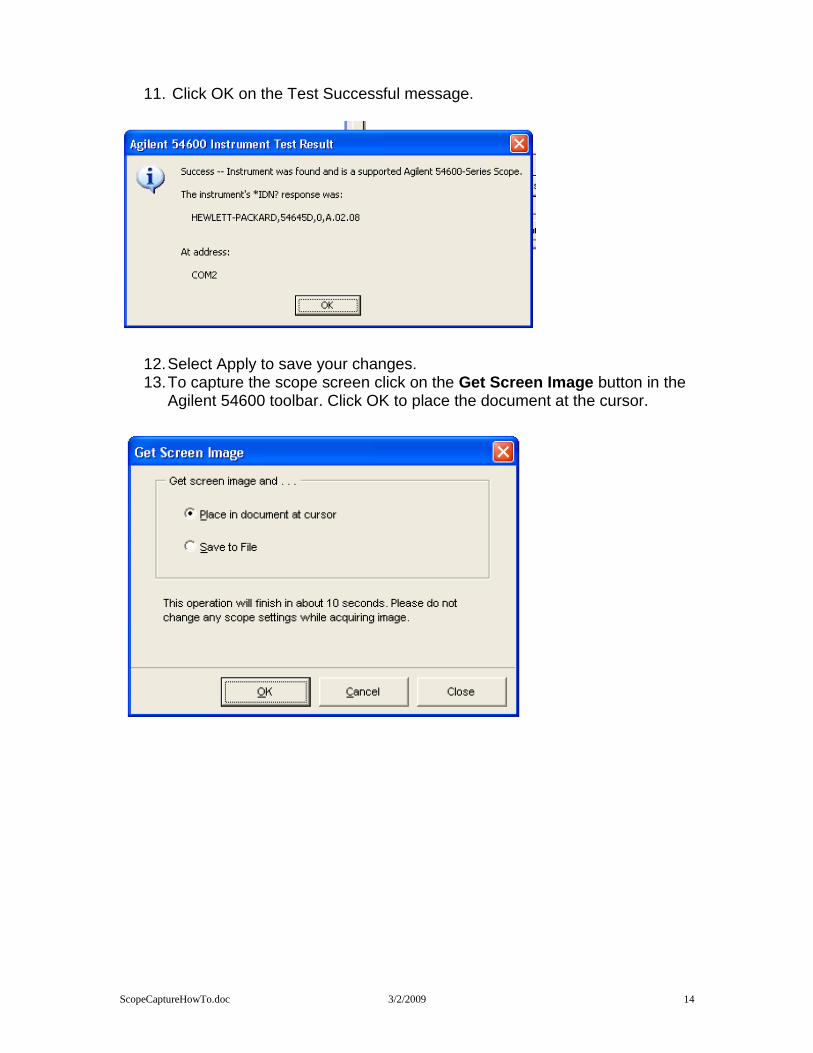
11. Click OK on the Test Successful message.
12. Select Apply to save your changes. 13. To capture the scope screen click on the Get Screen Image button in the
Agilent 54600 toolbar. Click OK to place the document at the cursor.
ScopeCaptureHowTo.doc 3/2/2009 15
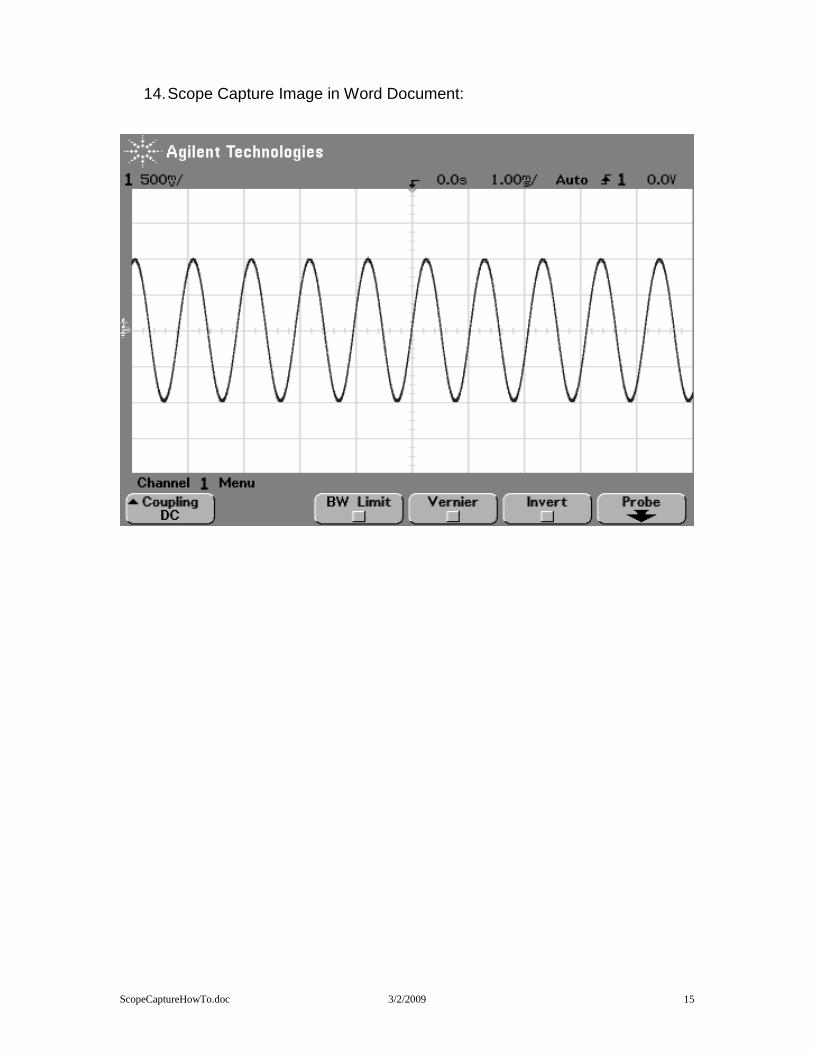
14. Scope Capture Image in Word Document: