Embed Size (px)
Citation preview

AIRCRAFT BUILDING
FABRIC COVERINGCommon Problems
BY RON ALEXANDER
Covering an aircraft with fabriccan be a frightening prospect. Thereason is very obvious . . . you havespent literally months and yearsbuilding your prize-winning fabriccovered airplane and now you are go-ing to cover up all of that beautifulcraftsmanship. The only part of theairplane most people will ever see isthe outer layer of fabric. This canchallenge any builder. Perhaps youhave covered an airplane previouslyor maybe this will be the first time.You simply know that you must dothe absolute best fabric covering thatanyone has ever done. After all, theairplane is going to be judged largelyby the outside finish. Not only ispride of workmanship involved, butalso a lot of money and time will bespent on this part of the buildingprocess. Words of caution — do nottry to save money at this point.Through the years I have listened tobuilders and restorers trying to findways to cut costs on the only part ofthe airplane that really shows — theouter covering. This is not the time toeconomize. Resign yourself to spend-ing the money necessary to completethe project with the same high qualitywith which you have completed therest of the airplane. All of the materi-als to cover a J-3 Cub size airplanewill cost around $2,500 to $3,000 re-gardless of the covering process. Ifsomeone gives you a quote muchlower than that they are not includingeverything you need. You will spendthat much money when all is said anddone. Look at it this way, you are go-ing to save approximately $10,000 inlabor costs by covering the airplane90 OCTOBER 1998
yourself. Yes, that's correct. . . theprice charged by most professionalsto cover an airplane will range be-tween $8,000-$ 12,000.
If you cover your airplane withfabric according to the instructionmanual (this is important) the fabricand coatings will have a service lifeof about 15-20 years. The time vari-able is dependent upon how muchtime the airplane is exposed to the sunand elements. Most aircraft ownerswill want to inspect the inside of theiraircraft at about the 20-year point re-gardless of the fabric condition.
If fabric covering is fairly easy todo, why do you see so many prob-lems with the fabric and coatings onaircraft? Surely there is more to thisthan meets the eye. I know you haveseen airplanes with the coatings liter-ally peeling off in sheets. We have allseen an Aeronca Champ or a J-3 Cubwith wing tips that are bowed up (nota new type of high-lift device). Whatcauses these problems and all of theother fabric problems so many peopleencounter? Is it dependent upon thetype of covering process they are us-ing? Rarely is that the case. Eachtype of fabric covering process hasits own advantages. Again, if the in-structions are followed to the letteryou will usually not have problems.Well, if that is true, why all of theproblems? That is what I will addressin this and subsequent articles —common fabric covering problemsand, more importantly, how to pre-vent them.
In writing this article I conferredwith Jon Goldenbaum of Poly-Fiber,Inc. and asked him to list the most
commonly asked problems he en-counters regarding fabric covering.These problems not only involve thePoly-Fiber process but also encom-pass most of the other systems thatare available. Whether you use ure-thane paints, nitrate and butyratedopes or Poly-Fiber products, the ba-sic problems remain the same. As amatter of fact, most of the basic stepsof all processes are the same untilyou reach the chemical stages. Oneimportant point, regardless of thetype of fabric covering process youselect, follow the instructions to theletter. Do not experiment with yourown techniques or mix fabric cover-ing systems. As an example, do notuse Grade A tapes on Ceconite fabricor nitrate dope on Poly-Fiber fabric.These are common practices thatcause problems.
If you are covering a productionaircraft, you must strictly follow thefabric process instruction manual. Aproduction airplane requires a cover-ing process that has been approvedby the FAA. It must have a Supple-mental Type Certificate (STC) thatdefines the aircraft that the processmay be used on as a direct replace-ment for the original fabric. The STCdoes not allow you to mix and matchdifferent fabric processes. It is inter-esting to note, however, that the STConly applies through the silver coatsof a process and does not specifywhat type of topcoat will be used. Ifyou are building an experimental air-craft you can legally cover it withanything you would like. I will em-phasize that, even though this is true,you should use an approved (STC)

system for your airplane. This iscommon sense. Your experimentalairplane flies through the same air asa production airplane carrying thesame people. Just because you canlegally mix and match systems andexperiment you should avoid anytemptation to do so. Otherwise, I canalmost guarantee that you will be re-covering your airplane within a veryshort period of time.
There are seven major problemsencountered in covering aircraft. Thislist incorporates the most commonreasons aircraft owners have to re-
(Right) Poly Fiber's"How To Cover An Aircraft"
How To CoverAn Aircraft
Using thePoly-Fiber System
CALL THE CUSTOMPANEL EXPERTS!
CUSTOMPANELS FOR
KIT BUILDERS0m ***
_ IB a a BJLj » *Jf,;,M,,
RV-6(A)
GLASAIR SUPER II
CUSTOM PANEL FINANCINGAVAILABLE THROUGH
Pacific Coast Avionics hasextensive RV-6 and Glasaircustom panel experience aswell as experience in mostpopular kits. Our completeavionics and instrumentinventory is backed by thetechnical expertise to custombuild a panel to your exactspecifications. We can evenpre-wire for equipment to beadded later. Call for details.
new catalognow available.
Call for your•» FREE copy!
WE ACCEPT WE SHIPWORLDWIDE
Aurora State Airport FAA Repair station *OPXR455L22783 Airport Road, N.E. Class 1,2/Limited InstrumentAurora, OR 97002 Mon-Fri 8:00am - 5:30pm PST
ORDER LINES 800-353-0370SALES INFO 503-678-6242 • FAX 503-678-6292
http://www.pacavionic.comE-mail [email protected]
For information, use SPORT AVIATION'S Reader Service Card
SPORT AVIATION 91
cover their airplanes prematurely. Theproblems are:• Inadequate preparation of surfaces• Selecting the wrong weight of fabric• Not following the procedure manual• Improper tautness of the fabric• The first chemical coat improperly
applied• Inadequate protection from the UV
rays of the sun• Topcoat problems
Prior to probing into these specificproblem areas, it is important to notethat there are a few general dos anddon'ts to remember. The first is not torush the covering process. Manybuilders push to complete an aircraftfor an airshow or convention (I amsure you have never done this). Rush-ing through the fabric covering stageis not conducive to completing a tro-phy-winning airplane. Fabric coveringinvolves the spraying of several coatsof chemicals. Each coat must thor-oughly dry before the next one can beapplied. A good rule of thumb is to doone coat in the morning followed byone coat in the afternoon. Allow plentyof time for each coat to dry. Anothermistake made by many first time cov-erers is to tackle a large surfaceinitially. Do not start covering a wingor fuselage without practicing. Startwith a practice panel and then proceedto a small control surface. Then, if youdo make mistakes, you are not goingto have to spend a fortune on materialsto correct the problem. I would alsosuggest you attend one of theEAA/SportAir workshops on fabriccovering. This 2-day workshop affordsyou the opportunity to learn and prac-tice covering techniques on actualaircraft surfaces. After participating inthe weekend course you will certainlyfeel confident to undertake the fabric
covering of any aircraft.Another generic problem area is
found with temperature and humidity.The ideal temperature for fabric workis 77° F with humidity between 0%and 70%. If the temperature is below60° and/or the humidity above 90%,wait unti l a better day. If you arespraying nitrate or butyrate dope theproblem is more acute. With dopes thetemperature should not be below 65° For the relative humidity above 80%.Hot temperatures are not as critical.Retarders may be used to offset theproblems encountered with high tem-peratures and humidities. More on thiswhen we discuss final color coats.
Let's start with the fabric coveringproblem areas above and present theirsolutions.
PREPARATION OFSURFACES
FOR FABRIC COVEROften a builder or aircraft restorer
will have the mistaken idea that fabriccovering begins when you cement thefabric in place. This is far from reality.As a matter of fact, a lot of time andeffort will be needed prior to ever cut-ting the fabric for placement on theaircraft. Anyone who has ever restoredan airplane certainly knows that mostof the total work involved is in the
92 OCTOBER 1998

preparation phase. A few basics needto be presented concerning adequatepreparation. First of all, if you are re-covering your airplane, take care inremoving the old fabric. You can saveyourself a lot of time and effort bycarefully cutting the old fabric away,leaving the inspection plates, draingrommets, reinforcement patches andcontrol cable cutouts intact. This willhelp you with placement of these itemson the new fabric. Secondly, alwaysmake sure you use epoxy primer onmetal and fiberglass parts and epoxyvarnish on wood parts. Why, becausethe majority of other primers and var-nishes will be lifted from the aircraftsurface by the chemicals found in cov-ering processes. MEK and reducersfound in covering process chemicalswill not affect epoxy primers and var-nishes. They will lift other paints andvarnishes like a paint stripper allowingmoisture to collect in the metal orwood with obvious consequences. Ifyou have already primed or varnishedwith some other product, test it beforeapplying the fabric. Soak a rag withMEK and leave it on the surface forabout 30 minutes. If it lifts the paint orvarnish you need to redo the surface.Often you can simply spray epoxiesover the existing finish without havingto strip them. This, too, can be tested.Spray the epoxy over the existing sur-face on a small area to be sure it doesnot act as a paint stripper prior to ap-plying it to the entire piece.
Before priming or varnishing a sur-face be sure it is completely clean andfree of all oil and other contaminants.Do not prime over rusted pieces. Re-move the rust and immediately prime.A piece of bare steel will rust withinhours if a primer is not in place. Makesure you fill all dents in leading edges,etc. I would recommend a productcalled SuperFil rather than Bondo.Bondo is a polyester filler that willshrink with age. I do not recommendusing Bondo on aircraft surfaces unlessyou are prepared to redo the filled por-tion of the surface after it shrinks andcracks the topcoat. SuperFil is an epoxyfiller. That means it will not shrink overtime. It may be used on wood, fiber-glass or metal with equally good results.You may want to use a cloth paddingon a really dented leading edge. Poly-ester padding is often used between theleading edge aluminum or plywood andthe fabric itself.
All of the sharp edges that couldpotentially cut the fabric should becovered with anti-chafe tape. Thisusually involves rivet heads, metalseams and sharp edges. Let your senseof touch be your guide. If you feelsomething sharp, cover it with theanti-chafe tape. Do not use maskingtape for this purpose. It will retainmoisture and cause problems later.Also, paper masking tape will turnbrown with age and possibly showthrough a light colored paint.
On your wings you will want to en-sure the ribs are parallel to each otherand aligned properly prior to place-ment of the fabric. Inter-rib bracingtape is used for this purpose. It willkeep the ribs straight up and downwhen the fabric is heat tightened overthem. When complete, the inter-ribbrace looks like a series of Xs in eachrib bay (Figure 1).
SELECTING PROPERFABRIC WEIGHT
This decision has a major impact
upon the life of the fabric on your air-craft. If you use a fabric too light inweight for your airplane, you will cer-tainly have associated problems. Firstof all, let's look at what fabrics areavailable. Grade A cotton was the fab-ric of choice until the 1960s. It wasreplaced with polyester fabrics de-signed to be shrunk with heat. To myknowledge, Grade A fabric is virtuallyunavailable today. If you do find itmake sure it meets the FAA standardsrequired for production aircraft and testit prior to placing it on your airplane.You could get old fabric that has beenexposed to sunlight and has lost itsstrength before you even put it on theairplane. My advice is to stay awayfrom Grade A cotton today. Polyesterfabric is much easier to apply.
Polyester fabric comes in differentweights and strengths. The most com-mon fabrics are light weight, mediumweight and heavy-duty. Light weightfabric weighs 1.7 ounces per squareyard. That equates to a total fabricweight of about 9 pounds on a J-3 Cubsize airplane. Medium weight fabric
• Best buy in a kit 4-place home-builtcomposite airplane
' High tech canard style, with swept wing andpusher configuration
' Easy to build - time-saving pre-molded parts,finest quality aviation materials
1 Kit comes complete with builder videos,builder manual, and factory support; no needfor special tools
• Affordable to build; economical to own,maintain and fly
• Long range cross country capability; spacious,quiet 4-person cabin and adequate baggagecapacity; new XL model is our biggest!
• Build time as low as 800 hrs. with fast buildoptions.
30 n..:....... & Info Pak$29.50 US & Canada, $39.50 International
(Visa/MC/Check-US$/Money Order)
FACTORY & HOME OFFICE:200 West Airport Road, Sebastian FL 32958
Ph: (561) 589-1860 • Fax: (561) 589-1893VELOCITY WEST:
I4IO-B Flightline Dr., Lincoln CA 95648Ph: (916) 645-6866 • Fax: (916) 645-6944www.velocityaircraft. com
For information, use SPORT AVIATION'S Reader Service Card
SPORT AVIATION 93

Inter-Rib Bracing
weighs 2.7 ounces per square yardbringing the total weight of fabric onlyfor our J-3 to 14 pounds. Heavy-dutyfabric weighs in at 3.4 ounces persquare yard bringing our total compar-ative weight up to about 18 pounds forour J-3. Typically, the coatings willadd 30-40 additional pounds to theoverall weight. This is dependent uponthe process applied. The strength offabrics varies from a breaking strengthof about 70 pounds per square inch upto about 130 pounds per square inch,light weight versus heavy-duty. Selec-tion of fabric for your airplane issimple. If you are covering an ultra-light, glider or an airplane with a smallhorsepower engine (below 65 hp), youcan safely use light weight fabric. Ifyou are covering an aerobatic aircraft,large biplane, Warbird or crop duster,in short, any high wing loading air-craft operating under severeconditions, use heavy-duty fabric. Allother airplanes (this constitutes themajority) should use the mediumweight fabric. You cannot go wrongusing a heavier weight fabric. Prob-lems are much more likely to occurwhen you use a lighter weight fabricthan the one recommended for yourairplane. These problems surface inthe form of damaged coatings on topof the fabric caused by movement of94 OCTOBER 1998
the fabric itself in the form of drum-ming or beating. So, if in doubt, add afew pounds and go with a heavier fab-ric.
By the way, Ceconite, Superfliteand Poly-Fiber fabrics are all basicallythe same. They are polyester fabricswoven at the same mill on the samelooms. (Don't forget the STC.) Theyare all capable of being shrunk about10% and the thread count is the sameon the warp and fill. That means youdo not have to worry about the orien-tation of the fabric. It can be placed onthe surface in any direction.
FOLLOW THEINSTRUCTIONS
This is a key point. You must fol-low the instructions written by thefabric process manufacturer. Review-ing the STC's mentioned earlier, on aproduction airplane you cannot mixfabric covering processes. Not only isthis a legal issue regarding the airwor-thiness of your airplane but it also canresult in having to recover your air-plane prematurely. As an example,Poly-Fiber coatings are not compatiblewith nitrate and butyrate dopes. If youput Poly-Brush (the first chemical coaton the Poly-Fiber process) on fabric asyour first coat of chemical and then
switch to nitrate dope for subsequentcoats, you will have problems in theform of cracking and peeling. Theseproblems usually do not appear rightaway but they wait until you finish thejob and fly for a few months. Thenthey appear. What is the solution? Re-cover the airplane. By the way, if youdo have major fabric problems such ascracking and peeling of coatings, it isimpractical to strip the coatings off thefabric. The best course of action is torecover the airplane. Even better, learnfrom other people's mistakes, followthe instructions and you will not haveto recover for 15+ years.
Another area of concern is experi-menting with a proven system orlistening to so-called "experts" whoprovide you with a quick and easyway to short-circuit the coveringprocess. I have encountered individu-als who are experimenting withvarious steps of the covering processfrom the type of fabric cement theyuse to using latex house paint as a fi-nal topcoat. Let me say this veryclearly, the fabric coating manufactur-ers have tested their products. To myknowledge none of the tests involvedlatex house paints. In other words, if itis not in the manual don't do it unlessyou want to spend another $2,500 torecover the plane.

FABRIC TAUTNESS
How tight should the fabric be be-fore you start putting on thecoatings? This is a very good ques-tion and an additional problem area.If the fabric tautness is not correct,you may have difficulties. If the fab-ric is too tight, you may do damageto the structure itself. If too loose,you may have the coatings crack andpeel due to too much movement. Inany case, take the time to properlyshrink the fabric. Remember, thefabric is capable of shrinking about10%. Keep that in mind when youcement the fabric in place. Youshould initially put it on the surfaceso that it is snug — a technical termmeaning neither too loose nor tootight. A good rule of thumb . . . on asurface such as a wing you should beable to lift the fabric about one inchabove a rib prior to shrinking.
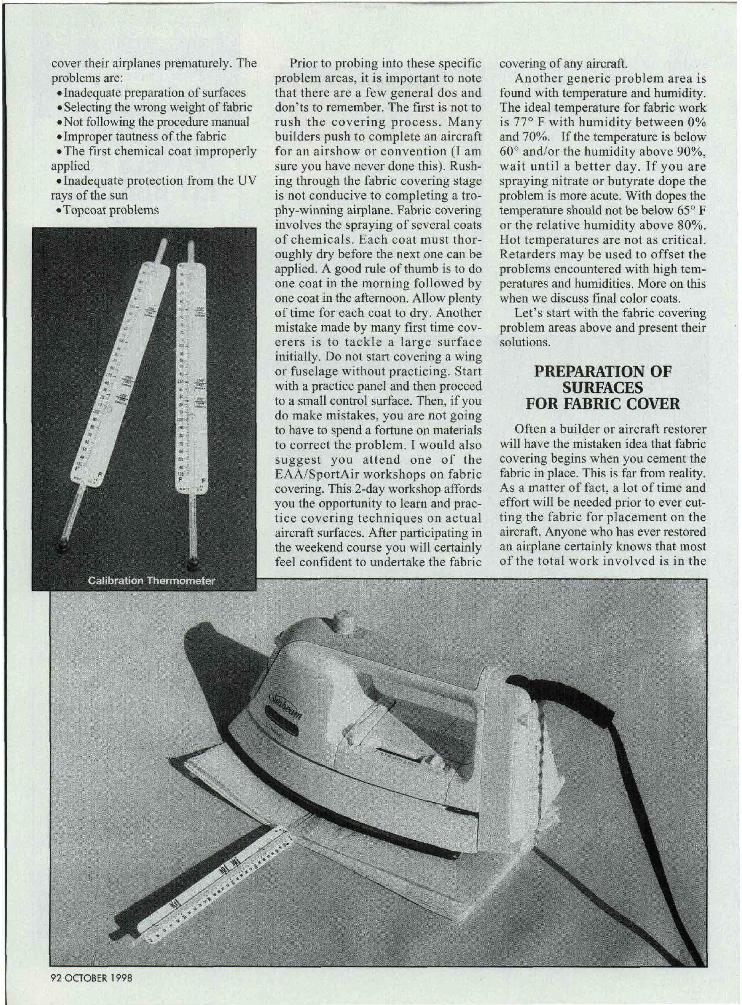
One thing is certain, you must usean iron to shrink fabric. If you have a
heat gun, hide it until you have cov-ered the airplane. You cannot controlthe temperature emitted from a heatgun. It is absolutely essential that youshrink the fabric using an accuratetemperature from the iron. This canonly be achieved using an iron that israted at 1100 watts or higher. Youmust calibrate this iron for accuracy.When you shrink the fabric it must bedone at a precise temperature within±10°. The initial shrinking of thefabric is done at 250° F. At this tem-perature the fabric will shrink about5%. If you are using nitrate and bu-tyrate dopes this is the finaltemperature that you will use. Nitrateand butyrate dope (yes, even non-tautening) will continue to shrinkfabric over a long period of time. Ifyou have an ultralight or smaller air-craft you may want to stop shrinkingat 250 because of structural consider-ations. Fabric, when being shrunk,has incredible power to bend andtwist. You should watch for evidence
of this while using the iron.Most aircraft structures require a
final shrinking of 350°. This ensuresproper tautness of the fabric. Do notexceed 350°. At 375° the filaments ofthe fabric begin to thermo-soften andactually loosen on the structure. Ifthis occurs the fabric will appear asthough it has not been tightenedenough. At 415 ° the filaments beginto melt. For this reason it is absolutelyimperative that you calibrate youriron using a glass thermometer. I donot recommend using the spring typethermometer. It is not as accurate as abulb type. The Poly-Fiber manual hasa very good explanation as to how tocalibrate an iron. If you are coveringan airplane I recommend you pur-chase this manual regardless of thetype of covering process you are us-ing. It is very well written andexplains fabric covering in detail.
Next month I will continue the dis-cussion on common fabric coveringproblems. *
The EAA/SportAirworkshop schedule is
as follows:October 3-4.. San Francisco, CAOctober 24-25 . . . . . . Griffin, GANovember 7 - 8 . . . . . . Corona, CA.. (Aircraft Builders Conference)December 5-6 . . . . . Phoenix, AZInformation on these workshops
can be obtained by calling800/967-5746 or by contacting
the website atwww.sportair.com. The author
may be emailed [email protected]
The July issue of Sport Aviation'sarticle on "Maintaining A ProductionAirplane" erroneously stated, "Theowner of an experimental aircraftmay perform the maintenance on thataircraft including performing andsigning off the condition inspection(annual inspection)." This is onlytrue in the case of an amateur builtexperimental aircraft (homebuilt) ifthat owner possesses either an FAARepairman Certificate for that air-craft or an A&P license.
If You Only Have Three Wishes ....Make This Panel One of Them!
This is one wish we can make come true. So you or your Genie should callus today for free information!
The most sophisticated,accurate and reliableinstruments availableanywhere. Offeringextraordinary featuresat a reasonable price, allunits are 2 1/4" (orcomplete panel shownis only 5" x 7.5") andrequire no externalboxes. All units areSTC'/PMA'd, many asreplacements forprimary engineinstruments.
All EGTsAU CHTsShock Cooling2 Diff. Limits16 High Limits
OATTITCarb TempFuel FlowFuel Pressure
16 Low Limits Fuel Used
Fuel Rem.Time to EmptyRPMTach TimerFlight Timer
Oil TempOil PressureVoltsAmpsDischarge Alarm
Manifold Press. High Volts Alarm
®Electronics International Inc.2092 N.W. Aloclek #523 Hillsboro, OR 97124 (503)439-8484 CX
For information, use SPORT AVIATION'S Reader Service Card
SPORT AVIATION 95

AIRCRAFT BUILDING
FABRIC COVERINGCommon Problems
BY RON ALEXANDER
In the last issue of Sport Aviation, Ibegan a discussion on common fabriccovering problems. As a review, themost common problems are (1) inade-quate preparation of the surfaces, (2)selecting the wrong weight of fabric,(3) not following the procedure man-ual, (4) improper tautness of the fabric,(5) improper application of the firstchemical coat, (6) inadequate protec-tion from the UV rays of the sun, and(7) topcoat problems. The first fouritems were outlined in the October is-sue. One additional problem areaneeds to be discussed — attachment ofthe fabric to wings.
I am going to emphasize one majorpoint again: you must follow the in-structions of the fabric-coatingmanufacturer. Each system has a man-ual that should be followed to theletter. I repeat, do not experiment withsystems. Through the years I haveseen more problems with this one areathan any other. Individuals will tryshort cuts, they will hurry the drying
process, listen to techniques developedby other people, and, in short, doeverything other than follow instruc-tions in the manual. These sameindividuals will then fault the productrather than find a problem with theirmethod of covering. No matter whichcovering system you are using, if youwill follow the instructions to the letteryou will achieve success in the formof a long lasting fabric cover.
Let's continue talking about com-mon fabric covering problems.
FIRST CHEMICAL COAT
After you have attached the fabricto the surfaces of the airplane andtightened it properly, you are ready toapply the first coat of chemical. Thisprocess is generally referred to as"sealing the fabric." The first coatmust bond to the fabric or all subse-quent coats are in jeopardy of peeling.I am sure many of you have witnessedfirst hand the peeling off of fabric
Figure 1
coatings. This is a common problemarea. If the first coat does not bond tothe fabric, you can literally peel off allchemical coats. I have seen aircraftthat you could take an air gun andblow the coatings off the fabric insheets. The problem is usually causedby one of three things: (1) the fabricwas contaminated with dirt or oil, (2)the chemical was not applied properly,or (3) the chemical was applied intemperatures that were too cold.
The first chemical coat also providesa secondary function — it acts as ce-ment that soaks through the fabric andfurther acts to secure the fabric to theairframe. I recommend brushing thefirst coat onto the fabric. This should bedone only after you have thoroughlycleaned the fabric using a cotton ragand reducer or MEK. All traces of oiland dirt must be removed. A tack ragshould be used to wipe down the fabricjust prior to applying the first coat. Fail-ure to remove dirt and oil will result inan inadequate bond.
With the first coat we are workingto literally "encapsulate" the fibers ofthe fabric. This means the chemicalshould flow under the fibers and "gripthem" for a good bond. Polyester fab-ric does not absorb liquid. This is whyI recommend brushing on the firstcoat. You must penetrate the fabricwith the liquid to get it to the backside.Unless you have experience coveringaircraft, it is difficult to tell when youhave an adequate penetration if youare spraying this first coat. Use a highquality polyester or natural-bristlebrush. Brush on a wet coat. Be surethe chemical is penetrating the fabricand flowing to the underneath side.You must be careful not to allow it to
SPORT AVIATION 107

drip through to the other side of thesurface. To do so may show up on thefinal color coats as a difference ingloss. You also need to be careful towork quickly and not leave any brushmarks. In normal temperatures thecoating will dry rapidly. If you are us-ing the Poly-Fiber system, you willsee runs on the inside of the fabric (seeFigure 1). This is perfectly normal andthey will not show on the final prod-uct. If you are using nitrate dope, youshould avoid flooding it to the insideof the fabric thereby creating runs.They may show on the final finish. Bythe way, if you are using nitrate andbutyrate dopes, it is imperative thatyou use only nitrate products for thefirst chemical coat. Butyrate dope willnot stick to bare polyester fabrics.
Finally, take your time during thisinitial step. Unless you thoroughly en-capsulate the fabric with the chemical,you will be faced with this commonfabric-covering problem. What is thesolution if you have all of the coatingspeeling off your airplane? Usually thefabric is good. If so, and you can eas-ily peel coatings to bare fabric, youcan often solve the problem. If the fab-ric has not been exposed to the sun orlost its strength in any other way, youcan reapply the first coat of the processand continue the build-up of the coat-ings. Seek the advice of someone withfabric experience prior to doing this. Ifyou cannot easily remove all coatingsto reach bare fabric, do not try to use apaint stripper. Use of a paint stripperto remove chemicals from fabric is nota recommended procedure. The strip-per itself is very difficult to removefrom the fabric.
SECURING FABRICTO THE WINGS
Another fairly common problemarea arises in attaching fabric to wingsand control surfaces. A lot of contro-versy exists with this step. I am goingto give you my opinion based upon alot of testing and experience throughPoly-Fiber.
First of all, fabric on wings must besecured to the ribs. Lift created duringnormal flight acts to raise the fabricoff of the topside of the wings and, insome cases, the control surfaces. Thismust be prevented. You can think ofthe lift created by normal flight as agiant vacuum cleaner that is trying to108 NOVEMBER 1998
2" Overlap
Figure 2
Figure 3
peel your wing fabric off the top sur-face. Beginning with the first aircraftthat were flown in the early 1900s,fabric has been mechanically securedto the ribs. The Wright brothers used asewn pocket in the fabric itself inwhich they then inserted the ribs of thewing. (This method is being used suc-cessfully by several ultralightmanufacturers today.) Bleriot aircraftactually used a piece of wood physi-cally attached on top of the fabric tothe rib below.
With the advent of the ultralight, anumber of people have used alterna-tive methods of fabric attachmentincluding cementing the fabric to ribs.This has become somewhat commonrecently using the cements designedfor fabric. In developing products atPoly-Fiber, fabric cements have beendesigned to hold two pieces of fabrictogether against the shear forces thatmay try to pull the fabric pieces apart.
This is illustrated in Figure 2. The fab-ric on the leading edge of a wing isoverlapped by 2 inches. That overlapis secured by applying fabric cementto the two pieces of fabric therebyholding them in place. The cement isnot designed for peel forces that areapplied to the fabric as a result of thelift created during flight. I recommendusing a form of mechanical attachmentwhen securing the fabric to the ribs.This can be in the form of rib lacing,PK screws, pop rivets, or fabric clips.
On production aircraft, the methodused to secure the wing fabric to thewing ribs should be the same one usedat the factory when the airplane wasmanufactured. On experimental air-craft, you may use whatever means youdesire. I would suggest rib lacing eventhough your plans may call for cement-ing the fabric to the ribs. You can evendo both if you would like. If you areconcerned about tying the proper type

of knot I would recommend that you at-tend one of the EAA/SportAir fabricworkshops or visit one of the work-shops held at various airshows. Theknot is demonstrated and practiced atthe workshops. The knot appears to bevery challenging when, in fact, it isquite simple. If you have an experimen-tal aircraft and you are having problemswith the rib-lacing knot, simply tie asquare knot with each lace spaced prop-erly. The proper spacing requirementsmay be found in the Poly-Fiber Cover-ing Manual or in FAA AdvisoryCircular 43-13. The distance betweenthe mechanical attachments is depen-dent upon the never exceed speed ofthe aircraft. As an example, if the neverexceed speed of your airplane is 150MPH the distance between fabric at-tachment points on each rib will be2-1/2 inches within the slipstream ofthe propeller and 3-1/2 inches outsidethe slipstream.
Remember, attach the fabric mechan-ically. Use the method recommended bythe manufacturer. If you insist on ce-menting the fabric to the ribs, add anadditional safety margin by rib-lacing. Ifyou are covering an ultralight or a veryslow, low horsepower aircraft, simplytie a square knot every 3-4 inches to se-cure the fabric properly. It takes only afew hours work and a few dollars toensure you will never have problems.By the way, use only approved riblac-ing cord. I have seen everything fromstring to fishing line used. Don't dothat! You are placing yourself in un-necessary jeopardy.
Incidentally, you must use a tapetermed "reinforcement tape" over thefabric (see Figure 3). This tape is ap-plied over each rib to reinforce thefabric so that the rib lacing cord,screws, etc. do not cut through the fab-ric. You can see what would occur ifyou did not use reinforcement tape.The fabric would be cut allowing it torise above the wing creating a majorcontrol problem. The mechanical at-tachments will be covered usingfinishing tapes. This will further se-cure the attachment and in addition,serve to enhance the final appearance.
INADEQUATE PROTECTION OFFABRIC FROM SUNLIGHT
If we were to find one fabric cover-ing problem that is the most commonit would be this particular one. In spite
of being touted as a lifetime fabric,polyesters will deteriorate. Theirbiggest enemy is sunlight. Specifi-cally, the ultra-violet rays of the sun.Polyester fabric, when exposed to pro-longed sunlight unprotected, willweaken and degenerate. The only thingprotecting the fabric from the rays ofthe sun is some sort of UV blockingchemical. The best chemical to placein fabric coatings is aluminum pig-ment. Aluminum pigment suspendedin a coating will protect the fabric. Ofcourse, the correct number of coatsmust be applied according to the man-ufacturer's recommendation. That willusually be three or more "cross coats."A cross coat is one sprayed coat pass-ing the spray gun north and southfollowed by a coat passing the guneast and west. In other words two per-pendicular coats.
A common issue involving alu-minum pigment is the settling of thepigment in the can. Aluminum pig-ment is heavy and will settle to thebottom of a can. It must be thoroughlyand completely mixed prior to spray-ing. This is very important. If notmixed completely, you can be sureyou will be recovering the airplanewith new fabric within a short periodof time, particularly if it is regularlyexposed to the sun. Use a paint shakerat your local hardware store for bestresults. Even then, be sure the pigmentis in suspension before you spray it.
Aluminum coats are sprayed ontothe surface of the fabric. Most fabricsystems suggest sanding occasionallybetween coats. This will provide amuch smoother final surface. Be care-ful not to sand off all of the aluminumpigment. This is often mistakenlydone. In other words, the proper num-ber of silver coats is applied only to besanded off with the end result beinginadequate UV protection. By theway, you will often hear the aluminumcoats referred to as the "silver coats."This terminology has been in place formany years and is used to describe thealuminum pigment coats.
How do you know if you havesanded too much? A good test is to usea 60-watt light bulb held up to the fab-ric. Look through a cut out inspectionhole and see if the light is blocked. Ifyou can see light you need more silvercoats. (A word of caution: Use only acaged and protected light bulb and donot place the light bulb inside a wing
MANIFOLD "Hg
9 »_* * »
I U. U
t b '-I U
ALTERNATOR
Complete EngineInstrumentation inMiniature Gauges
Self-contained and stackableDigital "Slim-Line" EngineInstruments with an automat-ic alarm system that warns ofexceedence conditions. Eachis a weight-saving 3oz. with abright red display, the sameas our famous scanner.
J.P INSTRUMENTS
P.O. Box 7033Huntington Beach, CA 92615714-557-5434 Fax:714-557-9840For information, use SPORT AVIATION'S Reader Service Card
SPORT AVIATION 109

Tools A LittlePREHISTORIC?
Then You NeedOur Best SellingTool Kit
Call Today fora '98 Catalog!
1-800-521-4800
For information, use SPORT AVIATION'S Reader Service Card
110 NOVEMBER 1998
EAA/Sportair Workshop students inspect rib lacingh.
or fuselage that is full ofsolvent fumes. An acciden-tal break of the bulb couldignite the fumes.) If you areconsidering the purchase ofa fabric covered airplaneand you are unsure aboutthe condition of the fabric,perform the test outlinedabove.If there is inade-quate UV protection, youcan often open an inspec-tion plate, look through itto the top of the wing andactually see daylight. If you see lightof any sort coming through the surfaceI would recommend you not buy theairplane. Chances are it has inadequatesilver coats and the fabric will deterio-rate prematurely. You will often seelight along the edges of tapes wherethey have been sanded. This shouldnot present a problem.
To recap, you must protect all fab-ric from sunlight. Be sure to put anadequate amount of UV protection inthe form of at least three cross coats ofthe recommended chemical. Be sure tomix the pigment thoroughly prior toapplication. Do not sand off all of theprotection. If you are sanding thor-oughly between coats, you may wantto apply 1-2 more coats than recom-mended. Remember the basic rules ofspraying — spray out of the sunlight,out of the wind, and at the proper tem-perature and humidity.
TOPCOAT PROBLEMS
Selection and application of thetopcoat constitutes a major problemarea. First of all, use the topcoat rec-ommended by the fabric system
A roll of finishing tape.
manufacturer. Do not experiment withlatex house paints and paints designedfor metal. Yes, latex house paint. Ihave personally talked with a fewbuilders who are emphatic about usinglatex house paint on their fabric cov-ered airplane. If you want to recoveryour airplane within a year or two,then use paint designed for yourgarage. I am serious about this issue.Do not try to save money on your pro-ject at this stage. In the days when Iowned a major supply company, oursales people fielded at least one callper week from a builder who had useda topcoat paint other than the one rec-ommended by the fabric systemmanual. They wanted to know whatcould be done about their fabric — thepaint was peeling off. Unfortunately,there is usually little that can be doneto solve a major topcoat problem otherthan recovering the airplane. I haveseen absolutely beautiful fabric air-planes, covered less than one year,with major topcoat cracking problems.When the owner is asked about thetopcoat in 90% of the cases a productother than the one recommended hasbeen used.

Just because a paint works well onmetal does not necessarily mean it willwork on fabric. Why? Because fabricflexes and moves during flight. Thetopcoat paint must also be flexible.Several paint manufacturers have de-signed finish coatings specifically foruse on fabric. They have added chemi-cals that allow them to be flexible. Ifthese additives are not present the paintwill eventually crack due to the move-ment of the fabric. So, do not useenamels, lacquers, or epoxy paint overfabric. Use only polyurethane paintswith the additives necessary for use onfabric. At the risk of being repetitious,use only the topcoat paint recom-mended by the fabric system's manual.
What other topcoat problems mightyou encounter? There are several andI will discuss only the most prevalent.
Not getting the correct color match.This problem usually surfaces for oneof two reasons. First of all, not shak-ing the paint is usually the culprit.You must shake the paint thoroughlywithin 24 hours of use. This is veryimportant on color coats. Take thepaint to your local hardware store andhave them place it on the paint shaker.After doing this you can use the paintby simply stirring for about 2 weeks.The second part of this problem in-volves different paint batches. Allpaint manufacturers produce a paintcolor that may be just slightly differ-ent in shade from one batch to thenext. You can solve this problem bybuying total amount of paint neces-sary for your aircraft, opening all ofthe gallon cans and placing them inone large container (a clean plasticgarbage can will work). After doingthis, thoroughly mix the paint andthen pour it back into the 1-galloncontainers. You now should have oneconstant color shade in all of the cans.
Bleed through of primers. If you usea dark green primer you may have diffi-culty hiding the color. I wouldrecommend you only use a white primer.If you want a zinc chromate look on un-painted areas, use a dark green primerthere but not on surfaces that you are go-ing to paint a different color.
Bleed through of other colors-silvercoats as an example. Often it is diffi-cult to hide the silver coats. This isparticularly true when using a red oryellow color. The best solution to thisproblem is to spray 1-2 coats of whiteover the silver. This will provide a
KIS SPORT AIRCRAFT• FASTER BUILDING • BETTER VALUE
• VERSATILEKIS Cruiser TR-4 4-PlaceCruise Speed-75% 185 mphStall Speed 55 mphUseful Load 1100 pdsPowerplants 160-210 hpBuild Time 1200-1500 hrs
KIS TR-1 2-PlaceCruise Speed-75% 185 mphStall Speed 55 mphUseful Load 610 pdsPowerplants 80-125 hpBuild Time 800-1000 hrs
KIS two and four place all composite kitbuilt aircraft are designed to Keep ItSimple. Pre-molded high temperature composite and prewelded metal partsmake KIS assembly easy. Both KIS aircraft will perform well with manydifferent engine options.
INFO PACK $15 • VIDEO $15 • OVERSEAS ADD 50%-TRI-R Technologies, Inc., 1114 E. 5th St. Oxnard, CA 93030 USA
Phone (805) 385-3680 • Fax (805) 483-8366 • VISA/M.C. Accepted
Carburetor Crisis?This guy doesn't have an Ellison carburetor. He'll be ordering
one, however, when he reaches shore. Ellisons patentedsystem evenly distributes fuel for quick starts andefficient engine operation; giving you maximum time inthe air. And, they're fully aerobatic.
Find out why Ellison is the right carburetor foryour aircraft. For product literature, write, phone425-271-3220, fax 425-277-9333, or visit our website to email or to upload.
EFS4
Carburetors You Can Bank On!www. ellison-fluid-systems. com
Ellison Fluid Systems Inc. • 350 Airport Way • Renton, WA 98055
For information, use SPORT AVIATION'S Reader Service Card
SPORT AVIATION 111

Brushing first coat of chemical - Poly-Brush.
good foundation for subsequent colorcoats. Doing this will provide a moreeven final color and also require fewergallons of the color coat. This can beimportant when using a red final fin-ish. Red paints are typically muchmore expensive than other colors.
Dust and dirt in final finish. Toavoid this problem you must have asmall spray booth. As discussed in
other articles, this can be homemadeand simple. You also need to filter thepaint as you pour it from the can intothe spray cup. Finally, clean the sur-face using a tack cloth just prior tospraying.
Spraying problems. Of course, thisis probably one of the more commondifficulties incurred by individuals.This is a subject in and of itself. I will
For information, use SPORT AVIATION'S Reader Service Card
112 NOVEMBER 1998
Poly-Spray
only say that you need to practice,practice and practice, prior to sprayingfinal topcoats. You need to have anadequate place to spray, correct tem-peratures, enough light, low humidity,etc. Proper equipment is absolutely es-sential.
Fabric covering is not a difficulttask. As a matter of fact, it is reallyquite simple and enjoyable. This is theone area a builder or restorer shouldenjoy doing. Learning the basics willkeep you from encountering the prob-lems we have discussed. Attend anEAA/SportAir fabric-covering work-shop. Talk to other people who haveexperience with fabric covering. Ofcourse, once again, read the manualthoroughly. Start covering with a smallcontrol surface so you can correct ini-tial mistakes. You certainly have thepotential to do an excellent job in thisfinal step of building or restoring.
The EAA/SportAirworkshop schedule is
as follows:November 7-8 . . . . . . Corona, CA. . . . . . . . (Aircraft Builders Conference)
December 5 -6 . . . . . . Phoenix, AZ. . . . . . . . . . . . . . . . . . . . . . (Workshop)
January 23-24 . . . . . Oshkosh, WI. . . . . . . . (Aircraft Builders Conference)
February 13-14Minneapolis, MN. . . . . . . . (Aircraft Builders Conference)Information on these workshops
can be obtained by calling800/967-5746 or by contacting thewebsite atwww.sportair.com. Theauthor may be emailed at ralexan-