Embed Size (px)
Citation preview
A L - U R D İ ' N İ N " R İ S A L E T - Ü N F İ K E Y F İ Y E T - İ L -
E R S A D " A D L I M A K A L E S İ *
Sevim TEKELİ
Ö N S Ö Z
Kritik edisyonunu ve Türkçe ve İngilizce tercümelerini verdiğim bu
makale Hulagu'nun himayesinde Nasirüddin-i Tusi tarafından kurulmuş
(1261) olan ve Avrupada Tycho Brahe zamanına (16'ıncı asır) kadar mü
kemmeliyetine erişilemiyen Meraga Rasathanesi aletlerinin tasvirini veren
Al-'Urdi'nin Rasatların Niteliklerine Dair bir Makale adlı eseridir.
Al-'Urdi Suriyeli mimar mühendistir. Şamın su tesislerini yapmış Hıms
Hükümdarı Al-Mansur için astronomik aletler inşa etmiş 1259 tarihinden
sonra da Nasirüddin-i Tusi ile birlikte çalışmıştır.
Eserde verilen tasvirlerden aletlerin inşasında gerçekten çok titizlik
gösterildiğine ve dakik sonuçların elde edilmesi için montajlarına da itina
edildiğine tanıklık ediyoruz.
Bu eser 1909 senesinde Amabl Jourdain tarafından Memoire sur l'ob-
servatoire de Meragah et sur quelques instruments employes pour y observer
adlı makalede çok eksik olarak Fransızcaya ve 1928 yılında Hugo Seemann
tarafından Die Instrumente der Sternwarte zu Maragha nach den Mitteil-
ungen von al-'Urdi adı ile Almancaya tercüme edilmiştir. Bu tercüme oldukça
mükemmeldir. İslam astronomisinin temel kitaplarından biri olmasına
rağmen bu eserin metni şimdiye kadar neşredilmemişti.
* Bu Arapça metin ve Türkçe tercümesi 2 Temmuz 1956 da Dil ve Tarih-Coğrafya Fakültesinde kabul edilmiş doktora tezimin bir bölümünü teşkil etmektedir.
Arapça metnin ve Türkçe tercümenin hazırlanmasında Sayın Hocam Ord. Prof. Dr. Aydın Sayılı'nın pek çok emeği geçmiştir. Kendilerine bu vesile ile teşekkür etmek fırsatını bulduğumdan dolayı bahtiyarım. Ayrıca iki yazmanın fotokopilerini temin etmek nezaketim göstermiş olduklarından dolayı da müteşekkirim. Prof. Dr. T. Tancı'ye de çözümleyemediğimiz kısımların aydınlatılması hususundaki yardımlarından dolayı teşekkür ederim.
1 Bu eserin bir yazmasının da Tahranda olduğunu Sayın Hocam A. Sayılıdan öğrendim.
2 SEVİM TEKELİ
Metin üç yazmanın karşılaştırılması ile meydana getirilmiştir. Yazmalar
dan ikisi İstanbulda biri Paristedir.
İstanbuldaki nushalardan biri Ayasofya Kütüphanesinde 2973 numarada
kayıtlıdır. Kütüphane Müdürlüğünün verdiği bilgiye göre yazmanın tavsifi
şöyledir.
Sahife eb'adı: 186 x 120 mm.
Yazı sathı: 130 x 75 mm.
Kâğıt cinsi: Samani renkli mühreli şarkkari kâğıt. Haşiyesiz oldukça
hatasızdır, ender olarak noktalanmıştır, nushaların en eskisidir. Kimin tara
fından istinsah edildiği bilinmemekle beraber sonunda Hicri 864 senesinin
Şevval ayının ikinci günü tamamlanmış olduğu yazılıdır.
Diğer nusha Nuri Osmaniye'de 2971 numarada kayıtlıdır. Kütüphane
Müdürlüğünün verdiği bilgiye göre yazmanın tavsifi şöyledir:
Sahife eb'adı: 257 x 1176 mm.
Yazı eb'adı: 190 x 100 mm.
Kâğıt cinsi: Abadi
Cildi: Kahve rengi meşin miklebli ve şirazeli
Muhtelif risaleleri bir arada toplıyan bir mecmua içindedir.
Yazı okunaklı ve temizdir. Mühim kısmı noktasızdır.
Paris yazması Bibliotheque Nationale'de 2544,10 numarada kayıtlıdır.
Okunaklı ve noktalıdır. Müstensih iki nushayı karşılaştırmış ve aradaki fark
ları kenara işaret etmiştir. Bu yüzden yazma metinde P, Pa olarak iki yazma
şeklinde gösterilmiştir. Pa müstensihin karşılaştırdığı ikinci yazmayı temsil
etmektedir. Sonunda 867 (Hicrî) senesinin Cemazi al - ahırının 12 inci günü
yazılmış risaleden kopya edildiği ve Hicri 1009 senesinde Hafız Hasan b. al-
Hafız Mustafa tarafından istinsah edildiği bildirilmektedir.
Paris yazması ile Ayasofya yazmasında müellif adı yoktur. Nuri Osma-
niyedeki yazmada Şamlı Al-Urdi tarafından telif edildiği baş kısmında bildi
rilmektedir. Eserin ne zaman telif edildiği kaydedilmemiş olmakla beraber
içinde verilen bilgiden Meraga rasathanesinin inşasından sonra ve Nasirüddin-i
Tusi'nin ölümünden önce kaleme alındığı neticesi çıkmaktadır. Eserde alet
lerin inşa tar ihi olarak 1261/2 civarındaki seneler verilmiştir. Nasirüddin-i
Tusi 1274 de öldüğüne göre eserin 1262-1274 seneleri arasında telif edildiği
AL-URDİ'NİN "RİSALET-ÜN Fİ KEYFİYET-İL ERSAD" 3
tahmin edilebilir. Mamafi al-Urdi bazı aletlerin modellerinin yapıldığını bil
dirip, fakat onların rasathanede inşa edilip edilmediğini mevzuu bahis et
mediğine göre, bu 1274 tarihini biraz daha geriye alabiliriz.
Gramer kaidelerine göre fiillerde mutabakat yapılması caiz olmakla be
raber şart olmıyan hallerde de, mâna sarahati sağlaması bakımından faide
mulahaza edilerek, fiillerde cins ve sayı mutabakatı yapılmış; yapılan bu
değişmeler notta gösterilmiştir. Yani, bu bakımdan ve imlâda bazen yapılan
değişmelerde tesbit edilen hata yazmaların hepsinde farklı olsa da, bu gibi
değişmeler hata tashihini içermemektedir.
Tercümesinde mümkün olduğu kadar metne sadık kalınmaya çalışılmış
tır. Almanca tercümesiyle karşılaştırılmış ilk kısımlarda uymıyan yerlere
işaret edilmiştir. Fakat sonlara doğru manâya sadık kalınmakla beraber nis-
beten takribi tercüme edildiği için farklara teker teker işaret edilmemiştir.
RASATLARIN NİTELİKLERİNE DAİR BİR MAKALE
Esirgeyen ve bağışlıyan Allahın adı ile. Hamd yalnız Allahadır. Peygam
beri Muhammede ve yakınlarına da salat. Yardım Allahdandır.
Bu risale, bilginlerin önderi, mühendislerin başı, matematik bilimler
erbabından, milletin desteği Şamlı Mu'ayyad üd-din al-Urdi nin kaleme aldığı
bir risaledir.2 O şöyle der, "Bu risaleyi rasatların nasıl yapılması lâzım geldiğini
anlatmak ve yıldızların dolanımları, kürelerindeki yerleri, alemin merkezin
den mesafeleri, yer yarı çapı birim olduğuna göre bu mesafelerin değerleri,
hakkındaki bilgiye ulaştıracak metotlarda pratik ve teorik sahada ihtiyaç his
edilen şeyleri ve rasat aletlerinin nasıl yapılıp kullanılması lâzım geldiği hak
kında bilgi vermek için yazdım".
Astronomi matematik ilimlerin teorik ilmi mükemmelleştiren bir dalı
olduğundan ve diğer bütün ilimler içinde ilahiyata yaklaşmayı en çok bu ilim
sağladığından, bu ilim iki bakımdan şereflidir: konusu bakımından ve argu
manlarının sağlamlığı bakımından. Onun konusu gökler dir ki, bu her şeyden
tenzih edilen Allah'ın yaratıklarının en büyüğü ve eserlerinin en harikulade-
lerindendir. Argumanlarına gelince, bunlar aritmetik ve geometriye dayanır.
2 Hugo J. Seemann, Die Instrumente der Sternwarte zu Maragha nach den mitteilungen von Al-'Urdi, Sitzungsberichte der Physikalish-medizinischen Sozietat, Erlangen 1928, S. 23. Bu kısım yok.
4 SEVİM TEKELİ
Bundan dolayı kendimizi ona verdik ve gayretlerimizi onun için sarfettik.
Argumanları temelinde rasatlara dayandığından, rasatlar da aletlere ihtiyaç
gösterdiğinden, onları anlatmakla başladık. Eskiler ve muahhar astronomlar
onlardan bir çok çeşitlerini imal etmişlerdir. Onlardan bazdan kusurlu, bazı
larının ise kuvveden fiile çıkarılması zordur. Bu zorluk imal güçlüğünden
gelmiyip bu aletlerin planındaki bozukluktan ve tertibindeki kusurdan
ileri gelir. Bundan dolayı bazılarının zikrinden vaz geçtik. Eski aletlerin en
mükemmellerini zikrettik ve onlara arız olan şüphe veya engelleri de giderdik
ve bunlara kendi icat ettiklerimizi de ilâve ettik. Bunlar, bütün bu aletler
içinde en dakik ve mükemmel olanlarıdır.
Onların (aletlerin) montajları esnasında rasat yerinin meridyen doğru
sunun bilgisine ihtiyaç vardır. Onu kolaylıkla tayin etmek için çeşitli metot
lar düşünülmüştür. Bunların içinde en mükemmelinin Hint dairesi diye meş
hur olan ve eskilerin kullanmış oldukları metot olduğunu gördüm "fi'amal
al- kura al-kamıla" adlı risalemizde onun sıhhatinin münakaşasını yaptık.
Bu alet hususiyle, güneş dönencelerden birinde bulunduğunda kullanılır.
Gerçekten, Hint dairesi dönencelerde senenin diğer zamanlarındakinden çok
daha dakik neticeler verir.
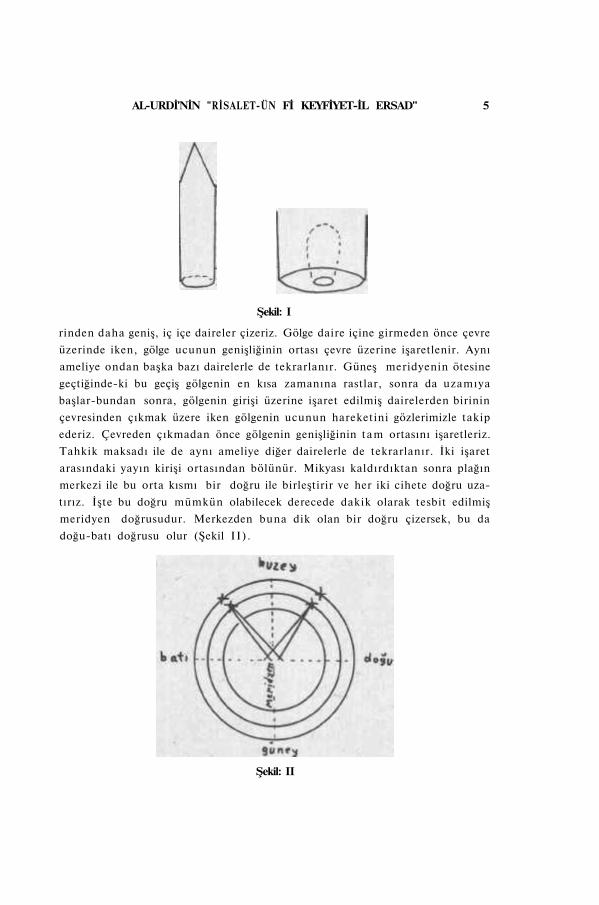
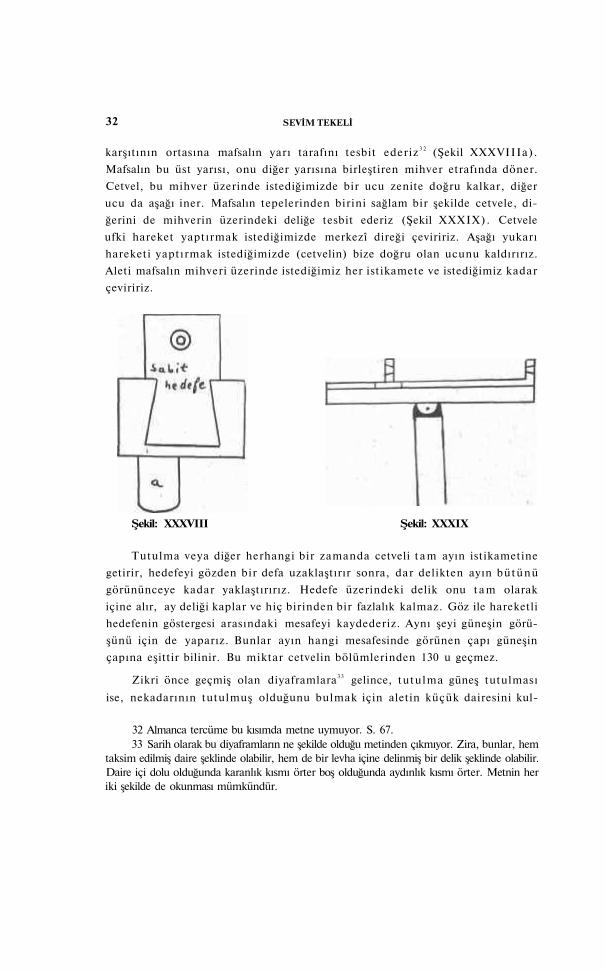
Onun yapılışı. Tahtadan bir levha veya düz bir taş plak alırız. Üst yü
zünü iyi bir şekilde tesviye eder, ufka paralel olarak yerleştiririz. Bu, fadin
diye bilinen duvarcı terazisi ile yapılır. Alet kışın kullanılacak ise mikyasın
tepesi sivri, tabanı yuvarlak olsun. Eyer mikyas bakırdansa ağırlığı kâfidir,
eyer, tahtadan ise, kaidesinin merkezinin etrafına, torna ile, dip kısmı, ağız
kısmına nazaran daha geniş olan bir oyuk yapar, ağırlığı sebebi ile konulduğu
zaman onu tesbit etsin diye tam doldurmıyacak 4 şekilde içine kurşun dökeriz
(Şekil I).
Sonra plağın merkezine, çapı (mikyasın) tabanının çapma eşit bir küçük
daire çizeriz öyleki, mikyas kaide üzerine konursa merkezi merkezine intibak
eder, mihveri de plağın yüzeyine dik olur. Plak ufka paralel bir duruma geti
rilip, kireç veya herhangi başka birşey ile yerine tesbit edilince, gölge birisine
geldiğinde gafil olunulursa diğeri onun yerine geçsin diye, merkezine birbi-
3 Gölge boyu yaz ve kış dönencelerinde değişeceği için mikyasın boyu bununla orantılı olarak uzayıp kısalacaktır.
4 kelimesi olarak okunduğu için ten az olarak tercüme edilmiştir. S. 26.
boyu plak üzerine çizilen en büyük daire çapının kadar, yazın kullanılacaksa
çapının kadar olur.3 Torna ile ona bir mikyas yaparız. Silindir şeklinde
AL-URDİ'NİN "RİSALET-ÜN Fİ KEYFİYET-İL ERSAD" 5
Şekil: I
rinden daha geniş, iç içe daireler çizeriz. Gölge daire içine girmeden önce çevre
üzerinde iken, gölge ucunun genişliğinin ortası çevre üzerine işaretlenir. Aynı
ameliye ondan başka bazı dairelerle de tekrarlanır. Güneş meridyenin ötesine
geçtiğinde-ki bu geçiş gölgenin en kısa zamanına rastlar, sonra da uzamıya
başlar-bundan sonra, gölgenin girişi üzerine işaret edilmiş dairelerden birinin
çevresinden çıkmak üzere iken gölgenin ucunun hareketini gözlerimizle takip
ederiz. Çevreden çıkmadan önce gölgenin genişliğinin tam ortasını işaretleriz.
Tahkik maksadı ile de aynı ameliye diğer dairelerle de tekrarlanır. İki işaret
arasındaki yayın kirişi ortasından bölünür. Mikyası kaldırdıktan sonra plağın
merkezi ile bu orta kısmı bir doğru ile birleştirir ve her iki cihete doğru uza
tırız. İşte bu doğru mümkün olabilecek derecede dakik olarak tesbit edilmiş
meridyen doğrusudur. Merkezden buna dik olan bir doğru çizersek, bu da
doğu-batı doğrusu olur (Şekil II) .
Şekil: II
6 SEVİM TEKELİ
Şimdi, Maragada, Şehrin yakınında ve batı yönündeki tepe üzerinde bu
lunan mahrus rasathanede inşa ettiğimiz aletleri zikredelim. Bu işler Hicrî
660 yılından önce gelen ve 660 yılını takip eden bir kaç sene içinden yapılmış
tır.
Bütün bunlar en büyük Önder, erdemli bilgin, mükemmel inceleyici, ilim
adamlarının örneği, hakimlerin başı, sade İslam ulamasının değil, fakat, mü-
tekaddiminin de en faziletlisi efendimizin işareti ile olmuştur. O, bütün fena
lıklardan münezzeh olan Allahın, zamanımız ilim adamlarında ancak teker
teker buluna bilen, erdem, asalet, iyi huy, yumuşaklık, sağlam muhakeme,
güzel hareketler ve bütün ilimleri ihata etme gibi kabiliyetleri kendinde bir
araya toplamış olduğu kimselerdendir. İlim adamlarını etrafına topladı ve
bol ihsanlarla bağlılıklarını artırdı. Onlara, babanın evlâdına karşı olduğun
dan daha müşfikti. Biz onun gölgesinde emin, onu görmekle bahtiyar olduk.
Şiirde dendiği gibi,
Onu sınamak için kızdırıyor,
Her iki halinde de iyilik ve yumuşaklık buluyorduk.
Bu şahsiyet, yüce Tanrı günlerini daim etsin, Milletin yardımcısı Nasirüddin
Muhammed ibn Muhammed al-Tusi dir. Onu görmeden evvel hakkında çok
şey işitmiş ve bunları mubalağa zannetmiştim. Bizzat onunla karşılaştığımız
da hakikat bilineni önemsiz duruma düşürdü. Bizi onun hizmetinde bir araya
getiren bu günler ne güzel günler. Bu günler bizi vatanımızdan aşiretimizden,
çocuklarımızdan ayırdıysa da bütün bunları telâfi eden onun (al-Tusi) mev
cudiyeti vardı. Onu bulan hiç bir şeyi kaybetmemiş, fakat onu kaybeden her
şeyi kaybetmiştir. Allah bizi ondan ayırmasın ve uzun bakası ile bizleri fay
dalandırsın.
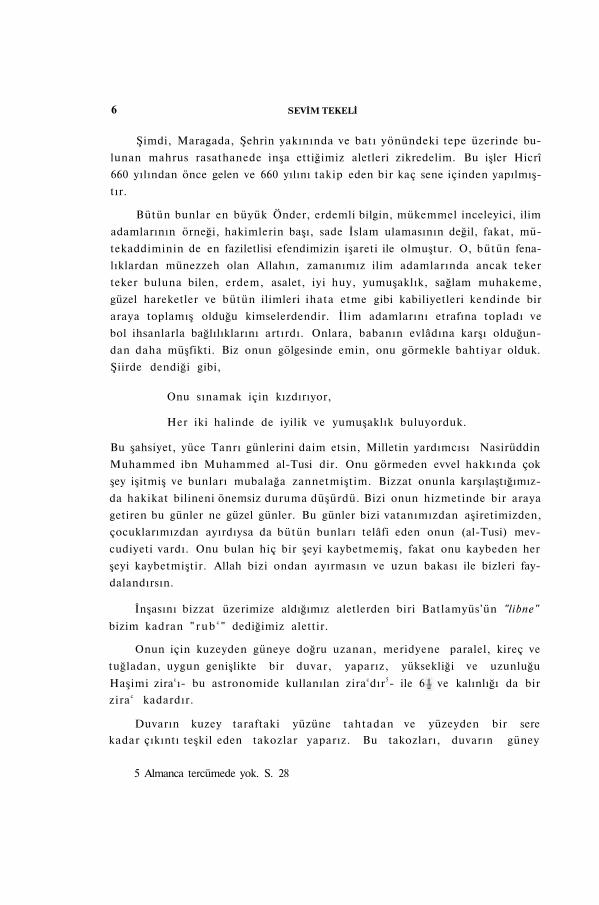
İnşasını bizzat üzerimize aldığımız aletlerden biri Batlamyüs'ün "libne"
bizim kadran " r u b c " dediğimiz alettir.
Onun için kuzeyden güneye doğru uzanan, meridyene paralel, kireç ve
tuğladan, uygun genişlikte bir duvar, yaparız, yüksekliği ve uzunluğu
zira c kadardır.
Duvarın kuzey taraftaki yüzüne tahtadan ve yüzeyden bir sere
kadar çıkıntı teşkil eden takozlar yaparız. Bu takozları, duvarın güney
5 Almanca tercümede yok. S. 28
Haşimi ziracı- bu astronomide kullanılan ziracdır5- ile 6 ve kalınlığı da bir
AL-URDİ'NİN "RİSALET-ÜN Fİ KEYFİYET-İL ERSAD" 7
köşesinin tabanına yakın kısmından başlayıp, üst kuzey köşesine doğru
kavislenecek tarzda ve dörtte bir daire teşkil etmek üzere eşit aralıklarla tes-
bit ederiz. Ayrıca, daha sonra zikredeceğimiz kadranı taşıyacak olan iki cet
velin tesbit edileceği, diğer başka takozlar da bulunsun (Şekil I I I , a, b).
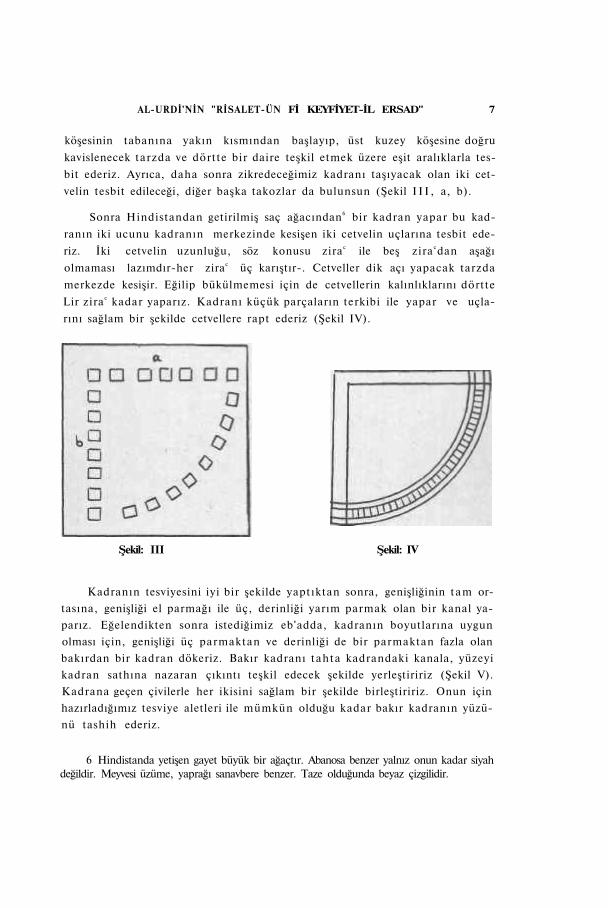
Sonra Hindistandan getirilmiş saç ağacından6 bir kadran yapar bu kad
ranın iki ucunu kadranın merkezinde kesişen iki cetvelin uçlarına tesbit ede
riz. İki cetvelin uzunluğu, söz konusu zira c ile beş zira cdan aşağı
olmaması lazımdır-her zirac üç karıştır-. Cetveller dik açı yapacak tarzda
merkezde kesişir. Eğilip bükülmemesi için de cetvellerin kalınlıklarını dörtte
Lir zira c kadar yaparız. Kadranı küçük parçaların terkibi ile yapar ve uçla
rını sağlam bir şekilde cetvellere rapt ederiz (Şekil IV).
Şekil: III Şekil: IV
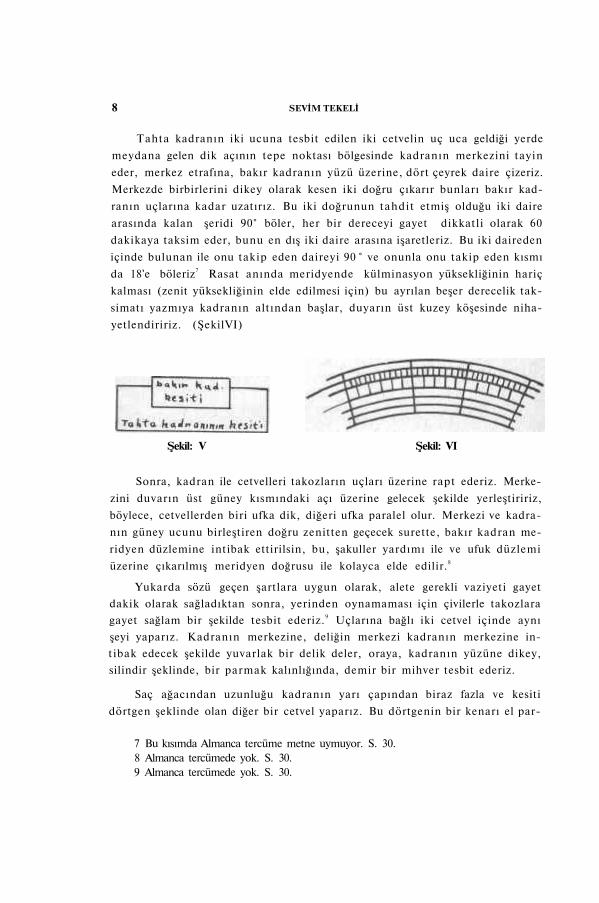
Kadranın tesviyesini iyi bir şekilde yaptıktan sonra, genişliğinin tam or
tasına, genişliği el parmağı ile üç, derinliği yarım parmak olan bir kanal ya
parız. Eğelendikten sonra istediğimiz eb'adda, kadranın boyutlarına uygun
olması için, genişliği üç parmaktan ve derinliği de bir parmaktan fazla olan
bakırdan bir kadran dökeriz. Bakır kadranı tahta kadrandaki kanala, yüzeyi
kadran sathına nazaran çıkıntı teşkil edecek şekilde yerleştiririz (Şekil V).
Kadrana geçen çivilerle her ikisini sağlam bir şekilde birleştiririz. Onun için
hazırladığımız tesviye aletleri ile mümkün olduğu kadar bakır kadranın yüzü
nü tashih ederiz.
6 Hindistanda yetişen gayet büyük bir ağaçtır. Abanosa benzer yalnız onun kadar siyah değildir. Meyvesi üzüme, yaprağı sanavbere benzer. Taze olduğunda beyaz çizgilidir.
8 SEVİM TEKELİ
Tahta kadranın iki ucuna tesbit edilen iki cetvelin uç uca geldiği yerde
meydana gelen dik açının tepe noktası bölgesinde kadranın merkezini tayin
eder, merkez etrafına, bakır kadranın yüzü üzerine, dört çeyrek daire çizeriz.
Merkezde birbirlerini dikey olarak kesen iki doğru çıkarır bunları bakır kad
ranın uçlarına kadar uzatırız. Bu iki doğrunun tahdit etmiş olduğu iki daire
arasında kalan şeridi 90° böler, her bir dereceyi gayet dikkatli olarak 60
dakikaya taksim eder, bunu en dış iki daire arasına işaretleriz. Bu iki daireden
içinde bulunan ile onu takip eden daireyi 90 ° ve onunla onu takip eden kısmı
da 18'e böleriz7 Rasat anında meridyende külminasyon yüksekliğinin hariç
kalması (zenit yüksekliğinin elde edilmesi için) bu ayrılan beşer derecelik tak
simatı yazmıya kadranın altından başlar, duyarın üst kuzey köşesinde niha-
yetlendiririz. (ŞekilVI)
Şekil: V Şekil: VI
Sonra, kadran ile cetvelleri takozların uçları üzerine rapt ederiz. Merke
zini duvarın üst güney kısmındaki açı üzerine gelecek şekilde yerleştiririz,
böylece, cetvellerden biri ufka dik, diğeri ufka paralel olur. Merkezi ve kadra
nın güney ucunu birleştiren doğru zenitten geçecek surette, bakır kadran me
ridyen düzlemine intibak ettirilsin, bu, şakuller yardımı ile ve ufuk düzlemi
üzerine çıkarılmış meridyen doğrusu ile kolayca elde edilir.8
Yukarda sözü geçen şartlara uygun olarak, alete gerekli vaziyeti gayet
dakik olarak sağladıktan sonra, yerinden oynamaması için çivilerle takozlara
gayet sağlam bir şekilde tesbit ederiz.9 Uçlarına bağlı iki cetvel içinde aynı
şeyi yaparız. Kadranın merkezine, deliğin merkezi kadranın merkezine in
tibak edecek şekilde yuvarlak bir delik deler, oraya, kadranın yüzüne dikey,
silindir şeklinde, bir parmak kalınlığında, demir bir mihver tesbit ederiz.
Saç ağacından uzunluğu kadranın yarı çapından biraz fazla ve kesiti
dörtgen şeklinde olan diğer bir cetvel yaparız. Bu dörtgenin bir kenarı el par-
7 Bu kısımda Almanca tercüme metne uymuyor. S. 30. 8 Almanca tercümede yok. S. 30. 9 Almanca tercümede yok. S. 30.
AL-URDİ'NİN "RİSALET-ÜN Fİ KEYFİYET-İL ERSAD" 9
mağı ile dört parmak, kalınlığı genişliğinden biraz azdır. İmkân nisbetinde
tesviye ederiz. Uçlarına birer bakır parçası geçirir, genişliğinin ortasından
böler, bir ucuna zikri önce geçmiş olan mihver çapında yuvarlak bir delik de
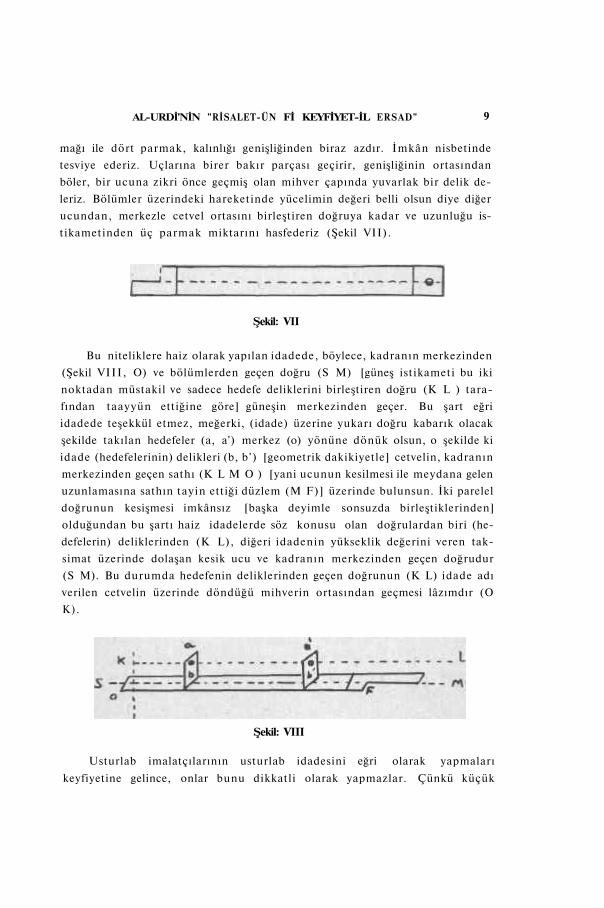
leriz. Bölümler üzerindeki hareketinde yücelimin değeri belli olsun diye diğer
ucundan, merkezle cetvel ortasını birleştiren doğruya kadar ve uzunluğu is
tikametinden üç parmak miktarını hasfederiz (Şekil VII).
Şekil: VII
Bu niteliklere haiz olarak yapılan idadede, böylece, kadranın merkezinden
(Şekil VIII , O) ve bölümlerden geçen doğru (S M) [güneş istikameti bu iki
noktadan müstakil ve sadece hedefe deliklerini birleştiren doğru (K L ) tara
fından taayyün ettiğine göre] güneşin merkezinden geçer. Bu şart eğri
idadede teşekkül etmez, meğerki, (idade) üzerine yukarı doğru kabarık olacak
şekilde takılan hedefeler (a, a') merkez (o) yönüne dönük olsun, o şekilde ki
idade (hedefelerinin) delikleri (b, b ') [geometrik dakikiyetle] cetvelin, kadranın
merkezinden geçen sathı (K L M O ) [yani ucunun kesilmesi ile meydana gelen
uzunlamasına sathın tayin ettiği düzlem (M F)] üzerinde bulunsun. İki parelel
doğrunun kesişmesi imkânsız [başka deyimle sonsuzda birleştiklerinden]
olduğundan bu şartı haiz idadelerde söz konusu olan doğrulardan biri (he-
defelerin) deliklerinden (K L), diğeri idadenin yükseklik değerini veren tak
simat üzerinde dolaşan kesik ucu ve kadranın merkezinden geçen doğrudur
(S M). Bu durumda hedefenin deliklerinden geçen doğrunun (K L) idade adı
verilen cetvelin üzerinde döndüğü mihverin ortasından geçmesi lâzımdır (O
K) .
Şekil: VIII
Usturlab imalatçılarının usturlab idadesini eğri olarak yapmaları
keyfiyetine gelince, onlar bunu dikkatli olarak yapmazlar. Çünkü küçük
10 SEVİM TEKELİ
aletlerde miktarı bukadar az olan fark his olunmaz. Fakat alet büyüyüp da
kika ve daha ince taksimat yapıldıkça buradaki değişiklik kendini gösterir ve
bu her şey bir tarafa, his ile bilinebilir.
Cetvelin ucuna yakın kısmına bir reze ile bir halka ve duvarın üst tara
fına da hareket eden bir makara takmak lâzımdır. Orada, idadenin ucundaki
halkaya bağlanan ve makaradan geçen, idadenin ağırlığını taşıyabilecek sağ
lamlıkta bir ip vardır. Kadranın tabanından itibaren yüksekliği bir küsur
zira c kadardır.
Mahrus rasathane için yapmış olduğumuz aletlerden biri, Batlamyüs'ün
tarifini verdiği altılı ve İskenderiyeli Theon'un dokuz halkasına luzum bırak-
mıyan beş halkalı zat-ül-halâktır.
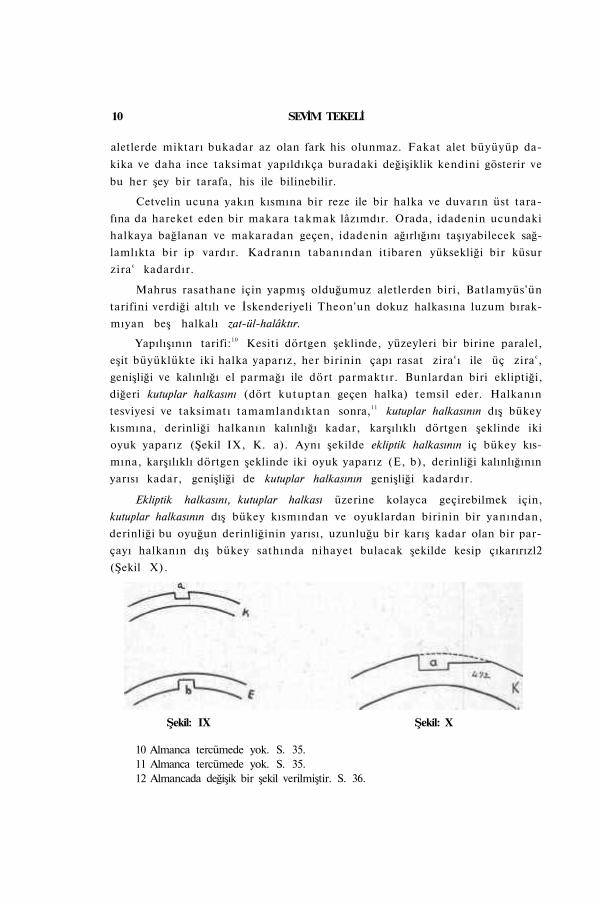
Yapılışının tarifi:10 Kesiti dörtgen şeklinde, yüzeyleri bir birine paralel,
eşit büyüklükte iki halka yaparız, her birinin çapı rasat ziracı ile üç zirac,
genişliği ve kalınlığı el parmağı ile dört parmaktır. Bunlardan biri ekliptiği,
diğeri kutuplar halkasını (dört kutuptan geçen halka) temsil eder. Halkanın
tesviyesi ve taksimatı tamamlandıktan sonra,11 kutuplar halkasının dış bükey
kısmına, derinliği halkanın kalınlığı kadar, karşılıklı dörtgen şeklinde iki
oyuk yaparız (Şekil IX, K. a). Aynı şekilde ekliptik halkasının iç bükey kıs
mına, karşılıklı dörtgen şeklinde iki oyuk yaparız (E, b), derinliği kalınlığının
yarısı kadar, genişliği de kutuplar halkasının genişliği kadardır.
Ekliptik halkasını, kutuplar halkası üzerine kolayca geçirebilmek için,
kutuplar halkasının dış bükey kısmından ve oyuklardan birinin bir yanından,
derinliği bu oyuğun derinliğinin yarısı, uzunluğu bir karış kadar olan bir par
çayı halkanın dış bükey sathında nihayet bulacak şekilde kesip çıkarırızl2
(Şekil X).
Şekil: IX Şekil: X
10 Almanca tercümede yok. S. 35. 11 Almanca tercümede yok. S. 35. 12 Almancada değişik bir şekil verilmiştir. S. 36.
AL-URDİ'NİN "RİSALET-ÜN Fİ KEYFİYET-İL ERSAD" 11
Sonra, birbirleri ile dik açı yapacak ve her ikisinin gerek iç ve gerek dış
bükey kısımları bir tek küre yüzeyi üzerinde olacak tarzda, ekliptik kutuplar
halkası içine geçirilir. Bunların birbirleri ile birleştirilmesi düz ve dairevi yü
zeylerin tesviyesi, mümkün olduğu kadar iyi bir şekilde tamamlandıktan
sonra yapılsın. Dış bükey yüzeyini tamamiyle düzgün bir hale getirmek için,
kesip çıkarılmış kısım eb'adında bakırdan bir parça yapalım, bunu mahzuf
yere koyup yapıştırmak suretiyle sağlamlaştırırız. Usta mahirse oyulan kısmı,
sonradan yapıştırmıya lüzum kalmıyacak şekilde ustalıkla yapar.
Sonra iç bükey yüzeyi önce yaptığımız ilk iki halkanın dış bükey yüzey
lerine temas edecek şekilde, ikisinden daha büyük üçüncü bir halka yaparız,
genişliği ilk iki halkanın genişliği kadar, kalınlığı da genişliğinden bir parmak
az olsun. Eğe ile tesviyesini yapar, iç ve dış yüzeylerinin yuvarlaklığını düzel
tiriz. Bu halkanın genişliğini çaplarından birinin iki ucunda, birbirine zıt iki
yüzeyde kalınlaştırmak lüzumlu ve elverişlidir. Bunların uzunluğu 1 3 birer
sere kalınlıkları da ikişer parmak kadar olsun. Bunların faydalarını geri kalan
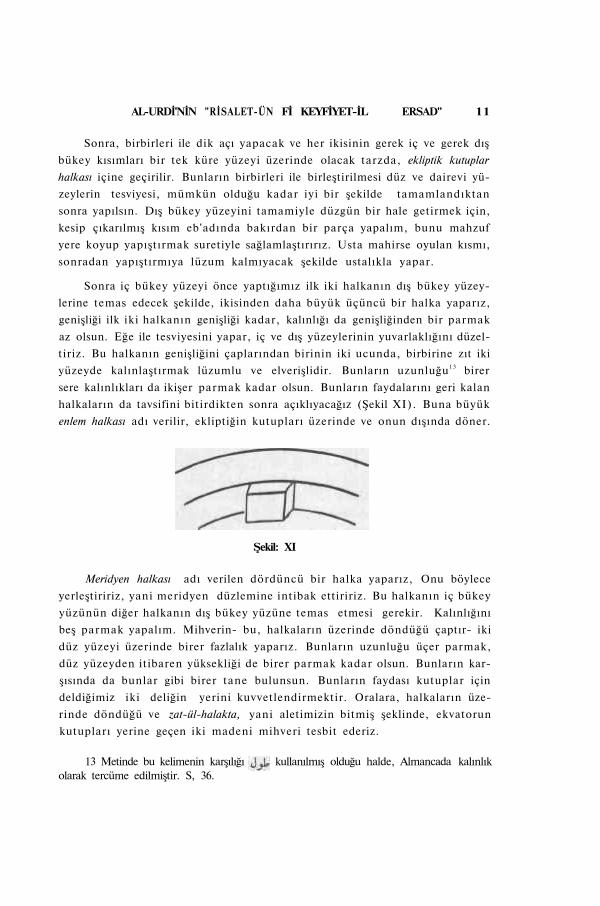
halkaların da tavsifini bitirdikten sonra açıklıyacağız (Şekil XI). Buna büyük
enlem halkası adı verilir, ekliptiğin kutupları üzerinde ve onun dışında döner.
Şekil: XI
Meridyen halkası adı verilen dördüncü bir halka yaparız, Onu böylece
yerleştiririz, yani meridyen düzlemine intibak ettiririz. Bu halkanın iç bükey
yüzünün diğer halkanın dış bükey yüzüne temas etmesi gerekir. Kalınlığını
beş parmak yapalım. Mihverin- bu, halkaların üzerinde döndüğü çaptır- iki
düz yüzeyi üzerinde birer fazlalık yaparız. Bunların uzunluğu üçer parmak,
düz yüzeyden itibaren yüksekliği de birer parmak kadar olsun. Bunların kar
şısında da bunlar gibi birer tane bulunsun. Bunların faydası kutuplar için
deldiğimiz iki deliğin yerini kuvvetlendirmektir. Oralara, halkaların üze
rinde döndüğü ve zat-ül-halakta, yani aletimizin bitmiş şeklinde, ekvatorun
kutupları yerine geçen iki madeni mihveri tesbit ederiz.
olarak tercüme edilmiştir. S, 36. 13 Metinde bu kelimenin karşılığı kullanılmış olduğu halde, Almancada kalınlık
12 SEVİM TEKELİ
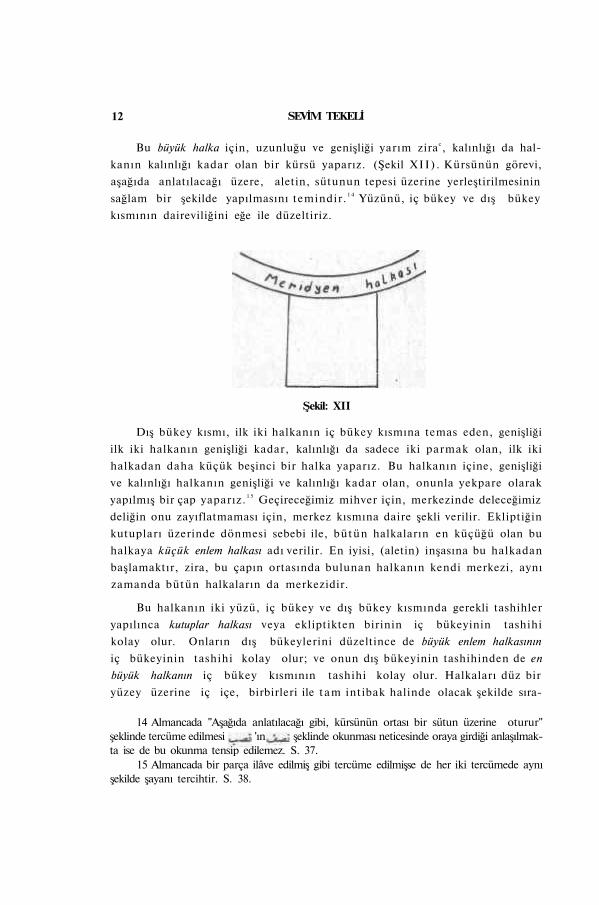
Bu büyük halka için, uzunluğu ve genişliği yarım zirac, kalınlığı da hal
kanın kalınlığı kadar olan bir kürsü yaparız. (Şekil X I I ) . Kürsünün görevi,
aşağıda anlatılacağı üzere, aletin, sütunun tepesi üzerine yerleştirilmesinin
sağlam bir şekilde yapılmasını temindir. 1 4 Yüzünü, iç bükey ve dış bükey
kısmının daireviliğini eğe ile düzeltiriz.
Şekil: XII
Dış bükey kısmı, ilk iki halkanın iç bükey kısmına temas eden, genişliği
ilk iki halkanın genişliği kadar, kalınlığı da sadece iki parmak olan, ilk iki
halkadan daha küçük beşinci bir halka yaparız. Bu halkanın içine, genişliği
ve kalınlığı halkanın genişliği ve kalınlığı kadar olan, onunla yekpare olarak
yapılmış bir çap yaparız. 1 5 Geçireceğimiz mihver için, merkezinde deleceğimiz
deliğin onu zayıflatmaması için, merkez kısmına daire şekli verilir. Ekliptiğin
kutupları üzerinde dönmesi sebebi ile, bütün halkaların en küçüğü olan bu
halkaya küçük enlem halkası adı verilir. En iyisi, (aletin) inşasına bu halkadan
başlamaktır, zira, bu çapın ortasında bulunan halkanın kendi merkezi, aynı
zamanda bütün halkaların da merkezidir.
Bu halkanın iki yüzü, iç bükey ve dış bükey kısmında gerekli tashihler
yapılınca kutuplar halkası veya ekliptikten birinin iç bükeyinin tashihi
kolay olur. Onların dış bükeylerini düzeltince de büyük enlem halkasının
iç bükeyinin tashihi kolay olur; ve onun dış bükeyinin tashihinden de en
büyük halkanın iç bükey kısmının tashihi kolay olur. Halkaları düz bir
yüzey üzerine iç içe, birbirleri ile tam intibak halinde olacak şekilde sıra-
14 Almancada "Aşağıda anlatılacağı gibi, kürsünün ortası bir sütun üzerine oturur" şeklinde tercüme edilmesi 'ın şeklinde okunması neticesinde oraya girdiği anlaşılmakta ise de bu okunma tensip edilemez. S. 37.
15 Almancada bir parça ilâve edilmiş gibi tercüme edilmişse de her iki tercümede aynı şekilde şayanı tercihtir. S. 38.
AL-URDİ'NİN "RİSALET-ÜN Fİ KEYFİYET-İL ERSAD" 13
lanır. Bunlar küçük ve büyük enlem halkaları, iki eşit halkadan biri merid
yendir. Bunları bu şekilde birbirleri içinde döndürür, eşit olan iki halkadan
birini alıp yerine diğerini koruz. Ve böylece düz yüzeyleri ile, iç bükeylik
ve dış bükeyliklerini düzeltirsek bu suretle her halkanın dış yüzeyinden
onu aynı pergel açısı (aynı yarı çap) ile çevreleyen halkanın iç bükey
yüzeyini tashih ederiz.1 6
Yapılışını ve tashihini tatmin edici bir şekilde bitirdikten sonra, taksi
matına başlarız. Onlardan taksim edilmesi icap eden sadece üç tanedir, eklip-
tik, küçük enlem halkası, büyük halka yani meridyen.
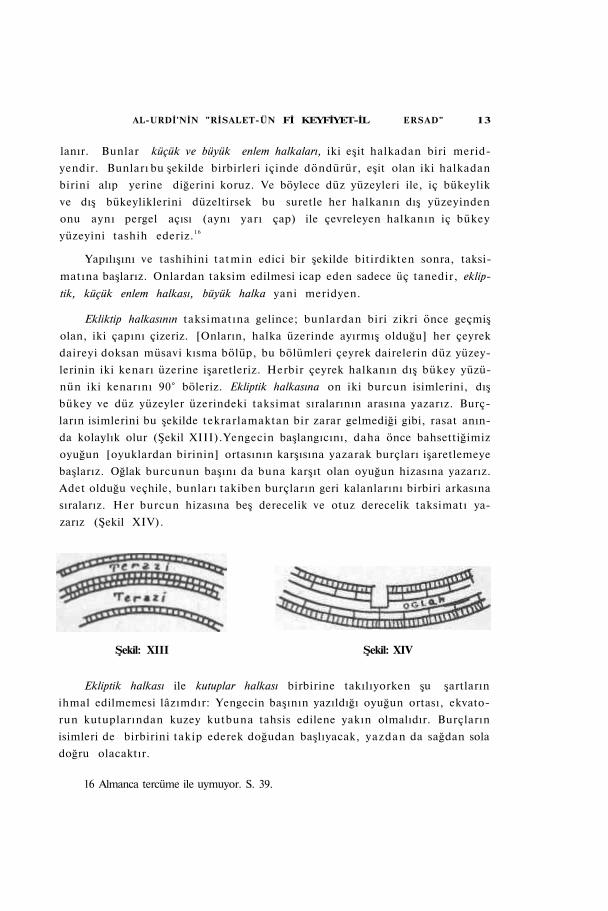
Ekliktip halkasının taksimatına gelince; bunlardan biri zikri önce geçmiş
olan, iki çapını çizeriz. [Onların, halka üzerinde ayırmış olduğu] her çeyrek
daireyi doksan müsavi kısma bölüp, bu bölümleri çeyrek dairelerin düz yüzey
lerinin iki kenarı üzerine işaretleriz. Herbir çeyrek halkanın dış bükey yüzü
nün iki kenarını 90° böleriz. Ekliptik halkasına on iki burcun isimlerini, dış
bükey ve düz yüzeyler üzerindeki taksimat sıralarının arasına yazarız. Burç
ların isimlerini bu şekilde tekrarlamaktan bir zarar gelmediği gibi, rasat anın
da kolaylık olur (Şekil XIII).Yengecin başlangıcını, daha önce bahsettiğimiz
oyuğun [oyuklardan birinin] ortasının karşısına yazarak burçları işaretlemeye
başlarız. Oğlak burcunun başını da buna karşıt olan oyuğun hizasına yazarız.
Adet olduğu veçhile, bunları takiben burçların geri kalanlarını birbiri arkasına
sıralarız. Her burcun hizasına beş derecelik ve otuz derecelik taksimatı ya
zarız (Şekil XIV).
Şekil: XIII Şekil: XIV
Ekliptik halkası ile kutuplar halkası birbirine takılıyorken şu şartların
ihmal edilmemesi lâzımdır: Yengecin başının yazıldığı oyuğun ortası, ekvato
run kutuplarından kuzey kutbuna tahsis edilene yakın olmalıdır. Burçların
isimleri de birbirini takip ederek doğudan başlıyacak, yazdan da sağdan sola
doğru olacaktır.
16 Almanca tercüme ile uymuyor. S. 39.
14 SEVİM TEKELİ
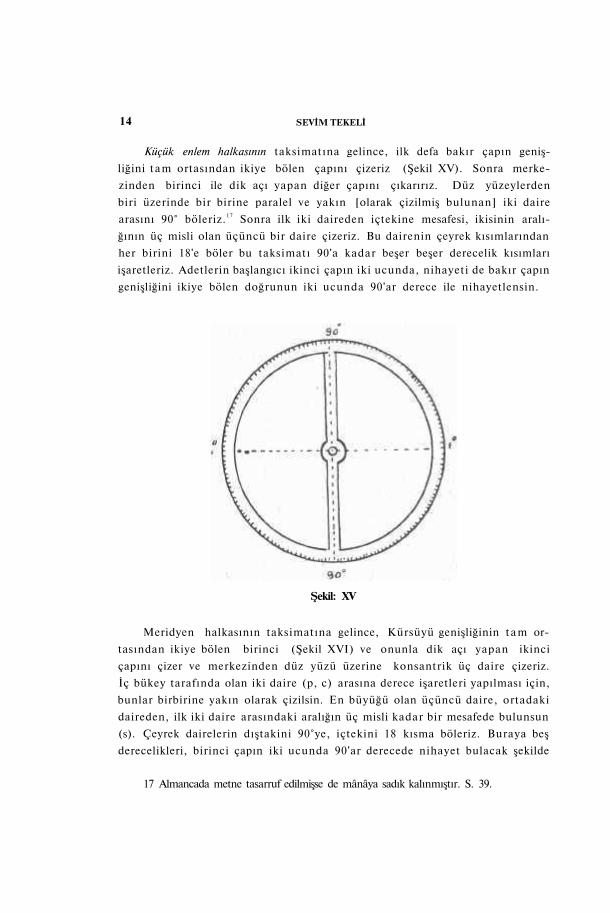
Küçük enlem halkasının taksimatına gelince, ilk defa bakır çapın geniş
liğini tam ortasından ikiye bölen çapını çizeriz (Şekil XV). Sonra merke
zinden birinci ile dik açı yapan diğer çapını çıkarırız. Düz yüzeylerden
biri üzerinde bir birine paralel ve yakın [olarak çizilmiş bulunan] iki daire
arasını 90° böleriz.1 7 Sonra ilk iki daireden içtekine mesafesi, ikisinin aralı-
ğının üç misli olan üçüncü bir daire çizeriz. Bu dairenin çeyrek kısımlarından
her birini 18'e böler bu taksimatı 90'a kadar beşer beşer derecelik kısımları
işaretleriz. Adetlerin başlangıcı ikinci çapın iki ucunda, nihayeti de bakır çapın
genişliğini ikiye bölen doğrunun iki ucunda 90'ar derece ile nihayetlensin.
Meridyen halkasının taksimatına gelince, Kürsüyü genişliğinin t a m or
tasından ikiye bölen birinci (Şekil XVI) ve onunla dik açı yapan ikinci
çapını çizer ve merkezinden düz yüzü üzerine konsantrik üç daire çizeriz.
İç bükey tarafında olan iki daire (p, c) arasına derece işaretleri yapılması için,
bunlar birbirine yakın olarak çizilsin. En büyüğü olan üçüncü daire, ortadaki
daireden, ilk iki daire arasındaki aralığın üç misli kadar bir mesafede bulunsun
(s). Çeyrek dairelerin dıştakini 90°ye, içtekini 18 kısma böleriz. Buraya beş
derecelikleri, birinci çapın iki ucunda 90'ar derecede nihayet bulacak şekilde
17 Almancada metne tasarruf edilmişse de mânâya sadık kalınmıştır. S. 39.
Şekil: XV
AL-URDİ'NİN "RİSALET-ÜN Fİ KEYFİYET-İL ERSAD 15
yazarız. Dıştaki taksimatın her derecesini de mümkün olduğu kadar daha
küçük bölümlere ayırırız.
Şekil: XVI
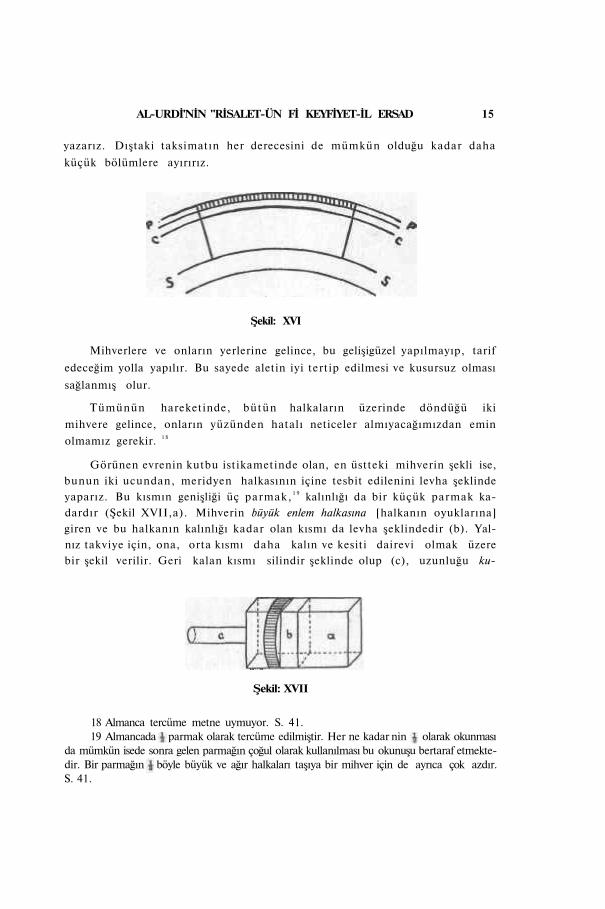
Mihverlere ve onların yerlerine gelince, bu gelişigüzel yapılmayıp, tarif
edeceğim yolla yapılır. Bu sayede aletin iyi tertip edilmesi ve kusursuz olması
sağlanmış olur.
Tümünün hareketinde, bütün halkaların üzerinde döndüğü iki
mihvere gelince, onların yüzünden hatalı neticeler almıyacağımızdan emin
olmamız gerekir. 1 8
Görünen evrenin kutbu istikametinde olan, en üstteki mihverin şekli ise,
bunun iki ucundan, meridyen halkasının içine tesbit edilenini levha şeklinde
yaparız. Bu kısmın genişliği üç parmak, 1 9 kalınlığı da bir küçük parmak ka
dardır (Şekil XVII,a). Mihverin büyük enlem halkasına [halkanın oyuklarına]
giren ve bu halkanın kalınlığı kadar olan kısmı da levha şeklindedir (b). Yal
nız takviye için, ona, orta kısmı daha kalın ve kesiti dairevi olmak üzere
bir şekil verilir. Geri kalan kısmı silindir şeklinde olup (c), uzunluğu ku-
Şekil: XVII
18 Almanca tercüme metne uymuyor. S. 41. 19 Almancada parmak olarak tercüme edilmiştir. Her ne kadar nin olarak okunması
da mümkün isede sonra gelen parmağın çoğul olarak kullanılması bu okunuşu bertaraf etmektedir. Bir parmağın böyle büyük ve ağır halkaları taşıya bir mihver için de ayrıca çok azdır. S. 41.

16 SEVİM TEKELİ
tuplar halkasının kalınlığı kadar, kalınlığı da küçük parmak kadardır. Bu
kısmın etrafında kutuplar halkası ve onun içinde olan diğerleri döner [ortası
geometrik mihveri] levha şeklinde olan kısmı iki eşit kısma böler.2 0
Bunun karşısındaki mihver ise, uzunluğu onbir parmak, kalınlığı bir
parmak 2 1 olan bir silindir şeklindedir. Bu mihverin dışına içi boydan boya
delik, sağlam, madeni bir parça geçirilir. Halkanın ağırlığını taşıması için me
ridyen halkası ile kutuplar halkasının arasında, mihverin orta kısmının et
rafında bulunur (Şekil XVIII) . Böylece halka aşağı düşmez. Bu madeni par
çanın yüksekliği büyük enlem halkasının kalınlığı kadar olsun. Kutuplar halkası
ile meridyen halkası arasında bir ara parçasıdır (bir destektir).
İki enlem halkasının mihverlerine gelince, bunlar, aynı zamanda, eklip-
tiğin de kutuplarıdır. Üst taraftaki mihverin orta kısmının kesiti kare şeklin
dedir ve bu kısmın uzunluğu kutuplar halkasının kalınlığı kadardır. Bunun
geri kalan üst ve alt kısımlarının uzunlukları, enlem halkalarının kalınlıkları
kadar olan silindir şeklindedir (Şekil XIX) . Üst kısmının etrafında büyük
enlem halkası, alt kısmının etrafında da küçük enlem halkası döner.
Şekil: XVIII Şekil XIX
Alttaki, silindir şeklindedir. Her iki mihverin uzunluğu el parmağı ile
sekiz,22 kalınlığı da bir parmaktır. Bu uzunluk üç halkanın yani kutuplar hal
kası ile iki enlem halkasının kalınlığı toplamına eşittir.
Bu mihverler için halkalarda yapmış olduğumuz deliklere gelince, bunlar
dan meridyen haklasındakilerden üstteki, halkanın dış bükey kısmının or
tasında, dörtgen şeklinde, uzunluğu daha önce zikredilmiş levha şeklindeki
20 Son bir cümle tercümede yok. S. 42. 21 Tercümede zuhul olarak 12 parmak olarak yazılmıştır. S. 42. 22 Üç halkanın kalınlığının toplamı 9 parmak olduğundan bunun da dokuz olması lâ
zımdır. Almancada 9 olarak tercüme edilmiş not konmamıştır. S. 42.
AL-URDİ'NİN "RİSALET-ÜN Fİ KEYFİYET-İL ERSAD" 17
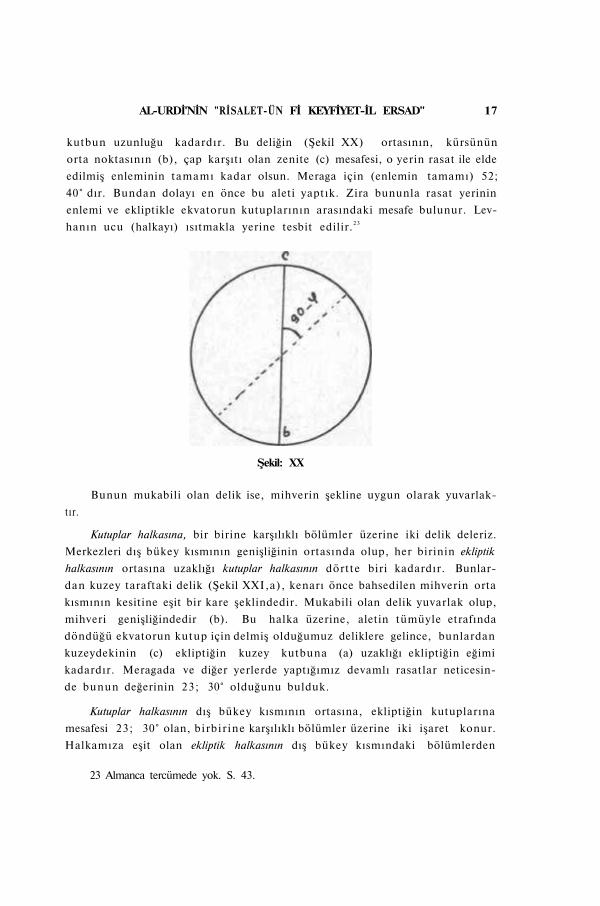
kutbun uzunluğu kadardır. Bu deliğin (Şekil XX) ortasının, kürsünün
orta noktasının (b), çap karşıtı olan zenite (c) mesafesi, o yerin rasat ile elde
edilmiş enleminin tamamı kadar olsun. Meraga için (enlemin tamamı) 52;
40° dır. Bundan dolayı en önce bu aleti yaptık. Zira bununla rasat yerinin
enlemi ve ekliptikle ekvatorun kutuplarının arasındaki mesafe bulunur. Lev
hanın ucu (halkayı) ısıtmakla yerine tesbit edilir.2 3
Şekil: XX
Bunun mukabili olan delik ise, mihverin şekline uygun olarak yuvarlak
tır.
Kutuplar halkasına, bir birine karşılıklı bölümler üzerine iki delik deleriz.
Merkezleri dış bükey kısmının genişliğinin ortasında olup, her birinin ekliptik
halkasının ortasına uzaklığı kutuplar halkasının dörtte biri kadardır. Bunlar
dan kuzey taraftaki delik (Şekil XXI,a), kenarı önce bahsedilen mihverin orta
kısmının kesitine eşit bir kare şeklindedir. Mukabili olan delik yuvarlak olup,
mihveri genişliğindedir (b). Bu halka üzerine, aletin tümüyle etrafında
döndüğü ekvatorun kutup için delmiş olduğumuz deliklere gelince, bunlardan
kuzeydekinin (c) ekliptiğin kuzey kutbuna (a) uzaklığı ekliptiğin eğimi
kadardır. Meragada ve diğer yerlerde yaptığımız devamlı rasatlar neticesin
de bunun değerinin 23; 30° olduğunu bulduk.
Kutuplar halkasının dış bükey kısmının ortasına, ekliptiğin kutuplarına
mesafesi 23; 30° olan, birbir ine karşılıklı bölümler üzerine iki işaret konur.
Halkamıza eşit olan ekliptik halkasının dış bükey kısmındaki bölümlerden
23 Almanca tercümede yok. S. 43.
18 SEVİM TEKELİ
faydalanmak suretiyle işin yapılışı kolaylaşır. Onlardan ekliptiğin kutbu ile
yengeçin başlangıcı arasındakini kuzey kutbu yaparız. Diğer kutup (güney)
ise bunun karşısında bulunur. Bu noktalar merkez olmak üzere, önce zikre
dilmiş olan mihverin uçları genişliğinde yuvarlak iki delik deleriz.
Büyük enlem halkasına, karşılıklı, genişliğinin ortasına kutuplar halka
sının iki tarafından çıkan ve ekliptiğin kutuplarını temsil eden mihver uçları
için dairevi iki delik deleriz.
Küçük enlem halkasına gelince, dış bükey kısmında, bakır çapına dik
olan "ikinci" çapının iki ucundan iki yuvarlak delik deleriz. Oralara kutuplar
halkasının iç tarafında çıkıntı teşkil eden ekliptiğin mihverinin ucunu geçiririz.
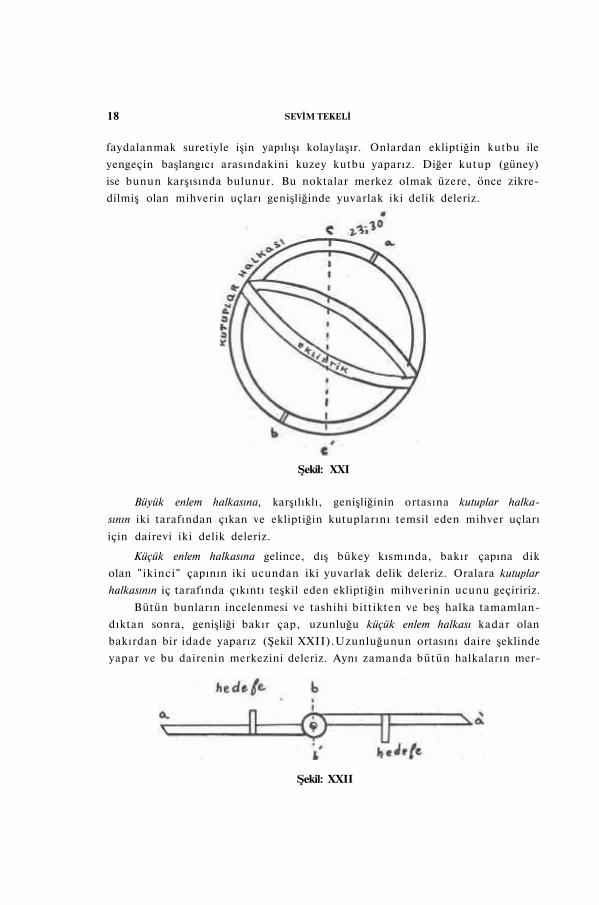
Bütün bunların incelenmesi ve tashihi bittikten ve beş halka tamamlan
dıktan sonra, genişliği bakır çap, uzunluğu küçük enlem halkası kadar olan
bakırdan bir idade yaparız (Şekil XXII).Uzunluğunun ortasını daire şeklinde
yapar ve bu dairenin merkezini deleriz. Aynı zamanda bütün halkaların mer
Şekil: XXII
Şekil: XXI
AL-URDİ'NİN "RİSALET-ÜN Fİ KEYFİYET-İL ERSAD" 19
kezi olan bakır çapın ortasındaki dairenin merkezini de deler, idadeyi çapın
merkezine, adet olduğu veçhile mil ve pim ile tesbit ederiz. İdadenin her iki
ucundan ve bir birinin aksi yönlerden idadenin genişliğinin ortasına kadar
(a a) ve merkezinden geçen doğruya kadar (b b') bir kısmını bazen kesip çı
karırız. İdadenin uçları bir birine aksi istikamette olur. Sonra üzerine kare
şeklinde bir birine eşit kapağı olan iki hedefe yaparız. Genişliklerinin or
tasını deler oralara kapaklan tesbit ederiz. İki deliğin arası iki karıştır.
Sonra bu alet için bir temel yapar, üzerine taştan bir sutun
dikeriz. Üst kısmında meridyen doğrusunu çıkarır, oraya kuzeyden
güneye doğru uzanan dörtgen şeklinde bir kanal yaparız. Bu kanala
halkaların en büyüğü olan meridyen halkası'nın kürsüsünü tesbit ederiz. Ka
malarla gerekli düzeltmeleri yaparak, meridyen düzlemine paralel yaparız.
Halka üzerinde bulunan kürsünün orta noktası ile zeniti birleştiren doğruyu,
ufukla dik açı yapacak şekilde tanzim ederiz (Şekil XXVIII, ZT MM). Aleti
çeşitli yönlere doğru gerekli şekilde meylettirerek bu tashihi yaparız; bu
işleri şakulle yaparız. Alet arzu edilen durumu aldıktan sonra, bu kanala, boş
kalan yerlere ve kürsünün iki kenarındaki boşlukları doldurmak için erimiş
kurşun dökeriz. Sonra geri kalan halkaları meridyen halkası içine ve kendileri
için tesbit edilmiş mihverlere yerleştiririz. Diğer kutuplan yerlerine geçirir,
kutuplar halkasının ağırlığını taşıması için madeni parçayı yerine takar, iki
enlem halkasını da ekliptiğin kutuplarına geçiririz. Aletin muhtelif parçaları
nın bir araya getirilme işi bu suretle tamamlanır ve alet kürsüsü üzerine gerekli
tarzda ve sağlamca oturur.
Aletin daha mükemmel ve kusursuz olmasını sağlıyan ilâvelere gelince,
bunları aşağıda zikredeceğim. Halkaların ve mihverlerin resimlerini çizecek
ve onların faydalarını açıklıyacağım.
Karşılıklı iki mihver için yapılmış deliğin hizasında ve meridyen halkası
yüzeyindeki ilâvelere gelince, bunlar iki mihver deliğinin (halkayı) zayıflat
masına mukabil onu takviye etmek içindir.
Büyük enlem halkasındaki ters yöndeş iki ilâve ise, bunlar ekvatorun
mihverinin girmesi için (büyük enlem halkasında) yaptığımız iki oyuk
içindir. Bunlar (ekvatorun iki mihveri) meridyen halkasın'dan kutuplar
halkasın a geçerler, bundan dolayı büyük enlem halkasının kutuplar halkasına
intibakına ve tam yarım devir yapmasına mani olurlar-bunun neticesi olarak,
büyük enlem halkasının ekliptiğin bölümleri üzerinden geçişi tamamlanmaz
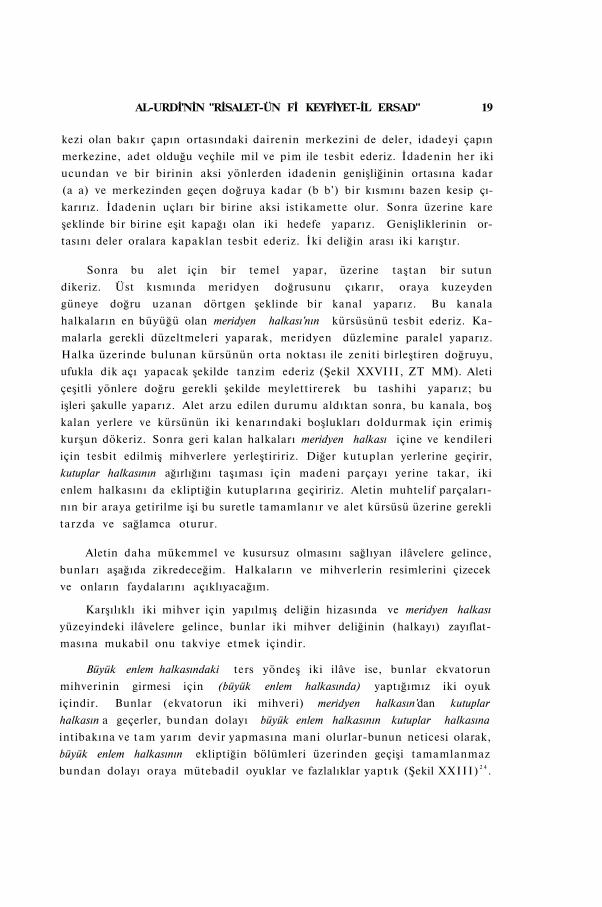
bundan dolayı oraya mütebadil oyuklar ve fazlalıklar yaptık (Şekil X X I I I ) 2 4 .
20 SEVİM TEKELİ
Şekil: XXIII
Diğer bütün halkaların yüzünde, kutupların kenarındaki ilâveler ise,
bunlar, onları muhafaza eder ve kırılmalarını önler, başka bir şey için değildir.
İdadeye gelince, bu, enlemleri olan yıldızların enlemlerini almak için
Batlamyüs'ün beşinci halka içine yerleştirdiği altıncı halkadan müstağni
bıraktırır. Nitekim biz cetvel ve onun iki hedefesi ile yıldızların enlemlerini
elde ederiz. Şimdi altıncı halkada görülen bozukluk ve kifayetsizliği açıklı-
yacağız ki, bu gibi şeyler cetvelde vuku bulmaz. Onun yapılmasının ve kulla-
nılmasının altıncı halkaya nazaran daha kolay olduğu açıktır. Bu cümleden
olarak, (altıncı) halkanın beşincinin içinde dönmesi ve yüzeylerinin daima aynı
düzlem içinde kalmaları icabeder. Bundan ötürü, altıncının yüzeyinin beşinci
nin yüzeyinden taşmaması için bir takım tırnaklara ihtiyacımız vardır. Bu
mâniler iki tarzda olacaktır. Onlardan biri altıncının dış bükey (yüzünün)
ortasına çepe çevre bir kanal yapmak ve beşinci (halkadan) onun iç bükey
(yüzeyinden) geçip oyulmuş kanala girecek şekilde bir takım çiviler tesbit
etmektir.
İkincisi, altıncının her iki düz yüzeyine uçları dış bükey (yüzeyinden)
dışarı doğru çıkacak, beşinci (halkanın) yüzeyi üzerine dayanacak, altıncı
halka yüzeyinin beşinci halkanın yüzeyinden dışarı çıkmasına mani olacak
bir takım tırnaklar tesbit etmektir. Bu tırnakların beşinci halkada olması im-
24 Hulasaten tercüme edilmiştir. S. 46.
AL-URDİ'NİN "RİSALET-ÜN Fİ KEYFİYET-İL ERSAD" 21
kansızdır. Çünkü, taksimatı gösteren müş'ir bu halkanın yüzeyi üzerinde
hareket etmekte olduğundan, 2 5 tırnaklar (beşinci halkada oldukları takdirde)
bu (altıncı) halkanın hareketine engel olurlar. Eğer, altıncı beşinciye gayet
sıkı bir şekilde temas edecek olursa, bilhassa alet büyük çapta olduğunda,
hareket ettiricinin onu hareket ettirmesi zorlaşır. Ve eğer, sıkı temas etmezse
(altıncının) ağırlığı dolayısı ile aşağı düşeceği, böylece, merkezinin beşinci
halkanın merkezinde kalmıyacağı aşikârdır.
Onda şu kusur da görülür. Alet büyüdüğünde, çapı üzerinde bulunan iki
hedefe arasındaki mesafe de büyür ve rasıt (hedefenin) iki deliğinden yıldızı
göremez. İkisinin arasını birleştiren düz bir boru yapmak ta zor olur. Eğer,
birinden diğerine nüfuz eden ışınla faaliyette bulunulacak sa (ışık) gölgelenir
ve dağılır ve onun tahkiki de zor olur.
Alet küçük olursa dakik olmaz ve faydasız olur. Halbuki, onun yerine
geçen idadede hedefeyi onun (idadenin) istediğimiz yerine koymak mümkün
dür ve bu durumda da bunu yapmıya mani olan bir şey ile karşılaşılmaz. Bu
takdirde, beşinci halkanın merkezinden ve onun sabit olarak mevcut oluşun
dan faydalanabilme durumu vardır. Halbuki, idade bulunmaması durumunda,
bunun zıddına olarak, yine dairelerin hepsinin merkezlerinin tek noktada bir
leştikleri farz ve kabul olunduğu halde, bu noktayı tesbit ve tayin eden idade
gibi maddî bir vasata merbut değildir. Bu sebeble, aletin imali sırasında bu
noktaya çok ihtiyaç his olunmasına rağmen, bu ortak merkezin bilfiil tes-
biti ve ondan faydalanılması imkânsızdır.
Halkalarda yapılması gerekli tashihe ve yüzeylerinin tesviyesine gelince,
bu zahmetli bir iştir. Halkaların gerekli tashihlerini yapmıya yarıyan bir ta
kım tesviye aletleri yaptım.
Bakırdan uzunlukları yarımşar zirac, genişlikleri, tesviyesi yapıldıktan
sonra üçer parmak kadar olan sağlam levhalar yaparız. Onlardan birinin iki
kenarından birine tashihini yapmak istediğimiz birinci halkanın iç bükey
yüzeyinin çizildiği açıklıkta (yani çapla) bir daire yayı çizilir. Y a y ı n dışında
kalan kısmını törpüleriz. Diğer kenarına halkanın dış bükey çevresine eşit bir
yay parçası çizer, bu sefer yayın iç bükey kısmının ihata ettiği parçayı eğele
riz. Bu suretle levhanın bir kenarında dış bükeylik, diğer kenarında da iç
bükeylik elde edilir (Şekil XXIV). İç bükey kenarı ile halkanın dış bükey yü
zünü, dış bükey kenarı ile de iç bükey yüzünü tashih ederiz. Halkaların (dış
25 Batlamyüs'de böyle, Almagest, Kitap 5. Great Books of the Western World, cilt 16, S. 166 Seemann Batlamyüs'teki bu durum olmadığı takdirde aldığı şekli belirtiyor. S. 46.
22 SEVİM TEKELİ
bükey ve iç bükey) yüzeyleri eşi olmadığı takdirde her halka için bir başka
safiha yapmak lâzımdır. 2 6
Şekil: XXIV
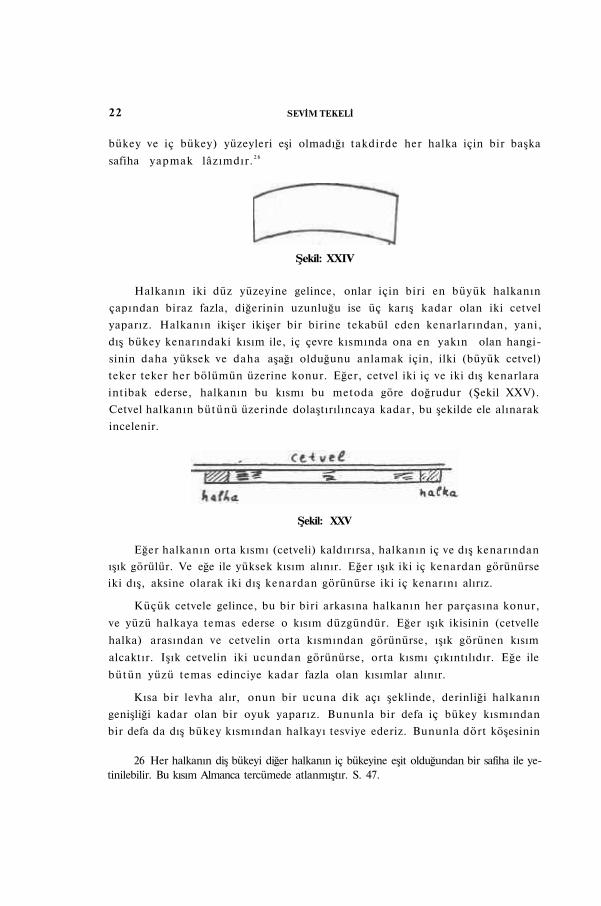
Halkanın iki düz yüzeyine gelince, onlar için biri en büyük halkanın
çapından biraz fazla, diğerinin uzunluğu ise üç karış kadar olan iki cetvel
yaparız. Halkanın ikişer ikişer bir birine tekabül eden kenarlarından, yani,
dış bükey kenarındaki kısım ile, iç çevre kısmında ona en yakın olan hangi
sinin daha yüksek ve daha aşağı olduğunu anlamak için, ilki (büyük cetvel)
teker teker her bölümün üzerine konur. Eğer, cetvel iki iç ve iki dış kenarlara
intibak ederse, halkanın bu kısmı bu metoda göre doğrudur (Şekil XXV).
Cetvel halkanın bütünü üzerinde dolaştırılıncaya kadar, bu şekilde ele alınarak
incelenir.
Şekil: XXV
Eğer halkanın orta kısmı (cetveli) kaldırırsa, halkanın iç ve dış kenarından
ışık görülür. Ve eğe ile yüksek kısım alınır. Eğer ışık iki iç kenardan görünürse
iki dış, aksine olarak iki dış kenardan görünürse iki iç kenarını alırız.
Küçük cetvele gelince, bu bir biri arkasına halkanın her parçasına konur,
ve yüzü halkaya temas ederse o kısım düzgündür. Eğer ışık ikisinin (cetvelle
halka) arasından ve cetvelin orta kısmından görünürse, ışık görünen kısım
alcaktır. Işık cetvelin iki ucundan görünürse, orta kısmı çıkıntılıdır. Eğe ile
bütün yüzü temas edinciye kadar fazla olan kısımlar alınır.
Kısa bir levha alır, onun bir ucuna dik açı şeklinde, derinliği halkanın
genişliği kadar olan bir oyuk yaparız. Bununla bir defa iç bükey kısmından
bir defa da dış bükey kısmından halkayı tesviye ederiz. Bununla dört köşesinin
26 Her halkanın diş bükeyi diğer halkanın iç bükeyine eşit olduğundan bir safiha ile ye-tinilebilir. Bu kısım Almanca tercümede atlanmıştır. S. 47.
AL-URDİ'NİN "RİSALET-ÜN Fİ KEYFİYET-İL ERSAD" 23
durumu ve iki iç paralel dairelerden birinin diğerine eşit olup olmadığını
ve bu iki dairenin merkezlerinin halkanın mihveri üzerinde bulunup bu
lunmadığını öğreniriz. Aynı şekilde iki dış dairelerin vaziyeti de açıklanır.
(Şekil XXVI).27
Başka bir levha alır, ona dörtgen şeklinde bir delik deleriz. Bununla bü
tün halkaların genişliklerini ölçeriz. Bir defa iç çevresi üzerinde, bir defa da
dış çevresi üzerinde çeviririz. Bu durumda, bir kenarı halkanın bir (düz) yü
zeyi üzerinde diğeri, diğer (düz) yüzeyi üzerinde dolanır (Şekil XXVII).
Şekil: XXVI Şekil XXVII
Bununla bize halkanın kalınlığının düzgünlüğü açıklanmış olur.
Bunlar halkaların incelenmesine yarıyan aletlerin beşidir.
Eğer daha fazlasına erişmenin mümkün olamıyacağı kadar halkaların
yüzeylerinin (tashihini) dakikleştirmek istersek halkaların yüzünü düz bir
yerde her tarafından imkan nisbetinde Fadin adı verilen tesviye aleti ile ufki
duruma getiririz. Çömlek yapılan çamurdan alır, iç kısmına, iç bükeyini ku
şatacak tarzda bir kanal yaparız. Kanalın tabanı onun yüzünden biraz aşağı
ve iç kenarı da halkanın yüzeyinden daha yüksektir. Havanın suyu dalgalan-
dırmıyacağı bir zamanda veya bir yerde kanalı su ile doldururuz. Suyun yü
züne alkali bitkilerin döğülmüş külünü ekeriz. Suyun seviyesinin halkanın
yüzeyinden alçak olduğu yerlere bakar ve su her taraftan aynı şekilde taşacak
tarzda yüksek kısımları eğe ile alırız. Geri kalan halkalar da bu tarzda düzel
tilir.
Ekliptiğin eğimini ölçmek için hazırlanmış eski aletlerden biri, meridyen
düzlemine sabit olarak dikilen bir halkadır. Onunla ekliptiğin ekvatora olan
en büyük eğimi elde edilir. Dakika veya ikişer, üçer dakikalık gibi küçük bö
lümlere ayrılabilmesi için büyük olması faydalıdır.
27 Almancada bu kısım takribi olarak tercüme edilmiştir. S. 48.
24 SEVİM TEKELİ
Batlamyüs Almagest'te ondan bahsetmiştir. Onun içine yüzeyi ilk iki
halkanın yüzeyi içinde kalmak üzere, güney ve kuzey yönüne doğru hareket
eden diğer bir halka yerleştirmiştir. (Halkanın) iki yüzeyinden birinde ve çap
karşıtında iki hedefe yapmış, ve onların orta noktalarına ilk halkanın yüzü
üzerinde hareket eden iki tane de müş'ir koymuştur. Bunlarla, güneş veya
yıldızlar meridyende bulunduklarında yücelimleri bulunur. İç halkadan elde
edilen yalnızca müş'irin ve hedefelerin bölümler üzerinden kaldırılıp indiril
mesidir. Zat-ül-halagın altıncı halkasında sözü geçen hususlar ve ıslah ça
releri bunda da söz konusudur.
Bu alette de yine çapı beş zirac, genişliği ve kalınlığı dört parmak olan
bir halka yaparız. Zat-ül-halagın beşinci halkasında yaptığımız gibi, halka
ile yekpare olarak dökülen genişliği üç parmak olan bir çap yaparız.
Zat-ül-halagın meridyen halkasının kürsüsünde söz konusu bahis ettiğimiz
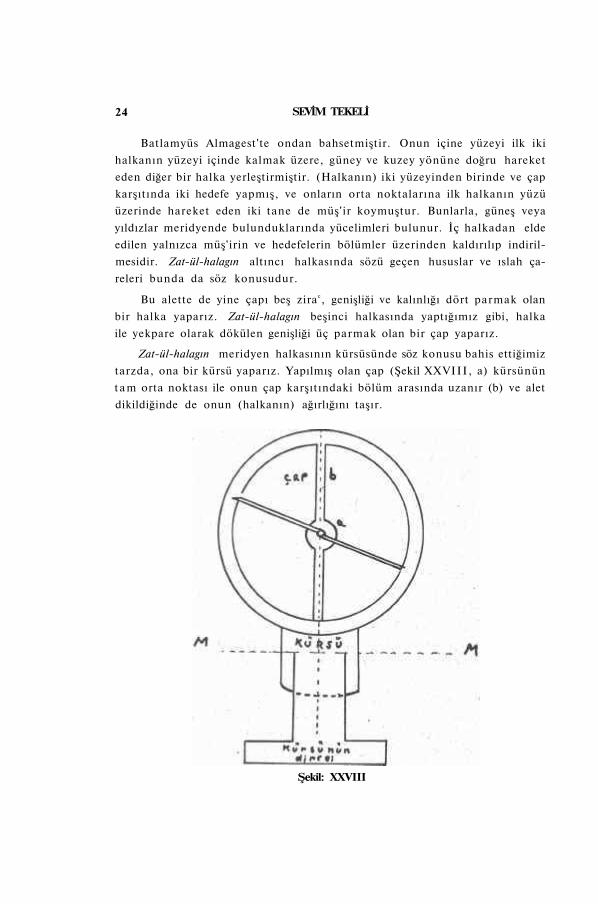
tarzda, ona bir kürsü yaparız. Yapılmış olan çap (Şekil XXVIII, a) kürsünün
t a m orta noktası ile onun çap karşıtındaki bölüm arasında uzanır (b) ve alet
dikildiğinde de onun (halkanın) ağırlığını taşır.
Şekil: XXVIII

AL-URDİ'NİN "RİSALET-TİN Fİ KEYFİYET-İL ERSAD" 25
Halkanın beşincisinde yapmış olduğumuz gibi, ona bir idade yaparız.
Halkanın çevresi 360 dereceye ve her derece de mümkün olduğu kadar bö
lünür. Yüzüne çizilmiş olan en küçük dairenin çapı beş zira c olduğunda, bu
dairelerden en büyüğünün çevresi 16 zira cdan aşağı olmaz. Ve bunun
nin yarısı-ki,bu üç sereden daha fazladır- en büyük dairenin çevresi üzerinde
22; 30° tekabül eder ve her derece zira c parmağı ile bir parmaktan fazla
olur. 2 8 Onlardan her birini bir birinden sarih olarak ayırt edilecek şekilde, 60
veya 30 parçaya bölmek mümkündür olur.
Merkezden ve bakır çapı boylu boyunca kesen, kürsüyü ikiye bölen çapa
tekabül eden çapını çizeriz. Alet dik olarak monte edildiğinde bu çap zenitten
geçer. Bölünmesi bittikten sonra, başlangıcını zenitten geçen çapın iki ucun
da 90'ar derece olacak tarzda ayarlarız.
İdade üzerine, yükseklikleri ve genişlikleri bir birine eşit olan iki hedefe
yaparız. İdadenin de merkezi olan halkanın merkezinden geçen doğru, bu
hedefelerin her birinin genişliklerini ortadan böler İdadenin üst (yü
zünden) itibaren eşit mesafelerde bulunan yuvarlak iki delik deleriz. Bun
ların merkezlerinden geçen doğru, idadenin genişliğini ortalıyan ve idade ile
halkanın ortak merkezlerinden geçen doğruya paraleldir. Silindir şeklinde
düz bir boru yaparız. İki deliğin arasını, göz ışını deliğin birinden girip, bo
rudan geçip, diğerinden çıkacak şekilde onunla birleştiririz. Burada söz
konusu olan şey ışın olsun veya başka birşey olsun durumda değişiklik
meydana getirmez. 2 9 İdadenin bize doğru olan müş'irinden de yüksekliğin
derecesinin miktarı bilinir.
Bu aletin diğer bir faydası da, hiç batmıyan yıldızların yüksekliklerin
den rasat yerinin enlemini bulmaktır. Alt ve üst külminasyonda (bu yıldız)
aletin düzleminde bulunur, her ikisinin toplamının yarısı kutup yüksekliği
dir. Bu ise, o memleketin enlemine eşittir.
28 Bu kısım da Almanca tercüme metne uymamaktadır. S. 55. Notta da yanlış olduğuna işaret edilmiştir. Not 7. S. 57
ş = 12 Parmak f = 11 Parmak
29 Urdi zamanında görme olayının, gözden çıkan geometrik optik kanunlarına uyan bir nevi ışınla izah edenler olduğu gibi, buna zıt görüşü tutanlar da vardı. Urdi burada buna işaret etmiş olabilir. Gölge veya cisimden çıkan ışınlar da mevzuu bahis edilmiş olabilir.
26 SEVİM TEKELİ
Kaidesinin üzerine tesbiti, yönelişinin gerekli şekilde olmasının sağlan
ması meselesine gelince, bu zat-ül-halağın meridyen halkasında olduğu gibidir.
Ondan asla hiç birşey ihmal edilmemelidir.
Dördüncü alet, ekvator düzlemine dikilen ve Batlamyüs'ün Almagest'de
güneşin ekinoks noktalarına geldiğini bildiren halkat-ül-üstüva diye adverdiği,
eskilerin kullanmış oldukları aletlerden biridir. Bu, yüzeyleri birbirine paralel,
bakırdan bir halkadır. Yapılışı ve kontrolü zat-ül-halağın yapılışında söz
konusu edildiği gibidir.
Montajına gelince, bu, rasat yerinin enleminin doğru olarak tayininden
sonra yapılır. Rasat yerinin enlemi, halka düzleminin yani, ekvatorun zenite
olan mesafesini verdiğinden, buradan ekvatorun ufuk düzlemine nazaran
eğimi elde edilir. Ve bu suretle halka ile ufkun meydana getirdiği açı bulunmuş
olur. Halka maksada uygun olacak şekilde dikildiğinde düz ve paralel yüzey
leri ekvator düzlemine paralel olur.
Bir kenarı diğerini gölgelendirdiğinde, iki iç bükey kısmı eşit derecede
aydınlanır ve bu, güneşin iki ekinoks noktasından birinde bulunduğu zaman
dır.
Bu alet (ekvatorden başka) enlemi olan ufuklar üzerine dikildiğinde
(alete) bir meyil vermek gerekir. İşte bunun için, aletin tepesinin meyilli
olması dolayısı ile montajı bozulur, aynı zamanda onun dikilişi de kolay
olmaz.
Olması lâzım geldiği tarzda montajına gelince, onu tavsif eden benim (?).
Bana göre kaldırdığımız iç halka yerine meridyen halkası kullanmamız ve
halkamızı ona tesbit etmemiz lâzım gelir. Ekliptik ve kutuplar halkasında
yaptığımız gibi, bu halkanın birleştirilmesi, meridyenle dik açı yapacak tarz
da olsun. (Ekvator halkasının) birleştirildiği yerdeki oyuğun ortasının (Şekil
XXIX) zenite mesafesi, rasat yerinin enlemi kadar olsun. Oyukların
bulunduğu yerlerde onları koruyan ilâveler yaparız. Meridyen halkası onun
ağırlığını taşır ve onun dik durumunun bozulmasına mani olur. Bu halkayı
meridyenin içine takacak olursak, onun [meridyen halkasının iç bükeyinden]
daha büyük ve daha hafif olması için de kalınlığını daha az yaparız. Taşıyıcı
(meridyen) halkasının dış bükey kısmını iki oyuk sebebi ile kalınlaştırırız.
Cetvelin ucuna ekvator halkasının takılması için, meridyenin taksimatını iç
bükey çevre içinde yaparız. Bütün bunlar açık ve seçiktir. Bu durumda ek
vator düzlemine dikilmiş olur. Onun montajı ve eğiminin kontrol edilmesi
kolaydır. Zirac, onun eğimi meridyen halkası yardımı ile ölçülür.
AL-UHDİ'NİN "RİSALET-ÜN Fİ KEYFİYET-İL ERSAD" 27
Şekil: XXIX
Ekvator halkasını meridyene nisbetle meyilli bir daireden alırsak, Bat-
lamyüs'ün bahsettiği hal, İskenderiyede revakta monte edilmiş halkaların en
büyüğünde görülen kusur, meydana gelir. Bu halka bir ekinoks zamanında
iki defa aydınlanmıştı.
Eski aletlerden biri zat-üs-sakbeteyn (iki delik sahibi) diye bilinen hede-
fet-üs-seyyareti (müteharrik hedefe sahibi)dir. Batlamyüs Almagest'te sadece
onun isminden bahsetmiş fakat tavsifini bildirmemiştir.
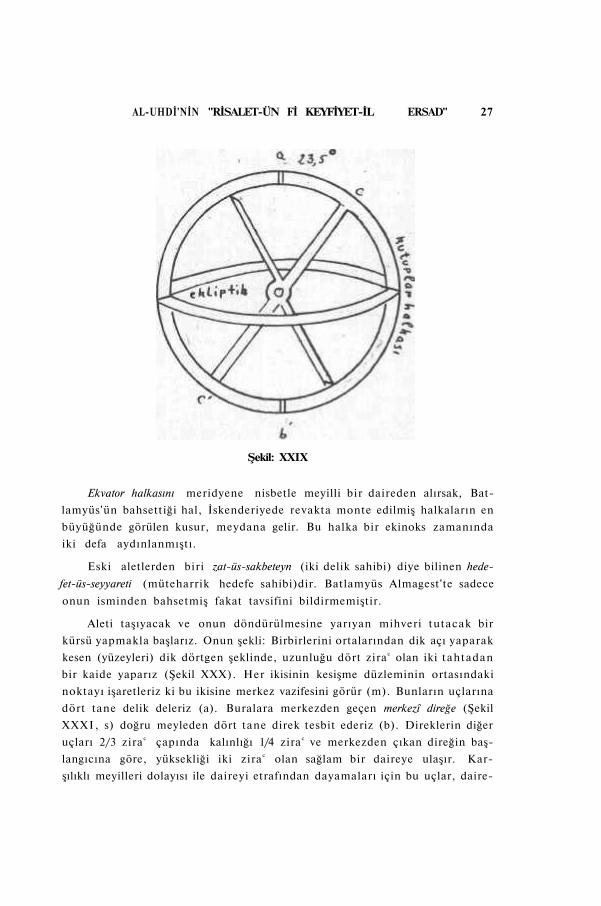
Aleti taşıyacak ve onun döndürülmesine yarıyan mihveri tutacak bir
kürsü yapmakla başlarız. Onun şekli: Birbirlerini ortalarından dik açı yaparak
kesen (yüzeyleri) dik dörtgen şeklinde, uzunluğu dört zira c olan iki tahtadan
bir kaide yaparız (Şekil XXX). Her ikisinin kesişme düzleminin ortasındaki
noktayı işaretleriz ki bu ikisine merkez vazifesini görür (m). Bunların uçlarına
dört tane delik deleriz (a). Buralara merkezden geçen merkezî direğe (Şekil
XXXI, s) doğru meyleden dört tane direk tesbit ederiz (b). Direklerin diğer
uçları 2/3 zira c çapında kalınlığı 1/4 zira c ve merkezden çıkan direğin baş
langıcına göre, yüksekliği iki zira c olan sağlam bir daireye ulaşır. Kar
şılıklı meyilleri dolayısı ile daireyi etrafından dayamaları için bu uçlar, daire-
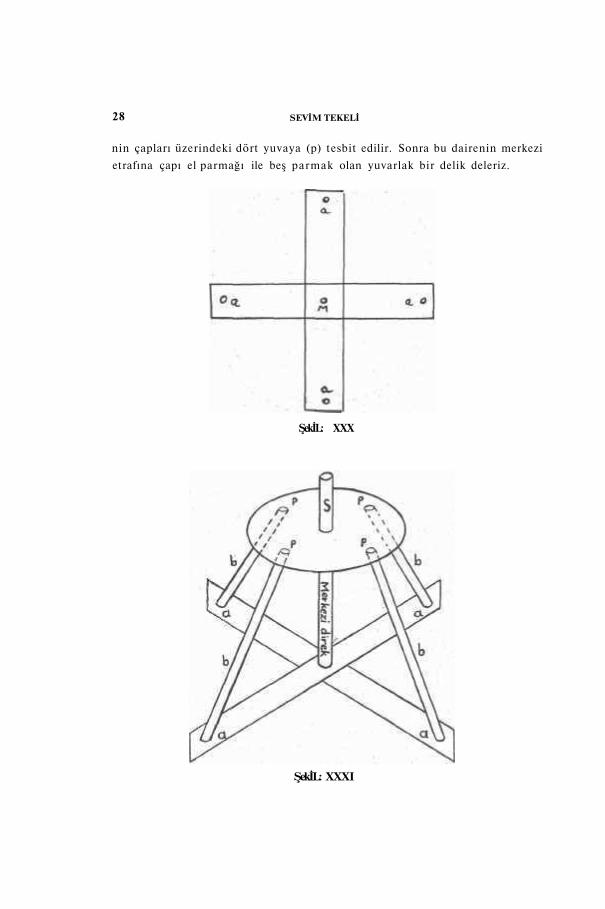
28 SEVİM TEKELİ
nin çapları üzerindeki dört yuvaya (p) tesbit edilir. Sonra bu dairenin merkezi
etrafına çapı el parmağı ile beş parmak olan yuvarlak bir delik deleriz.
ŞekİL: XXX
ŞekİL: XXXI
AL-URDİ'NİN "RİSALET-ÜN Fİ KEYFİYET-İL ERSAD" 29
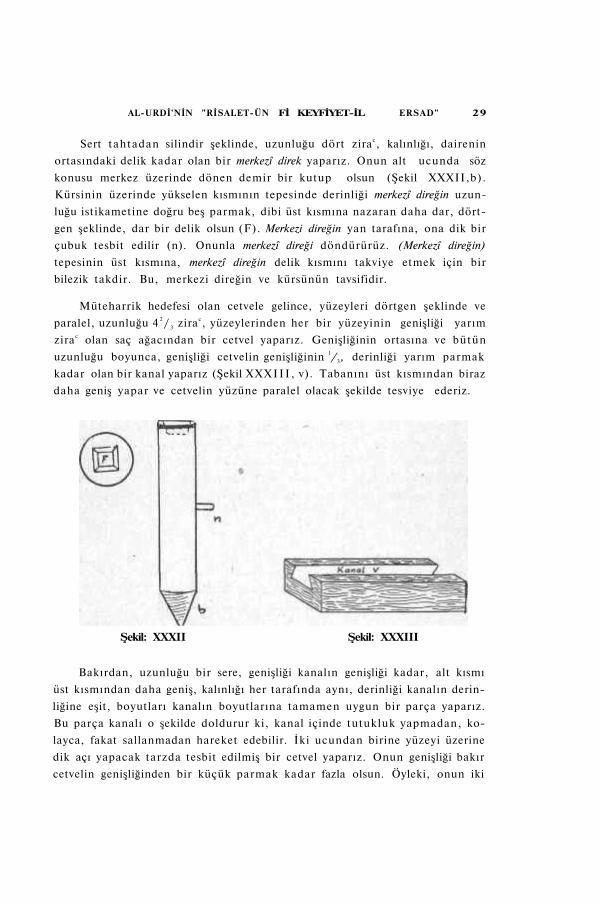
Sert tahtadan silindir şeklinde, uzunluğu dört zirac, kalınlığı, dairenin
ortasındaki delik kadar olan bir merkezî direk yaparız. Onun alt ucunda söz
konusu merkez üzerinde dönen demir bir kutup olsun (Şekil XXXII,b).
Kürsinin üzerinde yükselen kısmının tepesinde derinliği merkezî direğin uzun
luğu istikametine doğru beş parmak, dibi üst kısmına nazaran daha dar, dört
gen şeklinde, dar bir delik olsun (F). Merkezi direğin yan tarafına, ona dik bir
çubuk tesbit edilir (n). Onunla merkezî direği döndürürüz. (Merkezî direğin)
tepesinin üst kısmına, merkezî direğin delik kısmını takviye etmek için bir
bilezik takdir. Bu, merkezi direğin ve kürsünün tavsifidir.
Müteharrik hedefesi olan cetvele gelince, yüzeyleri dörtgen şeklinde ve
paralel, uzunluğu 4 2 / 3 zirac, yüzeylerinden her bir yüzeyinin genişliği yarım
zira c olan saç ağacından bir cetvel yaparız. Genişliğinin ortasına ve bütün
uzunluğu boyunca, genişliği cetvelin genişliğinin 1/3, derinliği yarım parmak
kadar olan bir kanal yaparız (Şekil X X X I I I , v). Tabanını üst kısmından biraz
daha geniş yapar ve cetvelin yüzüne paralel olacak şekilde tesviye ederiz.
Şekil: XXXII Şekil: XXXIII
Bakırdan, uzunluğu bir sere, genişliği kanalın genişliği kadar, alt kısmı
üst kısmından daha geniş, kalınlığı her tarafında aynı, derinliği kanalın derin
liğine eşit, boyutları kanalın boyutlarına tamamen uygun bir parça yaparız.
Bu parça kanalı o şekilde doldurur ki, kanal içinde tutukluk yapmadan, ko
layca, fakat sallanmadan hareket edebilir. İki ucundan birine yüzeyi üzerine
dik açı yapacak tarzda tesbit edilmiş bir cetvel yaparız. Onun genişliği bakır
cetvelin genişliğinden bir küçük parmak kadar fazla olsun. Öyleki, onun iki
30 SEVİM TEKELİ
tarafında, kanalın iki kenarında hareket eden iki çıkıntı artsın. Bunlara bö
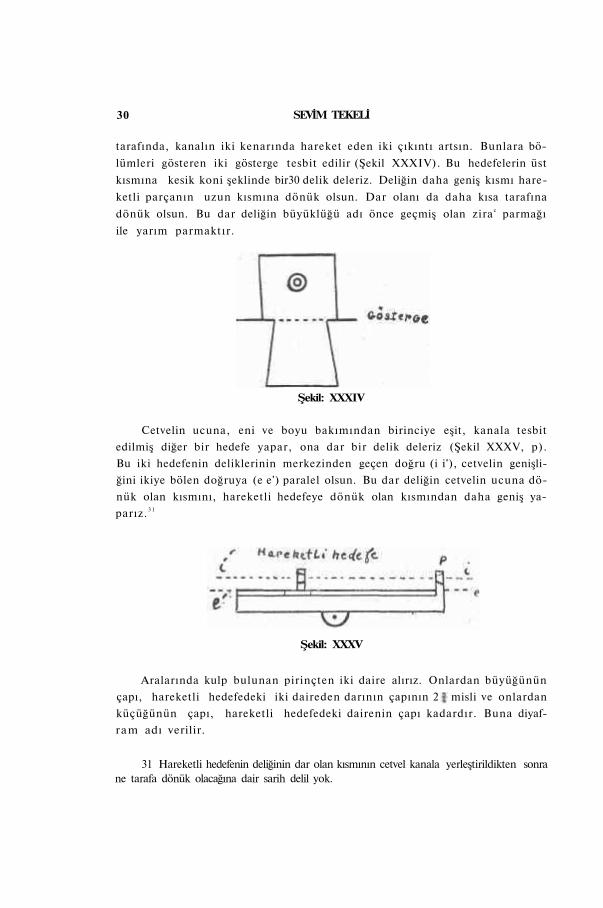
lümleri gösteren iki gösterge tesbit edilir (Şekil XXXIV). Bu hedefelerin üst
kısmına kesik koni şeklinde bir30 delik deleriz. Deliğin daha geniş kısmı hare
ketli parçanın uzun kısmına dönük olsun. Dar olanı da daha kısa tarafına
dönük olsun. Bu dar deliğin büyüklüğü adı önce geçmiş olan zira c parmağı
ile yarım parmaktır.
Şekil: XXXIV
Cetvelin ucuna, eni ve boyu bakımından birinciye eşit, kanala tesbit
edilmiş diğer bir hedefe yapar, ona dar bir delik deleriz (Şekil XXXV, p).
Bu iki hedefenin deliklerinin merkezinden geçen doğru (i i'), cetvelin genişli
ğini ikiye bölen doğruya (e e') paralel olsun. Bu dar deliğin cetvelin ucuna dö
nük olan kısmını, hareketli hedefeye dönük olan kısmından daha geniş ya-
parız. 3 1
Şekil: XXXV
Aralarında kulp bulunan pirinçten iki daire alırız. Onlardan büyüğünün
çapı, hareketli hedefedeki iki daireden darının çapının 2 misli ve onlardan
küçüğünün çapı, hareketli hedefedeki dairenin çapı kadardır. Buna diyaf
ram adı verilir.
31 Hareketli hedefenin deliğinin dar olan kısmının cetvel kanala yerleştirildikten sonra ne tarafa dönük olacağına dair sarih delil yok.
AL-ÜRDİ'NİN "RİSALET-ÜN Fİ KEYFİYET-İL ERSAD" 31
Üzerlerinde hareketli hedefenin iki göstergesinin hareket ettiği cetvelin
iki tarafını, her bölüm hareketli hedefedeki dairelerden darının çapına eşit
olacak şekilde taksimatlandırırız. Taksimat başlangıcı sabit hedefenin göze
dönük olan yüzü hizasında, nihayeti de 220 olarak cetvelin diğer ucundadır.
Bu parçalardan herbirini de 12 kısma böleriz. Bunlar güneş ve ayın her ikisinin
çap parmağını temsil ederler. Adetleri sabit hedefeden başlayıp 220 de nihayet
bulacak tarzda yazarız.
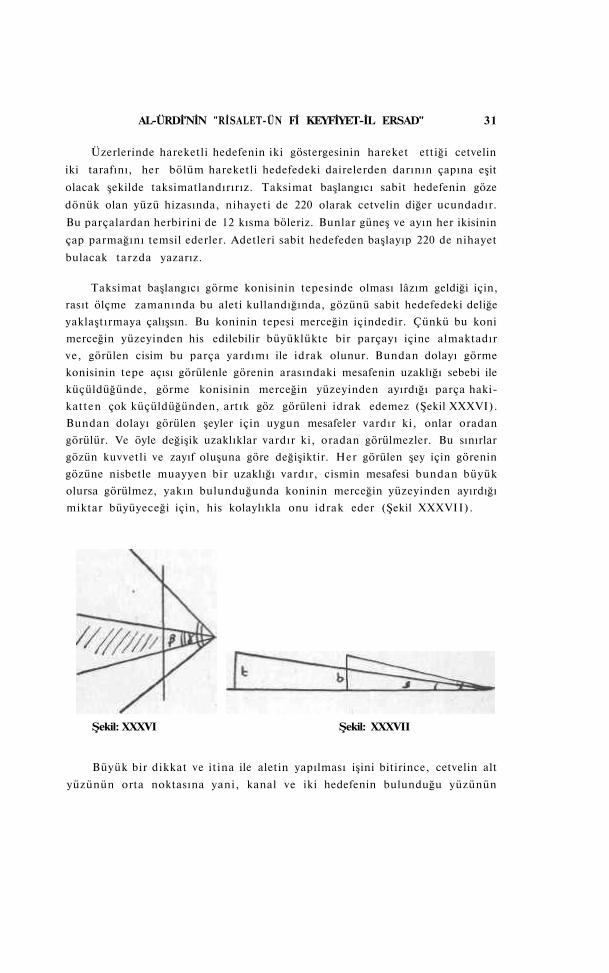
Taksimat başlangıcı görme konisinin tepesinde olması lâzım geldiği için,
rasıt ölçme zamanında bu aleti kullandığında, gözünü sabit hedefedeki deliğe
yaklaştırmaya çalışsın. Bu koninin tepesi merceğin içindedir. Çünkü bu koni
merceğin yüzeyinden his edilebilir büyüklükte bir parçayı içine almaktadır
ve, görülen cisim bu parça yardımı ile idrak olunur. Bundan dolayı görme
konisinin tepe açısı görülenle görenin arasındaki mesafenin uzaklığı sebebi ile
küçüldüğünde, görme konisinin merceğin yüzeyinden ayırdığı parça haki
katten çok küçüldüğünden, artık göz görüleni idrak edemez (Şekil XXXVI).
Bundan dolayı görülen şeyler için uygun mesafeler vardır ki, onlar oradan
görülür. Ve öyle değişik uzaklıklar vardır ki, oradan görülmezler. Bu sınırlar
gözün kuvvetli ve zayıf oluşuna göre değişiktir. Her görülen şey için görenin
gözüne nisbetle muayyen bir uzaklığı vardır, cismin mesafesi bundan büyük
olursa görülmez, yakın bulunduğunda koninin merceğin yüzeyinden ayırdığı
miktar büyüyeceği için, his kolaylıkla onu idrak eder (Şekil XXXVII).
Şekil: XXXVI Şekil: XXXVII
Büyük bir dikkat ve itina ile aletin yapılması işini bitirince, cetvelin alt
yüzünün orta noktasına yani, kanal ve iki hedefenin bulunduğu yüzünün
32 SEVİM TEKELİ
karşıtının ortasına mafsalın yarı tarafını tesbit ederiz 3 2 (Şekil XXXVIIIa).
Mafsalın bu üst yarısı, onu diğer yarısına birleştiren mihver etrafında döner.
Cetvel, bu mihver üzerinde istediğimizde bir ucu zenite doğru kalkar, diğer
ucu da aşağı iner. Mafsalın tepelerinden birini sağlam bir şekilde cetvele, di
ğerini de mihverin üzerindeki deliğe tesbit ederiz (Şekil XXXIX) . Cetvele
ufki hareket yaptırmak istediğimizde merkezî direği çeviririz. Aşağı yukarı
hareketi yaptırmak istediğimizde (cetvelin) bize doğru olan ucunu kaldırırız.
Aleti mafsalın mihveri üzerinde istediğimiz her istikamete ve istediğimiz kadar
çeviririz.
Şekil: XXXVIII Şekil: XXXIX
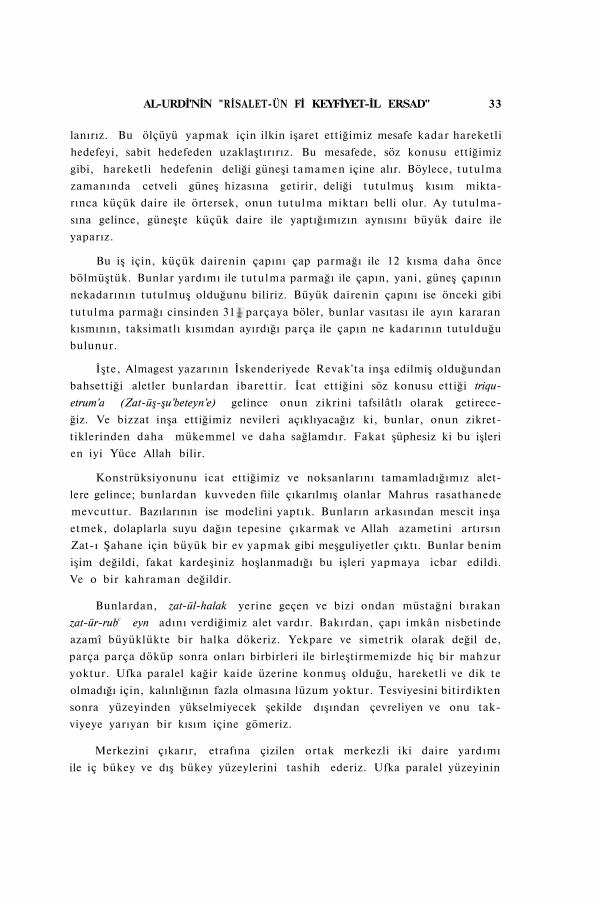
Tutulma veya diğer herhangi bir zamanda cetveli t a m ayın istikametine
getirir, hedefeyi gözden bir defa uzaklaştırır sonra, dar delikten ayın bütünü
görününceye kadar yaklaştırırız. Hedefe üzerindeki delik onu t a m olarak
içine alır, ay deliği kaplar ve hiç birinden bir fazlalık kalmaz. Göz ile hareketli
hedefenin göstergesi arasındaki mesafeyi kaydederiz. Aynı şeyi güneşin görü
şünü için de yaparız. Bunlar ayın hangi mesafesinde görünen çapı güneşin
çapına eşittir bilinir. Bu miktar cetvelin bölümlerinden 130 u geçmez.
Zikri önce geçmiş olan diyaframlara3 3 gelince, tutulma güneş tutulması
ise, nekadarının tutulmuş olduğunu bulmak için aletin küçük dairesini kul-
32 Almanca tercüme bu kısımda metne uymuyor. S. 67. 33 Sarih olarak bu diyaframların ne şekilde olduğu metinden çıkmıyor. Zira, bunlar, hem
taksim edilmiş daire şeklinde olabilir, hem de bir levha içine delinmiş bir delik şeklinde olabilir. Daire içi dolu olduğunda karanlık kısmı örter boş olduğunda aydınlık kısmı örter. Metnin her iki şekilde de okunması mümkündür.
AL-URDİ'NİN "RİSALET-ÜN Fİ KEYFİYET-İL ERSAD" 33
lanırız. Bu ölçüyü yapmak için ilkin işaret ettiğimiz mesafe kadar hareketli
hedefeyi, sabit hedefeden uzaklaştırırız. Bu mesafede, söz konusu ettiğimiz
gibi, hareketli hedefenin deliği güneşi tamamen içine alır. Böylece, tutulma
zamanında cetveli güneş hizasına getirir, deliği tutulmuş kısım mikta-
rınca küçük daire ile örtersek, onun tutulma miktarı belli olur. Ay tutulma
sına gelince, güneşte küçük daire ile yaptığımızın aynısını büyük daire ile
yaparız.
Bu iş için, küçük dairenin çapını çap parmağı ile 12 kısma daha önce
bölmüştük. Bunlar yardımı ile tutulma parmağı ile çapın, yani, güneş çapının
nekadarının tutulmuş olduğunu biliriz. Büyük dairenin çapını ise önceki gibi
kısmının, taksimatlı kısımdan ayırdığı parça ile çapın ne kadarının tutulduğu
bulunur.
İşte, Almagest yazarının İskenderiyede Revak'ta inşa edilmiş olduğundan
bahsettiği aletler bunlardan ibarettir. İcat ettiğini söz konusu ettiği triqu-
etrum'a (Zat-üş-şu'beteyn'e) gelince onun zikrini tafsilâtlı olarak getirece
ğiz. Ve bizzat inşa ettiğimiz nevileri açıklıyacağız ki, bunlar, onun zikret
tiklerinden daha mükemmel ve daha sağlamdır. Fakat şüphesiz ki bu işleri
en iyi Yüce Allah bilir.
Konstrüksiyonunu icat ettiğimiz ve noksanlarını tamamladığımız alet
lere gelince; bunlardan kuvveden fiile çıkarılmış olanlar Mahrus rasathanede
mevcuttur. Bazılarının ise modelini yaptık. Bunların arkasından mescit inşa
etmek, dolaplarla suyu dağın tepesine çıkarmak ve Allah azametini artırsın
Zat-ı Şahane için büyük bir ev yapmak gibi meşguliyetler çıktı. Bunlar benim
işim değildi, fakat kardeşiniz hoşlanmadığı bu işleri yapmaya icbar edildi.
Ve o bir kahraman değildir.
Bunlardan, zat-ül-halak yerine geçen ve bizi ondan müstağni bırakan
zat-ür-rubc eyn adını verdiğimiz alet vardır. Bakırdan, çapı imkân nisbetinde
azamî büyüklükte bir halka dökeriz. Yekpare ve simetrik olarak değil de,
parça parça döküp sonra onları birbirleri ile birleştirmemizde hiç bir mahzur
yoktur. Ufka paralel kağir kaide üzerine konmuş olduğu, hareketli ve dik te
olmadığı için, kalınlığının fazla olmasına lüzum yoktur. Tesviyesini bitirdikten
sonra yüzeyinden yükselmiyecek şekilde dışından çevreliyen ve onu tak
viyeye yarıyan bir kısım içine gömeriz.
Merkezini çıkarır, etrafına çizilen ortak merkezli iki daire yardımı
ile iç bükey ve dış bükey yüzeylerini tashih ederiz. Ufka paralel yüzeyinin
tutulma parmağı cinsinden 31 parçaya böler, bunlar vasıtası ile ayın kararan
34 SEVİM TEKELİ
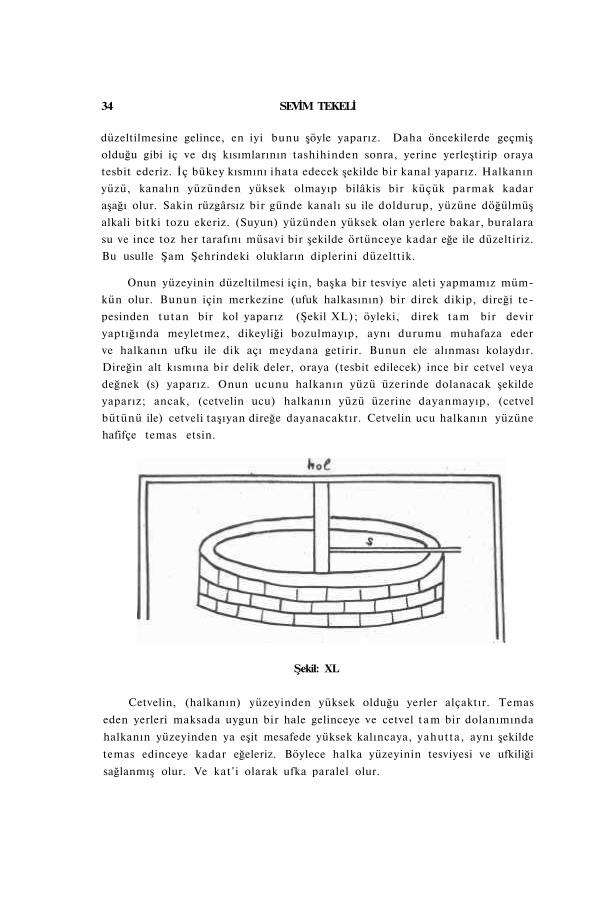
düzeltilmesine gelince, en iyi bunu şöyle yaparız. Daha öncekilerde geçmiş
olduğu gibi iç ve dış kısımlarının tashihinden sonra, yerine yerleştirip oraya
tesbit ederiz. İç bükey kısmını ihata edecek şekilde bir kanal yaparız. Halkanın
yüzü, kanalın yüzünden yüksek olmayıp bilâkis bir küçük parmak kadar
aşağı olur. Sakin rüzgârsız bir günde kanalı su ile doldurup, yüzüne döğülmüş
alkali bitki tozu ekeriz. (Suyun) yüzünden yüksek olan yerlere bakar, buralara
su ve ince toz her tarafını müsavi bir şekilde örtünceye kadar eğe ile düzeltiriz.
Bu usulle Şam Şehrindeki olukların diplerini düzelttik.
Onun yüzeyinin düzeltilmesi için, başka bir tesviye aleti yapmamız müm
kün olur. Bunun için merkezine (ufuk halkasının) bir direk dikip, direği te
pesinden tutan bir kol yaparız (Şekil XL); öyleki, direk tam bir devir
yaptığında meyletmez, dikeyliği bozulmayıp, aynı durumu muhafaza eder
ve halkanın ufku ile dik açı meydana getirir. Bunun ele alınması kolaydır.
Direğin alt kısmına bir delik deler, oraya (tesbit edilecek) ince bir cetvel veya
değnek (s) yaparız. Onun ucunu halkanın yüzü üzerinde dolanacak şekilde
yaparız; ancak, (cetvelin ucu) halkanın yüzü üzerine dayanmayıp, (cetvel
bütünü ile) cetveli taşıyan direğe dayanacaktır. Cetvelin ucu halkanın yüzüne
hafifçe temas etsin.
Şekil: XL
Cetvelin, (halkanın) yüzeyinden yüksek olduğu yerler alçaktır. Temas
eden yerleri maksada uygun bir hale gelinceye ve cetvel t a m bir dolanımında
halkanın yüzeyinden ya eşit mesafede yüksek kalıncaya, yahutta, aynı şekilde
temas edinceye kadar eğeleriz. Böylece halka yüzeyinin tesviyesi ve ufkiliği
sağlanmış olur. Ve kat ' i olarak ufka paralel olur.
AL-UHDİ'NİN "RİSALET-ÜN Fİ KEYFİYET-İL ERSAD" 35
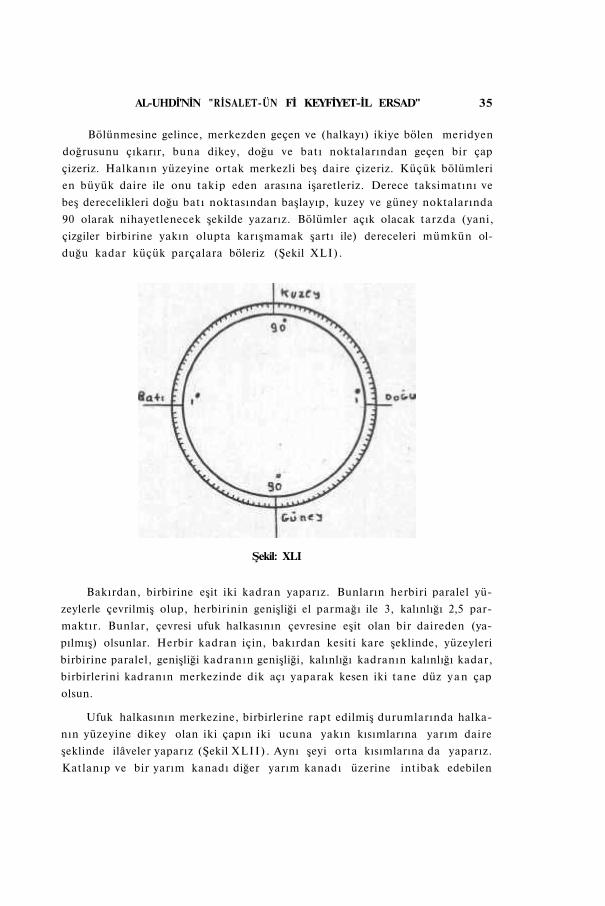
Bölünmesine gelince, merkezden geçen ve (halkayı) ikiye bölen meridyen
doğrusunu çıkarır, buna dikey, doğu ve batı noktalarından geçen bir çap
çizeriz. Halkanın yüzeyine ortak merkezli beş daire çizeriz. Küçük bölümleri
en büyük daire ile onu takip eden arasına işaretleriz. Derece taksimatını ve
beş derecelikleri doğu batı noktasından başlayıp, kuzey ve güney noktalarında
90 olarak nihayetlenecek şekilde yazarız. Bölümler açık olacak tarzda (yani,
çizgiler birbirine yakın olupta karışmamak şartı ile) dereceleri mümkün ol
duğu kadar küçük parçalara böleriz (Şekil XLI) .
Şekil: XLI
Bakırdan, birbirine eşit iki kadran yaparız. Bunların herbiri paralel yü
zeylerle çevrilmiş olup, herbirinin genişliği el parmağı ile 3, kalınlığı 2,5 par
maktır. Bunlar, çevresi ufuk halkasının çevresine eşit olan bir daireden (ya
pılmış) olsunlar. Herbir kadran için, bakırdan kesiti kare şeklinde, yüzeyleri
birbirine paralel, genişliği kadranın genişliği, kalınlığı kadranın kalınlığı kadar,
birbirlerini kadranın merkezinde dik açı yaparak kesen iki tane düz y a n çap
olsun.
Ufuk halkasının merkezine, birbirlerine rapt edilmiş durumlarında halka
nın yüzeyine dikey olan iki çapın iki ucuna yakın kısımlarına yarım daire
şeklinde ilâveler yaparız (Şekil XLII) . Aynı şeyi orta kısımlarına da yaparız.
Katlanıp ve bir yarım kanadı diğer yarım kanadı üzerine intibak edebilen
36 SEVİM TEKELİ
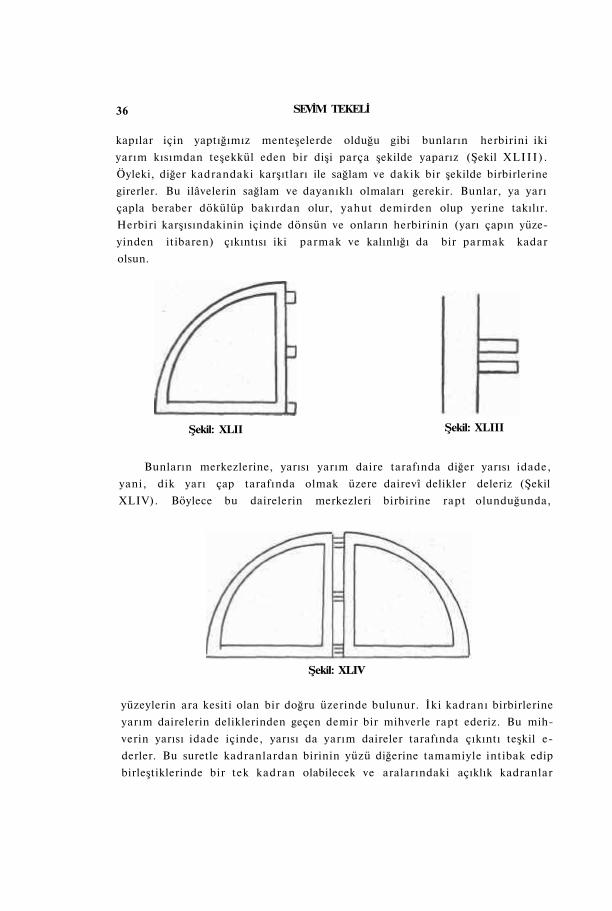
kapılar için yaptığımız menteşelerde olduğu gibi bunların herbirini iki
yarım kısımdan teşekkül eden bir dişi parça şekilde yaparız (Şekil XLIII) .
Öyleki, diğer kadrandaki karşıtları ile sağlam ve dakik bir şekilde birbirlerine
girerler. Bu ilâvelerin sağlam ve dayanıklı olmaları gerekir. Bunlar, ya yarı
çapla beraber dökülüp bakırdan olur, yahut demirden olup yerine takılır.
Herbiri karşısındakinin içinde dönsün ve onların herbirinin (yarı çapın yüze
yinden itibaren) çıkıntısı iki parmak ve kalınlığı da bir parmak kadar
olsun.
Şekil: XLII Şekil: XLIII
Bunların merkezlerine, yarısı yarım daire tarafında diğer yarısı idade,
yani, dik yarı çap tarafında olmak üzere dairevî delikler deleriz (Şekil
XLIV). Böylece bu dairelerin merkezleri birbirine rapt olunduğunda,
Şekil: XLIV
yüzeylerin ara kesiti olan bir doğru üzerinde bulunur. İki kadranı birbirlerine
yarım dairelerin deliklerinden geçen demir bir mihverle rapt ederiz. Bu mih
verin yarısı idade içinde, yarısı da yarım daireler tarafında çıkıntı teşkil e-
derler. Bu suretle kadranlardan birinin yüzü diğerine tamamiyle intibak edip
birleştiklerinde bir tek kadran olabilecek ve aralarındaki açıklık kadranlar
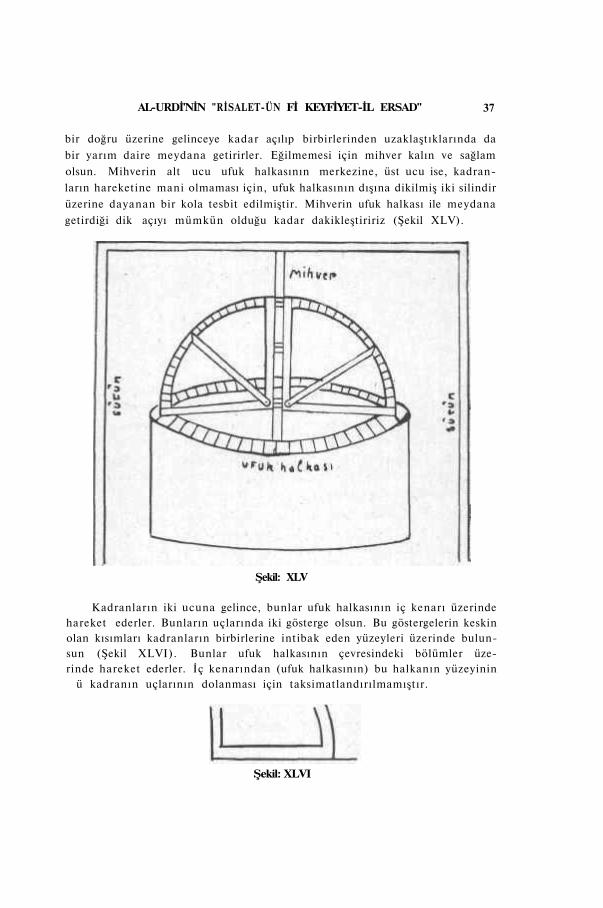
AL-URDİ'NİN "RİSALET-ÜN Fİ KEYFİYET-İL ERSAD" 37
bir doğru üzerine gelinceye kadar açılıp birbirlerinden uzaklaştıklarında da
bir yarım daire meydana getirirler. Eğilmemesi için mihver kalın ve sağlam
olsun. Mihverin alt ucu ufuk halkasının merkezine, üst ucu ise, kadran
ların hareketine mani olmaması için, ufuk halkasının dışına dikilmiş iki silindir
üzerine dayanan bir kola tesbit edilmiştir. Mihverin ufuk halkası ile meydana
getirdiği dik açıyı mümkün olduğu kadar dakikleştiririz (Şekil XLV).
Şekil: XLV
Kadranların iki ucuna gelince, bunlar ufuk halkasının iç kenarı üzerinde hareket ederler. Bunların uçlarında iki gösterge olsun. Bu göstergelerin keskin olan kısımları kadranların birbirlerine intibak eden yüzeyleri üzerinde bulunsun (Şekil XLVI). Bunlar ufuk halkasının çevresindeki bölümler üzerinde hareket ederler. İç kenarından (ufuk halkasının) bu halkanın yüzeyinin
ü kadranın uçlarının dolanması için taksimatlandırılmamıştır.
Şekil: XLVI
38 SEVİM TEKELİ
İki dik yarı çapın çıkıntı teşkil eden yarım daireler tarafındaki kenar
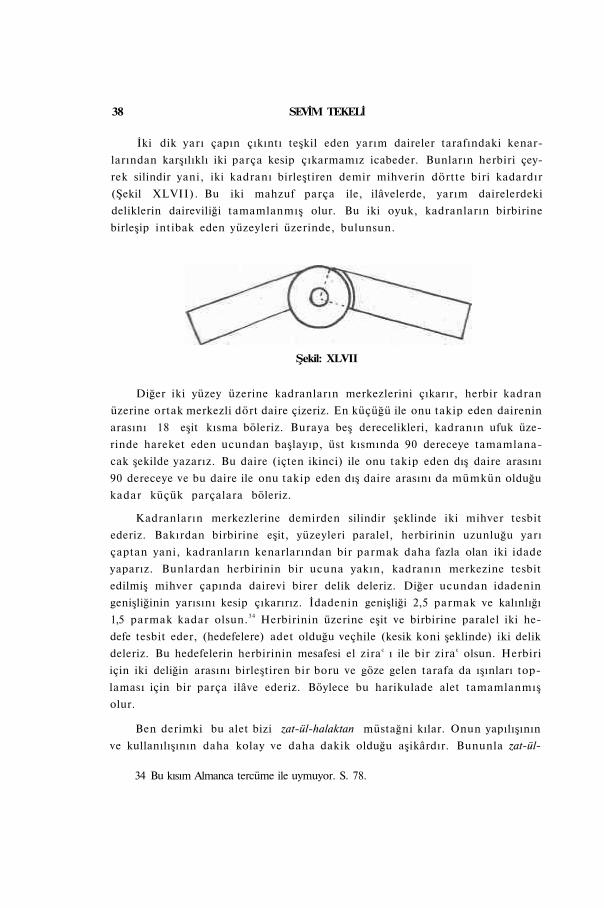
larından karşılıklı iki parça kesip çıkarmamız icabeder. Bunların herbiri çey
rek silindir yani, iki kadranı birleştiren demir mihverin dörtte biri kadardır
(Şekil XLVII). Bu iki mahzuf parça ile, ilâvelerde, yarım dairelerdeki
deliklerin daireviliği tamamlanmış olur. Bu iki oyuk, kadranların birbirine
birleşip intibak eden yüzeyleri üzerinde, bulunsun.
Şekil: XLVII
Diğer iki yüzey üzerine kadranların merkezlerini çıkarır, herbir kadran
üzerine ortak merkezli dört daire çizeriz. En küçüğü ile onu takip eden dairenin
arasını 18 eşit kısma böleriz. Buraya beş derecelikleri, kadranın ufuk üze
rinde hareket eden ucundan başlayıp, üst kısmında 90 dereceye tamamlana
cak şekilde yazarız. Bu daire (içten ikinci) ile onu takip eden dış daire arasını
90 dereceye ve bu daire ile onu takip eden dış daire arasını da mümkün olduğu
kadar küçük parçalara böleriz.
Kadranların merkezlerine demirden silindir şeklinde iki mihver tesbit
ederiz. Bakırdan birbirine eşit, yüzeyleri paralel, herbirinin uzunluğu yarı
çaptan yani, kadranların kenarlarından bir parmak daha fazla olan iki idade
yaparız. Bunlardan herbirinin bir ucuna yakın, kadranın merkezine tesbit
edilmiş mihver çapında dairevi birer delik deleriz. Diğer ucundan idadenin
genişliğinin yarısını kesip çıkarırız. İdadenin genişliği 2,5 parmak ve kalınlığı
1,5 parmak kadar olsun.3 4 Herbirinin üzerine eşit ve birbirine paralel iki he
defe tesbit eder, (hedefelere) adet olduğu veçhile (kesik koni şeklinde) iki delik
deleriz. Bu hedefelerin herbirinin mesafesi el zira c ı ile bir zira c olsun. Herbiri
için iki deliğin arasını birleştiren bir boru ve göze gelen tarafa da ışınları top
laması için bir parça ilâve ederiz. Böylece bu harikulade alet tamamlanmış
olur.
Ben derimki bu alet bizi zat-ül-halaktan müstağni kılar. Onun yapılışının
ve kullanılışının daha kolay ve daha dakik olduğu aşikârdır. Bununla zat-ül-
34 Bu kısım Almanca tercüme ile uymuyor. S. 78.
AL-URDİ'NİN "RİSALET-ÜN Fİ KEYFİYET-İL ERSAD" 39
halakta elde edemediğimiz bir çok şeyleri elde ederiz, yalnız şu var ki, yüksek
likten maada bununla faaliyette bulunmak bütün işlerde bizi hesaptan müs
tağni bırakmaz.
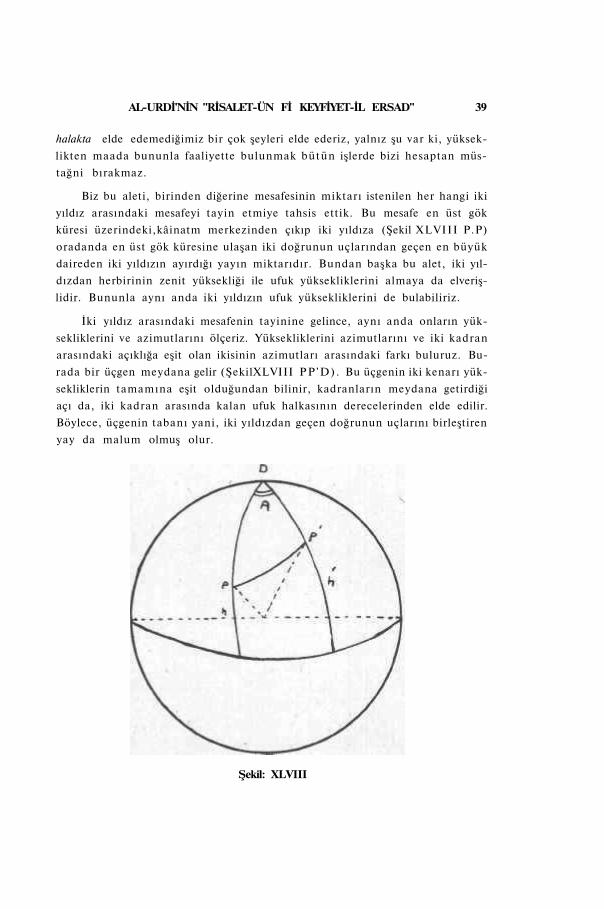
Biz bu aleti, birinden diğerine mesafesinin miktarı istenilen her hangi iki
yıldız arasındaki mesafeyi tayin etmiye tahsis ettik. Bu mesafe en üst gök
küresi üzerindeki,kâinatm merkezinden çıkıp iki yıldıza (Şekil XLVIII P.P)
oradanda en üst gök küresine ulaşan iki doğrunun uçlarından geçen en büyük
daireden iki yıldızın ayırdığı yayın miktarıdır. Bundan başka bu alet, iki yıl
dızdan herbirinin zenit yüksekliği ile ufuk yüksekliklerini almaya da elveriş
lidir. Bununla aynı anda iki yıldızın ufuk yüksekliklerini de bulabiliriz.
İki yıldız arasındaki mesafenin tayinine gelince, aynı anda onların yük
sekliklerini ve azimutlarını ölçeriz. Yüksekliklerini azimutlarını ve iki kadran
arasındaki açıklığa eşit olan ikisinin azimutları arasındaki farkı buluruz. Bu
rada bir üçgen meydana gelir (ŞekilXLVIII P P ' D ) . Bu üçgenin iki kenarı yük
sekliklerin tamamına eşit olduğundan bilinir, kadranların meydana getirdiği
açı da, iki kadran arasında kalan ufuk halkasının derecelerinden elde edilir.
Böylece, üçgenin tabanı yani, iki yıldızdan geçen doğrunun uçlarını birleştiren
yay da malum olmuş olur.
Şekil: XLVIII

40 SEVİM TEKELİ
Eğer, iki yıldızdan birinin enlem ve boylam bakımından yeri bilinirse,
(bu alet yardımı ile de) onun yüksekliği ve azimutu ve o yerin enlemi elde
edilir. Buradan da ekliptiğin doğan parçası (talic) bilinmiş olur. Yeri meçhul
bir yıldızın rasadından doğuş derecesini bilirsen onun yükseklik ve azimutunu
işaretle, onun enlem ve boylam bakımından yeri bilinmiş olur. Zat-ül-halakta
elde edilen en önemli şey ise, yeri malum bir yıldız yardımı ile meçhul bir
yıldızın yerini tayin etmektir.
Halbuki, bu alet daha mükemmel ve yapılışı da daha kolaydır. Bununla
iki yolla coğrafî enlem ölçüsü yapılır. Birincisi, güneşin (yaz ve kış dönence-
lerindeki) meridyen yüksekliklerinden, ikincisi, hiç batmıyan yıldızların alt
ve üst meridyen yüksekliklerinden. Bu zat-ül-halaktan elde edilmesi imkân
sız olan şeylerdendir. Muhakkakki bütün bunlar Yüce Allahın isteği iledir.
Zat-üş-şu'beteynden çıkardığımız nevilerin tavsifi, Mahrus Meraga
rasathanesi için yaptığımız zat-ül-üstüvaneteyn (çifte sütunlu alet) bunlar-
dandır.35 Bu alet için yüksekliği takriben rasat ziracı ile altı zira c kadar olan,
yüzeyleri dörtgen şeklinde, iki sütun dikeriz. Onları sallanmamaları için sağ
lam yaparız. Her birinin üzerine ufka ve birbirine paralel olacak şekilde birer
başlık (Şekil XLIX, B) tesbit ederiz. Bunlara derinliği ve büyüklüğü bir birine
Şekil: XLIX
35 Bu kısım Almanca tercüme ile uymuyor. Z i r a , k e l i m e s i ş e k l i n d e okunmuştur. S. 83
AL-URDİ'NİN "RİSALET-ÜN Fİ KEYFİYET-İL ERSAD" 41
eşit dipleri yuvarlak iki delik deler, bunların aynı seviyede olmalarını sağlarız.
Seviye denkliğinin kontrolünü, delikler arasına cetvel yerleştirmek ve üzerle
rine duvarcı şakûlü koyarak ölçmek sureti ile yaparız.
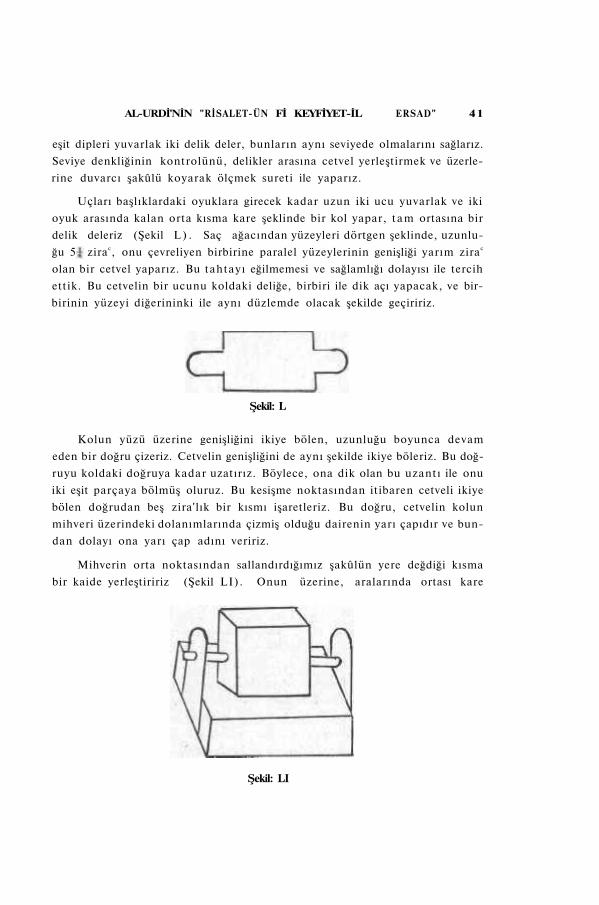
Uçları başlıklardaki oyuklara girecek kadar uzun iki ucu yuvarlak ve iki
oyuk arasında kalan orta kısma kare şeklinde bir kol yapar, t a m ortasına bir
delik deleriz (Şekil L ) . Saç ağacından yüzeyleri dörtgen şeklinde, uzunlu
ğu 5 zirac, onu çevreliyen birbirine paralel yüzeylerinin genişliği yarım zirac
olan bir cetvel yaparız. Bu tahtayı eğilmemesi ve sağlamlığı dolayısı ile tercih
ettik. Bu cetvelin bir ucunu koldaki deliğe, birbiri ile dik açı yapacak, ve bir
birinin yüzeyi diğerininki ile aynı düzlemde olacak şekilde geçiririz.
Şekil: L
Kolun yüzü üzerine genişliğini ikiye bölen, uzunluğu boyunca devam
eden bir doğru çizeriz. Cetvelin genişliğini de aynı şekilde ikiye böleriz. Bu doğ
ruyu koldaki doğruya kadar uzatırız. Böylece, ona dik olan bu uzantı ile onu
iki eşit parçaya bölmüş oluruz. Bu kesişme noktasından itibaren cetveli ikiye
bölen doğrudan beş zira'lık bir kısmı işaretleriz. Bu doğru, cetvelin kolun
mihveri üzerindeki dolanımlarında çizmiş olduğu dairenin yarı çapıdır ve bun
dan dolayı ona yarı çap adını veririz.
Mihverin orta noktasından sallandırdığımız şakûlün yere değdiği kısma
bir kaide yerleştiririz (Şekil LI). Onun üzerine, aralarında ortası kare
Şekil: LI
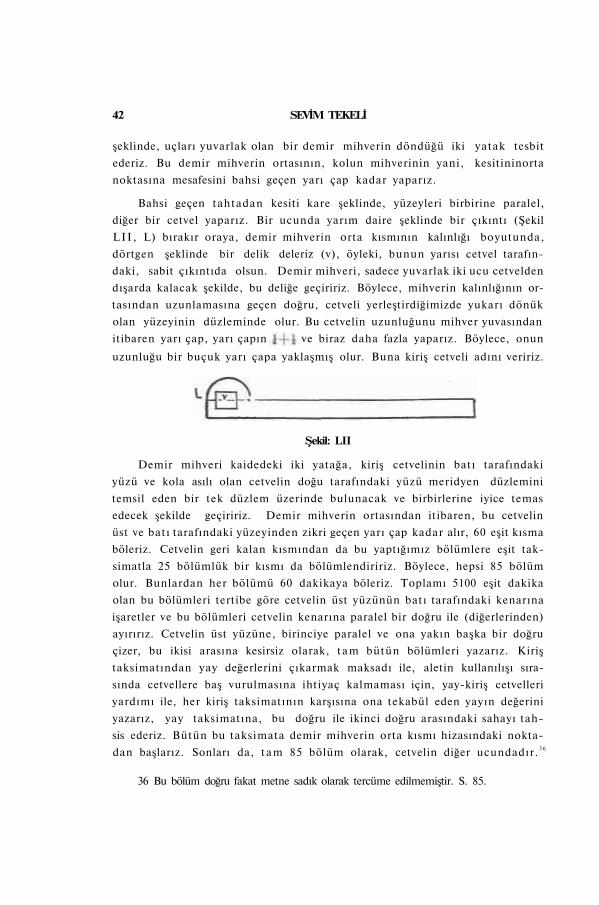
42 SEVİM TEKELİ
şeklinde, uçları yuvarlak olan bir demir mihverin döndüğü iki yatak tesbit
ederiz. Bu demir mihverin ortasının, kolun mihverinin yani, kesitininorta
noktasına mesafesini bahsi geçen yarı çap kadar yaparız.
Bahsi geçen tahtadan kesiti kare şeklinde, yüzeyleri birbirine paralel,
diğer bir cetvel yaparız. Bir ucunda yarım daire şeklinde bir çıkıntı (Şekil
L I I , L) bırakır oraya, demir mihverin orta kısmının kalınlığı boyutunda,
dörtgen şeklinde bir delik deleriz (v), öyleki, bunun yarısı cetvel tarafın
daki, sabit çıkıntıda olsun. Demir mihveri, sadece yuvarlak iki ucu cetvelden
dışarda kalacak şekilde, bu deliğe geçiririz. Böylece, mihverin kalınlığının or
tasından uzunlamasına geçen doğru, cetveli yerleştirdiğimizde yukarı dönük
olan yüzeyinin düzleminde olur. Bu cetvelin uzunluğunu mihver yuvasından
itibaren yarı çap, yarı çapın ve biraz daha fazla yaparız. Böylece, onun
uzunluğu bir buçuk yarı çapa yaklaşmış olur. Buna kiriş cetveli adını veririz.
Şekil: LII
Demir mihveri kaidedeki iki yatağa, kiriş cetvelinin batı tarafındaki
yüzü ve kola asılı olan cetvelin doğu tarafındaki yüzü meridyen düzlemini
temsil eden bir tek düzlem üzerinde bulunacak ve birbirlerine iyice temas
edecek şekilde geçiririz. Demir mihverin ortasından itibaren, bu cetvelin
üst ve batı tarafındaki yüzeyinden zikri geçen yarı çap kadar alır, 60 eşit kısma
böleriz. Cetvelin geri kalan kısmından da bu yaptığımız bölümlere eşit tak
simatla 25 bölümlük bir kısmı da bölümlendiririz. Böylece, hepsi 85 bölüm
olur. Bunlardan her bölümü 60 dakikaya böleriz. Toplamı 5100 eşit dakika
olan bu bölümleri tertibe göre cetvelin üst yüzünün batı tarafındaki kenarına
işaretler ve bu bölümleri cetvelin kenarına paralel bir doğru ile (diğerlerinden)
ayırırız. Cetvelin üst yüzüne, birinciye paralel ve ona yakın başka bir doğru
çizer, bu ikisi arasına kesirsiz olarak, t a m bütün bölümleri yazarız. Kiriş
taksimatından yay değerlerini çıkarmak maksadı ile, aletin kullanılışı sıra
sında cetvellere baş vurulmasına ihtiyaç kalmaması için, yay-kiriş cetvelleri
yardımı ile, her kiriş taksimatının karşısına ona tekabül eden yayın değerini
yazarız, yay taksimatına, bu doğru ile ikinci doğru arasındaki sahayı tah
sis ederiz. Bütün bu taksimata demir mihverin orta kısmı hizasındaki nokta
dan başlarız. Sonları da, t a m 85 bölüm olarak, cetvelin diğer ucundadır. 3 6
36 Bu bölüm doğru fakat metne sadık olarak tercüme edilmemiştir. S. 85.
AL-URDİ'NİN "RİSALET-ÜN Fİ KEYFİYET-İL ERSAD" 43
Asılı cetvelin kuzey tarafındaki yüzüne birbirine eşit ve paralel iki hedefe
tesbit ederiz. Orta noktalarını cetveli ikiye bölen doğru üzerine getirir,
aralarında da el ziracı ile bir zira c mesafe bırakırız.
Güneş meridyene geldiğinde asılı cetvelin ucunu kuzeye doğru, hedefe-
lerin biri diğerini gölgelendirip, güneş ışınları üst delikten alt deliğe nufuz edin-
ciye kadar çekeriz. Kiriş cetvelinin bize doğru olan ucunu, asılı cetvel üzerine
işaretlenmiş çapın ucuna yüzü temas edinciye kadar kaldırırız. Kiriş cetve
linden güneşin zenite olan mesafesini, ondan da yüksekliğini buluruz.
Doğudaki sütunun kuzey tarafına bitişik olarak, takriben beş zira c uzun
luğunda ve yüksekliği sütunun yüksekliği kadar olan bir duvar yaparız. Doğu
taraftaki yüzüne, zenit yüksekliğini ölçmek için daha öncekine benziyen yalnız
ondan daha küçük bir kadran yerleştiririz. Duvarın üst kuzey tarafına, batıya
doğru çıkıntı yapacak şekilde bir kol yapar, ucuna iki makara takarız. Aleti
kullanma zamanında asılı cetvel ile kiriş cetvelinin uçlarına tesbit edilmiş
halkaya bağlı, halka ile makaranın arası, halkadan makaraya, makaradan
halkaya geçen ince bir iple birleştirilir.37 Yüce Tanrının izni ile.
Mahrus Rasathanede onun için bir modelini yaptıklarımızdan zat-üh
cûyûb ves-semt adını verdiğimiz alet vardır. Bu aletle ufkun her istikametin
den yükseklik ölçülebilir.
Bunun için bakırdan bir halka yapmıya ihtiyaç vardır. Halka nekadar
büyük olursa okadar iyidir. Buna ufuk halkası adını veririz. Yapılması ve
düzeltilmesi önce bahsedildiği gibidir. Bu alet için 1,5 zira c yüksekliğinde
dairevi bir duvar yapar, onu, bunun üzerine tesbit ederiz. Ufka paralelliğini
önce geçmiş olduğu gibi tashih ederiz.
Üzerine meridyen ve doğu-batı doğrusunu çıkarıp, çevresi üzerine ortak
merkezli daireler çizeriz. Onların ikişer ikişer aralarına adetleri, dereceleri ve
derece kesirlerini doğu ve batı noktalarından başlayıp, kuzey ve güney nok
talarında 90 derece olarak nihayet bulacak şekilde yazarız.
dörtgen şeklinde bir çap yaparız. Onun iki ucu ufuk halkasının iç kenarında
hareket etsin. Tam ortasına tahta çapa (Şekil L I I I , e) dik, uzunluğu iki zira c
riz (t). Her ikisinin ortalarına birer oyuk yapar, traversle çapı dik açı yapacak
şekilde sağlamca birleştiririz.
37 Bu kısım Almanca tercüme ile uymuyor. S. 86.
Ona sağlam ve iyi bir tahtadan kalınlığı ve genişliği zira c olan yüzeyleri
yahut, yaklaşık olarak çap kadar, kalınlığı zira c olan bir travers tesbit ede-
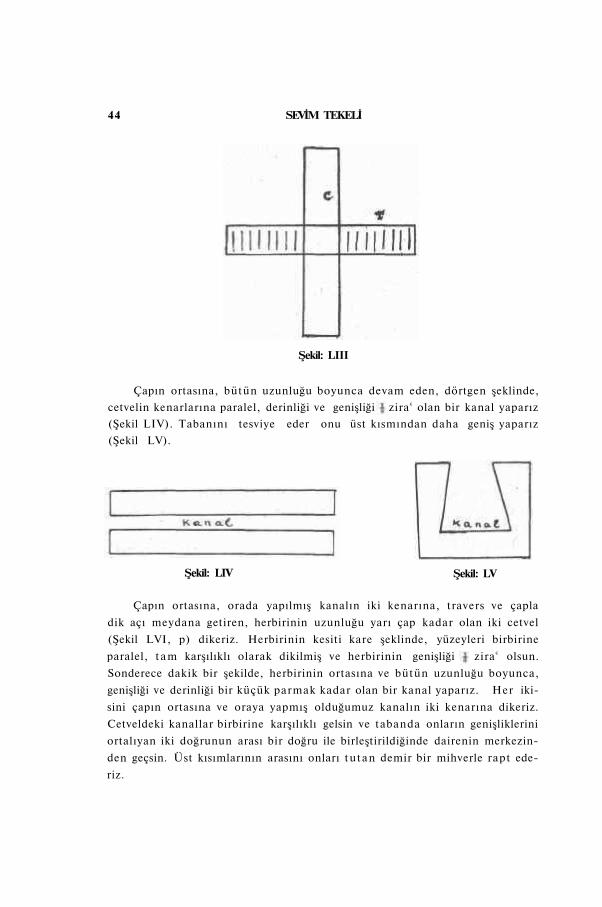
44 SEVİM TEKELİ
Şekil: LIII
Çapın ortasına, bütün uzunluğu boyunca devam eden, dörtgen şeklinde,
cetvelin kenarlarına paralel, derinliği ve genişliği zira c olan bir kanal yaparız
(Şekil LIV). Tabanını tesviye eder onu üst kısmından daha geniş yaparız
(Şekil LV).
Şekil: LIV Şekil: LV
Çapın ortasına, orada yapılmış kanalın iki kenarına, travers ve çapla
dik açı meydana getiren, herbirinin uzunluğu yarı çap kadar olan iki cetvel
(Şekil LVI, p) dikeriz. Herbirinin kesiti kare şeklinde, yüzeyleri birbirine
paralel, t a m karşılıklı olarak dikilmiş ve herbirinin genişliği zira c olsun.
Sonderece dakik bir şekilde, herbirinin ortasına ve bütün uzunluğu boyunca,
genişliği ve derinliği bir küçük parmak kadar olan bir kanal yaparız. Her iki
sini çapın ortasına ve oraya yapmış olduğumuz kanalın iki kenarına dikeriz.
Cetveldeki kanallar birbirine karşılıklı gelsin ve tabanda onların genişliklerini
ortalıyan iki doğrunun arası bir doğru ile birleştirildiğinde dairenin merkezin
den geçsin. Üst kısımlarının arasını onları t u t a n demir bir mihverle rapt ede
riz.
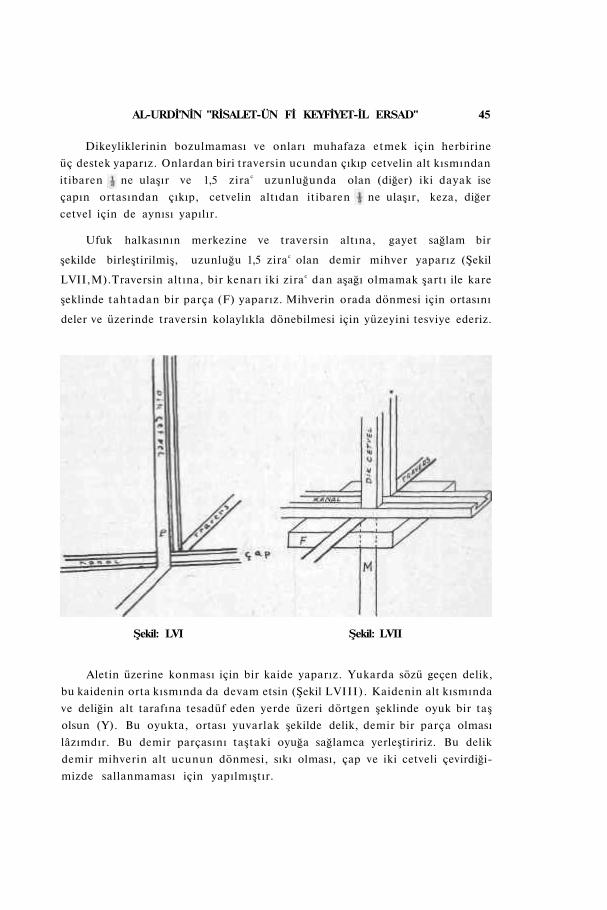
AL-URDİ'NİN "RİSALET-ÜN Fİ KEYFİYET-İL ERSAD" 45
Dikeyliklerinin bozulmaması ve onları muhafaza etmek için herbirine
üç destek yaparız. Onlardan biri traversin ucundan çıkıp cetvelin alt kısmından
itibaren ne ulaşır ve 1,5 zira c uzunluğunda olan (diğer) iki dayak ise
çapın ortasından çıkıp, cetvelin altıdan itibaren ne ulaşır, keza, diğer
cetvel için de aynısı yapılır.
Ufuk halkasının merkezine ve traversin altına, gayet sağlam bir
şekilde birleştirilmiş, uzunluğu 1,5 zira c olan demir mihver yaparız (Şekil
LVII,M).Traversin altına, bir kenarı iki zira c dan aşağı olmamak şartı ile kare
şeklinde tahtadan bir parça (F) yaparız. Mihverin orada dönmesi için ortasını
deler ve üzerinde traversin kolaylıkla dönebilmesi için yüzeyini tesviye ederiz.
Şekil: LVI Şekil: LVII
Aletin üzerine konması için bir kaide yaparız. Yukarda sözü geçen delik,
bu kaidenin orta kısmında da devam etsin (Şekil LVIII). Kaidenin alt kısmında
ve deliğin alt tarafına tesadüf eden yerde üzeri dörtgen şeklinde oyuk bir taş
olsun (Y). Bu oyukta, ortası yuvarlak şekilde delik, demir bir parça olması
lâzımdır. Bu demir parçasını taştaki oyuğa sağlamca yerleştiririz. Bu delik
demir mihverin alt ucunun dönmesi, sıkı olması, çap ve iki cetveli çevirdiği
mizde sallanmaması için yapılmıştır.
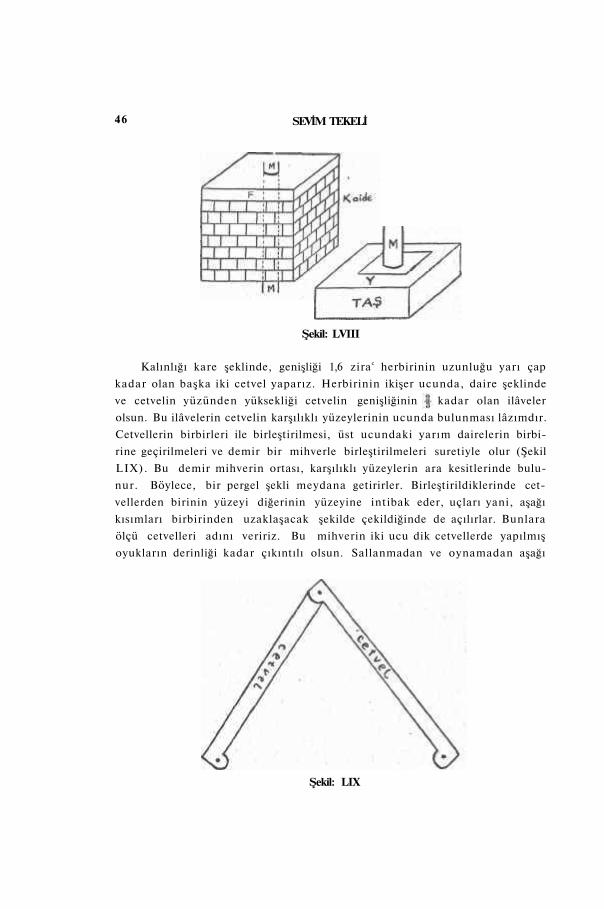
46 SEVİM TEKELİ
Şekil: LVIII
Kalınlığı kare şeklinde, genişliği 1,6 zira c herbirinin uzunluğu yarı çap
kadar olan başka iki cetvel yaparız. Herbirinin ikişer ucunda, daire şeklinde
ve cetvelin yüzünden yüksekliği cetvelin genişliğinin kadar olan ilâveler
olsun. Bu ilâvelerin cetvelin karşılıklı yüzeylerinin ucunda bulunması lâzımdır.
Cetvellerin birbirleri ile birleştirilmesi, üst ucundaki yarım dairelerin birbi
rine geçirilmeleri ve demir bir mihverle birleştirilmeleri suretiyle olur (Şekil
LIX). Bu demir mihverin ortası, karşılıklı yüzeylerin ara kesitlerinde bulu
nur. Böylece, bir pergel şekli meydana getirirler. Birleştirildiklerinde cet
vellerden birinin yüzeyi diğerinin yüzeyine intibak eder, uçları yani, aşağı
kısımları birbirinden uzaklaşacak şekilde çekildiğinde de açılırlar. Bunlara
ölçü cetvelleri adını veririz. Bu mihverin iki ucu dik cetvellerde yapılmış
oyukların derinliği kadar çıkıntılı olsun. Sallanmadan ve oynamadan aşağı
Şekil: LIX
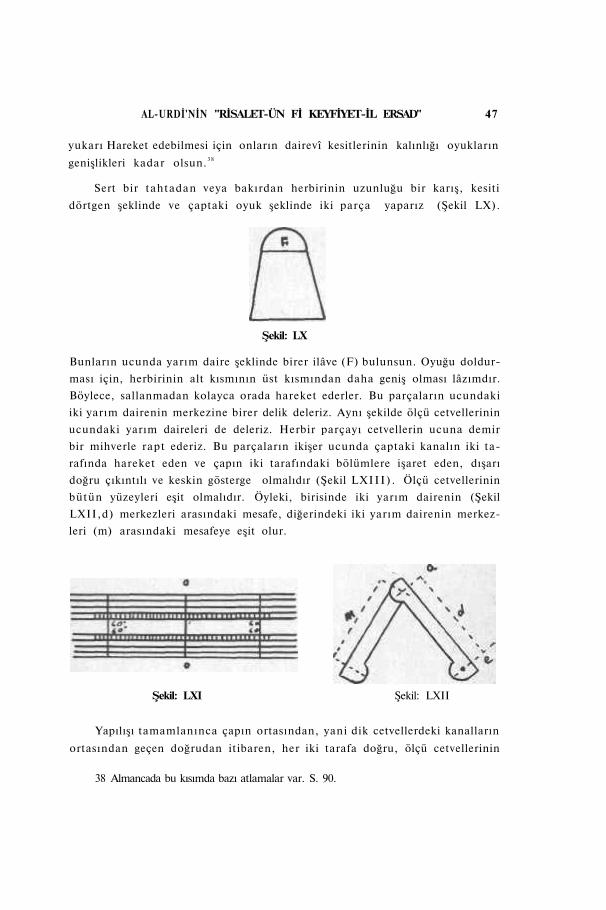
AL-URDİ'NİN "RİSALET-ÜN Fİ KEYFİYET-İL ERSAD" 47
yukarı Hareket edebilmesi için onların dairevî kesitlerinin kalınlığı oyukların
genişlikleri kadar olsun.3 8
Sert bir tahtadan veya bakırdan herbirinin uzunluğu bir karış, kesiti
dörtgen şeklinde ve çaptaki oyuk şeklinde iki parça yaparız (Şekil LX).
Şekil: LX
Bunların ucunda yarım daire şeklinde birer ilâve (F) bulunsun. Oyuğu doldur
ması için, herbirinin alt kısmının üst kısmından daha geniş olması lâzımdır.
Böylece, sallanmadan kolayca orada hareket ederler. Bu parçaların ucundaki
iki yarım dairenin merkezine birer delik deleriz. Aynı şekilde ölçü cetvellerinin
ucundaki yarım daireleri de deleriz. Herbir parçayı cetvellerin ucuna demir
bir mihverle rapt ederiz. Bu parçaların ikişer ucunda çaptaki kanalın iki ta
rafında hareket eden ve çapın iki tarafındaki bölümlere işaret eden, dışarı
doğru çıkıntılı ve keskin gösterge olmalıdır (Şekil L X I I I ) . Ölçü cetvellerinin
bütün yüzeyleri eşit olmalıdır. Öyleki, birisinde iki yarım dairenin (Şekil
LXII,d) merkezleri arasındaki mesafe, diğerindeki iki yarım dairenin merkez
leri (m) arasındaki mesafeye eşit olur.
Şekil: LXI Şekil: LXII
Yapılışı tamamlanınca çapın ortasından, yani dik cetvellerdeki kanalların
ortasından geçen doğrudan itibaren, her iki tarafa doğru, ölçü cetvellerinin
38 Almancada bu kısımda bazı atlamalar var. S. 90.
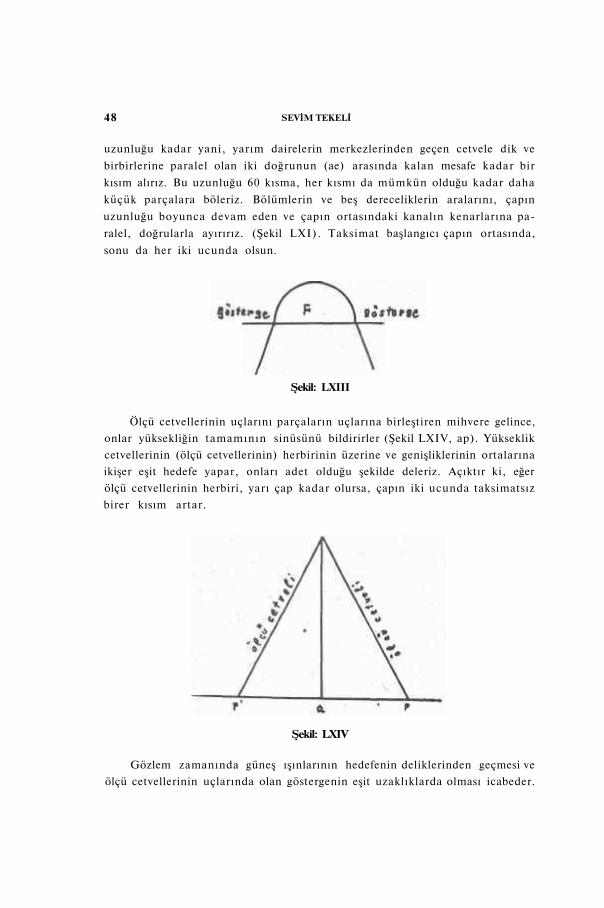
48 SEVİM TEKELİ
uzunluğu kadar yani, yarım dairelerin merkezlerinden geçen cetvele dik ve
birbirlerine paralel olan iki doğrunun (ae) arasında kalan mesafe kadar bir
kısım alırız. Bu uzunluğu 60 kısma, her kısmı da mümkün olduğu kadar daha
küçük parçalara böleriz. Bölümlerin ve beş dereceliklerin aralarını, çapın
uzunluğu boyunca devam eden ve çapın ortasındaki kanalın kenarlarına pa
ralel, doğrularla ayırırız. (Şekil LXI). Taksimat başlangıcı çapın ortasında,
sonu da her iki ucunda olsun.
Şekil: LXIII
Ölçü cetvellerinin uçlarını parçaların uçlarına birleştiren mihvere gelince,
onlar yüksekliğin tamamının sinüsünü bildirirler (Şekil LXIV, ap). Yükseklik
cetvellerinin (ölçü cetvellerinin) herbirinin üzerine ve genişliklerinin ortalarına
ikişer eşit hedefe yapar, onları adet olduğu şekilde deleriz. Açıktır ki, eğer
ölçü cetvellerinin herbiri, yarı çap kadar olursa, çapın iki ucunda taksimatsız
birer kısım artar.
Şekil: LXIV
Gözlem zamanında güneş ışınlarının hedefenin deliklerinden geçmesi ve
ölçü cetvellerinin uçlarında olan göstergenin eşit uzaklıklarda olması icabeder.
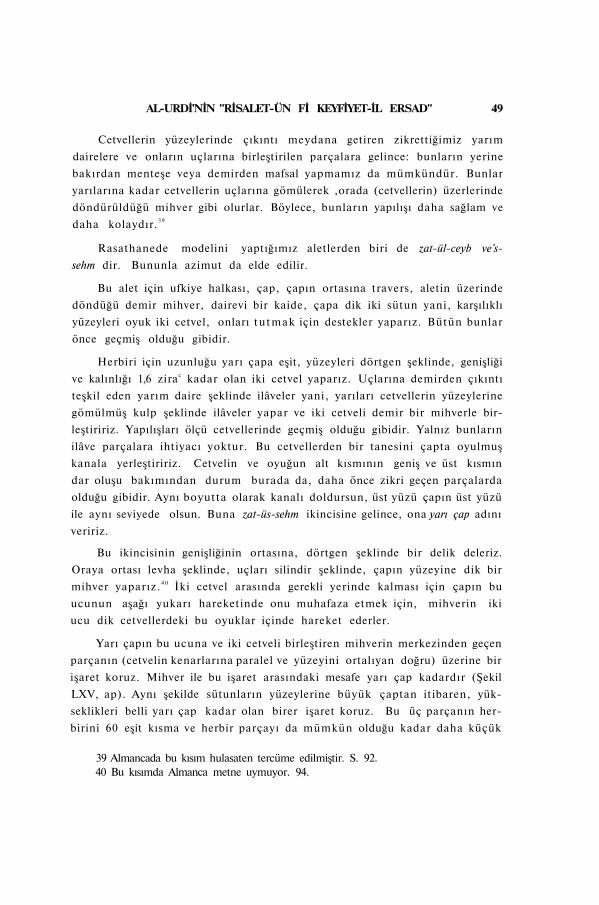
AL-URDİ'NİN "RİSALET-ÜN Fİ KEYFİYET-İL ERSAD" 49
Cetvellerin yüzeylerinde çıkıntı meydana getiren zikrettiğimiz yarım
dairelere ve onların uçlarına birleştirilen parçalara gelince: bunların yerine
bakırdan menteşe veya demirden mafsal yapmamız da mümkündür. Bunlar
yarılarına kadar cetvellerin uçlarına gömülerek ,orada (cetvellerin) üzerlerinde
döndürüldüğü mihver gibi olurlar. Böylece, bunların yapılışı daha sağlam ve
daha kolaydır.3 9
Rasathanede modelini yaptığımız aletlerden biri de zat-ül-ceyb ve's-
sehm dir. Bununla azimut da elde edilir.
Bu alet için ufkiye halkası, çap, çapın ortasına travers, aletin üzerinde
döndüğü demir mihver, dairevi bir kaide, çapa dik iki sütun yani, karşılıklı
yüzeyleri oyuk iki cetvel, onları t u t m a k için destekler yaparız. Bütün bunlar
önce geçmiş olduğu gibidir.
Herbiri için uzunluğu yarı çapa eşit, yüzeyleri dörtgen şeklinde, genişliği
ve kalınlığı 1,6 zirac kadar olan iki cetvel yaparız. Uçlarına demirden çıkıntı
teşkil eden yarım daire şeklinde ilâveler yani, yarıları cetvellerin yüzeylerine
gömülmüş kulp şeklinde ilâveler yapar ve iki cetveli demir bir mihverle bir
leştiririz. Yapılışları ölçü cetvellerinde geçmiş olduğu gibidir. Yalnız bunların
ilâve parçalara ihtiyacı yoktur. Bu cetvellerden bir tanesini çapta oyulmuş
kanala yerleştiririz. Cetvelin ve oyuğun alt kısmının geniş ve üst kısmın
dar oluşu bakımından durum burada da, daha önce zikri geçen parçalarda
olduğu gibidir. Aynı boyutta olarak kanalı doldursun, üst yüzü çapın üst yüzü
ile aynı seviyede olsun. Buna zat-üs-sehm ikincisine gelince, ona yarı çap adını
veririz.
Bu ikincisinin genişliğinin ortasına, dörtgen şeklinde bir delik deleriz.
Oraya ortası levha şeklinde, uçları silindir şeklinde, çapın yüzeyine dik bir
mihver yaparız. 4 0 İki cetvel arasında gerekli yerinde kalması için çapın bu
ucunun aşağı yukarı hareketinde onu muhafaza etmek için, mihverin iki
ucu dik cetvellerdeki bu oyuklar içinde hareket ederler.
Yarı çapın bu ucuna ve iki cetveli birleştiren mihverin merkezinden geçen
parçanın (cetvelin kenarlarına paralel ve yüzeyini ortalıyan doğru) üzerine bir
işaret koruz. Mihver ile bu işaret arasındaki mesafe yarı çap kadardır (Şekil
LXV, ap). Aynı şekilde sütunların yüzeylerine büyük çaptan itibaren, yük
seklikleri belli yarı çap kadar olan birer işaret koruz. Bu üç parçanın her-
birini 60 eşit kısma ve herbir parçayı da mümkün olduğu kadar daha küçük
39 Almancada bu kısım hulasaten tercüme edilmiştir. S. 92. 40 Bu kısımda Almanca metne uymuyor. 94.
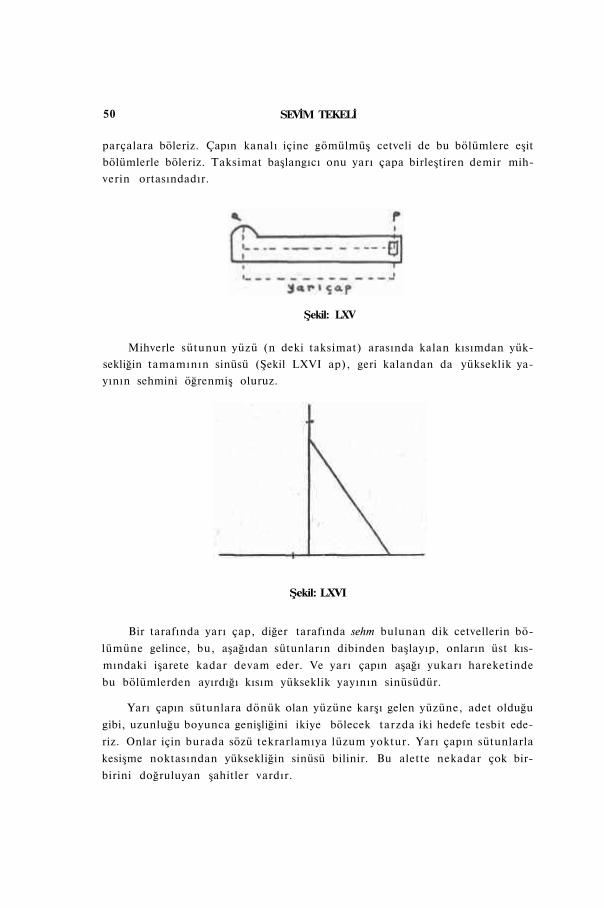
50 SEVİM TEKELİ
parçalara böleriz. Çapın kanalı içine gömülmüş cetveli de bu bölümlere eşit
bölümlerle böleriz. Taksimat başlangıcı onu yarı çapa birleştiren demir mih
verin ortasındadır.
Şekil: LXV
Mihverle sütunun yüzü (n deki taksimat) arasında kalan kısımdan yük
sekliğin tamamının sinüsü (Şekil LXVI ap), geri kalandan da yükseklik ya
yının sehmini öğrenmiş oluruz.
Şekil: LXVI
Bir tarafında yarı çap, diğer tarafında sehm bulunan dik cetvellerin bö
lümüne gelince, bu, aşağıdan sütunların dibinden başlayıp, onların üst kıs
mındaki işarete kadar devam eder. Ve yarı çapın aşağı yukarı hareketinde
bu bölümlerden ayırdığı kısım yükseklik yayının sinüsüdür.
Yarı çapın sütunlara dönük olan yüzüne karşı gelen yüzüne, adet olduğu
gibi, uzunluğu boyunca genişliğini ikiye bölecek tarzda iki hedefe tesbit ede
riz. Onlar için burada sözü tekrarlamıya lüzum yoktur. Yarı çapın sütunlarla
kesişme noktasından yüksekliğin sinüsü bilinir. Bu alette nekadar çok bir
birini doğruluyan şahitler vardır.
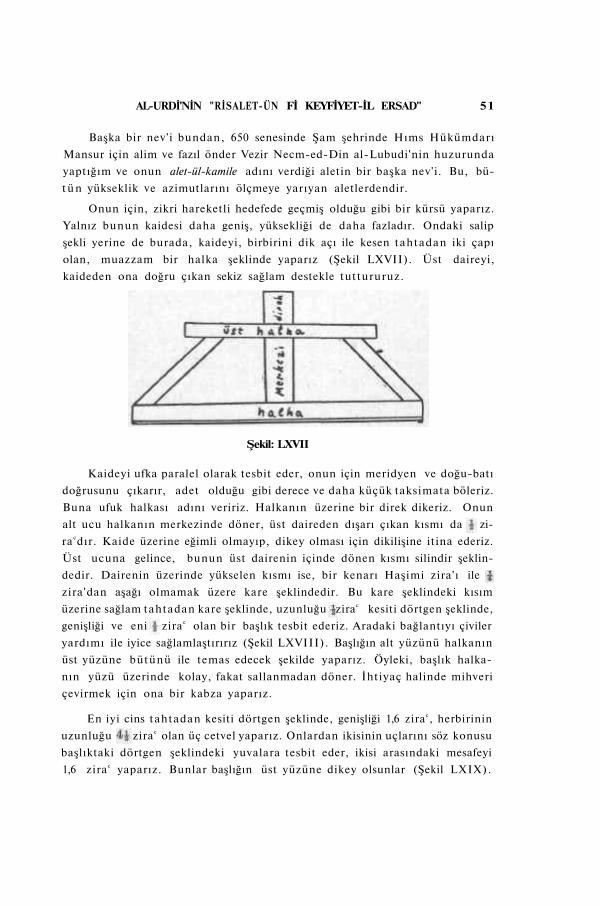
AL-URDİ'NİN "RİSALET-ÜN Fİ KEYFİYET-İL ERSAD" 51
Başka bir nev'i bundan, 650 senesinde Şam şehrinde Hıms Hükümdarı
Mansur için alim ve fazıl önder Vezir Necm-ed-Din al-Lubudi'nin huzurunda
yaptığım ve onun alet-ül-kamile adını verdiği aletin bir başka nev'i. Bu, bü
t ü n yükseklik ve azimutlarını ölçmeye yarıyan aletlerdendir.
Onun için, zikri hareketli hedefede geçmiş olduğu gibi bir kürsü yaparız.
Yalnız bunun kaidesi daha geniş, yüksekliği de daha fazladır. Ondaki salip
şekli yerine de burada, kaideyi, birbirini dik açı ile kesen tahtadan iki çapı
olan, muazzam bir halka şeklinde yaparız (Şekil LXVII). Üst daireyi,
kaideden ona doğru çıkan sekiz sağlam destekle tuttururuz.
Şekil: LXVII
Kaideyi ufka paralel olarak tesbit eder, onun için meridyen ve doğu-batı
doğrusunu çıkarır, adet olduğu gibi derece ve daha küçük taksimata böleriz.
Buna ufuk halkası adını veririz. Halkanın üzerine bir direk dikeriz. Onun
alt ucu halkanın merkezinde döner, üst daireden dışarı çıkan kısmı da zi-
ra cdır. Kaide üzerine eğimli olmayıp, dikey olması için dikilişine itina ederiz.
Üst ucuna gelince, bunun üst dairenin içinde dönen kısmı silindir şeklin
dedir. Dairenin üzerinde yükselen kısmı ise, bir kenarı Haşimi zira'ı ile
zira'dan aşağı olmamak üzere kare şeklindedir. Bu kare şeklindeki kısım
üzerine sağlam tahtadan kare şeklinde, uzunluğu zirac kesiti dörtgen şeklinde,
genişliği ve eni zira c olan bir başlık tesbit ederiz. Aradaki bağlantıyı çiviler
yardımı ile iyice sağlamlaştırırız (Şekil LXVIII). Başlığın alt yüzünü halkanın
üst yüzüne bütünü ile temas edecek şekilde yaparız. Öyleki, başlık halka
nın yüzü üzerinde kolay, fakat sallanmadan döner. İhtiyaç halinde mihveri
çevirmek için ona bir kabza yaparız.
En iyi cins tahtadan kesiti dörtgen şeklinde, genişliği 1,6 zirac, herbirinin
uzunluğu zira c olan üç cetvel yaparız. Onlardan ikisinin uçlarını söz konusu
başlıktaki dörtgen şeklindeki yuvalara tesbit eder, ikisi arasındaki mesafeyi
1,6 zira c yaparız. Bunlar başlığın üst yüzüne dikey olsunlar (Şekil LXIX).

52 SEVİM TEKELİ
Şekil: LXVIII Şekil: LXIX
Üçüncüsüne gelince, buna yükseklik cetveli adını veririz. Her üç cetvelin
genişliklerini, uzunlukları boyunca devam eden doğrularla böleriz. Dik cet
velin genişliklerini ikiye bölen doğrulara, başlıktan itibaren eşit mesafede ve
yukarı kısımlarına yakın olmak üzere birer işaret kor, oralara karşılıklı birer
delik deleriz. Aynı şekilde üçüncünün ucunu da, genişliğinin ortasından de
leriz. Bunu ikisinin arasına geçiririz. Üçünü demir bir mihverle rapt ederiz.
Üçüncünün mihvere paralel olan yüzünün genişliğinin ortasına iki hedefe
tesbit ederiz. Önce söz konusu edilen aletlerde olduğu gibi, adetimiz veçhile,
bunları yükseklikleri bakımından eşit mesafeden ve genişliklerini ortalıyan
iki delik deleriz. Üçüncü cetvelin uzunluğunu üst yüzeye temas edecek şe
kilde yapar iki dik cetvel arasına geçiririz.
En iyi tahtadan kenarları dörtgen şeklinde, uzunluğu üçünden ortada-
kinin 1,5 misli, genişliği diğerleri gibi, kalınlığı beş parmak kadar olan, dör
düncü bir cetvel yapar, buna kiriş cetveli adını veririz. Bir ucuna genişliğini
artıracak şekilde bir ilâve yaparız. Bunun uzunluğu 1, genişliği 1,6 zirac,
kalınlığı da cetvelin kalınlığı kadardır. Cetvelin ilâveye bitişik olan ucundan,
uzunluğu 0,5, genişliği 1 /6 zira c kadar yani, dik cetvelin genişliği kadar olan
bir kısmını keseriz. Oyleki, eyer ilâvenin genişliğinin yüzünü dik cetvelin yan
yüzeyine intibak ettirirsek, kiriş cetvelinin ilâveye bitişik olan yüzeyinin
karşısındaki yüzeyi, ve dik cetvelin iç yüzeyi bir tek düzlem üzerinde bulu
nurlar. Bu da ilk üçten ortadakinin döndüğü düzlemdir (Şekil LXX).
Dik cetvelin yan genişliğini ikiye bölen doğrunun alt kısmına bir işaret
koruz. Mihverle bu işaret arasındaki mesafeye eşit bir uzunluğu, mihverin or
tasından başlamak üzere orta cetvelin üzerinde işaretleriz. Bunu, orta cetveli
üst mihver üzerinde çevirdiğimizde çizdiği dairenin y a n çapı yaparız.
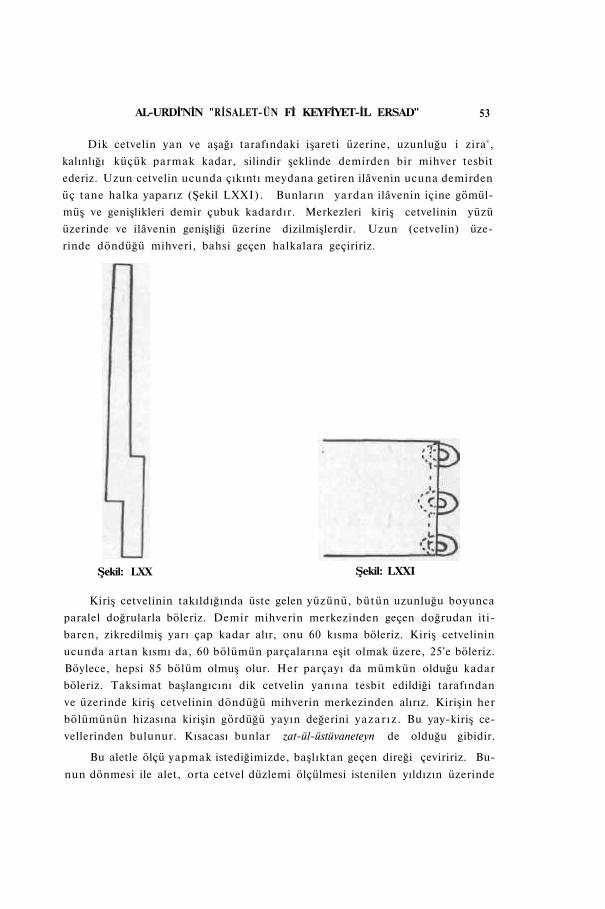
AL-URDİ'NİN "RİSALET-ÜN Fİ KEYFİYET-İL ERSAD" 53
Dik cetvelin yan ve aşağı tarafındaki işareti üzerine, uzunluğu i zirac,
kalınlığı küçük parmak kadar, silindir şeklinde demirden bir mihver tesbit
ederiz. Uzun cetvelin ucunda çıkıntı meydana getiren ilâvenin ucuna demirden
üç tane halka yaparız (Şekil LXXI). Bunların yardan ilâvenin içine gömül
müş ve genişlikleri demir çubuk kadardır. Merkezleri kiriş cetvelinin yüzü
üzerinde ve ilâvenin genişliği üzerine dizilmişlerdir. Uzun (cetvelin) üze
rinde döndüğü mihveri, bahsi geçen halkalara geçiririz.
Şekil: LXX Şekil: LXXI
Kiriş cetvelinin takıldığında üste gelen yüzünü, bütün uzunluğu boyunca
paralel doğrularla böleriz. Demir mihverin merkezinden geçen doğrudan iti
baren, zikredilmiş yarı çap kadar alır, onu 60 kısma böleriz. Kiriş cetvelinin
ucunda artan kısmı da, 60 bölümün parçalarına eşit olmak üzere, 25'e böleriz.
Böylece, hepsi 85 bölüm olmuş olur. Her parçayı da mümkün olduğu kadar
böleriz. Taksimat başlangıcını dik cetvelin yanına tesbit edildiği tarafından
ve üzerinde kiriş cetvelinin döndüğü mihverin merkezinden alırız. Kirişin her
bölümünün hizasına kirişin gördüğü yayın değerini y a z a r ı z . Bu yay-kiriş ce-
vellerinden bulunur. Kısacası bunlar zat-ül-üstüvaneteyn de olduğu gibidir.
Bu aletle ölçü yapmak istediğimizde, başlıktan geçen direği çeviririz. Bu
nun dönmesi ile alet, orta cetvel düzlemi ölçülmesi istenilen yıldızın üzerinde
54 SEVİM TEKELİ
bulunduğu azimut dairesi düzlemi ile intibak edinceye kadar, çevrilir. Orta cet
velin ve kiriş cetvelinin uçlarını, yıldızın bulunmuş olduğu cihetin mukabiline
getiririz. Orta cetvelin ucunu, her iki hedefeden birden yıldız görününceye kadar
çekeriz. Kiriş cetvelinin bölümlü üst yüzü orta cetvel, zikri önce geçmiş
olan çaptaki işaretten geçinceye kadar kaldırırız. Onun (kiriş cetvelinin)
üzerindeki bölümlerden zenitten ve yıldızdan geçen iki doğru arasındaki açının
kirişi ve onun gördüğü yayı bilinir. Bu yüksekliğin tamamı olup doksandan
çıkarıldığında geri kalan da yükseklik yayıdır.
Eğer yeri ölçülen güneş ise, ışınların hedefe deliklerinden nufuzu dolayısı
ile iş daha kolaydır. Yıldızlara gelince, onları gözetlemenin daha sarih yapı
labilmesi için, daha önce olduğu gibi iki hedefe arasını birleştiren ve delikleri
rapt eden bir boru yaparız. Ve yıldızın gözetlenmesinin daha sarih yapı
labilmesi için deliğin göze doğru gelen ucuna çanak şeklinde bir parça
takarız.
Aletin montajına gelince, meridyen doğrusunu çıkarır, kaidesi üze
rine işaret etmiş olduğumuz güney ve kuzey noktalarını bu doğru üzerine
getiririz. Kaideyi, üst yüzeyi ufka paralel olacak şekilde tesbit ederiz. Yere
gömülmüş tahtalar çakıp, kaideyi ona çivilerle rapt ederek sağlamlaştır
makla gibi, rüzgârın tesirinden müteessir olmasın diye etrafını duvarla
çeviririz.
Direğin alt kısmına ve dikey olacak tarzda, ucu ufuk halkasının üzerinde
dönen bir cetvel yaparız. Bununla azimut bulunur. Cetvelin azimut dairesi
düzlemine yani, orta cetvelin hareket ettiği düzleme tesbit edilmesi lâzımdır.
Şu var ki, sivri ucu yıldız istikametinde, başka deyimle kiriş cetvelini ve
yarı çapı çektiğimiz yönün mukabilinde bulunur. Öyleki, cetvelin ucu ve
kiriş cetveli ile orta cetvelin birbirine temas eden yüzeyleri daima azimut
düzlemi üzerinde bulunur.
Almagest'de adı geçen de (zat-üş-şu'beteyn) ele alınamıyan bir çok prob
lemlerin, ondan çıkardığımız bu aletler yardımı ile incelememizin mümkün
olduğu aşikârdır. Bununla, meselâ, yeri enlem ve boylamda malum bir
yıldız aracılığı ile her hangi bir yıldızın meçhul olan yeri bulunabilir. Şöyleki,
bu aletle herhangi bir yıldızın azimutu ve yüksekliğini ölçebilirsek bu yol
ile tal i c de elde edilir. Bunun hemen arkasından yeri meçhul yıldızın yük
sekliğini, azimutunu ve tal i c derecesini ölçersek, yıldızın yeri enlem ve boy
lamda elde edilmiş olur.
AL-URDİ'NİN "RİSALET-ÜN Fİ KEYFİYET-İL ERSAD" 55
Eğer bu, zat-ür-rub'eyn den elde edilirse, her ikisinin yüksekliği bir anda
alınmış olacağı için netice daha dakiktir. Muhakkak ki bütün bunlar Yüce
Allahın rızası iledir.
Almagest'e ki zat-üş-şu'beteyne gelince, bizim (inşa ettiğimiz) aletlerle
elde edilene nisbetle bunda hata vardır. Nitekim, onun yapılışından bahde-
derken Batlamyüs şöyle der. Yüzeyleri dörtgen şeklinde her birinin uzunluğu
dört zira c olan iki cetvel yaparız. Genişliklerini, uzunlukları boyunca devam
eden doğrularla böleriz. Onlardan birini bir dik kaide üzerine ufukla dik açı
yapacak şekilde tesbit ederiz. Bunun yüzeyi meridyen düzlemi üzerinde
bulunsun. Üst kısmına, kalınlığı boyunca doğudan batıya doğru devam eden,
dairevi bir delik deleriz. Diğerinin ucuna, genişliğini ikiye bölen doğru üze
rine de aynı surette bir delik deleriz. Onların raptına yarıyan demir bir mih
verle birleştiririz. Bu mihver üzerinde ikinci kolayca hareket eder.
Dik cetvelin genişliğini bölen doğrunun aşağı ucuna yuvarlak bir çivi
çakar, oraya ince üçüncü bir cetvel yaparız.
Alt ve üst mihverlerin arası 60 kısma bölünür. İkinci cetvelin üzerine,
üst merkezden uzaklığı iki mihverin merkezleri arasındaki mesafe kadar olan
bir işaret koruz.
İkincinin üzerine adet olduğu veçhile iki eşit hedefe tesbit eder, ve
iki delik deleriz. Göze yakın olan hedefenin deliği dar, hedefelerin üsttekinin
deliği ise ondan ayın bütün cismi görünecek kadar geniş olsun. Ay meridyene
geldiğinde rasadını yaparız. Cetvelle dik cetvelin ortalarının arasında kalıp
ve üçüncüden ayrılmış olan kısmı işaretler, üçüncü cetveli dikey cetvel üze
rine intibak ettiririz. Dikey cetvelde işaretin karşısında olan bölümden, dik
cetvelle müteharrik cetvelin genişliklerini bölen iki doğru arasında bulunan
açının kirişi bilinir. Cetvellerden de bu kirişin yayı bulunur.
Geri kalan şeyler, onun söylediği gibi malumdur. Burada onun metnini
aynen iktibas etmemiş bulunuyorsak da, mânasını onun kast ettiği şekilde
verdik.
Zikretmiş olduğu bu aletin, bazı şüpheli tarafları ihtiva ettiği, noksanları
bulunduğu, ve kâfi derecede sağlam olmadığı hususunun pratikte mahareti
olan bir kimse için açık ve seçik olduğuna işaret edelim.
Şüpheli hususlara gelince, o, üçüncüyü kürsü üzerindeki dik cetvelle
birleştirdiğinde, üçüncünün iki yüzeyinden (dik cetvelin) hangisine birleştir
diğini bildirmemiştir. Eğer o, dik cetvelle ikinci cetvelin temas ettikleri düzlem
üzerine konursa, üçüncünün kalınlığı, bir birine temas eden iki yüzey arasına
56 SEVİM TEKELİ
girer. Böylece, üst açısı mihverde bulunan, tabanı ince cetvelden teşekkül
eden üçgen meridyen düzleminde olamaz.
Şayet, dik cetvelin (diğer) yanına konursa, cetvelin kalınlığı, iki hedefesi
olan müteharrik cetvel düzlemi ile kiriş taksimatlı cetvel arasında bir mâni
meydana getirir. Böy lece , açıyı çevreliyen cetvellerin ve yüzeyinin hiç bir
durumda meridyen düzleminde olması imkânı yoktur.
Yükseklik zenite yakın olunca da açının ince cetvel tarafından kirişlen-
mesi zor olur.
Sağlamlığının az oluşuna gelince, müteharrik cetvelin devamlı hareketi
sebebi ile ağırlığı, asılmış olduğu mihveri aşağı doğru çeker. İşaretler ve hu-
dudlar ilk koyduğumuz durumda kalmaz.
Noksanlarına gelince, bununla meridyen yüksekliğinden başka bir şey
elde edilmez. Bu yüksekliğin de 30 dereceden fazla olması şarttır. Dik cetvelin
taksimatı 60 bölüm olduğu ve zenitten itibaren de meridyende en sonu ancak
60 derecenin yayını kirişliyeceği için, onun anlattığı şekli ile bu aletle yükseklik
30 dereceden az ise bununla ölçülmez.
İnce cetvelin yerine iplik kullanılmasına gelince, ipi germe esnasında
kalınlaşıp incelebileceği için bununla faaliyette bulunmıya itimad edilemez.
Böyle önemli meselelerde doğruluk ve dakiklik istiyen bir kimse nasıl ipliğe
itimad edebilir.
Ancak bizim kasdımızın hakikat ve doğruyu tercih etmekten başka bir
şey olmadığı, haset ve aşırı derecede alehtarlık zihniyetinden uzaklaşarak
yaptığımız tenkidin künhüne vasıl olan bir kimseye aşikârdır, gizli değildir.
" T H E A R T I C L E O N T H E Q U A L I T Y O F T H E
O B S E R V A T I O N S " O F A L - ' U R D İ *
Sevim TEKELİ
Introduction
This article includes the critical edition and the translation of the Risala fi kaifiya al-arsad wa ma yuhtaja ildilmihi wa amalihi min turuq al-muwaddiya ila ma'rifa'audat al-kawakib (The article on the quality of the observations and the teoretical and practical knowledge needed to make them, and the methods leading to understanding of the regularities of the stars) of Al-' Urdi. It gives us a whole discription of the instruments of the Maragha Observatory which was constructed by Nasir al-Din al-Tusi in 1261 under the auspices of Hulagu. Only at the time of Tycho Brahe (in 16th century) did the instruments in Europe become as perfect and precise as the instruments constructed in Maragha Observatory.
Al-'Urdi is a Syrian architect. He constructed the water installations of Damascus. He has also constructed astronomical instruments for Al-Mansur, the ruler of Hims. After 1259, he worked in cooperation with Naşir al-Din al-Tusi.
We could clearly see from the descriptions given in this article t h a t the constructions of the instruments and their erections were done with great care in order to have accurate results.
An incomplete French translation of this article was made by Amabl Jourdain (in 1909) in Memoire sur l'observatoire de Meragah et sur quelques instruments emploiyes pour y observer. In 1928 it is translated into German by Hugo Seemann as Die Instrumente der Sternwarte zu Maragha nach den Mitteilungen von Al- Urdi. This German translation is quite complete. Though it is one of the fundamental books in Islamic Astronomy, its text has not been published up to now. The text herein is the comparison of the three manuscripts. Two of these three copies are in Istanbul and the other one is in Paris. 1
This Arabic text and its English translation is a part of my Phd theses accepted in July 2, 1956 at the Faculty of Letters, of the Ankara University.
It is a pleasure for me to mention in here the great help I received from Prof. Sayili in the translation of the Arabic manuscript. And it is my duty as well as privilege to cite his efforts in finding the microfilms of the two manuscripts. I am also indepthed to Prof. Dr. T. Tanci for his generous contribution of time and thought in translating some very difficult sections.
1 I learned from Professor Sayili that another copy is found in Tahran.
58 SEVİM TEKELİ
One of the two manuscripts in İstanbul is enlisted in the St. Sophia Lib
rary and its number is 2973. According to the information given by the Di
rectory of the Library the description of the manuscript is as follows:
Dimension of the page: 186 x 120 mm.
Written area: 130 x 75 mm.
Quality of the paper: yellowish polished paper. It is without marginal
notes and quite correct. It is rarely punctuated and is one of the oldest
manuscripts. It does not include the name of the person who has copied
this manuscript but it includes the date of its completion: tenth month of
the lunar year 864 (H.).
The other manuscript is registered in Nuri Osmaniye Library under the
number of 2971. According to the information given by the Directory, the
description of the manuscript is as follows:
Dimension of the page: 257 x 176 mm.
Written area: 190 x 100 mm.
Quality of the paper: Abadi.
Binding: brown leather with head bound.
This is a review which includes different manuals. It is clearly written,
but mostly not punctuated.
The third manuscript is in Bibliotheque National of Paris registered under
2544,10. It is clearly written and punctuated. The transcriber has compared
two manuscripts and pointed out their differences in the margin. That is why
in the text this manuscript is showed P. and p a as two copies.
P a stands for the second which was compared to t h e first one. At the
end it is written that the manuscript has been copied by Hafiz Hasan
b. al-Hafiz Mustafa in the year 867 (H.) the 12th of the sixth month of
the lunar year.
In the Paris and St. Sophia manuscripts the name of t h e copier is not
included. But in the Nuri Osmaniye manuscript it is written in the beginning
that it has been transcribed by Al-'Urdi of Damascus.
Though the date of the transcription has not been indicated in the manusc
ripts we can easily deduce from t h e informations given in the text t h a t
it has been written after the construction of the Maragha Observatory and
before the death of Naşir al-Din Tusi. In the text the date of the cons-
AL-URDİ'NİN "RİSALET-ÜN Fİ KEYFİYET-İL ERSAD" 59
truction of the instruments is given as 1261/2. Since Naşir al-Din Tusi died
in 1274 we can estimate easily that the manuscript is transcribed between
1262 and 1274. However, since Al-'Urdi indicates that some of the models of
the instruments have already been construted but without saying whether
they have been constructed in the Observatory or not, we can make our esti
mations further then 1274.
According to the grammar rules, it is necessary to accord the verbes but
in addition accords were made in the kind and number of verbes, when this
is not contional in order to provide precision and these changes are indicated
with notes. The errors thus made in the dictation are different in the manusc
ripts but still these changes do not require any corrections.
The translation of the manuscript was made word for word. It has been
compared to the German translation and the differences were noted. But
towards the end of the German translations more emphasis was given to
the meaning without a literal translation. That is why the differences were
not noted separately.
RISALA FI KAIFIYA AL-ARSAD
With the name of God, the merciful. Thank God. Praise to prophet
Muhammad and his close relations. The grace comes from God.2
This article has been written by Mu'ayyad al-Din al-cUrdi of Da
mascus who is the leader of the scientists, head of the engineers, connoisseur
of mathematics and the supporter of the Nation. He says: "I wrote this article
in order to explain the technics of the observatios and to give information
about the construction and the use of the observational instruments and
the other things necessary in the field of theory and practice to lead us to the
knowledge of the movements of the stars, their positions, their distance from
the earth and their efficiency when the earth's radius is taken as a uni t . "
Astronomy which is a branch of mathemetical sciences t h a t developes the
theoretical sciences and the branch which is closer to theology than t h e others
is glorified in two ways: of its subject and the soundness of its arguments.
Its subject is the heaven which is one of the most unique and wonderful
2 Hugo J. Seeman, Die Instrumente der Sternwarte zu Maragha nach den mitteilungen von Al-'Urdi, Sitzungsberichte der Physi. medi. Sozietat, Erlangen 1928. P. 23. This part is missing.
60 SEVİM TEKELİ
creations of the God, free from all defect. When we come to the arguments,
they depend upon mathemetics and geometry. That is why we endeavoured all
our efforts on this subject. The arguments depend upon our observations and
the observations require instruments so we started with the description of
the instruments. The ancient and the modern astronomers have constructed
many of them. Some of them have defects and the others are difficult to rea
lize. This difficulty does not come from the complexity of its construction,
it is the result of the defect in the planning and the fault in the design. We
will not mention these in here. We will mention the most accurate of the old
instruments and remove every kind of doubth and obstruction befalled on
them and we will add the new ones we constructed. These instruments are
perfect and precise.
We need to know the meridian of the observatory during the erec
tions of these instruments. Different methods were put forward to determine
this. I saw that among these, the best method is the Indian Circle used by
our elders. We have discussed the precision of this method in our Risala fi camal
al-kura al-kamila. This instrument is especially used when the sun is in one
of the tropics. With no doubth the Indian Circle gives precise results when
the sun is found in one of the tropics, rather then when it is found in any other
point.
Its construction: We take a wooden or a stone plate and, level the
upper face and place it parallel to the horizon. This is done by fadin
which is a scale of a bricklayer. If this instrument will be used in
winter the length of the scale should be 1 /4 of the diameter of the largest
circle drawn on the plate and if it is going to be used in the summer then the
lenght should be l/3th 3 . We make a scale with a lathe. This should be
in cylinderical form with a pointed top and a round base4. If the scale is of
copper then its weight is enough but if it is of wood then we make a hole at
the center of the base which is larger at the bottom then at the mouth and
fill this hole (not completely) with lead so that when the scale is placed this
weight will help to fix the scale (Figure I ) .
Then we draw a small circle [whose diameter is equal to the diameter of
the base of the scale] to the center of the plate; thus, when the scale is placed
3 Since the height of the shadow will change according to its presence in the winter or the summer tropics so the height of the scale will get longer or shorter accordingly.
4 The word is read like . That is why itis translated less than 1 /3. P. 26.
AL-UHDİ'NİN "RİSALET-ÜN Fİ KEYFİYET- İL ERSAD" 61
on the base, their centers coincide and its axis falls perpendicular to the
face of the plate. The plate is put parallel to the horizon, when it is fixed
to its place with lime or another material, we draw concentric circles
so that when the shadow comes and we are unaware, the other one will
replace it. When the shadow is not yet inside the circle but on the
circumference, the middle of the width of the tip of the shadow is
marked on the circumference. The same operation is done with the other
circles as well. When the sun passes to the other side of the meridian-this
happens when the shadow is the shortest, afterwards it becomes longer-
then we follow with our eyes the movement of the shadow when it is at
the point of leaving one of the cicumferences of the circles marked at
the enterance of the shadow, We mark the middle of the width of the sha
dow before it leaves the circumference. To verify this we repeat the same ope
ration on the other circles. The chord of the arc is divided. After we lift the
scale we connect the center of the plate with this point by a straight line and
extend it at both sides. This straight line is the meridian established in the
most precise way. When we drop a perpendicular from the center to this
plane, this is called the east west line (Figure I I ) .
Now, we will mention the instruments we constructed in the Observa
tory which is devinely guarded near the Maragha at the west side hill.
These constructions were done in the few years, before 660 (H.) and after
660. (H.)
All these were possible with the suggestion of our great leader, the eminent
scientist, the perfect investigator, the symbol of the scholars, head of the jud
ges, the most virtuous of not only the savants of Islam but of all the ancient
and the present thinkers. He, who is capable of comprehending all the sciences
and the nice behavior, sound judgement, tenderness, good nature, virtu,
of which only one is found in a scientist, is a rare creature of the God who is
free from all evil. He gathered all the scientists and strenghtened their devo
tions towards him by donations. He was much more closer to them than a
father to his son. We were safe under his protection and happy to see him.
As it is said in the poem,
To test him, we vexed him,
But what we found was tenderness in both states.
This rare person, God give him long life, is Naşir al-Din Muhammad ibn
al-Tusi, supporter of the Nation. I heard many things about him before I saw
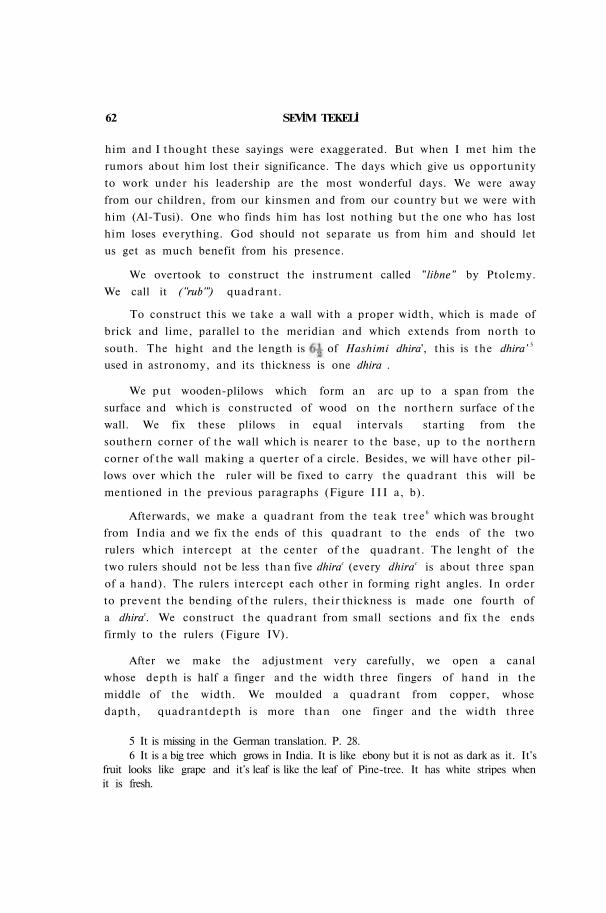
62 SEVİM TEKELİ
him and I thought these sayings were exaggerated. But when I met him the
rumors about him lost their significance. The days which give us opportunity
to work under his leadership are the most wonderful days. We were away
from our children, from our kinsmen and from our country but we were with
him (Al-Tusi). One who finds him has lost nothing but the one who has lost
him loses everything. God should not separate us from him and should let
us get as much benefit from his presence.
We overtook to construct the instrument called "libne" by Ptolemy.
We call it (''rub'") quadrant.
To construct this we take a wall with a proper width, which is made of
brick and lime, parallel to the meridian and which extends from north to
used in astronomy, and its thickness is one dhira .
We put wooden-plilows which form an arc up to a span from the
surface and which is constructed of wood on t h e northern surface of the
wall. We fix these plilows in equal intervals starting from the
southern corner of the wall which is nearer to the base, up to t h e northern
corner of the wall making a querter of a circle. Besides, we will have other pil
lows over which the ruler will be fixed to carry the quadrant this will be
mentioned in the previous paragraphs (Figure I I I a, b).
Afterwards, we make a quadrant from the teak tree 6 which was brought
from India and we fix the ends of this quadrant to the ends of the two
rulers which intercept at the center of the quadrant. The lenght of the
two rulers should not be less than five dhirac (every dhirac is about three span
of a hand). The rulers intercept each other in forming right angles. In order
to prevent the bending of the rulers, their thickness is made one fourth of
a dhirac. We construct the quadrant from small sections and fix the ends
firmly to the rulers (Figure IV).
After we make the adjustment very carefully, we open a canal
whose depth is half a finger and the width three fingers of hand in the
middle of the width. We moulded a quadrant from copper, whose
dapth, quadrantdepth is more than one finger and the width three
5 It is missing in the German translation. P. 28. 6 It is a big tree which grows in India. It is like ebony but it is not as dark as it. It's
fruit looks like grape and it's leaf is like the leaf of Pine-tree. It has white stripes when it is fresh.
south. The hight and the length is of Hashimi dhira', this is the dhira' 5
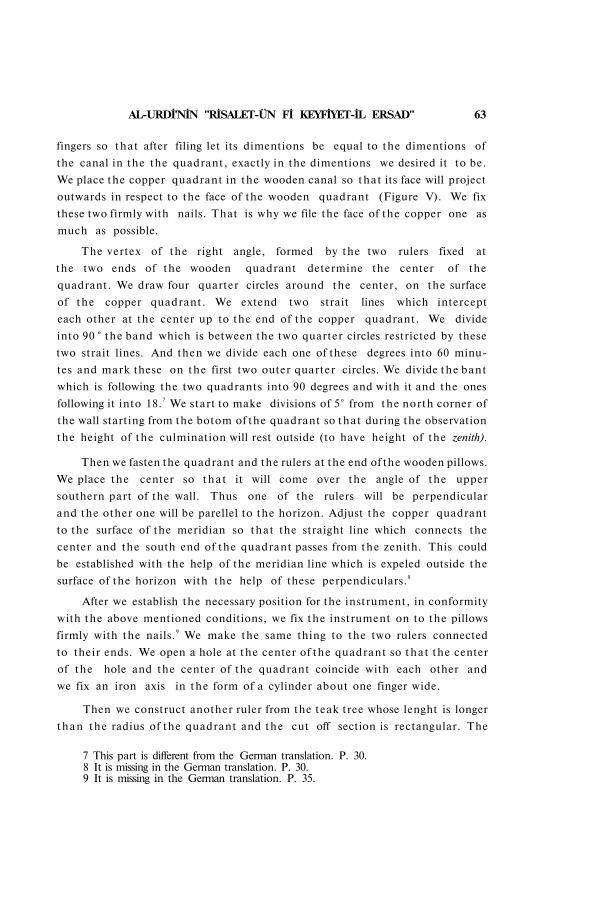
AL-URDİ'NİN "RİSALET-ÜN Fİ KEYFİYET-İL ERSAD" 63
fingers so that after filing let its dimentions be equal to the dimentions of
the canal in the the quadrant, exactly in the dimentions we desired it to be.
We place the copper quadrant in the wooden canal so that its face will project
outwards in respect to the face of the wooden quadrant (Figure V). We fix
these two firmly with nails. That is why we file the face of the copper one as
much as possible.
The vertex of the right angle, formed by the two rulers fixed at
the two ends of the wooden quadrant determine the center of the
quadrant. We draw four quarter circles around the center, on the surface
of the copper quadrant. We extend two strait lines which intercept
each other at the center up to the end of the copper quadrant. We divide
into 90 ° the band which is between the two quarter circles restricted by these
two strait lines. And then we divide each one of these degrees into 60 minu
tes and mark these on the first two outer quarter circles. We divide the bant
which is following the two quadrants into 90 degrees and with it and the ones
following it into 18.7 We start to make divisions of 5° from the north corner of
the wall starting from the botom of the quadrant so that during the observation
the height of the culmination will rest outside (to have height of the zenith).
Then we fasten the quadrant and the rulers at the end of the wooden pillows.
We place the center so t h a t it will come over the angle of the upper
southern part of the wall. Thus one of the rulers will be perpendicular
and the other one will be parellel to the horizon. Adjust the copper quadrant
to the surface of the meridian so that the straight line which connects the
center and the south end of the quadrant passes from the zenith. This could
be established with the help of the meridian line which is expeled outside the
surface of the horizon with the help of these perpendiculars.8
After we establish the necessary position for the instrument, in conformity
with the above mentioned conditions, we fix the instrument on to the pillows
firmly with the nails.9 We make the same thing to the two rulers connected
to their ends. We open a hole at the center of the quadrant so t h a t the center
of the hole and the center of the quadrant coincide with each other and
we fix an iron axis in the form of a cylinder about one finger wide.
Then we construct another ruler from the teak tree whose lenght is longer
t h a n the radius of the quadrant and the cut off section is rectangular. The
7 This part is different from the German translation. P. 30. 8 It is missing in the German translation. P. 30. 9 It is missing in the German translation. P. 35.
64 SEVİM TEKELİ
width of this rectangle is four fingers and its thickness is less than its width. We
file it as much as possible. We place copper pieces at their ends, divide the
width from the center and make a hole at its one end about the size of the
diameter of the axis t h a t we have mentioned above. From the other end, we
cut off three fingers from the lenght up to the straigh line which connects the
center with the middle of the ruler, to clarify the value of the culmination
during its movement over these sections (Figure VII).
The ruler made according to these conditons, the straight line (SM)
(Figure VIII) which passes from the center of the quadrant and the divisions
(since the direction of the sun is determined only with the straight line (K L)
which connects the holes free from these two points) passes from the center
of the sun. This does not form on the curved ruler only provided when the
pinnules (a, a') placed on the surface of the ruler in a raised form should turn
towards the center (o), this should be in such a way that the holes of the
pinnules of the ruler (b,b') (with a geometrical precision) should be in the of sur
face (K L M O) of the ruler which passes from the center of the quadrant that
is to say the surface (M F) which is determined by the extended surface which
is established by the cut end. The interseption of the two parallel lines is
impossible (in other words they meet in the infinite), that is why one of
the straight lines mentioned on the (ruler) with the desired conditions
passes as a straight line (S M) through the center of the quadrant and the
cut end which moves over the divisions which evaluates the height of the ruler,
and the other one passes through the holes of the pinnules. In this condi
tion the strait line (K L) which passes through the holes of the pinnules
should also pass through the center (O K) of the axis over which the ruler
called alidade turnes.
In the case of the construction the ruler of the astrolabe by the astrolabe
manufacturers, this production is not done with precision. They do not give
much care because in the small instruments small differences are not percie-
ved. But when the instrument gets larger and the division is very small then
the differences show themselves clearly and can be percieved easily.
It is necessary to hang a hinge and a hoop at the end of the ruler and a
pulley which moves on the upper par t of the wall. There, we have a string
strong enough to carry the weight of the ruler, which passes through the
pulley and fixed on to the hoop which is at the ent of the the ruler. The
height of the quadrant from its base is about some fractions of a dhirac.
AL-URDİ'NİN "RİSALET-ÜN Fİ KEYFİYET-İL ERSAD" 65
One of the instruments we constructed for the guarded Observatory is
the armillary sphere (dhat al-halak) with five circles which does not need
the ninth circle of Theon of Alexandria and which is not same as the ins
trument described by Ptolemy as having six circles.
The description of its construction: 1 0 We make two circles in equal size
whose surfaceses are parallel to each other and their cut off section in a rec
tangular form. The radius of each of these circles are three dhira accor
ding to the observation dhirac and their width and thickness are four fingers.
One of these represents the ecliptic circle and the other one represents the
polar circle (which passes through four poles)11. After the termination of the
filing of the circle and its division, we make two cavities in the shape of a
rectangle at the convex side of the polar circle who face each other and whose
depth is equal to the thickness of the circles (Figure IX, K. a). The same way
we make two cavities (E, b) in the form of a rectangle at the concave side
of the ecliptic circle which face one another. Their depth is one half of its
thickness and their width is equal to the width of the polar circle.
In order to place the ecliptic circle over the polar circle we cut off a sec
tion which will end at the convex side and it will be a span long with a
depth of half of the depth of the cavity, at one of the side of one of the
cavities of the polar circle12 (Figure X).
Then they are both placed inside the ecliptic circle in such a way that they
form a right angle with each other and their convex sides as well as the
concave sides will be on the same spherical surfaces. After a careful filing of
the straight and circular surfaces they are connected to each other. In order
to smoothen the convex surface, we construct a copper piece having exactly
the same dimensions of the segment cut off from the polar circle, we
strenghten this by attaching it to the section we want to protect. If the
artisan is skillful, he makes the carved section in such a way that it will not
need any attaching.
Then we construct a third circle larger than the others which will
touch the convex surfaces of the two circles that we have previously construc
ted. The width of this circle should be equal to the width of the other two
circles and its thickness should be one finger smaller than its width.
10 It is missing in the German translation. P. 35. 11 It is missing in the German translation. P. 35. 12 A different form is given in the German translation. P. 36.
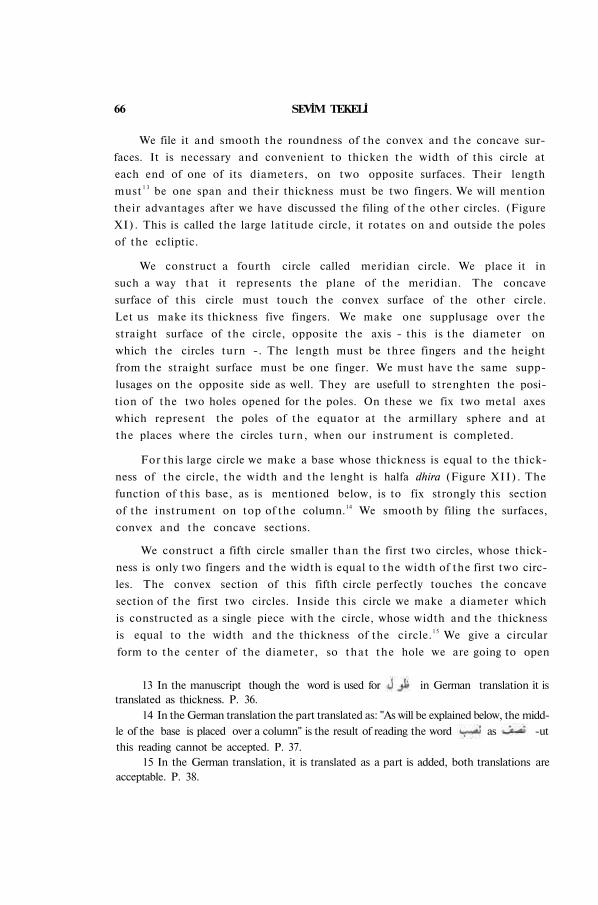
66 SEVİM TEKELİ
We file it and smooth the roundness of the convex and the concave sur
faces. It is necessary and convenient to thicken the width of this circle at
each end of one of its diameters, on two opposite surfaces. Their length
must 1 3 be one span and their thickness must be two fingers. We will mention
their advantages after we have discussed the filing of the other circles. (Figure
XI) . This is called the large latitude circle, it rotates on and outside the poles
of the ecliptic.
We construct a fourth circle called meridian circle. We place it in
such a way t h a t it represents the plane of the meridian. The concave
surface of this circle must touch the convex surface of the other circle.
Let us make its thickness five fingers. We make one supplusage over the
straight surface of the circle, opposite the axis - this is the diameter on
which the circles turn -. The length must be three fingers and the height
from the straight surface must be one finger. We must have the same supp-
lusages on the opposite side as well. They are usefull to strenghten the posi
tion of the two holes opened for the poles. On these we fix two metal axes
which represent the poles of the equator at the armillary sphere and at
the places where the circles turn, when our instrument is completed.
For this large circle we make a base whose thickness is equal to the thick
ness of the circle, the width and the lenght is halfa dhira (Figure X I I ) . The
function of this base, as is mentioned below, is to fix strongly this section
of the instrument on top of the column.14 We smooth by filing the surfaces,
convex and the concave sections.
We construct a fifth circle smaller than the first two circles, whose thick
ness is only two fingers and the width is equal to the width of the first two circ
les. The convex section of this fifth circle perfectly touches the concave
section of the first two circles. Inside this circle we make a diameter which
is constructed as a single piece with the circle, whose width and the thickness
is equal to the width and the thickness of the circle.1 5 We give a circular
form to the center of the diameter, so that the hole we are going to open
13 In the manuscript though the word is used for in German translation it is translated as thickness. P. 36.
14 In the German translation the part translated as: "As will be explained below, the midd
le of the base is placed over a column" is the result of reading the word as ut
this reading cannot be accepted. P. 37. 15 In the German translation, it is translated as a part is added, both translations are
acceptable. P. 38.

AL-URDİ'NİN "RİSALET-ÜN Fİ KEYFİYET-İL ERSAD" 67
will not weaken it. This circle is called small latitude circle, which is the
smallest of all the circles, because it turns about the poles of the ecliptic. The
best thing to do is to start the construction from this circle, because the center
of the diameter of this circle is at the same time the center of all circles.
When we make the necessary corrections of the small latitude circle
the correction of the concave face of the ecliptic or polar circles becomes
easier. When we adjust their convex sections, the correction of the concave
face of the larger latitute circle becomes easier; when we adjust the convex
section the correction of the concave section of the largest circle (meridian)
becomes easier. We place the circles one within the other and in perfect adap
tation. These are the small and the large latitude circles, one of the two equal
circles and the meridian. We turn them thus one within the other, and change
the equal circles. In this way, if we adjust concave and the convex sections
with the straight surfaces, then the same way we can adjust the concave
section of the circle which is exactly touching everywhere the convex
surface. 1 6
When we are through with the correction and the construction then we
can start the division. Only three needs to be divided from these, ecliptic, the
small latitude circle and the largest circle to say the meridian.
When we come to the division of the ecliptic circle; First of all as menti
oned above, we draw its two diameters. We divide into equal ninety degrees
each quadrant divided by these diameters, and mark these divided parts over
the two sides of the straight surfaces of these quadrants. We divide into
90° both sides of the convex surface of each quadrant. We write the names
of the twelve signs over the ecliptic circle between divided rows of the con
cave and the convex surfaces. There is no demage in repeating the names of
the signs, whereas the names can be useful during the observation (Figure
X I I I ) . We start to mark down the signs, by writing the head of the Cancer
into the middle of one of these holes. And we write the head of the Capricorn
into the middle of the hole, opposite this one. In a habitual way we put in
order the rest of the signs. We make divisions of thirty degrees and five
degrees by the side of each sign (Figure XIV).
We must not forget the following when we are connecting the ecliptic
circle with the polar circle: the middle of the hole into which we write the
head of the Cancer must be near the one assigned to the north pole of the
16 It does not correspond with the German translation. P. 39.
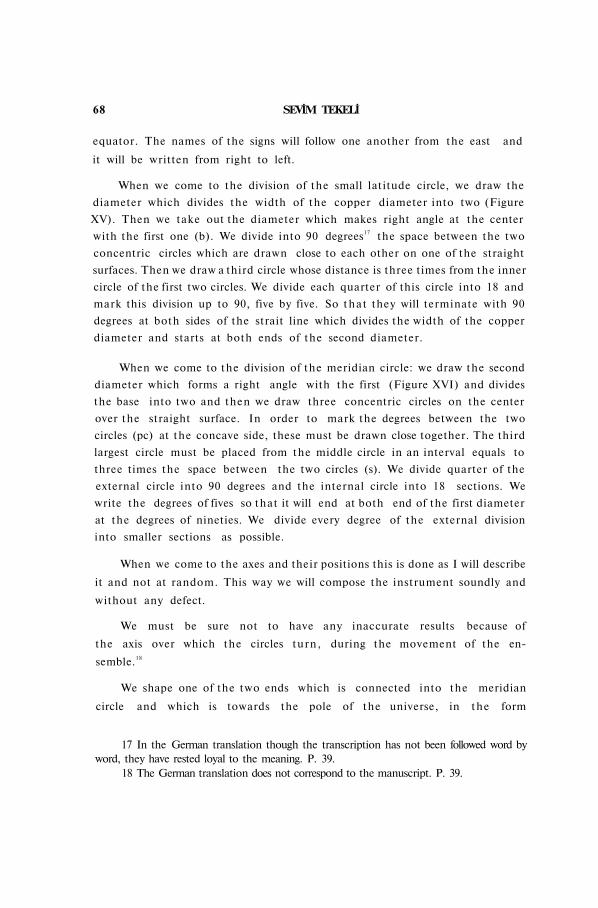
68 SEVİM TEKELİ
equator. The names of the signs will follow one another from the east and
it will be written from right to left.
When we come to the division of the small latitude circle, we draw the
diameter which divides the width of the copper diameter into two (Figure
XV). Then we take out the diameter which makes right angle at the center
with the first one (b). We divide into 90 degrees17 the space between the two
concentric circles which are drawn close to each other on one of the straight
surfaces. Then we draw a third circle whose distance is three times from the inner
circle of the first two circles. We divide each quarter of this circle into 18 and
mark this division up to 90, five by five. So t h a t they will terminate with 90
degrees at both sides of the strait line which divides the width of the copper
diameter and starts at both ends of the second diameter.
When we come to the division of the meridian circle: we draw the second
diameter which forms a right angle with the first (Figure XVI) and divides
the base into two and then we draw three concentric circles on the center
over the straight surface. In order to mark the degrees between the two
circles (pc) at the concave side, these must be drawn close together. The third
largest circle must be placed from the middle circle in an interval equals to
three times the space between the two circles (s). We divide quarter of the
external circle into 90 degrees and the internal circle into 18 sections. We
write the degrees of fives so that it will end at both end of the first diameter
at the degrees of nineties. We divide every degree of the external division
into smaller sections as possible.
When we come to the axes and their positions this is done as I will describe
it and not at random. This way we will compose the instrument soundly and
without any defect.
We must be sure not to have any inaccurate results because of
the axis over which the circles turn, during the movement of the en
semble.18
We shape one of the two ends which is connected into the meridian
circle and which is towards the pole of the universe, in the form
17 In the German translation though the transcription has not been followed word by word, they have rested loyal to the meaning. P. 39.
18 The German translation does not correspond to the manuscript. P. 39.
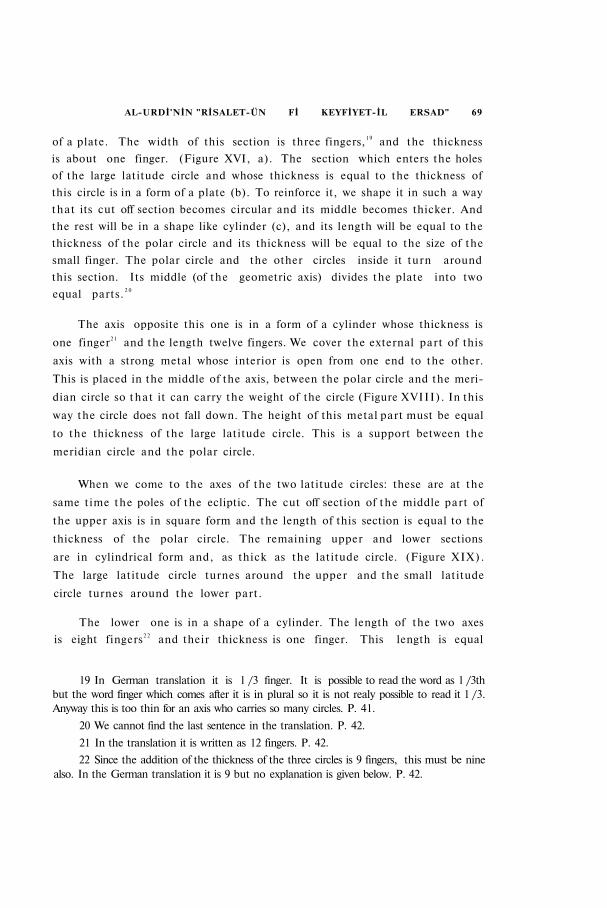
AL-URDİ'NİN "RİSALET-ÜN Fİ KEYFİYET-İL ERSAD" 69
of a plate. The width of this section is three fingers,1 9 and the thickness
is about one finger. (Figure XVI, a). The section which enters the holes
of the large latitude circle and whose thickness is equal to the thickness of
this circle is in a form of a plate (b). To reinforce it, we shape it in such a way
that its cut off section becomes circular and its middle becomes thicker. And
the rest will be in a shape like cylinder (c), and its length will be equal to the
thickness of the polar circle and its thickness will be equal to the size of the
small finger. The polar circle and the other circles inside it turn around
this section. Its middle (of the geometric axis) divides the plate into two
equal parts. 2 0
The axis opposite this one is in a form of a cylinder whose thickness is
one finger2 1 and the length twelve fingers. We cover the external part of this
axis with a strong metal whose interior is open from one end to the other.
This is placed in the middle of the axis, between the polar circle and the meri
dian circle so t h a t it can carry the weight of the circle (Figure XVIII) . In this
way the circle does not fall down. The height of this metal part must be equal
to the thickness of the large latitude circle. This is a support between the
meridian circle and the polar circle.
When we come to the axes of the two latitude circles: these are at the
same time the poles of the ecliptic. The cut off section of the middle part of
the upper axis is in square form and the length of this section is equal to the
thickness of the polar circle. The remaining upper and lower sections
are in cylindrical form and, as thick as the latitude circle. (Figure X I X ) .
The large latitude circle turnes around the upper and the small latitude
circle turnes around the lower part.
The lower one is in a shape of a cylinder. The length of the two axes
is eight fingers2 2 and their thickness is one finger. This length is equal
19 In German translation it is 1 /3 finger. It is possible to read the word as 1 /3th but the word finger which comes after it is in plural so it is not realy possible to read it 1 /3. Anyway this is too thin for an axis who carries so many circles. P. 41.
20 We cannot find the last sentence in the translation. P. 42.
21 In the translation it is written as 12 fingers. P. 42.
22 Since the addition of the thickness of the three circles is 9 fingers, this must be nine also. In the German translation it is 9 but no explanation is given below. P. 42.
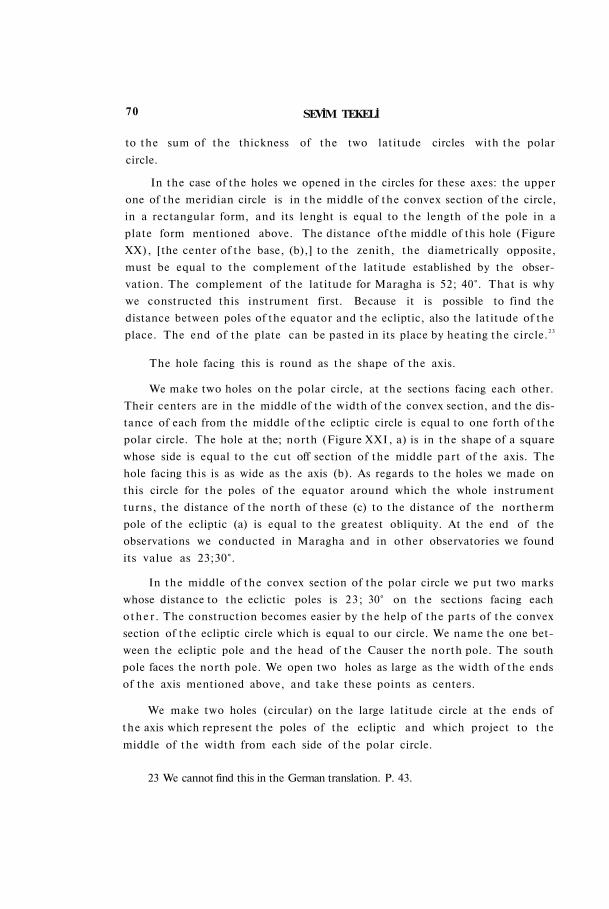
70 SEVİM TEKELİ
to the sum of the thickness of the two latitude circles with the polar
circle.
In the case of the holes we opened in the circles for these axes: the upper
one of the meridian circle is in the middle of the convex section of the circle,
in a rectangular form, and its lenght is equal to the length of the pole in a
plate form mentioned above. The distance of the middle of this hole (Figure
XX), [the center of the base, (b),] to the zenith, the diametrically opposite,
must be equal to the complement of the latitude established by the obser
vation. The complement of the latitude for Maragha is 52; 40°. That is why
we constructed this instrument first. Because it is possible to find the
distance between poles of the equator and the ecliptic, also the latitude of the
place. The end of the plate can be pasted in its place by heating the circle.2 3
The hole facing this is round as the shape of the axis.
We make two holes on the polar circle, at the sections facing each other.
Their centers are in the middle of the width of the convex section, and the dis
tance of each from the middle of the ecliptic circle is equal to one forth of the
polar circle. The hole at the; north (Figure XXI, a) is in the shape of a square
whose side is equal to the cut off section of the middle part of the axis. The
hole facing this is as wide as the axis (b). As regards to the holes we made on
this circle for the poles of the equator around which the whole instrument
turns, the distance of the north of these (c) to the distance of the northerm
pole of the ecliptic (a) is equal to the greatest obliquity. At the end of the
observations we conducted in Maragha and in other observatories we found
its value as 23;30°.
In the middle of the convex section of the polar circle we p u t two marks
whose distance to the eclictic poles is 23; 30° on the sections facing each
o t h e r . The construction becomes easier by t h e help of the parts of the convex
section of the ecliptic circle which is equal to our circle. We name the one bet
ween the ecliptic pole and the head of the Causer the north pole. The south
pole faces the north pole. We open two holes as large as the width of the ends
of the axis mentioned above, and take these points as centers.
We make two holes (circular) on the large latitude circle at the ends of
the axis which represent the poles of the ecliptic and which project to the
middle of the width from each side of the polar circle.
23 We cannot find this in the German translation. P. 43.
AL-URDİ'NİN "RİSALET-ÜN Fİ KEYFİYET-İL ERSAD" 71
In regards to the small latitude circle, we open two circular holes on
the convex section from both ends of the "second" diameter which is perpen
dicular to the copper diameter. The end of the ecliptic axis which forms
a knob inside the polar circle is placed at the end of these.
After we finish the correction and the investigation of all these and comp
lete the five circles, we construct a ruler whose length is as long as the small
latitude circle and the width is equal to the width of the copper diameter (Fi
gure XXII) . We pierce the center of this circle and shape as a circle the middle
of its length. We pierce the center of the circle at the middle of the copper
diameter which is at the same time the center of all the circles, and fix the
ruler with a pivot to the center of the diameter as is done always. Some
times we cut off parts limited by the straight line (b b ') which passes
from the center, and the line dividing the width (a a') of the ruler from
opposite directions. The ends of the ruler become in opposite directions.
Then over it we make two pinnules which have covers equal to each other
and they have the shape of a square. We pierce the middle of their widths
and fix covers over them. The distance between the two holes is a span.
We place a stone column (c) over the foundation constructed for
this instrument. We draw the meridian line on the upper section,
and construct a canal at this place from north to south in a rectangular
form. To this canal we fix the base of the meridian circle, the largest of
all. We make it parallel to the meridian plane by adjusting it with the help
of t h e plumb. We arrange it in such a way t h a t the straight line which
connects the zenith with the center of the base over the circle, formes a right
angle (Figure XXVIII, ZT MM). We make these adjustment by leaning the
instrument towards different directions accordingly, and by using plumb
-line. After the instrument takes the desired form, we pore lead to fill
up the empty parts on both sides of the base and to this canal as well. Then
we place the rest of the circles inside the meridian circle and the axes
prepared for them. We fix the other poles to their places, attach the metal
part in its place so that it will carry the weight of the polar circle and place
the two latitude circles over the ecliptic poles. Thus the parts of the instrument
are put together and the instrument is placed firmly on its base.
The additions t h a t should be made to perfect (even more then is done
up to know) the instrument will be mentioned herein. I will draw the pictures
of the circles and the axes and explain their advantages.
72 SEVİM TEKELİ
In regards to the additions over the meridian circle and on the sides of
the holes made for the opposite two axes, these are added to reinforce the
holes for the axis.
The inverse corresponding additions of the large latitude circle
are for the two holes which is opened over the large latitude circle
so that the the axis of the equator will be able to enter. These (the two
axes of the equator) cross from the meridian circles to the polar circles, and
that is why they prevent the fitting of the large latitude circle to the polar circle
and obstruct it from making half a tour. As a result of this, the coinciding
of the large latitude circle over the plane of the ecliptic circle is not com
pleted and consequently we made additions and holes at these places. 2 4
(Figure X X I I I ) .
The additions on the face of the circles, at the sides of the poles are made
only to protect these from breaking.
In regards to ruler, this does not necessitate the sixth circle placed
inside the fifth circle by Ptolemy in order to obtain the latitudes of the stars.
However, we obtain the latitudes of the stars with a ruler and its two pinnules.
Now we are going to explain the error and the insufficiency of the sixth circle,
these erors are not found in the rulers. The construction and the utilization
of the ruler is easier than the sixth circle. It is necessary that the sixth circle
should turn inside the fifth circle and their surfaces should stay on the same
plane. That is why, we need clutches to prevent the overlapping of the surface
of the sixth circle from the fifth circle. These impediments are done in two
ways: one of these is to open a canal surrounding the middle of the convex
surface of the sixth circle and to fix some nails which will pass through the
concave surface of the fifth circle and enter into the opened canal.
As we come to the second of these impediments: we fix some clutches on
the two straight surfaces of the sixth circle which will project from the surface
of the fifth circle, to prevent the projection of the sixth circle from the surface of
the fifth circle. We cannot fix these clutches on the fifth circle. If the clutches are
on the fifth circle, it will prevent the movement of the sixth circle because the
tracer which shows the division moves on the surface of this circle.2 5 If the
fifth one is closely contacted with the sixth one, it will be difficult for the
24 In the translation this part is summarised. P. 46. 25 It is like this in Ptolemy, Almagest, Book 5, P. 166, The Great Books of the Western
World. Vol. 16. Seeman explaines the form it takes when the conditions in the Book of Ptolemy is not present. P. 46.
AL-URDİ'NİN "RİSALET-ÜN Fİ KEYFİYET-İL ERSAD" 73
observer to move the instrument because of its great size. But if they are
not in perfect connection, the sixth circle will fall down because of its weight
and its center will not correspond to the center of the fifth circle.
Another disadvantage is the following: when the instrument gets larger,
the distance between the two pinnules increases as well so t h a t the observer
cannot see the star through the holes of the pinnules. To construct a straight
pipe which connects these two will be very difficult. If the light which
penetrates from one to the other is used, the light will get shady and dispersed
and its verification will be very difficult.
If the instrument is small then it is not sound and is not useful. Whereas, when we replace it with ruler, it is very easy to place the pinnules on the ruler and nothing will obstruct of our doing so. In this way we make use of the center of the fifth circle and its fixed position. On the other hand, we will presume t h a t the circles meet at one center when we have an instrument without ruler to fix this center. That is why in the construction of the instrument, the need for this center is immense but to fix and to make use of this common center is impossible.
To file and to make corrections on surfaces of the circles is not an easy job. I constructed some levelling instruments to make the necessary corrections of the circles.
We construct strong plates from copper whose width is three fingers
after the filing and the length half a dhirac. We draw an arc on one of
the sides of these with a diameter equal to the diameter of the concave
surface of the first circle which needs correction. We file the section outside
the arc. Then we draw an arc which coincides to the circumference of the
convex surface of the circle and file the section included in the concave section
of the arc. This way we have convex surface on one side of the plate and a
concave surface on the other side (Figure XXIV) 2 6 . We correct the convex
surfaces of the circle with the concave side of the plate and vice versa.
When the concave and the convex surfaces of the circles are not equal
we make a new plate for each.
As we come to the straight surfaces of the circles: we construct two rulers. One of them is longer than the diameter of the greatest circle and t h e other is in three spans. To understand whether t h e surfaces of the circle are smooth the first ruler is put on each divisions. If the ruler coincides inner and the outher borders of circle this part is levelled.
26 One can be contented with one plate since the concave of every circle is equal to the convex of every other circle. This is missing in the German translation. P. 47.
74 SEVİM TEKELİ
If the middle part of the circle lifts the ruler then we see light at the outside and the inside of the circle. The higher part is cut off with a file. If the light is seen from the inside we take two outside borders, on the contrary if it is seen from the outside then we take two inner borders.
In regards to the small ruler, this can be placed on every part of the circle successively, and the section where its face touches the circle is smooth. If the light is seen through the two ends of the ruler, the middle is bulged. We remove the excess parts with a file until the surfaces coincide with each other.
We take a short plate and make a hole in the shape of a right angle in one of its corners (its depth will be equal to the width of the circle). With this we correct the circle from the convex and the concave sections. And again with it we learn the position of the four corners, whether the two inner circles are equal to each other and the centers of these two circles are found at the axis of the arc. The position of the two other circles is established in the same way (Figure XXVI). 2 7
We take another plate and over it we open a rectangular hole. With it we measure the widths of all the circles. We circle it ones around the inner circumference and ones around the outher circumference. In this situation, one side whirls around one of the straight surface and the other whirls around the other straight surface. (Figure XXVII).
With it we find out whether the width of the circle is proportional.
If we want to improve the precision of the correction of the surfaces of
the circles to a limit, we bring the surface of the circles over a smooth place,
from every side, (as much as possible), into a horizontal position by an
instrument called Fadin. We take from the mud t h a t is used for making
pots, inside it, we make a canal which will encircle the concave side. The base
of the canal will be lower than its surface and its inner border is higher than
the surface of the circle. We fill the canal with water in a place or at a time
so that the water will not undulate. We pour over the surface of the water the
powdered ashes of the plants. We control the parts where the level of the water
is lower than the surface of the circle and file the higher parts so t h a t the water
overflows from every part, the same way. The other circles are also filed accor
dingly.
One of the old instruments to measure the obliquity of the ecliptic is a
circle which is fixed on the surface of the meridian. The largest inclination
of the ecliptic to the equator is brougth forward with this circle. It must be
large so that it can be divided into small sections of three, two or one minute.
27 This part is not literally translated in the German translation P. 48.
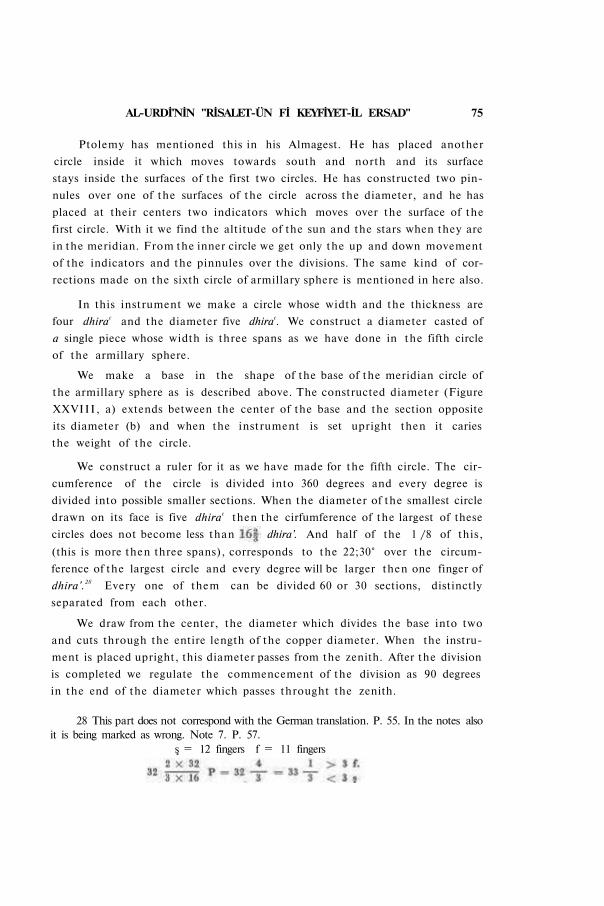
AL-URDİ'NİN "RİSALET-ÜN Fİ KEYFİYET-İL ERSAD" 75
Ptolemy has mentioned this in his Almagest. He has placed another
circle inside it which moves towards south and north and its surface
stays inside the surfaces of the first two circles. He has constructed two pin
nules over one of the surfaces of the circle across the diameter, and he has
placed at their centers two indicators which moves over the surface of the
first circle. With it we find the altitude of the sun and the stars when they are
in the meridian. From the inner circle we get only the up and down movement
of the indicators and the pinnules over the divisions. The same kind of cor
rections made on the sixth circle of armillary sphere is mentioned in here also.
In this instrument we make a circle whose width and the thickness are
four dhirac and the diameter five dhirac. We construct a diameter casted of
a single piece whose width is three spans as we have done in the fifth circle
of the armillary sphere.
We make a base in the shape of the base of the meridian circle of
the armillary sphere as is described above. The constructed diameter (Figure
XXVIII, a) extends between the center of the base and the section opposite
its diameter (b) and when the instrument is set upright then it caries
the weight of the circle.
We construct a ruler for it as we have made for the fifth circle. The cir
cumference of the circle is divided into 360 degrees and every degree is
divided into possible smaller sections. When the diameter of the smallest circle
drawn on its face is five dhirac then the cirfumference of the largest of these
circles does not become less than dhira'. And half of the 1 /8 of this,
(this is more then three spans), corresponds to the 22;30° over the circum
ference of the largest circle and every degree will be larger then one finger of
dhira'.28 Every one of them can be divided 60 or 30 sections, distinctly
separated from each other.
We draw from the center, the diameter which divides the base into two
and cuts through the entire length of the copper diameter. When the instru
ment is placed upright, this diameter passes from the zenith. After the division
is completed we regulate the commencement of the division as 90 degrees
in the end of the diameter which passes throught the zenith.
28 This part does not correspond with the German translation. P. 55. In the notes also it is being marked as wrong. Note 7. P. 57.
ş = 12 fingers f = 11 fingers
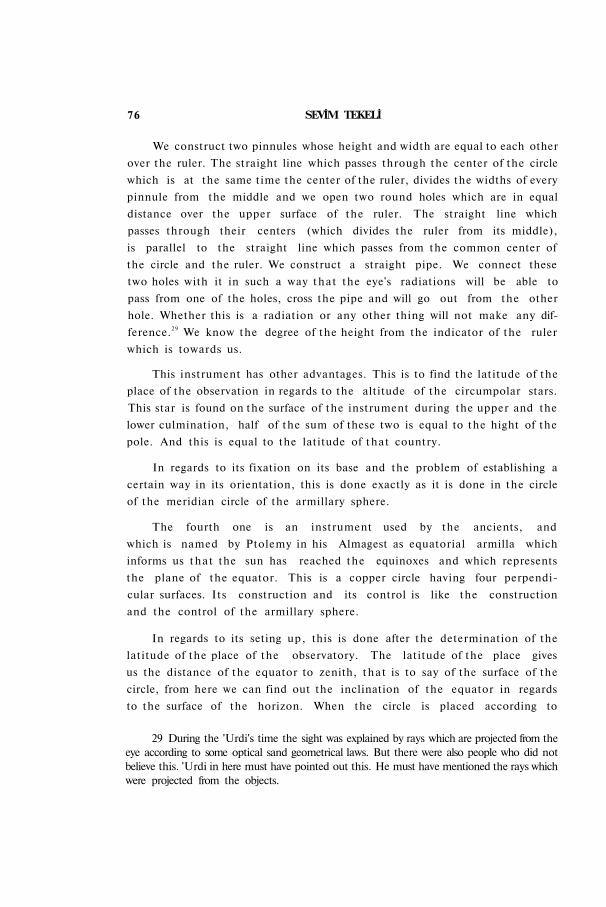
76 SEVİM TEKELİ
We construct two pinnules whose height and width are equal to each other
over the ruler. The straight line which passes through the center of the circle
which is at the same time the center of the ruler, divides the widths of every
pinnule from the middle and we open two round holes which are in equal
distance over the upper surface of the ruler. The straight line which
passes through their centers (which divides the ruler from its middle),
is parallel to the straight line which passes from the common center of
the circle and the ruler. We construct a straight pipe. We connect these
two holes with it in such a way t h a t the eye's radiations will be able to
pass from one of the holes, cross the pipe and will go out from the other
hole. Whether this is a radiation or any other thing will not make any dif
ference.2 9 We know the degree of the height from the indicator of the ruler
which is towards us.
This instrument has other advantages. This is to find the latitude of the
place of the observation in regards to the altitude of the circumpolar stars.
This star is found on the surface of the instrument during the upper and the
lower culmination, half of the sum of these two is equal to the hight of the
pole. And this is equal to the latitude of that country.
In regards to its fixation on its base and the problem of establishing a
certain way in its orientation, this is done exactly as it is done in the circle
of the meridian circle of the armillary sphere.
The fourth one is an instrument used by the ancients, and
which is named by Ptolemy in his Almagest as equatorial armilla which
informs us t h a t the sun has reached the equinoxes and which represents
the plane of the equator. This is a copper circle having four perpendi
cular surfaces. Its construction and its control is like the construction
and the control of the armillary sphere.
In regards to its seting up, this is done after the determination of the
latitude of the place of the observatory. The latitude of the place gives
us the distance of the equator to zenith, t h a t is to say of the surface of the
circle, from here we can find out the inclination of the equator in regards
to the surface of the horizon. When the circle is placed according to
29 During the 'Urdi's time the sight was explained by rays which are projected from the eye according to some optical sand geometrical laws. But there were also people who did not believe this. 'Urdi in here must have pointed out this. He must have mentioned the rays which were projected from the objects.
AL-URDİ'NİN "RİSALET-ÜN Fİ KEYFİYET-İL ERSAD" 77
our purposses, the parallel surfaces of the circle will be parallel to the plane
of the equator.
When one of the sides shadows the other, the both concave sections will
be lighted in equal degrees and at this moment the sun will be at one of the
equinoxes.
When this instrument is placed over the horizons who have latitudes
(besides the equator) we have to give some inclination to the circle. That
is why the position of the instrument will be disturbed because of this
inclination and at the same time to place the instrument will not be
easy.
When we come to its mounting as it should be done properly, I described
this operation. According to me, it is necessary to use a meridian circle instead
of an inside circle and fix the previous on this meridian circle. The connection
of this circle should make a right angle with the meridian as we have done
with the circles of ecliptic and poles. The distance of the middle of the hole
(Figure X X I X ) at the place of the connection of the equator circle with the
zenith must be equal to the latitude of the place of the observatory. At the places
where there are these holes, we make some additions to protect them. The
meridian circle carries its weight and prevent the upset of its position. If we
place this circle inside the meridian circle, we construct the latter lighter
and larger than the concave section of the meridian circle. We thicken the
convex section of the meridian circle (the carier of the other circle) because
of the two holes. We make the division of the meridian inside the concave
section so that the circle of the equator can be placed over the end of the
ruler. All these are very clear. In this condition it is placed on the
surface of the equator. It is easy to control its inclination, and the setting
is not difficult at all. Its inclination can be measured with the help of the
meridian circle.
If we use one inclined circle then the error which is seen in one
of the largest circles mounted in the Porch of Alexendria as is mentioned
by Ptolemy will produce itself. This circle was lighted twice in one
equinox.
One of the old instruments called dioptra known with two pinnules,
possesses a mobil pinnule. Ptolemy in his Almagest mentioned its name only,
and did not describe it.
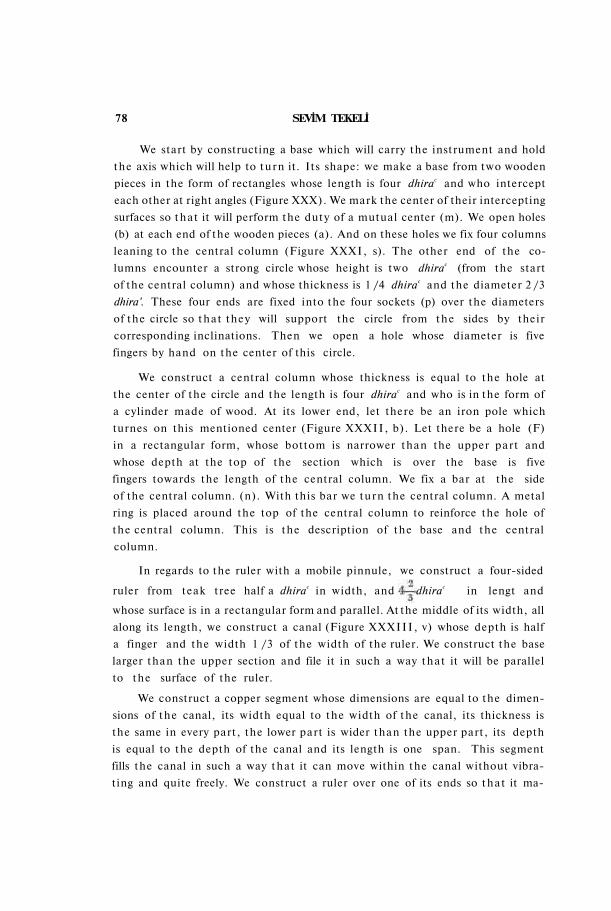
78 SEVİM TEKELİ
We start by constructing a base which will carry the instrument and hold
the axis which will help to turn it. Its shape: we make a base from two wooden
pieces in the form of rectangles whose length is four dhirac and who intercept
each other at right angles (Figure XXX). We mark the center of their intercepting
surfaces so t h a t it will perform the duty of a mutual center (m). We open holes
(b) at each end of the wooden pieces (a). And on these holes we fix four columns
leaning to the central column (Figure XXXI, s). The other end of the co
lumns encounter a strong circle whose height is two dhirac (from the start
of the central column) and whose thickness is 1 /4 dhirac and the diameter 2 /3
dhira'. These four ends are fixed into the four sockets (p) over the diameters
of the circle so t h a t they will support the circle from t h e sides by their
corresponding inclinations. Then we open a hole whose diameter is five
fingers by hand on the center of this circle.
We construct a central column whose thickness is equal to the hole at
the center of the circle and the length is four dhirac and who is in the form of
a cylinder made of wood. At its lower end, let there be an iron pole which
turnes on this mentioned center (Figure X X X I I , b). Let there be a hole (F)
in a rectangular form, whose bottom is narrower than the upper par t and
whose depth at the top of the section which is over the base is five
fingers towards the length of the central column. We fix a bar at the side
of the central column. (n). With this bar we turn the central column. A metal
ring is placed around the top of the central column to reinforce the hole of
the central column. This is the description of the base and the central
column.
In regards to the ruler with a mobile pinnule, we construct a four-sided
ruler from teak tree half a dhirac in width, and dhirac in lengt and
whose surface is in a rectangular form and parallel. At the middle of its width, all
along its length, we construct a canal (Figure X X X I I I , v) whose depth is half
a finger and the width 1 /3 of the width of the ruler. We construct the base
larger than the upper section and file it in such a way t h a t it will be parallel
to the surface of the ruler.
We construct a copper segment whose dimensions are equal to the dimen
sions of the canal, its width equal to the width of the canal, its thickness is
the same in every part, the lower part is wider than the upper part, its depth
is equal to the depth of the canal and its length is one span. This segment
fills the canal in such a way t h a t it can move within the canal without vibra
ting and quite freely. We construct a ruler over one of its ends so t h a t it ma-
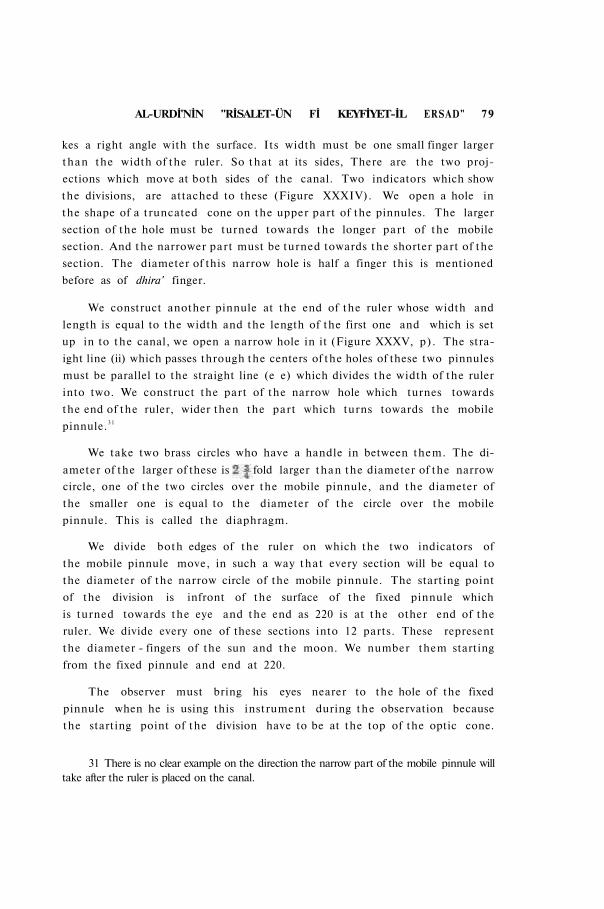
AL-URDİ'NİN "RİSALET-ÜN Fİ KEYFİYET-İL ERSAD" 79
kes a right angle with the surface. Its width must be one small finger larger
than the width of the ruler. So that at its sides, There are the two proj
ections which move at both sides of the canal. Two indicators which show
the divisions, are attached to these (Figure XXXIV). We open a hole in
the shape of a truncated cone on the upper part of the pinnules. The larger
section of the hole must be turned towards the longer part of the mobile
section. And the narrower part must be turned towards the shorter part of the
section. The diameter of this narrow hole is half a finger this is mentioned
before as of dhira' finger.
We construct another pinnule at the end of the ruler whose width and
length is equal to the width and the length of the first one and which is set
up in to the canal, we open a narrow hole in it (Figure XXXV, p). The stra
ight line (ii) which passes through the centers of the holes of these two pinnules
must be parallel to the straight line (e e) which divides the width of the ruler
into two. We construct the part of the narrow hole which turnes towards
the end of the ruler, wider then the part which turns towards the mobile
pinnule.3 1
We take two brass circles who have a handle in between them. The di
circle, one of the two circles over the mobile pinnule, and the diameter of
the smaller one is equal to the diameter of the circle over the mobile
pinnule. This is called the diaphragm.
We divide both edges of the ruler on which the two indicators of
the mobile pinnule move, in such a way that every section will be equal to
the diameter of the narrow circle of the mobile pinnule. The starting point
of the division is infront of the surface of the fixed pinnule which
is turned towards the eye and the end as 220 is at the other end of the
ruler. We divide every one of these sections into 12 parts. These represent
the diameter - fingers of the sun and the moon. We number them starting
from the fixed pinnule and end at 220.
The observer must bring his eyes nearer to the hole of the fixed
pinnule when he is using this instrument during the observation because
the starting point of the division have to be at the top of the optic cone.
31 There is no clear example on the direction the narrow part of the mobile pinnule will take after the ruler is placed on the canal.
ameter of the larger of these is fold larger than the diameter of the narrow
80 SEVİM TEKELİ
The apex of this cone is inside the lens. It is because this cone includes a
part (which can be observed easily) from the surface of the lens t h a t the
object is percieved with the help of this part . When the area cut off by the
optic cone from the surface of the lens is realy very small, so small t h a t , the
objects cannot be percieved with the eye, because the smallness of the apex
angle of the optic cone, as a result of the distance between the viewer and
the objects (Figure XXXVI). That is why, there are convenient distances for
the objects, and these objects can be seen from these distances. There are so
many different distances but they cannot be seen from these distances. These
limits change according to the strength of the sight. For every object there is
a certain distance in propotion to the eye of the observer, if the distance of
the object is larger it cannot be seen but when it is nearer, the section cut off
by the cone from the surface of the lens will be larger and this way it can be
percieved easily (Figure XXXVII).
When we have terminated the completion of the instrument with great
care, we fix the half of the joint to the middle point of the lower surface of the
ruler, that is to say to the middle of the opposite of the surface where the canal
and two pinnules are found 3 2 (Figure XXXVIII a). The upper half of the
joint turns around the axis which connacts it to the other half. One of the ends
of the ruler on this axis moves upwards towards the zenith while the other
end moves downwards. We fix firmly one of the apexes of the joint to the ruler
and the other one to the hole over the axis (Figure XXXIX) . When we want
horizontal movement from the ruler we turn the central column. When we
want up and down movement then we move upward the end of the ruler
which is towards us. We can turn the instrument as much as we want and
towards any direction over the axis of the joint.
During the eclipse or any other time, we bring the ruler to the direction
of the moon, we keep away the pinnule from the eye once and then bring it
forward untill we see the whole moon. The hole on the pinnule includes all
of it, the moon covers the hole and there is no excess left. We mark the distance
between the mobile-pinnule and its indicator with the eye. We do the same
thing for the image of the sun. We know at what distance the appearent
diameter of the moon is equal to the diameter of the sun. The amount from
the divisions of the ruler does not exceed 130.
32 The German translation does not correspond with the manuscript. P. 67.
AL-URDİ'NİN "RİSALET-ÜN Fİ KEYFİYET-İL ERSAD" 81
In regards to the diaphragms,3 3 which are mentioned before, if the eclipse is
the eclipse of the sun then we use the small circle of the instrument to find the
eclipsed area of the surface of the sun. In order to do this measurement, we
keep at a distance (marked previously) the mobile-pinnule from the fixed
pinnule. At this distance, as we have mentioned before, the hole of the mobile
pinnule encircles the sun entirely. Thus, if we turn the ruler towards the
sun during the eclipse and if we cover the eclipsed area with the small
circle, the quantity of the eclipse will be established. In regards to the
eclipse of the moon, we make with the big circle the thing that we have done
with the small circle during the eclipse of the sun.
We have divided the diameter of the small circle into 12 parts with the
diameter-finger. With the help of these we can calculate the quantity of the
eclipsed part of the diameter of the sun. We divide the diameter of the large
of the eclipsed part of the diameter of the moon by the help of the section
separated by the circle from the divided part.
These are the instruments that the writer of the Almagest has mentioned
as being constructed of the Porch in Alexandria. In regards to the (dhat al-
shu'beteyn) triquetrum, we will describe it in detail. We will also mention the
ones that we have constructed which are more precise and firm. But again
these things are best known by the Great God.
In regards to the instruments whose construction is created by us
and whose missing parts are compeleted, some of these have been put into
practice and they are found in the Great Observatory. We constructed the
model of some of them. After these, we had other engagements such as: to
construct a small mosque, to carry the water in large containers up to the top
of the mountain and to construct a house for his Royal Majesty, God protect
his supreme being. These were not my job, but your brother was forced to the
jobs that he did not like to do. And your brother is not a hero.
There is also another instrument which is called (dhat al-rub'eyn) instru
ment having two quadrants, which replaces the armillary sphere. We cast
a circle from copper whose diameter is as large as it possible could be.
33 The forms of the diaphragmes are not clearly explained in the manuscript. They could be in form of a divided circles or a hole opened over a plate. When the circle is filled up, it covers the dark section but when it is empty it covers the lighted section. In the manuscript this section could have been read both ways.
circle into parts with the eclipse-finger with these we can find the quantity
82 SEVİM TEKELİ
We can cast this circle in segments rather then of a single piece and
connect the pieces together afterwards. It is not necessary to make it very
thick because it is immobile and is placed on a circular masonary foundation
and parallel to the horizon. After we finish its filing, we inter it into a
section which will reinforce it and encircle it from the outside and it will
not be higher than its surface.
We take the center out and correct the convex and the concave
surfaces with the help of two concentric circles. When we come to the
correction of the surface parallel to the horizon, the best way to do this is
the following: after correcting the inside and the outside sections, as it is
done in the previous ones, we put it in its place and fix it. We construct a
canal which will include the concave section. The surface of the circle will
not be higher than the surface of the canal, on the contrary it will be one
small finger lower. In a calm day we fill the canal with water and we scatter
over the water the plant dust which has been grinded. We file it so t h a t
the water and the plant dust will cover it in equal quantity in every part.
We rectified the bottoms of the gutters in Damascus the same way.
It is possible for us to make another levelling instrument in order to rec
tify its surface. For this we set up a column at the center of the horizontal
circle and construct a handle which will hold the column from its top (Figure
XL). We set up this column in such a way t h a t the column will not lean
when it makes a complete turn, it stays in a perpendicular position, and
stays in the same position making a right angle with the surface of the circle.
This is easy to handle. We open a hole at the bottom of the column and we
construct a ruler or a thin stick (s) which will be fixed at this hole. Only the
end of the ruler will not rest on the surface of the circle, the ruler as a whole
will rest on the column which carries the ruler. The end of the ruler should
bearly touches the surface of the circle.
The sections where the ruler is higher than the surface of the circle,
are lower. The sections where the ruler is contact to the surface of the circle
are filed until the ruler will be in equal distance from the surface of the
circle or it will be in contact with it the same way all around in the complete
tour of the ruler, so t h a t the connection will fulfil the requirements. This
way we will accomplish the horizontality and the filing of the surface of the
circle. And in this case it will be definitely parallel to the horizon.
In regards to the division, we take out the meridian line which passes
from the center dividing the circle into two, and we draw a diameter
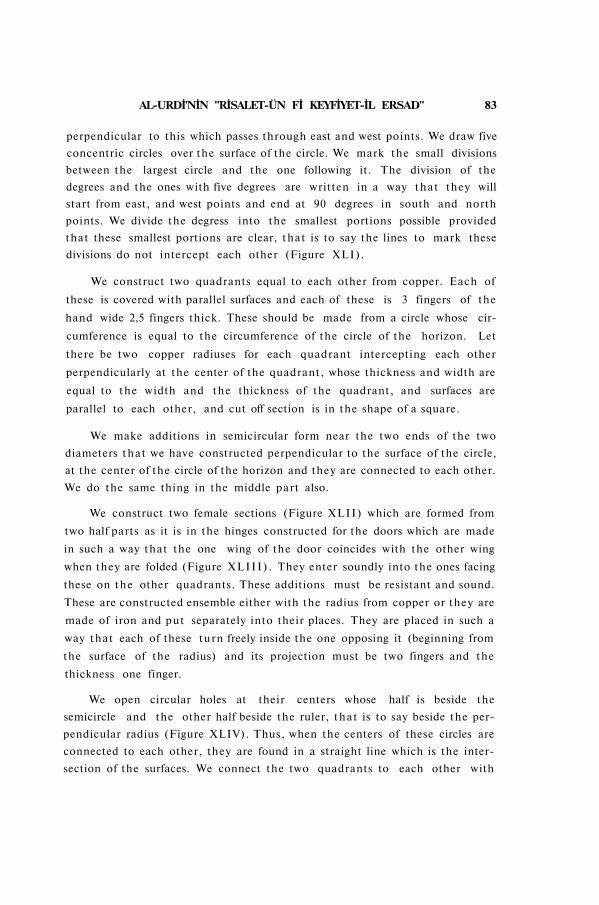
AL-URDİ'NİN "RİSALET-ÜN Fİ KEYFİYET-İL ERSAD" 83
perpendicular to this which passes through east and west points. We draw five
concentric circles over the surface of the circle. We mark the small divisions
between the largest circle and the one following it. The division of the
degrees and the ones with five degrees are written in a way t h a t they will
start from east, and west points and end at 90 degrees in south and north
points. We divide the degress into the smallest portions possible provided
that these smallest portions are clear, that is to say the lines to mark these
divisions do not intercept each other (Figure XLI) .
We construct two quadrants equal to each other from copper. Each of
these is covered with parallel surfaces and each of these is 3 fingers of the
hand wide 2,5 fingers thick. These should be made from a circle whose cir
cumference is equal to the circumference of the circle of the horizon. Let
there be two copper radiuses for each quadrant intercepting each other
perpendicularly at the center of the quadrant, whose thickness and width are
equal to the width and the thickness of the quadrant, and surfaces are
parallel to each other, and cut off section is in the shape of a square.
We make additions in semicircular form near the two ends of the two
diameters t h a t we have constructed perpendicular to the surface of the circle,
at the center of the circle of the horizon and they are connected to each other.
We do the same thing in the middle part also.
We construct two female sections (Figure XLII) which are formed from
two half parts as it is in the hinges constructed for the doors which are made
in such a way that the one wing of the door coincides with the other wing
when they are folded (Figure X L I I I ) . They enter soundly into the ones facing
these on the other quadrants. These additions must be resistant and sound.
These are constructed ensemble either with the radius from copper or they are
made of iron and put separately into their places. They are placed in such a
way that each of these turn freely inside the one opposing it (beginning from
the surface of the radius) and its projection must be two fingers and the
thickness one finger.
We open circular holes at their centers whose half is beside the
semicircle and the other half beside the ruler, t h a t is to say beside the per
pendicular radius (Figure XLIV). Thus, when the centers of these circles are
connected to each other, they are found in a straight line which is the inter
section of the surfaces. We connect the two quadrants to each other with
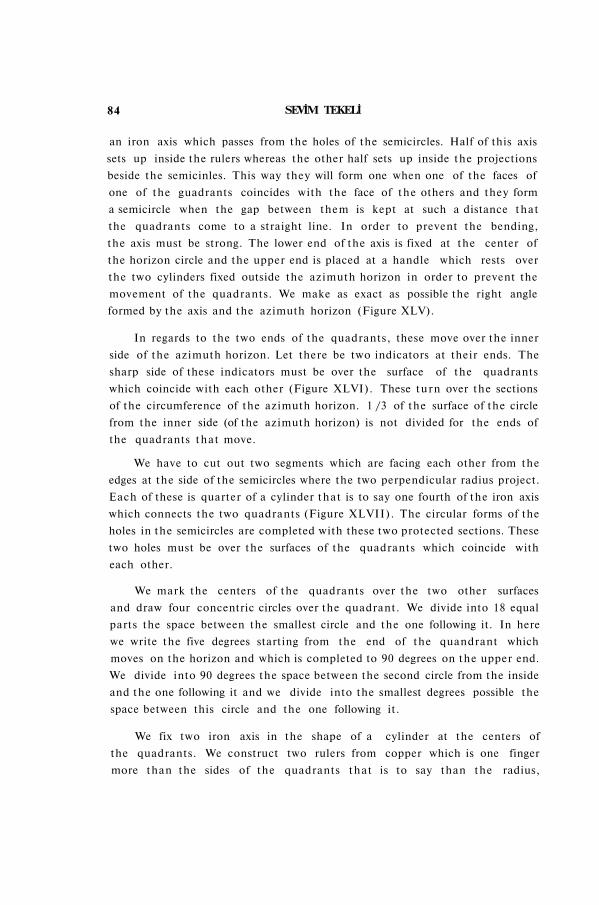
84 SEVİM TEKELİ
an iron axis which passes from the holes of the semicircles. Half of this axis
sets up inside the rulers whereas the other half sets up inside the projections
beside the semicinles. This way they will form one when one of the faces of
one of the guadrants coincides with the face of the others and they form
a semicircle when the gap between them is kept at such a distance that
the quadrants come to a straight line. In order to prevent the bending,
the axis must be strong. The lower end of the axis is fixed at the center of
the horizon circle and the upper end is placed at a handle which rests over
the two cylinders fixed outside the azimuth horizon in order to prevent the
movement of the quadrants. We make as exact as possible the right angle
formed by the axis and the azimuth horizon (Figure XLV).
In regards to the two ends of the quadrants, these move over the inner
side of the azimuth horizon. Let there be two indicators at their ends. The
sharp side of these indicators must be over the surface of the quadrants
which coincide with each other (Figure XLVI). These turn over the sections
of the circumference of the azimuth horizon. 1 /3 of the surface of the circle
from the inner side (of the azimuth horizon) is not divided for the ends of
the quadrants that move.
We have to cut out two segments which are facing each other from the
edges at the side of the semicircles where the two perpendicular radius project.
Each of these is quarter of a cylinder that is to say one fourth of the iron axis
which connects the two quadrants (Figure XLVII). The circular forms of the
holes in the semicircles are completed with these two protected sections. These
two holes must be over the surfaces of the quadrants which coincide with
each other.
We mark the centers of the quadrants over the two other surfaces
and draw four concentric circles over the quadrant. We divide into 18 equal
parts the space between the smallest circle and the one following it. In here
we write the five degrees starting from the end of the quandrant which
moves on the horizon and which is completed to 90 degrees on the upper end.
We divide into 90 degrees the space between the second circle from the inside
and the one following it and we divide into the smallest degrees possible the
space between this circle and the one following it.
We fix two iron axis in the shape of a cylinder at the centers of
the quadrants. We construct two rulers from copper which is one finger
more than the sides of the quadrants that is to say than the radius,
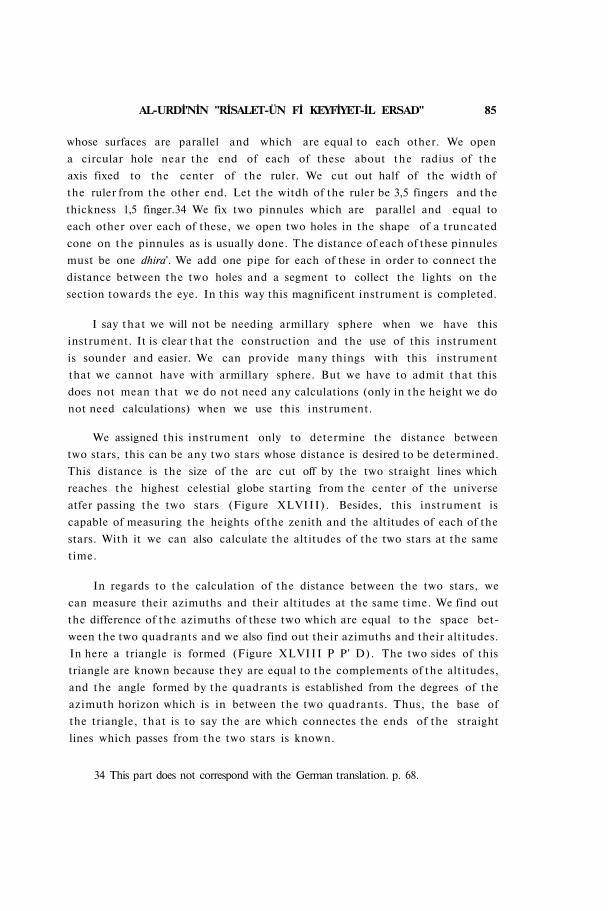
AL-URDİ'NİN "RİSALET-ÜN Fİ KEYFİYET-İL ERSAD" 85
whose surfaces are parallel and which are equal to each other. We open
a circular hole near the end of each of these about the radius of the
axis fixed to the center of the ruler. We cut out half of the width of
the ruler from the other end. Let the witdh of the ruler be 3,5 fingers and the
thickness 1,5 finger.34 We fix two pinnules which are parallel and equal to
each other over each of these, we open two holes in the shape of a truncated
cone on the pinnules as is usually done. The distance of each of these pinnules
must be one dhira'. We add one pipe for each of these in order to connect the
distance between the two holes and a segment to collect the lights on the
section towards the eye. In this way this magnificent instrument is completed.
I say that we will not be needing armillary sphere when we have this
instrument. It is clear that the construction and the use of this instrument
is sounder and easier. We can provide many things with this instrument
that we cannot have with armillary sphere. But we have to admit that this
does not mean t h a t we do not need any calculations (only in the height we do
not need calculations) when we use this instrument.
We assigned this instrument only to determine the distance between
two stars, this can be any two stars whose distance is desired to be determined.
This distance is the size of the arc cut off by the two straight lines which
reaches the highest celestial globe starting from the center of the universe
atfer passing the two stars (Figure XLVIII) . Besides, this instrument is
capable of measuring the heights of the zenith and the altitudes of each of the
stars. With it we can also calculate the altitudes of the two stars at the same
time.
In regards to the calculation of the distance between the two stars, we
can measure their azimuths and their altitudes at the same time. We find out
the difference of the azimuths of these two which are equal to the space bet
ween the two quadrants and we also find out their azimuths and their altitudes.
In here a triangle is formed (Figure X L V I I I P P' D). The two sides of this
triangle are known because they are equal to the complements of the altitudes,
and the angle formed by the quadrants is established from the degrees of the
azimuth horizon which is in between the two quadrants. Thus, the base of
the triangle, that is to say the are which connectes the ends of the straight
lines which passes from the two stars is known.
34 This part does not correspond with the German translation. p. 68.
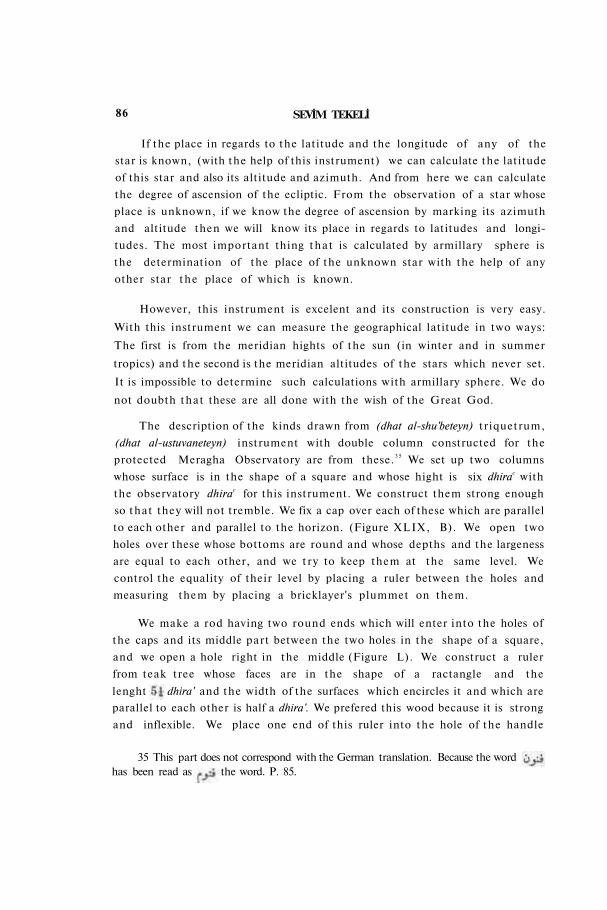
86 SEVİM TEKELİ
If the place in regards to the latitude and the longitude of any of the
star is known, (with the help of this instrument) we can calculate the latitude
of this star and also its altitude and azimuth. And from here we can calculate
the degree of ascension of the ecliptic. From the observation of a star whose
place is unknown, if we know the degree of ascension by marking its azimuth
and altitude then we will know its place in regards to latitudes and longi
tudes. The most important thing t h a t is calculated by armillary sphere is
the determination of the place of the unknown star with the help of any
other star t h e place of which is known.
However, this instrument is excelent and its construction is very easy.
With this instrument we can measure the geographical latitude in two ways:
The first is from the meridian hights of the sun (in winter and in summer
tropics) and the second is the meridian altitudes of the stars which never set.
It is impossible to determine such calculations with armillary sphere. We do
not doubth that these are all done with the wish of the Great God.
The description of the kinds drawn from (dhat al-shu'beteyn) tr iquetrum,
(dhat al-ustuvaneteyn) instrument with double column constructed for the
protected Meragha Observatory are from these. 3 5 We set up two columns
whose surface is in the shape of a square and whose hight is six dhirac with
the observatory dhirac for this instrument. We construct them strong enough
so that they will not tremble. We fix a cap over each of these which are parallel
to each other and parallel to the horizon. (Figure X L I X , B). We open two
holes over these whose bottoms are round and whose depths and the largeness
are equal to each other, and we t ry to keep them at the same level. We
control the equality of their level by placing a ruler between the holes and
measuring them by placing a bricklayer's plummet on them.
We make a rod having two round ends which will enter into the holes of
the caps and its middle part between the two holes in the shape of a square,
and we open a hole right in the middle (Figure L). We construct a ruler
from teak tree whose faces are in the shape of a ractangle and the
parallel to each other is half a dhira'. We prefered this wood because it is strong
and inflexible. We place one end of this ruler into the hole of the handle
35 This part does not correspond with the German translation. Because the word has been read as the word. P. 85.
lenght dhira' and the width of the surfaces which encircles it and which are
AL-URDİ'NİN "RİSALET-ÜN Fİ KEYFİYET-İL ERSAD" 87
insuch a way that they from a right angle and the face of the one will be at the
same plane with the face of the other one.
We draw a straight line over the face of the rod all along its lenght
and which divides its width into two. We also divide the width of the ruler
into two parts . We extend this straight line up to the straight line in the rod.
Thus, we can he able to divide it into two equal parts with this extension
which is perpendicular to it. Starting from this interception point, we mark
five dhira' from the straight line which divides it into two parts. This straight
line is the radius of the circle drawn by the ruler about the axis of the rod from
that is why we call it the radius.
We set a base at the place where the perpendicular from the center of
the axis touches the earth (Figure LI). We fix two beds over it, an
iron axis whose middle is in the shape of a square with round ends, turns
between these beds. We make the distance from the middle of the axis to the
middle of the cut off section, t h a t is to say of the axis of the rod equal to
the radius.
We construct another ruler whose surfaces are parallel to each other and
the above mentioned wood and cut off section is a square. We let at one of
its ends a semicircular projection (Figure LII) on which we open a hole (v)
in the shape of a rectangle and as large as the thickness of the iron axis.
Half of this hole will be towards the ruler and the other half will be at the
fix projection. We pass the iron axis through this hole, only its two ends rest
outside the ruler. Thus, the straight line which passes all along the middle
of the thickness of the axis is found on its upper turned surface when the ruler
is placed. The lenght of this ruler from the socket of the axis is a little more
than of the radius. That way its length will be almost one and a half
radius. This is called the chord ruler.
We place the iron axis into t h e beds of the base so t h a t the surface at
the west side of the chord ruler and the surface at the east side of
the ruler hanged to the rod will be on the same plane which represents
the plane of the ecliptic and will touch each other. We take from
the surface of the west and upper part of the ruler an amount equal
to the radius starting from the middle of the iron axis, and divide it into 60
equal parts. We divide also into 25 equal parts the remaining section of t h e
ruler. Thus the total of the divisions will be 85. We divide each division into
60 minutes. We mark these divisions, who has 5100 minutes as the total sum,
on the western edge of the upper surface of the ruler and we separate these divi-
88 SEVİM TEKELİ
sions from the others by a straight line which is parallel to the edge of the
ruler. We draw another straight line which is close and parallel to the first
one, and we write the complete integral divisions without fraction between
these two. We write the values of the arcs suptending the chords, opposite
the divisions of the chords with the help of the chord table so that it will not
be necessary during the utilization of the instrument to apply to the chord table
and also with the purpose to drive the values of the arcs in the chord division.
And we assign to this division the area between the first and the second
straight lines. This divisions start from the point near the middle of the iron
axis. The ends as 85 divisions are at the other end of the ruler. 3 6
We fix two pinnules which are parallel and equal to each other on the
northern surface of the ruler which is hooked up. We bring their middle points
over a straight line which divides the ruler into two and leave distance of
one dhira' with the dhira' of hand between them.
When the sun comes to the meridian we pull the end of the ruler, which.
is hooked up, towards north until one of the pinnules shadows the other
and the rays of the sun penetrates from the upper hole to the lower hole. We
raise the end of the chord ruler which stands towards us until its surface touc
hes the end of the radius marked over the ruler which is hooked up. We find
the distance of the zenith of the sun from the chord ruler, and from t h a t we
find its altitude.
We construct a wall adjoined to the north side of the column at the east,
whose height is equal to the height of the column and the lenght is about five dhirac .
We place a quadrant at its east surface which is just like the previous quadrant,
only a little smaller, in order to measure the distance of the zenith. We const
ruct a handle at the upper north surface, which will project towards west
and place two pulleys at its end. During the utilization of the instrument,
we connect the circle and the pulley with a string which passes from the
pulley to the circle and from the circle to the pulley and which are fixed to
the ends of the chord ruler and the ruler which is hooked up. With the help
of the Great God.3 7
There is an instrument called (dhat al-juyub wa'l-samt), the instrument
having sines and azimuth we constructed for him its model, in the divinely
protected Observatory. We can measure the altitudes from every direction
with this instrument.
36 This section is right in meaning but it is not a literal translation. P. 85. 37 This part does not correspond with the German translation. P. 86.
AL-URDİ'NİN "RİSALET-ÜN Fİ KEYFİYET-İL ERSAD" 89
That is why we need to construct a copper circle. It is better to construct
the circle as big as possible. We call this the azimuth horizon. Its construc
tion and the correction is done just like the one we mentioned above. We
construct a wall in a circular shape, about 1,5 dhirac height for this instrument
and fix this over it. We correct its parallelism to the horizon just like the
previous one.
We mark over it the meridian and the east-west direction, and draw
concentric circles. We write between them by twos the numbers, the degrees
and their fractions starting from east-west points and ending as 90 degrees
at north-south points.
We construct a diameter from a solid wood in the shape of a rectangle
whose width and thickness is 1 /3 th of a dhira'. Let its two ends move on the
inside edge of the azimuht horizon. We fix a traverse (t) right in the middle,
perpendicular to the wooden diameter (Figure L I I I , c) whose lenght is about
two dhira' or equal to the diameter, and the thickness 1 /3 of a dhira'. We open
a hole in the middle of each of these two and connect them solidly so that
the traverse and the diameter make a right angle.
We open a canal in the middle of the diameter, all along its length,
in the shape of a rectangle, parallel to the edges of the ruler and 1 /6th of a
dhira' wide and deep (Figure LIV). We file the base and make it larger than
the upper section (Figure LV).
We set up two rulers in the middle of the diameter, at the two sides of the
canal opened at the place, which are equal to the radius and perpendicular to
the diameter and the traverse (Figure LVI, p). The cut off section of
each of these must be in the shape of a square, their surfaces must
be parallel to each other, they must be set up right opposite to each other and
their width must be 1 /6th of a dhira'. We construct a canal in the middle of each
of these and all along its lenght whose width and depth is equal to a small
finger. We set up both of these in the middle of the diameter, at the edges of
the canal opened at the place. Let the canals in the rulers face each other at
the base, and the straight line between the two straight lines dividing the widths
of the canals passes from the center of the circle. We connect the distance
between the upper sections with an iron axis which holds them together.
We construct three supports for each of these in order to protect them
and prevent any defect in their perpendicular position. One of these supports
comes from the end of the traverse and meets its l / 3 t h starting from
90 SEVİM TEKELİ
the lower section of the ruler; the other two supports come out from the
middle of the diameter and meet its 1 /3 th starting from the lower section
of the ruler, likewise the same opperation is done for the other ruler.
We construct an iron axis at the center of the azimuth horizon, below the
traverse; it is connected firmly and has a lenghth of 1 /5th of a dhira' (Figure
LVII, M). We construct a part (F) from wood in the shape of a square below
the traverse whose edge is equal to not less than two dhira . We open a hole in
the middle so t h a t the axis can turn there. We file its surface so t h a t the tra
verse can turn over it easily.
We construct a base to place the instrument. The hole mentioned above
must continue in the middle of the base also (Figure LVIII). At the bottom of
the base there is a stone (Y) whose surface in touch with bottom of the hole
is in the shape of a rectangle. Inside this hole there must be a bar which is per
forated (in circular shape) in the middle. We place firmly this iron bar into
the hole of the stone. This hole is constructed in such a way t h a t the bottom
end of the axis can turn, and the instrument will not be shaken when we turn
the diameter and the two rulers.
We construct two other rulers in the shape of squares, l / 6 t h of a
dhirac in width and the length of each is equal to the radius. Let there
be additions at both ends of each of these in the shape of a circle and
let its height from the surface of the ruler be equal to 2 /3th of the width of the
ruler. These additions must be at both ends of its surfaces. To connect the
rulers to each other, we connect the semicircles at the ends of the rulers with
an iron axis (Figure LIX). The middle of this iron axis is found in the intersec
tion point of the surfaces. Thus, we have the shape of a pair of compasses. When
they come together the surface of the one coinsides with the surface of the
other. And when the two ends are pulled away from each other they are
opened. We call these the measuring rulers. The two ends of this axis must
project out as much as the depths of the hollows opened in the rulers. The
thickness of their cut off sections must be equal to the width of the hollows so
t h a t it will move up and down without shaking. 3 8
We construct two parts from wood or copper in the shape of t h e hollow
in the diameter, whose cut off sections are in the shape of rectangles and the
length of each is a span (Figure LX). Let there be additons at the ends
of these in the shape of semicircles (F). The lower section must be wider than
38 In the German translation at this section there are some missing parts. P. 90.
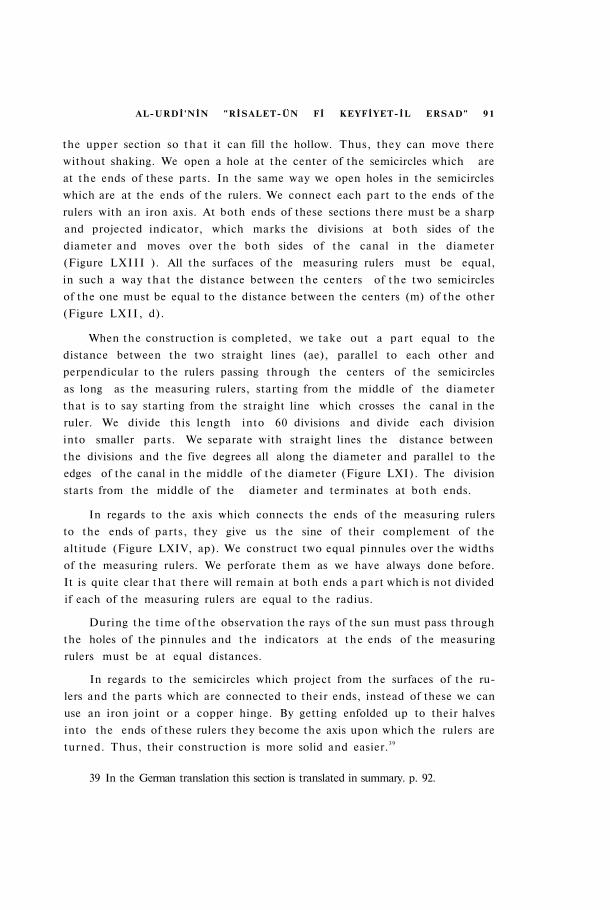
AL-URDİ'NİN "RİSALET-ÜN Fİ KEYFİYET-İL ERSAD" 91
the upper section so t h a t it can fill the hollow. Thus, they can move there
without shaking. We open a hole at the center of the semicircles which are
at the ends of these parts. In the same way we open holes in the semicircles
which are at the ends of the rulers. We connect each part to the ends of the
rulers with an iron axis. At both ends of these sections there must be a sharp
and projected indicator, which marks the divisions at both sides of the
diameter and moves over the both sides of the canal in the diameter
(Figure L X I I I ). All the surfaces of the measuring rulers must be equal,
in such a way t h a t the distance between t h e centers of the two semicircles
of the one must be equal to the distance between the centers (m) of the other
(Figure L X I I , d).
When the construction is completed, we take out a part equal to the
distance between the two straight lines (ae), parallel to each other and
perpendicular to the rulers passing through the centers of the semicircles
as long as the measuring rulers, starting from the middle of the diameter
that is to say starting from the straight line which crosses the canal in the
ruler. We divide this length into 60 divisions and divide each division
into smaller parts. We separate with straight lines the distance between
the divisions and the five degrees all along the diameter and parallel to the
edges of the canal in the middle of the diameter (Figure LXI). The division
starts from the middle of the diameter and terminates at both ends.
In regards to the axis which connects the ends of the measuring rulers
to the ends of parts, they give us the sine of their complement of the
altitude (Figure LXIV, ap). We construct two equal pinnules over the widths
of the measuring rulers. We perforate them as we have always done before.
It is quite clear t h a t there will remain at both ends a par t which is not divided
if each of the measuring rulers are equal to the radius.
During the time of the observation the rays of the sun must pass through
the holes of the pinnules and the indicators at the ends of the measuring
rulers must be at equal distances.
In regards to the semicircles which project from the surfaces of the ru
lers and the parts which are connected to their ends, instead of these we can
use an iron joint or a copper hinge. By getting enfolded up to their halves
into the ends of these rulers they become the axis upon which the rulers are
turned. Thus, their construction is more solid and easier.3 9
39 In the German translation this section is translated in summary. p. 92.
92 SEVİM TEKELİ
One of the instruments whose model we constructed in the observatory
is dhat al-jaib wa'l-sahm. With this instrument we can obtain the azimuth.
For this instrument we construct an azimuth horizon, a diameter, a tra
verse in the middle of the diameter, an iron axis upon which the instrument
turns, a circular base and a support to hold these. These are done exactly the
way we have done before.
We construct two rulers (for each of these) whose thickness and the width
is 1 /6th of a dhira', the surfaces in the shape of a rectangle, and whose length
is equal to the radius. We construct annexes in the semicircular shape, which
becomes an iron project at their ends, in other words handles which are enfolded
into the surface of the rulers up to their halves and connect the two rulers with
an iron axis. Their construction is exactly the same as the ones constructed
in the measuring rulers. Only they do not need annexes. We place one of these
rulers into the canal opened on the diameter. The situation in here is the same
as in the parts mentioned before because the lower part of the ruler and the
hollow is wide and the upper part is narrow. We must fill up the canal with
the same dimension and its upper surface must be at the same level with the
upper surface of the diameter. We call this dhat al-sahm and the second the
radius.
We open a rectangular hole in the middle of the width of the second one.
We construct an axis for t h a t hole in the shape of a plate whose ends are in
the shape of a cylinder and which is perpendicular to the surface of the dia-
meter. 4 0 The two ends of the axis move inside the hollows opened on the per
pendicular rulers so that we can protect its position between the two rulers
during the up and down movement of the diameter.
We p u t a sign over the main support (the straight line which is parallel
to the edges of the ruler and which divides the surface from the middle) which
passes through the center of the axis which connects the two rulers, and over
this end of the radius. The distance between the sign and the axis is equal to
the radius (Figure LXV, ap). The same way we put signs on the surfaces of
the columns starting from the big diameter, their heights are equal to the radius.
Each of these three parts are divided into 60 equal parts and each of these
also are divided into smaller parts. We divide the ruler buried into the canal
of the ruler into the same equal parts. In here the starting point is the
middle of the iron axis which connects it to the radius.
40 This part does not correspond with the German translation. P. 94.
AL-URDİ'NİN "RİSALET-ÜN Fİ KEYFİYET-İL ERSAD" 93
We can calculate the sine of the complement of the arc of the altitude
from the section left between the surface of the column and the axis
(Figure LXVI, ap); and from the rest we can calculate the versed sine of the
arc of the altitude.
We place two pinnules which will divide the width along the length into
two parts, on the surface of the radius opposite the surface which is towards
the columns. We do not need to repeat ourselves here because the operation
has been mentioned many times before. We calculate the sine of the arc of
the altitude from the interception of the columns with the radius. There are
many proves which verify each other in this instrument.
In the year 650, I constructed another instrument for his Royal Highness
Mansur, ruler of Hims in the City of Damascus; I constructed this instrument in
the presence of the Wezir Najm al-Din-al Lubudi and he called it (ala
al-Kamil) perfect instrument. This is another kind of this same instrument
which helps us to calculate all altitudes and azimuths.
That is why we construct a base just like the one mentioned in the
mobil-pinnule. Only its base is wider and its height is higher. Instead of its cross
shape there, we construct the base as a very large circle with two diameters
from wood which intercept each other in right angles (Figure LXVII). We
attach the upper circle with eight solid supports.
We fix the base parallel to the horizon, and take out the meridian and
the east-west line and we divide them into smaller parts as usual. We
call this the azimuth horizon. We place a column over this circle (p). The
bottom end of the column turns in the center of the circle, and its section which
projects over the upper circle is l / 3 t h of a dhira''. We are careful to place it
over the base in a vertical position. In regards to the top end, the section
which turns inside the upper circle is in a cylindirical shape. The section
above the circle is in a square shape whose side is not less than l/4th of
a dhira'. We place a square shaped head whose width is 1/2 of a dhira' and
the lenglth l /3th of a dhira' over this square shaped section. We strengthen
the connection with nails (Figure LXVIII). We construct it in such a way
that the upper surface of the circle exactly touches to the surface of the
lower par t of the head. This is done in such a way t h a t the head turns over
the surface of the circle without shaking. We construct a handle over it in
case we need to turn the axis.
94 SEVİM TEKELİ
We construct three rulers from the best kind of wood, in a rectangular
shape; each of these is 4 and 1 /2 dhira' long and 1 /6th of a dhirac wide. We fix
the ends of two of these into the rectangular sockets of the above mentioned
head, and we make the distance between the two 1 /6th of a dhirac . They
must be perpendicular to the upper surface of the head (Figure LXIX).
In regards to the third one, we call this the ruler which gives us the altitudes.
We divide widths of the three rulers with straight lines all along their lengths.
We put a sign on the straight lines which divide the widths of the perpendi
cular rulers into two, starting from the head in equal distance and nearer
to the upper section, we open one hole at each of these signs opposite one
another. The same way we pierce the middle of the width of the third one, and
place this in between the two. We connect these three with an axis, and fix
two pinnules at the middle of the width of the surface of the third one parallel
to the axis. We open two holes at the same hight ,dividing its widths from
the middle. We make the length of the third ruler in such a way t h a t it will
be in touch with the upper surface and place it between the two straight rulers.
We construct a fourth ruler from the best kind of wood whose edges are
in a rectangular form, whose length is 1,5 times of the length of the middle
ruler, whose thickness is four fingers and width five fingers, we call it chord
ruler. We construct an annex at its one end so t h a t it will widen the width. I t s
length is 1, width 1 /6th of a dhira' and the thickness is equal to the thickness
of the ruler. We cut off a section from the end of the ruler connected to the
annex; this section is 0,5 long and 1 /6 th of a dhira' wide, equal to the width
of the perpendicular ruler. The surface of the chord ruler opposite the surface
to which the annex is connected and the inner surface of the perpendicular ruler
will be on the same plane if we coincide the surface of the width of the annex
with the upper surface of the perpendicular ruler. This is the plane over which
the middle of the three turns (Figure LXX).
We put a sign on the upper part of the straight line which divides the
width of the perpendicular ruler. We mark the length equal to the dis
tance between this sign and the axis on the third ruler starting from the
middle of the axis. We make this the radius of the circle drawn by the
movement of the middle ruler over the upper axis.
We fix an iron axis about three fingers thick and 1 /4 th of a dhira long
over the sign at the side and bottom of the perpendicular ruler. We
construct three iron rings at the end of the annex placed on the end of the
AL-URDİ'NİN "RİSALET-ÜN Fİ KEYFİYET-İL ERSAD" 95
long ruler (Figure LXXI). Their halves are buried inside this annex and
their widths are equal to the iron bar. They are placed side by side over the
width of the annex with their centers on the surface of the chord ruler.
We place the axis on which the long ruler turns inside the mentioned
circles.
We divide with parallel lines throught the length of the surface of the
chord ruler which comes to the exterior when it is placed. Starting from
the straight line which passes from the' center of the iron axis, we divide
the mentioned radius into 60 parts . The remaining from the end of the
chord ruler is divided into 25, each being equal to the sections divided as 60
parts. Thus, we will have 85 parts. And each part is divided into
smaller parts. We take the center of the axis over which the chord
ruler is turning and the side on which the perpendicular ruler is fixed as
the starting point of the division. At the side of each division of the chords
we write down the value of the arcs suptending the chords. This arc is found
from the chord tables. In short this is just like it was in (dhat al-ustuwa-
neteyn) the instrument with two cylinders.
When we want to measure with this instrument, we turn the the handle
which passes throught the head. With it the instrument turns until the circle of
altitudes on which the star to be measured is present, coincides with the surface
of the middle ruler. We bring the ends of the middle ruler and the chord to
the opposite direction of the star. We pull the end of the middle ruler until
the star is seen from both pinnules. We raise it so that the divided surface of
the ruler will pass through the middle ruler, t h a t is to say through the marked
point of the diameter. From the divisions of the ruler we will be able to
determine the chord of the angle between the two straight lines which pass
through the star and the zenith and the arc subtending it. This is the
complement of the altitude and when we subtract this from ninety the rest
will be the arc of the latitude.
If the measurement of the position of the sun is being determined, it is
easier because the rays of the sun penetrates through the holes of the pinnules.
In regards to stars, in order to observe them clearly we construct a pipe which
connects the holes and the distance between the two pinnules. And we fix
a cup like section at the end of the hole for watching.
In regards to the mounting of the instrument, we take the meridian
line and place the north and south points marked over the base of
the instrument on this straight line. We place the base so that its upper
96 SEVİM TEKELİ
surface will be parallel to the horizon. We bury timbers on the ground and
connect the base with strong nails to these timbers and surround it with
walls so t h a t it will not be disturbed by t h e wind.
We construct a ruler whose end turns over the the azimuth horizon at
the lower par t of the column and in perpendicular position. We calculate
the azimuth with it. It is obligatory to connect the ruler to the circle of the
azimuth, t h a t is to say to the surface on which the middle ruler rotates. Only
the pointed end is on the opposite side towards which the chord ruler and
the radius is directed. In such a way that , the end of the ruler and the surfaces
of the chord ruler and the middle ruler which touch each other are always
found on the plane of the azimuth.
Many problems which cannot be solved by triquetrum in the Almagest can
be solved or investigated with the help of these instruments. For instance
with this we can calculate the position of an unknownstar from a star whose
latitude and the longitude is given. When we measure the altitude and the azi
muth of any star with this instrument, we also determine its ascension.
When we calculate the altitude, azimuth and the ascension of a star we can
at the same time calculate its longitude and the latitude.
If this can be calculated from dhat al-rub'eyn the result will be more pre
cise because the altitudes of the two will be taken at the same time. These
things could be done only if the Great God wishes it.
In regards to dhat al-shu'beteyn in the Almagest, the results are more
precise obtained with our instruments than the results obtained with this
instrument. Consequently, Ptolemy says the following when explaining
the construction of this instrument. We construct two rulers, their lenghts
are four dhira' each and the shape of their surfaces are rectangular. We divide
their widths with straight lines along their lenghts. We fix one of these on the
base so that it will be perpendicular to the horizon. Let its surface represents
the plane of the meridian. We open a circular hole along its thichkness from
east to west. The same way we open a hole on the straight line which divides
the width into two parts. We join them with an iron axis. The second will
move freely over this axis.
We fasten a round nail on the lower end of the straight line which divides
the width of the perpendicular ruler and at tach a third ruler to this.
AL-URDİ'NİN "RİSALET-ÜN Fİ KEYFİYET-İL ERSAD" 97
The distance between the lower and the upper axes will be divided into
60 parts. We put a mark on the second ruler whose distance from the
upper center will be equal to the distance between the two centers of the
axes.
We fix two equal pinnules on the second one as usual and open two holes
on them. The hole on the pinnule towards the eye will be narrow and the
hole on the upper pinnule will be large enough so that the full moon will be
seen through this hole. We make the observation when the moon comes to
the meridian. We mark the section which is seperated from the third ruler and
which is in between the middles of the perpendicular ruler and the mobil
ruler. We make the third ruler come to contact to the perpendicular ruler.
The chord of the angle which is in between the two straight lines which
divides the widths of the mobile ruler and the prendicular ruler can be
determined from the division of the third ruler opposite the mark on the
perpendicular ruler. And the arc of the chord can be obtained from the
tables.
The rest is known by all of us. We did not quath his article word by word
but the meaning he gave is exactly given in here.
We have to point out here that for some one who has practical skill the
instrument mentioned above is not precise and it has many errors and unreli
able parts.
When we come to the unreliable parts, in mentioning the connection
of the third one to the perpendicular ruler he does not clarify to which face
the third ruler is going to be connected. If this is placed over the surface
which touches the second ruler, the thickness of the third one will go in
between the two surfaces that are in touch. Thus, the triangle whose upper
angle is on the axis and whose base is formed from a thin ruler cannot be
at the meridian.
If it is placed on the other side of the perpendicular ruler, the thickness of
the ruler will form an obstacle between the surface of the mobile ruler which
has two pinnules and the ruler with chord divisions. Thus, it is not possible for
the surfaces and the rulers which surround the angle to be in the plane of
the meridian.
When the altitude is near the zenith then it will be very hard for the
thin ruler to subtend the angle.
98 SEVİM TEKELİ
In regards to its de fec tuosity: Because of the coutinous motion of the
mobile ruler, the weight will pull down the axis t h a t it is connected to .
The marks and the boundries do not keep their places.
In regards to the short comings, we can calculate only the culmination
of the heavenly bodies. And it is necessary that this altitude must be more
than 30 degrees. Since the division of the perpendicular ruler is 60 and since
it is the chord of the arc of 60 degrees, the altitude when it is lower than 30
degrees, cannot be calculated with this instrument.
If they use thread instead of the thin ruler, since the tread will become
longer when pulled from its end, the calculations made with it will not be
precise. A person who expects exactitude from the instrument cannot depend
upon a thread.
For someone who understands our critical analysis, it is clear and open
that our purpose is to find the t ruth and not oppose someone whom we envy.
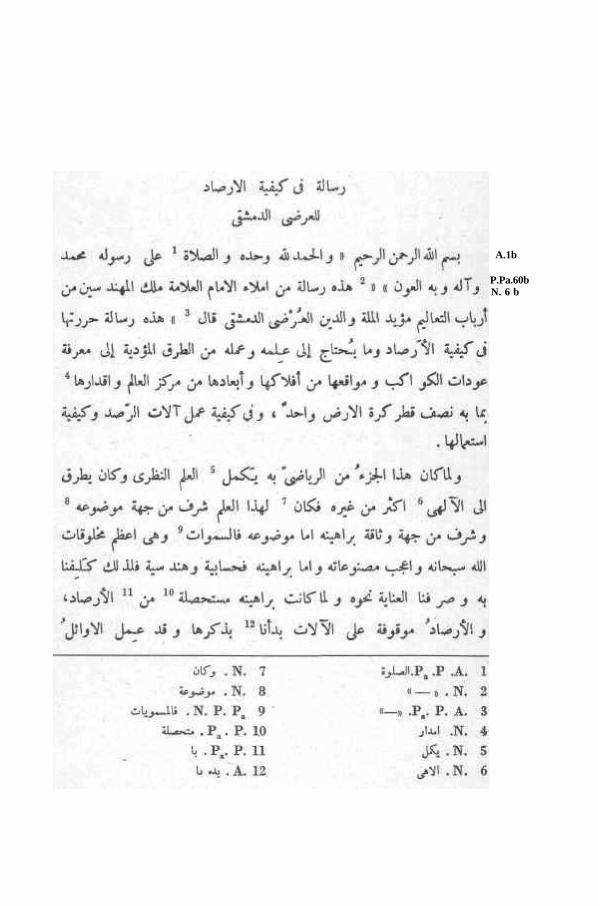
A.1b
P.Pa.60b N. 6 b
100 SEVİM TEKELİ
A. 2b
A.2a
N.7a

1. P. P a . . A . N. . T o r n a m a n a s ı n a gelmesi
m u h t e m e l olan bu kelimeyi l û ğ a t t a b u l a m a d ı m .
- . P . A . 9 . P a . P . l a
. N . 10 P a . P . l b
. P a . P . 11 . N . 2
. P a . P . 12 . N. 3
.N. 13 . . N . 4
. N . 14 . N . 5
. P a . P . 15 . P . P a . . N . 6
P a . P 16 . N. 7
.A. 8
A.3a
P.Pa.61a
AL-URDİ'NİN "RİSALET-ÜN Fİ KEYFİYET-İL ERSAD" 101
102 SEVİM TEKELİ
. N . 11
. P a . P . 12
. A . P . 13
— . N . 14
. 15
.N. 16
. A. 17
. N . 18
. N . 19
. P a . P . 1
. N . 2
— .N. 3
.Pa. P . 4
. N . 5
— N . 6
— . N . 7
. N . 8
. N . 9
. P a . P . 1 0
A.3b
AL-URDİ'NİN "RİSALET-ÜN Fİ KEYFİYET-İL ERSAD" 103
A.4a
N.7b
P.Pa.61b
SEVİM TEKELİ 104
A. 4b
N.8a
A.5a
AL-UHDİ'NİN "RİSALET-ÜN Fİ KEYFİYET-İL ERSAD" 105
106 SEVİM TEKELİ
P.Pa.62a
A. 5b
AL-URDİ'NİN "RİSALET-ÜN Fİ KEYFİYET-İL ERSAD" 107
A. 6a
A.6b

108 SEVİM TEKELİ
Şekil : 1
N. 9a
A. 7a
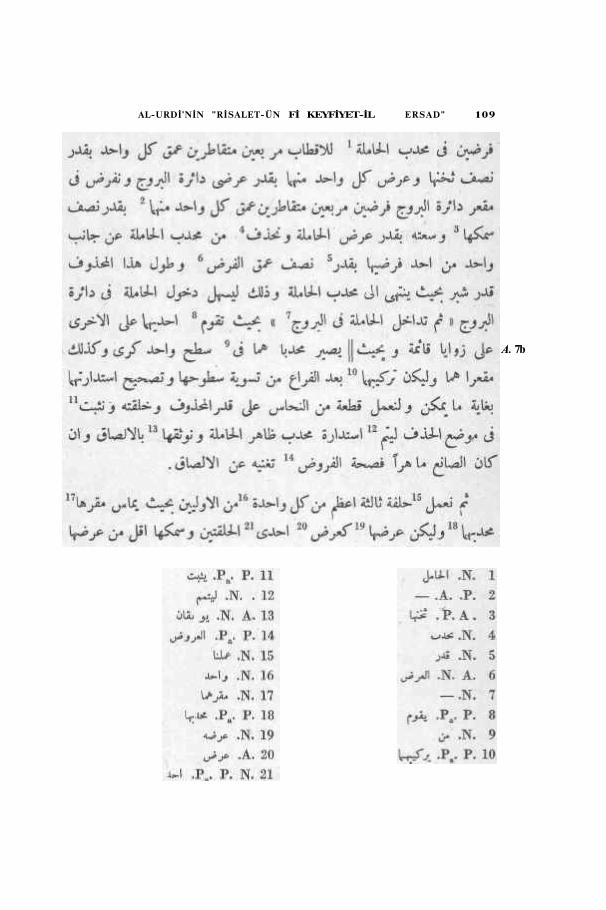
A. 7b
AL-URDİ'NİN "RİSALET-ÜN Fİ KEYFİYET-İL ERSAD" 109

A. 8a
N. 9b
110 SEVİM TEKELİ
P.Pa.63a
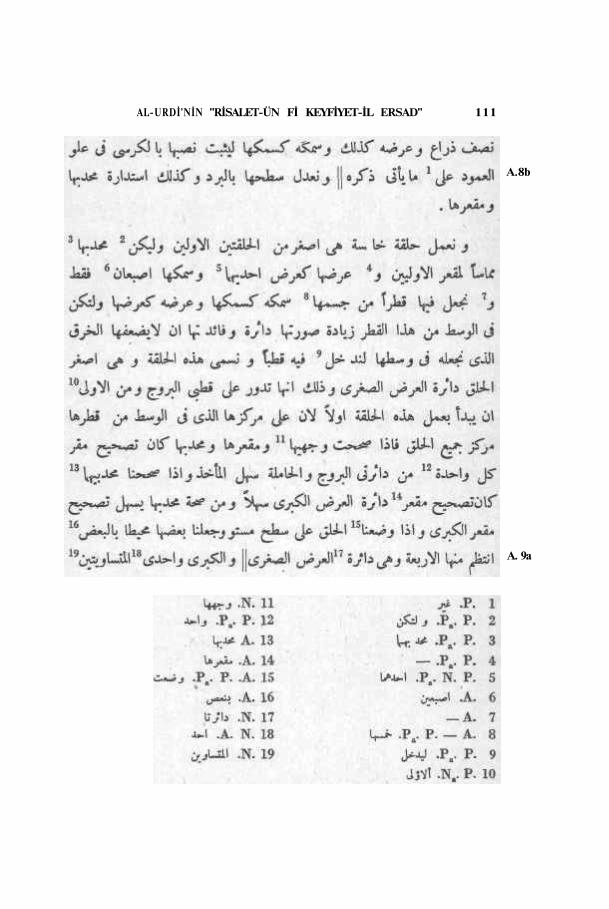
A.8b
AL-URDİ'NİN "RİSALET-ÜN Fİ KEYFİYET-İL ERSAD" 111
A. 9a
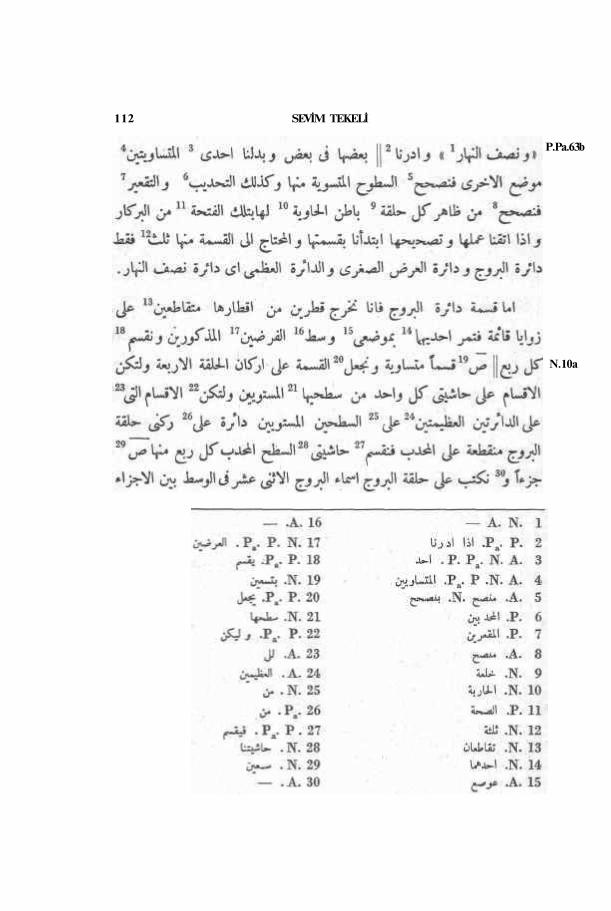
P.Pa.63b
N.10a
112 SEVİM TEKELİ
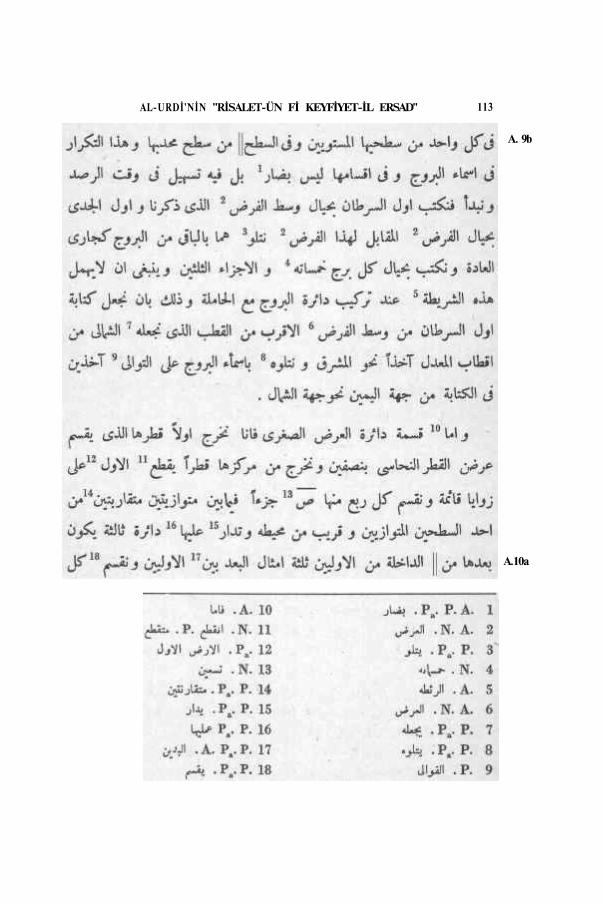
AL-URDİ'NİN "RİSALET-ÜN Fİ KEYFİYET-İL ERSAD" 113
A. 9b
A.10a
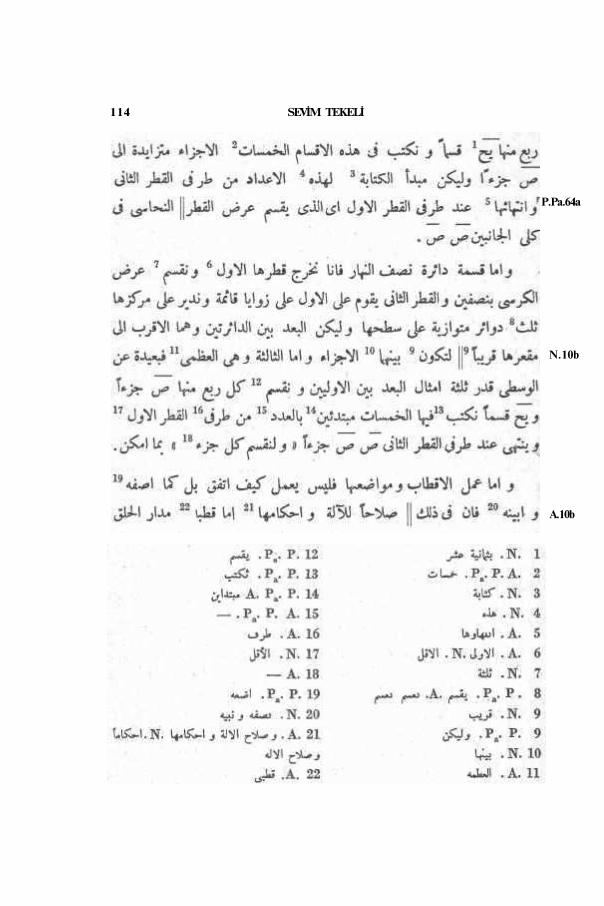
P.Pa.64a
N.10b
A.10b
114 SEVİM TEKELİ
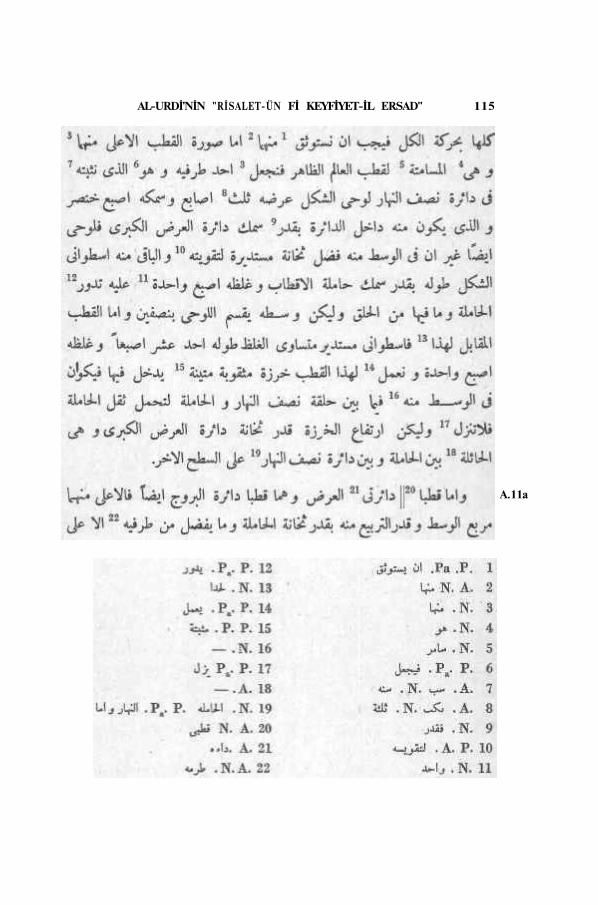
A.11a
AL-URDİ'NİN "RİSALET-ÜN Fİ KEYFİYET-İL ERSAD" 115
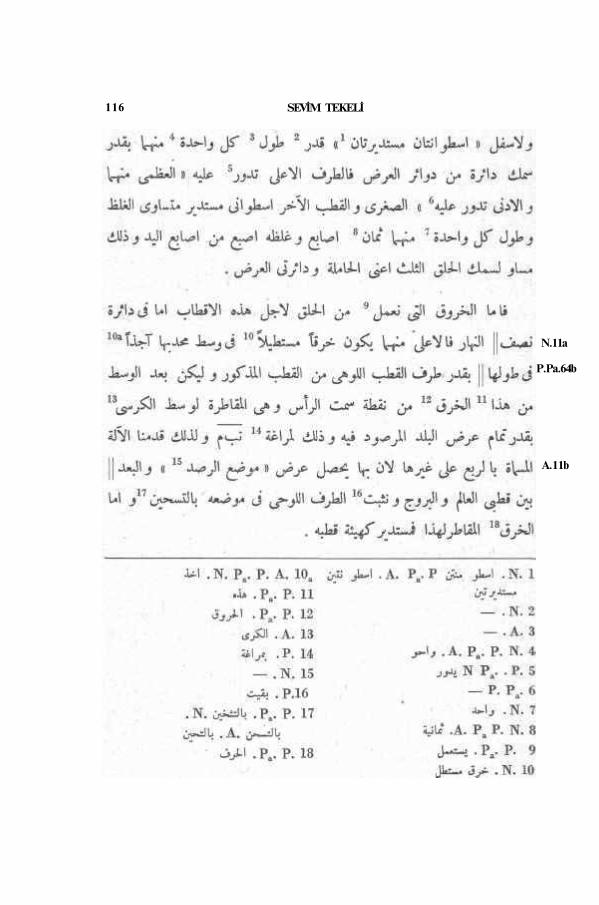
116 SEVİM TEKELİ
P.Pa.64b
N.11a
A.11b
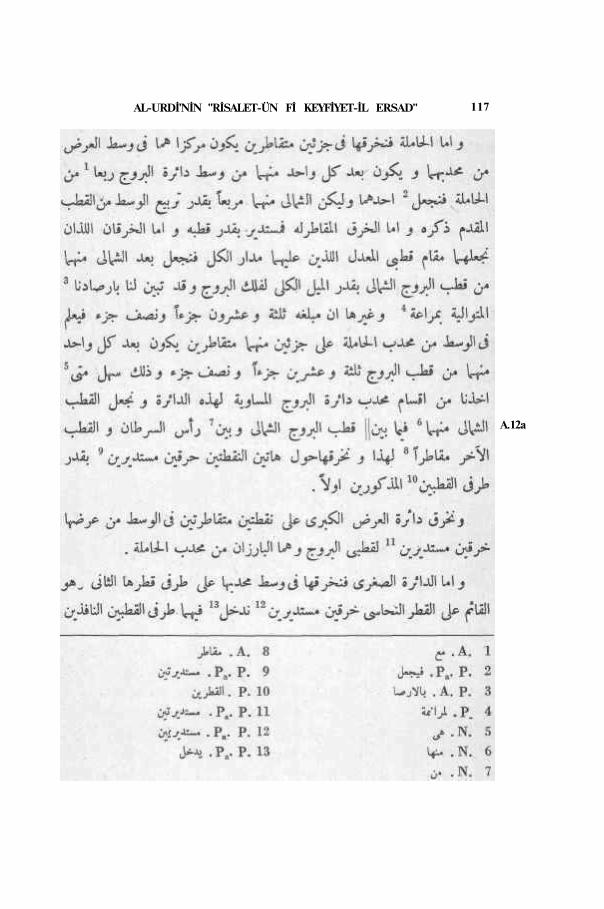
AL-URDİ'NİN "RİSALET-ÜN Fİ KEYFİYET-İL ERSAD" 117
A.12a
118 SEVİM TEKELİ
N.11b
A.12b
A.13a
N.12a
AL-URDİ'NİN "RİSALET-ÜN Fİ KEYFİYET-İL ERSAD" 119
P.Pa.65b
SEVİM TEKELİ 120
A.13b
N. 12b
A. 14a
AL-URDİ'NİN "RİSALET-ÜN Fİ KEYFİYET-İL ERSAD" 121
A.14b
SEVİM TEKELİ 122
P.Pa.66a
A.15a
P.Pa.66b
AL-URDİ'NİN "RİSALET-ÜN Fİ KEYFİYET-İL ERSAD" 123
N. 13a
124 SEVİM TEKELİ
A.15b
A.16a
P.Pa. 67a A.16b
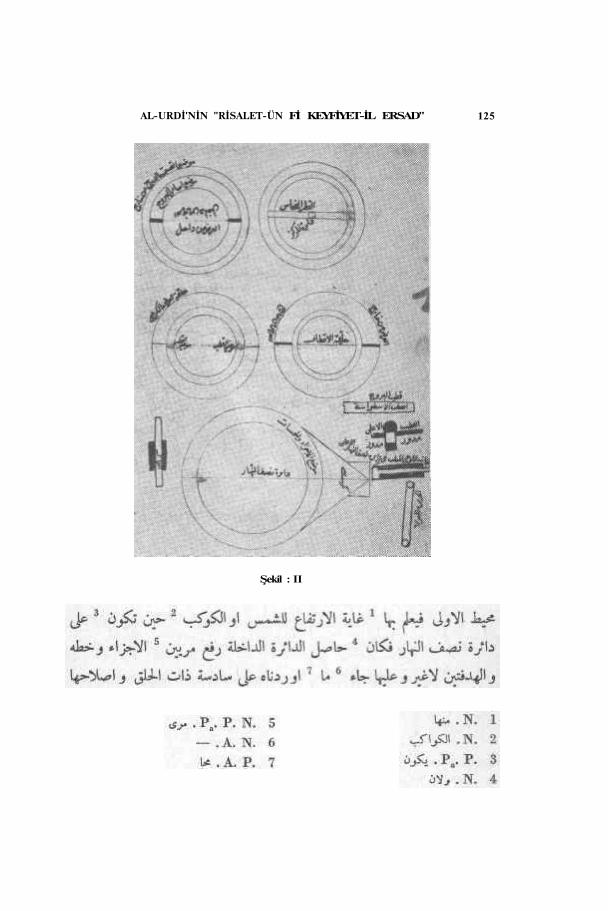
AL-URDİ'NİN "RİSALET-ÜN Fİ KEYFİYET-İL ERSAD" 125
Şekil : II
126 SEVİM TEKELİ
N. 13b
A. 17a
AL-URDİ'NİN "RİSALET-ÜN Fİ KEYFİYET-İL ERSAD" 127
A. 17b
P.Pa.67b
18a.N.14a

P.Pa.68a
A. 18b
128 SEVİM TEKELİ
AL-URDİ'NİN "RİSALET-ÜN Fİ KEYFİYET-İL ERSAD" 129
A.19b
P.Pa68b
A.19a; N.14b
N. 15a A. 20b
A.20a
130 SEVİM TEKELİ
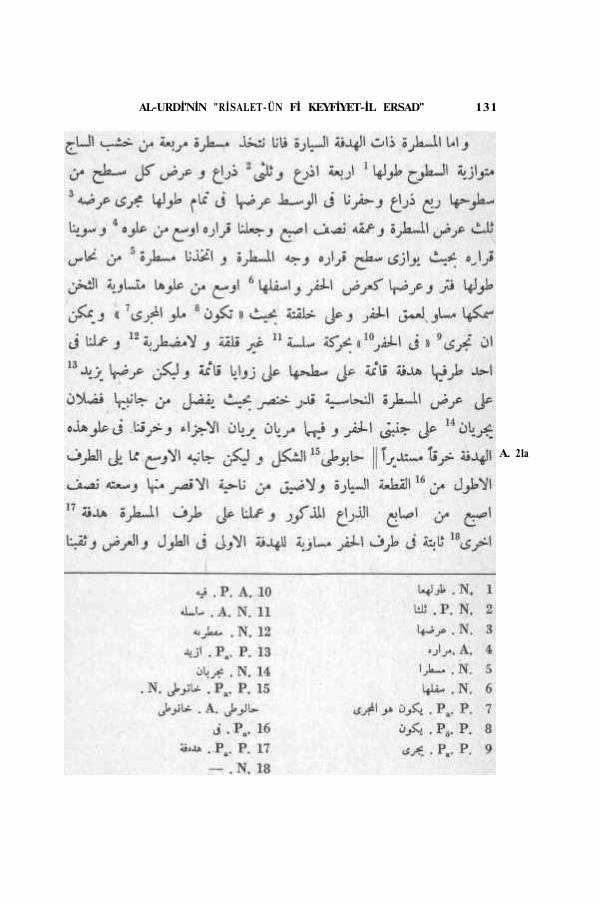
A. 21a
AL-URDİ'NİN "RİSALET-ÜN Fİ KEYFİYET-İL ERSAD" 131
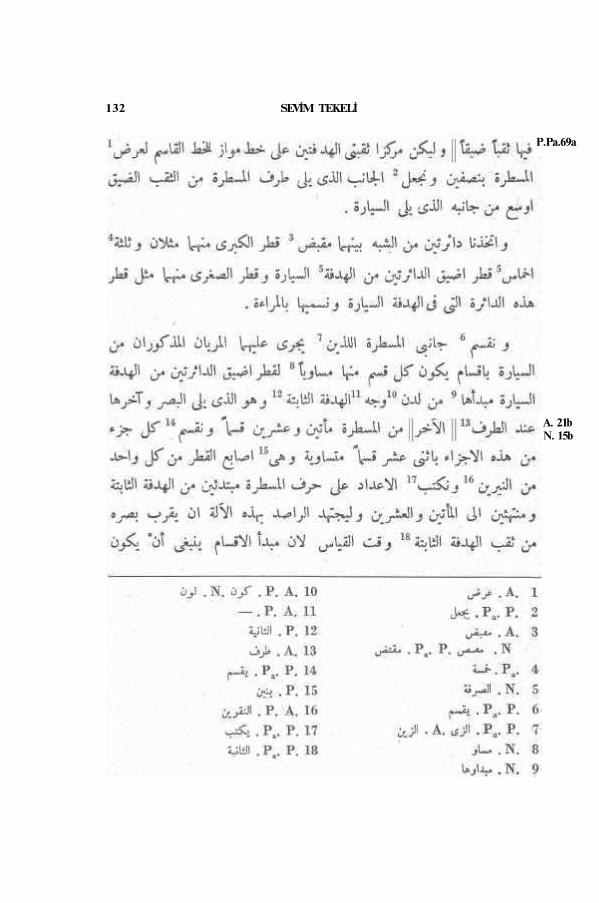
132 SEVİM TEKELİ
P.Pa.69a
A. 21b N. 15b
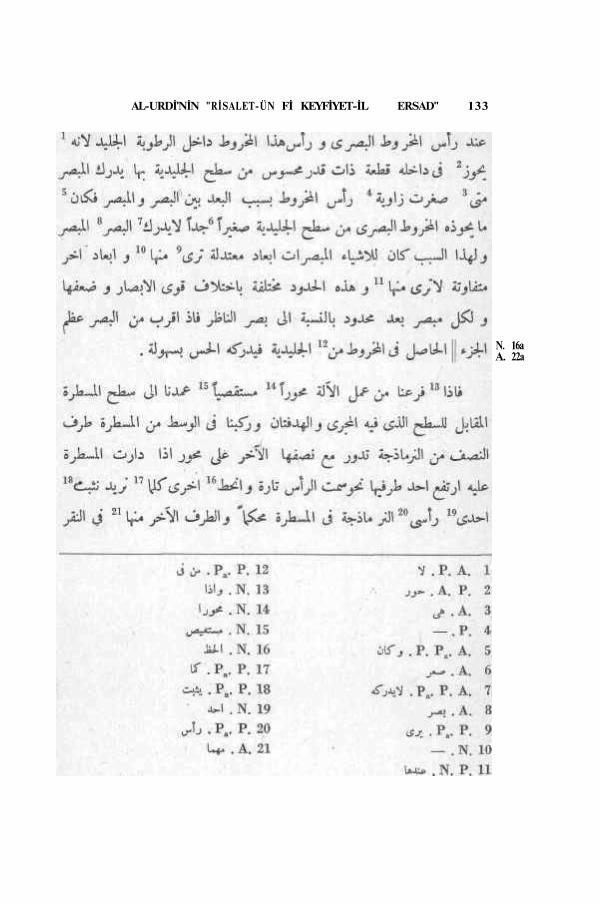
N. 16a A. 22a
AL-URDİ'NİN "RİSALET-ÜN Fİ KEYFİYET-İL ERSAD" 133
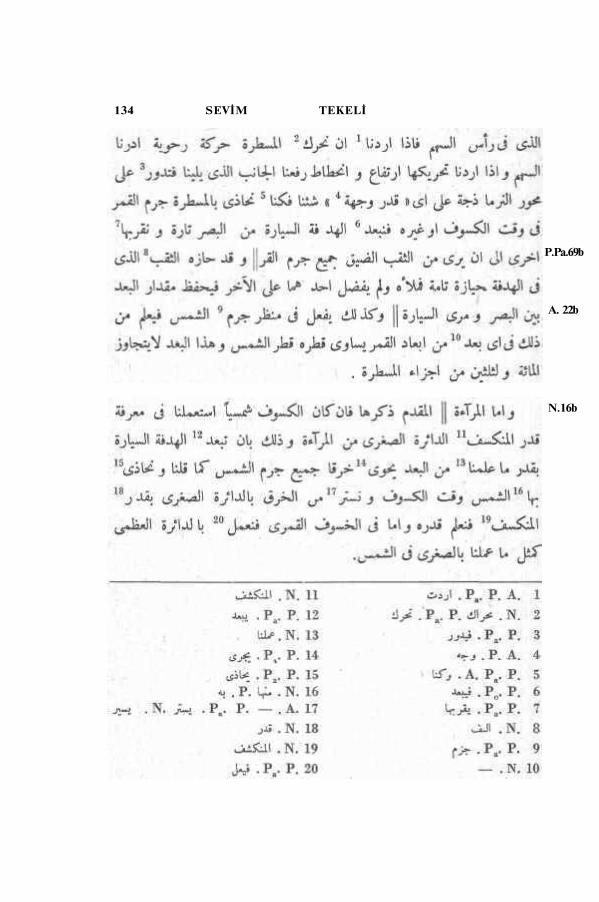
134 SEVİM TEKELİ
P.Pa.69b
N.16b
A. 22b
A.23b P.Pa.70a
N.17a
AL-URDi'NİN "RİSALET-ÜN Fİ KEYFİYET-İL ERSAD" 135
A.23a
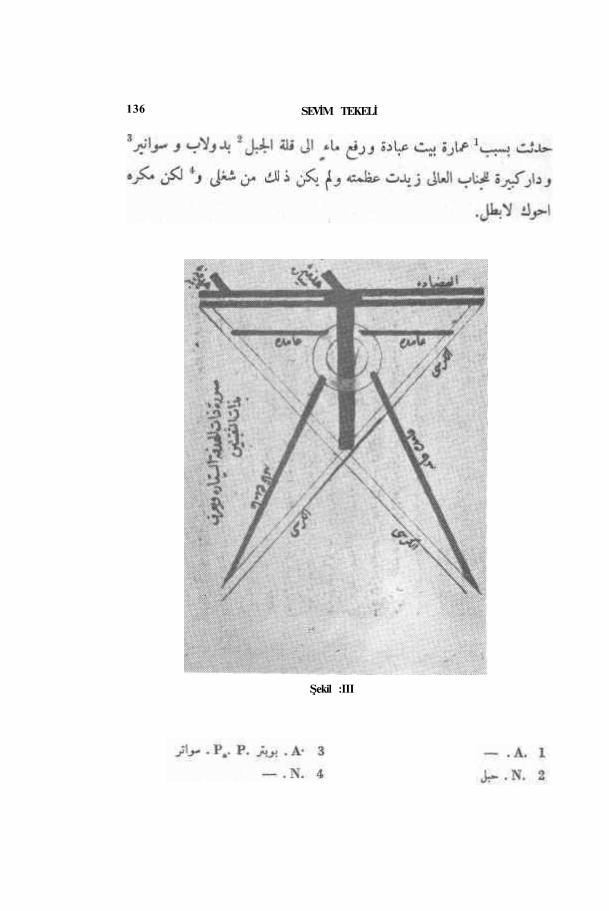
SEVİM TEKELİ
Şekil :III
136
AL-URDİ'NİN "RİSALET-ÜN Fİ KEYFİYET-İL ERSAD" 137
P.Pa.70b
A. 24a
A.24b
N.17b
138 SEVİM TEKELİ
A.25a
P.Pa.71a
AL-URDİ'NİN "RİSALET-ÜN Fİ KEYFİYET-İL ERSAD" 139

A.25b
N.18a
140 SEVİM TEKELİ
P.Pa.71b
A.26a
AL-URDİ'NİN "RİSALET-ÜN Fİ KEYFİYET-İL ERSAD" 141
N. 18b
142 SEVİM TEKELİ
A. 26b

AL-URDİ'NİN "RİSALET-ÜN Fİ KEYFİYET-İL ERSAD" 143
A.27a
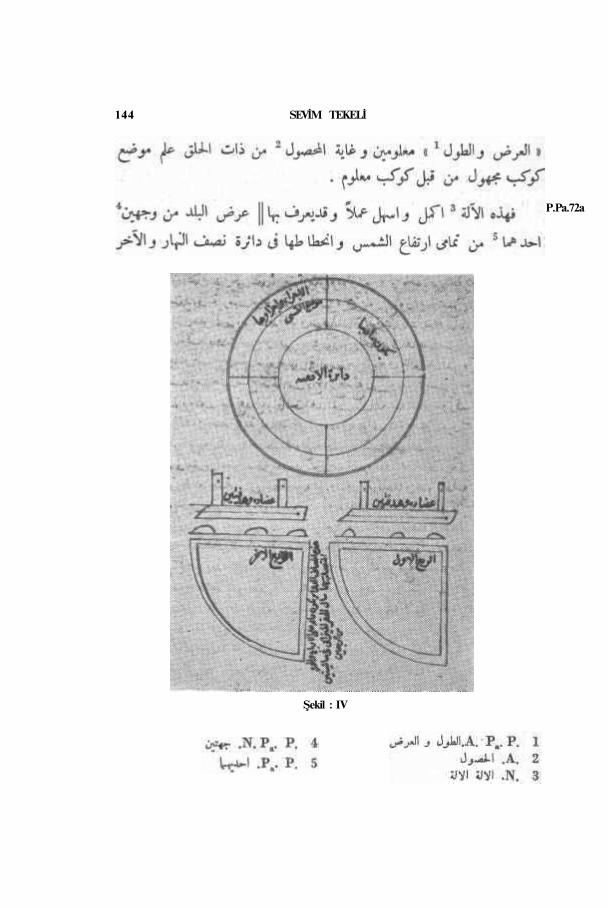
144 SEVİM TEKELİ
P.Pa.72a
Şekil : IV
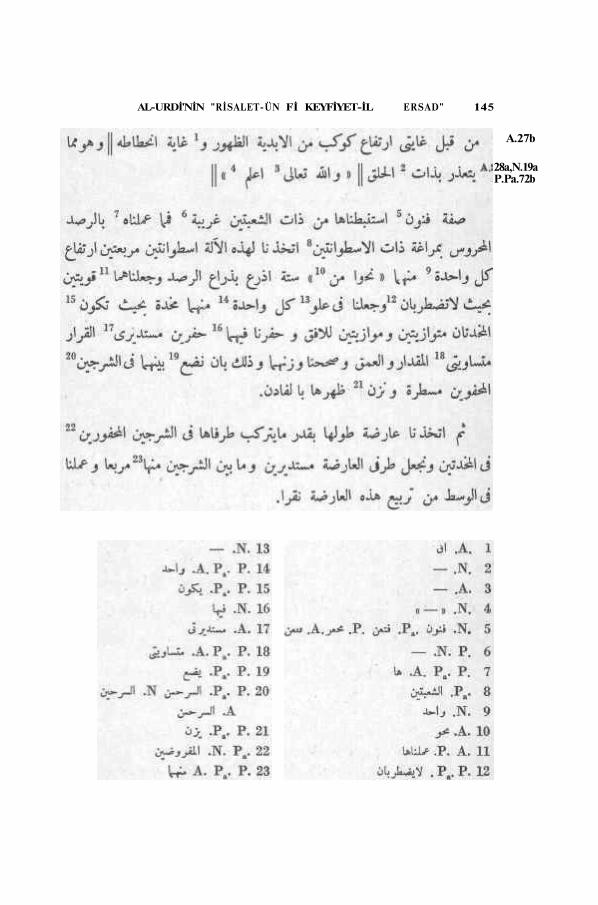
AL-URDİ'NİN "RİSALET-ÜN Fİ KEYFİYET-İL ERSAD" 145
A.27b
28a,N.19a P.Pa.72b
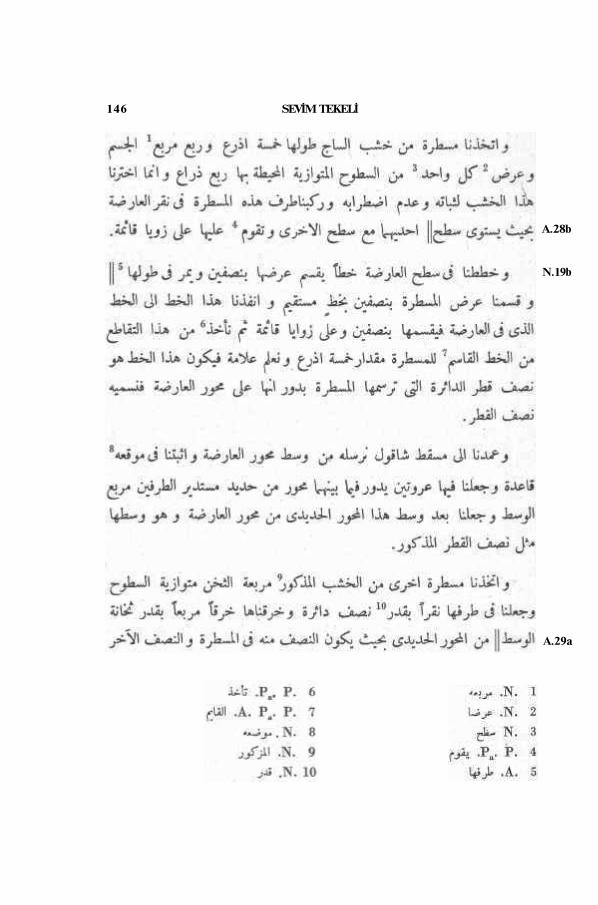
146 SEVİM TEKELİ
A.29a
A.28b
N.19b
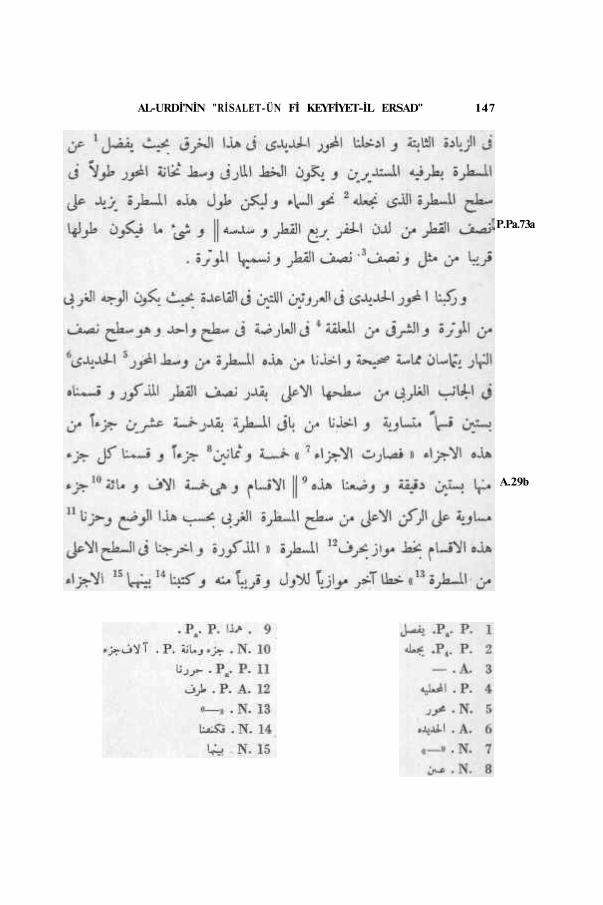
P.Pa.73a
A.29b
AL-URDİ'NİN "RİSALET-ÜN Fİ KEYFİYET-İL ERSAD" 147
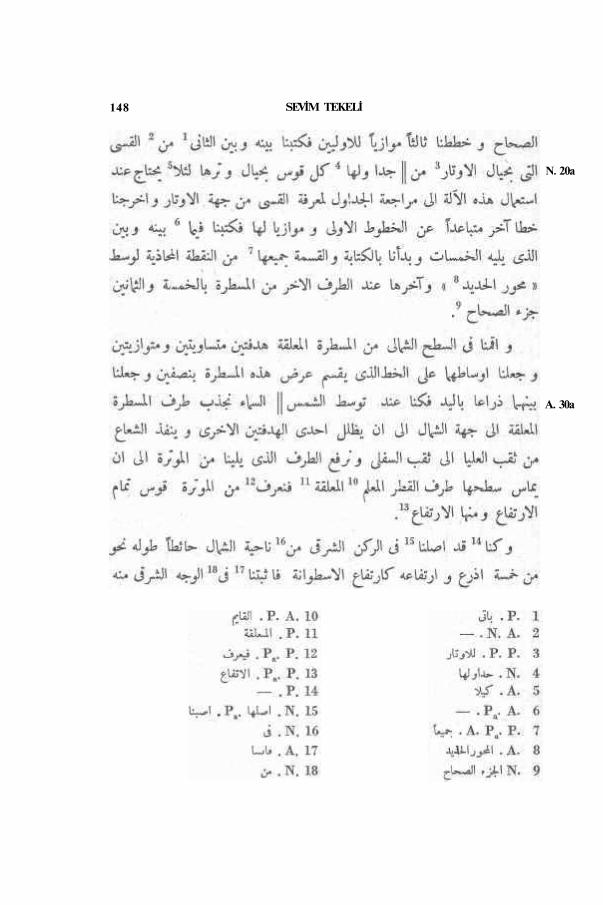
SEVİM TEKELİ 148
N. 20a
A. 30a
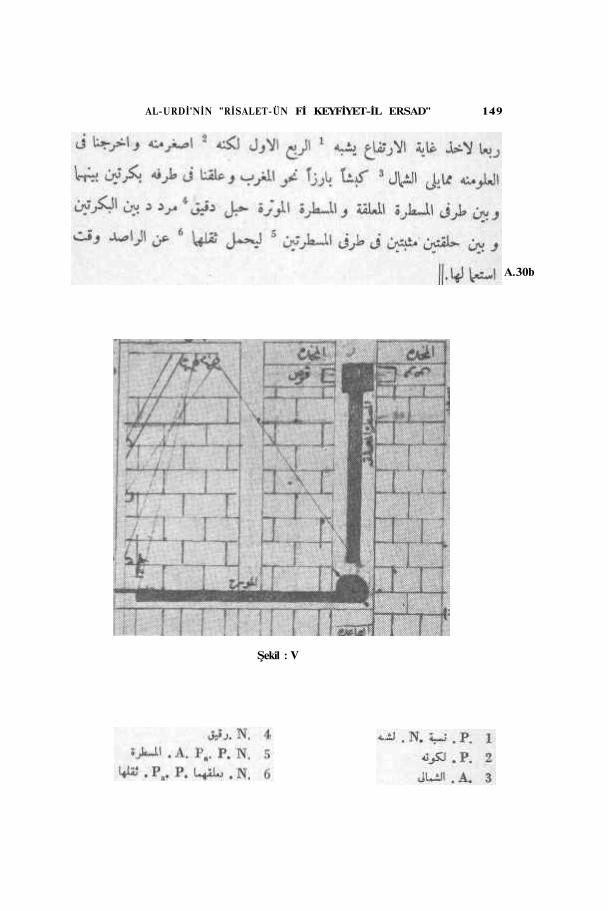
Şekil : V
A.30b
AL-URDİ'NİN "RİSALET-ÜN Fİ KEYFİYET-İL ERSAD" 149

A.31a
150 SEVİM TEKELİ
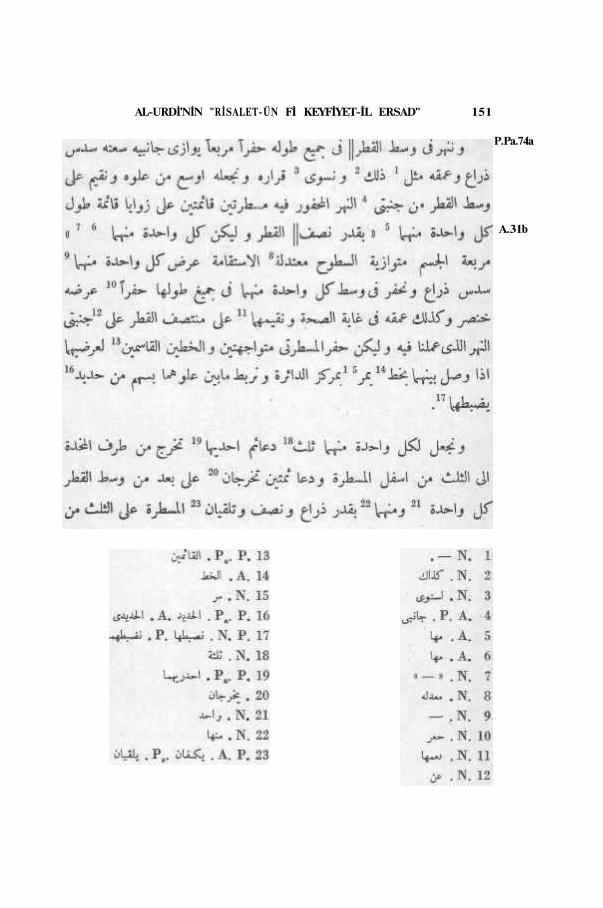
A.31b
P.Pa.74a
AL-URDİ'NİN "RİSALET-ÜN Fİ KEYFİYET-İL ERSAD" 151
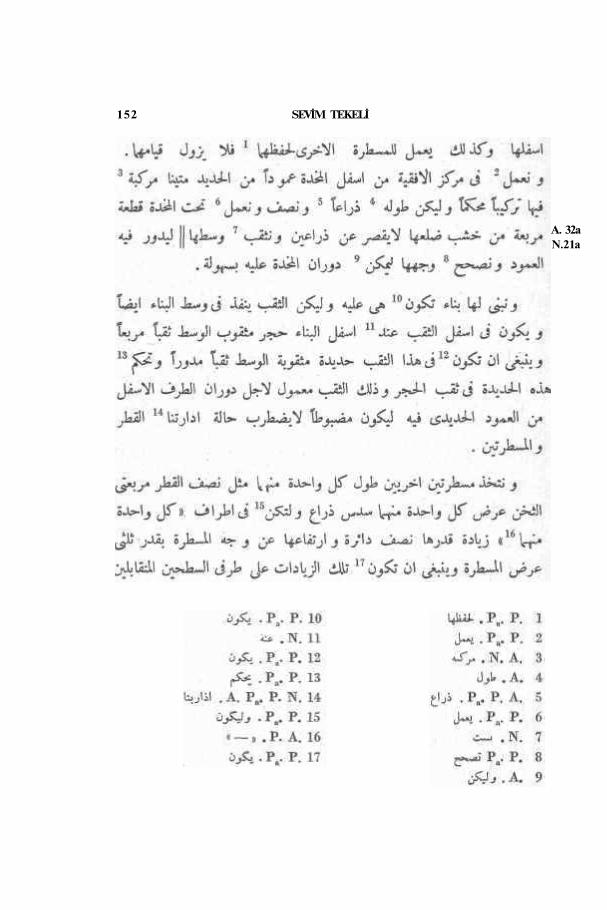
152 SEVİM TEKELİ
A. 32a N.21a
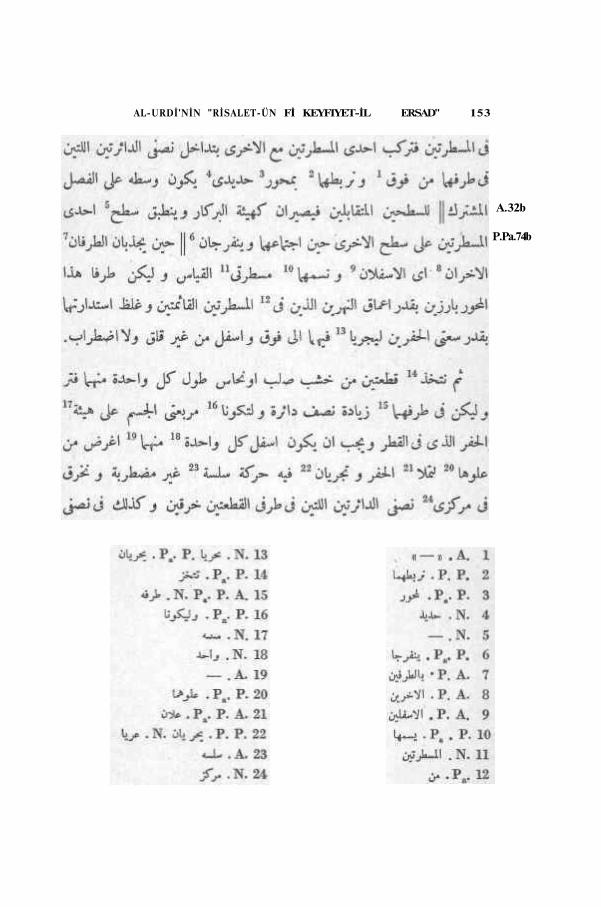
P.Pa.74b
AL-URDİ'NİN "RİSALET-ÜN Fİ KEYFIYET-İL ERSAD" 153
A.32b
154 SEVİM TEKELİ
A.33a
N.21b

P.Pa.75a
A. 34a
A. 33b
AL-URDİ'NİN "RİSALET-ÜN Fİ KEYFİYET-İL ERSAD" 155

156 SEVİM TEKELİ
Şekil :VI
A.34b
P.Pa.75b
AL-URDİ'NİN "RİSALET-ÜN Fİ KEYFİYET-İL ERSAD" 157
A.35a
N.22b
158 SEVİM TEKELİ
A.35b
A.36a P.Pa.76a
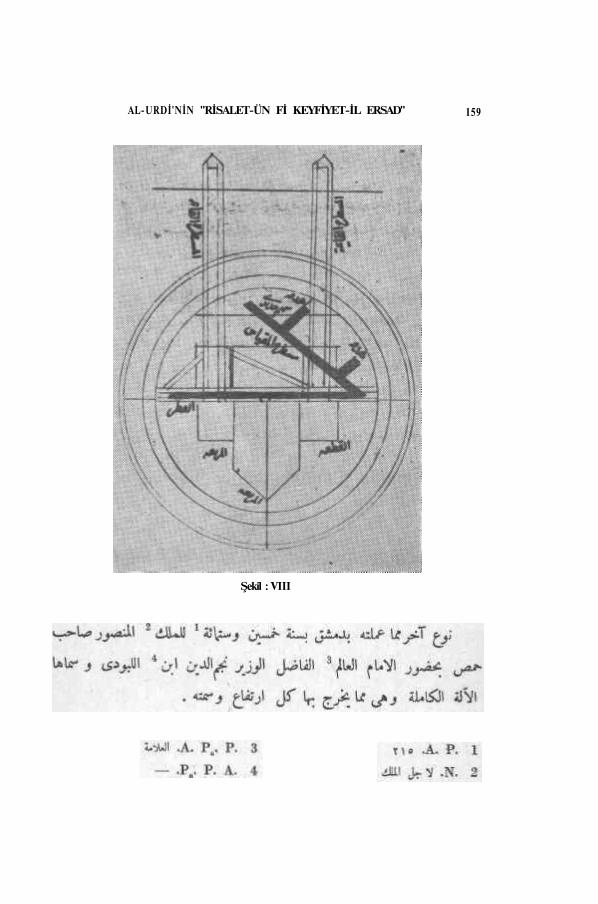
AL-URDİ'NİN "RİSALET-ÜN Fİ KEYFİYET-İL ERSAD" 159
Şekil : VIII
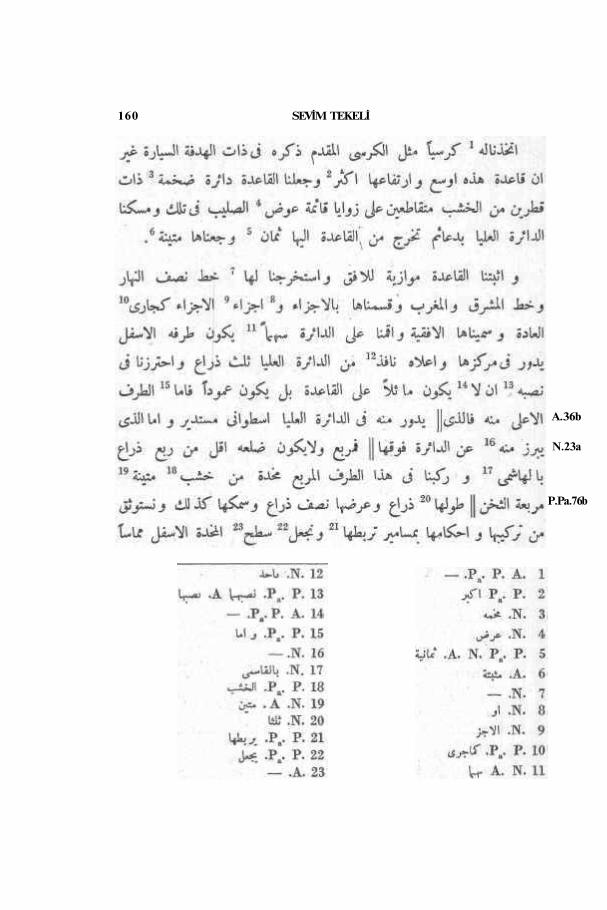
160 SEVİM TEKELİ
N.23a
P.Pa.76b
A.36b
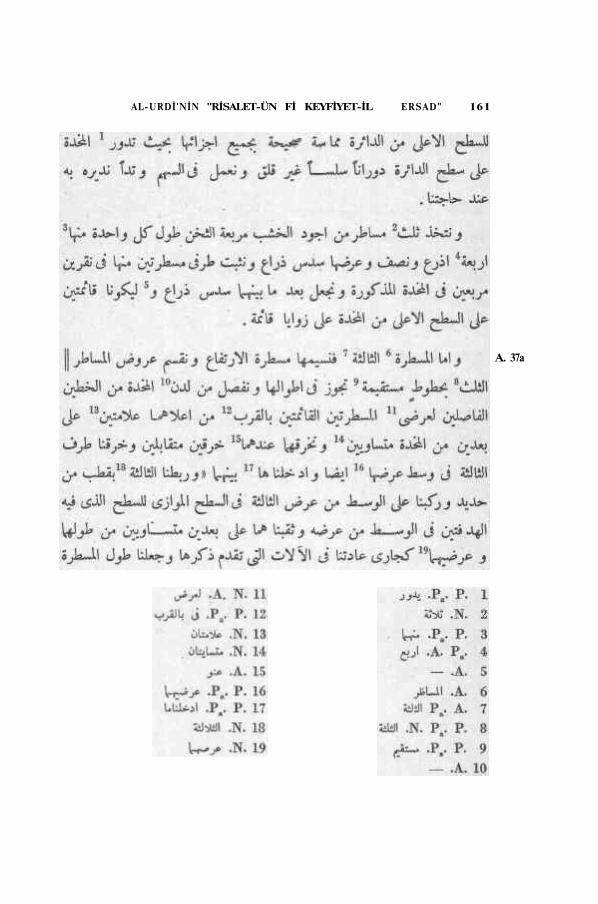
A. 37a
AL-URDİ'NİN "RİSALET-ÜN Fİ KEYFİYET-İL ERSAD" 161
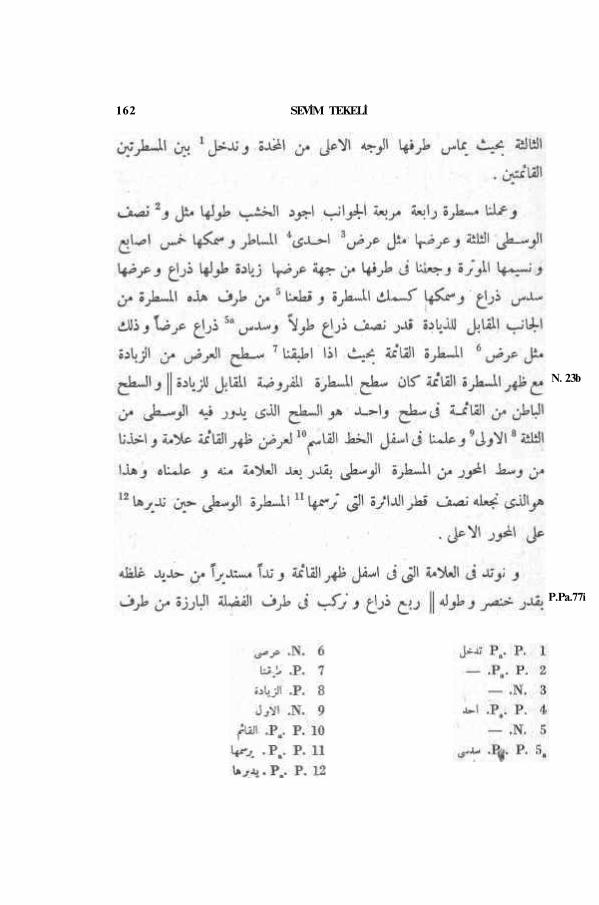
162 SEVİM TEKELİ
N. 23b
P.Pa.77i
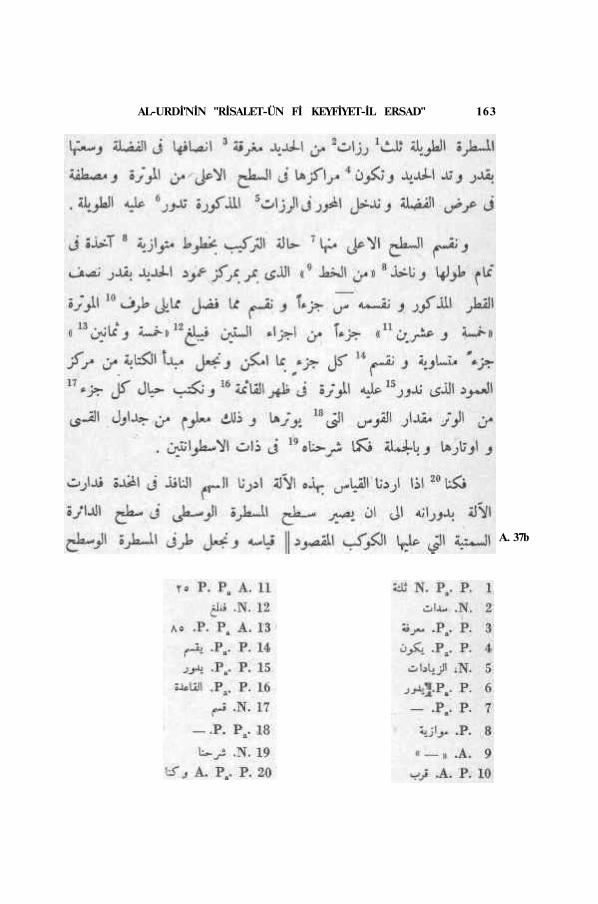
AL-URDİ'NİN "RİSALET-ÜN Fİ KEYFİYET-İL ERSAD" 163
A. 37b
SEVİM TEKELİ
N. 24a
A. 38a
164
A. 38b
A. 39a
AL-URDİ'NİN "RİSALET-ÜN Fİ KEYFİYET-İL ERSAD" 165
P.Pa.77b

166 SEVİM TEKELİ
Şekil : VII
P.Pa.78a
AL-URDİ'NİN "RİSALET-ÜN Fİ KEYFİYET-İL ERSAD" 167
A. 39b
A40a
N.25a
168 SEVİM TEKELİ
P.Pa.78b
A.40b
P.Pa.79a
AL-URDİ'NİN "RİSALET-ÜN Fİ KEYFİYET-İL ERSAD" 169