Embed Size (px)
Citation preview
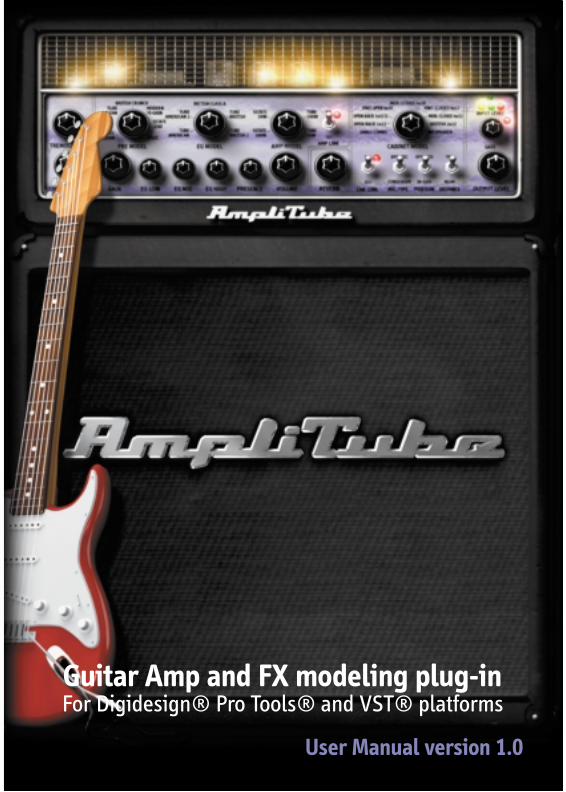
User Manual version 1.0
Guitar Amp and FX modeling plug-inFor Digidesign® Pro Tools® and VST® platforms

User Manual version 1.0
Guitar Amp and FX modeling plug-inFor Digidesign® Pro Tools® and VST® platforms

4
5
P L E A S E N O T E :
AMPLITUBE IS A TRADEMARK OF IK MULTIMEDIA. ALL OTHER PRODUCT NAMES
AND TRADEMARKS ARE THE PROPERTY OF THEIR RESPECTIVE OWNERS, WHICH
ARE IN NO WAY ASSOCIATED OR AFFILIATED WITH IK MULTIMEDIA. PRODUCT
NAMES ARE USED SOLEY FOR THE PURPOSE OF IDENTIFYING THE SPECIFIC PRO-
DUCTS THAT WERE STUDIED DURING IK MULTIMEDIA's SOUND MODEL DEVE-
LOPMENT AND FOR DESCRIBING CERTAIN TYPES OF TONES PRODUCED WITH IK
MULTIMEDIA's DIGITAL MODELING TECHNOLOGY. USE OF THESE NAMES DOES
NOT IMPLY ANY COOPERATION OR ENDORSEMENT.
Contents
Interface
License and copyrights
What is AmpliTube™?1.1 Description
Requirements2.1 System Requirements Pro Tools system (LE, TDM) Mac2.2 System Requirements VST system Mac/Win
Installation and Authorization3.1 Installation 3.2 Authorization
Using AmpliTube 4.1 Connecting your Guitar to your a computer 4.2 Input Level – optimal setting 4.3 AmpliTube signal path and effects chaining4.4 Stomp Module 4.5 Amp Module 4.6 Post FX Module4.7 Presets4.8 Recording/Bouncing in Pro Tools4.9 Recording/Bouncing in VST (Cubase/Logic)4.10 Automating parameters in ProTools4.11 Automating parameters in VST
Stomp Module5.1 Wah-Wah5.2 Delay 5.3 Chorus 5.4 Flanger 5.5 Overdrive
I
II
III
Chapter 1
Chapter 2
Chapter 3
Chapter 4
Chapter 5
I - Contents6
I - Contents 7
Amp Module 6.1 Pre Model6.2 EQ Model6.3 Amp Model 6.4 Amp Match 6.5 Cabinet Model 6.6 Cabinet Match 6.7 Microphone Modeling6.8 Tremolo 6.9 Spring Reverb
Post FX Module7.1 Parametric EQ7.2 Stereo Delay7.3 Stereo Reverb
General AmpliTube controls/display8.1 Input Level 8.2 Gate 8.3 Output Level8.4 Module Bypass8.5 Presets
Support 9.1 Support9.2 User Area
Chapter 6
Chapter 7
Chapter 8
Chapter 9
II - Interface8
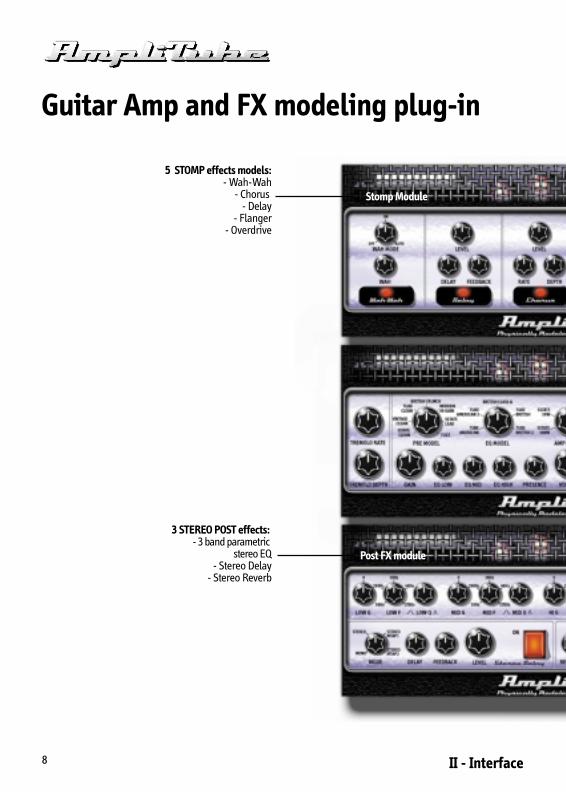
5 STOMP effects models: - Wah-Wah
- Chorus - Delay
- Flanger- Overdrive
Stomp Module
3 STEREO POST effects: - 3 band parametric
stereo EQ- Stereo Delay
- Stereo Reverb
Post FX module
Guitar Amp and FX modeling plug-in
II - Interface 9
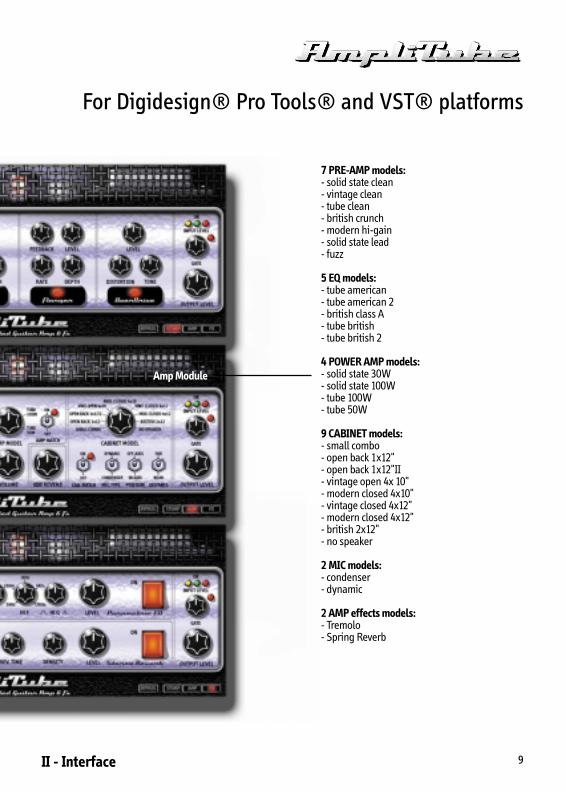
7 PRE-AMP models: - solid state clean- vintage clean- tube clean- british crunch- modern hi-gain- solid state lead- fuzz
5 EQ models: - tube american- tube american 2- british class A- tube british- tube british 2
4 POWER AMP models: - solid state 30W- solid state 100W- tube 100W- tube 50W
9 CABINET models:- small combo- open back 1x12" - open back 1x12"II - vintage open 4x 10"- modern closed 4x10"- vintage closed 4x12"- modern closed 4x12"- british 2x12"- no speaker
2 MIC models: - condenser- dynamic
2 AMP effects models:- Tremolo- Spring Reverb
Amp Module
For Digidesign® Pro Tools® and VST® platforms
III License Agreement10
License AgreementEND-USER LICENSE AGREEMENT FOR AMPLITUBE™ SOFTWARE
Please read this document carefully before breaking the seal on the media package. This agreement licenceses the enclosed software toyou and contains warranty and liability disclaimers.
By breaking the seal on the media envelope, you are confirming to have taken notice of clauses of this agreement and you acknowledgeyour acceptance of the software as well as your acceptance of the terms of this agreement. If you do not wish to do so, do not break theseal. Instead, promptly return the entire package, including the unopened media package, to the dealer from whom you have obtained it,for a full refund.
1) DEFINITIONS"EULA means this end user license agreement"
"AmpliTube™ software" means the software program included in the enclosed package, and all related updates supplied by IK MultimediaProduction srl - Italy .
"IK Multimedia Product" means the AmpliTube software and the related documentation and models and multimedia content (such asanimation, sound and graphics) and all related updates supplied by IK Multimedia Production srl - Italy.
"Not for resale (NFR) Version" means a version of IK Multimedia Product", so identified, intended for review and evaluation purposes,only.
2) LICENSEThe "IK Multimedia Product" is protected by copyright laws and international copyright treaties, as well as other intellectual property lawsand treaties. The "IK Multimedia Product" is licensed, not sold.
This EULA grants you the rights as specified here below, All other actions and means of usage are reserved to the written permission ofthe right holder IK Multimedia Production srl:
Applications Software. The "IK Multimedia Product" may be used only by you. You may install and use one copy of the "IK MultimediaProduct", or any prior version thereof for the same operating system, on a single computer.
Storage/Network use. You may also store or install a copy of the "IK Multimedia Product" on a storage device, such as a network server,used only to install or run the "IK Multimedia Product" on your other computers over an internal network; however, you must acquire anddedicate a distinct license for each user of the "IK Multimedia Product" from the storage device. Any given license for the "IK MultimediaProduct" may not be shared or used concurrently or otherwise on different computers or by different developers in a given organization.
3) AUTHORIZATION CODEThe "IK Multimedia Product" only functions when you are in the possession of an authorization code. You will receive an authorizationcode upon completing the authorization code request procedure. Once your authorization code is activated, you may use the product.
You agree to follow the authorization code request procedure and will provide true, accurate and complete information about yourself. Ifyou provide any information that is untrue, inaccurate, not correct or incomplete, or IK Multimedia has reasonable grounds to suspect thatsuch information is untrue, inaccurate, not correct or incomplete, IK Multimedia has the right to suspend or to revoke the license.
The termination of the license shall be without prejudice to any rights, whatsoever, of IK Multimedia.
4) DESCRIPTION OF OTHER RIGHTS AND LIMITATIONSLimitations on Reverse Engineering, Decompilation, and Disassembly. You may not reverse engineer, decompile, or disassemble the "IKMultimedia Product", except and only to the extent that such activity is expressly permitted by applicable law notwithstanding thislimitation of components. The "IK Multimedia Product" is licensed as a single product. Its component parts may not be separated for useon more than one computer.
Not for Resale Version. If the "IK Multimedia Product" is labeled "Not for Resale" or "NFR" or "Evaluation Copy", then, notwithstandingother sections of this EULA, you may not sell, or otherwise transfer the "IK Multimedia Product";
Rental. You may not rent, lease, or lend the "IK Multimedia Product" to any party.
Software Transfer. You are not allowed to transfer, license or sublicence your rights as Licensee of the AmpliTube software or any IK
III License Agreement 11
Multimedia product, as licensed to you under this agreement. The carrier on which the IK Multimedia product has been distributed can-not be transferred or otherwise made available to any third party.
5) UPGRADESIf the "IK Multimedia Product" is labeled or otherwise identified by IK Multimedia Production srl as an "upgrade", you must be properlylicensed to use a product identified by IK Multimedia Production srl as being eligible for the upgrade in order to use the "IK MultimediaProduct".
An "IK Multimedia Product" labeled or otherwise identified by IK Multimedia Production srl as an upgrade replaces and/or supplementsthe product that formed the basis for your eligibility for such upgrade. You may use the resulting upgraded product only in accordancewith the terms of this EULA. If the "IK Multimedia Product" is an upgrade of a component of a package of software programs that youlicensed as a single product, the "IK Multimedia Product" may be used and transferred only as part of that single product package and maynot be separated for use on more than one computer.
6) DUAL-MEDIA SOFTWARE.You may receive the "IK Multimedia Product" in more than one medium. Regardless of the type or size of the medium you receive, youmay use only that one medium that is appropriate for your single computer. You may not use or install the other medium on anothercomputer, including but not limited to portable under the exclusive control of the registered developer. You may not loan, rent, lease, orotherwise transfer the other medium to another user, except as part of the permanent transfer (as provided above) of the "IK MultimediaProduct"
7) LIMITED WARRANTYIK Multimedia Production srl warrants to the original purchaser of the computer software product, for a period of ninety (90) daysfollowing the date of original purchase, that under normal use, the software program and the user documentation are free from defectsthat will materially interfere with the operation of the program as described in the enclosed user documentation.
8) WARRANTY CLAIMSTo make a warranty claim under the above limited warranty, please return the product to the point of purchase, accompanied by proof ofpurchase, your name, your return address and a statement of the defect, or send the CD to us at the below address within ninety (90) daysof purchase. Include a copy of the dated purchase receipt, your name, your return address and a statement of the defect. IK MultimediaProduction srl or its authorized dealer will use reasonable commercial efforts to repair or replace the product and return it to you(postage prepaid) or issue to you a credit equal to the purchase price, at its option.
9) LIMITATIONS ON WARRANTYIK Multimedia Production srl warrants only that the program will perform as described in the user documentation. No other advertising,description or representation, whether made by a IK Multimedia Production srl dealer, distributor, agent or employee, shall be bindingupon IK Multimedia Production srl or shall change the terms of this warranty.
EXCEPT AS STATED ABOVE, IK MULTIMEDIA PRODUCTION SRL MAKES NO OTHER WARRANTY, EXPRESSED OR IMPLIED, REGARDINGTHIS PRODUCT. IK MULTIMEDIA PRODUCTION SRL DISCLAIMS ANY WARRANTY THAT THE SOFTWARE IS FIT FOR A PARTICULARPURPOSE, AND ANY IMPLIED WARRANTY OF MERCHANTABILITY SHALL BE LIMITED TO A NINETY (90) DAY DURATION OF THISLIMITED EXPRESS WARRANTY AND IS OTHERWISE EXPRESSLY AND SPECIFICALLY DISCLAIMED. IK MULTIMEDIA PRODUCTION SRLSHALL NOT BE LIABLE FOR SPECIAL, INCIDENTAL, CONSEQUENTIAL OR OTHER DAMAGES, EVEN IF IK MULTIMEDIA IS ADVISED OF ORAWARE OF THE POSSIBILITY OF SUCH DAMAGES. THIS MEANS THAT IK MULTIMEDIA PRODUCTION SRL SHALL NOT BE RESPONSIBLEOR LIABLE FOR THE LOST OF PROFITS OR REVENUES, OR FOR DAMAGES OR COSTS AS A RESULT OF LOSS OF TIME, DATA OR USE OFTHE SOFTWARE, OR FROM ANY OTHER CAUSE EXCEPT THE ACTUAL COST OF THE PRODUCT. IN NO EVENT SHALL IK MULTIMEDIAPRODUCTION SRL LIABILITY EXCEED THE PURCHASE PRICE OF THIS PRODUCT.
10) GENERALThis Agreement shall be governed by the internal laws of Italy. This Agreement contains the complete agreement between the parties withrespect to the subject matter hereof, and supersedes all prior or contemporaneous agreements or understandings, whether oral orwritten. All questions concerning this Agreement shall be directed to:
IK Multimedia Production srl - Via dell'Industria 46 - 41100 Modena - Italy
AmpliTube™ is a registered trademark property ofIK Multimedia Production srl - Italytel +39-059-285496fax +39-059- 2861671
e-mail [email protected]© 2002 IK Multimedia Production srl. All rights reserved.
1 - What is AmpliTube™12
What is AmpliTube™
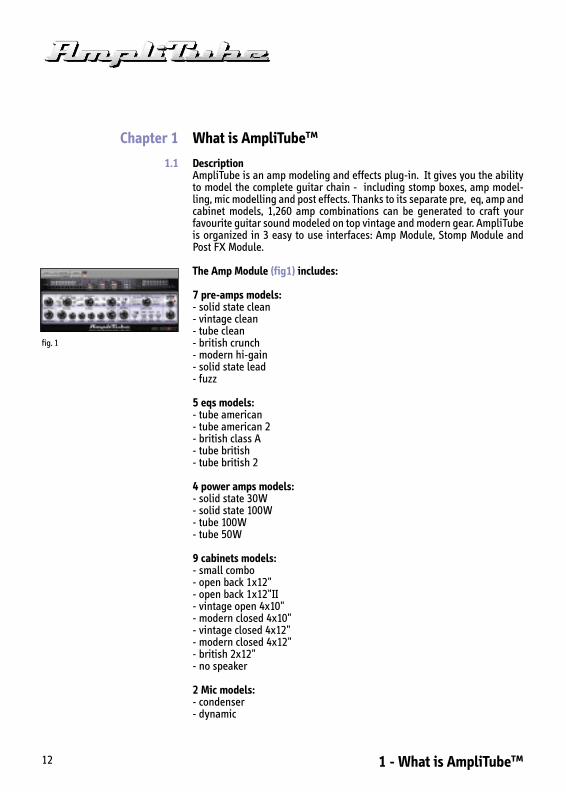
DescriptionAmpliTube is an amp modeling and effects plug-in. It gives you the abilityto model the complete guitar chain - including stomp boxes, amp model-ling, mic modelling and post effects. Thanks to its separate pre, eq, amp andcabinet models, 1,260 amp combinations can be generated to craft yourfavourite guitar sound modeled on top vintage and modern gear. AmpliTubeis organized in 3 easy to use interfaces: Amp Module, Stomp Module andPost FX Module.
The Amp Module (fig1) includes:
7 pre-amps models: - solid state clean- vintage clean- tube clean- british crunch- modern hi-gain- solid state lead- fuzz
5 eqs models: - tube american- tube american 2- british class A- tube british- tube british 2
4 power amps models: - solid state 30W- solid state 100W- tube 100W- tube 50W
9 cabinets models: - small combo- open back 1x12" - open back 1x12"II - vintage open 4x10"- modern closed 4x10"- vintage closed 4x12"- modern closed 4x12"- british 2x12"- no speaker
2 Mic models: - condenser- dynamic
Chapter 1
1.1
fig. 1
1 - What is AmpliTube™ 13
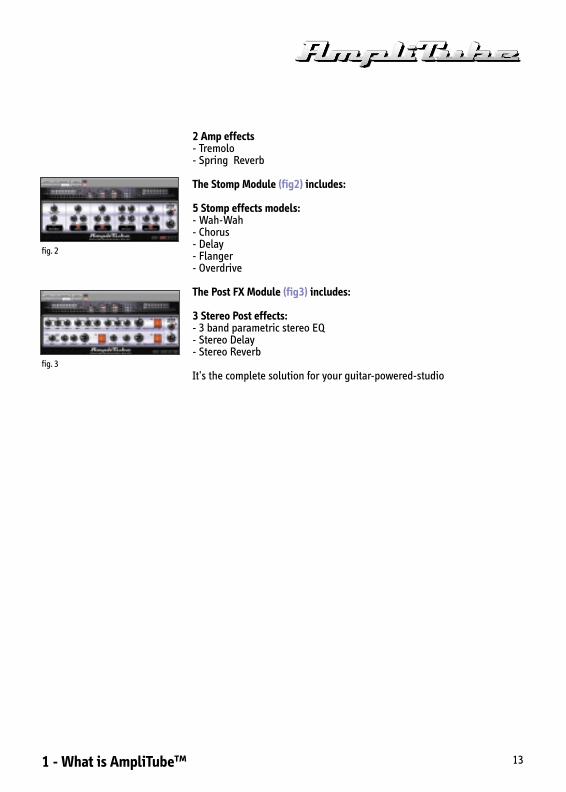
2 Amp effects- Tremolo- Spring Reverb
The Stomp Module (fig2) includes:
5 Stomp effects models: - Wah-Wah- Chorus- Delay- Flanger- Overdrive
The Post FX Module (fig3) includes:
3 Stereo Post effects: - 3 band parametric stereo EQ- Stereo Delay- Stereo Reverb
It's the complete solution for your guitar-powered-studio
fig. 2
fig. 3

2 - System requirements14
System Requirements
System Requirements Pro Tools® system (LE, TDM) Mac
A Digidesign® qualified PCI-based Power Macintosh® running ProTools®|24 MIX™, Pro Tools®|24 MIX Plus™, Pro Tools®|24 Mix (with ProTools™ software 5.1 or later), Pro Tools |HD (with Pro Tools software 5.3 orlater) ProTools® LE with Digi 001™ or ™ III (with Pro Tools™ software 5.0or later), M-Box (with Pro Tools LE software 5.2 or later). Qualified ATA/IDEor SCSI drive, 128 MB RAM (192 MB recommended), Apple® Systemsoftware version 8.6 or 9.0, colour monitor with resolution 832 x624(1024x768 suggested). Optimized for G4.
System Requirements VST system Mac/Win
Macintosh® VST Power Macintosh® G3 with MacOS 8.6 or later system software, 64 MBRAM. Screen settings: 800x600, thousands of colours, 50 MB of free harddisk space. Suggested: Power Macintosh® G4 with 192 MB RAM and1024x768 screen. An ASIO card is recommended for low latency real timeplay. Optimized for G4.
Windows® VSTIntel® Pentium® II with Windows® 95, 98, ME, NT™ 4.0, 2000, XP, 64 MBRAM. Screen settings: 800x600, high colors (16 bit), 350 MB of free harddisk space. Suggested: Intel® Pentium® III 500 MHz with 192 MB RAM and1024x768 screen. An ASIO card is recommended for low latency real timeplay. Optimized for Pentium® III.
Macintosh® and Windows® VST SequencersCubase VST®, Logic™ Audio or any other sequencer compatible with VSTiinstruments plug-in. Cubase VST® PC version 3.7.2 or Mac version 4.1.1, (orlater), Logic™ Audio PC and Mac version 4.5 (or later).
Chapter 2
2.1
2.2
3 - Installation and Authorization 15
Installation and Authorization
3.1 Installation
1) Insert the AmpliTube CD-ROM into your CD-ROM drive.
2) Double click on the Install AmpliTube icon according to your sequencertype (install RTAS/TDM or install VST).
3) After accepting the license agreement, you’ll be requested to enter yourserial number (you will find it on the registration card included in the
box).
4) Proceed through the rest of the installation procedure.
NOTE: you'll need to install and authorize AmpliTube on the machinewhere you plan to use the software.
Have your registration card available during registration and keep it in asafe place.
Once the installation process has beenn completed you should check that:
Pro Tools®
- Installation: AmpliTube has to be installed inside the Plug-Ins folder, which is inside the DAE folder within the SystemFolder. It’s named AmpliTube.
- UnInstallation: locate the folder “Plug-Ins” that’s within the System Folder: DAE and delete the files mentioned above.
VST®
- Installation: AmpliTube has to be installed into the selected VstPlugIns folder. It's named AmpliTube.
- UnInstallation: locate the folder “VstPlug-Ins” and delete the files mentioned above.
Chapter 3
3.1
3 - Installation and Authorization16
Authorization
The new AmpliTube plug-in requires an authorization code for full instal-lation. Until it is fully authorized, AmpliTube will work only in demo modeand will insert random white noise during processing. Follow this procedu-re for installation and authorization of your new AmpliTube:
1) Launch your sequencer (ProTools®, ProTools® LE or any VST® sequen-cer such as Cubase® or Logic™).
The AmpliTube plug-ins authorization window will displayed, showing
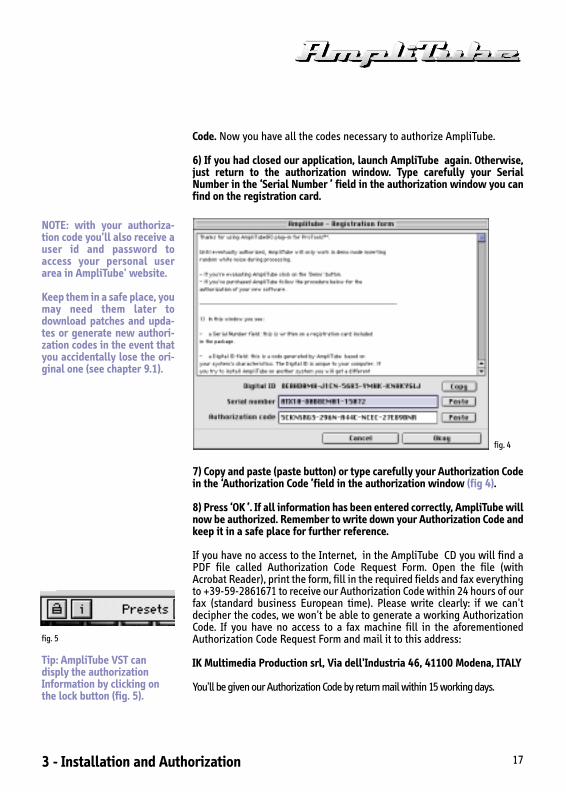
- a Serial Number field: this is obtained from the registration cardincluded in the package.
- a Digital ID field: this is a code generated by AmpliTube based on your system’s characteristics. TheDigital ID is unique to your computer. If you try to install AmpliTube on another system you will get a different Digital ID.
- an Authorization Code field: this is generated by each user registration,and is linked to both the Serial Number and Digital ID. Whenever the Digital ID changes, the Authorization Code will be void and AmpliTube will revert to demo mode. You will need another AuthorizationCode to authorize AmpliTube again.
2) Copy your Digital ID (copy button) or write it down if you don’t have aninternet connection on the machine where you're installing AmpliTube .(note: Digital ID and Authorization Code have no letters ‘I’ and ‘O’. Those youmight see are actually numbers: ones and zeroes, respectively).
3) Launch your browser and access the AmpliTube registration page:
http://www.amplitube.com/ATReg.html
Your browser will need to support frames and Javascript; all recent versionsof Netscape Navigator and Internet Explorer will suffice. The AmpliTuberegistration form will be displayed.
4) Complete all the required fields, including your Serial Number andDigital ID. All codes should be entered in capital letters. Remember to pro-vide a working e-mail address: it will be used to send our AuthorizationCode. Press ‘Submit ’.
5) Open your e-mail client software and check for new mail in the addressyou’ve just inserted in the registration form. You will shortly receive amessage confirming our registration and giving you an Authorization
3.2
3 - Installation and Authorization 17
Code. Now you have all the codes necessary to authorize AmpliTube.
6) If you had closed our application, launch AmpliTube again. Otherwise,just return to the authorization window. Type carefully your SerialNumber in the ‘Serial Number ’ field in the authorization window you canfind on the registration card.
7) Copy and paste (paste button) or type carefully your Authorization Codein the ‘Authorization Code ’field in the authorization window (fig 4).
8) Press ‘OK ’. If all information has been entered correctly, AmpliTube willnow be authorized. Remember to write down your Authorization Code andkeep it in a safe place for further reference.
If you have no access to the Internet, in the AmpliTube CD you will find aPDF file called Authorization Code Request Form. Open the file (withAcrobat Reader), print the form, fill in the required fields and fax everythingto +39-59-2861671 to receive our Authorization Code within 24 hours of ourfax (standard business European time). Please write clearly: if we can'tdecipher the codes, we won't be able to generate a working AuthorizationCode. If you have no access to a fax machine fill in the aforementionedAuthorization Code Request Form and mail it to this address:
IK Multimedia Production srl, Via dell'Industria 46, 41100 Modena, ITALY
You'll be given our Authorization Code by return mail within 15 working days.
fig. 4
fig. 5
Tip: AmpliTube VST candisply the authorizationInformation by clicking onthe lock button (fig. 5).
NOTE: with your authoriza-tion code you'll also receive auser id and password toaccess your personal userarea in AmpliTube' website.
Keep them in a safe place, youmay need them later todownload patches and upda-tes or generate new authori-zation codes in the event thatyou accidentally lose the ori-ginal one (see chapter 9.1).
4 - Using AmpliTube18
Using AmpliTube
Connect your guitar to a computer
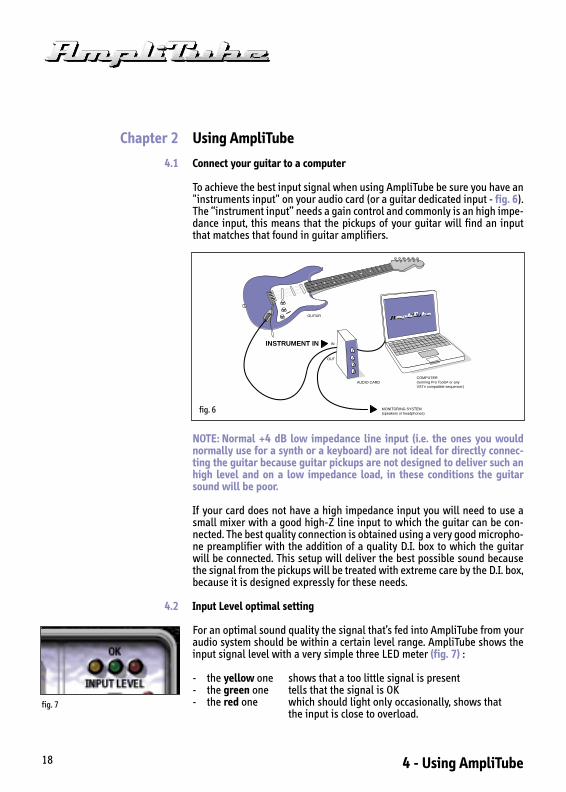
To achieve the best input signal when using AmpliTube be sure you have an"instruments input" on your audio card (or a guitar dedicated input - fig. 6).The “instrument input” needs a gain control and commonly is an high impe-dance input, this means that the pickups of your guitar will find an inputthat matches that found in guitar amplifiers.
NOTE: Normal +4 dB low impedance line input (i.e. the ones you wouldnormally use for a synth or a keyboard) are not ideal for directly connec-ting the guitar because guitar pickups are not designed to deliver such anhigh level and on a low impedance load, in these conditions the guitarsound will be poor.
If your card does not have a high impedance input you will need to use asmall mixer with a good high-Z line input to which the guitar can be con-nected. The best quality connection is obtained using a very good micropho-ne preamplifier with the addition of a quality D.I. box to which the guitarwill be connected. This setup will deliver the best possible sound becausethe signal from the pickups will be treated with extreme care by the D.I. box,because it is designed expressly for these needs.
Input Level optimal setting
For an optimal sound quality the signal that’s fed into AmpliTube from youraudio system should be within a certain level range. AmpliTube shows theinput signal level with a very simple three LED meter (fig. 7) :
- the yellow one shows that a too little signal is present- the green one tells that the signal is OK - the red one which should light only occasionally, shows that
the input is close to overload.
Chapter 2
4.1
4.2
COMPUTER(running Pro Tools¤ or anyVST¤ compatible sequencer)
GUITAR
IN
OUT
INSTRUMENT IN�
AUDIO CARD
MONITORING SYSTEM (speakers or headphones)
AmpliTube
fig. 7
fig. 6
4 - Using AmpliTube 19
AmpliTube does not have an “input level” control, because it’s very impor-tant that the level is actually correct at the analog to digital converters ofthe audio system.
During normal playing the green LED should be the one that lights moreoften. If the yellow one is the one that’s more often lit then increase the gainof your preamplifier or audiocard break box; if the red one is blinking thenreduce it slightly.
AmpliTube signal path and effect chaining
The signal path within AmpliTube is the same as displayed on the interface,from left to right.
The input signal is fed to the stomp boxes section first, then to the Amplifierand then to the mono to stereo post FX section. The input signal is mono -in the situation where AmpliTube is inserted on stereo channels or bussesit will sum the left and right input to get the mono input. The output signalis always stereo, so it is not possible to open AmpliTube as a ‘mono to mono’plug-in, while it can be opened as a ‘mono to stereo’ or ‘stereo to stereo’.
The very first module that the input signal hits is the Gate, then in order:
Wah > Delay > Chorus > Flanger > Overdrive
for the stomp boxes.
The Gate is the first so that all the Amp and effects tweaks won’t affect theGate response, which is very sensitive and fast.
Then there is the entire Amplifier model, from the Tremolo (at the very firststage) from the output of the microphone model, passing by the Preamp, Eq,Spring Reverb, Power Amp and Cabinet.
Mic Model > Tremolo > Preamp > Eq > Spring Reverb > Power Amp > Cabinet
After the Amplifier the signal (still in mono) will reach the post stereo FXsection in this order:
Equalizer > Delay > Reverb
After this last stage the signal becomes stereo because of the Reverb andDelay processing. At the end, after all the processes, there is the OutputLevel knob which determines the amount of signal that AmpliTube will out-put, this is very useful to balance the level of different kind of sounds andpresets.
4.3
4 - Using AmpliTube20
Stomp Module
The first module that the signal goes into is the Stomp effects (fig. 8).
The sound of the effects is very different if they are applied before or afterthe Amplifier.
In AmpliTube you have choice of both the options and the units are special-ly designed for the “pre” or “post” operation. This “pre” section recreatesthe sound of some of the classic pedal stomp boxes and it is patched, as fora real guitar setup, before the amplifier.
It is equipped with 5 pedal processors:
1) Vintage wah pedal, with manual or auto wah options and, thanks to themodeling technology, a real-wah sound!
2) Analog delay, delivers that typical warm tone of the early stomp delay units, without the hiss!
3) Analog chorus, modeled after one of the most loved 80’s chorus stomp boxes.
4) Analog flanger, capable of a wide range of flanging effects - from subtle choruses to jet-plane like extreme effects.
5) Analog solid-state overdrive stomp box, this is the perfect unit for “driving” the first stage of all the AmpliTube preamps. A warm, rich and versatile overdrive pedal, that can saturate itself and overdrive the amp aswell.
All the connections between the internal stages of AmpliTube (and also ofcourse between these “pedals”) are 32 bit floating point for an unmatchedaudio resolution that’s essential for a realistic emulation of what happensin the analog domain.
Amp Module
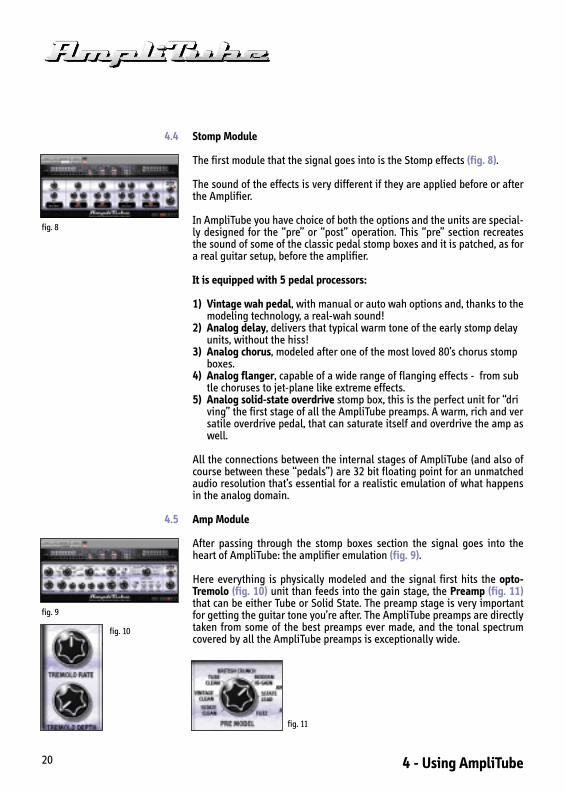
After passing through the stomp boxes section the signal goes into theheart of AmpliTube: the amplifier emulation (fig. 9).
Here everything is physically modeled and the signal first hits the opto-Tremolo (fig. 10) unit than feeds into the gain stage, the Preamp (fig. 11)that can be either Tube or Solid State. The preamp stage is very importantfor getting the guitar tone you’re after. The AmpliTube preamps are directlytaken from some of the best preamps ever made, and the tonal spectrumcovered by all the AmpliTube preamps is exceptionally wide.
4.4
4.5
fig. 8
fig. 9
fig. 11
fig. 10
4 - Using AmpliTube 21
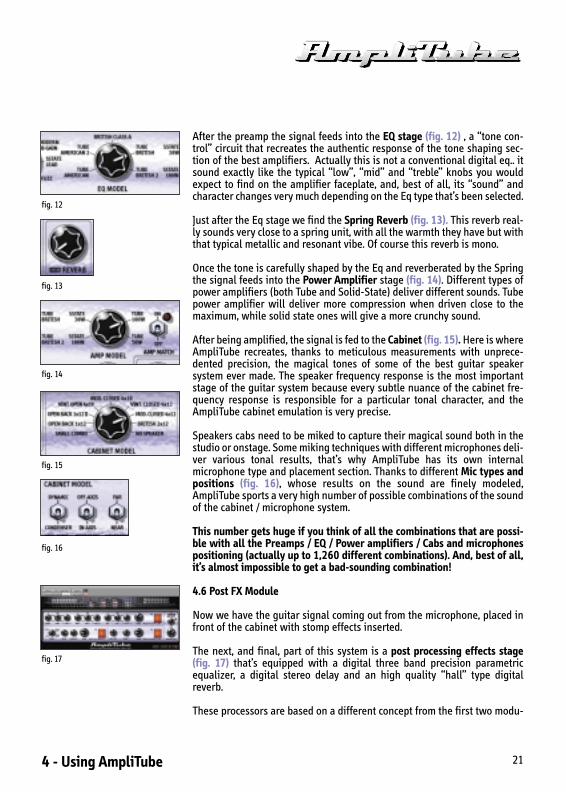
After the preamp the signal feeds into the EQ stage (fig. 12) , a “tone con-trol” circuit that recreates the authentic response of the tone shaping sec-tion of the best amplifiers. Actually this is not a conventional digital eq.. itsound exactly like the typical “low”, “mid” and “treble” knobs you wouldexpect to find on the amplifier faceplate, and, best of all, its “sound” andcharacter changes very much depending on the Eq type that’s been selected.
Just after the Eq stage we find the Spring Reverb (fig. 13). This reverb real-ly sounds very close to a spring unit, with all the warmth they have but withthat typical metallic and resonant vibe. Of course this reverb is mono.
Once the tone is carefully shaped by the Eq and reverberated by the Springthe signal feeds into the Power Amplifier stage (fig. 14). Different types ofpower amplifiers (both Tube and Solid-State) deliver different sounds. Tubepower amplifier will deliver more compression when driven close to themaximum, while solid state ones will give a more crunchy sound.
After being amplified, the signal is fed to the Cabinet (fig. 15). Here is whereAmpliTube recreates, thanks to meticulous measurements with unprece-dented precision, the magical tones of some of the best guitar speakersystem ever made. The speaker frequency response is the most importantstage of the guitar system because every subtle nuance of the cabinet fre-quency response is responsible for a particular tonal character, and theAmpliTube cabinet emulation is very precise.
Speakers cabs need to be miked to capture their magical sound both in thestudio or onstage. Some miking techniques with different microphones deli-ver various tonal results, that’s why AmpliTube has its own internalmicrophone type and placement section. Thanks to different Mic types andpositions (fig. 16), whose results on the sound are finely modeled,AmpliTube sports a very high number of possible combinations of the soundof the cabinet / microphone system.
This number gets huge if you think of all the combinations that are possi-ble with all the Preamps / EQ / Power amplifiers / Cabs and microphonespositioning (actually up to 1,260 different combinations). And, best of all,it’s almost impossible to get a bad-sounding combination!
4.6 Post FX Module
Now we have the guitar signal coming out from the microphone, placed infront of the cabinet with stomp effects inserted.
The next, and final, part of this system is a post processing effects stage(fig. 17) that’s equipped with a digital three band precision parametricequalizer, a digital stereo delay and an high quality “hall” type digitalreverb.
These processors are based on a different concept from the first two modu-
fig. 12
fig. 14
fig. 15
fig. 16
fig. 13
fig. 17
4 - Using AmpliTube22
les of AmpliTube, as these are high precision digital processors used tocreate exactly the sound the user is searching for, and sometimes this goesbeyond the stomps > amp > cabinet system.
While the first two sections are entirely modeled after real gear whichsound is magical and has to be respected, this last section is extremely pre-cise and you can think of it as a set of studio units, that are usually used onthe sound recorded from the amp, to add a little Eq or a bit of clarity and ste-reo reverb ‘shine’.
Presets
AmpliTube comes with a very large set of factory presets.
These are divided into two main categories: one is dedicated to the soundsand the presets are named with a “type of sound” scheme, the other is dedi-cated to famous guitarists and it’s filled with presets that aims to recreatetheir typical tones, whenever this is possible, of course! AmpliTube is able to emulate the amplification/recording chain but not theguitarist! The two sections are named “Amp” and “VIP”. The first one alsocontains some bass-oriented presets.
Recording/Bouncing in Pro Tools
Pro Tools LE versions:Use AmpliTube RTAS with Pro Tools LE versions.
Pro Tools TDM versions:Use AmpliTube HTDM with Pro Tools TDM systems.Using the RTAS version on a TDM system will not offer the real-time inputlive processing because Pro Tools TDM bypasses RTAS plug-ins on a record-enabled track.
Just create a mono track in the session and setup the input on the samechannel where you have connected your guitar. If you are using the M-Boxbe sure to select the “instrument” input on the front panel, if you’re usingthe Digi 001 be sure to use a good DI Box for the guitar connection (see 4.1).If you’re using a TDM system you need a quality mic preamp plus a DI boxto go direct to the 888|24, 882|20, 96 and 192 I/O interfaces with the guitarsignal (see 4.1).
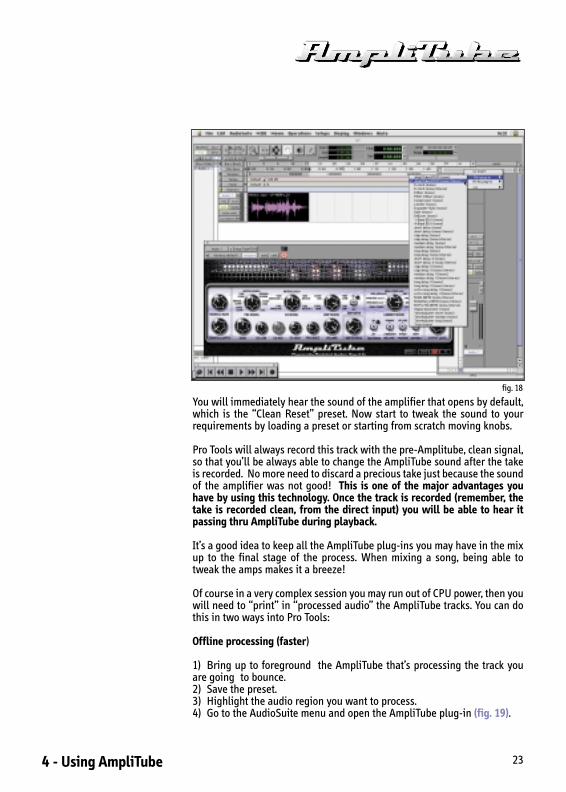
Rec-enable the track and if the input is correctly selected you should hearthe clean sound. After you can hear the direct signal of your guitar open theAmpliTube mono to stereo plug-in on the first insert slot of this channel (fig.18). If, for some reasons, the channel you’re going to process is already ste-reo AmpliTube will open as stereo to stereo, but the left and right channelsof the original stereo sound will be mixed to mono because AmpliTube is amono input plug-in.
4.7
4.8
4 - Using AmpliTube 23
You will immediately hear the sound of the amplifier that opens by default,which is the “Clean Reset” preset. Now start to tweak the sound to yourrequirements by loading a preset or starting from scratch moving knobs.
Pro Tools will always record this track with the pre-Amplitube, clean signal,so that you’ll be always able to change the AmpliTube sound after the takeis recorded. No more need to discard a precious take just because the soundof the amplifier was not good! This is one of the major advantages youhave by using this technology. Once the track is recorded (remember, thetake is recorded clean, from the direct input) you will be able to hear itpassing thru AmpliTube during playback.
It’s a good idea to keep all the AmpliTube plug-ins you may have in the mixup to the final stage of the process. When mixing a song, being able totweak the amps makes it a breeze!
Of course in a very complex session you may run out of CPU power, then youwill need to “print” in “processed audio” the AmpliTube tracks. You can dothis in two ways into Pro Tools:
Offline processing (faster)
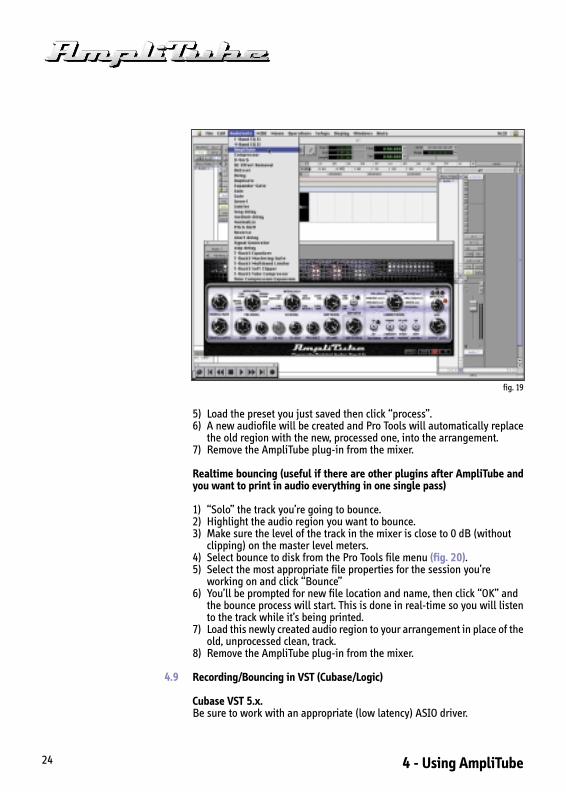
1) Bring up to foreground the AmpliTube that’s processing the track youare going to bounce.2) Save the preset.3) Highlight the audio region you want to process.4) Go to the AudioSuite menu and open the AmpliTube plug-in (fig. 19).
fig. 18
4 - Using AmpliTube24
5) Load the preset you just saved then click “process”.6) A new audiofile will be created and Pro Tools will automatically replace
the old region with the new, processed one, into the arrangement.7) Remove the AmpliTube plug-in from the mixer.
Realtime bouncing (useful if there are other plugins after AmpliTube andyou want to print in audio everything in one single pass)
1) “Solo” the track you’re going to bounce.2) Highlight the audio region you want to bounce.3) Make sure the level of the track in the mixer is close to 0 dB (without
clipping) on the master level meters.4) Select bounce to disk from the Pro Tools file menu (fig. 20).5) Select the most appropriate file properties for the session you’re
working on and click “Bounce”6) You’ll be prompted for new file location and name, then click “OK” and
the bounce process will start. This is done in real-time so you will listento the track while it’s being printed.
7) Load this newly created audio region to your arrangement in place of theold, unprocessed clean, track.
8) Remove the AmpliTube plug-in from the mixer.
Recording/Bouncing in VST (Cubase/Logic)
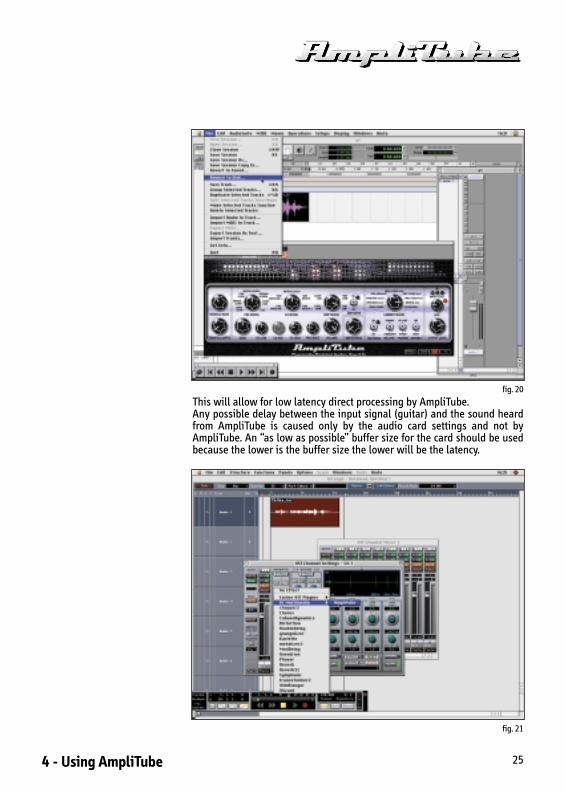
Cubase VST 5.x.Be sure to work with an appropriate (low latency) ASIO driver.
4.9
fig. 19
4 - Using AmpliTube 25
This will allow for low latency direct processing by AmpliTube.Any possible delay between the input signal (guitar) and the sound heardfrom AmpliTube is caused only by the audio card settings and not byAmpliTube. An “as low as possible” buffer size for the card should be usedbecause the lower is the buffer size the lower will be the latency.
fig. 20
fig. 21
4 - Using AmpliTube26
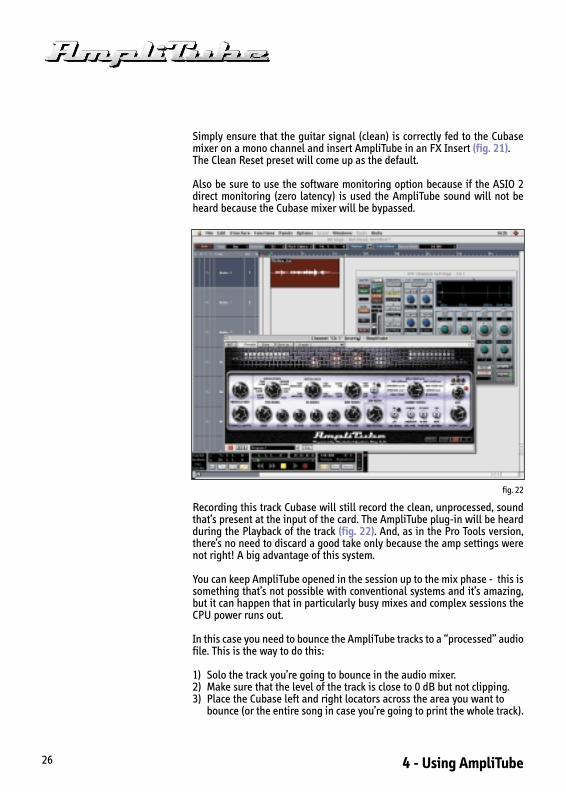
Simply ensure that the guitar signal (clean) is correctly fed to the Cubasemixer on a mono channel and insert AmpliTube in an FX Insert (fig. 21). The Clean Reset preset will come up as the default.
Also be sure to use the software monitoring option because if the ASIO 2direct monitoring (zero latency) is used the AmpliTube sound will not beheard because the Cubase mixer will be bypassed.
Recording this track Cubase will still record the clean, unprocessed, soundthat’s present at the input of the card. The AmpliTube plug-in will be heardduring the Playback of the track (fig. 22). And, as in the Pro Tools version,there’s no need to discard a good take only because the amp settings werenot right! A big advantage of this system.
You can keep AmpliTube opened in the session up to the mix phase - this issomething that’s not possible with conventional systems and it’s amazing,but it can happen that in particularly busy mixes and complex sessions theCPU power runs out.
In this case you need to bounce the AmpliTube tracks to a “processed” audiofile. This is the way to do this:
1) Solo the track you’re going to bounce in the audio mixer.2) Make sure that the level of the track is close to 0 dB but not clipping.3) Place the Cubase left and right locators across the area you want to
bounce (or the entire song in case you’re going to print the whole track).
fig. 22
4 - Using AmpliTube 27
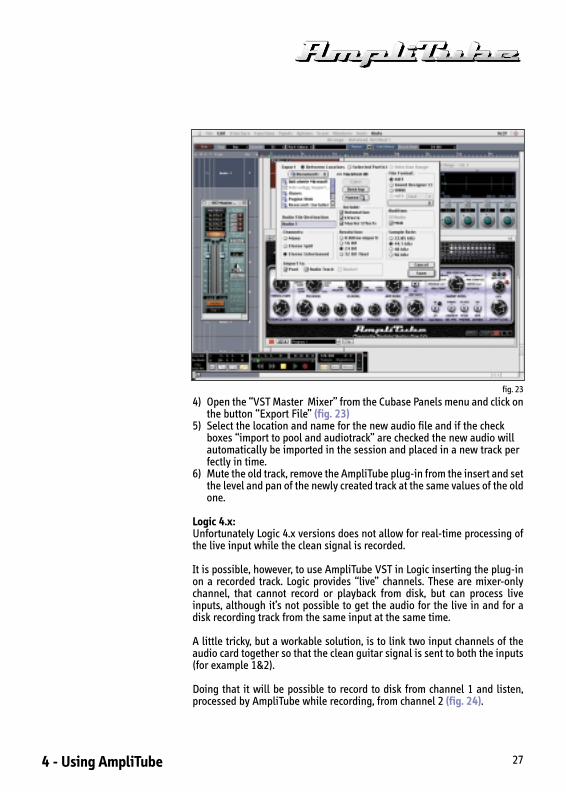
4) Open the “VST Master Mixer” from the Cubase Panels menu and click onthe button “Export File” (fig. 23)
5) Select the location and name for the new audio file and if the check boxes “import to pool and audiotrack” are checked the new audio will automatically be imported in the session and placed in a new track perfectly in time.
6) Mute the old track, remove the AmpliTube plug-in from the insert and setthe level and pan of the newly created track at the same values of the oldone.
Logic 4.x:Unfortunately Logic 4.x versions does not allow for real-time processing ofthe live input while the clean signal is recorded.
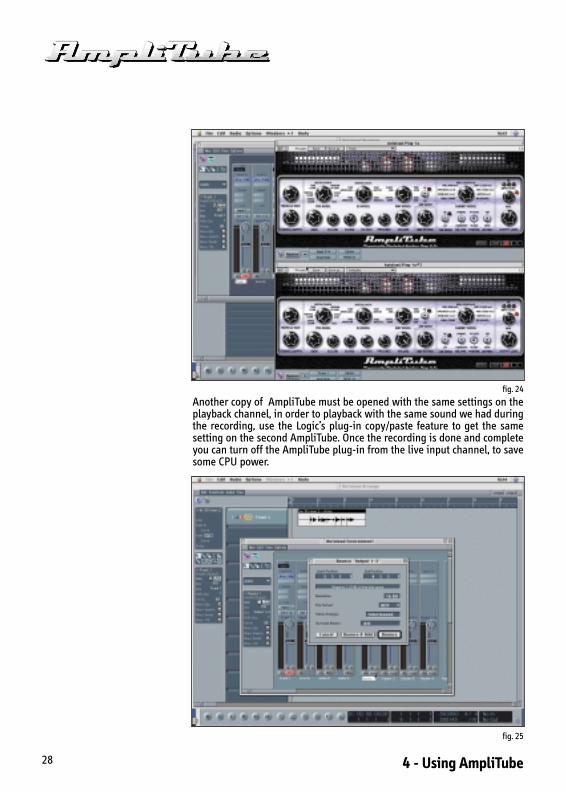
It is possible, however, to use AmpliTube VST in Logic inserting the plug-inon a recorded track. Logic provides “live” channels. These are mixer-onlychannel, that cannot record or playback from disk, but can process liveinputs, although it’s not possible to get the audio for the live in and for adisk recording track from the same input at the same time.
A little tricky, but a workable solution, is to link two input channels of theaudio card together so that the clean guitar signal is sent to both the inputs(for example 1&2).
Doing that it will be possible to record to disk from channel 1 and listen,processed by AmpliTube while recording, from channel 2 (fig. 24).
fig. 23
4 - Using AmpliTube28
Another copy of AmpliTube must be opened with the same settings on theplayback channel, in order to playback with the same sound we had duringthe recording, use the Logic’s plug-in copy/paste feature to get the samesetting on the second AmpliTube. Once the recording is done and completeyou can turn off the AmpliTube plug-in from the live input channel, to savesome CPU power.
fig. 24
fig. 25
4 - Using AmpliTube 29
You could also bounce to disk the AmpliTube processed track using theLogic’s bounce function:
1) Solo the guitar track you may want to bounce.2) Be sure the level is close to 0 dB on the master but not clipping.3) Select with the Logic’ locators the area you want to bounce or highlight
the whole sequence.4) Click on the “Bnce” button on the Mixer master channel, you will be
asked for new file name and location and after clicking OK the mix will commence (fig. 25).
5) Once the process finishes load the newly created audiofile to your sequence and remove (or bypass) the AmpliTube plug-in from the channel insert.
6) Remove the Solo.
Automating parameters in ProTools
Every AmpliTube parameter can be automated in Pro Tools.
A full Pro Tools automation implementation has been adhered to, meaningthat clicking on the “auto” button at the top of the plug-in you will able tochoose from all the AmpliTube controls to be added to the automation para-meters list.
A typical use is, for example, the “wah position” control automation.After the controls are added to the automation list they will be highlightedon the AmpliTube interface and the automation will function - moving theknob with the mouse or writing movements from the Pro Tools graphicaleditor. All the controls have the same name into the list of the controls sothat the identification is really fast and simple.
When an AmpliTube knob or switch is red marked by the auto this meansthat it is ready to be written (write mode), when it’s green this means thatthe automation is controlling the knob (read mode).
To learn more about the Pro Tools automation refer to the Pro Tools manual,AmpliTube follows the specifications of the standard plug-ins automation.
Automating parameters in VST
Cubase VST 5.x.These 16 AmpliTube parameters can be automated in Cubase VST 5.x bothMac and Pc:
- Wah Position- Overdrive On/Off- Overdrive Level- Tremolo Speed
4.10
4.11
4 - Using AmpliTube30
- Tremolo Depth- Preamp Gain- Stereo Reverb Level- Stereo Delay On/Off- Stereo Reverb On/Off- Stomp Delay Level- Flanger Feedback- Wah On/Off- Stomp Delay On/Off- Chorus On/Off- Flanger On/Off
To write and edit automation in real-time open Cubase’s “Channel Mixer”and Write enable the automation system by clicking on the WRITE red but-ton on the top left corner of the mixer window.
Play the sequence and move one of the 16 controls than can be automatedand the movements will be recorded. After that switch off the WRITE buttonand enable the green READ, Cubase will send the automation DATA to theplug-in.
You can also graphically write and edit the automation data by opening theCubase graphical editor on the automation track and use the standard toolsyou already know for writing and editing midi controllers.
Logic 4.xAll the AmpliTube knobs and switches can be automated in Logic.Highlight in the arrange screen the channel where AmpliTube is insertedon, switch to the mixer window and hit the REC button on the transportpanel. Now every movement of any AmpliTube knob and switch will berecorded in the arrange window as MIDI data over the audio track.Going to the Event List or Hyper Draw screens will let you edit or write fromscratch the events and the movements as well.The midi controller numbers that are assigned to the Plug-In are not alwaysthe same because of the way Logic handles the CC’s for the plug-in automa-tion, therefore we cannot show a table here with the CC’s number relationto the controllers.
But it is very easy to identify the number of the controller, if this is neededfor manual editing, for example: just record a simple movement of the knobyou want to edit (as explained above) and go to the even list to see the CCnumber and values.

4 - Using AmpliTube 31
5 - Stomp Module32
Stomp Module
The Stomp boxes module is accessed by clicking on the “STOMP” button onthe lower right side of the interface (fig. 26). Once the Stomp section isdisplayed the “STOMP” buttons turns red and, in this case, the “BYPASS”button disengages the entire Stomp section. If, for instance, the Delay andthe Chorus are active both of them will be turned off by selecting “BYPASS”.This is useful for instantaneously check the sound without all the Stompboxes in the signal path.
Wah-Wah
The first stomp box in AmpliTube is the wah pedal (fig. 27).
It carefully recreates that typical mid-rangey funky sweep of the best vinta-ge units.
Click on the “Wah-Wah” big button to engage the effect. The red led showsthat the unit is active.
Mode: used to select the wah type.On: manual wah mode. The Wah knob determines the cutoff fre
quency of the wah.Auto: envelope follower mode: the cutoff frequency is controlled by
both the Wah knob and the envelope of the input signal.Wah: sets the cutoff frequency. Then in On mode this is the static cutoff
freq, when in auto mode this is the base frequency, that will be modulated by the input signal envelope.
Delay
This is a physical model of a high quality analog delay stomp box. Very finefilters in the delay line and feedback networks provides that warm “full”sound of old analog delays (fig. 28).
Click on the “Delay” big button to engage the effect. The red led shows thatthe unit is active.
Level: determines the amount of the delay. Fully counterclockwise is dry, no effect, fully clockwise is only delay.
Delay: sets the delay time. From 2 mS to one second.Feedback: determines the number of repetitions. Being an analog delay the
sound bandwidth will decrease on each repetition. Full clockwise gives a sustaining effect.
Chapter 5
5.1
5.2
fig. 26
fig. 27
fig. 28
5.3
5.4
5.5
5 - Stomp Module 33
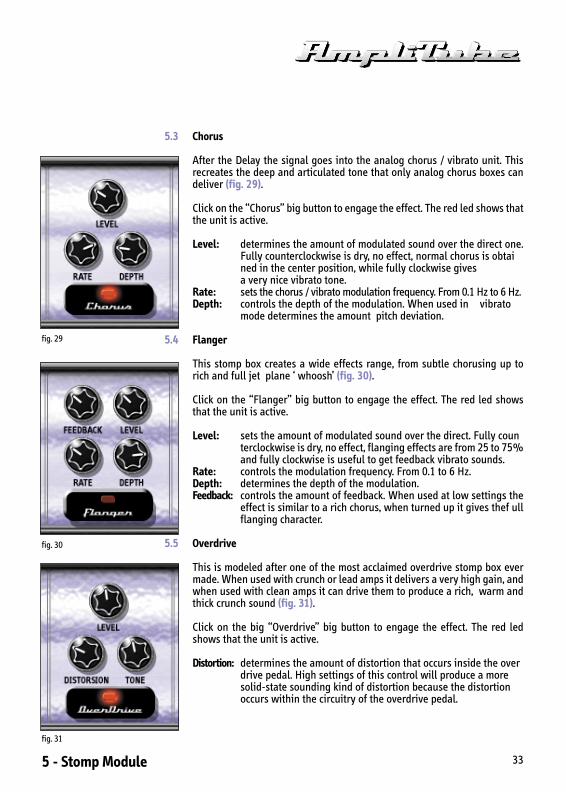
Chorus
After the Delay the signal goes into the analog chorus / vibrato unit. Thisrecreates the deep and articulated tone that only analog chorus boxes candeliver (fig. 29).
Click on the “Chorus” big button to engage the effect. The red led shows thatthe unit is active.
Level: determines the amount of modulated sound over the direct one.Fully counterclockwise is dry, no effect, normal chorus is obtained in the center position, while fully clockwise gives a very nice vibrato tone.
Rate: sets the chorus / vibrato modulation frequency. From 0.1 Hz to 6 Hz.Depth: controls the depth of the modulation. When used in vibrato
mode determines the amount pitch deviation.
Flanger
This stomp box creates a wide effects range, from subtle chorusing up torich and full jet plane ‘ whoosh’ (fig. 30).
Click on the “Flanger” big button to engage the effect. The red led showsthat the unit is active.
Level: sets the amount of modulated sound over the direct. Fully counterclockwise is dry, no effect, flanging effects are from 25 to 75%and fully clockwise is useful to get feedback vibrato sounds.
Rate: controls the modulation frequency. From 0.1 to 6 Hz.Depth: determines the depth of the modulation.Feedback: controls the amount of feedback. When used at low settings the
effect is similar to a rich chorus, when turned up it gives thef ullflanging character.
Overdrive
This is modeled after one of the most acclaimed overdrive stomp box evermade. When used with crunch or lead amps it delivers a very high gain, andwhen used with clean amps it can drive them to produce a rich, warm andthick crunch sound (fig. 31).
Click on the big “Overdrive” big button to engage the effect. The red ledshows that the unit is active.
Distortion: determines the amount of distortion that occurs inside the overdrive pedal. High settings of this control will produce a more solid-state sounding kind of distortion because the distortion occurs within the circuitry of the overdrive pedal.
fig. 29
fig. 30
fig. 31

5 - Stomp Module34
Level: sets the output level of the overdrive pedal. By turning this up the amplifier that follows will be overdriven. To get a more ampdriven sound use low distortion settings with an high output level.
Tone: Controls the timbre of the overdrive pedal. From extra warm at the full counterclockwise position to extra bright and sharp at the fully clockwise position.
6 - Amp Module 35
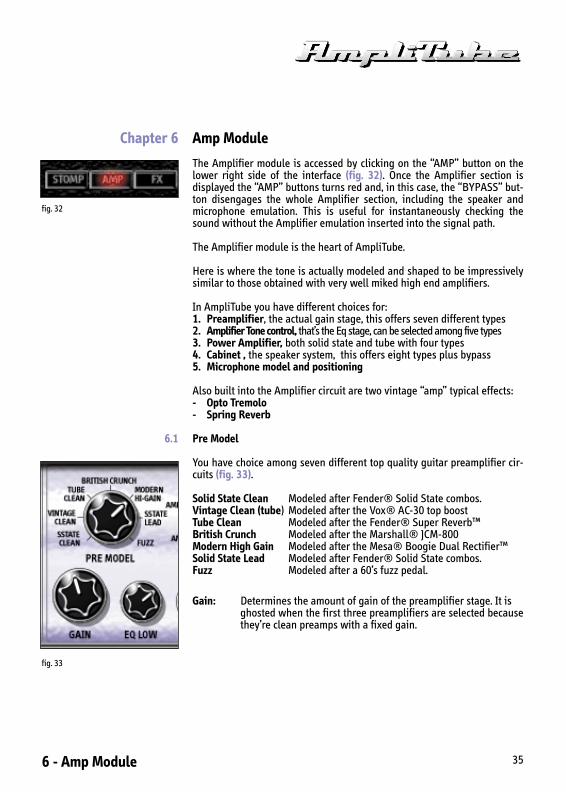
Amp Module
The Amplifier module is accessed by clicking on the “AMP” button on thelower right side of the interface (fig. 32). Once the Amplifier section isdisplayed the “AMP” buttons turns red and, in this case, the “BYPASS” but-ton disengages the whole Amplifier section, including the speaker andmicrophone emulation. This is useful for instantaneously checking thesound without the Amplifier emulation inserted into the signal path.
The Amplifier module is the heart of AmpliTube.
Here is where the tone is actually modeled and shaped to be impressivelysimilar to those obtained with very well miked high end amplifiers.
In AmpliTube you have different choices for:1. Preamplifier, the actual gain stage, this offers seven different types2. Amplifier Tone control, that’s the Eq stage, can be selected among five types3. Power Amplifier, both solid state and tube with four types4. Cabinet , the speaker system, this offers eight types plus bypass5. Microphone model and positioning
Also built into the Amplifier circuit are two vintage “amp” typical effects:- Opto Tremolo- Spring Reverb
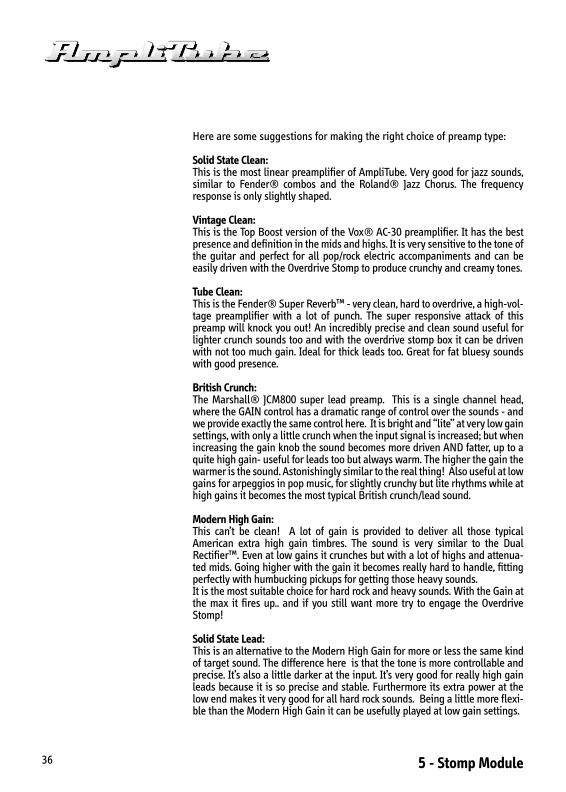
Pre Model
You have choice among seven different top quality guitar preamplifier cir-cuits (fig. 33).
Solid State Clean Modeled after Fender® Solid State combos.Vintage Clean (tube) Modeled after the Vox® AC-30 top boostTube Clean Modeled after the Fender® Super Reverb™British Crunch Modeled after the Marshall® JCM-800Modern High Gain Modeled after the Mesa® Boogie Dual Rectifier™Solid State Lead Modeled after Fender® Solid State combos.Fuzz Modeled after a 60’s fuzz pedal.
Gain: Determines the amount of gain of the preamplifier stage. It is ghosted when the first three preamplifiers are selected becausethey’re clean preamps with a fixed gain.
Chapter 6
6.1
fig. 32
fig. 33
5 - Stomp Module36
Here are some suggestions for making the right choice of preamp type:
Solid State Clean:This is the most linear preamplifier of AmpliTube. Very good for jazz sounds,similar to Fender® combos and the Roland® Jazz Chorus. The frequencyresponse is only slightly shaped.
Vintage Clean:This is the Top Boost version of the Vox® AC-30 preamplifier. It has the bestpresence and definition in the mids and highs. It is very sensitive to the tone ofthe guitar and perfect for all pop/rock electric accompaniments and can beeasily driven with the Overdrive Stomp to produce crunchy and creamy tones.
Tube Clean:This is the Fender® Super Reverb™ - very clean, hard to overdrive, a high-vol-tage preamplifier with a lot of punch. The super responsive attack of thispreamp will knock you out! An incredibly precise and clean sound useful forlighter crunch sounds too and with the overdrive stomp box it can be drivenwith not too much gain. Ideal for thick leads too. Great for fat bluesy soundswith good presence.
British Crunch:The Marshall® JCM800 super lead preamp. This is a single channel head,where the GAIN control has a dramatic range of control over the sounds - andwe provide exactly the same control here. It is bright and “lite” at very low gainsettings, with only a little crunch when the input signal is increased; but whenincreasing the gain knob the sound becomes more driven AND fatter, up to aquite high gain- useful for leads too but always warm. The higher the gain thewarmer is the sound. Astonishingly similar to the real thing! Also useful at lowgains for arpeggios in pop music, for slightly crunchy but lite rhythms while athigh gains it becomes the most typical British crunch/lead sound.
Modern High Gain:This can’t be clean! A lot of gain is provided to deliver all those typicalAmerican extra high gain timbres. The sound is very similar to the DualRectifier™. Even at low gains it crunches but with a lot of highs and attenua-ted mids. Going higher with the gain it becomes really hard to handle, fittingperfectly with humbucking pickups for getting those heavy sounds.It is the most suitable choice for hard rock and heavy sounds. With the Gain atthe max it fires up.. and if you still want more try to engage the OverdriveStomp!
Solid State Lead:This is an alternative to the Modern High Gain for more or less the same kindof target sound. The difference here is that the tone is more controllable andprecise. It’s also a little darker at the input. It’s very good for really high gainleads because it is so precise and stable. Furthermore its extra power at thelow end makes it very good for all hard rock sounds. Being a little more flexi-ble than the Modern High Gain it can be usefully played at low gain settings.
6 - Amp Module 37
Fuzz:Typical fuzz box sound. Actually the fuzz sound can be truly heard only with thespeaker emulation turned off but even with the speakers on this is a quiterough kind of distortion, typical 60’s fuzz sound.
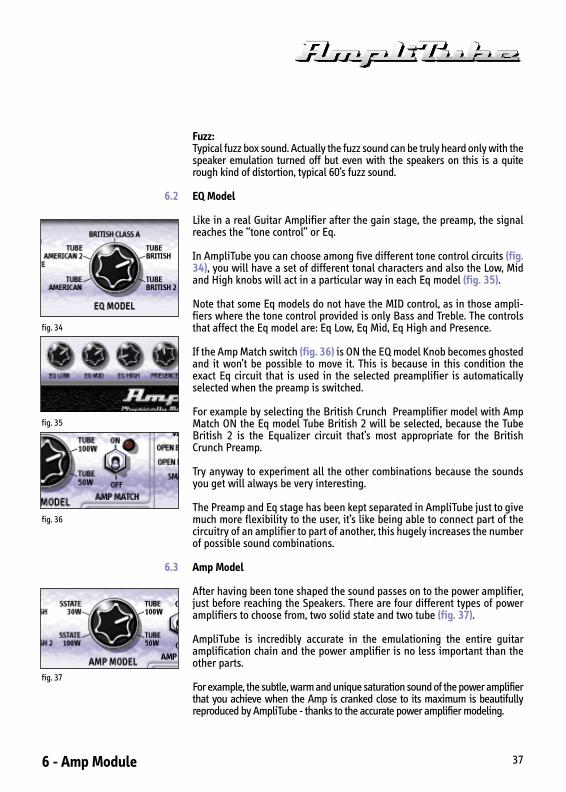
EQ Model
Like in a real Guitar Amplifier after the gain stage, the preamp, the signalreaches the “tone control” or Eq.
In AmpliTube you can choose among five different tone control circuits (fig.34), you will have a set of different tonal characters and also the Low, Midand High knobs will act in a particular way in each Eq model (fig. 35).
Note that some Eq models do not have the MID control, as in those ampli-fiers where the tone control provided is only Bass and Treble. The controlsthat affect the Eq model are: Eq Low, Eq Mid, Eq High and Presence.
If the Amp Match switch (fig. 36) is ON the EQ model Knob becomes ghostedand it won’t be possible to move it. This is because in this condition theexact Eq circuit that is used in the selected preamplifier is automaticallyselected when the preamp is switched.
For example by selecting the British Crunch Preamplifier model with AmpMatch ON the Eq model Tube British 2 will be selected, because the TubeBritish 2 is the Equalizer circuit that’s most appropriate for the BritishCrunch Preamp.
Try anyway to experiment all the other combinations because the soundsyou get will always be very interesting.
The Preamp and Eq stage has been kept separated in AmpliTube just to givemuch more flexibility to the user, it’s like being able to connect part of thecircuitry of an amplifier to part of another, this hugely increases the numberof possible sound combinations.
Amp Model
After having been tone shaped the sound passes on to the power amplifier,just before reaching the Speakers. There are four different types of poweramplifiers to choose from, two solid state and two tube (fig. 37).
AmpliTube is incredibly accurate in the emulationing the entire guitaramplification chain and the power amplifier is no less important than theother parts.
For example, the subtle, warm and unique saturation sound of the power amplifierthat you achieve when the Amp is cranked close to its maximum is beautifullyreproduced by AmpliTube - thanks to the accurate power amplifier modeling.
6.2
6.3
fig. 34
fig. 37
fig. 35
fig. 36

6 - Amp Module38
Solid State models will, in general, deliver a more clean sound.. becoming alittle saturated when pushed to the max, while Tube models will add somefrequency dependent compression too.
Amp Match
AmpliTube offers the choice of a number of options for the single stagesthat an amplifier comprises of, so that you can try to experiment on yourown with a huge number of combinations. Even so you have the capabilityof making things much simpler. By activating the Amp match switch (checkthe Red led that lights fig. 38) you will notice that the Eq Model and AmpModel to become ghosted and locked. This is because when “Amp Match” isactivated the configuration that recreates the exact original amplifier setupis automatically recalled, and everything is controlled by the Preamp modelknob.
By selecting a Preamp model the most appropriate Eq circuit and PowerAmp model are selected. This recreates exactly the original tone of theamplifier used for the measurements. For example by selecting the“Vintage Clean” preamplifier with Amp Match engaged the exact top boostVox AC-30 from preamp, Eq and power amp is recreated.
Cabinet Model
A guitar amplifier can sound authentic only with its appropriate speakersystem. The frequency response of guitar speaker systems is very specificand is far from being flat, because guitar amplifiers use typically full rangelarge single way speakers that cannot exhibit flat frequency response.
AmpliTube uses a very high resolution system to capture and reproduce thetone of a guitar speaker system, for example the frequency response of allthe AmpliTube cabinets are sampled at very high frequency, this delivers anultra-accurate reproduction of all the small but so important irregularitiesin the frequency response, even at the high end.
There are eight high quality cabinet models into AmpliTube (fig. 39), and inthe 9th position (No Speaker) the Cabinet emulation can be disabled for a“D.I.”, typically for extra fuzz sounds. The available cabinets are:
Small combo Fender® small 15W solid state combo (80’s)Open Back 1x12 Ampeg® AX-30 100W Tube Combo (90’s)Open Back 1x12 II VHT® Pitbull™ 50W Tube Combo (90’s)Vint. Open 4x10 Fender® Super Reverb™ vintage Amp (60’s)Mod. Closed 4x10 Marshall® modern 4x10 closed cab. (80’s)Vint. 4x12 Closed Marshall® vintage 4x12 cab (70’s)Modern 4x12 Closed Marshall® modern 4x12 cab (80’s)British 2x12 Vox® top boost AC-30 (60’s)No Speaker D.I. line out (after the power amp)
6.4
6.5
fig. 38
fig. 39
6 - Amp Module 39
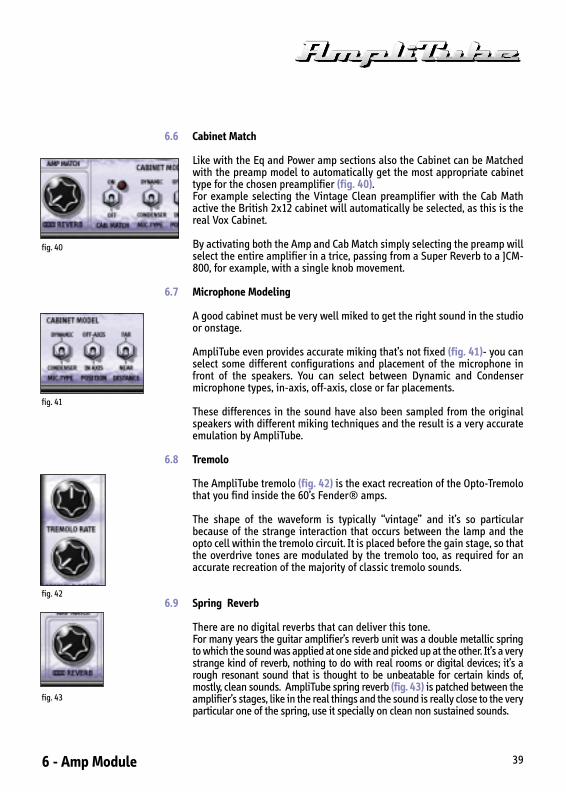
Cabinet Match
Like with the Eq and Power amp sections also the Cabinet can be Matchedwith the preamp model to automatically get the most appropriate cabinettype for the chosen preamplifier (fig. 40).For example selecting the Vintage Clean preamplifier with the Cab Mathactive the British 2x12 cabinet will automatically be selected, as this is thereal Vox Cabinet.
By activating both the Amp and Cab Match simply selecting the preamp willselect the entire amplifier in a trice, passing from a Super Reverb to a JCM-800, for example, with a single knob movement.
Microphone Modeling
A good cabinet must be very well miked to get the right sound in the studioor onstage.
AmpliTube even provides accurate miking that’s not fixed (fig. 41)- you canselect some different configurations and placement of the microphone infront of the speakers. You can select between Dynamic and Condensermicrophone types, in-axis, off-axis, close or far placements.
These differences in the sound have also been sampled from the originalspeakers with different miking techniques and the result is a very accurateemulation by AmpliTube.
Tremolo
The AmpliTube tremolo (fig. 42) is the exact recreation of the Opto-Tremolothat you find inside the 60’s Fender® amps.
The shape of the waveform is typically “vintage” and it’s so particularbecause of the strange interaction that occurs between the lamp and theopto cell within the tremolo circuit. It is placed before the gain stage, so thatthe overdrive tones are modulated by the tremolo too, as required for anaccurate recreation of the majority of classic tremolo sounds.
Spring Reverb
There are no digital reverbs that can deliver this tone. For many years the guitar amplifier’s reverb unit was a double metallic springto which the sound was applied at one side and picked up at the other. It’s a verystrange kind of reverb, nothing to do with real rooms or digital devices; it’s arough resonant sound that is thought to be unbeatable for certain kinds of,mostly, clean sounds. AmpliTube spring reverb (fig. 43) is patched between theamplifier’s stages, like in the real things and the sound is really close to the veryparticular one of the spring, use it specially on clean non sustained sounds.
6.6
6.7
6.8
6.9
fig. 40
fig. 41
fig. 42
fig. 43
7 - Post FX Module40
Post FX Module
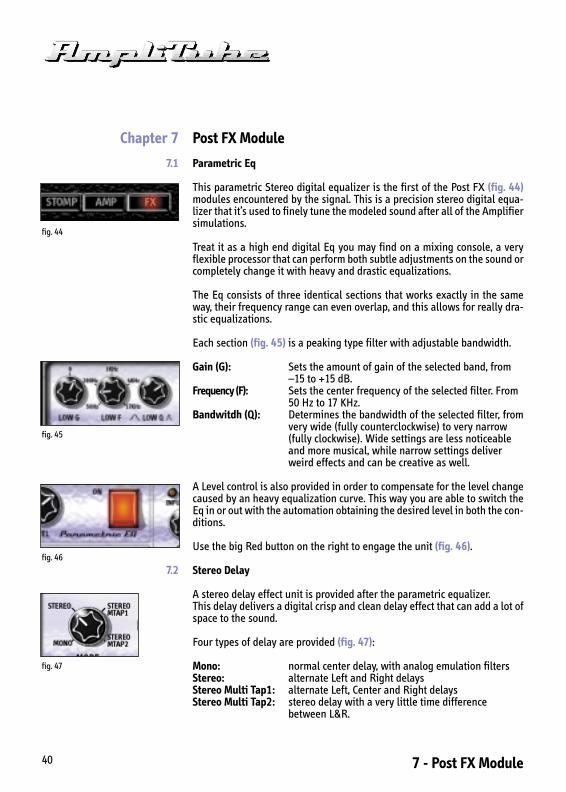
Parametric Eq
This parametric Stereo digital equalizer is the first of the Post FX (fig. 44)modules encountered by the signal. This is a precision stereo digital equa-lizer that it’s used to finely tune the modeled sound after all of the Amplifiersimulations.
Treat it as a high end digital Eq you may find on a mixing console, a veryflexible processor that can perform both subtle adjustments on the sound orcompletely change it with heavy and drastic equalizations.
The Eq consists of three identical sections that works exactly in the sameway, their frequency range can even overlap, and this allows for really dra-stic equalizations.
Each section (fig. 45) is a peaking type filter with adjustable bandwidth.
Gain (G): Sets the amount of gain of the selected band, from –15 to +15 dB.
Frequency (F): Sets the center frequency of the selected filter. From 50 Hz to 17 KHz.
Bandwitdh (Q): Determines the bandwidth of the selected filter, fromvery wide (fully counterclockwise) to very narrow (fully clockwise). Wide settings are less noticeable and more musical, while narrow settings deliver weird effects and can be creative as well.
A Level control is also provided in order to compensate for the level changecaused by an heavy equalization curve. This way you are able to switch theEq in or out with the automation obtaining the desired level in both the con-ditions.
Use the big Red button on the right to engage the unit (fig. 46).
Stereo Delay
A stereo delay effect unit is provided after the parametric equalizer.This delay delivers a digital crisp and clean delay effect that can add a lot ofspace to the sound.
Four types of delay are provided (fig. 47):
Mono: normal center delay, with analog emulation filtersStereo: alternate Left and Right delaysStereo Multi Tap1: alternate Left, Center and Right delaysStereo Multi Tap2: stereo delay with a very little time difference
between L&R.
Chapter 7
7.1
7.2
fig. 45
fig. 46
fig. 47
fig. 44
7 - Post FX Module 41
These are the controls available for the Stereo Delay (fig. 48):
Mode: Determines the working mode / algorithm of the delay, see above.
Delay: Sets the delay time of the effect. From 2 milliseconds to 1 second.Feedback: Determines the number of repetitions. Full clockwise gives a
sustaining effect.Level: Determines the amount of the delay. Fully counterclockwise is
dry, no effect, fully clockwise is only delay.
Use the big Red button on the right to engage the unit (fig. 49).
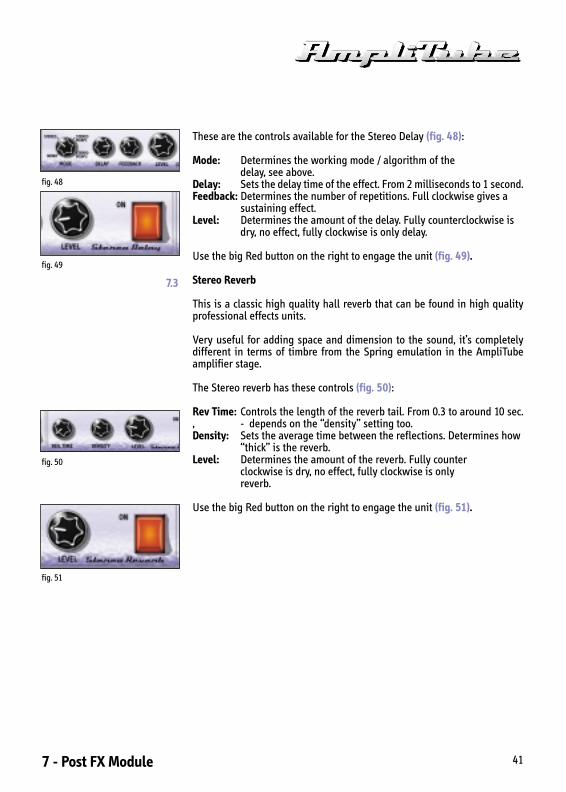
Stereo Reverb
This is a classic high quality hall reverb that can be found in high qualityprofessional effects units.
Very useful for adding space and dimension to the sound, it’s completelydifferent in terms of timbre from the Spring emulation in the AmpliTubeamplifier stage.
The Stereo reverb has these controls (fig. 50):
Rev Time: Controls the length of the reverb tail. From 0.3 to around 10 sec., - depends on the “density” setting too.Density: Sets the average time between the reflections. Determines how
“thick” is the reverb.Level: Determines the amount of the reverb. Fully counter
clockwise is dry, no effect, fully clockwise is only reverb.
Use the big Red button on the right to engage the unit (fig. 51).
7.3
fig. 49
fig. 51
fig. 48
fig. 50
8 - General AmpliTube control/display42
General AmpliTube control/display
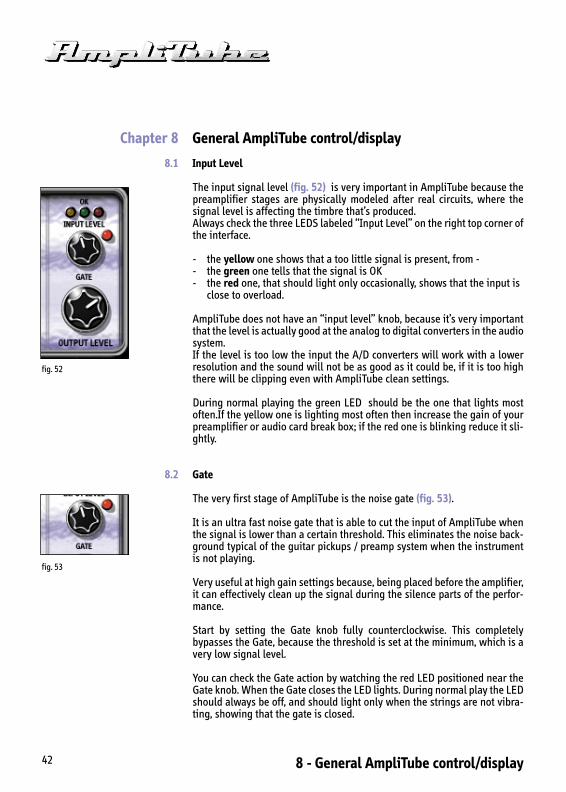
Input Level
The input signal level (fig. 52) is very important in AmpliTube because thepreamplifier stages are physically modeled after real circuits, where thesignal level is affecting the timbre that’s produced.Always check the three LEDS labeled “Input Level” on the right top corner ofthe interface.
- the yellow one shows that a too little signal is present, from -- the green one tells that the signal is OK - the red one, that should light only occasionally, shows that the input is
close to overload.
AmpliTube does not have an “input level” knob, because it’s very importantthat the level is actually good at the analog to digital converters in the audiosystem.If the level is too low the input the A/D converters will work with a lowerresolution and the sound will not be as good as it could be, if it is too highthere will be clipping even with AmpliTube clean settings.
During normal playing the green LED should be the one that lights mostoften.If the yellow one is lighting most often then increase the gain of yourpreamplifier or audio card break box; if the red one is blinking reduce it sli-ghtly.
Gate
The very first stage of AmpliTube is the noise gate (fig. 53).
It is an ultra fast noise gate that is able to cut the input of AmpliTube whenthe signal is lower than a certain threshold. This eliminates the noise back-ground typical of the guitar pickups / preamp system when the instrumentis not playing.
Very useful at high gain settings because, being placed before the amplifier,it can effectively clean up the signal during the silence parts of the perfor-mance.
Start by setting the Gate knob fully counterclockwise. This completelybypasses the Gate, because the threshold is set at the minimum, which is avery low signal level.
You can check the Gate action by watching the red LED positioned near theGate knob. When the Gate closes the LED lights. During normal play the LEDshould always be off, and should light only when the strings are not vibra-ting, showing that the gate is closed.
Chapter 8
8.1
8.2
fig. 52
fig. 53
8 - General AmpliTube control/display 43
We suggest leaving the Gate OFF (fully counterclockwise) unless you noti-ce high background noise from the guitar signal. In that case try to slightlyincrease the gate knob up to a point where the LED lights and the Gate cutsthe input.
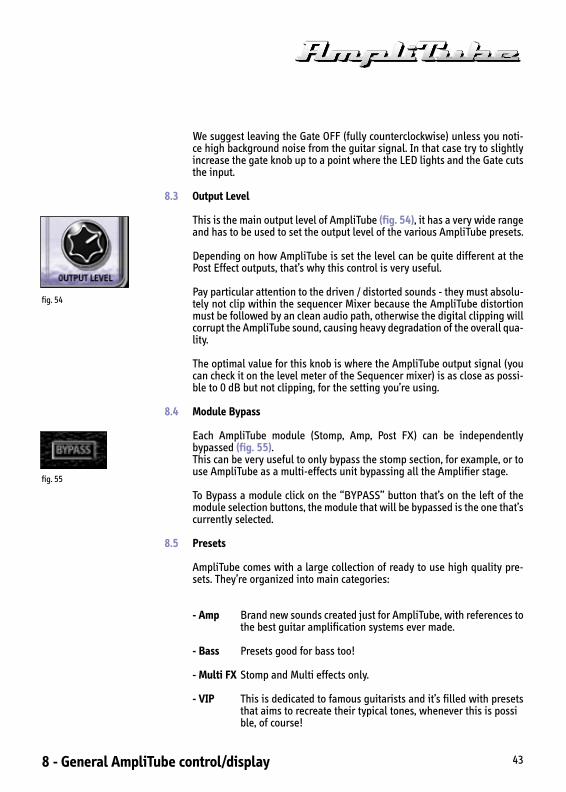
Output Level
This is the main output level of AmpliTube (fig. 54), it has a very wide rangeand has to be used to set the output level of the various AmpliTube presets.
Depending on how AmpliTube is set the level can be quite different at thePost Effect outputs, that’s why this control is very useful.
Pay particular attention to the driven / distorted sounds - they must absolu-tely not clip within the sequencer Mixer because the AmpliTube distortionmust be followed by an clean audio path, otherwise the digital clipping willcorrupt the AmpliTube sound, causing heavy degradation of the overall qua-lity.
The optimal value for this knob is where the AmpliTube output signal (youcan check it on the level meter of the Sequencer mixer) is as close as possi-ble to 0 dB but not clipping, for the setting you’re using.
Module Bypass
Each AmpliTube module (Stomp, Amp, Post FX) can be independentlybypassed (fig. 55).This can be very useful to only bypass the stomp section, for example, or touse AmpliTube as a multi-effects unit bypassing all the Amplifier stage.
To Bypass a module click on the “BYPASS” button that’s on the left of themodule selection buttons, the module that will be bypassed is the one that’scurrently selected.
Presets
AmpliTube comes with a large collection of ready to use high quality pre-sets. They’re organized into main categories:
- Amp Brand new sounds created just for AmpliTube, with references tothe best guitar amplification systems ever made.
- Bass Presets good for bass too!
- Multi FX Stomp and Multi effects only.
- VIP This is dedicated to famous guitarists and it’s filled with presetsthat aims to recreate their typical tones, whenever this is possible, of course!
8.3
8.4
8.5
fig. 54
fig. 55
8 - General AmpliTube control/display44
RTAS and HTDM Versions:
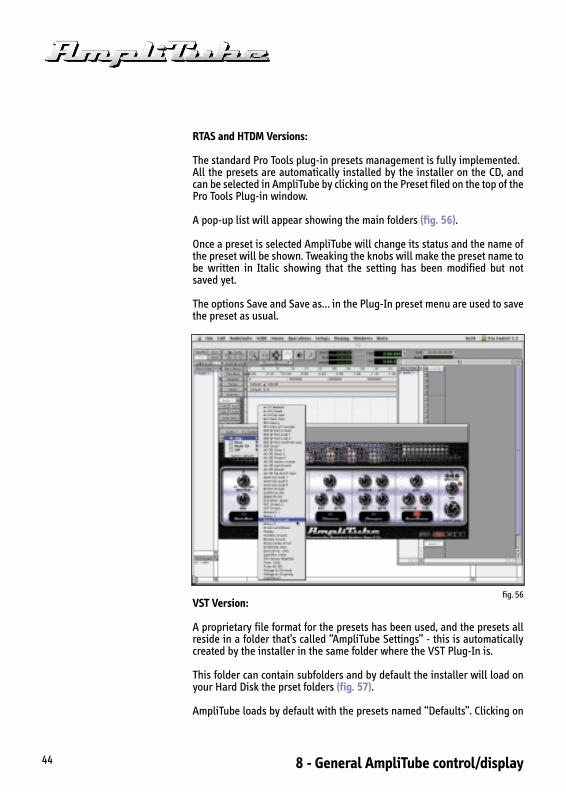
The standard Pro Tools plug-in presets management is fully implemented.All the presets are automatically installed by the installer on the CD, andcan be selected in AmpliTube by clicking on the Preset filed on the top of thePro Tools Plug-in window.
A pop-up list will appear showing the main folders (fig. 56).
Once a preset is selected AmpliTube will change its status and the name ofthe preset will be shown. Tweaking the knobs will make the preset name tobe written in Italic showing that the setting has been modified but notsaved yet.
The options Save and Save as… in the Plug-In preset menu are used to savethe preset as usual.
VST Version:
A proprietary file format for the presets has been used, and the presets allreside in a folder that’s called “AmpliTube Settings” - this is automaticallycreated by the installer in the same folder where the VST Plug-In is.
This folder can contain subfolders and by default the installer will load onyour Hard Disk the prset folders (fig. 57).
AmpliTube loads by default with the presets named “Defaults”. Clicking on
fig. 56
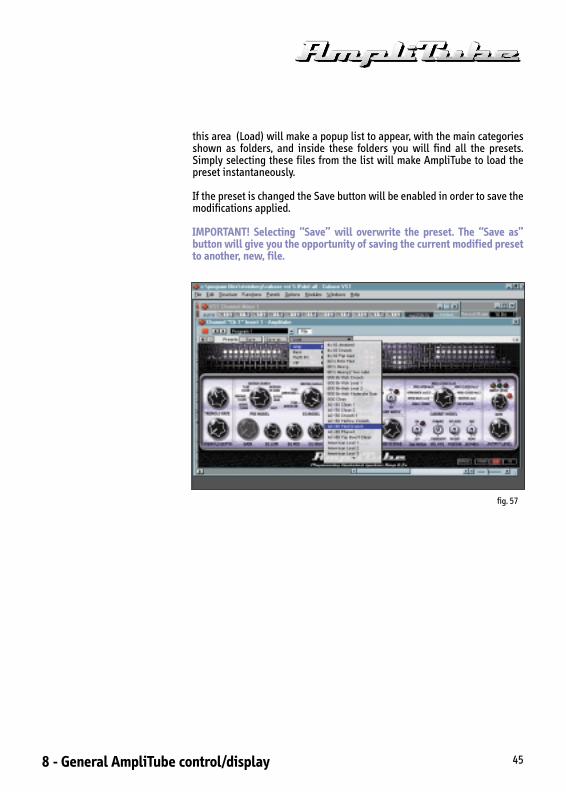
8 - General AmpliTube control/display 45
this area (Load) will make a popup list to appear, with the main categoriesshown as folders, and inside these folders you will find all the presets.Simply selecting these files from the list will make AmpliTube to load thepreset instantaneously.
If the preset is changed the Save button will be enabled in order to save themodifications applied.
IMPORTANT! Selecting “Save” will overwrite the preset. The “Save as”button will give you the opportunity of saving the current modified presetto another, new, file.
fig. 57
9 - Support46
Support
Support
For any question you may have please refer to the FAQ at:http://www.amplitube.com/FAQ.htmlwhere you'll find answers to the most common questions.
For free support write at:[email protected]
User Area
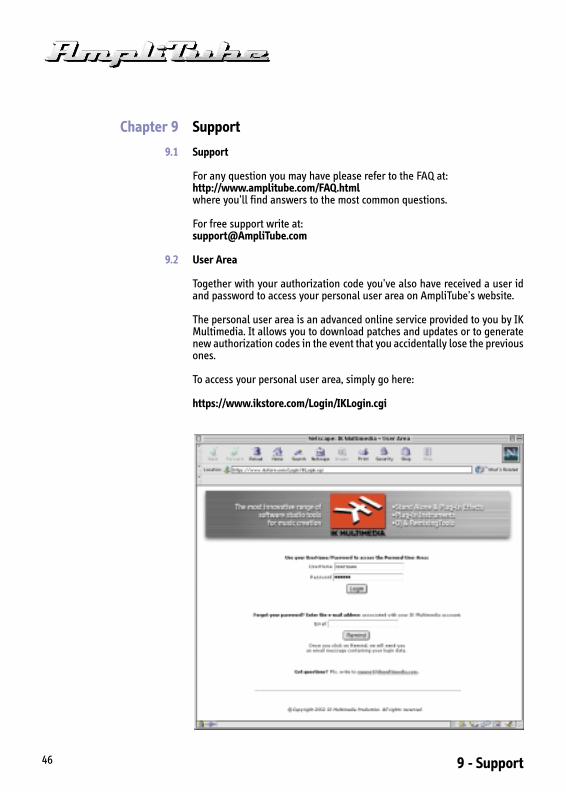
Together with your authorization code you've also have received a user idand password to access your personal user area on AmpliTube's website.
The personal user area is an advanced online service provided to you by IKMultimedia. It allows you to download patches and updates or to generatenew authorization codes in the event that you accidentally lose the previousones.
To access your personal user area, simply go here:
https://www.ikstore.com/Login/IKLogin.cgi
Chapter 9
9.1
9.2
9 - Support 47
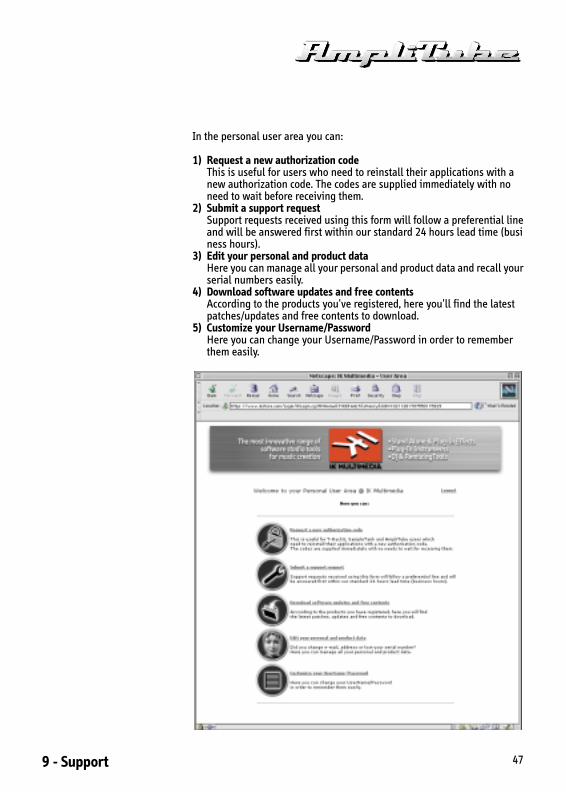
In the personal user area you can:
1) Request a new authorization codeThis is useful for users who need to reinstall their applications with a new authorization code. The codes are supplied immediately with no need to wait before receiving them.
2) Submit a support requestSupport requests received using this form will follow a preferential lineand will be answered first within our standard 24 hours lead time (business hours).
3) Edit your personal and product dataHere you can manage all your personal and product data and recall yourserial numbers easily.
4) Download software updates and free contentsAccording to the products you've registered, here you'll find the latest patches/updates and free contents to download.
5) Customize your Username/PasswordHere you can change your Username/Password in order to remember them easily.

AmpliTube™ is a trademark of IK Multimediawww.ikmultimedia.com
www.amplitube.com
Via dell’Industria 46 - 41100 Modena Italytel +39-59-285496 fax +39-59-2861671
All specifications are subject to change without further notice.
©2002 IK Multimedia ProductionAll other trademarks are property
of their respective owners.