Embed Size (px)
Citation preview

ANASAZI SOFTWARE Windows Client Data System
Quick Reference Guide
Copyright 1998, Anasazi Software
Updated as of 11/09/99

ANASAZI SOFTWARE 2
User Training Manual
Section One:System Navigation

ANASAZI SOFTWARE 3
Exploring the Home PageUsing your computer mouse, double-click on the Anasazi Client Data Icon on your computer screen. It will take a minute for the system to load onto your screen. When the system loads, you will be at the Client Data System Home Page.
This is the HOME PAGE for managing all Client Data information. Some common terms will be used throughout the manual to refer to objects on the screen:
TITLE BAR MENU BAR TOOL BAR STATUS BAR TASK BAR

ANASAZI SOFTWARE 4
To select the appropriate button, move the mouse so that the pointer is located on the button.
LAUNCH BUTTONS
SAVE, CLEAR, RETURN, EXIT
ADD, EDIT , DELETE, SHOW, FIND
The following buttons can be found on screens throughout the Anasazi Client Data System.
Learning about Buttons

ANASAZI SOFTWARE 5
Client Look UpIn the Anasazi Windows Client Data System, users have the ability to select Clients and/or perform exhaustive searches for Clients through the Clients selection window. This window is accessed in the following ways:
Click on the Client Icon displayed on the Tool Bar
Click on the Selection Button at the end of any Prompt labeled, “Client”
If part of a Client Sort Name in any Prompt labeled, “Client” is entered
If an incorrect Client Sort Name or ID in any Prompt labeled, “Client” is entered

ANASAZI SOFTWARE 6
Exploring the Clients Selection Window
Clicking the Clients selection window Sort Name, Case Number, SSN, Primary Unit or External Case Number column headings will sort the associated column information either alphabetically or in numerically ascending order.
The Display radio buttons are used to Sort the Client Display
Open Clients: Must have at least one active assignment to display
Closed Clients: Have no active assignments
All: All Clients
ANASAZI SOFTWARE 7
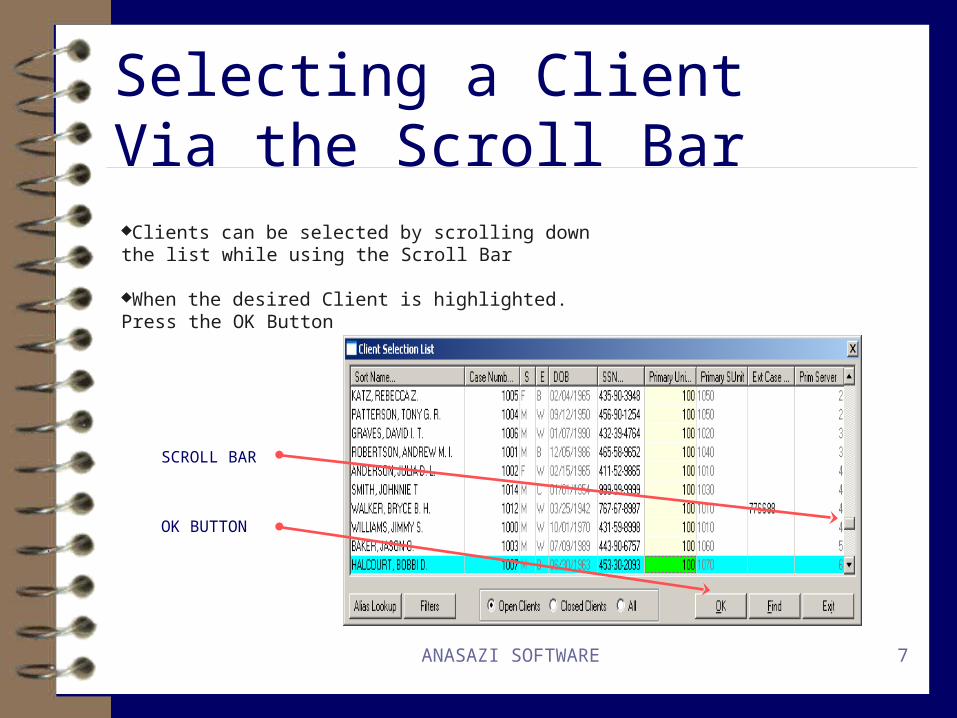
Selecting a Client Via the Scroll Bar
SCROLL BAR
OK BUTTON
Clients can be selected by scrolling down the list while using the Scroll Bar
When the desired Client is highlighted. Press the OK Button

ANASAZI SOFTWARE 8
Selecting a Client Via the Filter Function Button
FILTER CRITERIA CLEAR FILTER BUTTON
To narrow the Client records displayed in the Clients window; click on the Filter Button to access the Filter window.specify the type of filter to be utilized. Common filter types include: Sort Name, Age, Sex, Ethnicity, and Primary Unit.
Enter the appropriate filter information and click the Refresh button in the Filter window
The desired Client record group should appear in the Clients window
Highlight the desired Client record and click the OK button in the Clients window to complete selection
If the desired Client does not appear in the Clients window, click the Clear button and try another filter type or selection method

ANASAZI SOFTWARE 9
Selecting a ClientVia the Search Function ButtonTo quickly select a Client whose Sort Name, Social
Security Number, Case Number, or Date of Birth is known; click on the corresponding column to specify the type of search to be utilized
Next, click on the Find function button to access the Find window
Enter the appropriate search information and click the OK button in the Find window
Dates of Birth and Social Security Numbers must be keyed with slashes and dashes respectively.
The desired Client record should appear highlighted in the Clients window
If the desired Client is highlighted, click the OK button in the Clients window to complete selection
If the desired Client is not highlighted, click the Find button in the Clients window and try again
FIND WINDOW FIND BUTTON

ANASAZI SOFTWARE 10
User Training Manual
Section 2:Completing a Treatment Session

ANASAZI SOFTWARE 11
Select the appropriate Client.
Click on the Add button to add a new Treatment Session.
Enter the Date Opened.
Enter the Treatment Session Type from the table by Clicking on the Treatment Session Type Selection List.
The Presenting Problem, Program Requirements and Urgency fields are optional based on the needs of the Center.
To complete Presenting Problem and Urgency, Click on the appropriate Selection List.
Enter any Program Requirements .
Click on the Save button before returning to the previous screen.
The Clear button can be used to “erase” what has been entered prior to saving .
Click on the Return button to go to the previous menu.
Adding a Treatment Session

ANASAZI SOFTWARE 12
Closing a Treatment Session
Select the appropriate Client.
Highlight the Treatment Session to be closed.
Click on the Edit button to edit an existing Treatment Session.
Enter the Date Closed for the Treatment Session.
The items in the bottom box are optional upon closing a Treatment Session, based on the needs of the Center.
Click on the appropriate Selection List and Click on the item. ..
Click on the Save button before returning to the previous screen.
Click on the Return button to go to the previous menu.
A Treatment Session cannot be closed if there are Open Assignments attached.

ANASAZI SOFTWARE 13
Section 3:Completing Assignments
User Training Manual

ANASAZI SOFTWARE 14
Adding an AssignmentA client must have an open Treatment Session before Assignments can be added. Multiple Treatment Sessions may be open with different Assignments. In the Anasazi Client Data System, a client is considered to be “Inactive” or “Closed” until the first Assignment to a Unit/Subunit is made. Then the client is “Active”
Select the appropriate Client.
Select an open Treatment Session by Clicking on the Selection List.
Click on the Add button.

ANASAZI SOFTWARE 15
Adding an Assignment
Enter the Effective (Open) Date of the Assignment.
Enter the Staff completing the form or the staff making the Assignment..
The Date Entered and Form Entered by are automatically determined from system configurations.
Click on the Form Type Selection List to select the appropriate form.
Click the OK button to continue with the Assignment.
Form Types
A - Admitted
C - Closed - Closing an Assignment
R -Registered
U -Update - Update a Server or Primary Unit, Enter absences or Family Members
ANASAZI SOFTWARE 16
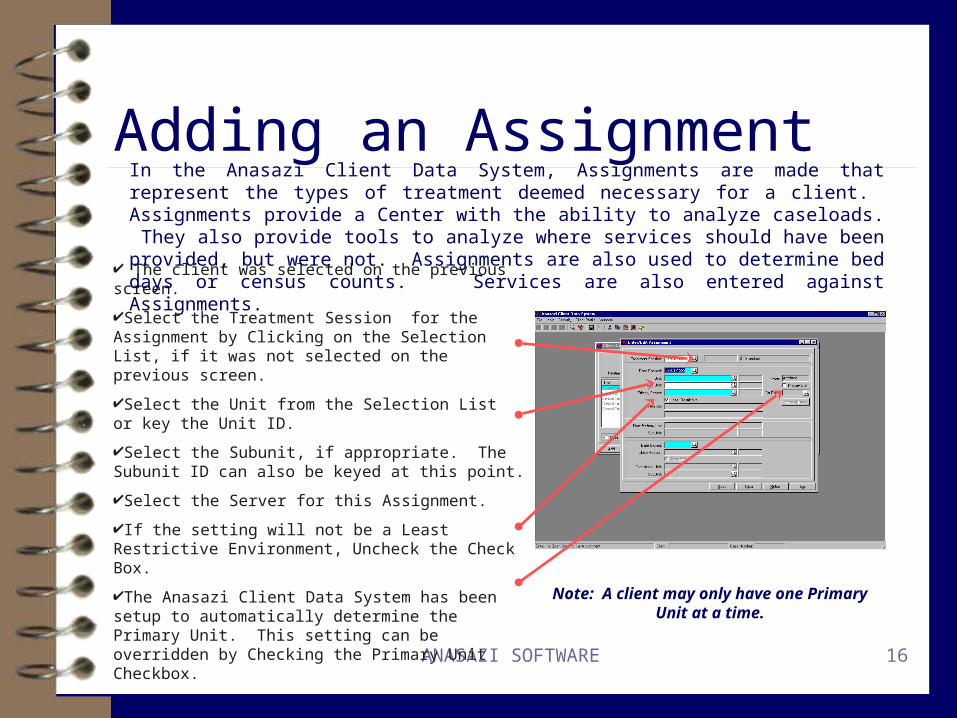
Note: A client may only have one Primary Unit at a time.
Adding an Assignment
The client was selected on the previous screen.
Select the Treatment Session for the Assignment by Clicking on the Selection List, if it was not selected on the previous screen.
Select the Unit from the Selection List or key the Unit ID.
Select the Subunit, if appropriate. The Subunit ID can also be keyed at this point.
Select the Server for this Assignment.
If the setting will not be a Least Restrictive Environment, Uncheck the Check Box.
The Anasazi Client Data System has been setup to automatically determine the Primary Unit. This setting can be overridden by Checking the Primary Unit Checkbox.
In the Anasazi Client Data System, Assignments are made that represent the types of treatment deemed necessary for a client. Assignments provide a Center with the ability to analyze caseloads. They also provide tools to analyze where services should have been provided, but were not. Assignments are also used to determine bed days or census counts. Services are also entered against Assignments.

ANASAZI SOFTWARE 17
Updating an AssignmentHighlight the Assignment to be Updated. Be sure to use the Display Radio Buttons if necessary.
Click on the Edit button.
The Clear button can be used to select a different client.
The Find button can be used to search for an Assignment to a specific Unit.
Enter the Effective Date of the Update to the Assignment.
Enter the Staff completing the form or the staff updating the Assignment..
The Date Entered and Form Entered by are automatically determined.
Click on the Form Type Selection List and select “Update”.
Click the OK button to continue editing the Assignment

ANASAZI SOFTWARE 18
Updating the Primary Server
To Update the Server , Enter the Server who’s roster this client will be displayed on in the Current Server field.
The Start Date will default from the Effective Date of the Assignment Update.
Click the Save button before Exiting this screen.
If a mistake was made, the Clear button can be used to blank out the date and server prior to Clicking on the Save button.
Click on the Return button to return to the Assignment Screen.
The Anasazi Client Data System maintains a Server History for all Assignments.

ANASAZI SOFTWARE 19
Updating an AssignmentHighlight the Assignment to be Updated. Be sure to use the Display Radio Buttons if necessary.
Click on the Edit button.
The Clear button can be used to select a different client.
The Find button can be used to search for an Assignment to a specific Unit.
Enter the Effective Date of the Update to the Assignment.
Enter the Staff completing the form or the staff updating the Assignment..
The Date Entered and Form Entered by are automatically determined.
Click on the Form Type Selection List and select “Update”.
Click the OK button to continue editing the Assignment

ANASAZI SOFTWARE 20
Updating the Primary Unit
To Update the Primary Unit , Click on the Primary Unit Checkbox.
Click the Save button before Exiting this screen.
If a mistake was made, the Clear button can be used to blank out the date and server prior to Clicking on the Save button.
Click on the Exit button to return to the Assignment Screen.
The Anasazi Client Data System has functionality to have the system automatically determine the Primary Unit. This decision can be overridden when appropriate.

ANASAZI SOFTWARE 21
Closing an AssignmentHighlight the Assignment to be Closed. Be sure to use the Display Radio Buttons if necessary to display all Assignments., not just Open Assignments.
Click on the Edit button.
The Clear button can be used to select a different client and start the process again.
The Find button can be used to search for an Assignment to a specific Unit.
Enter the Effective Date to Close the Assignment.
Enter the Staff completing the form or the staff closing the Assignment.
The Date Entered and Form Entered by are automatically determined.
Click on the Form Type Selection List and select “Close”.
Click the OK button to continue closing the Assignment.

ANASAZI SOFTWARE 22
Closing an AssignmentThe client was selected on the previous screen.
When Closing an Assignment, the Close date is defaulted from the Effective date on the previous screen.
Select the Close Reason from the Selection list or key the ID.
If the client will be transferring to another Unit and/or Subunit within the Agency, Click on the Transfer Checkbox. Otherwise, Click on the Save button.
Select the Unit and Subunit that the client will be transferring to.
Click on the Save button to save this information.
The Return button can be clicked to return to the previous screen, but the information on screen will not be saved unless the Save button has been Clicked.
Click the Exit button to completely exit from the Assignments Maintenance screen.
Once an Assignment has been closed, Services can no longer be entered for that Unit/ Subunit.

ANASAZI SOFTWARE 23
Approving a TransferOnce an Assignment has been transferred to another Unit or Subunit, it is displayed on the Assignments Screen with Pending Approval as the Server. This Assignment can then be Disapproved or Approved. If approved, this client must be added to a Server’s roster.
To Approved a Transfer, highlight the Assignment that is Pending Approval.
Click on the Edit button.
The Approval Screen will be displayed. Click on the Yes button to approve the transfer.
Note: If the No button is clicked the Approval is not accepted. The Agency has the ability to determine what happens with the Assignment when answering No.

ANASAZI SOFTWARE 24
Approving a TransferAfter Clicking on the Yes button, the Assignment Form Entry screen will be displayed.
Select the person completing the form from the Select List.
Click the OK button to continue.
All information regarding this Assignment was completed when the Assignment was closed and transferred except the Server this client is assigned to.
Select the Server from the Selection List.
Click the Save button to save the transaction.
Click the Return or Exit button.

ANASAZI SOFTWARE 25
Section 4:Completing Financial Information
User Training Manual

ANASAZI SOFTWARE 26
Completing a Financial ReviewThe Anasazi Client Data System maintains historical financial reviews for clients. Numerous other screens can be accessed from the Financial Review Screen through the Launch buttons located at the bottom of the screen..
CLIENT INSURANCE
HISTORY FINANCIAL REVIEW
Insurance: Click this button to access the Client Insurance screen.
History: Click this button to display a client’s historical Financial Reviews.
Financial Review: Click the Add, Edit or Show button to access a client’s current Financial Review.

ANASAZI SOFTWARE 27
Financial Review - TXThe Texas Financial Review screen and it’s functionality has been developed based on the Texas Administrative Code. The functionality of numerous questions is dependent on the policies at the Center and the setup of the system as determined by the Center.
Enter the Review Date. This is the date the Financial Review was signed by the Client.
Select the person who Reviewed the Financial form with the Client.
The name and address in the Bill To: section should be completed for the person that the client statement will be sent to.
If the statement is to be sent to the client, the bill to section can be left blank.
The Bill To section may default to the Next of Kin name and address on the Demographic Form. (Based on Center Setup)

ANASAZI SOFTWARE 28
Financial Review - TX Check the Financial Information Provided box if proper documentation has been provided. Otherwise, Select the Reason the Documentation was not provided.
Check the Assignment of Benefits Checkbox if this was signed by the client.
Key the Client’s Monthly income in the for each of the sources.
Key the Client’s Monthly Exceptional Expenses.
Enter the Number of Family Members and the Number of Family Members Receiving Services at the Center.
Once these fields have been completed, the Client’s MAP will be calculated and displayed.
Click the Save button before returning to the previous screen.
Based on Center Setup, the Anasazi Client Data System calculates a Client’s MAP from Monthly Income, Exceptional Expenses, Family Members and Family Members Receiving Services.

ANASAZI SOFTWARE 29
Maintaining Insurance CoverageThe Anasazi Client Data System provides the ability to maintain up to eight concurrent insurance coverages. The Client Insurance Screen displays a Client’s coverage in order of Priority, the order to bill. Insurance History is maintained so that services during the correct coverage period can still be claimed.
Display Radio Buttons can be used to view Active, Inactive and All Insurance Coverages.
Click on the Add button to Add new Insurance Coverage
Highlight a Pay Source. Click the Edit button to make changes to the Coverage information.
Highlight a Pay Source. Click on the Show button to display the coverage information.
The Find button can be used to “Find” a specific Pay Source ID.

ANASAZI SOFTWARE 30
Adding Insurance CoverageThe Anasazi Client Data System uses the same screen when capturing information regarding Insurance Coverage. Based on the Pay Source Type, different questions will be required.
Select the name of the Pay Source from by Clicking on the Selection List button. If known, the Pay Source ID can be keyed into this box.
Enter the effective date of the Insurance Coverage.
Once this has been entered, the required fields for this Pay Source Type will be enabled.
Enter the Priority that the Insurance will be billed.
Enter the Policy Number.
If appropriate, Select the Benefit Plan from the Selection List.

ANASAZI SOFTWARE 31
Changing Insurance ScreenAny time that a change in Insurance Coverage that will affect the billing algorithm, the change date and reason for change are required. Changing items such as expiration date, priority or policy number are examples.
Make the changes in the Client’s Insurance Coverage information.
Enter the Date that the Change is effective.
Enter a short comment stating the reason for the change in the Insurance Coverage.
Click the Save button to save the change.

ANASAZI SOFTWARE 32
Medicaid Insurance ScreenMEDICAID INFORMATION – TX
* Pay Source
* Effective Date
* Policy Number
Benefit Plan (if appropriate)
* MR Only
•QMB
•SSI
•OK to Bill
•Copay
•Copay Amount
•Met Max Copay
Notes
Alias

ANASAZI SOFTWARE 33
Medicare Insurance Screen
MEDICARE INFORMATION
* Pay Source
* Effective Date
* Priority
* Policy Number
Benefit Plan (if appropriate)
* OK to Bill
Capitated
Capitation Rate
Notes
Alias

ANASAZI SOFTWARE 34
Private Insurance ScreenPRIVATE INSURANCE INFORMATION
* Pay Source
* Effective Date
* Priority
* Policy Number
Benefit Plan (if appropriate)
Group Number
*Relationship to Insured
Policy Holder Name
Policy Holder Address
Copay
Copay Amount
Mex Max Copay
* OK to Bill
Capitated
Capitation Rate
Notes
Alias

ANASAZI SOFTWARE 35
Section 5:Completing Authorizations
User Training Manual

ANASAZI SOFTWARE 36
Maintaining AuthorizationsThe Anasazi Client Data System provides the ability to maintain Authorizations for multiple Pay Sources and multiple Authorizations for a Client. Services for an Authorizations can be tracked so the clinicians are able to determine when new authorizations are needed prior to providing services.
All Authorizations for a Client can be viewed from the Authorizations Maintenance Screen.
To Add an Authorization, Click on the Add button.
To Edit an Authorization, highlight the Authorization. Then Click on the Edit button.

ANASAZI SOFTWARE 37
Adding an Authorization Select the Pay Source providing the Authorization by Clicking on the Selection List.
Select the Benefit Plan providing the Authorization by Clicking on the Selection List.
Enter the Authorization Number.
Enter the “from” and “thru” dates for the Authorization.
If provided, enter the Referring Physician, Address and PIN number.
Enter the Authorization Limits.
Enter the Authorization Criteria.
Click the Save button to save the authorization. The Template button can be used to pull
in data for Authorizations, if these have previously been created.
Authorization dates

ANASAZI SOFTWARE 38
Viewing Authorization Usage
The Limits set for this Authorization can be viewed.
The Actual usage for this Authorization can be viewed.
Registered Services - Services which have been entered and are attached to a specific Authorization. These services can be Unregistered and moved to another Authorization.
Unregistered Services - Services which have been entered after the Authorization, but are not attached to an Authorization. These services can be Registered to an Authorization
Pending Services - Services which are Registered to an Authorization, but have not been place on a claim.
Claimed Services - Services which have been rendered to a claim for a 3rd Party Insurance Company.

ANASAZI SOFTWARE 39
Viewing Authorized ServicesA listing of the Services which have been Registered, Claimed or are Pending for an Authorization can be accessed from the Services tab on the Authorization Screen.
DISPLAY FILTERS
FIND BUTTON
The Find button can be clicked to search for services provided on a specific date.

ANASAZI SOFTWARE 40
Viewing Authorization ClassesService Classes can be defined for an Authorization. For example, if an Authorization for Counseling is given, numerous service codes may be billed under this Authorization number. Service Codes which are covered by a Pay Source/Benefit Plan can be attached to a specific Service Class in the Billing Setup. A Service Class can then be attached to an Authorization allowing only the appropriate services to be attached..

ANASAZI SOFTWARE 41
User Training Manual
Section 6:Completing Service Entry

ANASAZI SOFTWARE 42
Services Overview
The Enter/Edit Client Services screen is the same for each of the billing entry types, with the exception of the Group Services Entry screen
Fields that require entry are highlighted in blue
Services cannot be edited once they have been saved
Services can only be deleted while in their original state (not part of a claim.) Once services are part of a claim, they cannot be deleted.
Form numbers should be tracked on the paper form for easy retrieval
Each Service Entry Type can only be retrieved from within the same Entry Type screen
Duplicate Service entries are not recognized at the time of entry. Duplicate services are only recognized by the Anasazi System through the Duplicate Services Report.

ANASAZI SOFTWARE 43
Exploring the Individual Services Maintenance Window
The Individual Services Maintenance window allows entry of Services for a single Server at a single Unit. Users may also manually enter Bed Day and Residential services from this screen.
Form #: Displays system assigned form number which should be tracked on the original paper form for easy retrieval
Server: Clicking the Selection button accesses Employee Selection List
Unit: Clicking the Selection button accesses Unit Selection List
Client: Displays the Client Name for which the entered Service has been provided
Date: Displays the Date of Service
Start: Displays the Start Time of Service, if applicable
Service: Displays the Service Code of Service provided
SubUnit: Displays the SubUnit/Unit Code
ID: Displays the Transaction Number within the Form Number assigned from the ongoing system transaction sequence
Clicking the Add function button accesses the Enter/Edit Client Service screen; initiating the process of Adding a Service record
If Service records appear in the Individual Service Maintenance window, the desired Service record may be highlighted then:
Clicking the Delete function button will Delete the selected Service record
Clicking the Show function button will display the selected Service record
Clicking the Clear function button will clear data in window and allow access to another Form number or entry of a new Server

ANASAZI SOFTWARE 44
Exploring theEnter/Edit Client Service WindowThe Enter/Edit Client Service window is accessed through the Individual Service Maintenance screen, the On Line
Service Maintenance screen, and the Billing Ticket Maintenance screen . Form Number, Server, and Unit fields are generally populated from the Individual Service Maintenance window.
Date: Date of Service
Supervisor: Clicking the selection button accesses Employee Selection List.
Collateral Servers?: Clicking the check box activates the Assign Servers function button
Click the Assign Servers function button to Add a Collateral Server. This accesses the Enter/Edit Collateral Servers window:
Server: Clicking the selection button accesses the Employee Selection List
Length of Service: entry field for the total time of Service in hours
Click the Save function button to complete the addition of the Collateral Server
Click the Delete function button to delete an added Collateral Server
Click the Clear function button to Add another Collateral Server
Click the Exit function button to return to the Enter/Edit Client Service window

ANASAZI SOFTWARE 45
Exploring theEnter/Edit Client Service WindowClient: Clicking the selection button accesses Clients window
SubUnit: Clicking the selection button accesses SubUnits Selection List. If no Assignment is open for the client at the designated Unit, a message will appear stating that the, “Client has no Assignment at the Unit/SubUnit. Please select a valid Unit/SubUnit.” The SubUnits with Assignments Selection List will then be called.
Highlight the desired SubUnit and click the OK button to select that SubUnit
The SubUnits with Assignments Selection List may also be accessed by clicking the Assignments function button
Service: Clicking the selection button accesses Service Codes Selection List. Click OK and then press the Enter key to continue entry.

ANASAZI SOFTWARE 46
Exploring theEnter/Edit Client Service WindowLab: Linked to Service field, Clicking the selection button accesses Lab Services
Selection List
Start: Start time of Service in military time, linked to Service Code
Stop: Stop time of Service in military time, linked to Service Code
Time: Total time elapsed for service, calculated from Start and Stop times
Quantity: Number of Services/Number of milligrams, linked to Service Code
Fee: Flat Fee for Service, linked to Service Code, entry is required if Service Code is flagged as “Fee Service” and “Enter Fee during Service Entry”
Provided To: Clicking the selection button accesses Persons Contacted Selection List, set-up as a default field
Provided At: Clicking the selection accesses Place of Service Selection List, set-up as a default fieldOutside Facility: Clicking the selection button accesses Outside Facility Selection List
Contact Type: Clicking the selection accesses Contact Type Selection List, set-up as a default field
Appointment Type: Clicking the selection accesses Appointment Type Selection List, set-up as a default field
Billing Type: Clicking the selection accesses Billing Type Selection List, set-up as a default field
Intensity Type: Clicking the selection accesses Intensity Type Selection List, set-up as a default field
Number of Participants: Entry allowed if the "Allow Entry of Number of Participants during Service Entry” checkbox is checked in the Service Setup screen.
Click the Save function button to save the Service Record and return to the Individual Service Maintenance window
Click the Clear function button to clear the entered Service and related information
Click the Return function button to return to the Individual Service Maintenance window
Click the Exit function button to return to the Home Page
ANASAZI SOFTWARE 47
Exploring the Billing Ticket Maintenance Window
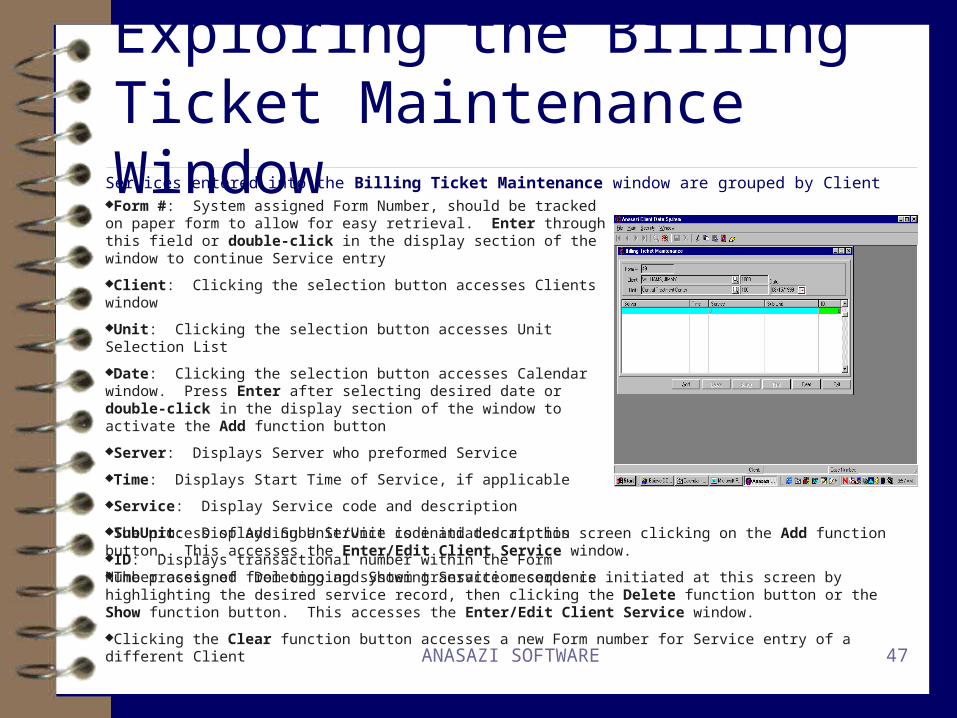
Services entered into the Billing Ticket Maintenance window are grouped by ClientForm #: System assigned Form Number, should be tracked on paper form to allow for easy retrieval. Enter through this field or double-click in the display section of the window to continue Service entry
Client: Clicking the selection button accesses Clients window
Unit: Clicking the selection button accesses Unit Selection List
Date: Clicking the selection button accesses Calendar window. Press Enter after selecting desired date or double-click in the display section of the window to activate the Add function button
Server: Displays Server who preformed Service
Time: Displays Start Time of Service, if applicable
Service: Display Service code and description
SubUnit: Displays SubUnit/Unit code and description
ID: Displays transactional number within the Form Number assigned from ongoing system transaction sequence
The process of Adding a Service is initiated at this screen clicking on the Add function button. This accesses the Enter/Edit Client Service window.
The process of Deleting and Showing Service records is initiated at this screen by highlighting the desired service record, then clicking the Delete function button or the Show function button. This accesses the Enter/Edit Client Service window.
Clicking the Clear function button accesses a new Form number for Service entry of a different Client

ANASAZI SOFTWARE 48
Exploring the Contact Screening Maintenance WindowThe Contact Screening Maintenance window is used for single contact entries, I.e. crisis, prevention, intake assessments. A special
Assignment is both opened and closed at the time of Service entry for those clients who do not already have an Open Assignment at the selected Unit/SubUnit. Centers should have specific forms for this type of Service entry. Contact Screening is designed for use with Generic, Pre-Registered, or “Regular” Clients.
Form #: System assigned Form Number, should be tracked on paper form to allow for easy retrieval.
Date: Clicking the selection button accesses Calendar window.
Client: Clicking the selection button accesses the Clients window
Unit: Clicking the selection button accesses the Unit Selection List. Generally a specific Unit is designated for this type of Service entry.
SubUnit: Clicking the selection button accesses the SubUnit Selection List
Clicking the Assignments function key will accesses the Client’s current Unit/SubUnit Assignments
Pres Prob: Presenting Problem populated from the Treatment Session associated with the Unit/SubUnit selected, or from a previous Contact screening at the selected Unit
Urgency: Populated from the Treatment Session associated with the Unit/SubUnit selected
Close Reason: If the Client has no Assignment at the selected Unit/SubUnit, this field defaults to the Close Reason determined in the Client Data Set-Up Screen 2. If the Client has an Assignment at the selected Unit/SubUnit, this field will remain blank.
The Refresh function button must be clicked to capture entered data and proceed with Service entry

ANASAZI SOFTWARE 49
Exploring the Contact Screening Maintenance Window
Server: Displays name of Server
Start Time: Displays Start Time of Service, if applicable
Service: Displays Service code and description
ID: Displays the Transaction Number within the Form Number assigned from ongoing system transaction sequence
The process of Adding a Service is initiated at this screen clicking on the Add function button. This accesses the Enter/Edit Client Service window.
The process of Deleting and Showing Service records is initiated at this screen by highlighting the desired service record, then clicking the Delete function button or the Show function button. This accesses the Enter/Edit Client Service window.
Clicking the Clear function button accesses a new Form number for Service entry of a different Client

ANASAZI SOFTWARE 50
Exploring the Group Service Maintenance WindowThe Group Service Maintenance window was designed for entry of Group Services. There are two segments
for entry: Service (Servers) and Clients. In this format, users must Post to Save Service records.
Form #: Displays auto-assigned Form Number, Enter through this field to continue with Service entry
Date: Clicking the selection button accesses Calendar window.
Start: Start Time of Group Service in military time
Duration: Duration of entire Group Service in Hours
Stop: Stop Time of Group Service in military time, calculated from entry of Start and Duration fields. Enter through this field to continue with Service entry.
Emp ID: Displays Employee ID of Server performing Service
Svc ID: Displays Service Code ID of Service provided
Start Time: Displays the Time Server Started providing Service
Case #: Displays the Client Case Number
Client Name: Displays the Client Name
Start: Displays the Time Client Started receiving Service
ID: Displays the Transaction Number within the Form Number assigned from ongoing system transaction sequence
Clicking on the Lead Server button displays all designated Lead Servers and Start and Stop times for Group Service record

ANASAZI SOFTWARE 51
Completing a Group Service EntryTo Add a Service Line:
Select the Enter Service radio button to access the Service Segment of the Group Service Maintenance screen
Click the Add function button to access the Enter/Edit Server and Service window.
Server: Click the selection button to access the Employee Selection List
Service: Click the selection button to access the Show Service Code Selection List
Start Time: Time Server began providing Service, entered in military time
Duration: Length of time in hours that the selected Server performed Service
Stop Time: Time Server stopped providing Service, populated from entry of Start Time and Duration fields in military time
Was Server the Lead Server during this time?: Selecting this check box indicates that the selected Server was the Lead Server during this time. Only one Server may be Lead at any given time.
Upon completion of the last field, a Service line will display in the Service Segment of the Enter Group Services Log
ANASAZI SOFTWARE 52
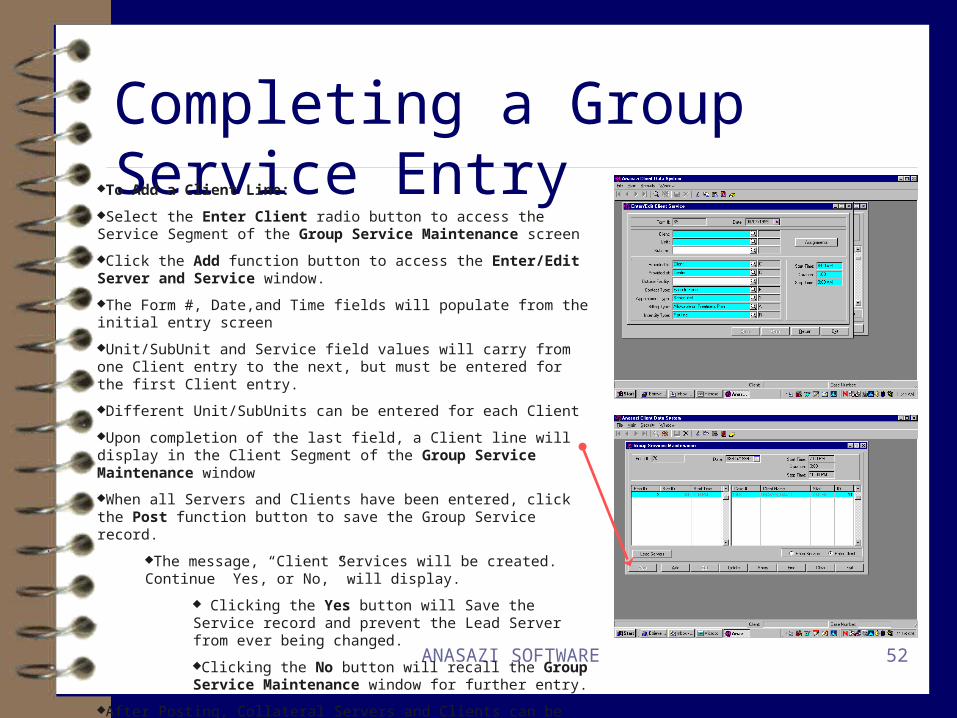
Completing a Group Service EntryTo Add a Client Line:
Select the Enter Client radio button to access the Service Segment of the Group Service Maintenance screen
Click the Add function button to access the Enter/Edit Server and Service window.
The Form #, Date,and Time fields will populate from the initial entry screen
Unit/SubUnit and Service field values will carry from one Client entry to the next, but must be entered for the first Client entry.
Different Unit/SubUnits can be entered for each Client
Upon completion of the last field, a Client line will display in the Client Segment of the Group Service Maintenance window
When all Servers and Clients have been entered, click the Post function button to save the Group Service record.
The message, “Client Services will be created. Continue Yes, or No,” will display.
Clicking the Yes button will Save the Service record and prevent the Lead Server from ever being changed.
Clicking the No button will recall the Group Service Maintenance window for further entry.
After Posting, Collateral Servers and Clients can be Added or Deleted, but not Edited.
ANASAZI SOFTWARE 53
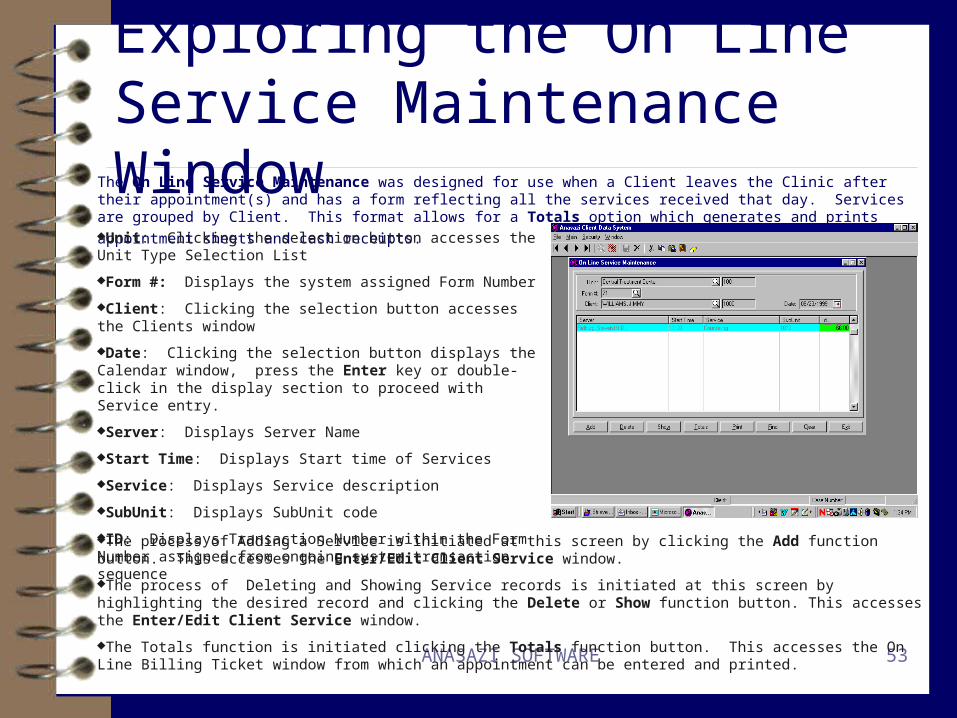
Exploring the On Line Service Maintenance WindowThe On Line Service Maintenance was designed for use when a Client leaves the Clinic after their appointment(s) and has
a form reflecting all the services received that day. Services are grouped by Client. This format allows for a Totals option
which generates and prints appointment sheets and cash receipts. Unit: Clicking the selection button accesses the Unit Type Selection List
Form #: Displays the system assigned Form Number
Client: Clicking the selection button accesses the Clients window
Date: Clicking the selection button displays the Calendar window, press the Enter key or double-click in the display section to proceed with Service entry.
Server: Displays Server Name
Start Time: Displays Start time of Services
Service: Displays Service description
SubUnit: Displays SubUnit code
ID: Displays Transaction Number within the Form Number assigned from ongoing system transaction sequenceThe process of Adding a Service is initiated at this screen by clicking the Add function button. This accesses the Enter/Edit Client Service window.
The process of Deleting and Showing Service records is initiated at this screen by highlighting the desired record and clicking the Delete or Show function button. This accesses the Enter/Edit Client Service window.
The Totals function is initiated clicking the Totals function button. This accesses the On Line Billing Ticket window from which an appointment can be entered and printed.

ANASAZI SOFTWARE 54
Exploring theOn Line Billing Ticket WindowOnce a Service record has been entered from the On Line Service Maintenance window, the
Totals function button is activated. Clicking on the Totals function button accesses the On-Line Billing Ticket window. Open balances and today’s balance due to Pay Source 9999 is displayed and entry of Cash Payment is allowed and applied to the Services just entered. Both the receipt and the appointment information are printed.
Slide %: Displays the percentage amount of slide
Ext Price: Displays the extended price of Services provided
3rd Party: Displays the amount due from a Third Party Payor
Map/Sl/Aj: Displays the amount of Map, Slide, or Adjustment
Prev Paid: Displays any payments previously entered into the system against the Services included in this Form Number. It is possible to enter more than one payment against Services by recalling the Form Number and selecting the “T”otals option.
Any Payments entered will be applied only to the Services included in that particular Form Number

ANASAZI SOFTWARE 55
Exploring theOn Line Billing Ticket WindowOnce a Service record has been entered from the On Line Service Maintenance window, the
Totals function button is activated. Clicking on the Totals function button accesses the On-Line Billing Ticket window. Open balances and today’s balance due to Pay Source 9999 is displayed and entry of Cash Payment is allowed and applied to the Services just entered. Both the receipt and the appointment information are printed.
Slide %: Displays the percentage amount of slide
Ext Price: Displays the extended price of Services provided
3rd Party: Displays the amount due from a Third Party Payor
Map/Sl/Aj: Displays the amount of Map, Slide, or Adjustment
Prev Paid: Displays any payments previously entered into the system against the Services included in this Form Number. It is possible to enter more than one payment against Services by recalling the Form Number and selecting the “T”otals option.
Any Payments entered will be applied only to the Services included in that particular Form Number

ANASAZI SOFTWARE 56
User Training Manual
Section 7:Client Profile Screen

ANASAZI SOFTWARE 57
Selecting a Global ClientThe Client Profile Menu offers quick, show only access to a vast array of Client information. The functionality supports the ability to select a “Global Client” such that all desired information can be viewed without making repeated Client selections.
Click on the Select Client icon positioned on the tool bar
Select desired Client from the Clients selection list
The Client Name and Case Number will appear at the bottom right hand corner of the Anasazi Client Data System Home Page
All information displayed will be that of the selected Global Client
Click the Clear Client icon positioned on the tool bar to select another Global Client

ANASAZI SOFTWARE 58
Viewing Client Profile Information Once a Global Client has been selected, Click the Client Profile pull down menu
The following informational screens are available for quick, show only access:
Show Client Services: Displays detailed listing of Client services including Date, Server, Unit/SubUnit, Start Time, Service Code and Description, Extended Price, Balance, Pay Source and Benefit Plan
Show Client Summary: Displays multifaceted Client information including SAI, Current Insurance Provider, Map/Slide%, Date of Last Service and Payment, Center aging, Last Treatment Plan, Diagnosis, Financial, and GAF Reviews, Date Treatment began, Primary Unit, and Primary Diagnosis
Client 3rd Party Coverage History Maintenance
Client 3rd Party Coverage Maintenance
Client Financial Review History
Client Financial Review Maintenance
Client Authorization Maintenance
Client Treatment Session Maintenance
Client Assignment Maintenance

ANASAZI SOFTWARE 59
User Training Manual
Section 8:Reporting Functionality

ANASAZI SOFTWARE 60
Reporting Overview
Most of the important management reports of the Anasazi Client Data System have been developed utilizing a format called the Anasazi Report Macro. Some of the advantages of this Report Macro format include:
A consistent look and feel to the user interface such that if a clinician/director is trained on one report,they can intuitively use any report based on the Anasazi Report Macro model
The management reports based on the Anasazi Report Macro are “hard coded” such that management can depend on the accuracy of the result, even for substantiation for audits
Specifically defined reports that can be named by the operator and easily saved as a standardized report. Sets of these standardized reports can be selected and run as a batch. This batch of reports can be run on a fast workstation to free up the user’s workstation or can be set to run when the operator leaves for the day to run overnight.

ANASAZI SOFTWARE 61
Exploring Report Macro Selection CriteriaA typical management report developed utilizing the Anasazi Report Macro is the Case Load Performance Report.
This report allows the operator to select a non-contiguous range (an intuitive selection of set of ranges and/or individual records.) This ability to select individual types or non-contiguous ranges of types on each of the selections criteria allows the operator to exactly specify the information desired to print on the report
The system defaults Selection Criteria to AllTo view information for 1 Client, select a Client Name from the selection list, key in the Client Sort Name, or key in the Client Case Number in the Client text promptTo view information for a range of Clients, key the range of Client Case Numbers (I.e. 1000-2500)To view information for several Clients, key the Client Case Numbers separated by a comma (I.e. 3600,4535,5940)This functionality holds true for all selection criteria within the Anasazi Report Macro
SELECTIONS TABSELECTION CRITERIA

ANASAZI SOFTWARE 62
Exploring Report Macro Sort CriteriaOnce the Selection Criteria are defined, the operator may custom define the Sort Criteria. This allows
Management to get specifically the information desired in exactly the format desired.
To determine the Sort Criteria, the operator may select from a set of optional Sort Criteria Segments to actually sort data on up to six different Segments:
Highlight the desired Sort Criteria Segment and click the Add button. Selected sort criteria will then appear in the adjacent boxCheck the Print Total checkbox if data should be totaled/subtotaled at that particular segment levelCheck the Page Break checkbox if page breaks should appear at that particular segment levelCheck the UnDupCnt checkbox if a non-duplicated count should be calculated at that particular segment level Segment Order may be manipulated by highlighted segment to be moved and clicking the Up or Down Arrow buttons until desired order is obtainedIn addition to the sort and selection criteria, the operator is also able to control the level of detail to print.
Check the Print the Assignments checkbox to print the Assignment informationCheck the Print the Subheaders checkbox to print the report subheaders
Key the desired Report Title in the Report Tile text prompt
SORT/SUBTOTAL/TITLE TAB
UP & DOWN ARROWS

ANASAZI SOFTWARE 63
Printing Report Macro Reports
Click the Print button to initiate the printing processSelect the desired Print Destination and click the OK button
Printing to the Screen will bring the report up in Print Preview
Clicking the Print icon will Print the report
Clicking the Close button will terminate the print preview and return to the Sort/Subtotal/Title report tab page

ANASAZI SOFTWARE 64
Batch Printing Report Macro ReportsClick the Save Batch button to initiate the printing processApplication name, User name, and Application Description field entries default and may not be editedReport Title defaults to the entry on the Sort/Subtotal/Title tab page, but may be edited
Select the desired Network Printer for the report to be printed to
Enter the Start Date and Start Time the report should be printed
Click the Save button to save batch printing information
Click the Cancel button to return to the Sort/Subtotal/Title tab page without saving

ANASAZI SOFTWARE 65
Creating Report Templates
Once desired selection and sort criteria have been established, Click on the Save Template button
Enter a name for the Report Template and click the Save button to create the template

ANASAZI SOFTWARE 66
Retrieving Report TemplatesReport Templates are retrieved by clicking the Use Templates button
All current report templates for the selected report will be displayed on the Templates window
Highlight the desired Report Template and click the OK button
All selection and sort criteria established on the selected Report Template will default and the report may be printed