Embed Size (px)
Citation preview
EX
CLUSIVE
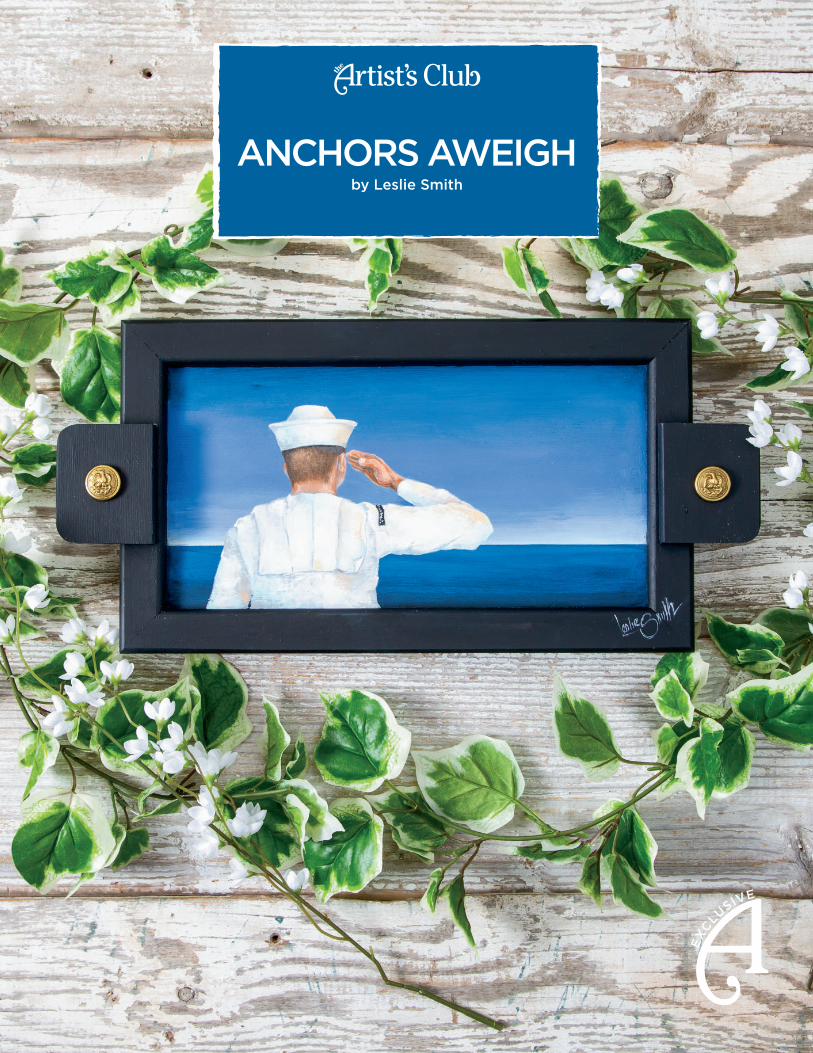
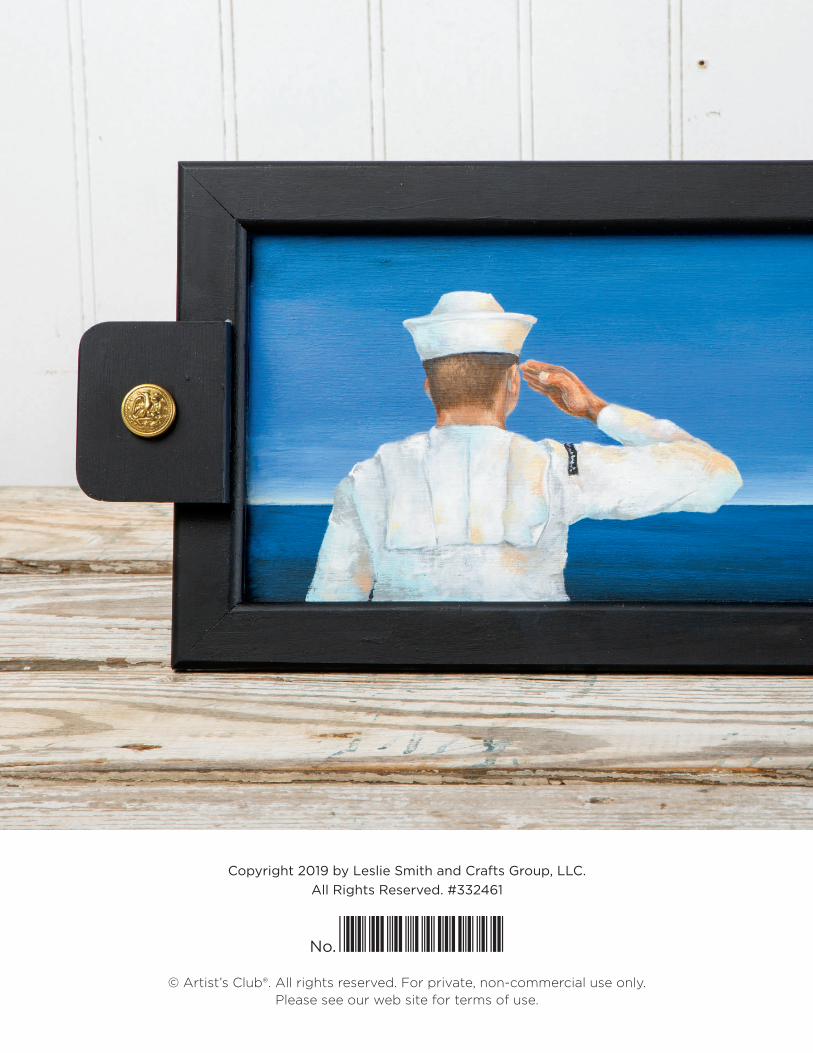
ANCHORS AWEIGHby Leslie Smith
2 | artistsclub.com
INTRODUCTIONAnchors Aweigh, my boys, Anchors Aweigh! If you
have a guy (or gal) in the military, you are rightfully
proud of them. And, so, here is a tray, painted to show
our pride in them and the United States Navy.
This tray is the fi rst in a series of fi ve: one for each
branch of the service, capturing their uniform, their
goals, and their pride.
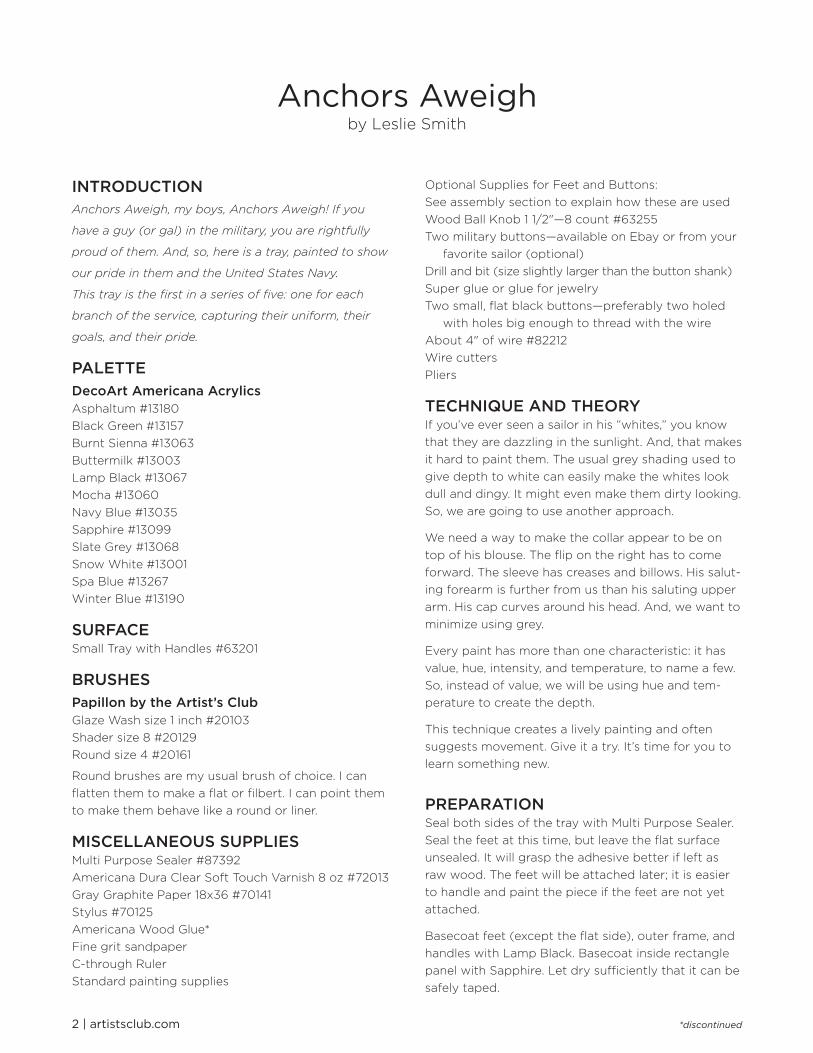
PALETTEDecoArt Americana AcrylicsAsphaltum #13180Black Green #13157Burnt Sienna #13063Buttermilk #13003Lamp Black #13067Mocha #13060Navy Blue #13035Sapphire #13099Slate Grey #13068Snow White #13001Spa Blue #13267Winter Blue #13190
SURFACESmall Tray with Handles #63201
BRUSHESPapillon by the Artist’s ClubGlaze Wash size 1 inch #20103Shader size 8 #20129Round size 4 #20161
Round brushes are my usual brush of choice. I can fl atten them to make a fl at or fi lbert. I can point them to make them behave like a round or liner.
MISCELLANEOUS SUPPLIESMulti Purpose Sealer #87392Americana Dura Clear Soft Touch Varnish 8 oz #72013Gray Graphite Paper 18x36 #70141Stylus #70125Americana Wood Glue*Fine grit sandpaperC-through RulerStandard painting supplies
Optional Supplies for Feet and Buttons:See assembly section to explain how these are usedWood Ball Knob 1 1/2"—8 count #63255Two military buttons—available on Ebay or from your
favorite sailor (optional)Drill and bit (size slightly larger than the button shank)Super glue or glue for jewelryTwo small, fl at black buttons—preferably two holed
with holes big enough to thread with the wireAbout 4" of wire #82212Wire cuttersPliers
TECHNIQUE AND THEORYIf you’ve ever seen a sailor in his “whites,” you know that they are dazzling in the sunlight. And, that makes it hard to paint them. The usual grey shading used to give depth to white can easily make the whites look dull and dingy. It might even make them dirty looking. So, we are going to use another approach.
We need a way to make the collar appear to be on top of his blouse. The fl ip on the right has to come forward. The sleeve has creases and billows. His salut-ing forearm is further from us than his saluting upper arm. His cap curves around his head. And, we want to minimize using grey.
Every paint has more than one characteristic: it has value, hue, intensity, and temperature, to name a few. So, instead of value, we will be using hue and tem-perature to create the depth.
This technique creates a lively painting and often suggests movement. Give it a try. It’s time for you to learn something new.
PREPARATIONSeal both sides of the tray with Multi Purpose Sealer. Seal the feet at this time, but leave the fl at surface unsealed. It will grasp the adhesive better if left as raw wood. The feet will be attached later; it is easier to handle and paint the piece if the feet are not yet attached.
Basecoat feet (except the fl at side), outer frame, and handles with Lamp Black. Basecoat inside rectangle panel with Sapphire. Let dry suffi ciently that it can be safely taped.
Anchors Aweighby Leslie Smith
*discontinued
artistsclub.com | 3
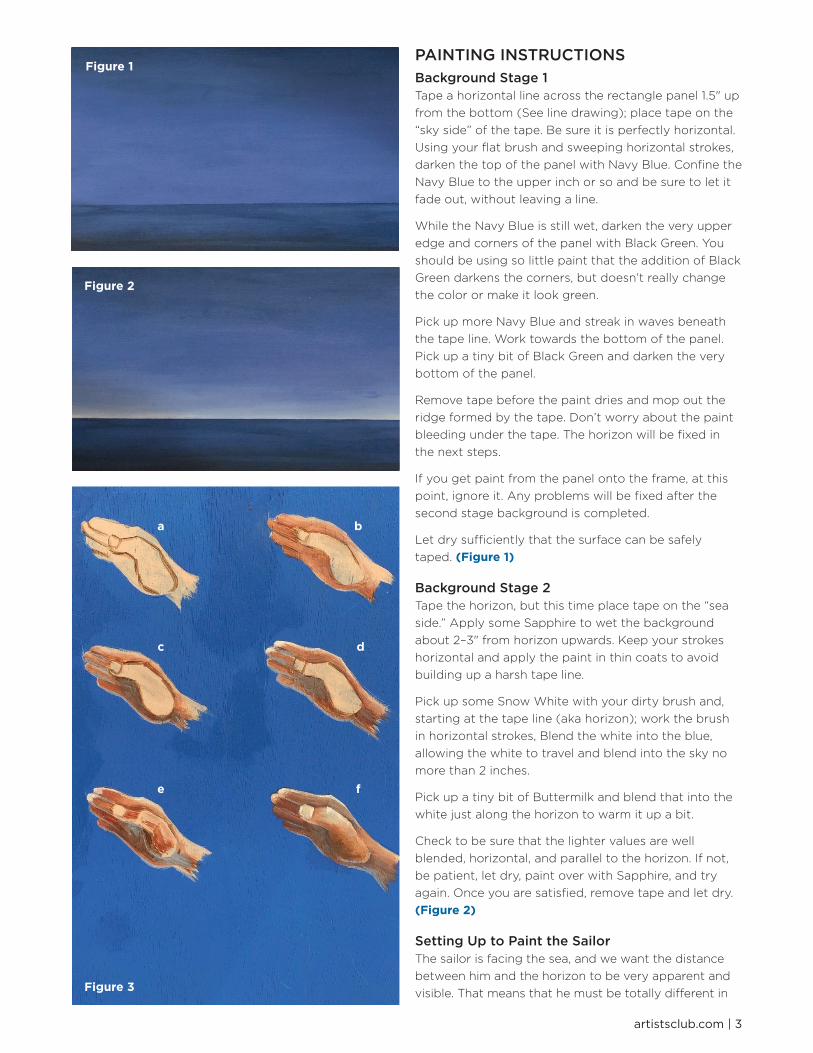
PAINTING INSTRUCTIONSBackground Stage 1Tape a horizontal line across the rectangle panel 1.5" up from the bottom (See line drawing); place tape on the “sky side” of the tape. Be sure it is perfectly horizontal. Using your fl at brush and sweeping horizontal strokes, darken the top of the panel with Navy Blue. Confi ne the Navy Blue to the upper inch or so and be sure to let it fade out, without leaving a line.
While the Navy Blue is still wet, darken the very upper edge and corners of the panel with Black Green. You should be using so little paint that the addition of Black Green darkens the corners, but doesn’t really change the color or make it look green.
Pick up more Navy Blue and streak in waves beneath the tape line. Work towards the bottom of the panel. Pick up a tiny bit of Black Green and darken the very bottom of the panel.
Remove tape before the paint dries and mop out the ridge formed by the tape. Don’t worry about the paint bleeding under the tape. The horizon will be fi xed in the next steps.
If you get paint from the panel onto the frame, at this point, ignore it. Any problems will be fi xed after the second stage background is completed.
Let dry suffi ciently that the surface can be safely taped. (Figure 1)
Background Stage 2Tape the horizon, but this time place tape on the “sea side.” Apply some Sapphire to wet the background about 2–3" from horizon upwards. Keep your strokes horizontal and apply the paint in thin coats to avoid building up a harsh tape line.
Pick up some Snow White with your dirty brush and, starting at the tape line (aka horizon); work the brush in horizontal strokes, Blend the white into the blue, allowing the white to travel and blend into the sky no more than 2 inches.
Pick up a tiny bit of Buttermilk and blend that into the white just along the horizon to warm it up a bit.
Check to be sure that the lighter values are well blended, horizontal, and parallel to the horizon. If not, be patient, let dry, paint over with Sapphire, and try again. Once you are satisfi ed, remove tape and let dry. (Figure 2)
Setting Up to Paint the SailorThe sailor is facing the sea, and we want the distance between him and the horizon to be very apparent and visible. That means that he must be totally diff erent in
Figure 1
Figure 2
Figure 3
a b
e f
c d
4 | artistsclub.com
value, color (hue), intensity (brightness), and tempera-ture. The outline of the sailor must be crisp and defi ned.
I know already that my brush might wander a bit from the sailor onto that wonderfully blended blue back-ground scene. And, because much of the background was mixed on the piece during blending, I won’t be able to duplicate the paint perfectly. So, instead, I will protect my painting at this stage with a single thin coat of DecoArt Americana Soft Touch Varnish. A bowl of clean soapy water and brush (I like a fi lbert for clean-up) will sit on my painting table while I paint the sailor. The varnish will allow me to more easily clean up any incidents of paint straying outside his outline.
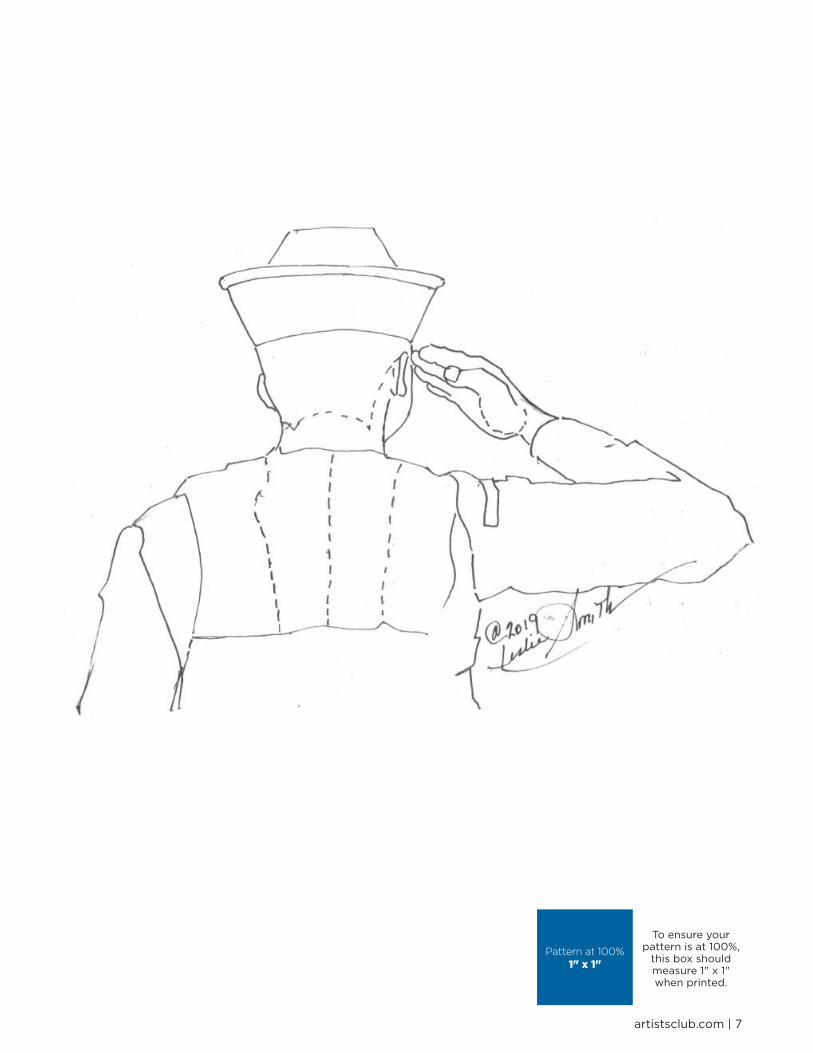
Transfer the outer line drawing for the Sailor; you need not transfer every feature (ear, fi ngers, etc.) at this time. He can be placed “almost” anywhere on the piece, so if you have any goofs or poorly blended spots along the
horizon, consider using him to cover them. Carefully sand out the any tape ridges within his outline, sanding in the direction of the wood grain whenever possible.
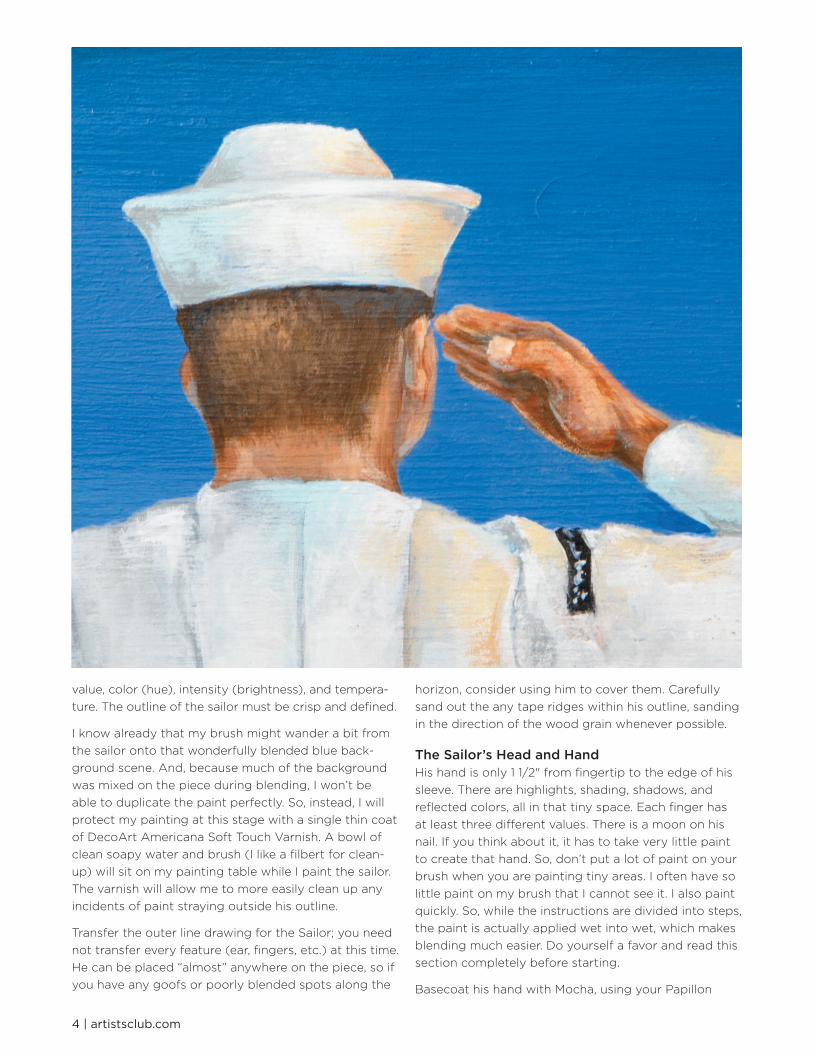
The Sailor’s Head and HandHis hand is only 1 1/2" from fi ngertip to the edge of his sleeve. There are highlights, shading, shadows, and refl ected colors, all in that tiny space. Each fi nger has at least three diff erent values. There is a moon on his nail. If you think about it, it has to take very little paint to create that hand. So, don’t put a lot of paint on your brush when you are painting tiny areas. I often have so little paint on my brush that I cannot see it. I also paint quickly. So, while the instructions are divided into steps, the paint is actually applied wet into wet, which makes blending much easier. Do yourself a favor and read this section completely before starting.
Basecoat his hand with Mocha, using your Papillon
artistsclub.com | 5
round #4. Mocha will be our medium value. But, because his hand is cupped and facing down, away from the sun, the palm will be fairly dark and in the shadows. Very little of the Mocha will remain once the hand is fi nished.
Let dry. Transfer the inner line drawing lines and paint them in with Asphalutm. (Figure 3a) Figures 3a-3d are not blended to aid you in seeing where paints are placed; 3e is blended.
Working one section at a time, wet with Mocha. Shade the length of each fi nger, the area around his thumb, his palm, and the bottom edge of his wrist with Burnt Sienna. (Figure 3b) The lower three fi ngers and palm are almost entirely Burnt Sienna.
Darken under his thumb and bottom edge of this wrist with Asphaltum. While the Asphaltum is still wet, work some Slate Grey into the darkest area, mixing and blending on the piece. Add a broken line of refl ected color along the length along the bottom edge of each fi nger and palm with Slate Grey. (Figure 3c)
Highlight edge of tip of index fi nger, ring fi nger, and the upper edge of his hand/wrist with Buttermilk. Paint in his nail. (Figure 3d)
The thumb is bent at both knuckles, giving it three sec-tions. Each section is shaded with Burnt Sienna, but, on each the shading is in a diff erent location and shape. The mound of his thumb is painted with Asphaltum and dulled with Slate Grey. The bottom edge of the thumb mound has a thin line of refl ected color, painted with Slate Grey. (Figure 3e)
Paint in and reshape his nail with Mocha as necessary; the free edge and moon are Buttermilk. Highlight upper edge of thumb between second and third knuckle with Buttermilk. Keep the upper edge of his nail parallel with the edge of his index fi nger. Otherwise, he will have a hammer hand. Blend areas as needed. (Figure 3f)
His face and neck are painted with the same palette and general method.
Basecoat, one area at a time, with Mocha. Shade face about his ear with Burnt Sienna. A smaller, darker shading (actually it is the cast shadow from his ear) is painted below the ear with Asphaltum. The front or edge of his face is in the sun, so it remains lighter Mocha. If it looks too dark to you, add a tiny edge high-light of Buttermilk.
The rim of his ear is highlighted with Buttermilk at top and bottom. Don’t forget that he has two ears; the ear on the left is kept fairly dark, so it is just Mocha and Burnt Sienna.
His neck is shaded on either side with Burnt Sienna; the
shading on the left side is larger. There are two trian-gular highlighted areas—one on either side of his neck and coinciding with points along the hairline. They are Mocha, lightened slightly with a tiny bit of Buttermilk.
If you reach back on your own neck, you can feel where there are strong muscles that run the length of your neck and support the weight of your head. Did you know that your head probably weighs ten pounds or more?
His hair is dry brushed with Asphlatum, using the same round brush. Make it fairly dark and solid under his cap and along the left side. Pick up some Mocha and dry brush a vague round highlight, as indicated by the photos.
The Sailor’s Cap and BlouseIt’s time to paint the dazzling whites. For this tech-nique, we need three paints with which to shade: a neutral grey, a warm color, and a cool color.
Here’s the logic behind this technique. First, all three shading paints have to be essentially the same value, ie., equally dark or light. They (other than the grey) should be, preferably, from the color families already on our palette (in this case, we already have the blue of the sky and ocean and the yellow/orange of his fl esh). They need to be complimentary or close to compli-mentary. When mixed 1:1, the resulting mixture of warm and cool should be really close to the grey you chose. If those four conditions are met, the resulting paints will almost always work to provide a dazzling white object.
Sapphire (cool) and Burnt Sienna (warm) meet these four requirements. But, I wanted to use Buttermilk and/or Mocha because they are brighter and they simulate the bright yellow of the sun. Both were much lighter in value than Sapphire. So, I chose Spa Blue, which is every bit as bright and light as Buttermilk. It is warmer than the background blues, but cooler than Buttermilk and/or Mocha. Again, the shading paints do not have to be the exact same hue—just in the same family.
If you want to try this technique, but use other paints, consider other complimentary pairs: red and green—purple and yellow—and so on. To test your choices, mix them together 50:50. If they are both the same general value AND the resulting grey resembles the grey you have chosen (value, temperature, intensity and hue), it will almost certainly work.
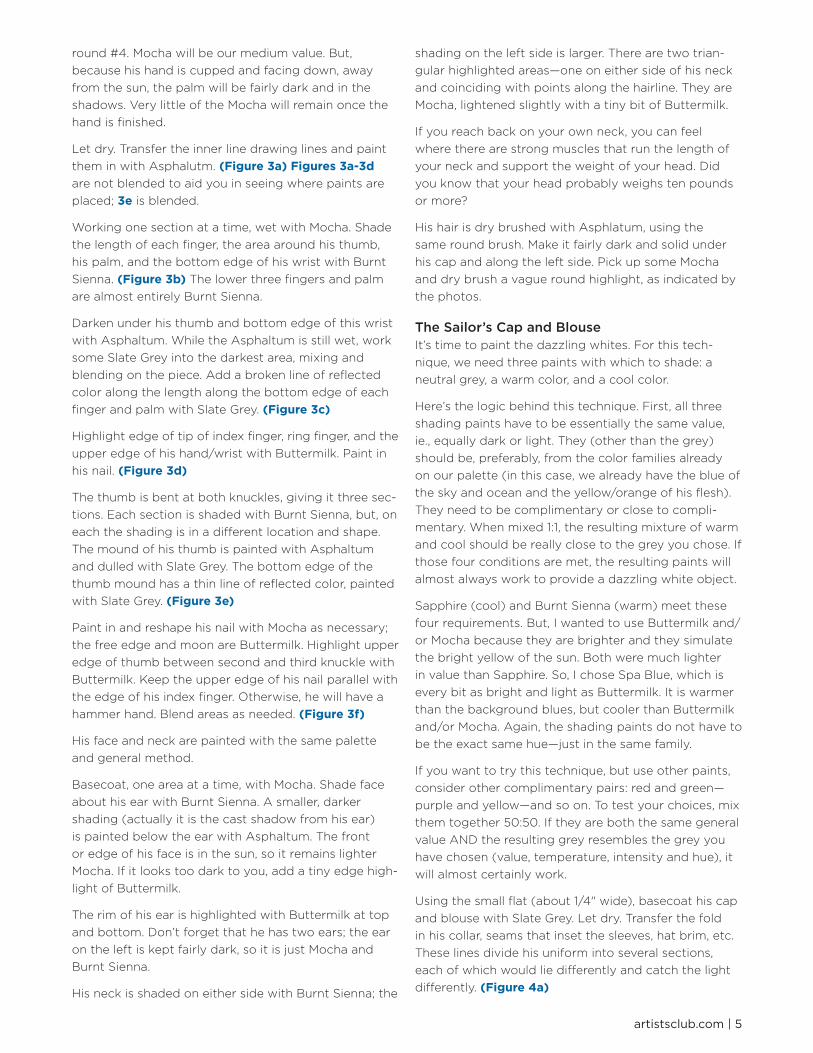
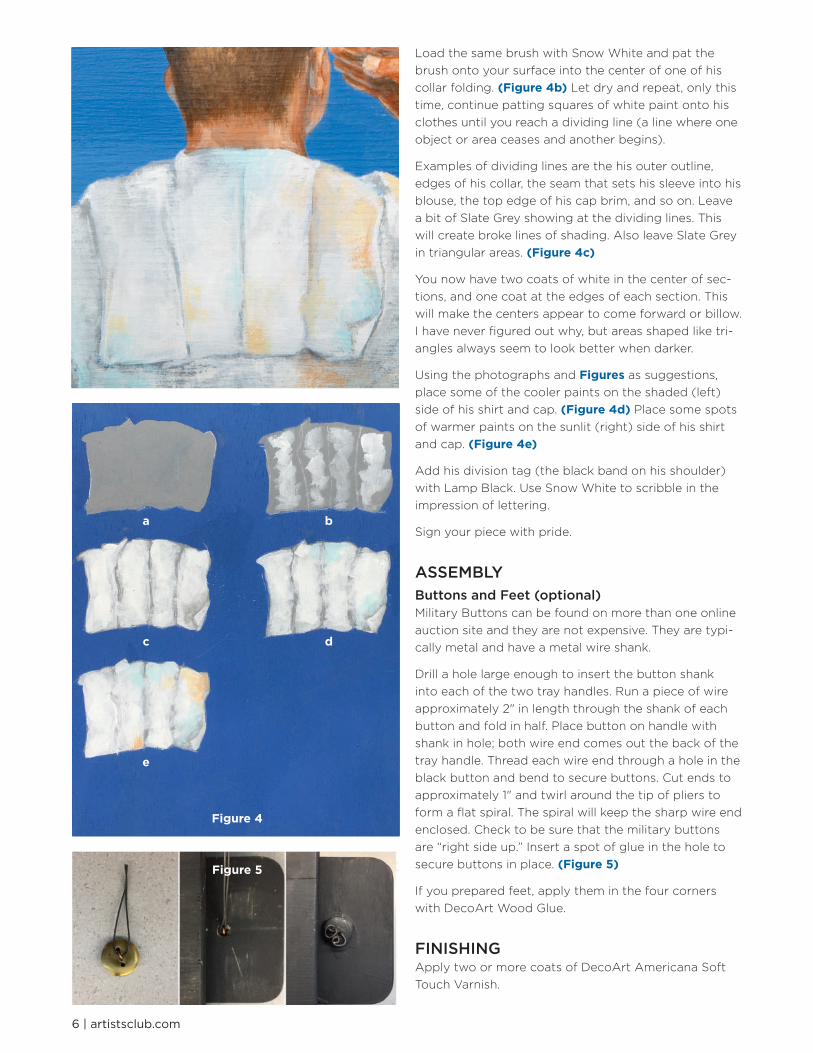
Using the small fl at (about 1/4" wide), basecoat his cap and blouse with Slate Grey. Let dry. Transfer the fold in his collar, seams that inset the sleeves, hat brim, etc. These lines divide his uniform into several sections, each of which would lie diff erently and catch the light diff erently. (Figure 4a)
6 | artistsclub.com
Load the same brush with Snow White and pat the brush onto your surface into the center of one of his collar folding. (Figure 4b) Let dry and repeat, only this time, continue patting squares of white paint onto his clothes until you reach a dividing line (a line where one object or area ceases and another begins).
Examples of dividing lines are the his outer outline, edges of his collar, the seam that sets his sleeve into his blouse, the top edge of his cap brim, and so on. Leave a bit of Slate Grey showing at the dividing lines. This will create broke lines of shading. Also leave Slate Grey in triangular areas. (Figure 4c)
You now have two coats of white in the center of sec-tions, and one coat at the edges of each section. This will make the centers appear to come forward or billow. I have never fi gured out why, but areas shaped like tri-angles always seem to look better when darker.
Using the photographs and Figures as suggestions, place some of the cooler paints on the shaded (left) side of his shirt and cap. (Figure 4d) Place some spots of warmer paints on the sunlit (right) side of his shirt and cap. (Figure 4e)
Add his division tag (the black band on his shoulder) with Lamp Black. Use Snow White to scribble in the impression of lettering.
Sign your piece with pride.
ASSEMBLYButtons and Feet (optional)Military Buttons can be found on more than one online auction site and they are not expensive. They are typi-cally metal and have a metal wire shank.
Drill a hole large enough to insert the button shank into each of the two tray handles. Run a piece of wire approximately 2" in length through the shank of each button and fold in half. Place button on handle with shank in hole; both wire end comes out the back of the tray handle. Thread each wire end through a hole in the black button and bend to secure buttons. Cut ends to approximately 1" and twirl around the tip of pliers to form a fl at spiral. The spiral will keep the sharp wire end enclosed. Check to be sure that the military buttons are “right side up.” Insert a spot of glue in the hole to secure buttons in place. (Figure 5)
If you prepared feet, apply them in the four corners with DecoArt Wood Glue.
FINISHINGApply two or more coats of DecoArt Americana Soft Touch Varnish.
Figure 5
Figure 4
a b
e
c d
artistsclub.com | 7
Pattern at 100%1" x 1"
To ensure yourpattern is at 100%,
this box should measure 1" x 1" when printed.
Copyright 2019 by Leslie Smith and Crafts Group, LLC.All Rights Reserved. #332461
No. *A332461*© Artist’s Club®. All rights reserved. For private, non-commercial use only.
Please see our web site for terms of use.